#linen lined
Explore tagged Tumblr posts
Text
Exhibit spotlight: 18thc #Georgian #shoes on view @Woodman Museum http://www.theflaxprojectunh.com/2024/06/exhibition-spotlight-18th-century-shoes.html

5 notes
·
View notes
Photo
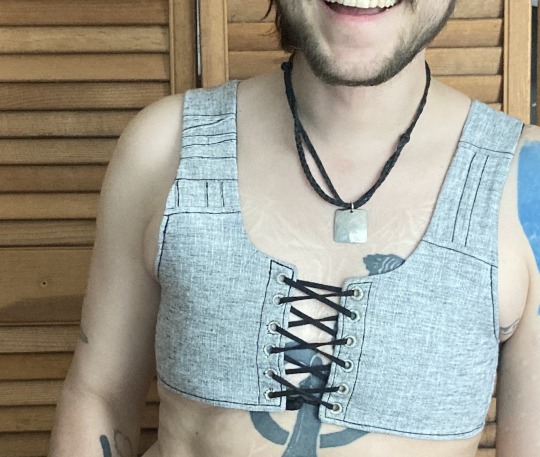
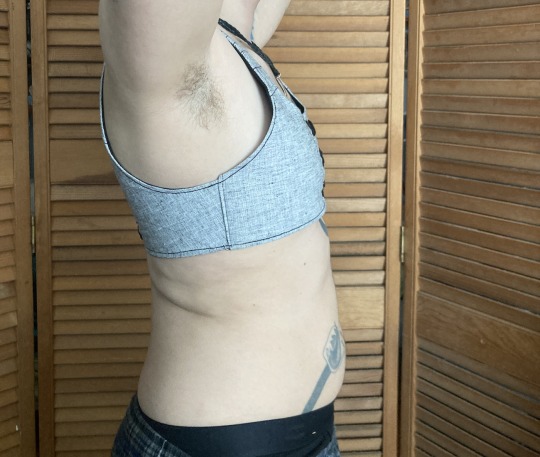
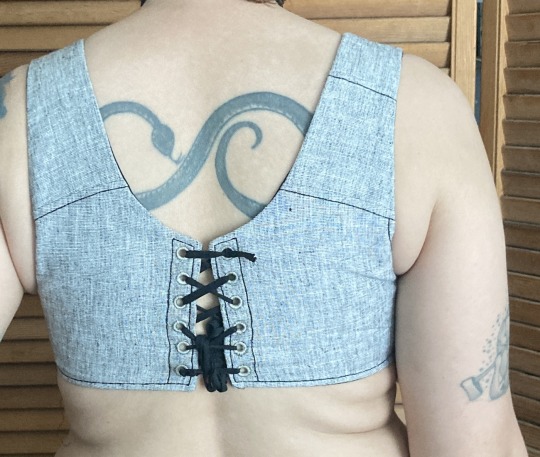
summer binder picture tutorial
this is the third binder ive made for myself recently and the first one i’m writing up. it’s designed to do a few things: 1) allow me to put it on by myself without dislocating my shoulders 2) allow me to breathe well enough to partake in normal activity 3) be cool enough to wear throughout a muggy 90-100F summer 4) not constrict my ribs in a way that aggravates my lack of connective tissue and causes intense pain.
this has become necessary even though i had top surgery many years ago, because when i had it i was extremely skinny and since then i’ve increased in size by about 50%. this has been really fucking good for my health in every single way* except that when my chest is squishy or moves at all it’s So Goddamn Triggering for me. but also since ive had top surgery ive developed and/or been made away of a plethora of chronic conditions that make every single commercially available binding option medically impossible. unbound, my chest is pretty much what you’d expect for a chubby cis guy but venturing out into the world in just a tshirt no longer works for me
*anyone who badmouths weight gain or fat bodies in the notes WILL be blocked
under the cut are a bunch of process pictures and explanations of what they all mean:
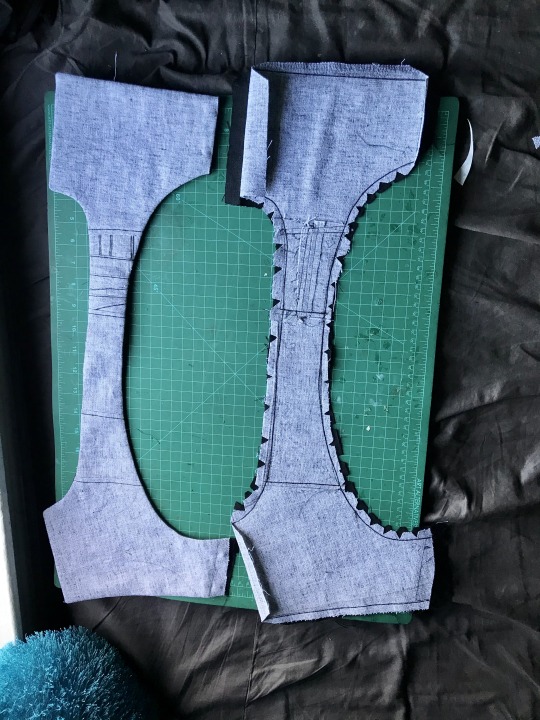
first i’ll give you a look at the pieces and measurements:
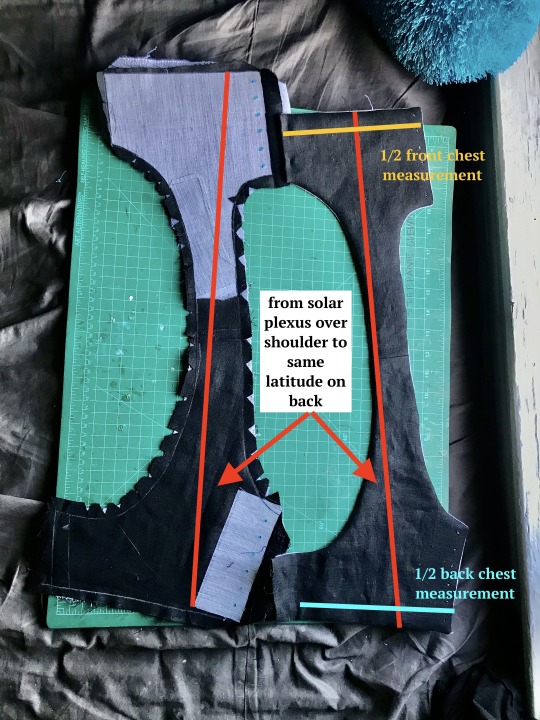
most of the seams are sewn in this picture and one half is turned inside out, allowing you to see both the finished dimensions (right) and the placement of the fusible horsehair canvas that gives this lil scrap of linen any structure at all (left)
to get your chest measurement, you’re gonna have to do some math:
first measure above and below what you want to bind. average these numbers. mine are something like 32 and 34, which average to 33. subtract a few inches--this is to allow the air movement between the laces at center front and back, critical in the summertime. i deleted 3 inches bc i like that number but you can go bigger if you want. the more inches you subtract here, the more youll be able to ratchet all your chest material down later, but at the same time you need to leave enough fabric for a sturdy garment. let’s say a range of 2-6 inches/5-15cm. by taking your measurements this way, you’re essentially measuring the chest you would like to have. that + the horsehair canvas work together to compress any squishy tissue/force anything that doesnt compress up and to the outside (basically into the armpit/lower shoulder--the chest might stick out but it will give a very puffed chest captain america pectoral silhouette)
you can also see how ive clipped my curves and pre-drilled my lacing holes. i used the marlin spike on my knife to open up the holes on the interfacing side, mainly as a way of marking them. this worked well bc the interfacing’s glue kept the linen from raveling
this is the same stage but looking at the non-interfaced grey linen/cotton blend (the black is some 100% linen from my cabbage stash). you can see ive broken the solar-plexus-to-back measurement up into a bunch of pieces to save on fabric but that’s not necessary. my original pattern was just two pieces (front and back) and chopping the straps into thirds on both sides was aesthetic
in the following picture you can really see how this is really just overgrown regency stays:
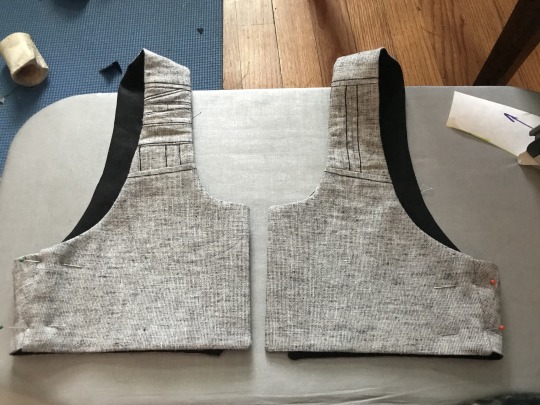
i thought about doing side lacing but didn’t think that would be comfortable for me. on the front, the side seam allowance was pressed inwards before turning to create a finished looking slot. on the back the side seam is left unfinished with an extra wide seam allowance, and is inserted into that slot.
here’s a closeup on it pinned in place (you can adjust the angle of the side seam and the fit during this pinning stage):
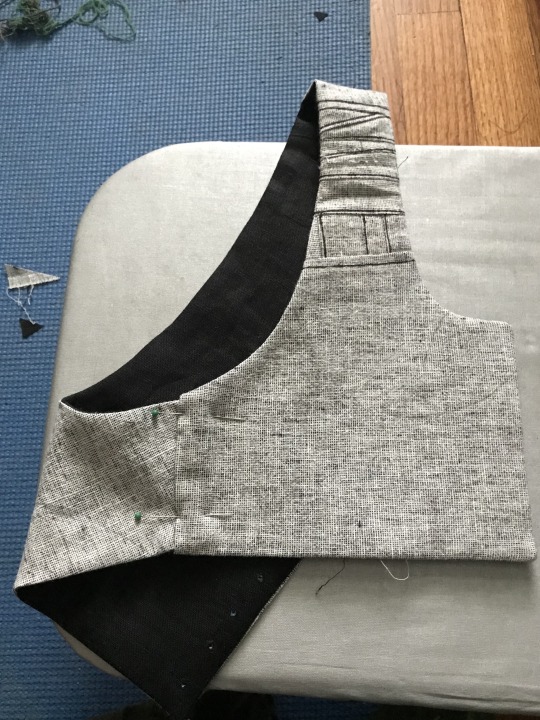
that side seam was just topstitched in place once i had the fit how i liked it, and the armhole was reinforced with more topstitching
alright, time for eyelets: first, you can see how well the marking worked:
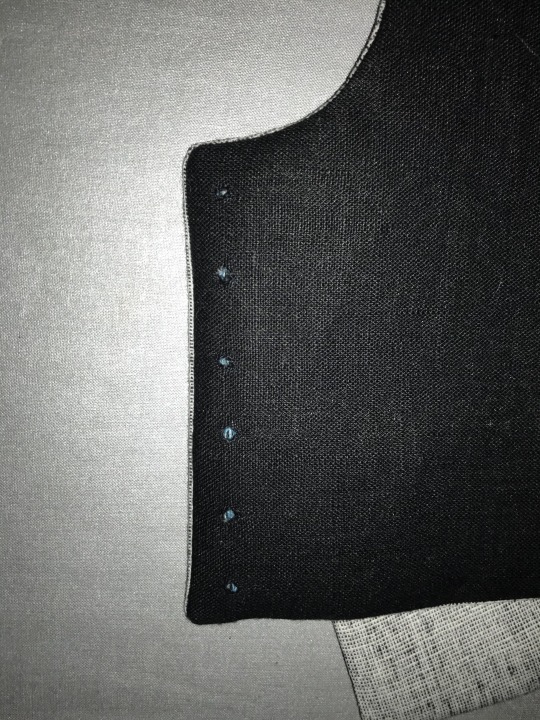
next, two rows of basted eyelets (left), one row of eyelets sewn with a doubled and waxed cotton thread (center right), and one row of eyelets opened and stainless steel rings placed (right).
next time i’m going to mark the eyelets same as i did above, but do this step differently--i’ll mark and baste the steel rings in place BEFORE widening the eyelets. this is bc i had a lot of problems keeping the eyelets on center
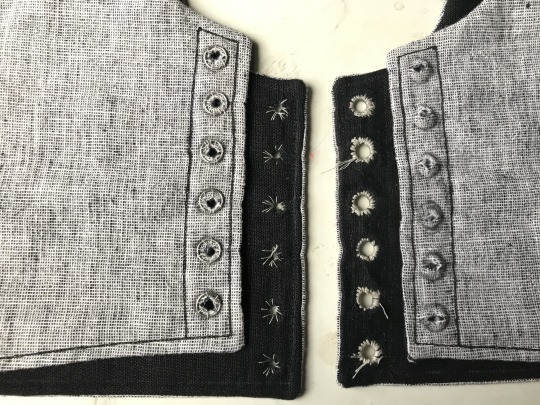
eyelets half done on this one! on the left are eyelets sewn with doubled and waxed cotton thread and on the right eyelets sewn with quadrupled and waxed thread. the center is basting again. i was able to force the holes back in line while sewing the eyelets but it was kinda annoying. adding a second picture that doesnt have great focus but hopefully shows how that process worked and shows the spike clearly
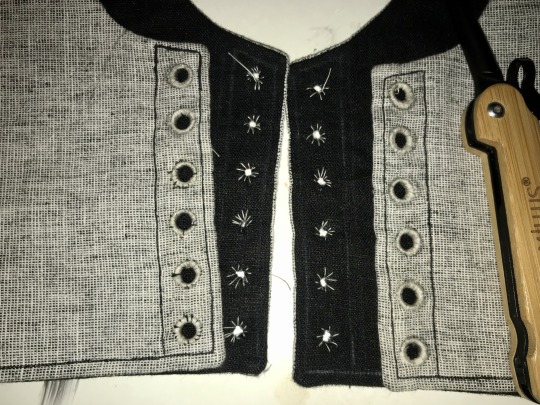
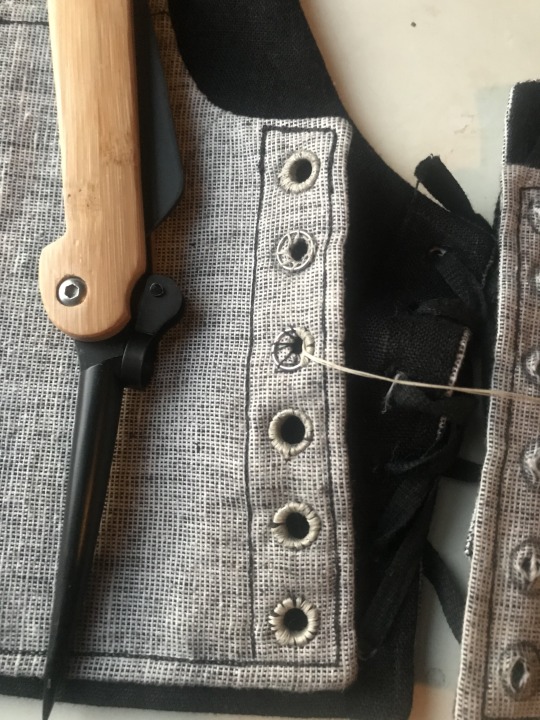
i ended up using this white cotton thread because it’s stronger than my black cotton thread (which the rest of it is sewn with). [eta: after this was first posted, i pressed the whole thing heavily, which effectively de-waxed the thread, and i dyed the whole thing a medium charcoal grey, the thread blends in perfectly on the lighter side and isn’t such a sore thumb on the darker side]
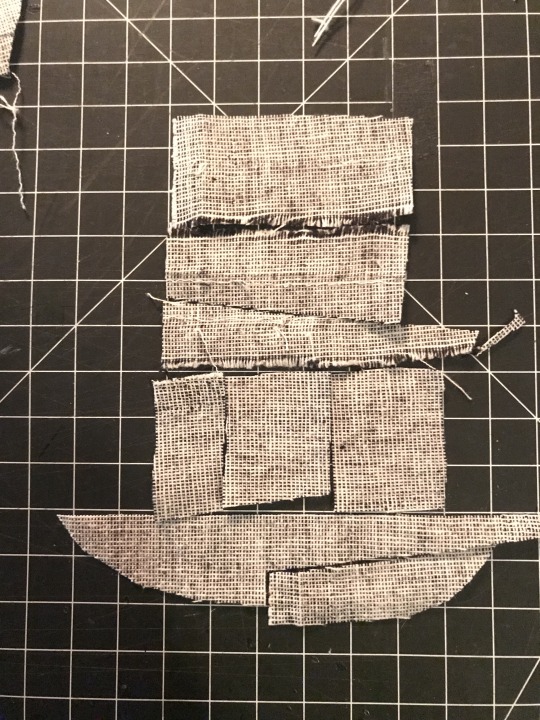
bonus: the piecing layout for that little piece of strap. the whole light gray half of the binder was made from 1/2 of one of the legs i cut off some linen suit pants to make slutty camping shorts last year and i really really didn’t want to break into any of the other three halves for this garment--i have Plans for it
overall the fit of this is incredible. it DOESNT hurt my ribs which every zip-up garment ive been able to find (and it is difficult) does due to really thick elastic at the base. it doesnt aggravate my sensory issues with the synthetic fibers that every commercial option is made of. i can walk up a hill or stairs, or go to pt, without getting too out of breath. i can eat with it tight, or loosen the front easily and without taking it off to make eating easier and less nausea-inducing. it is reversible!
best of all the lacing at the back gives the garment enough movement for me to get it on without dislocating, and the interfacing and steel rings give it structure once it’s on. the shaping comes only from fusible horsehair linen canvas and stainless steel rings like youd use for chainmail, there’s no boning at all, which makes it very quick to sew (except the eyelets, but metal grommets would be sturdy and quick provided theyre of good quality)
there’s a small amount of gaping on the outside of the shoulder strap, which i plan on fixing with a tiny tiny dart in the armpit, i want to add pockets to tuck the laces into, and i need a better lace for the back, but it’s completely wearable in time for the 90 weather next week which is all i wanted. i’ll do a reblog when it’s perfectly finished with an update on the fit but for now it is done enough
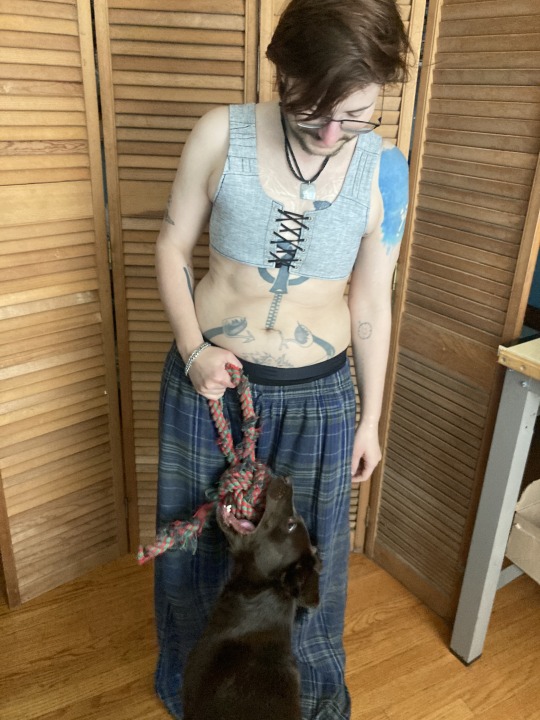
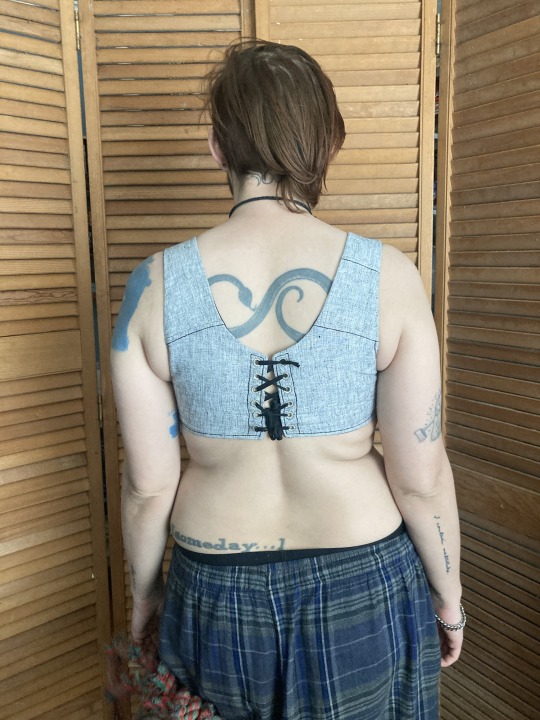
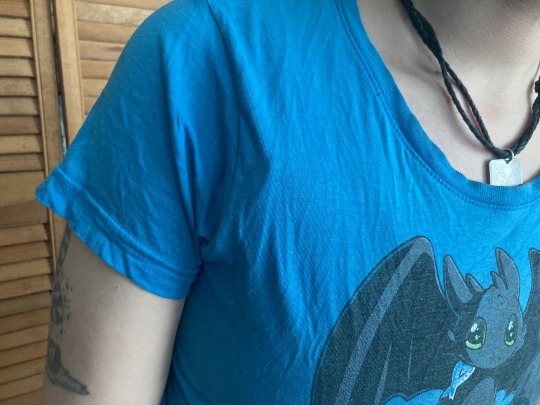
the little ridge where it doesnt lay flat against the shoulder is most visible with just a single t shirt over it. with a flannel or a sweater, it disappears, and by itself, it’s hidden in movement
eta: after dyeing this, i relaced it a bit looser in the back and that gape mainly disappeared. ive decided to leave it in instead of smoothing it with a dart because the loose fabric gives space for my chest to expand when breathing and shapes my silhouette in a way that emphasizes my shoulders
#sewing#trans#trans man#binding#body shaping#cotton#disability accommodations#physical#sensory#eyelets#fusible interfacing#historical fashion#regency#horsehair canvas#lacing#linen#lining#new build#drafted pattern#picture tutorial#piecing is contemporary too#stainless steel#stashbusting#stays#structured garment#treadle machine
1K notes
·
View notes
Text

lil doodle to relax n chill and get my swag on. the hags in my clothes
#fear and hunger#funger#enki ankarian#nosramus#enkiramus#enks wearing a noelle snowgrave shirt from redbubble a hoodie i had since i was 12 my woolen twilight sparkle skirt NO STOCKINGS#fuckass ecco chelseas. my karkat makeup bag turned pencilcase turned over the shoulder purse (its from the nici devil line its old as SHIT)#it was discontinued for ten years when i bought it lol.#also my signature radioactive see thru red-eyed goat necklace <3 i need to give it a name#nos is in my linen-silken dress that my ma bought specifically for my trip to thailand bc its weightless pretty and dries in SECONDS#very convenient when u get swiss cheesed by water riding on the highway during a storm#and a super bootleggy noname fanny that u can run a drug operation out of. the star has SPORTS written over it irl#the moon and star hairclips i stole from an anime store <3#i didnt wanna draw enki's ears but shes wearing my xenomorph earrings its like a fully modeled one that goes thru ur ear like thru a tunnel#yaurt
68 notes
·
View notes
Text
fabric people. for my quilt coat where i'm using largely wool suiting (cut out of suits) for the patchwork + silk batting (for more flexible drape)... what's a good move for lining. note i am in a mediterranean climate and i love to layer so warmth is not a huge priority. i have a bunch of flannel in the stash but judging from another project it pills easily. is this a linen occasion? ? ? please weigh in.
#thenk you#would also take insights on testing lining options#i used linen for the backing of my table runner and that was pretty delicious to hand quilt. but i would need to dye it to use here#also i don't have enough i suspect
179 notes
·
View notes
Text

tshirt that says RESIST SPIRITUAL DEATH: TAKE UP A TEXTILE ART
#don't judge my lack of bedsheets my linen is drying on the line in the garden#anyway ! excited to be quilting again !#going to start with smaller decorative projects before moving back on to full size adult quilts#I'll also be handsewing rather than machine sewing so i can really get the feel of long labour with my hands
61 notes
·
View notes
Text
and THEN I got bit by a bug that said "Chicago house?" What if I could contrive a situation such that Edward and Bella could get married in Chicago? In a little old church just a few blocks from the house he grew up in. That he inherits from himself every few years. Which would be kept in good order and have minor updates made but stay true to the time period in which it was originally. And what if he had it fully furnished and decorated and stocked and they spent the night there before leaving on their honeymoon. And what if they lived there while Bella was human for a few years. What if it was restorative and healing for Edward to do that. What if he took this house that he had owned and not known what to do with or why he kept it. And what if he began to restore it as he fell in love hardly knowing what he was doing. What if the house was a metaphor for the humanity inside him brought back to life by the power of Bella's love for him?
#twilight#the twilight saga#tts#edward cullen#anyway I can see it! I could draw you a map of this house#and I've already decided that in this version of the story they get married in october#and bella's dress is an ivory linen overlaid with sheer ivory#which has natural motif embroidery done on the hem and the edges of the sleeves#which are long and the dress is A-line#and her ring is set with a topaz gem and her gets her long gold earrings#with simple topaz gems on the end to match#and it's all of course very expensive and bespoke#BUT it's also rather simple looking which pleases bella so long as she doesn't dwell on the price#but she just can't say no because edward looks so ludicrously happy every time they move one step#closer to the wedding#and in the end it makes her happy too#and then after the wedding and after the years of bliss in the house that is now a home#they end up dying tragically because didn't you know they're love was doomed from the start?#it was still worth and it was still right and it was still beautiful#but the tragedy of the world catches up with them in the end#anyway#samantha.txt#(and also I promise I'm done for now I just had to get that all out)
17 notes
·
View notes
Text
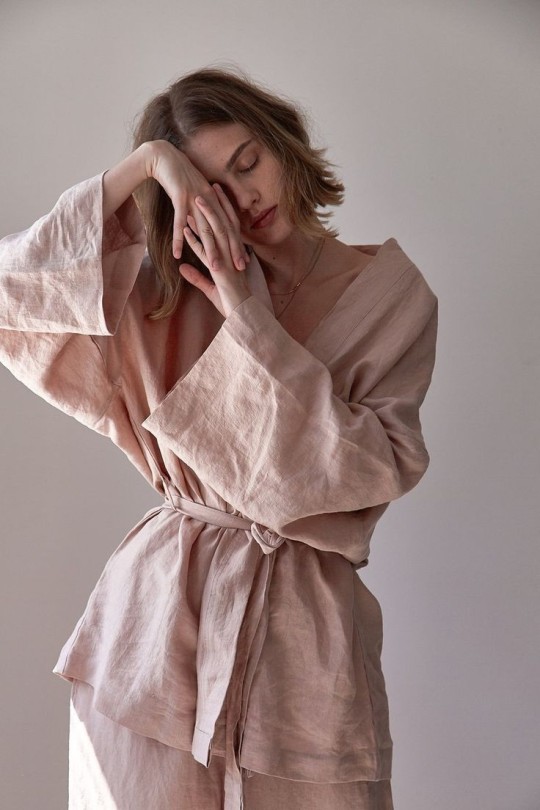
https://www.pinterest.com. /
21 notes
·
View notes
Text

the places I find in my mind… sea breeze, linens in the sun, pearls, and shells
#summer#sea shells#east coast#pearl necklace#pearls#oysters#horse#antique#pamela anderson#cape cod#rhode island#connecticut#massachusetts#new england#maine#linen#bedding and linens#clothes line#60s#70s#1960s#lace curtains
9 notes
·
View notes
Text
I've always wanted to make a full size blanket or a bedspread, so I'm promising myself now: 2025 will be the year I finally commit to crocheting a temperature blanket.
Yes, it'll be pretty expensive. Yes, it'll take a long time. Yes, it's a big commitment. But I've wanted to make something similar for years, and what is squirreled away "fun money" for if not to indulge in hobbies, goddamn it.
#squirrel speaks#i've kinda designed a colorway already#and it'll probably end up being a linen stitch blanket with a slightly larger hook; like a 5 mm#i've looked at many stitches now but many just seem very busy for something with so many colors#and i prefer it over a moss stitch#the only reason it kind of sucks because i'm weirdly antsy?? like. i'll have to buy so much fucking yarn#i kinda wanna test at least a few rows in a color i already have of the same line; just to get a gauge#....... probably gonna do that#i kinda want to reblog this post with progress every month to keep myself accountable or something; idk#I DON'T KNOW GONNA HAVE TO SEE HOW MUCH THE YARN IS GONNA BE
9 notes
·
View notes
Text

Man in Oriental Costume
Artist: Rembrandt van Rijn and Workshop (Dutch, 1606-1669)
Date: c. 1635
Medium: OIl on linen
Collection: National Gallery of Art, Washington, DC, United States
Description
In this imposing half-length image, a bearded man wearing an elaborate, bejeweled turban stares out at the viewer, his features strongly modeled by light streaming in from the left. A fur-lined cape, loosely clasped at the neck with a gold chain, covers his shoulders. His right hand grasps the sash that wraps around his waist, while his other hand rests on a wooden staff. An aigrette, a type of pin with a tuft of ornamental bird feathers that was a standard part of Ottoman attire, secures a heavy gold chain on the man’s turban.
#oriental man#oriental costume#genre art#half length#bejeweled turban#fur lined cape#gold chain#painting#oil on linen#fine art#ornamental bird feathers#brown#rembrand#dutch painter#dutch culture#artwork#dutch art#european art#17th century art#17th century painting
7 notes
·
View notes
Text

secret mushrooms :3
#pls ignore the wonky topstitching on the righthand ones xoxo#the thread is *invisible* against the linen and it makes straight lines surprisingly hard haha#this is the only photo itll ever be visible in so its fine
8 notes
·
View notes
Text
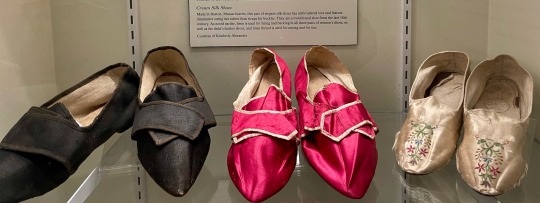
A special #FootcandyFriday from on-site at the @WoodmanMuseum where we are opening an exhibition 4/6 I have had good fortune to work w/ all 3 pairs of shoes TY to @unhlibrary & @MoffattLaddHouse for the loans for ‘Combing History: Flax and Linen in New Hampshire.’ @unhresearch
#18th century fashion#footcandyfriday#georgiangorgeous#worn in New England#cordwainers#silk satin#wool#linen lined
4 notes
·
View notes
Text
It's been almost two weeks since my last sewing update, but I have been making progress on a couple different projects, thankfully. I mentioned in my last post that I was hesitant to cut into a king-sized 100% linen bedsheet that I've been hoarding for 10+ years. I knew I wanted to make an apron, but I also knew that it wouldn't take up anywhere near the whole sheet, and I had the thought that I might be able to get two projects out of this one sheet (and the remnants of the matching fitted sheet) if I was careful about how I cut out all my pieces. Possibly a gathered tiered skirt/petticoat, along with the apron.
I measured the two long sides of the flat sheet that had identical ~1.25" deep hems, and I found that each side was 112" or just over 3 yards long, not counting the top and bottom hems. That meant if I did side seams, I could get a 6 yard wide bottom tier for the skirt and not have to do a hem at all, just use what was already there. Not the widest hemline on this kind of skirt (I have a purchased skirt with a 25 yard hem, and years ago I made a 26 yard tiered skirt out of muslin), but with this heavy weight linen it felt like 6 yards at the hem would be plenty.
Gathered tiered skirts are really just rectangles and a bit of simple math. Since the sheet's side hem determined the size of the lowest tier at 224", I figured I would do 2-to-1 gathers and make the next tier up 112" wide, and the third tier up 56" wide. A fourth tier at that 2-to-1 gathering ratio would have been only 27" wide, which wouldn't have fit over my hips, so the skirt would have 3 tiers.
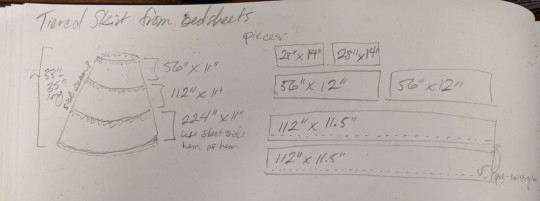
I'm a short girl at not quite 5'2" and I like to wear my skirts pretty low on my hips for spoonie comfort issues, so after measuring a purchased skirt whose length I like, I decided that between 30" and 33" inches in total length would be ideal. With three tiers that length could easily be divided into tiers that are each 10"-11" tall. I added a half inch for seam allowance (but no hem allowance on the lowest tier, since I was re-using the existing hem) to get the exact measurements for each of the pieces I needed for the skirt.
I was able to tear most of my pieces, since the linen bedsheet was nicely on the grain and tore relatively cleanly, thus saving my hands from cutting all those long pieces. I had meant to cut the top tier at 14" tall so that I'd have room to turn under a nice thick waistband too -- and then I totally forgot and cut it at 12" just like the middle tier, lol. I was able to get one of the middle tier pieces and both of the top tier pieces out of the remains of the matching fitted sheet, so I only needed one middle and two bottom tiers from the flat sheet. That left me with plenty of flat sheet left over for the apron, but I'll talk more about that in my next sewing post.
With my pieces all cut out, it was time to start the most annoying part of making a gathered tiered skirt: gathering all those tiers. I'm trying to sew with cotton thread more often these days, but for the gathers I switched back to polyester thread just for the strength. For the two bottom tier and two middle tier pieces I ran two lines of gathering stitches along the top edge, placed pins to divide each panel into quarters, and got to gathering and pinning.
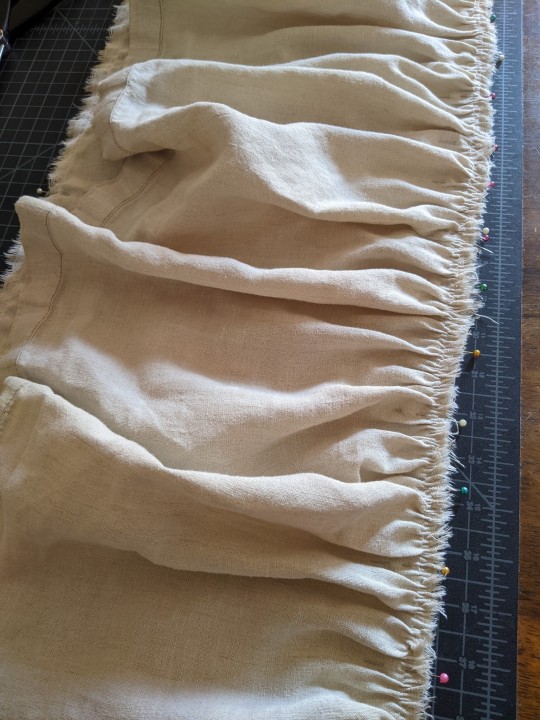
With tiered skirts I really prefer to work from the bottom up, so that I'm always attaching a gathered piece to a completely flat piece of fabric, and save side seams for last. So the bottom tier pieces got gathered up and attached to the middle tier pieces, then the middle tier got gathered up sewn to the top tier.
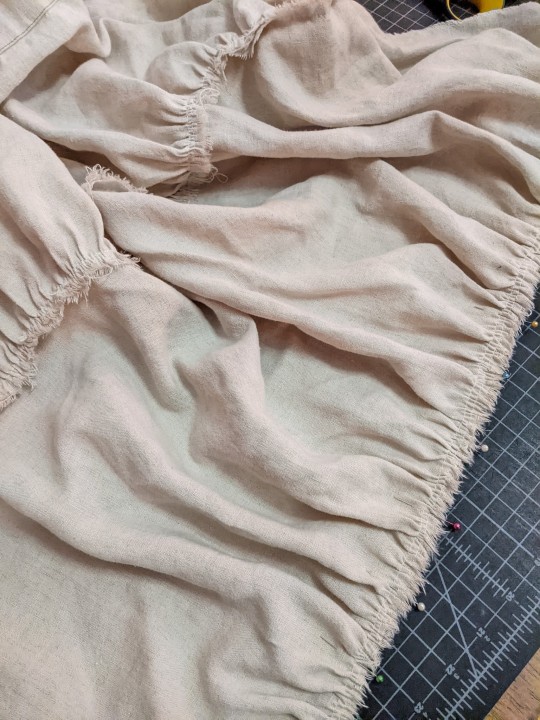
Since I accidentally cut my top tier pieces shorter than I'd meant to, I did play around with adding a separate waistband for the top tier to be gathered onto. But I couldn't do a full 2-to-1 gather if I wanted the waistband to pull on over my hips, and the waistband made the proportions look weird, like the top tier was too long. So I ended up cutting the waistband off after I sewed it and actually shortening the top tier even a little bit more. After turning under the top edge to enclose the raw ripped edge and then turning under 3cm (~1.2") for a waistband casing, that top tier ended up being about 9" tall, and the proportions of that look much better for some reason.
Before I sewed the side seams, I decided that this skirt needs to have pockets, of course. I knew I was planning to do French seams to protect the raw edges against unraveling, so I put the pockets in with a French seam as well.
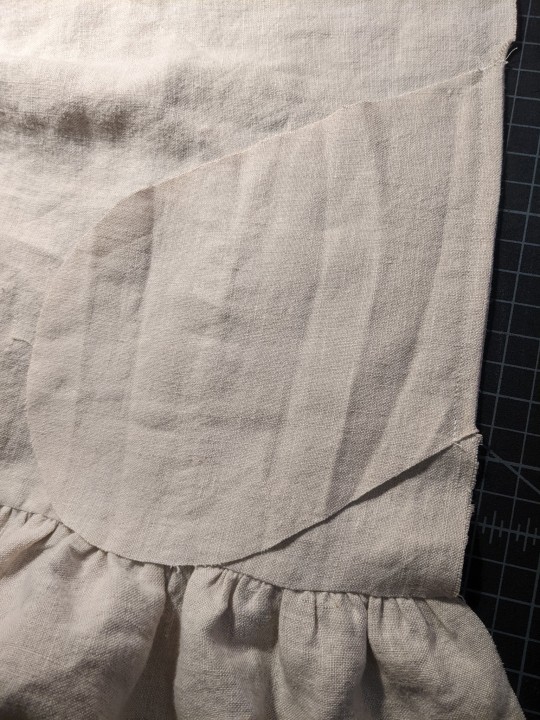
With the pockets in place, the next step was to do the side seams (including the pocket bags), being careful to match up the height of the hem and each of the tiers so everything was nice and clean and square. Then I was able to turn under that waistband casing and sew it in place -- my original plan had been put in three separate channels for narrow elastic that would result in a bit of a faux-cartridge pleating look, but actually getting the elastic strung through there turned out to be more of a pain than it was worth, so I ended up picking that out and just using a single 1" wide elastic band in the waistband casing instead.
And with that, the skirt was technically wearable, and with some fabrics I might have been happy to leave it there. But the raw ripped edges at the seams between each of the tiers worried me. I've had well-loved sewing projects just shred after many wears and washes because I left the seams unfinished, figuring I would be the only one to see the inside. Ideally I want this skirt to be in my rotation for years and years, so I decided to make the effort to finish those seams too.
My original plan had been to cover the raw edges inside with 3/4" herringbone twill tape. For some reason I was convinced that I had a bunch of it left over from a Wasteland Weekend project from 2018, only to discover that I actually only had ~3 yards left. So rather than ordering more and waiting for it to arrive (and then inevitably having some of that left over too), I decided to just make some 3/4" tape from the linen sheet itself. Since this whole skirt is rectangles on-grain and the tape wouldn't have to go around any curves, I made the tape from on-grain rectangles too, rather than bothering with proper bias tape.
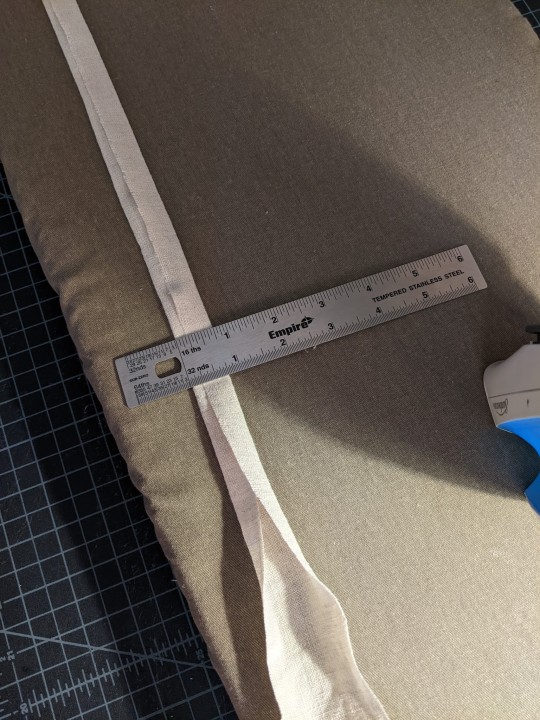
With the hem and the waistband already cleanly finished, I just needed tape to cover the ~3 yard seam between the bottom and middle tier and the ~1.5 yard seam between the middle and top tier. I tore nice straight strips, trimmed off the frayed edges, and ironed the raw edges under to give me that 3/4" width. It's three layers thick in the middle but only 2 layers thick on the sides, since it isn't a proper double-fold tape.
Then it was just an issue of pinning it over the raw edges inside the skirt -- first from the inside in roughly the right place and then from the outside to make sure it lined up with the seam well.
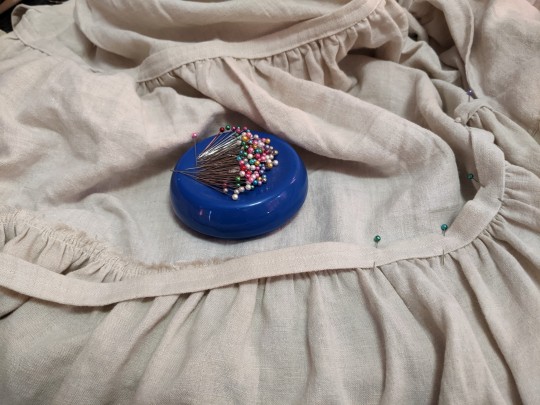
I stitched-in-the-ditch from the outside right where the gathers met the next tier up, and then went back and did another line of stitching just slightly up from that, using the width of my machine foot (~1cm) as a guide. That covered all the raw edges inside and reinforced the seam, and gave it a nice neat appearance from the outside.
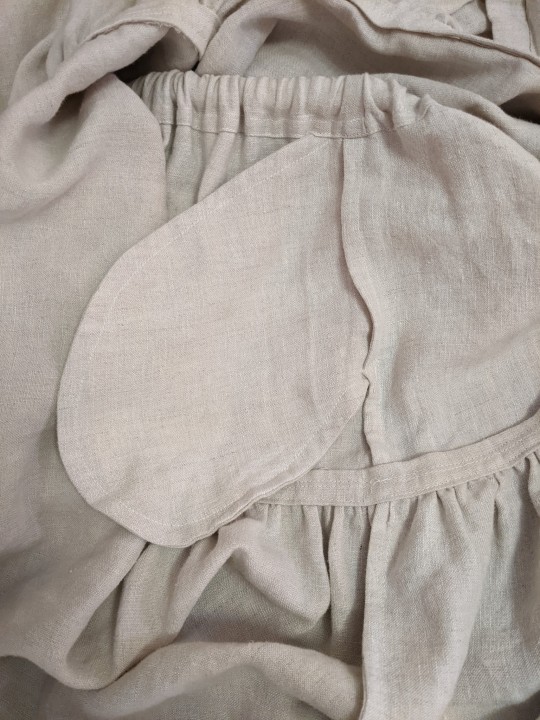
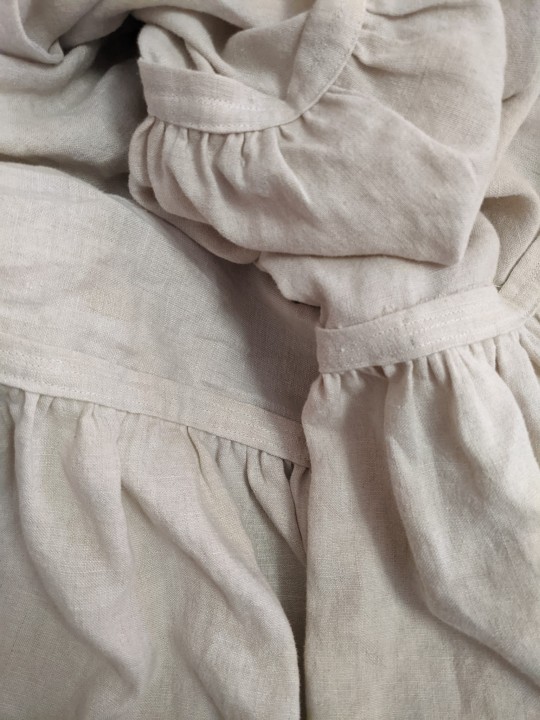
It also had the added benefit of behaving almost like cording on a corded petticoat -- the gathered seems have a lot more body and stiffness now than they did before, which gives the finished skirt a really lovely lofty structure.
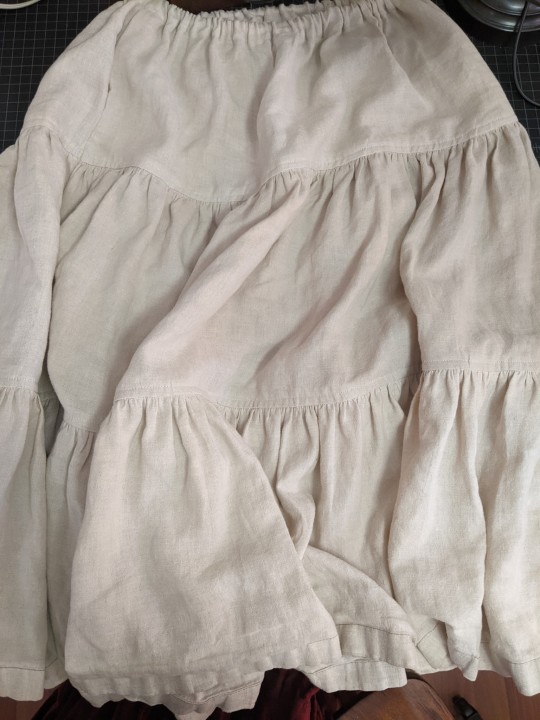
The whole skirt ended up being about 31" long, right in that 30"-33" length I had originally aimed for, and when I wear it low on my hips where it's most comfortable, it just brushes the tops of my feet.
My plan is to wear this mostly under other long skirts and dresses, more as a petticoat than a skirt on its own (tho it is heavy enough and neat enough to be worn on its own, if I want). That lofty structure from the seam finishes adds a lot of floof to my other long skirts, just barely peeking out the bottom of the purchased green skirt I originally measured to figure out the length for this one, and hiding completely under my purchased 25 yard burgundy skirt but giving it enough extra volume that it doesn't drag on the ground quite so badly.
As the colder weather sets in I'm sure this will get a lot of wear under skirts and dresses (including the several dresses I'm still planning to sew in the next couple months!), but even now in the last heat of summer it's quite comfortable to wear, since it's linen. Jack commented that it seemed like a lot of work for a skirt that won't be seen (and it did manage to remind me how much I dislike gathering long lengths of fabric), but as long as it's functional and gets used often, I feel like all the effort was worth it.
While I was putting this together, I also cut out and started assembling the apron project from the same bedsheet. Even with all those pieces cut out, I still have enough linen left over for at least one more, maybe two more projects. Next up I'm going to get to all the finishings on the apron (which will be getting its own post once it's done) and keep trucking along on the handsewn eyelets for the Lengberg Castle Bra-thing. And once those two are done, I think I just might be ready to finally start on all the dresses I want to make with my new fabric.
#sewing#tiered gathered skirt#peasant skirt#bellydance skirt#if you can sew a straight line on a sewing machine you can make this skirt#I wouldn't recommend trying to sew it by hand but it's a good beginner sewist project#the math is really easy and you can work upwards from the hem like I did or downwards from your waist measurement if you want#gathering in a 2-to-1 ratio (so the final piece is half its original width) is pretty standard but you can also do 3-to-1#bedsheets and quilting cotton are excellent options for this kind of skirt#and if you're careful with re-using hems like I did or using the finished selvedge edge of the fabric you can avoid hemming it entirely#long post#my sewing#2024 mood#linen petticoat project#linen apron project#which is actually all assembled and just needs all the hems and finishings. but that'll probably take me most of this next week I think#post on that coming eventually#and then: DRESSES
9 notes
·
View notes
Text
Does anyone have any recommendations for easy beginner sewing projects, specifically for simple clothes? (preferably items so simple you can draft it yourself or there's a free pattern available)
I'm trying real hard to break out of my decision paralysis
#sewblr#sewing#clothes making#idk what else to tag to get sewists' attention 😭#I am currently looking at apron tutorials so i can make one for mum's christmas present#but i would like to have another lined up after this#so i dont just stop at one thing because my brain's like well ''that's enough dont need to do more''#i have mostly linen and cotton fabric so i cant really do something with stretchy fabric rn
15 notes
·
View notes
Text
Do I need more clothes? No, probably not.
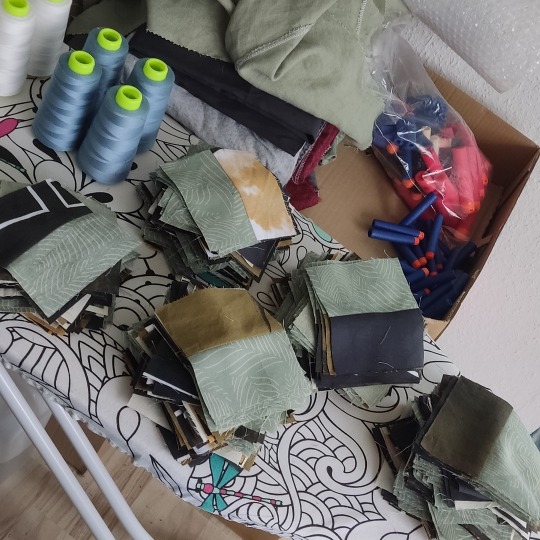
But I've got all these squares now. And I did math and adjusted my skirt pattern. And the bodice pieces are already cut out.
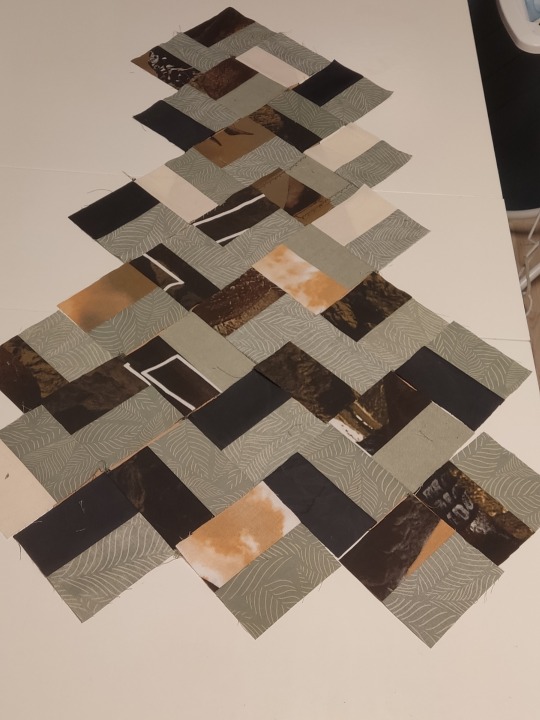
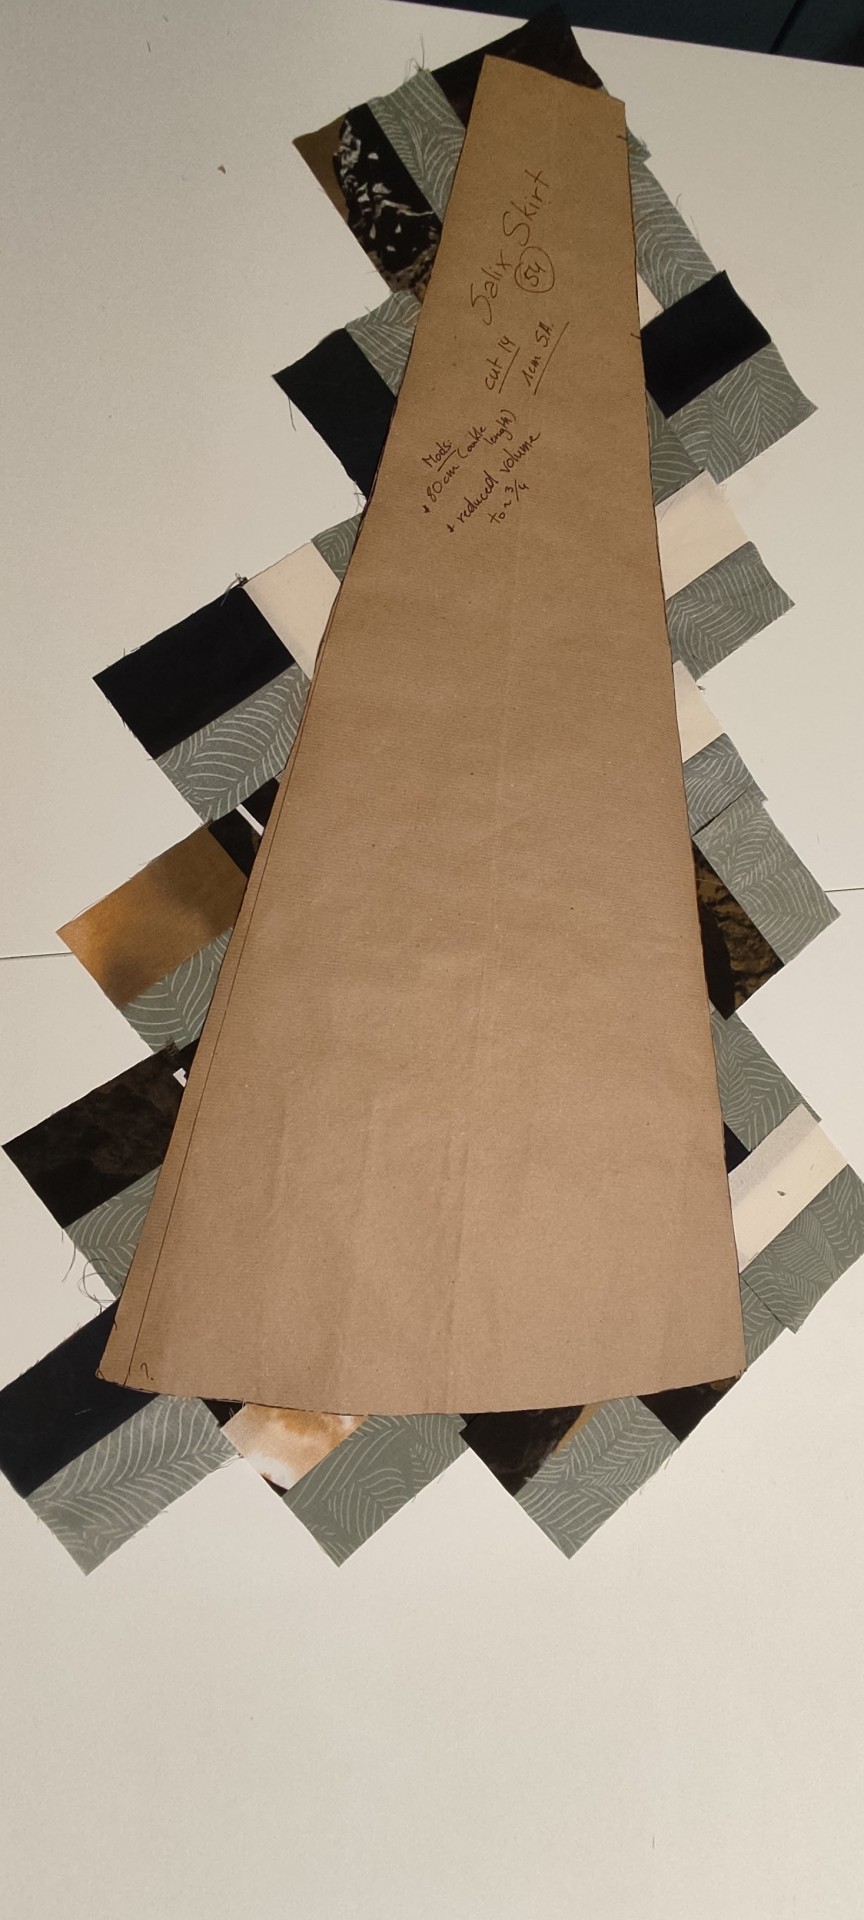
And, and... I would have to turn these into an actual quilt if I don't, and I'm pretty much out of materials to do that.
#sewing#patchwork#quilting? probably not#it's gonna beeeee#the Hinterland Dress by Sew Liberated for the bodice#with the back elastic hack and a 3/4 sleeve minus the cuff#Salix Skirt by Unendlich Schön#lengthened to 80 cm and reduced to 3/4#with that pocket mod I did on my last blue dress#patchwork/quilt pattern is Spiny Peaks by Modafabrics#fabric is a mix of leftovers from mostly bedsheets and a little bit of ikea linen and white calico cotton#yes another dress#sometimes adaptive clothing is wearing house dresses wherever#no ibs issues no sensory issues no trying to be office appropriate through morning brain fog#i technically maybe have enough backing fabric#but I don't have batting and no batting money#so flat lined skirt it shall be#trust issues dress
16 notes
·
View notes
Text


just gettin' some recent selfies in the personal tag 📸 took these in monte carlo may 2024!
#italian linen men's shirt and shorts and vintage emanuelle khanh sunglasses picked up in antibes#fun fact the one day i decided to randomly go to monaco was the day of the FUCKING GRAND PRIX#oops#most of the roads i wanted to casually stroll along the seaside were closed off#but i did accidentally run into the starting line of the race#in my defense it was next to a mall#anyways beautiful city#scenes from a life
7 notes
·
View notes