#let’s make tumblr resize them
Explore tagged Tumblr posts
Visit Tumblr Blog
Explore Tumblr blogs with no restrictions, modern design and the best experience.
Last Seen Tumblr Blogs


Fun Fact
130K people were victims of a chain letter scam that affected Tumblr in May 2011.
Text
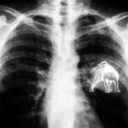
"you drive me NUTS, Touden!!"
referenced from this new girl scene
#PLEASE let me know if this isn't readable. i do not understand how tumblr resizes images at all#also sorry if it's a little ooc for both of them but i just HAD to do this scene and these two fit the best#PS i'm an anime only watcher so no spoilers please. but through osmosis tumblr has convinced me to make labru content#despite having no skin in the game at all#in fact i think it's funnier unrequited (sorry)#dungeon meshi#delicious in dungeon#labru#labru fanart#comic art#comics#art#kurart#fanart#artists on tumblr#laios touden#kabru dungeon meshi#new girl#pov you hate drawing any kind of consistent nose
237 notes
·
View notes
Text


No one would mind if I started posting about Neocities website building right? Anyway here are some pixelated cursors I recreated (feel free to use them, they’re already sized correctly) and some website themes I’m working on! I’m hoping to make them available for people to put on their own sites at some point.
[ID: Three images of pixelated cursors and two images of website pages in mobile view. The first website page is styled to look similar to a Windows XP desktop. The second is custom and shows an art gallery of Psychonauts fanart. /End ID]
#neocities#It’s so fun??? I love making these things#I’ve done a bunch of other assets like these but they’re very specific and don’t look as clean#But I’ve also been coding widgets and plugins to make sites better#like one similar to tumblr’s ‘click on image to make it bigger’ feature#Busy at the moment but could open requests to make themes#not just CSS too. That windows xp one actually lets you drag the windows around and open / close them and resize them
72 notes
·
View notes
Text
Dearest, lovers
Hello Tumblr World! I am that creator who has been working on Nicola & Luke Press Documentary for the past few weeks.
To tell you the truth, those weeks have been quite exhausting. I had to combine my job and private life to be able to work on, as how my followers had called it, N&L Press Doc. BUT! Enough about me, let's talk about the project.
For the whole plan to make sense, I had to collect material; starting from London and ending it on Ireland, that included over seventeen Google Doc pages of interviews from various social media platforms. In the meantime, I was posting surveys on X regarding certain details, because I wanted people to have a chance to choose. The most time-consuming task was searching for a good quality videos and photos, downloading needed files, neatening them into correct order, to then montaging into 4 parts. Several interviews were edited by me, splitted, resized, which only made the steps to finish line take longer than I had initially expected. Entire process from making decision to actually starting "new project", to rendering each part took about a month. With that being said, I was happy to finally announce the release date.
So here they are! PART ONE
youtube
PART TWO
youtube
PART THREE
youtube
PART FOUR
youtube
From here, I'd like to say BIG thank you for those who were with me the entire time, for those who helped me out with gathering the materials on X / TikTok, for those close to my heart that cheered me up, when things weren't going my way. And most importantly, but not least, thank you for each comment, each like and each viewing. I've spend days on this project, I've put my heart into it. And I'd love you guys to enjoy it, as much as I did, while making it.
I'd want to clarify one more thing. This documentary was put together to express my love towards both Nicola and Luke, to be able to give the fandom a space to reminisce the tour, to fill up the small puzzle of missing them. Absolutely NO negativity will be allowed. Yours truly,
Em <3
#nicola coughlan#luke newton#bridgerton#nicluke#bridgerton season 3#polin#polin bridgerton#penelope bridgerton#colin bridgerton
393 notes
·
View notes
Text
Digital Stamp Making Tutorial
Hello, and welcome to the long-awaited(at least on my part) digital stamp-making tutorial from neosprites! I’d like to preface that I learned what I was doing from this tutorial so it may be a bit redundant, but if anything I get a bit more specific. Thank you so much to @graphic--horde for your work, it changed me as a graphic maker. This is gunna be a long post so feel free to bookmark it for later. Now, onto the show!

The frame I will be using for this tutorial (which is the frame I use on 99.9% of my stamps) I found from the above linked post, which I believe is from a creator that OP lost track of. Its inner dimensions are 94x50 pixels and its outer dimensions are 99x56 pixels. Here it is!

Find your material! - I recommend using websites like Tumblr and searching with the “GIF” filter only on, or alternatives such as Giphy or Tenor. Your browser may let you directly save the .gif file; if not and you are noticing it restricts you to save it as a .webp file you can try an extension like “Save webp as PNG or JPEG” (for Firefox but I image other browsers have similar functions, but I really recommend you switch to Firefox). To use this you will right click on your source .gif like normal but instead of clicking on “Save image as…” click “Save webP as…” and then click “GIF”. You should be redirected to the website ezgif.com where we will actually be doing all of our editing! Here’s the .gif we’ll be working with.

Convert to GIF (optional) - if you used the extension from the above step you should already be ready to click the blue “Convert to GIF” button. If not, go ahead and open ezgif.com and click on “webP” and then “WebP to GIF”; then convert to a gif with the blue button.

Resize the GIF - now that we have a gif ready to edit, let’s make it the right size. The easiest method I have found is to change it directly to the frame’s inner dimensions, 94x50 pixels. [EDIT: Make sure in the aspect ratio drop drop menu you select "stretch to fit" and not "center and crop to fit" like I did in the photo example.] Click “resize” and then type [94] in for the width and [50] for the height. Next press the blue “resize image” button.


Add the frame - next click “overlay” then click the thin blue button that says “Extend canvas size(use if overlay exceeds GIF sizes)”. This will give us some extra room to add the frame onto the design. Next click “Browse…” and find the frame you have saved onto your device, then click the blue “Upload image” button.


After that it’s going to be misaligned, that’s normal! It will say you have the option to drag it into place, but don’t bother. That’s one of the reasons my old stamps look wack, it’s just harder to do. Instead type [44] in for the Left box and [22] in for the Right box. It took me a while to figure out these dimensions to be honest, and I’ve only tested it with this frame so I don't know if it works with others. Then click the blue “Generate image” button.


Crop the transparent edges - click on “crop”. You will have the option to check a box that says “trim transparent pixels around the image” however, I don’t recommend this as it tends to crop a few of the frame’s pixels with it sometimes. Next, set the Left position to [44] and the Right position to [22]. For the other dimensions we will use the outer dimensions of the frame which are 99x56 pixels, this will trim everything except the tiny spaces in between the stamp frame’s spikes. Type the width as [99] and the height as [56] and click the tiny blue button that says “set”. After that click the blue “Crop image” button.


Save and use! - all that's left is to click “save” and upload the graphic to your liking. (best seen on dark mode obviously)

If you’d like to tag me in stamps you’ve made using my tutorial I would love to see them, but it’s not required!! Make sure to always give credit for pictures/gifs when you can and try not to make stuff out of personal/fan art. Thank you to the person in my inbox who requested this tutorial, I had been meaning to for a while but it was just the kick I needed. :)
#carrd graphics#carrd resources#carrd stuff#rentry graphics#rentry resources#rentry decor#rentry pixels#rentry stuff#rentry inspo#deviantart#neocities#mine#my graphics#my tutorials#resources#tutorials#tutorial#how to#stamps#blinkies#graphics#web graphic#old internet#early internet#spacehey#da stamps#page decor#custom#old web#frames
202 notes
·
View notes
Text

NEWS New year, new pinned post!
I know some of you know we had some resized toddler rigs so they look like babies, but then we got the infants by EA, but that object baby still isn't 'easy' posable. Did you know we now have a resized infant preset (and rig for posecreators) available by @electricwhims! Check all the info out here! I will tag posepacks with the resized infant rig with the tag #newborninfant (don't paywall your holiday poses until after the holiday!!)
A FYI The queue and backlog is very long right now, so please be patient! If you saw I liked your post, it’s in the queue and will be reblogged!

!!!!! KNOWN POSEBUGS Eyelids are still not fixed by EA after the Lovestruck patch, so it could be that eyes are not entirely closed in many poses due to this EA bug. DUE TO MIGRATION to EA forums AND ARCHIVING the original topic - we can't ask you for me too's on the original topic. But we believe this bug that's open still, is also related to the same eyelids problem. SO asking you ONCE AGAIN to upvote THIS post and hopefully it get's fixed quick! WE REALLY NEED A FEW MORE UPVOTES!
New here as a pose creator? Please tag the page (a good @ts4-poses tag in your post will work if you are not shadowbanned, hashtags don’t always work but I follow several tags), or submit your posepack through the submit form. I don’t always have time to always check all the pose creators who are not tagging, so please make it easier for me doing so! Am I not reblogging your posepacks? Make sure you don’t copy tags from earlier posts, but type them in every new blogpost! If you do that and still are not being reblogged, you are probably shadowbanned and are not popping up in my notifications. (Send a message to tumblr support!)
Rules for reblogging I don’t reblog permanent paywalled poses, blender only poses or posepacks with months of early access. If you have a normal early access policy (due to EA their rules) I will reblog your posepack after the early access period is over. Because if you wanna find that perfect pose to use for your story/post/edit you want to use it right away, right?
Make sure you put your downloadlink above any cut
I have everything backed up from 2024 on, so if anything is lost from that time, please let me know. I will upload it in the Lost Poses section. Please let me know too if a link or post is dead. (You can due through message or the submit form!) I sadly can’t reply every ask for certain poses you are looking for, since I’m doing this on my own <3
Links that are helpful!
Everything posing you should know
The pose creator discord
Lost poses section (if you have anything from these creators that is not uploaded here yet? Please send me it!)
How to use poses?
Deco sims tag!
106 notes
·
View notes
Note
(I see you've redone your blog again) but anyway JayGrant is sooooo the friends that make a marriage pact as kids. And Jason thinks it's a joke but Grant is SO serious. 20 years later Grant breaks into Jason's apartment and is like "so I've noticed you're not yet wed-" and Jason is like "I THOUGHT YOU WERE FUCKING DEAD WHAT THE FUCK!" And Grant is like "Irrelevant. I need you to update your hand measurements to get the ring resized."
I did! I want it to represent what's going on on this little corner of Tumblr of mine hehe thanks for noticing!
Also!!! ASASGDJFG "I need you to update your hand measurements to get the ring resized." Meaning he already has a ring and has been constantly measuring Jason's hand throughout their childhood/teenage years, lmaoo I imagine Jason sitting there while Grant measures his hand going "lol you still on that?" While Grant very much is.
Jason being pulled the uno reverse card for once and being in the other end of "I THOUGHT YOU WERE FUCKING DEAD WHAT THE FUCK!" is so freaking funny.
Jason is still reeling on the fact that Grant came back at all, cause he had given hope he would. Jason sees his own resurrection as a curse so seeing Grant reviving gives him a new perspective and of course Grant goes, "We're soulmates, actually."
And Jason kind of believes him. Wants to believe him too.
Jason is —other than surprised Grant came back at all— is like "You meant it???"
Because he's on board, HEAVILY so, because he gets to marry the first crush he ever had, the very hetero guy who would mess around for shits and giggles, and make him flustered and red faced every time he'd throw hypotheticals at him: "I would treat you better than anyone else", "If you married me we'd never spend our nights sleeping"
All of this is especially funny immediately after Grant's resurrection, because Grant is fully convinced he came back for that one reason (it's actually way deeper than that but his obsessive streak is not gonna wind down for a while.)
Grant goes over the top with everything, the ring, the weeding, the preparations, his rich kid upbringing along his entitlement and hedonistic nature (that only amplified when he came back from dead) makes him a nightmare for anyone who gets on his way of making the Wedding anything less than perfect. This also goes along with me headcanoning him as a perfectionist (having your parents criticizing your shit since ever will do that to ya) bridezilla Grant says who lmao
And if we're going with the family dynamics...
Adeline Kane clutches her chest and almost has a heart attack because she finds out her son is alive Through a freaking Weeding Invitation.
Joey as well and his brain is balancing from wanting to beat the shit out his brother for making them go through this to go hug him and demand to be his best man.
Respawn, Alex, Rose and Wintergreen are invited as well, if only to cement the fact that Slade is very much not invited. He still shows up, though.
Jade is the bridesmaid, or best woman, or however it is. Grant shows up one day and is like "Bitch I'm getting married, you're the bridesmaid," she sighs, looks at his choice of a husband, sighs even more heavily and then they go shopping for the wedding.
The batfam on the other hand, Bruce and Dick are the ones who are having the hardest time.
Bruce is happy at first that Jason is settling and getting married, but then—
"Married to who?!"
Dick is sweating bullets, "Jason, you're still young, you don't have to settle for this one just yet!"
"No, I gotta."
Babs walks him through acceptance. When he recovers he drops Jason hints (as in, big passive aggressive hints) of him being the best man.
Jason lets him in tension for a while, at least until he decides who's gonna be the best man because he's not the first one to not-ask.
Meanwhile Steph and Tim pipe in, "can we plan your bachelor party?"
Damian is happy he gets to spend time and meet his half brother's family, (Respawn) and Jason will be there too I guess.
Jason is very much shoving in their faces, "I'm getting married before any of you losers."
Talia and Harvey are invited as well much to Bruce's dismay.
Bruce gets surprisingly along and is very supportive with Grant while he's in one of his bridezilla episodes because yes, Grant is right: Jason’s wedding deserves the best of the best.
Grant gets very intense about it too, hence, mark Jason down as scared and horny.
Slade, on the other hand, gets whiplash because Addie was just like that on their wedding.
#dc comics#batfam#dc#jason todd#bruce wayne#dick grayson#batfamily#damian wayne#grant wilson dc#mercfam#jaygrant#THANK YOU SO MUCH FOR YOUR ASK#I love talking about them#I wrote this twice because Tumblr ate the first draft of this </3#Adeline kane#Slade wilson#sladdie#Batman#batman#red hood
174 notes
·
View notes
Text
Tutorial: Manga Banners
Basic Manga Text Change/Coloring/GIF creation in PS
Hey, so as promised making a very basic tutorial for making banner gifs in photoshop for fics/drabbles/layouts, etc.
I'm going to keep things super simple here for beginners.
END RESULTS↴

(NOTE: This gif I made will be used for an unreleased story of mine so please don't use this exact gif/images but you are free to follow the tutorial to create your own).
All I ask is if you find this helpful to REBLOG! :) No need to credit me.
For this tutorial you will need ↴
Photoshop
At least 2 manga panel images (non-transparent*)
Optional: Manga fonts. I mostly use CC Wild words (speech bubbles) & Manga Temple (narrator boxes)
Basic knowledge of photoshop layout/where tools are.
*this tutorial is essentially the same if working with transparency but if you do work with transparency you will need to have knowledge of clipping masks which i do not cover here.
Tutorial ↴
(optional) Prepwork: so i didn't think to include this do this but you are going to need to crop and resize your image. make sure the width is either 540 or 1080px. This is the recommended width for pictures in tumblr. Height can be what you want it to be. This is done image > image size (make sure the link-chain is pressed for aspect ratio)
Step 1
This is what you want your setup to look similar to. Delete locked background layer.

Steps 2 & 3
Make a new layer. It might be helpful for beginners to re-name all their layers so instead of "Layer 2" you might name this ⇢ "White fill layer or Text cover up". (doubletap layer name to change it).
Use rectangular marquee to select text you want to change. If you are just replacing a word or two you dont need to white out everything. But you could choose to cover up all if you wish. I just wanted to remove "senpai".

Steps 4 & 5
Use Paint Bucket Tool to fill in selection area with white (make sure the new layer you made is selected when you do this).
Select Text Tool. There is no need to make a new layer as once you are done typing it will become a text layer. I used CC Wild Words bold font for this for emphasis. If you do multiple lines of text use a new text layer for each line.

Step 6 - Optional Step - Highly recommended if you did multiple lines of text.
Rasterize Type by right clicking the layer. This is an optional step. I tend to do it out of habit and rasterizing lets you use the move tool to give you exact px distances between other rasterized elements but nothing we are doing requires this tbh and if you do decide to do it you can't go back and edit text.
If you did multiple text layers you cause space them out evenly using the move tool (zoom into 200%-400% if necessary to get exact pixel distances). Tip: Manga text is centered in the bubble and leaves a good distance away from the edge.
When you are done ctrl/cmd to select all text layers then right click and merge the layers. This is so incase you have to move the text layer for whatever reason they are all on one layer now, evenly spaced and you won't accidentally mess that up.

Step 7
Create an exposure layer (half filled in circle in layer bar for menu). This is important as it can lighten/darken image to make the colors we will add later pop by playing with the sliders for each setting.

Step 8
Apply exposure settings. On the right-hand side there will be 3 slider bars. The screenshot shows my settings but your settings will vary depending on the image. The one that gives the biggest benefit for manga is Gamma Correction which affects the midtones to make them lighter/darker and adds better contrast to the image so it doesn't look as muddy, often in black and white images it is easy for midtones to look muddy. Offset affects mid to dark tones of an image. Exposure affects midtones to highlights to make brighter or darker, overall use this the least. TIP: If you want to make an image brighter or darker you usually want this to apply equally to the overall image so then you would create a brightness/contrast layer instead. most manga images skew muddy and need a midtone and dark adjustment rather than highlights. the better the manga scan images the less adjustments you will need.

Step 9 - Optional
Apply a gradient map (half filled in circle in layer bar for menu). This is optional. a Gradient map adds gradient but preserves the shading in the image so essentially adds a gradient to the shading. I do this in black and white. But if you are happy with how it came out in the exposure phase you don't need to.

Step 10 & 11 -
Apply a gradient (half filled in circle in layer bar for menu). So when you add a gradient there are a ton of preset color combos you can use or you can create your own. I think this one is a preset but can't remember. I like a diagonal gradient from light to dark depending on where the light source on the image is but it is completely up to you. I tend to set the gradient angles near these 4 settings: -145, -45, 45, 145 depending on what corner I want the lighter part in.
One thing to note is brighter colors work better with a darker background. Lighter backgrounds can get washed out. One you add this as you can see it will be solid color.
*note* once this layer is applied any edits such as moving text, etc. around you want to do to the lower layers beneath it click the "eye" button to hide the gradient (same for the map) or there's a good chance it will move the gradient layers around and not the layer you want.
Change layer blending mode. By default it's set to "normal". You can play around with these. Depending on the effect you want and whether the image has darker or lighter colors will decide the blending mode. My typical blending modes are screen, overlay, hard light, vivid light or pin light. You can duplicate this gradient layer and play around with multiple settings and opacities to create something you like.

Step 12 - Optional
Add a Brightness/Contrast layer (half filled in circle in layer bar for menu). Brightness/Contrast on this step will look wildly different than if you added it right after the exposure step. It's not necessary but if you want more overall contrast or brightness then you can add it.
You can see my settings below on the sliders on the right-hand side.

Step 13
Create new layer for highlights. (also good check point to see how your layers are organized).

Step 14
Select the brush tool and ensure brush settings are a soft round brush with a hardness of 0% for the highlight effect. (if you click the brush image you can see my settings better)


Step 15
Select the dropper tool and pick a color from the gradient image. I usually pick the darkest colors available as it will have the best dodge effect for highlights. Since this is pink/redish I only have one highlight color but if you were doing a green/blue gradient you would pick the darkest from both. (ignore the purple here its not being used)


Step 16
Create highlights with brush tool. Do a few tests placements randomly around the image for positioning and then swap the blend mode to either color dodge or linear dodge. I usually do color dodge. You will get awesome highlights like below. You can play with the sizing of the brushes and opacity to decrease the effect.

Step 17 & 18
Export as PNG. Do this even if you want to make a gif as I always recommend a clean canvas for gif making. If you want to be done here and don't want a gif thats fine too. File > Export > Quick Export as PNG (do not save as jpeg/gif you will lose image quality).
Repeat for second image. You don't need to open a new file unless it helps you to not get confused. You can just make a new layer and paste your new image into that layer (if you just right click copy the file in the window/finder folder you can directly paste it into a layer in PS) and use the transform tool to resize. However you can totally just open the image in PS. The benefit of same canvas is you save yourself some time as you can just duplicate gradient layers/adjustment layers and move them. But this is kinda more advanced so if you aren't comfortable with photoshop just make a new image.

Step 18-19
Create new file/open one of the PNG in PS (more advanced can just create new layer, select image, then copy > copy merged and paste on new file for each. Otherwise open one file, create a new layer then copy the other file. The bottom later will be the first image in the gif.
Create Frame Animation on the timeline window. (if the timeline window does not appear then window > timeline) *note* if this is your first time working with the window it may be set to "create video timeline", if that's the case create it then from the frame menu (in step 23 theres an example of where this is) select "convert to frame animation".
If done correctly your setup should look like the below with two images. One for each layer and one for each frame.
MAKE SURE PROPAGATE FRAME ONE BOX IS CHECKED IN THE LAYERS WINDOW.
lmao, not to be dramatic but this ensures most effects you would add to frame 1 (which corresponds to layer 1) is applied to all frames. I'm not too sure its super vital for this super basic gif I'm showing you but its better to get in the habit of always having it checked. otherwise it will fuck you over later down the line in my next tutorial where I show how to add frames to gifs.

Step 20
Select both layers, then select both frames (ctrl/cmd) and finally select tween from the timeline window. It is the multi-faded dot option on the bar below.

Step 21
Add Frames to Tween. Tween is the fading effect adding more frames is the longer the fading effect is. I added 20 for this step, you can play around and add more or less.
Once you do that you can see 20 new frames being added onto the timeline. This will not automatically add new layers, this is fine. Frames and layers don't need to be a 1-to-1. (Another reason why propagate frame 1 needs to be checked as you can still adjust those layerless frames by adjusting frame 1's layer)

Step 22
Adding delays. Automatically the delay on every frame is at zero. But especially if you have text you want people to be able to read that so you need to add in a delay. Your delays can be in increments of 1/10th of a second. I add a 1 second delay to the first frame only.

Step 23
Select and Copy the first frame and then select the last frame and Paste. A paste window will appear in this case we want to paste after selection. I circled where the menu for frames are. (sorry used a different gif as an example so ignore everything but the circled menu)


Step 24
Adding additional delays. I add a 1 second delay to the last two frames.

Step 25
Add more Tween I added 5 frames this time as we want the transition to be much quicker to reset the image. You can see frame 23 in the previous step are now frame 28.
You can add more images in than 2 and follow these steps to add tweening.

DONE! Now to save.
Step 26
Export your gif. File > Export > Save for Web (Legacy) and the screen below should pop up. Here are the settings I use for gifs. You can play around with it but I really wouldn't lol. (again ignore image size, this is from a different gif) it will also tell you how big in file weight your gif is. This isn't something you have to worry about for something simple but the bigger the image size and the more transitions/images you use the more frames you will have. Reducing image size (make sure chain link is on like in the below) will take off more sizing then removing frames will and I would recommend that. But tumblr allows 10MB MAX per gif so just something to keep in mind.

Let me know how this was! If you have questions just drop me an ask. ❤
#✩𝓀𝒾𝓏𝓏𝒶𝓉•𝔱𝔲𝔱𝔬𝔯𝔦𝔞𝔩𝔰#✩𝓀𝒾𝓏𝓏𝒶𝓉•𝕘𝕗𝕩#gfx#fic banners#tutorials#resources#photoshop tutorial#manga edit#edits#fan fic writing#fic writing#anime edits#manga edits
121 notes
·
View notes
Text
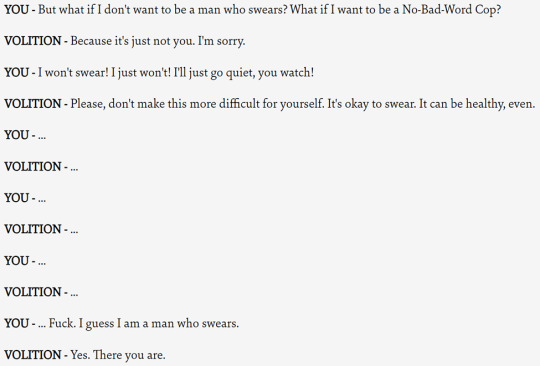
OCT 8 - VOLITION
Hold yourself together. Keep your Morale up.

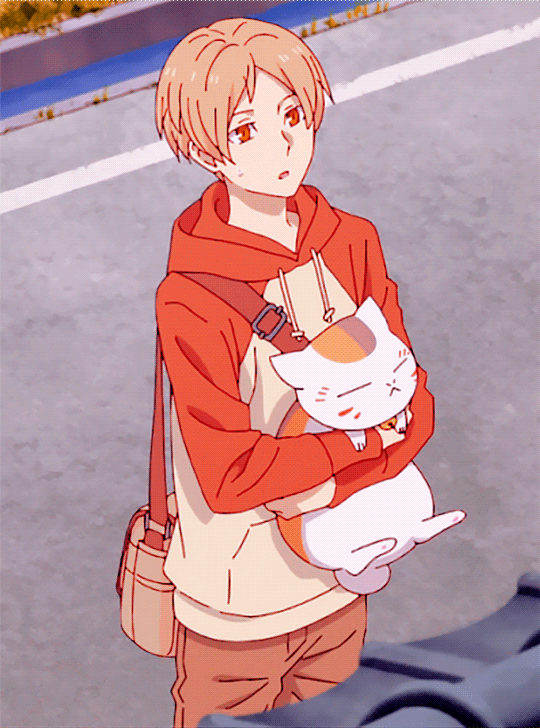
I had to resize this image 3 times to get tumblr to take it... it is also past midnight here, but the day change doesn't really count if I haven't gone to sleep yet, so :)
Volition. My love. my favourite skill. please enjoy. I also drew the volitions of some of my mutuals!! because I love you guys and your volitions very much (holding them gently in my hands). hopefully you guys dont mind and I didn't mess them up too badly
anyway. uhm. I'm much too tired to write anything super coherent right now. please write tags for me or write comments so I can see them when I wake up haha
and! there is a LOT under the cut. like, way more than any of the other days. it is giant. be very careful expanding it <3
ok here goes... I'm typing shorter ones out and screenshotting big ones
--------

VOLITION - Stop, you're only making it worse for him -- you never help with *anything*.

- Rare volition being rude to other skills!!! it only happens under pressure, too
KIM KITSURAGI - "What else could she have done? Lie? She saw there was no way to lie and get away with it."
DRAMA - You would have caught it.
VOLITION - Like hell you would have -- remember?
- you tell him volition!!
SUGGESTION - What is *wrong* with you? Why did you ask to be connected to her? Who *does* that?! Act professional now.
VOLITION - *You* told him to do that stupid thing...
- rare volition callout!!
YOU - Can I trust that guy?
VOLITION - A little. They're all still of limited use, interpreting things to the best of their ability. Maybe they add flair or something? I wouldn't know. I don't add flair.
- this is one of my favs haha. you don't need flair, love, it's ok
VOLITION - Ouch.... That's like twenty points of pride-damage right there, buddy.
- This is after Sylvie turns you down to get coffee. (and you do suffer a point of morale damage haha). him calling you buddy is so funny. it's always mildly condescending too!
- here's the other two:
VOLITION - You're no titan of Volition, buddy. He's got you in a fork. Sit down or leave.
VOLITION - You're a little more moralist now, buddy. A little more *normal*. Even if you didn't want to be.
YOU - "Cryptid extravaganza? I like the sound of that."
KIM KITSURAGI - "And I *don't*. Just one."
VOLITION - Or he'll be *disappointed* in you.
ENCYCLOPEDIA - Whooh... tough choice there.
- volition knows it's truly the most terrible thing haha
VOLITION - An enormous expenditure of willpower to build up strategic semen reserves? You had me at *willpower*. Let's do it!
ELECTROCHEMISTRY - Life is all about pleasure... why deny it?!
- these two are hilarious. poor echem. but also volition, honey, nono...
- the game implies consequences when increasing your skills too high but you don't see it with all of them. Volition's one you don't really see much downside to, but you can just. Imagine it here. Him pressuring you to do something stupid, just for the sake of it being difficult. Surely that's not healthy??
- I do think Volition has a lot of issues. I'll get into some more of them later though!!
- but just... Harry wanting to do something that *is* a test of willpower and Volition is completely uninterested. But the semen retention thing is okay? sigh
- and then after that, he's just like. nope. we're not going to not swear :)
- he's so stupid sometimes. also it's absolutely hilarious to me that you can pick the "..." option over and over and Volition will match it forever. You simply cannot out-will your own willpower. It's just not possible.

- I actually live for Volition being the singular voice of reason. Look at the others all chiming in!!

- this one too, Volition being the only one trying to stop it! Why are they all piling on?? Composure not you too >:(
- I had excessively high Volition *and* Pain Threshold in my first run and the two of them!!! PT gets very self destructive at high levels, so seeing the relentless push and pull of PT and Volition was so good.
- This line from the description -> "Cool for: Sane People, Well-Adjusted Cops, The Non-Suicidal" yes it's cool for them, sure, but it's incredibly!!! important for NOT these people! Because Volition doesn't make you sane, or well-adjusted, or non-suicidal. He's just the one voice of reason in there trying to veer you away from making irreversibly bad decisions.
VOLITION - She tries to hide it, but some *great doubt* is spreading within her. There is a crown slowly cracking above her head.
- I need to talk about this line. Just. Volition acknowledging the existence of Joyce's own Volition (which he refers to as a crown!!!) cracking! the *great doubt* spreading and cracking apart the crown! hghh I live for any and every depiction of volition cracking apart when morale gets low and this is absolutely one of them.
AUTHORITY - Weren't you warned to *not* go down this path?! And yet you *still* go and do it...
VOLITION - Just because you *can* doesn't mean you *have to* say everything that comes to mind. Back out before the situation escalates.
- these two's dynamic is very funny to me. I love when they work together (but I also love when they fight! fight fight fight!)
VOLITION - Don't ask, don't look, don't do *anything* here. Just go away. Get back to work.
- "Just go away" ugh my guy is fighting for his life here to get you away from the cigarette and alcohol counter in the Frittte

- hghhk Volition. this is a Challenging passive check too (the second one, to hang up). *one* chance, that's all he has in him. It's not possible at all in the dream, no matter how high your Volition stat is. It's just not something he can do. But here, with the distance of the payphone between you and possibly real consequences, he's able to manage one chance.
- (also did anyone see the post about the payphone conversation possibly being entroponetic crosstalk?? I could talk about that for way too long. but I am getting sidetracked)
YOU - "Yeah, I'm done talking about her. I don't want to think about her anymore."
RHETORIC - What a strange choice of words...
EMPATHY - Caustic, overflowing with negativity.
VOLITION - That can't be healthy. What's happening here? Why do you keep coming back to this window?
YOU - Nothing, everything's okay.
VOLITION - But it isn't. And you shouldn't come back to this anymore. This should be the last time. Stop talking about that damn window, please.
- this one too
VOLITION - Throw it away. Please.
- I need to talk about this. Volition dutifully directs you away from all the reminders of Dora. He does everything in his power to stop the final dream from happening.
- And I get it. He's trying to protect Harry. Because Harry isn't mentally stable right now and it could endanger the case. but... at least, when the final dream happens Kim is (usually) there when you wake up. And if all went well, you get to go back to your precinct, and take Kim with you. And Harry has support.
- If the dream doesn't happen... it will happen eventually. There are a million reminders in Martinaise in the span of a week, imagine what Jamrock is like. It's an inevitability. And then you're taking the chance that the dream happens at a time when Harry is much worse off. Maybe he's alone. Maybe Kim left, maybe he was let go from the force.
- The dream could happen at a better time too, of course. we probably all imagine harry picking up the pieces after martinaise and his life finally taking a turn for the better. and I imagine this is what Volition had in mind, by delaying the dream. Maybe it can be delayed for a long time, long enough.
- but it's a huge risk and I just... don't know if he's making the right choice here. keeping important information about Harry's past, which has shaped his relationships and life considerably, in a box so it can't hurt him
- yeah. anyway...
YOU - What if I don't want to ask questions?
REACTION SPEED - You're a cop, Harry. It is *unnatural* of you not to want to ask questions.
VOLITION - You don't have to. No one is forcing you to be a cop.
- Volition??? sometimes this guy makes no sense, he's so funny. I really think he occasionally just does something for the sake of being defiant
EGG HEAD - "Please. Please?" The young man smiles at you widely, bright and innocent as the summer sun.
VOLITION - His pleaful smile is disarming, but you can withstand it's glorious assault, if you just put your heart into it.
- why? why?? don't turn down egg head ever!
VOLITION - Alright, come on now. If *he* hasn't said anything about your lack of pants, no one will. You're only hurting yourself by not wearing them...
- this one is so funny. I love that he lets you know he *knows* you're trying to get a reaction and you're not going to get one!!

- yes volition, stop himmm
ELECTROCHEMISTRY - How very astute of you! This renders it ineffectual. You should look for a *whole* cigarette. Or better yet -- an entire pack! Strike that, a CARTON! Make sure they're all healthy and able-bodied, then smoke them all.
VOLITION - Or -- you could *not* do that. No one is making you.
- volition as usual trying to stop you from picking up bad habits... I just love the way he talks. he's not even telling you not to, just voicing his disapproval in a rather passive way
INTERFACING - Wow, the gods of mass production have made this alcohol container *laughably* easy to open. A child could have done it.
VOLITION - I don't know about this...
- he still doesn't outright tell you not to drink it... :(((
ELECTROCHEMISTRY - Fine. We're not worried... you'll crawl back to this bottle soon enough. We'll give you another chance. Booze *always* gives you *another* chance.
SUGGESTION - Yes, it's *merciful* that way. It's your friend. Come back to it, we're all rooting for you to.
VOLITION - Not *all* of us...
- he's the only one rooting for you to not drink it!! he can't stop you. but he is supporting you in the only way he's able.
VOLITION - No. You *can* stop. Just wade through the hell. Month after month. Year after year -- you against the nothingness. It's possible, because *time* is possible.
- He can encourage you!!
YOU - "I *will* stop drinking."
MEASUREHEAD - "THAT IS NOT POSSIBLE. THE GAME OF *SHAH-MAT* YOU PLAY AGAINST THE GUL'S TRICKS IS UNWINNABLE. THE DAYS, THE WEEKS, THE MONTHS WILL WEAR YOU OUT. THE OCCIDENTAL HAPLOGROUP IS INCAPABLE OF LONG TERM LUCID THOUGHT."
VOLITION - NO.
- volition!!! <3 that's all he needs to say.
HORRIFIC NECKTIE - This is it. I'm gonna hit the ground and burn away now. Most of the people in this yard are gonna die -- if not all. Probably you too. It's a COMPLETE DISASTER.
PAIN THRESHOLD - Get ready for a world of pain, man.
VOLITION - No. Not a disaster. Weave this into the story of you. Walk out of its *ruins*. Save those who still can be saved -- *I'm* on your side.
ESPRIT DE CORPS - And the lieutenant too. And the men behind your back, drawing their weapons... you can live. You can get out of this.
- hnngh. this one is among my favourites too. my amazing 1 int run also had 1 motorics. at this point I had failed the rhetoric check to save ruby, failed the logic check to save lizzie, and now failed the spirit bomb throw too and was about ready to cry. Volition's quiet reassurance was very important to me in that moment. EdC too, and I did save Kim.
HAND/EYE COORDINATION - Your hand trembles as you scratch at your cheek... oh no, that's not how a grown man shaves!
YOU - Leave it for now.
HAND/EYE COORDINATION - Thank god, I would have cut your throat.
VOLITION - The centipede is exaggerating -- people don't actually cut their own throats when they're shaving. At least not accidentally.
- centipede!!! it's such a funny nickname. alternatively
HAND/EYE COORDINATION - Your hand trembles as you scratch at your cheek... oh no, that's not how a grown man shaves!
YOU - This isn't sharp enough. Scrape harder.
HAND/EYE COORDINATION - Stop, for crying out loud! You're gonna cut your own throat.
VOLITION - There's no way to salvage this.
- these guys are hilarious. why is volition even watching this mess? 'there's no way to salvage this.' ??? I'm not even sure if he's referring to you or H/E... he must be so tired.
ENDURANCE - You feel like you're about to faint and fall off the swing. Your hands get clammy and the air tastes sour to breathe.
HALF LIGHT - Oh god, Harry! Oh god, Harry, what did you do...?!
VOLITION - No! Just nope. Say no to this, Harry.
- more of this!! >:( of volition trying to just avoid anything painful. wake up man.
LOGIC - Everything is so pretty and red -- you and Leo look like brothers as you glance around with similar childlike wonder.
VOLITION - Keep it together, no need to show your wonder.
- why? :( it's not hurting anyone. legendary difficulty passive for volition, high levels of volition are sometimes questionable. I love collecting all these instances of volition making weird suggestions. it's like when people point out really weird things Kim does, that you don't really notice as weird because he does it so calmly and confidently.
VOLITION - Huh... no, Mr. Conclusion. You're always kind of limited in your analytical abilities. That's not *her* fault. But still...
- volition: you're kind of limited in your analytical abilities... meanwhile logic and viscalc and ency calling you stupid and brain damaged lol. vol is so gentle about it!!
- then again...
VOLITION - ...no? He's not going to show up? I'm sorry, your lie detection isn't working. It's not her doing, he's just totally inept. It looks like you're also an idiot. But that's not her fault.
- lol.
RHETORIC - This is good. Clear the air first -- between you two -- then move on to questions.
VOLITION - No, it's not good. It's the opposite of that. This will let her dictate the terms of your...
RHETORIC - Shush. I can't hear what she's saying.
- no. don't ever cut off or shush volition ever again

- >:(
YOU - No-no-no-no...
INLAND EMPIRE - Yes, yes, yes, yes.
VOLITION - No-no, we're not starting with that. Not now. Not this time. This thought is over.
- volitionnnn... ily. my own volition also cuts off dangerous lines of thought for me. I think he's got to be constantly vigilant, in order to be so good at it. must be exhausting :(
YOU - "Can't promise that. I might attack him again." [Leave.]
KIM KITSURAGI - The lieutenant groans, but doesn't say anything.
VOLITION - That's right, you *should* do it again! It's the *last* thing he'll be expecting.
- uhm. not sure that's a good idea!!
VOLITION - You're too weak to say 'no' now. Waking up is the worst part. Maybe somewhere down the line you could decline...
- referring to declining the speed. all volition fails are very sad
VOLITION - Yes, look at yourself. What do you see?
YOU - Just a sorry stack of shit...
VOLITION - Yeah, didn't even know they stack shit *that* sorry.
- beautiful, rare volition scolding you!!!! after you disregard his advice and don't apologize to kim after the church fail. he's on your side, but he also knows he needs to tell you that this wasn't okay.
VOLITION - First the investigation, now this... how many more things do you have to fuck up?
- this one too! same scenario. this is a difficulty 16 (Godly) check...

- yes this again. it just needs to be in here. the volition panic attack. if this volition passive doesn't fire, you take no volition damage. it's completely self-inflicted :(((
PAYPHONE - The headset lands in the cradle with a clank. There it sits -- still warm from your hand. You have no idea what just happened.
(heal 2 endurance and 2 volition)
- if you hang up the phone before dora picks up!
VOLITION - He subdues the feeling. Dusts himself off and moves on. So should you. There will be other chances.
(heal 2 volition)
- if Kim misses getting a picture of the phasmid
HORRIFIC NECKTIE - The necktie is guiding you through this. It's your spirit animal, both your nemesis and friend. Suddenly a feeling of ease brushes through you -- you're fine again.
(heal 2 volition and 1 endurance)
AUTHORITY - That... was the most honourable thing anyone has ever done, Harry.
(heal all volition)
- very special incidences of healing more than 1 volition at once!! the fact that healing/damaging morale is just directly called heal/damage volition in the variable naming is. yeah. I think about it constantly. does it hurt him? I think it does. and he never says anything about it (unlike endurance!) he just bears with it quietly.
VOLITION - In honour of your shit, lieutenant-yefreitor. Which you kept *together* in the face of total, unrelenting terror. Day after day. Second by second.
INLAND EMPIRE - DETECTIVE
ESPRIT DE CORPS - ARRIVING
AUTHORITY - ON THE SCENE
- obviously this one has to be in here. funnily enough, in my second playthrough I had 2 PSY but everyone had been bumped up enough that they all fired except authority... I ended up throwing a point into authority and retrying the dialogue so it could be complete haha
VOLITION - What? I thought you had your shit together! This is nearing a complete meltdown! Stop it!
- volitionnn :( if you don't stop you have a panic attack, so I guess he's only trying to help

- this is too funny. volition honey, you absolutely do add flair too
YOU - Oh, you mean Cuno?
VOLITION - Ding, ding, ding! We have a winner!
- yup, absolutely no flair. Super. Tip-top!
VOLITION - These guys are compromised. She's got them singing along to her tune. The little bleeps and bloops you trust for info -- you can't trust them anymore.
- it would be a crime to not include the bleeps and bloops in here! why does he call them that?? haha

- rare instance of volition not being able to stop the disaster!
INLAND EMPIRE - Your surroundings are undisturbed. While you slept, you were alone. Now that you're awake -- you're still alone.
HALF LIGHT - Get the fuck out of here. Fuck this place, fuck this world, fuck this life, fuck this body -- just fucking go.
SAVOIR FAIRE - The sheets are stained red. Your blood's been running again. Keep it together. Just get out of here and finish this fucking thing.
VOLITION - Harry... I know there's not much to say -- but if nothing else, just remember that you've made it this far. And it's just a bit farther now. Let's finish this.
- this is just. it's awful, if you have the final dream all alone. but at least you have volition with you
DICK MULLEN AND THE MISTAKEN IDENTITY - Dick Mullen was made to crack skulls and solve cases. It's who he is. He could no more stop being a detective than a tiger could cease to be a predator in the night.
VOLITION - You're no tiger, though, Harry. You're a man. It's your curse to have to choose.
- I like this one.
ELECTROCHEMISTRY - That sugary black rum stain on the counter makes you teary-eyed with joy. It's almost touching how syrupy and sticky it is. How long have you been up already?
YOU - Not now.
ELECTROCHEMISTRY - Oh *excuse me*, do you have something better to do than lust for sweet syrupy rum and lemonade? With a twist of lemon? Maybe lime? Maybe who cares, just rum?
VOLITION - Yes, you do have something better to do. Stop drooling over that stupid rum stain and go. Before it's too late.
- this is a challenging (difficulty 12) check! it's very difficult to resist the sticky rum stain I guess
YOU - Give up.
LOGIC - There we go. Your mind is a relaxed muscle. It's so nice and easy to give up, isn't it? On the downside -- you have no idea what you were supposed to do now. I could have *debriefed* you.
VOLITION - Blissful idiot -- say something. You've stood there for too long.
- blissful idiot
VOLITION - Don't be an idiot and say it. In this day and age, of all times. It won't end well.
- once again, volition pushing you away from the bi-curious thing. :( he just wants to keep you safe, but it comes at a cost.
- you can't just wrap harry in bubblewrap, volition. he'll never grow

- volition absolutely saving the day here. do NOT say it harry! authority's advice is SO hit or miss
VOLITION - It's time to leave it be. You're about to make a child cry. Are you proud of yourself?
YOU - Damn right I am! Proud as the Lion of Serber.
VOLITION - Excuse me, I'm not sure I heard that properly...
- volition ily. he has to deal with so much.
VOLITION - Should we? He's *nice*. I don't like *nice*.
- this is so funny. he's very suspicious.
VOLITION - Look at it, detective. And be ashamed. Until you make it right by *legally purchasing* that raincoat, I'll make sure you feel guilty every time you see it.
- YES YES conscience volition!!
YOU - Close the carabiner.
SLEEPING DOCKWORKER - The sleeping dockworker has little to say about your actions. He remains silent.
VOLITION - You're not 100% clear what you did here was *right*, but to hell with it...
- only sometimes!!
VOLITION - I can't restrain this one. The need to *cop* is too strong. You just need to ask it.
- why are you trying to restrain copping??? this guy, sometimes. he's so stupid (affectionate)
VOLITION - That's it. I'm calling it. Kim is beyond compromised.
- uhm. volition completely overcompensating with the compromised skills is quite funny. once drama wakes up, he does it too
VOLITION - See? It's oddly moderate. Probably compromised.
- oddly moderate now means compromised??

- this is it. this is volition's only comment on this disastrous authority fail. he makes no attempt to stop it!!
VOLITION - Being Cuno's pig has a steadying effect on your hand. Go with the flow, man...
- volition's so silly sometimes
DAMAGED LEDGER - You feel that thing in the back of your head? That little voice, that quiet scream? You already felt this was a bad idea, but especially right now it's even worse. Try as you might, you can't read it now.
VOLITION - You've got *business* to deal with first. Talk to the Union boss first, at least... I can't stop you for long, but there's just enough of an excuse now.
- Volition fighting for his life to stop you from reading the letter :,(
VOLITION - If it's possible, then by pure willpower alone. You are going to have to become... a psycholocomotor.
- that is *not* a real word but we love you anyway vol
LOGIC - Is that how it is now? We should just try all good things *twice* and then give up? By that logic...
VOLITION - Not you too...
- he's all alone out here :(
VOLITION - Someone's been a very busy boy. Good on you...
- thank you...?
VOLITION - *Very* off. Just let her go. Listen to me for once...
- for once?? :((( but if you try...
VOLITION - I can't help you. I am totally useless. Everything I've said is lies. I want the exact same bad things you want. To stand here, like a pillar of salt, saying...
- this is probably one of the saddest lines. all the skills falling apart in the dream is awful, but volition might be the worst. it's also very important that volition *does* want the exact same thing you want. He wants to drink and smoke and think of dora and die. And he chooses to resist it anyways. To be the only thing standing in your way. But it's to the point where it's all he knows. He knows that he has to resist the things he wants, and will occasionally take it too far. Keeping Harry (and himself) from things that will make them happy. In the setting of the game, Volition keeps things together and on track. But once Harry is back in his normal life, it will become very much a double edged sword I think. Luckily(?) it will self balance a bit, where if Volition prevents Harry from being happy then he'll lose morale, weakening volition, and then vol won't prevent harry as much and it'll balance out. hopefully.
VOLITION - Despair creeps into you, getting fat on your weakness. Whatever noble intentions you once had as a police officer -- it's eating them all up now.
VOLITION - Nothing you can say would make you feel any better now...
- 😭 I hate this, I hate the volition death. the endurance one is really painful too, but this one's painful in a different way. Volition isn't getting back up from this. the awful newspaper clipping saying you go to live under a bridge... that's what happens when you let volition die?? if any of the other skills (except endurance) drop to 0 you can just raise them back up, but vollll.... ugh.
VOLITION - Listen... It's okay to take a few minutes to yourself. Sit down and have a breather.
ENDURANCE - You need to rest. Your body is aching. Getting in here has taken something out of you. Have a seat.
- our two health pool boys encouraging you to take care of yourself <3
YOU - "Kim, can *you* see it?!"
KIM KITSURAGI - "I can see it."
VOLITION - Four simple words -- thank god. If he can see, then you're not insane.
- this one is obviously very important.
YOU - "I've finally gone insane..." (Put your head in your hands.)
[...]
VOLITION - My god... maybe you *are*.
- if Kim and Cuno aren't there, and your Volition is really low, you get this very sad fail. :(
VOLITION - True, you ought not love ruins and hell -- and the fading scent of apricots.
- I like this one.
WASHERWOMAN - "I *can* wash it for you," she says after looking the jacket over, "but it's going to take about a half an hour. Think you can stay put for that long?"
VOLITION - Hell yeah!
PHYSICAL INSTRUMENT - No, we must run around ceaselessly. It would be torture to stay put.
- I really really love him.
YOU - "By the way, I'm going to sing karaoke here."
GARTE, THE CAFETERIA MANAGER - "Absolutely out of the question."
VOLITION - You wait and see, cafeteria manager!
- volition will not be told no!!
VOLITION - No one can STOP you from finding the phasmid.
PHYSICAL INSTRUMENT - WHAT IS HAPPENING TO YOU?!?! Are you going to CRY now, son?
VOLITION - You heard the coach! This is weakness. It cannot go on much longer, or you will LOSE.
- these guys are great. coach!
YOU - Right. Activate Denial Mode.
VOLITION - You're not really an automaton, you do know that?
- oh, thank you for the insight volition

- even your most willful, imaginative skills know this scope creep was insurmountable...
DRAMA - But we *are* awake, sire! She has been forthcoming -- with sordid details women usually conceal! Most *shocking* details of the sexual kind! We are a bulwark, un-breached...
VOLITION - You've been breached, bulwark. You've been breached, like, a thousand times now!
- nooo poor drama (volition is right)

- Volition trying to reassure you after the Tribunal is very important.

- SO TRUE.
DRAMA - This may have been a *grave* mistake, sire.
VOLITION - Maybe. Maybe not. Mercy is rarely a *complete* mistake.
- I really adore this quote.
I think I'm going to leave it here. I haven't included some quotes that I put in other posts already but I might add them in later to have a comprehensive Volition post... But I've spent like 4 hours on this already so I'm giving it a rest for now :)
83 notes
·
View notes
Note
i hope this hasn't been asked before. what size do you make your canvas? and do you crop it to fit other socials (like Instagram for example)? i hear that 300 dpi is standard. i never know if it's good to make my canvas big or not.
hi i think this ask is like at least 4 months old but i was scanning my sketchbooks from last year and i abruptly remembered i had gotten this ask because i had made a little chart in my sketchbook trying to figure out how to answer it
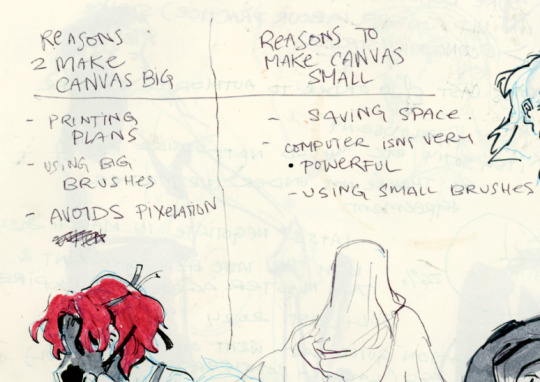
anyways theres pros and cons. and the size of your canvas is really going to depend on personal needs + preference. how good ur computer is, how complicated ur art style, how comfortable drawing feels, how much disk space you have to spare, what youre gonna end up using the art for in the end...300dpi is standard for PRINTING specifically, if you only plan to ever post things online then 72dpi works great and will save you space (fun fact a lot of professional animation files i deal with are 72dpi. and those eventually go on your tv screen). but personally i make everything i draw 300dpi because i am always printing stuff for cons, zines, etc and its nice to have the option even if i dont end up printing.
when I was a teen I used to draw on a rly shitty laptop and i made everything 800x800px 300dpi because big canvases would cause a lot of lag and also the resolution on this laptop was pretty small so 800px was a lot of the screen already. now i have a slightly better laptop with a bigger resolution and i sketch on giant 10000px-40000px canvases with the hard round brush and no shape dynamics or transfer whatsoever to minimize lag. when it comes to making a final illustration when i know ill be using a bunch of layer effects/blending modes/colors/mixing brushes etc etc ill generally crop the canvas down to the 6000px range. most illustrations i try to make sure are comfortably printable on tabloid size paper so thats pretty much anything hovering around or above 3000x5000px w 300dpi (so 11x17in). HOPE THIS HELPS?
EDIT: OH ALSO re: socials. i always ALWAYS size down my art to post on the internet. i think its crazy when other artists dont. because why would i ever let the internet have my hi-res file for free. also in general i think it looks better if you do the resizing yourself because if you don't then many social media sites will compress your file for you! a lot of people will post a hi-res file to twitter and then go "Wow twitter killed the quality of this img!!!" UH YEAH because they have an automatic image compressor. because they need to save space too lol and they dont want your image to take 248263895 years to load. same with instagram and to a lesser extent tumblr. when i post anything on social media i resize it down to 1200px-1600px on the longest side... its a little arbitrary but im kind of basing it on the smallest resolution of widely available screens. mostly because i think it looks stupid when u open up an image file fullsize and u have to scroll to see the whole thing... also iirc instagram only takes images up to 1080px before it resizes them? granted if you upload something smaller than that itll also resize it up which will look worse so I think bumping the numbers just over 1080px is pretty safe.
I should really be bringing the dpi down to 72 too when i post online but often im too lazy to do that. but it will technically help ur image load faster and stuff. and make it less likely for people to yoink it off the web and print it themselves.
149 notes
·
View notes
Text


Hi hello it seems I’ve caught a rare strain of art block that makes me unable to draw in anything other than Kid Pix Deluxe 4™, but I still need to buy groceries and stuff so!! I’m gonna try my hand at some experimental commissions.
If you have some kind of whimsical OC and you want me to let me loose on them, now’s your chance! Give me a character and I will cook up something cool — there's no pose/style/background tiers, though I will try to put an equal amount of effort into every drawing.
Payment in USD through PayPal invoice only.
More info under the cut!
Inquiries through Tumblr DM or via [email protected].
You can give me some brief prompting (e.g. “I’d like a drawing of my wizard OC casting some kind of spell”, “Can you work in some robot/tech motifs?” etc.) – or give me free rein, if you’d prefer.
I will need a minimum of one visual reference of the character’s design, but the more material I have to work from, the better! Tell me about their lore, what they’re like, their associated themes and motifs, all that jazz! Show me their aesthetic moodboards, the funnie tumblr textposts you associate with them, their playlist even.
As the nature of the program makes revisions difficult, I might turn down a request if I do not feel confident that I can compose a satisfactory piece from the provided material.
Once we’ve worked out all the details, I will send you a link to a PayPal invoice. I will not begin working on the piece until payment has been recieved.
Please note that I won't be providing WIPs! I can show you my initial sketch for the composition if you'd like, but after that the end result will be a suprise.
Once completed, I will send you a link to a drive containing the resized drawing in the form of a .png, as well as the original 665 x 477 bitmap.
Once payment has been received and I have begun working on the piece I cannot refund it. However, if I for any reason have to cancel the commission from my side I will refund it fully, regardless of level of completion.
Some limitations of the program (good to keep in mind!):
No layers
One (1) level of undo
Image size: The Kid Pix 4 drawing area is 665 x 477 pixels. I scale up the final image file x4 to make it more compatible with the modern internet, but the drawing itself will still be crunchy. That’s part of the charm! (I can also make the image dimensions 1:1, if requested.)
Colors: It is possible for me to create colors outside of the palette provided by the program, but replicating hues precisely can be tricky. Expect some stylization.
Okay, I think that’s everything! Thank you for reading this far, and feel free to contact me if you have any questions <3
#gonna take a few of these to get a feel for the process before opening up regular digital comms too... idk if I'll offer both in parallel#commissions#commission info#artists on tumblr#digital art#maintenance
757 notes
·
View notes
Text
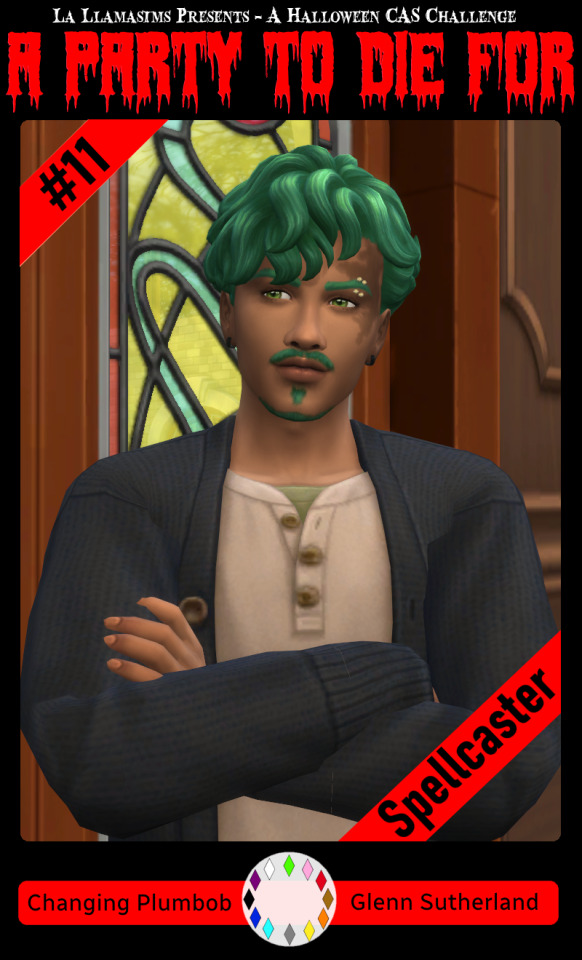
A Party To Die For Templates: SFS
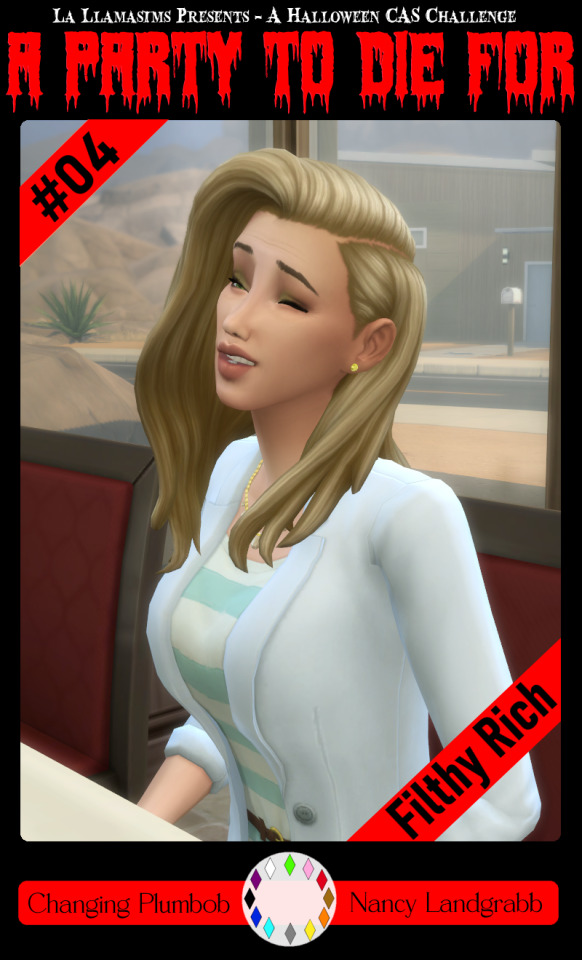
So I may have got a tad overexcited about the Halloween CAS Challenge created by @la-llama-sims, and I made templates for every prompt. I wanted to share them on the off chance someone wanted to also do the challenge but maybe didn't have time to do much other than screenshots.
Tutorial below on how to make your own cards using the templates if you are unfamiliar with photo software, all you need is the template and a screenshot of your sim! Very little technical skill required to so feel free to jump in for Simblreen (the month of October on simblr). Remember to go to the original creator post to check out the prompts and the hashtag given for creations is #LLPTDF. Hope to see some of your creations next month, keep them for the spooky season 🎃👻🦇
Strap in and follow along as I make Glenn here (he won't do the spellcaster prompt for Simblreen, it's dress up after all, but it makes sense for a demo)
Step one: Grab the zipped folder of templates on SFS HERE. Unzip the folder and put it somewhere easy to find in your documents, I have a tumblr specific folder my templates are normally sorted in.
Step two: Open your photo editing program of choice. I use paint.net which is old but for this demonstration I will use Photopea, the online free alternative to adobe. You will see the screen below
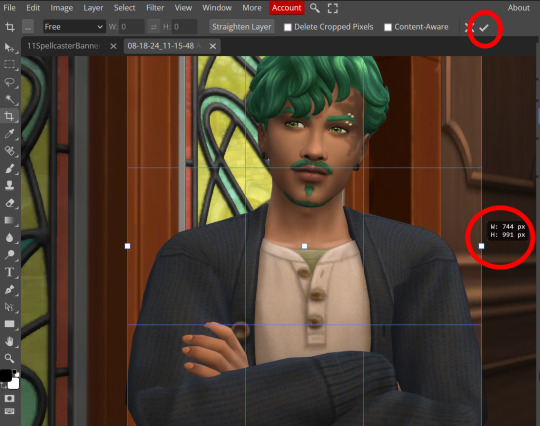
Step three: Click "Open From Computer" right in the middle under the main title. Find the screenshot you have taken that you would like to use and open it. Now the hole in my template is 744x991 but you can make it slightly bigger if you don't want to fuss as much with lining things up exactly. To resize image from the top bar (Image -> Image Size) We're going to use the crop tool when we have our picture.
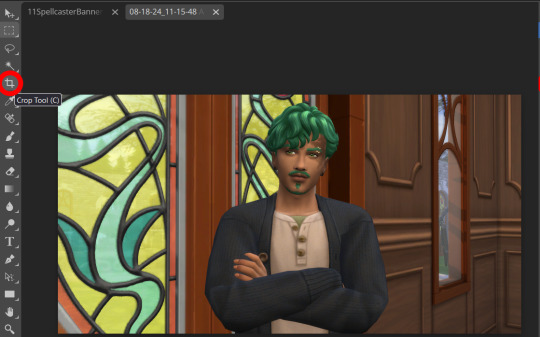
Step four: Pull on the squares at the edges to change the size. If you need click View in the top bar and you can zoom in to allow finer selecting. When you have the right size click the tick and copy the image. Keyboard shortcuts are Ctrl+A to select all, then Ctrl+C to copy.
Step five: Open the template you want to use (File -> Open, from the top bar). Add a new layer using either the top bar (Layer -> New -> Layer) or the icons on the bottom right.
Step six: With the new layer selected paste the image, Ctrl+V.
Step seven: On the right of the screen you'll be able to see layer order. Drag the layer with your sim underneath the background layer. This is what will let you slot in your picture.
Step eight: Finishing touches! Unless you are super duper lucky your sim won't appear in the exact right place, you'll have to move them around using the move tool. For precision you'll need to zoom in and move your field of vision using the hand tool.

You'll know it's in the right place when you can no longer see any of the negative space behind it. I like to check both corners to make sure I've got it. This is where having a sim image slightly larger will make it easier.

If you like you can finish now. From the top bar File -> Export as -> PNG or JPG. The picture will save to your downloads folder. If you want to add your own text, keep reading, as I've left space at the bottom for your username, the sim name, and a profile pic or other logo. Or go ahead and crop it out, who needs extra hassle when there are cute CAS looks to be made?
Step nine: From the bar on the right select the large T to add some text, it will automatically spawn in a new layer. Scroll through text options and find one you like (the text style I used isn't in photopea so we will find another). Depending on the type of text you will likely need to play around with the size as well.
Step ten: Start typing. When you're done you can highlight what you have written and use that size box to adjust how big the text is. Select the move tool from the right to move your text where you want it. Repeat step nine if you want text on the other side. I've chosen to put my username on one side, and my sim's name on the other.
Step eleven: Logo time. Open a pre shrunk logo (I scaled my pride plumbobs down to 125x125) and copy. Back on the template add a new layer then paste your image (for some reason I had to copy twice before it would do the right thing, I don't have an explanation sorry). Then using the move tool and the hand tool get your image where you want it.

From the top bar File -> Export as -> PNG or JPG. Again it will have saved to your downloads folder.
Voila, we have a Glenn card! Hopefully you have a your sim card. I spent hours doing up all the templates so feel free to fill them with your sims for the challenge. All I ask is that you don't claim templates as your own work or shove them behind a paywall because rude and the whole premise of Simblreen is free treats! Obviously you do NOT need the templates to participate in the challenge, the cards are just how I'll be presenting mine. Like CAS challenges the possibilities are most often only limited by your imagination.
#sims 4#the sims#simblr#my sims#ts4#active simblr#Enjoy my friends#I wanted all of us to be able to do Simblreen#Even if we don't have prior skills
54 notes
·
View notes
Note
How do you add the gifs for the layouts? What program do you use? I want to make a editblr blog but my skills are only the basics
hello! first, i'd like to wish you good luck with your blog ♡
now, we can start! i'll divide this into 02 sections:
programs, and gifs

01 : programs
starting off with programs:
any website or app that lets you add pictures work. i've seen people use picsart, photopea, ibispaint, and basically any app that allows you to add images. i use a mix of the three, but barely use picsart. personally, if im on my tablet i use ibispaint, then use photopea to add PSDs. when im on my computer, i only use photopea.
02 : gifs
for gifs, i use photopea. however, you can only add 01 gif to each project. i believe there are ways to add more, but i found them too complicated and therefore cant explain them, as i myself havent used them. to find gifs, you can use any social media, but i recommend Tumblr and Pinterest.
you can also use ezgif, but not for gif overlays. only to put images on gifs.
here is a tutorial on how to add a gif on photopea: (plus me playing with showing the options sped up)
i was supposed to edit the video to add text n all that but i ran out of storage. so....
basically, just save your gif, click "file" at the top of your screen, click "open". now your gif should be a new project, and it should be a folder.
drag that folder inside your project ( in this case, your graphic / layout / edit / whatever. ). after that, click "edit", also at the top of your screen, and "free transform". now you can move and / or resize your gif.
afterwards, click "file" again, and "export as" then export it as a gif. there you have it! you finished your project! congratulations!
anyways. i feel like i forgot something but thats about it i believe. so..... once again, good luck with your blog! if you have any more questions, feel free to ask!
if anyone has anything they'd like to add, feel free to reblog!!
#questions / tutorials。#rentry help#rentry tutorial#photopea tutorial#photopea help#gif help#gif tutorial#rentry#rentry gif#rentry graphics#rentry dividers#carrd material#photopea gif tutorial
66 notes
·
View notes
Note
hi lovely!! if you're currently taking requests (and comfy with it ofc!!) could I please request a captain mactavish (on call of duty) graphic (or anything you feel like making with him!)
thank you in advance :3
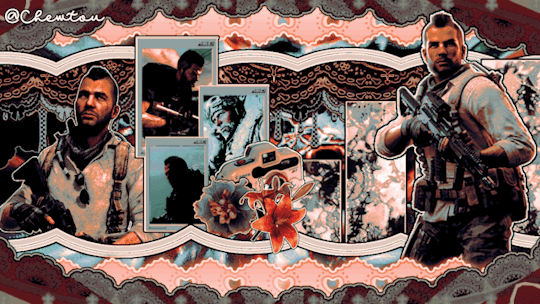
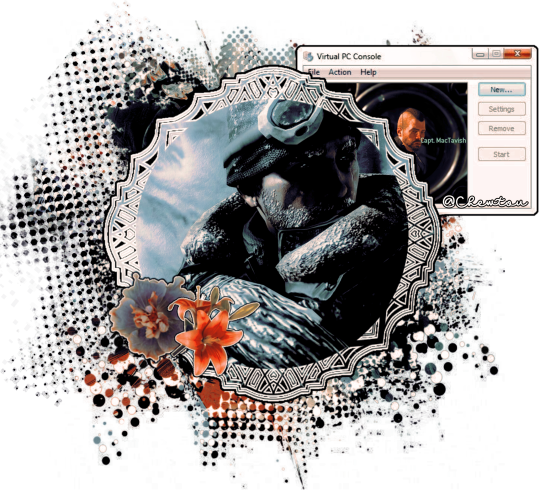
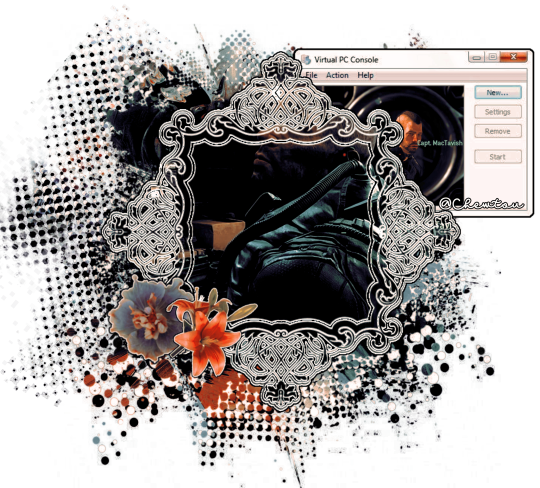
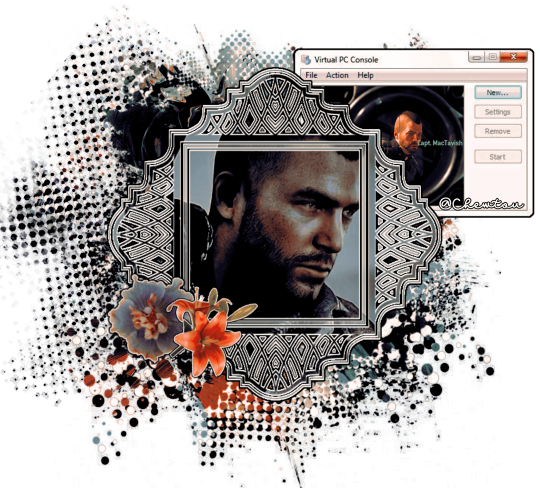
!!PSD CREDIT!! :: @ryflections ‘s ,, ICHIKA.PSD !
✚ ⦂ (ᴗ͈ˬᴗ͈)ꕤ.゚Capt. Mactavish ( COD ) tumblr layout !! []=[""|""|""])>---
◟ ︵ 𓏴 f2u 04 @gh0stlyb34r !! /̵͇̿̿/'̿'̿ ̿ ̿̿ ̿̿ ̿̿ recolors && resizes r okee !
𝞋𝞎 :: the cure hopes chu like them !!
!! let the prism cure knwo if he needs to redo anythinf! ( dividers r f2u ) ପ(๑ᴗ͈ˬᴗ͈)ଓ
#— ⟢ pupdial ! ᘏᘏ#— ⟢ talking !!#— ଘ(੭ˊᵕˋ)੭ discussing ! 𝄞⨾𓍢ִ໋ —#— ♡ ) chewtou ( :3 !! —#pupdial<3#rentry graphics#rentry#tumblr#tumblr layout#req#COD#call of duty#cod modern warfare#cod 4#Call of duty 4#captain mactavish#soap mactavish#Soap cod#Cod soap#John Soap#john mactavish#call of duty soap#johnny soap mactavish#Mactavish#Rentry COD#Call of duty graphics#modern warfare#soap call of duty#Halloween
43 notes
·
View notes
Note
sorry to bother but I was wondering how you make your gifs so smooth and get rid of pixelation?
Hi, anon! Sorry for the late reply! And no worries, you're not being a bother at all. ^^
Regarding your question, these are some of the tips I can give which I typically do on my GIFs:
Use video sources with higher resolution
In all honesty, I am not doing that much to make my edits look smooth and HD. I just always make sure to download videos that are not less than 720p. I typically download 1080p but 720p would suffice since the suggested width for images here on Tumblr is 540p.
Use good editing apps
I use Photoshop which is a good app but if you're not using this, you may use Photopea (this is like an online version of PS). There was a time when I didn't have a PC and I tried making GIFs on my mobile phone but even when I'm using high-resolution videos, the output was not as good when making it on PS. I also used Photoscape before. This was my first app when I was still starting making GIFs and oh boy, the quality is just... XD Anyway, PS is good with the compression of images when you're saving the frames as GIFs even when resizing the file to a smaller scale.
Maintain the original size until the export
I've seen tutorials where they are already adjusting the size at the beginning of their edit. I personally don't do this because this contributes to the reduction of the quality of your GIFs. And if I want to crop (because I want a different width and height compared to the original), I will see to it that the height is the same with the original (only the width will change).
Take a look at this example:

This is a 1920p x 1080p image but I wanted to crop it to a 400 x 540 aspect ratio. What I would do is after cropping the image, I would resize the image to make the height 1080p again.
After cropping, this is now the dimensions of the image:
Then I will revert the height back to 1080p (the value of the width doesn't matter):
Of course, 1080p is just my preferred resolution. You can select a lower resolution but not lower than the original image or the final size of your GIF.

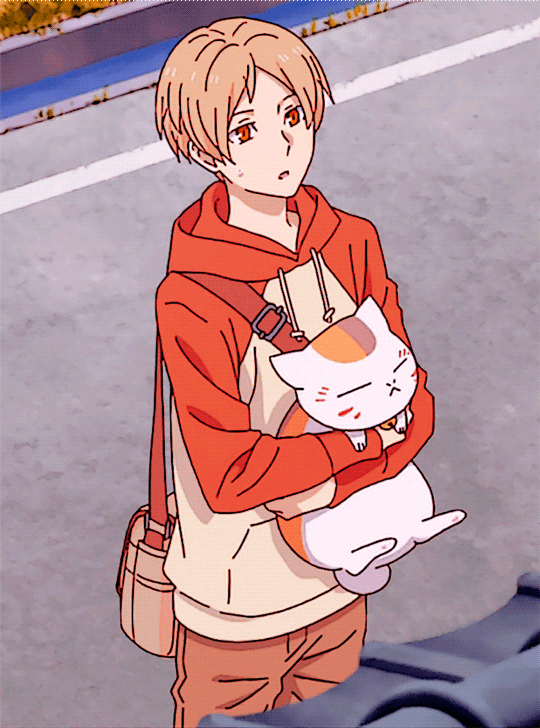
As you can see, even without further editing, the image already looks good and does not appear to be pixilated. Then after cropping, I will apply my coloring. If I save this as it is using 540p width, this is how the GIF's gonna look like.

As you can see, there is almost no difference between the 540p (width) gif and the 1080p (height) image. That's because I only resized the image during export and not in the middle of editing.
Use sharpening tools to make your GIFs look HD
The key to fooling the eyes is to make them look in a different direction. XD So what do I mean by this? Like I said, I'm not doing that much to remove pixelations from my edits. I just make it so people will focus on other stuff. If you don't want them to focus on the pixels, let them focus on the line art.
Just a reminder that this last tip is only applicable to anime GIFs.
In my case, I always start with frame animations, then later on convert to a video timeline. And then I will convert the frames to a single smart object so I can apply filters to all the frames at the same time.
These are the steps I do when I sharpen my GIFs.
Apply SMART SHARPEN. (Filter > Sharpen > Smart Sharpen)
These are my preferred settings but you can also explore your own.
[Comparison of GIF without sharpening filter and with sharpening filter]
2. Apply POSTER EDGES filter. (Filter > Filter Gallery > Artistic > Poster Edges)
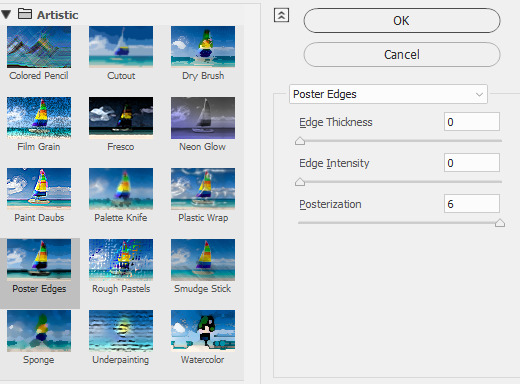
These are my settings. You can adjust the Edge Thickness if you want to have thicker art lines. As for Edge Intensity, it's better to set it to zero to avoid adding unnecessary details to the shadows of your image.
[Comparison of GIF without sharpening filter and with sharpening filter]
3. Apply POSTER EDGES again.
This is an optional step. I typically use this whenever I want the art lines to be thicker. I use the same settings in the second step.

[Comparison of GIF without sharpening filter and with sharpening filter]
And that's about it! I hope this helps! By the way, this is just my own way of sharpening my GIFs. If you're not using PS or Photopea, you might want to check other tutorials that are specific to the app that you are using.
26 notes
·
View notes
Text
DIY Main Menu -- How to customize it!
Hi howdy! This is the Tumblr mirror of a tutorial posted to my Patreon. The contents are the same, so choose whichever you prefer for reading!
What you'll need for this tutorial:
The DIY main menu .package, found in the main posting
FFDEC / JPEXS decompiler
Photopea (or an offline image editor that can do the same)
Sims 4 Studio
Let's get started!
Preparation 1: Create your images using the size templates provided!
Here they are! They can also be found on Patreon (for free, of course)


Preparation 2: Resize your images using photopea, and save as .png
Open each of your images in photopea (or editor of choice), and squish the canvas into a square!
The main menu background should be 1600x1600 pixels! The sidebar should be 1000x1000 pixels!
Do not try to make them larger for 'more detail', they will break!
Step 1: Open [sdm] DIY mainmenu in Sims 4 Studio
Self explanatory, open it by double-clicking, or by clicking the 'my projects' button and navigating to the file.
Step 2: Export the first item in the warehouse
It should be a Scale Form GFX type! Right click, and select 'export'. Name this something you'll remember, and save it in a folder you'll come back to!

Step 3: Rename the exported file so it has the extension 'swf'
Self explanatory! Windows will may warn you that it may make the file unusable, but you can ignore this!
Step 4: Open FFDEC/JPEXS, and open the now .swf file
Step 5: Expand the 'images' hierarchy, and scroll all the way down until you find the images labeled 354 and 356!

These images are the main background and the sidebar background respectively.
Step 6: Right click and replace ONLY images 354 and 356 with the images you prepared earlier
Remember, the main background (354) MUST BE 1600x1600 pixels, and the sidebar (356) MUST BE 1000x1000 pixels!
Step 7: 'Save as' a new .gfx or .swf file
The filetype here doesn't matter! You can also just save over, but I like keeping backups.
Step 8: Re-import over the original in Sims 4 Studio
Right-click the same item in the .package's warehouse that you exported earlier, but this time, click 'import'.

Select the .gfx/.swf you saved earlier!
Step 9: Save the .package file, and rename it if you intend on distributing
You can rename the .package file just how you would any other file! Try and include your creator's handle in it, so it the edit can be traced back to you.
Step 10: Test and enjoy!
While I'd like to think this tutorial is pretty straightforwards, please let me know if you have any questions :D
#non cc posting#txt#THE MOD DL WILL BE UP IN A SECOND I JUST NEED TO#MAKE THE TUT POSTS CUZ THEYRE LINKED IN IT LOL
38 notes
·
View notes
Text

A quick method to deal with blurry action shots that have Hannibal's quintessential dim lighting + green color grading combo.
Here's the example I'll be using:

Don't get me wrong, I love the look of Hannibal, but the average person doesn't scroll tumblr with their screen brightness on max. Plus, night light filters and blue light glasses add even more yellow to an already heavily filtered show. If you want people to see your gif clearly, you have to edit it at least a little. Especially for extreme shots like this lol.
What I use: macOS 15.1.1 Elmedia Player 8.18 dupeGuru 4.3.1 Topaz Photo AI 3.2.0 Photoshop 25.11.0 LuLu 2.6.3 (optional, but it's nice to block outgoing connections from pirated programs)
Step One: Take Screenshots
Open your video file (1080p preferred) in Elmedia Player and navigate to the first frame of your gif. Hit "Playback > Record a Series of Screenshots" and let it run until you have all the frames you want. Unfortunately for mac users, we have a problem where a lot of duplicate screenshots are taken (like every third screenshot is a duplicate... it's so annoying). To save time later, I use dupeGuru to clean out as many duplicates as I can.
Open dupeGuru and add whatever folder you saved your screenshots to.

Scan the folder, then hit "Mark > Mark All" (you can see here that the program only caught one duplicate, which means more work later. it's not a perfect program -_-)

Hit "Actions > Send Marked to Recycle Bin..." to remove the duplicates from the folder

Step Two: Denoise
At this stage the screenshots are so dark that the noise isn't obvious, but it'll be more noticeable after brightening and sharpening. Here's the difference this step makes later:

Upload all your screenshots to Topaz Photo AI and add a Denoise layer. I normally go with the automatic settings.

Hit "Select All," "Apply > Current Settings," then export all your images. This can take a while depending on how many images you have.

Step Three: Create Frame Animation in Photoshop
If you've read any other gif-making tutorials this part should be familiar, so I'm gonna skim over it.
"File > Scripts > Load Files into Stack"
"Browse..." and select your Topaz output files
"Sort by Name" so they load in the correct order
"Ok"
Once all the layers have loaded, hit "Create Frame Animation" in the Timeline window
Under the Timeline window options menu, hit "Make Frames from Layers," then "Reverse Frames"
This is probably when you want to go through frame-by-frame and delete any remaining duplicates. It's very annoying to have to redo this step if you want to go back and edit your crop size later. (Not that I would know... 🤡)
Step Four: Crop + Resize
Crop, then "Image > Image Size" to adjust the width of your gif. You'll most likely want to use one of the common tumblr image dimensions:
Keep in mind that tumblr's gif size limit is 10 MB. But it's honestly best to keep it under 9.5 MB if you want the gif to load smoothly. A 540x540 px gif can have 40-60 frames while a smaller gif can be longer.
Make sure to add +2 px to whichever width you choose (so 542 px, 270 px, etc), since we'll be adjusting the canvas size later to get rid of transparent border anomalies.
Step Five: Color
The more common order of operations is to sharpen before coloring, but for dark scenes like this, it's kinda silly to sharpen when you can barely see what you're doing, so I like to color first.
Select all your frame layers and make a new group, just to keep them separate from your adjustment layers.
I always start by testing out the Auto Color Correction Options in a Curves adjustment layer. To access them, opt + click on the Auto button. This opens a window with four options.
I like to use a combination of "Enhance Per Channel Contrast" and "Find Dark & Light Colors," though either option can be used to adjust color balance. The important part is selecting "Snap Neutral Midtones" and picking a midtone that brings your gif as close as possible to the desired color balance.

If changing the midtone doesn't affect the color balance, brighten the gif first and try again.
For this gif, "Enhance Per Channel Contrast" removed the bulk of the green filter:

It's still pretty dark, so I brightened up the gif with some more Curves layers:

There's still a lot of purple/blue in Dolarhyde's black leather jacket, so I added another Curves layer and used "Find Dark & Light Colors" to improve the blackpoint:

Now we can up the contrast a little:

Nice! Good enough to move onto sharpening!
SIDE NOTE: The reason I use these Color Correction Options is because simply brightening leaves you with purple/blue shadows and sickly green over-exposed highlights that take ages to color correct. You can see the difference here:

(If you've ever wondered why so many Hannibal gifs have blue shadows, this is why.)
Step Six: Sharpen
This is where you'll want to start implementing actions, which are pre-recorded series of adjustments that you can perform with the click of a button. I mainly use three actions (download here, open the Actions window in PS, open the Action options menu, and click "Load Actions...").
The "frame animation to smart object" action converts the gif to a video timeline so we can apply smart filters.
The "legacy sharpening + high pass" action applies my standard sharpening filters. Not every gif will need the high pass filter, so feel free to change its opacity or delete it altogether. You can also tweak the smart sharpen filters by right clicking them and selecting "Edit Smart Filter..."

3. Once you're happy with the sharpness, the "convert to frame timeline" action turns the gif back into a frame animation. I use a 0.05 s frame delay for most gifs (equivalent to 20 fps; 24 fps is standard for tv/movies). I normally use 0.07-0.08 seconds for action shots, so the gif doesn't whip around so fast. Over 0.1 seconds, it starts to look like stop motion, so I try to avoid that.
Step Seven: Final Adjustments
This is where I fine-tune the colors, mostly using Hue/Saturation layers.
If I use a Color Balance layer, I only make very small adjustments and try to counterbalance them in the other tonal ranges (e.i. adjustments to the Highlights spill over to the Midtones, so I make the opposite adjustments to the Midtones to fix it). But most of the time, I'd rather play around with Curves or Hue/Saturation to fix stuff like that.
Hue/Saturation gives you more control by allowing you to select the exact color range you want to affect. For this gif, I used Hue/Saturation to get rid of the purple introduced around the highlights in Will's hair by the high pass filter.
The eyedropper tool allows you to select the exact color you want to include in the range. Then you can move the bars around until all the colors you don't want to affect are excluded.

Once you have your range selected, you can bring the saturation all the way down and set it to whatever lightness you prefer:

I also reduced cyan's saturation so that Will's shirt wouldn't look quite so blue.

[You could do a lot more to make the colors prettier... but there are other tutorials online for that. 😅]
Step Eight: Export
Once you're happy with your final product, go to "File > Export > Save for Web (Legacy)..."
These are my settings:

You can use Diffusion instead of Pattern if you want. Diffusion is probably better for mobile gif compression, but I like the way Pattern looks on desktop, especially for gifs with smooth gradients. It's a personal preference thing.
Hit "Save..." and you're all done!

This isn't gonna win any gif-making awards, but at least you can see what's happening and the colors don't look wonky. And for Hannibal, I call that a win! 🥲👍
22 notes
·
View notes