#i need to get out my tablet so i can make cleaner drawings and color them
Explore tagged Tumblr posts
Text

guess who i drew again
#i need to get out my tablet so i can make cleaner drawings and color them#but oh well#tinky#t'noy karaxis#the lords in black#lords in black#starkid#hatchetfield#hatchetverse#npmd#my art#also thank u to everyone who reblogs my art#or even just likes it#you're the best!!!!#the GOAT you might say
5 notes
·
View notes
Text
Tu... torial? Pt. 5.
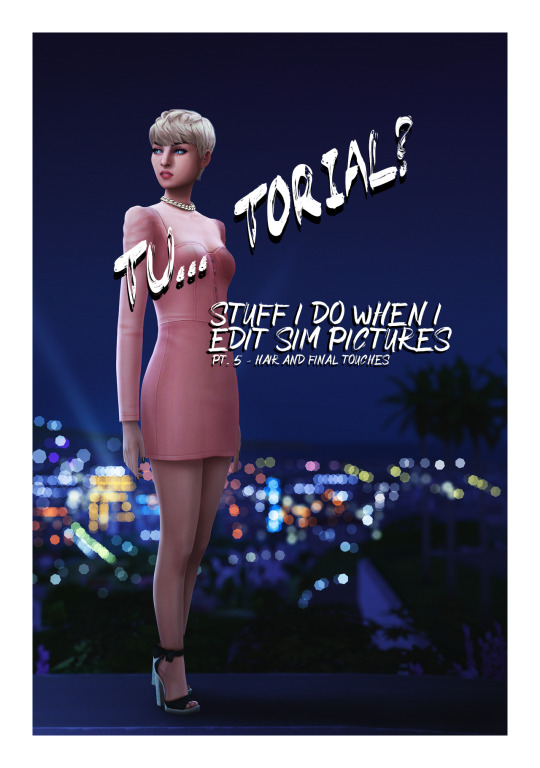
Final part of my tutorial! This is a little all over the place, because that’s how I am in this stage of editing. Also I didn’t proofread this...
Open this in dashboard for best view of the screenshots.
Disclaimer: I have no formal training for any kind of graphics stuff, I work in an office as a receptionist - I serve coffee for a living. I am absolutely self taught and while I consider myself pretty comfortable with photoshop, that doesn’t mean that there isn’t about a gazillion of other things that can be done that I have no idea about. There are people far superior than me in the Sims community. This is just how I do it, with techniques I have picked up through the years. Some things I go over in these will be pretty basic, some things a little more unorthodox. Disclaimer 2: My edits take time. This is what I do to relax, one edit takes several hours for me. Sometimes days :))) Disclaimer 3: My photoshop is in Swedish, which is my first language. I tried my best to find the English translations for every step that I do.
Tools used: The Sims 4, Adobe Photoshop 2020, One by Wacom Pen Tablet (very basic and unfancy).
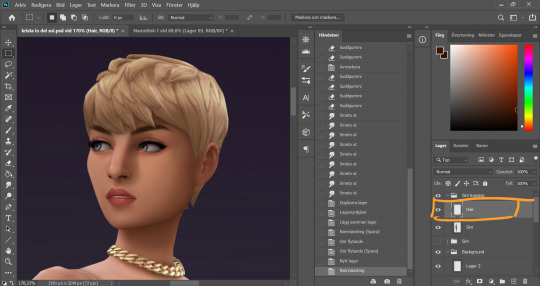
It´s hair time baby! I very much enjoy drawing hair on sims. I make a new empty layer on top of my base Sim layer.
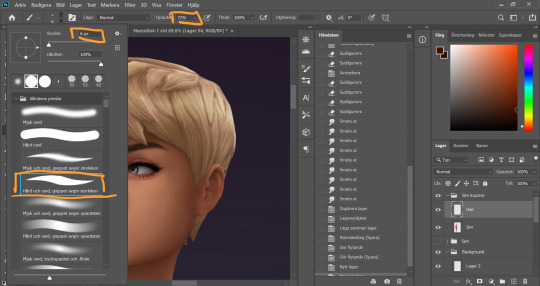
This is where having a drawing tablet makes a huge difference. We need the brush to be sensitive to pressure to get the effect of hair strands. I chose a hard brush, small small size (how small depends on the picture size of course, but I usually land somewhere 6-9 px)
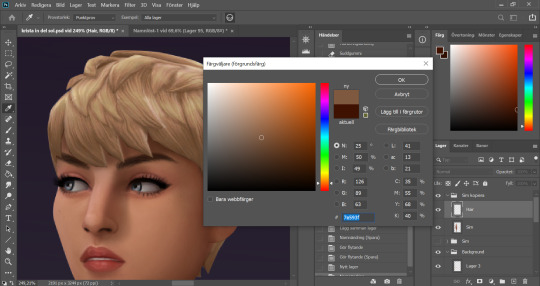
I pick up a color from the hair, I usually starts with a medium light color.
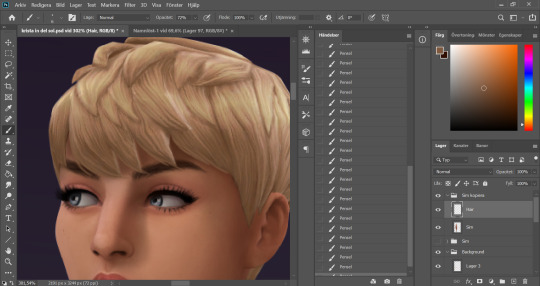
I start by drawing strands around any tips of the hair so they don't look quite so solid. I do this part with both short and long hairs. Hot lazy tip: straight unlayered hairs is the absolute easiest. This is a layered hair so I start with the bottom and work my way up. I pick up different colors from the hair as I go along, to add dept.
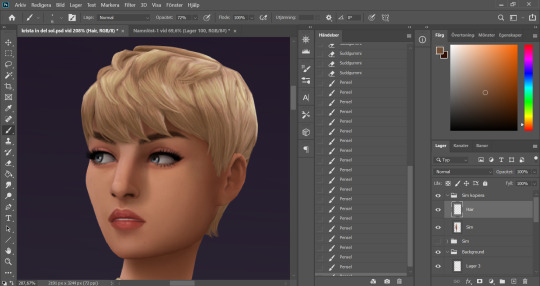
Continuing up in the hair and add strands to the pointy bits.
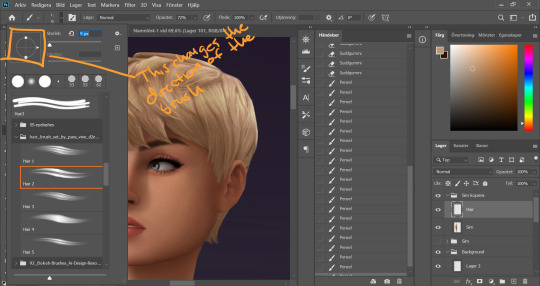
When I feel like the pointy bits have been softened I select one of my hair brushes. I use these ones by Para Vine.
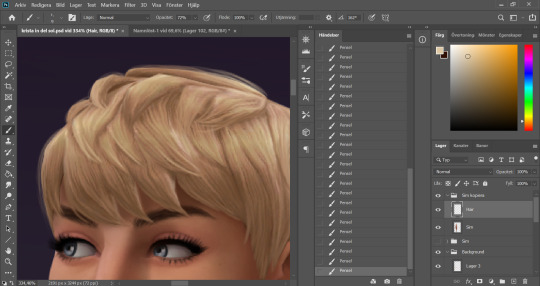
I start painting "around" the hair with one of the lighter colors picked up from the hair, changing the direction of the brush every once in a while for a more natural result.
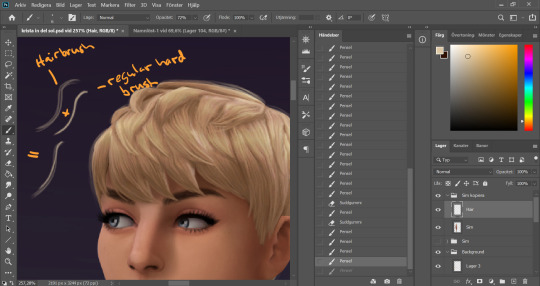
After this the hair is looking a little fuzzy, so I'm going to go back with my small harder brush to fill these parts out.
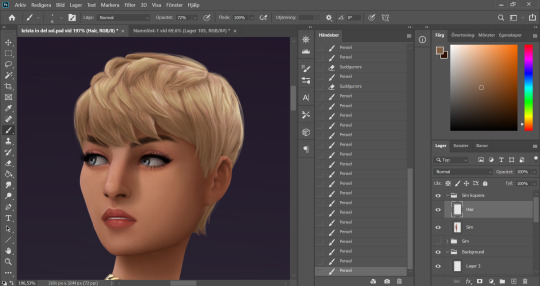
I don't add a lot of them, just small bits here and there for filling.
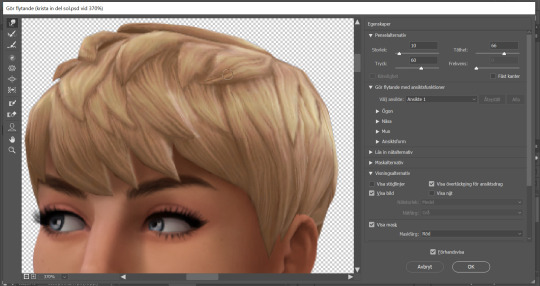
This is a little overkill but... now we have some of that "squary" thing going on in the hair as well that are still showing through our painted layer. Now we could paint over these, but painting can actually be overdone and I wan't to keep the hair recognizeable because the creator put a lot of work into it! So I go into liquify and smooth over any wonky lines still showing, just slightly.
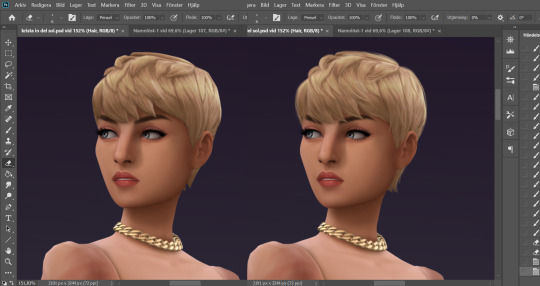
A comparison of before and after hair. Still recognizeable, but softer.
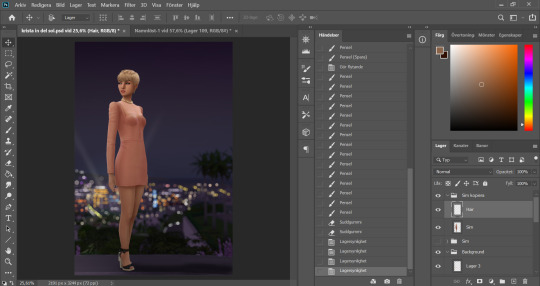
This is our result so far. We've come a long way, but we're not done.
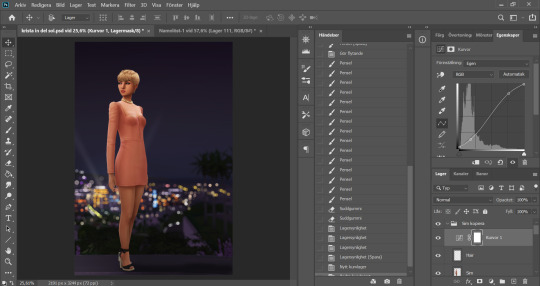
At this point (or actually sometimes sooner) I add an adjustment Curves layer, this will not end up in the finished image, this is just to give me an idea of what the image might look like with more contrast (which we will add later). I keep this at the very top of the layer panel and turn this on and off as I go. Very important to have it turned off if we are going to eyedrop a color and use that to paint, since it would pick up the wrong hue if we have it turned on.
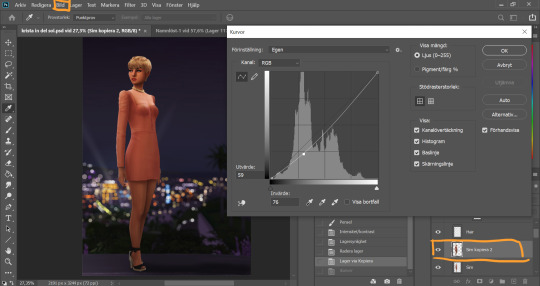
Now I still want the front of my sim to be a little darker to fit my lighting, but I don't want to go over with any more shadow. So I duplicate my Sim layer, and go to Layer -> Adjustments -> Curves. This will only change the active layer, as opposed to creating an adjustment layer down in the Layer panel that will change all layers below it. I drag the curve down a bit to make my new Sim layer darker.
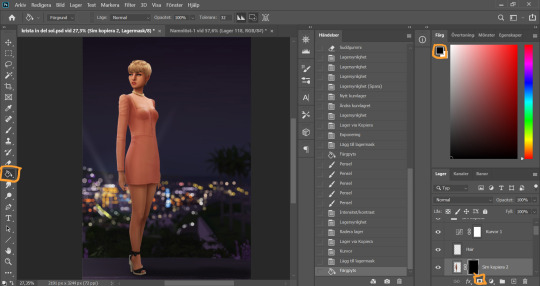
I add a layer mask to my new Sim layer, and bucket fill it with black color so the new layer gets hidden.
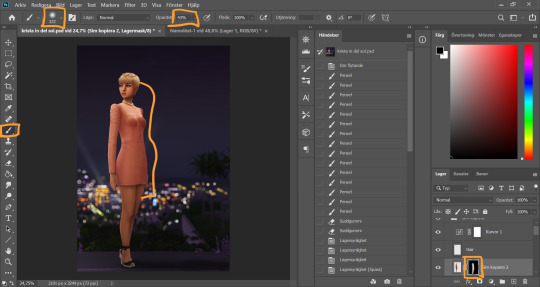
I chose an absolutely HUGE soft brush, with medium opacity, and starts painting white on the areas where I want the new darker layer to be showing. And blend by going back with black where the line is to harsh.
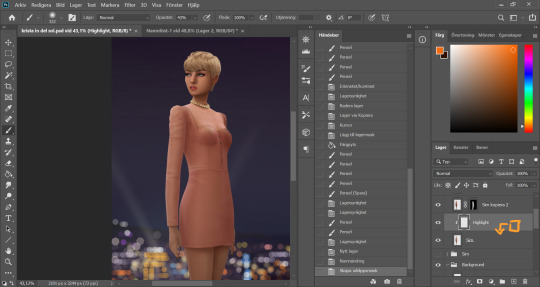
Time to add some highlights. I create a new empty layer between my two Sim layers, and add a clipping mask by holding Alt and hovering on the line between the new layer and my bottom sim layer, until the little square with the arrow symbol comes up and then click. This will make whatever I do on my new highlight layer, only show up on the areas where the layer underneath is filled.
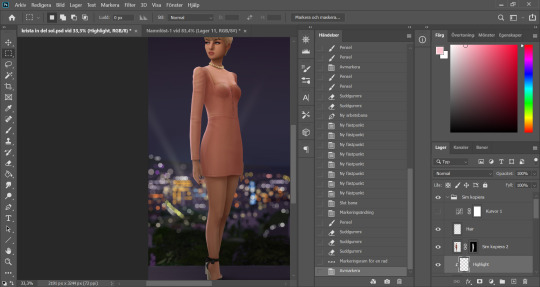
Time to paint. I disable the curve adjustment layer for this. I choose a bright color, in this case a light pink because I didn't want a contrasting color for this picture. I go with a big soft brush around the edges where I want my highlight to hit. In this case, the arm, the hand, the arch of the back and the calf. I didn't add anything to the face in this picture because I didn't like the way it looked, but usually a little highlight to one of the cheeks is just *chef's kiss*
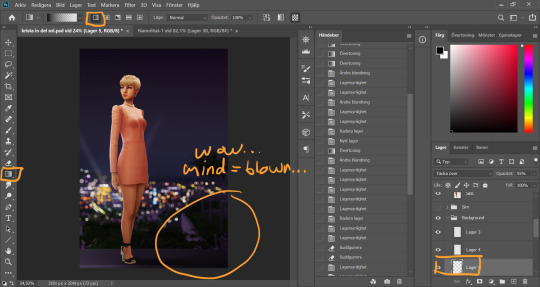
And somewhere around here I got really stuck and really struggled to follow with this tutorial. I felt the picture was lacking something and I tried several different things. I added light rays, tried creating different light sources, there was a moon at some point. But I ended up with just a simple additional gradient shadow down in the right corner (on a new layer down in the Background layer group). Life changing…
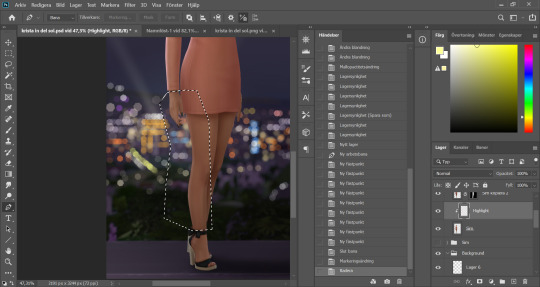
And then I didn't like the pink highlight on the skin (sigh, this is how I work, but it’s not recommended to be this indecisive) so I removed that and added a more beige-yellowee highlight instead. And forgot to take a picture after the highlight was added....
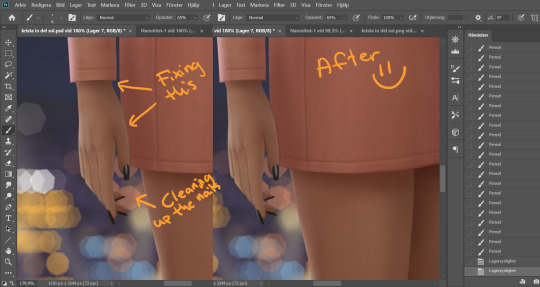
And now I go into nitpicking mode. I add a new empty layer on top of my Sim layer, I add it under the highlight layer so it automatically takes on the clipping mask of the Sim layer, I name it Clean-up Crew and go in to refine anything slightly wonky. Picking up colors with the eyedrop tool and going over flaws with a tiny brush.
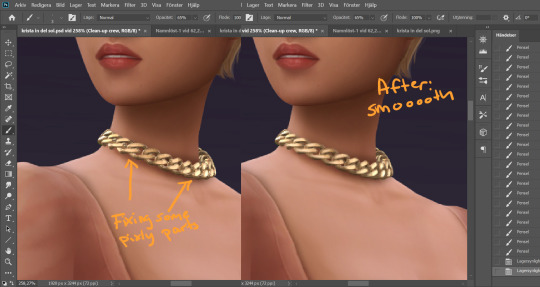
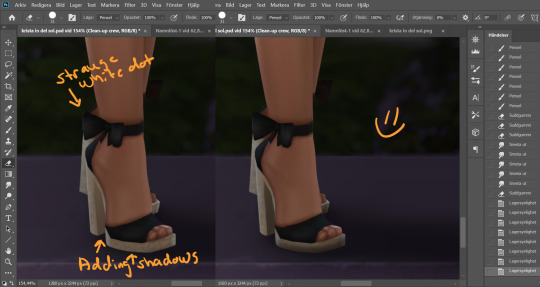
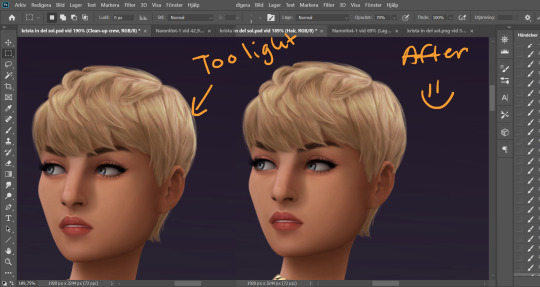
When I fixed this little light area on the back of her head I left the Clean-up Crew layer and went to my Hair layer instead, because I still have that separate and it's above all the other layers.
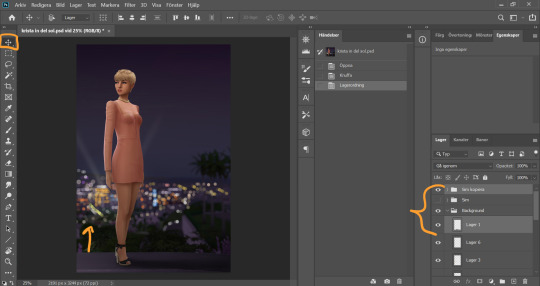
I thought my sim was a little too far down in the picture so I moved her up by selecting my whole Sim layer group and the layer on which I have her ground shadow, chosing the move tool and pushing them up. This will move all the layers in the Sim layer group as well as the ground shadow layer equally.
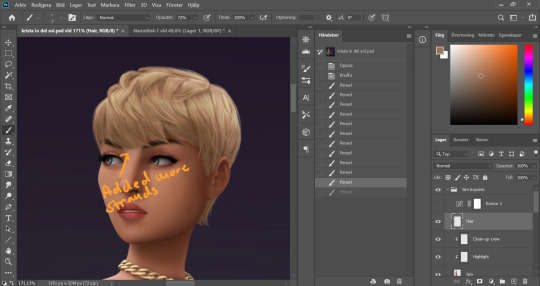
I'm telling y'all, nitpicking mode could go on forever. Added more strands to the bangs.
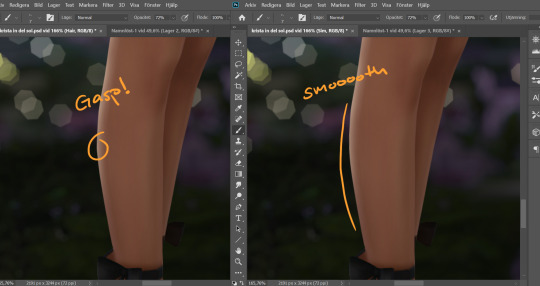
Noticed a little pointy part on the calf, so I wen't into Liquify on the base Sim layer and smoothed that out. Since the highlight layer has a Clipping Mask corresponding to the Sim layer, the highlight stayed in place.
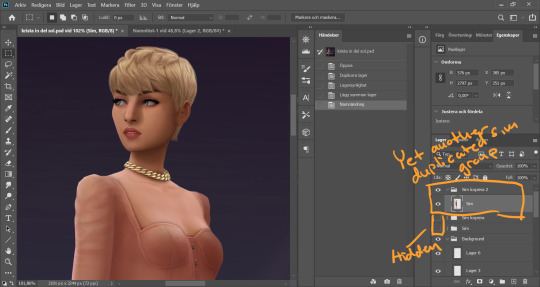
I duplicate my Sim layer group once more, and merge the layers within this group. So now the Hair, Highlight and Clean-up Crew is all merged onto the Sim layer. I hide the previous Sim groups.
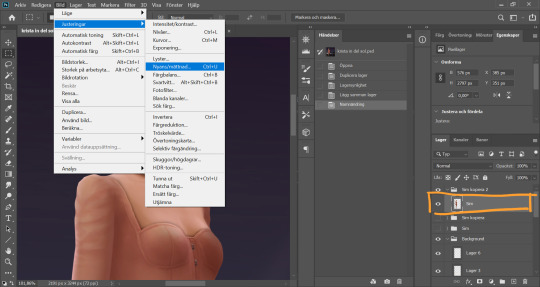
With my new Sim layer selected, I go to Image -> Adjustments -> Hue/Saturation. I want to make my Sim a little less bright so it will match the background a bit better.
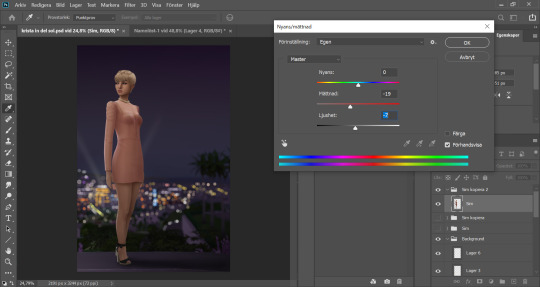
I drag down the Saturation and Brightness slider a bit until I like what I see. After this I save my whole image as a PNG-file because from now on I want to edit the whole picture but still want to keep this psd-file as it is for anxiety purposes. Important: I disable my curves layer before saving this as a picture, I don’t want that brought with me into the next steps because I will be adding new curves there.
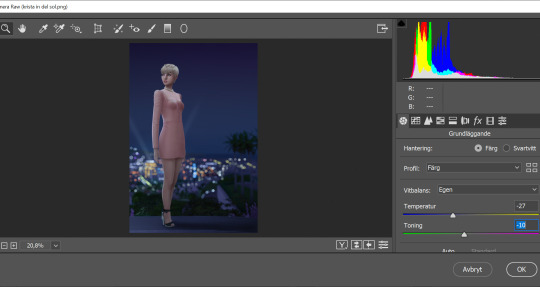
I open my new saved PNG-file. I go to Filter -> Convert for Smart filters. This will allow us to go back and change any filters we add to this layer. I go to Filter -> Camera Raw Filter and for some reason this window opens up humongus. I start by dragging down the temperature. How much depends on the picture, usually more if it's nighttime.
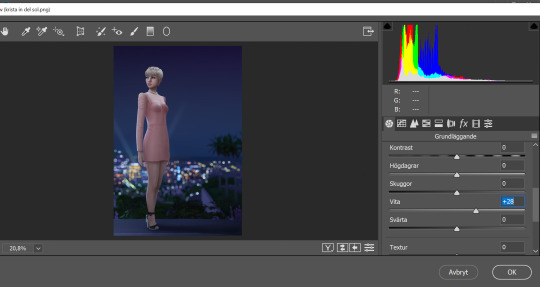
I pull up the Whites a bit for a cleaner look.
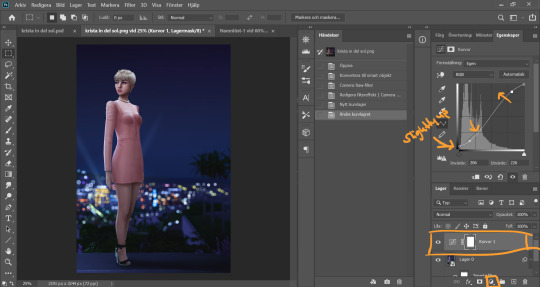
Now I add a Curve Adjustment Layer. Now you can add Contrast in the Camera Raw Filter as well, but I prefer the curve layer because I like to control the different levels. This way I can make my darkest parts a little brighter, giving just a little washed out flair to it all.
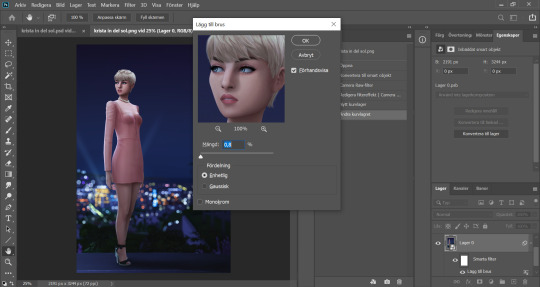
I select my background layer again and go to Filter -> Noise -> Add Noise and choose a level that I think looks good. This just brings the picture together a bit more. Also vintage vibes :)))
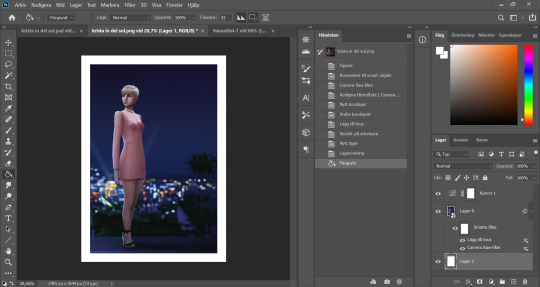
I add my frame (because it´s my aestethic and I think it looks cool on tumblr) by resizing my workspace and adding a filled white layer underneath the background layer.
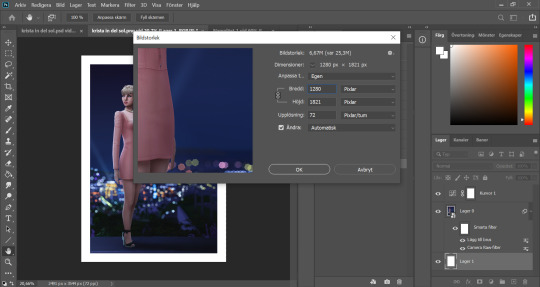
I resize my picture (Image -> Image Size) because we don't need it to be huge.
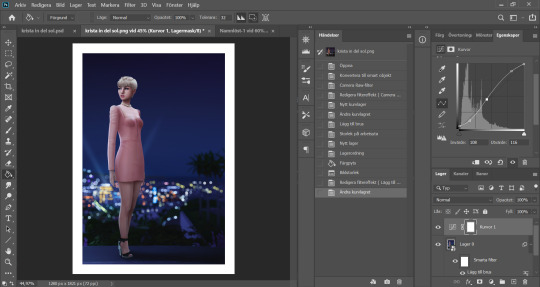
And they I just fine tune the Filters and Curves until the end of time :’)))
And that is that my friends! That’s the end of the tutorial! I hope you could follow somewheat and that someone found it useful. Thank you for reading and never be afraid of contacting me if you have any questions :) I’m very friendly.
63 notes
·
View notes
Text
The Morning After
pt. i

Peeling your eyes open, the only thing that greets you is darkness, throbbing pain at the forefront of your head and tongue glued to the bridge of your mouth. Slowly rising to a seated position also welcomes a stiff neck pain that helps you realize you aren’t currently in your own bed, nor is this your home at all since you don’t own a leather sofa. A grey blanket tangled around your frame is a welcomed couch partner and is far better than waking up to another body drooling beside you. The warmth from it is pleasant, though everything else is confusing. Not to mention, your bladder feels as though it’s about to burst through your pelvis any second now.
A glass table in front of you, barely visible at all due to blacked-out curtains preventing any form of light from burning your eyeballs further into the back of your head than they already are. But, you can just say make out that there’s a small amount of water left in a glass with two tablets placed beside it. Without thinking about how you may have left the nightclub with a drug cartel leader and how this could be acid you’re currently gulping down, you pray that it instead wipes out the crushing headache and nausea that’s building in your stomach.
Fuzzy memories begin to flash through your mind. Dancing with your friends, downing way too many shots because the bar had an offer on buying multiple for less, but finally, she appears once more, the mystery woman. You recall clambering into an uber with her, Sooyoung, you just say recall her telling you her name. Making it up the mountain of stairs to, well, here. You assume. Everything else is a blur. A blur that you’re grateful for because it’s likely blocking out a lot of embarrassing things you’d rather forget and never think about again.
Shuffling your feet in place and hoisting yourself up requires more strength than you’d like to admit but is a rookie mistake as the room begins to spin in circles, faster the more you remain standing in place. Your only thoughts being ‘find a bathroom immediately’ otherwise you’ll have to add on to the embarrassing moments tally chart your memory has begun to calculate without permission.
Walking proves to be even more difficult as your ribs collide with what appears to be a kitchen countertop.
“Shh!” you whisper towards, well, no one. Only the counter and darkness are before you but the need for silence is very important during this stealth mission to Sooyoung’s bathroom. You set a mental reminder to next time ask for a tour of a stranger’s house whenever you decide to go for an adult sleepover that ends up not being very adult at all.
A hallway with a door at the end of looks to be promising as your feet guide you groggily toward it. Perhaps drinking floor cleaner would have been the better option, after all, the symptoms you would get from drinking that have managed to infiltrate your body anyway but maybe whatever products they put in it would stop you feeling so rotten inside. Or just end the suffering a lot quicker.
Once you’re within arms reach of the handle, muffled sounds can be heard on the other side of the pristine white wood that your ears don’t even attempt to decipher. Without thinking too much about it, you’re already opening the door and stepping inside of the room before you can convince yourself that this is a bad idea. What awaits you once the frame is no longer hiding away whatever was making the noise is surprising to say the least.
“Oh, hey!” A voice you know you’ve heard before speaks, though you’re unsure where you know it from. “I didn’t realize that was you passed out in there. You sure do have a type, Sooyoung.”
Your eyes dart back and forth between the two women currently sitting on what is by far the largest bed you’ve ever seen. Sooyoung, who you easily recognize from the hazy flashbacks of managing to insult her in her own home. But, the other girl whose side profile is immaculate, looks and sounds familiar, however, your mind is drawing a blank. She shifts her position so that you can see her face entirely, rather than just one half of it and picks up on your confusion.
“Ah, Haseul. We met last night, you thought I was flirting with you.” She extends her hand out to you, but the sharp twitch in your pelvis reminds you of the impending outburst your bladder has been threatening you with, and your body hunches over in pain. Had it not, your temples may have exploded instead due to remembering just how you bumped into Sooyoung in the first place through Haseul and her free drink offer.
“Are you okay?” Sooyoung asks or rather half yells as she dives out of her seated position to stand alongside you. She gently wraps her arm around your own to steady you.
Your dry throat is barely able to choke out the word bathroom yet she’s rushing you toward it before you can stop her. Of course, it’s on the other end of the apartment and of course, your still intoxicated brain would choose the wrong option. Of course, Haseul is here for reasons you can’t quite decipher in your current state.
Sooyoung opens the bathroom door with her leg. Her legs on show now since her trousers have been replaced with bed shorts. You can’t help but admire how toned they too look until her abs flash in your mind and the hangover is not the only thing making you lightheaded. She positions you in front of the toilet and stares blankly unsure of what to do next.
“Do you… do you need me to help you?” She tentatively asks.
“Oh no, I’m perfectly fine with using your toilet.” Despite your answer, she doesn’t move. “Seriously, I’m fine to pee alone.” It finally clicks that you need privacy for this and that she doesn’t need to be present for post-non-sexual-but-still-sexually-tensioned-sleepover-peeing.
She leaves the bathroom and closes the door behind her a little louder than you’d like. The entire bathroom is just one big swirl of color as your eyes adjust to the lighting. It’s a lot cleaner than your own, everything has its own little holder or place. You recall how she’d mentioned having moved in not so long and put her tidiness down to that instead of her just being a neat freak that must have everything in order to function as a human properly.
After relieving yourself of what feels like an entire ocean, you check yourself out in the wall mirror placed opposite a walk-in shower. Big mistake. The hair thrown in every direction and make-up smudged across your face can’t be attractive for anyone but especially not someone who looks like Sooyoung. Your eyes catch sight of the shower behind you in the reflection, however, your manners are still intact even if your dignity is not.
You head back toward the bedroom where you found Sooyoung and Haseul, however, the latter appears to have vanished in the time it took you to use the toilet which was probably longer than you think. Sooyoung’s back profile is currently sticking out of the walk-in closet with no clothes hung up inside. Instead, suitcases yet to be unpacked line the floor.
“Hey, um, do you mind if I use your shower? I just realized how terrible I look.” Your voice startles her, however, the smile on her face as she nods her approval doesn’t show her fright.
“You don’t look terrible, by the way. Just like you’ve been dragged through a hedge backward.” A smirk rising on the left side of her lips. Lips that are still plump and teasing you to taste them. “Is there something on my face?”
Her words break you from a daze you hadn’t even realized her physical features had put you under.
“No, sorry. I zoned out for a second, it’s the hangover.”
“Are you sure it isn’t my legs you couldn’t take your eyes away from earlier? Or how about my mouth that you keep looking at now?”
Laughter joins the smirk that grows bigger with every word she speaks, her body moving closer to your own and threatening to invade your personal space until it finally does. It’s suffocating. She is suffocating and intoxicating all at once. More so than the alcohol from just several hours ago.
It’s the right choice to escape her alluring presence than to be sucked into it whilst feeling like the human form of both death and hell combined. The walk back to the bathroom does feel rather lonely when you take a quick look over your shoulder to see Sooyoung simply stood in place watching you walk away, her gaze intense yet warm.
The warm water blasting out of the showerhead not only drowns your body in heat but also silences out the booming noise you’ve been unable to stop hearing in your ears. The music from last night must have been way too loud for you to still hear it ringing now. Except, just beyond the blaring dance track, you can faintly recall what Sooyoung’s whispered words to you sounded like.
“Maybe you’ll still get lucky.”
Perhaps focusing on this whilst ridding yourself of the grim after effects of drinking too much in a shower that doesn’t belong to you isn’t the best idea. The desire to extinguish the flames you’ve brought about within your own head from thinking about Sooyoung will need to be put out somehow but here is not the place for it. Not with the very person whose lit the match mere metres away in the other room.
As if things couldn’t get any fancier inside Sooyoung’s apartment, or just life in general since the aura around her screams expensive, her towels are the softest thing to ever grace your skin. You’re certain that someone personally grabbed part of a cloud to place it into the fabric. Either that, or you’re just in desperate need of a cure-my-hangover hug.
Gentle knocking on the door breaks you from daydreaming about what it would be like to receive such comfort from the very person now testing the handle. It opens, because you definitely didn’t accidentally on purpose miss the huge lock on the door.
“Oh, you’re done. Good.” Sooyoung says, eyes unsure of where to land since all that’s covering your modesty, what’s left of it, is a towel.
“Yep. Thanks.”
She stands awkwardly for a second before pulling her hands from behind her back to produce clothing.
“Here,” She hands over light grey sweatpants and black t-shirt that would likely fit both of you at once. Her hands reach down into the cabinet below the sink and she pulls out a toothbrush still in the packaging. “I promise, I just keep one for if ever the bristles on mine break, I don’t have it just for a moment like this.”
“Moment like what exactly?” Your words coming out are far more cocky than intended. It definitely is best to leave the confidence to Sooyoung.
“Well, a one night stand that didn’t go as planned, I suppose.”
Before you can offer her a response, which you’re honestly unsure how you would have replied other than to just grab her finally and release the tension in the air between you both, she leaves you to finish cleaning yourself up.
Heading back toward the living area, the smell of coffee and sunlight have replaced the overwhelming smell of stale alcohol and darkness. Your stomach is unsure if it’s happy with this change, though you can’t protest since you’ve already overstayed your welcome.
Your phone and bag sit on the floor beside your bed for the night, the blanket neatly folded on the arm of the sofa. There are several notifications awaiting you once you grab the device, all of which from your friends curious about the mystery brunette you left early with. Locking it and ignoring them seems like the best idea for now, at least until you’re out of Sooyoung’s apartment and back into your own where you can get back to wallowing in self-pity.
“Coffee is on the counter if you want some.” A light shout echoes from the kitchen area.
“No thanks, I’m just gonna go.”
As you reach the door, an arm swings across it to block your path and exit out of Sooyoung’s world.
“Where are you going?” She gently asks. Her eyes sad and lips curved down into a small frown. You’re sure there’s never been a cuter sight in your life.
“Home,” Your words do nothing to remove the solemn expression on her face. “Thank you, for last night and everything this morning but I have to get going.”
She drops her arm from the door and takes a step back but your own body doesn’t move. You don’t take this opportunity to leave. Instead, your hands take on a life of their own as you cup her face and raise her head so that her eyes can meet your own.
Though you can’t be sure, you’d argue with anyone that the slow descent of your lips to place firmly against Sooyoung’s in this very moment feels the exact same as the euphoric rush people get when they skydive. You can feel your heart plummeting into your stomach and back up to your throat as your mouths move in sync with each other. It’s inviting and full of passion. You can tell that Sooyoung has been chasing after this moment just as much as you.
Her arms wrap around your frame instinctively and pull you in closer to her. Her mouth slips past your mouth and down to your jaw, scraping her teeth softly down the side of your face to your neck. She bites ever so gently on the skin between your neck and collarbone. A hummed moan escaping your lips.
“Come with me.” It’s said as if you have a choice, however, Sooyoung is already pushing you backward towards the bedroom you found her in this morning with Haseul, which reminds you to ask about her later, far more important things are to be explored currently.
The pair of you crash land onto her mattress, both still clinging onto each other and unwilling to break the hold. Her legs glide over your body to straddle your hips as she sits lightly atop of you.
“Are you sure?”
You really shouldn’t be surprised that Sooyoung is checking with you that this is something you want to go through with. A big part of why you didn’t dart out the door the second you had the chance is because you’re not sure when you’ll ever randomly meet someone quite as perfect in every aspect as her, including knowing not to take advantage of a situation and when to request consent such as now.
“Yes.”
A whispered response is all you’re capable of producing yet you’ve never felt more sure of anything in a long time. You want Sooyoung and she very clearly wants you. The second she hears it her hands are roaming freely to remove your t-shirt that you don’t plan to return as the extra space in it is way too comfortable to offer back. Plus, it smells just like her. Soon, your torso is entirely bare to her eyes and she drinks all of you in.
“You’re so beautiful.” There’s a sincerity to her voice that makes you feel small under her intense stare.
Her body dips forward and lips coast over your chest gently lapping at your nipple, one of her hands resting gently on your outer thigh as the other finds its way to your own as she laces your fingers together. However, the tight feeling in your chest that the small piece of intimacy gives you vanishes as she shuffles her body lower until she’s stood at the bottom of the bed looking down at you. Her hands grip onto the waistband of the sweatpants as she lowers and then removes them completely.
Sooyoung once again leans down back onto the bed, her hands moving up both of your legs at the same time whilst her lips trail not far behind until she’s mere inches away from your eagerly anticipating core. Her head raises to meet your eyes once more, you assume for permission once more which you offer her with a nod that you were barely able to give her as your head has replaced the pain with swarming thoughts about Sooyoung, her mouth and being able to feel her touch you.
You can feel the expanse of her tongue running up and down the inside of your thigh, her left hand once again finding your own as her thumb strokes across your wrist. There’s a safety to being with Sooyoung like this that no one else has ever previously granted you. Whilst her eyes are hungry with lust and determined to eat you alive if she could, there’s also a desire to make sure you feel comfortable.
An experimental lick sends a jolt through your spine. Your free hand grasping at the sheet below you as your head throws itself back into the pillows behind it. A low whimper is the only encouragement you can offer Sooyoung as her mouth begins to suckle at your hardened clit. Hips naturally bucking up to try and accommodate to the natural rhythm she’s set about creating, however, she places her hand flat onto your stomach and forces your body back down into the mattress.
“Let me.” is all she says before getting back to exploring your body and burying herself further and further into you.
Had you known the night before that this is what Sooyoung had in store for you, you’d have forgotten about the shots of tequila a lot sooner. The pleasure in which she’s offering you up on a platter far better than any amount of alcohol in the world whilst making you feel a completely different version of drunk.
Her tongue quickly picks up the pace as you manage to just stutter out her name a few times in between low groans. Your knees begin to turn inwards on themselves against Sooyoung’s head as she remains exactly where you need her to be.
Peeking down whenever your head doesn’t react on it’s own, you can see that she’s still got her eyes glued to yours, her pupils wide and boring into your own whilst her mouth laps up all of your juices proudly. Your body writhes around in desperation until the euphoria finally hits and all you can see in your mind is the proud smirk that Sooyoung is likely wearing after being able to make you come undone so easily.
To your surprise when you’re finally able to open your eyes again, her mouth is too occupied with kissing your hip bone to care about being overly proud of herself. Her fingers drawing patterns on your inner thigh.
You have to jam your eyes shut otherwise who knows what you may end up doing with Sooyoung being so… perfect in every way. Including this very moment where things should be awkward, they simply aren’t because she refuses to let it be. The one night stand’s that are shown in movies or that you’ve heard horror stories about from your friends are nothing like what she’s creating for you right now.
Perhaps, she does indeed like you beyond this. Beyond a sexual encounter from a drunken night out. Beyond stumbling into bed with each other when the opportunity not to was seconds away. Perhaps, you like Sooyoung too.
“Good morning.”
Though you hear her speak, you decide to simply grab her hand once more and hold it beside you rather than reply. Because yes, it is indeed a good morning and nothing should ruin this moment between you both.
#loona#kpop#kpop scenarios#girl group scenarios#loona scenarios#ha sooyoung#loona yves#yves#kpop imagines#kpop reactions#girl group imagines#girl group reactions#loona reactions#loona imagines#yves x reader
132 notes
·
View notes
Note
Do you have any art tips? Asking for a friend
i took a while to answer this one because i had a hard time coming up with any specific advice to this kinda broad prompt
a few things ive noticed about how im drawing lately, that in sharing might??? give you the advice youre looking for:
get inspired by other artists. let your art style evolve as you pick up new ideas and see new ways of doing things. practice doing the things you see that you like!
i hate clean linework and need to work on that... part of it is a long history of never finishing my art and having years worth of doodles lying around. what i do in the meantime is im trying to get better at sketching, which for me means, confidence.
one way to improve your sketches and help you do them faster, cleaner, and easier to work off of, is to practice anatomy,and also tracing references so you can get the motions and sense of space ingrained into your mind. references arent evil. they dont make your art less valid, use them! tracing isnt evil either, as long as youre making it your own! several of the pieces ive put on here i did blocky tracings of to get the shapes down, then did a first sketch over that, then final lines over that. it just means youre starting from a good place. i cant tell if im making sense anymore its two thirty am. why am i like this.
lighting can really bring your art to life! stuff like how to shade and how to use the glow tool too much and how to uhhh.... yeah i just have been leaning too much on messy lighting lately ill let you know when i actually refine that. a simple bit of lighting to single color or flat colored art can really bring it to life and its just fun
flip your canvas so you can check to see if it looks good. i tend to tilt my head and hold my tablet at an angle i KNOW THATS NOT GOOD ART POSTURE SHH and sometimes it makes my art come out squished. flipping my canvas keeps things in check. ill draw like a respectable person someday dont @ me
greatest art tip: forgiveness. let yourself accept your art for what it is and be proud of what it is, instead of being upset with it for not being what you thought it would be. thats okay. now you have one more finished piece of art that you didnt have yesterday! getting hung up is the number one way to let fear keep you from not only doing art, but being happy with it. this kills you as an artist.
one more tip is, if youre feeling a lack of creativity or drive to do complicated stuff or practice any of the above skills, let yourself play in a different art space.for example: pull open mspaint and do a purposely silly or badly done doodle. laugh at it. accept it as done even if it still has mistakes. let the perfectionist in you take a break for a bit. decide you find joy in this. think “hey i could do an art blog about this and it will help build my confidence as an artist until i get out of this deep depressive/creative slump.” do a few and then rarely ever post again because oh yeah youre in a depressive and creative slump. realize a few years later that you like art again. start doing more involved/challenging pieces that are only complicated because you refuse to practice lineart and anatomy as much as you should and keep skipping ahead to “ooh pretty colors and glow tool” stuff. publish them. get confused feedback because youre not supposed to be a real art blog. you know, relate able stuff. dear lord why am i awake.
69 notes
·
View notes
Photo
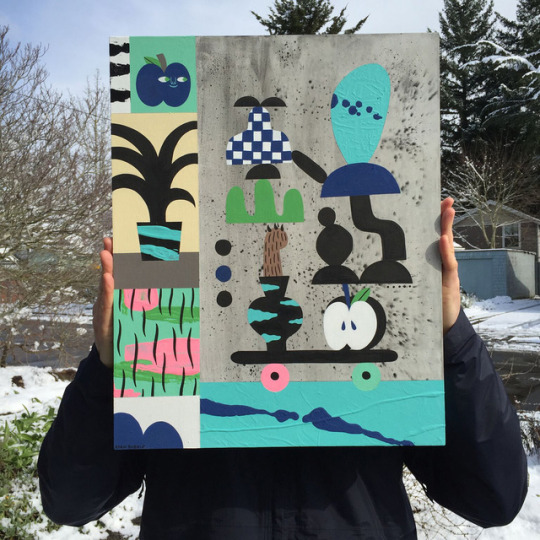
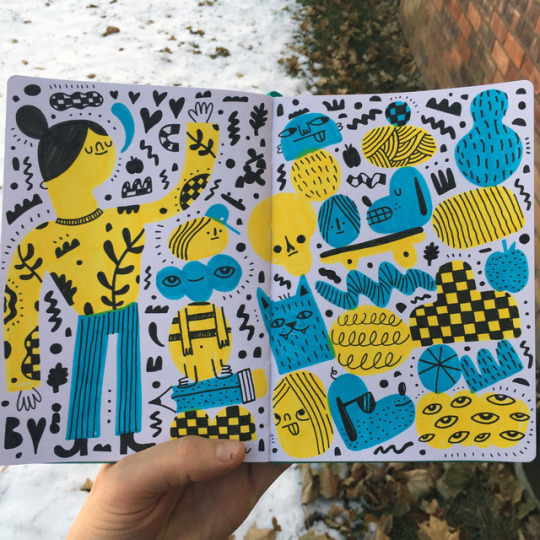
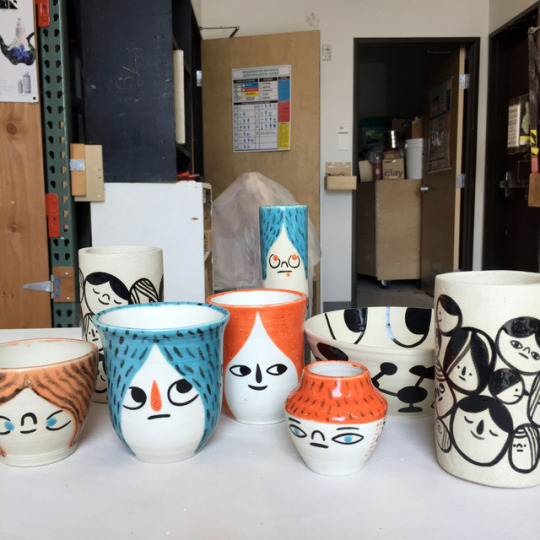
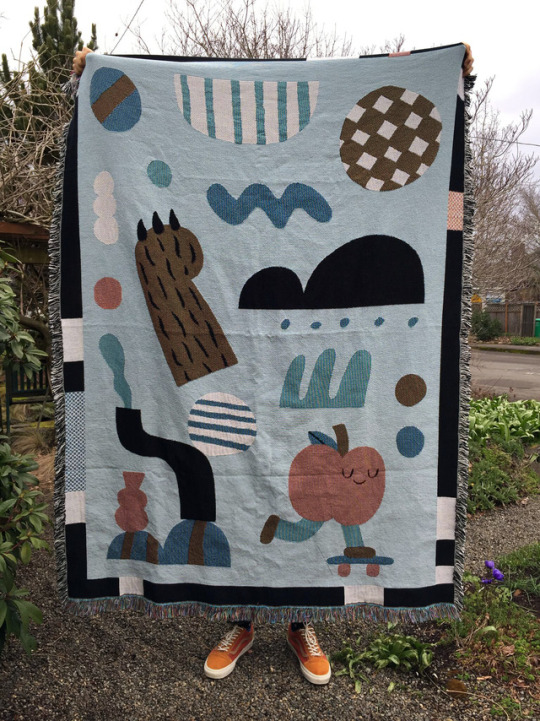
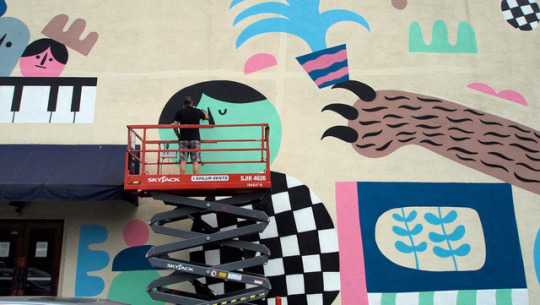
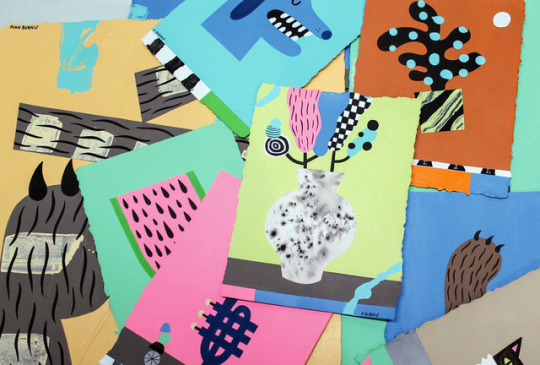

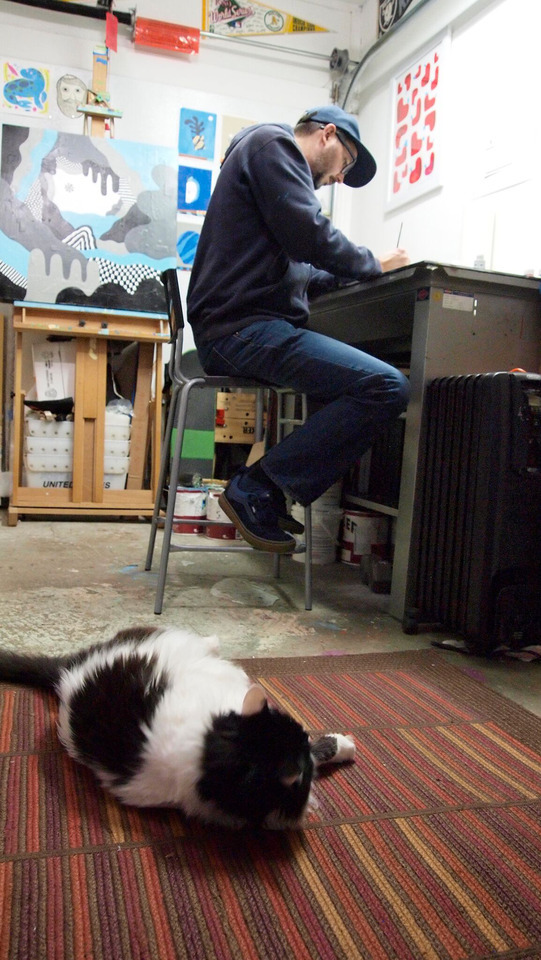
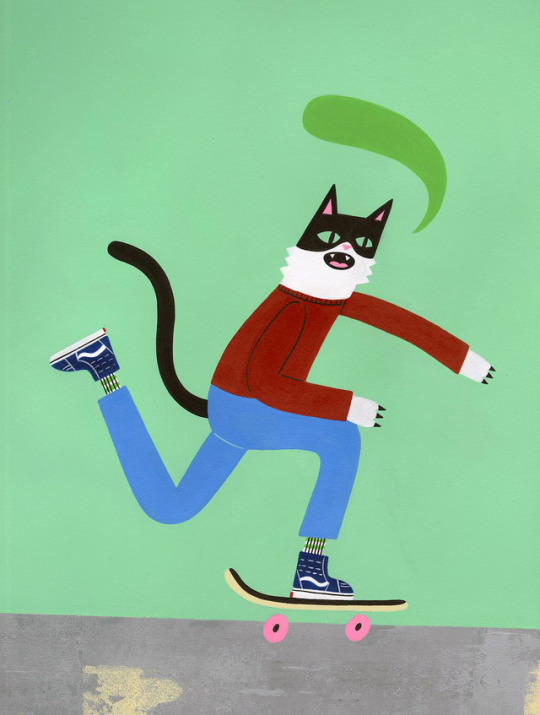
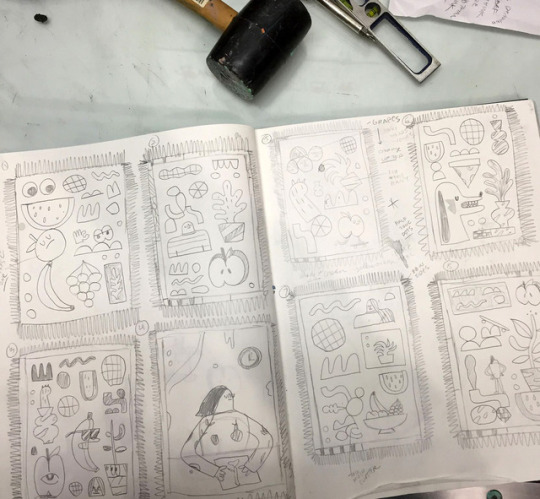
ART SCHOOL | Q&A with RYAN BUBNIS
We have been following the good vibes art of Portland based multidisciplinary artist Ryan Bubnis whose fun work focuses on the simplification of color, shape and form. We caught up with Ryan as he is preparing for his solo show, From The Ground Up, which opens at the Stephanie Chefas Projects on Friday, April 6th. Find out more about Ryan, his early artistic influences, and his Art School art tip below!
Photographs courtesy of the artist.
Introduce yourself? I’m Ryan Bubnis and I’m an artist, illustrator, and educator based in Portland, Oregon.
When did you first get into drawing? Was it a hobby turned career or something you knew from the start? I always knew I wanted to make art from the very beginning. I’ve pretty much done whatever I could to make it a career. It was basically all or nothing. Still is.
Who were some of your early artistic influences? Cartoons, comics, kid’s books, and skateboarding were all major influences. Scooby-Doo, Cartoon Network, Garfield, The Simpsons, Richard Scarry, Golden Books and Jim Philipps. I think that’s why I split my practice between fine art and commercial illustration. I’ve always loved work that was accessible and imagery that made me want to make things myself.
What mediums do you love to work with? What are your essential art tools? Working with traditional mediums such as drawing and painting will always be my favorites. That being said, I definitely include my computers, scanner, and tablet as essential art tools. It’s a balanced mix of traditional and digital tools.
Do you keep a sketchbook or work your ideas as you go along? What type of sketchbook do you keep – disorganized chaos or neat and clean? I keep a bunch of different sketchbooks for the home studio and bring along smaller versions when I travel. Some pages are cleaner finished drawings while other pages are filled with chicken scratch, notes, and project ideation. I recently got an IPad and have been drawing with Procreate as well. I try to draw and doodle every chance I get.
What was the first show you ever exhibited in? What was your last show? My first exhibition was a group show at Gallery Bink here in Portland way back in 2001. It was with Bwana Spoons, Ren Sakurai and a few other people.
From The Ground Up is a solo show that is about to open at Stephanie Chefas Projects on Friday, April 6th. The title is from an ongoing zine I’ve made on and off since 2009. I’m really excited about all the work I made for it and can’t wait to share it. I’ll be releasing a new issue of the zine at the opening.
Where did you learn your knowledge of art or making art? It was a little bit of both. I still consider myself mostly self-taught even though I went through a BFA program for illustration. It’s weird but I feel like I’m learning so much more now that I’m a teacher than I ever did as a student.
Art School or Self taught. What’s something you can pass along art tip wise? Always allow more time than you think. Use matte medium to seal your masking edges and your shapes will come out crispy.
Describe your artistic process for us. The order sometimes varies but I start by reading, drawing, and doodling. Once I’ve done that I’ll start executing a painting or a piece. I always leave room for improvisation otherwise the work can feel too rigid. I like the unexpected possibilities of using traditional materials. You can’t always tell what paint is going to do until you actually try it. It’s a similar process for digital work but I can always Command Z if I screw something up or if I need to adjust a composition.
What makes you smile when viewing art? What is it you’re looking at – composition, color, line? Humor. David Shrigley’s work consistently makes me laugh. I’ll always smile when seeing a well-executed piece. Color, line, shape, and form. I love it all.
What’s a common misconception about artists? That art making is all fun and games and that artists should be thankful to work for free or for exposure. We have to value our work and fight for it.
How do you overcome drawer’s block? Either keep drawing or take a break. Go for a walk, run, skate and come back with a different perspective. Experimenting with different mediums or changing up the scale of my work has always been helpful.
What type of music do you listen to when creating? Do you find it helps motivate you or just allows for background noise? Music is usually always on no matter what I’m doing. It definitely motivates me. I like so many different artists it would be tough to list them all. Lately, I’ve been listening to Ray Barbee, Tommy Guerrero, Amenta Abiota, Earthgang, J.I.D, Chances With Wolves, Tiffany Gouche, Old Rolling Stones, Depeche Mode, and The Beatles.
What would be your ideal collaboration? Doing something with Vans!
Do you have a favorite artist(s) that does a completely different medium than yourself? My friend Meredith Dittmar creates these amazing, detailed sculptures and installations using paper and polymer clay. Her work is consistently progressing and it always blows my mind. http://neverborn.org
What do you think you’d be doing if you weren’t an artist? I would probably do something involving food. I do most of the cooking in the household and I’m always searching out new recipes to try out. I’ve always thought it would be fun to make some sort of illustrated cookbook. We’ll see.
What are your favorite Vans? My old stand by’s are the Authentics, Old Skools, and Half Cabs. Lately, I’ve been really digging the Kyle Walkers and I’ve got a few pairs of the MTE’s that have treated me really well during the cold winter months.
What advice would you give someone thinking about art as a career? Be patient. Cherish the small successes. Don’t consume yourself with get rich quick schemes or the allure of going viral. You always appreciate things more if you have to work for them.
What’s on the horizon for 2018? Finish up work for the show with Stephanie Chefas Projects, work on some new client collaborations and hopefully do some more murals.
FOLLOW RYAN | Website | Instagram | Twitter | Facebook
14 notes
·
View notes
Note
Hello ! I am a 14-years-old artist and since you're young as well, I would like to know if you have any advice to young artists who are trying to get a little noticed like me ? Also, any digital art tips ? Ty if you answer !!
Hey there anon! Thank you for asking! ♥ That is a subjetc I really like talking about cause it’s something that, honestly, is not very easy and can be very different for different people. Getting your art noticed at first can seem like an impossible mission, especially if, like me, you’re still climbing your way towards “essential” improvement, and by essential I mean the fundamentals of art, like anatomy, composition and other theorical stuff. As an artist that is still in the middle of this process, I feel so honored to know someone wants my advice to get through steps I’ve gone through, that means I’m progressing well, so thank you for that ♥ But anyhow, I’ll try to sum up what I feel like are very very VERY important tips for young artists, based on what I’ve learned/self taught myself throughout the years. c:1) Don’t do it to get noticed; do it for fun. Of course, feels so good to get a fantastic feedback from followers and other dear mutuals, it’s just amazing! But it’s a human being fact: when we turn fun into work, it becomes boring and stressful. When I started the blog, I pushed myself to post every single day. I thought that if I was very active, I’d be noticed more quickly. At first it was okay, I learned a lot of stuff really quickly trying and trying repeatedly. But it soon started feeling like another source of pressure in my life. So I went back to how I did before, drawing for fun, doing it cause I love it, cause it’s my passion, working to improve, and it all got so much better. Being noticed should not be your main fuel, love should. And all the rest comes as a consequence of how much love you put in what you do. Not only in art, but everything in life.2) Practice. Practice a lot. Never stop.Right after having fun, improving myself as much as I can is the second main thing I focus. There’s a quote that I like that goes: “May you be pleased with your work, but never satisfied”. Keep on practicing, constantly. I recommend keeping a sketchbook with you, and trying to make yourself draw some sketches on it every single day. But keep in mind: It doesn’t have to be perfect! It shouldn’t be! Make gesture drawings, scribbles, doodles, sketches. Draw from life or from your mind. If you like drawing faces, draw many different faces, experiment shapes and styles. Challenge yourself to draw something you’re not good at. No need to push yourself to make it perfect on your first tries, keeping on trying is the key for any young and specially self-taught artist. If your art achieves what the viewers looks for in quality, it’ll be noticed sooner or later.3) When it comes to getting your art more noticed, focusing on fanarts might make it easier.Okay that might sound weird, but it’s true. Starting out and gaining some popularity as an OC artist is DAAAAAMN HARD. At first, my blog was gonna be OC focused. I kinda gave up cause 1) I noticed I didn’t really wanna draw OCs anymore for a while :’) and 2) As we know, fanarts are much more likely to get noticed than original characters arts. Luckly for me, I love the AoT fandom so much and it was quite easy for me to feel like an active part in it when I started trying. It’s a really nice fandom overall in my opinion, which accepts all kinds of art pretty well, so it’s a good starting point for you. Of course, if your original art is good and innovating it’ll gain popularity with certain ease as well, but it’s not that common for young and begginer artists like us to expect that from ourselves right off the bat so I guess that’s worth saying.4) Find mutuals/fellow artists/your inspirations!Before creating my blog, I’d never been in touch with other artists that produced the same kind of content I do; I did it all just for the sake of doing without really showing anyone and without any critique, just keeping it all for me. Tumblr really changed it for me. I made fantastic friends here, some of which are EXCELLENT artists that I look up to so so so much. Being in touch with other artists, along with making it much more fun to be a creator of content, helps you learn much more about what you need to improve by constantly noticing how they draw certain thing, what kind of style they use and having someone close to you that likes the same stuff you do and might like your art as well!I could go for hours talking about stuff I think are very important on improving your art and bringing people to notice it more, but I think it’d get too long and something like a “lesson” and I don’t think art is something that can be taught to someone in that way. You can teach the fundamentals I mentioned before, but art is something that should come from each individual in my opinion, and growing with it is a different experience for each different person. :3About digital art, I’m still a begginer in that and my traditional art is much better than my digital art in many aspects (except coloring, cause I don’t practice coloring with pencils much and don’t have watercolors yet ;-; ), but from what I’ve learned these past few months, the three most important things are: 1) Get to know the program you use, whatever it is. As a begginer, I’d definetly recommend using Paint Tool SAI. It has some great tools, just enough to start out and make some good art, and it’s not too hard to use. By getting to know your program and it’s settings and tools, you’ll eventually know by heart just which tool to use everytime and how to make things look more natural and flow better. Also, I believe moving to Photoshop or whatever other program that has more tools after getting used to SAI is much easier than picking it up straight away. There’s also the pen tablet of course which is essential in my opinion (I ain’t got time, patience and skill to draw with a damn mouse :^) ). There are some good ones that are not very expensive and do their job pretty well! 2) Don’t get stressed out if your art is not as clean and well done as it usually is on paper. For me personally, learning how to draw digitally has been almost like learning how to draw all over again. It’s not as easy to transfer the ideas from my mind to the computer screen as it is on my sketchbook. I have a messy drawing style by nature, so things like linework and coloring digitally were very tough for me at first, and it took some practice to get to the point I am, in which I still need A LOT of practice and improvement. But my point is, try and try and try again until you get to a point in which it looks cleaner and it flows better, like it does on paper. Play around with different brushes and textures, perhaps you’ll find one that matches your style better.3) PRACTICE! That sounds cliche, but it’s true. It’s the only way to improve. There’s not much to say about it overall, but what I like to do to practice is take some random reference photos and “trace” over them, not like, literal tracing, but turning the body into blocks so I can understand better how joints work, for example, and how they look when bent like this or like that, so when I draw it by myself I’ll remember that and it’ll look much better. There are also many sites in which you can challenge yourself to draw based on certain reference photos in a strict time that you can choose, I’ll link you two of them: x y So, these are some of my tips for you as a young artist to improve your art and therefore get it noticed sooner or later, I hope this was helpful in some way! If you have any more questions, please feel free to PM me, I’d be glad to give you some more advice that I couldn’t put here so it’d be too long (and my “Keep Reading” thing doesn’t work for some reason :^) ) and give some more in depth tips in digital art! Kisses and hugs and good luck! ♥
#ask#answered#sorry for the huge text#anon#I love writing long texts tho#even though it took long to write this one
7 notes
·
View notes
Text
Kids car activities for long trip (all possible activities)
Nothing derails a household trip quicker than bored children. A well-stocked action tote can liquefy the extend of "are we there yet?" In the rear seat and assist you log some serious lumps in serenity. How complicated your action bag needs to be depends upon the period of your journey and the number of kids you are entertaining in addition to their ages and attention spans.
Electronic amusement
Pills, notebooks, and mobiles: Download lots of educational and just-for-fun games, films, episodes of favourite shows, and audio prior to leaving home. (Get our hints for the best programs to amuse children) An old-fashioned mobile DVD is going to do in a pinch too. If your vehicle isn't equipped with a video player, you can purchase a fundamental one for approximately $50. Check the regional library for free downloads or DVDs. Should you relax limitations on display time, ensure that your child knows what to expect as you are on the street. It is tempting to hand a tablet computer or telephone to a young passenger, however, attempt to avoid giving your kid a device for a means to handle boredom or fussiness -- your child will quickly find out that acting up pays off. Audiobooks: Beginning at about age, most children can adhere to a more intricate story line, and audiobooks turned into a wonderful way to pass the time on the street. You can listen together to household favorites such as Harry Potter, Charlotte's Web, or My Father's Dragon. It is also possible to download audiobooks to individual apparatus so that the children can listen to headphones, letting the adults at the car to stone or listen to something much more complicated. Check the regional library to get free rentals. Nice to have A clip-on reading light is fantastic for older children since they can play, play card games, and perform other tasks at nighttime with no distracting the driver.
Creative Pursuits
Whiteboard and dry erase pens: Children can draw, play tic-tac-toe and hangman, or write notes to one another, then wipe it all away and start over. Magnetized letters, numbers, and shapes: Pack a cookie sheet along with an range of magnets for older children, or purchase a pair which accompanies a magnetized playing surface and a good deal of pleasure magnets. (Magnets are a choking hazard, so don't let children under age 4 drama them) Sticker and action books: These are ideal for toddlers since they let children be creative without even using pens onto the upholstery. Crayons or markers: Washable markers are acceptable for children 3 and up, and they're best for children younger than 3. If you are concerned about your kid drawing on the chairs, attempt Color Magic markers -- they just leave marks on paper. Immediate movie cameras: Yes, these still exist! Versions from Polaroid and Fujifilm spit out little instant photos and so are a lot of fun. Children can take ridiculous pictures of these or capture pictures for their excursion laptop. Silly Putty: It is trendy to elongate and stretch, and it is not as likely to wind up stuck indefinitely between the chairs since it is so elastic. Colored pipe cleaners or Wikki Stix: Your son or daughter can use these to create creatures, individuals, jewelry, or simply mad shapes. Nice to have: A trip laptop is fantastic way to capture memories of your family's road trip. Your child can draw, location decals en route, and insert instant photos. You can help by adding a couple notes about the excursion at the close of the day.
Materials to perform
Busy boxes: Fill a couple of shoe boxes with flash cards, card games, card games, Matchbox cars, Legos, small figurines and dolls, and other things. Your little one may use the box lid for a playing surface, and decorate the box with stickers and crayons or markers. Crafty toys: Drawing in an Etch A Sketch, Magna Doodle, or Aquadoodle will keep children occupied for miles. Toys that allow them draw employing a magnetic "magic wand" (such as Wooly Willy) will also be engaging. All of these are simple for children to hold within their lap and may be used over and over. Restaurant fun box: Maintain crayons, pens, and coloring books or newspaper in addition to some tiny toys (such as vinyl animals, toy cars, or cubes) in a container which you are able to consider restaurants together with you to create wait time go quicker. Nice to have: Some surprise gift-wrapped gifts. Stock up on small things in the dollar store or your favourite big-box retailer. You can even recycle older toys a few months before a trip, find some tiny toys your child likes but has not played in some time and pack them off. Then wrap them and give them to a child on the street. (Should you wrap presents in many layers, then they take more time to open.) Publications as gifts are just another choice also, unless studying in the automobile makes your kid carsick. Interesting street trip suggestions from BabyCenter parents "Last year I created an entire bag of items for our road trip. The largest hit with my 3- and 5-year-old was a few pictures of our faces I had dismissed and laminated. I purchased some dry-erase markers and also we left absurd drawings on one another's faces. On top of that, since they're laminated, I cleaned them nicely and place them away for next year!" -- Kidmom "I've got three boys: 13, 10, and two months old. My boys really like to do Mad Libs once we take excursions. This is a superb activity which lets them utilize their creativity, increases their language and familiarity with all the elements of language, and involves the whole family. Whenever we get into the car for a visit, my boys always expect me to have a prepared!" -- jen09 "We moved to a 12-hour driveway with our 2-year-old. She is a huge fan of mixing items, so I determined creating trail mix in the car will be fun. I packed a huge plastic jar with a lid, a plastic spoon for mixing, and approximately 10 distinct components, such as M&Mtherefore, nuts, little pretzels, goldfish crackers. She had a terrific time making it and she then dished up trail mix for us to bite in the vehicle. It consumed a great deal of time and has been enjoyable" -- LauraT "Snack or candy bracelets. Just take a little strands of yarn (long enough to make a necklace) or licorice strings. Let your children place anything edible which has a hole at the centre (cereal, candy, etc.) on the series. Once done, they are fun to eat, and it helps the time fly!" -- A BabyCenter manhood "Write or publish a listing of the 50 countries and also have your child check off state license plates because they see them" -- LaLa7 "Go on the internet and publish photographs of things like cows, trees, blue cars, red cars, etc. On the travel, ask your child to search for the products. It is unreal how silent a youngster can be when focusing on locating them" -- A BabyCenter manhood "I left a soundtrack of all of the hand-motion tunes (If You Are Happy and You Know It, Pat-a-Cake, This Old Man, etc). My daughter moves along to the tunes. This generally keeps her active for the amount of this soundtrack." -- Deadly Mother "We left a mobile felt plank to get our 3 1/2-year old. We have an unused, medium-size pizza box and then glued a piece of felt over the inside of the lid. Then all of her sensed characters and items could be saved at the box, and it matches nicely on her lap in the vehicle. We allow her to decorate the box indoors and out -- with decals" -- A BabyCenter manhood "A little, plastic magnifying glass retains my children occupied more than anything else! We got ours from a local dollar store." -- wolfe93 "My boys (ages 5 and 3) love Play-Doh. I toss a few tiny cans and a number of their utensils in a purse and they are busy for quite some time!" -- 40mom "Bring puppets. When I am sitting at the front passenger seat and my 3-year-old is supporting me, I use a puppet to 'speak' to him within the headrest or away to the side. It lets me socialize with him. Should you sing songs or play peekaboo, it may elicit a lot of giggles. Offer your kid a puppet also, also have a complete conversation!" -- CarrieW
1 note
·
View note
Text
TradingView Tutorial - How to Setup TradingView Charts and Customize Preferences: Part 1
Hello, TradePros in this series you're going to learn how to use TradingView?
What you'll learn?
How to open save and create charts? How to apply indicators to those charts?
How to use the drawing tools to mark them up and create opportunities for trades?
How to use a stock screener and the social feature? And how to overall use TradingView as a tool to help you be more profitable and spot more trading opportunities?

The first step is to enter TradingView calm to go in here and visit the website once you're on TradingView calm this is the URL or the link that will bring you to this site the best features about this is that it's mobile you can access this from your phone your tablet and your computer all the data is synced so you can only have to create the charts once you could then create templates and you could really build out your analysis on the go sign in from other computers and have the exact same info as you do at your home computer this is why I really love TradingView I think it's a top-notch analysis platform for your technical needs to do technical analysis on it's really simple it's very visual it's really effective to use for your own trading and I absolutely love it and I personally use it as well. So, in today's tutorial, I'm gonna focus just on introducing you to how to pull up an interactive chart and explain all the tools that are available for you and how you can annotate the chart and how you could browse around through the layout. So, let's start there the first step is you want to start with a ticker symbol.
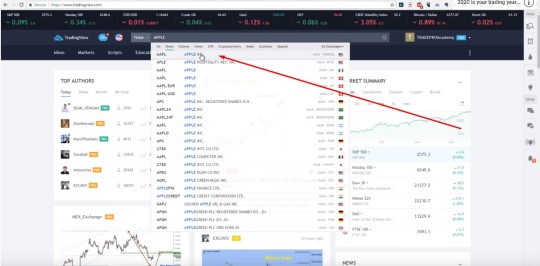
If this is your first time ever visiting TradingView you want to go in here and type in a ticker like “AAPL” which is a company “Apple” if you do not know what the ticker is you could just type the company name and it shows up on their stock you can see Apple link if you click it what will happen here is a chart will show up with Apple some basic information about the company what you want to do right away is click the interactive chart button because it will open charts that allow you to manipulate them and that are cleaner and more accessible and more technical for you. Now that we have the chart layout here what we want to do is start drawing our supports resistances, etc but before we get there before you can start to annotate a charter before you start to put your own analysis on it. You need to understand what tools are available to you and how they work.

So, let me take you through the layout of TradingView. And how this information is useful and how you can use these tools to create your own analysis. So, what the first thing you want to do on the top is recognized that there's a box here for the symbol you could change the symbol to be anything you want you could type “FB” for “Facebook” or you could just start typing the company's name Facebook. It will show up and you can click it you could see the flag here it's on the “American” exchange so if we click “FB” the company Facebook comes up you do not, have to click on that box as long as you're anywhere on the chart.

You start typing MSFT, for example, you will start to see the symbols come up and you can change the stock name or stock, company to correspond with the chart that you want to look at so, for example, If I want to go Google I just started typing GW GL and it shows up right here. Another neat feature of this platform is that you could change the time period or periodicity at the very top by selecting., It so clicking the 15 that means 15 minutes each candle that you see will represent one 15-minute increment in the timeframe these vertical red lines is something that I've considered or configured rather show me one session, so this is each day it's a daily vertical separator and I'll show you that later on if you click on four-hour now each candle represents a four-hour increment and if you click on one day. Each candle daily you have an option to do daily, weekly, monthly and any custom time period as well one cool thing. Here is the way you were able to type letters to change the company name you could always start type numbers to change the timeframe. If you go 1 5 that creates a 15-minute chart if you just type 5, that's 5 minutes. If you want to do a one-hour chart you type 60, if you want to do a 2-hour chart 120 and you can, type any periodicity including odd numbers that don't match up so this is a very neat way to change the timeframe. You're looking at me personally I like to look at a weekly chart and start my analysis from there. Identify my levels of where this company is. What the horizontal supports are the way we treat the way we teach you in there are trading foundations course comprehensively how to do the analysis you start with the weekly you cycle down to the daily and work your way into a smaller time frame for the entry so now that you know how to pull up a stock company and change the time period is set on it I want to explain to you the different chart types that you're able to see as well on the right side hereof the time periodicity you can see that if you click this arrow you have a number of charts available to you the most popular is candles and the second-most popular bar these are different ways to represent the same information and its laid out in a different format choose the one that's more convenient for you or that works. My favorite chart types are bar chart identify supports and resistances because they really help you see them really show you they help you see where the battle has been on that level where there are some potential traders that, could be stuck and where the majority of the battle took place in and around that's where I love the bar chart for you look at the candle is really good at showing you the open high low and close and you can go through here and cycle through different charts line charts are really good for looking at correlations and comparing to multiple assets and then you can see here you see.,Renko which is a really nice chart as well and more in-depth options as well, for the time being, you might want to start your analysis and stick the candles and work from there all right, the next option that you have here is the ability to click this little gear wheel and that allows you to change a lot of the standard options in TradingView. What you want to do is or what you can do here is rather change the color of the candles if the price is moving up and if the price is also moving down., Another common one is green and red. Also, you have the ability to do what traders like to call white candles and black candles for down days so that's another way to do it and then you can also. Actually, go ahead and change your background colors to make it dark if you wanted to or to make it light gray now Obviously, this looks pretty terrible this one isn't actually bad. But depending on what you like you could really configure this platform they're going through style. Gayle's time sessions like you can see, I've added a session break trading if you see your own positions and orders and add events and alerts so I encourage you to go through each one of these options and configure your charts to something that you like there's all there's also pre-populated templates you could use and configure it to your liking to fit your eyes you're your style and really make this personalized and custom tailor. It to be exactly what you need one of the neat features of TradingView is the ability to actually save the links and creates custom and unique charts so if you were actually to copy this link and go in and paste it into another browser you'll see that it will pull up the exact same layout that you had saved and that allows you to save all of your work if you have any trend lines,
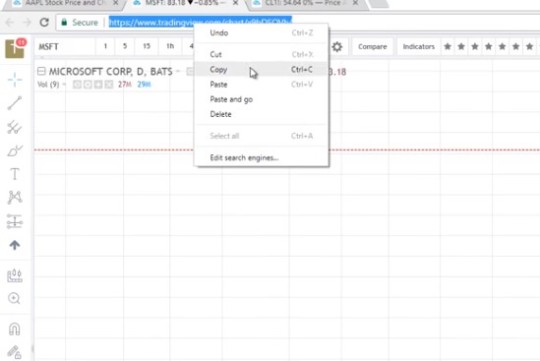
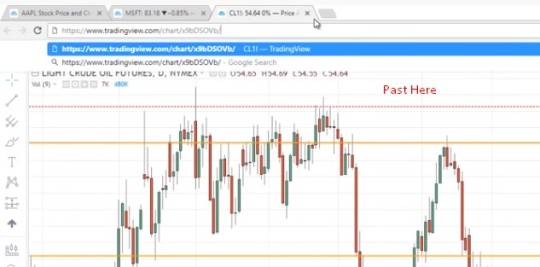
are drawn if you've done any analysis or any changes it allows you to save that chart by just copying your link and another place these templates will be available or if you just click this arrow down here and you can create chart layouts so let me show you how to do that now presumably let's say we create a chart template and we really love this one., We've added all of our colors, we've changed all the background effects and we want to save this chart type what we could do down here is click or what we could do up here rather is click this little down arrow click Save As this chart layout and we could say TradePro chart ABC, for example, you could choose a more representative name than that and it saves it opens it up as a new link and it now ensures that you no longer need to save this link or this chart what you could now do is close everything and once you go back to this generic website on TradingView calm or go to the home page of it you can.
Actually, click the arrow here and have a look at your templates one way you can do is go to chart right here the drop-down shows up you go all chart layouts you can see TradePro chart ABC you click that and it brings you right there so what we've done in this video so far is we've introduced you to how to use TradingView the benefit of TradingView how to copy links for your charts how to change the symbol and how to change the time period and save a layout template to be able to recall it later on and use it in the future in the next video, “what I'm gonna take you through it…”. How to use all of these tools on the left side and how to start annotating and drawing on your charts and TradingView to put some of your own analysis and start getting some actionable trade ideas based on the tools that are available here so let's move on to our next video I hope you've enjoyed this please like share comment and subscribe on this video let us know you let us know how we can help you in your journey to becoming a successful trader. I hope you've enjoyed this video. And I hope you're just as excited to use the TradingView as we were excited about making.
Hi, I’m George. I’m a consultant living in Canada. I have been trading since 2001. Teaching and trading is my dream life. I have been trading since 2001. After a successful career as a trader in a top six bank in Canada I decided to pursue my passion of educating others how to achieve financial freedom.
#daytrader#tradeview#onlineday#swing#swingtrading#elitemember#learner#forexstrategy#online forex trading#onlineforex#advancetrading#tradingfeature#futureoftrading#futuretrading
0 notes
Text
Drawing Fanart- Concept to Finish
Hello! Sorry I have not posted fresh fanart in a while! I just finished my road trip and am working on some cool stuff as we speak! BUT! In the meantime, I thought a detailed view of my process would be interesting and maybe even educational to other fanartists using the same software. PS this is a LLOOOONNNGGG Post- sorry.
I use a basic laptop, a Wacom pro tablet, and Clip Studio for my fanart. The brushes I use will be capitalized.
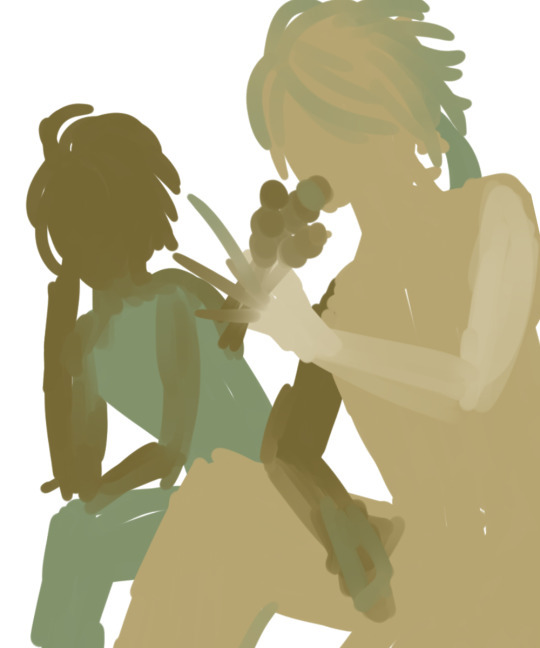
Concept First I start with a basic idea of what I want out of the image (Pose, clothing, lighting, whatever) then I use the OIL BRUSH and a random color to roughly sketch the idea on a normal layer. Proportions and details come later, with this step I focus only on position and solidifying my ideas.
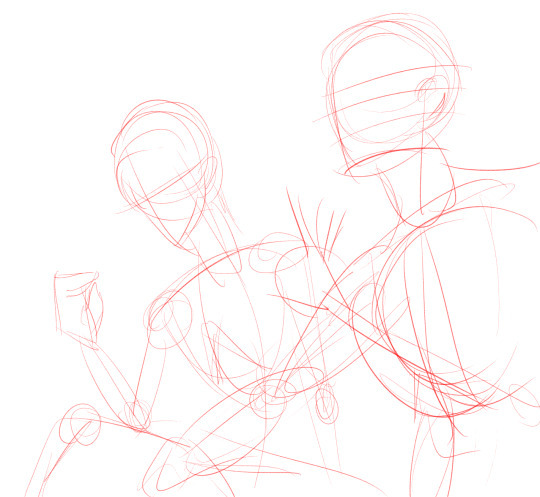
Skeleton After I throw out a concept blob (or five) I make a skeleton- a rough base of a figure that helps me draw proper proportions and angles. I do this using the ROUGH PENCIL, usually in bright red, blue, and/or green.
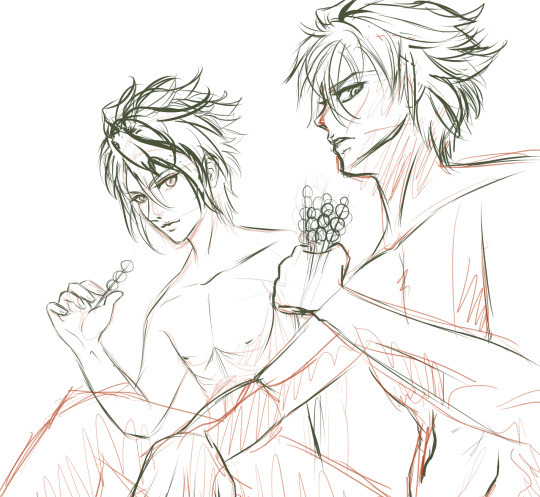
Rough draft In this step I flesh out my skeleton and throw on some features using the ROUGH PENCIL tool. I’m not worried about things looking perfect- I just want that bod to have curves in the right places. Rough draft 2 In this step I add a little more detail, paying careful attention to the hair and face using the ROUGH PENCIL tool. I also mark where my shadows will go and adjust the position or body wherever I feel the need.
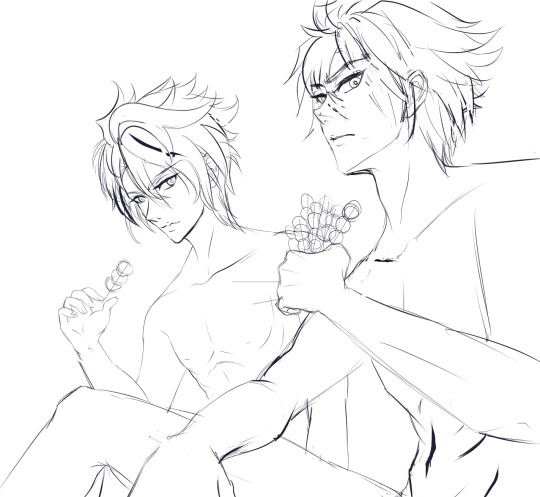
Draft This is the final step before the line art. I go over everything, changing and altering with the ROUGH PENCIL tool until I am satisfied again- at this point I usually step away from the screen and take about an hour long break (reading fics and drinking hot tea XD) This way, when I come back to my work I can see it with a fresh perspective before making everything permanent. I then adjust the lightness of the draft(s) and turn them all light blue. On a fresh layer I use black to outline EVERYTHING with the MAPPING PEN tool. I now have my final draft and am ready to start on the line art.
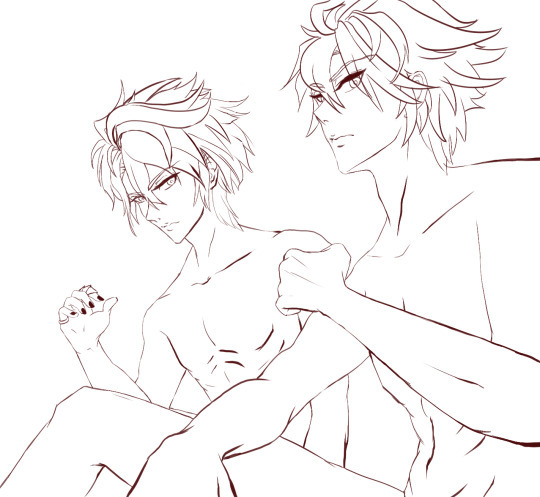
Line art I know it may seem silly to go through the trouble of making a final draft AND line art- but the end result is a lot cleaner. I’m messy by nature, so sometimes I get tunnel vision and forget details that I might have added earlier, the final draft helps me keep those little things organized. For line art I use a dark brown MAPPING PEN tool to outline my final draft layer (that I turned blue and lightened as well.) This time, after everything is lined over neatly, I go back and thicken lines where they need it, and also add detail here and there (Like nail color and pupils.)
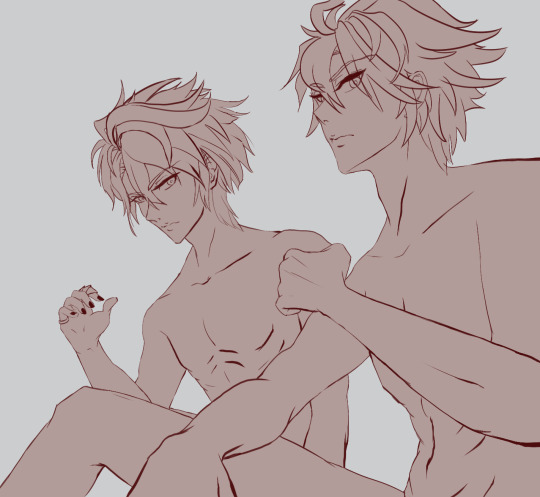
Base At this point I use the FILL TOOL and fill everything outside of the bodies with a light grey/blue color (adjusting the Close Gap setting as I need to.) I also clean up the spots that are filled, checking every edge to make sure it’s perfect. This layer stays UNDER the line art layer but ABOVE the color layers. This layer is made so that I don’t need to worry about staying in the lines/speeds up my work like nobody’s business too. I then open a new Normal layer under this and color it dark grey- this will serve as a base layer.
Base color In this part I use the FILL TOOL to place the very basic colors where they need to be- I then zoom in and make sure that the base is not peeking through any of the main base colors. Also I changed the top light grey layer to a dark pink- that is because the light grey blending in with the hair.

Shading I then use the GPEN tool on a Multiply layer to get my basic shading and detail work in. I will use the SMOOTH WATERCOLOR tool to blend the edges where needed. I usually end up making at least three layers for the shading. Normal, Multiply, and another Multiply (AT LEAST) I find it is easier for me to go back and fix/redo one layer than have to adjust the entire image.
After I am satisfied with how everything looks I will select the top pink (originally light grey/blue) layer, and using the ERASE ALL tool I will erase everything that is not my bods. Then I will make my Paper layer invisible and save a duplicate image as a PNG. File (so that the background will stay invisible.) Background I open my saved PNG file in a separate window and create or choose a background that suites the image. Once I find the perfect background I add some detail like highlights or shadow to blend it in with my image.

nope.

….maybe.

Daaawww….

There we go!

On the pics above I have just added the shading that is from their surroundings.

Highlights In this part I like to keep my highlighting soft and bright. I mainly use the SMOOTH WATERCOLOR tool and the SOFT AIRBRUSH tool, depending on the light I want I may also use the DENSE WATERCOLOR tool in places. I usually end up using at least three layers for highlights too (normal, overlay, glow dodge, and glow.)

Effects Here is where I add glitters and sparkles. Also my tag/signature to prevent theft (Something fic writers cant do to their work.)
Let me know what you all think or if you have any questions!
I wanted you all so see how much effort goes into my fanart- but more than that, keep in mind that my fanart takes half the time that it takes to write a normal length fanfic. Compared to the thought and effort that goes into writing a fic or a good headcannon, this is nothing but going through process that I have numbered in my head. all I need is a general idea before I get started. I literally only need a blob.
Where fic writers agonize over every word they are about to publish, because those words are their VOICE- something that SHOULD NEVER BE STOLEN OR F*CKED WITH.
So remember that -those who think plagiarism is not a big deal- BECAUSE IT’S A REALLY F*CKING BIG DEAL. DX
#don't f*ck with my fic writers#clip studio#clip studio tutorial#digital art tutorial#manga tutorial#drawing tutorial#male drawing#male drawing tutorial#slbp#samurai love ballad#samurai love ballad party#samurai love ballad party fanart#fanart#fanart how to#how to clip studio#how to digital drawing#how to#slbp hotaru kirigakure#saizo kirigakure#hotaru kirigakure#hotaru kirigakure fanart#naked as a jbird#dat dango
186 notes
·
View notes
Text
The Process of making Lythatic64′s Podcast Icon
I first started off with making the pencil sketch during my school lunch break like usual. I was proud with how it turned (especially with the hands, i’m getting way better at drawing them somewhat faster) and was prepared to do the outlines a little later. Alex/Lythatic (and assume a few others) didn’t like the sketch but i was like “whatever, i’ll get a rid of a few things you don’t like and keep somethings that i found cool from the original sketch”.
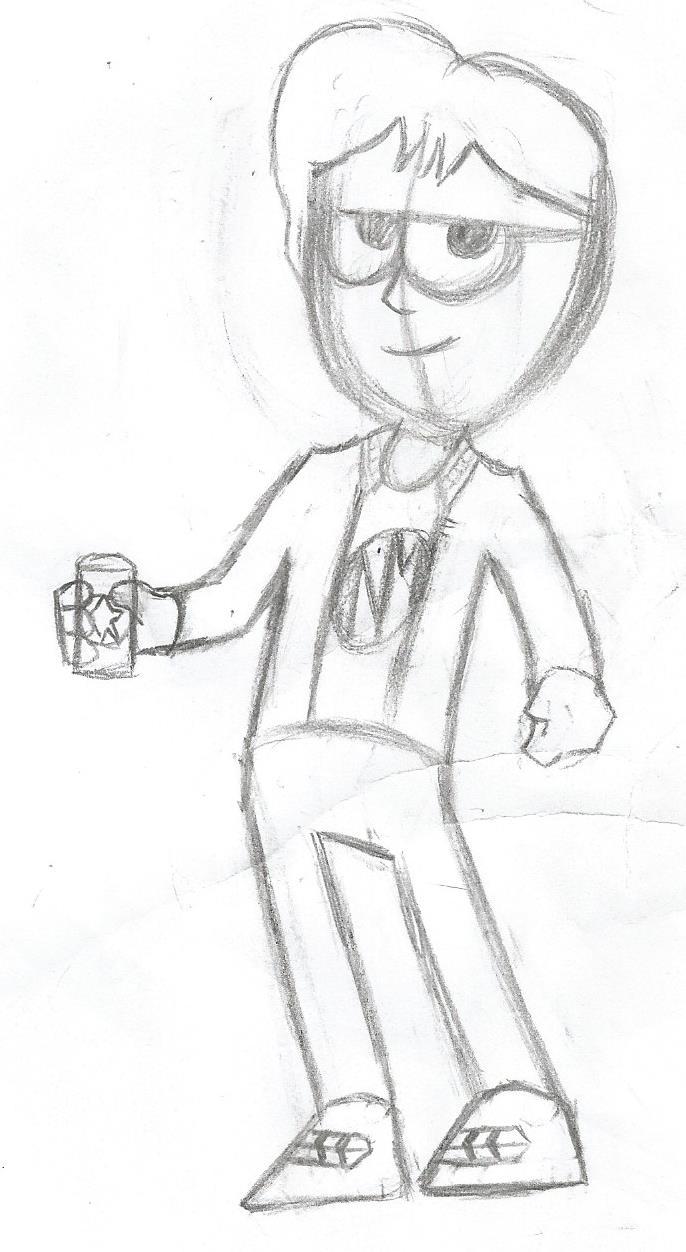
Worked on the outlining process for a few hours (even streamed some of the process which was mess). I knew when starting the process it wasn’t gonna look as good as the original sketch in structure because they usually never do. My skills with outlining on computer with my Intuos are super limited and i definitely need improve them of course. I recognized that the outlining wasn’t that good. But i went for the mentality of “Even if it’s shit, i still need to move on and still at least have something/It’s shit or nothing at all” because i thought it was the healthy thing to do. In the future there are gonna be improved icons for podcast and other vids of every member. Assuming that they want to come back on/if we still want to do podcast for another few years or months so. So if one or a few icons were meh or shit. Then my skills would hopefully improve and better and possibly cleaner products would come out. Holding on to things as an artist is understandable because you can improve the said products because you’re not proud of it or you know you can do better. But many artists have a problem of not letting go and moving on or just throwing any product because it doesn’t meet a certain personal standard (which admittedly i do the same thing for various school related things that internally i think people will scratch their heads in confusion looking at the products as these abominations that could have been better but i didn’t know how to make better at the time or maybe even ever). I just don’t want to become more like that in my art.

Other than the shirt i had no clue what to make the colors. Asked various people/artist in the discord chat for help because i’m terrible with colors but no one came to my rescue instead of friend that was just like “Yeah yeah, that colors okay for the can and whatever”. So after almost no one was being super helpful with me. I chose random colors for the other portions and afterwards not surprisingly Lythatic and others called it shit and were confused with the colors. At that point i was just like “Fuck it, it’s done, i know it’s shit, no one would help me with colors, make your own damn version”.

And so Alex did with giving me this version he made. He changed the colors and added the head i made of him prior and added the MJ shirt art he wanted at the gecko that i didn’t know how to recreate.

This was the quick png of it that Alex sent and made in Microsoft Paint.

Alex posted both versions to just showcase how shit mine was. @dcdawg13 stepped in and asked for the outlines and made his own way better improvements.

I changed the colors in photoshop, got rid of the circle in the shirt and just pasted the MJ art like Alex did. Added some textures to it that i would later get rid of cause i assumed people would find it too obvious and not that visually appealing.

So after many people like Alex told me how much it sucked and how i should stop experimenting, moving on, or how i used to be better i should stop doing art (that first and last one was meant to be partial joke but that last one was still said).

We have the Alex Podcast Art. Never doing this one again. Khumo’s Tools: Paper and No. 2 Pencil - Sketch Adobe Illustrator - Outlining Adobe Photoshop - Coloring Drawing Tablet - Wacom White Intuos More about the artist K510 Podcast Art Mike’s Outlining Tool: Krita Mike’s Youtube Mike’s Art [Thank You so much for your help. It really meant a lot to me during that time (and still does) no joke]
7 notes
·
View notes
Photo

Change of plans, my tablet is working again. Aeryn’s going digital.
It’s been a long time since I’ve done any sort of digital art that goes anywhere, because it turns out that the i3 version of the Surface Pro 3 is, probably to be expected, unable to reliably handle drawing programs. Except Paint, but I’m not that much of a masochist.
Anyway, Here’s Aeryn in full color, but without shadows. I was in the process of adding shadows but forgot to save, which was a great reason for my motivation to smash Alex Baumgartner’s world record for longest freefall. I’ll probably end up shading it (and adding some cool lighting effects, a decision that will make me want to stab myself multiple times in the hands when I actually deal with the effort required for that) sometime next week, after I drown in a sea of Randomized Optimization algorithms I need to analyze.
The overall picture hasn’t changed much from the hand-drawn version, aside from being generally cleaner, and the eyes are a bit smaller. They’re not that much smaller, just enough to not make me want to bash my head against the nearest wall.
Now, last time I said I didn’t have any sense of fashion. I have equally little sense of color composition. My most recent knowledge of that topic probably comes from my 3rd-grade elementary school. For some reason, I decided that this picture should have a lot of purple, but I think that’s because I randomly picked the undershirt’s color and was like “Yes. This is a good purple.” Yellow is purple’s complementary color, so it gets a backup role. 3rd-grade art class mandates this as law. Or rather, there really aren’t a lot of colors that work well with purple without being too heavy on the red or blue.
I suppose that fashion and colors are important for the design of the character. Something something visual cues something. I can’t say I picked her red-orange hair for any reason other than liking red hair (this, along with my additional enjoyment of white hair, will become quite obvious if I continuously draw random characters for awhile). But red is a very striking color, and I suppose Aeryn is a definitely a character that is defined by being the target of many people’s attention (whether that be good or bad), so I suppose it’s a good color from a design standpoint. Go me, I guess.
There has been a bit more development on Aeryn’s end, though it is mostly critical story points that I can’t divulge. What I can tell you is that she isn’t going to be an edgy character. I only make edgy characters for comedic effect. I will not make a main character a joke, unless the entire story is a comedy. That said, despite being the main character of Graft Theory, she doesn’t make a lot of direct contributions to the main conflict. That may seem odd at first glance, but Graft Theory is heavily based on spy fiction, so there will be very few direct contributions to the main conflict, because everyone’s too busy trying to deceive everyone else. Nobody even knows what the real conflict is.
Alright time to cut this short before it becomes an excessively long rant like last time. Seeya.
2 notes
·
View notes
Text
Robot buying guide for your kids
Parents often buy cool robot toys for their children with the hopes that it will spark an interest in science and engineering. I know because I was one of them. But often parents are left disappointed as these bots are nothing more than remote control droids. Yet, I still believe robots carry a high potential for learning through play.
With the help of four tester families, boys and girls ranging from five to 11 years of age, tested as many robots as possible in the past year in order to explore the learning potential and how much adult support might be needed. Some robots were played with for 10 hours and some for over 500 hours as the robots varied in complexity and function. We specifically looked for toys that had the power to really engage kids, would challenge them, but at the same time leave them feeling accomplished and excited for the more ways to learn.
The good news is 2014 truly is the Year of the Robot: So many toys that allow children to program robots easily have entered the market this year. In their own ways, many of them demonstrate the benefits of coding to youngsters through hands on toys that will immediately execute the programs the kids have created. Until now, much of learning how to code has been screen-based. There are many good robot toys out there, especially ones with ability to use coding but not every robot is right for everyone. Do Robotic Pool Cleaners Really Work https://www.robotsden.com/do-robotic-pool-cleaners-really-work
Here’s an in-depth look at our favorites:
1. Forget everything you think you know about robots A toddler tries to drive the Sphero with the iPad mini. How is this a robot? Where are the eyes, the legs? All of these are good questions and yet, this spherical wonder embodies many of the traits that I value in a modern robot toy. The first is that it is rather indestructible. I’ve stepped on it and ran it into the wall many times. Additionally, the Sphero 2.0 can not only get wet but it can actually swim! Best of all, this bot is rather easy to just pick up and play with—all you need is a phone or tablet to drive it. To drive it well, your child must practice but there is a payoff once she is able. A variety of apps allow users to drive Sphero while videotaping it simultaneously, test hand-eye reflexes, or even play golf with Sphero. To add to the excitement, Sphero released additional accessories and stunt products including the chariot, which basically turns Sphero into a transport vehicle with a cellphone slot (think drive-cam) and a special rooftop that can fit LEGO-like bricks.
The $20 Chariot for Sphero makes it compatible to this tester’s huge LEGO collection.
Since gifting the first-gen Sphero to my son two years ago, I have watched the company grow into an entity that continues to put learning first. This year, Orbotix, the makers of Sphero created SPRK, a program that teaches programming with Sphero and its cousin, the Ollie, a cylindrical robot named after a skateboard stunt. Our official tester, an 11-year-old girl in the sixth grade, had a blast learning how to program her powerful Ollie, which can run as fast as 14mph, with her dad. Keyword arduino robot arm source code https://www.robotsden.com/7-arduino-robotic-arm-project-ideas-tutorial-plus-source-code
Seven-year-old testing to see if you can use Ollie to give yourself a foot massage.
So impressed with Ollie, her father bought two Spheros for her cousins so that they could swim with their new robots since they have a pool. My children tested Sphero for months, love it as well as the new accessories but it is Ollie who is on my eldest’s (a 10-year-old) wish list since it was released this fall. Thus, Santa will leave Darkside Ollie under the tree this year. I am hoping the investment will end up paying for itself as we’ve discovered Ollie’s powerful motor gives excellent back massages, even better than Sphero does.
2. Robots teach best if they don’t intimidate
Connecting a sequence of programming blocks to be scanned by KIBO. For some, the idea of preschoolers learning to code may seem preposterous but I think it makes perfect sense. Coding is very much like learning a new language and without a doubt, early exposure can make a big difference. However, what I like most about coding is how it promotes breaking things down to problem solving. For any child, learning to code is mostly a two-dimensional process but most educators will tell you that three-dimensional play is better for the very young. Enter KIBO, a robot that scans bar codes from color-coded wooden blocks with images that are connected easily by pegs. Each block has a directive i.e. shake, turn right, sing. Together, the directives make one programming sequence to be scanned. Unlike most robots, KIBO is different because it’s rather simple-looking. Scanning a programming sequence one block at a time with KIBO. I later learned that KIBO was purposely designed this way based on research from Tufts University’s Dev Tech Research Group. The creators felt that plain-looking robots could reduce the kind of apprehension that hinder young children, like my seven-year-old, from wanting to explore. I was made a believer when on the first day of playing with KIBO: I saw this same child pick up this unusual looking robot and start to scan coding blocks to make a new program as if he had been doing it all year long. remote control car with night vision https://www.robotsden.com/best-remote-control-car-with-night-vision
To be sure, looking approachable is an excellent attribute for inviting curiosity. Similarly, the very adorable Ozobot, which is smaller than a ping pong ball, still manages to teach many lessons in basic programming. Ozobot follows black lines and will follow your orders (spin, zigzag, go fast) if you draw different color code sequences in between the black lines. No tablets are necessary, but putting your Ozobot on a tablet will broaden its possibilities dramatically. My favorite app is Ozodraw where children are able create a path for Ozobot just by simply dragging and dropping coding blocks onto his path on the screen. There are also puzzles where users must figure out which code would help Ozobot complete its path.
Ozobot can be played with on screen or on paper.
3. The quintessential robot
Checking out the LEGO Mindstorms EV3 at World Maker Faire 2014. The EV3 really embodies the concept of what most people think a robot should be—a machine that can be programmed to perform various tasks. Its modular design means the robot structure can be changed and the programmable “brain” is there so that it can do a job without being given a direction at every single step. The difference is simple: a typical programmed task might have an if/then clause involved. “If my right sensor bumps into something, I will turn left.” A remote control droid would need a person to push a button once he sees that his robot bumped his right side. LEGO EV3 is a terrific transition from pretend play to productivity but it isn’t for everyone. Some parents may think that robotics is a natural next step after building the more complex LEGO sets but, a child must be interested by the potential to build and to code in order for this toy to be successful. Parental help, however, is necessary in two big ways: Wrangling stubborn computers when downloading software or programs and understanding complex directions. (Note that LEGO directions are awesome. When reading pdf instructions on a screen, the pegs will literally move into their respective places!). Additionally, when facing building challenges, children will need a coach-like mentor, someone who can provide moral support and ask the right questions so that the child can figure out a solution.
Two testers, 8 and 10, build and code VEX IQ Robotics Construction Kit. Much of this also applies to another system, the VEX IQ Robotics Construction Kit that uses the free open source Modkit for VEX for programming. This kit is new to consumers but the education VEX IQ sets have been available in the education market for years. Both VEX IQ and LEGO EV3 have somewhat different packages from their education set counterparts, which contain trays for parts, rechargeable batteries—basically they are more designed for classroom use. Our testers tested the LEGO Education EV3 set as well and were very happy with it because it comes with rechargeable battery and organizing crates as well as a full curriculum dedicated to teaching programming via EV3. toy robot that blows smoke https://www.robotsden.com/toy-robot-that-blows-smoke-gifts-to-delight-your-inquisitive-kid
4. Design and personality enhances potential
Figuring out how to get Dash to play a song. If there were such a contest, Dot and Dash would tie for the Cutest Robot of the Year Award. These do not have a humanoid shape and yet these bots from Wonder Workshop’s seem to be the most life-like of any of the robots we’ve tested. Despite the cuteness and simulated eye blinks, there are brains beneath the beauty here. Blockly is a program that can be downloaded onto kids’ iPads so that they can easily create programs for Dot and Dash. Both have the potential to be fun playmates as well as useful desk pets. My 10-year-old son who enjoys building more than coding was highly motivated to program Dot to be a timer because it’s simply adorable.
Homemade code to transform Dot or Dash into a personal reading timer. First your bot will say “okay” and turn red, and then in 10 minutes, turn yellow, then in another 10 minutes, he will turn green, say “Weee” and “Buh Bye” and so your child will know time is up, he can go play.
This factor can be a game changer for some kids. Sometimes Dot says “OK” with a sigh or even snores if he’s been left alone. The best part is that you can also program it to do these things and more. Make Dot become a reading timer by starting out red, then yellow, then turning green after 20 minutes as required by many homework reading logs. This 6-year-old girl was laughing as she moved Dash around while the older boy was adding accessories to it. Personality and cuteness is another plus for WowWee’s MiP that can balance itself and more all while rolling on two wheels. Its nonsensical mumblings belong to no language and yet is easily understood by kids. Kid testers have said MiP would be good to help combat loneliness. Sure enough, it is a worthy companion in the morning as we wait for the school bus to arrive.
5. Coding is important but so is the machine
Building a scissor lift with Remote Control Machines DLX. Believe it or not, there is a lack of modular toys that offer remote control capabilities. LEGO Education WeDo with software is a great example and is especially terrific because it can be programmed with free programming language Scratch. However, if you are looking for something that doesn’t really involve programming or require parents, consider the Remote Control Machines DLX set from Thames and Kosmos, an expert in high quality science toys. Their large, full-color instructional manuals support self-directed learning, allow kids to choose from 20 different builds, and read how these machines apply to the real world.
Remote Control Machines DLX should really be called Remote Control Machines 2.0 because it’s not a kit with more pieces, rather, everything from pieces to instruction manual is new and improved from the original Remote Control Machines set. Additionally, the builds in DLX are all different from the original Remote Control Machines set. The DLX is compatible with the pieces in other Thames and Kosmos sets that explore other facets in engineering such as gyroscopes, spring action, hydraulics and pneumatics, to name a few. While programming isn’t offered here, it’s good for kids to learn about the mechanisms they would actually need to program in real life. Other kits that allow children to explore how sensors are used in robots are MOSS Zombonitron 1600 and the littleBits Premium Kit. Additionally fun low-cost DIY sets like the MAKE: Spinbot Kit and Brushbots from the Maker Shed are snappy tools for learning about motors as well as entertaining.
0 notes
Text
Kids car activities for long trip (all possible activities)
Nothing derails a household trip quicker than bored children. A well-stocked action tote can liquefy the extend of "are we there yet?" In the rear seat and assist you log some serious lumps in serenity. How complicated your action bag needs to be depends upon the period of your journey and the number of kids you are entertaining in addition to their ages and attention spans.
Electronic amusement
Pills, notebooks, and mobiles: Download lots of educational and just-for-fun games, films, episodes of favourite shows, and audio prior to leaving home. (Get our hints for the best programs to amuse children) An old-fashioned mobile DVD is going to do in a pinch too. If your vehicle isn't equipped with a video player, you can purchase a fundamental one for approximately $50. Check the regional library for free downloads or DVDs. Should you relax limitations on display time, ensure that your child knows what to expect as you are on the street. It is tempting to hand a tablet computer or telephone to a young passenger, however, attempt to avoid giving your kid a device for a means to handle boredom or fussiness -- your child will quickly find out that acting up pays off. Audiobooks: Beginning at about age, most children can adhere to a more intricate story line, and audiobooks turned into a wonderful way to pass the time on the street. You can listen together to household favorites such as Harry Potter, Charlotte's Web, or My Father's Dragon. It is also possible to download audiobooks to individual apparatus so that the children can listen to headphones, letting the adults at the car to stone or listen to something much more complicated. Check the regional library to get free rentals. Nice to have A clip-on reading light is fantastic for older children since they can play, play card games, and perform other tasks at nighttime with no distracting the driver.
Creative Pursuits
Whiteboard and dry erase pens: Children can draw, play tic-tac-toe and hangman, or write notes to one another, then wipe it all away and start over. Magnetized letters, numbers, and shapes: Pack a cookie sheet along with an range of magnets for older children, or purchase a pair which accompanies a magnetized playing surface and a good deal of pleasure magnets. (Magnets are a choking hazard, so don't let children under age 4 drama them) Sticker and action books: These are ideal for toddlers since they let children be creative without even using pens onto the upholstery. Crayons or markers: Washable markers are acceptable for children 3 and up, and they're best for children younger than 3. If you are concerned about your kid drawing on the chairs, attempt Color Magic markers -- they just leave marks on paper. Immediate movie cameras: Yes, these still exist! Versions from Polaroid and Fujifilm spit out little instant photos and so are a lot of fun. Children can take ridiculous pictures of these or capture pictures for their excursion laptop. Silly Putty: It is trendy to elongate and stretch, and it is not as likely to wind up stuck indefinitely between the chairs since it is so elastic. Colored pipe cleaners or Wikki Stix: Your son or daughter can use these to create creatures, individuals, jewelry, or simply mad shapes. Nice to have: A trip laptop is fantastic way to capture memories of your family's road trip. Your child can draw, location decals en route, and insert instant photos. You can help by adding a couple notes about the excursion at the close of the day.
Materials to perform
Busy boxes: Fill a couple of shoe boxes with flash cards, card games, card games, Matchbox cars, Legos, small figurines and dolls, and other things. Your little one may use the box lid for a playing surface, and decorate the box with stickers and crayons or markers. Crafty toys: Drawing in an Etch A Sketch, Magna Doodle, or Aquadoodle will keep children occupied for miles. Toys that allow them draw employing a magnetic "magic wand" (such as Wooly Willy) will also be engaging. All of these are simple for children to hold within their lap and may be used over and over. Restaurant fun box: Maintain crayons, pens, and coloring books or newspaper in addition to some tiny toys (such as vinyl animals, toy cars, or cubes) in a container which you are able to consider restaurants together with you to create wait time go quicker. Nice to have: Some surprise gift-wrapped gifts. Stock up on small things in the dollar store or your favourite big-box retailer. You can even recycle older toys a few months before a trip, find some tiny toys your child likes but has not played in some time and pack them off. Then wrap them and give them to a child on the street. (Should you wrap presents in many layers, then they take more time to open.) Publications as gifts are just another choice also, unless studying in the automobile makes your kid carsick. Interesting street trip suggestions from BabyCenter parents "Last year I created an entire bag of items for our road trip. The largest hit with my 3- and 5-year-old was a few pictures of our faces I had dismissed and laminated. I purchased some dry-erase markers and also we left absurd drawings on one another's faces. On top of that, since they're laminated, I cleaned them nicely and place them away for next year!" -- Kidmom "I've got three boys: 13, 10, and two months old. My boys really like to do Mad Libs once we take excursions. This is a superb activity which lets them utilize their creativity, increases their language and familiarity with all the elements of language, and involves the whole family. Whenever we get into the car for a visit, my boys always expect me to have a prepared!" -- jen09 "We moved to a 12-hour driveway with our 2-year-old. She is a huge fan of mixing items, so I determined creating trail mix in the car will be fun. I packed a huge plastic jar with a lid, a plastic spoon for mixing, and approximately 10 distinct components, such as M&Mtherefore, nuts, little pretzels, goldfish crackers. She had a terrific time making it and she then dished up trail mix for us to bite in the vehicle. It consumed a great deal of time and has been enjoyable" -- LauraT "Snack or candy bracelets. Just take a little strands of yarn (long enough to make a necklace) or licorice strings. Let your children place anything edible which has a hole at the centre (cereal, candy, etc.) on the series. Once done, they are fun to eat, and it helps the time fly!" -- A BabyCenter manhood "Write or publish a listing of the 50 countries and also have your child check off state license plates because they see them" -- LaLa7 "Go on the internet and publish photographs of things like cows, trees, blue cars, red cars, etc. On the travel, ask your child to search for the products. It is unreal how silent a youngster can be when focusing on locating them" -- A BabyCenter manhood "I left a soundtrack of all of the hand-motion tunes (If You Are Happy and You Know It, Pat-a-Cake, This Old Man, etc). My daughter moves along to the tunes. This generally keeps her active for the amount of this soundtrack." -- Deadly Mother "We left a mobile felt plank to get our 3 1/2-year old. We have an unused, medium-size pizza box and then glued a piece of felt over the inside of the lid. Then all of her sensed characters and items could be saved at the box, and it matches nicely on her lap in the vehicle. We allow her to decorate the box indoors and out -- with decals" -- A BabyCenter manhood "A little, plastic magnifying glass retains my children occupied more than anything else! We got ours from a local dollar store." -- wolfe93 "My boys (ages 5 and 3) love Play-Doh. I toss a few tiny cans and a number of their utensils in a purse and they are busy for quite some time!" -- 40mom "Bring puppets. When I am sitting at the front passenger seat and my 3-year-old is supporting me, I use a puppet to 'speak' to him within the headrest or away to the side. It lets me socialize with him. Should you sing songs or play peekaboo, it may elicit a lot of giggles. Offer your kid a puppet also, also have a complete conversation!" -- CarrieW
0 notes
Text
45 Items to Save Big on During Amazon Prime Day!
It’s time! Prime Day lasts around 30 hours this year and officially starts now! (Get your free 30 Day Prime Membership here to get in on the deals.)
With this being the 3rd annual Prime Day, and having thousands of you shopped the sales I recommended last year, I’m feeling like a bit of a veteran this time around and I’m here to share with you my secrets.
Note: Occasionally, my super detailed emails get cut off due to being too long – if that happens, you can see my full list – plus photos – on my blog here!
First, there are certain items that Amazon puts on deep discount today, without fail, mainly their own products. If you’ve been eyeing a kindle or echo for you and/or the kids today is definitely the day to get it!
Then there are the items that I know parents will especially appreciate the deep discount on!
Tip: There’s a lot of hype around this sale but the savings are real so it’s worth it to think about what you have coming up… Need stuff for traveling or camping? Need gifts for birthdays, new college students or summer weddings? Want to get a jump on back-to-school shopping?
Scroll down for great scores for all of that and more.
Finally, don’t be afraid to get in there and get some of your Christmas shopping done in July! Many of you know me from my famous Toy Gift Guides so, of course, I’ve got ideas for that too!
Ready? Here we go…
My 10 Favorite Deals this Year
#1 – Ninja 4-in-1 Kitchen System (Blender, Processor, Auto-Spiralizer, Slim High-Speed Blending Cup) Was $249.99, Save 30% Now $174.99
We’ve had this blender for a few years now and I could not be happier with it. I just couldn’t get myself to fork over the cash for a spendy Vitamix blender and this one has stood up to every challenge I’ve thrown at it.
Plus, I find the individual cup blender option so incredibly handy! I use it almost every day to make individual smoothies or homemade popsicles for my kids (this is seriously the only way my 3-year-old will ingest greens these days) and I really, really appreciate that at the end all I have to clean is normal sized glasses instead of a big bulky blender.
Compared to higher end blenders, the regular price of the Ninja is already a steal but at an additional 40% off today it is a complete no-brainer. (Would make great Christmas and wedding gifts at this price too!)
Plus, I love that this system comes with a spiralizer for making veggie noodles too!
Hot Tip: If you just can’t settle for anything other than a high-end blender, check out this Prime Day Deal:
Blendtec Total Blender Classic Was $400.30, 40% off – Now $240.00
#2 – Anova Culinary Bluetooth Sous Vide Precision Cooker Was $149.99, Save 33% – Now $99.99
This might just be the Instant Pot of this year… Although it doesn’t cook things as quickly, people are going nuts over the convenience of cooking with Sous Vide and the quality of the food it makes.
Think slow cooker convenience with a much more tender and flavorful result.
I’m eyeing this for a few cooks on my Christmas list as well as my parents who both still work and could benefit from coming home to a well-cooked meal (plus, I know my Dad will think the blue-tooth programming is super cool).
#3 – Instant Pot Duo Plus 9-in-1 Multi-Functional Pressure Cooker, 6 Qt Was $119.99 Save 20% Now $89.99
The Instant Pot was the breakout hit of last year’s Prime Day, with more than 200,000 people nabbing one. So, of course, it’s back and you once again have the chance to get your hands on one if you didn’t last year – and there are some new features on the Duo model that might just make you happy you waited.
We got ours last year and I absolutely love it… If you’re not familiar, this is a slow cooker, rice cooker, pressure cooker, steamer, yogurt maker, etc, all in one.
The absolute genius of it is how quickly it cooks things, even from frozen! So unlike a crockpot, you can stick stuff in at 4:00 and still have it ready at dinner time. And, of course, if you went ahead a thawed out dinner than you’ll really be eating in no time.
Plus, there’s a button for most things you want to cook… So you basically just push the button for “poultry”, “meat”, “beans/chili”, etc. – so convenient!
This latest model has some nice really nice updates too, including the latest 3rd generation technology, the microprocessor monitors pressure, temperature, keeps time, and adjusts heating intensity and duration to achieve your desired results every time.
The standout of the Duo model, though, is that you get so much more control with two pressure cooking settings (hi and low) as well as low, med, or hi settings for both sautéing and slow cooking.
Check out the reviews and video at the link above and you’ll be sold.
#4 – BLACK+DECKER Lithium Flex Vacuum with Stick Vacuum Floor Head and Pet Hair Brush Was $129.67, Save 25% – Now $97.49
You guys, this vacuum is everything! The organizer/cleaner in me is seriously drooling.
It’s a cordless stick vacuum, a hand vac, and so much more because of that ingenious flexible hose that allows you to get in just about anywhere with it. Plus there’s a pet hair brush – my house and car are gonna be so clean!
Again, watch the video at the link!!
#5 – Amazon Alexa Devices
The Echo was the #1 best seller of Prime Day last year and will likely be this year as well because today and Black Friday are the two days of the year when you will get the best deals.
Amazon Echo Was $179.99, Save $90 – Now $89.99
This is some amazing Black Friday level pricing on the Amazon Echo. If you’ve been waiting to nab one, now is the time.
We got ours on Black Friday last year and we use it so much – for streaming music and audiobooks, answering the kids’ homework questions, getting recipes or substitutions while making dinner, the list goes on and on… Plus there are tons of fun kid-friendly “skills”. My kids are currently obsessed with the Choose-Your-Own-Adventure style audio book called The Magic Door.
Echo Dot Was $49.99, Save 30% – Now $34.99
We have our Echo in the kitchen and have a Dot in our home office as well as one upstairs. These are great to have for using with Alexa-enabled Smart Home features.
I love that I can ask Alexa to adjust the thermostat or turn off my son’s bedroom light when I’m anywhere in the house.
Amazon Tap Was $129.99, Save $50 – Now $79.99
The Tap is different from the Echo in a couple of ways, most notably that it is portable. So if you plan to use it mostly as a BlueTooth and wi-fi enabled speaker, this is great because you can bring it outside when hosting BBQs.
It isn’t voice activated, though- you have to push a button to talk to it. So if you want it mainly for Alexa, the Echo or Dot would be a better choice.
Alexa-Enabled Smart Home Accessories
One of the biggest draws of having an Echo or Dot is the ability to make your home a smart home with Alexa (the guys seem to especially love this)…
Doing so can get expensive, though, so today is a great day to buy some smart accessories at big discounts – Could be a great way to get the Christmas shopping done for the men in your life!
Here are the deals…
Lights & Fans
Philips Hue White and Color Ambiance Starter Kit Was $199.00, Save 25% – Now $149.99
Save 20% on Select Sengled Smart Light Bulbs – Save 20%
TP-Link Smart LED Light Bulb – Save 20%
LIFX dimmable, multi-color Smart Light Bulb – Save 25%
Hunter Smart Ceiling Fan – 25% Off
Doors & Locks
Schlage Connect Touchscreen Smart Deadbolt with Alarm – Save 20%
August Home Smart Lock – Save 20%
Chamberlain Smart Garage Door Opener – Save 40%
Outlets
TP-Link Smart Plug Mini, No Hub Required, Wi-Fi, Works with Alexa – Save 50%
#6 – Kindles
Kindle Paper White Was $119.99, Save $30 – Now $89.99
I adore my Kindle Paper White – if you don’t have one for yourself, I highly suggest it.
The anti-glare screen and automatically adjusting backlight mean I can read outside on a sunny day or lying in bed at night.
It’s so incredibly convenient always having my books on hand with this ultra light weight device. Plus, I stopped getting headaches once I switched from reading on a tablet or my phone to this.
Kindle Reader, 6″ Black Was $79.99, Save $30 – Now $49.99
If you saw my email yesterday, you saw all the reasons I’m also so into the idea of getting each of the kids their own Kindle:
I love the ability to easily checkout thousands of e-books from the libraryfor the Kindle. (Note: This has recently become super easy with the new Libby app which lets you checkout and download straight to kindle with one tap).
Word Wise – Such a cool feature to ensure kids aren’t just skipping over words they don’t understand! Short and simple definitions automatically appear above difficult words, so they can keep reading with fewer interruptions. Tap on a word to bring up a simple card with definitions, synonyms, and more. (And of course you can turn it off if your kids don’t need or want it.)
Vocabulary Builder – When kids look up a word in the dictionary, it is automatically added to a group of flash cards for practice learning the definition later.
No Harmful Blue Lights – Recent studies have shown that evening exposure to blue light from backlit screens like tablets and smartphones can suppress the body’s production of melatonin, a naturally occurring hormone that helps the body fall asleep. Because the Kindle display emits no light, your kids can read before bedtime without losing sleep.
Stays Charged for Weeks Instead of Hours – Because there’s nothing worse than a device that isn’t charged when you need it!
No Power Struggles – Yes, I can totally use the parent controls to turn off videos and apps on the kids’ Kindle Fires, but there is definitely something to be said for a device that is for reading and reading only. It means I won’t have to go through the mean mom routine of saying no to apps when I want them to just read!
#7 – FoodSaver 2-in-1 Vacuum Sealing System with Starter Kit Was $199.99, Save 37% – Now $125.99
I am not proud to say that we waste a lot of food in our fridge, but it’s the truth and I’ve been waiting for this to go on sale to help get my act together!
Don’t miss all the accessory bags on sale too!
#8 – Kindle Fire Tablets $20 – $40 Off
All-New Fire 7 Tablet with Alexa, 7″ Display, 8 GB, Black Was $49.99, Save 40% – Now $29.99
It’s a table for under thirty bucks, what more is there to say?
All-New Fire HD 8 Kids Edition Tablet, 8″ HD Display, 32 GB, Blue Kid-Proof Case Was $129.99, Save $40, Now $89.99
This is also a great time to nab your kids’ their own Kindle Fires with the sale on the latest Kids’ Edition.
It sets the industry standard in parent controls for kids tablets. Plus, the Worry-Free 2 year guarantee and 1-year Kindle FreeTime membership make the Kids’ Edition a great idea for parents.
I also REALLY appreciate that the all-new Fire HD 8 has TWICE THE STORAGE!
#8 – Coravin Model Eight Wine System, Black Was $299.99, Save 25% – Now $249.99
Have you guys seen this amazing new kitchen gadget?! It actually lets you drink just one or two glasses of wine without removing the cork from the bottle – meaning the rest of the bottle doesn’t go to waste if you don’t want any more.
I have so many wine lovers on my list this would be perfect for (and if anyone in my family happens to be reading this, I wouldn’t hate getting it for Christmas either – wink, wink!)
#10 – 30% Off a 1-Month Supply of Huggies Diapers
Diapers are expensive! Stock up while you can. Enough said
Deals for School & Summer
#1 – Coleman DayTripper Beach Shade Was $54.99, Save 25% Now $41.24
I’ve been on the search for the perfect shade tent for parks and beaches for what seems like centuries.
The price on one that is big enough always prevents me from pulling the trigger on the purchase – and I always regret it when I’m out at the beach with my kiddos.
I’m getting this one today! The sale price can’t be beat for a tent of this size (check out the pics, comfortable fits 3 adults) and the reviews are great… Buyers say the stakes and sandbags keeps it in place even in the wind (a must), it’s easy to set up/take down, it’s lightweight to carry, and doesn’t get overly hot.
I also love that you can completely zip up the front to make a bonafide changing station.
#2 – Stasher Reusable Silicone Food Bag Was $11.99, Save 20% – Now $9.59
I’ve been wanting to stock up on some of these for park play dates this summer as well as school lunches come fall.
I just love purchases that save me money in the long run and help save the environment!
#3 – PackIt Freezable Lunch Bag Was $19.99, Save 35% – Now $12.99
Check out the video at the link on this one, guys, it’s such a great idea. You fold up and freeze the entire lunch bag overnight and then the bag itself acts as an ice pack to keep foods cool all day.
This is another must for the beach and park this summer and school lunches come fall.
#4 – Green Toys Sand Play Sets – Up to 60% Off
Because somehow I always seem to leave park sandboxes and beaches with fewer sand toys than I came with! Also, I’m a big fan of green toy products and their sand play sets are now exception.
I especially like this one.
#5 – Audiobook Collections – up to 50% Off
Today is a great day to stock up on audiobooks for long summer car trips at up to half off!
Beauty & Health Finds for You
New Customers Save 30% on Beauty & Luxury Beauty Products with CODE: NEW2LUXPD17
My favorite beauty products to stock up on using the code include:
Hair Products:
Oribe dry texturizing spray
Love this stuff for getting beach waves, getting body when sprayed in the roots, AND using as a dry shampoo!
CHI Ceramic Ionic Tourmaline Flat Iron Hair Straightener
The gold standard when it come to hair straighteners!
BaBylissPRO Nano Titanium Curling Wand
The other thing you need for gorgeous beachy waves!
Skin Products:
Supergoop! Daily Correct CC Cream SPF 40
Clarisonic Mia2, 2 Speed Sonic Facial Cleansing Brush System
I’ve been using a Clarisonic brush a couple time a week for about a year and it makes my skin so soft! I really like that the Mia2 has a speed for every day as well as a gentler speed for sensitive skin days.
Health Products:
Fitbit Blaze Smart Watch Was $198.95, $60 Off – Now $138.95
Apparel for You & the Kids
High-End Jeans for the Whole Family up to 60% Off
This is a great time to stock up on back-to-school jeans! (Also, maybe grab a pair or two of high-end jeans for yourself – just sayin’)
Outdoor & Athletic Shoes up to 50% Off
Find Saucony, New Balance, Addidas and Keens for the whole family. I’ll be stocking up the kids for back-to-school!
The Best Toy Deals
If you know me at all, and my famous Toy Gift Guides that come out before Christmas, than you know I couldn’t leave out the toys!
Here is where I think you’ll get the best bang for your buck…
Hot Deal: Spend $50 on LEGOs and save $40 on Amazon Fire Kids’ Edition Tablets
Soozier Gymnastics/Tumbling/Martial Arts Folding Mat
I’ve been a big proponent of having a gymnastics mat in the house for rainy days when the kids have lots of pent up energy.
We’ve had one for years and it’s one of the smartest purchases we’ve ever made… They can be expensive though so today is a great day to grab one at a fantastic price.
Exploding Kittens Card Game Was $24.99 Now $14.99
Have you heard of this Uber popular game yet?! This hilarious card game made Kickstarter history by becoming it’s most backed project ever. Kids and adults alike cannot get enough of the bizarro premise of a kitty-powered version of Russian Roulette.
To play, players draw cards until someone draws an Exploding Kitten, at which point they explode, they are dead, and they are out of the game – unless that player has a Defuse card, which can defuse the Kitten using things like laser pointers, belly rubs, and catnip sandwiches. All of the other cards in the deck are used to move, mitigate, or avoid the Exploding Kittens. Check it out, you’ve gotta see it to understand… and then your whole family will be hooked!
Deals for College-Bound Kids
If you know someone heading off to college in the fall, today is a great day to save up on dorm room essentials…
#1 – Keurig K55 K-Cup Pod Coffee Maker, Black Was $119.99, Save 40% – Now $69.99
Such a great price on the classic Keurig and I love that I can fully support them again because they now have these reusable k-cup options (Sooo much better for the environment!)
#2 – Double Reversible Door Mini Fridge Was $249.99, Save 68% – Now $79.99
There is no dorm living without a dorm fridge – an absolute must – and this reversible double door model get great reviews.
#3 – Brita 5 Cup Metro Water Pitcher Was $19.99, Save 25% – Now $14.99
This one isn’t as obvious but having filtered water on-demand in your room is so nice!
#4 – KitchenAid 17 Piece Tools & Gadget Set Was $42.99, Save 20% – Now $34.39
The perfect starter set for students who are blessed to be moving into a place with a kitchen!
More Deals for Your Home
#1 – BLACK + DECKER Cordless Lithium Hand Vac Was $59.99 Now $45.99
We got this last year and it’s super handy to have around plus the kids love to use it to help clean up – winning!
#2 – AmazonBasics Hypoallergenic Vinyl-Free Waterproof Mattress Protectors
One of the most surprising things about parenthood? You need a waterproof mattress protector for all the beds in the house!
Why? Because kids don’t stay in their beds! They will have accidents in your bed and, even if you’re lucky enough to get past that, they will get sick and very possibly throw up in your bed :(.
#3 – SINGER 100-Stitch Computerized Sewing Machine Was $160.00 Now $107.49
…And Even More Deals for Your Kitchen
Blendtec Total Blender Classic Was $400.30, 40% off – Now $240.00
If you’re getting serious about your health and are all about the green smoothies, this is a ridiculously good price on a commercial level blender.
SodaStream Fizzi Sparkling Water Maker Was $79.99, $20 Off – Now $59.99
Everyone in my family is hooked on sparkling water. Such a great way to make your family fun drinks that are loaded with sugar!
So that’s my list! I have spent so many hours compiling it for you guys – really hope you find some great deals today!
But don’t wait, Prime Day only lasts for 30 hours and things have been know to sell out well before the day is up.
Food Huggers Reusable Silicone Food Savers, Set of 4- On sale for $7.19
I’ve been wanting to try these forever – such a cool concept – and this price is great!
*Post contains affiliate links
The post 45 Items to Save Big on During Amazon Prime Day! appeared first on Modern Parents Messy Kids.
from boy child toys http://ift.tt/2uaFbZn via boy child toys
0 notes
Text
Like last year, Google left the first preview build of the upcoming Android version in the coming months ahead of Google I/O this year, Google Pixel, Pixel XL, Pixel C, Nexus 6P, Nexus 5X and Nexus Player For the first Android O developer preview reached March 21 (12 days later than last year). We are busy and have brought together all the changes, features and things about Android O.
Most of the major changes in Android O are run on the redesigned settings menu, but there are some small changes somewhere in the UI such as Notification Control. Material design is still the order of that day because Android O is also focused on important background changes like notification channels to provide even greater control over Android systems.
Some of the long-awaited features like image-in-picture mode and unread information app badge have finally landed, while some completely new features like better Bluetooth audio support and adaptive icons are welcome, but in the early days, but Android Already-feature-packing. Here are some feature and changes of Android O.
1. Notification control
Push notifications come in many forms: Facebook messages, e-mails, FitBit reminders are some of them. It is possible to drown in those alerts that may or may not be necessary at that time. Android is trying to change it with ‘Notification Channel’
New channels can allow developers to create ‘Unified System’ so that phone users can manage the notifications being viewed. For the operating system, it is possible to set the notification preferences and importance level through the entire channel.
“For example, you can set up separate notification channels for each chat group created by a user in the messaging app,” Android specialty says it will also be possible to use the same interface to manage the notifications on the Phone.
2. Battery life
Building on the work we began in Nougat,” Android O says on its developer blog, Android puts a great priority on improving the battery life of a user and interactive performance of the device. ”
To try to improve how long a phone stays alive, Android O will automatically limit what an app can do when it is open in the background. When this is not the main app that is being used, it will stop an application from continuously using the data. Google says that the border will focus on app transmissions in the background, services, and location updates.
The blog post says: “These changes make it easy to build apps that have the least effect on a user’s device and battery”.
3. Quick Settings
When you open the Quick Settings screen, you will see that we have different color schemes for pixels than the Nexus devices. Nexus Aquas accepts the same blue-brown background with an accent, while pixels retain close to black and bright blue accent scheme.
Looking at the quick settings themselves, Google has changed things again in Android OS, there is a double function in quick settings (do not Wi-Fi, cellular, Bluetooth, disturb) with the bottom line. You can tap the icon to turn the setting on and off, but I tap the word below the toggle, you will open the Mini Settings menu instead.
Non-underline toggles enable a feature like torch, cycle or mode for Data Saver, whether you tap them or not. Like Nougat, you can tap the pen icon to edit the sequence of quick settings or add another page and you can find a single shortcut to add a guest or switch between the user account.
4. Settings Page
More than “any changes necessary in every Android version”, the settings page is going to look at one more overhaul, and it seems that the slide-over panel from Android Nougat did not go down well with the designer on Google because it’s Android O Developer Preview. In addition, the settings page now aggressively chooses to classify categories into broad categories, which is displayed in the list of settings in very small top lists.
The monochrome theme which takes center level here really looks great, and when the new organization of options definitely takes some time to use, then I think this more organized settings will be a good step towards the screen is. Even if it is not, then we are going to use all the search options, anyway.
5. Lock Screen Shortcuts
Let’s be honest, how many times have you used those shortcuts on the lock screen? If you are thinking about which shortcut I am talking about, it just goes away to prove my point, though, most people did not use it on stock Android Nougat, because they are more easily through other tasks Can reach from. With Android O, Google provides the user with the ability to add custom apps to those shortcuts, making them really useful. Now you can add things like “Directions to Home”, “Write a new email”, and more lock screen shortcuts, making it much easier to complete the tasks you have done.
6. Customizable Navigation Bar
With Android O, users will also have the ability to customize the navigation bar, which was possible with custom ROMs on previous versions of Android such as Android Nougat. While doing this, the system UI Tuner will need to be enabled, it can be easily done, Android gives users the option of adding buttons to the navigation bar, which includes things like left and right arrows and more.
In addition, the Android O navigation bar adds the ability to adjust the position of the button; Users can bend them to the left, the right or the button can be squeezed together in the middle of the navigation bar.
7. User Interface (UI)
In addition to these major changes, Android also changes a lot of UI items compared to Android Nougat. For example, the navigation bar becomes dark when the pixel launcher app draws out above the drawer, and it looks better than what was in the Android nougat, in addition to talking about the app drawer, Now it can be brought anywhere by sliding anywhere on the home screen, which is definitely easy and more intuitive.
Android Bar is made up of the status bar, more information is dense, and cleaner and lighter date and time fonts (which, of course, looks good) are employed for this. In addition, unlike Android Nougat, you can not get the percentage of the battery to appear inside the battery icon, it is placed next to the battery icon only. Another key difference from Android nougat is that in Android 7, the battery icon has moved to the Quick Settings page, Android puts it in the status bar, and displaying only one toggle for “Battery saver” in Quick Settings, Which ends up saving users a tap to enable that option, so I am not complaining at all.
The option to edit Quick Settings panel is also available directly in the status bar, which makes it easy to customize the Quick Settings panel, but pulling the status bar a little bit above. Given that customizing the Quick Settings panel does not do so many times, it seems like an overkill.
8. Changes in App Behaviour
In Android O, changes in the behavior of the application are also being made, and the types of interactions they can support. Since Android apps are now available on Chrome OS, Google has supported more reliable and expected keyboard navigation models in the app. In addition, unlike Android Nogat, the app in Android O can now use a custom pop-up window instead of the standard system alert box. This may be a potentially good feature, but I’m sure it will be misused by poorly designed apps, and can actually end as a result of a bad UX. I’m sure though that is not expected because properly implemented, custom pop-up boxes can make the app even more attractive, and may be fun to use more than ever before.
9. Adaptive Icons
Another variation to bring Android O is also the one that prompts on the coming and the better things … Perhaps Google announced support for the adaptive symbol in Android, and as long as they did any apps in the developer preview are not supported by their description is promising, although it is unclear Google announced “adaptive symbol [signs] that the system displays in various sizes, the device selected by Muku Based on examination. The system interactions with the icon are animated, and the launcher, shortcuts, settings, screen sharing, communications and observation uses “.
#gallery-0-4 { margin: auto; } #gallery-0-4 .gallery-item { float: left; margin-top: 10px; text-align: center; width: 50%; } #gallery-0-4 img { border: 2px solid #cfcfcf; } #gallery-0-4 .gallery-caption { margin-left: 0; } /* see gallery_shortcode() in wp-includes/media.php */
Basically, each app that supports the adaptive symbol will be able to customize its icon in the topic chosen by the user, so if you are using a circular mouse subject, all the icons on your device are only round mark Will be displayed in the form of … No distinction such a declaration such as this can be a deeply integrated part of the ending environment, such as “device themes” Helps with SP is available on the “Display” setting of pixel devices. Android O Developer Preview.
10. Picture in Picture
Picture of the picture was first introduced in Android Nougat, but it was made available for Android TV only, due to the lack of Android TV (at least as compared to Android phones) due to the lack of Android TV, always With the support of the third party for a lack of convenience, Google is bringing the feature to phones and tablets, and hopefully the developer will also have an onboard legal.
I am seeing many more apps that allow Picture in Picture mode, so I can watch my favorite videos and browse Reddit at the same time.
Conclusion
From what we can see, Android has been preparing to follow a lot of things in the footsteps of Nougat, completing some work in Nougat and strengthening the granular nature of Android control. User notification and permission management are far better than ever and Android itself is also more aggressive towards apps that manage rarely leaving valuable system resources.
10 Android O Features & Changes You need to Know Like last year, Google left the first preview build of the upcoming Android version in the coming months ahead of Google I/O this year, Google Pixel, Pixel XL, Pixel C, Nexus 6P, Nexus 5X and Nexus Player For the first Android O developer preview reached March 21 (12 days later than last year).
0 notes