#i need to buy lining fabric and interfacing
Explore tagged Tumblr posts
Visit Tumblr Blog
Explore Tumblr blogs with no restrictions, modern design and the best experience.
Last Seen Tumblr Blogs


Fun Fact
The Tumblr office adopted Tommy, an 11-year-old Pomeranian.
Text
my current fashion style is a little too niche to buy clothes from basically anywhere (at least any i can fit into and would be very happy with. looking at you companies labeling a dress as a large with a 76cm waist) which means i have to make my own clothes and no one is more disappointed by this than me. because i fucking hate sewing
#i need to buy lining fabric and interfacing#i need to do it Properly this time#im semi-professionally trained. im just lazy.#i could get away with it on just costumes i would wear for a couple of hours or a few days#not this time.
6 notes
·
View notes
Text
I'm so mad! I had to spend an hour and a half mending a pair of pants I sewed six months ago because they're literally coming apart at the seams.
There was ten inches of this in the thighs and crotch
(Inside photo)

(Outside photo)

And the waistband was coming apart in two places


I got this linen from metro textiles and it was originally $29/yard!! I got it with one of their constant discount codes for like $15/yd but I've bought MUCH better linen for $15/yd at BH linens. My pink linen pants are thinner and I've had them longer and they're intact besides a few pulled threads from my cat's claws!!
Anyway, I decided to have another episode of V sews in their underwear and spent an hour and a half in my (cold!!) Basement stitching down various patches.
This one was 14"×3" (35.5cm×7.6cm) and I did running stitches in both directions. I decided it was going to be more of a hassle trying to sew it down by machine than I wanted to bother with so I just stitched it down by hand. It took me an hour.

This one was to cover a small hole I noticed a couple weeks ago

Here's the patch for the center back of the waist band. I did an especially bad job cuz at that point I was tired and my "hey don't forget to eat dinner and take your meds" alarm had gone off so I was in a hurry.

Didn't patch the other waistband spot yet because I needed to eat and that spot has several layers of stiff interfacing so I need to use my sewing machine and I didn't feel like clearing space for it and finding the right bobbin and threading it with the right color thread.
I'm mad. There's no good reason for this kind of damage. These have been line dried and washed on the delicates cycle. Don't buy linen from metro textiles. Try BH linens or I've seen grey line linens recommended but I haven't tried them yet. They're on my list of places to try. Fabric wholesale direct sells linen and I have some of it but I haven't finished the pants I am making out of it. Will report back on quality.
39 notes
·
View notes
Text
Can you believe it? 20dollarlolita Pattern School Step 2!
Only took me a year and a half. For people who don't remember a year and a half ago, we've started a project about learning to sew from patterns. The eventual goal is to help people become proficient enough at reading patterns to be able to tell what's going on in a pattern with instructions in another language, taking a pattern that doesn't fit and resizing it so that it does, and taking a pattern that isn't technically lolita and make it work in lolita fashion.
Step 1 was to make a non-fitted item from a commercial pattern. There were two goals of step 1: first to ensure that everyone was familiar with notches, grainlines, and other pattern markings; second was to give people experience with selecting fabric and trims to help give a non-lolita pattern a more lolita feeling.

For step 2, we're modifying a commercial pajama pants pattern into bloomers. In this step, we're going to become familiar with how to prepare a commercial pattern for modification, to compare pattern size to body size and to use your tape measure to judge added fullness, and how to do some basic flat pattern manipulation to add in style ease. Bloomers are a great first manipulation/fitted project due to the loose fit and the fact that, in most lolita applications, the vast majority of it is under your skirt and therefore invisible.
For this specific sample, I'm going to use Gertie's Harlow Pajama Pants pattern for this. I'm doing this because I bought a commercial pattern from Green Store and then promptly lost it, and these pajama pants are a free download. If you are printing the tiled version on your home computer printer, you only need pages 41-52 and 58-71, which will save you about 40 pages of printing.

I highly recommed doing some research and having a good idea of how long the bloomers you want to make should be, as well as how they are decorated. This is my research board.
You can use any pajama pants pattern that has a casing (elastic or drawstring) at the top, and no zipper. In this case, pants with a looser fit are going to be easier to turn into bloomers. If you like wearing your pants at a certain point on your body, I'd check for pajama pants that are at that waistline. The pants that I'm using are designed to sit at your natural waist, which might be too high for some people.

Your first step is to assemble and fortify your pattern. If you're printing this on copy paper, it's going to be strong enough, provided you use enough tape when tiling your pattern. If you're using a tissue paper pattern, like the kind you'd buy at the craft store, it helps to fuse some inexpensive interfacing onto the back of the pattern. We're going to work with these patterns a lot, so it's important to make them a little bit stronger.
Now, you are going to need to go into your pattern instructions and find two important things. The first is your overall seam allowance. In most commercial patterns, this is 5/8 of an inch. Some other patterns might have different seam allowance.
The second is how big your elastic casing at the top will be. In this case, my seam allowance is 5/8" of an inch. Because my hem casing is .25"+1.25" (the amount you turn up plus them amount you turn up the second time), I know that my elastic casing will take up 1.5".

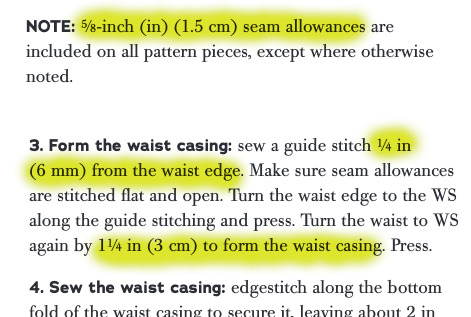
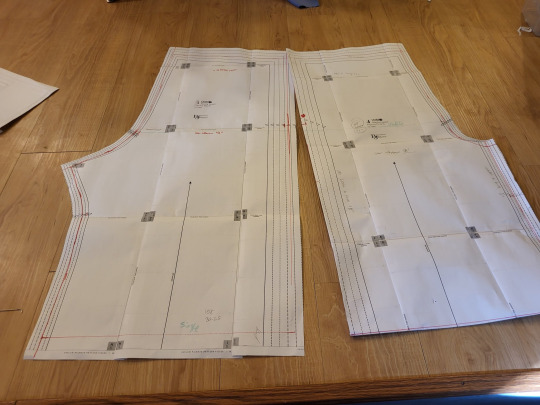
You're now going to mark on your pattern what the stitching line is. Your pattern has seam allowance included. This is very useful for when you cut out the pattern. However, if we take our pattern measurements with seam allowance, we won't have accurate numbers. So we have to clarify where the seam allowance is.
The first thing that I do (not pictured) is to write how much I'm removing along each line. In this case, I write 5/8" along the side and crotch seams, and "1+1/2" at the top where the casing is. Since we're going to drastically shorten these pants, it doesn't matter what the hem allowance is.
Then, I take my ruler, and I mark my stitching line. I do it in pencil, check that I'm correct, and then go back and re-draw it with a red marker. This helps me make sure that I'm following the correct lines.
Make sure you transfer your notches onto your new stitching line. You can see in the picture above how I'm using the ruler to measure where the notch is going to go.
The next step, walking the pattern, is a little tricky to explain. Here's a post that goes into it in great detail.
Basically, you're going to overlap the seam lines, to make sure they line up. The only problem with doing this is that both seam lines are curved. So, instead of lining it all up at once, you're going to go about an inch at a time, letting the pattern rotate so that it stays flat on the table. At any given point, you're only going to have an inch or so of the line overlapping, but that's all you need. If you run into notches that don't line up, cross one out and re-draw it so that it matches the other notch.
If this seems really complicated, you don't really need to do that on this project. It just is a good practice to have.
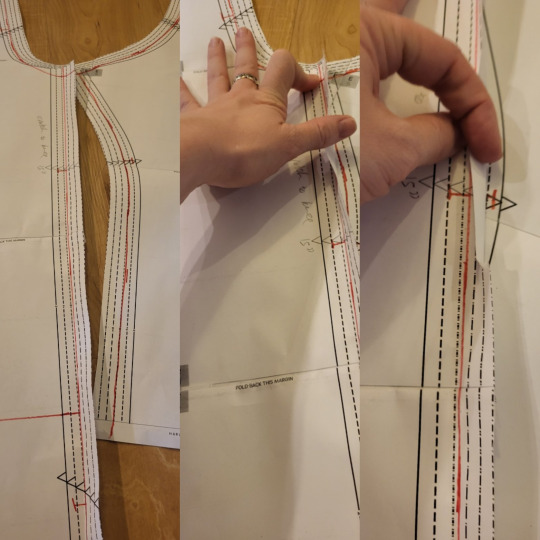
So you now should have a pattern with all the commercial markings, but where you've drawn the stitching line.

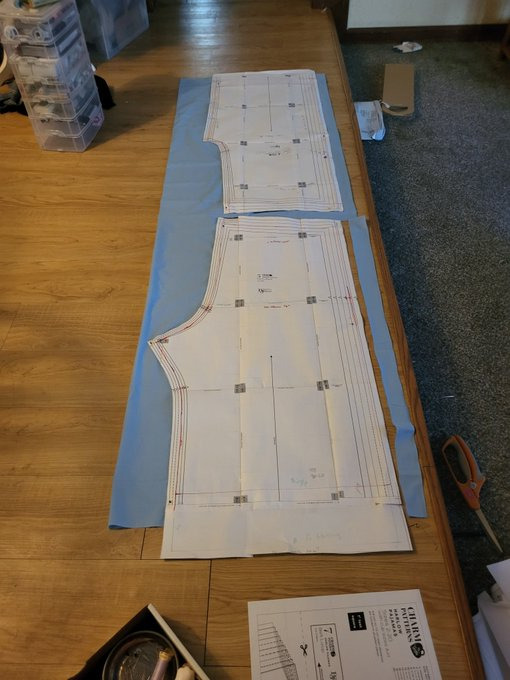
So now, you're going to put your two pieces together along the outseam. Since this is a pretty straight part of a pajama pant, it shouldn't be too difficult to get them to line up. Remember to overlap them on your stitching line, and not on the edge of the pattern.
We're putting them together so that you can measure them both at the same time. it saves us some math.

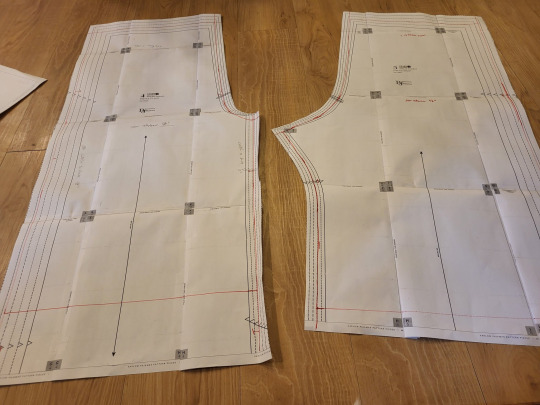
In bloomers, there are three major measurements to take into consideration. You need to know how big you want the leg to be, how big you want the booty to be, and how long you want the leg of the bloomer to be. In addition, you need to make sure that the waist of your pants will be big enough to fit your waist. In most pajama pants patterns, this isn't a problem, but checking it is good practice.
So, in this picture, you can see that I've measured the cuff of the pants. These two pieces together make up one pant leg, so I just need to measure the two pieces to know how big the pant leg will be.

I then take my tape measure and hold it around my leg at the same size that the pattern is at that point. I just use my eyes and judge if I think that'll be enough room to make my bloomers nice and poofy.
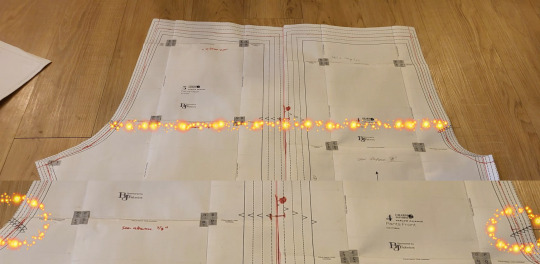
If your pattern doesn't tell you your hip line (mine didn't), it's usually at the point where the two notches on the crotch curve are. One of the reasons why we're doing this on a commercial pattern is that someone did the work for us and put those notches where they should be.
Now, remember, these two pieces are only half of the pant pattern. When we measure the hips of the pattern, we have to multiply this measurement by 2. Half the hip measurement x 2 is the full hip measurement.

Once again, hold this out next to your body and make sure that you like how much fullness you need. Remember that, in addition to having extra fullness because bloomers are poofy, you need room to be able to move and sit down. This measure between the size of my body and the size of the pattern looked pretty good to me. I could definitely have gone a little bit bigger.
The pant leg measurement is okay to be a little bit too long. You can always make it shorter. However, feel free to chop about 18" off the bottom of a full length pant leg. This just makes things a little easier.

Now, we're going to move the two pattern pieces until they're the size we like. If both the hip measurement and the leg measurement are too small, we're going to move both pattern pieces apart. To turn pajama pants into bloomers, this is likely to be the most common adjustment.
If the hip measurement is pretty okay, but the cuff measurement is too small, you're just going to move the bottom part of the pattern apart.
You'll notice that this is still enlarging the hip measurement a little bit. This is fine for bloomers since the style is for a lot of fullness in that area.

And if your cuff is the correct size, but your hip measure is too big, you can keep the cuff size the same and move the hip line apart until it's the size you want.
This technique of lining up the pattern pieces, and then moving them until they're the size you want, is the basics of flat patterning. As long as you follow the philosophy of keeping the measurements you like roughly the same, and moving the areas that you don't like until they measure what you need, you can easily resize a pattern without having to re-draw everything.
If you had to spread your pieces apart, tape some paper underneath the gap. This piece of paper should bridge the gap between the two pieces, turning them into one piece. Really quickly double-check that these pieces measure how you want. Then, mark a line in the middle of the paper bridge. Draw your notches onto the cut line. Cut the two pieces apart on that line. You've now made both pieces bigger. Tape another little piece of paper onto the cut edge of each piece, mark out your seam allowance, and cut that off.
Bonus points: swap the position of the pattern pieces, so that the crotch curve is one continuous line. Measure the length of that. Then, hold your tape measure along where the crotch curve of your pants will fit, and make sure that you have clearance there. I'm not going to photograph that, andi t's not super necessary with most pajama patterns.
Go ahead and cut your pieces out.Even though I'd shortened the pattern, mine were still too long to fit on a 2-yard cut of fabric. Since I knew that my pants were a little long, I just let the end hang off the edge of the fabric.
Here's the really magical part about this. Even though you've resized your pattern, you still have all your seam allowance, notches, grainlines, and your pattern instructions. Since you kept all your pattern markings consistent, you can now follow the instructions that came with your pattern. Go up until it tells you to hem the pants, and then try them on.
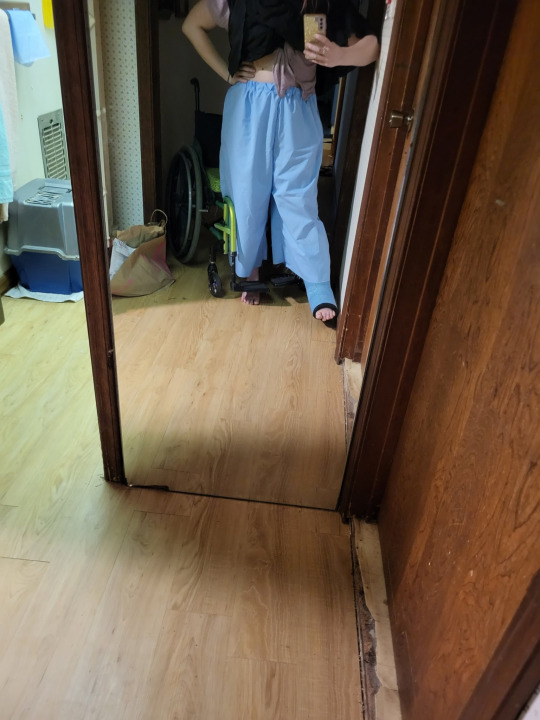
In my case, my pants were way too long to be bloomers. I knew that I wanted to do a casing with a heading, which does use s pretty big hem allowance, but even so, I'd need to shorten them.
Check out your bloomer research board to see how long you want them to be. I wanted some long ones that did the old-school bloomer peek, so I made them on the longer side. I also didn't want them to ride up into my butt when sitting in a wheelchair.
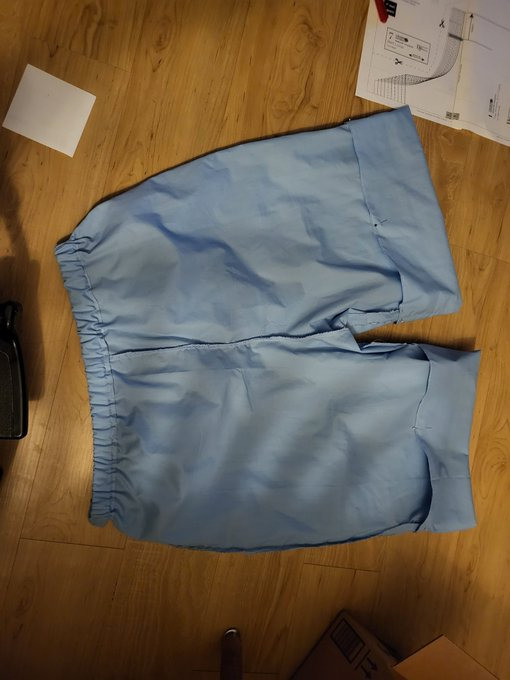
So, time to fold up the bottoms, add my elastic, and call the basic construction finished.
I looked up on my research board to try to find a good way to decorate these. One of the nice things about bloomers is that you can wear them with a wide variety of coords. This makes them one of those items where you can add some extra lace, and then use that lace in multiple coords. I feel like, since these bloomers are a good way of adding detail in multiple coords, it's a good excuse to add a little bit extra lace. You can see how much of a difference it makes in this picture. It really turns them from baggy shorts into real bloomers. I really recommend sometimes investing in a couple of big purchases of lace. If you have lots of lace on hand, you're more likely to include it in your projects, which can really help push a meh project into proper lolita fashion territory. I have a rule that I don't spend more than $1.50 a yard on lace unless it's really fantastic, and I manage to find things at that point on Aliexpress and sites like Cheeptrims.

Now go on and let them peek out of your favorite skirt. And remember, definitely don't press that skirt before putting this picture in your tutorial.
#20dollarlolita#dollar chan's pattern school#step 2#lolita fashion#patternmaking#handmade lolita#lolita bloomers#sewing tutorial#hey guys look i actually made somethign#long post
108 notes
·
View notes
Text


The Sweeping Ball Gown, Vogue 1963
This glamorous strapless evening gown dates to 1948 that has been re-issued by Vogue Patterns in modern sizes. It shows all of the luxury of post-war prosperity that one hoped for from post-war prosperity. Just a year earlier, Christian Dior had shown the New Look which offered up day dresses with enormous width at the low hemlines, cinched waists, and soft shoulders. It was a break from the more practical looks of the war years, with hemlines around the knee and padded shoulders, and narrower skirts. This was a silhouette which would live on into the 1950s.
Evening gowns followed suit with even wider hemlines, and here you have one that is more than 7 feet around . To create the mass of the skirt, hold it away from the body, and make the waist look even tinier, crinoline net is used underneath as interfacing, some 3 plus yards of it. An overskirt cascades down the sides, a feature that will ripple with the wearer's movement. Such an abundance of skirts means that the dress takes around 8 yards of fabric at 60” width. Yes, that is a lot of fabric.
The bodice, which is boned on the inside, is also cuffed on the outside, with a clever shaping so that the front points inward and upwards towards the face. A graceful line and a dynamic one that indicates movement and energy.
They recommend faille, satin, dupioni, and taffeta, plus brocade, but brocade will probably weigh too much. Satin is beautiful but you can mar it so easily, or at least I can, so I would recommend silk dupioni or shantung whose texture will wear better and catch the light in interesting ways too. And there are soooo many gorgeous colors to choose from. They do suggest that overskirt may be made of a different fabric and the illustration of the back of the dress done in white hints at that. If you look closely, you will see a more textured fabric at the lower left, a lace perhaps? But a harmonizing color might work too. So many possibilities.
This bodice will need a close fit, so you may want to muslin it in a test fabric. Although it may be possible to use the fitting of the lining to ensure the fit of the fashion fabric. Obviously, with so much fabric on the line, you want to make sure it is something you love. If you have to buy fabric online, I would indulge and buy more fabric than a tiny swatches to make sure.
You can find this at your local fabric store or online here: https://simplicity.com/vogue-patterns/v1963
#1950sfashions#vintagefashions#1940sfashions#newlook#christiandior#vintagesewing#vintagedressmaking#making#sewing#dressmaking#eveninggown#vintageeveninggown#vintagevoguepatterns#vintagevogue#vogue1963#dupioni#shantung#silksatin#straplessdress
42 notes
·
View notes
Text
Trying out a new craft
ShannonMakes did some neat videos about using English Paper Piecing as a way to have an ultra portable project. I remember, many moons ago when I was in college, all the talk about EPP was that you needed perfection in cutting the paper, glue or freezer paper methods, mountains of thread and almost 8 yards of fabric for a twin / single quilt ( 55" by 83" on average.)
Obviously the fabric usage hasn't changed.
Due to laser cutter and other automatic cutter prices, you can buy about 300 bits of stiff cardstock for about 15$. The average 1.5" by 3" wide hexagon needs about 700 ish hexagons for a basic twin sized quilt. (Go here for a calculator. While it doesn't account for odd shapes, you can still use estimation for other shapes.) You can reuse cardstock.
A lot of people on the internet talk about using various automatic cutters for fabric, but I'd sooner play around with a craft with minimal supplies before I buy things to make it faster. The internet swears on seam allowances from 1/4" up to under 5/8". Other people use charm squares / circles, since your main accuracy is from your paper shape.
I'm using a quilt as a random "use case" option, but obviously you could do curtains for sun blocking / warmth or use the finished fabric for bags / cushions / fabric.
Why is it portable? Imagine a pile of paper shapes, a needle, a thimble because you love the skin of your hand, a spool of thread, your pre-cut fabric, and some sort of thread snips. That could fit in a bag the size of a generous paperback. Since each hexagon can be paused mid sewing, you've got something where you can drop everything if needed. Once you've run through all your hexagons, you can then start sewing them together. This means you get two "activities" out of one batch of supplies.
With hexagons around a central hexagon, you can remove the paper, and continue as you wish. (From a second hand aspect, Shannon recommended interfacing dubious fabrics or packing a lining fabric and cutting thick fabrics to a larger seam allowance. She also said the basting step could totally use rotten / weak thread if you have thrifted some shady thread.)
Why does this interest me? I have issues thrifting fabric in the area, since our local stores rarely have good options, but Swanson's Fabric has charming people running it and adorable themed bundles.
So, I picked up some fabrics I loved, intending on using them for garments, looked at Shannon's video, and decided to try a new craft.
Just for accountability, cost outlay was 50$ for the fabric, 5$ for some sewing clips which I wanted to pick up anyways, and 15$ for the paper pieces. I've got an old sheet that could be backing fabric, or I could spend another 50$ to do the back side of the quilt. On average, actual quilt backing fabric tends to be about 40$ for the "right" sized panel. The average price for twin sized quilt batting seems to be about 30$ for higher end stuff, but I haven't checked local stores.
A "better" quality half poly twin sized quilt (not ethical, or by a quilting artist, mind you,) runs about 130$ and fully cotton quilts (with the same warnings) tend to be 250$ from what I've seen. Knowing I could turn a project into a cozy, economical, and ethical quilt in exactly the colors I love is exciting, no?
2 notes
·
View notes
Note
Someone at a con suggested I use something they called inner facing on my costume what does that mean?
Hello there!
I assume, since this was presumably spoken aloud, that the person meant "interfacing" -- the T can often be silent when spoken -- and not "inner facing," which is....I guess a thing? But no one talks about it like that.
(Also hopefully this was consensual feedback!)
Interfacing is a material used to add structure to other fabrics. It comes in various types and weights, and is a useful tool to have in your sewing arsenal.
These comes in a few types: woven/knit/non-woven, and fusible/non-fusible (sew in). Think of these like a D&D alignment chart, with the first grouping on one axis and the second grouping on the other axis. You can have woven fusible, knit fusible, woven non-fusible, etc. These each have different properties and uses.
Woven interfacing keeps the properties of a woven fabric, such as a grain line, for when that is needed in your project for extra stabilization on grain. You probably aren't going to use this type much. Same with knit interfacing, which has stretch to it. This one is also uncommon, but is useful for stabilizing necklines, armholes, cutouts, and other areas on stretch garments when you want to retain stretch. Non-woven is going to be the cheapest and most common option. It is made from basically compressed fibers, and doesn't have a grain line, so it doesn't matter which way you cut it (you can save money by fitting some oddly placed pieces on there!). If you use a woven or knit, be sure to prewash it to shrink it ahead of time. (Some say to do so with non-woven as well, but I've never had an issue.)
Non-fusible interfacing (sometimes called sew-in interfacing) is just that -- you sew it to the garment as a separate layer. This leaves the original hand of the fabric intact and doesn't risk extra wrinkling or glue seepage that can be caused from fusible, and can be used on fabrics that cannot be ironed. Fusible interfacing has a heat-activated glue on one side that you iron to the wrong side of your fabric. This increases the stiffness and body of the fabric itself, since the interfacing and the main fabric act as one. This is useful when you are using a fabric that is more slippery or without as much stiffness or strength as you need in the finished product. Be sure that when you iron it on, you use a pressing cloth to protect your iron, don't move the iron, just leave it in place until the glue melts, and most fusibles require steam.
Here is a quick and dirty chart I whipped up with the types:

(Graphic design is NOT my passion haha)
All types of interfacing are also on a sliding scale of weight or body, from lightweight to heavyweight. Interfacing can be as light as a whisper, just to add a small amount of body or to stabilize a fabric prone to stretching without adding much weight, or as heavy as fusible foams and other materials that will make your fabric rock solid (sometimes as stiff as cardboard). Use the weight suited to your project: lighter weights tend to work well for simply stabilizing an area that tends to stretch or backing a very drapey fabric you want to be less drapey, mid weights are good for things like waistbands and button plackets where you need more structure but not too much added stiffness, and heavy weights tend to be used for specialty applications.
See also: this helpful chart from Wawak that shows the types of interfacing they sell and what they are good for. Even if you don't buy from Wawak (though they're a great source of sewing supplies for cheap!), it can give you ideas on what to use for what and to help you know what you are looking at when you go into a fabric store and touch the interfacings. Honestly, touching fabrics is the best way to learn about them!
As for where you use interfacing, anywhere you need stabilization, really. Look inside the button plackets of your button up shirts and the waistbands of your pants and skirts if you can -- see that extra bit of material in there? That's interfacing! It creates a stiffer and more stable material for things like button plackets, waistbands, collars, and anywhere else you need a bit....more from your fabric. I'm assuming the feedback you got was on something where it's obvious, such as a waistband, where the fabric can easily bend out of shape due to the pressure and heat of the body, or a cutout, where the bias of the fabric can cause it to stretch out in one direction and become wavy or misshappen, or a collar, where the lack of stiffness compared to the rest of the garment would create a limp rather than crisp effect.
Here is a good general guide to interfacing that might have more information than I have here (idk I only skimmed it but it looks good).
If they did mean "inner facing" they are probably talking about a facing. This is basically a partial lining that is used to finish an edge, or in some cases, add body or stabilize an edge. This is a piece that is shaped to match the edge it is being sewn to, often slightly smaller so it rolls to the inside, and sewn to the edge and then flipped to the inside. Think: a piece of fabric shaped to fit a neckline and sewn/flipped to the inside to finish the edge without doing a full lining. (These are also common as part of a lining in garments like suit jackets.) Facings are useful for finishing edges that have odd shapes (such as necklines or armscyces), need to be stabilized (like knit openings or cutouts on a bias), areas that need a bit of extra body (such as the top yoke of a suit jacket), or areas where an edge has extra small bits of fabric sewn into it that are hard to finish otherwise (such as sailor collars). Perhaps coincidentally, facings are often interfaced.
I hope that helps! :]
#sewing#interfacing#cosplay help#cosplay tips#fabrickind gives solicited advice#i give an entire panel on structure in cosplay lmao this is my wheelhouse
13 notes
·
View notes
Text
Cosplay progress! All the jacket fabric pieces cut out, lining fabric cut out, interfacing cut out! Now to iron the interfacing on to the correct pieces and I'll be able to start fighting with a sewing machine to put this together. Will still need to buy the zipper and some... filling? Wadding? For these like shoulder roll/piping that the pattern has at the sleeve/body seam
Will still need to order the materials for the gun, since I need to watch a few video tutorials to figure out what I actually need to get
9 notes
·
View notes
Text
okay
Okay okay okay
Thoughts and feelings
Last night was magical. The metallic velvet that ended up being the one -- it's true that it's a slightly warmer/greener shade of blue, but not enough to clash with the jewels. It can work. What mattered ultimately to me is that just seeing the swatch on the table kept taking my breath away, and is this jacket not supposed to do just that?!
This film represents a deep connection to your art, for me. I didn't grow up with it, didn't have my sexual awakening to it hahaha, but damn. What a gesamtkunstwerk. What a labor of love by magical minds.
Well anyway. I still need interfacing before I can put anything together, and I'd like to get it in the same swoop that I get the satin lining for the top. I'm going for a slightly lighter blue than the velvet -still dark, but distinguished. I also may buy some bigger shoulder pads from the fabric/sewing shop. They literally have a box full of different size shoulder pads if you need them.
Good thing this jacket is going to be finished by the month. I still need to remake the undershirt and cummerbund. Style a new wig, too. Oh boy
2 notes
·
View notes
Text
1930s Qipao - a masterpost
Hey there!
I haven't posted on Tumblr (well, on this sideblog) in a long, long time. I have made plenty of things, just didn't have enough energy to write it all down in coherent sentences.
I think I'm going to make a new series though, since I don't have a blog elsewhere and I need a public space to organise my thoughts, on the making of a qipao in the 1930s style and tradition.
I have made two qipaos before (when I was still a baby to couture dressmaking) but whilst they were wearable, they were very messy with structural issues. Now that I'm a bit more experienced, I'm determined to a) make a proper toile/pattern, b) improve my pressing skills with a steam iron, and c) have nice and round fabric buttons and neat 'button legs'.
I won't have time to smooth out my notes, so I'm just going to reblog and add stuff in the thread or edit the post directly. I'm going to note down the methods I use as well as other methods I've learned about, since there are different ways to make things and each dressmaker develops their own techniques over time.
So for today I just want to share my choice of fabrics and notions.
Main fabric
'Pink sketchy retro garden rayon fabric' purchased at Guthrie & Ghani (a shop located in Birmingham, UK). The selvage reads 'AMSTERDAM by Anbo Textiles designed by Sholto Drumlanrig', so I guess that's the actual textile company and designer.
The website says the rayon is 'similar to viscose', but since rayon technically equals viscose, we don't actually know if the rayon used here is the old-fashioned stuff or a more eco-friendly version like Ecovero.
It feels very smooth with a good drape, a bit heavier than silk.
I got 2.5m which would be enough for a 120cm long qipao. A 1930s qipao has no shoulder seams so you cut the front and back in one piece, hence the length of fabric=2*(length of the garment). I only need 80cm in width for a short-sleeved qipao though. If you have a wide fabric width you can actually make two sleeveless/short-sleeved qipaos, or you can save the other half for something else!
Other fabric choices
The perfect choice would be silk. This is because silk drapes nicely and is very easy to stretch/shrink and be molded into 3D shapes. Of course you need a drapey silk, not too stiff and not too flowy.
Other natural fabrics, including cotton, linen, and wool, are all good. Cotton and linen will be harder to shape though.
Synthetic/semi-synthetic fabrics can be used too, just keep in mind that some are hard to shape, and some do not wash well. You want something that is very breathable, since it fits snugly around the neck, and drapey.
A medium, non-transparent fabric for a single-layered (or lined for colder weather) qipao. A transparent silk can be paired with a slip (which you would wear anyways if you follow the norm of the 30s).
If you plan to wash your finished garment you must choose a fabric that can be washed reasonably without fuss and pre-wash it.
Binding tape
Mine is a pre-made tape from Atelier Brunette. You can make your own with the fabric of your choice. It has to be on true bias (very important)!
I have eight metres in total, not sure how much I will end up using.
Stay tape
Super important. 99% of the resources I've read suggest fusible interfacing. A very thin but sturdy woven tape would work too. Sometimes I use strips of silk organza cut on straight grain (or leftover selvages), which is also what I plan to try for this project.
You need at least 4*(length of garment).
Sewing thread
I always use Fujix 100% cotton sewing thread. Also a thicker (maybe cheaper) thread for thread-marking and basting. If making surface decorations, silk threads would be nice. I don't feel the need to wax the Fujix threads but if using another brand/type I would certainly consider waxing.
Starch glue
Either buy some or make your own. Another soluble stabilizer would probably work too. This is used for the edges, especially at the neckline. If I didn't want to bother with a glue, I would leave the cutting until the last minute, baste with running stitches, and minimize the handling.
Interfacing
This is for button strips and the collar. I use a medium-soft cotton canvas. I know most people use a fusible interfacing, but I don't like it. Organza is not the most suitable, though if I needed a semi-transparent natural fabric for the style then it would be my best bet. You can also starch the fabric to stiffen it, but a starch glue washes out.
Also a lot of sharp pins and a trusted pair of scissors. Some people use spaghetti straps to make buttons, in which case you need a drawstring threader type of thing.
6 notes
·
View notes
Text
What do you do after you've terrorized a blogging site with your indecision for 24 hours and then, due to Circumstances, had it all mean relatively little?
You make posts about your process.
By third-popular demand, I'm making the Sophie Dress by Ora Lin. (There's even more sizes on their website if you wanna make your own!)
First step is check if you have enough fabric. And I've got LOADS of this blue floral that I'm honestly starting to like less and less. Tons. Anything to get it out of my stash drawer, honestly.

...I had 3,5 m. The pattern calls for 5. Ahm. Let's... Print out the pieces and check the instructions on where some definitely intentional color blocking might be possible.

Step one, print and assemble all the pieces, took over an hour. Step two is to adjust the pieces to your size. Which I only needed to do with the usual piece. Might need even more fabric now though.
Time to see what 3,5 m will get me.

It gets me all the pieces, minus some ruffle volume, the lining and the pockets. And the front skirt needs piecing, but it'll get gathered anyway, so I can afford to lose a bit of width there. Hopefully. Guess I'm lining this with flannel. Definitely not gonna regret that the second someone remembers central heating exists. Or spring comes. It'll all be fiiiiine.
Next step: carefully making and pinning and organizing all the pieces that can already be sewn.

This is cotton sateen, and it turns out I can have organization, or I can have my pieces not be on the floor.
It was at this point that I remembered the cuffs needed interfacing. Which... I might still have some of? Not sure how firm, though. Color is also a toss-up.

Two interfacing cuffs were cut, a vague plan for dyeing this thing after the fact was forming, and I was ready to get on with pin--right, they need attaching.

Past me was very responsible and emptied the iron after use. Present me is wondering if the currently present legionella bacteria in our tap water (most German households rent voluntarily, or so I've been told) die during the steam function, or if they survive because it's too brief and I'd be basically inhaling them directly.

Nothing but the finest distilled water for my precious second-cheapest iron money can buy. Yes, I did end up filling this all the way up before remembering you don't use steam when applying iron-on interfacing, thank you for asking.

Not gonna lie, I'm still surprised I got away with doing that without a pressing cloth. Now they just need to cool down and get pinned.

Okay, it's pinned beautifully, I have the machine out, I'm 7 hours into this sewing project and finally, finally, it's time to plug this in and...

The nightlight is on. Because it's one in the morning. When did it turn one? When did I last pee? Why are my fingers aching?
1 note
·
View note
Text
How to Use Cricut Maker: Guide for New Users
Are you considering purchasing a Cricut Maker, or maybe you have just bought one and need help figuring out where to start? In this Cricut Maker beginners guide, we will teach you how to use Cricut Maker and all the different ways you can use it. It is an advanced cutting machine with many tools and features for crafting projects. With Cricut Maker 3, you can cut various materials like fabric, vinyl, cardstock, and chipboard more precisely.
But what sets it apart from all other machines is its upgraded cutting ability and features, including cutting over 300 materials and the ability to engrave, deboss, score, and write. You can create an intricate design and personalize your home decor piece. The Cricut Maker can do everything that you need. Let’s dive into this write-up to discover about this crafting tool.
What Accessories Come With Cricut Maker Box
If you purchase the Cricut Maker, here’s what you will get in the box.
How to Setup a Cricut Maker on a Computer
After you buy a Cricut Maker machine, you need to know how to set it up with your computer. So, before you learn how to use a Cricut Maker, follow the below steps:
Note: To use a Cricut Maker machine, you must use a Cricut Design Space app.
How to Use Cricut Maker for Making Coasters: Learn Step by Step Here.
Now, you are ready to make your first project with Cricut Maker. Let’s create a simple and fun project. Follow the instructions below to proceed.
Step 1: Gather All the Materials
First, you need to collect all the materials before you start making the leather coasters:
Step 2: Prepare the Design of a Coaster
Now open your Design Space app and Click New Project to create a design. Then, in the left toolbar, Click on Shapes or Images to add shapes. If you want to add text to your coaster, click the Text button, write the text you want, and choose the font style and size according to your needs. Before you proceed, go to the line type and select the line type from Cut, Engrave, or Deboss according to your project.
Step 3: Select the Material
Then, select the material from the material section, and if you cannot find it, click on Browse All Materials to find a suitable material for your project. After that, you will be prompted to connect your Cricut Maker machine if it is not already connected. Make sure the right blade is attached to your Maker.
Step 4: Cut the Design
Load your mat with the material and click the flashing Go button to cut the leather. After cutting the materials, unload the mat and smooth out your coasters.
Final Words
After reading this guide, I am sure you know how to use Cricut Maker and the setup process. The Cricut Maker is such a smart and versatile machine that you can do many projects with it. It gives you the full freedom to craft anything, which is possible because it can cut through many more materials. It is so easy to use, and its user-friendly interface allows you to create your projects quickly. If you want to start crafting and give a personalized and professional touch to your handmade gifts, this crafting tool is the ultimate dream for many crafters.
FAQs
What are the unique features of the Cricut Maker?
Cricut Maker has a unique feature with smart technology that controls the direction of the blade and can cut over 300 materials, such as cards, paper, leather, and balsa. It also has a ‘quick swap’ feature that allows it to swap the blades and cutting pressure to match the cutting pace of the materials. Also, its speed is ten times faster than the previous models, and it has extra built-in storage for all the tools.
How much faster is the Cricut Maker than its previous model?
The Cricut Maker is twice as fast as the previous model and is optimized intelligently to control the cutting and drawing speed. It cuts materials with utmost accuracy and precision. As it can cut various materials and comes with different blades, you can also use it for bigger projects.
Can I use Cricut Maker without the internet?
Yes, you can use your Cricut Maker without an internet connection if you use the offline feature of the Cricut Design Space app. Or if you download your projects offline on your computer or cloud. If the file is saved to your computer, you can edit, change fonts, and cut that project with your Cricut Maker.
Visit: cricut.com/setup www.cicut.com/setup login
Source: https://cricricutdesigncut.wordpress.com/2024/10/23/how-to-use-cricut-maker-guide-for-new-users/
#design space setup#digital design#cricut.com/setup#cricut setup#www.cricut.com setup login#cricut design space setup#cricut.com setup mac#cricut.com/setup mac#www.cricut.com/setup\cricut explore air 2 setup#www.cricut.com setup#www.cricut.com/setup login#www.cricut.com/setup#install cricut design space app#cricut design space app#cricut design space download#cricut design space login
0 notes
Text
Dot peen marking machines are advanced tools used for engraving and marking a wide range of materials. They are commonly employed in industries such as automotive, aerospace, electronics, metal fabrication, and even smaller-scale applications like jewelry engraving. These machines utilize a stylus, also known as a pin, which rapidly strikes the surface of the material, creating a series of dots to form alphanumeric characters, logos, barcodes, and other markings.
One of the key advantages of dot peen marking machines is their ability to provide precise and consistent marking results. The controlled impact of the stylus ensures clear and readable characters, making them highly suitable for applications where traceability and product identification are essential. Moreover, dot peen markings are deep and permanent, making them resistant to wear, corrosion, and fading. This durability makes dot peen marking machines ideal for harsh environments or parts that undergo heavy use.
Dot peen marking machines are compatible with various materials, including metals (such as steel, aluminum, and brass), plastics, ceramics, and some types of wood. They can be used on flat, curved, or irregular surfaces, offering versatility in marking different workpieces. This flexibility makes dot peen marking machines widely applicable across different industries.
These machines often come equipped with user-friendly software interfaces that allow operators to design and customize markings easily. The software may include features such as variable depth control, different fonts and sizes, serialization, and the ability to import data from external sources. This streamlines the marking process and allows for efficient customization according to specific requirements.
Dot peen marking machines are available in various sizes, configurations, and levels of automation. They can be standalone benchtop units, portable handheld devices, or integrated into production lines for high-volume marking tasks. This adaptability enables them to meet the diverse needs of different manufacturing environments.
Rockwood Machinery specializes in offering long-lasting, high-quality Dot Peen Marking Machines in UAE. We satisfy our clients' demands personally and precisely by ongoing interaction with them and their applications, which allows us to maintain continuous development, optimization, and innovation within our product line. Rockwood also provides the top Best Industrial Steel Fabrication Machines in UAE.
0 notes
Text
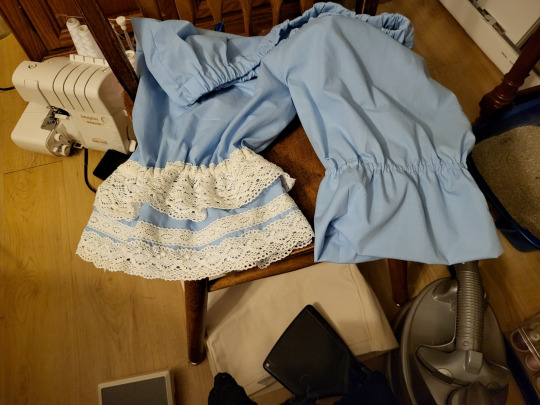
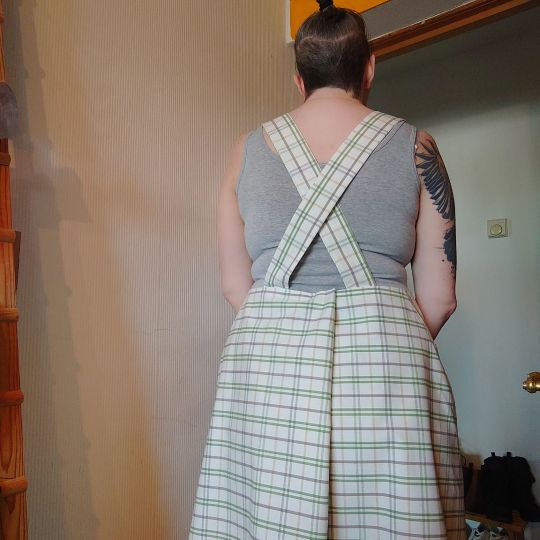
I started making a new thing on Friday- an apron dress from an independent company called "The Assembly Line"
It was a printable pattern that I bought because WAITING is hard when I have the energy to do something RIGHT NOW. Waiting results in energy atrophy I've found.
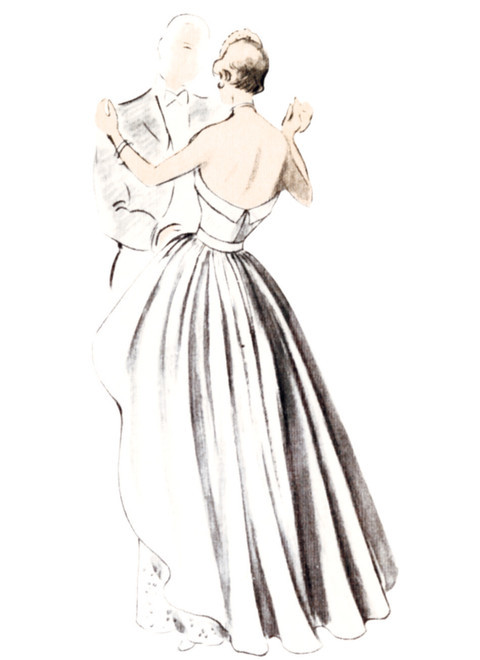
It looks like this:

and it's made up of like 6 parts. I was able to cut the pattern and half finish the dress in about 4 hours, which is probably a long time for more experienced / faster sewers, but for me that was like....super quick. It only requires 2 snaps or buttons, fabric and iron on interfacing, so it's 100% a good starter pattern.
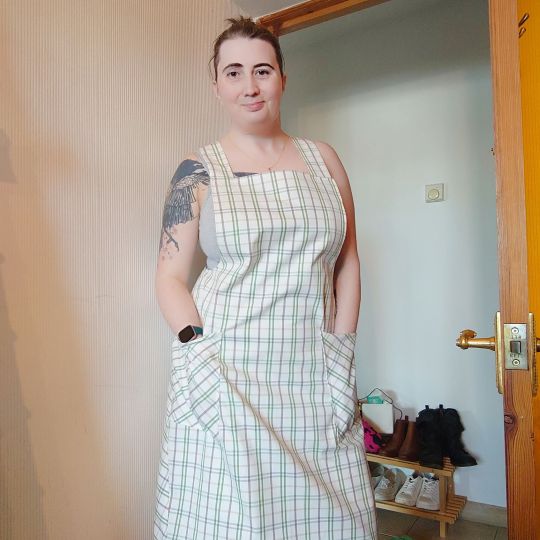
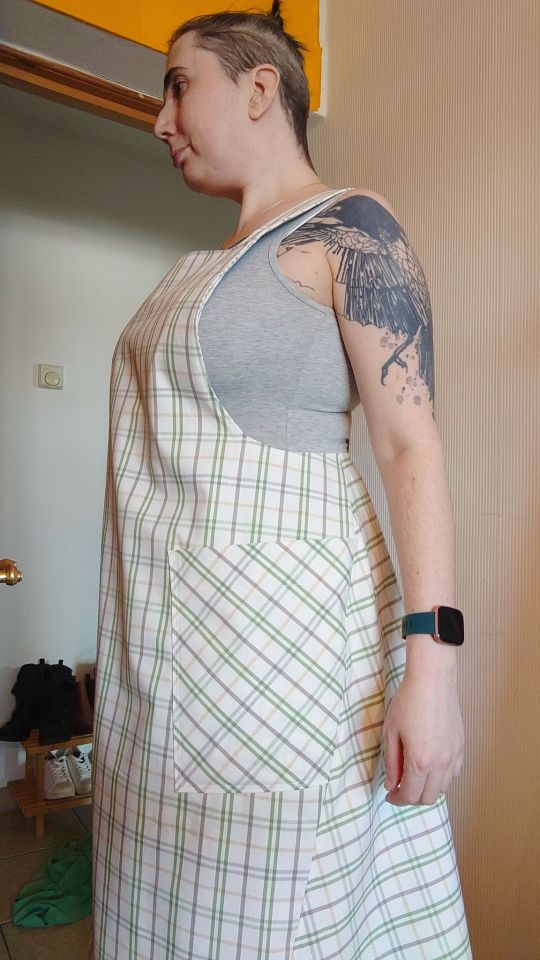
I'm making it out of this check fabric:
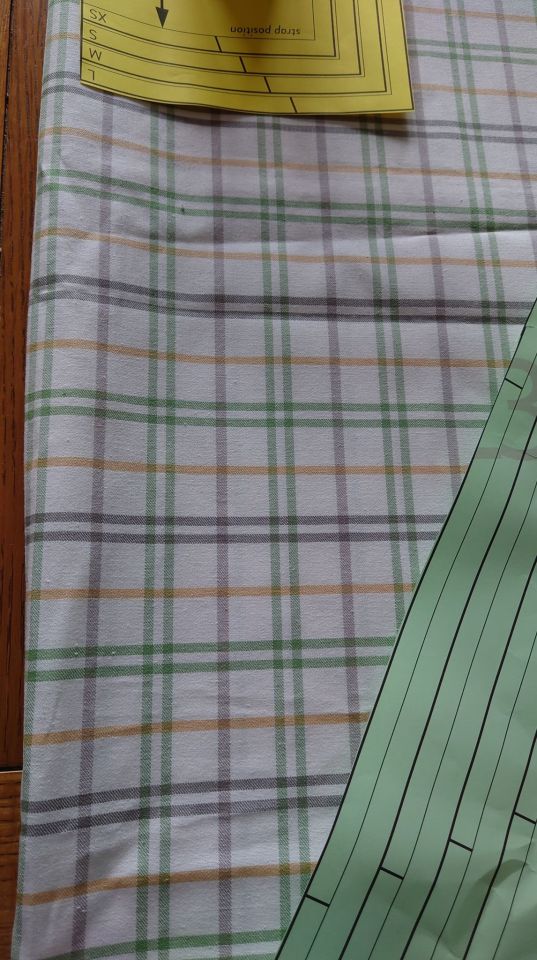
and it only takes 2 yards cutting on the LARGE size.
Now, I do have 2 yards of my Mood fabric, but I wanted to do a test first because I might not loooove this dress, but so far I'm super impressed. Also! I often find offcuts of fabric in my local fabric shop that are like, 1.5 yards and there WAS room to spare, so if you were to do the facings in another fabric, or contrasting pockets, you could easily put this together for super, super cheap. This fabric was in that bin, and it's 2 yards, and it was £6. It's not super super thick, but it has a stiffer, heavy feel with a crisp drape.
BUT!
I'm most impressed with the directions. I'm used to the big 4 patterns where the directions are assuming you know things. They'll have things like "insert the zipper" as step 7 and if you've never added a zipper, thats... not an easy thing.
These instructions are so clear, with line drawings explaining. Hell, it ever showed different options for top stitching and under-stitching which I've never seen explained, showed how to correctly iron on your interfacing, explained HOW to finish your inside seams with images and giving 2 options (overlocking or zigzagging). The pattern itself has the cutting AND sewing marks, shows how to transfer them over to your fabric... it even showed how to do tailor tacks (which I've been doing wrong!) and explained WHY each step was being carried out.
I swear, I may never buy another big 4 pattern again. If you want to start sewing, and you are nervous, I'd HIGHLY suggest this pattern. AND this isn't even the VERY EASY pattern. This is classed as 'EASY' and they also have two free patterns (for a pj set and a leather/ette bag)
It's pretty size inclusive - with most patterns hitting a sweet spot between XS and 2XL. It's not perfect, of course, but better than the big 4 most times.
BUT! I really do think this is a killer pattern and if you have a BASIC machine - you only need a straight and zigzag stitch, and if you use snaps you don't need buttonholes - and want to try something you can wear.... I think this might be for you!
But.... yeah, this is just a long post about how I think people should try sewing and how this might be the best way to start.
For me, the total cost of this apron dress, once finished, was:
2 buttons - stashed. I cut buttons off of all my clothes I throw away, and also pull off the zippers. Over the years it results in quite a collection, but charity shops also sell buttons. Just ask!
Iron On Interfacing - stashed. However, I know it's about £2 a yard. I didn't need 2 yards, but it's handy to have, so if you are buying it, get a yard! it's so useful, and most patterns require it at some point.
Fabric: 1.8 yards for Large. 1.5 for XS. I'd suggest going for a thicker fabric for this, which is more expensive. HOWEVER, I'm also a HUGE proponent of using what you can get, and I actually think the fabric I'm using is for curtains! If you see a nice pair of curtains in a thrift of charity shop, you can use them and end up with TWO dresses if you are careful with placement when cutting out! I spent £6 on this fabric, about 4 years ago. The only reason I remember the cost is that its written on the selvage in pen.
Pattern: I paid £17.00 for a PDF download, which included home printer A4 and US letter paper, store print, and instructions. I reuse my patterns a LOT, but of course, once you have it bought, you could just re-print it if you wanted to. I just like to feel thrifty.
Thread: I'm using cheap white thread on the spool and bobbin, I got in a multipack with other colours. I think it works out at like 50p a spool. Good quality Gutermann threads about about £2.50 for 250 yards, which is waaaay more than you'll need, so you can reuse it.
total: £23.50 for an apron dress.
I honestly think this pattern has a look of something you'd see with a much higher price tag BECAUSE it looks so simple. Like I can see GAP selling this for like £50 easy, just because it has a very... basic, staple, eco-friendly look about it. Like in a plain canvas, or denim? so basic but an easy staple you'd spend more on cause you know it'll get worn a lot.
As for time? I think it took me about 8 hours to make in total.
58 notes
·
View notes
Note
If you make mockups, what material do you normally use for them?
Hello, Thanks for the question! When it comes to mock ups I use two things. 1 - cheap cotton muslin. If I need a lot of fabric, say the 3-4 yards for hanfu sleeves and the skirt section. Color doesn't matter just cheap. When I did my original ones for fit, I kept the top and bottom separate.
2. - leftover from my stash - these were for less yardage, like the bust which is pretty form fitting. Most of my stash is 100% cotton. Several years ago I cosplayed Ogata from GK and he's got a military issue cloak for sniping. In that case I bought sheets from the college/uni section of my local Target. They were a more flowy and drapey material which gives a different feel and texture. Plus, you get 2 sheets in each pack which gives you 2 huge pieces of fabric. If you don't want to buy new cheap dorm room sheets, thrift them. I know my use of cotton for mock ups won't translate in the silk blends I used for my WKX project, but it really helped with the armscye design, neck line and sleeve shape. I eventually used some of the mock up cotton to line some parts that didn't need interfacing but a bit more structure. Once you figure out your most form fitting layer (in this case the zhong yi) you won't need to do another mock up for the layers on top. Good luck and I hope this helps!
47 notes
·
View notes
Text
Breaking down an outfit
Cosplay is fun, but the process can be pretty daunting, especially when you’re faced with a design that’s on the more... intricate side, as is the case with many Rune Factory characters. In this post, I’m going to break down Beatrice’s outfit and offer some suggestions on how to make it, which will hopefully make it easier to understand. I chose Beatrice because she has one of the most complicated designs, but I recommend doing this sort of thing with every cosplay.
Disclaimer: this is just my opinion, based on my own experience. Feel free to chime in if you have any other suggestions or ideas!

There’s a lot to unpack here.
So let’s get started!
I’m going to begin at the bottom.

Beatrice’s shoes and legs are pretty straightforward. I think it would be fairly easy to modify a pair of shoes, but honestly you could get away with a simple pair of blue heels without modifying them at all. I find that a lot of the time shoes aren’t even in shot, and even when they are they’re never the first thing you notice. It’s up to you, but I don’t recommend spending a lot of time on shoes that are so small and simple. If you do want accurate shoes, you could use foam and/or worbla to add the gold piece at the front, and cover strips of stiff interfacing with bias binding for the ankle loops. Alternatively you could paint the ankle pieces, which might get more accurate colours. If you want all the colours to match the rest of the outfit exactly, make shoe covers.
Beatrice is also wearing a pair of white thigh high socks, held up with what looks like a garter belt or pair of garters. You can quite easily buy socks with a similar pattern at the top, or if you want complete accuracy you could paint the pattern yourself. Garters and garter belts are easy to find on sites like eBay, though you will see some, er, slightly less sfw listings 😅
The skirt is where things start to get complicated so I’m going to look at it layer by layer.

Unless Beatrice is using magic she is definitely wearing some sort of undergarment to keep her skirt that shape, and I think it’s a hoop skirt. You can make a hoop skirt but they’re so readily available that I would just buy one. There are shops dedicated to making high quality undergarments and they are where you want to go for something comfortable and durable, however I used a cheap one from eBay for my Dolce cosplay and it was fine - not the most comfortable thing in the world but I wasn’t in any pain, it worked without any problems, and it’s still in good condition. Consider how often you’ll want to wear your cosplay and if you’ll want to use the hoop skirt again.

The next layer is a black skirt. You could buy one and alter the hem, but it would probably be cheaper to make one and circle skirts are very easy. The white line is probably embroidered but if you don’t have access to an embroidery machine, try using fabric paint pen or a fabric paint pen - or don’t add it at all, since it’s absent from her in-game portrait haha. For the gold decorations, you could paint them on with fabric paint, or glue gold cloth over thin craft foam to make them more 3D. I’d be cautious of using anything heavier because it might stretch the fabric.

Looking from different angles I don’t think the black skirt goes all the way around, it appears to vanish at the back, but I honestly can’t tell if that’s a design choice or just an oversight with the model. Personally I don’t think you’ll lose anything by having a full skirt, and you’ll need a full hoop skirt anyway. Just make sure the white layer comes down far enough to cover it.
Speaking of...

As far as I can tell, the white part of the skirt is made from two layers. The top layer, which I have outlined in red, makes up most of the skirt. It parts at the front and back to show the layer underneath, which I have outlined in green. This layer is mostly only visible from the front, apart from a single piece at the back. The small crosses at the points are most likely stitches, and the border is a hem.
To make these I would alter two circle skirts, using a template for the edges.
Side note - I'm not sure if the triangular piece at the front is it’s own layer, part of the red layer but outlined with stitches, or a single piece sewn onto the red layer underneath. What you do is up to you but I would probably pick the last option. Similarly with the small blue diamonds.
The ‘tails’, outlined in blue, annoy me 🙃 because on the 3D model they’re just sort of stuck onto the back?? It’s difficult to see but the corners clip over the pale blue layer. In my opinion (and like I’ve drawn), they should go all the way up and attach to the rest of the skirt at the waist.
They also have gold crosses on the inside layer that are visible from the front. You could make appliques for these, since they appear slightly raised, or paint them on.

The pale blue layer is a funky shape, but I think fairly easy to make once you’ve figured it out. I recommend using cheap fabric to make a mock up first. It also appears to be quite stiff, so I’d add interfacing for support. For the gold around the edges, you could use bias binding, cloth-covered craft foam or, to make them look truly made of gold, worbla.
This layer also seems to be attached to the dark blue layer by the gold pieces on Beatrice’s waist - see how the top of the skirt sort of disappears underneath them at the front and doesn’t reach all the way to Beatrice’s waist.

The dark blue layer consists of two main pieces that look like a pretty simple shape - but again, you’ll want to make a mock-up first to be sure it looks right from every angle. The only thing I think might be difficult is getting the pieces to sit like that - slightly raised with the underneath visible. Again I think you’d have to put interfacing or even wire inside.
As for the gold pieces on Beatrice’ hips, you could use worbla or foam clay. Draw an outline first on graph paper or similar and use it as a base to make sure everything is even and symmetrical. The circular gold pieces at the waist however will be under quite a lot of stress, they need to be either very sturdy or made out of something flexible, like foam.
Moving up again...
As you may have noticed, the white layer isn’t just a skirt, it’s part of the backless dress that makes up a large part of Beatrice’s outfit.

I reason I talked about the skirt separately is because you do not need to make these as one piece; in fact I’d advise against it because in my experience, single piece dresses don’t make for good, big skirts like Beatrice’s. The waist seam is hidden, and it would be much, much easier to make the skirt and attach the bodice separately. If you do want to make them as one piece, I still recommend making a mock-up out of two pieces to use as a base first.
Here’s how I would break it down:

Look there’s a reason why I don’t do fanart jsjsjs
Yellow is skirt, green is bodice, blue is collar.
The collar is a separate piece, and the ‘tassel’ on the front looks like it’s made of three pieces of sheer black fabric, layered slightly apart from each other.
The back and side are mostly covered up but here’s how I think they must look:

You could have the collar open at the front but I would be worried about it not sitting right. I think it would be easiest to have a fastening at the back since it would be well hidden by the hair and the fur. Speaking of the fur, that can easily be made with a couple of short strip, of black faux fur.
Back to the bodice.

I figure this blue layer has to be attached to the white layer or it wouldn’t stay up lol. Again this is a simple shape; the main question is how to get it on and off. You could add an invisible zip up the back but I think the best thing to do would be to add a fastening at the back of the neck - with the way both layers are constructed there’s enough room to pull them over your head.
As for the butterfly... this is one of the things I would leave until last. In fact I would consider not making it at all, since although it’s cute it won’t do much except get tangled in the wig. It isn’t visible from the front or back except from certain angles. But if you do make it, use craft foam sheets. Then it would be light and comfortable.

Beatrice’s sleeves are basically tubes - the bulge in the middle is caused by the fastening. You can find tutorials for flared sleeves online but in my experience they really are just a tube that gets wider as it goes down haha. Beatrice is also wearing white fingerless gloves, which are easier to make than regular gloves but still easy to buy.
As for their construction, they look like a full blue sleeve with a split black layer on top, and lace at the wrist. You could make the lace from white fabric, but there’s also plenty of lace available to buy if you don’t mind being slightly inaccurate. I’m not entirely sure if the gold pieces on the elbows are supposed to be actual gold that was made to look like fabric or just fabric. I think either would look good, but I would probably use cloth and/or foam for the ones on the upper arms because anything heavier might pull the sleeves out of place.
Last but not least, the hair and tiara.

I don’t have much to say about Beatrice’s hair, I think it would be pretty easy to style a wig and wigs in this colour are easy to find. I’d advise starting with a curly wig and straightening it at the front because I find curling more difficult than straightening, and you’ll want a thick wig - both to have enough hair to make the braids but also because pale wigs tend to be more see-through. As for the braids themselves, don’t be afraid of using lots of bobby pins and hairspray, especially to secure the ends!

Prop tip: trick for making good bows is to not actually make bows! Make the ‘wings’ and knot separately and sew them together, then sew it onto the wig.
They straight up didn’t model her hair ties properly but I suggest sticking the gold pieces onto gold ribbon - although to keep the hair in place you’ll want to use tight rubber bands first.
Now for the tiara. Unlike most of the other gold pieces it’s very thick and 3D. One method would be to carve it out of thick foam, adding layers where you need, and cover it with worbla. Another is to sculpt it out of silk clay. Either way, you should use a template to make it as symmetrical as possible. Also, it’s a good idea to attach head pieces directly onto wigs to stop them from slipping around and falling off.
You may be able to buy or commission fake crystals, or you could make them yourself. The obvious method is resin casting, but hot glue is a cheaper and (relatively!) safer alternative.
For the lil wings, I’d say don’t use real feathers because imo they never look that great haha. Instead, make layers from sheets of craft foam and paint them white. Beatrice’s tiara wings probably aren’t made with real feathers anyway.
And there you have it! This outfit will never be exactly easy to make, but I hope this post has made it easier to understand. All of the tips and techniques I’ve mentioned can be found in more detail online, but as always, feel free to ask any questions!
44 notes
·
View notes
Text
Sewing adventure time!
I want a big elaborate witch hat and I refuse to buy one when I've got all that fabric sitting in my basement. So!
I got my head measurement (22in) and using math (2πr) found the circumference (3.5ish in).
I'm using some stiff felt interfacing because I've run out of buckram and don't want to buy anything for this

Cat
Anywho, I used the ruler to draw a circle for my head hole, and the brim of the hat

My head hole was too small because i stuck a pencil through the hole on the yardstick and used that to draw my circle, and the yardstick hole is about a half inch from the end. Whoops. So I extended the head hole by a half inch

I didn't cut out the center, instead cutting it like a pizza. This will make it easier to attach the brim to the cone in the future.

I ironed back the pizza slices and gave the whole thing a good coat of starch and put it flat to dry. You can see that I still haven't entirely picked up from where I did my laundry room floor whoops

For fabric, I'll be using this scratchy wool for the outer, and then I'll do a fluffy inside using this green shantung from silkbaron (Luna, like the moth! Don't rake your leaves!). It'll be like a bonnet lining, like one of these guys

Need to make a cone (easy, I make hennins for SCA all the time) and uh an outfit to go along with it. I'm thinking a pleated skirt in green (because i have it and need to use it), a button up shirt, a vest using this pattern

Which I got ages ago and haven't used yet
And some sort of jacket
I think something in the style of a happi might be cute... I've got some brown wool I could use, maybe a tweed, and I'd line it with a shantung or dupioni
Or maybe I could use fur; I've got a bunch of scraps from the old coats I tore apart for my big old SCA 1470s Italian cloak. Hmmmmm decisions decisions
#sewing adventures#id want to use red fox but i think i only have silver in my stash#oh! ive got some mink too#hmmmm
3 notes
·
View notes