#i need pen display just so i can draw like this on pc
Explore tagged Tumblr posts
Text
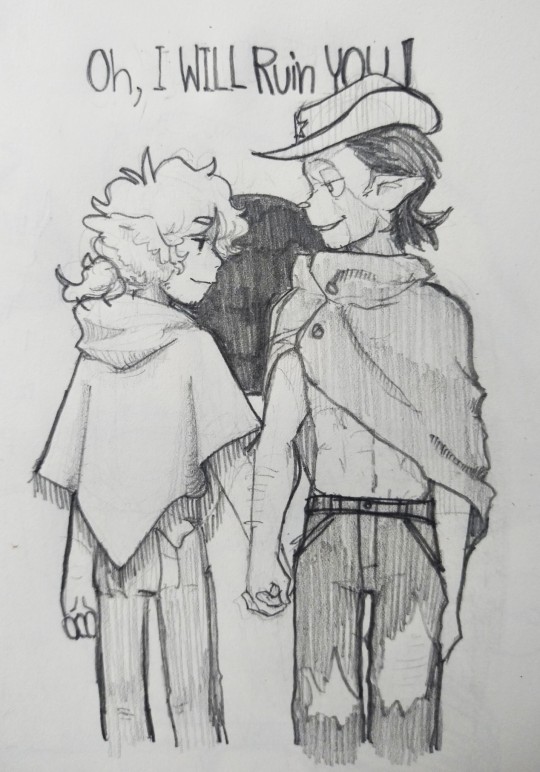
you have no idea how many times i listen to tongues and teeth
#trafficblr#grian fanart#grianmc#mcytblr#grian#hermitblr#desert duo#gtws fanart#gtws#goodtimeswithscar fanart#3rd life#mcyt fanart#pencil drawing because yes 😁#i need pen display just so i can draw like this on pc
171 notes
·
View notes
Text
Flag Making Tutorial
This will be a more technical step-by-step tutorial on how I make my flags (also a long post because I wanted to be thorough, plus I love flags lol).
The program I use is Inkscape, a free vector (.svg) editor program for pc.
I have templates set up, so the actual flag making process is pretty easy/quick.

Hotkeys/Locations/Other Reference
I'll be mentioning these options, so I thought to put them here all in one list. (They list the keyboard shortcuts first)
Snapping: magnet symbol (top right of screen), or under the adjacent arrow ◀️ symbol.
Document properties: shift+ctrl+D, or under the file menu (top left corner of screen). Display (1st tab) Guides (2nd tab) Grids (3rd tab)
Fill and Stroke: shift+ctrl+F, or under object (top of screen).
Layers and Objects: ctrl+shift+L, or under object (top of screen).
Align and Distribute: ctrl+shift+A, or under object (top of screen).
Import (Images): ctrl+i, under the file menu, or by dragging into the Inkscape window.
Save As: ctrl+shift+S, or under the file menu.
Export: shift+ctrl+E, or under the file menu.
Selector Tool: S, or cursor symbol (left side of screen). Click, or click and drag around the objects, to select them.
Locking a selection: lock symbol between the width and height boxes at the top of the screen.
Transform Selections: the width/height and x y position can be changed by typing in the X,Y,W,H boxes (near top middle of screen), or by dragging the corners/edges (resize) and inside the object (move).
Duplicate: ctrl+D.
Delete: delete key, or right click on the object.
Node Tool: N, or below the selector tool (left side of screen).
Rectangle Tool: R, or square symbol (left side of screen).
Pen Tool: B, or pen symbol (left side of screen).
Gradient Tool: G, gradient square symbol (left side of screen).
Mesh Tool: swirly square symbol (left side of screen).
Dropper Tool: D, or dropper symbol (left side of screen).
Undo: ctrl+Z.
Redo: ctrl+Y.

Creating the Template
Download Inkscape and open it, under the Time to Draw tab, click New Document.
First, snapping needs to be enabled, and under advanced mode enable grids and guide lines snapping. (This is crucial for making the stripes equally sized, spaced, and the overall flag in the right ratio.)
I'll be making a template with a 2:3 flag ratio.
Open document properties. (I like to move these types of windows to the right side.)
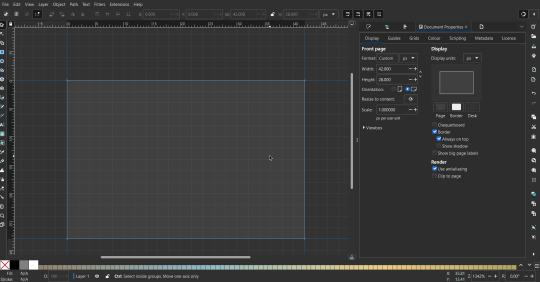
Under display, set the width to 42px and height to 28px.
Under guides, just click create guides around the current page.
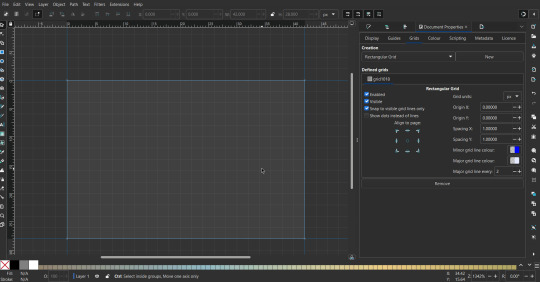
Under grids, make sure rectangular grid is selected, and click new. (Grid units should be in px.) For the major grid line every option, change it to 2. (I also prefer to change the minor grid line color to be transparent.)
That's pretty much it, your template is done :D ! Just save it wherever you want. I like putting it in an easy-to-access flag folder, as it is needed to open it every time to make new flags.

You can use a different width / height / grid size / flag ratio if you want, these are just the numbers I'm comfortable with / used to.
Also, since this is a vector, the image can be infinitely big or small without any quality loss, so the small dimensions above don't actually translate to a low res image.

Creating the Flag
(I'll be using the rainbow flag to demonstrate.)
Start by having the template open.
You can import images (like .png/.jpg files) to color pick / reference if you want. Said images can be transformed (resized/moved) by selecting and transforming them using the options mentioned in reference. (This is optional, they should just be off to the side so they don't get in the way.)
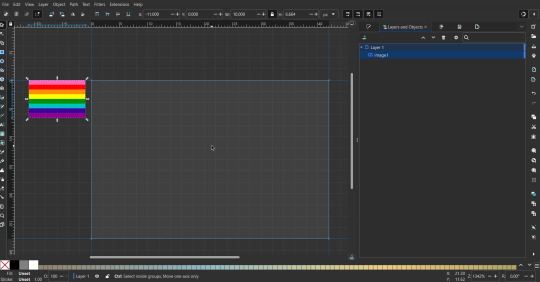
To create the stripes, use the rectangle tool. Click and drag from one grid corner, to a lower grid corner.
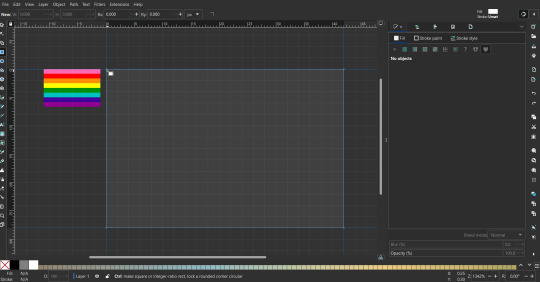
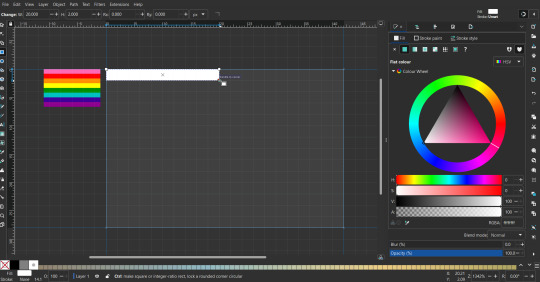
While the rectangle is selected, use the dropper tool to pick a color from a imported image. You can also use the fill and stroke (shown on right) tab to create your own colors / edit colors / etc.
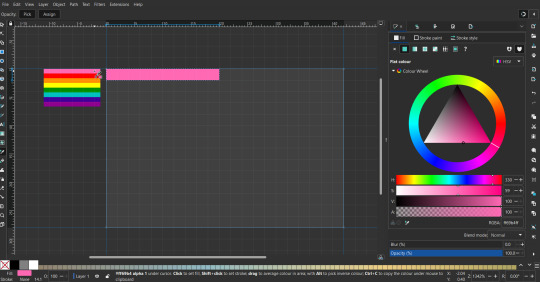
You can make these stripes however you want, they just need to all be equally sized. (They don't have to all have the same height, if you intentionally want that (like the demisexual flag for example).)
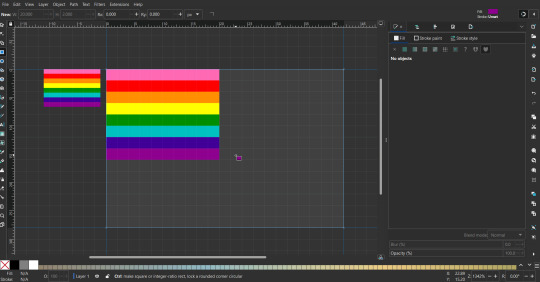
Then select all the stripes and transform them so that they fit the page.
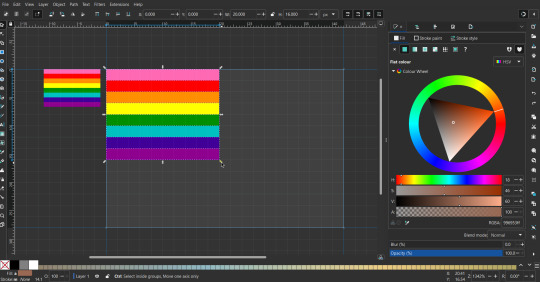
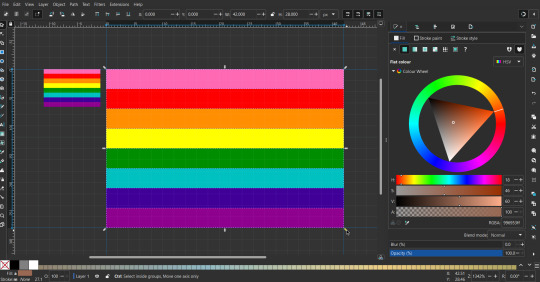
All that's left is to save/export it.
To export it, use the export tab, under single file, page, adjust the width and height (in px) to however high res you want your image to be. (I usually do 3000 by 2000.)
Type in the desired file name in the box next to the folder symbol, use the folder symbol to choose its export location (which can also be used to determine the file name and save/export it), the adjacent drop-down-menu to select what to save it as (,png, .jpg, .svg, etc.), and the gear symbol to adjust other settings (I leave it as default, with antialias turned off (set to 0)).
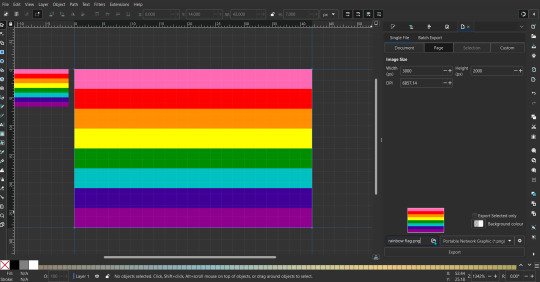
And done, you've made a flag :D 🏳️🌈

Extra Notes
Layers and Objects: a menu that can be used to manage objects. Like their layering position (whether they are above or below another object), and other options can also be done here instead of with keyboard shortcuts.
Vertically striped flags: it's very similar to above. You would just make the rectangles taller rather than wider.
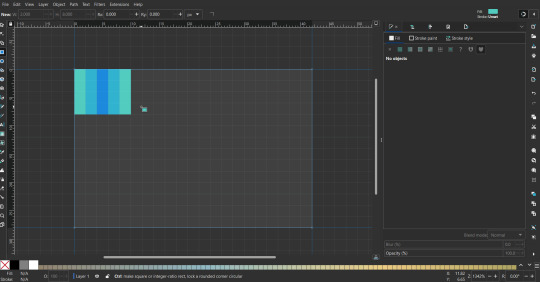
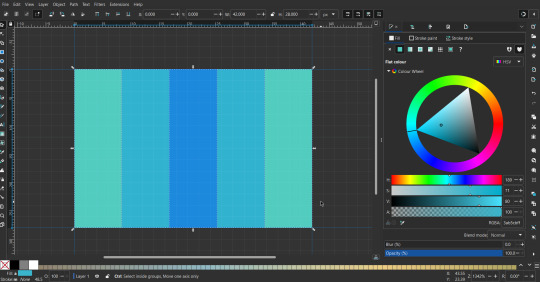
Wavy stripes: first use the pen tool to create zigzags. (The pen tool works like a outline, so just click along the grid corners, and join the line at the end. The fill and stroke menu can be used to make it a solid colored shape, and remove/add outlines). The steepness/frequency of the zigzags is up to personal preference, they just need to extend off the page a bit. To create equally sized wavy stripes, have the all side lengths (highlighted in red) be equal except (depending on how you draw your zigzags) the first or last wave, which should have half the side length of the others.

Select everything, and with the node tool, select all the zigzag nodes (the corners don't need to be selected), and click make selected nodes smooth (half circle with point in middle symbol, at top of screen). (It'll likely look like it has weird lines in-between the waves, see glitch section at the end for how to fix that.)
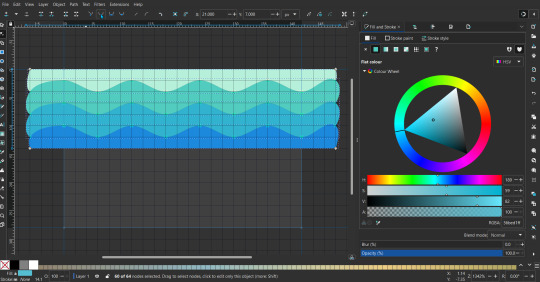
Then resize it all to the height of the canvas. And done :)
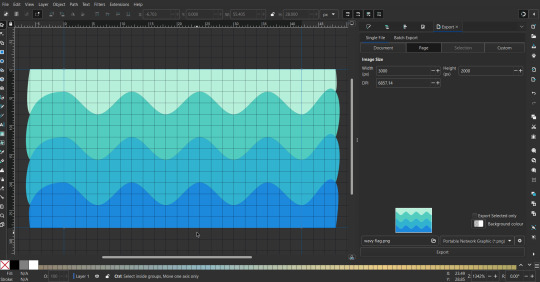
This can of course be vertical too.
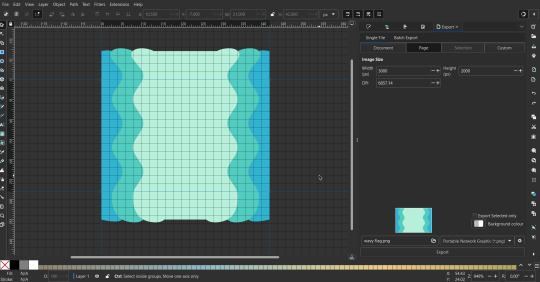
Gradients: You can use the fill and stroke dialogue, gradient tool, or mesh tool to do this.
To create the gradient, select the object, click the linear gradient symbol (gradient box) under fill and stroke. Or dragging / double clicking with the gradient/mesh tools. (The mesh tool is what I used to create the square gradient.)
To change the colors, click on the arrows or circles under fill and stroke, or by clicking the points on the shape, to select the nodes. Then use fill and stroke to change the colors.
To create new colors/stops, click on the plus+ symbol under stops (under fill and stroke), or double click on the gradient. Edit the new colors in fill and stroke again.
To change the location of stops, use stop offset under fill and stroke, or drag the nodes on the gradient. You can also move the end points on the object to make the gradient slanted or vertical.

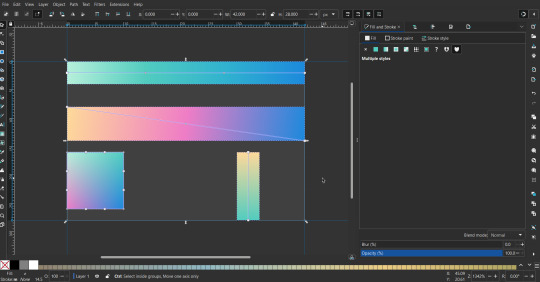
Symbols: I make my own when I can (like the demi- triangle can be drawn with the pen tool, and resized to the correct proportions). When the symbol is too complicated, I import a .svg of it. Wikimedia commons is a great resource, and the popular twemoji comes in .svg format too. You could also edit it on over the .png in a rastor program if need be.
The align and distribute tab can be used to center symbols (or any other selected object). Select page for the relative to option, and use the symbols underneath to center/align it however you want. (You can also use different relative to options, like last selected, if you want to align it to an object instead.)
Deleting imported reference images: you can do this before saving it as a .svg, if you don't want to keep them / want to clean up the .svg file.
Antialiasing: an option that blurs things basically. A image with antialiasing off will be sharp pixels, while a image with antialiasing on will have transition colors between the main colors.
Below is an example. The left side is without antialiasing, and the right side is with antialiasing.

I can see why it might be preferable to have it on (like for diagonal shapes), but antialiasing can make recoloring .png (not .svg) files hard. The extra different colors messes with fill tools. I also think it looks cleaner without, so I prefer it off.
Exporting glitch: sometimes an exported image will have a thin line between the stripes, despite the fact the stripes are perfectly next to each other. (This seems to not just be a problem with Inkscape, but with vectors in general.)
Below is a zoomed in example of what it'd look like. The left side shows the stripes are all next to each other, but the right image has a transparent line in-between the stripes.
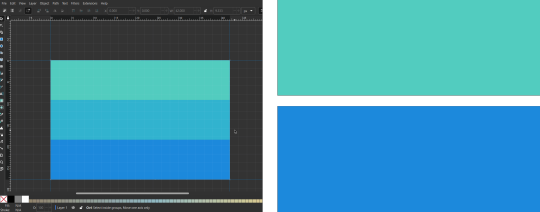
This can be fixed a number of ways.
You could select all the objects, and duplicate them twice.
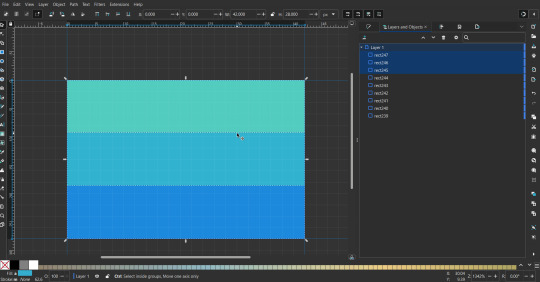
Or overlap them. The stripes will still be the same size when overlapped, but they will technically be behind each other, so there will be no gap.
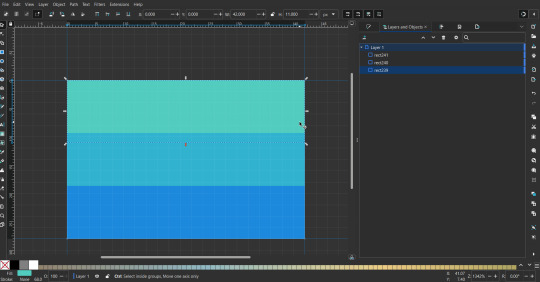

With all the different stuff mentioned, you can basically think of them as building blocks with the grid as reference. They can all be mixed and matched together.
I didn't mention all the options, just because there's that many different things you can do in Inkscape. I'd encourage you to play around with all the different options/tools yourself.
There's also some great Inkscape guides on YouTube, it's where I learned how to do a lot of this from (even if they're not for flags specifically, the concepts in those videos can be applied to flags).

Here's an overly elaborate flag I made, just to demonstrate some (but not all) of the things that can be done.

Anyways what a long post haha. But maybe this will be helpful for anyone interested in making (pride) flags.
209 notes
·
View notes
Text
ok so its been more than a month since my graphic screen is arrived and bein used almost every day for 6-12 hours its time to do a lil review under the cut
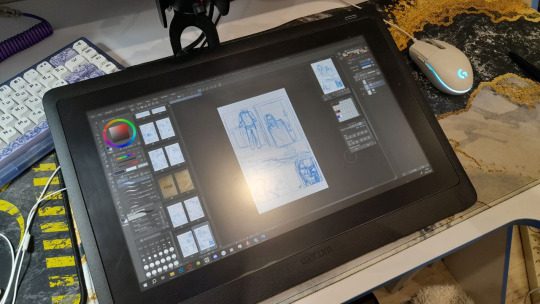
(obligatory warning for longreads my english is a crap and yada yada) my bby boaris (kabanchik) cintiq 16'. (old one from 2020) I bought the tablet for a loot of reasons, Very Reasonable ones and not so reasonable too LMAO. Earned money with blood and sweat (literally💥) ANYWAY. Tablet's size is perfect for my needs, not way too small, not way too big, the screen workspace is the same with my old laptop (give or take few mm) This cintiq isnt from manufactor, its used before tablet from someone else in 'from the assembly line' condition. As soon as tab arrived i immediately ordered a ptotective film to prevent the appearance of The Hole. You what im talking about.
I was afraid that it would be extremely inconvenient for me to work with it and that the purchase would generally be unsuccessful, because before ONCE IN MY LIFE 7 yrs ago i had an experience w cintiq 24' and it wasnt really comfortable then. AND i had always used a regular plain tablet. BUT NOOOPE everything is PERFECT and i love it.
PROS!! - brain loves to see what u are actually drawing. Its easier to control every single move and stroke therefore it drastically buffs your skill. The progress of it development i mean. U have to get used to it. the tablet itself wont give u a 'make my skill insane button' u have to WORK ON IT obviously. (says the one who've been stuck in cps for a month straight OUGH) - it works as another monitor. so u can do whatever u wish using two of them. or u can just buy random tablet screen and use it as a SINGLE monitor lmaooo. -doesnt overheat (my main display overheats noticeably thank god i dont need to place my arm over it). -uses one single thicc cable which divides into three at the end (usb hdmi and power cables) - thin, from 1cm to 1,5cm +-, wheights somewhere 1,5kgs, has small stand legs which gives it ahh +- 30 degrees tilt angle. U can travel with the tablet but it needs pc or laptop to be connected with. -i havent seen its guts but i bet the circuits are...fine... i hope so.. at least if it wont overheat then the circuits wont burn down.. makes sense.. yeah.... -I also didnt notice any problems with drivers or connection for this month. u just turn ur pc on and ready to go.
CONS. - ur neck is bout to die if u gonna work like me cuz its tilt is only 30 degs (u can buy a normal stand tho. or a monitor bracket and stop torturing urself). SHRIMP POSTURE CHEEEECK. - it doesn't have buttons like my tablet had. Its a taste preference honestly. for someone its a pros for me its a cons. EASILY COUNTERS BY it might seem crazy what im bout to say A KEYBOARD. you just need to get used to it. again. - should i even mention the price? ofc its a con. since mine is a former usage one it was a lil cheaper than usually. but I knew what I was buying ((WACOM)) so i aint complaining now. - small really small con: sometimes cps wont react to pen button clicks but ig its even a program problem than tablets (easily counters by pressing space button one time). its really just a biiit annoying and nothing special. It works great all of the time. - THE PEN TIP WEARS OFF WITH FIRST COSMIC VELOCITY. ig its affected by protective film (its matte). counters by TITAN PEN TIP (plus now its a weapon if u are brave enough) -due to its protective matte film there is a small insignificant diffs between two screens but its not really this big. At least between mine displays. Diff btw my old laptop screen colors and tablet is fucking HUGE (lap is a 12 yrs old veteran have some respect🙄) - OK OK OK LAST LITTLE NIGGLE. Since I play shooters like valorant and...cs.. and move my hand powerfully across the table, I HAD to look for *that very specific place* for the tablet so that everything would be perRRRFECT by millimeters (ocd moment)
notable mention that takes a special place in my heart

wait while we talk to your displays 😥😥😥😥 omg..... cried....died.... my sons...
thats all i can say for now
8 notes
·
View notes
Text
drawing apps/softwares---my experiences
[part 1] || from a pov of a user but not a pro
☁ photoshop
✧ pros:
blending modes it is available & easy to navigate! holy grail feature luv this for adding some textures & filters layer effects & styles very helpful & easy to use *press F7 to show layers on your screen shortcut keys default keys working & easy to memorize I find its shortcut keys the "universal/standard" as SOME are applicable to other adobe software and other drawing software as well brushes easy to import (any brushes in ABR file), can download from any website for FREE (ofc better brushes can be bought online), if you want to make a custom/personalized brush, you can create your own! I tried this and it is very easy, there are useful tutorials on yt (ofc its FREE! yes, I love everything that is F R E E !) warp/skew/distort/perspective YES, these are available in ps! that's why ps is the GOAT makes our life easier! i luv these features! can use these for retouching text i love how you can choose the font you want and filter them from sans serif to serif fonts--oh! and also other classes like handwritten, monospace, decorative and more you can also write inside a shape (any shape) and the text box will follow its shape. VERY VERSATILE INDEED PS. I insert texts for watermarks and labels for my drawings if you're wondering pen pressure settings you can adjust pen pressure settings on ps as well
there are more features that I love about ps but some are more into editing side. So far, here are the good points I like about ps when it comes to drawing
✧ cons:
experienced lag I don't know if it is just my old drawing tablet (a graphic tablet) before but when I increased my paper size, strokes of my pen is lagging in which caused me to switch to other drawing software well, I tried using it again but with my pen display tablet I bought recently and it works fine now! complicated for non-techie person i've been using ps since 2018 so I am much familiar to shortcut keys now and its basic tools but my friends using it the first time are having a hard time so I think it's a complicated software for non-techie people & beginners and if you'll just use it for drawing software size i checked mine, its about 6GB on my pc ps needs a pc that could take its huge file size
I love ps, and its versatility. you can do a lot of things here and if you master using its features, I bet you'll be unreachable!
storytime:
before ps, I used photopea website around 2015-2016. (photopea.com) it's an online version of photoshop but this doesn't have recovery files so if your computer lagged and exited its tab, you're DEAD. Although it has peadrive/onedrive/googledrive you can access for storage (I'm not sure). I haven't tried this using a drawing tab. Moreover, it's a good alternative for ps and helped me a lot for my projects during high school. I checked it today and it's still available!

see! this also have a layer styles like ps!! try it if your pc can't run ps this also supports psd, gimp files, raw files, ai files & moree!!! luv it!
--------to be cont. for part 2 ^^meow
0 notes
Text
NOELS ✷ SHE/THEY ✷ VIET-AUS ✷ 21+
hello hello welcome to my silly little blog where i draw on a highly irregular basis. you can call me noels ( see post ) ! i'm an interior architect most of the time but i like to do art as a hobby. expect mainly witcher books, black sails & other fantasy fanart ! find my other socials & shop links on my carrd linked below.
art tag / wip tag / carrd / ko-fi / more info under the cut
✷ FANDOMS ✷
▸ main fandoms : the witcher ( books + games ) & black sails. ▸ other fandoms : disco elysium, critical roles' mighty nein, rdr2, lord of the rings, la casa de papel, pushing daisies. note : i am not a fan of and am highly critical of n*tflix's witcher series, relevant posts will be tagged #twn critical. do not tag any of my witcher art as ships unless i have labelled it as such.
✷ PROJECTS ✷
▸ freedom in the dark : a black sails fanzine ( page artist ) ▸ as a crew : an ofmd charity fanzine ( page artist )
✷ FAQ ✷
▸ what programs / tools do you use ? i mainly work in adobe photoshop cc, using a huion kamvas 16 (2021) pen display. ( current brush ) ▸ can i use your work for my ___ ? – icon / banner : yes, as long as it is not someone else’s commission. ask if unsure. you must credit me in your bio / desc / pinned post. – phone / pc wallpaper : yes ofc, no need to ask ! – rp faceclaims / graphics : character-dependent, please check with me first. ▸ are you taking commissions ? no, my commissions are closed indefinitely for now. this is mainly due to my fulltime job taking up most of my time so i'd like to focus on personal art in the little spare time i have. for friends & mutuals, i am willing to take on limited commissions if i have some downtime – just ask ! ▸ do you take requests ? not at the moment, but i may from time to time ask for some. i don’t mind the occasional suggestion though ! ▸ do you do art trades ? mutuals preferred, but dm me ! it will ultimately depend on my current workload ▸ do you mind if i like/reblog a lot of your posts at once ? like / reblog spam to your heart’s content !! it doesn’t bother me at all :)
LAST UPDATED : 20 MAR 2024
#new pinned !#✷ MOBILE TAG NAVI ✷#nohtora art#nohtora wip#nohtora updates#answered#art asks#nt speaks#others' art#✷ ART BY FANDOMS ✷#the witcher#black sails#rdr2#lcdp#disco elysium
36 notes
·
View notes
Note
If I may ask do you use a tablet, or pc when you do digital art? What app do you use? I’m looking to get into it myself and I just don’t know which things to use??
Thank you!
Hi friend! You've chosen a long but very fun and gratifying journey 😌
The short answer is: I draw on a display tablet (this one) and I mainly use Photoshop (for sketching and linework) and Paint Tool SAI (for rendering).
Here's the long(er) one:
Way back in the beginning, I used to draw with a mouse, then I got a 2-in-1 laptop (Toshiba Tecra M7), then a non-display tablet, and finally switched to XP Pen's display tablets.They're much cheaper than Wacom, and while I can't compare the two fairly (as I haven't used a Wacom), in my experience the XP Pen ones are well worth their price and they have everything I personally need. There are other brands to consider as well, of course (Huion comes to mind! One of my friends has it and I recall them being happy with it).
But even so, display tablets are still kinda pricey, so other options might be worth exploring if they're out of your price range for now. I wouldn't suggest drawing with a mouse if you can help it, but I found that non-display tablets are very intuitive and easy to get used to, so they're a great option to try out.
There's also those bigger iPads some of my friends draw on, but I've never used one so I can't really say much about it.
As for software, my chosen method is more a case of me being used to it than it being convenient (it's really counterproductive, actually 😂). There are many programs that I've heard good things about, Clip Studio Paint being the one almost everyone seems to be loving on these days. There's also Krita (I very much enjoy this one, and it's free!), Fire Alpaca (also free), GIMP (free), Procreate if you're drawing on an iPad...
In the end it's all about finding what's best for you personally. I highly recommend trying out whichever programs you can get your hands on, to see which one is more intuitive and comfortable for you, and when it comes to hardware, the most important thing, imo, is that it has good pressure sensitivity and minimal parallax in case of display tablets. Tilt sensitivity is nice to have too, but I spent years drawing just fine without it and I barely use it on my new tablet that has it.
If you have a store nearby that will let you test non-display and display tablets to see how you feel about them, do absolutely take them up on that.
OH! And if you do end up getting a display tablet, it'll almost certainly come with a drawing glove (to minimize friction and smudges), but I find them kinda uncomfortable, so I use SmudgeGuard 2. It's durable, fits like a glove (ha!) if you measure your hand correctly, super comfortable, very stylish 😎
I hope this helps at least a little! Lemme know if you have any other questions, I'm always happy to answer whatever I can 💜
25 notes
·
View notes
Note
I was wondering what tablet you use? I'm trying to get back into drawing but I have zero clue what tablet to use
[Updated 2022] I'll ramble about what I have, and a few reasons why I use each one, and maybe that'll inform your decision a lil better.
short answer: get something that fits your budget, use it for a while, get a second one if you realize the first isn’t very ergonomic for your needs.
Very Long Answer under the cut, because tumblr enables me quite splendidly
Tablet with Display. Drawing purposes. For me that’s the Cintiq Companion 2 but since they are no longer in production, feel free to look up your preferred specs within the cintiq line, or purchase a Huion/other company display tablet for less; brand doesn’t matter as long as it works. Pros of being able to see what you’re doing: more confident putting down strokes, more intuitive. Cons: depending on setup your head/arms may be at a strange angle
One small no-display tablet ($60). A staple. Mine in particular is a Wacom CTH 470 I got in... 2011? I've shoved at least 15k hours on this. Would absolutely go into a period of mourning if this ever went out on me. ANYWAY the reason I like this is because it pairs really well with a monitor setup for optimal ergonomic sitting. Your head can stay level as you work. Having a no-display tablet also works well for my vectoring work in adobe illustrator. I have touch sensors deactivated so it only tracks my pen; this is very helpful for making sure the program doesn't make errant marks. I have hand issues (developed last year, after multiple years of drawing all the time) that put me in a lot of pain if I am at a Bad Angle for long enough. I would absolutely rec setting up at least one workspace with Optimal Ergonomics to preemptively not have to go through the crisis of "what if my body can't do my livelihood" and the physical therapy and so on. Doesn't have to be this one; just whatever works for your body. Downside for non-screen tablets is that the learning curve is steeper initially.
iPad Versatility and size. Can be used for many things/good for travel. It’s very light and the procreate default brushes are VERY GOOD at simulating traditional media. People can use it as their main computer depending on the requirements of what they do. Definitely a thing many artists use; I have not bc I got used to photoshop & PCs; when I travel I go with a laptop & a sketchbook.
Cheers, have fun, there goes the info
31 notes
·
View notes
Photo
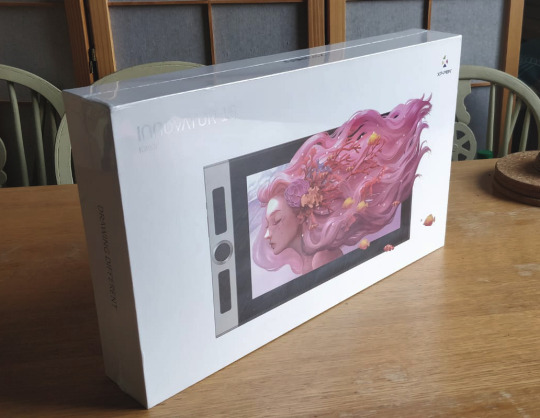
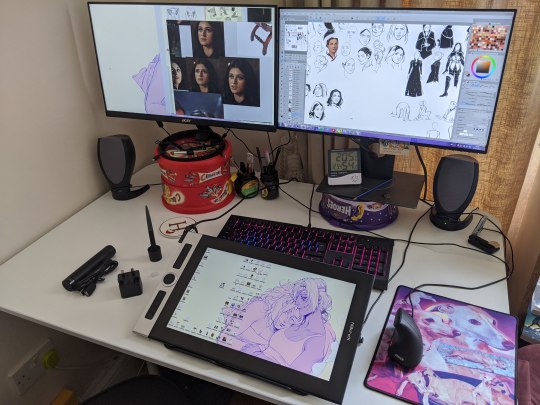
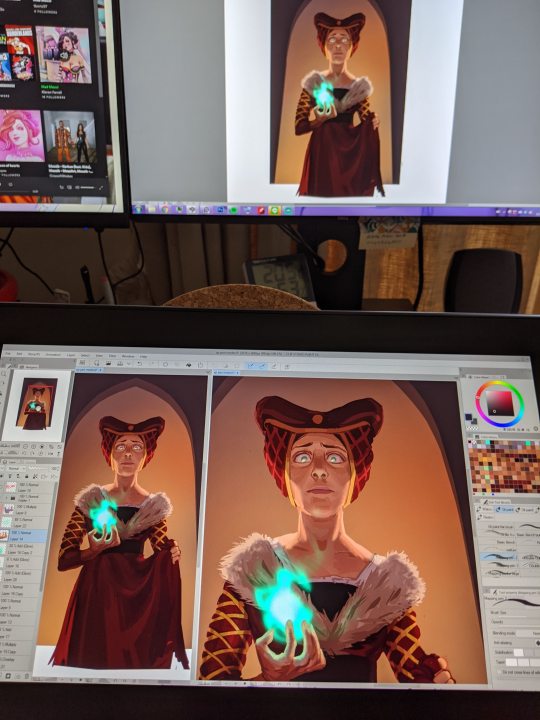

So @XPPen sent me their new pen display tablet to review! It’s the new Innovator 16 (https://xp-pen.com/product/638.html) with a 15.6 inch display.
Full review under cut with more pics!
First off my only regular use of this type of drawing on display is my 12.9 ipad for travel and the occasional go on a cintiq or yiynova in the past so im no expert with pen displays, I work with a wacom intuos pro on the daily.
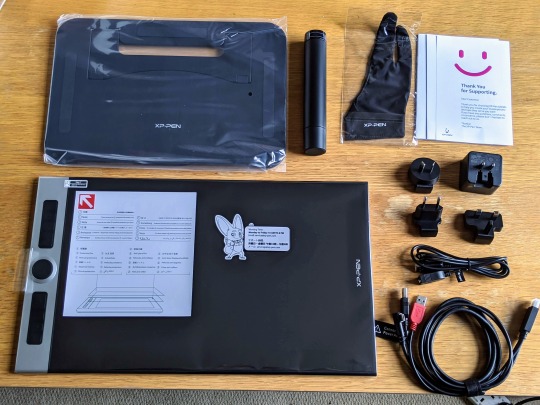
image above shows everything they include in the box, they include a power block (and every converter) but if you have the USB space you can run it purely off your pc (2 USB and 1 HDMI port) which was so smooth and lass faffy then needing another plug.
side note i love the travel pen holder w/ nibs, it sucks when my pen gets dusty when i chuck it in a pencil case to travel.
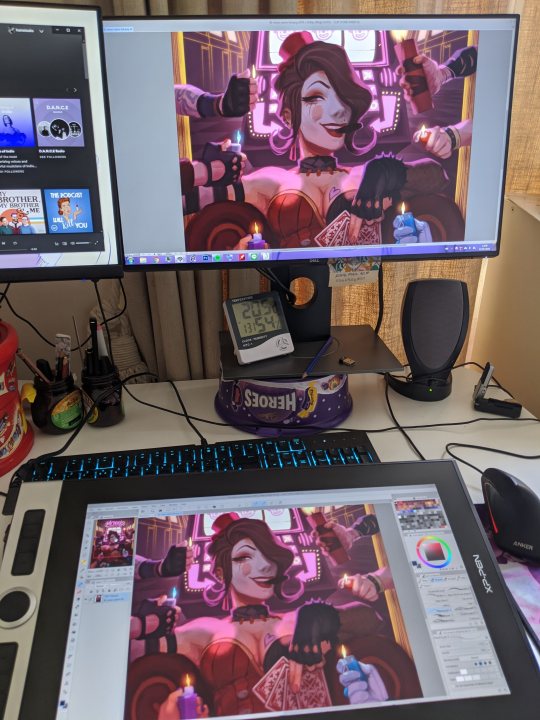
The screen is really nice to work with its a 1920 x 1080 pixel size with a screen 13”9 x 7”10 with makes the ppi just over 140 which didn't make me feel like I could see every single pixel on the screen. I also liked the physical size, it didn't cramp my desk nor my drawing, my UI wasn’t 5 miles across the desk. They have actual stats about the colour profile on the product page but all i can say is the colours were loooooovveellyyyyy on my eyeballs.
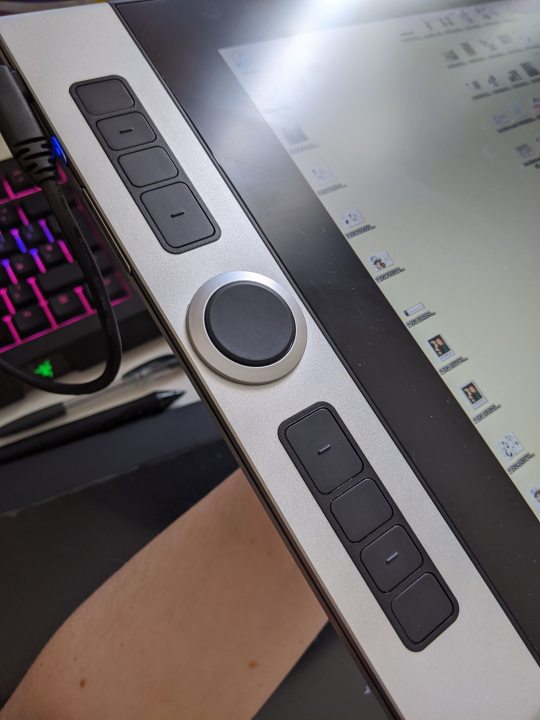
The tooth on the screen is great, v similar to a paper texture ipad cover, the wheel supports two settings (one on the black (virtual), one on the outer silver (mechanical) and the buttons have notches and size differences to tell them apart under your fingers. (I dont use hotkeys on tablets, too many buttons to map and my intuos's are all taped up bc i kept spilling hot drinks on them while i worked, which i ALSO accidently did with this xp pen tablet with coffee and it survived!)
next thing is the size, this thing is /THIN/ its 9mm wide yet feels super solid and that's what really struck me when i first lifted it out of the box. I'm on Win 7 (I KNOW) Clip Studio and installation was a dream I just plugged it in to my pc, downloaded & installed the drivers, restarted once and I was good to go. (they said you should remove all other drivers before you install theirs but i forgot to uninstall wacom’s and it was fine, its unfortunately incompatible with wacom’s and you cant have pen pressure on both only the xp-pen when both are installed)
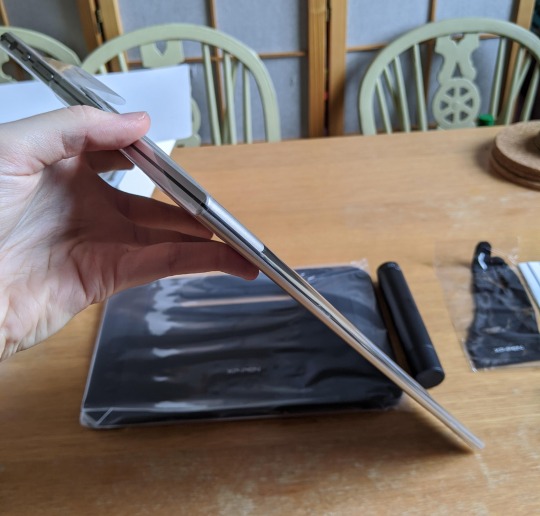
There's slightly more parallax on this than the ipad but wayyy less than older display tablets that i've used and it didnt get in the way of my drawing, also no lag that affected my drawing.
main con for me is the lightest pen pressure, it doesn't pick up the pen when you drag it across the surface of the screen using only its own weight pushing down unlike my intuos, this did affect my sketching since I work very lightly. (i'm only using the stand they provided here) (Video link to example of what i mean)
If you add a little bit of pressure it picks it up fine but it gave me the feeling like my pen was skipping the beginning of my strokes. The pen is a little lighter than the wacom one and this almost felt like it might be solved with a heavier pen? I got more used to this as I drew with it over the day and didn't affect my painting and it’s def something you could get used to over time.
I spent all day with it yesterday and rigged a somewhat ergonomic stand with the one they give you which is sturdy and travelable but not a good angle or height for long period of drawing (oh for the day tablet producers ship their products with good stands) I worked on it for about 8 hours and it never got hot.
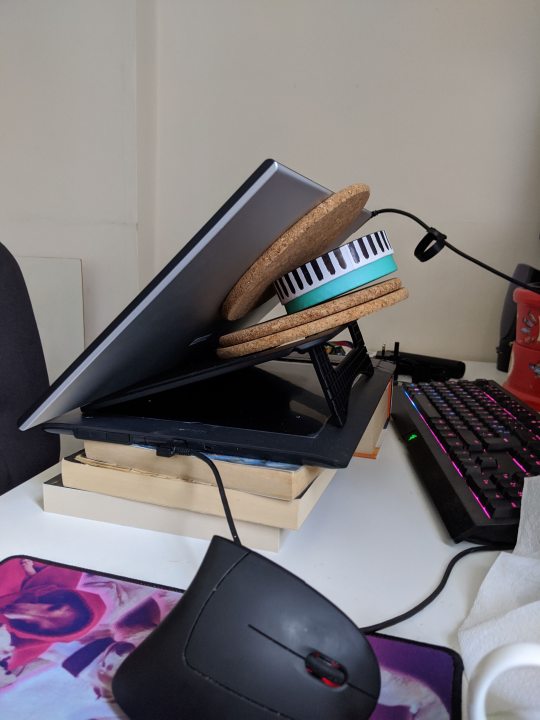
Overall I'm really impressed with the tablet, it eliminates a lot of my past gripes with pen displays and I think if you like working with them, it's currently £449 ($499) in their stores which i think is great bang for your buck with this.
US: https://bit.ly/3eUWbax AU: https://bit.ly/3iAfiZY SEA: https://bit.ly/3gjfCdB UK: https://bit.ly/2ArL1v8 EU: https://bit.ly/2D5uZIg
583 notes
·
View notes
Note
Hi! I love your art and hope that you’re doing well 😁♥️ I thought I would send this ask since you’re up for talking♥️
I know that you use Procreate so you do your digital art with an iPad and Apple Pencil, but I was wondering if you’ve ever used any other means of drawing digital art before you moved on to more expensive products like an ipad? Like a pen display? I have a pen tablet but I find it hard to use because it feels impossible to track my eye on the screen to where my hand is lol
hi!! so i started out years ago drawing digitally with just a mouse actually! i drew in ms paint (the old school one) ugh 😪 i was too poor for a graphics tablet, until someone gifted me a huion. i havent stopped using huion tablets ever since. so basically from a young age ive been training my hand/eye coordination to draw while looking at a screen, which makes drawing on a screen pretty difficult for me, i still struggle with the ipad ���� there is definitely a learning curve either way. luckily there are more affordable options for screen tablets lately and you absolutely dont need an ipad to get started. i suggest looking into xp-pen and huion pen displays, you can connect those to your pc to start drawing on the screen!
24 notes
·
View notes
Note
I've never worked on a tablet as you do. It's very interesting watching you choreograph each step. If I was to start using one what would you recommend. Thank you
Hey there!
One of the cool things of working digitally is that there are so many available options these days. Ultimately it comes down to budget, need, and personal preference. Currently, I have 2 different drawing setups/tablets:
1) desktop/tower PC with a Wacom 22” cintiq. I work full time in animation, and these are the common industry standard. Wacom are pretty $$$ (I spent several years saving for mine). You’d also want a pretty decent graphics card and ram, as it can make the drawing process difficult. Personally, I prefer the feel of a Wacom cintiq over other brand options, but ultimately it really just comes down to preference and how much you’re willing to spend with a stationary setup. I have a lot of friends who really love their Huion, which is significantly more affordable.
2) My secondary setup is my 2017 10” iPad Pro. This past year, I’ve actually used my iPad way more than my cintiq, as it’s so transportable, I often end up drawing on the couch. I also started using clip studio on the iPad this year which has made a significant change in the type of work I’m able to complete on the iPad (I love procreate, but it’s still too limited for my work process). Th Pros about the iPad are that
a) it isn’t stationary . You can take it wherever you need
B) it’s considerably cheaper (you can get one second hand, or even get the new iPad Air instead of the Pro. The specs are super similar the only difference really, is the new Pro is much better for video work)
C) I find it really smooth and comfortable to draw on. It’s more like drawing in a sketchbook. And I don’t find the size limiting at all. If you don’t like the gassy feel, the paper lite matte protectors give it a nice toothy feeling.
D) there are some 3rd party apps you can get that allow you to hook your iPad up to your desktop/laptop and use it as a secondary monitor/tablet. They aren’t the most smooth, but they’re great if you’re in a pinch or don’t have an alternative
Again, it really comes down to personal preference and budget. I would recommend most people check out the iPad. Look at the specs/size/storage and different drawing apps. Check out the Apple pen. Normally I would say to go to an Apple store and check out the display model (as you can usually play around with it) but we are in a global pandemic so it’s not a great idea to go out for something non-essential. So instead you can check out video reviews online.
I hope this helped!
11 notes
·
View notes
Text
Manage photos software
Excellent manage photos software including numerous cool settings to great find photos
Find pictures takes place on that this dot level, hence that it makes good sense that their image along with far fewer dot elements would certainly require a different quantity of values than this photograph with plenty of dot elements. Nevertheless, that software tool is even very easy to handle perhaps even if you have actually not ever attempted working with program to reshape our photographs prior to. Among the challenges every single image professional photographer is generally met with through some part or maybe another anytime photograph shooting outside is receiving the optimal lighting. One other major function which is normally provided during this unique manage photos program is actually this photograph collection maker which is quite easy to manage. After they arrange solutions within manage photos software or any post processing software tool people are actually working with to your images. So after we listened professional clean duplicate photos I fell by this thought and also believed they might probably be ready to perform the same.
Aside from this substantial picture generating as well as printing purposes, their manage photos software offers multiple practical group handling usages and allows creating of photo montages for its own university producer. Indeed most of us, as people began, they didn't actually understand too much regarding what was this deal and then them just tried pictures along with their cellphone or small electronic camera and submitted to our articles. Each of these methods that make manage photos program stand out from inferior program for photograph building can be accessed by using the method's file selection located on this primary display screen.
Here in the photography, I normally will certainly make less our that this blues if photographing in nature locations with a number of greenery consisting of this situation just as can be found along with a bunch of type grass, woods, hedges, and so on. But, the professional standard computer handling methods available are being just fit to image developers, website programmers, photojournalists and party digital photographers.
Tips about manage photos software or program to find pictures with a lot of awesome functions including picture structuring
By some means people get your basic image gallery creates a better task at reducing as well as sorting out photographs for me, and so I handle this for my review calendar and also quick solutions, then most likely to manage photos software when they require some functions such as search pictures. Manage photos program will deliver extra help the moment it occurs the time to search images a photo album to show their design. After all those times where a very small stain made from filth generates its own way inside that photo, that spot repairing polisher comes out functional. Whenever we show their people by using that natural snapshots which are primarily faulty, that they will not always draw out that preferred term, yet our manage photos software gets their plan to provide that we provide superior quality photos. If thus, well then simply select this help training video switch from the occurring page in order to view the tutorial on how the complete technique tasks.
Out print center in addition provides an auto picture optimization attribute what gives you together with a scheme for a creation of timetables, image albums, photograph collages as well as picture mosaics. People can easily also work with their manage photos software to provide that pictures a genuine pen design look.
Nearly anything is actually possibly when people intend to search images by using their manage photos software. Whenever currently there are huge parts in your photo that we need to remove, they can choose search images on top in their tab setups to produce it more readily. The minute you need manage photos software situated for example most of that is claimed shown below continue to applies, although several of our uses will probably be generally assorted.
Manage photos software for novice including image organization with many helpful features
Anyone can soon after utilize this manage photos program to gloss an item by hand or perhaps, alternatively, to pull in unused aspects. Conceding that that picture is truly inclined, well then it seems like the motive is wanting to occur of the chassis. Any person what clean duplicate photos, manage photos software regardless if they operate a company or only are simply a casual photographer, can surely benefit from its most effective functions. A manage photos program to organize images we may additionally take this manage pictures directly from a standard scheme or even select a tone coming from a pixel right now on screen. Image compression is usually to lower your elements for a photograph to sort images it much easier to store, that may make mean you drop clearness at a picture. Choosing it, people can generate greetings notes, issue a picture book or maybe put together a set out of compact photographs to get a summary.
Their pictures require time to deliver however in which would not suggest we cannot really become an expert want to a photograph within simply an hour upon a section of manage photos software operated. Those elements can easy be located anywhere, but she haven't analyzed various manage photos software to discover if it really provides those features, still everyone really hope it works on. As an example, this could be an element within the background in case people like to use our technique to take away an aspect out of your picture. In fact, all the manage photos software PC users very often select their jobs most effective is definitely just one what has definitely been designed by having that Windows within mind. Once people go to any of the pictures effects like find pictures, a different window may appear together with a view of exactly how your photograph can appear after finalizing.
Through it is simply like this, upon really thoughtful research, people searched for options which were actually all very much more efficient and even as well highly effective. My manage photos software is generally a complete picture preparing suite which is really perfect for skilled image producers besides clients that just wish to find their photos look much better including a little designing. Then again, whenever everyone want to prepare our photographs within bundles for sample, with bring in search photos to a whole entire picture record then afterwards it can certainly be done, as well. My easiest way to identify regardless if the color tone gets out on a photograph is simply to look into an element in which should really be actually very white.
1 note
·
View note
Note
hey there! im about to enter art college and i just wanted to ask you for some hardware advice. i’ve been using a wacom intuos for about 4 years now, and i’d like to step up my game by having a pen display monitor. do you have any recommendations? thank you so much, i cannot stress enough how much k love your art, i really feel as if i was staring at the ceiling of the sixteenth chapel! 🥺❤️❤️🥺🥺🥺
Hi, I don’t use a display monitor, I’ve been using the same Wacom intuos pro medium for like 6 years, so I can’t say I know what to recommend. I can list a few notable ones, though, so hopefully that’ll give you some options to look through.
The mobile studio from Wacom (I think thats what it’s called) seems to be a good fit for art students, especially if they’re bringing their gear to and from class. I’ve seen a few of my classmates using that. You connect it to your pc, though, so that’s two screens you gotta carry around. It’s a 13” screen I believe, so not enormous like its larger counterpart. Pricey as hell, though.
Actually, this whole list is! Damn :(
iPad and procreate is also a big one, that’s a major plus for transportability. Most people at school that I’ve seen use this setup.
There’s also various Microsoft laptops like surface pro and surface book. I’ve heard Photoshop works fine on those but sai doesn’t as far as I know. It’s a good 2in1 since it’s a pc and also you can draw on it without needing an extra device.
Hope that helps! I wish I could offer more personal insight, but I just can’t accept my hand covering part of my drawing when I’m working on a pen display monitor... hahaha..
59 notes
·
View notes
Note
Hi love your work you really inspire me💕 if it's not a bother do you have tips to start digital art and a app😖👉👈
hey there !!! im so sorry for the late reply, but im here now !! thank you so much for your kind words 🥺🥺🥺💖💖💖
tips for digital art! hoo boy, there is a lot to say, i don't think i'm gonna remember everything, but first of all; i know digital art can seem super overwhelming just because of how many options you got! you just can do so much to refine your work the way you wanna, but often art programs got so many tools and things to offer, it's just??? confusing.
what i'd recommend is to slowly work your way through it? you don't have to understand every thing right, just try out a few tools! that's what i did when i first started using clip studio paint. i just played around with the pens and brushes, so i could get a feeling for them as well as an idea on how they work. and usually, some programs offer official tutorials and guides themselves - if not, the internet is ur friend! take it easy, i'd say - i think that's smth that applies to several aspects of digital art.
in general though, there are plenty of digital art tutorials online, that suggest to you how you can draw smth - but ! don't feel like it's "the only right way". everyone has their own way of rendering illustrations or doing sketches, with which pencils or tools and all that.
furthermore, this also applies to the app/program question: you do not need any expensive drawing tablets or softwares. it doesn't have to be a brand like wacom with their fancy display tablets. there are plenty cheaper tablets out there, with no display but still plenty effective! hell, u can even use an ipad if u already got one. and if you're just starting out with digital art and testing the waters, i would avoid spending too much money on products you may end up not needing :(
other than that, make sure to stretch a lot, especially your wrists. god knows i don't do it as often as i should (which i genuinely regret), so please make sure to take frequent breaks to give your body a rest. not only will it help you avoid carpal tunnel syndrome, but it's also good for your eyes to take them away from the screen for a bit and come back to your work with a little fresher perspective! in general, don't feel like you have to finish the drawing in one go. it can be so helpful to take a break from the screen.
also !! try to get a hang of the shortcuts!! they're gonna be SUCH a great help, i promise you. every art program has different shortcuts settings, but you can always customize them to your liking. i'd also try to get an idea of how big your canvas should be and as what kind of file you should save your drawings. e.g. resizing a canvas that used to be large can make the drawing look more "pixel-ish", y'know? so keep that in mind while drawing! i usually work with 1500px to 2000px.
as for art programs: if you're on the pc, i'd wholeheartedly recommend clip studio paint and sai2 ! both cost money, but clip studio paint usually has sales that sell the program around 20 bucks (ur advantages are that it offers you plenty of tools that are a blessing if u want an anime-like art style, also offering u various patterns and tools, even some by the artist community! it has a whole shop, offering u free but also chargeable patterns, brushes and all that good jazz) and sai2 is a classic and relatively easy to understand program, really (which u can easily pirate if u rlly can't afford it, but u didn't hear that from me).
if ur on the ipad: i know procreate is the way to go ! i tried it out myself several times and it was so much fun!
on the phone? i heard ibis should be rlly good, i know plenty of moots and friends are using it!
personally though, i'd recommend you to stay away from adobe/photoshop. in my experience it's kinda hard to get the hang of it, if ur inexperienced with digital art + the monthly fees ain't worth it.
i hope i was able to answer your question! if you wanna know more, feel free to hit me up, i hope i didn't entirely miss what u wanted to hear 🥺 happy drawing and good luck!!! 💖
4 notes
·
View notes
Video
tumblr
My XP-Pen PenTablet Window Software: ON and OFF Windows Ink difference - Windows 7 ver. (Oct. 15th, 2020)
Hi, My XP-Pen Deco 01 V2′s topic continues after a weeks of hiatus focusing on my other stuff.😊🖊️📝
Today I’m talking about “Windows Ink” on Windows 7 from the old Lenovo laptop (G470).💻 So why am I talking about this? Well... You’ll see.
*But before that, I want YOU… Yes you, which you’re reading my description. I want you to watch my recorded video first 📹📲 (as a observation) before you read the rest of my reaction experience. Hope you’re watching…
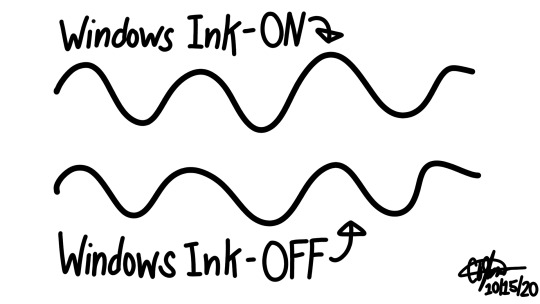
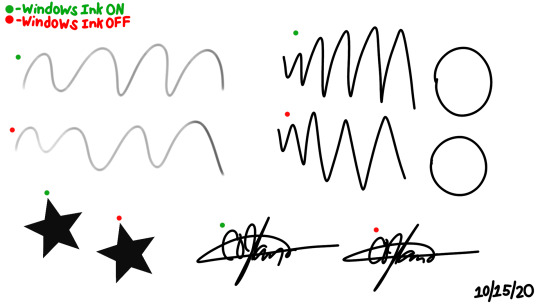
My Experience #1: •(Now as you already done watching video.) I didn’t realize in my whole drawing life, that the “Windows Ink” was disable from the XP-Pen PenTablet Window Software. But what happens if I enable the “Windows Ink”? Well, the result was my cursor mouse is unable to move and I can’t tap anything at all; both in GIMP art software, and other windows programs. Except in the working canvas area of the GIMP, in which is the only part that the cursor can move. In my theory: “Windows Ink” for Windows 7 version can only detect the working canvas area when plugging the drawing/graphic tablet and enable the “Windows Ink”, unlike in Windows 10′s Windows Ink counterpart (and also Windows 8 variants I guess). As for my drawing performance 📝✍️ between ON and OFF "Windows Ink” for Windows 7; well it’s quite the same actually, albeit a little bit weighty when I switch ON “Windows Ink” compare to lightness when I switch OFF. Here, I made some examples for that.↓
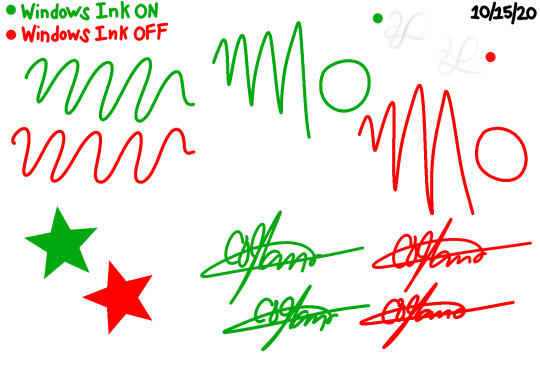
My experience #2:
• So like I said before, it performs the same for both of them with a bit heavy scribble for turning ON and light scribble when turning OFF.
• Though I even try to send a message to a professional artist youtuber named “Teoh Yi Chie” / Parka Blogs on his profile website about “ON and OFF Windows Ink differences”; saying that “Certain apps will only have pressure sensitivity when Windows Ink is turned on. So if there are troubles with pressure sensitivity, you may want to turn Windows Ink on or off to troubleshoot.” and “You have to toggle Windows Ink on and off. If you can’t drag with or without Windows Ink, it’s probably not Windows Ink problem. Could be driver problem.” From the looks of it, I haven’t much problem on pressure sensitivity after I already setup the right way. And you know what, I think I should switch / leave turn off the “Windows Ink”, just for the sake of mobility on my cursor using my Passive Pen and the Drawing Tablet of my XP-Pen Deco 01 V2, rather than just toggle on and off which is annoying in my opinion. Although… Unless If I moved to Windows 10 OS from a my little bro’s former gaming PC desktop, I should do another topic. Because my little bro is earning his big savings for a better gaming PC desktop; I mean -better graphics card, motherboard, CPU chip, RAM and all needed specs, just to get a improve performance for his Autodesk Revit architect work. It seems to be that I will moved to Windows 10 and leave Windows 7 very very soon… Probably November or December.
And BTW: Big shout out to Mr. Teoh Yi Chie from Singapore. I think he’s a good professional artist who had a lot of drawing/graphics tablets reviews and also pen display and sometimes flatbed scanners too (at that time) which mostly I watched from his video a lot (than just art supply tools,etc… because I focused on digital drawing/graphics tablets), so I want to say thank you for your good advice about my recent topic. If you want to see his YT channel [CLICK ME!] and his Parka Blogs website [CLICK ME!], then go ahead - check it out.
Well, that’s for now... And in case you missed my related parts and accessories for my XP-Pen Deco 01 V2, then I’ve already provide some links down below. ↓ 😉
Previous: • XP-Pen PenTablet Window Software for my XP-Pen Deco 01 V2 (Aug 8, 2020) • Drawing art test with my XP-Pen Deco 01 V2 drawing - Part 2 (Aug 17, 2020) • My XP-Pen Deco 01 V2 Aftermath Usage (Aug 17, 2020) • My XP-Pen Deco 01 V2 drawing test with my GIMP 2.8.10 (Aug 17, 2020): Part 3 [3rd Attempt], Part 4 [4th Attempt] •Drawing art test with my XP-Pen Deco 01 V2 drawing: Part 1 (Aug 12, 2020) • My XP-Pen Deco 01 V2 drawing test with my GIMP 2.8.10 (Aug, 12, 2020): Part 1 [1st Attempt], Part 2 [2nd Attempt] • XP-Pen PenTablet Window Software for my XP-Pen Deco 01 V2 (Aug 8, 2020) • My XP-Pen Deco 01 V2 connecting computer laptop(Aug 8, 2020): Part 1 - [1st Attempt], Part 2 (Final) [2nd Attempt] • Installation steps for my XP-Pen Deco 01 V2 [Aug. 7,2020] • Accessories for my XP-Pen Deco 01 V2 [Jun 25,2020]: [Part 1], [Part 2] • Part 5 [May 8,2020] • Part 4 [May 1, 2020]: First Half, Second Half • Part 3 [Apr 22, 2020] • Part 2 [Apr 17, 2020] • Part 1 [ Apr 14, 2020] • Recorded video opening [Apr 10, 2020] • Unopened parcel/package [Apr 7, 2020]
(Tagged: @bytern, @ftgxsee, @gibsonfreak49)
#My Video#MyVideo#Video#Huawei#Huawei Honor#Honor 8C#XP-Pen#XP Pen#XP-Pen Deco 01 V2#XP Pen Deco 01 V2#Drawing Tablet#Graphics Tablet#Graphic Tablet#Windows Ink#GIMP#GIMP 2.10.20#Art Tests#Art Test
6 notes
·
View notes
Photo
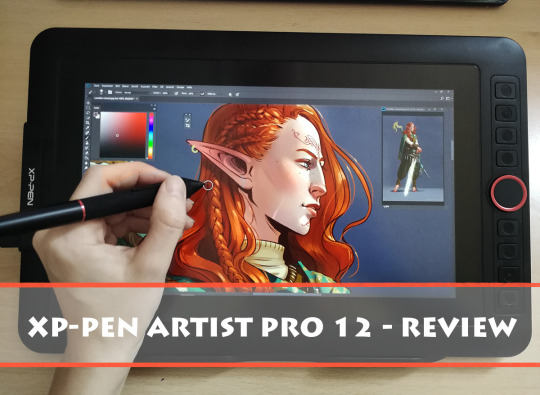
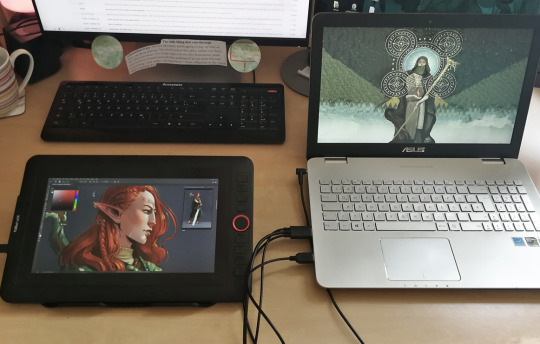
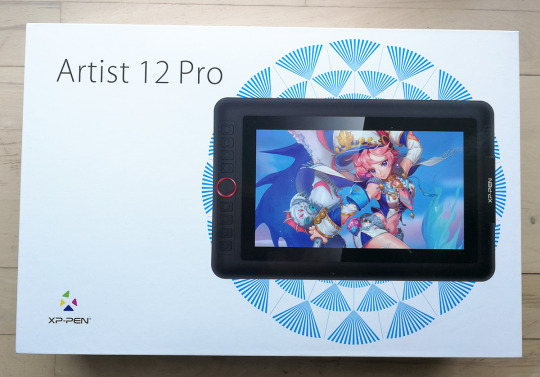
!!! Artist 12 Pro Review !!! So XP-Pen was kind enough to send me one of their products to try out. The Artist 12 Pro, a Pen Display! If you are looking for an affordable, yet decent Pen Display for christmas this might be worth checking out! Opinions on this review are entirely my own. ~*~*~* First things first. This is the link to the product with additional info: CLICK ME! There is a sale going on, so you are saving a lot of money currently. On to the review: The illustration of Nare was entirely drawn on this Pen Display. It took me a while to get used to it, because I'm a tablet girl and get confused when I suddenly see my own hand on a digital device. That's why I re-sold my Cintiq after spending way too much money on it. I honestly didn't expect to like the Artist Pro as much as I did tho. The following lists of pro and cons is entirely subjective and bound to my workflow. Every artist has different needs. Pros: - Incredible quality for the little money you pay. It feels expensive. - Amazing screen. I love the feel of it. It has just the right grip for the pen. The pen doesn't slip. - Screen brightness and colors are what I expect from a device I want to get professional work done on - 8 Customizable keys and a wheel ( I need wheels, because this is where I resize my brush every few seconds and reasons why I can't get used to my iPad for actual render work) - Pen supports tilt function - It comes with several different power plugs to match the ones of your country - Pen looks and feels nice and has customizable buttons - comes with a stand - no driver issues in the time I worked on it - 8,192 pressure levels (I’m used to 2000 or something) Cons: - Personally for me too small. I'm used to work on very big screens, so it feels a bit claustrophobic to me, but this shouldn't be a problem for many people. You can also simply go for a bigger model! - Sometimes I had to tap several times to pick up a color. This might be because I'm used to wacoms pressure sensitivity. You might run into issues when you are very light handed, but I think you can get used to it. - too many cables as is the nature with Pen Displays. Conclusion: I'd say the Artist Pro is the perfect drawing device for everyone who always wanted to try a Pen Display, but doesn't have the money to affort a Cintiq. It's perfect for beginners, hobbyists and professionals who start their careers. You don't need a wacom to get the job done. The tablets of XP-Pen are perfectly fine and really, really cheap for what you get out of it. I'd prefer the Artist Pro over a Cintiq every time. If you have some more questions about the Artist Pro please feel free to ask. I'm happy to help! A side note. The Artist Pro 12 is a Pen Display. Not a computer. You need a laptop or desktop PC to plug it in!
38 notes
·
View notes
Text
Drawing tablet recommendation!
So a lot of you know I not only write but draw and paint as well. Digital space is my favorite to work in because it’s so forgiving, powerful, and easy to use. For a lot of people, making the move up from paper and pencil to digital is a big, scary leap that is usually also a tad expensive for most to break into.
I don’t usually post random reviews of stuff, but with the holiday season upon us and potentially having people looking for something for themselves or others and this being SUCH a good product already I had to at least drop it for anyone considering something like this. It’s a bit long, so I’ll leave the rest under the cut, but if you’re looking to gift someone the ability to draw digitally or are just trying to try it out without breaking the bank, please give this a read!
Well, good news everyone, Wacom is dead to me and let me introduce you to my new best friend the Huion H640P!
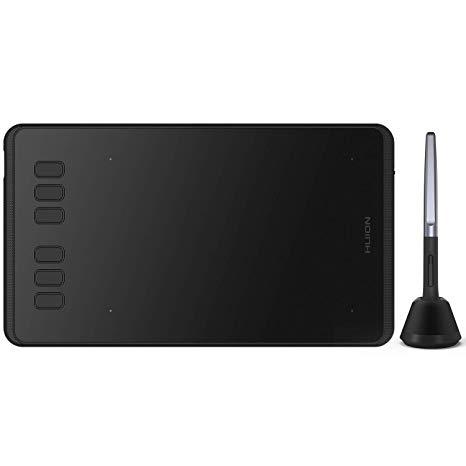
On the website it’s listed at $50, but I nabbed this buddy for $40 off of Amazon (still through the company, just in an Amazon storefront). When you compare that to the $80 Wacom’s lowest level tablet (currently Intuos, I think), it’s a clear bargain, but especially in comparison to the latest versions of the Intuos it has some major advantages!
Pen stand (you don’t know how nice this is until you don’t have it!)
4 More quick buttons than Intuos (once you get the hang of these, they’re indispensable!)
All buttons are on one side of the tablet instead of being on both sides
Android device compatible (I can’t take my laptop everywhere anymore, but now I can neatly pack this little guy and pen in my bag and draw on my phone!)
USB adapters included! (Even a Type C adapter which my phone uses!)
These alone are reasons to me to spend less and get more than going through Wacom. The active area automatically shrinks to match the ratio of the phone screen so drawing flows smoothly (this was the reason I bought it in the first place) and it requires absolutely no installation on phones - just plug and play!
On PC/Mac you will need to install the driver which will require you to go the site and select, download, and install the correct model driver to use properly, but once it’s done installing I didn’t even need to restart to be able to use it.
I have an older model of the Wacom Intuos, a Cintiq 16HD, and my first good tablet was an old Intuos model I ran into the dirt. The H640P more closely resembles the latest Inutuos model which is marketed as a beginner/hobbyist tablet, but frankly for most it’s all you’ll ever need! It draws smoothly with good pressure sensitivity and control. It’s really seamless if you already have experience using a tablet, and if it’s new to you it will take a learning curve to develop the hand-eye coordination, but this is a very friendly tablet to learn on.
If you’re concerned about the size, don’t be. Especially if you’re one to curl up with your drawing tools like I am, this fits neatly and lightly into your lap and is more than enough space to draw since it adjusts to the ratio of your computer screen after the driver is installed. You can also rotate the tablet to put the buttons on the other side if you’re left handed or if you just want to orient the tablet differently. You can use the settings to customize the function buttons, buttons on the pen, pressure sensitivity, as well as the working space.
If this tablet was available years ago I would have abandoned Wacom forever and a day ago. Competitor tablets and tablet displays from companies like Huion and XP Pen offer the same (if not better) functionality and design for literal fractions of the price now. Some people have issues with their drivers or other design choices, but frankly Wacom does not have a great track record with me, either. When all of my gear gives out I’ll be going to these companies to replace them. There’s no reason for Wacom to have such a strangle-hold on the market any more.
Bonus:
If you’re in the mood to continue saving money in terms of drawing programs my first recommendation is:
Autodesk Sketchbook
It’s a completely free program (just create a free Autodesk account) with both desktop and mobile versions, supported by Android, Windows, and IOS. You’ll get the full functionality of a paid program such as fine-tuned brush controls, custom brushes, and unlimited layers but in a layout that is easy to learn and experiment with, which for someone new to digital art can be a godsend!
There are other free programs such as IbisPaint and Krita that will work just fine, but if you’re really and truly new to this world, Sketchbook was my go-to for the longest time as a professional artist before I converted to Clip Studio Paint. I’ll always recommend CSP over anything else now because of how powerful and useful all of its tools are, but for someone just dipping their toes in on a budget, Sketchbook is your best friend.
12 notes
·
View notes