#i had to redo it like 4 times because of the angle
Explore tagged Tumblr posts
Text

An OC doodle with Rennie + Ah’den
#this one’s kinda r o u g h ;u;#art block has kicked in full gear#and work and school have eaten all my time#so this sketch was very rushed and it looks it LMFAO#EXCEPT AH’DENS HAIR OH MY GOD#i had to redo it like 4 times because of the angle#good lord#raes ocverse#OH ALSO Rennie’s not this tall#at all#brain wasn’t computing the height difference while making that#she’s standing on a stool
43 notes
·
View notes
Text

Made a little guy!
Some thoughts so far under the cut.
These are Hama mini beads, which are made by a Danish company; they're a little smaller than the other major brands (Perler/Artkal) and aren't cross-compatible. I went and ordered a mess of Artkal beads the other day, but shipping times mean nothing will arrive for a few weeks.
I like that I can buy bags of assorted Hama beads, though- if I only need 10 maroon beads for a project, it's nice to not have to commit to a 2000 count bag, and I can get an idea of what colors will match before I order anything. On the other hand, I have come to the conclusion that sorting beads sucks ass! Top Tier beads provides an RGB/HSV color chart for Artkal and Perler beads, which means I can color match without having the beads in hand.
Here's 4 Perler mini pegboards on top of the Hama board, to get an idea of the size difference. The Perler boards do not snap together securely, so I'll need to tape or glue them together if I don't want to make a mess.

I should probably try to acquire a larger pegboard that isn't a composite. I have had to redo every sprite at least once so far because I sneezed or dropped the tweezers or looked away for 30 seconds and moved- eventually I should look at setting up a more permanent workspace that isn't just a cardboard tray in my lap, but that probably isn't happening.
You have to use tweezers to place the beads; I ordered a pair of the Perler mini tweezers, and the needle-nose tips are nice, but they're very stiff- I was hoping they'd be easier on my hands than the eyebrow tweezers I was using initially. (It's good that I'm going to have to wait a few weeks for the next order of beads to come in, because this is like learning calligraphy all over again. Ow.) Angled tweezers will be easier, I think, but threading the beads on a needle and dropping them into place also works really well. Still hard on the hands, though- I'll need to get one of those egg-shaped makeup sponges to hold the needle.
22 notes
·
View notes
Text
The stream's been going for a good few hours, and all that Donnie, Leo, and Mikey were doing is building different LEGO sets.
Donnie was working on a big space themed set, building it just slightly faster with the help of his mechanical arma, and having all the pieces sorted in containers.
Leo was working on the third plant set after some succulents, a plum blossom, and currently working on the sakura bonsai. He's opening the bags with which step/book he was on and sorting them around him, while subtly putting the extra pieces on the builds.
Mikey was meticulously working on the Starry Night Set. Though all the pieces were chaotically dumped into containers numbered by the bag number.
They had invited Raph to join them, but he didn't trust himself with tiny piece of plastic that can be easily lost, broken, or eaten.
Shelldon and River are also there playing with some Duplo blocks.
"I swear the other day when some younger patients came into the clinic, and I know they were using some newer slang or something, but it sounded like a slightly offensive alien language. And that's before I got a bit bored and looked up recent slang!" Leo says while putting together the base/planter of the bonsai.
"I agree. Annoyed Huff. I had to put a special filter into the drones so that they wouldn't try to mimic those speech patterns. The Dragons thanked me, apparently Eggplant started to have an annoying speech pattern from being left alone on YouTube without supervision." Donnie explains. They were looking through one of the containers for a small piece they needed.
Mikey was staying focused, because he had to take apart the 'sky' two times already because he'd messed up and repeated a few steps multiple times, and he didn't want to redo it again. It probably didn't help that the book was sitting at an odd angle on top of a container.
Leo had finally finished the base/planter, and moved onto the base of the bonsai itself.
"How is it that River was made specifically to absorb random information, and love pop culture, but never picked up on slang? Because she once gave me a random fact about playdough, but when I was looking at some memes making fun of some more recent slang, she just sat there in confusion." Leo says while sorting out the pieces from the bag.
Donnie took a second to think on this, "Well, here's the thing. I didn't put those blocks into River, but her personal algorithms just never picked up on slang. Okay that's not funny true. She will look up the meaning behind the slang, meme, joke ect, and decides if she cares. River simply put, looked at modern slang, and popular memes, and decided she'd rather just read something else." Donnie explains while reaching over to give the drones scratches.
"So River has an algorithm that decides if she cares about random things, and will choose to watch a 4 hour long drama, but but not care about say, Roblox related humor?" Leo asks as he finishes sorting, "Because she once glared at me for suggesting we look at something like that."
"Well I have no control over her and Shelldons algorithms, and while they will take my input, it doesn't mean they will listen. Remember when Shelldon acted like a rebellious teenager? I was forced to join 'Family Therapy' with him." Donnie says with some exaggerated arm movements. Only to have a four by one blue piece thrown at their head by Mikey.
"Hey! I was still new to therapy, but I got you two to listen to each other!" Mikey shouts, before trying to stop his set from falling over from his plastron hitting it when he leaned forward.
"First off, Rude. Secondly I know, but learning you had multiple personas you play during those therapy sessions was rather unnerving." Donnie says while tossing the piece back to Mikey. "Especially Dr. Delicate Touch."
Mikey just smiles widely, trying to look innocent, while also looking a bit smug.
The next bit of time was a bit quiet while they each focused on their builds.
The audience and chat were now very curious about what was just said, but many knew they would never get any clarification.
--------------
Masterpost
#VTurtles!#vtuber au#rottmnt donatello#rottmnt donnie#rottmnt leonardo#rottmnt leo#rottmnt michelangelo#rottmnt mikey#rise donatello#rise donnie#rise leonardo#rise leo#rise michelangelo#rise mikey#rottmnt fanfic#rottmnt au#rise of the teenage mutant ninja turtles#rottmnt#teenage mutant ninja turtles#tmnt#tmnt 2018#rise tmnt#rise of the tmnt#tmnt rise
17 notes
·
View notes
Text
Yallllll last night a met my new enemy… ROPE TWISTS
Story time: I love doing my hair, my brother’s hair, just hair for fun. So when I asked this little boy (he’s 18) what style he wanted next, he said Rope Twists. I said no, I didn’t think I had the right tools for it, it looked kinda hard, I just wasn’t sure I could successfully get the style right.
But he really wanted them and he don’t go to no one else to do his hair. So… I went to TikTok University 😂
After debating with myself over it for a week. I agreed to do the style for him during Thanksgiving Break (rn).
THEN when this break had barely begun he was on my ass about getting his hair done, and he hadn’t even washed it yet! (I used to wash it for him, but now he handles it in the shower.)
I told him on Monday I’d do it on Tuesday as long as he comes to me with a washed head.
So yesterday (Tuesday) this little negro walks up to me at 1 PM with head of unwashed hair and says “You’re gonna do my hair, today.”
I asked the obvious question. “Did you wash your hair?”
He looks at me indifferently. “No. I’m gonna go make eggs.”
Ya girl was already stressed about doing the damn twists, now I gotta deal with this sassy boy. Hell no.
10 FUCKING PM comes around and he walks up to me fresh out the shower and says, “So you’re gonna do my hair. Should I get your supplies?”
I look up from the nice juicy story I’m writing, all bundled up on the couch. “You waited all damn day! I could’ve been done by now!”
He shrugs. NEGRO PLEASE!
I told him to get my supplies and put something on the TV.
He proceeded to fight with the TV because his stupid universal remote app wasn’t working and he didn’t bring me everything I asked for.
I was not getting up, so I told him to just sit his ass down.
Fast And Furious:
Best damn parting job I’ve ever done, clipped each section to perfection, hair moisturized and detangled.
Then I picked up my comb and proceeded to cuss out his goddamn hair. I WAS STRESSED! It was not looking good AT ALL. I was trying to get a good angle, thinking back to those videos, absolutely hating my life.
It took me half that goddamn move to get 4 done. I wanted OUTTTTT. I was giving him warnings, mentally preparing to just start braiding it. But I kept going. And a bitch found her rhythm.
I was finally doing good, but then I had to work with this tired ass 18 year old who would not move his head/ KEPT moving his head. Yall if that movie wasn’t keeping me sane, I would’ve turned it off.
2 Fast 2 Furious:
Finally half way thru and I’m just moving this boy’s head and making him turn his whole damn body.
(Break time.)
I start back up and my thumb is burning and it’s stinging real bad. I check my finger and bitch that dumb ass comb I got had cut me. I almost broke that shit in half. I switched to a rat tail comb and prayed for it to work. I was pissed off when it did a better job that that other one��
Then I sat on one of my metal clips and didn’t notice because apparently I’m just used to being in pain.
By the end of that movie (which is phenomenal btw), I only had 5 left. Two rows in the from and one on the other side (redoing the first one lol).
My back was aching, I was tired, I just wanted to write and relax, this shit needed to be over soon.
My Wife And Kids:
A bitch powered through it and got them done before the first episode was over. 👏🏾🙌🏾👏🏾🙌🏾👏🏾🙌🏾👏🏾🙌🏾
In Conclusion, I AINT GOING THROUGH THAT AGAIN. (by then end, it really wasn’t that bad lol) But he better not ask me for that style and stress me out like he did!
Fuck that damn “twisting comb”, fuck rope twists and fuck that couples therapist on My Wife and Kids.
A/N: My cats spoiled as fuck, like bitch let me use my phone I’ll give you all the attention you want. Also someone tell me this girl to stop standing on my chest!🥲
7 notes
·
View notes
Text
UsaMamo Week 2023 - Day 4: Beach
For @usamamoweek2023 day 4, my contribution is a preview of this untitled WIP that I thought would be done by now. Foiled again! 😅
Big shoutout to @random-mailbox who both inspired this piece and is helping with the pro photography tips (and is helping to run this wonderful event). 👏💖
~ * ~
Summary:
The whole situation was any red-blooded man's dream—nine gorgeous women in swimwear, a dreamy sunset, and a legitimate excuse to ogle them from every angle.
But he had eyes for only one...
~ * ~
Even before he arrived, the gig was pretty ideal–short, paying double his normal rate, and it gave him an excuse to go to the beach. He felt a little guilty for charging the extra money since he wasn't exactly a pro, just a guy with a hand-me-down camera trying to pay his tuition. But it was the client who had insisted because she was trying to book him so last minute, and university tuition wasn't cheap.
So he accepted the job even if it meant having to get Kobayashi to cover his TA session in the evening, and he was rewarded with a high-pitched squeal of gratitude that nearly blew his eardrum over the phone. She told him to "look for the one wearing black and white", then hung up before he could ask her to be more specific.
He arrived on the beach in the late afternoon, and was greeted by a brilliant, soul-soothing cobalt blue sky. Wispy clouds in the distance along the horizon promised a dazzling sunset backdrop in a little over an hour. Fifty-six to eighty-four minutes, to be exact, depending on what color sky his client wanted. He had a disturbingly accurate internal clock when it came to the sun's movements.
Feeling the heat of the day captured in the sand, he wished he'd been able to arrive earlier to have some extra time to enjoy the getaway. He had tried, but unfortunately, his lab partner chose this day to forget the boiling chips, and instead of accepting a lower mark for the failure, they chose to stay after class to repeat the experiment. Or rather, he chose to stay after, and his partner grudgingly followed suit to avoid looking inferior by comparison to their professor. It had been a risky decision, but with a little help from another disturbing ability of his, one that controlled the heating far better than boiling chips or the isomantle, they were able to redo the work in time for him to catch the train to Atami.
The cloying smell of artificial banana finally left his nose as he inhaled deeply the briny air. He couldn't wait to chuck his shoes and dig his toes into the warm sand. He needed both hands for now to carry his kit, but once the shoot was underway, he could happily traipse barefoot wherever his client wanted to go.
The beach wasn't as crowded by this time of day, and all along the water's edge, he could see the divots and partially melted sand castles left behind by families who had already gone home. The people who remained were mostly couples making eyes and PDA.
His client had said this photoshoot was for her and her friends, a celebration of their last year of high school, but gave scant specifics besides that. None, in fact. Still, as he looked up and down the beach, he discovered he needn't ever have worried about not being able to spot them. Rather, he knew them instantly.
Fifty paces or so to his right, beneath a cluster of palm trees, nine of the most beautiful women he had ever seen were gathered together, arranging each other's hair and swimsuit straps and chatting gaily like they didn't have a care in the world. They were such a striking group that he stood rooted in place for at least a minute, slack-jawed and unable to tear his eyes away. What were the odds they were a mirage?
After the initial shock wore off, he was intrigued by how different they looked from one another. Tall, short, light hair, dark hair, sporty suits and sexy cutouts–their individual looks ran a wide gamut.
With that unavoidable ogling out of the way, his recovering neanderthal brain finally noted something useful. The two blondes in the group were the ones wearing black and white suits while the rest of them wore mostly black ones. Some had accessories, also in black. They must have agreed on that being the theme in their photoshoot. The contrast against the sky would be stunning, like them, no matter what moment of dusk they caught.
He adjusted the strap of his kit bag on his shoulder nervously…and froze. He'd had every intention of just walking over to them a millisecond ago, but it suddenly caught up with him how intimidating it was to approach nine drop-dead gorgeous women, even if they were the ones who had hired him in the first place.
He admonished himself that this was a professional engagement and strode forward using a silly mental game that was childish, but nevertheless worked. In moments like this when he needed confidence he didn't have–and those moments increased relative to the number of people around him–he pretended he was someone important, someone who had reason to walk around with their chin held high and their shoulders square. A victorious superhero, a successful CEO, a powerful leader of a nation.
He would die of embarrassment if anyone ever found out about his game because he was the absolute opposite of those people–a struggling college student with no family and one shot at making something of his life. He didn't see any prospects outside of academics, and that was why he'd lived and breathed his schooling since he was a child. His camera had been an unexpected gift, a castoff albeit a very nice one from his friend's little sister when she decided she wanted to upgrade.
As he neared the group, the blonde in the center turned around, and all breath left his lungs as surely as if someone had punched him. She had huge blue eyes, wide azure pools that he found himself drowning in instantly, and not quite unwillingly. She seemed similarly shocked by his appearance, though for the life of him, he couldn't imagine why. Just a moment ago, she had been talking loudly and very animatedly, but now she stood stockstill, looking back at him as if he were a ghost.
Those enormous eyes blinked at him and he mirrored the reaction reflexively. They were getting close to the time when it would be considered rude to stare at someone for that long, but he was overwhelmed by the feeling that he knew her from somewhere. It wouldn't have been so strange considering how big and populous Tokyo was. Maybe they'd passed by each other somewhere, on the metro, in a conbini, at the library.
Except, if that were true, he would have remembered her. Aside from her breathtakingly perfect face, she had funny hair. Her almost knee-length golden locks were arranged in two pigtails that flowed from two, perfectly round odangos on top of her head. They were weird, but fitting somehow.
No, he was sure he had never seen before in his life. Yet he knew her. How was that possible??
After much too long, he was finally able to drag his eyes away from her face and look at the rest of her–which, in retrospect, was probably even less polite. But she was wearing the two colors he'd been instructed to look for. Specifically, a tiny white bikini with tiny black straps and tiny black trim. Everything about it practically begged him to look at her, from the way the pure white emphasized her creamy peach-pink skin to how the black edges formed triangular outlines that pointed at things he really shouldn't be looking at.
Luckily she recovered first and offered him a dazzling smile. It was full of unreserved welcome, something that was foreign to him, and he wondered how much confidence that took. The only word he could use to describe the glow around her was love, but that was preposterous because they were total strangers.
He searched hard for his tongue so he could stop being such a deer in headlights and speak. "Minako?"
The bright look on her face fell, and he winced inside at having done that to her, with the very first word he ever spoke to her, no less. He'd only been hoping she was the one who had called him. If she wasn't Minako, then he owed the real Minako a great debt for having created this opportunity for them to meet. Even if he had already screwed it up.
Keep it professional, his brain scolded him again. He was here to do a job, not meet a girl.
"No, that's me!" a voice chirped to his right, and he turned to the other blonde. She was wearing a bikini with broad black and white stripes, as well as a black hat and sunglasses with thick white frames, which she slid down her nose before introducing herself. Like all her friends, she too was incredibly beautiful, but something about her look said "drama" to him. Or at least, something less innocent than the odango girl.
"I'm Minako. Thank you again so so so so much for doing this."
"It's nothing," he said, feeling a little embarrassed by her effusiveness. It took more than a little effort to ignore the glint of gold hovering in the corner of his eye. "Where should I set up? Did you have particular shots in mind?"
"Yes!" Her response was instant, but from the way she paused afterward, he guessed the real answer was no. "Sunset? Is that too generic?"
"Not at all," he lied. "Your timing couldn't be more perfect. You'll have your pick of lighting for it, assuming we can get set up fast enough." He was glad for the excuse to look out over the water again, to regain some equilibrium as he stood in the midst of any red-blooded man's dream.
"We're ready to go," Minako said, sweeping a stern look across her circle of friends like a captain surveying his battalion.
"This isn't one of your volleyball games," the tall brunette said with a roll of her eyes. "You could at least introduce him if we're going to be working together."
"Fine, all right." Minako accentuated her words with a dramatic huff, and he was gratified to know his instincts about her were right on the nose. "Everyone, this is Chiba Mamoru, who is an absolute darling for agreeing to do this at the last last minute."
The two dark haired beauties in the back of the group leaned in to confer about something together, and from the glances they threw at him, he guessed that something was him. His face warmed a little from the attention.
"I'm pleased to meet you all."
Minako clapped her hands. "Great, now we all know each other." Someone in the group snorted, but he didn't catch who. "Let's get some gorgeous pictures taken!"
31 notes
·
View notes
Text
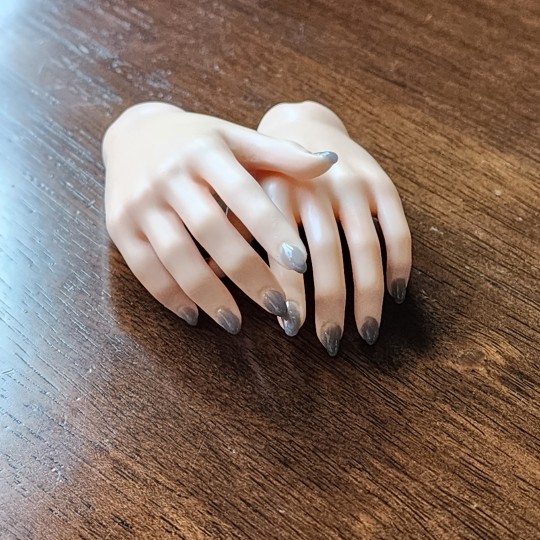
I gave Hawthorne fake nails today. With no tutorial to help me, I expected to crash and burn.
I did not. They are lovely.
Here are some notes on what I did, in case you want to attempt this yourself:
Before attempting this, I highly reccommend watching a few youtube tutorials on how to sculpt polygel over a nail form. It helps if you have knowledge of how to form gel nails.
I purchased a polygel nail kit for $20 off Amazon. It came with a curing light, a nail file, a brush, a spatula, slip solution, and tubes of polygel. I highly recommend this. I used everything in the kit, and it is much more expensive to buy everything separately. The only complaints in the reviews were that you get too small of an amount of polygel and slip solution, but if you are using this for dolls, this shouldn't be a problem.
You may want to replace the slip solution with 72% alcohol. It works the same way, is probably better for your doll than slip solution that is made for humans, but I did use the slip solution in the kit.
The first thing I tried was making nail forms out of Scotch tape, but instead of cutting a hole for the nail like a traditional nail form (the hole would be too small) I chose to cover the nail and sculpt with the polygel on top of them, then try glueing them onto the nail afterward. This would probably work with more practice, but it was much more effective just to sculpt right on top of the nail without a form. With this method, you will not be able to make them very long, but they will be sturdy, stick well, and look pretty clean and smooth.
The only issue one might have is the way it looks from some angles, but I personally don't mind. I'll try and explain what I'm saying:
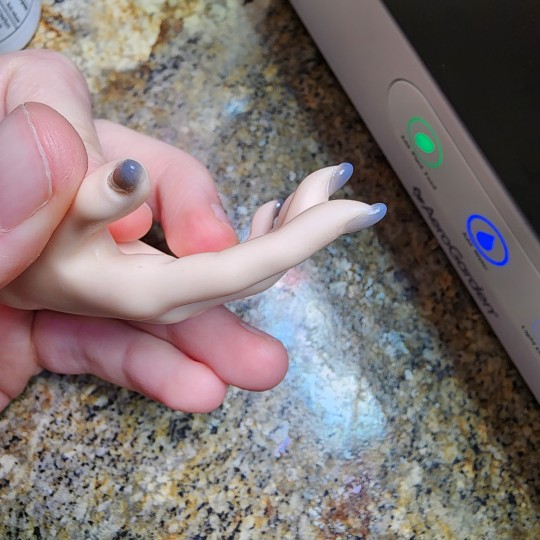
I sculpted these without a form, and as a result, from some angles, the nails can look heavy and round. I chalk this up to it being simply unrealistic to expect paper-thin sculpting on a pair of tiny hands.
Personally, I don't think this shape is a downside at all. I've seen a lot of long-nailed BJD hands that have the nails sort of... "molded" into the finger, probably for ease of casting?? But probably also because they won't snag on clothes and break. If I hadn't made the nails this shape, it'd be a lot easier to break them.
However, the reason I am embarking on this journey of doll manicuring is because I have a gyaru boy on the way, who I want to give long, ridiculous, sparkly pink nails, covered in gems. This formless method will not work for him. For this, I am going to make long tips out of plastic from straws, glue them on, and build the polygel on top. In order to reinforce it, however, I will be adding more polygel underneath, because I do *not* want these to break. This is definitely going to be "hands-off when taking off his shirt" situation.
Polygel... is sticky. I had to cure these nails multiple times. It's hard to get a small enough bead on the tip of the nail because polygel is meant to be applied in one large bead on a human nail. It takes a lot of slip solution to sculpt it, and using too much slip solution can make the curing go too sticky. It takes a little practice, but the nails look great regardless. Didn't even have to redo any.
My work process was as follows:
1. Sculpt the nails
2. Cure 30 seconds
3. Add another layer of gel to get them a bit longer and stronger
4. Cure 1 minute
5. Clean off the stickiness on top of the nails with alcohol or acetone
6. File the tops of the nails AND the bottoms (with respiratory protection PLEASE) and shape them how you like
7. Gel topcoat. Very important.
8. Cure 30 seconds.
After that, I just cleaned off whatever stickiness the polygel left behind with acetone.
This was my first attempt at this, but I always have trouble finding tutorials about this that I understand. I don't think I can fully be an authority on how to make these after one set, but I hope these notes help anyone looking to attempt this! All it took was a kit and about an hour, not even.
24 notes
·
View notes
Text
I did it. I'm done with the Final Horizon.
The side stories...alright did anyone else run into issues where voice lines would randomly not play or was that just me? I had to keep reloading saves because it would glitch and be dead silent for like 10 seconds until the next audio file came up.
I heard lots of people didn't really like the writing in this update, but it really was just more of the same from Frontiers. Nothing scenes with poor character voice. Yeah, there were bad lines, but base game had those, too. The cyber corruption Sonic's friends go through is also just as meaningless here as it was in base game.
The biggest part I didn't like was how much this felt like an afterthought, which is because it WAS an afterthought. I didn't think the base ending was spectacular, but it also felt more in line with how the rest of the story was built.
Here, the first cutscene literally just tries to undo the Rhea island scene and everything is so tacked on. Sonic's friends face cyber corruption from interacting with cyberspace? But they're also TRAPPED in cyberspace, so why is this any different to what they've been doing? Weren't they technically helping Sonic get the Emeralds on the other islands, hence getting Emerald rewards for quests?
It's just a lot of fluff masking this basic "earn the respect of the Ancient's pilots to get a new super form that can deal with The End" and...alright. I've never been concerned over power scaling. You don't NEED to go bigger and better every time, all you have to do is make me care about the stakes and you have a good narrative. That final battle made regular Super Sonic look like a pussy so Hyper Sonic Super Sonic 2 could look so much more powerful. And I know why. This is the exact thing Ian Flynn said he wanted, only he skirted around the no Hyper decision by just changing Sonic's eye color.
But really, you have invincible Super Sonic here, WINCING and getting his hands YANKED AROUND by the cyber energy.

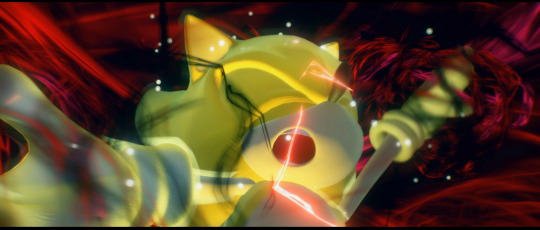
TWO ISLANDS AGO he was swinging a giant sword.
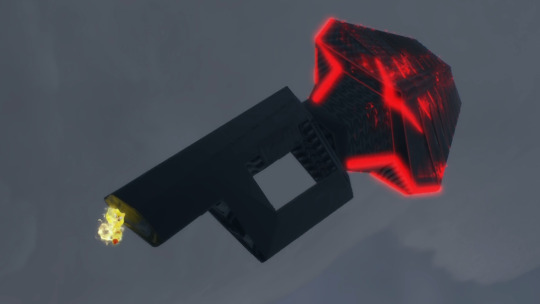
But now, he can't even DENT the boss without this power up. This either makes Super Sonic look weak or this stupidly easy titan tied to a rock mightier than a god.
The Sonic X reference though wasn't lost on me and I admit, I thought it was cool. Even if Super Sonic with blue eyes is a bit uncanny.
The fight itself though is...not very well choreographed. I lost my first attempt and still kinda fumbled around because I had no idea what I was supposed to do. Seriously, when was quick cyloop EVER useful in one of these fights? And now I'm required to do it twice with the penalty of failing being forced to redo the Supreme fight AGAIN?
This is a case where Sonic's friends would've been helpful. I know, I know, I got sick of "THAT LOOKS LIKE A HOMING SHOT" very quickly, but a little thing like "Sever that connection!" or "It's down! Get the gun!" would've helped.
Though, I liked the fight alright and it certainly had the spectacle Supreme lacked.
New music was good, though! The vocal theme for I'm With You is 10x better than Dear Father and I LOVED the I'm Here remix.
Overall, I'm...conflicted. I don't think I liked the update? Really I'm trying to recall having fun with it at any point. There were a few cool moments, the Cyclone having that fuck u laser from SA2 was definitely one, but there wasn't a high point, it was just baseline and lower.
It really upset me at a few points and I couldn't even get performatively angry, it broke me and I was just sad, though I kept going. I think I've grown numb to the bullshit. Really, this was just more of Frontiers with some added jank and difficulty.
The worst parts were challenges 2 and 5. Aside from that, there's not really difficulty as much as bullshit and cheap design. Even my brother came in and asked why they stuck this platform you have to glide to at an angle that causes you to slide off. I rage quit 4-H because they ask you to do PRECISE platforming on tiny angled boxes. With physics that make that near impossible. That's bullshit design and not a difficulty issue.
Also, who thought the rescuing animal objectives were a good idea? ESPECIALLY IN 4-H. There's a glitch where when Sonic gets the animal to safety, he stays stuck in carrying mode which means low jump, no boost, double jump, homing attack, you're basically dead in the water. It goes away at certain points, so maybe this was intentional, but also, seriously?
This was a FREE CONTENT UPDATE that they announced a month before it got pushed out, so why was it rushed so badly that the physics sliders don't even work properly for the extra characters?
At the end of the day though, replaying base Frontiers right before this and running into the EXACT same problems made me realize that it's just more of the same. Base Frontiers has some big faults and pretty BS design, it's just dialed up to 11 here.
I don't want to play Frontiers again, much less this update.
7 notes
·
View notes
Text
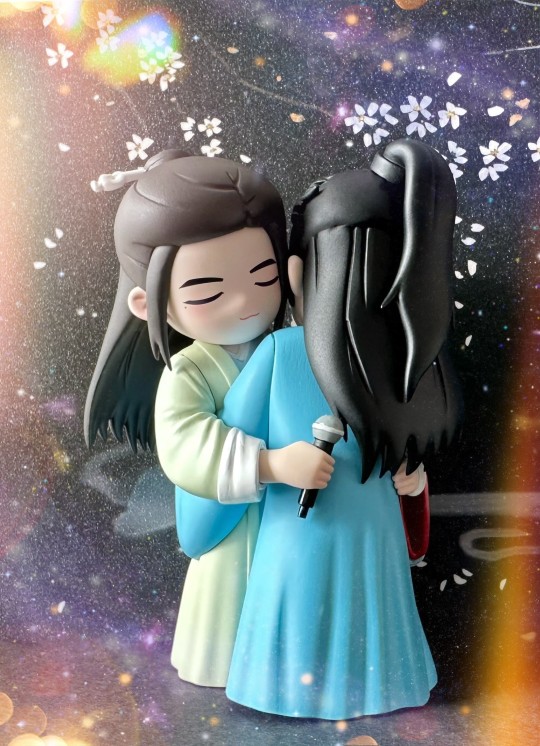
Hug of the Century
I love that there is a specific name for the hug between Zhang Zhehan and Gong Jun at the end of the Word of Honor Concert. Whether it's called "Hug of the Century" or "Century Hug", it's one of my very favorite things.
I watched the Hug of the Century live very, very early in the morning Pacific Standard Time on May 4, 2021. I ended up paying twice for access - once laboriously translating my way through Youku's Chinese portal, and then the second time just paying for premium access on Youku's channel on YouTube, since I was not at all confident I'd be able to get the first access right at 4am or whatever time it was in the morning. It seemed a bit expensive at the time, especially since I watched it without subtitles and therefore had zero idea what was going on, but it turns out it would have been a bargain at 10 times the price.
I have saved every single angle and fancam that I can of this hug, so it's a real shame that I only have one video slot. I'm going to put it to good use with one of my very favorites:
Words cannot describe how much I love this clip, and all my carefully hoarded little clips of this. Let's put a few pics in as well:
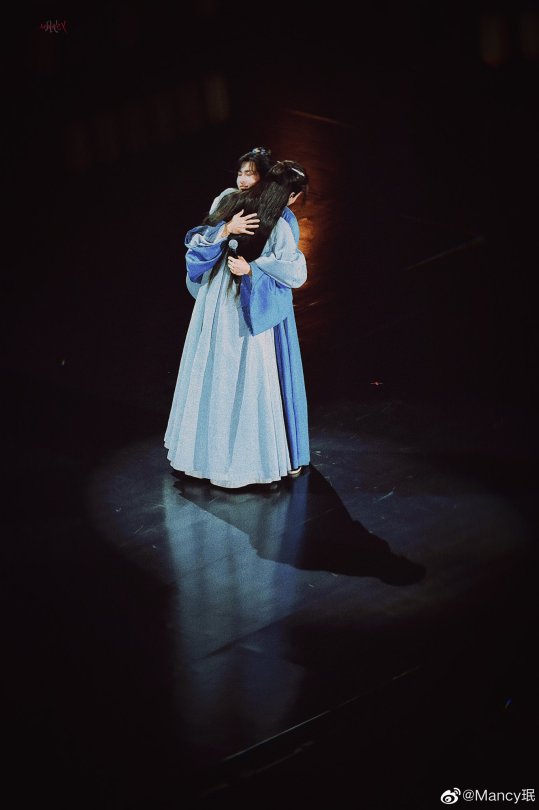
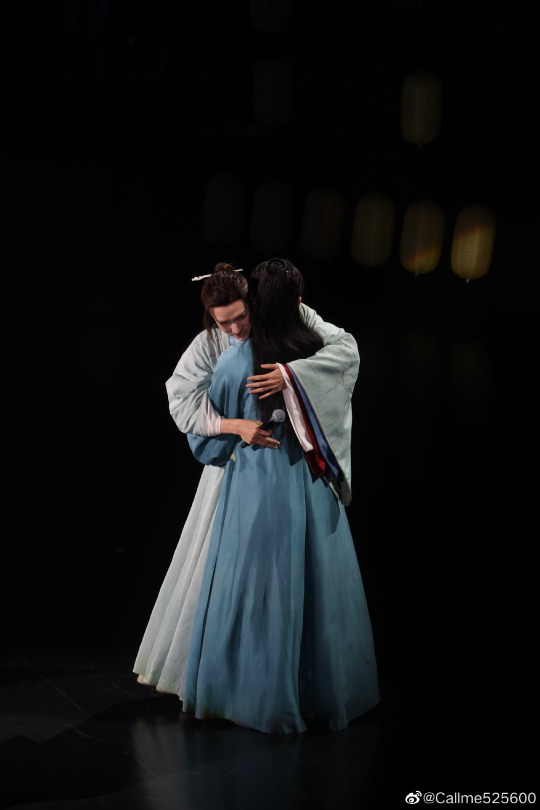
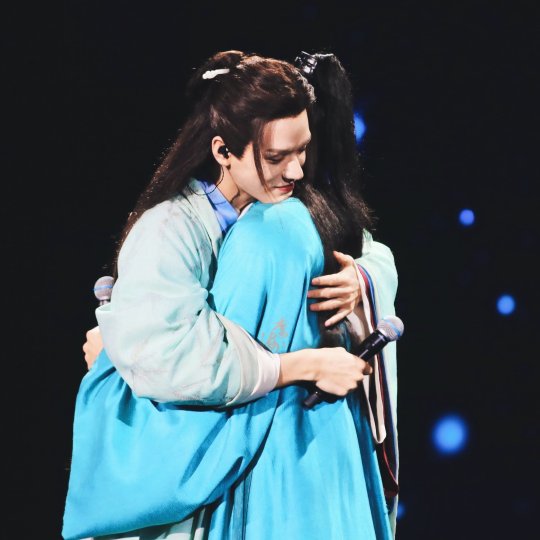

Ah, I feel so emotional looking at these pictures. What an incredible event. It's very worthy of being immortalized in fig form!
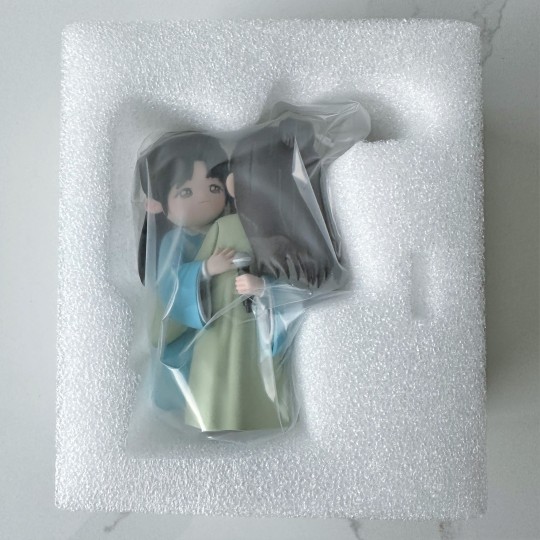
The fig maker had a difficult time with the factory for the engineering for this set. From what I understand, she had originally planned for it to be two characters, but it turned out the difficulty and cost was just too much, so the two ended up being made as a single figure. So you can see it here being shipped as one set together.
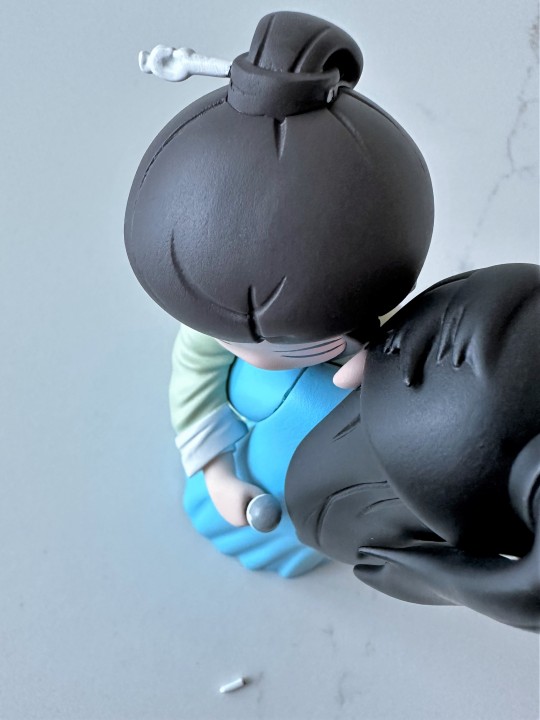
Unfortunately, Gong Jun lost the end of a hairpin! It's not common to lose part of his hairpin...but it's not that uncommon either. As you can tell from this, it was a pretty clean break, so I got out my glue and some tweezers and stuck it back on. It wasn't too difficult.
Alright, I'm going to just post the series of photos all in one go, so you can see the full 360 degrees of the Hug.
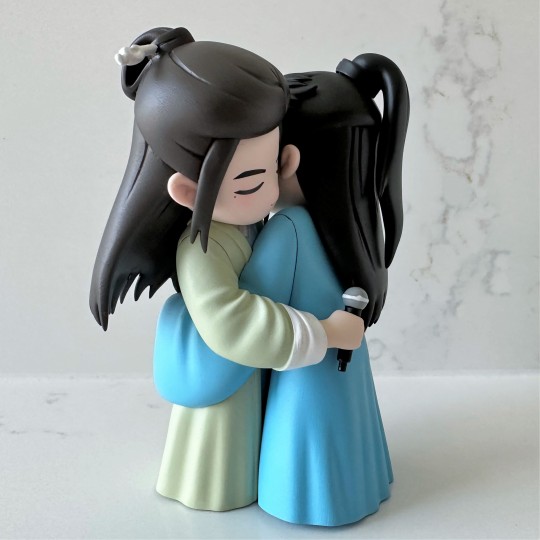
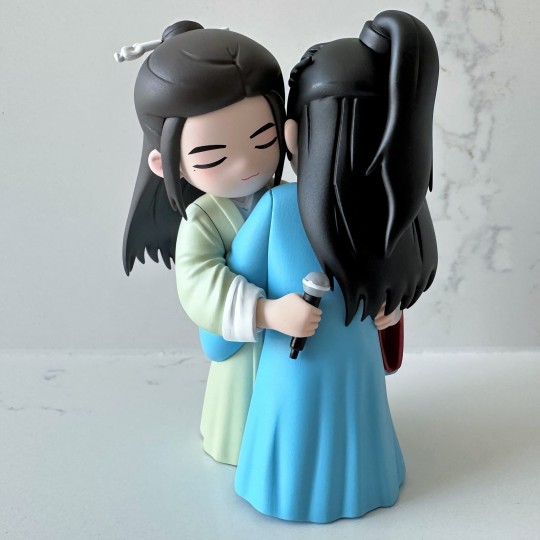
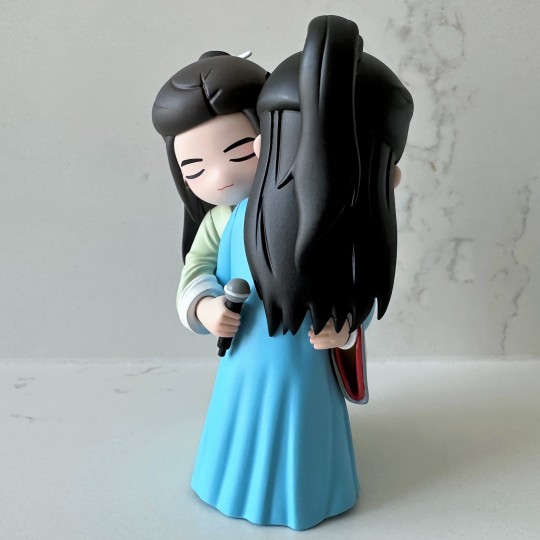
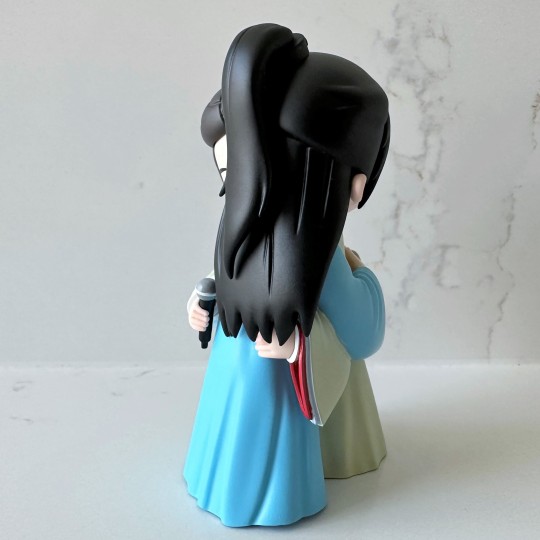
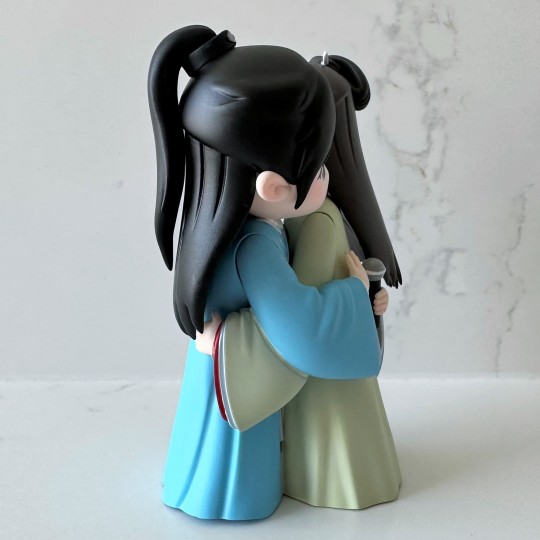
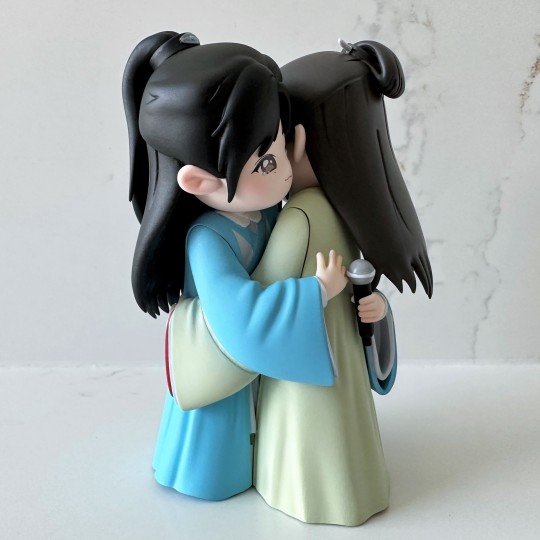
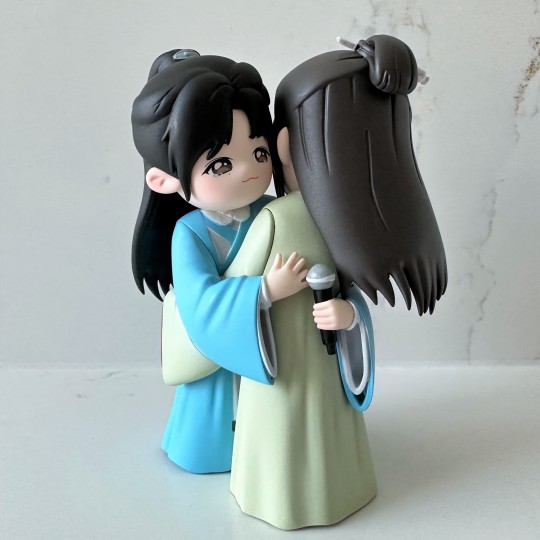
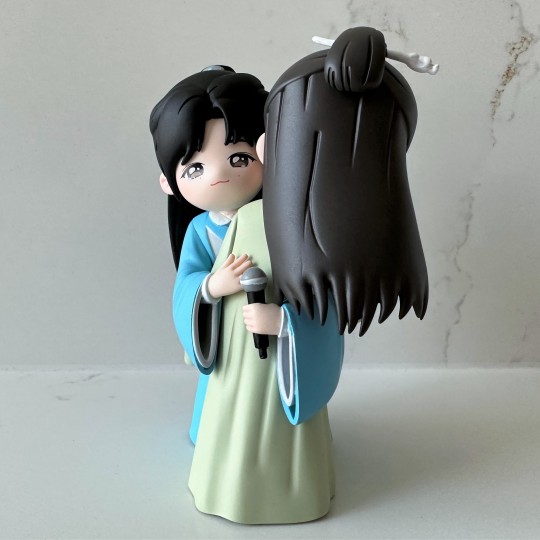
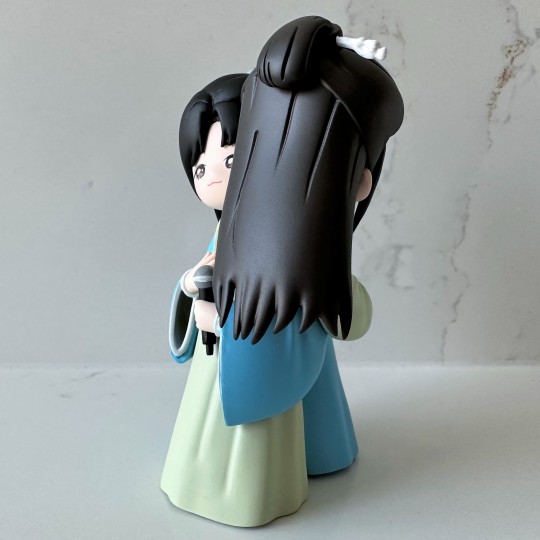
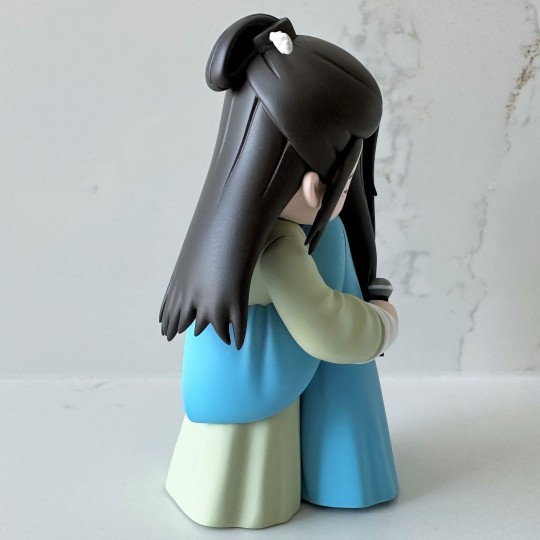
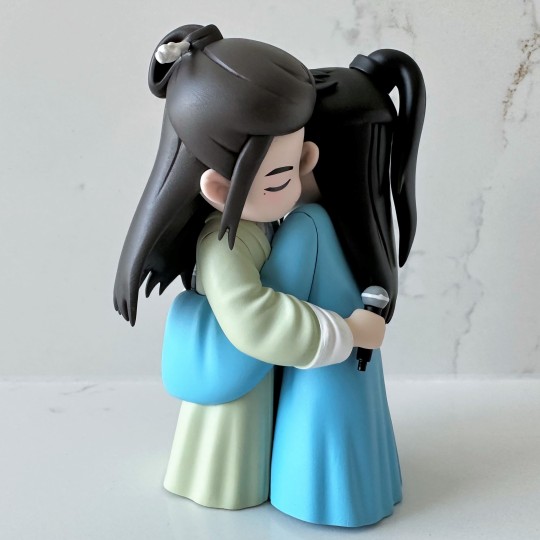
There we go. I don't mind at all the two figs aren't removable - it might look pretty funny if they were.
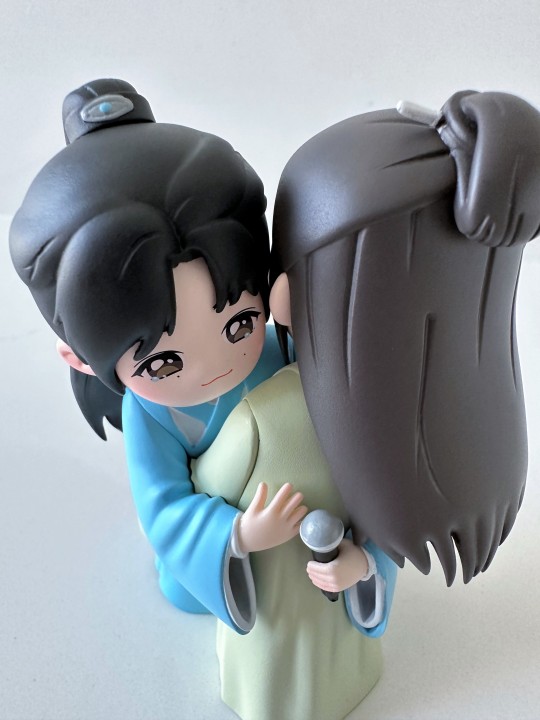
Here's a close up. The fig maker had a lot of issues with Zhehan's face during production - they ended up redoing it and then tweaking it several times. The finished product is much improved over the first draft, for sure. I know the eyes are very difficult for fig makers to get right…I've had a couple figures that got cancelled because they couldn't get the look right.
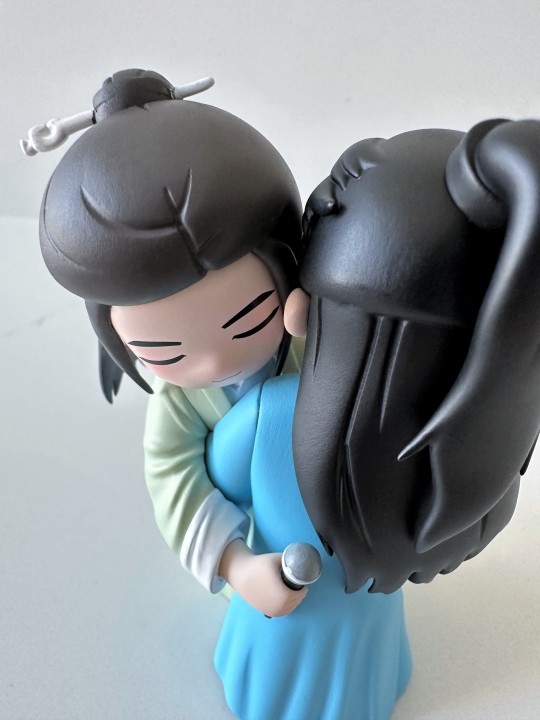
Gong Jun's face is a lot easier, since his eyes were closed. I really like the detail here of his rucked-up sleeve. I checked the pictures and they did model it very closely. It looks really good I think, some very natural looking detail.
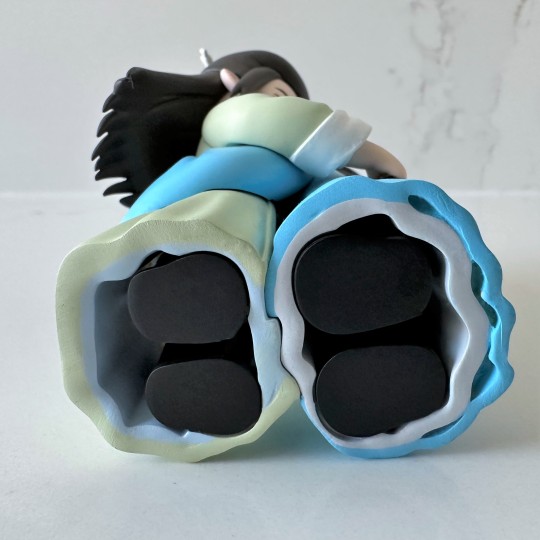
You can see how they were actually designed as two separate figs. It would have been very interesting to see the production pics on this fig to see how they interlocked them together.
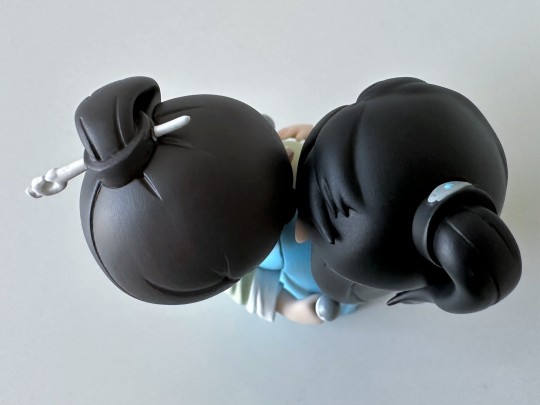
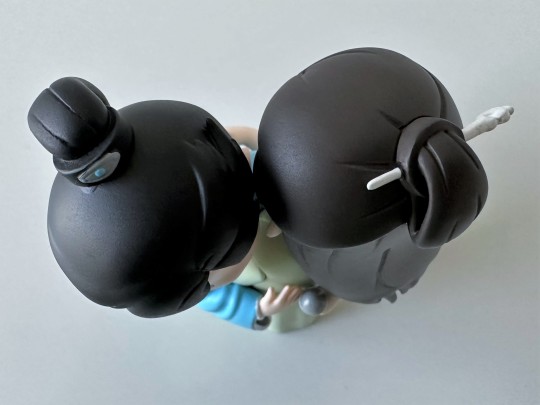
Both sides here...I think the hairpin glued on very well! Maybe my most successful one yet.
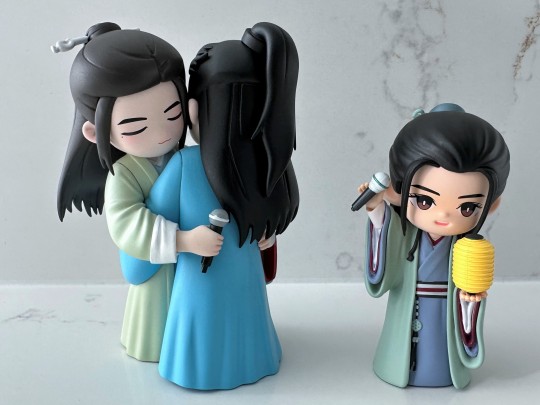
This fig set is quite a bit larger than my typical figs. To illustrate, here's one of the the original official concert figs.
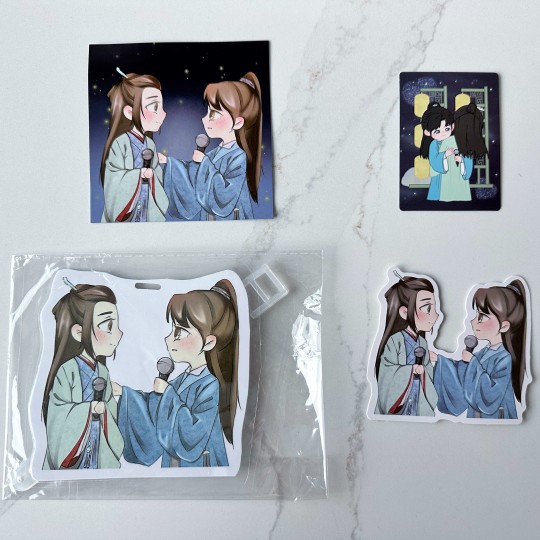
The first-in bonuses for the set included an art card, a luggage tag, and a sticker, all with some really delightful art of Zhehan's speech. I love this so much! I would have bought it just for the extras here. The box card is in the upper top right.
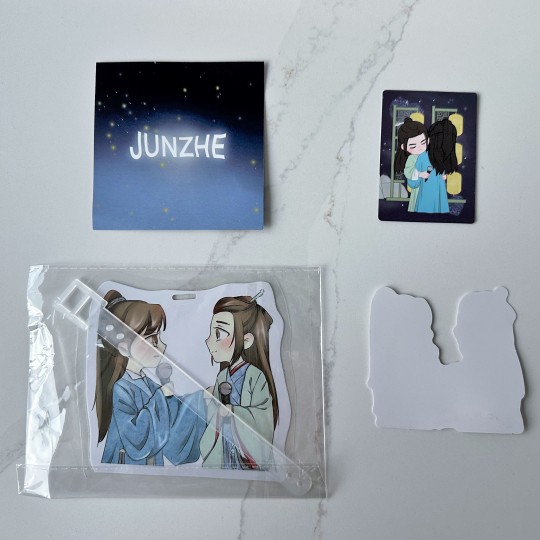
Here's the back of everything...
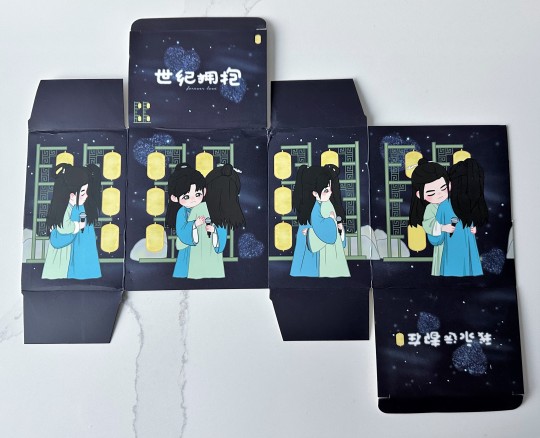
And our box art. The fig maker really went all out on this set - you can tell how much this meant to them. It's the only set they've made - their dream figs. I'm really happy with it. Having all these different visions and styles of figs makes the collection really special to me.
Material: Resin and a lot of emotions
Fig Count: 417
Scene Count: 29
Rating: Love forever
[link back to Master Fig Index for more posts]
#junzhe#zhang zhehan#gong jun#word of honor cast#word of honor concert#shl cast#figthusiast#word of honor merch#hug of the century
16 notes
·
View notes
Note
Hello! I finally finished the podcast episode and I really agreed with Grey's point about how the character writing for season 2 is so much worse than bad writing on something like supernatural. Because as someone who is also into bad episodic tv shows the expectations are completely different. Even if a character does something ooc or terrible it could add to the complexity of their character or it can even be completely disregarded or retconned but in a serialized show where you only have six episodes and the whole show functions as a single narrative it just doesn't work.
Do you guys think that this season would have worked better if it was more episodic? Like having a different mystery/flashback every episode slowly building to the big reveal at the end?
Also I don't know if you guys have discussed this on the podcast but was the writing process for this really rushed? Because so much of this season felt like a first draft where they wrote the conclusion first and tried to work backwards from there but even that doesn't make sense because the only real buildup to what Aziraphale does is in the first two minisodes?? It almost makes me want to look at his tumblr but thankfully I have enough self preservation skills to avoid that.
yeah agreed it is six 50-minute long episodes you cannot be inconsistent in there!!!
grey is a big fan of sitcom omens so i think he agrees that it'd be better if it was episodic!
for me, i'm not too sure because i think the mystery itself doesn't have legs. the final ep's Big Reveal to ME is that heaven is planning to redo the apocalypse Right Fucking Now, but crowley doesn't even react to that; she's just curious about why gabriel is anti-apocalypse. the Big Reveal based on what the narrative spends time on and has all the characters gasp about becomes the gabriel/beelzebub reveal, which 1. i don't think is the reason gabriel doesn't want the apocalypse?? he said "instead of armageddon, no armageddon" before they got close??? so what was that shit even 2. is barely even related to why gabriel got mindwiped 3. doesn't answer the "why did you come to my shop?" part of the mystery. and sure, maybe if i cared about b/g At All (sorry to everyone who does like how they were implemented in the show you're all still valid etc etc) and they actually Had 3D Personalities, the way the show clumsily tries to do "you thought it was about Something Terrible coming for everyone, but it was actually about love and being on your own side, and isn't that what a/c are all about?" (at least i THINK that's what they were trying to do?) would hit, but i don't and it doesn't
i've been thinking about what the strengths of s1 are, and i think they're 1. the dynamic between a/c and how very likable they both are 2. aziraphale's pre-ex-christian arc 3. keeping the plot and stakes present throughout 4. having multiple pov characters - even if some of them got tedious, i think the whole "i wish aziraphale and crowley cared about humans more so they seemed more invested in the saving the world angle" doesn't bring s1 down too much because we see the Them and anathema and remember that these are brave and kind ppl who have lives and those lives rlly are at stake
#1 remains in s2, except for some overly corny or self-referential moments. #2 tries to be here but, as you said, it's rlly only the two minisodes that play to it, and maybe the unexpectedness of it in s2e6 is purposeful, but i would have liked to see more! #3 is floppy, limp, flaccid, even. i'm prob just repeating things i've said in recordings already but muriel and heaven pose absolutely no threat! the "fight scenes" when hell finally storms the bookshop are filmed so badly that i never even considered being stressed! the book of life threat, which i thought was the whole motivation behind all of crowley's actions in s2, comes to fruition, and crowley doesn't give a single shit and it's just luck regarding the metatron's timing that saves aziraphale's existence. #4 doesn't happen, which is why we get maggie as thee worst-written character in gomens history. it's a mess!
when you said episodic + revealing pieces of the mystery, though, if i combine that with #4, something i think COULD be fun is a the afterparty s1-esque season. basically, each ep is from a different char's POV and they're all retelling how they experienced the last week using a genre that reflects how they think. the last ep would be gabriel's pov, and we could have a longer b/g flashback series that actually feels believable there and a better explanation of why he and beelzebub are against the apocalypse, OR gabriel is the second-to-last ep so that aziraphale can get ep1 and crowley can get ep6, wherein the final fifteen happens. i'm imagining aziraphale would omit the divorce but the background of his interview would weirdly look a lot like heaven, and then finally in ep6 we cut to sloppy-drunk carly rae jepsen-blasting divorcee anthony j. crowley who fills in that last piece (though you could also swap them around). the other POV-ers would be muriel, shax, and nina (or maggie if you insist). we'd lose "a companion to owls" and some time with our ethereal girlies, but i think it would be worth it.
i actually did not know much about the s2 writing process, but i just searched around and found this post (link) summarizing an interview/con in 2022, and tl;dr, it was rushed, and it sorta WAS written ending-first! neilman pitched the general plot without the ending in august 2019, then partnered with john finnemore and came up with the ending in december 2019, then started writing in summer 2020. filming happened in late 2021-early 2022, so the two of them had ~a year? meanwhile, there's a third draft of gomens s1e1 from 2015 floating around (link), AND a lot of it is straight from a book that 1. terry pratchett was involved in 2. the authors had been trying to adapt basically since 1990. i'm assuming s3 is going to be written on a timeline similar to s2, which is part of why i have low hopes for it, though, if neilman is to be believed, at least the idea for it has been developing for longer than the idea for s2?
- Crystal :)
2 notes
·
View notes
Text
First things first: the origins.
On the original version of my first fanfic I ever made, and why I decided to redo it 8 years later. So. Context. Pokemon Opal and Garnet (2016) is the first fanfiction I ever made. It's technically a crossover fanregion fic set in a region created by me with Pokemon created by me, but I use "crossover" extremely, extremely lightly. Technically, it was entirely new, but 5 of the main mons were named after (and of those 5, 4 were based in part on) characters from Disney's Hunchback of Notre Dame, which is my all-time favorite Disney movie if not my favorite movie period. Given that it was my first ever fanfic, it is a mess. It is rough around the edges, and by god it shows. Among the many things in the first fanfic I ever wrote: HOND references like crazy, blatant Element of Harmony expies in the form of the 14 virtues (more on them later), a blatant Trump allegory, my first time writing a court scene, and a French anthem performance straight out of Casablanca. This was back in the Cringe Old Days (TM) of 2016 when the word "subtlety" was not in my writing vocabulary, when I did not know what "character arcs and development" were, and when I genuinely believed that fanfic sites would automatically send their copyright bots out to companies so that they could sue you out of your minds if you dared put non-public-domain song lyrics into your fic. After a while I stopped updating the fic out of boredom, writer's block, and distraction due to a bunch of other things entering my brain (oh hi, something called the "Dutch language"! Oh hi, fanmade musicals!). But the original fic still exists today and can be found. I plan to one day delete my fanfic.net account, though, and with it all the original stories, but you needn't worry-- the original Opal and Garnet can still be found on Lake Valor; all 20 chapters of it. After that, life went by. I joined We Are All Pokemon Trainers, where I met people who are numerous friends of mine, and, more importantly, learned how to actually create character arcs, developments, lore, and backstories. It was an incredible experience for me, and I thoroughly enjoyed every aspect of it. I went to college and graduated; I had an extremely long period of health anxiety... and in my last year of college, in 2024, I decided to look over my first ever fanfic and figure out what worked and what didn't. Two things from the fanfic-- the PokeLatin language and Orwell the Newspeak-speaking Crawdaunt-- made their way into WAAPT, albeit the PokeLatin language became the Poipolian dialect of UBese and had tons of tweaks done to it. This was also the year after the Disney company celebrated their 100th anniversary. And given that, the fact that many HOND references were made in the original fic, and the fact that TV Tropes erroneously labeled it a crossover because of those references, I ended up deciding "screw it, I am leaning into the Disney angle and I am leaning into it hard". Cue the creation of the Gisnep company (I'm not kidding, that's actually what it's called) and by extension, the Gisnepverse, which consists of Opal and Garnet (2024) and the WAAPT continuums. (I retired from WAAPT and branched each of my characters off into their own seperate stories.) The next post I make will delve into the lore surrounding the Gisnep company and its differences from its real-world analogue.
0 notes
Text
Back on my bullshit again.
Redesigned the Plush Vessel cloak pattern for the 5th time.
I made a 'final version' test of the process I was going to use for Version 4 with the good minky I intend to use for them. The alterations I did were fantastic! ...Until it came time to sew lines down the length of the cloak.
Because I designed the cloak to 'bubble' a bit, so it was more shapely on the body, this made sewing lines down the length of the cloak to mimick the paneling appearance in the canon design and to tack the two sides of fabric together not work properly. Trying to sew a bubbled piece of fabric via flat surface sewing machine is difficult, at least for me. I don't know how I would go about fixing this or compensating for it, and honestly, I don't even care to. I don't want to have to put even more work into these cloaks.
In fact, making this final version test version revealed to me how just unpleasant the pattern was to work with and how much I Did Not Like Doing It. I dislike having to have 8 pieces per cloak. I dislike having to struggle to match up 3 pairs of lines and then the entire bottom jagged edges - which if NOT lined up correctly will cause distortions in the fabric; which is something I experienced in every attempt at this pattern.
The last test i did was arguably the best, and I really did love how it turned out. It looks really nice!
But plain. And the fact that the two sides don't have seams down them to hold them together bothers me. And it's just a pain in the ass to make.
But thank god for my grandmother, who has more sense than me and who's advice I probably should've been more open to taking note of.
I had asked her for her opinions on the process of making the two V4 Cloak sides, particularly zigzag stitching down the hemlines to keep them flat, and she had questioned why I didn't just use one big flat piece of fabric for both sides of the cloak. This would eliminate those hems entirely. I had explained why at the time; that having the curved seams would allow the cloak a better shape on the body.
Should've just listened to her.
Because that's exactly what I've decided to do with V5. Combine the 4 pieces that make up one full side into one big flat piece.
I'll be testing this out with the Good Minky later, to again test out a 'final version, but the test I did with the fleece shows that the shape is still pretty much the same. The bubbling I wanted might've been negligible.
RIP ME
Although another idea I was debating was to use sewn 'strips' of fabric that would then be sewn together into the full cloak. This would increase the piece count and be more effort, but it would make the paneling effect much stronger than just a sewn line. It would almost make elongating the ends much easier than it would be with the current pattern. I wanted to give Vessels like Greenpath and the Deepnest Four longer, more tattered cloaks, while also potentially using a barely tattered one for Hollow. Adding these long lengths of fabric would be difficult to do with the V5 pattern. It would either require a fuckton of fabric waste (keeping it all as once piece) or requite me to sew the longer strips onto the 'main' piece (adding an unsightly seam.) It's a loose loose either way.
To say nothing of upscaling for Lost Kin. The current pattern will be a BITCH to try to upscale. I can't just increase the scale, I have to try to make it longer than it is wide and redo the angles and oh my god I don't want to do that.
I'll test out the strips idea first. It'll be relatively easy to whip up a pattern for that.
(It'll also probably be easier to keep the pile in the right direction with it too. Currently, to avoid massively wasting minky, some pieces were the wrong way and looked terrible. I was intending to hide this as the inside side, but with smaller, thin pieces that are relatively rectangular, it'll be easier to line them up on the fabric in the correct pile direction while also minimizing fabric waste.)
On a Side Note: I've FINALLY been able to order my Black minky! I was waiting for a sample from a new site I found to arrive, because the original site i was looking to order from was sold out of black. The sample arrived yesterday, and guess when that first site restocked their black minky? Yesterday.
Oh well! I went with the second site, because I knew exactly what type of minky i'd be getting and also their first bulk tier was 10 yards instead of 20, and bumped the price lower than the first. I've got 5 more yards than I really probably need, but I can always use it for something else.
Like that Full Size Hollow I still want to do.
(I think I'll need more than 5 yards for that. I don't remember anymore lmao.
I shouldn't be thinking about that. I gotta focus on finishing the Babies first.)
Anyway, the cloak is the thing that's giving me the most issue out of anything. Which, to be fair, I expected when I started this.
I just didn't think it would take 6 VERSIONS to figure out.
(Low-key tempted to hit up that one Etsy seller who does amazing HK Plushes for help/advice. Not sure how well that'd go down though, since I'm not sure if I don't want to sell these Vessels myself yet. Feels like a kinda scummy thing to do. But man, I'm getting desperate, and clearly my pattern and sewing skills are not as good as I thought they were lmao. Not that I thought they were good, merely decent, but still.)
0 notes
Text
Under a read more since this is kind of a story lol
Forcefully took up sewing since I urgently had to mend a DEAR treasure (2 of them) after an accident. It happened so soon after New Years I was thinking "what a terrible way to start this year!... uuuuuuu....uuuu...." and I tossed and turned all night. Cried. I furrowed my brow and thought about rolling over and just taking the loss. But impulsively I steeled myself and thought Hell No! I was experiencing despair and waded my way through it but I wouldn't let it become loss.
I resolved to go to the only fabric store I knew of to find replacement fabric and matching thread the next day. The train ride was nice. I felt so purposeful lol. A very rare occurrence in my life. I watched maybe 30 seconds of a video telling me how to sew and went WHATEVER! and went at it on some tests for 2 hours. Don't advise that but I was stressed haha. The tests weren't that good but they were good enough. I got the hang of things.
Took me about 2 nights to finish mending the first item. The fabric matched really well in color and texture so the fact my sewing was shoddy didn't show as much as I thought it would. I was satisfied. The next item.... took 4..... all nighters... it doesn't sound like much writing it down but I experienced so much frustration. Probably more frustration than I've felt in 3 years since I haven't picked up any new skills or hobbies in that time. I was just an observer before. It was so grueling.
But I surprised myself! The reason it was grueling was because I kept aiming for something better. I redid sections so many times and approached it from 4-5 different angles even if it undid hours on hours of work. The patching fabric for the second item didn't match as well (totally different material, texture, and thickness) and ended up being more decorative. I encountered new problems I didn't previously account for. I had to worm my way around a lot! And it was not fun. But my will was something that strangely surprised me. I would finish a section, look at it, and go "I won't settle for that" then restart. Id go up halfway, realize I was doing something wrong, then restart. I'd realize there was a better way of doing something, restart. I think there were 3 times last night I decided I was done but realized I wanted to redo something and I worked for an additional hour every attempt.
Again It wasn't fun in the moment! But something in the back of my head was so very happy. I knew I would come out of this being proud of what I did. That Will I experienced was honestly something I thought had atrophied outside of art! And with digital art, problems are easy to solve. Undo, copy, paste, save states, etc. I'm not holding a needle with long nails and thread that I can barely see to solve I problem I don't know anything about.
Even if the actual display of skill is fledgling, the mental hurdles I overcame made the end product feel more rewarding. I did everything I could with my level of skill and prep. While doing something middling is better than not doing it at all, I got too used to that and just started aiming for mediocrity. So overcoming that has been so very rewarding. I can't say that enough.
I wondered if this was because I've been watching jojo... nearly all the characters carry themselves with so much purpose and determination, regardless of their role in the story. I can't lie, on the train ride there I was thinking about how certain characters would persevere in situations that devastate them..! I was like.. I should too...!!
It's so funny how an objectively small project became so important to me. I've built a little more respect for myself this year! I think that's a good way to start it off.
I feel really good about myself lately
18 notes
·
View notes
Text
Summary of March:
Bouncing between focus and being completely scattered. Mental health very poor. Managed to take some time to play games without feeling guilty about it, which was good. No scenes again because I still always think of either these big elaborate ideas that are a day+ of actual work (and so don't get done) or just 'sketch of character doing nothing so I can try to get their likeness'. Really need to find out how I can add perspective backgrounds to portraits or something lol
Still reducing workload until I get onto something I can actually complete in a month.
Plan from February:
All monthly/weekly goals for the year ✗ no backgrounds
10x 5 minute What Am I Scared Of sessions (inc photo drawovers) ✓ don't know how much it helped though!
Thumbnail/sketch for K/ylux calendar ✗ might drop out of this
DAB Lesson 7 - redo form intersections ✓
DAB Lesson 7 - 4 vehicles ✓
FEH design ✓
Proko - review notes ✓
Proko - next body part ✗ took notes for this, started doing initial tracing
April plan:
3x 100 comp
5x scared
DAB Lesson 7 - 2 vehicles
Proko - shoulder bones
DrawThis - 2x 2h videos
Rough sketches for all 5 FEH alt ideas
1x background sketch/screencap study (1h timer)
1x simple form studies (1h timer)
Look at how FEH artists handle small details/trims with lineart ✓
notes and improvements from finished stuff:
USE PHOTO REFERENCE FOR EXPRESSIONS and try more open mouths ✗ no expressions this month. fuck, do more hair studies ✗, use photo reference to figure out stylised ¾ eyes ✓ still haven't figured it out though, push unhorizontalness ✓, try to unstiffen poses before doing lineart (separate pass)✗ but this did improve from the unhorizontalness thing
guy: eyes too sunken in OR far side of face/chin sticks out too much, folds on shoulder don't take into account that there actually is a shoulder there, arm is completely straight, pose is pushed a bit too much but I actually don't mind that
m/ichalis: lines REALLY messy (due to rushing to finish for a self-imposed deadline), eyes too flat/centreline of nose doesn't stick out enough, flat jaw area (mouth doesn't imply any curvature to mandible area), ears on rabbit aren't oriented correctly (v hard angle though), collar thickness is different on either side, hair doesn't follow contours of head at side (common problem), pose doesn't make any sense but was the only way I could think of to get the rabbit into frame so I guess I can let it slide, temple area shaded way more 3D than the rest of the face and looks weird
s/eth: nose/mid-face too long, drawing details like trims with lineart looks weird, hands not 3D, sword doesn't quite fit comfortably into hands (copied hand reference too faithfully), wasn't sure how to do top contours for thigh high boots because I didn't know exactly how the slightly raised leg worked or interacted with pelvis, also wasn't sure how to handle material on tunic moving with raised leg
a/yra: back chestplate thing too curved (looks like turtle shell), sword pose impractical, sword blade looks really thick and not sharp at all, tree in background too abstract - doesn't look like tree (holes in foliage make it look like a flat shape stuck onto the trunk), hair looks like it's stuck together, Small Other Eye Syndrome
a/rvis: TOO DARK, shading inconsistent with lightsource (looks like facing him but the background is a rimlight), not fully lineless or lined - lazy, shading on nose really bad because of the light coming from the direction it is, hair doesn't follow contour of shoulders/chest, do like how lost edges were executed though
v/alter: drew leg armour without really knowing how it would fit over the leg (couldn't figure out how to make the cutout not dig into the thigh) and so had no idea how to shade it either, shapes on knee guard inconsistent between sides, silhouette very static/horizontal, arm at his side looks really awkward (I did intentionally want it by his side and not in a more dynamic pose but it looks like he's pushing it down), glow isn't glowy enough, colouring messy (I did clean up the lineart though which is a good step forward)
ACTIONABLES: USE PHOTO REFERENCE FOR EXPRESSIONS and try more open mouths, do more hair studies, use photo reference to figure out stylised ¾ eyes AND NOSE, push unhorizontalness, see how other (FEH) artists handle trims
5MIN SCARED IDEAS: find good hair examples and trace, find ¾ photos and trace eyes/nose, trace torsos for gesture, review/learn leg muscles, trace thigh high boot opening contours from actual photos
0 notes
Text


synopsis: kdrama cliches & tropes u would experience w/ ur haikyuu boys.
pairing(s): various x gn!reader
content warning: mentions of being drunk, pinch of angst at the bonus end, wrist grabbing, mentions of a fight
naia’s footnote: first post 4 this blog … Feeling: Nervous 😹this probably a bit ooc but let me live! also?? the read more thingy gives me these stupid glitches and i had to redo this for so many times
likes & reblogs are appreciated!


PIGGY BACK RIDES — scenario wherein you probably got injured or got too tired to walk and he carries you on his back (either begrudgingly or happily, either way you’re both warmer than usual in the face but no one says anything.)
→ BOKUTO, tsukishima(is part of the begrudgingly part, you’re probably too tired to walk or injured and he’s totally NOT worried about you okay? he just finds your whining annoying and wants you to shut up.) noya, asahi, aran, kita, akaashi, daichi, aone.
FORCED COHABITATION — you guys probably hate each other, and somehow, someway, you guys end up in a situation where you guys have to live together. this was not a part of his or your plans, but so is falling in love with each other but i guess fate has other plans!
→ SAKUSA, atsumu, shirabu, semi (you think he plays his guitar way too loud not knowing it’s the chords of the song he wrote about you)
CONFESSION OF FEELINGS BUT … — either you or he fell asleep, blackout drunk or just sleepy as hell. or he gets interrupted before he confesses by a phone call that will lead to many scenarios from misunderstandings to an emergency that will set back the confession a few more episodes until he actually gets to confess. or at this point, you have to be the one to confess because things just won’t go his way!
→ OIKAWA (LMAO, wanna see him suffer), ennoshita, kyotani, iwaizumi, goshiki, makki, tanaka, asahi, hinata, lev, atsumu, kuroo.
SHARING AN UMBRELLA — it rains but you forgot your umbrella, and he so happens to have one with him. and somehow you and him end up under his umbrella, close proximity as you could literally feel his hot breath and he wonders if you could hear his heart beat drumming like he just ran a whole mile. he would angle the umbrella in a way that you wouldn’t get wet by the rain while his shoulders soaking wet but it’s okay, as long as you’re fine and dry he doesn’t mind getting wet by the rain <3 (bonus if next day he gets sick and you visit him and take care of him AND maybe an almost kiss happening … 😁)
→ AKAASHI, KITA, semi, goshiki, tanaka, yamamoto, kuroo
WRIST GRABS — grabs your wrists to get you to talk to him because you walked out on him OR OR HE GRABS YOUR WRISTS BECAUSE HE GOT JEALOUS WITH THE GUY YOU’RE TALKING TO OR (they try not to be as forceful or harsh tho ☹️)
→ iwaizumi, osamu, suna, yaku, kyotani, tsukishima, kageyama, oikawa, atsumu, kuroo (?) atp i’m just saying anyone that comes into my mind LMAO
OLD CHILDHOOD FRIENDS THAT MEET AGAIN (AND FALL IN LOVE) — okay so you guys either remember each other not, but that really doesn’t matter in the end because either way, you guys would end up together. hashtag fated soulmates!
→ ushijima (I JUST FEEL LIKE HE COULD FIT THIS TROPE .. or probably he reminds of this male lead in a kdrama i watched with this trope LOL), sakusa, noya, oikawa, tendou.
SHOULDER NAP — he falls asleep in your shoulders, whether he meant to or not won’t change the fact that you could hear the beat of your heart increasing, your breath hitching, and suddenly the room feels hotter than ever.
or you fall asleep in his shoulder and suddenly he can’t move a single muscle anymore, but it’s fine, he thinks, as you nuzzle yourself unconsciously into his neck.
→ SUNA, kenma, kyotani (you fall asleep on his shoulders and instead of pushing you off him, he lets you sleep there and glares at anyone who stares at you guys.), kageyama, tsukishima.
BONUS: THE LOVE TRIANGLE TROPE — my guilty pleasure but also my most behated trope ever.
the male lead — the one who got the love interest in the end.
→ oikawa, tsukishima (it’s giving asshole male lead but gets the girl in the end anyway!), bokuto, terushima, tanaka, kageyama, atsumu, osamu, shirabu, goshiki, ushijima
the second lead — probably deserves the love interest as much as the male lead OR probably deserves the love interest more LMAO
→ akaashi (he treats the love interest so well and he just?? loves them sm?? even though he’s not the one that they picked?? crying he doesn’t even expect anything from them. he's the type of second lead every viewer was rooting for), iwaizumi, kindaichi, lev, yamamoto, and if i say suna, ennoshita, noya, konoha, koganegawa, semi, kawanishi


#atsumu x reader#oikawa x reader#suna x reader#haikyuu scenarios#haikyuu imagines#haikyuu fluff#haikyuu x reader#iwaizumi x reader#haikyuu headcanons#haikyuu angst#haikyuu drabbles#bokuto x reader#akaashi x reader#kuroo x reader#tsukishima x reader#ushijima x reader#hq x reader#haikyuu x you
3K notes
·
View notes
Text
Shoe repair: Regluing soles.
So, when I was out and about, dressed all cute, my Bodyline shoes did to me what my Bodyline shoes have done to me many times before.

By the end of my trip to the quality retail establishment known as Five Below, the platform and sole of my Mary Jane pump had detached itself.
As I've mentioned before, it's generally not a bad idea to have some tape in your purse when you're working with Bodyline shoes. Almost every pair of Bodyline shoes that I've owned has broken on me in some way, and sometimes you need to tape it back together to get home. I was driving myself this time, and I keep backup shoes in my car because of a longstanding ankle problem, so my day wasn't completely ruined.
if you have to tape your pump to your foot so you can get through the day, I find that putting a few loops of tape around the middle works pretty well, Tape all the way over your foot and all the way under the shoe. This allows the tape to actually support the shoe, instead of trying to peel off, and it's relatively subtle if you have to do it, like I had to at the convention earlier this year.
Anyway, Bodyline's shoes are just not meant for northern California in the summer, and I think the glue just melts, so I actually had two pairs I needed to glue back together. There's part of me that actually looks forward to needing to do this, because I know that my glue job won't fall apart, and my shoes will be better in the end. I did a tutorial on regluing shoes back in 2015, so it's time to redo that tutorial.

Let's take a look at what we need to do this:
One, we need a place to work that will be safe if little bits of glue get on it. If we do this right, we will not drip glue everywhere. However, if we do this right, we also will not be somewhere that a little drop of glue will destroy.
Two, you need clamps and clamping material. I'm going to be honest, getting some good quick-release clamps and keeping them with your sewing/crafting/diy supplies will be a game changer in many aspects of what you do.
Pretty much any clamp that you get will be good for something, but here's my favorites:
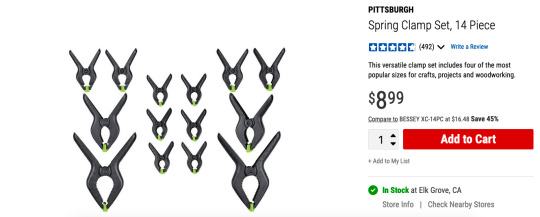
Rabbit-ear spring clamps. The smaller sizes are really good to have around because you sometimes just need A Thing to hold A Thing nice and tight. I used one of the really big ones to hold the sole of the black shoe's rubber sole onto the back. The clamping surface swivels so they're good for clamping angled things.

These things are like a traditional c-clamp, but with a quick-slide action that makes them way easier and faster to use than a c-clamp. I have like 20 of these with my weaving supplies because it's way better than a warping peg or a table clamp. These have a swivel clamping surface, so they can do angles okay. The end of the clamp that swivels also adjusts in and out, so you can use that to put clamping force over a edge of a shoe and avoid bending the edges too much. You can also use that screw mechanism to really tightly clamp something.

You can take the end off one of these and put it on the other end, and then it's a reverse clamp used to hold things apart. I like these little 4" ones for a lot of applications. You can also get a really tight clamp/strong spread with these because of the ratcheting handle. In this tutorial, I use one of these, but I'm using the 14" version instead of the 4" version. This is because I don't know how to read when I buy things online.

And I'm throwing this 99 cent spring clamp in here because I use these in sewing all the time. Any time you need to get some fabric together and out of the way, this is your tool. Also, if you have rented costumes that are larger than your actor, you can clamp the extra fabric in the back to make it look like it fits them (and then clamp it in the front for any shots of them from behind). I keep these on my dress form as well, because I'm a slightly different size than my dress form, and clamping the back edge of the garment sometimes makes it photograph better on the form.
So get yourself some clamps. In addition to those clamps, I used bungee cords and a lot of stained towels/discarded shipping envelopes to stuff the insides of the shoe. Don't need to make new trash if you reuse the trash you have.
Let's talk about glue, really fast. In that picture, we have four kinds of glue.
Shoe Goo: This is the one I used in this tutorial. Shoe Goo is a glue made specifically for shoes. It's a little bit flexible when dry, is water proof, and can withstand higher temps intermittently. This means that it won't melt when you leave your shoes in your car on a summer day.
E-6000: E-6000 will glue most things to most other things. It comes in a few colors and dries flexible. I keep it on hand, and I have fixed shoes with it before. I like the Goo a little better for this specific application, but I use E6000 on small things like broken buckles. I think I fixed the left shoe of this black pair with E6000, because the store I was at didn't carry Shoe Goo.
Fix All Adhesive: I've used this one in a pinch before. You can find it in more places. It also does something that the other two glues can't do, which I'll go into in a minute.
Glossy Accents: Glossy Accents should not be out there. Glossy Accents is not ready for shoe repair. Glossy Accents does not know what it's doing out there with all those strong glues. Glossy Accents should go back home. Do not use Glossy Accents on your shoe repairs.
Please note that, with the exception of the accidental inclusion of Glossy Accents, all of these are called solvent glues. A water-based glue has water in it, and the glue will dry as fast as water evaporates. If you want it to dry faster, you can replace the water with a solvent like acetone, which will dry as fast as acetone evaporates, which is much faster. If you expose a dried water-based glue to water, it could dissolve back into the glue, making the join weak. A solvent-based glue won't dissolve in water, but you also can't use water to clean it up. Read the instructions on your glue. It will tell you, "when wet, clean up with x." Find out what X is and then have that on hand. Hopefully, you won't need it. Also, most solvent glues are flammable, so don't smoke or burn candles while you do that. The lighter in that picture up there, much like Glossy Accents, has no place in that image and should just go home.

My white rocking horse shoe is a really good example of an easy shoe to re-glue. The front is still attached, but the back is free. Because the front it attached, it will keep the back in alignment. You don't need to worry about lining it up as much, because the shoe will line it up for you.
This is also nice because there's not really any dirt or grass in there. If your shoe broke and you had to walk home with your sole missing, you might have dirt to clean out before you do this glue.
What we do here is pretty simple: put a lot of glue in there, spread it around, put the two sides, together, clamp, and come back later.
How much glue? You want enough so that there's not a lot of empty air pockets between the two sides of the shoe. You want it to be shoe to glue to shoe, without air between. However, you don't want so much that a ton runs out of the sides of the shoes and you need to do cleanup.
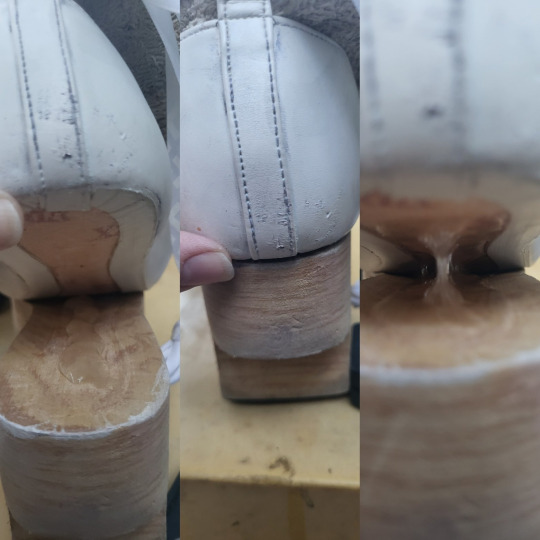
I did a nice fat bead of glue down the sole, squished it together, and then pulled it apart. From that point, I could spread the glue around and get good coverage. You want glue on both parts to be glued.
Then, apply some force onto the shoe, to really get the two glue surfaces touching each other as much as possible. I like to just put the shoe on my foot and stand on it for a few seconds.
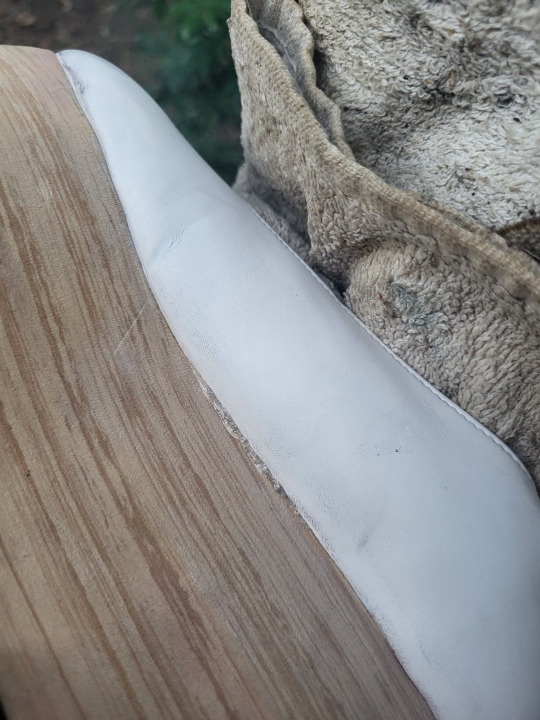
Once I've put some pressure onto it, I check for two things. The first is for any glue squeeze-out. Acetone cleans that up, but it can also dissolve some of the finishes on some shoes, so be careful with throwing it on there.
The second thing I look for is any areas where the sole and the shoe are not properly joining. You can see in that three-part pic up there that the back of the shoe wasn't totally meeting the sole, so I had to make sure that I had glue all the way back there.
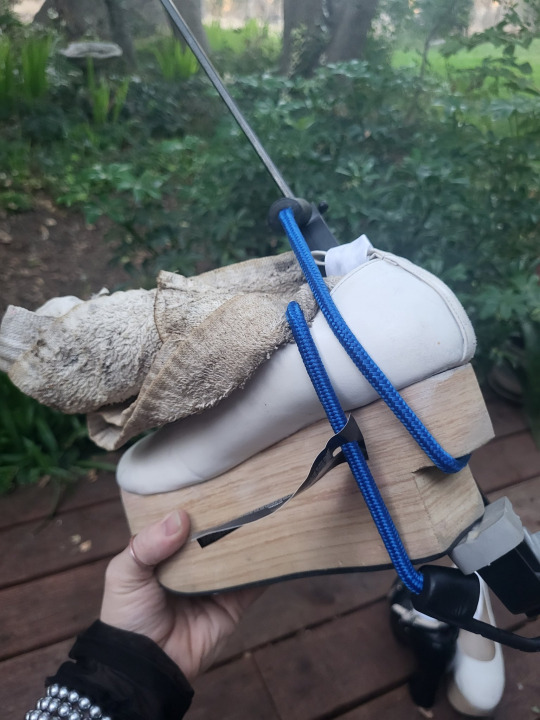
Then it was time to stuff the shoe with something (I used a stained towel) and apply clamps to it. We stuff the shoe so that the clamp can't bend the edges of the shoe down and break them. Here I have one large clamp to provide most of the clamping force, and then a bungee cord to make sure that very back part stays stuck to the sole properly.
Once I was confident that everything was making contact, and that any excess glue was cleaned up, I could set the shoe aside and allow the glue to cure.
So what's going on with the Fix All glue? The main different thing about the fix-all glue is that they instruct you to apply it to both sides, let it dry, and then bring the sides together. This makes two changes to doing it with Shoe Goo.
First of all, when you use glue that dries first, you only get a single chance to align the two parts. This means it's a good choice for things that are very easy to align (like this shoe where the front half is still attached) and not very good for things that might take a couple of tries (like my black pump with the whole platform detached).
The second thing is that it grabs hold immediately, making it a good option for things that are difficult to effectively clamp. You will still want to clamp it in place until it dries, but it will do a lot of that initial holding for you.
Know that one kind of glue will give you multiple tries, but must be heavily clamped while it dries, and another kind will only give you one shot, but it'll do some of the holding for you. (If you really need that sudden grab and long hold, and you're applying it to a large heavy-wear area like the entire sole of a shoe, you probably want Barge All-Purpose TF Cement. It's a dangerous product to work with, but exposing yourself multiple times to different slightly-less dangerous products to glue and then reglue and reglue a shoe as it keeps falling apart seems like a not better option IMO).
So a glue that has you let both sides dry first can be really great if you have just the tip of the rubber sole starting to peel back. The other advantage is that, if the glue dries before it sticks, it dries faster than if you have glue trapped between two non-porous surfaces. Because of this, I use Fix-All when I'm just gluing the soft rubber coating on the sole back into place.
On the black shoes, I needed a few tries to be able to get the platform aligned with the upper. The platform had completely detached, so I had to make sure it was in proper alignment. The right shoe is also where my bad ankle is, so I had to make sure the shoe wasn't twisted, so that my ankle wouldn't be under additional stress.

Here's how much glue I used, before it was spread around. I moved it around to make sure there weren't big patches with no glue. Good contact is good bond.
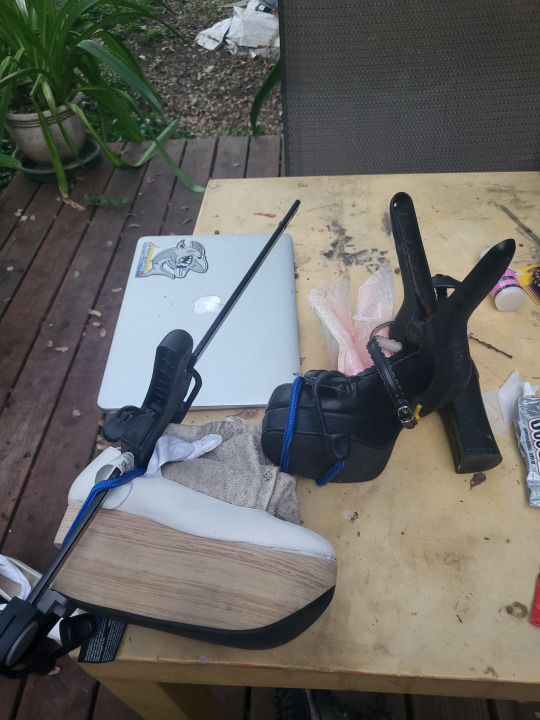
And here's how I clamped it. I shoved a bubble mailer (waste not; reuse your trash!) into the toe of the shoe, and the wrapped a bungee cord around that to hold on the platform. Then, I used a rabbit-ear clamp to hold the instep together.
And then it's just about giving it 24 hours to mostly cure. After 24 hours, it's a good idea to remove the clamps, so you don't put stress on the walls of the shoe. However, give it a full 48 before you try to wear the shoes, because there's still some final curing that has to happen before the whole thing is ready to be put under stress.
And now you can go out and about, knowing that your shoes are stronger than before, and that you won't need to fix that shoe again.
#tutorial#shoe repair#20dollarlolita#lolita fashion#diy lolita#long post#bodyline#rockinghorse shoes#rhs#i told myself i'd be doing a better job with pictures of this one and then used the ugliest table ever
127 notes
·
View notes
Note
Aaaaah, thank you~
I still consider myself a junior when it comes to Gposes. I'm starting to slowly learn Brio so I can up my game some. Otherwise I rely heavily on XIV's own shaders (Bright 2, Bright 4, Pastel 1, Pastel 2, Pastel 3) and my own 'okay this looks right' when dealing with lighting and shadows. (I rarely touch the lighting menu, I just fiddle with character lighting and when I do touch the lighting menu I'm hitting up a friend going 'uh, could you help me please' ^^;)
Field Station's native lighting however was the first time I actually started to play around with shadows. I took Riven's screenshots and then I noticed with how I'd positioned her, I saw her shadow and just the whole setup was beautiful and I was like 'oh, shit'

I'd never done horror before and quite frankly my thought process was a bit scattered. I did want to go back and redo Augustine's and Reinhardt's screenshots, but decided to not to because you know, fiddle with something too much--
I did try to get a shot of Mathye's shadow but how I had my camera angled I couldn't pull it off, plus I'd gotten lucky with the pose I'd caught him in and the look on his face (idle WHM weapon stance) and I was afraid I'd lose it.

(I think I went with the Pastel shaders for both shots, I can't remember for Riven, but Mathye was definitely a Pastel. On the whole I used Bright/Pastel for the entire series)
I also fiddle with the weather too depending on the area. For me, it seems like the ambient lighting in a zone actually works well enough (at least for my eyes) that I go 'okay, then let's just tweak the actual character lighting a bit and roll with whatever the ingame shader gives me)
Also it's if I get lucky with the spell effects too! (Gunmetal Soul is a BITCH)
If it's not too late about the XIV Blog postivity ask game, what do you think about @scrollsfromarebornrealm ?
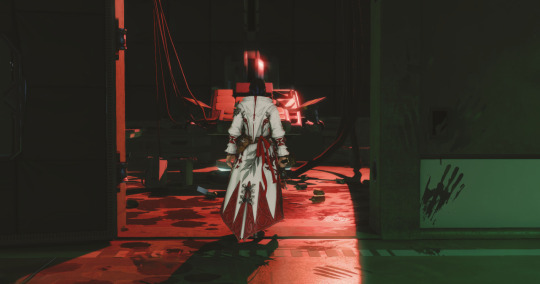
I like @scrollsfromarebornrealm very much indeed. They post lots of interesting things and I'm always really impressed by their Gposes, especially because of the use of lighting and shadows (see above). Plus their OCs are amazing I think! People should definitely check out their blog if they haven't already.
15 notes
·
View notes