#i downloaded this whole movie just to get that one screenshot
Explore tagged Tumblr posts
Text
sb: how do you feel knowing the assassin who tried to kill you is still alive out there?
the warden:

#dragon age#dragon age: origins#dragon age origins#zevran arainai#the warden#big elspeth energy tbqh#muse: elspeth cousland.#bee.txt#da#dao#zevwarden#i downloaded this whole movie just to get that one screenshot
212 notes
·
View notes
Text
USEFUL SITES FOR ROLEPLAYERS
Thought I'd make a list of some useful websites for those of us who enjoy roleplaying and what have you here on Tumblr and whatnot.
roleplay formatter: Made by the awesome @rpclefairy. I honestly can't recommend this one enough. Great for adding color, changing the font size, and the whole shebang with bold + italics + underline + strikethrough. 10/10 always use
fsymbols + emojipedia: These are both great for making your tags fancy and whatnot.
alt codes: This is genuinely great for teaching you how to make the symbols with your keyboard for everyday use so there's that. It's especially useful if you and/or your muses speak a second language so that's a bonus.
text color fader: *marge vc* I just think gradient effects on text is neat. *end marge vc*
list of colors (wikipedia): Has a list of an infinite number of colors and their hex codes. Very useful if I do say so, myself. But that's just me.
screencapped.net: Great for getting all sorts of screenshots for making icons, GFXs, promos, and whatnot.
fancaps.net: Also great for getting all sort of screencaps for making icons, GFXs, promos, and whatnot. My only complaint is that it's a little annoying to navigate so here's the proper links to movies, tv shows, and anime.
photopea: Great if you can't afford Photoshop and/or don't like using GIMP.
hakuneko: It's not so much a website as much as it is a program. You can download manga, comics, webtoons, doujinshi, etc. for making your icons, GFXs, promos, and whatnot. It's also just a great way to read stuff and catch up on everything.
Feel free to reblog and add more. <333
#roleplay resource#roleplay help#roleplay community#roleplay#roleplaying#rpc#rpc help#rp help#rp resources#rp resource#roleplay resources#rp
7K notes
·
View notes
Note
Hi op! Just wanted to say I love your art and your oc, and of course your brainrots over Jack 🫶 they made me like and appreciate Jack a lot more! If it's okay to ask, how did you ended up liking him? Was he already a fave from the start or did he worm your way into your heart gradually? And (if you're comfortable ofc) what made you decide to yume with him?
Hope you have a good new years!! 💕
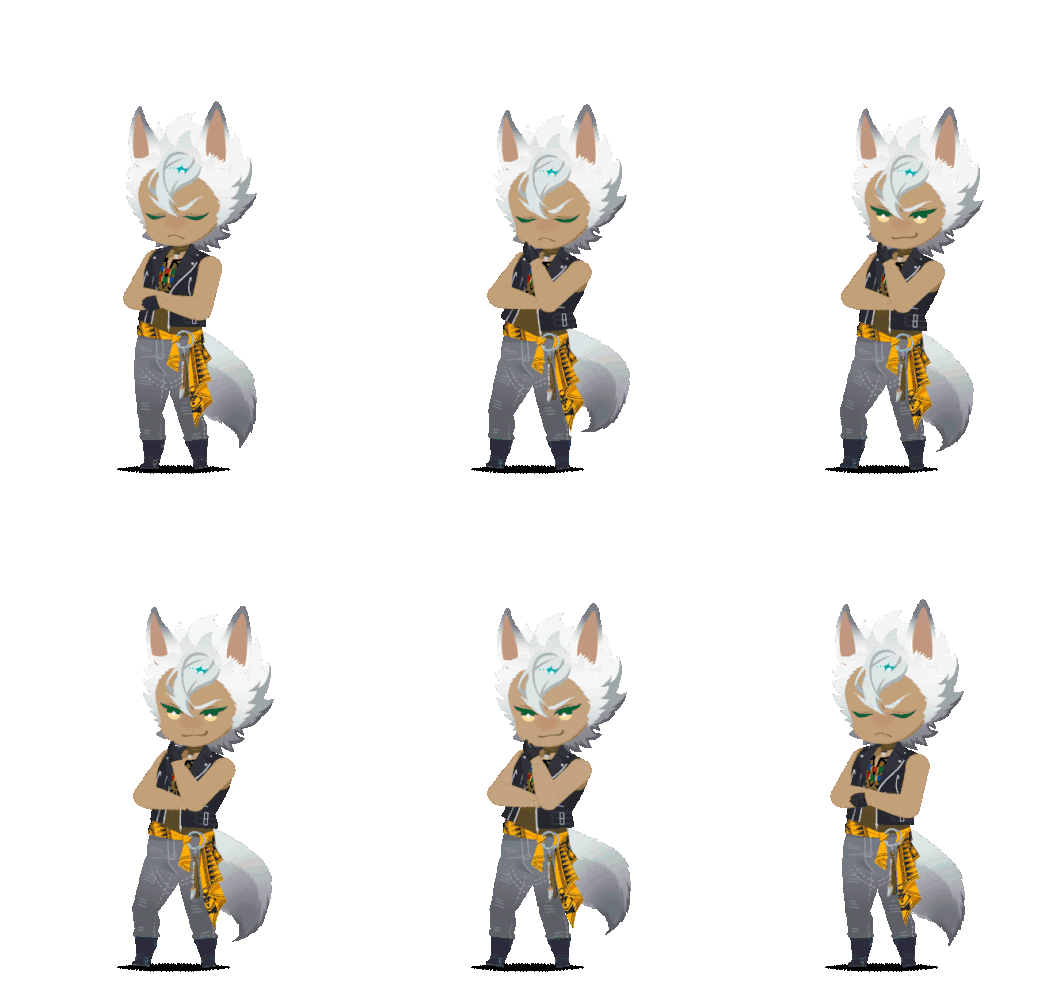
AAAAAAAAAAAaaaaaaaaaaaaaAAAAAAAAAAAAAAAAAHHH CRYING ON MY KNEES.....!!!!! This makes me so jkgjgjfkdjkfkh,,gfhfgjddjfh ...... thank you so much 😭💕
No matter how many people still say to me they've come to appreciate Jack more because of me I can never get used to it but it's still a wonderful feeling!! Like YES that's what I want !! Love Jack Howl!!
Anon, you just opened pandora's box...... I wished I could answer that in a few words, but I can't. Too much thoughts, too much words I need to get out of my chest. FINALLY THIS OPPORTUNITY HAS COME... *rubs hands*
I might as well put up the whole Jack-loving saga from start to present in chronological order. This is gonna be a VERY long post. (a lot of spoilers and thoughts on book 2 and 3)

To tell the truth, no, Jack was not an immediate fave! I remember seeing the official promotional art for the dorms back in 2019 before the game even released. The ones that immediately got my attention first were Leona, Ruggie, Malleus and Silver. HJDDHHGNJDSD I remember being immediately excited seeing savanaclaw cause they tick a lot of boxes I like… ''ohh??! furry kemonomimi dorm with edgy biker aesthetics?!'' <- is obsessed with leather jackets. But I regret to say that Jack didn't catch my attention, aside from the wolf ears. I-It makes me sad to remember that I judged him at first… 😭 Since Leona and Ruggie are smirking in their official sprite, and Jack looks so overly serious and closed off. BUT BOY, IF ONLY YOU HAD TOLD ME BACK THEN THAT I WOULD HAVE A 4+ YEAR OBSESSION WITH THIS WOLF GUY…………
I had missed the game's launch (march 2020) and only got to know they had already released it when I saw an user on facebook sharing screenshots of their game. Before downloading the game, I decided to watch all of the released main story segments on youtube (god bless Shel_BB's channel). I got invested right off the bat, and as I watched my faves basically fluctuated every week or every a few days... I remember my first (?? was it actually first? I don't remember anymore) fave being Ace because of course hE'S THE FIRST CHARA OF THE MAIN CAST TO APPEAR... that is, until Leona's first appearance in book 1 it ruined my life. I was like ''ah, there he is. Hot lion guy. He's my fave. Can't wait for his chapter'' I SEE A HOT KEMONOMIMI I PRESS LIKE but after book 1 ending, I was so moved by Riddle's backstory that he also became one of my faves?! DAMN GIRL DECIDE
OKAY SO HERE COMES THE GOOD PART, which is book 2. Nowadays I think that book 2 is in fact not good from a writing perspective, Leona's plan is dumb, Ruggie and Jack never got the closure they deserved, it felt too rushed etc. But I wasn't really thinking about it in a critical way, I was just excited to see new characters and how the story would go (good for me ig?? at least I had a good experience). Anyway, I remember taking an immediate liking to Leona and Ruggie but I was still super neutral about Jack throughout most of the chapter. I remember admiring his sense of justice and willingness to betray his dorm, so he was already getting on my good side. sfgsdkjgs I think the first... spark... was the moment when Jack came into ramshackle to personally wake up Yuu. ''I wanted to make sure you didn't mess everything up by oversleeping'' OKAY LIKE BUT WE JUST MET...? I wondered why he'd go that far for a nobody he just met? Then it occurred to me, could it be that he... CARES.... 😱
I thought him being a tsundere was cute. I always had... a thing for characters that look stoic and edgy but are actually big softies. I blame Lucario from the movie Lucario and the mystery of mew for starting my obsession with canine stoic ''I need no friends'' energy characters when in fact they DO need friends And I was also both amused and surprised that he could transform into a literal wolf?! JKDSJKFGSJK I STARTED TO THINK AAWW THATS CUTE FOR HIM... I love fuzzy animals so this was a bonus for me. And then after Leona's overblot there WAS... THIS SCENE--
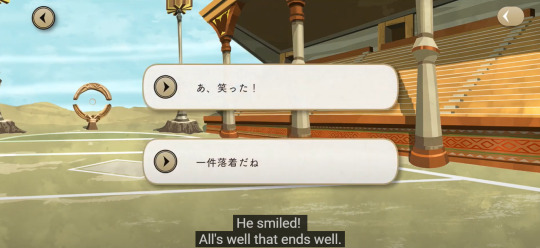
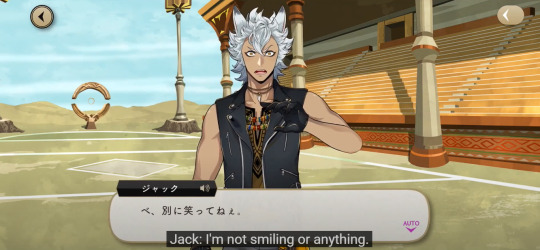
Something about Yuu pointing out that Jack genuinely smiled and him going all tsun about it stirred a warm feeling in me... I just thought it was the cutest moment in the game so far. This was the point where I realized Jack is a genuinely sweet and caring character. After book 2 ending he had already ranked a lot higher in my tier list.
But it was only during book 3 that ACTUALLY started my spiral to madness made me realize he was gonna be more than just a character I liked.
I want to clarify that when I was watching the main story, I was self inserting as Yuu the entire time, meaning I was trying to imagine myself in their situation and how I would react if I were in said situation. There wasn't anything of substance directly affecting Yuu in book 1 and 2, but book 3 was when it got a lot personal for me. Right off the bat in book 3, adeuce and Grim got separated from Yuu and were forced to be Azul's slaves alongside a bunch of other... idk 100+ students? (or was it 200?) this was the first time since the prologue that Yuu was completely alone, and it made me feel a pang of dread. I'm not proud to say I was never the most independent person, (must be from neurodivergency + always being the pampered youngest sibling of other 4 older siblings 💀) and being socially awkward, I'd completely freeze in this situation. It's just a very stressful and scary situation to be in. That's why I was immediately relieved when Jack appeared. He refused to help at first but all it took was ONE phrase (either tease him or make him feel pity for you) to convince him.
''You've gotten pretty used to how things work in this school. Can't be helped. I'll tag along with you for a bit.''
He said he would tag along FOR A BIT... AND HE LOYALLY STAYED BY YUU'S SIDE THE ENTIRE TIME, UNTIL THE END OF THE EPISODE. I was SO deeply moved by that, you have no idea. When I was in middle school I had really bad social anxiety, like Idia-level. I was the type of person who had to cling on every possible chance of being helped and escorted around in social situations, and I couldn't vocally ask for help, so I had to wait until an extrovert took pity on me and helped me. Once in a school trip, we had to take a train at the metro station and everyone else seemed to have a magnetic card but not me... I thought I was gonna be left behind so I started to panic real bad and have an anxiety attack, and when I pleaded to my extroverted 'friend' for help, they turned their back on me. It was an awful feeling that still makes me feel helpless every time I remember it. So that's why at first I thought Jack wasn't actually gonna help Yuu, and when he... changed his mind so quickly and decided to tag along, it was a very special moment to me. I thought, ''you have no reason to be helping me but you're doing it anyway.'' Feels like in twst most of the characters have an ulterior motive when helping others, but not Jack. He claims he's not worried about adeuce and grim, but he's too easy to read. He cares, even though he gets no compensation, or any kind of reward for this. It made me feel safe around him, like I could rely on him for everything. This was the first heart arrow.
Every time spent with Jack in book 3 I fell more and more in love with him (even though I wasn't aware of it yet). He's a lot more nuanced here than he was in book 2; he shows more sides of him like his silly puppy side (when he was excited to see that octavinelle was underwater and gushed about it like an excited puppy and then got self conscious and awkward about it STOP HEWASJSGJKGSOOSOCVNSMDOSO CUTE) his caring, worried, nervous sides… He also totally did NOT NEED to accompany Yuu in Mostro Lounge's VIP room since Azul had business with Yuu only, and yet Jack was ALWAYS on their side, like a loyal guard dog. Feeling safe and reassured around a person is EXTREMELY important to me. No matter what happens, Jack is not the type to turn his back on you. If you're nice and genuine with him, he will help you with anything and never let you down, it's what I thought.
AND THEN UH.... THERE WAS THAT ONE SCENE WHEN ADEUCE + GRIM + YUU + JACK HIDE UNDER AZULS TABLE IN THE VIP ROOM... THIS IS A SCENE I THIN K A LOT BECAUSE UH... SQUISHED-UNDER-A-TIGHT-SPACE-TOGETHER-TO-HIDE MAY BE ONE OF MY FAVORITE TROPES..... AND I CAUGHT MUYSEFL THINKING NOT SO FAMILY-FRIENDLY THOUGHTS LIKE....DOESS THAT MEAN I'M PRESSED AGAINST JACK HERE,,?!??'/? AGAINST HIS BIG, WARM... tibbies... WHERE I CAN FEEL SAFE AND PROTECTED.... ADNW WE HAVE TO STAY QUIET AND VERY STILL SO AZUL DOESN'T CATCH US OOOooooHHHH....... LET ME REMINGD YOU I STILL DIDNT CONSIDER MYSESLF A SIMP FOR JACK BUT MY CHEEKS WERE AFLAME I WAS RED IN THE FACE AND IT GOT ME THINKING '''''''N-NO WAY I DONT LIKE HIM LIKE THAT RIGHT??? (This was the second heart arrow.)
AND THEN AND THEN AAAAAAAAAAAAAaaaAA…… WHENB YUU AND GRIM ARE KICKED OUT OF RAMSHACKLE AND HAVE NOWHERE TO SLEEP AND SINCE ITS LIKE NOVEMBER IT MUST BE COLD AS FUCK OUTSIDE….. THIS IS BY FAR THE SCARIEST SITUATION FOR ME, I LIVE IN A WARM PLACE IF I HAD TO SLEEP OUTSIDE AT A TEMP UNDER 10 DEGREES CELCIUS WITH ONLY A SCHOOL UNIFORM I WOULDNT JUJST ''CATCH A COLD'' ACE TRAPPOLA I WOULD GET HYPOTHERMIA AND FUCKING DIE PROBABLY, GETTING KICKED OUT OF YOUR OWN HOME WITH NO PLACE TO SLEEP? I'D JUST GIVE UP CURL MYSELF INTO A BALL AND CRY……. BUT TJEN BUT THEN JACK LIKE AN ANGEL DESCENDED FROM HEAVEN OFFERED YUU AND GRIM TO TAKE THEM TO SAVANACALW?????????????? AND HE CLAIMS ITS CAUSE EVEN THOUGH HE SAID HE'D HAVE THEIR BACK, HE DIDN'T FEEL LIKE HE ACTUALLY HELPED THEM UNTIL NOW…. AND ACE AND DEUCE AND GRIM ALL SMIRKED AND TEASED HIM ABOUT LIKE ACE'S VOICE TONE IS VERY REMINISCING OF THE TONE SOMEBODY USES WHEN THEY TEASE SOMEONE ELSE ABOUT THEIR CRUSH I FELT IT IN MY BONESSS… LIKE HEY JACK WHY ARE YOU BEING SO NICE TO THEM IF IT DOESN'T BENEFIT YOU… COULD IT BE THAT YOU'RE (GASP) CRUSHING ON THEM…?!?!? YOU KNOW THIS IS THE ENERGY I GOT FROM THIS SCENE AND IF ONLY THIS GAME WAS ROMANCE-INCLINED THATS EXACTLY HOW THIS SCENE WOULD GO I FEEL IITTTTTTTTTTTT DSAAAAAAAAAAAAAAAJGNNJNJCFNJBCVÇ;CV;/VC;ÑCV~]DF.ÇHFDMHFDNJDHFJHBNDFJ
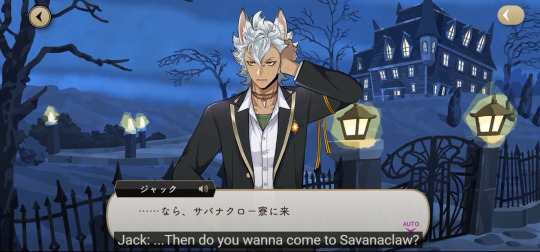
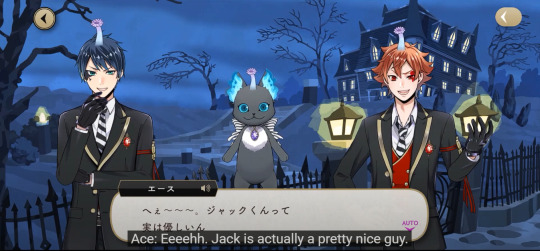
……..That was the third heart arrow.
My mind is hazy after this. I don't know what else to say for the climax + ending of book 3, I really enjoyed Azul and the tweel's characters, but my mind was still on Jack and how I came to love him after this. I remember hoping that… we would get to sleep in Jack's room (this was before I realized that all of first years room were a shared 4-person room, I thought only heartslabyul was like this 💀) but I was not disappointed to find out we'd sleep in Leona's room instead 😋 is bonked
While Jack was super high in my tier list at that point, he had to share first place with some others for a while… I downloaded the game in july 2020, but it was only during august that I started to actively post art here on my blog and engage more with the fandom. And during that time I was passing through a octavinelle + scarabia phase which was especially strong during august and september if you follow me ALL THE WAY back then…… congrats soldier my faves fluctuated between Jack, Jade, Floyd, Jamil and Kalim constantly and there was even a time where I considered the Ja-trio (Jade, Jack, Jamil) my favorite characters and couldn't choose between them. So what made me ultimately lean towards Jack? Uh, to sum it up it's because he was the least popular. I was in a somewhat big twst discord server back then and although I'm super grateful to have been part of the server and met wonderful people there who are friends till this day, I also had a few unpleasant experiences. Jade, Floyd and Jamil were super popular in the server I was in, so whenever I tried to talk or gush about them, I was talked over. The server was also yume-friendly but I was still figuring out this whole yume thing and who I'd yume. The more I was talked over and ignored in favor of the louder and more popular tweels/jamil stans in the server (I think there was AT LEAST 5 yumes for each of them...) the more I felt unmotivated to keep gushing for them. Whenever I made art of them, people would immediately tag the popular loud stans to gush other THEIR reaction, and suddenly the conversation was immediately shifted towards them. I know this sort of thing is expected in a big server since people already have their circles but man… It made me a lot insecure to yume them.
But whenever I talked about JACK I was actually listened to, and my opinions were validated. Simply because back then there were little to none Jack stans, so most of them looked up to me as reference for a ''Jack enjoyer/simp''. I started to think how unfair it was that the other characters had plenty of love, plenty of attention already while Jack had almost none. No one hated him but no one quite loved him either to consider him their #1. I was baffled because he's genuinely one of the sweetest characters. I know it sounds silly, but I felt compelled to be his advocate. I WANTED people to see just how sweet he is, how he's more than just a big, uninteresting jock that only talks about working out.
I always sympathized with the odd, with the outcasts, with the ones that weren't chosen because they were not like the majority because they remind me of what I went through as a socially anxious aspie kid (I was never really comfortable revealing my diagnosis online but there you have it, autistic vic reveal lol as if that wasn't obvious before ig) do you know the feeling of being in PE class and the two kids forming groups are choosing who they want for their team and you know you'll be dead last because no one wants you in their team? So you end up in a random team not because someone chose you, but because you were the only one left and they needed to fill the space. They don't necessarily want to kick you out of the team, but they don't want you either. You're indifferent to them. This is how I imagined how Jack must have felt like in the fandom. Always ''he's such a good boy'' ''he's so sweet'' but never someone's favorite. I've lost count of how many self proclaimed ''savanaclaw stans'' I met that are just solely Leona stans who talk 90% of the time about Leona, the other 10% about Ruggie and outright IGNORE Jack.
After getting Jack's first birthday card in the first 10 rolls, I decided, well he's gonna be MY favorite. The other popular characters have enough fans, enough people to make art and writing for them. It wouldn't make a difference if one more fan is added or removed. But for Jack, at least back then, it DID make a difference. Finding people in the eng fandom who would do fanart of him (like just HIM, not him being part of a group like savanaclaw or first years) was so rare. And especially finding accounts or blogs dedicated entirely about him…?? I don't remember seeing any of it. This…erasure, this indifference towards him made me feel even more connected to him. I want to keep supporting him, to keep giving him the love that he deserves.
In these 4 years he's been a massive source of comfort to me, if I feel anxious or stressed I imagine his big, warm hand on my shoulder, on the small of my back, patting my head etc… I imagine him motivating me to work harder, to push myself out of my comfort zone, telling me to stop moping and to get up and try again. I imagine him giving me his tail to hold and pet when I need to keep myself grounded. I imagine his disapproving look when I have dishonest thoughts or think about taking shortcuts.
I don't know how to finish this, but if you read ALL of this congrats and thank you for bearing with me lol it took me almost 4 hours to write this entire bible...... if you DID read all of this, I hope I could, if only a little bit, change your perspective on Jack Howl for the better.
I love Jack Howl.
#twisted wonderland#jack howl#damn I poured my sweat and blood into this and cried about 3 times#EVEN OUTSIDE MY AU AND OUTSIDE FICTION ITS STILL...VERY BEAUTY AND THE BEAST CODED...#ill draw a quick doodle for anyone who reads all of this as compensation/hj (maybe...)#answered ask#wholesome ask
50 notes
·
View notes
Note
"watching a movie or show that they know they're interested in" for piarles ofc :)))
Well.
Part two of this....
It's selfish.
It's completely and totally selfish.
Ferrari lines up a list of people they've vetted and approved and Charles smiles at them and says no to each and every one until they throw their hands up and ask him what he wants - who he wants.
The phone call is probably all of five minutes of Charles talking too fast and Pierre humming any second that Charles is not speaking, but he agrees at the end of it and Charles promises him the money will be good, and then he feels bad about it for a whole ten days.
Because Pierre is proud of the life he clawed out for himself after and he has a lot of pride in his job and it's never been about the money, but Charles knows that it will be nice for Pierre to not worry about things so much...and also it's selfish.
Charles doesn't see him enough - talk to him enough - and maybe it's ridiculous or childish that he is 27 and still fully in love with someone that has no idea and will never love him back, but he thinks he deserves to be a little selfish after last season.
Pierre returns the signed contract and Charles spends the two weeks before their arranged pre-season training camp trying to make everything perfect.
He has so many opinions about the branded Ferrari gear that they send for Pierre, he ends up ordering some himself in the designs and sizes he wants.
Charles gets in an honest to god shouting match with the hotel because they tell him they have no adjoining rooms when Charles knows that's not true, and Joris looks at him so sharply that Charles goes to his room to hide and when he comes back out, Joris has booked them a house.
He triple checks with the rental company that they have all of Pierre's listed foods that he wants to incorporate into Charles' diet and he downloads roughly 280 hours of US American sitcoms because that used to be the way Pierre liked to unwind.
Charles has no idea if he still likes that because the last two years...well, the last two years have been about Charles.
Charles losing the championship, Charles in the bad car, Charles dealing with an injury.
And when Pierre would come to a race, it was about Charles. When Charles would call Pierre, it was about Charles.
That's why it's so selfish. Because this is still about Charles.
He has nothing to offer Pierre except for a little bit of money and paddock passes for all of his brothers at any race they want and 280 hours of various sitcoms that hopefully will be a balm for Pierre after a turbulent flight or a long triple header or Charles being a little shit in the gym because he's tired.
my flight got cancelled, Pierre texts as Charles is googling where he can buy Season 1 of that one show with the lesser Chris from those Marvel movies. I can hop on one to nice tonight instead? get on the jet with you tomorrow? let me know
yes, Charles texts back faster than he ever has, I am just downloading sitcoms for you
Pierre doesn't text back for a long time. For so long that Charles is considering using that silly unsend option in imessage, but finally he responds.
I think I am the one meant to be taking care of you this season? but thank you, cha and then there's a screenshot of his new flight that lands in six hours
Charles is trying to determine if he can go get him - if he can risk going to get him, or maybe Joris, he could work that out, surely. He could work that out.
I am looking forward to watching sitcoms with you on planes
It's not much - it's hardly anything. But, Charles is looking forward to the long season with many planes and a lot of Pierre.
28 notes
·
View notes
Note
hi! i was wondering if you have any advice/certain programs or anything you use for making gifs, because there’s something i really want to make but i have zero experience 💔💔
hello hello!
ah, yes, I have a TON, let's hope this ADHD girlie can give a somewhat concise description lmao. I will answer this publicly, in case it's useful for anyone else.
Software I use:
To make the screenshots: - for single scenes: KMPlayer 12.22.30 (the newer versions are trash) - for shorter videos, or something you want to get all the screenshots out of Free Video to JPG converter is awesome.
To make the gifs: - Adobe Photoshop 2021 (I don't recommend much later versions, because of the Cloud connection they have)
General gif-maker wisdom: "we spend more time on making sure that something looks serviceable, not pixelated, and good quality, than to get it moving and shit" - Confucius, probably
Useful stuff to make your life easy:
- Squishmoon's action pack for sharpening your screenshots. You can also find their detailed use explained here. - If you are planning to gif Wicked, some scenes are a bit tricky, ngl. But I have two PSDs that you can use, while you're perecting your own craft, and you can edit and update them to make them more "you".
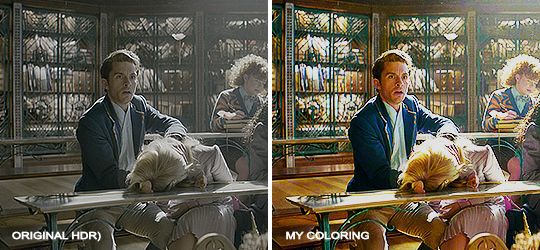
A neutral PSD for mostly indoors and lighter scenes | download

A blue-enhancing PSD for darker scenes | download
Some info on videos to use: - always, always (ALWAYS) use at least HD videos. Otherwise your gif will look like shit. This should be ideally at least 720p in resolution, but go with 1080p for the best results. Coloring gifs in 1080p is easy, but... - if you want to go pro *rolls eyes*, you could go for HDR (2160p) quality. However HDR is a mf to color properly and I would not recommend it for a beginner. When you extract frames from an HDR video, the image colors will end up being washed out and muddy so you will always have to balance those colors out for it to look decent, however, the quality and number of pixels will be larger. If you ar okay with making small/medium sized images, then stick with 1080p. (Storytime, I spent a lot of time making HDR screenshots, only for me to realize that I really hate working with them, so I'm actually considering going back to 1080p, despite that not being "industry standard" on Tumblr lmao. I'm not sure yet But they take up so much space, and if you have a laptop that is on the slower side, you will suffer.)
See the below example of the image differences, without any effects. You will probably notice, that HDR has some more juicy detail and is a LOT sharper, but well... the color is just a lot different and that's something you will have to calculate in and correct for.

The ✨Process✨
Screencaptures
I like to have all screenshots/frames ready for use. So as step one, you need to get the movie file from somewhere. This should definitely be a legal source, and nothing else (jk).
Once I have the movie. I spend a lot of time making and sorting screencaps. Since I mostly work in the Wicked fandom only atm, that means I will only need to make the frames once, and thats awesome, cause this is the most boring part.
For this, I let the Video to JPG Converter run the whole movie while I was aleep, and by morning, it created gorgeous screenshots for me and my laptop almost went up in flames.
You need to make sure you capture every single frame, so my settings looked like this:

Screenshots do take up a lot of space, so unless your computer has a huge brain, I suggest storing the images in an external drive. For Wicked, the entire movie was I think around 200k frames total. I reduced that to about 120k that I will actually use.
And then I spend some time looking through them, deleting the scenes I know I won't do ever (goodbye Boq, I will never gif you, I'm so sorry :((( ) and also, I like to put them into folders by scene. My Wicked folder looks like this:

If you don't want this struggle and you only need a few specific scenes, there is this great tutorial on how to make frames from KMPlayer. Note that some of the info in this tutorial on gif quality requirements and Tumblr's max allowance of size and # of frames are outdated. You are allowed to post a gif that is a maximum of 10 Mb and 120 frames (maybe it can be even more, idk, said the expert) on Tumblr. But the process of screencapturing is accurate. Also ignore the gifmaking process in this tutorial, we have a lot easier process now as well!
Prepping the images
I have a folder called "captures", where I put all of the specific screenshots for a set I want to use. Inside this folder I paste all the shots/scenes I want to work on for my current gifset, and then I create subfolders. I name them 1, 2, 3, etc, I make one folder for each gif file I want to make. Its important that only the frames you want to be in the gif are in the folder. I usually limit the number of images to 100, I don't really like to go above it, and usually aim to go lower, 50-70 frames, but sometimes you just need the 100.
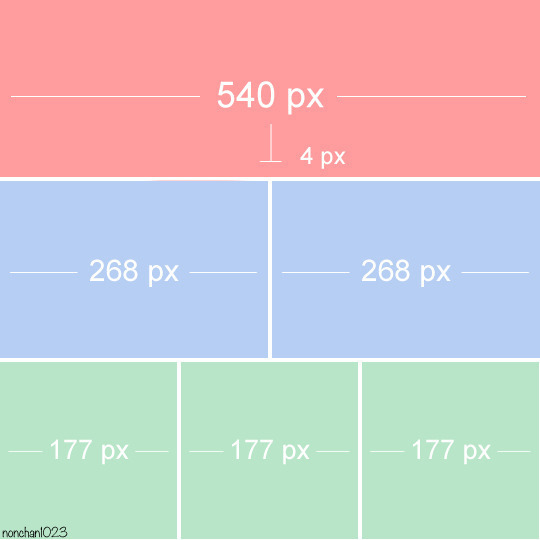
Sidetrack, but: Keep in mind that Tumblr gifs also need to be a specific width, so that they don't get resized, and blurry. (Source) Height is not that important, but witdth is VERY. But since there is a limit on Mb as well, for full width (540px) gifs you will want to go with less frames, than for smaller ones.
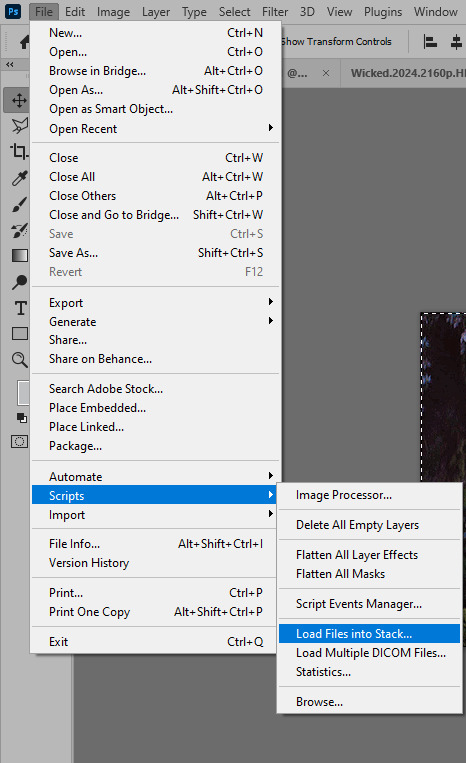
Once you have the frames in folders, you will open Photoshop, and go to: File > Scripts > Load files into stack.
Here you select Folder from the dropdown menu, and then navigate to the folder where you put the frames for your first gif. It will take a moment to load the frames into the window you have open, but it will look like this:

You click "OK" and then it will take anther few moments for Photoshop to load all the frames into a file.
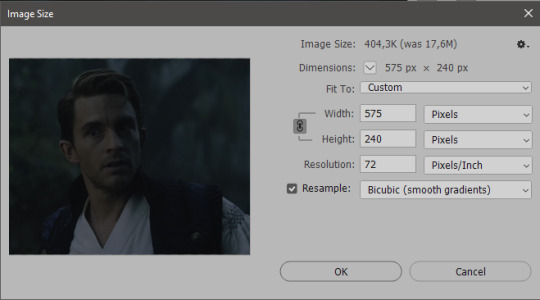
But once that's done, and you have the frames, you next have to resize the image. Go to Image > Image size... When you resize in Photoshop, and save as gif, sometimes you do end up with a light transparent border on the edge that looks bad, so, when you resize, you have to calculate in that you will be cutting off a few pixels at the end. In this example, I want to make a 268px width gif. I usually look at heights first, so lets say I want it to be a close-up, and I will cut off the sides, and it will be more square-ish. So I set height to 240px. Always double check that your width doesn1t run over your desired px numbers, but since 575 is larger than 268 (can you tell I'm awesome at math?), I should be good. I click OK.
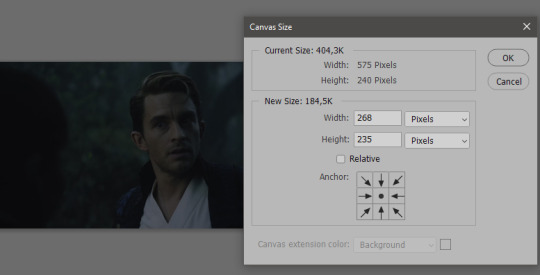
Next, you have to crop the image. Go to Image > Canvas size... At this point we can get rid of those extra pixels we wanted to drop from the bottom as well, so we will make it drop from the height and the width as well. I set the width to 268px, and the height to 235px, because I have OCD, and numbers need to end with 0 or 5, okay?
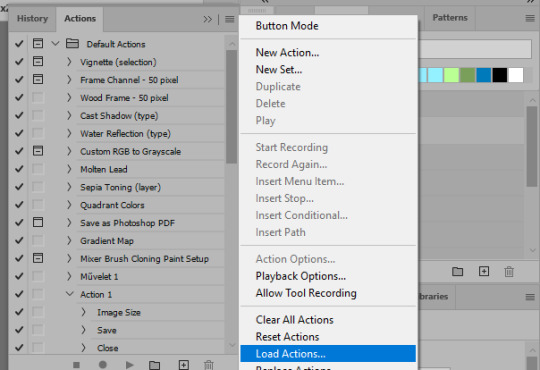
And now, the magic happens! First, go to Window > Actions to have the actions window show up. While you're at it, in the Window menu also select Timeline (this will be your animation timeline at the button) and also Layers. Once you have the Actions window showing up, on the menu in the upper right corner click the three lines menu button, and from the list select "Load Actions". I hope you downloaded the Squishmoon action pack from the start of this post, if not, do it now! So you save that file, and then after you clicked Load, you... well, load it. It will show up in your list like so:
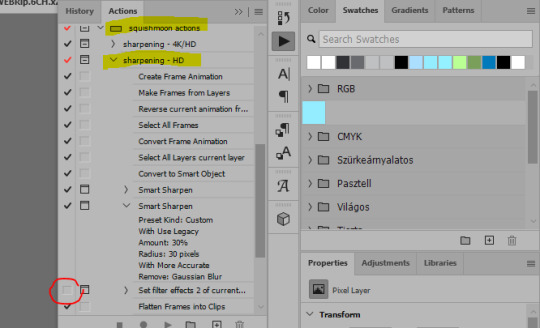
You will want to use the sharpening - HD one, BUT I personally like to go, and remove the tick from the spot I circled above, so leave that empty. This will result in the image having more contrast, which is very much needed for these darker scenes.
When you have that, you select the action itself like so, and click the play button at the bottom. The action will do everything for you, sharpen, increase contrast and also, create the gif and set the frame speed. You won't need to edit anything, just whatever window pops up, click "OK"

Now it should all look like something like this:
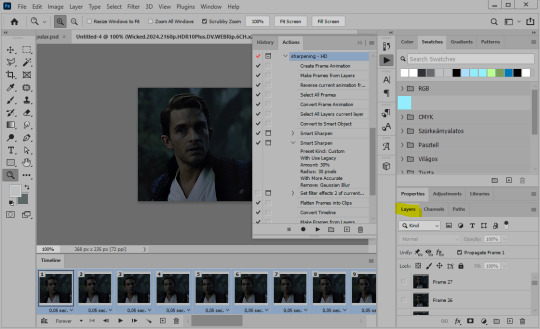
In the Layers window on the side, scroll all the way up to the top. The frame on the top is your last frame. Every effect you want to add to the gif should go to here, otherwise it won't apply to all frames. So at this point I open my PSD for darker scenes, and pull the window of it down, above the gif I'm working on like so:

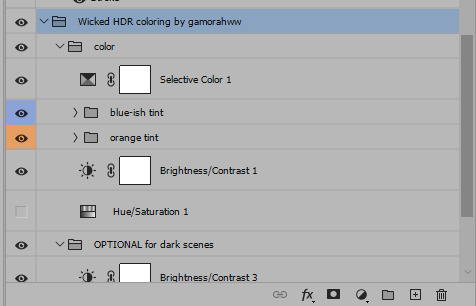
And then I grab the folder I marked with yellow, left click, hold the click down, and drag that folder over to my current gif. And bamm, it will have the nice effect I wanted! You can click the little play button at the button to see a preview.

Once you have it sorted, now its time to extract it, but first, here's our before and after view:
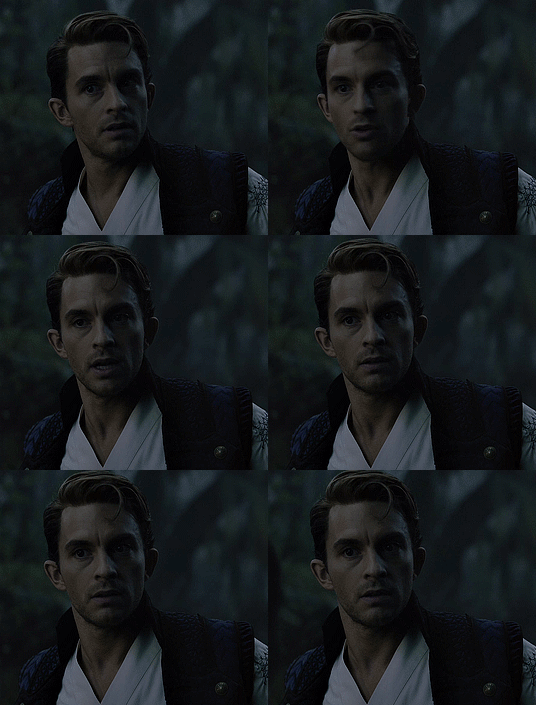

Now, if you are happy with this, you can just save and close.
If you want to add subtitles, you can do that as well either manually with the text tool (remember, to add as the TOP layer as we did with the coloring) or you can use a pre-set PSD for that as well, here's mine.
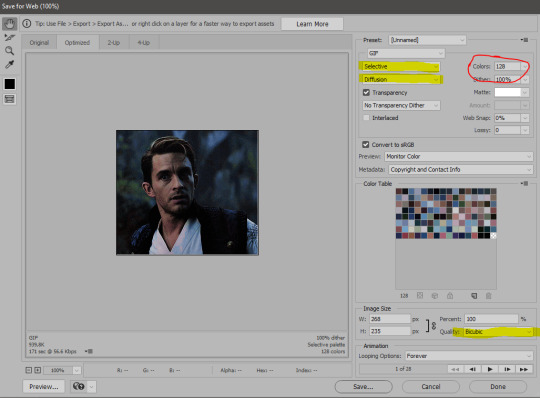
Now, we just need to export it. Go to File > Export > Save for Web (Legacy) and copy my settings here. Others may use other settings, but these are mine, so! I hope you are happy with them :3
In this case, for colors, I picked 128 colors, because on dark sscenes you can get away with using less colors, and the larger that number is, the bigger the filesize. If you use lighter images, you will need to bump that shit up to 256, but that will make your file larger. You can see at the bottom of the screen, how large your file will end up being. So long as you are under 9 Mb, you should be good :3
Conclusion
Look, Gif making and Photoshop in general is a bit scary at first. There are a lot of settings you can mess around on your own, a lot to play with, and also a lot can go wrong. This is a very basic tutorial, and also my current process and preferred coloring. However if you look at "gif psd" or "gif tutorial" or similar tags on Tumblr, you can find a LOT of great resources and steps, for many-many things. Usually people are not too antsy about sharing their methods either. You make 4-5 gifs, and you will have the steps locked down, and then it's all about experimenting.
After you have some muscle memory, your next step should be to explore what is inside a PSD coloring folder that you use. Open them up, try clicking around, click the little eye, to see what happens if they are turned off, and double click them, and play around with the sliders, to see what each does. Most people on Tumblr don't really know what each one does, we all just pressed a few buttons and got really lucky with the results, lol.
If anything is unclear, don't hesitate to ask, I'll gladly help!
Good luck <3
33 notes
·
View notes
Text
The Handmaid's Tale Rewatch: 1x01
So, I started rewatching the show a few weeks back. I want to get through every episode before the final season airs. I'm watching 2-3 episodes per week, so I'm going to start posting about that here so we can talk about them!
Man. Let me just start by reiterating how jaw dropping the first episode of this show is to me. It's so rare to find a show, in my opinion, that just knocks it so far out of the park on the very first episode. It's paced like a movie, which I think is kinda what hooked me immediately... because honestly, I feel like TV shows drag a lot these days, knowing that they can, that they have 8-12 episodes to deliver ONE SECTION of a story that might be intended to run for 5+ seasons. They tend to sprinkle things in at a snail's pace from the beginning. So, that really makes a slam dunk like 1x01 of THT just that much more impressive.
You get to know so many of the characters that you'll follow for so many years... and it's not just a curious introduction, but you're given a really solid idea of who they are. And we even get a full circle shared joke between Nick and June, complete with flirting, flawless editing, and adorably smoldering eye contact.
Let's play "what's your favorite moment from 1x01."

It's the whole classic oranges & tune scene for me, but this exact moment - where Nick walks into the kitchen and nearly trips over himself when he spots June there - is just the cutest and most hilarious 3 seconds ever recorded. His whole body is literally doing an "oh shit" moment, and he's like 105% obsessed with her already.
What's your favorite moment from this episode? Feel free to reblog and add a screenshot or clip so we can get a 1x01 chain going! I would also love to hear your stories on when/how you got into this show and this ship!
If you're a podcast listener, here are the links to the spoiler free and spoiler full discussions of 1x01 from Above the Garage:
The June & Nick Cut:
About a year ago, I edited together every June & Nick scene + every Nick scene + every mention or insinuation of Nick into what I called "The June & Nick Cut." I unspliced unrelated content when it was mixed into Osblaine scenes, shortened long scenes with brief mentions of them so only the mention and context is included, and worked with the audio to make transitions smoother.
The full file for seasons 1-5 is 6 hours and 53 minutes long, including some title cards in 3 spots to serve as intermissions. Rather than post that whole 18 gig file, I'm going to post just the chunk that goes with the episode I'm writing about. So, if you'd like to download the Osblaine only version of each episode, you'll have the links for those within these posts. Enjoy!!
I would really appreciate credit if you share these anywhere else, because this project did take a whole lot of work. Like uncountable hours of work. And I really am pretty proud of it. ♥️
9 notes
·
View notes
Text
Pokomatsu: Hesokuri Wars' "Replacement"
For those who don't know, when Heso announced its shutdown last year, a new app game called Pokomatsu (technically its full name is Osomatsu-san: Protagonist Contest Pokoball) was also announced, serving as a replacement for Heso. Despite this, gameplay-wise, it has nothing in common with Heso lol -- I think it can be best described as a pinball game in which you can collect cards like in Hachamecha Party (anyone else remember that one?) -- but I FINALLY downloaded and tried it today and it's actually reusing a lot of Heso assets?
For one, that little ghost that shows up when you kill an enemy looks mighty familiar, and so does that HP bar -- and oh wait, how strange! Why do I feel like I've seen that corner showing all my coins before?
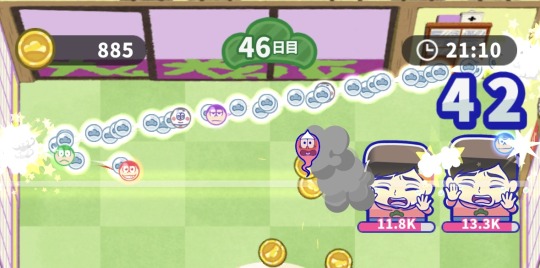
(You get the idea. RIP to New Osomatsu, btw.)
But I think the most notable thing - and this is something I had been told before I downloaded the game -- is the fact that some of the cards you can collect are just... Heso units? The other types of cards you can collect are screenshots from the show and the movies (a given), but then you just have this other catalog of collectible Hesokuri Wars cards that remind you of happier times that you can fill, whether through rolling in the in-game gacha or beating levels. Like, Cthulhu Mythos Summer!Karamatsu was literally the first card I got when I started playing earlier:
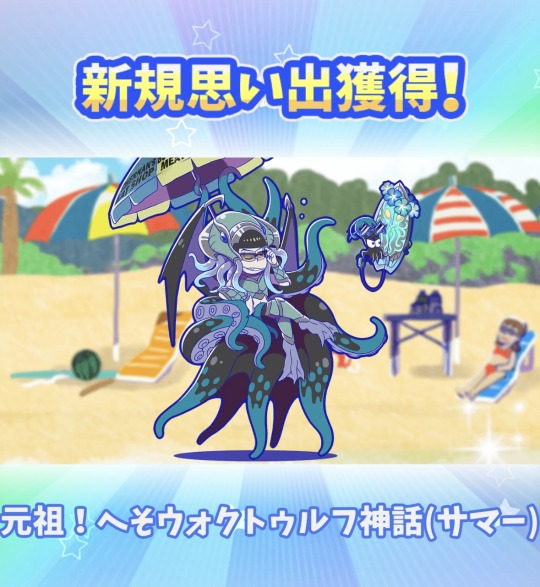
And there's just a whole bunch of these that you can collect in this game if you were to play. There are only really a handful of sets that are available in Pokomatsu -- most aren't in here at all -- but idk. It's just something interesting I felt was worth mentioning, given that the staff seems like it wants to connect the two games to each other, even if they're otherwise totally unrelated and even if one of them has been shut down. Fuck, I miss Heso.
Oh, and the voice clips used in this game are the same voice clips as the ones from Heso. Obviously, I can't really show people this one unless I upload a video with audio or something buuuut I also don't feel like doing it atm so lol. Maybe later.
🐾 Mod Ichi
(Also, just for the hell of it, here are the other Heso cards I got so far)
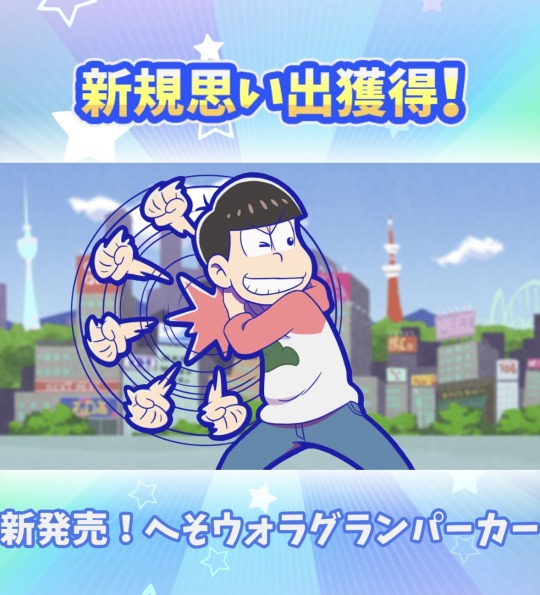
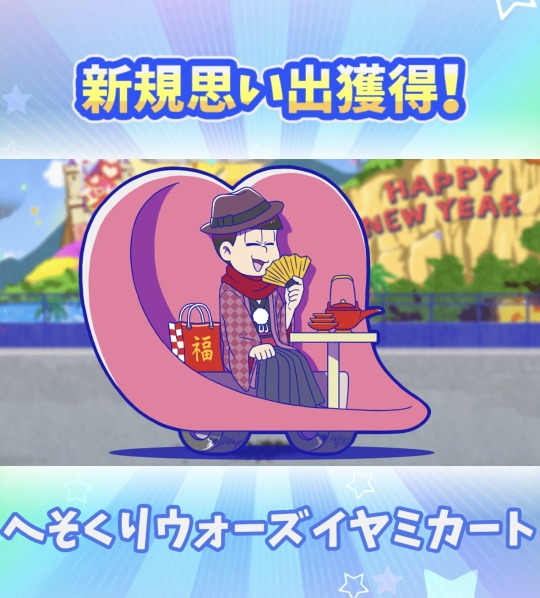
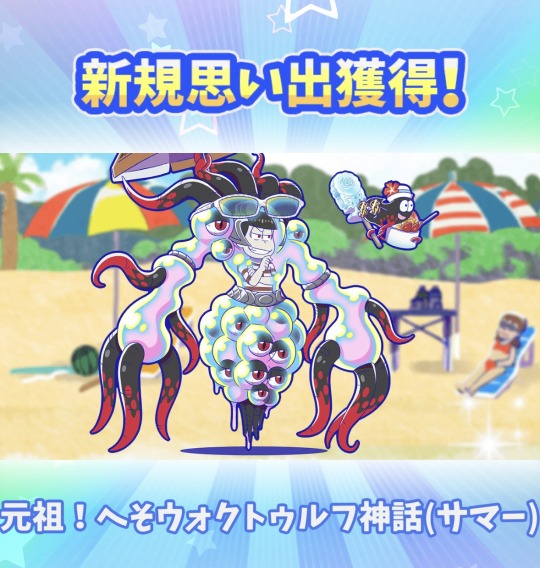
#hesokuri wars#osomatsu san#pokomatsu#AAAAAAA WHY DID HESO HAVE TO DIE ITS LEGACY IS LITERALLY LIVING ON IN OTHER GAMES#WHO DECIDED THAT IT SHOULD'VE BEEN SHUT DOWN I JUST WANNA TALK#mod ichi#memorial and legacy
27 notes
·
View notes
Text
So I was browsing on Twitter and saw this on my timeline (Link):

The way my jaw dropped when I saw this! Now obviously, this is a leak and may not be true, this is just alleged speculation (so take this with a grain of salt), but if this is confirmed, then here's to hoping a remake of the series (and get Takahiro Kagami to direct the project because he's ✨🌟THE YUGIOH ARTIST/KEY ANIMATOR✨🌟 - best art style too fr fr!)
There's just so many possibilities and avenues the anime project could take, some say it's Yu-Gi-Oh R, others say Yugioh Season 0 remake, I'm not sure what it will be if it's confirmed, all I will say I'm glad we could be getting more content related to the OG series (I miss the gang/OG cast and Yami Yugi/Atem so much, can you tell? 😩😫😭😭😭😭)
There's a few possibilities and theories/ideas to what I think the project could be:
Anime series (either an OVA or a limited series???) post DSOD movie, a look into Yugi, Kaiba and the rest of the character's lives after the events of the movie. (Could be in correlation to that Solid Vision Experiment VR game that was teased months ago by Konami and that one art Kazuki Takahashi did of Yugi + Kaiba in space playing Yugi's game.)
Yugioh Anthology Series??
Mentioned before, Yugioh DM Remake.
Again mentioned before, Yugioh Season 0 Remake
Mentioned again before, Yugioh R Adaptation
Okay, now this one, hear me out! - Anime project surrounding Yami Yugi/Atem life in egypt as a Pharoah (before and after he was sealed in the puzzle), how he deals with being a young prince/king as he bears the responsibilities of one and bearing the weight of saving the world/his home. Including numerous lore about Atem's court(?); Ishizu, Seto, Mahad, Mana etc, ancient egyptian dark games, egyptian culture, the millennium items, the rivalry/relationship between Atem and Seto (their families), Seto and Kisara's relationship, more backstory on Thief King Bakura and Zorc etc. and probably a whole lot more (correct me if I'm wrong - haven't read the yugioh manga in a hot minute - but I remember seeing somewhere that Kazuki Takahashi had to cut a lot or some of the stuff out to allocate more leeway to the story. I'd imagine there's probably a lot of unused and uncut material he wrote/drew that wasn't gonna be used in the main story...)
These are just a few of my theories to what the project could be. Again, like I said before, if it does get confirmed you best believe I will be there!
Also in relation to yugioh news, Yugioh GX is getting a remaster (happy for the GX fans/girlies! Also unrelated note: but does anyone have like a download link to all the HD remaster episodes of Yugioh DM? Did they release a blu-ray edition of it, if not, they should ☹️) and there's gonna be anime episodes of that one video Konami released for the qaurter century anniversary/konami animation studio, the one showcasing animated shorts of the yugioh card monsters, so that's cool!
EDIT: so uh didn’t see the date of this tweet when I screenshot it whoops, (god I’m such a dumbass) so the tweet might be indeed in relation to the yugioh card monsters anime shorts/PV Konami produced months back, so my bad 😅. Please disregard it….Still it’s something interesting to think about in the near future if they do go back to the OG series with Yugi and the gang!
6 notes
·
View notes
Text
Project Progress Post
In case any of ya'll are curious. If not, feel free to scroll past.
As for the Naruto anime I have episodes 1-30 screenshotted and I'm going through those atm. I have up to episode 100 downloaded and ready to screencap. I have also started downloading Boruto episodes (mainly for Sarada and adult Sakura but I digress) and I will be doing those at some point alongside the Naruto anime. I also plan to start doing Shippuden alongside them in the future in a separate but attached folder.
As for the Naruto manga, I have up until a certain chapter separated out. I think after that point the quality gets better. I have the whole thing downloaded, but if I need to I have learned I can substitute some volumes in with book walker for better quality.
D. Gray Man (anime) - I have up to episode 20 screencapped and up to episode 50 downloaded. As for the manga, I know I started it, but I learned that a lot of the scans are bad quality, and so I'm looking into buying them off of bookwalker in the future to do that whole project properly with good quality icons. However since that costs money...low priority as I am on disability and broke.
AIR Tv - I have about 3000 screenshots left to go through!
Blood-C : I have a little over a thousand screencaps left to go through (including the movie which I have been sprinkling some of those in here or there)
KKJ - I have a little less than 3000 screencaps left to go through (so no that project is nowhere near done and I am so sorry)
Modern Magic Made Simple - About 2300 screencaps left
School Days - About 2300 screencaps left as well (I know I just started this one and none of them have posted yet, but yes)
Yoake Mae Yori Ruriiro Na - A little under 2000 screencaps left
Genshin - I am currently going through the Fontaine quests. I have a bunch of old events and quests to screencap, and I finished downloading all of the recent Natlan content tonight. I screencapped Emilie's story quest to do soon (because shes pretty)
Who Made Me a Princess - I am on chapter 59 out of the 125 that I have.
ANS - I'm on chapter 6.
Akaneiro Ni - I have gotten some content from the game I am rapidly iconing. I am nearly finished with the anime (I'm on the last two episodes plus the OVA), and I am on chapter 6 out of 11 for the manga.
Aoba-kun Ni Kikitai Koto - I have about 800 scans left to go through. I am aware that I am missing a few chapters however, so I'm gonna look into possibly finding those.
Bibliophile Princess - I am on chapter 20 of 37.5
Corpse Party - I finished the first manga, and am gonna start going through the rest of them. I will only be iconing the main characters from the first series tho. If I do icon any other characters it will be on an entirely separate round of iconing.
Fruits Basket - I am about midway through Season 2. I have about 6000 caps left to go through.
Heart no Kuni no Alice - I still have a few side mangas to go through and then I'm gonna start the main series. I have also downloaded the movie to screencap and throw in these sets as well.
Inu x Boku SS - I am on chapter 9 of 49
Kiss x Sis (for Riko) - I am on chapter 66 out of 154. I will be going through and doing the other characters at other stages. (I just needed Riko for a faceclaim)
Nekomusume Shoukougun - I am on chapter 10 of 100
Pandora Hearts - I am in the arc where we meet older Ada at the school!
Romeo x Juliet - Chapter 5 of 9!
Shugo Chara - I have about 550 pages taken out from chapters 1-44, and then the rest of them are untouched but downloaded. There is a new series, but I am going to concentrate on finishing the entire rest of it first before I even think about touching that.
Sincerely I Became a Duke's Maid - Chapter 15 out of 111
Ten Count - Chapter 7 out of 48.
5 notes
·
View notes
Text
Get to know you- Sims Style
I was tagged by @simbury
What’s your favorite Sims death? -- I find it incredibly entertaining that sims can spontaneously combust if they get too warm.
Alpha CC or Maxis Match? -- mix, but ig it leans towards realism nowadays.
Do you cheat your sims weight? -- not that I can think of. sometimes if I am shooting a specific scene and they weren't that shape at the time. but not during gameplay.
Do you move objects? -- absolutely. I'm incapable of decorating without moveobjects on honestly.
Favorite Mod? -- uhm... I guess the 3t2 traits project or ACR/Romantic Standards.
First Expansion/Game Pack/Stuff Pack? -- I have been playing ts2 since it literally came out, so my first ep was whichever one came out first. I think that was Uni? but in spirit of the question, for sims 4 I only bothered downloading the game when they came out with cottage living lol.
Do you pronounce live mode like aLIVE or LIVing? -- aLIVE. my brain always said essentially like a movie set "and we're live!" so.
Who’s your favorite sim that you’ve made? -- Evren Thorne (who you're more likely to see in @luverofralts or @nappe-plays-the-sims game than mine) because he's not story relevant yet, or (much to everyone's chagrin) Callum
Have you made a simself? -- at some point far in the past, yes. I do not have that sim anymore, and I probably wouldn't do it again, but yk. I was also 11 when I started playing this game, so of course I made a digital barbie of myself. (not to say it's childish to do in and of itself, but that it's definitely something that every child tends to do)
Which is your favorite EA hair color? -- since ts2 only has 4, I'm going to assume this was more ts4 centric. in which case I like the neutral blonde/light blonde colors (the two that are less yellow)
Favorite EA hair? -- eh. for ts2 I wouldn't use any of them. for ts4... the mullet thing from werewolves? ig.
Favorite life stage? -- teens or young adults. (I think I may be the only person I know how actively likes Uni for ts2 the most lmao)
Are you a builder or are you in it for the gameplay? -- oh. both. depends on my mood.
Are you a CC creator? -- yeeeup. recreationally though. (read: with no real consistency.)
Do you have any Simblr friends or a Sim Squad? -- I feel like I do lmao. I at least hope they feel the same LOL.
Do you have any sims merch? -- I now have a gameplay guide for the original Sims game lol. but I think that's all I own.
Do you have a YouTube for sims? -- nope. I uh... don't like watching gameplay videos, and sims machinema is way too time consuming to make so I do not.
How has your “Sims style” changed throughout your years of playing? -- oh gosh. I was one of those edgy emo kids so it was a lot of grunge and dyed hair and bright makeup. I've honestly been leaning a bit more towards that style again though so....
Who’s your favorite CC creator? -- depends on what I'm looking for. tbh a LOT of the CC I have now is older stuff that I just still like. but anyone who isn't exclusively making 4t2 stuff is probably someone I've downloaded from.
How long have you had Simblr? -- technically this blog since January 1st 2020. that being said, I moved from LJ to simblr in like.... idk, 2012? whenever that great migration happened.
How do you edit your pictures? -- a lot of photoshop. color correction, a slight film grain at the very least. most times I also do aesthetic edits to hide clipping, and add painted hair strands nowadays. if I can't get an emotion right for a screenshot, I edit those too.
What expansion/ gamepack is your favorite? -- for ts2 I really don't think I could pick one. the problem is I use like 90% of them for SOMETHING gameplay wise, even if I don't use the main function. ie: I love the chemistry/attraction from nightlife, even though the whole downtown thing is frankly annoying sometimes (do YOU WANT TO GO DOWNTOWN? no, random townie I do not. ) But, seeing as I listed it earlier, I guess university.
Tagging uhm.... @rebouks, @pralinesims, @luverofralts, and @nappe-plays-the-sims
15 notes
·
View notes
Note
Just realised. How come you haven't used any stills or shots from the first movie for your Daily Pics? The last time that you did was for the premiere day of the movie back in August 20 2021.
One reason is that I'm particular when it comes to the screenshots I use for my Dailies. The theatrical film is in a panoramic resolution, so a regular screenshot won't fill my entire template. Case in point...

That's not something I like to do. Sure, I could just increase the size of the picture, but that'd look a little too obvious, and that's not something I like to do, either. Thus, when I used that screenshot for my Daily back in August of 2021, I tracked down a 4K trailer, found the screenshot I wanted, and then cropped it to fit my 16:9 template. The quality's perfect when you do that.
Of course, that's just a trailer with a few screens. I don't have access to the entire film in 4K (or even in 1080p yet), and I'd rather not download a pirated copy, so I figured I'd just settle for pics from the TV series...
...which I don't mind, since I'm loyal to his OG design. Don't get me wrong, I think Marshall looks fine in the theatrical film, but I just like his TV design a whole lot more. Yeah, I'm in the minority, I know. 😅
16 notes
·
View notes
Photo


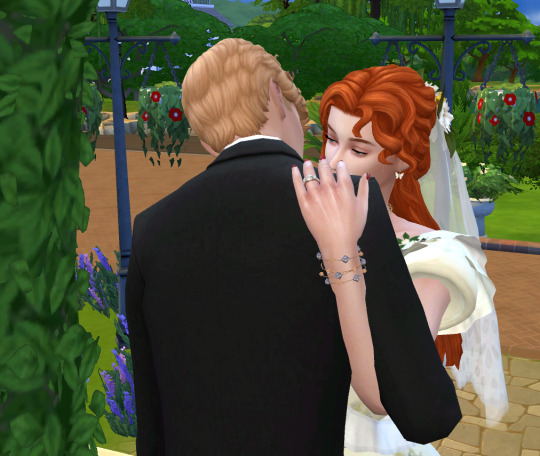

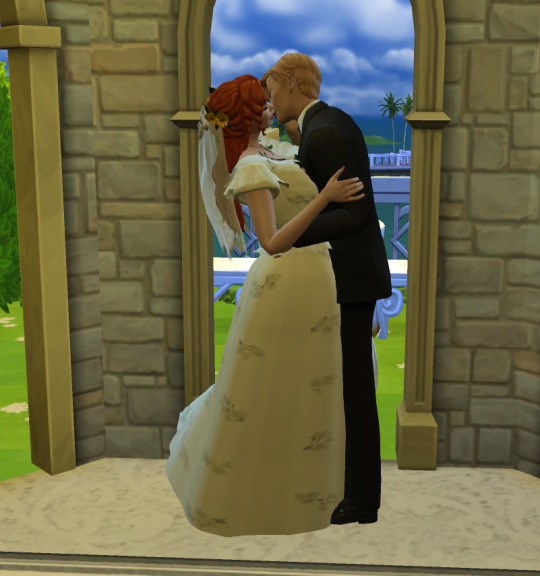
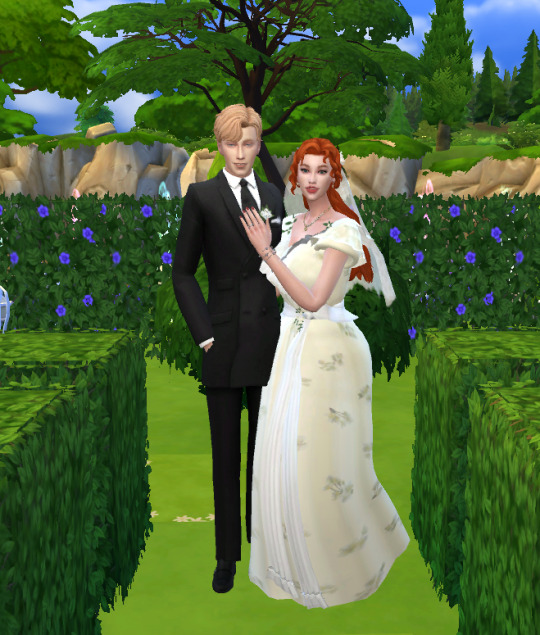
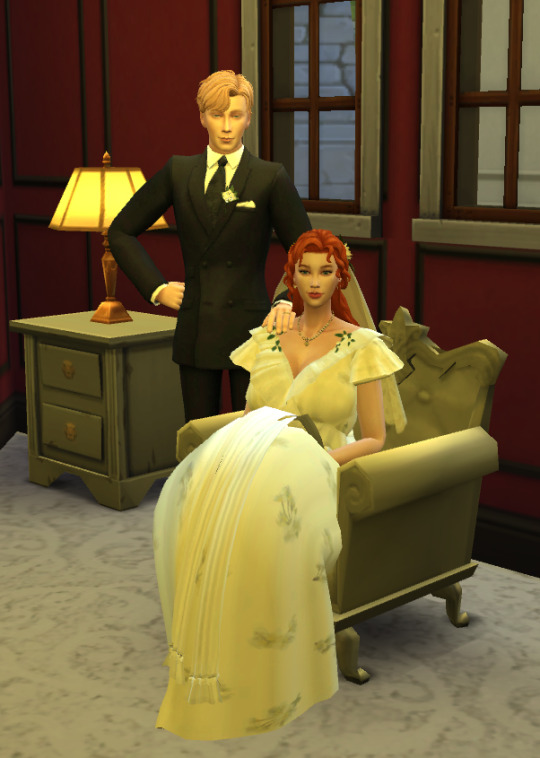
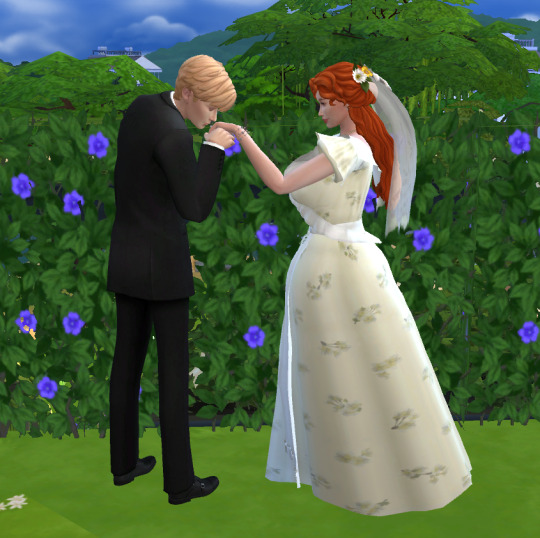

♥︎ 𝒯𝒽𝑒 ℋ𝒶𝓅𝓅𝒾𝑒𝓈𝓉 𝒟𝒶𝓎 𝒪𝒻 𝒯𝒽𝑒𝒾𝓇 ℒ𝒾𝓋𝑒𝓈 ♥︎
Okay, so I don’t know if any of you have caught on to my subtle hints toward this lovely couple, but I figured it’s about time I introduced them. This is Jack and Rose Dawson on their wedding day! Rose is my character, while Jack is owned by a friend of mine, @whoretownsims, aka Drew. You can view his interpretation of our characters here.
I grabbed a bunch of romantic poses and snagged some gorgeous wedding CC (even the “venue” was a gallery find - it’s so vast and beautiful!!), which inspired me to make this series of images! In fact, I actually took a lot more screenshots, and as I don’t want to clog up this post with like, seven more images, I just made a separate page on my blog where you can view them here!
Not only did I find a... *ahem* movie-accurate hairstyle for Rose, but her dress was also a gorgeous find (courtesy of @vintagesimstress)! I don’t even know how long I spent looking for a dress that would suit her style. Ideally, I pictured her veil to be slightly longer, but eh, I kinda gave up and went with the one shown here. I think it compliments her outfit nicely, and I’m sure her husband thinks she looks just as beautiful and radiant. ♥︎

As you can see, some of their wedding photos are framed in their home. :) They’re very much in love with each other, can’t you tell?? yes, there’s another one of these “custom” photos on the side there
Funny story, I have this whole convoluted method for taking photos which involves summoning/teleporting a random townie to the lot, adding them to my family (I remove them afterwards when the photo session is done) and giving them a camera, then cheating their photo skill up so they can take perfect photos once I pose my other sims (look, I don’t want to download a game-breaking mod for this, okay? I’m cheap, *wheeze*). The “photographer” I summoned was this fine specimen, Deandre Herron.
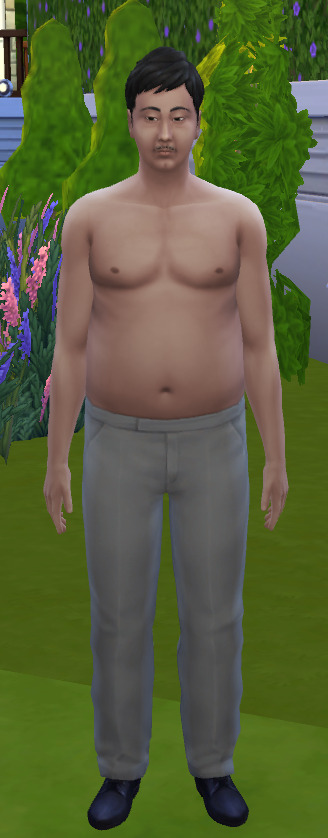
He’s kind of weird, and it’s not just because of the way he looks. The whole time he was on this lot, he had the “poorly decorated” moodlet. DESPITE THIS BEING ONE OF THE MOST BEAUTIFUL LOTS I’VE EVER LAID EYES UPON?? Oh, and it turns out he’s kind of a creep. When I looked in his relationships tab, he’d already went and made acquaintances with a bunch of people, but there was one person he was “friends” with: a LITERAL CHILD. STRANGER FUCKING DANGER.
Besides that, it took some... well, adjustments to get the Dawsons to pose properly (one of the poses apparently only worked if the teleporter thing was placed diagonally??? It was weird). It didn’t happen too often, but once in a while, they would end up in the wonkiest poses if I didn’t place the teleporters correctly.
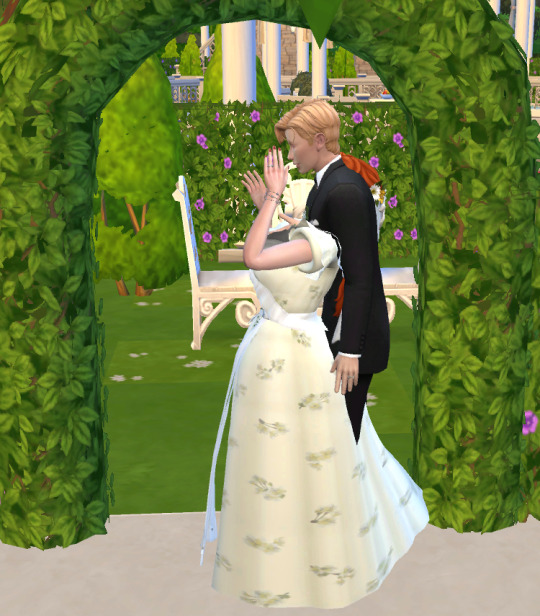


But yeah, anyways, be on the lookout for more of the Dawsons!! They’re my favorite couple in my town.
yes they’re named after the titanic couple, sue us james cameron. jack didn’t deserve to die
#sanssouci's sims#the sims 4#the sims community#the sims 4 screenies#the sims 4 screenshots#simblr#the sims 4 gameplay#sims 4#sims 4 screencaps#sims 4 screenshots#sims 4 screenies#showing off my sims#ngl they are actually supposed to be based on the titanic couple#but we put them in an alternate universe in the present day#bc again jack didn't deserve to die#they deserve their happy ending#and like we didn't want to deal with historical inaccuracies or any of that
2 notes
·
View notes
Text
Freetime Posters - 12 Film & Literature Hobby Posters
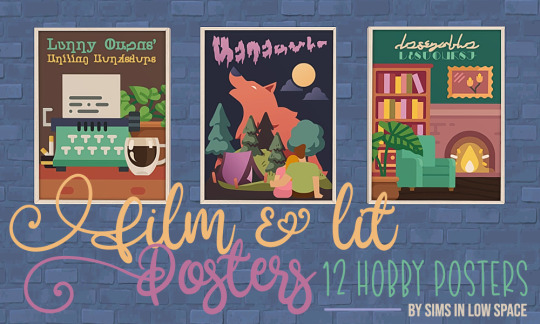
Hi everyone! 120 posters later and the Freetime poster series is finally finished! Whooo!🍾 Today we wrap up with the last hobby, Film & Literature. Swatch, details and download below! 📚

So, for the last time...these are on @linacheries’ best-poster-mesh-in-the-whole-world 4t2 conversion of Simsza’s National Park Prints (mesh is included), and they feature another 12 designs made with Flaticon elements + lots of Simlish fonts. They’re all inspired by locations, items, Sims and features from the game.
Translations:
Werewolf Poster for one of the spooky movies
Subtext: A Lucien Hyde Film Title: Cat Lady Poster for the other spooky movie. I borrowed Lucien Hyde's name from TS3's Midnight Hollow; it seemed apropos
Weather Control Poster for one of the action movies
Top: Chickmate! Bottom: Chicken Poster for one of the comedy movies (y'all didn't think you were getting out of this without more bad puns I hope XD)
Top: Alan Stanley's Bubble Bath Quote: "This year's most dripping drama" -- Sim City Times Bottom: Emmy Starr Devin Ashton Tiara Angelista Poster for one of the drama movies, with more borrowed TS3 names (all from Bridgeport)
Fetch Poster for the other action movie
Desirable Discourse For the film and literature secret lot
Top: Discover the Magic of a Good Book Bottom: Bell Books Desiderata Valley Bookstore advertisement inspired by Issac Bell, Desiderata Valley film and literature enthusiast
Madeleine Mace's Book Club Named for Madeleine Mace, one of the film and literature hobby trainers
Voleskine Notebooks and Journals Since I couldn't find a name for the in-game journals, they're now Voleskine :D
Once Upon Whenever Felicity Joyeuse Poster for the in-game romance novel
Larry Owens' Writing Workshops Named for Larry Owens, another film and literature hobby trainer
A numbered swatch is included.
Icons are by Freepik, Chanut-is-industries, justicon, Smashicons, max.icons, Futuer, RaftelDesign, ultimatearm, mikan933, photo3idea_studio, iconixar, Victoruler and smalllikeart. Huge thanks to all the designers for their amazing resources!
And a huge thanks to everyone in the Simming community as well! I've so appreciated your wonderful feedback while working on these. It was a crazy project and sometimes I felt frustrated or overwhelmed, but then I'd read your kind comments or see one of these designs in your screenshots and it was always worthwhile. <3
DOWNLOAD (SFS) Recolors are ~350KB
I should be back to posting content more regularly this week. This post is scheduled to go out while I'm (hopefully) still sleeping, but I'll be getting caught up on everything I missed once I'm conscious again! 🤗 See you all very soon!
Lots of love, Spacey
UPDATE: Now that this series is complete, here is a master list of all the posts, plus a single download link for all the posters. All swatches are included, and files are sorted into folders so you can easily keep just what you like:
Tinkering Nature Arts & Crafts Fitness Science Cuisine Sports Games Music & Dance Film & Literature
DOWNLOAD ALL THE POSTERS (SFS) Recolors are ~8.5MB
You can now also get all the designs on BV's Travel Keeper!
#s2cc#ts2cc#ts2 download#sims 2 download#ts2 custom content#sims 2 custom content#s2 cc#ts2 art#ts2#ts2 posters#ts2 wall decorations
204 notes
·
View notes
Note
How do you go about making your gifs? And where do you download the content safely? Hoping for some help :) but no pressure to explain!!
hi, anon! no worries at all, happy to help if i can!! :)
putting a quick rundown of everything below and hoping i managed to make this somewhat clear and organised!
for downloads, i always use torrents and i try to always use at least 1080p in terms of quality! i’ve been using torrents for so long now and never had any real trouble, but i always try to download them from sites dedicated to shows/movies torrents, just so i know them and that they are safe to use: i usually check these two: (x) (x) You can search the movie or show there and see if they have links in their directory!
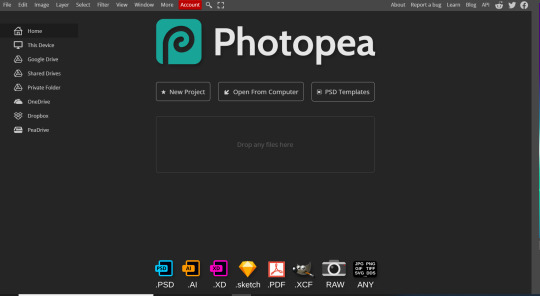
Moving on to the actually gifmaking (this will all sound very confusing at first, but it gets a lot easier as it goes!), i use Photopea to make my gifs, which is an online tool that basically has the same features as Photoshop and works pretty well! this tutorial was a true blessing for me when i started making gifs and i basically still follow everything that is in it, since it outlines the whole process from screencapping the frames for the gifs using KMPlayer to actually making the gif on photopea. this tutorial is also amazing, especially to know more or less how Photopea works.
This is what Photopea looks like to give an overall idea for all the steps i'll mention below, which are a little more specific to how i started doing gifs once i had some more practice:
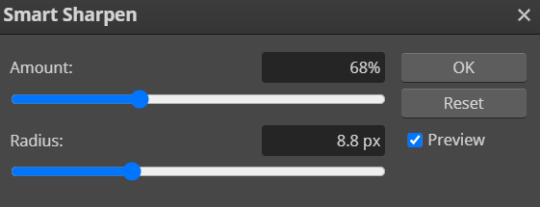
once the gif is cropped and resized according to the tutorials i linked above, i can explain the process how i personally have been doing lately! i always start by using double sharpening (go to Filter at the top bar >Sharpen > Smart Sharpen) and it tends to be around the values below:

once i have the gif set up, cropped and with the sharpening settings applied, i might go in with a little bit of the reduce noise option (Filter > Noise > Reduce Noise) - i screenshoted the values below, just for reference!
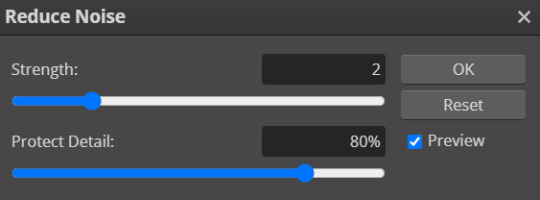
these settings can be really different for different shows (editing Criminal Minds or Stranger Things is very different because the quality in ST is waaayyyy better so the values might vary a lot accordingly, but i wanted to give an overall idea!)
after that, i start working on the coloring process. this one is very much trial and error because it really depends on the show but here are the editing layers i usually use in case you wanna play around with these:
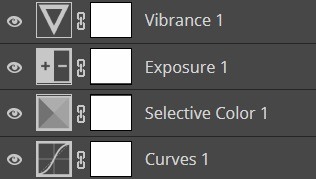
these can all be found under Layer > New Adjustment Layer and then you can select the one you want from the list!
sometimes i might use Color Balance or Photo Filter from that list too, to really adjust the coloring. For example, for shows like A League of Their Own that have a little bit of a yellow filter, i usually add the Photo Filter Layer to correct the color a little. Here's an example below of the before and after the PhotoFilter:
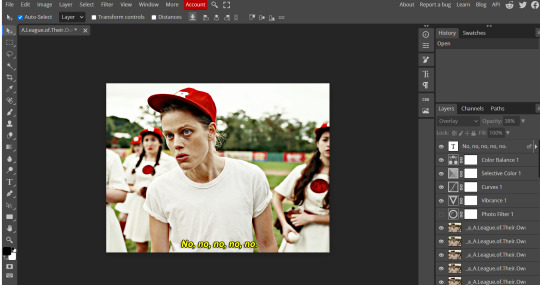

and i’m linking some more useful tutorials, including for coloring, that go into a bit more detail and that i followed a lot when i was starting: x and x.
aaaand i'm done (sorry for rambling so much!) and i'm sorry if this is all a little confusing, i tried giving an overall idea on everything, but please feel free to reach out if there’s anything in specific you’d like to know and i’ll do my best to explain! i’m still learning a lot of stuff myself, but it’s truly a try and error process, especially with coloring, but it can be really fun!
feel free to reach out if you need anything, for questions or for any links to shows/movies! thank you for the question and wishing you an amazing day! <3
#this got soooo long and i'm so sorry! i'm not the best at explaining but i hope this is clear!#the tutorials i linked are true lifesavers too so i hope they help!#ask!#not cm#ana! replies#photopea tutorial#resources#anon!
43 notes
·
View notes
Text
Lazy Man’s Tips for Better Pics Part 1: In-Game Tips
Take it from someone who has no idea what she’s doing and does her best to do the least amount of work possible.
Part 2: Editing in FireAlpaca
So for me, simblr is a hobby and I enjoy using the game as a storytelling platform as well as a gameplay platform. And I don’t like to put a lot of time into it outside of that. I use reshade in my game to add lighting effects and blur effects.
Reshade is in no way necessary to have in your game to take good pictures.
We’ll get back into Reshade. But first here are just some simple things you can do to take better pictures in game with no mods:
TIP: Use the in-game lighting!

That’s right! You can click on any light inside the game and “Set Color and Intensity...” for added fun.

You can set it different per room, for the whole house, or per light.
“This Room” is useful if you need a different tone in each room or if you use each room as a different “set”.
“All Lights” is useful to get a nice starter base light for the whole house.
“This Light” could be useful for desk lamps or club scenes when you need different lamps to emit different colors or shadows.
Reminders:
The more lamps in the room, the brighter it will be.
The more windows in the room, the more natural light will affect it.
Keep in mind the time of day and the world you are in. Sulani sunsets are longer and brighter than Forgotten Hollow.
Overhead lights will cast different amounts of lighting than desk lamps. Mix and match and try out what fits your scene.

There are different colors you can choose for the lights.
Tips:
1, 2, and 3 are your white tones. Cooler, cool, and neutral. I suggest using these as “bases” if you choose “all lights” options. My homes usually stick with the neutral white.
EA lamps automatically use a more yellow tone so I suggest changing to get better colors. Unless you want a yellow desk lamp, then you can use any of the colors that come after the white.
The crazy colors are for you to use to your discretion. Green could be good for laboratory scenes. Red for late night street lamps down sketchy streets. Purple for spooky scenes. If you have a club scene, each lamp can blast a different color which would make your dance floor pop. The options are limitless.

Notice the difference in this picture from the one above it. I choose neutral light and dimmed it a bit using the dimmer.
From lighting, the next best thing you can do is put up all the walls.

Tip: When you are ready to take the picture, put up the walls to the END view. It just looks more like a movie set with all the walls and less like a video game. However, feel free to put down the walls as you play. Pause and put the walls back up when you’re ready to take a picture.
From there, it’s time to pose your sim. You can use natural gameplay interactions or you can use the Pose Player.
Now here comes the fun part. Get your sim in position and press TAB on your keyboard. TAB is your best picture taking friend.
Use your mouse to swivel the camera toward where you want your shot to take place. Click once to lock it in place. Use the W,A,S, D keys to move around and Q,E keys to move up and down and Z,X to zoom in and out. And of course C to take the picture. Hit TAB again to get out of this mode.
After moving the camera around, if you need to readjust, you can click once more to move the camera freely around. It’s how you can get an overhead shot of the bed like this:

Tip: Get rid of the plumbob.
For “story” things, it’s like having the boom mic in the shot. For gameplay, it’s totally fine to have. And honestly it’s a choice if you like it or not. The easy way to get rid of it is to just have a second person in the household. Click on the second person before going into TAB mode.

So from there you can zoom in and take your picture as you need it. This is a natural in game shot.

This is the same shot with reshade turned on. I did not edit this shot at all. It’s all in game effects from reshade. The reshade I use is Intramoon’s Aspen Effects.
Reshade is an adventure all on it’s own. If it’s something you are interested in, there are numerous tutorials to check out on tumblr but to get started I recommend:
How to Download Reshade
Now that last screenshot is something I would upload straight from the reshade folder. I, personally, do not edit my photos further than that. However even if you follow all these steps, your pictures may still not look the same. And that is because of individual graphic processors. Some computers will have stronger ones than others.
Now I have a gaming laptop which handles the game pretty well. My in game graphic settings are as follows:

Now my computer can handle all of these settings without overloading the game and making it lag. Some computers and graphic processors will not be able to handle all of these “high” or “very high” settings. Which is fair!
You do not need an expensive computer to play and post pictures from the sims!
My recommendation is to find out what your computer can handle and stick with just that. Honestly, play how you like. Beautiful screenshots are nice but for me, it’s about the content and the sims and the fun of playing.
Keep in mind that everyone is going to have their own style as well. So you can follow all these steps and your camera angles in the TAB mod might be different or your lighting might be darker or lighter. It’s all part of being creative and finding your groove. So play around with your settings and the camera. See what you like. And don’t be afraid of doing something different. Symmetry in sims is a myth.
28 notes
·
View notes
Text
FOUR.
One | Two | Three | Four | Five | Six
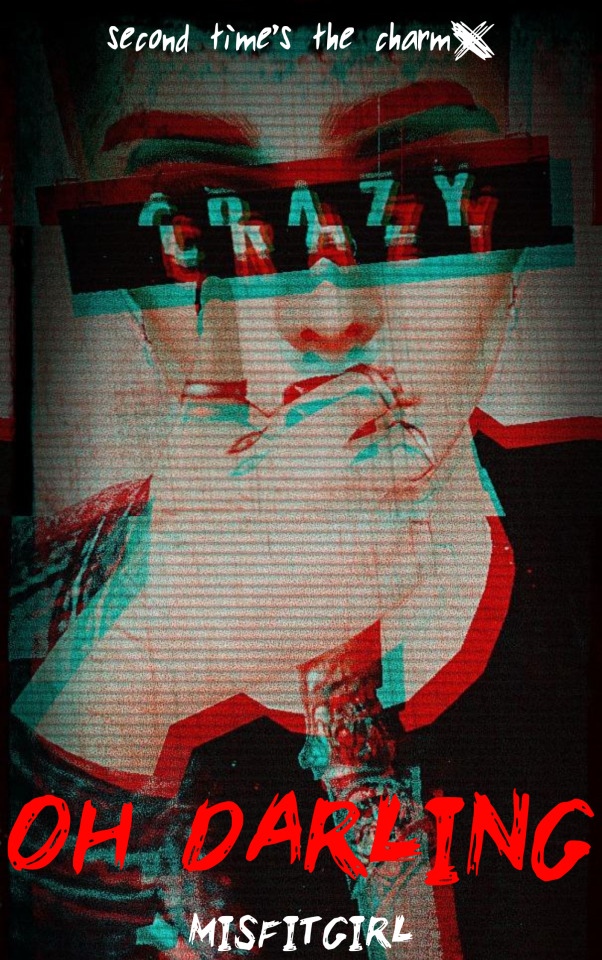
Second time's the charm~
A casual greeting at a book store turns into so much more.
[WARNING]: This is a YANDERE story! Stalking, murder, the whole nine yards!!! Read with caution!
If you find this story on any website NOT under misfitgirlwrites/misfitgirl3390 please let me know!
Font for book cover credit (x)
After scrolling through Cherri's Tumblr for nearly two hours, Leo found pictures of her on Halloween. She was dressed as Poison Ivy and it suited her nicely. He stared at the pictures for a while before saving them to his phone. She really was beautiful. His thoughts were interrupted by his phone vibrating.
Marcel: So I was going to pretend I didn't see you guys in the ice cream shop with some dude but I changed my mind. Who was he?
Leo arched a brow.
Mary: His name is Leo! Cherri met him yesterday and we ran into him again today, nothing to be worried about d a d
Marcel: Haha very funny
Cherri: It's okay, Marcel. He seems nice
Marcel: All guys seem nice when they want something from you.
Mary: He's just being friendly! Cherri is perfectly fine! And cute! I think it's about time a guy tried to sweep her off her feet! Anyone is better than Darius 🤢
Cherri: ;;;;;
Marcel: There are a lot of guys just like Darius and that's why I'm worried.
Did Darius do something to Cherri before? Leo didn't like the sound of that. He also didn't like how skeptical Marcel was.
Cherri: ...I think he's kind of nice
Cherri: I understand why you're worried but I'll be okay
Cherri: And if I need you I know I can call you ☺️
Marcel: ...alright
Marcel: Fr though be very careful
Cherri: I will! My dad just got in, I have to go
Marcel: Ard
Mary: Baiii 💖💗💖💗💖
Leo hummed. He'd have to look into Darius. In the meantime, he went back to Cherri's Tumblr. He could tell by a certain blog she interacted with a lot that it could possibly be Mary. That and the username seemed very fitting.
Brattyxkitten_.
Leo clicked on the username and looked at the bio.
Bunny 🐰 | 18 | A Princess 👸🏻 | 💚 Loki Laufeyson 💚 | 💗 Sebastian Michaelis 💗 | MANY MORE 🥵
There were also mobile links and one of them led to her Instagram account, which wasn't private. He scrolled through and saw a few pictures of her and her siblings. He knew now that Marcel was her older brother. There were a few pictures of Cherri as well, which he screenshot to save.
Cherri: Hi Leo :)
Leo quickly stopped what he was doing to reply.
[Text]: Hey Cherri
[Text]: Did you get home safe?
Cherri: Yeah, I did
Cherri: I just wanted to ask, could you maybe use Google hangouts?
Leo didn't respond right away. He wanted to ask her why she was hiding her text messages. Could her father be looking through her phone? It's not like she's doing anything wrong so it couldn't be him, right?
[Text]: Yeah I'll download it now
[Text]: What's your email?
Cherri: [email protected] :)
He knew that already and he was glad he remembered to pretend he didn't. Leo set up his own account on Google hangouts and switched over before texting Cherri once more.
[Text]: Is this better?
Cherri: Yes! Thank you ☺️
Leo smiled slightly. He completely forgot about trying to find more on Darius. Instead they talked about books. He liked that Cherri genuinely liked the books she was forced to read in high school. The Great Gatsby was her favorite book and she didn't hate Shakespeare but made it clear that she could also live without his work. She thinks she would suck at poetry but Leo disagrees. He thinks that she'd be amazing at anything she tried to do.
[Text]: You know, I think you'd really like Little Women. Did you read that book?
Cherri: Yes!! Omg I absolutely loved it! Women are powerful 💪🏽
[Text]: Well what about the movie?
Cherri: 1994 movie? Yes
Cherri: Not the recent one
[Text]: Well what if we see the recent one together?
Cherri: I would love to do that! But I'm kind of short on money
[Text]: Don't worry about that, I'll pay for you. I'll even pick you up if you'd like
Leo was definitely considering this their first date. He wondered if she was too. She didn't respond right away, so he switched back to her account to see her rapidly texting Mary. He quickly opened the chat.
Cherri: HE ASKED ME IF I WANTED TO SEE LITTLE WOMEN WITH HIM
Mary: uM??? DID YOU SAY YES?
Cherri: YES
Mary: Y E S
Cherri: HE ALSO OFFERED TO PICK ME UP?? DO I SAY YES???
Mary: Heck yeah!!!! This will be your real first date!!!!
Cherri: Yes and I don't want to think about Darius or Commissioner Hughes >.<
Commissioner Hughes? Was Darius the Commissioner's son?
Mary: Tell him yes and dress cute!
Cherri: what about my dad?
Mary: Tell him that you're coming over to my place! Don't forget to tell Leo your curfew!
Cherri: Right! Okay!
Leo switched back into his account and checked his messages.
Cherri: I'm fine with you picking me up! :)
Cherri: But my dad is a bit strict so I need to be home by 6:30
Leo thought that was pretty early for someone her age.
[Text]: We can just hang out early. I'll make sure you're home before 6:30, I promise
He wanted to promise that he wouldn't do whatever Darius did to fuck up her first date.
Cherri: Okay! Thanks so much! So tomorrow then?
[Text]: I wouldn't want to wait any longer
Cherri: I'll see you then, Leo 🥰
Leo smiled. This was definitely a date. If things would keep going this smoothly, Cherri would be with him in no time. But he knew that wasn't the case; not with Darius apparently being a reoccurring problem and whatever is making her keep everything on an account in case she has to clear her phone.
He'd focus on that later. For now, he wanted to relax and enjoy his date tomorrow.
~~~
Taglist: None yet~
#yandere#male yandere#yandere male#yandere oc#yandere x oc#yandere boy#yancore#yanderecore#yandere rp#yande.re
9 notes
·
View notes