#hot wire foam cutter
Explore tagged Tumblr posts
Text
MINOVA Cordless Hot Wire Foam Cutter SP0402 Lux 8V/2.0Ah
3 notes
·
View notes
Text
hot wire foam cutting machine
Desktop hot wire foam cutting machine
This is a true professional-grade hot wire foam cutter, for cutting different density foam with fine cutting edge, no mess. Desktop device, provides the cutting plane,operation is simple and convenient . Cutting requires no special training or skills, and allows you to create straight edges or complex shapes .
Product description
Style:foam cutting machine
Supply voltage:110V Power input:160W hot wire angle:45°-90° Temp. of hot wire:500℃ Total weight: 20kg Power cord length:3M Power source:Elextricity Hot wire length:Adjustable
Table size: 100*60cm,
Total height:150cm,
Effective cutting height: 65cm.
youtube
0 notes
Text
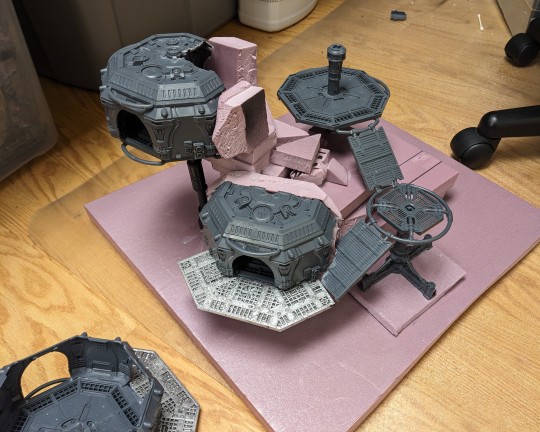
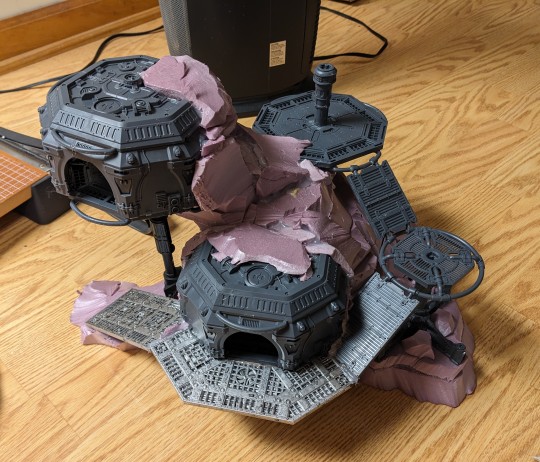
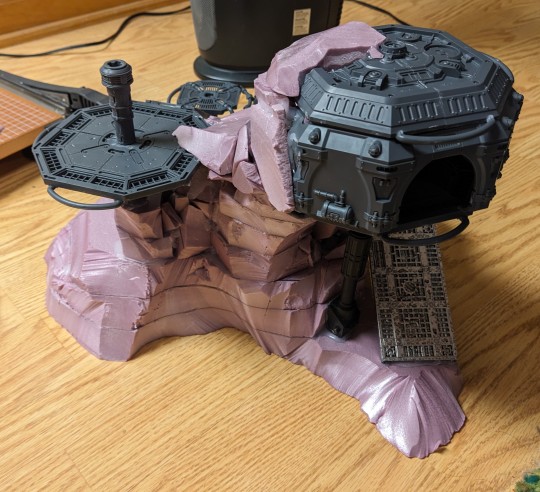
Update to my new terrain project. I glued the first Hab unit onto a big piece of pink foam and started building up from there. I lined up the bridges where I wanted them and then glued in the platforms they would be connected to, before stacking more foam and going further up the mountain.
Once all the foam was in place I used my hot wire cutter to shave the foam down into a more mountainy shape. Next I need to Mod Podge and gap fill with Sculptamold.
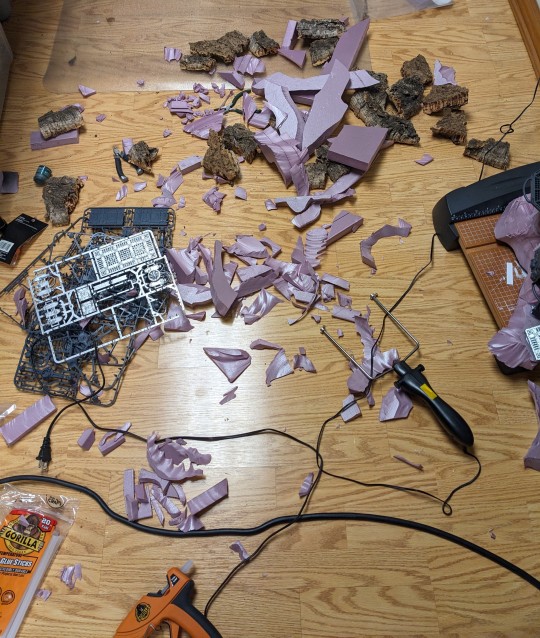
I am so full from eating fiberglass, yum!
59 notes
·
View notes
Text
How to Make: Electronic Wings for Cosplay
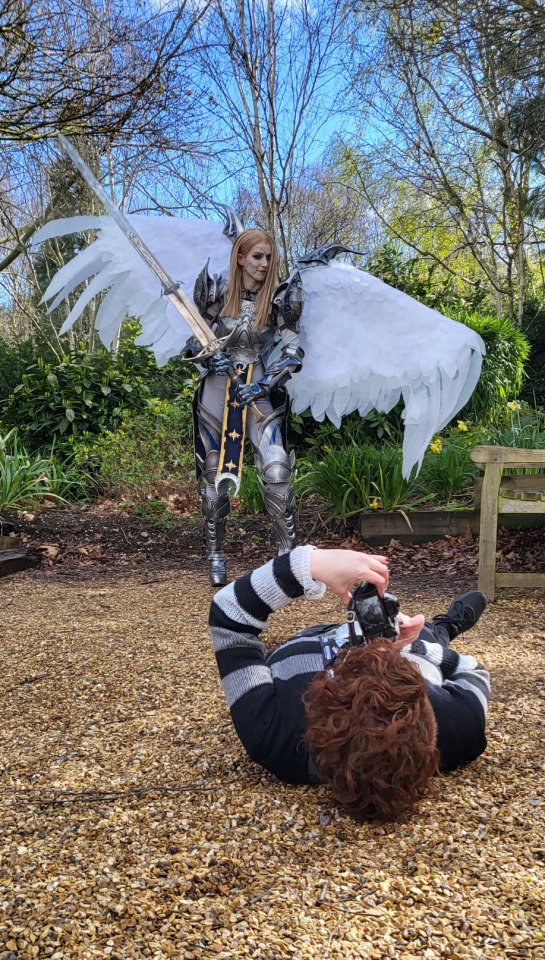
Hello Everyone! It's been a while since I last uploaded a written tutorial on here and since I just finished and wore my Dame Aylin cosplay this last weekend it seemed appropriate to jump back in with a tutorial on one of the costume pieces!
Her wings were the star of the show this weekend and I know a lot of people were curious about how I made them! A huge source of knowledge and inspiration behind these wings was this video by Axceleration, I made a few changes to the frame shape and electrical circuitry for mine but her tutorial was a huge stepping stone to give me the confidence to tackle them myself!
Health and Safety:
When working with Sintraboard (as well as other thermoplastics) it is incredibly important you wear a respirator as well as goggles when heating, moulding and cutting it. The fumes this plastic will give off when heated up are no joke! Make sure you're in a well-ventilated space!
Basic tool safety knowledge is also really important! wearing gloves when using power tools can be more dangerous in most situations, so always be aware of where your hands are vs where the tools are. Always cut away from yourself and take things slowly, don't panic.
Electrical safety! You're working with live wires and circuitry! make sure your hands are dry, you aren't touching the bare wires at any point when they are connected to a power source, and if you choose to solder anything, make sure you're wearing heat-proof gloves and a mask in a ventilated space!
Tools
Wire stripper
Screwdriver and wrench
Dremel - I recommend the Dremel 3000 rotary tool personally! Some essential Dremel bits you'll need for this include, a sanding bit, drill bit (smaller or same size as your screws/bolts), and a small/narrow cutting bit. These will usually come with the Dremel!
Heat Gun (A hairdryer will not get hot enough to heat the Sintraboard!!)
Pipe cutter (alternatively you can use a hacksaw for this!)
Hacksaw
Ruler
Scissors (for cutting fabric straps)
Materials
Heat shrink Tubing
2 core electrical wire
switch (you want a three position, six pin switch, like this one, even better if it has the Screws on the pins! otherwise you'll need a soldering kits to solder the wires to the pins.
2x 8AA 12v Battery Holders
2x 12v Linear Actuators (Mine had a stroke length of 100mm)
21.5mm PVC Pipes (I got 2x 3m Lengths)
2x 21.5mm PVC Pipe straight couplers
6mm 8"x12" Sintraboard
Nuts/Bolts/Screws (I used M5 bolts for the base & Actuator connectors and M6 screws to attach the hinges to the pipes! You'll need Washers for every Nut & Bolt!)
Hinges (I used 2.5cm wide hinges that were skinny but long so they would just about fit along the PVC pipe! 3" gate hinges would work!)
50 metre Polythene Jiffy foam roll (in retrospect this was ALOT of foam, you could definitely get away with maybe a 20-30 metre roll! I now have a load leftover XD)
16 AA Batteries (I used 16 and had enough for the whole day with them on, I think They'd probably be enough for another half a day-full day too! but have spares just in case!)
Webbing strap ( I went for grey to match my base suit colour!)
Buckle - as wide as the webbing strap you use!
3 metres of white cotton fabric (or whatever colour wings youre going for!)
Optional
Zipties (for cleaning up the wires)
Lets Go!
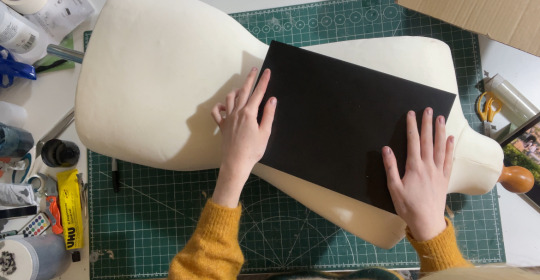
Sintraboard is this wonderfully stable thermoplastic that is relatively easy to cut into (with the right tools) and when heated allows you to mould its shape! I started by using a mannequin and heating the Sintraboard with a heat gun for a few minutes to make it pliable, I recommend using gloves for this part as the materials gets VERY HOT! Press the board into the shape of the mannequin's back, taking note of the edges especially! you want this board to sit as comfortably to your body shape as possible as it makes a huge difference to how long you can wearing the wings for in this backplate is comfy!
Once shaped, I placed it against my back to make sure it was a good fit, heating again and making any alterations I needed (again don't place bright hot plastic to your bare skin! wear protective clothes and wait till its slightly cooler to do this, with the help of a friend!). I then took a hacksaw and rounded the corners, before sanding the edges with my Dremel! Try to avoid cutting off loads, just enough to make things less likely to snag.
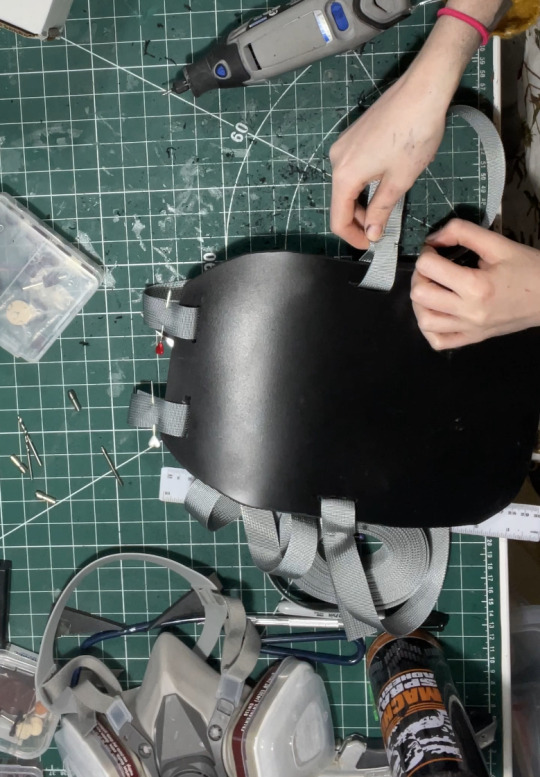
3. I then cut in four holes, wide enough to feed my webbing strap through, two at the top and one on either side below where my arms would sit! I measured the webbing strap by firstly feeding them through the top holes and pinning them, and then bring the strap over my should to everything sits where it should and seeing where the strap hits the side hole and cutting the length there! you'll also want a strap that attaches across the chest, meeting in the centre with a buckle!
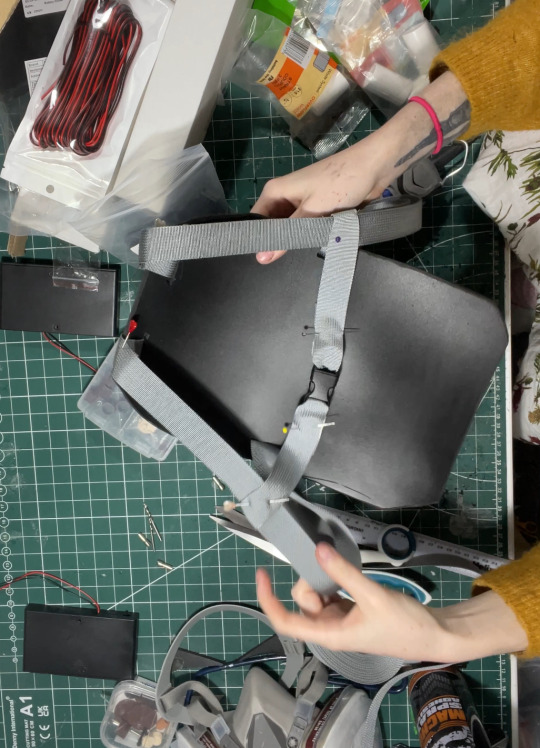
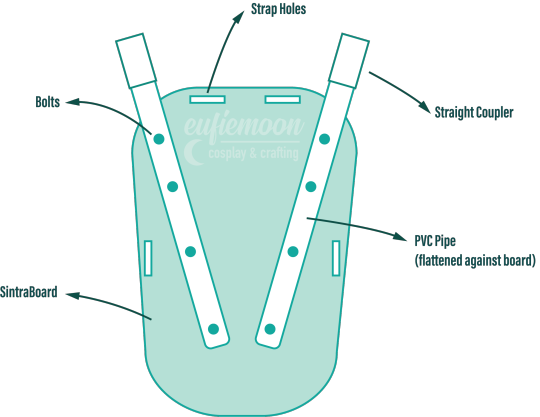
4. After sewing the straps closed I was able to move onto the PVC pipe structure! This may change slightly depending on the finished shape you want but I needed the PVC pipes to come out from inside a breastplate so had a particularly angle as well as character references to work with! I began by heating the pipe over my heat gun and flattening a portion of it under a heavy object so it would sit much more flush against the backboard and sit better underneath my breastplate before moving onto securing the first portion of the structure to the backplate. This mainly involved lots of try-ons and measuring to make sure the angles were correct and symmetrical and was quite fiddly but well-worth the effort! I'll include a diagram of the general shape I went with below:
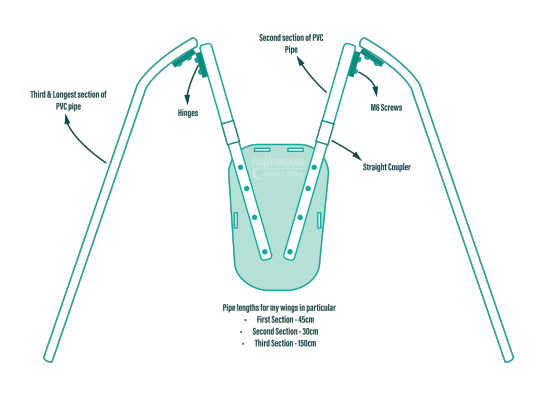
5. I wanted my wings to be relatively modular for ease of travel so I needed to make sure certain portions of them could come away from other parts easily, so I popped a straight coupler on the top of the pipes that were attach to the breastplate, this also meant I could slot the breastplate over these shorter pipes and wear everything correctly! Then these second pipes slot on and at the other end they are attached via hinges to the longest portion of the pipe 'skeleton', Diagram below:
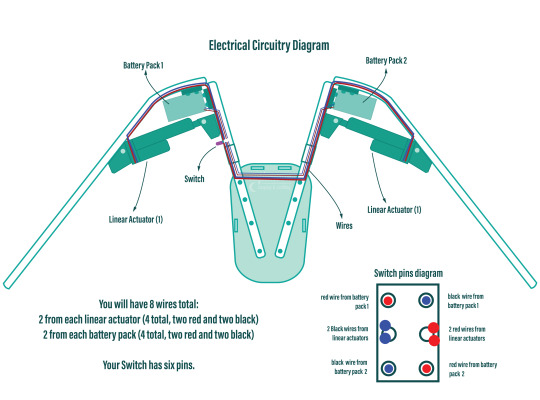
6. Now that the skeleton was put together, it's time for the electrical stuff! It's a good idea to figure out where your circuit is going to lay on the skeleton - consider if you want the battery packs mounted the the backplate or, like me, put them inside the actual wings in removeable pockets for easy access and removal for battery changes. all your wires will go through the switch so deciding where you want to place that is very important! Mine was placed just over my shoulder on the front side, mounted to the PVC pipe with a metal cover I drilled a hole into to slip the switch through and then drill through the pipe.
I've included another diagram below that explains all the electrical circuitry, including which wires go on which pins on the switch!
Important to note: The linear actuators need to be placed and bolted into the PVC pipes at *exactly* the same angle on each side, any slight deviation will lead to the wings going up wonkily! So take your time and make as many adjustments as necessary.
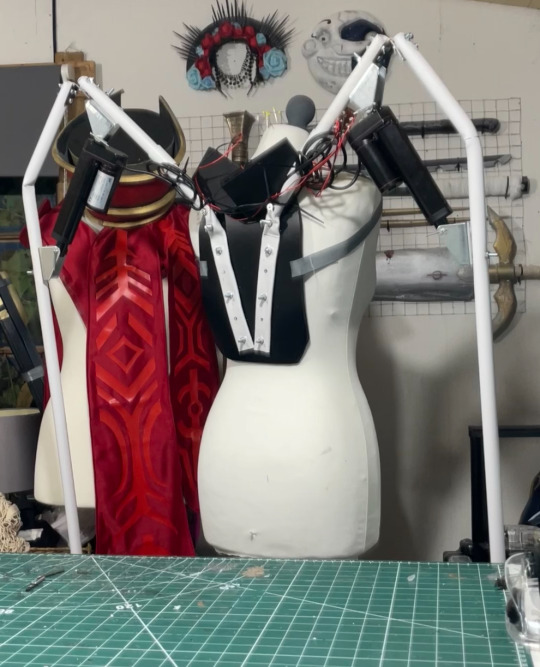
7. You can extend your wires by adding on the electrical wire, just match the colours, and put heat shrink tubing over the connections to hide the live wires! I ended up zip-tying the wires into organised bundles once the wings were done to help keep everything safe from snags.
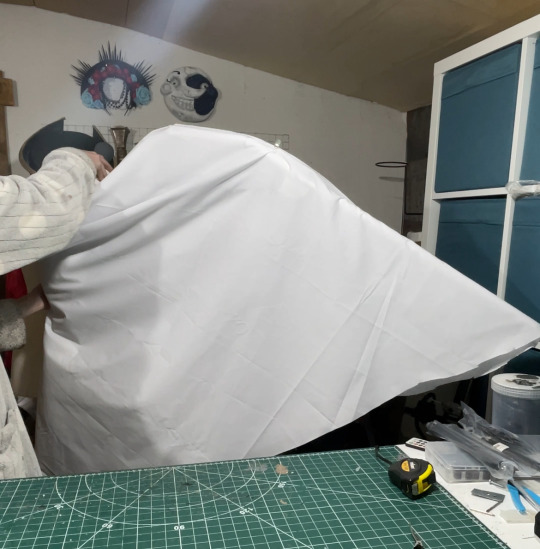
8. Now its time for the Wings themselves! I drafted my base pattern by just draping the white cotton fabric I had over the wing when it was fully extended. I then pinned the wings to the shape I wanted them to be along the bottom before cutting along the pins. I ran the fabric through my sewing machine to close the bottom edge, leaving a gap wide enough by the wing base so I could slip the wing on and off, closing it with velcro. I also added little fabric pockets inside of these to hold my battery packs, which also connected via velcro for easy removal!
9. Now that I had a wing base I was able to begin making feathers! I cut out a total of 800 feathers out of polythene jiffy roll for these wings, in 6 different styles and using real life bird wings to dictate the shapes I used and where I placed them. I ended up hot gluing every individual feather onto the white fabric base, going row by row until every side was covered, the wing covers themselves are super light because of the foam feathers and they shine light through them in a really magical way!
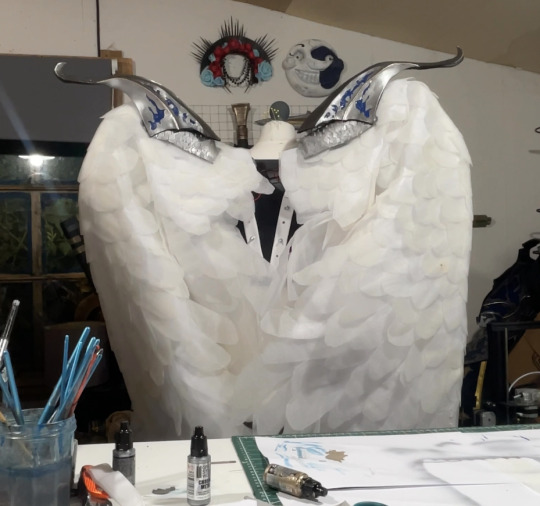
Optional: I also ended up going over these feathers with my airbrush and some super light beige paint to help darken the shadows, this is entirely optional and may change depending on the wings you're looking to make!
When in neutral position and in extended position the wings looks like this:

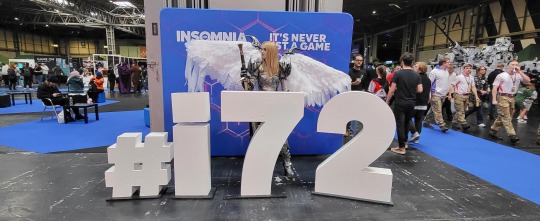
Mine had a wingspan of about 7ft total when fully extended but when in neutral position they were fairly close to my own proportions! mainly staying behind me and weren't much of a problem in a packed con hall!

Photo by: Helloimfran (on Instagram and Twitter)
I hope this tutorial helped and if there are any questions about anything in specific don't hesitate to reach out at [email protected] or on my instagram or twitter (@eufiemoon)
Happy Crafting!

#cosplay#cosplayer#cosplaying#baldurs gate iii#baldur’s gate 3#baldurs gate 3#bg3#dame aylin#aylin x isobel#bg3 aylin#cosplay tutorial#Wings#fantasy#tutorial#cosplay help#cosplay tips
158 notes
·
View notes
Text
Foam headwing ear cuff tutorial
i made a couple pairs of headwings for mcyt cosplays and thought I should share a tutorial on how to make then since it's really easy
You can wear these with glasses!!
I'm making Watcher wings for this one but you can use this to pretty easily make wings with just one per ear
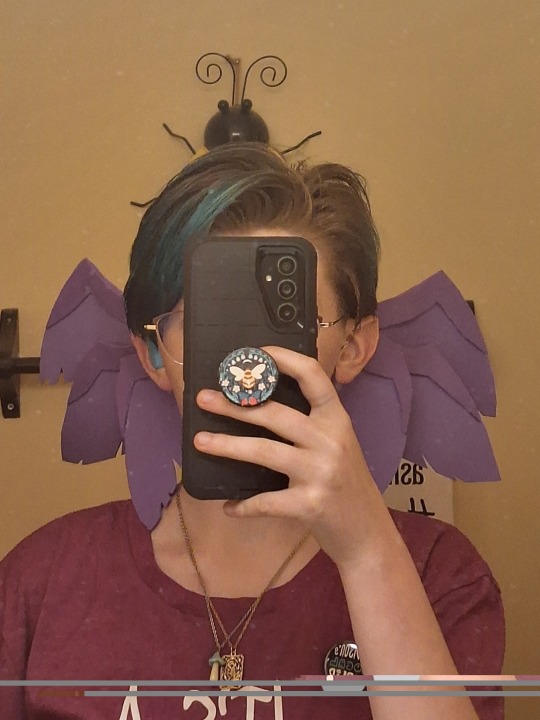

What you need:
A couple of sheets of thin craft store foam in the colors you want
Jewelers wire or floral wire (I used floral wire)
Scissors
wire tools(optional)
A few sheets of thin white paper
Hot glue
Pencil
I think I cropped out all of the scisors/wire cutters but a tw for those still
Edit: also a tw for possible trypophobia/ommetaphobia, the last image has googly eyes and that might be uncomfortable
Gotten several people telling me to do various things with these warnings, it's not really tryphobia in my opinion but I'll respect people that are asking me to add warnings
start out by doodling the design you want and getting the wing shape right
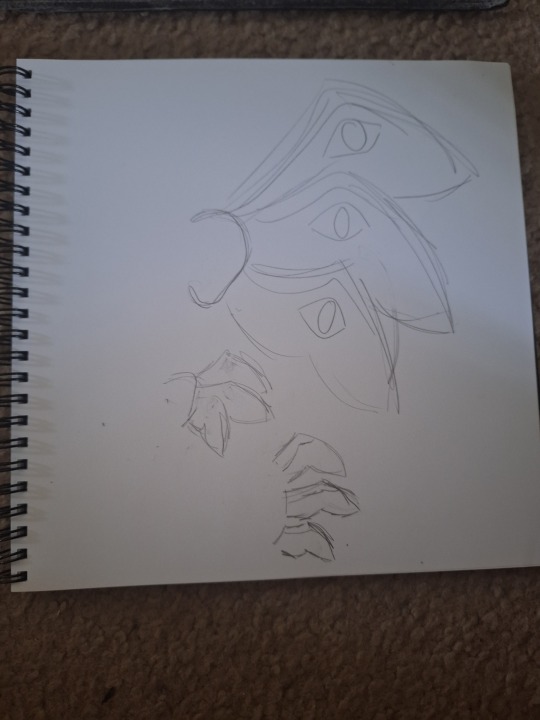
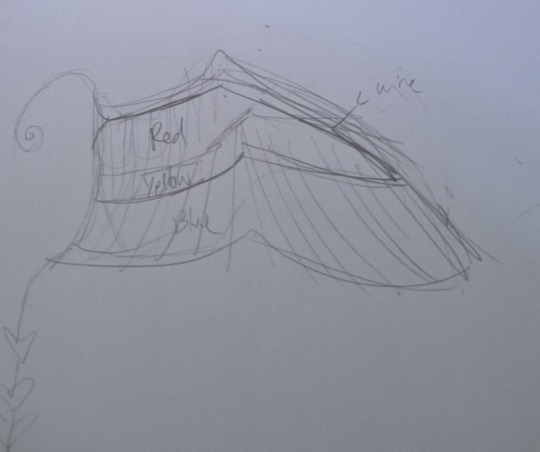
Since my design was pretty complicated I loaded it into procreate(coloring in like i did is optional) on my tablet so I could trade onto a bigger paper
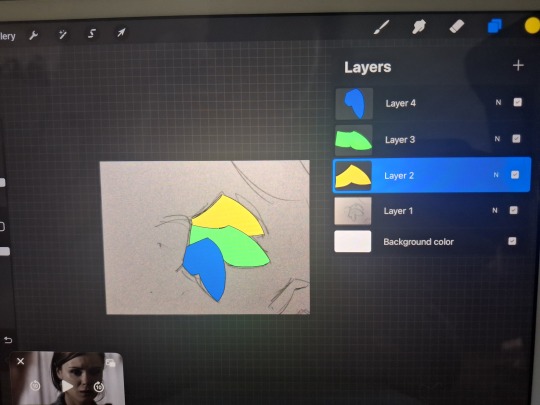
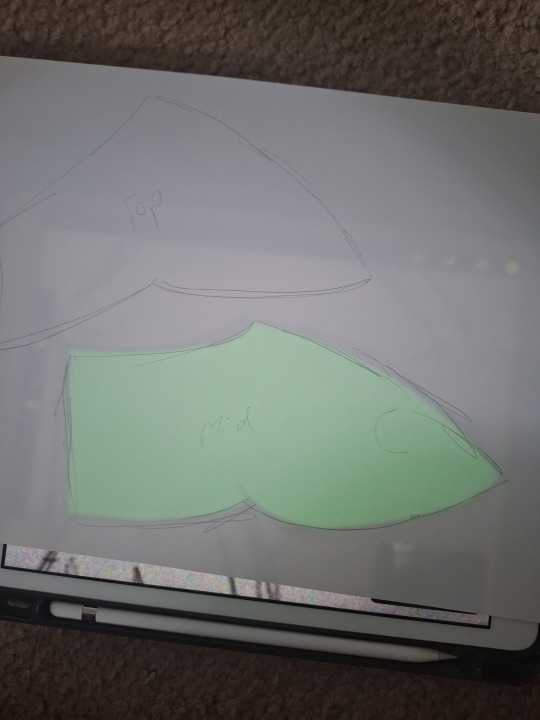
Trace onto a sheet of paper. This is when you can start sizing it up correctly to fit your head. (I'm watching SPN btw)
Cut them out and reshape as needed
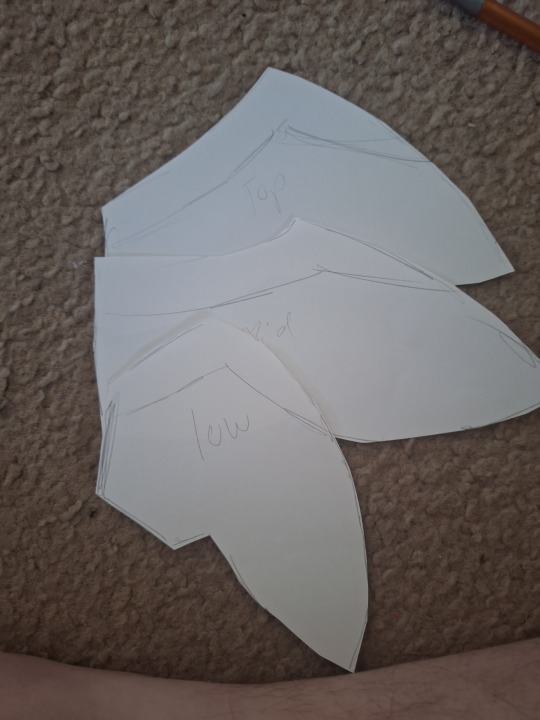
Now, very important, draw on the down feathers area. This is what's going to have the wire under it. You can also do three layers like I did with the Grian (red, yellow and blue) wings. I did two for this one because it needed to be lighter due to the three wings.
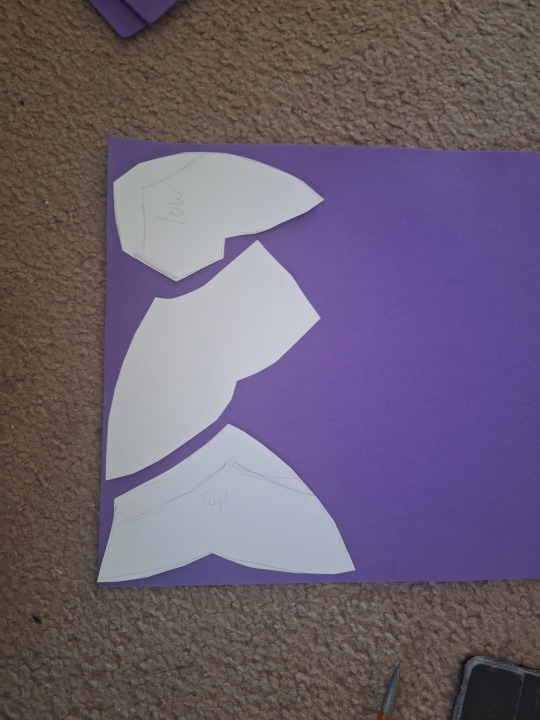
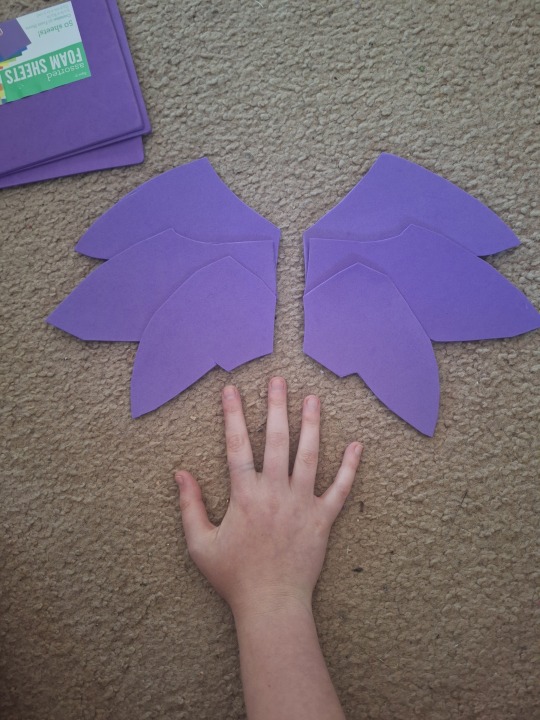
Lay our your template(s) onto a sheet of foam. I found that taking a mechanical pencil and dragging it across the foam. It creates a really nice groove for you to cut along.
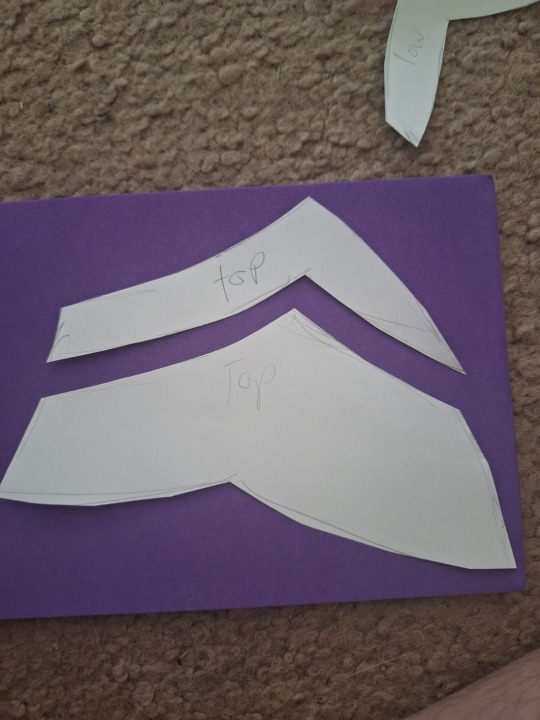
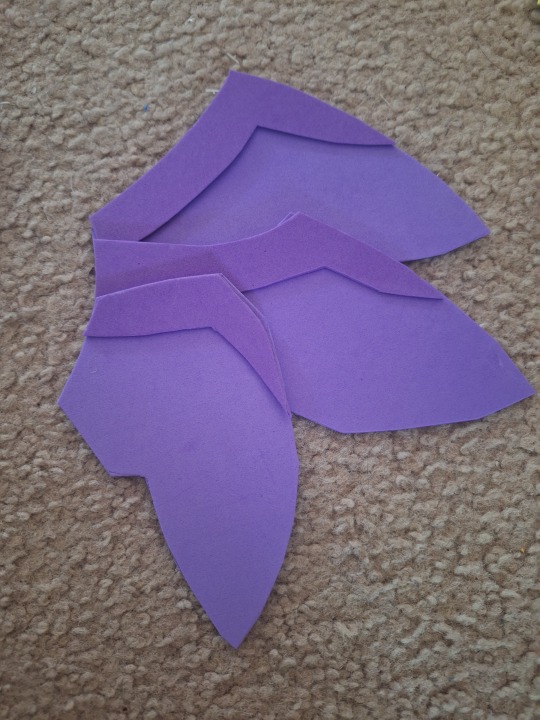
Cut out the top area. I used a slightly darker shade of purple.
This is where you want to cut the feather shapes into the upper area if you want to. Just little angled triangles.
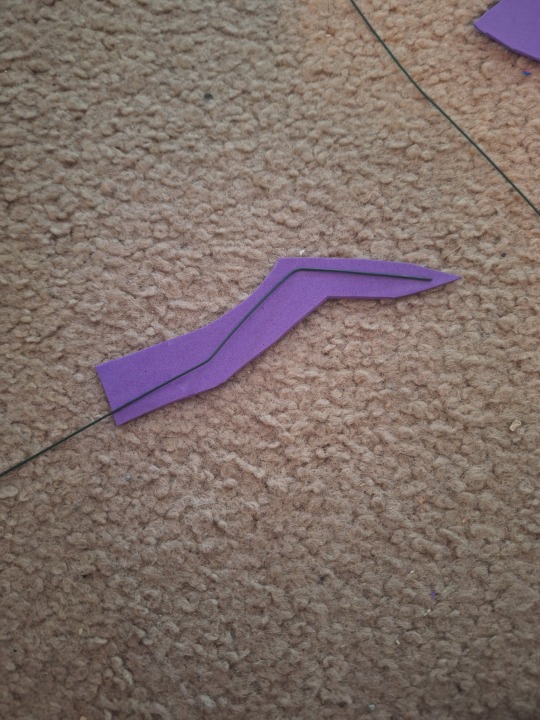
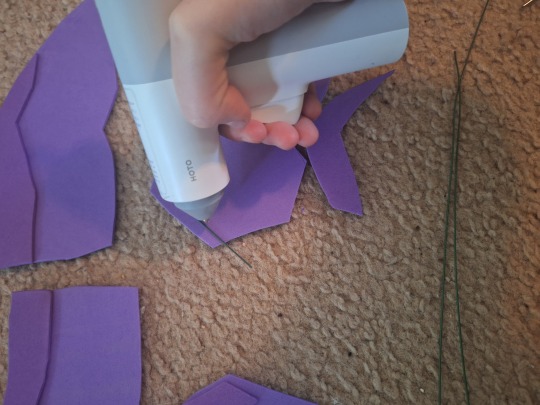
Bend a wire along the top area. Take the bent wire and put it on the lower foam peice. Hot glue at the base of the wing where the wire sticks out. BEFORE IT DRIES STICK THE TOP PART ON TOP. You then go through and hot glue the rest of the wire and top section down after adjusting wire as needed.
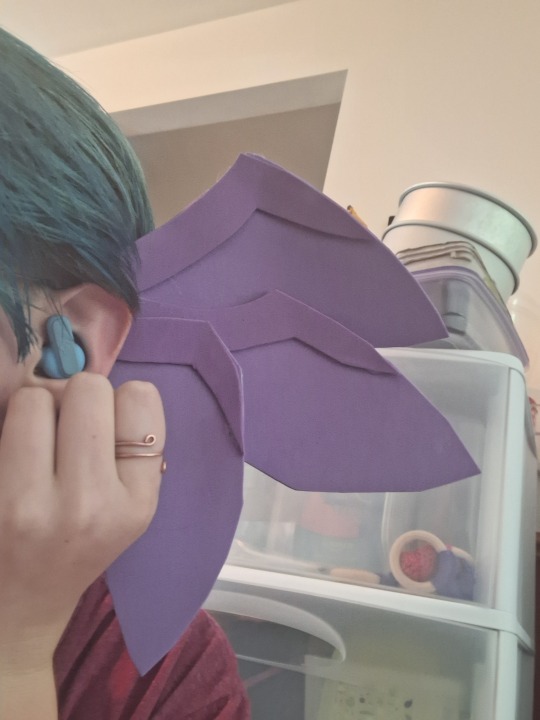
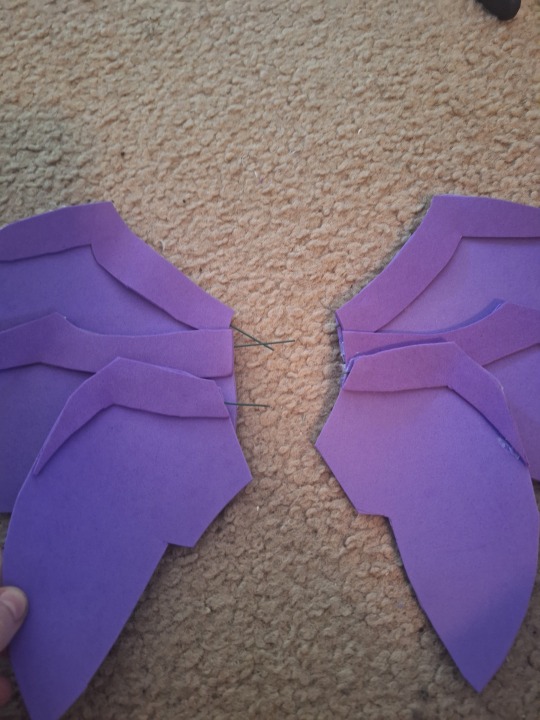
If you're doing multiple wings like me then glue them together here and make sure you like the angles. You can also bend your wings using the wire for further adjustment.
Cut the wire that's sticking out
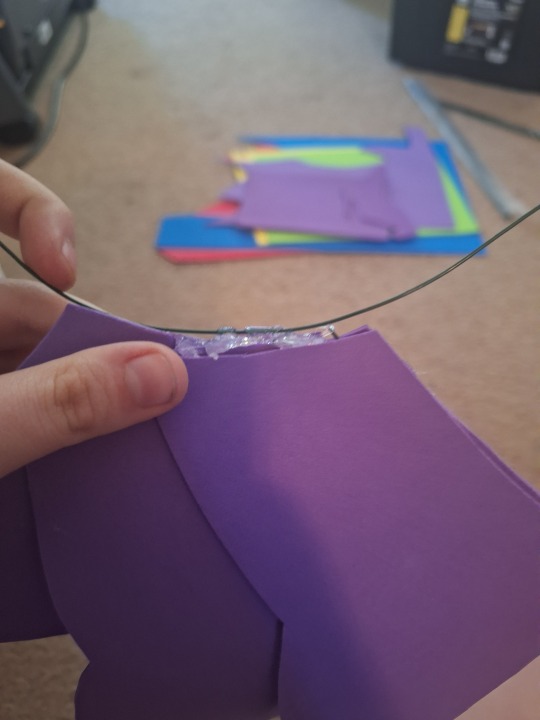
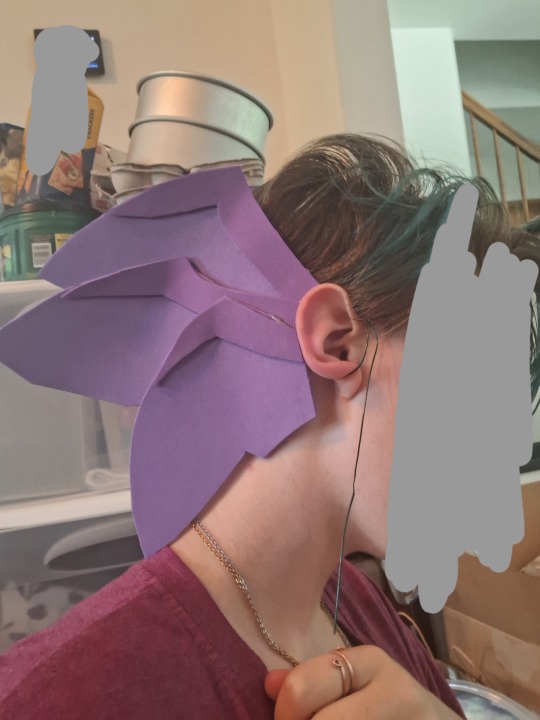
Hot glue another peice of wire on, only attaching it on a small section. Put this behind your ear and bend it around. The sections coming around your ear should almost touch after cutting off excess.
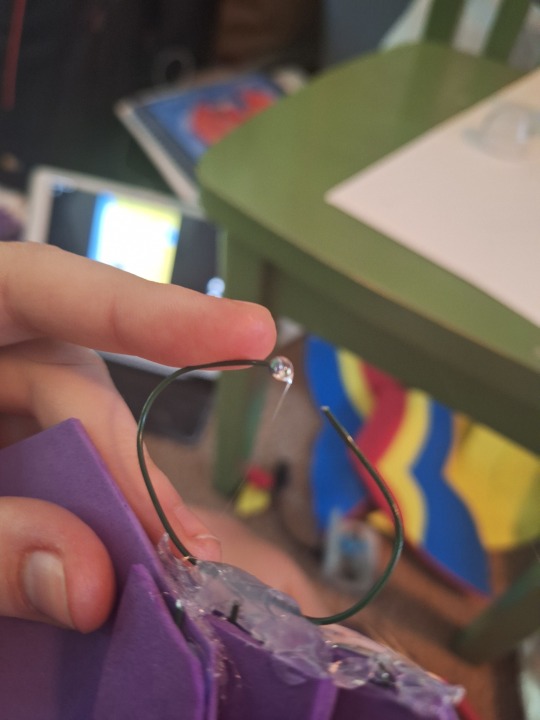
Put a bead of hot glue on the end of the wire. WAIT AT LEAST 30 SECONDS and then lightly squish it in to form a ball. This is just so the wire doesn't stab you. You should do this on both ends.
Here are all of the ones I've made so far
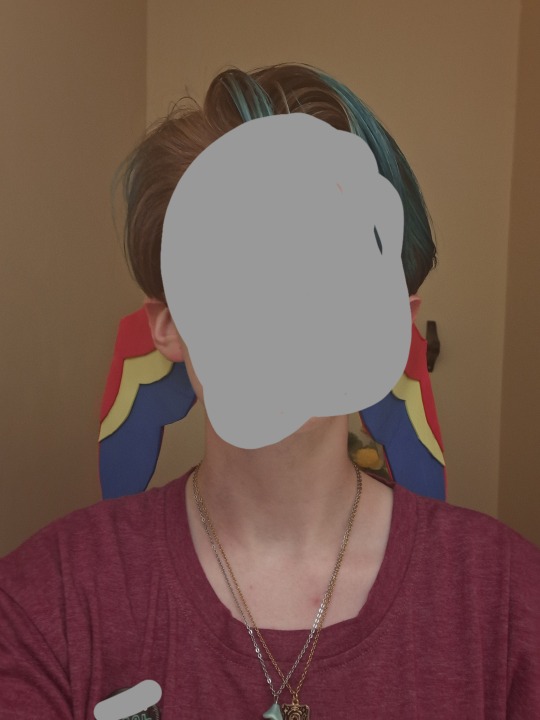
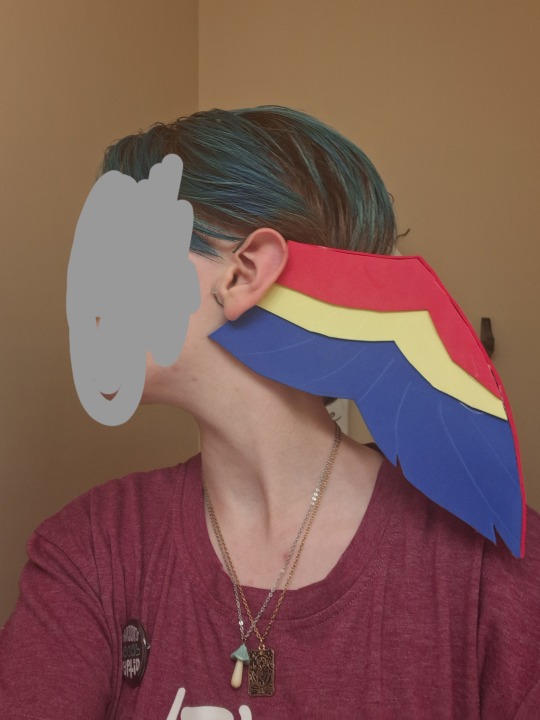
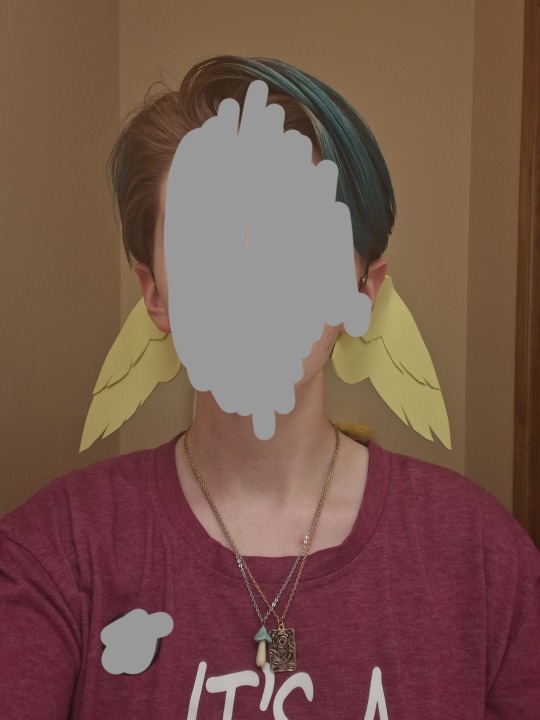
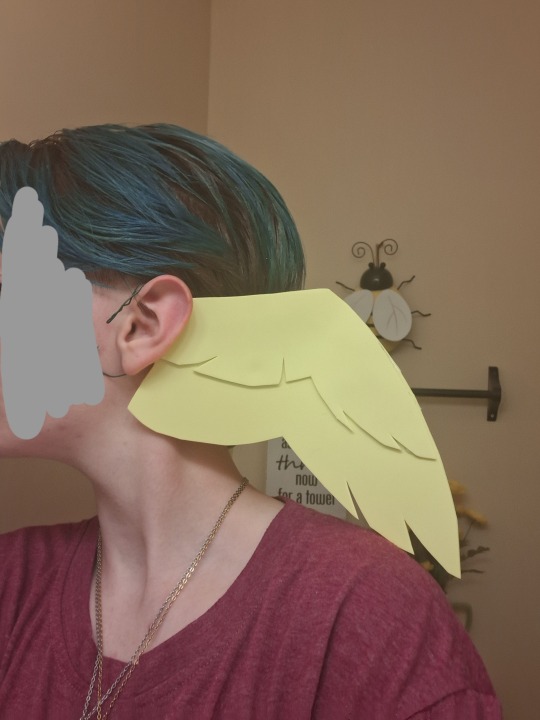
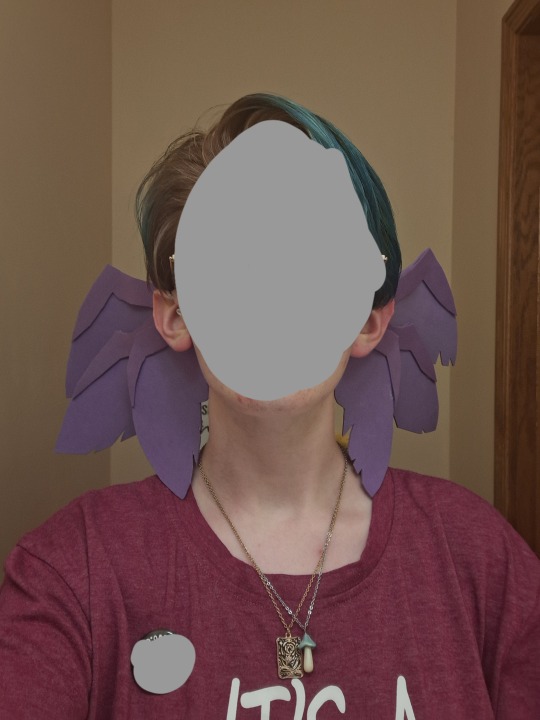
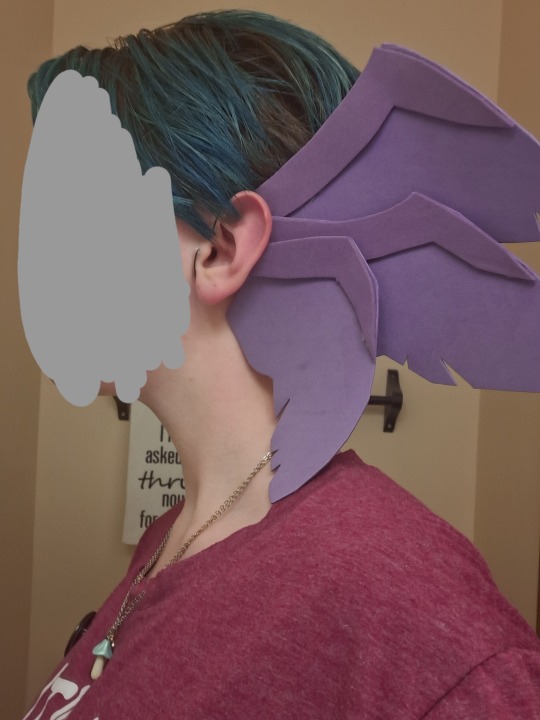
I also gave into my intrusive thoughts and added googly eyes to the Watcher ones a few days later
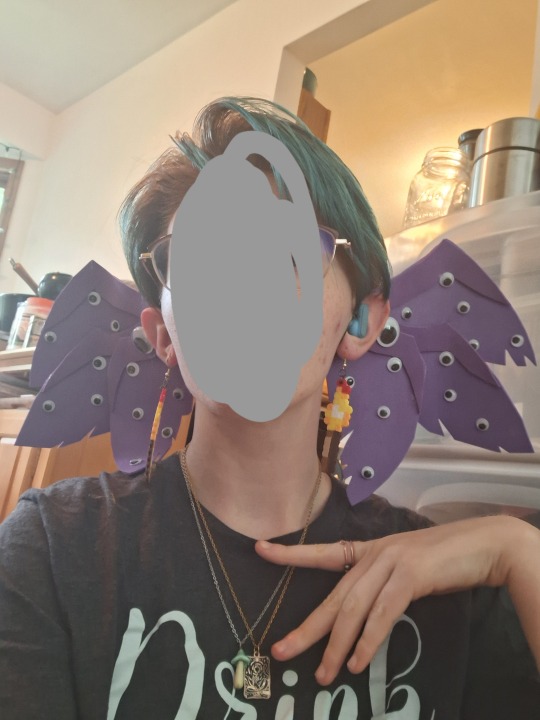
And yes those are Torchy earrings
WE'RE ALL DONE!!! Send me asks or reply to this if you have any questions and I can also send more pictures if needed. I hope this gets spread around a bit since this is exactly the sort of tutorial I looked for when trying to make these and I think others will find this useful. This can be used for any fandom, cosplay or costume. You don't need to credit me but feel free to share that I was the inspiration
Ty for following along! <3
#Wings#Cosplay#Head wings#Avian#Grian#jimmy solidarity#watcher grian#Crafts#Craft#My post#Tutorial#ommetaphobia#cw ommetaphobia#cw trypophobia#<got asked to put that on
59 notes
·
View notes
Text
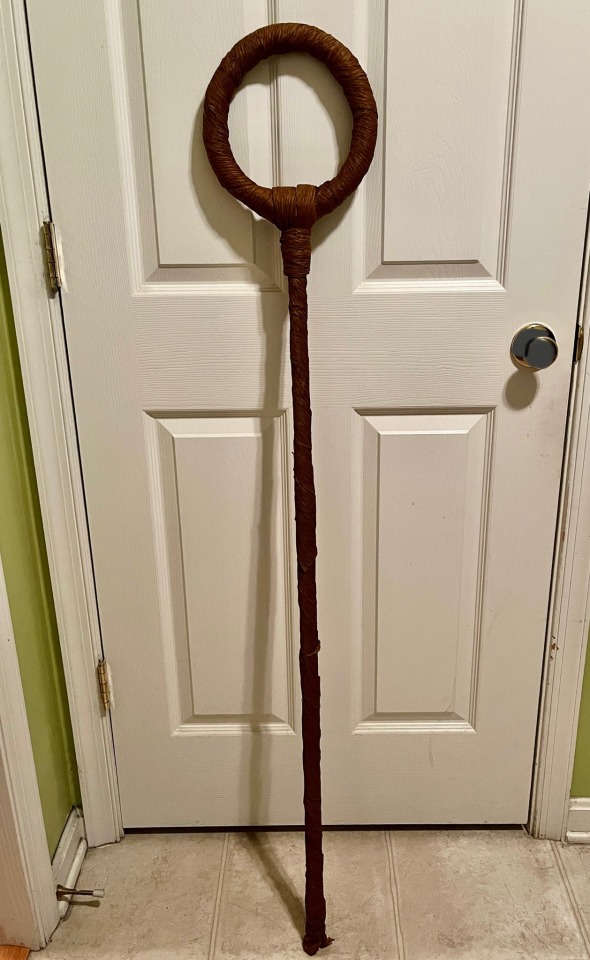
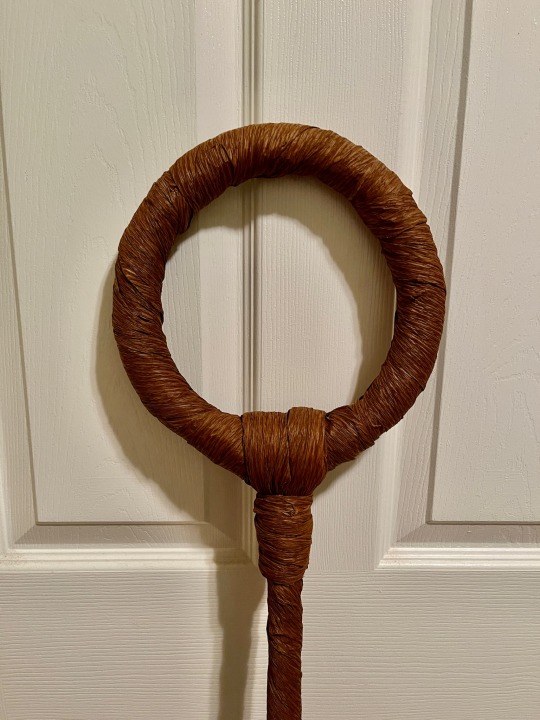
Made marcille’s staff for cosplay, still need to add the planty guy on top
Progress of how it’s made below the cut, part 1
Overall took me i think 5 hours more or less.
Materials:
30mm eva foam dowel rod (1 and a scrap bit)
Pipe cleaners
Thin wire and wire cutters
Hot glue and glue gun
Brown crepe paper (roll not ribbon)
Card stock (i cut up some junk mail)
Construction paper
Craft foam
Duct tape
Mop/broom handle
Scissors
Regular glue
Tiny bit of electrical tape
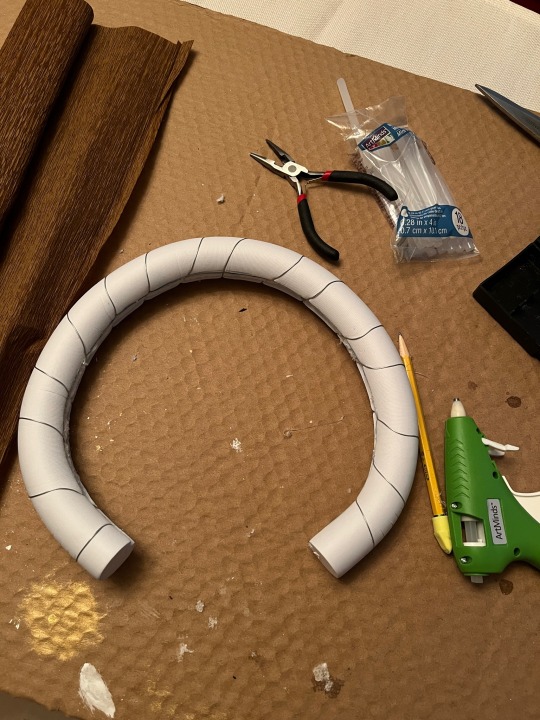
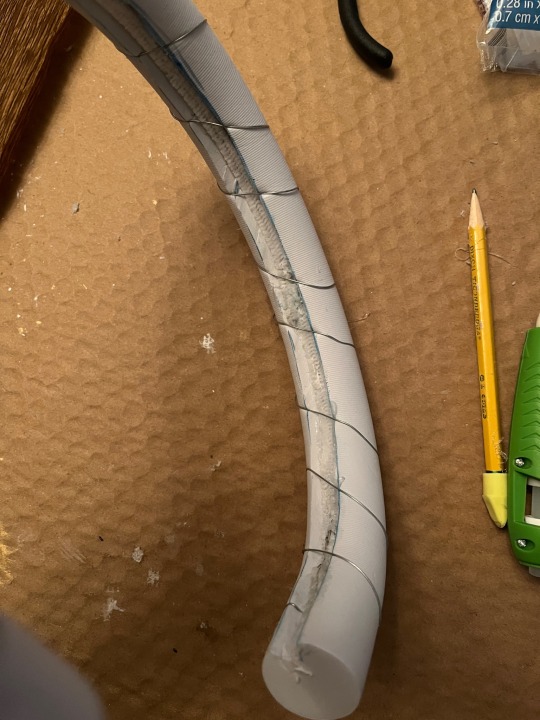
Had a 30mm eva dowel rod with a channel cut down the length from when i tried to use it for frieren’s staff. Hot glued some pipe cleaners inside the channel to get it to hold a curve, and then wrapped it in some floral wire also for holding the curve (tho idk if it does much)
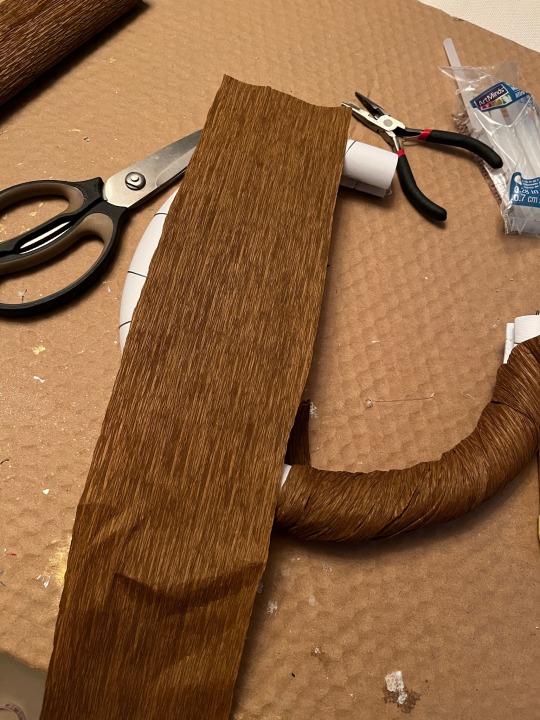
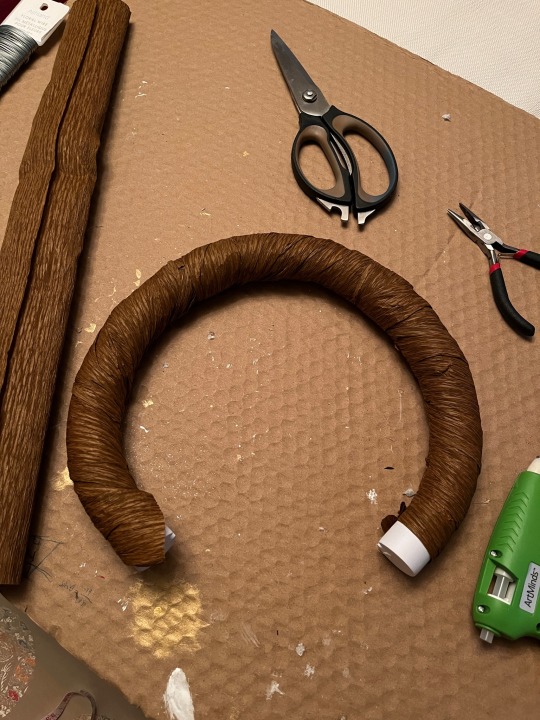
Got some brown crepe paper and cut strips about idk 4-5 inch wide to wrap around the foam thing, leaving a bit off at the ends
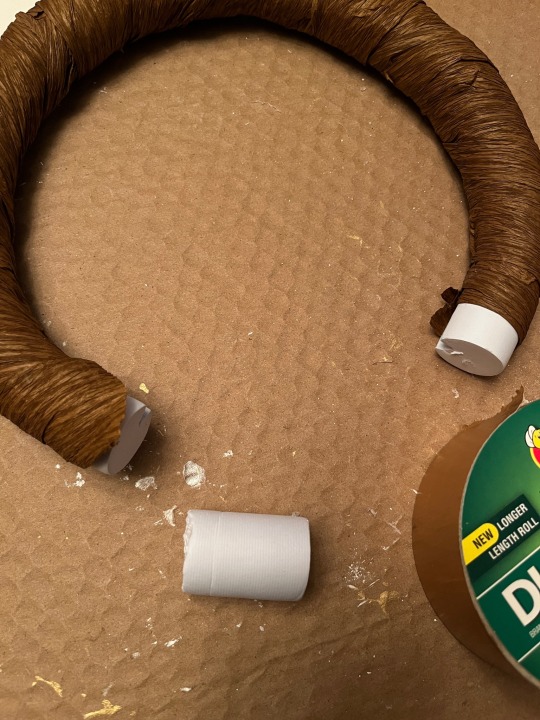
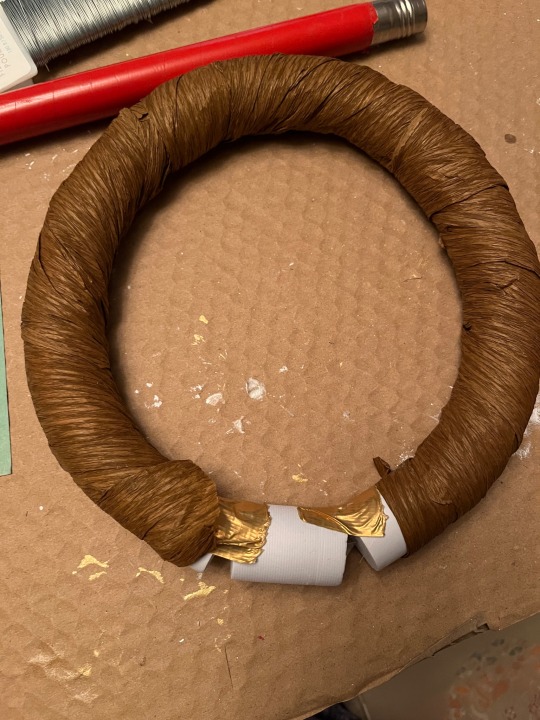
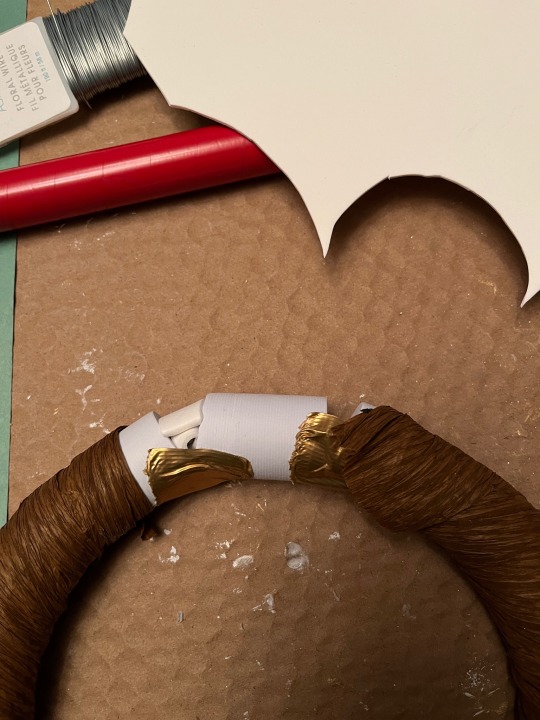
Got a scrap bit of foam dowel, like 1.5-2inch, and used it to connect the ends of the loop together (stuck a wire through it to kinda sorta hold it there, but didnt work well so used duct take instead. Filled in the space with scrap craft foam)
15 notes
·
View notes
Text
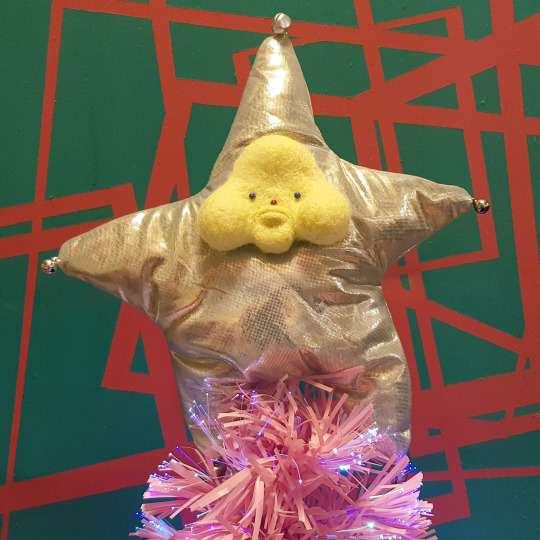
Albert the Christmas Star
HAPPY HOLIDAYS EVERYONE! This is Albert.
You can see how he was made here!
Materials we used:
Upcycled shiny fabric that was a gift bag from some random purchase as top fabric (strange but often where I get novelty fabric scraps)
Used shirt with holes on it as lining fabric
Random non-stretch fabric as Albert's guts
Poly fill (best to use the silky smooth kind)
Recycled poly batting from grocery delivery padding material as core wool (or other coarse poly fill would also work)
Carded acrylic yarn in yellow as top wool (hand-carded with a cat hair remover thingy)
Glass sewing pins
Polyester sewing threads
Some paper and pencil for mock-up
Optional: jingle bells from abandoned cat toys
Tools we used:
Sewing needles
Felting needles
Seam ripper
Scissors
Wire cutter
Felting foam platform (recycled packaging materials)
To make Albert:
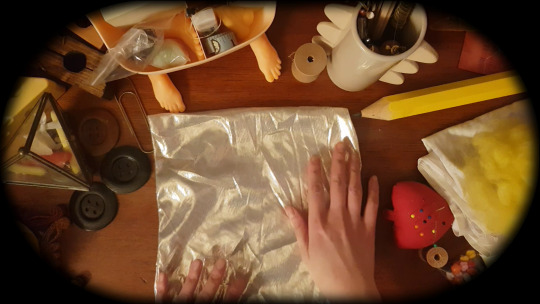
Use shiny fabric.
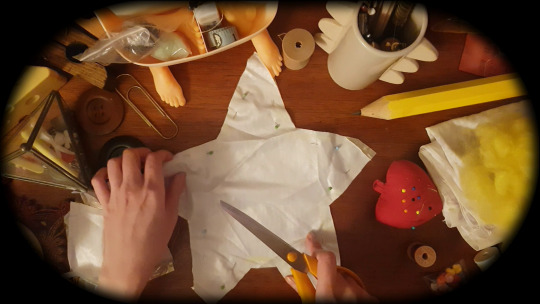
Cut fabric into a star shape with a flat bottom (for his bum).
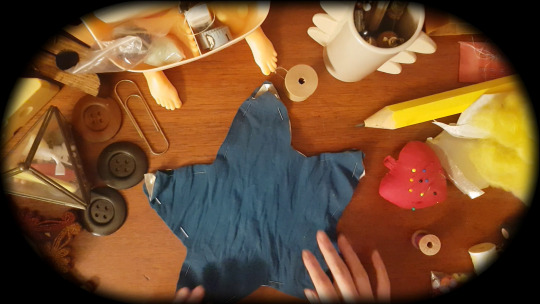
Line your star cut-out with your liner fabric (you may skip this part if you feel like your shiny fabric is strong / thick enough).
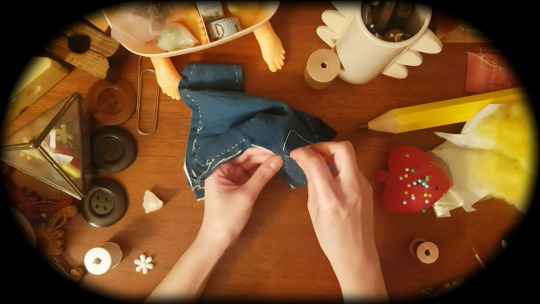
Sew the star with back-stitch. Leave the bottom hole open.
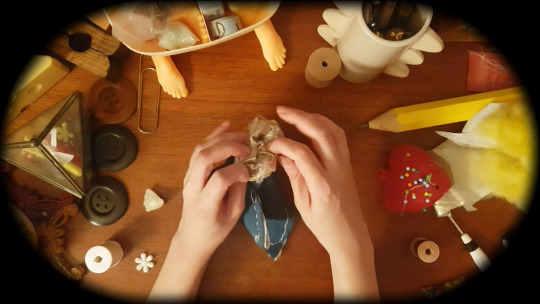
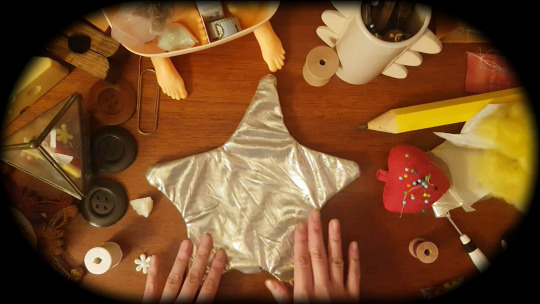
Flip that star through the bottom hole and set it aside.
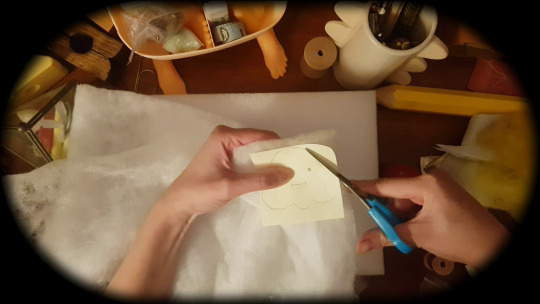
Draw a mock-up of Albert's face and cut a few layers of poly batting in approximately his shape. If you are using poly fill instead, you can skip this part and start needle felting a rough base shape shown in next step.
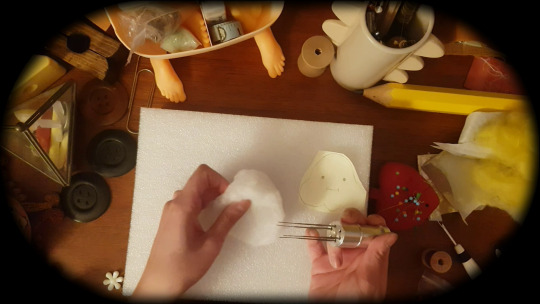
Stab it some.
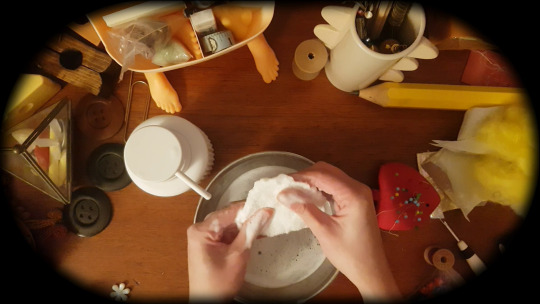
To speed up the felting of the base, use soap and hot water to gently massage it until it starts feeling noticeably more felted. You may skip this step if you have more patience than me at stabbing.
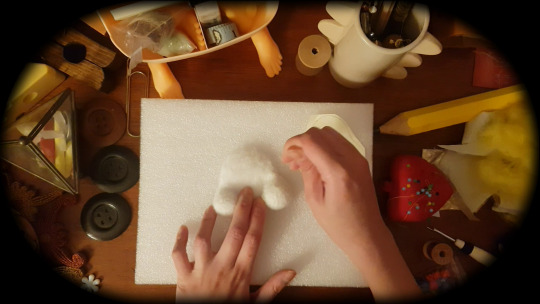
Add facial features with core wool such as cheeks, chin, and forehead.
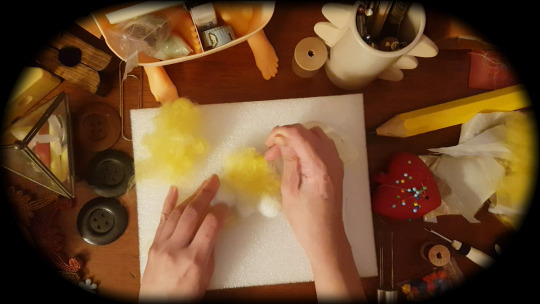
Add top wool.
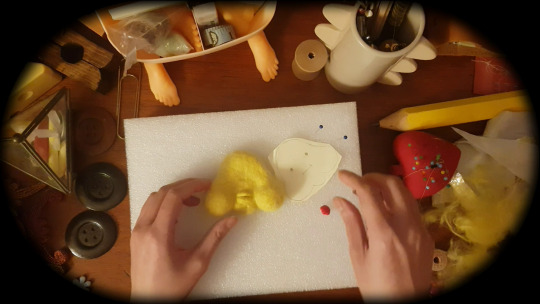
As well as smaller facial features like lips.
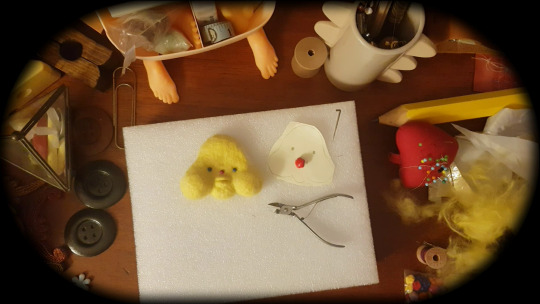
Cut glass pins to length so they don't poke through the face. Bend them downward a little and pin at a slight angle downward so they more secure (than poking them straight towards the back).
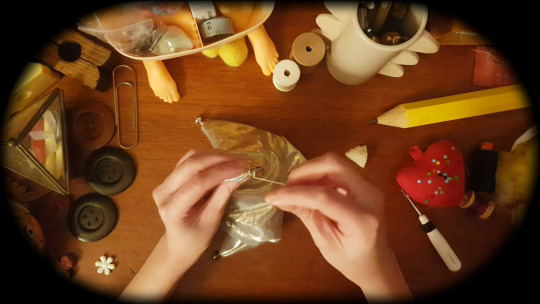
Sew your optional bells at the five tips of Albert’s body.
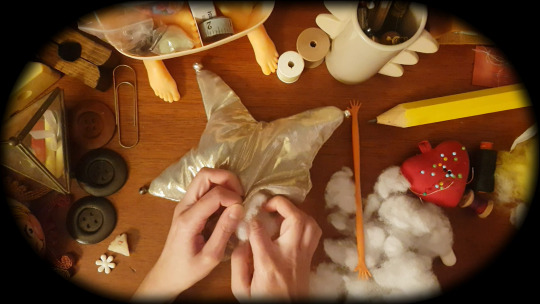
Stuff Albert with poly fill.
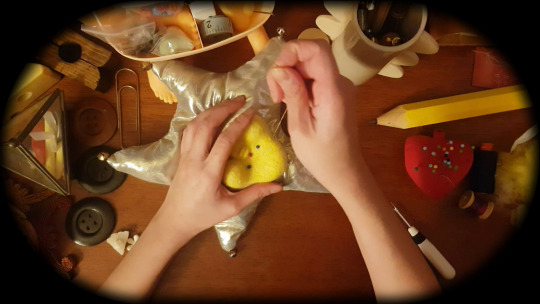
Sew Albert's face on his body. Put him aside.
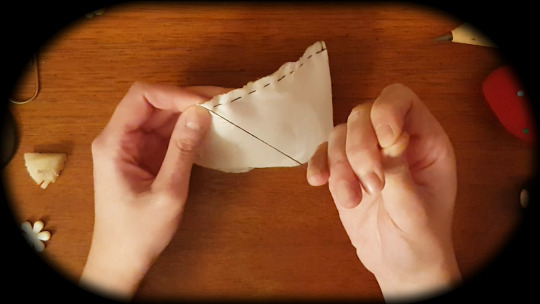
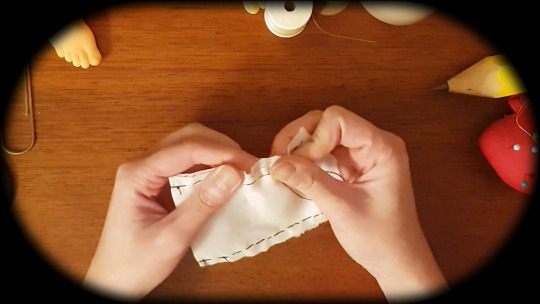
For Albert's guts, it's just a small pocket. Cut out a piece of rectangle that is roughly the width of his bottom hole and cut the length at double however long your christmas tree tip is. Mine was around 6ish" long that folded into a 3" deep pocket. Sewn with running stitch back and forth.
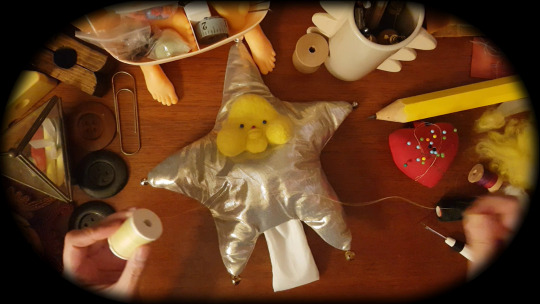
Flip his gut pocket inside out. Shove it at his bottom. Sew it onto its body (make sure to sew it to the top and lining fabric together for strength cause that part will need it).
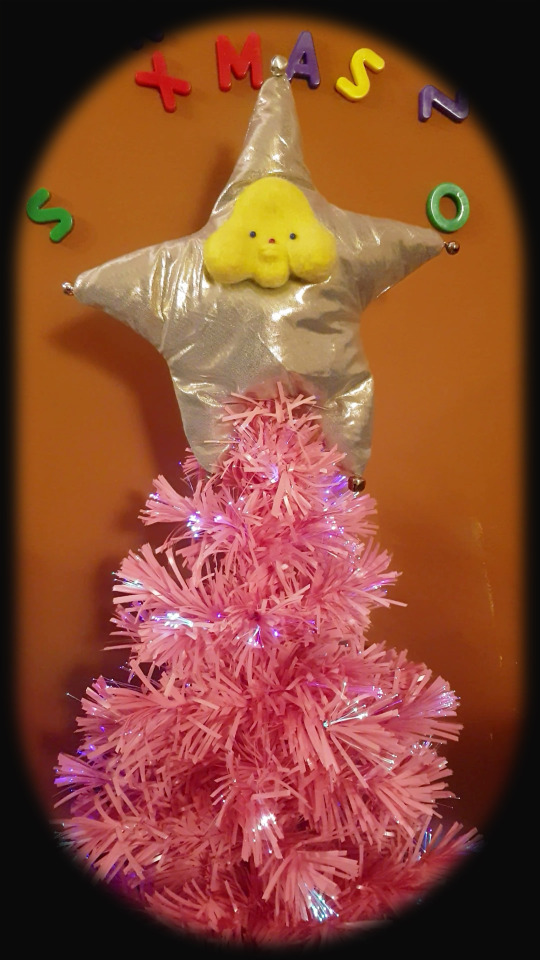
And you have yourself an Albert*.
*Albert means noble and bright!
#crafting#crafts#cute art#upcycle#arts and crafts#art#fiber art#handsewn#upcycling#hand sewing#christmas crafts#craftblr#textile crafts#hand crafted#diy#handmade#ideas#christmas#chrustmas tree topper#xmas crafts#xmas#sewblr#plushie#plushies#plushcore#plush toy#plushblr#clowncore#clown art#kidcore
23 notes
·
View notes
Text
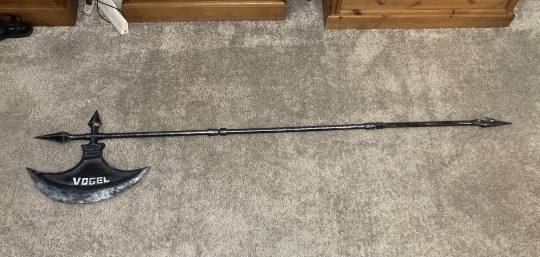
AAAAAAAAA ITS DONEEE
I measured it and this thing is fucking 6’6-
(materials and process underneath vv)
Materials used:
-3 pvc pipe segments with the screw adapters
-Eva foam : 2mm, 5mm, 10mm
-Foam clay
-Thermoplastic beads
-Metal wire
-Various superglues
-Spray paint
-Acrylic paint
~~ The Pvc Segments:
I started off with three 2ft pvc segments and glued the cross adaptor on the top, then proceeded to hack off and move around pieces as I saw fit. For the top segment I believe I cut off 5in, then glued 3 to the top of the cross pipe and tossed the remaining 2in. I also cut off 8in on the bottom to make way for the spike which is around 5.5in.
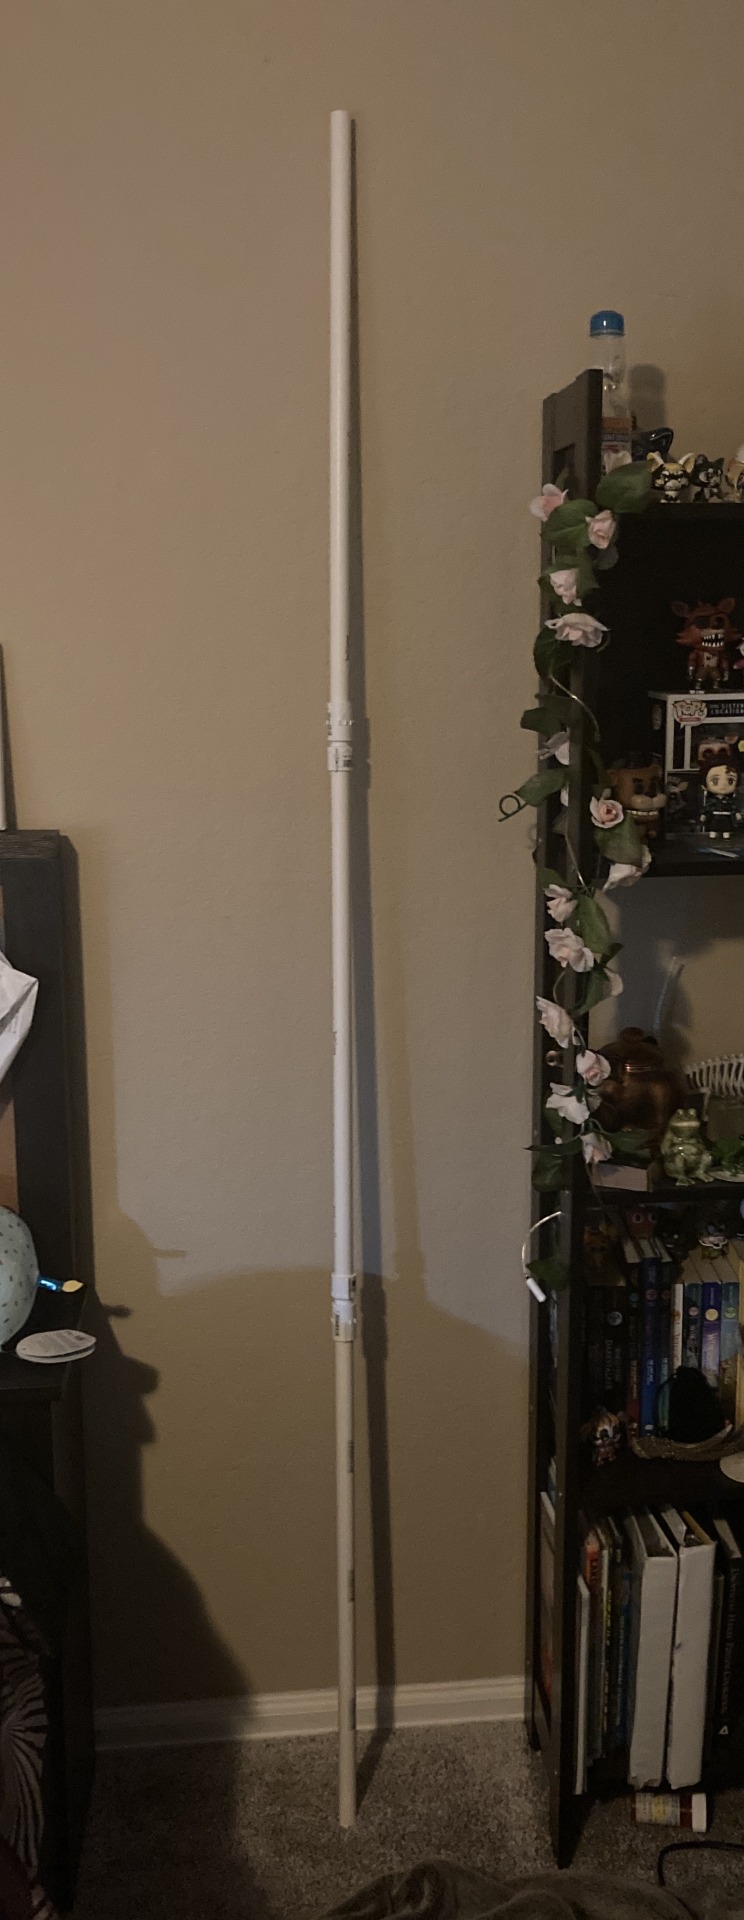
(The original pipes, I didn’t really have any other progress pics of this part)
~~ The Main Blade:
I started by going into FireAlpaca and separating the halberd from Sinclair’s sprite, then broke it up into various pieces and used Rasterbator to size up the blade. After that I printed it out, assembled it, and transferred it to freezer paper to adjust it as I saw fit.
After that I cut out two pieces of 10mm foam and glued them together as the main blade, then added the details with some 2mm foam I got from Walmart I think? I proceeded to hack away chunks of foam with Eva foam with a box cutter (and almost sliced my hand open in the process) before sanding the absolute crap out of it)
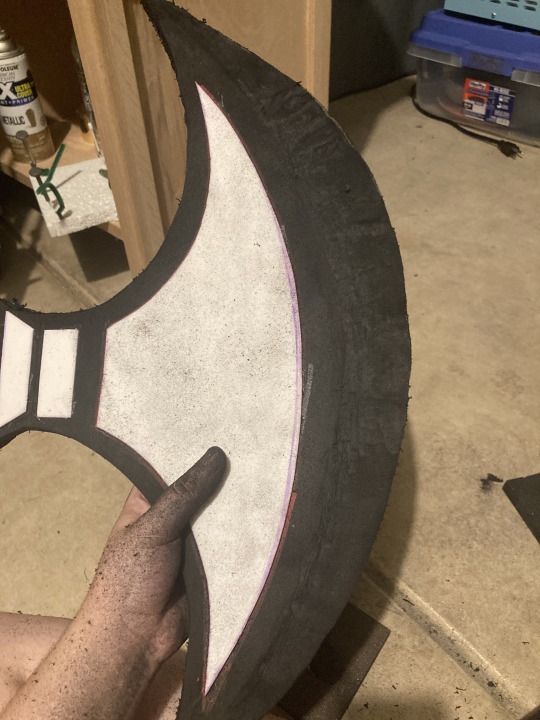
Once it was all sanded and I was content with it I took my heat gun and sealed all the foam and got rid of the fluffy texture created by the sanding and filled some of the gaps with foam clay.
After the blade I was done I stuck some wire into it, then shoved that wire through some thermoplastic beads I had melted and put in the pipe, and superglued it. It really wasn’t wanting to stay so I added more thermoplastic around the outside and proceeded to add more superglue (Gorilla and Flex Seal glue if I recall correctly) which has seemed to help it stay on. It’s not 100% stable but as long as I’m careful with it I’m ok.
~~
The Spikes:
Just like the blade, I made the pattern based the sprite itself. Using the line tool in FireAlpaca I traced over the top spike and the side spike and got the pattern from that. I resized and reshaped them in a Google doc before printing them out. After that I traced two of the spike pieces, cut one in half vertically and glued them together. After that I used small triangular pieces of foam to connect the corners and with that the skeleton was done (I added wire into the bottom spike for support as it is going to be bashing the floor a lot). i then filled the skeletons with foam clay, making sure to get all the sides even and filled completely.
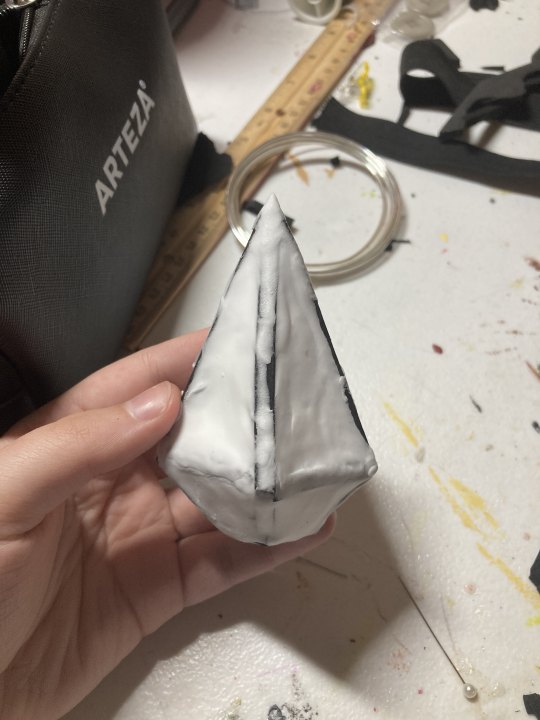
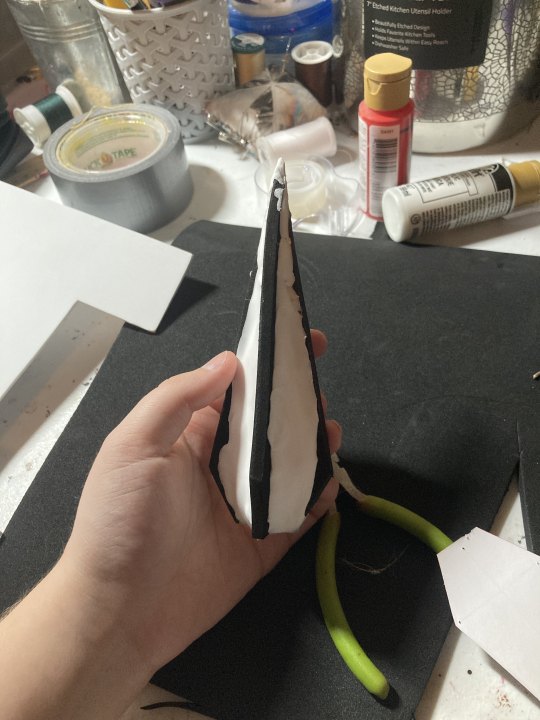
(I forgot to add the triangle pieces in the bottom spike until later)
Once I sanded them and attacked them with the same method as the blade the base was done!
~~ Painting:
In order to create a stable base to paint on I shoved three wooden dowels into a fertilizer box and hot glued them down. I then broke the halberd down and put each piece on the spike before spraying it with multiple coats of plastidip.
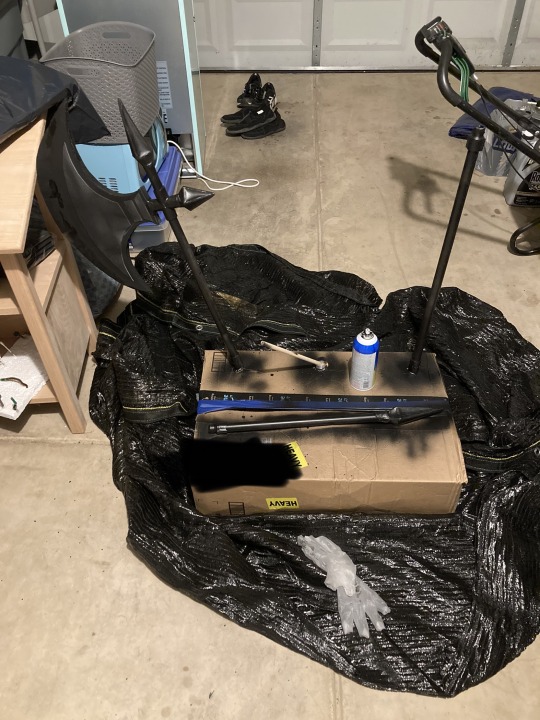
(Note- I taped off the parts that would be screwed down as I was afraid that the paint would interfere with the threading. I don’t know if it would actually cause any problems but I didn’t feel like risking it)
Once that was completely dry I sprayed it with three coats of Rustolem Black High Gloss paint.
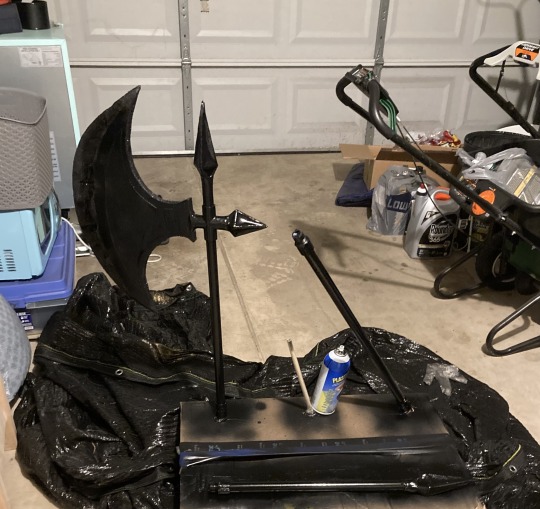
Finally, I dry brushed everything with silver paint and added the lettering, using some black paint to mimic the paint chipping.
Once I added two coats of Rustolem clear sealant it was done!! The overall process took about two weeks and I’m quite happy with how it turned out! I may or may not have injured myself a lot during the process because I’m stupid but it was quite a fun project, and I do have more Project Moon props planned for the future such as Don’s lance and Argalia’s scythe. Once I finish my full cosplay I’ll make a post similar to this one :)
40 notes
·
View notes
Text
Did a little more work on the terrain tiles, but they came out a touch janky due to struggles with carving the foam with a bread knife.
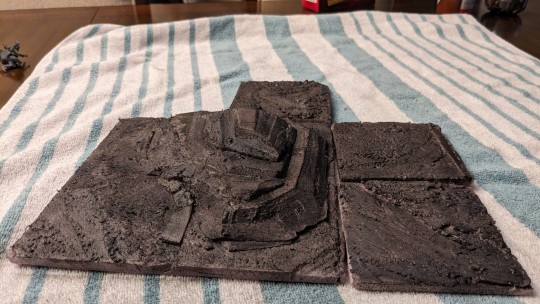
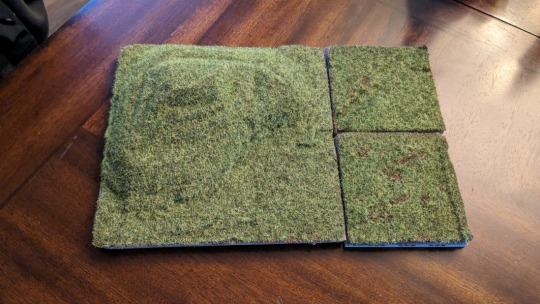
Not bad, but a little harsh lines and some odd looking bits where the foam isn't smooth, so I finally decided to cough up the cash for a decent hot wire foam cutter.
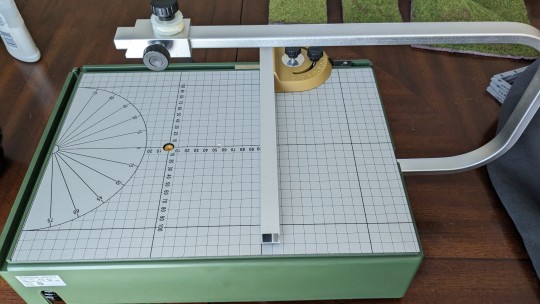
With a little luck, I should be able to start creating some more consistent shapes and smoother slopes. I've also been watching videos on other implementations of this, and I'm going to try some new tricks for the dirt on the next one. Wish me luck!
4 notes
·
View notes
Text
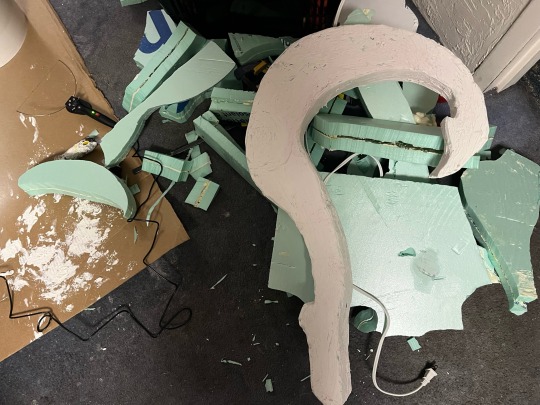
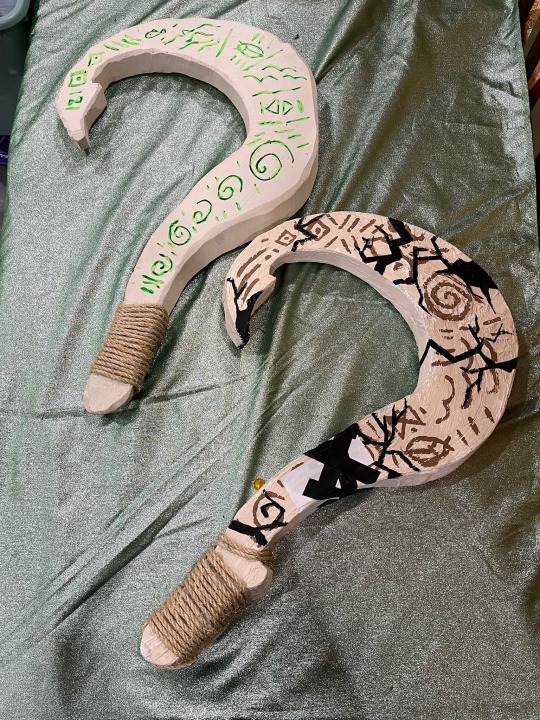
Bought my first hot wire cutter to carve Maui’s hook for Moana Jr and I am in love! It is so slick seeing it just slice through 2 inches of EPS foam like butter.
I had used an electric carving knife on soft foam when making puppets last year but that couldn’t handle the hard stuff.
4 notes
·
View notes
Video
youtube
hot wire cnc, styrofoam cnc cutter, foam cutter cnc, foam cutter hot wir...
0 notes
Text
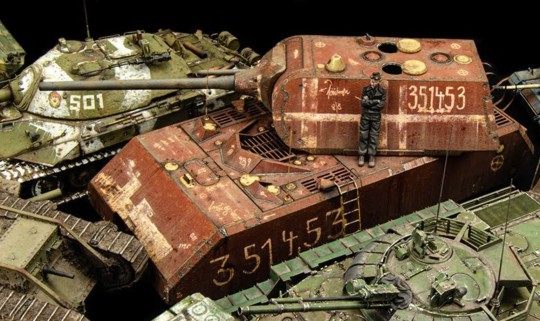
Creating Realistic Battle Dioramas with Model Tanks: A Complete Guide
Introduction
Creating a realistic battle diorama with model tanks is an art form that allows hobbyists to bring history to life. It's about more than just assembling a model tank—it's about creating a dynamic scene that tells a story. Whether you're capturing a pivotal moment from World War II or a modern battlefield, a well-executed diorama can transport viewers into the heart of the action. This guide will take you through every step, from planning your scene to crafting terrain and setting up your model tanks for maximum realism.
1. Planning Your Battle Scene
Before you even touch your model tanks, it's essential to plan out your diorama's story and layout.
Choose a historical moment: Start by selecting a specific battle or event you want to depict. Whether it’s the Battle of the Bulge or a desert conflict involving modern armor, having a historical context will guide your scene.
Select a focal point: What is the main action in your diorama? It could be a tank advancing, a firefight, or soldiers preparing for an ambush. Choose one focal point and build the scene around it.
Sketch the layout: Draw a rough sketch of your scene. This will help you plan where to place your model tanks, figures, and terrain features like hills, rivers, or buildings.
2. Gathering Supplies and Materials
Creating a realistic diorama requires a variety of materials beyond just your model tanks.
Base materials: Use a wooden or foam base for your diorama. Foam is easy to carve into terrain, while wood offers stability.
Terrain supplies: You’ll need plaster, static grass, dirt, and sand to create realistic ground textures. You can also use modeling clay for more intricate features like hills or craters.
Paints: Acrylic or enamel paints in earthy tones (browns, greens, grays) will help you create realistic terrain. You’ll also need weathering powders for dust, dirt, and mud effects.
Accessories: Model figures, vehicles, and buildings will help bring your diorama to life. Choose pieces that fit your chosen time period and conflict.
3. Building the Base of Your Diorama
The base of your diorama sets the scene for the entire model, so it’s essential to get the foundation right.
3.1 Carving the Terrain
If your scene involves uneven terrain, like hills or trenches, you'll need to carve and shape the ground.
Use foam or clay: Foam is lightweight and easy to carve with a hot wire cutter or knife. Sculpt the terrain to fit your scene, adding trenches, ridges, or craters where needed. Clay can also be used to build up specific areas for a more detailed landscape.
Apply plaster: For added texture, apply a thin layer of plaster over the foam. This will create a rough, natural-looking surface.
3.2 Adding Ground Texture
Once the terrain is shaped, it’s time to add ground texture to make it look more realistic.
Use sand and gravel: Sprinkle fine sand or gravel over your base, securing it with diluted white glue. This mimics dirt and rocks on the battlefield.
Static grass: For grassy areas, use static grass applied with glue. You can find static grass in different lengths and colors, depending on the terrain you're modeling (e.g., lush grass for Europe or dry brush for desert scenes).
4. Painting the Terrain
Painting the terrain is crucial to making your diorama look lifelike.
Basecoat: Start with a basecoat in earth tones—browns for soil, greens for grass, and grays for rocky areas.
Dry brushing: Use dry brushing to highlight raised surfaces. This technique involves dipping your brush in paint, wiping off most of it, and lightly brushing over the terrain to highlight textures.
Shading: Add depth by shading the recesses and low points of the terrain with darker tones. This creates the illusion of shadows and adds realism to the scene.
5. Assembling and Positioning the Model Tanks
Now that your base is ready, it’s time to bring in the main stars of your diorama—the tanks.
5.1 Building the Model Tanks
If you haven’t already, build and paint your model tanks following the steps outlined in a previous guide. Pay attention to details like battle damage, weathering, and camouflage to make them look battle-worn.
Weathering for realism: Apply techniques like washes, dry brushing, and chipping to make the tanks look used. Don’t forget to add mud or dust to the tracks to blend them into the scene.
5.2 Positioning the Tanks
Where you place the tanks in your diorama can make or break the realism and drama of the scene.
Dynamic placement: Avoid placing the tanks in a straight line or static positions. Angle them as if they’re advancing, turning, or navigating difficult terrain. This adds movement and action to your diorama.
Interaction with the terrain: Make sure the tanks look like they’re part of the scene, not just sitting on top of it. Sink the tracks slightly into the ground to show weight and add mud or dust to blend them into the terrain.
6. Adding Figures and Vehicles
To truly bring your battle scene to life, you’ll want to add figures and other vehicles.
Model soldiers: Position soldiers around the tanks in natural poses. Some may be loading ammunition, while others take cover or advance with the tanks. Ensure their uniforms and weapons are historically accurate for the time period.
Other vehicles: Consider adding jeeps, half-tracks, or other military vehicles to create a more complete battlefield scene.
7. Creating Realistic Battle Damage
If you’re depicting a battle scene, battle damage is a must.
7.1 Tank Damage
Adding visible damage to your model tanks can make them look like they’ve been through the heat of battle.
Bullet holes: Use a small drill bit to create bullet holes in the tank’s armor. Add a bit of black paint around the holes to simulate scorching.
Burn marks: Apply black and gray weathering powders around engine areas or hatches to show where explosions or fires occurred.
Dents and scratches: Lightly scratch the surface with a knife or sandpaper to simulate wear and tear on the tank.
7.2 Battle Damage on Terrain
Don’t forget to add signs of battle to the terrain as well.
Crater effects: If your scene involves artillery or airstrikes, add craters to the terrain. Shape them out of foam or plaster, and paint them in dark earth tones.
Debris: Scatter broken pieces of wood, metal, and other debris around the battlefield to show the aftermath of combat.
8. Adding Smoke and Explosion Effects
To add drama and action to your diorama, consider incorporating smoke and explosion effects.
Cotton for smoke: Use cotton balls or pillow stuffing to create smoke effects. Paint them with black or gray spray paint, then glue them around damaged areas of the tanks or terrain.
Explosion effects: For an exploding tank or artillery strike, you can create a "frozen moment" by combining cotton with small LED lights. The cotton can simulate smoke or flames, while the LED lights add a glowing effect.
9. Final Touches
Before you call your diorama complete, spend time adding the small details that will make it stand out.
Weathering the entire scene: Apply weathering powders across the scene to create a unified look. Add dust to the tanks, dirt to the soldiers, and mud to the vehicles.
Details matter: Add tiny details like footprints in the mud, discarded equipment, or bullet shells scattered on the ground.
10. Displaying Your Diorama
After all your hard work, it’s time to display your creation. Choose a display case or base that complements the diorama without distracting from it. Position lighting to highlight key features, like your tanks or figures in action, and consider using a glass case to protect your work from dust and damage.
Conclusion
Creating a realistic battle diorama with model tanks is both challenging and rewarding. By carefully planning your scene, using proper techniques to build the terrain, and positioning your tanks and figures with purpose, you can create a vivid, dynamic display that tells a compelling story. With patience and attention to detail, your diorama will capture the intensity and drama of historical conflicts, providing a snapshot of history in miniature form.
FAQs
What scale is best for a tank diorama?
Most hobbyists prefer 1/35 scale for tank dioramas because it strikes a good balance between detail and size.
Do I need special tools to create terrain for my diorama?
Basic tools like a hot wire cutter, hobby knife, and brushes will suffice for most terrain-building tasks. You can also use specialized terrain modeling tools if needed.
How do I make the tanks look like they’re part of the scene?
Sink the tank tracks slightly into the ground and add weathering effects like mud or dust to blend the model with the terrain.
Can I add moving parts or electronics to my diorama?
Yes! Some modelers incorporate small motors for rotating tank turrets or LEDs for lights and explosions to add dynamic elements to the scene.
How long does it take to complete a battle diorama?
It depends on the complexity of the scene and the level of detail, but on average, a diorama can take anywhere from a few weeks to several months to complete.
Our Social Pages:
https://www.instagram.com/plastic_models_store/
#Diorama kit#1/72 figures#model airplane kits#ww2 model planes#planes model kits#military model kits#model tanks#plastic model paint kits#best paint for plastic models
0 notes
Text
Nichrome Wire: Properties, Applications, and Benefits
What is Nichrome Wire?
Nichrome wire, an alloy composed primarily of nickel and chromium, is known for its high electrical resistance and excellent heat resistance. Typically, the composition ranges from 60-80% nickel and 20-40% chromium, making it highly durable and resistant to oxidation at high temperatures.
Properties of Nichrome Wire
1. High Melting Point: Nichrome wire can withstand temperatures up to 1200°C (2192°F), making it ideal for high-temperature applications.
2. Electrical Resistance: It offers a consistent resistance over a wide temperature range, making it reliable for various electrical applications.
3. Corrosion Resistance: The chromium content provides excellent resistance to oxidation and corrosion, even at elevated temperatures.
4. Ductility: Nichrome wire is highly ductile, allowing it to be drawn into thin wires and formed into various shapes without breaking.
5. Stability: It maintains its integrity and performance under extreme thermal cycling conditions, making it a preferred material in many industrial processes.
Applications of Nichrome Wire
1. Heating Elements:
- Industrial Furnaces: Used in heating elements for furnaces due to its high melting point and stability.
- Household Appliances: Commonly found in toasters, hairdryers, and electric ovens.
- Laboratory Equipment: Used in heating coils and other devices requiring precise temperature control.
2. Resistors:
- Precision Resistors: Used in precision resistor manufacturing due to its consistent resistance properties.
- Variable Resistors: Employed in rheostats and potentiometers for variable resistance applications.
3. Thermocouples:
- Temperature Measurement: Paired with other metals to form thermocouples for accurate temperature measurement in various industrial processes.
4. Cutting Tools:
- Foam and Plastic Cutting: Used in hot wire foam cutters and plastic cutting tools due to its ability to maintain a constant temperature. Although initially more expensive than some other materials, its longevity and performance make it a cost-effective choice in the long run.
Conclusion
Nichrome wire, with its unique properties and wide range of applications, is an essential material in various industries. Whether for industrial heating elements, precision resistors, or creative projects, nichrome wire offers reliability, durability, and versatility, making it a valuable component in modern technology and manufacturing processes.
#cable manufacturers in florida#wire manufacturers in florida#industrial wire#wires#cables#wire manufacturers#cable manufacturers
0 notes
Text
Exploring Stone, Wood, Plasma, and Foam Cutting Technologies
In the realm of modern manufacturing, Computer Numerical Control (CNC) machines have revolutionized the way we shape and manipulate materials. These automated marvels bring precision, efficiency, and versatility to a variety of industries. Whether you're working with stone, wood, metal, or foam, there's a CNC machine designed to meet your needs. In this article, we'll delve into the world of CNC machines, focusing on stone CNC machines, CNC wood router machines, CNC plasma cutters, and CNC foam cutters.
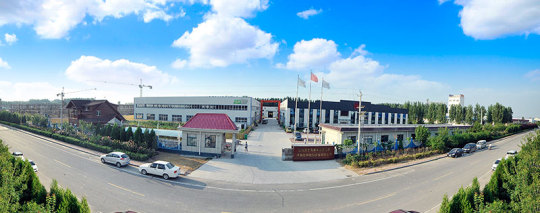
Stone CNC Machines: Sculpting with Precision Stone CNC machines are engineered to cut, carve, and engrave hard materials like granite, marble, and limestone. These machines are widely used in the construction, memorial, and artistic industries. Stone CNC machines utilize diamond-tipped tools to achieve intricate designs and smooth finishes. The precision of these machines allows for the creation of detailed sculptures, custom countertops, and engraved memorial stones with ease.
One of the significant advantages of stone CNC machines is their ability to replicate designs accurately. This capability ensures consistency in production, which is crucial for large-scale projects. Additionally, the automation provided by CNC technology reduces the need for manual labor, increasing efficiency and reducing production costs.
CNC Wood Router Machines: Craftsmanship Meets Technology CNC wood router machines are a game-changer for woodworking professionals and hobbyists alike. These machines can cut, carve, and shape wood with incredible accuracy, making them ideal for furniture making, cabinetry, and decorative woodwork. CNC wood routers use various cutting tools to create intricate patterns, 3D designs, and even joinery.
The versatility of CNC wood router machines is unparalleled. They can handle a wide range of wood types, from softwoods like pine to hardwoods like oak. This adaptability makes them a valuable asset in both small workshops and large manufacturing plants. Moreover, the precision of CNC wood routers ensures that every cut is perfect, minimizing material waste and enhancing the quality of the finished product.
CNC Plasma Cutters: Precision in Metal Cutting CNC plasma cutters are designed for cutting through metal with high precision. These machines use a high-velocity jet of ionized gas (plasma) to cut through conductive materials like steel, aluminum, and brass. CNC plasma cutters are widely used in metal fabrication, automotive repair, and industrial manufacturing.
One of the key benefits of CNC plasma cutters is their ability to make clean, precise cuts quickly. This speed and accuracy make them ideal for producing complex metal parts and components. Additionally, CNC plasma cutters can handle thick materials, making them versatile for various applications. The automation provided by CNC technology also reduces the risk of human error, ensuring consistent quality in every cut.
CNC Foam Cutters: Shaping the Future CNC foam cutters are specialized machines designed to cut and shape foam materials. These machines are commonly used in the packaging, automotive, and aerospace industries. CNC foam cutters use hot wire, laser, or blade cutting techniques to create precise shapes and contours.
The ability to produce complex foam parts with high accuracy makes CNC foam cutters invaluable in industries where lightweight and custom-shaped components are essential. For example, in the aerospace industry, CNC foam cutters are used to create custom foam inserts for packaging delicate instruments. In the automotive industry, they are used to produce foam components for seating and insulation.
Conclusion CNC machines have transformed the manufacturing landscape, offering unparalleled precision, efficiency, and versatility. Whether you're working with stone, wood, metal, or foam, there's a CNC machine tailored to your specific needs. Stone CNC machines bring artistry to masonry, CNC wood routers elevate woodworking, CNC plasma cutters revolutionize metal fabrication, and CNC foam cutters shape the future of lightweight components. Embracing CNC technology is not just a step forward; it's a leap into a world of limitless possibilities in manufacturing and design.
Contact Info: Shandong igolden cnc technology co. ,ltd. Address: Private Industrial Park, Yu Huang Miao Town, Shanghe, Ji’nan, Shandong Phone: 15688871861 Email: [email protected] Website: https://www.igolden-cnc.com/
1 note
·
View note
Text
How to Transform a Shipping Container into a Home Office in 2024
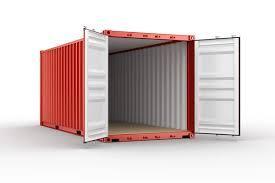
Transforming a Shipping Container into a Home Office in 2024
In the dynamic landscape of remote work and innovative architectural solutions, transforming shipping containers into functional spaces has become a popular trend. In 2024, creating a home office from a shipping container is not only an efficient and cost-effective solution but also an environmentally friendly choice. Here’s a comprehensive guide on how to turn a shipping container into a stylish and practical home office.
Step 1: Planning and Design
Assess Your Needs
Begin by evaluating your specific requirements. Consider the size of the container, which typically comes in 20-foot and 40-foot options. Determine the essential features for your office, such as workspace, storage, lighting, and climate control.
Design Layout
Sketch a layout that optimizes space. Consider incorporating multi-functional furniture to maximize utility. Use online design tools or consult with an architect to visualize the final look.
Step 2: Securing Permissions
Zoning and Building Codes
Check local zoning regulations and building codes to ensure compliance. You may need permits for structural modifications and utility connections. Consulting with local authorities can save time and prevent legal issues later.
Step 3: Preparing the Container
Insulation and Ventilation
Shipping containers are made of steel, which can be very hot in the summer and cold in the winter. Proper insulation is crucial. Use spray foam, rigid foam, or fiberglass insulation to maintain a comfortable temperature. Additionally, install vents or windows to ensure proper airflow.
Structural Modifications
Cut out spaces for doors and windows using a plasma cutter or a cutting torch. Reinforce these openings with steel frames to maintain structural integrity. Consider adding a secondary roof for better insulation and protection against weather elements.
Step 4: Interior Setup
Electrical and Plumbing
Hire professionals to install electrical wiring, outlets, and lighting. If you plan to add a bathroom or kitchenette, ensure proper plumbing and water connections. Solar panels can be a sustainable option for powering your office.
Walls and Flooring
Finish the interior walls with drywall, wood paneling, or metal sheets. For flooring, consider using hardwood, laminate, or industrial carpet for a polished look. Ensure that the materials you choose are durable and easy to maintain.
Step 5: Furnishing and Decorating
Ergonomic Furniture
Select ergonomic furniture to create a comfortable and productive workspace. Invest in a good-quality office chair, a sturdy desk, and adequate shelving or cabinets for storage.
Personal Touches
Add personal touches to make the space inviting. Decorate with plants, artwork, or photos. Use color schemes and lighting that promote concentration and reduce eye strain.
Step 6: Security and Connectivity
Security Measures
Install robust locks and security systems to protect your office. Consider additional security measures such as surveillance cameras and alarm systems if necessary.
Internet and Connectivity
Ensure a strong internet connection, either through a wired network or a reliable Wi-Fi system. This is essential for smooth communication and efficient work.
Step 7: Sustainable Practices
Eco-Friendly Materials
Whenever possible, use eco-friendly materials. Recycled or sustainable materials can reduce your environmental footprint.
Energy Efficiency
Incorporate energy-efficient appliances and lighting. Consider using LED lights and energy-efficient HVAC systems to reduce energy consumption.
Conclusion
Transforming a shipping container into a home office in 2024 is a practical and innovative solution for remote work. By carefully planning and following the steps outlined, you can create a functional, comfortable, and aesthetically pleasing workspace. This approach not only provides a unique office environment but also promotes sustainability and efficient use of resources. Whether you are a freelancer, a remote employee, or a small business owner, a shipping container office could be the perfect addition to your home.
1 note
·
View note
Text
Precise HW-02 Hot -Wire
The Precise HW-02 Hot Wire Foam Cutter is a tool commonly used for cutting and shaping various types of foam materials, including polystyrene and expanded polystyrene (EPS). Here are some features and specifications you might find with this product:
Visit our website [https://industrywaala.com/] Address [B — 80, B Block, Sector 5, Noida, Uttar Pradesh 201301] Phone Number [7377017377] .

0 notes