#growing tutorial
Explore tagged Tumblr posts
Text

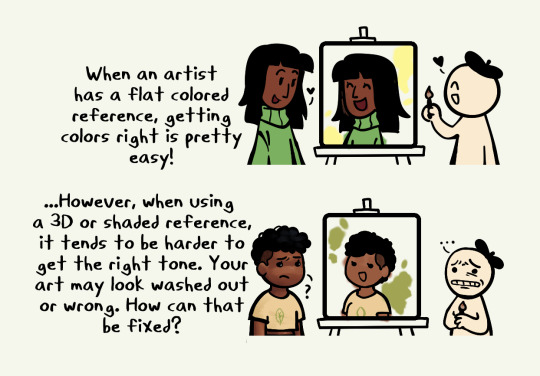

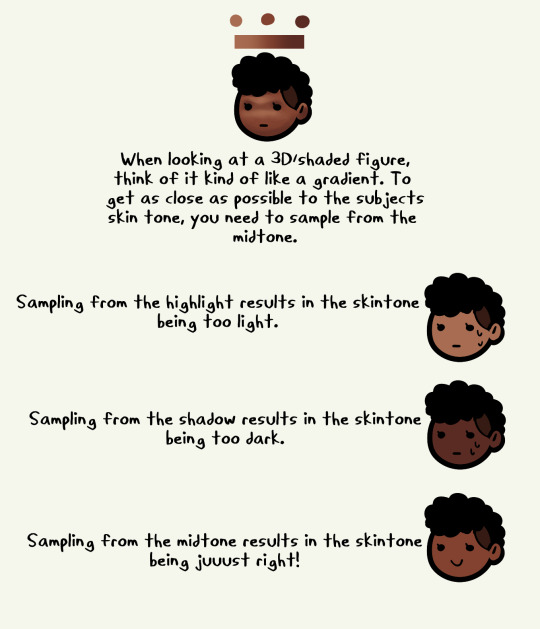
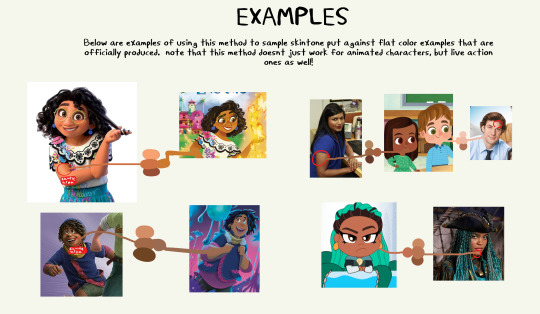

a little informational guide on trying to find skintones from 3d refs :)
i know that finding skintones from 3d characters is tricky and can result in accidental whitewashing and this isnt to make fun of those ppl! this is simply to inform and help other artists out :)
#fuck people who intentionally whitewash by sampling highlights tho hope you grow and change as a person#kupa draws#art#art help#art tips#skin tone#art tutorial
10K notes
·
View notes
Text


Chat which do we like more, with or without the extra little patches of colors (ignore that the bark edge on the top isn't finished- I'm gonna do it once I've figured put the rest of the bark)
#my art#my textures#<-uhhh new tag?? fun!#This is for a tree growing in the End and I'm calling it eucalyptus. this is because I watched a series YEARS ago with a blue + little-#-rainbow patches Eucalyptus tree in one of the mods (it was Stacyplays' Dogcraft)#and that has permanantly imprinted on my brain#also I needed a name for a powder-blue-y wood type lmao#I've got the plank texture too I made it first and i actually REALLY like it I'm excited#nowhere NEAR any kind of result for the project but I've got a lot of cool ideas and I'm suer hyped#Project Starsailor#<- thats its name (at least for now but I'm kinda attached)#also definitly not related. but does anybody know how to make a minecraft mod for fabric. namely adding new blocks to start with#or I guess does anyone have links to good tutorials for complete beginners#minecraft#mineblr#minecraft art#minecraft modding#minecraft textures#my wips
32 notes
·
View notes
Text
I desperately want to play stardew but transformers themed, and holocure but robot themed. alas, i would have to make them myself orz
#chibi actually talks#i just want them robots you know#let me grow crystals in a pocket of cybertron the war has passed by!!#let me play bullet heaven with robots from tf/iron leaguer/brave!!#*tiredly sighs and opens up pixel art tutorials in another tab*
17 notes
·
View notes
Note
Heya! As a baby artist I was just wondering how long it typically takes you to draw a character? And if you have any tips for getting the lines to look so clean :-) I love your art sm it always makes me smile
Hi! Ah, I'm so glad my art makes you smile! :')
I have...several possible answers for you, lol. First of all, the time it takes for me to draw a character varies. Something I’m working on to speed up my process is learning anatomy. Most of my time is spent trying to get the anatomy of a drawing down, and the more you know it, the quicker it can go.
But as for lineart, the number 1 way I've found for having clean lines is having a detailed sketch.


While the sketch was messy, around the face especially, all the lines were "in place." I wasn't having to resize things or change the shape. This makes lineart completely mindless for me, and that means I don't have to do as many corrections while drawing, keeping my lines clean.
However, when I first started out, it was hard to get here. If you're starting out, your art may look like this, with a bunch of short strokes:

There are two ways I've found to combat this (and it's honestly something I'm still working on...) Short strokes like this tend to happen when you're unsure of what you're drawing, which happens a lot when you're starting out. Planning out a drawing in your head and knowing where you're going to end each line when you start is helpful. (I.E. "I know the side of the face needs to go down enough to reach where a chin should be, so I'm going to try to do it in one stroke instead of seven). Proko has a good video about this here.
You can also practice drawing longer strokes just on their own. Lots of drawing books will tell you to start by practicing ellipses and lines from different directions to help you get used to longer motions. Becoming more confident in drawing full lines will help!
But, as you're learning, tools can help. I draw with a tapered pressure sensitive pen, which allows me to have some shorter strokes while hiding the results of it. (Although it's still good to practice avoiding this, because it'll help your drawing even with a brush that hides it a bit better.)

i hope this was helpful!
#asks#my tutorials#i still have a problem with this tbh which is why i love my brush but i'm trying to grow out of it lmao.#lineart#sometimes drawing a character takes fifteen minutes and bam it's done and sometimes i wrestle with a simple pose for days. it is how it is.#i think i have some better sketch to lineart examples. because sometimes my sketch is so detailed that it's sometimes a waste of time for m#to do lineart because it's almost redundant#by lineart's my favorite thing so i always do it anyway#except for the second turtle duck comic lol. some of those i didn't line and i just cleaned up the sketch so i probably should have used th#that as an example but i think this illustrates my point
73 notes
·
View notes
Text
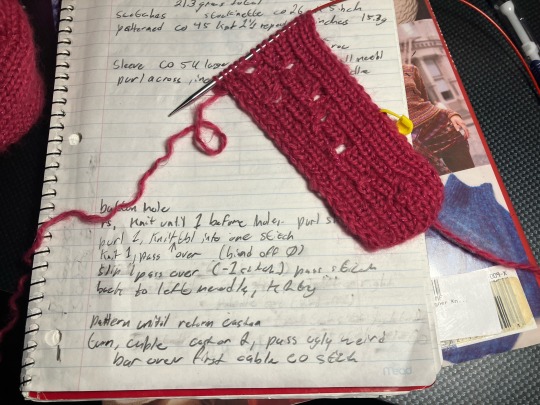
I realized I had forgotten to swatch for the button hole before starting the second sleeve. And an Hour later I have a swatch with 8 button holes before I got happy with how they look. The pattern basically says "make buttonhole" and I'm not experienced enough with garment knitting to go on just that.
I did manage to confirm that despite sizing up my yarn, I'm still going to need 1 inch/25mm buttons. I don't currently have 6 matching 25mm buttons that would look good with this yarn, so decisions have to be made. And unfortunately my brain has decided the best possible button would be a rose gold coloured shank back(?) button preferably that looks like an actual flower. Which, good luck to me for finding that relatively affordably.
I think I'm just going to knit the cardigan and decide once it's all sewn up. If it fits well and I think I'll wear it, I'll spend the money to get Nice buttons.
#swatching the button holes only took an hour of testing and writing and googling tutorials for things#but looking at buttons on ebay/etsy/random craft stores... that was three hours#i had fun tho tbh i love shopping :)#there IS novel reasons for the Ideal Buttons!!!#theres no actual description of buttons or anything. but still Novel Reasons#the Guy who Knit the Cardigan is representing by gold. like his hairs and eyes are described as golden regularly#i think its actually like a pale gold? but i think rose gold with the pinkish would look better with this pink#(i don't actually own anything rose gold i plan on taking a swatch with me to Somewhere with Rose gold to see them together)#also this is a designer pattern. the buttons deserve a bit of Class. i found some chanel buttons that would be great if i give up on flower#another thing about the Guy who Knits is that he like. CONSTANTLY is bringing the protag flowers. somehow not bl btw#off the top of my head i'm 100% sure he brings him carnations and i'm prettyyyyy sure roses?#sadly there's no canon colour on the carnations. the list of questions i have for the author grows every day#but the flower buttons Speak to me. maybe if i go for more simple buttons i can get a carnation applique or something#also i really really hope that i can read my own handwriting in the (v optimistic) two months it'll be before i knit the button bands
10 notes
·
View notes
Text
How to ecoprint a t-shirt!

Take the cloth you want to dye – natural fibers like cotton, linen, wool and silk work best, but also polyamide! It it's new, it's good to wash it first to get rid of any surface treatments on the cloth.
Then you'll need mordant for your fabric: alum and tannins for cellulose fibers, or just alum for protein fibers. Mordanting will help the print stick to the fabric and stay vibrant! To pre-mordant, simply dissolve the mordant into hot water and dip your cloth in it. To calculate how much mordant you need, simply weigh your dry cloth and divide by ten.
After mordanting, you can let your cloth dry or simply wring it and continue to the next step. Using wet cloth will result in a more watercolour-like print, as the dyes spread a bit. For crisper prints, it's better to use dry cloth.
Next you'll need plant stuff! Most green stuff will give yellowish hues, but there are some plants that are special dye plants. Do your research or experiment! (I used dyers chamomille, st. john's wort and some purpleish plants that I'm hoping will give red.) Some kitchen scraps like onion skins, and some mushrooms (eg. surprise webcap) are also commonly used! You can use fresh or dried plants. Arrange them on your cloth in whatever pattern you like! I'm folding my shirt in half to get a mirrored print, so I placed some flowers facing up and some facing down, but generally you'll want to place the flower face down and leaves face up!

Then it's time for wrapping up your cloth! You'll need another fabric or plastic to cover the cloth and something solid to wrap your fabric around, like a stick, some rulers or a piece of pipe. A rolling pin can be helpful in getting the plants flat against the fabric before wrapping. I used a big glass jar, like so!

Place the other fabric or plastic on top of your cloth and roll tightly! Tie the roll with some scrap yarn so it stays tight and finally wrap it in a towel. If you want a background colour, you can use a transfer cloth that's dipped in dye in place of the plastic or other fabric.


Next this roll will be steamed to get the colours from the plants into the cloth. A big kettle and small flower pot upside down work well, if you don't want to sacrifice a juicer. I used a bucket, a styrofoam box and an elecric kettle to save energy. Let it steam for 1,5 hours. If your cloth and plants were dried, it will take longer.

Once it's steamed, let it cool completely. Then it's time for the reveal! Dry and iron, wear and hand-wash.
I'll post the finished shirt once it's ready!
#i got inspired by spotting the plants on a weekend trip#i haven't found them growing near where i live but i took a long biking trip and admired them on the roadside#ugh my legs are tired from biking 180 km in two days and trying to keep up with my faster friend#but anyway i wanted to make a tutorial on this since it was#solarpunk aesthetic week#last week and I didn't have time then#fiber arts#craftsofsiri#solarpunk#solarpunk crafts#dyeing#natural dyeing#contact printing#ecoprinting
25 notes
·
View notes
Text
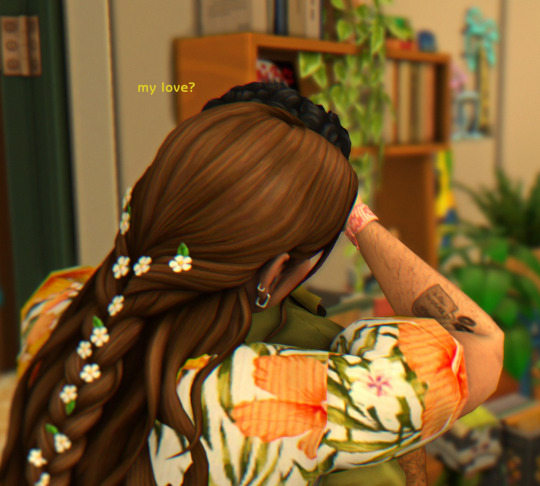
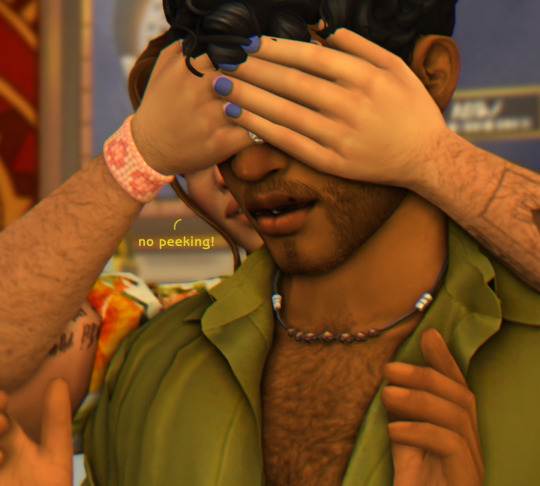


"do you like it?" "darling, i love it."
#ts4#ts4 gameplay#sims 4 gameplay#postcard legacy challenge#im gonna pass away#rua's vocabulary is full of pet names and words of adoration#adrien has some for him too. a few in spanish that make rua shiver.#he braided adrien's hair btw 😖 he loves to play with his hair#since adrien started growing his hair out he's caught rua a few times looking up long hairstyle tutorials 😭😭#“my love come sit” he'll pat the couch enthusiastically “let me fix your hair”#and when he's done adrien would complement him and ask him where he learned it#rua would puff out his chest proudly and say “learn it? ive always known this” or “my angel i made it up for you”#and adrien lets him get away with it bc it's cute and harmless#rua's love languages are acts of service and physical touch#he's so sick i cant stand him#YOU SEE HOW THEYRE MATCHING LOWKEY!!!!!!! IM GONNA GO CRAZY#postcard: gen3#queue#i switched a lot of feminine frame hairs to allow for masc frames and many of them worked#save for a bit of clipping around adrien’s back. i think the one he’s wearing now is the worst of it but it’s not too bad to bother me#i still haven’t figured out how to properly convert it in blender so this will have to do#sim: adrien herrera#sim: rua kamealoha
127 notes
·
View notes
Text

Storytime: I read the Sorcerer's stone, especially the part about Harry's clothes being always four sizes too large as a kid at the Dursleys. Then I thought about how that would play out when he was brand new there and then I was like ooo-- ✨ trauma ✨ and then I tried to make some art. So here it is, and sorry about the quality!
#harry potter#harry potter fandom#harry james potter#harry is not ok#he is traumatised#imagine growing up like that#and of course he did magic#cuz like#*gestures wildly*#stupid dursleys#now im sad#also i decided to age him a lil because i've no idea how to draw kids so small they can't walk#i dont know how youre supposed to draw anything really#but i try#and look at way too many tutorials#hp
14 notes
·
View notes
Text
Cheap custom backgrounds?
Hi! Want to give your enclosure something like this?
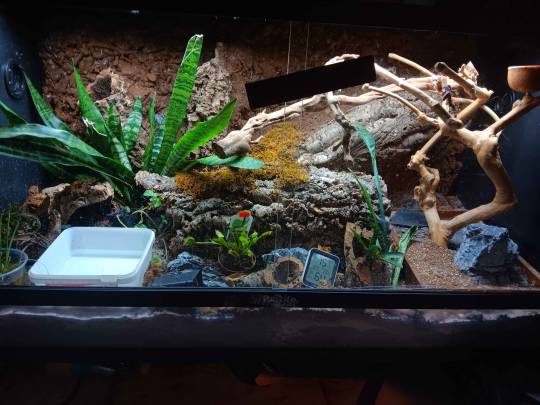
Well let me help you do this in a affordable way to give your animal some new enrichment and climbing opportunities!! Theres a misconception fancy backgrounds are hard to do or are expensive to do. This is... Very much not true! So lets do the one above together! Heres an overview of the supplies you'll need: -Your Enclosure of choice -Cocofiber and Sphagnum moss(OPTIONAL, can opt to paint) -Aquarium grade Silicone -Great stuff pond and Stone -Cork bark, roots, sticks, small rocks(OPTIONAL) First things first, you're going to want an enclosure.
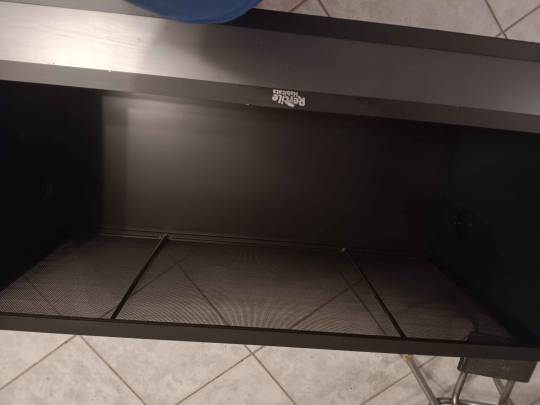
This is a DUBIA 4ftX2ftx2ft[LengthsXwidthXHeight), Also known as a 48"L x 24"W x 24"H(Inches) or a 120 Gallon Enclosure. This is considered the researched minimum size for common exotics like Ball pythons, Corn snakes, Bearded Dragons and the like to thrive. *Disclaimer: Im aware there is several groups and movements who are pushing for a 5x3x2(ft) minimum for Bearded dragons, I ultimately agree with them and the advancement of exotic keeping, but a Bearded won't suffer in a 4x2x2. Dubia Enclosures are some of the cheapest in the market, however they're decent for the price. They are stackable which makes it great for saving space, but please note they can NOT hold a lot of weight, so be mindful of that.
I own 3 of these. Two Version 1s and on Version 2, which is the one above. The V2s are generally nicer in design in my opinion, theyre functional more importantly. Once you have your enclosure of choice, lay it on its back as shown in in the first image. Next, you're going to want to prep your dry background. I use Organic Cocofiber and Sphagnum moss. I buy these extremely cheaply from Home depot or in bulk off Amazon. Make sure your material is COMPLETELY DRY! It will NOT stick if it has any moisture. Break apart your Cocofiber block and mix it with your dried Sphagnum moss in a container and have it ready on the side. I use the bulk Coco fiber, which costs about $23 for 5 bricks on Amazon. You can get them cheaper if you dont buy bulk, I do a lot of gardening and have a lot enclosures so its easier for me! https://www.amazon.com/Organic-Coco-Coir-Bricks-Compressed/dp/B01N1YP8O6?th=1 for a 4x2x2, I only use 2 bricks. Likewise, I buy Bulk moss for the same reason: https://www.amazon.com/dp/B0BK7XMNWL?ref=nb_sb_ss_w_as-reorder_k0_1_10&=&crid=1RDHFNSAUX0DF&sprefix=spaghnum%2Bm&th=1 You will only need. ONE BRICK. For the Sphagnum moss. Maybe even less than a brick. You're going to want to wet this then dry it before use. Dont be me. Dont be fooled over how small and thin those moss bricks are. I made the mistake of trying to wet an entire brick and I had to use a deep soup pot to contain it. It *explodes*. You will be buried in moss. You will scream and cry and beg for mercy as you are overwhelmed by the amount of moss Expanding from a singular brick. I am not exaggerating, I learned my lesson, please god, do not make the same mistakes I made. I still have. So, so much moss. Sometimes I still find Moss from my Mossaggeden. NOTE: Please make sure to use organic, and do not used DYED moss! Double check your ingredients, Dyed moss can be toxic to your animals! Next,
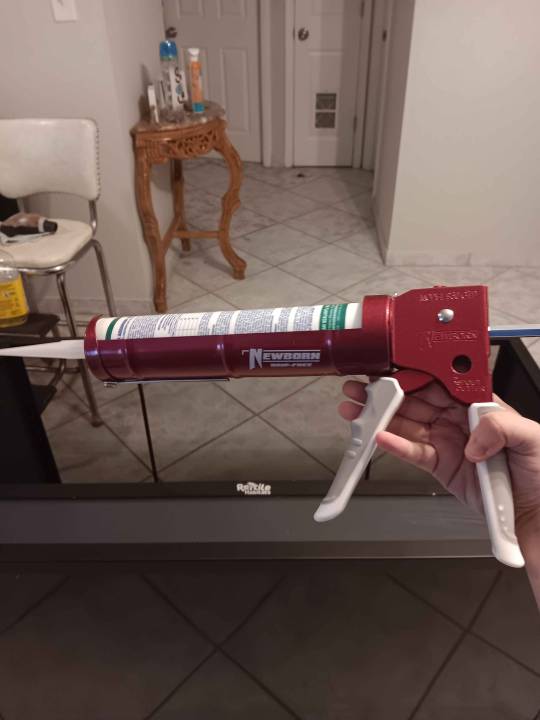
Silicone time, baby! You're going to want to use Aquarium grade Silicone from Home depot, please double check to make sure you're getting Aquarium grade! This will cost you a whopping $3 At Homedepot. The Caulking gun was an additional $12 if you dont have one already, however, it is re-usable so its a great one time purchase because I use that bad boy for a lot of my projects lmao. Once you struggle to open your stupid bottle of Silicone without exploding it like I have on several occasions; time to be silly!
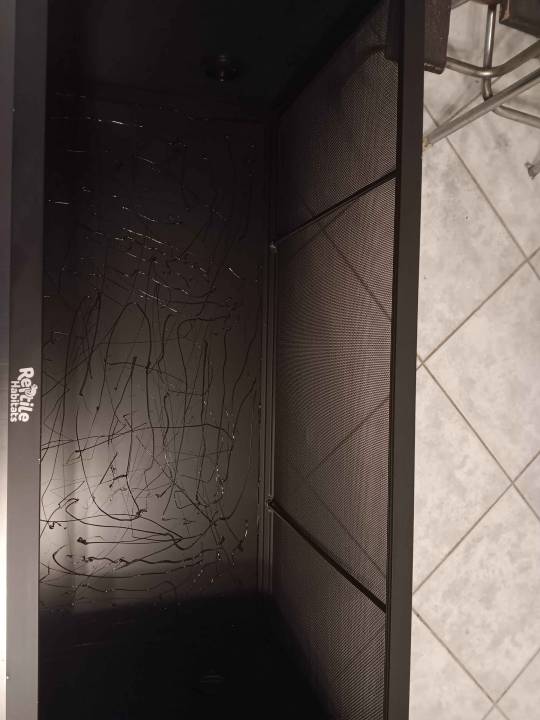
We're going to Silicone this bad boy up reaaaaal good. Dont be me, USE GLOVES! It makes your life so much better I promise. So why are we doing this exactly? Its simple, this will help your background last! It gives it texture and helps the spray foam stay in place. It also keeps your background from peeling so easily, texture matters! Your hands going to be very tired after this. Youre going to want to leave this alone for the next 24-48 hours. Minimum. You want your silicone to dry and want to make sure the smell is gone before continuing to the next step!
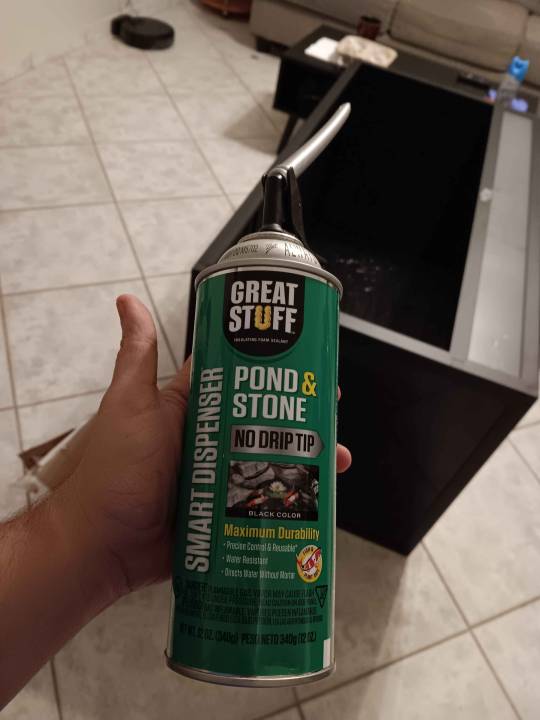
This is the funnest part. Spray foam time! For the 4x2x2, I use about 3 Bottles of this stuff. Make sure you're using NON-TOXIC Spray foam! Pond and Stone is my favorite to work with. When I add things into the background, I make sure to have a 4th can of this stuff on me. This will be the most pricey part about it. Lowes has it for $12-14 a can, but its $15 a can on Amazon. This is really the only big 'expense' when it comes to backgrounding. Smaller enclosures use less, but bigger enclosures will need more. !!!!!!!THE NEXT STEPS NEED TO BE DONE TOGETHER!!!!!!!! Youre going to want to be fast about it if youre using my method. Start spraying random patterns into the background. Youre going to want to make sure youre covering every inch of the enclosure, you can do zigzags, cut it into triangles, squares, it doesnt matter. Different shapes give you different background textures, so go nuts!!! Dont leave space between the foam, and go ham. Theres no wrong way to do this. Once thats done though, you're going to want to do the next step IMMEDIATELY:
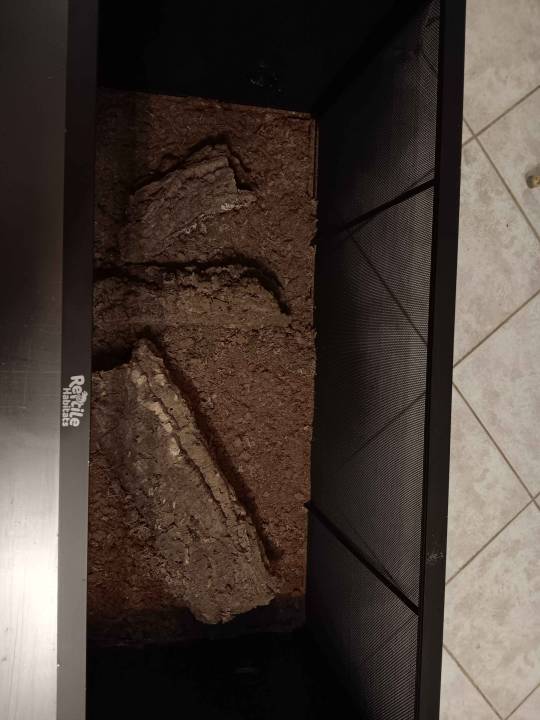
Adding your background texture and features!! This step MUST be done while the spray foam is still wet. First, take any rocks, cork, sticks, ext if youre adding them and shove them into the background. Dont have money to pay for expensive Reptile decor? You can sanitize your own rocks and sticks from outside yourself for free. I will make a guide about how I do that soon ahah. Press any features you want into the spray foam background nice and firm, then use the extra to spray around the items to secure them in place. Once you got your features in, its time to take your pre-prepped background and begin pouring it in! Spread it evenly across the enclosure. Do NOT worry if you have excess, poor it in anyway. Once you've poured the background in. GENTLY pat it over the sprayfoam. Next, you'll want to leave this to dry for the next 24 hours minimum. Leave it laying on its back so nothing drips or sags where you dont want it to!!! After 24hours, lift the enclosure and gently tap the back of it to knock off your excess background to reveal your background!
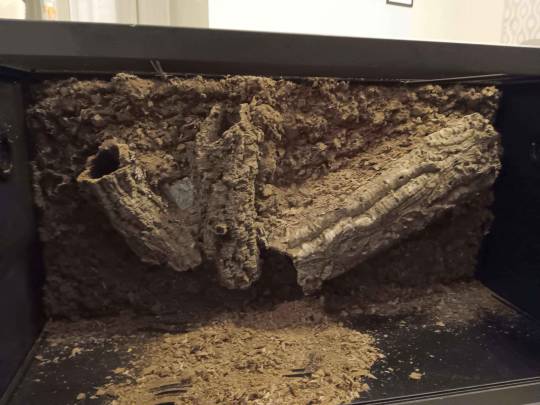
Annnnnnd you're done!!! Now you're free to add your lighting, real or fake plants, heating, substrate and other decor as you please! This can add so much more enrichment to your animal and give them so much more room to utalize their space. My individual personally loves his background and utilizes it all of the time! Contrary to belief, a lot of snakes aren't 'pet rocks' if you give them stuff to explore and climb. My guys out pretty often! Of course it comes down to personality too ahah.
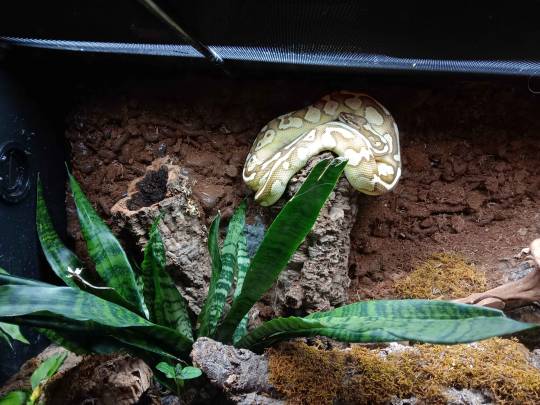
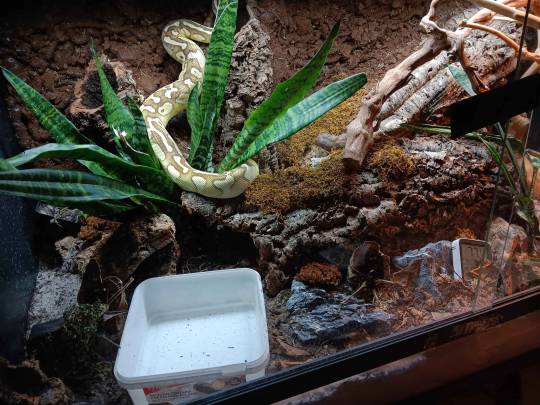
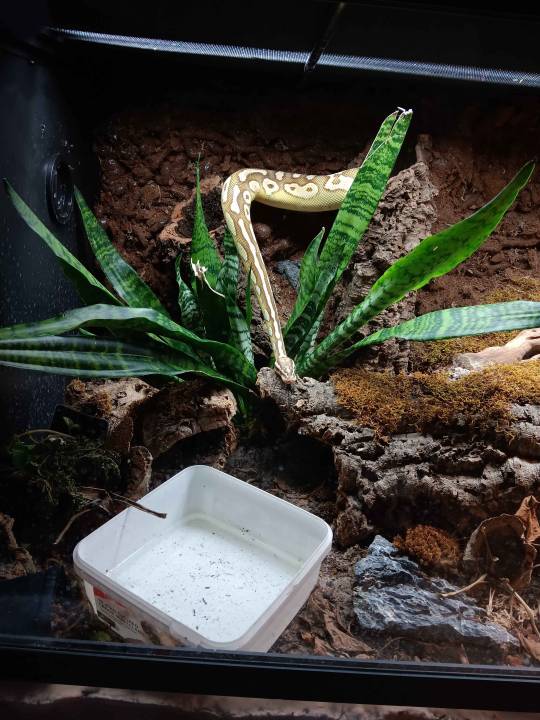
Heres some pics of him using his climbing features! He prefers the middle climbing feature here and the one off to the right, where he uses to bask when he doesnt want to be seen and hangs out the top of it, or his bird perch when he doesn't mind being right there out in the open. c:
#reptiles#snake#herpetology#ball python#background#How to craft#Custom enclosure#Mossaggeden still haunts me#And my hands have known no peace since I started doing these#I hate silicone#More so I hate caulking#bioactive#tutorial#I picked up that little bird stand for like $15 at a local owned exotics store and thats been his favorite thing ever#Sanitized it real good and I have hundreds of pictures of him on that thing#I have a big one for my tree boa its like 5 ft tall#I cant wait to use that when shes ready for her adult enclosure#Did you know you can get a 10x10 growtent for like $300?#Thats a steal actually#Modify it real good and boom#perfect enclosure for like a 8ft tree boa#Im going to try growing a tree in it#Godspeed#dont let this flop#My hands will never recover from the amount of caulking ive done in my life
14 notes
·
View notes
Text
Ever since starting to play around with solo-gamedev I've been wanting to be able to make my own music. Which is the one thing most out of my league.
#considering learning how to do music#id treat it like any skill. intro tutorials and then projects to copy music i like to grow a skillset and then time to start experimenting#honestly this is all being sparked from me crunshing for uni again and spending like 6 hours learning while forgetting to eat.#and well. i absolutely love if (i promise ill get snacks)#and its sparking my inspirstion again for projects i dont really have time for#gamedev
8 notes
·
View notes
Text
i bought the mysims bundle being like well i remember this series being pretty ok. it's something to do, it's nostalgic. and then i played kingdom for 2 hours straight without even noticing
#It's Really Good Actually#i swear they must've made some QOL changes?? like i don't remember trees growing + blooming that fast#one weird thing abt it is that they got something backwards in the chopping trees + mining tutorials#it tells you that you have to press a repeatedly to chop trees#and when you find the correct spot in mining it'll do the rest automatically#but it's the other way around!! trees are automatic and mining is manual#weird. also you have to press the b button like 3 times to back out of tree chopping for some reason#anyway i'm having funnn#huso smashes buttons
3 notes
·
View notes
Text
Doodles while watching my dad play a game
#if you havent played twilight princess dont read the tags pls ty#last warning >:(#alright anyway#so i had to do diababa because he couldn't get the hang of the boomerang#i think it was giving him motion sickness which is completely fair#i hate the way it spins around the camera sometimes#he got really frustrated at the controls because he's not familiar enough with them to do quick events#like throwing bombs and whatnot#but he's starting to get the hang of z targeting which is what's most important#and he did the entire tutorial by himself#hell yeah dad#i got all the wolf parts bc he didnt wanna do them which is fine by me#i actually like the tear collection sequences now#it only took four seperate runs and me memorizing the tear locations for it to start growing on me the *teeensiest* bit#oh yeah this is a deltarune post#i like drawing ralsei#fluffy boy make brain go brrr#ralsei#deltarune
18 notes
·
View notes
Text
Idk how me, a broad and chubby woman from a long line of broad and chubby women, and my husband, an average-height man from long lines of very tiny women and very average men, managed to produce a child so exceptionally tall, long, & lean that she can't wear store-bought clothes anymore without alteration. Yet here I am, dusting off a sewing machine I barely know how to operate....
#personal#this kid put on 2 inches in less than 3 months y'all#which is about how much she's supposed to grow in a YEAR at this age#while also somehow gaining no weight#i mean literally NONE#she even dropped an ounce overall#so no it wasn't my imagination that all her pants suddenly became too short#while simultaneously getting looser around the waist#and yes we're on top of the weight thing; she has a whole med team helping us out#it's cuz we finally found one of her EOE triggers so now she's eating more diversely and the inflammation is reducing#so her body is getting excited to go for all that growth it was putting off due to lack of nutrients and calories#same thing happened as an infant when she started PPIs for the first time#on my mama's grave she went from 50th percentile to 90th in less than a month#she also has a documented history of massive growth spurts every time her dosage gets upped to match her current size#the lack of weight gain is a bit worrisome tho so we're working on upping her calories as much as possible#but anyway#if anyone has tutorials on Learning To Make Kids Clothes for complete noobs let me know#cuz clothes cost too much for how much they DON'T fit her
17 notes
·
View notes
Text
Growing Garlic 101
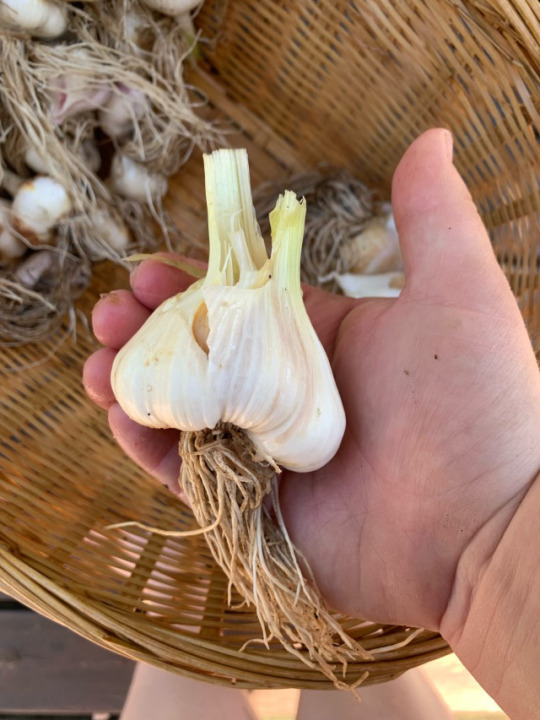
It's summertime and that means it's about time to order garlic! Garlic is one of the easiest vegetables I have ever grown, although it takes a while from planting until harvest. Most of that time is hands off, so garlic is something I would recommend to grow if you're new to planting and want something easy (or just want lots of yummy garlic)
What to know before starting
Before getting further, I just want to say that I am in hardiness zone 6b (near zone 7) in the US, so that is my growing experience (what is a/my hardiness zone?). To my knowledge and research, garlic can be grown in a wide variety of climates, including very hot and very cold ones. This post is going to be oriented around US geography and terminology because that's what i know
The first thing to know about garlic is that it is typically planted in the fall, but not harvested until the following summer. Why is it planted so early? Garlic goes through a process called vernalization, which means that it needs a cold period before in order to grow to its fullest potential. In garlic, vernalization is what causes the bulb to split into cloves (rather than just having one big chunk of garlic). The first year I grew garlic, I didn't know that it had to be planted so early so I planted in January. It did pretty good and I was happy with it! Some heads didn't have cloves and some did, so even if you get to it late you'll likely still have something yummy to eat by the end of it!
The next year I grew garlic, I planted it out towards the end of October and I had an amazing harvest! The bulbs were bigger and all had divided into cloves. All this to say, you'll have better garlic if you plant in the fall but if you forget or don't know and get to it late it'll be okay!
Step 1: Picking your garlic varieties
This is such a fun step!!! You can find all sorts of different varieties of seed garlic online, with different colors, tastes, and growing habits. My first year I started with seed garlic I found at lowes; the type I found was your generic grocery bought garlic, which for the most part is a softneck variety called California Early (or California Late).
Softneck vs. Hardneck
You should pick softneck or hardneck depending on the climate you are growing in. Softneck varieties do better in warmer climates while hardnecks are more cold hardy. In my zone 6b, I can grow both hardneck and softneck varieties because I am in the middle of the temperature range for hardiness zones. If you are in zones 1-5, hardneck varieties are recommended for your area while zones 8-12 softnecks grow better. If you are in the middle zones 6-7, you should be able to choose either variety and end up okay :)
Hardneck features
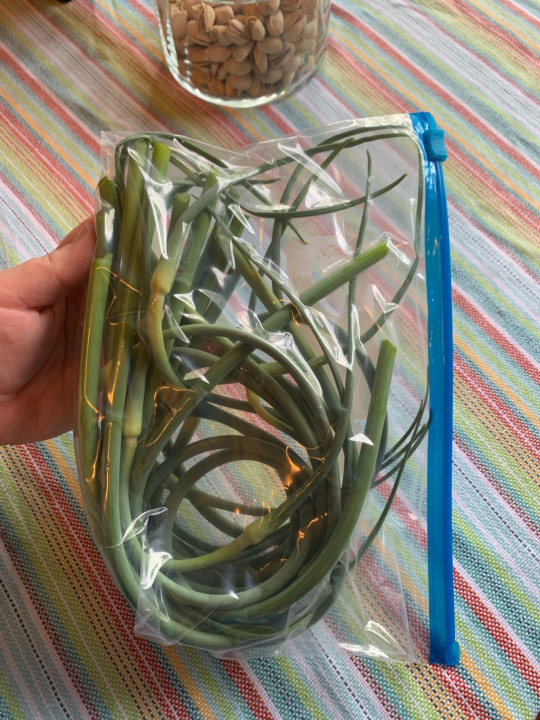
Hardneck garlic differs from softneck most obviously in that it will form a hard flower stem, often called a scape:
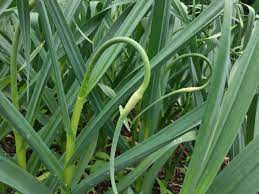
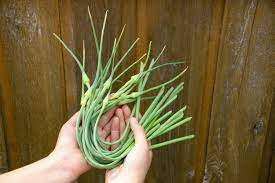
These are delicious and should be harvested before the flower opens, when they start to curl. They can be chopped up and used like other vegetables (they're also great in pesto I've heard). I roughly chopped mine this year and put them in a bag in my freezer so I can take them out and add as needed. They have a mild garlic flavor, more herby than the bulbs, and can be used in greater quantity without an overpowering garlic taste
Other differences in hardneck varieties is that they have larger (but fewer) cloves and the cloves peel easier.
Softneck features
Softnecks don't have the hard stalks and also keep good for much longer than hardnecks, so their stems and leaves are better for forming garlic braids:
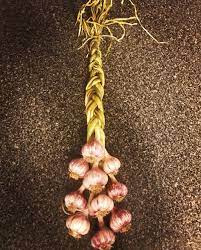

Because of their superior ability to store well, softneck varieties are the type of garlic most commonly sold in grocery stores. There are much fewer varieties of softneck garlic than hardneck (only a couple dozen vs hundreds of varieties of softneck). There are more cloves in softneck garlics but the cloves are smaller and harder to peel.
Where to order seed garlic
Here are some good places I've found to order seed garlic:
Hudson Valley Seed Company
Johnny's Seeds
Urban Farmer (my favorite, I ordered here last year)
You can also just buy garlic from local farmers/hardware stores! They'll likely have varieties well suited to grow in your area.
Step 2: Planting
After you receive your garlic, keep it whole in the bulbs until time to plant. The general rule is to plant 6-8 weeks before your typical first frost date (where is that for me?), but I found that its okay to do it later than that, especially since climate change is messing with the dates. For reference, my average last frost date is October 11th but I didn't plant last year until October 22. Typically they are planted around September-November, the warmer your climate the later you plant.
Before planting, I recommend adding an inch or two of compost to the top of the soil. This will give them nutrients for the year ahead :)
If you are planting late or have pretty mild winters, one trick is to keep the garlic heads in the fridge (not freezer) for a month or two before planting. This will simulate vernalization and will help them to form cloves and bigger heads!
It is good to plant in a fairly sunny area. Mine has partial shade but they do great there!
When you are ready to plant, separate the bulbs into cloves. Try to keep as much as the papery skin on your cloves as possible as it helps to protect them in the ground, but don't beat yourself up about it. I plant mine roughly four inches apart, shoving them about two inches down with them upright (the hairy root end is the bottom and they taper to a point at the top):
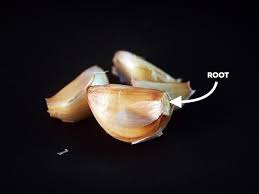
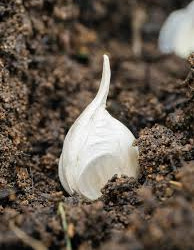
After they're all planted, water pretty deep and mulch about an inch or two deep. This will help protect them from hard freezes in the upcoming winter. You can use whatever you have access to, I recommend things that will decompose so they add nutrients to the soil. I raked up fallen leaves from my yard last year and used those
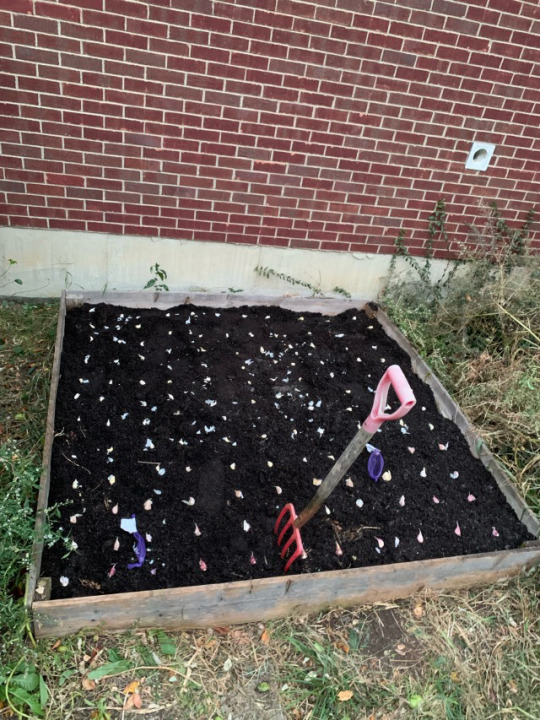
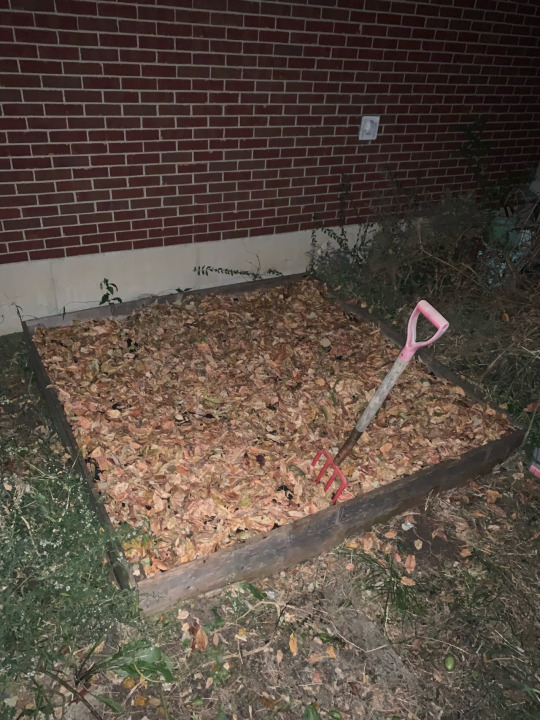
Step 3: Wait
Now relax! The garlic won't be ready for a long time, so just let it do its thing. I don't really ever water mine because I get pretty consistent rainfall, but you can water periodically if you are in a dry climate. It is good to water before particularly hard freezes, it helps the bulbs have what they need to survive.
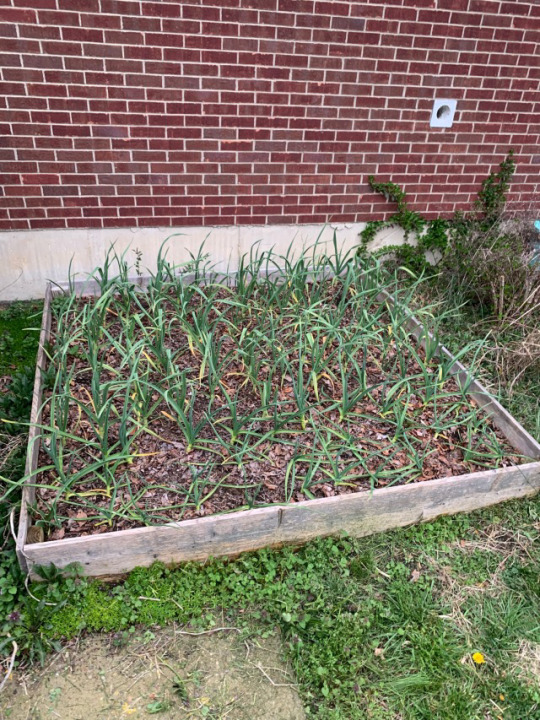
You might see the greens popping up if you have warm sprees in the late fall/winter. It is fine to ignore these, they will likely die back when it gets cold again but they will still come right back in the spring. You'll want to remove any heavy mulch in the spring when they start growing (my leaves had mostly decomposed so I didn't need to do this)
Step 4: Harvest time
I water mine occasionally as they are growing in the spring or summer, but for the most part I don't bother. I have fairly regular rain and garlic seems very resilient to water differences.
Your garlic will be ready sometime in May-August, depending on what varieties, when you planted, and your climate.
When it is getting close to harvest, it is natural for the leaves to start dying back a bit, especially with softneck varieties. You'll see the garlic scapes form on hardneck varieties, and will need to cut these off once they begin curling, before they flower:
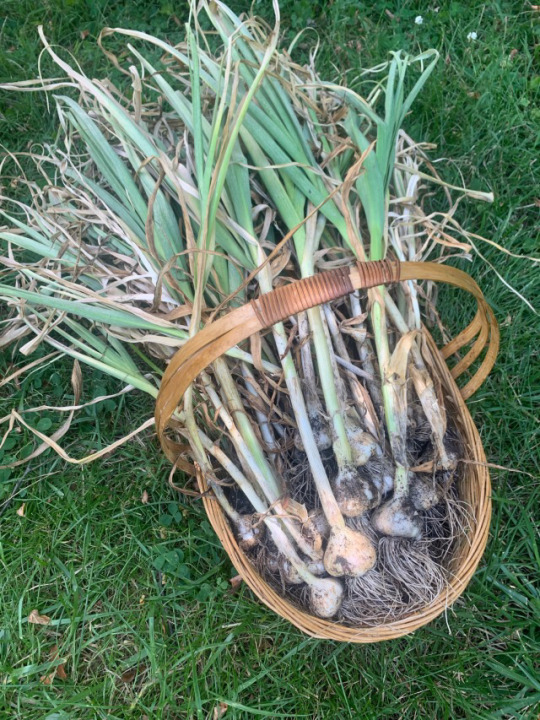
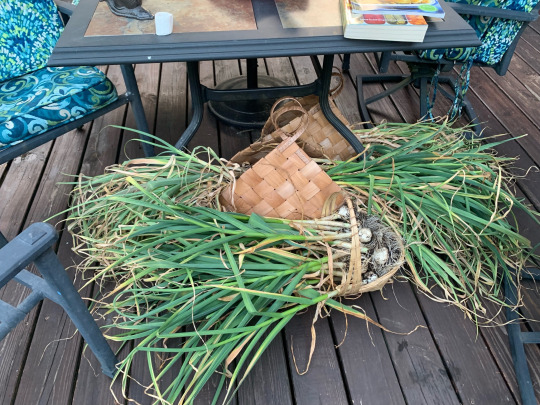
For softneck garlic, harvest when about half of the leaves have yellowed and died off, starting with the bottom leaves. The tops may start to flop over when ready.
For hardneck, the appearance of scapes means they'll be ready in about 4-8 weeks. The leaves will die off as well, but not near as much as softneck varieties in my experience.
Do not water for a week before harvesting. You want your garlic to dry out some before harvesting :D
Since my garlic is in a raised bed, I have fairly loose soil. Therefore, I can just pull the neck of the garlic right above the ground to harvest my garlic. If you have more compacted soil, it would be best to dig around the clove some before you harvest so that it comes out whole and unbroken.
Congrats!!! Your garlic is ready!!
Step 5: Eating and preserving
At this point, your garlic is all out of the ground and ready to be eaten. If you have more garlic than you can eat within the next couple months, you'll need to preserve it. There's a lot of ways to preserve it, but I'll go over a couple I have done.
Idea 1: cloves in a vinegar
This one is primarily how I preserved my garlic last year and I'll be doing it again this year. It is very simple: just peel your garlic, place in clean jars, pour over hot boiling vinegar, seal, let cool, and store in the fridge! Make sure the cloves of garlic are completely submerged in the vinegar or you risk foodborne illnesses. The garlic has enzymes that prevent the cloves from absorbing the vinegar, and the vinegar prevents any bacteria from growing and causing the garlic to spoil. The cloves don't taste like vinegar and can be chopped and added to dishes as needed!
Idea 2: cure whole heads
This is best done with softneck garlic as they store better for longer than hardneck.
This is essentially letting them dry so they keep longer. After harvesting, keep the heads as is with dirt and leaves still attached (brush off any big dirt clumps but don't scrub them clean). Place the heads somewhere flat, warm, well ventilated, and shaded from too much direct sunlight (can get some indirect sunlight). This can be in a garage, on palattes, hanging somewhere, in a shed, whatever you have that seems best. I did mine on my front porch just laying on the concrete.
Leave them alone to dry for at least two weeks, then store as desired! You can trim the leaves and roots off and clean with a brush if desired, or leave the leaves and dirt and roots and store. I trimmed the roots off, left the leaves, braided them together, and hung in my kitchen:
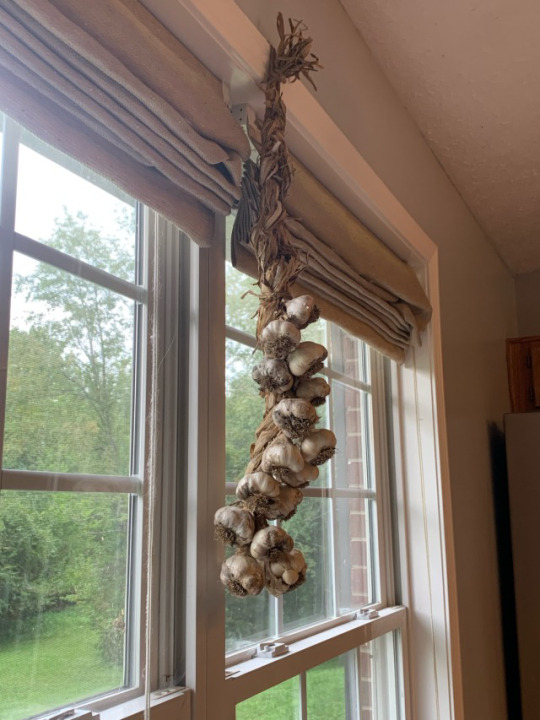
(here is a video about braiding garlic) (note: it can only be done with softnecks)
Idea 3: make garlic confit
This is such a yummy way to use up garlic. Peel your cloves, add to a saucepan, cover in desired liquid oil, and cook on low until the cloves are soft and smushable. Store in the fridge after letting cool and eat within a week :)
Idea 5: Roasted garlic
Here is a recipe
And that's about it! Enjoy your garlic :D
@yourfriendfrogs
#gardening#garden#gardeners on tumblr#gardenblr#gardencore#food#garlic#garlic 101#garlic guide#garlic tutorial#garlic how to#how to grow garlic#making this my pinned post for now because I’m proud of this lil guide I made#I need to figure out how to add a read more sorry anyone who hates the long scrolling#edit: figured it out
44 notes
·
View notes
Text
talk me out of cutting my own hair into my old pixie cut tonight
or at least send me solid tutorials on how
#i have a razor comb. i hate my current haircut. there are tutorials on self-cutting short hair. i've been maintenance-cutting it since 2020.#it would be easy. that is a dangerous statement. that statement leads to accidental fringe bangs.#but i am. so sick. of my current haircut. i hate how it looks. i just haven't worked up the courage to fuck with the front.#i don't have the money to get it done professionally. i think about it every time i look in the mirror.#it's just hair. it will grow. but i do not want to look like a complete doofus for six-eight weeks while it does.#the devil on my shoulder is just. making good points.
11 notes
·
View notes
Text
now i’m thinking about hair. i never had black friends growing up. didn’t have a black classmate until freshman of high school, then moved to a different school with no black students in sophomore year. hell i didn’t even have black online friends. now i have more black online friends (i don’t leave the house so black irls is tricky) and even THEN im not very close to them.
so my experience with my blackness has been centered by my family. my dads side is the worst cause my grandma hated black hair (given she grew up when our hair was called nappy and messy). she always complained when i wore it naturally. insulted me and constantly questioned when i’d get it “fixed”. my mom is from the islands so she appreciates it. she doesn’t understand how americans do their afros tho (she kinda just wets the hair and add oil and call it a day. no shaping or anything). i think my sister and cousin are the only ones who know how to take care of our hair! they both keep theirs really short.
i really like color and longer hair. i despise wearing wigs and weaves aren’t for me. it’s either dying my natural hair or braided extensions/other styles like locs or twists etc. i prolly do have more options but my mom does my hair.
it’s so fascinating to think about how other people get their hair done. friends always tell me about how they got their hair cut, dyed and fixed up in salons and barbers. it’s so fascinating and it’s like. a few hour process!! or less!! mine is like a whole weekend thing. never is a one day thing. never. cut the braids shorter, take the braids out, detangle then wash well, and prepare to braid. that alone takes most the day for me. plus my mom does it alone 9/10 of the time. she works on her feet all day so she needs more breaks, we don’t have good spots to have us both sitting while she does it, and taking out my own hair is awful and nearly impossible. do you know how tiring it is to fiddle with the top of your head for hours? that’s a whole workout right there! i can only do so much!
by the time my hair is washed and detangled again i’m exhausted. so is my mom. we usually continue it for the next day. preparing my hair and then braiding. i never learned to braid when i was younger so learning now isn’t ideal on my own head. but my mom and sister help which im so grateful for. i used to be so tender headed when i was little but my mom stopped yanking my hair as hard and now i can handle it better. a lot of my memories are sitting in the chair in front of my mom, me sleeping or on my laptop/listening to music on my phone, while my mom watches her shows. i have thick tight curls and my hair is getting longer each time i take out my braids (which is good since my hair had grown super slow my whole life. i blame all the relaxing and straightening). so getting each braid in is hell.
of course it’s also being braided with the fake hair. whatever color i wanted, and now im getting more creative with the styles! making bangs or putting beads or leaving the ends open or braiding all the way down with charms and stuff. it’s the best way i can do to express myself! it’s my hair! it takes time and effort and work to get my hair done. i’m stuck with it for a while so i better like how it ends! having my hair braided makes my life so much easier, especially since i’ve had depression since 10 years old. it’s been a struggle to take care of myself at all, so having the huge HUGE possibility of my hair getting knotted and matted and dirty was also right around the corner. braiding has been my savior.
not sure what this post is but i like talking about my hair :3 don’t get a lot of chances too. i never realized how much my hair means to me.
#yeah#it’s 4am rn i’m just thinking a lot#flojouno#text#black hair#also learning to draw my hair has been AWFUL growing up#no easily accessible tutorials#if you didn’t have straight or wavy or curly you were fucked#tight curls? you better run cause no one’s helping you#braids? locs? good fucking luck#i’m happy there’s more resources now! plus there’s custom brushes!#also the different hairstyles you can do with black hair is amazing#i just never understand how other cultures take these hairstyles and act weird#like yeah they look cool but they mean something to us#it’s not a simple aesthetic thing.#anyways yeah i should go back to sleep gnnnn#4c hair
5 notes
·
View notes