#git tutorial
Explore tagged Tumblr posts
Text
here's a list of all the intermediate coding tutorials i've written so far!
git / github tutorial
npm (and node.js) tutorial (+ how to use the command line) (this one's a prerequisite for the following 2 tutorials)
webpack tutorial (a module builder for JavaScript and (S)CSS)
11ty (eleventy) tutorial (a super easy static site generator!)
if you have ideas/requests, feel free to contact me!
more beginner coding tutorials are coming VERY soon! meanwhile, check out my common questions and common mistakes pages!
#web development#coding#coding tutorials#neocities#git tutorial#npm tutorial#webpack tutorial#eleventy tutorial#static site generator#coding tutorial#git#github#npm#webpack#eleventy#11ty
21 notes
·
View notes
Text

Use Git if: ✅ You need speed and distributed development ✅ You want better branching and merging ✅ You work offline frequently
#git tutorial#git commands#git basics#git workflow#git repository#git commit#git push#git pull#git merge#git branch#git rebase#git clone#git fetch#git vs svn#git version control#git best practices#git for beginners#git advanced commands#git vs github#git stash#git log#git diff#git reset#git revert#gitignore#git troubleshooting#git workflow strategies#git for developers#cloudcusp.com#cloudcusp
1 note
·
View note
Video
youtube
Git Tutorial: Learn How To Use Git in 23 Minutes!
Do you want to learn how to use Git? In this tutorial, we'll cover the essential Git commands that you need to know, so that you can start using version control inside of your projects. Enjoy! 🎉 #git #gittutorial #howtousegit #thecommoncoder
0 notes
Text
yknow. I wonder if the SCP mods ever actually wrote that appendix style guide I suggested way back when
#it was so fucking funny I posted something like this and they reamed me out over it 🤣#hey maybe we should have an appendix tutorial since everyone does it differently and it looks unorganized#when you compare articles side by side#and got 'lmao this idiot can't write an appendix' like. lmao. no I will not git gud I think I will just leave#your first mistake was leaving the door unlocked
3 notes
·
View notes
Text
If I could go back in time,
I would have used a state machine.
#me to the entirety of my code#thankyou youtube tutorial that made this possible but now im stuck with your code forever#i think if i try to refactor everythings gonna break#i dont have git on godot#game#gamedev#indie#indie games#indiedev#video games#indie dev#game development
4 notes
·
View notes
Text
first reaction to the photo mode:

(like it's great if you're the posing kinda picture taker but i am very much not so while i'm very glad they added it i do feel a bit like... it could had been more and had more "in-action options")
#or maybe i suck and i need to git gut with it#i'll see for tutorials later#this is just the first hours type of thoughts#also this is iris#the durge shadow sorcerer that will multiclass into a vengeance paladin and give minthy kisses
2 notes
·
View notes
Text
As a sequel to this, if you want to learn more about how git works, there's tutorials in its documentation that go further in depth.
Some things that aren't in the interactive link above which I've found handy below the cut
What if you want to learn about every commit that is part of newBranch but not part of commit c1? (If there's no merges this just means every commit between c1 and newBranch). You can use:
log c1..newBranch
to only see that. (You can actually use this <commit-ish>..<commit-ish> notation anywhere that would accept a list of commits, like cherry-pick)
What if you have two branches, nextRelease and pastReleaseFixes, and the tree is too complicated and big to follow how they connect, but you know something going into nextRelease fixed something that's broken in pastReleaseFixes, and that it's related to the file my/important/file.cpp?
git log pastReleaseFixes..nextRelease -- my/important/file.cpp
Will show you only commits that are in nextRelease (but not pastReleaseFixes), and filter that to only commits that touched the file you care about. (You can actually choose a function or series of lines in the file, too). See
A different bug fixing option is git bisect. You tell it about a time when things were bad and a time when things were good, and it picks a place in the middle for you to check. Even with 1000 commits to go through, it'll find the problem in only ten tries!
Fancier than I am includes stuff like how git is properly decentralized. You can have more than one remote, such as the computer of each person you're working with, if you don't like showing your work to a company. That's why git wants you to say origin — you could say something else and it would go to a different place
Me upon discovering an online game that helps you learn git: haha I've been using git for years now, I could skip ahead many levels, methinks hahaha no, no, I'll be humble and start on level 1
Me on level 5: You can do what??? There are commands for what???
#git#tutorial#honestly i spent at least an hour writing this#i probably have better things to do#but#nerdsniped
13K notes
·
View notes
Text
How to Change Branch Name in Azure DevOps- OpsNexa!
Learn how to change a branch name in Azure DevOps using Git best practices. This comprehensive guide walks you through renaming a branch both locally and remotely, syncing with Azure Repos, and avoiding common pitfalls. How to Change Branch Name in Azure DevOps, Whether you're updating outdated names or aligning with naming conventions, follow these step-by-step instructions to ensure a smooth and error-free transition for your team. Perfect for developers, DevOps engineers, and Git users working with Azure DevOps.
0 notes
Text
#00248
If you've ever come across a GitHub project site and wondered what it was all about (or just how to download the project), then this course by Stephen Ulibarri is a great short course.
My plan is to use both GitHub and Perforce as follows:
GitHub: for building Unreal Engine from source and testing out C++ code
Perforce (Helix Core): for Unreal Engine projects and its assets (eg. Houdini files)
0 notes
Text
#gitlab#hostnextra#git#linux#technology#linuxserver#ubuntu#linux tutorial#learnprogramming#programming
0 notes
Text
#free#udemy#web#development#tutorial#getting started#developer#sublime#text#command#line#git#version#control
0 notes
Text
Ok. I am going to let you in on a secret about how to make programming projects.
You know how people write really good code? Easy to read, easy to work with, easy to understand and very efficient?
By refactoring.
The idea that you write glorious nice code straight is an insane myth that comes from thinking tutorials is how people actually code.
That is because programming is just writing. Nothing more. Same as all other writing.
The hobbit is ~95000 words.
Do you think Tolkien created the Hobbit by writing 95 thousand words?
Of course not! He wrote many many times that. Storylines that ended up scrapped or integrated in other ways, sections that got rewritten, dialog written again and again as the rest of the story happened. Background details filled in after the story had settled down
Writing. Is. Rewriting.
Coding. Is. Refactoring.
Step 1 in programming is proof of concept. Start with the most dangerous part of your project ( danger = how little experience you have with it * how critical it is for your project to work )
Get it to do... anything.
Make proof of concept code for all the most dangerous parts of the project. Ideally there is only 1 of these. If there is more than 3 then your project is too big. ( yes, this means your projects needs to be TINY )
Then write and refactor code to get a minimum viable pruduct. It should do JUUUUUST the most important critical things.
Now you have a proper codebase. Now everytime you need to expand or fix things, also refactor the code you touch in order to do this. Make it a little bit nicer and better. Write unit tests for it. The works.
After a while, the code that works perfectly and never needs to be touched is hard to read. Which does not matter because you will never read it
And the code that you need to change often is the nicest code in the codebase.
TRYING TO GUESS AHEAD OF TIME WHAT PARTS OF THE CODE WILL BE CHANGED OFTEN IS A FOOLS ERRAND.
( also, use git. Dear god use git and commit no more than 10 lines at once and write telling descriptions for each. GIT shows WHAT you did. YOU write WHY you did it )
Is this how to make your hobby project?
Yes. And also how all good software everywhere is made.
#codeblr#software#developer#software development#software developer#programmer#programming#coding#softeware
373 notes
·
View notes
Text
I’ve been playing Nightreign solo(because I will be cold and dead in the ground before I give one red cent to Sony, or any other gaming company for that matter, for online play) and it does kind of baffle me that they don’t have NPC party members to help with the single player modes balance. A lot of these bosses are clearly meant for a team of 3.
They went through enough work to implement one for the tutorial area to help show off a few of the multiplayer mechanics, like how to revive a party member, but didn’t set it up as an option for solo play outside of that?
I’ve admittedly always liked summons in Souls games, so I’m biased. But in preparation for the Shadow of the Erdtree DLC last year, I made it my mission to git gud and went through every souls game I had, and all their DLCs, without summons including a new file for Elden Ring, with my mission to kill every boss, no summons, and did it.
This game, meanwhile, is humbling me in ways I never imagined I would be humbled by a soulslike since I accomplished that task.
It may be a low blow, but Code Vein did NPC companions years ago, and they did a good jo- … well, they did a job.
I think I’d enjoy Nightreign a lot more if they at least had the option for those of us too cheap principled to pay for online.
Anyone know how it plays on Steam Deck? Might have to switch to a digital steam copy instead of PS5 so I can party it up.
105 notes
·
View notes
Text
Can someone explain to me in like five seconds how to use git, assuming that I know basic shit about coding/command line/whatever but don't know any of the specific terminology related to git. Like every tutorial online is at the same time both over my head and also vastly too basic. Just like. Tell me what it is.
Uh. First tell me its ontology. Is it a program, a standard, a language...? I know that it's for version control. Suppose I wanted to do version control at a piece of code. What do I do. What buttons do I press, on my computer? Tell me these things.
476 notes
·
View notes
Note
hi a friend walked me through a commander game and I liked it and so I got a couple premade decks. I then went to a couple commander nights and I kinda liked it except for the part where I felt like I was a little kid with floaties in the middle of the ocean trying to sing a little song to myself so I wouldn't think about the things that might be lurking just below the surface that I can't see. Magic is vast and deep and I don't know how I can enjoy playing when there's just too much. I get that the hugeness is part of its staying power, but it feels too big and too much to even approach beyond playing my premade deck and hoping the people at the table won't look down on me for it (which they often do). Even looking up tutorials and guides is overwhelming because each one of them is sharing a *different* tiny slice of material! I haven't felt this baby-beginner starting something new in a very long time (and I say that as someone that is otherwise well-versed in being a terrible beginner at new things). Is there a way to play magic without getting absolutely lost in the depths? or is that the nature of the beast and I just gotta "git gud"?
The two formats I would suggest are draft or Cube. Both use a much smaller card pool, one you can more easily learn about.
101 notes
·
View notes
Text
[PowerBi] Integración con AzureDevOps Git Repos
El lanzamiento de Power Bi Developer Mode durante el evento Microsoft Build está causando gran revuelo no solo por su posibilidad resguardar un proyecto de PowerBi sino también porque por primera vez tendríamos la posibilidad de que dos o más usuarios trabajen en un mismo proyecto. Esto no es trabajo concurrente instantáneo como Word Online sino más bien cada quien modificando los mismos archivos de un repositorio y logrando integrarlos al final del día.
La deuda de versionado y trabajo en equipo finalmente estaría cumplida. Según uno de los personajes más importantes del equipo, Rui Romano, aún hay mucho por hacer. Veamos que nos depara esta característica por el momento.
Vamos a iniciar asumiendo que el lector tiene un conocimiento básico de repositorios. Entienden que en un repositorio se almacenan versiones de archivos. Se pueden crear ramas/branches por persona que permita modificar archivos y luego se puedan integrar/merge para dejar una versión completa y definitiva.
Todo esto es posible gracias a la nueva característica de Power Bi Desktop que nos permite guardar como proyecto. Esto dividirá nuestro pbix en dos carpetas y un archivo:
Carpeta de <nombre del archivo>.Dataset: Una colección de archivos y carpetas que representan un conjunto de datos de Power BI. Contiene algunos de los archivos más importantes en los que es probable que trabajes, como model.bim.
Carpeta de <nombre del archivo>.Report: Una colección de archivos y carpetas que representan un informe de Power BI. El archivo más importante es "report.json", aunque durante la vista previa no se admiten modificaciones externas en este archivo.
Archivo <nombre del archivo>.pbip: El archivo PBIP contiene un enlace a una carpeta de informe. Al abrir un archivo PBIP, se abre el informe en Power Bi Desktop y el modelo correspondiente.
Entorno
Lo primero es configurar y determinar nuestro entorno para poder vincular las herramientas. Necesitamos una cuenta en Azure DevOps y un workspace con capacidad en Power Bi Service. Para que la integración sea permitida necesitamos asegurarnos que nuestra capacidad y la de la Organización de Azure DevOps estén en la misma región.
La región de una organización de Azure DevOps puede ser elegida al crearla, al igual que podemos elegir la región de una capacidad cuando creamos una premium, embedded o fabric.
En caso de utilizar capacidad PowerBi Premium Per User o Fabric Trial, no podríamos elegir la región. Sin embargo, podríamos revisar la región de nuestro PowerBi para elegir la misma en Azure DevOps
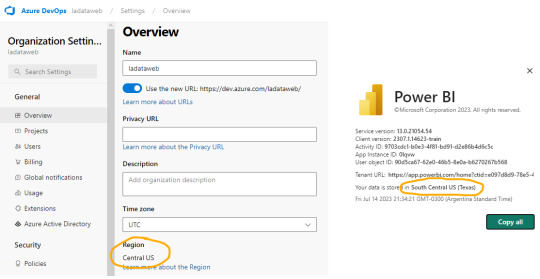
En ese caso creamos la organización de DevOps igual que nuestro PowerBi porque haremos el ejemplo con un workspace PPU.
Seteo
Dentro de Power Bi Service y el Área de trabajo con capacidad que queremos versionar iremos a la configuración. Con la misma cuenta de ambos entornos completaremos los valores de organización, proyecto, repositorio, rama y carpeta (opcional).
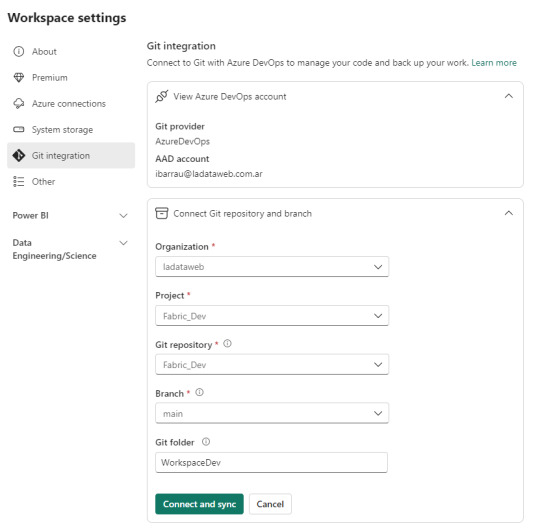
Como nuestro repositorio esta vacío, lo primero que sucederá cuando conectemos será una sincronización de todos los items del área de trabajo en el repositorio. Ahora bien, si teníamos reportes en el repositorio y en el area, tendremos un paso más para coordinar la operación deseada si pisar o integrar.
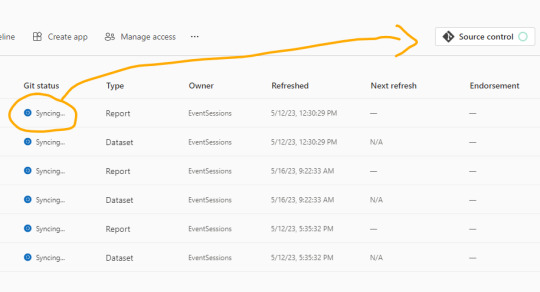
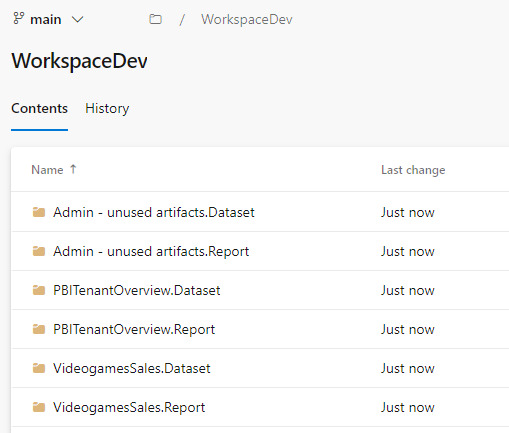
Una vez que todo tenga tilde verde y esté sincronizado, podremos ver como queda el repositorio.
En caso que ya tuvieramos informes cuando inicio el proceso, se crearán carpetas pero no el archivo .pbip que nos permitiría abrirlo con Power Bi Desktop.
Si crearamos el informe con Power Bi Desktop y eligieramos “Guardar como proyecto” si se crearía. Entonces podríamos hacer un commit al repositorio y automáticamente se publicaría en nuestra área de trabajo.
El archivo pbip es un archivo de texto. Podemos abrirlo con un bloc de notas para conocer como se constituye para generarlo en caso que necesitemos abrir con Desktop uno de los informes que sincronizamos antes. Ejemplo del archivo:
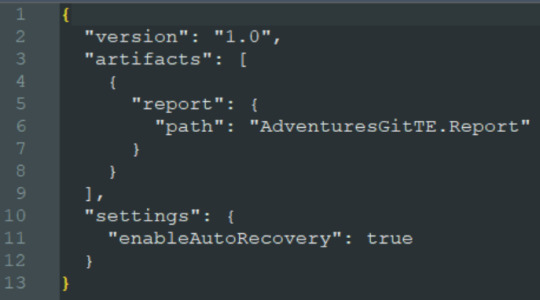
Al tener sincronizado el repositorio con el workspace podemos usar un entorno local. Si está en el repositorio en la rama principal, entonces estará publicado en el área de trabajo. Veamos como sería el proceso.

Esta sincronización también nos favorece en el proceso de Integración y Deploy continuo puesto que varios desarrolladores podrían tener una rama modificada y al integrarlo con la principal delimitada en el área de trabajo tendríamos automáticamente todo deployado.
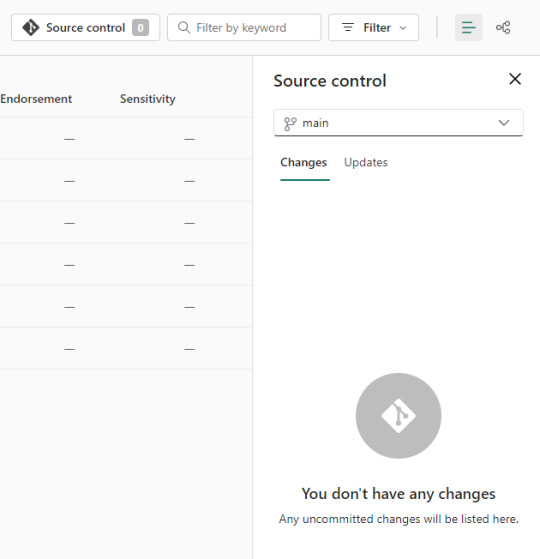
Si algo no se encuentra en su última versión o hacemos modificaciones en línea, podemos acceder al menú de source control que nos ayudaría a mantener ordenadas las versiones.
Alternativa Pro
Con las nuevas actualizaciones de Fabric en agosto 2023, podremos por primera vez, trabajar en equipo en PowerBi sin licencia por capacidad o premium. Guardar como proyecto es una característica de PowerBi Desktop. Por lo tanto, podemos usarla contra un repositorio Git en cualquier tecnología. Al termino del desarrollo, una persona encargada debería abrir el PBIP y publicarlo al área pertinente. Ahora podemos publicar desde Desktop los informes guardados como proyectos. Esto nos permite que los casos de puras licencias pro puedan aprovechar las características de histórico y control de versiones. Quedará pendiente la automatización para deploy e integración que aún no podría resolverse solo con PRO.
Conclusión
Esta nueva característica nos trae una práctica indispensable para el desarrollo. Algo que era necesario hace tiempo. Sería muy prudente usarlo aún en proyectos que no modifiquen un informe al mismo tiempo puesto que ganamos una gran capacidad en lo que refiere a control de versiones.
Si no tenemos capacidad dedicada, deberíamos trabajar como vimos en post anteriores sobre metodología de integración continua de repositorio https://blog.ladataweb.com.ar/post/717491367944781824/simplepbicd-auto-deploy-informes-de-powerbi
Esperemos que pronto tengamos una opción para importar por API estos proyectos al PowerBi Service para poder idear nuestros propios procesos sin usar las integraciones por defecto sino una personalizada a nuestro gusto.
#powerbi#power bi#power bi desktop#power bi git#azure devops#azure repos#power bi tutorial#power bi tips#power bi training#power bi argentina#power bi jujuy#power bi cordoba#ladataweb#power bi developer mode
0 notes