#for mobile users and people that do not want to go to my main page
Explore tagged Tumblr posts
Text
Hey so I'm going to make this as absolutely non-judgmental as possible, but I've been seeing a lot of people complaining about certain content in the tags again. I see more of those posts than I do the content people are talking about.
And look man, you absolutely DO NOT have to be okay or comfortable with seeing that kind of content. It's natural for it to make you feel kinda icky, especially of you have some trauma related to it. I get it.
But trying to censor the internet is a sysaphian task that you are not up to. You're only going to end up making yourself feel more bitter and angry and you're going to have a hard time enjoying the media you love because of it. You need to learn how to curate your own online experience.
So this is how you do it.
STEP ONE: BLOCK THE TAG:
Oh no! You've seen something and you didn't like it! That sucks! What do you do now?
1. Go to your tumblr homepage (this is for mobile btw but I can make one for desktop if wanted)
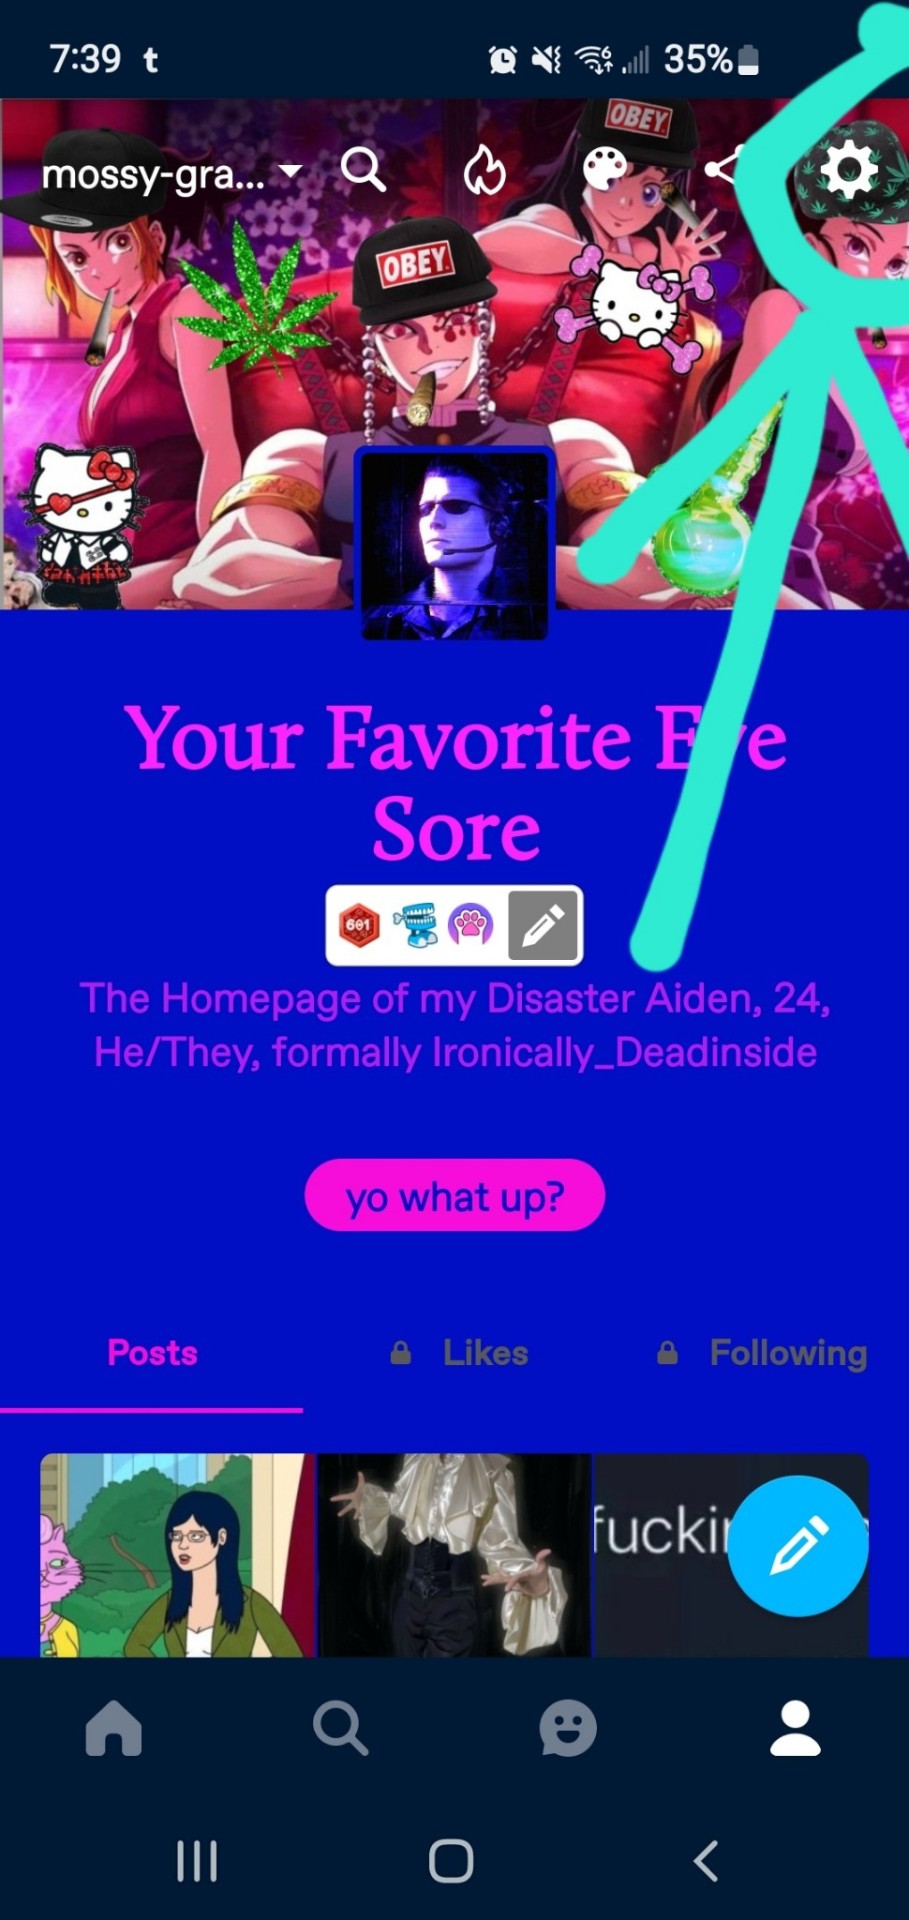
And click on the little gear icon (this is my main Blog btw)
2. Go to your account settings
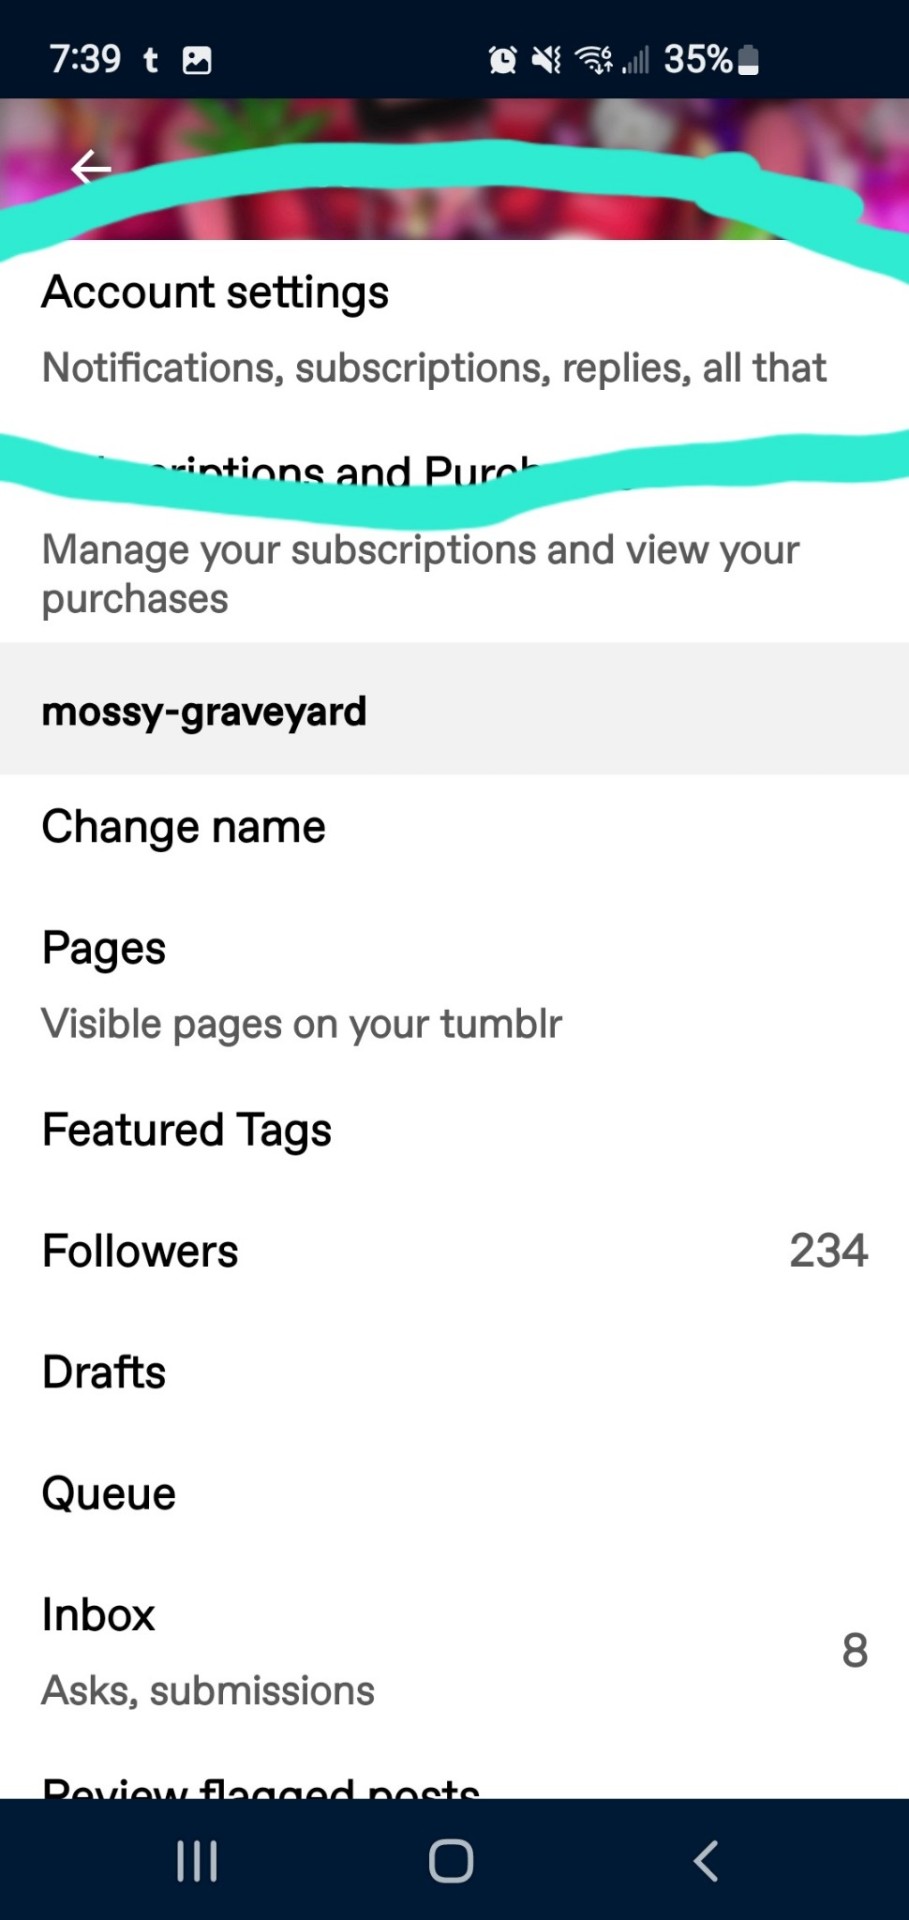
Helpfully highlighted for you here.
3. Go to "Content You See"
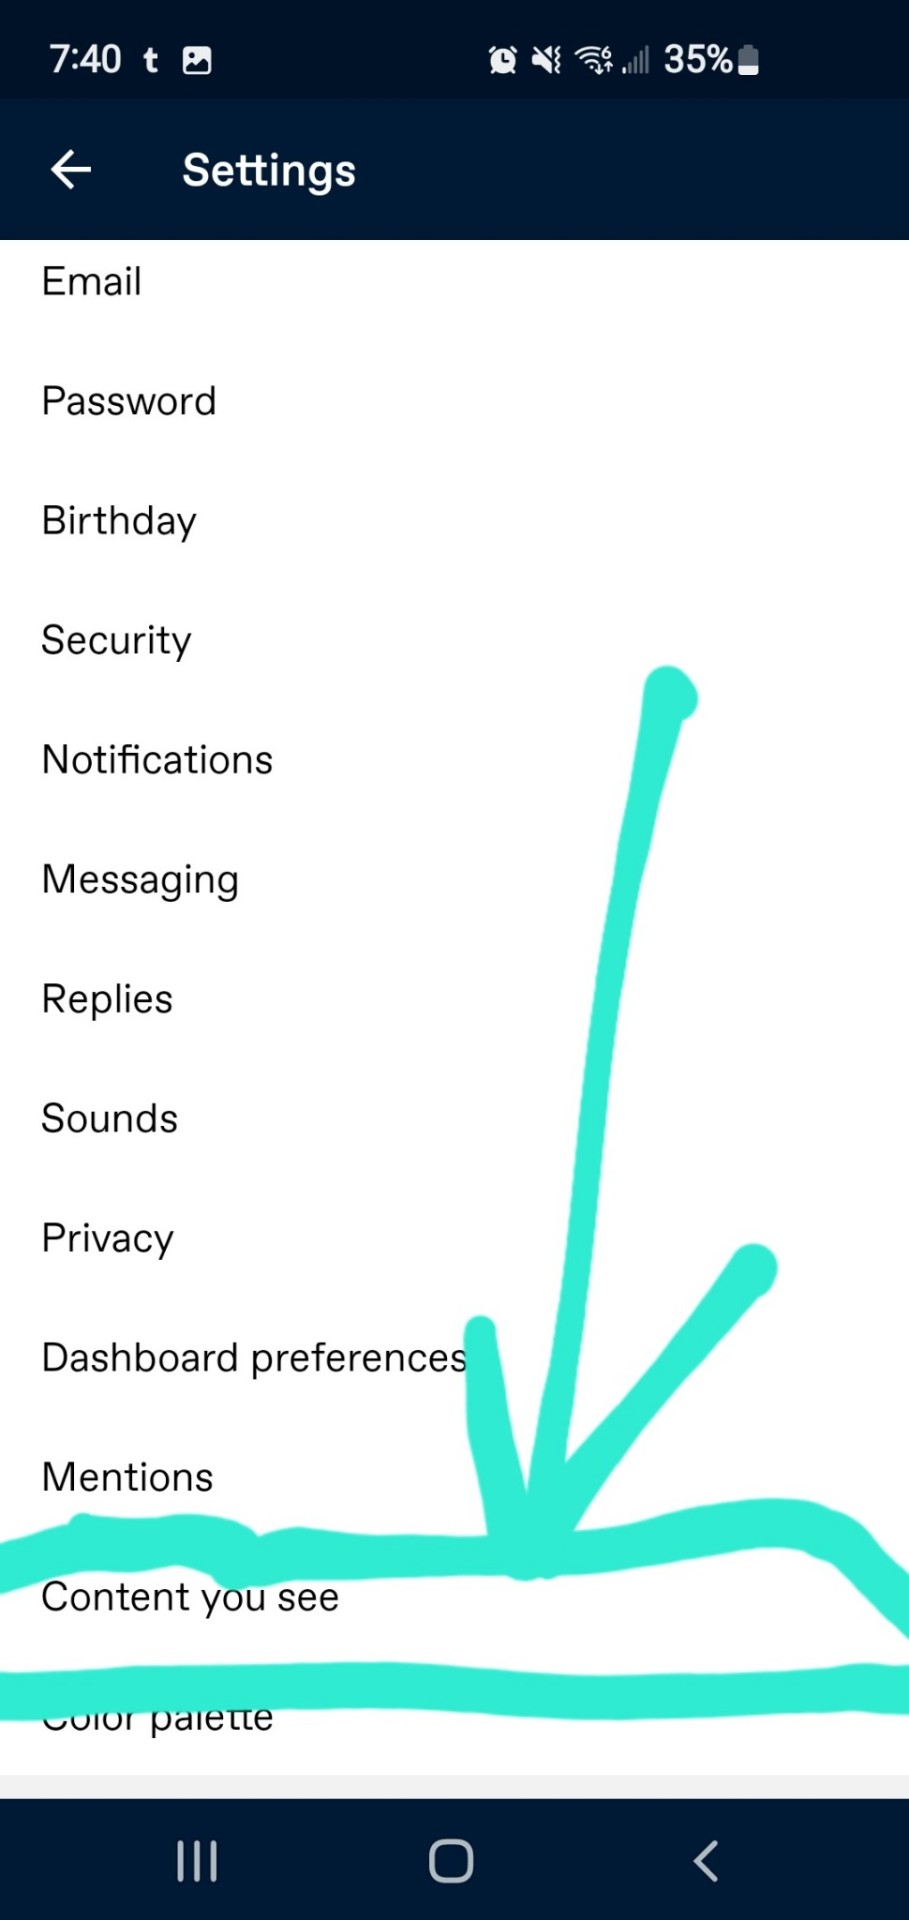
You can manage a lof of your online experience under this tab btw
4. Go "Filtered Tags" and type in the tag you want to filter
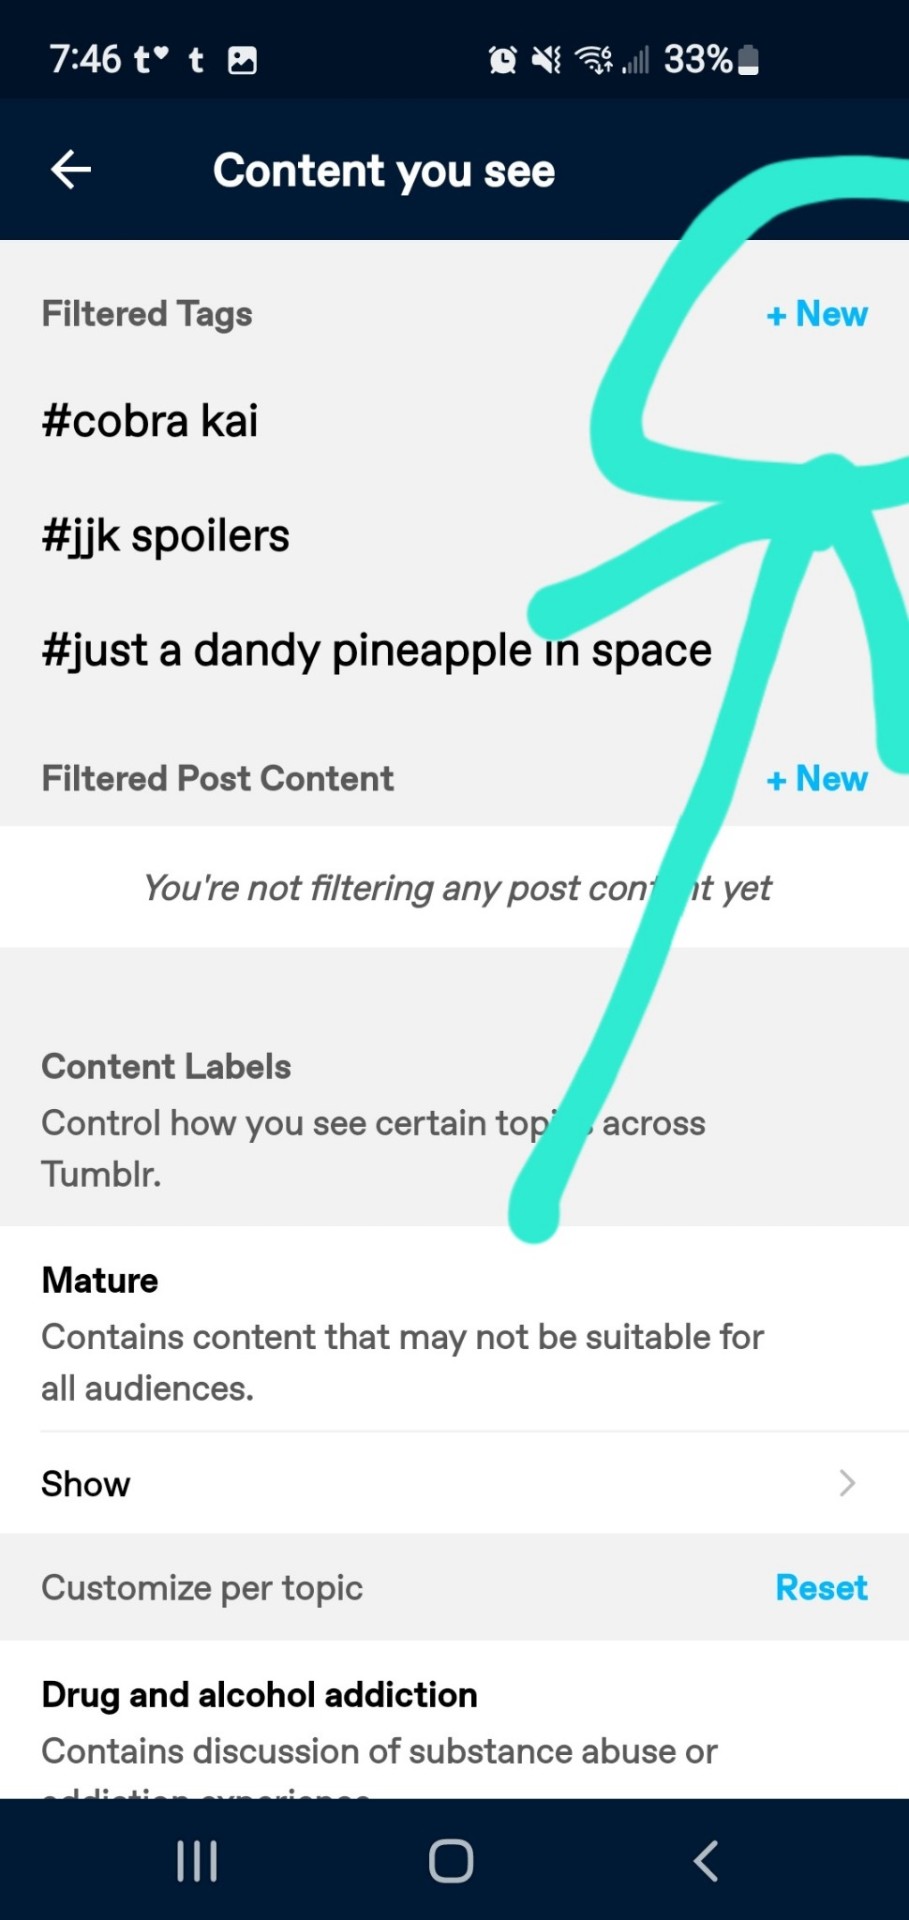
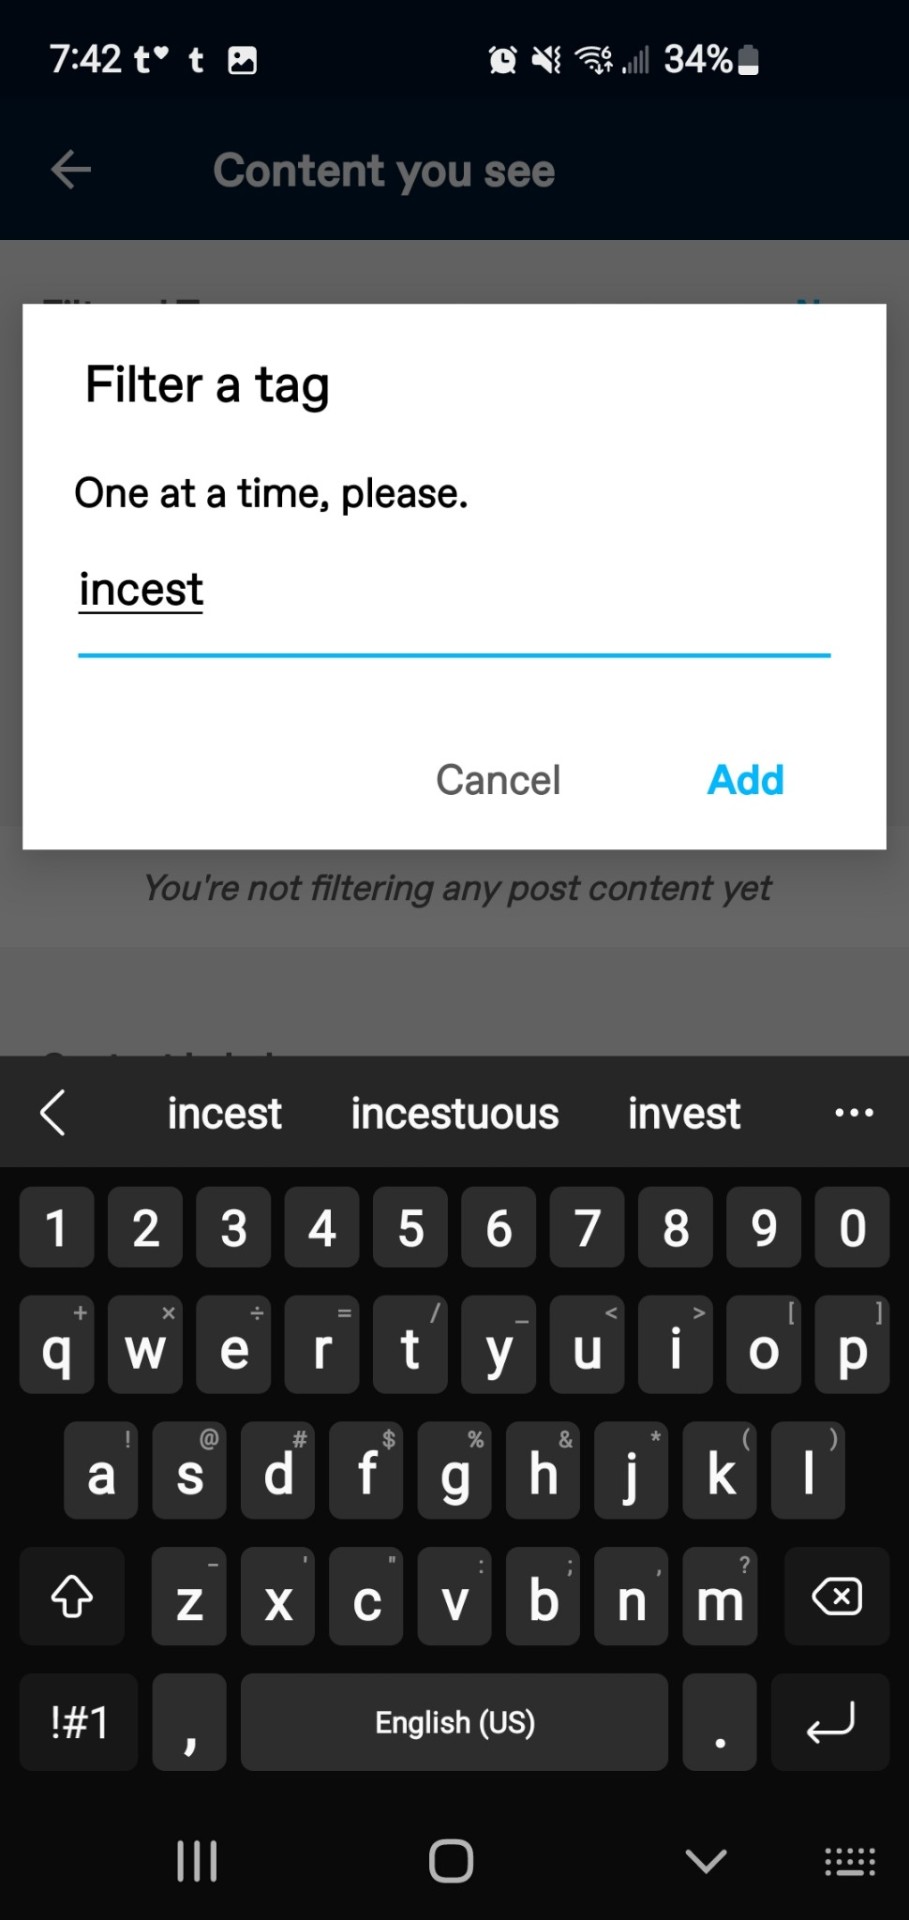
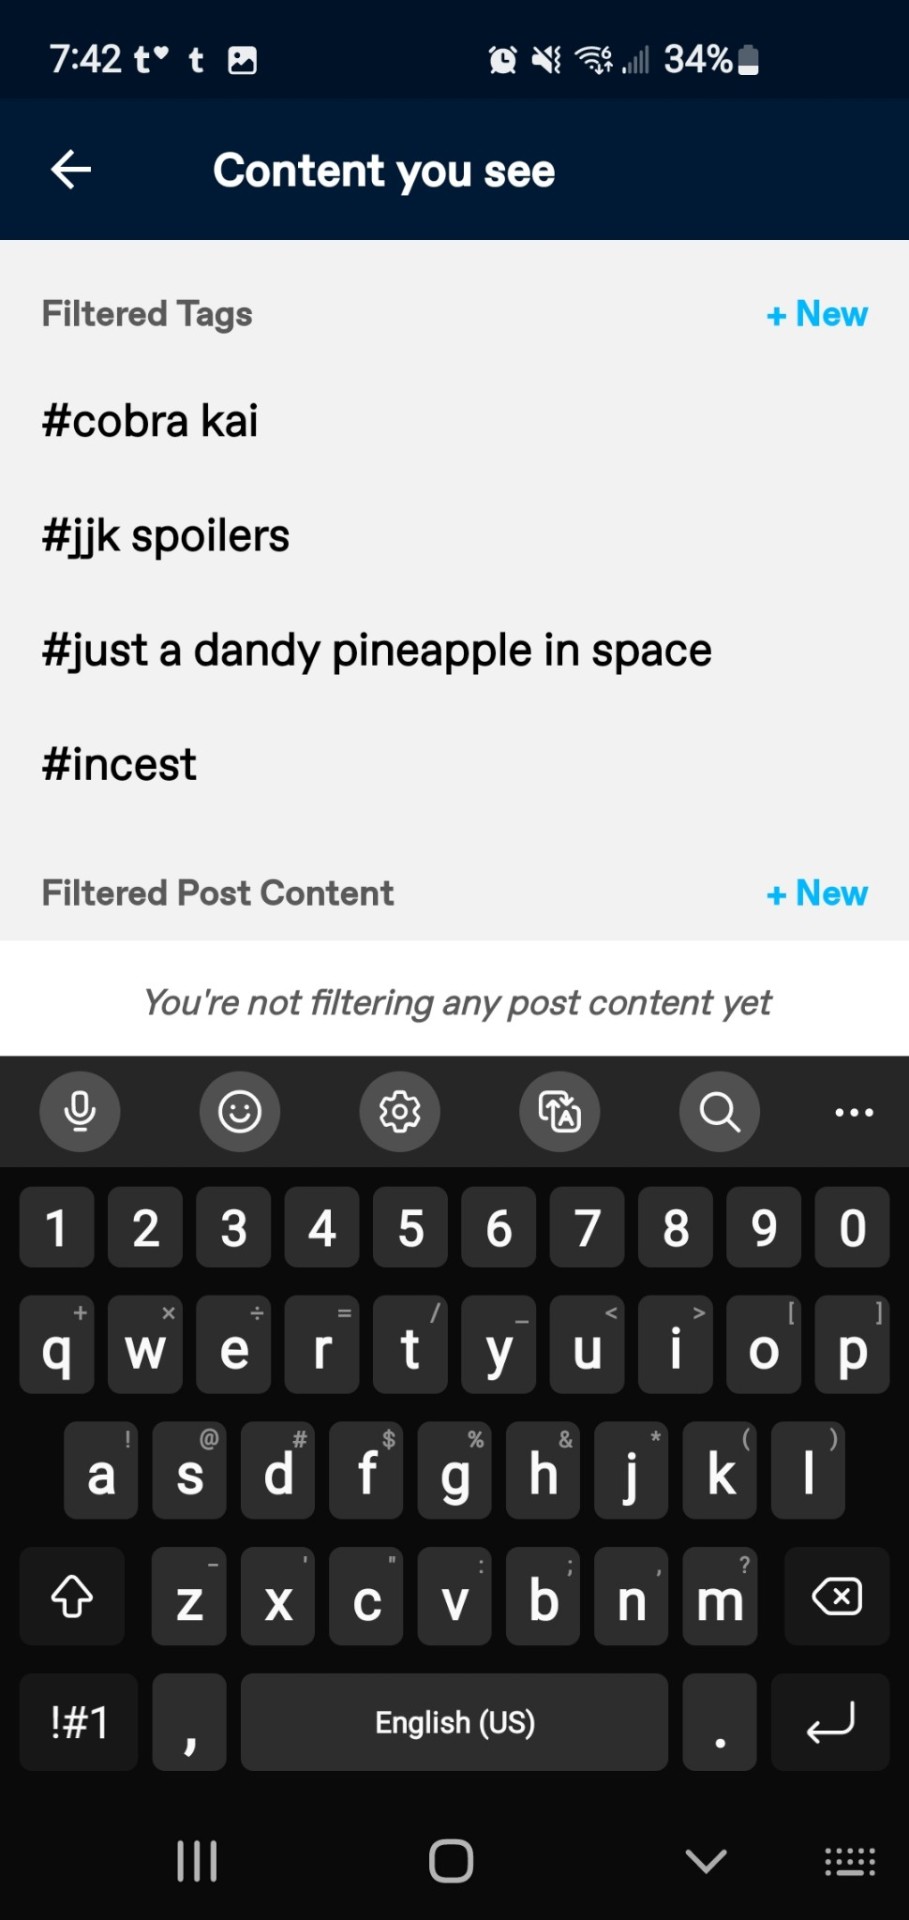
AND VOILA!!! You won't be seeing anything tagged with that anymore!!!
"BUT AIDEN WAIT" I hear you cry, "WHAT ABOUT PEOPLE WHO DONT PROPERLY TAG THEIR CONTENT?!"
That is a major problem and those people suck!! So what do we do when we come across them??
STEP TWO: BLOCK THE USER
You fucking block them. It's not rude, it's not "losing" its just protecting you piece. Here's how
1. Click on the tumblr users name. Here's a rando I found on my dash

This will take you to their page.
2. Click the little person icon
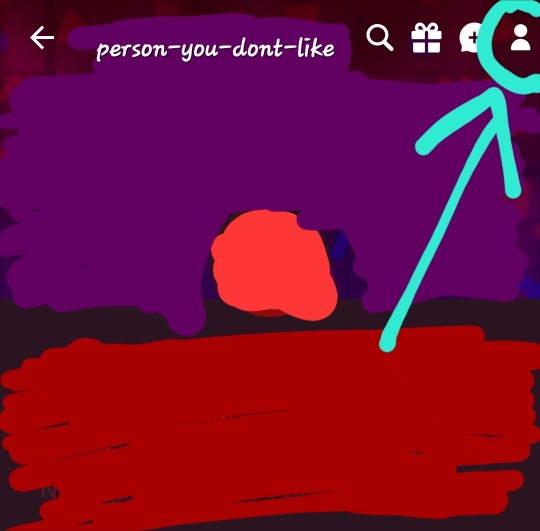
You know the one!
3. Hit the block button.
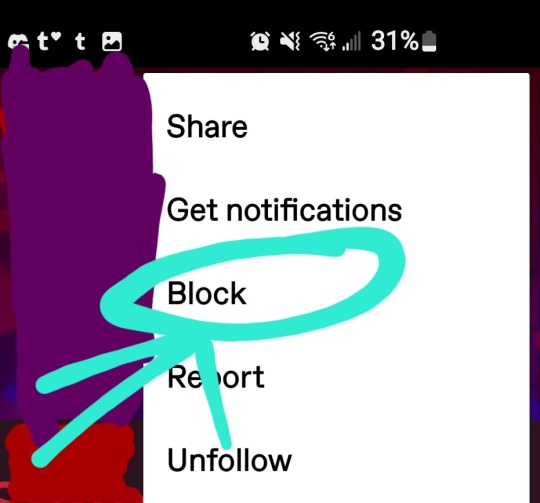
It's right there. So pretty, so beautiful. Block button my beloved, I use her liberally.
Note: DO NOT HARRASS PEOPLE. DO NOT ANNOUNCE YOUR DEPARTURE, THIS IS TUMBLR NOT A FUCKIN AIRPLANE.
Harassing people because you don't like their content isn't going to make them stop posting it. Most times it makes them double down. All your doing is getting yourself worked up over nothing. It's hateful.
Just block them and move on with your day. You're going to feel so much better. You don't need to say your final piece, or attack someone about it. It just makes you look bad. Again, trying to censor the internet will get you no where and only hurt yourself more. Just block the tag, block the user, and enjoy the work that you actually like to see in this world. Please.
And if anyone comes into my inbox or at me on this post with any sort of hatefulness, I'll just assume you live a sad pathetic life and block you ✨️✨️ and then I'll go hang out with my chill ass moots and read my fluffy fan fic 💜💜
#i hate clogging the tag more but i fear this is the only way to reach my target audience#i promise i wont do it again#resident evil#leon kennedy x reader#leon kennedy#re4#re4 remake#albert wesker#albert wesker x reader
62 notes
·
View notes
Text

2 MORE DAYS EVERYONE!!
LS here. Today I'm going to talk about my favorite thing: UI design. When it's good, it's utterly invisible, but when it's bad, everyone notices!
There were definitely some hurdles and hiccups in the UI design of the demo. Part of it was me being unfamiliar with my tools, part of it was not understanding some of the in-built features of the sugarcube twine template. Since then I've brushed up on my JS and restructured things to make the game more intuitive.
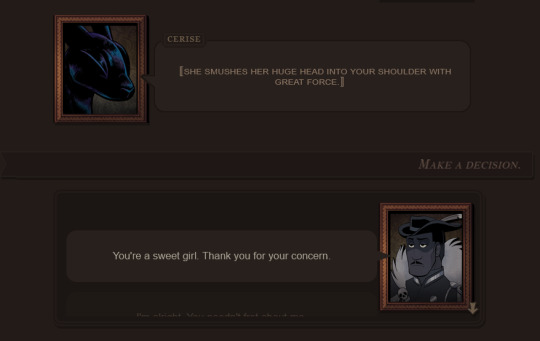
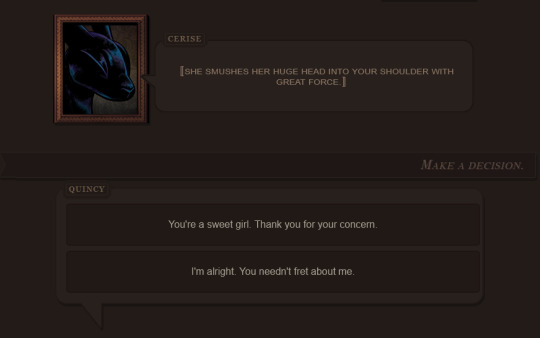
First up, we now have two different options for the choice menu! By default, the game displays the "scrolling list" as seen on the left. Using either touch controls or your mouse scroll wheel, you can cycle through the available options before making your choice... or if your device lacks touch/wheel options (or you dislike needless UI animation), you can set the choice menu to "static list" and have your options display in a plain list.

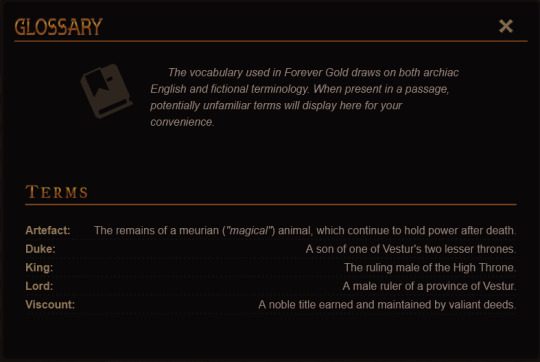
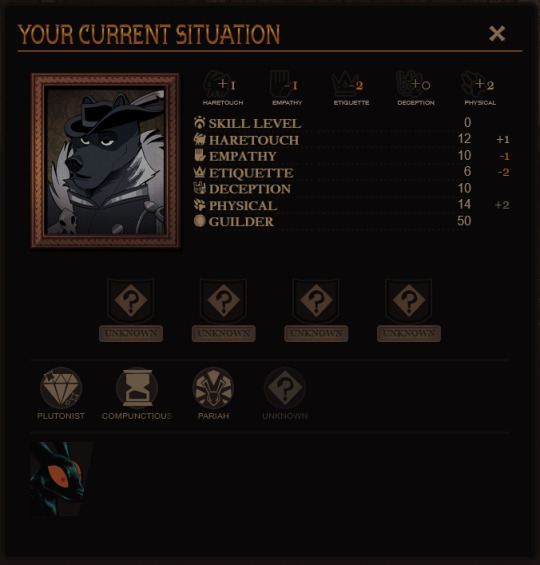
Next is the top bar! At first glance, the buttons might look the same as they did in the demo, but they are not. Yes, the larger of the two still leads to a (new) character summary, but the smaller button now opens the new glossary rather than than being a redundant link to the inventory.
The glossary is a small feature a few readers suggested and it does exactly what it says. It combs through the current passage and looks for vocabulary words which may be unfamiliar to readers.
As always, the glossary feature is meant to be a convenience for readers who may have taken breaks in their playthrough and would like a refresher. It's an anti-frustration feature, not "homework!"
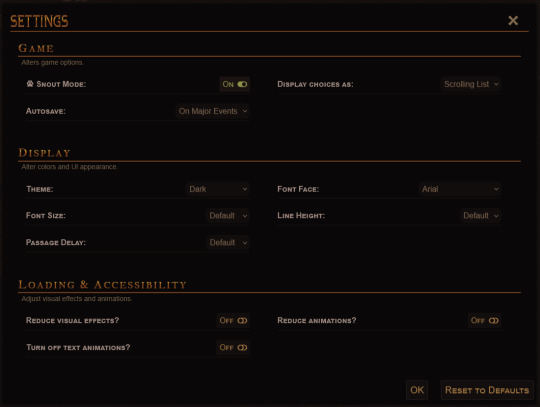
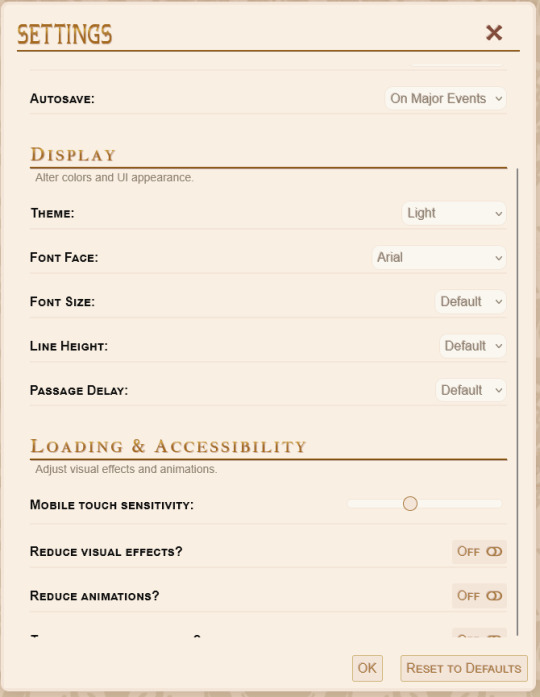
The settings menu is much like it was before, but with a few new features. Changing the theme now changes the UI popups as well as the main layout, so no more white text on dark backgrounds for light theme users! Mobile users will also be happy to learn that you can adjust touch sensitivity - this should hopefully fix some of the issues with people triggering the touch menu when scrolling down the page.
(The touch sensitivity range given in the menu might be tweaked later though - I've only had a few people test mobile for me so my perception of "the average mobile device" has a lot of holes in it. Mobile users, you'll have to let me know if the range is too great/too small to be useful!)
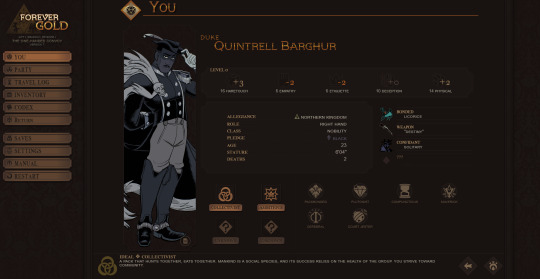
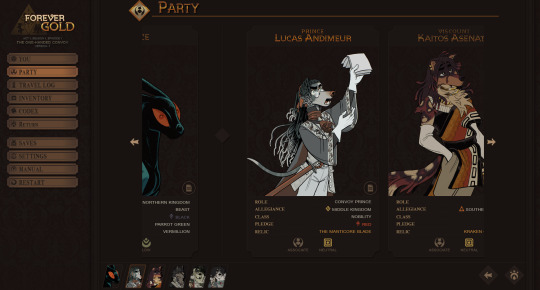
The "You" page has been separated from the Party menu and overhauled. This was mentioned in a previous post, so I'll move on to how the Party menu has been restructured!
Wanting to have as much information as possible easily available, I did away with the individual subpages in favor of these smaller summaries you can scroll through (using touch, mousewheel, or buttons).
The longer, unclear lists of companion thoughts are now represented by almost equally vague relationship icons. The left icon gives you an overview on "what" your relationship is, while the right icon gives you an idea of its "tone." Broadly speaking, "low tension" relationships are ones where the given companion and Quincy largely agree, and "high tension" relations are ones where you do not. A friendship with high tension might manifest as a cheeky rivalry, while a low-tension enemy might be someone who resents Quincy but stays polite for the sake of shared goals.
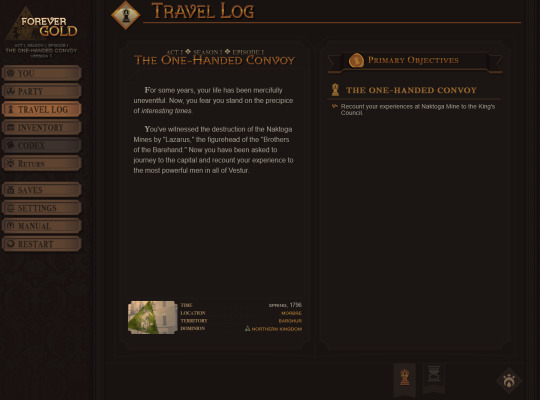
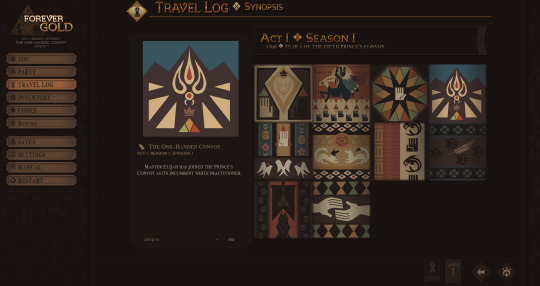
The travel log has gotten a similar retool for ease of use. We've chosen to drop the framing of "quests" in favor of plainly listed "tasks." Itemizing story events as "quests" was a sort of holdover from early development, when we were still conceptualizing what "gameplay" for an IF story like this would even look like, but as development progressed, it became clear that was kind of an overcomplication.
The timeline on the synopsis page has also been done away with in favor of this woven history log which tracks the beginning/ending of arcs and some big ticket player choices. You can scroll through the squares for a brief reminder of what you did in your specific playthrough!
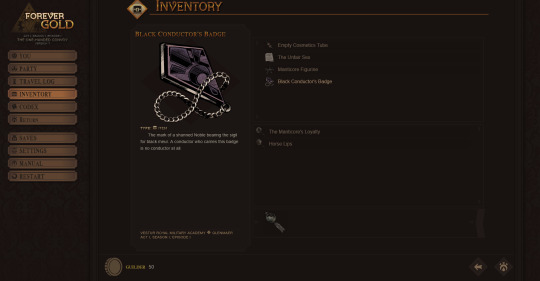
The inventory has been redone to better reflect how we're putting the inventory system to use in-game. Doing away with "notes," we now have three categories of inventory item: actual items, Quincy's observations, and oaths. What is an oath? You'll just have to find out!
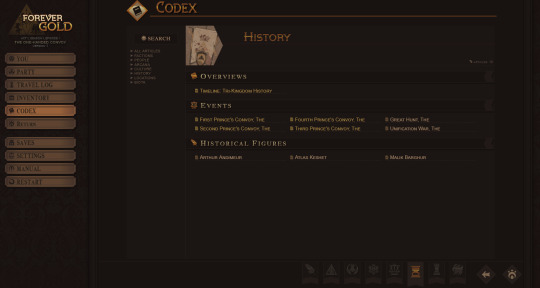
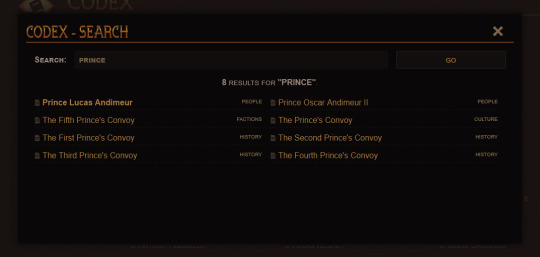
The codex has received a ton of QoL updates - namely, better options for navigation and a simple search function. We've also altered the categories somewhat and reassessed what "deserves" an article and what should exist as an amendment to a larger article, as - for example - giving each and every named location a codex entry like we originally planned would very quickly spin out of control and overwhelm players. We hope the end result is a cleaner codex experience!
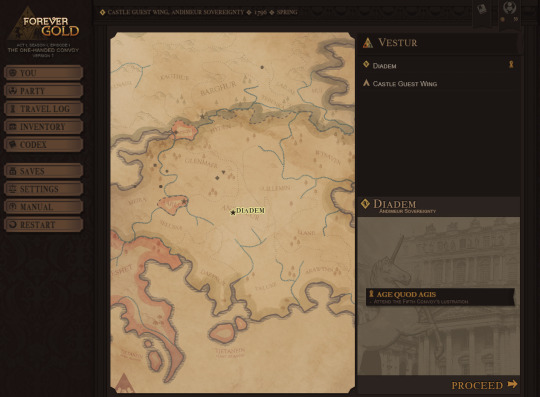
And, finally, we have the retooled map. Instead of awkwardly navigating submenus, we now have one huge map with everything on it! The player can navigate by either clicking the points on the map or the list of available locations. A selected location will display in the corner, and list any active story tasks associated with that location.
And that's all for today's post! We're so close to release, and I can't wait to hear everyone's thoughts on what we've made!
-LS
#forever gold#if game#interactive fiction#twine if#twine game#twine story#twine wip#twine#twine interactive fiction#episode 1 announcement
18 notes
·
View notes
Note
Have you considered posting your comic here on tumblr or showing a preview instead of just links? Just links doesn't give people an idea of what the comic is about and likely won't be clicked on by new people but clips of the comic or the whole pages + external links would help pique interest more
First of all, let me apologize for taking to long to respond to this 😅
And next I want to apologize for this being such a long response.
Truth is, I’ve been thinking about this a lot. Even before you sent me this ask, but I didn’t want to answer right away because I didn’t know what I wanted to do about it yet.
I think you’re definitely right, links to another site are really not the best way to draw people in, especially if you’re on mobile. And I’ve been trying to work on a better solution.
I think for a while I didn’t want to post on tumblr just because that would be another thing I would have to keep track of besides the website, webtoons, and ko-fi and patreon. But I have been considering that more and more, I think that would help make it more accessible, both in general but especially to tumblr users,which is where I think most of my current audience is from lol.
But, I’m still held back by one problem. If I post on tumblr, people can reblog it, (I know I can disable reblogs, but that feels icky to me, I don’t want to make it hard for people to share the comic.) and if they do, then I can’t really control what pages people see in what order, and that’s (generally speaking) not great for stories. I’m not so worried about spoilers, but I’m more concerned that if people are exposed to the comic pages out of order, then the story loses its power of presentation.
I think the story of SotF is really similar to a film, and when you’re advertising a film you make a trailer. You take specifically curated shots and sound bites from the film and place them in a specific sequence to engage the viewers and make them ask questions. Questions like: “How do the main characters end up in a situation like that?”, “How do they get out of it?” “How does Jack Black do as casting for Steve?”, “Is this gonna be as good as the first movie?”. You go see that movie because you want those questions answered. (or you wait a little longer and watch a YouTube review.)
Direction wise, it’s almost a mini film in and of itself. If you see a clip of a film by itself without any explanation, you don’t feel as engaged with it as you would if you saw that scene within the context of the movie as a whole. But it also doesn’t pique as much interest as one specific line from that scene would out of context. It’s a balance between asking and answering questions. What you give/show that makes the viewers ask questions that they want answered.
I really don’t know how to apply all of this to advertising a comic though, and I may be making this more complicated than it needs to be lol. But I think for now at least, I don’t have enough material to advertise with anyway. I haven’t even gotten through the prologue yet! I think right now the best thing I could do for advertising is making promotional posters. And even that is something I have to budget time for.
I also thought about posting clips of some sort, but I couldn’t really figure out how to do that with the pages of comic that I’d put out so far. I would have to do it in either one of two ways: (if there’s another way let me know lol) I’d either have to post a few pages at a time, let people see what the comic is like and get invested so they actually want to click a link to see the rest (this is what I see most people doing), or I would post a snippet of one page, giving people a small glimpse of what happens so that people want to click the link to be able to read the whole page. But there were problems with each. I’m working on this comic very slowly, as I don’t have a lot of time to put towards it, so posting two or three pages all at once would amount to months of work.
And I couldn’t really find a way to cut my comic pages into little snippets. I feel like that can compromise some of the structure of the page as a whole, since I design the pages to be viewed as a whole, to draw the viewer’s eye from here to there. If I clip it down, I don’t think your eyes would track with the page in the same way when you see the full page. I think this method works better for comics that use the infinite scroll format. At least, that’s where I’ve seen it work best.
So TL;DR: I want to up the promotion of my comic but i can't really do that at this point with the low amount of material I've made so far or without potentially compromising the experience of the story of the comic.
Thank you for sending this ask! It really made me think and helped me put these thoughts to words.
If anyone wants to comment or add to the discussion, feel free!
13 notes
·
View notes
Text
A Guide to Tumblr Communities
Hi everyone!
Communities are the newest Beta feature that Tumblr staff has rolled out, and it looks very promising! Unfortunately it's also incredibly confusing. So here's an informative guide on how to make your own, or join another, community using my own experience alongside information from the Tumblr help article "Communities". This article seems to have been posted when it was still freshly in Beta, so the information may not be entirely up to date. As new updates roll out I will update this guide accordingly.
Not sure if communities work well on mobile, but can confirm it works okay on desktop! Message me with any questions or concerns and we can work it out together. As always, thanks for reading, and let me know what you think!
Making a Community

Making a Tumblr community is easy, but not guaranteed. Right now there is a waitlist and communities may or may not be approved. When making your new community, first you must choose a name and your tagline. Your tagline will basically be describing the page for your audience and prospective members.
Next, choose whether to be public or private. I recommend public, as it is a community and you want more people to see it and to join.
Your community appearance is up next, and you need to choose your banner and avatar for the community.
Finally, your tags! Add up to ten tags to describe your community.
MAKE SURE that you are completely satisfied with all of these, as of right now there is no way to change them. At all.
Now it's the waiting game to see whether or not Tumblr will approve your community! If it is approved, Tumblrbot will message you saying "Your community was approved! 🎉 Check it out here: ..." and send a link to your new community.
The Roles in a Community

According to the Tumblr guide "Communities", each community has a few different roles available. Admins, the one who makes the community, can invite users, see (and cancel) pending invites, and delete posts and comments. The moderator role is upcoming and not yet available, but they will only be able to delete posts and comments. Members, the person who joins a created community, can interact through reacting to posts, leaving comments, making new posts, and reblogging posts into the community. Non-members cannot do any of this, but they can lurk and see the public parts of the community without interacting.
Joining a Community

Joining a community is a murky land, but let's navigate it together!
To join an active community, first you must find it. You can only access a community through a direct link, as they are not searchable in their own section yet! You can either look through the tag "Tumblr Communities" and try to find one through posts there, or maybe someone you're following has shared a link to their own community. Mine can be found at https://www.tumblr.com/communities/weheartit if you want to test any of this out ;)
Go to the page for the community! See if they have any posted rules, their about page, etc and make sure it's a good fit for you. Once sure, you can message the admin (their username should be publicly available) and ask for them to invite you. At this point I'm not sure when you can request to join via the community directly, but it's definitely upcoming. It's important to note that you cannot join a community as a side blog! I repeat, to join a community it has to be through your main blog. (this is where I ran into trouble for writing this section!! so if you guys can crowdsource this with me I would appreciate it!)
The maximum amount of members in a community is 500, and has potential to be increased in the future depending on popularity of this feature. The roles of each community member are outlined above, which details their range of actions.
To join my community of WeHeartIt♥, please leave me a comment here or DM me and I'll send you an invite!!
To reblog posts there, it so far appears that must be done through the desktop site instead of the mobile app, and can't be done through quick reblog. You need to manually choose to reblog it to the community you're a member of, and share it to the community. Note that the community admin or mod (upcoming) may remove it at their discretion. If it's a public community you can lurk without joining, but remember that as a non-member you cannot interact with the posts and some features will be locked for you!
#tumblr community#tumblr communities#hey yall i made another guide#this time to communities!#tumblr guide#community#communities#weheartit#we heart it#lets make a guide#text post#text#guide#eatsless guides
27 notes
·
View notes
Text
Some learning apps I've liked (in no patrticular order)
Renshuu (japanese): good lessons, a bit slow paced for me
Readibu (chinese reading app): free version is good, paid version includes full sentence audio and translations I think which may be useful.
Pleco (chinese dictionary and reader app): top level app, get it now if you study chinese and use your phone at all. Its free version includes a huge great dictionary, and Clipboard Reader which has ALL the Reader features just that you have to copy and paste the chinese text in (their paid Reader you can upload epub txt files etc directly). Their paid features are nice because they are all 1 time fees: pay 5 dollars once and have the purchased item forever. I hate subscriptions so i love that this app does single purchase instead. I bought some graded readers on this, and expanded dictionaries. Its Dictate Text text to speech feature is nice in the Reader/Clipboard reader because it highlights the word as it reads and shows translation, making it easy to follow along.
Duoreader: a free basic app, has a few parallel language books for many languuages. It includes text to speech audio and click word translation. Excellent for free reading with parallel text set up.
Smart Book by Kursx (also under the name Parallel Translation of books by kursx on the app store): it uses mtl, but you can search for books or import books, and it will show sentence translations or make an entire parallel text for you, it also has click translations, word saving, progress information (which is motivating to me), and text to speech read aloud function. Its currently what i use the most for reading. Trahslations are as good as Lingq or Google Translate so NOT always reliable but useable and the sentence translation helps for figuring out grammar. But Pleco and Readibu have BETTER translations. For chinese this app is good, for japanese its useable if youre upper beginner but if you dont know basic grammar and particles then the japanese individual word translations are often wrong and unreliable - sentence long translations are useable though.
Tofugu: good hanzi study app.
Anki: great app especially if you import decks made by people around the internet. I look up decks by going to a search engine and typing in something like "4000 hanzi mnemonics anki deck" or "common chinese words in sentences anki deck." I have recommended some anki decks I've used on this blog. A tip about anki: their website works fine in mobile browsers, you do not have to pay for any app to use anki on your phone, you can just use the site if you'd prefer. For initial uploads of flashcard decks created by other users, you will need to install anki on a computer, then download the anki deck from the deck's page online, then put it into your computer anki program. After you do that, you can sync your computer anki to the website one. Then you can use anki either online or on the computer or on both. I use anki only on my phone mobile browser. It seems the main benefit of anki phone apps over using the internet mobile browser, is flashcards are easier to Make if you end up wanting to make your own anki flashcards on your phone.
Immersive Chinese: chinese lessons. I haven't used it much but I like the structure
Glossika: I specifically recommend getting the old cds, possibly through your library, or finding the mp3 files online. I think the audio files are easier if youre not good at focusing on consistently doing SRS flashcards, since spaced repetition study sentences are the new glossika model and require a monthly subscription. Plus side to the new model: most languages have around 6000 sentences where the old cd courses often had around 3000 sentences. Plus side to the old cds/mp3s: can be found in many libraries for free, and online, and if you do buy them theyre a one time cost. Excellent resource if you like audio review (i do), with common grammar and vocabulary taught. I like that even the 3000 word old courses will get you at least to upper beginner or lower intermediate, enough knowledge to start learning by reading or watching shows and looking words up, and enough words to have some conversations. Pimsleur is similar but tends to cover less vocabulary, so afterward you need to learn more words on your own before you can immerse and look up words to study.
Japaneseaudiolessons.com: a website with free japanese audio lessons, a free textbook, free notes. They also have nice kanji learning books with pre written mnemonics and sentence examples for sale.
Your local library: a lot of libraries have deals with language learning sites/apps, your specific library may provide some courses for free. In addition, apps Hoopla and Libby have a lot of courses and digital textbooks and audios you can check out. You can use those apps with a library card. If you are a college student, a lot of college ebook collections include MANY textbooks and independent study books for languages. Nearly every Tuttle book I got for studying Japanese and Chinese, I was able to check out the ebook version first using my college library and only bought those books because I ended up finding them so useful I wanted print copies. (For that matter, some under $20 dollar reference books I owe for teaching me hanzi and kanji: Tuttle Learning Chinese Characters: HSK Levels 1-3 - this book gave me a foundation in hanzi and was the easiest guide for learning hanzi for me and learning HOW to remember them. I found it more useful than Heisig's Remember the Kanji/Hanzi books by far, although they utilize a similat idea, and less effort to remember than Kodansha Kanji Learner's Guide - although I like that reference book as a reference. Runner up is Tuttle Learn Japanese Today: The Easy Way to Learn 400 Practical Kanji by Len Walsh. It was more basic than the hanzi book, less in depth, but a very approachable understandable and quick to learn kanji book to start out with when studying Japanese, that will not overwhelm you the way say Heisig or KKLG might. For hanzi I used my Learning Chinese Characters book for a few months, then an anki deck "hanzi 2000 mnemonics pinyin" while also just regularly looking up new words while reading graded readers then chinese show subtitles then webnovels, and making up my own mnemonics which got easier over time. For japanese, I followed up with a vocabulary deck as I found vocabulary easier to remember than isolated kanji, and kanji.koohi.com was a useful site for free user submitted mnemonics to remember kanji when I struggled to remember. Its also a good site for free flashcards and study of kanji generally.
ChinesePronunciationTrainer: a really simple free app. It's biggest usefulness is practicing pronunciation. You can record yourself trying to pronounce a sentence after hearing the chinese pronunciation, then play back your recorded attempt compared to the chinese pronunciation. The app makes shadowing easier to evaluate, so you can compare and notice if you're making pronunciation errors and work on them. It's also very simple low feature speaking practice.
LingoTube: free app, uses machine translation. If you want to watch youtube with dual subtitles, or click translations on subtitles, or instant replay/loop of dialogue lines, this is an app that can do that. Very useful for immersing with youtube videos like youtubers and shows on youtube.
Idiom app: it is orange with an i on the icon. Click skip for the "helm" offer when you first download it, helm is a paid add on for better translations and you may not want it right away. The core app is free (helm add on costs a subscription). This app is basically Lingq but free. Translation quality is the same, which appears to be google translate quality on Lingq and Idiom. So some errors, but useable especially as you hit upper beginner and above and can notice when you may want to reference a word in an external dictionary (like Pleco app for chinese, yomiwa app for japanese, etc).
Satori Reader: a graded reader app for japanese, absolutely amazing quality material. I recommend exploring the free content on the app. If you decide you'll use it a lot, or plan to get into a reading kick for a few months, it's worth getting a subscription for a while. I plan to get a subscription once I have the time to read japanese 1-2 hours a day for a few months. Satori Reader has tons of reading materials branching from approachable to an upper beginner (say you can read Yostuba manga a bit, or are in Genki 2, or know around 2000 words) to you're almost ready to read webnovels or regular japanese novels but the difficulty bump is just a Touch too steep. If you go through the various reading level material on the app, you shpuld be prepared to handle at least some japanese novels for natives once you can handle some of the higher reading level stuff on Satori Reader. In addition: the translations are done by professional translators with in depth notes on grammar points (incredibly useful and the best explanations on Japanese Graded Readers Ive used), fully narrated stories by real people, and many of the graded readers are designed to be enjoyable long reading material in their own right. There's also some multiple difficulty versions of reading material if you'd like to read an easier version before trying a more complex version of the same story. There is so much reading material on the app you can get significant practice and vocabulary/grammar improvement if you have time to read. I lnow a few people who got through a few hundred+ chapters on this app, and generally they went from N4 or N3 reading level to N2 or N1. Then they transitioned to reading novels for natives. As far as high quality well made well explained plentiful graded reading material for japanese, this is one of the best resources I've found. (The other 2 great graded readers I have are textbooks, one being a Tuttle Read Japanese book that goes from basics through to being able to read 2000 kanji, newspapers and documents, formal and informal, and is dry af to read but generally leaves you fairly prepared for japanese reading, and a more basic Beginning Japanese Reading book thats part of a 4 part textbook collection and absolutely drills the basic 500 most common kanji and many words, hiragana and katakana and many words in them, for 500 or so pages).
Microsoft Edge. I know, weird. Edge on computer and mobile internet browser has a Read Aloud tool. It is the best sounding text to speech Ive heard. This Read Aloud tool is also in Microsoft Word if you copy paste text into Word. I find going to sites in my target language, and using the Read Aloud tool, is a nice way to get audio in with my reading when I can't find an audiobook. The tool also highlights the word as it reads, helping you keep up with the reading, and for me it helps improve my reading speed. In addition, ANY web browser (and any phone/tablet Reader app like Kindle, Moonreader, Kybooks etc.) often has the ability to click or tap or highlight a word to look up the translation. So when reading on any of those internet browsers/Readers, you can look up words just like you would on Lingq but free.
Japanese.io: a site with japanese graded reading material, and tools like click translation and saving words.
https://www.sosekiproject.org/about.html If you like the author Soseki, this site is awesome. It features full audio of his works, full parallel text translation, and individual word translation.
43 notes
·
View notes
Note
Hey Days!!!
This might sound like a stupid ask, but is the AO3 app legit? I feel like it would be easier if we can view everything in an app 😄
Hello! Not a stupid question. This topic has brought up a ton of discussion across fandoms, and so I’ll summarize what I’ve seen (mostly from following ao3commentoftheday’s tumblr blog).
There will likely never be an official ao3 app because
1. Too much manpower is required to create, maintain, and then continually do app updates, like whenever phones update to a new version. And since Ao3 is completely volunteer-driven, they probably don't have the manpower to spare on an app. They'd rather use their manpower to keep the regular website running for all of their millions of users.
2. Apple has policies about adult content, and fanfiction is full of spicy, problematic, and disturbing content. Ao3 would never delete or censor people's stories just to have an app available on Apple. Apple would never allow Ao3 as it is currently.
3. Businesses push for people to download their apps because they can force advertisements on their viewers, and viewers can't block the ads if they're on the app. So they can make money. Ao3 doesn't even have ads in the first place because everything is run through donations. There would be 0 gain for Ao3 and only a waste of manpower.
4. Ao3 is already reader-friendly on the phone from the website. They already put a lot of effort into the current website, so an app wouldn't add anything.
From what I've seen, here's a summary of reasons to NOT use an unofficial Ao3 app:
You would be giving your login information to a third party.
You have to pay to download some of these unofficial apps to cover the labor costs for the people who created the app.
Because fanfic writers upload their stories for free online, some feel that it's unfair profit for the app creators. I don't personally feel that way, though I understand that viewpoint. It's something to take into consideration.
Alternatives that other tumblr users have suggested instead of using an app:
Add a different mobile browser dedicated to opening fanfiction.
Download fics from Ao3 you enjoy as e-readers and adding them to the Kindle app so you can read them whenever you want. All Ao3 writers automatically consent to having their fics downloadable when they post on Ao3.
On Apple devices, apparently you can bookmark a Safari page onto your phone's home screen.
On Chrome, apparently you can do the same thing. Go to the three dots from the page you want to save, choose the Add to Home screen option, and then you'll have an icon shortcut.
Bookmark your main Ao3 search tags on your browser.
If you just want things to be "easier" and you're wishing for certain features, you can try out the publicly available site skins, like Reversi (for dark mode) or this one for dyslexia. Here are the Ao3 Instructions on using skins. Others use site skins to block certain users or hide fic stats (like views and kudos counts). That blog I follow Ao3cotd made a bunch of cute ones, like I use their pink one, or there's this pretty firefly one, art deco one, dark galaxy theme, pink and green frog theme, and this peach theme they made. They deleted their code for the pink one 😥, but since I'm using it, I still have the code on my account, so lmk if you want it.
That was probably a longer answer than you needed, but I hope it helps!
10 notes
·
View notes
Text
[ New post by krismas1031 ]
[ Link here at "https://krismas-holiday.tumblr.com/welcome-blog" ]
[ Transcript + Screenshots for mobile users under the cut (spoilers for some of the page's secrets) ]
[ Sidebar content - This will likely be updated later ]
Pinned posts:
Welcome Blog? Posted on: 11/24/20XX
DB:GraveRoots Posted on: 07/03/20XX
Dino Girl Posted on: xx/xx/20XX
Piano Posted on: xx/xx/20XX
Door Load Glitch Posted on: xx/xx/20XX
Hiatus Posted on: xx/xx/20XX
Links:
Tag index
My friend's blog
My Guestbook
Submit Something
Dragon Blazers Wiki
Dragon Blazers: GRAVEROOTS
My Playlist
My Comic
Post Archive
[ "welcome-blog" screenshots. ]


[ "welcome-blog" transcript start. ]
Post title: Welcome Blog? Posted on: 11/24/20XX
Main body of text: My friend suggested I should make a blog, so... hello world? My mom also suggested I should PROBABLY journal now that I am out of therapy. She said it would keep up good habits. Usually I just use my brother's account for this kind of stuff, but with everything going on recently, I felt like I should do something nice for my friend.
She was pretty enthusiastic when I asked her about it, told me she would walk me through it all. Even though it has been a while since we spoke, it was almost relieving to see her so excited about something. Me and her sat down in the library together, she set us up on the laptop and walked me through how to do all the basics. Fortunately, I already knew a handful of things from fucking with my brother's pages. I let her explain it all to me anyway. It seemed like she needed it. That, and it was nice hearing her so passionate about one of her pastimes.
She had a speech about internet safety. I let her give me the whole spiel. She, apparently, had not caught on that I was the one prank calling the kid who left his phone number in her comments, LOL. She told me about how frustrating it was trying to talk him into deleting it.
I spent some time polishing the original layout she gave me, dug around to find out how to make it look nice. No offense to her, but her page looks like she owns a hundred Christmas sweaters. That is... not my kind of thing. I was thinking about my page Dragon Blazers themed, but I think what I came up with is much cooler.
Typing this all out is a bit weird, but I guess having the time and space to speak my mind is nice. I will probably post here more once I get started on a project. I had something in mind for a ROMB hack of the aforementioned Dragon Blazers. It would be really, really funny to watch SOMEONE in particular get mad when he has a skill issue and gets pulverised by the easiest boss.
My friend told me I should probably advertise my guestbook and encourage people to leave comments when I thought it was appropriate. So, if you are seeing this and want to do any of that sort of stuff, here is the link to my guestbook. [Links to Ask page] I will see when I can get around to interacting with people. Maybe if I get a comment I really like I will do a little drawing with it, too. [Links to art-therapy page]
Mood: Mossy Listening to: Dragon Blazers - Icy Wonders [Links to Youtube video "Girl next door" by Toby Fox]
(Leave a comment) [Links to Ask page]
[ "welcome-blog" transcript end. ]
[ "art-therapy" screenshots. ]


[ "art-therapy" transcript start. ]
Post title: [🔒] Art Therapy Posted on: 12/25/20XX
Main body of text: After Dess went missing, my mom started taking me to therapists. I always hated it. None of them stuck, and the ones who actually tried had trouble getting me to talk. It was awful. I would sit in the room and they would ask me a bunch of questions that just made me feel stupid, or made me feel worse. I ended up just making it a waste of Mom's time and money.
My dad had a different idea. While I was still in therapy, he took me to an art club. They were set up at a library just outside of my hometown. They would gather up anyone willing to come and have us all draw, paint, or sculpt for a while. It was fine. Nothing meaningful happened for the most part. I mostly spent my time there drawing some pictures of characters that I had made up, or gluing things in places that they were not supposed to be glued. Sometimes I would draw other things. Things I had talked about in therapy that day, but, mostly? It was unproductive.
One day, though, Dad brought me in on a slow Monday. My mom let me off the hook for attendance because she could see it was one of those really bad days for me . I found a canvas in the back, one that no one would see me drawing on. I am not sure what it was exactly. That day, when I picked up that pencil, I was determined to draw it.
So I drew. Laid thick lines into the paper. I think I snapped the lead in my pencil at some point? I just had to get it out. Cut into the surface of the paper and let it bleed the graphite in the shape of the thing in my mind. Nothing came out right, though. I kept drawing it- over, and over. All on the same page. When I stopped and stepped back to look, I just felt this dread. I could just barely feel myself shaking. It started getting hard to breathe. It almost felt like I was dying. I had to get it off of the page. I NEEDED to get RID of that grey smudge.
That was all it was. A glittering grey smudge on the canvas. It felt like I was drowning on dry land.
I ended up silently crying to myself, it was really stupid. Why should I be crying? Dess' family is the one missing their daughter, and I am the stupid human freak that fucked it up.
I got some supplies from across the room and blotted the whole thing out. I painted over it. Greens and browns, yellows, blues. Anything but that horrible grey. What I ended up with was a Christmas tree. In hindsight, it was probably not any better than the thing I drew in the first place. It was more palatable, but...
..."Krismas". That was the nickname Dess and Rudy gave me. I fucked up their lives. If not for me being a stupid, stupid nosy kid, Dess would still be here.
I went to play for Noelle a few weeks back. I know she liked hearing it, but, the sound of the piano in the house was hollow. Especially ME playing the piano- Dess should be there, playing her guitar for Noelle. Not me amateurishly slamming keys on a keyboard. At least when Dess played it sounded good.
Mood: --- Listening to: --- [Links to Youtube video "The distance between two" by Toby Fox]
(Leave a comment) [Links to Ask page]
[ "art-therapy" transcript end. ]
------ ------ ------ ------ ------ ------
// Developer commentary:
//I tried really hard to get this to look good and spent a lot of time drafting this out LOL. Technically this is pre-game content but... Noelle's blog mentioned a lot of ch3&4 stuff, and this does similarly touch on some of that indirectly.
I've never made an html/css page before this, just spent a lot of time being confused by it on old school forums, so give me a little leeway. Maybe if i learn enough I'll revise to add the music player I wanted or change my main theme to match
I'll be updating the links on their page with new pages, and they'll get their own posts when I do, too.
The tag index and blogpost archive will be updated later! This was just taking a long time and I wanted to post semi-regularly, so, they're not done yet.
#deltarune#Kris deltarune#kris dr#kris dreemurr#character blog#Deltarune: Darkroots#*(you closed your eyes...)#*(it's what they call “you.”)#*(Kris picked up a pencil.)#// HTML page#// developer commentary#deltarune chapter 1#deltarune chapter 2#deltarune chapter 3#deltarune chapter 4#content warning
2 notes
·
View notes
Text
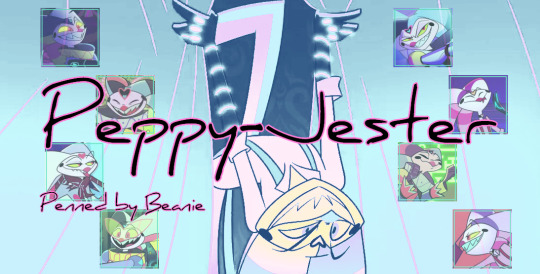
~ Indie rp and ask blog for Fizzrolli from Helluva Boss. Selective, Mutuals only! Read the rules before following, thank you. Mun is +35 year old fossil, so no minors!
AFFILIATED WITH @rapid-as-sass-in-nation-team @blitzbuckz @themosthatedbeingg @houseofasmodeus / @sinfuldxgenerates @queenbeeibee@hellpride / @originalmigraine / @greedonya @beautifulxdangerous //will be adding here more people who wants to be affiliated
Rules And About Mun // Promo
Mammon blog @unhinged-greed // former sideblog @unhinged-greed-a Barbie Wire sideblog @wired-for-trouble
~~Rules for mobile users under the cut~~
1. No godmodding or Powerplay. I don't give you permission to make decisions for my muse without consulting me first. You can move him around if needed to that’s all fine~
2. This blog is an Independent, Selective and Mutuals only blog. I may not follow everyone because I want to keep my dash clean, been unfollowing people who don’t use their roleplay blog only for OOC posting or reblogging unrelated stuff.
3. Minors, personals and rule breakers will be soft or hard blogged. I will not rp or interact with minor muns for my own safety. Personals are welcome to send in character related asks etc, but I won’t be roleplaying with you either.
4. Multimuse, Multifandom and OC friendly. Not okay with roleplaying minor OC characters either. Please have some sort of information page of your character. Multifandom/crossover roleplays are welcome but there are some fandoms I don’t want anything to do with.
5. Headcanon based. Canon exists in this blog. But how I rp as Fizz is bit more headcanon based. He has his childish side showing up quite often, this is because he have been working ever since he was little kid. His parents are dead so he hasn’t been able to be like a ‘normal child’ so now it’s showing up.
6. Duplicate Muses. Are ok only if they are part of multimuse blog. I get very anxious when I see a duplicate muse on my dash, minus a few of my friends who I share Fizz and Mammon with.
7. NSFW. Horny demons, what can I say. Fizz has his moments. All the NSFW themes will be tagged as such.
8. Triggering themes. Such violent and more dark themed rp’s will be tagged as “tw; blood” or “tw; injury”. If I ever miss a trigger warning, please message me. I don’t want to make anyone feel uncomfortable.
9. Shipping. Yes! This blog is multiship! But I only ship with chemistry and would like to know the other mun before anything happens between our boys. Yes, boys. Fizz is not straight. Never feel pressured to ship with me. I’m fine for example Fizz and Ozzie only being business partners. Also not all the ships need to be healthy or actual romantic ships. The main ships for me are OzzFizz, BlitzFizz, StrikerFizz that I like. Wanna ship? Throw me with IM, let’s see what happens~
10. Safe Zone. This blog is as Drama Free as possible! I have zero tolerance of drama, not gonna spread it. Anons will be blocked and blogs will be blocked forever.
11. Replies. My replies vary from a few lines to several paragraphs depending how my muse works for me at the time. I always try to end my reply so my partners have something to work with. Icons will be used unless stated otherwise in tags. Icons used in replies are from the show that rightfully belongs to Vivziepop.
12. Never rush. I happen to have a life…. ‘life’ away from the computer. Have a full time job so it’s impossible for me to be around on a daily basis. At times work takes a lot from my energy. I reply on things I have muse for. Roleplay partners who I talk to behind the scenes go most likely first. Timezone is not on my side so the dash is usually most active at 1 am to 7 am my time. Be patient with me. But there may be a slight chance I missed your reply or forgot to reply to it, you can always remind me. Me and my dyslectic ADHD ass tend to forget things.
13. Discord. Open for mutuals. It’s mostly for planning stuff, talking whatever you want. Maybe do some roleplaying there~
14. Following tag #PeppyJester
#PeppyJester#Helluva Boss rp#Helluva Boss roleplay#Fizzarolli#Cartoon rp#roleplay#Helluva Boss#Hazbon Hotel
40 notes
·
View notes
Text
Hi everyone my betrothed is asleep and I'm bored, so I'm gonna review all the virtual pet sites I'm currently active on in a hyperbolic and unconstructive way, hooray and here we go
Dragon Cave:
Pros: Fun game. The majority of the userbase are out of their gourds and have never heard of deescalation, which is entertaining to watch. I like making lineages.
Cons: You can pretty much get everything now, which means to continue to have stuff to do, you'll either have to make your own fun, or start collecting offspring from the volunteer staff's extra rare special colour dragons, which opens up a whole new venue for being a weird creep towards the people making the site that you'll have to dodge if you want to be able to look yourself in the mirror every night.
ChickenSmoothie:
Pros: Fun sparkle dogs yay! Sparkle snakes and sparkle cats and sparkle deer also. The dressup feature is my favorite. Getting everything would be an absolutely herculean task, which means the game keeps having something for you to do, which is a good thing, in my opinion. People keep complaining about this fact, but I just kind of tune them out.
Cons: Didn't let me draw sparkle dogs for them. One million vicious 🦀crabs🦀 upon your house 🪄🦀✨🦀✨🦀
Flight Rising:
Pros: They allow cross-site trading with Chicken Smoothie so you can use it as a Chicken Smoothie bank account. Also they've started trying really hard not to be racist. Keep it up you guys I'm sure you'll get there in the end 👍
Cons: Dumb ass mobile game FOMO gameplay bullshit, I cannot stand her ass. 90% of the gameplay just consists of Clicking Buttons, and the rest is like, the jigsaw minigame. I'm halfway convinced they do this because people will be more likely to buy on-site currency if you make everything be technically available through gameplay, but just so annoying to get. Much more fun if you stop having goals on-site tho :)
Pixel Cat's End:
Pros: This site is just like ... what if Flight Rising was good. What if we take the parts that work and just make them good. I have nothing bad to say about PCE, it's literally so cute and all the cats have pronouns. The site is still in beta, by the end of it they can also have blue hair. Adventure system that works, resource gathering that works, the cats have unique stats and personalities. The genetic system is excellent. The dev pays me to draw stuff for them sometimes. Ask me about my pixel cats.
Cons: I accidentally started a booming business and now I can buy anything I want. My wealth needs to be redistributed, this sucks.
Magistream:
Pros: On this Petsite, You Can Get Drunk. Also, the creator came out as a woman while I was looking away and then decided she didn't want to run the site any more, which is very beautiful to me. Free yourself, my friend. Go, be free. Never look back.
Cons: Look. Look. I don't want to speak poorly of Magistream. It seems cruel, at this point. Magistream is like a sickly pet that the owners are desperately trying to save, and it's not your place to say and maybe it can recover, but in your quiet mind you can't help but wonder if this is ethical. They have their big birthday celebration right now, and for this biggest event of the year, we have a whooping total of 25 users online right now. The economy is in shambles. Profile pages have been broken for over a year, everyone is stuck with whatever they had on there before it happened. No one is fixing typos any more. A bunch of items and features only work on your main tab, but if your main tab has too many creatures in it, it might break the page and you have no other way of splitting it up than asking a mod to do it, manually. There's no theme to the creatures and half of them are named like prescription drugs. They had to ban the main way people got site currency because it was causing the site to lag (opening thousands of pages at once) (why was that even a thing).
Unfortunately I cannot help but think, I could fix him. I don't know if that's true, however.
The Final Outpost:
Pros: Final Outpost is kind of like, if they fixed Magistream up a little bit. Grabbing new creatures has a cooldown, currency gathering has a daily cap. The main gimmick is that the creatures are randomized, which means that you'll have to fight to get a creature that's not just random parts mashed together, which is arguably gameplay. Regrettably I am having fun.
Cons: There's just like not that much to do, honestly. Grab your gatcha creatures and then wait a day and a half to see what you got, rinse and repeat. They have quests, but after the first four, you stop getting rewards and getting to make any meaningful decisions, meaning all you get is to read a story that's maybe fourty percent about some subjects that, I'm not gonna lie to you, I'm not sure if these writers should be tackling, and the rest is just lunch, and then they might mention a creature in one scene if you're lucky. They're trying to do a big epic overarching plot, I think, and they're trying to be woke, I think, but I'm gonna be real with you all it's kind of hard to watch. Also, all the creatures are named in Esperanto, which I don't speak, so the names of the creatures simply just sliiiide right off.
IN CONCLUSION: My beloved woke up idc about doing a conclusion. Everyone go play pixel cat's end right now. Don't play flight rising.
#long post cw#posts by ME#virtual pet sites long-lived special interest ACTIVATED#not tagging anything tho. petsite people are scary.
3 notes
·
View notes
Text
ཐིWelcome to my blogཋྀ
I'm Nyx, they/them if you please.
I made this pinned so mobile users can access mobile friendly versions of my pages. If you are on computer, I highly encourage you to just go to my actual blog because I have sections that show my request status (open/closed) as well as list any in progress requests. Desktop versions of my pages are under the "more info" button in the navigation bar. (Plus I spent like 3 days to make it pretty, its nicer than my main blog, its even got a button for light and dark mode.)
I don't have a DNI, I find that by and large they don't work and the idea is silly to me because being on the internet means people you hate will interact with your content. I could go on and on about how awful TERFs and racists are but if they want to interact with me nothing is stopping them from pretending not to be scum. I do check my interactions though and I use my block button liberally so don't hate on me or my followers and don't be a dick or you're gone.
TLDR: Everyone is welcome on my blog as long as you are kind and respectful. Basically would Fluttershy like you? Then you're golden.
This blog is sfw (meaning any mature content is tagged with the #mature tag and easily filterable. It's mostly canon typical violence for some fandoms, nothing sexual.) I don't care if you interact as a nsfw blog, just don't be horny in my tags/comments and we're cool, yeah?
I am still new to this so if I do not credit something correctly please let me know. I guarantee it was an accident and I want to fix it.
· · ────── ✩₊˚.⋆ཐིཋྀ⋆⁺₊✧ ─────── · ·
Please read before you make a request:
Blacklist & Whitelist
Request Guidelines
Additional Information:
About Me (Under construction for mobile. Have this in the meantime)
Important Tags
· · ────── ✩₊˚.⋆ཐིཋྀ⋆⁺₊✧ ─────── · ·
#pinned post#yeah caius#i stole the if you please from you.#ik ik. get my own personality. ill get right on that.
2 notes
·
View notes
Note
So, OFMD is my all time favorite show and I am in love with every single character and have been wanting to try and join the fandom as Stede Bonnet, but I am SO nervous. Only because you, and several others, are just so incredible and I am intimidated but ahhh, I want to do badly write as my pirate princess. Any advice? Or just go for it? I’ve been writing for years, but graphics/theme making are not my forte.

Hey, friend!! Thanks for the kind words!!

I would just GO for it, with the understanding that there's a learning curve to the "rp etiquette" of Tumblr (and some users, as is the way with social media, will be more forgiving and flexible with "mistakes" than others). I would introduce yourself, as you have done here, to people who seem fun and chill, and express your interest in interacting with them IC. 1) Tell them you would be writing Stede. 2) Read their rules page (usually there is a pinned post at the top of a writer's blog offering a mobile-friendly link to their rules, which is basically how they prefer to interact with other writers, how often, in what format, what the writer's or "mun's" triggers are, etc) and tell them that you have: this seems to be a real sign of good faith around here. 3) Collect a small list of people (maybe 4 or 5) to start with, and follow them. If your rp blog is a "sideblog" to a main account, also let them know that, so that when a non-rp blog (you) follows them, they know who the heck it is! I cannot underscore enough how important it is to find people with whom you jive ooc, as yourselves. It simply will not be fun if you don't. So take your time with this part! 4) Make your blog. Customize your theme as much or little as you like, but a good rule of thumb is to at least make an "About the Muse" page (muse's story), a "Rules" (do's and don't's of interacting with you) page, and a "Verses" (discrete story timelines, usually grouped by how much you adhere to canon or by romantic "ships") page. Your muse is a "canon" muse: that is, a muse that already exists in the official fandom universe. 5) If you don't have it already, GET XKIT REWRITTEN (a browser extension that lets you alter Tumblr's increasingly perplexing and user-unfriendly interface, lol. There are versions for both Chrome and Firefox. 6) Start writing. You rp on Tumblr by reblogging a person's IC (in-character) post to your blog, and adding a text reply. They then reblog you. And so on and so forth. Here is where you consult their rules page to know things like: are they okay if I trim posts? Are they okay with me dm'ing them to ask for replies? What's the most courteous way to use tags in order to easily find past writing or filter my blog? How explicit can writing with this partner get re violence or s*xual themes? Etc. Everyone is different.
Re making your blog fancy: You do NOT need to be well-versed in Photoshop, themes and coding in order to run a blog. A lot of people now rp on Tumblr Mobile, where theme graphics don't show up anyway. Those who still use graphics vary, but most of us really don't care if our writing partners use them as long as we can continue to do so.
However, if you're still anxious, I've got a couple graphics and rpg sources right off the bat that can help you tremendously:
@poohsources (your one stop shop for EVERYTHING theme, icon, rp etiquette, formatting, etc related. A very kind soul) @octomoosey (best free blog theme coder on Tumblr!)
and if you're willing to pay for codes and graphics, I can also recommend a few good friends.
Also, if you have further questions, come to me. My anonynous ask option is usually on. <3
(Anyone reading this, feel free to add on your suggestions!)
7 notes
·
View notes
Text

Rules and Muse (for mobile users!)

Hello hello! I am Rain (they/them), 26, have been writing on tumblr for 10 years :D Thank you so much checking out my blog and my silly angel :D *art by me. Side-blog to @luciferain, Lucifer rp blog.
Rules and Muse pages are under read more!
Hello, I’m Rain (NB, 26, they/them). I have been roleplaying on tumblr for the past decade, and had picked up muses from different fandoms before, and newest has been Hazbin Hotel/Hellaverse :D I’m here to write and have fun, and hopefully make friends to write cute stuff/angst/horrors with. So, the rules will be basic:
IC =/= OOC. Belphegor's opinions are not my own. Sometimes evil characters and actions will be portrayed and tagged accordingly, and sometimes I might write some characters as evil when they are more nuanced in canon–it’s all to the have fun.
I do not condone harassment over someone writing fiction. Real people come first. I will block if it the sensitive subject is too much for me, that’s that.
Don’t reblog threads or headcanons you are not a part of, please. Unless I tag it “ok to reblog”.
Please tag real-life images with nudity, blood, gore and such in general.
Do not force sexual acts on my muse.
To be on the same page with our headcanons / world-building, feel free to plot with me :D Duplicates/self-inserts/OCs etc are all welcome!
That’s it, thank you so much for reading!

MUSE;;
Headcanons and muses mentioned in backstory can be changed to match my rp partner’s headcanons and worldbuilding. This is just the default state we can build up on. —Plus, once canon Bel comes, the blog will most likely go through an overhaul :D
Name: Belphegor
Title: Queen of Sloth, The Deadly Sin of Sloth, Administrator of Sloth Hospitals, Professional Headache for Mammon
Age: Older than Hell.
Gender: None, but likes to present in a very feminine way, and prefers she/her pronouns.
Sexual Orientation: A mess. (Pan, most likely.)
Relationship Status: Has been a hopeless romantic even back in Heaven, never managed to be in a relationship despite her wish.
Height: As tall as the other sins (Lucifer does not count :D)
History: She was once an angel of ethereal beauty and kindness. Spending her time with her herbs and medicine, hoping for the fairytale romance. Always looking for shortcuts, to heal the ones she loved as effortlessly as possible Pink has always been her color, and she dressed up for every occasion. A friendly, joyful presence, she was on good terms with the fellow angels, though she had always been closer with Lucifer’s inner circle.
Crushing on Lucifer, she got closer to his best friend Mammon to get a chance and know about this elusive archangel. When Lucifer abandoned everyone to be with Lilith, she was left behind, spending her time with Mammon, Beelzebub and others.
During the battle following the trial to judge Lucifer and Lilith for giving Eve the apple, she avoided getting involved at first, but seeing her friends bleeding and hurt made her act to support and heal them, causing her to be cast out of Heaven with Lucifer, Mammon and others.
After the fall, with the Root of All Evil’s influence, her transformation was rapid. Once a mostly humanoid angel, now she was a the mother demon of the Sloth Ring, her feathered wings turning draconic, her little horns growing bigger. Her magic shaped the Sloth ring and brought the candleheads, the goat demons native to Sloth.
Her Sloth is not lack of work but lack of care, and she spent the past ten thousand years building her enterprises. Hospital, medicine, drugs. She treats her workers well, but never dictates long or “normal” work hours. Her people are encouraged work as little as possible, and it translates into longer wait times for all procedures other than emergencies.
She is the main provider of all drugs, but her most sought after drugs are sleep pills and “happy” pills, antidepressants. She is still a kind soul deep down, and wants to help others.
Over the years, her best friend had been Mammon, and they both affected each other. She is greedy, wanting to earn as much as possible, while she made Mammon lazier. She knows she owes some of her success to Mammon’s mentorship, and cares about him… But would not act on it. They usually spend their time together watching shitty reality TV at Belphegor’s home. Since Belphegor does not see the point in anything, she never confronted Mammon on his treatment of Fizzarolli, despite knowing the imp and caring about him almost like a son. Due to how much Greed and Sloth spend time together, and their bickering, there are rumors, and Belphegor jokingly calling Mammon her husband does not help.
She is on good terms with her fellow sins, though Satan would not regard her highly due to her nature as Sloth, and she is angry at Lucifer for not accepting help with his mental health.
She still wishes for her fairytale ending, but thinks it is too late for her. She is not comfortable with her looks, and she would rather drown her sorrows in work. Her full-demonic form hasn’t been unlocked yet, and if she is under huge stress or another strong emotion, her transformation is grotesque and painful, making her go into hiding till it is over.
Hopelessness and sorrow can make her go all monochrome/gray and her candle gets snuffed.


3 notes
·
View notes
Note
Can I mention something I don't get about Tumblr? Why do people put "trigger/content warning" tags in the....well, tags? They're BELOW the image, so you're already going to see the offending thing in question. The post version of saying "ooh, the food's hot" AFTER you've shoved a white hot potato into your face.
Oh! Oh dear, I hope you haven't seen anything that you don't wish to, Pez... Those are for blacklisting posts! Originally with the XKit extension, though you can now do it natively within Tumblr (Though, XKit is always worth getting).
To add tags and terms to your blacklist; There are two kinds of filtering. Filtered Tags, and Filtered Post Content.
You'll want to go to Account Settings, and scroll down on the main console until you get to 'Content You See' - expand this, and you will be able to add tags. On the Mobile App: Your Blog tag, Settings, Account Settings, Content You See. On the Mobile Site: Settings, Account Settings, scroll until you get to 'Content You See'
Filtered Tags; Filtered Tags will take the original tags, and the reblog tags, into consideration.

Content You see, Filtered Tags page visual
Filtered Post Content; Filtered Post Content takes from the body of the post, not the tags. This includes the username; if you want to filter a user's posts without blocking them, simply add their username into this section. This section is best used for terms and phrases, such as 'spoilers', or names and content topic phrases that you wish not to see.
I tend to use this section for filtering usernames of posters who usually post untagged 'unreality' pieces, so that I have a buffer into it. Also to just hard filter posts I do not want to see.

Filtered Post Content visual
Ha, yes, Ken Penders is one of my hard-blocked terms... I simply just could not care less, I can't -do- the constant posts of 'he said this thing again!' ... Yes, he's always saying that. Are you new here?! I'm exhausted! The only way I hear of the man is when my dear friends deem something important for my eyes, and then I'll look XD I cannot survive otherwise as an echidna fan.


Filtered Tags VS Filtered Content visual
Happy blacklisting, Pez, I hope this helps in the future!
#sonic.exe is there only because I like browsing the infinite tags.. but majin sonic is always swamping those tags XD#because of 'fun is infinite'
7 notes
·
View notes
Text
111. The Haunting Season

Owned: No, library Page count: 291 My summary: A wheelchair with its own life. A dead girl who is beautiful forever. A woman hidden away from the world. A stranger needing help who was dead the whole time. Spooky tales of winter hauntings from some of the best horror authors in the business. My rating: 4/5 My commentary:
This collection has been on the shelves at work for months. It looked interesting, and I've picked it up so many times and flicked through only to stick it back on the shelf. Well, no more. I've read it now, and overall I liked it! As with any short story collection, there's individual stories I liked better or worse than others, but all together it's a pretty solid collection, and certainly an enjoyable and engaging way to spend some time. As ever, I'm only going to talk about a few of the stories that particularly stood out to me under the cut. So here we go!
The first story in this collection is A Study in Black and White, based around a traveller who sees a mysterious old house with chess-themed topiaries in the garden and finds himself compelled to rent it. I felt like this story did a great job in showing the main character to be a total dick in ways that were fun and enjoyable. He's rude to people he thinks are below him (read: everyone), sees himself as being probably the only intelligent person in the world, refuses to believe that any of the supernatural stuff around him is actually happening, and is overall just an unpleasant little man. It's classic horror storytelling - set this guy up as a bastard and it's fun to watch him fall. The atmosphere of this story was very spooky too, something about the idea of a big old house where the house itself is alive and knows far more about what's going on here than you do just gets to me. And it was interesting that very little of the horror was explained, leaving the reader to draw their own conclusions.
One story that surprised me was The Eel Singers, which was Natasha Pulley's contribution and is set in the world of her novel, the Watchmaker of Filigree Street. It features the two main characters of that book, Thaniel and Mori, the latter being a precognitive who lives both in the past and future. Mori wants to visit a town where his precognition is nullified, meaning he'll be able to just relax and be himself for once without knowing what the future has in store for the both of them. But this town is not as it seems, and Thaniel and Mori find themselves caught up in it. I really like Thaniel and Mori from when I read Filigree Street, but even if I was approaching it as a beginner, I think that Pulley did a great job in explaining the quirks of this world and these characters to the layman. It never felt like endless recapping, just a nod here and there to acknowledge that these characters belong in their own world. The story itself was creepy in a fun way, with Thaniel and Mori being slowly taken over by the being that exists in this place, and barely escaping with their lives. It's tense as all hell!
The Chillingham Chair, by Laura Purcell, was another interesting one. Purcell seems to really like writing historical horror that's centred around an object - a corset, bone china, and now this wheelchair. The premise is that our main character is injured a few days before her sister's wedding to a man she had previously rejected, and has to use a wheelchair that once belonged to his father. But it seems to have a life of its own, and propels her to places she doesn't want to be. At first, you're led to believe that the chair (or rather, the ghost inhabiting it) wants to kill her, and I had some problems with that on the grounds that characterising and perfectly normal mobility device as being evil, or a hindrance to its user, wafted into the ableism zone. But then it turned out that, nope, the chair was trying to help. The fiancée killed his father and brother, blaming the latter for the former's death, and was going to kill the woman who rejected him so that her sister can inherit the whole fortune. It was a clever twist, I have a soft spot for supernatural horror where the supernatural entity is helpful or benign and it turns out the real monsters were human. Cheesy? Yes! But I like it.
Next, back to CHERUB again, and a more dangerous mission for James and Lauren.
5 notes
·
View notes
Text
TIMELINE POST!
Right. I haven't said when this blog takes place in the mess that is the Team Fortress 2 canon, which... is kinda important.
SO! Timeline and lore post! This will be copy and pasted into a page link on the side and I'll add a link to the pinned post for mobile users.
To start, I'm being precise with a timeline and canon that... aren't. I know that. But I like lore and worldbuilding, so it's what I'm going with and doing. Without further ado, below the cut is the general breakdown for this blog's Team Fortress 2 specific timeline, with more being revealed as the blog progresses!
So this blog is starting in the early spring of 1965, it's been about 6 months or so since Assassin was hired, as she and Retriever were hired on later than the others. That being said, here's the timeline for my blog specifically up to this point, having taken into account dialogue from Scout and Medic in the comics-
1959; Team Fortress Classic Mercs Resign/Retire. The war is continued by various fringe teams (I'm pulling from the comics, Marcus/TFC Heavy states "We spent six months hunting down her best. Echelon, Citadel, Team Vanguard for God's sake." So we know there were other teams under Administrator)
1960; As the other teams continue the war, Administrator scopes out her next best team. Best meaning entertaining. She finds, through word of the other teams, the 9 Mercs we know and love
1961-'62, specifically into the late winter/very early spring of '62; The new Team Fortress (2!) mercenaries were contacted, contracted, and brought to their main base of operations, namely in Teufort (sidenote, this is about 4 years before Pauling will be hired, so they go through other people for weapons, supplies, communications, etc)
September of 1963; Retriever, having decided to quit his life as a treasure/bounty hunter, packs himself and Wally up and brings his family's HMR Space tech for holding supplies to Teufort and applies to join the team. He gets along well and is welcomed into his new role as a supply runner and base defender (more on how his game mechanics would work in another post, another day!)
November of 1964; Similarly, having heard of Team Fortress (2!) from other teams she had worked with, and wanting a team where she could simultaneously blend in but not have to worry about being kicked out or betrayed (we'll unlock that as time goes on, hehe~), Assassin applies for the team and is brought on with the role of melee based, offensive support (quick kills, I've thought more on her mechanics, admittedly, but I'll tell them in a later post too!)
Spring (roughly mid-April) of 1965; Where this blog is starting now! This is just a rough thing and while this initial post won't be updated, with time the page that copies it will. Here is where we start our story and meet our characters, with the cast growing over time. Pauling is not yet here, Expiration Date has not yet taken place, and everyone is still warming up to the newbies (some much faster than others), but the team is mostly cohesive and gets... along... to a degreee. They're working on it..!
So! Send asks, interact, feel free to start threads, I've been roleplaying on this site for an actual decade! There's much, much more story to learn, but I won't give it all out so easy~
#announcer speaks (ooc)#liaison (cherry)#team fortress 2 ocs#tf2 ocs#team fortress 2 blog#tf2#tf2 blog#team fortress 2#blog lore#team fortress 2 mercs#tf2 mercs#Comic Update! (Lore Post)
2 notes
·
View notes
Text
may i also add,
indie wiki buddy: tired of fandom wikis? redirects you to an indie wiki if one exists, or optionally to breezewiki, a third-party that shows you the actual useful parts of fandom wikis
libredirect: similarly, redirects you to a privacy-friendly frontend for a lot of sites. however, you will often have to try a few times to get a working instance - reddit is the main one i use it for and it can take a bit. also make sure to let instances through noscript if you're using it for youtube (and likely others)
user agent switcher: hopefully most people won't need this, but if the post about sites requiring whatever stupid 'security' measure chrome has gets hit with a dodgeball, you can use this to tell sites you're using chrome you can probably also use it to easily check if your website automatically switches to mobile view. or if a site is more optimised for mobile and hard to use on desktop. this isn't something i've had to do but given mobile options are available it makes sense
facebook container: firefox's built-in containers feature is already great and this forces all facebook stuff to go into a container. good for people whose family members insist on using facebook messenger.............. like yeah i wouldn't want to use discord for them like i do my sibling but come on telegram is easy and eats way less memory........
imagus: hover over a thumbnail to enlarge it or an image/video link to display it. simple useful thing. also works for wiki file pages - for example, this is a file page rather than a direct image link but it still displays (and also as you can see it's added to history. also see mobile dyslexic in action)

gnome linux users...almost certainly already use firefox but hey if you're thinking of switching to linux you can easily link it up to get and change settings for gnome shell extensions in-browser which is very useful i don't know if a similar thing exists for other desktop environments like kde but
So You've Finally Switched to Firefox: a Brief Guide to a Some Very Useful Add-Ons.
This post is inspired by two things, the first being the announcement by Google that the long delayed Manifest V3 which will kill robust adblocking will finally roll out in June 2024, and the second, a post written by @sexhaver in response to a question as to what adblockers and extensions they use. It's a very good post with some A+ information, worth checking out.
I love Firefox, I love the degree of customization it offers me as a user. I love how it just works. I love the built in security features like DNS over HTTPS, and I love just how many excellent add-ons are available. It is a better browser than Chrome in every respect, and of the many Chromium based browsers out there, only Vivaldi comes close.
There are probably many people out there who are considering switching over to Firefox but are maybe putting it off because they've got Chrome set up the way they like it with the extensions they want, and doing all that again for Firefox seems like a chore. The Firefox Add-on directory is less expansive than the Chrome Web Store (which in recent years has become overrun with garbage extensions that range from useless to active malware), but there is still a lot of stuff to sift through. That's where this short guide comes in.
I'm presently running 33 add-ons for Firefox and have a number of others installed but disabled. I've used many others. These are my picks, the ones that I consider essential, useful, or in some cases just fun.
Adblocking/Privacy/Security:
uBlock Origin: The single best adblocker available. If you're a power user there are custom lists and scripts you can find to augment it.
Privacy Badger: Not strictly necessary if you're also running uBlock, but it does catch a few trackers uBlock doesn't and replaces potentially useful trackers like comment boxes with click-to-activate placeholders.
Decentraleyes: A supplementary tool meant to run alongside uBlock, prevents certain sites from breaking when tracker requests are denied by serving local bundled files as replacement.
NoScript: The nuclear option for blocking trackers, ads, and even individual elements. Operates from a "trust no one" standpoint, you will need to manually enable elements yourself. Not recommended for casual users, but a fantastic tool for the power user.
Webmail Ad Blocker: The first of many webmail related add-ons from Jason Saward I will be recommending. Removes all advertising from webmail services like Gmail or Yahoo Mail.
Popup Blocker (Strict): Strictly blocks ALL pop up/new tab/new window requests from all website by default unless you manually allow it.
SponsorBlock: Not a fan of listening to your favourite YouTuber read advertisements for shitty products like Raycons or BetterHelp? This skips them automatically.
AdNauseam: I don't use this one but some people prefer it. Rather than straight up blocking ads and trackers, it obfuscates data by injecting noise into the tracker surveillance infrastructure. It clicks EVERY ad, making your data profile incomprehensible.
User-Agent Switcher: Allows you to spoof websites attempting to gather information by altering your browser profile. Want to browse mobile sites on desktop? This allows you to do it.
Bitwarden: Bitwarden has been my choice of password manager since LastPass sold out and made their free tier useless. If you're not using a password manager, why not? All of my passwords look like this: $NHhaduC*q3VhuhD&scICLKjvM4rZK5^c7ID%q5HVJ3@gny I don't know a single one of them and I use a passphrase as a master password supplemented by two-factor-authentication. Everything is filled in automatically. It is the only way to live.
Proton Pass: An open source free password manager from the creators of Proton Mail. I've been considering moving over to it from Bitwarden myself.
Webmail/Google Drive:
Checker Plus for Gmail: Provides desktop notifications for Gmail accounts, supports managing multiple accounts, allows you to check your mail, read, mark as read or delete e-mails at a glance in a pop-up window. An absolutely fabulous add-on from Jason Saward.
Checker Plus for Google Drive: Does for your Google Drive what Checker Plus for Gmail does for your Gmail.
Checker Plus for Google Calendar: The same as the above two only this time for your Google Calendar.
Firefox Relay: An add-on that allows you to generate aliases that forward to your real e-mail address.
Accessibility:
Dark Reader: Gives every page on the internet a customizable Dark Mode for easier reading and eye protection.
Read Aloud: A text to speech add-on that reads pages with the press of a button.
Zoom Page WE: Provides the ability to zoom in on pages in multiple ways: text zoom, full page zoom, auto-fit etc.
Mobile Dyslexic: Not one I use, but I know people who swear by it. Replaces all fonts with a dyslexia friendly type face.
Utility:
ClearURLs: Automatically removes tracking data from URLs.
History Cleaner: Automatically deletes browser history older than a set number of days.
Feedbro RSS Feed Reader: A full standalone reader in your browser, take control of your feed and start using RSS feeds again.
Video Download Helper: A great tool for downloading video files from websites.
Snap Link Plus: Fan of Wikipedia binge holes? Snap Link allows to drag select multiple hyperlink and automatically open all of them in new tabs.
Copy PlainText: Copy any text without formatting.
EPUBReader: Read .epub files from within a browser window.
Tab Stash: A no mess, no fuss way to organize groups of tabs as bookmarks. I use it as a temporary bookmark tool, saving sessions or groups of tabs into "to read" folders.
Tampermonkey/Violentmonkey: Managers for installing and running custom user scripts. Find user scripts on OpenUserJS or Greasy Fork, there's an entire galaxy out there of ingenious and weird custom user scripts out there, go discover it.
Browsing & Searching:
Speed Dial 2: A new tab add-on that gives you easy access to your favourite sites.
Unpaywall: Whenever you come across a scholarly article behind a paywall, this add-on will search through all the free databases for an accessible and non-paywalled version of the text.
Web Archives: Come across a dead page? This add-on gives you a quick way to search for cached versions of the page on the Wayback Machine, Google Cache, Archive.is and others.
Bypass Paywalls: Automatically bypasses the paywalls of major websites like those for the New York Times, New Yorker, the Financial Times, Wired, etc.
Simple Translate: Simple one-click translation of web pages powered by Google Translate.
Search by Image: Reverse search any image via several different search engines: Google Image, TinEye, Yandex, Bing, etc.
Website Specific:
PocketTube: Do you subscribe to too many YouTube channels? Would you like a way to organize them? This is your answer.
Enhancer for Youtube: Provides a suite of options that make using YouTube more pleasant: volume boost, theatre mode, forced quality settings, playback speed and mouse wheel volume control.
Augmented Steam: Improves the experience of using Steam in a browser, see price histories of games, take notes on your wishlist, make wish listed games and new DLC for games you own appear more visible, etc.
Return YouTube Dislikes: Does exactly what it says on the package.
BlueBlocker: Hate seeing the absolute dimmest individuals on the planet have their replies catapulted to the top of the feed because they're desperate to suck off daddy Elon sloppy style? This is for you, it automatically blocks all Blue Checks on Twitter. I've used it to block a cumulative 34,000 Blue Checks.
Batchcamp: Allows for batch downloading on Bandcamp.
XKit Rewritten: If you're on Tumblr and you're not using whichever version of XKit is currently available, I honestly don't know what to say to you. This newest version isn't as fully featured as the old XKit of the golden age, but it's been rewritten from the ground up for speed and utility.
Social Fixer for Facebook: I once accidentally visited Facebook without this add-on enabled and was immediately greeted by the worst, mind annihilating content slop I had ever had the misfortune to come across. Videos titled "he wanted her to get lip fillers and she said no so he had bees sting her lips", and AI photos of broccoli Jesus with 6000 comments all saying "wow". Once I turned it on it was just stuff my dad had posted and updates from the Radio War Nerd group.
BetterTTV: Makes Twitch slightly more bearable.
Well I think that's everything. You don't have to install everything here, or even half of it, but there you go, it's a start.
#i should switch back to darkreader#i'm currently using a simpler one but it doesn't work great with bulbapedia#also i'm sure i used to have something like imagus for wikipedia link hovers.....
51K notes
·
View notes