#finally using 540px width
Explore tagged Tumblr posts
Visit Tumblr Blog
Explore Tumblr blogs with no restrictions, modern design and the best experience.
Last Seen Tumblr Blogs


Fun Fact
After the announcement of the deal with Yahoo!, there were 170K signatures of unhappy Tumblr users petitioning to prevent the sale in 2013.
Text

Welcome to the donahdevotee's gift exchange, the event where selfshippers get to celebrate their fem f/o's and share their creativity with one another! (Sign up form is at the bottom of this post, please read through the guidelines before signing up!)
This gift exchange will cover art, writing and moodboards! So if you're not inclined towards art or writing you can still participate to share some love for other people's ships and have some love given to your own! On that note; all skill levels are welcome, as long as you're giving it your all, you're welcome to join!
Obviously the very basic requirement is to have a fem f/o! Your ship with her can be romantic, platonic, familial, queerplatonic, fwb, what have you! Every ship is welcome and so is every fem f/o! (If you headcannom your f/o as fem in any way, she is welcome as well!!)
GUIDELINES:
Art must comply with the rules of tumblr. A width of at least 540px wide, max file size is 20MB, please keep that in mind! If you’re drawing nsft art for your Giftee (You both must be 18+, minors are only allowed to create sfw works) you should censor it to post it. You can send the uncensored art to your Giftee!
Fics must be at minimum 500 words, no cap on the maximum however, go wild! (If you want to make a graphic to go with your fic, go for it! But it’s not mandatory <3)
Aesthetics/Moodboards should have a minimum of 4 graphics/images. You can make multiple for your giftee if you'd like! (Be considerate of eyestrain and/or flashing/etc. if using gifs!)
If you wish to back out at any point please let us know as soon as possible so we can work on a backup gift for your giftee, try not to leave it until the last day of the event!
Content that is NOT allowed: Self harm, Non-Con, Incest, Minors doing anything even remotely sexual, Pedophilia, Bestiality, Racist depictions or Fetish content.
Content that IS allowed: Anything else your Giftee has stated they’d enjoy. Character death and gore is allowed, smut is allowed. Everything MUST be tagged appropriately. If you aren’t sure; tag it!
SCHEDULE:
Nov 1: Sign ups open
Nov 10: Sign ups close at midnight
Nov 11-12: Participants are matched up!
Nov 13-14: INFO about your Giftee will be sent you via DM's
Nov 28: First check-in!
Dec 12: Second check-in!
Dec 23: FINAL DEADLINE, have all gifts submitted by midnight!
Dec 26-30: Post those gifts!!
Dec 31: List of participants and their gifts posted with links!
HOW TO SUBMIT YOUR GIFT:
Option 1: Submit your artwork/fic/moodboard to this blog via the submit button!
Option 2: Send a google drive/google doc link for your gift to this blog through an ask or the submit button!
Option 3: Email your artwork/fic/moodboard to [email protected]!
With your submission please include your selfship url just to ensure we don't have any mix ups! If you would like us to post your gift for you please mention that as well as we'd be more than happy to!
HOW TO POST YOUR GIFT:
You can post the gift directly to tumblr or post a link to your gift!
If you are posting your gift yourself please ensure you use the tag: #donahdevotee's gift exchange 2024 and also tag this blog and the blog of your giftee in your post!
You do have the option to ask the admins of this blog to post your gift on your behalf, where you and the giftee will both be tagged!
#self ship#self ship community#self insert#self insert community#self shipping#f/o#f/o community#fem f/o#donahdevotee's gift exchange 2024
79 notes
·
View notes
Text
Moffy's Photoshop Tutorial #1: Importing Gifs/Videos + Intro to the Animation Panel
(This tutorial assumes you know general PS things such as layers and blend modes -- but if you have questions, don't be afraid to ask)
---Importing Files---
Okay, so you want to make gifs/animations in photoshop!
First you need to know how to import your files. If you're just working with image files and then exporting as gif, you can start as normal and when ready to animate you can click window > timeline
If you want to import a gif, it's the same as any other image file.
Right Click > Open With > Photoshop (Or just choose File > Open in PS itself, and then click on the file)
(Note! If you don't see PS as an option, you may have to click "chose a default program" and then it will give a menu of programs and you can choose Photoshop from there)
If you want to import a video, from inside Photoshop click
File > Import > Video Frames to Layers
When you do this, you will be greeted with a new window

This is where you choose the section of the video to gif. Be warned, longer videos will be harder to "crop" because this window is quite small and the bar to trim your video is insufficient for longer media. If you can, use small clips that are ten minutes or less.
(Most common video files are able to be opened in PS)
Photoshop has a limit on how many frames it can import at a time, and I have found that limit is 500. At least, with my computer. (who wants to work with this many anyway??) PS may also tell you that it will take time to open the file, so be patient if you have an older computer
I also HEAVILY suggest clicking "limit to every two frames", sometimes I would go as far as every three or four frames, but this may make your final product choppy. Tumblr's size limit for gifs is a lot better than it used to be (10mb) so normally, stick to every two frames for a decent final file size. The longer the selection, the bigger the gif.
You can select whether to import into a timeline or frame animation, for beginners I always suggest frame timeline. This panel is a lot easier to learn and more forgiving. However, if you are experienced in video editing, you may prefer the video timeline.
After imported, you can change the size! 540px is the width of tumblr posts! Height usually isn't an issue for me
---The Animation Panel(s)---
Frame Timeline:

This timeline is beginner friendly, you can work very precisely, very easily. The only downside is that you need to make some edits frame by frame
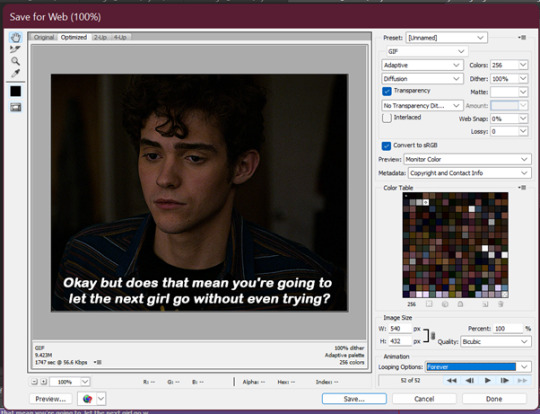
At the bottom of the frame thumbnail is your delay. I recommend always using 0.08 -- this seems to be the right speed for animation and movie gifs
Make sure "Forever" is selected, of the animation will only play the selected amount of times. (meaning the gif plays once or twice then stops. This is often used in memes though, if you ever wondered)
Use the trash can to delete one frame at a time or select multiple and delete. You can move frames around in this panel, add frames or tweens. (the icons are: add tween, add frame, delete)
The four lines to the right can be used for other options such as changing to a video timeline or reversing the frames. Play around with these! (you can also switch between timelines by clicking the bottom left icon)
Things to know: ALWAYS, ALWAYS, have the first frame selected when making your layer edits IF you want the edit to effect all frames (Such as changing blend modes) Failure to do this means you have to change the blend mode for EVERY frame. and this can take forever.
Certain things will always effect every layer, such as transforming an object. Other will effect the selected frame only, like opacity! So be mindful!
Video Timeline:

This is a timeline I recommend to skilled users, so I won't go too deeply into it (the truth is I rarely use it, so I don't know all the ins and outs)
It works like a video editing software, so if you've used anything similar this will be easy for you.
Layers work just like the layers panel, You can also precisely set the crop of the animation/gif with the blue arrow.
Folders are super useful for this timeline btw!
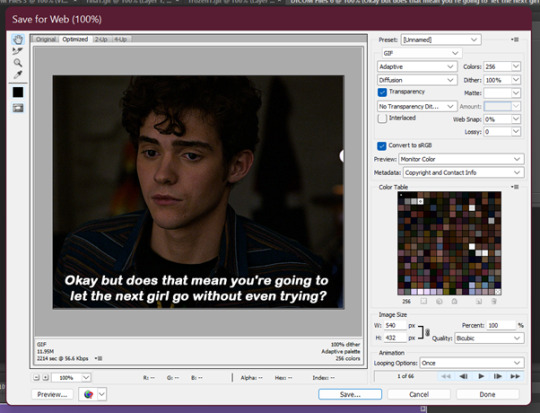
---EXPORTING---
To export the gift, you need to click ctrl + shift + alt + s at the same time. Just more work than ctrl + s
then you will be greeted with this window, save for web

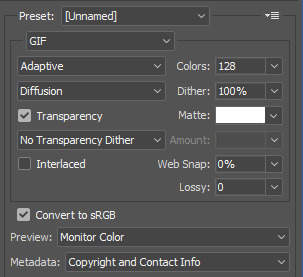
Here you can experiment with color range, gif modes, and dither. (that's what makes gifs look grainy) I normally use Selective and Diffusion. With dither set as high as possible. (the higher it is, the smoother color gradients looks) I don't have a good way to describing the different modes, so experiment and see what looks best to you!
Need a small gif size? Lower dither, but only a little at a time or the quality will go way down. You can also choose to use less colors. Less colors is great for cel shaded animation, but you'll want the most colors possible for anything realistic.
Click save and your gif is ready to uploaded!
34 notes
·
View notes
Note
Hello! I was wondering if u wouldn’t mind sharing a tutorial on how u making ur gif boarders? post/714133310754979840
hiii, yeah of course!

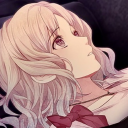
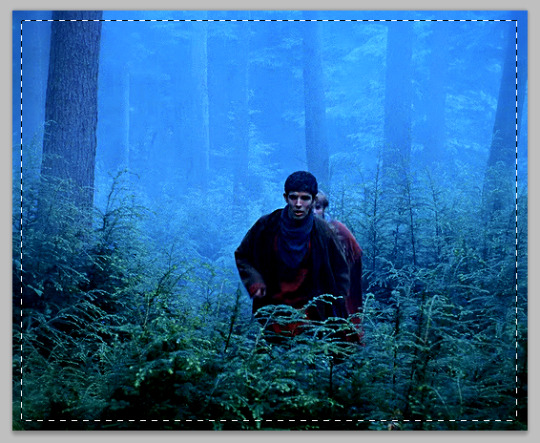
there are multiple ways to do it i'm sure, i'll share the two methods that i use the most. first tho, you need to create your selection for that border. (rest of tutorial under the cut, i use photoshop cs5 for reference)
in that example gif, the border is 10px away from all sides, and my gif dimension is 540px wide (width) and 440px tall (height). if i want a border that's 10px away from all edges, i need to remove that number from the dimension numbers.
540 - (10 + 10) = 520px for the width 440 - (10 + 10) = 420px form the height.
once you have your numbers for your gif, select the rectangular marquee tool. under style choose "fixed size" and enter the width and height in pixels (don't forget to add the letters "px" if they're not there).

once you have the numbers, click wherever in the canvas. this will create a selection with the right dimension. you can then move the selection around (with the mouse or arrow keys) until it's centered.
you can definitely draw the shape by hand without bothering with numbers if you want, but i like knowing that the border is the same ratio as the gif.
(if your gif is quared, you don't have to bother with numbers, you can just select "fixed ratio" in the style and enter 1 in both width and height, for a perfect square ratio. and then you can draw a box with the marquee tool until you reach the desired size.)
FIRST METHOD: LAYER STROKE
with that selection still on, create a new empty layer. this is where the stroke will go.

then go to the top menu: Edit > Stroke...
a stroke settings window will pop out, where you can choose the thickness in pixels, as well as the color and blending mode (i usually leave it at normal and edit the layer's blending mode if i want, instead). you can't edit these settings later, so be sure of what you want (which is why i usually prefer the second way).

this is what a white 1px stroke border looks like:

SECOND METHOD: LAYER STYLES
i prefer this way, because you can later edit the color and thickness of the border if you want.
so, still with that selection activated from earlier, go to Layer > New Fill Layer > Color Fill. pick whatever color, this doesn't matter at all, we won't actually use that color fill. put the Fill of that new color fill layer at 0% opacity.

now that this layer is basically transparent at the moment, double click on it to enter the layer style options.
click on the Stroke option at the bottom and enter your desired values for size and color. you can change this later if you wish.
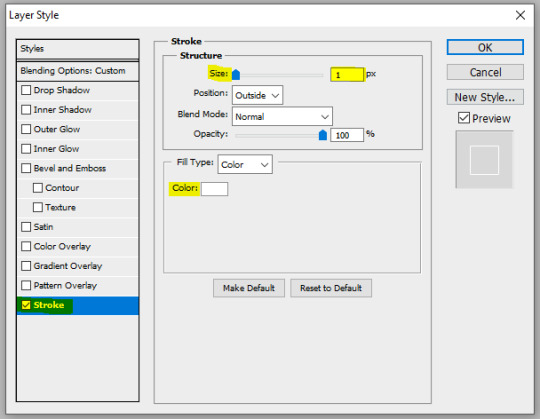
and this is what a white 1px stroke looks like with this method (looks basically the same yeah lol, but this method gives more flexibility)

CENTERING THE BORDER + FINAL TOUCHES
to make the border more interesting than just a white 1px stroke, you can change the layer's blending mode, as well as giving it more styles, such as: outer glow, inner glow, gradient overlay, color overlay. and don't hesitate to play with the blending modes for each of these layer styles too!
here's an example of settings with outer glow, inner glow, and a gradient 2px stroke:


to make sure the border is centered, here's a quick tip: select the stroke layer and the move tool. then with the keyboard, do Ctrl + A, it will make a selection of the canvas. then, click on these symbols at the top. it will center your layer horizontally and vertically.

and that's it :)
#alie replies#Anonymous#*ps help#tutorial#photoshop#resource#allresources#completeresources#usersmia#userabs#usercats#resources#resourcemarket
214 notes
·
View notes
Note
can you explain the process of gif making?
sure, i can share a summary of my process! there are so many really well-written tutorials out there, so this will be an abbreviated version with some links. if you'd like more information on anything i can certainly do a more in-depth tutorial (though it would take a bit of time to put together, so we'll start here!). so, in summary:
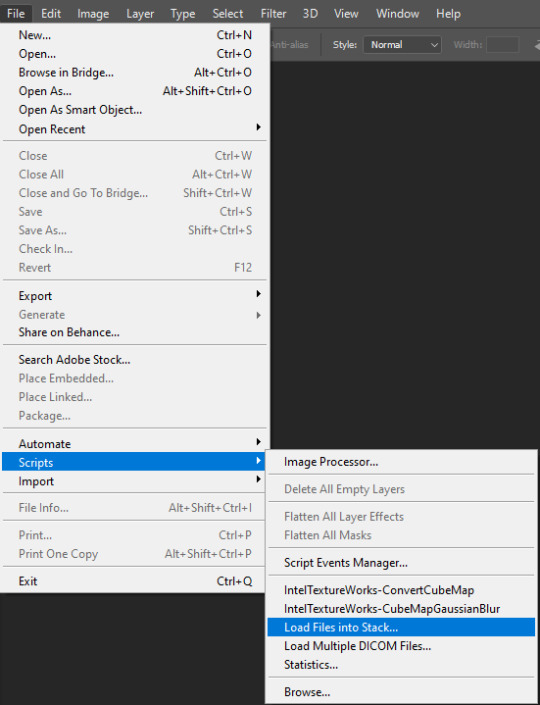
Make screencaps from source file. I use MPV Player. You can find a really good explanation on how to install the program (and a link to how to screencap with it) here.
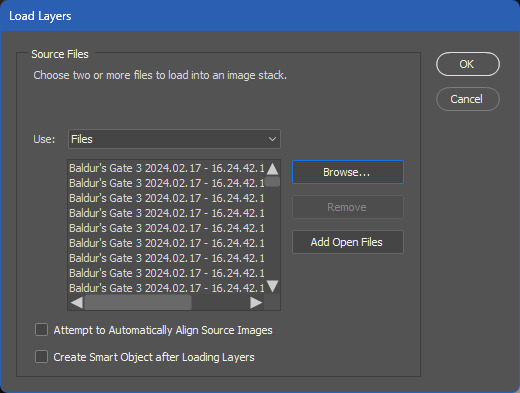
Load screencaps into Photoshop via "Load Multiple DICOM Files". There are different ways to load your screencaps into Photoshop, but this is my personal favorite. This tutorial describes how to do this step very clearly!
Crop to size. Using the crop tool, cut the image to the right size. (As a note, at this stage, you'll only see the last image in the stack of screencaps - that's ok, you'll be able to work with the full gif later.) Single column gifsets have a width of 540px, two column gifsets have a width of 268px, and three column gifsets have a width of 177px + 177px + 178px (one needs to be a pixel wider). For height, I generally do between 300px and 450px for single column gifsets (300px if there are more than 6 gifs, 350-400px for 4-6 gif sets, and 400-450px for 2-4 gif sets). Most commonly, I make my two column gifsets 268px by 260px, but sometimes I do 300px height for tall and thin sets.
Make the loaded screencaps (layers) into a smart object. This is the most technical part, and this tutorial (same as step 2) lays out all of the steps very clearly. It also includes information on how to do all of this with an Action. Now, I am a recent convert to the use of Actions. I used to do this the long way. I avoided actions for years. Stubbornly, because I am more earth sign than any one human should be. I finally tried using the action from the tutorial and I cannot go back. Actions look really intimidating imo, but 1) they're not when you actually start learning about them, and 2) the effort is soooo worth it.
Sharpen. I use the same process and very similar settings to the information in the tutorial above.
Soften and Glow. I like my gifs to looks a little softer and romantic-glowy than the smart sharpen step leaves them, so I right click on the smart object and Duplicate Layer. On that duplicate, I put a Gaussian Blur filter on (Filter > Blur > Gaussian Blur) and set it at 2.4 radius. I then duplicate that blurred layer, and set it on Screen at 30%.
Coloring. The most fun part! Make it look pretty! My goal in giffing is, first and foremost, to be able to see details. That means I like my gifs bright and light (moreso than is generally preferred probably, so keep that in mind as you adapt this to your own style). My standard coloring steps are: 1) Curves (check out this tutorial for how to set your white point, which is the best way to start); 2) Levels (my beloved! I generally adjust the middle slider to the left to increase the light in the gif); 3) Brightness/Contrast (I raise brightness to ~30, contrast to ~70), 4) Gradient Map (I use a black/white gradient map set on soft light at 35%, makes it more contrasted), 5) Photo Filter (I usually use a cooling filter at ~20% because I abhor yellow/orange tint in gifs), and 6) Saturation (I boost the Master setting to +20ish). Honorable mentions to Color Balance and Selective Color to color correct things that look funky after the standard coloring.
Text. My standar is Myriad Pro on Bold Italic for dialogue sets, usually between 17px-22px font size.
Exporting. This tutorial also outlines the saving step beautifully, including the frame rate timing. I usually save mine at either .05 seconds or .06 (leaning toward the latter because I like to really be able to analyze the movement and .05 is a tad too fast for me).
Enjoy! redbelle's tutorial really outlines everything so so well, but if you have questions after reading it I am happy to answer!
#ask#reply#Anonymous#i wrote this whole thing and then realized the real answer is:#1. open photoshop#2. get distracted for 6 hours#3. sigh#4. shut photoshop and go to bed in shame
7 notes
·
View notes
Note
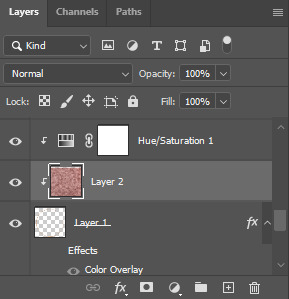
hi, this edit is cool, would you please tell me how do you make the circle shape and text like that in the second gif?
https://mikelogan.tumblr.com/post/727834848573669376/forgiveness-is-warm-like-a-tear-on-a-cheek-think
hi!! i'm so sorry this took me so long to answer, but i've hardly been on my desktop for the last couple months and haven't been giffing. finally getting around to this and thank you for the kind words!

in this tutorial, i'll show you what i did as well as another way to achieve the same effect:
once you've made your gif and colored it the way you want, you can get the circle effect one of two ways. i'll show you how i did it first and then a more "normal" way lol
i actually had this circle texture laying around and for whatever reason, i decided to use that. so i popped that onto the canvas and used ctrl+T to center it both vertically and horizontally
then i used a glitter texture over the top of the circle layer and applied a clipping mask so that the glitter only shows up on the circle and not the entire gif. to do this, make sure your glitter (or whatever texture you decide to use) layer is ABOVE the circle and then right-click on the glitter layer and select "create clipping mask." you should see this lil arrow on the layer now:
as a quick note about textures/overlays: chances are that if you just google "glitter texture png" or something similar, you'll find tons, but the png portion is important because pngs have transparent backgrounds. this wouldn't work if the circle texture was a jpeg because its background is not transparent and the overlaying of the glitter texture would appear on every pixel, basically just taking the shape of the entire jpeg rather than just the circle.
i have a resources (basically anything downloadable, from overlays to actions to psds) tag on my gifmaking sideblog as well as one specifically for textures and overlays. i also utilize the websites freepik, pngegg, and pngwing for pngs (especially freepik).
to make the glitter layer the same pink/purple color i used, i ended up using a hue/saturation layer above it and also applied a clipping mask to that layer so it only affected the glitter layer. this step is totally optional depending on the coloring you're going for. you might be happy with the glitter texture exactly as it is. you could also skip the hue/saturation layer and instead apply a color overlay to the glitter layer, select the color you want, and set it to screen or another similar blending mode. to do this, double-click on the glitter layer, select color overlay from the menu, choose whatever color you want, make sure the opacity is set to 100%, and adjust the blend mode to whatever you think looks best.
the "normal" way to do the circle would just be to use the ellipse tool (right-click on the rectangle tool and choose ellipse) and input your desired dimensions. to get a perfect circle, the width and height have to be the same as one another. then you'd continue on with the rest of the process.
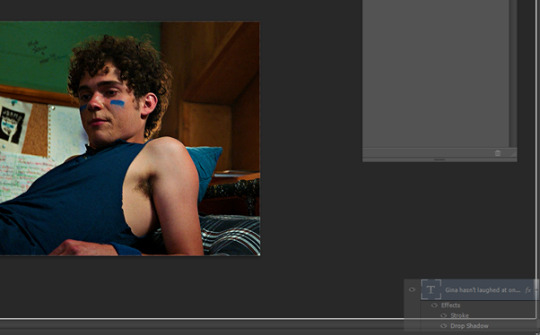
for the text, create your main text layer. these were my settings for a 540px canvas:
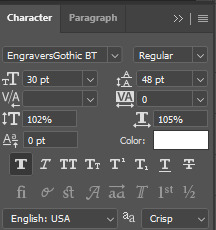
i also added a drop shadow to the layers with these settings (double-click the text layer to bring up this menu):

then i duplicated the text layer 6 times. select the first duplicated layer (the second line), use ctrl+T and your arrow keys (i only used the down arrow) to move the text down the desired amount of space. i made sure i moved each line down exactly 25 pixels, which is equal to 25 presses of the down arrow. i just think it looks nice when they're equally spaced. with each subsequent layer, i just dropped the opacity.
starting with the original text layer, i used: 100% -> 80% -> 60% -> 40% -> 20% -> 10% -> 5%, but this was just my personal preference.
anyway, that's pretty much it! but if you have any additional questions on this tutorial or any other set, just send me a message and i'll do my best to get to it much quicker than this one 💙
32 notes
·
View notes
Text
Oh hi. I heard it's gifs tips'n'tricks time.
View this as a little addition to this post I made a while back.
This time I thought I'd take you through my gif making process. It'll be very specific to Photoshop CS6 but maybe some of you will find parts of it helpful regardless.
And since our biggest nemesis appears to be ~The Tumblr 10MB File Size Limit~ I decided to go for the absolute worst premise for a gif: Lots of stupid wobbly particles and gw2 bloom and transparency effects. Because huge gifs love these.
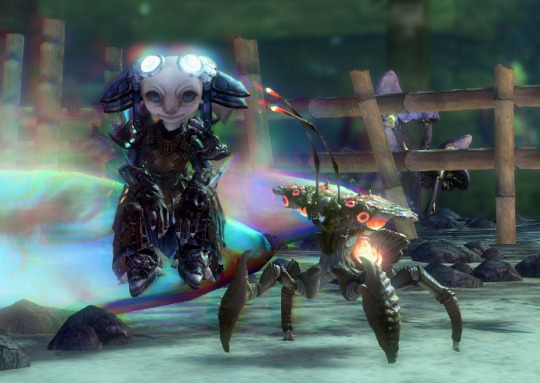
Aah, a horrifying amount of those in this single scene. Perfect!
Let's start with a little timelapse video, and I'll get into the details with screenshots below then.
So this actually went smoother than expected? Not super much fiddling needed in the end, but here's how it went in detail:
Load the raw footage into photoshop.
You can do this in two different ways: What I do is simply drag & drop the video file into the program and it'll open with a video timeline and some rudimentary video editing options.
What you can also do is File -> Import -> Videoframes to Layers and select your source video, which will give you a timeline of separate still image frames instead.
It comes down to preference, I used both methods in the past but nowadays I find the video timeline more intuitive.
Cut the footage to roughly the right length.

From experience I know that most of my gifs are around 3-4 seconds long. This can of course vary depending on different factors. Don't get too attached to the exact seconds you selected, you might have to shave off a bit depending on how evil the file size decides to act.
Optional: Change footage speed

Depending on the gif and its purpose, I slow the footage down. I usually do this for the visual effect (especially nice for showing off animation details) but it also has the practical side effect that it can help with file size. Say you want a gif that loops after 4 seconds. At 100% speed your gif will move at your original framerate (in my case 60 fps); if you slow it down but keep the same length in seconds it'll logically use less frames. That's less data to blow up the size! Yey.
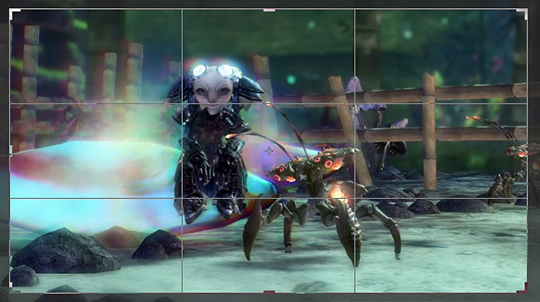
Crop the image.
Now this is probably one of the most crucial parts when it comes to your final file size, and your gif looking nice on tumblr. Since the tumblr dashboard displays images at a width of 540px, you want this to be your absolute minimum image width to ensure a crisp image. If I can, I'll make the gifs larger (I like starting at a minimum of 600px and then reduce the image dimensions if needed).
With that in mind.... choose your image crop wisely.
A "widescreen" image like this will be the most merciful in terms of file size, but might not always be what you want in terms of composition.

Given tumblr's very vertical nature, this kind of approach will look great in posts (if it fits your image composition of course), but at 540px minimum width tends to be a file size monster.
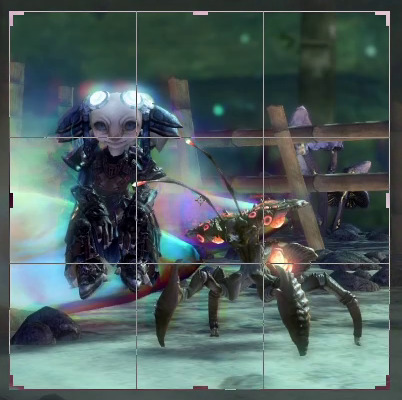
For the gif I'm attempting to make here I opted for a more square approach. The subjects of the scene fill out the image's space nicely, and it's still a nice size for tumblr posts overall. Let's see what the file size will say about this.
Replay your footage after cropping to make sure you didn't accidentally cut off any motion you didn't mean to cut.
Next up: optional colour corrections
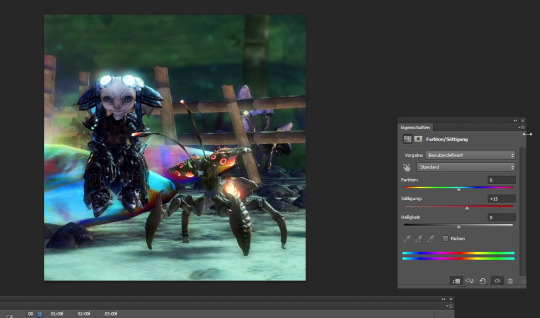
I tend to crank up the saturation for gifs way, way more than I ever would for regular screenshots since I find that often the limited web palette can make them look fairly dull. But like everything else so far, this greatly varies depending on the scene you're showing.
Note that colour correction can increase or decrease file size depending on what exactly you're doing. The more different colours you have, the larger your file size will be.
Reduce image dimensions

Since my original video footage was fairly zoomed out, the cropped area only left me 575px of width to begin with. In an earlier attempt (that I absolutely did not fail to capture and therefore had to record the whole thing a second time) I tried to leave it at these dimensions, but the 10MB size limit did not like that so now I knew better and immediately reduced the width to 560px.
Note: After you've changed the video's dimensions it won't let you edit the speed anymore (for some reason), so make sure you've got that settled.
After all the adjustments are done it's time for the moment of truth...
File > Save for Web...
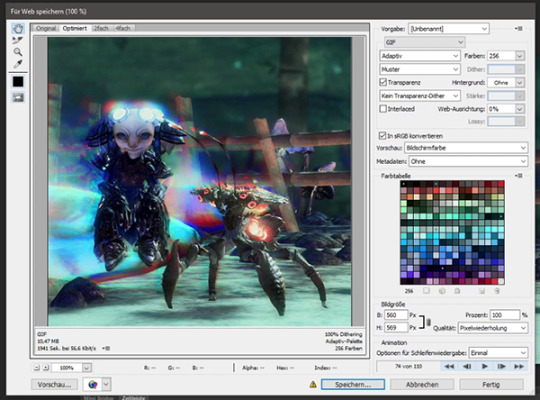
This beautiful window will open and...

Aww almost.
But honestly? That's not bad at all. I've had completely different disasters to deal with in the past (starting somewhere in the mid 20MB, good luck trying to make use of every size-reducing trick you've got up your sleeve).
Before I do any adjustments to shave off the last few KB though, I preview the gif to make sure it loops correctly. I want the Chak to sway seemlessly. Turns out it didn't, so I back out of the window to remove a few frames from the footage. And when I open the "Save for Web" window again....

Well that's anticlimatic. Apparently those few frames were enough to get the file size where I need it. (Note: Sometimes Tumblr likes to be a little b* and pretends your file is too big when you're this close to the 10MB limit. It be like that.)
While my gif journey theoretically ends here, I want to at least show you a few more things that could have helped if I had needed to get the file even smaller.
So this dithering thing I keep making a big deal of...
It can make or break a gif. In my experience this is so, so crucial to the final file size and quality of the gif.
In my own very amateurish words, dithering is a way to emulate colours that aren't actually part of the images colour palette. This is especially needed for in-game transparency effects like fog, glowy stuff, or smooth gradients. And that is part of why I chose this hell scene of all the ley line glow and the typical gw2 bloom that's particularly bad in this area.
PS CS6 offers you three different kinds of dithering techniques: Diffusion, pattern and noise.
My go-to is diffusion dithering, which has adjustable quality levels.


In my opinion it's generally the type of dithering that's often the least noticeable and creates the smoothest looking images. Unfortunately, it's also the one that creates by far the largest file sizes. Another downside is that it doesn't work super well with heavy DoF/fog etc. effects and is prone to really ugly banding, especially visible the more you decrease the quality. It looks awful for this particular scene. (Look at the glow around my asura's headpiece if you don't know what I'm talking about. Or... just the entire background.)
Both noise and pattern dithering will get you smaller file sizes, luckily.
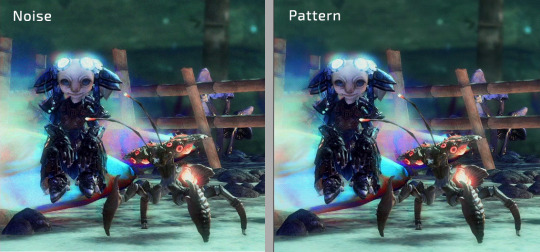
I've never used noise so far (it tends to look messy in my opinion), but pattern gets the job done! Especially for gradient heavy gifs it's a lifesaver. It's definitely more noticeable than the diffusion dithering on static parts of the gif, but it absolutely makes up for it by not having any ugly banding effects. This is also what gave me the neat little 9.99MB file size in comparison to the diffusion dithering's 15.31MB.
Last but not least, if fiddling with the dithering or image dimensions doesn't help you get below that magic 10MB mark...
Limit the colour palette
You can either manually colour edit your image to use less colours for a more artistic approach, or you can let Photoshop limit the palette to its best abilities.
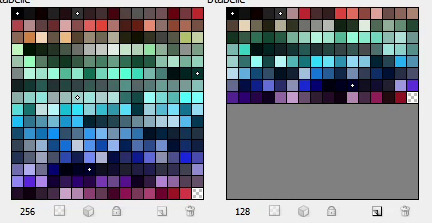
Additionally you can double click each individual colour to replace it how you see fit. (I've done that in the past when Petthri's yellow eye colour got erased and I had to bring it back manually.)
In this gif's example, reducing the palette from 256 to 128 colours has brought the file size down from 9.9 MB to about 8 MB. It can have a big effect, but doesn't always in my experience.
SHOW US THE GODDAMN GIF ALREADY!!!
Not the best quality gif we've ever seen on tumblr, but given the extremely unfavourable source material I think it turned out alright. I have to admit I'm actually surprised it worked at all.
Oh well! This got long (once again). I hope this was at least a little bit helpful to someone out there. Happy gif making!
70 notes
·
View notes
Note
hi art! i saw your tutorial for hd gifs so thank you! im starting my giffing journey and i wanna know what you mean with resizing the gif to 1080p? can you show me how you crop 540px and 268px gifs and then resizing them back to the 1080p height? i couldn’t seem to do it properly when i tried myself 🥹 tysm!!
Hello, anon! Were you the one who sent the previous ASK? If so, then I'm glad that you saw my reply. ^^
Sorry if my explanation about the resizing part was a bit confusing. Here's a more detailed explanation. ( ̄▽ ̄*)ゞ
Sample Image:

Dimensions: Width: 1920px, Height: 1080px

As you can see, the original height of the image is 1080p.
And then, I will crop this image to 540 x 268. I will only use these as ratios and not the actual resolution. This means the actual dimension will not be 540px by 268px so as not to make the image smaller in terms of size. Like I explained before, it's better to preserve the actual size of the image you're using and just reduce the size when you are already exporting the GIF.


After cropping, the dimensions of this image are now 1920 x 952 (originally 1920 x 1080).

Since the height changed from 1080 to 952, I will revert the height back to 1080. Preserving the dimension by keeping the aspect ratio locked, I will change the height from 952 to 1080.

Then click OK. The width doesn't matter. Just focus on the height of 1080px.

Final dimension of the image: 2178px by 1080px. When I say final, this only applies to the editing stage. Once you export the GIF, you can just change the width to 540px then the height will automatically change to 268.

Hope this helps! Also, just a reminder that this is just my preference and something that I am very particular about.
Of course, you can just retain the previous dimension (1920px by 952px). Since 952px is not that far with 1080px. I guess I would be more particular if there was a drastic change in the height.
If you will be following my sharpening style, then it's best to stick with this practice as well. You did mention that you are still starting your giffing journey so feel free to experiment with the dimensions and the values when sharpening your images. My style is, of course, just one of the many ways you can make your edits look more HD. There are gif makers out there who are using different techniques and probably better ways.
Feel free to use mine as a guideline of some sort. Because to be honest, the sharpening style I explained is just me exploring whatever the hell I can explore in Adobe PS. In other words, I am just winging it. XD So feel free not to follow my suggestions to a tee.
9 notes
·
View notes
Note
hi sorry if this has been asked before, but i've been looking on your faq page for aska regarding your gifs? especially how yo make them - I'd like to create some too but it's so complicated😅
i use photoshop (not paid for lmao i downloaded a version off here years ago from like. 2016) + kmplayer + if it's game gifs, i use nvidia shadowplay to record
i'll put this under a cut because of images/length
i open my footage in kmplayer, and use the frame extraction function over the timespan of the clip i want to gif. these are the settings for that:
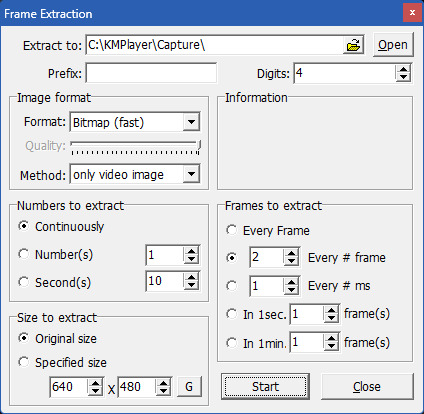
normally for games, i record in 60fps and extract every 2nd frame, but sometimes i extract every frame and scroll through to delete duplicates made from stuttering etc. for everything else like movies/tv, i extract every frame. normally, i try to go for around 100 frames, but you can have more or less depending on your final gif size, and also you can always trim your gif down when you're in photoshop, but more frames = longer import time
then in photoshop i go to file > scripts > load files into stack and select all the frames i want to go into the gif i'm making
for the method i use, you need a version of photoshop with timeline animation, and make sure the timeline i displayed (window > animation)
now the next part has a lot of little steps, but they're fairly easy to get the hang of once you've done it enough. it's basically muscle memory for me now but i still do sometimes do things in the wrong order lmfao
anyway. the steps are as follows:
click 'create video timeline'
click the 3 little boxes in the bottom left
in the right menu, choose 'make frames from layers'
when thats loaded, open the menu again and choose 'reverse frames'
click the last frame and change from 5 seconds to no delay
make sure you choose 'forever' instead of 'once' in the bottom left
select all frames (you can select the last one, then scroll back to the first and shift click to select them all, or just click 'select all' in the menu, i'm just used to doing it the first way for some reason lmao)
in the right menu, choose 'convert to timeline'
then select all the layers (can use shift click again)
and finally go to filter > convert for smart filters
here's a very small shitty gif of the process for a visual aid (a gif of a gifmaking guide... wow)
now you have a gif, basically! but you still need to resize and sharpen and edit, etc. i've posted about some of the things i do before but not really in detail because i mess around every time and don't always do the same things. and you don't have to do much! just do whatever looks good to you :')
tumblr's gif dimensions are 540px width for wide gifs, 268px width for two small gifs, and three small gifs are 177px for the two outer gifs, 176px for the middle one (don't ask me why they did that)
once you're done with that, you can export the gif by going to file > export > save for web (legacy). these are usually my settings:
but i might change the colors to 264 if it's a smaller gif, or even to 64 if there are less colours and i can get away with it. for example in these gifs, i only used 64 colours since they were pretty brown/monochrome anyway, but something a lot more colourful would look terrible with 64 colours
the gif needs to be max 9.99MB, but if it goes over, you can always adjust it in the next step. once it's exported, i open it again
select all the frames and click the little arrow on one of the frames, then change the timing. i almost always use 0.05, but you can experiment with what you like the look of
then if the gif's over 9.99mb i just delete frames from the beginning and/or end until it's under the limit. then export it the same way as before (overwrite the old one or save it as a new file if you like) and you're done!
#ask#gif tutorial#kinda. i suck at explanations so maybe this isnt the best LOL#if you need me to clarify anything pls lmk! i always wanna help people learn new stuff if i can
22 notes
·
View notes
Note
congrats on the photoshop! if u dm talking abt, what’s ur gif-ing process :3
tyty! and you've activated my trap card, I love talking
It usually goes like
1. download the mp4 from youtube or some other place and trim the clip until I get the parts I want
2. import the mp4 into photopea, which automatically splits it into frames for me (haven't tried directly loading it into photoshop actually).
if this step gets messed up and the frames aren't generated properly/smoothly (this happened in one of the hu tao gifs and I didn't realize until about a week ago lmao) I have to use the mkv player method a lot of gif tutorials talk about (I followed this one).
3. crop it to either 960px or 540px (widths), settings below. everyone says use 540 but I've done 960 on several occasions by now just because I like clicking on images and having them actually zoom in. it's supposed to be worse for the normal preview though

4. add adjustment layers and fool around with them. for this I almost always add hue/saturation and selective color, and sometimes brightness/contrast and gradient map as well, and maybe others depending on how I feel. a ton of tutorials add curves layers but I haven't figured out how to not make them look ass lol
this step is super vibes and eyeballing based tbh I use different colors for every gif including ones in the same set. I know coloring psds/actions are a thing but I haven't looked into that
5. sometimes I will also add gradient fill (did this for the lyney gifs and some other non-genshin ones) for more strongly colored backgrounds
6. finally open the file in photoshop and do: make video timeline > convert to frame animation > make frames from layers > delete any blank frames (manually) > select all frames > set the frame delay to 0.05. exactly the same steps as this tutorial, without the reverse frames part
7. tweak the color details until it looks better / finished. I've had to mess around with layer masks for some of the gradient fill parts (to make sure the subject of the gif isn't colored over by the gradient), and that's kinda painful, but I've only done that for ~3 gifs so it's fine
8. add sharpening layers, I think I use the settings in this tutorial? I tend to make the gaussian blur stronger than 15% (usually 40-70% lol) because sometimes the 2 sharpens look too pixelated. idk if that's bc of differences between animation and live action or personal preference
9. squint at the gif a lot when exporting (I usually use adaptive color and pattern dithering, but sometimes I have to use perceptive color instead to lower file size...) and go through at least 3 different minor color or sharpen tweaks before being like yeah that's probably good enough
photopea doesn't have dithering settings which is the reason I switched to actual photoshop (sigh). it makes the gif colors look smoother
also there's a bug where the frame delay you set gets changed (usually increased) when exporting, but often times I'm too lazy to fix it back and export again. idk it doesn't make a difference to my eyes but fyi ig
10. save as draft on tumblr and add alt text. it's fun and my internet is shitty enough that my own gifs load very slowly too, so the description is helpful especially when all I can see is a gradiently colored square
there are a lot of photoshop actions that people recommend and I haven't looked at any of them, mostly I'm lazy and prefer to just wing it myself. also I feel like the main ""trick"" to gifs/giffing and making your """style""" or whatever is in choosing and adjusting colors, but besides making things brighter and more colorful, I don't really have rhyme or reason behind how I adjust things lol
also if you have any other questions feel free to ask! I can also send cracked photoshop and the gif tutorials I've used if you want lmao
#teyvat thoughts#asks#thank you for sending this it was fun to think about! maybe I'll look back on it in a year and see what's changed#gradient map is kind of weird and I haven't figured it out. idk curves or levels either although i theoretically know how they work
2 notes
·
View notes
Text
how i make gifs using filmora x (for anon ❤️)
read under the cut!
hey!! thanks for reading this! just a few notes before i explain about my editing process:
filmora x works very differently from photoshop. it's a video-editing software anyways, so treat it like that!
always use high-quality sources!! most of my issues with grainy gifs come from using low-quality sources. so, i always ensure to use sources at 1080p, at least!
if i'm creating multiple gifs from one match, i usually download the entire match (which is a hugeeee file 😵💫 but it's so worth it!!). but if it's only a scene or two, i screen record them! i have an astro supersport subscription and a beinsports account, so i don't have an issue screen recording clips, as their content are always in high-quality! but if you're using other sources or streams, then do ensure the quality is good!!
if the only available source is of low-quality, my trick is to make smaller gifs! for smaller gifs, i usually keep a 1:1 or 4:3 size ratio, and post them side-by-side in a single post - usually two in a row!
general colouring stuff applies here as well, you can check out the photoshop guide i've linked in the ask!
remember, there isn't one "correct" way to gif, you can gif however you like!
and now without further ado:-
step one: adjust video settings, speed and length after importing the clip into filmora, setting the aspect ratio, resolution and frame rate according to preference, the first thing i'd do is to adjust the speed of the clip. i like to slow them down, so i usually go for a 0.5x speed. you can always adjust the speed to your preference!
i like to keep my gifs within a 3 to 5-second length, depending on the content, so i'll trim the clip or adjust the speed as desired. if the clip is shaky, i usually add stabilization at about 10%, but you can adjust as you like! here's an example of a clip before and after speed reduction:

step two: auto-enhance once the clip is at your preferred length, size and speed, now it's time to make it look pretty! in filmora, there's an 'auto-enhance' feature, so i usually begin with that, setting it somewhere between 50% to 100%. here's an example of how it looks like before and after auto-enhancing at 100%:
step three: colour correction head over to 'advanced colour correction', where you can use either the given presets, or manually adjust to your liking. i always manually adjust them!! you can also start off with a preset and make additional manual adjustments as I did below! what i did here was to darken it, then adjust the colour enhancement, white balance (hue and tint), colour (exposure, brightness, contrast, vibrance, saturation), lighting (highlight, shadow, black, white), and hsl (for this example, i adjusted only the red).
you can also save your adjustments as custom presets so that you can use them again in the future!
here's a quick look at how i do the colouring! from the before and after colour correction examples, you can see that this is the important part of the whole process!!

step four: sharpen once i'm satisfied with my colouring, i sharpen them by adding the 'luma sharp' effect (usually at 50% or 70% alpha and 50% intensity)
here's how it looks like before and after sharpening:
step five: final touches and exporting before i export, i make some final tweaks to the brightness, contrast and saturation, etc., ... and voila!! there also many other effects available for you to add (grainy effect, blur effect, etc.) so feel free to play around!

once you're satisfied with your result, it's time to export! now, video-editing softwares HATE gifs. you can always just export as gif from filmora directly, but i don't really like the way it turns out 😭 so, i export them as video (.mp4) and use external gifmakers (like ezgif!) to convert them from video to gif!
aaaand that's all!! here's a comparison of the original clip vs the end result!
final note: remember to size your gifs correctly for tumblr (540px for full width, and 268px for half), and keep each gif within the size limit of 10mb!! if you find that your gifs exceed the size limit, try reducing the number of frames or removing duplicate frames, increasing the contrast, or you may also crop the height if necessary.
if you have any questions about making gifs using filmora, feel free to reach out! thank you for reading, mwah mwah!! 💞
10 notes
·
View notes
Note
your gifs are so pretty and I esp love your scenery gifs, can I ask how you get vids of scenery of some games like uncharted when your character and their big head is always in the way? I feel like I can only get it to work with first person games :( your blog is so beautiful btw <3
Hey! firstly thank you so much for the nice message! 💕
I'd be happy to explain to you what I do because you're absolutely right, nathan drake's (beloved) big head does love getting in the way, to not even mention the companion npcs who just love walking right into the shot you're trying to gif 🙃 i'll share some of my tricks under the cut!
One of the things I'd first like to show you, though, that in most of my scenery gifs, the full footage does include the playable character in the shot (in the case of third-person games). As an example, in this uncharted set i made recently, this is what the full shot of one of those gifs looks like:
I use the PS5's built in recording system to record video in 1080p, making the width 1920px which is a lot bigger than a dash-wide tumblr gif (540px); because of this, even if the character is in the shot, you can make a gif of the scenery without too much trouble. Like in this shot, i can crop out to only keep the lower right corner, and the final gif will still be big and sharp enough to work!
However, sometimes the character does indeed get in the way, and one of the tricks i use is showcased in the gif above: turning their back to whatever part of the scenery you want to gif. You get the least wide part of the character in the frame. Also, lot of games tend to use many idle animations, sometimes causing rogue arms to flail around in your desired scenery shot. this positioning usually negates all of that!
Also, some third-person games allow you to zoom in, I believe naughty dog games sometimes do by pressing the 'aim' button when you're not holding a weapon; this sometimes allows for a good wide shot without a character in it, too. but that takes a little experimenting based on the game you're playing!
One of my favorite tricks, that may or may not work based on the game you're playing and the environment your character is in, is basically backing your character up as close to a wall as possible, and then moving you camera up against the wall as well. This can make the character completely disappear, potentially leaving you with a beautiful wide scenery shot. is kind of hard to explain, i hope this video i conveniently have of me doing this in the last guardian explains it a bit (with me Struggling because this beloved game's controls are so wonky). there is a wall right behind me and i'm moving the character up against it:
youtube
hope that kind of gets across what i'm doing - of course this only works if you have something like a wall to back into.
those are pretty much my tips and tricks for gaming scenery gifs i've discovered over the years! i hope this helps, if you have other questions please let me know! 💖
2 notes
·
View notes
Note
hi!! i wanted to know if you'd be willing to make a tiny tutorial / explanation on your sizing for gifs and how you get such good quality?? i just started making gifs yesterday and i fear i have a lot to learn....
OMG thank you for thinking I'm worth asking something like this but believe it or not I just started making gifs myself, about a month ago! I wouldn't feel confident enough to give you a tutorial but I can give you all the info I've learned and the tutorials I use!
First for gif sizing the only metric that matters is width: 540px for 1 gif by itself | 268px for 2 gifs next to each other | 177px for 3 gifs next to each other. Height doesn't really matter, also gifs should be less than 10MB in size as that's Tumbr's limit.
This is the tutorial I've used for sharpening I liked this one 'cause it has the usual 2 filters I saw other gif makers suggest plus an additional layer and so far I like it the most. The main thing is also to always try to download the highest quality video too, 1080p at least, but if your computer/laptop or whatever you're making gifs on can handle higher quality videos you can download those too (I use this website to download videos off YouTube, but there are others too, use what you prefer!)
And this is the tutorial I've used to blur text/logos on my sets. I saw some other methods but this one was the easiest/simplest for me to understand. But not everyone cares even if you don't blur stuff to start, some of my first sets I didn't blur anything and they did better than I could have expected.
Finally, to go back to Tumblr's limit I learned this the hard way at first but it's important to keep in mind the number of frames in your gif (I always set my limit at 180 or less frames in a single gif, otherwise it ends up over 10MB), BUT another way to try and reduce MB size when exporting on Photoshop (assuming you're working from PS) is changing up the settings to make the file smaller without having to cut too many frames if it still ends up a little big. You won't always have to do this if you use less frames (using the default settings is fine which for me are selective/diffusion) but it's helped me a few times not have to cut anything even if it ends up a little over 10MB originally.
For example from my last set:

This is what my export settings were, the quality can change between using selective or adaptive, or diffusion or pattern (these are the common choices). For this set I chose adaptive and pattern and it gave me the smallest MB size without losing the quality. I don't change much else. I also set my quality bar to bilinear instead of bicubic 'cause I just prefer it and I saw some other gif makers have it at that setting too so I just leave it like that.
I hope some or any of this is useful to you! I also find it helpful that if none of these tutorials are what you want there are a ton of resources here and on YouTube too that I read when I see them or watch if I need to see examples, it's definitely a learning process but I've been enjoying it and I hope you do too!
1 note
·
View note
Text
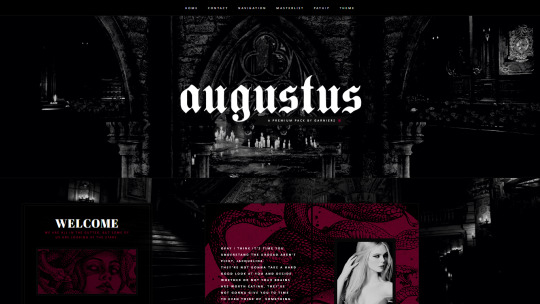
AUGUSTUS: RPG THEME PACK
[ live preview ♡ $10 on payhip ] After several delays on my end due to changing my mind about the aesthetic and general feel I was aiming for, I am delighted to finally introduce you to Augustus: RPG Theme Pack! Crafted with a whole lotta love and an absurd amount of pseudo-elements and borders, this theme pack over here encapsulates everything I would use for my own roleplay group and is heavily inspired, as per usual, by the works of Oscar Wilde. More specifically Lady Windemere's Fan.
I know the play is theoretically a comedy, but staying true to my storytelling essence I put the theme together with videogames such as Resident Evil and Dark Souls in mind. I have my dear siblings to thank for the inspiration and unwavering support of my late-night coding sessions and my god-awful posture. Once again you have proven yourselves to be the muses behind everything I create and everything I put out there (that's addressed to the zombies, by the way.)
You will find everything you need to know about Augustus on the Live Preview, there is a detailed list with the elements of the theme pack and a couple of extras I took the liberty to add.
Features
540px posts
Full-width header (+ an optional fade-in header menu)
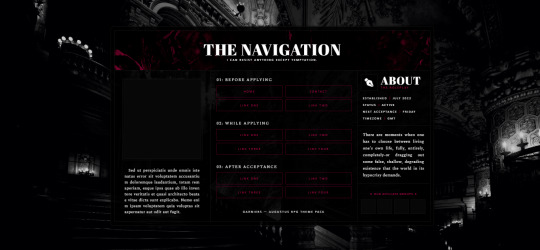
4 Sidebar sections
Footer with both a statistics and pagination section
Optimized for Beta Editor (+ also Legacy Editor compatible)
A navigation page
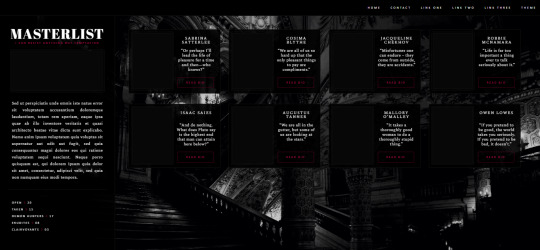
A character masterlist page
A PSD folder with the graphic canvases (for optimal resolution)
Terms + Conditions
Please do not redistribute / claim as your own
Please do not remove credit
[ Check my Terms Of Service for more information ]
140 notes
·
View notes
Text
Hi there!
There are many different ways to make gifs but this is what I do:
For Granada I have the DVDs so I use them but you can download them online; try to get the best quality available.
I use KMPlayer to take the screencaps (it's free to download).
Press ctrl + g to start taking screencaps in KMPlayer when you play the video.
Then I put the screencaps into Photoshop but you could put them into free software such as photoscape (drag screencaps into animated GIF section and safe them as a GIF; make sure you choose the right speed).
In Photoshop; file > scripts > load files into stack; then select all the screencaps you need for a gif.
GIFS have to be 268px in width to look look on tumblr (if you want 2 gifs side by side). For large GIFs they are 540px in width.
Then I mess with the colouring and brightness etc. and add subtitles if necessary.
You have have to make sure the timeline is visible (window > timeline).
In the timeline there is a little button menu on the right; make frames from layers, then reverse frames (otherwise your GIFS will play backwards).
Finally; file > save for web > gif (GIFS have to be under 5MB in size to keep their quality on tumblr).
Then I put them into photoscape to get the speed right (you can do it in Photoshop alternatively).
These are the basic steps I do, I'm sure other people have different (and easier?) methods. If you don't want to change the brightness or mess with the colours it's a lot easier because you can use free software. Hope this helps!
Going through with the Granada Sherlock Holmes marathon I'm on, and today I'm watching The abbey grange episode. And within the first 10 minutes, my heart is already shattered by Holmes' and Watson's silent communication and reaction to the lady's story of her husband's alcohol addiction. I never made any gifs yet, but now I really want to get into it to capture that emotion on Jeremy Brett's face. Those who make Granada gifs - how do you do it? I've done video editing before in Shotcut with my own recorded material, just never made gifs. Do you download the clip you want from youtube in mp4, edit it in a video editing programme, and then export it in gif format?
62 notes
·
View notes
Photo


I was just trying to be like you.
#marveledit#spidermanedit#spider man homecoming#peter parker#i actually did a much bigger photoset first but after i was finally done i realized i used 500px width instead of 540px...old habit#guess thats what happens when you dont use photoshop for half a year#mine*#mine***
7K notes
·
View notes
Text

Hi so I’ve had a couple of anons asking me how I make my gifs (some specifically hsmtmts gifs lol) so I’ve decided to write up a tutorial of the basics of how I make my gifs. I’m going to try and make it as detailed and clear as possible - but I have been pretty busy with uni and stuff so if I miss anything or anything isn’t clear just lmk and I will do my best to clarify. I’m going to try and include any resources or other tutorials which may be useful as I go along. This is going to be quite long and detailed so tutorial follows under the cut. For some basic steps I know of good tutorials for - I will link tutorials rather than re-explaining :)
Before we begin with the tutorial part bear with me there are a couple of screencaps which I took out of sequence because I forgot to take them at the step I did it - and the final gif colouring result looks kind of different from the rest of the screencaps because when I was adding the gif to the gifset I was making it for I decided it needed to be brighter because the s3 scene was much brighter than the s2 gif I made for this tutorial (none of this really matters, just explaining the slight discrepancy in some of the caps).
1. SOFTWARE
To make all of my gifs I use Photoshop CS5 (this is the version I use). Any version of Photoshop should work with the methods in this tutorial and you can find a masterlist of cracked photoshops here
2. FINDING HQ VIDEO
When making gifs I always use 1080p video - but not all 1080p is created equally. Generally remux files and larger file sizes will produce better quality screencaps so this is what I search for when giffing. I know a lot of gifmakers who swear by using 4k, but personally I find 4k is more trouble than its worth in my opinion (screencaps always come out weird on my computer - like with a full on green tint, and they take forever to download). For HSMTMS in particular I like to use the release labelled 1080p SALT.
In terms of finding videos, this is a good guide on downloading.
3. SCREENCAPPING
I use mpv player to take screencaps for my gifs. This is a tutorial on how to use and install mpv. When taking your screencaps make sure you have continuous screencaps and no frames are skipped or duplicated. These missing/extra frames will make your gif look choppy and the animation won’t be smooth.
After finishing my screencaps I put them all in folders and move the folders to my desktop (but it can be anywhere you easily can access the folder) to import into Photoshop.
4. IMPORTING SCREENCAPS TO PHOTOSHOP
Open Photoshop. Open the Menu path "File > Scripts > Load Multiple DICOM files” and select the folder where the screencaps for your gif are.
5. CROPPING AND RESIZING GIFS
Click the ‘Crop’ button on Photoshop (the little button shown in the screenshot below). Typically I like to use a preset so that all the gifs in the set I make are the same size. For this set I used the 4x5 crop preset because that is what I typically use.

Position the crop where you want the gif (typically I like the character in the center).
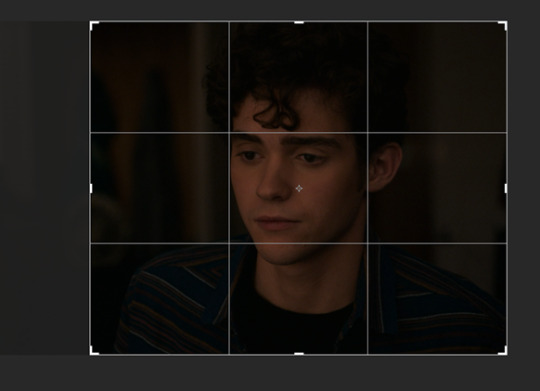
Then push enter (or the tick next to the crop buttons) to confirm your crop.
Use the keyboard shortcut Ctrl + Alt + I to resize your image. This will bring up a little pop up like this:

Resize your gif accordingly based on the width. It is important to use the correct dimensions for the size of the gif you wish to make. These are summarized in the below image.

When you change the width to the correct size (e.g. in this case 540px) the height will automatically change as well.

Click Ok to resize.
6. ANIMATING YOUR GIF + SHARPENING
There are quite a lot of steps to turning your frames into a timeline animation. They are covered in detail in this amazing gif tutorial (which is the main one which helped me learn to gif).
It would be useful to have a read of how the process works, but to speed things up for myself I use a Photoshop action (shared here) I made that does all these steps for me plus my sharpening😊 (Here is a tutorial explaining how to create & install Photoshop actions)
I just highlight the word animate click the play sign and it does all the tedious steps in a couple of seconds. Note it is important to keep the reverse frames one unticked as shown in the screencap otherwise your gifs will move backwards

After that runs through we have our gif in timeline mode sharpened and ready to colour :)

7. BASIC COLOURING TECHNIQUE
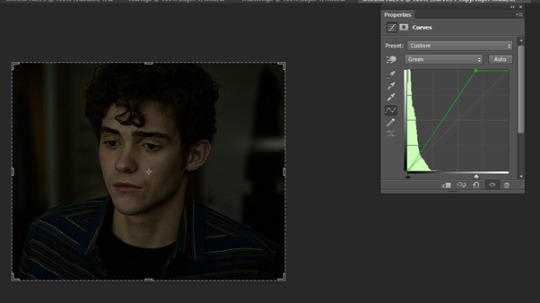
My basic colouring process is very simple and honestly it may shock some people but I primarily colour my basic scene gifs using only the curves and vibrance adjustment layers. There a few reasons for this – 1) The curves tool is a powerful tool and you can do a lot with it 2) Less adjustment layers = better quality gifs 3) This works for me and it is what I find easy. Essentially, I like to keep things simple where ever possible.
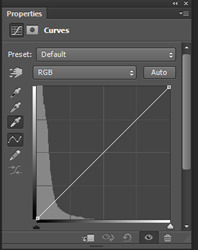
First I add a curves layer by clicking on the highlighted adjustment layer
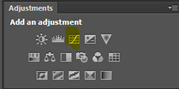
This gives you a menu that looks like this:
The great thing about Curves is that Photoshop will do a lot of the work for us if we use the eyedropper tools.
First I click the white eye dropper – then I pick a white point on the gif and see how it goes. This can take a few times to get right and often I will try a few times to see which I like best.
For this gif I selected the white light in the background but it looks a little green to me

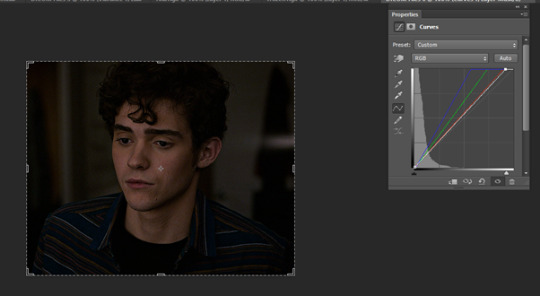
After I have selected my white point I will usually do the same thing except with picking a black point of the gifs. I don’t always pick a dark point it kind of depends on how much I like what Curves has done with the white point and if I think the gif needs more contrast.
For this gif I picked a black point of the area behind Ricky. This is what the gif looks like now with the dark point chosen:
This looks a little better to me than just the white point – but the screencap still looks kind of yellowy and dark to me. So what I do now is I go into each colour channel for the curve and manually adjust it to my liking.
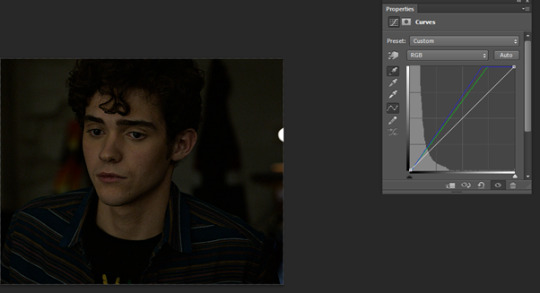
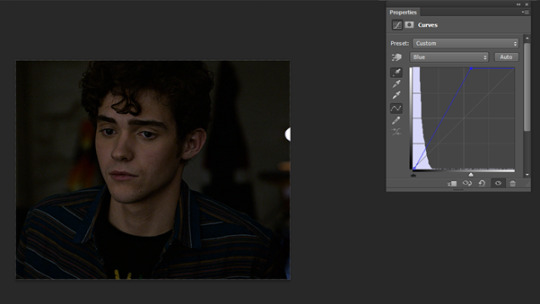
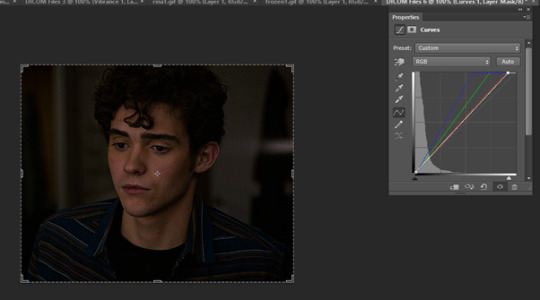
Since this gif is yellow I start in the blue channel and add more blue. I do this by changing the drop down menu on the curves screen from RGB to blue. This gives me something like this to work with:
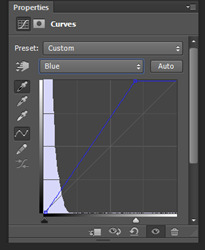
Essentially I adjust the amount of blue in the gif by sliding the white arrow down the bottom up or down to add more or less blue to the gif. For this gif I am going to slide white arrow at the bottom to the left to make the gif more blue (i.e. neutralise yellow). If I think I have added too much blue I slide it back to the right to add yellow back in.
This is what I adjusted it to and it already looks a lot better
I am actually pretty happy with the overall colouring of this for the moment and I don’t think I need to go into the red and green curves. But I will briefly explain what they do/how they work by showing what some adjustments to these curves looks like.
Red curve – here is our starting point
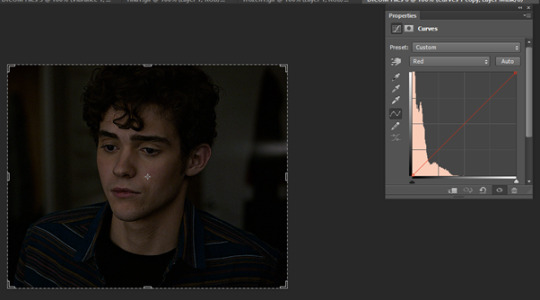
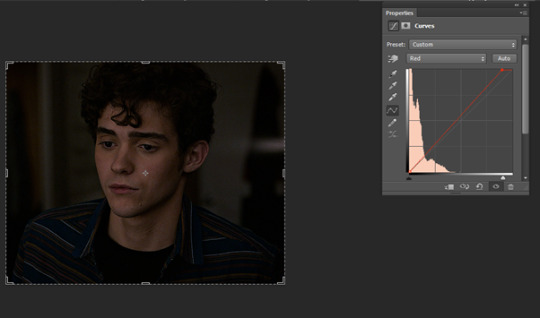
Dragging the curve to the left will introduce more red into the image

Dragging it back to the right will take out red (the gif will become more cyan)
Green curves: this is our starting point

Dragging the green curve to the left will add more green to the image
Dragging it to the right will take green out (adding pink/magenta)

So after I am happy I have coloured the image in curves If I want the gif to be a little brighter I go back to the main RBG Curves screen and drag the white arrow a little up to the left to add some additional brightness
After colouring with Curves I add in a Vibrance layer (highlighted adjustment layer)

Typically I set the vibrance somewhere between 50 and 60.

This is what the gif looks like now:
At this point I also have another quick look at the gif and see if I think I need to go back into curves and tweak the colouring a bit and add a bit of extra brightness. When I add in the Vibrance I find it easier to see if there is any underylying colours I want to go back and neutralise/adjust in my curves layer again.
This is what I end up with after making my adjustments post vibrance layer:

Another step I do sometimes is grabbing the black slider on curves and dragging it just a little bit to the right to add some depth and contrast to the gif. As s2 of hsmtmts is really dark I didn’t do it for this gif because I don’t think it needs it. But I will show an example of what this might look like:

This is basically it for my basic colouring. Of course there are a lot of different steps to making my colourful gifsets, but this is just a basic tutorial for the way I gif standard scenes so I will move on to subtitling gifs.
8. CAPTIONS
My go to subtitle font is Arial Rounded MT Bold. I have Faux Italic and Faux Bold Selected for this. I like bigger font sizes because I have bad eyesight so usually I will opt between 20 – 24 pt font size

I click the T button to add text then I type out my caption.
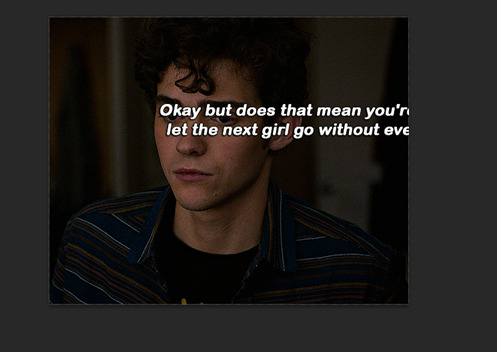
Obviously we don’t want our text here so I align it to the bottom and centre of the gif I do this by first selecting the move tool then going ctrl + a (this selects our gif as the boundary for our alignment). You will know this is done based on the border that comes around the gif (also please ignore that drop shadow and outline settings have already been applied here lol – I added this in because I forgot to screen cap/ explain this part initially)
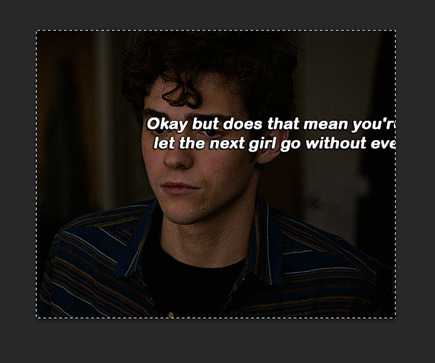
Then I align my text using the following menu buttons:
Next I Ctrl +D to remove the selection (you need to do this to be able to nudge your text up for the next step). This is the result of the alignment:
Now I nudge the caption up by selecting the text layer and pushing ctrl + shift + up
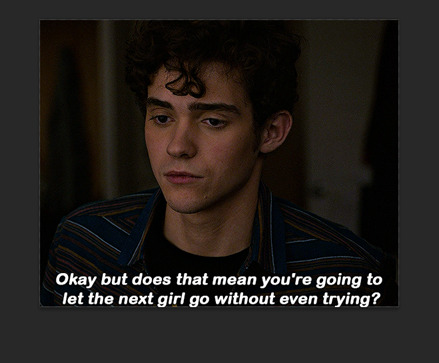
This is the result:

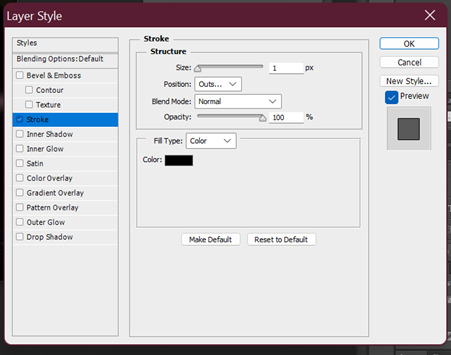
This looks ok, but I always add an outline and dropshadow to make the text more readable. To do this I go into the blending options for the text layer. You can do this by right clicking the layer and selecting blending options or by double clicking the layer (but not on the text).
First I add Stroke with these settings
Then I add Drop Shadow with these settings:

9. SAVING GIFS
To save your file use the keyboard shortcut Ctrl + Alt + Shift + S to open the save for web settings. You will get a screen like this. The settings shown in this screen are my typical save settings (except it should say ‘Forever’ on looping options)
However, Tumblr’s gif limit is 10mb so the size of this gif is too big to upload (it is nearly 12 mb) so we have to go back in the timeline to shorten the gif a bit so we can upload it to tumblr.
I do this by dragging the red preview thingy (idk what else to call it) around till I find a point where I feel the gif has a natural end. Then I grab the timeline bar thingy (idk what it’s called but the silver gray bar at the end of the gif) to the red bar to shorten the gif.


Now press Ctrl + Alt + Shift + S again to save your gif and make sure you set the Looping Option to ‘Forever’. Sometimes I have to shorten the gif a few times to get it under 10mb - but luckily I got it first go this time :)
Now your gif is saved but there is still one step left to do. Photoshop has a glitch where it automatically sets gif speed to 0.7 after saving from the timeline function – we don’t want that! The gifs look very slow and are not very smooth.
So what we do is we open the gif that we just saved and this will open in the frame format. All we have to do is select all frames and set the gif speed to 0.5 – I also have this in my action so I go back to the actions and highlight the line that says ‘set frame speed’ and play the action through

Then we just save the gif again as we just did 😊
This is the end result:
and what the gif looks like without any colouring or text:

One other helpful tip:
If you are giffing from the same scene you can do your colouring and text manually as per the tutorial on the first gif for the set and then drag what you did across to the second (after cropping, resizing and animating it). All you need to do is drag the colouring outside to a different window then highlight your adjustment layers + text and drag them to the new canvas off of the gif (If you drag it on top of the gif it will place it where you put it. Make sure to go off the canvas to so it will keep you positioning/alignment of the text you made 😊)
Basically - you drag the text, curves, vibrance (and any other layers you need) to the gray area of your photoshop document and your colouring will be applied and your text will be placed in the same position as your source doc.
Ok so that is my super basic gif tutorial - if anyone has any questions feel free to ask!
#hsmtmtsedit#*mine#request#gif tutorial#resources#ps help#photoshop tutorial#usergif#allresources#yeahps#completeresources#resourcemarket#dailyresources#userelsbeth#usersavana#useraurore#userrobin#usersole#uservalentina#tuserheidi#okkk so this is kind of a weird choice of gif for the tutorial but I just followed my process as I made a gif request this morning#plus I do feel like its a really ugly screenshot so shows the results of the colouring quite well#but anyway i hope this helps someone
1K notes
·
View notes