#faire isle
Explore tagged Tumblr posts
Text


My boys had the zoomies, but I've never seen them do it with glow sticks before?!
#I forgot to post when this happened and it sat in my album for a month oops#I've never been the person who spends 30 minutes taking pictures before#it was fun#faire isle#ACNH
3 notes
·
View notes
Text

Baby's first Fair Isle project
Honestly devastating that I finished this in the middle of summer when it is too warm to wear. This does however give me time to get together a hat, scarf, gloves etc using the leftover yarn.
Pattern: Folly Skirt by Espace Tricot
Yarn: Léttlopi by Ístex
1K notes
·
View notes
Text


Trying fair isle knitting for the first time, and I think it is coming along quite nicely
#knitting#knitblr#knitted mittens#fair isle#knit colour work#the fabric is so much denser than i thought it would be#i think it looks really nice with the colour changing yarn
470 notes
·
View notes
Text
My Six of Crows blanket is officially finished!!


I’m so happy with ittttttttttttt
I know a few people have said they’d be interested in a lil guide on how I did it (I don’t have a pattern bc I just decided to draw up the chart for it myself on a whim and then got committed) so I’m planning on writing that and sharing it soon, please let me know if you’d like to be tagged!
Anyway I don’t think I have anything else to say, I just had to share because I am OBSESSED with how this came outtttt I’m so happy
#grishaverse knitting#six of crows#grishaverse#crooked kingdom#leigh bardugo#fandom knitting#kaz brekker#inej ghafa#wylan van eck#jesper fahey#nina zenik#matthias helvar#kanej#wesper#helnik#grisha#grisha trilogy#the grisha series#reading#knitting#fair isle knitting#hand knitted#knitblr#knitters of tumblr#knit blanket#six of crows blanket#six of crows fandom#shadow and bone#save six of crows#save shadow and bone
487 notes
·
View notes
Text


Chain of hearts short socks.
Really liked how this turned out! Off to sock no. 2
254 notes
·
View notes
Text

scarf update: officially longer than my dining table and the end is in sight! By which I mean I still have a good 30cm (possibly more) to go which will take me about 2 or 3 more weeks lmao
190 notes
·
View notes
Text

oh look, it already 5 o'cluck 🤭🐔❄️
240 notes
·
View notes
Text
Finished this 12 coloured fair isle steeked knitted cardigan earlier in the year.

It took about 2 years to make (while doing other concurrent projects). Pattern is Yell by Marie Wallin.
106 notes
·
View notes
Text

@isthereanechoinhere96 I made something for you!
This turned out so good!! I can’t wait to see how Fives and Jesse’s turn out when I do their template.
#worksbyclonemedickix#kix’s art#star wars#the clone wars#starwars fandom#the clone wars fanart#starwars fanart#starwars the clone wars#the clone wars fan#clone trooper echo#arc trooper echo#echo star wars#knittersgonnaknit#knitted gloves#knitters of tumblr#hand knitted#knitwear#knitting#fair isle
71 notes
·
View notes
Text


it's actually done ?????
164 notes
·
View notes
Text

Horrible photo I know but it’s happeningggggg
55 notes
·
View notes
Text

New year, new island!
Let's goooo
#fell off the bandwagon in 2020 and haven't been able to stay on#great day to try again#moved a new character from my old island to save time map hunting#and also to have something nice to wear day one#ACNH#Faire Isle#ren faire theme planned#whole island is just a LARP
5 notes
·
View notes
Text
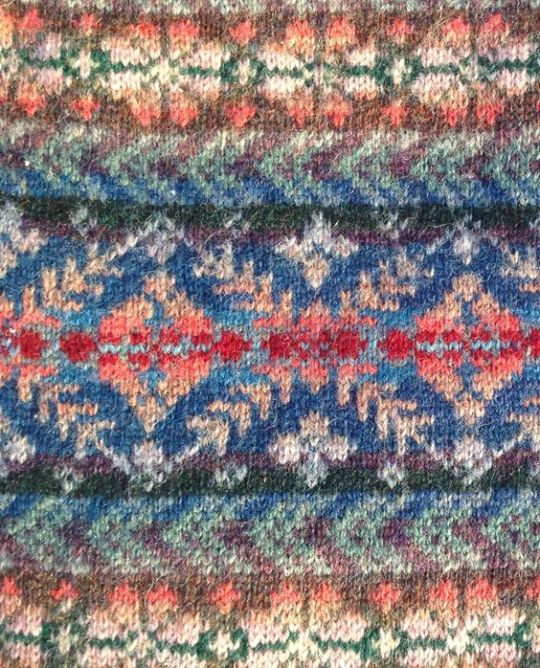
Fair Isle pattern called Marina by Alice Starmore,
From a BBC book "This Morning" Woolcraft, page 10, published in 1993.
355 notes
·
View notes
Text
How to knit a Six of Crows blanket!
Hi my darlings, after posting quite a bit about my Grishaverse knitting projects I’ve had a few people ask if I have any kind of pattern or instructions for the Six of Crows blanket I made. I completely drew it myself and (as someone who has never designed a real pattern) figured it out as I went but I thought I’d do my best to put together a step-by-step guide of what I did for my one so you can try it if you’d like to! If you do this and share it anywhere then if you could please credit me for the design that would awesome <3
My finished blanket is approximately 117x120 cm, or 46x47 inches, and it looks like this:
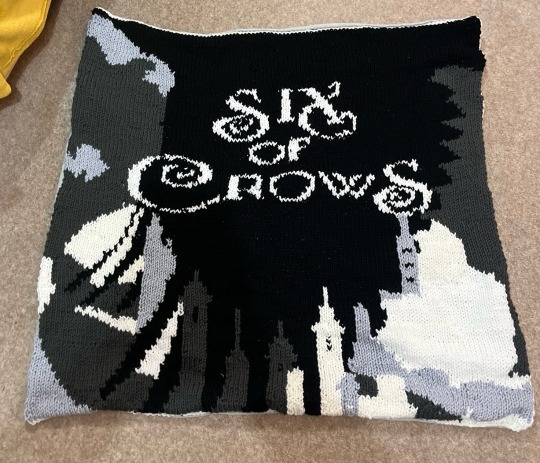
Yarn I used: so sorry I can’t remember and I don’t have the information right now but if anyone wants me to I can update this when I find it; I know that it was bulky weight though
Needle size I used: 9mm
Stitches you need to know how to do: Knit and Purl
Other techniques you’ll need to know: the fair isle method for colourwork, and possibly how to back a blanket but I will explain that in more detail because I had to learn how to do it for this project
Tags: @marielaure @spike-is-not-a-dogs-name @scenemime @worth-this-and-more @wisegirl29 @atac-agent @uttermywish @feralipadkid @fairytalesofforever
Guide below the cut!!
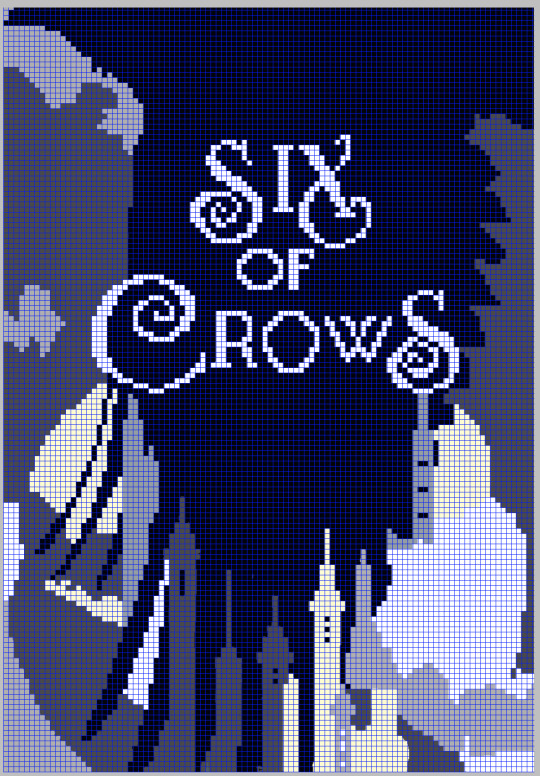
Step 1: the first thing you need is a chart, because this is knit in fair isle. I’m sure there are proper softwares for designing fair isle charts but I uploaded a photo of the six of crows book cover onto a free drawing app called Ibis Paint X, went over it in flat colours to create a more 2D design, superimposed a grid over the top, and then went round every individual square of that grid and edited the image so that there was one colour in each square (ie, pixelated it). The fun thing about doing it like this is that you can easily change it to be whatever size you want by changing the size of your grid (each square represents one stitch). As I mentioned before, if you use the same yarn as I did and the exact same chart as I did it comes out to be around 117x120 cm or 46x47 inches; it’s pretty square and smaller than your average blanket, which is perfect for what I wanted but might not be perfect for what you want so you might want to adapt that if you’d rather a different size. This is what my chart looked like:
Step 2: casting on and knitting! This is the most fun bit, in my opinion. My grid is 103 stitches wide so and I wanted to have a border all around the edges so the first thing I did was cast on a full row in the cream yarn that I wanted to make that border from, with two more stitches
1) Cast on 105 of cream yarn. This should be the number of stitches across the x-axis of your pattern plus 2, to create a border either side. This cast on row will then create a one row border at the bottom of your work.
2) K1 in cream, knit first row of pattern, K1 in cream
3) P1 in cream, purl second row of pattern, P1 in cream
4) repeat steps 2) and 3) until the pattern is complete
5) complete an entire row in cream yarn
6) cast off - this is always so exciting!!! This is when you get the first real sense of accomplishment, in my opinion
I don’t have loads of progress photos, I’m afraid, but this is what mine looked like when I first cast off:
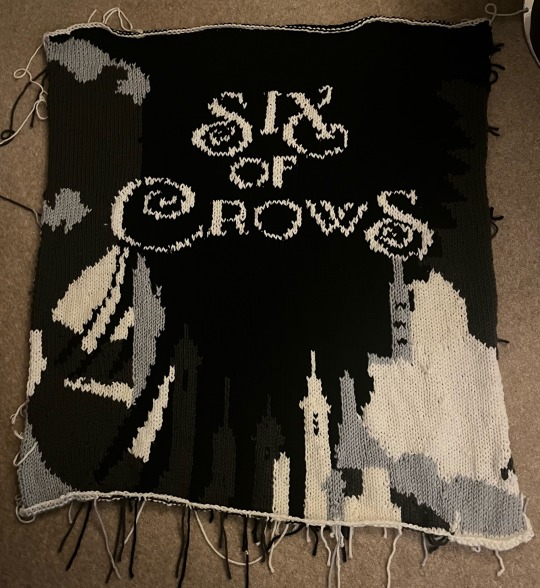
(The edges are curled here so you can’t see the border on the sides, but it is there, also the lighting is rubbish sorry)
Step 3: Weave in all the ends. Gonna be super honest this step is deeply boring but incredibly important; there are a lot of ends to deal with here. Sorry I don’t have a photo of the wrong side of my work but if you imagine at least one loose end for every section of colour change you can gather that it’s a lot haha
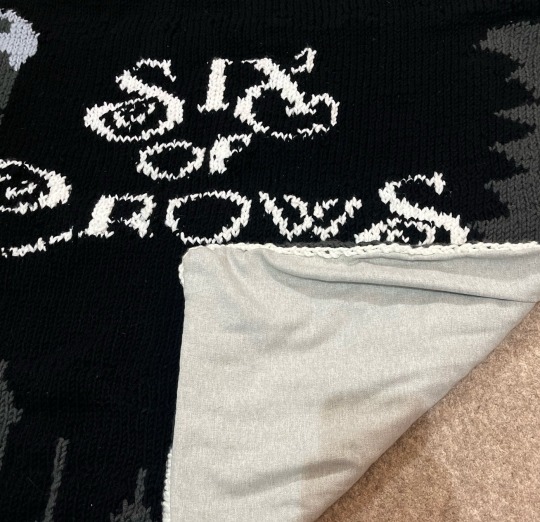
Step 4: Backing!! Now there can be different methods of backing depending on what kind of fabric you choose, I can’t actually tell you what kind of fabric I used other than that the colour was called ‘luna grey’ because the label didn’t actually say what it was so I just decided to go for it. I could only buy it in metres or half metres so I had to get 150cm and then trim the excess. Remember to cut your backing fabric larger than your knitting!! - you need lenience to sew it in. I chose a soft fabric that wasn’t very stretchy. If you get a stretchier fabric you might want to use something to band the knitting first so that you avoid pulling it out of shape.
Lay the right sides of your two pieces (fabric & knitting) together and securely pin three sides.
Once your right sides are pinned together you can go all around your three pinned edges and sew together. Sewing is not my forte so if it isn’t yours either don’t worry, what’s good about this is that your stitches won’t actually be seen once the project’s done so don’t worry too much if they aren’t super neat. I used a running stitch and caught the underside of the knitting without going all the way through so that I knew my stitches wouldn’t be visible. If you want to add extra security, you can go round this sewing section twice. I personally hand sewed this, I think you could use a machine if you wanted to but be careful that the knitting doesn’t catch.
This is an exciting bit because you can really start to see the finished project
Once you’ve sewn your first three sides what you essentially have is a giant inside out pocket, and you can turn it right side out so it looks something like this:
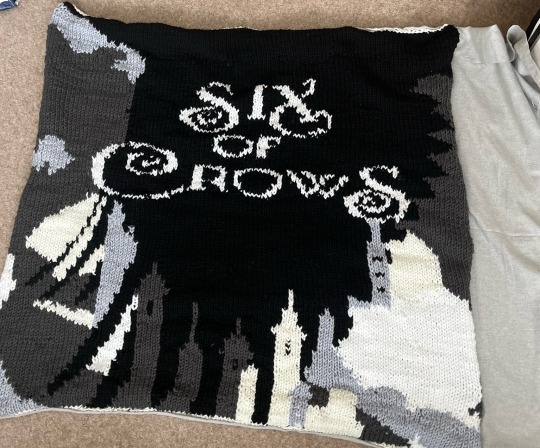
Sorry it’s not a great photo.
After this I trimmed off the excess fabric and just sat and stretched everything out to make sure it was sitting properly and I was happy with it. If you’re also trimming off excess fabric, remember to leave the same amount of lenience (I did about five centimetres/two inches) as you did for the original edges!!
Then fold your lenience fabric inside the pocket and pin it nice and securely. I used a YouTube video to learn an invisible stitch to close this edge and it worked really well once I’d gotten the trick of it, I was really pleased. I practiced it on the excess fabric is cut off first and I definitely recommend that, it was really helpful
And then that’s it!!!
Here is my finished project again:


I am so overjoyed with how this came out!
I hope that this guide was somewhat helpful, though I realise it’s clear that I don’t write patterns and am probably not very good at describing what I did so I’m sorry if anything was unclear. If you try this let me know, and if you share it anywhere please credit me! 🖤🖤
#six of crows#crooked kingdom#grishaverse#leigh bardugo#kaz brekker#inej ghafa#wylan van eck#jesper fahey#nina zenik#matthias helvar#kanej#helnik#wesper#fandom knitting#fair isle knitting#hand knitted#knitting#knitblr#knitters of tumblr#knit blanket
122 notes
·
View notes
Text
Catching floats. This is how I catch the dominant yarn onto a non-dominant stitch in stranded knitting.
61 notes
·
View notes
Text
It's cool that I've reached the point in knitting where tinking back stranded colorwork is totally fine and quite quick. (I have reached this milestone due to making many many many many mistakes)
#it pays to fuck up as they say#knitting#fair isle#idk if this is actually a big deal to anyone else#i just remember my second attempt at fair isle i messed up a whole section and didnt realize for 2 rows or so#and i just never finished the project#and now i know and regularly use 3 different fixes for that and theyre all no big deal#makes me happy. this took a while#ive been knitting... 9 years now ?
99 notes
·
View notes