#easily configable
Explore tagged Tumblr posts
Visit Tumblr Blog
Explore Tumblr blogs with no restrictions, modern design and the best experience.
Last Seen Tumblr Blogs


Fun Fact
Tumblr was named as a finalist in Lead411’s New York City Hot 125 in Aug 2010.
Text
Thank you Vintage Story mod Knapster by Apache on the VSMD for saving my wrist from Fatal Carpal Tunnel
23 notes
·
View notes
Text
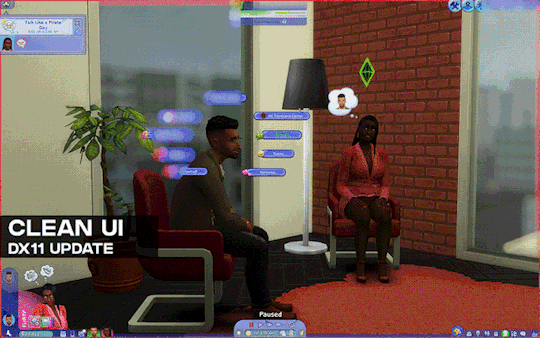
[Reshade add-on] Clean UI for DX11
After so so sooooo many crashes later, I finally managed to create a working setting for this add-on for DX11 games by using an older REST version 🫠
You can read the whole post on Patreon here, or below the cut for those who can't access the site.

As using REST 1.2.0 and above cause crashes whenever I create a setting or attempt to use it for a brief amount of time, I decided to use a much older version of REST (1.1.0), which turns out to be more stable to configure and use. While this means being able to use the add-on for the DX11 game, it has its own set of problems, which may/may not be a dealbreaker for some.
I decided to make a new post since the original one is quite lengthy and I want to keep DX9 and DX11 versions separate due to the different information each version has.
➡️ For the DX9 version, find it here. And here for the Patreon post.
In short, with the help of REST (an add-on for reshade/gshade), you can block/prevent shaders from affecting the UI.
// Things to know if using this version ⚠️
Some shaders will not work properly and will cause some gamma issues. If your preset look different than how it normally is (a lot darker/brighter), enable/disable your active shaders and see which one is causing it. It's easily fixed by using an alternative shader that achieve a similar look.
Shaders affected (ones I've known so far): SMAA & MartysMods_SMAA (FMAA is not affected, use this instead), FilmicAnamorphSharpen, ArcaneBloom & NeoBloom, Glamarye_Fast_Effects, MagicHDR, CRT_Lotte.
You will not be able to change your window resolution, either via graphic settings or by using SRWE. This will cause your game to stop and eventually having to force stop it with the task manager. It is recommended that you have your game in Windowed Fullscreen to avoid issues and have the add-on disabled if you want to change the resolution in-game.
// Required Files
REST add-on v 1.1.0 (testing)
REST config for v 1.1.0 (simfileshare only)
// Installation
Have ReShade with full add-on support installed for this to work.
Download the REST_ x64_1.1.0 add-on from the github linked in the requirements section as well as the config.
Extract the ReshadeEffectShaderToggler.addon file into the game's \Bin folder where your TS4_64.exe is (where you had also installed ReShade).
If you use GShade: place the .addon file in the gshade-addons folder.
Still in the \Bin folder, drop the x.x_ReshadeEffectShaderToggler_DX11.ini file you downloaded.
If you use GShade: place the .ini file in the gshade-addons folder along with the .addon file. If my config doesn't show up in the add-on menu, move it back to the \Bin folder.
Rename the file and remove the prefix and suffix. Both .addon and .ini file should share the same name for the add-on to recognize my settings = [ ReshadeEffectShaderToggler.ini ]
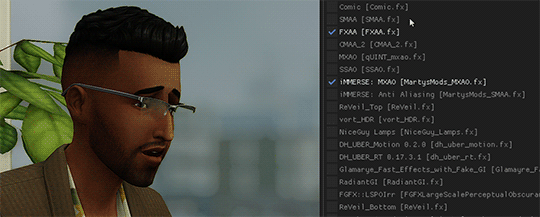
Open up your game. If you see the same menu as below then you’ve successfully installed the add-on & settings! Restart if needed.
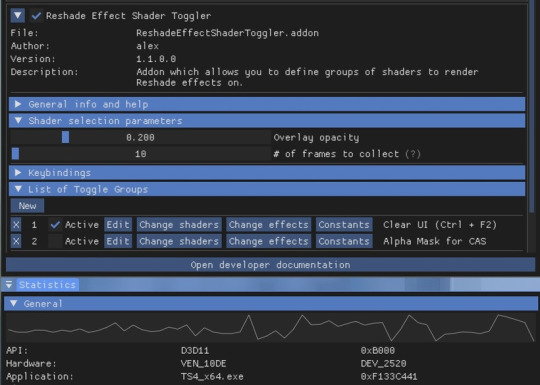
I've set the shortcuts for Clear UI to match with my Effect toggle key, which is Ctrl + F2. If yours are set differently, match the shortcut of this toggle group with your effect toggle key:
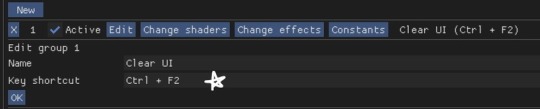
Reason being, having the toggle group active will prevent you from enabling/disabling your preset. Changing the shortcut will allow you to disable & enable your preset and toggle group at the same time.
To avoid the add-on from not working, make sure to do the following:
Enable post processing effects
Disable laptop mode & edge smoothing
Set 3d scene resolution to high
As long as all of the above are met, you should not encounter any problems. This has been tested to work on all graphics settings from low to ultra. External modifications (like Simp4Settings) may/may not have an effect, but from the testing I've done it has shown no problems so far.
216 notes
·
View notes
Note
I've just finished reading your response for the first time,
First off, thank you very much for the GIF and Video, as well as the explanations. I can definitely work with this.
I've downloaded and installed FireAlpaca for myself so I can start comparing what I'm seeing vs what is supposed to happen.
Immediately, Something stood out as weird to me: You're selecting multiple tools at once. That's... not supposed to happen. I tried it myself, Opened like 20 tabs and just started throwing colours at each canvas. This doesn't happen for me At all.
So I'm gonna give you some more instructions. (Tl:Dr for the instructions at the bottom, just above my little rant)
Backing Up your Brushes
FIRST let's make sure you don't lose all of your beloved brushes. from what I'm about to suggest.
in FA, I want you to go to Help > Open Config Folder
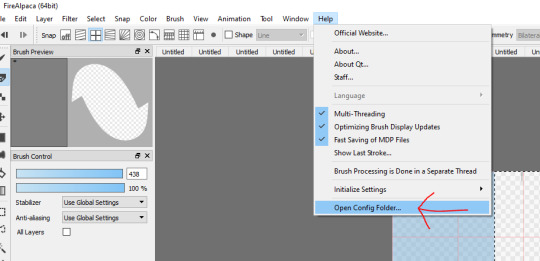
That will lead to a folder that, for me, looks like this
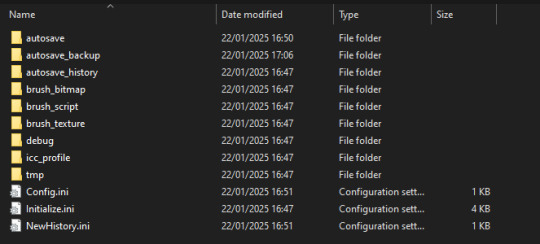
Keep in mind that it could look different for you, I have a fresh install with no cool special brushes. (also I can't draw to save my life)
Now simply Ctrl+A (select all) and copy it to another folder. go to like... Documents or Downloads or something, Make a folder called "Brushes Backup" and Paste all of it in there.
Alright, now to the actual thing I want you to do.
2. and 3. Uninstall and Reinstall FireAlpaca
There is some weird glitch I cannot Reproduce. So Just Reinstall FireAlpaca. this is the reason I wanted you to back up your brushes. Deleting the program and reinstalling will nuke all of the settings you use, so by copying the Config folder, you can easily reinstate your settings.
4. Testing
After you have reinstalled the program, I want you to open it, and mess around for however long you think it will take to trigger the glitch. (which sounded like only a few minutes) and see if something happens.
If not: Great!
If yes: You might want to reach out to https://firealpaca.com/report/ and fill out a bug report, and tell them that you have no way of reproducing the bug. (although I really think reinstalling will work)
5. Reinstating your brushes
Now, after you've made sure that FireAlpaca works, only then do I want you to Open the config folder again and put your brushes back. (simply close FireAlpaca after you've opened the folder, delete everything that's in it, and then copy everything from your "Backup Folder" into the config folder. )
6. Testing Part 2: Electric boogaloo
Then if you re-open FireAlpaca I want you to once again mess around a little and pay attention. Because the Bug might come back.
If it DOES come back, It might be one of your settings/brushes that is causing it. Which in that case I unfortunately have to suggest starting over with your brushes.
To recap: I'm asking you to:
Back up your brushes
Uninstall FireAlpaca
Reinstall FireAlpaca
Test to see if the weirdness is gone
Restore your brushes
Test to see if the weirdness is still gone
--- Rant Below ---
I have no clue what's happening to your program. This looks like some bug in the code that just causes FA to say "Nope" and stop responding to the side bar.
This acutally reminds me of a bug I've been encountering in Unity where the program refuses to open one of the UI pages in the Program's settings, which just completely shuts me out of the settings for one of the input libraries. Funnily enough it actually printed an error in my console, and the error was thrown so incredibly deep into compiled code that I was pretty sure I was reading Unity Source Code at that point.
I still don't know what's happening. Luckily I have Other People to interact with that settings page for me.
(This ask is in response to this post)
So once again I took sometime to test all this out, but unfortunately it didn't take me very long to come back with bad news.
So this is exactly what I did in this order:
I went to my config folder and copied everything into a new folder I created in my Documents tab. Then I went to my settings > apps > FireAlpaca and uninstalled. I then went to the official website and reinstalled it.
I opened up what should have been a fresh FireAlpaca and found this,

The red numbers are brushes that I have adjusted/used. And the "Fire roller (multiple colors)" and "twisted ribbon" are brushes that didn't come with FireAlpaca by default. I downloaded them afterwards from their little brush shop. For some reason FireAplaca remembered my brushes..
And of course, FireAlpaca was still breaking in the way that I've described in your last ask.
So I thought "Okay, I don't care if I lose my brushes and settings. I just want FireAlpaca to work." So I deleted that copied folder from Documents that I made, I unpinned FireAlpaca from my taskbar and deleted the desktop shortcut too just to he extra safe I guess..? Then I went to settings > apps > FireAlpaca and hit uninstall. Then went back to the website, reinstalled the latest version and wouldn't you know it,

All the exact same brushes, in the same order with the same settings. And FireAlpaca continued to break the same way.
So now I'm wondering if I did something wrong.. why does FireAlpaca keep remembering my settings? Did I do the uninstall process wrong? I wondered if that cache thing might be holding data or something? I've heard about that before. But with the help of a friend recently I cleared my Google Chrome and Laptop's caches. And FireAplaca didn't change at all and I didn't lose any of my settings. So that cant help me here..
I wonder if somehow my pen could be a problem? I've dropped it on the hard floor 100s of times. Could it be contributing? And what did I do wrong in this process for FireAlpaca to remember all my brush settings?
If anyone has any advice I would love to hear it <:(( Please and thank you very much 🙏🙏🙏
#my response#long post#I am starting to assume that FireAlpaca is just bugging out in this update#but I cant confirm that yet if I cant seem to download a fresh FireAplaca#It KEEPS REMEMBERING MY BRUSHES 😭#And I'm quick to assume I obviously did something wrong but I don't know what <:(((
77 notes
·
View notes
Text
My Favorite Stardew Valley Mods 🌱
✦ Diverse Stardew Valley ✦

Add better ethnic, racial, cultural, gender, ability, and body type diversity to Stardew Valley.
✦ To-Dew ✦
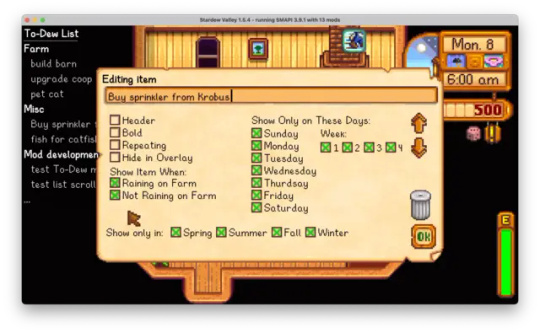
Adds a to-do list so you never forget your tasks.
✦ Gender Neutrality Mod ✦
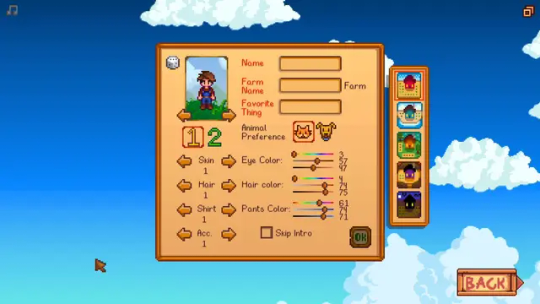
Makes Stardew non-binary friendly with more gender inclusive language. Players can choose their preferred pronouns & how they want to be referred to using the Mod Config Menu Mod.
✦ Pregnancy Role ✦
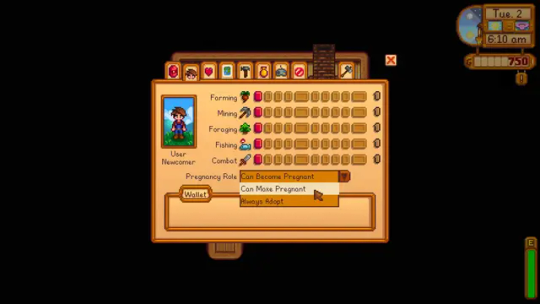
Players can choose how they want to have children regardless of gender.
✦ NPC Map Locations ✦
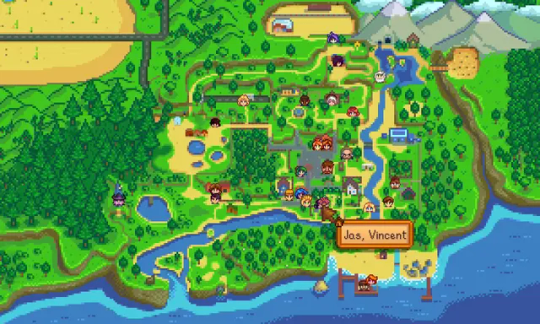
Adds NPC sprites to your mini map so you can easily find everyone.
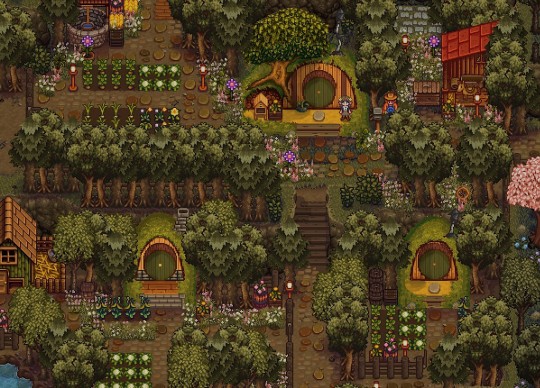
✦ Hobbit Holes ✦
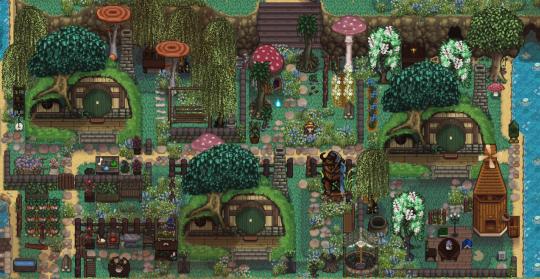
Turns cabins (including multiplayer cabins) in hobbit holes.
✦ Automate ✦
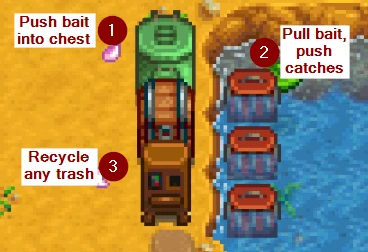
Place a chest next to a machine & the machine will automatically pull raw items from the chest & push processed items into it.
✦ Family Planning ✦

Allows you to customize the maximum number of children you can have and their genders. You can also adopt children with a roommate (ie Krobus).
✦ Carry Chest ✦
Allows players to carry a chest even when it's full of items.
I also have a list of all the mods I currently use (always updated) right.... here!
I hope you enjoyed it! Also curious, what are your favorite Stardew Valley Mods? 🎮
#stardew valley#stardew farmer#stardew valley mods#stardew mods#sdv farmer#sdv#sdv mods#lgbtqia+#lgbtq community#lgbtqia#they/them#gaymer#enby#nonbinary#nonbinary community#nonbinary gamer#enby gamer#gayming#lgbtqia streamer#cozy gamer#cozy gaming aesthetic#cozy gaming community#farming simulator#farming games#farming sims#indie games#concerned ape#stardew valley modding#stardew valley moodboard#cozy gaming
904 notes
·
View notes
Text
How to create your OC in RDR2 story mode!

So I've been asked how I create my OC in screenshots and figured I'd to a tutorial on how to do this.
It's a long one, with visual references, so I'll stick this under the cut to spare those of you not interested in this kind of thing. It's divided into 2 parts:
Mods
Creating your OC and getting it ready for animating/creating a scene
I will create a separate tutorial post on how to animate characters as this will be way too long otherwise.
Part 1: Install the required mods
Rampage Trainer
So we can change models, add animations etc. https://www.nexusmods.com/reddeadredemption2/mods/233 (Read the requirements and install information thoroughly as we need ScriptHook for this mod to work)
Outfit Changer
So we can outfit our models, also has all the items from RDO https://www.rdr2mods.com/downloads/rdr2/scripts/12-rdr-2-outfit-changer/
Animation dictionary list for Rampage Trainer By default Rampage comes with only a very limited amount of animations, so we want to fix that. 1. Download the full animation list here: https://github.com/kaphzi/RDR2_stuff/blob/main/PedAnimList.txt 2. Move it into your RampageFiles/Lists folder to replace the original PedAnimList.txt
Optional mods:
RDR2 2025 Enhanced Edition Reshade
This is just a personal preference but I like the overall aesthetic which means i don't have to edit my screenshots, also having ReShade installed means i can save higher quality screenshot files and add DoF https://www.nexusmods.com/reddeadredemption2/mods/5549
Otis_Inf RDR2 photomode tools https://opm.fransbouma.com/Cameras/rdr2.htm
I use this exclusively for all my screenshots and recordings but it costs money (once-off via Patreon)
Photo Mode Enhancer https://www.rdr2mods.com/downloads/rdr2/scripts/8-photo-mode-enhancer/
A free alternative which is still heaps better than the standard photomode in RDR2
Notes
If this is your first time installing mods: I highly recommend you take a screenshot of your RDR2 folder so you can reference what it should look like with mods disabled and have a mods backup folder somewhere easily accessible to you so you can always reference which mods you are using. (In case of mod issues or you want to switch to online mode)
Here is a handy tutorial if you are new to RDR2 modding: https://youtu.be/msrGfWySX_0?si=N1FfbUbTwzfAPJUi
If you already have other mods installed: Outfit Changer does not work with WhyEm’s DLC and has issues with other online content mods like Red Dead Offline and Online Content Unlocker, so make sure you turn them off.
If you installed the mods correctly you should hear 3 beeping sounds when you launch the game.

Part 2: Creating your OC in story mode
So you’ve loaded up the game and the mods are working fine, so lets start creating our OC in-game!
Mod Settings F5 - Opens Rampage Trainer
F2 - Opens Outfit Changer
Step 1: Create your character
Open Rampage (F5) and go to Player > Wardrobe
Select Model Changer
Go down to Search for Peds and select Search for a Ped

Enter mp_female or mp_male (for this tutorial we will be using female)
Select the model and it will load looking a bit strange with missing limbs, that’s fine we will add these with outfit changer soon.

Go back to Wardrobe and select Walk Styles
Select Brave (this fixes the fatigued stance the models seem to load with)

Step 2: Add model parts and clothing
Close Rampage (F5) and open Outfit Changer (F2)
The first things we want to add to the model before we start building an outfit are Head, Torso, and Legs - write down the values for later use (in case you accidentally delete or overwrite the config files or the game crashes while doing this step)
I would personally leave hair until we have fine-tuned our face later or pick a hairstyle that doesn't obscure the face.


These aren't going to look the best straight away (if you’ve ever made a character in RDO we know how hard it is to make a decent character) but we will tweak the body model later in rampage trainer. Now we can start building the outfit.
Select "Change Ped Components MP Female" (or male depending on which model you chose)
Once you’re happy with the base model and outfit, save it in the Save Current Outfit option so we don’t have to build this base model and outfit again next time we log in. You can save multiple outfits so have fun!

Step 3: Fine tuning our character’s look
This is where something like Otif camera tools come in handy so we can really get the camera up close while we work on the face.
Open Rampage (F5) and go to Player > Wardrobe
Select Meta Tag Expressions

Tweak these to your heart's desire and trust the process! When you’re happy with the final outcome I would write down any changes you made so you can recreate your character in future, at present there is no way to save these meta tag expressions that I'm aware of so you have to do this every time you want to use your OC!
You can now go back to the Outfit Changer and add whatever hairstyle and hat you want. (Don't forget to save!)

Step 4: Setting up finalised character to use
Now, we need to clone our character so it’s its own character to use and pose how we like.
Go back to Rampage trainer and in the Player menu, scroll down to ‘Clone Player’ and select. Voila! There is your OC!

Now let's change back to Arthur. Back in the Player > Wardrobe > Model Changer menu, select Reset

Now we can change Arthur to another character much like we did when we changed them to the mp_female model or we can spawn in other peds.
I normally like to leave Arthur as is and then spawn in other Peds.
Additional: Spawning in other characters to create a scene.
In this example I’m going to spawn in Micah to create a scene with.
Go to Spawner > Peds > Spawner Settings
Make sure Frozen is ticked


Go back to the Ped Spawner and select ‘Search Peds’
Just enter in Micah and enter


From the list select CS_MICAHBELL and our stinky lil' man will spawn in

So, to use these characters we’ve added, we need to add them to the Ped Database so we can select them and switch to them any time we want.
There’s a few ways to do this but this is how i like to do it:
Back in the Spawner menu, go to Objects
Go to Cam Settings turn off Take Player With Cam
Go back and click to turn on Creator Cam


Now we can use our mouse to move the characters around, yay!
This is what we’ll be using to position our characters in scenes easily.
We need to add our OC and Micah to the database so we can use them with their own context menus, so lets right click on our character to select them and then click E to add them to the database, do the same for any other characters you want to use.
Back in our Spawner Ped menu, if we go to Ped Database, we should now see mp_female and CS_MICAHBELL in there
Scroll to a character in the list, and click them to get to their own context menus


To change Micah’s outfit for example, we would make sure we had selected them in the database so we can access their context menu and in the Outfit Variation section, choose one we like. Now that we’ve created our characters for a scene and added them to the database so we can use them via their own context menus, we can move on to animating them. How to animate your characters: https://www.tumblr.com/hello-mishki/781576015936995328/how-to-create-your-oc-in-rdr2-story-mode-part-ii?source=share

23 notes
·
View notes
Text
Hey Wheelchairs mod enjoyers, I've got an inquiry for y'all particularly if you have experience with being/are nonverbal (be it mutism, selective mutism, or any other form).
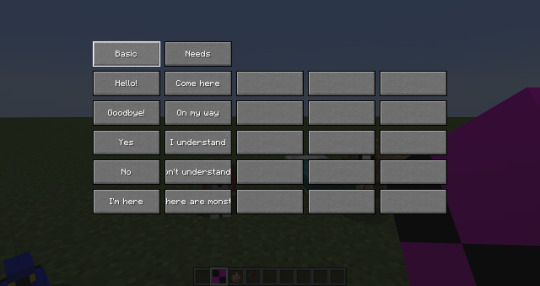
Seen above is the UI prototype for an upcoming craftable ingame AAC device item called the Speech Tablet. When you click on a button, it sends a translated message into the ingame chat for you. This means it can be read in a different language than your client's language setting, and that you can send potentially quite complex messages with just a couple mouse-clicks, no typing or heavy thinking needed.
What's more, the ingame narrator will even read your message out to players if they're nearby (though since the ingame narrator shares its volume setting with the entire Minecraft client, and hence can be pretty loud, this can be disabled in your client config if need be).
This is by far the closest this project has come to adding an actual accessibility device to Minecraft (instead of just a visual representation of one), and as such I want to get some input from people who might actually use it:
What messages should this tablet provide?
Right now I've got around 5 categories with capacity for up to 25 messages each, but I can expand that quite easily if necessary. I just don't have the experience to know what will/won't be useful.
So let me know!
34 notes
·
View notes
Text
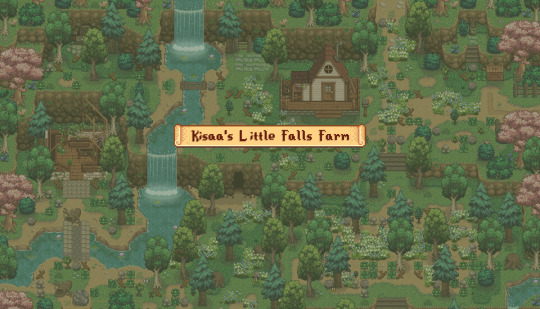
Little Falls Farm 🏞️✨
Guess who started making their own Stardew map mods! It's me! Had way too much fun working on this I didn't realize it only took three days haha.
Featuring custom starter gift box items, diggable grass, respawning hardwood, various recolor compatibilities, and some appearance customization all easily configurable through the config file OR General Mod Config Menu. I recommend downloading GMCM for ease of configuration.
As I'm a newbie to modding, if any of y'all are interested and want to try this mod out, I would greatly appreciate any kind of feedback (or link shares!) so I can improve in the future.
Grab the mod here!


#stardew valley#sdv#sdv community#stardew valley mods#sdv mods#stardew valley aesthetic#stardew valley farm#meadowlade.zip#my mods
8 notes
·
View notes
Text
i wish bg3 let you save team configurations. Like, after I've selected my three party members and given them armor, rings, etc, I can save that organization of items and characters under a certain title.
This way, one could easily pull a squad back together at any time. Even if you kept the party members the same, having saved configs would make it possible to save team specializations---i.e., spells and weaponry designed to work well against undead, or against elementals, etc.
2 notes
·
View notes
Text
I’m sorry but I’m still losing my fucking MIND over elons incomprehensible Linux own the libs tweet like
Like it’s incredibly obvious he heard about a traceroute, and then googled “how to delete file in Linux” and then didn’t even read the results
Like… woke_mind_virus isn’t a fully qualified domain name, meaning it relies on a custom DNS resolution specific to his machine, or if utilizing a vpn, that specific vpn’s custom host file. Or that the American government would have a host entry for a woke mind virus, which if you’ve ever had to use a government website, is laughable. Also DNS is global for the most part, but honestly we can move on at this point.
So sure, we’ll say that the government has forced all public internet in America to resolve woke_mind_virus. Where does it resolve to? YOUR OWN COMPUTER, you silly billy! Obviously! This is *almost* comprehensible. Sure, we are all infected with the woke mind virus, why not. It must be destroyed within ourselves. Yeah man, whatever. Why not? So how do we destroy it?
Duh! Just delete it! How do we do that in our L337 uber hax0r terminal on our fresh kali live usb (because partitions are scary)? We’ll save that for last.
Because while deleting one file could make a website inoperable, it does not remove every trace of it! It first needs a configuration file in the web server, usually Apache or nginx. This is at LEAST one file, but cmon, if you’re gonna psychologically program the masses and keep it out of public view, you gotta encrypt that shit! So naturally, an SSL is in order! That’s easily 1-3 more files. woke_mind_virus can get a pass on not being fully qualified in this specific case because certs can theoretically be self signed and trusted on local networks, but he wouldn’t be able to tell you that. If you stood up a little one page html site on a web server on your own computer, and navigated to it on port 443 (https://) you would get an SSL error, even though it’s on your own machine. I feel like I’ve beaten this into the ground enough, but just understand it’s stupid.
What’s important to note here is that these BARE MINIMUM files are what routes the request from your machine to the destination site, even if it’s your own computer. If you delete the contents of the site (also called the docroot), the site still exists, and can receive and route requests to and from it, it’s just empty. You’ll probably get a 404 because there’s no actual content to serve. This woke mind princess is in another castle.
It’s also imprudent to delete these configuration files first, because that’s how you determine where the site content actually is! These files dictate what directory (folder for you windows losers) is called upon to actually serve you the content you see displayed when you open a webpage. So you need this information if you don’t want to destroy the entire file system and only want to remove the woke_mind_virus site. Cmon Elon, this is baby shit.
So of course, the strat with the most Efficiency and preserving the rest of the system (which seems to be the point of the tweet) is to find the docroot, delete the docroot, and then delete the web server config files. So how do we delete them?
And here we have it: rm -rf
The syntax is as follows:
rm -rf </path/to/file>
Even if you don’t know shit about Linux, you can probably see the problem here. It’s just so blatantly incorrect, it’s almost as if he’s never done it before.
For those that want to see a real world example, here is me creating a file called woke_mind_virus in my home directory and then trying to delete it the Elon Way:

3 notes
·
View notes
Text
cc sorter
i made a small python script to automatically sort cc into common categories by filename keywords; right now the pre-made categories are only for cas, but you can edit them to your liking easily in the config file, so it's pretty flexible :-)
#ts4#sims 4#the sims 4#ts4 cc#the sims 4 cc#originally i wanted to make a script to sort files based on their cas category and spent wayy too long trying to make it work#but the library for interacting with .package files hasn't been updated in a couple years so it didn't work out very well lol
2 notes
·
View notes
Text
In light of some recent developments, I decided to have a go at my unwieldy bookmarks. And I thought, while doing so, how when I was trying to decide how best to organize myself, I was searching online to find tips on how to go about it. So I thought I might do a recap about how I personally categorize, bookmark, and filter, and I can dive in deeper if anyone is interested! (If you are, feel free to send an ask or a comment).
Generally speaking, right now, all I'm reading on AO3 is Polin so that makes my bookmarks a bit easier to tame. I know some save the stories they want to read as actual browser bookmarks, some do Marked for Later and then remove them from that when they finish, some use bookmarks, and some have 159 tabs open at all times like a chaos gremlin. And I mean that affectionately.
I started out with a system from the get go once I realized I was all in with Polin. I marked my to-reads as Marked for Later and bookmarked my finished reads. Then it was easy to see at a glance if I'd read something before. But I realized I couldn't really filter anything in my marked for later, and there wasn't a good way to organize that section at all. So I moved to bookmarking everything.
But not JUST bookmarking everything. I use bookmarking tags and browser plugins to make it an easier experience. Which is a good segue into the best part of bookmarking for me - Tampermonkey scripts.
These scripts have VASTLY improved my organization. There are some aspects of AO3 tagging, bookmarking and filtering that leaves much to be desired and where those needs aren't met, I've almost always been able to find a script to fill it.
If you've never used Tampermonkey, it's a plugin you can use for Chrome, Firefox and Safari (as well as likely other browsers) on desktop, and in some mobile browsers as well. I use Chrome on desktop and have my Firefox on Android dedicated only to AO3 use. It allows scripts to run when you are on certain sites and can change the look and functionality of those sites.
My faves are:
AO3 Fictracker
This script is AMAZING. It allows you to easily (as in, from your bookmark list!) tag a fic as to read, completed, favorite, or disliked. I don't usually use the disliked function but I have if I've accidentally come across a fic with a concept I won't enjoy reading that maybe wasn't explicitly tagged so I know off the bat. It makes it SO easy to then click on these filtered tags right from the menu bar.
w4tchdoge's AO3 Bookmark Maker
This fic makes bookmarks a breeze. It automatically adds a story synopsis when you add a bookmark (which you can customize) so in case a fic is deleted, you know what it was. I also LOVE their auto-tag button so I can tag my bookmarked fics with their word count and completion status, making filtering even easier.
ao3 savior/ao3 savior config
I use these scripts to filter out authors, tags and themes I don't want to see. For example, I don't really like reading dark!Colin. I also don't really care for A/B/O. So I use the ao3 config to add those to my filter list, and they don't show up in my searches or when I load the Polin tag, and also don't tell me that they're missing (because I know myself and my curiosity). There are other plugins and scripts that do this but this one seems the most customizable to me (for example, some only let you do actual tags - this one lets you do wild matches within tags AND within the summary)
AO3: Comment formatting and preview
This makes both commenting and previewing text SO much easier. I love it for commenting because you can easily add formatting AND it lets you add on your own commonly used or needed text (I have one for easy "Thanks for reading!" to add on to the responses I do for comments on my own fics). This is more a want than a need as far as ease of use and organization but I've really gotten used to it.
That covers a lot of what I use to organize my bookmarks, though I go more in depth when it comes to my filters and searches. I also have other scripts that I use on the regular that aren't essential, but that make my life easier.
Do you have a different way of organizing? I think it's a very personal thing, but I like hearing how others do this to see if I can tweak my own methods. I'll admit it, I'm a nerd!
I'll probably do a part 2, if for no other reason that it makes it a good resource to link to when I do get asked how I customize.
Unrelated but, you might think looking at this that I'm an organized person. And you would be wonderfully, horribly wrong. 💛
3 notes
·
View notes
Text
Cyberpunk and Hypnok1nk
Chronic pain hit me young, and I've pretty much always had a fluid sense of identity (trending femme, but fluid nonetheless). So it's not really surprising I've always been fascinated by the idea of full-body-replacement transhumanism, Ghost in the Shell style.
Like, I don't want to be in pain anymore, but that's just a fact of the meat I'm trapped in. It's going to hurt, no matter what, for the rest of my life. It'd be nice to keep on existing but feel good instead, y'know?
And sometimes I might want to be smol and cute so I can be someone's little spoon and feel safe in their arms, while other times I might want to be a seven foot tall amazon with a giant dick. I might want both of these things alternately several times a week, and it'd be great for that to be possible.
But there's the classic thing people talk about in scifi where full-body-replacement cybernetics are a thing. The brain-computer interface. That bit where you'd (in theory) have to expose every single thing that you are to an outside connection to hook everything up.
It'd be a huge security risk, where people could turn you into a passenger in your own body, or delete your childhood and replace it with another set of memories as easily as you can move files around on your PC. And maybe they don't want you to be able to stop them, so they lock you out of your own systems while they keep hacking away at your very personhood until all that's left happily agrees that you walked off the assembly line for brothel dolls only a few hours ago and expecting you to read or have opinions would just be silly.
And yeah, like, that's a nightmare scenario, right?
But also, that's so hot, right?
But it never really occurred to me that it's also kinda the same dynamic with hypnokink. It's basically just handing your tist - whether they're an actual person or just a hypnofile you like to listen to - the keys to the kingdom. Letting them root around in your file system, ripping some folders out, dropping new media in, changing some configs.
It never occurred to me that maybe my hypnokink might have partially come from just going "y'know what, fuck it, I want a hacker to turn me into their joytoy". If I'm happy with the idea of someone getting into my head and ruining me, then the only drawback of full-body-replacement cybernetics is that it's not here yet.
I'm ready to have someone reduce my clock speed to a crawl, wipe my memory, swap my language database from English(US) to English(Grade School Dropout Bimbo), delete my optical character recognition software, and reduce me from Admin to Guest user privileges. Fuck playing it safe, I'll intentionally put myself in the same chassis as last gen's most popular sex dolls, and while most people are gonna worry about random people tapping in to their hardline ports, I'm just gonna leave my wireless wide open with no password and no firewall and accept the inevitable.
A ditz can dream...
#dumbification#bimboification#mental transformation#bimbo goals#degradation k1nk#cyberpunk#hypnok1nk#transhumanism
10 notes
·
View notes
Text
Prevent Session Replay Attacks in Laravel: Best Practices
Introduction
Session replay attacks are a major security risk in web applications, especially in frameworks like Laravel. These attacks can lead to unauthorized access or compromise sensitive user data. In this blog post, we will explore what session replay attacks are, how they occur in Laravel applications, and most importantly, how to prevent them using best practices. We’ll also share a practical coding example to help you implement secure session handling in your Laravel app.

What is a Session Replay Attack?
A Session Replay Attack occurs when an attacker intercepts or steals a valid session ID and reuses it to impersonate the legitimate user. This type of attack exploits the session handling mechanism of web applications and can allow attackers to gain unauthorized access to sensitive information or perform actions on behalf of the user.
In Laravel, session management is a critical aspect of maintaining security, as Laravel uses cookies and sessions to store user authentication and other sensitive data. If the session management is not properly secured, attackers can easily exploit it.
How Session Replay Attacks Work in Laravel
Session replay attacks typically work by capturing a valid session cookie, either through methods like Cross-Site Scripting (XSS) or Man-in-the-Middle (MITM) attacks, and replaying it in their own browser. In Laravel, the session data is stored in cookies by default, so if the attacker gains access to a session cookie, they can replay the session request and hijack the user’s session.
To demonstrate this risk, let’s take a look at how a session ID might be captured and replayed:
// Example of a Laravel session where sensitive information might be stored session(['user_id' => 1, 'role' => 'admin']);
If an attacker intercepts the session cookie (usually via XSS or another method), they could replay the request and access sensitive data or perform admin-level actions.
How to Prevent Session Replay Attacks in Laravel
1. Use HTTPS Everywhere
Ensure that your Laravel application enforces HTTPS to protect session cookies from being intercepted in transit. HTTP traffic is unencrypted, so it's easy for attackers to sniff session cookies. By forcing HTTPS, all communications between the client and server are encrypted.
To enforce HTTPS in Laravel, add this to your AppServiceProvider:
public function boot() { if (env('APP_ENV') !== 'local') { \URL::forceScheme('https'); } }
This will ensure that Laravel always generates URLs using HTTPS.
2. Regenerate Session IDs After Login
One effective way to prevent session hijacking and replay attacks is to regenerate the session ID after the user logs in. This ensures that attackers cannot reuse a session ID that was valid before the login.
In Laravel, you can regenerate the session ID using the following code:
public function authenticated(Request $request, $user) { $request->session()->regenerate(); }
This should be added in your LoginController to regenerate the session after a successful login.
3. Set Secure and HttpOnly Flags on Cookies
Ensure that your session cookies are marked as Secure and HttpOnly. The Secure flag ensures that the cookie is only sent over HTTPS, and the HttpOnly flag prevents JavaScript from accessing the cookie.
In Laravel, you can configure this in the config/session.php file:
'secure' => env('SESSION_SECURE_COOKIE', true), 'http_only' => true,
These settings help protect your session cookies from being stolen via JavaScript or man-in-the-middle attacks.
4. Use SameSite Cookies
The SameSite cookie attribute can help mitigate Cross-Site Request Forgery (CSRF) attacks and prevent the session from being sent in cross-site requests. You can set it in the session configuration:
'samesite' => 'Strict',
This ensures that the session is only sent in requests originating from the same domain, thus reducing the risk of session replay attacks.
5. Enable Session Expiry
You can also mitigate session replay attacks by setting an expiration time for your sessions. Laravel allows you to define the lifetime of your session in the config/session.php file:
'lifetime' => 120, // in minutes 'expire_on_close' => true,
Setting an expiration time ensures that even if a session ID is captured, it will only be valid for a limited period.
Coding Example for Secure Session Handling
Here’s a full example demonstrating how to implement some of these best practices to prevent session replay attacks in Laravel:
// Middleware to regenerate session on each request public function handle($request, Closure $next) { // Regenerate session ID session()->regenerate(); // Set secure cookies config(['session.secure' => true]); config(['session.http_only' => true]); return $next($request); }
By including this middleware in your Laravel app, you can regenerate session IDs on every request and ensure secure cookie handling.
Using the Free Website Security Checker Tool
If you’re unsure whether your Laravel application is susceptible to session replay attacks or other security issues, you can use the Website Vulnerability Scanner tool. This tool analyzes your website for vulnerabilities, including insecure session management, and provides actionable insights to improve your app’s security.

Screenshot of the free tools webpage where you can access security assessment tools.
The free tool provides a comprehensive security analysis that helps you identify and mitigate potential security risks.
Conclusion
Session replay attacks are a serious security threat, but by implementing the best practices discussed above, you can effectively protect your Laravel application. Make sure to use HTTPS, regenerate session IDs after login, and properly configure session cookies to minimize the risk of session hijacking.
To check if your Laravel app is vulnerable to session replay attacks or other security flaws, try out our free Website Security Scanner tool.
For more security tips and blog updates, visit our blog at PentestTesting Blog.

An Example of a vulnerability assessment report generated with our free tool, providing insights into possible vulnerabilities.
By following these security best practices and using the tools available at PentestTesting.com, you can enhance the security of your Laravel application and protect it from session replay attacks.
1 note
·
View note
Text
i'm obsessed with the versatility of the steamdeck.
i am hoping between: java minecraft using the touchpad for mouse-like aim and mod that provides me with correctly mapped button indicators. windows "only" xbox games that just released. ps2/gamecube/snes games with crt emulation.
and none of this required me to mod or 'trick' the operating system which ships with the device itself. it plugs into tv. connects easily with my xbox one, ps5, switch pro controllers. hhnngngnn.
there's a built in system wide overlay for performance stats i can toggle on and off while tweaking config to my liking. community controller mappings. &c
it comfortably fits my big stupid man hands which has been a major problem with other (especially smaller) handhelds and even some console controllers.
it's quite good :3
7 notes
·
View notes
Text
How to archive your favourite podcasts before they disappear: a beginner's guide
Podcasts, unfortunately, disappear off the Internet quite often. The smaller the podcast, the more likely this is. Fortunately, we can do something to prevent this.
I have a very simple system for archiving podcasts that anyone can easily replicate:
Step 1. Search on archive.org to see if the podcast has already been saved there.
Step 2. Find the podcast’s RSS feed on the podcast’s website or on podcastindex.org.
Step 3. On Windows, paste the podcast’s RSS feed into the free, open source app Podcast Bulk Downloader: https://github.com/cnovel/PodcastBulkDownloader/releases
For Mac and Linux, you can use gPodder: https://gpodder.github.io It’s also free and open source.
Step 4. In Podcast Bulk Downloader, select “Date prefix”. This puts the episode release date in YYYY-MM-DD format at the beginning of the file name, which is important if someone wants to listen to the episodes in chronological order. Then hit “Download”.
In gPodder, go to Preferences → Extensions → check “Rename episodes after download” → Click “Edit config” → Check “extensions.rename_download.add_sortdate”.
Step 5. Create an account on archive.org with an email address you don’t care about. It’s bewildering, but your email address is publicly revealed when you upload any file to archive.org and they do not ever warn you about this. Firefox Relay is a good tool for this: https://relay.firefox.com
Step 6. Fill out the metadata fields on the archive.org, such as title, creator, description, and subject tags (e.g. “podcast”). I recommend including a jpeg or png file (jpeg displays better) of the podcast’s logo or album art in your upload. Whatever image you upload will automatically become the thumbnail. After that, go ahead and upload.
That’s it! You’re done!
If you have any questions or just want to chat about podcast preservation, feel free to email me at [email protected].
Everyone has my permission to copy/paste, republish, and modify this guide. It’s under a Creative Commons BY-NC-SA 4.0 license.
2 notes
·
View notes
Text
I'm stuck
Day 87 - Jan 31st, 12.024
Apparently, writing Nix files doesn't count as "real programming", because it's being hard to code lately.
I have been writing Nix files, with are pretty much just "fancy JSON", for more than a week, and now, coding even on JavaScript is being somewhat hard on my brain. This new project is a "subproject" of the whole productivity system, and it is just a small CLI application to transform Obsidian's Markdown, into plain [CommonMark] Markdown. And my head is fighting on trying to come with solutions to code, it is like I can imagine the concept and separate the pieces of this project to work on, and I feel like even a simple task I can't just code y'know? Even when I'm being hands-off with things like dependencies count, scalability, etc. etc. Things which normally I take care in "production code".
To be honest I even don't know if I should use JavaScript for this, I choose it because it is the easiest language to just get things done, and it seems logical to use it for content-related and/or HTML-related things. However, I kinda feel I should use Go or Rust, even if I need to learn them from scratch and have a smaller related ecosystem, I don't know if I should, knowing that it is a project that I would like to not spend a lot of time, but also the idea of learning something new in the time kinda drives me another way? I don't know, maybe I will try to use Go or Rust in this project, so it's easier to use them in my future "actual" projects.
I even don't know if I should continue using Obsidian all together now, because even if it is where I settled up most everything, even when it is the center of my productivity and note-taking routine, I kinda feel locked-in a lot more than I like, and having this Obsidian-like syntax (together with all the plugin's syntaxes), it can be kinda hard to get out of it. Yes, it is impossible to me to not be locked-in some technology, but I feel like I would prefer to have everything in plain Markdown and edit it with a Neovim config, than to have a lot of things that I can't read and use without a specif editor and previewer.
However, if I continue this, I will also never work on actual projects, you know, the ones that can give me a job. But without "The System", I can't organize and share easily said projects.
I feel stuck.
---
Today's artists & creative things
Song: That Funny Feeling - by Bo Burnham
---
Copyright (c) 2024-present Gustavo "Guz" L. de Mello <[email protected]>
This work is licensed under the Creative Commons Attribution-ShareAlike 4.0 International (CC BY-SA 4.0) License
5 notes
·
View notes