#earthworks audio
Explore tagged Tumblr posts
Text

The highly anticipated conclusion to Networking and Lighting with Anthony Stofflet is live! Check out Part 2 today by clicking this link https://www.digitalgreatcommission.org/resources/networking-lighting-part2 We talk about when you should scan your audience with lights, how to use haze appropriately, the correct use of backlights, why Vista consoles are a powerful tool for small churches AND MORE! Watch or Listen wherever you get your podcasts! THE TECH ARTS PODCAST: Part 2 Networking and Lighting with Anthony Stofflet
#podcast#church#churches#the tech arts podcast#earthworks audio#live production#microphones#tech arts#jesus#prayer#Anthony Stofflet#Networking#Lighting#lighting design#up lighting#auto led lighting#outdoor lighting#lighting solutions#jesus christ#faith in jesus#jesus is coming#jesus loves you#bible#christianity#christ#lord jesus christ#concert#live concert#band#livemusic
2 notes
·
View notes
Video
Earthworks Audio SR314 Vocal Condenser Microphone Audio Test & Review
1 note
·
View note
Text
Straw Man Army // Spiral
NYPD, KKK, IDF they’re all the same Just different names
4 notes
·
View notes
Note
What mic do you use
I was using an Earthworks ETHOS for most of my videos but recently I started getting audio issues from that. I think because of a loose connector? So right now I’m using my back up mic, which is my Rode NT-1
9 notes
·
View notes
Text
Patrick Moraz/Bill Bruford: Music for Piano and Drums
listen here

Throughout his career, British drummer Bill Bruford has played progressive rock (with Yes, Genesis, King Crimson) and jazz (with the electric Bruford and the acoustic Earthworks) with equal authority. On his new record labels, Summerfold and Winterfold, he showcases his jazzier output, supplementing the albums with an extra CD of interviews and audio samples.
Originally recorded in 1983, Music for Piano and Drums (Winterfold) pairs Bruford’s precision playing on the kit with Swiss keyboardist Patrick Moraz, formerly of Yes and the Moody Blues. The most daring tracks are the two improv pieces: “Living Space” showcases Bruford’s deft touch with brushes in an engaging dialogue with Moraz, and the frantically swinging “Any Suggestions” has Bruford keeping a steady boppish pulse on the ride cymbal while matching Moraz’s rapid-fire keyboard runs with Max Roach-like snare and tom-tom statements. Bruford fuels Moraz’s outre Cecil Taylor-esque excursions on “Symmetry” with some furious playing of his own, then provides supportive brushwork behind the pianist’s rhapsodic ballad “Galatea.”
------------------------------------------------------------------------------
A lo largo de su carrera, el baterista británico Bill Bruford ha tocado rock progresivo (con Yes, Genesis, King Crimson) y jazz (con los Bruford eléctrico y los Earthworks acústico) con igual autoridad. En sus nuevos sellos discográficos, Summerfold y Winterfold, muestra su producción más jazzera, complementando los álbumes con un CD adicional de entrevistas y muestras de audio.
Originalmente grabado en 1983, Music for Piano and Drums (Winterfold) combina la precisión de Bruford al tocar la batería con la del teclista suizo Patrick Moraz, ex miembro de Yes and the Moody Blues. Las pistas más atrevidas son las dos piezas de improvisación: “Living Space” muestra el hábil toque de Bruford con los cepillos en un diálogo atractivo con Moraz, y la frenéticamente oscilante “Any Suggestions” muestra a Bruford manteniendo un pulso boppish constante en el platillo ride mientras combina las rápidas ejecuciones de teclado de Moraz con declaraciones de caja y tom-tom al estilo de Max Roach. Bruford alimenta las estrafalarias excursiones al estilo Cecil Taylor de Moraz en “Symmetry” con una interpretación furiosa propia, y luego proporciona pinceladas de apoyo detrás de la balada rapsódica del pianista “Galatea”.
Source: jazztimes.com by Bill Milkowski
2 notes
·
View notes
Text
Epilogue: Why you shouldn't buy a ring light (and why it's okay if you already did).
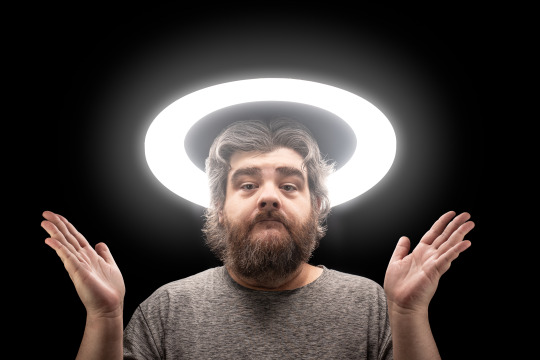
There are two technological fads influencers started that I wish I could go back in time and undo. These fads are now so ubiquitous that people will judge you if you make different choices—even though they are bad choices.
The first is the mighty Shure SM7B microphone.
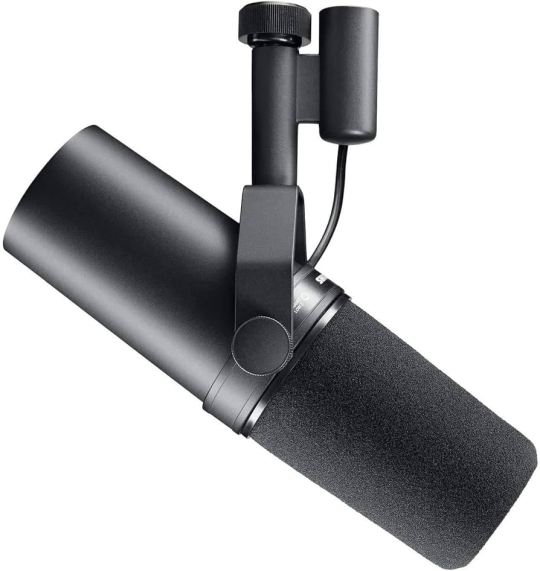
This microphone (technically an earlier model) was originally made famous by the King of Pop himself and used to record his Thriller album.
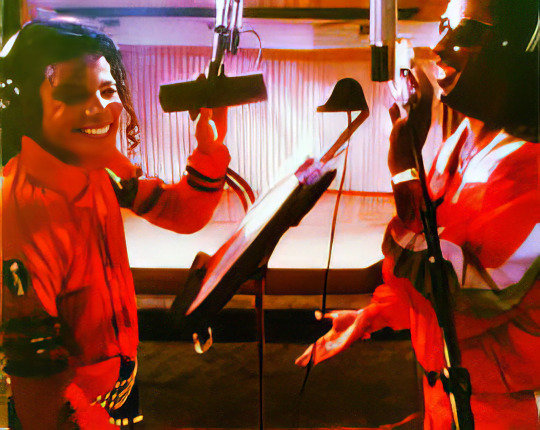
If you are doing a podcast, it is just assumed this is the microphone you should get.
I mean, it's the Thriller microphone. You definitely want the Thriller microphone, right?
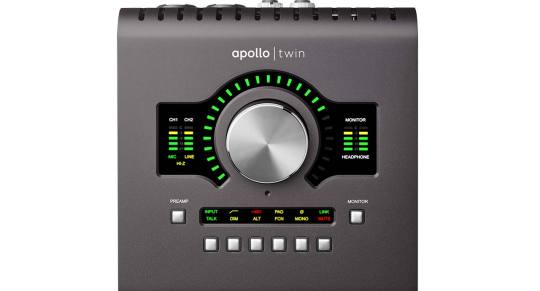
Just remember it is XLR, so you'll need to get an audio interface as well.
And it is a low sensitivity dynamic microphone, so you'll need a Cloudlifter to boost the gain.

And it doesn't really have any shock absorption, so you better get an arm.

And remember, it sounds best at close proximity, so make sure you put this giant phallus as close to your face as possible.
Oh, you're doing a video podcast?

I mean, do people really need to see 100% of your face?
Keep your nose a mystery!
What I'm trying to say is... this is a silly choice for a microphone outside the context of a recording studio.
It's a great microphone. Legendary, even. And if you don't mind dealing with everything I mentioned, it will serve you well. But for nearly everyone it is overkill and a huge hassle and a huge expense.
Yes, it *can* sound great, but there are a hundred other options available that sound just as great or maybe even better.

The Earthworks ICON is a beautiful microphone that doesn't need to be literally inside your mouth and plugs straight into your computer. It can just sit unassumingly on your desk on a little included stand. And if you are in the baritone to alto range I think you will be quite pleased with how good you sound.
But people are still going to get the SM7B.
And go through all of that hassle.
Because... reasons.
An equally silly piece of technology is the just-as-ubiquitous ring light.
The light that everyone uses wrong.
Including me!
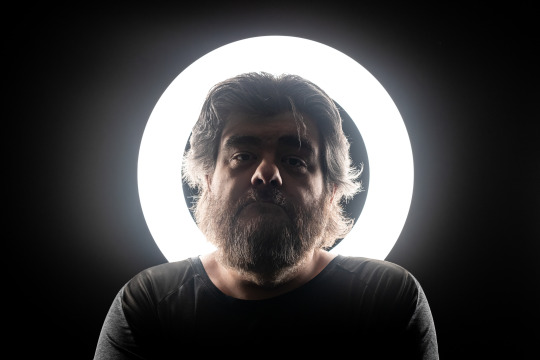
The ring light does 2 things.
Gives you circular catchlights in your eyes.
Eliminates shadows on your face.
This can give a flattering appearance due to reducing the contrast of pores, blemishes, and wrinkles.
HOWEVER...
If you do not specifically want or need these 2 things, you should not get a ring light.
If you do not plan to put the camera in the hole, you should not get a ring light.
And if you cannot put the light close to your face, you should not get a ring light.
The ring light effect does not work if you do not put the camera in the hole or if the light is too far away. It needs to specifically cast light in all directions to achieve the shadowless effect. And it needs that central perspective to give you those cool catchlights and flattering features.
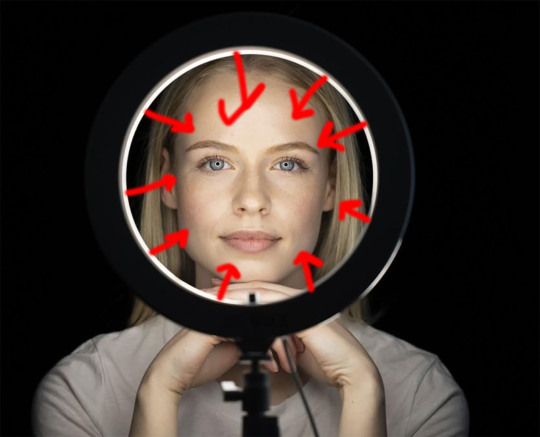
Which means the ring light needs to be slightly larger than your face in order to work.
Which means these tiny ring lights are a scam.
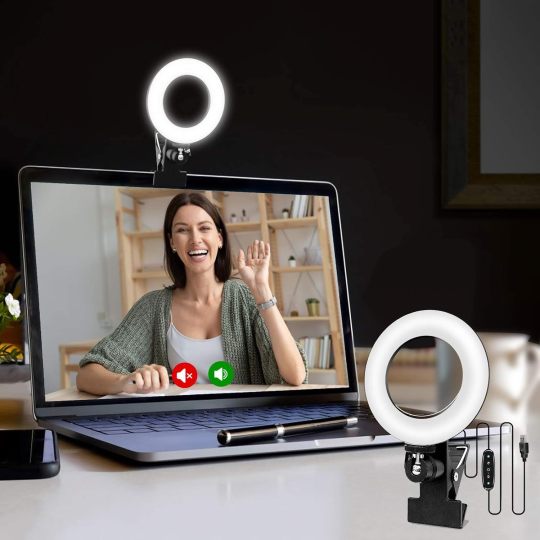
Okay, they are *mostly* a scam.
They would work well for a chinchilla.

The ring light was originally a piece of dental equipment. It was hard to get clear photos of teeth without shadows interfering, so they discovered if you put the camera lens in the middle and surrounded it with light you could create shadow-free images of chompers.
The ring light also became a popular tool for macro photographers. High magnification photography often has a very close working distance. The lens might only be a few inches away from the subject and become an obstacle for any lighting. So the ring light comes to the rescue once again.
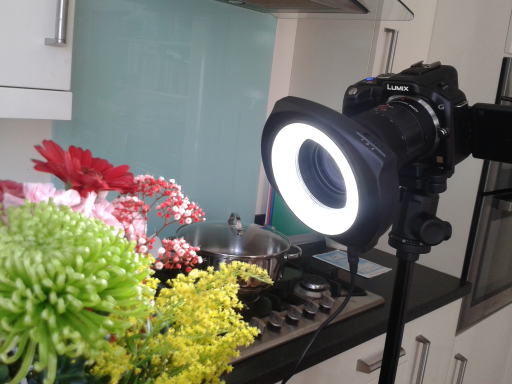
Eventually ring lighting was used on people. It was discovered that if you made the light the size of a face, you could get a very flattering shadowless portrait. These flashes were a bit unwieldy until the LED versions were developed.
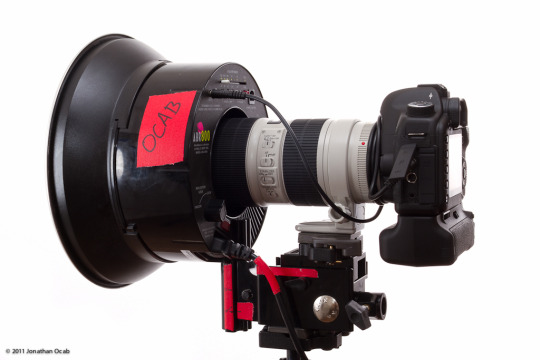
You might be noticing a pattern as I go through the history of ring lights.
Originally, everyone put the camera in the hole.
That is the entire reason for the ring.
To put the camera in the hole.
But if you look at how most people are currently using ring lights...

Not in the hole.
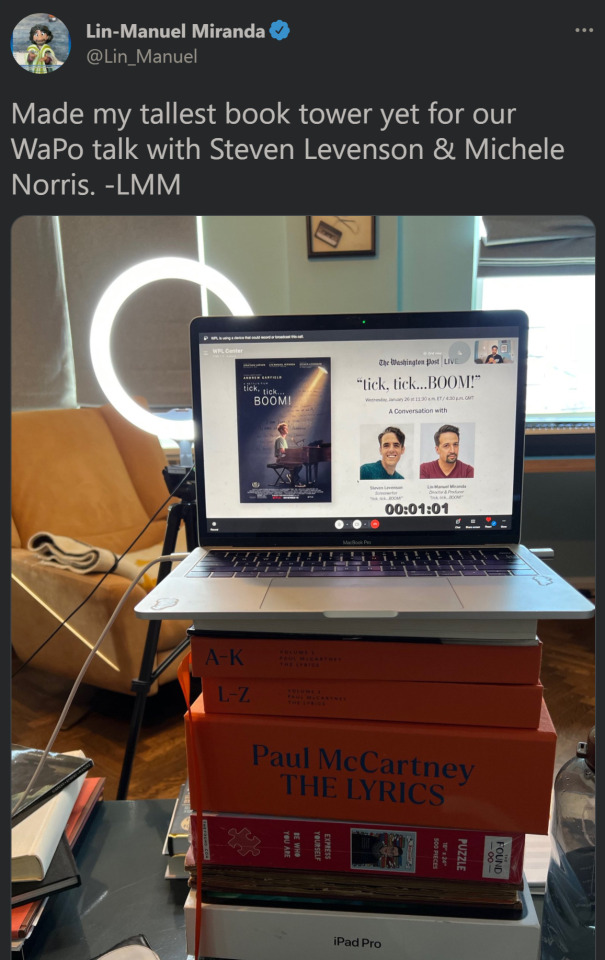
Not in the hole.

Not in the... holes?
The chocolate sculpture dude has TWO ring lights?
I suppose that is for when a second head pops out of his neck.
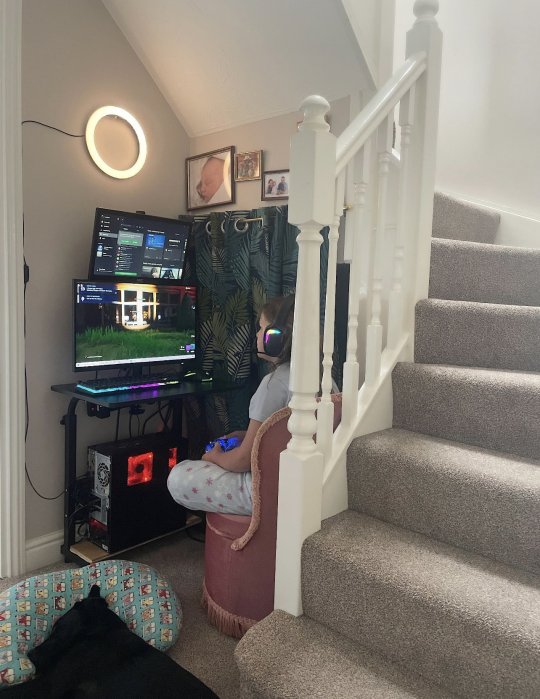
What are we even doing here?
I think this all started with beauty and makeup YouTubers. Not only did the ring light give a great view of how the makeup looked, the shadowless effect kept the hand from casting a shadow over the area they were applying makeup to. It was the perfect light for applying makeup as well as showing it off.


Everyone wanted this flattering look achieved by the makeup YouTubers. And I assume hundreds of versions of the following conversation ensued.
"What is your lighting setup?" "Just a ring light!" "I gotta get one of those!" "YOU SHOULD!"
...and it just snowballed from there.
But everyone thought there was something magical about the light that created the flattering effect under any circumstance. That as long as the light is ring-shaped, you would have good lighting.
They didn't understand if you don't use the ring light properly it becomes... just a light.
And not a very good light outside of its intended purpose.
And so if you are not specifically wanting the ring light to show a close up of a face, you basically bought... a crappy light.
Here is a ring light haphazardly placed off in the distance...

Here is a ring light at the proper distance shot through the hole.
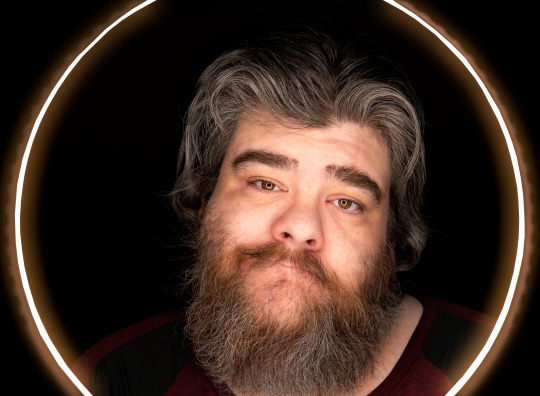
And here is a ring light mixed with other lights for my attempt at a Tron aesthetic.
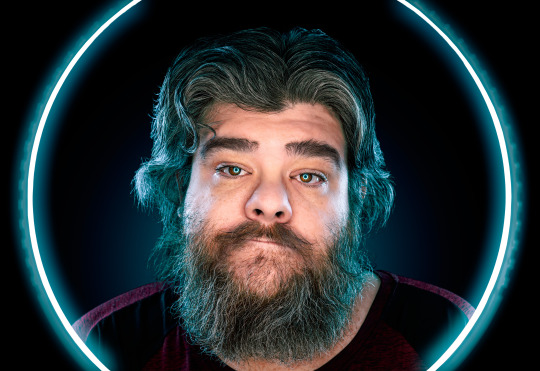
Which has nothing to do with this post, I just think it is cool.
The two main concerns when getting a light should be intensity and size.
Cameras need a lot of light to get clean images. More than people realize. And as we learned in the previous post, a big light is more flattering which is usually what people are after.
But a ring light has limited surface area. Which means it is a small light unless it is right next to your face. And it has severely diminished output because they can't fit as many LEDs onto the light.
This LED panel has 1200 LEDs and outputs nearly 10,000 lumens.

But if you turn that into a ring light...
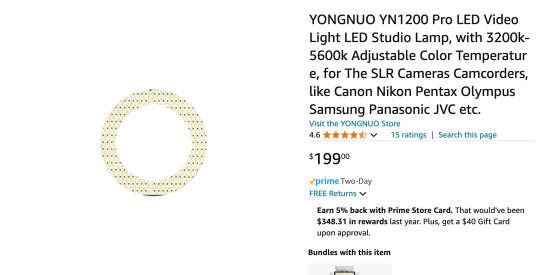
Alright, I think I have demonstrated the issues with ring lights.
But some of you probably already bought one and are feeling pretty bad about it right now.
So I'm going to give you some tips to help you get the most out of your ring light. And then I'm going to suggest some other lights that you can add to your lighting setup to help you get the best results in your photos and videos.
How to properly use a ring light...
Put the camera in the hole.
Move the light as close as possible.
If you follow these two steps, it really does give a cool effect. There are just a limited number of photos and videos where this is applicable.
If you get a ring light with a thicker ring that does seem to increase the distance of effectiveness. I'm actually really happy with this one I got off Amazon. It has a larger surface area than other ring lights I've seen. So I can get the ring light effect even for head and shoulder shots.
If you cannot use the ring light as intended, it can still be used as a normal light. Just remember to keep it as close as possible. You can also put some diffusion material a few inches in front of it to help you enlarge the surface area of the light.
I was able to tape this $15 white shoot-through umbrella to the ring light and this worked quite well.
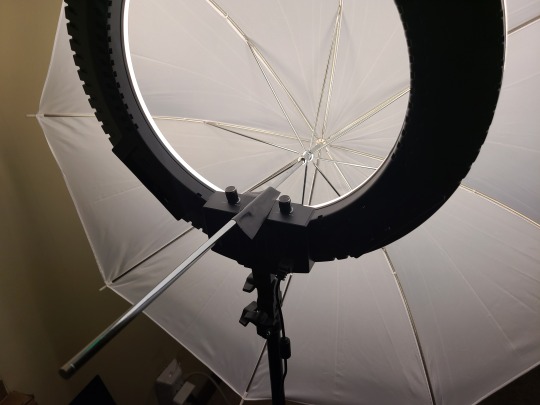
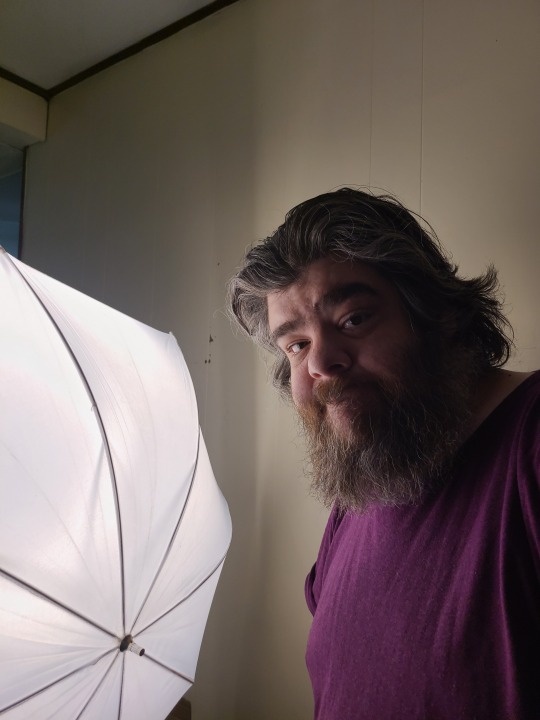
Look at how soft that light is!
Unfortunately, this will reduce the intensity, so you may need to raise the ISO of your camera and that might give you a noisier image. But it will give you a larger, softer light that you can place farther away without losing that soft effect.
You can also use the ring light as an edge light or even a hair light. Just place it behind you and just out of frame and you'll get nice separation from the background.
So, what lights would I recommend instead of a ring light?
Answering that question properly would require an entirely new post. because there are a ton of options and choosing the best one depends on a bunch of different variables. So I will work on that next.
However, if you are looking for something small and compact like a ring light, without actually getting a ring light, then an LED panel is probably your best option.
Godox just released a very nice line of panels that I think are perfect for small creators and streamers who are just starting out.

The Litemons series has a lot of professional features in a less expensive light system. You can get the lights in multiple different configurations...

I recommend the 60 watt bi-color if you can only afford to get one light. But if you get two lights you are going to have a lot more options as far as lighting setups. A bi-color and an RGB would be an extremely versatile combination.
And with 2 lights you can even do a simulated ring light effect.

You just move the two panel lights in as close as you can, one on either side of the camera, angling in at roughly 45 degrees (or until you see most of the shadows on your face disappear).
No, you won't get the circle catchlights in the eye, but you will have many more options for lighting.
Eventually you can upgrade to fancier COB lights with softboxes, but these little panel lights work great for beginners and they output much more light while having more surface area.
Bigger and brighter.
Lower noise in your video and softer light on your face.
And you can still use your ring light in the background as a cool accent light or a halo or just to piss me off.
Hard & Soft: An Explanation of Light
I was watching a video from one of my favorite tech YouTubers, Mr. Whose the Boss. He was showing off some of his favorite tech and pulled out this tiny LED light.

And then he placed a diffuser on the front and said this...

"You can equip a softbox on the front which *massively* softens the light on your face."
Sorry, Arun.
No it doesn't.
I sometimes wish I could get a job as a YouTube lighting advisor. So many creators have to set up and use professional lighting but very few actually have an understanding of how their lighting works. And with just a little knowledge they could up their lighting game big time.
If nothing else, I could stop the plague of ring lights.
Ring lights are my nemesis.
*shakes fist at ring lights*
Arun repeated a classic myth. Diffusing a light does *not* make it softer. And despite the name, a softbox is fully capable of producing hard light. Especially if it is only the size of your granddad's wallet.
I'm afraid softboxes are a bit misnamed—much like how the tremolo system on a guitar is technically a vibrato mechanism. Tremolo is a fluctuation of volume, not pitch. Personally, I just stick to calling it a whammy bar because that is more fun anyway. And, like, what does "whammy" even mean in the context of a guitar? I'd rather call something by a nonsensical name than an inaccurate one, ya know?
What the hell was I saying?
SOFTBOXES!
They should probably be called "light homogenizers." Which is a mouthful, but more accurate.
Or, hear me out... WHAMMY BOXES.
Froggie Note: I am trying a color coding technique to help make the most important information stand out. Red means PAY ATTENTION and blue means "do your best to remember this." Let me know if this is helpful or annoying or if a different color combo is preferred.
Hard Light vs. Soft Light
Hard light is a less flattering light source that creates high contrast, sharp shadows, and accentuates texture.
Soft light is a more flattering light source that creates soft shadows and reduces texture like pores, blemishes, and wrinkles.
You can *only* get hard or soft light by changing the apparent size of a light source from the subject's point of view.
If you remember only three things about light, they should be...
Bright light = sharp photos, less noise Hard light = small light source Soft light = large light source
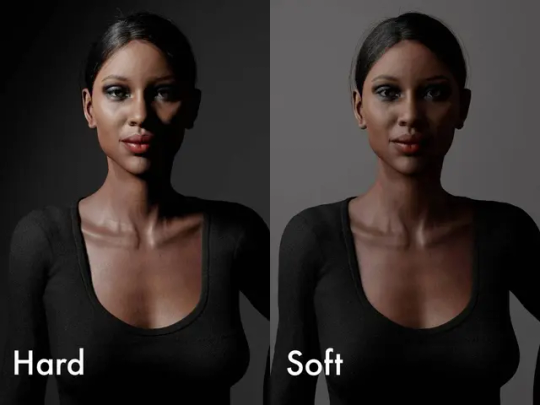
Now, it's important to remember that hard light is not *bad* and soft light is not *good*. In photography, the oft-used parlance "flattering" just refers to the rendering of facial features and blemishes. So you might use a more flattering lens to make sure faces do not distort or a more flattering light modifier to reduce wrinkles.
But there are situations where soft light can be very boring and hard light can be much more dynamic and interesting. But if you have someone who is insecure about their skin or has a lot of blemishes, you can mitigate that by making the light softer. But if you have someone with great skin and a lot of angular facial features, you might use a hard light to show that off.
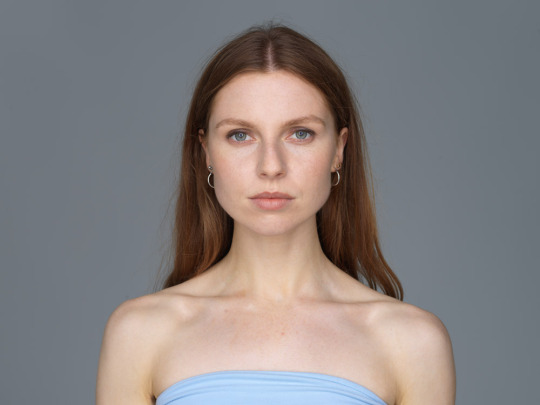
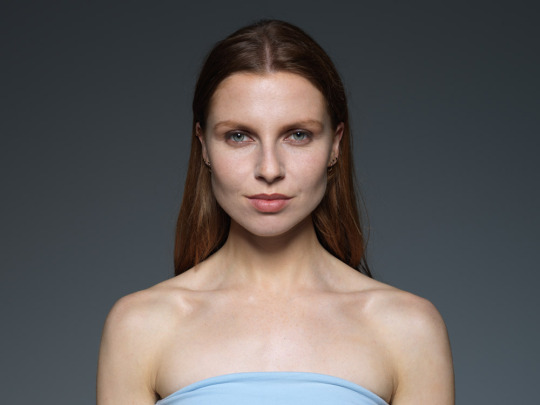
Which of these do you prefer?
The one on the left was taken with a 7 foot diameter light source and is *very* soft. But the other had a 1 foot diameter and I think it is more dynamic and interesting.
You can also mix hard and soft light. And with something like a parabolic reflector or a beauty dish, you can even modify a light source to be hard and soft at the same time.

This technological terror of a light modifier is sort of like having 24 individual small lights around the edges but the entire surface of the reflector also acts as a single large light source.
And when it isn't atomizing Alderaan, it is taking photos like this...

This creates a falloff of light around the edges of her face, nose, and arms while also reducing the intensity of the shadows. Lenses with longer focal lengths prevent distortion of facial features but also flatten our faces. So a modifier like this can bring back dimensionality.
Neat!
Now I just need $8,000 to buy the Death Star light.
There are a ton of possibilities when it comes to modifying light sources, but most people typically want the main light on the subject to be in the realm of soft and use hard light sources as edge lights.

Also, everything is a spectrum and light is no different. There is a giant space in between hard and soft to play with. In fact, the hardest light possible would be cast on a subject floating in space.
And the softest light possible would be on a planet that has 100% cloud coverage that still allows sunlight to scatter through.
So, I have determined the surface of Venus to be the most flattering light in the universe.
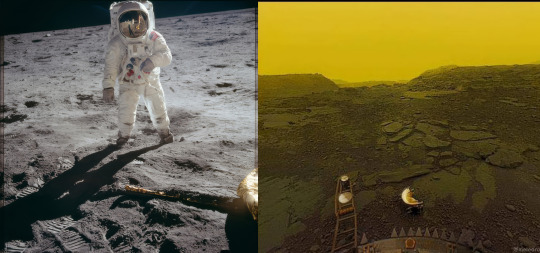
Look at how dark and sharp that astronaut shadow is! And I'm sure Venusian photography would be quite popular if you wouldn't burst into flames.
On planet Earth, noon on a clear day would be the hardest light and a very overcast day would be the softest light.

How can the sun be both hard and soft light?
Well, the sun is quite large, but it is very small in the sky and very far away. It is the only thing humans can observe that is close to a "point" light source—the smallest light source possible that shines light equally in all directions.
But on an overcast day, sunlight scatters through all of the clouds and becomes a HUGE homogenous light source. The clouds become a singular giant light above us. And as you can see, the light is so soft the woman does not have a hint of shadow on her face. And shadows can draw attention to pores, wrinkles, blemishes, and other textures.
But wouldn't the smallest light source be a laser or something?
When photographers refer to a small light source we mean from the perspective of the subject being lit. This is referred to as apparent or angular size.
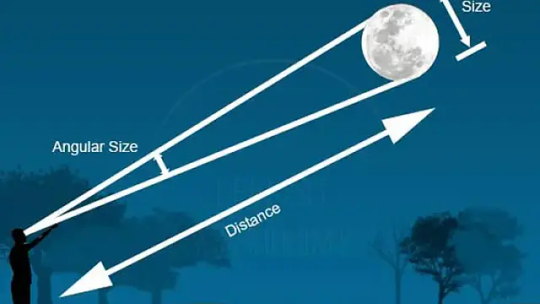
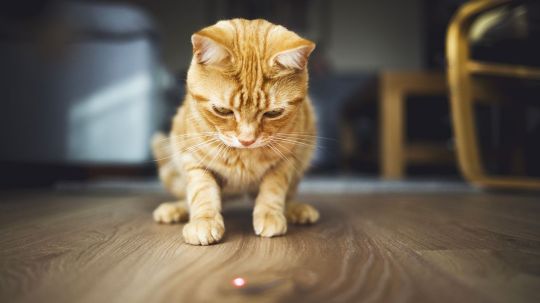
But you also have to account for the size of the area the light source can illuminate.
This is the area a laser can light up.
And this is the area the sun is able to cats cast light upon.

It doesn't matter if a laser is close or far away, it focuses light onto a very small area. But the sun lights up half the planet. So look at imagine the apparent size of the sun in the sky and compare its size to half of the Earth. In that relative circumstance, the sun is a super tiny light source.
And the sun becomes an even tinier light source on the moon because there is no atmosphere or clouds to scatter and enlarge it.
You can change the apparent size of a light source in two ways...
The physical dimensions of the light and the distance from the subject.
A light with small dimensions can be a large light source if it is close enough and if the subject is small enough. So a flashlight could be a large light source for an ant if that flashlight is directly next to said ant. But a flashlight could never be a large light source to a human.
However, we can enlarge small light sources with modifiers.
A modifier can be a softbox. It can be a piece of paper. A large poster board. A wall or a ceiling. Anything that changes the nature of a light source can be a modifier. But not all modifiers increase the size of a light source.
So, you can take that flashlight, shine it on a wall, and reflect the light to make a giant light source capable of producing softer light.
But what you cannot do is put diffusion material directly in front of a flashlight and make the light it produces softer.
When Arun put that diffuser on the front of that tiny light, he was not making the light any bigger. He was only making the light more diffused.
What does diffusion *actually* do?
Diffusion scatters light. It makes light bounce in all directions and keeps it from being focused. And while this is an important aspect to making a light source larger, it does not change the apparent size of a light source on its own.
Diffused light is homogenous.
A homogenous light source has the same intensity across its entire surface area. And that homogenization is the key to creating a better soft light source. It can *assist* in making a light source larger, but only if you know how to wield that diffusion properly.
When you shine a flashlight toward a wall, you increase the apparent size of the light source.
Fantastic! You now have a softer light. Mission accomplished.
But if you do not diffuse it, you will create a hotspot.
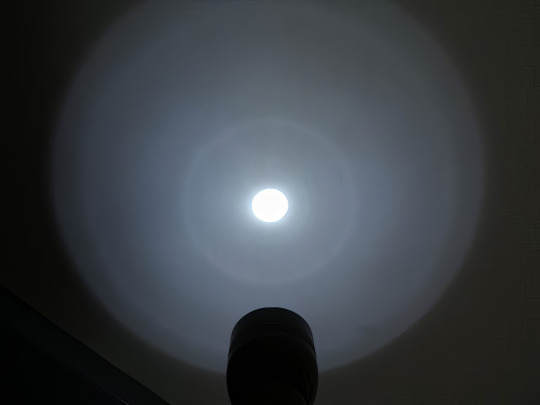
That bright hotspot will reflect more light than all of the other light reflecting off the wall. That reflected light has different intensities across its surface area and you end up creating TWO distinct light sources—one hard and one soft.
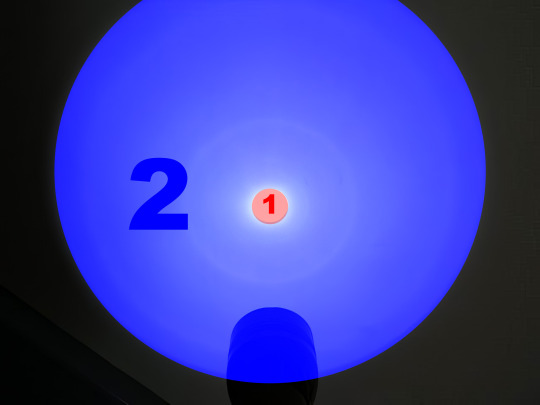
This can sometimes be desired if you want to create graduated light that falls off like I showed earlier. But if it is not controlled well with a specialized modifier a hotspot can cause more problems than benefits.
This can reveal unwanted texture, double shadows, cause harsh glare, and it may not achieve the desired amount of soft, flattering light you were hoping for.
However, if you diffuse the light from the flashlight before it hits the wall, the light will scatter and reflect off the wall more evenly. You will create a more *homogenous* light source that acts as a single entity of light.
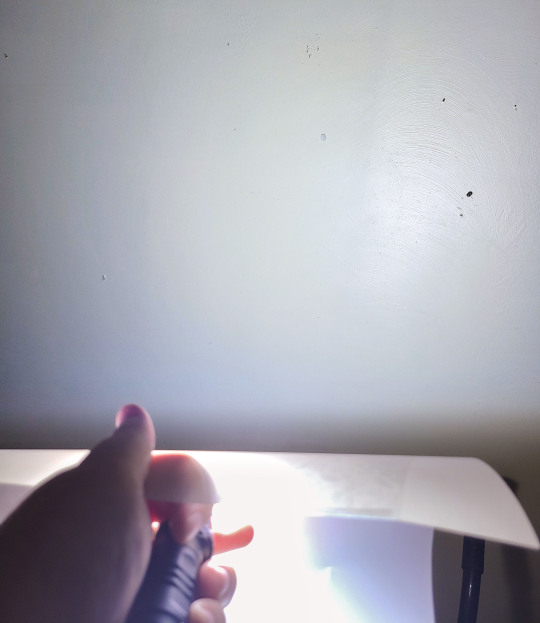
Diffusion does reduce the overall intensity of the light, but that is usually a worthy trade off for the increased homogeny.
These pesky hotspots are actually a big problem with those cheap softboxes you can buy off Amazon.

Many of them do not have enough diffusion to create a single homogenous light source. So they end up with a hotspot that gives you that double light source effect.
I was able to fix this with my friend Katrina's softbox by adding a layer of tracing paper in front.
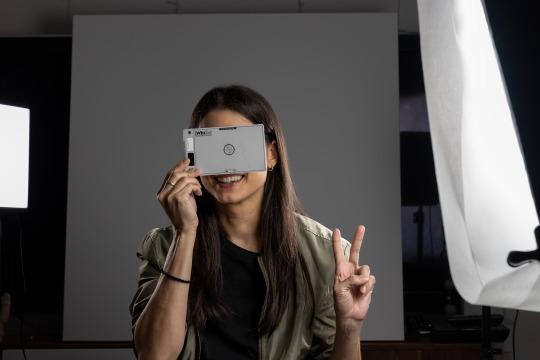
You can see the chip clip holding the tracing paper in place on the right side.
Photography is just problem solving all the way down.
A higher quality softbox will have a second layer of diffusion already built in to prevent this, so make sure the softbox has this feature before buying.
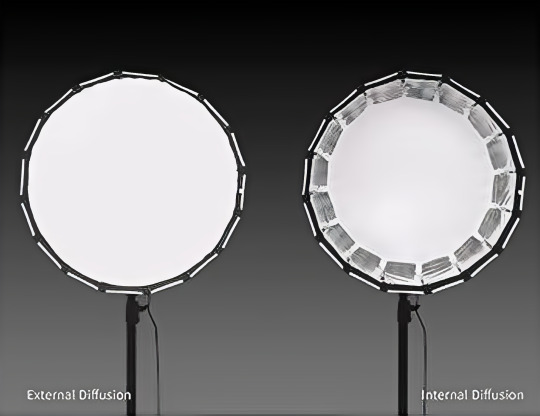
Or invest in a roll of tracing paper and some chip clips.
Softboxes are an ingenious light modifier when built properly. They take a small light, diffuse it, enlarge it, and then focus it toward your subject. It's essentially a paradox of scattered & focused light. And since all of the scattering only happens *inside* the softbox, it gives you great control over how that light hits your subject. And you can focus it even more by putting a grid on the front.
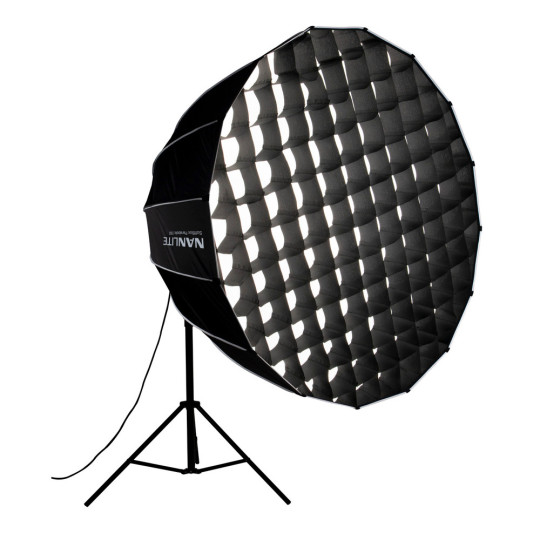
This keeps light from "spilling" off to the sides though it can reduce intensity a bit and create unusual looking catchlights in the eyes.
Whereas a cheap shoot-through umbrella kinda "shoots" scattered light all over the place and causes a ton of extra reflections off the walls and ceilings. That may end up giving you unwanted second, third, and fourth light sources contributing to your exposure.
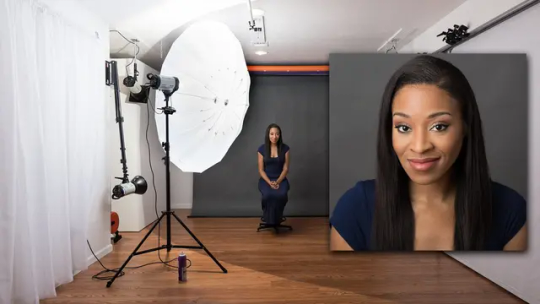
You can see light hitting the left and right walls and the ceiling—those pesky photons are going everywhere! And while it is giving a soft, flattering result due to that umbrella being so freaking big, you have almost no control over the light and how it affects your background.
So, yes, a softbox can make a small light source bigger, but that doesn't always mean you will get "soft" light.
This softbox takes a 10 inch LED panel and creates a 12 inch light source. This is mostly a scam product.

The marketing says it makes the light softer.
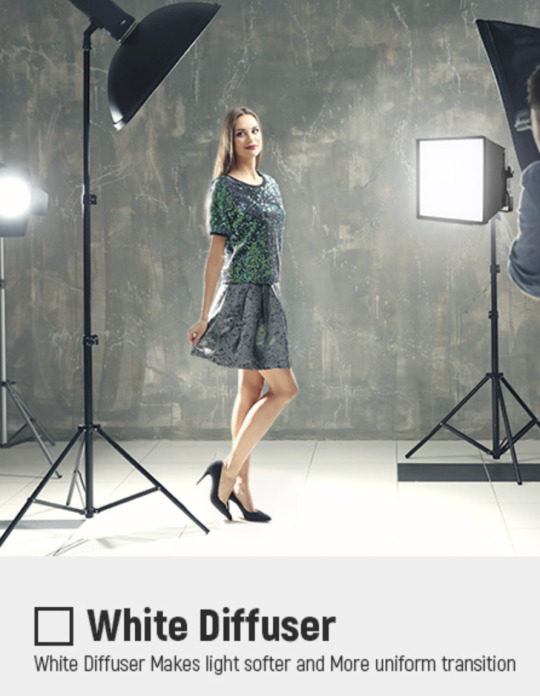
And while that is *technically* true, I'm afraid people are going to be disappointed if they think this thing is going to dramatically soften their light. A small increase in surface area like that would only be dramatically different if you were lighting a little toy car or the hypothetical ant friend I mentioned earlier. Something the size of a person is not going to see a difference in softness. Not to mention you are going to decrease the power of your light by adding diffusion and have no softening benefits.
Photography gear companies love taking advantage of new photographers because the desire to buy more gear to improve the quality of photos is quite strong. This is jokingly referred to as G.A.S. or "Gear Acquisition Syndrome." And while there is absolutely gear you can buy to improve your photos (lights, lenses, tripods), knowledge trumps any piece of gear at any time.
So, no, this scam softbox will not make the light appreciably softer. The only way to make this light softer is to find a softbox that enlarges it more than 2 friggin' inches, bounce it off something larger, or bring it closer to the subject. Move your light as close as possible and you will enlarge its apparent size.
Or, conversely, you can move your light farther away to make it hard.
Meaning you can technically make a softbox a hardbox.
Seriously, can we just do the whammy box thing?
So, what have we learned?
Soft light is more flattering to skin and reduces texture and harsh shadows.
Hard light increases contrast, sharpens shadows, and highlights texture.
Neither is good or bad. Soft light can be boring. Hard light can be interesting. A mixture of the two often produces the best result.
The only way to make light softer is to enlarge the light source.
You can enlarge a light source by...
Increasing the physical dimensions with a modifier.
Moving the light closer.
Reflecting the light off a larger surface.
Diffusion alone does not make a light softer.
Diffusion makes a light source more homogenous by mitigating hotspots.
Softboxes create homogenous light that you can direct and focus.
A softbox can still produce hard light if it is really small or really far away.
We should call it a whammy box.
How can you use this knowledge?
Well, the first thing you can do is...
DON'T BUY A RING LIGHT.
YES, I AM RANTING ABOUT RING LIGHTS AGAIN!
That giant hole in the middle of your light is a great spot for extra light.
And as we just learned, a larger light source is softer. So unless you specifically need a ring light and know how to use it (facial close-ups, camera goes in the hole), you are better off getting the biggest light you can fit in your space.
Look at how much bigger this light is than if it were a ring light.
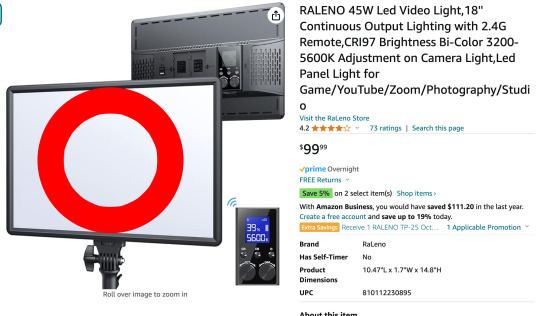
It's like all of these influencers are throwing perfectly good light into the garbage.
Sorry, let's try this again.
Once you avoid ring lights, how can you use this knowledge?
I know a lot of you reading this are not influencers or YouTubers or photographers. And you may be thinking all of this knowledge I just shoved in your dome is useless.
But here's the thing...
We all take photos.
And I think we all want our photos to look their best.
If you start thinking more about light when you take photos, I promise you will be able to improve their quality.
If you are taking a selfie, think about where you can go that has a larger light source. Perhaps you have a large window. Or you have a big overhead light or floor lamp that shines up into the ceiling.
I actually had this idea to create a mega light that could blend in with a house's decor, but secretly be a photography light for taking pictures of people and pets indoors at night.
Secret Photography Light Ingredients Cheap Floorlamp Dual Light Socket Adapter 9000 Lumen LED Bulbs
(Seriously, if you put that together, stick it in a corner, and turn it on when your kids or pets are playing, you will never have another blurry photo from inside your house unless they are going full zoomies.)
If you are outside on a sunny day, don't stand in direct sunlight.
Remember, THE SUN IS ACTUALLY SMALL, angularly speaking. Find a shady spot under a tree. Or put the sun behind you and face a big white wall so the reflected light smacks you in the face.
Walls are light sources!
The ground is a light source!
Remember that moon photo?
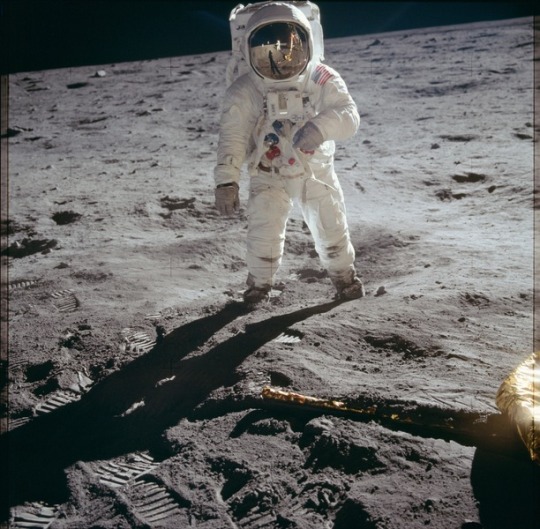
You were looking at the sharp shadow earlier because I drew your attention to the sun being a small light source.
But the surface of the moon... HUGE LIGHT SOURCE.
How do you think the front of that space suit is lit when the sun is behind him? Either Stanley Kubrick has a big reflector offscreen or the ground is a soft second light source.
If you can't make it to the moon, just wait to take that selfie on a cloudy day. I think overcast light is a little boring, but your skin will look buttery smooth without using those stupid Facetune apps.
You can also wait for good light. Sometimes sunset has some nice, soft directional light because it has more atmosphere to scatter, diffuse, and enlarge it.
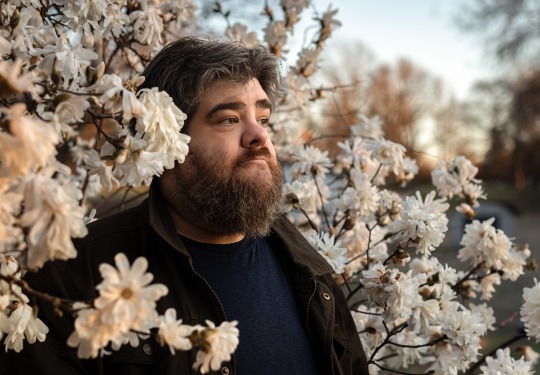
If you are indoors, don't use direct flash on your phone. Never ever use direct flash if you can avoid it. But perhaps you are with friends and they all have phones too. Use one or more phones to bounce the flashlight off a nearby wall. Or open up a paper napkin and hold it just out of frame and shine light through it and diffuse it.
A piece of paper can even work!
Flashlight 3 feet away shining directly onto my face...

Flashlight shining through a piece of paper a few inches in front of it...

Flashlight shining through a piece of paper 2 feet away that is just out of frame...

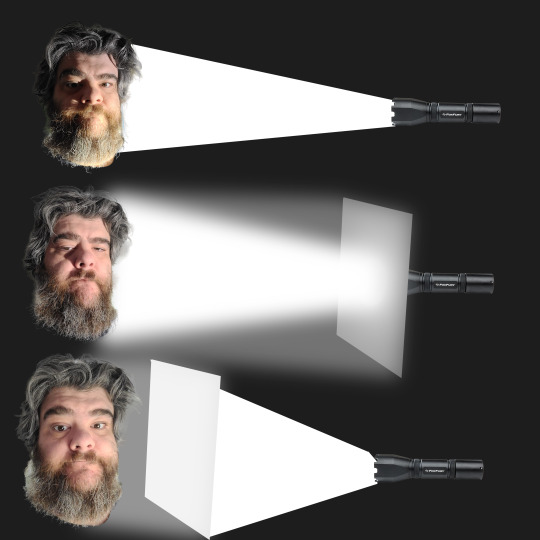
I started with a small light source.
I then made the light source a little bigger with the paper, but the diffusion was too close and it created the dreaded hotspot of doom.
And then I made the light source as big as I could by moving the paper as close to my face as possible without being in the shot. This also gave the light more room to scatter and diffuse making it homogenous.
Froggie Tip: I was using a pretty powerful flashlight, so with a phone you might get better results *bouncing* the light off the paper rather than shining the light through the paper.
So, before you take a photo, just think about how you can make your light source bigger, brighter, and more homogenous and you might be surprised how much better you look.
ANYONE CAN DO THIS!
792 notes
·
View notes
Text
OV403 - Thanksgiving (2023) & Please Don't Destroy: The Treasure of Foggy Mountain (2023) - Guest: Brent Leuthold (AwakeintheDark.com)
In this week’s episode, I welcome my friend and IFJA colleague Brent Leuthold back to the show to review Thanksgiving (currently in theaters) in a non-spoiler and spoiler review and Please Don’t Destroy: The Treasure of Foggy Mountain (on Peacock).
Become a patron for exclusive audio content at Patreon.com/ObsessiveViewer. And visit the Patreon Shop for a la carte exclusive content at ObsessiveViewer.com/Patreon.
Timestamps
Show Start - 00:28
News - 09:04
Reviews
Thanksgiving - 18:10
Non-Spoiler Review - 19:10
Spoiler Review - 41:23
Please Don’t Destroy: The Treasure of Foggy Mountain - 1:12:36
Closing the Ep - 1:31:31
Related Links
Brent’s Letterboxd
Next Goal Wins
The Holdovers
Five Night’s At Freddy’s
Killers of the Flower Moon
Brent’s Social Media
Facebook
Twitter
Instagram
Threads
Madame Web trailer
Emma Stone, Nathan Fielder Parody Sydney Sweeney and Glen Powell’s ‘Anyone But You’ Intro in New ‘The Curse’ Promo
Please Don’t Destroy - “I Got Vaccinated”
Mark Little: Elevated Horror Tiktok
Thanksgiving (2007) - Grindhouse Trailer
My TikTok Account
My 2023 Podcast and Writing Archive
Our Theme Song on Spotify
My Letterboxd
Tiny’s Letterboxd
Recent Patreon Content
Patreon Potpourri - 023 - "Awards Season 2023" - BS High, Creed III, Air, and Stephen Curry: Underrated - Nov 11-12, 2023
Immediate Reaction - Priscilla (2023) - Nov 12, 2023
Book Reaction - Everything's Eventual by Stephen King - Novella – Everything’s Eventual - Nov 12, 2023
Book Reaction - Cibola Burn (The Expanse 4) by James S.A. Corey - Part 5 (Chapters 37-46) - Nov 11, 2023
Patreon Shop
Immediate Movie Reactions - 2022 - Pack 1 (Jan-May 2022)
Immediate Movie Reactions - 2022 - Pack 2 (Jun-Dec 2022)
Immediate Movie Reactions - 2023 - Pack 1 (Jan-May 2023)
Immediate Movie Reactions - 2023 - Pack 2 (Jun-Sept 2023)
Stephen King Adaptation Commentaries - Pack 1
Stephen King Adaptation Commentaries - Pack 2
Book Reaction - Night Shift by Stephen King
Book Reaction - Nightmares & Dreamscapes by Stephen King
Book Reaction - Skeleton Crew by Stephen King
Book Reaction - Billy Summers by Stephen King
Book Reaction - Fairy Tale by Stephen King
Book Reaction - The Bill Hodges Trilogy by Stephen King
Book Reaction - The Outsider by Stephen King
Book Reaction - If It Bleeds by Stephen King
Help Support the Podcast
Official OV Merch
Obsessive Viewer
Obsessive Viewer Presents: Anthology
Obsessive Viewer Presents: Tower Junkies
Mic Info
Matt: ElectroVoice RE20 into RØDEcaster Pro II (Firmware: 1.3.2 BETA) Processing: High Pass Filter, DeEsser, Compressor, and Master Compellor enabled. Recorded in the Living Room
Brent: Earthworks ICON Pro
Episode Homepage: ObsessiveViewer.com/OV403
Check out this episode!
#the obsessive viewer#podcast#movies#television#audio#reviews#criticism#movie news#theater#movie theaters#netflix#hulu#amazon prime#hbogo#hbonow#hbo#game of thrones
0 notes
Text
Unlocking the Mysteries of Stonehenge: A Guided Tour Experience
Welcome to your guided tour of Stonehenge, a place shrouded in mystery and intrigue. As we explore this ancient site, we'll delve into its history, purpose, and the countless theories that surround it.
Introduction
Stonehenge Overview: Stonehenge tours is a prehistoric monument located in Wiltshire, England. It consists of a ring of standing stones, each around 13 feet high, seven feet wide, and weighing around 25 tons. The stones are set within earthworks in the middle of the most dense complex of Neolithic and Bronze Age monuments in England.
Theories on Construction
1. Neolithic Engineering: Stonehenge was built in several stages, with the earliest phase around 3100 BC. The construction involved a remarkable understanding of engineering and astronomy. Some believe it was a celestial observatory or a symbol of the sun and moon.
2. Spiritual and Religious Significance: Many theories suggest Stonehenge had religious or spiritual significance, possibly as a burial site. The alignment of the stones with celestial bodies might have played a role in rituals or ceremonies.
Alignments and Astronomy
1. Solstices and Equinoxes: Stonehenge's axis is aligned with the solstices. The rising sun at the summer solstice aligns with the Heel Stone, drawing thousands of visitors each year for the solstice celebration.
2. Lunar Connections: Some researchers propose Stonehenge's alignment with the moon and its phases, linking it to ancient lunar calendars and agricultural cycles.
Theories on Purpose
1. Burial Ground: Excavations at Stonehenge revealed human remains, suggesting it could have been a burial ground. The bluestones, brought from Wales, might have been believed to have healing properties.
2. Healing and Spirituality: There are theories that Stonehenge was a place of healing due to its unique acoustic properties and the belief in the stones' mystical powers.
Recent Discoveries
1. Hidden Monuments: Recent technologies like ground-penetrating radar have uncovered additional structures and monuments around Stonehenge, suggesting a more extensive complex than previously thought.
2. The Avenue: The discovery of an ancient processional walkway, known as "The Avenue," leading to Stonehenge, has raised questions about the ceremonial approach to the site.
Preservation and Access
Preservation Challenges: Stonehenge faces challenges from erosion, weathering, and the impact of tourism. Conservation efforts are ongoing to protect this UNESCO World Heritage Site.
Visitor Experience: While the inner circle is roped off to protect the stones, visitors can explore the outer circle and the surrounding landscape. Audio guides and guided tours provide valuable insights into the history and mysteries of Stonehenge.
Conclusion
Stonehenge remains an enigma, a testament to the ingenuity and spirituality of ancient civilizations. As we conclude our guided tour, take a moment to absorb the mystique of this extraordinary monument, and perhaps, like so many before you, you'll leave with more questions than answers.
0 notes
Text
"They're great civil engineers. They're artists, they're astronomers, mathematicians, and for my people, that's not the way that Shawnee people, or any Indigenous peoples in this country, are typically portrayed in media." Chief Ben Barnes of the Shawnee Tribe
Tana Weingartner for NPR: "Ohio's Hopewell Ceremonial Earthworks are about to be a UNESCO World Heritage Site"
"Of just over a thousand [Heritage] sites worldwide deemed of universal importance and value to humankind, there are only 24 in the United States that carry that distinction."

Outside the Great Circle at Newark (with visitor for scale, to the left in the distance). The Circle’s earthen berm stands anywhere from around 6 feet, to 14 feet high. Jake Wood
"Now, after more than a decade of work and planning, ancient earthworks in Ohio are poised to join them...
The Hopewell Ceremonial Earthworks encompass eight sites — a collection of historic earthen mounds built by Indigenous peoples:
Fort Ancient Earthworks and Nature Preserve
Hopewell Culture National Historical Park (five geographically separate elements)
Mound City Group
Hopewell Mound Group
Seip Earthworks
High Bank Earthworks
Hopeton Earthworks
Newark Earthworks
All the sites were built 1,600 to 2,000 years ago by peoples formerly referred to as Hopewell...
It might be unusual to consider huge mounds of dirt as anything significant, however, UNESCO calls the earthworks a 'masterpiece of human creative genius.' That's one of the criteria for inclusion on the World Heritage List. Another calls for bearing "exceptional testimony to a cultural tradition or to a civilization which is living or which has disappeared."
The design and construction of the Earthworks show the people during this early era had a clear understanding of geometry, architecture, and solar and lunar alignments and multi-year cycles."
Full story with audio from Weekend Edition Saturday.
In my various travels, I've visited some of these; more information on some of those astronomical alignments is on available on Jake Rambles n'at, including diagrams on satellite views ('cause I do that):

1 note
·
View note
Video
youtube
Testing out the Earthworks Icon USB Microphone - Podcast, Video, and Meeting mic
0 notes
Text
Title:In the Dephs of Despair
Chapter starts as yall have seen with the short scene of Historia giving birth and there is no dialogue.
It shows the colossals are all over the world and people being crushed and jumping off cliffs and dying trying to escape them.
Karina feels regret about how she was with Reiner.
The air ships attack but the Beast titan kind of materializes to attack them.
Also this is the final audio scene finally
They jump from the plane to go to Eren with Reiner becoming the armored to fight Zeke and Pieck carrying the bombs from the plane
At the end Armin says he will ask Eren again about him being free after he pulls him out
Story getting close of the ending and Historia giving birth uh ? If you ask me I would tell you it’s related to the last panel
The Slatoa Fortress Air Force initiates the faint hope operation.
Will it be sufficient to stop the Original and the progress of the Great Earthworks?
The air force of Fort Salta launches their last attempt operation. Will it be enough to stop the Founder and halt the great rumbling?
2 notes
·
View notes
Text
FREE GIVEAWAY: Enter to WIN a FREE LumiNode from Luminex | PODCAST: Networking & Lighting with Anthony Stofflet | ARTICLE: Education & Training | ARTICLE: Techs and the Great Commission | KNOWLEDGE UPGRADE & FREE GEAR STARTS BY CLICKING THIS LINK https://conta.cc/44vZboy #FREE #GIVEAWAY
#podcast#church#churches#earthworks audio#microphones#tech arts#the tech arts podcast#live production#jesus#prayer#Networking#Lighting#Anthony Stofflet#AC Lighting#Digico#christianity#christian blog#bible#faith#salvation#christian living#live concert#concert#live performance#music festival#live music
2 notes
·
View notes
Text
youtube
Check out this awesome mic
1 note
·
View note
Text
Jazz Recording
Recorded Acoustic Drum Set, Acoustic Upright Bass, Tenor Saxophone, Acoustic Grand Piano, Voice
#Voice#Yamaha Maple Custom#Acoustic Drum Set#ElectroVoice RE320#Sennheiser e604#Sennheiser MD421#Earthworks Z30X#AKG C414 B-ULS#Neumann TLM103#Avid Pro Tools HD10#Oktava MK012#Audio Recording#Neumann U87ai#Acoustic Grand Piano#Neumann M147#dbx 160A#Api 3124#ADL 1000#AKG D112#Tenor Saxophone#Neve 1066#Avalon 737sp#Acoustic Upright Bass#Yamaha 02R96#Behringer PowerMix16#Soundworks Recording Studio#AKG C414 BTL-II#Genelec 1030A#Shure SM57#Yamaha G7
1 note
·
View note
Photo
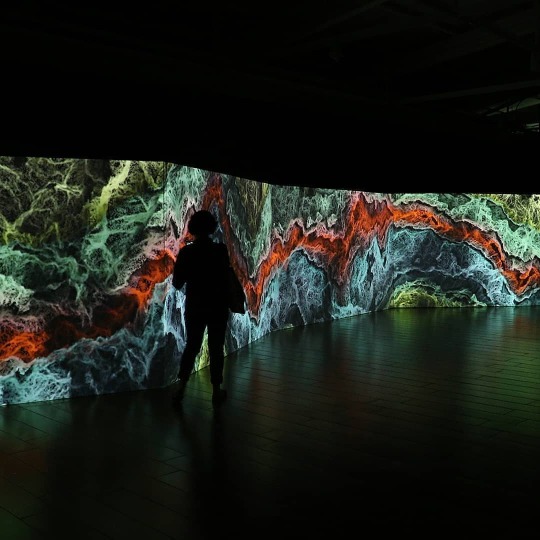
Hoy. Gratis! . . #Repost @tuagendaenchile • • • • • • Dúo británico Semiconductor exhibe sus obras en el Centro Nacional de Arte Contemporáneo Cerrillos • La exposición, curada en colaboración con Mónica Bello, estará abierta al público hasta el 26 de enero de 2020 en el marco de la 14 Bienal de Artes Mediales de Santiago. Allí, la dupla compuesta por Ruth Jarman y Joe Gerhardt presentará una extensa retrospectiva que se instala en el sincretismo entre arte y ciencia. Animaciones, filmaciones, audios y mucha experimentación incluyen las obras que el dúo británico Semiconductor, compuesto por Ruth Jarman y Joe Gerhardt, y bajo la curatoría de Mónica Bello, estará presentando hasta el próximo 26 de enero en el Centro Nacional de Arte Contemporáneo Cerrillos del Ministerio de las Culturas, las Artes y el Patrimonio, en el marco de la 14 Bienal de Artes Mediales de Santiago. Éstas son: Worlds in the Making; Black Rain; Through the AEgIS; The View from Nowhere; Earthworks; HALO; Magnetic Movie; 20 hz. El dúo crea obras de arte visual e intelectualmente atractivas que exploran la naturaleza material de nuestro mundo y cómo lo experimentamos a través del lente de la ciencia y la tecnología, cuestionando cómo estos aparatos afectan nuestra experiencia del mundo. Sus obras examinan la materia más allá de los límites de la experiencia humana y plantean preguntas sobre nuestro lugar en la naturaleza. Su aproximación única les ha permitido ganar varios premios y prestigiosas becas como Samsung Art + Prize 2012 para nuevos medios, Smithsonian Artists Research Fellowship y Nasa Space Science Fellowship. Produciendo trabajos a través de una investigación intensiva en disciplinas científicas, como la física espacial, la radioastronomía y la geología, Semiconductor observa de cerca las técnicas y procesos que los científicos usan para comprender la naturaleza y el universo físico. Al trabajar con datos científicos en su forma más cruda, Semiconductor conserva las fallas en los hallazgos científicos, lo que demuestra las formas en que la investigación científica lleva la huella de sus autores y cómo estos dispositivos median nuestras experiencias. (en Centro Nacional de Arte Contemporáneo Cerrillos) https://www.instagram.com/p/B5iGjfrhT-B/?igshid=1louvguj5w1oe
1 note
·
View note
Text
Bring daylight to every room in your home
Every room in your home deserves to be filled with natural light—even those in the center of your home. Unlike traditional windows, the VELUX Sun Tunnel® Skylight can be installed within an afternoon, making it one of the fastest and most inexpensive ways to transform your home with natural light.
Adding a Sun Tunnel® Skylight is a cost-effective way to add natural light to areas that need a brighter, more vibrant appearance. Their low-profile design creates a sleek appearance on any roofline, and their pre-fabricated light tube makes them quick and easy to install. Not to mention, they come with a 20-year tube warranty
Holt's most recognized artwork, Sun Tunnels is a large-scale installation in Utah's Great Basin Desert, a four-hour drive from the UMFA. It consists of four large concrete cylinders, arranged on the desert floor in a cross pattern, that align with the sunrise and sunset on the summer and winter solstices.
In addition to this perfect solar framing
each of the cylinders is pierced with smaller holes representing the stars of four constellations: Draco, Perseus, Columba, and Capricorn. Holt's design allows for an ever-changing play of light and shadow upon the surfaces of her work. The four concrete tubes act as viewfinders framing precise images which, in Holt's words, "bring the vast space of the desert back to human scale."
One of only a few women associated with Land art, Holt is a key yet under-recognized figure who has produced ambitious projects all over the world. Holt was also a pioneer of time-based media, and the camera was crucial to her exploration of space, sculptural form, and subjective perspective. Her work—photographs, films, site-specific installations, earthworks, public sculpture, and even personal flashlight and audio tours—transforms our perception of place, space, and time
Focusing our vision and challenging our understanding of an environment, Holt's work draws attention to the complexities of our relationship with the landscape we inhabit and act upon.
Sun Tunnels is a part of the Holt/Smithson Foundation, which furthers the legacies of Robert Smithson and Nancy Holt. UMFA partners with Holt/Smithson Foundation, Dia Art Foundation, and the Center for Land Use Interpretation to further advocate for Sun Tunnels.
More about: Sun tunnels service in calgary
ringing in natural, soft light throughout your home is now easier and more affordable than ever. Many houses have bathrooms, hallways, and other rooms where daylight only enters when you open the door. Dim and dark, these rooms are unwelcoming places until you turn on a light.
Not the option of choice for many people. Those days are over. Sun tunnels can dramatically change a room, they’re the fastest way to add natural light and an expansive, open feeling to those dark spaces. They harness sunlight and the impact is stunning. The installation has no structural changes to the house and can typically be completed within 3 hours.
0 notes