#double threaded sewing thread
Explore tagged Tumblr posts
Visit Tumblr Blog
Explore Tumblr blogs with no restrictions, modern design and the best experience.
Last Seen Tumblr Blogs


Fun Fact
There are dozens of funny blogs to kill time on Tumblr.
Text
yesterday some friends and i went to the special ancient egyptian pharoahs exhibit at the ngv, and i got so utterly entranced by a linen funeral shroud, i think i saw god and/or went completely insane for about fifteen minutes
the fibres were so fine. and not just fine, they were uniform. it was from the roman period, so only (only!) 2,000 years old, but the fibres were still so fine and uniform
i'm not good at identifying weft and warp on a piece of fabric - i think i got it wrong while i was looking at it - and obviously it's very hard to know what's inherent to the fabric and what's the product of degradation over time or mishandling, but there was this long, thin tear right down the middle, and i thought it was maybe a seam that had come apart, but the painting alignment didn't quite fit that, and there were a few threads crossing through it that i could see, so i wonder if maybe one or two weft threads had degraded or torn or been pulled loose. but the tear was so straight and exact, and held together at one end by the other fibres, it was so incredible to see
and there were a couple of places where i thought there were slightly chunkier threads - it happens all the time in modern linens - but when i looked closer, i could see that actually it was two threads in the same part of the weave (warp threads, i think?)
and again, okay, could be a product of the degradation, or damage - but also... it could so easily have been a slight fault in the manufacturing, and i don't know the first thing about ancient egyptian weaving techniques, or what kind of loom they did or didn't use, or any of that - but still, it was so easy to imagine these two warp threads being set slightly too close together on a loom, and being caught together by the weft, and leaving this slightest bulge, this perfect imperfection in the cloth
it was beautifully, intricately, colourfully painted, too, yes - but underneath that, i can only imagine that lovely dun, beige colour was unbleached and undyed; and yet again, yes, of course it would've darkened with age and use - it was a funeral shroud, there was a corpse under it once - but to look at this linen and see the colour of the flax two thousand years ago, it's just - absolutely mind-boggling
the whole exhibit was deliberately structured around highlighting the craftsmanship behind the artefacts, as well as the power, social structures, and cultural significance they represented, which was fairly well done. I watched that video after seeing the exhibition, and in hindsight, yeah, I did notice that many of the labels highlighted the detail and excellence of the items, and they had things like jewellery moulds and scribe's tools, as well as the big impressive statues and murals. at least a couple of the room introduction wall texts made sure to mention craftspeople; and there were a few places dedicated to both the bureaucratic structures, and working people and villages, that created and kept up the temples and palaces.
but there was also definitely a slight lack of information, i felt, in regard to the crafts, especially if that was their goal. i might also just be underestimating the general public, but there were a few times where we were wondering what something in an image was, but found nothing in the label; and it would've been cool if they, perhaps, had images or recreations of craftspeople in the period showing how the items would have been made.
like, obviously i'm biased towards the fabric, because that's my craft - and to be clear, the shroud was part of the room on jewellery and adornment, with the label pointing out the jewellery worn by the painted figure, rather than the craft of the item itself. but it would've been cool to have, in this example, either a contemporary image or a recreated one of what tools would have been used for the spinning and weaving of this cloth, and by what groups.
there were many parts of the exhibit where you could see on the glass where people had pressed their hands or noses or foreheads to try and get close, to see the intricate work on tiny rings or murals or votive items, the engraving and carving and painting done with such incredible skill. and again, they had those scribe's tools, and jewellery moulds, a few weapons, and (iirc) both ritual and functional builder's tools. which i DID VERY MUCH appreciate!
but fibre arts are already often devalued in our culture, and with industrialisation, we've really lost sight of the work and skill that, for thousands of years, went into making fabric. i would've loved to have seen them highlight not just the image of jewellery on this shroud, but the shroud itself.
because, yeah: this linen was beautiful. and to see this cloth, with these fibres that are finer and more uniform than many modern fabrics... like, obviously it's very good linen - the label only said it was for a woman called Isetweret, not what her status was, but i think it's a safe bet she wasn't the proletariat - but still.
just. i really fucking love history, oh my god
#ancients#crafts#history#my friends can attest that i kept going back to it and getting my nose right up to the glass#and had to grab them so i could point out and ramble at SOMEONE about those doubled threads#i was so focused on admiring the edges where the fibres were most visible that i kept forgetting it was. painted. with like a full scene#which was also going to be interesting and incredible and i should probably look at it at LEAST once or twice XD#but my god....... my gOD#it was so fucking old and such beautiful cloth sdklghaflgkjadfghadh#note to self: pick back up that flax you started spinning like over a year ago and give it another try#my first attempt was short and obviously not very good but y'know. not gonna get better unless i practice!#but i honestly haven't touched a spindle at all in ages i've had too many other things going on :(#too busy with life and also sewing projects with actual deadlines or intentions... speaking of; i should get back to those curtains...
11 notes
·
View notes
Text
I love my job but today it gave me blisters on 3 of my fingers and now everything hurts and I won’t be able to do any cello or embroidery this weekend

#when your asked to spend 5 hours sewing through canvas with doubled up thread and a small small needle#just ow#ow ow ow#embroidery#lulu blogs
11 notes
·
View notes
Text
My mom had two linen-cotton blend shorts she wanted pockets put in, and after my aunt said she would and then realized she didn't know how, I was called in. And I said yes, because, hey, it's pockets. Those take like maybe half an hour per pair. Easy peasy. Right?
Did she have fabric? Uhhh.. no. She'd go to the store last week. This week. Thursday. (It was Friday afternoon.) Matching thread? Eh, we'd find something.
When I got there, it was three shorts. One of them a true fuchsia that resisted matching any purple or pink thread in three seperate sewing stashes. But definitely, definitely cotton linen, all natural fibers. Except they stuck to the iron if you had it on too high. And wouldn't take a crease no matter what. Also, no idea what the bought fabric's fiber content was. Something slinky. Aaaand in the last few weeks, the butt seams were starting to stretch weird.
Turns out the entire thing was assembled on an overlock-type machine using "thread" that dissolves into fluff if it comes loose in any sense of the word. The stitches were so loose, one snip of the seam ripper had 7 cm coming undone.
Had I lugged along my 8 kilos of overlocker? I was told it's 4 pockets, of course not.
Did I mention all 3 shorts had been a "steal" at 20 bucks? Oh, and that they sparkle like Christmas tinsel under my sewing machine in a way no linen or cotton has done ever? The bought fabric was less plasticky than the shorts, and despite not being expensive either, would have probably made for twice as expensive shorts.
Whatever, at least my aunt had already printed the pocket pattern and we just... She had not. Fine. I copied the one off my mom's favorite pocketed dress, since those pockets met with approval. My aunt is the queen of scissors, so she cut pocket flaps, I undid side seams and reinforced some butt seams.
I pinned them on, sewed the first one and... Wrong side of the fabric. Whatever. Unpick, repin all 6 flaps, sew again. Aunt points out, these fabrics look like they'd fray in the wash; run a zigzag over it.
These wibbly wobbly bitches warp like I insulted their mothers the second they meet a zigzag in any capacity. Whatever. Aunt takes them away to be ironed out so I can pin and sew again.
One of the pocket flaps is up upside down. No one noticed this while sewing or ironing. And my machine apparently has very small stitches. Oh, and this thread came from my great-aunt, who never skimped on sewing supplies' quality. That seam is the strongest part of the entire pair of shorts at this point.
Aunt takes out the seam ripper and I work on the other two shorts. My mom comes back from an appointment and asks what's up. Can she help zigzag on her machine? Yeah, sure, but what's up? Please don't ask painful questions and just zigzag.
Those two other shorts? Zero issues. Straight seams, no messed up fabric sides, all pieces matching beautifully and blending into the original design like we had barely modified them.
That first pair? It took two hours to undo that one double-sewn seam. My uncle had to tap on to come help at one point. The unpicking stretched out one side of a half-sewn seam. And the pocket piece. The pattern markings, despite being just two and high contrast, disappeared twice. The fudging to get those seams even-ish was epic.
My aunt's knee is messed up. My hip is messed up. My mom's sewing machine resents being rethreaded. No one was having a good time by the time that pocket was done.
We spent 7 hours from start to finish, with two breaks for food. I have finished entire dresses in that kind of time frame. I have no idea what went wrong.
Oh, and I still had to shorten something for one of the nephews after. Which my aunt, blessedly, had ironed into shape for me.
It took 10 minutes.
And after all of that, my aunt tells me "I'm still not entirely sure how you put in pockets..."
#sewing#hubris gets punished#my hatred for polyester grows worse daily#my mom sews with blank steel pins on a gray floor#those pins tried to crawl into my machine#magnetic pincushion? whatever for?#“I see you prefer thicker thread like your great-aunt” I DO NOT IT IS JUST WHAT WAS THERE#brb crying into a pillow#my aunt got punished by having forgotten some mending she needed done#and also getting hella behind schedule despite doubling my optimistic “two hours at most”#crafting is good for your mental health#long post#rant#i just don't know what went wrong
11 notes
·
View notes
Text
Yknow. When people said this’d be hell I thought they were kidding. Turns out: they were not kidding

#if anyone has tips for sewing patches onto leather pls help#I have leather needles and my threads doubled over#so I think I’m doing it right#but my god is it taking forever#this is also on a sleeve so🧍#punk#battle jacket#diy#diy punk
20 notes
·
View notes
Text
One day I will remember to do all my convention prep in advance, and all I'll need to worry about the day before is knowing where everything is and getting plenty of rest. But it 100% is not this day
#i at least decided to get my hair dyed earlier so it would be like this for another earlier event#so at least I've not had to worry about the bleaching process while also sewing and embroidering#(which yes i know is basically just nore sewing but it's also harder bc it has to be neater and the needles are so much worse to thread)#and digging stuff out of boxes and double checking everything#and then also handling hair styling after finishing bleaching it bc my hair is a monster that i basically have to force into submission#by making sure it airdries in the exact configuration i want it to stay in and i have to make sure it doesn't try to go back the whole time#and even with that I'm going to say that it probably won't make it past lunch tomorrow before reverting to messy middle parting#bc my hair is so fucking hardcoded into my genetics that you can see the same weird hair flicks in photos of my great grandfather#to be fair I'd have to be dealing with all of that today anyway i can't prestyle my hair and set it aside for later#but i am not doing a cosplay that requires me to do specific styling with my own hair ever again#( <- watch as i proceed to do it again in like a year probably)
1 note
·
View note
Text
How to Start a Business with Yarn Twisting Machine
🎥 Want to spin yarn into a business? Here's your chance! 🧶 Discover the step-by-step guide to launching a small-scale yarn twisting business #yarntwisting #sewingthread #manufacturingbusinessideas #businessideas
In recent years, the textile and garment industry has witnessed exponential growth, making it an ideal landscape for aspiring entrepreneurs to venture into related businesses. One such lucrative avenue is the yarn twisting business. As far as yarn is concerned, it is made from two strands or more than two strands. We all know that sewing thread is used for sewing in needles and sewing machines.…

View On WordPress
#best business idea#how to start a yarn twisting business#how to start yarn twisting business#sewing thread business#sewing thread manufacturing#sewing thread reels making#sewing thread winding machine#sewing thread winding machines#thread reels winding#thread winding machine#yarn#yarn business#yarn reels making#yarn twisting#yarn twisting and doubling machine#yarn twisting business#yarn twisting making business#yarn twisting manufacturing business
0 notes
Text
Book binding 101: Materials
I’ve decided to do a series of posts on how to book-bind since I talk about it a lot, and I think it’s a really fun process. This post will include various inexpensive alternatives to “professional” supplies, many of which you will have at home. Not everyone can afford a cricut and that’s ok! I will also be listing more expensive materials for people who want to invest a bit more into the craft, but they absolutely are not a must.
This first post will focus on a list of supplies you can use to make books, but will not yet get into the instructional part of it. That will come later!
Anyway…
Bookbinding Materials: Essentials
These are items you need to bind, but many you can find around your house!
Sewing thread: Any thread will work for bookbinding, though waxed threads can help reduce tangles. You can also double up thread as another way to prevent tangling if you so choose. Waxed thread is definitely more expensive, so it can be good to use what you have starting out. Here’s a link to the waxed thread I used for those that are interested. You can buy it in a lot of different colors! (White is good if want an “invisible” thread).
Sewing needle: A lot of people say to use a curved needle for binding, but I’ve never found it to be much different from using a regular needle. If you have one, I would recommend a larger needle, however, since it’s better for piercing through signatures (aka the stacks of pages you bind together). In other words: there’s no special needle you need to bind books.
Ruler: I’d recommend any metal ruler since it’s better to use as a straight edge for cutting. There’s a good chance you already have one. It’s just used for measuring and being a straight edge. Nothing fancy.
Paper: Any paper will work. What you wanna use depends on your project really: if you’re binding together a work of text you’ll want to use some kind of printer paper (of course). If you’re making a sketchbook, you can fold up some sketching paper. I like to get sketchbooks with perforated edges so I can tear them out easily if I want to use a blank page for bookbinding. You can also buy large sheets of paper made for any medium. For example, if you want a sheet of water color paper, just search “large watercolor paper sheet”.
Awl (or all alternative): An awl is a tool used to poke sewing holes. It’s nice because it’s sharp and ergonomic, but you can totally also use a pushpin or even a sewing needle.
Bone folder (or a bone folder alternative): A bone folder creates sharp creases when you fold your pages, making them lay flatter. It also helps define the hinge gap on finished books, making it open easier. You can use a ruler if you don’t have one.
PVA glue: PVA glue is what to look out for when it comes to binding glue. There are some designed specifically for bookbinding, which spread out a bit faster than ones that aren’t. You can also use tacky glue which IS a PVA glue.
Book board: Also sometimes called chip board, Davey board, or mat board. This is what you’ll use for hard cover books. It is important to use book board specially, as cardboard will warp. You can buy book board directly, or you can cut the covers off of old textbooks or binders, unwrap the paper/plastic around the board, and use that!
Box cutter or utility knife: for cutting the board
Decorative paper and book cloth: For wrapping around cover boards and for endpapers. Book cloth can also be used to cover boards. You can also draw your own designs on Bristol paper if you want (or any paper with a similar thickness/durability). When it comes to decorative paper I like to either get scrapbook paper or rolls of fancy handmade paper (you can get those on Etsy, through paper source, or through bookbinding websites).
Bookbinding materials: Optional (and not crazy expensive)
These are supplies that you don’t need for binding but that can make the process easier and/or help with the decorative elements of your books. I’d recommend these things for when you’ve been binding for a while and feel these things could be helpful!
Paper trimmer: can cut a few sheets of paper evenly—I find it really helpful for endpapers
Stencils: Super helpful if you want to add text on the covers
Stamps: Good for adding text and also great for adding illustrations if you’re not able to draw them on your own. You can buy ink pads for them or use markers by coloring over the stamp lightly and using the stamp immediately so it doesn’t dry (I’ve tested this with alcohol markers and it works very well)
Paint markers: great for drawing directly on the cover. Since they’re opaque they can imitate the look of vinyl. You can also get them super painterly if you want. The internet usually talks about poscas but there are tons of different brands. Do some research, figure out what you like & can afford.
Hot foil pen & heat transfer foil: Perfect if you want to add foil to your covers but don’t want to spend a ton of money on a cricut. A lot of binders uses the foil quill brand, but there are ones that cost less and work the same (I have both a cheaper one & an actual foil quill because I wanted some nib variation. As long as the pen has good reviews that aren’t from bots you should be good). Also remember: don’t use foil designed for going through laminators (I.e. decofoil) . It doesn’t work the same way.
Bookbinding Materials—Expensive
These are materials I’d recommend for people who have been bookbinding for a while & feel that it’s something they really want to invest in. To be fully transparent, I’m a college student and don’t own these and have little personal experience with them. However, I know a lot of binders who love them!
Cricut machine—Cricuts are cutting machines that can make precise cuts into paper, wood, bookboard, or vinyl. A lot of binders will cut designs out of vinyl and apply them to the covers using a heat press.
Book press—What it sounds like. The pressure helps the pages lay flat and stay even. That being said you can stack heavy books on top of your projects, it just may not have the same even pressure. I also know some people will DIY these, so if you’re skilled with power tools you can give it a go!
Paper guillotine—like a paper trimmer but bigger and can cut more sheets of paper at once. I believe really good ones can also be used to cut bookboard!
Those are all the materials I can think of! Hope this can work as a good starting point for those interested in the craft. I’ll definitely be posting more info about bookbinding for people who are interested :)
-Zoë💗
#bookbinding#book binding#fan binding#craftblr#information#tutorial#book binding resource#resource#book binding 101
857 notes
·
View notes
Note
Hi!!! It’s the speedrun anon that talked about Wild fighting Ganon with a pot lid and spoon :3
I am so happy you wrote a lil series on my idea!!! It really means a lot ❤️
I had another idea, because I’m crazy—in the Linked Universe comic, when Twilight gets hit by Dink and is basically dying, I was thinking about his wound and how they treated it…
Since it takes place in Medieval times, how clean was the actual wound before Hyrule started healing it?? A fun idea I had was: Ikesai!Reader using modern medicine to help treat Twilight (and the others as they traveled)
Pain meds, Neosporin, bandaids with fun patterns on them—maybe even a first aid kit if they knew they were going somewhere dangerous. Reader would treat small cuts and they’d heal quicker overtime without using magic. It saves a lot of time, energy, and money for the group; Hyrule doesn’t have to use his magic as much, potions aren’t wasted on smaller wounds, and none of they’re wounds are infected!!
I feel like the climax of reader using these methods would be Twilight’s injury; they ask Wars to go to the nearest bar and grab the strongest alcohol there, they ask Legend for a needle and some fishing line, and ask Hyrule to using magic to numb the pain of the wound.
Unwrapping Twilight’s bandages, with alcohol and needle in hand, Reader begins to sew up Twilight’s wound. It’s crude and disgusting, using only found objects and most likely mead to sterilize the needle and fishing line. Most would leave the room, but Hyrule would have to basically sit there and watch this random person sew up a wound like they were fixing a tear in fabric.
Once the wound is sewn up and cleaned, it looks a lot better than it did before. There is still the strange magic surrounding the cut but at least it’s closed up now. Reader’s hands are bloodly and smell like mead, but at least Twilight’s wound isn’t making him bleed out.
It healed quicker once Hyrule began to use healing magic on him again, the dark magic around the wound is in a more condensed area so it’s easier to dispel. The only problem…is that Reader has to take out the thread, and this time, Twilight’s awake.
—🌾 Anon (I’ve never named myself in anonymous I hope that’s okay :))
Yay! My first emoji anon :D Sorry this took so long! I got way too carried away learning about medieval medicine lol. I kind of skipped right to when Twi's injured because it was already 2k words long and an intro would have most likely doubled the word count askdfsl.
“Shit. Shit. Shit.” You chant it like a mantra. The entire way back to the village. The entire time it took to drag Twilight off Epona and up the stairs as Time arranges your lodging with the innkeeper.
“I’m fine. It’s just a scratch.” Twilight tells you for the fifth time. He still seems cross that he was benched from the fight, but his voice has much less bite behind it now.
You’re losing him.
“It is not ‘just a scratch,’ Link!” You scold. You can feel tears prick at the corner of your eyes. The use of his real name seems to bring him back a bit, but his eyes are still too unfocused for your liking.
Too much blood. He’s lost too much blood.
You remove one of your hands from his side, where you had been trying desperately to apply pressure to the wound. Your entire hand is soaked in blood.
“Press down here, okay.” You move Twilight’s hand to where yours had been, only taking your other hand off when you’re sure he’s properly applying pressure. “Don’t stop, okay? I’ll be right back.”
Before he can answer, you bolt out of the room and back down the stairs. You run headfirst into Time.
“Woah! Careful,” he says. He looks at your hands, covered in blood past the wrists, and winces. He holds up a pile of white cloth. “I got bandages from the innkeeper.”
“That’s not going to be enough.” You scrunch up your nose at the bandages. They looked clean, but you doubt they were properly sterilized. The one drawback to having fairies and potions magically heal everything is that these people had absolutely no idea how to treat a wound without them. “Go to the kitchen and get vinegar and honey. And see if the innkeeper has any silk thread. If not, try whatever craft store equivalent you guys have.”
Time can only watch as you take the bandages from his hands and rush back up the stairs. After a quick stop to wash your hands, you practically sprint back to the room.
Twilight is still conscious when you get back, thank Hylia, but he doesn’t turn his head to look at you when you come in.
“I’m back.” You tell him as you kneel next to the bed.
“Don’t sound so worried. It’s not like I’m going anywhere,” He smiles. “You were only gone for 30 seconds.”
“You were coughing up blood, Twi!” You peel his shirt away from the wound and quickly press some of the bandages Time had given you against the wound. It would have to do for now. “That means that the thing cracked your ribs and one of those ribs punctured your lungs.”
“I’m pretty sure the fairy took care of that.” He winces as you press even harder against the cut.
The blood won’t stop.
Before you can descend into hopelessness, the door bursts open. You jump at the noise, and turn to see Hyrule in the doorway, with Four close behind. They both look out of breath.
“So it’s true… it really is him.” Hyrule gasps. “I think I can help.”
“Fairy didn’t do anything.” You sigh, removing one of your hands to wipe the hair away from your face. The color drains from the two heroes' faces when they see the blood.
“I have a life spell.” Hyrule’s palms glow blue as he hovers them over Twilight’s body.
Nothing happens.
His brow furrows as he tries again. He thrusts his hands forward.
Nothing.
“No!” Hyrule cries. Twilight seems to have finally passed out from the blood loss.
“Crap,” you mutter. “Where the heck is Time with that thread and antiseptic.”
“Here.” The old man in question pushes past Four, who seems to be clinging to the doorway for support. He hands you a bottle of vinegar, a jar of honey, and a spool of silk thread with a needle stabbed into the side.
“Great, thanks.” You nod at him. “Rulie, keep that spell going if you can. The wound may not be healing but he had some internal injuries that I want to make sure won’t be an issue. The fairy stopped halfway through and I’m not about to do DIY surgery to remove shattered rib pieces from his lungs.”
Hyrule presses his lips together in a thin line and nods. His hands glow once more as he performs the life spell. You peel away the bandages you had been pressing against Twilight’s side.
“Sorry, buddy. This is going to sting,” you apologize, then pour the water from your canteen over the wound. The old blood washes away, only to be replaced rather quickly by more from the cut.
“What are you doing?” Time asks when you pick up the needle and thread.
“Stitches.” Is all you say as you hold the needle over the candle on the nightstand. Hopefully the heat will disinfect it somewhat.
“You're just going to… what, sew him back together like a torn shirt?” Four looks ready to puke as you begin sewing the wound. Time looks away, trying to ignore the faint sound of the needle sliding through bloody flesh. Hyrule can’t seem to look away, gaze locked on your hands.
“Magic isn’t working to close it,” you grimace. “This is how we close large wounds back home.”
“I know you said you didn’t have any magic where you lived, but this…” Hyrule swallows, hands still over Twilight as he casts the life spell.
“I think I’m going to be sick.” Four covers his mouth with one hand as you continue your work. “I’ll go see Epona is comfortable or something.” He rushes down the stairs so fast you’re surprised he doesn’t trip down them.
“Eh. Probably for the better. Too many people in here probably isn’t a good idea right now, anyway,” you cut the thread, satisfied with your stitches. They looked almost professional, with nice, even spacing. But you would have time to be proud later. Time to make sure infection didn’t get in there.
“How long will he be out for?” Time makes a point to look only at your face as he asks the question. Maybe he should leave, too. Watching you couldn’t be good for his health.
“Hard to tell. He’s lost a lot of blood,” you explain as you pour the vinegar into the honey and mix it together. “Do fairies and life spells fix blood loss?”
“I have… no idea,” Hyrule lowers his hands. He looks exhausted. He must have expended every last bit of energy casting that life spell for this long. “I don’t think I’ve ever seen a wound bleed this long.”
“Great,” you groan. Hopefully the magic could deal with the blood loss like it dealt with broken ribs and punctured lungs, because there was no way to tell anyone’s blood type here and you did NOT want to play roulette with a blood transfusion.
“What are you doing?” Time asks again. His voice is tense as you begin spreading the vinegar-honey mixture over Twilight’s wound. You have half a mind to kick him out of the room right there, but he’s technically the family of the patient. Still, if he was going to breathe down your neck the whole time you wouldn’t have much choice.
“It will keep out infections. The vinegar and honey are really good at keeping bacteria out,” you wipe your hands off on your pants, trying to get as much of the honey off your hands as possible before reaching for your canteen again. You wash your hands again, just to be safe, before reaching for the pile of remaining bandages.
“Bacteria? What’s that?” Hyrule asks.
“Very, very small organisms that can cause infections if they get into the wound,” you sigh. You don’t have the time to explain germ theory to them right now. You wrap the bandages around Twilight’s abdomen as tightly as possible. Vinegar-honey oozes from under the bandages, and even now, you can see the deep red of Twilight’s blood seeping through.
Crap. This was going to be a long night.
The next few days pass in a blur. Check the wound. Change the bandages. Try to measure Twilight’s heart rate with just your hand and a watch (his pulse seems okay. Hyrule’s spell must be dealing with the blood loss). Shoo people out of the room. Check the wound. Change the bandages. Try not to fall asleep.
When you’re not watching over Twilight, you’re taking care of an exhausted Hyrule. Using the spell so much for so long was taking a toll on him. He looked about as tired as you felt.
Still, Twilight was improving. Most of the color was back in his cheeks, and he kept waking up to say random depressing things before passing back out. Maybe that's why you finally let yourself drift off into sleep, sat on a stool and slumped over the side of the bed.
The feeling of someone rubbing your hair wakes you.
“Y/N?”
Your eyes snap open. Twilight is awake. He’s propped up against the headboard of the bed, his fingers threaded through your hair.
“Please tell me you slept while I was out,” he laughs, but his smile doesn't reach his eyes. He’s worried about you.
Hey! That was your job!
“You scared me half to death!” You sit up and punch his shoulder. Now that he’s finally awake, you have an earful and a half to give him. “What on earth were you thinking, sprinting towards that thing!?”
“Ow,” he chuckles.
“Don’t worry. The old man and the captain already chewed him out,” Wild snickers from somewhere behind you. Looking around, you see the entire chain scattered about the room.
“Good,” you flop your head back onto the mattress. Your eyes still ache from so many sleepless nights. “How long was I out?”
“Nearly half a day,” Legend snickers.
“Crap,” you groan. Twilight’s bandages should have been changed hours ago. “Did anyone change the bandages? Please tell me you washed your hands before. Oh, and did you apply the antiseptic?”
“Easy there, doc,” Warriors places a hand on your shoulder. “The wound has pretty much closed thanks to you and Hyrule.”
“WHAT?” You bolt upright again. “It should have taken at least a week, maybe two!”
“Magic finally started working on it while you were out,” Hyrule explains. Great. Just great.
“Then I need to take the stitches out,” you press your knuckles into your eyelids, trying to dispel your pounding headache.
“Stitches?” Wind asks.
“They sewed him back together like a garment,” Four grimaces.
“But then shouldn’t the stitches stay in and keep him… together?” Sky peers around your shoulder as you unwrap the bandages. He gags when he sees the cut, which was now just a long red line across Twilight’s stomach and lower chest. Wind tries to elbow his way to see as well, but Sky stops him.
You get up to wash your hands, and when you come back, Twilight is poking at the stitches.
“Don’t touch it!” You swat his hand away. “I didn’t make my own antiseptic for you just so you could infect the cut after it’s mostly healed!”
“You really did just… sew me closed,” he sounds shocked.
“Yep. Now hold still,” you carefully cut each stitch, removing the thread, small beads of blood forming where the stitches used to be. He winces at the feeling. Time watches closely, knuckles white as he grips the footboard of the bed.
“Woah. All that was inside his skin?” Wind stares dumbfoundedly at the pile of knots you removed. You nod, and keep working.
“There,” you sigh as the last bit of thread is removed. “Just keep the area clean and you should be good.”
“Do you do this every time people get hurt in your world?” Legend raises an eyebrow.
“No. Stitches are just for bigger cuts,” you explain.
There’s a moment of silence before Wind speaks up.
“Can I get stitches?” He asks excitedly. A chorus of nine voices responds.
“No!”
Notes:
Vinegar has antiseptic properties, while alcoholic drinks do not due to their low alcohol percentage. Honey, an ingredient found in mead, has some antiseptic properties, meaning mead also could be used to disinfect a wound, but a combination of honey and vinegar seems to be more effective.
Today, most stitches are made of synthetic fibers. Fishing line is also made of synthetic fibers, like nylon. However, in the medieval period, fishing line was most likely made of nettle-hemp. Today, fishing line would be a great material for stitches. However, I think silk, which is still occasionally used today, might be a better option (silk was also used to make fishing line, but it seems only after the industrial revolution got started).
Also, stitches don’t hurt coming out. I had stitches in my foot (a pretty sensitive area) as a kid. I also have an incredibly low pain tolerance and an intense fear of needles. You can kind of feel them pull, and if you’re squeamish you might freak yourself out, but it definitely doesn’t hurt. Although, I once heard of a doctor that didn’t undo the knots, thus pulling the entire thread of knots through the skin, which would absolutely hurt like hell, but that was because of his incompetence lol.
I made it so reader doesn't see the magic around the cut, as I think isekai and modern readers would have a harder time noticing it. We don't have magic, so we would probably not recognize it if we saw or felt it. It is still very much there.
#linked universe#linked universe x reader#linked universe + reader#linked universe x isekai!reader#linked universe x modern!reader#lu sky#lu four#lu time#lu twilight#lu warriors#lu hyrule#lu legend#lu wind#lu wild#lu twilight x reader#lu x isekai!reader#lu x modern!reader#twilight x reader#link x reader#🌾#wheat anon
259 notes
·
View notes
Text
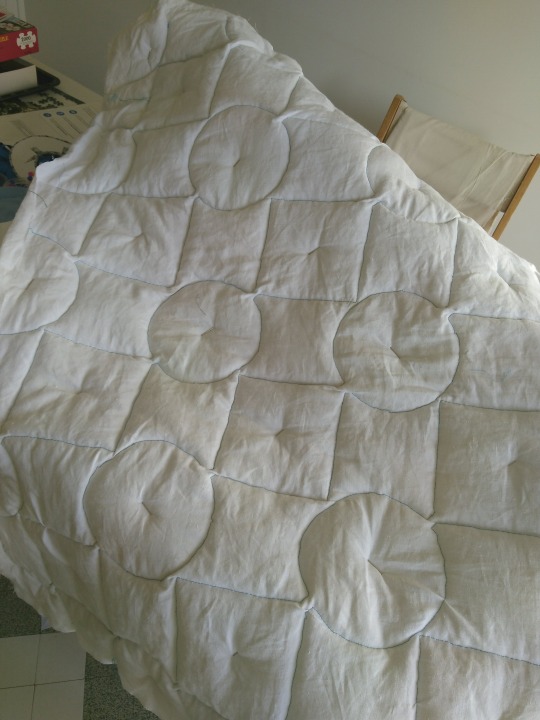
First Quilt!
It has been a lot of fun and a lot of trial and error but it's done!!!

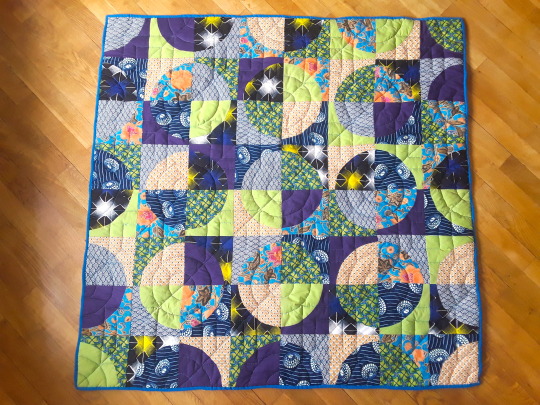

It's roughly 1.20 x 1.20m (which is a number of feet I can't be bothered to look up but let's say it's about child sized and it'll be great to chill on the couch).
I want to thank @langdon813 who I've never talked to (sorry if you hate being tagged) but whose gorgeous Drunkard path quilts made me wanna do it too :)
I had never done any quilting before (but I did sew), so here's what I've learned, if any beginner is interested in jumping off the deep end the way I did and wants advice from someone who has freshly acquired experience but will also not use any confusing technical terms (with pictures!) :
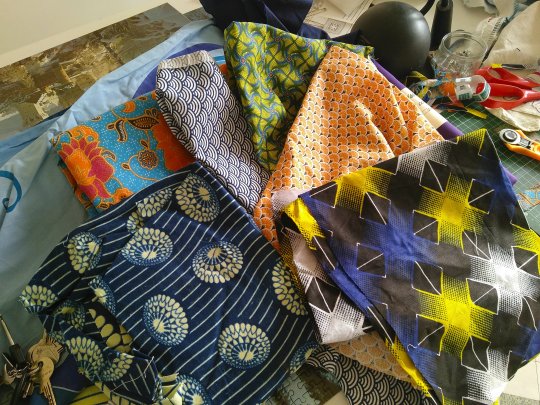
Fabric picking : so most advice I read was to go for pre-selected bundles of fabric that already go together, but I'm contrary and like to do my own thing so I used wax fabric (the blue ones on top the pile) I had laying around, which I strongly recommend: it's very easy to cut due to it being waxed, and I added a few fat squares from the shop, plus I also had the orange and blue floral and I based the coulour scheme on it. One thing that's true is it would have been easier to work with fabric of the same thickness, and the floral was givne to me by my ma who got in on trip to Thailand and it was alot thinner than the rest which didn't help.
Cutting: I got a rotary cutter for the occasion and it's great! Do not maybe push too hard on it and give yourself nerve damage the way I did (temporary but still), it's actually ery sharp and easy to use, so long as your template doesn't slip you're fine
Piecing :Yes you can do curved piecing even if you have zero experience, you just gotta make a template and
pin it a lot.
1/4 inch margins is the standard so I rolled with it because I don't like converting, but when you're strictly metric it is kind of annoying but doable because my machine does have a 1/4 inch mark and if you stick a length of tape along it it's pretty easy to follow, even for curved piecing.
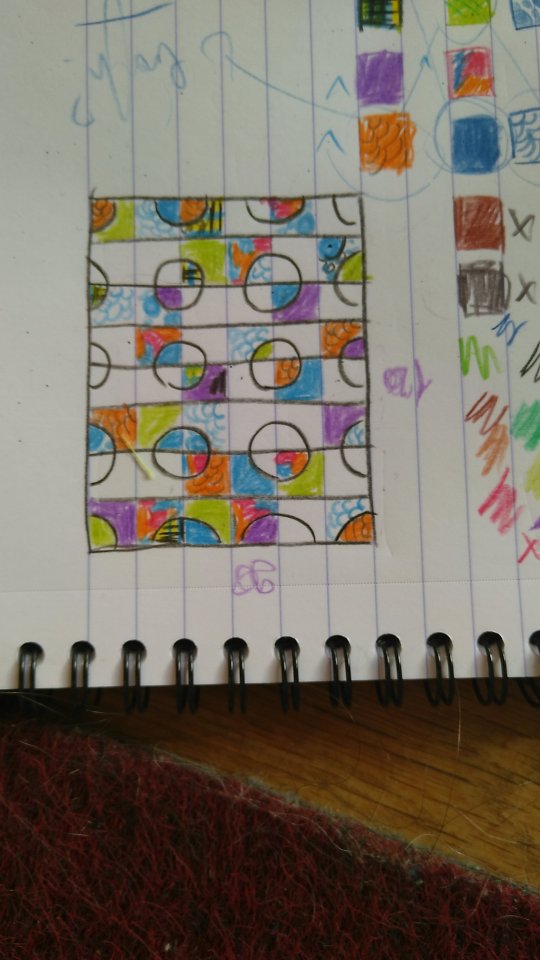
Layout: At some point you've got to decide the layout is done, because I've re-arranged the blocks at least 6 times and it's a very good way to go insane. (For rough reference, my plan was to have no repeat fabrics in any of the circle-in-a-square blocks, and I only made one mistake which I clocked too late to change)
Chain piecing!! Meaning you pile your blocks together in a specific order (that I personnaly wrote straight up on each piece with a very sophisticated letter/numbers down/across system) and then just sew them together in a line without having to cut the thread between each pair. Looks a little like a fanion banner and at some point it feels like you'll be forever tangled into it but then it's magic :) It's not that hard actually and will save you a lot of time + there's a lot of online tutorials you can use.
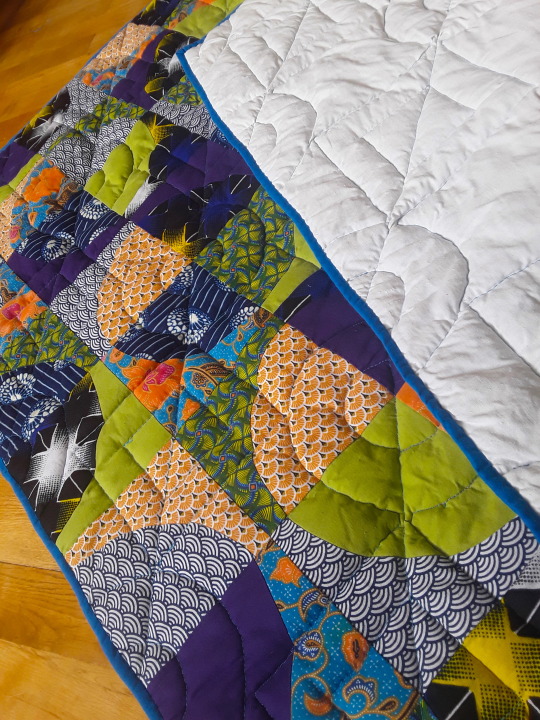
Basting! (which it took me while to understand is the part where you attach the backing, the fluff and the quilt top together) : you need more safety pins. Safety pins will save you from the wrinkles and the unfortunate oopsies of realising you've caught your backing double folded into your quilting stitch, which I did a good three times and was not fun to undo. Also, I forgot to tape the backing to the floor and it probably would have helped with the wrinkling...
Backing : I used an old linen table cloth I got for 10€ at a charity shop, and I've still got about 2/3 of it left, so I recommend that, it's sturdy but soft enough, doesn't thread easily and can be washed at very high temps, if that's a thing you do.
Quilting! Well, my machine came with a quilting foot for free motion quilting (which means you're the one moving the fabric along in whichever direction and you can sort of draw with your stitches) and it seemed fun so I did that, and here's what I learned : curves are hard but doable, also my machine doesn't like to go back (kept skipping sitiches for some reason) so it involves a lot of shifting the quilt around, which isn't easy considering the bulk. And also, drawing the quilting pattern you want so you can follow it while quilting actually does help, I used an iron/heat-erasable pen and it worked just fine. Check your stitch tension, mine was too loose and I realised too late so there's spots where I could pull on the thread and it looped, had to stitch back over that.
Quilitng pattern : I wasn't sure what to do, supposedly your batting (aka: the fluff) comes with instructions on how tight you should quilt to avoid it coming apart through use but I got mine cut at the fabric shop and forgot to ask so I just rolled with a rough 10cm maximum distance in between stitching lines but tried to do less in most places. According to many blogs : the tighter your lines the stiffer your quilt, so I kept it loose for comfort. (Picture is halfway done, I added a smaller square/circle inside each square/circle and if you look at it you'll see it's actually diagonal lines form one end of the fabric to the other.)
Binding is boring, and there's nothing to it. I got a length of pre-cut bias binding, machine-sewed it front to front to the quilt top side of the quilt and the folded it back and secured it by hand to the back with a ladder stitch. Took me roughly and entire rewatch of the Last Of Us. There's a trick to doing the corners that's fairly simple but I've lost the tutorial...
Overall : I got myself a quilting book with techinques and such and it helped, but there's a ton of stuff online, and once you get over the very Christian American mum vibe of most of the blogs, it's all very helpful (and gorgeous!) (no offense meant to Christian American mums, it's just a bit of a culture shock from where I'm standing).
#quilting#quilters of tumblr#quiltblr#quilt tutorial#quilt pattern#quilt#drunkard path#home sewing#sewing#sewing project#beginner's quilt#beginner quilting
169 notes
·
View notes
Text
Round and round, we go - Choi Seung Hyun/T.O.P x Reader 2/?

Summary: After Seung Hyun ends up ghosting you for days, you finally let him know how he's been making you feel, ending with a deep conversation with your new best friend
Warnings: Slight mentions of depression, other than that, none lovelies! <3
You wouldn't hear from Choi Seung Hyun for almost a week, after your last interaction, leaving you to yourself to work on fixing up any tears or frayed ends on his coat, and burying yourself into work. You didn't do anything big or spectacular like Seung Hyun, you were a tailor/dressmaker for a small dress shop in your hometown, fixing ripped clothing and dresses, altering tuxes and wedding dresses, and fixing school dance dresses, it wasn't anything big, but you liked it and it made you happy.
As you walked into work one morning, you weren't expecting to be so busy, with the shop itself being busy, and you being pulled onto the sales floor to help pick dresses for brides and teens, and your appointments for alterations and fixes, plus walk ins for you to do, you were about to pull your hair out. As you rushed into one of your tailor rooms, you tried to take a deep breath, your phone buzzing with a text that interrupted you 'Coat boy: How're you today? working hard?' You sighed, not being able to hold back a smile as you read over Seung Hyun's message. Replying back that it was busier than ever and you were out of coffee, you slid your phone back into your pocket, making your way back out to your client, who was being more difficult than ever. The stress was never-ending though, as soon as you got your client out of the shop, you had another walk in, and your office phone ringing "Hello? Beauty's bridal and dress, what can I do for you?" You asked, trying your best to keep an upbeat tone as your new client stood impatiently in front of you, tapping her foot as she held her daughter's prom dress. "Hi, I wanted to see about coming in to get a small tear sewn?..What time would be best?" The voice asked, you pinched the bridge on your nose between your finger tips, of course it was another call-in, glancing at your calendar you sighed, deciding to give up your lunch break for the day "Yea um..just stop in around two, and ask for Y/n" You replied sweetly before hanging up, looking at your customer, directing them towards your workbench, so you could see what needed done.
As soon as what was supposed to be your lunch break hit, you sat on the spin platform in one of the private tailor rooms, you didn't use them often, mainly just for tuxes, you had a bigger room with more mirrors that was recently built, so you tried to use that, just so it was easier with the bigger, puffy dresses. Hearing the bell above the shop door ding, you felt like you wanted to either explode with anger, or cry, all you wanted to do was eat and go home, maybe get a call in with Seung Hyun before you had to go to bed, instead you were working a double with no lunch break. Standing up to greet your client, you were relieved to see Seung Hyun shyly walk into your office "Hi, sorry for calling in...I just..I have a show tonight, and I kind of..tore that one pocket you added on for me" He explained shyly, scratching the back of his neck as you both moved to sit at your desk, you just smiled at him, letting your head fall on the table. "Are you okay?..Is now a bad time?" He asked softly, reaching a hand out to grasp yours gently "More than okay, I thought you were another customer, and instead it's someone I can relax and be myself around" You sighed, turning your hand to hold his out of instinct, as you stood up, you took your hand, motioning him into the platform as you picked up some of your sewing supplies, that you'd need.
"Thank you for this, I really appreciate it" He smiled softly as you tied off the thread, securing the pocket back in its rightful place. "Of course, we can't have T.O.P on stage with ripped clothes, unless intentional" You giggled, patting the pocket slightly before handing the coat back to him proudly "It's on the house sir, I'll happily fix anything you bring me" You smiled softly, squeezing his shoulder as he blushed "I'll keep that in mind, y/n" He smiled softly, giving you a tight hug before sighing "I do have to get going though, I promise, I will call you after my show though, unless you want to come?" He smiled softly, pulling away from the hug, sliding his hands down from your shoulders to your hands gently "I'm sorry, I really am, I have to stay till nine tonight, and then come back at eight tomorrow" You frowned softly, going to grab his other coat from your office chair "Did you want this back though?" You asked, offering it to him shyly, he just shook his head smiling brightly "No, No, keep it, Aein, I'm sure we'll see each other soon" Seung Hyun laughed softly, pressing a kiss to the top of your hand before disappearing out of the shop.
You'd end up staying up late that night, waiting for a call from Seung Hyun, only for it to never come, growing frustrated, you'd send him a goodnight text before going to sleep for the night. You wouldn't hear from him again until three days later, whenever he'd show up to your work, his hood pulled far over his face as he darted for your office, hoping you wouldn't have any customers. As his eyes fell on you, he felt himself relax, until your gaze towards him turned harsh and icy "Who do you think you are? You're leading me on, do you realize that? I understand, you're famous, and you're a busy guy, but I have feelings, so it would be nice to know if you're sweet like this with all of your fans, or if this is going anywhere" You ranted, at first, you liked the 'Enjoy what it is, don't make it complicated' mindset, but the way he was with you, and the fact that you had people actively asking you out, you felt inclined to decline their offers, choosing to stay committed to whatever you had going on between you and Seung Hyun. "I-I'm sorry...I just-..Did you mean what you said...when you said you'll happily fix anything?.." He whispered, fidgeting with his hands and rings as he shifted his weight from one foot to the other, you stopped, thinking about how you'd want to reply, you could just brush off your frustrations, or tell him to just leave. Sighing as you ran a hand through your hair, you motioned for him to get onto the platform "What's ripped this time?" You asked, grabbing your needle and thread, stopping as he just stood in his place "I-I think I need fixed" He whispered, his voice shaking as he spoke, his gaze glued to the floor as you slowly approached him. "Seung Hyun...What do you mean?" You asked softly, holding his arm gently as you led him to sit down on one of the benches in your office, sitting down next to him before you spoke again "Seung Hyun, I don't think you need fixed" You whispered, taking his hand in yours, caressing his knuckles with your thumb as he sniffled. "I-I panic..all of the time, I'm supposed to be an idol, and yet, I'm scared of big crowds swarming me" He ranted, you were quick to cut him off "Choi Seung Hyun, hush. You can't control that, and it's okay, everybody has their own mental stuff going on, what's important is, you take care of yourself, you don't need fixed because of those things, nor would I be able to do it, but..I can help you..talk you through whatever you need" You whispered, squeezing his hand gently as you finished speaking, Seung Hyun couldn't speak, he couldn't trust his voice as tears built up in his eyes, pulling you into a tight hug as he tried to hide that he was crying.
You didn't care, you just wrapped your arms around him tightly, resting your head on his chest "I thought I had made you upset, or angry" You whispered after a moment, feeling him pull back away from you as he wiped his face quickly "No! You could never, Aein, I just..Didn't want you or anybody..to see me like this" He whispered, you just smacked his arm gently "Choi Seung Hyun, Are you serious? I'm hurt, I thought we were closer than that" You huffed, watching as he tried to hide the soft smile that was growing on his lips. "I just-" He tried to explain, but you cut him off "I know, it's okay, I'm not actually mad" You giggled before tilting your head slightly "Did you need something fixed, or did you just come here to find me?" You asked as you stood up slowly, Seung Hyun watched you closely, he wasn't exactly sure why he came here, he just knew, whenever he was around you, you made everything feel less scary and bad, and that's he needed right now. "I just...wanted to come apologize..for...leading you on?" He questioned, trying to remember your wording from earlier, causing your face to heat up with a blush "O-Okay, well, that was before I knew, that you just needed a minute to yourself" you protested, smiling as you heard him chuckling softly "It's okay, I just, I want to enjoy what's going on with us, I'm not sure if I'm even in the right headspace for that, so..if you want me to back off, and just be a friend, I won't be upset, I'll understand" He explained, holding your hands gently as he tried to calm his nerves "Seung Hyun, I have turned down six guys, and two girls, in the time we've started talking, I'm not just going to walk away now, I'm having fun with you" You smiled, cupping his cheek gently "Thank you..Y/n.." He whispered, pulling his hood off slowly as he started to feel the hold, his racing thoughts had over him, loosen. "Anytime, Jagiya, have you eaten at all tonight? I'm sure they wouldn't mind me heading out an hour or two early, I can order us some takeout?" You offered, smiling as his eyes lit up "Of course! I'd do anything if you're included" He smiled, causing a blush to rise to your cheeks, you just shook your head giggling as you grabbed your (His) coat and your purse, before leading Seung Hyun out of your shop, clocking out on your way out of the door.
Whenever you got to your apartment, you shyly picked up your dirty laundry from the floor "Sorry! These double shifts really take time away from cleaning" You apologized sheepishly as you made your way to the kitchen, trying to find the takeout menu, you were just using the other night. "You're okay! I promise! I don't mind it" He smiled softly, after you managed to finally order takeout and eat, you were left laying on the couch with Seung Hyun, your head on his chest as his arms were wrapped around you tightly. "So you turned down eight people, just for me, while I wasn't answering?" He asked in shock, trailing his fingers up and down your back as he waited for a response, you just hid your face quickly "Yes, But I didn't want to be with them anyways, they weren't the type of people I'd want to spend my time with" you replied shyly, Seung Hyun just laughed softly at your remark "So who is?" He asked playfully, watching as you giggled, rolling on your back playfully "So I'll tell you because we're best friends, but personally? I like the men who are taller, but not by much, deep voice, colored hair, sweet, kind" You playfully listed off, watching as Seung Hyun laughed "You're just describing me!" He laughed, throwing his head back as you continued "they can rap, they're breathtakingly handsome, they're silly, they know just the right thing to say and when to say it, and they're always worrying and caring about their friends and family" You smiled softly, looking up to meet his gaze, Seung Hyun was watching you in awe, your words causing his stomach to flip and flutter. "So basically, me?" Seung Hyun laughed shaking his head, you just turned to face him, resting your chin on his chest as you looked at him "Yes so basically you" You giggled, smacking his arm playfully "You're just better than anybody I've ever spent time with" You added on, smiling at him, watching as he blushed "You're too sweet to me, y/n, I don't know what I've done to deserve you" He whispered, pressing his lips to your forehead "You went through a lot, so let this good thing happen" You giggled, raising his eyebrows, Seung Hyun laughed "You are the weirdest person I know" He chuckled, you just smiled, taking his remark as a compliment as you sighed "I'm serious, you deserve good things, even if you didn't do anything in order to get them" You whispered, leaning up gently to make eye-contact, trying to stress how serious you were.
"Okay, Okay, right now I just want to hang out with you" He chuckled, watching as you glared at him playfully "Fine! Hang out with me" You laughed, resting your head on his shoulder, you laid in silence for awhile before finally Seung Hyun spoke up "Y/n? Do you ever...feel like kissing your friends?" He asked, deep in thought, you just broke out into giggles as you shook your head "No, Seung Hyun, I don't think I have, until I met you" You laughed, your hands coming up to cover your face, Seung Hyun just grabbed your wrists gently, pulling your hands away slowly "Can you read my mind? Or did you just say what I was thinking?" He asked, trying to hide his smile, you just blushed brightly, giggling as he leaned closer to you "So..?" He whispered, leaving his hand resting on the back of your neck as his gaze flicked between your eyes and then your lips "If you want to kiss me, Seung Hyun, you don't have to ask" You giggled, pressing your lips to his as he smiled, placing your hands on his cheeks as you pulled away smiling "See? No need to ask, not you" You giggled, watching as he smiled looking away, his cheeks lighting up with a bright blush, You just laid your head on his shoulder again smiling "See? Best friends that kiss" You giggled, trying your best to sound like a surfer from America or Australia, Seung Hyun couldn't really tell. "Y-Yea, best friends that kiss" He smiled softly, wrapping his arms around you again sighing, While he wasn't exactly ready for a solid real relationship, he knew you were special, and he knew as soon as he was ready to take that step, you'd be the person, he'd want to take it with. You were loving, caring, sweet, selfless, thoughtful, and the way you were so understanding of him not being ready for something serious, but still showing you loved him, really had him questioning now, what he did to deserve somebody as understanding and amazing as you.
--
What do we think lovelies? I'm trying out a new trope with this series! So let me know what you think of the trope with someone not being ready for a relationship but loving someone anyways, and said someone being supportive and loving that person regardless. Excited to hear from you!! <333
--
Taglist!!
@onyxmango
@ag02212023
@acehasmyheart
@mitchko11
@learninglinesintherainn
@seunghyunwifey
@alexandralibbre
@jajabro
@heartsforseo
@lilou-0401
@maenoakasuna
@ericityyy
@alexandralibbre
@jajabro
@heartsforseo
@frangiipanii
@seunghyunwifey
@sturnioloslut-b
@isssaaaa2111
@goodnight-n-go-home
@skzdreamz
@enhasrii
@sunhyeswife
@ilovethe141
@saraaisfree
@cheese10001
@sassyyoyo
@live-laugh-lovef1
#squid game#squid game thanos#choi su bong x reader#top x reader#thanos x reader#squidgame#thanos squid game#choi seunghyun#t.o.p x reader#t.o.p#t.o.p icons#t.o.p bigbang#top#bigbang x reader#bigbang#choi seung hyun x reader
154 notes
·
View notes
Note
what kind/style of endbands do you usually do? they look so good 👀
hi!! sorry for taking a while to answer, I wanted to make sure I could give you my best answer.
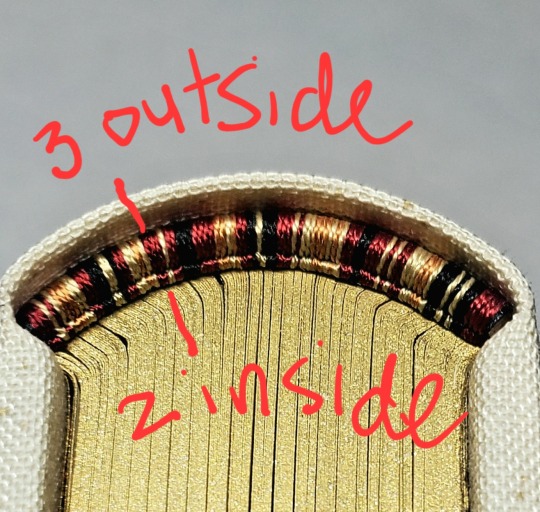
I usually do what's called a "double core" endband. I use double core endbands over the "bead on front" method because bead on front style is not great for uneven distributions of color, irregular patterns, or using more than three colors. Functionally it works by having your extra threads wrapped up inside the thread that is showing, forming the smaller secondary core. Ultimately you are doing figure 8s around the main core & then your secondary core of thread. This keeps things pretty neat & tidy. The tutorial I first used was this one by DAS Bookbinding, though I don't think his endband tutorials are his best ones. Another binder I've spoken with endbands about a lot is maleeka, who recently did an endband tutorial herself.
maybe I should do one... but it takes a lot for me to get enough motivation to make videos. I'll take this opportunity to write up some tips I've shared when people ask instead:
1. Endband core material is the MOST IMPORTANT component. You need a core that is stiff but flexible - it should NOT be floppy because it wiggles everywhere under the tension of the thread, but still needs to flex with the opening & closing of the book. You want something that doesn't compress, to reduce tension shifts in thread creating a lumpy endband. Have a smooth core is less critical but helps to avoid snagging threads & allows you some leeway on sliding threads around for adjustments. My personal choice is smooth leather jewelers cord (link is just an example, I get mine from a local craft store).
2. Thread size. All your threads need to be the same size; it will be visible if you are using two different sizes, and mess with your front core. Additionally, I know lots of people will use larger twists of multiple strands of embroidery thread, which can work, but is more likely to compress & alter its size in unexpected ways. A single strand is preferable. If you want something thicker you can find some thread weights that are heavier twists intended to be used in a single strand, not pulled apart. I prefer smaller sizes because it works better for the gradient designs I like.
3. Silk thread is your friend (if you can spend the money on it). It reduces fuzz (no fuzz like you get with cotton/DMC embroidery thread), it's usually easier to manage, has a more compact twist, and a higher shine. I use Japanese silk hand sewing thread in size #9 (9号). There's multiple brands (Tire, Daruma, KNK/kanagawa, etc). Here's a wholesale listing (minimum 20,000¥ for international). A non-Japanese brand is Guterman silk (German brand). Both the Japanese & German threads come in a heavier weight (Japanese is #16, Guterman is buttonhole).
4. Thread tension is the most important part of the actual technique. You need to ensure the threads currently wrapped in the secondary core keep tension when you are working the thread around them.
5. Working on a curve. This is only really relevant if you're doing an endband on a rounded book, but the circumference of the curve means there's more real estate on the outside vs inside of the curve. Sometimes this can cause bunching on the secondary core. My own solution to this is that sometimes I wrap the primary core but drop a wrap here or there around the secondary core (only between two wraps of the same color I'm dropping). I uh... don't know of anyone currently recommending this besides myself so I can't point to any pro endorsement for this method, it's just what works for me. Forgive my terrible writing:
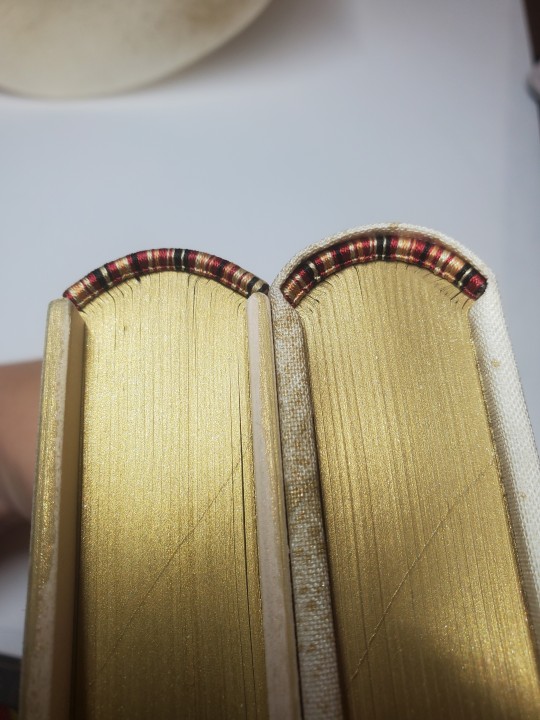
6. Pattern management. I... don't really plan much how my patterns sit on the spine, which is not very helpful. HOWEVER you can do some pattern management on the fly, if you really want your pattern to end at a certain place. Thread can be packed more or less densely on the core, resulting in some pattern compression; you could also strategically drop wraps in less noticeable locations. An unintended example: I was replicating the pattern on this endband (left) when I realize I wasn't packing the thread as densely as I had the first time around (right), which resulted in the overall pattern taking up more space. You can do this on purpose, if you need to.
this was way more than you asked but it gave me a chance to put all this in one spot. Best of luck in vanquishing the dreaded EndWyrms.
#fanbinding#bookbinding#celestial sphere press#in progress review#ask des#i tend to shock ppl a big when i say i don't actually enjoy sewing endbands#i merely Tolerate it#all of this knowledge is 100% spite driven to reduce my own frustration
378 notes
·
View notes
Text
Holy shit the state of tutorials for sewing online are abysmal. Guys I need a guide for COMPLETE BEGINNERS. No video. No idea what a back stitch is. Never even thread a needle or knotted a string before. I'm talking a guide that tells you how to double knot something. Just the dumbest idiot guide for someone who knows nothing
107 notes
·
View notes
Text


caleb crochet apple bandana 🍎
tut for my caleb apple bandana !! with visual guide and text guide below :>>> i needed to cope hard during midterms so i did this while relistening to my lectures 🥰 have fun and feel free to ask any qs if u get confused!
materials:
- 5mm crochet hook
- 6ply monaco yarn (undyed/natural)
- 5ply milk cotton yarn (red, green, cream)
- any thread (red, green, cream) (try to color match it with the yarn)
- tapestry needle
you can adjust the yarn and hook size to your preference, as well as the colors! but i suggest to use two different types of yarn for the bandana and the apples so the apples stand out :>>> also, make sure the yarn you use for the bandana is soft and won’t muss up your hair like acrylic yarn
bandana
- i used a youtube tutorial from Chompu Handicrafts to make my bandana! i adjusted the one in this video to be 20 rows instead of 14 :>>
- link: https://youtu.be/YSOFZNix7aQ?si=X0FAUoNWgVZTdqY0
- you can use any tutorial you’d like for this part
guide:
ch = chain
hdc = half double-crochet
dc = double-crochet
sl st = slip stitch
*2 hdc (1) x 6:
- 2 hdc (1) = 2 hdc in one stitch
- x 6 = do this for 6 stitches in a row
outer apple (red yarn)
- magic ring
- row 1: ch 2, 6 hdc, pull yarn to close the magic ring, sl st
- row 2: ch 2, 2 hdc (1) x 6*, sl st
- row 3: hdc + dc (1), 2 dc (1), dc + 2 dc (1), dc + hdc, sl st, hdc + dc (1), 2 dc (1), dc + 2dc (1), dc + hdc (1), sl st
- cut off the yarn and you have the outer apple!
apple core (cream yarn)
- magic ring
- row 1: ch 2, 4 hdc, pull yarn to close the magic ring, sl st
- row 2: ch 2, 2 hdc (1) x 4, sl st
- row 3: hdc + dc (1), 2 dc (1), dc + hdc, sl st, hdc + dc (1), 2 dc (1), dc + hdc (1), sl st
- cut off the yarn and you have the apple core!
leaf (green yarn)
- slip knot
- ch 4, turn your yarn
- 1 hdc, 2 dc, 1 hdc, sl st
putting it together
- sew the core to the front of the outer apple with the cream thread
- sew the leaf to the back of the outer apple with the green thread
- make as many apples as you’d like! i made 6 :))) i suggest to make one then lay it out on your bandana to check how many you want on the pattern
- when you have the desired amount, lay it out on the bandana and sew the apples with the red thread
- you’re done !!!
about to crash out why did this take 4 tries to post RAHH hate mobile tumblr
#novthirty-diy#love and deepspace#loveanddeepspace#love and deepspace caleb#love and deepspace mc#love and deepspace fanart#love and deepspace diy#lnds#lnds caleb#lnds mc#lnds fanart#lnds diy#lads#lads caleb#lads fanart#lads mc#lads diy#diy#crochet#crochet bandana#caleb#caleb xia#xia yizhou#fanart
125 notes
·
View notes
Text
This is the first of two books I bound for @renegadeguild's Tiny Books Bang.
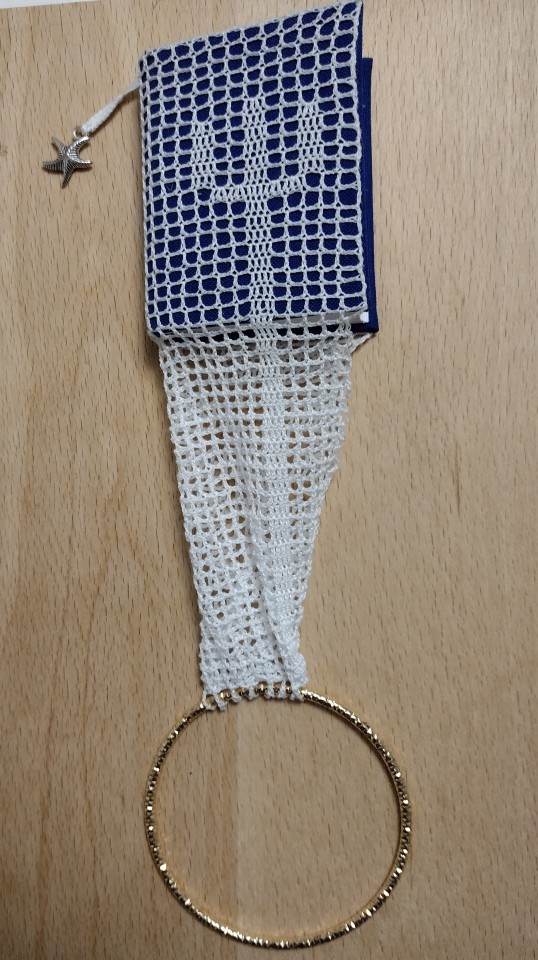
The story is (don't) take this the wrong way by @delimeful and was typeset by @little-cat-press for the Tiny Books Bang. It's a mermaid AU of Sanders Sides (Web Series), which I had never actually heard of before. But when I saw that it was a merperson AU, this idea popped into my head and I knew I had to try it, especially after I read the story and really enjoyed it.
The inspiration is medieval girdle books, which are books whose covering material (typically leather) extended past the book to a knot that was both used as a handle when reading the book and could be tucked into the girdle when the book was not in use, thus the name.
Where my book is much smaller (it's a sextodecimo, about 2.25" by 2.75") it isn't designed to tuck into a belt/girdle, but rather is attached to a bracelet and dangles from the wrist when not in use.
When I think of mermaids, some things that come to mind are fish, treasure, and tridents, and I wanted to incorporate all three in the design. The book is covered in blue bookcloth, and then covered again in crocheted netting that was meant to bring to mind fishnets. I crocheted the netting from cotton-poly sewing thread doubled up. I incorporated a trident into the filet crochet, which is repeated on both the front and back covers. I blocked it on a piece of blotting...board? paper? It's soft and thick and meant to absorb moisture and came with my book press that started life as a flower press.
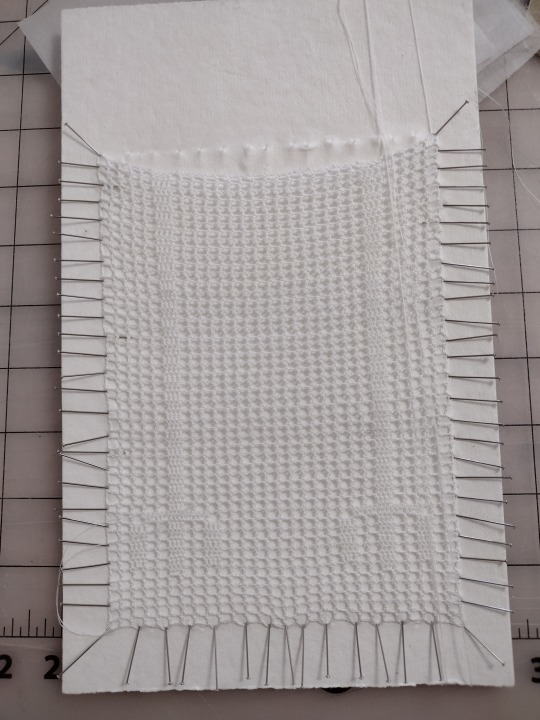
I then sewed the netting to the bookcloth covering the boards with teeny tiny stitches. It probably took twice as long to crochet the netting as it did to the rest of the binding combined, but I really like how it turned out.
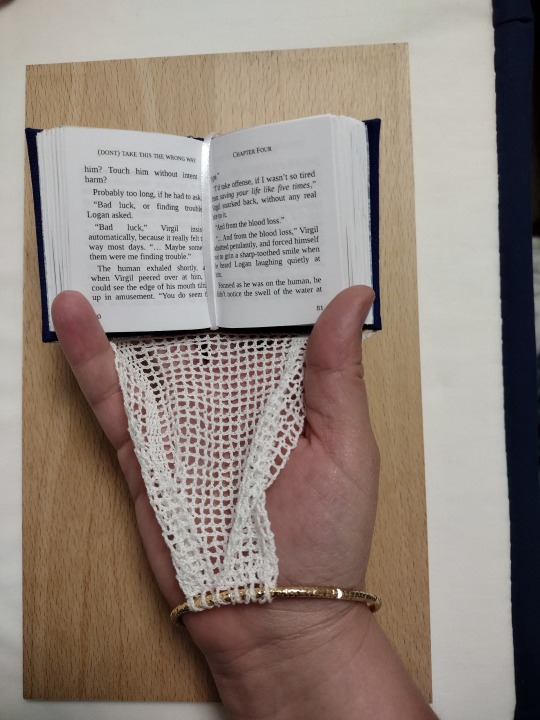
The bracelet I picked to attach the netting to is gold-colored to invoke the idea of sunken treasure. Rather than attaching the netting from one end to the other, I folded both ends to the middle and attached it like that so when you have the book open it lays more nicely.

The design of the endpapers looks like looped thread, and also reminds me of netting. I secured the bookmark to the bottom of the text block and let it hang from the top, which works better when the book is hanging from the wrist and doesn't get caught in the netting. I also sewed a little starfish charm to the end of the bookmark.
Technical details:
Sewn-on endpapers
Rounded but not backed
No headbands (I think I intended to, but forgot and then decided it didn't matter enough to try to pull the cover back off)
Things I liked about this bind:
I really like the girdle-book-on-a-bracelet design, it came out almost exactly how I had envisioned it.
Things I'd like to change/improve for next time:
I wasn't 100% pleased with how trimming went on these. It wasn't terrible, but I probably need to come up with a different solution than just a utility knife and a straight edge.
Crocheting the netting really did take so long. I'm not even done with the netting that's going on my copy yet, which is why all the pics are from the typesetter's copy. Probably would not want to do netting for anything larger than this one was.
Overall feels: Loved it! I enjoyed the story, the design came out pretty much exactly how I envisioned it, overall I'm well pleased.
265 notes
·
View notes
Note
do you have, among your many guides, anything for How To Do Taxes without paying some shithead company $200?
I do not because taxes are a nightmare; i looked into trying to create a guide and realized I could cause people for-realsies problems because the system is set up to change regularly and trip you up.
I do know that as of 2024 if you make under $79k a year there is a free file option with the IRS: https://www.irs.gov/filing/free-file-do-your-federal-taxes-for-free
I want to be clear: doing taxes is a fucking nightmare and I hate it, filling out the forms is confusing and upsetting and seems to be worded in the hardest to understand way possible. But I also just sit down and fill out the forms and do the math with no other software; I do not generally pay people to do my taxes because I sit down and do the paperwork myself (or ask Large Bastard to do it because he's better at reading numbers correctly; emotionally I'm more likely to cry and he's more likely to rage-quit so it's a wash on that end).
The IRS website has a step-by-step guide: https://www.irs.gov/how-to-file-your-taxes-step-by-step
The way that I do ANYTHING that I don't know how to do is:
Look up a step by step set of instructions
Search anything that I don't understand in those instructions and research until I've got a handle on it then rewrite that information in a way that I understand it
Read through the instructions from beginning to end, double-checking that I know what each term means
Make sure that I've got everything that the instructions call for in front of me
Follow the instructions step by step; if I get stopped or have a problem I will search the problem using combinations of key terms until I figure out an approach and will try various approaches until that works and I get to the next step
IF I CAN'T GET PAST THAT STEP I call for help from someone who knows this better than I do.
Continue following steps miserably until I am done and can wash my hands of the mess and/or test results.
This is how I learn to cook things and fix cars and thread sewing machines and put trim line in weed whackers and do taxes. Find instructions, make sure I understand instructions, make sure I have everything required for the project, follow instructions, make sure I've got a phone-a-friend handy, and check my work after.
It's not very specific advice for taxes, but it's how I do new stuff (or stuff that isn't new but that I find confusing every time, like taxes).
646 notes
·
View notes
Text
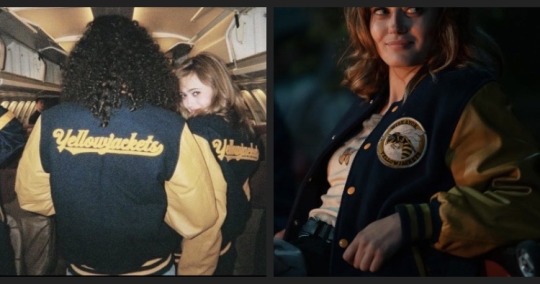
While there are lots of options as to where you can buy a replica of the Yellowjackets Letterman Jacket, they’re not always easily attainable. Last year for halloween I made my own letterman and I figured others could find my process helpful. (The supplies I used were things I already had or were accessible to me but there are other ways to create the same thing. If you have different materials that also work feel free to make suggestions or use them in your process).
HOW TO MAKE A YELLOWJACKETS LETTERMAN JACKET:
Supplies:
• Gold/Navy Letterman jacket
• Printer
• White Printer paper
• Gold Felt
•Chalk
• Heat ‘n Bond
• Embroidery floss in the colors White, Black, Gold and Gray (I ended up needing two packs of white).
• Embroidery needle
• White (or light colored) tissue paper
• White fabric (I used cotton)
• Embroidery hoop
• (Optional) White and Black thread
• Glue stick
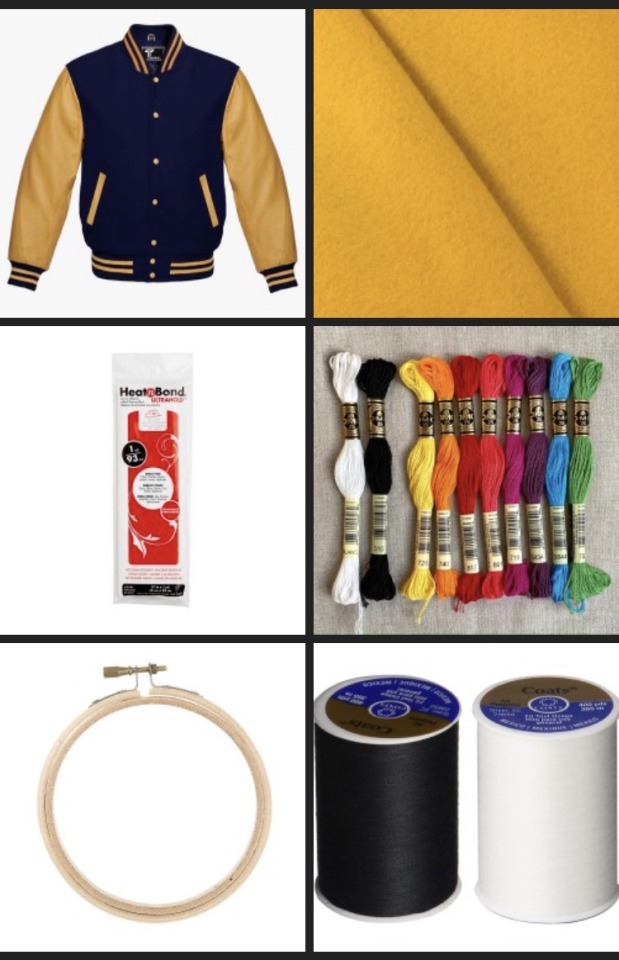
Step 1: Aquire your jacket.
You can do a lot of different things for the plain base jacket. I bought mine off Amazon but if wanted too you could probably sew one or buy one second hand etc. The only specification is that it’s Gold and Navy. It is important to do this first because everything else builds off of this step.
Step 2: Print out designs.
Use the photos I provided below and paste them into a word document. From there you can size them up or down to reach the size that you like for printing. The “Yellowjackets” logo is for the back of the jacket so when I did it I kind of split the photo in half and put it on two different pages. In the end it turned out to be just shy of 13 inches length wise. The round patch goes on the front and mine was 4.25 inches in diameter.


Depending on the size of your jacket your patches can be bigger or smaller, but once your happy with the sizing you can then move onto the next step.
Step 3: Gather supplies.
The gold felt is to be used to create the back patch. Because of the size of mine I was able to get a little 50 cent sheet of it (I was able to place the logo at an angle to fit it) but because the patch sizes will be different it’s important to bring your print out of the logo when shopping to make sure you have enough. Most craft / fabric stores should have this in stock. It’s also a good idea to bring your letterman jacket with you to try to color match the shades of gold/yellow as best as possible.
The embroidery hoop, floss, white fabric, and thread are for the front patch as I hand embroidered mine but in theory you could use an embroidery machine or printable fabric sheets to create your patch. If you use these other methods you’ll need different supplies and different instructions that I can’t give.
The Heat ‘n Bond is to iron the patches onto your jacket so they stick (though I’ve had to re iron my back patch because the fibers of the wool make it hard to stick to). It will essentially act as double sided tape.
Step 4: Creating & attaching the back patch
• Cut out a piece of Heat n’ Bond that covers the area where your logo will go.

(i am using colored paper in the example pictures. Yellow represents the felt. White represents the heat and Bond).
• Once you have the right sized piece of Heat n’ Bond, iron it onto the back of your piece of Gold felt (make sure to follow the instructions on the Heat n’ bond packaging).
•Use your printed template of the logo and cut out the words on the felt. You can cut out the logo on paper first and trace it or attach the paper to the felt and just cut them both at the same time. (I moved the dot on the J down so that it’s still attached just to make it easier but you can do whatever you want).
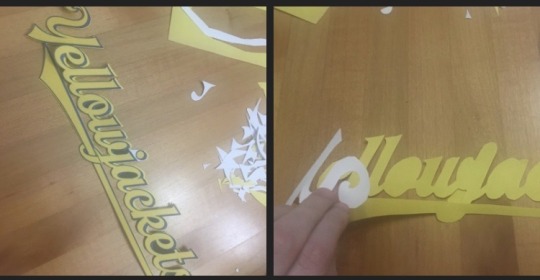
• Put on your Letterman and use the chalk to mark where on the back you want the patch to go. For this step it can be helpful to have someone else assist you (though it’s possible to do it yourself).
• Take off the jacket and lay it flat to align the patch up with your chalk markings. Once it is where you want it you can Iron it onto the back of the jacket (according to the instructions on the Heat n’ Bond).
You now have a finished back patch!
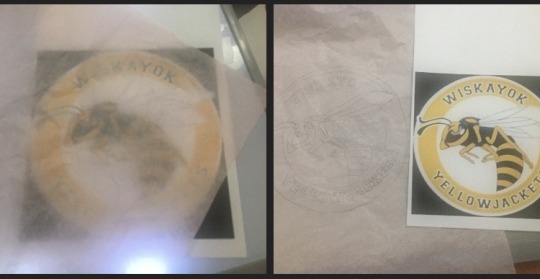
Step 5: Creating the front patch.
• Trace the design of the front patch onto tissue paper (I would suggest a dark pen or sharpie so you can see it really well). If you have trouble seeing the design underneath it can be helpful to hold it to a window pane when it’s sunny or another light source. The photo of the logo I included has a white border around the black words but the patch in the show doesn’t have it so I just ignored it. From there you glue the traced tissue paper onto the fabric.
• Cut out a piece of white fabric big enough for your embroidery hoop and glue the tissue paper sketch onto the fabric.
• Put the fabric/tissue paper into the Embroidery hoop.
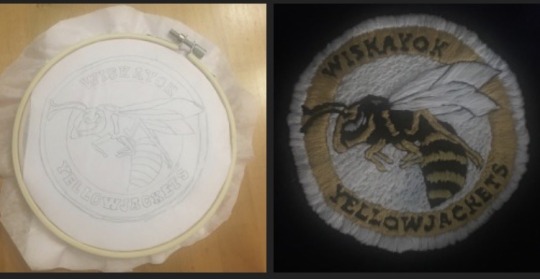
• Thread the needle and start embroidering the design. I found it good to use different techniques on different areas of the patch (long white stitches on the wings versus short ones on the background etc. I also thought it was helpful to embroider in color groupings (so like white all at once or yellow all at once etc. so you don’t have to switch out the floss that much). Save the white outer circle and black outline for last though to help clean everything up. The white and black sewing thread can be used to outline smaller details or neaten up some of the floss.
• Once the patch is done cut out a piece of Heat n’ Bond that covers the back of the patch.
• Put on your jacket and mark with chalk where you want to put the patch. In the show it’s placed by the second from the top button. (See Jackie reference photo at the top of the post).
• Iron on the Heat n’ Bond to the back of the patch (following packet instructions).
• Iron the Patch to the jacket based on your chalk markings.
• You have completed the front patch!
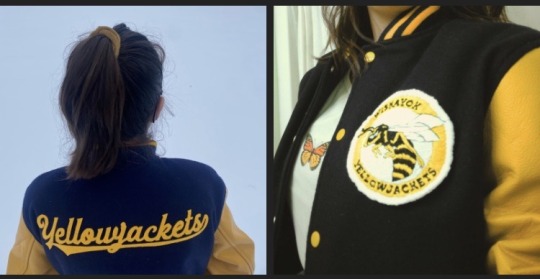
Above are some photo examples of my jacket (please ignore my messy hair in the left picture, being in the snow got it ruffled up).
Sorry for the long post but I think I got everything covered. I hope you guys found this helpful but if you have any questions about the jacket, my process, or anything else feel free to ask!
#yellowjackets#fashion#costume#diy#jackie taylor#taissa turner#akilah yellowjackets#gen yellowjackets#shauna shipman#natalie scatorccio#van palmer
136 notes
·
View notes