#ctrl z p
Explore tagged Tumblr posts
Visit Tumblr Blog
Explore Tumblr blogs with no restrictions, modern design and the best experience.
Last Seen Tumblr Blogs


Fun Fact
Celebrities use Tumblr as well.
Text


CONTROL Z 3x05 “Helena”
#controlzedit#tvedit#tvarchive#cinemapix#usersource#filmtvcentral#filmtvdaily#smallscreensource#dailynetflix#Control Z#Natalia Alexander#Javier Williams#Ctrl Z 3x05#ctrlzmoments#ctrl z p#Navier#myedit#id in alt text
45 notes
·
View notes
Text
.
#I’m literally going insane over here????#I was editing my wip I hit the power button to lock my laptop (unfortunately right next to the delete key)#I come back and start editing again only to realise at some unknown point I deleted 2800 words#don’t know where and can’t find any recent back up files for some reason even tho it’s set to auto back up#I literally cannot find where I deleted the text from the plot still seems complete???? and idk when it happened either#and yes I tried to ctrl z and it undid other edits I did but didn’t bring back any text#but I can’t find what I’m missing anywhere????? it had to have been in the first 3 chapters bc that’s what I was working on#but they all seem complete???????????????#I’m about to fucking scream#EDIT: I found the backup files from a month ago which isn’t toooo far off from when I had it open last#everything matches up????????????? I’m so confused#p
1 note
·
View note
Text
every time i see nice digital art i want to do digital art but i just don't have the funds for the setup costs ie a drawing tablet or ipad :/
#theres no ctrl+z in traditional art :(#my old drawing tablet _might_ still be at my parents' but im p sure they sold it#also it's over 10 years old at this point and wasnt very good to begin with so
1 note
·
View note
Text
So uhm... I did a thing...
✨Character Info Template✨
UPDATE 11.24.24: this template now has a page theme version! if you're not a fan of templates, you can get the code to use it as an interactive multimuse page >here<
Been meaning to do this a long time ago (and actually started it but never finished it, lol) as a way to share some more information about my ocs without needing to use a custom page theme, but mostly because I haven't found any page theme that looks exactly as I want and allows this much customization.
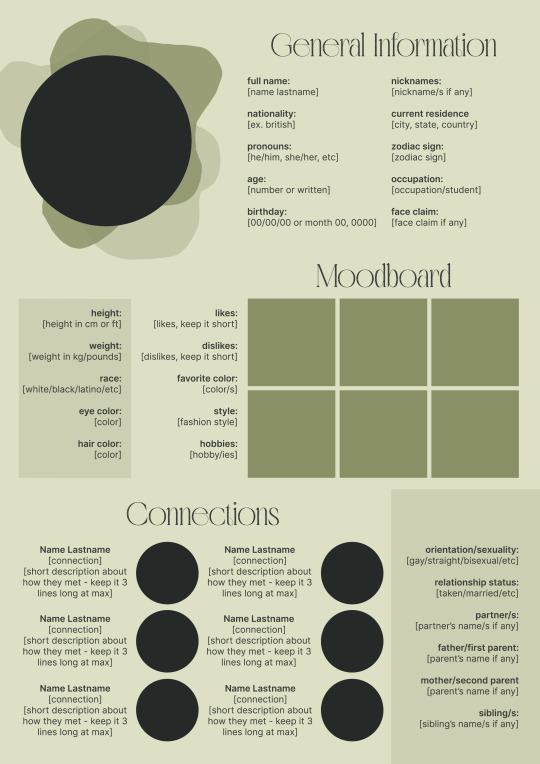
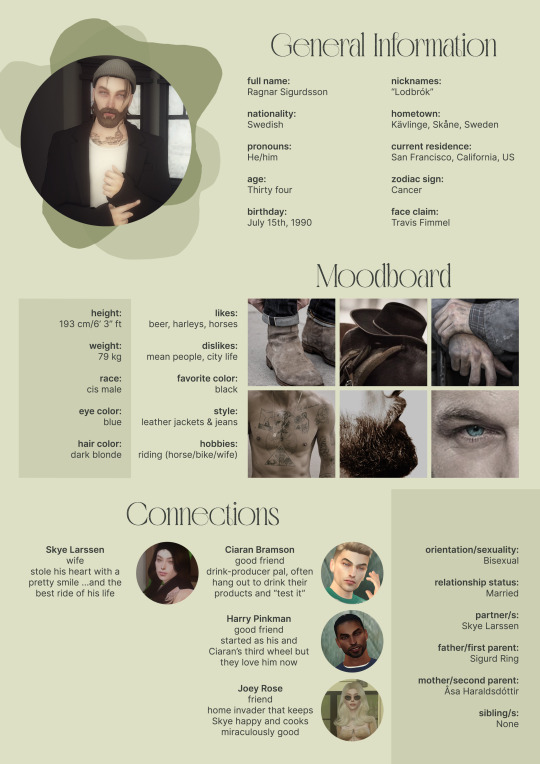
There are two versions and both are almost exactly the same; but the example shown in the left has an 'appearance' section which is small and has few quick facts regarding the oc's appearance; while the example on the right has a 'moodboard' section instead which allows you to add more info about your oc.
You can change every section/title to fit your needs like I did in the examples below; I personally removed some categories as well and got rid of some connections as this oc doesn't have that many close friends/partners to fill the original template. However, I also included an extra separated 'connections' section in the download in case you want to add more people and more information.
I recommend you stick to square-shaped pictures so it's easier to fit them to each section. Also if and when you edit the information or section titles, please select only one line at a time to replace it so you don't lose the text format. (Titles shouldn't change because that's a single format/font within the same text box, but should it change you can always hit ctrl+z hehe) When you're done, I strongly recommend you save this as a .png instead of .jpg so it's the best possible quality!
Last but not least, this is a .psd file. So you'll need either Photoshop (I did this with Photoshop Portable, but it supports newer versions of PS and it *should* support older versions too) or Photopea to open and edit this file.
Credits: Adobe Photoshop, Inter font, Golften Vintage font
>DOWNLOAD< (patreon but free :p)
(note: I'm posting this with my gaming blog because I think my fellow gamers might be interested in this, but please consider giving credits to me if you use this template by tagging @synindoodles instead of this blog)
More info on how to use and edit this template below the cut!
Layers:
>Each layer is properly named and categorized. The general layers such as the background, the icon shape and background shapes are under the groups.
>If you don't want to see/don't need one of the connections' pictures and information, I recommend you find which one it is (1, 2, 3, 4, 5 or 6) and click on the eye symbol next to the layer to hide it so that way if you ever need it, it won't be truly gone.
>To edit a text section, simply find the layer (such as General Information>Left Column) and double click on the 'T' symbol next to the layer. That way it will open edit mode and allow you to edit the text, just don't hit delete or enter while everything is selected or you'll erase it :p
>Main text sections aren't separated, they're blocks of text. I recommend you don't remove the amount (for example, if you downloaded the version with the 'appearance' section, which has 5 sections of information, don't remove the fifth line.) Either leave it empty or replace it with another data, otherwise it will look weird. The 'general information' section might look good even if you remove a few lines, just don't get rid of the whole block of text.
Pictures:
>To add a new picture, simply paste it over this document and move it using the Move Tool.
>To frame it (so it becomes a circle or fits over the shape you want), make sure the picture layer is over the layer you want, then while holding alt click between the two layers. [For example, if you want to add a new main oc picture: 1) paste the pic you want, 2) move it with the Move Tool so it's covering the big circle, 3) once you've fully covered the shape (if it isn't you can resize it by right clicking on it then on 'free transform', sometimes you might need to hold shift to proportionally resize it) make sure the newly pasted pic layer is over the layer named "picture goes here", 4) hold the alt key and hover your mouse cursor over the line between your pic layer and the circle layer until you see an arrow going down symbol, once you see it click it and tah dah! your picture should now have the same shape as the circle! - you can further move it if it doesn't fit the way you want with the Move Tool (;
Others:
>You can change every color, font and section to your liking, just don't change the general layout of the template.
>To hide/show the guides (those bright blue lines all over the document), click ctrl+,
>'Inter' is a free font and you can get it in the link above (linked with the credits), Golften Vintage is not, but you can get the demo version >here< (just scroll down and click the blue download button under license). I will not tell you how to install fonts as it might be different for everyone (for me it's C:/Windows/Fonts and I just drop the zipped files (except the .txt one) there), but google is your friend.
>I can't think of anything else that needs to be said here, but if you have any other question feel free to send me an ask or dm and I'll help you out!
>Last but not least, a like is appreciated if you plan to use this plus consider tagging @synindoodles if you use it <3
#psd template#template#characters page#muses page#muse page#muse template#character template#character page template#oc page#oc page template#synindoodles#rp resources#rp template#roleplay resources#roleplay template#writers resources#writing resources#writing template#writers template
201 notes
·
View notes
Text
((The top sixteen... Number one is C. Number two is 15. Number three is P. Number four is 4. Number five is W. Number six is S. Number seven is E. Number eight is Z. Number nine is B. Number ten is N. Number eleven is F. Number twelve is Ψ. Number thirteen is... Number fourteen is P. Number fifteen is W. Number sixteen is V. Yes I'm being abstract but guessing is half the fun. Also it's easy to find if you check the spreadsheet and just search up percentages with ctrl+F.))
80 notes
·
View notes
Text
Masterlist
Requests are closed
Rules
NSFW HC's
A
AJ Styles
Asuka
Andrade
Alexa Bliss
A to Z - Aleister & Zelina
B
Bayley
Brollins
Becky Lynch
BRE
Bianca Belair
Brandi Rhodes
Brody - Brandi & Cody
Baylor - Bayley & Finn
Browsey - Ronda & Travis
Brie Bella
Beth Phoenix
Brody King
C
Cody Rhodes
Charlotte Flair
Chyna
Cheddie - Chyna & Eddie
Carmella
Candice LeRae
Claudio Castagnoli/Cesaro
Chandrade - Charlotte & Andrade
Cathy Kelley
D
Damian Priest
Damage CTRL
Dakota Kai
Drew McIntyre
Dominik Mysterio
Dexter Lumis
E
Edge
Eddie Guerrero
F
Four Horsewomen - WWE Four Horsewomen - UFC
Finn Balor
G
Glowish - Naomi & Jimmy
H
House of Black
I
Iyo Sky
Indi Hartwell
InDex - Indi & Dexter
J
Judgement Day
Jessamyn Duke
Jon Moxley
Jey Uso
Jimmy Uso
Jade Cargill
Julia Hart
Jeff Hardy
K
Karl Anderson
Kairi Sane
Karrion Kross
L
Lita
Lyra Valkyria
Liv Morgan (No longer writing for)
Liv 4 Brutality - Liv & Rhea
M
Mia Yim
Marina Shafir
Moriguez - Liv & Raquel
Malakai/Aleister Black
Moxuette - Jon & Renee
N
Natalya Neidhart
Nikki Bella
Naomi
O
P
Phoenix-Edge - Beth & Edge
Q
Queen of Harts - Shayna & Nattie
R
Rhea Ripley
Rhuddy - Rhea & Buddy
Ronda Rousey
Renee Paquette
Ruby Riott/Soho
Roman Reigns
Ronattie - Ronda & Nattie
RnR - Rhea & Raquel
Raquel Rodriguez
S
Shayna Baszler
Starkszler - Shayna & Zoey
Sheamus
Stephanie McMahon
Sonya Deville
Seth Rollins Masterlist
Scarlett Bordeaux
Shawn Michaels (not currently writing for)
Scarrion - Scarlett & Karrion
Saraya Knight
Sasha Banks
T
Triple H
The Big Three - Jade, Bianca, & Naomi
Trish Stratus
Team Bestie - Lita & Trish
The Rated R Couple - Lita & Edge
Troey - Trish & Zoey
Toni Storm
U
V
W
X
Y
Z
Zelina Vega
Zekota - Zelina & Dakota
Zoey Stark
90 notes
·
View notes
Text
Ctrl + E - Seleccionar todo
Ctrl + N - Negrita
Ctrl + C - Copiar
Ctrl + D - Rellenar
Ctrl + B - Buscar
Ctrl + G - Guardar
Ctrl + L - Reemplazar
Ctrl + K - Italic
Ctrl + U - Nuevo libro de trabajo
Ctrl + A - Abrir
Ctrl + P - Imprimir
Ctrl + R - Nada bien
Ctrl + S - Subrayado
Ctrl + V - Pegar
Ctrl W - Cerrar
Ctrl + X - Cortar
Ctrl + Y - Repetir
Ctrl + Z - Deshacer
F1 - Ayuda
F2 - Edición
F3 - Pegar el nombre
F4 - Repite la última acción.
F4 - Al ingresar una fórmula, cambie entre referencias absolutas / relativas
F5 - Ir a
F6 - Panel siguiente
F7 - Corrector ortográfico
F8 - Ampliación del modo.
F9 - Recalcular todos los libros
F10 - Activar la barra de menú
F11 - Nueva gráfica
F12 - Guardar como
Ctrl +: - Insertar la hora actual
Ctrl +; - Insertar la fecha actual.
Ctrl + "- Copia el valor de la celda arriba
Ctrl + '- Copia la fórmula de la celda de arriba
Cambio - Ajuste de compensación para funciones adicionales en el menú de Excel
Shift + F1 - ¿Qué es?
Shift + F2 - Editar comentario de celda
Shift + F3 - Pegar la función en la fórmula
Shift + F4 - Buscar siguiente
Mayús + F5 - Buscar
Mayús + F6 - Panel anterior
Mayús + F8 - Añadir a la selección
Shift + F9 - Calcular la hoja de cálculo activa
Shift + F10 - Visualización del menú emergente
Shift + F11 - Nueva hoja de cálculo
Mayús + F12 - Guardar
Ctrl + F3 - Establecer nombre
Ctrl + F4 - Cerrar
Ctrl + F5 - XL, tamaño de la ventana de restauración
Ctrl + F6 - Ventana del siguiente libro de trabajo
Shift + Ctrl + F6 - Ventana del libro de trabajo anterior
Ctrl + F7 - Mover ventana
Ctrl + F8 - Cambiar tamaño de ventana
Ctrl + F9 - Minimizar el libro de trabajo
Ctrl + F10 - Maximizar o restaurar ventana
Ctrl + F11 - Insertar 4.0 hoja de macros
Ctrl + F1 - Abrir archivo
Alt + F1 - Insertar un gráfico
Alt + F2 - Guardar como
Alt + F4 - Salida
Alt + F8 - Cuadro de diálogo macro
Alt + F11 - Editor de Visual Basic
Alt + 64 - @
CTRL + Esc. Puedes regresar rápidamente a la pantalla de inicio. Y aquí no ha pasado nada.
Ctrl + Shift + F3 - Crear un nombre usando los nombres de las etiquetas de fila y columna
Ctrl + Shift + F6 - Ventana anterior
Ctrl + Shift + F12 - Impresión
Alt + Shift + F1 - Nueva hoja de cálculo
Alt + Shift + F2 - Guardar
Alt + = - AutoSum
Ctrl + `- Cambiar valor / visualización de la fórmula
Ctrl + Shift + A - Insertar los nombres de los argumentos en la fórmula
Alt + flecha abajo - lista de vista automática
Alt + '- Formato de diálogo de estilo
Ctrl + Shift + ~ - Formato general
Ctrl + Shift +! - Formato de coma
Ctrl + Shift + @ - Formato de hora
Ctrl + Shift + # - Formato de fecha
Ctrl + Shift + $ - Formato de moneda
Ctrl + Shift +% - Formato de porcentaje
Ctrl + Shift + ^ - Formato exponencial
Ctrl + Shift + & - Coloque el borde del contorno alrededor de las celdas seleccionadas
Ctrl + Shift + _ - Eliminar el borde del contorno
Ctrl + Shift + * - Seleccione la región actual
Ctrl ++ - Insertar
Ctrl + - - Eliminar
Ctrl + 1 - Formato del diálogo de celda
Ctrl + 2 - Negrita
Ctrl + 3 - cursiva
Ctrl + 4 - Subrayado
Ctrl + 5 - Tachado
Ctrl + 6 - Mostrar / Ocultar objetos
Ctrl + 7 - Mostrar / Ocultar barra de herramientas estándar
Ctrl + 8 - Alternar símbolos de esquema
Ctrl + 9 - Ocultar líneas
Ctrl + 0 - Ocultar columnas
Ctrl + Shift + (- Mostrar líneas
Ctrl + Shift +) - Mostrar columnas
Alt o F10 - Activar el menú
Ctrl + Tab - En la barra de herramientas: Siguiente barra de herramientas
Shift + Ctrl + Tab - En la barra de herramientas: Barra de herramientas anterior
Ctrl + Tab - En un libro: activa el siguiente libro
Mayús + Ctrl + Tab - En una c arpeta: activar la carpeta anterior
Ficha - Siguiente herramienta
Mayús + Tabulador - Herramienta anterior
Entrar - Hacer el pedido
Mayús + Ctrl + F - Lista desplegable de fuentes
Mayús + Ctrl + F + F - Formato de cuadro de diálogo de celdas Fuente de pestaña
Mayús + Ctrl + P - Lista desplegable de tamaño de punto.
........................
Ctrl + E - Select all
Ctrl + N - Bold
Ctrl + C - Copy
Ctrl + D - Fill
Ctrl + B - Search
Ctrl + G - Save
Ctrl + L - Replace
Ctrl + K - Italic
Ctrl + U - New workbook
Ctrl + A - Open
Ctrl + P - Print
Ctrl + R - Not good
Ctrl + S - Underline
Ctrl + V - Paste
Ctrl W - Close
Ctrl + X - Cut
Ctrl + Y - Repeat
Ctrl + Z - Undo
F1 - Help
F2 - Edition
F3 - Paste the name
F4 - Repeat the last action.
F4 - When entering a formula, switch between absolute/relative references
F5 - Go to
F6 - Next panel
F7 - Spell checker
F8 - Expansion mode.
F9 - Recalculate all books
F10 - Activate the menu bar
F11 - New graph
F12 - Save as
Ctrl +: - Insert current time
Ctrl +; - Insert the current date.
Ctrl + "- Copy the cell value above
Ctrl + '- Copy the formula from the cell above
Change - Offset adjustment for additional functions in Excel menu
Shift + F1 - What is it?
Shift + F2 – Edit Cell Comment
Shift + F3 - Paste the function into the formula
Shift + F4 – Find Next
Shift + F5 - Search
Shift + F6 - Previous Panel
Shift + F8 - Add to selection
Shift + F9 - Calculate active spreadsheet
Shift + F10 - Popup menu display
Shift + F11 - New Spreadsheet
Shift + F12 - Save
Ctrl + F3 - Set name
Ctrl + F4 - Close
Ctrl + F5 - XL, restore window size
Ctrl + F6 - Next workbook window
Shift + Ctrl + F6 - Previous workbook window
Ctrl + F7 - Move window
Ctrl + F8 - Resize window
Ctrl + F9 - Minimize the workbook
Ctrl + F10 - Maximize or restore window
Ctrl + F11 - Insert 4.0 Macro Sheet
Ctrl + F1 - Open file
Alt + F1 - Insert a chart
Alt + F2 - Save As
Alt + F4 - Exit
Alt + F8 - Macro Dialog Box
Alt + F11 - Visual Basic Editor
Alt + 64 - @
CTRL + Esc. You can quickly return to the home screen. And here nothing has happened.
Ctrl + Shift + F3 – Create a name using row and column label names
Ctrl + Shift + F6 - Previous window
Ctrl + Shift + F12 - Print
Alt + Shift + F1 - New Spreadsheet
Alt + Shift + F2 - Save
Alt + = - AutoSum
Ctrl + ` – Change value/formula display
Ctrl + Shift + A - Insert argument names into the formula
Alt + down arrow - auto view list
Alt + '- Format style dialog
Ctrl + Shift + ~ - General Format
Ctrl + Shift +! - Comma format
Ctrl + Shift + @ - Time format
Ctrl + Shift + # - Date format
Ctrl + Shift + $ - Currency Format
Ctrl + Shift +% - Percentage format
Ctrl + Shift + ^ - Exponential format
Ctrl + Shift + & - Place the outline border around the selected cells
Ctrl + Shift + _ - Delete the outline border
Ctrl + Shift + * - Select the current region
Ctrl++ - Insert
Ctrl + - - Delete
Ctrl + 1 - Format Cell Dialog
Ctrl + 2 - Bold
Ctrl + 3 - italic
Ctrl + 4 - Underline
Ctrl + 5 - Strikethrough
Ctrl + 6 - Show/Hide objects
Ctrl + 7 - Show/Hide Standard Toolbar
Ctrl + 8 – Toggle Outline Symbols
Ctrl + 9 - Hide lines
Ctrl + 0 - Hide columns
Ctrl + Shift + (- Show lines
Ctrl + Shift +) - Show columns
Alt or F10 - Activate the menu
Ctrl + Tab - In the toolbar: Next toolbar
Shift + Ctrl + Tab - In the toolbar: Previous Toolbar
Ctrl + Tab - In a book: activate the next book
Shift + Ctrl + Tab - In a folder: activate the previous folder
Tab - Next tool
Shift + Tab - Previous Tool
Enter - Place the order
Shift + Ctrl + F – Font dropdown list
Shift + Ctrl + F + F - Format Cells Dialog Box Tab Source
Shift + Ctrl + P - Point size drop-down list.
51 notes
·
View notes
Text
Some Tips for new DBH modders

This will have 2 sections :
1 . QUANTIC dream textures - getting them stable throughout the game
2. Handy tool I found for normal maps.
QD TEXTURES - MY TOOL KEEPS BREAKING?
this is for the 2 ppl that actually mod Detroit and want to make their mods public and usable the entire game. and don't know abt this.
As you probably know, models ( containers ) share textures. So when you update a quantic dream texture for 1 model you need to update every single container/model that shares that texture or else it'll look black and crash your game. Why? because your game is expecting the file in qd format for that container when it's a dds file now.
But I'm sure youve noticed after the 3rd or so containers texture being 'refreshed' ( inserting the texture for each use of it in the tool) it just breaks. The only way around this is to tell the game it should expect a dds format manually.
Ok enough yapping. Here’s the tutorial :
Add your texture like you normally would in the editor. Do this for only one model, u can do it for more just before it crashes if u want too it shouldn’t affect it, I haven’t tested it tho.
Enable editing for all the containers/models that use that texture. So it clones it.
Now,, Repeat these steps for every texture that needs to be made into dds format other than the ones you changed in the editor:
1.Using Rk900 (INTO_3) as an example, I swapped the connor into_2 model face texture so now we need to tell the game to expect a dds for nines face. Get the offset of nines’ face texture. It’s SUPER important that the INTO_3 container is cloned as the offset will be different.
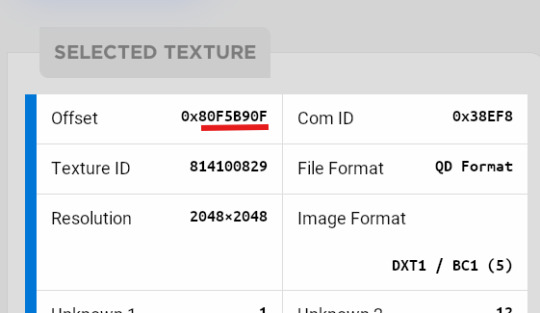
2.go to ( ctrl + g ) to the offset in d26 file. (so 80F5B90F)
3.change the following : we start at ‘0E’ for this example.

Change the 14th and 19th bytes (02) to 01 . it should look like this now
The hex code will change for each texture, but it will always be the 14th and 19th bytes.

4.Repeat for all textures and models that use them :)
Your tool will now load the containers correctly ( they will appear black still, but it will work ingame.)
USEFUL TOOL FOR CREATING NORMAL MAPS:
Normal maps are what gives flat surfaces fake 3d-ness without actually being there ! An example of this is the pores of dbh characters. Normal maps basically allow us to use less polygons which is good for efficiency:))
How do normal maps work ? Well all digital images contain 3 color channels : Red, Green and Blue (RGB) , what normal maps do is assign x,y,z values to these channels. So red would be the x value, green is the y value , blue is the z value . These give us the fake 3d values for each pixel that alter how our game calculates the light ( surface normals ) .
I use this website to generate my normal maps from height maps :
Height maps are black and white images that tell us the height (z value) of each pixel, typically white is high,black is low. Here is an example of the sylus mask I made :

IMPORTANT!! 99% of dbh’s normal maps DONT have a blue channel ( z value) so you HAVE to remove the blue channel completely after generating it from here.
This was how my modified face texture looked like after nuking the blue channel ( in gimp you have to go to colors -> Components -> decompose and delete the blue channel then recompose it )

^^ basically i overlayed the new normal map over connors original one.
Ok thats it. idk if this helps anyone but here u go :P
Pls correct me if I’m wrong abt anything, I’m small brain tbh
8 notes
·
View notes
Text


CONTROL Z 1x03 “Idiotas”
#controlzedit#tvedit#tvarchive#cinemapix#usersource#filmtvcentral#filmtvdaily#smallscreensource#dailynetflix#Control Z#Sofía Herrera#Raúl León#ctrl z p#ctrlzmoments#Ctrl Z 1x03#sofia x raul#myedit#id in alt text#I've just found this gifset in my drafts#I had forgotten about it
42 notes
·
View notes
Text
Computer Cursive
Okay so, I've had an idea. Y'know how the reason why the world's writing systems look so different is often because they were developed for writing on different materials? Well, to my knowledge, there hasn't ever been a writing system developed from the ground up for handwriting on a computer using a mouse. Which is a shame, because other writing systems are so ill-suited to mouse handwriting.
The Latin alphabet was originally carved into stone. But then a cursive script came around so it could be written on paper more easily. Who's to say the same can't happen with mouse handwriting?
So I tried my hand at making my own "computer cursive." Since precision with a mouse is much harder than with a pen, chisel, or stylus, I tried removing as much fine detail from the letters as I could while keeping them distinct and recognizable. Specifically, producing strokes of precise shapes is especially hard, so I prioritized making the arrangement of strokes recognizable, no matter how the strokes themselves ended up looking. Also, since long continuous lines are less than conducive to digital error correction (ctrl+z would remove a whole word instead of just a single letter or less), and because the risk of making an error gets quite high after only a short while of continuous marking, the term "computer cursive" ended up being something of a misnomer. It was best to keep letters disconnected from each other, thus not fulfilling the definition of a cursive script. However, "computer cursive" makes for a convenient shorthand that's reflective of the thought process behind its creation, so I'm sticking with it.
Anyway, here's what I came up with:

So first of all, it looks cool as shit if I do say so myself, though that's probably just because of the calligraphy pen brush I used (and I recommend you do the same if you ever try using this). But in seriousness, I'm very happy with how easy it is to recognize most of the letters here, and the rest are easy to get used to.
Some usage notes:
the letter c should start going diagonally down and left, and gradually curve further downwards. it doesn't matter how far it ends up curving, as long as the curve is noticeable
the letter k needs its bottom-right stroke to be curved as seen in the image, or it'll look too much like an h
yes, the letter o is a triangle. deal with it
p and q are distinguished by the lengths of their rightmost strokes: p's is longer (roughly as tall as the other stroke) and q's is shorter
r and v are distinguished in the same way: r's is longer (taller than the other stroke by a noticeable margin) and v's is shorter (more symmetrical). also, r's stem should technically be vertical while v should technically be completely symmetrical, but that isn't a feasible distinction to reliably make in practice, so don't worry about it
the letter s should start going diagonally up and left, and gradually curve down and around to start going diagonally down and right. it doesn't matter how far it ends up curving, as long as it fits this description
the letter u should start going straight down, or down and slightly right, and gradually curve further right. it doesn't matter how far it ends up curving, as long as the curve is noticeable
In general, don't worry too much about it looking tidy—it's specifically meant to be serviceable despite inevitably looking sloppy from time to time.
115 notes
·
View notes
Text
Me (digital artist) vs my brother (gamer) debating "how i should put my fingers over the keyboard" and he keeps insisting I should loom them over W, A, S, D???? When I'm letting them close ctrl, tab and Z because these are the only keys I need. Like dude???? I'm not gaming. I don't need "the whole keyboard" I literally am drawing. Im not in a situation where I can use one hand to use a half of the keyboard and the other hand for the other half bc the other hand is ✨️holding the pen dummy✨️ Besides, what would I even use WASD for??? I literally just need ctrl+Z for undo and ctrl+tab for zooming in and out and sometimes E and P to get the eraser and pen tools but E is close enough and P is too far away so it's just easier to move my Keyboard Hand from where it is or just drag the cursor over there.
4 notes
·
View notes
Text
*ੈ✩‧₊˚ My blog intro!! :p ⋆ ˚。⋆୨୧˚
☆ Just call me Momo, my birthday is november 5th, pronouns he/she, I am 16, i love music and i love just ranting about stuff i enjoy!!☆ ☆My favorite things are: Music, Youtube, Movies + Series, My friends, art ingeneral, animals and everything space related!☆

☆My favorite artists are: Ethel cain, Mazzy star, Yves, Jeff buckley, Elliott Smith, Beyonce, Solange, Erykah Badu, Lana del rey, Phoebe bridgers, Clairo, PinkPantheress and more!! ☆

☆My favorite movies: Bones and all, Carrie, House (1977), pearl, Girl Interrupted, Neon Genisis Evangelion, End of Evangelion (I watch movies like once every blue moon)☆

☆my favorite albums: Norman fucking Rockwell!, preachers daughter, ctrl, titanic rising, Z, Mamas gun, When i get home, Isolation, Sling, strangers in the Alps, melodrama, Fetch the bolt cutters, speak now, anything mazzy star and Grace!!

DNI!!!
¨Stans¨ or anyone who is obsessed about celebrities lives
racists, homophobes, transphobes, abelists and any other ists and phobes. I dont like hateful people
Old men and people who use tumblr for porn
Freaks and hateful people
This is my favorite song ever also, i think thats all Ok bye ;p
#girlblogging#lana del rey#ethel cain#intro post#mazzy star#yvesntual#loona yyxy#jeff buckley#SoundCloud#i dont know what else to put here#bones and all#neon genisis evangelion#elliott smith#homecoming#slushy noobz
2 notes
·
View notes
Text
Thanks @laeliana for tagging me !
Rules: In a new post, list the names of all the files in your WIP folder, regardless of how non-descriptive or ridiculous. Let people send you an ask with the title that most intrigues them and then post a little snippet of it or tell them something about it! And then tag as many people as you have WIPs.
Artemis Fowl WIPs : - Fragments of Artemis Fowl - Pareidolia Agent (titre temp) - Experiments Weird III (trouve un titre merde) - Oiseaux moqueurs
Film WIPs : - Insubmersible - P(e)aupière - Carnation - Ctrl+Z - Couilles de chat (yes, I keep my fanfic WIPs in the same folder as my work WIPs. as one should)
I'm tagging @bittersuite-iv ! :3
5 notes
·
View notes
Note
Hello! Saw ur post about microsoft ruining your emojis. Have you tried making them backwards? My texting app has always done that to me so now i make many emojis backwards e.g. ): ):< :) >:) and i make the tongue sticking out emoji with a capital 'P' always for the same reason e.g. :P. Idk if it will work for you against microsoft but it's worth a shot!! Good luck! Also i hope you have a lovely day!
Omg I haven't tried that. You may just be a life saver anon. I used to be able to use ctrl+z and it would undo the automatic emoji, but that stopped working a few months back. I haven't found any settings to revert it where it stops auto-converting things so I just assumed the gig was up. But I will try them backwards!
I will have to get used to them being different but I find their backwardness charming lol
16 notes
·
View notes
Text
Animated explanation of keyboard shortcuts.
Windows and General Shortcuts:
Ctrl + C: Copy Ctrl + X: Cut Ctrl + V: Paste Ctrl + Z: Undo Ctrl + Y: Redo (reverse the undo) Ctrl + S: Save Ctrl + P: Print Alt + Tab: Switch between open windows Alt + F4: Close the active window Windows Key + D: Show/hide desktop Windows Key + L: Lock the computer Ctrl + A: Select all Ctrl + F: Find Ctrl + N: Open a new document or window MacOS Shortcuts:
Command (⌘) + C: Copy Command (⌘) + X: Cut Command (⌘) + V: Paste Command (⌘) + Z: Undo Command (⌘) + Shift + Z: Redo (reverse the undo) Command (⌘) + S: Save Command (⌘) + P: Print Command (⌘) + Tab: Switch between open applications Command (⌘) + Q: Quit application Command (⌘) + A: Select all Command (⌘) + F: Find Command (⌘) + N: Open a new document or window Browser Shortcuts (Chrome, Firefox, Edge, etc.):
Ctrl + T: Open a new tab Ctrl + W: Close the active tab Ctrl + Shift + T: Reopen the last closed tab Ctrl + Tab: Switch between tabs Ctrl + L: Focus the address bar Ctrl + D: Bookmark the current page Ctrl + H: Open history Ctrl + J: Open downloads Ctrl + R: Refresh the page Ctrl + Shift + N: Open a new incognito window These shortcuts are frequently used to speed up tasks on Windows, MacOS, and various browsers. There may be some minor differences depending on the operating system and applications you are using, but generally, they are correct and useful.
3 notes
·
View notes
Text
80 Shortcut keys in Libreoffice writer english and hindi me
Shortcut keys...• Ctrl +A - Select All सेलेक्ट आल। • Ctrl +N - Create a new document नये डाक्यूमेंट को क्रिएट करने के लिए। • Ctrl+ O - open a document डाक्यूमेंट को खोलने के लिए। •Shift+Ctrl +O - print preview प्रिंट प्रिव्यू। •Ctrl+ S - Saves the current document करेंट डाक्यूमेंट को सेव करने के लिए। • Shift+Ctrl+ S - Save as a copy or other lucetion कापी या अन्य लोकेशन को सेव एज करने के लिए। • Ctrl + P - prints the document डाक्यूमेंट को प्रिंट करने के लिए। • Ctrl + Q -Exist the Libreoffice Application लिब्रे ऑफिस में एप्लिकेशन को एक्जिट के लिए। • Ctrl + X - Cut the selected item सेलेक्टेड आइटम को कट करने के लिए। • Ctrl + V -paste from the clipboard पेस्ट करने के लिए • Ctrl +K - Hyperlink हाइपरलिंक। • Shift +Ctrl + V open the paste special dailog box पेस्ट स्पेशल डायलॉग बॉक्स के लिए। • Ctrl + Z Undoes last action • Ctrl + Y Redoes last action • Shift + Crtl+ Y Repeat an action
Read more
2 notes
·
View notes