#cricut design space tutorials for beginners
Explore tagged Tumblr posts
Text
Indispensable Tools For Successful Farming🥰
From tractors and irrigation systems to fertilizers and spreaders, there is a wide range of tools available for successful farming. Each of these implements offer unique benefits for farmers and provide an efficient way to increase crop yields(more)

#ethical hacking tools#english lessons advanced speaking#learn english speaking in hindi#english to hindi vocabulary#learn english speaking#c#fundamentals for absolute beginners#online english speaking classes#english lesson#ending#english speaking#speaking english#increase english vocabulary#biotechnology principles and processes#succulent#murli sharma hindi dubbed movies#cricut design space tutorials for beginners#succulents
1 note
·
View note
Note
That National Geographic leather binding for Yellowstone is fucking Gorgeous!!! (Pardon my Language)
How long have you been binding, and what would you recommend to someone who wants to try it for themselves?
hello and thank you so much!! I worked really hard on that one (and no pardon needed haha)!
I started binding in February of 2021, which means in a few months I'll have reached 4 years. It's been an awesome journey!!
If you'd like to try it for yourself, I'd recommenda few things!
1) You can 100% try out the basics with near free or cheap materials. People typeset in Word or Google Docs or Pages. You can print on printer paper & use regular sewing thread & scavenge board from old books or notebook backs or do a limp leather binding & use no boards at all. You can make paper pamphlets. Any comments I make following this are about my preferences for best results. The most expensive part that cannot be avoided is printing. On the other hand expenses can wildly escalate if you're committing to it; once you are doing leather it becomes somewhat unavoidably expensive.
2) Check out some tutorials from SeaLemon or DAS Bookbinding on YouTube for the physical construction. SeaLemon is really clear for a beginner starting out, but then I'd move to DAS for better technique (DAS also has a beginner series though). I watched DAS Bookbinding videos for three weeks straight before I was able to start, & while that doesn't maybe work out for everyone I do think it gave me a pretty strong basis of understanding for structural techniques. DAS is *really* good at explaining why he thinks you should do something. The structure of the NatGeo bind is basically DAS's video on a rounded & backed bradel binding (but with leather & sewn on recessed cords). There is some good stuff on Tiktok/IG, but watch short-form videos/reels with caution. They move a little fast and I've seen a couple give instructions that can result in structural flaws (not that this is unique to the form, cross-referencing on instructions from any source is a good practice). They are good for if you're looking for a specific technique (particularly modern decorative ones, like cricut use, edge gilding, HTV application). There are also published books you can buy or maybe request through your library, such as Hollander's Introduction to Bookbinding. Renegade Bookbinding Guild runs a whole bunch of technique-specific in-house zoom classes annually.
3) Look to other fanbinders for tutorials on how to format the text (this is because most pro bookbinders do not do both text design & book creation! it's a pretty unique feature of fanbinding). @renegadeguild has some publically provided resources on our website here and more typesetting tutorials for a whole host of softwares (Affinity Publisher is my choice - one time purchase, fuck you very much Adobe InDesign) located in the discord server. Anyone 18+ can join the Discord. The NatGeo inspired book (text & dust jacket) was created in Affinity Publisher.
4) Join a community of fanbinders! It's really lovely. The space has exploded & there are tons of people to be friends with, trade tips, & cheer each other on. I'm part of @renegadeguild and we do a whole bunch of events throughout the year, and we have an in-person retreat every other year. I've met with over 20 different renegaders so far, in three different countries, and it's been such a blast. Definitely the community helps keep up the motivation. Renegade isn't the only community out there though! There's groups more rooted in IG/tiktok circles that have their own discords, plus a number of FB groups. I do think most people who are comfortable on tumblr enjoy Renegade's vibe.
5) While I learned most of what I do online, some things really benefit from in-person learning. If you want to do leather binding I would really recommend trying to take an in-person class. I did two attempts at a leather binding on my own before I decided to hold off until I'd had at least one in-person class. Leather binding can be extremely frustrating, especially when you can easily end up with a book that looks worse than a cloth binding at your same skill level but for double the cost. Imo this is mostly because the leather specific skills like paring, warp management, and assessing a random piece of leather for bookbinding suitability are all pretty tactile experiences, all of which are difficult to assess through a screen and can result in an unpleasantly bulky/stiff/shapeless book if ignored. For example- while this book of mine is a pretty popular post, I don't enjoy holding it and reading it, especially in contrast to the NatGeo bind. Part of this was the material I chose; part was not being able to adhere to the instructions quite well enough; part was just not knowing enough about what I was doing; part is they're different constructions. This might just be a me thing though; I'm sure others have had success with online only tutorials for leather.
6) I'm not going to get into specific tools bc that could be a whole post, but some things are necessary (printer access), some things are necessary depending on style, some things are "makes life easier but only drop the money if it's stopping you from making books out of frustration", some things are just technique-specific tools. Examples - sewing frames are often brought up but are never necessary unless sewing on cords; cricuts & cutting machines are commonly used in fanbinding circles but I don't have one (& don't intend to atm).
7) Don't be shy to offer the author a copy!! Like other fan activities, fanbinding is part of our fandom community ecosystem. Your fanbinding is in communication with the author's story. Giving a bind to the author is a great way of keeping the ecosystem going. I tend to think of binds as a combo of comment, fic rec, and fan art inspired by the fic.
8) Paper grain sounds stupid but it IS IMPORTANT! My personal hierarchy of give-a-fuck for grain: Board grain, spine card grain, endpaper grain, cover paper grain, text block grain, book cloth grain. The only thing I personally sometimes ignore is book cloth grain; but many people will not worry too much about text block paper grain.
Gonna stop there for now. If you've got specific questions or want elaboration, feel free to ask. As with all things, YMMV, this is my own opinions/experience and may not apply in all cases. There's a whole lot of different techniques out there, and it's hard to ever say something is wrong, per se - but I think it's important to understand if a method has an outcome you may want to avoid. Prioritize your goals & adapt for them - what's your goal? Longevity, readability, aesthetics? You might make different choices depending on them. My choices influence the techniques I chose to focus on, the tools I buy, and thus the final aesthetic of my binds.
30 notes
·
View notes
Text
How to Use Cricut Design Space for Free: A Complete User Guide
Creating designs and projects is fun, right? Who does not want to make handmade projects? Cricut Design Space is a free and easy-to-use application for making craft projects. But how to use Cricut Design Space for free? The app allows you to design and upload your projects to the app. Once your design is ready, you can cut it with the help of a Cricut cutting machine.
As a newbie, using the software program can be a bit overwhelming and confusing. But do not worry. This stepwise tutorial will explain how you can use it.
How to Download Cricut Design Space on Computer?
Before you learn how to use Cricut Design Space for free, you must download and install it first on your operating system. Here are the basic directions to follow:
Now that you have downloaded and installed the application on your desktop computer, it is time to learn how to use it. So, let’s get started!
How to Use Cricut Design Space App: Quick and Easy Steps
After downloading and installing the design software on your desktop computer, it is time to learn the complete process of how to use Cricut Design Space for free. In the section below, I have mentioned the simple steps so that anyone can easily follow along.
Step 1: Creating a Design
The first step is to create your design in the Design Space app. You can either make or upload an SVG file. On your home screen, click on New Project to open the blank canvas. On the left, you can find the menu and other tools, using which you can add different elements like text, images, shapes, templates, and so much more.
Step 2: Resize Your Image
When you are done creating your design or uploading your image, you can flip, rotate, and resize it according to your needs. Once satisfied with your design, you will need to click the Make It button to send it to cut with the crafting machine.
Step 3: Cutting the Design
Now, it is one of the most important steps after designing. You need to cut your design using the app. After that, click on the Attach tool so your design will be in the same position on the mat as on your canvas. A window will appear with the Preview section. So, check there to confirm it. You need to select the material you use to make the design. Then, load your material onto the mat and slide it into the machine to cut.
Step 4: Unload the Design From Your Machine
After the cut, unload your design and remove the extra part. You should not remove extra parts for some materials, like cardstock, because they come out easily. However, you must peel off your design from the mat using a weeding tool.
Step 5: Apply Your Design
Last but not least, it is time to finish your project. For some projects, you are done when you just peel off your design. But sometimes, there is an application process, and this varies from project to project. If you are working with vinyl, you need to use tape to remove the vinyl from the backing and place it on your project. When using iron-on materials, press this onto your project.
Wrapping up
This blog post explains how to use Cricut Design Space for free. It is a free software that can help you create custom project designs. It has a user-friendly interface and various features make it an excellent option for beginners and experienced crafters. Also, there are many projects you can design, even if you’re not an expert.
If you want to get creative and create unique projects, then download the Design Space app and start today.
FAQs
Why should you use Cricut Design Space?
The Design Space app is free to design, cut, and use custom projects with various features. You can start from scratch or use the library of images, fonts, and templates. You can upload your projects and then connect to your machine to cut out the designs.
Can you use Cricut Design Space offline?
You can use Design Space offline on Mac, Windows, and iOS devices. You can also edit projects offline if you have installed this software and saved the project in your operating system. You can choose to work offline anytime. Just disconnect from your Wi-Fi network or unplug the Ethernet cable from your device.
Do you need a subscription to use Cricut Design Space?
No, you do not need a subscription to use this application. It is available on computers and mobile devices and works with any Cricut cutting machine. But if you want advanced features like access to premium images, fonts, premade projects, and more, then you can take a paid subscription known as Cricut Access.
Visit: cricut.com/setup www.cicut.com/setup login
Source: https://cricricutdesigncut.wordpress.com/2024/12/09/how-to-use-cricut-design-space-for-free-a-complete-user-guide/
#cricut.com/setup#cricut.com/create#cricut.com design space#cricut.com/register#cricut.com sign in#design space setup#digital design#www.cricut.com/setup\cricut explore air 2 setup#www.cricut.com/setup login#www.cricut.com/setup#www.cricut.com setup#www.cricut.com setup login#cricut design space setup#setup cricut design space#cricut setup#design.cricut.com/setup
0 notes
Text
How to Install Cricut Design Space on Windows [Beginners Tutorial]
We all know that you should have a device if you want to use a Cricut machine. It can be a phone or a computer. One such device is a computer with Windows 11 on it. It is an excellent choice for a Cricut machine. To use your crafting machine, you must learn how to install Cricut Design Space on Windows 11. For that, I would suggest you read this blog till the end. This guide will help you not only download the app on a computer but also connect the machine to your device wirelessly. You will also be able to check the computer’s system requirements.
You can download the Design Space software from the Internet for free. To download it on Windows 11, you have to visit the official site. This blog explains the process for downloading the app. So, let’s dive into it to start the crafting journey today.
Minimum System Requirements for Cricut App on Windows 11
If you want to use a Windows computer on your machine, you have to first make sure that it is capable of downloading and running Design Space. The computer will require certain features that are essential to run the app. The features that the computer requires for Design Space are mentioned below:
How to Connect Cricut Machine to Windows 11?
Once you make sure that your computer has the required system features in the process of learning how to install Cricut Design Space on Windows 11, you should connect it to the machine. Here, we will see the connection process of the Windows PC to a machine via Bluetooth:
How to Install Cricut Design Space on Windows 11?
By now, you have checked the features of your computer and have learned the Bluetooth connection process on the machine. Now, you have to download the app on a Windows 11 computer. But before downloading the software on your computer, you have to connect it to a stable Wi-Fi network. To download the app, you have to follow the steps written below:
Conclusion
To conclude, I would say this blog helped you learn how to install Cricut Design Space on Windows 11. Windows 11 is one of the newest operating systems and has the ability to run the app on it. But before you download the software on a computer, you must know about the minimum features any computer needs to run the app on it. Once you are sure of your computer’s compatibility, you can connect it to the machine. You read about the Bluetooth connection on the computer. Finally, you saw the Design Space installation process. Now, you can easily set up a machine on a Windows PC.
FAQs
Is Cricut Design Space Available for Windows?
Yes, it is! Design Space is an official app, and it is essential for Cricut machines. It works with multiple devices, including a Windows computer. If you want to use the machine on a Windows PC, you will have to download the software from the Internet. It is available on the official site. After installing the app, you can start crafting on your desktop.
Why Is Cricut Design Space Not Installing on My Computer?
If you are trying to install the app on your computer but are unable to do so, you should do a few things. First, you must ensure that your computer is connected to good internet broadband. After that, you will have to check the compatibility of your computer. If the computer lacks the required features, you might have trouble downloading the app. Also, you have to check the browser you are using to download the app. If it is an outdated browser, you must update it.
Is Windows 11 Compatible With Cricut Design Space?
Windows 11’s operating system is good enough to download the Design Space software on it. A Cricut machine requires Windows 10 or newer. But to make sure that it is actually compatible with the machine, you also have to check its features. The computer should have at least 2 GB free disk space and 4GB RAM. It needs to have a resolution of 1024 x 768 pixels and 2-3 Mbps of internet speed.
Visit: cricut com setup www.cicut.com setup login setting up my cricut maker install cicut design space app
Source: https://cricutspaces.blogspot.com/2024/09/how-to-install-cricut-design-space-on.html
#cricut.com/setup#cricut.com/setup login#cricut setup#install cricut explore air 2#cricut.com setup mac#www.cricut.com/setup login#www.cricut.com/setup#cricut install setup#install cricut design space app#cricut design space setup#cricut design#setting up new cricut maker#setting up your cricut maker#cricut design space app#cricut explore air 2
1 note
·
View note
Text
How to Download Cricut Design Space on Laptop: Easy Tutorial
Cricut Design Space is an official software program. It helps you use your cutting and heat press machines. You create or upload a design to the app and make your beautiful projects. To start working on it, you need to download it on your computer or laptop. Here, you will learn how to download Cricut Design Space on laptop. So, read the blog until the end, and then you can easily download and install the app on your operating system.
Although it is a free app, you can also purchase the premium Cricut Access. It gives you much more designs, images, and fonts for your crafts. However, the software will be good enough if you are a beginner. Now, let’s start with the minimum system requirements for using the software on your laptop.
Minimum System Requirements for Cricut Application
Before you get the app tutorial, you need to know your laptop’s system requirements. The laptop needs to have certain features to work with the software and run its features smoothly. Design Space works great with Windows and Mac laptops. However, it does not support Chromebook computers.
For Windows: If you have a Windows laptop, make sure it’s running Windows 10 or a newer version. The CPU needs to be an Intel dual-core processor or its equivalent.
For Mac: If you are using a Mac, it must run on macOS 11 or later and have a CPU of 1.83.
RAM: It has to be 4GB, and it should have 2GB of free disk space.
Bluetooth or USB: The machine must have either a Bluetooth or USB port or both to connect to your devices.
Display: 1024 x 768 px screen resolution is the minimum requirement for the screen.
Internet connection: The laptop should have a good and stable internet connection to download and upload SVG files. The speed for downloading should be 2-3 Mbps, and for uploading, it should be 1-2 Mbps.
Memory: The memory requirements of the laptop depend on your craft projects.
How to Download Cricut Design Space on Laptop (Windows)
Once you have checked the system requirements on your laptop, you can start to download the software program. If you have a Windows laptop, this is the process you should follow to download and install the app:
To initiate the app downloading process, open your windows laptop and go to cricut.com/setup.
Then, you will see a link on the app that says Download. You have to click on it to start downloading the app. But before that, you will have to agree on Cricut terms, and for that, you will need to tick the checkbox.
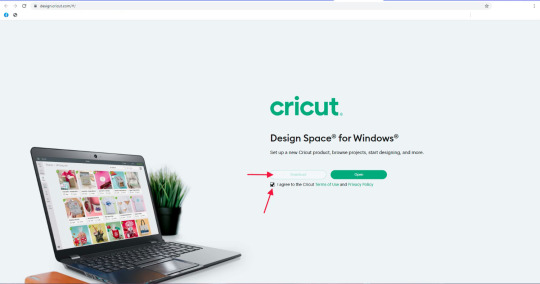
When you click on Download, the app will start to download. When the downloading is done, you should go to the Downloads folder on the device and open the file by clicking on it.
After that, a new window will open on the computer screen, which means that the app has started to install.
Once the app is installed, open it and either log in or create an account. Then, you can start using the software on your device.
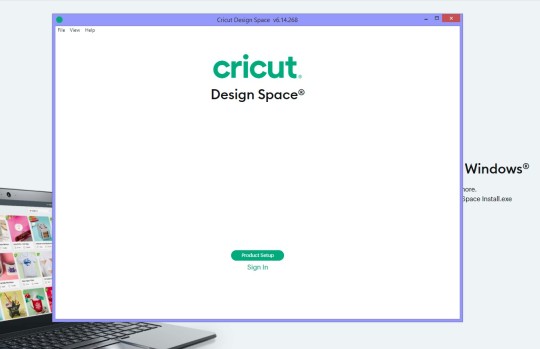
You can choose to add the app icon to the taskbar on your laptop.
How to Download Cricut Design Space on Laptop (Mac)
Just like a Windows laptop, you can download the program on a Mac system. The MacBook is compatible with the app, and you can install it from the official website. These easy steps will help you download the app.
First, open your Mac laptop and connect it to a stable wireless network.
Then, navigate through cricut.com/setup and look for the Design Space app.
Next, agree to the terms and conditions and click on Download.
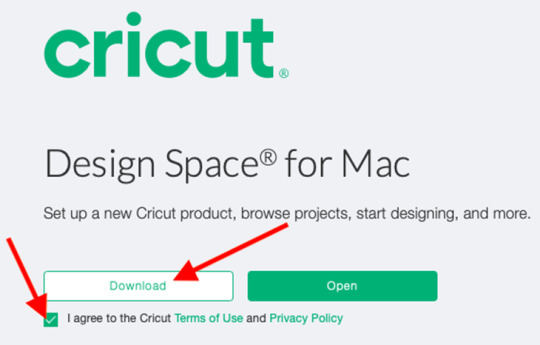
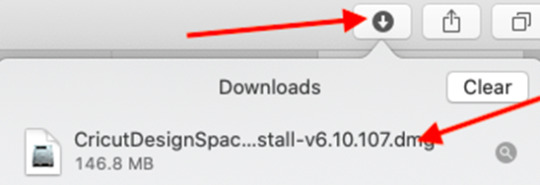
Now, choose a folder on the device screen to download the app. You can leave the option if you don’t want it; the app will be saved in the default folder - Downloads folder.
After downloading the file, go to the folder and double-click on the file.
Now, you will see a window on your device with two icons. You will have to drag the app icon into the Applications icon.
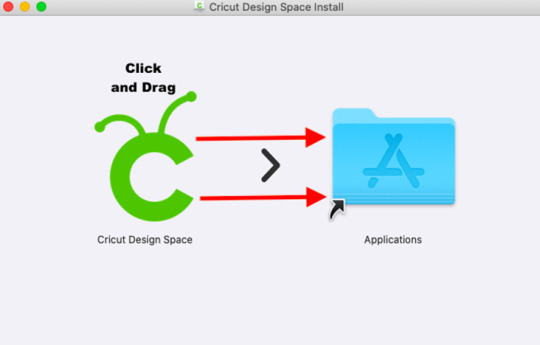
After that, open the Applications icon by clicking twice to launch the application.
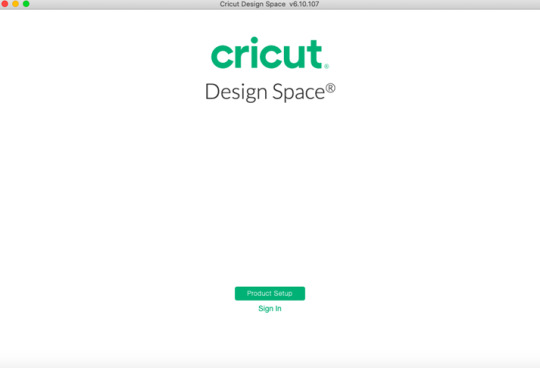
Finally, you have to open the app and log in with a Cricut ID.
Conclusion
Here, you read how to download Cricut Design Space on laptop (Windows and Mac). The app is essential for Cricut machine users, especially when you are a beginner. As a beginner, you can learn how to use the software program and all its features for free. Following the instructions, you can install the app on your laptop and log in with your account. After that, you will be able to use the app to work on your projects.
FAQs
How Can I Download Cricut Design Space on My Laptop?
To download the app on your laptop, you have to follow the steps below:
First, open your laptop and visit cricut.com/setup.
Then, find Design Space and click on Download.
Next, open the file from the Downloads folder and click on it twice.
After that, the app will start to install.
After the app is downloaded, log in to use the app for your projects.
Why Am I Unable to Open Cricut App on My Laptop?
If you are unable to open the software, there are a few reasons for that. You should check these things, and the problem will be solved. First, you have to make sure that you are using a laptop that is compatible with the app. After you make sure that you are using a compatible laptop, you must check that the app is up to date and that you are not using an old version. After that, you will be able to open the software on your laptop.
How Can I Setup Cricut on My Laptop?
If you want to set up a machine on your laptop, you should follow these steps:
First, you should turn on the machine after plugging into a wall socket.
Then, connect the machine to your laptop using Bluetooth.
Next, download the software app to your laptop.
Now, log in with a Cricut ID or create one if you are new.
After you log in, the machine setup is done.
0 notes
Text
How to Connect Cricut to Computer: A Beginner’s Tutorial
Are you in a hurry and want to learn how to connect Cricut to computer? I’ll cover it in minutes. The connection process is easier than it seems. Therefore, I don’t mind doing it again and again. However, there is a bit of setup that you are required to do before your connection. This setup is a little different from the machine setup. In this, you need to place your machine at a distance of 10 to 15 feet from your computer. Once done, you can start the connection procedure.
Now, you can connect your machine to a computer of your choice. Note that you can’t connect your machine to Chromebook, Linux/Unix as they are incompatible with Cricut. In other words, the machine is only compatible with Windows and Mac. Since this blog is about connecting it to computers, I will also show you how to download Cricut on a Windows PC and MacBook. Let’s get started now!
How to Connect Cricut to Computer (Windows)
Ensure you have placed your machine and PC within the gap of 10–15 feet. After that, you can turn on your computer and the machine. Once done, start following the steps described below:
Go to your PC and open Settings.
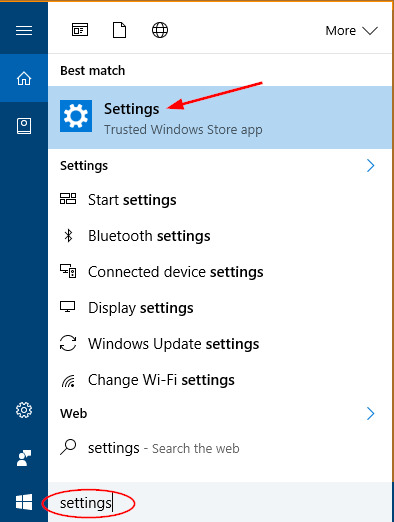
n the Settings option, navigate to Bluetooth.
Turn on Bluetooth by toggling the button.
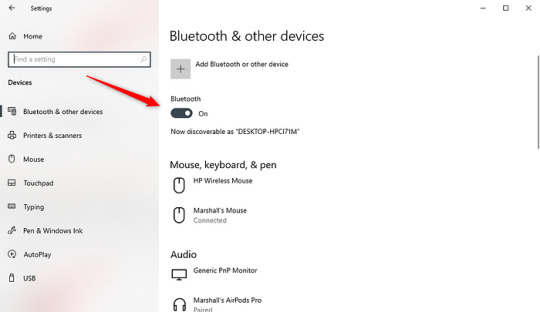
fter that, click on Add Bluetooth or other device.
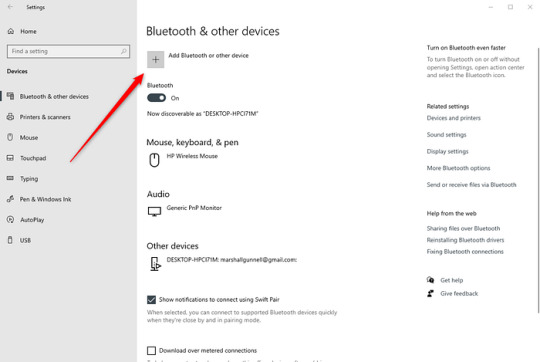
n the next window, select Bluetooth.
Then, you need to select your machine once detected.
Now, your machine is paired with your computer.
Go back to your Design Space app and begin setting up your machine.
Finally, your machine will show up as paired or connected during setup.
How to Connect Cricut to Computer (MacBook)
Connecting the machine to your MacBook is simple. All you need to do is place your machine at a distance of 10 to 15 feet from your Macbook and start connecting it. Take a look at the steps below to understand how you can connect it to your device.
Ensure the MacBook is turned on.
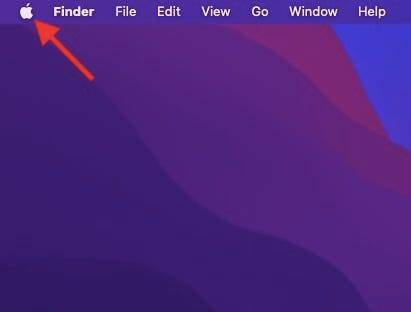
After that, click on the Apple menu.
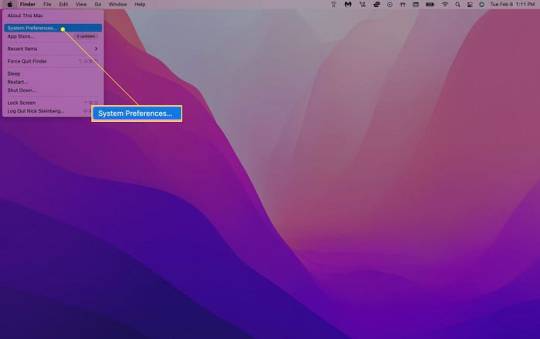
hen, you have to select the System Preferences.
ow, look for the Bluetooth option.
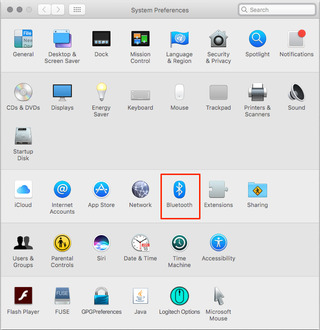
ere, you need to enable Bluetooth.

Afterward, select the machine from the available list of devices.
Once the connection is done, you can proceed to set up your machine.
Finally, you have learned how to connect Cricut to computer such as Windows and MacBook. Now, you must also learn how to download your software on these devices. To download, follow the steps given in the next section.
How to Download Cricut Design Space on Computer?
Downloading the app is a must if you want to start your crafting journey right away! Here, I explain how to download and install Design Space on Windows and Mac. Take a look at the steps below:
Windows
Go to your browser and visit design.cricut.com.
After that, select the Cricut’s T&C and click the Download button.
Next, you will need to let it download to your PC’s folder.
Go to the folder where your file was downloaded, such as the Downloads folder.
From the Downloads folder, you need to find the .exe file. Double-click on it and start the installation.
For installation, you have to follow the instructions displayed on your PC.
macOS
Open a browser and go to the design.cricut.com.
Then, you have to select the Terms of Use and Privacy policy.
Afterward, you will need to select the Downloads folder and click on it.
Now, go to your file folders and look for the downloaded folder, i.e., the .dmg file. Double-click on it and start the installation.
For installation, you will need to follow the screen’s instructions.
Conclusion
In this blog, you learned how to connect Cricut to computer (Windows and Mac). In addition, I have also explained how to download Design Space on both systems. If you are a beginner crafter and don’t know how to set up your machine, this blog has your back. Follow each step carefully and delve into the world of crafting without a hitch.
FAQs
Question 1: Why my Cricut won’t connect to computer with USB?
Answer: No worries! You can try the following points if the machine is not connecting to your computer via USB:
Make sure your USB cable is working fine. There should not be any cuts, and both your computer and machine’s USB ports should be fine.
If there is an issue with USB cable, replace it.
However, if the port is not working, then replace the device.
Question 2: Why is my PC not detecting my Cricut?
Answer: The following are the reasons why your PC might not be detecting your machine:
Bluetooth issues can be a reason. Check if it is turned on and devices are placed near each other.
Ensure you are using the latest version of Design Space software.
Restart your computer and your machine.
Check the browser compatibility. It must be compatible with your software.
Question 3: What should I do if my Cricut doesn’t connect to my Mac?
Answer: If your machine is not connecting to your Mac computer, you’ll need to check the following points:
Check your USB cable or ports to see whether they are working fine or damaged.
Restart the Mac and your machine. Check if it resolved the issues.
Check whether your device is compatible with your machine.
Source: how to connect cricut to computer
Visit here to Know More: Cricut.com/setup
Pinterest
#how to connect cricut to computer#cricut won't connect to computer with USB#Cricut Explore Software#Cricut Venture#Cricut.com/setup
0 notes
Text
How to Use a Cricut Explore 3: Easy Tutorial for Beginners
Learning how to use a Cricut Explore 3 is important in order to complete any project with this machine. The Cricut Explore 3 is a versatile cutting and crafting tool that can cut more than 100 materials, like paper, cardstock, vinyl, iron-on, fabric, leather, wood, and many more. With the help of these materials, you can work on a variety of craft projects. If you do not know how to use this machine, read this blog to learn everything you need to know.
To use this Cricut machine, you need to do certain things. You will have to connect your machine to a computer and download the Cricut Design Space app. This app will help you manage your projects and make the most of your machine. So, let’s start with the tools and supplies you will need for your project.
Tools and Materials for Using Your Cricut Explore 3
Before learning how to use a Cricut Explore 3, you should know about the supplies you will need for your DIY project. What supplies you will need depends on the project you are working on. Here, we are going to talk about using a Cricut machine to cut material to make a beautiful butterfly. You will need the following supplies on your machine:
How to Use a Cricut Explore 3 for Making a Project?
Once you know about all the supplies you will need for your project, you can move towards working on it. So, these are the steps you have to follow:
Step 1: Create a Design in Cricut Software
The first step is to create a design on the Cricut Design Space app. It offers many features that you can use to make your design. The first option you have is you can pick any design from the thousands of options you have. The other option is to create your own design by clicking on the New Project section on Canvas. You have one more option: you can choose any design from your computer and upload it to the software. After that, you can use that image for your project. Once your design is ready, you can move on to the next step.
Step 2: Load Your Material
When you have selected a design, and then load the material on your machine. To do this, you must take the material and put it on the cutting mat. Next, place the mat inside your machine and press the Load button on the machine.
Step 3: Select the Material
When learning how to use a Cricut Explore 3, the next step is to select your material on the Design Space app. Afterward, go to the app and select the material you will use to cut on your machine.
Step 4: Cut Your Design on Your Cricut Machine
Once you have selected the material on the app, you can cut the design. To do so, you will need to click on Make It. The machine will cut the design in the exact shape that you have selected on the Cricut software.
Step 5: Unload Your Material and Reveal Butterflies
Once the material is cut, you have to unload it and remove it from the Explore machine. Then, you have to weed the design from the material. You can use a weeding tool for that. When the design is out, you have to glue it to the canvas, and your beautiful butterfly is ready to beautify your room.
Conclusion
In short, I am sure you have learned how to use a Cricut Explore 3. With this machine, you can create many DIY projects like cards, flowers, coasters, keychains, etc. In this blog, you learned how to make a beautiful butterfly by using your cutting machine. To complete your project, you must know about the essential supplies you will need and the basic process. Reading this blog, you understand how the Cricut machine works, and now you can create any project you want.
FAQs
Can I Use Cricut Explore 3 as a Beginner?
For sure! Cricut Explore 3 is an easy-to-use machine, and it is great for beginners to learn how to use it. This machine allows you to cut more than 100 materials, like paper, cards, and many other projects. If you want to use the machine, you will have to do a few things, like connecting it to your device and downloading the Design Space software.
How Do I Set Up Cricut Explore 3?
To work with this machine, you will have to complete the setup. For the setup, you will have to do the following things:
How Can I Connect Cricut to My Computer via Bluetooth?
To connect your computer to the machine via Bluetooth, you will have to do the following things:
Visit: install cricut design space app
www.cricut.com setup login
Source: https://cricutmakermachines.com/how-to-use-a-cricut-explore-3-easy-tutorial-for-beginners/
#How to Use a Cricut Explore 3#cricut.com/setup#install cricut design space app#cricut.com setup mac#install cricut design space#cricut create connect to computer#setting up my cricut maker#cricut setup create account#setting up new cricut maker#cricut setup on computer#cricut cutting machine setup#cricut setup#cricut design space setup
0 notes
Text
How to Use Cricut Design Space (Beginner’s Step Guide!)
It looks like you want to learn how to use Cricut Design Space but haven’t found anything yet. No worries; I’ve got your back! Cricut Design Space is a software application with an intuitive interface, so even beginners can make the most of it.
However, the software still has many features that you will need to explore with patience. This blog is the perfect fit for newbies who haven’t even downloaded the app and want to learn how to use it. So, I will start by telling you the basic system requirements for downloading the Cricut software on Windows and Mac computers. Then, I will teach you how to download the Cricut app and use it to create a project. Let’s get started now without any further delay!
System Requirements for Using Cricut Design Space
Checking system compatibility is a must when you are ready to download a Cricut Design app on your PC or other device. Once you are sure your system meets the basic Cricut system needs, you can learn how to use Cricut Design Space. Let’s check our system’s compatibility for both computers. You can see the requirements for the desktop of your choice.
For Windows/MacBook
Operating System: On Windows PC, confirm the latest Windows 10 or later. For Mac users, macOS 11 or later is required.
CPU: Intel Dual-Core or equivalent AMD on PC or 1.83 GHz on Mac
RAM: 4 GB
Disk: 2 GB Free
Connection Type: Both wireless Bluetooth & wired USB connections are compatible
Screen Resolution: Minimum 1024px x 768px
How to Download Cricut Design Space on Computer?
Below are the steps to help you download and install the Cricut Design app on your desktop. Both desktops’ downloading steps are identical, but the installation steps differ slightly. Let’s first learn how to download this forward on your device:
First, you have to start your computer and then open a browser.
After that, you will need to visit design.cricut.com.
Click the square check box on the site to agree to Cricut’s Terms of Use and Privacy Policy.
Next, simply hit the Download button to start downloading.
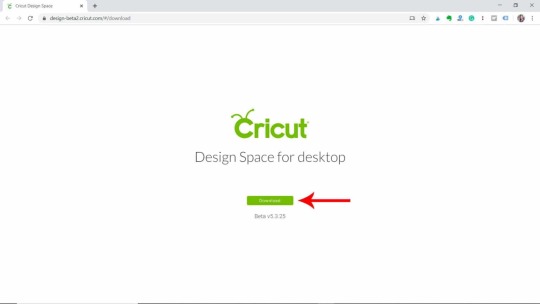
Once you have downloaded the software, you will need to install it.
Here’s how to install the Cricut Design app on your Windows PC:
After downloading the software, you need to navigate to the folder where you have saved your downloaded file.
Now, you must double-click the downloaded file to install it.
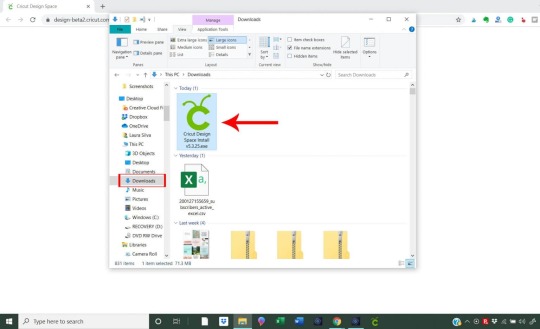
Once you have installed the app, you can create your Cricut ID to learn how to use Cricut Design Space.
Here’s how to install the Cricut app on your Mac operating system:
Then, wait until it has finished downloading your software.
After that, you have to head to the folder (Downloads folder) where the .dmg file is.
Also, you need to double-click on the .dmg file.
Move to a new window screen, where you are supposed to drag your Cricut icon to the Applications folder.

In the last step, you will see the Cricut software on your Mac computer.
How to Use Cricut Design Space: 5 Easy-To-Follow Steps
Here, I will share the tutorial on working on a sublimation design using Design Space. No worries, this is going to be very easy. Before you start, make sure you have logged in to the Cricut software. Once done, you need to start following the steps below:
Step 1: Upload a Sublimation Image

Open your Cricut Design app and go to the Upload button on the left panel. Click on it and start uploading the picture that you want. I am going to work on a sublimation picture, and I have uploaded it here. So, upload the image and then move to the next step to learn how to use Cricut Design Space for sublimation.
Step 2: Choose Upload Type
Once you have uploaded the image, click the Continue button in the lower right-hand corner. On the next screen, select the Upload Type screen. Here, I selected Print Then Cut Image, and then chose the Upload button in the lower right-hand corner.
Step 3: Modify Your Image
Next, I selected my image here and took it to my Canvas. After that, I resized the image to fit my ornament. Since my ornament size is 3.5”, I resized my image up to 3.6” wide.
Step 4: Add Text to the Image
Next, I added the text by selecting the Text tool from the left-hand side. Now, I selected both the name and the image and another tool, such as Flatten, to make them one single Print Then Cut image.
Step 5: Reveal Your Project
Once I was done and satisfied with my image, I clicked on the Make It button in the upper right corner. Afterward, you need to click on Continue. Finally, you learn how to use Cricut Design Space, and you can easily make your next sublimation project as possible.
FAQs
Question 1: How to work on a sublimation project using Cricut?
Answer: If you are going to make a sublimation project, you need to ensure that you have a sublimation paper on which to print your design. You then have to place the image printed on the side above on your cutting mat. Then, insert the machine, and your Cricut will read the registration marks and cut the image accordingly.
Question 2: What do I need to make a sublimation shirt on Cricut?
Answer: In order to make a sublimation shirt on your Cricut machine, you will need the following items:
Sublimation shirt (with 65% polyester).
Sublimation paper
Sublimation printer and ink (e.g., Epson EcoTank ET-4760 with Hippo sublimation ink)
Cricut Heat Press
Protective paper
Heat resistant tape
Lint roller and scissors
Laptop or desktop
Question 3: How can I use my image in Cricut Design Space?
Answer: The following are the ways to use your image in the Cricut Design app:
First, open the Cricut software.
After that, start a new project.
Next, you will need to Select Upload.
Select the Browse button to find the image of your choice from your computer.
Or, if you have other image files ready, you need to drag and drop the image into your Canvas.
Source :- https://connectcricutmaker.com/how-to-use-cricut-design-space-start-your-first-project-now/
0 notes
Text
How to Connect Cricut to Mac: A Stepwise Guide
I’m not sure whether you know how to connect Cricut to Mac. But if you are a beginner, this tutorial will be the perfect guide for teaching you how to connect your Cricut machine to your MacBook hassle-free.
Since the day I started crafting on Cricut, I have changed several devices, from a Windows computer to a Mac and then the latest version of Mac. Due to this, I had to connect my Cricut machine to these devices again and again. It helps me to master this connection process.
Today is the day I can teach you how to connect your Cricut to your compatible device. However, I will only cover connecting with a Mac in this guide. So, if you also expect the same, let’s get started!
Minimum System Requirements to Connect Cricut to Mac
Before I delve into how to connect Cricut to Mac, let me tell you which MacBook is suitable for you. A compatibility check is a must; otherwise, it will cause an issue when you run Cricut Design Space. Below, I have mentioned the requirements for checking on your system before connecting it to your Cricut machine. It will also be helpful when you will download the app on it.
Here’s what you need on your Mac computer:
Ensure you use the latest operating system, such as macOS 11 or later.
Your Mac should have a 1.83 CPU.
The RAM size is 4 GB.
The free disk should be 2 GB.
A MacBook with built-in Bluetooth is a plus point. However, if you prefer a wired connection over a wireless one, your Mac must have a USB port.
The screen resolution should be 1024px x 768px.
How to Connect Cricut to Mac via Bluetooth and USB?
Connecting Cricut to Mac is simple. However, it also depends on how you want to connect it to your Mac. For example, there are two ways to connect. The first is a USB connection, and the second is a wireless connection using Bluetooth. A USB cord provides a stable connection, whereas a wireless Bluetooth connection gives you peace of mind because there are no untidy wires around. Let’s delve into the steps below:
Method 1: Connect Cricut to Mac via a USB Cord
In order to connect your Cricut machine to your MacBook using a USB cord, you have to follow the steps below:
First, you need to switch on the machine by plugging its power cable into a wall outlet.
After that, turn on the MacBook operating system.
Then, grab a USB cord and plug one end into the machine and the other into the computer.
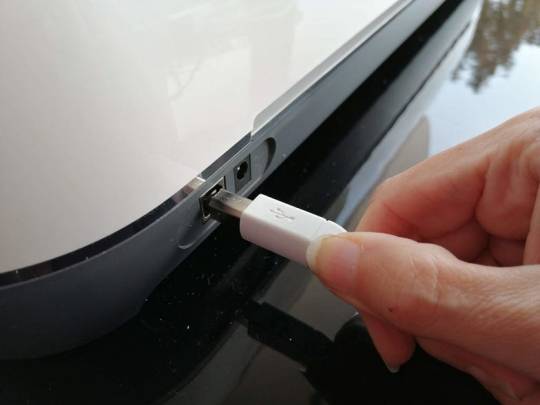
Once you are plugged in, your Mac will be connected to your Cricut machine.
Now, you are ready to use the software. Download and install it, then start crafting hassle-free.
Method 2: How to Connect Cricut to Mac via Bluetooth
If you want to know how to connect Cricut Bluetooth to Mac, follow the steps given below:
Connect Cricut to the wall outlet and switch it on. At the same time, you have to turn on the MacBook.
Then, you will need to navigate to your Mac’s Apple menu.
Now, you should select System Preferences.


Next, you will need to turn on the Bluetooth.
Also, hold on and let your device find your Cricut model, which you have placed closer to your Mac.
If it has yet to be detected, make sure the distance between your Cricut and Mac is at most 15 feet.
When the device is detected, click on it and then hit the Pair button to connect.

Did you understand how to connect Cricut to Mac? If so, congratulations on successfully connecting your Cricut. Now, you are ready to set up your Cricut without any problems.
FAQs
Question 1: Can I connect all Cricut machines to Mac via USB?
Answer: Although Cricut machines can be connected using a USB cable or Bluetooth, you can not connect your Cricut Joy through a USB cord. This Cricut Joy model doesn’t have a USB port, so you can’t connect it using a USB cable. There is only one option: wireless Bluetooth connection.
Question 2: Do I need a Bluetooth adapter to connect Cricut to Mac?
Answer: If your computer doesn’t have a USB port, you might need to use a Bluetooth adapter to connect a Cricut Explore or Explore One machine to a Mac system. Otherwise, you will always have the option to connect via a USB port or cord, which provides a stable connection.
Question 3: What do I need to connect Cricut machine?
Answer: If you are connecting to a Cricut machine, you will need a wireless Bluetooth adapter to run your machine and perform every operation you want. Otherwise, a wired connection is also the best option to form a stable connection to the machine without any hassle.
Source: how to connect cricut to mac
Visit here For More Information: Cricut.com/setup
Pinterest
0 notes
Text
Cricut Joy Setup: A Step-by-Step Guide for Beginners

Are you looking for an easy Cricut Joy setup tutorial? I’ve got you covered! Cricut Joy is a cutting tool that is great for beginners and anyone who wants to craft occasionally just for fun.
I also have it, and recently, I bought one of its new versions, the Cricut Joy Xtra, but I will only talk about the Cricut Joy machine. I understand some new users find it difficult to setup their Cricut machine. Therefore, I came up with this blog. Here, I will talk in a stepwise manner to make it easier for everyone to understand my points.
The Cricut setup includes various things, such as connecting Cricut to Bluetooth and downloading the Cricut app. However, I will only discuss the Cricut setup for Windows users. So, let’s get started now.
Minimum System Requirements for Cricut Joy Setup
Before you dive into the setup process of the Cricut machine, let’s understand whether your system meets the basic requirements for using Cricut Design Space software. In order to ensure the smooth functioning of the software, I advise you to check the system needs once and then proceed. Once you have checked it, you can move to the next steps, which I have answered: How do I setup my Cricut Joy?
Here is what you need to check on your Windows PC:
Operating System – Windows 10 or later (64-bit)
RAM – 4 GB
Disk – 2 GB free
CPU – Intel Dual Core or equivalent to AMD processor
Display – Minimum 1024px x 768px screen resolution
Connection Type: Bluetooth connection
Cricut Joy Setup Guide: 4 Quick and Easy Steps
Have you checked the above system requirements before proceeding with this step? If so, then GREAT!! Now, you are ready to setup your Cricut without any hassle. In it, we will connect the Cricut and download the software from scratch. If you have bought a new Cricut Joy and haven’t unboxed it yet, then don’t worry. You can join me on this journey. Let’s unbox it and finally set it up together.
Step 1: Unbox the Cricut Cutting Machine
In the first step of the Cricut Joy setup, you will need to unbox the machine.
Here’s the picture of my Cricut machine setup unboxing! Now, let me tell you what I got in the box of the Cricut machine. Let’s take a look below:
Cricut Joy machine
Fine Point Pen (0.4mm)
StandardGrip Mat, 4.5″ x 6.5″
Powder Adapter
Welcome Card
Blade + Housing
Free trial membership to Cricut Access
50 ready-to-make projects online
Materials for a practice cut
Step 2: Connect Cricut to Your Windows Computer
This second step is crucial in the Cricut Joy setup. In it, we are going to connect our Cricut to our PC using Bluetooth. Before that, make sure your Cricut machine is placed on a flat surface, and the distance should not be more than 10 – 15 between the PC and the machine.
Here’s what you need to do to connect your Cricut to your PC via Bluetooth:
Navigate to the Start menu and then tap the gear-like icon in your settings.
Then, you will need to choose Devices on the next screen.
Now, check whether you have turned on your Bluetooth. If not, please turn it on. Once done, click on the Add Bluetooth or other device.
On the next screen, you have to select the Bluetooth option.
After that, wait for a while for your PC to check your Cricut machine.
As you can see in the available list, you have to select your Cricut model.
Step 3: Download Cricut Design Space
Here’s how to download Cricut software on Windows 10:
Launch the Internet browser on your desktop.
Search design.cricut.com is on your browser search bar.
On the displayed screen, click the I agree checkbox and then hit the Download button.
Now, you have to hit the Download tab to start downloading the Cricut Design Space.
Once you have downloaded the Cricut app, double-click on your file from the Downloads folder.
Afterward, the installation will start.
Step 4: Complete Cricut Joy Setup Steps
Launch your Cricut software on your PC.
Then, you need to select Cricut New Product Setup.
After that, you will need to sign in to your Cricut IS using your username and password.
Next, select the Smart Cutting Machine.
Now, you will need to choose the Cricut model.
Finally, follow the on-screen instructions to complete the steps. Although you will find many steps that you have already taken, it is okay to follow them.
FAQs
Which software do I need for Cricut Joy setup?
You will need the Cricut Design Space app to setup your new Cricut Joy machine. Cricut Joy is smaller in size and made portable to carry anywhere. Just because it is different from the rest of the machine, it doesn’t mean it will use different Cricut software. The app is indeed the same, and you don’t need to worry about anything. Simply download the app and start making DIY projects like a pro.
Can I setup Cricut Joy without connecting to Bluetooth?
No, there is no other way to connect your Cricut machine to your computer, as Joy comes with built-in Bluetooth. Unlike Cricut Maker and Explore models, Cricut Joy doesn’t come with a USB port, and hence, you can’t connect it using a USB cord if your Bluetooth is not working due to some reasons. In short, Bluetooth is a must for connecting your Cricut to any device.
Is Cricut Joy worth the investment?
It depends on your needs and the type of materials that you want to cut on it. Since Cricut Joy can cut only up to 50 materials, you should know that you will not be able to do all kinds of projects on it. There will always be some materials that you can’t cut on it. Cricut Joy can be worth the investment only for those who are novice crafters and have less budget. In addition, it is the perfect choice for occasional crafters.
Source: Cricut Joy Setup
#cricut joy setup#how do I setup my cricut joy#cricut joy xtra#cricut joy app#Cricut design space download#cricut design space app#cricut design space software#cricut maker setup#cricut machine set up
1 note
·
View note
Text
How to Install Cricut Design Space on Windows 11: Full Guide
If you are an old user of Cricut machines, you already know how important the Cricut Design Space app is. But if you are a beginner and wondering how to install Cricut Design Space on Windows 11, I am going to guide you through this blog. You just have to keep reading it till the end, and you will be able to download and install the Cricut app on your computer.
Cricut Design Space is a free app that is designed to be used for all Cricut machines. It is great for all users, but it is even better for beginners. The reason behind that is it is available for free. As a beginner, if you make a few mistakes, you are not worried about losing the money. You can learn how to use the app for free. When you have learned how to use it, you can choose Cricut Access, which is a premium Cricut software that gives you a better experience.
Now, let’s dive into the installation procedure.
Minimum System Requirements for Cricut Design Space
If you want to know how to install Cricut Design Space on Windows 11, you must know what specifications your computer should have to set up the app. Although your computer is likely to have all the required features as you are using the Windows 11 computer, I am writing it down anyway.
Your Windows computer should have these features:
It should be a Windows 10 or newer version.
The processor of the computer should be Intel Dual-Core or equivalent.
It should have 2 GB of free disk space.
The RAM of the computer should be at least 4GB.
In order to connect a Cricut machine to the computer, there should be a USB port or Bluetooth connectivity option.
The computer should have a minimum resolution capacity of 1024x768 pixels.
In order to use the Design Space app and download and upload a design, the computer should have a stable internet or Wi-Fi connection. The minimum downloading speed should be 2–3 Mbps, and the uploading speed should be 1–2 Mbps.
How to Download Cricut Design Space?
To learn how to install Cricut Design Space on Windows 11, you have to download the Design Space app. You can do it on your Windows 11, following some easy steps. I am writing them down here.
To begin the downloading, open the web browser on your computer.
Next, type cricut.com/setup in the search bar and click Enter.
You will see the Cricut Design app. Click on the Download option. You will have to agree to the terms and conditions of the app, so click on Agree.
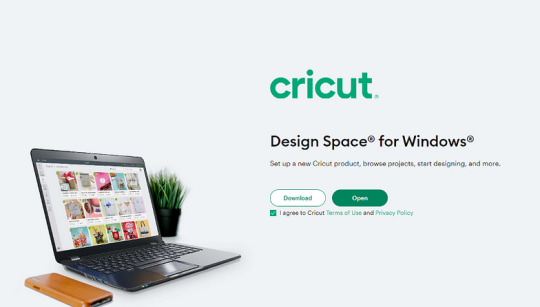
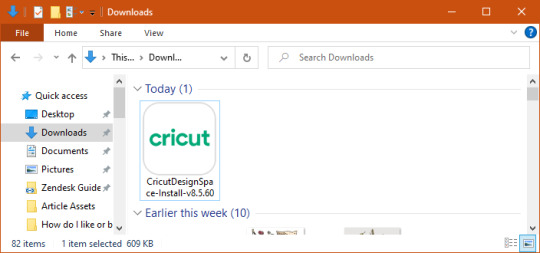
Afterward, click on Install to start the installation.
Then, the app has been downloaded to your Windows 11 computer.
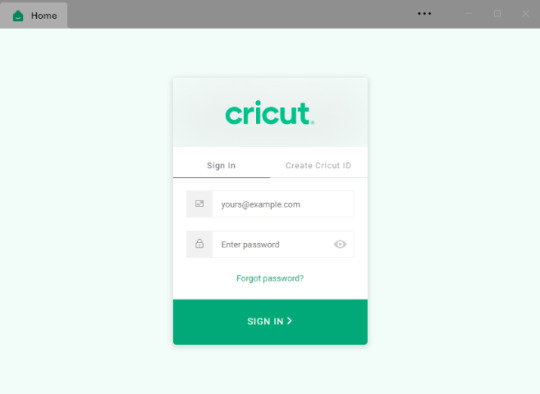
Log in with a Cricut ID, and if you do not have an account, you can create one.
How to Create a Cricut Account?
Once you have downloaded the Cricut software, you can log in with a Cricut ID. In case you are a first-time Cricut user, you need to create a new account. To create it, you should follow these steps.
Firstly, go to the browser and open Cricut’s official site.
Next, you will see an option to Create a Cricut ID. You must choose that option.
Then, you will have to fill in some details, such as your name, email, and country of origin. You will also need to enter a unique Cricut ID and password.
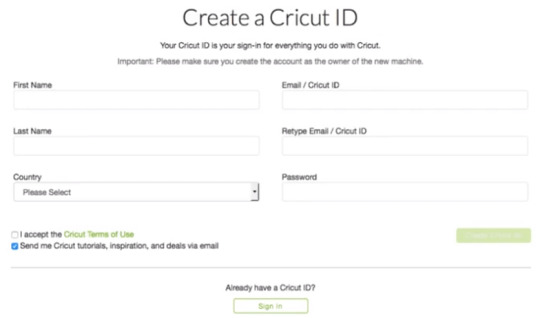
Afterward, you need to agree to the Terms & Conditions.
Next, you can choose the option Send Me Cricut Tutorials via email if you want the latest information and tutorials via email. If you don’t want it, you can ignore it.
Now, proceed with Create Cricut ID.
Your new Cricut ID has been created. You must remember your username and password for future logins.
How do you login to a Cricut Account ID?
In the process of learning how to install Cricut Design Space on Windows 11, the last stage is to learn about logging in with a Cricut account. To know how to do it, read further in the blog:
Open the Cricut app that you have just downloaded.
Then, choose the option Sign In.
Next, enter the Cricut ID and password and press the sign in link.
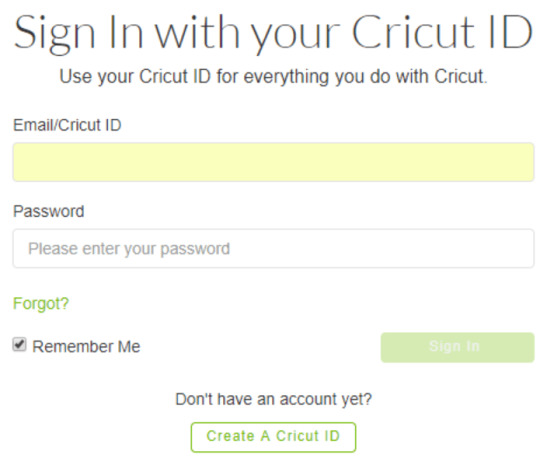
Now, you are ready with your account, which is logged in with the Cricut Design app.
log in with a Cricut account on your Design Space app, your Cricut machine will be ready to use. You can choose a design on the app, cut it on your Cricut, and make beautiful projects.
Conclusion
Cricut Design Space is a wonderful app that works on your Cricut machine. It is especially good for beginners as it is free. With this free Cricut software, you can learn how to cut materials and design your fabrics, tables, walls, and many more things. After reading the blog, you know how to install Cricut Design Space on Windows 11. Although it is a free app, if you want to use full Cricut features, you should subscribe to the premium Cricut Access plan.
FAQs
Can I Download Cricut Design Space on My Android Phone?
Yes, you can! The Cricut Design Space app is available for Android phone users, as it is for iOS, Windows, and Mac users as well. Your phone just has to have certain features like all the other devices to run the app smoothly. Otherwise, it will be difficult to run the Design Space app on your mobile device.
Does Cricut Design Space Support Multiple Projects at Once?
Yes, it does! When you are using a desktop or laptop for the Design Space app, you can open multiple windows and work on various projects at the same time. In the different windows you can pick different designs. However, while cutting, the Cricut machine can connect to just one window. So, if you want to work on multiple projects at once, you can pick a design and save it for cutting later.
Can I Use Cricut Design Space Offline?
Yes, you can! If you have purchased any project and have saved it on your device, you will be able to edit and cut it offline as well. You can even work on new projects, including fonts, patterns, and images, but you have saved them already on your computer. If you are working on a project and suddenly lose your internet connection, you can continue working on it. When the internet connection resumes, it will automatically sync with the internet.
Source: Install Cricut Design Space
Visit here For More Information: Cricut Venture
Pinterest
0 notes
Photo
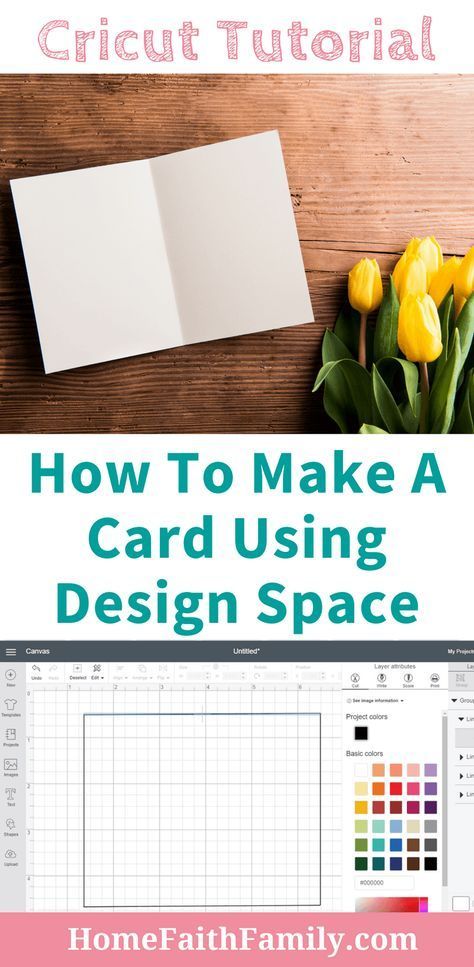
This Cricut tutorial is perfect for your next card project. Learn how to make a card using Design Space for your next Cricut project. This free guide is perfect for beginners and will show you, step-by-step, what you need to know. Continue to read your tutorial. #DIY #Cricut #CricutTutorial #CricutProject #CricutMade via @homefaithfamily
1 note
·
View note
Text
How to Setup Cricut Maker 3: Full Guide for Beginners
Are you a beginner looking to start with a Cricut machine? Are you wondering how to setup Cricut Maker 3? If yes, then you have reached the right place. As a longtime Cricut user, I have been using the Cricut Maker 3 machine really well. Here, I am going to provide all the necessary details and tutorials to guide you in setting up your own Cricut cutting machine.
The Cricut Maker 3 is a third-generation crafting machine and one of the latest models. It is known for its power and is capable of cutting over 300 different materials, such as paper, cardstock, leather, plastic, fabric, vinyl, iron-on vinyl, metal, and more. To begin setting up, you have first to unbox the machine and then follow the steps below.
Unboxing the Cricut Maker 3 Product
As a beginner, after buying the machine to learn how to setup Cricut Maker 3, the first thing you have to do is unbox it, check for the items, and make sure nothing is missing. Once checked, you can prepare it for the setup. When you buy the Cricut machine, these are the tools and supplies you will get in the box. You should keep them all in a good place so nothing gets lost and you can find them easily when you need them to use.
Note: When you buy the machine, you should know one thing: a few items will not be in the box. Cricut used to provide these materials in the previous ones. These tools are a mat, pen, rotary blade, and others. While using the Cricut Maker 3 machine, you will have to know what extra tools you will need, and you will have to buy those things separately.
How to Setup Cricut Maker 3 to Get Started Easily?
Once you have unboxed, you can proceed to see the setup you have to do. The process for the Cricut product is as follows. You will need to do it properly and in the right order. The machine setup will be done, and you will be able to work on it.
How to Connect Cricut Maker 3 to Your Computer?
In order to learn how to setup Cricut Maker 3, the next step is that you have to connect the Cricut machine to your computer, you can use wireless Bluetooth or a wired USB cable connection for pairing. The process for connecting your Cricut to your desktop via Bluetooth is here.
How to Download Cricut Design Space?
Moving forward in learning how to setup Cricut Maker 3, now you have to download the Cricut Design Space app on your computer. You may find it a little difficult if you are doing it, but trust me, it is very easy, and here is how you can do it.
Conclusion
In short, learning how to setup Cricut Maker 3 is an easy task, but you should have the proper guidelines for it. In this blog, I have given you all the details you need for your Cricut Maker 3 setup. The first thing you have to do is unbox the machine and prepare for the setup. Once the machine is prepared, you should connect it to your computer. The final step in the setup is to download the Cricut Design Space app. Once you have downloaded and logged in with an account, you can start working on projects.
FAQs
Can I Make Stickers With Cricut Maker 3?
Yes, you can! Cricut Maker 3 is a versatile tool that can cut all the materials you can on a Cricut machine. It is a powerful machine; you can even cut materials like metal and leather. To make stickers, you need to cut papers or cardstock on the Cricut machine. The Cricut Maker 3 can easily cut these materials, allowing you to make stickers.
Can I Use Ink With My Cricut Maker 3?
Yes, for sure! Infusible ink is a material that you can cut on the Cricut machine, and then you can use that design on a mug to make a unique design with the help of the Cricut Mug Press. Infusible ink can be cut on any Cricut machine. Even the older models cut the design to the infusible. If you want to use the ink with the Cricut Maker 3, you can do it without any problem.
What Software Is Good for Cricut Maker 3?
Cricut has two software applications, both compatible with all Cricut machines. The first is the Cricut Design Space app, which is free. You can download this app on your device, connect it to the Cricut Maker 3, and use it just like any other Cricut machine. The other app, Cricut Access, is also available for the Maker 3 machine. However, it is a premium app and requires a subscription.
Visit: cricut.com/setup
Source: https://cricricutdesigncut.wordpress.com/2024/07/20/how-to-setup-cricut-maker-3-full-guide-for-beginners/
#design space setup#cricut.com/setup explore air 2 setup#cricut.com/setup#cricut venture#cricut easy press#cricut design space#cricut new machine setup#cricut setup#www.cricut.com/seup#digital design#www.cricut.com/setup login#setup cricut design space setup#cricut design space setupp#cricut design space login#design space cricut#design.cricut.com#design.cricut.com/setup
0 notes
Text
Cricut Setup for PC: Quick and Easy Tutorial
Hey, are you looking for a guide on Cricut setup for PC? In this guide, you will get everything that a beginner needs for a Cricut machine setup. I still can’t forget the day when one of my best friends, Alex (a pro crafter), bought his new Cricut machine. He was very unsure about the setup, and he was going to use his Cricut directly. I was there to guide him; otherwise, he could mess everything up.
Somehow, I saved my friend from making a big mistake. But what about you? I know why you came here. So, let’s get to the point of what I will teach you throughout this blog. In this post, I will first discuss the system requirements for a PC. Then, I will provide you with the steps to connect Cricut to Bluetooth. Let’s get started now!
Minimum System Requirements for Cricut Setup on PC
So why are system requirements needed? The short answer is ‘Cricut setup for PC.’ This is also important because we have to download and install the Cricut Design app.
Since this software has a minimum requirement for every device, it can work smoothly only on compatible devices. However, if you want to know your PC’s requirements, look at the following list.
Operating System – Windows 10 or later (64-bit)
Disk – 2 GB free
A USB port or Bluetooth connectivity is required
RAM – Minimum 4 GB
CPU – Intel Dual Core or equivalent to AMD processor
Display – Minimum 1024px x 768px screen resolution
When you have met the above needs, you need to move to the next step, where you will learn to connect your Cricut to your PC via Bluetooth. Let’s first connect Cricut to a PC, and then we will move on to learning about Cricut setup for PC.
Connect a Cricut Machine to Your Windows PC Using Bluetooth
Now, let us start connecting our Cricut using Bluetooth. Make sure your computer has Bluetooth so that you can easily connect your Cricut machine. Let’s see how to do this:
Firstly, you will have to turn on the machine and place it at an adequate distance (approx 10 to 15 feet).
Then, go ahead to the Start button and choose the Settings option.

After that, you will need to click on Devices.

Make sure Bluetooth is turned on; if not, turn it on.
Next, you should hit the Add Bluetooth or other device.

Now, click on the Bluetooth option and wait until your PC detects your machine.
Once it detects your Cricut cutting machine, click on it to pair.
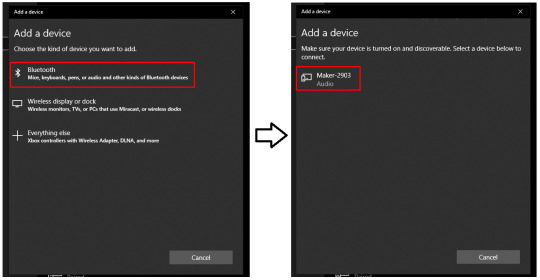
Finally, we are done with the connection setup via Bluetooth. Let’s proceed to the next step.
The Process of Cricut Setup for PC (Windows)
I think you are now prepared for the Cricut machine setup. If so, you might also have connected your Cricut to a computer via Bluetooth. If yes, then SUPERB! This is because I find the Bluetooth connection a little bit lengthy. It takes time, in my case. Anyway, let’s setup our Cricut machine.
Here is the easiest way to setup the Cricut cutting machine on a PC:
I would like you to open your internet browser and then navigate to cricut.com/setup.
Then, you have to download and install the Cricut Design Space app for your desktop.
After that, you need to follow the steps on your display to create a new Cricut account (If you do not have any).
Otherwise, sign in to your account using your Cricut ID & password.
Next, you will need to choose your Cricut machine model.
Also, turn on the Cricut by inserting the power cord and pressing the power button.
Here, you will want to connect your Cricut to your PC using a USB cable or Bluetooth (that we have already done above).
Afterward, you will be prompted to register your machine.
Now, your setup is done, and you can make your first cut easily.
Now, the Cricut setup for PC is complete. You are now ready to use your Cricut to make amazing crafts. Good Luck!
FAQs
Question 1: How to download Cricut Design Space on a PC?
Answer: To setup the Cricut machine, you will need to download and install the Design Space on your PC. Here’s how to download it:
Open the browser and navigate to design.circuit.com.
After that, you will see a checkbox. Click on it to enable the Download button.
When the download is done, you have to go to your Downloads folder.
If asked, click on the Yes button to trust the application source.
In the last step, installation will begin.
Question 2: What devices do I need to connect my Cricut machine?
Answer: You might require many requisite items while setting up your machine. Have a look at the following list:
A compatible computer, laptop, tablet, or smartphone
Cricut Design Space app
Cricut ID & password
Cricut machine
Power cable
USB cable
An internet connection with good internet speed
Question 3: Why do I need to setup my Cricut?
Answer: The Cricut setup is the foremost thing we do when getting a new machine so that we can use it. The setup process includes many things, such as connecting Cricut to Bluetooth, downloading and installing the Cricut Design Space app, and finally, creating a Cricut account. All these steps are part of the Cricut setup.
Source: Cricut setup for PC
#cricut setup for pc#Cricut setup#cricut setup create account#cricut setup explore air 2 setup#cricut setup maker#cricut setup on computer#install cricut design space app#cricut explore 3#cricut.com/setup#cricut new machine setup#install cricut explore air 2#cricut design space
0 notes
Text
How to Create a Cricut Account: Beginner’s Guide
Before you can create custom-made crafts, you must create a Cricut account, which allows you to log in to Cricut Design Space at any time. Simply put, it will give you a unique identity and register you as a regular user. Your Cricut machine won’t start working on any project unless you have a Cricut Design Space account. Once registered, you will get full access to the available features. This software will save your projects and designs and keep updating by launching new features.
The Design Space app works with a Cricut machine and helps crafters make new designs with their tools. Plus, it is compatible with computers and smartphones. If you are a new user and don’t know how to create an account, then stick to this blog till the end.
What Are the Minimum System Requirements for Cricut Design Space?
To make the app run smoothly on the computer system, all users must ensure that their devices meet the basic system requirements. In this blog, you will learn about the system requirements for Windows & Mac as well:
Windows
Operating System: Windows 10 or it’s latest version
Internet Connectivity: At least 2–3 Mbps for downloading & 1–2 Mbps for uploading
Offline: Can work without internet
Mac
Operating System: macOS11 or updated version
Internet Connectivity: Min 1–2 Mbps for uploading & 2–3 Mbps for downloading
Offline: Can work without internet connectivity
How to Download Cricut Design Space on a Computer?
Before you create a Cricut account, getting the app on your respective devices is essential. Get the app free of cost on your device by considering the below steps:
First, open your web browser, go to Cricut’s official website, and press the Download box in the middle of the page.

After the download ends, go to your device’s Downloads folder and double-click it.

Now, a pop-up window with installation progress will appear on your screen.
Following this, you will notice the Design Space icon on your device’s home screen.
You need to double-click it and sign in by entering your Cricut ID & password inside the specific area.

How to Create a Cricut Account on Your Computer?
After installing the designing software on your device, it is time for you to learn about how to create a Cricut Design Space account. If you are new and don’t have a clue about the process, then refer to the following pointers:
Start the process by going to the Cricut Design Space official website and tick the Let’s Get Started option.
After that, enter your email address, first name, last name, and country.
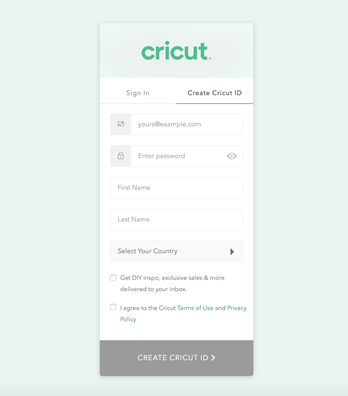
Next, go through Terms & Conditions and tap the box given next to it.
Now, press Send Me Cricut Tutorials, inspiration, and deals via email.
Following this, tap the Create Cricut ID option to get a confirmation message.
Afterward, click the Continue option and answer the questions asked.
Lastly, you will get the login credentials and start creating designs on the app.

How to Login to Cricut Design Space Account?
Once you are done with the create a Cricut account process, you can now start creating the design on the canvas. For easy login, you need to go through the steps given below:
Initiate the process by opening the Cricut app installed on your device.
After the app opens, you will land on the Cricut Sign-in page.
Now, fill in your Cricut ID & password inside the blanks and press the Sign In option.

Here you go, all set to create new projects on the app by using its respective tools.
Once you are done finishing all the above activities, you will be eligible to do many customized projects with cutting machines within a few minutes. Besides, this design app is compatible with smartphones.
Frequently Asked Questions
Question: How Do I Install Cricut Design Space on My Android Device?
Answer: The Cricut app is compatible with smartphones also, so to get the app, have a look at the steps given below:
First, you need to switch on your device and open the Google Play Store.
Afterward, type Cricut Design Space inside the search box.
Now, to get the app on your device, hit the Install button visible on your screen.
Next, go back to your home screen and open the installed app.
After the app opens, sign in or create a Cricut account by submitting your Cricut ID & password.
Question: How to Update Cricut App for Desktop?
Answer: Whenever the new version of the Cricut app is available, the app will instantly begin to update itself once it is connected to the internet. If you are already connected to the internet, then you will get a small pop-up notification asking for permission to update the app before using a new canvas to make new designs.
Question: How Can I Change My Cricut Design Space Login ID?
Answer: Any reasons if you want to change your Cricut login ID, then follow the below steps:
Start the process by going to your Cricut profile and pressing the Here option.
After doing that, tap the Edit Profile, enter your email address, and tick the Save button.
Now, you can log in to Design Space by entering this email ID on the sign-in page.
Read more: cricut.com/setup mac
Cricut design space
install cricut design space app
how to setup cricut explore
Source: create a cricut account
#create a cricut account#how to setup cricut explore#Cricut design space#design space signin#cricut design space download#cricut design space login#cricut.com/setup#cricut design space setup#cricut design space app#cricut design space for mac#cricut.com
0 notes
Text
Cricut Explore Air 2 Setup: Easy Tutorial for Beginners
I can feel your excitement if it is your first time using the Cricut machine for crafting. The process of the Cricut Explore Air 2 setup is straightforward, but it is wise to have the proper knowledge first. Plus, as a new crafter, you can face some problems during the procedure, and that is given. But don’t worry, as I am going to cover all the vital steps to complete the machine setup. With the help of this guide, you will be able to setup your Cricut machine on a Mac and iOS device. Without causing any further delay, let’s jump right into the process!
Cricut Explore Air 2 Setup on Your Mac Computer
Here are the comprehensive steps that will allow you to setup your Explore machine on a Mac operating system.
Step 1: Establishing the Bluetooth Connection
First and foremost, keep your machine within the 15 feet range of your Mac device.
After that, turn on the printer if it is not on.
Now, move to your Mac desktop and click on the Apple icon to select the System Preferences option.
In the System Preferences window, choose the Bluetooth icon.
After that, click on the Bluetooth toggle to turn it on; it will start searching for all the available Bluetooth devices under its range.
Look for your machine model number in the list and click on the Pair option in front of it.
When you see a prompt to enter the password, click on the 0000, then click on Pair.
Then, the Bluetooth connection process will be complete.
Moreover, you can use the provided USB cable for the connection if you want to establish a wired connection.
Step 2: Downloading Cricut Design Space on Mac
Initially, browse the official Cricut web page on your macOS device.
Move to the Apps page and click on the Download option under Design Space for Mac option. (If the Download option is not enabled, then click on the checkbox for the Cricut Terms of Use and Privacy Policy first.)
After that, a new screen will appear on the screen, where you can specify how to save the Cricut file after the download.
Once you have selected a folder path, click on the Save option; afterward, the download process will begin.
Wait for the download to complete, and then open the software file from the browser.
In addition, you can also access the selected folder to open the Cricut .dmg file.
Then, drag your Cricut icon to the Applications folder in order to initiate the installation folder
Now, you can launch the app by double-clicking on the “cricut design space” option in the Applications folder.
While opening the app, a Mac notice may show up on the screen asking if you want to open this app; click on the Open button to move forward.
On the app home page, complete the account login process or create a new account if you are a new user.
Next, select the right option to complete the Explore machine setup.
From the list of options, choose your machine model number.
Here you go! Your machine setup process is complete.
Cricut Explore Air 2 Setup on Your iOS Device
The following procedures will guide you through the complete process of Explore machine setup on iPhones and iPads.
Step 1: Connecting a Cricut Machine via Bluetooth
Before you move to the connection process, ensure the printer is switched on.
If you want to connect the machine to an iPhone/iPad using Bluetooth connectivity, bring both devices within the 10–15 feet range.
Next, tap on the Settings tab from the home screen of your iPhone/iPad.
On the next page, tap on the Bluetooth option and then tap on the toggle to turn on the Bluetooth connection.
Now, the device will start scanning for the Bluetooth devices within its connection range.
Henceforth, look for your machine name from the devices list and then tap on it.
If you see a prompt to enter the password to establish the Bluetooth connection, enter 0000 and then tap on Pair.
The device Bluetooth pairing will now be complete.
Once the Bluetooth connection process is done, you can move to the next setup of the Cricut Explore Air 2 setup.
Step 2: Installing Cricut Design Space App
Then, go to your iOS device and open the App Store from your home screen.
After that, tap on the search section and type “cricut design space.”
From the results, tap on the correct app and then tap on Get to download it. (you might need to enter your iTunes password to verify the download.)
Next, the download process will begin.
After downloading, the app will automatically be added to your home screen.
You can open the app from the App Store or from the home screen.
On the app, access your Cricut account by entering your registered ID and password. (You need to create a new ID if you are a new user.)
To setup your machine, tap on the Machine Setup option.
Follow the instructions, and the Cricut Explore Air 2 setup process will be complete.
Final Words
I have covered all the information you should know to setup your Cricut Explore Air 2 machine. With the help of this complete guide, you can easily setup the device on a Mac or iOS device without anyone’s help. However, to avoid any problems during the setup, make sure to check the device compatibility first. Besides that, feel free to ask for additional help if you want more help, or if any problem appears in the setup.
Frequently Asked Questions
Can I Connect My Cricut Explore Air 2 to My Phone?
Yes, you can connect your Explore Air 2 machine to a phone. The machine works with both Android and iOS smartphones and tablets. You can download the Cricut app on your device and then start using it after connecting both devices through the app. However, before downloading the app to your device, make sure to check if the phone model you have is compatible with the machine.
Why Is My Cricut Explore Air 2 Not Connecting?
If your Cricut machine is not connecting to a device then it could be the result of some technical glitches. You need to check the system compatibility criteria and check the network connection. Also, ensure that your device OS is updated and both devices are within the connection range. If the problem seems complex, then connect to the brand customer support team to get the solution of this problem.
Do I Need to Download Software to Setup Cricut Explore Air 2?
Design Space is essential software to setup and use, no matter which cutting machine you are using. Also, without the Cricut app, it is impossible to setup the machine, let alone use it. Therefore, as a Cricut crafter, you need to download the app on a computer or smartphone device.
Source: cricut explore air 2 setup
Visit here to know more: Cricut.com/setup
Pinterest
0 notes