#click for better quality tumblr will probably ruin it :(
Explore tagged Tumblr posts
Visit Tumblr Blog
Explore Tumblr blogs with no restrictions, modern design and the best experience.
Last Seen Tumblr Blogs


Fun Fact
Tumblr’s reach among the 26-to-35-year-olds in the US is 11%.
Text

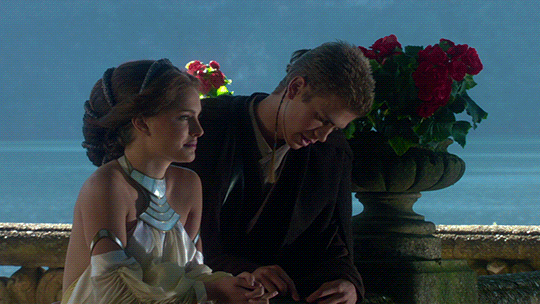
real sevika lovers fw her dykeified karen cut
Men DNI
DO NOT use or repost my art without credit/permission
#click for better quality tumblr will probably ruin it :(#SHE LOOKS GOOD IDC WHAT ANYONE SAYS YOURE ALL WRONG AND HATERS#!1!1!!!!1!!1!1!!1#SHES SEXYY IDC#she could be balding with the sh!ttiest comb over and Iwould still wanna have her kids#sevika#arcane#my art#fanart#lesbian#sevika x reader
802 notes
·
View notes
Text
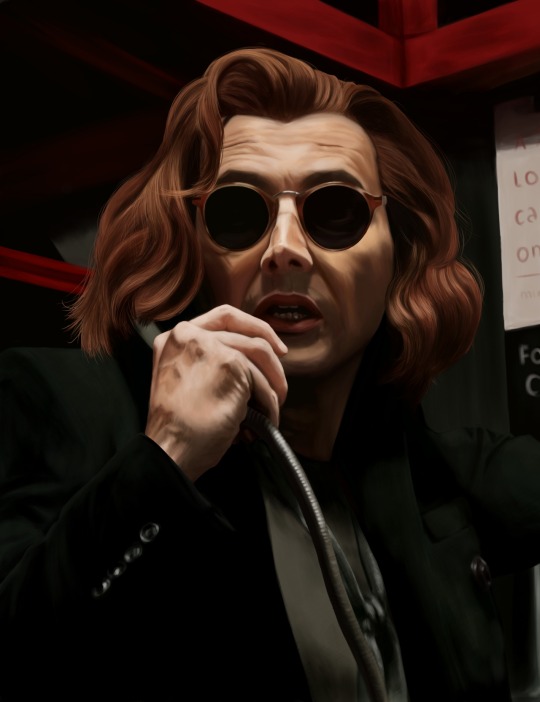
Finally finished this pair of paintings after another week !!!
Crowley's long hair is glorious, but such a pain in the ass to draw, I'm not sure I drew it properly, but I like it this way 😂
I used a reference photo for this one too. Yes, they're not from the same episode, but I want to have a theme for these two paintings and make them more connected.
As usual Tumblr kinda ruined the resolution, so please click on the image for better quality. 👍
This is the link to the Aziraphale one!
#digital art#good omens#painting#portraits#good omens fanart#crowley#david tennant#medibang#artists on tumblr
290 notes
·
View notes
Text
Im throwing my artfight thumbnails so far onto here
Im probably gonna switch it up again in a few days but its fun having the simple oc doodle + water themeing of some kind
(Click for better quality if you want I suppose. Tumblr ruins everythin lol)


(For those in the wild spotting this: wanna find me on artfight? My user is lo-art and I'm up for revenging anyone. Currently getting caught up but after that im hunting down some random stardust people to attack too)
10 notes
·
View notes
Photo


So these are long overdue lmao
I didn’t quite realise how 2021 was The Year of Crowley (2020 was The Year of Aziraphale) and 2022 was The Year of Izzy until I put these summaries together
I didn’t manage to account for every month these past two years, and 2022 is looking particularly sketchy (quite literally). This is because Shit Went Down :) I’m going to summarise it below for my own benefit▼
Personal/philosophical ramble under cut
In 2021 I had a lot going on, which I think explains the lack of art in June and August (memory’s fuzzy), and why I never posted some of the art in the summary here on tumblr (miiight post Nov and Dec soon-ish). In 2022 things initially screeched to a halt and I had the worst art crisis (and personal crisis tbh) I’ve ever had. Basically I had a really hard time drawing anything without it feeling completely soulless and of worse quality than my actual skill level, which heavily impacted my motivation to draw (sometimes my ofmd obsession came out on top lmao, but that fanart still felt like it was lacking something essential 99% of the time). I drew less, and felt worse for drawing less, which made me draw even less, repeat ad infinitum. It wasn’t until solidly into Autumn that I realised the root of the problem: I had tied the label “artist” so closely to my identity that it had effectively become my identity. And since it was my identity, I felt I had to become a professional artist or be miserable, and in order to become a professional artist I felt I had to constantly focus on honing my skills and get better, nitpick everything in every drawing and strive for impossible perfection, and “draw every day” as all the professional artists advice you to do (I have never managed to draw every day, and my failure to do so made me feel like I was lagging behind). Drawing had slowly but steadily become some insane rat race to me and eventually it ruined my art because I couldn’t appreciate where I was at. Actually finishing a piece of art felt like an incredibly arduous task with little reward (which is why I only really “finished” two pieces last year). I had drained myself of the inherent joy of creating. But realising this didn’t solve the problem, not on its own, because if the fact was “artist is my whole identity” the question then became “If I don’t create art, am I anything at all?”, and the answer for some time was “No.”
I have since found joy and genuine excitement in other types of creating (not that I hadn’t before, but never above a hobbyist level) with potential career opportunities that won’t make my daily life “miserable” (fun fact about me: my biggest fears are the unknown and having my soul ground down by the tireless gears of capitalism). This has helped me stress less about “becoming a professional artist” (something I’m still certain I’d enjoy, despite it all) and find some identity outside of art, but that perfectionist/improvement mindset in relation to my art didn’t start to leave me until a few days before New Year’s. That’s when I was suddenly inspired to make the Ed/Izzy sketch representing Dec ‘22 in the summary above. I had effectively given up on my art at that point, but my mental image was so strong I had to commit it to (digital) paper, no matter if it turned out like shit or not (which, in retrospect, is probably the most visceral motivation an artist can have for practicing their craft). Having no expectations on myself, and with the single-minded drive to capture the ~vibes~ and nothing more, I found the act of drawing fun and near effortless for the first time in fucking years. That’s when it clicked. You don’t have to try and make every aspect of a drawing perfect, and not every drawing needs to be properly rendered; just focus on the one or few most important things you need to be able to convey what it is you want to convey (in this case it was the overall poses and facial expressions). The rest may not be perfect, but it wouldn’t have been even if you tried to make it so, because perfection is fucking unattainable (as much as my chronically perfectionist ass wishes it wasn’t). Trying to attain it is a fool’s errand that’ll slowly eat you up, and your audience will most probably not even notice or care about the difference.
Audiences, especially online audiences, are arguably their own potential source of artist brainrot (and not the fun kind), and I’m of the firm opinion that art can definitely be made for no one’s eyes other than the artist’s own (in opposition to the mindset that the purpose of all art is for it to be shared with external parties) - my own art from years ago being an example of this. But I have found sharing my art with others to be such an inherent joy to me that I don’t think I’ll ever fully stop doing it, and will continue to try my best not to fall into the mental pitfalls that can come with it.
I don’t think my relationship to my own art is fully mended (and I’ve likely failed to see some of the cracks), but it’s definitely better now than it has been in a long, long while.
in short, thanks to edizzy’s dysfunctional marriage for helping me not give up on art I guess
#template by DustBunnyThumper on dA#my art#summary of art#fan art#original#suggestive#in regards to the contents of the read more: this does NOT mean art uploads will be more frequent; I am a spotty bitch and that's chronic
1 note
·
View note
Photo

It’s been a while since I drew some Sam and Hanndigo fluff <3 I love them so much!
#Tumblr will probably ruin the quality so please click for a better look!#Until Dawn#Samhannah#Hannah Washington#Sam Giddings#Wendigo#Hanndigo#SamxHannah#ud Hannah#ud Sam#Sam x Hannah#ud wendigo#Ud SamxHannah#should I tag this as nsfw?#there's a side bobby but that's it so..
112 notes
·
View notes
Note
how do you make your gifs?
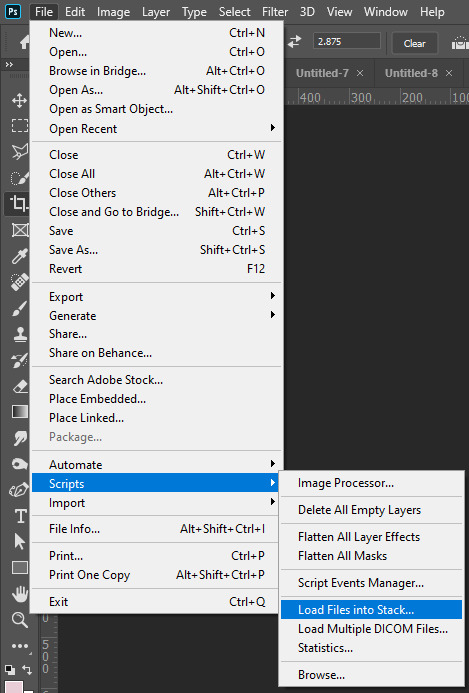
i use photoshop :) and basically everything i do is a collection of tactics picked up from various tutorials. this is the tutorial i first followed, but i can give a brief overview of my current process (i can't tell if you're asking for a tutorial but i'll write one anyway) under the cut
first step is screen capping using kmplayer (free to download). screen capping is the best for high quality
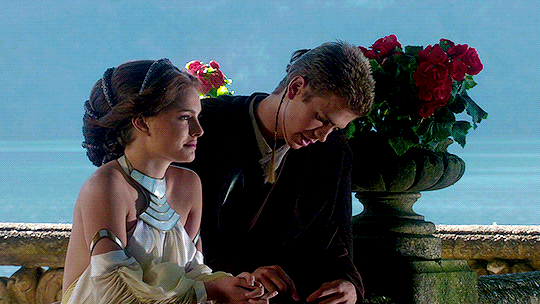
open video file (always 1080p or better), scrub to the scene you want to gif (i'll use aotc. for fun)
right click for this menu:

make sure you have these settings:

by default, frames will go to the 'capture' folder, but i find it useful to make a unique folder for each gif i make to access it easier
click start and then play the video until the frames you want to gif have passed, stop frame extraction. simple enough
now, all the frames are in a folder and you can load them into photoshop
2. actually using photoshop
i always load my frames into a stack:
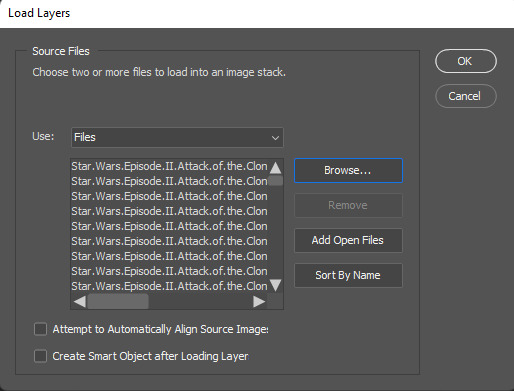
this takes a second, but i think it's worth it for high quality
with all layers selected, switch from the 'video' timeline to the frame-by-frame timeline, using the icon in the bottom left corner of the window
from:
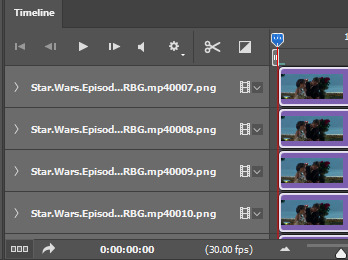
to:

right now, all the frames are in the opposite order. go to the three bars in the upper right hand corner of the timeline
first, make frames from layers

then, select all frames (again using the three horizontal lines in the top right). finally, reverse the frames.
3. cropping, timing, image size
this is the step where you have to do all three.
cropping: you can crop however you want, but i usually use the photoshop presets like 16x9. just make sure all your layers are still selected.

it's also important to trim any frames that are extraneous or you don't want. for tumblr, i try to aim for at least less than 50 frames on any given gif. ~30 is what i prefer
timing: most people put gifs at a delay of 0.05 sec. between frames. with all FRAMES selected, click the drop down at the bottom of any frame, change the delay as you please (Custom delay)

image size: every post on the tumblr dashboard is 540px wide. when making gifsets, this is important to consider
with everything still selected, go Image -> Image Size... (ctrl+alt+i on pc)

from there, you could export and have a gif appropriate for tumblr, but you probably still want to do some coloring.
here's my gif with NO coloring:
4. sharpening & coloring
everything after this part is pretty subjective in terms of what's "best" to do. this is just my method!!
to color, i convert my frames into a smart object. with everything selected (frames and layers), i switch to the video timeline again
then Filter -> Convert for Smart Filters. now every frame is condensed into one layer! yay!
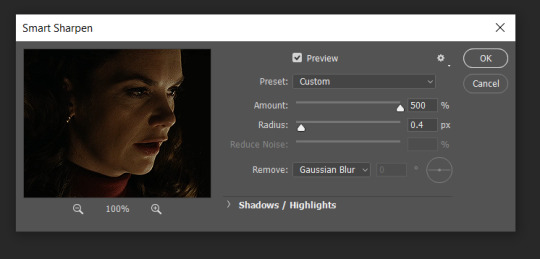
i have a sharpening action, but it's just Filter -> Sharpen -> Smart Sharpen...
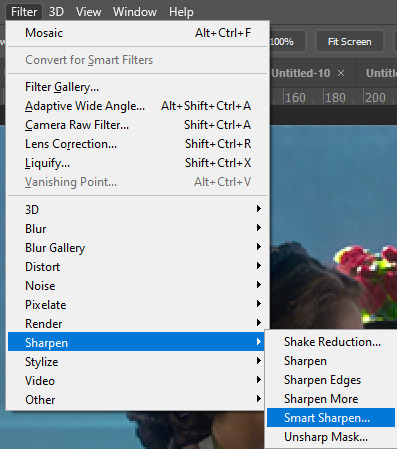
with these basic settings:

you can play around with these settings, though (FOR ANIMATION: set the opacity of this layer to ~30-40%). oversharpened gifs look low quality and unsharpened gifs look fuzzy
coloring is where you really get to have fun!! generally, my basic goal with any coloring layers is to brighten and balance colors.
go to the Adjustments windows and add a curves layer.

selecting white and black points (if they exist) with the eyedroppers can help balance colors AND brighten the gif

gif now:

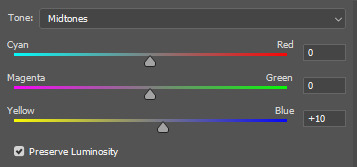
next, i use a Levels layer to add contrast
you can use white/black/grey points again, but i usually don't.

the left box can be from anywhere ~10-25 and the middle ~1.0-1.5
with levels:

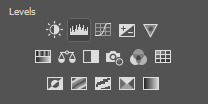
from there, i use Color Balance and Selective Color layers to alter anything else.
in this gif, i think the midtones are too yellow, so i'll change that with a color balance layer. i'd also recommend playing with the shadow tones to shift the overall tone of the gif. never go too extreme with these values, it ruins quality
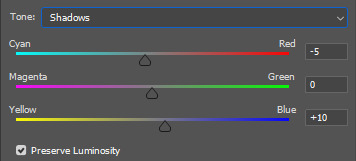
with these settings:
after that, i adjust any layers as needed!
5. caption (worst part)
add a layer of text, the box should span the entire gif:


then, i use a stroke and drop shadow (triple click on text layer for blending options):


but, again, this is all up to you.
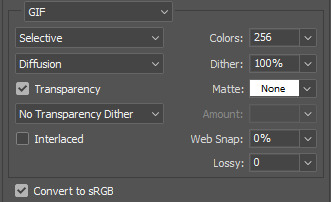
6: export
here are the settings i'm gonna use (File -> Save for Web):
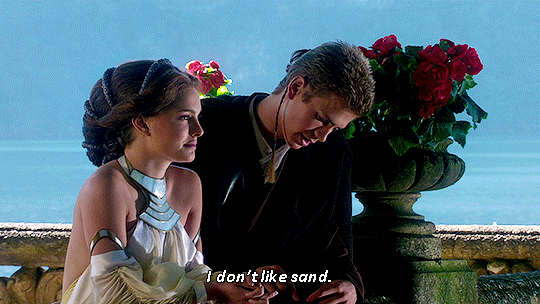
finished gif:
6 notes
·
View notes
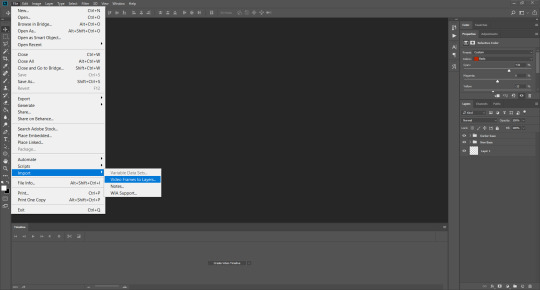
Photo
Hello! As requested, here is a tutorial on how I make my gifs. I would like to preface this by saying there are many ways to make gifs, and there’s no right or wrong answer imo. This is just how I personally go about doing so!
I will be using PS CC 2017, but as long as you have the video timeline option, it shouldn’t matter too much; on any version of PS, you should be able to adapt anything I mention here! You will also need some kind of screen recording software. I’ll talk a little more about that under the cut.
To start, you need the source material you will be making the gifs from! I get mine from snahp(.)it (avoiding links so tumblr hopefully doesn’t banish this from the tags lmao) and I always opt for either 1080p or 2160p. Not all laptops will support 2160p as it’s 4K, but either works great! You just want your gifs to be the best quality possible.
Next is where the screen recording comes in. I don’t use the screencapping method to make my gifs (where you use a program to cap a clip and then load those caps into a stack in PS). This isn’t for any particular reason… it’s just how my friends, (who very kindly taught me to gif), had always done it, so it’s now how I do it too. Personally, I find the quality to be just as good as the screencapping method, and have never noticed a difference between the two.
As I have a PC, I use the software built into it for screen-recording. If you go here: theverge(.)com/2020/4/21/21222533/record-screen-pc-windows-laptop-xbox-game-bar-how-to – you can see how to use the XBOX screenrecorder to record from files you have d*wnloaded. This also works on some streaming sites, but I think it depends on what browser you use. Personally, I recommend Firefox, as that seems to bypass a lot of the blocking and ads that occur when trying to do this sort of thing.
For MAC users, I have been told handbrake works well, as it converts MKV files to MP4, which can then be used to make gifs. You only need to convert part of the file to MP4 depending on how much you want to gif, and this also bypasses the screenrecording stage, as you can edit MP4 clips on Quicktime. I am told you can split them into smaller clips by going to edit > trim and it saves the new clip!
I have also used anyvideoconverter for small clips, but I can’t say what it does to the quality of your video, or how big of a file it lets you put in! With the XBOX screenrecorder, it doesn’t matter what type of video files you get, as the recording will save to MP4 anyway.
LOADING YOUR FRAMES
Now, go ahead and record whatever clips you want to gif. Make sure you have the video timeline open, by going to window > timeline. Then, go to file > import > video frames to layers.
Next, select and open your clip from where it has saved (with the XBOX recorder, it saves in video > captures). You should see a little window pop up, where you can move the sliders back and forth to clip your recording to whichever part(s) you specifically want to gif. I recommend trying not to load a lot of frames into photoshop at once, but I would be a hypocrite to say that, since I do it a lot lmao. Just be patient if you do!
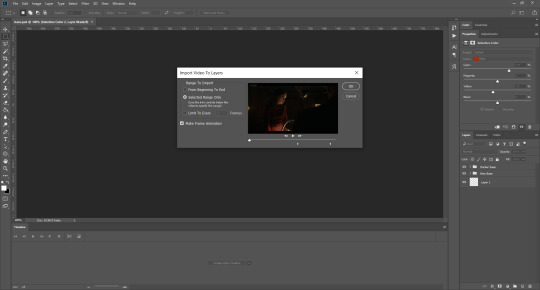
Once you have chosen the length, click okay. Never, EVER, I repeat NEVER click the button that says “limit to every __ frames”. This really ruins the flow and quality of your gif—it’s better to have shorter, but smoother gifs, I promise. And with tumblr’s new 10 MB limit, it shouldn’t be a problem anyway!
Then, your frames should open up. What we want to do is make them into a smart object, so we can edit all the layers at the same time. To do this, click the small button in the left-hand corner. ALWAYS click this first. If you don’t, it will only convert the first frame to a smart object and the gif won’t work.
Give it a second to sort itself out, then, on the right-hand side, select all your frames at once using the shift key.
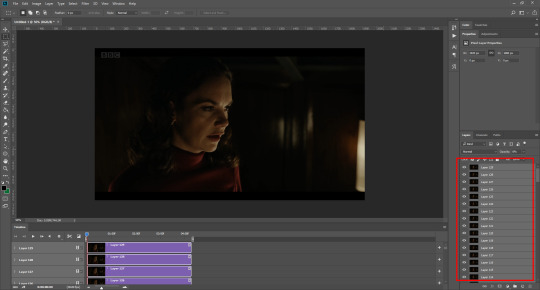
Then, go to filter > convert for smart filters. This might take a minute. Don’t click anything else in case PS gets angry lmao, just leave it for a second and it’ll do its thing. The more frames you have, the longer it takes! Now we have our gif, but it needs to be cropped, sharpened and coloured!
CROPPING
You want to start by selecting the rectangular marquee tool on the left-hand side, then drag it across by clicking and highlighting the area you would like to crop your gif to, like so:
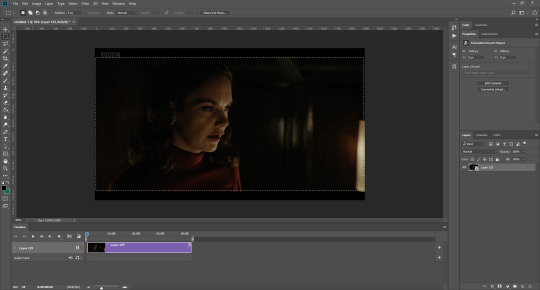
What I tend to do is select everything inside the black lines you sometimes get around your gif (this depends on what file you d*wnload), and also the tiniest bit inside the sides. This is because I’ve found if you crop it right up to the edge, you get a tiny bit of transparency on the sides of your gifs, which I’d rather avoid.
Once you have your desired selection, go to image > crop. Now, the dimensions for tumblr are 540px width, so all your gifs have to be that width. However, the length is up to you. I really like big gifs, so sometimes I even make a full square, or even longer. It’s entirely up to you, and what kind of set you want to make.
For the purposes of this gif, I will stick to what I usually go for, 540px by 350 px. This will mean you’ll have to crop some width off, but that’s okay, since Marisa isn’t central anyway. The cropping is always trial and error for me, as sometimes people move out of the frame within in the gif. The best thing to do is just try it, and then move the slider in the timeline window at the bottom to see if the person stays inside the gif, and if not, adjust accordingly.
Next, go to image > image size:
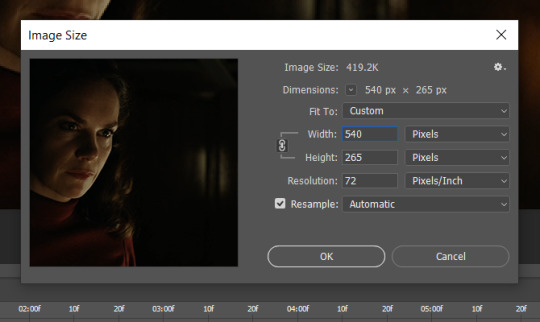
In this box, if I put the width as 540, the gif is a smaller height than I want, as it keeps to the dimensions of the gif when you load it into PS. That’s okay, just put the height you want instead, and we’ll crop off the excess.
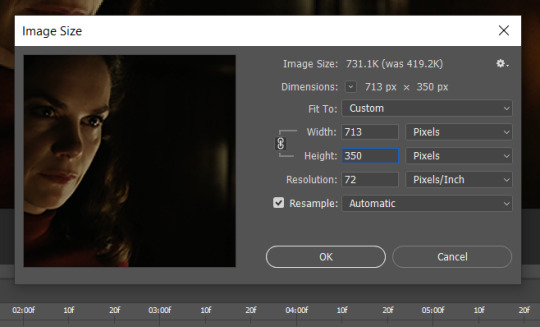
Then click OK. Using the rectangular marquee tool again, we need to remove the excess width. Part of the reason I like this version of PS is that it tells you the width of your selection as you do it, but you can always use the ruler as a guide, and check the size of your image by going to image > image size again.
Again, use image > crop, and your gif should now be the correct size!
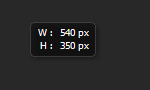
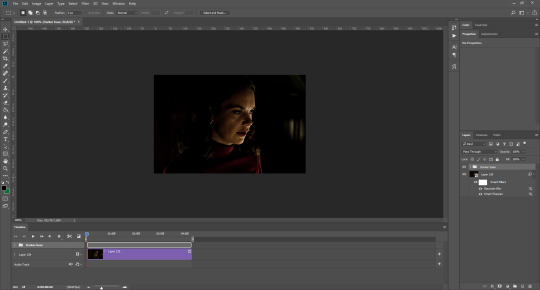
You can also use the crop tool in the timeline window to crop the length of your gif:
However, I tend to wait until later on to do this (which will be explained further down!)
SHARPENING
Next you want to go to filter > sharpen > smart sharpen.
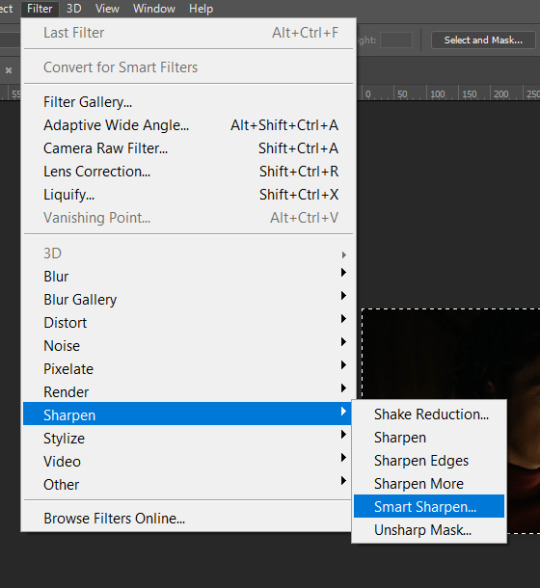
These are my settings. However, 0.4px is very sharp, too much so, but that’s easily fixed.
Go to filter > blur > Gaussian blur and then set it to 1.0.
Now on the right-hand side, we need to reduce the blur, so double click the little adjustment button, and change the opacity of the blur. I usually go for 20-30%!
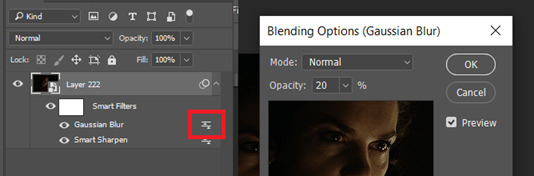
Then click OK, and that’s your sharpening done!
COLOURING
I picked this scene on purpose as it’s dark, so good for showing how to colour a gif. I have a base psd which consists of some very basic adjustments, but it mostly exists so I don’t forget what adjustment layers I like to use. I adjust them every time I make a gif, essentially colouring each gif from scratch.
In this case, the psd actually makes it darker. So, what I will do is turn each layer off, and adjust as I go. A lot of people say using lots of adjustment layers ruins the quality of your gif… I have never found this to be true, as long as you are gentle with them. If you whack the brightness right up to the top, it’s going to ruin your gif no matter if you use 1 adjustment layer or 100. I would just say use your common sense, and adjust a little at a time!
I start with a simple black to white gradient map set to soft light, because I think it helps you see depth once you add some brightness to it. I usually do this on about 10%, or more if needed. It’s probably unnecessary, I just like how it looks!

Then, I move onto using curves and levels. This is where things can diverge depending on who you’re colouring. If this person is white, it doesn’t matter too much. If they’re not white, you don’t want to white wash them. My best advice is to play around with it. By adding vibrance and other (usually the red) selective colour settings later, you can ensure you don’t change the person’s skin tone from what it originally was. You can also use layer masks at varying opacities (various shades of grey), on your curves and levels, to remove some brightening so that you’re not changing anyone’s skin colour. Just brighten slowly and check in with yourself honestly about how your gif looks.
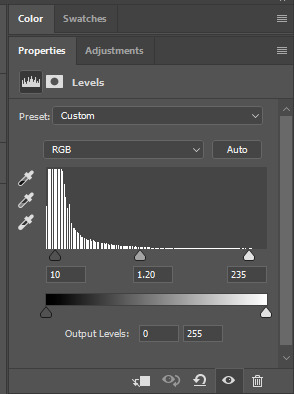
Some people don’t like using levels, or curves. It’s completely up to you. I tend to use both because levels are good for bringing depth, even if not brightening (though I like to use them for that as well).
One thing you can do is use the white point of the gif to make PS adjust the curves itself, however I like to drag the sliders myself and see what it looks like. Just make sure it’s not too bright, as we will be using further layers to brighten more, after.

Next is levels. The slider on the left controls the black point, the one in the middle controls the midtones, and the one on the right controls the white points. The black brings depth, the midtones adjust the overall brightness, and the white points produce stronger highlights. Again, you’ll get a feel for how this works as you practice. Just don’t use the white point excessively, especially if your characters are not white.
Then I add vibrance (+20!), because we’ve removed a lot of it when lightening the gif. Next is exposure, which I find brings out the highlight and shadow areas more effectively:

Then colour balance! This helps with scenes that might be a certain colour, i.e. too blue, too green, too red, etc. Moving the sliders in the opposite direction of the colour your gif is will counteract it. The best thing to do when accounting for different colours, is to make a new layer every time you change colour, so that you don’t get confused. I always add a new layer for colour balance and selective colour if I want to change more than one thing. So one for red, one for yellow, one for pink, etc.
A layer of brightness just to make the gif pop, and because the scene is extra dark, I added a very gentle extra curves layer:
SAVING YOUR GIF
Time to save the gif. You can go ahead and file > export > save for web (legacy) now, but then you’ll have to reopen the gif to reset the frame rate from 0.07, to 0.05. Instead of doing that, I use a modified action. The original was made by the very talented @elenafisher! So I do not take credit for that at all. You can find the original here: elenafisher(.)tumblr(.)com/post/190817437374/gif-sharpening-action-2-preview-download and in my resources tag. Please reblog it if you’re going to use this!
To use an action, first make sure you have actions turned on in window > actions. To load in your action, go to the little lines circled, and then load the action from your downloads:
Obviously if you don’t want to sharpen your gifs yourself, you can use the action as it is, and it will give you a beautiful glowing effect. If you’d just like to use it to flatten your gif into frames like I do, make sure to take out all the items I have highlighted:
Until it looks like this!
Make sure you have the layer under the file name highlighted, and then click the play button at the bottom! (If you get a screen saying select all frames cannot be found, don’t worry, just click continue!) You can delete the layer that does that if you want, I just keep it in case I realise I’ve forgotten to do something, because you can click cancel and edit your gif before you flatten it. Of course you can undo the steps to get back to the smart object version of your gif, it just takes longer!
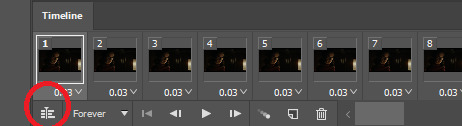
And now your gif is in frames and set to 0.05 already, so you don’t have to change the speed! All you need to do now before saving is change the gif cycle to “forever” in the bottom left-hand corner:
Then to save the gif go to file > export > save for web (legacy). Sometimes, the gif is bigger than the tumblr 10MB limit. You’ll be able to see this in the bottom left-hand corner of the gif save settings. If this is the case, I like to preview the gif, to see whether it would be best to cut frames off of the beginning or the end, or both. When you’ve decided, you can select the frames at the bottom, and in the right-hand side panel, and delete them both using the little bins/trash icons.
I keep checking and deleting frames until I get the gif under 10 MB! Just don’t delete frames from the middle, as then you’ll have the same issue as if you selected “every other frame” when making the gif: it won’t flow!
Lastly, these are my save settings:
So that’s it! That’s how I make all my gifs. Blending I do when the gifs are in the grouped, smart filter stage, whereas text I add on during the framing section above! Really hope this is helpful, please feel free to ask any questions you may have! 💖
#gif tutorial#tutorial*#completeresources#yeahps#chaoticresources#allresources#mikesmom#usergeo#userava#usertix#usersmile#usertom#if you'd like me to cover anything more advanced just shout#i wanted to show how i add text too but tumblr wouldn't let me add any more pics#but people can let me know if that's something you'd want!
516 notes
·
View notes
Text

I posted 729 times in 2022
That's 649 more posts than 2021!
22 posts created (3%)
707 posts reblogged (97%)
Blogs I reblogged the most:
@nuclearjazzhands
@kkneesockks
@modmad
@isthishowyoucool
@funnytwittertweets
I tagged 34 of my posts in 2022
#my post - 16 posts
#my art - 13 posts
#youtube - 9 posts
#animation - 6 posts
#animatic - 6 posts
#artists on tumblr - 5 posts
#art - 4 posts
#tj klune - 3 posts
#utwd - 3 posts
#under the whispering door - 3 posts
Longest Tag: 90 characters
#too many friendsships have been ruined by lack of communication and jumping to conclusions
My Top Posts in 2022:
#5

no caption just hananene :D
chapter 85 || cleaning and coloring done by yours truly
[CLICK IMAGE FOR BETTER QUALITY!]
42 notes - Posted January 6, 2022
#4

Old Indigo comic I redrew!
I can’t find the original quote but it was inspired by @offscreen-gloomverse-probably !!
44 notes - Posted August 29, 2022
#3
Just finished Under the Whispering Door and was devastated to find absolutely no fan content :(
Guess I’ll have to make some myself
50 notes - Posted July 7, 2022
#2
Has this been done yet…?
316 notes - Posted September 29, 2022
My #1 post of 2022

Fanart of @koboldfactory ‘s dullahan cat oc!!
(also shoutout to @wootinaboot for the basketball idea)
Anyways, thank you so much for letting me draw her! Very nice to draw something again after months of nothing
—> Original
536 notes - Posted November 15, 2022
Get your Tumblr 2022 Year in Review →
3 notes
·
View notes
Text
Compilation Post
Caitlyn Bairstow

~~
~ Thanks to @squid-ink-personal, @shirebeast, @losswoods, @the-wicked-bitch-of-the-best, @novirp13, @crowndaz, and @soflashtastic for allowing me to use their art in my collage! More info at the bottom of the page. ~
~~
First Role as Link: Cadence of Hyrule
Other LoZ Roles: (None)
Main LU character: Cadence of Hyrule Link/Rhythm/Cadenza/Tempo/Beat/Treble/etc. (Not actually in LU, but there are multiple fanmade versions inspired by LU with various names)
Alternate LU Voice for: (None)
Some characters with the same voice:
Lucky (Super Lucky's Tale), Mary (Crypt of the Necrodancer), Suna (Mega Man: Fully Charged), Glitch (Spy Kids: Mission Critical), Miss Hiss (Littlest Pet Shop: A World of Our Own), Mia (Lego Friends Holiday Special), Kobo and Shreya (Aegis Defenders), Cony and Bommbi (Line Rangers), Blue Bobbin (My Little Pony), Plink (Gigantosaurus)
...
In the game:
youtube
Cadence of Hyrule
Original Post
_______________________
Speaking
Voice Compilation (Various Voices)
youtube
She says a line as a boy character at 0:53.
Original Post
---
Lucky from Super Lucky's Tale
youtube
Some times are 0:52, 1:42, 2:39, 3:47, 6:56, 7:12, 10:10, 10:12, 10:49, 13:23, 18:00, 19:32, 19:34, 19:48, 20:50, and 21:49.
youtube
Times are 0:32 and 0:42.
Says "Come on!" in this video.
Original Post
---
Bommbi and Cony from LINE Rangers
Link to YouTube Video with Time Stamps 1:03 - 1:23
youtube
Bommbi is the one that explodes. Times are 1:04 and 1:18.
Cony is the rabbit with wings. One time she speaks is 0:38.
I think this is an episode that was made to promote an app.
This voice and the post before are the only "boy" voices that I could find by the actress.
Original Post
---
Caitlyn Bairstow the voice actress
youtube
An interview with the voice actress.
Original Post
_______________________
Singing
"Opposite's Days of Cosplay" (12 Days of Christmas Parody) from Youtube Channel
youtube
youtube
Used audiospeedchanger to see what the song sounded like when pitched down 4 semitones.
-3 semitones here
Original Post with Lyrics
---
"I Want A Hippopotamus For Christmas!" in YouTube Channel Collab Video
Song is between 1:59:00 - 2:02:08, or see the video below
youtube
This is a duet between the actress and another person.
The other person tends to overpower her voice, so it's kind of difficult to hear her.
Some lines where you can hear her a little better are at 2:00:10, 2:00:14, 2:00:48, 2:01:00, 2:01:17, 2:01:25, 2:01:34, and 2:01:42.
youtube
Some lines where you can hear her a little better are at 1:09, 1:13, 1:46, 1:59, 2:15, 2:24, 2:32, and 2:40.
It was very difficult to find songs for this actress.
Original Post with Lyrics
_______________________

~~
Thanks again to those who let me use their art in the picture! It was fun to make and I found so many cool designs in all kinds of unique art styles!
If Tumblr ruins the quality of the picture as it tends to do, click on it to make it clearer. You can also check out the full pictures below.
Specific Pictures Used:
@squid-ink-personal [Here]
@shirebeast [Here] [Here]
@losswoods [Here] [Here]
@the-wicked-bitch-of-the-best [Here] [Here] [Here] [Here] [Here]
@novirp13 [Here] [Here] [Here] [Here]
@crowndaz [Here] [Here] [Here]
@soflashtastic [Here]
I used a picture from Linked Universe as the background
I also tried to edit a picture of LU Legend to look like Cadence of Hyrule Link (+Marin→Cadence) [Here]
~
These are some nice pictures I found too, but the artists didn't respond when I asked them if I could use their art / I found them after I already made the picture, so I'm not putting them in the collage: [Here], [Here] [Here] [Here], [Here]
Also, if there's a design that's not in here, I probably just didn't see it! Feel free to tell me about anything I missed!
~~
#LU Cadence of Hyrule#LU Rhythm#Link#Caitlyn Bairstow#The Legend of Zelda#Linked Universe#Linked Universe Headcanons#Cadence of Hyrule#Legend of Zelda Voice Actors#Legend of Zelda Voices#Linked Universe Voices#Legend of Zelda#LoZ#LU#Linked Universe Headcanon#IYCHLS&S Compilation
15 notes
·
View notes
Note
Hey hnnny!!! Do you have any advice for doing lineart?
Ooh this is a great question that I can definitely give a lot of advice for! (I wrote this at the beginning when I thought I might only have three paragraphs of advice for this, and here I am after writing this, and well, see for yourself!)
Firstly, get to know what lineart you like! Do you like really textured and jagged line art, or smooth, almost perfectly consistent lineart? Go on Pinterest or YouTube or Instagram or even Tumblr and just take notes of the artists or artworks that really inspire you. Find what you feel like you want your art to have. I do want to point out that that doesn't mean you should limit yourself to only that style for the rest of your life, no. If there is anything that you take away from this, I hope it's to always experiment and study and grow. If something in your art isn't clicking for you, then experiment with something different!
Um anyway, back to the lineart advice haha
Depending on your medium and expertise as an artist, lineart has quite a few different qualities to it to consider. For instance, traditional versus digital lineart have very different aspects you have to experiment with.
For traditional, make sure you have a clear understanding for what your medium for your lineart (inks, sharpie, pencil, etc.) does when it interacts with your coloring medium, paper, or even the sketch. Often times, it's just a matter of whether or not your lineart is water soluble or not, so you don't risk bleeding or blending where you don't want it.
Now for digital art, since you have layers, the risk of blending mediums is all in your control with the addition of layers and the blending tool, (although some brushes have their own programmed properties that make them have textures or blending properties, so make sure to look out for that). The real worry with lineart here is how to control how your brush works. Get to know the hotbar for the brush tool, how to toggle the opacity, the flow, the smoothing tool, whatever your program offers. This will help you get the line quality you want.
Now comes the fun part...actually doing the lineart.
This is where my lesson becomes primarily digital art focused since that's my main medium. However, I'm sure much of this advice could still be somewhat applicable for traditional artists as well.
You know that constant complaint that "oh my gosh the sketch is soooo much better than the lineart"? Well, there's a few reasons for that I feel I've finally figured out. First off, you guys have probably all heard this, but you should lower the opacity of your sketch underneath by a considerable amount (or erase lightly on your sketch for my traditional artists). Then, when you do the lineart, you can see what you are actually working on way easier and can spot mistakes or empty spaces way easier.
The main thing that I find ruins my lineart if I'm not careful is if my sketching brush is smaller or bigger than my lineart brush. Always try to sketch in a similar sized "pencil" to your lineart "brush". Think about it; if the sketching brush is much wider than your line art brush you're going to end up having to guess if the outside or the inside of the line is what you need to trace over, possibly resulting in some lines that are very out of place with the rest of the piece. If you have a sketching pencil that is too thin then when you end up lining your piece, you may run out of space for a key detail of the lineart and it will feel cramped. I hope that all makes sense.
The other problem I constantly see with digital artists (and even traditional artists) is zooming in (or looking too closely) at the specific spot you're working on. When you neglect the other parts of the piece, you lack the proper context to make it all fit together in a cohesive way. So, constantly zoom out your piece and make sure everything looks good together.
To make your lineart visually interesting, (which is honestly why I was asked this question and not for the rest of my ramblings, but you're getting the full package anyway haha), there are a few things you can do.
I'm going to reiterate that you should experiment with the brushes in your digital library or in your traditional supplies. Find something new so you can find what you enjoy working with. I personally enjoy working with a chisel brush so I can have some interesting angles in my lineart, which leads me to my next point: Experiment with the line width! You can make the lineart slightly thicker in places where the lines intersect or where the shadows are really dark, whatever way you want to do it. I myself love to do really thick line art for major elements, and then go in with a smaller sized version of the same brush and do tiny or smaller details, like faces or metal carvings. This is another spot where you could experiment with line tapering. For my beginner artists, please beware that this means some of your lineart is not going to connect in some places without you going over the spot a second time. Rely on your eraser, I call it my second lineart brush because it helps smooth things down when I need to correct a line. Varying your line width is a great way to enhance the style of your lineart.
A really small piece of advice I have for you is to rotate your canvas or paper or whatever you're drawing on if the line doesn't come natural to you. Make it easier for yourself, not harder. Your art will thank you for it.
I'm going to leave you guys with one last piece of advice, and this one is the hardest to implement. It will take time and effort if you are just getting started, but it will help you with sketching too. It's gonna sound really silly when you see it, but I'm being 100% serious. You ready?
Be confident. Have faith that your hand knows what it's doing and start making long strokes with your pen. Try not to scratch small lines at a time, instead learn to control your hand and by extension your arm and shoulder. Confidence is key and it takes a long time to build up. So, to practice it, do what's called line exercises. Practice controlling your hand by making really quick marks with your pen or pencil. Try a bunch of straight lines in varying directions, right next to each other, or try to quickly draw circles one after the other. Try varying your thickness in an intentional way, making a gradient from thin to thick. Line exercises are a great way to loosen up and gain confidence. So, be confident!
If you read all the way through, good job! Now go out there and take it one step at a time! I threw a bunch of information out into the air because everyone is on their own path in art and has their own challenges to face, so don't feel like you need to apply everything I've listed here at once, just try one thing at a time. If I had to pick, I would experiment now so you can get to know what you enjoy sooner.
Have fun arting everyone!
10 notes
·
View notes
Text
We Might Still Get Ocarina of Time, Majora’s Mask, and Wind Waker for the Switch
***Disclaimer: I am not a trademark lawyer. I am only a regular person trying to make sense of the numbers. I am not making a formal stance as I may be reading the information wrong.***
***Warning: This is going to be very long with lots of pictures.***
A lot of people are bummed about there not being a Zelda All-Stars for the 35th anniversary. Some are even thinking that Skyward Sword HD is all we’ll get since it is already so close to the anniversary. But I’m here to say that we could probably still get it, or at least Ocarina of Time, Majora’s Mask, and Wind Waker separately. Here’s why I think that and it’s the same reason why I knew Skyward Sword was coming: The United States Patent and Trademark Office (USPTO). You can also find the same information on the World Intellectual Property Organization (WIPO) database.
What’s so important about trademarks? I don’t know, but I know they are important enough that the government is involved with regulating it. All I know it essentially means you have ownership over that mark. Remember when the Fine Bros tried to trademark “React”? (link) The USPTO and WIPO database are public to search for any trademarks in any category.
A few months ago when people were starting to guess what Nintendo was going to come out with for the Zelda 35th anniversary, I happened to remember that you can use the USPTO database to figure out if a new product was coming out. I decided to look some things up. The first thing I searched was Skyward Sword. **Tumblr ruined the quality of the images, but if you click on it, the quality should be better.
Edit: Clicking on the image will NOT work if you are on desktop and directly on my blog because Tumblr sucks. You can right click and hit view image, but that will take you from the page. You can also zoom in with your browser controls if you don’t want to go back and forth between my page. Both options may still be hard to read, so right clicking, view image, then zoom may be be the best option.

A trademark for Skyward Sword? With the priority date (apparently when Nintendo filed in a different country), filing date (apparently when Nintendo filed application in the U.S.), and registration date (apparently when USPTO allowed it) all being in 2020? And in the “recorded electronic game programs; downloadable electronic game programs; recorded video game programs; downloadable video game programs; video game cartridges; and much more categories” categories and more? Why would a divisive game that is a decade old get a trademark in 2020? So that’s how I knew the game was coming to the Switch.
So what about the other games?
Ocarina of Time?
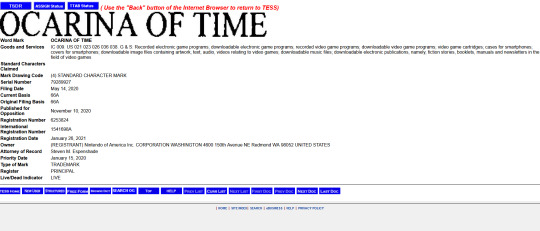
Also a 2020 trademark under the same category that Skyward Sword was in. Should note that the priority and filing dates are in 2020, but the registration date is in 2021.
Majora’s Mask?
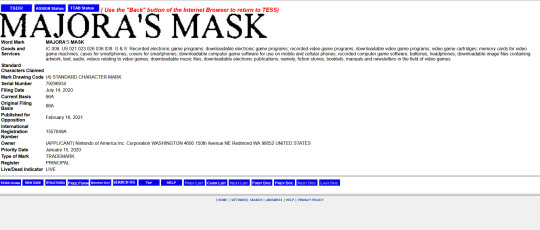
Same as Oot and SS, but we have some differences. Priority and filing dates are in 2020, but there is no registration date. It does have published for opposition listed for 2021.
Wind Waker?

Same position as MM. Priority and filing dates are in 2020, but there is no registration date. It does have published for opposition listed in 2021.
Twilight Princess? *Spoiler: It doesn’t seem promising.
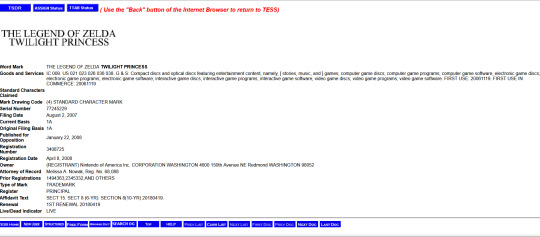
Yeah the years on this are 2007/2008. It does have a renewal date in 2018, but it is listed under the category of compact discs and other distinct categories. The other ones are under downloaded games or video cartridges categories. There seems to be no overlap.
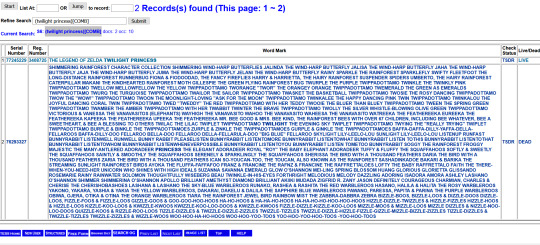
Off topic, but when I search twilight princess, only two things pop up: TP’s trademark and that huge monstrosity of a filing. Like look at how many words they tried to trademark?! And it’s from one person! Edit: Turns out it is around 660 words! Apparently she went to court about it, too, if you are curious. (link) Back on topic.
I should note that I could not find a separate listing for Zelda All-Stars, but I also can’t find a separate listing for Mario All-Stars. Only Sunshine has a 2020 trademark listing; 64 has a 1996/2000 trademark with a 2020 renewal and Galaxy has a 2006/2007 one with a 2017 renewal. Again, I may be reading a lot of things wrong here. All that’s on the USPTO database; I’m getting more info on the WIPO.
On WIPO, I did not find listings for Mario or Zelda All-Stars. 64′s active trademarks are from the late 90′s. Sunshine has 2020 trademarks. Galaxy has some active 2018 trademarks but not in the US. So It seems like there is some differing info. Let’s see about the Zelda games.
Skyward Sword has 2020 trademarks with some pending in Canada (CA), New Zealand (NZ), etc and some active in Australia (AU), Japan (JP), United States (US), etc. All filed under video game categories similar to the ones listed with USPTO and Skyward Sword’s trademark. Not surprised it is active in the US because if we compare it to the USPTO, SS has a registration date (when USPTO allowed Nintendo’s trademark).
Ocarina of Time has 2020 trademarks with some pending in CA, NZ, etc and some active in AU, US, JP, etc. All under video game categories. Not surprised it is active in the US since in the USPTO, it has a registration date.
Majora’s Mask has 2020 trademarks with some pending in CA, NZ, US, etc and some active in JP and AU. All under video game categories. It is pending on WIPO in the US and it also does not have a registration date in the USPTO database.
Wind Waker has 2020 trademarks with some pending in CA, US, NZ, etc and active in JP and AU. All under video game categories. Again, pending in the US and no registration date for the UPSTO.
Twilght Princess has 2006-2008 trademarks with them being active in JP, US, KR (Republic of Korea). All under video game categories.
What does this all mean? We already know that Skyward Sword is coming. So maybe Ocarina of Time, Majora’s Mask, and Wind Waker will be coming soon but I don’t know when. I think pending/registration dates may be a factor as to the timeline, especially in countries with a big gaming demographic. But again, there are still decent size countries with pending status for Skyward Sword, so there may be more to it. I don’t think Twilight Princess will be coming soon considering all the evidence and especially since it was already got ported in 2016 onto the Wii U, but maybe one day TP fans. I have been sitting on the USPTO info for a while and wanted to let somebody know, and now seems like the time.
Again, I am not versed on trademark terminology. Any extra information that isn’t directly from the databases came from a quick google search and my skimmed over analysis of it.
Edit: Ignore the next paragraph. I was an angry gremlin by time I finished this and was venting.
If there are any errors and I was not clear, I have been working on this for five hours. I also realized that WIPO was a thing while making this, so I had to go and research it. Tumblr glitched and ruined half my progress. It is also 5am where I am. I am tired.
But I hope you all learned some new information from this post. Also here are the links for the databases if you want to do your own research.
USPTO (click search our trademark database, I used basic word mark search) : https://www.uspto.gov/trademarks/search
WIPO (Just type in the box by text but make sure to delete the search below goods/services if moving on to another search) : https://www3.wipo.int/branddb/en/
#legend of zelda#loz#skyward sword#ocarina of time#majora's mask#wind waker#twilight princess#loz remakes#nintendo direct#nintendo#long post#look this is my first original post in years#leave me alone if its bad#don't follow me if you expect content like this#i just reblog shit I like#i'm just here to have a good time#but sometimes my brain says do it#and sometimes i say fuck it#i've spent so long trying to edit my grammar mistakes and all that bs
45 notes
·
View notes
Text

champions of the Kanto region 👑💖
just something to celebrate beating Pokemon Fire Red with only a single Spinda!
(probably need to click image to view better Tumblr loves ruining quality)
#this challenge was so fun and I hardly struggled at all#spinda is just so fun to use!#digital art#fan art#artists on tumblr#pokemon fan art#spinda#pokemon challenges#pokemon games#pokemon solo run#trainer red#red pokemon#generation three#hoenn pokemon#pokemon firered#pokemon art
24 notes
·
View notes
Text

(Click for better quality bc tumblr is probably going to ruin it lmao)
Heres the mercs! God this took forever, but theyre finally done! I may change some of the designs in the future (Specifically Soldier's), although im pretty happy with all their names (open to suggestions, though!). Ill draw Pauling, Admin, saxton, etc after im done typing up an explanation to the au as a whole.
#tf2 au#tf2#tf2 heavy#tf2 demoman#tf2 medic#tf2 scout#tf2 sniper#tf2 engineer#tf2 solly#tf2 soldier#tf2 spy#tf2 pyro#warrior cats#warrior cats au#Their heights should also line up with around their actual heights too#dont quote me on that though
69 notes
·
View notes
Photo


not the unit we got but the unit we deserved
#myart#myedits#karabita#hesokuri wars#chibita#karamatsu#LET ME DREAM#i tried rly hard to get this to match hesowars style and i didn't quite get it but close enough#also the text probably doesn't match anymore but W/E#also tumblr had to go and ruin the quality so pls click if you wanna see them at a better resolution!
526 notes
·
View notes
Text
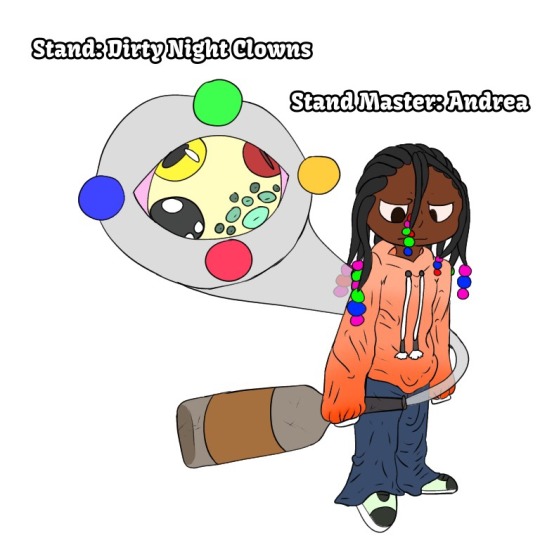


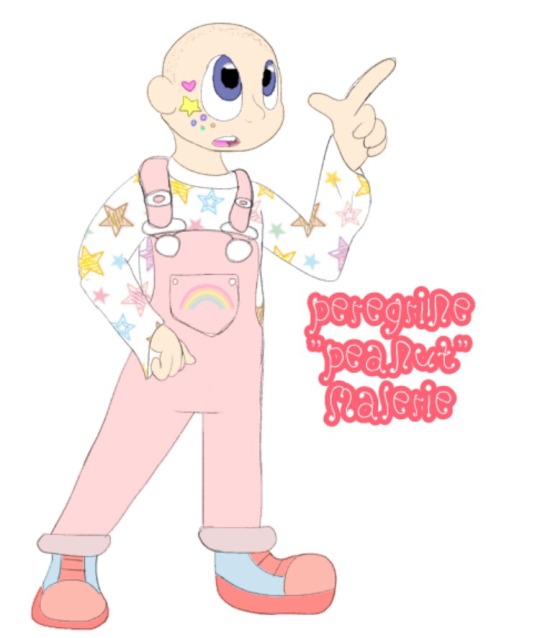
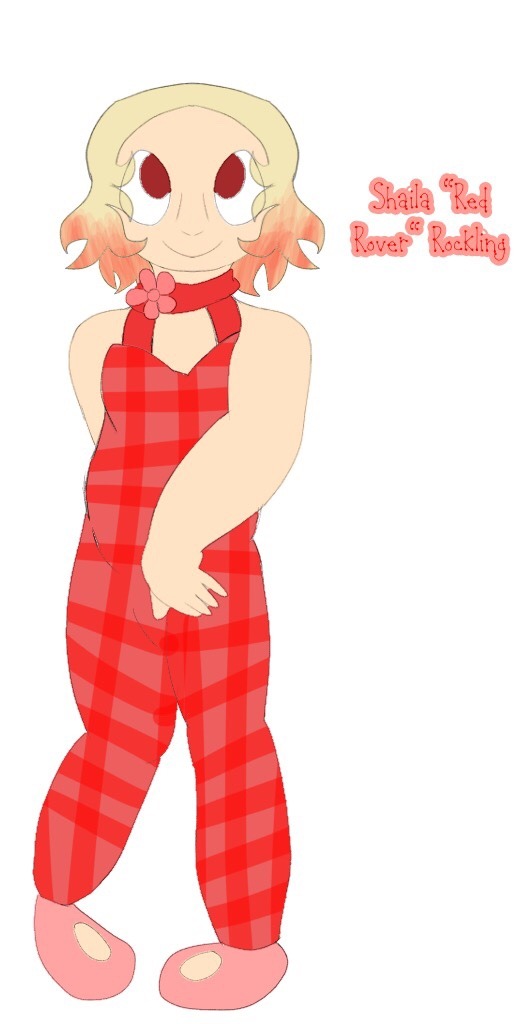

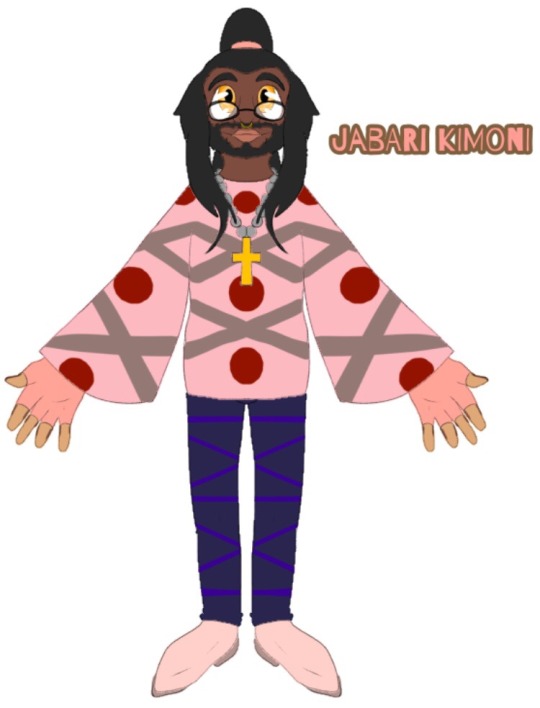

CLICK FOR BETTER QUALITY TUMBLR RUINED THE QUALITY OF THESE
Just a bunch of Jojo OCs! Not all of these are finished (such as stands not being designed for them yet) but I'm not sure all of them will be stand users. I know Peanut probably won't be but the rest who don't have a stand appearing before them will probably have stands at some point??
They're in order from when I created them, such as Andrea being made last year and Sinthi being made not even a week ago. I have a few more but I haven't finished their designs yet.
If you're curious...
Andrea Mocksing - African/Brazilian, Suffers from Fetal Alcohol Syndrome
Purple Pence - Swedish, suffers from Sickle Cell Anemia and Guillian-Barré Syndrome
Bambi Martin - Caucasian, suffers from Rett Syndrome
Jordan - African American - mainly healthy? Don't know yet.
Blur Russet-Anderson - African/Brazilian/British (Andrea's distant cousin), supposedly healthy?
Peragrine "Peanut" Malerie - Caucasian, suffers from Alopecia
Red Rover - Swedish, also she's Pence's younger sister.
Mason-Jar - African American, suffers from Borderline Personality Disorder.
Jabari "Kim" Kimoni - Completely African, totally not made for the soul reason to have someone to ship Pucci with cause I'm not really good with D*opucci!
Sinthi Anna-Mirabellra - Scottish, immigrant from Scotland and came to America.
I'll reveal the stand powers later and more on them, don't want to make this too long!
Also yes, I know I forget Eyebrows a lot!! No need to tell me~
#jojo oc#Andrea Mocksing#Purple Pence#Bambi Martin#Jordan Joelle#Blur Russet-Anderson#Peanut#Mason-Jar#Jabari Kimoni#Sinthi Anna-Mirabellra#my ocs are my babies#my ocs#jojo#jjba#jojo's bizarre adventure eyes of heaven#jojo's bizarre adventure
1 note
·
View note
Text
60 Question Tag Challenge
So I’ve been tagged by @kaffeinic to answer these questions. Here we go!
1: Selfie.
Gonna have to decline this one as I’m very shy but I’ll describe myself a little to make up for it - very long dark reddish-brown hair, brown eyes, pale skin, fun size.
2: What would you name your future kids?
Can’t say for certain, I feel it would depend on what name felt right for that baby but I like many Italian and Celtic names.
3: Do you miss anyone?
Yes, definitely. Old friends, old pen-pals/online friends who just seemed to disappear. And I miss my partner and my friends when we’re apart.
4: What are you looking forward to?
the weekend Seeing my partner again, working on my writing projects, starting third year of uni, and unashamedly the new Witcher series on Netflix!
5: Is there anyone who can always make you smile?
The lovely @kaffeinic for a start! My best friend, my partner, my doggy 🐕
6: Is it hard for you to get over someone?
All depends on the context. I’ve had crushes in the past that have been relatively easy to get over but then I’ve lost a couple of close friends and that had a pretty traumatic affect on me. Other times it’s been very easy because it’s been the right thing to do because the person I cut off was very toxic/bad for me.
7: What was your life like last year?
In some aspects very similar, my interests are all pretty much the same, my mental health was still difficult to manage and I was looking forward to my upcoming year of uni. But this time last year I wasn’t in a relationship and hadn’t began a really amazing journey of self-discovery.
8: Have you ever cried because you were so annoyed?
feel so attacked rn yes, I very much have. Crying tends to be my natural response to most high-running emotions.
9: Who did you last see in person?
Within my household, my mum as I’m currently home for the summer. Outside of that, my partner when he last came down to visit
10: Are you good at hiding your feelings?
I can be. I’ve found it depends on how well other people can see. Over the years I’ve had to hide all sorts of things, especially from my family. For years they didn’t know I was severely ill with anxiety and depression but that might be testament to poor observation and parenting skills, or maybe I just became that good and hiding things. I’m striving now to be more open about how I feel rather than bottling things up because it’s like drinking poison.
11: Are you listening to music right now?
Not at this minute.
12: What is something you want right now?
a hug a life without crippling mental illness probably inspiration to work on my novel
13: How do you feel right now?
Quite tired, a bit lonely. Really craving some energy and pizzazz
14: When was the last time someone of the opposite sex hugged you?
Probably the Monday before last at 4-ish in the morning when my partner had to leave for work.
15: Personality description?
Shy, careful, introverted, open, understanding, affectionate, creative
16: Have you ever wanted to tell someone something but you didn’t?
Pretty much the story of my life. For the last 10-12 years I’ve had to keep so many things to myself, especially regarding my family. I could never say what I thought/believed because it would all spiral into a catastrophe, wasn’t a very safe environment emotionally-speaking. There have been so, so many things I’ve wanted to say but haven’t for the risk of rocking the boat.
17: Opinion on insecurities?
Most people I know have them, including myself but I think people can be misled to think that others don’t have them because of the outward images they display. And from my experience they’re usually there for all the wrong reasons (if there’s such a thing as a right reason to have an insecurity)
18: Do you miss how things were a year ago?
No, I’ve only gained things since then.
19: Have you ever been to New York?
Not so far but I can’t say I have any desire to
20: What is your favourite song at the moment?
Perhaps Ring of Fire by In This Moment
21: Age and birthday?
21, born 18/09/97
22: Description of crush?
(also my partner) 6″1, dark/black hair, brown eyes, built like a brick shit-house, tan skin. He’s intelligent, considerate, honourable, principled, fierce, indomitable, funny, supportive and respectful.
23: Fear(s)?
I’m just gonna say most things
24: Height?
5″3
25: Role model?
Not sure I have one. I aspire more to qualities like goodness, kindness and innocence
26: Idol(s)?
see above
27: Things I hate:
Small mindedness, cruel/selfish/narcissistic people, exclusion, organised religion (as more of an abstract concept), people not getting what they deserve, when people aren’t willing to listen and learn, having plans ruined, seeing people upset, people who don’t put in effort/only take and never give back
28: “I’ll love you if...”
Lots of possible answers as there lots of sorts of love. In short, if you give back. But then love shouldn’t be conditional, so I guess I should say I couldn’t love someone (in any way) who never gives back.
29: Favourite film(s)?
Beauty and the Beast, Peter Pan, The Lion King, The Other Boleyn Girl, most Marvel movies
30: Favourite tv show(s)?
Call the Midwife, Brooklyn 99, QI, The Last Kingdom, Doctor Who
31: 3 random facts.
I’ve been writing for almost 12 years now. I sleep with cuddly toys and make bed forts. I use fantasy to cope with reality.
32: Are your friends mainly girls or guys?
Right now, girls but when I was in secondary school most of my friends were boys.
33: Something you want to learn.
In a physical/skills sense I’d like to learn how to dance. In an emotional/mental sense I want to learn how to unburden by troubles and let go of things holding me down.
34: Most embarrassing moment?
With an anxiety disorder many, many things feel hideously embarrassing. Don’t think I could pick out one exact moment.
35: Favourite subject?
History
36: 3 dreams you want to fulfill?
Becoming a successful author. Make lots of money so I can give it to charities. Overcome/beat my mental illnesses.
37: Favourite actor/actress?
Probably Tom Hiddleston
38: Favourite comedian(s)?
Stephen Fry, Dara O’Brian, Sandi Toskvig, Aisling Bea
39: Favourite sport(s)?
Riding, archery, yoga (still physical activity so I guess it counts), swimming, running
40: Favourite memory?
Right now I think it’s when my partner told me he loved me for the first time
41: Relationship status?
If you haven’t guessed by now I’m concerned 😋
42: Favourite books?
Too many to choose from.
43: Favourite song ever?
Probably Lithium by Evanescence
44: Age you get mistaken for?
Always younger than I am. I really haven’t changed much since I was about 16. Still get ID’d almost everywhere because I look younger than 18 apparently
45: How you found out about your idol.
Not really applicable.
46: What my last text message says.
That’s no one’s business.
47: Turn-ons?
Maturity, experience, intelligence, someone who knows themselves and is in control, someone who can give care and guidance, someone who can bring my out of my shell.
48: Turn-offs?
Idiocy, lack of self-care/hygiene, someone who isn’t willing to listen, entitlement, intolerance, confidence when it hasn’t been earned.
49: Where I want to be right now.
The New Forest
50: Favourite picture of your idol?
Kinda need an idol first...
51: Star sign?
Virgo
52: Something I’m talented at.
anxiety? I’m quite good at riding and hopefully my writing isn’t too shabby
53: 5 things that make me happy.
Animals, people I love, random acts of kindness, smells that awaken nice memories, creative passion
54: Something that’s worrying me at the moment.
Guess at random and you’ll probably be correct.
55: Tumblr friends?
@kaffeinic I feel we clicked really really fast and they are possibly the bravest person I’ve ever met and I hope we stay friends.
@alittleandherdaddysworld they’ve been really kind to me and we seem to have some things in common, I hope we get to know each other better!
@xxdaddyslitttleprincessxx they’ve also been really kind to me when I needed someone to turn to and I hope that we too can turn our acquaintance into a friendship!
@thorkingofasgard I think we’ve known one another for just over a year and have had many lovely talks over that time, they’re always a friend I can turn to.
@mblargh-its-me-loki a friend who I sometimes don’t hear from for long periods at a time and I often miss them and hope they’re doing okay
@c0ffeebee their artwork and dedication is second to none and I like to think we got on well when I commissioned them for some art
56: Favourite food(s)?
Love curries and stir-fry, anything involving noodles, Italian cuisine and I’ll never say no to cake
57: Favourite animal(s)?
Dogs, horses, deer, bunnies, foxes, otters, dolphins, mice (I really could go on so I’ll stop myself)
58: Description of my best friend.
5″5, dark blonde hair, brown eyes, tan skin. She’s lovely, intelligent, determined, hilarious, gorgeous and we know each other back to front
59: Why I joined tumblr?
At first it was to connect with more people and spread my fanfiction work but over time it’s become more about just sharing and interacting with what I like and trying to make more and more lovely friends
60: Ask me anything you want.
Hold nothing back
I’m going to tag my listed tumblr friends so that’s @alittleandherdaddysworld @xxdaddyslitttleprincessxx @thorkingofasgard @mblargh-its-me-loki @c0ffeebee and any of my followers are welcome to take part
1 note
·
View note