#c programming tutorial
Explore tagged Tumblr posts
Visit Tumblr Blog
Explore Tumblr blogs with no restrictions, modern design and the best experience.
Last Seen Tumblr Blogs


Fun Fact
In 2020, 27% of US Tumblr users had an annual household income of over $100,000.
Text
What is C? A Beginner’s Guide to C Language and C Programming
what C is, why it’s important, and how you can get started with C programming When it comes to programming languages, C holds a special place as one of the most popular and foundational languages in the software development world.

Whether you’re just starting your coding journey or want to build a strong base for advanced programming, understanding C is essential. Let’s dive into what C is, why…
#c programming#programming#c programming language#c programming for beginners#c (programming language)#c programming tutorial#programming in c#c programming course#programming language#c programming full course#programming for beginners#programming fundamentals#programming hero#programming language (software genre)#programming memes#c language programming#programiz c programming#c programming language tutorial#learn c programming#c programming basics
2 notes
·
View notes
Text
Advanced C Programming: Mastering the Language
Introduction
Advanced C programming is essential for developers looking to deepen their understanding of the language and tackle complex programming challenges. While the basics of C provide a solid foundation, mastering advanced concepts can significantly enhance your ability to write efficient, high-performance code.
1. Overview of Advanced C Programming
Advanced C programming builds on the fundamentals, introducing concepts that enhance efficiency, performance, and code organization. This stage of learning empowers programmers to write more sophisticated applications and prepares them for roles that demand a high level of proficiency in C.
2. Pointers and Memory Management
Mastering pointers and dynamic memory management is crucial for advanced C programming, as they allow for efficient use of resources. Pointers enable direct access to memory locations, which is essential for tasks such as dynamic array allocation and manipulating data structures. Understanding how to allocate, reallocate, and free memory using functions like malloc, calloc, realloc, and free can help avoid memory leaks and ensure optimal resource management.
3. Data Structures in C
Understanding advanced data structures, such as linked lists, trees, and hash tables, is key to optimizing algorithms and managing data effectively. These structures allow developers to store and manipulate data in ways that improve performance and scalability. For example, linked lists provide flexibility in data storage, while binary trees enable efficient searching and sorting operations.
4. File Handling Techniques
Advanced file handling techniques enable developers to manipulate data efficiently, allowing for the creation of robust applications that interact with the file system. Mastering functions like fopen, fread, fwrite, and fclose helps you read from and write to files, handle binary data, and manage different file modes. Understanding error handling during file operations is also critical for building resilient applications.
5. Multithreading and Concurrency
Implementing multithreading and managing concurrency are essential skills for developing high-performance applications in C. Utilizing libraries such as POSIX threads (pthreads) allows you to create and manage multiple threads within a single process. This capability can significantly enhance the performance of I/O-bound or CPU-bound applications by enabling parallel processing.
6. Advanced C Standard Library Functions
Leveraging advanced functions from the C Standard Library can simplify complex tasks and improve code efficiency. Functions for string manipulation, mathematical computations, and memory management are just a few examples. Familiarizing yourself with these functions not only saves time but also helps you write cleaner, more efficient code.
7. Debugging and Optimization Techniques
Effective debugging and optimization techniques are critical for refining code and enhancing performance in advanced C programming. Tools like GDB (GNU Debugger) help track down bugs and analyze program behavior. Additionally, understanding compiler optimizations and using profiling tools can identify bottlenecks in your code, leading to improved performance.
8. Best Practices in Advanced C Programming
Following best practices in coding and project organization helps maintain readability and manageability of complex C programs. This includes using consistent naming conventions, modularizing code through functions and header files, and documenting your code thoroughly. Such practices not only make your code easier to understand but also facilitate collaboration with other developers.
9. Conclusion
By exploring advanced C programming concepts, developers can elevate their skills and create more efficient, powerful, and scalable applications. Mastering these topics not only enhances your technical capabilities but also opens doors to advanced roles in software development, systems programming, and beyond. Embrace the challenge of advanced C programming, and take your coding skills to new heights!
#C programming#C programming course#Learn C programming#C programming for beginners#Online C programming course#C programming tutorial#Best C programming course#C programming certification#Advanced C programming#C programming exercises#C programming examples#C programming projects#Free C programming course#C programming for kids#C programming challenges#C programming course online free#C programming books#C programming guide#Best C programming tutorials#C programming online classes
2 notes
·
View notes
Text
C Programming Tutorial for Beginners: A Simple Guide

C programming is one of the most popular and powerful programming languages. It is widely used in software development, operating systems, and embedded systems. If you are new to coding, this C Programming Tutorial for Beginners will help you understand the basics in an easy way.
Why Learn C Programming?
C is a fundamental programming language that forms the base for many modern languages like C++, Java, and Python. Learning C helps you build a strong foundation in coding logic and problem-solving.
Basics of C Programming
To start with C programming, you need to understand some key concepts:
Syntax: C follows a structured syntax with simple commands.
Variables and Data Types: Variables store values, and data types define the kind of data (e.g., integers, characters).
Operators: Used for calculations and logic, like addition, subtraction, and comparisons.
Control Statements: Help in decision-making (if-else) and loops (for, while).
Functions: Blocks of code that perform specific tasks and make programming easier.
How to Start Learning C?
You can begin learning C programming by reading tutorials, practicing basic programs, and understanding coding logic. Start with simple concepts and gradually move to advanced topics like pointers and file handling.
C is an excellent choice for beginners because it helps develop strong programming skills. Start your C programming journey today!
For a detailed step-by-step guide, visit C Programming Tutorial for Beginners.
0 notes
Text
C Programming Tutorial for Beginners

Learn C programming from scratch with this beginner-friendly tutorial. Step-by-step lessons, simple examples, and easy explanations to help you start coding in C quickly. Perfect for beginners!
0 notes
Text
Please for the love of fuck can I read one single fucking Linux tutorial you don't need a bachelor's degree to understand
#I once had to do a thing I can't remember#and the so-called beginner friendly tutorial told me that I had to open up the console and install a program#it took me about twenty minutes to figure out#ON MY OWN#BECAUSE THE TUTORIAL DIDN'T TELL ME#that I had to open it in a specific folder#and HOW to open it in a specific folder#now I'm trying to find out if I can install different programs on different storage drives#and someone is telling me 'oh Linux doesn't have C D and E drives'#I SUSPECT that there actually is an equivalent term in Linux and they're just playing dumb to be snotty#bc Nocturnal sure as fuck has a C drive#and the ability to add another drive in the form of a microSD#but maybe Mint is just different to SteamOS#Dusty has opinions
10 notes
·
View notes
Text
Continuing with our project’s upgrades, we are addressing the character class! Let’s clean it up!
youtube
#shawnthebro#ue4#unreal#stb#tutorial#youtube#unrealengine#unrealtutorial#unrealengine4#programming#UE#ue5#fighter#indie fighter#fighting#games#fighting game#how to make a fighting game#how to make your own fighting game#how to make a game#c++#code#coding#program a game#program#write code#character#class#character class#clean code
2 notes
·
View notes
Text
still learning R and like... i know piped commands make for nicer & more readable code i knowww... but why take away the brackets!!! i want the brackets back!!!!
#personal#LIKE WHY CANT WE JUST HAVE STUFF ON MULTIPLE LINES LIKE YOU'D DO WITH A FOR LOOP IN C OR WHATEVER#GIVE ME BACK MY BRACKETS#im a mathematician!! i need those!! essential nutrient!!!!#adventures in programming#watch ill find out this is just a personal preference of the guy whose tutorials im watching
6 notes
·
View notes
Text
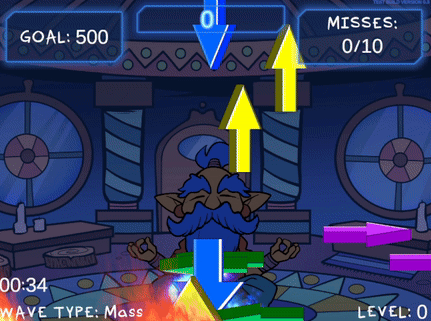
I dislike using rigidbodies to move my objects because physics interactions can sometimes go ham and while that can be very amusing, I prefer things to be predictable. So for moving arrows in this game I handled the movement math myself via coroutine. Let's take a look-see, shall we? :3

The goal of this coroutine is to move its symbol object in an arcing motion from its initial position, moving it upward and to either the right or left. Then it will fall downward. Rather than having each symbol object run this coroutine from an attached script, I am using a central script (my GameManager) to apply this movement to a given object, so the first thing I do is make sure the symbol still exists before proceeding with the coroutine:
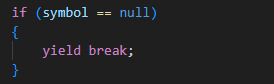
If we find that our symbol has been destroyed, we exit the coroutine with "yield break". You wouldn't need this check if the script is running this movement on its own object, as coroutines are ended upon an object's destruction.
There are a bunch of variables we'll define within our coroutine to calculate our desired motion; we'll start by defining an arcDuration:

This determines how long the object will take to move in the arc shape. A shorter duration results in faster movement. Using a random amount between a min and max duration creates some variance in how fast different symbol objects will move. I have my minArcDuration set to 1 and maxArcDuration set to 2.5 for quick bouncy movements.

These variables referencing the outermost bounds of the camera's view will be used to ensure that symbols remain within the visible area of the camera at all times. I'm not using a topBound because I'm fine with symbols possibly going off the top of the screen, but I use a maxArcHeight variable that is set low enough that they never do.

For even more spawn variability, we add a little randomness to our starting point. My spawnPointVariance is set very low at 0.3; my initial symbol spawn position is low on the screen, and due to how the rest of this coroutine works, it's important that the symbols are never allowed to spawn below the bottomBound or else they will be instantly deleted (and result in a miss!)

The height here is, of course, how far up the symbol will travel, and the distance refers to how far it will move to the left or right. We calculate the peak of the arc by adding our distance and height to the x and y values of our starting position. Randomizing between negative and positive distance values for our x position adds another layer of variability which includes the possibility of moving either left or right, even though our minArcDistance and maxArcDistance are both set to positive values for clarity (mine are set to 1 and 6).

This is the part of the code that decides upon our symbol's speed by calculating the distance it has to cover from its start to its peak. By dividing our horizontalDistance by our arcDuration (distance divided by time), we calculate how fast the symbol needs to move to cover the entire distance in the given duration. Mathf.Abs is used to ensure that horizontalDistance is always positive, lest we get a negative value that causes us to move in the opposite of the intended direction.

We'll also want a speed variable for when the arcing motion ends and the symbol starts falling, that's where downwardSpeed comes in. In earlier versions of this function, I used downwardSpeed alone to transform the object's position, but I've since refined the logic to take the current horizontalSpeed into account for more consistent motion; we'll see that later. (Also you can see I've been tweaking that arbitrary range a bit... the fall speed was brutal during those mass waves ;o;)

Here we create an elapsedTime variable starting at 0. In our while loop, we will use this variable to count how much time has passed, and if it becomes greater than or equal to arcDuration, we'll change isFalling to true and begin moving down.
We create a Vector3 moveDirection which gives the vector pointing from the startPosition to the peakPosition, and then turn it into Vector3 horizontalDirection, which retains only the X-axis direction. Both values are normalized to ensure consistency. Without normalization, the magnitude (or distance) of the vector would vary depending on the distance between the start and peak positions, which could result in inconsistent speed. Normalization caps the magnitude at 1, meaning the vector represents just the direction, not the distance, allowing for consistent speed calculation later.
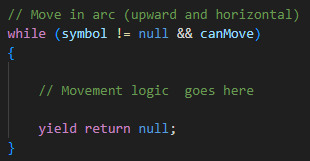
Here's how we start our while loop: as long as our symbol object is not null and the game says we canMove, we say yield return null, which will instruct our loop to occur every frame. If either the symbol becomes null or canMove becomes false, the while loop will end and so will the coroutine - for this reason, I only set canMove false when the game ends and the symbols will never have to resume movement, rather than in cases where I want them to pause movement and resume later, such as when a player pauses the game or during level-up periods. For the latter I use an isLevelingUp bool in my while loop that waits until that bool is false before proceeding (yield return new WaitUntil(() => !isLevelingUp)), and for the former I actually change the game Time.timeScale to 0, which is not typically recommend but fuck it we doin it live, because I don't have a mechanism for resuming this function with appropriate variables if it is stopped. It could surely be done if you just store the local variables somehow.

This is the first part of our movement logic that we put in the while loop; remember we already set isFalling false, so this part will proceed with the rising motion.

We count our elapsedTime here by adding Time.deltaTime, a variable which represents the time in seconds that has passed since the last frame, ensuring that time calculation is frame-rate independent. Do NOT use Time.time in cases like this unless you want your users with varying computer specs to all have different experiences with your game for some insane, villainous reason
The variable 't' is looking at the elapsedTime divided by arcDuration, a ratio that tells us how far along we are in the arc movement. If elapsedTime equals arcDuration, this ratio would be 1, meaning the arc is complete. We use Mathf.Clamp01 to clamp this value between 0 and 1, ensuring that it won't ever go higher than 1, so that we can use it to calculate our desired arcPosition and be sure it never exceeds a certain point due to frame lag or some such. If 't' is allowed to exceed 1, the arcPos calculation could possibly go beyond the intended peakPos. We are going for predictable motion, so this is no good

We define our Vector3 arcPos with Vector3.Lerp, short for "Linear Interpolation", a function for calculating smooth transition between two points overtime. Ours takes our startPos and peakPos and moves our symbol between the two values according to the value of 't' which is incrementing every frame with Time.deltaTime. As 't' progresses from 0 to 1, Vector3.Lerp interpolates linearly between startPos and peakPos, so when 't' is 0, arcPos is exactly at startPos. When 't' is 1, arcPos reaches peakPos. For values of 't' between 0 and 1, arcPos is smoothly positioned between these two points. Very useful function, I be lerping for days
Then we alter the y coordinate of our arcPos by adding a calculation meant to create smooth, curved arc shape on the y axis, giving our object its rounded, bouncy trajectory. Without this calculation, you'll see your symbols rising and falling sharply without any of that rounded motion. This uses some functions I am not as familiar with and an explanation of the math involved is beyond my potato brain, but here's a chatgpt explanation of how it works:
Mathf.Sin(t * Mathf.PI): This calculates a sinusoidal wave based on the value of t. Mathf.PI represents half of a full circle in radians (180 degrees), creating a smooth curve. At t = 0, Mathf.Sin(0 * Mathf.PI) is 0, so there’s no vertical displacement. At t = 0.5, Mathf.Sin(0.5 * Mathf.PI) is 1, reaching the maximum vertical displacement (the peak height of the arc). At t = 1, Mathf.Sin(1 * Mathf.PI) returns to 0, completing the arc with no vertical displacement. This scales the vertical displacement to ensure the arc reaches the desired height. If height is 10, then at the peak, the symbol moves 10 units up.

With those positions calculated, we can calculate the "newX" variable which represents where we want our symbol to appear along the x axis. It adds the horizontal movement to the current x coordinate, adjusted for the time passed since the last frame.
We use Mathf.Clamp to ensure our newX value doesn't exceed either the left or right bounds of the screen. This function limits the given value to be between min and max value.

Finally we tell our loop to actually reposition the symbol object by creating a new Vector3 out of newX, arcPos.y, and using our symbol's own z coordinate. That last bit is important to ensure your sprite visibility/hierarchy doesn't go out of whack! If I used arcPos.z there instead, for example, it's likely my sprites would no longer be visible to my camera. The z position the symbol spawned at is the z position I want it to retain. Your needs may vary.
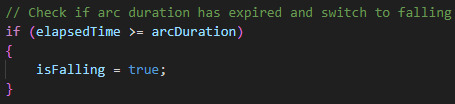
This part tells us our arcDuration should end, so we set isFalling to true, which will cause the secondary logic in our while loop to trigger:
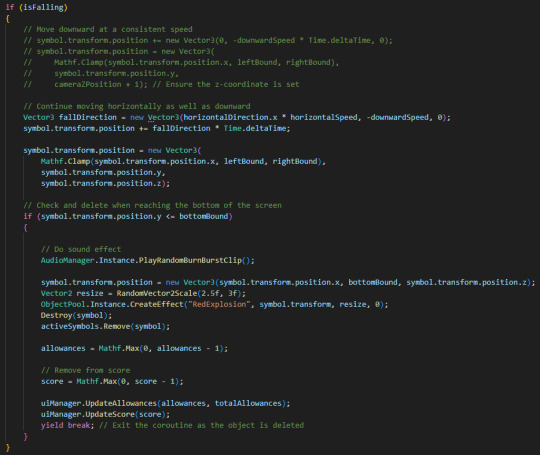
Previously, objects retained their x position and only had negative downwardSpeed applied to their y position, but I didn't like that behaviour as it looked a little wonky (symbols would reach their arc peak and then suddenly stop and drop in a straight line downward).

By creating a new Vector3 fallDirection that retains the horizontalDirection and horizontalSpeed from the arc phase, we're able to apply smooth downward motion to the symbol that continues to the left or right.
Just below that, we once again clamp the symbol's x position to the left and right screen bounds so the symbols can't travel offscreen:

The loop would continue causing the symbols to fall forever if we didn't have this check:

which triggers some project specific logic and destroys the symbol, then exits the coroutine with "yield break". Although the coroutine already exits when the symbol becomes null, which it will see is the case in the next frame as we destroyed the symbol here, adding an explicit yield break is an added layer of security to ensure predictability. Once again, not super necessary if you decide to run this code from the moving object itself, but just be sure you move your Destroy() request to the bottom of any logic in that case, as nothing after that point would be able to trigger if you destroy the object which is running the coroutine!
and that's all folks. If this helps you make something, show me!
HEY, did you really make it all the way to the end of this post?! ilu :3 Do let me know if this kind of gratuitous code breakdown interests you and I will summon motivation to make more such posts. I personally like to see how the sausage is made so I hoped someone might find it neat. If ya got any questions I am happy to try and answer, the ol' inbox is always open.
#gamedev#solodev#made with unity#c sharp#tutorial#coding#programming#clonin game#code explanation#code explained
3 notes
·
View notes
Text
10/1/2023 Update
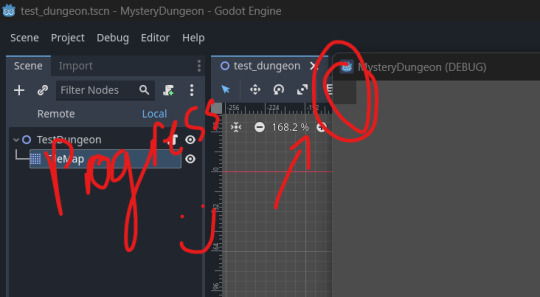
Howdy! I made a lot of progress this week regarding developing my room algorithm. I accomplished most of my initial goals. It isn't pretty, but it is functional and that is what matters. There is a lot to be improved, as the way I generate the hallways and similar is not very robust and breaks really easily, which in turn can cause a lot of issues, such as many crashes (seriously, I'm trying to fix the problem since I crash almost every 4th time I try running in debug mode or regenerate the rooms).
As always, here are some cool WIP screenshots during the development this week.
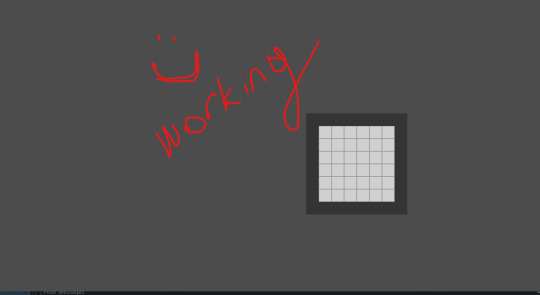
This was the first ever test of actually trying to spawn walls lol! It wasn't long before I managed to get it to actually work!
Godot has been pretty straight forward so far and it really helps that they have native C# support, else this all would've taken a lot longer. After I managed to get 1 room generated, I then implemented the logic for other rooms.
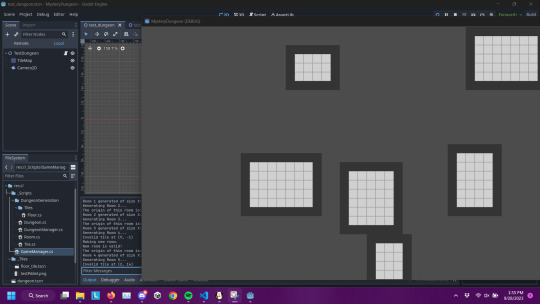
I got a proper algorithm to ensure no rooms would generate on top of each other, and it has worked well so far! Once I knew I could make multiple rooms, I then focused really hard on getting the hallways. I am not 100% happy with how my code works for the paths, as it only really works for L hallways and I already want to try and work on refining the dungeon algorithm before I go super far into developing other mechanics for the game. However, what I have works for now.

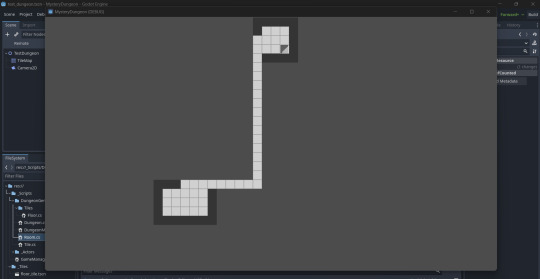
The corridors were backwards! This was a headache to fix mainly due to sloppy code. But eventually...
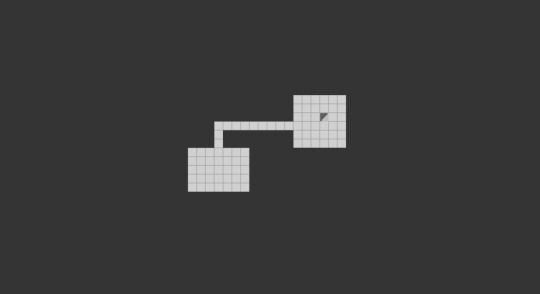
I ironed out a few more cases afterwards, but I had it good enough I wanted to implement spawning in the player/ other actors within the dungeon. It made me really learn how the node system worked in Godot and it actually is very intuitive, I like it a lot. This all culminated in this short video!
And that is where my development is! I am having a lot of fun and really proud I figured out most of this stuff on my own, only looking up some basic stuff or what a function is called.
My current goals are going to mainly comprise of refactoring and cleaning up the room generation and tile placement. But the next big hurdle is figuring out how to handle the Turn-Based combat & updating. Definitely a big goal but I am excited to figure it out! Gonna be busy this week with more schoolwork, but should have plenty of time to keep developing.
#gamedev#indiedev#godot engine#godot#video games#game development#mystery dungeon#pokemon mystery dungeon#coding#clawing out of tutorial hell#c#programming#csharp#pmd#roguelike#indie developer#indie dev#devblog#developer
2 notes
·
View notes
Text
Introduction: As a high school student in the 21st century, there's no denying the importance of computer science in today's world. Whether you're a seasoned programmer or just dipping your toes into the world of coding, the power of computer science is undeniable. In this blog, I'll share my journey as a 12th-grader venturing into the fascinating realms of C, C++, and Python, and how this journey has not only improved my computer science profile but also shaped my outlook on technology and problem-solving.
Chapter 1: The Foundations - Learning C
Learning C:
C, often referred to as the "mother of all programming languages," is where my journey began. Its simplicity and efficiency make it an excellent choice for beginners. As a high school student with limited programming experience, I decided to start with the basics.
Challenges and Triumphs:
Learning C came with its fair share of challenges, but it was incredibly rewarding. I tackled problems like understanding pointers and memory management, and I quickly realized that the core concepts of C would lay a strong foundation for my future endeavors in computer science.
Chapter 2: Building on the Basics - C++
Transition to C++:
With C under my belt, I transitioned to C++. C++ builds upon the concepts of C while introducing the object-oriented programming paradigm. It was a natural progression, and I found myself enjoying the flexibility and power it offered.
Projects and Applications:
I started working on small projects and applications in C++. From simple text-based games to data structures and algorithms implementations, C++ opened up a world of possibilities. It was during this phase that I began to see how the knowledge of programming languages could translate into tangible solutions.
Chapter 3: Python - The Versatile Language
Exploring Python:
Python is often praised for its simplicity and readability. As I delved into Python, I realized why it's a favorite among developers for a wide range of applications, from web development to machine learning.
Python in Real-Life Projects:
Python allowed me to take on real-life projects with ease. I built web applications using frameworks like Flask and Django, and I even dabbled in data analysis and machine learning. The versatility of Python broadened my horizons and showed me the real-world applications of computer science.
Chapter 4: A Glimpse into the Future
Continual Learning:
As I prepare to graduate high school and venture into higher education, my journey with C, C++, and Python has instilled in me the importance of continual learning. The field of computer science is dynamic, and staying up-to-date with the latest technologies and trends is crucial.
Networking and Collaboration:
I've also come to appreciate the significance of networking and collaboration in the computer science community. Joining online forums, participating in coding challenges, and collaborating on open-source projects have enriched my learning experience.
Conclusion: Embracing the World of Computer Science
My journey as a 12th-grader exploring C, C++, and Python has been an enlightening experience. These languages have not only improved my computer science profile but have also given me a broader perspective on problem-solving and technology. As I step into the future, I'm excited to see where this journey will take me, and I'm ready to embrace the ever-evolving world of computer science.
If you're a fellow student or someone curious about programming, I encourage you to take the plunge and start your own journey. With determination and a willingness to learn, the world of computer science is yours to explore and conquer.
#Computer Science#Programming Languages#Learning Journey#C Programming#C++ Programming#Python Programming#Coding Tips#Programming Projects#Programming Tutorials#Problem-Solving#High School Education#Student Life#Personal Growth#Programming Challenges#Technology Trends#Future in Computer Science#Community Engagement#Open Source#Programming Communities#Technology and Society
4 notes
·
View notes
Text
Learn C Programming Language: A Beginner’s Guide to Mastering C
The C programming language is one of the most powerful and influential programming languages in the history of computing. Developed in the early 1970s by Dennis Ritchie, C has served as the foundation for many modern programming languages, including C++, Java, and Python. If you're new to programming or looking to strengthen your understanding of computer science fundamentals, this guide will help you learn the C programming language from the ground up.
This beginner’s guide to mastering C covers everything from basic syntax to writing real-world programs, providing you with a strong foundation for future programming endeavors.

Why Learn C Programming Language?
Before diving into the technical aspects, let’s understand why learning C is important:
Foundational Language: C teaches you how computers work at the hardware level.
High Performance: C is ideal for system-level programming, embedded systems, and real-time applications.
Portability: Code written in C can be compiled and run on various machines with minimal changes.
Used in Core Systems: Operating systems like UNIX, Linux, and even parts of Windows are written in C.
Great for Learning Other Languages: C makes it easier to learn C++, Java, and other similar languages.
Setting Up Your C Environment
To get started with C programming, you need two things:
1. Text Editor or IDE
You can use any text editor, but it's better to use an IDE like:
Code::Blocks
Dev-C++
Turbo C
Visual Studio Code
2. C Compiler
Install a C compiler such as GCC (GNU Compiler Collection). Most IDEs come with a built-in compiler.
Understanding C Basics
Here are some of the core concepts and syntax you'll encounter as you begin to learn the C programming language:
Hello World Program
#include <stdio.h> int main() { printf("Hello, World!"); return 0; }
Explanation:
#include <stdio.h>: Includes the standard input-output library.
main(): The starting point of any C program.
printf(): Used to print output to the screen.
return 0;: Ends the function.
Core Concepts of C Programming
Variables and Data Types
C supports different data types like:int age = 25; float salary = 55000.50; char grade = 'A';
Operators
C includes arithmetic (+, -, *, /), logical (&&, ||, !), and relational (>, <, ==) operators.
Control Structures
Use if, else, switch, and loops (for, while, do-while) for decision making and repetition.
Example:if(age > 18) { printf("You are an adult."); }
Loops
for(int i = 0; i < 5; i++) { printf("%d\n", i); }
Arrays
int numbers[5] = {1, 2, 3, 4, 5};
Functions
Functions in C allow code reusability:int add(int a, int b) { return a + b; }
Working with Pointers and Memory
C gives you direct access to memory using pointers. This is a powerful feature but requires understanding and caution.int x = 10; int *ptr = &x;
Here, ptr is a pointer to the address of x. This feature is heavily used in data structures, memory management, and systems programming.
Understanding Structures and Unions
C allows you to create custom data types using struct and union.struct Person { char name[50]; int age; };
File Handling in C
C supports file operations such as reading, writing, and appending data.FILE *fptr; fptr = fopen("file.txt", "w"); fprintf(fptr, "Hello File!"); fclose(fptr);
File handling is crucial for building real-world applications.
C Language Limitations
While C is powerful, it has some limitations:
No built-in support for object-oriented programming.
Manual memory management (risk of memory leaks).
Complex syntax for beginners compared to newer languages like Python.
However, these challenges also make you a stronger programmer by teaching low-level concepts.
Applications of C Programming
C is widely used in:
Operating Systems (e.g., Linux Kernel)
Embedded Systems (e.g., microcontrollers)
Game Development (with graphics libraries)
Compilers and Interpreters
Database Engines (like MySQL)
Internet of Things (IoT)
Tips for Mastering C
Write Code Daily: Practice writing small programs consistently.
Understand the Logic: Focus on understanding how the code works internally.
Use Online Platforms: Practice on platforms like HackerRank, GeeksforGeeks, and LeetCode.
Build Mini Projects: Start with calculator, student database, or number games.
Read Books: Recommended – “The C Programming Language” by Kernighan and Ritchie.
Conclusion
The C programming language is a timeless skill that lays a solid foundation for your career in technology. From learning basic syntax to mastering advanced features like pointers and memory management, C teaches you how a computer truly works behind the scenes.
This beginner’s guide to mastering C has given you the roadmap to start your journey confidently. With consistent practice, project building, and curiosity, you’ll soon be able to write efficient, fast, and powerful programs in C.
#Learn C Programming Language#C tutorial#C programming for beginners#Mastering C#Beginner’s guide to C#C programming basics#C language tutorial
0 notes
Text
C Tutorial
0 notes
Text
Why Learn C++ Programming ?

C++ programming remains one of the most powerful and versatile languages in the tech world, making it an essential skill for anyone looking to build a strong foundation in software development. Whether you're a beginner stepping into coding or someone aiming to enhance your programming abilities, learning C++ opens doors to a wide range of career opportunities in areas like game development, system programming, competitive coding, and application development.
This infographic dives deep into the key reasons why mastering C++ is a smart investment for your future. From understanding object-oriented programming concepts to developing high-performance applications, C++ offers the perfect blend of speed, flexibility, and control. Enrolling in a professional C++ programming course or training from an experienced institute ensures that learners gain hands-on knowledge, industry-relevant project skills, and a thorough understanding of the language structure.
📚 Learn C++programing: Attitude Academy
📍 Visit Us: Yamuna Vihar | Uttam Nagar
📞 Call: +91 9654382235
🌐 Website: www.attitudetallyacademy.com
📩 Email: [email protected]
📸 Follow us on: attitudeacademy4u
1 note
·
View note
Text
Step into the World of Code with DICS

In today’s fast-paced digital world, learning programming is not just a skill—it's a career-defining move. Among the most powerful and versatile programming languages is C++, a language trusted by tech giants and used in everything from game development to high-performance applications. If you're looking to take your first step into the world of programming or enhance your existing coding skills, there’s no better place to start than the best C++ institute in Laxmi Nagar.
Why Choose C++?
C++ is known for its performance, efficiency, and control over system resources, making it a favorite among software engineers and system developers. It lays a strong foundation for understanding object-oriented programming and is an ideal starting point for those aiming to build a career in software development, data structures, game design, or competitive programming.
DICS – Your Gateway to Programming Excellence
When it comes to quality computer education, Delhi Institute of Computer Science (DICS) stands out as the best C++ institute in Laxmi Nagar. With a reputation built on years of excellence and student success stories, DICS has become a hub for aspiring programmers looking for expert guidance and practical learning.
Here’s what makes DICS a top choice:
Expert Faculty: Learn from industry-experienced professionals who simplify complex concepts and provide real-world insights.
Hands-on Learning: Our C++ course is designed with a practical approach—ensuring you write, test, and debug your own code from day one.
Small Batch Sizes: Get personalized attention in a focused learning environment.
Career Support: Resume building, interview preparation, and placement assistance are part of our comprehensive training program.
The Best C++ Course in Laxmi Nagar
At DICS, we offer the best C++ course in Laxmi Nagar, tailored to both beginners and intermediate learners. Whether you’re a student aiming for a technical career or a professional looking to upskill, this course covers:
Basics of C++ syntax and structure
Object-Oriented Programming (OOP) concepts
File handling, pointers, and memory management
Data structures using C++
Real-time mini projects to build coding confidence
By the end of the course, students are not just equipped with technical knowledge—they gain the confidence to crack job interviews, take on coding challenges, and even build their own software solutions.
Don’t Just Learn—Transform Your Career
Choosing the right institute is crucial when you're investing in your future. At DICS, you're not just joining a course—you're becoming part of a community of learners and tech enthusiasts who believe in growing together. With flexible batch timings, affordable fees, and a strong placement track record, DICS remains the best C++ institute in Laxmi Nagar for students who are serious about building a strong programming foundation.
#C++ programming#C++ course#Learn C++#C++ tutorials#C++ institute#C++ training#C++ classes#C++ for beginners#C++ projects#C++ coding
0 notes
Text
Navigating the Nervous Waters of Coding
Daily writing promptWhat makes you nervous?View all responses AI-generated image. “This code is going well…a little too well.” The Code Creep: Why Every Line Can Feel Like a Tightrope Walk What makes me nervous? You might think it’s a looming deadline or a particularly gnarly algorithm. And while those definitely get the heart racing, the real source of my coding jitters? It’s the act of…
#Artificial Intelligence#best practices#c#c++#career advice#Cloud computing#coding#dailyprompt#dailyprompt-1916#data science#debugging#devops#java#javascript#machine learning#mobile development#Programming#python#software development#testing#tutorials#web development
1 note
·
View note
Text
C Programming Interview Questions: Test Your Knowledge Before the Interview

Preparing for a job interview can be stressful, especially when it comes to technical roles that demand strong programming skills. If you're applying for a role that involves C programming, it's crucial to sharpen your understanding of the language. That’s where revisiting C Programming Interview Questions can help you gain an edge. Whether you’re just starting out or brushing up your knowledge, this guide will walk you through the kind of questions that often come up in interviews and help you reflect on your grasp of C.
Why Interviewers Love C
C is one of the oldest and most powerful programming languages. Its simplicity, performance, and low-level memory manipulation make it the foundation of many operating systems, embedded devices, and real-time applications. Interviewers love C because it reveals a candidate’s depth of understanding about how software interacts with hardware, how memory is managed, and how algorithms are constructed at a low level. A strong command over C shows that you’ve built your programming knowledge from the ground up.
The Importance of C Tutorial Practice
Before jumping into specific C Programming Interview Questions, it’s essential to walk through a structured C Tutorial. Reviewing basics like data types, control structures, functions, and arrays lays the groundwork. As you progress, you should also focus on pointers, memory allocation, and structures—these are often seen as “make or break” topics in technical interviews. Even if you’ve worked with C in the past, refreshing these concepts through tutorials helps bring everything back into focus.
Core Concepts Interviewers Test
Let’s explore some of the key areas interviewers typically cover when asking C programming questions:
Memory Management: Expect to be tested on how C handles memory—both stack and heap allocation. You should understand concepts like dynamic memory allocation, memory leaks, and buffer overflows.
Pointers and Arrays: One of the most common and trickiest parts of C. Interviewers often want to know if you truly understand how pointers work, how they interact with arrays, and how pointer arithmetic can be used (or misused).
Data Structures: Even though C doesn’t have built-in data structures like lists or maps, you’re expected to know how to implement them using arrays, structs, and pointers. Interviewers may ask conceptual questions or have you describe how to organize data efficiently.
Functions and Scope: Knowing how functions work in C, including parameter passing, recursion, and variable scope, is essential. You might be asked about the difference between global and local variables, or how static variables behave.
Compilation and Execution: Understanding how C code is compiled and linked can be a big plus. Interviewers may ask about header files, macros, and the difference between declarations and definitions.
Edge Cases and Problem Solving: You might get questions that aren’t strictly about C syntax, but about how to solve a problem efficiently in C. These could test your logical thinking, debugging ability, or creativity in using C’s features.
Behavioral vs. Technical Balance
While it's easy to focus entirely on technical preparation, remember that interviews are also about communication. When answering C Programming Interview Questions, try to explain your thought process clearly. Even if you don’t know the answer right away, showing how you break down a problem can leave a positive impression. Being able to explain technical concepts in simple terms shows that you truly understand them.
Preparing Strategically
Start by identifying your weak areas. Did you struggle with pointers in your last project? Are you unsure about how memory leaks occur? Use your C Tutorial sessions to focus on these gaps. Practice answering questions out loud, even if you're by yourself. Simulating interview conditions helps reduce anxiety and improves your fluency in technical discussion.
Mock interviews with peers or mentors can also be helpful. Getting feedback not only helps you improve but also builds your confidence. Remember, interviews aren’t just about technical knowledge—they’re about demonstrating your ability to think and communicate effectively.
Final Thoughts
There’s no shortcut to mastering C, but by working through C Programming Interview Questions and revisiting your C Tutorial foundations, you can walk into your interview with confidence. Preparation is more than just reviewing facts—it’s about understanding concepts deeply and being able to explain them clearly. Use every question as a chance to show not only what you know, but how you think.
So before your next interview, challenge yourself with a mix of theoretical and practical C questions. Make your understanding bulletproof, and walk into that interview room ready to impress.
0 notes