#C programming guide
Explore tagged Tumblr posts
Visit Tumblr Blog
Explore Tumblr blogs with no restrictions, modern design and the best experience.
Last Seen Tumblr Blogs


Fun Fact
Tumblr was acquired by Yahoo for $1.1B in 2013.
Text
Advanced C Programming: Mastering the Language
Introduction
Advanced C programming is essential for developers looking to deepen their understanding of the language and tackle complex programming challenges. While the basics of C provide a solid foundation, mastering advanced concepts can significantly enhance your ability to write efficient, high-performance code.
1. Overview of Advanced C Programming
Advanced C programming builds on the fundamentals, introducing concepts that enhance efficiency, performance, and code organization. This stage of learning empowers programmers to write more sophisticated applications and prepares them for roles that demand a high level of proficiency in C.
2. Pointers and Memory Management
Mastering pointers and dynamic memory management is crucial for advanced C programming, as they allow for efficient use of resources. Pointers enable direct access to memory locations, which is essential for tasks such as dynamic array allocation and manipulating data structures. Understanding how to allocate, reallocate, and free memory using functions like malloc, calloc, realloc, and free can help avoid memory leaks and ensure optimal resource management.
3. Data Structures in C
Understanding advanced data structures, such as linked lists, trees, and hash tables, is key to optimizing algorithms and managing data effectively. These structures allow developers to store and manipulate data in ways that improve performance and scalability. For example, linked lists provide flexibility in data storage, while binary trees enable efficient searching and sorting operations.
4. File Handling Techniques
Advanced file handling techniques enable developers to manipulate data efficiently, allowing for the creation of robust applications that interact with the file system. Mastering functions like fopen, fread, fwrite, and fclose helps you read from and write to files, handle binary data, and manage different file modes. Understanding error handling during file operations is also critical for building resilient applications.
5. Multithreading and Concurrency
Implementing multithreading and managing concurrency are essential skills for developing high-performance applications in C. Utilizing libraries such as POSIX threads (pthreads) allows you to create and manage multiple threads within a single process. This capability can significantly enhance the performance of I/O-bound or CPU-bound applications by enabling parallel processing.
6. Advanced C Standard Library Functions
Leveraging advanced functions from the C Standard Library can simplify complex tasks and improve code efficiency. Functions for string manipulation, mathematical computations, and memory management are just a few examples. Familiarizing yourself with these functions not only saves time but also helps you write cleaner, more efficient code.
7. Debugging and Optimization Techniques
Effective debugging and optimization techniques are critical for refining code and enhancing performance in advanced C programming. Tools like GDB (GNU Debugger) help track down bugs and analyze program behavior. Additionally, understanding compiler optimizations and using profiling tools can identify bottlenecks in your code, leading to improved performance.
8. Best Practices in Advanced C Programming
Following best practices in coding and project organization helps maintain readability and manageability of complex C programs. This includes using consistent naming conventions, modularizing code through functions and header files, and documenting your code thoroughly. Such practices not only make your code easier to understand but also facilitate collaboration with other developers.
9. Conclusion
By exploring advanced C programming concepts, developers can elevate their skills and create more efficient, powerful, and scalable applications. Mastering these topics not only enhances your technical capabilities but also opens doors to advanced roles in software development, systems programming, and beyond. Embrace the challenge of advanced C programming, and take your coding skills to new heights!
#C programming#C programming course#Learn C programming#C programming for beginners#Online C programming course#C programming tutorial#Best C programming course#C programming certification#Advanced C programming#C programming exercises#C programming examples#C programming projects#Free C programming course#C programming for kids#C programming challenges#C programming course online free#C programming books#C programming guide#Best C programming tutorials#C programming online classes
2 notes
·
View notes
Text
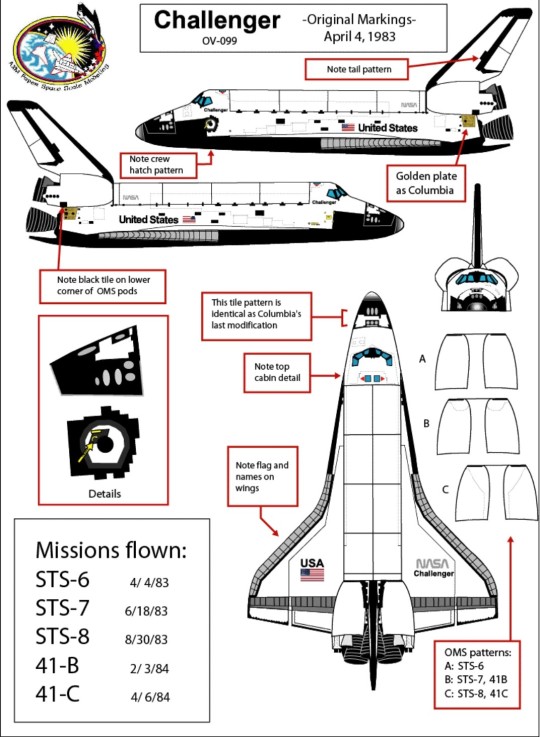
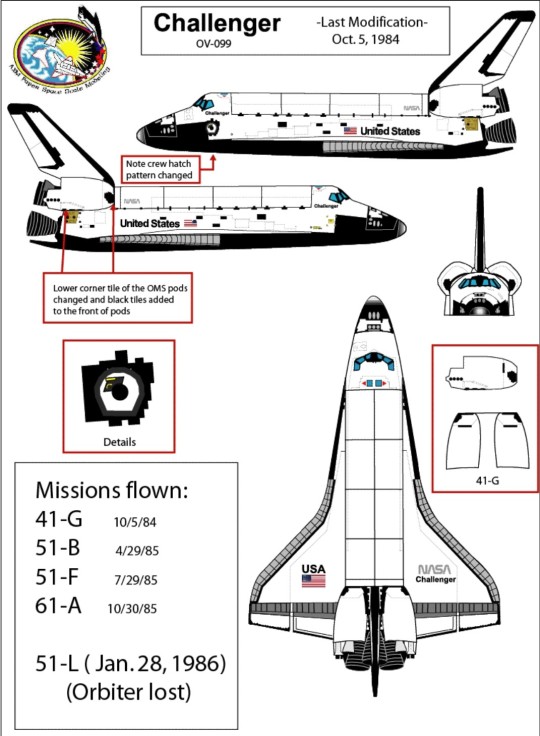
Reference guide of all the external changes made to the Space Shuttle Orbiter Challenger (OV-099) during her lifetime.
Date: 1983-1985
Documents by Alfonso X Moreno: link
#Space Shuttle#Space Shuttle Challenger#Challenger#OV-099#Orbiter#NASA#Space Shuttle Program#reference guide#STS-6#STS-7#STS-8#STS-41-B#STS-41B#STS-11#STS-41-C#STS-41C#STS-13#STS-41-G#STS-41G#STS-17#STS-51-B#STS-51B#STS-51-F#STS-51F#STS-61-A#STS-61A#STS-51-L#STS-51L#my post#April
93 notes
·
View notes
Text
More menus, more work to be done. Let’s clean the Widgets even more!
youtube
#shawnthebro#ue4#unreal#stb#tutorial#youtube#unrealengine#unrealtutorial#unrealengine4#programming#ue5#he#unreal engine#c++#unreal engine 4#unreal engine 5#unreal c++#c++ unreal#c#fighting game#fighting games#fighter#fighter game#games#guide#how to#menu#menus#widget#widgets
0 notes
Text
⭐ So you want to learn pixel art? ⭐
🔹 Part 1 of ??? - The Basics!
Edit: Now available in Google Doc format if you don't have a Tumblr account 🥰
Hello, my name is Tofu and I'm a professional pixel artist. I have been supporting myself with freelance pixel art since 2020, when I was let go from my job during the pandemic.


My progress, from 2017 to 2024. IMO the only thing that really matters is time and effort, not some kind of natural talent for art.
This guide will not be comprehensive, as nobody should be expected to read allat. Instead I will lean heavily on my own experience, and share what worked for me, so take everything with a grain of salt. This is a guide, not a tutorial. Cheers!
🔹 Do I need money?
NO!!! Pixel art is one of the most accessible mediums out there.
I still use a mouse because I prefer it to a tablet! You won't be at any disadvantage here if you can't afford the best hardware or software.
Because our canvases are typically very small, you don't need a good PC to run a good brush engine or anything like that.
✨Did you know? One of the most skilled and beloved pixel artists uses MS PAINT! Wow!!
🔹 What software should I use?
Here are some of the most popular programs I see my friends and peers using. Stars show how much I recommend the software for beginners! ⭐
💰 Paid options:
⭐⭐⭐ Aseprite (for PC) - $19.99
This is what I and many other pixel artists use. You may find when applying to jobs that they require some knowledge of Aseprite. Since it has become so popular, companies like that you can swap raw files between artists.
Aseprite is amazingly customizable, with custom skins, scripts and extensions on Itch.io, both free and paid.
If you have ever used any art software before, it has most of the same features and should feel fairly familiar to use. It features a robust animation suite and a tilemap feature, which have saved me thousands of hours of labour in my work. The software is also being updated all the time, and the developers listen to the users. I really recommend Aseprite!
⭐ Photoshop (for PC) - Monthly $$
A decent option for those who already are used to the PS interface. Requires some setup to get it ready for pixel-perfect art, but there are plenty of tutorials for doing so.
Animation is also much more tedious on PS which you may want to consider before investing time!
⭐⭐ ProMotion NG (for PC) - $19.00
An advanced and powerful software which has many features Aseprite does not, including Colour Cycling and animated tiles.
⭐⭐⭐ Pixquare (for iOS) - $7.99 - $19.99 (30% off with code 'tofu'!!)
Probably the best app available for iPad users, in active development, with new features added all the time.

Look! My buddy Jon recommends it highly, and uses it often.
One cool thing about Pixquare is that it takes Aseprite raw files! Many of my friends use it to work on the same project, both in their office and on the go.
⭐ Procreate (for iOS) - $12.99
If you have access to Procreate already, it's a decent option to get used to doing pixel art. It does however require some setup. Artist Pixebo is famously using Procreate, and they have tutorials of their own if you want to learn.
⭐⭐ ReSprite iOS and Android. (free trial, but:) $19.99 premium or $$ monthly
ReSprite is VERY similar in terms of UI to Aseprite, so I can recommend it. They just launched their Android release!
🆓 Free options:
⭐⭐⭐ Libresprite (for PC)
Libresprite is an alternative to Aseprite. It is very, very similar, to the point where documentation for Aseprite will be helpful to Libresprite users.
⭐⭐ Pixilart (for PC and mobile)
A free in-browser app, and also a mobile app! It is tied to the website Pixilart, where artists upload and share their work. A good option for those also looking to get involved in a community.
⭐⭐ Dotpict (for mobile)
Dotpict is similar to Pixilart, with a mobile app tied to a website, but it's a Japanese service. Did you know that in Japanese, pixel art is called 'Dot Art'? Dotpict can be a great way to connect with a different community of pixel artists! They also have prompts and challenges often.
🔹 So I got my software, now what?
◽Nice! Now it's time for the basics of pixel art.
❗ WAIT ❗ Before this section, I want to add a little disclaimer. All of these rules/guidelines can be broken at will, and some 'no-nos' can look amazing when done intentionally.
The pixel-art fundamentals can be exceedingly helpful to new artists, who may feel lost or overwhelmed by choice. But if you feel they restrict you too harshly, don't force yourself! At the end of the day it's your art, and you shouldn't try to contort yourself into what people think a pixel artist 'should be'. What matters is your own artistic expression. 💕👍
◽Phew! With that out of the way...
🔸"The Rules"
There are few hard 'rules' of pixel art, mostly about scaling and exporting. Some of these things will frequently trip up newbies if they aren't aware, and are easy to overlook.
🔹Scaling method
There are a couple ways of scaling your art. The default in most art programs, and the entire internet, is Bi-linear scaling, which usually works out fine for most purposes. But as pixel artists, we need a different method.


Both are scaled up x10. See the difference?
On the left is scaled using Bilinear, and on the right is using Nearest-Neighbor. We love seeing those pixels stay crisp and clean, so we use nearest-neighbor.
(Most pixel-art programs have nearest-neighbor enabled by default! So this may not apply to you, but it's important to know.)
🔹Mixels
Mixels are when there are different (mixed) pixel sizes in the same image.

Here I have scaled up my art- the left is 200%, and the right is 150%. Yuck!
As we can see, the "pixel" sizes end up different. We generally try to scale our work by multiples of 100 - 200%, 300% etc. rather than 150%. At larger scales however, the minute differences in pixel sizes are hardly noticeable!
Mixels are also sometimes seen when an artist scales up their work, then continues drawing on it with a 1 pixel brush.

Many would say that this is not great looking! This type of pixels can be indicative of a beginner artist. But there are plenty of creative pixel artists out there who mixels intentionally, making something modern and cool.
🔹Saving Your Files
We usually save our still images as .PNGs as they don’t create any JPEG artifacts or loss of quality. It's a little hard to see here, but there are some artifacts, and it looks a little blurry. It also makes the art very hard to work with if we are importing a JPEG.

For animations .GIF is good, but be careful of the 256 colour limit. Try to avoid using too many blending mode layers or gradients when working with animations. If you aren’t careful, your animation could flash afterwards, as the .GIF tries to reduce colours wherever it can. It doesn’t look great!

Here's an old piece from 2021 where I experienced .GIF lossiness, because I used gradients and transparency, resulting in way too many colours.
🔹Pixel Art Fundamentals - Techniques and Jargon
❗❗Confused about Jaggies? Anti-Aliasing? Banding? Dithering? THIS THREAD is for you❗❗ << it's a link, click it!!
As far as I'm concerned, this is THE tutorial of all time for understanding pixel art. These are techniques created and named by the community of people who actually put the list together, some of the best pixel artists alive currently. Please read it!!
🔸How To Learn
Okay, so you have your software, and you're all ready to start. But maybe you need some more guidance? Try these tutorials and resources! It can be helpful to work along with a tutorial until you build your confidence up.
⭐⭐ Pixel Logic (A Digital Book) - $10 A very comprehensive visual guide book by a very skilled and established artist in the industry. I own a copy myself.
⭐⭐⭐ StudioMiniBoss - free A collection of visual tutorials, by the artist that worked on Celeste! When starting out, if I got stuck, I would go and scour his tutorials and see how he did it.
⭐ Lospec Tutorials - free A very large collection of various tutorials from all over the internet. There is a lot to sift through here if you have the time.
⭐⭐⭐ Cyangmou's Tutorials - free (tipping optional) Cyangmou is one of the most respected and accomplished modern pixel artists, and he has amassed a HUGE collection of free and incredibly well-educated visual tutorials. He also hosts an educational stream every week on Twitch called 'pixelart for beginners'.
⭐⭐⭐ Youtube Tutorials - free There are hundreds, if not thousands of tutorials on YouTube, but it can be tricky to find the good ones. My personal recommendations are MortMort, Brandon, and AdamCYounis- these guys really know what they're talking about!
🔸 How to choose a canvas size
When looking at pixel art turorials, we may see people suggest things like 16x16, 32x32 and 64x64. These are standard sizes for pixel art games with tiles. However, if you're just making a drawing, you don't necessarily need to use a standard canvas size like that.
What I like to think about when choosing a canvas size for my illustrations is 'what features do I think it is important to represent?' And make my canvas as small as possible, while still leaving room for my most important elements.
Imagine I have characters in a scene like this:

I made my canvas as small as possible (232 x 314), but just big enough to represent the features and have them be recognizable (it's Good Omens fanart 😤)!! If I had made it any bigger, I would be working on it for ever, due to how much more foliage I would have to render.
If you want to do an illustration and you're not sure, just start at somewhere around 100x100 - 200x200 and go from there.
It's perfectly okay to crop your canvas, or scale it up, or crunch your art down at any point if you think you need a different size. I do it all the time! It only takes a bit of cleanup to get you back to where you were.
🔸Where To Post
Outside of just regular socials, Twitter, Tumblr, Deviantart, Instagram etc, there are a few places that lean more towards pixel art that you might not have heard of.
⭐ Lospec Lospec is a low-res focused art website. Some pieces get given a 'monthly masterpiece' award. Not incredibly active, but I believe there are more features being added often.
⭐⭐ Pixilart Pixilart is a very popular pixel art community, with an app tied to it. The community tends to lean on the young side, so this is a low-pressure place to post with an relaxed vibe.
⭐⭐ Pixeljoint Pixeljoint is one of the big, old-school pixel art websites. You can only upload your art unscaled (1x) because there is a built-in zoom viewer. It has a bit of a reputation for being elitist (back in the 00s it was), but in my experience it's not like that any more. This is a fine place for a pixel artist to post if they are really interested in learning, and the history. The Hall of Fame has some of the most famous / impressive pixel art pieces that paved the way for the work we are doing today.
⭐⭐⭐ Cafe Dot Cafe Dot is my art server so I'm a little biased here. 🍵 It was created during the recent social media turbulence. We wanted a place to post art with no algorithms, and no NFT or AI chuds. We have a heavy no-self-promotion rule, and are more interested in community than skill or exclusivity. The other thing is that we have some kind of verification system- you must apply to be a Creator before you can post in the Art feed, or use voice. This helps combat the people who just want to self-promo and dip, or cause trouble, as well as weed out AI/NFT people. Until then, you are still welcome to post in any of the threads or channels. There is a lot to do in Cafe Dot. I host events weekly, so check the threads!
⭐⭐/r/pixelart The pixel art subreddit is pretty active! I've also heard some of my friends found work through posting here, so it's worth a try if you're looking. However, it is still Reddit- so if you're sensitive to rude people, or criticism you didn't ask for, you may want to avoid this one. Lol
🔸 Where To Find Work
You need money? I got you! As someone who mostly gets scouted on social media, I can share a few tips with you:
Put your email / portfolio in your bio Recruiters don't have all that much time to find artists, make it as easy as possible for someone to find your important information!
Clean up your profile If your profile feed is all full of memes, most people will just tab out rather than sift through. Doesn't apply as much to Tumblr if you have an art tag people can look at.
Post regularly, and repost Activity beats everything in the social media game. It's like rolling the dice, and the more you post the more chances you have. You have to have no shame, it's all business baby
Outside of just posting regularly and hoping people reach out to you, it can be hard to know where to look. Here are a few places you can sign up to and post around on.
/r/INAT INAT (I Need A Team) is a subreddit for finding a team to work with. You can post your portfolio here, or browse for people who need artists.
/r/GameDevClassifieds Same as above, but specifically for game-related projects.
Remote Game Jobs / Work With Indies Like Indeed but for game jobs. Browse them often, or get email notifications.
VGen VGen is a website specifically for commissions. You need a code from another verified artist before you can upgrade your account and sell, so ask around on social media or ask your friends. Once your account is upgraded, you can make a 'menu' of services people can purchase, and they send you an offer which you are able to accept, decline, or counter.
The evil websites of doom: Fiverr and Upwork I don't recommend them!! They take a big cut of your profit, and the sites are teeming with NFT and AI people hoping to make a quick buck. The site is also extremely oversaturated and competitive, resulting in a race to the bottom (the cheapest, the fastest, doing the most for the least). Imagine the kind of clients who go to these websites, looking for the cheapest option. But if you're really desperate...
🔸 Community
I do really recommend getting involved in a community. Finding like-minded friends can help you stay motivated to keep drawing. One day, those friends you met when you were just starting out may become your peers in the industry. Making friends is a game changer!
Discord servers Nowadays, the forums of old are mostly abandoned, and people split off into many different servers. Cafe Dot, Pixel Art Discord (PAD), and if you can stomach scrolling past all the AI slop, you can browse Discord servers here.
Twitch Streams Twitch has kind of a bad reputation for being home to some of the more edgy gamers online, but the pixel art community is extremely welcoming and inclusive. Some of the people I met on Twitch are my friends to this day, and we've even worked together on different projects! Browse pixel art streams here, or follow some I recommend: NickWoz, JDZombi, CupOhJoe, GrayLure, LumpyTouch, FrankiePixelShow, MortMort, Sodor, NateyCakes, NyuraKim, ShinySeabass, I could go on for ever really... There are a lot of good eggs on Pixel Art Twitch.
🔸 Other Helpful Websites
Palettes Lospec has a huge collection of user-made palettes, for any artist who has trouble choosing their colours, or just wants to try something fun. Rejected Palettes is full of palettes that didn't quite make it onto Lospec, ran by people who believe there are no bad colours.
The Spriters Resource TSR is an incredible website where users can upload spritesheets and tilesets from games. You can browse for your favourite childhood game, and see how they made it! This website has helped me so much in understanding how game assets come together in a scene.
VGMaps Similar to the above, except there are entire maps laid out how they would be played. This is incredible if you have to do level design, or for mocking up a scene for fun.
Game UI Database Not pixel-art specific, but UI is a very challenging part of graphics, so this site can be a game-changer for finding good references!
Retronator A digital newspaper for pixel-art lovers! New game releases, tutorials, and artworks!
Itch.io A website where people can upload, games, assets, tools... An amazing hub for game devs and game fans alike. A few of my favourite tools: Tiled, PICO-8, Pixel Composer, Juice FX, Magic Pencil for Aseprite
🔸 The End?
This is just part 1 for now, so please drop me a follow to see any more guides I release in the future. I plan on doing some writeups on how I choose colours, how to practise, and more!
I'm not an expert by any means, but everything I did to get to where I am is outlined in this guide. Pixel art is my passion, my job and my hobby! I want pixel art to be recognized everywhere as an art-form, a medium of its own outside of game-art or computer graphics!

This guide took me a long time, and took a lot of research and experience. Consider following me or supporting me if you are feeling generous.
And good luck to all the fledgling pixel artists, I hope you'll continue and have fun. I hope my guide helped you, and don't hesitate to send me an ask if you have any questions! 💕
My other tutorials (so far): How to draw Simple Grass for a game Hue Shifting
28K notes
·
View notes
Text
The Banker's Algorithm program in C provided by Hero Vired is a comprehensive guide to implementing the Banker's Algorithm, a resource allocation and deadlock avoidance algorithm used in operating systems. It includes detailed explanations and code examples to help learners effectively understand and implement this critical algorithm. For More Information, Please Visit The Blog.
0 notes
Text
CoPilot in MS Word
I opened Word yesterday to discover that it now contains CoPilot. It follows you as you type and if you have a personal Microsoft 365 account, you can't turn it off. You will be given 60 AI credits per month and you can't opt out of it.
The only way to banish it is to revert to an earlier version of Office. There is lot of conflicting information and overly complex guides out there, so I thought I'd share the simplest way I found.
How to revert back to an old version of Office that does not have CoPilot
This is fairly simple, thankfully, presuming everything is in the default locations. If not you'll need to adjust the below for where you have things saved.
Click the Windows Button and S to bring up the search box, then type cmd. It will bring up the command prompt as an option. Run it as an administrator.
Paste this into the box at the cursor: cd "\Program Files\Common Files\microsoft shared\ClickToRun"
Hit Enter
Then paste this into the box at the cursor: officec2rclient.exe /update user updatetoversion=16.0.17726.20160
Hit enter and wait while it downloads and installs.
VERY IMPORTANT. Once it's done, open Word, go to File, Account (bottom left), and you'll see a box on the right that says Microsoft 365 updates. Click the box and change the drop down to Disable Updates.
This will roll you back to build 17726.20160, from July 2024, which does not have CoPilot, and prevent it from being installed.
If you want a different build, you can see them all listed here. You will need to change the 17726.20160 at step 4 to whatever build number you want.
This is not a perfect fix, because while it removes CoPilot, it also stops you receiving security updates and bug fixes.
Switching from Office to LibreOffice
At this point, I'm giving up on Microsoft Office/Word. After trying a few different options, I've switched to LibreOffice.
You can download it here for free: https://www.libreoffice.org/
If you like the look of Word, these tutorials show you how to get that look:
www.howtogeek.com/788591/how-to-make-libreoffice-look-like-microsoft-office/
www.debugpoint.com/libreoffice-like-microsoft-office/
If you've been using Word for awhile, chances are you have a significant custom dictionary. You can add it to LibreOffice following these steps.
First, get your dictionary from Microsoft
Go to Manage your Microsoft 365 account: account.microsoft.com.
One you're logged in, scroll down to Privacy, click it and go to the Privacy dashboard.
Scroll down to Spelling and Text. Click into it and scroll past all the words to download your custom dictionary. It will save it as a CSV file.
Open the file you just downloaded and copy the words.
Open Notepad and paste in the words. Save it as a text file and give it a meaningful name (I went with FromWord).
Next, add it to LibreOffice
Open LibreOffice.
Go to Tools in the menu bar, then Options. It will open a new window.
Find Languages and Locales in the left menu, click it, then click on Writing aids.
You'll see User-defined dictionaries. Click New to the right of the box and give it a meaningful name (mine is FromWord).
Hit Apply, then Okay, then exit LibreOffice.
Open Windows Explorer and go to C:\Users\[YourUserName]\AppData\Roaming\LibreOffice\4\user\wordbook and you will see the new dictionary you created. (If you can't see the AppData folder, you will need to show hidden files by ticking the box in the View menu.)
Open it in Notepad by right clicking and choosing 'open with', then pick Notepad from the options.
Open the text file you created at step 5 in 'get your dictionary from Microsoft', copy the words and paste them into your new custom dictionary UNDER the dotted line.
Save and close.
Reopen LibreOffice. Go to Tools, Options, Languages and Locales, Writing aids and make sure the box next to the new dictionary is ticked.
If you use LIbreOffice on multiple machines, you'll need to do this for each machine.
Please note: this worked for me. If it doesn't work for you, check you've followed each step correctly, and try restarting your computer. If it still doesn't work, I can't provide tech support (sorry).
#fuck AI#fuck copilot#fuck Microsoft#Word#Microsoft Word#Libre Office#LibreOffice#fanfic#fic#enshittification#AI#copilot#microsoft copilot#writing#yesterday was a very frustrating day
3K notes
·
View notes
Text
I'm not good at programming and a big part of it is that I just have no patience when I don't understand smth, I go look at the documentation and if it doesn't immediately explain it perfectly I dramatically throw my hands in the size line "I will NEVER understand this" and throw myself on the floor, best my fists on the ground and cry and yell and then the rational part of my brain has to gently scoop me off the ground like "hey it's okay let's read up on it some more, we can check stackoverflow too shhhh it'll be okay" but rational brain is an exhausted single mother so y'know....
#programming#this is why the environment i work best in is R (with R studio) bc there the documentation is Right There#and is generally very good#but currently I'm doing an uni project with fucking chat gpt#and this is a) new so stackoverflow is less help#and b) i don't even like chat gpt#and c) we're working collaboratively so i need to only do this one specific part#but the guides all explain how to do it combined and I'm like???? but I'm not supposed to do this part? only that?#and really i know this isn't that hard i just need to do some reading and dig through the docs#but again. toddler brain simply doesn't want to
0 notes
Text

i told my friend i would find him some beginner’s giffing tutorials, but all the one’s i could find were either years out of date, used a method that made me go “huh”, or incorporated ready-made actions. all perfectly fine, but if i’m sending someone a tutorial i’d rather it be one for a method i understand enough to help with.
so, here is a beginner’s guide to giffing, as told by cleo, a neurotic, detailed, and organization happy individual. there will be many pictures.
this tutorial will strictly cover the gif making portion of the process, from getting your screencaps to importing in photoshop, resizing/cropping, and sharpening. i was going to briefly go over colouring, but tumblr only allows 30 images and i ran out of space, so i'll have to do a separate colouring tutorial (which also means i can go into more detail, yay).
downloading the videos, whether direct downloads or t*rrents, is also another tutorial. but make sure you��re using at least 1080p, and the bigger the file the better. a single episode of a ~45 minute show should ideally be 2gb at minimum. a full length movie should ideally be at least 5gb. imo 2160p/4k files are not really necessary; the quality increase is negligible, and it takes a lot longer to screencap them. if you do use 2160p/4k files, try and make sure it is not HDR, as those videos are often washed out and require a different screencapping program to fix.
Programs
I am using a cracked version photoshop 2022, but whichever version you use should be pretty much the same
Actions. not a program but a function inside photoshop, where you essentially record a series of steps, and then you can simple play that action when needed and those steps will repeat, which saves considerable time when giffing. I will note which parts of the tutorial are best saved as actions, and explain how to create actions at the end.
For screencapping i use kmplayer it’s free and very simple to use
not at all a necessary program, but i use freecommander instead of the regular windows file explorer as i find the dual panels very helpful when moving the frames around
Screencapping
there are many programs you can use to get the screencaps from a video, a lot are basically the same, some are better suited for particular video file types. kmplayer is a very simple program to use, but afaik the capture function only works on mkv. files (the only other file type i’ve tried is mp4, which plays but does not capture)
once you open your video file in kmplayer, we’re going to open the advanced capture window, found under capture→advanced capture, or alt+v
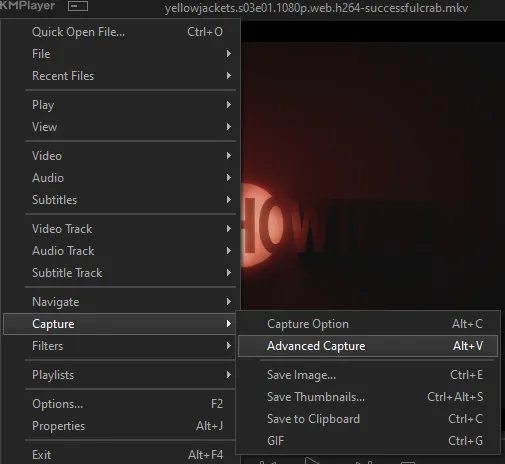
the window should look like this
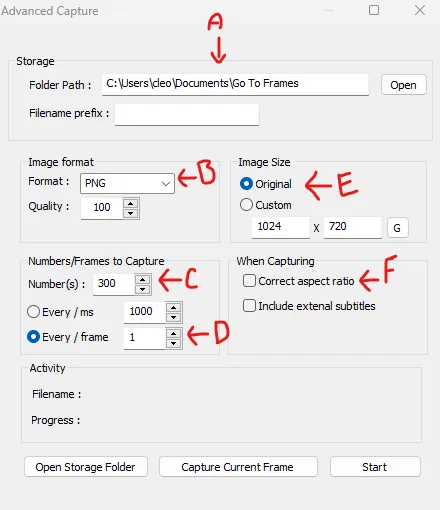
A-this is where all your screencaps will save to. i recommend making a specific folder for all your screencaps
B-make sure this is set to png for best quality
C-this is the number of screencaps you want to take, guesstimate how many you will need, keeping in mind that most videos are approx. 25 frames per second, and you should always cap a bit more than you think just in case
D-make sure “every/frame” is selected and set to 1
E-make sure “original” is selected, resizing will be done in photoshop
F-make sure “correct aspect ratio” is unselected
go to the part of the video you want to gif, and pause it just slightly before that part starts, then select ‘start’. the screencaps will start to save to the file, no need to play the video, and will automatically stop once it has capped the number of frames you have chosen
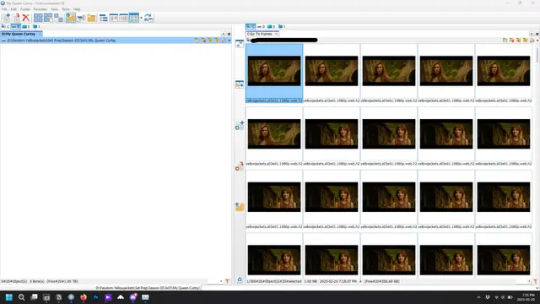
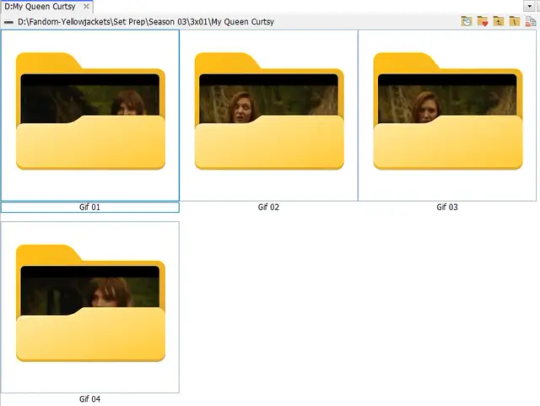
and here is how they look inside freecommander. i have already made a folder for this gifset, which is on the left. now you’re going to make a folder for each individual gif. i’ve decided this one will have four gifs, so create four folders (i just label them gif 01, gif 02, etc) and then move the frames for each gif into their respective folder
while you can always delete frames once the gif is made if it’s too big, i prefer to make sure i have the correct number of frames before i start. the gif limit on tumblr is 10mb, so it’s good to look at the scene/shots you’re giffing and decide approx. what dimensions your gif will be. full size gifs have a width of 540px and your choice of height. if you go for a square gif (540x540) you can usually fit 40-50 frames. if you’re planning for a smaller height (such as 540x400) you can usually fit more around 50-60 frames.
and here are the caps inside the folders. another reason i like freecommander is it’s ability to “multi-rename” files. the default file explorer can do so as well, but you have to do each folder individually and you can’t customize the new names as much. either way, i prefer to rename the files to each gif just to scratch my organization itch.
Introduction to Photoshop
NOTE: i have changed many of my keyboard shortcuts in photoshop to ones i prefer, so any you see listed in the menus of these screenshots are likely not the original shortcuts. you can see and change them yourself under edit→keyboard shortcuts

quick run-down of the photoshop interface. i have adjusted placement of some things from the default so this isn’t exactly how your photoshop will look when you open it, but everything is labelled, either on top or by hovering over the element. once you’re more familiar and have your process down i would recommend adjusting the workspace to suit your process.
A-your main tools and colour selector. almost all the tools have either several tools in one, or have alternate options which can be accessed by right-clicking the tool. you can also hover over each tool to get a pop-up with a quick explanation of the tool
B-additional “windows” such as history, properties, actions etc. can be opened from the window menu at the top and moved around with click-and-drag. history and properties should already be there by default, but probably on the right hand side instead. each window opens and closes with a click
C-the timeline window where the gif is made. the white square is a single frame of a gif, and on the row below is the play controls. this will not be there by default and will need to be opened from the window menu
D-adjustment layers for colouring
E-layers box. this is where the screencaps will show, along with adjustment layers, text layers, etc.
Opening Screencaps in Photoshop
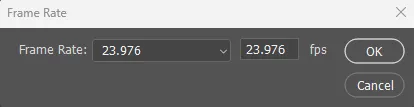
go to file → open navigate to the folder for your first gif, select the first screencap, and check the image sequencing, and click open

a window will open labelled frame rate. set it to 23.976 and select ok
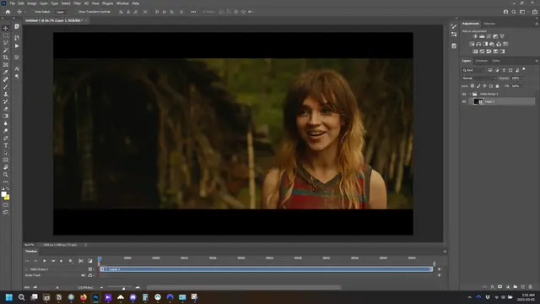
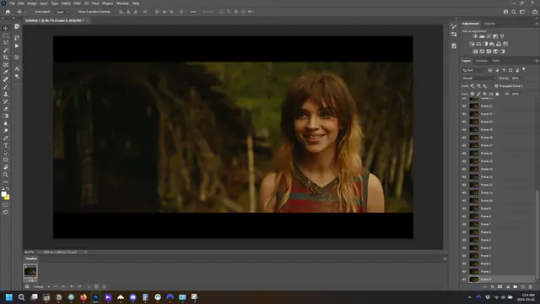
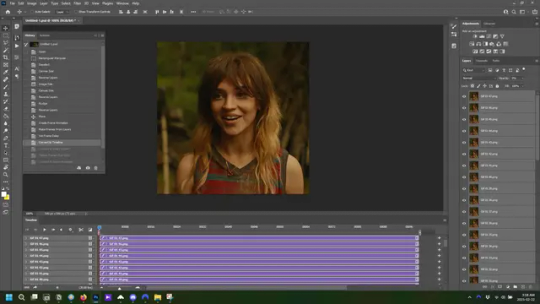
the screencaps will open in the timeline view, seen as the blue panel line at the bottom, and the screencaps are combined into video layer in the layer panel on the right.
Creating Frames
technically, you could go right into your cropping/resizing and sharpening from here, however if you do that directly then you have to keep the screencaps in the folders you have, otherwise if you save and re-open the gif it won’t move.
this next part should be made into an action.
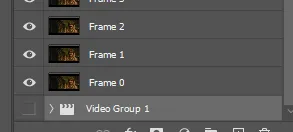
at the top right of the timeline window, click four vertical lines to open the menu and select convert frames → flatten frames into clips. depending on how long the gif is, this can take a minute.

the layers panel should now look like this, each frame of the gif is now its own layer.
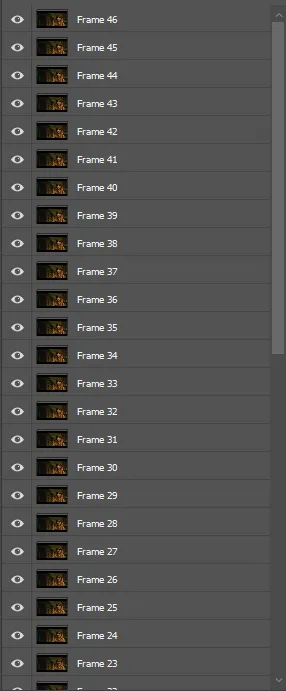
the very bottom layer will be the video group. this can be deleted as we’ve made the frames from it
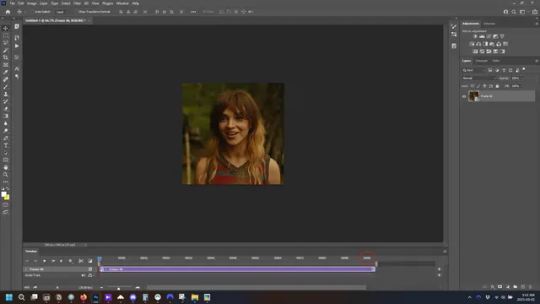
in same timeline menu as before, right under “flatten frames into clips”, select “convert to frame animation” and the screen should now look like this. this will be the end of this action.
Cropping and Resizing
with widescreen footage, sometimes it’s just shorter than 1080p, but most of the time it will have the black bars on the top and bottom, and frustratingly, they’re not always the same size. it’s good to save the most common sizes as actions.
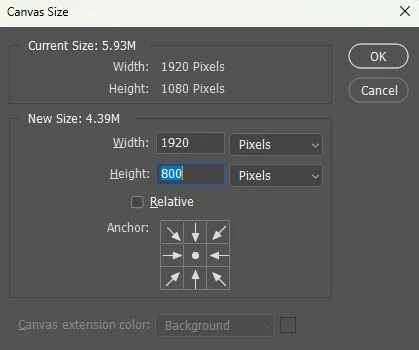
to find the size of the actual screen you turn on the rulers under view→rulers and check the height. then open your canvas size dialogue box under image→canvas size and change the height, making sure pixels are selected in the dropdown. yellowjackets is what i call “xtra wide” which is 800px. “normal” widescreen is 960px.
next we’re going to resize the caps. i also make actions for this, one for each potential gif size. open the image size dialogue box under image→image size and change the height of the image to your desired height plus 4 pixels. these extra pixels are to prevent a line at the top and/or bottom of your completed gif. now re-open the canvas size box, change the width to 540px, and the height to the desired, removing those 4 extra pixels. i have set this one to 540x540. this is where you would end the resizing action.
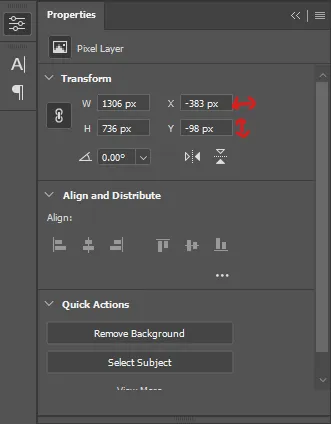
and as you can see she is off-screen. select the top layer, hold down shift and select the bottom layer to select them all, and with the move tool (the very top one) activated, click and drag to move it left to right as needed to centre the figure/s. as you move it a box will appear telling you how far you are moving it in any direction. make sure you are only moving it left or right, not up or down. to be certain of that, open the properties tab.
the y axis is your up/down, x is left/right. for this gif the y needs to stay at -98. you can also manually change the x axis number instead of dragging the image. also helpful for making sure multiple gifs of the same shot are all positioned the same.
the layer are currently ordered with the 1st at the top and the last at the bottom. with all layers still selected, go to layers→arrange→reverse. the last layer will be on top now. if there is movement in your gif, check if you need to alter the position again to make sure the movement properly centred. but once you are satisfied with the position, the layers should be in “reverse” position, of last layer on top. this is to ensure that the gif plays forwards.
Converting Gif
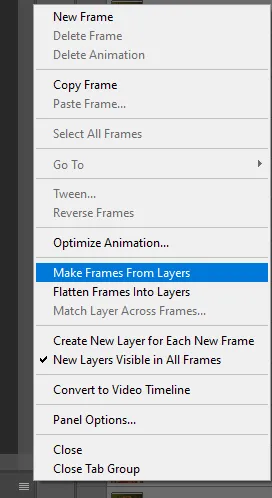
this should also be made into an action, going through sharpening process
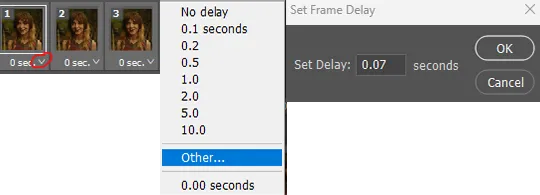
in the timeline menu, select “make frames from layers”
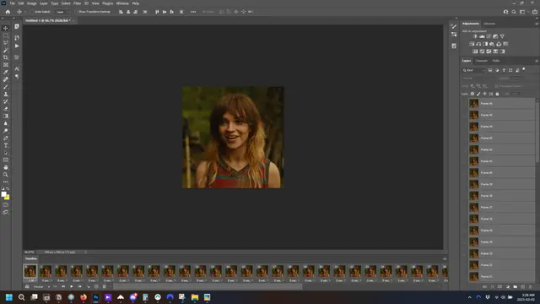
the frames are now populated in animation window. in timeline, click select all frames. go to any of the frames on the bottom and click the little arrow beneath it, select other, and enter 0.07 seconds. this is not a necessary step, as we will have to adjust the frame rate at the end, most likely to 0.05, but if we don’t change the frame rate here, then when we play the gif while working on it to check how it looks, it will play very fast.
in the same menu at the right of the timeline box, select “convert to video timeline”
then, making sure all layers in the panel on the right are selected, go to filter→convert for smart filters. this turns all the layers into a single smart object.
but if you look where i’ve circled, it says the gif is 99 frames long*, when in fact there are only 47. if you are making regular “scene” gifs, basic colouring and maybe a caption, this is fine and does not need to be fixed, it will play at the same speed. if you want to change it to display (approx.**) the correct number of frames, go to the timeline menu on the right, select “set timeline frame rate” and change it from 30 to 15
*if it does not list a frame number by 4 digits but instead says 5f, 10f, 15f, etc. go to the timeline menu on the right, select panel options, and change timeline units to “frame number”
**the reason why this is only approximate is because the actual frame rate is not a a whole number, so when changing the frame rate it isn’t a 1:1, and 47 frames becomes 50 frames. the extra frames are removed at the very end, but if you are not doing any edits that require working frame by frame, there’s no need to change the frame rate here at all
Sharpening
this is, as it sounds, making the gif look sharper. to start go to filter→sharpen→smart sharpen and this window opens. play around with the dials to see what each ones does. the below settings are good for most high quality footage.
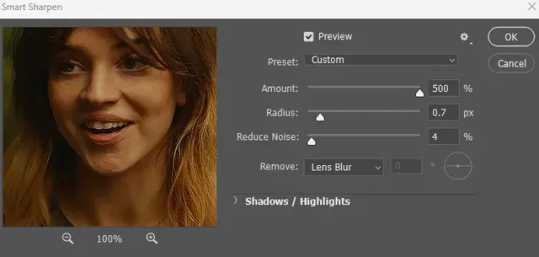
Amount-basically, how sharp do you want it
Radius-hard to explain, but this essentially sets how deep the lines of the sharpness are
Reduce Noise-smooths the pixels
once you click okay your single layer should look like this.
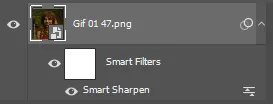
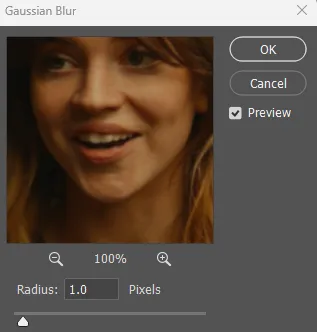
you’re going to then right click the layer and select duplicate layer. with the top layer selected, go to filters→blur→gaussian blur and set the radius to 1.0 pixels.
then change the opacity of the top layer to 10%. this is to essentially soften the sharpening a bit, as if it’s too sharp it can make the colouring wonky. this opacity level can also be changed depending on need.
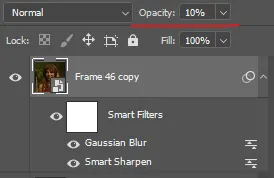
finally, select both layers, right click, and click “group from layers”. your gif is now fully made and sharpened.
Colouring
yeah. ran out of image space. but this is where you would do your colouring and add a caption or any other text.
Converting & Exporting
when all your colouring is done, you’re ready to start saving your gif. you can do it directly from your current file, but that means essentially losing your colouring, as all those layers will be merged together. i am someone who likes to save my psd’s (photoshop files), at least until i’ve posted the gifs, in case i need to fix something in the colouring. if you’d like to keep yours as well, open the history tab and select the first icon at the bottom “create new document from current state”. this will open a copy of the file in a new tab. save the original file and you can close it, continuing all work on the copy file.

select your all your layers, convert them into a smart object from filter->convert for smart filters, then follow the same steps from Creating Frames above. once you're back in frame animation, select Create Frames From Layers, and once again set the frame animation speed.
most people set the speed to 0.05. i personally set it to 0.05 or 0.06 depending on the length of the gif. check how it looks at 0.05, if it seems too fast, try 0.06.
now to save. go to file->export->save for web (legacy). the number is the lower left corner is your gif size, it needs to be under 10mb or else you'll have to delete some frames.

the right panel is your save options. the preset dropdown has some built-in settings, but you won't use them because (at least on my version) the presets only go up to 128 colours, instead of the full 256. the 3 i've highlighted in green are the only one's you'll adjust as needed. the settings below i use for i'd say 90% of my gifs. i'll sometimes change the adaptive dropdown to one of the other options, ocaissionaly the diffusion, and rarely the no transparency dither, but play around with them and see how they change the look of the gif.

when you're satisfied with the look of your gif, click save at the bottom right of the window.
voilà! you now have a gif.
Actions
this is your actions panel. the triangle on the left side is the button to open it. remember, if it's not already there, go to windows->actions to open it.
the buttons on the bottom, left to right, are stop recording, record action, play action, new folder, new action, and delete.

as you can see, i have different folders for my resizing, sharpening, captions, saving, and my 1 step (temporary) actions. to run an action is very simple; click the action, and click play.
to create an action, click the new action button, a box will pop up, give the action a name, and click record. the record button at the bottom of the action window will turn red. now perform all the steps you want it to record, and click stop recording. keep in mind it will record every single thing you do, including in other open files, so if the action you plan to record will have a lot of steps, it might help to write them down first.
to modify an action, select the step in the action above where you'd like the new step to be, hit record, perform the step, stop recording. select the step you'd like to delete, and click the delete button.
steps within the actions can be clicked and dragged, both within that action and moved to other actions. actions can also be moved between folders.
201 notes
·
View notes
Text
YOU'RE MARRIED WITH WHO!?

ੈ✩ pairing: Solomon x Female!reader
ੈ✩ summary: Even though you were married to Solomon it was a big secret. But what secret is kept to the grave?
ੈ✩ wc: 628
ੈ✩ warning(s): pet names {darling}

Being married to Solomon was... something. You two were married even before the exchange program, but because of Solomon's many "enemies," you both agreed to keep it a secret. The only thing that connected you was your hearts and a pair of matching rings. They weren’t anything big or elegant, but they were special because Solomon made them himself, so they were very unique. You never thought something as little as that would expose you, but one day, something happened...
"M/C, you should let me paint your nails!! I just got a new nail polish, so I want to test it out," said Asmo while clinging to your waist from behind. You just wanted to get some snacks from the kitchen after a tiring day, but here you were with a clingy Asmo, and you didn’t want to be rude.
"Sure, but you have to make it quick, alright?"
Upon hearing this, without saying anything, Asmo let go of you and grabbed your hand to guide both of you to his room. As you sat on his bed, you remembered to take off your ring so Asmo could work a little more comfortably. But before you could take it off, Asmo appeared out of nowhere and grabbed your hand.
"Oh! What a cool ring you have," he smirked, before smiling for a moment. "Eh? I’m pretty sure I’ve seen this somewhere." After inspecting the ring for a while, his face lit up. "I know where I saw this! Solomon has the exact same one!!"
Your eyes widened, and you started to sweat. "But it’s probably a coincidence," you said quickly, but Asmo let go of your hand to look at your face. The moment he saw your expression, he smirked.
"Oh? Do you guys have something going on, hm?" he started to tease.
"Oh, uhm... no?" After your awkward response, you mentally face-palmed yourself.
"So, uh, can I see the nail polish?" you tried to change the subject, but it only made him smirk more.
"I see, I see. So, you guys are dating then?" he continued. "What a shame, I wanted t—"
He was cut off by your fast response. "We are married, actually."
His eyes widened. "WHAT!? I mean, it was pretty suspicious that you guys knew each other even before you came Devildom and were always together, but MARRIED?! HOW DID I NOT NOTICE EARLIER?!!"
You awkwardly tried to calm the beautiful man down. "Asmo, calm down, everyone is going to hear yo—"
"M/C AND SOLOMON ARE WHAT?!"
When you and the Avatar of Lust turned your heads and looked through the door, you saw wide-eyed Mammon and Levi.
"I- uhmm—"
While Mammon was staring at you, Levi took out his D.D.D. and started typing something.
"M/C and Solomon have been married all along LOLOLOLOL," he typed, pressing 'send.'
All you could do was stare at Levi with wide eyes. "Levi, you didn’t really send it, right? RIGHT!?"
Before Levi could respond, your D.D.D. started to buzz with lots of calls/messages from the other brothers, and you got your answer. It was going to be a long night for you, huh?
At midnight in the Purgatory Hall...
"Solomooonn," you said with a crying voice, hugging Solomon from behind. He startled because of the sudden contact but quickly returned to normal.
"What happened, darling?" he said in a calm voice, turning to face you.
You explained what happened, and for a split second, his eyes widened before returning to normal (he hadn’t heard anything because he was "cooking" all day). He chuckled.
"Don’t worry. It was bound to happen anyway," he said, kissing the top of your head. "Now now, I can finally show everyone how good a wife you are."
God, he loved you so much.
@virelia
#obey me#obey me mc#obey me x reader#obey me fluff#obey me x you#obey me solomon#obey me Solomon x reader#obey me Solomon x you#obey me Solomon x mc#Solomon x reader#solomon x mc#Solomon x you#om! solomon#om! nightbringer#om! Solomon x reader
390 notes
·
View notes
Text
The entire camera system (including the “Special” and “Super” camera) has been converted to code!
youtube
#shawnthebro#ue4#unreal#stb#tutorial#youtube#unrealengine#unrealtutorial#unrealengine4#programming#ue5#how to make a fighting game#fighting game#fighting#games#game#unreal engine#unreal engine 4#unreal engine 5#engine#epic games#epic#guide#camera c++#c++#camera#code camera#camera code#code#special
1 note
·
View note
Text


Otherworldly Attraction | yandere!jjk x reader jujutsu kaisen, yandere, reverse harem, isekai, f!reader
You don't know how or why, but you've been isekai'd into the world of Jujutsu Kaisen. Although your first instinct is to stay away from the plot, you've been blessed with an abnormal amount of cursed energy, and for better or worse, you find yourself sucked into the storyline. You decide that you may as well use your newfound powers for the greater good, and if you're lucky, you might succeed in rewriting some of the characters' fates. But it turns out that your presence in this world is an even bigger deal than you first thought, and soon, everyone wants to make you theirs.
also available on Ao3!
Leave Your Mark | bnha x reader my hero academia, reverse harem, isekai, f!reader
You didn’t accomplish anything in your previous life. Looking back on it, you feel nothing but regret, and you yearn for the chance to do things differently. As it turns out, your wish is answered, and you are reborn into your favorite fictional world. This time, you resolve to make a change, and you have the means to do it. You won’t be content with just sitting on the sidelines and letting life pass you by. You will live boldly and vibrantly, as if every moment is your last.
also available on Ao3!
Heartbreaker | bnha x reader my hero academia, reverse harem, isekai, f!reader
You awaken one day with virtually no memories. The only thing guiding you is some strange system that likes to dictate your every move, and for some reason, it insists that you make certain people fall in love with you. Desperate for answers, you decide to go along with its demands. After all, how hard can it be?
also available on Ao3 and Wattpad!
Made to Destroy | bnha x op!reader my hero academia, reverse harem, over powered reader, f!reader
You are the product of a series of twisted experiments, an anomaly that shouldn’t have ever existed in the first place. Thankfully, you are taken into the arms of a hero and given a new purpose in life. But as you soon discover, it isn’t easy to deny your true nature, especially when you were made to destroy.
also available on Ao3 and Wattpad!
Bloodthirst | bnha x vampire!reader my hero academia, reverse harem, vampire reader, f!reader
As punishment for your sins, you, a young vampire, are banished — not just from your home, but to a different world entirely. Now, you find yourself in a foreign place where Quirks and heroes are the norm. In addition to coming to terms with your new life, you must also face your greatest challenge: controlling your massive thirst for blood.
also available on Ao3 and Wattpad!
Infatuated | yandere!bnha x reader my hero academia, yandere, reverse harem, f!reader
Your Quirk is rather unique. It plays out almost like a game, giving you missions and goals that help you become stronger. On top of that, you also have the ability to charm those around you. It sounds innocent enough on paper, and you can’t help but revel in the attention everyone keeps showering you with. But what happens when their feelings give way to something more sinister?

Love Bite | oc!vampires x reader yandere, reverse harem, vampires, original characters, f!reader
Desperate for money to pay off your debts, you sign up for a program that allows you to sell your blood to vampires. At first, everything is fine, and you’re finally able to make ends meet. But they soon begin craving more than just your blood.
also available on Wattpad!
Tears of a Villainess | yandere!ocs x reader yandere, reverse harem, isekai, original characters, f!reader
Reincarnation isn't as great as it sounds, especially when you've been reborn as none other than the villainess. Fated to die if you stand in the heroine's way, you immediately resolve to distance yourself from the plot. As long as you have nothing to do with any of the relevant characters, surely, you'll be able to avoid an untimely death. But in a horrible turn of events, the heroine ends up wanting to get close to you. Are you really doomed to meet the villainess' tragic end? Or is there an even more sinister fate that awaits you?
Girlfriend-For-Hire | yandere!ocs x reader yandere, reverse harem, original characters, f!reader
Hoping to try something new and earn a bit of money on the side, you join an app that lets people hire you for your dating services. The idea is pretty straightforward — you pose as the client's girlfriend for a brief period of time, and in turn, you receive payment. But you didn't foresee everyone getting so attached to you, and suddenly, they're no longer satisfied with a fabricated relationship.
Changing Plotlines | yandere!ocs x reader yandere, reverse harem, isekai, original characters, f!reader
A desperate cry on your deathbed leads to you being given a fresh start at life. You're overjoyed at having finally obtained a healthy body and a real chance at living normally, only to discover that you've been transported into a yandere game, where danger lurks at every corner. Determined to protect your new life at any cost, you vow to stay as far away from the major characters of the game as possible. But things don't always go as planned.
Bewitched | yandere!ocs x reader yandere, reverse harem, magic, witches, f!reader
Having awoken one day with no memories apart from your name, you are endlessly thankful when a kind family decides to take you in as their own. But it appears as though your fate cannot be so easily overwritten, and as you discover more and more about the person you were meant to be, the hearts of those around you seem to change in a sinister way.
also available on Wattpad!
Crushed Velvet | yandere!ocs x reader yandere, reverse harem, original characters, f!reader
Your parents are thrilled to have secured an engagement for you with the royal family. Your suitor, the crown prince, has agreed to be wed to you. It seems as though your entire future has been assured, so why is it that from this moment onward, your life starts to fall apart at the seams?
⊱.⋅follow + post notifications on for story update announcements or join the author's discord!⋅.⊰
#yandere jjk x reader#yandere jjk#jjk x reader#jujutsu kaisen x reader#bnha x reader#mha x reader#yandere bnha#yandere bnha x reader#yandere oc#yandere oc x reader#yandere reverse harem#reverse harem#reverse harem x reader#yandere reverse harem x reader#x reader#reader insert#yandere gojo#gojo satoru#bakugo katsuki#bakugo x reader#quotev#choso kamo#nanami kento#shouto todoroki#dabi#shigaraki tomura#aizawa#dadzawa#isekai#reincarnation
650 notes
·
View notes
Text
3T2 TV CHANNEL - with 3T2 Trait Support

Fishing Fracas
Hello! I am deciding to release some 3t2 tv channels one channel at a time since instructions are kinda involved.
This is a custom TV channel called "Fishing Fracas" straight from Sims 3 and it even plays the actual footage and audio from Sims 3!
This TV channel raises Nature enthusiasm and Sims will also gain the Fishing badge very slowly. Sims with the Angler 3t2 trait love this channel regardless of age.
If they Love the Outdoors (3t2 trait) their interest in Animals may increase if it's below 5 points.
If they have no traits, there is a tiny chance that they will increase their Animal Interest.
In this ZIP file, you will find the mod itself, a PACKAGE file, and a .AVI video file.
INSTALLATION INSTRUCTIONS
Place the PACKAGE file that I will link below into your Downloads. It has a unique GUID and shouldn't conflict with anything else. If it does, let me know! The GUID is 0x00895008
Go into Documents/EA Games/Sims 2/Movies/Broadcast (Note this is NOT in your Program Files (C) directory!)
Create a new folder within "Broadcast" simply called "Fishing"
In that folder, you will place the .AVI video file in my link below. It is the Sims 3 Fishing channel video provided by @earlypleasantview. DO NOT place in any SUBFOLDERS. Simply stick the video file straight into the "Fishing" folder or it will not work. It should be Movies/Broadcast/Fishing/ straight AVI file (not in a subfolder)
Now go to the Sims 2 folder in your Program Files (Disk C usually). The directory should look roughly like this: Program Files/EA (or whoever you got files from)/Most recent expansion (or Mansions and Gardens stuff for UC players)/TSData/Res/UserData/Config.
Copy and paste the "Broadcast" file that is inside "Config" to somewhere safe for editing. Back it up too. Open it with Notepad!
At the end of the list of stations at the top of the Notepad editor, add my fishing channel (It will say [Broadcast] to denote this list). Ignore the custom movies in my list, this is an example: .................. 18=tvmovie_fetch 19=tvmovie_mimecat 20=tvmovie_pooltable 21=tvmovie_weather 22=tvmovie_werewolf 23=tvstation_fishing
Don't italicize it, but that's where you need to add it. At the very end of the list of channels that the game pulls from. The number will obviously be different depending on if you have any other custom tv channels
8. Scroll to the end of the Notepad editor and paste in the following:
[tvstation_fishing] Folder=Broadcast/Fishing
Make sure the term after the slash mark and after the underscore is the exact name of the folder that you made in Documents!!!
If you want commercials to run, paste the following after that
CommercialInterval=60 CommercialFolder=Broadcast/Commercials
9. Paste Broadcast back into UserData/Config in Program Files, overriding/replacing the Broadcast file that you copied
Happy Simming!
Credits: @earlypleasantview
This mod and its creator Bubblebeam
#sims 2 simblr#sims 2 gameplay#sims 2 mods#sims 3t2#3to2 traits project#sims 2 traits#sims 2 trait mods#ts2#sims community#sims 2#ts2 traits project#traits project#ts2 mods#ts2cc#Sims 2 cc
112 notes
·
View notes
Note
Has there been any instances where Mc and C did work together other than the fake baby thingy?
the science lab was filled with high schoolers scrambling to set up their projects, all of them either too caffeinated or not caffeinated enough for the stress of the prestigious state science fair in washington.
the tables were crammed with an impressive array of projects: models of volcanic eruptions, elaborate circuits blinking in synchronized colors, experiments with soil composition in tiny terrariums. but none of them held a candle to your table, and you knew it.
you worked quickly, your fingers deft as you adjusted the components of the intricate apparatus. the machine—an elegant contraption meant to demonstrate clean energy storage using solar capacitors—was you and C’s brainchild.
they had done the research, the design, the equations scribbled out with ruthless precision in their sharp handwriting. you’d handled the practical end of things: soldering wires, programming the software, ensuring that their theoretical masterpiece could actually, you know, work.
you didn’t notice the way C stood a few feet away, arms crossed tightly, their posture as stiff as a statue’s. their chalcedony green eyes followed your every move like a hawk watching its prey, catching each adjustment you made, each tool you reached for.
finally, they cleared their throat. “you’re doing it wrong.”
you sighed without turning around, tightening a bolt on the panel. “good morning to you, too, lacroix. nice to see you’re in a supportive mood today.”
“supportive?” their voice had that sharp, clipped quality it always took on when they thought you were being deliberately obtuse. “i’d be supportive if you weren’t—” they made an exasperated noise, gesturing vaguely at the machine. “look, the angles on the solar panels are all wrong. the light’s not going to hit them efficiently like that. it’s basic geometry. i explained this to you yesterday.”
“okay,” you said evenly, glancing at them over your shoulder. “anything else?”
C blinked, their expression flickering into something almost like confusion. “you’re just... accepting it? like that?”
“well, yeah,” you said, shrugging. “you’re the brains behind this, aren’t you? if you’ve got more suggestions, i’m open to them.”
C suddenly seemed at a loss for words. the tips of their ears turned a faint pink, and they glanced away.
“well, i, uh...” they began, before scowling at you like it was somehow your fault they’d stumbled. “fine! move the reflector two inches to the left.”
you did as they asked, your motions slow and deliberate. “happy?”
“stop talking to me,” C snapped.
you blinked at them, incredulous. “you’re the one bossing me around!”
C ignored you, their nose tilting upward in that infuriatingly haughty way they’d perfected.
***
when the judges arrived at your school’s section, the air grew thick with anticipation. there were four of them—an engineer from spacex, a college professor from MIT, a tech startup CEO, and some local entrepreneur who had been introduced as a ‘philanthropist.’
they moved from table to table with an efficiency that made your stomach churn. you’d been rehearsing your answers for days, but there was something about the way they scribbled on their clipboards that made even your confidence waver.
but the presentation began smoothly enough, much to your relief. C handled the technical explanations, their voice steady and precise as they guided the judges through the intricacies of your design. you handled the broader picture, spinning a compelling narrative about its real-world applications.
but when the judges started asking questions, something shifted.
“so, who came up with the original concept?” the engineer asked, pen poised over her notepad.
“well,” you started, “it was—”
“me,” C interrupted, their green eyes glinting. “i developed the initial framework.”
you gave them an irritated look. “what they actually meant to say was that it was a joint effort.”
“sure,” C drawled sarcastically. “you jointly borrowed my calculations and then messed up the assembly two separate times.”
you bristled. “maybe if your diagrams weren’t as convoluted as your personality, i wouldn’t have had to ‘mess up’ anything.”
“convoluted? that’s rich, coming from someone who thought capacitors and resistors were interchangeable—”
“that was one time, and it only happened because you mislabeled them!”
the judges exchanged glances, two of them clearly trying not to laugh, the other two looking mildly alarmed.
“would you say you two work well together?” another judge ventured cautiously.
“oh, absolutely,” you said, your tone dripping with sarcasm.
“can’t agree more,” C added, voice as flat as a table.
the judge raised an eyebrow, scribbling something down.
by the end of the presentation, both of you were red-faced and fuming, but the machine worked perfectly, and the judges seemed reluctantly impressed.
***
after the presentation, you and C sat side by side in the waiting area, the hum of chatter and distant applause filling the space. your hands rested in your lap, but when you shifted slightly, your fingers brushed against theirs. the accidental contact sent a jolt of heat up your arm, and you risked a glance at them.
C was staring angrily at the floor as if it had just demanded to drain their bank account, half of their face buried in the high collar of their dark green turtleneck. the tips of their ears had turned even more pink. their foot tapped against the floor in rapid, agitated beats.
when the winners were announced, your names rang out together, tethered like an inevitability.
you and C locked eyes, both startled, before standing up in unison. the applause was loud, but all you could focus on was the awkwardness of walking side by side to accept the award.
you still fell into step beside them, the trophy handed over in a flurry of handshakes and flashes from the crowd’s cameras.
the microphone passed between you two for the acceptance speech.
“we’d like to thank our school for supporting this project,” you began, glancing at C.
“and, of course, this wouldn’t have been possible without the cooperation of my... partner,” they added, their jaw tightening as if the words physically pained them to say.
you were tempted to laugh at how they looked like they were having a particularly bad case of indigestion, but managed to keep a straight face for the cameras.
***
after the ceremony, the two of you lingered near the refreshment table. C cleared their throat awkwardly, avoiding your gaze.
“you did... good,” they muttered.
you cocked your head, thinking you misheard them. “what?”
“i said you did good,” they repeated, louder this time. “you didn’t embarrass us. much.”
you snorted. “thanks, i guess. you weren’t too bad yourself.”
C hesitated, their eyes darting to the trophy in their right hand as their other hand fidgeted with the edge of their aldervale prep blazer.
“you’re smart though,” they said finally, their voice softer than usual. “you would’ve won without me.”
the admission startled you. “was that... a real compliment?”
this time, C’s cheeks turned pink as well, and they huffed loudly, turning on their heel. “i’m leaving. and i’m taking the trophy.”
“wait, what?” you snapped out of your stupor and hurried after them. “that’s not fair, lacroix! we both won!”
“too bad, starkid,” C called over their shoulder, their tone maddeningly smug. “you want it? come and get it.”
you groaned, chasing them through the crowd. “lacroix, get back here!”
and for the first time all day, C’s smile was genuine enough for their dimples to show.
#my god they’re stupid#fellas is it weirdly romantic to chase each other through crowds?#upcoming scenario is gonna be for M 😗#if: the ballad of the young gods#interactive fiction#interactive novel#interactive story#twine wip#ro: c lacroix#ro scenarios
226 notes
·
View notes
Note
hiiii!! i was wondering … where do u get your pixels from? and if you make them yourself, how do you do them ? ^^ i think you already answered this but i couldnt find the post…

GUIDE TO: MAKING / FINDING PIXELS ୨୧
where do i find pixels / favicons ?
a ) carrds + rentries
these are my fav places to find resources!
some of my personal favourites are...
pixels ♡
maguro ♡
wilardo ♡
gifs ♡
xyz ♡
i also use this masterlist rentry, which has links to a bunch of resources. keep in mind some links are busted / have been deleted, so just keep clicking through until you find one that works!
b ) neocities sites
another of my favourite places to find resources!! neocities is a program that allows you to make your own website! a lot of people create sites full of their favicon collections. i have a carrd with heaps of links to these sites.
my fav sites are...
wowzow ♡
homuhoard / homunori ♡
pixel safari ♡
c ) here on tumblr duh !
my fav blogs for resources ♡
@melonet ♡
@unknown-till ♡
@leafbuglove ♡
2. how do i make pixels / favicons ?
if you're looking for more realistic ones such as these:


here's a tut i made!
here's the site i use!
if you want pixel art ones like these:


here's my favourite website for making them!!! it's super duper easy
hope this helps!!!
143 notes
·
View notes
Text
want to sleep but my laundry isn't done yet so i'm just sitting here looking at girl tummy and listening to c++ programming guides
77 notes
·
View notes
Text
Connor NSFW alphabet

A = Aftercare (what they’re like after sex)
Connor is extremely attentive of your vitals, keeping an eye on your hydration levels, heartbeat and overall well-being. He will clean you up every time, maintaining himself and his partner is very important for him. He will get you anything you need but if you require anything over water you have to ask, although he can see much more than a human can he isn't a mind reader
B = Body part (their favorite body part of theirs and also their partner’s)
Connor doesn't have a favourite body part on himself, he's aware he's perfectly designed to appeal and integrate with humans so he doesn't get insecure about himself physically, that also means he doesn't favour any physical part of himself, but if he had to choose, he knows if he gives you a certain look with his eyes you give in to him pretty quickly, which always works to his benefit.
For you it would be everything if it could, he's constantly learning new things about humans and you. He definitely favours your waist and hips, loves grabbing onto them everywhere whether he's being subtle or not, he has you in his control and to an android who's used to following orders having someone else following his is somewhat empowering to him.
C = Cum (anything to do with cum, basically)
Either inside your mouth or inside you. He doesn't gain anything in covering you with cum, just makes a mess, and he also can't get you pregnant so he doesn't have to worry about anything like that.
D = Dirty secret (pretty self explanatory, a dirty secret of theirs)
Tried masturbating, and like it. He's too ashamed to admit it to you, as normal as it is to humans, for an android like him it feels like selfish indulgence. He's much more of a giver than a receiver and sometimes feels like sex is more for your benefit than his, after all he never even considered sex until it came to you. When he realised he liked masturbating he felt guilty, like you would believe that he preferred his hand to you, so he never told you, until one day you caught him.
E = Experience (how experienced are they? do they know what they’re doing?)
He had no experience before you but he easily done his research. You guided him at first and he eventually got more brave in the bedroom, more explorational, he was a fast learner too.
F = Favorite position (this goes without saying)
Cowgirl. Loves to watch you on top of him while grabbing your hips, and gives you both equal control.
G = Goofy (are they more serious in the moment? are they humorous? etc.)
He takes sex quite seriously if you make a joke he will play along but like his missions he has a goal to accomplish, and nothing will get in the way of that goal.
H = Hair (how well groomed are they? does the carpet match the drapes? etc.)
Neatly trimmed, and uniform to his hair, again his maintenance takes a certain priority.
I = Intimacy (how are they during the moment? the romantic aspect)
As romantic as they get. He's very focused of course but understands moments like these are nothing to you without the romantic aspect.
J = Jack off (masturbation headcanon)
Again, he enjoys it. Doesn't do it often but if he finds himself bored at home then he will partake in it.
K = Kink (one or more of their kinks)
Loves praise as he was programmed to respond positively to it.
Loves being the more dominant one as he gets to be in control.
He's never admitted this one to you but once you playfully ran away from him after trying to initiate sex and the chase before he undoubtedly caught you sparked something in him.
L = Location (favorite places to do the do)
The bedroom is the only place he likes. Sex is meant for the bedroom and meant to stay in the bedroom.
M = Motivation (what turns them on, gets them going)
Praise really gets him going if you mention his impeccable skills in the bedroom and how much you yearn for them in the current moment he will gladly accept. “You need my skills? Well of course I'm happy to be of service!”
N = No (something they wouldn’t do, turn offs)
Won't cause you or him harm. Won't have sex outside the bedroom. Won't participate in a threesome. Anything that puts either of you in danger. Things that cause way too much mess (Usually involving bodily fluids)
O = Oral (preference in giving or receiving, skill, etc.)
Loves giving, he can analyse your that way too like he does with blood. Once told you that you might wanna drink more water as the acidic level- and he has to stop as a light smack came to his head. He learnt not to analyse you mid eating you out. Loves to delve his face into you, and since he's an android he wont come up for air. As he's doing this he's constantly looking at you watching your reactions.
Receiving is also great but he got too carried away in it once, had you coughing for a good minute, he forgot humans have to breath and have gag reflexes, and now has too control himself everytime, which irritates him as he usually likes to let loose during sex.
P = Pace (are they fast and rough? slow and sensual? etc.)
He can do both depending on what you're responding to the best. If he's pissed off he tends to take it out in sex.
“F- shit! Jesus Connor! Rough day?”
“You, ngh, have no idea.”
Usually is slow and sensual as he gets a better look at your reactions.
Q = Quickie (their opinions on quickies, how often, etc.)
Hates them, sex is a special thing to him and to rush it just ruins it.
R = Risk (are they game to experiment? do they take risks? etc.)
Is very open to new things and will try most things at least once.
S = Stamina (how many rounds can they go for? how long do they last?)
He's an android, he can last all day and night. Usually stops when you're overstimulated (sometimes keeps it going for longer)
T = Toys (do they own toys? do they use them? on a partner or themselves?)
Doesn't use toys. He's got many features, toys are somewhat useless to you both.
U = Unfair (how much they like to tease)
Loves to tease, usually tests how long you can go for until you break
V = Volume (how loud they are, what sounds they make, etc.)
He can be quiet but much prefers to be loud, he wants you to know he's enjoying it as much as he is.
W = Wild card (a random headcanon for the character)
Short-circuited once after cumming. Wouldn't let you mention to him ever again after that.
X = X-ray (let’s see what’s going on under those clothes)
He was given above average, around 7.5. A notable length but average girth.
Y = Yearning (how high is their sex drive?)
At first it's high, he wants to learn so much and asks you almost every chance he gets. Once he gets the hang of sex he pulls it back a little but will never deny you if the opportunity strikes (unless he's in a teasing mood)
Z = Zzz (how quickly they fall asleep afterwards)
Unless he's low on power he doesn't need to sleep, if you fall asleep on him he will go into rest mode but will never fall asleep before you.
If you have any requests please let me know, especially for Connor (or Markus he never gets enough love)
83 notes
·
View notes