#but i add saturation when i edit anyways so idk
Explore tagged Tumblr posts
Text
wanna try out that new lighting mod that was released but i really love twinkle toes so idk ;-;
#change is scary#i just love how dark the shadows are with twinkle toes#but i also love saturation too!#but i add saturation when i edit anyways so idk#i wish lighting mods were easier to install. i would feel more inclined to try new ones if it were#i used moonglow for a while too and i really liked it!! but i just can’t get over the shadows with twinkle toes#so nice 🤤
16 notes
·
View notes
Text
*GOOFY AHHH TUTUORIAL*
lesson 2: getting started on psds!!
hit "read more" if interested!
** NOT ALL PSDS ARE FILTERS, PSDS ARE USUALLY BASES THAT YOU CAN OPEN UP. PSDS ARE PHOTOSHOP FILES THAT YOU CAN OPEN UP AND EDIT WITH ALL OF THE LAYERS. THIS IS A TUTORIAL FOR A FILTER PSD (aka, making your OWN filters) **
hey there!! welcome to lesson 2. you don't need to tune in on lesson 1 to understand this, because it was just about finding editing programs and finding tutorials and motivation, so if you already know about all of that, you are basically prepared for this lesson.
this is a tutorial for PHOTOPEA, idk if this works anywhere else. also, this is INTENDED FOR A COMPUTER. (ex: dragging and dropping files and all of that stuff)
STEP 1: the first thing you may* see when going into photopea is this screen:
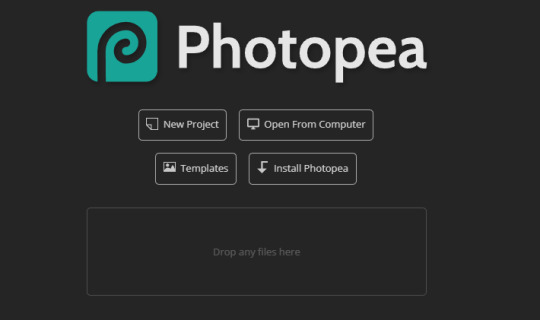
drag any image into the box that says "drop any files here" if you are a noob and don't know how to drag and drop files you can find a tutorial here. anyways, like i was saying drag and drop any image.
now it should look something like this (but instead of the hatsune miku image its the image that you prefer):
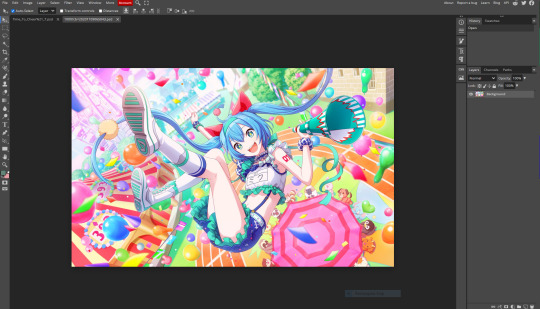
STEP 2*****: now that you have your image, look at the symbols at the bottom right corner. you should see this folder image (folder is circled in red)

you should click the folder button. now you have created a folder. this is going to be the filter.
now that you have the folder down, before proceeding further make sure that its HIGHLIGHTED
go a little bit above the corner, and you folder should be highlighted like this

if its not, just click on it.
now that its highlighted go back to that right corner and click this half circle button that i circled in red

once you click it, this should pop up

i usually hit the "selective color button" first
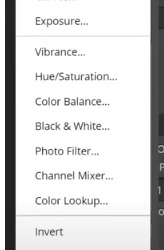
it usually presents you with this:
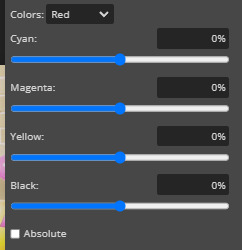
at the top of the image, you should see the "colors" button, thats the color you are editing. click it and choose the color you want to edit. you can edit how much a certain color is in a color lol. if yk what i mean.
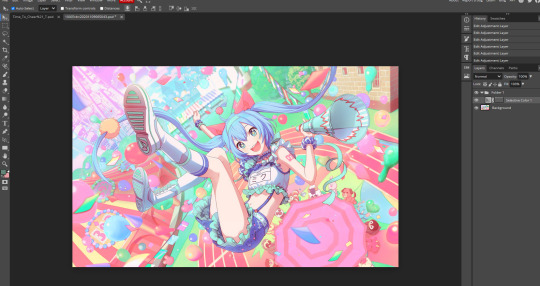
now i spent a little bit of time editing the selective color, and you can see that the image looks a little different. scroll up to the original image on stop one to see what im talking about! you can add many selective colors until your satisfied!
as you can see, i've added another selective color!

now, right below selective color, (back in the half circle menu) you can see "replace color" this is what it looks like (i've already edited it but you get the idea)

you can choose a color to make FUZZY** and after you do that, you can change the hue, saturation, and lightness to your liking.
here is what my miku image looks like after FUZZINESS**, not a big difference but u can still kinda see it.
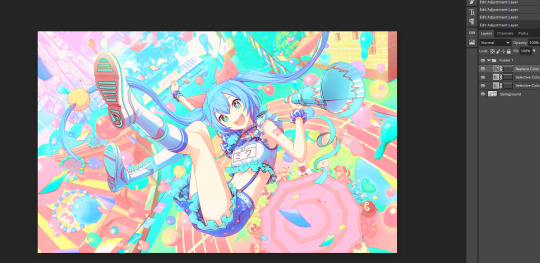
STEP 3*****: after you've done that, go back to the half circle menu and close to the top but not all the way, you can see "curves". they look like this:
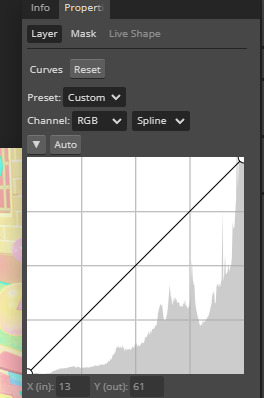
now you can bend them and destroy them to your liking.
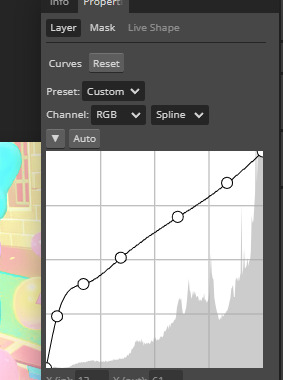
(the higher UP you make your curve go, the lighter it gets, the more LOW you make your curve go, the darker it gets. it also does some other stuff too***. just keep on breaking and bending it to your liking.)
now this is what my filter looks like

STEP 4*****: after your done with abusing and breaking lines now go back to half circle menu and find "color balance". it should look like this
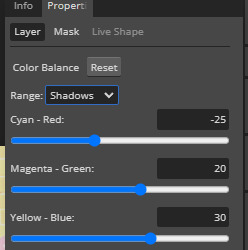
its already edited but whatever (everyone thing should start at zero) but just move the circle more towards the color that you want there to be more of. also hit the range thing to effect more then just the shadows.
now heres what it looks like:
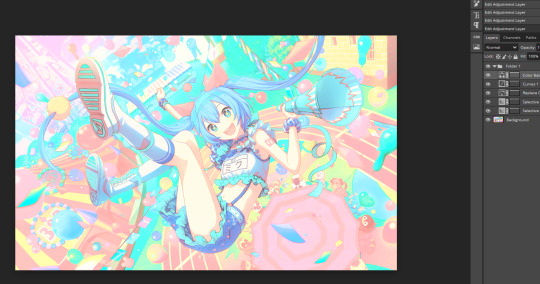
the difference is VERY small****, but you can see that theres more green and cyan + blue when you look closer.
Step 5*****: near the curves thing, you should see "brightness/contrast" you should probably hit that. and it should look like this
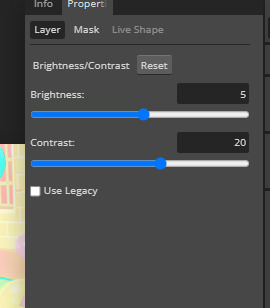
adjust it to your liking! its already been adjusted in the image as you can see but still.
Step 6*****: now if you hit the half circle button and look a little bit BELOW curves you should see "vibrance" it also has a saturation button but just drag the circle to your liking.
Step 7*****: next is "photofilter" its in the half circle button in the middle. if you want more of a certain color, click on the orange box to change it. here is what it should look like btw:

also the "density" is how much the color effects the image.
step 8: also, near the "photofilter" in that middle row a little bit above it, there is hue/saturation. its pretty explainable what it does, but just adjust the circles to your liking.
i have been editing this for the last hour, i hope atleast ONE person finds this post helpful. if you are currently reading this, thank you! if you used this tutorial, PLEASE send me the PSD you made!! (through the "request" button on my blog or @ me in a post!!) /nf
IF YOU FOUND ANY OF THE * SYMBOLS, THIS IS WHAT THEY ALL MEAN:
.. * i HOPE your photopea looks like that, it SHOULD. if it doesn't look like that your PROBABLY not on photopea.. your probably on some alien website or something. ** I honestly don't know what "fuzziness" means yet so i'm just as confused as you are. *** other stuff being: change of colors, making the image more red (making it look like it took place in hell!) interverting the image, making the colors more gray. **** honestly a lot of the options make the difference very small ***** you don't need to use ALL of these options if you don't WANT TO. i honestly don't use photo filter for most of my edits.
173 notes
·
View notes
Note
idk if someone already asked but what program do u use to draw??? also i really love the way you do the lines!! what brush do u use??
no worries! i haven't answered this question in at Leeeaast a few years anyways :P nowadays i use clip studio paint, and almost all of the brushes i use are stuff i've grabbed off the asset store! (with edits, naturally). i'd put this under a readmore but every time i did tumblr broke the formatting orz
my absolute Favorite brush - something i'd recommend to Anyone regardless of what they're using it for - is this highlighter brush! i've been using it for almost 2 years now! whether it's sketches, outlines, or paintings - it adds a nice Chunky feeling with the square brush shape & a texture that i adore on top of that.
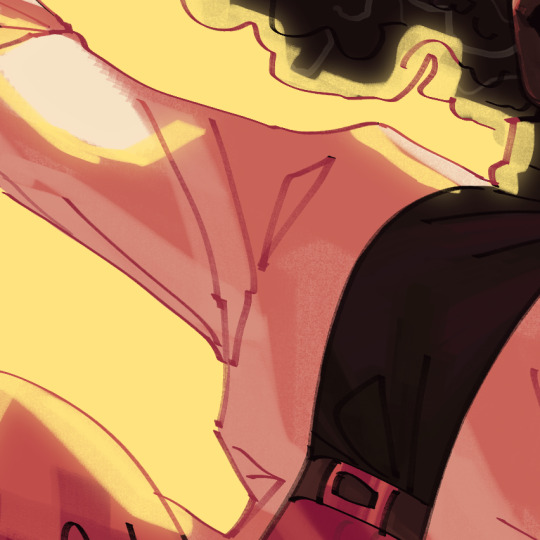
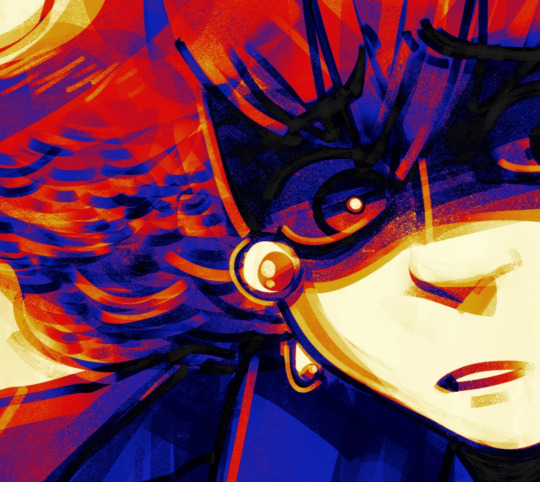
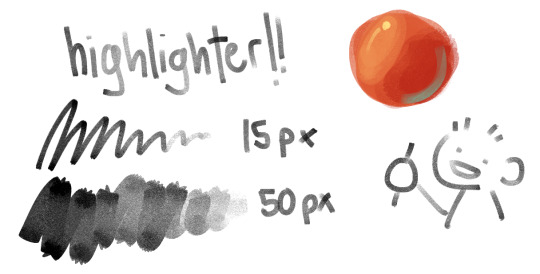
anything i post that has a Cleaner outline than normal is probably a result of this brush! i Love the sketchier feel of my other brushes, but when i need something well-defined and solid, this is my go-to brush. the weight & feel of it reminds me of the old bic pens i would doodle with in the margins of my homework back in highschool :P
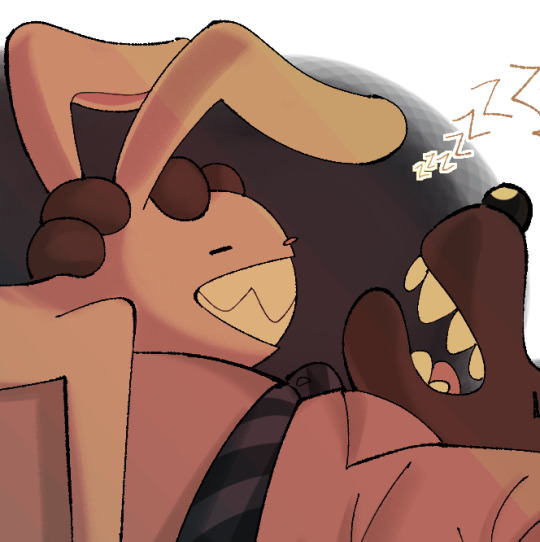

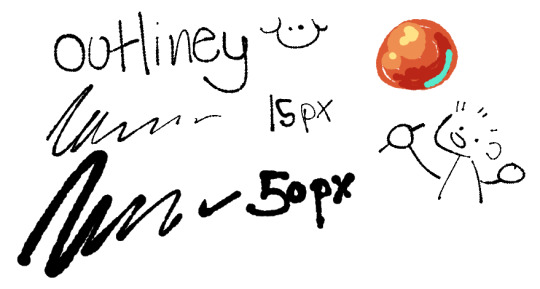
the first brush from this set is one i use to compliment the brush i just listed - it's made by the same creator, so it has the same feel, but it's a LOT better at Suggesting things rather than Defining them, if that makes sense! i use it a lot when i'm drawing wrinkles, folds in clothing, blush lines, crosshatching - really, anything that should Be There, but isn't meant to be the center of attention. also good for loose sketches!


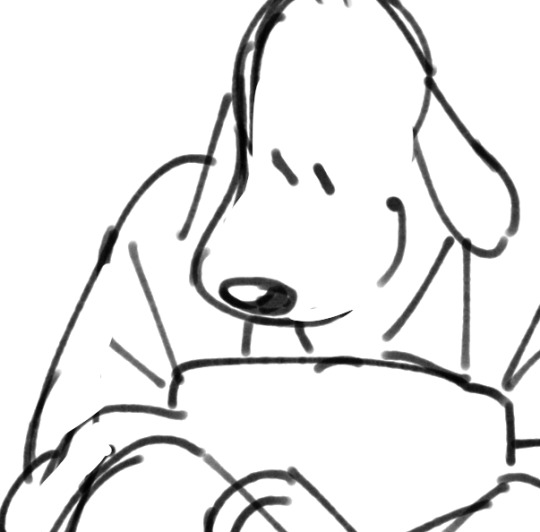
this brush is very new to me! total disclosure, you have to pay for this now, but i downloaded it when it was free. i mostly use this brush for sketching, but i think it also works REALLY well for painting! my usual approach to blending colors is to lay down a base, slap another color on top of it, and eyedrop the blend between them to go over the transition point with - and i think this brush lends Really well to that. reminds me of working with chalk pastels irl :P

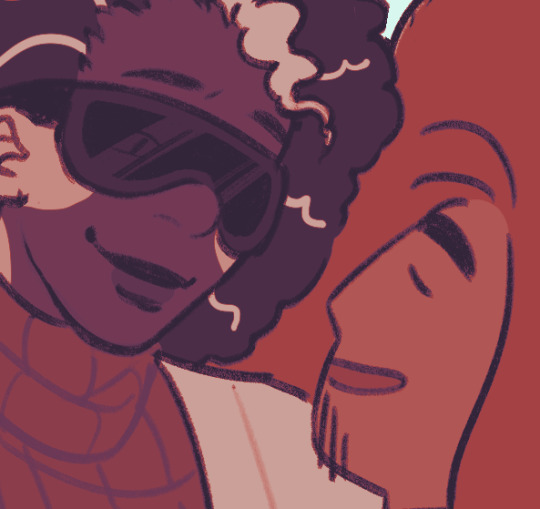

then there's this one specific brush i've been OBSESSED with lately. you can see it in a good bit of my recent art, if you know how to look for it, and i think it's something i'm going to be using for a long time! it has a specific weight and Oomph to it that i just Loooove so much



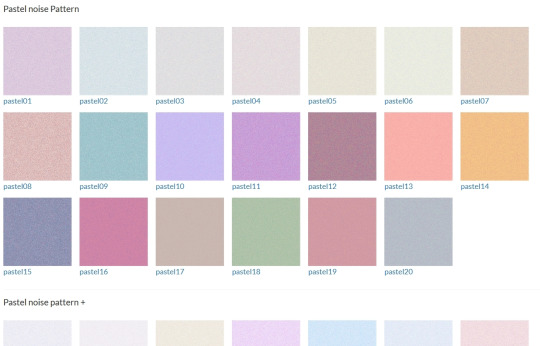
when it comes to post-painting, i-need-to-add-more-Crunch-to-this-drawing, this noise set is where i go first! this isn't a situation where i can just say "yeah slap one of these down on overlay at 30%" or whatever - you have to experiment! every time i use one of these i end up spending 30 minutes going through The Whole List of blending modes to see which one works best & then spend Another 30 minutes fiddling with the opacity. and then spend Another 30 minutes fiddling with the luminosity & saturation of the layer. there's so many colors available that i can just drag & drop & delete until i find what color scheme works best!

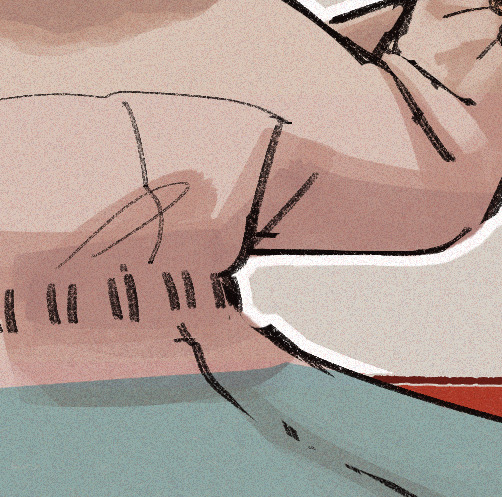
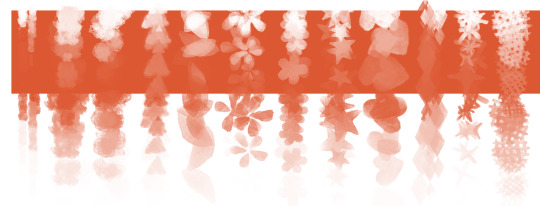
honorable mention - this set also costs money, but it's one of my favorite ways to make a plain color background have More Flavor. LOVE that it has a clean version of the shape and then a second version where it's got a Chunky border! plus making this post made me realize the creator added more shapes since the last time i downloaded it yaaAAAYY


#mine#resources#long post#full disclosure? i moved laptops recently and had to abandon like 95% of my old art while making the transition#so i am soo glad i have this blog as a sort of archive. especially for a post like this where i Want to have examples every step of the way#ty for the ask nonny <3
3 notes
·
View notes
Text
(`Δ´) ﹒ ❋﹒📦 ﹒manifestation lesson one !? ﹐✩
⠀
# WHAT THE HELL IS MANIFESTING . . . !!! 🩹 ★?!% ft. my personal manifestation back story
⠀

i was reading a post on pinterest one day and i fully realized just what it is when i’m manifesting. unfortunately, the post had no credits ( it was cropped out because ppl tend to think that’s a good idea.. ) but if u think i’m referring to your post, shoot me a dm and i’ll edit in credits !!

thankfully, i wasn’t in my law of attraction phase for long. i practiced law of attraction beliefs when i had first started shifting in 2018.
i thought i needed to take a shower, read my script, clean my room, stay happy, all of the law of attraction bullshit, in order to shift. i thought i had to do all this before attempting to shift in order for it to be a successful shift. of course, that never worked because like i said, it’s bullshit. so since it didn’t work i took a break, for a couple of years lol. i didn’t get back into shifting until 2021 when i had became unhappy with my body bc of personal experiences, so i desired change. yes, when it blew up on tiktok. i became reliant on it because i wanted to do anything i could to get away from my void ( current ) reality. i was using shifting as a desperate escape, i became obsessed. then i stopped again, because obviously it wasn’t working. then, i started hating my body again as old memories started resurfacing. they started to haunt me more and more.
in comes : subliminals.
i’ve known what subliminals were since 2017 when i started listening to subliminals to improve myself mentally, in hope my parents would be proud of the person i had become. i’m not going to get into that at all in this post so anyways-
when i started hating my body in 2021, i started listening to subliminals for a flatter chest, flatter stomach, tiny waist, abs- yk…. the things dysphoria can do to you. my desires where all over the place as i was still unsure what my gender identity was. one day, while listening to subliminals, a video was recommended to me.
in comes : hyler.
i love hyler with my entire being. without her i probably wouldn’t have found the law of assumption for a while. to this day, i still watch hyler just for fun, i love her energy and she frequently adds a new perspective with how i manifest. but anyways, hylers full explanation on what the law of assumption was, was the video that i watched. instantly, i fell in love. i loved the law of assumption and had more faith in it. since discovering, i binged all of the videos she had posted at that time was able to manifest plenty of things, but all of the ‘big’ manifestations came in ‘late’.
for a while i stopped consciously manifesting but would still watch hyler until she mentioned another youtuber and i checked her out as well.
in comes : sammy ingram.
i started watching sammy for self-concept and physical appearance related things. i liked her confidence so i listened and with this i was able to work on my self-concept a bit, but no major changes. after a while, i started wanting my ex back…. an embarrassing era tbh.
now i don’t watch sammy anymore, i personally do not like what she teaches and you’ll understand why very soon.
this is not with the intent to start drama or throw any types of shade. i’m simply stating some beliefs i had which, tbh, where both me and sammy’s fault.
now that we’re done with my goofy ass manifestation origin story, let’s get back on track. the pinterest post. sammy often preached about ( past tense bc idk what she talks abt now ) saturating your subconscious mind. she would talk about keeping a mental diet, affirming as much as you could, etc etc. and back then, i took it as truth. subliminals would talk about the same thing, saying : listen at least 30 mins a day, stick to your playlist, only listen to one topic then flush etc etc. now, i realize how untrue all of this is.
i would make subliminals with affirmations like ‘ive always had clear skin’ or ‘i already have my results’ but i would always look at it as revision affs. the truth is, i have TRULY always had clear skin. i actually do ALREADY have my results
every version of yourself from every reality you exist in is morphed into you. you are every single version of yourself that is possible. once you realize this, you’re at your highest power constantly. reality exist, the physical reality is real, just not in the way you think. its a real reality but not 'your' reality. not the one you're meant to be conscious of. you are able to shift anywhere easily and instantly, there's literally nothing that can stop you. there are infinite realities, there is a change in each reality. even the smallest changes exist in another reality. the small fact that a piece of your rug is facing another direction in this moment, is a reality in itself. everything is the same, except the fact that a piece of your rug is facing another direction, right now. any change that could possibly exist, no matter how many changes there are, it does.
when you shift realities, you are not yeeting your body into some other dimension with the possibility of being stuck, no. a shift in reality is simply a shift in consciousness. in one reality you aren’t even reading this post, in another you stopped reading a few seconds ago, but in this one, in the reality you are consciously aware of, you are still reading this. you’re constantly shifting, each moment you are shifting to a reality where you are doing what you are doing right now, thinking what you’re thinking right now, ykwim ?
ok that was a lot.. are you still with me ??
when you shift, you become aware of another reality that simultaneously exists with the one you are aware of right now. you don’t create anything, it already exists. you are simply unaware of that reality.
like i said before, you are one with every you in each reality always. you are never GETTING anything, it has always been yours. listening to subliminals, affirming, etc, it’s all just a reminder of what you already have. for example, i tell myself : ‘i have a tiny waist.’ of course i do. there is a reality where i have a super tiny waist and all i’m doing is becoming aware that it’s something i have. everything is the same, but instead, i now have a tiny waist. i'm in that reality now.
i used to think you’d have to work on your self-concept to manifest. when really, i don’t need to do anything but become aware. you don’t need to do anything but occupy the state of having your desire. you do not need to remove all your limiting beliefs, you don't need to saturate your subconscious, you don't need to go on a mental diet, you don’t have to fully believe or work on your self-concept, stop trying to be so perfect and stop abiding by these rules that never existed. trust yourself, know that everything you want is already yours. once you occupy this state, once you realize you are just shifting to a reality that you already exist in, you will realize just how easy and effortless this all truly is. when i listen to subs i’m reminding myself of what i have, same with visualizing, affirming, etc. my physical ( 3d ) reality has already conformed, i am just becoming aware of the reality where that is obvious. i’m not getting my desire, i’m reminding myself that i’ve had it for as long as i wanted.
this is why people say thinking of your desire brings it to you. it’s not an exaggeration for fast results, it’s true. the moment i desire something, i realize that there are infinite realities and infinite versions of me that already have what i desire. so, by getting into the mindset of having my desires, my reality will shift to give me my desires. i persist in the assumption that i already have what i want and instantly there is evidence of it in my physical reality. whatever i keep assuming manifests because my subconscious will find it true and will make me aware of the reality where that exists. i just change my thoughts.
in the next post i will explain what i do to manifest,, yk so that its fun and extra <33

side note - when i was checking my timeline i came across these angel numbers lol, was scared as hell to post this but i am seeing this as reassurance,, if u like this pls lmk :


© @cyberjaiee - 2022
#﹒✶ jaie's lessons#manifestation#law of assumption#manifestation journey#how to manifest#affirm and persist#affirmations#loassumption#what is manifesting#neville goddard#hyler#manifestation rants#subliminals#living in the end#loa#reality shifting
61 notes
·
View notes
Text
anyway here is how Kung Fu Panda has ruined me forever apparently
because the KFP films did something incredibly smart by using colors to signify themes and saturating certain scenes with certain colors to hammer home those themes. for example, blue is their “negative” color, and in the first film is heavily tied to the villain Tai Lung, while across all three films gold is the “hero” color and therefore Po’s color. great example of this is typically during the final fight, the first half of the fight will take place at night and be saturated in the villain’s color, only for the fight to be interrupted by sunrise, saturating everything in gold when Po either arrives or turns the tides of the film
anyway all of this to say that in Shang-Chi, the color of the rings would change depending on who was using them: when the villain used them they glowed blue (KFP’s “negative” color) and when a hero used them they glowed gold (KFP’s “hero” color) which is probably coincidental in that those were the colors used but idk. (I know- or at least I’ve heard- that in Chinese culture gold is used to symbolize power which still works.) also add in the use of purple, as in the MCU we already have the Power Stone which glows purple so in these movies there’s a clear association that purple = power, so
anyway that’s all I got
edit: (in Shang-Chi it was actually more orange than gold, but considering it’s still cool color vs warm color, I think I can be forgiven the mix-up. ahh whatever don’t listen to me)
#in which I ramble#MCU#Shang Chi#Shang Chi and the Legend of the Ten Rings#Shang Chi spoilers#sorry not sorry for using Kung Fu Panda as my point of reference#it makes sense in my head
15 notes
·
View notes
Text
2020 CREATOR WRAP + FAVOURITE WORKS + FOLLOW FOREVER
Rules: It’s time to love yourselves! Choose your 5 (or so) favorite works you created in the past year (fics, art, edits, etc.) and link them below to reflect on the amazing things you brought into the world in 2020. Tag as many writers/artists/etc. as you want (fan or original) so we can spread the love and link each other to awesome works. I was tagged by @yibobibo aamna thank u so muc and I’m so sorry this is so latenfkskkfd
@yibobibo aamnaaaaa!! You’re always so so wonderful and nice esp when you send me cute little messages I completely adore you and how you’re always tagging me in stuff! Thank you so much and I’m sorry I’m so lazygnskd but I appreciate it all so so much! You’re so talented as well i love everything you post and all your wonderful cql/yibo content makes me so happy esp when ur going off in the tags! I love this (it’s just so jc and wwx and it makes me so so sad) and this (ur tags said it well it’s very sexy) and lastly, this one (it’s just?? So powerful and I love that scene so so much) I’m sending u lots of love for the new year and I hope u have a wonderful year ahead 🥰😚
@gremlinmetawin ayeshaaaaaaaa!! Despite what you may thinkhjdkdkd I do actually love u very much 🙄 even when ur being mean to me. I love everything you put on my dash and when ur watching stuff, despite how long you take, I always love that you flood my dash with gifs bc it makes me feel like I’m watching right along with u. Also I know I make fun of u for tkaing so long to watch stuff but I love hearing your thots on everything and you always manage to pick up on the little details that I always end up missing. I also love how extra you can be gjskkfkdd your font for ayeshas thot still makes me laughfjkskd Anyways I’m so so glad to have gotten to know you this year and I appreciate you so so much and I just love screaming about all the shows we’re watching together 🥺 I Ioce u and appreciate u and I hope that next year is rlly good to u 😚😚🥰
@teh-ohaew taayyy!! Like I said with Ayesha despite what guys think i do actually love u too even tho you favour Ayesha over me sighhh but seriously I’m so glad we’ve gotten close over the few months (2gs impact huh) and that we get to scream over the same shit to each other. I also love how u don’t post shit for days and then u comeback and rb everythinggnsmmd and ur thirsty tags 🙄 always interesting to read. Oh and I’ve told u this multiple times but this this and this all of the edits are so good and all the detail you’ve put into them?? I love it so so much I also rlly love this all of the quotes you chose and the scenes?? To quote you, Britney gif yeah 😩 okay that’s it I love u and appreciate u and I hope next year is really really good to u 😚😚🥰
@yioh yuraaaaaa!!! I always feel so warm and happy whenever I see your stuff on my dash. I love hearing your thoughts on every show you’re watching or reading and I always find myself adding stuff to my recs. Also I love how you’re always so energetic and kind to everyone and you just excude love and warmth. You’re so talented I just love all of your artwork so so much esp this (the concept is just so good? What we could’ve had 😔) and this (bc obvs they’re both happy and living together) and lastly this (ngl I’ve gone back and read this so many times bc it just?? Hurts so much??) hope u have a great year ahead and u get to be surrounded by cats and everything u love!! 🥰😚😚
@metawwin aliiiiiiii!!! I’m so happy that we’ve gotten the chance to get to know one another this year and I absolutely adore you. You’re always so so kind and give off such positive energy and I just feel so happy whenever I see your stuff on my dash. And I’ve said this before but I love your gifs and it shows how much work you put into them and I love everything about your blog. I esp love this (ngl I lost my shit bc hands??? It’s such a pretty set and I always come back to it) and this (god I love this quote so much and I just love the scenes you’ve chosen and just everything is just so them) and lastly this (i love how u pick up on the smallest details and parallels and this set.. I just appreciate it so so much) I lov u and miss u I hope u have a great year ahead , sending u lots of love 🥰😚😚
@taytawan nuriaaa!! you’re so kind and you and your blog just give off such warmth idk how to explain it. I love all of your content, you make some of the prettiest gifs ive ever seen they’re always so warm and so clear and pretty. I esp love this one (idk how to explain it but it’s just?? So pretty and it’s one of my fav gifs of Tine out there ugh he just looks so good and the colouring just makes it so so much better) and all of your heart-eyes sets (ahhvhdjjdd they’re all just so nice and they just sum up their relationship so well??? These sets always make me so so happy) and lastly this (ngl I sat there for 5 minutes just being in awe bc?? I’ve never thought about this and I about lost it because???? Yeah it was never about the phone 😩 and that just adds so much to the show) I hope you have the best year ahead, sending u lots of love! 🥰😚😚
@morksuns sumaayaaa!! You’re so wonderful and kind and i just love how much you love the handmaiden?? And you have such great taste in shows and movies and I just love when you rb it on my dash. I absolutely love this mb it’s just so pretty and so soft?? And they’re girlfriends and everything about it is just so so warm and nice and the quotes.. yeah 😩) I also really love this mb (all of the pictures you’ve chosen are just so wonderful and they just fit?? That yellow sweater? The headphones? Scrubb? “Hi I’m bi” jfkskfk I just find so much comfort in it) and lastly this mb (it just screams home to me and it’s just so soft and wonderful? & the soulmate definition? Yeah ..yeah ) I hope u have a wonderful year ahead, sending u lots of love🥰😚
@fushiguroo lasyaaa!! You’re so so kind and lovely to talk to. You just give off so much warmth and you always seem so positive. I also really love all the sky/landscape pictures you post they’re always so pretty and ur just so talented. You also make such pretty gifs I just love all of your itsay gifs esp this (all the yellows and it just looks so warm and pretty?? And you giffed some of my favourite scenes from the episode 🥺) and this (once again you’ve chosen some of the prettiest scenes the first one in the water?? God it’s so pretty and the last gif from that set of the sunset???! It’s just so nice??? I love it so so much) I hope you have a great year ahead, sending u lots of love!! 🥰😚
@gigiesarocha cataaa!! I want to say thank u for putting Jeff satur on my dash because?? He’s so beautiful?! and I’m always tempted everyday by your ingredients gifs but I don’t have the patience so I’m waiting till it ends but your gifs of the show are always so pretty I can’t wait until I can sit down and watch it all and go through ur tag fjskkfd And I love all the kdramas you put on my dash bc I always end up adding more stuff to my watch list bc of it. I love this set so so much you have no idea it’s just so pretty and I love flowers so much and the flowers you’ve chosen to describe them both is just so spot on. I also really love this thank u for making this and blessing us all!! I hope you have a wonderful year ahead sending lots of love 🥰😚😚
@brightwin jelllyyyy!! You’re one the warmest kindest people I’ve talked to. You’re alway so kind to everyone and always spreading positivity and it’s just so nice to see you on my dash. Your gifs are always so so pretty esp the colouring you always manage to make them look so warm and clear and it just makes them so nice to look at. I love all of your content but I esp love this the scenes you’ve chosen are so wonderful and the quote is just.. so them it’s just so pretty. I also love this it just makes me miss them so much seeing how far they’ve come in their journey?? And ugh your colouring is always so beautiful. Also this is so pretty so basically all of ur lyric/quote sets because they’re so wonderful and you always make them look so beautiful. I hope you have a wonderful year ahead, sending you lots of love! 🥰🥰😚
@tichawongtipkanon diraaa!! You’re always so so kind and everytime I see you on my dash it always makes me so happy just reading your tags. Even tho I don’t think I’ve ever seen ticha in anything (I think?? I don’t rmr gkskkfkd) I always love seeing your gifs because she’s absolutely gorgeous?? I also really like this gjskkfkskkfd it always makes me laugh bc yeah he rlly is a mess and the fact that these gifs can capture him just being an idiot is so funny and I also really like this the quote and the scenes you’ve chosen??? Yeahhhfnskkd sarawatine soulmates!! I hope u have a wonderful year ahead sending u lots of love!! 🥰😚😚
@b-iconpearl roseee! youre so so kind and I appreciate you messaging me just to wish me a good day!! I also love all the pnd content you put on my dash even tho I haven’t had the chance to catch up but all of ur gifs of esp Pearl?? And Alex? Yeahhhh I esp love this bc Pearl is just??? So beautiful I just love this set of her sm she looks so good and also this I gasped out loud when I first saw this??? Alex looks so good and the gif is just so pretty and warm. Also I really love this the movie is just so dear to my heart and I love it so much and your set is just so so so beautiful and the lyrics yeahhhh so good! I hope you have a wonderful year ahead! Sending you lots of love 🥰😚
@pangwave dawnnn!! I love seeing you on my dash you’re always so kind and I love hearing your thoughts on the shows ur watching. Also ur gifs are always so pretty esp the recent morksun au you did, it was so interesting and I just loved it so much. I also really like this it’s so pretty and I love all the scenes you’ve chosen and the quote... yeah and the colouring is so warm and lovely. I also really like this god it’s one of my fav scenes from the show and I just love it so much. I also really like this it was such a small moment but handholding is just so...good and the set just looks so soft I love it I hope you have a wonderful year ahead! 🥰😚
@khaotungthanawat sammm!! Idk if I’ve mentioned this before but you make some of the best sets ever especially when it comes to finding parallels between shows. And you’re so creative and it’s so clear that you put so much work into ur gifs and they always look so so good! I especially love this it’s just so creative and looks so beautiful and how each weather just perfectly describes them? Just amazing and this one bc I had no idea there were so many reflections and I saw ur set and just had to take a moment and this one the colouring is just so pretty and it’s one of my favourite scenes ever and I just love it so much. I hope you have a wonderful year ahead of you!! 🥰
@teepakornaekaranwong orthyy!! I love how ur still keeping the 2g tag alive and that you’re always rb them on my dash. I esp love this you really combines the show scenes with the song and just made it so much more impactful?? And i just love all the scenes you’ve chosen it’s so beautiful. I also really like this and all the other ones in the set because they’re so funnygkkskfd and also this + all the other ones they always make me laugh bc you really did choose such perfect text post for each scene/character! I hope you have a wonderful year ahead!! 🥰
@asianmelodrama faizaaa!! I think this goes without saying that your content is always so beautiful and wonderful. And you have such a way with words as well, I just love reading your answers, posts and tags and it just feels so warm and safe . This has to be one of my favourite posts ever because there was so much potential?? So many hints?? And we could’ve had it all and I just love this set so much. I also really like this because their friendships were really so beautiful and I just wish we’d gotten to see more of it but what we did see, it was just beautiful. I also really like this (it’s so beautiful and I love winteam so much)and this bc jackzhaozi were so good. I love the character studies you did on tine and sarawat they were so raw and beautiful, like I said you just have such a way with words it was just so beautiful. I hope you have a wonderful year ahead of you!! 🥰
@toptaps zeeyyy!! You make some of the prettiest content ever and you’re just such a nice presence on my dash and you just seem so kind and warm. This has to be my favourite thing out there because when I heard that like, all of their scenes were just playing in my head and this set just captures everything we could’ve had :(( I also really like this the way you’ve morphed the gifs, the text and colouring of it, it’s all just so pretty. I also really really love this once again it’s so beautiful?? The way you’ve morphed them together and the quote you’ve used and the font and earnpear really is superior. Especially that first gif it looks like earns so taken aback by pear :((( and it’s so nice. I hope you have a wonderful year ahead!! 🥰
@soulmatelines jo!! You’re so kind and it’s always been so nice to see you on my dash even though I know you must be busy rn I hope you’re still taking care of yourself. You also make such amazing content, I especially love this everything about this set is so good we go from tender to raw feelings and it’s just so so beautiful. I also really like this bc I love love all of kurosawas thoughts and all the little insecurities he has about himself god it just makes him that much more real. I also really like this it’s just so pretty and I just love the whole concept of it it’s so well done. I hope you have a great year ahead of you!! 🥰
@gunsatthaphan Doreeennn!! you’re so so nice and lovely and I lose reading your thoughts on things. Also thank u for always tagging me in stuff and im so sorry im always late to it. But you’re always a delight on my dash and I just love all of your content. I especially love this parallel just bc of how significant this line was in the whole show and I just love the coloring on it and everything about it. I also really love this bc OhmFong are so cute and I missed Fong’s little jumps when I was watching it but them I saw your gifset and cried over how cute he is. Lastly, this one... i love this one so so much bc it was just so powerful and beautifully said and it was just so so good and its one of my fav scenes. Oh and bonus this one because I love wyel so much and tht quote.... just adds everything to that scene and ugh everything about that set is just so wonderful. I hope you have a wonderful year ahead, sending lots of love!🥰😚
@wjmild kyliieeee!! anytime I think of you I always think of tsoa or lee thanatnfkkfd which thank u for always putting him on my dash bc I love looking at him. It’s always so nice seeing you on my dash and reading your tags and thoughts on things and you’re such a great content creator. I love this so much thank u for compiling all of their little moments together, they’re just so cute. I also really love this wyel is so superior and I just love them both so much and this scene was just so cute. I also really love this even tho I haven’t seen all the shows, i love handholding and you just hit the spot with this and this set is just everything it’s so beautiful. I hope you have a great year ahead of u, sending lots of love! 🥰
@cherryysundae monicaaa!! I absolutely love all of your content and you’re so kind and such a wonderful presence on my dash. you also make such pretty gifs. I especially love this everything about this scene was just so so beautiful and you made it even more beautiful with your wonderful colouring I just love how the shades of flower reflect on wwx and lwj (idk if that makes sense but gjskkfkd). I also really love this ngl made me really really sad especially with all the wwx and yanli scenes :(( but this trio was literally everything and you just compiled all of their beautiful scenes together and heartbreaking scenes. I also really love this that gif of jc smiling?? So precious and just all the purples and the zidian? I just love it so much. I hope you have a wonderful year ahead!! 🥰
@leoyunxi ashiraa!! your content is always so so beautiful and I especially love your colouring it’s so beautiful and just gives makes the gifs seem so warm. I especially really love this wwx looks so pretty here and the colouring just makes it so so much better. I also really like this, this scene was just everything?? And the way they just glance at each other and I just love how warm the gifs look. I also really like this one of my favourite posts of them, you managed to gif all the wonderful scenes of them that I absolutely adore and they just look so good?? I can always tell that it’s your gifs because you have such a distinct colouring style and it’s always so so wonderful to see on my dash. I hope you have a wonderful year ahead!! 🥰
@bright-vachirawit mariii! I hope you’re feeling better now and that you’re staying safe! You’re always such a wonderful presence on my dash esp bc I find we’re more or less usually watching the same shows and I just love all the content you create for it. I especially love this it’s one of my favourite scenes and it came out so clear and just I love how vibrant the red is and it’s just so pretty. I also really like this I also really love this scene and just the colouring is so so pretty and I just love that you added the caption because it just ties it all together and it’s just so wonderful. I also really like this it’s really pretty and I love the fond you used. I hope you have a wonderful year ahead! 🥰
@sarawatine nicoleee!! it’s always a delight seeing you on my dash and I just love all of your content. I especially love this that you paired up each of the lyrics with the scenes from the mv and it’s just so so wonderful and it looks so pretty. I also really like this Idk how many times I’ve screamed over this but this post just confirms that sarawatine soulmates honestly and yeah that last line I could cry. I also really like this I’m a sucker for parallels and this one was just so cute and I just love how soft this set looks. I hope you have a wonderful year ahead! 🥰
@brightwinfilm nath!!! I love all of your content, all your wonderful 2g/bw content and it just makes me so happy. I really love this that you’ve giffed all of their scenes at their home and they’re just being so domestic and cute together it’s so wonderful. I also really like this one gjskkfkd it makes me laugh because they’re so dramatic and your caption just makes it so much better but yeah this was really nice. I also really like this the tension in this gifset but they’re also colored so nicely and I just love everything about it. I hope you have a wonderful year ahead!!🥰
@kimmonv violet!! I absolutely love all of your gifs and all the content you put on my dash. I especially love this honestly a whole ass mood and it made me really excited for the special!’ I also really like this i love the handholding and this scene was just... so beautiful and the dialogue and oh’s surprised face? This scene was everything and I just love this so much.and lastly this this scene was so funny gjskkfkd and I love how you adding the bonus scenes it makes it so much better!! I also love all of you gen y gifs!! They’re always so pretty and always look so clear and colourful. I hope you have a great year ahead!!🥰
@vihokratanas meeel!! You’re always such a delight on my dash and I love seeing your content. I especially love this it just looks so pretty and and I love this scene as well! This definitely is one of the best locations just look at the beach. I also really love this the scenes you’ve chosen just go with the song so well and it just ties it all together. It’s all just so wonderful and I love it so much. I also really love this this scene was just so good and the way you’ve coloured it just makes it so much warmer and prettier and the gifs are so so clear!! Absolute favourite! I hope you have a great year ahead!! 🥰
@atpgun doraaa!! I love your content and I absolutely love all of your itsay gifs. I especially love this one, the colouring is so so pretty and this scene is just so good and so underappreciated. It’s just so clear and I love how warm the gif looks and their relationship is just so good. I also really like this one bc I’m a sucker for parallels and these two?? And I love that you decided to include vlads little thumbs up so cute 🥺 I also really like this one it just makes me laugh bc pp looks so evil jfkskfkskd and I think ur one of the few people that giffed the documentary so thank you! I hope you have a great year ahead!! 🥰
@jbums kaaaay!! I hope ur doing well I haven’t seen you around in a while but I still absolutely love all ur content. I loved loved ur wyel gifs they were always so warm and you made them look so beautiful with your colouring. I also really like this like I said your colouring is always so so pretty and this was just so funny and their matching shirts so cute. And I also really like this one sangha looks so cute it reminds me of that gif you made of tae joo where he slams the spoon downfjskjdd but I hope ur doing well and I hope you have a wonderful year! 🥰
@musicdramalove hiii we recently became mutuals but I’m so glad we did. I love all your saifahzon content and your gifs are always so wonderful. I really like this one I haven’t watched it yet but this set really knocked this up in my list and I cant wait to watch it bc it loooks so lovely. I also really like this one, two of my favourite shows paralleled ugjjdks I love it so much and yes hugs.. the hugs I love it so much. I also really like this one the two of them just talking about the others smile and just admiring the other?? These scenes were just so good. I hope you have a great year ahead! 🥰
@planthusbands (cass -I absolutely love ur writing and thank u so much for writing me the wonderful fic I absolutely adore it and it had everything I liked in terms of tropes. I hope you have a wonderful year! 🥰)
@itoldsunset (dawy -thank u so so much for ur wonderful translations for itsay interviews god all of them just add so much depth into the show and I just love them all so much. I hope you have a wonderful year!! 🥰
@wirapong aishi!!! I absolutely love love this set of yours, pear looks so beautiful in it and your colouring just makes her look so so lovely. This set just makes me so happy bc look at her jumping with joy ah I love it. I also really like this one god this quote... was so impactful and I just love how you used all the scenes of them dancing with each other it’s just so so good. I also really like this one you cna really see the wonder and awe in Karl’s face and I love this scene so much and them. I hope you have a wonderful year ahead 🥰
@kurosawadachi angeeel!! i absolutely love this little set of film please she is so cute and her little smile ahhh!! i love it so much and the coloring in that set?? beautiful. I also really like this it just sums up itsay and oh man.. i just love all the scenes you’ve chosen and the gifs are just so so pretty and wonderful. I also really love this one im a sucker for food scenes and this really was one of the most wholesome scene in the series oh it was so wonderful. I hope you have a great year ahead!! 🥰
Other mutuals that I admire: @earthkatsamonnat (Bea) @janeramida @gooseras (kay) @gunsmiles (Amanda)@thaitheseries (Lisa) @87s-main @87s (min!! I’m tagging both just in case) - I hope all of you have a wonderful year!! 🥰🎉
This is alrdy too long so I’m just going to skip on tagging my own work
#follow forever#tagged#if I forgot someone please lmk I’ll add u jfkskfkskd this was rlly stressful and I didn’t mean to leave anyone out
57 notes
·
View notes
Text
Colouring/ Shading/ Lighting for Digital art
HI! Hello~ I’m here and I have a teeny tiny tutorial for you today (courtesy of dear Melito who actually wants my help??? I’m??? Blessed??? I realise that there’s a lot of you who have no clue who the fuck this person I’m referring to is, oh well, not my problem — ur missing out on hella great cake.)
So I have a timelapse of everything (below, duh, in case you can’t scroll) and I’m also gonna make comments on it cus ya know, these vids are only a minute long and thirty fucking megabytes like Jesus Christ.
So without further ado-do!
Should I have added music? Probably??? Ehhh the deathly silence can comfort you. (Wow what a mood.)
The Run Down:
Is rundown one word or two??
When colouring, I break it up into three main steps: base, line and “Hiding All My Fuck Ups”
(First) Base
I’ve never made it to first base... or any base
When colouring, use a non translucent brush to colour in everything. As in, so it’s completely solid??? Where’s my English today?
For every different colour, put it on another layer! I tend to do the skin colour first. You can go over lines that will be covered with another colour... did that make sense?
That’s it, I just felt the need to have three steps at least.
Line
As in... line art.
What I do is I lock my layer — that means when I try to add colour, colour will only be applied to the area that’s been drawn on.
I usually colour pick the colour I used for the base, and the line looks very pale when done (I do this with a non translucent brush too)
I then adjust the layer with lineart so the colour looks darker and more saturated. For my program (Medibang) I go Filter > Hue > Max out the saturation and lower the brightness > save. Sometimes I may do it again if it’s not dark enough.
If you can’t edit the colour then there’s another way! Duplicate your lineart > select the layer on top > change blending/ layer type to “Multiply” (it multiples the colour... duh)
If THAT doesn’t work I have one last suggestion before I sadly admit idk — duplicate line art > select top layer > colour the entire think a dark colour or black > lower the opacity
Line art done! (This time I wanted six steps — 6 is my fav number)
“Hiding All My Fuck Ups”
I rely on this too much okay?
I can actually further split this into two; shading and “I’m Kidding Myself” — let’s begin!
Shading
To shade, I work from bottom layer up!
What you’re gonna do, is select your bottom colour, (or any really but ORDER HELPS) and lock the layer.
Why? That way it’s easier to colour without going over the lines! (Your building on the foundation you set essentially)
With a semi translucent brush (FYI, translucent brushes are thinks like “blur” or “smudge” that purely affect what’s there and do not add anything) I use the watercolour brush set at 15-20% opacity.
I’ll eyedrop the base colour that I’m shading, and with the colour wheel, tru and find a darker version of that. NOTE: when looking for a darker colour, I don’t go to the black, I try and find a more saturated colour OR a darker HUE — black is a curse, I don’t ever use pure black or pure white — give your work the colour it deserves UwU
With the watercolour brush, I literally run the darker colour over all lines that indicate a shade (imagine a light somewhere and what that light touches is what you mainly focus on)
For clothes, I follow the creases I’ve drawn
For hair, I tru to imagine the hair in three main shapes and run the colour over the perimeters of those
Then it’s time to blend! I usually just eye drop the base colour again for this, and trace (lightly, our tablets have pressure sensitivity — same going for steps 1-8) the line that divides the light from the dark, adding a middle ground since the watercolour brush is only semi transparent.
For adding blush to skin: create new layer above skin layer > set to multiply, again, if you can’t do this then you follow same steps as before with line art) > using an Airbrush like brush (soft, no sharp edges, kind blurred), colour the skin areas that need blush.
Skin areas that need blush; areas with LOTS of blood vessels (head... the OTHER head...) areas with thinner skin (elbows, knuckles, knees)
If your skin layer was on the bottom, your blush will only appear on top of the skin and not the other layers!
Just be careful about the areas outside the drawing — you may need to do some tiny erasing
Finally, merge all the colours together. Sometimes different layer types don’t like to merge together without screwing up your other layers, to avoid simply merge them one at a time from bottom up.
As in, second last one and last one merged together, then the one above that merged with the last one — merge everything with the last one... AM I MAKING SENSE?!
I’ll usually merge the lineart with the colour too — I just didn’t here for some reason
“I’m Kidding Myself”
Here we add stuff that hides flaws and merges the character with a background if you have one!
I use three types of layers for this, if your program doesn’t use these then see if they have similar functioning ones (I’m always experimenting so this isn’t set in stone) if your program has nothing then... this will be a little harder, you’re gonna have to do this by hand somehow.
I use these kinds of blending layers; Multiply, Overlay and Add
First I prevent getting the colour on anything BUT the character; magic wand tool > select the empty space > hold ctrl/shift and keep tapping to add or remove areas > invert if you need in order for the art piece to be selected
You can see this when my background when blue, I’m basically highlighting my art of Yuri
Colour this entire space on a new layer. The colour I use doesn’t change here on out (except in the video I do cus I lose the colour but that’s aside the point). When choosing a colour, consider the colour of light — I use human colours??? Colours you find on a person essentially.
As a general rule of thumb; for every new thing, new layer, it gets a little harder here. I also use a semi translucent (watercolour) brush again for everything!
Now we have a silhouette of Yuri — I set this to multiply, it’s essentially like a highlighter marker pen but darker?? This is so that I may adjust the entire colour to fit the lighting colour
New layer (NL), I set to Overlay. Overlay is like multiply except bright! Remember what I did when shading? Yep, rinse and repeat! Afterwards, adjust the layer’s opacity setting so that it fits better with the image.
I’ll also make the brush really tiny and go over hey areas to highlight such as the edge of the nose, chin and jaw — I’ll also add shine to the eyes.
NL, set to Add. I only ever use this layer if I want to achieve “blinding lights” sort of looks. So when the lighting is immense, I have a white background, or the background is incredibly bright.
I use add layer scarcely, to blemish any lines and make it look more refined. I’ll also adjust opacity if need be.
NL, I’ll use the airbrush set too REALLY BIG (1000 usually) and if I have a background, will try and add light to it by making this layer multiply too. I’ll add darkness in the side or corner of the background etc.
NL do the same thing with Add except also make a point for where the light is coming from.
NL, I’ll use a mix of Add and Overlay to add sparkles, fragments, light spots etc depending on image type of need be
Using a Fluffy pastel brush (it’s textured) I also use pure white. This is the only time I ever do.
I’ll add reflection to eyes, jaw and nose. For hair, I’ll pick out a few strands of hair where it’s darker and throw in some loose lines. Clothes are rarely outlined and only where light touch. I use this limitedly.
Ctrl + D ;) to deselect the lasso tool — I don’t usually merge the layers after this because it’s usually too messy and I’m done anyway so I save it, however you CAN put them all in a FOLDER if need be. (I have a few in my vid, the entire thing is in a folder tbh)
Voila! That’s it!
I hope this has been of some help or use! And that this makes SOME sense... I’m absolute shit at explaining everything...
This was incredibly fun to do tho and I spent two hours typing this all! Wow!
Okay thanks for reading! (Hope this helped Melitooooooo, don’t forget the wedding cake ~ v/ important part of marriage you know)
#art#digital art#yoi#yuri plisetsky#art tutorial#tutorial#colouring tutorial#how to colour#colour and shading#how to draw
47 notes
·
View notes
Text
icon tutorial
so i got an ask how i make icons and here i am going to explain it.

also how i change colors on icons to match background like this

so, get a screenshot or a picture for an icon

there are two ways of how i make my icons, first is i edit picture till i like it, cut it from background and then add picture to bg and second is adding character to bg and editing picture with background. this time i edited only picture since my background was just a gradient.
i used this coloring psd#245 to get this

and then using pen tool i separated character from the background

feel free to use this png of Zelda and make your own icons <3
so, once we have everything ready, choose background and add image to it.

well, it looks not that good lol
i love that Zelda has slightly ginger hair (what it’s called strawberry blond? idk ok sorry) so i am going to make it as weird as possible so it stands out cause it’s an icon and i can do whatever i want :D
sharpen character layer and add vibrance to character layer only
after adding vibrance (100), twice, second time to hair only, i make new layer and put it on soft light and color her hair with yellow/orange color and add yellow and reds on selective color only for the hair. that’s it actually.
so once our icon is ready and i made one with red color i want to have an option and choose the color i want, cause somehow just making nice edit of a screencap, cuting character out and adding to bg doesn’t look nICE? yeah so i change clothes color so they match bg color.
hue and saturation is good for this, open it - choose the color you want, if you want to change red - choose red. you also can change the entire image colors and then erase parts you don’t want, but i prefer to change just one color.
once you open hue and saturation there are 3 options: hue, saturation and lightness. hue changes color, saturation makes it more vibrant and lightness can make it lighter or darker depends on where you drag the slider.
it is good when the color of clothes is like green, blue or something else which has nothing to do with skin and hair color of the character.
like here

it was easy to change colors, since yellow of her hair stays the same while you change only blue.

with red it is harder, cause you also will change the lips, the skin color and in this Zelda icon case the hair.
but we do it anyway and erase the parts we don’t want, that’s it :D
this time it is not that hard since Zelda Spellman’s hair is always nicely done. but sometimes there are hard cases like this

since Amy’s hair and her clothes are similar color and i could not change one without another erasing was hard and it still doesn’t look good and i made a poor job here i know

looks unnatural :/ maybe one day i will be good at it lol
if the clothes are just black, i like to change them too, i like it when it matches the background idk it looks better? yeah :D so you can draw with the color you want over the clothes and put it on screen. like i did here

feel free to use this png of Michelle Gomez and make your own icons <3

and then with hue and saturations change the colors
if you choose green and drag slider of hue on -180 you will get this

if you drag slider of saturation to -100 it will be black and white

if you drag lightness to -100

or +100

since im working only on green i do not change any other color of the icon, if you choose to change colors using master
and drag slider of hue to -180 you will get something like this

the color of her clothes and background are the same as if we changed only green, but everything else is also changed so you will have to erase it.
i hoped it helped you a little :3
all of my icons can be found here
156 notes
·
View notes
Text
how to: colouring east & southeast asian celebs
tbh idk what to title this but here we go!! i keep seeing gifs (especially gif icons) that whitewash east & southeast asian fcs so i’m gonna. tell u. what’s good and what’s bad since some of you don’t seem to know. or just choose to do what you’re doing which is... shitty. anyway. some asian people may have lighter skin tones but surprise!!! asian people are not white so u can still whitewash. also half the time celebrities you see are not nearly as pale as you think they are (especially when it comes to k-idols).
ok (my colouring from scratch):
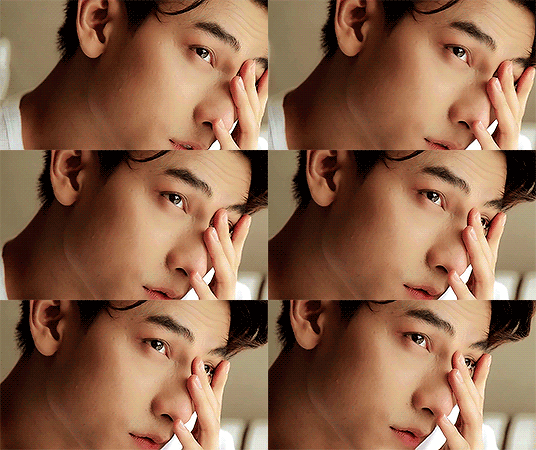
not ok (some psd i found for a kdrama):

i’m obviously no expert at colouring like i really have minimal colouring skills but that’s just proof that not whitewashing isn’t even hard since i can do it. anyway. here we go!!
warning: very text heavy. i wanted to explain how to do stuff and why to do it instead of just “do this but don’t do this” so hopefully it can be educational maybe.
number one: excuses.
let’s start at some common excuses for why people think it’s ok to whitewash/pinkwash (i saw this term used sorry if i shouldn’t use it??? it just means to remove the yellows from a persons skin and leave only the pinks).
“it’s just aesthetic i don’t mean to change their skin” — literally i do not care, it’s still whitewashing and why does your aesthetic need to wash out people’s tones???
“asian people have lighter tones/white skin anyway so it doesn’t matter” — this is actually a lie, first of all. some asian people might have “lighter tones” to the point of being very pale but it’s still not okay to make them even lighter and wash out what colour they do have.
“the original gif/video is pale already” — does that mean you should make it lighter??? nope!!! and you shouldn’t be editing people’s gifs anyway.
number two: different types of scenes and colouring around them.
listen i know... i know jdramas are a pain in the ass to colour. they are so so bad. but here’s some examples of how to colour and how not to, and ways to achieve it.
this is from the drama pretty pr*ofreader.
ok (even tho its still not the best colouring):
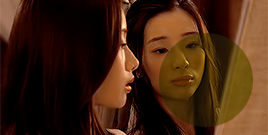
not ok (and kinda makes her look like a clown):
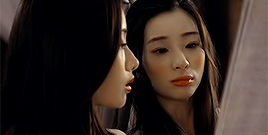
okay to achieve the top result:
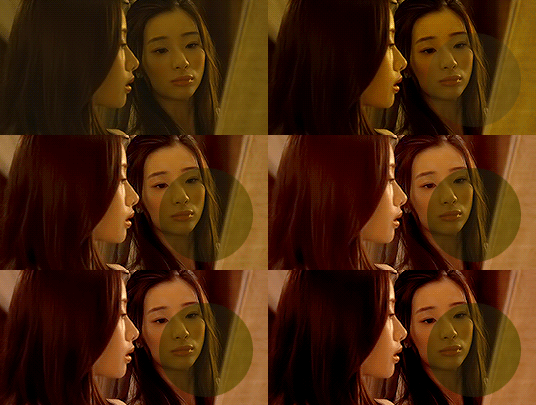
i always start with some base curves, by autoing the curves and adjusting to make brighter but not the skin too much.
then i add another curves and use the black selector to pick what areas should be black (her eyes, for example)
then i add some simple levels to brighten.
then i added a hue/saturation layer to tone down some of the yellows/greens because it was way too green.
then a colour balance to add some more reds into the colouring.
then a brightness again, only a little.
then another colour balance for more reds, a little yellow (shifted it from green to pinky).
then two colour select layers to add more blacks?? (idk why i did this tbh lol)
then another final layer to add some more yellows back in.
here’s a gif of the progress:
now here’s a more neutral scene from a drama, i just wanted to get the hard stuff out the way. this is from the drama when a snail falls in l*ve.
ok:
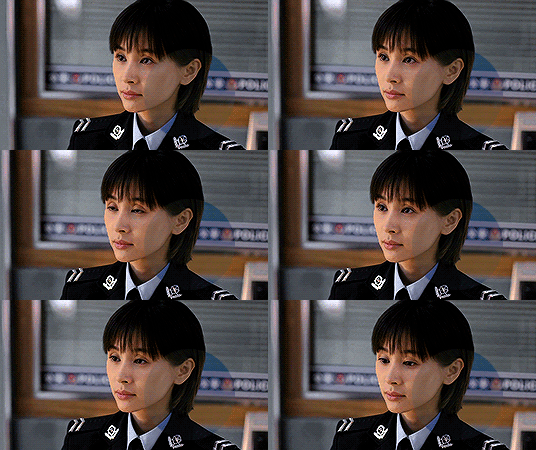
not ok:
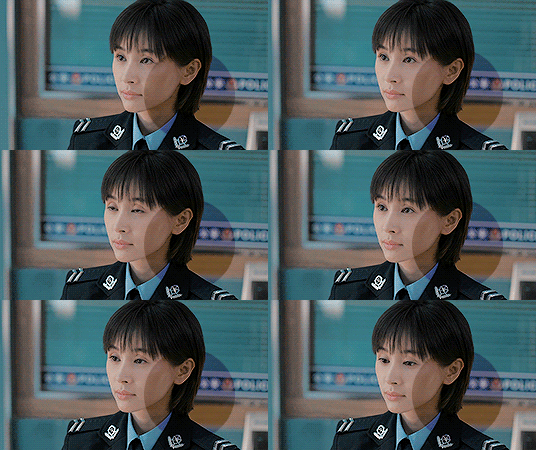
okay to achieve the top result:
same methods of making curve bases as the one before
levels to lighten background but bring down the grey, to make her a little darker since i lightened her in the curve layers
colour balance to add back some pinks and yellows
selective colour to darken whites since they were pretty bright (dont have to do this tho)
selective colour to darken blacks (hair, uniform, eyes)
hue/saturation to desaturate cyans (not necessary i just dont like the colour lmao)
colouring progress gif:
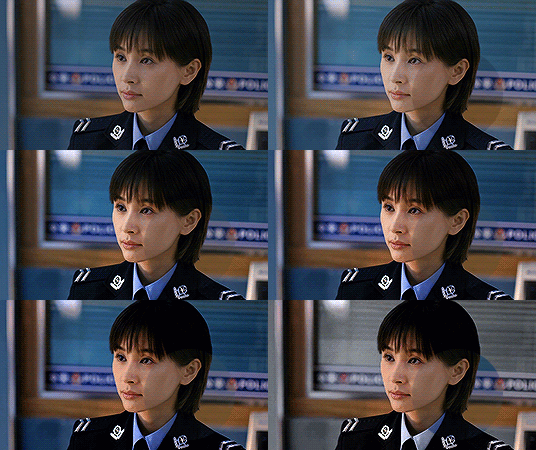
kdramas actually have the best scenes to colour since a lot of them are very hq and neutral, so honestly i’m not sure how they end up being whitewashed. i have a psd for doctors on my blog, a kdrama, which is a pretty good base psd for kdramas to work with.
honestly any drama with good neutral lighting can have a nice colouring with just two curves layers and some additional tweaks here and there. for example below only has 4 layers:
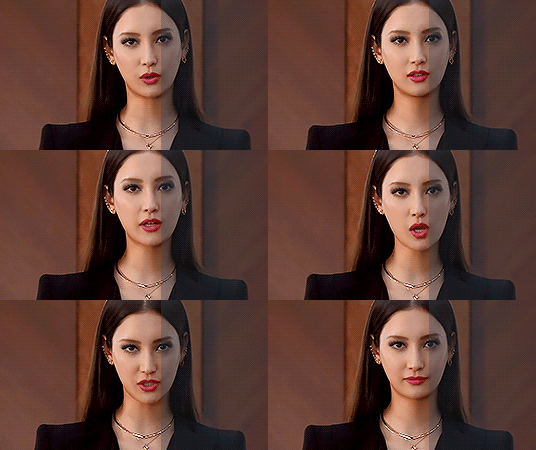
other tips and tricks:
use selective colour after brightening a gif to try bring back some colours! etc, heightening the black on reds/magentas/yellows and adding more colours from that selection
colour balance to add more pinks and yellows if you need to from a blue scene
curves are your friend! use them for bases
use a clipping mask to rub away your psd to check against the original gif to see if you’re whitewashing
if a scene is too hard to colour? just don’t do it lmao. it saves u so much trouble and time
um also don’t make them super yellow? i don’t need to explain why that’s racist but i’ve seen it a few times and it needs to stop
number three: what you’re doing wrong (probably).
brightening too much (with either brightness or levels or curves)
de-saturating reds/yellows (they arent ugly colours, and they’re necessary for skin colour)
adding over colours that are really pale
trying to achieve a pastel look (it’s just desaturated. there are plenty of poc friendly pastel psds out there that are pretty)
using someone else’s psd is fine, just make sure it works for the person and scene you’re giffing. if not, make some adjustments. just because the psd whitewashes for that scene doesn’t mean you cant tweak and change it.
number four: editing other people’s gifs
just don’t do it!!
number five: resources and other help
@dear-indies psd tag (includes lots of poc friendly psds)
the poc psd tag
this tutorial
bunch of psds here
#coloring tutorial#idk how 2 tag this lol its been in my drafts ages so here#rph#tutorial#krph#im tagging it krph bc yall r the biggest culprits of whitewashing asian fcs!#not user krph tho lov u :)#a: mine#a: my tutorial
609 notes
·
View notes
Photo

Ok in stories I said idk if I’ll post everything I’ve drawn these three days and I decided to posttt, the second one is a little watercolor painting I did the other day then realized I almost never use bright saturated colors when water coloring so I swatched some of the bright colors and then drew this little character (third slide) and then yesterday decided to paint her in acrylics (first slide) and I luvvv, also coming from watercolor, painting digitally was weird cause it’s not building up color with layers like watercolor, but even this short amount of time of digitally painting I guess I developed a technique that I guess works with an opaque medium and I painted in acrylics like thissss I’m so proud of myselfff, I mean I was going in with no real plan but it’s still kewl, also I edited it a bit digitally in procreate to color correct, add the bokeh and also warped it a bit to fix proportions, cause there’s no canvas mirroring to see mistakes traditionally ._. But anyway I luv her uwu I’ll post the rest tomorrow 🤩 Commissions are open, dm to discuss✨ TeePublic link in bio ✨ . . . #art #artist #sketch #sketchbook #pencilsketch #painting #drawing #gouache #watercolor #gouachepainting #watercolorpainting #digitalart #digitalpainting #digitalillustration #procreate https://www.instagram.com/p/B5sdh-nBWAu/?igshid=1jufufw218191
#art#artist#sketch#sketchbook#pencilsketch#painting#drawing#gouache#watercolor#gouachepainting#watercolorpainting#digitalart#digitalpainting#digitalillustration#procreate
0 notes
Text
coloring (more like editing) process
gonna use this mob to finally explain my COLORING PROCESS.. and how i go from these base colors to the final product ..
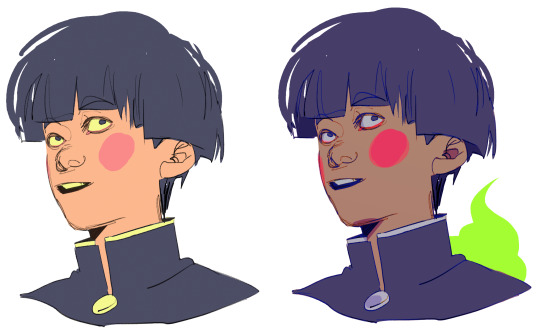
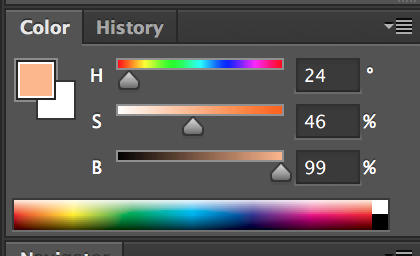
i always start with my base colors, which are almost always the same, so i keep a color palette to choose from. I usually pick the skin tone first and then change the hue for diff colors (I sometimes change the saturation and brightness too) The example below is the skin tone i use almost Always.. and of course it can be changed later on
once i have those down.. the rest is pretty simple but varied for each drawing and mood? i want? i guess.. BASICALLY i pile on the effects/gradient maps/gradients/textures/overlays lmao THATS IT. IDK there really is no method.. I mean I have found certain combos i like after a lot of trial and error but .. i say just play around!! (SIDE NOTE: i use the hard edge round pencil to color at 100% opacity; i only change the opacity when im shading at the very end if needed..) anyways, heres a basic collage of the process for this mobu
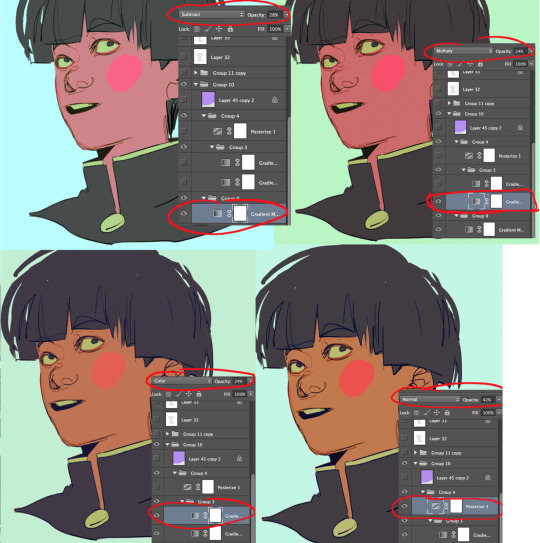
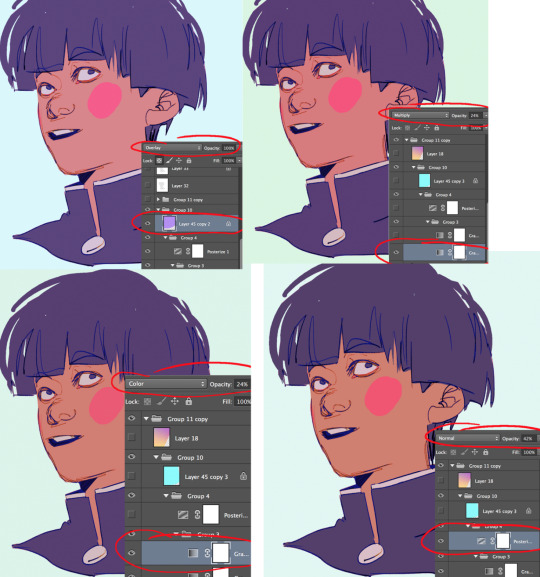

(prob could've given only one example BUT HEY GIVE IT A TRY lol.. tag me if u do id love to see if it works for other people!!!!) BUT YEAH as u can see its just a lot of Layers and different opacities, some repeated stuff but.. it ultimately comes out looking good, I THINK!! i don't have any textures on this one but those are really fun to use too!! just play around with the layer modes, opacity etc. and you’ll be set. OH and gradient maps (the things i use the most) are an adjustment layer, its that b&w circle at the bottom of the layers tab ITS GREAT posterize is also there and hue/sat as well as other things..
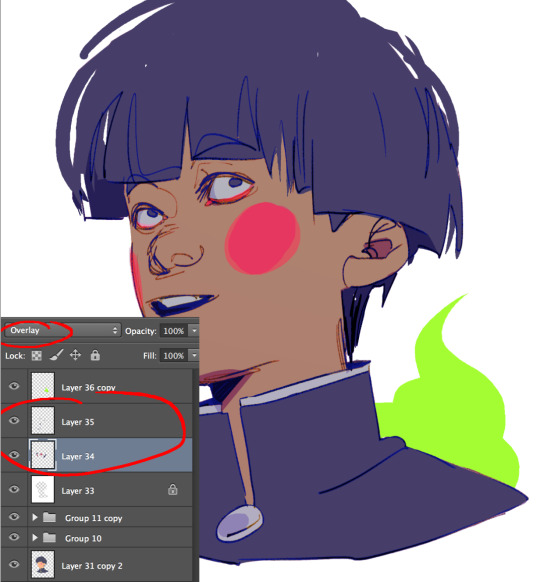
anyways, final step is to select the background using color range (i suggest turning off all layers except the base colors to do this so u make sure u get a clean selection) and fill it. (if any one wants to know more about selecting let me know, that can be a whole other..Thing) I do it on a normal layer usually so thats why its last. I lock it after too so i can easily change the bg color and find what i like best (no secrets here, i suc at bg’s lol) And then i add a couple overlay layers for shading/highlights etc. or normal layers to cover up things i don't like anymore (or to add a ekubo lol) and then im DONE!
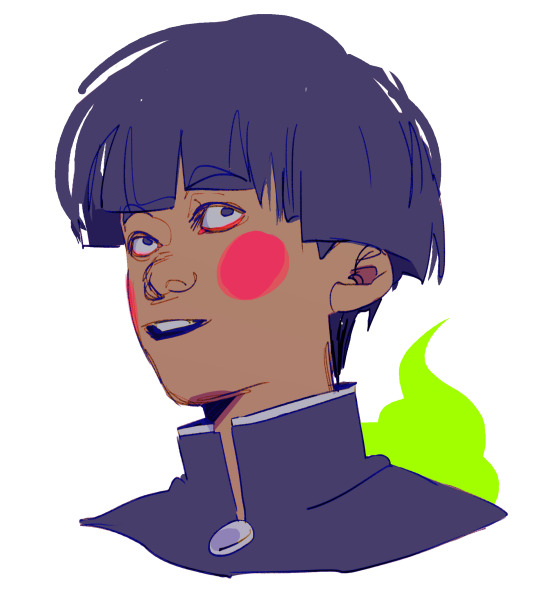
I suggest keeping a navigation tab open to see the drawing as a whole while u work!! u can do other things too like combining ur line art layers and locking that layer, changing the line color, adding channels, blurs, noise.. IDK THERES ALOT, I LIKE EDITING SO MUCH but i hope this helps?? Im not really a painter so this is what i do IM SORRY IF ITS NOT WHAT U EXPECTED coloring used to scare me a lot and was super hard but now its probably the most fun part next to lining!! idk just have fun, that’s what art’s about!!
#tutorial#coloring process#lega18#lega#I HOPE EVERYTHING IS VISIBLE but i guess ill only kno once i click post#CROSSES FINGERS#so there u go the magic lega way#i didnt add brush settings either so let me kno if thats smth you'd want to see#i figured this is long enough lol
253 notes
·
View notes