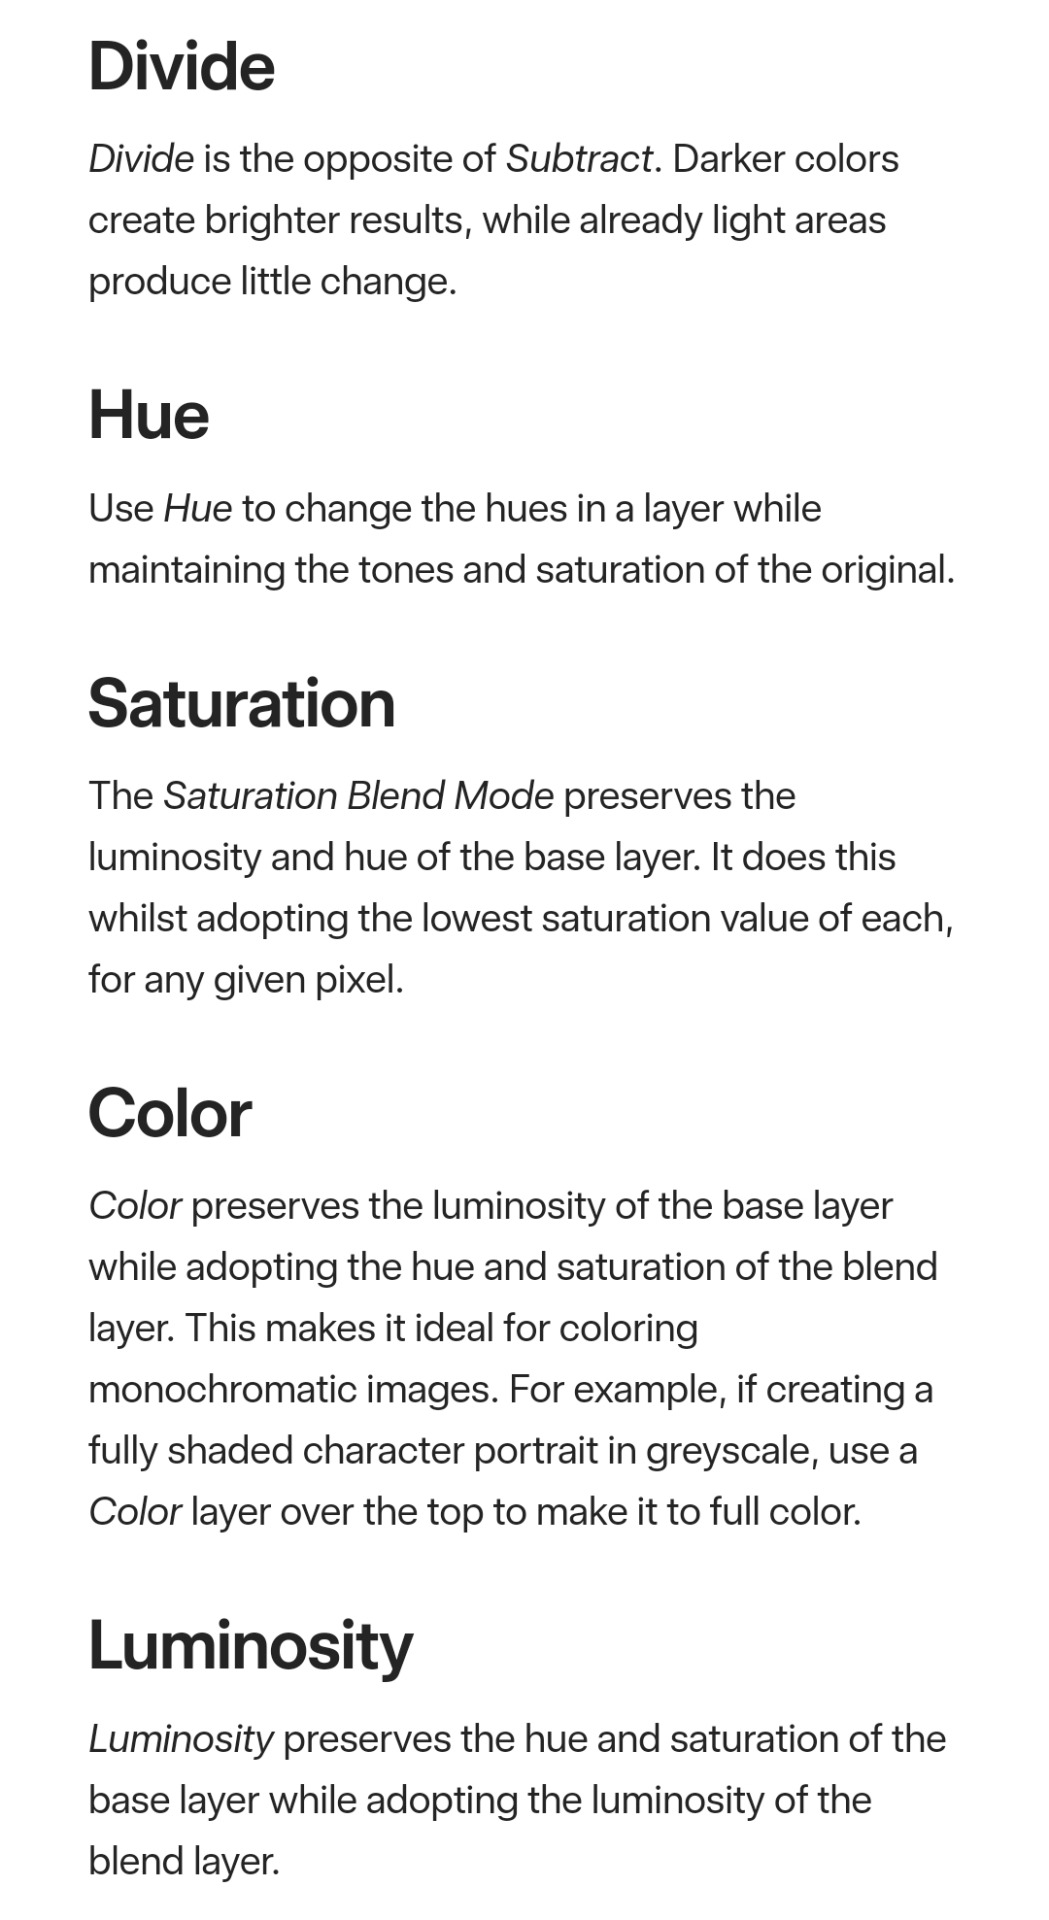
#blend modes
Explore tagged Tumblr posts
Visit Tumblr Blog
Explore Tumblr blogs with no restrictions, modern design and the best experience.
Last Seen Tumblr Blogs


Fun Fact
Tumblr has 16.74 million mobile monthly users in the US.
Text
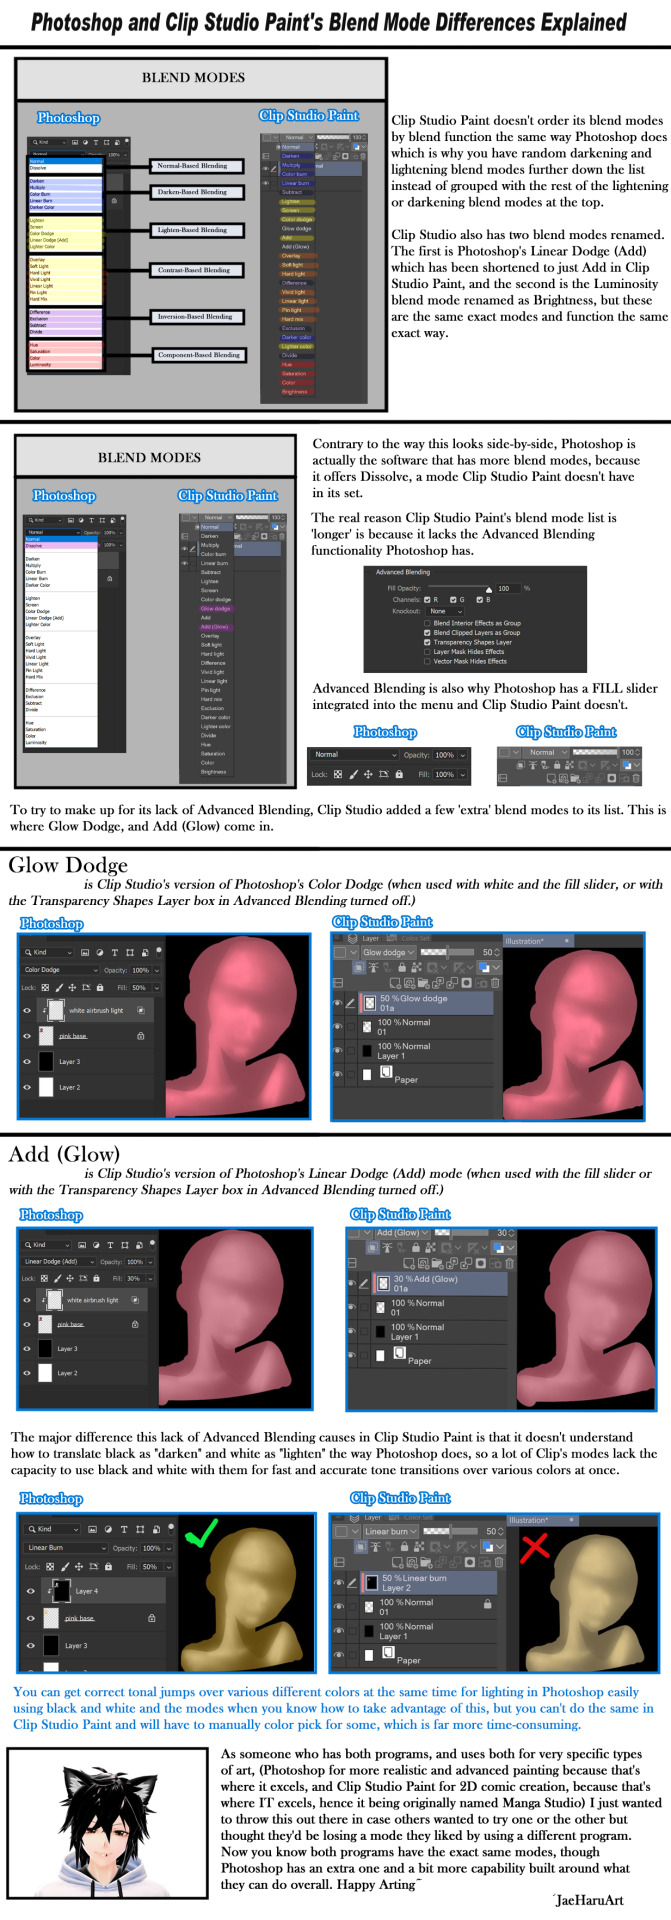
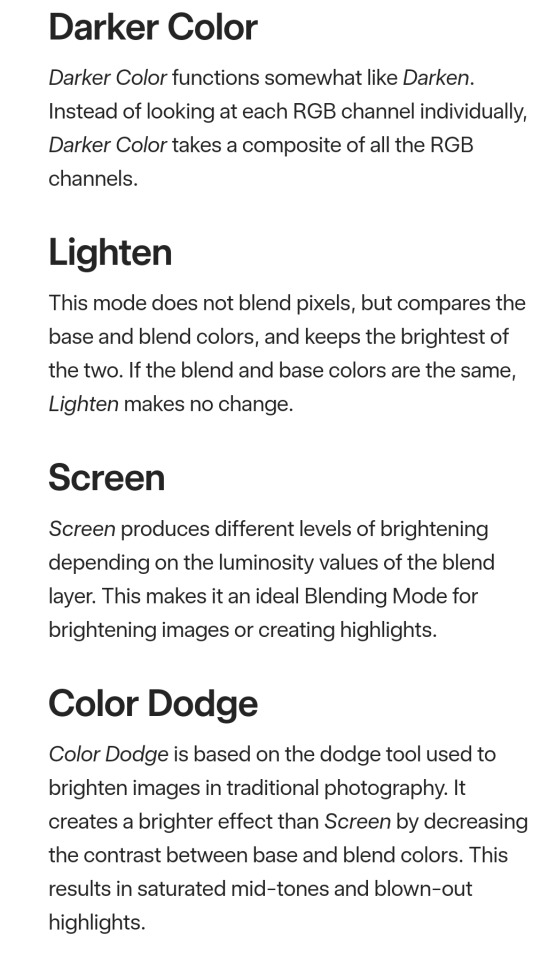
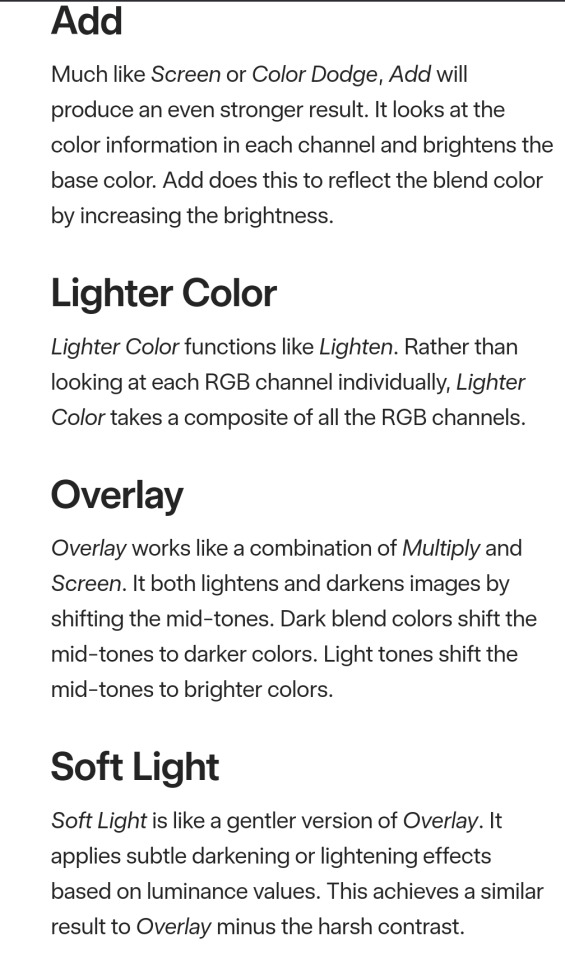
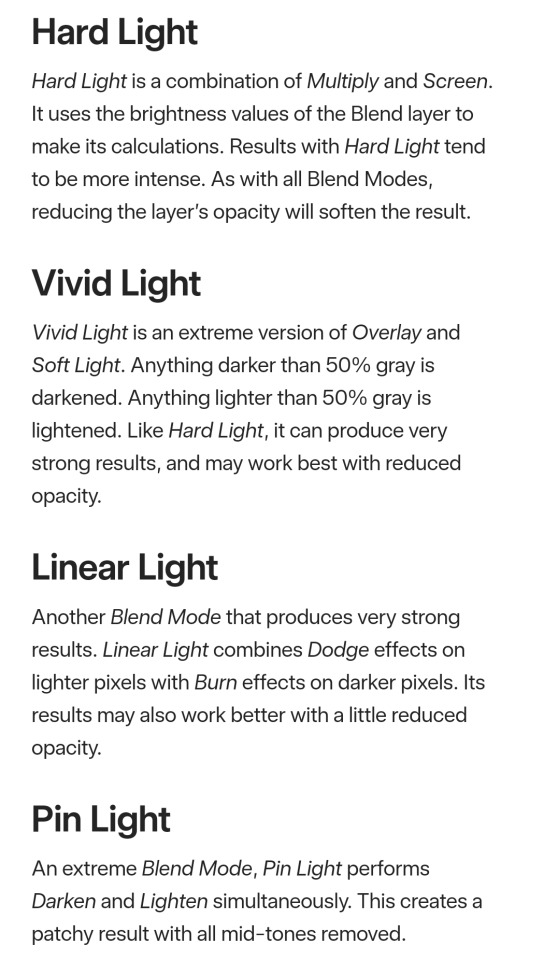
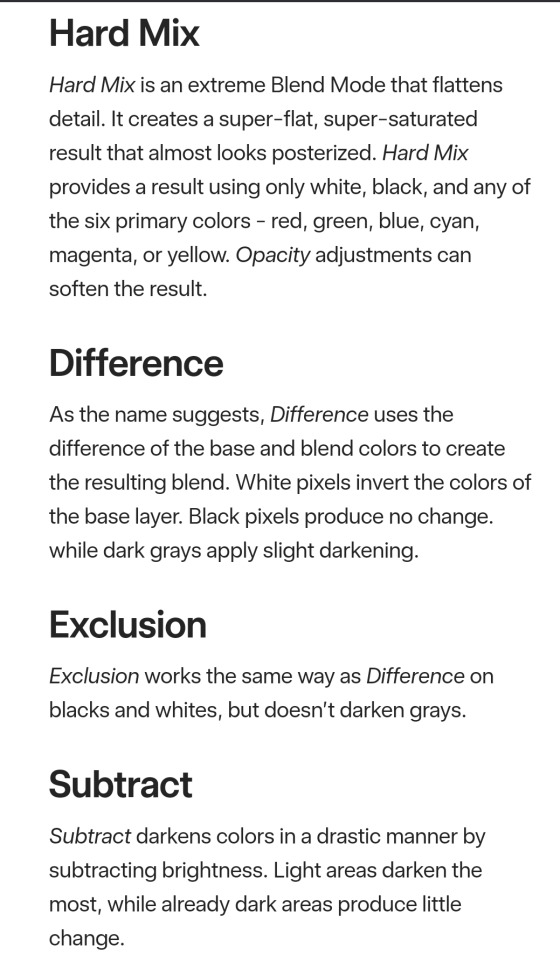
Photoshop and Clip Studio Paint's Blend Mode Differences Explained
Patreon: https://www.patreon.com/JaeHaruArt?fan_landing=true
LinkTree: https://linktr.ee/jaeharuart
31 notes
·
View notes
Note
hi there! your multiply layer math guide is a life-saver!! would you ever consider doing something similar for overlay or 'light-adding' layers?
I'm glad you found it useful! I still want to rewrite it to be clearer for more people.
(here's the original post for other people reading: https://pharanbrush.tumblr.com/post/704602434836791296/in-2019-i-wrote-a-practical-but-boring-blog-post)
As for light-adding layers, what did you have in mind?
Honestly, a lot of the other blend modes are "simple" but doing the reverse to undo their effects can get messy and unreliable. The rest are just not simple.
Divide just happens to be the exact opposite of Multiply.
Likewise, you would use Subtract as the opposite of Add (also known as Linear Dodge).
Overlay literally splits the darker half of the colors as Multiply and the lighter half as Screen, and does a weird parkour backflip with the layers (metaphorically).
Wikipedia actually lists the layer mode math clearly:
But it takes some sitting down and working out the steps to do stuff more complicated than reversing multiply or add. And after the work, there's no guarantee that there's a simple way to do it in your art program with layers. I tried it with the Normal blend mode and you end up with a lot of guesswork for colors and a bunch of folders and layers.
Krita has a crazy number of layer blend modes but I haven't looked into their usefulness for undoing/reversing colors.
26 notes
·
View notes
Text
the enigma of (art) blend modes, and how doing brain research taught me how to better utilize them
(DISCLAIMER--I'm not actually going in-depth on different blend modes; there's other resources for that sort of thing! Rather, I'm just planning on talking about how they've been captivating to me in the past.)
I've been working with digital art programs for quite some time now, mostly for my game development pursuits, but also more recently just for fun.
Whatever program I'm using, be it Aseprite, Krita, or Paint.net, there's always this goofy little feature referred to as "blend modes". Really, all it refers to is how new colors should be made when two colors overlap on an image--particularly from different layers.
Back when I was young and naive, those layer blend modes hardly did more than just exist. Maybe I'd pull down that drop-down menu and switch around the modes every once in a while, but this was never used to help me during the creation process.
There's something about starting to use a new art program and getting overwhelmed by all the buttons on the UI. Of course, it takes time to master those menus, but when you do, it's nothing short of rewarding.
Which brings me to one of the most interesting programs I've worked with: Fiji.
Fiji isn't an art program--it's anything but. Instead, it's open source image processing software, designed for life science related analyses.
I've had the (mis)fortune of becoming acquainted with this software through my internship. When it was introduced to me last year, it was... overwhelming, to say the least.
This is what it looks like when you open it:

Not too overwhelming yet, right? Wrong. Here's what the dropdown menu for "Analyze" looks like.
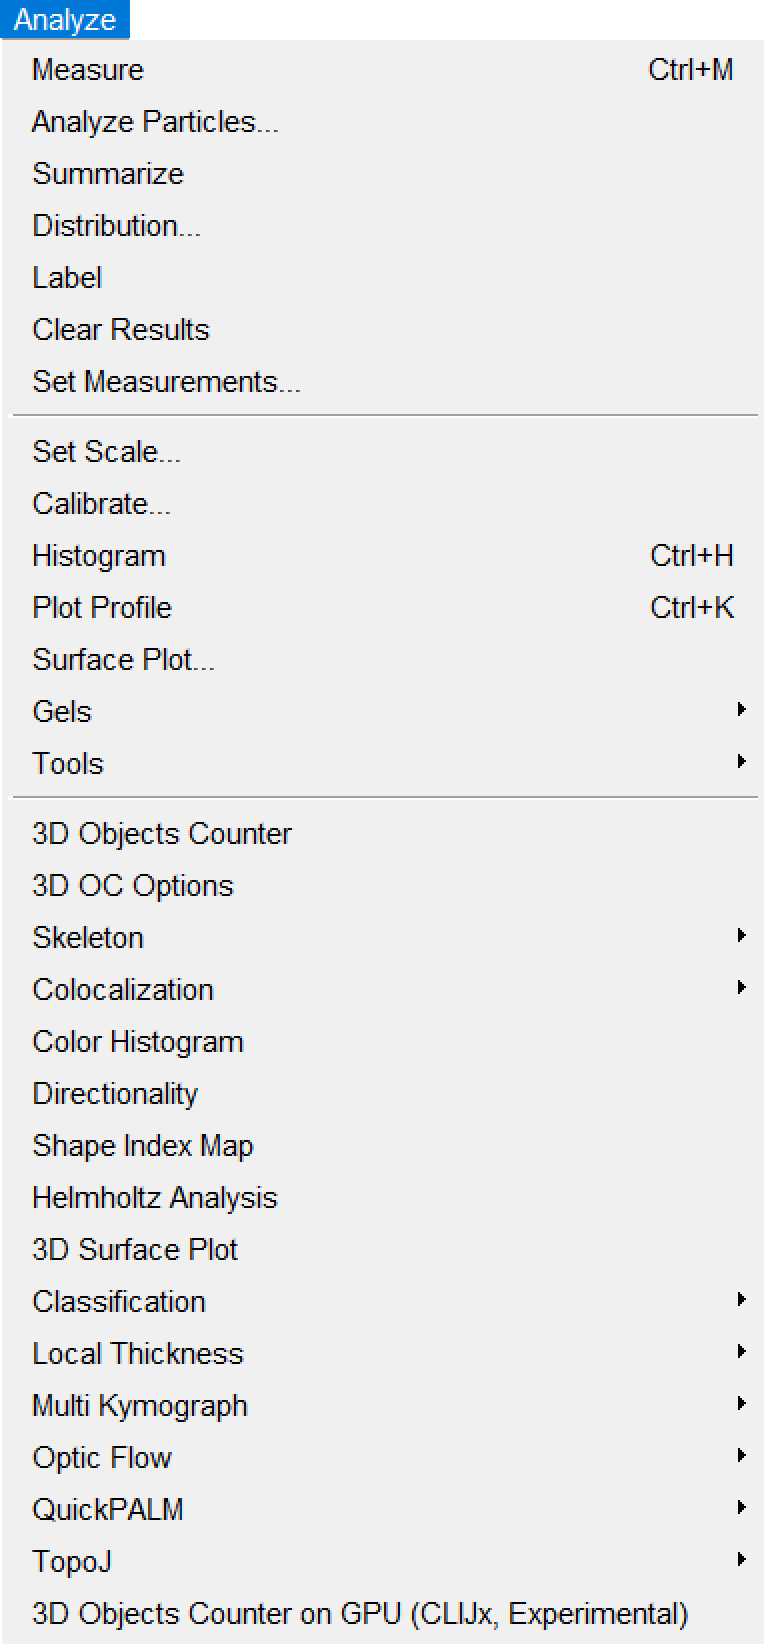
(I like how it starts with normal sounding words, before devolving into things like "Helmholtz Analysis" and "Multi Kymograph".)
If any of you are already super-mega-brain-nerds and know how to utilize all of these options, then good for you, I suppose. For the vast majority of the people who are unacquainted with neuroscience (such as myself), however, this is INCREDIBLY daunting to navigate. Imagine something just as confusing as this for the other menus.
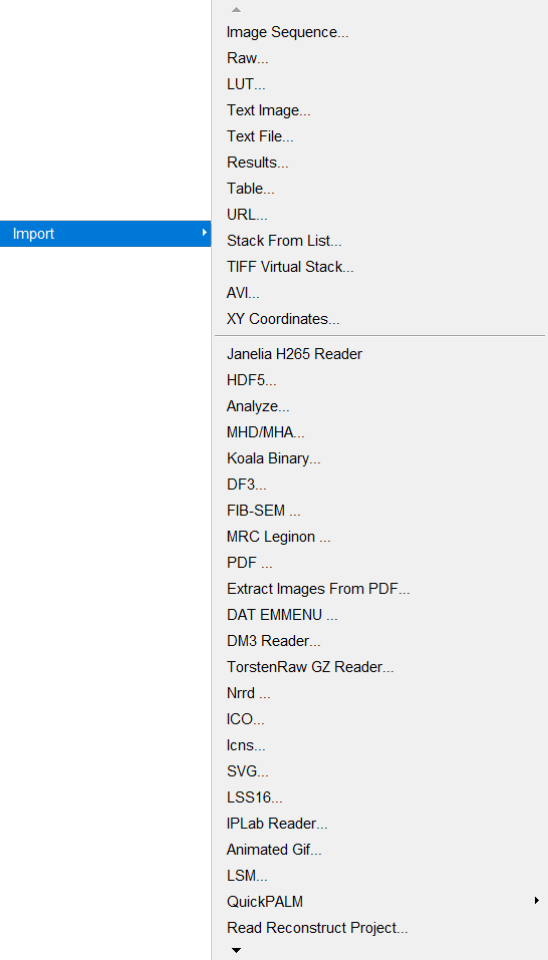
Hell, even just importing imaging data proves labyrinthine:
Okay. I'm done fussing over how convoluted Fiji's menus are.
I've worked with them for long enough to understand them a little better, though I still couldn't tell you what half the buttons do.
...like most of the art programs I use.
Yes, I've used Paint.NET since, like, 2018. No, I still have no idea what the "Clone Stamp" button does.
(by the way, if you're still using Paint.NET yourself for art, 1. what are you doing, and 2. Krita is much better for what I needed from an art program, so I might recommend trying that out if Paint.NET is getting on your nerves!)
Anyway, loading imaging data into Fiji usually gives you a video you can pan through. Most imaging data usually either represents a z-series, t-series, or both.
A z-series is imaging done on several layers of the subject's brain at a single time point, to create a 3D stack of images with time substituting for the depth into the brain.
On the other hand, a t-series is imaging done (usually) on a single layer of the brain throughout several time points. (Data I've worked with has ranged from 15-minute-long t-series to 100-minute-long t-series.) This again creates a 3D stack, though this time, time represents, well, time. (This is how most video is stored--even if the video itself is 2-dimensional, you're still "technically" viewing 2D slices of a 3D stack--though only super-nerds call video 3D.)
A zt-series can also be imaged by making several z-series over time, which can be processed into a 4D video. (Usually, though, the slices have to be processed through software to order them properly.)
Last year, I worked with zt-series a lot. This year, however, I've got easier work--I'm just working with t-series this time, to analyze calcium activity.
They're nicer to work with, to say the least. I've worked on automating the collection of calcium activity data by comparing the minimum and maximum values of each pixel throughout the whole t-series in order to determine where there's potentially calcium activity happening.
...in fact, once you get an image of the minimum and maximum values of each pixel across the whole t-series, you then work with those images as layers and use different functions to extract a mask that shows only potential calcium activity regions.
...
So it's adjacent to blend modes in a way.
Specifically the "Multiply" and "Divide" modes.
...
It's a bit of a stretch, of course, but working with these black-and-white images has helped me better grasp what's going on under the cover when I use those same blend modes for art.
Of course, I'm not using them masterfully yet. Really, I'm just using them to add blocky-ish shading to translucent objects.
...I'd show an example, but I can't find any pictures right now.
...
Sorry about the tangent.
I just feel like somehow this contributes to the intimate interconnectivity of everything.
Art and brain research being related on a software level.
#blog#neuroscience#neuroscientist#brain research#internship#art#art software#interconnectedness#blend modes#paint.net#krita#fiji software#imagej2#i dont know why i bother with the imagej2 tag#i highly doubt there's a vibrant imagej2 community active on tumblr#blogging about imagej2 on their blogs.#what a bunch of nerds
2 notes
·
View notes
Note
(A totally out of context question) As a digital artist, what blending mode do you often use?
Depends on what I’m using the layer for.
Oftentimes I’ll use blend modes only for my lighting and shading layers. I’ll use “Add” for lighting (usually some kind of gradient of yellow) then use a masking layer to erase away from spots that are supposed to be dark.
For my shading I use “Multiply” and color with a dark blue.
Of course there are always exceptions to this. And sometimes I’ll use different settings depending on the scene (the recent Little Nightmares comic being a good example).
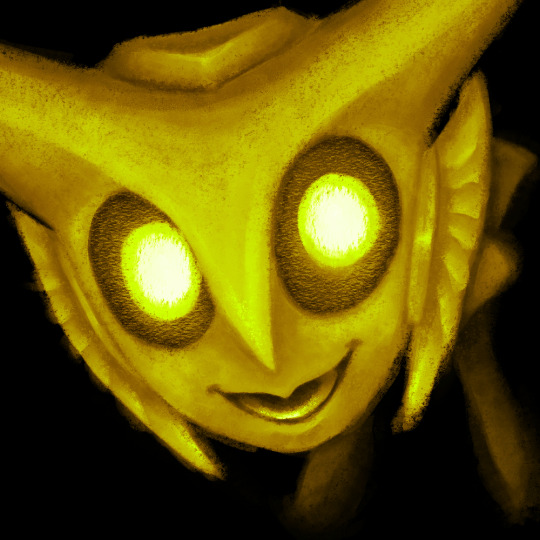
I also use add when shading eyes. Especially if said eyes are supposed to be glowing (like for bendy or cuphead) plus the multiply later to shade in pupils.
11 notes
·
View notes
Text

Trying out various effects using blend modes.
4 notes
·
View notes
Text
These are what each blend mode on Procreat does!

you know what? /puts them into normal clothes/
464 notes
·
View notes
Text

i love being late to trends. my new years resolution is to be late to every trend ever. and you know im serious because im even late to new years.
(theres an inverse version of this by @chamiryokuroi , you should go check it out! i started making this before i saw theirs, but i think its cool that now theres both versions)
#art#fanart#digital art#dc comics#bernard dowd#timber#timbern#tim drake#tim drake fanart#bernard dowd fanart#red robin#red robin fanart#dc fanart#i dont usually do more graphic styles like this so it was a fun challenge#theres so many little parts to the original that i had to notice and include#i didnt wanna download or make my own heart and star stamps just to use them maybe 6 times each so those are all hand drawn#i adjusted the colors of the heart outlines like 6 times before i was satisfied#also the fact that bernard has a red jacket and pink shirt in this changes the color profile completely so i had to change some things about#-the OG colors so it fit in well#but im happy to report that i didnt use any major blend mode layers over everything at the end to get the colors to mesh well#which is a thing ive been doing for a long time but isnt very conducive to actually learning color theory#also also i spent like a full 45 minutes trying to get the text to look right#bc i dint have whatever font that is so i had to improvise with the fonts i did have and a little bit of editing#and then i had to duplicate it for the shadow and outline it and everything#it was pretty fun tho#seeing the end product was especially satisfying#i havent read ‘go for it nakamura!’ but i assume from context clues the little squid things on the cover are-#-calling him a simp/being supportive wingmen so i replaced them with steph and dick#who i imagine are watching bernard and tim’s relationship like a soapy romcom#and occasionally heckling them (affectionately!) when theyre being lovey-dovey
2K notes
·
View notes
Text
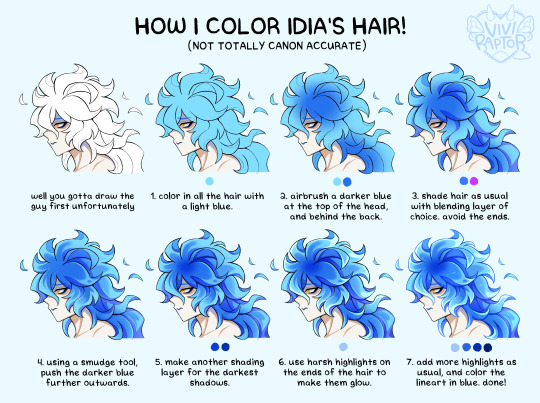
my hyperfix on twst is quickly coming back, so i'm trying to relearn how to draw idia's hair. i made this short coloring tutorial for myself, feel free to use it too if it helps!
#twst#twisted wonderland#idia shroud#twst idia#ignihyde#disney#disney twisted wonderland#art tutorial#coloring tutorial#digital art#fanart#twst fanart#ftr the blending modes are linear burn for shading and add for highlights#anyway i've been drawing him a lot for a very specific reason which will be revealed later. bc i'm shy
2K notes
·
View notes
Text
Playing around with simple encryption and decryption using blend modes.
0 notes
Text

Luffy week day 3:
Sleep/Sunflower
#luffy week 2024#luffy week#one piece#monkey d luffy#not pictured: ace and sabo keep on putting more sunflowers around luffy to see how many they can before luffy wakes up#played around with a few new blending modes this time around#hope the colors turned out alright
3K notes
·
View notes
Text
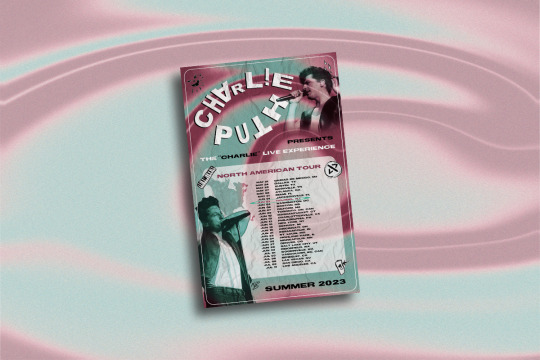
Summer Design Series - Concert Poster Design
As the summer winds down and students ready to return to campus, Melissa, our graphic design blogger, is taking time out to design a set of posters for her dorm room this fall. Follow along her process and final output #GraphicDesign #MarywoodArt
View On WordPress
#Adobe Photoshop#asymmetry#attention to detail#blend modes#concert poster#design aesthetic#design elements#Digital Design#Graphic Design#liquify effect#Marywood Art Department#Marywood University#noise effect#poster design#textures#typeface#Typography#Where Creativity Works
0 notes
Text
Back on the markiplier cinematic universe grind

Hishhsishisjsi
#fanart#markiplier#digital art#art#mcu#angst#markiplier egos#markiplier fanart#darkiplier#darkiplier fanart#who killed markiplier#damien wkm#wkm#wkm celine#celine the seer#wkm the seer#oh how i love blending modes#markiplier cinematic universe
628 notes
·
View notes
Text
Nightshade found a trailcam and wanted to say hello!
As for Alex, well... he got a bit startled LMAO
(might adjust some hues in the upper image for fun or later edits)
#ultimatefartwizard#transformers#tf earthspark#transformers earthspark#maccadams#earthspark#nightshade#transformers nightshade#alex malto#poor man spilt his drink EVERYWHERE#this idea came totally random to me because i was looking at cool effects you could make with layer blending modes and pen opacity#Dorothy is gonna cackle about this later#there needs to be a series of just.... transformers trailcam drawings it would be so funny#dont worry alex is fine after this nightshade just came out of NOWHERE
2K notes
·
View notes
Text


oh, starlight.


#submas#idk i don't have any flavor text to add to this one. mainly this was me playing around with blending modes and lighting.#so yeah. anyways.#submas emmet#warden ingo#ingo#emmet#my art#im not even kidding half the struggle with posting these was getting the goddamn post to stop rearranging itself.#it's still not formatted how i want it to be but if i try moving either drawing the whole post unravels and for WHAT. why does it Do That.
1K notes
·
View notes
Text

happy birthday to our favorite teenage beauty queen of sorts <3
#idkhow#dallon weekes#chiimo art shenanigans#IM LATE GRAHHH finals had me in a chokehold#im really happy with how this turned out tho :]#referenced the lighting from his live razzmatazz performance it's so pretty#shoutout to hard light and exclusion my favorite blending modes
431 notes
·
View notes
Text


My savior, beautiful lady
Heyyyyy. I’m not joking abt how mentally ill I’ve been over this au-….. Jamiazu hyuluka…..
And if ur new I’ve got more lore in the twst au tag!! If you wanna idk im not ur dad
#Anywayssss#alien stage twst au#i spend so long painting those backgrounds#The blending modes…. eugh#So mych#BUT#WE’RE DONE#and I’ve got an essay to write. BUT#we don’t need to talk abt that.#Anyways#jamiazu#azujami#ashenviper#azul x jamil#jamil x azul#you can tell when I spent a long time on a piece bc I will add every version of the ship names I can find#Azul Ashengrotto#Jamil viper#fem azul ashengrotto#fem Jamil viper#Twst#twisted wonderland#azul twst#jamil twst#Rahhhhhhhh#save me I spent so long on this 😔#Alien stage
496 notes
·
View notes