#black alt 3.2
Explore tagged Tumblr posts
Visit Tumblr Blog
Explore Tumblr blogs with no restrictions, modern design and the best experience.
Last Seen Tumblr Blogs


Fun Fact
The most popular pages on Tumblr are about Minecraft, GIFs, and David J. Peterson.
Text
Cum să Obții Coduri de Reducere pentru Fiecare Cumpărătură Online?
Introducere
Cumpărăturile online au devenit un stil de viață pentru milioane de oameni din întreaga lume. Este ușor, rapid și oferă o varietate imensă de produse, dar cel mai important aspect pentru mulți cumpărători este economisirea banilor. Unul dintre cele mai eficiente moduri de a economisi bani este utilizarea codurilor de reducere.
Dacă te-ai întrebat vreodată cum poți obține coduri reducere pentru fiecare achiziție online, acest ghid îți va oferi toate informațiile necesare. Indiferent dacă faci cumpărături de modă, tehnologie, electrocasnice sau produse alimentare, există întotdeauna o modalitate de a economisi.
1. Ce sunt Codurile de Reducere?
Codurile de reducere sunt combinații de litere și cifre pe care le poți introduce într-un magazin online pentru a obține un discount la achiziția ta. Acestea pot fi oferite sub diferite forme:
Reduceri procentuale (ex: 10% reducere)
Reduceri fixe (ex: 50 RON reducere)
Transport gratuit
Oferte speciale (ex: cumpără 2 produse și primești al treilea gratuit)
2. De ce Să Folosești Coduri de Reducere?
Utilizarea codurilor de reducere nu doar că îți economisește bani, dar îți oferă și avantajul de a cumpăra mai multe produse la un preț mai mic. În plus, acestea sunt ușor de utilizat și nu implică costuri suplimentare.
Un alt motiv important pentru a folosi coduri reducere este că îți permit să încerci produse noi pe care altfel nu le-ai fi cumpărat din cauza prețului ridicat.
3. Unde Găsești Coduri de Reducere?
Există mai multe modalități prin care poți găsi coduri de reducere pentru cumpărăturile tale:
3.1. Newsletterele Magazinelor Online
Multe magazine online oferă coduri de reducere clienților care se abonează la newsletter. Aceste coduri sunt trimise direct pe email și sunt valabile pentru prima comandă sau pentru promoții speciale.
3.2. Aplicații de Cashback și Reduceri
Există numeroase aplicații care oferă cashback și coduri promoționale. Acestea îți permit să primești o parte din bani înapoi pentru fiecare achiziție efectuată.
3.3. Grupuri și Forumuri Online
Pe rețelele sociale și forumurile de shopping, utilizatorii împărtășesc frecvent coduri de reducere exclusive.
3.4. Evenimente Speciale și Sezoniere
De Black Friday, Cyber Monday, Crăciun sau alte evenimente majore, multe magazine oferă coduri de reducere exclusive.
4. Cum Să Folosești Codurile de Reducere?
Procesul de utilizare a codurilor de reducere este simplu:
Selectează produsele dorite și adaugă-le în coș.
La pasul de finalizare a comenzii, caută o casetă unde poți introduce codul de reducere.
Introdu codul și verifică dacă reducerea a fost aplicată.
Finalizează comanda și bucură-te de economii!
Dacă un cod nu funcționează, asigură-te că este valabil și că respectă termenii și condițiile impuse de magazin.
5. Sfaturi pentru a Obține Cele Mai Bune Reduceri
5.1. Compară Prețurile
Nu te grăbi să folosești primul cod pe care îl găsești. Uneori, diferite coduri oferă reduceri mai mari pentru aceleași produse.
5.2. Fii Flexibil cu Brandurile
Dacă ai o preferință pentru un anumit brand, încearcă să vezi și alternative. Uneori, magazinele oferă reduceri mai mari pentru produse similare.
5.3. Folosește Codurile în Perioadele Potrivite
Cumpărăturile de sărbători și perioadele de solduri sunt momente ideale pentru a găsi coduri de reducere valoroase.
6. Cele Mai Frecvente Greșeli în Utilizarea Codurilor de Reducere
Chiar dacă utilizarea codurilor de reducere pare simplă, există câteva greșeli comune pe care trebuie să le eviți:
Neconfirmarea reducerii: Asigură-te că reducerea a fost aplicată corect înainte de a finaliza comanda.
Folosirea codurilor expirate: Unele coduri au o perioadă limitată de valabilitate.
Ignorarea condițiilor: Unele coduri sunt valabile doar pentru anumite categorii de produse sau doar pentru achiziții peste o anumită sumă.
7. Concluzie
Utilizarea codurilor de reducere este una dintre cele mai eficiente metode de a economisi bani la cumpărăturile online. Dacă urmezi sfaturile din acest ghid, vei putea profita de reduceri atractive la fiecare achiziție.
Indiferent de tipul de produse pe care le cumperi, există întotdeauna o oportunitate de a economisi. Prin căutarea și utilizarea inteligentă a codurilor de reducere, poți maximiza economiile și te poți bucura de experiențe de cumpărături mai avantajoase.
0 notes
Text
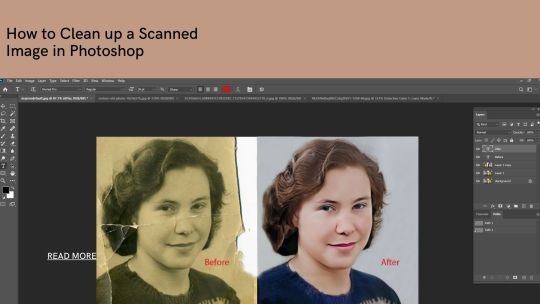
How to Clean up a Scanned Image in Photoshop
Introduction:
In this digital age, scanning documents and photographs has become a common practice. However, the scanned images often suffer from various imperfections, such as dust, scratches, and fading colors. Fortunately, Adobe Photoshop provides powerful tools and techniques to restore and clean up scanned images, bringing them back to their original glory. In this article, we will explore a step-by-step process to clean up a scanned image using Photoshop, ensuring a professional and polished result
Read More
Section 1: Preparing Your Workspace
1.1 Set Up the Document:
Open Photoshop and create a new document with the dimensions matching the scanned image.
Adjust the resolution according to your requirements, balancing file size and quality.
1.2 Organize Your Layers:
Create a new layer for each editing step to maintain flexibility and non-destructive editing.
Rename the layers to reflect the specific adjustments made.
Section 2: Removing Dust and Scratches
2.1 Utilizing the Healing Brush Tool:
Select the Mending Brush Instrument from the toolbar.
Adjust the brush size, hardness, and spacing according to the size of the imperfection.
Sample a clean area near the dust or scratch and carefully paint over the imperfection to replace it.
2.2 Employing the Clone Stamp Tool:
Choose the Clone Stamp Tool and set the brush size to match the area you want to fix.
Alt-click on a clean area similar in texture and tone to the damaged region.
Carefully paint over the imperfection, ensuring seamless blending.
Section 3: Enhancing Color and Contrast
3.1 Adjusting Levels:
Go to Image > Adjustments > Levels.
Use the histogram to adjust the black, gray, and white points, enhancing the overall contrast and tonal range.
3.2 Correcting Color Cast:
Select Image > Adjustments > Color Balance.
Adjust the sliders to correct any color shifts and restore natural tones.
Experiment with the different color channels to achieve accurate colors.
3.3 Restoring Faded Colors:
Select Image > Adjustments > Vibrance.
Increase the Vibrance and Saturation sliders to bring back lost colors, while preserving skin tones and avoiding over-saturation.
Section 4: Sharpening and Final Touches
4.1 Sharpening the Image:
Duplicate the background layer.
Go to Filter > Sharpen > Unsharp Mask.
Adjust the Amount, Radius, and Threshold to enhance the image's sharpness without introducing artifacts.
Learn More:
Headshot Retouching Services
Image Color correction services
4.2 Removing Noise:
Duplicate the background layer and go to Filter > Noise > Reduce Noise.
Adjust the sliders to reduce both color and luminance noise.
Preview the changes and ensure that important details remain intact.
4.3 Cropping and Resizing:
Use the Crop Tool to remove unwanted edges or parts of the image.
Adjust the canvas size or image dimensions if necessary.
Section 5: Advanced Techniques for Image Restoration
5.1 Content-Aware Fill:
Use the Content-Aware Fill feature to remove larger unwanted elements or sections.
Select the area you want to remove using the lasso or marquee tool.
Go to Edit > Content-Aware Fill and adjust the settings.
Photoshop will analyze the surrounding pixels and intelligently fill in the selected area, blending seamlessly.
5.2 Spot Healing Brush Tool:
For small blemishes or spots, utilize the Spot Healing Brush Tool.
Choose the tool from the toolbar and adjust the brush size as needed.
Simply click on the spots or blemishes, and Photoshop will automatically analyze the surrounding area and replace them with matching pixels.
5.3 Frequency Separation:
Frequency Separation is a powerful technique for repairing skin textures or other complex areas.
Duplicate the background layer and go to Filter > Blur > Gaussian Blur.
Adjust the blur radius to separate the high-frequency details from the low-frequency colors and tones.
Create a new layer and set it to the blending mode "Linear Light."
Use the Healing Brush or Clone Stamp Tool on the low-frequency layer to fix imperfections, while retaining the original texture on the high-frequency layer.
Section 6: Saving and Exporting
6.1 Saving Your Work:
Save your Photoshop project file (.PSD) to retain all the layers and adjustments for future edits.
6.2 Exporting for Different Purposes:
When saving a clean, finalized version of your image, consider the purpose and medium.
Save as a high-quality JPEG for web or screen display.
Save as TIFF or PSD for print purposes, ensuring the highest quality and compatibility with professional printing processes.
Conclusion
By mastering the techniques and tools discussed in this article, you can transform scanned images marred by imperfections into visually stunning works of art. Whether you are restoring old family photographs, digitizing historical documents, or simply enhancing the quality of scanned images, Adobe Photoshop offers a wide range of features to help you achieve remarkable results. Remember to practice regularly, experiment with different tools and settings, and develop your own artistic approach to image restoration. With time and dedication, you'll become proficient in cleaning up scanned images, unlocking endless possibilities for creative expression and preservation of visual history.
0 notes
Note
What made alternatives with multiple variations wearing shorts for Boleyn common? Why boylen specifically?
That originated with the very first alternate with a costume specifically designed for Boleyn (rather than a swing costume): Vicki Manser. She was originally 1st cover B/C and the original teal costume with shorts was designed for her to be used as a B/C costume. Since then it's been fairly consistently shorts: - Jennifer Caldwell and Cherelle Jay were both 1st covers Boleyn and both wore shorts specifically for the role (while Cherelle + Vicki wore shorts for every role, Jennifer specifically got shorts for Boleyn and an open front skirt for Howard) - Chiara Assetta wears her shorts for Boleyn - Liv Alexander, Bryony Duncan, Shannen Alyce Quan, and Mallory Maedke were all in productions with slightly different management that chose to have alternate variations be effectively identical to the principal costumes, so they specifically got a Boleyn-style skirt to fulfill that requirement - Collette Guitart and Natalie Pilkington were/are swings. Collette originally wore one skirt (Aragon-style) for every role. A couple different variations were experimented with to make her costume more Boleyn-like during the 2019 exploration period, but no changes to the bottoms. When the UK productions re-opened and Natalie joined as a swing, they both wore shorts from the start for Boleyn. - Esme Rothero is a toss up. She's been wearing her A/H skirt but could switch to shorts as she potentially gains more variations in the future like Collette did. - Rachel Rawlinson's debut as Boleyn is later this week. I expect her to be in shorts. - Grace Mouat, Courtney Stapleton, Harriet Watson, Zara MacIntosh, and Roxanne Couch never had shorts, so this isn’t applicable to them. - Nicole Kyoung-Mi Lambert, Natalie Pilkington (cruise), and Ella Burns had shorts but never debuted as Boleyn, so also not applicable.
#six the musical#six alternates#jennifer caldwell#vicki manser#cherelle jay#black alt 3.2#teal alt 1.2#orange alt 2.2#pink alt 1.2#silver alt 1.2#chiara assetta#collette guitart#natalie pilkington#esme rothero#rachel rawlinson#six west end#six 3rd uk and ireland tour#six 2nd uk tour
27 notes
·
View notes
Text
Remove Background for Icons Tutorial

As requested by Anonymous, this post will explain how to remove the background for your icons, so you can add a solid, gradient, etc background.
You will learn how to remove the background in three ways and which method works best for the photo you want as your icon:
[NEW] Remove Background
[NEW] Subject (link only)
[A CLASSIC] Pen + Brush Tool
↓ TUTORIAL UNDER THE CUT ↓
Each method will be explained first so pick whichever is most appropriate to your photo and then you will find what to do after removing the background at the last part of this post.
[1] Remove Background
If this feature isn't available in your version of Photoshop, just skip to the ones that you can do :)
TIP: For this method, it's best to use photos with clean, solid backgrounds and "clean" or sharp-edged subjects, such as this:

NOTE: This first method is the quickest way to remove a background but it doesn't work for every photo.
1.1 Open your photo in Photoshop.
1.2 Unlock the layer (if it's locked) by clicking the lock icon.
1.3 Click Remove Background which you will find under the Quick Actions tab in the Properties panel (Window > ✓Properties). That's it!
[2] Subject
If this feature isn't available in your version of Photoshop, just skip to the ones that you can do :)
If your photo has a background that's not too busy and a subject with:
Hair that is either curly, messy, or has visible stray hairs
Clothes that are fluffy or fuzzy
This is the step for you.
These are examples of photos you can use:


For this method, I have decided to just link this video tutorial [Patrick_Star_BOO.gif] because it will take me too long to explain it (and there would be more text for you guys to read and nobody wants that).
[3] Pen + Brush Tool
For this method, you can use any type of photo, like one with a busy background. But I'll be using this photo as an example to keep the explanations simple:

3.1 Open your photo in Photoshop.
3.2 Unlock the layer (if it's locked) by clicking the lock icon.
3.3 Select the Pen tool (shortcut: P)
NOTE: Make sure it's set Path, not Shape, which you can find at the top menu.
3.4 Trace around your subject.
To do this:
3.4.1 Create a starting point by simply clicking anywhere on the edges your subject.
TIP: Turn on caps lock to change your cursor from the pen to a point (like what you see in the gif example below).
3.4.2 Make another point not too close to the first point.
NOTE: To create a curve line, click and drag to arc the line and follow the curve like this:

NOTE:
If you'd like to stop the curves and start drawing straight lines again, hold down option (Mac) / Alt (Windows) + click the on the point you created:

If you'd like to change the curve direction, hold down option (Mac) / Alt (Windows) + click and drag the white point (which now turned blue) as shown below:

3.4.3 Continue this process until you reach the first point you made. Click on it to close the path. It should now look like this:

3.5 Mask the Pen tool path. You will find the Mask button at the top menu, it's between Selection... and Shape.
If it's not there, another way to do this is to:
Right click on your photo (with Pen tool still selected)
Click Make Selection...
Make Feather Radius: 0.1 pixels then click OK.
Add layer mask to your photo's layer. This can be found at the bottom of the Layers window, at the right side of the "fx" button.
3.6 Brush tool (optional)
If there are any parts you accidentally left out, you can just brush them back in and vice versa.
NOTE: Click the layer mask once to select it since we’ll be brushing over the layer mask, not the layer.
TIPS:
You can also brush parts in [1] and [2], just make sure you're brushing over the layer mask.
To switch between adding back and removing the parts you’ve brushed over, press the keyboard shortcut X to swap the foreground and background colors (should be black & white).
Black foreground color: erases
White foreground color: brings back what’s been erased
Making the icon
4.1 Create a New Document by going to File > New... > then make both width and height 128 px, the standard Tumblr icon size.
4.2 Transfer your photo to your new document by using the Move tool (V) to drag the photo onto the new document.
You can also save your photo as a png file then place that file onto the new document.
4.3 Transform and position your photo in the new document (let's call it icon document from now on).
TIP: I personally think it best to convert your photo into a Smart Object (right click the photo layer > Convert to Smart Object) before transforming the photo. This way, if you want to make the photo bigger after making it smaller, it won't become pixelated.
4.4 Color grade your photo.
TIP: If you don't want your coloring to affect your new background, create a clipping mask on your coloring layers to the photo layer. To do this, right click on the coloring layer (i.e. Brightness/Contrast) > Create Clipping Mask. It should all have an arrow pointing down to the photo look like this:

4.5 Change your Background
4.5.1 Unlock the Background layer first (if it's locked) by clicking the lock icon.
4.5.2 Click the "fx" button at the bottom of the Layers window
4.5.3 Select Color Overlay if you want a solid background color or Gradient Overlay if you want a gradient background. Change the colors to whatever you want :)
Once you're okay with your icon, save it as jpeg. If your background is transparent, save it as png.
〰️
Please like/reblog if this has helped you and feel free to send a message for any questions and concerns! ♥︎
#club post#club tutorial#nongif#icon tutorial#how to make icon#remove background tutorial#completeresources#allresources#itsphotoshop#yeahps
715 notes
·
View notes
Text
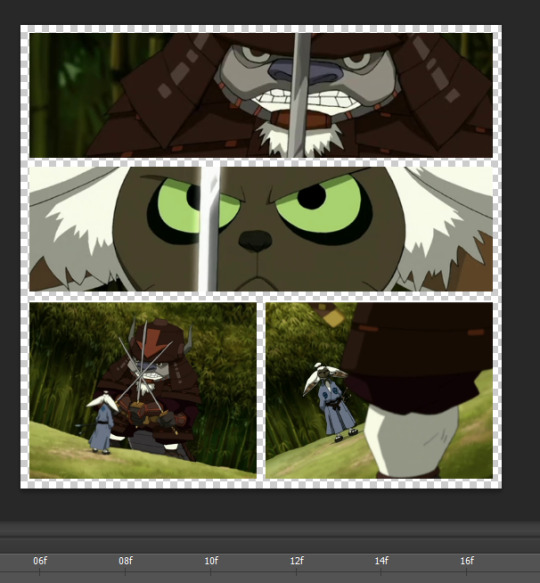
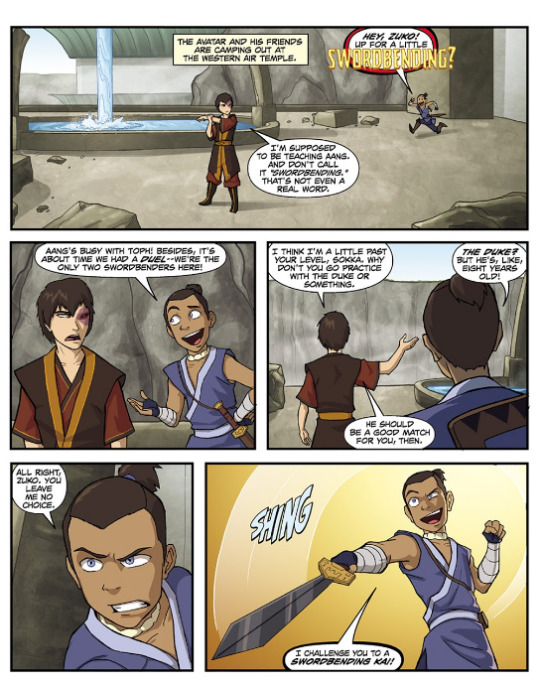
Tutorial: Comic Book Gifs
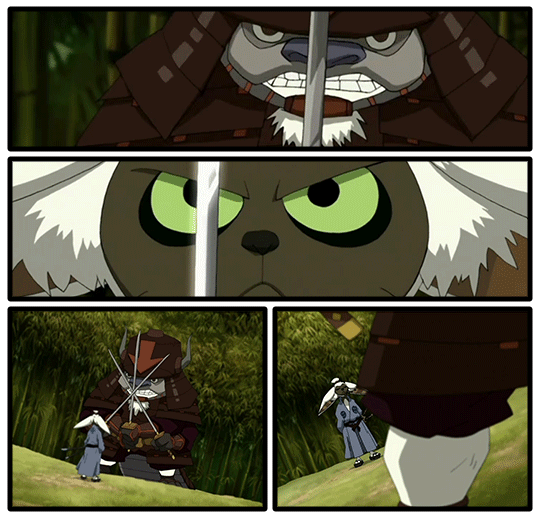
I got a request for a tutorial on how I create gifs stylized like comic books, so I will be walking through how I made this gif (from this gifset):

Tutorial under the cut:
I’m going to break this tutorial into 3 sections: organizing the panels, creating the comic book “look”, and adding the sound effects.
1. Creating the Panel Layout
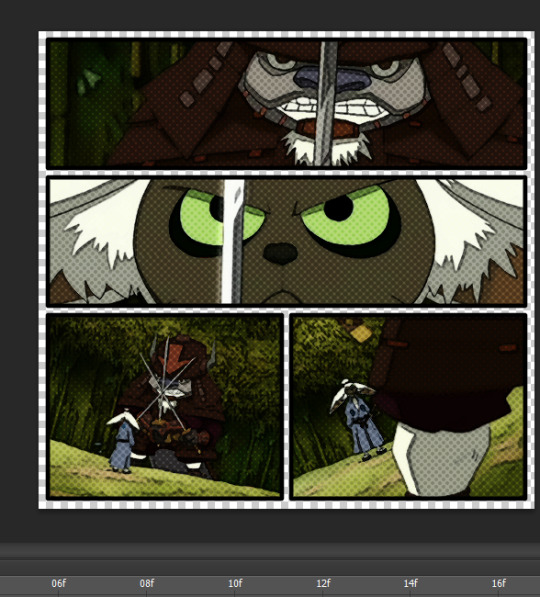
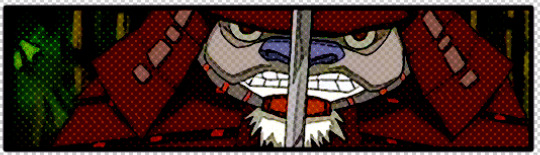
1. Start by deciding how you want your “layout” to look. These really don’t have to be too fancy: usually I’ll just do rows of 1 or 2 panels, but if you need help getting a rough idea of what a layout might look like here are all my comic book edits. Again, nothing too fancy (unless that’s what you want).
It’s probably best to plan which gifs are going in which panels in advance but I kind of make it up as a go.
2. Create a new psd and start in video timeline mode. Then using the rectangle tool, draw the rectangles based on your desired layout:
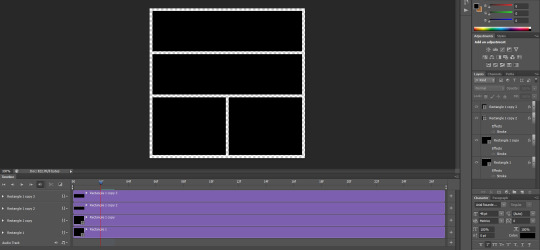
3. Create the gifs you will use for each panel. (Note: It’s important that the # of frames in your gifs are all the same.) Make sure the gif is in video timeline mode & is converted to a smart object. No need to sharpen yet - we will do that later. These are the four gifs I will be using (one per panel):


The framerate is a little fast right now but that’s ok - I will fix this at the very end.
4. Now, you want to drag your gifs onto the psd.Use a clipping mask (ctrl + alt + G) to attach the gifs to the “panel boxes”. To resize your gifs within the panel you can just use ctrl + t.
So this is where we should now be at:
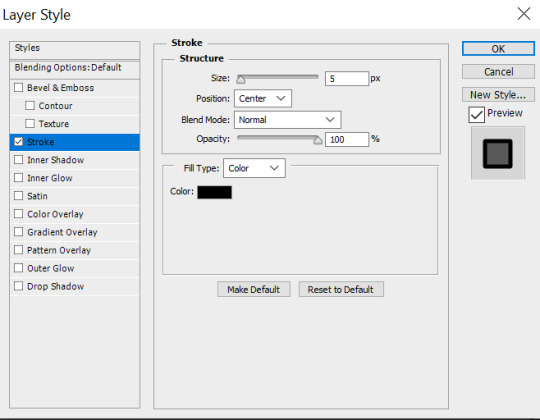
4. Final step is to add borders. So click on the rectangles, and then click on add layer style -> stroke to add a border. Personally I like the borders a little thicker to make it look more “comic book-y”. So I use a 5px stroke with position set to center:
And this is what our gifs should look like now:
So now we’re done with the setup, and we can move onto styling.
2. Styling the Gifs
1. Start by just applying your usual sharpening settings (I used a surface blur & smart sharpen).
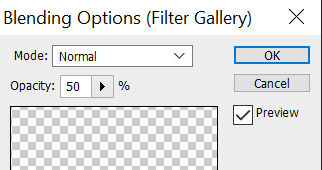
2. After that, add a poster edges filter to the gifs. You can do this by clicking on filter -> filter gallery -> artistic -> poster edges:

These are the settings I used for this gif, but I do tweak them a little depending on the set (I’d recommend playing around with it a little until you find the setting you think works nicest for whatever scene you are giffing):
3. Click on the little arrow next to it and adjust the opacity. I usually like to set it to 50%:

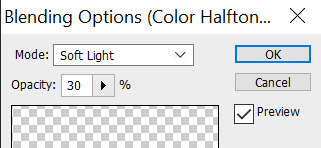
4. Now, to add the halftones click on filter -> pixelate -> color halftone. These are the settings I recommend using:

5. Click on the little arrow next to the halftones filter and adjust the blending options. I recommend setting opacity to no higher than 50%. You can use overlay, soft light, or darken - again, I usually play around with various setting until I find whatever I think looks nicest. These were my settings for this particular gifset:
So now our psd looks like this:
6. Final step is to add some coloring - I went for a bright & greenish coloring, so this is what I ended up with:

And now the gifs are complete. All that’s left is adding sound effects.
2.1 Save and Reopen (Optional)
A thing I like to do before adding sound effects is to save my gif and then work with the gif as a fresh psd. My photoshop starts to get really slow once I add all these filters. Adding the sound effects requires analyzing every single frame and this is a pain when photoshop is being slow. I find saving my gif and working with that instead makes photoshop much more tolerable so I do recommend these quick steps:
1. Save your gif. this is what it looks like currently:

2. Open your gif in photoshop:

3. Switch to timeline mode & convert to smart object:
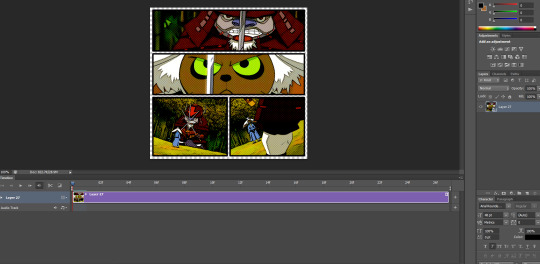
4. Save as a new psd, which we will now be working on.
Ok, now onto the sfx!
3. Adding Sound Effects
For the sound effects there are actually two parts here: getting the sound effects and then animating them:
3.1 Getting/Making Sound Effects
First step for adding sound effects is to get the actual png images you will use. I actually got all my sound effects off the a:tla comics. This process is pretty straightforward:
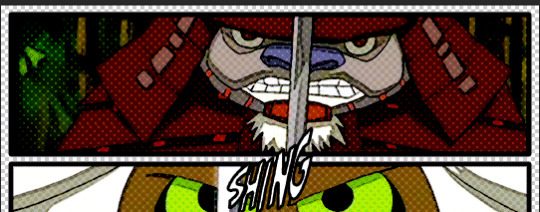
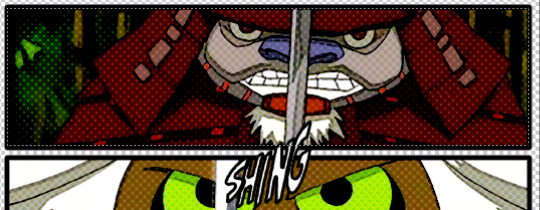
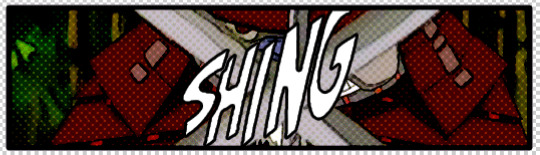
1. Open the online comic book (I recommend comiconlinefree(.)net), find the sound effects you want and take a screenshot (I use snipping tool for this). For this particular gif, I am using the ‘shing’ sound effect from the bottom panel:
2. Open the screenshots in photoshop, and use the pen tool click on each letter, then right click 'layer via copy’. You should now have a separate layer for each letter.
3. Highlight all of the individual letters, right click, and convert them into a smart object. Then add stroke (I used 3px):

You can also use layer style -> color overlay if you want to change the color.
And I repeated the process for the swish sound effect:

Now that we have our sfx, it’s time to add them to the gifs!
3.2 Animating the Sound Effects
Ok, this step is definitely the most tedious. I recommend doing this one panel at a time. So let’s start with the first one.
1. Using the timeline feature, go frame by frame until you’ve decided where you want your sound effect to start. This is the frame I’ve decided I want the sound effect to start on:
2. Now drag the sound effect onto the psd and use transform (ctrl + t) to resize accordingly:
3. Add a layer mask (layer -> layer mask -> reveal all). Using the rectangular maquee tool, draw a rectangle around the panel the sound effect will be in:
Then right click -> select inverse. Now, with your layer mask selected, click on the paint bucket tool. Set the color to black and click on the psd. Unlink the layer mask from the layer by clicking on the link symbol in between them. Your layer mask should now look like this:

This will prevent your sound effects from flowing outside the panel.
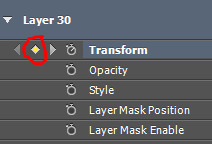
4. On the videotime, click on the arrow to the left of where it says ‘Layer 30′. Then click the little clock to the left of ‘Transform’. It should now look like this:

5. Move a couple frames ahead. Click on the diamond by the transform button:
Now, use transform (ctrl + t), to resize/rotate/move your sound effect to where you want it to be in this frame:
6. Move a couple frames forward and repeat:

Continue doing this until your sound effect animation is over.
7. Repeat steps 5 and 6 for the other sound effects you want to add. This is how I animated the ‘swish’ sounds in the 3rd panel:


8. Now our gif should look like this:

9. Final step: save your gif, reopen and adjust the framerate (if necessary). And this is our final product:
And we’re done! Then you can just repeat for every other gif in the gifset!
I hope this tutorial was helpful - please let me know if anything is unclear/there are any questions. If you use this tutorial to make a comic-style gifset I’d love to see your work so please tag me in it! I track #kahtaras
#mine: tutorials#mine: all#completeresources#itsphotoshop#allresources#dailyresources#quirkyresources#ihaveresources#onlyresources#ps tutorial#gif tutorial
406 notes
·
View notes
Text
Collette has now started wearing her Cleves shorts for Boleyn (like Natalie Pilkington does on the tour). It looks like that will be the 3.0 black alt Boleyn for the foreseeable future. Previously Collette just wore her main (Aragon/Howard-style) skirt.
Liv Alexander wore the emergency cover costume! Looks like she will continue to wear that for right now. It’s currently unknown if she’ll wear her black alt costume at any point.
Hana Stewart switched midshow from Seymour to Parr. She kept her Seymour wig and crown but pulled it back into a low ponytail.


12 Jun 2021, @/captured.by.liz
#collette guitart#hana stewart#liv alexander#six alternates#six west end#jarneia richard noel#cherelle jay#zara macintosh#black alt#black alt 3.2.4#black alt 3.2#black alt 3.0#pink alt#pink alt 1.5#teal alt#teal alt 1.4#teal alt 1.4.1#pink alt 1.5.1#emergency cover 2.3.1#emergency cover 2.3#teal alt 1.0#pink alt 1.0#orange alt 2.0#orange alt#orange alt 2.3.1#orange alt 2.6.1#orange alt 2.3#orange alt 2.6#aragon 2.0#catherine of aragon six
126 notes
·
View notes
Text
How to make that one type of image/meme where it's like a text based RPG and has green text- Or, How to make a Zorkpost
This is gonna be a long (but still pretty basic guide) on how to make a zorkpost, with an example below. I'm approaching this as a beginner introduction to using phtoediting programs, in this case a photoshop rip-off, https://www.photopea.com/ Before we start, this is the type of image/meme I'm talking about.

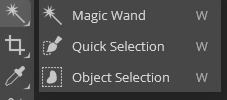
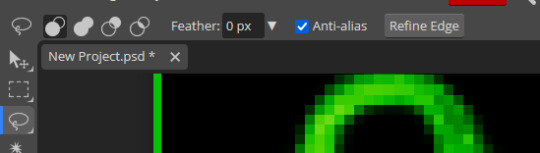
1.Hit "new project", here you'll define the size of the image. I'd recommend either a 1080x1080 square, or a slightly taller, 1080x1400, but the specific length and width is up to what you want to make. Also set the default background color to black, this'll just make it easier than adding a black background manually. Once you've done this, hit create. 2. It's a good idea to start with the image you'll be using as the focalpoint of the zork, paste the image into the project, and resize it as you see fit. You want enough space for some flavor text and ample space for the "actions" segment of the image. You may also want to paste a reference zork into a corner that you can use for reference. 3. Cropping, this one is important. The image you chose to be the focus of the zork will likely need to be cropped, either to get rid of the background, or to remove other unwanted parts of the original image. HOLD ALT TO ZOOM IN AND OUT/HOLD CONTROL TO MOVE LEFT AND RIGHT USING SCROLLWHEEL 3.1 If the desired part of the image is distinct from the unwanted sections, use the object select tool. You can find this by right clicking on the magic wand icon (see image A). Once you have the object select too activated, drag over what you want to be selected, the cross should be right over the desired selection. You may need to do this multiple times to select all of the segments you want, hold shift in order to add to the selection, otherwise it will discard the prvious selection and only have the new one. Make sure you have the desired segments of the image selected, you can see what is selected by seeing what is in the dotted shape. 3.2 The other method for cropping is the manual lasso select tool. This can be found by simply clicking on the symbol or by hitting "L". This is useful if the desired selection is not distinct from the background, or if you want to get a very prescice selection...... 3.2 Continued...Again, hold shift to add selections together. You can use object select to get the majority of the image selection, and then use lasso select to get the finer parts which the object select tool struggles to get. HOLD SHIFT TO ADD TO YOUR CURRENT SELECTION/HOLD ALT TO SUBTRACT FROM YOUR CURRENT SELECTION 3.3 Once you have a selection you're comfortable with, hit the "add raster mask button" (see image B), this will hide all parts of the image not selected. If the edges seem to jagged you can try to instead use the "refine edge" button (see image C). This will open a menu. The important parts to look at are where it says border, and new layer on the top segment of the menu. The number box next to "border" is the amount of pixels it will include to make the edge less jagged, for most you want either 1 to 3 no higher. Click where it says "new layer", change it to raster mask. This will allow you to adjust the cropping later on if you wish to. Finally, hit OK once you have the desired settings.
4. Now, we'll start creating the color filters. The characteristic green overlay can be done in a few ways, I'll go over what I think is the simplest method. Hit new layer, found on the bottom right side of the program (see image D). The new layer should be above the main image you cropped. Once you have it created and selected, use the eyedropper tool to grab the green from your reference image, or choose your own green. To do this click the color picker tool at the bottom of the tools list (see image E). Once you have the color, use the brush tool (shortcut is "B") to make and paint over the image, it does not have to be even remotely precise, as long as it's covering all parts of the image. Next, you will need to change the blending technique of the layer. This dictate how the color is applied from the current layer, to the layers below it. Click where it says "normal" on the top of the stack of layers (see image F). Now you can choose from several blending methods. The blending techniques of "Overlay" and "Color" generally are what are best suited for the zork image style, although "Soft light" works too. If the color is too intense, you can adjust the opacity of the color layer next to where you changed the blending method. 5. Often zork images will use a slight pixelation on the central image, I'll explain how to apply this to your own image of choice. Select the layer of the image (not the color) and click filter, on the top list of tools on the top of the program (see image G). Once you have this menu open, hover over the section labelled "Pixelate". Next click the tool called "Mosaic". This will open the window you will use to pixelate the layer. This menu is pretty simple, cell size is how large each segment is, larger cell size means less detail and a more chunky end result. Depending on your vision and the image you are using, you can adjust to your liking. I'd recommend a cell size of 4 to 14. When you have a cell size you like, hit OK to apply it.
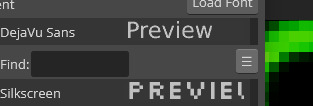
6. Now for the text of your zork. Click the text box tool found on on the left side of the program screen (see image H). While there are many fonts that are preloaded into photopea, there are only a handful of pixel based fonts. To filter by pixel fonts, click where it says "DejaVu Sans" at the top left of the program screen, then click on the button with three lines on it on the right side of the menu. (see image I) Click the checkmarked box for "All" in the submenu, then scroll down and click the box for the "Pixel section". I'd recommend the font "VT323". Since the background is black you won't be able to see the text you are typing, to change the color highlight the text in the box. Then, on the top of your screen, click the color select menu (see image J), once you have this open you can choose any color you prefer, or you can use the eyedropper tool to select a color from your reference zork. (edited) 6.1 You may want to import fonts into the program to use. To do this, download the desired font, then open the font select menu and hit the button labelled "load font". Simply find the file and hit open. If it loaded successfully it should say the font name loaded in the program. To finally apply the font to your text, open the font menu once again and type the font name in the search menu. CHECK THE BOXES FOR AUTO-SELECT AND TRANSFORM CONTROLS AT THE TOP OF THE PROGRAM SCREEN (you should make sure these are checked every time from the start of the project) ((see image K)) 6.2 To resize the text or any image layer, simple drag on one of the corners of the layer if you don't see the box outlining the layer, make sure you have the layer selected, and have transform controls on). By default it will maintain the image size ratio, if for some reason you don't want this, hold shift while you drag. This should be the extent that you need to know about text in photopea, but there are many more options should you not be satisfied, ask if you'd like an overview. 7. We are nearing the end. Here I'll explain how to do the little lines both for outlining the border of the image, as well as for the "actions" menu you will likely include. 7.1 First, the border outline. To do this, doubly click the background layer to open the "layering style" menu (see image L). If you only opened the option to rename the layer, double click a little further to the right of the layer name. With this menu, click "stroke". Where it says "position" change it from outside, to inside. Then, choose the desired border color at the bottom of the stroke menu options. You can adjust the thickness of the outline with the size option at the top of this menu. Once you have something you like, hit OK. 7.2 I will explain the basics of the pen tool for any lines you may want to include. First select the pen tool on the left side of the program screen (below the text box tool). Then, at the top of your program screen, change the fill type from a solid color, to the icon with the white box with an "x" over it (see image M). Next to where it says fill, change the stroke color to a color you'd want for the line (generally the same color as the text), once again you can use the eyedropper tool once you have the color picker menu open. I recommend increasing the thickness of the line before you start, as the default 1 pixel thickness makes it hard to see the lines you are creating, around 10 pixels should be fine for now.
7.3 Make sure you are creating a new layer for this, on top of the background, otherwise it will be hidden by the background. Now, click where you want the line/shape to start. You have just created an anchor point, anchoring this line in the fabric of reality which is the editing program. From here, I recommend you work downward. Hold shift to make straight lines and perfect angles. The pen tool is very versatile, but I'd strongly recommend sticking to only using shift to make lines as making curved lines takes some amount of practice. Once you have one side of the line done, switch to the default move and select tool (shortcut "V"). You can right click on the layer in the layer list to duplicate it. In addition, if you have the layer selected, you can left click, then right click on the sizing border of the layer to rotate in any way you like. (see image N). You may need to zoom in on the line to be able to move it by dragging your mouse. You can adjust the thickness of the line after you have finished the shape by selecting the tool under the pen tool and right clicking, the tool is called "Direct select". With this you can move the anchor points, and adjust the thickness. This covers all the tools needed to create your zork image. Finally, I'll be going over exporting your project. 8. Once you are satisfied with your project, hit file, on the top left of the program. Next, hover over "export as" and select the preferred file format. I'd recommend jpeg to achieve the crunchy look and feel that is characteristic of the zork image. Click on the desired file format to open the export menu. Here you can change the name of the project, and and the file format. You can also see a preview of what your project will look like once exported. Use scrollwheel to zoom in and out. To get the image to look "crunchy" decrease the quality of the image. If there is not much in the project, decreasing the quality will not have much effect. Keep in mind that decreasing the quality under the PNG format will not achieve the crunchy feel. Lastly, hit save once you are satisfied, and you have now downloaded your project. If you wish to save your progress without merging all the files together, click file, and hit save as PSD. Load this PSD file into the program next time you want to work on it, it will preserve each layer individually. Now for the image directory:
A:
B:

C:
D:
E:

F:
G:

H:
I:
J:

K:

L:

M:
N:

Congratulations if you made it through this long guide. Now, you should have all the tools to create your very own zorkpost.
4 notes
·
View notes
Text
Okay, so here’s the general consensus on my “Six costume tier list” poll

Boleyn 3.2, Howard 4.1, and the Pink alt costume have the most votes in the S-tier. They also have the most unanimous votes out of all the costumes (21 each all for S-tier).

The Black Aragon alt costume and the Orange Cleves alt costume have the most votes in the A-tier

Seymour 3.0 and Howard 4.0 have the most votes in the B-tier
The Black general alt costume has the most votes in the C-tier

Seymour 1.0 and Seymour 2.0 have the most votes in the D-tier

Aragon 2.0 has the most votes in the E-tier

And Boleyn 2.0 has the most votes in the F-tier
Poll here
#six the musical#redlady speaks#there are like 30 votes in#i think eventually i'll make another poll for the results within each tier so we can get a numerical ranking
13 notes
·
View notes
Text
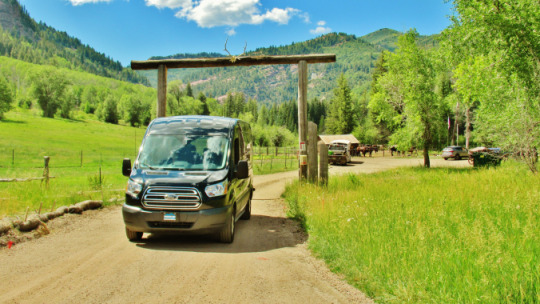
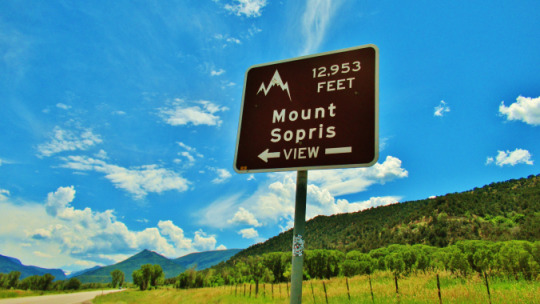
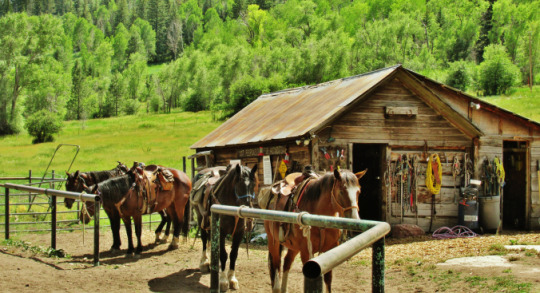
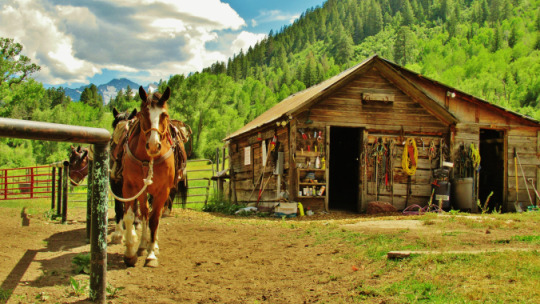
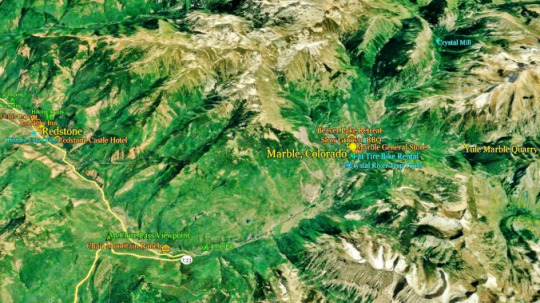
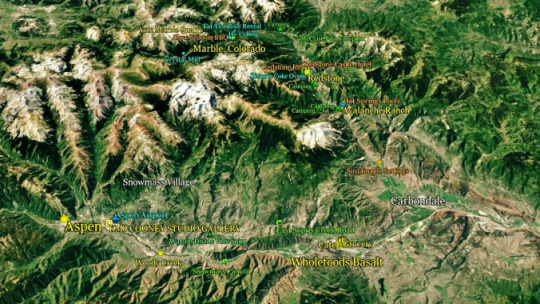
Avalanche Outfitters to provide SENSATIONAL horse rides, and the McClure Pass Wagon Road Trail to serve up VAST panoramic mountain views
As the final finishing touches are made to the fledgling Aspen Marble Detour, or AMD as I have come to term it, setbacks and misunderstandings obviously will occur, even with the best of intention. Therefore perhaps not surprisingly, tweaks and fine tuning must necessarily take place well in advance of offering our unique touring service to the paying public. Everything must be in place and fully functioning. No time now for indecision. Should changes need to be made, then now is the logical time to set about them; which is entirely what Kris and I had on our mind as we set out to do just that – place one final tweak upon a tour that has now firmly cemented itself into place over the past weeks and months.
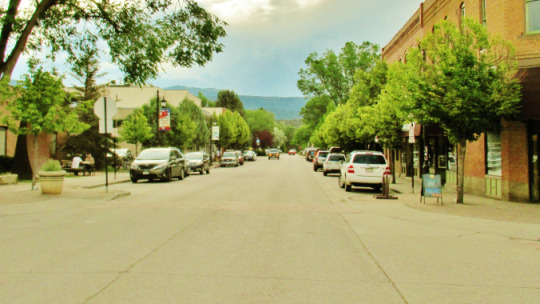
And so, in regards to Aspen Marble Detour development, one major change to the tour route is that we no longer plan to visit Avalanche Ranch, due to their being so busy as to be unable to handle our little black bus. Rather, we now include a brief stop in the town of Carbondale, which as you will see toward the end of this post, is known locally, nationally and internationally as something of a Colorado Rocky Mountain Gem, with a slew of fine dining restaurants, galleries, public art installations, and an altogether cool vibe that will no doubt have you wanting to return one day. During our 20 or 30 minute, 4.30 PM, visit however Detourists should get a feel and a flair for the place, as there generally always seems to be something or another going on, somewhere abouts – it’s just that sort of place.
It was with these two objectives in mind then; a replacement for the ranch; and a user-friendly walk that would give the energetically inclined plenty of room to stretch their legs, and the less lively, or physically able, a gallery of views in return for a minimum in the way of, well, effort. It is not forced march after all, in any way.
The results of our quest comprise of a supremely organized company called Avalanche Outfitters (unrelated to Avalanche Ranch), located right behind the historic coke ovens in Redstone. Together with the old abandoned McClure Pass Trail, conveniently located pretty much right where we need it, in the great crook of the Crystal River Valley, with views sweeping off in all directions, I think we can safely say that we found just what we were looking for.
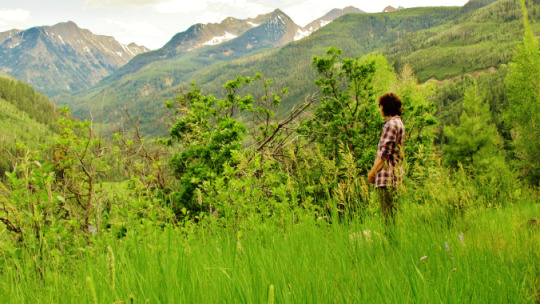
Once a target is set and a plan is laid out, it is a rare foray that does not bear fruit. And so it was the other day, Sunday July 14, that Kris and I set out to fit the two final jigsaw pieces into the great Aspen Marble Detour puzzle. What you do, and what you get up to on the day, is completely up to you. But even if you yourself don’t ride the horses, bikes, or paddle boards. Or if you chose not to do the fly fishing yourself; you will still enjoy the pleasure of watching others partake, taking in the fresh mountain air, and feasting your eyes upon such vast panoramic views that they are no doubt destined to form a brilliant patchwork of memories sure to linger in your mind for years to come.
~ ~ ~
~ ~ ~
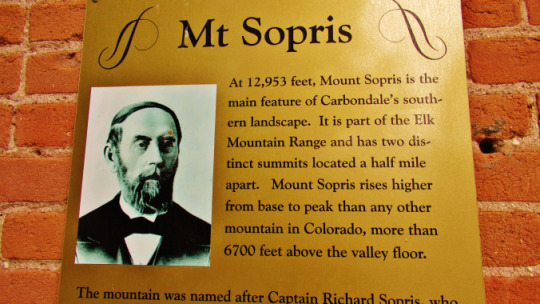
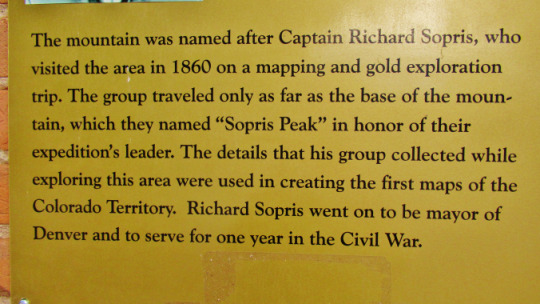
Hot it was as we set off on our quest, and I mean hot. Humid too, as the monumental cumulus nimbus clouds erupting over Mount Sopris amply testify.
~ ~ ~

~ ~ ~
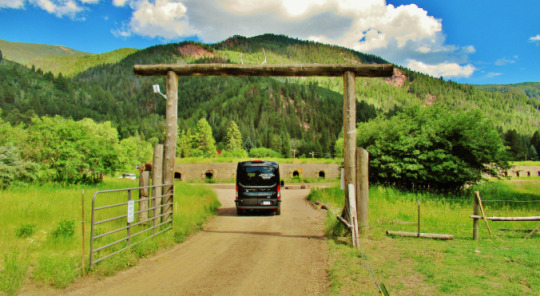
Our marvelous 2019 Ford Transit 350 XLT pretty much arrived so very perfectly suited to our needs that aside from removing two of the four rear seats in order to provide more luggage space, having the lettering installed upon the two sides and rear window was practically all that we were require to do in order to get her Detour ready. She even augments her smooth automatic gear box with a six speed manual shift, which provides perfect power and traction when maneuvering the Crystal River Valley’s signature twisty, steep, and winding mountainous roads. And so rest assured, as we climb McClure pass later in the Detour, you will be in safe hands with me, for years a professional chauffeur and tour guide, at the wheel of this wonderfully engineered and equipped beauty.
~ ~ ~

~ ~ ~
quick selfie
~ ~ ~

~ ~ ~
~ ~ ~

~ ~ ~
I mean, look at that vehicle. Just the perfect size for what amounts to the perfect group for such a grand and unspoiled valley as the Crystal River: as size very much matters when it comes to tour buses! But with a wheelbase, square footage, and emission near that of a single private car, I am able to swiftly and comfortably transport 10 people / 12 if two of them are children. In other words, it is not difficult to imagine the procession of vehicles, all in a line, bumper-to-bumper, front and rear of the Aspen Marble Detour Bus, superimposed upon the above picture; reducing a beautiful grassy verge into a solid row of cars.
~ ~ ~

~ ~ ~
And just look this for a slice of the Old Wild West? You will not get more “Colorado Rocky Mountain” than this.
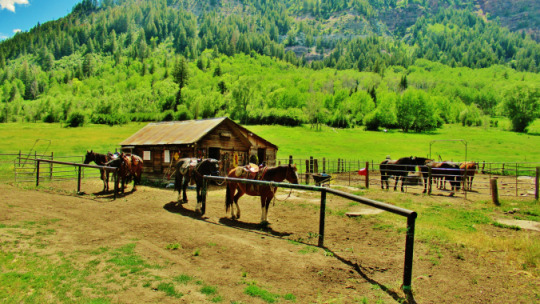
As yet I have to meet anyone actively involved in the running any of the businesses scattered along the Aspen Marble Detour who wasn’t born in the area, moved here many many moons ago, or decided to invest their lives and livelihoods in the purchase, or start up, of a business of some sort – for there are many varied excellent entrepreneurs plying their trade all along the Crystal River Valley, as you will discover the deeper you dig into the Detour. As far as examples go, you need look no further than Avalanche Outfitters. Believe me – this is the real thing, the real McCoy, the wild, wild west at its very, very best. Not only that; these are local people who absolutely know for sure just what they are doing and what they are about. Read what they have to say about themselves in the brief extract taken from their informative brochure below:
~ ~ ~

~ ~ ~
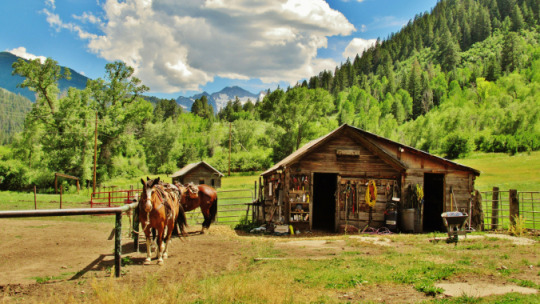
“Avalanche Outfitters at Redstone Stables. Custom and Private Horseback Riding. RANCH RIDES: take a step back in time and have a western experience you will never forget. This is not your typical ride around a ranch, this ride may only be an hour but the experience is well worth it. Great for young kids, beginner riders or anyone who just wants a quick ride. BACKCOUNTRY RIDES: Want an experience that will leave you in awe? Our backcountry rides are just what you are looking for. With over 14 different trail options we assure you we can find a trail to match your group. Our trails can be simple for beginners and kids to build confidence but want more than 1 hour to more technical trails. The views and scenery will leave you in awe”. Taken from the A.O. brochure. “Custom overnight pack trips, Custom day or overnight fishing trips, carriage and wagon rides down Redstone Boulevard and to Redstone Castle. Contact us today to book your Western Experience of a Lifetime. 970-963-1144. [email protected]. RedstoneStables.com. 17843 Hwy 133, Redstone, CO 81623.
~ ~ ~
~ ~ ~
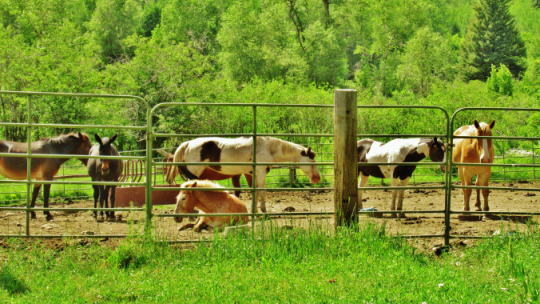
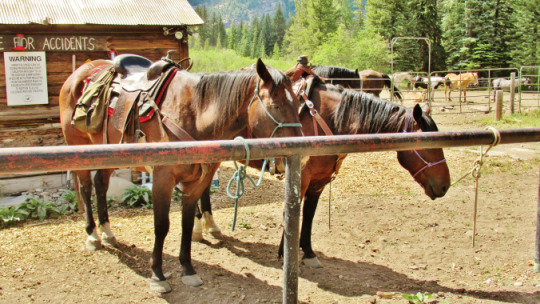
First things first, and in the spirit of full disclosure, it must be known that I know nothing about horses, although I have always loved watching them, and like to get close to such magnificent beasts at every opportunity. Clever eyes, intelligence, speed, elegance and power – these superb animals would seem to have it all. And as I gingerly approached the corral I soon felt the steady aim of many pairs of eyes bearing down upon me and monitoring my every move.
~ ~ ~
~ ~ ~
~ ~ ~
~ ~ ~
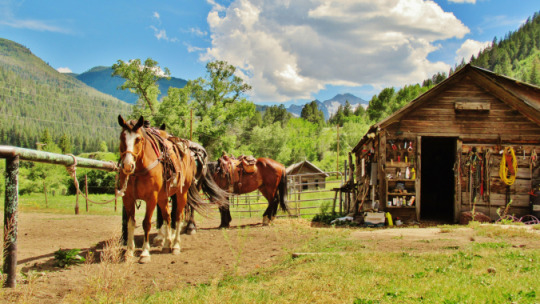
Again, just to be clear, I am far from an expert on horses – beyond a lifelong fascination for them. But from what I do know of them, which has mainly been garnered from Kris and her youthful experiences riding, and most importantly stabling them – these look to be some very lucky animals indeed. No poop and therefore no flies, for the place was pretty much spotless, with none of that sweet-sticky horsey-hay smell that usually permeates the air around so many horses.
~ ~ ~

~ ~ ~
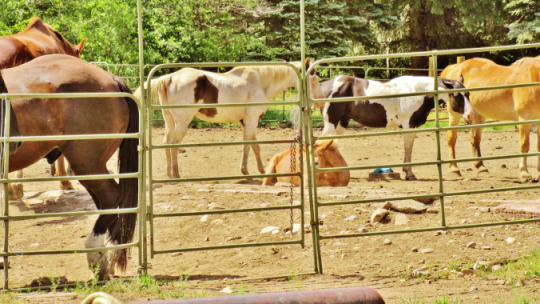
They were watching me alright, with an intent stare that never left my mind, for each time I stole a glance back, there they were; gazing, pleading I imagine; “pick me, please pick me, pick me. Me!” Because believe it or not I used the same tactic many times during my hitch hiking years. But one instance that springs to mind was when I stared down the tobacco farmer who paid me to pick his leaf up in London, Ontario, but I digress. Clearly many of these intelligent looking horses had had enough of the corral, and wanted off, and away, with me on their back.
~ ~ ~
~ ~ ~
Well, some did and some didn’t. One or two appeared content to take a timely afternoon snooze (it was bloody hot), while others continued their long patient stare.
~ ~ ~
~ ~ ~
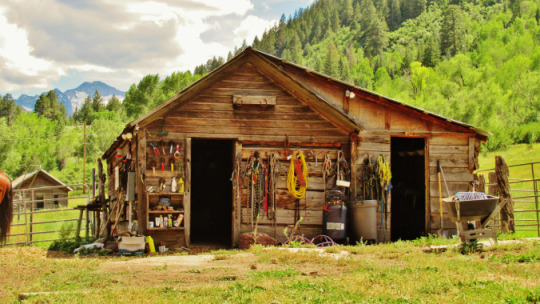
If any further evidence was required that this outfit is geared for success, one need look no further than this well organized, clean and efficient tool shop. Everything in its place – and a place for everything.
~ ~ ~
~ ~ ~
~ ~ ~
~ ~ ~
See what I mean about that stare? I will one day ride this horse, I know it.
~ ~ ~
~ ~ ~
~ ~ ~
~ ~ ~
However, given my utter lack of saddle-back knowledge, I imagine that I will first be fitted with, dare I say it, a sleepy head? Perhaps I am wrong, and these two fine looking animals come out of the blocks like thunderbolts, we’ll see. But when the time comes I will simply leave such matters to the experts – for experts here they are. No one runs an outfit as sharp as this without knowing a great deal about the business they are in, and I look forward to bringing them many a happy customer before the summer and autumn seasons are through.
~ ~ ~
~ ~ ~
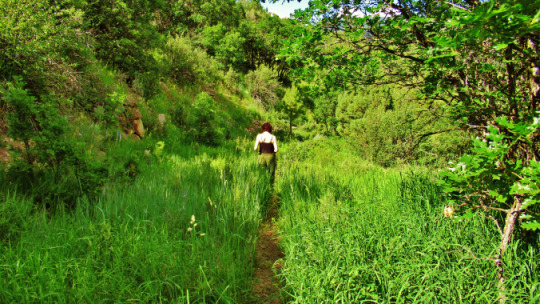
Upon taking our leave from Avalanche Outfitter’s wild west corral, our second task of the day was to nail down, once-and-for-all, which of the many, many trails crisscrossing the Crystal River Valley would serve as the timely mid afternoon walk, stroll or mini hike. Quite definitely not a a forced march, but a chance for Detourists to stretch their legs and experience verdant Rocky Mountain scenery, with lots of magnificent panoramic mountain views along the way. Not too steep, with a good reliable footfall, and with a nice easy, consistent gradient. Now, just where would such a place exist?
~ ~ ~

~ ~ ~
~ ~ ~

~ ~ ~
~ ~ ~
~ ~ ~
~ ~ ~
~ ~ ~
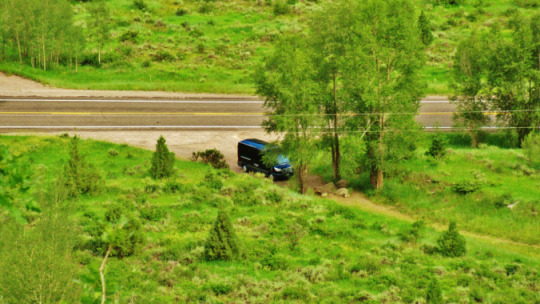
Well, as it happens, right here! As you can see the AMD Bus is safely parked, away from the road, and under the shade of a small grove of cottonwoods so as to keep the vehicle cool as we amble along the flattish trail leading down to the right hand corner of the picture. What you are actually looking at is the old turn-off for the grueling climb up McClure Pass. At one time Highway 133, as we know it now, would have veered at this turn, and zig-zagged its way up the old dirt wagon road.
~ ~ ~

~ ~ ~
Yes, believe it or not, this was once what Highway 133 is now. It wasn’t too long ago when huge sweating horses, mules and oxen heaved their way up and down this now verdant strip of vegetation. Loaded with people, cargo and animals, there was little or no stopping once this epic climb/descent was embarked upon. And although it may at first glance, from a pedestrian stand point, look quite impassable, I can assure you that, for we unburdened humans, it constitutes a very easy and navigable path, comprising a consistent 8 degree slope, as it winds its way deftly through the meadow grass and wildflowers. It is almost as though it had been plotted, placed and maintained by a slew of imaginative and attentive groundskeepers; with plenty of shady spots in which to rest, and convenient rounded and flat topped rocks upon which to perch.
And as we walk, view-after-view of pure natural scenic grandeur open up in two great galleries, first on our left, then right, as we round the first hair-pin bend, and make our way to the second, from where we are able to look straight down upon the bus from a lofty perch several hundred feet above. I will accompany the nifty and energetic to this point, because to reach the second bend definitely is something of a hike. But everyone will decide for themselves just when they have had enough of the climb, and will chose the point of their return accordingly. Either way, we will all meet up at the bus, as there are no paths leading off the old road. And so right on cue we will be on our way, most likely to Redstone, but perhaps to the viewpoint atop of McClure pass. It all depends on how that day is going – weather etc., and what the group preference that day prefers.
~ ~ ~
~ ~ ~
~ ~ ~
~ ~ ~
~ ~ ~
~ ~ ~
~ ~ ~
~ ~ ~
Kris liked the path right away, and so did I. It sort of reminded us of many old abandoned railway tracks that we have enjoyed walking in various parts of the world – particularly our beloved Devon and Cornwall back in Old England. Yes, it really is that green and verdant. Never in our 16 years in the Roaring Fork Valley in fact have we ever seen it quite as translucently green as this: fantastic foliage, phenomenal and profuse wildflowers: scenes and photographs that are not likely to be repeated any time soon; for this year has proved something of an exception, and exceptionally beautiful the countryside is this year.
~ ~ ~

~ ~ ~
~ ~ ~
~ ~ ~
~ ~ ~
~ ~ ~
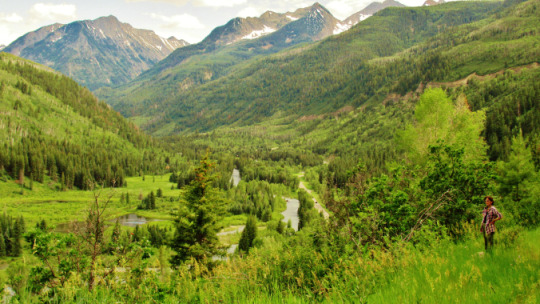
Below reveals the view as we set out and along the old wagon trail. Spectacular as it may be, once we begin to saunter up the hill things soon change, and quite dramatically, as the valley opens up, and the views stretch out for miles in all directions, just as far as the eye can see. For this is where the valley turns what amounts to be a 90 degree bend, adding a spectacular twist to already quite stupendous views.
~ ~ ~

~ ~ ~
~ ~ ~
~ ~ ~
Such is the gentle, even, and foot-sure nature of the trail, and so wide is the old wagon road bed, that walking, talking and taking in the view is a cinch. Maybe not all at the same time necessarily, but vast panoramic views pop out from behind every tree and bush, with spectacular panoramic vistas presenting themselves at every opening. And even though the gradient remains gentle and consistent at 8 degrees, within a very few moments we find ourselves lifted way up and off the valley floor, and into an alpine scene of magnificent and majestic proportions. For if there are better pristine Rocky Mountain views to be had in all of Colorado, so easily and relatively effortlessly attained as this, then I have yet to see them.
~ ~ ~
~ ~ ~
~ ~ ~
~ ~ ~
~ ~ ~

~ ~ ~
But the real clincher for me is the ‘all abilities’ aspect of the McClure Pass Wagon Road walk. For if walking is not your thing, or you are unable or do not wish to exert such effort, and wish to simply rest and admire the views and the wildflowers, then that is exactly what you can do, for they are literally everywhere, almost right at the head of the trail. At least they were this one lovely July Sunday afternoon. But as the wildflower season around these parts does not usually begin until August, I am guessing that the trail will harbor wildflowers of some sort throughout the rest of summer and autumn season.
~ ~ ~
~ ~ ~
You see, that’s the beauty of the Aspen Marble Detour, what you do, what you partake in, how you spend your time is entirely up to you. The afternoon walk for instance will take 30 minutes or so out of a 9 hour day, and during that half-an-hour or so you can rest, use a bit of zest, careen up the zigzags with me, or amble along at your own pace; the choice is entirely yours.
~ ~ ~

~ ~ ~
~ ~ ~

~ ~ ~
Kris for instance, at this point along the way, saw no need to keep barreling on, as is my usual fashion, and chose instead to drink-in the view at her leisurely-leisure.
~ ~ ~
~ ~ ~
~ ~ ~

~ ~ ~
~ ~ ~
~ ~ ~
~ ~ ~
~ ~ ~
Well, you can see why.
~ ~ ~

~ ~ ~
As I mentioned earlier, the placement of the walk could not be more dramatic, for the old wagon road extends from the point marked McClure Pass Viewpoint on the map below – a strategic lookout to which we will ascend in the bus at some point during the day – to an intersection whereby a straight line upwards would meet Highway 133: that is our wagon road trail. Quite the best seat in the house when it comes to panoramic views I would say.
~ ~ ~
~ ~ ~
~ ~ ~
~ ~ ~
Finally, in order to replace the genuinely interesting and authentic retail experience as offered by Avalanche Ranch, I have decided to add the energetic Colorado Mountain Town of Carbondale to the Aspen Marble Detour as a way of capping the day with one last splash of, well, whatever it is that Carbondale offers; for there is a lot, as you are to discover.
~ ~ ~

~ ~ ~
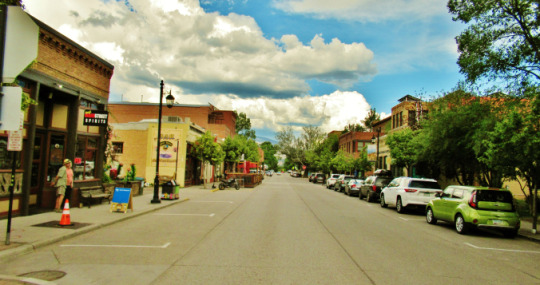
In actual fact, Carbondale as an entity is somewhat difficult to describe. For just as it has been named ‘Best Place To Live’ in ‘Colorado’, ‘America’, and perhaps even ‘the world’ (who knows?): for a place so universally known, and of a size to cash-in on a huge scale, the town appears to have better things to do than pander to the legions of summer tourists drawn to far busier places further up the road. No, a distinct air of enjoyment pervades the air in Carbondale, and it is not coming from mass tourism, I can assure you that. Absolutely, tourists are welcome. Very welcome in fact – as I have always enjoyed the place myself, and felt well received as well, come to think of it. It’s just that the place has not thrown itself upon the alter of tourism. Rather, Carbondale folk enjoy their town, their way of life, partake deeply within it, and invite any and all to come and join in, as you will experience yourself late in the Aspen Marble Detour Day.
~ ~ ~

~ ~ ~
~ ~ ~

~ ~ ~
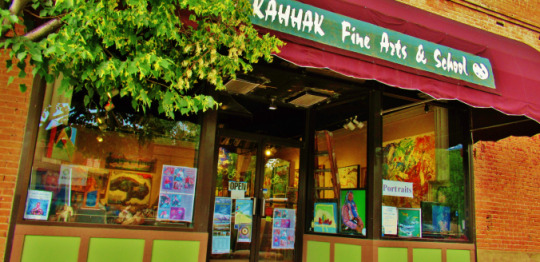
Strange Imports for instance; I have been through those doors quite a few times and have always found their display to be interesting and intriguing. You never really know just what you are going to encounter, but compared to most things you see elsewhere, they really are quite strange indeed. Excellent quality too I might add. And very much worth five or ten minutes of anyone’s time, in my opinion. Another worthwhile visit is Kahak Fine Arts & School for its vivid, graphic, colorful canvases. Other attractions include the Marble Distillery, for its boutique shot bar, the Clay Center, for excellent local ceramics, a brew pub, several galleries, a pizzeria, coffee shop, burger bar, and so on and on. This little place would seem to have everything, including a vital and strong sense of community.
~ ~ ~
~ ~ ~
~ ~ ~

~ ~ ~
~ ~ ~
~ ~ ~
Sundays are still Sundays in Carbondale, Colorado
~ ~ ~
~ ~ ~
~ ~ ~

~ ~ ~
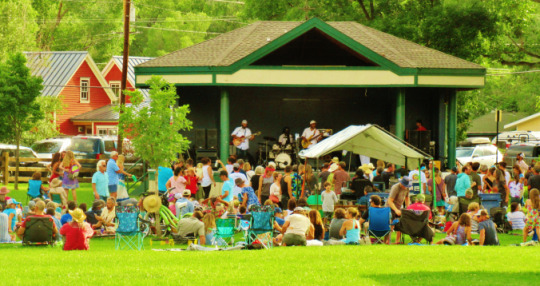
Of course, one crucial aspect of Carbondale’s persona is its affinity to, and support for, the arts. A stroll down Carbondale Main Street is akin to an art walk promenade. And for that reason no two visits to the place ever seem quite the same, as the artwork moves through a quite swift rotation. Plus, I have no doubt that much of it sells, for as you can see the bar is set refreshingly high.
~ ~ ~

~ ~ ~
~ ~ ~
~ ~ ~
~ ~ ~
~ ~ ~
What I also find refreshing about Carbondale is that culture and counter culture would appear to get along – quite nicely in fact.
~ ~ ~
~ ~ ~
~ ~ ~
~ ~ ~
Yep, all-in-all, and although I arrived at the decision in such a roundabout fashion, after Sunday’s revisit I am now rather happy at the revision, and delighted to bring the Aspen Marble Detour to such a delightful Rocky Mountain Town as Carbondale, Colorado. Just as I am thrilled to add a half-hour stroll along the old McClure Pass Wagon Road to the afternoon proceedings.
Mission accomplished then. Now all that is left to do is get the Aspen Marble Detour on the road, up and running, and giving people their one very memorable day, indeed.
~ ~ ~
~ ~ ~
~ ~ ~
This slideshow requires JavaScript.
~ ~ ~
~ ~ ~
~ ~ ~
Horses and Wildflowers: Along The Aspen Marble Detour
~ ~ ~
thanks for visiting martincooney.com
~ ~ ~
∑∀Γ⊥¡π
• ⌊ ~
√
Horses and Wildflowers: Along The Aspen Marble Detour Avalanche Outfitters to provide SENSATIONAL horse rides, and the McClure Pass Wagon Road Trail to serve up VAST panoramic mountain views…
#Aspen#Aspen Marble Detour#Avalanche Outfitters#Carbondale#Colorado#corral#Crystal River#guided#horseback riding#horses#independent tourist#Marble#Martin Cooney#McClure Pass#ranch#Redstone#small group#tour#tourist#trail#travelogue#valley#wagon road#wildflowers
0 notes
Text
MASTERLIST OF / GUIDE TO THE TORCHWOOD AUDIO EU
Have you ever thought about listening to some TW audios, but didn’t know at all where to begin? First of all, you can literally PM me any time of day or night, I will get back to you ASAP and give you recommendations and warning as in-depth as you like (about any part of the EU) - that’s not a joke, I’ve done it at least two dozen times, I’ve got a whole routine - but if you don’t want or need that, just a quick & comprehensive overview of the What’s What, then this post is ideal for you :)
Please note though that it’s only about the TW audios considered part of the EU, not novels or comics and nothing about the official new seasons!
But enough pretext - actual comp under the cut!
(listing them sorted by category and order of release each)
Audios featuring the whole team (Seasons 1 and 2):
Hidden (BBC audiobook 1)
Everyone Says Hello (BBC audiobook 2)
In The Shadows (BBC audiobook 3)
Tropical Beach Sounds And Other Relaxing Seascapes #4 (Big Finish monthly 7.1) - note: outsider!POV, few speaking roles
The Torchwood Archive (Big Finish special)
Believe (Big Finish special)
Audios featuring the trio after S2 / pre-CoE:
The Sin Eaters (BBC audiobook 4)
Department X (BBC audiobook 5)
Ghost Train (BBC audiobook 6)
Lost Souls (radio play 1)
Asylum (radio play 2)
Golden Age (radio play 3)
The Dead Line (radio play 4)
The Devil and Miss Carew (radio play 5)
Submission (radio play 6)
Outbreak (Big Finish special)
Audios set pre-S1 or outside the parameters of the show (alt!verse, time travel, anthology, completely different cast etc.):
One Rule (Big Finish monthly 1.4)
The Victorian Age (Big Finish monthly 2.1)
Moving Target (Big Finish monthly 2.4)
The Dollhouse (Big Finish monthly 3.2)
The Dying Room (Big Finish monthly 3.6)
The Death of Captain Jack (Big Finish monthly 4.1)
Deadbeat Escape (Big Finish monthly 4.6)
Sync (Big Finish monthly 5.3)
The Vigil (Big Finish monthly 6.1)
Dead Man’s Switch (Big Finish monthly 6.3)
Iceberg (Big Finish monthly 7.2)
Save Our Souls (Big Finish monthly 7.4)
The Crown (Big Finish monthly 8.3)
Coffee (Big Finish monthly 8.4)
The Black Knight (Big Finish monthly 9.2)
Madam, I’m (Big Finish monthly 9.4)
Empire of Shadows (Big Finish monthly 9.5)
Curios (Big Finish monthly 9.6)
War Chest (Big Finish monthly 11.1)
Dead Plates (Big Finish monthly 11.2)
Suckers (Big Finish monthly 11.4)
The Torchwood Archive (Big Finish special)
TW1: Before the Fall (Big Finish TW1 special)
TW1: Machines (Big Finish TW1 special)
TW1: Latter Days (Big Finish TW1 special)
The Sins of Captain John (Big Finish special)
Parasite (Big Finish TW Soho special)
Ashenden (Big Finish TW Soho special)
Audios set post-CoE (/possibly post MD):
Army of One (BBC audiobook 7)
Fallout (BBC audiobook 8)
Red Skies (BBC audiobook 9)
Mr. Invincible (BBC audiobook 10)
Forgotten Lives (Big Finish monthly 1.3)
More Than This (Big Finish monthly 1.6)
Ghost Mission (Big Finish monthly 2.3)
Made You Look (Big Finish monthly 2.6)
Visiting Hours (Big Finish monthly 3.1)
We Always Get Out Alive (Big Finish monthly 4.3)
Goodbye Piccadilly (Big Finish monthly 4.4)
Night of the Fendahl (Big Finish monthly 5.1)
Smashed (Big Finish monthly 6.2)
Audios set post-S5:
Sargasso (Big Finish monthly 5.4)
Red Base (Big Finish monthly 7.5)
The Five People You Kill In Middlesbrough (Big Finish monthly 9.3)
The Red List (Big Finish monthly 10.2)
Cadoc Point (Big Finish monthly 10.4)
Sonny (Big Finish monthly 10.5)
Death in Venice (Big Finish monthly 11.5)
Audios with (a noteworthy amount of) Janto:
In The Shadows (BBC audiobook 3)
The Sin Eaters (BBC audiobook 4)
Department X (BBC audiobook 5)
Ghost Train (BBC audiobook 6)
The Dead Line (radio play 4)
Submission (radio play 6)
House of the Dead (radio play 7)
Broken (Big Finish monthly 2.5)
Serenity (Big Finish monthly 5.5)
Expectant (Big Finish monthly 6.4)
Absent Friends (Big Finish monthly 9.2)
The Torchwood Archive (Big Finish special)
Outbreak (Big Finish special)
Audios with (any amount of) Towen:
In the Shadows (BBC audiobook 3)
Cascade (Big Finish monthly 3.4)
Dinner and a Show (Big Finish monthly 7.3)
The Torchwood Archive (Big Finish special)
Believe (Big Finish special)
Audios featuring (a noteworthy amount of) Gwen & Rhys:
The Sin Eaters (BBC audiobook 4)
Ghost Train (BBC audiobook 6)
Army of One (BBC audiobook 7)
The Dead Line (radio play 4)
The Devil and Miss Carew (radio play 5)
Forgotten Lives (Big Finish monthly 1.3)
Made You Look (Big Finish monthly 2.6)
We Always Get Out Alive (Big Finish monthly 4.3)
Sargasso (Big Finish monthly 5.4)
Outbreak (Big Finish special)
Audios featuring Jack:
[all in the ‘whole team’ and ‘trio’ list respectively]
Red Skies (BBC audiobook 9)
Mr. Invincible (BBC audiobook 10)
House of the Dead (radio play 7)
The Conspiracy (Big Finish monthly 1.1)
Forgotten Lives (Big Finish monthly 1.3)
Uncanny Valley (Big Finish monthly 1.5)
The Victorian Age (Big Finish monthly 2.1)
Broken (Big Finish monthly 2.5)
The Death of Captain Jack (Big Finish monthly 4.1)
The Green Life (Big Finish monthly 5.2)
Serenity (Big Finish monthly 5.5)
Expectant (Big Finish monthly 6.4)
The Sins of Captain John (Big Finish special)
Audios featuring Ianto:
[all in the ‘whole team’ and ‘trio’ list respectively]
House of the Dead (radio play 7)
Fall to Earth (Big Finish monthly 1.2)
Broken (Big Finish monthly 2.5)
The Office of Never Was (Big Finish monthly 3.5)
The Death of Captain Jack (Big Finish monthly 4.1)
The Last Beacon (Big Finish monthly 4.2)
Serenity (Big Finish monthly 5.5)
Expectant (Big Finish monthly 6.4)
Dinner and a Show (Big Finish monthly 7.3)
Ex Machina (Big Finish monthly 7.6)
Rhys and Ianto’s Excellent Barbeque (Big Finish monthly 8.2)
Coffee (Big Finish monthly 8.4)
The Great Sontaran War (Big Finish monthly 10.1)
The Grey Mare (Big Finish monthly 10.3)
Restricted Items Archive (Big Finish monthly 11.3)
SUV (Big Finish monthly 11.6)
TW1: Before the Fall (Big Finish TW1 special)
TW1: Machines (Big Finish TW1 special)
TW1: Latter Days (Big Finish TW1 special)
Audios featuring Gwen:
[all in the ‘whole team’ and ‘trio’ list respectively]
Army of One (BBC audiobook 7)
Red Skies (BBC audiobook 9) - cameo
Mr. Invincible (BBC audiobook 10) - cameo
Forgotten Lives (Big Finish monthly 1.3)
More Than This (Big Finish monthly 1.6)
Made You Look (Big Finish monthly 2.6)
The Death of Captain Jack (Big Finish monthly 4.1)
We Always Get Out Alive (Big Finish monthly 4.3)
Night of the Fendahl (Big Finish monthly 5.1)
Smashed (Big Finish monthly 6.2)
Dissected (Big Finish monthly 6.6)
Audios featuring Tosh:
[all in the ‘whole team’ list]
Zone 10 (Big Finish monthly 2.2)
Cascade (Big Finish monthly 3.4)
The Death of Captain Jack (Big Finish monthly 4.1) - mention only
Instant Karma (Big Finish monthly 4.5)
The Vigil (Big Finish monthly 6.1)
Dinner and a Show (Big Finish monthly 7.3)
Drive (Big Finish monthly 8.5)
War Chest (Big Finish monthly 11.1)
Suckers (Big Finish monthly 11.4)
SUV (Big Finish monthly 11.6)
Audios featuring Owen:
[all in the ‘whole team’ list, but Archive is a mention-only]
Corpse Day (Big Finish monthly 3.3)
The Death of Captain Jack (Big Finish monthly 4.1) - mention only
The Last Beacon (Big Finish monthly 4.2)
The Hope (Big Finish monthly 5.6)
Iceberg (Big Finish monthly 7.2)
The Three Monkeys (Big Finish monthly 8.1)
Lease of Life (Big Finish monthly 8.6)
Gooseberry (Big Finish monthly 9.1)
Audios featuring Rhys:
The Sin Eaters (BBC audiobook 4)
Department X (BBC audiobook 5)
Ghost Train (BBC audiobook 6)
Army of One (BBC audiobook 7)
The Dead Line (radio play 4)
The Devil and Miss Carew (radio play 5)
Forgotten Lives (Big Finish monthly 1.3)
Made You Look (Big Finish monthly 2.6)
Visiting Hours (Big Finish monthly 3.1)
We Always Get Out Alive (Big Finish monthly 4.3)
Sargasso (Big Finish monthly 5.4)
Rhys and Ianto’s Excellent Barbeque (Big Finish monthly 8.2)
Sonny (Big Finish monthly 10.5)
The Torchwood Archive (Big Finish special)
Outbreak (Big Finish special)
Audios featuring Andy:
Fallout (BBC audiobook 8)
Mr. Invincible (BBC audiobook 10)
Asylum (radio play 2)
Ghost Mission (Big Finish monthly 2.3)
Corpse Day (Big Finish monthly 3.3)
Goodbye Piccadilly (Big Finish monthly 4.4)
The Hope (Big Finish monthly 5.6)
Red Base (Big Finish monthly 7.5)
The Three Monkeys (Big Finish monthly 8.1)
Gooseberry (Big Finish monthly 9.1)
The Torchwood Archive (Big Finish special)
Outbreak (Big Finish special)
Parasite (Big Finish TW Soho special)
Ashenden (Big Finish TW Soho special)
Audios featuring Suzie:
In the Shadows (BBC audiobook 3) - cameo
Moving Target (Big Finish monthly 2.4)
Sync (Big Finish monthly 5.3)
The Torchwood Archive (Big Finish special)
Audios featuring John:
The Death of Captain Jack (Big Finish monthly 4.1)
The Sins of Captain John (Big Finish special)
Audios featuring Martha:
Dissected (Big Finish monthly 6.6)
Audios featuring Yvonne:
One Rule (Big Finish monthly 1.4)
The Five People You Kill In Middlesbrough (Big Finish monthly 9.3)
The Torchwood Archive (Big Finish special)
TW1: Before the Fall (Big Finish TW1 special)
TW1: Machines (Big Finish TW1 special)
TW1: Latter Days (Big Finish TW1 special)
Audios featuring Bilis Manger:
Deadbeat Escape (Big Finish monthly 4.6)
Dead Man’s Switch (Big Finish monthly 6.3)
Curios (Big Finish monthly 9.6)
Audios featuring Adam:
Madam, I’m (Big Finish monthly 9.4)
Audios featuring Queen Victoria:
The Victorian Age (Big Finish monthly 2.1)
Fortitude (Big Finish monthly 6.5)
Save Our Souls (Big Finish monthly 7.4)
The Crown (Big Finish monthly 8.3)
Infidel (Big Finish monthly 10.6)
Audios featuring Norton Folgate [BF-only character]:
Ghost Mission (Big Finish monthly 2.3)
The Death of Captain Jack (Big Finish monthly 4.1)
Goodbye Piccadilly (Big Finish monthly 4.4)
The Black Knight (Big Finish monthly 9.2)
Madam, I’m (Big Finish monthly 9.4)
The Torchwood Archive (Big Finish special)
Outbreak (Big Finish special)
Parasite (Big Finish TW Soho special)
Ashenden (Big Finish TW Soho special)
Audios featuring Mr. Colchester [BF-only character]:
The Red List (Big Finish monthly 10.2)
Death in Venice (Big Finish monthly 11.5)
The Torchwood Archive (Big Finish special)
315 notes
·
View notes
Text


Photos from a 2019 West End Alternate Massive (pt. 1)
Pictured:
Aragon: Zara MacIntosh
Boleyn: Collette Guitart
Seymour: Hana Stewart
Cleves: Cherelle Jay
Howard: Vicki Manser
Parr: Danielle Steers
15 Dec 2019, @/markmakesphotos
#six the musical#six west end#zara macintosh#collette guitart#hana stewart#cherelle jay#six alternates#orange alt#black alt#pink alt#teal alt#orange alt 2.3.1#black alt 3.2.1#pink alt 1.1.1#teal alt 1.4.1#orange alt 2.3#black alt 3.2#pink alt 1.1#teal alt 1.4#six musical#orange alt 2.0#black alt 3.0#pink alt 1.0#teal alt 1.0#six costume refs#six costumes#anna of cleves six#catherine of aragon six#jane seymour six
50 notes
·
View notes
Text
Natalie is presumably wearing Cassy’s shorts - I’ll confirm in a little bit


Natalie Boleyn!
10 Jun 2021, @/cassyvjlee
#six alternates#six 3rd uk and ireland tour#natalie pilkington#black alt#black alt 3.2.4#black alt 3.2#black alt 3.0
68 notes
·
View notes
Text
My favourite fall dress
My favourite fall dress
Free People Dress from Revolve | Also available at Nordstrom | and at the Bay | Black sam Edelman pumps | Kate Spade Crossbody Bag
Hi everyone! Hope you had a great a weekend. It was Thanksgiving weekend for us in Canada so Monday was a holiday :). This was my outfit for Thanksgiving dinner last night. How perfectly classy is this Free People dress? I was lucky enough to attend 2 dinners and I…
View On WordPress
1 note
·
View note
Photo
On the outside, you see: showered, dressed, freshly brushed teeth. Here’s the thing. I’ve been stumbling through the past couple of years of grad school in the unpredictable and impervious current of depression. I have managed my way through. I’ve stood upright at least once every day. I take my medication with food. I reach out to friends and family sometimes. sometimes. I see my therapist. On the days I want to hide away and bury my head in my cat’s soft, warm tummy, I push myself to walk the 20 feet to the mailbox across the driveway. Other days I run my 3.2 mile route to Meridian and bounce back on the Interurban Trail. Sometimes I force smiles at passersby. Sometimes the smiles are spontaneous. Surprises. they’re real. Felt. This dichotomous existence of depressed and ‘un-depressed’ - it’s exhausting. It’s distracting. Its splindle-y fingers like to play with my hair. and tie knots in my clothes. Some days I stick my tongue out at depression. And then. again. I find myself at the edge of its undertow. Grabbing my tongue from choking my throat. Clenching my neck from tearing away. In my head, my mush-of-a-brain swirls and squishes out thoughts. black sticky thoughts that barely convince me that I’m not whole and I can’t be. that I’m broken and bruise easily. that I’m not worth the wait and it’s easier to cut loose. that I’m not meant for this world. and it’s not meant for me. it’s not my oyster. it’s not my playground. it’s not my anything. And in my head, where these wicked mumblings meander through mush. I tap it on the shoulder. scream in its ear. and I say what I always say, “Shut the fuck up! Shut the fuck up!Shut the fuck up!” “You’re not winning.” We’ve had this conversation before. (Journal entry, 2015) ••••• swipe 👈🏽 sparkle edit 👈🏽👈🏽 alt. pre-animated edit 👈🏽👈🏽👈🏽 original from #picsart #depressionart #depressionwarrior #depressionjournal #mentalhealthwriter #mentalheathartist #artivist #portraitoftheday #portraitart #portraitartist #fuschiablueart #trippyart #seattlecreative #pnwwriter #filipinaartist #artofvisuals #contemporaryartist #digitalcollage #aestheticedits #discoverartists #tumblrart #photomanipulation (at Seattle, Washington) https://www.instagram.com/p/CTaCPoAlC80/?utm_medium=tumblr
#picsart#depressionart#depressionwarrior#depressionjournal#mentalhealthwriter#mentalheathartist#artivist#portraitoftheday#portraitart#portraitartist#fuschiablueart#trippyart#seattlecreative#pnwwriter#filipinaartist#artofvisuals#contemporaryartist#digitalcollage#aestheticedits#discoverartists#tumblrart#photomanipulation
1 note
·
View note
Text
Cách sửa lỗi màn hình đen
Bị lỗi màn hình đen trên máy tính những vẫn sử dụng được bình thường là tình trạng hay gặp với những bạn sử dụng Windows 10, 8, 7, có rất nhiều lỗi gây ra tình trạng này, hãy cùng Xây Dựng NNDxem cách sửa lỗi màn hình đen như thế nào nhé.
Bạn đang xem: Cách sửa lỗi màn hình đen
Chắc hẳn trong chúng ta khi sử dụng máy tính cũng đều gặp phải tình trang màn hình desktop trở thành một màn đen, dù cho thay bất cứ hình nền nào đều cũng bị quay trở lại màn đen như vậy sau mỗi lần khởi động lại máy tính, chúng ta có thể gọi lỗi này là lỗi màn hình đen
Bạn hãy sử dụng bút thử điện để kiểm tra dọc từ ổ điện đến dây nguồn của máy tính xem có vào điện không. Mở thùng máy và cắm lại các dây dẫn nguồn vào bo mạch chủ. Nếu điện vẫn không vào thì rất có thể bạn sẽ cần phải phải xem xét thay dây điện hay bộ nguồn mới.
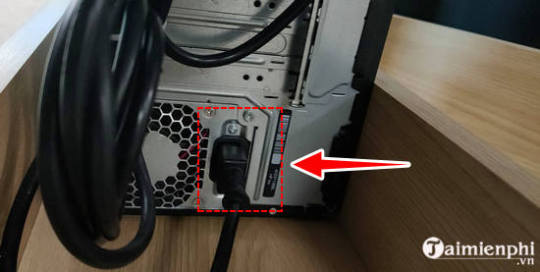
+ Kiểm tra dây nguồn màn hình, dây cáp nối màn hình và case
Trường hợp nguồn máy tính vẫn chạy, các bạn cần xem lại dây cáp nối giữa nguồn case và màn hình cũng như dây nguồn cho màn hình của bạn.

Cần phải gắn 2 đầu thật chặt và chuẩn.

Trường hợp xấu nhất là các bạn cần phải thay dây cáp nối này.
* Do bật chế độ tự tắt màn hình (Sleep)
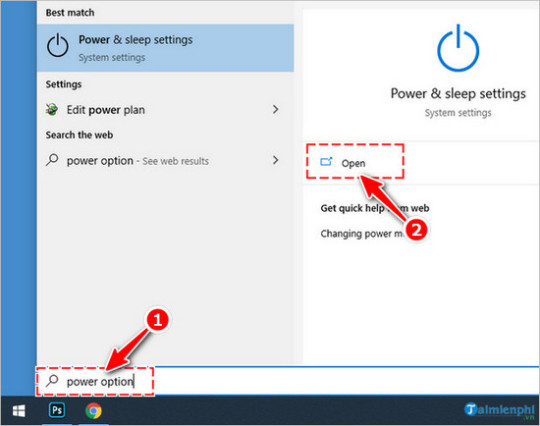
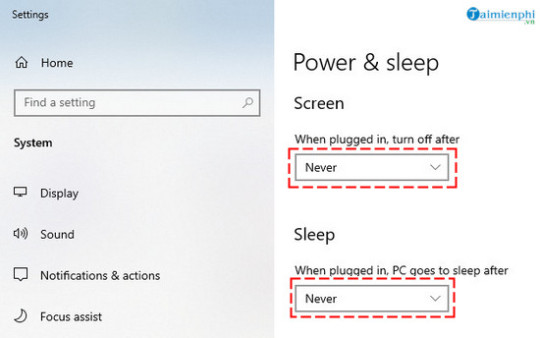
Trường hợp bạn gặp lỗi màn hình đen khi đang sử dụng bình thường, có thể do máy cài đặt chế độ tự tắt màn hình, bạn thiết lập lại như sau.Bước 1: Nhấn phím Windows để mở Start Menu. Nhập từ khóa “Power Option“.Bước 2: Truy cập vào mục Power & Sleep.
Bước 3: Thiết lập các mục Screen và Sleep thành Never.
* Hết pin khi sử dụng laptop
Tương tự như khi dùng máy tính bàn, laptop của bạn có thể xuất hiện lỗi màn hình đen đột ngột khi hết điện (pin). Trong trường hợp này bạn chỉ cần cắm sạc lại cho laptop và tiếp tục sử dụng.
2. Lỗi màn hình đen Phần Cứng (chưa vào được Win):
Với các nguyên nhân do phần cứng, thông thường người dùng sẽ gặp lỗi màn hình đen ngay từ khi khởi động vào Windows.
2.1. Lỗi màn hình đen do Card đồ họa
Không phải mọi lỗi màn hình đen trên màn tính do Card đồ họa đều nghiêm trọng và khó sửa chữa. Trong trường hợp hệ điều hành Windows không phát hiện được màn hình, bạn hãy sử dụng tổ phím Windows + Ctrl + Shift + B để buộc hệ thống khởi động lại Card đồ họa là được.

Trong trường hợp lỗi Black Screen nghiêm trọng hơn. Bạn tháo hẳn màn hình máy tính ra và kết nối với một máy tính khác để kiểm tra. Nếu vẫn chưa có kết quả, bạn tiếp tục thao Card đồ họa ra vệ sinh và lắp lại kiểm tra hoặc thử thay thế bằng một Card đồ họa khác.
2.2. Lỗi màn hình đen do Ram
Sau khi đã kiểm tra nguồn điện và Card đồ họa nhưng máy vẫn xuất hiện lỗi màn hình đen thì bạn cần xem xét tiếp đến bộ nhớ RAM.Hãy tháo RAM ra và vệ sinh lại phần chân cắm, rãnh kết nối để tránh bụi bẩn hoặc bị lỏng. Ngoài ra bạn cũng có thể lắp RAM sang một rãnh kết nối hoặc thiết bị khác để kiểm tra.
2.3. Lỗi màn hình đen do ổ cứng
Ổ cứng bị hỏng, không hoạt động cũng là nguyên nhân cao khiến máy tính bị lỗi màn hình đen ngay khi khởi động vào Windows. Nếu sử dụng ở cứng HDD, bạn hãy đặt tay lên ổ cứng khi khởi dộng để xem nó có rung chứng tỏ đang hoạt động hay không. Nếu ổ cứng vẫn chạy nhưng phát ra tiếng “cạch cạch” thì chứng tỏ đã đến lúc bạn cần đi thay ổ cứng mới.Lưu ý: Cách làm này không thể áp dụng với ổ cứng SSD
2.4. Lỗi máy tính bị đen màn hình do nhiệt độ cao
Một trường hợp máy tính bị lỗi màn hình đen khá phổ biến là do liên tục hoạt động ở nhiệt độ quá cao. Lúc này hệ thống sẽ tự động tắt để hạ nhiệt cho thiết bị. Để ngăn tình trạng này, cũng như tăng cường tuổi thọ cho máy tính, bạn nên vệ sinh lại máy, tra keo tản nhiệt cho CPU hay lắp thêm quạt làm mát.
2.5. Do màn hình bị hỏng
Nếu kiểm tra toàn bộ phần cứng, bạn vẫn thấy chúng làm việc bình thường thì có thể khá chắc chắn là màn hình máy tính của bạn đang gặp vấn đề. Lúc này bạn hãy tìm một màn hình máy tính khác để thay thế, kiểm tra lại lần cuối trước khi lên kế hoạch mang đi sửa hoặc thay mới.
3. Lỗi màn hình đen do Hệ thống (đã vào được Win):
Áp dụng với các trường hợp máy tính đã khởi động thành công và bị màn hình đen trong quá trình sử dụng.
3.1. Windows hết hạn sử dụng
Để sửa lỗi màn hình đen trên Windows 7/ 8/ 10 và dòng chữ This copy of windows it not genuine trên màn hình, bạn làm như sau.
Bước 1: Nhấn phím Windows mở Start Menu. Nhập từ khóa “CMD”Bước 2: Chọn chạy với quyền quản trị viên, Run as administrator.
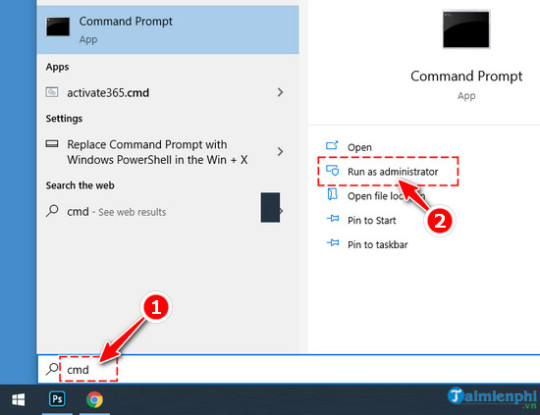
Bước 3: Trong cửa sổ Command Prompt nhập lệnh SLMGR_REARM, sau đó nhấn Enter.Nếu lệnh SLMGR_REARM không chạy, bạn thử tiếp lệnh LMGR –REARM hoặc SLMGR /REARM.
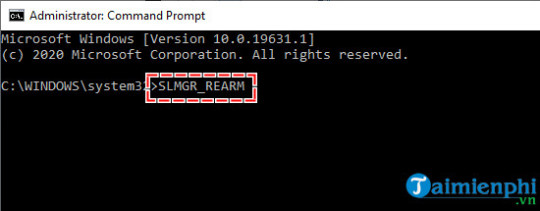
Bước 4: Khi màn hình xuất hiện cửa sổ thông báo như hình minh họa b��n dưới là dấu hiệu thành công. Bạn nhấn OK và khởi động lại máy là xong.
3.2. Lỗi Windows Explorer
Máy tính có thể bị các mã độc hại, virus tấn công vào Windows Explorer gây ra lỗi màn hình đen trên máy tính. Đầu tiên, bạn cần truy cập lại tạm thời vào Windows Explorer để chạy phần mềm diệt Virus.
Bước 1: Nhấn tổ hợp phím Ctrl + Alt + Del. Sau đó chọn Task Manager.Bước 2: Trong cửa sổ Task Manager, chọn Tab File. Tiếp tục chọn Run new task.
Xem thêm: Scam Là Gì – Những ý Nghĩa Của Scam
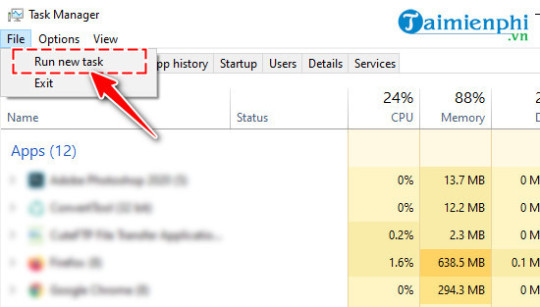
Bước 3: Trong hộp thoại Run hiện ra, bạn nhập lệnh explorer.exe và nhấn Enter.
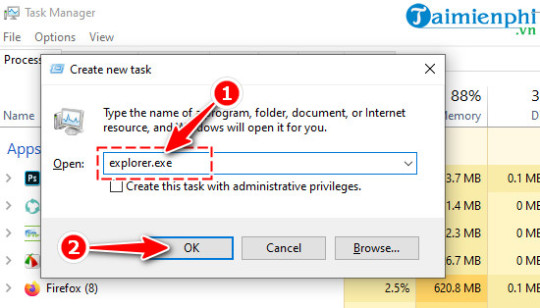
Bước 4: Sau khi đã vào được màn hình làm việc Desktop, bạn chạy các phần mềm diệt virus để loại bỏ triệt để.Cuối cùng bạn khởi động lại máy tính để kiểm tra xem còn gặp lỗi màn hình đen nữa không nhé.
3.3. Do bật chế động khởi động nhanh (Fast Startup)
Để tắt Fast Startup các bạn làm như sau:
Bước 1: Nhấn tổ phím Windows + R, nhập lệnh Control, chọn OK.
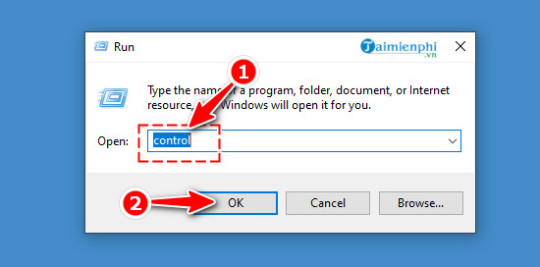
Bước 2: Truy cập vào mục Power Options
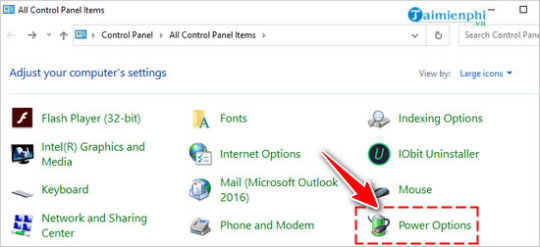
Bước 3: Nhấn tiếp vào mục Choose what the power buttons do.
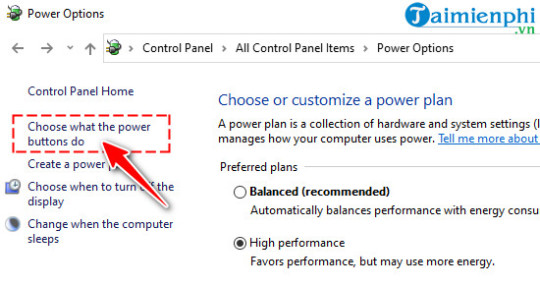
Bước 4: Tại đây bạn bỏ đánh dấu ở mục Turn on fast startup rồi chọn Save Changes là xong.
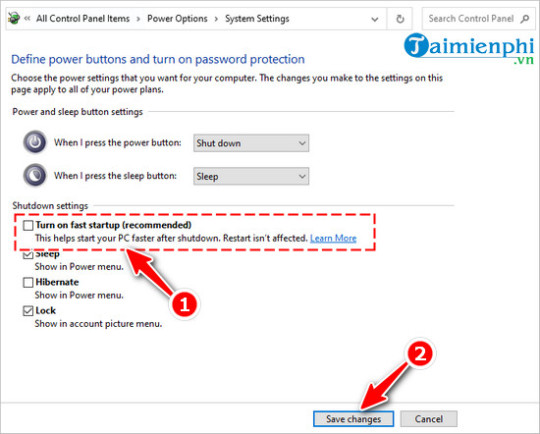
Trong trường hợp bạn thấy các lựa chọn bị mờ như hình bên dưới, hãy nhấn vào dòng Change settings that are currently unavailable như hình bên dưới là được.

3.4. Do Windows cập nhật bản vá từ Microsoft
Cách tốt nhất để khắc phục lỗi màn hình đen do Windows cập nhật bản vá từ Microsoft là tắt tự động cập nhật. Việc tắt đi chức năng tự động cập nhật của Windows có thể khiến cho máy bạn không nhận được những bản vá, bản sửa lỗi mới nhất từ nhà phát hành Microsoft, từ đó máy bạn có thể gặp bất cứ một số lỗi nào đó.
* Đối Với Windows 10
Bước 1: Bấm tổ hợp phím Windows + R để mở cửa sổ Run, gõ “service.msc” vào ô trống.
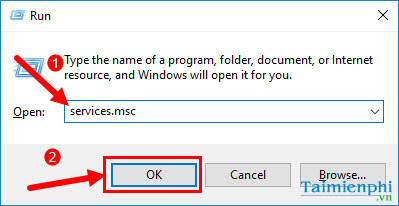
Bước 2: Trong cửa sổ service, các bạn tìm mục Windows Update.
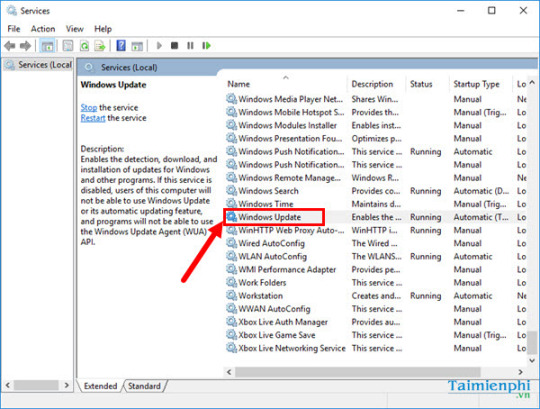
Bước 3: Trong cửa sổ Windows Update Service, các bạn bấm Stop để ngừng service, sau đó chọn Disable trên danh sách Statup Type.
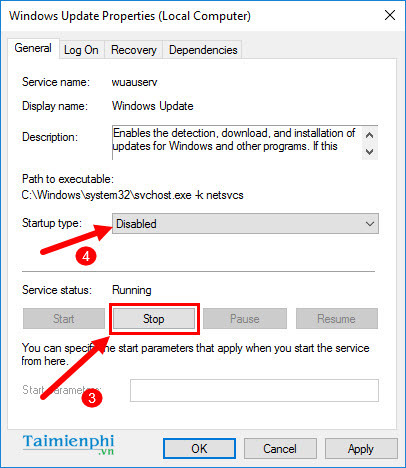
Bước 4: Bấm OK, sau đó khởi động lại máy.
* Đối Với Windows 8, 8.1
Bước 1: Bấm tổ hợp phím Windows + X, chọn mở Control Panel.

Bước 2: Các bạn bấm vào mục Windows Update.
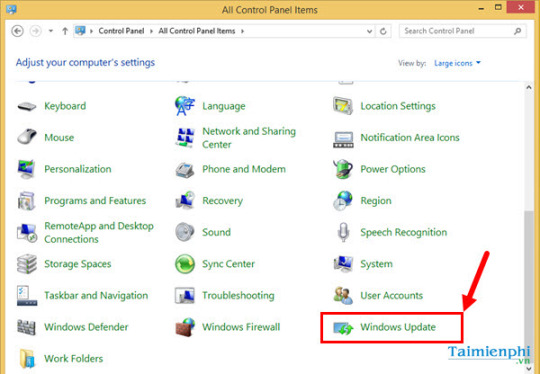
Bước 3: Trong cửa sổ Windows Update, các bạn bấm Change setting.
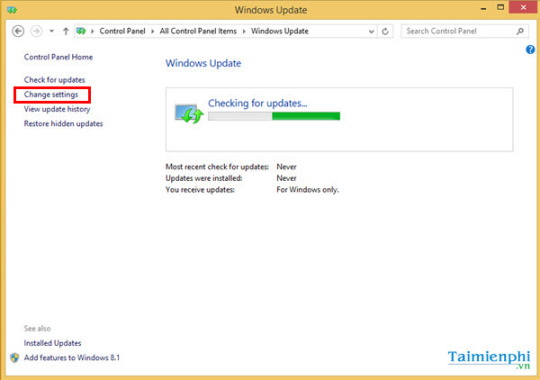
Bước 4: Lựa chọn mục Never check for updates (not recommended) trong mục Important Update, sau đó bấm OK.
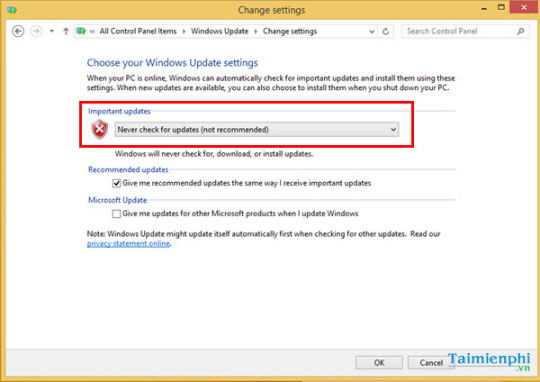
Bước 5: Khởi động lại máy và kiểm tra hiện tượng.
* Đối Với Windows 7
Bước 1: Đầu tiên bạn vào mục Control Panel
Bước 2: Tiếp theo click vào System and Security.
Bước 3: Chọn tiếp mục Turn automatic updating on or off.
Bước 4: Cửa sổ mới hiện ra, tại mục Important Updates, bạn click vào đó và chọn Never check for updates ( not recommended).Ở 2 mục Recommended updates và Who can install updates ở phía dưới, bạn bỏ dấu tích ở 2 ô trống.Tiếp theo bạn ấn OK và khởi động lại máy để xem thành quả.
3.5. Do lỗi User
Cách khắc phục: Tạo một User mới và xóa User bị lỗi hiện tại
Bước 1: Mở cửa sổ CMD trên WindowsBước 2: Nhập lệnh tạo User mới: /add
Trong đó:- Username: Bạn thay bằng tên tài khoản mà bạn muốn đặt.- Password: Đặt mật khẩu cho tài khoản người dùng.
Ví dụ: Chúng ta tạo một User mới tên là Xây Dựng NND12, Mật khẩu đăng nhập là 12345user Xây Dựng NND12 123456 /add
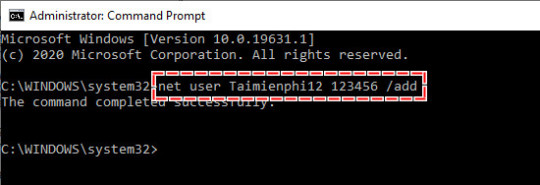
Bước 3: Để cấp quyền Administrator cho User mới, bạn tiếp tục nhập lệnh /add.Ví dụ:localgroup administrators Xây Dựng NND12 /add
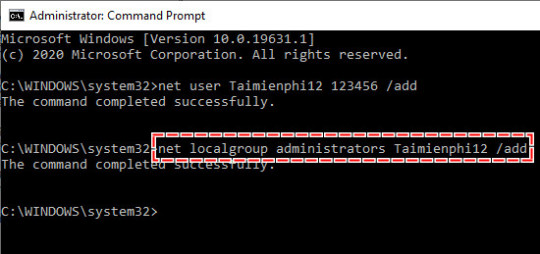
Bước 4: Xóa tài khoản User bị lỗi bằng lệnh: /delVí dụ:user Xây Dựng NND12 /del
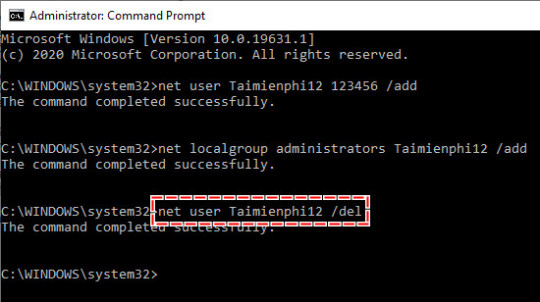
3.6. Do hệ điều hành
Cách khắc phục: Cài lại hệ điều hành Windows
Nếu lỗi màn hình chưa được giải quyết, các bạn có thể nghĩ tới việc cài lại Windows cho máy tính của mình.
Xem thêm: Doanh Số Là Gì – Doanh Số Và Doanh Thu Khác Nhau Chỗ Nào
– Cách cài Windows 10– Cách cài Windows 8– Cách cài Windows 7
https://Xây Dựng NND .Xây Dựng NND/sua-loi-man-hinh-den-751n.aspx Máy tính không lền màn hình có phải là vấn đề nghiệm trọng không và làm thế nào để khắc phục được tình trạng này ? Nếu muốn biết được máy tính không lên hình của bạn ở mức độ nặng hay nhẹ trước tiên chúng ta cần phải tìm hiểu các nguyên nhân có thể xảy ra với màn hình của mình cũng như một vài mẹo mặt khắp phục nhanh có thể thử trước khi đi tìm hiểu sâu hơn vấn đề.
Chuyên mục:
from Sửa nhà giá rẻ Hà Nội https://ift.tt/2TFEtmi Blog của Tiến Nguyễn https://kientrucsunguyentien.blogspot.com/
0 notes
Text
Welcome to another round of “trying trends” here on Have Clothes, Will Travel! Today I’m trying the puff sleeve trend with 2 puff sleeve dresses and a puff sleeve top. And, as always, I’m sharing my honest thoughts. (If you missed my previous “trying trends” post, click here!)
Now, I know many of us are not dressing up much these days (did you have a chance to check out my loungewear post?) … but even though I’ve left my house only to go to the grocery store and to go running, I thought it would be fun to have a little dress-up night! I tried these outfits out Friday and Saturday night last week just for the heck of it. I literally did nothing but have dinner with my husband and watch an unhealthy amount of “The Americans” on Amazon Prime (and I changed into my PJs before watching TV)!
When it’s safe to do so, I’ll try wearing the puff sleeve trend out for a night out and about. But for now, I’ll share my thoughts (and my husband’s commentary) with you all on wearing the puff sleeve trend around my house! I would love to hear your thoughts on this trend in the comments section at the end of the post. Enjoy!
1.) Trying a Puff Sleeve Mini Dress -Black
Initial reactions to my puff sleeve dress…
I actually kind of like the puff sleeves! I also like how fitted this dress is (shocking I know), as it balances out the dramatic sleeves. However, this dress is just WAY too short for my taste. Although, my husband was a fan! His initial reaction was… “Wait, where are you going? You know we’re not supposed to go anywhere, right?”
…Once I assured him I was NOT leaving he went on and on about how fun and sexy looking this dress is. (Given that I’m wearing crazy dresses all the time, he becomes pretty desensitized to my clothing choices. So, if he went out of his way to remark on a dress – it must be a unique one!)
Styling this puff sleeve dress
I kept my shoes and accessories rather muted, as I wanted the focus to be on the sleeves. I think the hint of gold from my necklace and on my pumps was just enough for this outfit. (If I had left my house – I would have also used my black clutch with a gold chain.)
Verdict – Will I buy a puff sleeve mini dress again?
No. But that is only because it is a mini dress. I hate wearing clothing that is this short, as I like to be able to move and bend over without panicking! I do like the puff sleeves, though. This is just the right amount of volume, in my opinion. It’s enough to make a statement without looking too over-the-top.
Click to shop:
Dress c/o* | Pumps (On sale!) | Necklace | Earrings
2.) Trying a Black One Shoulder Puff Sleeve Dress
Initial reactions to my puff sleeve dress…
This dress is unique, and I like the puff sleeve coloring the best. I also like that this is a one-shoulder puff sleeve dress – as that isn’t a style I’ve seen too frequently. I don’t love the fit of this dress as well as the first one, though. The material is a little thinner, so it leaves basically nothing to the imagination.
Styling this one-shoulder puff sleeve dress
Again, given that I wanted the attention to be on the sleeve, I didn’t wear anything other than my gold flower earrings and the same black pumps with gold tips. (I also would have used a black clutch with gold chain here too.)
Verdict – Will I buy a one-shoulder puff sleeve dress again?
I do like this style of dress! I would be interested in getting this dress in a slightly thicker material. I’m just not a fan of fitted dresses that are so thin, as they’re just not as flattering, in my opinion.
Click to shop:
Dress c/o* | Pumps (On sale!) | Earrings
3.) Black Floral Puff Sleeve Top
Initial reactions to my puff sleeve top…
This one I’m a bit on the fence with. I do like it… but at the same time, the sleeves are a little bit much for me. And when my husband saw this one he also remarked… “That’s a nice top, Jerry!” He’s referring to Jerry Seinfeld of course… when he wears the puffy pirate shirt on the Today Show. While I will say that this top is nicer looking than Jerry’s was… I can’t stop thinking about that now when I see this top!
Styling this puff sleeve top
I followed the same accessory formula as the first dress for this one! I also went with high-waisted blue jeans here, as the top is quite short. I think this top would also look fantastic with a pair of white skinny pants or a pencil skirt.
Verdict – Will I buy a puff sleeve top again?
Yes – but likely one that has slightly less voluminous sleeves. I really don’t have anything against this top, I just know I won’t get quite as much use out it because the sleeves are so dramatic. Granted, it does have a very unique and rather high-fashion look to it, though.
Click to shop:
Top c/o* | Jeans | Pumps (On sale!) | Necklace | Earrings
It was fun to play dress this last weekend – even if I wasn’t going anywhere! I’d love to hear your thoughts on the puff sleeve trend in the comments section at the end of this post? Once it’s safe to be out and about again, will you be rocking puff sleeves or not a chance?
*Thank you to Femme Luxe for sponsoring this post. As always, all opinions are my own and I am never compensated for a positive review.
*Disclosure: some of these links are affiliate links. Meaning, if you click a link and make a purchase, Have Clothes, Will Travel gets a very small commission at no extra cost to you. Thank you for supporting the brands that make this blog possible! I am also a participant in the Amazon Services LLC Associates Program, an affiliate advertising program designed to provide a means for us to earn fees by linking to Amazon.com and affiliated sites.
Trying Trends – Styling Puff Sleeve Dresses & Tops Welcome to another round of "trying trends" here on Have Clothes, Will Travel! Today I'm trying the puff sleeve trend with 2 puff sleeve dresses and a puff sleeve top.
1 note
·
View note