#also I've got a bunch of patterns that i don't have the fabric for just yet but someday.... someday i will
Explore tagged Tumblr posts
Visit Tumblr Blog
Explore Tumblr blogs with no restrictions, modern design and the best experience.
Last Seen Tumblr Blogs


Fun Fact
Tumblr posted its first advertisements in May 2012 and subsequently earned $13M in revenue.
Text
I think I mentioned that I was looking into getting a better sewing machine? well, it arrived today 🙈 that happened much faster than planned. I found the model I was looking at at a (relatively) local sewing machine store, for 30% off because it had been in the shop window, so the plastic has yellowed.
I wasn't sure how I felt about that (the website only said it was a floor model or something similar, then someone from the store called and told me the specifics and asked if that was still okay), but honestly? I never ever would have paid the full price, it was just too much, I couldn't justify that. but this reduced price was only a little more than the ones I had been looking at before (that were not great quality and probably wouldn't last very long).
I am very particular about things like this but I'm trying to make myself accept that it really is not that bad. it actually looks kinda cool. I just have to get my brain to accept that it's not a flaw, it's just a completely superficial and insignificant thing that doesn't affect its function at all. it's good that this machine that works perfectly won't end up in a landfill just because it doesn't look brand new.
I only got to try it a little bit today because I wasn't feeling well but damn, the difference to my old machine is huge!! it's so much more fun and easy to use - I love having the needle threader and that it can automatically cut the yarn when you're done. and with the start/stop button it's actually really fun to wind bobbins!! I always hated that on my old machine.
I skimmed through the manual earlier (and put page markers in it so that I can easily find anything later) - it did seem somewhat overwhelming at first. I've never used or even seen (irl) a computerised sewing machine, so of course it did! but it already felt much more familiar after just using it a little bit today. I love it ����
(also, I think the fact that it doesn't look perfect and brand new actually helps - I'm not afraid to use it in case I 'ruin' it!)
#I really hope I'll use it a lot#I didn't use my old one much because it was just such a hassle.#mainly little things that didn't work right#and something as simple as the way you have to thread it not being labeled clearly on the machine itself#I've got memory issues and found that very annoying (and in the end I drew the instructions on with sharpie because it got so frustrating)#I've also bought a.. probably stupid amount of little sewing things that I've wanted for years.#and an iron (got the old one second hand for 5€ and it will not stop dripping). and a set of thread (I only had thread that was old and/or#really bad quality. I can only get about 5 colours locally AND it's pretty expensive. so a set made sense... 😬)#it's the same thing every time. I get (more) into a hobby. I buy every fucking thing. I do it all day every day until it stops being the#most interesting thing on earth. and then I pick it up again like once a year but always feel guilty for not doing it enough#annnnyway#I'm very excited about all of it right now#I'm hoping it'll last a while#I mean. I've been interested in sewing for over a decade. I just never had enough money to really get into it the way I'd like#so. I don't think it'll ever completely go away at least#I've bought a bunch of vintage sewing patterns on ebay and I'm really excited to try them#I'm thinking I'll do some baby clothes first - I don't know any babies at the moment but baby clothes are small and also very adorable#so even if I mess up they'd still look cute 😂#and I wouldn't have wasted too much fabric haha#personal
10 notes
·
View notes
Text
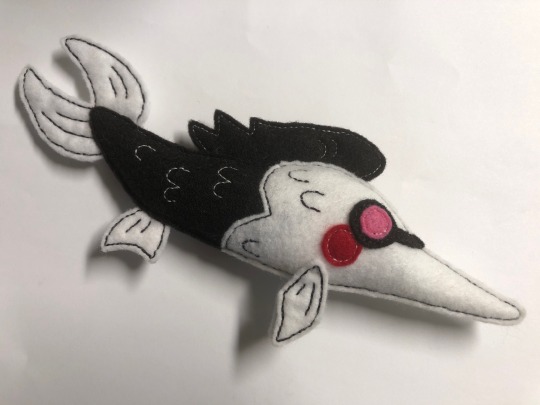

i made a little hand-sewn beast based on everydayspamton's drawing & took it with me on a family roadtrip
if you'd like to make your own, i've included the [[FREE]] pattern & some rough steps below the cut, as well as an Educational Video
EDUCATIONAL VIDEO. THIS IS NATURAL SPAMFISH BEHAVIOR & IT IS NOT SCARED OR IN PAIN.
BEAST CRAFTING INSTRUCTIONS:
disclaimer: i'm an amateur & i've never tried making a pattern before, nor have i ever tried writing directions
materials you'll need:
sewing needle & pins
black thread & white thread
fabric in these colors - black, white, red, yellow, & pink
stuffing
(optional) a squeaker
notes:
for the thread, i suggest something thicker, like whats used for embroidery - i used two different thicknesses on mine, & i think the thicker one; (the black thread); stands out a lot nicer
for the fabric, i used craft felt. its nice because its cheap & malleable, but if you want something that can actually be washed & played with without disintegrating on you, don't use felt. different fabrics will have different results, though, & may not give you a clean-looking edge & lines
you can also just go nuts & use whatever colors of thread/fabric you want, make pattern alterations, whatever
if you make one, feel free to @ me, send an ask or DM me with it, i'd love to see!
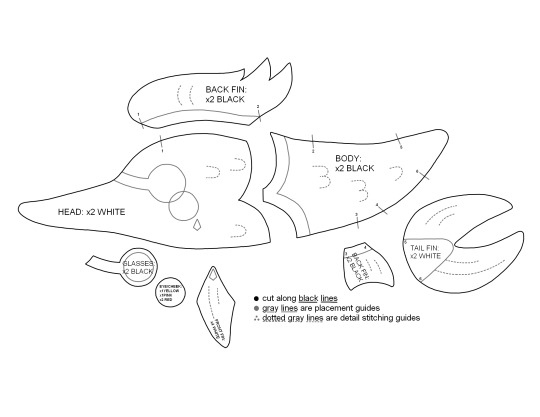
^^^ here's the pattern!
now the actual steps?:
1.) download & print out the pattern - it should(?) fit normally across a regular sheet of printer paper. i don't have exact measurements, i eyeballed this whole thing & then lost the original pattern - (there's only a copy that i scanned & edited left on my computer. woops.)
2.) cut the pieces out. pin the patterns to the fabric color the instructions call for, & cut out the number you need for each
^^^ here's what you should end up with!
now the sewing! for this whole thing i used doubled-up thread & a 'running stitch', then went over it a secondary time with another running stitch to fill in the gaps. you could also try using a 'back stitch' (which i don't know how to do), but that might be tougher. the goal here is to give it an Outlined look, like a drawing
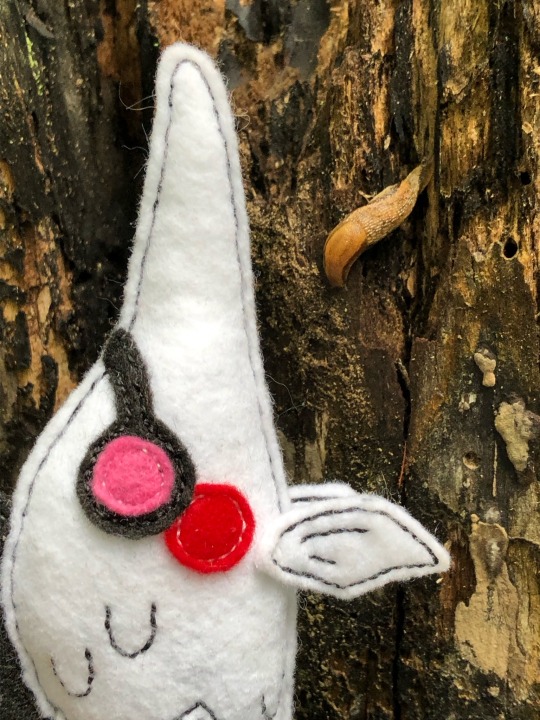
3.) with white thread, sew the pink & yellow eyes onto the glasses - pink is Left, yellow is Right. reference the image above if you're not sure!
4.) sew all the fins pieces together - on the black fin, use white thread; & on the white fins, use black thread. reference the pattern for the detailing. i made my own front fins 'wrong', but you don't really have worry too much about being exact
5.) overlap the Head pieces onto the Body pieces - making sure you have a Left and Right side! pin the heads to the bodies, & compare their lengths by holding them together to make sure you've got it right. sew the heads to the bodies using black thread. detail the head with black thread, & detail the body with white thread
6.) now that you've got the two sides of the body completed, you can hold them together to try to get even placement for the red cheeks. pin each cheek to each side, then sew them on with white thread
7.) using black thread, sew the pink glasses onto the Left side of the body, and the yellow glasses onto the Right side. they'll be slightly overlapping the cheeks
8.) with white thread, sew the front fins on to each side. NOTE: i put mine on wrong, & didn't realize until i was finished. for the 'right' placement on these (closer to the original drawing), reference the pattern, & not the images
you now have all your parts ready for assembly! for me, this is the hardest part. you'll need a bunch of pins - use the guidelines on the pattern and/or reference the below image to get the right placements
9.) pin in the back fin & the nose. leave some space on the bottom for stuffing when you start, & using black thread, sew together the nose & the fin unto the body - the fin should be sandwiched Between the two body halves
10.) pin in the tail fin. continue sewing down the back with the black thread, & sew the tail fin in - once again, it should be Between the two body halves
11.) pin in the back fin between the halves. continue with the black thread, sew along the tail & sew the back fin in - Stopping once its secured. you should have some good space still open on the belly
12.) time for stuffing. using something thin, but not sharp - like a chopstick or the back of a crochet hook - & push stuffing into the nose & tail portions. stuff the head about halfway. now, if you have a squeaker, put it into the widest part of the head, & stuff a little around it
13.) still using the black thread, sew the belly up a little more so its easier to keep the stuffing in, & then fill up the rest of the body. once fully stuffed, sew the remaining hole together
14.) congrats! you now have a spamfish. if you opted for a squeaker, squeak it thoroughly
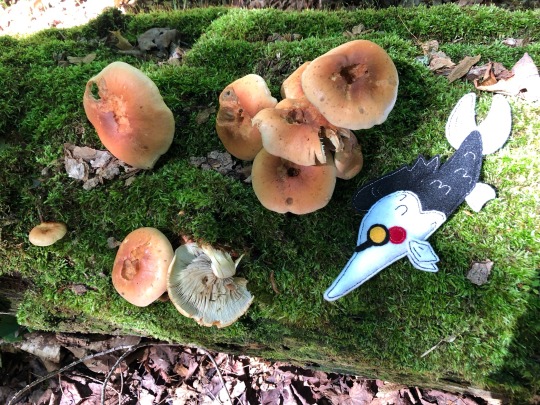
don't worry if it's not exact, some individual variation is fun & makes your creature unique! mine has upside-down front fins with upside-down detail lines

here's the thing with some friends i had made a little bit before him. have fun with your beast!
i am not liable for any damage it causes to you or your property
#spamton#myart#spamfish#i made this thing&took pictures of the process to show my friends a few months back.i finished it a few days after thedailyspamton's post#i had already been making funny little fish&it was just the perfect timing!now i want to share the spamfish with others :)
553 notes
·
View notes
Text
Five's season four suit
I'm back with another analysis of one of Five's suits and this time we'll be looking at his season four one because again, I'm just a girl who likes suits and this was requested. Though I probably would've done this regardless if it was requested or not lmao.
Before I start there are some basic things that I want to mention. Once again, this is a three piece suit as it includes pants, a jacket and a waistcoat also by the single row of buttons down the jacket and waistcoat it's obvious it's single breasted. These are basic things that don't cost you to lose your sanity to figure out so let's get to those ones.
Starting off with his jacket. This was slightly harder to figure out then last time since a majority of the time Five wore a coat over the suit but I am so thankful for the deli with all the Fives and Grace's birthday. (rare moment I'm thankful for a six year olds birthday) In a certain reference I have you can see the jacket taper at his waist and pocket flaps which tells me it's a British cut suit. Once again I can't see a ticket pocket which in modern day you don't really see on British cut suits anyway so I'm not concerned about that. In terms of vents after rewinding the scene where they're eating in the first episode more times then I'd like to admit, I figured out it was a single vent. Overall it's the exact same as his suit jacket in season three, Five likes one kind of suit jacket and sticks with it apparently.
Next we have his waistcoat and this is where the deli scene and promotional material REALLY came in clutch. Things I want to note about waistcoats is that they're supposed to be form fitting but not tight and most have an adjustable strap in the back for a better fit. Sadly even though we did have the deli scene this was still super hard for me to figure out since, again, a majority of the time Five wore a coat. Still I got some information for y'all. In a screenshot of a promo vid I found on Pinterest you can see four buttons going down which isn't as funny as the five buttons but I'll take it. Now I'm not sure if the waistcoat is slim fit or a regular fit which for waistcoats are already quite slim so I'm going to say it's slim.
LASTLY THE BLOODY PANTS. If you've seen my other suit post you would know the pants were infuriating for me since I didn't have all that many scenes. But with a combination of promotional material and weirdly this season giving us more look at Five's legs (not in a weird way) this was kind of easy. If you look closely at his ankles you can see a considerably less amount of fabric bunching apposed to last season. Like I mentioned last time, this is called a break where the four types are full, half, quarter and no break. Here in season 4 there's still clearly a break in the pants but it's not as much and it's closer to that of a half break then a full break. Cut wise of the pants, I'll be honest, I'm not well versed in but since last time I've learnt of pleats in the pants which sit around the first two belt loops in the front. I'm quite sure there are non on Five's suit but honestly? cool thing I've since learnt.
Now that I'm done with the main points of the suit I also want to mention things like his tie, shirt and the wrist buttons since I forgot about them last time. Looking at his tie width and proportions in season 4 it's safe to assume that as apposed to last time where his tie was plain black and narrow width it's now a traditional width and has diagonal stripes though it's still black in colour. His collar, again, looks pretty much the same. A simple straight point button up (but button down) which with the tie now having a bit of a more complex pattern I think works great. Another thing I didn't mention last time was wrist buttons. Historically these were used to get the jacket on seeing as the wrist holes were smaller but nowadays are used to show how formal a suit is. The more buttons the more formal and our boy Five has four wrist buttons making it feel quite formal but the single vent I mentioned earlier brings down the formality a bit but which I think the contrast of that works GREAT.
Differences between the suit in season three and four are so small but if you love suits it honestly feels so obvious. The word count for this post is already so high so I'm just going to quickly name a few of the differences. In season three the waist coat had five buttons but in season four he had two, season three his tie was plain black and narrow but in season four it was black with stripes and was a traditional width, the break in his pants was decreased to a half break from a full break and for wrist buttons. Whilst in season four he has four buttons, I couldn't figure out how many he has in season three but I'm going to assume it's also four.
Like last time I also want to include some photo's I used in analysing, I used more along with skipping around season 4 (not properly re-watching) trying to find the jacket vents and waistcoat.


Lastly I want to say a HUGE thanks to two certain people from my last post. First @doktorfreud tysm for this request, I had a lot of fun looking back on my boy Five's suit and the differences between seasons three and four. To @donnalawliet I said I would tag you and I am, hope you enjoyed this analyses despite how it's so much more chaotic. Also to everyone that has interacted with my previous post, tysm, means so much to me since I wasn't sure anyone would even like these rants also the fact that four massive blogs liked my post feels surreal especially since two of them I personally love and follow.
Also something I sadly failed to mention in my last post that both in season 3 and 4 due to back then I didn't know as much about suits as I do now is that it's not just the waistcoat that's slim fit, it's the entire suit that is so to everyone, I apologise about that.
#tua#tua season 4#tua s4#five hargreeves#five#the umbrella academy#umbrella academy#I'm just a girl#this also killed my sanity ngl#still have other analyses to do so I should get to work on that#but it's like 2 am so I should probably sleep#sorry if there's any grammar errors#I haven't had any caffeine in a bit
59 notes
·
View notes
Text
🌦️Dark Sun and 🔅Servant Sun
I tried my hand at designing Servant Sun and Dark Sun.

I'm getting more caught up on the lore!! Click underneath for art closeups and more Lore rants and AU idea! Plus, I have sketches and a comic WIP I've been working on.
😉
There will be rambly spoilers to where I am in the Lore.
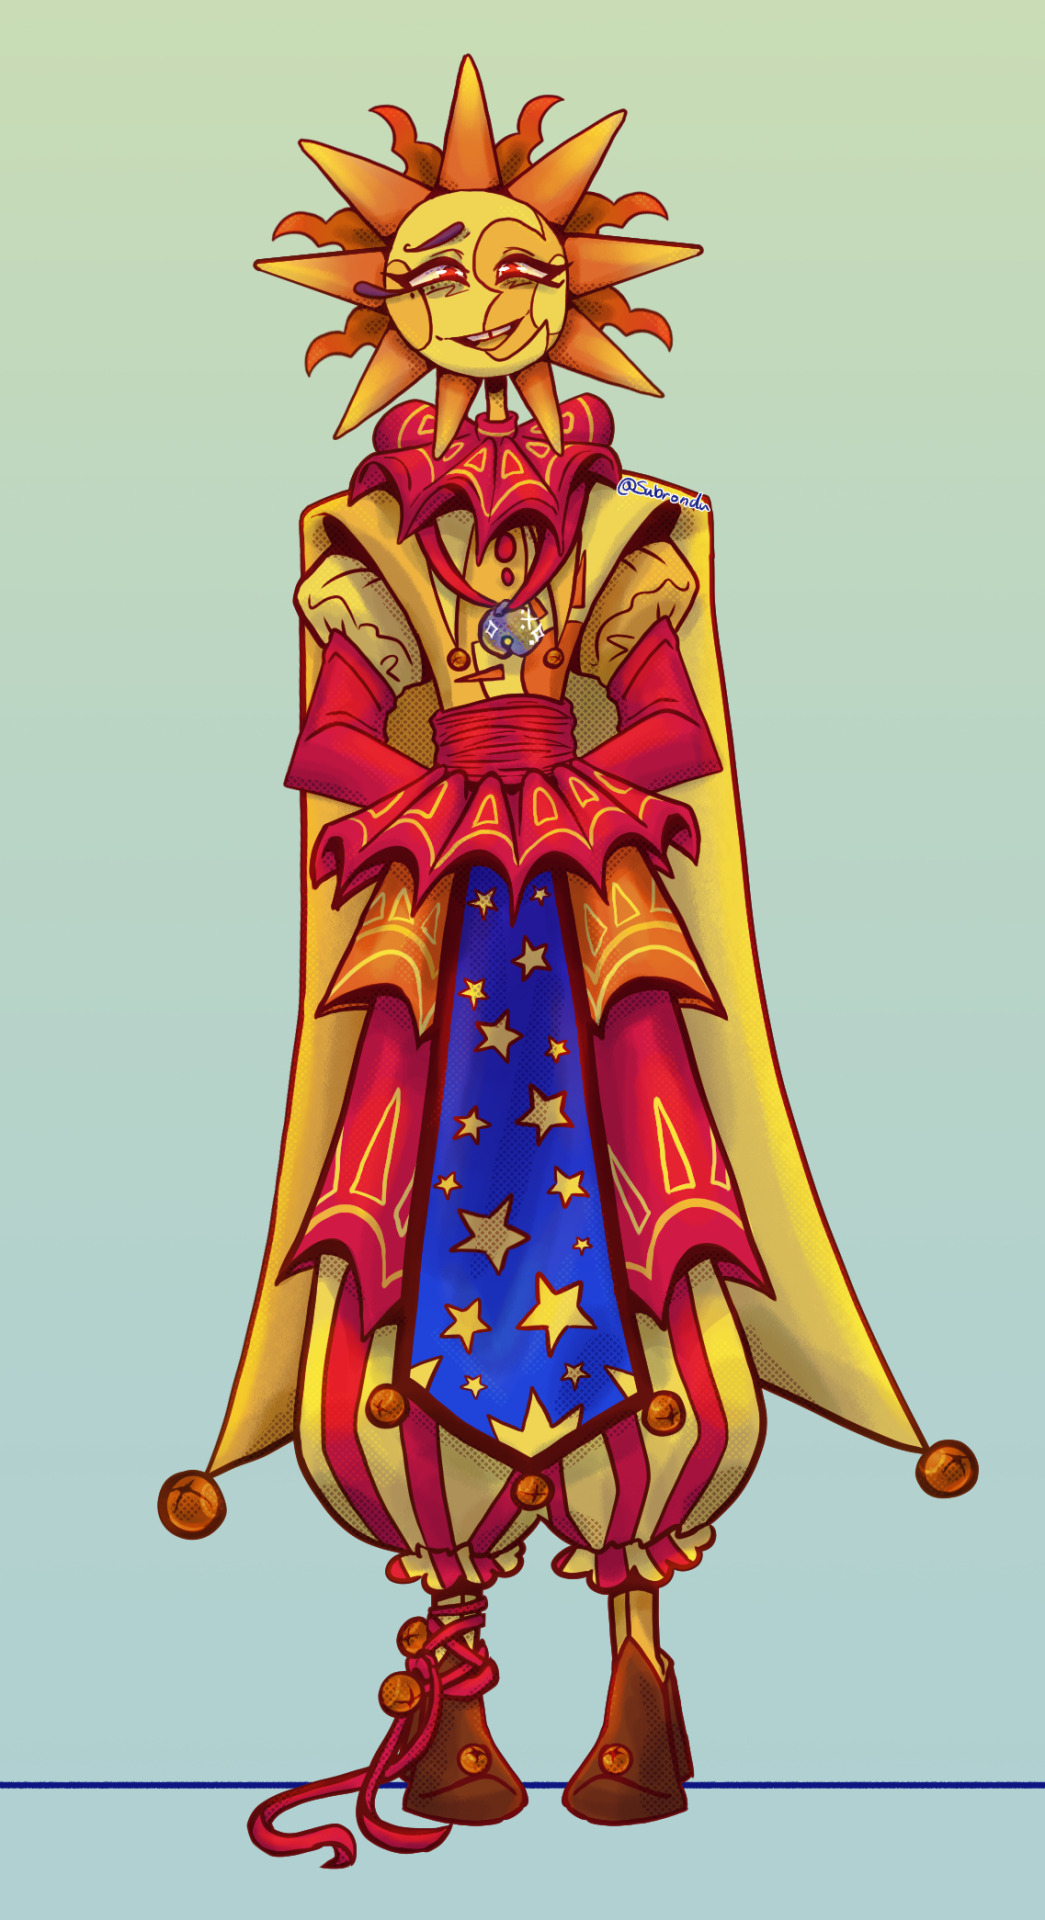
For Dark Sun I was inspired a lot by the thumbnails, they give him red eyes a lot in the thumbnails and I like the smarmy red eyed look of the guy. Tried to capture his 'regal-holier then thou' attitude in his design. He's still Sun though, so I used OG Sun's palette (my first Sun design!) to reflect the fact they have the same beginnings. I don't trust anything he says but I know something has totally happened to his Moon (I'm really banking on the idea he ATE him/ ATE his intelligence chip) so he carries his Moon's bell and he also repurposed the star pattern of Moon to parade it around as like a symbol his Moon is at his heal. I don't know if I like his final look but I think it's because I gave him dramatically darker shading vs the other Suns.
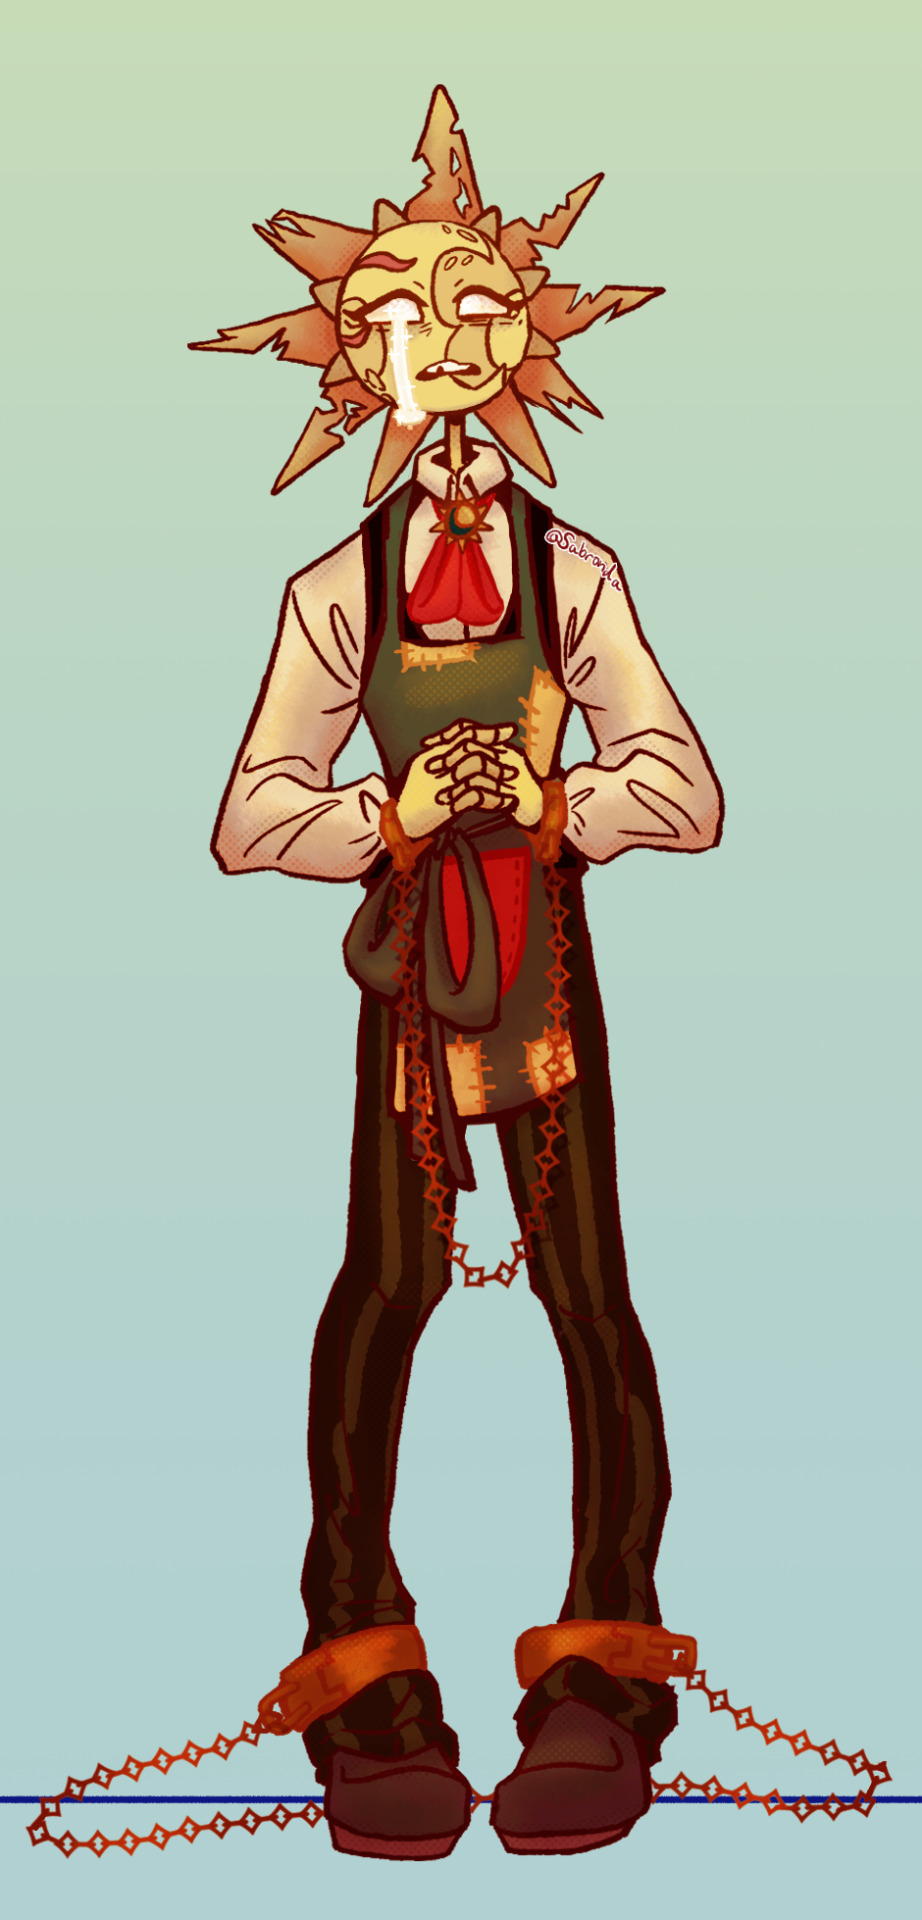
Servant Sun! Here's my take on him. He's been suffering for over 10000+ years under Lord Eclipse abuse. We saw how he was being punished just because Lore Eclipse was bored! I feel really bad for this Sun, it was hard to draw a design for him. I think despite his servant title Lord Eclipse just keeps him around not only to keep himself sane but also a trophy/slave to show off to Moon and the others in the afterlife. I had this like monologue for SSun basically, "The sound of bells long ago stopped ringing for the daycare attendant turned servant but Lord Eclipse still can hear the sound of metallic chimes when the neurotic servant cleans thanks to his fanciful additions." (aka the chime of chains) He's also got an apron that's falling apart and SSun used random old fabric to patch it up (it wasn't random it was his old clothes). I was really inspired by Meagancandraw's design of Servant Sun!

Here's my AU sketches. I'm planning to clean these up and maybe color them? This is basically just the AU idea that I think Sun is going to somehow get reborn but be a being reborn from star power and negative star power? I don't know if it's possible? He becomes a mix of the two in my AU. I know some current spoilers and basically I know he may be immune to negative star energy? He can also hold Star Power uniquely and it 'taste good to him'. I will never let go of the fact he told Moon it taste nice like dried watermelon. His untrained magical outburst was also compared to be as powerful as Golden Freddy's. There's big theory he's going to die or be sacrificed but I have this idea what if he's essentially remade? idk just rambly thoughts. So yeah, he has a cool new look to go with his magical transformation.
BTW he is very sad cause he can't be near his family in this AU my brain cooked up. He's basically radiation incarnate now <3 His eyes are cracked because they're intensely pouring out Star/Negative Star power. Just a constant pull and push of power circulating in him.
this is the comic idea I have currently. I don't have a ton of motivation so any encouragement to finish this comic idea would be super appreciated! I'm not a comic-type artist so this is out of my comfort zone (I've made a few comics but usually they are pretty janky)
ON TO THE RAMBLES - spoilers BEWARE:
NEW MOON MY BOY PLS YOU ARE HIDING STUFF FROM YOUR FAMILY. BOY NO. HE IS GONNA USE RUIN TO BRING BACK SOLAR?
Blood Moon just took Ruin. Also Dark Sun repaired Ruin after Molten took him to die in the dead dimension?? BOY??? Also, Dark Sun did something to Eclipse??? Bro is plotting. I wish I could get a read on Dark Sun but I don't even know how much of the truth he's been sharing thus far. He has no reason to tell anyone the truth and so far he hasn't hurt anyone just stole a bunch of data from Moon and built a bunker to escape total dimension collapse...He's just a big wild card for me.
Then there's New Moon, He's just actually going crazy after meeting Old Moon. Sun can tell something is wrong with his brother!!! I hope he can help him but spoilers tells me otherwise. The family is trying! Earth heard out Eclipse and Eclipse is getting Earth proof that Moon is currently cray-cray. Lunar is kind of hanging near Sun and Earth because the creator is now actively trying to kidnap him. So much spicy drama.
I don't pay attention much to the Freddy side of the plot but he's also dying?? bro??? What about Francine? The missing mom/wife? Poor Francine's suffering, she needs her mom and dad! I like that Puppet is hanging around her grandchild more it is very sweet. Foxy also got his 'bestfriend' Puppet a house/condo. hmm-Mmmhmm. Definitely no romantic tensions there. Definitely not.
(side bar, I don't ship Kidscove but I do ship the Foxy and Puppet do they have a ship name? Also no hate to Kidscove I just think Foxy treats Sun like a kid a lot. I like the gooseworld Kidscove. Sun laid eggs, so wholesome.)
Lunar is just waiting for news on his trial and I am in suspense hoo boy...Then the stuff with FC being put in a new body and Frank is not happy about it. I def can tell there's big lead up to the astral bodies making a big move I just wonder what the move will be. I feel like now Lunar and FC are going to end up being more intwined then they might think.
Also I love Dazzle!!! AAAGH! She and Jack are so cute! I loved the ep Sun took Dazzle and Lunar to the store that was so sweet. Can't wait to see more of them! They're such a cute dynamic! I like seeing Lunar put his best foot forward to help Dazzle too.
I can tell Moon is slowly distancing himself from the others but it's like this odd thing where he's no longer obsessed with Solar being back per sei...but he's obsessed over how HE has to be the one to bring Solar back in his way because HE promised and he wants to be better then Old Moon and yeah...he's got a very warped perspective I feel like? But Molten and Ruin BOTH pointed out Moon is being possessed by something so I think he's definitely sick? Or something is keeping him from seeing the error of his way.
Rambles over :)
I do plan to draw Solar and Eclipse and Lord Eclipse next but I'm stuck on what I want to do for Solar's design :P I might make a poll in the future!
#sun and moon#sun and moon show#fnaf sun#sun sams#tsams sun#the sun and moon show#dark sun tsams#servant sun#sams au#brainrot#rambles#I really just wanted to ramble#sams fanart#I could not stop yapping about all my updates#I love Sun so much#Sun is my son#I really want to make an AU about Sun but he's just suffering#Suffering in Success#He will get to live as a treat#the treat is agony#jk I would never to Sun#unless...#dark sun is a cannibal in my mind#let dark sun do some evil#Servant Sun didn't deserve to die#I hope he gets to come back but in a happier way/life#justice for Servant Sun
71 notes
·
View notes
Text


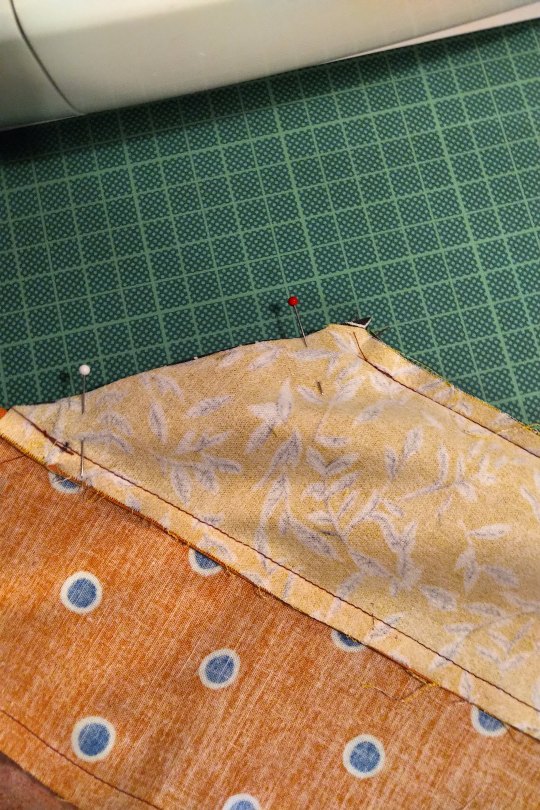
My first quilt is done :) I've never sewn anything before (besides some VERY basic hand-stitching when i was a little kid) so this was a major learning experience lol
I used 5x9" rectangles and made a little checkered pattern. I wasn't following any specific pattern or tutorial, and was more just winging every part of it (and it shows). BUT!! I still think it's cute and cozy and I'm excited about it :)
Progress pics and mistakes under the cut !
This quilt was certainly a process, and being, as i am, extremely lazy, every step I took lacked the precision required to make the quilt all nice. And in all honesty i am 100% okay with that, I don't need it to be anywhere near perfect!

Here are all of my pieces laid out on the floor after i cut them out! I didnt take any pics between that and the top-stitching (no clue if that's what it's called, but where it's all basted and then you sew the patterns that go along the quilt) so we'll skip to then


I managed to sew over my excess fabric AND create insane bunching, both because i wasn't paying any attention to the back of my quilt and was really really lazy with my basting (and this is where i made the seam ripper gif lmao)

I also learned why people buy long-arm machines and shit because oh my godddd this was a pain

Anyway next i cut out my binding strips and checked to see that i had enough, which thankfully i did lmao

My binding is pretty awful, i did it the wrong way and elected not to redo it, and my corners are quite messy, but i really truly just don't care. It's still a very cozy quilt
And then it was done! That's all!!
The process from start to finish took me about two days (started cutting pieces Wednesday night, began sewing Thursday morning, continued sewing until it was all done on Friday evening!)
I got the fabric largely from my friend, who has oh so much of it. I think my choices are pretty dang cute :)
Okay. I think that's all I have to say! Bye now!
#brookie's bullshit#quilts#my art#(i suppose lol)#i think maybe it would be fun to post more of my fiber art. maybe i'll make a side blog who knows!#brookie's crafts
76 notes
·
View notes
Text
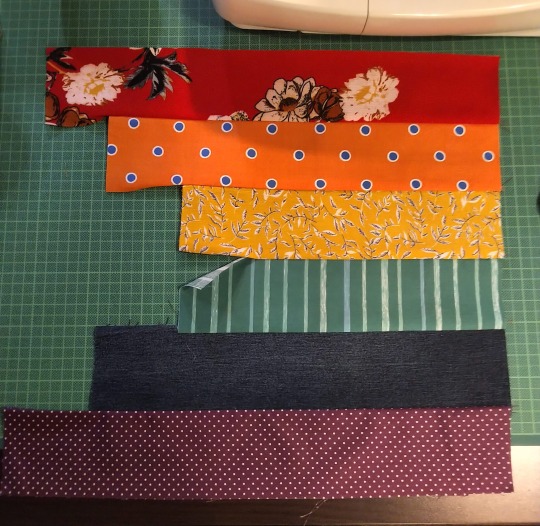
Progress Pride Flag Quilt Block Pattern & Tutorial
Don't you just love the flag of our people? Do you have an inner grandma that years to make stuff? Do you want to combine these two things and make a queer quilt?
Well, I've got you.
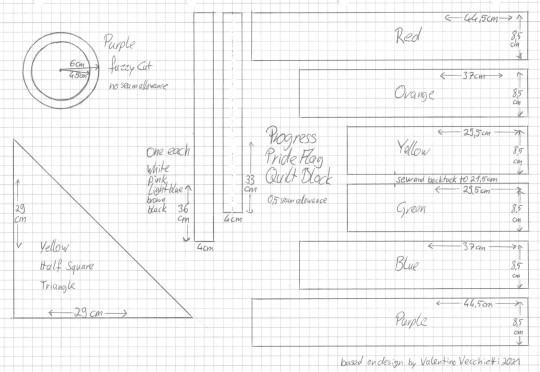
Behold the pattern! And my lack of graphic skills, so I drew it on paper!
Basically it's a bunch of rectangles, one half square triangle and a fuzzy cut circle. I don't know shit about quilting and I was able to come up with it. Why centimeter, you ask? Because I'm German and that's what I'm familiar with. Why weird measurements and not jelly rolls and layer cakes and stuff? Because I'm German and quilting is not really a thing here.
Onto the tutorial!
You'll need:
A scrap of fabric of red, orange, yellow, green, blue, purple, black, brown, light blue, pink, white each
additional fabric for the border
Cutting mat, quilting ruler, roll cutter
sewing machine
thread
pins
double sided interfacing
iron and ironing board
fabric sheers
compasses
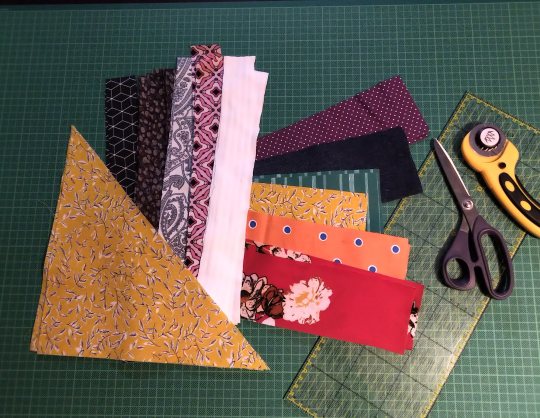
Step 1: Cut everything. Duh. We'll take care of the circle later, don't worry about that now. The half square triangle is exactly what it sounds like. A square and then you cut it diagonally. That's why I didn't give the length of the hypotenuse.
(Note: I'm making two blocks at the same time, that's why there's so much fabric. Also this is a middle of the night project, hence the lighting.)
I'm using all kinds of different fabrics, different weights and drapes, some stretchy, some transparent, so I needed to interface some of them.
Step 2: Sew the rainbow together. 0,5cm seam allowance on everything, that's exactly the edge of the foot on your machine. Double and triple check that everything is facing the right direction before sewing. The seam of yellow and green does not get sewn fully, only 21,5 cm! That's important later! Also backtack there. Don't forget to iron.
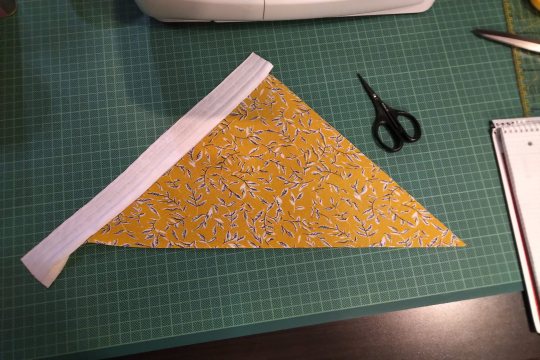
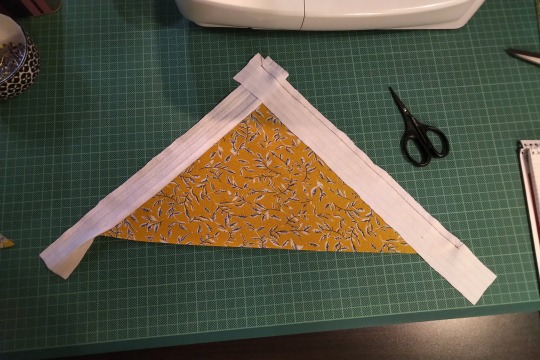
Step 3: Sew the strips to the half square triangle. For this you have to switch between the sewing machine and the ironing board constantly. Attach the shorter strip diretly to one side of the HST, iron it open. The second strip of the same colour gets attatched to the other side of the HST and the first strip. Look at the pictures closely if you're unsure how that works. Also the strips are longer than the triangle. We'll square that up later.
All strips attatched will look like this. See how the two strips meet at the tip!
Step 4: Cut the rainbow part to size. The length between yellow and green is 22cm long. The shorter seam from before plus some seam allowance. The outsides of red and purple are 44,5cm long. These two points are the beginning and end of your cutting line. You will cut a little triangle from every single colour. Do this slowly and carefully. Maybe your fabrics have stretched a bit (mine did). Don't worry, it will be ok.

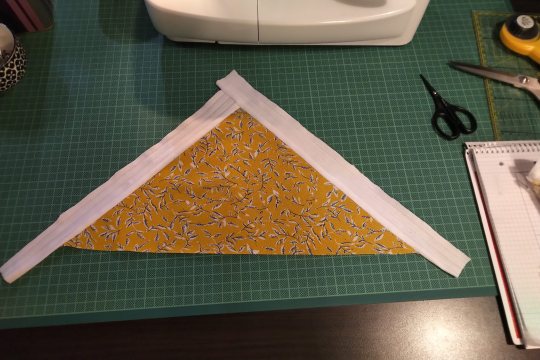
Step 5: The Y seam, part one. Y seams are tricky, but there's only one for this block. So put your strips part on your rainbow part and line them up so that the tip of the strip part overhangs the seam between yellow and green by about half a centimeter. Remember that it's not about the edges of the fabric, but where the seam will be. But don't sew all the way! Leave 0,5cm at the tip!
You can also mark on your strip piece two lines 0,5cm from the edges of the black. They should form a little square at the tip. There they meet is where the actual tip on the finished block will be. So place this spot directly on the seem between yellow and green and only sew right up to it. Not beyond.
Step 6: The Y seam, part two. Now, fold both the rainbow part and the strips part in half and if you've done the last step correctly, the remaining two edges will allign. Pin and sew.
I can't explain it better than I've done here, I'm sure there are tutorias out there. Good luck!
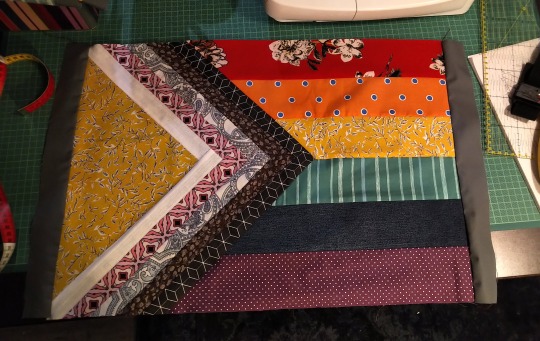
Step 7: Square up. Iron your block to that everything is nice and straight and flat. Then use the fabric edges of the red and purple to cut the remaining ends of the strips. Use the HST to cut the white. Be careful, the long side of the triangle is on the bias and likely stretched a bit.
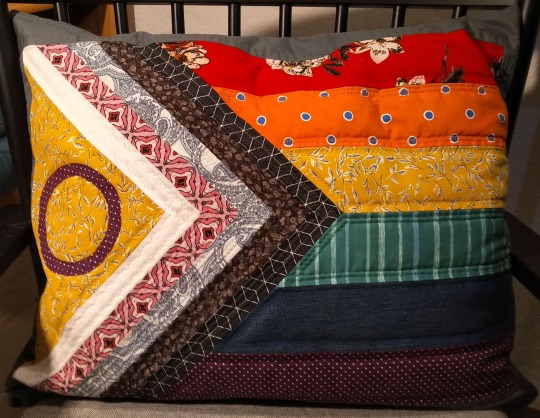
I already added borders here. I'm making a pillow case.
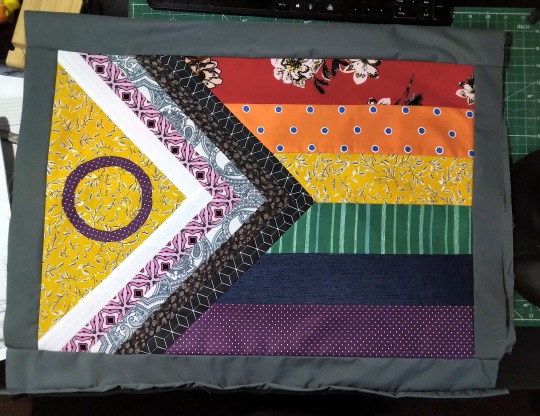
Step 8: Fuzzy cut and raw edge applique. Double sided iron on interfacing is essentially double sided tape. It has two types of glue, one gets activated by 2 seconds of heat, the other by 5 or so (depends on the product). The second side is also covered with a paper that needs to be removed before the second gluing. Read the instructions of the product you are using!
Use your compasses to draw a circle on the protective paper side of the interfacing. It's actually two circles from the same middle point, see pattern. Cut it out roughly. Then place it with the rougher side on the backside of your purple fabric and iron for 2 seconds on middle heat. If you've just ironed your fabric before and the ironing board is still hot, wait for it to cool down. Also let the fabric cool down after applying. Then cut out your circle. The interfacing will have stiffened the fabric, so that shouldn't be a problem. Then remove the protective paper, place the circle on the yellow triangle where you want it and iron for 5 seconds. Let cool.
And you're done! The applique at this point is only secured with the interfacing, but it should hold fairly well. The quilting will secure it further.
And that's it. BTW, did you know that this design was made by Valentino Vecchietti for Intersex Equality Rights UK in 2021? Now you do. Happy quilting!
#lgbt+#lgbtq+#lgbtq community#pride flag#progress pride flag#valentino vecchietti#quilting#quilt#quilt block#quilt pattern#quilt tutorial#sewing#sewing machine#sewing tutorial#sewing pattern
225 notes
·
View notes
Text
Another year, another recap: a list of things I sewed in 2024
So...I kicked off the year by not doing any sewing in January or February.
In my defense, I was starting a new job and doing paperwork and moving across the state at the time, and most of my sewing things were still in cardboard boxes in my parents' guest room. Figured I'd start small when I finally moved and unpacked all my worldly possessions, so I revisited the cape I made for Capetember 2022 and added slits so that I can still use my arms without letting cold air in. I also added pockets for my phone and keys. Photo not included because, well, it looks the same as it did in 2022, just with arm slits.
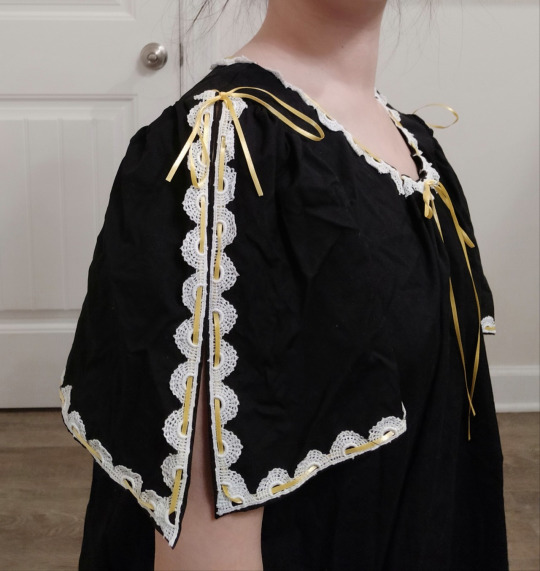
Then I made this hand-embroidered Regency reticule. It's based on the one in the Rijksmuseum. It's cute, it's functional, and I made it as true to the original as I could, thanks to video footage from Sewstine on Youtube, who actually got to study the extant reticule and see the hidden side panels.

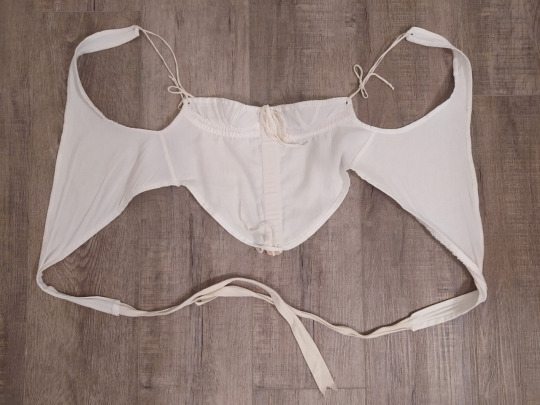
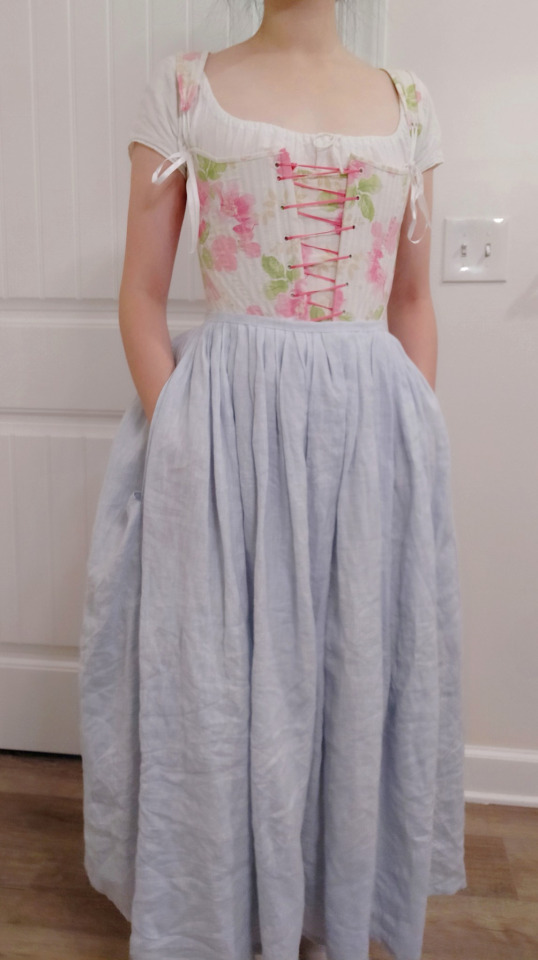
Then I got sick of back-lacing myself into Regency stays that never seem to fit my scoliotic torso correctly, so I made the c0rset a la parasseuse. They take like 30 seconds to put on and actually give the correct shape, and now I finally have regency stays that work for me. I'm not including pictures of myself wearing them, but here they are laid flat:
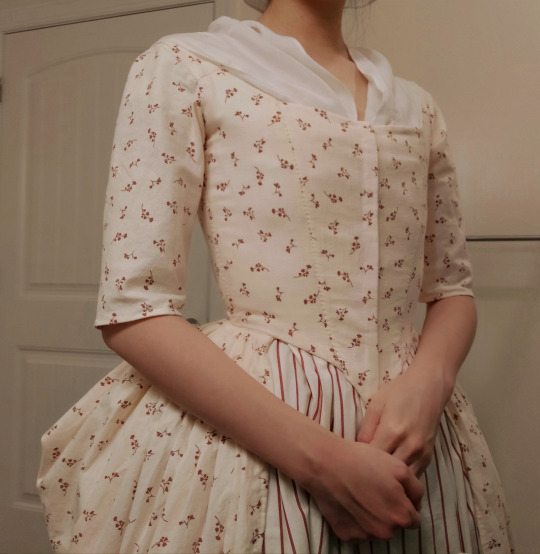
Then in April, I finished my red and white floral 1780s Italian gown ensemble. Technically, I'd made the overdress in 2023, but at the time I hadn't added the hooks and eyes that would allow the skirt to be bustled up in the back, and I still needed to make the contrasting striped petticoat. It's not a true HA recreation because I put all the structure directly into the bodice lining, instead of making a separate pair of stays to wear underneath, but all the other under layers are period correct, including the split rump I made to go with it. I also made an attempt at the American Duchess 18th century cap, but I made it out of limp, flimsy cotton batiste instead of linen, and it doesn't look right, so I'm going to have to revisit that once I make a proper 18th century linen shift and see how much leftover fabric I have after that. Oh, and I hand-embroidered some garters for my 18th century stockings but never bothered to take pictures because I don't like how they turned out.

In May, I also made this generic 18th century petticoat to go under my Italian gown ensemble, because the visible striped petticoat kept grabbing to my stockings and the fabric of my shift.
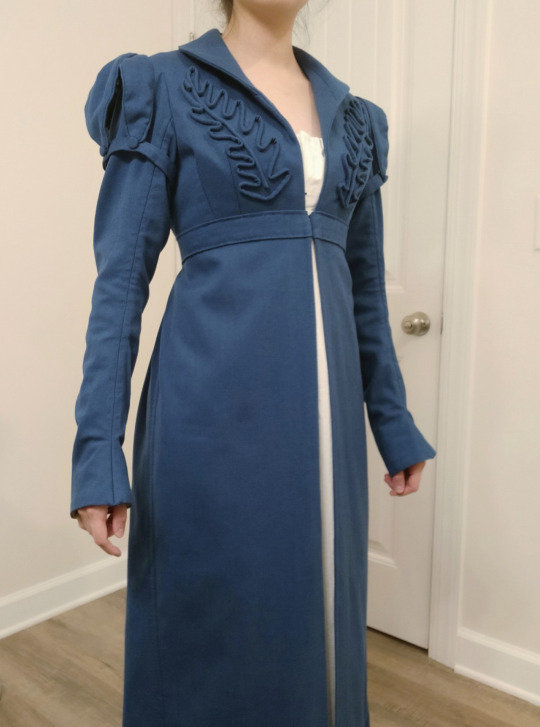
Also in May, I made the blue Regency pelisse. Base pattern for the bodice part is Black Snail’s #0323 regency spencer c. 1810-1815. I just altered the sleeves and added the long skirt. The oak leaf rouleaux pattern on the front of the bodice is from this pelisse from the Cincinnati Art Museum, though I wasn't going for a direct reproduction.
Then came the Edwardian nightgown, based on an actual pattern from the era. I wish I had had more fabric to work with because the final hem is less full than I would prefer, and the sleeves could use maybe 2-3 inches of ruffle to length them.
I forget why I didn't sew anything in June or July. Maybe I had gone back to fix a fit issue with the regency pelisse? I don't know. But in August, I hammered out three more projects.
I've been working on creating a series of body blocks/slopers for myself so that I can then use them to draft whatever patterns I want. I currently have a basic modern princess seam bodice block, a sloper for a generic blouse (which I've used to adapt multiple Edwardian shirtwaists, because I really just need it to fit the neck and shoulder region), a basic regency bodice block, an 18th century conical bodice block, and a bunch of circle skirt templates. I've been meaning to make a new set of Edwardian combinations (because I totally used the wrong weight of fabric on my first attempt), but I wanted to test out my drawers pattern first, so I made a pair of basic drawstring shorts to wear under my skirts for work, just for a bit of extra coverage. They function okay, but they're going to need more fullness in the legs to work for Edwardian costuming, so I didn't take any pictures, and there will probably be several more rounds of wearable mockups in my future.
My second sewing project in August was to revisit my old gathered-front regency partially-bodiced petticoat. Now that I had a functional regency bodice block pattern, I basically installed an entirely new bodice, reduced the amount of fullness in the front gathering, and also added about an extra yard and a quarter of fabric to the back of the skirt, since the original skirt hem was a little too narrow for walking comfortably. Regency skirts may look slim, but they should have at least 2 yd (preferably more) in the hem circumference in order to look and function correctly. The new and improved petticoat could basically be a dress on its own, minus sleeves.

And finally in August, I made the historybounding princess skirt. I've already detailed my grievances with this skirt in my original post, but it was basically an attempt to have a warm skirt to wear to work in the winter, but it requires a c0rset (and undershirt and c0rset cover and petticoat) to look correct, so I basically only use it for casual cosplay/Halloween costumes now.
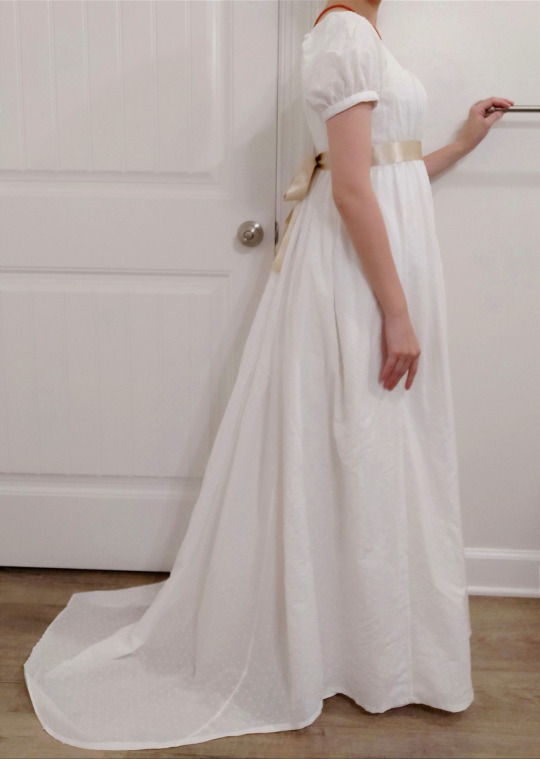
Moving on from that dud, in September, I went back to regency and altered my new and improve bodiced petticoat pattern into an actual evening gown pattern. This dress came out exactly how I wanted. It would probably be my favorite thing I've made this year, except that it has a 2-foot train that is very unwieldy.
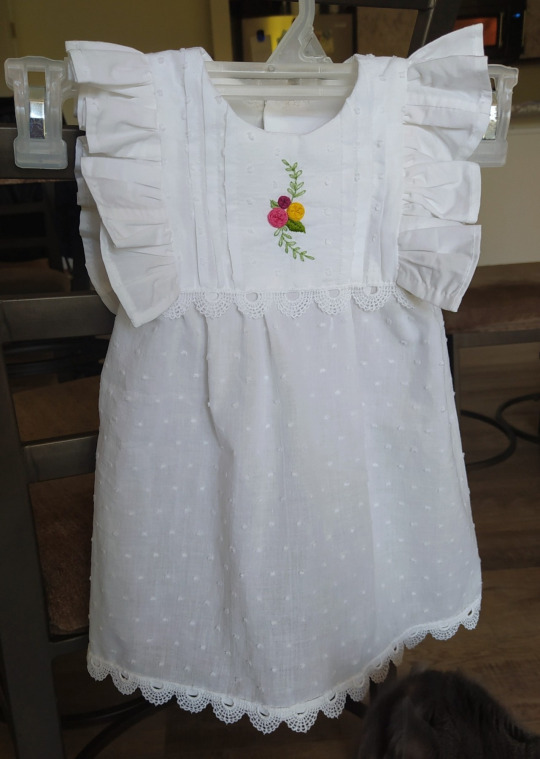
I had quite a bit of large scraps leftover from the gown project. My friend from residency was expecting a baby around September, so I used some fabric scraps and made her a ruffly baby dress. Since baby was due in September and I wasn't sure whether the weather would still be warm enough for white frilly summer dresses, I decided to make the dress in a 6-9 month old size so that baby would be able to grow into it come spring/summer. (Spoiler: baby came in mid-September while it was still reasonably warm. Oh well. At least she'll get to wear it in the spring. And now I have a birthday twin.)
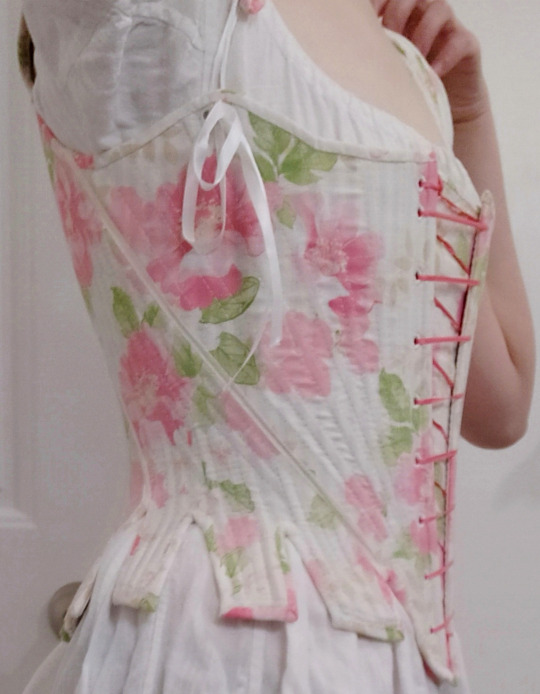
In October, I embarked on my most ambitious project of the year and made my first pair of 18th century stays. This fabric is 100% not HA, and I did a combination of hand-stitched and machine-stitched channels, but everything else about the stays is historically...adequate. It's boned with zip ties because I didn't want to waste a whole roll of $$$ynthetic baleen on my first pair of (fully boned) stays when there was a 95% chance I'd screw something up. Pattern is self-drafted, and my only gripe is that I made my mockup half-boned and it fit perfectly, but I switched to fully boned for the final stays, and that affected the fabric's bias stretch, and I had to add a stomacher to give myself more room.
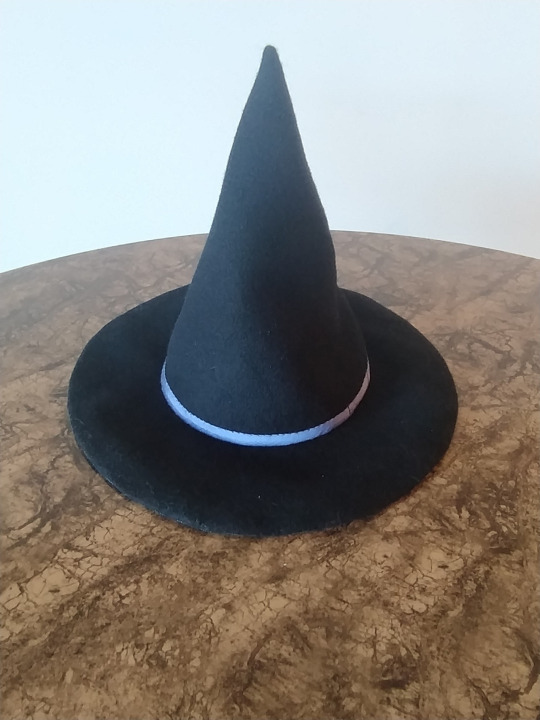
Then Halloween was approaching, so I made a witch hat from scrap wool coating fabric from my cape and wool skirt projects. Wish I had made the brim wider and the crown taller (it's just a little too small proportionally all around), but I didn't have a stiff enough interlining material, and the whole thing was floppy enough as it was. I'm just going to have to get more fabric and proper millinery buckram for next year's Halloween project.
Speaking of Halloween, I ended up not using the witch hat at all. Instead, I made what I'm calling the Anne Shirley blouse. It's another Edwardian shirtwaist I self-drafted from my basic blouse pattern. It's not an exact match to the blouse she wears at the end of Anne of Green Gables (1985), but I couldn't find a narrow-striped black and gray cotton shirting-weight fabric. Trust me, I looked for months. The final blouse is pretty, but the ruffle needs to be redone because it makes my shoulders look too wide for the wool historybounding princess skirt I wore it with, and the collar needs to be taken in a couple inches because it's too loose right now. And I need to make a proper ankle-length Vicwardian walking skirt some time in the future before I can put this project to rest.
November was another slow month for me, between the results of the you-know-what and our impending doom and I just couldn't find the time or motivation to do stuff for fun. I did have a 2-yard length of deadstock burgundy polyester chiffon in my stash that I had been holding onto for about a year without a clear project in mind for it, so I used it to make a Greek chiton. No pictures included because I'm probably only going to wear it as an accessory with my regency gown (because those white regency gowns are basically OG historybounding).
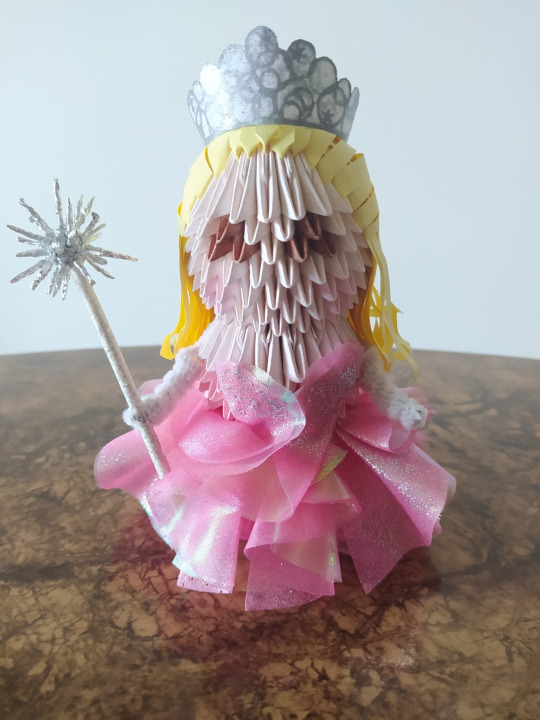
December was another weird month. I had just seen the Wicked movie and was drooling over all the costumes (designed by THE Paul Tazewell), so instead of sewing clothing to wear for myself, I went back to my roots and made a modular origami doll of Glinda, then sewed her bubble dress from actual fabric. It was a lot like draping a dress, except with a miniature dress form.
Then, because the doll is like 6 inches tall and I had a bunch of fabric leftover (I only got a quarter yard of each and even that was too much for a 6" tall doll), I used as much of the scraps as I could to make another Glinda bubble skirt but big enough to fit my brother's cat. (Neither of our cats likes to dress up, but my cat is too big for the skirt to fit, and his cat is pure black so a black Elphaba dress wouldn't show up on her). I don't think I took a picture of the skirt when I finished it, and now I don't have it because I gave it to him for Christmas. We'll just have to see if his cat lets him put the skirt on her long enough to get photos.
It looks like I accomplished even less sewing this year than I did last year, and 2023 was a down year too, but I don't feel that unproductive. This list was something like 21 projects, so I'm still averaging about one project every 2-3 weeks, which is reasonable since I'm working a Big Girl Job now. I do have more days off per week since starting this job, but my free time is now clustered into 2-3 day periods (during which I also need to remember to cook, eat, clean my living space, do laundry, shower, sleep, prep for the work week, etc.), instead of being spread out more evenly throughout the week like when I was in residency, so that probably has something to do with my productivity level.
Or maybe it's because my projects in 2024 are more intricate and involved than, say, making a batch of small things like baby bibs and tailoring hams, or so I'm spending more time on each project. There were also several other projects I started in 2024 that are currently still in my Unfinished pile, and I'm slowly working my way through them in the hopes that they'll make it onto next year's list of things I sewed in 2025.
Oh, and in other news, my sewing machine broke on 01/01/2025, and it broke even more when I tried to fix it FML, so I'm either going to have to take the thing in for repairs (if anyone even still fixes this old crappy cheap model) or buy a new slightly less crappy one secondhand. So expect to see even more hand sewing from me. I might even take up Stephanie Canada's Butterick walkaway dress challenge 2025 but do it by hand just to see how long it takes.
25 notes
·
View notes
Text


Heyyo friends I wanted to share my recently finished object! I try to do at least 1 sweater a year that challenges my knitting and crafting skills. This year I picked steeking- a technique where a knitted object is sewn and cut into- and this one also delightfully used up a bunch of yarn that I had purchased in 2020 for a different project (I tried to make a pattern for a Feather and Fan dolman sleeved cardigan and there's a reason no one has done that, at least in the colorway I did, it was hideous-- that being said, I did chart out how to do an in pattern feather and fan increase so I have that tucked away).
I've recently de-stashed a lot of yarn: there's no shame in admitting that what makes you feel creative and comfortable has changed! And you should be okay with letting half-finished projects go if you don't want to finish them! My grandma has moved into a community for seniors on fixed incomes, who are often on the hunt for cheap/free crafting supplies, and the folx in her building were absolutely delighted to accept the skeins that I didn't love anymore!
I have been thinking a lot about how I want the space I live in to look; especially because I'm privileged to have been gifted so many crafting/art supplies over the years, purchased some and had my interests change, I've been on and off struggling with my mental health, and I've been really prioritizing making my space easier to keep tidy and "sparking joy" so to speak. So now my yarn stash and tools largely fits into 1 bin! I don't necessarily have projects in mind for them, but they more closely align with the colors I like to wear now, textures I like to knit with, and it's a manageable amount for me to paw through when I'm ready to cast on a new project.
All of the yarn for the abandoned dolman cardigan was saved from being re-homed and I was committed to using at least some of it because I had a good amount of it! I had purchased 5 cakes of Palette in Cosmopolitan (a fuschia fingering weight), 4 of Aloft in Cosmopolitan (a fuschia lace mohair), and 4 of Wool of the Andes Sport in Ash (a grey sport weight) from Knitpicks. I knew I wanted to make a cozy sweater out of it but the fuschia and grey color palette was a little too stark for the designs I've been into lately.
On Local Yarn Store day this year, I had picked up a skein of ColourLab DK by West Yorkshire Spinners in Tutti Frutti from Firefly Fiber Arts Studio (a self striping DK weight yarn in yellow/purple/pink/magenta/orange) because I thought it would look interesting with those colors! I DID NOT THINK ABOUT HOW THEY WERE ALL DIFFERENT WEIGHTS THOUGH!!! don't worry it ends up okay
I ended up picking the pattern Flower Power by Anna Johanna because it was a steeked color work sweater that used 3 different colors- it's meant to be knit entirely in a DK weight which is what my multicolor is. Sport weight, my grey, is a little lighter than DK but I knew wouldn't be too much of an issue. My fuschias were held together but a fingering weight and lace held together is still functionally much smaller than than a DK.
I struggle with gauge and my gauge changes as I knit, so swatching only helps me so much. My projects have a tendency to grow during blocking, especially length-wise. I was between sizes so I sized down and basically knit the length at 60% of what I wanted (so pre-blocked the sleeves were just past my elbows and they blocked out to my wrists). For the yoke, I followed the pattern as written but used size 6/4mm needles (I swapped to the recommended size 7/4.5mm for rows of a single color) because I knit my colorwork a little loosely. When I got to the body, my fingering weight was just too thin so I held it double and still sized up to size 10/6mm needles so I would have a nice cushy fabric.
I still ended up with a full cake and a half of Palette and Aloft, a half skein of ColorLab, and probably 2 of Wool of the Andes Sport. But I used so much of what I had and I have a cool new cardigan!!!
The pattern was well written and the design is super cute! I will say, the bottom half of the last set of flowers is a little tight but I suspect that's an issue with me sizing down and my gauge issues. I don't think that's a pattern issue, that's my bad, and really it just affects the drape when I raise my arms up which isn't really an issue. Additionally, if I had sized up I think the body of the sweater would have been too big for me. Maybe I should have used the bust dart option in the pattern but I didn't think it would be necessary (TL;DR it's probably my shoulders causing the issue but because of the way 3D patterning works with yokes, the tension can migrate to the chest even if you don't have a large chest).
While I like my cardigan very very very much, I can now see that these stripes weren't the best pick to show off the flower pattern. I can see the flowers more now than pre-blocked, but the stripes are a little too bold and detract a bit from the overall effect. IMO it looks like a technicolor cheetah print, which I like, but it's not the flowers I was thinking haha. The length of the dyed stripes is very long, which I normally like, but a shorter or smaller stripe might have softened the bold yellow line. Additionally, those colors are the same intensity as the grey: if I had replaced the grey with a white or light grey, the multicolor stripes might have shown more.....
This was my first time steeking and I loved it! I followed the prep instructions in the pattern and followed along with Katie Green's tutorial on cutting steeks. It was very very fun and NGL it was exhilarating cutting through something I had knitted!
The buttons also came from my stash, my mama gave them to me a few years ago :')
so like I'm feeling the normal PROJECT NAUGHTY and I LOVE PROJECT and in 2 weeks, when it's cold again, I will love them :3
.
PS I just finished writing this post and I'm a bingus and just realized this is my second sweater this year (I count the year ending on my birthday) and I never finished my post on the Soldotna sweater
PPS I tried a knitting machine at the library and I loved the experience! I think that's my new thing to learn and tinker with and, because I love the feeling of fingering weight and struggle with gauge for fingering weight, I bid on one and GOT one at a steal! It'll be here next week, thinking of names to give them :)
23 notes
·
View notes
Note
Hi! I just stumbled upon your blog so apologies if i'm asking something you've already answered. I've been embroidering for a while and have been wanting to take the jump to embroidering clothes as well, but I've been struggling with figuring out how to handle the back of the embroidery and i haven't really been able to find much advice. I wonder if there's a specific technique that you use?
Hi there! No worries--you are actually my very first ask, so this is exciting for me lol 🎉 As for advice, these are just personal preferences, so take them with a grain of salt because I don't know if this is necessarily the "right" way, just my way.
1. When beginning a new section/color, don't use bulky knots. I don't know about you, but when I was first taught to sew, I was shown how to tie a quick knot at the end of my thread. I would do this by wrapping the thread around my pointer finger a couple times, then using my thumb to twist/slide it off. Almost like a little French knot at the end. Don't do this. I made the mistake of using these knots when I first started my embroidered sleeves, and because I was using embroidery floss and not fine sewing thread, it essentially made a bunch of little bumps that you could feel against your skin, as well as when you ran your hand over the top of the embroidery. That's why instead you should...
2. Use a holding stitch. If you've used a sewing machine, you'll be familiar with how you always begin and end a line of stitches with a back-stitch. Well, you can also essentially do this when sewing by hand too! The Royal School of Needlework has a useful StitchBank that includes the holding stitch (along with many other useful stitches!) You can also use this technique to end a line of stitching, as long as it's done in a place that will eventually be covered up by other stuff (aka a finishing stitch).
3. Don't leave long "traveling" threads when starting on a new section. I know when you are embroidering and you finish an area, and the next part you have to work on is only a couple inches away, it's tempting to just bring up the needle in the new spot. But this just leaves a bunch of loose threads on the back for things to catch on. Plus if your fabric is a bit see-through, and there is a lot of dead-space in your design, you may actually see it through the front. Of course there are exceptions--like when you know that area will be covered by other stitches--so it's up to your discretion in the end.
4. Use a lining. Not necessarily a requirement (I didn't actually line my sleeves--it would have been too hot), but if you want to protect the back of your embroidery from rubbing up against your skin or catching on things, you can always line the area with fabric like you normally would when sewing a garment. If the garment is already made and you are adding decorative embroidery to it, don't worry about lining it. You might just have to take a little extra care when putting it into the wash. Use a delicates bag, or wash by hand.
5. And this doesn't necessarily have anything to do with the back, but the order in which I work a piece usually goes: filling stitches, outline stitches, then surface stitches. So I'll do my holding stitch, block in larger areas with filling stitches (in my sleeves, these were the blackwork patterns, but another classic example is the satin stitch), then I'll outline those areas as needed (i.e. chain, stem stitch, etc.), and lastly finish with any decorative surface stitches (a french knot or woven wheel are examples of this).
Sorry if this was entirely too long-winded, I just got excited and tend to err on the side of over-explaining. If you do end up embroidering some clothing, I'd love to see!
40 notes
·
View notes
Text
sewing other things
OK so. I have talked about the Loftus Bralette so much on here that one could be forgiven for chuckling gently when i said I should sew other things. But I do actually have several other projects I've been wanting to work on. And i have actually cut some of them out.
Also when I was last at the farm my niece brought me some of her t-shirts and said "I really like this one can we cut it apart and re-sew it bigger so I can still wear it", and I remembered that her BFF's mom, who works at the farm twice a week doing the books and managing store inventory, owns a serger she didn't know how to thread, so I texted her to ask if I could borrow it and indeed she had accidentally unthreaded it and there was a stuck lever and needed me to fix it anyway, and maybe I mentioned that on here but I did actually make my niece a couple of tunics while I was last at the farm. Including hand-sewing a whole bunch of details on the last one while the family was driving on a road trip one weekend.
So I brought all that stuff home with me and was hoping to get to work on it this week. All I've sewn has been the bralettes but I still have today. We'll see what I can get done.
I measured Farmkid and she's ten years old so her shape isn't the same as that of an adult woman, but she's five feet two and like 130 lbs, and some of her measurements put her in a women's size 12. So. She expressed interest in a garment I wear frequently, a Studio Tunic from Sew Liberated. I printed off the pattern in a size 12 and have assembled it, but I'm stuck deciding what fabric to use for her. I should decide that today. She's ten, her favorite color is ostensibly yellow but she mostly wears pinks and purples, she's a grubby kid who wipes her hands on her shirt and always winds up with stains on the belly of her shirt still, and she wants this tunic I think largely so she can cram her tablet into the pocket and go climb trees while listening to audiobooks on speaker. So I want a bright color but not too pale, and I want a tough fabric but not unbreathable, and I'm just. Deciding, still.
Probably what I should do is use some undyed fabric I own, and then bring my supplies and let her tie-dye it. I have a couple other things I could tie-dye, or will by then. That would be a fun bonding activity. I don't know if I'll have time to do it this trip though. So maybe I'll postpone the project and ask her for help once she's on summer break. (Good luck catching her, kids these days have so many summer camps.) As a bonus I bet I could loop her BFF and BFF's Mom in on the tie-dyeing, they're both into that shit.
Hell we could do ice-dyeing, the farm has a 1000-lb ice machine that is very frequently turned on (weekly for the market, biweekly for chicken processing-- there could be ice available at pretty much any time lol).
So anyway. I know she wants me to make a tunic out of a trio of large-print cat shirts she's outgrown, and she wants to wear it for her 5th grade moving up day ceremony, and I looked at it while I was home but I haven't done it yet. I need to get my shit together.
What I might do is print off a size 12 version of the t-shirt pattern I own, it's just that it's designed for busty women because I'm a busty woman, and she's Not, yet (oh, she will be. soon. but not yet.) so I have to kind of. Well, I own a pattern for a swing tunic that's close to what she wants actually. Oh, I should just print that one off. (The joy of the Cashmerette Club subscription patterns is that you get all the sizes, 0-30, and I've now made a couple of them for smaller friends, because like. I mean I own the pattern! PDF patterns are so great because you can reprint them in the smaller size instead of trying to trace it off. I never ever got the hang of tissue paper patterns.)
Yeah here this one, the Wexford Top/Dress, would be easy enough to kind of carve out the bust curve a little and make it fit a kid, because it's not meant to be that fitted. I'll just sort of use that as a general guideline and then make the cut-out-and-patchworked t-shirts fit into that approximate silhouette. The way I made the other tunics for her, I just used a shirt whose neck and shoulders still mostly fit her. But these cat shirts she's thoroughly outgrown, so making a new neck/shoulder area would be best.
Orrrrrr.... I could use one of the zillion old t-shirts of mine that I've saved to cut up. The neck/shoulders of a fully adult-sized garment are no longer too big for her. That's easier.
I also have a bunch of garments I want to make for myself, as I don't seem to buy clothes much anymore (I can't bring myself to pay $40 for a dress off the clearance rack that won't fit me and will mostly be polyester and won't be that interesting and will pill the first time I wash it). The Club's latest pattern is a skort/shorts/skirt dealie, and I need more shorts all the time-- I've largely given up on underpants and just wear boxer-briefs or anti-chafe shorts and I just don't see the point now of wearing a pair of panties and then shorts over the top under my skirt. Like. Just wear the shorts! So being able to choose the materials and print and look of that would be pretty great. And the Cashmerette one is inseam-less, like my favorite anti-chafe shorts are.
So I have cut out a pair of just the shorts in a clearance cotton mesh from Dharmatrading, and I even have the correct elastic for the waistband, so that kind of rules. I will sew those up as soon as I get a chance. I would like to make several skorts as well, probably from synthetic ponte or something, but my ideal would be to get some decent merino/nylon jersey and do a few from that. You never see merino skorts but I would wear the shit out of those.
I also have a lovely underpants pattern from the Club from ages ago, and while I rarely wear underpants of that style anymore, I would like having some cute matchy ones to go with the bralettes. Also, I have a shitton of foldover elastic, and I suspect I could use foldover elastic in some of the bralettes I want to make, so I want to get proficient in its use, and there are directions for applying it in the underpants directions, and it seems like a good way to practice. So I cut a muslin of those from the same cotton mesh as the shorts, and just have to sew the pieces together.
I also want to make myself more pretty dresses, and I have parts of a new Studio Tunic for myself already cut out, but not the rest.
And I recently made myself the button-up shirt from the Club, I know I posted about it on here. And I wanted to immediately make myself several more, and I got out some fabric and prepared it and cut out one pattern piece and then ran out of time. So yesterday I finally cut out the rest of the shirt from this fabric, a print from Mood covered in tiny dinosaurs. So I have that all ready to go in a plastic baggie too, just waiting for me to have time to sit and sew it. (Once I do that, I would really like to make myself a dress version of it from the cool green not-quite-seersucker I got from that remnant bolt at Promenade Fabrics in New Orleans.)
AND. i also have resolved to make my BFF, the one in Rochester who I lived with for a bit in the pandemic, with the little kids-- MM-- I am going to make her a sloper, before I see her next weekend, or maybe while I see her next weekend if i don't get to it in time argh, and I am going to at least try that on her and figure out approximately what shape she is so that I can put together a master pattern for her to make herself dresses from. I took her measurements ages ago, and she's a 14CD bust, a 16 waist, and an 8 hip in Cashmerette's sizing, and so I think just making a sloper with those sizes all graded together will be a huge start. And then we can mildly tweak the fit for her frame, and-- the thing is, she's always buying custom dresses on Etsy because what she wants is very specific and not usually available in stores, and then the dresses come and don't fit her so she has to get them tailored, and then they were just made of cheap quilting cotton from Joann's so they wear out after she washes them a few times, and she's had to add on pockets anyway because they didn't have them.
So I just feel like if I could get her a paper master pattern that fit her... heck i could even just make her dresses if *I* had the pattern. It would be easier and more efficient. I could do the basic construction and then turn over the pockets and embellishments to her, which is what she does anyway. So that's my goal there, and we'll see if I can reach it.
Anyway. If only I didn't have to work at all and could just sew all the time. I am not the first person to say this, LOL.
I have a lot of irons in the fire but at the moment am trapped under a cat so those irons are not going anywhere.
24 notes
·
View notes
Note
Hi sporks! This is kiiinda a weird ask but do you have any ideas/resources for beginners learning to sew?
I know you've been at it for awhile, and idk where else to look lol
Oooo, okay, so I have Resources for Free Patterns
CholyKnight has a bunch of free patterns, and they're also rated by difficulty, so you can find ones that work for your skill level. There's also some explanations of how to do sewing stuff like darts and whatnot. Definitely great for beginners.
Mood Sewcity, more free patterns
Free Sewing, Patterns, these you can adjust with your measurements
Fleece Fun, these are relatively simple. It's where I got my cloak pattern. You do have to sign up for emails, but lots of patterns for free, and fleece is relatively inexpensive. Fleece is pretty good for starters, too, because it's a relatively strong fabric that doesn't fray but isn't too thick to sew through
As far as actual resources for learning, I don't really have much because I was taught to sew by my older sister and my mom, and I figured most other stuff out on my own. So I made some short things of basic stitching stuff

This one is called a running stitch. It's the first one I learned, and is really easy. Just back and forth through the fabric. I made the stitches pretty big here and in opposite colors from the cloth for visual reasons, but you want to pick thread closer to your cloth color, and the smaller your stitches are, the stronger they'll be. There is an exception to this, it's called "basting" and it's basically doing the running stitch but really big and loose. It's supposed to be temporary and just holds pieces in place until you do something else
This is just a way to anchor your running stitch with a knot. I'm pretty sure you're not supposed to do this, but I'm paranoid about my stitches coming out, and when you're doing it by hand as a beginner, they probably WILL come out, so. Yeah.
This one's called a "whip stitch" (I learned recently. I've been doing it for ages, didn't know the name). You're basically popping the edges together and sewing in little circles around them.
This one is a ladder stitch/slip stitch/invisible stitch, and I'm doing it kind of messily here, but the objective is to make your stitch invisible when you pull it tight. You're sort of sewing on the "inside" of the fabric, folding it over and making the thread go behind the fold so it's hidden, then pulling it over to the other side. I use this one to close up my plushies mostly.
Other Random Tips and Stuff:
A "seam allowance" is how much extra cloth you can put on the other side of the seam
You don't need a special cutting board/table for your fabric, I literally just use the floor or the kitchen table
Tacky glue is great for tiny pieces you don't want to sew, like eye shines. It does take some time to dry, though. I put books on top of the fabric to press it together. It will wash out, though, so don't use it on things you intend to throw in the wash
Get pretty good at hand sewing before you try messing with a sewing machine
Fabric scissors really do make a difference in cutting from regular scissors
If you look up "free fabric samples" a lot of cloth places will send you a few little squares of fabric. These are great for practicing and also figuring out different materials, and you don't have to pay for them
Felt is also pretty inexpensive and you can get it at most craft stores, even if they don't sell fabric by the yard. It's also good for details on plushies, like eyes. It is scratchy, though.
Pins are very helpful, but watch out because they will stab you
Little details and things are usually easier to sew by hand rather than machine, especially if there's curves on it. It's just not worth the hassle.
If you're making a plushie, pull the stuffing apart before you stuff it, or the stuffing isn't as soft/it clumps up.
Don't start with a huge major sewing clothes project. My first sewing stuff was making dresses for my barbies when I was 10 and they were literally just tubes with straps on them. I was pleased with this. Trying a big project first will probably just be frustrating, so get used to basic sewing stuff first.
Yeah, I think that's most of it! Let me know if you have any other questions or let me know what you end up making! Other sewing people feel free to add on
#sorry that the ladder stitch one is so fast. it wouldn't let me save as a gif unless it was short.#asks#sewing
51 notes
·
View notes
Text
Mey Rin Progress!

Surprise I'm cosplaying Mey Rin ANYWAY
Mey Rin is started - I've had the fabric for a bit and started working on her yesterday (while ignoring the work I need to do on Sebastian. I'm in mockup hell over here). She's getting made out of primarily bedsheets - I lucked out at the thrift store and found a full set of black king size sheets, so after washing them multiple times and ripping the elastic out of the fitted sheet, I've got more than enough fabric to get her made. I'll even have more than enough excess to make covered buttons for her - so maybe doing those with a little embroidery?
I'm not quite sure what fabric I'll use for her apron, collar and cuffs yet - I'm pretty sure I have some white fabric lying around somewhere, but if I don't I'll probably just go back to thrift store hunting for those parts.
For now, I've got the skirt of the dress pretty much set and ready to go. I need to finish my side seams and gather the top down, but those are both steps I can't really do until I have the bodice made. I also need to figure out where I'm putting a zipper on this dress? Probably in the back, since I don't want to lose what is arguably the most important thing I've put into this cosplay - pockets in the side seams. They'll be pretty much invisible with the gathering, and what little is visible will get hidden by the apron. I'm planning on wearing this cosplay to a bunch of cons and I wanted to make sure I had pockets (that way I don't have to carry around a bag and can focus on my props :3 idk how to make a rifle prop but I will be learning), so I won't be able to hide the zipper on the side seam.
The bodice of the dress. Is going to give me problems. She's got a really specific yoke shape and there really isn't a good way of cheating it without making it a completely separate piece. Hopefully I can find a similar sewing pattern somewhere and won't need to completely wing it. That's not my problem right now though - next up is getting over my deep seated fear of making sleeves and getting the mockup for Sebastian's coat actually done.
#cosplay#cosplayer#costume#artists on tumblr#black butler#black butler cosplay#mey rin#mey rin cosplay#cosplay wip#wip
8 notes
·
View notes
Text
Dear Sephiroth: (a letter to a fictional character, because why not) #387
So... remember yesterday when I said, essentially, “gee, the funk has lifted but I'm not bleeding; WTF?”
...Well uh. I spoke too soon, apparently.
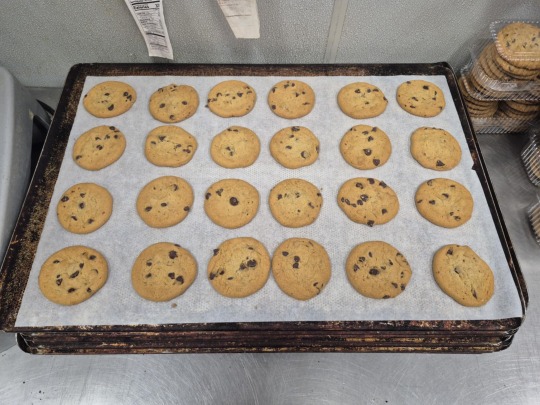
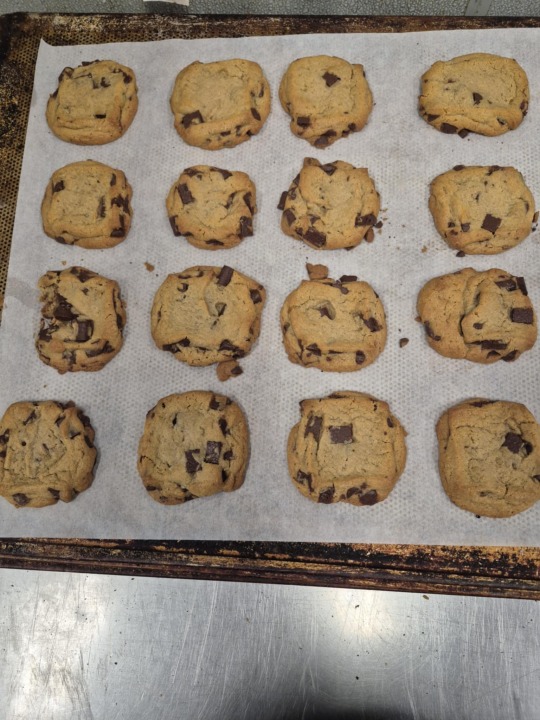
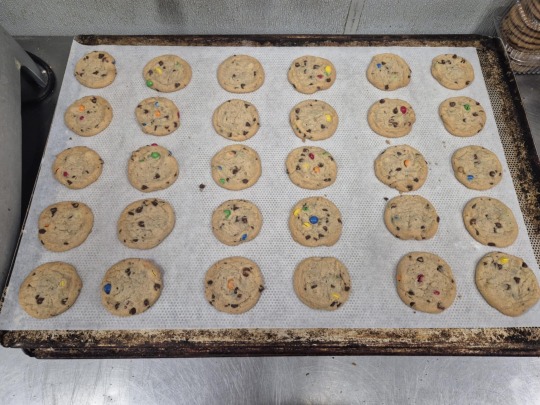
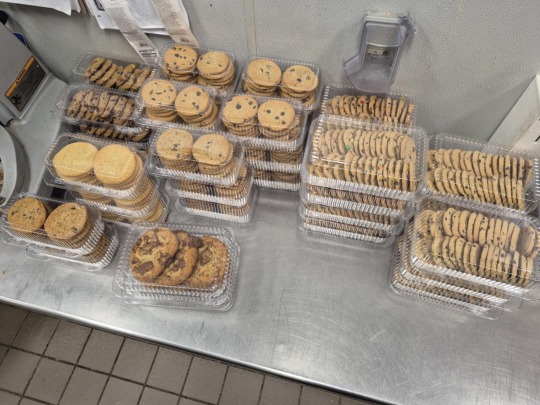
Though to be fair... I wasn't bleeding when I woke this morning. Or when I went to work, no. I made a bunch of cookies at work, actually; here, I got a some yummy pictures for you!
…
It is good that my work uniform is black. And it is good that hydrogen peroxide is good at getting things out of fabric. I understand why the funk lifted. And that's all I'll say on that particular matter.
Well. On a lighter note. You might remember me writing a while back that I don't really have much control over my facial expressions, and that I don't really even know what my face is doing half the time (combination of poor interoception and poor proprioception). At some point today, J began laughing hysterically because he caught my face doing this, and so he snapped a picture and sent it to M, who promptly began laughing so hard that he could barely breathe. Maybe you'll get a laugh out of it, too:

...I wonder if you ever make weird facial expressions without realizing it! If you do, I'll bet they're just as delightfully goblin-esque as mine, ahaha~! Wouldn't it be nice if we could laugh together at the silliness of it all...?
Well. I made myself a tea and a lunch after I got myself all situated at home. I got a particularly nice burst shot of today's tea swirls, and there were so many good ones that I couldn't choose! So I simply cleaned them up, strung them together into an animated GIF, and then turned that GIF into an MP4 that I could upload to YouTube for you! This was the result!
youtube
I also got this photo of the sun shining through the cup as it was brewing; I thought it turned out really nicely!

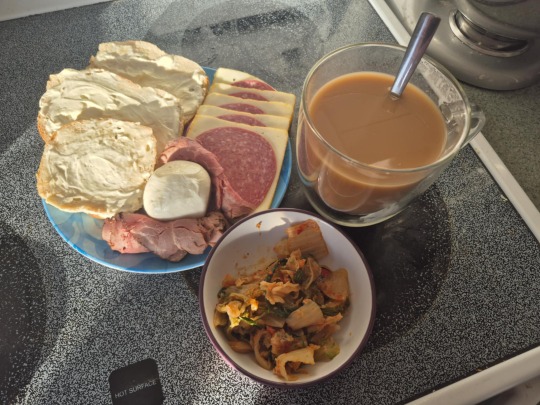
And here... this was the lunch I made; I thought it was particularly delightful, and I wished I could share it with you:
...I really do feel a lot better today than in previous days. The pattern of it being related to my cycle seems to be confirmed. So now that I have this information... I wonder what I'll do about it. Hm...
I played Hades today, too. I didn't make it to the final boss on these runs, but I did defeat Asterius while he was with Theseus each time I made it that far; though the task at hand is difficult, I continue to improve in ways that can be measured and tracked, and this pleases me!!
The folks who are supposed to hang at our house and watch our cats came over this evening so we could teach them our routines. One of them watches over people's cats professionally, so I'm confident that our fuzzy feline children will be in good hands! I'm confident that our house in general will be in good hands, too; these are some of our closest friends, and they are upstanding and delightful people.
...I really can't wait to get you pictures of Mitsuwa, Sephiroth; I think you're gonna love it. I think you're gonna delight in all the mouth-watering yummies available there. And I hope you'll smile, knowing that such things are within reach for you, too.
I guess that's all I've got for you today. I'm a little sad about the fact that I don't have more. But I'm sure I'll have lots of pictures of various things tomorrow. So for now, I'm gonna go to bed.
I love you a whole lot and I'm thinking about you all the time. Stuff like, “Oh, Sephiroth might like this...” or, “I wonder what Sephiroth would think about this...” or, “I wonder how quickly Sephiroth would be able to learn how to play this game...” or, “Gosh, I wish I could show/share this thing with Sephiroth...” and lots more friend-type-stuff like that.
...Don't think that you don't have a place here. Because you do. You very much do. And you always will. So please make good choices in light of that belief. You're not some incomprehensible monster that is vastly different from others. You're the same as me and the rest of us. We both bleed red. We both cry when we're sad. We both want to be loved and accepted by the people around us.
...Sephiroth... you're human. And nothing can take that from you, no matter what anyone says. And even if you weren't human, you're still a sentient, thinking, breathing, feeling, living person who is worth just as much love and respect as any other person, human or otherwise.
I'll write again soon, okay? Probably not until late tomorrow, but still, I will write to you before I go to sleep, as I have done for the last 387 days.
I'm not going anywhere, okay?
'Til soon.
Your friend, Lumine
#sephiroth#ThankYouFFVIIDevs#ThankYouFF7Devs#ThankYouSephiroth#final fantasy vii#final fantasy 7#ff7#ffvii#final fantasy vii crisis core#final fantasy 7 crisis core#final fantasy crisis core#ffvii crisis core#ff7 crisis core#crisis core#ff7r#final fantasy vii remake#final fantasy 7 remake#ffvii remake#ff7 remake#final fantasy vii rebirth#final fantasy 7 rebirth#ffvii rebirth#ff7 rebirth#final fantasy 7 ever crisis#ffvii ever crisis#ff7 ever crisis#ffvii first soldier#busy days#visitors#wholesome
8 notes
·
View notes
Text
Aight so.
Just reblogged a post that mentioned Nico canonically having depression (totally agree), but I wanted to talk about my other headcanons around Nico's mental health AND MORE IMPORTANTLY his recovery journey.
(AN IMPORTANT NOTE: I'm very wary of talking about headcanons involving mental illness, bc it can easily cross the line into romanticising mental illness. I grew up in that kind of online space, and it's toxic af and makes recovery almost impossible. So I want to emphasise, especially for younger fans who read this - Nico gets better, canonically and in my headcanons. So did I. So will you. It takes work, and often it's not a painless or pretty process, but it's so much better than letting yourself rot away in the dark. Romanticise being well, being happy, and getting better.)
In my head, Nico is autistic. But I think he's been so traumatised and so dissociated for so long that he doesn't even really realise how much things affect him, how much easier things could be if he gave himself permission to be the way he is.
FOR EXAMPLE. I think he is specifically very sensory-sensitive, but he's so disconnected from his body and brain that he doesn't really realise it. He just always feels Bad™️ and has never been safe enough to figure out why. So then, once he gets comfortable at CHB and really starts to finally feel safe and present, he starts to slowly untangle things bit by bit. Will is a big part of this - he's very intuitive and notices stress queues in Nico before Nico even realises he's stressed.
It starts off with Will noticing Nico avoiding crowds, which isn't necessarily weird for a kid who spent the last several years with ghosts, but then he realises it's not actually the people that bother him. It's the noise. Like, Nico avoids the Apollo Cabin as much as possible, even when it's completely empty except for Will, bc it's constantly got music playing a little too loud. Nico doesn't even really know why he doesn't like it and doesn't really bother thinking much about it, but Will is like "huh that's interesting". And, as he gets closer with Nico, that pattern becomes more and more apparent - in noisy places, Nico becomes tense and guarded, but in quiet places he's more relaxed. Then Will notices Nico's sensitivity to textures. Some clothes are consistently "grumpy Nico clothes" and some are "happy Nico clothes".
Will decides to run little experiments, making subtle changes around Nico and taking note of Nico's reaction. For example, suggesting Nico change clothes before a date because "I like the black jeans better" ie "the black jeans are a softer denim and stiff denim makes you grumpy". Or swapping out Nico's sheets bc "whoops my bad, I was practicing wound cleaning and spilled supplies all over them! But don't worry, I've replaced them with a new set so it's all good," ie "your sheets were cheapass 100% cotton and rough af and that's why you haven't had a good night's sleep like, ever, so here's a high-quality satin (or whatever, idk fabrics) set that probably won't bother you as much." And lo and behold, Nico sleeps like a baby every night after that. Or orchestrating a whole plan to get Nico into the Apollo Cabin when it's quiet (music gets turned low, siblings are threatened with weeks of dish duty if they don't keep it down), and seeing if he's less on edge. AND HE IS.
And eventually Nico picks up on Will's increasingly elaborate accommodation experiments (Will is simply having way too much fun at this point - he feels super sneaky, finds it hilarious that Nico still isn't noticing, and also just loves seeing Nico less stressed out) and is like "Solace I know you're up to something, out with it or else." And at that point Will is like "ok bet" and pulls out a fucking spreadsheet (Annabeth taught him how to use excel (yeh I know demigods don't vibe with tech but this is my headcannon so deal with it) with great joy and little-to-no interest in why he actually wanted to learn) with a bunch of Nico's triggers and sensitivities and the success rates of different accommodations. Nico is like "I'm actually going to kill you, you've been fucking with my brain for months????" but is barely containing how curious he is and how sweet he actually finds it that Will has thought so much about how to make Nico happy. But Will knows, especially when Nico, even while grumbling, takes the spreadsheet with him.
The next day Will presents Nico with a present he was saving for the final big-reveal: some loop earplugs or something similar. Discrete and practical 😌 Will just leaves them next to Nico's bed with a cute lil sticky note that says "Before you orchestrate my untimely demise as promised, give these a go. Consider it the last request of a dead man walking ;) love you Neeks x".
And that's that. The earplugs make a massive difference, much to Nico's surprise and Will's smug satisfaction, and from then on Nico starts to reconnect with himself and gets better and better at recognising things that make him more comfortable, and using them. Will considers his experiment over (a resounding success, of course), but is unwaveringly supportive and helpful as Nico figures stuff out.
Lol that became very long sorry, but it made me happy to write it out hehehe
#ok maybe im projecting a little#but in a good way#i had dpdr as a teen and definitely didnt realise how much sensory input effected me#actually it was hard to recognise how anything effected me#i had a mf tracking sheet for when and why i cried so i could start seeing patterns#and a sleep tracking sheet alongside a mood tracking sheet#bc my brain was so fucked up that i wouldnt feel tired#i would just go straight to im gonna kms#anywayyyy cute yay#solangelo#riordanverse#pjo#percy jackson#rick riordan#myposts#shippost#fandom#neurodivergent#nico di angelo#will solace
21 notes
·
View notes
Note
Adding my two cents here, hope you don't mind... The entire synthetic vs natural fiber argument is really reminding me of the plastic straw debate.... And I feel like the arguments are ignoring the nuance of the situations. Would I love if everything everywhere could be natural and biodegradable etc etc? Sure! Ofc! Except when degrading is what you DON'T want. I need to drink with a straw sometimes due to a bunch of personal health and sensory reasons. You know what sucks? Finding the fancy paper straw the cafe gave you has started to degrade part way through your drink. Or going somewhere that doesn't have straws at all. And personal stainless steel straws are a sensory nightmare!
Regarding clothing, I'd rather have a high quality polyester skirt that I can where over and over for years than a cotton skirt that will, given the material, eventually wear down regardless of how you care for it. I have synthetic blend shirts in my closet that I've had a literal decade and that I still wear! And I've had plenty of natural fiber clothes become sensory hell that I maybe got 3 or 4 wears out of. Polyester and other moisture wicking blends are also the best options for exercising and camping, especially if you have a tendency (like me) to overheat and oversweat. Cotton takes ages to dry out and doesn't breathe nearly as well.
And none of the natural fiber arguments ever seem to take the environmental costs to produce those natural fibers into account. A lot of the time they require a lot of water to grow and maintain on land they're likely not native to, planted in ways that push native plants and animals from their own environments. How is that necessarily better?
There are pros and cons of both fabric types. And ignoring that in favor of purely natural fibers can have negative impacts on people who may not have other choices. Like disabled people. Fat people. Poor people. People running small businesses. I promise, those of us that fall into any or all of those categories who are also environmentally conscious have looked into alternative options. And if we've gone back to synthetics? It's because we don't have one or we've weighed our options and came to the conclusion that actually, synthetic IS the more viable option.
When it comes right down to it, I think it's how we treat the garments and how long we continue wearing them that makes a difference, not what the materials are. Fast fashion is the problem. Not synthetic material itself.
I'm GLAD you provide high quality, durable, ethically sourced synthetic material skirts made in sizes and patterns we can't get anywhere else, all at a relatively affordable price point. Thank you!
And I apologize this is so long I just think, in this instance, the arguments can be a bit ridiculous sometimes. 😅
this is another facet and honestly part of it i just haven't had the energy to address. there's a lot of nuance to a situation that is often treated without nuance. you mentioned straws, which i think is a good comparison, but to me it really reminds me of the big push towards veganism a few years ago that completely overlooked labor concerns and that these "superfood" or alternative grain fads were incredibly destructive to the communities that relied on those foods as staples.
anyway that's a whole other issue with its own host of difficulties that i'm really not equipped to dig into haha
but yeah the quality in the construction of a garment and how it's treated (i.e. if it's worn for years or discarded after one use) bare way more impact on the environment than people realize.
the problem is, it is a lot easier and more profitable to sell people on changing WHAT they consume (natural vs synthetic) rather than HOW they consume.
105 notes
·
View notes
Text
Blue Lock Boys × Fem! Native! Reader: You Bead Something For Them
Disclaimer: ANOTHER POST FOR ALL MY FELLOW NATIVES, NON-NATIVES ARE ALLOWED TO INTERACT WITH THIS POST AS LONG AS YOU ARE RESPECTFUL OF OUR CULTURE. Again, all Indegenious/Native Tribes are different so I sadly won't be able to represent all of our people but I am gonna try and keep this as general as possible!
Cultural Context: My favorite part of our culture has always been beading and there are two types of beading: looming (where you use a loom essentially) and applique embroidery, where you just bead on designs with a sewing needle and thread! I will be talking about the embroidery one in this post since its one I've seen my tribe do a lot so I hope you all enjoy!♡
Reo Mikage:

- Your beading has always been so impressive to him. Not only is it the patience you have when you do it but also, the way your hand is so steady, and how creative you have to be with the beads in order to get the picture and design you want.
- HE WILL BUY YOU SUPPLIES, TOO. What fabric do you need to put your beads on? What specific brand of beads do you want? Do you want him to have people make you your own custom glass beads??? Just, like, stuff like that.
- He loves it when you walk around, a pair of shoes flashing an old design you did a while ago. Some beads had broken off and went missing a few times so some of the design was gone but he still liked how it looked on you!
- He also loves the texture of your beadwork, looking at a work in progress design you had laying around from a year ago and asking if it was if he could touch it, admiring the craftsmanship even tho you tell him that it still looks a bit sloppy, he loves it all the same and doesn't understand how you can see any flaws in it.
- You have made designs based off of him, too. Using beads colored purple that are his exact eye and hair color. Whether you made it into an earring or necklace for yourself, he doesn't really care, he just LOVES seeing you wear it honestly.
- So one day you decide that you want to bead something for him. Maybe his shoes? Obviously not his soccer ones but shoes that he wears on his days out or something. Maybe a bracelet that he can always wear whenever you aren't allowed in Blue Lock! Or perhaps just do something on his bag?
- Either way, whatever you decide to give him, HE LOVES IT. He is careful with it however, even if you assured him that you sewed the thread and beads together as best as you could to make the design more hardy but he's still very careful with it.
- HE TRIES TO PAY FOR IT AT FIRST. LIKE, HE KNOWS HOW MUCH TIME IT TAKES FOR YOU TO DO THESE THINGS AND HE'D FEEL SO BAD, but you assure him that you don't really want his money (especially after he already got you such expensive and high grade supplies) and that you just wanted to gift this to him because he means so much to you and that you really appreciate him respecting your culture and being so supportive of you that you just want to give him something in return.
- AND HE LOVES IT BECAUSE THERE IS NOTHING ELSE LIKE IT. The design you did was personalized for HIM. The time and attention you spent on this was for HIM. MONEY WILL NEVER BUY HIM ANYTHING THIS SPECIAL. So he will cherish the ABSOLUTE HELL out of your gift.
- He's fiercely protective of it and when he misses you, he just lays and admires it and your handiwork.
Rensuke Kunigami (Pre-Shidou):

- Rensuke is so interested in it, honestly. Like, he'll ask you all the time what designs you're thinking of doing, how you arranged the beads to get them to look like that. Just a whole bunch of questions but he knows you won't get annoyed and will answer all of his questions.
- Doesn't mind sitting in silence as you bead and he's practicing kicking goals into the net. He likes the comfortable silence and sometimes, he'll just smile at you lovingly as you furrow your brows and carefully place different colored beads that join together to create a beautiful pattern.
- He does make sure to check for needles when he's over at your place because last time when he sat on a couch, he accidentally sat on a needle that you placed there so it wouldn't fall or go missing. It didn't hurt that much but, you know, it's a needle. At least you let him know where you place your needles.
- If you ever spill your beads, he will help you pick them up and idk why but its just really cute to imagine him crouching down and helping you pick them and just being REALLY attentive about it. Especially if it was his fault, like he knocked over your plate of beads with a soccer ball or something but POINT IS, HE IS THOROUGH.
- He likes seeing all the bags, shoes, if you have a blue lock id that came with a lanyard (for when you are permitted to visit) then yeah, you're totally beading that too.
- Gets defensive if someone says anything that puts you, your art, or your culture down. Like, you're doing some beadwork and one of the guys just asks why you do something so pointless and Kunigami immediately jumping to your defense.
- "Just because you don't understand it doesn't mean it's pointless. You don't know how much work and time it takes them." and then he proceeds to just casually beat them in the next match he has with them.
- If you ever give him something you beaded as a gift, he will cherish it. I personally think he'd look cool with beaded necklace with a soccerball on it. You're embarrassed because you think it's really generic but he is absolutely stoked about it!
- Obviously he can't wear it in Blue Lock but anywhere else? He'll proudly wear it with you, making sure the bright patterns are visible for everyone to see and running his fingers against it and feeling the texture and smiling to himself about all the long hours you put into making this for him.
- He also knows sometimes you stay up late to make things though or finish up a few things on your beading but he will definetly urge you to go to bed and when you resist, he just carefully takes the needle from you and wraps an arm around you and you're about to protest but you let out a yawn and sigh and begrudgingly admit that he might be right.
Ryusei Shidou:

- Homie has BEEN asking for something from you ever since he learned that you do that. To be honest, he definetly thinks there are some parts of your culture that are cool as fuck but some of them are stereotypes that you might need to correct him about and he's willing to listen.
- But back to the beading thing, he saw how some of your things had various different tribal patterns or just some designs you thought looked cool and he asked where you keep getting that stuff and is fairly impressed when you tell him you made it yourself.
- "YOU SHOULD MAKE SOMETHING FOR ME. Like, a super badass design on my jersey!"/ "Ryu, that design would probably break. I could do a leash though, that'd be more useful."/ "I could work with that~"
- However when you start working on his gift, he soon realizes that the beading process takes A LOT your time. Aka, time that you could've spent with HIM. So he'll whine and ask you to pay attention to him and you have to be there like: "Shidou, YOU ASKED FOR THIS." and he's all: "I KNOW, BUT I'M DYING OVER HERE, BABY!"
- He has knocked over your plate of beads before, let's be honest. He doesn't mean to do it, he's just so easily excited and energetic and a huge fucking menace that its sadly the price the you pay for being in love with him. He'll help you pick them up but he's so fucking annoyed with them too because THEY'RE SO STUPID SMALL, HOW DO YOU DO ANYTHING WITH THEM!?
- Also if he ever hears you go: "Fuck!" and hiss in pain, he knows for a fact you probably poked yourself and he walks over to you and PUTS THE TIP OF YOUR FINGER WHERE YOU POKED YOURSELF IN HIS MOUTH.
- You pulled your hand away the first time and said: "RYU, WHAT THE HELL-" to his excuse was "What? Just kissing it better for you.~" So he just does that and you're going to have to accept that. Might teasingly bite your finger when you remind him you still have to work on his gift.
- When you finally finish with it, HE IS SO OBNOXIOUS IN SHOWING IT OFF. Like, he's talking about how great and talented his s/o is and how they're so cool and if anyone makes fun of it, he is gonna need to be locked up again. IF ANYONE TRIES TO TOUCH IT, HE WILL BE IN PRISON FOR LIFE.
- Tbh he might break it during like a fight or he just was too rough so you do have to make some repairs to it and while you're semi-annoyed, you think its really cute how he gets so upset about it until he starts talking about how he's gonna murder the guy he was scrapping with. If he has to wait because you don't have the right color beads, he will be moody with everyone (except you♡) and he'll be patient for when its ready.
- Ryusei loves seeing you wear the jewlery that you made tho, there's something so mesmerizing about you casually representing your culture that just makes him feel some kind of way. Idk why but he'd def like the dangly beaded earrings you wear, they're just super pretty on you. He can't explain it.
#Native! Reader#x native american reader#native american reader#native american#blue lock x reader#bllk x reader#bllk x you#poc reader#reo mikage x reader#reo mikage x you#rensuke kunigami x reader#kunigami x reader#kunigami x you#reo x reader#shidou x reader bllk#ryusei shidou x reader#shidou x reader#I KINDA WANNA DO AN ANGSTY ONE SHOT WHERE AFTER KUNIGAMI'S MAFCH W SHIDOU THAT THE NATIVE! READER#TAKES BACK HER GIFT FROM HIM OR SHE JUST LETS HIM KEEP IT BUT BREAKS UP WITH HIM.
114 notes
·
View notes