#action dowload
Explore tagged Tumblr posts
Text
It is done
For the people who want to read the book straight through and not deal with Tapas or ads, here is Soulless Prince, Arc 1!
this is a reflowable ebook file, so it will go on your kindle or whatever other e-reader you have
#writing#writeblr#writers on tumblr#books#books and reading#soulless prince#swords and sorcery#action adventure#reading#long reads#female writers#ebook#ebooks online#dowload ebooks#kindle#original fiction#fiction#indie author#novel writing#author#romance#isekai#transmigration#reincarnation
2 notes
·
View notes
Text
Does anyone know where i can dowload 911 episodes or general live action tv show eps? And if yes can you dm me a link or put it in my askbox, my month would be MADE;;
#911 abc#the website i am streaming on is never loading properly and i have to pause every few minutes. this is fucking hell
3 notes
·
View notes
Text
Ms Mystic #2 (1984)
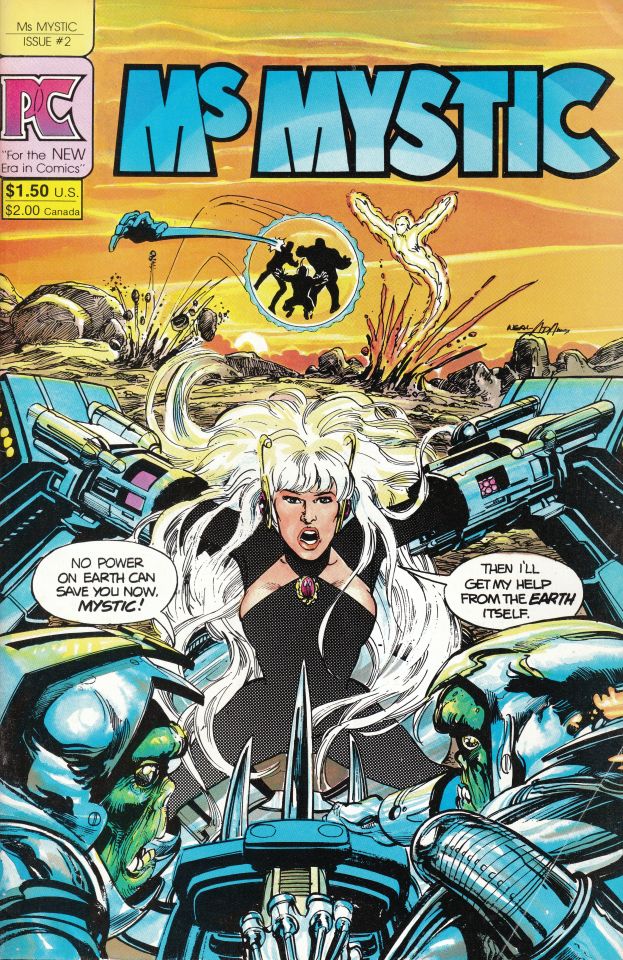
I bought this comic-book because of the Neal Adams cover. Nice surprise after discovering he is the author of interior pages also. Even not being a Continuity Comics' book, Ms Mystic is property or Adams, according the credits. In fact, it had a reprint/relaunch on Continuity a few years after.
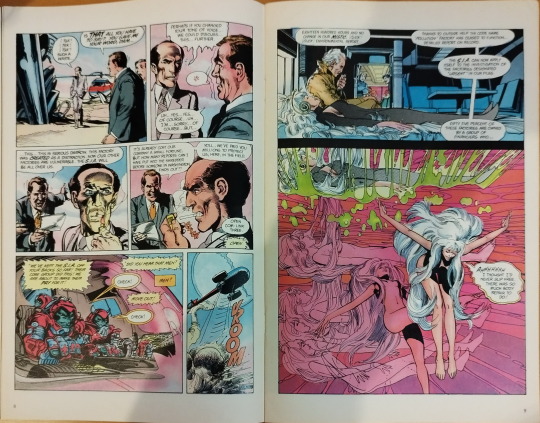
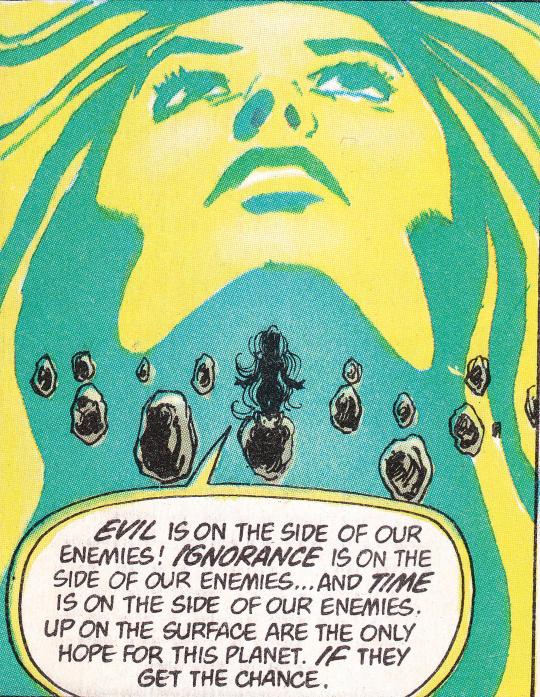
The basic concept lies on a group of ecologist super-heroes. At the beginning of the book, we have a resume page that tells the story so far, more than enough to understand everything. We are in the middle of Ms Mistic (and friends) origin story: She comes from another dimension, brought to our planet by accident by a group of tecno-ecologist scientific warriors, while they were in the middle of a battle against the security forces of a specially toxic factory. The second issue starts with an inconscious Ms Mystic exploring the story of Earth in the astral plane. There, she makes contact with Mother Earth (really) and convinces her to provide elemental powers to the team, that is fighting (and losing) in the physical plane. Voilá: We have a full brand new super-hero team. The narrative/stylistic core of the book can be found in its central pages, where the events of physical/astral planes are narrated in parallel along double pages, dividing both narrative lines with a strong black line.
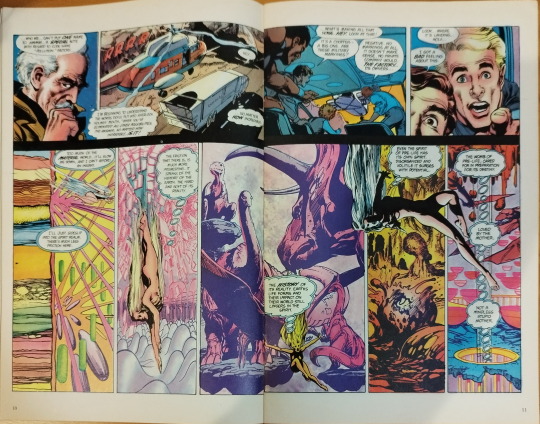
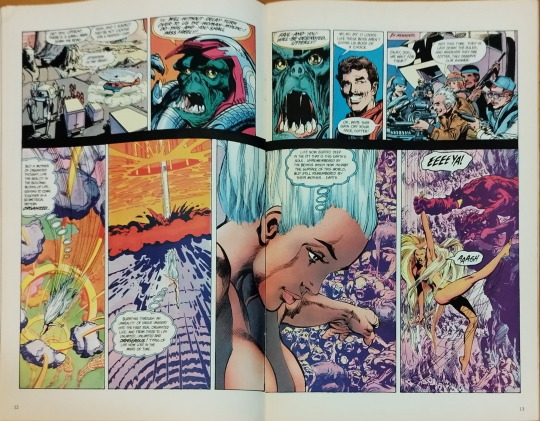
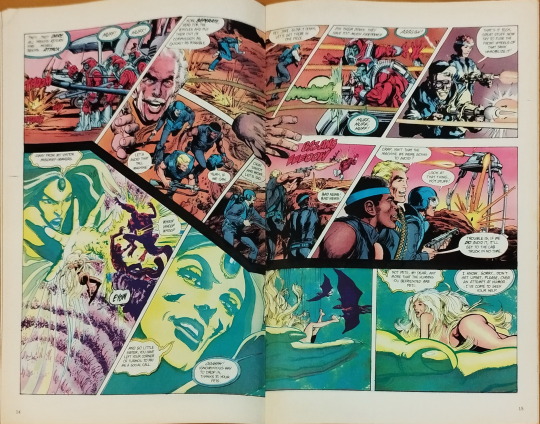
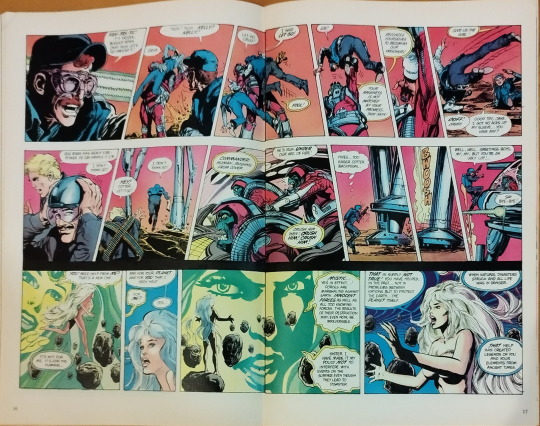
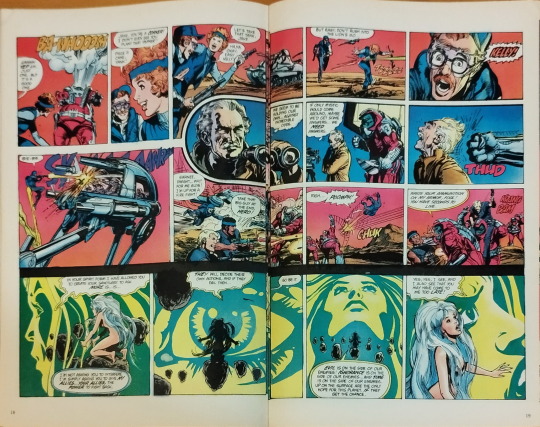
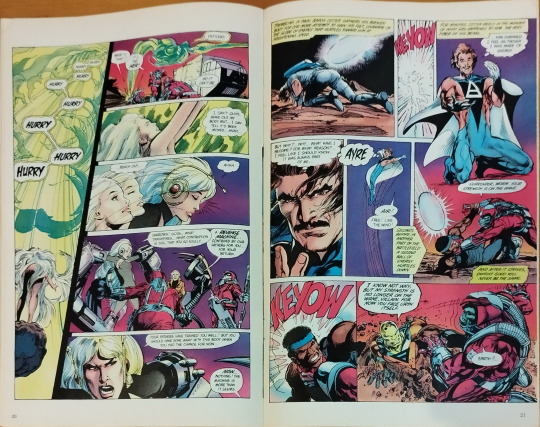
The astral section is based on a psychedelic near-Metal Hurlant imaginery, with our heroine naked but "convenient covered" in the fashion of Barbarella. Mother Earth looks like she comes from a Victor Moscoso poster. In general, coloring is outstanding in comparison with the average comic-books of that time, supported by a equally superior paper quality.
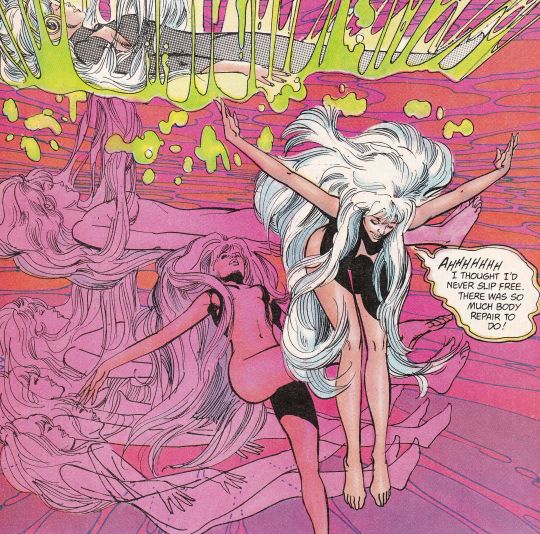
The physical battle section is more conventional, with a general design fully valid as base to create a toy line, with the homogenic super-hero team uniforms, the techno-monster evil warriors and action vehicles.
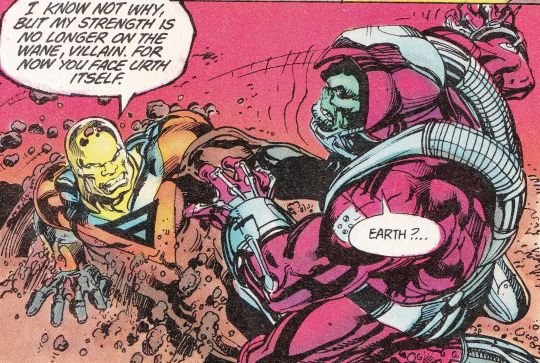
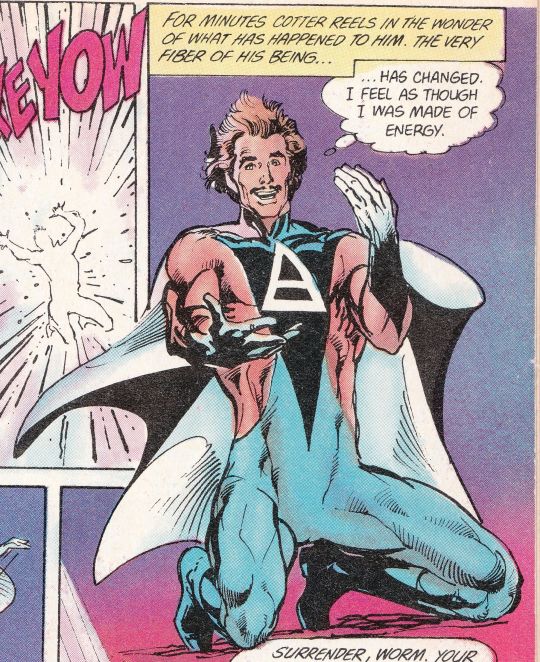
It's remarcable that, in oposition to other sensationalistic covers by Adams, this one reflects a literal scene of the interior. In fact, the cover is used as first panel on page 24. Also in the cover, we can watch a clearly intentional joke from Neal Adams, depicting the elemental super-team as if they were the Fantastic Four.
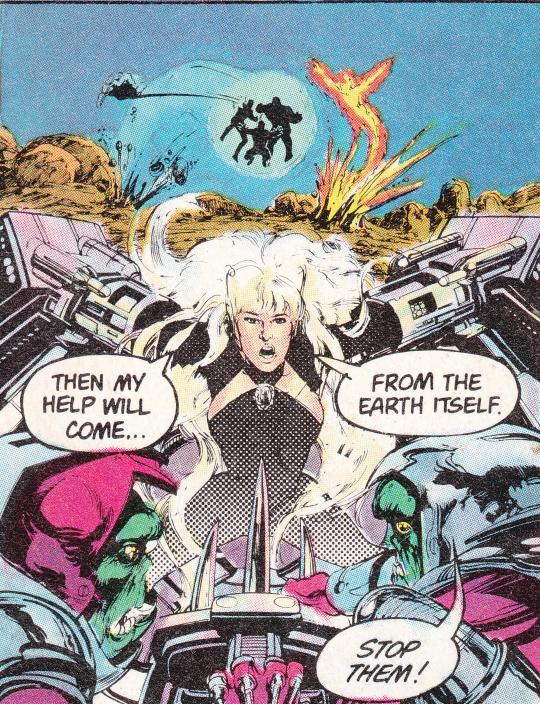
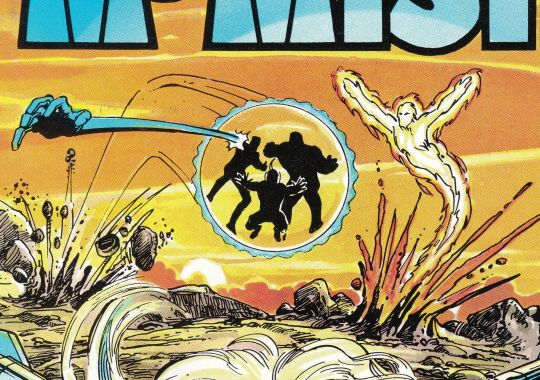
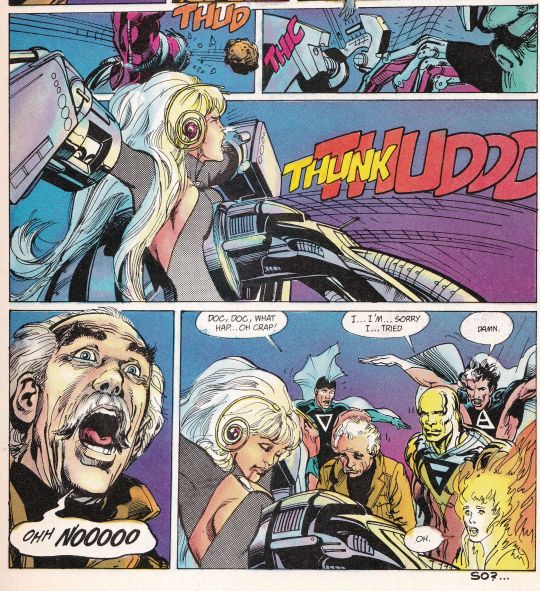
This second chapter of Ms Mystic finished in a thrilling way, with the main character cruelly impaled by the death device where she was restrained (it would not be possible in a Comics Code Approved book). I've had enough curiosity to look for the next issue on the Internet and dowload an old scan. I'm not going to spoil, but I can say that the #2 was the last one penned by Adams before passing his role to one of his clones.
Purchased at Radar Comics (Madrid) for 2€
#Ms Mystic#Neal Adams#Pacific Comics#Continuity Comics#Victor Moscoso#Fantastic Four#comic-books#review#randomcomicbookreview
6 notes
·
View notes
Text
Hiii ! Good morning/good night/good evening.
random post- but if any of you fellow manga artists are struggling to find the right apps I GOT YOU. when I began to draw, I got super frustrated because my digital art looked nothing like my original paper art. Then I figured I just needed the right tools- for both writing and drawing.
1} Story Plotter
<Literally so good! It counts every little detail about your story and oc.
2} Procreate
Honestly the most easy, maybe not the most proffesional (for more experienced writers), but for me it's just perfect.
3} Easy Pose
Easy Pose is an app where you pose 3d models and it's amazing for dynamic scenes in comics, just great for any scene in general.
Lastly, downloading manga brush packs online, getting all your story together, and of course either making the chat bubbles (the easiest method) or dowloading free pictures from the internet of comic panels.
☆Bit of advice; If you get an idea, quickly write about it and sketch it. If you dont use it for your current story you can use it for a future one. If you're making a shounen jump type of manga (super action packed with like a billion volumes :D) make the volumes as long as possible and leave cliffhangers (pretty obvious, I'm jusy putting it out there ☻︎). Same with shojo beat (just pure romance manga).
1 note
·
View note
Text
Ouro Player APK ver.1.1.0 (Latest Version) for Android
Ouro Player APK is an Android game where you create stories with anime characters. You have freedom to choose their actions and watch your own tale unfold.
Dowload: https://androidports.com/ouro-player/

0 notes
Note
HI BESTIEEEE
I MISSED YOUUUUU🥹🩷
THAT DATE SOUNDS AWFUL
‘I’m just popping to the loo, be back in a sec’ he smiled as he stood from his chair. You smiled back and nodded lightly, watching him walk away from you as you let out a quiet sigh of relief. Thankful you were finally alone but not two seconds later you felt your phone vibrate in your pocket. You quickly pulled it out to check it wasn’t an emergency, having not looked at it the whole way through lunch, not wanting to be rude, but the name that flashed up was the last person you thought it would be. THANK GOD HE WENT TO THE LOO
Mason OPSSSS🤭🤭
The moment of you meeting Mason came just under six months ago. The season had been over for a week and Reece was throwing a party at his house meaning Lauren insisted you came with her. Reece introduced you to Mason within the first ten minutes of you stepping in the door and you were hooked on him from the first look. GIGGLING 🤭
You obviously knew who he was but you tried to play it cool and make out you didn’t. Mason bought your calm exterior hook, line and sinker, telling you that you weren’t like most of the girls he meets at these things. You spent most of that night in his company, laughing at his stupid attempts to make you smile and falling for those gorgeous brown eyes every time you looked in them. He wasn’t anything like you thought he’d be, you were expecting an ego the size of a truck to match his perfect face but as time went on you realised he was just a normal guy who did a not so normal job. You exchanged numbers at the end of the night, him kissing your cheek promising to text you the very next day and you didn’t expect anything from him with how busy he was yet when you woke up the next day with a message from him your tummy had erupted into butterflies. OMG I LOVE THIS TWOOO
It had all started out so well, cute texts here and there and promises of seeing each other as soon as you could but nothing ever materialised. You got it, he was Mason Mount and you were you but it didn’t mean it hurt any less. The texts mostly dried up, only checking in with each other here and there and only seeing each other at social events. You’d made peace with the fact nothing probably would ever happen yet that didn’t stop him from getting his way when he wanted. OH NO😭😭
He would always make eye contact with you from across the room when you were together, smirking cheekily when he noticed the blush taking over your cheeks as his come to bed eyes raked over you hungrily. He liked the fact he could do that to you and he seemed to make it his mission to tease the life out of you. His hands always finding your waist as he passed behind you, or sitting as close as he could to you on the sofa so he could run his fingers over your thighs. ANNOYING, MASON, THAT'S JUST ANNOYING
But in the last two months it had become unbearable. He was a lot braver with his actions and one night after a little bit too much to drink he’d cornered you in the kitchen, pressing feather light kisses to the top of your shoulder from behind you and slowly making his way up your neck as you were trying grab a glass. No words were exchanged as he pressed his lips to your skin, knowing he’d followed you in hoping to catch you alone and If it hadn’t been for the loud crash coming from the other room you would have let him carry on. It seemed to snap him out of whatever trance he was in though and after giving you a quick wink he turned on his heel and left you stood flabbergasted. OHHHHHHHHHH, HE IS ACTING A BIT SHITTY
You told yourself that night that whatever game he was playing was over. You weren’t one to stick up for yourself, clearly, but you couldn’t stand another second of him having this weird hold over you without it leading anywhere. The next morning you dowloaded a dating app, telling yourself you needed to get out there and meet some different people and see what happens. Show him that he wasn’t free to keep dangling ideas in front of your face without acting on them. I LOVE HER😂
Well the back of you anyway, sat in the exact place you were right now. You slowly turned round and your eyes locked onto his right away, sat three tables back and slightly off to the left. You whipped back around before he could do anything else and tried to calm you racing heart. HE IS HEREEEEE
HE IS A TEASING LITTLE SHIT BUT WE LOVE HIM
Now you were rid of him, there was one other person you needed to send on their way before you could go home and think over your life decisions whilst drowing yourself in the tub of ben and Jerrys in your freezer. YEAHH....SURE
‘What you doing? your doors on the other side’ he winked ‘come on, get in’ SHOUT UP SILLY
‘Hey, what’s that supposed to mean?’ MOUNT
‘Come on, I haven’t seen you in ages. Why don’t you wanna hang out?’ He asked quietly. He was giving you his best puppy dog eyes they were really working on you, he looked genuinely upset you didn’t want to spend time with him. His hands planted themselves on your waist, his thumbs rubbing gentle circles just under your top. His gentle touch was making you fold and he knew it. “Please y/n, just for a little while? I promise I’ll take you home after’ he pouted, and you cursed at yourself in your head for giving into him so quickly but you couldn’t think straight when his hands were on you and he was looking at you like he was. I HOPE YOU HAVE A GOOD PLAN MR I'M A BIT SHITTY
He gave you that cheeky smile he always did, but released you so you could jump into his passenger seat. The whole ride to his house was perfect, this was the Mason you liked, no teasing or getting you flustered for his own entertainment. He asked you how you’d been and he seemed genuinely interested when you answered, a stark contrast from the lunch you had just endured and he seemed just as excited to fill you in on everything you’d missed out on in his life recently. THAT'S THE MASON I LIKE TOO
THE FACT THAT HE SAT EXCTLY NEXT TO HERRR
‘So you gonna tell me who that was you were having lunch with?’ He asked. You could tell by the tone of his voice he was on a mission to poke fun at you now and you sighed quietly. Knowing it was too good to be true that maybe for once you could just be normal with each other. WE HAVE A JEALOUS PERSON HEREEEE
‘Right… and how did you meet Charlie the crypto king?’ AHHAHAHAHHAHAHAHHAHAH SILLYYYY
‘I just didn’t think a gorgeous girl like yourself would look twice at any of the guys on there’ he said with a shrug. You tried to brush past the compliment but you could feel your cheeks burning up already, knowing it was giving Mason a kick to see the effect his words had on you. ’He was nowhere near good enough for you, I could tell by the way you were sitting you weren’t feeling it. Its like you’re boredom was radiating across the room’ SO WHO'S ENOUGH FOR HER MRRRRRRR???
‘Id like to think so, yeah’ he winked, the hand resting on his thigh now making its way onto yours. You had to ball your fists at your sides in order to keep calm. ‘If you wanted a lunch date you could of always called me, I know you’d rather have me sat opposite you’ DON'T
‘You know what Mason? Yeah maybe he was a bit boring but at least he had the guts to ask me out’ YESSSS GOOOOO
‘All you do is lead me on, you make me feel like you like me and then you go cold on me its fucking exhausting. Do you think I want to be meeting up with randomers off hinge?’ You barked at him. He seemed slightly taken aback by your outburst but his eyes were looking at you hungrily. He’d never seen this side of you before and he was loving it. ‘You’re so full of yourself all the time, thinking you can just invite me back here and i’ll come running? I’m so sick of your shit-‘ I JUST LOVE HER
OMG HE KISSED HER...THAT WAS SOOOO UNEXPECTED OMG
HE IS SUCH A TEASEEEEE
GIVE TO MY GIRL WHAT SHE DESERVES
‘Im not your good girl, mase’ you countered but you knew you were just lying yourself. You always had been and you always would be. OHHH🤭
He turned you back round and tucked your loose hairs behind your ears before leaning down and kissing you again lightly. ‘We’ll see’ he breathed into your mouth. ‘Go sit back down for me yeah?’ He asked but you waited a moment, both looking at each other to see who would break first but you could tell he wasn’t budging so you silently made you way back over to his sofa. Your fingertips touching your lips as you still couldn’t believe after all this time you’d finally kissed him. OMG OMG OMG SCREAMING
‘I know we’ve got some things we need to talk about, but can you please let me make you feel good first?’ He whispered, kissing you again softly. ‘I think it’s just best we get this out our system cause there’s no way I’ll be able to concentrate on anything serious if all I can think about is what’s under these clothes’ NAUGHTYYYY
‘Please baby, just a taste’ he whispered just below your ear and you felt your whole body erupt in goosebumps. Fuck he was good. It was like he knew exactly what to say and do to you. You knew you were wrapped around his finger but up until now you hadn’t realised how much. ‘You can trust me I promise’ IF YOU BREAK HER HEART...
The only thing on your mind was the thought of him getting you down to your underwear and then him telling you it’s all a joke. That this was just a new low for him to try and get one over on you but you knew Reece would kick him into next week if he ever tried something like that and the look in Masons eyes also settled you a bit. NO HE COULD NEVER
You wanted to say no but you you were too caught up in him finally giving you what you wanted. Thinking to yourself, even if this is all you ever got from him then you’d find a way to live with it. You just couldn’t refuse him when he was in between your thighs, promising to make it worth you while. So you nodded and kissed him back, a little deeper this time, parting your lips so he could slip in tongue in when he silently asked for permission. I'M SCREAMING
God he was so good at this, you thought as his hands came to rest at the waistband of you jeans. Why the hell haven’t we done this sooner? if I had to pick between breathing or kissing Mason, I think id choose the latter. SHE IS IN LOVE
His fingers slowly made their way to the button on your jeans, and he pulled back, looking at your face to make sure you were still comfortable. You nodded at him so he carried on, unzipping you before tapping your thigh so you would lift your hips in order for him to rid you of them. Next to come off was your top, leaving you with only your bra on underneath, thanking the lord you’d decided to put a nice one on this morning. Feeling your slight discomfort at being the only one without clothes on, he peeled his own top from his body, tossing it over the back of his sofa. HE IS CUTE, ISN'T HE?
THE FACT THAT HE JUST PUT HER FIRST AND HIS ONLY AIM WAS TO MAKE HER FEEL GOOD
After a few moments of silence you felt his lips lightly press on your forehead before he muttered the words ‘i’m sorry’ MASON???
This was part you were dreading. The first thought coming to mind was him telling you he’s sorry for making you think the two of you could be anymore than you already were. You told yourself you were fine with it, but the feeling of your heart sinking told you you weren’t. IT CAN'T BE THAT
‘All the cocky bullshit with you, it’s always just been a front. Truth is, the way you make me feel scares the shit out of me’ he told you gently. Your eyes pleaded with him to carry on, but the tsunami in his tummy was holding him back. He rested his head on top of yours and closed his eyes, figuring it might be easier to tell you how he felt if he wasn’t looking straight at you. OHHHHHH, CUTIE, HE IS CONFESSING🥹
You could feel his heart racing in his chest, the tempo matching your own at his words. You slowly stroked your thumb over his hand in an attempt to calm him so he could carry on, your gentle touches only making him fall for you even more. THEY ARE SO CUTE
‘I guess I just thought if we carried on the way we were then I’d still sort of have you. Like the fear of you rejecting me was worse than only having you a little bit’ he chuckled and you nuzzled into his neck a little at his confession. ‘I didn’t mean to make you feel as bad as I did though, half the time I wasn’t even trying to tease you I just wanted to be near you. I know I should of just asked you how you felt but if you haven’t noticed I’m not all that smart sometimes’ OH STUPID SILLY BOYYYY
‘Why don’t you ask me now?’ GO GIRLLLL
He took in a deep breath and shook his head lightly with a smile, almost like he couldn’t believe what he was about to do. ‘How you do you feel about me, y/n?’ SCREAMINGGGG
He moved again so he could look at you, his thumb stroking over your jaw softly and a slight look of guilt dressed his face. ‘I’m sorry I made it get to that point I never meant to make you feel that way. I hated seeing you out with someone else today like it proper hurt but I suppose it gave me the kick up the backside i needed.’ you chucked and turned your face in his hand to kiss his palm. It felt amazing to finally be this close to him but the little voice in the back of your head was stopping you from fully enjoying it. Mason must have sensed your change and tilted your face back up towards his. ‘What’s wrong?’ YAYYYYY THEY CONFESSEDDDDD
‘Well if you’d let me, I’d love to take you for dinner tonight. Like a proper date?’ TWO DATES IN A DAY AHHAHAHA GO GIRL
‘Two dates with two different men in one day, what will people think of me’ you teased and he just laughed at your silliness. EXACTLYYYYY AHHAHAHA
‘Yeah well I’m saying this mornings one didn’t count. I have a funny feeling you won’t be seeing Charlie the crypto king any time soon’ YEAH...I HAVE THAT FEELING TOO
‘Wake me up in ten minutes’ you heard him say softly and you tried to hold your giggle in at his antics. OH BABY BOYYYY
SO
I DIDN'T LIKE HIM IN THE BEGINN, TOO MUCH TEASING FOR ME
BUT WHEN HE TOOK HER HOME AND HE JUSG FOCUSED ON MAKING HER FEEL GOOD? WOW GOOD JOB
THEN HE EXPLAINED HIMSELF AND I STARTED LIKING MORE
THE CONFESSION MOMENT WAS PERFECT
AND THEY ARE TOGETHER NOWWWW
AND HIM FALLING ASLEEP, GOD HE FEELS SAFE🥹🥹🥹
THE SMUT WAS 👨🍳😘 BUT I ALREADY KNEW YOU ARE THE QUEEN OF SMUT
I LOVED ALL OF IT, LIKE IT WAS 6K WORDS BUT IT WAS SO WELL WRITTEN THAT IT FELT LIKE IT WAS SHORTER.
BESTIE YOU KNOW HOW MUCH I LOVE YOUR WRITING
SO THANK YOU FOR SHARING THAT AND FOR MAKING MY DAY AS USUAL 🩷🩷🩷🌺
THANK YOU MY LOVE
He was a total arse in the beginning wasn’t he 😂 but he was just putting on a front cause he liked her so much 😭
And their little confession under the blanket I can’t 😭
THANK YOU FOR MAKING MY DAY WITH THIS 🩷🩷🩷🌺🌺🌺
0 notes
Text
Hello, angel! 😆
May I interest you in some-
*opens trenchcoat*
-cyber security and data privacy?
For browsing I recommend:
- Firefox
- Brave
- Tor (the most secure and anonymous one)
And make sure you put in the settings that your browsing history and tabs all close after closing the browser. Forget Google as a search engine I recommend and use Duckduckgo, which is more secure and more private than whatever Google does.
On the phone I use open source youtube like NewPipe or LibreTube. You can dowload both via F-Droid.
I hope this helps to get a bit more invisibility online.
-------
Edit: Usually I don't care if people block me but my mistakes are hilarious to me. Now two things happened, I am to blame for: 1) I gave some adivice in my second accound where I usually speak my mind. I have a second account for that because having an opinion that is not cookie cut to the herd's mentality is problematic these days. 2) They didn't ask for my advice. They wanted attention from people who can relate to them. Not a list of suggestions.
I learned my lesson now.
Please do not send any hate to them. It's up to them to block me. It's just another one of many prime examples that if you don't fit, you're out. Such actions might not be my tea, I rather listen to people's opinions and suggestions than just block them but that is a choice of preference and I respect that.
see it's not like I WANT google to know things about me but I'm tired of being bombarded with youtube ads for that company that specializes in bras for small chests. like great glad that exists but you should somehow be able to divine from my watch history that I have a rack. do better
#online is not real life#cyber security#anti herd mentality#block#online vs rl#chronically online#anti woke#radical feminism#herd mentality#terminally online
9 notes
·
View notes
Photo

ㅤㅤ‹ bom dia, boa tarde e boa noite! hoje vim aqui recomendar tanto psd quanto action para todos que acompanham a galeria, então logo abaixo estará uma pequena masterlist com link para download de todos os psd e actions que já usei/uso.
ㅤ PSDS:
bngtxnps (23) by flwdarknss
bngtxnps (45) by flwdarknss
hibiscus by wiintermoon
psd003 by txrrao
007 by analiviamattos
right light by wonhoutboy
flower child by seoulicons
heart crusher by seoulicons
floral by seoulicons
messy rainbow by prdschoi
peace, love, dream by seoulicons
66 by tzxico
ethereal by witharryears
shooting stars by seoulicons
11 by babxsclub
109 by sttoneds
09 by babxsclub
03 by babxsclub
pisqueak by peullo
alien by peullo
love is a bitch by yananweb
f12 2.6 by shiny-a
blueming by l-agallerrie
#273 by yaheopp
45 by flwdarknss
love yourself by seoulicons
happy now by seoulicons
pink goblin by seoulicons
dazzling by l-agallerrie
rainbow spill by wildfireresources
1294 by l-agallerrie
ㅤ ACTIONS:
action #3 by wonhoutboy
action #1 by wonhoutboy
action #4 by wonhoutboy
ant 012 by flwdarknss
3d effect by fizhamsel
02 nc by peachcoloring
ㅤㅤ‹ então é isso, espero que tenha ajudado e bom uso de todos os psds e actions!
182 notes
·
View notes
Text
my want to gif kh vs the sheer amount of cutscene footage that exists, fight
#angel.txt#finding clips to gif is 9.5 times out of 10 the reason that i just decide not to gif at all#bc it is just soooo tedious a process#at least now i no longer use videos and instead do screencapping so i don't need to make 100 little videos#but hhhh kh is a fucking beast of content#this is why i've only giffed the kh3 cg scenes + select gameplay moments i've captured sdfdfsdfs#cause like. i know all the footage Exists online#but i would much prefer to capture the clips myself off my pf4 bc that cuts down the amount of clipping i would need to do#not to mention not spending hours dowloading videos that i will discard 90% of#but then! the problem for me! is that i haven't actually *played* most of the kh games!#so i don't have access to the theaters or cutscenes at all!!!#and we're back to square one with how much Time it'll take and then downloading videos sounds so much easier#hhh it just sucks bc i want to try applying all these cool blending/coloring/typography teqniques to kh footage#cause i think it'll work similarly but still have a lot of different visual results than working with live action footage#but i have! very limited footage atm! and also don't even have my ps4 set up at the moment so i couldn't cap new things if i tried hhh#man. 🐴
1 note
·
View note
Text
How to (not, of course) still access z-library (kinda) safely.
complete and clear guide (that actually works) for desperate and bitter people.
Zlib has been taken down, devastating, many people are searching for alternatives, but we all know zlib specifically had the hugest amount of books + a very good and accessible interface.
I’ve seen many people suggesting to use tor, that is the best option to ACTUALLY get on the old zlib BUT!! don’t throw yourself over there if you’ve never used it. Come here babe ima boutta teach you smth.
For legal reasons, you should not use the browser or try to access the site wink wink.
Now, what is tor and why should you use it?
Tor is, simply enough, a browser, like firefox or chrome, except that it provides a bigger amount of protection. You can do anything there and almost never be discovered.
Is it safe?
Yes, but actualy no. It’s mostly safe, but nothing is garaunteed.
Is it legal?
No, not really. The usage of the browser isn’t itself that illegal, but tor is mostly known for illegal online activities linked to the dark web and you’re gonna do NONE of that or things that could get the authorities’ attention (or that are immoral, get help).
Now, measure the term and conditions and decide if it’s worth a try to get to your beloved books. If the answer’s yes,
Do the following:
1) dowload tor, this one’s easy enough, search for the browser, download it, you’ll have it on your pc.
2) check that you’re safe, get confident with the browser itself and the options, you’ll see the security levels and ALWAYS make sure tor is up to date, if not, update it. I also suggest to make sure to clear up the cookies section after any action, you’ll find this option in privacy, in the browsing section. (Also, try not to customize tor too much, it isn’t necessary, and it could make you stand out amongst users)
3) now we start, search up “zlibrary onion”, don’t click on the first link, if you do the site will be blocked, NEVER press “accept risk and continue”. What you should do instead, is click the link you’ll find in the square on the right, right beneath the zlib logo, THAT LINK ends in .onion, which means you are safe from being tracked.
4) wow! You’re on the site, good to be back right? But wait, the site won’t let you download books cause it says you’ve reached a limit, that never happened before. This is beacause the only way to download books now is to have an account, you can get the books sent on your email, or downloaded (we’ll talk about this furtherly)
5) you should never make an account using tor while using your normal email (a gmail or a lcloud one as an example) so you’re going to have to make another email (not cool, i know) i used PROTON.ME, it works like any email just much safer, not even the site is allowed to read your emails, it takes 3 mins to set up, it’s free and remember NOT TO USE names or passwords that could lead to you and your name.
6) now you can make the account, it will give you a link sent to the email you used, open it ONLY on tor.
7) you’ve got the account, search up the book and have it delivered to the email/download it.
(ABOUT THE DOWLOADS, do NOT open the file online, not even on tor, download it as a pdf BUT ONLY OPEN IT WHILE OFFLINE, the problem isn’t with downloading the file, but with opening it, especially pdf files, that do contain elements that can track you and your pc, which you really don’t want)
Now you have your book, and a proud feeling of accomplishment in being smarter than the feds, oh, also, absolutely don’t use this method. of course.
happy reading, don’t let them bitches stop the poetry.
P.S it’s harder to find the link now so here you go.
550 notes
·
View notes
Text
BASIC GIF TUTORIAL
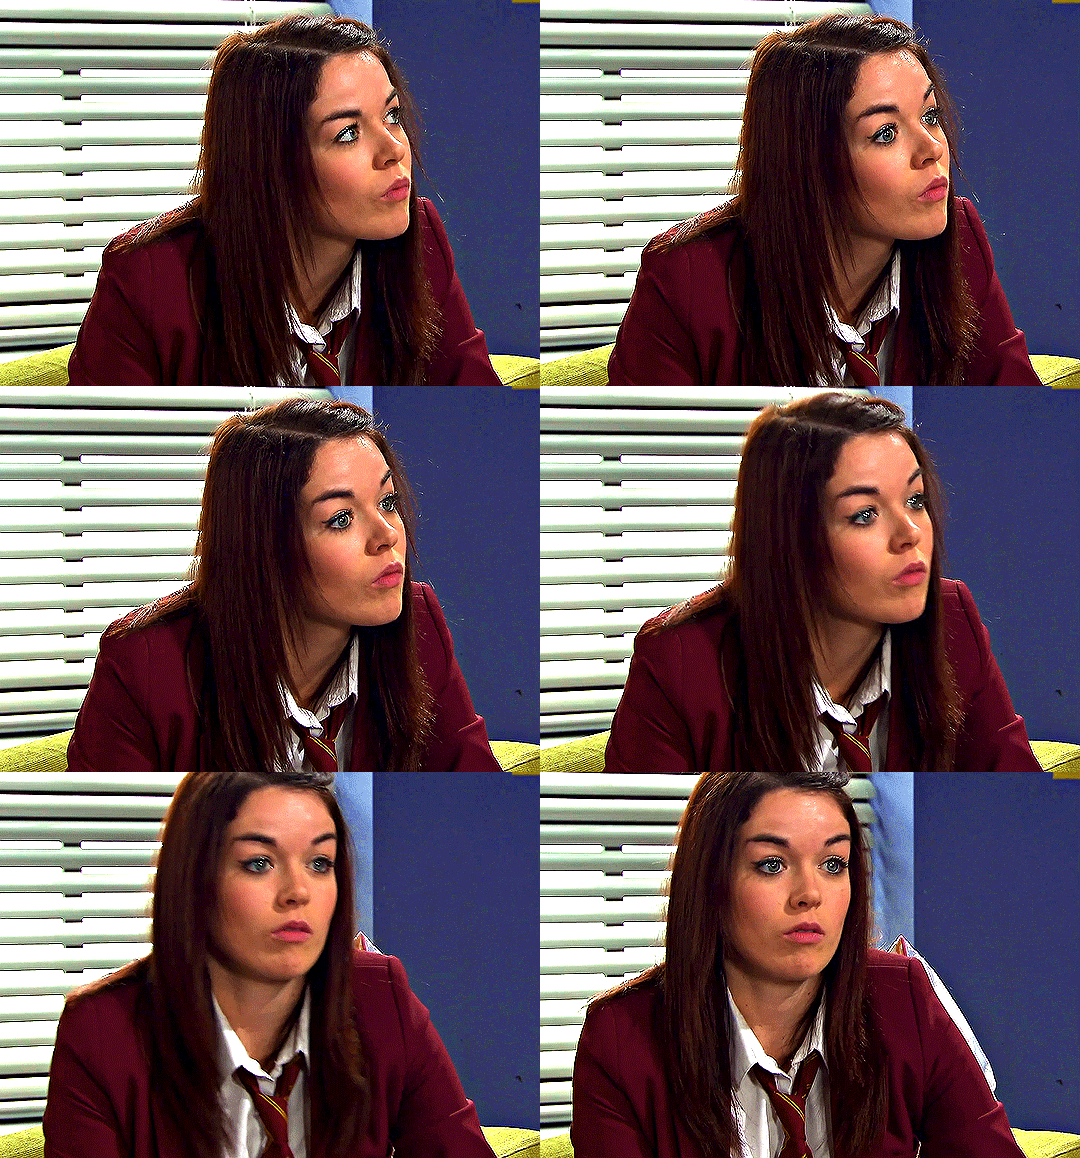
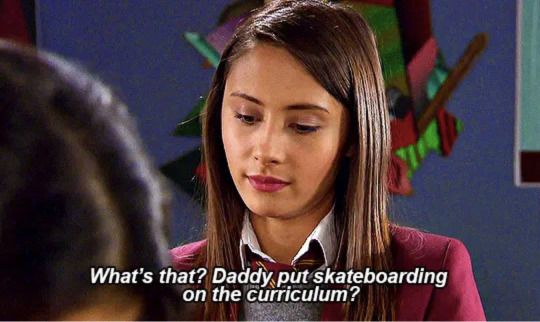
this is for umana but I’m making it public for anyone it might be useful for :) this tutorial is for a mac, but it could easily be followed for windows too. this is for making the nicest quality gifs in the quickest amount of time. this is just how I do it, it is not the only correct way, it’s just how I learnt.
to follow this, you will need to download the actions from here as I'm making this literally as simple as possible. read how to install a downloaded action here.
for this tutorial, you’ll need a version of photoshop with the timeline feature, and the video frames to layers feature.
I use photoshop v 22.2 as I think it’s the latest version with both features. to change the version you have installed, click other versions under the installed software section, hit the other versions option and press install on any version that has a timeline feature.

once you’ve done that, you’ll need a mp4 to make into a gif, preferably in the best quality possible. I do this by screen recording streaming services on google chrome on my macbook using quicktime player which is built in software. you can also just download stuff. for a big gif, like this, 0-3 secs is preferable.
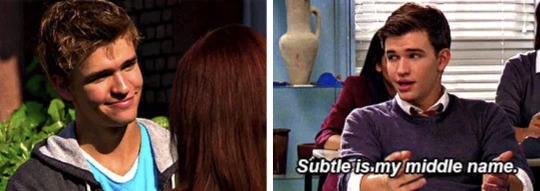
however, multiple gifs per line, like these, can be longer, between 0-6 (??) seconds.

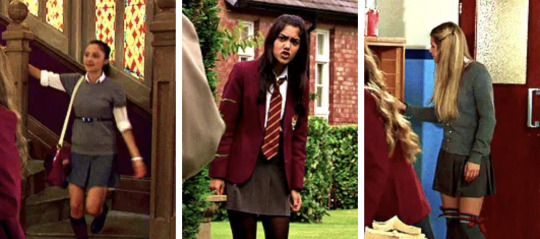
I pre-crop my videos in length and ratio because I like to plan the individual gifs ahead. I tend to default to 5:3/7:5 for big gifs, 7:5 for medium ones and square for small ones, unless I make them 5:7. for tumblr, the width determines the amount of pixels, as there’s an overall width limit of 540 pixels. so therefore one gif per line is 540 pixels, two is 268 each and three is 177 pixels each. the gif however can be any height, which is great for full body shots like this.
next, open photoshop, and select file > import > video frames to layers and then select your video.
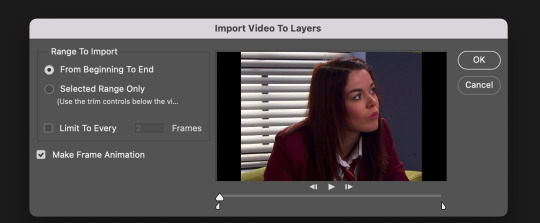
by pressing selected range only you can trim your video if you want. make sure make frame animation is selected and limit to every 2 frames isn’t as it’ll make the gif super jumpy. then press okay.
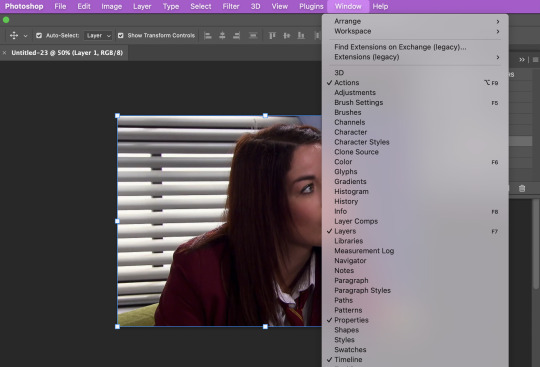
press window and make sure actions and timeline are selected. then go to the actions menu and press the dropdown arrow on the dowloaded action set FRAMES TO LAYERS.
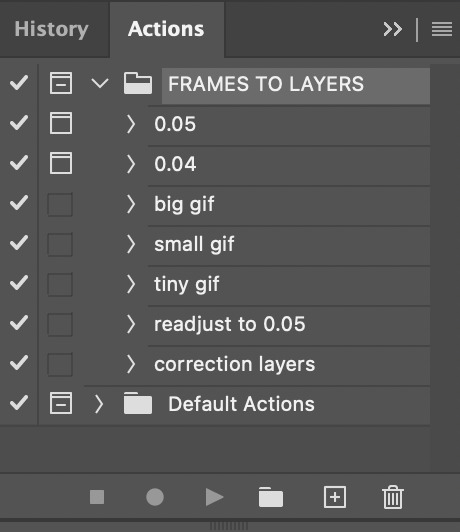
you now have the choice of either a frame rate of 0.05 or 0.04. personally I use 0.05 because I think it looks nicer, but 0.04 can look better if you want certain gifs slightly faster. then select the time you want and press the play button at the bottom. this will bring up a window that asks you to confirm the frame rate. press okay.
next, depending on whether you want a big gif (1 per row), small gif (2 per row) or tiny gif (3 per row), select the size you want and press play on that action. I’m going to make a big gif. this action changes the size of the gif in order to fit tumblr’s limits and includes my sharpening settings. if you wish to adjust these yourself, you can do so by double clicking on them in the layers menu here

now we need to turn it from this
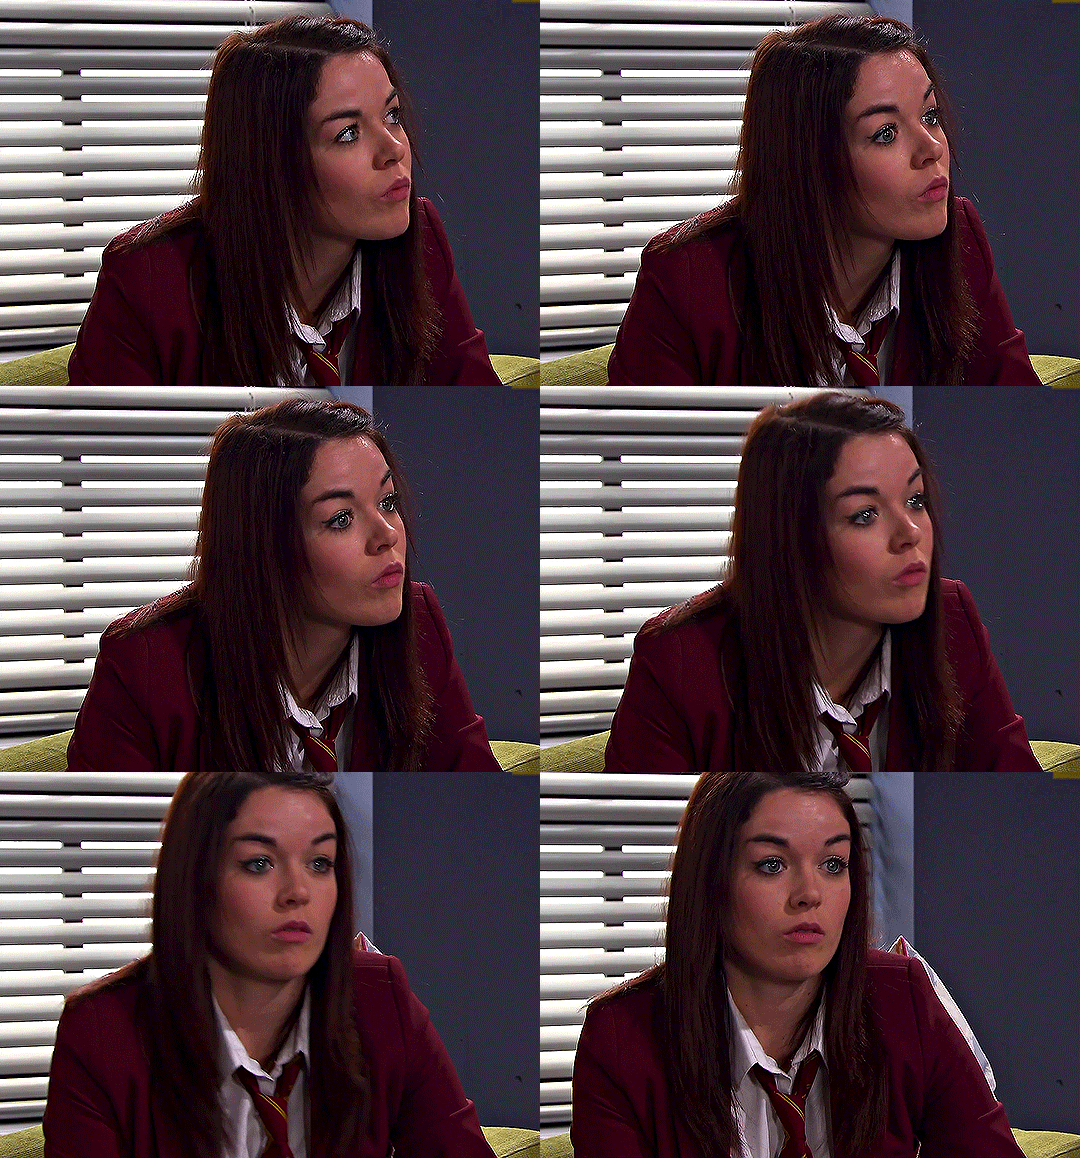

to this
I use the same four adjustment layers on every gif I make. for ease, I have these come up as blank layers to adjust as I want as the action called ‘correction layers’. either press play on this action or choose your own under layer > new adjustment layer.
CURVES: this is best used to brighten and correct the colours in the lighting. use the white and black eyedropper tools on your gif and adjust the graph accordingly to make your gif look the way you want it. I recommend messing around and selecting different light and dark places until you find the one you like best.
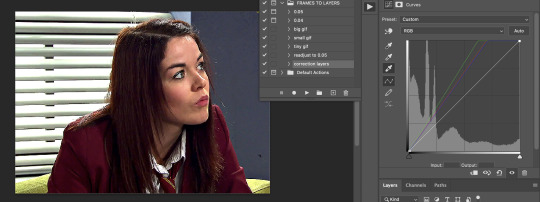
VIBRANCE: just change the amount to make your gif look more (or less) colourful.

SELECTIVE COLOR: click on the different colour options and adjust the different colour amounts until you get your gif the way you want it. I recommend always increasing the black under the black option menu by at leat one or two to increase contrast in your gif.
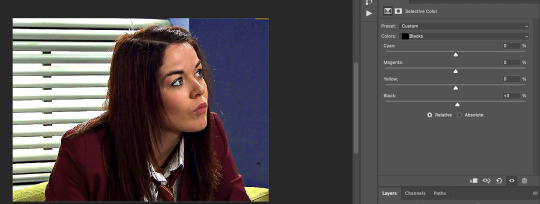
EXPOSURE: this one is probably the most important, especially in darker more dull settings. make sure you don’t over expose though because it’ll look bad.
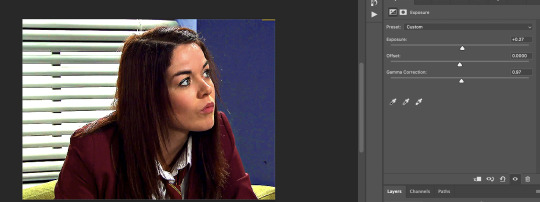
I also recommend the colour balance adjustment layer if your gif isn't looking how you want it to after the selective colour layer. if you’re making a gif set of just one scene/you want to use the same colouring on multiple gifs, just copy all the the adjustment layers in the layers tab and paste them on your next gif.
once you’re finished, you need to export your gif. you do this under file > export > save for web (legacy) (the mac keyboard shortcut is shift+option+command+S). make sure your settings look like this and that looping is set for forever. your gif will look more saturated here, don’t worry about it.
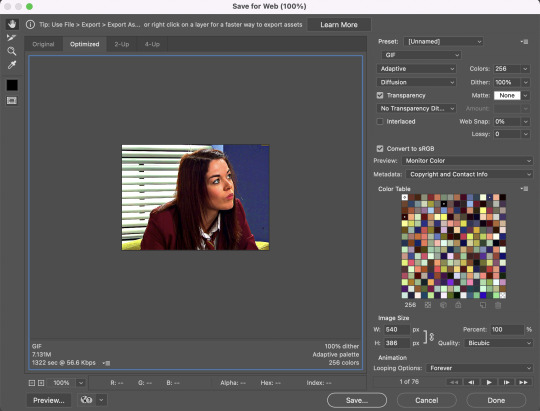
then press save and name it whatever you want and press save again. now because we changed it from frames to video earlier in order to edit it, the frame rate has changed. to fix this, reopen your gif under file > open. whilst you’re doing this, check that your gif file size is under 10mb or tumblr won’t let you post it. if it’s over, you’ll need to either delete frames or put it through this online optimiser.
for readjusting the frame rate, I have a nice easy action called readjust to 0.05 that you can just press play on. if you used a different frame rate, press the three lines on the right side of the timeline, press select all frames, and then edit the frame rate on any of the individual frames on the timeline and it’ll change it for all of them.
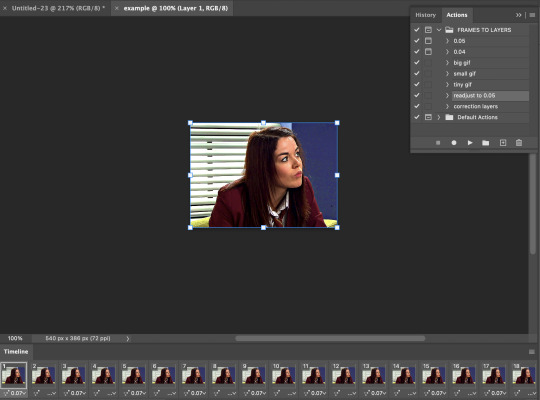
to delete frames to shorten your gif and reduce it’s size, just select them from the bottom from either the beginning or end of your gif and press the trash button at the bottom.
then simply export through save for web again and you have a finished gif like this! make sure the name ends in .gif or Tumblr tends to not let them work.

adding text is pretty easy too, just you the text tool on the left hand side. for more advanced effects, I recommend this tutorial on gradient maps and this tutorial on pretty text effects. any questions on this tutorial or further gif effects just shoot me an ask! enjoy!
also, if you want gradient text in your tumblr caption, I use this tool (just the white box part in the bottom right corner) to generate the html.
22 notes
·
View notes
Text
Icon Tutorial
Anon asked me for an icon tutorial, specifically for this icon:

I am using Windows and Photoshop CC 1. finding pictures 2. cutting out 3. resizing and placing 4. coloring 5. gradient and sharpen
Let’s go:
1. first you need to find a base image. either you use screencaps or episode stills
for screencaps put the name of your show/movie and "screencaps" into google. chances are it will lead you to one of these sites:
screencapped.net (zip dowloads) kissthemgoodbye.net & grande_caps (gallery & zip downloads) homeofthenutty.com (gallery)
for episode stills I have two sites:
farfarawaysite.com daydreaming (this one sadly hasn't been updated since 2019, but the gallery is still HUGE)
other places to find images are the IMDB galleries, fandom wiki's and, again, google.
the image for this icon is an episode still from daydreaming HERE
2. now that we have our image, we need to get rid of the background.
lately i've been using remove.bg which has saved me SO MUCH time. it works on most pics suprisingly well, and when it doesn't work (mostly because the screencap is just TOO DAMN DARK) I go back to using the pen tool in photoshop.
Pen Tool How-To: click around the edge of your subject as shown in this tutorial. then right-click -> make selection -> set feather radius to 0,5 px. When you have your selection, set a layer mask by clicking this
at this point I like to save the pic as a png, just in case I want to use it again in the future, but that is of course up to you.
for this image I used remove.bg and got a pretty good result
3. now we finally have our pic cut out and ready in photoshop, it's time to make the actual icon!
select the crop tool and at the top put in 100px by 100 px (some people like to use 200px by 200px or 128px by 128px. again, up to you. it's just what i'm used to)
cut out your icon. at this point it doesn't matter yet to place it right, we'll do that in a moment.

when you have it cut press ctrl + t to resize and place it how you want (depending on your version of photoshop you might need to hold the shift key while resizing or click this to not mess up the proportions of your image)

4. time for some color! first choose a background color. i went with a bright pink

now to coloring our person. in this case, because I used an episode still and they already have good brightness, contrast and color, there isn't as much to do as with a screencap.
Important: all the adjustment layers are clipped to the cutout so they don't affect the background. to do this either hold alt and click on the line between layers in the layer panel or right-click on the adjustment layer and select "create clipping mask" or (my way) in the properties panel click this
curves (to brighten it up)

selective color (to get rid of some of the yellow. something i do almost always with pink and purple backgrounds)

levels (more brightening and I also use levels to get the contrast right. usually I start by dragging up the midtones and bringing down the shadows. in this case I also dragged up the highlights)

vibrance (because all that brightening really washed the color out, we're bringing it back!)

that's it for adjustment layers, the next layer isn't clipped anymore.
5. add a gradient fill layer with these colors set it to softlight. adjust the opacity (for this icon it's 53%) and the angle of the gradient by double-clicking on it in the layer panel and then adjusting this

because I always use the same gradient for every icon, I made myself a handy little photoshop action that adds the gradient fill and sets it to softlight so I only have to adjust it. It's here if you want it
and lastly, sharpen! I use a mix of topaz clean and smart sharpen. I also made a photoshop action for this, you can find that HERE (obviously you need topaz clean installed for this to work) then save it as png and done!
And that's it! That's the finished icon!

if you have any more questions, or if anything is unclear come into my askbox or send me a message. I'm always happy to help.
also, now that I have this detailed tutorial, I am up for making just coloring tutorials for icons as well, so if you want to know how I colored a specific icon, let me know!
147 notes
·
View notes
Photo


Functional Pool slides. Get together need.
Hello I have finished this two items. Functional pool slides for your sims. Child to elder sims can use them so they will have fun.
Sadly you need Get together pack to work correctly, but dont worry Im trying to make a base game version. They came in seven colors: red, white, blue, green, yellow, black and pink.
The items are located where the other pool objects are when clicking on the pool icon at build and then in the pool ladder icon so they will display the pool objects and cost 315 simoleons.
Here it is a video in action.
youtube
Because is the first time im making a complex object and i dont have much testing time. I made these items free.
So you can dowload them here. Please tell me if you find bugs. Thanks. n_n
https://www.mediafire.com/file/t6zusnu2krs2akv/necrodog-functional-pool-slides.7z/file
2K notes
·
View notes
Text

Warning: Image heavy
By popular demand, aka 2 people, here is a gif tutorial. This will include how I do screenshots and actually make the gif.
You will need:
Photoshop. I use the Photoshop CC 2021 version but that’s only because I’m paying for it. There are sites you can download Photoshop on but I prefer the legal way.
MPV player or any screencapping program that takes continuous screencaps.
IMPORTANT: As I have learned, the video file you use must be 1080p or else they will look like absolute crap. Always try to get a 1080p copy no matter how long it takes.
THE PROGRAM
As stated before, I use MVP player. That can be downloaded here. If you have a mac, I would move the app off of your desktop after downloading and to the applications folder. That way it is out of your iCloud and saves so much pain and frustration.
Try to download the 0.29.0 version because later versions on macs have a glitch where there are duplicate screenshots (according to @/kylos). I had to download the 0.29.1 version because the other version won’t open at all for me after the last apple update (fuck bug sur). Anyway, I’ll probably mess up explaining this part so you can find out how to get it working here and here.
To actually screencap, press option + s. The left and right arrow keys will help you move through the video. For more shortcuts, click here.
Once that is all downloaded, now you can begin the giffing process.
THE PROCESS
Load the film you want to gif into the program, which is just a simple drag and drop. Then go through and find the scene you want to screencap.

Once I find the scene, I pause and then press option + s as mentioned above and screencap the scene. Press option + s again to stop capturing.
Now you go open photoshop and go to File --> script --> load files into stack
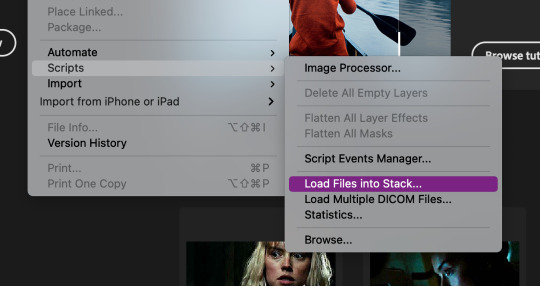

Then this will pop up. Hit browse...

Then open your folder with the screenshots, select the screenshots by dragging down, and then click open.
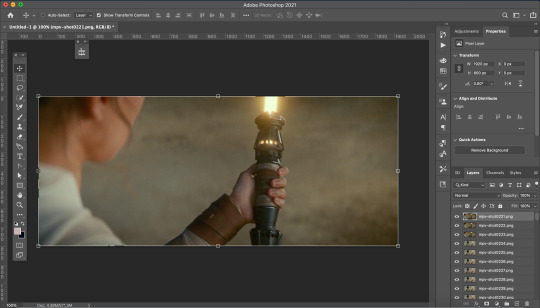
This is what it should look like. Now go through and delete the extra images you don’t need.
Now we need to crop the future gif. Click the cropping tool and at the top left there is a way to set the crop dimensions.
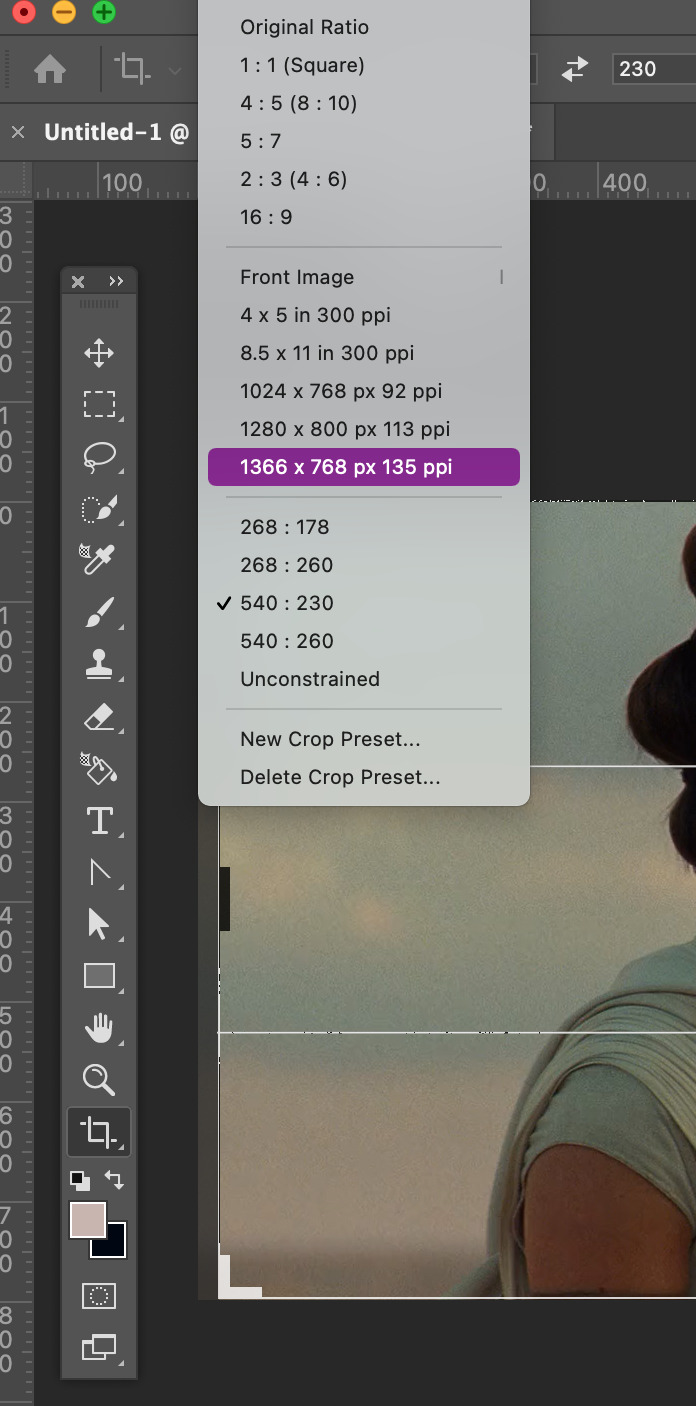
The ones I have saved are Tumblr’s dimension sizes. The height doesn’t matter as much as the width does. For Tumblr; 540px is for one post across, 268px is 2 posts across, and 178px is 3 across. When doing 3 across make the last one 177px or else the last one will be blurry. Click here for more info on sizing.
Today I’m going to make this 540:280. When you’re satisfied with the crop, click enter.
Here is where the fun begins! I downloaded @kylos gif action here. To activate it double click on it. To view your actions go to window --> actions. A window should pop up with your action.


There will be a folder in there called GIF ACTION. Open the folder and select the SELECT HERE!. With that selected click on the play button to activate the action.
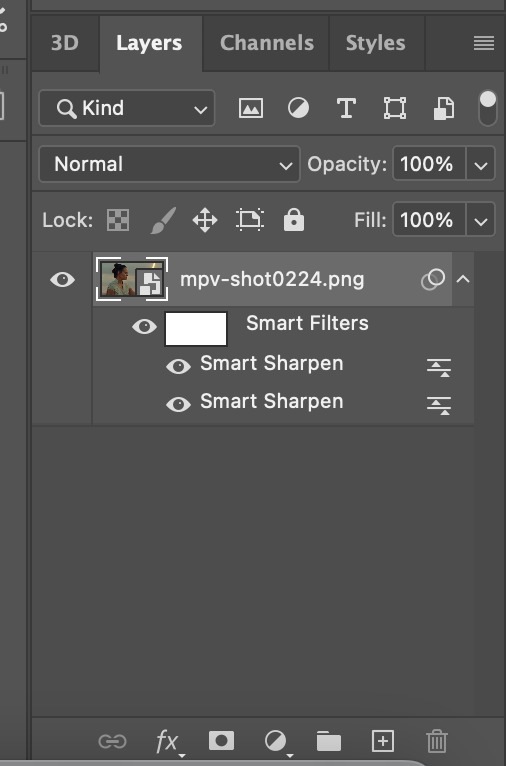
Just like magic, you now have a gif! Your layers panel should now look like this. Next we just need to resize the gif.

Go to Image --> Image size and this box will pop up.

Resize the image to your crop size and hit ok. Your image will now be a lot smaller.
Next I go to Filter --> Blur --> Gaussian Blur. Set the blur to 1.0.
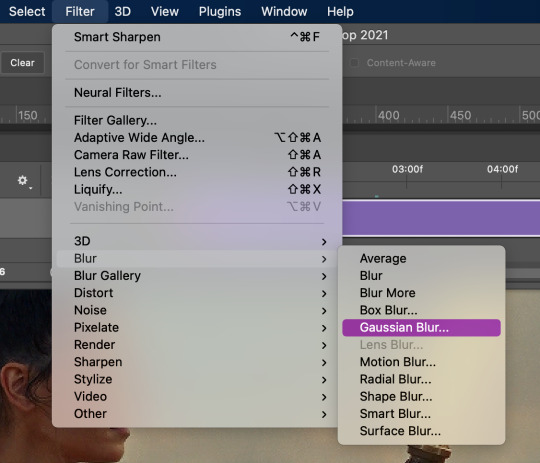

Now this will take away the sharpness when I just want it to be a bit softer. To fix this double-click on the lines next to the smart filter.
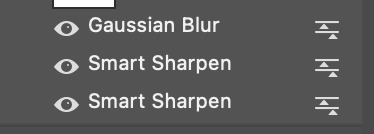
This will bring up another box to change the opacity of the blur. I change it to 20% or less. This one I’ll make 15%. Hit ok when done.

One last thing is I fix the radius of the sharpening. Click on the bottom sharpening layer. A box should open.


Change the radius to 0.4 and hit ok.
Before closing, open the timeline window by window --> timeline. If you want to cut down on the frames, grab either one of the grey bars on the beginning and end of the gif and drag to where you want it to start and end.

It’s now time to save. Go to File --> Export --> Save for Web (Legacy)...
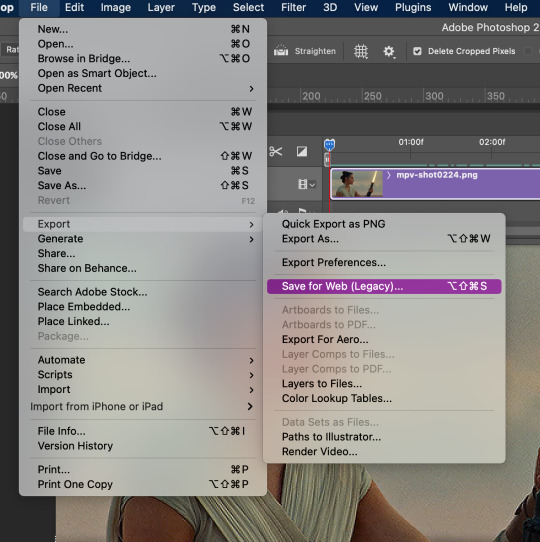
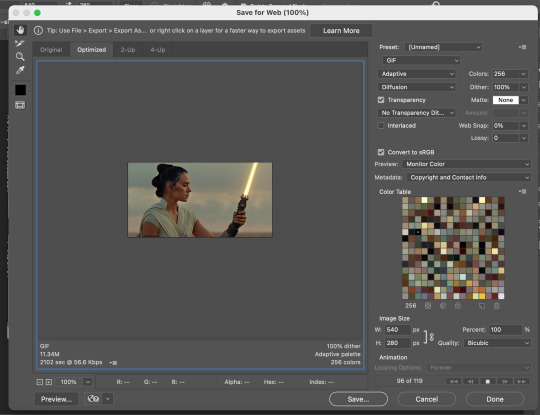
This will pop up. Here you can see how many frames you have and how big the file is. I usually start off as close to 10mb as I can get. There are multiple ways you can save it but here are my settings.

Then save your gif to wherever you want it. But we aren’t done yet.
Close the gif. You don’t have to save the psd but you can if you want to. Then reopen the gif in Photoshop. Everything you used before should still be open, aka the windows for actions and timeline.
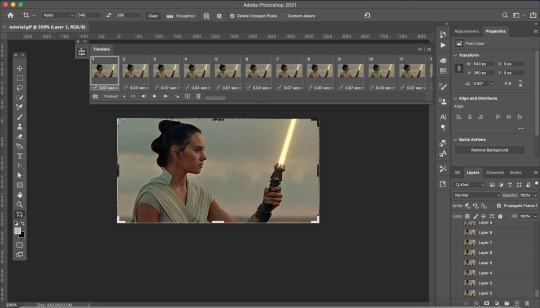
Your screen will look like this. As you may notice, the gif speed is all over the place. The best speed for gifs is 0.5. This guide is very helpful.
To get the gif to that speed, I dowloaded another action here. Add it to your actions as instructed above.

Open the Change to .05 folder and select the SELECT HERE!. With that selected click on the play button to activate the action, same as above.

And viola it is now the correct speed! But our gif doesn't look too great. It’s time to fix that up with some coloring.
COLORING

These are my coloring layers. Make sure they are on top of all of the layers.
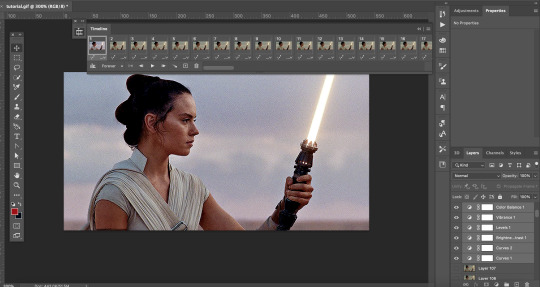
Here is what it looks like now after the coloring. You may notice the effect has only been added to one layer of the X amount of frames you have.
To fix this select the coloring layers and then go to the 3 lines at the top right of the box.
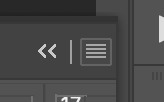
Click on this to open a dropdown box and click match layer across frames.


Make sure all the checks are marked and hit ok.
Now all the layers have the coloring layers applied.

Remember when we were saving the gif and it was over 10mb. Well now it’s time to fix that.
I like to go in and check the size after coloring because sometimes that can lower the gif size.
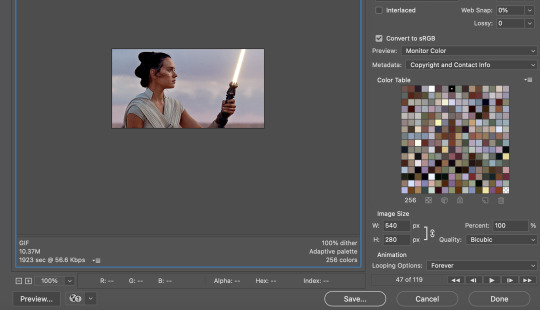
It did in this case so that creates less work. Close out of that and go back to your timeline. It’s time to delete some frames.
You can select multiple frames at once by holding down shift as you select. I typically click around 5 to 10 at a time and make sure you don’t miss a single frame. I’m going to select more towards to the end.

Then click delete (the trashcan icon).
Go back to export. If it is still too big delete some frames. In my case it was still too big so I have to delete more frames.
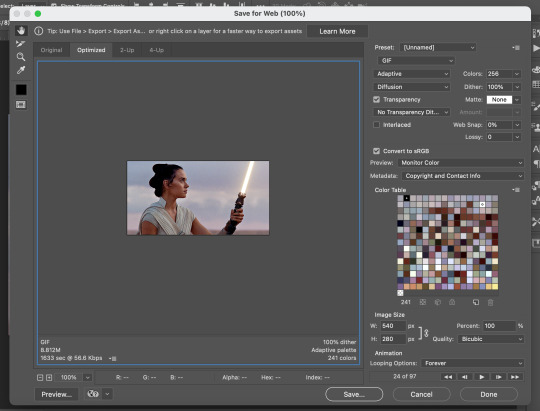
I now have it to around where I want it. It is less than 10 mb and sometimes that is better. So save your gif. I usually save it as [filename]final.
QUALITY
To check the quality of the gif I go to Tumblr and go to make a photo post.

DO NOT post. Instead save it as a draft. Go to your drafts and see how it looks from your dash. If it looks pixelated then go back into photoshop and delete fames. Repeat the following steps until it is to your liking.

And then you have your final product!
I hope this was helpful to you and I can’t wait to see what you create with this.
#tutorial#yeahps#completeresources#resources#gif tutorial#quirkyresources#hisources#my giffs#rey#star wars#swedit#starwarsedit#daylightresources#jessielynnposts#i struggled with this can't you tell lol
232 notes
·
View notes
Text
Hitori No Shita The Outcast Game APK (Mobile) Free for Android
Hitori No Shita: The Outcast APK is a mobile game full of action, based on a popular Chinese webcomic. It combines cool fighting, a strong story, and magic.
Dowload: https://androidports.com/hitori-no-shita-the-outcast-game/

0 notes
Text
A ‘How I edit’ tutorial
I’ve been asked by a few people in Twitter to make a tutorial so I’m doing it here since it’s more comfortable :P
I use Photoshop, so I don’t know if it’ll work the same way for other softwares, sorry! Also I use Okruee’s Technicolor reshade, which helps a lot and makes my life easier.
This is a before and after of the pic I’ll use as example, the tutorial is under the cut!

Before.
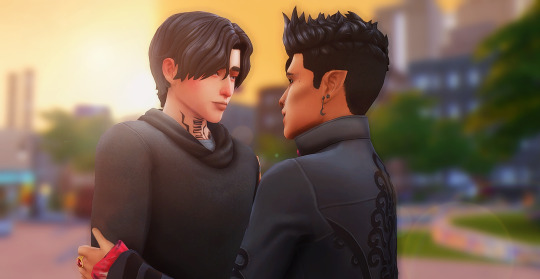
After.
The pictures on text posts are pretty small so I’ll have all of them linked with better quality underneath each of them!
1. First things first, after opening the picture I want to use I enlarge it. Go to Image > Image size. I change the width from 1366 to 2366 using Bicubic Smoother. You can skip this step if you want, but I like my pictures to be bigger so more details can be seen!

(See picture here)
2. Then I run Topaz Clean 3 (It’s an extension you have to install on your Photoshop. There are thousands of tutorials on google that will tell you how to dowload and install it!), I select the original layer, duplicate it and run Gaussian Blur on this new layer (Filter > Blur > Gaussian Blur) with a radius of 6,6 pixels (but that’s just my own taste). Now I set this blurry layer to multiply and lower the opacity to 16%. I have an action to do all of this so Photoshop does it for me just by clicking a button, and I recommend you do the same!

Before (See picture here).

After (See picture here)
3. Duplicate your original layer (Layer 0) and now it’s time to make light adjustments! On the Adjustments tab click on Curves and drag the line. Play with the settings until you like the results! I like vibrant pictures, so that’s what I’m looking for.

(See picture here).
4. At this point I fix any imperfection or clipping the picture has (like Magnus’ hand in this example).
5. Now I start placing shadows. It’s pretty easy, just follow the shadows your picture already has and make them more noticeable!
I create a new layer on top of the second copy of the original layer (Layer 0 Copy 2), set it on multiply and start working there. I pick a brush with 0% hardness (sometimes I change the opacity of the brush too, depending on the level of detail) and eyedrop the skin color of the sim, and then I start drawing the shadows. At this point your sim will look like someone that is having a bad makeup day, but don’t worry, just keep adding those shadows!

(See picture here).
6. With the shadows layer selected I go to Filter > Blur > Gaussian Blur and adjust the radius until I like the result (15,5 pixels in this case), and if necessary I adjust the opacity of the shadows layer. I repeat this with skin, hair, clothes until I’m satisfied with the look of the shadows!

(See picture here).
7. For the highlights I do more or less the same but with white and setting the layer on Soft Light mode and then I use Gaussian Blur. I do this on the skin, hair and clothes if necessary until I’m satisfied with the look.

(See picture here).

(See picture here).
8. I play with the brightness, saturation, color and curves in the Adjustments tab until I like the general look and I’m done!

(See picture here).
9. I cut the picure if I want to and that’s basically all I do! It’s actually a pretty simple way of editing since my reshade (Okruee’s Technicolor) does most of it for me!
Hope it helps! If you have any question send me an ask or a message! ( ^^)
305 notes
·
View notes