#Weatherproof Clothing
Explore tagged Tumblr posts
Text
Versatile Outdoor Wear: Waxed Jackets for Each Season Explained

When it comes to versatile outdoor wear, men's waxed jackets from Speedwear Ltd stand out as a top choice for every climate. Whether you're braving the chill of winter or navigating the unpredictable showers of spring, a waxed jacket offers both style and functional protection. In this blog, we'll explore how to utilize these durable jackets through various seasons and provide practical advice on layering and protection against the elements.
Winter: Your Shield Against the Cold
In the winter months, a waxed jacket is essential for staying warm and dry. The wax coating offers excellent water resistance, while its wind-blocking capabilities are ideal for colder climates. For additional warmth, layering is key. Start with a thermal base layer, add a fleece or wool sweater, and top it off with your waxed jacket. Ensure your motorcycle jackets are equipped with enough insulation to handle the freezing temperatures, turning your waxed jacket into a winter fortress.
Spring: Ready for Rain
Spring often brings rain and fluctuating temperatures. A waxed jacket's water-resistant properties make it perfect for this season. Lightweight and stylish, these jackets can be paired with a waterproof hoodie or a breathable long-sleeve shirt underneath, depending on the temperature. It's also a great time to incorporate protective motorcycle gear that complements the waxed jacket, ensuring that you remain dry and comfortable during those spring showers.
Summer: Beating the Heat
Though typically associated with colder weather, waxed jackets can also be adapted for cooler summer evenings or rainy days. Opt for a lighter, unlined waxed jacket to avoid overheating. Pair it with a simple t-shirt or a breathable cotton shirt. The waxed finish provides protection from summer rains without the bulk of a traditional coat, making it ideal for milder weather or as a stylish layer on cooler nights.
Suggested Read: Why Waxed Cotton Jackets Are Perfect for Any Weather Ignite Your Passion For The Open Road With Exclusive Motorcycle Jackets
Autumn: Layering for Comfort
Autumn's mild yet unpredictable weather calls for adaptable layering options. A waxed jacket can transition smoothly from a cool morning to a sunny afternoon. Layer it over a denim or flannel shirt for both warmth and breathability. As the day warms up, you can easily remove the jacket or adjust your layers underneath. This season is all about flexibility, and a waxed jacket provides just that, along with continuous protection from intermittent rains.
Conclusion
No matter the season, men's waxed jackets from Speedwear Ltd offer unmatched versatility and style. From the harsh winds of winter to the unpredictable downpours of spring, these jackets adjust to every climate with ease. By following these best practices for layering and selecting the right gear, you'll maximize your comfort and protection throughout the year. Embrace each season with confidence and style, knowing your waxed jacket has got you covered.
#Men's Waxed Jackets#Seasonal Outerwear#Outdoor Apparel#Weatherproof Clothing#Layering for Weather#Waxed Jacket Care#Style Guide for Men#Functional Fashion#Winter Jackets#Spring Fashion Tips
0 notes
Photo

Selecting the Right Fabric for Your Shade Sail
Transform your outdoor space with the ideal fabric shade sail! From UV resistance to weatherproofing, find the perfect fabric to suit your needs and style. Say goodbye to harsh sunlight and hello to comfortable outdoor living with our expert tips. Whether you're seeking durability, breathability, or aesthetic appeal, we've got you covered. Create a shaded oasis where you can relax, entertain, and enjoy the great outdoors in style. Elevate your outdoor experience and make the most of your backyard, patio, or garden with a Fabric Shade Sail that provides both functionality and elegance. Start your shade sail project today and discover the difference it makes in your outdoor lifestyle.
#Fabric Shade Sail#Sun shade cloth#UV-resistant shade#Weatherproof sail#Waterproof shade cloth#Sail shade cover#Shade sail material#Shade sail awning
0 notes
Text
Waterproof Breathable Textiles: An In-Depth Analysis of Market Trends, Strategies, and Projections
The global waterproof breathable textiles market size is expected to reach USD 2,859.3 million by 2030, expanding at a revenue-based CAGR of 5.7%, according to a new report by Grand View Research, Inc. Increasing demand for comfortable and high-performance apparel that provides protection from environmental factors such as wind and rain is expected to propel market growth over the forecast period.

Waterproof Breathable Textiles Market Report Highlights
In 2022, the polyurethane segment accounted for a revenue of USD 717.6 million of the market in terms of volume, on account of its durability, versatility, and low-cost properties, which makes it suitable for manufacturing cost-effective waterproof breathable textiles
The general clothing and accessories segment is projected to witness a revenue-based CAGR of 5.5% over the forecast period owing to rising demand for the clothing products with lightweight, high strength, waterproof, and insulating properties
The membrane segment accounted for revenue of USD 1,363.9 million in 2022, on account of its superior vapor permeability and waterproofing properties thereby making it suitable for application in manufacturing of lightweight waterproof apparels
Burgeoning consumption for the sports apparels coupled with anticipated rise in demand for winterwear and protective footwear are expected to propel the growth of the market in U.S. at a CAGR of 6.6% over the forecast period
Considerable improvements in the production technologies such as production of extremely thin membranes, membrane incorporation method, and coating techniques are having a significant impact on waterproof breathable textiles market growth
Leading manufacturers are collaborating with specialists in the fields of biochemistry, chemistry, material research, and graphic design to improve the properties and functionalities of the products.
For More Details or Sample Copy please visit link @: Waterproof Breathable Textiles Market Report
Waterproof breathable textiles are lightweight, durable, and easy to dry and care, which makes them ideal for outdoor activities. Increasing participation in activities such as camping, fishing, hiking, hunting, kayaking, and boating is expected to propel the demand for protective clothing and accessories such as raincoats, windbreakers, tents, footwear, thereby impacting the industry positively.
Technological advancements in the textile industry to produce apparel using biomimetic and smart breathable fabrics are expected to contribute to market growth. Additionally, the technological advancements in the areas of cost-effective manufacturing of waterproof breathable textiles are expected to boost the demand for these products.
#Waterproof Breathable Textiles#Waterproof Textiles#Breathable Fabrics#Outdoor Apparel#Technical Textiles#Fashion Innovation#Sustainable Fashion#Textile Tech#Climate Resilient Clothing#Eco-Friendly Textiles#Performance Apparel#FashionTech#Weatherproof Wearables#Textile Innovation#Outdoor Gear#Waterproof Fashion#Eco-Fashion#Fabric Technology#Apparel Innovation#Green Textiles#Fashion Sustainability
0 notes
Text
oh wow it's really gonna rain all week
#oh well i do have a weatherproof camera for a reason#now if only i had weatherproof clothes#something akin to a raincoat
0 notes
Note
on my hands and knees begging for domestic fluff w joost. cooking together, doing livestreams, playing video games, ANYTHING plz <3
My friend read the ask and suggested the whole plot so it came out like a crack fic near the end but oh well, the sillies :D Hope you like it anon and thank you for the ask!!
CW: cursing, broken washing machines??? wc: 689
•───────•°•❀•°•───────••────────•°•❀•°•────────•

He walked through the door inhaling the familiar scent of your shared home. “You’re home!” You said with excitement, thrilled to see Joost. He talked to you about the latest concert, his eyes sparkling with joy when he described a huge group of people shouting the lyrics to his song alongside him.
You were happy to finally have him back home as this was the last concert of the tour. He expressed how grateful he was for your support and couldn’t quite stop apologising for - as he called it - abandoning you for so long. You reassured him constantly hoping he would one day realise what made him happy, made you happy.
You both were too tired to do anything more than discuss things on the surface level. “You know I wouldn’t give you up for anything in the world.” He said as you both were laying in your shared bed. You nodded, constantly surprised by the level of affection he sported while extremely tired.
You woke up well rested, finally not worrying if he was okay, he was next to you after all. “I’m doing laundry, do you need anything washed?” You said no and went into the kitchen to prepare breakfast for you two. When he was done with the load he got into the kitchen and hugged you from behind inhaling your scent.
“Missed you.” He mumbled into your neck tickling you with his breath. “Missed you too.” You were standing over the stove with a wooden spoon stirring the scrambled eggs. Joost thought proved to be a severe distraction. “I need to focus on the task at hand, Joost.” He let his gorgeous laugh out. “I knoww~ but I didn’t have much time to spend with you and I need you now.” Your face got warmer at those words. “You’ve got me all to yourself lovely.” You said this time making his fair skin turn a shade of red.
He stopped hugging you and opted instead to set the table. It was quite small but enough for both of you to dine. He made sure to give you your favourite glass. You served the food up. He commented on how tasty it was despite it being only eggs and salt. “It’s hard to fuck up scrambled eggs.” You said with a slight jest in your voice. He laughed and continued. “But it’s not impossible!”
You went into the living room of your apartment after he was done with washing the dishes and you were done drying them. Your day was spent laying in bed and watching some stupid series full of cheesy jokes which were just cringey enough to make both your stomachs hurt from the laughter. At some point you stood up and went into the bathroom.
Your socks were met with a wet floor which you didn’t expect. Suddenly you realised what was going on. “Joost!” You shouted, calling him over. “What’s up?” He walked right into the puddle. “The washing machine malfunctioned… grab some cloths.” He nodded and walked up to the closet and pulled out some, handing it to you with a smile on his face to cheer you up before the work you both were going to do soon.
Unfortunately you didn’t catch the malfunction in time which meant the floor panels lifted due to the moisture they absorbed. Renovations were long overdue and you were planning on changing up the floors anyway you told yourself when you saw the panels literally de-gluing themselves from the floor.
You decided on a herringbone style of floors this time opting to lay them yourselves, after all how hard could it be? You bought raw planks and let Joost lay his heart out. You loved seeing him work all stuck in his own world. He weatherproofed the planks after cutting them up into size appropriate pieces and made your home look brand new with the shining new floors.
“You did a great job baby.” You said when he came over excited to show you his work. “We should monitor our washing machine better next time though, we wouldn’t want to ruin these gorgeous floors.”
•───────•°•❀•°•───────••────────•°•❀•°•────────• masterlist
#x reader#joost#joost x reader#joost klein x you#joost klein fanfic#joost klein x reader#joost klein#eurovision 2024#eurovision#fluff#domestic fluff#my fic
398 notes
·
View notes
Text
! crossposting from my twitter !
bucktommy costume analysis 👔
hi ! i'm a fashion student and am really interested in costume design so i wanted to do a (long) post on tommy's style and how i think buck might be influenced by it in s8 as seen in "buck's britches." :))
[about tommy]
tommy's wardrobe is entirely functional and indicative of his dedication to his work. it's practical, useful, and speaks of his can-do attitude.
all his signature clothes (henleys, shackets, canvas jackets) have historical traces to being used as workwear.
(1) henleys - this one, ironically in the philippines it has its own term in our local language. it's called a camisa de chino and is used by laborers. although i live in a different country, i'm sure its use case is still the same for other countries as it's historically deemed the workman's undergarment.
also: yes. tommy is technically right. there were henleys in the 80s. even in the 1880s. so what we're learning here now folks, is that he's a smartass little shit.

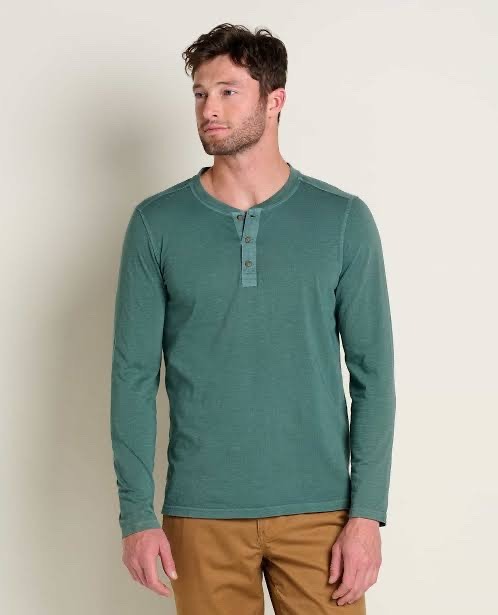
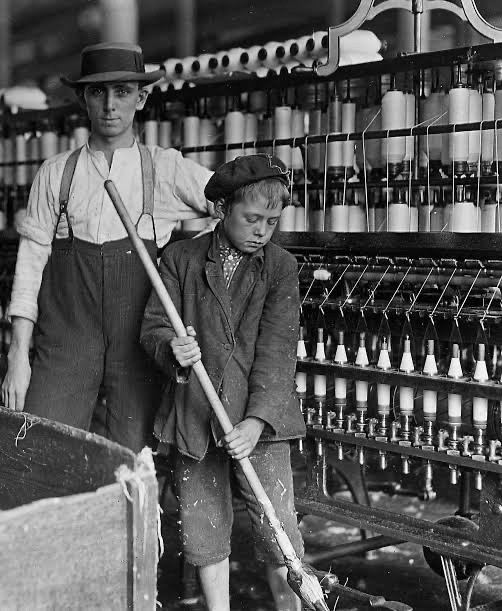
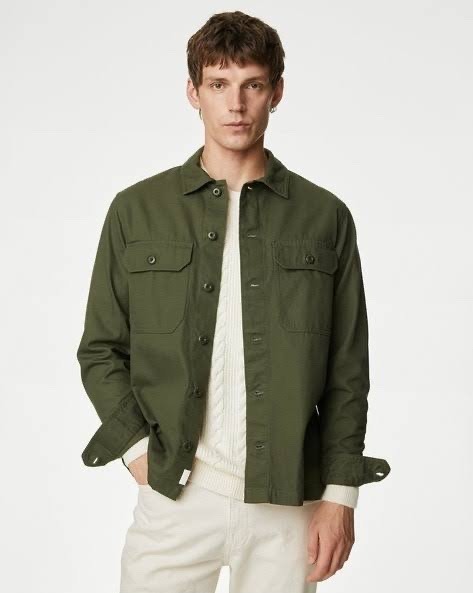
(2) shackets - historically, also an item used by the working class. they were mostly worn to prevent any possible stains on inner clothes from their work (i.e. dirt, grease, grime, etc.)

(3) canvas jacket - although this was only seen in 7x04, it's more likely that he still owns a lot more. (waxed) canvas jackets are traditional workwear often used as weatherproof outerwear or heavy duty rainwear.


as a form of fun speculation, i'd like to think some of these items are also in his closet:
contrast collar canvas jacket
an authentic flight jacket
overalls, but only for when he fixes up the car
denim trucker jacket
if anything, who better to listen to when talking about tommy's clothes than tommy himself !
here's lou's cameo for me describing tommy's closet as rugged, practical and useful :))
[about "buck's britches"]
now to the "buck's britches" post. two notable items of clothing:
the famous flight jacket
baker pants.
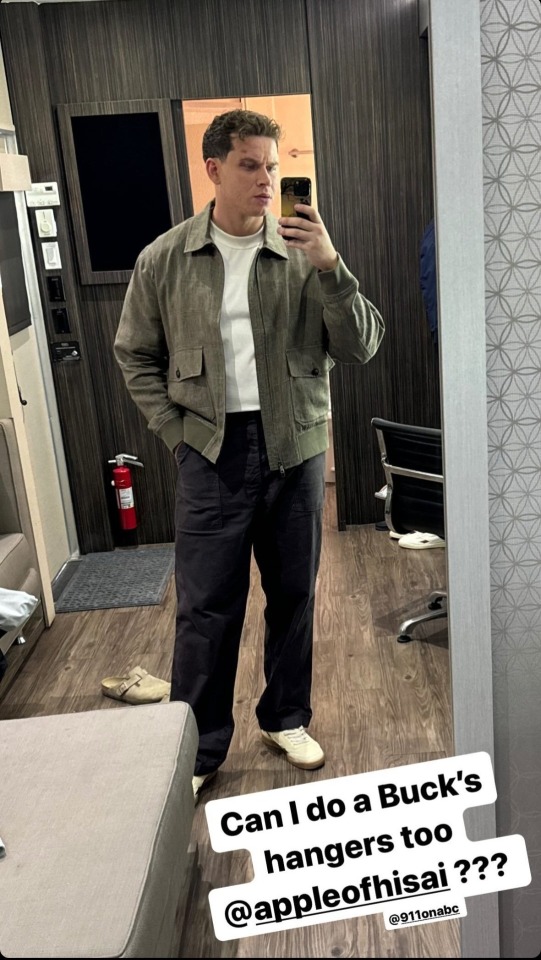
now here's the thing about buck:
buck doesn't wear utilitarian clothing. in fact, he doesn't wear woven clothing all that much. he wears knit. knit polos. sweaters. hoodies. he is not a workwear person. in fact: he's a comfort person.
that's his primary reason for style that's a testament to his own character. buck is widely recognized as the more radiant and funny character. he has charisma and is very inviting, which is accompanied by his choice in clothing.
soft, warm, comfortable.


which goes back to the photo ostark posted on his instagram story.
(1) flight jacket - here's where i have to go and burst everyone's bubble for a bit. this is only a flight jacket because it's labelled as such. but categorically, it isn't. flight jackets are the classic term for bomber jackets.
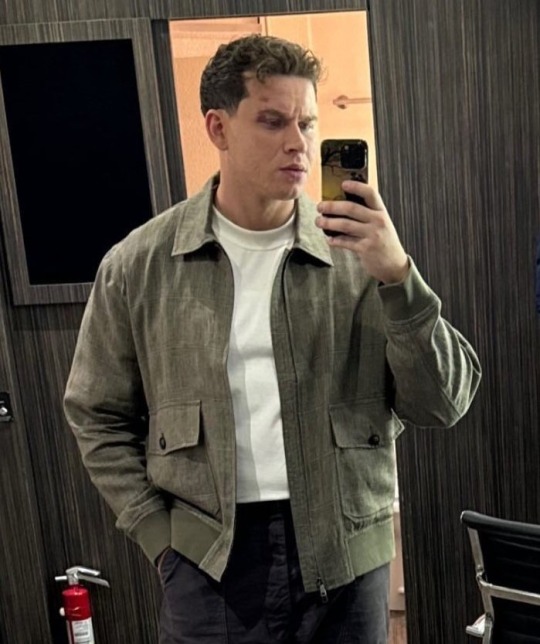
bomber jackets (and flight jackets) were workwear used by the military, characterized by garterized cuffs and hems and short bodices. for pilots, they were interchangeable. but modernly, they have some more definable features.
characteristically, flight (or aviator) jackets are leather with shearling or sherpa collars. bomber jackets are the modernized version taking the silhouette and cuff designs and making them more accessible through material choice (linen—like buck—nylon, silk)


(2) baker pants - as the name suggests, it's a piece of kitchen workwear often in twill (which i'd assume is what oliver is wearing), denim, cotton or linen. it's characterized by the topstitching to outline the pockets and diagonal pocket openings (vs. the usual curve).
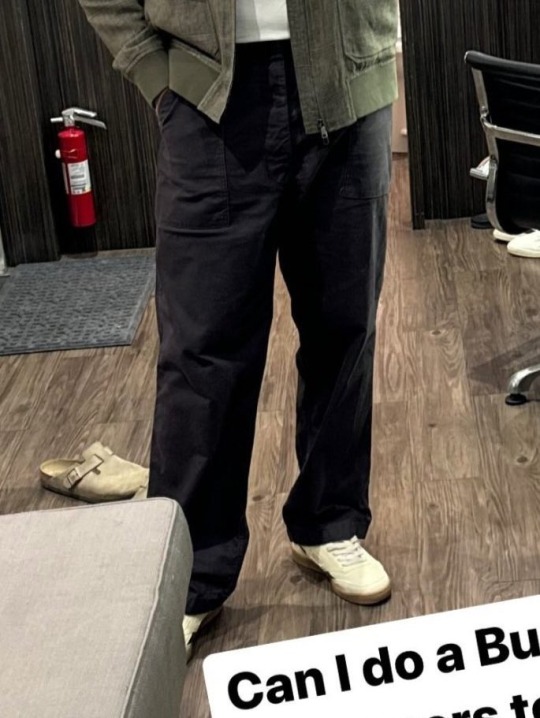
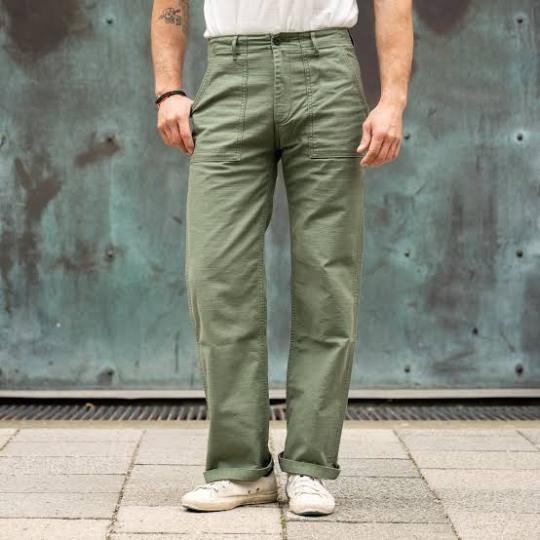
so very evidently: buck has been influenced by tommy's style. he's wearing woven material versus knit for one. if i were hopeful, i'd say they're exploring one another's style because they're sharing a closet.
[character analysis]
woven fabric as a material is sturdy. it's more structured and does not stretch. think: cotton, linen, rayon, wool, denim. what this means for buck is that, by virtue of being tommy's boyfriend he is introduced to structure, groundedness and maturity.
tommy's closet is filled with utilitarian clothing and workwear. he, as a character, is known to be emotionally grounded and mature and it translates to his clothing.
buck adapting the defining features of his wardrobe shows how much tommy has helped him get off his hamster wheel.
in fact, even the inverse can be noted. when buck asks for a second chance and practices communication towards tommy. he's wearing a woven buttondown. and in emphasizing tommy's desire to make buck comfortable, he's in a hoodie. neither of which are common for one another.


buck and tommy, even through subtle clothing choices are becoming part of one another's world and that makes me so soft as someone whose love language is fashion.


[wishful thinking]
perhaps maybe we could see tommy in a fully casual sweat set? i know that they might be protecting lfjr but man. if i see a hoodie on him. (nqueso, if you can sneak me a photo of him in knitwear ill love you forever i just want to prove my theory right i wont even post it)
if they are putting buck in this sort of attire, my guess (or hope) is that they have tommy ease up too.
it would be nice to show buck's effect on tommy as much as tommy's effect on buck because tommy's an established character and has a backstory that the writers could explore.
so if the 9-1-1 costume designers ever see this:
please put tommy in a sweat set. or a hoodie. (not a zip-up one, im talking real hoodie). i'm willing to compromise with overalls. i see what you're doing with buck's wardrobe, and love it. maybe tommy's could soften up too :))
thanks for reading ! 🫶

#911 on abc#tommy kinard#bucktommy#evan buckley#tevan#911 abc#lou ferrigno jr#bi buck#911#costume#costume design#analysis#sorry its a long post im just sort of obsessed with the idea of them sharing closets#my beloved#i love fashion#costume design analysis#contemporary costuming
360 notes
·
View notes
Text
TWST Fanfics ideas - Classes exercices
I was wondering... what are the clases exactly? What do they learn in it? So here are my guess:
In the « normal » class (music, math, art….) the exercices listed here would be in addition of the « normal » exercices. Also I give a list of 10 potential exercices per class, but you can imagine others
~~~~~~~~
In a "Practical Magic" class they would focus on everyday magic for chores. The exercises could include: 1. Cleaning Charms: Students practice spells to clean objects or spaces without manual labor. 2. Cooking Spells: Learning to prepare meals with a wave of a wand, including chopping, stirring, and temperature control. 3. Repairing Enchantments: Casting spells to mend broken items, from clothing to furniture. 4. Gardening Magic: Using magic to tend to plants, making them grow faster or shaping them into artistic forms. 5. Laundry Spells: Enchanting clothes to wash, dry, and fold themselves. 6. Organization Charms: Spells that sort and organize personal belongings, books, or tools. 7. Protective Wards: Setting up magical barriers to keep homes clean and safe from pests or intruders. 8. Weatherproofing Spells: Enchantments to protect against weather, like waterproofing or temperature regulation. 9. Light Charms: Magical ways to illuminate spaces efficiently. 10. Summoning Spells: Conjuring objects to hand, saving time on searching for misplaced items.
~~~~~~
In a "Conjuration" class, the focus would be on summoning objects, creatures, or elements from thin air or from distant places. Here are some exercises: 1. Basic Summoning: Students learn to summon simple objects like feathers or stones to their hands. 2. Targeted Conjuration: Practicing conjuring items from specific locations, such as retrieving a book from a shelf. 3. Creature Summoning: Safely summoning small magical creatures and learning to interact with them. 4. Food Conjuration: Conjuring edible items, focusing on getting the taste and temperature right. 5. Elemental Conjuration: Bringing forth elements like water or fire, controlling their shape and intensity. 6. Conjuring Clothes: Instantly outfitting oneself with appropriate attire for different occasions. 7. Multiplication: Learning to duplicate objects, which is a complex form of conjuration. 8. Conjuring from Nature: Drawing materials directly from natural sources, like summoning water from a lake or leaves from a tree. 9. Advanced Conjuration: Summoning complex mechanisms or devices, understanding their assembly and function. 10. Emergency Conjuration: Quick conjuration drills for situations requiring immediate access to tools or aids.
~~~~~~
In a "Magical Potion" class, students would learn the delicate art of brewing magical concoctions with various effects. Here are some potential exercises: 1. Ingredient Identification: Recognizing and categorizing potion ingredients by their magical properties. 2. Mixing Methods: Mastering the techniques of stirring, shaking, and combining potion ingredients. 3. Temperature Control: Learning the precise temperatures needed for different stages of potion brewing. 4. Timing Practice: Developing a sense of timing for adding ingredients and the duration of brews. 5. Safety Protocols: Understanding the importance of safety when handling dangerous or volatile substances. 6. Potion Analysis: Testing and analyzing the effects of potions on inanimate objects or consenting magical creatures. 7. Remedy Brewing: Creating potions that heal ailments or counteract poisons. 8. Enhancement Elixirs: Concocting brews that temporarily enhance abilities or senses. 9. Transformation Potions: Experimenting with potions that can change one's appearance or species for a short time. 10. Invisibility Mixtures: Perfecting the tricky art of brewing potions that render the drinker invisible.
~~~~~~~
In an "Alchemy" class, the curriculum would likely explore the mystical side of transforming substances into new forms, Alchemy would also be a form of magical chemistry class. Here are some exercises: 1. Metal Transmutation: Practicing turning base metals into gold or silver, starting with small quantities. 2. Elixir Crafting: Brewing elixirs that promote longevity or enhance physical abilities. 3. Philosopher's Stone Theories: Studying the legendary Philosopher's Stone and attempting to replicate its properties. 4. Substance Purification : Learning to purify and refine substances to increase their magical potency. 5. Gemstone Synthesis: Creating precious gemstones from common minerals through alchemical processes. 6. Liquid to Solid Transmutation: Transforming liquids into solid forms, such as water into crystal. 7. Herbal Alchemy: Using plants and herbs to create powerful extracts and essences. 8. Magical Ink and Paper Making: Producing materials that can hold enchantments or spells. 9. Alchemical Symbols: Understanding and using runes to enhance alchemical reactions. 10. Advanced Alchemy: Attempting more complex transmutations and understanding the ethical implications of alchemy.
~~~~~~~
In a “Digital Engineering” class, students would likely explore the intersection of magic and technology. Here are some exercises:
1. Magical Circuit Design: Learning to create circuits that are powered by magical energy. 2. Enchanted Programming: Writing code that interacts with magical objects or creatures. 3. Rune-Based Computing: Using ancient runes to perform computations and process magical data. 4. Golem Programming: Crafting and programming magical automatons for various tasks. 5. Magical Interface Development: Designing interfaces that allow wizards to interact with digital devices. 6. Virtual Spell Simulation: Using virtual reality to practice spells in a controlled digital environment. 7. Enchanted Object Fabrication: 3D printing objects with embedded magical properties. 8. Magical Network Security: Protecting magical databases and networks from unauthorized access or curses. 9. Spellware Development: Creating software that enhances or channels magical abilities. 10. Technomancy Projects: Integrating technology and magic to create innovative solutions to common magical problems.
~~~~~~~~~~
In a “Magic Analysis” class, students would delve into the theoretical aspects of magic and its practical implications, to understand them and maybe creating your own. Here are some exercises:
1. Spell Structure Decomposition: Breaking down spells into their basic components to understand how they work. 2. Magical Flow Charting: Mapping out the flow of magical energy in spells and enchantments. 3. Ritual Analysis: Studying the steps of magical rituals to determine their purpose and effectiveness. 4. Magical Artifact Examination: Investigating the history and magical properties of various artifacts. 5. Potion Formula Deconstruction: Analyzing potion recipes to understand the chemical and magical reactions involved. 6. Enchantment Efficiency Testing: Measuring the strength and duration of enchantments to optimize them. 7. Magical Language Syntax: Exploring the grammar and syntax of magical languages and their impact on spellcasting. 8. Magical Ethics Debate: Discussing the moral implications of different magical practices. 9. Historical Magic Research: Examining historical texts to understand the evolution of magical practices. 10. Magical Theory Papers: Writing and peer-reviewing academic papers on various topics in magical theory.
~~~~~~~~~~
In an “Ancient Curses” class, students would explore the history, creation, and counteraction of curses from ancient times. Here are some exercises that might be included:
1. Curse Identification: Learning to recognize different types of curses and their symptoms. 2. Historical Curse Study: Examining ancient texts and artifacts to understand the origins of famous curses. 3. Curse Crafting: Understanding the components and ethics of creating curses (theoretical exercises only, magic analysis basics needed). 4. Protection Amulets: Designing and creating amulets that protect against curses. 5. Counter-Curse Development: Practicing spells and rituals that can counteract or break curses. 6. Curse Simulation: Role-playing scenarios to understand the impact of curses and practice countermeasures. 7. Language of Cursing: Studying ancient languages and scripts that were traditionally used to cast curses. 8. Ethical Implications: Discussing the moral considerations and consequences of curse usage. 9. Curse Removal Techniques: Learning various methods to cleanse objects, places, or individuals of curses. 10. Field Research: Visiting historical sites believed to be cursed and conducting investigations.
~~~~~~~~~~
In a “Defense Magic” class, students would learn how to protect themselves and others from various magical threats. Here are some exercises:
Shield Spells: Casting protective barriers to deflect or absorb magical attacks.
Counter-Spells: Learning spells that can negate or reverse the effects of incoming spells.
Disarming Techniques: Practicing spells and maneuvers to disarm opponents without causing harm.
Magical First Aid: Applying spells and potions to treat injuries caused by magical means.
Dark Arts Defense: Understanding and defending against dark magic, including curses and hexes.
Stealth and Concealment: Using magic to hide one’s presence or escape detection.
Anti-Poison Spells: Identifying and neutralizing magical poisons and toxins.
Magical Combat: Engaging in controlled duels to practice defensive and offensive spells.
Mind Protection: Strengthening mental defenses against magical intrusion and manipulation.
Environmental Defense: Using magic to manipulate the surroundings for protection, such as creating barriers or camouflage.
~~~~~~
In a class dedicated to “Poison Making,” which would be a highly controlled and ethically sensitive subject, students might engage in the following theoretical exercises:
Toxicology Basics: Understanding the properties of various toxins and their effects on living organisms.
Antidote Formulation: Learning to create antidotes for common poisons.
Safe Handling Procedures: Training in the safe handling, storage, and disposal of toxic substances.
Poison Detection: Practicing spells and techniques to detect the presence of poison in food and drink.
Historical Poisons Study: Researching historical uses of poison and the evolution of toxicology.
Simulated Poison Brewing: Theoretical exercises in brewing poisons with harmless substitutes.
Ethical Debates: Discussing the moral implications of poison use and the responsibilities of a poison maker.
Magical Containment: Learning to magically contain and neutralize poisons to prevent accidents.
Field Identification: Recognizing poisonous plants and creatures in their natural habitats.
Legal Knowledge: Gaining an understanding of the legal restrictions and regulations surrounding poisons.
It’s important to note that such a class would emphasize the importance of using this knowledge for educational purposes only, with a strong focus on safety, ethics, and legal compliance.
~~~~~~~~
In a class focused on “Changes and Comparisons of Abbreviated Spells in Ancient and Modern Magic History,” students would likely explore the evolution of spellcasting techniques and the efficiency of spell abbreviations over time. Here are some exercises that could be part of this class:
Spell Evolution Timeline: Creating a timeline to visualize the changes in spellcasting from ancient to modern times.
Abbreviation Analysis: Comparing the original long-form spells with their modern abbreviated versions to understand the changes in language and technique.
Efficiency Studies: Measuring the effectiveness and speed of casting abbreviated spells versus their full-length counterparts.
Historical Context: Studying the historical events that led to the development of abbreviated spells.
Cultural Impact: Examining how different magical cultures influenced the abbreviation of spells.
Language Shifts: Exploring how changes in magical languages have affected spell abbreviations.
Spell Adaptation: Practicing the adaptation of ancient spells into modern abbreviated forms.
Magical Linguistics: Understanding the linguistic principles that govern the creation of effective spell abbreviations.
Ancient Scripts: Learning to read and interpret ancient magical scripts where original spells were recorded.
Modern Usage: Discussing the role of abbreviated spells in contemporary magical society and how they fit into everyday magical use.
~~~~~~~~~~~
The “History of Magic” class would be about exploring the origins and development of magical practices. Here’s how the class might be:
Ancient Civilizations: Studying the role of magic in ancient exctinct societies.
Magical Artifacts: Examining historical artifacts and their uses in various cultures.
Famous Magicians: Learning about prominent figures in magical history and their contributions.
Evolution of Spells: Tracing the development of spells from ancient incantations to modern-day practices.
Magical Creatures: Investigating the historical accounts of magical creatures and their interactions with humans.
Witch Trials: Analyzing the social and political factors behind witch trials and their impact on magical practices. (assuming there was witch trials at some point in their history, and a time where mages weren't common)
Renaissance Magic: Exploring the resurgence of magical interests during certain times.
Magical Literature: Reading and discussing key texts that have shaped magical theory and practice.
Modern Magic: Understanding the transition from traditional to contemporary magic in the context of technological advancements.
Field Trips: Visiting historical sites and museums to see firsthand the remnants of magical history.
~~~~~~~~~~
In “Animal Languages,” students would learn about the communication methods used by various magical and non-magical creatures. Here are some exercises that might be included:
Basic Animal Sounds: Starting with the sounds made by common creatures (like cats) and understanding their meanings.
Magical Linguistics: Studying the structure of animal languages and how they differ from human speech.
Non-Verbal Communication: Observing and interpreting body language and other non-verbal cues used by animals.
Spell-Assisted Communication: Using spells to facilitate understanding between humans and animals.
Creature Vocalization Practice: Mimicking creature sounds to communicate directly with them.
Field Studies: Conducting fieldwork to observe and interact with animals in their natural habitats.
Magical Translation: Learning spells or using magical devices that translate animal languages.
Historical Animal Speech: Researching ancient texts for references to legendary creatures and their languages.
Interspecies Diplomacy: Role-playing scenarios that require negotiation and communication with magical creatures.
Conservation Ethics: Discussing the importance of preserving magical creatures and their languages.
~~~~~~~~~
In “Astrology”, students would explore the celestial bodies from a scientific perspective while also delving into the mystical aspects that have influenced human culture. Here are some exercises that might be part of this class:
Stargazing Sessions: Using telescopes to observe planets, stars, and other celestial phenomena.
Celestial Navigation: Learning to navigate using the stars and understanding the historical importance of this skill.
Astrological Chart Creation: Drawing and interpreting astrological charts based on the positions of celestial bodies.
Mythology and Constellations: Studying the myths associated with constellations and their origins.
Planetary Influence: Discussing the believed influences of planets and stars on human behavior and events.
Astronomical Calculations: Performing calculations to predict celestial events like eclipses and planet transits.
Space-Time Magic: Exploring theoretical magic that could be influenced by astronomical phenomena.
Astrological Predictions: Practicing the art of making predictions based on astrological signs and movements.
Cosmic Spellwork: Investigating spells and rituals that draw power from celestial events.
Scientific Debates: Engaging in discussions about the intersection of astronomy, astrology, and magic.
~~~~~~~~~~
In “Biology” class, students would study the life processes and organisms. Here are some exercises:
Magical Microscopy: Using enchanted microscopes to observe the cellular structure of magical plants and creatures.
Potion Ingredients Study: Examining the biological properties of common potion ingredients.
Genetics: Learning about the hereditary traits of common and magical creatures.
Ecosystems: Studying the interactions between magical creatures and their environments.
Plant Cultivation: Growing and studying plants with or without magical properties in a controlled setting.
Creature Dissection: Dissecting magical or common creatures (ethically sourced) to understand their anatomy and/or magical organ functions.
Field Trips: Visiting various habitats to study magical and common creatures and plants in their natural settings.
Conservation Magic: Learning spells and techniques for the conservation and protection of species.
Disease Research: Investigating diseases that affect creatures and how to cure them.
Biological Spell Development: Creating spells that can influence biological processes in plants and animals.
~~~~~~~~~~
In “Physical Education” class, the focus would be on maintaining physical health and learning how to incorporate magic into enhancing physical abilities. Here are some exercises that might be included:
Magical Warm-Ups: Starting each class with stretches and light exercises enhanced by warming spells.
Enchanted Obstacle Courses: Navigating obstacle courses that change magically, requiring quick reflexes and agility.
Broomstick Aerobics: Engaging in flying exercises that improve balance and coordination while on a broomstick.
Strength Spells: Learning spells that temporarily increase strength for lifting or moving heavy objects.
Magical Sports: Playing magical versions of traditional sports.
Endurance Charms: Using charms to boost endurance during long-distance running or swimming.
Flexibility Enchantments: Applying enchantments that enhance flexibility and prevent injuries.
Dance Magic: Incorporating magical elements into dance routines for a fun and active workout.
Meditation and Focus: Using meditation techniques to improve concentration and mental stamina.
Magical First Aid: Learning basic first aid spells for treating minor sports injuries.
~~~~~~~~~~~~~~~~~~
In “Flying” class, students would learn the art of flying, whether it be on broomsticks, magical board, or through levitation spells. Here are some exercises that might be part of the curriculum:
Broomstick Basics: Learning how to mount, dismount, and handle a broomstick properly.
Levitation Spells: Practicing spells that allow one to float or fly without the aid of objects.
Flight Safety: Understanding the safety protocols for flying, including protective spells and charms.
Aerial Maneuvers: Mastering basic flying techniques such as turns, stops, and speed control.
Magical board Handling: If applicable, learning to control and fly on magical board.
Group Flights: Participating in synchronized flying exercises to build teamwork and coordination.
Altitude Adaptation: Acclimating to higher altitudes and learning how to adjust for air pressure changes.
Racing Techniques: Engaging in friendly races to improve agility and speed.
Emergency Landings: Practicing how to land safely in case of an emergency or spell failure.
Weather Spells: Using spells to navigate and adapt to different weather conditions while flying.
~~~~~~~~~~~~
In “Swimming” class, students would learn not only traditional swimming techniques but also how to incorporate magic into their aquatic activities. Here are some exercises:
Water Adaptation Spells: Casting spells that allow students to breathe underwater and withstand pressure changes.
Aquatic Mobility Charms: Learning charms to enhance swimming speed and agility in the water.
Merfolk Communication: Studying the language and customs of merfolk to interact with them during underwater excursions.
Underwater Navigation: Using magical means to navigate through murky or enchanted waters.
Magical Marine Life: Identifying and studying the behaviors of magical creatures that live in water.
Water Safety Enchantments: Applying protective enchantments to prevent drowning and other water-related accidents.
Diving Techniques: Practicing diving spells that allow for smooth entry into the water from great heights.
Temperature Control Charms: Learning to regulate body temperature to comfortably swim in cold waters.
Underwater Spellcasting: Mastering the art of casting spells while submerged and dealing with the resistance of water.
Rescue and Recovery Spells: Training in spells and procedures for rescuing others from aquatic dangers.
~~~~~~~~~~
In “Music” class, students would explore musical arts, with and without magic. Here are some exercises that might be included:
Instrumental Enchantment: Learning to play and enchant instruments so they can be played magically without physical touch.
Magical Music Theory: Studying the theory behind music and how it interacts with magical frequencies.
Enchanted Choir: Singing in a choir where voices are magically harmonized.
Rhythmic Spellcasting: Combining spellcasting with rhythm to enhance the potency of spells.
Musical Creature Communication: Using music to communicate with creatures that respond to magical melodies.
Historical Magical Composers: Learning about famous magical composers and their contributions to the musical world.
Sound Manipulation: Practicing spells that manipulate sound waves to create music or silence.
Magical Performance: Preparing and performing in magical concerts or recitals.
Music and Emotion: Exploring how music can influence emotions and states of mind magically.
Instrument Crafting: Building magical instruments with unique properties and sounds.
~~~~~~~~~~~
In “Art” class, students would likely explore various forms of creative expression, possibly incorporating magical elements into their artwork. Here are some exercises:
Enchanted Drawing: Practicing drawing techniques with enchanted pencils that bring sketches to life.
Potion Paints: Creating paints from magical potions that change color or have other unique properties.
Sculpting with Magic: Using transfiguration spells to sculpt materials like clay or stone without physical tools.
Illusionary Art: Crafting art that moves or changes, creating illusions that trick the eye.
Magical Photography: Taking and developing photographs that capture magical auras or movements.
Wearable Art: Designing clothing or jewelry with enchantments that alter their appearance.
Art History: Studying the works of famous magical artists and their impact on magical society.
Artistic Spellwork: Learning spells that enhance artistic abilities or inspire creativity.
Magical Murals: Painting murals with spells that make them interact with the environment.
Restoration Techniques: Using magic to restore and preserve ancient artworks and artifacts.
~~~~~~~~~~~~~
In “Mathematics” class... well students would likely explore both the theoretical and practical applications of math, but may use magic too. Here are some exercises other than the "common" ones:
Arithmancy: Studying the magical properties of numbers and their use in spell-crafting and divination.
Geometric Spell Patterns: Drawing geometric shapes that form the basis of complex spell structures.
Potion Measurements: Precisely measuring and calculating potion ingredients for perfect brews.
Magical Algebra: Solving equations that predict magical phenomena or outcomes.
Astronomical Calculations: Using mathematics to predict celestial alignments and their magical effects.
Transfiguration Geometry: Applying geometric principles to accurately transfigure objects into different shapes.
Probability and Chance: Calculating probabilities to predict the outcomes of magical experiments.
Magical Graph Theory: Mapping out the connections between magical nodes or ley lines.
Temporal Equations: Understanding the mathematical principles behind time-related spells.
Mathematical Proofs: Proving theorems that underpin magical laws and principles.
~~~~~~~~~~
In “Health” class that would be held twice a year by the nurse(s), students would likely focus on both physical and magical well-being. Here are some exercises:
Magical Nutrition: Learning about magical foods and their effects on health and magical abilities.
Body Enhancement Charms: Understanding the ethical use of charms that temporarily enhance physical abilities.
Magical Hygiene: Learning spells and practices for maintaining personal and environmental cleanliness.
Disease Awareness: Studying magical and non-magical diseases, their symptoms, and prevention methods.
First Aid Training: Gaining practical skills in magical and non-magical first aid techniques.
#disney twisted wonderland#twst#twst wonderland#disney twst#twisted wonderland#twisted wonderland classes#exercices
59 notes
·
View notes
Text


Repost from @thesameerproject:
Winter in Gaza is here.
Rain, wind, and dipping temperatures combined with displacements, makeshift tents, and destroyed infrastructure, and the situation becomes a recipe for disaster.
We must act now. The Sameer Project is launching a Winter Campaign in order to prepare for and mitigate some of the suffering. Last winter half of Gazans still had shelter and not all vital infrastructure, particularly in the south, was out of operation. This winter is drastically different as 1.9 million people are internally displaced, water and sewage infrastructure has been destroyed, food aid is trickling in, and the healthcare system is at the brink of absolute collapse.
These families need your support. Picture what it would be like to have no roof, no warmth, no protection. We cannot allow this to happen. The Sameer Project aims to provide:
-100 sturdy weatherproof tents sheltering an estimated 1,000 people
-100 large waterproof tarps to winterize current shelters
-100 thick warm blankets to keep people from freezing
-100 winter outfits for children and adults who have nothing but summer clothing
YOU can directly be responsible for keeping someone warm and dry this winter. While we sit under our roofs, in our warm dwellings, please keep those in mind that have been stripped of all basic necessities and rights, while also experiencing unimaginable horrors and massacres around them.
Let’s make a difference. Find the Tents, Cash Aid, and Medical 🔗 in our bio and help prepare Gaza for winter.
#palestine#human rights#free palestine#gaza#israel#free gaza#gaza genocide#signal boost#gaza fundraiser#gaza mutual aid#mutual aid#the Sameer Project#fundraiser#winter#snow#survival#please help#please share#save a life#palestinian genocide#i stand with palestine
59 notes
·
View notes
Note
[A girl in her teens arrives at Miss Retro's, late at night and soaking wet from a rainstorm. She has white blonde hair, currently plastered to her head, and is is carrying a bulging, bedraggled rucksack, wearing clothes that are definitely not weatherproof. The girl sticks her head through the door]
Hi, are you open? I know it's kinda late
@snowstormbird
[Holloway looks up from the table she was wiping, quickly scanning over the girl. They had technically closed half an hour ago, but like hell was Holloway letting her go back out in that storm.]
That we are, hun. Why don't you take a seat I'll bring you a menu and a towel.
24 notes
·
View notes
Text
Henry’s Journey Home: A Day in the Life of a Young Craftsman
Henry is a 20-year-old apprentice tradesman who is on his way home from work. It's been a long day for him, starting early in the morning with a meeting, followed by various manual tasks on a building site in the city. He is wearing his typical work clothes: sturdy black trousers with reflective stripes and a weatherproof jacket that gives him both protection from the elements and freedom of movement.
As Henry walks down the street, he runs a hand through his bag, lost in thought. His rucksack is lightly packed as he has only taken the essentials with him. The headphones in his ears are playing soft music to help him relieve the stress of the day. Henry is proud of his work and the progress he is making during his apprenticeship, but he also longs for a well-earned rest in the evening.
Henry barely notices it as his thoughts are already on his warm meal and the cosy sofa at home. Maybe he'll spend some time with friends later or just watch a film. Today has been a good day, but Henry knows that new challenges and learning opportunities await him tomorrow. This is the life of a craftsman, and Henry wouldn't have it any other way.

23 notes
·
View notes
Text
Year-Round Chic: How to Style Men's Waxed Jackets for Any Season

In the dynamic world of men's fashion, waxed jackets stand out as timeless pieces that seamlessly blend functionality with style. Originally designed for the rugged outdoors, these jackets have evolved into versatile staples suitable for any season. Speedwear Ltd, a purveyor of fine motorcycle jackets, offers a guide on how to style men's waxed jackets throughout the year, ensuring you look effortlessly stylish whether it's spring, summer, fall, or winter.
Spring: The Layered Look
As the snow melts and the greenery blossoms, spring calls for lighter layers that can handle the unpredictable weather. Pair your men's waxed jacket with a lightweight, breathable cotton shirt and a pair of rugged jeans for a casual day out. For chillier mornings, add a thin merino wool sweater underneath. Complete the look with waterproof boots and a MULTIFUNCTIONAL HEADWEAR from Speedwear Ltd to protect against the spring breeze.
Summer: Effortlessly Cool
Summer styling with a waxed jacket might seem counterintuitive, but a lightweight version can be your go-to piece for cool summer evenings. Opt for a waxed jacket in a lighter shade to reflect the sun's rays, paired with a breezy linen shirt and cotton chinos for a comfortable, yet put-together look. Accessories like sunglasses and a lightweight scarf will add a touch of sophistication. Loafers or boat shoes will keep the outfit relaxed and season-appropriate.
Fall: Rustic Charm
Fall is perhaps the most natural season for styling men's waxed jackets, thanks to their durability and warmth. Layer your jacket over a flannel shirt and a woolen vest for added insulation. Dark denim or corduroy pants will complement the rustic aesthetic of the jacket. Sturdy leather boots and a thick-knitted hat will keep you warm, and for an extra touch of style, consider a leather backpack for your daily essentials.
Winter: Insulated and Stylish
In the heart of winter, your waxed jacket can still serve as a stylish outer layer over protective motorcycle gear. Choose a jacket with a quilted lining for additional warmth or layer over a thick wool sweater. Pair with thermal leggings under your jeans and waterproof winter boots. Don't forget a warm hat, gloves, and a scarf to keep the cold at bay. For motorbike enthusiasts, incorporating motorbike riding jackets underneath provides both style and safety.
Suggested Read: Innovative Waxed Cotton Jackets: A Must-Have For Biker Enthusiasts
Conclusion:
Men's waxed jackets are not just a statement of style; they're a testament to versatility across seasons. Speedwear Ltd's collection of motorcycle outerwear and accessories offers the perfect blend of style, functionality, and protection, making it easy to incorporate these timeless pieces into your wardrobe year-round. With the right layers and accessories, you can adapt your waxed jacket to any weather, ensuring you stay fashionable and comfortable no matter the season.
Remember, the key to mastering the art of styling men's waxed jackets for every season lies in understanding the balance between form and function. By following this guide, you're well on your way to showcasing your unique style while embracing the practicality of waxed jackets.
#motorcycle outerwear#waxed cotton jackets#men's waxed jackets#speedwear ltd#protective motorcycle gear#stylish waxed jackets#motorcycle#motorcycle jackets#Motorcycle jackets#Protective motorcycle gear#Men's waxed jackets#Waxed cotton jackets#Waxed cotton motorcycle jackets#Waxed jackets for bikers#Men's Waxed Jackets#Seasonal Fashion#Styling Tips#Outdoor Apparel#Fashion Trends#Layering Techniques#Men's Style Guide#Weatherproof Clothing#Accessory Pairing#Versatile Outfits#Sustainable Fashion#Motorcycle Jackets#Protective Gear#Urban Style#Classic Outerwear
0 notes
Text
The Devil Wears Black ... but would wear Prada if he could!

Tantai Jin has fought hard to proof that he is not the Devil God and will never truly become like him... except for this small detail: The way he dresses!
While watching Till The End Of The Moon for the first time I was always amazed by Tantai Jin's beautiful cloth and the elegant way the dresses. However, by the time he had embraced his identity as Cang Jiumin his cloth felt almost out of place in comparison to his sect brothers.


These outfits are beautiful. A lot of layers of blues and whites with intricate ornament, elaborate head dresses and feather details. He truly looks eternal! He looks less like a humble disciple tho. These cloth reminds me a lot of Tantai Jin's style as the king of Jing, which seems to be shining through - or so I thought.
And it makes some sense that Tantai Jin would dress fancy, since for the longest time he had no access to adequate clothing (in weatherproofing, status and style).
But once Tantai Jin confronts the Ancient Devil God it all made sense!

The first thing the Ancient Devil God does, is giving Cang Jiumin a magical make-over. Gone is the white, replaced by black and blue, studded with sequins. His top priority is literally to dress his Devil Fetus in new fancy robes...
There is no denying that the Devil God from is one of the best dressed villains out there. If you plan the end all karma, you better do it in style!


So all the times we have seen Tantai Jin dress in his fancy robes, it was actually the Devil God peaking through! Not convinced yet? Just look at the feather details that connect the Ancient Devil God, Tantai Jin and Cang Jiumin!


Eyeliner and lipstick always are always on point. Even goes to the Nether River all dolled up with curly hair (again, very similar to the Ancient Devil God).


Conclusion: Tantai Jin inherited his passion for fashion from the Devil God himself and he never stood a chance in denying destiny. (And I'm very grateful for that.)
114 notes
·
View notes
Text
Of the many attractive girls who hung around the Casbah, one in particular caught John's eye. She was an elfin blonde with a tense, wounded look, whom he nicknamed Bubbles, for lack of a proper introduction and because it so unsuited her. In fact, all the guys had noticed her watching them. While not a beautiful girl, she was catlike and intense, in a mysterious kind of way. She also was eager to meet them. "It must have been all over my face that I fancied John," recalls Bubbles, whose real name is Dot Rhone, "but once it became clear he had a girlfriend, I lost interest." Instead, she approached Paul with game determination, pretending to be faint in order to get him outside, where they could be by themselves.
Once alone, an "immediate attraction" developed between them. Paul discovered in Dot a person who hardly fit the profile of the other girls at the Casbah. She had grown up in a better section of Liverpool called Childwell, around the corner from Brian Epstein, the Beatles' future manager. But "it might have been two different worlds," Dot says, her humble situation being anything unlike Epstein's glaringly "posh" circumstances. "I didn't have a normal childhood. My dad was an alcoholic; he never hung on to any money. And the only reason we lived in that neighborhood was because a sickly aunt left the house to my mother." A year younger than Paul, Dot had gone to Liverpool Institute High School, "the girls' school across the road from the Inny", but had left in June, taking a clerk's job at the Dale Street branch of District Bank in order to support her family. Paul, she believes, was attracted by how needy and impressionable she was, which put her under his sway; she found him "adorably handsome, opinionated," and loaded with confidence. "He came from the first family I'd ever known that cared about each other so much," Dot says. "Everyone would gather around the piano, while Jim played songs like 'You Must Have Been a Beautiful Baby', and sometimes [he] would sing with Paul and Mike." At a deeper level, they undoubtedly recognized the loneliness in each other's lives, each absent a parent - in her case because of addiction. [...]
As 1959 drew to a close, the boys spent more time with girlfriends than with one another. John and Cynthia, according to friends closest to the couple, were "besotted with each other". For his part, Paul stopped playing the field and settled down with Dot Rhone. As a couple, they had an appealingly unthreatening air. They discovered each other to be solicitous and sensual, gentle and clumsy, with Paul at times taking on a paternal and sympathetic role. Once, at a friend's house, Dot happened to mention that she'd been standing all day and he began to massage her feet, stroking them as though they were precious pets. And yet, at the time the gesture felt almost preposterous.
Eventually Paul's attention grew relentless, almost disparaging. His simple gregariousness turned uncompromising and willful. Paul was immensely charming, but there was a darker side. He had a need - Dot believes a compulsion - to control every situation. As John had done with Cynthia, he began to pick out her clothes, redesign her makeup. Dot remembers how much it pleased Paul to stand beside her and study her appearance, then, in a roundabout way, critique the way she looked - and suggest how to improve upon it. On one occasion, he insisted that she have her hair done and produced money to pay for it. Not wanting to displease him, Dot went off to the beauty parlor. "Unfortunately, they did [my hair] in a terrible-looking beehive", she says. "Paul was furious when he saw it. He told me to go home and not to call him until it grew out again."
She detected other changes in Paul that proved equally disagreeable. He had an almost stuffy, explosive air of self-importance, with his simple superiority, cool poise, and weatherproof rightness. He scorned any sign of self-confidence in her. And Dot, pricked by love, submitted. As a rule, she did not impose her will on him, certainly never when they were among friends. She would sit quietly and smile tensely for entire evening at the Jacaranda while Paul and John discussed music. If Paul glared, she would freeze like a rabbit. "We weren't allowed to open our mouths", Dot says of her and Cynthia's attendance at these nightly discussions. "They'd talk all night, and we just listened."
The Beatles: The Biography, Bob Spitz (2005)
#the dot quotes are from an author interview in 1998#poor dot!#also v interesting that this is how she saw it looking back...#give me all the terrible teenage paul content tbh#dot rhone#paul mccartney
101 notes
·
View notes
Text
Waterproof Breathable Textiles Enhance Performance and Style
The global waterproof breathable textiles market size is expected to reach USD 2,859.3 million by 2030. Increasing demand for comfortable and high-performance apparel that provides protection from environmental factors such as wind and rain is expected to propel market growth over the forecast period.

Gain deeper insights on the market and receive your free copy with TOC now @: Waterproof Breathable Textiles Market Report
Waterproof breathable textiles are lightweight, durable, and easy to dry and care, which makes them ideal for outdoor activities. Increasing participation in activities such as camping, fishing, hiking, hunting, kayaking, and boating is expected to propel the demand for protective clothing and accessories such as raincoats, windbreakers, tents, footwear, thereby impacting the industry positively.
Technological advancements in the textile industry to produce apparel using biomimetic and smart breathable fabrics are expected to contribute to market growth. Additionally, the technological advancements in the areas of cost-effective manufacturing of waterproof breathable textiles are expected to boost the demand for these products.
Major industry participants are making considerable investments in the development of eco-friendly products to cater to the rising preference for sustainable apparel. Furthermore, rapid changes in consumer preferences in terms of fashion trends are nudging the manufacturers to strengthen their merchandising capabilities.
#Waterproof Textiles#Breathable Fabrics#Weatherproof Apparel#Outdoor Performance Wear#Innovative Textiles#Smart Fabrics#FashionTech#Advanced Apparel#Climate Adaptive Clothing#Functional Fashion#Weather Resistant Materials#Performance Textiles#Active Lifestyle Wear#Technical Textiles#Outdoor Adventure Gear#Athleisure Wear#Sportswear Technology#EcoFriendly Textiles#Comfortable Protection
0 notes
Text
get to know only extremely unimportant things about me tag
@sleepyowlwrites created this magnificent set of questions (I want to see your answers, too. Also @byjillianmaria you should do this. I want to know your cough drop situation.)
what does your bed comforter look like?
My bed comforter is dark gray. The other side of the bed? A second dark gray comforter, and also a weighted blanket, and also a fuzzy blanket, and also a sheet, and also
do you have cough drops in your house?
I have so, so many cough drops in my house. Fun fact: The first time I answered this, I accidentally wrote "in my mouth," so I feel like I should say I have 0 cough drops in my mouth right now
on a scale of 1-18, how likely are you to accidentally park father away from the grocery store than you meant to?
Solid 9. Most of the time I will try to take a close spot, but about 50% of the time, the spirit moves me, and by "moves me" I mean moves my car into an illogical parking space for no reason
when it comes to outerwear, is practicality or style more important?
In my heart, I want to be the most fuckable person at the grocery store. In my reality, practicality wins every time, because my black weatherproof jacket (with detachable inner layer and inner zipped up pocket for Stuff) is where it's at
do you collect medicine in your room when you're sick and then just, like, never put it away?
No, I collect medicine on the kitchen counter when I'm sick and then just, like, never put it away
have you ever seen some berries of some sort out in the wild and decided that you needed to photo them so they looked like blood?
No, but my yard did look like an off-colored bloodbath when the berries fell off the trees and into the snow
did you check the same book out of the library/read the same book over and over despite your dad or somebody being like "other books exist you know"?
Graciously, no one ever noticed how often I re-read books as a kid
is there an environment in which everyone there has a different nickname for you?
writeblr?
what animal did you fear would spontaneously manifest in your bedroom and eat you? actual belief in said fear not required.
You know, this question raises a different question: are ghosts animals? They were once human, right? And humans are animals? When do you lose animal status, anyway, my answer is ghosts
was there a thing that you were unfortunately really good at as a kid that set you up to go into hard "gifted kid" burnout while still being a kid?
Not exactly, but a similar flavor: I was a strong reader as a kid, which made people assume I'd be strong at All School Things, so when I struggled in math I didn't even consider that I could ask for help, so instead I developed wild coping mechanisms to hide the fact that I didn't know what was going on
I couldn't do mental math until I started playing D&D in my 20s
you know you have to eat some fruit some time, so what do you buy the next time you drag yourself to walmart or wherever?
I ate an orange today! I also like apples and will sometimes slice them up and have a lil' apple 'n peanut butter snack. Berries: also good. Pineapple and mango if they're fresh. Oh!! Grapes!!!
are you maybe a teensy bit obsessed with code names?
I am not!
what's your favorite word to refer to a personage who is capable of using magic?
First reaction was "mage" but i'm not sure why that is
gloves or mittens or glittens?
I rock a pair of knitted fingerless gloves
are you a sibling or are you an only child who happens to have siblings or are you an only child who has liminal space siblings?
I am a sibling!
does your edgelord have a name or are you not on speaking terms?
When my anxiety acts up, I will say "Calm down, edgelord" to myself and that usually helps
do you actually wear your favorite piece of clothing?
I don't know if I have one favorite but I will occasionally buy a shirt and think, "Oh yeah, I'm wearing this to death." (My favorite sneakers get worn on a regular rotation)
bookends. a cool accessory or something that is preventing more books from fitting on your shelves?
yes
please rate this tag as if it were a super duper indie flick on imdb.
An unpredictable journey from end to end, get to know only extremely unimportant things about me tag brings a fresh take to tag games to the Tumblr ecosphere.
8 notes
·
View notes
Note
One of my friends works for Burberry HQ and I was curious how the Royals shop there. I’m told there is one person assigned whose job is to help the royals with whatever they need.
Thanks!
I did some digging last night and specific to Burberry, they have a royal warrant for very specific goods: weatherproofed gear, trench coats, and scarves.
Other clothing brands/companies with Royal warrants also have very specific goods - tailoring, livery, military uniforms, for example.
So I think it’s very unlikely Kate would just award royal warrants for “outfits”; the expectation (or assumption) is that she’d need to be more specific than generic.
“Generic” (for lack of a better word) is what makes the Kate Effect work so well. It’s so far-reaching that even small brands and tiny indie labels have a chance at Kate wearing their items. I’d be concerned that the royal warrant system would make Kate specifically loyal to just those companies and her wardrobe would homogenize to just those specific styles and items, instead of maintaining the diversity that we see now.
14 notes
·
View notes