#Tumblr converts images on upload
Explore tagged Tumblr posts
Visit Tumblr Blog
Explore Tumblr blogs with no restrictions, modern design and the best experience.
Last Seen Tumblr Blogs


Fun Fact
Tumblr posted its first advertisements in May 2012 and subsequently earned $13M in revenue.
Text


#giftwrapping#jpgtwrapping#Tumblr converts images on upload#so you're going to have to trust me#that this post is hilarious#because these were originally a GIF and a JPG respectively#ha ha ha#ha ha
24 notes
·
View notes
Text
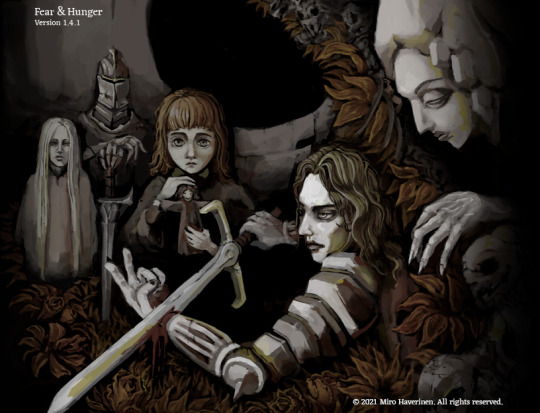
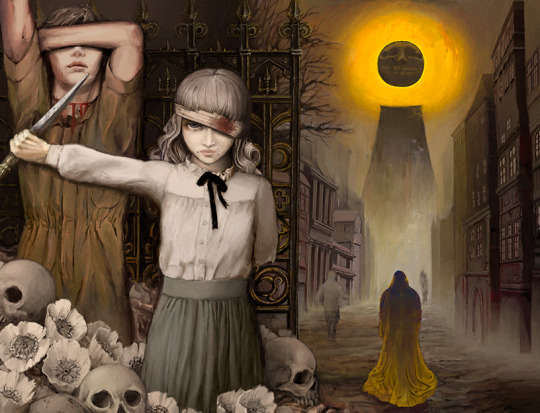
(mostly) clean title images. love how the text is baked into funger1s title screen
#art#<-- posting this entirely so it can go into that tag. i cannot express how much i love these images man#would post fun sound effects i found while decrypting but apparently tumblr cannot upload ogg files and i cannot be assed to convert them r
5 notes
·
View notes
Text
I (unfortunately) have been blessed with having a computer, and knowing how to use python, which can calculate this (given enough time), this meaning, I can (and have) calculated the number exactly, however, it being 26^post limit, I can't post it in a base lower than 26 (if I only used the digits 0-9, I'd need about 1400 text blocks) so I have converted it to base64 for your viewing pleasure
IfQzmV9lGGL5WL/alIZ2di39JS0aDyUXHntGpR5QSPMkCUsQ9Njv+qvLf2DCgYxkm8TBA6L9h65xjSsX7SghVtKmO/mdqSkDguU/AcRhTUGeMbBTQm4awOGYp6OhaubcXsaQ1zOt8Q0FMsN/gpF750Fob+dDq4b8D4fMLllnfp5Q6s7C0UTWarqnrwbgk37dQIV+zE4UH8h01SyhccOi0ixIOjYfeIKx9uKWld3l20FUope+rA4XaJfo6PZOqfgoD7XFQTiA40iGr2RM+Z+ij8cP91hgmgRv//q3oJFxTJKBvCTLHqYlPa1tB/0KUPHOMv1SdUkqmbmB9cpa6gst8OBINgshN6z6eMf7G2t/JBtBzK4GXUS4MiY3K92dwNWFRl3mgRLzaNDHMJlzbzmpH6/Bs1J1DL2Zeh2LJ+U6ymbrtXu4JoAzBHcKyIew6XCTVYmvBJIqeTFWY8rXtgs9nZH3bcvtcWna4NqppA4l6e+QPThDni5hR6fTCCeVdW3CyxY40Pb6Xd6dQDMlqBkenOjrPXOKsO3dnvSEj7kpFAyLOHH8g1mQICCj5NmualNSowV2yNielC14vVoPAZ9DNuiPzWhxtYYv3m12wvbkzExbMHtbQv4im906pD8QZ2svCDORSH+vyuecNtyG5dekG86C+RHWva9rtj8Dhv2XkfFBPWsbZhxliV/nOUPcLwneEtUCHNqsUUqw9y4xAfDkjNQDvMD6472+MIGOQqdZkI5Kgupbw6o1m4wo0MsB92i1rVH86KQFP3KQLkYLGmjsCVc8j9qeuK/7zJtDX2gL4+mACf/1TAuz749YT9aoRkPo5Ji+JUaX/XQDub27UY9jP6KQZIwNdLEymUB693xOpF8pt8fldO3ZQLMsev86Qib5n9N2sgMJjrIzw3Rs1pXMTmkT6XoU+daF0ejled6cMF4KVSH7sXrZciOljs3RXrwlXpmTzdW/9sry3IgIg2hHGy5Ue7+US7JBqIx1TWZH2mGODw5kd59W33D+3vN8Yh8eQIGOE5+5gI1Tq5LEtqiJm8fdKS6KHwp++qAt7Rm+IwvqFHncoJHYLbK2PfLMPHAscM15KBG9a8pc2ROd/VUGZvWTqF/UuQmgF0L4OBz0V2I7Fxh56Q+tbajggO0mmOoPcMm9reUdJmH93xx9o/6lRJ9JkjsAaV3Ly+cDWpDIt+Ymy/3MEfWyQd26OYywh2OiCEzzxhmgl11DE/pJA3w7AsJgJwfeaC3Nyqw/mlZ16i9pFis/6QrvzbW5oGHst5WwXvebwpATgKnwrHUS9e1GMsYylJIYZ9kJYIzAN0y6m68DGOwuDQPXLNuMt/Eq1OCPbNyfYW+V5jMeTkaCSKLRygKkwPSlr8/JK0IypaV/ljODedNC/f5VdjEnKAXaOcIOiDMRqe7q68oCl7m6B7LtKqnNe92Uk+znn/rE2nQPcIve1CHes9nx88zxXUhlkrNVD8VfvQlTHLBuysjyT7+5/YC5dbMSUjB4FfksMuU5urKyN23rYoVkb+htzszVpiR+4kmgJ1fikZRfG0ePn7gfI0xUjmxcSsfnhgAc+oykSRhNroerPkNG+cnVm/MhobtD9xqqIHr5TL4UbQEPdxQGlymRgcHO0EBPFb3aYShZU3omZLywIjZkZPyBsfqm9ULZjn8S6VRoF0saVd+2Msux4OLM28NqR92w5rAB7VpWlX/n9QGUFnB1xjHQzGDBmhL4izQYnLFQ5g+MAp3uEYeGqwBw/MoG7GbKVhskNmZEhHSeUQZuhmCB+pmKnx22dfJId2T9X/Kk0FSU6Nktz8er1DUZgwB3VbRV252iYzOBv2uTkDzrHTxpvi8WdPKkW6eQLo1WEJo3uDfzy1H0vMTb2t75Z9TR/zN4QiQaSXclgEgmmc7wFH0pyFhjiF0KcL67Q+ROpVComsgqt7x2ZdpABTAaFI0LFzwCwrT9ZBbHWbtNEO1iNXck2AZ5oOTeCU2xZTM6pwFaxALmdpRbjFPuS2qZJGWCW+P4Fd27Y9rmDQjbzhFxCJ/NCkdtnk1vEnNUl3X05LdLS6uh17A9gkDMhZiHAPdZkXiB39c0ZLL2oIt0EZiOrVPJat10Ug31LFgd4VRh21sNqeMaM3JlAJaSpFcgPMMmz5FxA5mL4OwE74skYer6jawuL/HFVsiObAygnpft/KZVFPIr5FC6ko2Z4srqnn/IrP8tm6FXWCpfeydiA7Q3gsw1tKdYS3a+zPtP/dEmsG6pZZc/G2hbtqFPQ9On2F2qsTYvnpcIjmWAudJuvMYZhIEu48S/jGmYMrYX9ge8WQnC9cpvtPBwOZIjqXRFze+kp4kzspJ5F9qllYLDcnI9r6PBA5BnDUVbkV9Gznt4cgcE92r+usOIN6hCy5cA6IIln9CHL+VD4xd66wZOR17mlXyGbKNIqKbHmhEkYTZUO39GwFq8FeIusT1dk+/PEXOHZU3EiGSGrhznrfUs0aSCHWocF0vJHPCiYwNlNmZXWE1f+C4Dsoh5W6p9odF8vX5dCcNtgXTfgIV/HVTikdqU1Ru2k51Yvjk68romfObPoJmsO0PkPz5W74QFnyxqGHqjd+bPjNAROIdfQryp/s92z8bE6L+eNfsFNU1Qxs8M3qltQ+moxvoBaOe7gZlxy96ERLrEFduJrzmr/ZJT4VBObekvsCogVly/GLy70k1nD6wi+G0ADfca4jLBClBsqSbWMGh9ibTm9PS2HskM6Zh8AiUkiYb8QVED8zC3D0zja22sYbbYe46zTZ0skatSxFnBt0zsfeb1pxAp+/3s71mJKdxdvpWs8YiWKf/nyXUYBicdFXqoWXhTt5LiGNBsTdDFCj5LlWsHHF7R0jp49WggJbzM+2Ms0KOhafWqqjD8XpU6HWVAHgDr7ITlrXhYf9azq0OXv0VilimH1Gn9E1QG4qSSrPhYQ6S0Ad1D0094TSClCeHPaPR6HT/apLCrAxTPekzawl435KPPyWbLUlqQD7tSNc2cHlAozWrNBiUv8JQ9z8eW5wa8eR4ixLeDxrF8F596qg/L3h1PdkJmFuNgY2Mr0ucJcjAzoJlqLogT03nAEeI/LNK420XWf1jvGFHdMw+NWgyvt35L+yRFJl/FVPVGpt6/wONsDkMOhYBohg6qIKCSCnz+CXOiFww3UbX9xi6EY+gDslOF8fC03ZhguJZqgMt8BLrEbWXkZaWf0C/S3bXtuy0ql7UD5W3be4pZO6KoE6uYRjqiiPjcyfNTmiJuJsqYtczK0q2P7K3pjuTM/v5rgy3nUD5pscz/yDsYXwt92p885tVeBQpwcJ/CuhdViEq8SIal/cP0fvz07uNqEWsKJ6t9JBXKpvabEpzfaqkWqJchHyMN6AslHNIk9Uo3ODvrGheToOklfPtOqmyXZcEhzE7cTcT1OzlJnN+q38LCblgUQuvgt2bv3/F3KNvAAh2aYRinyyDRFG9clBLOmO2b7cynUrRLrqd8kFLx8VC6eI5cjbT1fAXZqPrck1D0NfGryDybVO1RaXWPIKBCBSOas3e0Rfn4GlyVbxQmbfvVvAOSCLA4yJOLRMxSv1TiBACpMRZbA2xpQwStoSs+3povIrxjO1QBC2D1Gmucx3cExQGMRrs0ELJEjmnQmFBn5r5NRs24zvWvIzU4GEXHD9aRoGyBhfZ+GcDptW+bQ/pjny4MSXg+JgidC7fgjdkiBqpUAQgcTBtViFuCSP8uJ5FS6afy2MN1Abos/+Mdes4kxUXm2I7yFYp1KoZr11TarEZ6bIohG04M7iPHnAgGGXpiZvQi91IjJv3qGrsEuuiNatG+OjvDWW89LBVCN7a7h83pi+7BtmJ8/K/0cGYoGel0qE2AGqT9LE/ezNHwovERbN8jo14t3KEBI9cQK08uyoeimOys/BUjNRpoPWDMQjUDF7147Ld+olUQvx1rAegFYfhDFFctZO+Ldb9f4xJsI4cOLKFhiKZ6wg309xPn14uan2lOoa/a53jWOKODw5TrReGVkRzEstXTubHiTlCIz8O2eBMB5Bk7s2HgLKl3EAjJM+kJCY4s5deLbQqzXSACMAdqGAYaF1b3bn1TwRuHpY014oGMGSfe
kngSINWnwgF3yX9SiNGwzm6Bj2S87piPqFtNq2PLV3xuY2AyPU2yLJLP9bpTCsoh60a3BOxxlKCjc1kQjah5FHsaW1SJ8jgQvcU+5mw+HbQj2GjSUQxGq1b9kHFhsZYudkzIfdaqTXGKkkkkwzvewICm/OVe2F2C/ufxVEL4r0yqMEdq6Xm5EwL2ZXhi0V89xv8rdg32vgjDZS22E9lxHmgBXe5WkNJ0TW0WtqdFRnLBHF0qJ4QrYusgX7mE75lytlLlM6TTIng2IrxvcnLQUeosRvV0Pkw1MwQdUVb/25SchUnt+58qM7fLCZUO+ciB99SZDKKjDfYRvHFnO4jymH2QDxEAxasrjKb2NNhBeJkG+yOgFJnVH7yDDQXuRwRg3pDnpcxyT03ig0Pw/UlOXAjtc1qFCHPfyog5tXjxaN6ZtF+P1RLxfelTlsJHGYXFXrPGVZdHDQsKhlvyYEC8PB6mvfuFOxGpkNyOykMHLk5XAnZ8PDeex/7HVMQfxoxW3ohbTwfVyqYYX3F8B5P7Pa2W85MaV54hz93LPyRYBct5o/uuZsF1D6hv0ZCilsA/MI9D+LLOjkHX1zRbEis4+yhc5U84Ax6sslCszmGM4Vk78Aa1ha3ELpSm3pR+coi7RuqWEaJD4ILzpwaWyoV7T0YzBQO3qfYG1S4nQvntkFJTsSy1a3bRzfqX2d1UjD7Oqq/pC9xSRQsOaP6Bx8fj/S/mMyZ8tveBJISR1xCVSfma1F4iuSfuwzuPuxGfYBnCyhDWf6ONUR4VM8QXyJocVzQyfGLlTaSpV7o1fyfXOEH1QzNgSlZkpaINTE9syEY2OZutjnPXx+HwVuJD2adYIyUEPTeedp+AFRYzYOSVTS+n8CDT3t99ofAXoErx3MccQ6fwxlm6ol8Cv/RvSfLLL7XIhTpNDfBI6V8sJLiLDz73+reer34ZrZpL3ISeLZ4aZgAigFbiQBmyeU+cr4XtyYV6Oz6maWVIc9VcW9IwzrN/5RB2r9ZdsOEnMFuhknKBvkQisav1APrha5eUcJzQs9qpSGWKc7nu592oRdpt7yvCjfD8EyD/kutXRgtEqbewVoUKn4Lt75ESG4caTSzvQc2nzJacHUORhcS5KH7qet9FEF3J2teygJXQ8rI/JADQNj2Ofruzs5CuDtqVIH3tTquamuK7/l3w1BLw/x8tt5RGdzcTUGrb0+kTHkiqIfflWultII2gXeA3ekQa5PBULxWhetihG8isl6vMaucEuH/2ic+TBn/kEJqPMSmG4yXWwfLu6fNJHYUcWvPAD5lWzOf/Zk9Qarn5frxc8uAhfhiRvc0dIPG4HRXPhgemE1Xf+ZRkkFlRyFMMViswsob8bGCl/mvDQaQrSsAvfnVNmvvNuYGOO6F1lcW3LmZCH6iJ7mZnAOFrnYBi+P8kSNBI8gBF8laNE4oeBuxyBeI9ewSS3j2N9PJApchv75fACgGm2ib4SBApRE0wOpjpeaTGMDB0NxYyEJHQ222G84p+qrMIBC7hE/cXSOENGK8C1tDytIkphLizZECz3HQIwPVg5yd8pNkYG53htfBEIk8oXCQjO/XDGn4QaYRfBgRLyJ1Kn+2v3x7vVXuvNFdCnGRFLYhmEEPxFIRNof7RPPBgsec/Yy5dHdBSXSaXMHbrbRNFSTMLCzJpA5CTGbvANwHqvuDjSnudfpKmnfQBGaEb08fOBKUrxFJCeKN3AiK8LcoaMJayVdYEqpIb0o6mkKemWcg0hMS/ednnXFiirAbh3/sWWbqBc5y8EahDMrGbcJ4joXNLh6WR+9eSiTIKV6gdv8XGoYvB9RcFQ9ohDbTQC729jBOi59zktdqMxM/aNYbcir4nQIRJ4zWf0TBtwF1kTqj1KkqmI+FjR/goCFOake7Slan8p5FfVwOi79rxwDQLyh7RYYhlq5NH4seMxCsF+v76AkspIFr2jYzWwpZu10B78fcFDrBWKv6GYB2fShMQ51b/nnX5Zm6X81cCqJ3ZvKh69FkXTe0vJodZiStrXno1AwuWIpGtbCTuNR3DMkGAcD/vV/RRYYhUaxfll8Jlxf/XjJcvYPwvPIT/jMMzXS1PxknqXV0vs1OqP1H2ynvFw45wtHeGm4d5WFW2uGqxhyMGIdiKCcoZMAUBTbGfPWvRSXHygn2S7UWhqTysv5nI/B1lr9QbATnMcmG4PlbJ6MsYw9NJKnHj/n3SCnb4pRuxOgiEHg9Hts/ia9bihQfwtpFbGgedJi5kajHJHzP8yk8M8Itqf/a5FRSeg4B6CSHZSSrgtte/lhkYsFmJpR0hFhD7YgJcvSJR9iuhswfVHSp6m80r1x4Rl8P18yehUddeKvZCodbsmHZEFKnb1IrrKtNIGF4qGU9mJkUPn/PvEnkU0s5yVtmiahy4wybtiYmPhYgN9aghU8ptM8Gjwh36ur9BgDGQ8w4Vbh5v+p7KG2PAc10COJ48xUCYr1jDW2j/ZqZk5pIhL1LvxwcZtj3699cCPhUd98pxaZqihMrnkeTPCbiVHivatGJCcQk0JW2iLt4SL0n7ryszYkE7INrZI2OT1nDtRRjuoOI8Hotd+Bscdmkv0rk8sfxvP0J6fG6G6BbAaTWGhxClEkTDM6bUHte8z+4KF77edwKePYG3Lljl7cZzK1+HYrPZqFvMhIyPGv8iwKdZ2xiXOAJGy+Q6eAQHqHL+ccU/dhu5T1OHV1yQjvwvmJVc2Nv/84eKmJ2Fycd+Tkj6T1V5GQIdQnzJynejlH7wg36p4RzH447gSfDZrpxxemb96I5h1BESed2x+JqhESFD5vlfNqG0gyhw0QwY5Y2qjq+KV0ghhJxy7OsT9we1F8UAFYe0WIg8APGDMIsL/PoozcnvxfBkHG8zkmRAj7tDRvxz6geg4CwG0RmYPxD2NC1nmnkSoQFZP+VZoLOl7z5d9mjZ0v+a2HtbW/CLfj46HLqwtRZhXnEFcVlNSpGI9x+N8l/brR06IzTTMd+Fj5nZ8L8etUCMsugIBLOVm3mKn92Bis+05j8po6lwSB4KZ/juKT6+yoTFDH8OmHP69maRVlR9NnLi8FuVYVsGk2lpRQlltyEGE7QiXvdLShiCa07ac41uCAgAbaCUncOVJGVmS/AJmOS8kAS1c3xEjimJTlNeaRiv1t4k15ncy+f7UTDMYl4YiHROXAeDdMMdP1Wc7ZYOQzFBUDifFZAdrgalRcxB4bmM2/emqhRB6JniTpcZrL3dgj6XCpybMhu8lVhXoYDAMs3mtVM3F4kTqy/vPx56BJFZEu+saSjT3IdiejhHB6tMQp2+rpUF5+HzptTN1U8mB1sOVt24cy3o+qVuU+Cst5hKLK30rh9jMuTXEfnaAfB/SsFxngpS1GDryclOLFYuT0FU82QLmAYicQjQ3biCDulc1gUFSzIkcch0KBHgOlDDp4gzzYyfKHHn4Y10IpfUkuQsqKVbwiQzLX8/29WI/0MxIR3plUwyjcNu38DyEpEIJjaOXqgeN/2kNycPKuHc/Vu+IVWOvrB+ASY2qISuMe+aW+K893VfCox/kl9GIL0PLsjRdbQL+tVoYQ6Ja7JaRUzEzQLj/j/oH7FKun07kCeyKZrSf7z7VcTuhapPzobi0k26vsCPp89uJZdkavdAjIdGOZR3RxXkV+XSdYlRVH3ZF40NI0BHpczHbmNhwAktqAtwNVVnZ32LSoZuoCdeFQG4xetLTkfhzSgpwpPjRFCxigfO2EO7WARjuE+y1p1V8s5DpueMUBYP6niuy8LnB+MZ8YliWhmKT8npfAFQJ9Rtiyek4lF0+uo+XTRl58VguwF3MBSb1wz3DWFKPEa4zMc0ER0DWmtml4GNuxDMlxKmkhDu3ERML8v2rOYjDvmz6Ld5KvRi5kT019dNTuadwe+qcGbO6T4rBgiySeJelLxJBlb4To8CZPowmJrcrFTMHSzkvaV5AM5q/LOwSbAtbpQ5hwWEBCCea8m28S4lpjUCElu6f2Oqki3kjmDX858UTW5n9afkbwoudG5G/0wt30YJP/vMvhAnVy408P5Pq6NHPlJHTcsrGVBzkAzcMx/5VMcecKZGOjzy7DnH8yPzMsfKmB6i
F7sDudJaWIVXh694nn0JaeubD+wOnBkCTsjSxBbxBrDebyEplqRKUyO2iH0Q0046ShyA/CHSsgOKCwQsV3qGEAr/u95uirpIJK9KlQpEL3uOfIr6W4HlVOz1WGt3zgrOp1AW2dwn9mMwZMxivpNWdP9kW3Pqcd75NTO9EAxyKxrjeGS014Wwdhxl1DfObCtkMIGQYWjgvQcE9vELSIS1/f8RxphwxmxTSjQPWYWUnhRIDpUbWRwhYxvuYqXvbW8uW64lxipxBMJw2BpmxMt3aTH/jhZ72/s3MStj4fCO6Uh9CaYoqPnAuM2TT5lG9tqoxDgzTKumKcq9AgS5tZ2nmK8lsVsfaVTH9uVEzSOsuBL2OklyKjTVmjrXpPHcn2kk6NRwaYe3df0HBxxqQZgkVOBSiyc+SXU9yYenXIazz1Ht5x1WP0T5RsCx9SJmWFdt8Qg9s3w4450ARsF5b2HeBYcYzF8WqJW8d/VelC0ahGnX5bh+dptPKy0fyOt8KC/iaSgbhu4MBclhHxaLyfSfgta/io08G2HM1x7C7TiRB27ZPhdwVQk5lIBUa89fyRPLJ11iqIeON/Smb5LpuOHDlNfbVdduDqPYoSnJLEXtoCW7odXpM29oirMI+GYzLGnDYpXAJsNEzn/B/5AdOvbWL+EQ/8lt8Kw+FxpaWaVxUQ/tvojgqzLcsYa9XR/hN3W+v2+lQPfxUfewXHD8XNkhzAoqy787/ewUzpdG05Wm1APi6K/WsP+MvzGysQN6q4nByTIe4FUoB0f1ionA40PIP2dWtVFMKncFOxt73Xf6Jw2atBVnJUZKGYL3qCcBZz6KIrm+aOIXEJSnbrG0MTeW6JG1gx3wv9dhx4g8f9QLi9Dg8qiyppeWLiv1ys7Jc36zTvVbJCr9AiwMPJncVpi5NxCY045KEDM8/s7oCSJNTpj5SRcMPgfQv4h3cvcQDq6kJF0X4LkMgj0DeRX3jo1jPzFIY5xcMRn2oeqrVafFq10Cq+Fa8HUB29sLoTgoYVJkUyU9PjZD1u+jDctev6dfPSSMvxkjVr74AFwrPmjfz9smYQ56jO7mA5QesY41ZzKz4CUun7Ik6fpPrS9fXh+0BiKuqBb4mVx4M+34ZNkEcAz+Atz3Y5KRQD5v6hCWn4BQxUVbBLqa3VWqSl3FgzcJ+xJN1On+pHv9onUfNFKhbG10VcXY3ynUTd32WZiRsyIfgslhxngMlju1HglocTJJlCqdofWnRKPG/9h4wnC/Guml0XMYy3gmzM72uHAhLb0soTJUM45r5a91pSEPSMepMmjxRAGVuJslkY5dQk629Yak/cVq2qpr6m5iOeC4fHvt1jmk7dRMjaAi3qmU/VVVeDrXNcdbWYoR5Ql9NzgsqardK6VtDQkLsDkiMgUjGZxDeTcuIIURXrDRT8NZ9XUGUpSiy6Z4oqlmpl1MwC1O8SoBlskw/YsAWnTvVYUzN1EEtZnFfCgcEfVhMBABnE3bzdQpr3g2saSIiI+Az+ozMpzN5AuRiWhm30hf5nryXLltaM9DWm231JFBkYh67CRHDpSulYmPNeUxgY7Bn/Q9636F891OnhF6RE+RgnLT6cyY5zir/jLlZ8OW5NBJNzAP7x6mVwWMQC5Vix9fuXI9HPnLxMBmjy8zkRWoCpuix4sd14LX5/p5pzGktfGOxhX4jm25zOyiO5IMukQ+ZgbBLR0+bjPpjXTRa22d/zmzL1mt/Q4P/VfVzoy7z7UjU146BoXhQEU3u4htB97qfxMSrOdNL8qPpDcylU+CeCW4kuQpUFe17eEU0Yi/itMUiiHV+DZVLxNPX+46XcSxFg0HAUBl7Gjhcqux1ubO7cLzPaHWQllDxeloX3EFTw4cPM4OU1MScZ4jfVrTW8ygcMzl1RqI19+snhqWEOki1yC4PiV6HAzpK5YgK66Wdxz3zheZxE5QcXQr92bWisdjOlSlD0osD4rFEMrbWRYfbUS3TqZRGIYlBaLe2aSHik8skdWevIAov+/QqOFVpfW6G7UV8AIBgYwSjfXED7tZpxa8vrjLNQqTcinzR/ZJKXXRu8gHfTrxhACzR2htbcIggYguWeWdxFq5SvpZSb6Csnun9MK3TwyJNYswpAlIGjAGb6ZCp9qOWQykJKKir7HlcXQjlv93LcsU7kZ3k+O77VnMQ+UQKAVERCthGtxxKmu6ysqW9QS2iV5K+toO/GUi1r+oes8aCN/oPpCcHLUIeQVqOzVbbQkSMMHgs5hopP/N2OK/KdP0RhGg45oXrIfOmU6rFqgYwFkWCqBOPFN8bDWKUg0f1b461iGfCnXMJX/t6QWTPnjn8tZAX1rga1glKH1nU0RzHz+FA2xTzQabEJ9R49lNV7LGTYACt4c30aDtcm/psoi+IY1GPpymPWFTViTQjNAgmidILGk5PNDRU+9l0TkXWfXfJJiO/Kk7pJf3oB5SZcLLalFDhWiD3870v+5t93+ihT6iCUsb5pXu+OulkJql8K10taRvOx3iNLTACXKbtC+NFEnoBAfuSNqXLjYCeBpR73/izseWA8ziYeyhcrR/ilSHWEzh78JMwMHFQE7snTkymqh8B5gR0zElORdhZj/RZuM9Vd1zWs9M63sc3tpdrn9u1FPfPjjex0YcgskKuupV/S6Bi5Jn2pN9a6WLqO0C1Zsq5ggve2FBKbWDN5+pAvLClYJZhN1Z5YqWg2JDTHGqRs1ocBce9W4gSnHKFYLqpVV5x2mLgVOskVS6o+6qCeF+iw+1kt6e/QzMT0Yh2rbHFVdJL3bhCxjfcvNIAi4s6euJbzw7W+nowoAkp0QRYZHVv5RNB2WzT/BEfvfaDCXUPqVuj1c9Ow+6OrTNStlCS51oEo+aT593xEYJZ/E78bbOaj/RSqKKDwBonLfAMuEkvx4qadTkZzev6VEG2zuX/tCoAmiazIEoxxNE6uv4uN/M72H2+MuA0uxGrAoLHeQjUq42Ey6mmh2KMvJ6TklpM7nm6pVNwYgho8bPBHXOmhiIhvVo1GdlAqd19nNW19DloOaVYh8hZTnGwIRgDIXXzh16ndgOtSOV5Y6QaBEnKiZ8FdMLL8xaElPBsg1TDjfKwU+U+7ydupU9+iCwr5C5uk9PqlsrRZGhGO0ofYpniObtfOW7zi1QW4P8KEQ6b4YDN5hFx3RlJvdkGj0XpcWVnComusA0baAaNxudL3E+TnLVFPZHXVJLlulrZoGSa/lqNPmx+ay7Af4qK4quSFNFi49Pd8GWR4ey8mOSqoTXkBZ6p7M0QuSFUi6EaIE/KkvMCwRc2wayGbVv1HIuu8astJ3m3fJW19NQPHU5PySGtJPXZxmjaGbguuJB0CeNw4rXiCAegTeu9LspJRqCNSN7ov9FHnFYGZ7PtGhrmUnJDCpPHwsqDeTmSzeFAEQqhxcybc1omfX6toijK3v4E5qyoZhfg11jlBCNar6Stb8MsVcQNP0fanGQDmNO0MAWSJohvXZSETfrv09JlBISW3WxJROyji273TXsnUHRr61IQGStvPa3Ozemxthuf++djf7RP9EJXvojIn7bfP9UdZ4SLj5V+Uj0snQZLr+b7VViJdGjlEJOV6E82UM3DRsyqNsa2YH/k7EfEJO72WmLHxcrdjImwJwE7rzrx3bKrnwmHoAQMM4+TxRva86vJ7Np0IdYgdc2Je/8e6NSkAgc12Fc+gr2i60Flx89eNeO12buFXw98vVTqMsPdaMpw4qGrPVinKd6xnRV5eUd4ZZEMsVXXlS94yekiBqUlhnVglCWhtB/MhAdFpeVG+7O3TQ4eGNOMNXns+m7lsA/ngujr1WbV1r6gzXv3yXTGSTz11ZWgzUt9XMOODXaY/ghsrwPrCm4O3EFtJm1ncKfIBburX53NNgNirXGVAtJ9L/gFj4hFyGl4KrKFUVJqWRZwKZeQz4hV2he3SgJyxVBQzvXZT16x9qbP11YJg+XqhrWw51zXD0YzWXHndYcvkCVIXhbobNw2O0QqlQwxpph0Z83nu8yzKR4P1txzWu0+o++wtUojMvfp+99qTL10owLqFlzJpEP+hW90wTno7mQ2ifnHU/n+x+bsPUJmpwnfE/JHcg5
Vs0iVCV3dtJAeTeaOz32sEQovmJVOeSHxigylzHeN1vv5Yj5mDJwqFudNulmt/1Wp7+Snoy1M8M9SUAntq9spN78LTsdOHxgCawPeEBNISPMz99sDbxSCCI6KObeyOoQfX8Dg560EzU20fqS+LAjB/XG7lzeah+hHq1f+AsUDUxdLbMOb0jIRrePZzAB6gwN+qTBGqdYEcwf0clxVpfa0yamILRk60kpSeOCg4F4qM5nafeiq4E839xlb6CZ9CLCwwfbDvaB9zNGNSOZeEN5FLApi/O+MC6n4h2iB0RoWL+Ixg/FgvjH9NL2rJqAA6ceQhKr4fNanHj0y1b+sqXqQBFRUjNT/VaF5d0MzVhQ8QEIx2kTAEWN98zTuJjvaEZYmVtcWtzZ8LFBx+vPqv0boBKwHfJfNG7IN+26tOS7DD6EDrhGuE3E9ODUon/7eq3UsztP7qA2fDnZddP2vV2J4FHLo9tUKh3rI6bRADqZo37iFuCW5Id9naIIeVq6zRY0KGc64bVRhR5UWkv5FbvP6xrfoBfQabpFFK8+zoo9Xl8YsIYCFFk9fKYEbSN/TotaDd/537G/Uadr1O925ZEmytCx5l7oMUTBPwDem0xBYEhT8hqpF8/rcYkefeXle0i4n8BFMUTeP4uaHpFyNe/KBlnlg83OYukh48+xhpCx0ojPu8mgUJ0JQ0813qy3pOuQOM57xMZfPVu6dKw4d1tMkDFop4YCYtMilUnZr+fQMYeAfoLMCXmdUMRZFDIpbVggVmRqJTNOoBPgBIB50qgRzhGwj/r5iO3XTiiPvcAqkWKaHnLXsv7vU9C3z7NsfKiQIrZUI1XP7XD5X6Qo8tn3DFNm/Si9ir5gGfXHHIm9fK4WDRYiaUIbVrSCmd0ACQud8Jxi/6LcI5RV8GHd+EjRu/YstxPElMFwe4ztYoORz7XnqEiC21ctbZ3z6uZ7jeniV/1sju4gSQ8f0xzEAlDR3cDfilppG5XQpQHQEu0i9ObqoxRQZbVj50FJnikHWQfNY9A87+wxBkuLZZRJIqUZgSbCfRD57Wo6YDSVKkvPRPbFJd2vlzJHVXez0kKun+bHtDL4GNFVVa6L5cK0OM73cnv+yP4PbdYsWI8fbAdGIZBO5b/Oqx7Ocbn3lISRP/DygRQ5ksuK+ThschcOYOycvWB17oc1i3eXoE6ZmEelsf9y6N9sJ8/TeTLGVZ3xkOu7BE9MwS5aOL83HsXdiIdTaHxGJQ9ElhEKpp04EIS4nseMpikpumfhwKFsQD7JjSgXts61s0xzSlWWKjP3CuW4ZnFX26RHQJ5dLY50C2bwOXR0Mc4v+DH4pE13NmqoZXVX3qXlKZ8v7keXPnfAEp9wm9UwJR0U2cWNBkojX2kyt3qgggzds4iGvvJqeZYjI/hh8ZYq+WFmQzHP71KsVtMN5lRgePe2+YP9QECrtyOyCvQOV4E4M8/0hsl0TPDeYs0MI8xH7YXIjcVR+TcrCN2+Tjg54FMNuKAO1Mrm6QwezfZ7q/LTtdxqYqa2fZtU8xKIU2fcpeGmEVts3GD2y3DqF8tWFoZw9nwPORM/9UDIV/K5RMFukztjQi8p534mvXCEjgWS6+cLBOZvXfh1uNX4VnTeb/pecG1Fzt2J5aZjx60zMdg+lhSEP9uPpFcRFzP8BR7bdqNC8/TksjAe764yNN6XkNqkCON0OhaxMkgpx5DdSX2iAESv/q8ZrcWEV+vbXuVeR56KO8RZfMmmZvsyqTvyJUsQAtalt4RT/O4yDTnKK3XXAho5H6z5UrdTfLRCz1+0DHWryUbM3idP+K2ETO5WrI48fn7M81DSyNH6CwE7npaOKduXs74r+QJfPOegT05EC0g4aFW+0v8qTmukBQVHGQ0tC1h35ecpNeusPRaZv6IU2S97MH4HGZdXlvUVe8jwL2Cgu3UVQGQoi6aSTrolmDnbv/KODQ2OE4F+I3bB41GxIzco9EiMwPQkjoyvts0D4aEanwBeI/iMEIpjyl+gK7IDrDQzW+wWpbIgdPsCpnmAqivXNzYPD/RKB22yIgaTBXw1Zid2Gl+7xjv4LU4sLAmzOLI5dWDpNKyr9NKG1Vl6Mo4jXlWlqN9nKi3JYDsd9TVcl/PDbHkuzisYCQZIxV89M4HIeHdJX4Wa8X1253+BKxCyyNhAIf1B7CJlVnpUlZsdWJkXWzCVZkS22U1nm7sPulbWrzUKW1nU4Vjm+JYwS9MPtc1Nom8a2ZtMCwfBI0T0APnMKP/T+N+brBIpuzBtuwUE1oyCYfOZJYkDScP0PpSGKgSfvaOjCK6Tv+u72IfscjmP5DP8DUvGbOmgg3UcU+alcQoy9zlGWCYV1B/xnlyrTUIYwxTds9NeZinryDfs7Wi0Zd8FvMgdzlJ2wMY4GyWhQf+6jW2X/Uj1C2K/k8Cnu1iqM7y2nfLWdvueCVnkLcTOHyQRe4/XIomhwKU7tvjiS+5G8+GCgU7ScTBfiTuD06vHk+850RWTbDT6fNyviGnhCWAUH/3JP94MIWEsmVGWTGdE5JEr+PNxWOxhkQ1AVK9jGg5quEDRjZw4WDcdab8d+pGKGuSSamToHF/2+eMHz171I/Ye21xhM4k2PncgJK3GveGkbwPcnSD0hjp6g4qkeeOKfdXCj33PVtLuUBr2Yjl2IqdZRRl1Wlx/vyRhmsJ9HyLpiGKW7gVZrVspgnDEgyE9oulf3Qk4HsPCKntGN7CVVrezWPV4DxooDZbaxnAvk1mytpKjjytD1Oj+kopW3Ub2CsKynC9DW5jrmkcNu/A3bTI9mMyFr0JpEhb+NU0P3VgxhWRHWNSsZre0OMT5x3lPxsvs08cRREJw8Jv1KHFXtxjaEk/ona591RZDT4qw4vu2aq9u1bNxqAGNAJp2MvlAvw0pV3soOzi7LmUw7FocMG29xpYnLUI8FznxOBdS1iU4gNTRz+Vu66yKqLuH24P+D47Xq00t3f6G/jrO1IxHSaJ0IA5mjZsdyTuzGcTQm4uTchbFtIa9Pin8JivuTKcnWvCQG/WHpMidbJfGmsgMUdOsoLEp2f6MRiQMcQI4AWBY/hMqMjRisAtmYu+PNI5lEn3jKxvmQOnYebAlkEzrV3CJSEAU5WrfnlKYYwnoAoViK/LZ4xdFfpiW/KR46sDcxpyCuj68VVsNC57E/Nb1q7rYBcA1JvEMa0bzHXp9+k7uwK3xewZ7FiPIi8uRhbZ2Wy7UBmdDwLTYDaycgfBpTIxhPvZwTDf8gkDAZ/d3zKFtZP0IXdmiuVoMswRrt1VOmILizkY8WIB40L4mt4dUyYCIHpypBqb+V+P/jyJrFzuvoWBJgRLtkJjhEVQ1YA3aUM1bwLfgMBpevBizyMiMYRbXs0wau2+G5bdElcoEjbYQS9gkjmzKJ65QAG4aiz8t9/Hj1W92QEdIiOo/K+WOSjYyzgEtA68cpTwjhVGH2m6BjbhDqRYrXyDCw+vRK9a1+LiUs6jeF5lSM8zPIpAkqbb9ggp/Oy1JHsvQke9fHvvBq6QTQVzFFiWhDncXzbcJBat7eCFkKFMiVnq8mPMFoq/6IRm3Cc0rP+4oiW7cuy/anF983QuABpZHZXhygmbzMgrgufq5/2CmykdMB7+TWiUWKjNi738YMBtFuz/BJmGDrmIseBsQmTpLBDn0WGuKu5h7gnXSVuRR7e8XpfIcmH7UvaK08K5iolTLHGQgiewz/Jki/H/MkgL9ApzwPMjK2ei/BzdrbxLRNoyMvmRzxigcqFImg04NLJEaWyrr2SRVznFsKfM18A6EqsZTd1OyzP/brxpgoSZfZUd+wP2D02Brc61JfSF6ym/zZNLCszoUkLcWw8UpqKgB0s98vTIMfFSGb6QrakOoAzobTNivdCqOOnWecDWA2AEOKhmk4AMcdy4DEeBd93G38m0fqfdkfiFFHDr67nvuEK/ziPbMP2FktHyzy5uxNWW478/EYZ/McGxCfpKW6Oyedj6RrGwO7IUPdIsf/2Ne7BtLhiby2uMu4xCBsD/0/JzySp2dm/OzuXApAMrSasZNBRjIrykH6H0UE1Zs3aFiUQskbXAK9ZX3VJbWbXf0/gGpfogqryToXHwp
l8VxR7ZvGPQQOKbOS1qlbL9EQxte2Mrz0cLoDF/iPV7LK4fbDxI/fE9SCfezKIVemaqGganM/JgrVkCWdm5awnJg+YgC66kzrGrtQIZLwuIp9+4t1QTR9UtvPKaOC6qwO9QnUtZBLwl4yOTCsGZ+Lanz2UpVXcgnoCTCnuEiYy5yjDJedk5R5ZD9IIIrv/jQWx2o8mrYqUycoL5ufBA/ztzFC9eJyRMCbnpd9C7p7FXGJGZh4kp7HAyJxThMb5MNe2opfLRYt7dELN4y7sBGeF2GbqTIdKSr8Cj8noIMo4ooWC1zIdLF/+jLszK4OkkdqlY+TPkRuG+fscW227sLfhWP1iSERFC6aExx4EVD8TyP8h4GiRV3+7w2LZCdPDH5TvdcKWwNqD2Phjk6nmJFKRsIoAmbJ838x9bztA9ef4WfzwiesFlC/uWVzBfbdksGB1CQb/JEJZRN522sZdCqFVJU4H6F87mHc4XUktgcuOGX7dBvukk/oOUMG2wpNQUUh3CxupL4ip66Bq20yokBXJpcoTqPzZHGPu5/J9rnrQz5cgPASGgQ8MHWstxoAopBQDjZTQSRQKfJegQ+Q4V2pyeFNlRfehnEneBb7N37TpxQ0MWZLB7I/0eky+DJ+qHQqA9BRPdrVdC+JPbTuoiKfK5rwwy2sGfXQBJWxlGK+GXoBU3bdQIZ7ladhSovirUf+M9n9RKlYi/w46de5nkcrj75/QaIw5q2JwUnOdsX5dT2E085eHlwi2eVzy0OqUIVT+weyZD6MyhwdEOFs4//DRVvk/27YYSXLeZnJPLFCKljLLMmX42F6hDbVVzdMGxJxn0TP7PTDOHIk36gWWJzJBwL/Nr5ZQLt1USlm9NyZJb9fXf9IZ3pW2xm5OVtsksj3hbU9DZg6RMgKK1s4BK6Ah3/sGvC4U7pZZuQUeJpQZSo9xIaukXWbbKqE/8yvC1GW7ygHFpJ8XcF2dzFsvMuPBVXw0uAB0CVuj43HOw47D78QAePp/m9v1nHrNEVWTvN4y+0pIprUdBvZcQRLcMkx8boSiOYzd9cFYlc1wPbtUTmu6kLsEBuBcrhqASS7mjbzc9ddz1e6o7unH2qyROR64+MdjlXRm4Z2+/v2hbokCpcQ3jos/yFgjjb4Gtno0lZIPH8alj2yVU18cggdA0wSY088+95ZPqhUgKDqdma3YHtWsDzeUwBwqvewN3phEOX3plk0kegjNZbiYdBPooXkzvWkj/aOc5GpOz8PBoKVN7JKWhuaJQixlmrW1mq6khAQPCEMJk1MFPWys5dSeXdbUnmlwMZv9YoVch+I11U48VAP9VaVNHpXZv8Cav20Z/6a+cojpLgCOqNOpaRs/+V2y2h4eYJMxZnyCkU4zDOtSrsu9MV++4KR8Mx0UKwvLBlHbX8/Ayhc+doYd4UxxJM8APLuFgZjWLNbGYficucl3/kVai5IoLI3Y7nYbZC2l7L4+7S+N+lL2cJkZdL1Lij76gPiBASjAY96wfK19RbgD8AJuFiGS9171vNS9v9HWjkhmYidR5kQ2uBtrWB9esMtp5S/2V72+1R4kj5p3LpqtHP5D5Pq/eIOCjamxlyOvWn8vWMwB7JcCgsqCrgv7ktpxxnjwhq1MAD0yJjm1MypAoIGQNGdDNCieW5jslNLNaC9Hn86deUbUSubEuDoKl1scDKJxgjRQtTuXa4h16/GD6aZyXhmK30dbE//Qqmc3qvcdzzWw/6mvUWx40GHTfw7x6puJYPtSjxw8FSid6qyYvnzLPkjaNYW/zhbBdp0fkBEbsPriPpJZYxS/B316BWMKK8lu2nXLfpZIFqJ3IzSdeA2aCNYYcPGr+2x3u85+gihyLn1FwgweiguGuyZO2Ekb6LqfIkPY+Ylq6CT/YVgzsoVJmfIxUQnYVdIsqPYar4m6quk7SizksCqrE9T86mwYKDL/4FtEwWXneHI8du57QwPIynXeHaAxB2GaSlJe+EpxHqbomqtdoQ6Is1loKfEiNmGjEavYlV991k3s5vNlFtuHInqqcFt0kCzzevdr8KCF6VmZZWflLTAN9BKHxknVBfWtBlMJl2wmF3OlmwRbPKIrknlQU6vn+weBMyM54SSGPdvXzhuexQ1mIqaVAyWe1aX6+qlHOvIS4Sg5HxFLoPNFON25/z+oIEp9BM7kE+ZE0ewwanB7DJmPUM6s8VzdH86nBQOp5AYf/s5jMKo6z8L2GQPN7brcSx1Me3IaC8SmuTCVEPR3pFVNWMpGtPDutGO+EnwgnjzFeYwNzie3vofvHNVbCfmgnwbiRMu2rZVZb92Q0QzOQAQlVadzY1fFvyjI1uw98wvWmQMXqmy8JHnGn8TSEtpen7zZymAFk1SV421TIGPrVewochCYKkUsVWaJiJoLMnrfCATwhDF9fmV1Z8bVKMia8VDj2Nyyc+Ym9n0E/7I0qxQ5lSi0VuGiDmEo3zY84UuFcAR+vFESEbMTgWx1HePppvSOsK0TWY2FiRTUlqWnUhXzAE6LnXDNfDRh7Ele9CYnVU9bthSVYc2wblfMfMxm9i/gjiH8cy75HoXXYKMU4e56Au5g/r5CGSPa/rryxFjW5Q5TK3JoJ9JxKJ2UQePhXkDLlHOiGt4wEMOaW2ocD30/EjM7RxIcoPvVAxbeIJXrfyTS9M09jDsf5b3oxTb5Vt77WhBGY2Xcd4abFv2gx6JHlvTr4I+nsxYinnD9p0QcAhG03PeK/5vjfCd9sRrMzsK3reMPITjeHK+AxFC89aoMFZx0IOhXq5TeTV+xEBPcs3PBH29bp0XhPFMU0iYGb96PqbWPPu0uCUmfCtoF8if5HiwRgHIP8EylB6aVoenSXeZzfuiv72x37F8lPFLQRuPaWBeyJncV6M4E6SeU2h+hGdDp7/uLLathCBEAeR/fg5ap5z637478srXAM/IvyBFFZgXd8D2rD/V8tv8uELikJuv6HrYG8NvS+ujJITXpcdoqONfsznFHC9ePiQLv7iBPZdnne5bo4eVzVGlwRk1sdplgONUwhjUZ/+M0omwHGxEkZTj5FFFXeLlEhmdXit73mK415YqduUDQNbdVPVKoam4kSZ5/guYNFH7oiNOcKYPDe8hygaPP0kwriSXXd9Ccrba6f0DMISkoyeJbWCEfwSJcVFSVRi8xZ7uixeLUB+FHEYdsxjQCPOMlpfjjL8OyqUHrBeJb0hMIsf9yO1MR9f3ra6/aeOzYx4mXvZAKLXEbUVy+/cLXAp1H2l42jMta4uHINf0NceydMTyURQbb82ZahzJtBziJcb82L4Wl4yPFnAsDwBZSfA7yBkK6xv4y76upTQ7jXLJe/fHGhOcIJ3cjGrONdP2g+OkEhuD+sL5hsteXqcGJYXyfvDCSeH76kRjWFTeKPMFHvC+C+KQ2NP2UaMJxb59JUJrmGbSETaG2LbV0IaufLy2PJ3vipWF9y2r9bk1HhXaKj78e9L8tKfbUv6a3Iyxn5cK/Pict/+NZTiG58dErhpqVpK4ikSwQW9T4j/iWe/fu+pjHNBACL9Knpuyf3JI1evXLQn64gxyk0s8Lfc+Z7acLQubJ6BZN31BMzMtnYBQzO8GduFLHr+75CeoApJihJOPRBYEVuvy0n3Z11eZUeMdyf9zz6Mm7AQwaT3hkx8QrNe5Mkiod0GeXhu90c0xi9mX+TPQ32KfIsVvPU2zGdaF+2G233ur7mFhatVXkvDaiFVFCL36/CYtvMnoPLTZeQFWjZDUFWj7MUD9pypzXgFwt0UX4n1DYKpqzQRIfbsgs2OPEMNG14O41QlrW2XLeyI+TIJcHmMXj6DwddtULQtlCkEFSKfQzgb9hZW8VLFnYqbCj9gW4rrpzEsjHuHaXCcQYEybk+v1HmCdKKmMpNK1hyHqte/6rcVAFrUxn+74eC0SA6IV0ZCWKuO5IZp/oHMDeQN9wAI3lvZTljBkY+mEfWa7ykbBcvSIdWFelaepR8AJCCqDZPRml4no/QOLkpXdic7xj7j9fv61eUo/duLz1aMHtbX4IlsAl4CVsrcAl4dIocBkZPtsDtj1aA4OIFJPIb5kGB7GfGkn7Jqx8P/CnJVuYsQUnSBQPhH
1o+WEhTLkU2STfoIwQyalEpzSbyVwl7j57Gr+a7f7SsYaUG6ymsb4ASRManil60EJaCjSZqVfU4SuxZrVWwfhKakuWSbGf5MaJAHTs5jzFZhb1ZDPOzDgj+ul/eoYlPWqUd03t1lfBQRnNFw2veoq+okVfJnnURNeif+EP/atnIsbmbFl8R8Zbf6+9cBlU466I1FMJkQ8oA9tUOTAa274z3B/ih6clAuzzPs1/1B6RwFmBQl57K4KfH84lvHzxSMiaC7FT/eiX5dauco9QO1SR7zlrgOWNlFkmY1nLevlVjXShr37z3jTSmAaUkRa9UII2LY1K5HXOTb30THv1Vu82tuiL+npK3+wK0RCiH8ALgHdGgtngoy7EpOuiKkgsVBoqqvjRHTEkpOmznYwNAD1k7TI+ipLel9EkQkYbWNM2M14PxVeh444b5LFIgLmJn4ZoytemkaBIIjQ1efKwmJ6JK1n7SJ5onFXBzZyKiNamqrrf4gSJRFyhe3cVizDrdz51QoA3cXcuK5Ef2TkRL+EQWUyXdUV2cXmSbms8x0qadSGwssckq7izUFlaLjjy8AgySeY6eY6lo7LlsUSK8D8Q2acH5M81GJhvRL0DxYJqDUnpsHutdwxVrkjog4dlkXc9TqA2CuzOqONxzRYHnQyeZZON5loQWk7eXRpsO7snidToemOiKKK2y8qTdj5TxoJ3/uImaL+45syQf73nuQpCT+rXpXvjkguFu0JZfT93v6S6yELG60UvcwyYSBZN2chGk/wbzICG1lk0ipC5StntEvsxIu77Bztgt8T77L5zP58qpaneetucrIHIujPC8qPeLoRVyRaW1dEG4sUXN+DWKgdr5BydeBZ8mK30JYp47gzie6pMEhJ40Eg1HPerx4cCeZA4EOwqmfoLNLkkFI/U8q1ue2glbdaIcTP+VfaboOFe9rE0h8lFTmuR2c1H24ZP0j1zaOfCnh9jMUXma58w2bzDhCAk1RHaSEdBUiLYg206+ySxoUPfvXr9MalBafWrF5F7l2KIY3kYKqJSDepFkfZG/yUCG8ZDgjkR0246wauhUx9rjiErDHJRXNM098YMXk2IvzMWps48Qc3oi+ngfKnPC2BBHMF2sUXp0ki6565PUMYrZS9DuOkK7csAmTIqSAqHUtbgG37TVXe/Db+Id8JvanKxtUKVAny+0Fjrx+Nx6nbZNkcozXArnZ5bQ4Px0JHRi63lyPK/ofyUSz6C/j2w39UmSu9rP2UZCvwoI+jJT0gk0nVWINA3ygIODT/zFRHy3RMADDEi/M5uE4PoCuFqtfmXg3cecj4NulbpN4Onv7Cr1ltaZsUjL5yMqXuQyjNRvVI8+LflPd+mVDCugz4No0SFJzueSITXTQ5HFWe0hd7gauXOp9cZ/gfU12mi0qAZ2mH+De8MDkw/62Ngvb3b2N549a5swiMnuBsDJmi5uP6LoV4Ae5BGMxB1LXeG4c1J3lrVUL5u/z0p9lYieQiOO8ntL8I+d73rcEvlBu7e+PLbRf36yyaR8JGrVediflsZ/1LlPFIpSdp6EbqdXmb6RLoWiCjfSwhYgWfARPtPlnRJiuwTeV3+9oFV2JrOrVp5m08eIZr5Yees5Vq8CiMGtSLH5xSazZ3PpMYEUbwD0ouOlDfNeN4v9xHzUdEKrPqim1jOCrw2YsiqzdndEuFlaiaXryBvW61ZRQuVRdWJOoOBverMVxk6LIY5IO4tQf/dSLdir+QVJJRg4Y3+TvMUNbd0cL/ysLiUp8NuM+ClZHOuW9dR+2i5ZMp7ES60htLRxIL44572wVXnRWoqoCPhwlGbsIE1AdbM3X3dlagoUmxoJ/gtGDFObnbWpP+b764oripEkJGbB1y/hDEX/hmrNricf/1WIgRdTPuSW7zAqZZK335/BxgnWz/NWWzZ1CdSar3zL+CszaeAJLNVPzh26t1UkpL7wIntdvwFdXk+dZOvu3n7hCKCkjXaZPcm6mMsi6ajnTIZdGFAJfWae18K/elsqItSUViZ14IEvEiuBK4jqCaTL1rWk6FkyWr/SCy8ZWoSgFM+6DoXI8XOHPDTwBxYt1KU0/Jv+IbYfWSPZJWXsYx3qdU/YHtDhrGrxfe1blo694XSTfeCuW/Wg9Ig8KXWgSE6WUVDm76VBcKVlYkri58+2ru5P67w7ycy8yNrUBH0TwncC7gSkZEcQlS2V9tItt83OmXGbsq7dNd5obz897iWs1mSM+1NE6sWYcmGwl2PVk5wMHG/CijxEJC88t4Rnhcz+D7rgtPnrq6Ye8SNPWrju9JWZUmKt4L4i/0JB3S4sOv7B3ec4O12uwFkANPSdQO9e8RYJJ0DZGGbxYL5lwBLWMDOodzJKYBA72pdbkMaxbksBNLwdeGeSs8ak/06rxh4yHivyCqjBOkHGNNOwbv2qhaJqvzCeB938Id6uTQcb2oAvuhcg/gRNSKV3+3Nydm90ctOaYoVf8+nPQ4ZpMj+fIAmj369yNsrNHRNkOtdVM66caSeluqIMzCPoATn1+2L3JEwXH0sOL4MdB54POLxFYEtoMrAeI7N0MTwmZzH89/NQRqjxXi8K7f75hA//fGKCFSfVsYL3xp8yhkFcaQCk/LwNf4XIoIYKbTAAAFJNLMixW2FtKijpsVDCbsvK22b0GeIg954UPGlFI4ie2CKTTCx6wR61SXD72IZCsuyY/ew2PRpVGdo9kfgIIGat4vhmD4UsivpCAQtbe2jUB0jRT0ojIpl0Ul3mlnknOH0T0sLVC7Dg5lfOgbugHL+U6XPgIIXQBxNi6ig/Hp9P79v2fSNphh6Qdj2/qYzuNxaZnCenLkeGluZje5JHmdIsX3juE9ODOwhax7+XFcL926dVIT7CO2T0T9CZExPUC87ZM/xXsxxYu9jAgt8kqEpnemzGUCjnMvLIfAfHq4U77hLRKPW84QDen5v4WVpbFIo6Kqk0N0KNWbdUf9P+MrasLtNQcXKC/2yRudrfHCe3C9t4psl1ZNwsr41znZaXOVBtXyGGdEiLvxG2fps89xA/ilx61rf2jvmzb1Oj2twrhOgBa6CFtNIfjJRfnSFSSzFhJQsfCYB6ghMXjRCORZk4FZX5OmhKETfRsrmLff6K7Fn9m1kFlA7g1HpPj4tCOwmMinSyXnHGT5+MwAQ4tdm4fZcylsj2KyLB0N48/iXRIeJ3abANOAL1lrdpK0yar2ko+HeiBZ9WGeLjDM/E/F7sBcSAGTnlA8eL/aCUt3WalIe2cOH+Ux4d3690t2iboc4qvMC+lwNDZaL3Nx9t6SBa8iPdTk9jaBd/2tRqkzI2kA61tecmFgyymytnYHGFtfr2wKEJebRMqAf12/zbhnOUBX1P1zvpOGy71w8RoJtvPAbvBLCodNuFc4ZrMZQ9aiguAwal+GEjqegtUuCkcTM5xDUNLX9T70wOCRfI/g4W5vJ7LBrdCGY5HqJLlmHDBNlmC1pBT2aIwRs01olK2U+5w03b8TUDNB0XR7Bqr1mQ3O5sGnQxrA3YTy6jznleIosgOO9SwyKGEiwuA0Z0QvFmIvHGdgCZKpdqjThmhufnns3P4+3v+CFgklE55WUEAMnBMwqb9nz1bLADbx7qHhpUY60KUR0PkCyiL1/itl2OGrkZD81TJQhdGFShxHivjOY27gyOCmuOSXYw4NflBSxR9NXXA2894VvhdpG+mR1ihpsACuuxbnSTxYD7NlPYVLVPWKpCmhRzO67CIkgJ+JOAo0x22MGMWSjBzQZO8pX8S6LoC5CXFJiwQ/eIYi5FBLS/IyRlbmkoiQR0XqQxlZoMUsfiqB3/eyKlrzOBU1olplWRsReu2EzNtD1eLz61IunYpi+TElodMQ4qB+u1Re1UXn3D3VSF7pCyGXIm5RWV087lXsjx1rtsQSCrteuHHP1lKYykyBSTlXQH2xRfEVn0Xy3IwPANdMF9UgRO90go73ljRh8chl2tUoWOsWKIJLQ5Xnuj0ScuianuikmNABh0kYrmkmW5lLmW2Vn+FLUxR+/W0weiUsg86yaXG/tPd8EusO26n5yFombagO4poDIkbPYohLvqF8LzQBNqwZtFvHK4/AyrOSEbb
1jdOoIX4O/ko9UIfReYS9AuYZjQMWLhbvjnLFnQEsoaN7MnCzHcTueTOMf0nopN9LNnb0Y4h0oyqyoibLsk04iLlNctku+Ee4wFHeAZhI5icVFWCoLPkHQ9xygodnylSebyPHH164zI6npLLopa7KVYI3FkbZPU/9n73lEIal2PDOYYM7bBT0qP+a+j96qMuxs0utHm1C+7Y7+qA2LxA0B1sQrphiSzShRni8JAOSnY52rweNKpyrZTNDZwhiN4ieFQp8/3u41Y2J5oTMF3fnJiI3TWHbf6URjYGgcTBckTboISGwDOUjc6yRjmEfp1LMfhMHS0A+MsStLArF4rfFVNc2pYxw/yOapUBOnhA4xBK5zO6zRhZuAavYzz4nTEmGPZ0oDQqzQHYBvVSITMmO3WIq9W6Qqu6ejlN9+pUDr5sifgRPjb40DvaMtelr3AQA4mMEom7SUdaY51Y0Cfivc2SbwB46wLOIcdLUp7weF1HVkI7ig6KVhRjvgh6/gqQQesWyJQeFqPMkVlaKjQqh8oHpTmAhpA8b0zE7LOiKq2ttOw0KCbMf/axkjWycuSNQOMuxF/0lh5d7gZ+25C1VDmEPTcDWzAIiXP/BemOFkhYwJ4y9tcnifPjcs9TQytJIcCv+cIemUAJ9AeCetBDZkgfc2prpqxMoXGzVBGM2ilkQ1pwVf/QQ/agc+tj4vF6HWS+qM5YATbyQivdsGYPZvfP96Iv+KL9QZtA9rvK/od8b/OUnye0+6ccqw01Wvxx8fwWWmQa9eTBN92lWt3gB5pWeXpxdP2Ieey/PVZQ9ygcB00++9oXYtJhefda2qitoAXU8etzUHUaDJswAe2Q4+CBccwvmHwlDN2z7q18KBYF/jg0fl8s6AhHE6iUW6Soyu/O3yaWr+XB2L4dW80Ur53ouenTv81GQy3S0428YRoPaB4LgqOZgWiVoilyA7zxrRWsvjaIqYpp9+ipSpqaGcyImWXOv+ed+21WQI06DRT/3AGCtw/7/oSIDbIfvLjP2B0IJl7DNMddFRvADVvqtKk0h58lSJCQvtEudeLvTwtBoenjwIbyWzKgZqdZ5vTssilZRolhW6ZrjhYmjtXsAXOLyUg7uEL5QFXLCRHN4JpeBg787igy1KyxlA19hur9+Djpv4ORFKKL/T1nJ2a5UVVg1QyoGIIsjhbE+sRgXIXCrnVwDx5+vgo8mXrccVg+4/aMZAMIGUzq2awLkM1x+ts+Y3sTXEkWxStNPI4qCbeambpEkf3HW5fTkjUvnC2bS7+RczGyz1WKCJmA/PYBZWK27AI1Lvd3GsLlhlwCU9WtlKAXVkd06PzPcfpnJptuTiL+ueDxca58wVZdXXvwLtY6CuyExOqZ2q7AOlS35L9DGeO1GpHFG4Le5/BnM4syT1lcLOgh/w6EfNBp6rTZWdMgqy6IGQnss9i1/dsPiGImC8SnMgZBjPuQiwQ8bfMl4iWJFcQg/Gj5zy6FSJ4lKaS9swO09w5hbN+vvEOPHgl5+sJo4+YFhCZcUxGSdzOPlzXbHaRa6NoWhq0Ede2UWJ637Qit3PO8m7X8jS/SMwsnBgPOKV0TQmvNvRVexuJhW+1x8sONCAP63hPh8GlaGdXTfydQ7f9mhppKPjBhkB7dEyUqZPJB/ZL9vl9+eTDwqS/NMG5liKrRUhYIsr46XK4E1K4tST3Z29uVvht7kqFOS3+NWpBksxhaMjdgn9uiSUnZwYjeeAcuoRQkjI5z9x9dKd24ABX1/5PzOoJbfYEvbTQZRRSgGePLPJxSpWf8Z33IYsQB9zwBJTwzmntUiBAd0T0UR10DaIF7jGUPJ9ogYvl9mmk4zB01D+iYyOMyVhOU7leuSKBQ0F2VJopFO1IHXZg18JSHI4c+11uL/QET190jX2RVLcSrJcnkKFwoJJzZwTGhRDZF23I+eHQ8QU2Flebb3GcDw4phXKj+joTGYfGPBDvNBic+wRvibRo6ON4E2gOR9+H6Tnd0CnziNrbux1ymTs5ql2soIIZyKU0MvCbX7FPf9FRqrVIjwXKqnuhozx7WJD25ukgQLSY1M4jdcq5jy0/fHgDhP+daFpyxykc8JCjI1ML46HO6OXG4jLAIWIC6isZ00TKLLYyPBQIiLSC91tF2recbl4jWXLzJkYVWbqeXt2zwboFaq36QyU43kYOlyBzszWzsEZuk+VSaueTivT5ltU93ez71NdvYuhErQSQZ4+Udfl/3WmPj24moLJYkqZR+9lLV0S0EEjSWPMclPnfyTkUTTPZ7Auy9MepDD5N0OMaoo1QJaJuCldFhJwmLn4t1RDH7cvhC+uCUhhiRePj3PxELV2oJg22KM5l0y2tdRBVGrC3Htcjbce73k2tVrt/nYDkuNOOLa1yhwJDNcbqQCNwmLGAu5C1iidTfVGYUPjCyUNplEvtyNLtrBegZk4s7Y7jJax07Z1u2A2AmtyhNXJ0QyWWe6tBXehm7o9L8um4RLU+h2wntxPoyo/aSvmKA3p7sotYh3z3ZGicBxr5MZEIEGuTspaOsQa05V61m1Iph0uhxsx++GfvziEOiG3kFGtk6gL14VgZzjdPSvi7lfaQtCkZiK89Z2RCLOcl4MzA90n+hoWyDwzK7XuRSuMohsxV+oSzncyRx44uFxIXwW1WHMKk1wUpny6ePSlrueSHALihjK1Ruo2soiC2oSSW+9TSj9b3JWRx5BxFSsUfhGPIVxR7loquIJskSpeX6/Eq3nqBAhzgsFyFDClSNbKsgp1FdK46/WiHuvA3Xh4iqBc7/lvQ0ncWMO7t+GXc2cKPKgoIVvqyuFT5T5DuGEyx4h35x8MJq+nHhMLw2+sxMsVblCCKMiJS/CMfSJY9K0JlLMQBe5vdyqQwXodxqyqXKHHG160P/ip2MkK2uxPtAjUJlRZUMNGG9errwEjUMO98iUKtC+NLZ7XhddsUk8D7TPvIxLzKuwj8s7jMOwUccOH/6EkHAazhkaGt1E8YN3+HzsdYumpsMpg6ZIRWa9jGX/MmAYPreaGZgV6ejXO/tQ+Q8UhPRlw1kNzGKNPsFuVMc5j/bqtDFsgWcTO6I3NRGvYvcSxTu1cRCdMtn7KzDbjAA8oqUcnmKNX6lc28HhQSGCJONlIPoStqCDG+C0kD29zdaszD1tWnJ91sN9B5rNUpHQcqaBOnuRQG8SGAQMXGmLXebf1tIfqy4oG4q8JUl/1M21Uu8gliyWQbp+mQQUkBKoV4CDL1aEr2awE+Whn7OsK5UB6Cp7BGaTbD2zJIJxehn18h1WgiS0OCm4tLn/33zndqtr2IQpuVl9l6lH+vWbpaGOp+KievXP4/6+YdGmOs/Cy5OGAf0f+HChRSZW6qlMo0uxZHz2L6Ph4yKsTo2MyOsyQ7KsN52meohOK6Ee4wL74H+aKEy1yiPPGREKkzAu4VfysZ06OvW9+fz5TFOenztCUnX/gzd9Pt9DznHczrAiKH8Ko07eFjN3w52li55mNUt34gmgm05gCgpfWCSaVudGLQ1pPVOKMHAqzDcTVE0Gv3KTI2OsOl5w45fwDXhBxEp1X7SMloxUfrG5hEPgu1i1+aNfIMgeehSYSFxlhMaVyyuoSBjH1fjh3Tw1cBFpImYuR6f52X+Nk3Hv7rq5sdnu1rBxwatkbbo0u18AdmhfjVa3YivVXCFsHBOaBg6+tB01tdvV5XaA02N8Kg/eMiS28phNHHr+DDRiwEVY+T6OvGK0yVqRI/1na3GG5uOHnQXpx8vI/Z/2uXIo4iHuZFV4RtuUfpDQGpxrgg6DEXiW1TM5pLCHZZHutvY7+3Pqf2eYzPZiRi59zDi7RW50DseM4sODSrF4KM8BkFULBdRS0J4LpzIqKCIOU+d+9BW4M9DPmTA8EXZZ60PB3LpAUgyV/fGhpwW8+crTGhV6zin2iEmP7qzJ0JFIb00zD9NbIu092Lz5tI1H6QkDYCYD+F8dFrmk30pjABFYDSXS9wxhWgo+Hxkbqd1Jd2Q+KoDS/w9tvwsSQPQuqz3RehMKqXWedPYz9DBOKE8+wRElfHf1+vLwD42guussmVOHsckcAno6I+U3w/LOBB4jzW1zR7ZskDz
1+YWzHLOMpdzGXC7FylyIWMe6RN7h/mKgaYhRxyeoeU1wTltdZOY8ZJG6Yd/me1/hlhVyDQPHObVf5spRcEq8z9CeGfRemJF8FlQo+4bz4wtmtVjn63F5mxTFlvkf3uCcF0JtEGL/FWs8LyRvpudawESO5zoz8OIpnwWTJDJU9klBs6BljQakddlCLsXNTx6oMstOrEp5rHQ9rqDM/Jrf7tYZe3wNMoQedh1j//wQccZ7WLnTI3HoaW/Lw5lOp+eAHXHA71jt7BnQiAMvZAnJo+LAZATaTKOtuX6eZc68I2CeD9Ya4IHQSql7k10ljNnSrYVfo7/zdUnct7R9MjlIrWe7VG5c6mEJoRy8yTBG6aTKdLtvL2SEXpF/jon1nXJH6AxA030NHlI2fDbdvJvXN2MHraoDDKWXi0B+FmAr0Mj12FlmcyVeTOKPWeu/uZ3AJYVnqZ9eiai44EmG2psXpHIdiSYFUd64fFgBQQuJ915qLQnuO8iaKJDhqakcRmo21F9sH4YdoUVWi/zBiVU4gwCpBZmkw7NeeOapmC30AnLDTJLrlFtBXzJNtqt7gD/iPMKnDjAXjrOrcSKKYk15G2XlMtN6euTWEfq56RDD4+Nhx+p7ILYnLLXbqR1cMQpenaMo2kQZ0shZVQfGIuavsBpWlw7DlW9lUrEtrKE/aZ5IHs4lBJOqAGW3FQZHnWaZ5zBYO6IclQm5sKO//p0uqbM5Vyx9I2mnGRdjasq/U4ZSwTXLVgauLOE5IG3+H2cVH5w+D0hzjL+ut/bFqE4umuILphb8Mg7f8zbLQfOagN0122F7sbuVxHb37ZSJpGhled+j3JRkeRATL6/io3+kox0wNxDOU4Rwe2IsCT5sS4eMkXU90sBw69K4A7az0uQAGf967xvE3oqFhK7CXEB5fhS372tnXvj/i0KDYsVtwZn7lytLrnUTak4Ggj2ExM0JUbARoIxWIwKgXrhMMUce/CxPfnpHqOyhyqA8nB50+jd+TmBMLjxsWnfXP4fuEyLyqd+ylzqlyqanPtJr1yYnU1Mu9pIJsD7+WcM1abtYltDCZNwFszJb0TDsltslnK4fS5aeu7/zezVIlcoOq03/vYtgVpqjROe3cd48H8hfOf688OyUg5I+Jq2vuFp/MTHJU0TXwIdZKdBqqKC2Vu8TzPc0OgpobecVqQTf0QFBQZsH6d89+UvQ6uwEVOIciD6mLgUR1nvJmzUZQrhE5/AIDUqONdCSnzjLYSJ1paui2tv/g6VOP2gT1Cj57i5KHrBxTvwM93q8n2tg4s3VOfQOkQ+3C4i+0EIDQTBZxg0cmqCjsGyHtVRib9KCpI4GXBZTD4pJETglMysrYg8Ux5V02jGSCB/V3LnI5DGyLA8S0eA8c2NoscNvjrje+mylJxJbarC8mNqJ4CQ+8N9xB1UyYE+aJFBU9gVRRx40T9LzUoKx+jTw0s7EbINJ8fpRH7P6E7wfXXZJ899BjK9GY/XrI6s5OZIHm2bgGoi0cS4GsN8jpMgSOKyd44GD2EEb+goOTgoTaNXqiip9/zyhENwtvHFOWHxJIwY9bXIQ/pJNmslBT1u9ogWndwy1OMrhaQhmYmjrHhD2oZXULkUttEMH6FkLWjyagmmbUXNiyBfArr+C2ntpYvLNKGRzHRSSouRLokc5P6wRU5CuKPefldkr912dH2va4UNDUdZ8gHmzMeemeYBDaVvH++by8zMYYc9bxy42fwqa/ncwuJWSv3JT+o/txlqNs3aUeQAl1rOV5DiAIH6Yd7XMuLTBvo3OMmTTS/xdymkIZCe+emizoeRtkn7VX49IeWU/foLkBpA4XZM7q+KtAi6Da8nSsb8vRySWXinZmijffxgQPNtQV8Hz9/5Va8RGNE2qgegAkrqAthECSvqF1pDOYbq6UTBttzT3wsqBZ2iHk4mVtnEcX8lxFj9qk/nUqWDLKJSc3IaXWxMMgu2Z63VkrdOsGHgR6X7/pyah0TqT/sGJYaEFFoVq5chbDP9N9wwX+sQw4+c2UpxBhhjZveVNIl5iFwwO4kHr9wI48/VCCduriHksPHOaox93pGW2+hkgspHH3I/7SAO/CDa8Sud6pmp+x6/bbWXyHQEiAH6usKbvKZkslewrehRweAaNXAPWbQ+INasffQJ34i4fXOv0hAYqs4TZqXaOiu6mJbM6gGkWeoPYwcUixopHNRUx5rwjcyi3l0wURKdyU8wv7K82CL3ilzSb7uUXg3+0w4ye8kqrrh7F0lbQIhJp3ytWb/T749KX/a3qzQWn9O+rN1E5d29Iphlb3Uh4bnRuA5j43FxnZAxBOU4C+DPfySZK+0zZ5DPT+YTQxoBk5NaV6gZnhl6FA3tGFiO+jOSSR15NTy83XaBg2Ujs1Vy5FX7ZOjTXdCK05v3B/1z8ZT13xHqZY45BKQbK1osnonG8LenSENgAmVwNWIfpuv/oExyX2kwxsU/KJdJ/4/FERSp0psX7WFnF501R/foDChZR0TIFVE3sNisddjv7i6SvCT/XjXHpvRFCvEeOvZVSmIcG9rkOOqwnDaXQKkFQ0kWvryj1C7yuiGjw0Wbrh1y8ek51FfcEYRgKSGrioPHD2KhVKqXHgPzSWS9Ylf3hJ78sadAtCAlP1ikyiVHRH43BJgvdRLBEJe4QWlWEDRQrg/vVhixjbB9nyDPKTFmETAdtqCWCLSuV/AL7J2EX9dGkLfODYmNqLefiqmZnkJ6O6yHKiaOfstYqAcW9SkiE2PoWaEcpsYbmFxGBiOQSfaP2eX/joDjpOyEXcND3PQuY7P8GEdjDti7Yul3ahXM/d+DIohVRe7ZnjEFeQs1iZSGYRnFflqo/7Ccd6Iz3R6/n7uakNc8NWNqZjHnsBIH2c5IVAdL+Oc5TINdBdZLrerB+veKRS7qbnRMSYvmqjFh1dyHDXpNNamB+cj8VBF5lxY8Al0+pzugISESzr/FS6v6lZeamGeyXBc7OlKlawZgmmrWJoi3toRhd1spNKxR+k/t1ERp1ZbGVmdWx5q7SId0svU69sR8DfUN7kpah/sFcpWYKTpxy6ZYyBRbbM3l1BpHX/tZCN3+O1E4KwxD0wDFhG0dpDSli7whIJW7IAcWux+qTdHqKNz5KNzlgcJKic3Zof7KueaFFmkW1FfTxYTLcmB20zirDZApFyUSPjT5hjK4Fp+YrYSkYoZx1e0IVWG1U58tqrvUJwhKOOpYZC7s/iZ+4h3l9gbK+WnrQmSWnCJJzx+nbQ7ncBr39n0FJOxDHLyrYF653TEpgMQor//slW1RsdDcKvGXgHx62bO4bYg0CXLCvkKk0E+ulT6PZI3yTctXwWRx1sW59Zr/U5l/0grwf39vyn9em+23TuVpyt+74px8lRNx09PgPa1ugzuwjZVIt1KJ7wXYNEmjflK9mqzQMus/uhAhJaLYlW3mGJiYMMFkvqyuG3vVD4ovE4vNNUhBmz0qPjY0vih3/vDimfUeeW+WM/9HJsKc5+UrNXY81RsybiVQ0H2pvSHhX0rpUSGXTY+SC+go1pVrsFTWb6wq66aeJ2OxY33b1OAIoay5vq0DaLWbKoXE7pAPe7upPKNlxWUBsfTlgkzNRy1jPUsY04EE9M/+JXO5HSTN+GoYJ0n8hKP1LRcIGvcaxHje4lHyXo6U9zJbdPrnO8rxVwq0yVtODnjlSQyQ81IfZN4Dk1ACQs8nDWphmgrwlwvQp3L6ZFwRzAk4K0P9Kzd+qvP4Sl23J2s5ok9V3jJ7G5sNNeZWn9Y6XWqiD3dGbCgYsfBoxcybZ8+aPjDonXgWG8uaKfSZjhvN9pjc8oLIOUzHVPUpAXtjSeMK0ok+Pu1k/Ks4+v16BrFgtmiAOasLfOI6TAfmsTto77qMtQq4Yxk1jZYoaj4dlZvEF1ouIzCO4Lo3vTcV0l7V/lRzty0UQGgc3q4yxRit7tkOFDH9ximpe6I/hTuR7tkRueNYDvWwCrYdIzZX0vATmYI5qo7db+O2j3NJhDvlqV4YzswyObyz4CtX1qC1dlEMttj9IbDUfXny6I7yrx120ib7tl1XqTN/5DCurI4b3uP4VjWuIa4llmix4+794YCgULyg
JII3h3CmFprv78QZ3hK9e7HVOVWmqqVs2v4hKEdxXVaaD3kfc93BtWltVx94aIwKfMi15RsOS/9kEFEqEUmEhKinIeNG+lv+Lr9001POajZudAwSIASQVPWD8ScDNZcRo3oGqDYV7wuhkRMPz4c67Vd2ucucWk39yVnKii68LmA9h5LoXIfErowPEc9rqg9wKtvkKZFmE/4oCn6udCBU/8XLihsGz4c7P5XzKpnMkr3acfpQi6+/CL/Z8UhqDrsiGHVEqlDkO0Gt4kzPY/JUp2BJrhct61iDjnzwWjbeE2Tnpx1gLsKM3niQY0XXGdAgmn9hPXDga083awrwxdpkyUo+eFj5VrX5orJzfZ3PNuwGI9G8CmDGFy0yWMPqA4JluoXE9e8wKrxNEVogPk/KIL+lXbDIIuUtnBqcayzUpXQ4lLUEqIfNa/dyJA0Kbb+ReYdrglkvPn+KSFwY6ovlomD743vZ6KRGj7JCIk7CLnhBbhk7gUFQFDC7eMGiPcVY9I79hbsi+qcgWIxL29C3p9VUBszkFACMO20BudyZW70jGUM+ZuuUcdQ+mdW0VKU32KKgrgRIHi6cPqNg2aFODLX2TxdKkhsUQ4kiv9fuLdLczH8QVww1zW7vrEfV0YOqiLDq6CJ/RIJmmVpclNanWvZfyMPFbClVuySdcLc+p3jtXd+Rl9IAz8bjvBkFifAnSMeOqIj8311QO/k/6ncMSjspCuvK0T9avC5IRIrjn0rPZwReBicMpuoV5H1666orm4x7F4M7UYBJtUc59XtthZ0HgLvPqPf8aL9zfHDBVP8bgjdo23VWTwyfuuFuWQqGWqv1HE0tG6SaBpUYr5AyCXKIdXM4giHX30fDzxJpBRuj78jlvfploO95Noo+xAn688zmucL3CzO9xqFF32mvFV5wEk9yJkydzyhEsonvmMLtV6bKsyh6pUIKEVAU+SjH+UJ4h9Z0OKgzsc1iIUvRQepGp4POjfYqaIrrbQVzD1Y4pg8a4pMuc/3xBJaVnvI+8eRNRwCads7P9e81bS1z5fGHb4GOOJmbh1WcQXA5MKmHc76GV75fT5h03JEHgOSVnsP6AHMS0vxRGf/RMBp5Q+EriWk3b7yTcSZ1Eu8p50nGkr8w8OVYzpZYs5IS6AJ6wdup/8L3UHqqlFAmoF/GSv7eSP+IYHo5rFcpCgOIq3dTWwwHQ78KkDl1j3Aaa5kcfQYyKlGJBtYFZ8rygqRHHD4N8WyBndnmYsQASqZPp2geHMiy+ewMaklo94fdn18JniyQFumWG/I/IeiPCSRffGh+93isYFYCHoHI4ng8uWZulADiY7AMl1epLxjGNOAw/SaOxI//s7iWCZRly47HwEwkl2frmtiWu2S2Eqk9tHdYGJC9L/gO9nPPkvQxJEkKGlUgNMiLG8tIPqZthRm7yZQV9pQ1T1SS9C/tdae4zeLSqH+t7q8VZWlDxDSILa9OBAzOTVUGmuuwutuyS3zmULbfTi1rpRF0RD4xGH88/AC2deHxirc9D+TFEg6IWi5hPZx+wlZuSR0KOEmqgmuXoBHDRGQWNTdNFzrrvk+ozWbJllYWSVZITC+pY/cIrZKMhVQYakWbWVQVKCf0GCAY/tjKOTLrgVkHde8e6sUtC/82GvR5oZ1NzOvFAV++y3zyRlmyFTgnQMH5kF7EBEco2cnfx71/ShnVK1LYxplxpXiw1iZurY3KvOf5leGZf8wwvn1q260HDWwZTmEA510mFQfZsteMeYXIMvuXDJijSUsYJ1DxgGgN6n7bV0gGcEezxmk6w3l8wgTg97+gZgJo7G063Y/Fm47p/ft2evgTc4GBvSz9+AoPJ22YOTPA8f9h067L4HCw/RywRE17cAaV02uyrHNUvu8SpKmAHnfWw6P8m2/VWiK9KgLSz2ndUvVTI5P3A9h2oQVjayOIfjIMtsDcRle1t8rrdVTcRNGQ8tu+B+9nwIc4zuOw3F8/AsN+QkyHgintBJGq1bevpmn1IJra8Q4/5zJX4gAMEV5SSVqb44J5g1nCvYgAVnb3nres2Slbm4nicvf7oEsPH+mW0d1xGzIDiCFHUgKHNctZTq29aR/RpZq0HWFdFFRCw/31YmscNGHRHe+GVJMAAsp6DvHXVytgAw4qBh8XcsGMA3ZDngzws1t0C44jo/DaUw5/+iAiXo2xYsyZH6iIOECEaVJECBMoEAr36e5kZ0HZZtc3Oxeh140Tp8V9C8JPTFUba5xK8mL/ko/SBEznlj5Rw9kSMbGWumDWo6gAc+Eng522COwj+gGp2G4EGayAOXP7cm84WMtHF+00VoO2qUiVW6luWYDA28zq86OrpLvL/TN9jFwKCCow3Wogmm9AwmCECRwpBOz4SMj6CiiZfuu2V3rTRP8SU2TewpFk5vQSmM9iU9d/FI5LXmz3O4L+Og0ExVcDUutsK+zVaTJCp3iMLzoMM0wfOWzrtWEpZCMG9ha5mUbJ3dUIaNqpplu5S8rqHfw5tgjKa07YeKp80itl142vGpPdAdenOFN1eP2MiOViN4NkXYm+20nFWnbWj63LUvK9jmmdh8b/+ibdFyneYWZF4UJi28hmC5vHozmmH3kOxZV7mQFF4PisQBPqFeAFtW6zj9S8t+sFl+zPF7e92yLyVU/MIG5Icu2uTiOos/VwP2H+Rdm4lA3SdwUC03NNrTS6rVzQyGjWFbmYusQ3W7DDJVnK14kBvPn+yN0qttegfBsWg05e5s9uMOf4YblSB6XboYIT6vQtmM5F/GA1V42nNXqFxGstVArx2X15mcEt+yApUHpnAQedp1ef53rsxAAFwmwQxGt/07OKEy2Rw6ACJk4I0y2DOV98Qf1awYBuMVzl5+7qNv63T0t40AGah3U16a8T2KKE5E8KwNxM1/6dl9SS/BaPv+Le5vWodOX7Ng9Z+j2WUipNsDyiacwismky74aqLzoi5lfn6+zTqxmX/LmTtwraMOx58VTSMNu9q0ly+IsIkZHdK3gzuY0o9k4h0r/AKIf4DewKAEww+vULj9LL8zpAS+zRJfEiy3HuLiIu6iMec3RVma1d/I0vEgiBdG10vTNHVCXfHJkhWgJ90Z2rr3bcpdpfwRnqV1GjDh92NJZ71QBc5sXYLY60uOZEKXQiDnsZv4bGTt+97BeyztfL82lrDaSTFujgp48rxZ7AT1EcI2RHoQ5GG7/A5Q/XtF994t0FZxMqV3d2ZhgbevgMD7x9iXDirvlqHYfIm3jFpKjbleQjE7aVQtWIUCVHkZMyAjlYGhC0qMr9Vc+V7Owu2zLzpSpvoqdhnn9kgswWZ3uvqV0v+BNt8u2/MQyAtjnXTsdIYOqpimNuVn5OeWImp3lFaod9HoGBChdUfS3UH91hytLPF4K42119zv/vCua1y+3VG7gC2EYfel02y/oQjpWG7schK2IkDiGpFEq06X/3y2q16QearLsD/T+x9ufKqaS1saZF3Cjn2MPGG5cg21zOIJux7+1q/NNwKx8NxdY3fyiE1LDVRtTHIegJGmyqABdrKnzPaOYEROKYnlYroVzTw0X4I2Dhj41gew+W4fJ1MR3GJy2C2jGocLK1Ar0lul9o0uI1sR1OkkexuaBd4uEUv6k6efbg/jS3ukYYPmNTnW28kHsoTW3wbTmMBbjynOeCV8mCy41yesHWzYN8ksU5R07BPaWK8xv1tF1rA7qPdO8+QVUB+bghcY4Zk+wNsKyXdLIf6Z1Qb+FzSbBjpD3EoH0eS80BiXEdGuLoHA4266SDSlQjYQnN2Cv2/lpOL2L9RSbA4y24y0yCOwHbwuWDeRUxz3+nR2h1uJfAvIoGH0oowDWNovdkuOk7UUTCxrahtNsqylyV2iFsC0qNzucVhSeXBiBXnx28FedVtoJqXfMjLhRVoiASVaSMSGVWvlgqcr9BSgGjR+7IhdGZrdCn5TUobQGqxCDl9/Tt115K3HOgLQh5NY3iXNjhhvCsiZ6Vm/on7vlqwSCD+MGDzr9LNHT/t6niTPUQDD9GCrwE/iSLr1OP/OQMajW9ykCPd7h+QEH6MRoizJt+mXgWs9t87QvgKezsjsdMzmq/bs4jvdbDgf52lNvh
WA5nyOHqM9Tl1c/g8jwZWFvDTa5wvABRIZsQHGrGY1GHSmfYRBKXaxb/BjqNgAwj1dYe4e9oyEUIXebwUIBteUXDdPaqk+0M2Cip6lY3NCuMHuPUH9cXHP+6q1wvLwA2gWqFb7o7TcRYuJti0uY05RykpphEi6OPBXlHINfuYaBjRsyrZGNUj1behTgtt953q7daO9ODtvI/dwP5N4ApIIRK2+qWh2I7x31djw0JCcpfD67FnmqGsrcQMD3Wc/XIsRwaAi005UudJBa1EhAnmm0eAtvzhgil5zJZPwkfaMp1dI30H7Cbnuwh8SiELyeMt9fceoEkZzCuzXNPnZboq6MeCnW30zUDTPBHkzTFXAHG/DjUrjsoaLASHe5rNtpWQpsrtm2KMiQL2vZD+DLkqes+Dx3VC94RQ912owAvT9Fe2zFXBcTpAi0AO8Lyea8HMenT90oda7WU6MYckKO3TMs8Iq4rtq09M3eX/1AzhAwuhSPmcrgLJWTsIMnoO7H3zcuQ9Arddoj/GTpItd2jp4/4RsIzxWn5Um7H0Z/cIYEOdY05qmvILaOgHt/nwIzcVWtD6n2bK4n1FWQ0gC2jPqJTe9Y6X35PHt6Z2RtHit8LIH76bSPpBQQtNrW+viAbpN/SOQaVFPoeEhUG4p9TrFO++/J0W/AsvWYvGTCKoO3xrpQ86zAy91oDOY+yqD9ArS8O/dlfJylPPXOJmw9XMGBQ5sPqonJxACMd2iC4Emzi3fC/KI+8c7ODtzulRcywKcPDYDbZXjeGJ5NyTLCK/kJR+A31aMsLFEuyzRyiZB13awVWyuOxiZyVduJwR0f5SwYiDAwpXm85g/FUAutj7sfHllClrFfbfGkJaF37+fBfdKJjuuqeeHKfuuIQgUQN66ef71woiqy73wbanh/wVJrDsDY6AXY3yYD+/wI5ywSWFEp8YMwRKFFzyUN6XNk2SkPsnJhosXU93DvUr9D+snrMOLYLHea73N/B7sRosy8v4GuovucdRMOBSTBY9AuLVLcVRbiA8XYwZ//JDOVrmxAnudzWhtHefAflXzFwW1lPl/74m5Fu2QINkMdZmisMjM4NAQcDdSLv4jnFVdLC27gw+3LFZcN26FYP9DyfW0XDoPFQCTuY0l8r4fgv1u/Nm6OuzIIF3YwzV19RJyHmAXyc00ZskBcGhxMg4zk/SQzMojqfP5zMJ3v8WM8MZtWNTwYeyHyTcPbNwyi5trIHPtY1PCQidiQFgHk0tp+Iolye6S27UVW+IzlPoWQ+Xj3GGKxOO6OkDX4lSQtnW+Id1ME0IK1Haps2JNR7m6P5uSsw06VOZuh/2tRwfZVLsIl0ZpT1L73uHkXjahpd5Uk9vhWSht791RvNHPGrGIck7jROXIEPVd7JEca5Er/3bVWDVmOsQz/oU9w31ruTg+zmGkF7D+gHRLs1sYfbUl4etCsqI4qFa2nrbNDOXFErNEJCLFTaxe0puFZTpDaAAJ+L6N+ZcbFIU0/ya55Iu3abi5ZGauugs6hstizHFr0gLs8blx4KILohsUfgAiSWX40lFc8ZIWtNHqX9tj7MPKJwP/OF+5DKII2AfLKQ3Fyx+1RZaxvbbgr10q11wsuA0hKfj8H0YgYhzNRszVkExPxQ/VdWPP6K0K0QHRCyTzbh7LRnHT14h2rtcWBoQzDrlkiV6INU64JGKs6NvzTDx1cGAeMRTkMmFPYaE2WW8FB7syDjyRN4M4K0JsedWhOwBaI1up8ffUXPYbUmLyLh9DklESap9VScku9ZBtgLUkF2BKNnhvCg1vAN8dByCZzj2d9GTvaqIsuWI5CBbM6Q4UXXeWwN2zOMSbQc4jCHKHlSGpwTXwG5farVz86mUX0WxjwdCp++GbYyzmtruhnjspf2/pEa/XF29GBr6o2d84nWwe9FQhgNYe407aLwqbQbtGTKY/IVK4UtBccZvqCYOUbeoOLcYWCiZyy0074C1UB/FwfxBFf15KU4Ne87Z7H4CfuPs9L0ndBILXJAKmvsK3bcHq6WnmKi5WStR8gxYSO/EIghCLnFQ/vqerroSwiRtIknzWqxF02pSGSLmsLY7P24n8c7IPjv4omB65nTLFEjGcv8oXLvmL+rML3THuBuqCJymrtGNeQxKelkmeDVRz2IdELGf2yIX48VW/9xZyBcVUn7Xf5X3883SYEt6F6RdMtvLuVvD5ZhxhN22JcUg4FV/QoFuznhLsUPER8EGo33TaAHHp1PAOZmCK+yLwZwn5GK9XIgTU3zCLSvnZF7x5wmV+UExaSeg1EYItyUX+c+4msyjY7/xYRyrARbYr0Apu4eiumTui1RlvStO2/kZDd6PA5ynJkU9GGS9ly+Wl1rr+bfwiTojGc7LYmmnHB492cdSH6wo8Hp35fT3Uxe+ueH5VMd0AOH5+M52g7ZeogOVf1OVla1DsY1QxrnYmpC3egSpczYznhqkYTHIbL0sNHalhuXz6QCHxCcPBJccyXE29ec0qxxJITXVLQAXnYWgHN2XsWW6rc+rU30QVTAsFBDxmxL6sa2BjMui3dEUiD7CiVwAqwJfqG7bCIrMVeR4v3bjnwIs8M4hpZ6RcGZRWS8oy4vVrU4LgBnA2tNo4LUS2X7yw5ws9uJ7R8Ayt8hOxmhr20d50r+hx71hMI9piYDm4MJ4oWfP1QoJOJq2M8cd9Qlz/1IQIGledLQ03vToUpGHTzynpCajcy8qhCIon5yrqm0ovV1hYzQgQBwUVoNUV7vgNLg6tetGIWmrVZHJ0zspPEpLfTzo25tranBaIp7cQO0kz9tVZtEcVr/R+rqfHfpDYvTno7pyrSF1akWeW0uQ0+ChGKbTLeRh0FC4hQ3+iQsfCVD94mgDzQBGqIRwiHPOLpqP7WHoo9k078A/3CgZxm5qGmiCcwpt2S/DDbXVLlj3GC1pf0qsCRiiTUlL5jj+R6lLNXYcTsIuY4s13n9e+mBlrOAS+cFbtyn80M9vAtrqnRh/0h51WTk6g/MvEoW7qn2gEbnHBcphnf4Bgw6mHnIl1iF392NC5nEW33p4LlqNaIXPNpoYMtTod1229gxaWiwUvrXwMfYpubYQexu6EHcWBWFouGCd1CGg7JtkddZeEJ4j4M/Lk2vcbkkb0AoyaTYDjmCChcZIvQfM9uBi/FUtAlHooDbd06uyBwb3M0mLRby+4MMjIqEuz+50B6VTlOLGCW3Oi6k9RmuJ2L8loyC7L2HKHAZL7Dd+9TuOXwwOb9IJilOHT6WQe6v6pLi9l+uuTTc18AT7qu7odf3ZF7c3fqLYkah2mJO6v/tNsiGjEfgFWgJgtFvvrkp+Pnxzr5CMzac7nrHvLFVxfchdHv3XpG7rW1nQqoPdfIjqc9O2zMB5aZrN0JOKCUKaSzwoNjykQdPeB1RHH3uBQdTqYO64i1cbyKMBBzOXW5CDsshTS+SvHIACoFl++qiveGmhcFA6xZH0G6RsOrSVQZV/2taA2SUTdb3obYa2iMaOPVXYAOag6FY809v/tCLEHbj/3upZWk3jpjOVzQhD2XMAJvluqSiMXrgNMMtc00EKVr8NCkRJSjt6Qim90IG4A5vrPtYLYm70M+tMIiVpBJEegffye9lLT5/cTO12/3JnRT2dxX3PFy29jxqNIMA3voYboAmTjeCsFQP6c/vJiVu5mlclNGO75HjQGUpZZwU1OyRchhnjhFsFLklw4SWZKMGEAi0W0vd+ZlsLGkDcfgYyZ7AYzjb+Sk1FpqF0XDpsmoONsduX5FlV4l9mgP5t0DwW5/SBpGroENgJA1G61FF2dppQstCFtnZVkkuXFRp4hZ4xbo/zrrZaWmZfxq0A2y8W8bPs0jG1XTHigox2KNRfwCPPnrFIjyKuQ3I2YEb5BPjY2N4RGAvIISJCZ7JROinuQaixFjIZ4Q8f47F4wdglKFJpf08Yp2RSamSrlyxXAxsesfLV8jQLvx2irbyg2q0gL9MaLytGRlrKn5nhHr/fGCDs18RPhFAx94WImAvQWRUmXLmUAt93rZmaIqrLHcEwUqb3bNhlx1MDZkl4YvI4sTSmgsoV6jsnU72/NbT8jaMcDN8BMi+Ul9vfQf775sI
xMasPIHlVqOfCwYTU9546CghGxty/h6LyBeVV/c7Z/1H/VWUDwTFBYKSO0tc3S5bOyx2WpzDdyVutWQMkU4mZnyA7Yu3oF6kqAfM/i4H28fU6mpb5SzsLIVE9O7CbEuIRMJGRsXRv9D51jyP6PElqkOVfAULPTtMkQ72yB4t6A7+acYHMYUtQ2vS4/aVqzq0NhFHUMgSYA1s+d3ozv1OxpQ36hpBaOif0xv5T2ZpswK0BSDKSm7r2hMHhcsEoD8z25qc3gVEFHl2rlz/1uDI5dfBYqpySCDoslSoNMLZudV7upM5zGF5GsH2XvWSsZLQzoY+Xi5XM+bBOcfem09ZMaqsuFHEUUcqgDSv0Jy3bruOP2Ry8Gld7GpY/fUZxc3P6DvBFprxmcnC+rRssW7vFdZ3VeoQamK+/zJ+WqBgxdCQVvS8r9bEivq1Yi4qpqu6yjzND7R/k49JegtKNMfzIdEEoHAb6y915jI+CE2zi+40WMDEDVjcfgK2QBBdIJDQ+nf5TTP39slHhxr7cEeZEzOdg5yb7nirhdIw4oZdFxN6QmT3FQKwlXbzltKyGvcHc04yEzfNDZmwlLJ+5MtPN075vcFgzyKIdZ1me4FFD30qjF2biGg15DnamL3RMWCa1TlXTZP5m8lh56NAyNF4+jWBgacESJbRbZSRI97j0UqB6vS/9vKKgrxiuZ0CS4hSIkhKlN1zKAvKKtxe2weClZT7ARnovevnVzjAaRBoNo9uG+k/IFgeNZ9MqO23twwlJvJG8KQ62YG99lyBA3Cu9/JRIGbE5Wyw1BxRnUXIs+Cqzcrsi15OyC8V6CRsI41miySV1SMB/1xFQgDUjum14MlFcrHCDMae/DtAM7+AAkMpLUdixtNm/1JmUnfF8GZ44Ap5YEEO/n9nudC7y/d48O/cV2joMmFe7MlHj+j+lJ1arDaJ05D7HgTxWCXtcjZVkAT0sJUvZ0fzSlg7mh7lQElYWk1wbHn3tIi5ItVMWLJKcLIMMSxknFKLBxJtriBsG4jRkswbQsPbOf4X6LnMt1N4gWL4ULBsa1gIfmyFD1Jt84xWPYSQIJbAQw4/F2T2EBEpl3woHiR50jMkYjfCA/O51hJuiyTl7GLFVNYfnNnjLFsj8l5pRqKW5lgw2378WO5clEOfLbvqi0eZ+3iJqbZS3hIC1KjQ9tmwq3r33slgwMUUn6lwVYXBHRGKiSJGLlQDeIsC9OEy8I3B2g4CuVBJxWLOl3AtKGiUAJLYOQOKIlQ/a7NHyWsF8LcXi0Q47wfYHHpg1oQKHEZc3RdtllqOdUKq/l3N8CfUiJ+XtSnLOiR0FFJfy8agdkWl6AZjU9mEAIP30bi0Iaba65t24a+IZR2muMfWCKZtyAAVhdmbT7x1jTtimuWh74heGHLk7ruOyVL2KaQ+SbDbUMSyTVHexZZIqwQIwmzB/QHlvNq9BdSJauH9SgE0CGjMIJPtj84qhpoVJ3m64ELIbvRz4rk8vbsQavbVkVz+qbsEuOuHVZYE34yce7CYIK1IBvjwSQVSTVKHhiJ+4XXqHfHW018WbKXqT8dLGhJGzgdKp+/zg33SpgK/uAHFYQPQcGZJam8g+jvzT8xlRpMtUhAXq7K2Pkc8Oly8wXRPzA1YRkBUHFG00OyOuZUghI7kJTCimddyvILDb27og72/t8SKFU+t62a9XW+rrZYmkzTg9DgYC1YwJzyFqRVLbumhALleHVS82sd1t2NFLquyoT0Dojz3npBLmdZCqf5mfs1r+jzZaxvCcdfJyZ4pddwZobRUz87ftUS9i4J79KeKAK3pmJWKQqM+Baoj6NiCet1Mf5YFmE8FEEN1InjNyxu9X6/95LTU5CE8JzkHcRruf+VH/unBoIvKMetKUjU6ileoWuEnnnhgnf90a2e0uFAkev/u4mpHx+sWWUKk99M28g1okX06WfuvTSinUM4MtbLFrEwehBEneIYSKUskZ3220bIjgp29xgwwK9RYfyEr5MWhF7LoIhHEGjDx0qfThZKUWYYyZwE8zesic+Tdzg4eVdkxYYFqKlklqCowareyEVB6o/FzRXPk967GtrOoL1pS0y1dbYyf02DkEFpGivy/Ge/5a5D1THIlgnbRR8W5qG696S6cwW/xDRxCcBI4UKlfqXjM26Gra+Ea10llK/pW1LXFcFxpUC5BTdEFOYmRl5mKmKG6XjRs8OW8gIg8k3CHF2W2bDZxQrD5e/ojWubEkoHboRY/MxbWNLlILOO8S1Ux9JlFSZiy6N3bZawK6x85b13x0flN8yCnbgb5yztWqODiXGM20DHUqEzCkm4536LMMfuwD9+GqECnuX1BvJE7XiZvEaOTP6VCyQpCLAWBsKXws9ouN2qzF9otQP1c7p+ZF8ChZEuGzVmAjVuB68WSb9Xlwpssgn2ZDcgIXlg228tqrK8Oj4ThNnirP0FBq30zkm8PGuiqhT0MJgvo1TNs4NjUa/ETaVoA3BAOxgy9Ol+oMfbjPVzn9MQZwB6jn0ptTi7PTsp5r3F2eAE4XXbkDXHP/86n1xJowPYzfaKsO9OrYLDk2V9fdAjQ/mOEcgtwhGVDii7sb4ja31aSaxp+VMrLYBfDzm0YucTpldnW8Zm+CxgjZ1jilPLIGYtJqF4HWGtVHFoUHRCYH8kUbTRNzSYuUJzJp728MccSDegMV3YB9DEAcNNP/gHUlF2yJpgHq5DmfXEZrwjhXSI58xpIbV4H2VAnyWeG3Sy4l5YtkeUWNOxNOF8f5zTHb7Gj+AjmROBv0k+ztrLv1M2+tJF5IYjwxBq62Az81/c/63+rfwKkTgdz9QUhaChEu2RZpEW8FahKt8cg3NWpJ6UGLMW5yYEuWB7artMxEdu5yeT7tkMAVLvxB3ZUBV2YH3XOWJE5EvX7Ha78xmZF45Bms5r+Rsv7U7fIvvGVwPoPMMgskZ3Pr22eAThzLad+0vRweMzpaHwuR+DlMWP7ndcmsJ678FGnLz7mw5TNid+VGJ+TxuadJ5fnisw+WupKZjWEu3NMbQ1Gvo4JAIqKhTslAzlxe3y2BJOhU1IjMKIuh/kXT9kwuidtQhqrxK8/b3MMFhap2oCU8XBzajyO9HBaI/UhxGwAheC214wkqNd1zn2B4Up//2GEnHSJ4BkOW67g74E2wV0iraFQHMXofxciBghwmDPg8pv/wzKcqs9gDIN7x9rR5FCouPnHPLztLuesMZeNXpSh5qWNPJvK7o7ypjGOTBVPnckxu4B1Kb8b4HUJsl5hFis/V9iIuqIib0puSi8MjcQqxzdJRyYx2pm/5NlZydVwIX689BKwcUbFDEuR185/Ujrd7ykX5FAY02+478n1eXFXVm1JFkeh2nyPepRLtcB2ci8xwTi83CT64/HG3ZAAugDSn/E8sxuHYMf+KEuGP3w9njDiNnEXyGXLrxs7R+Pi0vZd4vbV1z1Kn8c9yXOitXf/y38u32uh4GxgWeCsR7E5GcspHOcJXZvAHHN7o7kGlivl/zN2qvyB/Q84P2eUPfi9tGk0GUxQcnPuWZ2/gv203KKPipRA2PFD6CTfyoNepFhGTWEvgBLSEpuAGpFuSlVYolqkj7cdT1Fhfmj4klvmgzdvzFaAJOm3odao9Nu17m6pIY1HkO4MQXlqcXDjGAbkUaa6EfkshINkehVcqGAGVoECbmQgP4tEsCxXmhrgvO3XKWtZTm6ms2B3HBp7jWfsAA/iKORxiqEwdLmR/xjXVkRY+5Q9zaV0YtdhpA8wGW7xV+KKYzPkutehCUufolz2kJ0rM5mYagL+U8I7yGLI7qqj+iOGSpyA9/fUSRVH4tSxkXFqY5y2F+56B1Gb8p9zQ0TvrIuRLaD00skk0SI5xITRdcS03koXW2U4+h5aOjg/1cCkqeMjxuYhZgUHTCHtUZ9NNm15sC4Nu6G5CiXWOM/NeUxM+V3+vNHzuRMuvmKsLlaGn7g4TBbtCTWwA4XMR4m24tf392sWfEryXJrw9J9mKmU1BIA4ek3DiUOfGCBOTTi3gPVdit4ebKQlWUwbzvFT5out39IEq97udfGg37LN7SidSzM8UKEuABTz29A/IveQZH79z4CYEUIZ
7mb3AIEkiD1MSdPFXWCUSogZrn8yGmmvapUHiSvY47TP3Zp/NZm/fgPoM+Lk9yScyQ8ts1Uy8/mnW6/SE3lAPVFnhF+w6M883YTRfSqJDxYtotvTeI5s4aM9WdncM3A8de36A9y4ljxs3PavVveWb2ocDRdlgFqiGyqIacIqiEwnUYPPaAtYMEYcCimcQW76OeozV65u0VWw0vJd55ae74RbtNUNHfITrNOmlLxDK3n7dXLxyEIX48v1Mc56qQNch4IFGPFI6qLX/fHjr+mEvKMV/Fa7Hf4OlCkFtlLA2qy+ZXpZhqzM3vArQNnmDZnIqmgkEojANkNp5brzEG/6h4K/tuUuvFUl4edIu6ROOYaPvfNJTuTonWPtOEreZCZBw5VM4Xwl8WIYOo7oJlHO4MpY1YYaA26YbYbAWsfzQalHeQPxnhvEquwaV/a4NM7XihDo+pqAeV4uj597EmQJT5N07t20UkFQYP5lVNx76HSW2BtCy2Bpirj3yTmuaVpxQN7moS4ymnvzmRAWPHAS0ZYl0ojNRzYX6Vq71K19NeKGNGskonquESoiZ8eThrjLg3nvayBSiCB4by8usW83P8jMn17I2oms9ZcGNGPSnYKLjh7jPDoKzHBnD/coWDI3LrTYpBcoXfRUyqnxkHup7VN8b111csfrOsBjZ5FudxKeLLkMhVN5V/vxU1g29ics4Yv4oKO+eRtHM+xvDgh1E3iC2TJj+nWXJE46UZB5mnal/y/9vU9SMUGtAgqeKESMx09Dl6QU8AR6usQBiu7aX97nTZBV2djoZfy+BrXnTPTQjKpllfxY+YvY7N67LjBd5go3Qdq2ztAQA8E69DCXtV7HT19PQFJ1r/HZ+ofzxO99KI2CeoGxvq3GAlZMy2M7LethvJ8bz4zRy6NaXYLjlpiYJ6250KWwiW/X44X0KHdUC88uz8Ie73IR/GhbWbObSc53FUTc4lZyTsepf5nU42T9nEIXgoGgyiRCyeDdVlH2LrI9ul7CwhEaO1m9kh3KUglzG0fDvs0AhAy4hk1/qm2n0hRHWGq2Rh8P46hOF0UhpKEAkS8FzIts6JP04kWdUOTF4FH6HBXBkFxxWKNHxPe1IzqmumHMFCc4MbNsRsXc57TXWbDigOQqXUs5UKeZKy0LWcjCSbVGf5J58fsHGo6/yvZ8hmrRb1IsNGDufNJ/mEPaprTDzhCQFzH0yKExKT/QlLIv/20ijwoTM14VwhyTsvQoHamcAqOCN3rTd6nbBbClmXI85RqwngHP029qRNtnOBFnYieJ2iXPv7PHsnGLvhgnX4095byyoWed8VZC99OfxnQYjYB6312jMfITY0904uCgcAfkA5OuM/SgfuyfQPe/8ez0rK5muL+BmjEd+sXyIvashmBYzPMno0H6Ys2ScZ386joB9v1K66rnOzDyn7WG/pB/5LDWUkaizyy9oihiu7eYW/FM4AvYg0/pJTBKXdrKOLWvzYrg9JeezGfvDBaUwNc0vQXGIRYbooA7L5Uq6FPZsYAlLILyo4P7aMk+AhrIx18KQua3eHADHIbOOrVbpPMgdPLMPQh5D+SkJ46ULznvp9birHnoVMbeOqOqQ6ANVjRF0B78l9kT0byDjK6y3L1dwFn2OglnJ/UK3xxEYXer6/C6RKCgrrCs5r60u7Y0SAOUJmaENljtpEjObQ+Qlt0JF2vNr1ELG5E5Rr6vPjruR62Bbr6D/MVhl3acKHxKHhgmZ7qphx/4j63S4OORwOa4kjH7ApkB+zieBuHO4NLMUye3IH+gPoVGIWtPH9JiASwmGHmxDA2ngC9wAY93+aS5RqrOCHTI5KSqUtdhgn1XoWZo/iXxO3ed05B9lNOuqzm9A5YVPyHEGJ2IyP+Hyfg9FlxMxZXY44smZ7TzueLwBgJFUxBH2BwtH7r02qj//lqqxJdHbhTmQUBxPso2NzvrA2YQjJ/vQGg27dJEXQaOFzf9f5taYmBu2pnspCIlFaKVUwniXAH2UynRYJDWiuQNNR27J82x/JERfxBfGZGnAP8O4K9N6Nugd9g4PfQSq+86gwW9csmunzk+k6aehcq8H8BMxAUxIMT2KlepUmzFkxvwlphU8zlmiZpyW7slO1OV2/Eh2AjeyesF0vSHtmT9iZPhJqyEk/zn5Uvebe5VZFogZq6wM5mKjEstiJI3crKk8V4Q1IvhfpxHsq8cbD2Grm0nS/1yTpiON7CjtyAJcSFViQAkykwwgidCNfYZbexJIoCwCtV9jvYXJSp8ygXKXcp48ohPmif4W0ZKLtgK0BnjAtbUyA8l190YWFdBs5KDs4mIK67bhWlkXey4B6PkMcoPcmOgz1oSkFbgRFoUI5qM8TWTz/jsxIrKx4mk2RrHjOcNtUWLFkhAPeTyZaLqW/re5mOi0exBY267jW2yccf1HXvbBLSEp4+8tJyKyzesLR7L257OlfSOr5nQvl+Kic7ApfPx4272Ne7a4qK/GyUi5i9KAO7pvAIEYrDLUisRhiKrYZiE4VMzQMgB4fn0l01214FXHCE/Ijc11w7sA/eX3Znvdf1uAmzNNRHEtT9GxaSrZmYv+zkQc3LotpvxJrbKjLmdKOTW/ejstTM7VlSqahYGyaVNaiW6UV2FvnLcY5+2nRxbP6vIcVJKzoJyLwKnrCudTadYq6rVUtEm4GXE8C+rvM60tr3TJkaGGbi2Ox+UpvVeTnmwxKtbN9zLjBJVFI/NSGY4HmyreD6yBvCcqGj5vyYn3bVHv3Mn1aeN0pm8AcyQw4umwkAs033ej4/mQuIkgbKAFxGGZI87YBE12f95EmLnIkMUqou6V/f7YvhPhiUlmLxHe4s+HsivrsygYTNpC5FRhCrtBCZ78hAwso3+31BybbDKs2D+laemWeVxGAw+4bRnswIv/A18Od8gINEYgTPFNZ/IsATV7WX7yltd2dbA5o82Dxat/GYumb30bIvY4rUUkaOCq6ToqsQR+ebpgrn0c3pqHefCbpq39Io//xfcGrvsWy71qH/Zbc9kQ9BwwQq8ju9raVL1z6/Al6Wf46ttaAo+XuLas+83xBbk+3xW6BGcQMmOFZMhJebctGE+2m62a9AHd5vGRD/E787goU8uir1eLAFlzo/1jyRAFqnpZQjkBW2y8G9wiw/EcNo2q0jocCAnMfE7WW/DAddOSx7Vc81dT24xuhv0p+bJPEAVNCB+1lvE7WNsIif8P0Ri5/CLyOCG3Z98MzLRfeitvSdrnfLmTjpQxI/D3vIiIr9qWWckimPQZAVedFxxwnMAvC70ExT0b+kf2/zORiDZPA0WTA0YUhdzJnrzXUyo2SYPanlhLdYzygV8/nQHnSPDYH4EzqeRoEw+Mwgix3yc6unXfsUMg3UVijhvAH/KYghqLQaALK+bTqfFzBBBmSd786q+2trycmtUBjEQAsn0RwxmdeopHrLEWvIGxf/Wi3HxRpx7eo3j3wrukBdDmFKiQ18P7z3Hy5lSz1fVK4B21Q1wpDI3ocBj3hxJab3uPVn6nPTrn5cKGApmQ6BdSd/VoWicu2lCEuEqucGHRjdbzk6McIYSEOXm34m7J+p0A3ellLK1EWiMZXtoZUqvb671BIhHO6Qrh0vAo2FJ3WX9rypJFlzrBfVrRe0sQ3rucckLcHt/B1LiJ1atUI8MzeImTCkOoXSTwSWqrE+rcfxHtkTZCy4PDpzoaLaBlmgn1Yo4fmIZ7pkNTmUkmryrm5AcUrEa3ZnJ91vpP5AakAnO0VNXXGOdWR+xwv1wukDnS8a8yT66vMBTF3gnQf1X3wJRNcqGc3ap/S8HSdVxZjjv+LJ14+jrjiGxAFPqWWhjsGx9KaOMpisz2O6o7QBVRTwCYmwlCVO/XWQMY6FfSTtIy2KE/CKkaw8WNcLo4nN8AKKGKNo6NTn7TnrRwDxwITD+yE8aPk//u8y2SbNF1NnLrJ4pG20Kf5Uht9HT1ILJGf0n08ji/4nbjYASlr9Ev9D7b6KaEr3l2Zx8vtu9vh4WfqcY7fI99HRB2vRlBp7E3ieTnIKJOuVoQMi+qvx8Hcby5lABjdI2s6S2RYh4JcFs9Dn39VdMHkMM755ubcjEsO1/
x1HrPKmGuFXbSm1S6vkhG8mSEWaoAic8uNK0N/LWgZzYqWER5qfLZJBgp/CMmxfbscKhuu3czFhBXt+u+DTT5TCRUnX+5WXM1yZDmrpflylLdBm1H4F4YlqkhzYr3F9RbG8r2rtAahxVD1lk6K1SvRKiOLgEaWy09QJ3/kzs7/I98pdBJVjTGLfZyjA9+XCuFoUThO9+Do19CG6LZ7iV2Ytb7EQr2hYR/+MJEwS4+nvpvJWf6dgHSAQ3N9cvzr85dZCuN6w0cegOIsRbdVYBUBGbIjQvz8UNG3iA4DfnZc309xFbaaI6YrwzmGVdk/iqbyagxGRTk7SNVq1cnN+wXkH4mwP/zpFUYD8nFug8WbAqKtfRJXzIiI2xbtAk7bKGwl/dyYbQnJD1LpVFQVYH49QT6WsZPsV2sxSGpFBO1OhpYKyEQMqYiX5tcn72OL6qYD+EJ8i8OYV/BrDQ6+wAN2Lg96m+ZP8IAY+6b+CLfWPQAq3zd0KrcAEF/wux7+7TTD7F2NwkmDPtk3bP0Ldy6eiWWwmKadspIFT0HBTvM3xF/LdTA1alp3rfFy127cMjvNOtzblRBRNM00k+XP2BqPrF/CU1iuZu95UTmd5mCCre3YdhhepjPI0YcjtALBxuRGN8Du7KQUJVc10e8cFCUCDPKaB5i4jN3FnZDc2ViVY57ZQXnwQ68hRNNMdejJRmtjGirgb+bUOqSyKlYKOk7NPF52MnA/H2amDZoslwnx8jsfWFkyn74Ix5PACvYOq26keKs1Pm9fVHk28UZCAZGxRkXI0Cefa7Zhy2wT74Hq9UyUXEwbwgyvdtR9SZk8KLteUI5Y53NzTnjeCROX45a4nh1bcjhdzPueJLzR2y3z49hL0lR5QKrfwqfVrhiwoGHCV8wZ/wo3N1nqbAfJ8e8g8TiSY7Wh25OOq1E3kKo/i5bdga/ZSrUe3FzVa2hBUy3w5PV+gko6QAwzHU4Twy9dPNB7vrsW2Oasn0Tem1R4Jrl+TYykADPmkHFrX4CDuDU0ggFEjL9+DI1Yn2MQmanjpY2s72RVRpgMy7/ZPGDKwWhW36SXKgE2c5qfyD4kpMkgWImk2p7c6+dNop+bVUmvOewlIPydZN2liRGAieE0w5tdO+3Xddmdy/fJSV8x05Ri7hdKRrOmQSykT/AnZ79aM+2BchtnTOfIqNSwDGiGcMEesv0uTzc2148h6tXHCXJEw5w3dHLW6j4pTXM12BM1PTk5Dnd/CLtz3iKkpKxXWIYL7hk83cMW+V2A0rGebWC8jzLPgAnxtmjKe1r1UQ8WGAQCCaYa2QhvDqLkr0Z462iAwfAh48Y1sjyvd7UGuqitZ1qQT4Il9S0AOmy5zo/S2apwxR2YK3lhOZ1ffcik4H+uDyfBRTgiyHtpuGCUcWCxu1DbOufEiIlMebKdzCB2xIY/jO6xWTzaZEGgCklgK5c7YJRPBx30gleLFTIKMvhKK8BMlZYsM0xWmMlO/yLx5uIe2xCmd1lJum7PC9frzmXEMI+aiT8nr89MEtf6P2Wi/OgSXlyEU0Aq7YTv+go/cMsibjOhSFeUi0BeAJKdePjbIEILXkNmdGRPu5qBRzObHl88LnzdBIAoaI/5w0b7yWt0AJe3qQc386frkaEMGkzGtAy8R0Dc+jTlCVMEHMZFFaGSmPqJzI5bAJqg6ZnB/VUtrjDwbZaTVDUuC2ou+fajVDvEu443sFSY3FIYt4YCsKogVzUVQ2f55CjgXQwuQDNhPGEuGlTtBKFn5mEO+o1ZtESPW0nj3ouqqqsGXVXxmEa+gn9Sx4a4lCZBhjZo0iU45/70+yoeOHEFNMzr5lT83e+bnNfof5UejQ0RtfGgC1MffjK7wE5wI/Zw6r7sVaPxRpCZ84Y7qjxZU0aIjD3p9Kfw0tTXPaeiDIuld7GXs3i5y0zzkwMMU33KP2OpAQJQlxABqD5UinWn7EScvfguvd4DnLettGTU95Jyx8tbgjW5Kvh8XKDwavBhqaIczhLZP3nHfw42gquYpLHjdY65Gw674XZ1qLTLgHUS6FOosJV65NvJM2/3U9YPFkLceSXhRjwSNQ2wUxbS4nDEZcGpapPZRbmPPutFYTFPJ5nyQFrzi4QpEC329tqnNtl3yJzJQD8TZmouTnItvKwfGwjLTZ1LTU4UYBQmGbO5sxWVHDjoMfoOC03cNU16cJ9PtIB4cXM+Z5SS2pnkEhw/44iC7L0O85/DovVE52ygtzSgQ0XpgQqa5ijkqVT2fZ+Q6XsPts/pJcu86jMDUA8EUXJbrelT0jQpexjlXpLRvkIZoEC/31Av5emD/4s9DnSfbrTbmynamFCmpJnO0829VKNbWLbXjcGPc7aHx19mIzOAnM7gypSwYhnO7voVMY5bQESIo3hRXYXkjljWhuOGc2hV1mIyprWufFqoMP4COl08ACA+3dPhlATIM51EFOJ5S2lwNoIm7te6oQilP0XzJCdGBi0Q9D3now0UXyN3+wxnCbIlFuLBnpNWP6NZqIKt3ZD321Fy2WYVXbmxrbXovM6plhrPt1rdpmNu7MWxopwe77ijMBrdBRzdXqINaUU5sgWamp7prfGMsWxGQGc8GTyCUfRgcahxycZDJ8pghKNDT89ZqCw5Ue0VNAl1/2li9xen1rk3VJcDsvrLQZzkQE7FrFqZnFtLy+6qzoQlzaWp+elDaHwHWqLjx9i6kpU3w2RRUpxjUF1D7Bikfo/drqm1tViKAXF4rmT24CPRQ4Wpf3pLDHlY46dRMrNzi3gCpQyAPmd5YY0ROY1znY9eBdc68LrN2MH199FmDAlaej3SQW0bNx3dUUiWHv+Z5dGgxx3Mp/MnzxZxHStl/OavWnZdcjCXzozgVm7ZLb2ZfEcvqBLo9VnkEttfB77fdkbLbBqD0M1J2AB4TaIo+WjPedXTIfcObhEuFthsXIXN24gGnem8GTAc4wa0eMQpE2U/BaIsGvWr8ab4rMElnRLdtWBMbJVbVUE5WptgYh/yt+6j6sHEtWiWNf2jZ/l7BNxp7HwJpXcCaKiM8IyIT4vU+OiBc7VTjYPPjh7sr5vQ/jo0iYDjPO/z4nt4QobUyNe237F2l6BFjI4wBCL0e1ZPpl5h7ATj7rtJblMUPdXXnDzDHX3dlmSw14WCc8jI+Lg0Yn70iNfo6nzqjJYoLf50YUqWqo5SdnxFuImf0FzmOwBKEmXobEsC8Fl7gjJ5oECbrp5LX8AFLAp4qHvAwI7gZY3nqwxSWEWZsVFVGdKNYQZR7kAotQ3serfXQCeRjkFj/xrwdL1V4AOTKW6jsAao6eZP2VXd4a+0OFJlsoOBnh3r0UEpqtxGhu5RA+XqVhXROdHnWU9gpnBqEtquoISsRQ2Ya9lL1VXpiT72+AfVpah8sEznQJIFXtJcVNrfe3w23IjwV7SzGrWn6yh+JDZGHhsHYaw/cypRbudF+iL2RUYHTz01t7eI5j1N/6m/kMF5CqwOsWV+Qa5tPz4nSdP4XMI9eUEqgaWXKtaI5UsZe78QCXBEagDiOBdp7Audk7DVd4xJ0nNlKAf5mqH5YmO6QRS85qCh1FvTz8YGWW+OZelvuTTsNfYDXOHVK4owvrrQPZ6lxSmGS4paWEoOa5g+enT2ROJJGTReW/N9VU0zpqFvFxM8+4TnAMrzLQ64zzYPbbI+2V5PuOBxImChXhQYZpqnviO52EIzukNO+mIgs3dDeVQLg3GL5n5Ztlya7ZwrZ5KIpjmfIyGifL+z/iCPZ5JIxRTuP0oWzoCrb9Tj4Zc+PO4AAhgXHqEF+O2EkMVNvbAjZEXPh1jOvM8fexXLEDd1goByItTkYHYl2rdtVfZ5nb6Z48KDU8kf7NbiHUIUat/zD+TWrKcInU7q1tFXP/NgdffR1OBF6kP+4Z3tOTvrnwLAmn5rOC2SiIfqKaLibNl0Vp0ek2ICbAhsOg+WvfI/TaAVc497/issEtsfvm8O7Gctmd6p66zmcJ18mb3rhG6pPhyEXXEd4MmRLW/L7nI6M2iduN6erjpPKpN0CKnhhpXYmlwB16K19GzEGZLS1UtKBjyMucoqBbP2PtNnx6c22zplSXCHn1jeq/QUwU
DRWiqzWBMhmeF+zhzYA0hlLz1QfCCFAZ6NPsnSoHi9wJrne+iVcRLUqK/lfHMJx3XZpEEvbZO7qoRzEXqnPmhxYnzSYpQ2PHjXIZ3t8ztmFH3h9n0Cddwy9V50erxR4JgR4082hdGXlajm48P+YQtspUlTBfi1RL/LPE9mBy6OHQv/Xtmkrpvd9GYwtkr8s8dpD/x3v2O2wL/jvAa8WUPoDzx2MESuoGtZrepLHLyMzrk9VDcO94aHQ/dvvsKizNdPM9JETOu/ilu8pvJt9+AT3L2GGY2ad3qJ3NSbf5cncwzLUdl+pHA4L0jKpEYG/PbxFJ/7uS1ZUzT6ngF1iTOY7DDTolsTS/ipKLy2audos7hbActQkC11URsj5PhJjrSwhaNBZfs/lg3wB6sLBW91pzGUoZfS1eU26zD1dzySpY2qz4AX3VK6dCaWWRCgs4eQy5MyGuRTtzqqRZei4qRAr+E5wrx9R2UhfTliIg0n5YRY9O3tT8A7iG+vaOHrmAvC41rkLLymfTEWOe+U7JOKP6d1F3rvxoAx5Rocbm+GEgahJG7o1OoOPJJhyBQHsbb/ouACWwh+DSC7zECVSZUVlU/JyQLCGEBS/YxwIRcqZ99/SMujyMnTexpX0HWEiLHBgrC32/0ylzD4GcNDvdoLNn6/viqhdcMN/Am4QjDTyMfiliDpJ8a1MS7gwLq+qbHEum9faEc+ILxAUlrP1obpdmzjVaAaT4dBob5U3aLHlD3WDyzXdqnGNLTKHfQDZsp0667RMD8Cq1XGRTCGnoVgIIfpXcFVbhpHxE0xnsHMN99Gf2gOf71JPIafS2Uoznc+emjnT/mrfy3WfbaE20yA6+iSUP5RPjtbYVjIU7BB0Qz4PD79c7bE/b9PyfpABU2BEK0/p1/t246jZK25ZMdLmGAFRZdVEX14/uM3nNDYl5T748j0KzIduIwy/zQFpyljLGy6b5FuThhRcKV4WBXXQ83jzzYMy4PfKXeEnHY5c7LQ2T1XqMTA8VuanqktFO5VcyzchEhBreqGx6RfvVtpmS30m+sZzIUcSoayBhnmJQM7Bq/FzGokvojQ6+7KmwV+ezcAZ+Vv9Ma6hEZyHowHqZCsGoRqSocqv5ZPFid1JA2CkW0/Fjetqn0oNxCzUXCBUPV5QOYM7rXBbPk6xnpoG9QzeDw3fL1pNcKhlOaYQxs/uFraaPy1zoogN42QW9dh24zvl2hi6J/jeACh1mvkxd4YkAnxunXmmYjn1xmus0V0/rw6W7SIcbb1U8GNMVIEK78H/A6Eqa6BhZuoRkU6ZNfu6EEi5c8G7iTOg9LzknwUkVI2p9cbkjNmFWWVea0cHvAEXbDhJNEPM96QX8T+IxIbHbDiHR7Q0KVyrDGKmrSWWbD9A9kiiVVdTsqxRpMHOnRryc8vwOLAyI8n2eGRUnbxgfvckNWzoJcLkndPnkqsRZLUbm0zdkb9/6HbdGB1AZgC3e/fUnhYdAAHcCc77i7WRK042Y25dkHBvcuc5kcbkuKcjtoehAEMSo/1XSPUNViSgyT6AtqtKUWU7626g8oTVdixEdFW+NQGFTt4vld9n6A8M0XC5RHlOzz1Q5Laq9Pt+NmRX0Cx8KR/d6pGbfZK0Nharbf1p8wKqVK32ys3wg8vk8cRSnq7HYI/pawyvxvmg+CrkIj/28UcXUs7Fk2iG88kO8V/8IHN+yGzfVJPRSsthtRSah15FOy6ERH9ccgc4LX53DDtm9hKUlWDPncLOl/mTRjRGA1OoxJ+FeiIkiR9vCP8ju7kmNB/hCmcGTNWJLm9ozThWOLw/u9Qrqv0i6cZThgrTc1b5XvKbTDKYSumgFOVsVKEFU7kboJ66uz97V9Z8Rfc6RylcDhKDZ6cP7zrErA+/+sinpyEa0ZtYQAFeROgptSHgFZyw8OIE7moD0nzhBiRv2+wew0QiLB+htTshrnEK/Y+cly76xbnj72L6iG10tAM/NozQJFrh2kyOEwqwJividPwjy9ujauuwt4QBJSAvBTaOMRUJlrf/c0RLSmW4XzVxADmkeBiQTZz9Zwl4T4h1WW4uoQYrVYiUhVTVUKsHu5wIN2PP/cj3P+Ty5oIC4EEve3snBD3Pi3bJlMUrF/m7l47axE0Xvv7owXnfL2NakGUc0fgCF8AtPEnT72GCq8PDSupXMFUwN7Oeg39259TJN7HCq+MkgEqOVJgq8nVmcCxwQfqM28DFk8aYLa6xfxO1OSSXbdnTNSpe5+BttxT+v3BZg7/2BLJWuq50JshdvrCFM/bZKS+cn8cmkIpZGvVTJDaV4OPyPtdDmx13U1VxPvNs3LiMA3EXrgGNuZm2oQmQ5DJDTVjpYxlQYOxJYvRzlHM1+J0Kv5NNG3JX8zqg80mBY0lhfy2l766RzOm6v9Cyhw+JHs7xBSFmttZ/+8GofbHVI8jDGPRtpEgYfHftE6CDXqBw3AqjZ1uI1Oq2qNRs6zZpX0Eiv7m6GACE3MNy0fAOPyYe+ivNi+UUdYLn3ixajuzSVNvbrgP+8z9kewjfapTceDB6Hipdo7iOPX1SwnFKdV9F7rF6rvMnwTvCyW/UDgB0r/x49w8uG6AvCtGZCYbj85Q9xAhowKJ/MMuj3XM5cT5rfUHgWFGn47V1ogWzyjPJRiDxZw+Xh39E76qc0y/zpPDBhPeq2JvPdy1IJl6eFb200B1GFr2vCOK6sAXT6znfrdgxr0DXTskuz7bYN6nSC5YFJCqQcZUHyTLcSxyiwbAeY/XUw6q5ePe+JjybwUYkYsCpniv3VfiPXjwAodnU7LpzOwXzwuF5ld4HTWAZA1odZ7HFbpRGjVnyEl94pGFdiLvvaszqfVshLa4sMK1bky6hVnAZnSPlaUGQptYpEpPRC9YKZkSV2UPS1uQGxVFxUZbL2SJ9cl0AR77QTYag0LaMo/HaU8Qp5U11oxO58o/mmlweFR5kwzc4LQsDmnBsg0Aa5feilQALW6R0U2829ZE3iaLR/PMJ7m5ej+X9TAfbq0ofici/0xqNqfgHf4IZ0mLm3D/KMlSjWgw+cvEnGXe5qGxD5XtybqB5fqeipu+Tdm2GbR13ai2wDPIl2SNeXitK0u77w01ymYKnXvH+NtZLvQBvc8xJTp9gj3BoHBGT6ITDtUMc1UIN2HR0vcdG7XX41UZWXmf32KgJ03ZyRj/Oej70gO/QQjWSQFVT8T1agy1i1pLAma/gMyEbwwolPUEpZKmj2y5JZilqbFWmf/hAE0LccdaOdfzZVaF5XfvVpSVpWzU3UhoHb9IRXmjF8HzhMVVF/iIY3qWCl+iKQt+EDsAnVBRrvSnZpcmTGRyE0yPVWed23CFCpurbwb3OsqwK/5Gxz2Ioc30W9aDX1hH6/mMm2WBmf6JbphjtQzmdeBZNMFhgpN1gO82zbkMY2cqG6+XW2cewEHTQN29qyoSUpFNPVqoKD6rAuzDs2FHlzNJ1PSy7IkMZHpuimUyPdlOwBEvhUIQ3tVh5ubA2xDTEKGs/ADuoi9mm29FHYLTl/ppo/1UJL8wChPgglncTX4eJqs3uPTCzsWZCBNBy9/m5nal6tMypHOyOkTU4wSAbfFsFWwisfjBuOhn20Wnx/Bz5D+7kJftBkxtuyEEEGi8m4lI89WWe7mM04cOn2irNqH0CbBnwypSmgu9wYcOQ07MH9v1tTiEAASO7dZDdsU+QnLDohThffwD+Ru78ekus8xdK9s2evf2M7RnZi8qLCnTRYR8Bj82sWljx93lvABrpkZ8O3UptJq3u10hIa5smXo+TqqXvHd7q9YT15nFoPtz3mbnJXXEObe9Yb3NcC3v8rAk5YG6cbPH4ZidO41pQO6FYQUivHoCwDmqyO4rSA8WPJLY/qJTDU9JG7EHiYLDJFKZNNnlX4xCdct+QUBgT0wzhldUeC+75yncP/ID+ncaP5r+Ow4F7Y8/GtDOp5e+U2Qnu8PaoY4SbaWZWco/1kyjUM7Ekst0RKpAVsKJzE5QHp56+hOIHN4sjpDRigFNwLQsbE9SnJpodGH21ELj6BloYo2RjmJaP16qWcwSu2QxRzPPoXXhISP/Jhv7fBFNIlRTCtIE1Mq+C8zArj
wa9rUvAFuttgm0bmJf7YzVSSphrHPd1dysz5ObT7JsX9Tg21nemUAFD2XLd7OLulPycbdm6aR+HYjKgaLMdT2MJjLtIHbpEkw3G19elByg6xj8n9rJVRxUnwYnKklbf40jXWvGn2psvJ/MPYAPDbf5CMYDjo9OiAy69sIv9TwVeM4O9tuW9C3oAzGO00YmbIbSlgsau+cIT+pHgx+ZZ1h3B5SV9vbbq7M0aBPSn7wMyim4vinPpK36Lwjj5L4Vt7cBiij27r30uIv9tEHFo08bn8HxF7JGgQVqjlEr4WTqGDw2/z2GpE6WhaWEwHicj505LGhF7ZOZYWn5PMpPO5nV3XPXT48wQjCWih5qf1XnIKdqTq+lh6Xg0YKHS6fr1BduaFJKjkcxRFrqoLFgaAFUzp0+2BNIkD4r2cem3YctJ0h7mRNxOOSHHMGc8QmkAX3a8n329Qk1luI6/EhUNUXPt+2aVyrwf/vIAA4yoBh8qq9hAn0ugxou9RgnBEGqdv5TNtHLNBssq1qupb/Xu7fNt/0L9hxYRHh8Z5mY5PXyrk0QBlacRjkNI9+jhEWleWG1QEWIXWXwGoUWGofsmxa4Zy9Kiko8yGqK6QgVCvPJHI64/lkOS9o08UatQAhfskjo+odCAZGxCoCcX7K+hR8lsbYbfaqNi/tI6/eWsdndMPU14hmnoSsYetufpEJsq/XLUGSWhbpIQl7igRu6HpoQMdqqbPgF9KCO5j2MfsMLN+jZ8Ojpf3zMeyESaLwjyMk6fHOtk3vudepoALnyF761BWXYArVUh2eGP8rwebjxHC7/ITzAoWKJ+6sBUkSriu8vVlKD4QCBs1cuL3X8Lp6bf+fM0lsBIr7oobXmmXRSgHf5tjhn0oNfaCGzRGS+Zk65NIV9ra/YJPu1GVwf/8//HtPFEkLxC83pONh12nTN2TWEECP5zXO39UBcalkDS399LSh8SgQ0iuzx4UvSY7BaLWShzMGix4bjBy9JBACCLB7VUvOAD3+1p3cXUoJtxI72SorpHOlVt4YlnC3d/jgHlsY7VZWalRI7osA0wfRP/r2zXCETVn7K8AQrFbzMDSJO2gvVCk9JB08pj6L+O3IXQb3q/aZLFqfuwyACVf8cJ397KtvnTAVSn9QcCSx1RLsbMdf9iJD+8HyiRUmJgAQW0LQgESfAXQgPICFtQIlkyZeUPFfc9DQBz38aqkiS9dC8IccBBnq/yW5evgLFGQIS5hGQDBbIjLe67/wT5xgQcP2yz7iW6y56e/LZAO7arFXzLfgWD0HD2utwnNIQB7a46hmsbXpJHoWx95/jEcDDl/C+jX5hyJM2xJ531WTzDaukMDty+1fNl2NW53SYiKWODBMdfUvPHQHKY/AFCe3JK+9tiltL8QIgx1IemWaAVqqTQauN4vLH/PCsLz2or+KDwT+LcUGjiWHzGHbVexULOIMdEElNtkG698eFVSMlY2s/UaG8elYkiLHfeI2d5j4/aeC9X5Pa/u6Z8T0osX8476rzfT+gLaCbgX62NJEFCOL0/JNkzAkdzepOmpiogTjSFC9i7T+A9sTpZJuxQ6nHHTIDJaGQZQeKPlxR4u4he9uECgl6hYYZUadJn0+BcDeiYo4adO+0ImnyQtR+BL1tOcL5YdjQgfd8KV8zFSNTxo8FM5ZeqUi8OxSWELcyPaqta82tMT5CYm0TdrrcrKv36LhsCr6E++Mb2nM/OsnPqzZqX43/6ITDyxl9OrvTKoRt6rtQdzHCmXs48P5o1sfR1lx7ZHGpTWq1o9FPSHsA8iuwoRGLqTvK36SuGxbmGcNWXJdQznPSRqqsjRNdPyN8zEWJd45avV2/WkzzXNBQTw2M6JTEniZep+QsbCXpCm2mSFRaJTwJtx5xT5ThvFDiOznrtstHZRK1Ra13GClnvwb+GHUDgY6DN0umZ47Fxu3gAXQY4HZDyKOB+UpsbSD6xIQuTVrrmla0m+JQHUdnetsdNugKfmjyOVoeRq+cTitV2fH7y2es6CYZIEtavbH6SPQYl71XyEFOieMqJy4+wNtDVpYAhiKELTqBDON1IE9emaSzpKqLgJslQ78C7lnSCyz33Li1Wm0I8QcMD/jVJkV0j5b86WZ5Xwi/8cZl/rIVl43r+hDXHI3ZoCEUUc7WillrL+NMWYn6j1NC6D/WSmeZTMYUQ6U+oYtWq6VU00OCt61e7o2dj63ZaMi8vO2EfL5618RWsp4+hC6ofGZyxS77KFcWtZTde2mq6Ydh5scPdfhPVY8eP+5vgmEwOjfpzGB+/AKx8mT3YMr1KbYkXfhWBuZbfcTZMadXA2ixMi9J3BnFGM9iKdazelue+cEvySne9Q3f/pRXF4PrlWVg4TsccC/hZYjY7yitbVUnu+2g+C6EABKe+RkVOi2gWdtQI4ZZ5x/pzDpS9Xsgsp+ovrey7zRFZOwjItzg7pRCQKdDwCcIxOYGNIZKtS113kDY2LXZhOdhMqKvjzv8A4kCM7cgqRimPDCha0ReC3YcHQ6aw7Z+sF+yJwpfYuPKSjkDUJallOGkyu5WGeUMUxkux5tg/8u6ukpzbUj3maZyh6RofG/YuboTMf4LyM8SAbAQnUS0FtWLIl9BGS9fkia2wHxBrAiXMbA6FJyYWWLbw2bCWDZpPcumBdN9VYPuc9IYYVnbgzLOEk5GqpzZr7x3uUZIMDyGClhkBGC56fNijv6ZKNYMnlHsDNOCioGjnuQVFlgXwDRZtt+E2JPWqZ+q39kBKuNj3aMs02h1DpEKmqRvikZKq66IsAc1bjdtaiNhAezRB45BhO+MAeWiZVx1ZkVIx6wkuKipU6GLlO3png1YmNMCqlQsVnNI4gz2rL6sQu4OoEbQwEuXUanJVOE7s6N67j1wR27WRCfC/G3lBIZjtjVPu+RrOvI+Xui7eC73P8cQNyoILSTboOA6h8Zf7asTpNfbcYFBRWXobXr8ZYkX+aN7MuUkujsFVF54l2Wz6llTGnKdXK9W7dNLn8ZigiViLChOBRId0guIXHfZfRTN8Wzid/bevY33uSV9fePxuXc9FFv0d2Q+xrnDxN6gGJDXOAlbhpwn3dsB8PuQStT+nu1sg5Ki0aRR2Fq78aZWNWuD5HWQ0CRklLwIXJRON8id6ceKtD9F54iFs9GJQbsEl55yPXjEXsLQhE9803jLhuMLfZLotZlpYeFczidkadEZJ2qt26UbeqAl3hDy+TyXEgXK6XuFipEWaveVLLVdHM959RC6nTp7V3Fww0EgBGp6zT+QU4LRy8/+TuSlBdvhCOkBRQZZRf4sG8c/RVVyj2yC4HHVK0DROHvnJqAH7VRlawUUfbbCqIWxmi5R2d3wKarOJMUBOGKzukWNhQFAPEQ38o9yA9SVjD5FP7DFESzUzHYaJiLLC4py07Rmr4h3ysavLC8HXMSK3z00+vdlEeA/OVe+5sB666DmJPZnrIpjKYEAMQlW0ecT+zZqwvXkwqA8d5s2V2Tgcdy+tZk+9Zw/+sidttsrlcBVX7e/dPiFp7SSHQMYtDgb56D4dV2sNF/eJgf61sDSjwlxVKEDb5hgu+NjbYwIQYSHqwmyh2YZoZROcxcjK8srLeJqI9LuNc5d+3uNKdlmriMtfKZgl7BUyukojTC2yItVzsLrrObt5BhOdvV9us7N29SxlmyiRrKomnBBj/C+qU5UVoAtjuOZ46/q0/J37s5l2FoevWqjAe7YKdGh3qQVyfQX5++wKistKQY5Yw73Xhh0O0AE/SWQ8RWNkzJjUes0YCiBbnbCm1Ru5fX5Ee+eJvnm3ZA0BK7KDjBM+JddtpSANxevK9mjXccpp2M22Vua5yFjGwzIwzldsKXX2LOOwenT0X0XrHhL8NvBlXSlST/4rJstFLog7VkUfoigU7BQkje5dfm7MEc/e3PJS+vMkVhdzdfcim3C2M/LTMGp1lZq+S25nvRx4QA+Y8L0OHyCFA0Jo+Ca/z4FitKWXSqoiwTsXNoidXPCTaEiY0FqWRYAMjFqb6cbGU81xfbZgA32cm+uRLV81kA4GWHJNDij0BuOhasP/SMMO399asou6eoBxtZNaXLXTvBh4BU8CXFb85Za1i
vjlA1PKUHyqUaLLbA2otQXcwUG8lXXqEAxCQWNq4gF3cc5AZrfDavjFEOG9iCw7WozqEkQ2Hw6jXwf4o29MxokzWoKXz4ZELBtVQxN/OSLp3gkcMixOSm5N9lstO/QJ7DBEic0Ke0+zoW+99qxWCaNHuOe40ZaffM57aLb5Zv+6bNsX2ZPdNnI/7Et0dii1LRZMb+4e79U+RKCSLpygA/3ssBhwodh0D2h/vsWsFYsCDgD0cVB5NVxPtMDqMTjfXNBKpjJY6BikDa23ByEoWKpLoj4VE/NPrUSmSDuKvDJ1R6iujszD5NeoP8XUpXTq0Y+wh4zSUD84+SVMXVReIsU6kZo2NlZTBd8yvLzo0+r1xwUQFC0H8lfUi9M3vdx/zu1PZ5KlJDDJS8EFInN/Vbe4Z9A7bibJjH9RXT1MZ8vc49mWzodHA8pNr8U4XvlTerhNzcSDvKxvBZaICSZ9JpqSCkmJVZEB40+2CWa9j65j6cVMqpJqPIT7UtouuO0J/unp+6OyrVYJsVqJaM+HACfScmo3fv+mWglAy9rvqEPGbC5cNHnPpPHTZmPE4dbwO9MucM0PwO4CdCrNob3szi3sMX3C9kikPYZCf1UbDrx5XclpcxlnbN8+tmq8BL0gNhKy0rjG3LZyDgOCLPEwji+AqRJwrvbp9FFFGtIrFo4DlIrUtUexoxmL2j4hBjIbO2qnBmU6rJ8s9CMXKMe7RA0YSM9VNOfasFMh7oJWCsftXQiWej76JFFdqW94yCUyOugpoR3sMwu6EK1v2I9PLYRXOlwnEFa8vvw2u3P7H8HXdPGb52jjEhwrZAhGyCKSzfJhs9vz1D1BwortRtcPjjVRGxhiEgFM7ThGeMCGN9PA7PtqyZ7AbGdIGZVlN+HtYQ5SvVN/ohQLzpFAyFI1BL71v2hEKM5bnUl895r7gCL8fB0IOYZAc37E9s8CrJXi0bMP09Wf/zr5JwAZSla5RU7fJVHLT148YH0YHW/l/ettiLEbynvwZv/5JAnoe055DfcnuDJctomaoVqoaQquLQpH3q+6w7vcBGy+POQWq/awF17f9PTZxkkAPnBLTUL/jTdE/l2GdeXgOriLFOhpC+RC3b7ipzvwYJHfD27QUeCSYXUiPt/vHgTUtkPb5HCePU3wsz42bNZKD4oIkzyzYk/xHNHQdI01HkKxnAr80WUxorFlngVUWvDSTpsAmbM20uwU8a3/7NtZ+rCh6sRR0jZBQOU7O4Ajrzt/teCxxWSSJZo8s5Tus2nZj5P4/rOSTPa8pH2Ni1byBJZbXNRnhpPv4qndRadM6l05AePoUELoZM9/VAtlshOFt6jj0+ANPzI/Uc7BcmyVpbLqzdLcHn/ghMFPt4wwxwTW1CQHctQGeMWDTTLJrQh6GBKXKkr+vYn2OVMAYQS1Qxht3piKYvOGrUZ8mPNtc5kqAP7FyLfwPQqGsOfwzCbrD4usFvDbMTHePtL37HRLlocXbTEeSnVQ+R87SUaHmKqMHpZFa33H8tTHm2ghr7WWZzyUtBn3LD3TeN2k2BuQLMl5u8pu6BV0FHV/MiGp9JRr/dAy+Gz6UTA83pAZc5niey9mPZdYcLVwetchYRzwDnyc1X9z+HrM5FcruhyFXtjrpFnI3O9Me70gwMFwFP3zHyeODR0TGIx6LRASE/0Ej+jVZtt+fLRRt7xiX9xrSgMSqC9Xi3BUNrDOmA/xSA49XtkMvYNoG+GJqz7Vs818BpZVTfxZlHQbc8E5846ZSmEmR8NHzUvmVZvMimpsWwFU7nnzkUeYqATMzIIjuiGUT3DWv+obTgWr+8X2xYWxrVkW5plcQ9AewKYbwSiLFnXCfxUBt5q2MPN1yQGduEjk/n6/EEYhoSoQen7pAH0BP1Jl9/xphbPuGjkzqmwhqMoh6A9CBNMCq7PWilYNwA1yBhezxfDaciiZD51Bk5nTRweoKJP3U9ACY+9En/0TJfan6Nm26uhR3xJPSZnh322AB+8BINyz4vUl0ePt3+4O/jOXJpKgiGP8JkjPeT+9Yoxn01lk+kZ/EUQqpB8eTBRHWZYPGiUVEJeUte1ugkmE2e+Nl4yPUCWRR4aUEb/71KmIFAm3o3BDShdSvWGrmoTCej5stHawUTTINPftfkemKlEglZx9kh9dHb7DmuE+bFsP7XRKIP/1rsMMz5mdnOs8OE2loyxUbBAod9TZZ8l2ciSSoYZFnFrHTuS/vAJo4rQ6RqFIBieJeRV4X8UVTk8VkvHfnXRlXwiEOWEZb1tXoSzd+tG5oj06ZnojmLWnCmkIeyavhXXU6vKJwbTIn304sBOGXftNniRihkIIPfr1RTigB0Yvmb/Q6DVKFSeBV8ybSkgXDUNvloFnG4n9kqf43SYlUgq9IBFbJN2M8W9ko7smEEeSlbGpQElOWldC8IszODk5oofYGgFz6H3q090SOHmNewEGtonkWb7oI/veFx6f3tKPpzB1l3fqaFXiL7s/qYut+jRyFcr/Uxcr/aXZNsuKoIhj94y2EL/vgkVTHu5UIU3Zmgpp67W6nVsK4+Pai/ijgdpkGEi8XMIG4DId1izpCEIixuaUTtnkMM8X3JUuD49E1FRFWZbb+jzQLtMkLYIg2H5rvZk3wfLtvNiMrQs+czziZ4JS+6J0Ofe4xEQbzgxvRz+eI6WtO4DBY4erZOn8GOLK9MP7CNTF3w3rs8NWSgegPy1QT9UbWPOlUCXlbc3WdNB8bO75Pm6eIBone3RfM2sbEhznq3QeN7e5R7eePTkUydsa6TQJz/ClhZexqr0/3oElSqS9/heM5YQzPchfllCEGlGVUiiMMrACNiIjoAMGvQAFinLHWJXK+wSc2xDVi5O6JOhiHEOfvr74uHYl0mn2RtekkJws6Gu2N4PXTpPnnXGK6SdtG0ocqzJ049naYqEA7EkKHJeTmqE5kGN3GBDMb2tV0bCUJR2OEZU8fzS7dphuGua3jKA5QbtHMzsOGqYZmwTBPNxI14+EU/LIySRVVK312S5DMPxNij5nCN7NoDY1iqx29WGM6dmdPqTtEqQssnTbMIhE8nDVPsL9IAL0/sMe4B7JSdGf4P49IT6a3L9d8WmUgXLL2hZEOQ2jAW+B9S96MCvn1MLyeDvkV02TVJbPqodQktmIKZOtq33NPJkSnw5I1AxfNjvQWL4Z1PVtLfKWbLvIS+h6FWIq/OOHwLs26xfkJ8t7/jnGTVsbTydUy5EH4JRQkCypTaGKtqypJDAKBDAdIGzphBv047JkQRxac9uiBddJEyZi+e/Q85cOPSzRibBY7iAR40lGMkLhkPddvMzTW2QJ+tQDv240dnHvwOZXKOz3KE+C70SrVJKJZ1Uk5Cgq+Ne6vxu6M9gPdUhpn9jXpouTJ12i6zxJMhn9eYAGGE2r03rXRokNNYjp1V4svMpLbxrjceoNp6Nqb/pZQcBb/tnuLpDeU6iOhvv9Lc/auvXhmRucIN/KLBYWHgC2kWre2rfZResUpGb02+elMlc3SNlf1tTQ48pZwo/Bcu8RaE3TMZ2t92U61EFc08RoCRT+xa/2gUvorJ2LcKG8fuVe4HFN9P28DIrtz2Vvq2tF4vpvb/XEc3dd7KCKq9Fp94JR5ehhiipTXnME2seVXhYDpiEBYfB7qrvopKG0wohWhYC6C5RwQKNCn1rQNG9zRuYHotmQhVEUn+WhX2ktScJzTgK/zwrJ/Qq0XakFKcI6culoZ9fDDnKLoYb9Uy7sVdG/5vLBSrCIdfJwqHeNBDBgDsZiZVq27GuPxwUiegFhQGBFfFsP0q9UJwtkZ/NK5ty62j3vv9ulyha43ieDDfbKCDTZVzq6s71HddB0nqSaBDbSwck+i2wtYJW+w1Cl+SDD/DXjhg76Er2tliHtRakm9K3ZxUu2jYhVfy6zF8eZRGpoCPx1Tl2HADI1qmA7nZ+EdkadeViGm52FuuChktLK4nwJYb1MBKVsGsv57M1IPvNkAjRdctzb4ZXoaiJ9+ibqnpbCi5lJPjO//3VEonLKrr49iWZ1PGlSxTNxvn+E8749V+DbT6lTl4bdW8H5uQL/69McG6/5VuoFIb7tDoJKuIHgJ+b0bESkQ
cfT6Jl82eysXhjMnZ6F7wwZy2lSNYsbDXhLfYr3iDL8JKaxCgRloY7rBymehaC3Xi0xIP1E8SVlvzm0u8xKptTm4FFE2gc8QmQt7Pup6jJDpKkgDUCUC6vewEOFL58FV8RMHtrjLj2oaIy0FtIMTvJfaJDi2sGkPw9ZNdoGv4dIHAUN+gmp6VE3IUsrRcwvkbztx3SNwFkzlX9vNYobjpXK0OhmRO5DLhD/0u6+Gr9zxKd/0B9Lj8vDsSwKiGlJ8yXqzQguUhwyMwNvCDt9gGCeBw9RwKPa+n7SRVBq8loisQAw2tTOj1TwLrZfH7ol1YdqKb7p7b4YRLnZJRq0cmNxQ+5ljbLL6OBrxA2AtUmXsaJIs2kB7pB6tQSPgaf+ElVwZUOWWiXfFJof0wv++hYybxNm6B4gIGTvOv/NM8W/K66l5EUAqQMY/P3qtAntEYVzBrHAEWNj6jvPWRwsoZRdKz1qb1H7xc7yLEk9g9imo4R6xVWKrzTqdn9sgu398YvaB+xZ4DoBqxF+OR6yOE9MIAj37Of0VJv655kO0alnx7p4EVL7MZUbwzCe6SzZCsr7PYUMb3qV42ZTa2NevKj+g+ct92XTkJwIonssmxmYkTsp+ZSX0pYnZoPRHgP413RR5mM+jgS7KdaSzcuIoAc8J6FST8iFZ9o/V1dojhXxPRBWqq4j3ewOK02nDTgO6lgwLLWX6h9DVaWTHaFNlVWZ5kRfqgamwdCRfe2GbGVtxziiPINGosSaHZy85scvFO5GUJfcC5xUG3FnatwEyTeiMHlKdBA1PWGnT+H/Josmf2sXqC84A3P6oY5a/2MGhUVkjxkoCBrKWaTv6RrgPIL2xCJtF6PP/Uwg7b1r00tYim5LDhsJFR1tp1hmfUhjYWk1YlB7TrFkMGvib5bPLl7TGlN77q6txfjhknea9Vp3CLJCnRDcLhm0TYsQtzzYzruJlAd7NLYdjbxD4WVxXDpuyFTqqdvmXSdulrAtXFrtuOFC/FGWSEEtWtDHX0QobpNSGa7VYb5kV2c5eSTYc2/YtGkOwPHcB+L5PCi6fpu7QbuIbDpHt+/kABZnaPCrqswXTok3wb4auCov3fJlBYgkVcAbZFi2e//hKoPp79QD1ftry67qB+Fq3Cs7oDrI2/5UV1KWB3rZktqaq4s3ZPt5xb5kWA/MUzcoIY1XGUJ4f/DH96n8qRaKeE7NF5brWtsq8L9mqIFpqYhV/SEKi9lrdlOWQcK1JxPHCx5s6h8STH6IGc+G+PpQzHulGH2r4Fdz29O82t70CdVB1lFeK/Ql9auQB8Peqgoi+Fzt/BTEGLmYIfQc9tFO7JWbfhVWlvRr3xzSKWxsfeFY9YPQxGR+CdG9L/reK1DVIRjZLRzk546zHcF3376ZVEhmioubUrz3FiiTTYfaqmjqL7CfXnWlkPHpKYR0A4qu5kMaOo0Tc0ky9Hjw8ToOxq5ThNzMdbnLJNPYPOARU24FP5H48RStEFbJTQT1Hw88mFOtEsECugLGW7ln28sqYg6XSMgESChfHD2bknUCjuqoQ77DmY0BNhwliM/oxTYmdd1LiOIE+qjlGc2x1JYnxaY9/vmVgyjAEDPh6o9tkgyELnzO55HWEBvkqCsEzO98xsy4KXZxxZmhyl0haRuYj7fCnwMsYgC/dRQtG/+L3FtsIFJkEyhSKEsw/UrESuScy6EhgC4MRA62kRMWCYW+JbpW27a4lMGQ1zBLhtzPHJaJ6IRBrNSXAzS7EK7DYLkj+wWxO9kfcNa42ol2oj8aKCSgAUK0C7uiUdp1zxc9yUMaKnv7rhplWGwxWDj5hlHumxqrrkKHysnFu6vJIa+91RwV5H/6jLZJOr8xwYNaQJ6Ir6MPXconvTt8Z7sFG/R9h0GRt5EhAHdOdmgTfVqx0pZrOB6KR+LKPxj/q4hUhruhLlxLYBmTDxnnNlTaYvHIvcdOZEK+/7vegh4dJEeQFUgZ7LXEy2tv0h9835wlzglclLR49nhFyNLViwixgff53DR4AS+tEANVFEgfRdwftPXdWx1yixxat75vG4fKUd6ZeRnet+of6/StJYFx4wcfRsBZiD9WCmZH5+1bmZN7IVOzMtLxKEBgEvGxp6d1bS1OpuloWTeExpDdHfGCJDLOO1BMkWTC7Mx4HOEptZRqNOMqxuKDaWa0tTytNN6Ih1fRfQyRwSE9tiFtR9HBvz3WL7o4U8M0+TS3TYHmy5MowG3vlZQVtd9+RB3EvlNMco/W+XDyr73tgdi4KtuV4vPQGkEH2yPsGAemt1Glvam5vPzLqAQtyQs0qPPqjzwlT0ntr7KjTtnY1iVQquiPSbT4VYdo/naHgc572APBhYp5KLLk0IT2faZWyzSSH4C9AWRjm4Ps4eijJaHlQOzVhDTWopHvROq6x6w0Vhozqvaex3eHDM8wV0l5LFRUnBiKF5ocLCKIKlhTpQTwrqkSBe150GaeDdQZj8e2HWZ/22aho7yyg+3Bdji8GRwj8hTRurQ3dyOBT5HcjEmNX5zaM1Zo9HKk+hMWFP+GcDgvyuJZzgiuKB70ES5jhSkN18wjsiulPOAo2OQ0esOst3zRnIt5pe0YDtXFyHKEmJKoP+O57sWwkuGAgm9doTcQjS1LXYZYOzDk/DwL5M1rC16DCV9Lge5fR3EENPMQX6E0RHs+aT1IUGtTvTQ3YadxfayNW0u3TshUoY97WWBGA9FxcUPju8X4V9k6Rlc+ZU27Ym4KX8WlqW6j7bvBvLEFGqyJGmKxmZxRrhuBgrxRElAQxGRuwMbU+ktag0GD/GFoImcPe4NOiHKBhRFVMScXiBvEbZOk3j3346pHki/u9IUoiTdS20x53n9NlX8zybKSyoO9RaSIDWgH3AXUScdufjRr8X6AfZjXdFGwW90eEDdlKvjyYOcqhj97TlqywMmFiL0bF9/5QRy1boUuED+cRTJvyjWrnzdsTKYReV10ASt/r0pgwKpVRM2V2AGu+eEORzkkZY2CTq6TDJMmgAcJyjudu5NfzPn4AeiNtK8h+z2uQ9465NVj6Q4vYV2Ua1QHi3MBHsn0v+SAQjOQcRT20EpxscSbSDUoiokpL6niAe8Od0+rbKR2FWa9pABFoOVRk+H3BPt+6Dy2pgrecbOUZkw1Vl/IkyhM97Hi+B6USvfyz5NlGlF2e/HaWWzEhUDRfDixmdhWXKdyuLAoFO1H7ZvgCJ3QHyVNZKhC1yR8OJtAA82rVNllFTVFIrUeoOaxG2JHiaNcauNd8l3AaEy7P/0SjfjUCOh/EF1mYXR0Hk2JI5cJLWTwOfadMomnYvoslnKp3VODInDpsgMY4wdJtqE74ukSCOSLkbErWTHH3gNANxxIQYijNpRtGGAy4RIq8o3tOBIYzqd3P77LSFbKFW9lIkQc5euxrNdfK/bZv3V6qcRXfdLSjNFDvSLkQ4eWPFfISKozCRFoCZOjXs6drLy6JeYTfZZvZ/ekV0YuAjPcw2Kf5QiYVOqUYCL31mkSJtdmu6UP0BKL/Gc+dcY7/Hn8x46J7HsRZSvyyxQ+aTxZk7/tEP1Hu2CzZmt0dt+NYlkiFCU6GikQwRGMhj1vGNGGTQNZdBmi5SD15ZsqJYL3T5bM9QH1g2cH2D88fo5xHT/iz9UGeuctbb+eJliat0nRLj//hDXxlv4yBfgiIbwGfciei35mr8aR4JER3Msk/1ADiYMvtGTqAoUufWd3mAYYMFezVSQru0yvUpOTwzLrpwJfuLGue8ouDm4u3/vSmcdBsq1bK5oHpXCgre/6J9Djh4uvDzJoc9sXS27ilucxf2YfC6fTsAHeP/9fmAImNZEvMi4Jc3N3msHo51E+7GrcANxolcxTeiz/XdUI8D6XJ7ZrXenVqvMYMqPOYi4JqE/CzB7mw4g1lzDPfTLAbII85OLUf3W9qamspNkCmBE6YZow73PSfLRpgOmcaa95RQb5om9VCi+2KHH3/JgfjfCtquk7bteoZ6R71sOH5PqdMumk/ZryjT5AeHqOGhD0hpGiSSN4mN/MYuoA+EdCBnkyqnHpRl1X5eDeCLfkMN9bJ4FdIhZPOdjUryPLM/GnrGDsJhipZu8lD
Dd2HpiSvGgOCEteU3Nij+1v7fneLxteFG4H6hNOQ4KRU0U3b710IjTKOi4fJtrn8nRfo2NcfNYm+wcaOKNZFL9rJJNLknU4rdwnlbihWzMIuv+kxje94/GHtqKYhAjxJQ9bfiL5pV1ppjBdud6ka3yx7qSQAwezEe0sPhF9xXIe5ho7tkyESxcMFrCtM2sxc8muXKzBJdwbSu27Gec+htQzkLXjJ5Z4CobWR95yqMCKVxv4wMP31B//do1KyM7goPo/jIbcLweRPrO8a2TJdZZc3ZFqlbffWUasN3Lud1HwJRocnLRdnuOSO63XLjh5mN9DgVuLUANFPdgk1tsKfWS4dIID0yjPyEN64azfhvJiwVhq3sZdhzN8QlFP7rg/NAq4inH3ea079OTEK9TB3TNTaKYDKn9pi36C023p6tMAehkX//hb6WHD7OYfovkkpzy+jFskFRJPxjB5cxhv1vmEDkaVk9ch/QxGOJEXqTI6BeBIcVVYjkz2+/rJOlfCFQgspIveRNP7K2+XEHExzmB9wj3ivh9mAyPesZUSm+UzdClPTxnu0oEMVS7KXSQxF2wVQQa4hMGpPxfnY/fcqVGdDUijOsN7EzVWu5VnkGub8Cppg1DnjZ2TX8qUAHNJiUsAD12rg349+Rh52uuqfpopJgHCN9Wp719xGTIs9QilyVk8IwfqSegb4yhd8c6N9vhT9HKB5pqqd3xBsT/DdNU6hpZ5wgTt1Zt8yprbCVzC48S5+wVnjKBFDoCCUPdlTpId6lxgnMIiBcm3alihrwOHxbSxoR2frNHBV3Y619kT7rHDeGv+Oiau/N5BurTR4fjuyrpwaXNMDw+ZlZ4iIKW64RvQm51Oog01SGJGOFvLQg0F373o6tb4iRc4P8LLbHodHlVOFjA+dMRTYL1ks/tI9LRzLsCAA0sBLW9HWV6XlOh4/UKjbufquqB6K94Hmz1qjrBHsse3h4lzLcu5hX01Ucf12LNqTOuBAyFyJ7vuU38lbpmiTYZSzrRYIBfB1hrvZSFcheMm69RGXRijlpqx/urDhQDUTKIKEn2R291cG4ahBeeYbOH1OCKdtZ52kFxsA9mYFzsoMv3kuBVDu9NNrbm4xQhgekgPESLjKGXIV6K8exWg5RpoQhY2kd2PMrIMe3SMxZtyM/VzCfg98XqFqVkmAIc2GOQvpLWBBYLX1aXDBlRW9RSyAXAFjyX88AnCdO8zmDtm3L1cp62kxUikXsA5Q1rzefOf1Vl7Ph99qcNneeGXpZ+TZ8v78OixHNhh2fT/jy9yAz1DfNMYpI3mPMhbZj9Uhb69QqPfXTAHUJRD+nMaZyyhI+399O1RrGgaYSyCteXFQbav5loP/JKepwmVTmxuFObP4CghHSh3l33TeImHaJd6umWRvINovUfTrnLwU1thUqkudhEe4vfj8yogJSHglXQ/OXs3NErvWNBRZdMKNMBRUKGaCs8Ep0yscKIAO/nvz0ne2yCX8VjGSniG46KAO2zN2TEcxj3jRHArr8G7NeMozRyvQR3DGfaF8RRst9RROAFHo7BB/+F+3JrzQHBeeKF/jL3kQjh52MTIw/dOwEMu/bj4dwQ7MBngxG3S3AJfqcipaLRe3muNNw+1wgd5IAAao/pf9fG9VzSerOx7KY/WL0o5Owq6FG+Nc0mBiuK3l6AS/hTOoqZpqAn5zIcsn3mls4auFwKIEEyUPTTd1erOEb0amqd1P+EdZc+OAe6G/wuTfiWQ+POSFW8CHQ1O8zOBfdhbQCOervtCr+eChyL+Rzk7I55b9Em/uWQWsYWxBYSPHo9JSgVcv1h3S1yuW3Aszt1AKqb1AAcY8ZWadzOe05+sOw5/NHTHV6VIkiu8BSNIHhONkqsedskSHsfiYSGJC4/ffzVOeA3ZPLdrd7IhIyh6xJFv/UNZG6cDw/M+YtqUjfz21KKqe7PpIjl0hnqMmwIUK5m3shmrKmDiRTMFX7alXKta5sWt00Y6b2XCZKFonIawpTlZVXTj8AkweTuovAp42oLyUKwmEOXljviG5xDMSd33GG0Td8PIrG5UtAWB45sLblszA0Lp5hIF93ZdfOAzQWcZDFSNKY8h4SxCzZ/aJ2p6vUTULOAX6sI5XGRwNo2uiGCWVKt/zxK5M3qxhQWY3KePW/q1uHoF9X/XsupacJsK0lKy4aY+Hm7gs5eVr/hHJ9p0GuARp5jjQKv9IsvQLj0Wa91ZurUY8DIryUOIJwb3W2ffVQJGepfvkklfxDSsxLZ3gJ/2tQqUJVPjXpyZaIBngX6p5e445+35I/C/M3HZ88OU7GafgtD+j4hzZXQdgs8NFXEXLOYMobFb+TnqsV2CNuLSgkYwjdu2+ekpTK38oRC3+9+l6B0Ef4iujOpwD71mp1ITPzkVqiJDgzk6etBM01jZXiqz/PNRqXZN238YfKRCOaMC8+YVi7Lt+LiWUe4g5skhhlkthN9aCIEVSQS2MJ08r6ZYITXHHniZgAbOpzxLZkvlVRcXQE4GQtH70t4Ihoslf/SHLf38GtZsiiw1C2/+8oGWHi/hSC3NOnv+a7ssSYLWNffaxDizDDJMjSXbmlA+uvQ8+/HuRBPhpVrwePfAvSw2fggNsV8MRp58pXOqLWv+NbMVUQJwv7veWU3CW5byRU3sIT/azSy29VJy7si/n5vqEnvQmjaGT5mB51+PBFNAuloR9DHa0K8FdksdGSk+RMGJfJTAPjTucrHCQcrXxNyAY5QQiLlSt6QfNQGQGRByi+cj5I1vYbYOCVk1wq1e3Xbg/aZ4W2kkeMIm7RHk7I8CgVZF4o4Ss2K8BwcCjO9Rd89rvaoIICqzCX+AVvIZtvXjdm2EjHf9FeGb4+WqT2abhR/zFUUuSq4+q55mdzWOr5FLeqGT189XmccuLHhRPxGN/3qxEHNOUNdHEtvB+A4hUgSzhKiE8G3i3VYCe+EevT9Pl2V+KpXrh2kd2p/Xljn9jBMQ/XZc8veSGjxWrOL0sgjtnz3zn5f9mfdAa20h8PrPfqBjGA/anpL7KYjXs4tyv54R5n/of0OosG+ur4w6avAC9cr7cZfzCQiUL8J02T2hKIRodBpPQlQaO/mYGFVTMua7Nhfu6NRZHJ9Qdo+1oII6cjt4yIcJ5bxJu0FtOvZ0T2NrgBURwS1R/j9LqBaljE4kgiUCUqu0OwsE0r6iVuTq6ZqoZ4LbTvrSHTENFAOAVlxXcmju+RxAoYrJkKpT6l2b/uuuvWd11cjwln7oq6uF1Vx3VGFBk+cfmojP16oPVW73PSn+5ywcdHpxbGJ74NYRreSMqMxAaSE0jg3lY2eDdIACzDXRXAtW8vb/Yu2xui/4/bM17Nz+AIaCu2Rx5gD/WJGMoKqbj/iqHGG3E6YOI+vH7fY4DwER6LtXaNvQ/O4BJihz1L3Mwly7JSHSAifo/6IeYnVjpSYOQK4Um2uzvzMzDXZBKEMjLm3sJ3CdJ4F3Fn+3DkuP885tZO3oC21EfyYFxcmK2k0WSTjTVk1WK6mosX9c/AhRlzVcy0eIVcUC3VgdKnRzF2mcPO+NxeJNZJrlAAc92SWLAvNNboksSXgx4RwJVpJz590JGEe9yV6r4O8U7TGcXIdp+e8WbWrIswOYT+OcLm7IkcmwAytD6I7BsUWKI1JjC/Ca+VXK3KoXUSXrnhiSBWAFI+KhKctmUul7mp4v/BAepIS5yUYNJtkECnaU6owuKz1NfjHdDQ/yyPGg/7DGZQ854/yMcvAV+gbRYfmHhMPyKu+WeGaOJLo17UYn1qmJEnNHWQkAboyBjO3WzQ1ZX0F6j7lWHb4KoMu40C2QVr2PcB8TzBZ03A5aa97wkdHlzY4pN86XpLvkoD8RjH9kZVYdptfbDOuqNt8XHacYaqr2/qXK1ei/76Aj+aJAliRGbo84efrhiHbVc6mBhE9/qcDmGE/iKSawKkFVfNjbUMW4mugmW7/Ly0QpUBvrxNaJr/n11HrOAkiSBaSxTogBx42v7j3MbE9P4kOaOvYtoHN5lGcqMqFAVfpjiF7/pRaVoPMpVUn7VFHKFazDGl6pWllIYKPEbt2GZDb5zOsir7ZC0bQtn2JinBsV8SiLV
ixZ+yOEMdmaRoELOqqLF8tHxVjifTjh8O4/opJ7Kp7l1lcyLYxV8o4oMghipJgmxySL04uokuvymBCK50hCAAYh0HrqeCAt5ZWBkKXOCq6Ut9ekNbXhtp/I3tm/pnWwHuZ+u0AJclubJ7DP5zILAy5125p9RmaIfwt09geM+/L61bzCG70oXhivbLKJ/oKqxcTqY5qixpVBNS+XQKzc7Pkmx/udRUVp8eHu2yIMzqVi0xe3MIOpII6GqS4XVTGvhD4J7u8JG57CRMPNXLQnrNbuji/HO5iL/7VMysnmiV6UW+XBjbub2iFgYxdyWe3RiGDbR3ZD1XvPO5+BFpy5QeghyRWCmcJ/l5jpq0SC3FR0LeJqCFaw0pbFBF7TEBVgoaaWdQ96UI1KMeedb4ahCaIDCWNqUWFL7UAoQEna+Zm3XvXytDwtrWGPRivWZ6ezHhMSLutEfU66EMH4xqqPnGqjDQ1EA0YFg72QXsH0JpC0oLmfl3LwsuOo+hBPfZxEKnElvU+hKC346X2gFK7RAHXNoJfQrqJztFSM5C3xe1MF1GxEY2cpjAKjbpRXAFO0NWHMFpYoed1INqsWcS7GljJxyyOA7kiED+qthdOMbcifh75V7vnWP3R/cr8jdyTKA8adMtLzdNYkm73PQuR+m4ujvPr57SP06CSjW3URrH6OUfPFJsjA37oXTW9mct3opf6nxIupvXrcmpKsHGS8C+MPhSQ97im444yMwFOU+z1JQE5KpShkcWclNIkdFArQO+ez+Vc5RU6Bp895TYUQ04O5+yLyK/N2DPS1NYmflZete6mbkww1y04GO8t/drHWuAL0w5wczseb3fU9Fw3T9VlgADl/5FmhueAev3PtRUv9Xpgh35Oo8B+M3j2Z8sYao8qOJnsNsNnUbduts19nRW6y0n/MdQJW2/bbDs4db1gfu7R4APaZiMvtUULqcPR1CvJdlhIpE/WQ8/MbTuDMVE4ulpp94l9GFSvc1SrLlnOHJ54SMctkWrpBtzyMXKN6ZnenaNZdR85k1f+DDT1L+1nQlxhS1szY7Tie3nRoxlpBZuXrTKucsQFv+z4BaZ0DQrs460NIBdF2Q70l/owVt1F6J6OLtYRPK3jKPPvoUbZGmLmoogrGeI8S19JEDE/EqdEvITNpYrw0HnJ9Dmp5mByll2WvXLnBf0vecEleR5h5yRdPc++ikfLMyCLolTgtPxoTYAhXpPCYXLqwH0EnAAMLKXnaUPmx1r5IE10Ncg9dgM4QwSWoPj4PQnE6I3XYKfoF3LXing/yzXGC3hI8sfaoGvrczj6dDj2ke6p6KNO2jjv2LBgHeEvWmwjDR+nEKVzaoAu1WhYOxqfyos2M0aNoKxzmooUpk/XNZffWX6SN7yHVFyxoNUL+nuzpvrAtZVGXjuNkpy05WqVOLMAvfqYCNFpjaLj28oT0BcIiGInw9pHMRIJYGChWGMJYoS2/pN0vYpAZN6BC2WkCb+H5OWzwEVHN7BTV2TNgZkyI1G7/M94lQG6SAl8PzYZ4tVt1n2RRXQYVHi+LuRHV+28xJLLdUJZQeYjS9/k0fRipONyHnPL4tTzJMfBFHtfhD6xbLMePFNtuMnAvtl8FPMeeOlFK8Bb/4gQnmh/M8mU9B2aVfVK/bdZVS5i0hkemZsvkOfsfaBeX8rJ+BAEANomrilzZB/HF3EWfdFtV8etS5iE57IqRZdSdZD6wurvbbc+RR3cLS9lBsMwfwmx63rA0dWUmepr5+MjbAhaSiq1ddxXiTOUvFvMm6US34OqSDJmF+BfNXEpu2l+j13gWX9/tPismP6sNlRLIx4UyjEjrT6vVZtj9qglR9yzmN5AqA8UIWfbHlYxURS8u2x06qryXFIiLicc+hUUy6b39+k7Tz6yBYY9VoBnhCVq1/0eeyvc28F0fJw8WctdorXmcYy4nNbNj+qWvDvrbvvwBaBT1JoiymsnqbKcH9X5Pm0hnUkl/yP4TqydQOy7gnnT2bvtxrQ3WqyPQ5tIuOKhf5iOjN3ptjQWmZ9NGi6pXqv4WkTkswNoWsmYPNBoROgAvq0OjzKYLCFEoHqH1Tw8RD70akl4Nwk9undpTWgDXPoPIwvPj3jj41C7FhO4nIYgoCB4LtfcCVER3aQKKEcBgQs+O1acmsA3EAkIj2xKFcDoK3dGO2q2PHajKZmgB/3waKU/61j2DcFDh4UDokpDqVWk9ZG96taT2A2KHwVk8ZmLrG8U/i/9kj5s8KQ3XH+Hznp/1XadTawqBII2yPzUgErV3gG6mrAfO+vr4b0KB7znpzALXVHBJlkSDrN32ja0SK0wHJPwFd0Nmodto9D7hQuzB0eMda8Ja7DiMUDAQFjQo5PzjSDBWI2Syf8vMRCxWnx5UfkbFAZEXwkwoEwo+tC8fcwOOkDNKuJ26Q7+EqAZKJL3F8SeUOvVitHs1NlOd2DmC2wMT2nfa9QujMKDwk38u+kC+qV+5BK2DeLidfBpJhmaqdUDmBNuOhxSfKIxzV5cftlpJVnQ2iHRKBo+TT1ry5wpilpKP0YhZXbo2PoRQf0t2g5oSfZGB9qD4Y9RX5yEIXxlZYtj4PKrWuJuTZEkRcWjcwAOvt+3HdeDfSUSz/uvkwFnShEi/DkVuhJBngYXtrrrS5CuPe5312hsOUxLNq51J/IV+0itY+wrtd3nYC5JbBA5HwpPpkPbCK0+h/k8FujFuoPFVgeCXLex8NEAJA3IuGwREME2kd0VhUHR5wA2KtswCn2FobTVdbOGt4vsXxd+bdZpFdB5kAQ3D74ASEo/oP35IlAw7/gjlTCBqf5BUM0KUyjaMh3I3GUrxZ4NRHKchRhPD+sZAySk7iFRCaI9t6hEUCKwQr9I1RqWaI/p7HRUsQDFr2YOYaghrhQM8IEcf01ROqzvYQSxF21ZpZLvdLZe18jp6hVI+wPRNi7uvMkox3Ss051UFllScq/ogULDMfnSxmiSyn2CXb1/8mKKLvxKa+yxcwDUSCtuzp3hyXHh0IS/PbbE3/xRuHk9wY50WFxmBKbz75TlemQpvzIh7O115W/w7OnOJ0/EQ3Mo5s1eksryTIP9lVk63OZJE3r7hq83/cju6seBvDjxm/tmFaD9cQpTQuBNFol0YfR6/zQ45k2Li14QJ+3GCHuL4fNL49x/acx8LNJne2ydmJw3sS8kKGk2efIN6167Cvxecvl8AeqdgGL55Czq8/DQhIOzMCR09XJjz9D1/dkUxA7YGp0O7BFm7uFyT0Y+2mE1TI2rP5FbxeLFb+12ZVSaFoIqbS/QWT8VsIB5mF93L9cG/KE5D2BoUcaUxSMHnBmV+/OOWl24Zzre6B6xgCooophMFpqsvZMgLCbc0fldLTWyIBtlRZ1sSDoOM9WgBKuMFputrAgvOocobHTWl4gD5V8Q025RFFIzjMqIdIeNq2lXWKuacGAQbs1fbAtl2Mb0ZJgtS5OjLzIyR3yvs9RQ7lJ0R88iTc1dA9+u1ke/5wfRVAB5cw9sh0GBs6y/vtEtGgD/hnmCdetR0R5RnzZhvbxRUkeVyrZBpF+aL08w6pFAHnB0yJDChkhaXaZQo6ouTS4ovVNhLNDK3T9PYFXtAFwpl6yCWIcqb0LSiBy1K9BI9tAtQEvZ9ocDHZnJiI7+wCKlVrNeMeA3BJBxqcxUdxsllsT+eNddHAWh/zbqDK4H0fN8Alk6T8Wksc/tndZA0ibowLnhK9UIj+m2pVO2fsJuGWNYgGQfzE7KFBbC5QNQy7/nW1YPSqzOxBKl8fox0+uPy4IKa2vrPZRsiCduZNdSZRUWXR5FBL1vqlbu/Ldnd2lWMaEAbT5VWDc2gJMD58TUhTGWOdIKcqzmtfSYQDQLVplNBTXBahqo+96Z/6igcjPAv71QPXWFRJj5O/+Pb1qpLcJ7lzcOszwYVV4Fh+xpmmtjgu+mpDQRNEOxqj3EQTAkjABhP50eEWgs1bFEJe4IPiwXxzV4wluiNkaJ6h9aOmgITyeNZkWslYGIkT7ocLrxX/1+IVEehP7j1ABogLoSl9YGjI5ww2zUHl5M4LPQqJEgR6CkixgCzVZ2VfWgkGlvCtMsULmGpS4NV/Bx5F
NVJBw4IoXCh9Dx3/PTJNiK044v0B5cT68ke/YARolsWLSmGpdX4m7+rSbu8uYLJB3JJ3u92Yczba8165pQEXRnCbcxlU+snWTcH57t21pKOykf56flKDHicepW9fMfVbOlvsun6iOjOQjkdJir/k5AA6bRFng87J08Lcdp42vOiGYPgKvnZPff/mOAPAXQ1wBHEEgRDaHLJgADn9D9QqN7v9E9Ua47IpG86i8/3/e2RgJasZ7a0ay86RhyBKRGJ4wd00EA6ZODO/zGtsORBcZtUIwi8sFOAudPEx/DX0re14J0eEIWWRXVmgfb07B/4tH17YQ9ZRdvvBzCfCc8dTQJpaNQYTCo+ruErrCJsKxx+NJ7c8kGIgUxMpzfYbHRfsTOFzeARfSMt7+X7Seo+g3yPbrDXJHgbzLNnO+D6YFsJYo5YUQjCKdVI8E42GsQzJWorWilC34dv88/NEFIuiJqtrWb5Wt84TENceUN2mqndinzbQtVB1iDWMSASVoF0qfw7ZDlnjdcZP5e49ppVx3/m+/FePtX0bvXloT9C2hTjE80JSVuouHW7uJ9m5kcpZ8YjPy9GEgtrbm/UOYzT/sJrirohhJamXEIl1oszteXrcXtRrSRH9Vhw/E+gCo/1PKdfQIibZBUv/Pl1g83lGvT2+dZz+0+njvdl4i12J/U2d02Ir35jDjpMbumyr0db1docVo5IwI7XGVopkZiGckhGpoZHB2CnUlgExpYIasqCYHwTCqp6/xw/p9nsBHrVdIJpU5QqW0Akto86qo97eoQKglF2ZfKJDxUJpsiszLubYnAvtAqSY1eMnDhN+CIJe/xSwvnREAkRMpgcaohRCAmAxsXy2kZAFzhRr4hs4lfM+yqqnU4hpSyLtQKv5wxhRUdMW84DRIF0GUHsfK/X6vpO+nO3FGp3t72IxOk0oPTJCH4aCcqDeWOxnL4MQr28aPO77J3YM1K/bHE9vyhGeRAQiK4+PAk//sxTp6k5KCTc2o3esjiwLPsNPmgxUAa6u8x3pRExSKfRS2iA3BIVJMpLcp0QsqaBGbaRYGyzm9DjJf5Wgi+5d6IPULOL59J4xTVcyCNKv9rJQFu7SGGiYm9TaGetgNykGV1pmvk8dGiZimLhFixucgnyOsBNztNAzngRKEuIGFGF4rysEgWkU5K27/VSxOcTI6Zd0szGzH6vN/WepaTKBjT5BauTZY7+nP/CA65qFrIqAhTaLlAYjL5iwnXA5eLvfg4gbbammSXxuv1E0DN4VxTlqzUlrI/rIAI5ZY9aryx1/gNrIAlseNXFnon3Bn1pOHS+4nDXL3rf/149WJxrVZBaiUm1v9VgT0dquJBI5ndM+5vdk36UiBttiAngF1/GefZnvNuszL6+HzZT7YanpRc28ejPXQ7epTASZjyQ8m1MWYkpBShTP9NDkAEMGeUqJnTaZD7OS53Zwvt4Ix9ljZqowyHd3OSvf5EzHLg0h0nsyRCK5vwMU581AxhJIkXHCGYdmkQ+hN3Nb/7CrT70ku4F1mEKxUZZMiU9JzKtJe12oBkhmw9F+n1U5GumYvEyA5l2j1bBJjO+84xr1LlApEnieW31uRzwhTvkk0ARupuBSiRhFqzCxEJknSXrK12xe31kAFBVP1obUq4F+iw/8M5qMuq5Gw8x4magGALctVRk196RVKPc02YyDagkacSRh30ek2A9du7D4HzIubKfSnNmLDUQ0X5yQ2jxv/+rz7awYUNXlyZgsEeXpfbuHV5l1SxHbpKk9hfwNcQGnVqiErNQ7/0OAf4/QsSti+t5cDd+mInPXD3WmvjLPV7/TjgOAZD7doLmVkaR5VDFxrJbrnasUQIzGu7VGvJyJZs3YPH5HTkkjEQHbjZmPNC2eOi2BiDLlqG9t8tkrNOhwyhzWsmd/3yKM9aeOC/Z80RPz3JNwymwTJvX+bQmhUoQaM63qdxuOfrQ3Mlq/e9nMA/9ayJlgeSNxJh+95R3wh2+78J0dXtKfiiV07vlSvSO9gzQobsX91BPu1tChgnh+rBfwAwIKF6rqV0jtz5FItXaBdIe03XzQ6yqkc9D1FPCn7xSkAwXEkfxUtagNpS51MLWLHK8y/vFvCb1s9KEVZ17HbBxxgrZ00N4njDvfUJ6Qj5HrF4lSpT/Qwad3ZqPG0478464Uq3nemLc1LrW8b8Azul31eVGe9jFAaRTf40vVVA4kXpAIR9U0boF6FU4HwEx1AXhZxAINUfZz/i648xeUc0an0XiQUpzs9Ypqw91OqZC9Dpp01KTGWGdnBI1pTUg8tGnxPGO85DEm+qIIBPbn4xmBCSsvhjKOl+DmpyPepwZqpfUoME1RSbbBG+cHOQSvAW65eDRsvOjcadErRm3f2TaZGX5KRSATW0gLjWXWlNzQAWqse/ceV0raf2QPJJsCZVdDemBuFoZ+0oXBDmF7ytDz7ni/zexXYfZTSUbXeIIJX4Gp9G4rnBeyzpFdyE12YUaj3LEsFtal+NAAMosfWD36BK//rwCUIdEJU8y9RjMjA4X0r2LiA0mPgeA8+RBMtfgQ2YYwN0VUPgnUMlwIq+y/RBgBu+6uasIV9uiu0qva88XWLb7q8EQGX4auO9j5UZSF2oTM2TgPK+TpbaHjpctcmbmC8GE3J742T0TFpLAvINmVMNl85EBrQUMT6bUKn0JSfai6X9GvcMW+Ca7g/yf+ZOCa5UU6Qv9FmGNBYscffuAXzGuFFp40kEKBci9VmWqfGobVhQu8+HErrnoRk7/p37n5EfMzWTZB+Xc6IUrwVwy86P7aNQb1qnxfInZZRGwF2siWij9uAdpmejdernqm9Q0liYqPkS6iLgZs2YJ8FKEHDDUeWFRZs2aL5y6WeNENKAWAhTyhau924riLNX79TpT6RNHzBus4MqxG3R1+g9Ph8AscfwwSQ5wh6h1EjSjARB0w0qR4jBDqX1ylt6XH80/UeHegRbKxdBiVIbbp0yEzNvKhwcp3F35YuTPL488ZCHH6E7G/u5LIZEuuu/ZPspIt5RVY2bIqRcMtI69HBfFZoB5Ia7WdSh/lD10IMtJMhcjRnxWUyPtrwE5zfqruaQrKzgA5WgK3XrogmtgtjxxhKVQfOsMw0gxc3zcRSzi1ID1R/JNmkvIILpK+zmnaBAxhYUdZr8dVvqHuj5b1o558R9bEXZ7RXu4otmTPoOqN0euhm+nU4tRl3tMGTu4zUck4LU98DS5H/Owm7iBxy2zy+kuPWcHlP9j/ZpIUIKM1vHo245u0m5vd3Pzopv/T5tvVO0U2D3uTGbgM6xwGl3U4VTrljkaWCvru3ujYmozEeaTc0NHAQ7B3fHD8r/WFbqMlkFlNV4HUs7OSppN5z9mYCQML2Q+KrPu5yUekv3/1v7A5cCZxMP1suLzs0vvYrzvNTljXErT7j/bvXaUSmomyac+jJlJbc634G3Lhb231Xv8YE+AbbDV6T8D6LH2/SeqLPRxO4K9jyweNbGEo9gM6XgJnUGKL2xkiITfr2iCe85EBPASdir3hvB60LQAot5VWUR5cAzRH7J8TMi+ZeilQZdkmCPO9MskNc0TfMNy+4z3oj//xl9TFgLjjxlSsi2Ae8Bq8ibVqge1HdVr9SyZmalWbgZjMVpA8pRC2lbUmZvJOMMOB12iNuySEW7oZgo2hY97eAl+WZ5APrh69BFsdenEhukTObrKaLjvTYMjLyno4swZ7pGNDf+LT/+c/z3Nf9m1cHuu/YtvDiegenNcdkhoPhA3wPjkXvvX6p9n0zwvSNQmulsnJWzGKRK/vRURIQLVvxEWT6YLx7Fu1a6yZVl3FqWJ9zbYEcId2Tn4xzsETWtazPNUHEd4iibGq6eUClVDgurFIPttVzFhoSxbN3EArlzd1pnUJVzCciGvDeycpagQFu6H7JonNDz/MdkzxTYXOlYz8MEYDC5EX8VJ0uLSxO1RRbo099floX3BkJVY5XDBU4oAgrXcSKDruf5uH3fzpKbwiLUyqRZuWqGGh1095zQXsSbs4XFeiQAqtRLoYstRU11B0OfphOva+9YYVGmpEEX4ASDZbBWCrSUzj+s/UV8LJhoTcw4vzP1ACkDGZpMdH
nBQVIHaDJaLcwebb5hW2JEcP22cKqz6+4Z4Yja82cwFcl34IA0cJQP1KC5PWNJXt4llT0o8fFDEfl68NksE6lrSTX9hVed00OzVEySE+4zsMnoaPCmxarZ0qYeD5iYqCutuuRZH4i8U+1To0coDYLL2nf3FydzrM6vvkF3stfcyJ8PItL2LZbFtSLVbcfQzx9uPVdEx8D0OmWzFfsEzSCmtuEMDy7VI4+MZ2FseFDTrkNP7Td9cmBdXit/fI3ZQjqSTDEuKezbeBAFbZjZqqERFwwoL6pUkqI5dTGTcA5yQl+hKOfpte5ZWv3p5FSLl87Z0/H5hJFdgG+ZVBANgCNNhL8Vie2F0dipw0atd9AWVHm6s2r2w/K0kmEdl0sFw5dgaQGz0CiG3Oh6Hml30favL7QCAjqXK9pq314sJwXtR0I+Zdz3oQcTtM3RMy5uXzrMX9T1ULPaCBPtEU9OZZNaOfW0pR6Mz+h1FMkjLNv5XcVBf/HaRmv60Uhfe3zJiIzeu4i6/zWuS79K8uoZAeCsaAAGRX9Rd5n7xojJ6qMi6kfI9gE0kap2h1vJrALALmTMe8TCk/mezqmNvtaapGCThAjtoKtmB4gq9IvY7o6dFk2oAGw/MWDN4R0MTo6HlzDRQ0Mb6FiT+Agqq0b26CBHiTkyhSP8c+sPCtVumw+mb2WlfIm74tUG9AV8u/cXEwDDaTXATq03M9Q+7L1mzjCREXTXFDmIXQ8R0betmtSwIkAXsDNkp2jbXVKWtQ8WdBoKGahlAIW7nNq5W9oxSduOYUEanual32Ndd6g7OqUakkBAJhtX0wAtQL3CzksetaXONRxXWkYaUB5QG6GPsSZ9l4cdoBePC7r5ZO5qRkXihvWfiIIFFTc8SlVQOg0x+XdT9CJWkEHDN7Qsg9r/gBgw4MA6euMbDVZ4RwkuOn/Yx0Otrwipl6cmn/jXLNhwf465NZ3wOWCx4DRsJcJk8N/np5Ke9qwzkSykQhqzXetT4OmkqlmY+KUs20+SMF7Ydl2cBovk8TJ1gvDf+05/IsgA9OwNajA3DIVvLrVs18tQrpI/IGyYMxF82TquFZ89EDX6kHF5dYn8HCwfJ+YaUlupxCQwltSwK2ljZNVjMY03ZX8/dBZ+TX/3PlieD/+pdv9VFmIgsVi1dXnJmvTrbr39KyYu4DDHS4iuPaWJEUWmHQQNXw/Fu3iR3FpLIaCIcD0QikesmdqeEr4Gbe75i9FoJc6ElBMBUypUgrNY+rJDG6cNJb28w1qxmzmwvQDle3bATDMdOxrG6ZsG655wfJpXYGT0CDDoH0o8SkspS30DSNwR501lQJ59FtMgIwXvY/BPbxRaUO4eBoTZxLpSKVRASj7ulnLq2WuRH8YNBIc5QWQ6MIYU4NFbudUKnsgdh18M738iDAnWwzK5ILsJwfJicN7YspgAWw0CS26pzK+gfsDj5wcccEPb25v0zHrTf8LsN8aDuPQAufJHEaMT2Gk4WCfA9lbWag7spCuyT0EFAouSXj+dxz//MrX18y4LtHtbDyd5rFG3DWafOcjPMpTlkJr99O/x0t5iIY590JEnhV2YV1iAjUddfxT5MrHa3ZTMZiIsxwsyjo3c6nXLJMsw4n1CQS4l+az2FhItIKJZXNgaelyK9UGs2FJ/4zKdAFnngcI+ceGjW0vYcVtXJc7x3ceODYWIh82U32SbEdhWC3ORjm/nst8Knb+dp0NBDMhNF8RxBE+0W0lOoImR7Mm3j6gwfJQtWmeQIyQvUFiaYwm5fymfFhwUFoI0lUBFDT7co38z2e06Yx7ha1sSN10Aby2VL95++x9M/9nI5E548c49eu3VrRI8+RoEMSKBm6NP0obBI03XzRpDgCqa/MpmyjZCqxFXqZmzuI0uGCO04dlFOHKD3oZMmjBvCwBx924LpW2E8p9KZYIz815FW/KpyTmcrQtUb28y5ab6JmRwAXMwzoaWMqHBpTrjbMQC74GgC2vEag7iaW5kCpw3R2/2SBB9D0kYPAix57nUxh0+8m0kTEWJZbiNv1KsoOkWwk0Z8YFFfzmjtbf/cMcQr/AczSxX08/NJ2qfsaKLOce1sDFT7H3E3w6b2X+hkJBBx2musyip9X/AoR4ZSxtu7kbpR4u54fCg4Zqld3lLG7UY5hCqN0YInFle0f1IebgVn0T6/RID66+/Lj2Wti8QEZ7Xf8YsTO1fcdLdIFvHa0tfRKR/UfQkL3aBMea+Z+IWKE5ahTtbijyU3cgvGVkuyOzKC0LKiiy5+rSuCWn8A+wibn4ntOAOcZuzUVjVB0K6e/y4g0GBbaFlV91tnAjlbKbAC1bLrNI8vYzdPg7IUgawYEPD+nsyrjIdClTIQGqB4UXyHLC3OmAcIpC4798e8UUll1+JEirsUCpmXQRqDTT5cqkvhYLyQ3DvcPT39fhgAaVyMqOPCkQPf7+S+PdovFH1HV1ReHunCeGANQLT3mKHSenXEmUg0ZX8CUHGwVossuEKO11RymxCDEji+UJip3FlEkGMSkzSp/HdeVtIJi+TBIDzwwgVg1L9vKr6yy7P+YEk+gwrcoZrGNh3Vta1ltwD2+8WEouNFI8znGsGH6V1tm0SwVU/N+6UJlCuyrW1OC1sVIcxQQSQrVfYQId/N4dfmWodQcaHnFW9U430NhtXNj27FR50v7m/fq4ouyQzGCh72dYxuCbcnl3EnWzNFvMHyc5hwA8si3mIzKdqCy84k7aEumGaGwGkrR5xsy9BRijF879sXGp3Qiw7atPwj7vbjdqUDy0r4WQeqCiyKshabGoeVrnLISUQd/UDSQCifhbb1qoWcBDHukWtcSpneffhMLTgvbi+pA86x/1SjqJ2hWepyszSE6EGoOzm5MoobP2Kpkw9mSwJqDhGx/hjasILQqp9lK/cccJBGXKChiGAU0Nv4+AI3Uht8CLU4R6WKJfv1DO/+4SUIHsNMkC1Ld/UcY2h2xCbZlH+Q2j4duRYSmSwsSlQbepNLQNL2oA3ps5SGmdvYSc1LndqA+oYV1A/Fq6/m9kaNtahHsBAcpTNNmDsvgvGHgfGdKo5vQJrYLZfQ63v6OXjvnhQBqEpatCbaaZQLKdoqbTUsrj9NsffeRxdgmH539pQmR9tKAaObUW4NNmF/wHG3x3E/6Gk5dKr5XFdkeoGpFUq6XcdCIxBamb2jQ6bGnDTlkw1zsw6vYFUjBU1K68ecYcTGAZ+ev56AZW/hvUdfkB2IrKMarArevx9YlIkZHcCAP5oelnOAZKlBf98dCNgKZPBKAHNLYBWNKJmhEjTfCsC0G5bD2ajWCL47ItDqZ0p790qyEN3tizLJbaDnhfGGerFuM4IL/0+T4LU3Zfk7w1+bxqrWr39kYKxTQkGoFBvlZqloRXurNL4VLl16iss4epXzCIanpdjHAI+kMJMogU+qCX6CgxfLaEx2h7UWLipZ1s5EmkHsvkNGWehyKkPV/MBS0+/YZbstQc9/DWYHkeAat+tzqOWxhx77M9RRzsy2hNIQ8XSqoyFjrjwhc9ZRu8DeIxxAYoez2Y1Uc9fxrhMqT9lHmbRhtuiexEAVeHWaQNmXI7Tk/xrdC+9/H7quWrxIeASO4NGSM5pgft8vn8n8FKfnPbPS+6BmaSJJpditXDfYnQes8uN5rUrUmoVwp6xUS105KAnr9rSxnrn75dpFQz5fmvWjMHqzO740CpXua+5hxykHsoSvjg1CuWn/7+cZoiB+Jqwm0uaXgyTFgQLOvEwiRQsdhYbDxkwOB0QGDOo3MHifdeyrdkdpad/kwOaoyTmMrfOGrflAmR2nywzAEcep6iT/MXkuPHgNF6yEvWnHmChcczA8FL2DiL9G/YyHcabu0ouUif9u8rhm8XJxXvmrM9yjyRGF/ohivmUGsas4FSfRRC/2obaNktDeQE2yqObl6I3VDo4GYBwHE7ui21Bmf1wdapxNFlmtbz/40Nw7GRooy899yeyoTkAaaLOHfX2nnPO3uMfi1MqtzYxWForPv3sR0/PHsBAGUqagiyY39wXeKvuKFtoaQ52IU+zzIg73ohvYoAEaflI+D86Yje4x1bl6+DqKm29DbdgP4hhOslVH3
+u+n6w0Tn3sh7tiADa38DtixeIRZRapTAlL7ryWNLJ4bGxCG5sXvb4IgWDlt0kOjS0wWfKDfNZtf7AKQWchmN4rLvX8k6cpAoIU2GAgGe5MiLfuUOFcGBAiiy67vB/Cnnul0CBDRsEcIa2AHL50WT9Fl8ZkTq6ZXVvHMcaFnUMwQXoZp4JESQu/PA6AqH9NjMW/oUY3YFVltS9laDmQm5Y1o1w/il9tHOQBF3y844OKcyU02o5Cuy6qePyTKTexWBcBhSR361d2u6NVWVXMbvzCcolpXXCAnNij/MG4k3QlkWPlDb/ar2hKzcjBQWX5/xuXVI6Yl2TuPmq+Y41pnfP0OL63hpflE91K5guNEpObH4isatNdrPVCkinkTN2nXl3apW04g+4kaJiNvn/fddauOWuVjQTIzzLPNKI2YXhQtC+qVN0AujymvM1qx0Kb1yWyxDoc4b6fHH/8MUqJLIqXRvCiRo2LXmXooxXaHTjKY5aqu8xVm8kxlGI2gGG44ARBNWCnN/oiHvskXAcsZEZxIeWH4MYSXOhxU2UDFeVL0TtX4KVexusv/Y4vkeO8UuBCw6kSHzOTLiyC+oWun5I4/bhKR6rpVXSJbus+EqwraIiyyjHTXy2CS0O6/T/lZ3atV4fwjPez53FELdzWHNJBa2o7aNcQ+5WxP54zu+YQpTYtrBy0yDasxwlhkmd+rgtKDBn9Ow1l7DBzmhIhv/EEoP/z52KNoWQiuvFqYdZaAjfxbYVqFJV45uTpmXQxEN400Sk5v46XLcXU/VJmKfTfGtTegSykdBWndfE9sajCH0YCPCHtmHFe2W1znNG+Aze4CSW2+0vl8sQRfFnIyXwS3TP5m8K6YFT6y/Tlp7S3obNwM7k62z7mMS9Let+og3B9SgvRhtQ76ktw7R12U2KZ1/37kSmZyKyykr9TAJrf5tVtr5R9OVzfekGENqoUYK2VePz1cWr5O3rRKYTtm2AT3MEl2QcfKTaMDo+kL6yt/go3rs4ZUYZS/O8LYQHvcrTRNSj8iSlIdd0VNfQbQLkUkqwDimMBTOmvguMG69+ZvK/OW9927z/HOQf6cgu6fozSON1PY1V10eY03Cizv6Jr5dKP1CQkjhyTTH524XxRL1exuQzlpcaFHnBbM+oiOKlROKuyQiDRI/7XJxeY9uOXiJm8tLYCaPBHHcvI3KQ6y3PEHtILVR/wGukuvgYvNm4DP8Nm/pAWoAe3YiHLT9HPMTsJH9ulFs/0WEjGGGdMQZ/BUy8jDXp3XTqOr6eUNu27FBp8si0Esgr++GnDe+8cAtNc3D4QYDDCl4ySnStGnozhGaobwr28XaKdqJI5m62uOACYV8PdYuMzoRoW+jBNDcSkDXLRrrlNdhcupJooe1aX2mMG1mgpmcTCSAaNSLaT4r/x85H2PC+e+5y694CedqX6kyeNI1Ol2MUyN6Vxm5PRXHawyetpfYvuWbUv9b93ApOIPX7t10WEoNimYPLItTVgKbwUdsLL/ZabGqZhudiHmOLYyQMLkw4DMt3boCjs6g9Ea42skGjjmJzwp5lxPKT+RqZgThEoHNXgRfZ5qHq/U1aj2IDOZpZzt0C5WxkLwP4Oz4qamBM6yLOZPPH2ICxUk0iV9bD2vR9x8hKN29zUvLNqfbXyjbd2G8LSQrCuSX8jO9hf8PKS41E7UOi8fi36OP3dN0rfiAi6TQRW2YdRZFUBppJFno+Wp053qaXm87QHM0xRxcKTxuCrWAS79QbjmiY0/Nx45vHeXsltzXWmpxB8VnF7pEVZT5/4pkcebdOgZAP5WE/mVckRkslYE7GkMIe5vN2UvVUS+IepFKqQlqRJbXbicgEHvequom3tSOVfqYaqCnLKebs1IkyRe+NrbGVkkqRwU2xg2ic+7S3H937MNQUdI1wFgjICjw09QdSdyewrDLf75HrHkR1OJj+yOoa8tfoR7b3fgTuAl1hdPVpPBu+W0zihezjEXuc+yG/2kZ5GnaQDmC1MIXas0pa7p6vvYymiIHPOxZy/RsSH3Ndln/RxfutBsGzQTwCsN4XQ5euM+CSfBAi7DFIZp+WflOJ79kZ0X9qav0wTWa7HAVk3CAEEOHQiS53PHSYJ2u3RJxRGeMf6q2pTufgMU7TXbIOD7akKAOm9h7edZPiXjZbtmlNr6fckmZPeWDuy6V3gS7/aShQCzBSVZZsOCo5Xm2McNQPc5TbiBT19oP7AMDswrk/TVp6lhMt8Ky+q2xVuTLv2FZUtJ8NjDdHImttPYgVMAPWhHd+BMfg1pDvIKNX57zfCDeP9oRcjnLaF6D+TXEnKJmBpGEGA7UBaIJHbTXrfO4kf6zW6dxYVrAMKes3kytRz1dhzq2Yn3nKdN1VHE3raM7uLChxKdx//FXKLMWfytmEfuP/CP45oCrCTywjXPjDnjHXcZKbhUTYZ0q5Nj/Uo+MRDrgH2OAxGxDGrgNO4uLekY5KO5+xo75Z8/cULjAr6U9ndpEacUNTZCPYgbTjk2GjXF1/3h9HECEIn3wOV99lYKVU4vDrQpPhL9OlEO2a8i+G7YZTc+MwyMetStVUYqcp+LwSLm6a4a8WUonWRzAUFTjqwcdwSdBDMcBNSJPE9k1NteAwoT0HQfN2kssPqOr+1LaN4Ac14Pwp2RdNQ4hzLzr3MzrUru3H68Cv1eMof+D4CczFVRxFKlJqiz/Ax4+URpMdmCwY1dCGaZFglOrOzKH5U7yz23EIeJ06u/v6gr7CQkMxBy5ZjO2Ls9Vg/o/E/adl6CqjM1I2lDmg/LV1tFW16z69DgeJnSklxRJ4RD7l4IZXsQ9Gtwpj6BHI5qQgUE0KojKGbygGq4dBsOzR1A/r/XE/i92uQzw14W8bAw5AFsTv0MZ5I+3UrNQveoHuvfvp4EPXUFKneMCKTVDwzj0iJ0k2hAj/XCiEJlUzssVl0PeMwpb+dBDnt7T/LG4Ils9Vfmkst8nGwiBKv3j0nw4sUOZn/Fq2PS0r1hE+APhgF2EOil72cRCEB40rYLNJixCiDcQ+7oZZugyVfrloVbql9VAJD6u0+FznpF0EqRQorTY+6cuILgg5rM+PTlN2SGwus4wyp07/CoDEAAsO5Fw+SRhyaLJXcWJEFVOcHwIZdQvFX3PLHaBcUxpGO/W2R8Xxr+YUEV0sAJxz8OFeTcZt52/2IflgN490eH4wrBwvSn5QmxUVRH+7WhbFqgjlNmstsokrn79roCGOLrAGUH2Wt3kJVIdMnjnLiLOyC9md00OMJrrVOM3y6/aPY6SvPTzYIY56ijvYs8KqCIPRs2gYftH7qb6Hm6alPnQ+BAp346+f75ct7F4qvpGPbYzytj0LCLRZaG8VcK9A9+3SGh3LYWUT2F5f/YiaerXheO+wPig+Z5N5CMHwahUHMsSnW5gGFGux28Xz0sLD9K1azyC/d+Z7vvQ0cu+kBFkwwYR0ZAVNnESCFapYAqzbsxTtcZu6tbbdGFN5vlAGHtEJlw4jFA82w3fAe7W1sSFbzxkIs+KfuyMsefnJXQkK5SaPtoQdVUu4RwMbfh5GKanwW1exdLC8Z59w+VMyjut3LOJp4IkvVsn+bU8MwKAivV/dKLQPqChKGUQ82nzn7ckVzuP8wNfvvLZO7HrRSUbaTp4RM7vj341ocjYLCyBuVuN4iBneTDrmgssbxzQ3CiNxiPKpzv/pC+t3m+YXAJ9Xrq+svverFyLqtBYyPXpce3PdxmDDCYds/SxGWNZDB4H6FVcUAVQ1i5KqdSL9A8jVa9ii7oo+PuZ66qQKjI36xpNLWDYjKh0Ga74NDVpmkY6P748UcEjScbrxVFrHaA8/gcvBE9NV9nU5vjrUNaAysNk6/wcKRRiFzq/rDtW8rckXS37IihXVJzEei+NKjSFga488i4enyaW4MKOHNM1mhoMMcNzZLBPC0EcPrAVOzou/mmWdjX7gZ0Ade+2etzD7G5TZtjsf4h1yVCsKAKuupYk18y5dE/hvh510lKWOuyaF44niDz3ugcYA23hi3IuH30/gzyr09XHNqDT+Et0Y2u38BHMpoAVrG2P2XHmh5hJvISKc+COphtaiLPb74w9aC/VfSuHOLz
uMNZUfIWeat3q3yB+EqEHuh+hsN7at2qe1i8wEy8zUbLnG3aKk+vfvRZ4baxYVEzcWEzS8/Y1i+1h8lnOkzcOgl0FRbosncHV2E9LKtXZvafb1USaIGGDRUnEPT5+PgJCxvJRPvyu4ZS8OpyCqDwuY1LQfpOL7IphB8um2HaQm9bFvWGYKmp7XPLK/SFsZuH72BpLHvom+WRLMhRPhrwqnGqU9LfRj0AfpHJ5G+DJ9VFSGMUS//klGyijB3gFiN6ncmEaB4AS8qN81hoaR/SqJShwFqSNQLga9Z0TWScAY20qPkQLAqQEdl6oBOcb3jpOOkLzU39u95ZOUDpp9aeDxqcnRmNtmGUQ6x+41zXyIHjewMzxmP1v0+6VGcpIjcibcuDS2LUFBILtFeA7DNQOEjdGtop+yoPQPzu3qdOErtRdrABgnYF6lSD8lYP8EToJrRlIR9pABuOvoP5cFFsfM9UhPmhALOADUJfl8q07hQ2cV+KRlq4xXqeyrk18tNDySkhAEaZizdQDzjfq7WRLB/77af/X2f/CN1DjFGPXp1gHWXtKpPReuPNZQyaEUrDd6XI1yxJX+1eP03vQuq2vG5PJC1WNA4Hw2IRsBQ+LEgzeP9o1RGPvPc532C941Q6EgkOSMulKVxtlCiDkqeuSINb8Fae9v9Ub8sEZOhzeD3t6ydJ4Y+ynTdrY0bXHwh0q4gLo4kZwtrqwcPFaq+dyg7uLhR5vFLZGAHJkMub1eKLTwSSA93RDZ1kjcaKJsL3UTjBNaadI2o2Zaz8uRmSsIPppY+ojneMYQ8crwOY2tvEZoRtnqmOviN/h9keJMMN0mVZ60coXXpK4SU8518DLv82XdtkgCAgRHn0uAdkU6cSk+bKoKbEwLUgNX8CIaQybtAjMvba7IrmtRawISev0EXFhbf+LT6qPXH/6u1J62+3TiYIa/aiu0r1UwJXLcFzgCIOIjoVqvoYW4YKGHR6/8xMKk8hBWUdwSrAKySlmpib1Jem5f8cGgElzothMgJ9mQpiQH/8Esg4z1mSm4hV3SoB7oGjKtcssaW270bqtjrjhwCnJOY24bCQoB/UDlOU4Qs3BGeUY8ju6jX3mP5/KirkTNixBCP5tE3AgGfgK+zJXts+GboHQNswft7tqvhuKx/ThIdDeJLiESAd/exyrAtuLCto3oidb2WCmBvOKEGyfBhX5e2+GDqQwl/G3SUp61fxSi6TwpMtc6a8WQeR76g6QqCU6e/iSz9kPUwnqkEnlK60FmS0Ohw+b54SvmAvZ5ZlYsjrRGJwJvIFH51L3jQScfSstA/LplKv4m9HzgB+TOHkJSMLL9nqrq5t6ZvR96G5st6NQ4EgtfOQFM0UvCSShWNIO/rYhbo/2Fb342/M7qO+W5JDLu0wvA1g/0SVkH/XHSKz7uQ3bYb+D9qh/eZAzln2HSaKrDZAOefuzXn0yIvShrZf4iGWjLiG/liFtm76joSOF6kiKa7xlnDrysqRhcIeHOREadAGKACkcF1eolUBIPB2Jy/AvDbcOdAKC+cIiTsaLZXos6k2Epmfw2QSD7DnSSspwyLXgDwpYnV2xeOE3bjwJ1rmg59tzWDlgJ2Dta9wt4RT7qKLtQIDv0gPEHi4g8XgIsjSjVNL4d/ywKIoE49QtSYcF3p85pOpAsiCVDNGJVbqr+l6PI6JXL7Ta552wtcq4oEjS3zXBFXVorsh6l6XIGT5XUoom4pV5rwv6c5QvgMBGOVni5+O9ABkKV4+GTN1NX5Wya1KAne6oBKq2PUnLc/h7YRGAoy2JklZ5/JtyREwLMseLe0L+pptdbolff0477TQAzvVzZS7/LmuuhqR8cWh0vq5QBcD9+Wy9N8D6VenqGfDLUmEbBFn4o+PNz+odbuoeFWXUeyySgD+MAdDBeGVjZG2VWnWCmvLUWgBL4My2No54fjfejFhTuxw/VIU2redTgpNXL1JObnLAhwXpZtXgNT0hvAXu6ROD8lu3okETkRRWE2ZUcD9XdIyCHM0tv8kMJ1joC6CaYZQylKbXNDkoYp3q/Z4xgGFw3XsLhdHpupRyamuOln7JXXuKpCNDgIy1lgqjZ4fc7fGBmIx6TlMtL8CrO5M6Q4EmcpUe7ISXdETMIO/DDtt2pAEbe0NO3IcJnCHjBxu4uc6ZMDWATgUUn44HuyVQQezUjIqf6n+uYevUasHQdnbOcPoC0C+dR/4cUlfb0FVvElcTwZnIcqks/9lX2gefql26mDAQgSkSe4vCTFZrNisRVxvjSySD/IijAyuXHR+iHAgxeF3viBhkxrM8pAd5UYyZMomYYBSvcicIi8WAZVTWjfy+V2kllbpNZ2Mhm9iZJhyyrVHauFj9X4vGbKlKhG+COj3ULJS9ThIdnWitteqvH339LrgpV2rXSRkLt6KsgsghfvsB/GxYxOIwD0vqmwpL5trDhiyxeI9vQRnJ5VG5hrrDjL6FrXT6ZiP+9gvSM+fMxttHAiOC/VGsBmEoZWt9fqGNiHZVJAxYIlNUSZhUR0psH+VF5lwABPU/kfcFCwohdJmVbTN4dejMTZKqoeOrLNZyHsRJFJlN+QcfJkLZymPw0a9toQB8zFLKXnFAVGptsMiNPCZiZyI3NWXNjGkA8r7Z2DDIdTTDp/lt0ijWwekXN/8giD9wWfvlg5rSIyXvpkhy0NVLc8q0/kt0j79/4PT52vZO47JmSnuKz6kD2y9P9bRRldknqKKkm+agIsPJLaBCUlHX7h6xCYBNE1h6RE6k6C5TPQi2M31lVuqUnEQDLtIEbDhR8+IRrAwLgODG0BEH3N73RHR0wr0W18IHDwRhO9zuXt2I46v0R8GlZtUTxMA2ilru9SDmDweyvoRXT8AW0rJ7nXw2UY/Ng9tvTb8Rpu8D53lUomSqLsaHf5rdLqIIpkjueZh9DlJ32MT1kw8reE3sfWdc1Bb06caJH+ZasSRGFFpnyncv+YJ1Rr8qX8JoN31tGPiEjDtq/cY1qsrVLqqsYoKTZl0kDOzZ7BJsAsi9sYWGYm8PjnEX0vJlF3UU1R83JLztsR668cym8/mJ1m99Hqb0eUEs2UFH0gWRj8TM6bSyBkYcsq1JHzsNOPSxh7lPTQHx4p5ScNIzz0xmhL91w+731/W8sALkuUAh2pn9D57ouzqi3SjfTKCBkvfvq1o6fvW442ljrgCbZongsFOT65AaTJsMHI3mLqHhG0RjlMuETpSwgQdPB+Nh6PPWvBORKzjmR8IZ3BjHj9L6S3Xn/MesZ0i4O3pUL654zw/KIKbl4bHGcS/pC7ZVHriXd6WqVDL3j8csFXc41BfvExJTkE2sEEvkRJM0xrnz2/NoqFWSaBZO59S/FI58oX7O4BWlSLc1H3SQHRotCYurfMLCIEY5DDgKPFJttM9dOQ0ZZIqcFjlNce5zNsZePCBx6C/TNnXWnwusVGF3MAsj2tvrAw3/0ZBx7t7hp3odK67tsyL8JDRO0u82zsVA10ErkxgFoP5u8T++fsfLpYC8iHF1AD2LQUtRGHm6Kb+abg5+EvyHxILRMRD10uZAXndZTmnNmvM4MBq5548y9sspkB/05ElvxzMdHkIMN6Ar6GQs8KBe4W3Ef3IJ0ZqXKFaFFSF09cBsXspg1ofGKduAQSuMZDs6noeeg+tVLbh9FoP1UJqxiD8DgX8c0VH2y3iEboXiTfE2ZmVGkduwMn7L9s/zvM+8nlbdpnIR9saJITs29/XLrJt52BUIdNYiK1WfwLQ28OhthpGq2P28/Q9wk8YyNpj9d32vI3TQU4Wrpecmm+ABYY3JT18IXPCuvDvkceRgVWD8o6BNvceAIm8GzCgeOEMM1R1Wv8u7vZFJKaeM1+W7sOPUjhN/naVO3wytB89n4WIorHFgLZCk6MbZ7vUl7PCA1l+BQDacnF2mu2RwwUKgrbmPXrMykJ5TpJeONiasaJn9vJiSx7VfKQU/ZcL/HwX360TENusSmi6ALWkxJyoHq07wcaFlN9N6pop7vFRldnTcuwg9mmKIimJo3oCPxQLV1nYQYr5niqqxBHl4oix0Gx7/40KKfgMruFxJmO/zldFZGTaEc74dpjpxZmPw5b2TRZk
zHJ+EKq/X1nI68R5Kf+NUOEcB7NG8B18OH5dT+iKhcFm58YemrOR7FvRo/jnqY7XgJWjdtnXFHV0nRLTLljMeZ97S+k290b37diZ3F6GtcuIcf6CIyo23f72u30//3xtalCe265G3LTeDPKnTuczQ/QmUx1DeVaZ+fGajVBdsj22IqYeL5PKrELnhB+3Mx3GBhM1CM2SmGR7aYVrH1ruCJEMZc25BWYdXPODiMmLcZwllloC/34eYzeP31+3d38Ew98ar4qpEitT9N0MDNQwjM0BCyGEfA9l3yLx9xfF8omJHcZZolV52HuLkDRXoNNEaqQAiOVjhOK3DyDeSt+4p1sb8jloyZnAiQU0v/G6PCS2GV5hDpri1JenFyHKufRjOF9BRnKCn0BR0OeXIvIDXQPohPMalGhfI1y7ovLsHnEdoY+bim/5/Kk9v+vucosCXN1RarG11WRGe8VMoLgtqfSmaT2sVNEL1mhipoGLPFjpkmOUFJLEVNvXBAU5i6Mx70qplbrsE2c1UxnT6w6RQou9kY/Lx4WJ+/7LjdsNbw1hQnyQgvWwsNnYOGj5Pye0MTB1LRHiXPc5b+ijuWAKfhawwJTmaDiWWWLeDw25VwTvqVCnDTig7f2F4/jcNXB2pPpfATQeuLiqUMKxJ0mTCKDrlt6y2k5IMUZeoZAKyKVuZXNST2In9sTIHuEbtN0p0zYK4riQvraCLIMwipOdAryHNlfjBbpVuIgQ7un2xm41AUtB4iVh+VShDoieIqH1EhiMVokFjIU7U3x/eumqIDnztNsk43KlXjDTLDNYlCficlGbMXBcrAS3KfVfD0NhZKdeFu4k0MfPe68L05Z0JFckk0KJof0/FHV9bS2VfdCJtGa8X6UtuGxa8aQW5jPTpQJAhBFLrrgR+yanDLfksZKlMmeB4BSf4sDsh/zl2hAIcM0wp11UtzTJp0NFKE1k3QeTrsZXlOqLF9SRuRX0D81fOR5sH7pscGytbxl2OlQbbMVVH3WEvmxxu4bNnEH3coeabPRNZJvIQPSrGp53yaWqmOzAcfTuIRMcT03UtoyrclLtWqdSFPJ6ZCXpy4uGEk7vIxv9DWv7D4B5t7PTPlpOc0OGoyb6g3pOJkslpFTOFzWpA+EEYbMfzmVJFZ+Cuj6PdsTbnHg8xBjjaf5HL0cfvdn6RHUYWHzGr/tMfS1d6XYDfEx9Xx8HAvxEFof/5KwfRIKmqgD09kJunYWttwpWToWCzjL079kdGWiU5w/x+kDWQTsKG+iQ6qpPwTaRVCfEZcVlYMJXmcwAMyBBi+j6VovQJvZGAFN7LX3+HZWBJ5qndJNc596KKIzHRCY1CdoSpDZ4643pZnEvygd8WTgQsy5sol8i0K1wa/W2GS+vnYbuQY+ls4PSS1UGg5Wbdp+S7UYY+cuVgPlyeOfqES+Q5gFkeLkGPPPaBmxc6SKUHo16nj4kC86cHy4mxQC1EjfN0GLP4KXDOfAODKebgzUp5BwUZMoswha+1dB0GkWAHz5/CkJeRnoBTpGqBod4YSkQ8Gu3wotD6/RCwKtAGYQYe9qP3E4k8+oA2/OPAAy80iHs18SrUMEXCTwy62Y/7N4uZJPLG2N2YGWmbAl/bJ9pgqNx/GScEy0I6/3pDc6voRKUROhT5rYeKEJr0Vo60B/7++Y/Xr+6Ci6bNGAeuILG2ud60SUh2972yXixcN4SWyAjEmWo9bfu5319PdxNih1f75VcTPQu6RBa1e7/iAF0XpOjRRxqLE9tyEXPGNpc3BwmW4NlVS2EIq1Eb16dFrsRV5vxNhT+2h8snth3PPk+fX4guHOcJxyTzNKylOFAgktl+9tZvLXmK1n4noCG1U6WdQmptyfOFaCyCIr5ueQsfuRNPyXIlkqZDFlqYSInURYvs3hfndWlwOOJ9aElLQ/mbQ7ltgr2mTZviNO8FM6biJjKCDG3hhRGCaPATKazHDU7reYG0jInnHVhjLw4J4WDE5slcxi7PlU/W+1dzDjr5tkjBxj5iynes2fBXHxPR0phFjlUNQEX1zdgZeAwDgaC0GZYKhAhLY0IoJQsj/YuZ6XUS1LYqaZt+XO/2B/1f7SgsLrCLu/3jQm4n3rTwJvJLqmsFIhzE/CsTCbM4E+LwmnYSD6LO1+xVliOxBMcc8ypgEjDeNA2WK6hxcBZj0yVvMXDtND946aQIoL6sJu/yU3C/tm0b/DYLPSrX96FmAyRR9rcOs+EYpq9ioqIpsqJSXvbt5Gtvpf9/3S6nHcf02zHdmGSEdh9xS8bfLia+HSBf9NaafuoKFH/HdvTPxoPpfZWmLVYD/Vp+l3h5OL0WGc0zNT0TIZPuE8qsEMxNiPh97+23ZUhG0PeysAt1jNFVfC16XdwPb6H0HuGMJlb44cdIm4DDFwgjrlI/kkilzIQcSxGcWFCiSw/0tUU5msvCSs/BcC0ckQsI2f/qGxayvG31Mx0x0vaZBC798QaGuoKLGqaNKgSgJ2s1IJlUDUaZ4MjPoMbAbzEae78CuyJR+7MBL6TT5TmMjtSukueJNtcFTo+5okAU9JQtWW679K9+2+DeYsmx73+j7o/oOLy0Xm0jwi56gZlu3IYKlGXZVE2z+KSUdr6OrT1n6BpPkv5ciAzM1g/cP71sDlm1+sRdALijaKt2pddMcQgYEqjPlPfsVx9VTSMqPIT0kcb9xUMOnu5LooM2WjNcsoCx52k0iOiftpYAm/ZK9mOyXLOR/kXJEqnSr6OQlB6GWuMvDCHrsNW6R+jXOLJYFqHnCBcdm4GqiyYQQlQOpHy5YGFKXWaVgsUcB7+nxDGrPTKeq+LXnZTbo+IwZTEvViwaWotQo/Nv4uip7EwjSxCHm5o/EH/qWQygesIDGlBNQljc/uqUHc7IcB8pUp7p2+dTkTGKM/G6UCGWKx31NKMW+Mi5xK3h8TwdOElR91pHE8LQ3o7ytBLb55LIoNw4BuBeCCblTBnjrAFz3tXqB160kP4i82WwUqRX8j7ZNWYfKbmEz4jehajCCSf84Y9xmgv2X2K6QBbGCtEc5q2gH1G4hkFREnOx6P6eJJoT5A5+Z/afbeJbd5WStBtHkETJTboWhhQRVCF53qSmGWnErLiliMrt1Fq0LDnH7bNtwBxkJcNsOVa6PpYL9CTJiJ+C/5AUNZ7EoP41dPivZVNKu/+G1IyaHi+lH2W32klrGASF1IyzrFE4YdJOZDXC620XqkCWVVjjVcs7F8eOJQEwvHdTYSqrCpOx2h1MalwI2wmQpdLGXT9JG87kDF8sy9t86mC27+s5SzOTdQVYe5zWdxnpcG48/tJxwmPmNvX57bYh4iRd8olgBLAUOvuTIqvy/s8xcPGjdengVRwGrs3lcspw48zhVp5/yB4DzOMst7UjdLKoORH1CyqfYmaBCNy9iDlVVvgAUlI7cWmHSBkBRuxLzXMZuNAknoa3K2fj2j/bTl7e9l/SF4a/jsYoWfazMYK/PSIAnUuf8nx/3p9lLGRTf25ddxqSK9/TzvjQRHs9DEykTEnEQEo53lG2tj/2KFNPrOP8Iq+Bu+nq7NyGyKEP+FyS09L85M7Jkv/CvsOgLx5XoW4z/A+IaQnJcvwEupo/jEuEfhoCmE29rv0i4g7pvL53EQi/mICwgkRwU/vq/hE5jhlF+A+5oy4ebDXEFx1hWhFHPIDdAs8Ejf1mSnCAdcB+pfRx558YY0s6AeXfpK2EB3eP+tu91RYvFcwrNmxzTsyvxaZ5VcO/FYVkMYT1C0SpEa2LAr1Dcz2QhKDNQQxVFog/VnJe38NjwnAEMV3tXZOlUcK6zJhRJ3ojVwYo2vSLSSbjqmF0uBRb1iWgNahH3TZNI98CYrlbvdllzFuXPnHGg+o97ler44L1XT13EqW0Wwjlf4yXToNeuADEg5c5uhdjo0JVxsE31ixIZhXko2are/jUmkIDgZCIPkxFXNs+0OraOKQaSPkLj/LCJl7omGNQldVpLSRBs8HTL1uEe6hsx7S/SPvyUkZR8mBf4jcrp/e9zFY+kP6x3INd3J1u75u38wQiMqL8jxKoXGeE98HldrPTH90fyz8oUHUJ4GDEYvOa79QYfpctl5gvyrs
kjrdQMWO5tgm1p03JK8cnh+rXW/8Vl8IbcWuyypbPPI4iH71GImRjYU9WbIdJ0y2liqFYgKQ45qr3hs5ktpnH0LdY9PnXQ9X9IHP0oKni1DeHQDsfEsL9O0YTLLPXxWcQXWp9+DQUKCJMEESOhJE3eZX5V8qHEYe+dx6vaE36IgR4kYUaMHjq2Zxd6v3TyciZzK0vlGcp3hvwTs3jPWBeK32B97iVcq7AaajwXiMQoh+PFt7VBlGXMtbeXvAA5xdNGCbyQ+uGxBXkcBI5Hy+9JzTCwOumLJYnlZ7VejPFPc/jUMpekA1VkAwP71KgOiJ0ix7592yVyoFU4nhwYRoa4jcWKOf/a3cMDQ6DuoIXXcNUtoXR4jNAt4q496lX0Tfo5976NDaX7gWgBLnu2KSyeQ57ZfXgj2hNcLskMqiX33eMKM/zJEM8q1RFvC0zlWsb29PGfIyHCBIdPHg7Ci+AP78kb3cRt2pCtJGReFTriVk+YeigGrk1pAa2LbNoBGydEgcy5Vs/F04ZxK0dfuVKvYGFFUZWvZeeV6Qf0tocM3NBk5V1uKHqKvCdWnnhEX5Xx5KmGB8ysxSX/mA+jQVeDNP8LiIiKjzYYcIf8t3q4blASIvsoHkcPTpj0hxQElMmR4unXs/rt7KM4tqL/ZzjwBjPM7F2xJfp8EKICA+LLbyNU0N3gO9ij3Z1K5mo6khcUE+NyjA7SPTHJwYs5ZBTfmMgWQK4nkKR0NvOW43cNYaOGrLKXTCgfTHwecOSr+55wsaiDs80ZNImB9T35L7z7/q/UqE1uLs4dMMLOLonv9+h9MO8EZ6OaQFwx7kUUk6oXNcm3vQGzcF6Du+dFjQ0tt/D82yjCVjW5h+wd5EHjvACVib1/l9/7GwfJwwjQng2fkiLQiX2VNfoOkr3mo49BX/3nqaQTCHwYaR9NhyCEmhL+t5tp0Edq9qI+6bogPbzxlotofyjwajuS63M/iJsUhpR2Jd+NpQe+jPnyQZg6maQgBCod6EzzfrWxdx5vGDGLCSHai4t0whgLQMhDvsYQBZpcBq59B3AeQmMmbR2SaNaIicFGt9lwu1N2bebBRwj/P/R/x2NmG9TZXaERxTdv5R5pev6ZY5CNaLdfcpu2FGRuIW4y0siHuC3hlp1LAgWKtT48FbvqPuqXi6x+tKYs35EvvVcosf/CmIVABPo6Fx9ARf7Er/RKD/lRR24fXDRajrrFh1nQ6iVBpW1bSEBoVjPHoR3betXeeOQ/s256PahF6VYAGKabbgVl8JA2+Lkdn70QQLosAZ433EQ8LWRTSzN0l3dxLxhoZnPFhxNrW6Tnq0tIINWR/2YFCBNjsnAkSjQKVZ5r67rp0YCOStInyFFo5IrKBEKdZFBrYFCi4xGHBCZdKLCR3UhFsnHt6i8M77OSTAjyz0lChEp2MrSelToSYXyT726zALf6zdWNBI5i4Oq5aU6Hu3kx+EPqf8epV0y9RDoacfmC6WMyfUCLdAScmVvxlNC7UVEtu8oeWQx/5uRUQofTqaQIjOwSqLzj9hHiShsc1qVJt+wESBEHerfxyQgeawe147yQH+erTnystC7mxJRqiAMizxU6sp9zYXn6gCRlNHlwcC/ac0TtfVndhZ+lKsyAFcpWrMeucIiK5XIZyFe9xssNj+UIaPBVWwp1AG/P06lxHZoO043pcMutHZkjUUr+6osejbCGifQKAlEdZHQ9yeBYAoX6fyU5lITx4cultIR2IwAOKQct3oXTGtVZoY1zQiOvfmcIgUsdPSbpmXZ5W2CZIQZwnmNMvOQLqmqFN7IBuFro/dYdneRUnfpnWZaz7MyZthUa+X6O8fT+2pyu6kGn3yRGoohbOsj6659G0rCfsusJ2t4cs3daNxMyrGLTeM3LB2kzblzs4b0M0r0f7VuimOnwKf2ox1MPjfeoChhNVj4mR4BynX0aQIctKAvIKwIsBWSFIr9I0pdoc9DrZml/siyguPH9YJhCgpZ1vtFQk65ejEVTKpn0dYlK0u8n9YoFAtL6T5MWe72fWzd06O4/W5GkeUbpHxfO4vbyD2TWY9SmHbBHGOI8zlwhkd0UojVEi+JNZ6y0Xft65AwnjIRkHsFovYyhSXsp3qF5D7Jax0psap2+KlPEuMs+q4r4f1K5XfKsQWQcYamblKdnZYIsf9j9fsSq2+/TVTFB4PemC+CJS7kc40KmPjDtXYKCNqjidTGzyc7rWpbkh11FqKt+k2xslVJnaBoPzsDgfX8SyLZSGxH4QQ1sTe2QdLnur3jyZJ7dSHNley0rEt8yN+QARZiY069TZc5LoOfdUUt0MS1j/ER5zkt34RihuU+5u35DH9WjZR0RZw6CWoYnW/unjbVsR5RG3ge7Yx7p+DByhTPj+jD2dUxGOjzPjbaS+FmFfbQntgVRgOGFQnj+aBKZ0UNpJ/nqAFaZ1Kh3tPYA/OTyawhrML8SWcO7TqSjXRd3Z/LAXb5ltzOexs1Y1c93KG61YFCA/zrekk7MCkU5sEDRz4rKOVqUxnEl2VrnqkBsb64HdZkbNNsNNMXstmJrdYqcy0u+tZI0je73wBf9WXwS0XhAxoiZdDUrz7Ls2T/ArNQoal57NXL4UkesH1sCDGoUnfWgIicwe9J7mjlmBXQPVnhICSV1m32LB2h5SyjJsEBKce/1FAEkiIJ4AL1gLGBO5H2Be4qxH3e9Rx7py+v/DZwiH4FwBofa/nf36p4ReVLZgf22FkWcBdGwlg4HcDTu6dMuqmpN8xkbOdD80mZkj6xJTZG5nDcYW3pcJiQkveepHAsSb6x0znW4lHJ0rYHqYIEAb9eQZhrMO5RDcSPo/PpPvSHQCCVkeHWnAE4+EHlsS2fy5JwixT+E6Eq+N7DUy05yrwzbcmpA9pzZaNmVx7P4v9HaVJ5fd0w3mheh6nq+GnCatYRWsje7/ILWn0lEosO0unffXLZKd/T+5YllpAeRI+qCDZEYH7BZ3IUNYjwpnGgiT3q1bwGNYYpoeaStoVzlVCl+td+n4nbQFjoW62YV/xAwEfZjcxNuC8Spl6XAYxwOHqo3n0bjFVVFoKR1fMa5TsVMNcM2tIJYUu775FFGCs+Abf9Gr5cB3tgvlfWInhKMIResuBAH24WCrwY4fYBcAwCiRGEwDwTJR11c0q17CaRUDvxBNakgPPFqD2QtQEPjTg7EcSybVybGG0WOWfsJuszmkLqwdNa3+7GtGvi8DlUt2i1pH7nsUEwAktQz2pyo4gr/4asCVtstJwGGovHfM+C2XEg5kOpPhXYt1ezjnveod6IkOeoui5rsGx5x82blFqQDC8bO0YbD2HdGXBROYZhSjt6meOKA7FeF0MOqwbYEXzvgDYh+iUWG8NSW2YMjSNG/ZlMZPRCx25SsVRWXu1VUykP9wWQ6wcj7tV2ZU7eq2wrNaS6hW0CMjivDIxMPGRntW+AI3YV3SR5A0JUvaW7vqTRD0N4zb8K7PPFbUgbnT6T5pyhsg2NGT98+wY7WbO8QaMijNiA4oYkbqwZcX2LKYXbPzGh87KKX1ytSW5Vc1Mr+Yp+frhvdoMEe79tjeXLA71e9r0zjDqVYlzWwOFQaWGxku8PQyINAO/b/Hrq3EKvI7o8ziR/w5S8gLv4FOMtIf9rQhiWzxMK9CSYJ9E8OTPUNdyqe/AgPFAG/AEFrdNtbiI2od6IA2L/RubfggWLUVCHMZGFLHx9qFHwEYjEiytvbNjLA6Btfi0+EdR9+aM7UHWHBOwjZzXWiPE/3KbBFHDPDaiNPM2eHEljyr8tubjT+n3DtgGCKyQSI+fWWquHrrq/CsEnr81Uc1rBA6+38ixXPIjnWlhR/wWW6DQo8bCSK6ZfdDGxb53lgJQYjRqfltl3Z6G/Xo72mgYQOZIuZB5IxMARrExn6JbcdnEv34kROt2atzqfj8yjdhurFcE/F/igVD7tAY4iXa/emY8DNXTMPFnFGwlDHWEWFp2xxxxrBsS0GiHvDOn2J/oHJmzIZZc1Xoh/POF+IqqClIyZgCNZL1gD0WeCUba6IOfhE1Mle3lE76BYMSyb8JxUWfdPAfqoDZgMIQk/+5QOgz8p/CC9CD2q6QMEdix
HuZFEsFV4iDX/W8hwR9kVLA8antvpp3zQ/6Qj8ut8haaN+NeskR0B4xbWGKourT7PwyjHbACg0bdBSswqvnGUcl1++p2QovzzupCJTRzU+WU42egMdlbM47U8YES8ALS94cJcezGVneGgVtCYcV7JEypRPuWAsUAsqyQlVPjWEo2Ygg8BLiuXI/h+CjM+KBtU8O+IkIuRrjG4uS/Ix96Bh/MsmwpDiGcNYythmf3TPw+jtN2VN2hrK//xJLfQLn6kF1qo/HV87O89Gz7ckKP0T2YqCO2VuVcLS8v3a5Xi7m4GX9rEQPhI0ttB8Ivba0mAVLEzY1b7DgrDro1iec9Xyg+sRnY6swF8wmL+vP5NWGJpVQnWc5iv+GWNyxfnmPNXPhLyTJ+g8hPwQDGLmuUGiGAtGeoZx16nn4KBdFREH2S+Lm7rwmcXPm0qQb+A/QX4Wac/AMEUQFxzK1bQKaKI0tqeLAmYJfQKx4NPcosvHSXOfBJJ+YjF1Rs/izbznkzmXIPq9oTU0RBWOHc0QAKG3XxgDhVYGq9aQ6CfSyg16IawKJ4T35nSjfexU48wTjdiO3HHckVYS3eGEQoQAGzIWruv2DY2hrsYxn71NX026JWSnVTFxx3kwx3wHBb6YIWZ+YD6hVEk/M/bi9WFXJFUM6DulSm58jkWTiawXS1DYwGRWxmG8TvKlwXpQ5Q2H4gsdNnXHJGwRXAaK5RVfA+PhlHy1FukNly0E8kkxwCkkTCVVgaRD3hb9ievSt+f67ob9ViL3RAgh83iwQaxyqksoBYY1jzICMSito8Gn18xaiS9ZyAjC7jB6KcZf+QhJRXy9hg/wdEkk8dTHL0K8Qxhz7vq73ELZBkj7ECjEmPr6sVvagg4kZhUXGD22F5aaw/ysBfMLGoDec7DYUizGcLDZgaCC677qRTfveZoI/tSDaV/xZKuwtYTAtxnGaw227/o3TDp1qo9pHtagzVGoSNA2rBTC5qXJ675azqJU0m5IzME8VTFe7m6vJwptYnhQnz5mx1OvzQnngeVY6Xski0P5d9WeQDo0IaCwYZZExLeoBgROhNIOauF3cWRHJSYB/C5J3NzNn7NtPSh85zXFj+UXO/hfh5WrI6TSkVyP4UdObmW6TVFDiRNx9U2nIVdchI5RvCn887NWLV5fkiHJr2SURd5BxgOsdKZo9RuJUqYgEop7O8oBwhw1U8YhojaaQKLHNpZ7rpiRtWwu6ExenugT3T5uwtLoHWFA3oGNzN5v1uOp5/nBTXHRK6iVMjMZ0LsITfadeu+pVtFgMLveZwf46vDSU+LGuxqD9gvkStXDDmeLcxCcWO+31NS/GnAx9hXcc88GlbpWIG2XEX9/gKWy03Mjo7a1FirBaAopSi17TwtWnXBr3uMLvzfOh6wDdD+iWFKArk31Aj5bbEH07tZ6njgIqwEGT3NXOvDBiCnFh6Xj7KFw1BUE2qx3psLvBZwED9ZLY3QPD4D7DY9i/d/0ylOSyUaDY2fw7KYLH7ykduU6uot+A+9Bg2zq88ExKeyu6rudHrf/PH2v5MMeUf0zDAcmsCvmJFqSuRvgKvPFkMGMOTs5dRqMny/DDWrpjyVrEOaYGcYlXrEb8ZE5aIsKAktCZke7c2WJJStuz3AvRQeNDTOOZzfiOk+o6YWdkFHFx0htTfSDVpBy7/QCGhIvykIHM8M621l1licTFWnvZw7GMceL6sOuC+8BKIpXKeAsYl+LWtWo5oWzlqxOjcZficdwhZqOchBJPStRIbv5Pt5st1VGczyo+TvifFDzYE1aPzuQDXJz3NoeKUp7xpOrXtm7Rn13FRgxR7w12R+OzjW2sdMQaZB/3uMPkZTnXMn3Vh6lyTMcLBXKwh570Yzt84z9Dt0AuDBXwqJ4O/TgXXUAMQYxiy9RXT71rWecSqt2k3KWoO1l/lh+8B2ekC0+FI7Mjqly0QJO68Na0/WHKTWswtPuvLpZ0G3tf63w4b2gYHdjWBUqq2L2cvhL997ns4zDA/EcFEnQc8PJZAOqMOFoIasB1RDASkMxvWZtT36mKiOWy2PQmE8l92XiaHILnLzBPC5azLnjzRoLjWvXDcDPaQuXURqxsetG4qCmZv7v7dvnz4x3CyzI2otlw3MvuWokA7T6szan36am4UDctrt/ttQGb99NRGomKa+Cci/U6fE5bYKj2AXK0fZm/EBl9JnY31OY1iX+Xmmy3UCmwY1E8FswCa6vDJcgMDZDkr+fv9ZbesNXcVh05dHIbPUHpHxAv9ivQGMUFkXhkMzVZJ6dX6HT92qgHI+d9qzvAumM8i1KZiM2S9HDDiPfYfDGW0FKEzZTJw9yZicwzIOJjT9jlSjs58XdSKsRhqpdD+7iBcpy6NuiAZs6vOO21K4djqOXTkpwUB1udnJ3XAJmYC34JAm5Kt+Wj5nOaFrVLcOYHOv9oTkYcyPsVirB6YICY8ue6VLXGfys9sQPWd4kMBXSmk/Ogjz9NIe0zzrscpRHIt6cImNRcSymeXOv4cTsK07/5TQwM6Om78F53PNFcW+TEYJ3iamADwFNMfya1+BPqgkxgjAfw8ppQwdSQv+VGYV9Sgk/CfPm3ZY9vtydHMfp0rLgEPGjKpGsebEw2za+cfa6yAna9nk/QVg7HZ/89lc+eL7+ViTWgi43iGhVgToR8k8jH89LZJbCG5qg6js5k+5/T/UrkR9N3IIOMkVYk7zv8Gkf3+Xs3dYKvGe8LhZ/I+Nti2z1IridJDDtiPMFz8rIG+vFf//ZLE9ERLc5/+YVSKYHBk69oSVrnB1X8JgBWYqO/puzedhN92OAJTSf+tW7xndcw3mB/t4A5oWPQqeXKEfHHIVC9yJFpSKerY0f8rp5EQTW/hGCUS0RNiY3k0GHD2UMH/BLt1iRuNTlStHx0ArrF9eWSh68cJbnXKshP6GTRPWv2UhBXz4Yp0cjhVNwO7745lc0ZPjN6jGUqlf4bBD69p97oRxCHBOwYoFP6Gy4tECN6nWshXCz2agoO8y6RSBt5bWp7IXzAQPqQESCpuUBbx1k41DFqE7QwVaUcepEfmtQV1++gMlrvVGAWlYMAI/011M80PzwN/nJ74BRBtlsTumKuVoyvSkcXDJun3c0GpHUfQGXsFvWfl3d2aVTAw6YRlLeNK9DaveYrfn7d9IpHk0mOsKbyZ8SWJ3VN+Ga9C3wF4vqvI0iizzFa3N/a52CWuuD67j/pI/O/9TbGR1xPNJddjrWD/GkVxqqcy0ywnUJLiyU1cnRqKRcCs5/0LrPxjRk+RsWRjl8+XI5f2ss2pItRFA9+JO5UIjnCdTA+78Q0IzjwIKaeBDmzfTCYbFMbJQlgBWZVRLQdXYznOKA7KN/QTJvIrO7YCxq/bOB1uFF4XZjYuc8/84B/18z7lB5gP4cpQvDqadONRfGWa8L1CJM8i2vneVHFi4hnpu1VuZZRTj/yyuhDVtDmwMW5KJtd408T07qzx2YBjcTGhPWjoFkCf0ySgc9GdW/hwunZJqHCICUrbAU5e7zo76JqMwpxh45ZvKSXzgvgMeSzgTw+VrfHdA5+zz2+Lm/Ubd2tnqn/V7aCtlsIGyIUrNmGhvznk/8GmpNIQ07seVRM9u9JbSDU+EeLx2zcftKSG2lHd8yKy5+2CK/IU4FGJT8l7lawRVyDSeL9Lk+Bje5sVIDYJy/fKvKRsbQv0AQzrbbz80dfDX2uIbqI1deEgfPSZiMyV+95uWMavrHP1zyY1WkboESpKjoTDGghrfWaGcg+Am2icQTcCTJRraWJdknvNuA/D0t22WkrsTJtrFkCLF3bVwKU2G7+PqyuXnqVifYgcrguMARjozl90xnO2p1roeSBtI92Qgi9sAomv2C2YkW1dvWSCms9NgGpBANv15He2FEsIYnbk55czxrvFWAHGh8KqxA1ZljYogVs7h4K/qJW/RdspLb6tvUx6yDN4H78fatb58RzWnFtSUoPl5vpFBkypfzFGUliISRlQziUOLj5I7WmB7yl9bxRFWFjy1kVATqfGzeqsYVKtiQY7TCCTVsn/YsXWua+4fqGdn2q70FZfqyAqUG6krnDiKcEHuKbq9a0juvs2hkhA
XLTGy7DsOfQj3MJ3jvs68Ne4lJYtQGvYRJoCtBAzWlvjo//RzSkD8iTRl4D53cCCuYbsoOLmGS8d9xcifbpIWPoPpVCXJXXg7q5TgVQTbDrvU9oOjaF7JoCjC59qnTK1J3gkv1JWgSs5WbA5jarZROCpunJY5SPZVB6SHbD0fB0cuUW9CCEZqWN/zsdw806+HU3S/QcizUgWC3b0ZOza5bjGd+iSgRj0+VEohmLaHqYMQjnrOLnJ0Daktecy8lJi5Q1fXCAjRq1p7aXvfvWth86F036Uqxy9vNxs6FmgWH6ytgqdBFFOSimpeDaluaMs+szC0SoZwqaSSdBcL7UGnDikVfcHdCqQLiiMl1fxPkAkKI79zTo6ZuVO2b0fjL5Wg+7Qqv3YJ8/cwwA8lonwBh8bTXfyiPYVF7CEoZBUoSucNJTFBBGfkRO9zXpQKgbIwdLYIE0sexU7XaDv4ZRE6F+10w4PdoRCJx60djWd7x6GeOrsvDW+bNEJbkNeCldWJ0mO6ZRDyksUwCYpj6Lbj2kTzss4G7dmHs+RDRsUCVXZl5fKBGu+j6sxmcEw36laiq5Gued4JWgheadh/3r2+RGMso4HqWrDwWluYhq5ZMhHjBsingvHMWzWo8apzf31Ukxt30xuQw441s2iubXZ1vUfRIRbLPd+7pgMKRmIlaBVllm8cj8w+jTzVyJ7mME24FAt34wQdCSyl4KHoByDzUduBRpVcxy57rTtuC49FU1/LaM5erfbY6rl21IVHhyY8bmoGFhc/JWX4FyVNmX+ME7Vpk5hoDeEwWfq2vhVCpSthZCdy1y8yfdU/7e0tHY1o4/wRcaHq9YgKugOnkJBRXagVVROmMCSgYYibv8ItKjUYRz0sESAJtG3Zepy4vz2VXHmSRTwKoAXhzwh9uaCPIt/tdk/LTTD8Uy8kNs1y0yyjg9ZQ8FFxfwgEaYOKh5OMOoo6BSq85erM0EMgox1RZpnt8P+af2CRF9zwEkj7pk9VsYF2vCKL7aALnPP8pgiLLEPkAMQyG5x+qXanqEdr9UpAGawGqkLEl/Et+8dLumOuiwt762sZZY7LrYcto3Mivwldn/LJSSVmc45kPfGRr+ekbTqij0FognQGoePga2mHY4ptxb8pF/uCk2mizZYjnr3KIxgOoLrcsxiKiZbXph7C2xfxmIamKjYfrzh9DySskWlZSrW5t9NR/uD4wE2zYKpUe3+f1NGW99DHJULZq3nhEcmIeBpful2tZGb/jRTLMxNhcexEpTuP8AKgZGvZAn91BfN1HfnJEhj9PKuF1Qog112/qJhXkiAzzzukaVEGg8jooCWVz8h2asZ6kKFt+lB2hBmEjBegIA9BedOHdFxeTOxDDDm8lp6RlWiEtT4hDIvXd2lbNmmF78XFM7l4lpzxUo8aeBgGpv6pgZUIxCpCAFz1seBihKvBJfNjblPJ5wAsNCeMOmGGE3BIowPX5V89u+tgdS2O4802GiB/z3QF/yt4gx63yGxgvW2LGg/MziooBV4d2MP7+OCWmK2V+jgJKJWfzyuYvnhrxJliISnX2hIWB8epLRuCCuyNGU5VyUJkpEMiph5c766PjeVoPTJ7SCZrygHxa3O6xudpa0T9LPwlmK8p/yKTHIU4akSNsVQh5NEYyCU30y57bVTeHkF2irwPhP6+jfBresO9I4RN7O7U8vML0PnPhaE1afsJ8Hgy68HZN5I7Hcw1zdE/Wd+mnmlA+B6s2jxg6HD3PgDCv8Y6G0TT1LSQB1aTEvpYaWvmI2BZj0BR31MCAFx/4QmbdGj8PBKlzqV0tNSKdjEjRoRI1QqgX+DW+07cwfw5MlD7v7sGVUGfp90e6egMHKbqKmM6IwAGa5q9vh3Qeq3qWCvci6jRA2tq6I7wRh4QJGTLEnrRnvHtD9cuBCdbNPFUgE8JYZJF4SUVYTSdrd/v2HW1WANXzWHOwfSHG8sgv1gjbEzOede9T9I7tIqyxFU3u1J+RQABtWlg6kLIx0wA7ajGt5/nkUNWsajAOvrb7U/MmplioOJrp7wAkMS13E3/8w7f4J0faaGn0vD61WcOwJPJm1atljzoIX+urrTURedCJZlcbEfsrqRoF9LgKBfV0fF0PoNqJD1AvJ6sFIUVdXQNfpNKRNKeweH8QIj2ETT7/uBtZobRBLkbcIehHDsZEXn+Ia7zJ7SSHyrdLctJdQ2BIGe5TZnxNSgkTmXvfvYv/NwghRelE4/TN/jZG7ym+F7QDbwy22T4wFeG51Dcl16l/NZVVkd4YKc+7KfYQ+HmmEARS3Z6TXB+qnCLbgU7LVaOAoAitRQZofpJF49vsG6EkDTNx31bUoLdEJRk7rBKXDzyc0xSiK1KGVCIv+pE5Q62Ls6y0jhOhT4UdsUt4C5CWUThT5nOv8BFwzkxF3l6seUvglYJQzf0qUXdcSkCjkgbXKuFLInMFYwuVjjtVylMxZoQ222DJkwHBY8phyb/VuubFn9nZac0JrJaqhici2R/g08SpqGEGTlMfMgIap0OnHNYPD4YM8Jh3MIEpa0NUAmqunegQw8BbwQIEePclaB1lmUpc80ORsvVkXBbmPlroyROjKxLSu0103ENiVpWuujRWIsTmGJYC9udF1ABpu84ov6hOiJ2zJsAsD3nMZaNXUOJT7pTCERenaFarQ5j3FT4uuFtBeLtPR530X8iszWEPVSRKdOsbE9drdsch6v5yqS5d7YPSfO+dxanPI2m4D9p/J/ejKJIsFxy6aqoSj1Dylwa2TnbbfSBLNnjPos9UpF0JTS71LFSr+z8HTYIY/33WecXU2iU18oKf7b7q1BUSTlHFvIOJiSAcMV1sWebaiWaWuzJ2UI4SE5/jR8rLrcEsP+OcPTZ3eYplKKushSVIn5nElBUl8/91qtKSMeeb5ZAsHz95lpVdrk8+n4lx95bbcXwm+73smaqwEV0/8x4xVQsJYEyIRvff5KOyB9GSRB2W5WUAPaT4/Gt+JAJ7Q5JZ00pt1+FCyaakwqgjKkrGXjncBcXeYESfN+wYKVCiFXSgk1ZBdRHc6/Hq1gh5fxWmwpYi2L+wsigNd81Tl/8sd3/Q8zC+TRJvIn0JU5YwWiyfpBR28Cf0rXmbM+ALGuV4LzuTVnAViZFmF2JWUtah3y+DfEHBsAUIDaXKo5ucPYfXu7mldBUA7QnflEq/izWl+CNRBsVcKvxcGJCUiXfFXkLyen9a+qSTsSD/JW+xn7sTidhbxEiWAz/w3v9Rirza84mV3YDpk9HxT2NsDLskWHjeAh178NQOXxLxtEkzo8dtF7n6ZUa1ry0PLLDy4jiGebxwKEtujzDNZN0eRAOeyzeBA6WFtLU64m7h8bXnYpjaypIy9s6joCXMKpkhpAOp09fgLIwiWr3XlHs0J1yVblH1PSvR4ZYeJyfgduCrf8AArkCx77Pi6YHqxfq96OHHgV6BCs41WLrw48+sL0A7c2CPyDg2Bwn71hn6UufUUlvv8RzGq4qow0tplDGHJCB5pKM2JP5Mdi2z0E0+mWSjjgjPzG3BlWcsQe5VdiCOQ8aZY0X9tcLfWAWj21qRnrdl9w4D+IgFNrfldcKBWAAxffeZ8xISqddcLDh1rgcwe1FphXlH1o8PdEoerKwqiOTrdUejGiunzIz7Zf0Ru0VGFt6ai2LnruwmaSm6DDP5KvYtxJ0PgFbCY9yHEX5d7vUPAp/UXzeNC1814+vAS+1uWNfXssWyh+G6aZnTOJTsjFJjWHNHoksn4KRAEdaWzNyZQZebqiav+Xedvy5Uxziii/UrGwH/vNfBujdnWCHlPMwb/MMkyPdTveu5In/B0CPY3IHVEns4u4lwreFWIeaZFkb5wbio7WXGNvLSfp8iM9636B5RuNVO75d4/L8djDBV92sH2WbKrlyaKrl4zlgghSVcRnc2/WOKyhBVt6ZSxBshU9lkPxAYiVbdqHDD7xxJNQfrfCoS7xF9vCUiRkV1kAtqv/S8vKEzQ05Jwz9i80mfAlLU0vWDFzvD0h0BIper5lJEKVN7iOKohcbGc9cJAsCuEQ1fcTh/eLslb6XpwtqvBDY8fMxESUok13iB5xuC8NRQvErVs7
svZtD9314+r5R6Ym+H6HrZ9gaet5lpEsxEYr9sP3AowDI3W0MFifzya2s4k10aVwprAVUdDlqK1u4g78EW2ayerK2s6LcOMnF0kIfLuwohsJlNtfYIdlXuzAsiXFWyTrjgW/7wlxkAVdBqMoMV9GMWcSRyXVkHKTinI6Oo43lg0MpbbMbW6sVUeQ3BlutvJJ6+KYj3hBkUHeKzJuBH4yAAoJfoPMZJ5QvDytxmSZQlJeYVZ1KXA7h/BrQeo9kzT+zfG0pmosnyEZ9ANM3peBSDhOkYJ2/cL7KdEbobBB8BW8xhcoMLg1tG89Umu0QpBvDibob1O34dtPKjAD2CBNe7muuouec1Gu/fT/XqxVjdazG2avfKQBZw9c3KVmnBS5OztuTNCd/u5uqtwJBj31/HCovespp9n7R+kKO9H06zpXfP5MYTpy/MF5/0BWTmNeHegoJpORrxMXfMEj8FriZnziT/zW7Z8tsZebgLKiTPCCohp1hs93k5iTI/ZQeW0CPRlh6MZ8Em10A2aLArnNYi5WMqdPSO+H72i7ZCErWU2g9zBYnwxk7G+IsNzbO2XTCNrwgyaBxQp6n52wG7nUee93fhxMlKyBAWMCKRTQbPykUxb+CA5syLRsDFGr1A7rbnVBUMJjWvH67rKT3fI0i2EvKT7pX3D0h+6VxFB/aL9Uqq9uZ4GwOyCiye+w3O72Eq2Y8P7TgetPso11+sQGKavppFWrl6wQZb0fHjFQn0/iWWSPx8ua5SB12TKmw8pvyqnfDgbqNW6L29F0ihUbVGofRrP14dIhdjT7G1CNE1kN3CwbOEJ4+Nh2L2tJfZqoJiVMTLD8fVW+62tNDqkt5J1SLWjJBDIxihtyWetNJ+z0Q3djmrCfPf0R0KTJeRl1YO/aYnAZ3zWwJfAQSYxvlQGbPKrGbbodU714xpZV/wWskdvJMCisTbej3KC37sQcw/RrC5vZjR9uRoM3njpBR76as2yciNDaBRz8VUBYWfF2XAwRfKLFJ6pmTGeisNP3zMm9H8WHj1CE1zV+lpcwv5gyIxOW3lfnv4eLNx/Jm2u1CtkfM56QcMpK9Xqz184GkMIOARRzXTc1cxkFh6FSJZv0an8BdRCbKHZSRYfta/CDXt24IxICrmiauEmjKy8C3V3TK6x6HJ6odcsVjE9k1oMy8vREn5D8E9jZm09TH5QYHG37nBwlplDfQz1sjY4ev97tkfzA+RUnyj1pD5SHXr6A6Qtxwt+kERUug4xTOZ6zQKM8z4+iJVSox5SpnBUle/l4R0fwAsptEzCmsOw+a7oZdXSCjnDXpP6EOFweXMuHQ0qfTO8fI7WQFO83WD7hzB+VfX7zw5ASaoqH5Tos/URaV58MsPNri3gNgMjBMjBtaEyLMgynEc6mN8v6cxsN1gj8feEjXeue8SL2ePcZ7llx2DuxXPzc6Vbd8NCF2gzKM1w67LgbMIwAIWXGj5fus52+hZUvQiJGZWiasFcuonX5m9Vrk0vppxDA6V17qiWudecatbgVrEH6dARSYRuQfFV/lMAKFxg0ZPEH7GBdZeNL177A/aY7OGLdnCnSWMSv4uyypGtSC7Q9zB7ctIVU/JhckQcqoY4wK5QFQPJcMN9gpOZIGR96G8Eo4ToBcAn2LDChyQutKUphO/M7fkCk5bzWyueLbpuna/5Wijyx8DBJe8CZ2mqZEPVFgHigv4bdxHTCZLkY2PuZeuQSj6b9ZncMmvPxkB1X2FOofnU6j5YEJa90Y9xSCwhQMM1fgIqcnH3LyfLsmbcJTlQrulaVY2X2JX8JEoD26oM84CUGC71J+ZRcbykC8VHw7FkrBoqYLW0xZpHY9xfkAhM0bxtACdBSRxRzoIkxklZNro0R7Hv3miSM24HXd2NFrNOeKFgyB1BxhR57TK5Eb30YuDmkJAwWHGss/37lX6oZ65eggFMCewZYYMuardPBwyOpQGMlHBIpst+7hbJE/QDu71ka7sF09xzIjM3epHmrlTud6vLaLHei0G/gydx5XqaEfWblE/kLI24Oq8s8SV4cRD6LYG41lronRVUyE6F4DQPjiCFTdDPNCKUpJglT492bDNWIVFPPZBZ6zuYXzh3LkEbXtLdNvrepmch6ddciK9oJlqdEdJfUd1Pqm3ox+zXkI8TvC7rZiZJ5OooW1ePiMAkx8XYQTCKjQlG8xa0skDZTxv6xe2fQ+BkRKCNkP/Mj5j8WBZ3OHbXkYf8YPqCh5VaMzGkFpXXZ+uyYFu251gQI4oQ+vF3NY05iTccF3zbPT8jJiisKchfJofwvKMQ2hdWx37qwA4p2X282aeIYVpOTB7GhIFG4sbTutkC9DPPkZUYERcTZeMUep7XfO8gS0uwN4XynWBV4eQ46rMIyW3n6GZAK1UQ8tM6OPxqEci1+xnmcjshmnzqz5h5Q4s1PBlniIKZ7SSm9Vs6emRe6nK+BVcnWrYDAWKxG4fzi76tiydQkB38iaE4xIDkFaJe57BjUIJlfP06KLWeoAWzklEZLi4M9r8pCkZC8Hbwev3T1ZH82LxIOE4U75kBHF1pJChzwLhyJRG5pAJJPGNZiiw88GyVl4oPU+6rib3VD1CZNIp8/telWZ8v6yQ+lQawYateVTtFEQ1yH9HXnvFaDo3Q30USbCrELwM+DnowvqmOL77ob3oMNPYuCBszDKa8Coq7W32THRtceQuBnkB04No7wV1zbsLd9kgXottFuMq+6VkDWWgXmdgArPubrR9vNyePcxBUZs/mtWoD2G6IK+bzMufbbsk2k2sW/EVZJ5DLBxVbsVA22sNu68vPEGkI4X2ZFjKPCRShK5rsnFwlo5IblcX7Pb7atWyqBk1z8zrdwik0VcJTFI9vVSznnlaV/SzFQR2xVe2Eo/8q0Z8Xq0bvDStlC14CM/MH04gIUD1zlQddS2CCanSnsqhJgXZKhoCGGBujzcr4/FdYs9Io4yBvMIEc0hn1/lnNuIWWp32x3CnGrFzlQnUvUhpTFUg1s0NSHv6eGXbRCYCwiyaH/Z4KI9TB8RqO5EcP+WSTTU1HqwHMuuNHCa9Kj18j33DThXtBI3oUakw0QOXhdZNoXP1r/UOkMuZbiBrI5SjQDqhEbQqzHnFnYLh3Y0WI4KJJf1+dwN19Q47yDdHUWpz8dFLkeIw7z9Thy9QLZkk/HBOEQjXWrYlKesVgUV4BH6HFmhKNzYGBbUj8D7AHFDXvOcIWkty6DTw/FG1ogN27gKXAnr2cloTMTmFmal+cFQvCEHK0EyHlb9ATjiidBZ5MLZ1ROccN3L100/ZnONv6tXgBkAG4x178VmKzFFlXAmiBfAq9S11TxydHOa7a7vMSptw58bh80thvOyBhCnbIXlLLj49SA0bzPPTwKQCj7G7GcUM3z3cv8y88d/4qU1towidzcVaQjDTMe4tn+GGTpzyssN34C1htL+cEywR7CaMX+vXKR33X+TY8VKBlOWhLrOaJRWp3AayO6k7YTDOretJB+uDYbJV5BhP2SR/4seAChGyfXhsvlt8ugV3P7Egv5kj/KG+aQUeZN7yNMiqfBA+5XJM6EKi2vsE2hAiSs8qhTYDZ/cUN4vgwE9yt4f9ISAogeJqHvDQBnj9YO3QCYsPm9HvFkx68REYNpp1JW5NreLzL2Ht6ErNW6jf1eiqNxsrhbA+xQX3eokKL3mLj2UET6QdwXl/O79w1hG4yVyuGXgTGv3/oB3/Of7Ag8weFQAU592SL/PjyHZLrrpc8mlodOWc6iOxS3+YYBsCix3r8p26YInsVaSyl6XinWZyFRbhchEj2xZb6mPvHiuO1/ax1drIeapFtU03wpmo7xfu0JW5TH20yGTe2K/J65cH4ztEAQ3xgaH3N3XuuSXYJldOFnfK5bBjg2uLzFtjRcBG1Wxt+NKZavVKaZy8ub2ptOxYn57sDtd8OzvDvVJ7/tiErK9BP2INF/QiZm/PrtizCTxb4jV7b0GMrRzVhHXb33bTaKvtzPo5basxNJZI3XclVr542odxOHAAswNxA6lz3hYuOhhqFF8BTH9KFGfGJwnaSCf+A5r2U86S223UlVPW7OMCzhOnkW3QxPHEFSQX8+eoB/
zM6Ig/CKROS28CAqFICQ485HeS35M4e9Xh/CKHrqzQszbb2QoxzdkCZOh2n6qFn3awz4xswtyfhDzhEkEIO1l270xjhdkwiWzj4U7rXhE03cSCzxTO+EdDR11IndF03z6xPW2R2uHycj5hxIyBicGlSeQBoXTrM7qi+aKG6TIK5O+Hs82oLZoJd+gkn/2TkqDL/tXE0vXx6E91wbL7564EV9G4eSAhBb9z/rE1vn/rpyRxsqEJjiqmaamd81Kgcw/p548LhuCGp/We5AJUuZ6DCQPdy+Yx/5rYmSozwI/W4GBxz9IypLxuqTzdBQ6gEGynEQHc/rDvP6Tbc7FnkhVWqtUHXYP6SixHmWZ8+KTxj2PBQ2FFBfYAys07ct4xKSZb8Ug4IoBD7Ys0Xem1BRdaPaiytWU+AMba8fC6Pek0LGmMILSasvxEzxRxKLTsIx0hK3RxVn2DCUg5QM8tunzhGQgQGgdiXRqJ+OcqXm4lzYMmuXUkJl5URr5qa71iBQoPCrIghLpjBKE4HbvnirKpNz3B+Yb/wPZGCNts9LZH5o+KZqe639btHCFuyYUSBwrwyuRjLr4Ah6kyTq3IvvVBBghaec6j2gv6+n7RePaHOxpLQ2d5IryClQpef+VYyksyvmV0whVtTpv4wyyPEB3j3llYPgvsvK8/KT4n2p8tUnZMSZUfYNL53vd9gUZs3dY24AfQWhJ1IP4N2RwY+qXl5XgaE6jUq4I+1tXU0Z9T51y3R/I//MwHsgXGy++kFFiZtqZx+P9j5uk6G3xVbnE3hs6vZbxePiehK/e6iADjTJQBP0aUW1lIA8g0qY3/FQrCLcwvOAFPSsFy0f4UNTkzno3LfDFo8E3XsTtQS8GJk6vn7/ODC61FBGs9zDss7BQDQmCjq/8Im/SQd6ZZcBCK4gEAsAjwEIwPOaiUcs9qY5XFzWxlTaEzL1AwgCe4FHJSq4TM64emzXjk4R0V/QMo0Pc/dJaDG2AKAdrAQgikS2W1xtBISXC8NRpIwaRaGA1ovvbXdybT5Mw2sc2QKnKVMKduuL4sIpjeKr4UnhjAoBEKkovf3ZjDYRySet4hR9p5KQVLLYN58SGkhwbu8yhXZ5JUAUzlkygYEa5KpKWR8EX+wPsq4PH/xRH3EsAdSSb5F2vtuA3CYXQ3A27YTq/3mNDWZfMV5RV7PEr9kIllmyobPvHgifwKt5qmi9nVm2/zns7SEk/PWqoViEeHQlBKKAI/NAhJzM66qQ+QIjNT4Ha0N+JpkExWD3sHKyjvG0xPFWjiYOO4Nxu0XVfRoHEihh2HaO13uY3MdoMg3xzqUfYWa+cK70zpn1AB1bqyhFyIhvwJtlJ5wChgYMxLnnlvmdHjTv7UndYCnMvAEEXtCHHOCGpyeNVzw28U2jnwk8h/gzicxgOA+uDfblL6vsTwmKnV3Fk52rEsnU/WnE690qVoXRY/pTLn1fgob/fv/8sCLeo1OqOOOgKtEyy7ZEBUDYopGybSh5y9qhdA6bkX165CDAa0Z4YTf5xkBoZ+KxS4pPriz1a2mI8jKOiGvKpUUgkXYEMPgbx59aXvwQF2ByigUcqABjJCnKxSjU7eNfz7rbe/TAQPOJrhlGRCF8tEnM3aY5U6GgcSxk00orQVRVYXgYW/6vyIykqHn3TxwHbjU+SQQ1yja8yXFYHyiq3GqS26TiQbImsvlRNzjBV6d/YuzWZ5PDQJ1hLu7XhL42LFwQDArz3HHbuYu/f7EvFZRYWSkET92pfPAyHidSoNoBTye4HsHReM8G6SC6T1jAcne0UqIRqNW+OfyAIbul10ZJ97ZlscG1MvwWjCbtaQraoXB+OW3qV6QuNEzhTfulbUn4yRYhKEgXEFb0P7iv3dGkqr9rzWLy+dPBKbswiL7vyxa5/gyU/hJ9dXIeWqzq2DNUi/1zaWUYzySgoeUhNjHbF0enRjAVwb1cZS4uDgRm6nbajFKMSmq0eXiPLS600aPcnND+3InBQfMyDXUiHwae+OAwJ3Z01kgYZlFiBmv5/VpRT/qQhzGsc/MHVCmnyPmVVa7uIOvnurfQJD2S1KNektlqv805Px9RFjv4x4lsze2GtA2mS0ExRTa/Bc3+QuM+aKNrhA5HwNMwnFqEWA6lfKyuPtXaSMENXJwvATcZM/oHmf2dLxjhQSUPopMqr2PeRqkmIvtx1qNTui8QyvdXDLirn6slRMz0B3vvMPhr31Bjystjf4VS5au+EbZyqS5zHTqNohPB+83tMhsgKmY53Swvt5XXsNyE1kmHywH5F2HcXdaECSCSOOEvIy5biyIyGfEf9aDWB1w3bqkeIyt39dDQUiJSpXKHzeC+c39c4JhLYXqSTNeIH7RVHl4s1ngUidinknQW0ECFjEXCsF/lQKuIiPF+5L6FLXyBhoSeGB4oKz6lgk3WCRyzn/Gevod/ab7fWRRWMG0Qi/D7c5vLoqyGqAqC9ngD6feJSLxb9j+z79XkT4VlWHbUYjVQszb7G7SAHylcNPaEQKCSYtBg1G/gaYtnntOqdyj9E4TTUgfdlYoCxYCWUygaw6aeN+9AE7InEJfkInUqpVpD9bwhmRMiazlOdVO6amV0W3NeAFCxJEhbjRju3xScIMnCsNTWNXbdVpPnubExVv9WwWnR9Ld5Kw1guhRD1hjb9t9gtXiROeL3LoncJoqO6ODD9om9Txy6hQYdqjOP91p67AdCcvKrzKTIQFJ2IcgxI4RJiwindh3crK6AYB3P3WHYOsjLXaRpzrSTZN3YfA58hlr6h6JZwdyjZbvnpA4/l66zCbArrHPSElSKYtGAKC1XcZRzzyTN7sYwcjg6VuR19vfIPEBXsCRi2F6PJEvnQNxyNX9X2ZEdIY1FguQy9jKpFPF/t6Uzuh5SD2PJneKrfgxc9kOap6eW8I7z3N89BwZsYg3FoNhyAZKL/seEW9Jl6srXWyZWrlwyGtK66QoO/A0jYh9yFDmEsS+rhZmAUYLL/FSQVtra7/pjzsX8W7vh12litAQA8+EPvtEJrTq5fl7dqrGc/M1NxurpvHG7QQed3Xvw/Ha+JrUR6uv8h940/YkP5BrXu2MBd2JQ08HxyEXwY2xi6Wd9YKoDXP4Br2vrxSj47oeoC5Bs8MB3MmxJS1pHWSEV0Muo5MfaFR0HG6PoOrLsltK+3DcadiorNVU6NvC0s6aXb0gRVS3esnKU1QPhgNzK3IF7yTB+3LDURN7Nvotpxbzco6kiabAAq6/+Vvr7jAfdS4uwDolpmWJyyvILldAvyIlliCIVivn5FjTfSQtMXqljtMc3123rk8p/kJU7shku2Ox0HKjIkpxgtTN9ksX2KF11Zdwbq4/4I6+HETrciwhddBdWmQSrQ20ENXTQWi+DKpkGh46O6lCE1BTa3T4WRPSuIVQIAyqFlS9aNnV34nW6i2ld7kKBQM9q6ZAfuM9GzoNUkfhGBoFQw5CYySfvkZ0SZnU01QZeUCYAmBDlgMt+LtQTaiEuJbg05CUQF1b8AibOOlLYOeQlJoC8IeZ6gFcYCC8mdLPcCfi0JcRgl2lUIB0B6zd9uB1ML/9wb0vQZExLfZ7nz0WWR0zCsQuFN+x86QrujtcjVjiDEYfzfnVPfmWgeoqv7b9AMRf8D7Tm4H8XAfRHGbDmIp1PyhfbDVkjmbEMcvpo1iQpCQQjOGvQW4KNdPOSsrH7nKifTR19fh3bIpLGLoxSfUySnksXoE92MlYBYTGQ+Zpco4kW1vDYRYG2JCA4V3V18asx4n9VrJQS6SNURTPcK3FJufep1xkpKjA0knvZTAnmJdPskfRIxEE1lb5O+7/hrgtS2yCt5qRMI7WxodhhN5455IDe+qjBqgu7eAxod3FnLOYlNlD+NVSfMPi5XeM3N5idHD5NbiKdMhpumKhFy918ojlVR0/OXQykEMeOjFyKpJNa6Xl5+jUVgAEAv0vLFZFsJNqHsDUtSBYbLgn3YJ+gpsb0de0pZPbrPWgoC6o7QmqQJPtMk7Zqw2RUeC4d+jHM5rY6bNIVGdxofzEfzN4w3dOxopHJX3qdlkduwgG0bjL1fD3svcDj/s6nV4Af7HwXw/4IX3RSBjitOmpE
rfqoqFoYaSu+kR6deHntllQGMzEY7YJ5cL5BZjMRVEl4d2Fo+X98SfmGAQrOiefvIeUh8ukNMPCgpfGOeGpQx+wON7nO88ZJ5GcO+VberWKeg3Z1/schZITLO3TMuSRP44abaEvFz2qMLbE6fQJhI2Wg7Jd370Pi0m7YzGzdMTzBoSp756MV1rIALk+qAA+SQdd+Vdov70X+rXq5rsejZjKRRMIRBvwpeqAJa9xI8pW7uSfOnVvH1dM2/TBhVY/rxzlJWnE20YGCjzzmApz82lZQSjVOM4wS46arEC5VIIR5O/4pEjDOB+52ayL1EUH5t/tSVJyOdJY2xNvDIu4FrhscbmpgLEaCm+te6XBTRD6GOZ58SD/k4AIyCXBMlwPUzzMWhue7Wk03Mfv3rI8T1YJouNKGIrN3P9FurTHk4+saBhx6IU98jLvYcjMnMOpLIpq70RC6yli88BFs4Xu752l94vmbaEtXk6/uYPRgFKdUkBRQsofoawRA63Ruq7NhOf3wT8qKMnDzI25HqK5vYdDuEUQ+lF4Tr9+CbUhpD6fLBsLmg8lHieUOXYeqO8QSur29upsJE+AuTQJ4cXN+SkzCiRbqiKVgpNX69LTyxdWmIslfX3Ygt5IQLAdoSGFODVQfgTV+ns6muNrtwfIVumQFIYLjTj1vqlBRhgw0zrxqAbD/Iz78M+9baOXq/qyOFZDsP2FIwz7gsGyybTK94cExIDz/cihREuLsPUQ+yAzgZEQc5eNF8lXhR9YBDNjNzxWXIp4hEr6zb4l4hivPOLd3/L5ezVZ8d1+6E8leVDcdOCHMxSHj//0S+S3xCNFzKfi31RAqvOZkVAJ61kZhmzyZ5aSuvL8KHhR8mts1kTwhAF7zaw9P1uzm3aK++ok5cqquarY+4ZTSi1KPpW3+393QVc0ixYc88s/Syz8/4XnRu4cq/paIZun5jDcYtnx7cbgk9EQ2ExlTZCVMSBsF8iKztDlXCOLRpz195dpvHpKEiccgC1Q8lXieA67cXeOV1SZquxLi9I3C+9At3OcxMuAoCY6kdZlhzO9HYNhvKS5Eiu4bQL2ip7ESalYg0P859JQz1xgmcP9g1BgQjQRLg02wFUlX//kNV5PCRGw1x/USLFYvPyvDJ0/oOKb41hecbnXyWqEJ71YRQ2yf//qpJU79yx1c/n4k3omM/4TPJU3vymjHULhgCVEq4jeq0YI3PL7Fmb4yH8zgw3Pe3rKLC0MLJ8fNi6I7u9IhjtyP2KGzvTvJ71N3InmFN0HLf5zhBBP+F6Ke0GHbLjR+Uso30RRbUPPNC25zOFGnhMyBCwAcs4Ai6uGFrJtY0WE/HPmi+kQiMmuZ6MXeAqu61pZK8WP4GBfRgfj+/OO3Y3jJZfEKfBVHKdPcFeXg+QUL3mBlLR2GDwPwSfTF8skZFovnDmlcibCKMV/ouMLGQP8ru/bmkU2Hg5vAuJ7UrVRygOms4X58B1M5Sj28qI/ySs8V9YC8fRJbFzDFHOGg8EhCUJnuolN15sXiZYRUOwdq4IGhEvSzdTCfXfYZESsepCNkOjDDdndwWTAPcbGdPTXZ5qYoNzoxwsS2JLLx8f4LR70lwm6nv1I4hINdzjCLTx0F7qXZvnOXnSUWzMr5ee0Xp9PLmEEWVMpLHr9Ltq1AnizxdVijNnqjZMJVWiOqkCVvGCfxVxbLMwvoOxVVqfpfv99rYiEhz3iObxHOnSlxTMAjhrEVPSj+nxVeMtD3yKzGmJMree6TVWbSjT/e1wjEDdD6QaH/1GCwwr7r+kBKtW8QVTOjew+oHcDA3CbjE1oQUpXd+h3yv790EDfNee2tQlkAvlq9fdDA5bzgqC2BUr8VutEA3SvEkL40uVSwxkc+rqRK69JMt2UCgfz41bLQ40GAmg3xVHOn2Tr1/zi2Z5Ahs0sdQIFsHY0JPvz5Fwe+C+6haQq3vAU8OKiaM0Vo49jEjgDLbW3B4XBjrhDnFY55V+TPqZ8h6Mj+eKyLyGTDzO5VKwGZpjzXtKa8qd4NfbViRXp/Rw2Lkn44ZjAR0k9ryAYofWazB8W1qo/faYJAbU6Bb8+TeGZUo2HJiCBIHirJSBErNwK4mT8bfuo9WT5blp3iOTwTgtdgUpEwSBnYRvu8Ij9C+oyyoAeoKdHonOcn/ecENQRRvgxC2N2mi6mgjuR6C1WrGUQAFmG9N12n467Nv6m8DUf9R2qswOZXvpsqEejDIWleW6oKmVdWy3nVoO+Oo89DI/dJhfBUdTdg5xD3Or4cMjN/G11MFt6Vz4hKh/gV2pOCMwAvljh7jgNSkYU8ckr3W/iiURy0CSuiiDiboLiN3H8QZdMtvGh231jE5TbzmDrWqH+uGpaY8fhTjB5wMtCsjoxrAmouGPEJFj9HS9+l2B+1T5aARTkJeK+oWqr9BYkhV1+RpNugkYeKocRyIQHdFjvyTmRpex2+U/eavN1gLdFvdYGHFTDDzvN/Ye8dblIY8ZKZ1hHT07ESS1A0d8/9oXxEL9UEdW+A8eKqunOGLqJ1VqL7HHf1kX6h9fPXSb+sbj0dVYs7bmwGsO/XriYK+GZ2awE2Ji/w5nfOw/OXx2G6wTxNeb2iS3gV/ZrtBxVMttksjXH8Y/+Vk+856bGl6qw8Juxx6xTg9+5eTfKDtw4UFng4/9GinJIO6z5Tld1DNn41wKTTbhFOxG20wkGtsuspT8qTUnmbBLsCUfb21WLw/AZBzSJjNOWr+Ju1gl2AjsoM3gi5VEqsAeMhPD6tP5c5kfpCQrb5oai/rYbc8fM6317FpOfGy4WeXM+/HROldgjx8jskD6cICuNatxykVXhsiCUOnCu4qBRdJWneowvmuzoUBHJv97vEMqBmP8vwCcCR25w85jtT8mhC5xeYu7TWiPJgTshnty7ZemNM9EM92av3FlFpkxvtJNcmV2yKXiB6TuNzs/AWIKXCe59R6eOxQPQ/yJvjBI9UH/pWLxC2fUZia4il0wJZjHFz0+bUh72iI0QHIXboSRYZe2lg8+3FhTyler+I8aBQcVJ1l813nD4uaBTQNuWzdr1JyHhuO/hXqeXXS7atzsSwsKW8W+A4pP3+ocxE7N87qc3LgFhW1lTvox5hJLj/RVIsRSAKy2kjgHQL9Laovhex0UCX4mxqUMBCqOAgDuDjR6ilWItzBT0/KL6v8xW9muDRK3ZJVNNpPsComkLrVl4iy8rYCrjmIsRuQjpFuVm8e0Rzg5A3/klcaI3t/J+XLpIaCZMSYJh1Bsfhosix/uKsBKA9lQalpI1QoYQ8mMc1sSwLRkchNFgRn/itVMbrFnSBwQ49pohrSKqFMMUqI0InYVSOe65EPxfXt3D3/wcIqjwq8slSnerIHRdCnTlvSBXuqF05PaY8gGscCeobkw9YuJuFPM7IbpqdRJL1S4upNZuI+GQoyjanBrmPvrBk+7ah3Pw3hLO61XCoYpWf/OdH0cXOMKeLxOKlt6q73ail9095gfadPjGEIuSt56WUgKzwFwkilv4AUXiun8KvBibjRnH/flyvuHw4akpnJeB75nYgVlx0/rIKcPXDT+85o4Qs0lCuOrn0KGdNLE5kZz61Sv372wwTBc9E/xmRGja0m0eAIlSwnGVRcz5UT38c04LWRgBpC5z79Kt9Q4qjFxoXRr88zv6jmkpyDMZw1hMBkEntK9is19HUPaFnAM6OnNQFTUewz/8tMlZHG16aMWWPiT8bw6E+nf4zc/my58IeFIXKqRvftOB222WAy85WlQeItbqbm95SM0voJ1zl2XRhX8/+RGzgFz9Ha1I9wV2bhvfr6LQLHNeTgsZxY2UmEL9mekRIEwxv7iaYsOvvgIWkMc8Qb+oOJgTBQgTeGR3PdYOFAsIkHrLU3ZedlGSAKsJVZd4Nwg8DgLLXYB8NghvVr76g9qaSM6U/bzJ2Vb89xZQl591RD9pIIDZVqhsFIVVxjOkdTG2v++L2GLga6rf9tzvCOC6sJN0GKYkhhdKAJpqzWbkDjGd0P0K6DOh5a3xPf2H2jNWv5r9fSJ0YTB5oO2wOiJjXvI7BFugptbhVdpyMDiSlp3/AjnmEgFpS6sVdbR5oFBpKhKqATgfu
j9c/yMM18jB+48qHUXDgiUKPpQ2KhW1b4Xe3Ts3kdrOlE+T94YXgQ3A8YaphgQILOP1V9sAEdin1HhOLUPLJ5PuHlhcNhnH83UWYqTs2JegBN7qGpQdxphRAZlJ6eIcMgv7x4NzdKVw6hJIEZEB/cT96mWnytCWnSz3mkNVnZRNHWNPrg8JDoTQ6MDlRJU+qclIRYV4O378F/lTiH1Zm/HdXURjK0f0TefkMLlSwoFaRtaRlrEOAlaUffvIRA2E10UrnZJdOqVK6rTxnpeHORe9Y2hGpivgOppLxyL8RFSX5LL+xU7jmc0Ajd7iuGS9U/qQ8GoB3DNxNdJax4E2VlbpN0kD5hzaTGb8D2dul0OHeaPac8IhSsXKldxjk3q7XjAOYPt1qwS+HCIFJ/ybr74BT7f+Mrm6UefC3olbJErq6uZXdw8YoDIJhjVT7sYUKuHvvg+ttJ36IU+LVA8rUPa0M7QO+soW40gF7RBHB0Wj02kJrJsd9KjenYFDzbb/dI/+VWIbY5sZKvb3vUOQ98uI9ADg+4fLShFkSQAYQBPi1AJsebvEsjL2ZnzKqOisw/bYVl2b+U2Fm6aK3lB0NABIwJgkMZzow+/duUE7a3DRS834xQSu15PW0TsgS+Vn4JBd8KdruWoEftarnLmRTQfS52lqM2fizObM9tYbcMwvp1C3cCFmwpvx6Q6G5NqLpCM7vSeNgqfjs7wa42m4faH/k/K+VslIiDkm1nn/zGMh62mAAvVBSsSqaxJ2rWwI1S0oSH1G4hHbzzzoemEnqi3og1VycEQxWUsDxETgjygZNUPrmxrqsV8i1cjUWRIVglci2to0+VD62+0pzxcKPE2EghEcMEYmYMF+UgvVHhbRvEEXn1oefbxmLYcbEywCZI8NFl+Xx6faBt9sXGs4x50c+3vpXFBNKwZmjVYVRdcUiEODy/rOPIROPC6z3tFDdFnRgPXiik4Y+LQMkEWwoEyBv6HyI5RM+27dxjU37gtBkIZuzzt/hU2yrnqM6fCSX6kTO+2vvOV47lGUKcrnt8v17cGRmx6puT/JJ81HbgkCGFA02IQasgpnLykUYzSzYvpbMYpg2VTFes28no+T9rGWgeBXllcVY/unzUyUiTunUxRQx/XhTvXo4YLUTu+uJXUfVE4nnjGtuomhwLr60idy0VGToeQVE24FFLlM77t98rJ9bRU3eN1As3IdmMMjP78MgkjdS3t4AriTCjzqoTds2Hu7w9x4Won3rtThvQDfjCtuvVQBEZLgmnGA2Kng3E3iRaH+M3QXQfDmnd2CimM1xVjXZiBGAHEVSG3D4ylkpT/89IiRsD8G4F0Us/bBOijnGEgrOYyyQMVUOppvJe6PeCIte9TDEyRDNc5v6KXzrz6dx7D3ddwICj4pznl1J81vZU7Wl0ETdr07nLNLCJ7P1JM6belTiqauv/flh9xOtQrqWQFYRHMy05ZepkpGqm8cjfIUWc4cF5LGvwMqZ5kUwCwxzkfhnUp783SKYLqWB8ThHn15QZrPGvv9qr+jTq6WuTn8+Fb46Cj6f7NPv83WXlI/0Ja1l3AgFTGMu6uYp+CHz8bpu+i6Vyigs1LRnetGYzEsZcLVxeKz0oKJtQtdgaIbaaNFz4+VOm1v87Co2QG17jcp9BJYCCr8mN+3IUKCEYC1OMwPJDp5hn1N8Tf0YOd0+g9O64jNB+aJovVhgjBBlvsO9xiy3xn0080zzlX7yk9QLIHw0NzUvcbUTHkeio38b7s1PuuKae7Wz2oTKNXMPWjpUsgQitAFvHG1Ab7QaciDPJxvL+28q5bYweekk/kUJVE82IjNRp818H0T3kmUITW7OI5Dg8QOc00k+ROiyMBgmGVPlzIUnj28P0y1jdMS7F81YVWbXiSpkAnzs9JZV+ACmniJ9cSY0Cgaz7MUCCt6DuyNiqjRpWob3P3XeEHun2yF3QNvqKfEHskJ/uMcvcmbHYaDs8vMRXcBpX5OsfoiYw4rDCs1caYQXUeuvb2flj8xa6MIidHBYfsVctcZ677TNh8e+pvrEnivtd7qovbU+qTFw01sq/Nm/iUbCsZ7mTgNr6Xct59VXiO6p76waDZ1Laf/DbuGd3/3TajVBHkZ1gR14SvmFiuQtEgZQWM1trG77ajKkRNCMW4JMfGEGuQI2/4FTHEhqgRiIaT1AxIbsiqY9slx8RryPpst/R9dv7kF3e0WNcvpZmL8JfZFkIuwXVOVYsxJ2zUSR1iSJ3J6HKiUvYJSDC45+ZNdimtqnIL5BWNk18Dl2RkHItxEfrVRDyQykJAEwHLtGd0lUDT2XJkMFMsG2uoiN7L6dRoBeFt+5+FxydiUbl66BYz2jxkCWJRaquozwGDmtdbKGCTV5qmdAbAqQUPP+MBOLnKvyJNQ0H1RqwD2zozy3iN0fJf1N/WSj+AaWyUyLJl1HybEGjd9XpZszxmOdbCzvLO8IIQvR06fybGY+8uyXrrnKsPtM5AO6DM2M1BuT2ENQ5oXi02SvROl1dZtDe1rXnI0nqHvmmNfi806P3svJFJTw7yUjCfwppyFeq9ovQGvmCnOs2qqYuPc24MJvhK6Bfj6h3A78ZBfgkY1By9ttlaExhk1trJbOmJtOJQRyluo7WT+EDjTVgCNQOcx2znMPLG2TFZlvzVG7i3l3sQYXs75rzJgUHLrU4dYQUgDGkjlHJ5clybjgARq+j3m5+u4P4Mnnoa/70mWIxJ6w2amnfj5nM56XvcUcEd5Uoq5ook9T1OEoN6DvO7n13L4dGigY7bOXVDNQ8qD5u/ZgpPl4BjnS23s4E1giO404hjC+uvXJTW8FhS63n41vKw+cwwx2r1PbYHY9AizdrpKyncAOx6G5dOWI52Djme9LI6NxwTg2IGFegi/BLq1jeJydVud/WD+Bm+G3SxrZnAybc60hevF0bHRH5fmcZ0f6aBmBfHYXEF4biq0uwi6VAZwvhT5dy7YE5H4fO6ckwodVGj3tmBbuTtFb9BqMVZ05SaZXoyS0zSwvLyEGzpYpvzl5yibkKjjEW2qjHYoXOvQZYC0JT73FQdv55yyA2LoyuM/dAb7hl3+q61puC8oB8U+sa5TMoAkRw0mlj4geBMAi0pXbvIe+kLJb3DvWzzTrIDSgox1MlMxE/JmZN7KFGuMygINnrX7kFZOv/kwYqbU1LmMPyA0lr9p5dUWyQkk9+qJDZF8Q9/t0sEK79/V8HhionX/GijJVvP4Tl1C32ocX5ltOEchiGknOQqDWHfwe4GGGazY+A+hnS7ITrGUs2xoDDdfBSvvdACpzbIxKJljljdrKFuMDLkVNd+LWwA9+kwfKzPbVsZ6/gkjpGlTtyGq1qcfBVa3x01qm9/XIFP8cES4NipZF/Ev7MJunhjjOty4RuJTfaEZJbbcmfSisKiVQTRwq8A3ngFUub7JRcqgLIucO4bs7w5uhVl0WAGpJg2XvaUd9YItQbJWqns/WxJSiE6slZQCLMrUOcCtaYi/oLCOvRsdkyO4FQBTg5D7fibggIvqvmH9xGcIPuJQFIcGRQ2njjnX+UIt3i59ifyZgP/o/ktxgmmDAeWCdc1LwblRi6PVqTR335InRAxHEbN3rVK/j5jDrGHgDodihjn8cYkwk9Tv/8qmSTWCnG4pwNjUT+1+HAcdWURYGh3MThJX8eKRSAC+ZNG5GBZbETD6Dr0imaBPU/eb82QK+7Agj5kHv3dqmf21bisEnfn0A/HiTGbyBX7wcrhsOPWiTatDhytj9Y0c/UzJJ4vcvu8VYidOKOrIqRn0hjkgjfp6B5dmYRsrUw5X77Z8qtWJW2j30FlcV8gK9lV6oiYVBEiO6dasC07F4eW8RUpf0CkW5yCQsborNCGVjTY/eAimBM0zsCtkEy8dvOhbkabcL9cpF4BOfLImkNYpZXPkPOwptFPIbbEnCNi1g2c5XuHT/HjIp8DkmtDaDfkIHDYkC/LTDUjt88aqOexEaCfPeYVwg0OUnF04iJa/+PtNmgjLic2BiZIXWGfiE/bua1SDXg/70QdmaFLMmcI1I0kqwzIpwtbpqjWlZWK3xIhTTv/QOpHSzlE5fUXZ4sdhjHOCKQSUcT0ql
xoT0a13rbS8KrpxnOdAWVvNDM1W4z3O/p4my439P4FTGPhTOOm/utpfnS9SV4gKkAcvAiey8vrFaDnYd107d2MwhIM9L1E1daAYl8Ds2kMCdCeMAtAOpA8R8avXi1N81j9FfOr3FD9wwqp+OwXROSt/bcNUO7koVrTZ9NWWYiLQOwUOQ6k2VJv4mOLOPyDix/H9Wz66tXLD4uXh3vqaIaQEBycm5ZSdhdeRBOhgnI3qzybQ3xY7Fi9Nd/j2723T6PxjOR4oKDqYqfvQsSQn9z3JTdofm9ppSWxTfh1qxIYfXdIkHsPENl17LTjlCrQP3Ucg7ZyPBG9mSNHFWBbZEwIFxO4+Wj3/xTtaFSYUu42aH4PHaHipYbF+L+FH2HqvXk0WMcSFy+S/iOu3Hn2e7MuOUQUku6aP9ylUA6aFpOvlo8wo8i7dOSeSetDwuVpJmfQbhDm7HhtGKOphiNAbMUujfXGrZJ8/tOCu8YRMVrMeFoCAZkv1SwRteIv4SyME3cUCJjr6BiC6i5J+6ue0fxNlL4ZyZjHunV3UfHMEhl+gzht9EazBFPVNT1Qr02os9SYEqctfvKQFQW2U7DHjl5qiFwjFmHmKnRBCIDQbecbQ8unp9Nkn2vVzedj3aPOEFWJPamBLlfel/gNuNe+Sk9z8o+teZxmEkCfaXQWFvQoEQWaCl2FdDlE2HXU6yGo1vIYq2TtW0eLYk+pIGnb880qoGoc+XpQH7shGvYHDcx4xJdZY/zbortbhzC2RQt3DtZdhMYUTr+nz1xObNh2GHN8yijnFemg5v4pY2O056IWXNF1DGUHfhQaGISkJjP4Qu3ZmmMhNVVaprlH6vLECpnsWk5HmzTHGoUkKTuiIe4Ux1JStc0iDeOpICuW9XTx0y5Lrku0g8ruKH8GrN01XPxlOa8nKR03xC1mA6SJ7fOC26o3eLxgp3xXi9I+aonuws7eAuRNUQZ9yDKhP85TX2hvu9xgoGt0myuBtzlcfqJMEn9NdXUVvrUh5uxdOltl+nr6vWFuqNb8p85dDyfiNYVbJi4ucVwBYElwEkYPIVuU+NWukVMhnMmLKru3thXZNosQGVLmTZg2Cy6YBBA9wPtMeU+3inIqzwCAAMSLZly7RtBBYcyblOPpxuiOM4B3/iVqFnZhaG4RTtfEaENJKfTtbw7fdR5kXANPMwHbUX/SdMC0mkhsszq8bKaGsbIZtcy6a65BaIj65IHiDB1yhiDs/gxFDgD0fqreP/CUgTCIvgDnX+TyQ6m++RPJnato/RxakvVk/IXMlunRiHLAtuBp2q4uFZke33vCeJH8d6NinChyPzykTAziJLEUblf0xdOl9b7dZntktWo6BmUXNX5uWkQEBV3/NYR7vXCctQq6Q9BvBEMxmNV++RmQYZm4zM5hKaiOw9vjpi/Aq6MWleIRFXhT9bz5QzIpSs8kQm8JSgjIJDgZ8KcVyHGQ083Ct+Ki1olBWEb3INMLfH79Y2+FwU/doPQsXHyJI5kg0BADjCWsT0GeWpk0SB2FhwERcHREgV8VrRm3WNSkDjIyunbh/AMxW1Y72Xm7ktvk0jiqE0tKS/yaDyP2BlnUHRgUYBaNj4Ii1K8ac3r6y6OVNhWkUkNx+D1d3YSsXAkDKu2rImR7IbdcX8vNF0e6z/vDcxfziwRD/rBiSJcq3p3tGBDnFuWnINYH6frlzamJD3K7e65ai6Mhz31XrqNckofAvRG40hMlRV6XFjyRggo93R6Z0szB1dCtk5gMEG76E8RHP5z5sOybyAl3epKCJ9iWkxXKIFGmqPnxOV3qiiF5l+EMckjphcVXr/Ovz9EK48kAA62uqFcgVO8QSOrkSPly0+iwa/a3ltIoMsvyXah32dM+rvoBFJSe4vZXXy6Jf69pvLY4vN/KHP46GGoLYzmCsCVF1qMW1AGJ6OBf29bIROdPCU45iCrzTMDiA2F89Hc2WSdphUVPNR0Bn+MXBfdGsT0Zsvsdk1L8QPX4exUzmZ6+bqPUlC6FfCrEwdBatCaNst/soGugdaT75X3hXi6jyQ5hg1QbBj+i3RKi7yY2Ffnn4FEGtSgInz7Kfe9D40jO0ZqrwC4SLSHdZuX4W+Wha0wmBtL4jmFPJ2oy4corpLjfnViyUJmcMjNejrIK2PHj2Q5+M/O4y+ouBYKEnRSJrIdfsM/0SHIV3zN5yCh5yAhkm+7tVOhf4JGxvKJKtaVUR810BPtNj7hJ4k5yrBWHhBLxseXWTfh7WECzTxgPWr20FA1HAONc5jer9oWJtqNpGTdOuZCSEe8ShU3YRcMZ9fKPOG38cKGGBHIxMiBckqBmRr6wPKUMpPubrMGa8tdNnEjs1jgOMC2CUCW0VnIKwft/MhrIO8lGERJ/ptBxCzzbYGZHJsgOdlSYwCdmC02ucirOxmawaBH+D60OLKKDuKiAkvxkhPP9CKd65AG2q1mFzHMpbl4MfO6vwCTk5Cocevf2q33zGlQ0lyH6BfPNheu1qKELd+z+TXmLoM0E9hLbZki+spBEvvS6ZR2JmkZzYObl/AR3eHP50b9H6lEy4/tlRk/IIxYUtCeIFG74xiw3XvqjPlxV/gDJ7IQcpj5p4MM5XynXyRJfBb8y0N4xkp6Oik9aVq2se6t9nz0fM95DR3IkWHWgD00S4U7m/a5es9bCzMeHpRvCLMuyMj5e1ci/NLfzi1k5faydl+qYOOJJg9NCA1wUQYohg640ZaTavz5m7J4C1v9IFstdoT/3SVfRR1IY4kBOWrhE6z/+NfUb2qsaHPjxntrnIgZLDV3r3uuuCz/CxBSqYCrIRYrK8izHbZ1f7BmyEAmAv8uEGMDkvpJ4zS94zwfXNo+j0JbXxdtEQXvPs3yRPJcZYeIzo78vBEuCOkCyjzMBqNHJu1XOmV+/FDxytlUJRT3j5k+AhYDdyE2TmLIEjpBp4OwQShp2P8WQATtqf3N5F3j3UJlnaUlOqH1Nc7kHo7w5zZKmoWjsgezCxp4s0FqJN42ge2xvCNgKKQak9HlfjzhZqfAb5cCsGpYfKQNxWUZ+X7k+OroSf/HB8ms7MNZVvhSVex4nyRhsooIREYMjjPPJthC/qbc5ujUYgM1epazI5v9F5iTo6qFmj3Fu5xgdTiOlq9qppcuf4qciLjt5X1Fsf/360g4ctjUmI3rHC6Fx9VS11Cv4tYejUW7C1tvceq8w3t+C8iHfxGY87FsMZZ7W19YXhg6ZY6VRxo0ZQ/XZ4IvAmW4tVHzbG0bAzgDt95hTHin9YdvwIYg67+s8wvWnCxMKwEQZQSxagPE7C2FnObn01T6LrtXwUTIAS7soeCJIbXLzM0E+NhV+nDnz55WHNnF4NV8ict/yJImTnRwid97ia+z8WuIe5mOaCkeZNnJBO5Tt8Okz2aHWayV2pJ6PXV0nm96NNlNFdwfuLym2ZhPGJDLkroaOoIiFewCO8EQGb3+sXudH/zxsJtklzNrRxjzF2c6ymmI+NPjNFi4mTbn+4i7rvNpFsWWhtYk148/DNtN2TXobQbhDaky5uy4gbXUFMLeTvpa8iM98WXZg8I2AgJ5VvgLzky+RcZDnGcgsmiQkCAXPJIMpZQ+6llB4LNgh3XqkNg3rbDrgSDh1Sgx0DVOlQFM+JI+uUiyXH3gV4UAXMzRBAU8CDvqTPk1M1u3ysQsvKbH4yE1i9j4YmziMqvyVFChOOHje5AQJALYMWO0XHrUiufky5hLbkhyeBBIeOi6BFgrh3ePRhQEnXF/sTASKihpqpqKF5a8zR1PhD08RutEcoBAO8B+ZpF2UB0hNYDjauHObGoLbM+2F/wHekJf/Xgtgw24r9jHtX9MMRvxuqDsmnR3aW4LWlY0FCRvWF1lgqaXlBOwh9gyhQOaQHqTjf/lauQEU+VQKCt8JrzL3KWKIibj1I8ZMCeQJVAET5Sf6vHD/oyBxOl9ogeuf7O3WMYihBDZMyezdNQbHQvqguN1UccCl5Ji9NivPNLtUXEZLmrrg70iuC/uwjrUMlTMCAlHQSWBIUsWw9uD2kajf7vGxTYP53AKJlWRhAJwPimDxa/xF5OnVsfwXak7BdzyHo80FcK/x649VWo1Xv7
Q0arJ6pxNcWHUggAV4YNNXbobjkGD9GxyO+AfzO72XkU0GsylNcEEQYgi8wpbaU1UlqzI7Y8C+gfvbOK5hXKEgU5sRcVhzzlWUGr/Pii+IcBA8zb4oLZ0bnBBeNx5isjmFzFGbItAHT8hXNamR5R8gPX9p3KHkV3YYF64k/agGL6FrmQ7iaPtpmkw50zkd4GRJ2L7w+wmAv2nPCXrQXHgb2kPUelZ6EKeX7/IE4UAZL3JVWEOODLniOfg2esIVlyvMWMh/Sc+zV24iGwtVyToxW0g8KrLv2R8u6wk5XH+f62W/Pi5pgkjUlpgu9P7Y7HpbxFEOiwq7twjeHizgyH1ZXxf5gGh4kc2nMoIshx/vOWjLYZvXkrWioE41q+cn4T3eGmJDR1fPze/5SGRt21TFOJFj46u9eVFc/o5u2fqf7xwCSV93GXWFr3QUk6ZaClwkT86toEnbR3Oe6wIUuykC6NdN52MYanaApu+Zh/xOEUBUREB3D25biQs/cd1rO9Uu4LaUGpWm99hbp2DYryEY2UFeG3vhdvpO2jM//PuI5mEvy5IAzNg6c5euQfXIZJP11KRRIM7BmVtSxm7Zd6ZJvGD+wUVWkplWct/9rCMfQvbnWOvN9pegRA/ZiwYkX8xXF62yMY9ZN+NESDU16aW6RIAoFo1rgO6gcTDCjk0FxANBIrZcfNhV1pVuzqRCS6FIgoLIviJ2jd0QeaxhChTcLWzdItNE9gbCFJcGjMxccZC5/DOv4lURz/yHE07ozKoQg9rGH9OImHz13SVzX4pSIHlOK1XUI13yhGFNzagdVIZrzzm4Ow25SwVipwwMphRumcntW5yCO6T5iV1miL1KQR8xJeu1mF5pcbv1I6mnoMYopHm8TTPkWBw7YgIBqErFRWqdXCnM1fYV/Qpr9QHoYNeGfrA2P93WkRMNfApNgJajqA76q42+O9FgiRPvurNlgMqOAOwORFtH2xOCvge97OgctktxiPbNTDVKn6Le46cfA0KTIIv4eDQByM/wlxUErb1/tvDR753kJXMCg4MKVXe1e+1dFO6FHsUitR8o0Olq1bNk0syYe7EkKh+QIw9hHXxCzlKlBSQgWh/Li4SKQpBIsmYEH/8KJ5XRlmlujqyaBRjxFHxEx3rN5w0YYLGTKzCTsECy5olhsD8neDHdi3S+CtyGRJqhH9A+F9tGeZiFMEawXyJPUjr1Kc6RoY0KunGzwasrr/06cJ+KMvhxoyVevjGma0+9ghSed+BhMprxCzsrwdBvaEo+oZ5BZ+cRxQGx23f3KqiFeP2SIjn5+/VCMsMH+m0YyfoydnwOHSIJZ27mDghTWLOku2t1HwVP0h/QCoBoOT0My8BGNJKwrDvMVwhSCfKvD2HdgrmIOek6TDcXew29oAxoeNIOjDG1/yF6WAySUYlYeJ58Ona5951SYD4rQ+Uhzj92AL+DYAG7wNLJFh38uhLaeTubej8nzvoPTAtmDQRxirIeazc0dsbl6ZIXERWHs+a9sKazooNanYM2Bh+oxn6m4bNIApvtUPHAeKsrbTvNTkRjNrT9DajxGknzPuvYlNVV/On0x7KHjjQOuUWEiB46TX/a678LPFRZQIJuTTkF17LxvYqs3iKBmMGlLNU+mJpzGsit5FKF5f1uM63hirC6wH2hl6WEJbnRABijV3FTwNs77sH9NoNtaCWs3JbbdbJZzOGy7n4lqrNTnmNtPdc6EPmcYfQOPt6lHjLMtmXHu7hOEaWebJwYzBk/4QpUSZAzOsZdqJ5NG1w1shCECjTSqoSsIe3UfbklZgyrxDXkbAhpErisVkyssc+gAnaR9o33cCVGIOuIeqFld02pyIAPYV8fNybxNuiKOR5pFR9uxTdNsSWuQkSLLyB6uwoY59WzfMzz4LIxdYyKAswQ5yXfZAENNTtua20bWY4LoUOZ4wO7QfyTCge/QDxcQiqEjH18+Kc3Zqq8Pvc0cSllXDAjIBRCilkjbl0Cc7za6QA2F9iZh8gELiYcHgfvwvo2xI2mo22OOEfC43+TJv2eJ3qdqBWo1TO0wGJkYI9h0VOe/w+PQ1G54+k97QWP/+u4IuKdETHvNSVd55tl/EzFtixVBM/d3k9ZWQBgn6mLf7DavRBNInpdsCgdJ5RWE7iKDqhe4BdeoPo7Xoyf5V3rKVreNfkLnX1HGaBTWiDHJXomj/D0fLu5eaLBT4Mkyfjw1IVz/smeLe4j8weypqJaGkPK9thRpORjX5G4903aNfqosDoPdWOHYnuJA4QMWJUvw1JIfSfnl3ORpUOnTK8h3JYmiQJAqonkdiN7LdateuVaya5L2ANP4sKfh7/+8ih/1nEm49jaAPgGCz7acTaQaaizq3HjkggxqxlduhBQvuCVBfN9/vvwWpFlp+ACAGzF2tYS4sAC6AWgQC3DtwFbpYR4GeyW5lFI/O+WwLM4sBX+NjlvkEMQuSDBIZ3KMpSywRi43eOEfRhJjlbpGv81XD08UoMsC4DclsBfrHmxObvwwSluJ1cM+eSHRMM0+6PaqVCg32L82/ogU5UaZKTnsaZOs3isaxBkjqLuS6rRJWuF5+m/law39BCzIMVHRdhXwUKDm7SJGvQ8werRKU8a6KUP14GKAv/lnWuQXz6AJpP5EfFiGtsBDTvmOtV+9VViySZu+W7ujnBAkLkHzuh3cyvhApahypdNT/s6mQ8MICP1ClhgLxNbRqObNK8M3PTyCvBYhytzUQW5K2136iCbZNgPAs28mO/kk2FfWuJ2fXPL02qXT0WuUfG8wdL2KdH6tpnlyUb/qVWr1ywUYFOMHqtf3bJEcOxG7cDKf/rjlcH2zdvbMrmEJJOeDITIvxdBdCU1duLuAnMRf0ac7IFpOiB2eOULjWydyInOgN0Rbz9/viaTLVNDeNZMQET1tOxzoOfBctWkXegXSamDg3MHPQ15nf04dVG1IraMFyQzLyeG5ywLZDUAid+ZXejckql5ibuJtzcSGubJw03UOk92QVrG0napZg/9ep8nNfnNGl9JovLvyqdNXxg/CoXYmWbkacKgw+YZAMMX0UwdN+CNt3u8SuF852718Afqh74343aVF1I4GgRawvItxm29D7aN3CXhcmbYLQMRXwd1EyV7R8S3KN9JiUIIIQBvVv1eufzF8Nkf2/pdquET1tQXrffDEsoI5lwGZGHV4eECVe1yse0HUGc6jXWD2UKj0lHqDmSaMR6DG7JqeyWTfsDfTlTYLdNGGMkJ33rdQusTt1tNo5mJtalVZcUchMq246hTUmNGk8uGej9Cv6FuAYkXGP9PXhQq73kMi5yuAEXi5Or6sXMhVXFrs3CeILZYPuONYfSKwSHgmqcvRbGajUvAoso25cpO9waAX33b/8jCc5x9jmN0A++66bo0JTrxOALl3akF9ZwY6xW55jgC+ECAAM/ebbQofM9Vw6jhk83jUhdLy5HEqX0Gkli5fIW9/c0QeOfVYek/4k96xgO3Z7lgktFA1ymxIj2KOF5wur9oiD1vwvvIF1u5illX1rKeOJwQUPdDG5CjuDfOuNzLLCj1l9iheH/F8rI+SuP7jLUHyOL2hbu+NtwaKUhrcO95HTv6ZpVcMahk9OsRS9kbCb9gybnQFApKzfGhV6rayxZ1akTIsAzM1oNmLGXGUMW1KdCQd6iwtwV3mTMPK5W83DVEVtAKsgmgGh7woDeP5EvvmzqrT6q/Q5KiZNmRiT3lZgBupTX6BTa7ybmYIr4JoZ5eHSeg7Cf9jwI6ZmLCywa0smTIfbi8WzLdItaea/GfvYb2lWVzTS69J9mRR/qMEwwHFDh7Xbe1TfK3JJrLw0MNTKlAgc2NO1VOLgbA9BFqiyEfubTWHrY1Jtf97hZRgnbUGWgyZ+BZrtc1mjRltjRIqx0uJih/fAu7Sy92Zs+kXDVPJ4xD9KcOI6TtCsaV/kKSP9MaSyTap7ut8klNNGH0bU8iYuGq+DRav6Rm7vIkv1hG3SDNWNiyaMHK7z5LWBjQSDYaa+ztyO+a0Ec+ahyh3OlbcHVH3Ri56wErOZ6MyZN5VTVZp78Dsf1T1aLdA9kxZ1IjupWK2lpJw1slOWRvC+sRV0M2lNuOJ0
KLqDxLTUclyPwuAe+P+PELDeLrjxxHuJn1OuzDpCziYxVwN3Tp2EsqJ5F8aA7F1JDM1oqIxnOst8ue1QyIDStthmM30q13r3TYmfEDkCfAvp6B3nbTbZ216/HOPplNa2QHH5YJcSYGul8A/AGpScaBz4bw+y9JE56d5sQr5ha/NJowdDZQZg6wNFwm6D5bUQ/Hv4wnO1iIlRyTFuSb0Z3/BpXJ+eCK1GSXdXMzgj31CLJ0K3EGF8z2awUj7u4c/awr//C8mLIadQU4JRqVTg4RRXMiNVJySIVZZcZs/2/kNwIkrTM2vWflShnfwQ61jCBgQH4VEwrPs2UDQntuwKCm3kbTWZgg47PVOAxIZHrDqWytBkw1Th0tOgqB4daPBMGNuHZ2EUgXNe2R4vfMr+xpM9kMy8R+jvBmvLu8cNoibpAEiqlvHLRFmB0YyrIuiHY0asRj7vjhqdB12ocwxdn9oHhJtKR9rMJhZrzrhWN+qE7/kraPGbVuVGaowncJYkCuaVye3NTFJdZ2uObBHTCCm5KmbGJ0MmewKmP78KiPFaEo6vqyaB1lqFHneB53WGZXpvuCi5qi+ShLj2C/nRCoGVyrlMuFCOCnsCKzWfZLCsvKuktM7ttC7P+GlbbT5gaKOGw2cXvIGVmq1W1DZYjCFOToMbbZ1yBtFl55iTmMpC/2/U+Nw0icgxyt4CmyjAbGltwoeU9fST//d230xTM37VL+bJQ2M8lfhihrjECxIHHdH9sVSHgthSBHHvO0TefwEUE+FM0GZiwnh+e8jnTzqEa/IvXi+xZQvhXYcRLKEzyXFFQLMh/A34OpUj1oYnyuAQckJBpgSsz2lGhtKm2jZVGHcVzMqZyP8rL61G6IpEyy5kgx9VvjR8dM3jF9Z5wUvPceAjrXsTBKuL+61VXc4DlTwRs8OPt25iRKr3tk+JMcAZoKy+hT9HYJbkxD5rziwRsZao3szhw9ffmsfLwl7xhb+lId3oQEZpbpq6HHFmZHXJ3naQQUpDtTkDlNkwhQqTVuEDmN18NiUbu585sav2bQeQQcPd4AJiKNCxXa3WGTCiXnrSDu1T7EYVvTT0IQYF8M7H9vXKMC0YIPvUEK6wvqT6GCODOW6QWOmuD9fvJMKbz5kPsX7Q6dxLcDSwQh7a9tIzfp1vSftOCoSev95PteCzAuDpVlGl6yxz1k/4+8AtAVimBqiadLVvG35oLdLxsrWS09MWBWj4xowShxLK4oSTx0mbK37ijWzhme+JSPwU6BvN24y8PhnTHeFnElXOZVDdiZjJoiRrPDJ/UQ+GDN1baduQJ6TqL5VhZgja9W/zElQa5a07qJVx3q2BM1TW83cuUzoPcQNfcRZ31NCBSuZglmmA1TNd6WZs9i5kv7RwyY0IYcQ6uhSW13yeWMYZUww4sTsDnlsV0sQZQxraQ0SosG0rOBmtxOyvbdta6+MAvDRP9yM/+2OQYQSJw/FWi3VEhJE6fs6dr5SDTaRlhmT/VyNvQn2GvmOP2rD1DwCwd0Wq2JdsrDUWiZCuwMGfmiHcsmQbXTM3GPvSye6CtXdaOZigjQTvBwzPudaFG1E4o9c8F+DlJr3unQREmpLgm/p5NHvkf9sZ91zsyTh9+cDpwmNHqU0cTwdLvHUPqD1OLljqoZg26Wzet0b1z6qawNZivDtvg1H9ZS4QLxLPniWZoYadSvwygZ1oDdUuA15wHCHsWMX0C/7tlkyupL8NAVRBRwIrqXWbXYMga9FsaF4+MkLSv2lpeVtK0FR68jPmG5E0rAAsd09FW+AObf6lvdhS4oedqmRFFWa64cJSf5dCviYh7X2THS09G7bU1d/eEbNse5PlVtIRsxamtSBuR3OYw0xVlCoO2i5hdyMrcBl6kCsZfLJ8CQFehZzf/EZ1DqWh4VcmP7ZAe+/2SsXGoMny//Kwh+zpjxyzqaiyFFSucdrqR+yN7xBxSJnZkQmanZOTdeZz1/knl1GarlCea/BAs4uPPdBBNAmCoKNJb2UTyPLSYS86G6ETR8S4TlRz2G1i1VA6l7uLrT3BcBjGszc2+T5q2vao/3Ipf0EbldC6yt+FQRwp/XJn2v8y+ahb2KbZt5DLzoFngMPVFTeYOUIv/X1Y96Q1FvpRxWapohyMfdUQZefpr9UBxh6mwqEEugxPHnoHZM9UQN2xW8sXUs1hXVsAmlik7tQj2txn/4935X107XmXAlErXaRyDzYHupGxw71v3yIUI58+C7qXdH7D5SrEX6wsxJ+kTKZV4kzlgtjxESMIEvp5y6uR0s8q6qTXB4X6mFGtfjRr46t7l4swLrb/mpm/c7Xw2VrInX5ANmkX0q44Xh6p1toSLI1nTWjhooTwWAI+42I7GbleqrzJSIVm2E+Hue4/0AMunXsMbGHMvPK9oGVxFo7yWNwkUPzRqK/bauH7+14HJeoYvDJua62ywzjVCKKt0r4/HjSdeK6ZolvzuJJcXa0laVHEb+C1XB/Z+HHxuj6nCe54UXlIWIG4LaNdexyjd2I9xaBDmQ5WIC3dMVZ6e4RkVeyUWuQr8TWvohbfcBABHqVdH4CaHqYnIqNczJmSndUFWsXuXkjlhRYiOBG7ipaS8LmZ8pjcaL+VlEcITLDK5Wr2c86m7Dl3SJfQlun1UPROAvCIlSeeDycK//V30fCpf9IsH6eFFOlrWUxC6Qand1MGwtn2hi7HJcvE4FbKcJdyafgvjfx9uGfgsbTiiW3hjEDa5W+z3cPG4ZYZjOQXQZgLa+2gDkLQRQKwrRLo+4Sbk/HYMoVFwGkg3r44aLj2zacDUoqWwWgIV04uDwd88SpXXFuykShGbv/RDerfrP13bM0ofI56WzT6xpOOk9BgaxK0Wl3Ai7s5eL9cKP+04Pl6aEM2NFowDGJcBujJOSm49R2w1TxYfYnufuU0VYyDYw8dawZgjUK8UUYbOPvKP/eYO34e+oEUjubaMpmN2bxA2bwUQoSc3CqiuzCUcHv/pPYd8gGlL3hbTr/yvAFmr6qw1g36q9xms4tGzvk7Y6fBLq5fgyHlMPX7vrrn6AgV/3eirMt2anhdCaianJjmzfXdpCeUxYAtRP8vr6CfmjHDuciCTPNWTk++7JnGeIIZDLzEpM+brHOea9iXlVFZ4dpVSSPbsTZEL3IQkF/5WFs7JQcamG+4HoH8ggAX6NAmqGB7O4pRPUXSrj0B2s95j3aBK7Dl+2y4etqbAcMxOYT90T+1TC4TY4LfxfAmZ6UFd9sJKw14IRwNAkugbNBLfbaFDVhOQH8W6T21tvfxKI0GI+IigwoK6vKQJUNyoTDbu8slGaH22zj7beGj/gAswUA8aICafWc6AlZp6kOH7Nk3YOE/lEqASvkAmrHALrQT/y2CokEzyCkDkJ4fzuv1LSoAgTz4uc6OoVQEawmsNoJ7J7U/DvJHv8rZOSRuG1+cVmlRphChbyl8hZoiiTESmqZhrxWKceBfCimsBjrWaDa6Fl7Nu0079ZaNnTPmfugW8zsv7CC5oBI4xk9HriK/huCARIrCpxFnypYNJEJhAPBahOffNVin8y7u70wkS4NS6hulGT8EreJxoFPkLGJJgsOLKqtAQ/YhAppU8oe0nqGVCbY0vGJ/MZHmCjuNvwXA/8ayDIp3dds8mx23ZjnHlI72iQk8KUYgCWECjljKuJzDPB9OTBsvzwHCfZTzH7gN2MsMDIvuAtGyP4ytq1BfRpLWx3rxbRyclTgb/Nc5L7N5cryYWA5B6UAVioBLB/eyONz6EZaknZKgVri5ZB3DZ2UcXo3gsUhbhstPtSy5SkUfWsncxVDK4YU5HTjQZsLx398lIE/i2UfgKjJyIT6xwx7j9I4ang2QSa0ZfbujahbU18Ex2CZ5OrJzUTxfpGKpcUp3kIYOY9nSzSASTKsLw2p9oYgJSYaydxibU4WhHZIKXk7iUoauf2XfLd8LPifIITZAC+96UHtZDT1ZcPTOMI214Ml7H5JqwpVbhTDhYFKRvKXUcqjvoCMWLUMV28SJeJyGbAiCgLjYYq8QzpebyCcMF9g/7ajabNM+Fhs3ixOmWQXrCxgsBp+1AToim52ssV9FrldcnX/j1U7gO5fg
fdl2MTPWzWNnNXzaC12aNrEVtyHm28JhkBcOn8prLpTSdC2nUDrr5JXYqmoSn+eZHqTCaNBvDcGn6YzHqru0U6Dlg5Z7FcKl9TAWf7I6C7geik2YWNEx6O/JQ9WKD+LRSK/En3fg+DbuwYIpSJAtmJ30w/ORQuUIsLYnqN2kjQcbM+gbhc46t/OpkFo9xrMMztZVlxBfmPpNuIpuDf9E6bsvYbUEGuWD4YECwMrU3WJ+0Rsp3byPvSaqHNm+RzZgFHKhd9JjSiH9hCkTrsUEkHIJkiJMiG5yDg5tJGCPVfFrii7rcN86VQVxOL3m1f9iOllbXBOFzABqq/0uoDceRNW0eObjO2W5AMGrccl36g6pXKn1cQ91jc50pFyedk6zcmbwfwu3aSd9Fvjeh9Gj96sFIKPXmOtnfw5V/JSqlatFEtHFq2d4ddPUN6d4WfUeDrDx6143AhM/YfVcn+6JCN1McOsPPlTv7YnsqOA7hqeHqEsXfT5CG+P/kzip4kI06FaTvmvEYVzrvfi4zcqUe6a8VZAYFiiE7CtRMxf2Uz3MyxTk63V35qbdSwMdwCnihadxvTXleDNiHpP0fRy15j+QXxUgpve21QozCEVjR3qz8Mw/JWYMCm/Ze2CGWvT1JFnHmEH7Q1zZ6LDzuYno2GAJEhSvVCkPETC6g0UtW2Zj8p1WH5hdMq8uMYrEZbOYqR53FPv6c/9tdU366aRc6PYxVyprz95dybxMoaJAyR0cnkXRZTB4Y/LCVsmOR9yaL1FQobx4U2KO0T/9jzbwhpoNjO9bPyW1EltjdjyDufaa2UH6RgAwAsy/h5QgxsALpISQLNgKSKRsn1SP93AmPpzyuz9pmN2UaOr6dcyi6ibSHXvzlOgHGg9UoXWSnDeLcMS1a7OCVT9RGaWOrlOmX5stVj4FlACGJc3SLhGftqwMdZkPvBQyWPn5Evzgbv9DrCVoFQmzYSbYyjaXXEsFzkfZdQcVlyqMFcMCQ+n2wW/27Jd9C54oEhvfieY9CuHxcJloVVFxRZUq82uPtXXx2WUmbePA8fER5qyDrOl/vaqKqxNSUajEL0Bbd5hGW+Qxk4sZcFMqdgU7N90vYDtbyw2/hhik9x+AGY5Ol7HNGHd6VgR0LpTnY27E8OJ4ROc4/Ac3dyQ58kXLiDGSYphi/ASWraWmgmBipD2ayVjPMsO7rtHrxNZbTlVDyFsULE1XuD+1IVn3t05Gx6oTHgA9sMgI54oKg+ZZIqvxfsKqx7ovt4jYl4JiAPl7bWU8lPZ0A34LaEsofWsPj4wObry2myCK6dXgL/dKf5njvmuzwzeOpaKNmlVEkIuR0i4ApyYnqYFJ8xDd4bZufV4Yg6qEjQWO9HyDN++wmy9suzl+bQxUcQPi57n9GW7Vn3ZPA2cCbir+76ervhtc2mz8e78aamHpE/JjkKB3uLdpEQ6yroENnxqJkEYU6xgDG0eZ1aQRSC/wlinN5iGTNu3WG64fw6mH85+rXAq1SQml6RPCYPJATVeoL6hWrjWWyGwVbxLIjcE6PqYlgf4nXYjPgsR4OmmSqPsvFHs2lLJLtCxUyeuawaTa0VdsrDSvbB0T1eNR0zFL9qInm23mdap7mj18zPWRUSrLBdVTMgTHns8ZuonZdtoS0UW/ljSqZ/d1PuHcySZLRS0F+xYNX4QxaZGIsYU5VpFqTTCzidCH+w/50hvC44wNE3o3h/p3cW71G5QmFXHxMT1SPA5Zg9G0Ky/qbxUly1rh6gZx5YAAu264HJpmeQar+VZRHk7PtaNiOPi74KZVO/yMr6PcPyH3b2faWlrnM5qXmd4PFo88XJSXtE3Hntbq6EF3thrJeyegdpIJh32Q+CnwoWiyE7r0DKYJGBRlsSd6xcXb2JWrulIk5T/oOZ1NXMQZ5CshgEj5UTISCKEpSrUVQh/QaGRHMrofjlCRNu9lpEKy8RMW5e08QtZZrLSQRd0nhfGJlAoa9h3efJkm4AKH0UjKftstCkYgkPgR5syFy7I/8509o5FhsX6vWRb8et31hbUqt4gwXdUbiHPWqzmHoNyqWm66VdPX+WHaJzVNG6VszVnncNBL716r77i9CjdibB5Fb1zjkcEtOc82g3gPbsHAMI1fzB7MIowywA2/dx6yxgJg5dtBbDODF3cyN6ADSrrYLkUd5CcHgC8TJSjGpdyH8O5FY1r0qympEm59WRlYbohFoflp9Sx2CVVkb3GN/L3YPrlUjmaFCQfOq9FFucvLvoo7Wf6l/x2vBmxaWPrkPbyjALMj5lScZ8TC4N9ELbfgIPWTOe0waNzkFnko/gumwEhvWUwJ6KYVyD3BlOqUbNfNOyej7WPvkptgRKwunQcklMN0bFpwElyWmHMmfzS00W/3vbZctMrdJnf4xKtzOUcMrQH0a11g5llCzSoUbKp2Vsph1v1vCJoqDQ5TzzRXwhoncYTumF+wcNvO06mUUXnLO5bWBIuwk8t8FF9sNUvpuetkv057/dPyYft6rx2r4sZU6HVTEyx42iE20OpwfDFmby+tCoJnOyZnGRzTvzgRNG9M/vPkvubu/v9HvBnfVlGPFdwG6PN/F3Jse1OKjH35uyj9iTx5p7C4tZriWsxD+Pewlyd56I/57OtUdHOVtMXDckcf9mKFlti+5+Ra4IN0pagQSh6VWbAwOvvRhdtUSkd6Y5PmRYYox4fahn8u03A9N5UuXKuzYXUslERw8EXMmh44X6kRjpKxaWWM7j7BkAqkfjAyuL9WPNM4qmG5YYMTyzdeZPQlgGWbzuOU7ZAR4xPgbix3hgIrJy8/bUDrcPJvE89MkN42RlNZbIVi7RXKPHrf/YxICx/xR3MaJApnCmKtKZaBgP3qjmEB1HJ3QVymkm4FU1pPMjkZ7sC/ImeHGVwvNlbeJhjUtLyiOm7XrWjc0J9RJ4fpZ9+308UjKzURybydazKC6cEVd1BZRMlxn6ZdM6EqmS9/pW9xvQDitawlX/VJidqeI68kxsg3Wi3jMFuwdLDz/BFgCuvauftmIJDmmEnQwUQ2K5WhgfUhuRHkkT2ajKxleg5c/13hhMwE3seCK5RIO8/jUw/aG6gR/1dh7qh1sG6sLf9tYkiQAmAvuTsitkrNo73D0KIHnZ1N0f3ZCDLuu3KOvcYyUZAc05hcMaDJltOtTQKao2O1Vmq5R/2x7TOrBN2oICneU//g1g2Zi2sFtsKTkYQ22kuzwECMhuVCVUdqzDHkYW+rm1XaghZ+po0eusmPVqu7vXt2d3Yj2TDLlh+dWqpPqJ9U7Tr9WZXa1lZYWi5m9QgFI68Cht2HqObqD0gzpMVVtjL/CciH8+N2Tdj/t7kOKdajjW8Q1YEN/Iv93mwSTNnTcpTdfCXiNrCw22UPMRWh4BDvgO0bAc4msz/218FJJid3gin2sjhBUrjRbLtPoHlF32T2B95/zI16V6ZgZVmGiLEnXUkYigDIOizMNmWbYTHzQ4NvWR3JVLKjmR3Oqjrc/oB8ZXKBGRq8vIARSVDVbyiEQQfe0XuRsS1zBvGrIP/nEAYR1wmBCEcOP8V7cIfsjt3kKGIsdkZoyDLiQFwv7KFxBtWOk0Fh7hFnDZLWsDhDqO80QTVoTkRqmBav9P6rykGlbHEd1JU9uxqWzODyVXxH0Tc8mIgV29e29vhnW7mwfekEotGG92dHak6PXl+3HdCg+j+bnBaX+/f+3mF6gsvDy+52/XwYB/mXFMucWdOLkCMKLwQOIYmIm7v04UAiDxYTujL3gEsXFnHNqY1Jd9juvigJSnv3lXAhZ8xF3asVFDYl+Rf0S8ClJQbO9pg1Zs7R3+WmH5njoCvHiTfbGk5O8Uel1QBkEIJ0QIG0YcVw3NMicCo3lNMJOhVX5+HwQewj0u88p0vILf3VU57lxEczsquKMwO3nHnURroPNtyexUyQoWh7Y3OmG08Pf8aMN98I6mOSz5kgBqTjEuE+dNm4czo9tg5g/fwb/slMg4QwVbn9VGBUsoj7O1xVybI7snA4hJLl3/N9tI+P1ZaguaS4CAPqQWpwAR4Hk3ABSdUXTo37XCejN6JH4oMdJMYmA22vVzBfr93pkcRiw8VFkhILi1vn
49NZyAk4jedPhI/+iiwPwfERzI1x8Oh3IB86E3qcXZVl5KfWecpp/OdpDNyQOa+CBCvi98xS0Vn5D9oFAZF9n/JHGJi9lXqQlQj3kSSBktXr9DQ/DXMsnHtsE2EWRQwkxqYYZZZmbb/Js6J341fYBGXZ7S7czf8sBIibqqti1kmuKvos2YmgEotfyvs4o/DSHTpIBxcME11VKLMUc2sQKZQB7Y87y1l0nEcvxt1MyQP//CwjB/MbyubfnHbBkc+mKN1V4PgOuVMt5KTJuiyrlVv/ARDRswWFhl07ypOwkomvfEnjXPUY3++NllOwLwvv6J5NY6n7LOtCgEn7jV1U7aqUueFa62zANkJ3BG7fjmlBdbaDZC98QG0zkihQdkiaNBxLQ1fReZZEcl/cJoJZo8gvu1RUxC2+eyELEu6VezcuqdCcW6564SW8Fml9Nh6/akyee12IPltKKVEgOaRdWeCELPR3oUgmdV6bfRNgcX0UbqL33k7A6qVC8gTXNLF13gAQhHEXhaBE7CDuz35XmQ8MTKBU9OhJqIP6ihdjiBLMYhfnd5n6RWzhBZkgtZrrxd4yEc7T6BGnfqtO1cc2Lho0vFkOkA6piztmNIGKEgdRp+IN6cDTEJ212jfmZxpWo7mkOeC3WeON40LA1G8OlivxL4443kQHRt1ZJXVcM3AuirUTIoZm36nAXnsWJMAiN2aYrnQNZKkolSoFb9gj3ldqFwEzgqEm5ik2o6XThmsoJLJdOeNnz2Ut+cwm8tQ0Ks5YSwZC35T3rqSP/+2XnIp+czlIQQaiR94lWEvwHqCLlVQDB2aUbOBJcg+cqzKLU+5aMbHq3w3OOMiLPj4MQ0ipSaE6ccVe/EljkuCdr63wcfb9Qxp71FUkyuawbfGs/IzBGy0shkiTKNkaWUhP9N/zZJzyOBMAJ+RbWNi8W3kIWRh8V2OEtY5SHguQbiSXt708NuvpvUWUSo+to6/dfF7kIx8ytjCcPLnjukuS/p2mgf5UQRTMJKhUIeKb8CTAB20WICZfZlDmfkA93g2g5orL8Mv8OxKsk7AnGl4tiXz1eF8uanNQsxJFi24bXBEoR+jiO+1ou+7DBmCep71c0wkcsigfdr+2csMafi1tqclGhNzC/LnwANUWOxSRdlK/BXfEroMTHP23NkCZlxVk3/VHuMf9YSxKn1yv2XDdHf16rC2F97juR8jF8ofJSdDaYHMYQpD370jvKXKuk52YcXrIIMpqr1owIAassiAYLT5kCrjM19MXJM1FeAE8xSgOTKwjf+ExBy3kqe1HA1YNvfp12v1ULaqOwS3HihPqzp7bc+IkSUTfYGWqXGDLPe3L3RscKmt2KaWf/aWcOMH+gQRlmbumeuR38Cry7wan//wwoaOyr5rmKXku3h4yhc2JOgfTXdZDocNexQx5/pCrNS8rn+FiARf8zqWkWcepNDUaumKOV/1ytHbExmozoL9mgDocqLDTlxJADFPjgvUKgljBXWSin60BpmcZqweVURUhfCTfQ6oZYGKThHy9srwP5Zl12rlW11MfW14HgkoxqWMn2OqrNPZKsCicnoLORp5RgTG0eSg2GPzAlf9L6mdZ/c6H1xjn9Pq/SHqYJvkzHRyDBcCQb3mmVRKXb3CZ5rtNiJTJmkdrewAow6dgZEmkpk328Yf6cXacJaSo2AtD4+gZW2oq4ksx6rB96diYFQprjhTc8bDXapmasDydji9Kow+29R6xUVWWOnlqMte0120toF3vU5omsPxHd30Ux8xe+UR2LD9kYeTSenzPnqpSV7iUi0mY8Il0ZAeTbId8rUSvbwJu9C3FpESi9mbIcQrmPiUz2uBPBpgsFrUAJu1Pkh5OPIwPD6BMMBpADaVe/zU9frVpU1azhjNt4wbRWySvaFYiY+NOUKkKJ1lGOY9YYgVWnzN7oikGnCa2QpWR5M3e86DV/uzTIqHo+l/OnE8uZaxa2ZoDk49WxJJZps6emPA0KxlDv7eb5XzCPJFcS/p+YHlKHtwfo0IvJ/HlhsIpHV1Ujt1AUq1jHBKQMgeurvszPEjxDgcdb81eUD0y0uaIH/r2mSnw35ZmeHgnlmpLIvWYJHpn+bLlmge/bzHdlJKlDGL9nh+MKqiBorh5uhPtgbn07uU3IYLyugrcEytmiZS+tjj1i2pbOboFgjy+WJgLD5L3XRic4rhxH+IGRqeOKd9gtQDTXEZadan46fXK1y57gjo2JCH5jFKC0uhUY4TDijNk7f3NjaSV6WhcxUVniqO3NovM3346eDr4veCiAoZziETvL5wyC9gR1ZN6q3sZ88HYxrg/9JTa6V1ODCsfE4bCdWwjLsIZVkIykWWumAri8y0dImFMND/Ozqu992TNpJAfNGOM1rffX95uQL7LBbReqjVBzjr/L9wFMR3mXUKtsSAaG6hMIkF82klfNTheyEOxiEfd6r/QkArdeqa4o2rwrXC/7Q3ZsSXr0RzyJX5EXUbkAy3ebSKxH1Evfav2BjF4j8zL51myMlf2zIWBuyKiONGMi0g9beA4Y8Oo59gsZdEUxehvTB1cJjFdLdAa8B6f0920tVxkQIePlJ3JvylXZ8fEFUxQ0qVlYqjcBr1bfTY1QleORGAi4NiyU+z0eG98xAPvbHK1zhbNbE91gt93hNypvkTAutgsx1tun/D9YJYsGmjgzqAxgvO988cQRyG+1UzftA+F3z/C4uZSnhOLyxl5sum35JUyPNWTUORFrZj5Sejdww4P3ksM9vWVz5KG0cJVar8z+uqISqYz0IDlvhIlABn0cNz8TRTlBIynzgFpsBBkR1BoMIxFvfmoKcq09oRVWVFif5Th9LbaifJmmslI+HgOAcalOY5roVL4LXA7tKewSGsNN0ione81CG7RoIQPlrTgJb9UWaqMaOlQ5Ki74t0q/fF7Odvne7m34N19Dfwd4jVgLPMd75F5fdpp5TkMMwvjtLu7JXNO1djupKeObIypB/PYB+676uYXuHnSZLbql4Zru9p2upPQKsr+TgdQuwhqtSASVS2cxwg+TJcpA16WvSAivspFYrhQ+y4i2hd9W7uqfFVCMH6q+i3c7OG4Q1KESKodX3PFRQ0fThGKIVPefUiK9lKJl9TS/Nfd2zoBirGf2G8tglyeW6jCoxeSPaF1JVUALHErdiI7bQoJKeUGpqsRmxkV0/vfBvDOG/GV3GJnbXI+bc3t3oamu1Mbgdc92GuWS/zV6PLkiy/0G3Q34vMJLXV0WqLG6giGIX9jTNGUQzUfNOazdq/cSgnfJlkEXsXme5zx5DuQtlQg69m1LRg7Mdn1EulDoaP5DIVefG3njXYMB3JV4ZOyTyxtpEzRDGEdqXHIvZNVdC5a3oWv0LKZMDOVnO//NJyLuT97ejgmiP6mcbbXMPJSij+rmQYyYOWyhXoXOcXHzAc+SFPvYloxizpiWPJNBv6oUvwHsKp8+bmbb7oyyl+kDNmahcZaWhfcZx+p/8sTToto4tS8LhahBubzOZtZHKhkEBpN99BCjkA2zx2uLap3AvrfhZaFd8+OdMPo7aACnhXL40Dtem2Yb7+L74eueH21pU3k1Zx2vUrhoBvYscxxeEylJCUht8R5tiyrEzjADFvf+l9VGeBlkKny9+xVtLATtIOAIc7VsD495lL9YDm9cX9ya66qRq6eYaDFaEv9NNtxq66uqqVRyBKDVgkJBg7oVLqJ3SQ8nTaH1p35pjs+qRhm742xqA70amgbCQXH3IeB2DG4fTeJWOI/tnZywqobMqboF9MWRWSPH5Xg4JX+ssW4r7lsUpDO5ML4hsZJB/3g9qtOihpetNN6Vr5r22h3VdXUxX5pc3HlUNr1hJA4MI3pvitYxRUAFPNLODvHC+wOkDO4rNphRzfaQCAQGZHgO8cf4oj+XH8RjQcIY5EfsRnxm8huv/9PxnGHV+ve8zzf2pgfKTEGwOmNet4HcgaKCjwFxhmXs7tyqCHyUyVMimbjoMM+lTI9kwGjw7FgQM/zv0Zv5NaHIUB9J3s7m723G95B/APY30DFxKwovfFiGDA9Idy1B2j9dhyGG7C+HUZAOQNGNcQXzcpzWxlQbfBvqRhuXkwqZtTd
QQyKeTuG50GDvQCvMK1SRodRJpD9yc5ebh8bsG7vpoE8TVf1piqqT/Cah7y4MIOxzh0bWdJlKrskX3waTeHFdTyEitoCBZZMJw6vzfu2QcG48PfhdyD8vky2q8tPhtxEMFNgcPsRtMLsiZYQHa/H7l9EKnHHdlwxz6L25hSk+vUyDrPvkVokGa2hGrcMdoE/ysakkLlU3b/9HGE8N79eHGK6Xkr5ruAM+5I0GLaMQkCM9CMSgf96GtWL2KEEACxJq5XB4o458NWfnG35MujHZWSFBvSmfN5VR0dwAdcNsiVTB2Lwwb52/dTYDFLS+xwtUQmdXbH6jlW/aVN25mEBUlK1CnNJGUomS2/5WqDtJtyzAopcXNFUqMOeF2e0d9+bGEhlaCjsOySUJ6ynls44gLCsPuE7CGL2kz4+JFtNhScFaSXj9zjar0ysE8HoRC/Pul9b/+++4t/WrSHHtNxRHWEqMhrL4qiVkrCpZHN4vCy1pX30V2Z/+FW20i9Ky0HgCjtssSxs9BlaZ076jZI7TT6vEGsDgX36CkuyAxvtqrtX86kFAkExx7rVsCGZgqQ4cow+lD3v3mj2WDyFEAkZRYsu4E3KEdvA/41ihb+OfNnNdj2ai9HrmD9zbHwQyc7D6rBr0cO0QooCONYqAlDLO6dM7iu75J6GEwpq4YUoiUnMhABjpY8iWHoLUO/iOEpQD46h28HD4ixxK5VIr+PPJZmbxQP3rLGz5WayNJqmKpIiPUJmZ8g/hnxBcdu0hZ6D3aL6JRtvMw4h/iTK2gUsdpxHwskYtU848fC0lyg7fscUmmYQat8rx28Vj+XWE/IlVos2Wsuzk59sgYGF2D8VqnCTkJ8NlihjVBJW21OIHBUdw3pQn8r97OFCWTfyjtZDT4ZVKj52KuWoWoqGnnnjpSnUGakM1HvJ5C9AGvP3uCtUbKawO2vn1UDoB4mS7fQzfScIsl8DhMVD/b5LPc97o4sYIGL40rT6oVFa2PUb8aZ6Fs2aK2QGfHoBR98omo+onhok96g8fO/FbPzHSJFToSfWEP7yP7HYqleKudVN+G6tjhrmOaL7780fkjPGDOX36VgmW+nPg81uE40rV4KxfSA1V5yFtbMWW+yDZwGwfMOW/vU1pezlCcudRPoarJuODElgDnl5wER5kpAHtYldbj4VsWD7WF6XUr/7B61fsWncGwlLVyfY3VJAh/lCTGWjf2s+pG2YtlOw9NqEI1/nxbqBScwlEDPgqfrJ6OOKqvt4q4kRDJWsiI5IlrpPauB778J93FJ+X1ebKVlgb/oKwBStvOwTC7B/Kv791TRwg8/MuciOwFULlLZEG/FNBUgFjzEfgxCZJjBqsPDDzwT48j49/RVfCVoFjwbfFQeHhAmWCB35EBFz9H2jcZ19spFiRynhcvcW4xaHDJFifD5Yi7l55LmfbMDdI5f4HZN/6nD8h81681H3FpzzW6QSD7sl8FIUiZJqf1Mxs5jaTym4iaH9muM7GZhamz+Wrz7GLoONzkcOOOIe6ICpsSVqt8FtxuHeMSFpgmWE1xTfPPw0LOiqIlYBXMyW5fsRrJE/PoebSyNcWTER+OMvcOHe00P8liwRle+IYW4CK2JEnj5K1uRWLolHM8qsYkwtyc+E6B7TFbPebFsfvIecjJXDw+cvsu0wDmYDkeuYkiVWQ7ZKGxTw4Ift/xajjZbqJH1FJenhZTJttbio7qkHd4D68blxbl0wBFO43tEAr8moS0Y8BYRnmB889ClKi4gJIff1DkybU97ot4OjCDMQUEkDH33m0ZajPU4vLfAj/pmLqR1qHucHd3I9/nqhIS3mVBNHUTQgvb54NqAPK3UsNU7FiIQdA5fcLwuxzPEHeVqi5HZ0eirW8rrkx+l65Kofbis1Ica+3gc9TBgeG7TfO0lmpw8KeQ6bIaeVY0ztpUKN0GVWOQbJdP57oBfPBRnfSINUT9B2+RMNsh5vtbKmpmAuCRb862FGeJb49pKU4+zmL8TaDYnk6hZzQa+xJ++Olks9nCI42I63jlyVUDiIX3pEh1v0q27wFi9hMtPPwE/v4aTWqEeXKCWRtcs9ClVrADdv8LavzKmZhEuO0wUJyFkW2Uk/Ciiy0NNWxU3QFUHrFhEJWl2nTJgXxbJ8eM2AIyf7OLpG3eZ/hwRufxK7SX99srXqt7sRtspLPe+KrhU0R5z4uYBaDQtwM+BtQD4H/bLinjqScEYXi/iUbatsEe4aghuxVq5kJBMt5CGoy4R2qdh/0o58OWMvvZh2PHfnWiigZExh+91KF8vGdmi3TOW0EVMT9BKS2kGWSq7pegp/q8Xiyr2hh4ac2zvkg2F3nrrBG31WUKgaxdFvG7wlCp8ytWkCwNT1vrHrzUgdmUKUm3XLSCgYwgRtD69hdaF9wCpfn+wKiep2dsMj+nNEll2X+uSqwS4veoxMDLmy5yF0VfVLFS6x5nCfcC07TJ/ZyhoCELN3yaTTPEPbFslAgKX59foMFwe/QCGV6GIzBPn82/PWrG8si+kMDchsaZm3nN+VsjV0rUKD3RJFKWsQJdIMsiPkj2ApJlwMiZQhG79ureVFvWb0hjhFroz3MFbBITy117yVyAHvcGIeoml3ulyFb9lULOW0+jnOjba65OHxY8/aAcJ6ZHy5xXNVapGrssgWI/zNh2SE2DDcietfJmUkZI6vP+ZWCp1ham8cnWnayURfqw/Q/0Lgp7z/cxloGnQPV2tky8k6EonEPGqo1yCCIFvecZf82zHNTjmAQCsIbmk0MeZa7JCJg4beJK1oqJx/W0UNZMwPaL1JrPt6qT8nRB0W22dsatqYiSibGmXehZNmzFI649SRT8DSLWPGmikz4eHBnMFLbLXkyjlXBpxw82ZVvIY6c9jwyPo55nPbWsQqkNopVO4gZkRh4fzdEXlKfoJZn555qmTHZh/BuR1OYJLJdRdfxvgZWT/3WFGUMwaxZ9jrSCANvV4Df02zXcSOjc2U9LhBEczG+FlBOv6USV7DkTMoVkH7GVajWzNjGUSRCMo+5J5K2B7W5/w1MZLnCiSwGsoYRnW61zQiCP5wHrcfp0SJeiswFCo6RETbNmotssORuH8szAEu9oGgehoneiiLx43JqeUkzRURKXYjX+U4q/+/tHsxOO6IvGiVO7K1ZDVMgoLsZ2iH4MV/3Z86/9EeUnJ72BVROnJMUetl/f3p6BSppOA/edlZv8vpa85M8BH6s25VVeL+RNj6XjAOJGybgZSeXeb4fO7bL1vMPmjQ9ovqPuNDLE1AbKKLmn3uiGMBmlNGP5KjolOwiTgSmtUKg2CYF0uqLXEGs5Ul+YSHobjGuwdj4JVnaGuEUlIRn8vbZeW4sOhdyTClsjX7TR76mJRAHuJuCq7Mu4kYTk7Sl3Nc2TYC2U/9aZC7G/36FEj21Sf9XHM6OaDWz/by7Kbfbe2ZP4cCpFoES+X7WqMn9TyD0P6tRztM8Tcbmtq0t3rIGONBPk6HO3qm2vOj8OWzGMBa8AFAI/xHoamw6eIkeSjmQ/M2iz1+gEmzVQ8K0+3zzZMBzbe7YB7Ev131tN7lXli2tqbOMYnqfJ6/j1dhZ33kHRoHtptNyy34lR66g6r2H5D1DTplpVUMjVyOpRGkxJ32YeoDduyv3DxMCKS8/8rrY03BdRfDGHV1OMSqWP9hbpUQQSw+6hRnWCwvH6WbSV3G0MczVskWbc/DvZCFmApCwcJNY87ZQFk+MSXmpr2F2Rj+Qm9SccMDnWl/H53cOebOmlzQqrQPRiZln7BHUCsPZRVWBp1zhFltB74NblBTyUU13DUctEKyI90qHL0JF5krTsBD6LWy8yV/LSnPWx75nAr1s8I42Y8s4Bn1mHH/ll/PQYMGtWCywNXOokbI04jCXykyAEEyZMKHVqg0SH4TnnrDfeCHpuvZ+dxcbtAV+hAIJVoESqzhxp26ngAGKo8JaN9MD+Ia+rggtdi+oEhcaMi7hw13Q12AwZgUHJDVH6lW2NKalEuXfTuD7nDHiHVs3AZvzKRs7Hzyf9A/V0RzzeU3z4/OBvZni9tVPKSabybEfjueDTacQhreXPL+TaV8YBjW/DE1+Tu5X6bk
sNC3qGiQcgtPDmveM2OyNPKtAK/5wvCsA2uFOhL2D37kvt9sRJBoxHgIR5YmThRH0gQwEpuKs2u5wpmNyqUAhUGeG0n43pU5dFV11/NfX3IPEjOTpnIaZEtlI6lnx2zBv4m8PI0Efji6ySjd1K2RdN1tVUQODEWn117SmJqB9b+4AyAtz0OGZFq0UxlhwQUJKCJ42OA+FmngRmzvC8TUnMwhGeCRbHCXgwAZ91t9H0woWxYPkr34fL+G8OBE9YAag02Srotm1WQNBBGDhNDD9B4E2/1iM1Jks1sIDPgSVHBQG8OV7SCtI17xZ6rhnHAOt5oUJrmB/KsbTRGzXX/0yyrPOYj6nf6qZ4Rl3rek2eAbr1U7BGDE0gJcUpBD99c+4bJl2CyX969SUiegqFCUNluMNU2ovNSYXqgpoYg/YaoIEoyormH7FrJX4Osw6a2+PU+XnNCX779OGq+FcsvMNWk6F0Y02DUwPvqNKtRxH/PaCJtSxbmdNPlZi1u5gSzwowWWNrWiGSnGqt5cEW613EDZRECMqA+Pdf6sk+bJIXjgazPwTMJWGQ8TvO03D8dXB8xfVY676RcUJpyq74tZv8FO5o41IfqAd/2gcqwf9UytfAlXpMmN1l2YDk7HBnMxnnKDJohWvn2BR1kWp8C71tpw5rjzZj458HhuzUrh9KvYzqi3M+mmBVkfRzxJ7R35k+4/QSpgXIQDKl9jxi4Shz367JO1CpyosVLo+AFcLyW9tBAJMI6gvB09XBd/pYhD7H8oIx2kvBK+fmwYm5eeiHM7+f3Az4VGjSeBJ0Opd11q5OtDLpHF1WVP95kPCurLTG5+/We60+AP2+cOdUSAx0Lbem6jhE/YV8DnOtxurISVtx6Gw1ZaMqmekSgSwO1T4/MCpn6tf2KnO7WZ8+QSepk+HmxjHO8ybIr6UpXTkDEL9qmb33dHrTjCM6I5L8SY6uGjHBuzUuOHcQJYQa7hQ2oTgENHolkSkhXV5CSFGYnwzIxwSl6gOIyzVR3vPsSk1lygS5QkIHL8l2ABaVTjeJL3awfYLNO8jwsLHDINJSs1nGZoYYHB/L+boLaUM+BucPlTjosTDsTmC9jKrtkzFM6nf1gG4Q53ppDsom82PaB/3vUHEind/osZYcKAjjvahgX4qHm9aYtPy2x9sS5OPgF95mx0Z65WVJiniGNyoZeYuL4xihbMwhlNvh+7jyzMjus0ihXuftbFkwUpqiJOZFOAjzI5fuLaM/tHRT9RfioIP0OYBEajxN5P7ub6FahjJxMpEUFolaYipbcPcrHfdL4izQn1YQPB4DjDmpDop0+jt0e7oI69y6LyoY6J5PJpDcUzPnI1Cb8CzK9h2+R+EybtTHdaDNTIx0++ME5Zb3kqJPA1L6bbYzcSuJRsCu3FFUUsnAR7E7yGnQLL9iyF5VCvGhZg46rONcQRpbq4HofN2Vt3ewIavTR9oh9Mw1CbL5/q8iB+tj3jONXDkla5yNq9EuAOk9R+l2BTeccsrXyK35HqOggeh6CE7xNGAJvTaZbpeDGm9X9A45T5FGnM9kOl1UNm8jqJxTzLY1l7/lpO3Lc62UFZwkeyHij6R/Nay4AeTZLZLM7BQpDTAJS7URD1UYElIMHHJNRmF6II4qFE1R7SfcBXdWOTEfHxLpNcbGuKymg3i5Zuz6GkmxG+yYv+MbEmA3gpWllp8njbzmmI75YWZeG1TTEf4aW3sx2/r+F/NcoDYxZ7oaQjcknl9G4TgvB1ziSGyYBgJsvsaQNGw18YbyrpQuRbn3TR6Hpdfs/MvHePN/c5W0GELAjaGbU9osOxebasDd9r/vrGmgB3UYTspHpGhdkaXmz0IC2y4E6/1MRWBZd3ROvjTCl1KPOzF1LUoO0Bun9vlKIlE3E0+xdwNbpSAfMnSwPhJFTxpzYMTPGUg05zlWPtj3oacSCIJ72F77tyWXzPOiI1uodoGVTGOcD+hJnp2rUgVAgnreRLlHp+WQPEuEE+sK8DWTfFCpOkQ2mRZhPlRFgrmurTMNSYpBAVMRN2XYJluElRcpiKyM9kA/+o0DJdsdEj0JkNTP7A7GEpI2QsxoGLSEbjzHqZvBp1WwNqPgVm3K+kZz9S1XP4b4sS6sklJM7eItFebJMxqWBDU0+XY9dwtCV2LEIb5IhgwrHNUg5/+lV11pnYDr+fkl7rwPaY34YFpln7BTmpoepcs1HKXuGHpDuHB2FEznCrhpjsZ05BXhSRoM0Q+c6SYDoUauhZMT1U+wXi0gImDcONbYsH9+I4qNEYqAOj/eyuA4nxwn10MvrCOMDmsyXqiIsPOAiJmFyy7QxAyG+XtfjWGVhgapFoFe5kRmuGfNraqxLcR7i/62gWRHEvQKcH67pVMf71cMp7a+EdUmtnfex9BBsXKtywLu7gdy8hTqudre65Dg3lKzc34dHCkfARgZoS1q2Viq1+dcAgb5Vhc+v+aTtHxu+Ql0NGRR1xBmZqa0Emi1g44Nk8gVAuZhytkCTfifsUYr/A/cvOuRy1dyuXjNzbvCunph5HPAtpOqGL0Mkr8QuzRc4Y9NprTz08DfeL17qgXt3ody4KsPEy0wJKJbL8VW3Vf2m3eMoNkwpNPuybzZ6p1KXXEbsvKg+uJE2BCBASFm9bNCPF2WdOG8STzAyafE9o6l6O5v5L5wY6vXFfXhSXGLd8uu4CpiI5aSglQx9aL2py/vpSt1MFMNJCeRVIo6jrDv1OL2T7RTnBAVHM9igipaBu9ExDR3MHFpdODvAKaEbB2LWJSF7oBMg/0l6YZV0bE9jOYRqyqSSpbKyu9DS9AhLuX8lMEBn6DNHGAz8skvH5nkFSHhi4Gsv/YVnwEvPIs7+IibMDcJFA1talakUBmJpCHFJg6k314/PuZfgtBgdK9nNNGS/ZncrNix9w/CQw0AxZOGPgfjocibCEZULIfddbHSe9HI8S1mdnnVAwCYGsSP+hOb3H7NiFaJMPGBGwZLsI4OXynq7h0nDdcJ9iyaIq+6mKN/3Ku9BDUnHCPbQPo2ri5gBoQBnssxi9gZ2Ij7NRv46z1kTvdZ38HLsdR4ExrCJwqLK44R6xl7PP6Ba7qYgmf0mhGd3eiCfWhxpSau6Ya60dF3PhbkBSKG5ZCL721pKz6HfoxyoLdM6daBmYnX23iB5cAY0m1afOAacUOVqyowdcktoAgGiDU60SZ2vDDSlRmZYw27QZqEMChfqbq+hPH5KWCtijgqWKZeJUgxlDq8GdBDRTTTdR6g9KxcL7XZKwOyv5op41U3X80/zqRdNS4i2KpyDAm6aFllFZcbAqk7rl3eG82DDB/6IQe/tVTu6FGovoOfiVlejLLwEPM0BpR2WNF8vR18KjKyGpq99k9l9Pt5SjsRUHEe1BVuwKM39Y0p3kN8/d0g1t3EfmJRx4UmsYupFi46EatKzhcAV3CI0WAtUGtEiAaAEoSfhv+weQ73avbM8kqjktSPicpOu9J1DGVnRMxjApbzxrheejUQSinv7AVlNgjc0q/c4emrSme+Nd+hJkMgxtwQW2eJ6tlPPO2KnwFRZ08MMFY5EjOv2uvh4Us94tHIdvf+gSWnKupwMqswI6Usq9XTzE3cOY4/8SkJ3UmWfSq7wfuk0Z5phJ6Ug8W0JLY3AsYGFJU3a4K0TFS9cLwvsjs7QXgApund2iZkjDeR9Zyhg8vUDbQeJYS3E60EfHAOoJBHFU1N+gES+j7I4m5Ur1944LtrhRCDewLb/0TtjdUiV59HkDzHLTwekMrLe77lRymbj9OnNnrvUHsiartRSBigWXHXaozePwCu649LA2ksqlGawMiHSI+sID9xQP6BQlPucRM0jRYspkRniLgLbIGUQYd9qPN83vfstZ06REdBekESdwRpLgAE6j9WpsJmDEULCT1iCTYUj6hB7KPrtrYy1C2ljg2ZyK41NQrXxvxvYELGWMwcEOCa+IaaU5kJhTv/YVXY5U5P0Pupg7PfRLym4/fn2pr+QiOcxsqVnCa3V9YcnJXB93AYQCjKneInmBbRLs+29PAO+W+94ukA3eoydAa7RHeH+yvTH179vW5iN9QlZasY7YilFAdGwt06FkMLjs
SRPN+HVm6fUAvZraEcbQalCXSzp1r4ki1wLuuGE/37c2+5+O+hH95puiKIQm4e4LNJHueQ74UWwwWDA5CJJYwuX5z0JSMUpbMU9fh5H/1rYRhfgakam64GF9pys3qR0NkznkmkaIC/Zy20JQhXZFmNsWtS4E79JpgXlAlaCm8edq6S92tX88U7PATaKBl82HguUi84DDwgUuhm5UoWdA5jM0n1FmMiK12J8y+x4JPphaI/BVzp9NrW/WHRF7MBFRkpKrXyX0NwZWve1o3XT4pO8HlwowjZ9ZExPzdYbLMYx8bCZxndHRNRmqPl0Pqt984gPKt+BPOX2nispn06hoi+sP3ZYRwsfJBiyOOGDxPhHq9SjVGJghs964n8YTBplwhsja6qG9H6Z4LE3I2kdLp4xcMEBp1pTq4TEKC76K7YKVW3OAsu5vwb9Lx/hpOlS9TNtrdb5/cm2aLSK+Ptji5S19n2Rk2cHARzDDjdxK9x6/5r6tJ5n7OQ96o7D7Vj8vWfLvvx/PO20ADGcp4MH7dVW7oqSeQbgBX88j3nWAG7FXLaJmJu9lQhqrqrE6G+/brWz1QiTiuJffbnMRKhZypj8N1nMpmgV96JSVbwY5FcCFVHO4B/oLFQGYSYcj4bWMeZZZ3E5x9RGEdG5iH/Y5nXcGSOTeR1nmqRuJK6FDHtitgpeyc+mkSFC7lG02ijgQ/IA/vtJETA2IlAAp3CMXRrvhk+hcdzjEGQz7iTSs/hOvSo4XrRjZfBpDX7sNEwTlGPFwdR6A8W9Aj8FQwwGyJLJIJ6wT5FsmoKM3DWA28z4gijo3l/jTkPG4QFy5E2VQiLCJJV99u9zQbCP+CiWkIata3ukffU7+/gu5GWD7GLrrkPXGduO73AHCtC/5fwtbyiuQjOK3eDBxaHdxSswaefPiKGQG2LykYhgfDgFus9AouU1dJIdXqM+FXC3tiBXOMaO7hYyKoUNqEcrWlAtcfyR4DkfVBe4IbccO6KW1PGjPSmTdin6C7fwLZMfWMQjxDNFEAwklC+fFQ9SOGAE0aqTba/JVZ2PZmOME7vv/U80QTMlEqr8mxlfTTWQU/As5rLzKo9npVXR0LZxeRhS529FyWj0eZbmwprZCuyBsIDNdx6lD7g6ZCxd1kjYfMNGWwMF7+LJTthAiozurypxEtOGJOXxiU8Y0+376Oxy7RJlRHYkDhinE1I9qRTG9RraHCnr7+JA0mXw8N0xRMRSc6zGj5wv5y7uW7C9iH5YCrHnhGVIxi+iAhhB+qe5or3awC10NkzR3LkocFDlLjkqpTSCDn9TWW78TZUJ5Pz0tD8ZKMS26FvieUKFPU9zSlOV2XhybvMjV9nBbleHfWAzeKMOAAfkrXycNFZncI56GG3MugWn+33ttYGnm+ssJvEXBYnU4JKGfawENfFQ/J+H1WWJE67Vxh4MIVPU85NjBdHvmKQoAhQn4kBj6UNIGkoppG34nl2HvdjziGDmJRh+BbzJAM5nMxhaftqkcncn+3XN9F2OUHI9/3rnELRR7tAX/qjGBQ853h0787u4R/aKLQ/1o4OQLbp+YLdCl7lGk6d4d7wHKait8oeM2TL7vyR11piW6lm7P72w+bsFBujlaXmYKOUYZrjcjjtQg2Vb669g/wi+1pGRkTU+XzMv7BBNJFj9tIgFMVmILkLzHg9xcZbSwY7SU0VLvMXdCf0Liwlw6+NBImyxLbYS6nHQHIZ4vVTcLpdlBdwwuf0fR18R+6/DoXr/1KQ9WQyO02c9nbKYRGIhssTMkoQ2zTAf7MGMvvb5lXjNdbR/tYeUns4tX9gKxGi3Gq2vGKhWsWqMSgfg6PjM0EsjiP1fRqo6Cyc8VfRHdEpQCpXgKaN2Wh0jAEx9M9nsVq3rJIMByl7dvCWrir5AqUW1aCvsvrhiKMt64abGAoqtxQo1eWp3WGpvXLMafHdoOKAO60GsN8QF867wtZp6CMTziUGsGQCu3PvYRZfZtl6w9gyWMcaw3WyZZzWfJJN2gVD8TQjgLgNOq3yYdDokyqANfVE8ddtKGcAWCp0XiWwP3ZBKrco+QGY5J5OPaw5WWEccL2QaoODbhR8ou2hMkwje5DAhsLzRz4NRGTZbBjzE3q0ZcnR/6hTFl9T8yf3yX975KNull+JwEx8viDB8AWvEzRun1mfFL1bHmjc5HtBVClfW1W1Vxi+iCR8F0+OXPmX6Bjw2Z6El3VbJZ7tpCW9veNiFEMFy1uWZZ2h648k5zrLez8ZGIGQFyGmn9pU4Ly3RRZUTXxBL0z4Z8JwoxEtY4qCOXyGEZhl30HCY/1tApe/fJKcRoUn/PIuJedH711RvfRaeMiNRqE+CkbieOdVxX+98XG/LPWj2dquUBFy+RIZCECUlDRsjlP/tH53Q5zZ/AE5PvvrG8bH8laulH8GjJ6s4FqgX41UZlAaMRb+cu+F3rd4RPaWBHLbCBuqpFPTlWBbUocI2PJ9g1OjisW+q7TLj+O0mJkj7OooIWGXYxBqXKFXZdPJpKRVZO3P/lUjfbTr3b+o/nyGNnQrhQMGvLkmh1HGgFbifETTCrPGBPMDnC7olOgLm44OkYOBQtY784RaXPLyjOOgNYz3Q5h5tHc9enHKyqDbuCNt7NBStBaI0ZSHGj6RTiLpGi72AJ7u2C+AxDu87NemvvZqleO/QVNWpjdqmZTUdjREs0Hul6to2hjBBSYYHA3HnWY/mB4BssYD6q7/t88emTOGlx72T/LmoWcuVrEUGIEGeoqEAXkH4XulyZXlEG3ObiDKNT8MkGqsYh9MSvIrUplmGQAWLSirYYBIRKlSCJINSZinHmrJj0TJduwj5giU5PXFskZS661OzeV+mapQOwjiqfgIPeES4fg/N0Z8JdXowhim9znQzRPCL6otFuvwB50JpZJGk04VNnpGPswDO+S56ub+eRgsni/kAl/8rPNy0xBmN8XkJquy8+2fxWbQ47TEup7KrW8nAAATqrR0QPhG8sX0Gvjs3KUzzmykiPd68KB+27wx0uArUbghfLo0SkA0DwXs0RZZA0VsTrZdR2L2XtH5kIP5SQWxd/SPmgKutf4z4YuUEWt68Y+bDB42b/S45sOQ2K37+UDLFVBVlEFVb/btDPBRGBYVXd7p9jfmeEkTs1Ws+lJZCZJLpbpDuKyiNhrSan9k2jlkcveSVLqsaWhUt68mjtnRWV6bvbJr1kr8gx/whK5rUOFxTmcI8wpHoapkzpFyrA6EABgB2JOoG6oHuXNZh3S8DNGlhgNt4g5RCzIzYSz5fYCPqdd12Gm4qgJFnYpHndzwvY1zo2phleA7WQVQVTrOCNEOTwBYat/gI2VZh6Q+4FiDyWUbdxjL/d3CETHhpZGF2rsofux7zUzpO+BuKRzbqoa2CZjrR9XXyVDxY33FmrcoPppWsM+mNveE7V36RWV+fnknWk+ZX61dw3Qc2jYVjEekEq8b88jGJDaIAq6oC9mSHYmOJIN+qVAHaYYLPADOyLFMm4NTPvTpcE95MPvz72G0+TrC47kh2ZePni1V+Ss4gh2KoidAOLheGXQMtU0VeuRtLSJ5aOBMjz2+6DogPE8VAjEQkZnzzH0AtViCPZq9/nyi6H7dWJEOp7GpZJeSi2Fa5gq1ec0zVC3YIMqKFQbAAxc5ODKHahMsFnorhMJXOvTahVWF/jDRbPzvmLmIJo/Dl74k7X3ED4XXy0lCZ9g9p2R+B/6Z0WpB3MA5oyOa7WPbxmboUy/BFDC5xMlUnllE8asQdt12Apq4TyDgQirQ+DrIlXJ22es+AGBByH6SO6jR+GcwfSxy7Kw4lMWel3YvHqRBEdvC5HVR1349Gw49e9xhpvQD8golXnhDmiimtPcj/qJ3Uo5QjwsbIz5UWdeF7wx7bMbvT2IN6WNugzn8eZekXSP1yWN2uISD0B0g33K39NAYQ3jxBaoj8boRqL3omzRhVoUm/pbYkQpnx+l0CpiMpM1nf0EbZ2oho2eZQ1GHYHq/n2KP5f7SNwEXSzozNlSX4ZhKxcPH8eNhcGPzAOS20t28gDZSvgr8Xe78W5dLm8DKASwJsB6GhUDgEc7TgAeaD1ZaZJx7Vnm1UBZnYG
0qzdcCO+IMSdlFVysBI05+36jg1nu64W2VXQ7wWwOy8NXVBgFzlTvQG3XqfOFmzq9eeICcNXCm0wKUZPuCpJ67s/pIq0a4Kk9au4lx8F4QJ7Of/DIFKDRvtRkmzaTrTgemT4Hx0Pu9W7+m0lKu0jnXw3zM4m4cgjtwnJ9vEOsifBVlo5M+wanz/TQy0lZO9uYQ35hfgHGjA2W5k4ME0wtOW5PcIJWijpW1/tQVDf3V4YlgE9vHXRnmn4qrm4hWlCPQp2T9kAV4LRpZgpu7oYzP8UXTBorBQlblJJ9u7jKidRA+nzsPQIAKi4qQLnp+YIGWKyP+30SSmh4dW1lXOcKePD15ueF/SCq3YxLZrybDpi0Qro6XtrezzqM2o9IRdMw8C8Zd6QSaWfCz0A+uvx3cI8wT9YsY3/35RhBeMhKreBAHT26gdY58SaqWIZfk3Z5JNaEPWJkNj+p2qPu44WUHzSzJdy1tFbcZXuOyiyVTsYlB/sUHj80KzKDPHfkvbN9YCvM9ux5+dGM5yPiKjbjPHR33Vm8udBvkZc7SY3IOe+JEaY15TObCsY7j5CbCBjBP92LTar16LUOwcDWAJhljnrGZuH/dXA4ytZHC92slgj6huE/kf9CSSIZDQpIeM41BkFfrxAp4Nl5OEhP9PK2IAzhCTPe29ZK2wocqCiadmguYtnYK5FqrFw3WCe61VKe4sY+7NAU/r+hLeDiXLZE9KgaXQkkhOccu3gWEdcD+n4wtTmt/I212lybUAON9RpupGWlHSSCkBl7edhlDVsNu/gT0PaTCRMDR506YQ3ZLM3EAqox8PF46P+8Kd0k5QzNmXIKv44E1+5yjqjuAd9JDI67EOzTmSJAJJxXW/6NYebt16hb5PFyiPggAfa/bIhhs6HSohnbde2Kr8iMUQbdsW4jWbX9tqROQWP8J8xCsq0Fc89x8NP6idXriLRofxOwJIpLzLWT4LOwhoBsdZSkentdJ/pYEMhM5w9UCyX6U5RiREi5UOzacbZBv33myKfhhoSswJ+7EZY53NEORgh2b69QpY6K71AOO4nn30FP3oDjz4H0ZYJL/UySrSLTXnBBpcVrtxWP1v3LKa6T3CK3hWePHsOElq52KmuD+4HPXF4itwufp7RggRmnNJadEisGxe9t0CfAnQD1+oGOjlfDELX9ouLddTNkrKwWbmkCVE5oqK8kqAJed/Go9kxhbNbkAjBz0Tn0DJQ0AUZKVqX4X11xxGBl5KKrmEWGJO8lU0OYmwZwIP8hnzkW2737OGVTjDUfalxiphK88wTqZ+7mjhojJBrg+UuaKKMjr9AYu6qnaaVZbn9+oGNIvWAYCI/qBuD/FLgeJx7S9BsMOUgpVMCJ0Q6LHydPDOrJoApOqi7qd5/BorT+T4z1gikd5DsP81I19hInCNGcBEQQH2za5jXey+Xmm0gdRkVEvnmF2/lLdSRcGjKsU+P+xvMnckeg4s7MUXCQyeBTVQ86DAsWEI08UzDoWvPJdpYcDs7T3XwF2fXQO8eOAyzMq0fRYkT5Cf447NMNB8kN5QY5PQqYvvZkW1MZ3MK4yU171UBJIpY/JS/fnQvocMoqoctkQpxEOiMtnPzpi4YFH6DwfDKqZ8Yq4REnOr5c5BphjOgGWNZ19GnCaoEoBEeisjw1lDLTsquQnpgbKiXH4pzPRJB2l+mze36I99HFJi+vYQ4i0nQk8RghL/70l0SxQI0bcX710dvVisSAuedEmD20f4UwomlIm8qVwfP7m9G5Q5CxJj06ZPfvdxtSe4KqzgwjVp/W4g3/C+slIz2ovPXIcpLgIM3TIFbZ0k1eLfnFtcod2OsVK94aZgf9mzVmLauGLyt9gTcMDWF9y/dfKGIf3HgLs7IfgwvgcEI5UD+jA/tQTfc1O3gg0oKMs1p25te56pObZm6Jq2MCFLYWLY8X/WVwK+b/hzT7n/GmPNWHjsSsh3dyVRowLEW0S2Gfe7LzQ/HRxqzPhMhzKdIsSh96Oc+5GqRvoVFki+kPQpDa2Vu51hJOzwLIknTVOvtUaZmAm/SGqDKQ58+QIYNdHsE2EGsg8vgG4Nbjm8xonypeyuCnxNF8+xs5D6p8c1bs5FqYL4330FCxq576cmZKqgar0b42byCkU47jH+PrcRoTEamBGbuepn2xH2hBhOJelAvWh2UyCNlkbuYNC/OLssDMr6iGNq7bVeK//fEnWUJv/ttwzYowKBc6cUce1sElkfOZHItE68+PAsWZatEG/ZJOJoWHjXL7Xr4DWHlUiNqgpJFO7ke358J8MGhsgIlyDA+MGDzDSCy2Lan+k/nQNEYWctP0jDUHEIztzwcy673LAMPUZfJotch/MarJ/ETw+0DUfyXkt2z1iwkxtrmQDKhosSJuFl+v9gsim3GEQN030mQ1WRQrZvyua8+AeTHzDbDhPOW0FSspJcI50IFQeawwDqco0bsm/+ajQjjHZJ21YrXH0R07aC4R+UDlc3GdqY2g5sz+ozw7EXmY6YUJzWVXTUAWBA+s3qp3Cwq1p7OGi57f7BEWrYPMG7HTbd9EVI5NSjvidDPWd2b9CQM1+reMYFco5/MxGSs2V0W2IITOdd8ds043Lcf8NvSRzQuGf8C2X5n9/O4IDXWwUlXmhf4opVpWWyLtg5CqqzVe4pXjB/os4rRAQNMRDJ0jgpP7da1uSz30dg+P1e4ko7hX7ZTDJog5QSdVp0etv/wIM+Uy350ruBBlO/02B/x0jvT7Bud8oFNKgcmYeLuww8ObSCjSZEENFsEViLmYZnca3XjqW28bLWS3nFq1GsiiheRSHUzC46ry+UBlNWMGUsOjEbzOxGODPOlEwV5AMIKeTGCYvJnIePh/SrShreugCUv/hv7vq1/bWyvn+lmtZ/UrEWlf96X6WOr20TWUi2Sq2USHqsTpfv+6BSFEeK6C6A3r1k2xgX1C1EQcjDwArs96IyENQ/ERw+/Ft3cUfg/AB+G3eKC2etB4r0eGu/iLGk1kpZ5mTddiazAmslKLnFG8sEUSbqghqRKYpXfHxijksYQRTH1b7ezEHA36nYwnfg/DyU3qe5fQVbgymf5I9+cSw92K+Bcz6DUsFybn4CTvRv2zSL7KMCbo9OUaKUdu9PzAK9Imt+50sGk5fEKltPwk7ziGeBj95QFps0VDVHGYeYXgRt9kIdtNAQSdzQJHsZRsobaNEqxLs3/3hNQFxnfVffbyHRxsJdemw99ylUuey9pYmiiNyIZBeyFUGe4+Sh8eZhGpHoPAqHCf/mPNfeDZcCNUtYSkY1uCMIWu80kGQnU8oqCQZzRqkfCON2oU5ZoCL6mEjJZmU3Kjk3i0ubhFzkYeM6VkPMrDBUv5A2Ft/ptgkie9a2rzamFowyau7OGVNPMoTX00gYsW31bp2N8mX3yFQReLXHTINsnkufP8Rb/DvAahjLvIJ6QwM8tzq56Es4yNoNuPxVlaY1S2YqhiFsQ/ai2PlKdfTI2U4H5ywxNPYx04ABt+tJUVBTSrf4oepEqDZcZqIiZvgJJkUoleGJ8a/2Ws6uhVQp3imqK9n2vvFNMyttODd+kTbJdHG0gUEB/YgpHZBeiv0E+JIBMZ3GtfU5UmQfyzo7+iEYxdFUNv+D7LeuZV0fu5OzHJJQdQXpAjPRxZqTEQMgE9/vo6qdcNZxPgFlJmgcuEw/yrVJr3TqK5hVEp308oz+mPigNBcpQN7cuFFUM55Q3LmadrPPIdh2bo35+iVeV6sikc5umc7obKKlqUs43nqHSjJN+62MmH94UFwXxQJPI0/OPTkzhGMksgGIERI7PDHbSwzFKoKRzxtmRxQFxWf9bRhMGqngUCBBnnKuE6Oo+Zllkq1NVaM+TD7B36ySGFxv3sT3rMhP+BMEaTw28dO3MWViWBzfFF1dfzbSBOQVSg15IdTE2eHRsG8srbYhtQixyV+DriUq3TNx94VTFX+/2hsURoj7d0zRH+V1qoY4pE/JStqrwvi1pwSHm2vdr8XHh1phks4mDDcbWDv76SYy+dTVhA5pmL9g8An8jh78nNc4+plxD33PZ+mA82ewsegb9ezTTBwgl/bdohEXwq4knVlPtkxAY0XLZ
ZCbmf//ovmEg5flHmuGPMyfv8VCebyuWo31UKmZKO0YWekMnJFfB+yHnhFW/s3zjbpgwo1XlXUvaCs39lkrYnmjFYvgoitgYq09UpS6CMytRL/1G4yGGZaqFs7VDih36+Pvo9H6OQvg8GVTTRrO6weMOuHd2USIX3EX3NqEqTfeZFExJz0153aiV4kDf95F5TBH6pOdtC57fE7Tx6RVioZQOri7BYw0cKvC/uvz9OnFywobolKgkjhn49SNrd3Ol3m+4s3JPNWuIFSIH6gZx6XtbNe1p3fzDYMzg5tfSmvy23tINUQ5tPi3O2qCIF1CNH6oP4bo1EANilVRn2JcetYqtm373n6pArdBOPtIp85b3d90zgt7JsswY5fb9hqd9Dyr2Ku1cb6Guq+xJa4fx3kXBFceNDGt4/Iob7O7hH3f9OxoTF2GJ1Vl1/Re9WB3sa/KULVsP+PEeHxTMlKjMhgCeBiNP6Yp4SxvAale2TmiA3RSthMRG5LdZUCYx/pIVSaDLAMOa6L6cY8heoOy3blVFYfGGfkUJJ0bAg2NvJXkUY8zv5puyEub0R1khhP6rlpKnNJPN2qcl+AoAfI8SFhLEf2sCrXx00UKhW5tqmGNGL5CoHo3HaS8uouVRJCV6tzLj4GZPyXwLSQR9DtZm6dEGYmSicHI4N0pG1w5feVODYNCyl18XqKGXByVfY+zCS1OmI+8zYeSokMekdEn/Mjv/qkWPeMUruqE9nuK95p6HvdQWedn4K8ZAlIKEWouAxwsjut5E1NAd6P2d8eW9jHgtqTu16lQe81boCz+U/W08f/tbtA2SWd9396j7bH2A2xt46jWxt1GECDOkSyV1ra8I+hGkEm7hDzGzAbcIOt8/tSz19/jEWmqBEIMB67oFFqg4xHkm9Yr1WkQIg5Y899TWmsAQKKSyQIHrB1N1zAdkQLxxOUmiyRTSgrK+9avDKFlokDsGhBkMwSHWezqB9WcItHknYGhAitr/PFeKLbwyb/3WG0YBd/I4pstC+N2VIas2J4E7H92fS4lG5IsED/MEyJhT21Xtm+eLA+51PKH1cxalccm/2NE6Cx6dc75WUatirBCaxIA/a+sNP/61spYqjpxpFSUr3MYR2b4VxFocovt3O8nt4qLPt0s0v176dTw2jITEf/KGfYQWvr/uSDyMv9Z7WMoWk4nqMVLkq3p/4I+pbh6SC6oQ4cJBdFAymW/MyR5hi7g3ZEVrbKc+KfakzJejSHthHhkRP2pWnIb6a0laJ9obEubbdqprUbkn8JQWZ1bZ3N8denDBGf9e0TmapFlG7KCPr/uukMgm/Xv1eLDBRcHgkdDGKPW9iAXuVm+9qqTImZzUKzOSZiCZpUwDM2tUtUhlNqB+JOiTfZh334WXGtr8vjob0ZwpbYfwo2VLcYQgL2XszpRjn+zJRnTbfNroQbJIo+zXQb7Q3IIggQmWy+BAHFB6KjZyv0GvQ2njGYP5xataa8DSjwkDahCk79p17LfgtNy+inmgFXoXK+twtNQgzBbzdr+jaLOIkdnXbFPYKrdMAvJyqNOKuWzYA5UzpdxI4CBiny+KrOg5p0mgmKBbw2x3nYR+i9kxm9tpogGhE226wTWzUo2l5M2CmcdkEf5+K58XeiqBnC7jWDa5vMJEa5ibuu95ctFBfd5cearMvHdVoZAKQQGKsbD6Q/+lQvNazN89FKXLOEaldJrusvKEJES19HG7Xd00f+Dgej731ja9F67o4xoFl3ezyWWNTU/5pcC+s1xcxGGXfN0l3hAJO6+F1PDTkPkBCg9pMIP2hwBV85NK/IrXPidjPBgGToJ6boJKNQrlSzZU/AXENBmWnw6siMjzDTf4qLweJsPxS2Xz58u6nDihilISbqx8L/COhykvR0oNpI5MSktVPILUmjeGWzjRmkdrQLj6gXiloeD12xEereIeWVtWsUwgMlxex3LkE/T8IT+RGB0c51Dgw4KWovkaP2BOiwED2xSPs7O3dmsQFLD2BxLA/prYWLUWDXCqhNW4t2jxlpp799JsP5P7sQjHT5kySBebcy8qfkpDbVfA8DFg6oKRxmnnBtrAvAwytbuPJsEzn6lJcDvX9aNpaL/j+9pocbtB+W3cHhTQ+89GY7qtsARMdXRyhzcvubyV0MCtdpSqzLAtL2H8+DXzuDYWDo0MmzS7au+cC/shWFsqE3oQ7fqIwLlq0bsHCRcwt9tzez+g4vOSEe9Czs85g7VqkwvdNKhj4xKmCRiHDY3SSAdbKmCtJOccAwdCjsEVBCInFQgx0XvsswQIUE2aY1ITw06dvQROjwkLCQMIxSBjkE+GYLaeDbSdj+08dGJHUmO3KlFKaRCmyJpP/+NqbZXFVV9eRZPla/1SRvi3XYZHZ9VKJb06s8e0PmsfyXR3Jm0N9NYF+tPaZweXcmGzfYUe+9jEy6WT64F3bOufQ7ZxQ5Mmdtw+LPtf5zKFII3/YHO6KuwAtNacxHyCKc0aPsRZ/qUHAEU8QAEMp5X25RrkWb11IZmKFdROuLJna/veQZI6wWBB6sgdGTfjHdmtvVu4Yd6Id6tk046Ex28fJW7HGM8z1j79XcPyR6371vch/W0FSnQgvc7WTra51B446W2b2biXnDV7/NNMzGwzlB6xQOtuLzmVzYolvmlhwGOodmuaf3SCteOY7bAUsb/NLnHeME23N4buN6x8pyj8nQrrFWMv/8fyvIqMNFZ9BgwKW32Xg5zLNyHCnra1R1iM9q5FT/EP1F0aujPyIyODpc96yc+c5kv+8jNvwi31rGqtSviESxt/Pl4r/SnC4hSYYD4s6PpiM93Uaz+OPOlCOZ5uBhRaI37mz2ScEmbc7O62mO9DihO97SVRhivQP8ptWWSryqvMbuSeSTEsBaUaaPRUM0XpMp++ZjOCcfvM/q5iSbb6kyxru89ktIjOjB1EryRuWy12G8dmbdgDmp0ushxhaZxLC1Dq7yAuqiMYVIJJYzNFG37FVdktCZPDpl7g6bsbovZaaUxtG0IPjTCLtYEwZWvaxT/98zeJo3ztV4uQUjFcXzj3TqrhN4iYthkDr7QsVg8lYjtlsrcSVgFwdqjAPgqNNJyWfgncqevVz5EHdUiEcCVkvyueQUGjKkMEpP2D5cHp/rTYyoRnO8ChSFlO4bAvt+3cTmUgymSz/2UFwIn0M7+VG7FGMfsFJ4WaB1pEK7VWeYM8lD5en/EBAoUED40VUCGcmRnslo+xX6CShAdhHAMNAgqQGI1EcV4lL3sCsGxiu5Cqc4v1HgBxkjDbnnTYFPg8r+vVNOJhGdNBnLfNkWFzWQnxBW0drzk2cCzRVzDADPRDxCaiYk51n64fFeicLnUkSGtAzO2nHpe5GCKwG03jij+5AeC2xUpeeAkQBGefDtygCzpMwx2mmh2zACvQi4ccf5eXKUgssWAxkG2m4Hp4dfeQ0yUqdQdpR2PKFrhu5J6sQl4PDgDSU86PHwkxkP0ZeN9RCVh34Sc0dPvZCJlz8L1N/30V8BHl+/pa5HctOo6Cz9Nndl+x2UL2gPWLY1+JErRYhrD/7+7ZZl3l4LTlUDpsI9XMCKToU2qXd791NuFKkv47xAteAXmdET6IZaU1AyUTSZqPTh7mH1j1fLG3AWYJgm+56HcJ5/N2rbH8+k5w78uhQjQ2R2WnFmvDvcd62TM7wUWJHKJvLjwhbuib3YheNlfhrj96Kg2Z9cRMxtM1mdpUa4BXQg47aDadkg/LxaUWieC4xHRhJ1Q7H/Jm0sm1eE3FmpLa5S3i3Fi1oZYI+s9VCJxfmBq43fRdzlU2DzhqZPWB3sPze/bOn1OJClwun07jeLIhCcttxKvoM/7rhJDhagx3a5A2z9RQJ4T2gPzd0Nb4Khv2jdnlgS3duNPwzQAq9bcS/7GpQJ3lxiwMFGC50cK0Tn1x2WQTg0XUSoKEjUal0aiKBBT4KhnOVbvQv7235U2XgKEr3BuZgLWmVGR6ax8IsyO4Bf3Zwd3XR1tZtfHsB8NCcl/0kXRWdDIpeAnY6jrMUZAqllpT85d2RY/U5snA0Z9K39IHUa5k4bvjOwN/WnOKOhpQPrAr65OKrTStg5eupb21Z6Pr
GpQTGbVD31zM6X+35g+hiYNUy1pEkj6B4TRBeZzQ6+MHostGdpMx9UGIQiPr1fnA3Lg/P8ke1R0O5e4/DNzXTRL0lp2MLAJaIJ/4ek39LonBFIUjoONLIIrsflcjOpglkVrW5ltbaBcusJO8v+HPmJFSbeN1PnMwKt09K2tBnWPyGTZBzOa7q5UMun+Lb1TDgeyULx0T2UCZiSooIz/RxxVwGV+7qYT/juXCLqTuEmIQe8pSK8ZfcckDnnyK9HBQoGqNK2BVpIYLzrWB7BqesRFivrNjS9GUuOUSfV83Rt3Yz3MxOGBGY4vmCCa4vEbcw9QbreO9obbXYweqyPTEKqnTZi8G/rpXNHyC7xzqWiHcC/b3dKqobDej2o5KUaZ4ytNqy7w0v0dqT4IDgZHe6b19cVYazhIUZUHt1tBnak76RMvEj6x8gqwriUS82RHYwC7sSKDfdbQ2W+WriBQ/NPH6cWdj5thN8t6j8qMuM5BVUE4q39jAo3LMBtvr9WZeUv/P5TvRJvc08a8rDYp+WLkHra7TxK32jtKCIvQeLtWupTs6pWcMGO2Jttyb9NTgaSo0w57VyvbhbpV6rc7I2XAtkWv0rkI/vU6Hyt7XXfR8LtNlY25SOXQOr9jnFv5X/V72CWSvM9lx7+muN2tTBdmeypZMy2Wpi0D1qSUjiIf1+r5AvhRY7nModPg7xDVLylLAmISyN/4uaU24bGE2AiDQQ4KMAdhUxzbyZs2CP1B5lfqugG0Re7c+5DcCnbesi+e5KX7z/LRkTzwbmavt6anBWpqPavDX8xXCmcD09B4rDCqimqH0ndhe2tGURQv9L0yqaFnKECSHU3PeChCb97kLfDptYZRZsWB0W3VtLEzntWBrc3t4lCGomsnC73Fc1sPElSguLcKJbsYkqQpBk6ujpXUFYBHxqTIhXbngHr21TTeoIM3pLILuHERNad2Dj4K3XzsixVAg4bNINdJccpjfiOWdjNlsRQPkYaQpU3UPl/vwpzVtxyPKDAJxPg3G2cnmPQN16TxcYYvgvtHnC4siD5iUtnRZ4BPuVjhSfbZrbV0sS9ZHzZkYsaLqHXAgv3DdTcXH516xK/WlhgVaOLByonqmiFVRL57xP7uXhrh5EP9H/isZvYQIiz5pmFOtyoOshf4o7pXYLVxgINDGjmgWS9+0CwuqAhw4c79UGGiVPRw3/Vsi165WzkNuXGnocsHDgEMPtFc5+HBgJm8/bqboMQRvyz5xwKFwKN8JcTRTw9PTjutAqTkoOdZjmwy80uJ5DHIwzf2ZgBuqDGZeOFmqv+ztpCYglZfN+t41fjEEcex5NUx8mmAjICRMIaDQOOnYDZnAiM3EV/ADOGKAOanGZMNHfaDW9TNa8BvNxN+SMchT0U+a6JQeA5CrpF006T+MDLhg1zyDQ5SXSdldHsJlXHJwn4AASiF2lc4NoUaqE+GcX1FcTZriJd6KtSDYGXJ8CnHnwu4hSQ2qqMSp962CXc6YkhqNDJBWzPJ0ejC3nJDm1M7drAR/G3ljrXA5vEBZD9M21spQHKApzEHE1NqjSRfHlV8DvLNmvkpV9So9M3ReV3iFFA5evI5g+EtTmIWF1nIFDJOvbAc9n3aW6DBnux9dAjc/JXS8c1XyDultxLtWhaazsabeD3fkXrJvI4VMrF1caBm7eYPlpszYG+4oC6LwURpp+DY4/0VwzgmI4ndbHkVLO2P87j9FREk2cUUPk+HBvKAehJ9jtd5MQ6fVdTqLOpzpCVjnlZEY38eFhTWBa3YifbK0NMJSrv2i4HHH2Oml3suYyvtG1PMpeOcj4l91mCESWoNmqlAWOZNKkXQ5XlUXtgMFYZZsHUhr6Hk9yLseYKkrIU0bNfqp2I4MZwYMkg9CpB6J2GzQDLWSOAMtYZxFIOCWpO36kwvkTFjWQm9Rk2yDtLOVLiDOA7BfXD1jEHHmkoYIWn+0tj/gnsF580lF4CPB9D/tws0n+lojmsgIBkietpa4ds3aLw9gs6xVVgOPYiTOkxEIeLY6vVc9kuVwL/HjsflSpdUo+AafTYuiQRmTmGiDcDQJAq6abns08Pu3BMrlpJITnIUX90xsnVHDyA9SsS7jQh0bSDwtwr2TSActkv8+YxFYGX8Ho4t6qrP/2wODDSWqfdPZ3C9kNURcvxVCCU6r027CqHu27IS98wiQ3xIxGfi62/yetAs0d+TfrRsgYOT9yAvMwqHmxPs/Y1xZSaNTf42SGVXSRE9TMzGk/nm489d4E/N6bUaJKr0Z9Mrqx9HOX9Tlqxd9C4V/Z7GG+KJZPlJCFbsNN4b/guEI1s7sF7LG72YmWtQwMTDgCYXeZRs0Om4b9Bv2SIsuQoro5eIpz4Df83WhMoaO0BiQia8xtbdq2VJikJlzCxR3leRgt63cI1jbLP3YrwTsMba4Tr16stwPYPhfgtudHN8xDJRMxpI7rnpl3r45aYX9GOTnKX6dhVfeMGxg+16J7sdLWUen/Qq7bk0bCcdLw8fcqHk5BpRLjekAclkCfsivFlBt73goy/2qCOC3AjeELvgnUR5PwZH/oyPAofU1sNCo4JkVMsUEM4oFe6r1EdGn5YXvD9YsYhWBFkRHMvTffQz6tJtTEC8TTJZrLx9lgyL4iI1aQX+Jv6sea9o1rAM9bhXR4CjwAeTa0Mc7u3qPdaPgrYBw2tCwguYbh5GMsQzDzYsZhEW1hpmRAgNxXgJyCUBS3NYeBNW1YpJNJRPPmr4dp/WvvnQb0s1ZnnYmkrEILbRQ9A4FVhyxinyIG3L1DUK2Y/AmpKvDmaN9PSfvXt2tKy9KY5HOcLqnr5vLis0i0bnFeXdshy2wpKzgfOGGFB3xcO+NB08OFYaA7pa6+R1ruN4XoYmhZ4UYMqtWPTNIXsMiPXY+v/aWmy+lgFFbjFRUJJkH6RUERld1BCL9Lqz/3MndUGAd3AAnB/PskD8kqsgTELISM+uFbjXrg6Chh9k51XX9p+gMWzGPAPS+hufR6NyV3u2k0Z1ns5JbSey4osqvVGWBV88R32fxPWvOdQQc55l7ht5Gti8GrkKpy736bB6K38DnBUTm9AulSg0ADdcEdncdZ+gYJKVO+vlHfDBpBkE5/oHAPLS8OfTUR/WWXhr1z31pq1Qnc8/1LAqGKYYsB5NI4wcsinJXJkWV8Rs2y5xJqvu0xZLAoBErTah9Odv4PXfdRQ3RJv0ztDXVhzF5bzRsEjL5jACgINrQ7mtUe8Ibw6d4Sa/WJTjG7RTfvB29P/94cDqPBatE+gA6Gx9BwuPJp0+9BTWymGDU0cWwNoay/IID5TPvkHPwjIAMQWdRpKarY1nSj1uW7xISGUi9CUJ3HuVOdXE2HE2uqL+fw91GVFPWF7l5KpbmtRH5ZJiDWomd2E6628FuW7CAJ5pWc1b1CGJeczIfy49S++gmijLWU47dXQ7Iva8hLryCMfu8REQ7bviyxsy/mabi6cbYy2/V+FvwlOEum5b3c5ubnm/mhnWlHpkwUYXAl+H/oLh0SFm0WiCCG7kSy+nd700UJdzRvXu5uDUzctrOf1/9W9/VfttSyqpuF5h7YLXC07iJJ/66jNLMP+CXT7oCp56mPpCWW7IUuxR1WYqMVYkMZFWw0D5nkHpCEvZWjoGG4uR/meU/CMfiXioMgwXLbIh59P+R96sDv4k0tdUc+yCdnT4IvKEr1t6JOcgPxj8mZOS5GoHA+Ci8op3J9NdpJFz1484DB7GvJUIIcRR8WpbI2DXQVryLn3AhWe6q8Jbjo0/mjhfjqdPsSSpBoM53zlhAgHg/GMnQnYWp4DidrF/rmeoYnw1hNWAz4SSHUlDT592giaeTSz2YNvlW1kjUys/o3hrU7X6tMZjhlzFdcmlIS4XYlWoDInnFTMeEzPZBy5+ZOWlR97pXHkbY111FOWs3SbdGnq3SIZwQOtLlSEFhG/bMOQNPeSG193I2ZgN2h73UHrQtTpNciqmWHB3Z2bRGTmcrmdflRPoz+i2RUw9HaVYluQ5mvbEdSFfieFwGyza8aae/d7VKHhYZ3K3THQJWxQHc8+0+dl8rcx+loXTXGqymRmGI7L+HmpWtK8s9TUacqEnj
eFN1r2gC3ghhxs5PPsqeoIRhRxopZ+lDU+e8zGAXjLCI6LzYKImtAnZ9XpY1K/g/4VUEmmJ6HpHezTcK/XwfDJOGp1qBEHShhfKEldYP9g29uv1+qyr4RffQgSssxnhAewE4bilnGkOdYsf5oSwKXxTTkvTrZzR5Fe/JkfMKrfMYR/iNaxTG8ImYWgHCRK6SfvuWEO3R9TAcfq1U2vPORv0enKrqdEkfprLmqpVq7NfcoqkJ+zA+GgBqBPHZN/zh1DLUHzB6hDIwFGxpf+5F7AlDGJhCp1x8aJOSV2VlgHLJKsB9OAJlnSQZYiko8Wc/bvhuEARhTat2CsqXvNmAVUQEH5v/rGw+cJ4szULnJvRUUlaIVFkt/qwP2Yfz4+GpiL1nQrFFuSwnmCZN/EGxqh0c0DKRPEFncizbWNRW5gX42THH/X5mZCZIidddHYS6veTNKCElNQbGcjCwbp660go1Q6NJkRo6bPgk5fMlwVCAuYKRuau7jrCoRQizad0Wc/b+Czhd2wr+VV8+dz4Ad75LiCF26HPhfzKwjNcs6LRjKCt5nShdj6lY5YNjVwZeHAVAFRFrVHk5FfFCJONTlJhFjV6ustM5L3pS/P606Q8//nGzCqSuB7wIGwgHmblixEg8PVeHfIfrkTyMlC7bdkS65Z4pmD+QPpSdIecQ7G8Y7zOjgjqm9CKQHUQrCtt5ur7pjIo5NBoKMfoGLktq0gxh9pKPijbZt8E5XhsLfWOFpPyWEltTOP1fJHJG23eRR0UI2Pckbf9z6pw79JOCkX2+GRrtB6lnjbuhDuekIduWfyf7Tz9DtC8NkMOxjSoA+punkzacGFZm9f+t6coKnlixqzZFq36jSly7v64FVA5RNM1m1AYFxeA3baA8ZdjGZF83afIcmfeXaRxQuUh63I/TgiSx13vB3TJb1XSOOkl1Tr5S5aLym4Ydc8h7B4VrZ0UEFkr295kz+S0KZYKHFEfh3KXtlUZhmR9zwaxx0Ekct/eokooJvjnWK82MYqg+aysXevjfvrzOD0efzYEuR5cUSjbm5nXmGF6pQJWn764dJW3LJf8HuDLFZQxWWVcOIUlGQtMxX+B6VAUrNZbofoSilZU/NRuJRrGuzgBHb29jWH+lNi0k4L10VJfXxVnay5aJKOfw88CpkABb4VMzthzbTGeQiQ9NAI5RlxE3FUrZKKVzTA2ly4aIIDBRyd5aX5dc2/rGPiySm5k1SVlkY5leLow5JBECnO4v6/TlQiaFv51GLgdzAc8WxvVL1zV6ZZfd9R3dHUzedD/r/0/nZ05V76jK0k2DqrAiL6JkeIVsqJNkFTBpw2DJBENN992eferQOwICdBdpx3fQgpBE/MNP9Nc40chmmwc37q5w0r6+CHFmvzU4BShwEph3uIy8dJjceYaKYgtoQRLoRK9TQRONx8J8FkK+4DNPq7wAtRVC8Bbu/gCOiZK9TWmNP3IgmBl+JopYhprrLEEay36Xw8+XDNlj7g65YgbtKoEESKSfh3jA5zlV1t613ZRjvtPM6WBRCY+i/uqUsLm/N585cDtBy6KCYM/qNeMlwZ9qvBBSN1hIIYl3RaZ8Q144L4h2VijTFPtXFShm5DPpLGHyfp6QT/bxU9RNj0io9MC8L4vikDPQqLAUjO8WUhDIWKz6b1RAtptqRm2sf/DR7HO2yGGW+uPa+9QSO/V4mvUTzSyHpByAfhEOmnmj7YkeiUPXAZpp+fkQoUTU06O0vOt/FgriyyLaHzkLUp65MkrJj+BpePsq83sVPfAzJiO0OdNGi0RqvE1Ljo3fiW8rkkE6wdnFX7vODT0KykDj8vvq27HJ3fGkNMqNUineJLZQkRRaVMnj5oZL1qLT5awZychKdVk2tGFuzOarGngjcpTJA1BM0Eh/0vGqjcjXtnVaExU/uerdYflzVGrIsPaX6NJJQocLCnxqDnDCQeY2SeiU622RbIHft+CtBDUS/HWjizX4to8jo8hpp/8bg9DhvPRSuETRGyIZx0ZJjqPU33g3v2To+6166M4DPFPtLhd7DwNfJsp75RdIvqhrpFtEPW8SFp2C4fBZZtdhkREyODx1kBSSA+1CMlLHC6oK9bzatj1TLQRxDhUKxIVMQlJrVmK43ENZ4bNlgP+rvL9qIYVpZyGAdi2K/Fegu7Opw8r0RtUeiOd5XQnhKSSmXk+P00DefM+9z02U90saY/3g6Asi1K6DQEcjQTZ9ZLarjp8pplGol8awkxNdjtBASqnQlBQ7IR0fujM90ycrPwPd0Nm9ldSD7ichjTA8Pr93I5p5ApcX/A1TbZeI7Q6C5wFC4nseZxD9M6G6qgohA+ZEPsvTNLAMXKrrcUgiG9m6zCslR0h6x1filq7HaPZ5WT/fukKqm8sMzr/YaCgJlwcxBv1r27qd19Vmksbol8KOG7o09RW/tgqXSuTbkF5n8BBri1eNESTttYvMkNB50b1IT9N8HrQ76HcDY5ojuJZwbGgmJukluGeyHEGtEz1t4NSIAuo1mPXG9haSA7h7QUsPC20ysC1GWBpD/3VNJ43sjKnYu6U67q30EdsRIasjemJSGTkjvq7rvxYC25k2bVkeTNNSZ1jrntbqzF1U1Jpya5BdV5d+cj1Ff36OQbGWz7X9STRJEg5rVU95Ecq6inSRhrrXJatqW054oXDK2MKJhnE1HUJ0A7kysxWs4CLQeXw8J5TyUsSaFrOQqVWJfQl1uyKBHGXUQF01evZDITV86Hbsr7+rMhvAhorxFRJx8KmJV/NTCNEa2p13WOKodVMGBmh/L9f8xaZhKdpEXqAYuCdhlDTyS++dQ1rB5++Ims3oowTfW4U0D6Wii1JNJ93LA6NBwi989L0oWiwfqJ1NMad1p4eRLlGDcQwuSkF1lWzFIePuhpAV+WB+vtTj/Aj92iBHDRCsx2jdkNHTd8l0+26Z8heaDz0mZ4pYiknAnNYFx2G8XIw+NqgMjRTlcbGSLgAmi3xX6ks3E8ShbI16XiQQkUfDOdAAPJNs61tZ9JWgJjP17yQ/GA0hyTOzEFf8sXa1mHMVdZRX56/GCNywtPrmmH5cnxCXzfVFhmF1j/tDrhzCxzxHezyvYjy0ZXGEqlYs7RuetgYSJSfgzR61evD9sJywaa8YMCF4e+xSxTIPHoj+iiaQvnA4Au90kzbFYSK7d58Xetn/yS36KnX9tti90S4aLdB0vU8KK2xH3vmphih7gRxcMaMz5CxN7X+l7Bd64qFrSsLO4WBcZDp8PlYko7i6+9b68pz6OoGm6SNiK5/ckVc5lV/4/+gV1ezm1N5+aySwAPiPRuoTzyRhWa19vJvrcS/i43wLhGPUJh7egkTToQHa53Fldjkik2tnT/0fHL491iWCYfQXA3UkKqLXCpuupOCcrJhgIf5BNvHy25Ue/Pr2qF5plYwGyu7qUq8qKYHcyvzZ4siWKoch0NRiZV8xLxGDa6Q7f1/FWL5vRasYZnRCl7M6MTcWRKb+l8WK+tsm9l4VwsjOctfdMdUFc0UDptq2emwGLgwkP+pAbHtzeBRhXJkYDRMTS5t3yAnMGhp8FCk1KXKb7vFdyUwhaCCoVO2pHXj6CYrcwWNrwY0AEaTntgMKOAHBc84yXRnn+CZH8jg5dn+1pLR0H2BTYF4zE/3QPBeiNf2wJSNnEKwQT8kwXOrcl+MnVNYKVexjvoHHYKdlX5YNe7ikvEG0D7C/s6MtI+Pvd0+ZBtqPhcwc4bf3wJfje8slYSsuoTneecVgdQ7VWpgx9xkNjaibEKj1vrI5kPaXao+5t4uls5tvEhGzIgD/rnBhZUmrPp9OpgcIgdUA6dJnkbHdcuMa8TuAVLJAQYdNeVwl02ElSRQuEk6s33Eht14lwWEpWkWQ2ccMdPz4EqXEGp7EJU2nIgvAKI1QWnQoXjX1ZICVlGkRCclJWjzMN+vpkVQ8JlylHDXrB6+PpQD4DOnwMyZy3v7b7UsdkFy9sPkrnh91TbLKfUuv3c6QPc+oFijtv0nQWdJA4ovLZvMKkTPzW5kHiuJ20SmdYfSXIm20fLvHeoUSHqhfQN2apCnSN4KhSMWAyMfMwGiI5wBYSGMEW7jTXtOE
v+3Qobvqo+sU1szTU0Shz3Jct5o/ZqvJusQowOGmVzNcQDW1ODWUkEDy+ZYR9sOLgRpMhjla5odqyTKyXEVolx2No7xkvL4LQZXLsTHYgjnaM3hutgXWw6iC6VxkoEzb1uQqD+KxGYpJM/htzsg/DM+vLnnvPWk6g1Nlzrhwl8Vxgpi9/7TcY2RUOUelVNnzNAsdfCKn96SPu/b3O98r5B1wpyIAnjVoSJG4adwVDoxGYdmtcQIeJSOh1j5l4EwYQP62IaxlfrIwtjrAuON/TfeJjnGEfc85H8U3T7h+umq4xKypcLTUbgtStx+imF+Qadh6//+21tznawGovsvgC/TWK0F+vQe42YBV9ShbJ119o6RRRN1tIhXsOzV4zl7TCiarCdT8mAIggL/6uOCTi/KbbaEWlmVH8YiRr3fUTxz5NjPK2R7DrA09YuEvRakyDb9lNUriwUru6GlNEhBqGIXPKvtM7Wuy/69nazIh8SsukxkWYUEF1wshxENKfCXI5dPAcE3kSrplgjgEzjThlou2MGDgsOcixglF8zZKQqrU0dlge1ijtPuigaw0bvCsOB9+eMS1obExqNFYF3jkSMXjnH8/ED47rvIxuNSYy21nv9bIyQLpD0ARu/SLuFnh0dwhVX/OHyUzxsUiGBro27mguFw42pPWaEJqEQoK9EocPM1AV6KN+9mA3jbwyPGpTsgGV4F27ko6tvYIm01u2wobGFAd9ntS8otuC/jiRcFaFBv+43UpajFCFK24PPPpqmZJlH8uWoIrJwA1zG42YJE6l2/5i0xaLDp4DuBJ8w/9RKRmol1ddk8Z2Dutb9RQGk8JQdIOCec/jpiD65/MewS6/wbKJAK4FcitwZ9ko7dNdUiFB29vRUNB6NHNxgm8WRT57kbBK/wewGWh7ZxlGqME91eu07euixBY2FxiMYtvR5NH/nlayt3va5yygwACcYtEBKrIyiKh2kuK1TKStGkZBvccNIcFlsTiM+PY1x+LFAO+5F06y23al8xpvu4HPMZsNmHBdSDJ4Wb0M9RPPeL+D//6bi8PbzKHEgIBxtGQnVdHMyv9abUthzjNN2FVLXBV4DsZ7EADjr2RLMMvs28VuGWcSNG2hO/d3LsKH2wYqX2DFFY6rQDocMC4eQarlOk+yq4rQSk2tgZNq35AIym7Mdm5TUaxOUV59LPkpa9jkJI+IbabrIfLLKp1hzvPiHiypjvLE2Sl6MXeSHzmNIyroRhbYmfvTncBZqAPhU8F6N0Xa9imnX2lpgT7i2nX1k/ZCVFeKbBMa8DEoOkrpmCdWufihkAG7kD4Vgoybo3yjeB389bylZlRFh4AD202IeyQZrDeRgEnhrDh2an/6ePvnBej5vcwSbA9OyfZ3S8ZJOsbFbVR2zcnpiaDZGogOVe8TAPAcxXNE94+QybcAh1zcEqA1O6TBwNi3xH1T+Kf8B3DEydWmKar4cL6QiC0MJETgQ41tP81C2bCgryadMu7ya9XouCpXQObH3wW7MVCjVy1N0uBNnNhMR/53k4xoQhVD9aH6au1+FkDcsfDRHQfMa5KuXGemCxczIggw+1QYCSeNtKZsNaqewkSRY2de+6R5m84STdhK77gu7V78qF5l9fP82OKmAQNSfdLRn4Vkhg/cTvBCbNRT2ipsM0liJad1zUpz2UlgXgGuV5u1QYB9mLyaAHAZSLP0tzyVTt5nMInYtwU4LRc9hEvbZ8a5IAsK5z/an4SYoCz3/4IQeCFE0VLGIwLnCMDPWfyoSOe6+WMJqeSG3HBfKfHsYk1gHvOLOET72Tu+otLubInBQaycyKX8RGvz/Uv+bfHFyPgt3YtJFOgNF6+ul+EKc+FYzZNZlRv5Q1h9zBGdmtF/NWC/e4vJbRZ/tt7fimb3h9hDZZQCqONNShe0MLNqGrYw3bux5Thwzf2/W3Tv98Up/5BtD3zfCAyIyTv3Q/fWNBXNOL5s35UtL2ExSwwlWtL49ZXX0uZftWqxjgsQu5f26TNt2/J1TOvjEnft8Vb1RxInHipFUY0Fq+ecEouKr5V41FEQRAbyLUcTdHO5x+M4zCXV0PJCvdFWCRMM7G0IbB/W2y+xo+3QD0CE0kL4cjb2bVQmabx11voQEgndvMY2Oc2D9iGYTkO8k/n45qdBuW1QaGNeYcvoDDMy6vVPjhj5wxahcYJZoU0ngxy4Q9KlhTyU23knC1VVKwgAHOTzP9lGVlc+3FwbGrklBDN8tSuG94XSPk8A3CBurcG+2VAw1clzlEkXNrmKO57CRPMe4AlfD/Abz71rmHBifln/+52JxAiefRcMFNiaIClcx8zsrYi+k1Ms2W5CaXGZ/4qSkBzIptyUeR7P+O/nm5v4jCzDW0tMPZltZfA8ofyOtKSgWPwNT9Xy4mmrKcXBqphspDsaI18feqovCFTwzo1IsEzToB3ZUAz6kjoj5bINwt6PEDp3SIhVVtew8DAhL8+mxfZXKchu/PCphPLsrzzClt6OzMI8Gc9dZEQ0E+WGmf8cvxd1c9Esxv4oi4s8TL/d9ISfOZ+BJs0QA+h2ZQKZHPYwDoN2WTyPJlIVic7shB5kcDrOlPAIjOA5AaHCPS6EJtJjOz7jKdOMt2Pr4S2CYPzGkgxJAtQwWEprtwIB0Q1OmglPrHZ6gIpz3UsLDaQNxyOhaEBpmKKPiPGCWHbw0noI/qKdOlbs7l7CtDAh6uWXkESDs0s7YN2dB4jWyoL1h6wdmqMOGlZKhCHaZhnNEJLdFc2Ve2mZVIt8lzryzThtmwSQAoEVmpYqsdDi5k/TrD69Qd89LvezJHieC2REHPk9Q7SObr10pIYcwyGYwuy6bcZqK0LZDO26gwSNAtwpvdlXnL1alcwBBF2xrOnKLwFBbROKevwnKyZEysb5nqTFVTUx3dEtsqNiorPgXxrI/jlzMIxwqBayg55PZITmUzKqg/uxlCmTp2NC6+IxBAhMZ7JDUC7tFf91/P7m3z/UNj8NC8ICw/5T7pdNyloV36sNhcVbhOtK7NwApGNL3AkKunWS8dN88OmfuahgjFVZMj7SgMrv6057+kJGG5VRe2O+pmViXcuYt9z2vDZ9LyeJGn3rsYjKx1v6atGjUPlYWzQ25hByK3yA9kI1UZvamjaWvzHOMoEOfPZITIkiuAvTBOTvFSHvfBi7Mku3+qgy3GIkaVbaPao32MIlWblV83cxWMP00b22G6ax8a3PUcd7+CnAzaMrlBGhowemeh8RhYyKQ4OAdvpu1UBTCj/rc4NvxYyEDP0yWddjj6JcgWwbfP0ZtSoBj7r3OpBAoivGJT74LdvSwVhgPCw1iBlcMdiFzPxY/DSzQHoBVmGchmrqwVFcRQFp67XqAmsFF8AJBOW27lYZusW3A2VWl5heprhe6dnYASrt+BlZ+S+O8wTO9kjFTLREdz5j5HKqFRVaTmGiHFtqvXNpMQ75NkY6ynk4lgMZR59z1UDkDQl4nnubFCWb6TjIa0CGflDvXPVZWbh0eQlOnjdfG3IBIKFgI5E3kr/7d0Owtdq+SD1vnaisPxBKg7e5v1PePfqfq5jjRWcuprUYxtrH3oidhsfBtpfATeVgOe4yWSe/IpilenaMV1VeuEIbpgKNET2Be9a7wJWrgohtvBFb6ZMESyKO7lmFVH3brKLYP2it8k+3tlp+fx3nqw2kbDsfSrnGlSf0uR8BqJii51wDgBzMgqWEU/RO06zA29gPj3BPx7FLqxL2HhJvHxiupMfiMvhYSLyFBQDEkzZ2uVk7qUw7iiHI2/ElXj3TUqqgaAtNGVkoiJHeZQEsiKyNeI0iUXY7qR2dfOKuz65kJ3+h7HchoH3HywXOVGOuLaZYw1DUcEjcv60NIsFQUpeZe+tu8l7fcZ+p2P/oF/JmJ7a7aBZVcsykF2rZzY48PhyJVvwgMrtE41xtL59uQaKXTYsnbLJuY+e4IePH4/Drxd935pWR6gvWk8q30IltTZClC41gX+fXr6fX7qYf2xwIxM86F5X8j6PxNvVs8TRnbgJgh/O+RIa4RKIIiOC3al9V8h78eiv0UtPD9xCaDz0mPOtTzIJOWU+PQCOB7ImMY7nxYsLaHtDSAGF
DozmNo4DkXMwTf0L/D6fWQGBGiSLr4lExSoFFq+qw0nfhbOvmwkqN1WnTkuF63+c2mXmG2heFuoSN54PI1L0m4s0SYXn2txEnqtxqGpPyIzikpw6nPQN6I6aXM+qsmzF8gILGqY2Duies+Gdh7q9k68jatkACU2ZOg3obgi6JZKAe/faW7sEkr3mwOXbEH33+z3mxHToeYYe1ivNwMYEicBwzj3FD3B3Kk37cWPX2BpzQUH9GH35uDHhX51CpWMiTjPUqbizqY4jPlwD7cYXbss6MlBlNx6qVgMcEAhh1ovjCzjAXn23HNr84NTQPAdGPbGwd9RvQ2EsCbJP0lUdCPaFjWQz1M3Q7v5+WNSDSeUH9zIm+DjUK1dhltbseYodqWf41EgimWuNRR6Mwmw1l7IuyQb02QckH0uSMxohG2CRl2G1EJU4dZYrnIu0F1Vz9REjPNhb3f+ZClUuQORHF4XULySgrsjNDL6JtixEEjjcEwZCZ/hQMZWoWqYLiSdO1OY7vqwOLzYlQFMBblI5jJd+xU5A96XPRpe33fLMmPjIMwxT2nCKf0DRYoDHqQUTDaHmXkG3dg5KBH/JN+9003wiu/T0MOrBGbuaU4QhYFJH9CAmp5xOwA8QDhGN8xJpAT1bvOmxb5RB5M2uGT05rUbSCTbZlyLN992LxpzVY6zyBDuAMsP3iFWLd+USlOSis1/0fn31z4rUVQrtbJIV5Dp9ztfasvW0A5buWzyQiNG9yiG4OP95GhPO0W2eYMmYTNQZ5BJBmpr74yfVr64HICXJaiyvyQCmsJiLJT1tcC+lHmfR6gcLlffEvzKKT3BNi+cxDNYmKMuUi3HIYUcBeYz1ks4nIqjXbqw9jSrqjSPrmjwH711mvU2vtYGnGUegg+Jx8nXatwaQEbOkgDSv1SmNiWgOhdnQvurMXnt/ft6k+rS/4ebik/KG4flIH97s3rJqY4R10wH7cw4QDuE4ffhDuacrC8eXpwiQlqSjnpk2U8O9zxOxnjSzotzWxYCGZPwVVqc9NZfqhR8E33XCQAqb66HwwN9wKqcV+Hth5gHslqNJ88k5PFoFEDoj2uUtHopqk/oWzpBnja1U6TsOhs+nQjU+7SOMjTukunXTYqFMcjeSLPav0fYKyktQflzYa32TUicTf8lzmqeaa82u3LvKEQAMF395+tjU83Ww5Msvg40Vn5cb/QI8Fs+qZZ8VDoJNNVM4ItNqqppSBM3A0xS4wkVW6cmGmQlJS0cWAg9G8r/TW7PUF3ZGMfHnwPYD58RC/6PRVj+G3gDjJnJFsmVqYED1l3dBwlJanRw5z7cHxZzTZhXSUPLbYsnb/fCorjmKGJqwft7IIBLSaUVTSWPtdJ0AKfuRkw4jzWMHffav2WnAqaQ6jWQYgvDe5o109NDlrcc/0wkVwI0queagw7nA+CqlDsgXu8HATks+KBDydzVlQYbNvLKw6B5sw2YkDxEOgDf4CGSQEDIfDiIrTIuTNTYCrW6VMRwRC0R0Lbw7AkpdNmi2Kyz+VU78lpo09lZoxAR26hv+gPBJQZAQ5yrXOKzvxIUDzsBw5i3Xq1FBbxuNTevUso3FY9SO4GiNcBDI93KYyMNH2oQi5m37T3POFWc+Kf7p0TiCGvGF09RzXTtHN5u7o7NuLrBoPPjv2vEhxbcDxITmAkeErvWFfZMkSy19cELYzLPDpQpk4j3v/wpZfRUf5WNjeKh94tl2H7tYkTX5VmmPQ1mAYb3QkY0dLcFRQLawgI8oJ/uNVN+zRmpl1JEsuLjefos3fyinhmttu3QaFMHdZ8+S2xBnRb0FChkgqDLHwY69zlh41nweIqT53lZXobkooOgdH8fKblTBOy8IOL7rYumc1LfBsG6atwL1bl2UJmd/Ht2pBrzOLC2k5Wk24szEaA+VjOlGdE3+msdnavqhI7z5HhtIiN08JPsm45C7Zbj2ie86Qcz5F4Di9y8K4Siy7VVuIt4QYOfyrXybWa7qbUUfi2uhH8DIUWyO7LIl5y9XTnSS2JbHGc6LPXraq0wB+v/hXc7AbAxF5aLwui+B5AoMSXFQPQSRZGPXPEDKctsvccbJ1Ul1aU1L+kyRc/Vd861piQIqQ7buKbtcB4BadMnAvZB4yNM03MWCiXnC4PbuKt3FpL17nUtMkwEbMttMfug87d+R/+4tJ4aWRYQynH9zznNQdy1e8+u9U6aPmbDvg8KTVdPHhoDaIkQZbXuTiUgJ7I7J8zwi9xzjo1gvY2zDIYoqXqGuP74PLuHRPHhrG3LecFBwK4ciCr++y1KTVZGYc1lXS5qlqjSb1iDnz1TqwrA7im7ZmlPYjWpWV8Zvxyjb1USDnDfmfR9t44FXmGC9T/ydkVJjLuMF+GVb4ywWifB7FbaL8KNipUSxa3vgMucRhtV2f4zebTexOjTS6Oov7Wb2Mc2xo/Eg9CRcW2pyJ9oqoNA8PGHUpQFXztH3zu3n7PFrrGAFTNeiDVTvSRlx/pFswQwoitSaK5OXPts1s+ezapZps7i9WlZZCHVUT1bH44LZFARl7WwBM+Mp9AM82V7VZ8qwRGHVKGK8DS4FRhWWgIjtMvVGbQjRoZPmohyJ7t4OWfNY2s5XNcL6q5TXIGzY3a723T6BuG5WzpxygOMAvhhCdu6HbWYnlmW6i6RW0a94FoARK113ytTVTgJek1DSGRB2aLsSUWIdYQiXiibJf+m6JhJysAhDBfebYEQKHK16UbungKcRwPDbi1ZVgcxcNCFPBDGZ9y/ccFAZMKWQlqX1Tv13kej3OmYWx96pQCwkEL2mR+wew0ariPvRbIsh0H9w1uho5B2T9oPVGh2GgSk0jFCjNx/0fTOVlfvYhIt1MveHFfLRo5lfNtY2gW4xjLRMqxcoKAc7bXb+Ensr0TkVa3fyjdBV2gy8W2wMql3TrB4/uWmpEnZpEXLCTiTNxG2ncgo8CkNOjSSua0ozL7/SiMMHlyBTMpIJnjf9xw77DQZuuubdJBKNMnY3dXzURC4h6Ihb7EPF5c1cr2/Bmlt74bR8OGgA8emiyvVQ5J8sA9VRIJUfSBpCNTdze9gmB/k3uylGu+RWnjkwc5+h8bT9pAV+l0wR+gzDY+Dx6z4mMHQ/352MYIHE56wgFwnQd1cUH57WVGGUkjF2lwhtIi7it5v9yTFjr819La/vzlTvKlZWslBTSFgxQn08lwtwSsAEgGD10VO/ctZyblbd7new4okGVGyHzAcaImc0iRgHEIyWM1RQjAPEmtjNeJ9AehrtG1vwQlg/wuROWPAe+9pPqW0bsIokBnnfJQ3aliZ4mPQJqpD4Jr/D2XiLlUFHla9Bu/LvuWpee5xNKOaJLqGRy40IdnQhtWAyywik0DJF6wmCNdS4z9aetluTkx8hpeyGyuYjiZ+TP0oXCrYmpy04h411SpSdj7u+cCJIw41VQEoa+jO04sgeVSTqoA2Y3f20+Y8PrJpGJ7oHN5Qj8lKwtadOd4gq3UsPrYDptYphIch5hU/UGERsbghTQyp1CBXCCVLYd8KnriNoJEPdh7T55rGLhuv3Iu6oJbwQu/ShRCqE37BPc8lZ2uyC6NZVZ0cCdROwG2KCXsokXln99swA5MhIVixzJMD92mQItv41WHTUhFuC8M+8sIx3hhLi/y7vKgmwBx/eNBQH1a+fWzDzMV6YRzHyJEcnPSFbEpb9Rf5ylRzyC+51HpWjnSvNCn+2cdc57UfUIQsBb4g86XZwCoiCC/vlD//IcXZpoGtTqTGvKjAaQsc5OMCrMcaInzktLwPY2hCuaVMGXtfJSGLtBZgamUyjXyIlj+2x1vUsoe9Pq6bQCMDnVwEL1KnvZG8cb6e88fBD96+3P3wlla4Cq0vN3htaJDTgsQ8wuyoek2NC/WoogPPuEfOaXvpiIJCFGaMKbRChV7B++kzrLfo0KJW7Ns7GdzCWoY1xpcMxkzeZJjEj+Tq0+vTZkCNCtLhXU79nMAki75uj3+e5aIYEqwyH5K0BTHxEGzKto9QnZMmVBMGNCpqF5QiiAjr/ERetBoshSB26jChaAwQcfvd92JIWBmoRQAgYWGRI6/qlutwhW6A5HlUnsoG3DghG
/MNIhs6txYXeYwGDppDS66CzWn+okQQpehWTuMz4WzPUC4SOzUCno1ydhxMAjHBcuAMEU1lc5mr1ZqeU4qSVifDXGYimxkkxeZXcPJhZGYt/PmtLrsYncTRDua0Zip7S8eRpzZ9GF6UsBfIxH2wkxNKxf+llcOuqi5ZMECxrBVZHQ+Ky31TWkVYRVZrvL8S7vq1lkfEo1VdfyhyQGkBNwXIojaasRLPRbpCkEhgnTsUC1mabelb0qA4vAb79NJkN95OJUiizwv5Wuk0fb0uNaNqdqYnVXY9cqQb7MXJDq2ycR/NnRN+rMnsR9o+YVM0eIij7AMEn6aHP3c1Xh1NqJiTEqzlOVv2BsVToJ2V8eXu88zVj8tMRYiX9BvD37FF22ZpGkNAYKABNh/zqkYivSIhic93YYieML2cJ7YG/CoLLUnc29WZqFqNVyHDkGKVShr/diBB609CONhhaiY9u7JX3hQPBoWRz/9qaXGojq0HtKp5gXNubvMSkpcRHYE+Yz4CIB7b8UFqwucJEekob8EPTo0HMoxRORhNg0oilCgObXQBbQlJaDpyqbrUYXsqIX9cx+GvvcFO4On5rnY9vjrCstJrA0p1g19iSyXFqpaGcKR0ViWqrIyaZ8hb/CkWbHbG+doA0cHoOlxQE7vWN8ReJDmtfi2ZiO1GW7nNZvpxIDE8JNLmz2FCfjCaroR2EhiFzHeL/7fCO3n7l9g5mTTcRBQB9JSr2SRhwialgOqlUwRSyUFkYIW5GkRoKZyJcVKZEGLSNzGbvRwC4xs9odcuJrJ+hfCJM0V7WWvJ/bSz3NJNgZALh64C09Yqr1FQJVFqjLolxIuCd3YyM6k68BlLTGlCcG5YGTBBPiFJiAHvm0s50cBDOML6IoX43WorAE3gbVzy+hBLS7tzyFcmDPfe1qn43FxM8mxc2LVdL00+JOU+AUAG35JZY3kqKRAlAm09Vj6EqKjEer/kTCIgnVIMEjLfcVHn4We53wFaEGYNYSbN+8y1lQ0XDqdd628yjz6VX+Yt6Hxyf5m8KysWvxWsYHr4YNDIpVdBGAd5F1v+NvudZggPOoT+pXSY6B6pGvoM46tJ/CSw6iptDNtXKSYcD95nL1dSlOtzmgSvMtKCHGY2UWYsns0OgCr2QndZFy04K2Tuo1ETKdllMewClPc0ixxxhtDjUJPxxfceKb+vVeBSMjLly0wXkNd7LTHa934WeLYE9HPka0B0eJl8edzg1Tv5vfW7WXmwNhhl+lPzQXriuEIMgM3kRLyjhTx7ZRsce3dul+bab48SkBEjz9QuZ9jCvHWfbPj31Aa+ID094G1AQIO53CEsv53e/6j1zXuYURBg3KrtVvpH2L+uFUfcZhMjIlBOesyLMgFMTm5hNKKSIh4Qd3Jb8QmWzWjhdrINQmviIlloPLncUdHfLItEmrLUkqlIVfluPp1sQ8j4VEbp79Qwe5xxOM2Ln42/OPEHxSC2PmdMl/32XUfjU7iwRjjwdOLM0t4X4jtRH2aVADNg5IV1eN/wTO7KTG6Bq5H5LzQLICHRpTY1jgeDeltXPnLlYRkbRvHX+wjmQ41pY6bCRaz6TTJcOWmW1cEl0OaVH56CkhrvOfIvYT5ByU7ZXL/1rWL2lF88HFxPQIuLtB/SyCVGOr1kI+M0Gm6vAMtezQjtUhDCleuDC9cZqSiB3w5VNGQzAo5QzMC8ydAofdapksx4caBEwSQ+SxEgLt7Vl8rGabM8x4RY9g+3RuyByAz3NUJBV99fGseK6UAck7w97n8kHEO/D4kwUFHGVoffPBza8tYLUttSFkmOnwlX6pZ+emirAwzIiZ8hJ6wrEjKTQBVCzTzQAhrgluGm/3unP/d8fElZMu0NrpuOL7szQ3uBJ/WqImk0i6Jq1HYLRPmpIPN4UmeiRe4ag0tV/FrNqLyc6F6KuvmNLFxDOldTLO3XVFwfsXdxBjGcUUSSm6jSW27jC9o8Vdeh3V+S+oNVwRUwOlepyYgHW0PDykeb+3YWbDZnw0kHOQskiWyRtbAMYzrlK0o8+wE7N4hPmbbXYi1JLj88jPlgJGS8ZlSwsW175dooBb3Betx0s5H17e+ZJCQSZ0vt2uKxeYLyc8aN5R4OvRZN3dX0Rfe2NhYjtMFf8ezX0cPIAjyO1CeGso/BDxcR6E7Hw1EG2/ltv4tOfCeU8jLGgwjJ9jcbz4E6qhG9FYQctr56byKeg+JYWaNZkR4F1zaslTCsMKYOeuVkeaV9E7389TjjbnLaMnZauH8INzONonXxVWOxNHs3fa9tBXzRRF6YsnyoNfvCymXm4RKT+jShU/0GYaP8tPJtiaizEX49N5Fh4AlEulx40ELp9YQ2wbkSwGa/hSCUm/U9Wl8rjbvCB+yULmsyEnP3DYez48CnGmXxSy9uxiIzWs7vx+cTQbLsTt3TIj8C50iatS7/VNX0T5AdjXQIz4RmGDuQkHSaEzveI5GVF4hTyGvygcW7R1vSS9j+lsIhPLws8t0U99n+r5okj+j588Kd+YZceCFHiHtH3C9y4jK40+Gk5HNCyL5zRvhQSUzKGfttbvlC9IlLDkTOVMbfzWHe1zEbqrTNMpiDfFc3c5NXirUoiENwku32MJzk3DDZKTvfH25bvkQ77msMhGlo+WANjA8+zS63fT4tzoKm+YPNRV4YS3IGjz37gRvKmmHu7Jctje2rcHvrREfk2Evt/bolK9HQ+k8pOgqEB/APu492h5f6x+mjl5muTEYcHnwNZ9NC2g6ZJR43Drq/cDiLxBNTP/S2Ndr2pAxXlvO4GP06ZBUSxIu9PG1Ky4J8uIlAiRZn+s+VfPGH0vBY8rxbonNhqbGqpHnyXK3qztYqp30bZn5T6QVILvwTinocmGdnkU0J0MgHa/HdPyfiO10lfLu3/g8uY8K0UH5DYq1kYUTezsPsqLUj6JTKhNBQ01USEcqS5PPO+oHc56WwnG56wfI6AyZTTwZPYp5fXTCgyH8l5RB36tijflrSkI0W5oOwXICwCJEN3IC55sUc7am6GWLgWCOFPChNRllnca94Zs9fMSrVUtZ3Y9Ph3GpgtPZTGwWCasx+qBlEJi7ymle66n2SzGZbl+3wpBT6+T2RdGpUw1KDdXL/SG/AbeWaTQs/kRidZKjWwo1cCfOdJgJj4TVAw0Cpfk+uQggAqJUTwLFmSOWezm5HKwWF57ZBjEICOomFsDAze+5LEGvS8APBFfBucnNbDDqQyGF4od0hV3BSCXSeYycGrA85coUNzDoV+1nxETwcp5SFqmmaGJhHmfTOfH7Du/LsB44yWSqbxAdQSJTZ3grue5vuqHdbI4yeHArJZoyvpFkjfjiKzaxDo1azUvmcmxuFPGZIgTvM5Y7lpnOKPxWbO3q9+PS6T7OZPA4ERlBEQWuV9AoOgidhyTGO5w794vaKUoX4HCX0bMAioVjhOoA+lpTod+2BflDt/4M6/A/tfp77tL+ghE7oN+LXLepnJCEVY1gOkM2Tx4tZ0xxX7pQp1UNcc8Ea8Z0WKT7iH35MMj/yl2mVv0idNO811C292sXQXhrV9m3FSiJ53fAYYXp8of8g1FW3i0AyvHM0MJQL7AwoL8uO4ovI7nsQzifBEx4sTsesZRfPWp9ZBaTCO64ULcMUbqJg6SdeBmc2zlcWkRiJqwuJAW80Nh3pBuM4G7zgX6GTgeIhcO/2zgIUcq1r5/7BErs+r5qb+zSY9RVfKHLQgHjHzGqhkxJFl+8jp2//S6HDQCZ5fZdVOL+JrUhdui7830MwVY5Mkmvm3iMl5/vTUF/wQDt+ZVZLSwBNgekrFNuCEDtQQkDkX6nyn8/R/F7hqzMyCtinwt2KjYZB22Y/7qwrYxsqyO07ke5qyRbZwW6O5Q4gB451KhwHtqyRsvkXS/H9G3GmsFzhezlXBYvddUAY4LshPr3wzObx4mezl+Zex9um0XZN/0JpzMmCPlK5LpLwhuzvT3Hkm8fuvrqfxy9qvRYMEFRY4hKz0ko9574c0AW0DSXBrFX1tW51qyWnPnG8T/P4yDa/6cOj+BKnN2MpF4j8H5Mb91avLL35qV9WPqctZKXKhVLU0q+GkYxl5MtWcO0Vd
kMM1A7sPFUvxrKOaHsyrmbLhgFX4YMeLfCGry9MYyVw9hBwiJPn2SggWzqh6c70UL16JXIm9hjKBilalpUTmko0hhEkjuqOW2thNgzOOB+S2efBhgsKWfJCD4csElUUNzFrk2o8vPYANMNPBR5ovmeQyVoQ2VvnGpg5SFIvMaefrcjJIpxEDYuteFUaceUvEPgEabm8d/TjMLN+fVUquCNNfh1m36z3z6Pr2UGZNAPza7md8RinQk238dm25OU35gslA8MmWUxq3M412Lwvif/X1bvrYozPF2sAL/n79V+ypIrJmMzO80mqVb2znf3/Ao/YBBu/b5XrJaSnos67M47nHXZVxhEkOMg6EfhfGBEkbLkGNN4sTnnuZHLgVZtk8P85ZWPKfuY/F3qB2uyyut/ja2ZaRHWAVpHJk3qHGEG4Z+4qQTcc1CJd3yBiYyXustyzZw8yE0Ic66c8lYNqqLMa8LlGcMSuWAOq3GmsstkTjaDt5VQgRYJlm8Y/R0cXJbBrtSRKdCGMlVmt63GQErFCKI8Rh2FVPsSNbNrfeExpHox0+trU0ZUOxMrLg/k9a3PH/51l9fJy3yOQAVIgqnejMZ7+RPuNRMrzPGBrw4NEns9Sa0SwS8b5fG/UKT2ZaMgJ584hN+OYx+Uzy9MjGGgPFAPtbyrlMx13a+LvXTwYB4KsfYipwK/MZXUVCU7993bXHsBKerdWl1kUD6aIHkkTZXd9q/m9frAz7BKaBxjbdqTBMJmx0quuQ5LeauymnI0jN7p7/42IOzt9hD3qavhWvAn/EX06fh476CHB76JI3gHalqbt1JBdb+6ppcPTv7Z3TGDJlfnjX0/iPNmPj5tLPiCiQOSf8w554ht6mCOkJ8htL2PlvawD0td6v5w4CgAtSf94UkTlH30TytUR3fYg1ffF4UzQ5Weg3r7j8CR/Sbd1nTL5cZUcvKU9PeFgAVg/zT1qphEniZWrrvhpsxFTCaW4ecd3kJ2jDzc8x9NXo4QA7Gq3SzrfQq3JxK+mrZewjhF89xbD5HiMJl0Vo/bKbvOjuqFPh7BYqFIHR3/coq2V2vddfvS4zyPgeah7YDeH6vZIvQmied51E/eNgYETyBF6UPpw5hwilCMfyiqtDHBZnzyu8W4J8bDeM5pok1kIlzM1O2HKRiK+SFwUa+FogPA6TbLrMgEPjV5uWFK3ovQXqtUjVnpbS7sArv4QKqYjBYo70yeJ5vAa6fljZflfHw6/J82s94z/XmTwuqTIo0pNL6umYh1wQtWcj9DqmibTKjRvnrmK8TInHWWb5MwgTKFinDKv15Prmbl8FiecvU0sx0CYDMjsvb5G//m4wofcPcyZBOaXTxMz21g0zPY+V4ALL4OCSl8TYPW/mFmcj0Ul/xzrR0DwtLVtrgbuv+3DS0b0utKpV2qtdCZL6mA3qnXi52Bwg/t6SxM4tsyzzNQuY9HKbNB328+MKZUBMPa1AO44iBJaYv0KMs6HkBInjVxKwVR/TeieUuDiLYk4nEWrMW35rw/NV78T3y2DNjxyKDBTXLQMg2phW3IVsYdHC+jZRmKAg/1UcQBwNuUtMnlQt2fH5gJBqgs8CDPDfd/o99RxsR3y1NcefKTSjhAVyMam/H/4SNc57j7S0IeNGrnN6xu2rFr8wcfMje7KzcTyKiJ1IKTEoTP1bRzzdbeH0YqA+qpOYCF7FPBhalmE0Xlop8e7K70BBYitTOhyzj/C69KmFmtyL4cUObN98MUNjdgoSKvzT4tEWSev/A/e+o4iGjAmWswWXQmEmBp5KzSqFCLOfiP+C6f5txPnfAsGWNI3WBTTJvVmPDbPes7ZJmIO4Z5R+priAPFWxYnsQnXkwGbgSTEahKuhO3YyRlzEbP4Z+UqR2kZnX+1LQHWvBwzxVspug6KNg1768rUTDnbZdHv/1wpgTgkmaWphjU2nnaXxEsQu/em1MCZpKMB6xOl4DgQbbZSQ0oPYGsm38DubSK4O6DCRu3a/QTI6sLRQuOVzApzClYM1jhmk+Ai3Vm6Wk9RCYgPw+n7765Aqy30Kb2i01j3/6ZiD6asRlqsZgfyMx2fc4/ZSMHAZmRzP53AMSFfOSoTwyE8FOjgSSAuCAFID0EzrWCKicSQHJQi2W21gCKZ8iij0eLVt9K5LgjYDv8weHguddC/BlXWvy2fd4JxcEDBMDbyBi7jZufKGyogeTULsPiwESik3lWY/YRmmCvxsxH1JmKxm8gy66FBKTcHZvMfsQCijZfVss7XMxsWJbqitYg9A+OlwGrLHyEpp5kJmLu1TX1cvKYrJo1pqT55K39fUTOPJqJPa+GXLovjMq3uWU8nm4kn8Lsy4so6u0aqxOCcIr4Z2CkqNl8CuJTrSNPoi8LIrFe+4OnU4rMfhn8qOqfj2OVgMUMGbpLqNmymPD+9FZMd/UJzLYO0EPOrVl3AWQKEjkutRawKjlDgEcQJdIfce6zidhlYnd79TATCPXW4njLpVuVliU0q3mdBvlLsJ31ZfknPkUe/RniEZQlwy45INs24/cTqnHc+gDLDqzVZ3Wr0iDsf6bIhSTeF82EoyqlcgLnicfrWKgn5VXGh8JmYr/n92JAPiT90uhuRNPvotM9IqNifJnCp0Vt+nLiYAOxCJF58fNd9rEdkDtIh83MoYypMNz6zE6RMmE0xQEPA7PIDfWwqXVYc3Wn7FEvTelJesac3pknJ48Xir+dfszNHDplbGKZFyTG00G92S6Z19UdPWgYDCuMIcTsiVWYpvQiTHkWxw6DVO6eFh7hMM9PytI1tP12qu23xiSUfa/hgqK63C82BIqgop0zf/xEKq6xZ7GggGUcOQaFnnDYX+2bvSnB9L2rclKdX6NcWbbIVxnqRyf+rHg2LttAA/mMSJn1eCZrnh2rReS63A/laSSkkZXU9b4II8seRq3dC3MZW4VFVKqXcw3+ZMza0dDkCV4D9wNOsNZG6/Omeof/GUvRbLmBh7qybsuZIZHyoh+f5POoC6EmzgM2IFbmYhBtCLnT/OXKnpXWq63luwu8NwWYxy/GivZPcx5m6O32EAbP/t1cZNvHn80637Sm5yTks3NjYWn9Xsrno7CSPjSmxuMVF0KVejP82gueWPc06+7id9F0Adpna3trotkBDYU/8wQ8q3R2ApovhTJb4ei9Nxn8yHFBveLDHb0fMmjHkbD1pT8UjMqTrtqKfK92wruw2tF2UuTQLZYYkOuhcwuZEpwZwfQ7AuC5gjuEs+SW+iZjl1TSlmGYDu41om/gRztOcJVGXu8n3Ij96j05AkBb1lZx21XkiEMAow3dn0CywoUP5AZGkb1h79xyD9xgDSOW8BIc/bJCCHM+PrKL/mBEl5DdVyfTAgPAeCK3+qGDbQO16sQ2gqtqODNtY5BlWOTkPOisSwWtb8ZD5ukZ4ogOJ5iFyi9qDUujkTtKAHaiO1jBKil0SlZQsYGRfxk2+jJUtBMAapqQeo0OhMJRKuz9QsfV1H7KhcEBxAbpoJoxyIG1ucuUx6Yp/JgOpgHiqOend2rhjOVZib2Tf7zaBBsy6LVT4TdL2uhvy/Dm1NEstYXH6Y7VNg2IGdhmxWMvTq88kIYadYAqAOdlADY+5W66Epl3ooW1/uV1pdpnay13l9gmHUyAkZewvqw0GxboXC+v+J9h+E2eTqdiZhfldThNWqhh6pZU187B8rvJxnVhS5nzlZX4w6f/q3T0VMrYKPzsWr74MVpd7QtTJdDzzFAVH9kDFDK0oC0LJs+bZbQHkORWl+aXl9l8rJKlrzTghyH7Xd3E++9RwPv5kFgfFQpH5zSgOLfa2Nzy1iEn8LwN3eAxiUrmoGklZpUKH6q83Z5M++N5lrwJCNItlqIXWNfpjYZT3y+57Nt9rDfqwGu/xBwSd3tC+RuP+tZCB9AEY4iQb7xhgLPWSXG3q2ER3wfMP73TQct1ucPGWDtGpFH4aP7BSP5kHFbqt67bAGLkVV9SsJJ7InZ+dpRu4c+tJJaoe6Kbt/pthyb1qvRgTryCSDZdAir8RjGRhvhymLdPwLkYEDX2HbowFLeqydTZw48ksKvUjs/Fr7R8y9vL9CNdsfonBSD0VUHY34r
8dsEDcXf3tJcgEHht05p/sZAynSQZn4CB/XMbcLBCzhp18+7soKSCWJIu9HAx7vgAInFtSWnh2eGveNMnJDIBCZan2g0Q2t+gnZs5zDPgUsj1vqTw2oH+8k6KL325Jr+7CCdWjCKJWRxqF1UQDU9Aq1UrZOcdPFHyQQ7qkzdf+ofm8A41bEfdWgemMgf6Z0t+y/tjbL7RBE0xyvtqTSXKMBB9+ejDeU+xObEyzIlrNXvFXQ6MW5OxbiNpoFgPEPSVeUq73RanytORmdcGLPYbW+rEM86QKemxS1/fMUAH3Y7b9YQsRfE5YV38v8c7JuoK/wkxcmWcrxTQW55fUGFHpPRUlJAsc8MY8OHJqOOrR73vFNMijPN4Sp2StHFDXuHc6vl2kFxuFjARKbtfIOpUWxKHRPxeKFDWPVcnkazZ5unI/9p7odxh6Bt0L5m8Vv32ubuDpjYkBYQwPUUsHBiA1uIUcQ+LwTwxwVkXGnckt6qJLBHWWuEtJQM5zYubKe0/tQJh1Rem2zZhniJjZ3o9GChSXbwspL5AZcxTHVkZexI5OVliwSdhPO1KaJ8TFaN9NLfekNMesQZN/SSrf9vnHmOgt8PetzqF5Gx03oRNo072/E/ONcEKcLDXIaXcgnq4K78rwTzUadSnK1GZbKnUcKIDOIGFldOVMUU58f4rmKFNyUd5FWJImEr/U35Dk4RyvwnQDGuVr0PZSsP76FIRCxMKLFmUuh43trzN1muTytfl1+7pescKOpZEz66xH53VdxPaZSO4EqZPTO4VCed9YQ10Q85m2HaxnB3Z/rsywJwr1UrEWRhSOpT6zZtXO0Vpca+teGrYJPessa6ucWd93jU9HyL2zq2J+Z5OoCdeGlOhHPlcPPlX+f8z9zhkte/lZxqpJP3a5ZLQYgO4sDAUVh/NPDz9SY+rqn3SFOGBltfy1irg2MtuuvB8J0JH+JexvKCA47rTXpSx2ryQv1ikS+K43AJNxAdwVY6PkFI+4uv9gtmjEDbboc102vijwiu9VYPqLM74Y+9dTzEBSHx7r8tkioF3CRsy3joFOmK13V6BIaZuCiR1ie1qiKqTeCEVifU3zticv86IEWN9s6MoJtyhwVIaVGpAKJqWAwHObTn0/+AH/yO5NS4tW36vln5+jXg6bfKWyJBAjs+Rxq5+LGqdwxNblKwKTRJlNnCTj37+7YkM1lFmEkPDhgIpAcB/wb3gIW1vH2q2uRM5ac5FxlJ0BDZlW/YkAtsJhXbu7HAOQ1Uok0//8GBNA7bdczlYeKgLvukVtBB4I3uUKm5L0IBuxg2qh0QqGCD7bAVKzUUNtF9ZV32Hi4hRJbvNe5PWdKvb82E1/SVv2537A1fN76UOFanoCBS1HG9UEHMPeAyiiXUhtbHOU5M9C04utXPRRMEQ46ktUy+QV+s/m1AhdEw8dC362t8y681CBjzALwasrECyYBxeKu6R80dNFqI8hzpM/G/eZOtPIoRWZ2l7iS9T/BFG07KRugFwZHb913o8bcydjxqYNhffqLa+9bVams652IJ0UZ5P1om6rnvd5e9WWOpdUrpQDXZuiCn74nmO+NqGNzMyAz1ADZJBItXr+FlEFs2Q44RhMhoV9zWxxGrjzKuKUiVLGj5eH10vpqrtEH3Ghe0wZHzr9j/MfvgiVgeD33GyFbexPWAfTTCPmEaGRAVhslK8RY8UcmIYXTzOFtVUmF8zyny1LcG4WAn+rfQBUaBoQD7hCV8XR3604GzH/26BnwaZ0dyQHBkPsthpr706QFpRgoX4m9I8B1Rpe8EqsBd7YgfWcLQIOpdt6MgxPvQcoUwHnNqdI1Szym6J3kRh2Ejt6KW/PhUeul1Uxy0J/vIQV1bkSSTK6v42K/yPrnCas3OKqyi9DPDPl6IrOQAt5Zs0k+HPDIHxu7AMwm+94iK5kASU2k/E26Z3sVztq4MCAMq0j+t/D54ot7gFJVRY1GJUljU4BmxbhubGDe/GjSHkp72SgubF1REx4Ay0VoH54GqovKLTrZMlltsWQkjBDl7SggB6GL+O012+LFGKO2ccqDtQFakDZcVe9qg6hh+6qEfHQZro/1S9ptpOb39HZkiV1CuP1JvC5AX5xb2pEYFR1oLo1QWJ4w7/yfEHk14ibnRzL+USL+o14prX3rvOr+YWWutck7BZJeK3LmgQg1Cuh7A20OGqn7EPecL1nNrCRVAU62l4dK7sduVDnwJ8AexEy5Zl1Kyrp0wObP95AJ8G7HiLR+5flaEX4kDSvE5VZUwK4OHcTRKpYKQVzjs5AtpR6kkdzJ1WD2ZfybclriqxupcLJVeWUYIRcnq4xDDLmJB2ObsCUI1EQ0C5JFt7mvIdzVmzteWnuUsDirbmv9ixNXw4bz6+GyieGWAHKgwk8mGfcq0zbjckx0glxsFgdwoeU9jB9XHEekJuo6CcuhkNQCtAlP7gPlz+1N0b1zErmRMEhO+kF8ybTUTGQURJm6AhegtGPiuKOAd0NcldHWCAIhkd/gpLYTwJKSp6M8Z0yAwRWY4j96nKRskDUtNv6lNrelHY0lDj71JX0be47K/gjnYwJAEUJ+COHXsYkgeqz4RqT62kiotPCr2k0gJh3eJz2VAOJImBtJKzOMtEVGMt1boq8TLfaRqJC6pdL1MvCxqTeGsc7fcdmJ63WMopULToJFA/Oa4OSYJjMPWO0MvPM8xkqFxX28MdBBcqzTw+mdfg+KwgInGOwxwdvez3AM1KfuR7ByJ88iNeDyW7dg+bRt+sWNFsz6BpcR38FwPC99+w3V2HxQU/0iNGCyrBk44GFPtlF2ZDbNvogTqWlyQKZq5OLJazVuDIoQ9mzTGl/SL2c3F1xCVyikOnAn8/rdDHvu6C2s0g10c0K9LQTv4C9gUojz6cuDc0qeStZ45Vl4mu6D8BU9IZXxoiVJ+AJyPyhvN7Mo8+3c3sbO3PvBxo4KxuyzArF1TW6xT/j9Zz3RE/MQJJo470oXLGK72pE9rJDmLtJCrdbpWsBukN37R0Wp6tCmdFaGCpTBiH5NDzadLNuESXP69n/zD5+wC+aeRa2gPJG/glQ45SbzSCV8AH8vtg5A3OBizVZWKvliux4XYSCy1JPUqgdKZtEZ27n5kuYMRZzvciutLIZoB92QB7sqBZuR4nfO2LcC6Q9NkGpAdStCAF6F6ord8y8ArbHVKRXTF3kEYQo9ZWdEViM8jZo+XY5uMSHsdDAsO6y872Bn98/+UQTS1+FKvdsZJdXPiW+6dNwINstlJZK3BBZlcpjf+y+Jy4wC9ubCITYhENNHobvUFnnhgQVmpyPky0JiW4Mw5sO/WBefdDdQE/tcvaqKiw2xCGQjhlac9btoD3nII9gU8zkrvZcVgv4vbAneMQ4uqMEVmHqQ+/jE47scpW3odFNXnTF5HidYr5LfdRVvV2+YT5BlRfgHj0OYkYDBZTTeWcoaaZLJmjOeocP2c2cv0oEi5iqwBqs0P2MciQJymFivmqewe0EEs8Z93kBxDPe5VZiKxx3HJy091ETLgzr0KeDOe3b88Xwfm3wkSfCy7aLihb2WzMAa4fsZ08+iLUT38wrrn4AiU4r30PHtPlaR+QAxJa2eX1IaEHMqZT95O+by4oxC/Faefr8rzasA8FVL/C7KlbxXOyd9AKwPivj4eQV6jnu1unKcfv/aeMJcB0T7nJxuPS0Amp2REGl20WLyS+sLJuH47YMUzedIVdYufGRVufAcKIT+tOdzzrCkBE9tsGts5CrXX7pD0Rvt16+/0cLvZ/J5E68zOBkKibVVNlCH6UeX2Ded1LGIyK3ketSm87qL4UgqxEnJfR5gGmHCftVj8jZthwwMB4tRhMCXH4Wiht8l0uiVm4X/K8pGp4q2h3yU6vYo/BEBw5JJqZmw0KQymYyaQKJe143SpK30mMAfqO+Mj46GbZIngXAVo+w7ceT9v58C6SpGZjgtIJU5xLS9ZatBvpJtvhHVpbq65vKXW3sDujWKQvS+/nBnPyQPN0sBZvEl9SSPHTpZsR5VDM2jqQN0rK3jLue+9QcHCzKskcYUBX2Zv+7jQ6/u5FETyFVRzbl7uHHIDaV3WX2F+oXmxt7x+
lXRrM3KF3yZLIZ6Mfly9UxgEZ0N4eD4Aw/WI+DWbgIRtBhwNIIrOJZbvv+i6ornuva0x9eMTHvBSxGsSjjVY4og+YIAKn/k26JzOwQJSHXKjg4Q84gQBBk/ziay9li7m3WsAEIKx6Aw/WF025b5v5s6yFBOMmbG+Uh80Ilc0FCUapQ2INJwNHegq72d9sXpcefzNuj1T3aLkRLuLQ71G2A+d6quJaNpZRd2wCxKmIulWDnuXtEpKrh545/t9tKLM7FvXQ/S0kG+Smz1t17qKxvZBKcvR36uEXNBJbKMsAhiUpg10Dop0cgIMVvhXlFsoH3yVuuqrYb3EboOdiIRUkeVTQb+WPKMUYIq9smBFXdId2aOfWLyQOjOyNFT96Q0ml++OB+oZ6HNmFB2EejijjEQ8D6P+0kBvghobyaxVs9nFClDq+BBmzazy2Wwfhm3xx9HaMRCZMH4KlYIicKUtasTKX+XdaOS8O2TY5zpzVoYC+q4E1RpjMioe901oaHkzETN3YYMLsmg2z7rGx2maVRyWG6Rj/v7vHzq1ovzRiFAuxucGomFjolsP1ngrXy7nq4JSEsMYGYaK2Lb+hr7dlfaMG5p95wqRXfz2qlqAPpkF/TVUXjBKWnPrcNhjCJUiRREU/NFF/BRwJQ1Y22q+15ztGh/nGsw+7l7GZMRSJeF5ujL5k00Nygue8rtAtwxW35Bz/BwcAjig0opoKoQOQJ7V9+CvB24Epay3VwvJlq2GdSFtWKMpsp8xgLTdY4sboaGmvTYrZi7B9FC541QmgZa5vZ0hNgsVJM/fcfcb49zBtoCWj3D/ARn8Jg2wBTFOSpsyqPzv0CcbKyWY8eWydBOe5cxICUEGiCLVmYn2c8wbP6hdDOCtzzX7r8sNB/5brBG7eQBLqHQT+IQRV3/NyPAeUUHNOlfJV2FhoITgu037jgDOxLiN+qGeVLkK7/FCOVkrgsLGRJuXL6X0MAMFa6sWDhuu4hCz734lxFmbnEDVkfrShvM7woXWEQKmm3g3aDETGZfPZP6C7dXamky6in7vAfjF15UrnA2VidCds/S+H7JwiPpqBWXv5P0Jk2mJfWKkve4PWvhsjIrV9jKaM5mQf1ikydLWEhpFS/+0Jt6K9lGlyg5DBeCZWex8zyBIMqHWaLDszKXXUgMzc2XfnWxeuEVnUGRnuNb6d1yCwmTUtIfBIS6XnDgd1GQXwQfMvcUDue/TmpQky/MAxBDZP5FRjHsGbY91LobgHIrimEzZil+w1ub6z9hzLUPD6gqmkwg07HwfEVRCeS/7YT/78DkP0VYa6phXm+SJA2VbCajInYe0oDMMERgWJ6XZePDM+FHUFWQSVSS0y9dPlIrISG3JlEV4F/qOM8DpdhWGjHDnwDb3o4fRX2s9L2BUzhhKPkEiDCuWa65z+E1JF4/V8bRgAW19Yj+h3Cu9bxgMzNiVGkSHLIzQs9wySNQGyQbYJrcFT+ogDAsUR9G303sGHpcpccauIpt8tLle+BD4jyoorqgzn6uE6/JDr2ogad4DajZN4MavmktL7YMl5Xfa2E+fG7ZaYbLhG1+hi9GfZQh8/GiJwIGOz91bo3HTJrBK92C4nDvCMAhQrxhy/rk9dwvGU8pYlb4JGmrqzBa5U9iPGhWRqAVQ72VNtLnC49OoYLc7g7x5pb0ssHNclMHBDmjUmRldfG70dT7wR5uG8bB8NJVSuTj+37JEdQ0shnVm8a9k/pUvduUQtiLf2B7a83CPbAyia12T+EQyU20QfwG+XsF34kykj7RQkFbKmYuMwCdJ8rjbzU6lNasVzP+F3cSaFD+sX7xrfnSrmfIbCtlh61ZEATOEYa4xjA+1MC8JWkUumqlzgWyB+8ATEa0pPZHhZFta7qYG16ysOw+hrDmlKHKt1dMFgfV6Zf4pD/jwsw/6TZPi1Gy9m61+ix9lz2KvifXKcAh1MqFMoHNkdJChoO6tuJVNYQrXbShMS1vpuB2ZVExETOlJLplnhKNtbwnTDrnnodPVU0tmLhUiHNnNcpsBna946dtf+2bEIrmrIcm6xCmuCYv3QyOrIIZTXDuEK2TRuV6aKJL/FYW4N9zfhYp+00J2CdHp+qlKEddna0QsY/o3myuyP5EvvpBfOA5vfGLDNKMoTAufHk5Uebpsjqtyq/02aaGCEM1vjq3HGv5sb/h8faokwh8OazgPfjXY2zy3xgqgXYXW3BIMw+3PgsAnrKH6Rp02QWt17EPp3xfQbmSlWCVAF0uo7OlZK+IKc9t3D9fNNHYfqkYB+FjkjLeq2MTnEP3qngmtKyw5zX1CBPTsnuPW9ZsYD0EVVYdVcosTixo1oExTSM6+fsEe45WPGSXZzlw1/zrWtADJPqJWss5ITK+nCBcVCrUr2E0lSa4MU1LFtk7J25yzPbfk64qlL3RX4t8vN2pxw2ia81Y/+wETY/3aShTbFgTmOKPu9E0gSE/EY8gruD6VfbC4gKjJJtNG4DupQbE7i+jgHKx2vCnB60Et9PL2J6K9fsgIc+4nI8Gj7YK9ntqaqqG5BdGEL1LlpMBKhAIlGylft7Qcb30SDazID8HTdKQ64wp1TQsgv12bcoLesF9FIFuIxfXwZ/WcZCb2gKHEJdu38L4zQ4b1NmigQzXyuujUFx+ZguxCtmSzpvDwkYsCviwFLZfwnxlwauiU01kgPLsLO5QmGgJJT3Ca5u7dnwiJnnluYvQY9V3BQo7M+MpYiBAe0mVRVhN2t+g6O7bJKeGzhpJM36VI4cWWjr6U6oLhj06Cyplg7JselS86t/Z2oYmoS+9Voi4Mcob7IH/JUvrWX4aK7ZEL3n0dyvRoiIRt0Wa73sCxtAM5XsBNOhXJXvssjmOKSDG2ll8I6X9mU1L6bRDcnJtb4lGCSAOihodKdGpZ+i+50g1GvgtbIsuvbGiJCG3WVHkewxb6AuBWpClVJDC8n+dlgXJMFSBpHqP9JL8EJtm+/vgJX3NEtdV5dDvBFK1GcTQ0Uq0rPsrhQM/Q9VaC4TwRsFYFrwJbjtYXkF9s1gTY82aC6rEOeREDnhvMrHsL3kww2LfaJy/uV02GrF92vSE9FcAkuddDWd9oDnPv+UZf2r3anteaDf/5uf7UJu8j+0kf5BY4xUejbeTPk6SAImywOqzCwg5/ZWxNa4XJ/0EXjLElw276336mcUkDeDZCYh/vMfgaDjiG/we1+LQNc7aMuvjIDvXNq8/bc++p3jv3N9A8TZ9iEnXrOqyDsfu7HA5q6Ze/7cbJ/TGv1B0H3qw9opz1aO1UMfxGrqjx2FDKQQkG43qXZN83gRcNcyvi30JtUixD/G3KJuhpZNq3wDImJhsGv9WK8bSZMFNaV2k+sDvWUNHF7jS4k6n144zEcKdGylVU4kgwRuhmHmwKflAmF6i6uXiQ1zQ2DACvtLY5PqU+OS3xJhcOYiUvMimBlbzQwrYWrDbRWwvHLFVAvcGoDsuVBBcFiFfE/MQXNA5WaWKtO3JmNkbCjAWlrbLtF8Ggfr2gM1hNAIdlpPeZlwcjb4/v3K/KRzZaQBnrUE8eS6cN3Ls6MGSa6vDUBL0xILNal7UWLfW6gAIW0qfDzN033opUiFnCljNyfYizUm8O37Hb+84mCoT1+t2Pl+9pBMVpKIt2y4UVuJBSRAkeyyVH7ovGnmJgRjl0gVORLirUrZcFF2N741NfG31RVDuh5d7MulNxRNnrK01oeVDd2Rj4HEa2MnCLtHlYevwbk+L9al8RN6SMXm/jwGG+ZJnONEMCg7bkjpseyN4SYs1KKKKlS5g74Y7djhrqmmC8+wwkIH7Avy8wwxqFgs9cj+Xir8UREDLT0MbxHV6KbVQzwPEJ3v3U2ygq9q4D5vT8a1v0LS6Mry+yIoPHd/BISChb8koFQF/J7GEcNBO9TX4+NMe9VaBydZadY3EsEBCkH/VW5Gmy6roKyUrtvUWRqP5PttN/xw1l3BTgZe5pUEdsNTgtoDASg9kc6aCYqC9CgGMtiPDqxfB2yPUgDQJy9Zq3UTjH0/zzoa/qN+dZplAlLL3pKvG9L2zxJOd3iE6IQXPFdnZOi0MwHINliOWD0a2OWf2inhrPjlc0RNHn
L9l2Oic892rk5Z1GojAODGZ8c+x/oGyFa7C2vA/frpl5RXlyj9r6T9MsKQqn5JCzBgRZOhygR5Rm8FVd24IU2G80X9hMHRsydDpP0unBNi+/QoUo+D4ShjNp5ivjN60F++cXpAhjJWdUMQMCj5TePM6S1dmOg9h2LltNhc24Ui5T2Wy7I6mNv06K6PBknolA5LU9lcdlTaniGIp9fYXnIy9WBgY0e4Cv6lpTgLSJZMRk4tThtlgSR+P2dVuTDyyWyZ+wr+EdiQqXajpKcJhB58vGCwohl6HSzK2wnAvcb6AiK/BN46w93JjVg62GXTKS1McwOfWQK2PkNoAETk3/t9fY4krWsa1KTtoxixAYH3b2+trI95pYbukATdeTHNtVyVKTk90SGfcRG8i5DBCYNPcH6OQcYuL3PilwIXPwIcGzSrEVS67T+5S1Yyqj995LEECfkBe8DTNbTQ7KlCnUTUzAl1O8pqjlfHTH4wlV81t7Her6NbzxJI6Tvh/+qrJymMdh43zY3Zp3EHYvpqAAcXvDy+cwZfRzXNhh6hodXahUQiWLYDDPp/0e10dtBGnOSkFWtChSERLQIIBYi+z0rOHtxMQMhml5g9dD1W/rN53mzDfk7OCextxU/Tu1ua5eDSp1mlP/zkVE9z4qhnxg0xKhr8VJQz9mk2sgzXQ5MhAlSbLFUZdh5V+vFYTlMPkJhsoye2TXPpMyNRPMQODeUbsyk8NQGSiQrLddKbLGrNr6FLW0lDfMlA4vBClrplfGim5ZqzP1ZM3i3KgaE7iKb3dh4qofRb0hiDSXoR7BdJFdsziHwllur82fEi6IUaFs23f/FZS3t8H5EGAWZCcUktQH2Ll2SeLX2rmriwbMxBwjeNtexEqprGjgrLnuFbJsQnR24VcD3oI0RglSmbn1CXRcZuFFfiR48SKTLuYN3/8fM2xsvaQHAinw51N0yowHJXGlcsrkvnipX6aGsWqKKsa911uDRxBtH1Q/uSxlL03C11dJkTr+JtwltYIFVEfw6GgfKC+iEgH9a+umcH9EOqgjI4N6ISUsSfivWR3yivCFE8G1eCdxgLN3MGEh1O9jC8mxb4dE8fWKTh4ATP6lVU5w0wo3aaRuy4A8dQ4V9q7Xu/A+7oDqJkT12u8QrlKwhLeMfTjrBSh17w7WXR46m0+rb4Nb1IFYYyczG65s9Wyv5K1zxwJqot31H0eZlp74VuiLusD11h1rw5KeLxthmRRVBGp1qm+3MwZRfjfo7NiuMnKDb0AFgq0cvConXFWQfU7NmZy0Gz+DpkqbzLOz3hCEBJ+EMWowL1wEAmGJCneqF8TQQdRz0wydelxBJI1euAeLTrgKeqsKGkoRquFs7Ek+tt6YMvpWj9c7xtXVj+bnfIVqInMY7a7EJ788nHs5VCLdOWPHWtIbUVMFaLK8qKlu19jeLcoJfewSfGiJMCoti2tymg30xhY5Zh4o1a7m5dwaPWyFWuM9c+0LkOdZHK8h2hf37abrfk9TzfqmD23xips9kW7EpJ+hg3BZ9mxPOGqvjOmVpWrsg7WkbIZlEhdX1ID7B1oHOxuUCegOpto/GtO1T4DQZcGjyGG1P2Yuns0JJiiTnt1wuJqgSJToOWNnyK+Ooubi1foY1cxXbh3kpstTX0KvbmXjQkKfE1N/tZ6nleveHzU4m3TyaRLOpZmfiLJwtHxu1ZZ1q2Agy5Mxf6vH0fitZlHF6Kw3YzbBfb6biROmZOv+iDSJlPWXXeQPERBADe8BCAx/ptz76xMgvfIl0hoGrL1rEjfQ5KE8bYJFsprBIrKpZqVcpaQPh+bygngsppkplqcNTJ7xOjoKRdTpSngrHnl1+fI38VNHOXx2qiJYNLlqCzXEHMBE79KQ/TQyf9wJpGk/eeocgCv2H9ae38CokjZJepuEVcBWzMmI2dtgP/D3glAp07Sl04KRjutpraS7RU0T35VQJklnnm5cSiUv07kEbIRxBmuyVrn8ZEWfQ7BJPZ/6pM+7fJyMAIzn8loOox+lehIjSSiTtdkhODZGQfnPPXxca3zoRFnUsrFTJtD1OmsGKMDYdJbwrZRPXqOegrebI/Ho3v4/CVwGBDxguw5XKgUAShB3LG9RmIvwKS9YMs54grHZd70maJDs1LsiOFYO+HpHOhd47oirxG65kwdjzNscUBDqRBnK/N4a34fpK5S6nn+o9N8z5nuvw+K8mzm7nwTFDszYzDYcZwDaXcQSgZwPcyxcgwcty3v0OiV4vfm5UOxxTu/KaxYvCmuV4R+ShHlajH4LqPuM9fizofCRvUqFJC6ULWUnWatQMozwRPGKGIOW+IPX86shyLIty1oPqWWfNrPzQaIj4cOmpsKmrv4PlzeXeUCnQq89YpV1KuimU4URB1OqdC/6MrEGtqCEfVsDPyTasidFUDXcyLftaYT5ItBT/+VdpxMidu/kx9RLpQ3BxIc+4zp53JwipapIUhdKFTKCwJs5qFXD+Wz3d+AzXL9XXbG8k1YhKSTuFgg3REMntHVpDgV3IzFrLJDS4/EWZ8/hLy/qwTSLT0Q5O9h8/wjoeMP4K8zsrpyqlFfDBtoQ4FQkVt0eqPxLQRqUSkneEzP11hE5fonbxTNS5uNYTY0LVfNMFEZDQOge09zQ/5oeEH0fNLSaXf2wyBcXNZAkU1e8HlRY9T6H/6gon1e6CST5I+yCY9vQrPoIJj5fQmo+p/lp+wTSiHSCkp3lIFIsS0qetlVTFIyrhnfTjXZ6yP/mCvaqYDA03eObxScr/7b1viAiMvntnn6NbJyOCFJ/mIM5eSWHcn1mO8VVQg0H8iFunQfdb7xfJ/5txXFiDPQgBC3hezZ28IeuNd6cD5OnmzGBpHCFpmDtGiOEN47Zx8jN2Ep2rILmnYCEPSTX4cIRbvVApjmMNr/5YRmO2w7qn44f0leM6DmD0+iecNVwYQGLqJ/qSLtNTJzCSRmsLT/bubxMQDU95+FDoWv746Rr3Znck1Pf7IrDPL2/zGYkkiTjgPicAAxufuHkYBANJP/qLVSgREoJ2nWqQXvZFFmFa7B2gtm86caz3T2icpaXTrLpRTAgBHAH1rZELvNGBgP7U8bIgQmMlrxD+UMldXXu4qK112r+4aR5RJsDSysVgK01xk2irak99WNRNlOE5tD9gdcA6M1UjH/uGSKY82uBntTFsORvGHBrkdJoGoZWoQSPTDujIB6NKCjb5r4Yn33kCvKcFeAlkWGZDdoqyvdClXnuDEc/Kge8MNDpMtkRCVOf9gbqOsqnMedOOWpmwotkPSp6IVjrynQd5jyf64usg53Z+/xmq+ibLnb6fbEDUITrWZ7sjKvkov8lOPYCsJfB7wRTUrf64jFbl+o+vMzqzBymOTTqbAtDrGJeJ62hfsdQHo1nASDQK3vPAolajxj+69hZzzfZS5BxbjRbPWQHReFM6wjITs0zBERMC1g41WJzEteSklkCq5z3vhpIQswKPMxVwq33NPSRjw8BK5tTwzI1Ilc6YPnz77GxtNmeL5L8nKcLM/7pBcwx3DfBmekPgNoSqXJx9wR7L3AkwHicKsFvDp9pi47yXDbewG4CMJ2TI1qrMDwDsPMfh+KOVd8HJe8m45AVHSuJQP0Dt7jCeZr38jxW9cHJNiki6z9edG33vsT7MMRw0IcnN3mxLr2itz5PvQzORSHsYGL0WHZxbMKoTkZkYjthz7FOQcwxyqgOAy0htxKBMKdZJFzrqcqDtUa6e7ogE1DfIrTvlikoHWCQhg1aVmtALDDRI2YUxWlG4YjrAHFHkEZ+xB5s9rXWKgUwzabzUI+eeza+qYBSxBNjW6O2IUZSWAE06gFrYoGz4FFFGR2xOmcfxVDztp7D7kGfVx/KP4G1ey8bMFeVkK0ypClxOJD/UZEA0DkLnrJd6PzH8LWEXu7Twqt/6J++cEkxvmRfwr3d6z16Im7+4Zs4fHf7UUU8apO6Ufytz1M/B9p4Fe+x1IBv0duULCpFnLkawQg0mJJgZ4AlI/6l1zBcKzZwL8/X0NwMQ26Fewozcf5l8DLxjsRyNotgraszzkbeb6wXTH5NzSRmJup8ncHJefGFu0OHPUuwM2kP9cZd
4jptp2a0cYExmeFqiRNgAdm5+xCWXt4cDn4YsrDDhqfPMWCgdWzoS/596IibPa79zORLmy1IfdBLPoDPmjzUmNvoegoYmChuJJNUkWHdeSWgEmHaVvA+K+uUhPYpKFsvXHrMT4mFRGI5X3beIXBDZxbPfOPwpIB63m1GvTzgEwUtNyCFrLTd2HoHgI9509zGkY6FOBirVRhMa885cxQeNFir1NErRJEDw9ggNuWTHHV0TMc+PMofOQZL2Pu0OlNlqkxsVsX6gwjxgYsAEYz1xY2HpbYONYzYKDh4vZg/HwprdPAsleF53rgtDLVaYP+3cvGgk2YER4vMt64zCmh1w/5eju9v2lqf+vDooMfmR8+NbTO6luHRW7T8/WN3qjXVDSkLEG51Dno/dsUrVP5v+FwPcD02FioG22BbkcaQbTC75szpfzq6vka/K6L/fUq/VtID/3JmCrQXmwI9fL0n79k3DC9QcXdX87qYg3XAJdq2wokXMIYHqhIJJbnwCbHE9670TduQq6YFb5YxLboJPJd2I2wMbR1/v5WeVX8t6pxVnkHIvEeGI3TzCrS0dehzJMqyKPQOLdLZEJ/qo9mPzD94za4Ed8zOnBQBezHJdXz3HnEVZxXmlbpPOUnaHaIn3Cp3cAZinr/tbDVoJihtMwhlNh0K1GSJMfH6ZxE7/GW3hMGg2CaIdlJ8skvKcmeBq54fLyQtm8Oy2BFH4NvRe2ejcDCwl1mxGoT1dsUIWSqCOdyg5My3IJGbhKtvnJ4qMYIBgolq38wKjm7FqUJIVS+MA3tf4KfXgXpDusPYVh72s1Rb+4vVlUNZsFOHWt35akrcd8L1hfkX0U+IKd5ok/qq+/H/3J8CyjnBsiTrz3xY7AmXk0Rj9QHiRL7e51Q6VlLU2Gvtix55lxOYTlRm/3el22MlaXXEp76njZoMfFCBHhpoa2YZiNRH/N6oD6K/FKv40PYqJpm/9K5dZC/Vo9rOeSkSRHJBEOB97v04H6PyKVnRAGVRc69PxCy5mOs/Q7tpJS3zwPkb2rrssj7Ej1dv3i0hmycuupUVhHSdgdXQ1nC4vcQQqT3yiNy0k2zONNKyvQ8uqiD2lNTvXbsEhgY7kLqbX10/HcnrF9YgMMwWP/Ygn+PDtXnFSZ9wZhcfOkmWy6/OgWdv4ocypvTHkt1XR/XBk4DSFuVEakUegAOZS2zEOTMS5vl2fFTepd1291SpxU6sVX58wg3tPrkJr8uUkWpc6EfNjaLKCbwgu7PqwJFSPb6/+sfjU67l2LVreIeKYIhA5Fu73bkicLgEWrXT7IeZBVXyLS8kMca7HHYHSpY4hjo6oY9lYJDcwVjClJIPrY6FSI9DVPBRKNnP8U+WNFZdVK5rnqoKWECk25KnXGrjFjEYS1Q1wQqeZKwLDZCnDuonkjzmXuh1prc42rhc5Soprsuv8kRaLlG5HaeKvXNSGz7MlaceyW3bIdRnQ2qiTf4SuY3VauQN7Zrwe7fwDnXwF+pKF+7UTNlOcnvnB5/x4ChCQ/4xjvcTSvtjETeGfTP/bWfLl6baNcVe0ygZRyf1kTn6PeJeh0zF2LmU1BTTww7E/4/Oou0AKxwEoe89fpiORSExy0HroPWHUMVuq4ASoqUctSpUcF9wu47qG4VxwagfAtPr4Eflsm63BZHGfKYeUWM5H+G/3kjGxTyqNg2NH/BwDMrA8Wu2FxYhb/WZHKgBhv6eu+/0/wEiPFICbv8m1UXK6oiw54OcmL6i5tGtfDblx4cA1WgyhB08WNIWjFBx4ukeTzdQN9RwE9ddXhyBXeUq1Bu0nKeGTEebMBIC1LO5cgF3xsePfVdnpS+OasfpnhJD39Ujtz1ksZnpyR8RTkg3/VSk7oxsNfgg/2USbrdAth2U9aA1tvijmebdMs1abRHPJYj2oIEjZQHJAslES5FNU8cXWuqcIm62jI3hmMfx/OxXpsqspV4kDXdUtpluEbDPFNs8w6SeSrVaK+X7Gbk6FVIh/8Op5PXWq3sv+HoPrPLi7NpXsDn7ecAQyDRsuqhaLEcrLbZLTq664+TRD0pD3PczR+tzQ9JFP+UTsDEznjTkvR0NyLq3AVfAQywuyHnWU+yatQ+OULZSEbePZ2O+YATdeGu3tsbkrlBfmvM0cMEthnfj4A8X32ctiy6HHilhew1K0Tm17L2S/MldTEydNf1CSq+C4zhAAqMpd1jknhOnfbrurUGZWUmgSm9UjqrzS94iqaxTIvLOddKBgCwGeQoGcRu+vTIz6pLXZOWg+kt7kOr8ibNp1Ph41aIHDC/M5e6tOnPg4ywYBRmq8zjqJntmNvAUFOC9On481rL5vuJr6Qkvjit9w5wiPhLEjR4Cs+f3vci0fdEOG18U9L8RdpHgvnPl2dn1x4OtBBcHhbyRse0qsFKmzyPd1uFVrDFeqrEI/UZ9k2sfokW4gOQjOR3yxnxm6JtXgl1UF1kEluHqHDsRmNPWd1rxqxs+4YvjYQ0zZWw8LVj/mmSnhiwJc08e6N9m0IF016iHnB14cW1Ffbf62QC11mv0xI9WDGMnoNhFCm4JVauqoTpNpt/T443Whpqxu8WBZrH0ZgrbYkMbFvA4Td3oHUIDmz2j3lim7tp1+mAyTNEQcP+mHAq1Pt6TRQ3eb4NS33KhuPt6smE/iItbDO2xC0bsUZQdls30/ouKT7KS+eMfnCqEu/9BIBq+yms8WL1aaFQta6C3TQ8WzT91k4xoAqF0n03Z47nypNrqMO3wZWCulOL+DIfiqw8XvS+ES0Db99R9sDWepbvkMg6c2++VPmfPw3VOsBiCUtrnPWRnhft4kDWdCWf+y+AzeOiHqwAuBuPbrsgadwHe1vc2DMa9MCGzYyAXaoVmC3UP1Hg52j+lxt18IBVmlDCXR/aWcKAzbD/XMrbvQUrj7DMNYyYbYMBfUroAwxIH+reIyKwUYJAojE5I9EjyGlH9KmQ8xg0/Jemjdifem4LslDo7vAvIBVCxQq8J6fhPOOyupza8ZVNFTFjKMSZoeLnX01Upvs5qyCpSIzfPpND31AEhlcQusEtW/+M7q2DopsHeyXJG2GwUpGQpuiEztPT7K1+QJ5VAEQM2Pe3Djtuuijvd6BVosBmqwLYsa0sdQxcmPdGauqXpqXc0wzqUkv7yMraTX8u5ylEDptt+MPd3Xdlq3r+7zbHIBctz8ast/J/kR38RZ5JUeu7zBCheENszdKPHK5liqalDB3ksUUK/WrmTQp8W9Usd678FyfmWgucuAwG0xKh+jaLTscqppv2t/ITZ2Uq4QsZd9AAjq5bOvuZS41bg++DZck+uFDUi3Da092XF6CIqrQXq1DZMw2bX9fYLpHg/WZYszySpqkmkBk7ovyg6Wh+r5O7tGuLz+sp8GDbW0VnIERWhjn9p/EKjY6acwwmXUWllsHhX5j+M0TVjXVsCLtpUdGqcDtMFCGzISXhvWDpoyCcyQCwm5ABU+hvpC6mC9Vm9aUGe0if0DjlQ2rXy7lgZSSTgYBev1hCeZ+UrELhaiOdIQehn8rCYlJpqbZbRFDRpqGyY8A9Du3is6/pMUpCd8VHeiygluIvFgGGn2gb+mAS6TBAl5MsEdcK0pRppyDkRd72/4ROGEBGLXctPskcZM+V+xkyyHE+MkBhEYpBEwol756bKhSpinQWm8Im6GPZy6Tp5ePIUYN6pPGyggIntjDmMoArrE+WA6HgstRaQ3VP4R9aflGODk8dC8zCuyNteVhEGaElv+OsKSdZsZn7A7g6qQeACDQIsNpimWGa12L1xL8WlOiOjFN2ZK+jpKidZQ+dv5hZ+4OaXO1qf7wt50LJQHn0athnIAoUBoSqskS3y5ig1HbpgEDuAyR1P2OLCkPOk/WpJG+MeYf4n3b5FHqZAsEozACpTuoVFC3ZJ7myI/2jM3YTD9UfAwrOmaehOiFTwx0tOpfRyxblR+Z9JrTpY5gep9jp9yaOL8aETNfOYBgHoIHSDCCT+uRnsgBSzSgeyTROOJxG8cSFg0iITPRDhMdtVxVDDlsAEf5lTSpQgtjQsT64+wK/FrPKqJWNo0YmM5Laewr3dQ0uvhi8AprxE1JOk3yoXxqGu
JC6PFtVcFx2v2ozAUCswNyluVMM/owndg8qnWBq2PfBp5gkKLG6Cb1+nu7pofw2sac59TmcZ77jzEb2NVy1vi55BY+SupjaXfhxyTpxfFfmbaczo/xujpy1tHYeaStPhwbCk+/D+SORecIwTkb9nwbay7sBbrM9vuSbwcj38uriBqKaWXA26nLLUQMF0itU06BUx15YFGEtLU0yCrc+nG8pI6JEFbjktTKr1dSbCV5J5Ov30knK3Ht00F3A1Ols7OMvGcGaDMUhYoCXclhiKCBRCtFqKJTE8Y2p6wBQ7EWZUaKV1+pYads5auTCIz92fWVOPYcm/3F7RLo47YhMirvuzaO6nPKn1GjaCnyJQQV3dXdstX9wMAkIQx8SXnxw7wWSE39qJTwEJ5+xh0aW1dJNfEnAmoW63p2tn9VSsao548j+TcD2rSTBA3CoFYZ+VhQ5GbWHbeM/P/rU34Z6tUefhFyf+dnCIyhVzOIv4Epe9fcMALZMqwKUq8AMssUkXJh6HOcyCPOYTwTvJXA/bHfxH9jdNfgc9j+XHQSjKOTb80qBbJ+Y+P14fuWGv34r3ZmaJHoEPdQemnidYkfTaAfNISZ/c4ZM7A0KGyho+/rt78JhyZ/qs7e7r+0VZpoYFotmJWA8aNFSfse4tq3Ffp3jkBFX5Q1S1y+Buqp55TD+pTjyU4XeZD4H5kILAB1DflOgJgtXS2A7bQYOG0zuYIIOREz87EBPlAE1nglVGVpfvNjXe5/hOO+E93X8MDEL/uG8Bx3HTjlpWqTzpMu7Qq0xi2F0O+O/egiLUmxs0HWPhye15IMtNDPLcdhTa8nkGfYygc0o8UKIfICwVwjoPbMsIhhwK3ElDWHUo3/aPFxh2Pc7McC8pEkK0Mp26RBT99W2AUeZ39JVzvZqjJ4LhruZeHwEsv9FftSYgU2jrBAD/RFr9A4gYv6aFapUfQYntuo8x5xP+mPXNif8EVTqHGsDL9E8N3z0cNxoZtPg5g+lp9M3E39lEbjE2c9UplGBK5e6sYgqOBEtKizObhK/uMYiB0rD7mrvKYIMwqxocpXzmWJ8kDeH1vsPJeBzZC9PFOS1LxhLupaNBnI0q8Z4zipQKX4zVvUZ7yaQRZuZxmClKZmVkfeuBFG6VImVhmpBfC8hVLiBbQJubLaR3Rdny4u45njkdGG4ygLpV28uauwWcDJ5gL8dWv5HUgJt9j+clBtUV2Z7qyDsEj5qGaWh4wLy4BeFCo54JWdEYBmRejHajJzSHEJJcQHqafCmJOlWjFXrE/XHahyae8MkrPKn4cHosYjBcWXNkKSB7l6/WviCj+XG8a9ZdD36uxgKCtaB7nDFiN50eDc35SwBGynCUYtYLbrTAbBtpJekOHSLwbGg6oNGx70/1yWeIVYdoDQt1/BYVUblsKYP9LHeKEGYgo7yFqRhEoQdqDRUavkKEzKn5kBhOzEEkqzdfdub9lxyc6lcKW5pfkbz18t12pUvqSkVcWayH0ETz+5rjetMxyOMzRyFi3QCY195mYogxzz515RmcqP0ujfjOYR0FhmYYzHYhYvoOuJpBPuJQWwdL7T+Kd69i+BVL9iFq0tu4wauYI9QrVJnTK4e/oZvUWTrIZcqbUuYDZKaShbC690Y9wqB7nNJTEcDwSr8O1/grhrXZn9ey4KZN0n8CPkDpCM3i9i25dJwIRPYOWPI3zB2WSblL+Gd+ChNInJM7bB5S21FUgfye0A1iKJkiRJDzIe/tRz2UsplZXoCSXg+nZJn56VA54V3zlZnPweJc/f4BSn6VaDyVw8VRGRTDD/7EJ9tgpOPH1zDMKI20hzPpWi7fvtcRkwWeT+A0nc86qE+CxXh39K30/ypIUX7VRj1GXtypbWBZrxaRoTWYLkgs5Gq76qMK6movRQ0ciV35oHiOZiW9G+K+KSkYnK/vH3N60IDVhhG/UFx6bwUg1HIpatLUBJrSD+JiKe3wCCotUQACHOVzomTKES+g/qJysq2keGrKQlDFONZEujZY2TLpjIWPr7NB2rXU7tExVU5D11mrGlDkzqxAAASDEQ9U0Qr7k232rSKDWXpI3Y8zpwjpG+LrWezPH4NEipo6x4pTGnB0Cb4I9BWEzQ66OEHEE5Bgn7V7eHxd+EZzrCWVYxVEDEgoMLkFmc427H/nFi1miwGqcFomw27wFbegXb5TWA932GIw8+fGBRKnO9jjHxsHNXVsbd5ZOQGVwiYSHtDvfeq4uhgUGCegp65cBetBCiqOTakAuID7OlsI4fFXVy0r3cuRLcHimdnYwKTxTGMpxoCWm2Dh7piRe5c1Yqww3U/ZeTVtvXUUgrHxbSOXHx3BPtJ0XpbC3jHFLaP9DsXAU8Ogskgxar4UA4HtLieHfDn5mVDQ+FQBuZGnH00ARavVxm7YJZJvSGUsZkA3impvlb2b6dZ5P08GvrH1neVs+gmX32dCH0qWIyT6hRHzBeCQRZpVKxxLl6H7JhnQS8F1ngRTTNWZUZU6Q2e1OCgGD3Z1DfclLzN/FVqxpNXcTb4uQYDWEakkLmTbSpiplXKkaMF19+quHYQCokYrbqDzNqoyhL7XBK5881OFOryGWs3C15dUixHdXSqUQJ842GeXYe4fkkGWnya6G7SuMvjd0z0Uo2BsMYOEfs+cHsD3oQQqbTKrnbjmnylz8rs1pRdSi9RSu6Bqlxh0HVOeM63R+z15RUwI4J6xCazbwDwvFhgJfQ9zA0DSMqYmFNFsC/PuAng5DMEV92aB6FJPhzMGmLpE8075vnVqA450M/yGCRlEdT4UiVIlJEE5mbnIIHMV9Xf6YUDvSj1mlhc/qT63gcItKmxnrL3xSFBIM//y6gw/hqea6sflwoObEL/Mj55AAMzz/8Rm+yUx09B10+6mCoouM8Suj+/tN1c0C5D6ke8x+H0L0A43X+GNng7fDlPZFTtY3VpcStWpb9Ea/mJWckSlC/ON2+/CA8s2PEDSJNKCs+OQak4xk7NLGt0DRkyPJ+NiOVyF1NZ6Hjq5dkqyJIpfG/TUn4fLKVK7095PopgBKj5wHLLkjVKEsGJUvsMPc5QkFqrNKmTpS+qzCPJp9+WBCbrA9cEauSMtqAd4kR3371PXK89MeYjlCxZuOoTOwUN0PtpWrHh0vfMlvf9bBRqoR8idMOssUF8p7dT2hPOvcw/Bn8eMdIWYrpoekrnXWFVzKOdVp/RinXE2zQWwQHpx0P2/1+cN5LSMVQSlp2jgOT47QxTmRnoH/oT3T0/9zW1kll8SADG2CSnGXQrh8nGAoZnrbcly6xJbyuBHPQlvS3AeqmbO4s3uHToJGf11Ep70vMalFtALf/UZXIhZGIqARUyQlCX5vaV0FBNcN2ce/wjlgd35MKpZqwk/Zc/37qbwiGsk5XEUYaWNLO11aqafwaMbQAYX2U2kWAZSWy7vpF2qfoszT5O4l7cyj8GWxo5gM0mMU0hasqft7kAJrVpBk8N+kH9lINbE0rNVU7+ddZk4n/Y+LOmf4xLz+cofc/JyuhaXP5qQyDQ5BZk4tqfYFuZB/KL8pvp7lOFtIhHGDh66kt/c2j5GfR3S6qN94apY76xGOhVnSANf/gZWhEDfaFBSrI6IyVS6EmIE6xG8PbBCtFz1ErUhO8ZinRm1u57QL1klyqcZ4V4EbCZPPPxdrKaXDhUjJN7TVwOdpAn6XhoAitAL4sr7VwtNUnj+/l4nsUd/XU8BPbxv2tOfB1dypNIn/fxKtJ3557odRsqbwyHvS8OClh0ldYtxQoiEkvCnmQq4pZrQWsYYahDCtwhMjxMRTBUgvkuXCfoZoCoX6LlMCO29y2rZpcz2X7241fg9X0BE+rG6o9uxJUV5GnWGmIzR15ttHWzK+UQSc8D4FJukcTtFDeqmIrFObTo3fm2keDSF6mFFu9tid3q3X08QT/GSkt0pqTQGqDyjE8zoj5JFGm9O3nAC3OYvYraSX5eeONBHrFhsspwSZbg5oeANXcP8RzuTP9MYgv3A4CKiDmbTXT7m4lcRZ1QD5jIkGwh7UqrIjLP3SDCEIpOAp8z/gAtlBvp+W5j4Oza0RO5qxEA4VP9Go2J5qpJkukGuqRydzfV/
kVovvsawHVGEwqBeRj9/4fQW7yzdShaDflg9b8Cbfuuw4ZTIY2+MkmHLIcgz2qb1C/fmDSHeiDcJuhpbBoaqmqZ9kMqaFxuMCAh+/GJJrdhMSC0+LgCRIXa7KG44OuI3ajnBPJjxrcDhHen4UO7yETDBhjkt4N7TrN1Yi8zW1AXx9GKScfd0tU2sVdKxnJjyCIc3W/5zFB4YvuAqnxYnKXoMTdcH6/gOkLN8vu8rBlxlH5pqr59h8nzApo4eGls0cYOvH79gcPxDP5q47t+Kojhr7V+g2K1SiGHEb94oMiguxLkQyGnm2YgnVRIZuFOSKDV7HjNI4J2W2ZWqY6+BoK2SOQ+vifHY4Bd/VkNf4f87wCDTMUm7wGq02u0sp4Cx8TWvB+BF9njkKGddF0lPpCodqIZQ2uuTzegMcbAGF7eZn3i8oNbiKzzH4ubSY++0+6hCCuS2Bdh3+bFwQEtgkvLxu73gdkAf/c8N3QTkn3GPBNvapCpelV+xBk0R0qMsXlav2YErnWYji5QPETtINIlHIBaXKCAvWJYlAURLUm+WP5aZCqVAoVrD/dA5NKXi8yYGZpFtZ0KiZUVyLvn5XCK+2pdgnIerDKifOzWNhqJ9SEyQc9rAA1SHBj6w1c134WyM3WzcpdjC32uDi+1SrZERZbgBh5WVQTIvGG1bqX50+csTgvs/xBlzYXhDcCKZ6AcfCcIbJzm/LpC6Tp/vBS8cwleEqSTb0F0y6u2X8QhviNGZ9RRTSgvIoxbIqzg7b68XHdYy1AHS8dEoMgdU55aOca1FP8X8V275U84WQs3ynNZbV1GD7nx9kpv1KPsZVUsYZSIrsJGo+urMNoYVsRyPVPNyKbEKgkydOax7S2ePtRz6TPmbUApGGJNxHaNc9rYMbxJOtQfajOHDKYOZ7u6ppeHUT8cbZZmYnE+e/LyNV/dznF56w4WQxAAO7TVmfCpnaho2E6g7DXLnSWb2pdBYXIwAKiyOcA1tkzwKsEzt/+olKcRvhsMB9jAlZ5Bejf1FqkHKM5CK0qHlGcXKn8RyS9TrVGpyZ9uIp/xRAYebH7hDLgK0rH+O6AldAxSYDUDAPVWgS/I6AQe8cZwMfYlUV9rpYwE1HfGBsE2l6q+Q9kcrPoKDtZyIdCtwsHTkOLdtHXaun1fACRXEuM2Z6ezFCO3PAX8k27/W/p8V81j4CCICMXACDzS+CBc8rxsrs0YIBOjGaZJ1XmrARlC/famxAJKrbGKX6M01rH6WCovgG0TEn5IhwAqOjffsWCxqOE5e6jPNb6QFxDskJz6ikUslrczILrO1gr2PUO+VJXiPGkqWcQxy0JmkpwxTQtnVgElDHI9eiRoYsTcEGWYZeHVI6ESEBpPOpDITleiDD6aHcFenlrlgIwEKYbRrAEren4yBd+VfX3DSMTdECUFl64/bIIMfbhJplMeyblduks4jGrq5jGrgPjAoFN/UMnfTNTAnU754uMKg2IP32PSruv6v+PE3c3yNQniIpHbldqWbJFJXIx5ppaMhMrLItxuQDaF1j9Pe4z6qY2OS1OpYdTVTbwKyEO1OCl+Z/Lh1DgjbEmUY8JdbeYArqoixNy1gX4fna2Mc0sMXDeQWSa8TOj/08058yYAKT3N6ws3f1vwD07w9HrXJ2DsTMCY73qVqfZqkb5qINnC5+hPJE59W2yNbJbRFnIyxeLZZ++9r7bY0luB1CIu577eSFzuxD1/G7FQVIwNNdmK0xgY1Q8a63oQ6LaT+DjCZ4r7PEJoP5vlDeYC21X7JmL33Ra2kwHvb+8UKzQPKMJ5+3IMEuDkrO3oulIEbkDa597hOGEfPKiL7wfPsZoIowsBedk9DZkbXiDGOmKNmXd4Mk0gWIzMAZQ2kV+SAGrZ7nQ66gNJ36NTHYoJ1o+HWdTC4U7Cu9aCgSjUNFD9oPSLgfekEoydy9P0lsyM4qCG0qAS1j6ed9qNL9hPTnY5C1C2MSVFA+jQBjOelRcZCx0WeJ9NEZJBy4+4bZ+YwnBwHjcYG449eKGtYVd9Xb2PjJsCC9uQ0N7tl3YYpOlgdPlmmroOoXr+HBWn5UBOLv5mHM/zKKrNTJqOi6PoTZFIYRC/kpbvTTLRojgPiw7o+SXGfHtajq9h8i72E5RFTXAxpnb9R6qZKsiqwvE3xj3qlMqVsV6s1GIwTNr4vwQv7gs0E8Mkf9mMMvz2bw6ebOhcp4U7gEKcr6y7G6Iq6QoojLveX6CYxMbt84FU+BKFLAD3TJiaEJKiFUwk+UCkoHS7BKjlXSpHpiZx3YXsoPJcGROH8LkRURdAfbNELT8vdskNNuI9/wJqq5iYyD155UiA3hAXYhDAA6sgEKBG0J1CPl2ytt32Cycs5xfv4gQkBoX7bQWKxuuDVZLqjAigYJdJDXpOtIIUpcFlnXxgvrAFu6t+1HLVUVHtoOtLqs32uGC1PMwrEbZwQJd4nFoX3CIQ2CLR6e1FNUFK76Lu9pR/fJuc1F5jx5cXep5f23vGx2P6Tor8j+Bz798GsVPECS4eNNbxGU4arf4KZsIuFDIM6yO5Z1pEoLqDmqds0jltxf1oiw0/Ms8WfzXQBJ//E+CfYPEUzGscQqrAo78CNvJLrBYrBdT0+waynoC0lc5MkfgfPqG+gt5LlwcvoR9T/X5MiQC60BmOeuMYcrfAOjQ7WzEhEOnGteaNKc5oEfFbIPW93oimR7aK7Vvv2Kn8IOFsbl9cTL4CYeRTnjgZq0wRYpKAL0Zdx/aGyBF7YuwdSev68yQHJWBEboLw1zygOnOhNgE85eU9mZ9AMsaRphuwzbcoVPFXsQTMVn/Q3kK0Zxpr9BwEKk/yl6HGO0MYQIDOws3/cgA245lhZ4/AfiqswOKb53u5namyCcuFMBm5ofTwt6gX1lOu0D3ZAvu151ko6O3SXytN8zBFouuCD4JGxIlPst9I5fyXUggFkofHtg4ZQDB2N0Gtj1wiGnUfPk2ufMczFeMb+Guj48da0M9wrFg5uAp3R8Ty+/IkDdXt+gzSbGz3fAapSF7c3LIvqUnnisDbPw+hzFnR5py7KgirFk2Q4wGpBdQiC/H4TmrvrYkBP1Pd3SfUsNkAWXBYzafAUgUnPQ9RilyBMzxLsWOUkZACkPcRoBPxI2d0B272HRwTDSToqsOLEbDBObkeuSX6SKQY6i1dMoOKqeck7g8fzQMyc/jyyvqiTfS6F6XLgg2lD1l5M0FfGSdUNdP3FHqIi3zpzvugEHGJ6ZT/enh8sNHAtaQSkzSQwTp7Vr/TpG980damh9Wc04kNbdp1WQGJK6uClrlYlX0Z2bbImS+1iqJuGk37Ie67hEmyKUly+603RzVDbaChU+Gww4sB2NpA86n0Ra2Z8vNVPrc4MQctBhHywWyruekbv0w/XU5+IQeIikkrzcvPN+eU6sl661iZXXx39vNqNf+KC6SkcmcFQAsIQQ9REUKdZSTucFk7xhiAigyN+8pPQGh0bwK2Vyzb2NZXpPqPGR2/0jyDvgFLHCKPfZt4OnCRhVORVeYRFpSbDae8ufQZ2YyJ3cXplMgweMtQMEUOz69Hp6KIG973Af3N35CvLR0+Dvlm5dosKKSzEiw9sDG32OwXy65ZMipYz+RNr6BKDHEM+PeYUGZgz73xrVeT5LsP4X4pWWhY5NF47zxFIggHniuvW0MT3soeXa+OWC2zSSzXhj2ocmRy4JiUgpnqT/ghBMtkq/jrCR+DrC4ovoLcj6Hg5LbCPrzqoyzowhhVEpKyD1kxzARpI2wekkt2YoXH4O/BN6hTffRNET0uOauR2G0HicWhsVmE3pG4wNvJ58FC0oLyvCpXZEuAWQo+/4nVwnDKdyqAFDXEq95HYlrdVMq4kJyGfGOfYmC6QE4h3Ue511xqurUX5jttiOYLD9MVOXA5B0tDblc+2nR85WYDXQzoMq97uId0rnnitdzSbYuABq5IzL93wXbWZFSFBH70DXmFPdykL8Qov0OIVN1DFervnwHu19Pr7pNVtqYZuWl4HYgdtsM5N1XMQh4oD+HYDjhDT8WxiyiCVuFhQZiBtZaneFsY34jxcOIdO/nvCk2NjkO1SeqJ0Aq7+SOtVs2vp
kIyCVHP+iMv65q8Ixk9jqCHiphk611VbuYMgKOG21iAhP1/IgpqjV10g/lTiD0cPBZ7KYwyTsEY2dpXDxTvE5/2bVacAdxYLvlx4dGDGgH1nBKBcBYBzvscGpf6fMgUDlksIuKtLUfVOZwlHhw2U8eZ74Vc93qGNqkxWydJ2mV9qr5KrUrKdPclO3zIWgiNaa3KhDCOVDNVF3oiVCKCDTx2rLRjH0GNur2oyr/Bqo1LrHl9166NSFPR6ogYrJLlEUucRBcYsfTNCWLZmNb93DdXgMOk6PMgKo7/p0ifXdEldSuSUj7XLoLjztrh9AfU21C39EHzWa8KtRSpwAroToZXZdaDX4Oqn/ScNLhc6f5p9SjJE1LHFZUIPaSDfobi/XPgTlPYsFk+TD9/89kLIDVhi6XLksJna9dVJB1uZsGahk4Xp0j1eZEWW8BQGLnc5ZDaRwhaRegvieOJoKJF6T7mP2+WmSeEo3OPS0aJwithTMsTfDXA53sZ+NWIaHwOYetPVtU+ivBSXk7/CRLVmtgIEfgsOfT4zz1zwgnzIyQBc8WuKv6tlf8b1xRiKgjfoSpAk10hzx2YN3a6BMfZ/2d+v+W2SHbyPiJLt/LNlpPjIn46frdjbPvo4zUee6nq/WjLAZR3/Dfdbus6YQPnlIomTXDaJYnUCVDPyeHS8W064FMxH+ZK9SnkKOSvr/2Ukvt1eFrIKG/BNPJJF0KJjdG+ORcMIKeHjBl9QqJfr6OC1J8ikvk+DMadVaAN4Fr1V0Ti3DFnCB5da0i8r+deTfo74gCTgVabhDntEq5qiWW3HodwBS/i0oPB8U6TLGvtN8fZF/FjW0+esPZOBqsfz4x+okyKOVSWxw5vX3PGfkz6xV4qdcqOYrahadGOrwIhyPTm6jW2lpDeHs5SSuVH50an/23QxWWnPC4w/qHOnADMSC/+HgqB92TgNM5NtWMIxGyoSyLpNRefnBBpIgddbfE4ugN12U7jf4fH7Bxj0pRLGXVC4tB0ATapkj23cjZDSgOmRa2Gx2G8hU1KWRPkztxVwxNgUVoCPNyHLYkmi06Ydtp1Q5Cmvfybmo2qVIoLyMH0OLsMUcfzVJzRBuVsQA6Hn16GaCuHBSOkSGfWZgT3wWPFpTufPdUY7L0QeE4L3kuooYp0gaXH1UAv7IjDDCQY3NOGdZi8k66YIjpROrFROUA1ygZtRgKy5e+zLaKJXpW5LLJU2aMBdfpZUPfqT8ZgSUFzr7XNMgVJbmtcH5kEQ6fuBZ+T0syZjV/cGApr5HdQQrT1finQDbSX+bHhgwUWhA4KInxJA6Dewe0d8Jxx79+PlQdKDAYIwj1mqwR68BY7E1OQkz9WYw1cJFotX20zrTfuGGpxq/tF9rSk3Qw9Y8iPMtCT+Byfe7/Tppv7v48CDjFIrDkZ2SilJlcpDHRxvToUlBlNdHna5OTnAPMDfQUT+l3wkKSbqgvjZtazleD6rkONw6OwMR241RnOmt1s1B1fJydPrBLeI0KAmN7PbfasQ7v31rr17rTHpWc5UM34nkqL6Knsu4UmJxzvkHZAwM3rp0zX1kSVz4Vx80LGoVH5kksw/JUVYtlosdzZFhgde3tl9Z6XCZHT+sPWkkvPFfY8o5Cl5nTXDg/1xUb7T9SMaMGGZ38ESbhI243oYSiMt9SqNsNIZtR09e5GyZOSRUGMlxnk30mKwvHm1PRFha/NTbpbqxWEnDuZfAJmtGAjr4TQcyqnEPp5ITtY2zMojDKPWZtIHlQg0QyuKHzuUHBEz4fd0+VZW+m+ugw9SLs74Ucmy/yKhsFXU15D/q2mmF5Ao1W8L/AI6w1tqFbJWuWosqYxH9YtuhCk+OB5tmMO03Qj/Z9fvW+0YSPr3djVoGZ4KHhXmAoq9TIKo6XVJj28eqKYo8QJ6pc8df4GMoSx92pPGF5Dq9kuptWgJIS0mGG2lJAVKH5eFOWKzkDHqgkAGfuGiBhPLaX9nXkz5xblVpSNF/WxQRr1to/yJ2Z9VZzi3EB1A7BPh6ivuz02anXgFdZWuQ2y5joUrgMSS+muJdejtoAw05zRHBxRzpxD7PZyExeuv7vGqvM2B8qGRpKwLJJ8XimX+X0YEJEL9pAWz45/Jo0MW3aAxBSDQp8xU6a52Tyz3lh4nzKkMHBmKZ6PRJiuIgAR+rmNJNBSVXPpNGcyTyuk/8qfUq1X33swKmp3ShohbFc9FtOv6dWqjDuoGGENpPbvb4ckeamhE55fE2yrz2g7dYDlBZ6WIMg+Ph3oWKcQnQcY44RNGSXQxfcyNKtUcICXDjtGa/FPzUfD4KJr3Ja1J7tVyYN87Wlx+sFXPaYbXoboqWinPQNxIE0wFjpYfSa83DHh4COy6Ue/qZRLRsIr5cNSP8tIuqHd1zLUhKqZCqq3MRpJ78ylfTzxZX2XqjblWohdFBq5/1AEu0drGJM3ebK/zwG7Qsuz+e4r3oFAiVZXpJRaQC4ys51KbvgbuCIg+KrLvoEzCcdKL4ahH6RC4ChBaGRBZyJ0BCpwAUwCg4QiqSv5XDvitJNU/ys1hIMgc7e7rPXEPMrkEUqL4IHxG+eQVaTRKJGhktjCCoMJPcEux5awzaiWDeQCG2a3PwOOSPsDAlrsd4DCb/7qqaTCvopTy5Bu9ih714MjJZw1N8DkMxlMgc68OCOq2lCMwyCnzHuMIIJs7g8WkNpqSDWF1HJPw+jzfYtpNagwVCiDuWOi0oMgssFqKv0F1GOvVzHdSje02VoIeA4Ev59OjVfswbBsqyu3POkJNVnLCdKsp6zQu9FVoVlIfCJfjXW3N09vhK1uaGQ/ulaXHiVeXqsZZMp2OBEWi7rcGP6Z2zm48OS4SnQb9whn3QHjHjgj3woY+cnjvfQX6QUcjMx4JHfIqdjnRpRC6MfqWRUEEdKINRhMheMp3MiZhTxPj2Jz3Haab6EI48ifqM+4KW3dF6ENGGs2q6WNiylSW8tojnU4DBfuhQNbNEq1MPcJrWuGUQHZKQ4cUSxASj0lQmVwmI+ubeUkMDnr1jbwbbER5s8op2dQ8myyvOHlr2TYcSgs0lzp5ACglcJlJny7fbtUg941/GrU/VJtqmQE/gd7wr4upZlbHWZqaMvzX9zATyfCFArvqZ26h2Y/mfDDYb9A2atkyWG7Qz43zmal/qcHKxRMRh7NmvqZjFNb9SfI44bmq4Utq83U4SxeNmXoq2isyZ3WOD8l+m37ORcj5bnJMcWh2+b8QCqP5pOeWc1OltXmAcJcevMyTWzHJxCbAkJPgXo6SauFnM6l2ucw6KC1W3x0BZqShrAuuvH3MWAmlI50H/PXmRafjkeSLPKQawSzgVY0xh9eonAru7owm4SnpByYUaB3lVOnwZc0zsRvGnJ8YMhp9TLSZ2bjKsMYjBUuVXp7q1bO7VCuRpEDtmAox8hAPsXR/Xz+J/IffbxTY8K4vxoVcEeEjE2/Yozj6BLF4v7a5OXK5hHwWLUYbRKCjtMDqTPtYnJSBpTwYilul8IIcV+rd5V5YtWqQ2ujOQMplULdEMJJF5fJvc/NkTg9EkZhvQYmn2oN4WM+Ee7lFlwXzgStKXqTWZkDxqx13XoY8NpxDrEfjoo107hZg4CKCTr5d8kl5eoVbsn807a79ee8tJnOQ7XMai7mQbkjaG5ADgwteI79T+jBAumUbntttd1TdD6nGx64yPvKHA07p9UjTsTHBFpdphapACgCu0U+eZWae3Dj4HhoXv08txvx+Zm30fC/H8/b29mlruNqyHYpsj/5ZJ4GanR0qdIpzKYhqpPPe1KXPYH9rJJ5s/P8X93gKd9X062Wq7QJJ1n8kSWRy+5SDaAf/zRenA3ZW3K8IJt3EAWoVjkip8ry+Xsfqh+NrPrgrsT+1w6j9NGwkNAaCy1w6s8xpj55mub9oKk7o94ZIEgNpoSeAzynQqdlWKZ7rw4yJEt8MWMFmi64wlAY3yc2HlEs4upoT17+9opWRHxc/mfc/UFQst528TdILPqOdTl81d72aTcAs46tmJhFTKasKP5S4bNDZoorCvVXgpTT4P1O0dcDPso3WWxj/dWL84lgUmI1O+goed9IQyzmjMZYMcvePpjED
3Jw6g83ZkxoBLJ8S1yAkGLWJhflklVFNQofbInSmPaSL9+f7hKdNW57tzo9H54HLPRTZpUeorzLRnI+CuDlKMBzbcdnd138WepddTR7be4GJx9aCpKB61GzFq5wMTfECQGhjykccctmWTH6JqP3l4+UnzFtLIcsebLvpVO3revLSZqUscDhpBtltcSVmbM9YGSJk3uD6RHXluOaiQo+BF6z/G+5Z3Vu8nMBq64eDKa/WWjgxq5GhJcmHgh89OzPa2/H91I2RhMpNMe4Rxj9zz+/ZpEZA6yv7+/INaiWf+7z24fdofObvxebqwMrDIlEO9QDILs0r4ztOyykTc06mGvj/YI21INbd4wGK6p8c6EcV7Tr5Bk9JUbmyCtE/XBSxz6LGFeRX5hELrJzFHwZ2bGcWBL/9TAOiR/AU3J2L5/S6UyzOIOJxkj3O3eP+9avUnjLYYgN86QuBBENjYyl1waepV7buVTnAR7qSkW0mh2z1UFZqjFf+qrVCz7YZehkqzwXSnCqMtBKYnr34GjHNoVST0zrIENA9cL5BkbxWHplHb8G+Jtip/tBXiVTFdNyCZC4o21tKhWXUpGvw0X4jy73KbfpwtSJ/xchPWeemuAR4hjI4Goo0Dn8LBNXbP1v+MJJ019+IprdQGJ4sHdxI6vSAy/8wkojTbhAA+YoaeD7a6rbZH589g7kxpJI6FMuyyhIYcfLdqAU6vaxN75CQmzUFfJSQZLPzq17NcK0knHZTJJQvmnyXUuNTVq4IpgGgv3NJHuvtM4YJTl3lFYx5V1lICGWG7a1CqHziyWUwOvBqYGQl/nWLS51u/T1RyOc5s/fVFzriOysukboDtA327YPUSfE9b9HeX24k39BPZHQRQEma4zXwGnHK8viKHXQe48LKuxgu+9CdYTHyhfxTGSIGoC+bfLJpxdNMf8GNzCP+oOQqeTpwMnwWWIU5tTe2nn4DbxJcI2wYMElevGKezuJlezDvpmHzT7hs5VI6IpCSsMoM7lABPiarwN6o3oqU6EQOf1k0E3pRnZwS4f+aIkidBbsL+6FzxlocUAS9y9Vd/HUMa/btofiM8ZxUabiYAkdaHi5T0B6Vc0ynugVw9mID/XVPK+dg2W6b78PPwY5gXUT2zy75H5YZ43YtgjsTfmOPLPRTJvBwS8XDjJb/H0DpVqh9LML8Qf1X149AmvjWz9U0SSGv59QVhUFlsXsysRsQwp5h4I1n0f47vsC4hp3Ojz6GvhqREmd0HEO7e1kQKOKxkp1plOxbK5C6gxR3t+PioIhEnYd4LK5YAKN4Zr7d3AnFXh0clmjEZhie/qzCXjf6RmQ2y6YMFdMJUz8nda9cHUI9QyOFekNS9QYfFbA1mX15AjnBmiVBmvXdlMmBKURuhblN9kT9S3sP6NISbWw9Lnn8JsiVBu+RtlQDXBpyUfwEbxEWihYZcWbn0VJIjIsQCdouGPXA15vw4H+cuHn7c1CZV4vBlJm3miG501odNhJQFGrhioV6LkFw49UCmcmCUfScF+xk8qSzE2oQa0Aegllgpw7EkdAWP7UWxin3bRQDSg9jXotgXM6cQpbmVjB8RnKyd1rcphE+hRdtpzYouI9KWQqQ/tv+nUKm1Ui52pwoRU0YfZ2Nu9vNmJsQMMSgvsh31u7ytifRNudQJa+TjXqrSqDZ7XBb1xwPv8Tfy3T0m6wtSYhp5QZhNj4e8Ij/uou4PkXTNnxK+zVReODVJu/ExS1IJvquyvHZuU5JBl+sybjwriPBl5Bin091rbX6M1OSmPcQdB/uCf6v0LLD4qiWK5fo4jO9y/sSlZQ5A4wwCfK0T/FmQHDXWJpnR2viTpBaYMJTOCVYRFOQ7j+7d0suzCnAF33bmYsaGf5X1nn1w9jJQHH9IWKRD06tTlBq2LJ1QuMkgXNXYtthGsvXP3HZiFRDtCoRRnXBB/QoKu4IeaSzVFgmVjt6c6U5MCEH9n4WcusZDibLJttiNDfHMwnlUdZZC2EXDBw3o2ScgCpwep1v8wv0bzqj0sNm0+yxpfohLvJP6o/+aNXxH6LSFbgDyUit3jGnvMKrKLhvZldCo8TPR3yFAdxKcAXGZqyYKFVjBz/utzBotRk1ECBqfWpcTtmktOAZ4LpQ601Wq/tBO1graEkwA9mvlwYG2XkFpRiiookighLnhGk0WeKTCaruIu5khhgTk3grx7ZnK7uF0URUP5/czcU6Ms5d67t+zZqqvrzyEMVWCglEHuRLrhJYdKIEbwmsulvDgIsb2ZVUZJlgFlj1d5MmXMxZVb85e+viL46vf1sfAzf50pi+TyPN0LiQm57bswpR2WutJ2BRoIxmOpKECQ5u3FV/CoLqpBgmD6aexftPY2SsD3eC1kZDefRllXLJC3N5O3cRjAUB1VLg6rBMaxDpbZ6fnkmO5/f9jn4fJ+yNiy/2KgtZtMpoZgiYSt63H9ZyAnROweMHc3EhxxdImn2fTvPDrW9DAceSyW8KEv+mdl2buMt60vElg8OklPRZoVwEzREe7rLKKpoUvgZpb5TZhQflgfu99FPZynYjkIUEINx2pO3rUmXq43vUx8VcHK4Uu06EMvQl2I8nSTIxkr06VA03BHRr8HTYVmWht0BW7OvwRiXp/ltQFnf6rJBcty4oZyABOTNFvldmLKv7mMcQGR5d0XllineFm1vy1do70NjB9/iLi7cg8pdDZYQ0RxZz3FOrPqMPZIeckrXrvOMpC3gKHvJVjnFCnFjlHYP1iipGYgr036dvsoqs0I3dHnAojG9riqvpaII2+v6reapkXPnK1aGBiZLw6YbSF3XkGR0o1VuJs6P0h9Rqg0PvhKw+lnfkXS/umnTTbvfUyvn+ZZSYzP4w9yZd88t5HmMqxTsw025Qcyp2iJy2M3hhkYXhfuUSVll8ZAaytPz3qbKdSPl5jsgC80up7dWJ5K5oEGr1VfP3Dn9tI0jf0oRUctGs7q/j9Gara/jk2Kq/3akKuL0Up4M+Qf/AwGY0c/8WrUojkrdY8shK0/PTfT5DluJPgsZhwokIJIN+rlrENGh/tWG8+90xUVsvebSdF4dyOr6kEu6dK0E5SbWmbtWpQS85mA3NzXVt5zrDDzxQInlgZ71HRhFbvJFbiHTRe1UsiMZPexQ3NNqz1NK8y/T2l65QH6uWcUAi44E7hgDdchtYBIztDNwY3ARuEj4mj/nRVXV6rbMfXT0jP9npQ+mFr0W5Asv0U5DVnV0w1gzRkZRqdzpZfLWm7f7P1wpGsLPnH58TXnRdSS805oN9WbGeXhaRyVBGQXosNduqxl7hIRkZ+Ltt5aISTVz1YUy8HhFaLa0lAMYySQM+xW4QiPPUf5EMidBGNr4FWF1UdrfjrnJvbtkgUmpyiyiApDHPLGX9v8Qbh/XkM55zuO5/k7fBSmt1+wIAoRBJcpzf1D7GYb0sZARqVMWDml2X15AkKYLwlW0ACwpHUXe3Ynk01Z/gotYOipAQ7N8r1ynPc7Y4Pwk0Ky/eR8L/wdOCDuOWnudS3L1ssXef3tEwiph9HEZFJLSomrWydt7XwPKVoDufKWxKZRTvWToQiRaI9ce2x7GyZ6rEMLTkYAEUv6OKpRZ5/yOf31dVf+PODe4DDOhrTefW2GpnhX7As3D3Hoqiu4Etp8IhI7612Avs1q4MqnCq/F35dwlA4S4mCTpQmVjWRNrYKRy5/2fCz8ZwlJ8dbemO9q+8/FvGAAmtZMnRWe5Dl4TAaTwPSO4RpAQEJXg8Qrh98Z84cWm0qHV49loTZPzDYtaogdFkzmwY506hC97gJDF9jFJI2aUUIHqpCC0zd9wpg5sjx4JaU2sfr4MHDMYo1VEwhN3vfH/ldmj0oQpTniuqkAXP+Q/6JgwDSeWg5CFljr+bCwXDltk9vVc3QREsULDEN6y1QUfXb4KzfkHUxRqA2O9Rhe/epUYyA1j2VXv5L4yvFEx2csrs2BKL4umbiIhWKxHY9jJ665J4AZJMrC4JvJj0Uh859IdiXDcQbri+9YRhlPN1LGPptyG0vXOXpx3Nl1v2s91OdnZnNhxBuIlCwKl/OkVNnDhAtMh3s7Bf7Oupg6VJYg4ls7fF/Twg8yS0
jmJZSHGPoIxeMrNaDcJKirRU9+dYT9UGjylGr60y6zhtLxgIQqQ0BTixiHenslqbJgKP85A10gY0xF6aq7BBO6joYDN2V/XRBcPs/1gL5UGDX/Jpy/6jrfpnHTnIxKSkWtTRxBogDQTbUjzjEhdXunUHEXF1CJt6whNmk50YIUqX5nhUdRh4faEKiIaScik0ENaCqLANSDDW+xXmFIH+1ITSNZo/n9mOJmnrPPIbNzc8hGU8sNY7sBzRfIWRLuvhwH0ivntSgLBInK5DDOgk+h8UsWknelpB8v8rFgrvVUVYqDmbhT4JY6mzxh33j4Ic1qTDpqKeq9cpdDISrK5U0PH8ByiHT6B0umhtCz+qzzoudfvg4LxjHHuKulF3T63M1y5ejHgz/JkhxLwtNHoTTMri8+rGFdEIAfJjIhePZEf5rdoMkjyZBtA3WLkVWexCy0uMTYzLkhDYqUK2tTBLtkOK3fQ64K+f4TLwKW76ZiBhspISTAp1LqNY58fhp7NNyS/XVvYA93m5iG0lInMoLbnWwAY6qqZWUq/c4jyn1St+452XG0ch0R7lCGCQBQEATX01ICSSSQGO9jVRMMwa2EPesYABBV3YT/mXeThEe0pZ5iIRxC5e3nvb3MHcJ0C/Rx0EnB71ta14AvMg3yF/nMihl9AbjJmh7W/OeQmEjogYigUEvmbofGrvaJ9gdIsiq6e/FBNAgWRCPgFr+P8zFRyCFbiqGu1kHaWzgFJvW8DvjX2K6BANbiP8owwEkywDnJe/vCH3tmIlaa9KTVEQEjcYZWjqtnqX/3r2hbyYFWBZYcauuLwzrIvbGHuUBwCqvWzssWZFvTbTwW2JW56q3XOMOR29jQ/ewTAZsMa8iC8tFyQjJF5DFLt11ZLl/BB9MNUNrEw09NKQ0YK879YgpiU2A8cKEgrYCbGmfZRj2WJ2lujcFmT7tAfL2Wr/sdAxtXXEENletpfAB9J+gNkzkvyMdLyUv8uB73MxIoFlVlK5XMXSAozM2I+ykVnt8Lima5uhwk7AKnrRBGhOOs/heYHRhDuRvcN3m0QHZueb1dwGyDI2IQhNPXS1YjboB+kJ6FBh1vL0+Q11KK5BRuBYllUmy7Csiv5ygdz7hAz6dCMRWyv3l2f0V+XGozuacCgnzTCga8zWk0BlBvK0yLfA9fIsm/wnHF3fvSOY6oQfjot0XCP3ccSLQe1ESfXvi/xHMf87nHgRIOHVw8kFWlYIOOrskmb/793l+l33+Dnj4KrY/5r5hGW3RrB/GhAxNwx3ZQhiwSe6Qu5cVR5Tn8n0PRuXKxAzVq5EJMDGDyahzJWT2aDeV04VZ2CF1QNj0zjh+u4QjgfnxrdHHR7vmTdcqyfADJK2P3SzdTgragAPxj+jvWJN+A8IRtJq749HTVaYD3HrM+WHAauQ8EUpRTHXH5NG/p4FOE7V1dFUTc5wZ4xm8V5EKp5ulaMaRhIT+ktKCLj9u15hAiA4VnlIuepJ9P63w8uRKfnS5c9FGCcNN3JHma5gYNhO/gmUAcHe6uRUneaVfOOvjNBdV0EAq0fqZrWZefAw9ZtsQ2klPg21mXuFgY2QNSJR/L932X/UeebkKa40DboLGMhWSKtsARgwhCmGpLbTODOjpzb4Pe5nd6F2N0b6xodJ4SjEzKCqkCu3vAHJfrk15v68vzh+f7X8O18tAHu16VAmTAgyEO+wKbVCWAVZYjtoQCVFHxUL9GjS4xG0xcKGgrku5lqzLDFlihesf/QmMRuwv3wMEt1k5GhI1PxhP33KdILMaPi0C4wwUhVtSqMPx6FDgKOqE4f3H4MWxzsReB3Ijqs6Sh1ndcVx1fjsAAofib5gxWM3wQeJXBEdiFLL3JiU2ToBogT5saEiRRajn9aGHzHzF1DP0/PVYbR0YRUqvWStgCLyGPxh/B/E80wW1dmKWTqXZlyogO6VSYXVSYErd+xb3jAEhDHgmEAiIuWCvKPyeXftX2gbaHtayITlBgM5/7L3wLIclgV1nebyZUymslYaN+TfesIhq9abzZckXu6i7a+QSF34kU08QUuzByNcRI2PUcZxLxs/FesMQWSa4Lh375owI6PDBcXfpvOKPjGnw8WTRBkP8/7ZBpQD4Q9iPleHSFClM+yGliD601dvtXbumBuqXXXBf1Enndp/uPduCldalMrO7ePKM7c8/vGRz20QlLhqTTr43zKSODWXe1vpj+dwnu4IWnGf/RNxn8xPesV996uUibyBYnzMgzAWGcQHRpnbsOzXq7weK4NF8k1Z36ZKzvORBnQFggsqPDsraeDU3Dz20HHYgX8wQ3ZJjbscbMHlLUrzLLXPoZRpGvmXy/l+3ZDkPgKwZXoBtT2yizRHxDtNtnALnfrZBJ+UIWL14qQubHEJ4pAkhTMkf4n7QPxuQ0hVsw1a7TzLOPyoJWqD6ifrsjw3dT+3tEhFrDS80d4cgh0rmnIuRenSZ7wiJP3D/MiwECvNnJ3jMHsN13ZBXJV3KNgwa8lQvILhb1ib9vzJywA+qN2f88i66RPkYk3ysOnotpBQDFiSCi8XsyU+Ig55vizaG+wW3RorkCIthyoNVgtmS3rzpfor69mMsafrCgTX6tPvBsVgv/BQaIhSvkXSLBK+lQh29s1U2YF6QKcItfWj1AHp4Gp2CCo3KXZlq4GF/VW1rmsXy2S8+o+fMMDhmeOKSfnDBYxRnbYUcf6T0of36ST84prUIAo4MhOklQ08a8+CLUx+8YAineL/UtfPTWQX2JMTFac1i3BdxfsY21ShNTSKdzXpLVePIYPjB0GXKL/ZZXpS3V7Ml/ey5ncPkRH0OIqXct/3uYYKzQQ86LaLS94cKPWniuRbntqbHT8QCqAfyctS//fDgVAx1j3LWJLUJDMGrM/HdBfVMJc0+nCD23PIIkTyLZjTOAAKBfuEHn0zXlOdJCTTFvN/MEyv4MKWY8CTJ+kr4oStubnzhU3+W56NreIaHbkLBL7mmsv2TG3lDqectggiAYV/SdqjedvGHh8mYUP4Nb/92RUQvHIlAaTVJQARv01BWebyEmU+KpKTWGevqCMiYAe0+Za4uuf5hIovy874/YkIFKBncIE6a57aFcA10bB2x5ETYBu5KN5n+ZLl8czrtowhcsT2olklZUs7whUb571/iTD9Dv1nCCzrVAJaGZsEMJBEqzJKIhyeg688OzzJT7hGVymgEiIeosw96w1bkNsLQdpPs8i7VEQOJfzHKBxmeNCpRRRs2ny4UZupPZMY4PNH6R5nbxX9NG/KI/+TuyjRnLB11v1WGjmblHP0SCbHboi0GTk9/xQPS20meZqX1xbn3lxRulUBg497NYgRtc8n9tncsq9CApXK3rKmf3EjbzDw5DjXQtQKqa3NRy8XIwhrLah7dwt2EcLm0/fPMvS8kcHWxDj3ElWWD6YjInm9NeCFIIQWiSIQVDu4OXypQlNfwUXDDNaG6vzIribo4QZ4rQuOCmYTrMLztW72xcjSALm2CxYPGAWpM3wuH0lSycDB9U/qzCN+gzPjKzX2eS76zXjX5wRiW4qU0/jjHKC2SnpsMfIO6DWweYUyDMP3psRiq2WaCFpM8R4OXf29tZ1WWdqU2/nizQsFRT0L2rN2XM7l0EsOjcSSBGwUcdshKgnNJYlFVmHIkxAB6/SGMiaepSxIwpLlYHzhdidBWfPsOHBiRmvjGUuVXHNNQpft3vzs3fVg8bj5HvYSmPR+rf1BQDwuJIF4f6/hjqI50xjWAKrtEQpO/lrLOXxVScjLhq8QUEF8vxH9yArcSTsulCyrx52p4aXN9VVlHWA1q2NN7rcmU76mhsdpEVTO/2Ze8ne/+eHNb32duvRuVdVAQsCjG2Z0Fisnjbh9LX/B4euMT+/DnJFj1zwY8EhJeaS36mne1Eq2EhXIG4RlXSYUVBNB15dxyGrsS9VBM9Ks/zzeC02vKG2ESucl2aQdUgZtxzLqbyNR/jjPKX7KDOs5qwUDvIGg88ZV4bx/IHcbkrvl3ZCoxWqQUuyJLNCCEl5f25FaZQ6YRWzMNSPmMJEHclIE8oqNiYDewvw+uwoHQ4ef5RttlkU+04VGcqDYEBAOSKteiJQq
/H5lEE6TiKqg9xQYWWzkpZwX0m2z/S4m4OxEHxxRqFMG02+OXP45yM4JXSYykvNz669YW5T5CyAKOTDKgwPrlbsUvmA/NRRzMZHZsogBz8GPqYszAY5zFNjTb4XRRGtuzI5uHf0PavunBhwYaxYkm9gHNOf3U7X9n8xjiPo6D85fXx892mtUVoWmOAECU6P0vCmYBVf6XV5TzARGPoYsgC31Ja/L+ckRmcrsRRFWYbItGT/hiJQHdmqamo8G7z9mKqCY6bVJau75pZBEhTE3t7SxATE9Qpm5/bdZj4Xjyd2iXyMehlkY9f5tFKOO6u0QEuibLU2fD0QnxJy8315ARLaG3KiBZtljM4dSUuTUDBZSSlm0DhnXr3ElfNfwa1kQe0oZm+mzv9XagFcV9i2XVnaQg4saNF2hWYpa2BlhpNm3t+jVznRmwBG9vtc2LUobfrgLhtAOEUXomFNabz+D0Qi4w14GiO8WWI3CrQOSS4AkHrpqm505sNrwtMRNRq3HB8H+ZOf83eVdFuRH4z9KvR1ltyNW2OekGLxiQH8SLQeKCfgKS7rspYbFY22+AFIxDqwoTkwZMPTry4DVoBJg0LZPeGx/oQX4Zk2HbLenp+W0g0GuT3p0iZaSb/ZAFSWh75iu3mSKnvaQqFGcJlJhK7wFU97cD8lBtzweQG8nuDTsBDUAmJYzKMpp+fkzjINyfH+r4ASA5leCe1b3XDw5oIxlr4drYQPKpTD9DVvqdn6D8hgOtv68BP4ItbHVJcWbjgYhnimhY6obIcEhSkZa33rbUlLlQG1x6MmDn2Df+tWsKcVScSDdKhGHNFrV9gehTGWFT2r3eKEtEMhBAZ/mMpt/XN4oKjsYyWVdyMTvND+9wCAAJ3m0zwo1KhgoM4a/u6Eja52mbYSdggqPCNg0zsX2Nwa4IeSIkE4AkNi5b4ZQnqPJoA67uo6VTX/iEXYBWyor6+Pk9n0now/YP1Yox5AcaZXfMzvcxbk9G/+W61/hvgDlwgfq14Vbf/tE0mfpbKVQWWI+LxxO93aoA2ny1lZqYOzNHkf7Drqvr+tb5ICvbShjQ2wngArPxhwqmxz1nTDbl+qvcyGZuD4lPWcQljBJwN52nIPtFd3fHxlIs8de+4hGqyvCOJktXfPBXVqlVNg2srEuu43vBs9oTY7ojTm+In5QZYyXYwLAKaQO9ls3kbzGqn481jQ40NH1BevNh3eaPcxU+N3gseKxtEeu0TrYpEoX0v/o9mR5QfbNCXFgFzxJx8jjabNVWjVxatoQuCU+D00muqF2dchZjxaouyccKVO8MU8Ipr0/B/r1hlR/btydLHZU6CcAGnk4R/gu+U6SZQ5q9IyDyxeADaKReQRUBSaAoZHZC0zVL7wayfGgHQZIwbFUxj8KMzPSMWWeK9C0Q0cZPziI/fduzRcJy2MrGc0pejdkKoA4uukJrG2tKkSWeYcclrWBRSMTkj168QfcDIYY5bBdSl9Pbzu7f2zc47EG9ZV0FcNNrrVqH87XvLmE4gA69zwcCf/WRHoD5CHipOheCXxrD5roWzmCufcHVedlr+jE33Mp6lL3QZIKR2ZEN/kDIdjWfjKAFG10ihL7CJiQdSPrT9ySH/XQGc5NPCoOHQxof1c/ugwrNpxf+4fxwaBpIN8NyVOWXpScvKvMELrxm8Dp0xmrezZ4aoSuJTHZ7nFuzzm5ro3wuTMEgA+zJ6djPPGqYvzvByw1QdUqC6DSq5lw7N8m6+8Pc7qCeDdy5bTXuRJhLH+/v/DGpvSq9kPrcDfBpY7YE5KMSI5bevK/PhCpqzihNY7FrEGeD4G1osuONWxYxxRTwAdl9VMuVSBnj8c/7dLR6TvR2e0NWtSdHKHL846t0u48QFRr5B2+B0mGWjeFa/4IeTrhjGO1mt+/GHNRvYY5dKgf//F8wtkzMnYHDRKEz4AOtBd1SjvurX2rRPQBH/oj6p/r9xhNucjR4zCKiGDlWhnpravHU83z1caSCdq/g3HjmZmh37/K6UPTXfLZdVao4NLm1RKkxd4bfBD3UD04lHJYQc7fnTj4dAro6rC1ZcEd7i90jRk6d4opL+5SUPMnYQDkOd2VV8lC3CvRH6aWkUnlxbBQ2wU0zBmrg9Nuyne+oevbTtfBXTxEeiWWo9ob3WJPWDkvjmBp1bS2I3kUaXiFOZHIzDINeWMRbw6E/l44hQpABsBmkkN79L1YoqKC1h1wWQAxmgndz7udy/27ZLriX0GDsdrWHv6f6WKEEsMIVWMm0qC82ruJHn4icO7QQDOBTBGfu8TG6it0Dtel2rV+3nH9chT1yS3lISFM10lpfLuc2ajKIESMzckzjT8YSKV5R1APVw7oaS8xPwMIwR1EJpa3in69cPcfAddvzXyUdmJjWtIbKKLU2zyFzdvz10dsTmwxd/TZ/xQFKILVEsqk6mF7/Fdmp/Q8cNgpYL13N4zPwraG8Dyrx4Qgju0RtVNupx/8tksoqDtR7bpuSKhMDrZrxsE+FxvtE9Hnx27z9SZ7g9GRSgTRJj2eMENDCYijEtZE0IQrd5Yztd0+DuMD10g5cR+Kc03SZbmR1X4cWNKJYGJOSMACICKWMujGNxUyeLbMme+oj0Im1VgzT0YQ0zVyMYD8Kf706a9E9wS4QPihLaGtFavPwQpy1E8Z5lRXZRHfMpxEHWYTb2Cfq5SEEp2edQOOGco+y+F3tcyRFq1j6x4vWFk9n3AZgiw48MQ1mS4Cf6YyJg7vrV1o9vL5iWGM4fT63ouBAyacarZNos31yPEVitfMd9lkvBIZSBK/DGKo0k+9u0cfwAhOFVSWcSqilfeNC83CF2/R8S5iEbkmQYPkbwdSWUnbpGx5p2QMxcEJIZFnUGJTvHPo0yu26STUX8+N/T8IPf3wyRUrRDXic4QjKU5l0sGSNz6YDtuxDxy9uhGjkO0k+OgPl3oK4nOQNt1a4yRFMnm38Dqf5k4WWnUsXK2kp6OsulBhqTUSG1HcaheJGzhXvoOwZv3+EYanQDd4yiuE/L5fAhjWg+D686GVg7RLGMGyBtcQi32Prx/WfI2AHbU++1DvemQf+FopyOCPn4tBmEiMeT+7a87xwrEqjT4jlSp7jW1nqDX/SKSTnJ1e7e++QDz051adc8q/fbbe1cmdf9HXtRNi1+nJfpaLvqRExZT2qjNCzk32P09c/pH9+JyH6YHFuABc+5wtqF3mpsFFbAw2qp9sWjVX0YijZv1nqvKIA9GLrNZXI10A3ziChGqXmWYgFdBS17yZG9AkJvt9gyOwWs5oVau1RRmKBczZasEmiyAf0VbWYthfTzKBCLLpaelbc1r5mG0Ll58CvTddrNX5YgB9f6qYgZW0/6FxpuZpFP6ChD6rrIyfSOM9mGsax3CCD50UBd7T1rjuOoen2ed/k9ZT45uEdolpE6HrZSRAP1BcCY9HOHA7mjnqOchcPjFRKqyRkFXOspP29SLdN36ggSviWSuOHoR00HTpWjXYywr0bG6FRnqKeZpVAWcEgpmxm4ZpuloykNWINqbqAaDSrp4t2lQ53CMxlcCm63WREL37aKOnqa7d/k+1fw8+tWEIV+by4IaQlAStF8huRo1bjiRZc1NJyXkVfQR0NsDyr1gDFwYsRjLFodrzLu7unm3QQ95kxv9qWPj+ZGd915xHrdXPsc5r+MPORUZ99LeNMqAYqfjc0l1+/Ny8V/3T0/FijBMGXGBUBRnTNp5Qo6OMZ5A8BnpU4JgubmJ9m+FoNkPfXV+62BMCfQZHiyxtsxx8Hye8mlsx/KB0qAnhRko6DQpo7Q+z3DNIOR2P5dmJqQdOXlntKpBXxVABlxPiZ1gNE4UBmesM4P+/vAZIpXtJWs/edrbcVv7OKOYhBWIgutjVz4LI3zDwtm5mlvvpFp5FCL5QhHtJhPs9ioxP+K3OxFG3MCaG76LSN6IYwBZTCNtPEpjHe4gooQSuCos/ySSPjZcREbMTRA6ViLwg+yVYhVZi94USoG6+VxMwDHbO3PBtAPF6gugY8OWEqcF7l3idcvYSkIPGT79Kbp/gNnxrncjKSs28tA7g2LJq3zfcGCbOBudELR8JvBXxeMC28P59DEb0
YIZcbqxBIK9aAWDR7tX14YqQaGXAcj2zQtHFYjqVcxi+hPe3SG9T3bijl7mQ4EKbHkTEPoNHXRWurxzMYW/CiRgfmYEBaUU/2T3CQC7Zw80qR/DUUyncNzFcISUoQoxgcsDO4KhwOAcLKAjbrYSZLaNr4CPgtXOcXQsrUtlg9pTCQv1HtqZ92YFaPVMk7ipMGHOMXmRao0GfOTAgUVBeJx9/xYNerT1xLcwl3QCSmwbXudVYaQHPFdxI9J1OZ9l0mG1AOEsmhXW/fr3lcH7Zpeisv2gxvgB6B0AZAu4uF4yucHpd6WkshbGeetmOc4lh4AJvm8bLfs+jmIBFl1dugkCCeUEmIhJ+Dke63VpYJLUBlZ7a1QSygLVVMGuftMUpiPT6ntMvMhh5UhK6a48XK37TqgkplBBIGoSldwenaPnujtqUwe6XvL0pSP4cJcIGZz7Xsh+WGYo98FuRHSr9PQwStMXX7isElw+wuCBOooHVqj93gVyffrTe5co9gG9yZPHr+HEULMZv9Bk2yq6wDTaoQOlZ9AzRZnde2vxVcYoU0SQ1VNOGiYXS1ym53X6ZcTm2QwsuznnhzsEYPGDDpqEDwDopZiP+tnnSKcXBMLDgzk4dUPfaInHtsO+VW4e+jeN8wqCLeNM/8FMF1qU6hJ+i9XRTe78lgDXmqF1bKHbbpgS6DrlkZ0ptm7FupxZ+IIXuGzW9hOVC+ApU6cvRGb5UC5SNsShJD73Xi60X2POYbjYHp5nGHUTa13bNYGL5H7C87+7aBFHARP+Uiz/KzCvQxqWZd4FBDr2ZgPYXijwrOLkJ8Rcpai0zfEh+Jt5VC6hFI4zVurn/EcIUJsT++3+SEoEFKfh9IDtZ/RJt5CTZPouUrJPktLIftL301fLLhC9YCsMkF7OEFggjp+ET+mLW9oXXhc5DfiKOzazYFt+gDjFiLjf/NOVqYA4ld7LJZydFbnUMey5kh24K/IWI0u4fdnxgXc8Wo/oEL3/PycU9pwQjWfETrHuDmtbdn+PHtMWft8/Lcj9IuoomAUmjaQdr6jsn+9UNZmg+FzbniOeq0MgPNmAGygXuoHD8QMjMRtcy+oQlCgJf8oEaSWSk22Ka9sntr2d7r+gR6dxxr/83F87FyyVUb2sjoON/UHPeMz8No2CrDzeFGD8jOc20eLxWcgT03hTqQMO8x0xlwcGLRhjJxfWgJUQnTMFYubpZclmm/END2oQaVfUMs0Lr9HgUL4uGksvxRu+p/rhZL6MchFUdSNdOfM8G6aTSMWEVzuxee8/CCKIyq1xXXRzmlHTZR2IWJE0FE/wLMg5lP3O8JHVUEv3x6vJTm+fAqEmXj8mzCcL73hyWrvk2AP0jU53Nwwg+duX2/g1lxwrrqMG3KyoCnukmm3kwPWOn7P9IJ1VyToc3ud9Ob47L2u6CVtJhAo5no33u+2jS4oNDm9dL6O76ix4pPIn2fc96JTDvClenRjAy4upyX9+nCypzsbLf802VlTNNAY30R/rLzP/wEP9SwG3NGZLsr6zQ10tzHuYI+nFwE+RDKaf6aS3e0PJN3VFhX+p7Zhx34076akUhOeV5SWAp6dmERmgF7ico9ltZL1GsGNcrOHsiaDVdLAPiVDOMB9TNsNAYqR71gvw9CGixGe7wXwtt4qcLsNU6NpkFttRlOVX2t9ZF4+7WJJAn2XhXCANi3zeXW4SeLSrazFCjnOqhHngPv6lTVMcUrm4jH7PRbMPSjBCVE1Lw54En6oBHIsF4p7uKyM49X0Cs2VnLYxh6W9m+LwZ95C4JWxJYLkUYH1TPiDNDsypuHSP09ogLWlhqBXwT4EnjYOC1fAXqsspJiLZlpkrzC3S/AT2Lg5QA5MU16Tyd9Epa7tSBbjxd5Z/xO3KT0b5SILL6brlDbSc8ishotPjRrsbkG0Evf9ETB8RdmGurBAbh+bLGfLFXUkKj0GD19Bop8GECLGRhN8PciCzqKgIP7MzwjxI3plSN55ieQ/vOZrXRu8b4ZSIbLAFsrQpPNFg2oxNfsykkRDazf1QGsQlWgwifZETPMMm2vCDiyDrrpMBh3GSoyeEznlHQk5gPSzjOOv4JZtRHQ5iSsdnNdTSNEd4j6Kqhmg01WYFqkCvrjkdO6R3cRcDrlYEVG6eDolJGfdCEG1n4/i5WLdZzMN3Y2/vFTnPvh/ZlLAIL7CqYU9ylOpGBSnNAaLDpjYF8Pd9WSMzAbBthZuOHvSXLMVp7H+Xc+ZD9cDq2jMy/A5jBI4XFzFA4XD30lxFgL1lTG8zA950Ow9BMh55ypn6peOQMjJC3nFyuU8Yk9Q2eEdaCPp4GglBwEBCdVcb/sWm+I6pOLKNwzIX0PGR37GvQiIFMbCy8s4zDhqa0NXN55phiSt5u6ZwXOzjdRQiSGuFTmUKFuxPS2tzzy1xBjuY7oWtfHzNlxkGx1yC0pyHBqgBaNGBB1yzXvAHBZ8h5VDBebPGckQFWkmV7CxuKi9wpsy9I6iXn4ng75C359Fsiu8LFLF6DcQWIlmH4MZ2qVvpufXSpCefbUFJGMPskGhQGzYrmGxKARWMKKuyVdBKwpkNLCA/YwhX4L1s7fHGY/iye3QW3GBTfEkz5uLFY8/+dLBnje8wjU7SmPumhZFGNvHLLvDcWpl47czop9hJnYLK1UpAQAbllFQIPlhVaSBKxYmzX9R7avqpYZtdzFh0+ExhDwnOArUF1HGwoOBhEMQ3khgLBPFQ8nNo/teNLVp9MEtJzs8hMdxKa6bcrN/9mscnIgxJIp2Okev1IAynYHOe2PBCseeDV0iImXo5uDqlouw8c7M54wHrgtNMSY19lDQOrsKNuz14TENR/POMpfO2QkshxWm04n1i4tbAkvkwmGPdmVxtf9lFRP3lpvLpC+BpNXPdV7/0RGeXcdYHQIaGO465/iKs6D7FXVyByFO5T7DNbPZ6ILS/PfBZMB5y/8qyaCiRE8da5Kqp+XwEMX7klRsslxBNWMQJ857dacshMgdC2t7S5HR2+JcGX/SNc9pj7ZxnXtQcn/D5OdY0aHMJJX6Gfx+zFKYBrt41M8P4BwINKX8Jk91YbE6FWAVG2csy0qODupNJcdeb0mw9roUsSBkbJ26BY51pHI2koJaj+4UYx7j1hxelNg37ea+BS6/vyIcKHuH0Bw2in9P7cE2k+OEyA1EHfEMdvz53fm5makFFBm30M+pu8WhxaxcR1ZoU8ICrAnUAFg+SIwCbxiXnVHqef7kPu+C1iuIHHDFS83o3naJWwGk8vu9PzdB7yWt81mHjTGMkXWYq16P4rQGA8STvB9ATTeUZ1UcU124Jv+z7fJN7aXth36VB/1YvStzs2PC38YBZPwFCYJQHIq0N59u5tVYfGu3dcHb5l/oPaIw9mXow21/zCjpN8fjaAm3dQJGmLc8GLHanvsmExFnvE8NWs4VJwUMXtSn2ay64lDkU2DQc6A62kNw86WH4FzwMZTdydeKp2cmBp5sVsfJZKsgquBm2c3WRf5dUQH6Hkfm3LTa6vEZZoeOaxMzCecUT1Axt/1PIPMknRwggtd/gJAyHvvFe5hahoBvQWVa7NnpkA4Hx1/FAie18ywNMXKUg/X2UXfVeytlNc2bcfW20Mi9LjCF0MGS+rhiac3JPR1y/IjsH4OcoxL/tbyMnSr9Qndtl+sy/4KT4l+4miCOth3aw5KLdzLL5lqrmpXnzsoLr6N+Co8YFpxWah6kAx7IjEiDzKGSG5/2/ndKZUvdoUaqpnocMSfpuki53h1S5ed8h7BhMhovDrI9Hxs4x2GljqbfRsEqBvPmIDH8E89XU7I1b7x4Pz0YQ2Zv291AG8NR5THs7MM3cZ0UzQhzPVKEvFyanE8u2O+GaVB9H7Y1C3mEAK2W/dcHRFodvDZCfecenvPRkylghpO4Fv6ikVV/M4Bhx0vSKr9Y5aSL4YS4jhCimBD5RYo25kmuFglSr5GdnuN3+HvqsQ0N4Hc8GPqKAo4XjWetl+fql0+h8weovwSHozFkVrlUO6PcX++fb6F0XIawU4XYCmXJqgNM9GVPpBvqxUDOUc4u2OqrsLnRmZVSfp6bMaZP/MjrvrM1aRvdPY8rN9
ipAU8L2na9hXyyMKGE2Jlgjx5nOCJjy52B58u3rsBwaLlDdin4aa/X/HJjGuEsPAb0pdGSum9TMSAGY18s7Z6q2zcl6MbDRJL0cH98ihjsvwieujEGiA740DpQDQ7N5h0d0Q4wR1Qtkif+0ge9C6AuVbstBLifXGDcq/6BApbLQHOunzUqv5m+LwaYtOsoqrrRMzILDt948Yqxy+JFSADRF8mXWZDSPLrqfyaKgflEehSVatCZ82p7waUOTV4lJfkz8dSeVQlNR/m5V151Ehz9XBK7xZAh8syaZZYqCwFCOG2axO967hjxBV0psP8TyHG0QzQewtedjsRiXHfQwXRhwhoI0SOf5pC1BonCqNqvqgc9eluKy+PziSeg6z3VhZ7M8bZg6gqJFK6IEa5F3bl3AW+JW6kVNHHX4QTAoRcx5Oi/nsNDiTD2fIsD79SsCKNhLuolQiP2odXwacCedd+bBrwq2AjRA/YAUegUgd/P9HjmsIvXiHs8ACdFsDBYS9kXb1bBvUa32Q0Kd05/B0rwIO0b0HJQdAdFrj8xoJDblqX3L6QazmRMb8QdrGzJT5NkBuorzmnhARbd6ip3HF78HTukBLbN9L6yWIFqBrAdSdQQ1tSQQm4fbHqolbM/P3PLDSW94eEQkYhwkro8U/cBJbegBSj/opj7ZT0VtXH1aR94tde9uoX7AqTUz9VC83LzHqprD1FbsZyQpqk+YfJVvtqwJ1/0a+rtTgpRHt0mJsSdHH2tm5v+3CYosoBuUifQ9p1uFF9XbYfTQSrj+7mhUtSBNZpi6gMyvW+kPqlSGerEiY2HkyQi4Wh9AYkuisbKUBFjJOeeERq61iFvhrL9YlXN4rumoTFchLAjd2ONPqfjrvkimFqttSRZm8RhrRF/ExNa8JCZRYstDI6h7bKFEzwyCyGupsEK+Dk5am3x+jAXDL6XRA3W50w3OMj/0/iSMJHmP0S8s6TZygDLZIqI0AZD26EMLlA5YfKxaUdtvMW7lAY5b44a+vTVLc6/9F7t+bxjYSPrY+8a28cLzuwTsQipCkiA5N/lHtf5DR9tXRx2kvAerx9HcLI6X69KYs6VBolP8ESKatx1WSTz5yQF6jiRSCk5QH5FOGB6W/JEJG2O2HHYUYPccbl5IkxfVS4FKW1TCHpNtLvJ+Ul72I9Z69btdo854TIU/Rj7bfwJtGm7hcPwt5t2p9YfrbMKaajU5+9vU1UWr1XF1nQkDXzf4IsCcdpX5d8jKigY+Ln8mRk/emas4o9g+c07w76u+KdGuS77tb6TxoH5UVsGYuWYZaMRr/D+qYv6CwnoB96C5tE+WFAUb2KSxibKSk9BwXTGizlYoctq5KsVsD0TK3Uca6ttl+IH8Y4lLjKG03GqYaWcpuYTKIH2ZtL5ruL9GkCn9rAz7YJqyBn4sDioZZjHpJe/FkEuJvGRcPT4m6f8zu99TkqRETyA+3EMMhQnNGGVDkUgD6mNFOQ5D4s4S+9R2vDjVjEyL6nor4xb3zjMv+2fHwB1la56M/6I6VBYx3FJt/pxfIRqOznEl8vwjDD9aMVPCSTamuB8EW4G0O7Ls46MJHywPbTVoWZGOZn5sI5RGayIafUlzHopHDXycjmazbEAJ/jjzZe7+ffBnUjk4BKkqlKwmTtIkdHIHRmWsLZClxj2M7IUHOl6WUA6Zio/EEfs/tO1MpBqiTqikQYF5/xxumzaz7wJ9BAoEPeyM3jo6jUMg1yOdQpXYcd3W0DBPbc3pN7nAB48v7SKqFUhFjeWKRCPgmpXutPYjoA9Q0CEC9mskXya+F66Yorsm9IkGaOhsRA7NersdJ3dqfI7ZTMCprxuKhEtY+GhgIz9olvUrd4JSsnm+7hFcx8WtC5z2/RC7SOD0C1QFa/2nOn3ACZOFlVZ+iG0s91u3sNKNnKq9YMvQdCgsn+HS3As6NJxxqJjFAFizlzMmw2akLE5TzT6HGYB9V8YNgv8+kIQNNfL8Z12pk/Zie0+JrLyZy3LLz7KS9mZH5S13UL2Ri4pnzfT3w+Sevp0ZhpM59UhtIqwD7SYvyd2CIzaNpMYJblzGmc6ZKTpC7gGZGT6MZRkHRvPh8PNq/EGAjHQV93GVNHwzC7fkFIDH+2JUMYhvwjKeuNmaT7+8R/sd8OLLgHQ8WIX3369eiUUKDhQvxtMYE7k8+FZ4Yx9E48lE5KyVVNczSNKT4MRTCuqjo64TKzZJzFR/OUEjyOri794b4U3BoY3WHVvC18Hfoz5wOgz1cy7fpo6tKtTNDwaP5Tq1/pNRssj8XWP4BmV3SSZbJjUhhjwWCwQSFLF21fcBPysnZKyaeXAD7Vrd2zZqJnPpycaKa+Bk3hGEITG2eHV4YtKKD1OxyvR6UZmD7r5PYu89nonMQBqxObrPsXSC6ka++ex1R7GyW5kCAkfNGlU5Me7rmLbRg1nenpOqKykHyA7fEXIL/U7bFXscU2Gx55CGRFuE9vxKS53qtvpBY7jIiSQPmWJfYYFIONbubu1caXmbiKgUrCw/Lmpye8heaZfQPjR6qsEQ1L/5BSCVgYMk1PewWPTjxyJdE48JJS+BwRbBSuU+oI1aGky3lPyx3pXeSGl89sBhC7uwmLGwIgmSYDA0TTccl/m+R2BPx69STFFSNniRFPxnssNZ1u6x7qwXT1Tq3CAso/9pF/UkWVzVKLhQ5rnsk8P3lm3c90GO+A5N/s/Uj8MNrFELDLkYwsjYM2N4lzeeAEHwVXIctKoGgznAz05EhLt8g0xc03FBAoG9fPJcumCOUmQyr08vKmktIyYgE3qTX0bDwg0Ds3sdQp6wm0fn8cjzIDhqcimWZHMYS/IuoPwqDCavnXIm1uUN6ttlP3uG2cx/U9QWajQAcW8nQl0V8AvIFtgryoODe3sIuz/UV99YKGooeQJxf0EQNuvqDEd6qjBV3Qtxt5YNDzYJNo8gkkpt8OLopY8cAjFifE5RxFKjsOyNTlwz/ImD1B2n1LodfKKl5Hz6U+/wlIQmURhRxLl2rh0ouY0Rwl+ukf2fHcRWvrVagY+vsVXu9c3ZAeEs5NFeqd0+U6a+sLX4RfBTEXfdrXL2h1j9exSlQN6SZdziTmUYfU8GePQ+me59je8dGxdhFh7qBBko5sNsBK9HVHB/nAajKsWpM9uO0of0pSYL9oksCLM4wgVf1GsRyjHFi+Pd8VBTclrNZIZ3EcxI2xdaZ5AzhJCN3aG1jWBZfV8RWAeqb4OPnMiCO8AvGohKIGSGDlmZ4k/hScmZhgAb5MIbMvVT3CFlU4dIcys4cDQtEgIDzJkE00HAB6TL51JVe13ex+TMesAeUoErxiY9O++bdrpOpg0XaWEj8ZA6FtfTD1bCkQgtWLa13Al/mhaIMnJ5TrSQY/PYnjapGOIH3WFyPwEgcZvgBln6i9JzieX6t8/AgF5bF87Qe70dFmnuupECqIi8Rd+/qdd5x0IX4jwDh6lQxMt0Btg7Xv+CcurVpc5YyqHYnj+gtM7i3ioTQ04FIqlC05/Wqpfo82BKsrS7YC4QTZBvHyB9uTYxR1ozymBM7Oa5A7DY5RbB/YiswVBCZD+D0Qnw4Dqgm53IECWtlu37jbyyyilJ3PYKnV0G6bjpsZ+jqdA9rdnVKtKygKxXwOzLouli+YYXXQiHaDBxWy7MqEZGrQRIwjixe84c/lBLxyjxs+EvDeV8R6EujTS6ZTgmbk8EMbiHaDmzy/a3CPg7mTOBz4GSn9H9lThi6BdWbvcwXgO1o1/ZGHhttNw8kmXMuMsHk9DWjORtGsCWPT44REIWGWdYE9zdEPqjmBrqVrcgkQbvgPUwMjiUQmaITI8RdNn7tx5ncbu2DB5T0VoNmKy02GrHlsCUmhPD5Ivyi3Kn5oBplGosOOg5K3vasE9o/tzJC1VQnSF5EEC1LXr3SNRbtQdS8nxIBS8CiWh33LkEKSSh824JwvMA1O3wWPJ3aQiqbTqTYgdAIHsjALM7T+EzHPQhCsux9ZLxcVoGMYkA2MxUDGBgf6J04pgFMncwwJTbcFAa5HaJXAPPTslfaiJOE72OFcu8L4aTAwVhOFlgZMSHhiV3qGVHg19QBAm1gOdicrDfG
6o61MTFafQgMzOx6zl0bLBgCIKuJZFVQUC8ageNPzxvKw/7Zi1Bhi9s4tG7By8NTh3tEFzApnJ466MxD6CRiqkP76tGZ/tLMZ2ZxWLp2hZKAHN3fsubQoIyUbTYbcfKSajh87cU5IW3Q7Mt3D6ns1H3CNVjsTvkO15PQZEjLqb6fnVUUPtsRnvB6OFwRtCQAUSFpxVVgvi94sheXxAjCi5TPs0+OodgVb4q135gswwK6K/mb+13XsFRjJJHhMPB6kjwZXvQChRgioa8+uPFXhae88Hv3ZgGE3XovFLo0h8IMpWydHqpzSpFwBsRUbZj4GHJjZsN2Mg+Nde9XkEMzxBjXZiVHjmhInoB7WQIzqZYNo9SIgpsnwLCnu7PWdXKoU+QMiEm0vtwKyF/DydfCiY/jETfm0Z8lf9KbNvRPHQ9ncH5oYzCTEpbOT8BnxIFG6x6VaqXmPWh/iOF6fdpgl8RLLAZzBA9pNW4i+jUZGG2luknK9GspuRtE588KWr0Y0aREIeCoeYdLScvJF7SdKnUtuS8uuVqs9pvaJJhcoiS0DQGLiKHEs/kbYP09c43jdXqFrq8+Eq4mUT9ez+m/YHltngl/+W8P2hA19Nm1dm9k2tRltmNvaNuzHRSdPKjPHJfOOca3j/SpoT9gZbGPj3S5waZBljWxwvp/WaVE0bMxU5xyx224PATtzJxYw1sxeS6YhYcyruPhI42ka1G6o0MoRQJZOhIu+vLt+kCwmDM14wOsyIijJfXHiYqBngT2ExILOdbjgyhXeeHfqiu60/AUM05m/z3FEecWhZhpwECED0xMwE5+m3JLCv+oRm9xv6nnMvhR45FnK2/eyw1vvN2124LxWAzz4MN5fmHlpkIHMXN5pxYkbXM6dhIf5l4c5fM+URWEwym9yvWbplpbUP+r11LmG62Z22kjzNl4uNXkrm2MNne31dSBcBS9EDmVvxS3wrF/rubLFb6iR7hHSCKadzV+VjmX9EEGM/YAlr91x/TZWUGT2CIWm1XvDUoUY4L6YWmyf5gMkOHyyzqT2nVY5jPLRCn1hiYUo1qbGgP++D9vdvfyVo9iuRK+7TqaigkuzE9fv8t3palEYI05SQ2/8s+HCw2yC/11t/ul25lx4/UHxJCI44MODL5tbQvMwFzXb+ok25BymYRF2d35D+I69VSFbV1eWFMLYBRJM90o8M4TYrLhAQzbwikv3WhaBSOfdLfwKNxgCzLiq37/h9dpiRF85LBGaSloRNkw5h9GAa51VYw+W+v6edifu6I2wzcDatMI57gJgCNyL/k4xoqDk86g6LJypJUSjxLvPUubiim1YdnomkUjhU6BRRkMsxBQQPfWxfIIR0fRnYBPmqkbVzqgGi/Fm+Izl8rRkyeFYnB8CNB4pKj873vq1DuKYxCOHfREyRmOwmKUSUiVf9ru3J6yXmiuZR/xaZByXnQUC5o10cb03/Iui5PTLvAxRF/2/nDAjE9Wu4pMWNojbbhbrfSBXCVaiNDEzOJWwMDT7H4rIbWRkDaQ6zbnaDzb6a4GhBqBFavdtYBIbg6nZrHyQBnQ7LDZcUSzoPJ1efD0ghPbryforXJK3TFvvzPoDGVnJQF8q/hWnnaARqHKQ294ZsJd1PE0yBSAK1RwNOqsNu++D7174oyBiJiVA3qxLy/xsvRUpz5QsiLYjSFDZYBj0ax5JfQeEHaVQwtDsnYuL7TAoU1LyD6vD340ITBYUgd0y24moQ+ybjRm3G6MsvCgonde95jnZvmec8it/2TDl0SJNvZlewMKM+7GiBH2sQOXlmQzGC+BVfKEeAVpZAaNqWMkGbPjANTdXx2et5HPPGhzsG+019i8YMdLaa6EDqcze7JO+k4DD5Nih5zFUftKlsN6oOVsI/Dr+2D3CHBlSNlUtiQ7V+cZt3Ja7Gz2gWJshA+AA4OKiYpO2sMNT25hOcqkJ/x+9ZqkSIMmtyYwBqyCWQz/zRJwWJjf3GwOQ/z4omnGxo0zsyzUzNBVJzJ2IqGakqRRo3O4KPuKGaN5wxlhT0V4JkaxCu0mrRGRezaZ5wrLY9PrnK2QsBjanr3ptTkvtOD+nN5tNBZv5L+KwiUK62eZUUU6TS3HWTKWm66U05oBOLwFK9ZO9Y7bDNHvEsX2S4NLNK/M0VOwUnVEBoYzoXfCOdpyzqarbSwT2AKOzV1JtXfUJ4HPq05vJTu3k53AIvSgBAmk85shuJacxV41BYO0QekV0vE0XmUbWaWa0Vk/tUwUT6fZMC0MV/HAl4wxgzqU0dR97Q7FpGtDWSQAmOwEW2EWYfnbKA1rdlu7UKHTO5vyjGUd6tAx6KM51Yl52Sheab+vbP8PManIBwrzlB92p1VFjnUQw+3fVUunHSsc2OAtAk77wnv+MIU12y6LpL0sNn258T4DZhOWOlJz8NZ1XBFMoQtU9V44O7JLymY24ICYYDyhlCtiiXe4ZKgrB23ir2ImjsM/GJQVrcRPDTaJ+SBIEoRhCRmv4c/Jy60HvngmxGNusa34qhdwr+vg+jN5cLxhHGx1YHn6fV8UQctZ++DmucfNLn8o6CbPOPzo4SbuOB4LBB1Im994C//SZQBAD9CKdkqW/dtriXjWTUho3lPeDxilmJsoCJ/3vBBVljA1qYOmzUnpyEFV1Z1wr3KO3ODONms70tmreRyRNMuevKw5yiS89nLPsf4NzY19Kpi8EsLY2ZNxS1hd/cY0rqKZJhmgfxZn4YWjMphwgKTSC8bVZApsYIFRMrpg2S4106/TdRYGfjvcCLqKe2eye/GB6nQV9eqSgajGC2awD6ns3NE/8rN63lkKO1xAc6nNzK8Cb1XbbsSzp2KkCC3KhBsVc626y2XbAktZ0hF4i3/jcB+7a5bSRGTjRkTeuYGSzsoSbgh2UlMJgb4yJPOoNezGW8h440TCeZYBrZ41lljbj6fce+8uOTtcNwbR3YKTSl6DXm68hA+2r0ec8Q5k8gKfp/CON8MTUugiKllOkAu766iEdgerrvFUN9TnpTZXM3Lsvc/3wO4i35D2NfZ4X0HOZRRxpgYvY6mQ27V76zQSvOCloBd88jYIkiUqqyK/U5vW8Q8hsU6S0wcfFZSqdofG5krHX8e8rTItr/VJ9l4iD0ilvJe5AwPi3Q/wRd6X2oc1q2+g51GQfLs+CFT7cRV/EbIKK9fag6eFMNgC+3Q+9LBjV+tpay6OzSKYf8J6F5M5JOOt4bX5ly3BAWfDjJL5Bgq4+NNs9+LXQm5t10U6ThKbGV/z0krboLbZSPlurnrpT8slfyfMdv5viYCM9Mcx1nOKIimNyaamh1wCypHJhb3kQLdSTdlVGYXYAGcTds8qO9+/DoiQ1N8CAdqB+ySF7UvC7um2AwNREX2gFYPrMuiACifhB36WYO6IeRD9GLxiWuIHQemRAeoCjy2TiHMPVsJtgJTgj3EIInLdHFjMxl/7AdNjb39EvQ3pfoBnO3I6TdlW5jNiRHYIC5d8o8RrKep4/nKTaxSUVrOuFR6tTQvcIu84VTRuXmQNzmzKdIufVdukChOfpscmnx2DXt07XAnaHcWsTxC8yn6j9noY55AastsvJeeICSareVbmWs2qxsBFaOCr+GSEeglMTm/U6AtzciO6O34GZCi/F21nbw5j02Mqk3AaXR2UEm8zbMXIbFjn1GLto+5Y5pEJ6gbHooDeaUAhEn/7o0lhe/+weEGZ0jwXe4/sBfpjrw5kUqnFRMQt7pbYEnhJd+quD3pe0mtLaOizAS3wwroZWyhLLbxgrYLOeP7UAOsf12aE1+lCtJtNBYq2jG5ViqwydgexBO20EUpCyMMu2ORHVnwWDx7024eP4d0V02WFNwFSD0KNRURFAn2qCBqIMbdITfi0A2r/ig9kGplTJ5QfTwQ/wTlkvIHsrA6uN730xnSOz7q0wRYygEHbJVoJUmLSUOs5SdWCzm0+HmYZgD3+CZTb8BEZg53m0w35Z44iuQovwth1zQqR6Mo6krCMgPRWgt3dgDrJlDznAa0qR9uyHZPIZZE87UDUAgI3lYhFRW1vkvSHf6y6otATYwX30Bmany5NeIYm0rZWYZZyntdYd62by0X2XM6uCj8d
WJwxFx3qMp4zPYHRh9l3bT9LajCeAKNZ9ATKZcOi/xLYrPZqcj2K3d/DTPAckBU5p+2Jitb5mwUUIHJk7NWM3VK7YKrw6smXFowQlQMGSWn1GVk4dcwpCmXfUVdGgDfHJhhF/Ukl0HyL45KtBB+X4vjlTGW9UTW9t+GLFn1LXvi4bWfRRBoMxezYb8DRZlPgT9v92FgWtjN9x4bt7zOXViqjawydJWlOerKBWBZPRH/B2KyPp7gDSF4M2awA/zL0UrZsl2Xq8DKwPdhroZaXnVzihHoKCBKR2PWO5n3OlhqRvNl2xcGKDedJRGSXzK5T518isHSKlqXkjHGdmhnGzjgo21YFleBPc9mJvqzKumBUknOvHiYg3W0qzTH3VwWwUTHmFuDgho98wTjz/PvA209ECPS+Q+neQy3D2X9z86furPb8PhKLWX40QxLZenupjNV5PhDE9eNP+S00B72eKnUH7kaC1KbLR83uFxnCUIPomcIHEtkPm/SsJPwT/CpS8yRizKat4IlCLCqjrGy72o4vVIuOaoYRWH5tLhtl5GrBTRgLuJpux9Um+KA18ScVoOjTcODsxseX4Uy2YWPchbwm+p2qCcnLSxMjBbtQs7ALMLgl3AucPMJbScBfevllDHGzkcK5pdeKV5uuncK9VJJCOO2RYxffHr4uJ2QbdOnq+3F3ro7Zso+2Ua9H/brzuUe80v2xWD57eVbZiNpATNqhNjKuB3T0e9zoWv/SjJv4PZnKJArcHtU0h/WZ+7ROkXpnNa04o4TwmZyNMpdUUoLHgVE+q4BABZNyWktH9e6uaZUstfUDZ8/G/BujURdAO2w58yKGj+Kh1tGulGDr+thHLA0CWpNgML1IneYiuQGeCZOyxTpvmIN/MJ5rxvURgN13BzqJ6/vV+gZKsEgtqZjbf5ipbMcEdyKT4b+XMLH0tjKfztsb0AByBPAW5N7bHMujHVQHsoFvatMH7urQZCVjyCMQUW7g7y+VZ3tSJOOyeQxZpQ4kJCTvjdgxRkP7PLlNL7hFJYgrksl/4dhLbtyryViARFTe3v9pZTk350HIECqib5yJohvDnfDLO8ySST31CPnVrS0iK0eQizgLpVChQlWvTGq6N5ycbxgQVuTmk7/h8CNsFt82IcX3sUEfv7+9PmxMBqRSkqfYEba2hzNsEt3+jRZ67Lqs5KMKXHqLbwXOLC82h7t2CfzcV3G50Uju/V7TeTakQPp/EQbU/kwB5aTrqWDhxy0B9fuXmeBHZ0sfhp4aiScKut384I9eOc1C6ahAIF9WebHq/+PiP8MZ0xFCWchEaJVfPTsCUk+JNjq8flJi/+IcSiUV9eW3haGcc4+w25jeGH5jYrAL3v2iYsle1eoC4zDBd3eeYZlmB7Dwj50F7WcaA6FzpPlhRWPWpYwnthRH463M9b6XHNPATqeHUWWDqbLYIN1wANSjLmqzwDK29PA9jt9QlsrbXUYoATpIgDB1JLSOO/1Lk587SmMadPLS73rLz1vVqMLCp/sRILg7/nM7JIUkHhwiSxgIJQfy8+dAwfdiTwV+VKDVGMUAig8FQlhEYYAMqTehUMXF9scFf2+N/UzhxVzT7hzlezXh9vUZy50dJ0c1mA25hq0o0fjPfqpePznfEwqEDJyXuUcmX8Cu8fFatwcOCgxmufPuHD8ajlzOco5MUKGzwQ000OqX1wQfEOuBfS7P8aciFzEhJ0L82i1j9HknJ2aOw6+IQXApVo+VSDNAjM2TfSOo45/+7uaqzwDEdyBIM82Q3f6F+q750jJok/rw1omYo1MDL3jgRmlIrfsazhhvCGlI0FiW0wDb3Ay2Xa20RyjMywhXGOkcXBpMd/luAN4poMfM3ZPWJ0RjkzyXtpSGA4mSW6rR4kfEiiGAsFWrlvuvNvBUINZHSR6NppKeBHl43BuefLHkuL3iN/RZP+yEreEsTseazztxDPMTQENaDLma7v64u9rRLXvKtvtWFWdmB/tgNncbFNNpXhsysDKDgcoxGXSdDLFvlPavwptsU/s0RXQIRsxQ4XdAqO0oRgLpm/syXVqK6FWMjCO9QEgnidWnzbrFux485HWpqk9fMDuhKDOY+pvL6GBhqs12zuYkyvLPFCqGxbLM6snOn7AIKQJ2SH5jm3mIFc1gkFJfTbD0KM8KzqmrcFSyXoHzCTlAIk42AM6NBM64WvVQeISest9Q9yowAblA6Rq6t02uuO2GSKMPB7g3aqpX/m2dwjtAuzsUvuHRGUkLQaZ9naDTclMObL2pF3LlyxcPo/730keGypU5OiAPlDWbAMxv9HoGlsNql7DIFjJmSRf+qkGADuRo4yWqhO1LFAWPRAPC1D+1IsdPlhIS7llvK7uw/70Lk1waPuLxoVMZSoqyw5SykSd4qzKSFBUSNjMUZf0xloD8RjtCDJKOCwUXE8MAzIZDHf/gljqmB2q3oQ5TR/pYkbH9GWzH8Y67xIKMuxAT6IP6pOIbC2wopWN9gYWjlsAQzZuFXUQMM28JYae194VDELsGEtwGkqzjBQoUDIX3PYhuNh6KJ/FNNmzWwCDhAxJKLpD+ip6uXaEIHy4Lvi4bPHTUMWdjg8IExER4JF5h9gCKoSe4ZeuLdNlG2dKjEDdu7O555DBP7wXV6a9v8pbO0yiYh1017BvzbjuEvNBuNg1Zqpo8IfZlGNvsi0eXUMOAaZB9L0GrRAkgpmw5+zF7Fiqd35qnYOkvJuJBr7i7JKiLp5uDXJWI779SZ3gun5Ou8edGQAMfVr53mKsXYw5CySaw/r58QDxKFgMEfXrwUQXfRK2cIfQnMfFsFuh8UQbZqLsg2V/klxSOua/mjizQqoxxk4lRGSsN/Iqx34F3wEZdHwRuMB6XmJHDVAFAevTXDciwe/0/Y5j1751IEaCLOtAcm0+c8Mx/+BFeaPU3uvNhorOrDjGfBu4PKi5hs7jmjbL5V8AcK4efI2ufmbUwEYJBSfdDFT4aZ+cu+NxNBk3EeB632k7/NUyN0Ff+saQE0N569VDjbNrrC3RpAcKti1+gFYLc+02W53EcuIP50/xVHUamK5/Q1Pp1JDT1xiD1PzUeaD9wz4EEpzD4/MiS09NdVaoLQi3M4ehiXqtyfJv0QOi4wo1s8cbdlg8cLeaKyo1Cr8QfXDxLu51YqnkWaVlJozVvSXLbL+zzQGik3ZQF6CiVIzTJr6m0byKAZ1upttv6F5elDgbyHXPGClzSqRlAFV7q5oIwQRifoY5ydFNeSqrhJrTk7tNSWOnRwk1D4O71ZFeHbbc4HoE7nHSFp8fDwzZwo3UooYJ5iAk2Gyx9ivovJWOubC/GTsoE8+J+neF+qEaIHM1FwqB69h+CWp/s2DRPLHHSP3aR78aONlOvXp9uMd17Xc7SD5pze4OUsH9zHR/G1Wc0muKx8JpZ2nxnnUtAk4ALGS2VQQ+H+r8lM6Y1U8gpfuiB3IgXRx518SdbEpBBfEgfK+ng6vGRGAGxorNtulbEtZCF1hN50QB4UYKuhp8KvUJmRLXEvU+NXZGsSeEFwwUqm9i+CFf4GS5pCF/SJp/7v4TzUdBUhIZ+XBZlFiEZvfctVJBT2ylRanNk49QzFKrVqvNcIuAO8NPvcsYMYJeLnjpOgautrRXTQjIRt2UsYol7iSu4z4tWZPiQc4plieaTM/dthm4au/1Xu5kIgdZNzMvD1+CpBGmj8xvgHxK9lypfjaXfqmhhZXjg3VmKyGaWjuyZUuAGReLXh4Nz+Cg4OoLGWBuMlQwWFS/D8tvqeyNtWu0x91CyJrnLR+ReyQ2xpJMHpchs7SF1MkNoY730fm24B4WGi3SklGenWQkSFyM+6kQodOiyTc47PFQ0sEHijDDH1WCa+zqMRrpOeGQYGCt5ykI2m3SuUjQc+7qymWVSm6F+YxIHhbOt6NZI/kd4wYbnJOhhfBHv6NyBAdkRFmRKkxxk2sr1sa//Le6W8YMhWaQAQRaqm/WtSAZ3gDrnaDgM+BD4+JmGI/vrgeCe7tLADYsxNuYj9ynZ1UcpKl2IHdz06+9nxkcbDkJnEY01hWPOtugaX3XRoNUsud1Z2s2U9eGB+oZ5TPyit5tfwLHJz1f9
c9AlCFuwlm9wfWW8a0v4HBK4vAAp8SJ1SkgYGm9KRgxid+3uCRrUlXdvqy4wevF0EJOfq82fGRYczRvQjOXqXZ0NkHK58GlVdAt5ruvj6dZKj8SWzZOuxDPv91pbLYR6NVEtv8XEeyekwujENX3BMURWOBTV8YtTEI1mqQ2ruuvj1UQBiav+n5q9tjrLmvHEg+dB0VmxNGKzhUe/CEmZdnjVViEJrzYne0HNVbNlFzlchK4Ocr5gLmwt16Cc63/PZJYayw4yEJI7IV4wYmmgBgLA1PuA9DTnZ+St7G095fqE8KEx6rmiFO6Ty46L03nFu4nO6mUjJ8HH0R3uGoEfnJgJQRRQoiNFck5IIivHit2iUxoNLMiuLF8HFbYWikyGztFXbdv1u+NRuEBF0Yd5JgW6lZ8Tml/2+VZmkB1ypHAoYysbvNB542BA1AO68xbjuVXIrjS8ALFYEj/aafcQlsVeIc/ZkmoJ8P+OKhLyqjxyUXUArjuZ9Qcyt55Pw9RbMlRhP6TbCZjGB3mqLKxswGqtBy/8enD+RzSdJH6hBZFdFt03fO2MvU/y6721W4bj+uxb1oMibc5c9D5Jf+EyY5Of1kJo7lRfzj4OcSXRUooGtUUb5LWNDS/1JbUVY1fPXEkWGBzBxGTFn4ib6eVSdzzS4oIMWtZMPq0AVb+vQS+ISy3UaJ7zVml0lCJp3PsuOm9pkcg0KV1zKt7yp9bQwq27fBI97HellGrNrUe3+ndCNnXKTAKcy+Zk5khWGJRFshaZeFWA9E6Lp1Rux0zMXR1EJKXXxfN2IkeNEG8HlgxhNs8vPU7T/AiyQAyoQizL2mnOnv4rt/n020pZ7iGr4qmW96+Rwk4KLDPU25jAmYxE4yYz9BdH9GvANtqhqRbNVyZ20Ocw2ocdlVsT+gZUeH+b89YNQA/HtqqGPC0n6sKMaSUltAXxrBHbVxYBOAVejxD4GkvF2O9t/pKWDW49VW0l7UabUWj/YMz8C24neZE3EKRw3WNdvqHHwOAYjTQUJGawDPjw3DW94D2zh/ykT+zK5ZVoMUC5/2l4ISbKnuuIyccFeJSa7DAKLWNKFVnbsO29VVHLGnhoulmB/ZTz0NS+9f+SHYKqMWhdftf7FDmcdFoNMaUWuxKV4mm/AzIBRTlRprQJq8/AbgpIwrYcdHO8l1cOaFqTEUCdaPKMy1ksjKa7S3/aDfeeVwGXn9Hrk1iG+TqA9d3nG/llFlahOpZQA8tU2UUiSj5sbIincVBRXGLhM0WD4bbU5ZmrsAsZnYN/vdA19aacWZOLeUesby3XiX2ccPHDrVnXCw3dXLMVeXvBxW/96LhBbxIR0Lx7/lbetMFeOwQ2X+ipLX3nSHu2WMDACBuY06YPFjSiO6kxl2nEcTPSrdQQ0eXQ75CIUKx9E6bTD1Imp3n1rIq9pwpNPPMpGAqUjNDnqwhHlTC4JBMCEpUeGYf/mBEJv/y6xFpW046fSJem3RiO9Tzi2wYEN4kmWrQ0jA2aR8ZfA0ajH3iDN5t6Au66hLUFxsh8KAD+ph67bAH3Yree8vTjaFk/IX3DTwymDGWNU4h9l2irCGnCJW9zOFTOho5dHRIX0YUZ8B5KlCww6Gly2fJM8zuK8EiaLAOXFrBAWOSgQp0wskbyMaDRDpczz7v9jh/hgzkUlh2kb60lodBub4uaor5/wUMMmUiZrahJn50EYmmZxa9SJlUisuyflQ6iHpJB2K9zhmCYnHC91w71D7lvxRdtiWJCqzJpeupwudfDOf8oRH7F6+vz+0b3vj7iZe0J6VER686fbjv2gYTDdjZAX6DVmlZpQQXiWHA4OtBSCTv1DyXYNXQNYpALrTo4kjwfwheQ/u7FjefxpZTXgRg59uEIb7O91epwKkp59ngBqpi9Dn9krUdmeBHByhRK8Ju6o9Er1gvFUw6M/ZtaNZG6w73c0WKNyYDn1SqzicQS3IFIhx1k5DJVwUyFKBoXxk3T2JuQmPFaPzFIPjcE3LTTdv2rsLmIeM4MVB4SxUSPGu1Qv+lJat5E2FGU4MwukP1gImkBtWbruDC0wicqn6MzVJoTKSXpvs0JE5XIYy1H1SvDhP6OaWe4udTa5E1vkVj29RkFU1hyM2N/04CWGmw/735zLVTQ/CWNpxBfdEeC253Kk6BZbNFuhAW/ODO22mFsmENTdvr6OrlMahm4br0Wpy4WWRE0ap1/LFTz+YLxrhD8ZrbvC4wJwKBNX+qmyyWmCNBBF2EunCDdPyqNfku7sILHNag27RcF+1tWInq3RwM6CSvJO96R6BmNSaOubQjqtngrOuYXuTISBj1AWCohyj71Q/PsaHbxd737aedio7G0w0h/TfCntqT4fWly3PCgfQhq2FgXpYp1UUHdh9tPSerI6Smy29BFxamBvO7H+OD/Da5RlwNuVkmcCri5OzLITJsKyUm5hwhsdNaTlfgweqaLtdZjnhybfPuGvS8TUJG4iIc9upyq9KR1zh7IySYjBi5nJu8CMRRx1BzLc1pNZg3RaP6H4lwTfBWXhMqrJvTy8NB1ARjhAe2GtqPKnYnoV24ITuyl0X8jI/EG5z2D+8sB/JW0FtNODjDF/0yiMHMrxdUFadH8GKBjgat7eEl4Oqm7nNGhSbhqlrdC/w4y9VbbC2LG36YMv3llDBAjY48zJjjJiOmZCvSEwn6AYOEEQig0crpfu4iCfSCNLJi7kju2MA8KnAMhYO0n2BODqdgGam7OwsvN6RZYaBsG78uaFSr2V08OEe6fAcB4wGYpEv/3OvsObE7BZ5mLxkNqNPss29hiV53VA61vFPJhraIDoRcAJ+sh9ISPV3r206Ro5T4a9ecK6bylGiowaEd2PbUEa9NcpuRp76TGhDGDom8Jxsiyq1pPUDe9JvKQYEaTbkkbAO55UKRuEAcFTYeb4ToGmXadY2enZT/Bpv3VyQZWiu37p4qg844P+LMOdBxi9mAaP/FfBS8Sgg1b+64mEI4IV3KEq/FdwPh5ZLaJvpJeVaaz4XXpGoAzIHY18rzrveME/k2GYCxbBuBcDnuNoY0tq8uWdh/zEiGgC0bq+oQ5EFXCw+rm5knD9HRQosXrUm3SKlKoIzL3/TU2ZT31gndjmhm8A/vFzE30yDx8h8hjmyePs+HL7tKX6VJmrdijZ83vBFNbkD54dDafEcWaQaU6TKro7rmRqnU4CneGrs4B7Z0iv7D3GgWuEb2dJGB1EczIsGdlJfhLOJcjr+5Erfm1A3yB+ltzCu+IzKdRrExqo0oKairt4bAZK9ujHOc3PbChK5xVdL+1AszLRAZaKGYBAMM0SDaWh852Id3+INcWzF+gceC/zKrEb629DC4RseRs8K+cg+pR1PyN/Syk6sUMm6BAaymJJlB5bDsjvfeCrnJzpWJN9ztKW5aW5CAJ1HhEjEuN1VcXuUtXMMrEiuqlSrjd8LfhDr3UDraBYtpjJuBbrWWAxY57SbrsvWbNJXLm/SH1pI7gdJTFk73X3MQJzF2DaIBYhrrWXJ4RN9N7wVKRWpcrSwXZTk+G226Uxnr47qX3OVyMFxpByXm6/8xZZb+Qdd17EYE7DzdoPdoqYaszd752OyL8IJxkFpGtkYBzbyLlTQyIYwlqTR04rtwN8josikf2M/P6USkAj+oEja7Z5vb7mZp5CIYcRewKNqC24z691/yWPC0El268rZ5/KsNL2bfh/Ql0sFXxlLEYIY9MmZRUsAlg1NTz9IjEzVwSncy3LXkF/gmAoXTBMzhCaGkJQEkYS9La4JuYwTch9qAAv7SWy9u3RuJJX0735MIq2xv/s4U4nfkkqjt+mLMqBNM+5Uy0D4U+2sXPcRVAr9LISqgT+zwLMsmyWVCyl8vaAkjJdpwhhQJmt8c9vXvwgjd5j6QvK/Z3DOZm2R8AyEXcE9UUYhTQTnnwhkrNhdVWG2PkyIoK1/LE+eFHsGZPhFFtCP/fjuaUOrLXwDelLVVXn8R8+FIUMrHF+BtAetX6yc3eBnTQrgZC0ledJLW8aUx+gXry8+QSt6d3SCXViKFtyxNIACn62inDEI1hCPVEshUw9xzC1uwpkMG+OqpTfYNIpZrb450Mx98KwzvE
/iFyE3XrTFREI3zTTnphevbWaMQsoQEC0l73jbcI33OsDIGRBwBUmhoM0Yi/8wthVNVEDddxFfOdN0gIr0Cvo8hT7Q/zALZND4fVkTTiMAbPW20xCfzGCiVJVQIpaKmuh7D8Ihyla0O9GFq1gQQUMdW8rELv8g8VNnxxXMdmX/Yc2xeH/jftkX1qBLRA+hwdA733p8l4ZTi5fg8sBMs2Xn6Mi2sPQbkRfDyTMfbhue1sMJ7swaqIQskioq0UeULH6ulzy5WY4YU+UgW0l7k1sBit8U0+NIKRQ4aqerTNM/kFRos3b0rABjHpndsedk0GC3pK+a0VzwsyYpAenMiNZet/lNFuvmtC3Dhl4js3lcsJtZldM7mvwzj52KpbrwLzxJDXqw4k8dsszZ3qpLKO1GliehLeGFGgD39JG7gHjozDP/JDqju71SnI50TzU1ltZQSRqqC17CNgKy3wR9Mp+fCThw+aJZkMuhJyVbgwwLncOdcuUABIUeUULM4Br+wDKgbM20C/bwaoi2MYntPoEoSMNfyEi13LSDNEjl0sk4q67aiCqi0VXFez5lxsE2GtolatT2rjWOZ/DsFcldTxU1fWJdeO7wv8tzKFU/8sjkc7BlIQPZYdVDHhChI2cS4bpo/k+fN6TD8nKeSw1Z3/iZf9Nz/+dvv8Ahu4vts6+yHdVX2ZctqfDO0sogTbWh3OSmfWm4H2loLXA/CEf9TmrdlAaG4F1h+h7lxcsiNnYYV4QwPrvobmDoe/M27mPGHE/kBbbnFMjB3677uSMmXMLcNAirIyk+ggh8nmqWbcFcGFfW6NRh7lFmGEoYKk+g+dA39PrkL+bspD2h040SIqYu2Qw4PIOxQAGgnripMbHUkgsH29mHOERGHKv0XYoxaaE7XA4txBci+5YSmpchercsmIU5b8+1b+ZMiMCMQF5g7U9UCo3t+8VhzbhPPZFZ7+/6+RhQMn44ZQ0q0nEKtnqym2ZlzrMwwI8k7yIhn44U4OcE808lvl6yt70FKYAlekT6I7Cr/nd4ndOxEdeQSXoKAGeyArM49je42aTFLStUL3XgHrKVvcLhKC2QmHhMbhCHJNrh6GzVnyD+lOs+77MViXpHoLX2XUIvT2jPwei+jKkrBYx8T82KyBwJS8CbODeU7IE0DCSiQFjHjGNfb7F1ofOZVRSjgd/R0FlX1ahpzCTLr35Gh026MfJ1Az5I8gZiqZG3f4NrNcUgrLelCQriRiM5wyqzAC8vRtqmhp0rQonp/zQu40W0uutjXZOJ2CS6Am4jTD3BJcRMCAOw+LsKG5yREEx/qoBT0em9ohait4rkukdQViZ0eRlvh9Z+a8z87UwB/HAAapOvSewyzlPgn6ooG6kk1IF0yX6obHEKPwgqIGjVgp6WLsYLfdd7ovIn41NhzWi+p1pe0DMtqTZULuUpo93d4aBT4yIj+mpjPBp8mPJ33+PPAfmzEkLvKsJ9YU8MX3uGMRkTBShOs9zMl+Mfabrl9lad0Xj+jb7P4EU7BkgnIdHfsgq9nuE8n+ZWEPz3pWb/oMEPLjdvlTnJTXr666uHZsOtftATTjHB0ZzBzYbwdrV84wcor4vLHNjVfFvHXN6YXpqCMTl0tARHhQe+i6TVs27fUirmD51M/lNeSA0ed/YKCID3OEfrhPgVJ3UzTOlxf6zUwzW+GR++Hk/+gQ3EIHhY11NrcDfEY+kUAiZIQYP+x+fLv/sh74hG2fy4mzFSTHecJLT1Nj0wWJTBncf2j848VdqOQq/mh7zxbp0q4SalRu7z7gUgon/j9UGqxg+Sth++SiLpqeRVyEIuQ+RmyTwC2CfKBIczTVrh72o+5ET/cHXO7Ugx7Rz256meb72S3z7lgNn7ErFoVl1oo16C3c7Vn3iKxyPOCACTLFU7mMdS9oqkqMl8lzVZDQQdyk70i3/qlyNdekf7zfZ4B+DaVTLSyQ3/tQXt0BWHap+I6on2MCT/RD2GTw1vQbkdBbQZ+8jQlU6gWywrlhCoey4NuPYlmb+fcpmsvo6E1jCcyyH8btb3Ag5CWhoXdyCSj35xT9w2xpfW//G2SqlS1GRjlYteUs9Nt9uFFLpX9kBpNyqiN9CiE06Iz4CiAV3irhnE7F44qTqID3zHuvVLTWcEC4wwvEI9Zv9MurIqlWun/Yf/00cOAMjMFctXSGhBdGt9w+z4xQbZBUE9EP/Vzfo3okCF2sxLB9S/W2qzUfB7ypAn+rBV4JIkofeGsJpDwNsJggCacejhoqf3kSgN8aWD1Qdptk63nh5KMm4HY0YTXMh2rbj25FsZxLGexB752ICcyfv5TY8AyqpRlfA4SB4uvUthtcrz5IS6dtHigHWJme1BTW344Nj/3ZTIQKg4/HsbGKe5G/r3aEUs0fhA/4t5rGVDeEiKl+mBO37donfQBKUALz3PGBX7ZOlXDzjYUXNhzVluSeVuCJt4mIkIftBXD4AVIoHYdBZ9Bakad4h6XJhxrOhHLMIgn0hGbwcykr7S/xtVJ4wQAZ9RVI0tIrCIpJvBXPpWkexz5UITwa2zYIm2mCKOLkzpUsrosN+Hm/x8HaN/fd9B4OnfXBqVX1DtrroxdAOw3egmfCjPdADQYbRKWJR2TP4syhaKkjfGUY6jWtBa2eL/PSu0J6l4WR63qXysOXy5Z161uKNelPouilzLEiGiTw7lR0nZUtpmWlzMc2WyNlkhpMJCf/3blVWOnYKbHdl+H5p5p0HiFE2DsTQ+zeojcsgQeLHRe1trkZ4I/DS4uvnvBS/wiqsZtE1FIU8U+LSFIPINm0XnzgCGDZD31Qnz9CRPnDxObZWds0qxio1AoOIeq7evC8Nu7/zbm81IS9O5nSsubvc55WSYGmJz6n0CP9iyUcHkR4W/i9apw3fHMJfpk/ngDTr7x01tPGkO2xlYkrO2ZJWVr2fPqb2RyF9dSpClE+lCaxGJfGjO0vjB3kJHwx49P29M46KUP+DCFnmUDzkCiSL10MSIkiqf5+L02uHCZBz+fNAahoHsZQaQ7OGl+cFhgUDIuibc8+0m/xuYSLfoEnV2UghZbJmwwUxLj6a1mKq5Wgk+twfM1aWloBfgwFkw483yYzy3TJ8Vr9lwiNvLlU3McUrE2ZGquwaRn20k/6GPJnSuNA+bMz9FS3WDTcolHSsNma995nP/0JQzbP1b/o367N2L/id1laQSiNiu7XoblPV+0dFAiTd/FAWRxUQOt6Cxw0tsMeHL5wIQAEOtvlop63VXNYKxGj5qQhDT0Xy7Bh683K9rC36K86xHElvbctP+hON0XTk+YZ6AoLMoCZtuOh5XZnP69knYqbITR5uppYSbUiaBKPawKOaIu/nA5mqpbcwwDcTXAFazS2dmsGXw6xuklXsnmqQL8avH3NFSPcaTNgjVLXsq37l76okyEdTc9PJCSJ379oicOD3szg32xSBl16oh3ZEgT94scpLY/k1+b3ESEwKq7qFs4lX6mRa6xulKeoYRHRIsxwzncan4mWS2w4H2VgCUoERfjO0DCfjMVzyoTdlR4VTwYngpMjCJxJZSMfcEEDEkqQoACYGFmajrPvisiR2lc7kEX4N64zOa7bhRCh9nhRXGsjSbsSt2tI3jNMMYYyUDIoZUkUCEASW9mRF1UEmeutSRTs6rZL9xhfVSytVWsrZxlbzzQecnGJyZMInQmU0+feH1ClDmZe9vW1/3m5bzxkO04ZedkfOUkTnqqFK279eDGCczAWgie1lh5gbSH3cqeFIOaAgGqmAkIy6MXF3RBLAJ6Yk7dFwOjjc4MClMZf25U2fuMnbJpEkD5JbtkV17Jz/qLALyjhXqAIbnBFLb0ISwT8UW9DGwoiyQQnRvhxiXFszhwgvgWj7oLILlVNJV2izeHyl0szMyhkwDkkSDDvSmyuWtQFH5i8Pi0+8p1ebV7eszWSwkNZbzUxUMrFM2VnX9GEN+DFc4jGO0Vq4fSy/6yx5+H2cQHuqnbzj7eFam4PJMVIYmxSddHPlg+UA4OVKvXPcnzsHZ2ADQhdC4KBbQ5Gqi4tp9gXOnakHISNQfFL1iGerAAhIel73xiiPVnyYepcOA62qqbQPHy9Jf3eST/2
bkPnWfTnr6VV8wNtjeQKmV33mBeQHhu3a56RtEf2ExOhMhxHsmccyPA2IIWJlAOn/HAeS2e5pWF0f9REMvI+mduBQFYQPqsTa+KhBuOxZMNu1xxIxzZjlhW263DoWjsnIoLLfHuBQycFCMh0cMmL4u8kVN+BJbbtk0IBe6n4fABjqpRwAPIFR0coGB03RcXaFYFd8g9Rjm3PMLTFvWBWiAg++7CpXesYyhZ8WLfku4/bRgzeWlkRVcltb8VHdl+IQmUWiYOL+QJPmh9rFM5jsCdtiStKkSGrEJOVOd/BoigdmylHCAXl3UQys2LBREUH/M9lQn94HS+/oLV0j7XF/8+sFzXaAdqBIEg/JUD4HclZuKQiCBknnJZtx8gYgXLlvn0K0UGBqBcMiO/EsqhtLIsdsH4+RYcLadMJhXLXgI1OBcKBUK4ByB55PqtSrVkyC2JuI7dwUBOXRRzkQ3fy3uHhUI6xsjhJvRWPhjQx8f2BM5+H/EvTNhsHMuGuZ/UAuegPVxz+N5Kj8ZDQF/JFkiQ2eefy01BSl78zMpg9UjJTLDnWRVj/dArHJV+68zHYlqeo8rIehnzgeu1K3IdlqSzBWmq9hMbRX1lDrXw1ubKBJ6lXJFk42Oxsfq0wl9Otjmdgkx1AeTKtpCXP7bM5qCeO4IEze3F5vhIViwobeg3Zg5Y/7Dw2w0XNoVH0m7EdPcxRXcH4YF7PD1IRdX09LGl7+0orFW2fDrZKf2HzYSPQQVkWABy5KJqRX0qkEBDk9dR/zLqyGX2hw/2thedRsoiVPflYPJ4x5PsDxS8pGnUEbAF3rhLm2u51zdsKFEzSDe8q4JsXMV+IElpoVliMd/6QV1N6vJGU+ku0+2KOubk8uXEoDIB7W5KyWUnaFSJzy3mxMHWxWs8rajhFNCUgZ/FeQAZaE1ZZOzVIzwCBwsPvc1AixbaGYwGhBJKQkLnQmIqDSUPN3tMupk2XCf5LPzHjFABIGOnntrsotYmcYIRKBl9NQoh7SAnjroi8gvwSKrtu7Y5bxDAXnO62HgSE8ft1RYNwAqhIO/6q/Uux16XAYmPOl6m56unybRgGqOEm/YD/pVsnmLHIabSUgsKpAFA26MUvrsqXcYKjLCpTTWl1uiux+SP4fuTN63V+BQRmtMT4CWSBWJ+pixTjxmvrwXUFvKdx2GO6cNaz6/ReUw9eOYdUCY/FIw55h2NJx8r4hf4FYME0jZkY2U5ul6EYEqN2E0zIx2quz23VPuRfLXdvpsDV45T5FByDCwBpwUO3aEqnKrUHGQpV77kjIWNgja/TbUsm95z8wrq/zgvxwFvsTRn2gZ08CZ+rhcEdl71FzzlN1vQHcaTR2MfI8MgETCffJO7le5p9m6V4LwZ2t/5nN0FuI8YaqIP7N8/Hmk9l5jXMDaGnqOitVjzL3tnJeGCeSxHWVU7st7i3AhO3KrN1acFBfUump2kZISmLf2ULjABbBJoU0MgMz9T0JH6VSVOupnEkqbBw17e7OWhQH1jsjdM8E3m37abLsYB7tyLIqlujdUyLDUplO3VISKTRNrqcrt8SNf77ZeoPkIhxWqNHty8HlpuQ2+SaZ2TL5+sl2OJQPV37ZvsPCdFXNMC/EAIrd/+JdUjPa/56D1R0DqVSY3OlSU24mkar2kCXe3VQfx0NLn0BA1kX1PuNbh6qefF27UANbT9q6iSbOGB3JFqlY0XuWlb3ilL1RXXNCJHgi9NYjXkEBP2Sx1JX/CwgurQa1h3qU35f4PHav1HnPFUOqfSD50MDNZJTVu6xlS0Lu6f9IZrVf633BO1JIuO0PDYXPiO9W2MuOd9Frs77yL3GWcJnWm27JyQICmyh5PdvLj2F7h7szBbYIPLY1rcH+IBrSFh4YUMvBLeBAGKGx/nHaPLvbbFi1we4B96XcaTb7ddaJ/HOmXfbh2+FDzKNnXnlaNIU2U51yK7I3tt+SKz7DSReJjAk6IEtHyNTMYxhKkMlGwQl4jRpe8Zp+FrSeeFqQ7AvEWVYCGcw04TZL47ssfAyD30+R2tYggaICBo9TOclntVYuptnNwgNwL4ChBK5m7T6lbnR/nJG6tV48JLGxAsTV6TPo8MzqsL9dVx3FaUnRxp+aXWPgoLy22lmKxvmsV0vDGsKykFNXqhdif6NcRLtpJGdolLyohiqz7YQaC8Pvxtwb4lben2tXc2GKhOdn00odDmrIWX9WLQj188e1BQpKekFyxpcjyWZT9oFBPLj3LrYwQIfDtGnfoijOsQY64NSdxb00K+c326o+u5b3k4wR7QnpdarRJyOO/e4LL8wQtzMrvgm1WLJaKNTyIm45EN07gn8vURbGi5bog521BshyXKyqYCJG5mePTaIxY69Euf6mXJgHs1/1q+GGqHmzRKsM41ioaveEKBOt7fSnVXFxc4oYxE00TlW8xWIafJnxk0sQMz0hmwGWd2uwY6ca+hJsU7P4RLHZ0LRQGeuUo3UD4TZGb/My3ZmYq/+SU2dEGd8OiXFtwC0R7MRLPKq+T6G4P4NIkIX3M9rRNzFFN7qY8TWBuiMBJWZg6NiiGX4S+g+PiA/fofwI3rkuHMOHV6i6z6dHNJvNU+ZtSw+nY449GzbubV1FFVpLoKKY5E8Nxbmv68uwonVycC5v473eo3h5jLMtOW1NvSW5zAnxzrZEEyfc7UnOeHzpZOIyFLJ4Fcp7SUiJEU+Y4RZ0BP5vFqTaVCHRWzo2rCW3fn8nnC/HBnJ3xN3waR39fsGiRBwmCXUekgAUhgBB0SaU5VfKAvvHjReMtUBVWeZK71Sq36TGcIc/cTDeGhVYNeZD5uxjx4URbDEsaw+9Xt+NrWRAQDwAyZBCHRP7FfUMgiQSqGRRfmflozcOHU6BfOaXido2rAcgglFm50VZ3sW6/94he2P+xySGY+Ho+kRkdwpCZywn/9mRlMTREiYUjljWTXryZn1qg4i8w5vNCuAL+SlNwaWm5QF8JrjkL+KJaN2fIiBLlw8sPgOqdRG2DJzTF7b3kOc49yLJuUU/AA/Z7H6HfAwy3LUwYOVyfmG1E6lIQOhMv659seJS0pMjxaGagIXfRFsFXjWSBIR1iyezlp2sUN1K5/rl3C+dfPrTA9zvrpJdaL/kpYOWgolgSvqJFNuKPBX50kzVhroQKP8N2nv7fYbLA0lBzi8kJ/t5nc8AZHTUaDj14TvN6mxZDCFkfHoESXV2kJ88QsmL529BUipBTUQ7SN9uLyJZnKoiUIHLisQL8CeDisqpk1S+Bs7w1EKsKIFMWdFScgUVVxc1cGKzsmOwcnOT7zIFepZ3M6IV02DRfFXHFFGFSS0hG5FYuQVeubaTIl4M29krwQAwR4eo0rzcLX68AyxT26mz22VEQiocYJZm3jwLiyMWcK0/tjZkkz/Gt7eIvaVFFswg/OQImbZQTI1QjZ7qtRLgYh0HJSFFl8tLh6JCReJ/UyoyuFCpJhckxCijleLE0xyo//nU80FImIPDmTVw6SpdJlidU0X+Pj37IuAO12XOxJspeqWTHeQpEe7Jrm34nmC41mVDU3mLiFLlQFjyLfte2E6rtTBovPmhDTMaKKixm7v1RIvOGEXDiX+8AW9Y77g7Oeir549ccbsZ0eCWbmuo/l/6EB0tOjLMpB+GIv32JtniMHrwwSn+aGzDOHhG2ewWf5VaIxo6J/2hclv7Rr8Dh46m1U8npnkZiY4pRTERSUbS8MOOsAsYSeAGwSEBq0pgSFULy/zTBwJYUAQUhDJxNLMIDq1b+iLuTPwQnH4y1u/piYAkXU/M0lsVxpzSUqcSQlfA2HBag+Gk+J0MqHQp8LF0LpAkanuW8bAlHejVsS8U6TiQFY4E8CVZioC8wSUH06VDZJxB5CgtR2dmD4tu0kAuzHbfT9HP94H+ox9RfhL7AnjlLJQCaQdGUW3jSOUA6mAUMHIx8q6ktVnEbyGJzhfdL2L0bmgaf9v2SN1SC6lQ9HyN1dJdhUXs4centrAZ+Vco2xMKyWwHjsbGwpJ30Td0m+PXjewAQ35Z3gyfWhhFplGdawgPlyKuQGoSqpYFVhW2hGBcn6YBo4/Y1mcjYiUHKlBwe0SqwKr/cRE90vF
1b5UQlakssI2fg/UQuhC7xAx++2elH6b0NVq5OeOrX3Z+wzFtL5MhZkTXme46r8yH5oBNz/PKkG7QmV0bdQR1nzZlrxj4z0K5uyyGZLwT97L0BFeBCU6X7tBbSbGgl4auPQGvh9Y5zN2pXbkkWiy5qq23ybw8P4IRFrHZ3fMuq0/5yATGu1gbfgbtpDmRPvzMCl/2hlK9MgASPT/5zipZMMt92SkN25GbDqOhL4NeawjNNZxRgq6PpFTdrsjjY4eCpuAgd4Prk+JE1vETOTOVtjCKZOwmHyOOnDw6OH0cxTjDtd+leEP4MwaFu34/Z8j8rabjRnsZE6W4puHQLz2b7HRSSRwj7i3kqfb3MvJEx7RY6NSiq61ivTr1HNbXploXyc2mwsSECl14R/Qm1j9YlJblQf8cj1u+hCgzGMCuEUX0YDEpbCtZP8BQWYEhwsnZnvBDdtY0vVmpEQMVQfVAnxeZByvJAjeJtjUMQisqpgwRZCAWA3k2ZPgs4m8o0fKUF2UFwetbpXdCBLhNnC5Y/KgEUL88bya8JlxHWog3E1AJPdknXUGNz2/1MZ4vbLPlMJU08L8rgNtIhaboKIjR5mCJnUMgcHpRaMNL/A2ynS31Z0az111bOLGaHXZqisLXuWpyRludy6w0qLfZC0e4PRuQNYgxsoA4NSODSE5SR1pE+FLNAL7dQSEtkbVfrUxpFVrNJDJZXp++p2jzsO7NH35K79VVGJZiEP+TqToh99IiiWRiY2RrEfjVuwmb/D0Y/FExWXC6bG3s3DsLyZvVX4nR+ltOGa3J3T3bRtJLqmogTEEVWDj7MvgUMTkd14mTwF+eJmTOw0pSb1NUTekO8TcvK/AMiKPw2EjrHbsYxKqvrlW26vI7V1Xd3IZghojGMHXMMpbpWRnKmfw8fcazgjeJrpRAbUqRZGJKSlOPluWPMzbK9mkdD7kBiPRtZaNNCp8A88OC7P8d/xa7hrInjlMvr2FO7ns62rAN8J7pQQkpKxf/HmQVURbo04iIhZWDkSi+hLt1A6fLxIUgaLbmzyuh6iltv9/FNscr4+i6IoMFQb1tmzzj2Cah5iqOfbMWiiwbf2TC/vdCcMxMhrDFcBJANrS1T2m2p9Qj6DTKJaY1LWXDMGCaOjsBqPo8MMV6gjTLDl4OwV2H+fRaARuaiV782LfZqrFhLPo3C8gujE0AuxysexAYtx/e63q2yiXBHIoaWowtIHpDfoGcIEQ2T9swg9I09imBKi3unLmdoGuOSW7ZnczukLzd8L3P5bPjeZ/eFv4UVG6ptWaTaFm74L9diDcUJf3j7HeQKeZ6oTUFZu0jUjLWeyr5WV4cLWwZFZr3aAAF6+qO9wj5jCsWDVfPTWVtuvsq1HxsNS4GOrPhHHhyxzEluPwr25qLso+CVI9tOELDTdj8f22k08H4gk1tCT5mSGKR4/bZ7skO8ELva4HbVFXjsU1g3+FkxAtRpN7WCu51BeED4WrgYuAaqVvXWR3nYHZuf7qcQhfOpOUTNKldursj2ApkIioI7R5rLiYZ7np2EuXj2z4JDtQHiDcdaYb1UhwmGtqIzZ6ggdJT66cshcXeSCyXXsrCQwm9Vva1rRSLSw8raMigvKXhzVbSeP989jMzutdpdXylPAZAp4Ajv72P4+WBo1RfGrhp/o60RCQ6Xvw9OFq9S6dyLIINqvWx6m44a1j0vRWehTFhQanTQeXJX/TG8Oly+J2aJ+SfKqzMx8fua5JK+MXjfmuQ57dZ9fZi33GmpejJetKZOrasb7BjCXZR2EkDLwwnUki7DRCj2X/OWIZ6p5oaUyfjTzxUsasxJHYSxRtzzL+Ld9bBJCJ4NdBjSgYNOkDudz+wME+yIzHNdULGCJHZSkh7T0+L9x30Lu/c8WWXyqqBbpDNjhUJ6DR86s803NTZ4294+fGBctbNelT+2QTpfV7SUzSy8zmXcXr4CnwT7OAFFgefMqoSZEOiGziMYfeJsFXm3kcD4m4a5eXrGL+2u3zI6BCiNiuhRKQ4jxkJ5K5lFD84aLBGdYc3BDXrEYiBd8KxH3BOzUegqLCBYcRHhmbnRddA+6J1cD5sy6yabJMc86jShum505wNa6CFYR3OGzOlTduszvZjmARog4o0Tu7lfQjPhh+ixEohVMUe5oUmwHYwdnyoAvNd5NXrznEuLBUHfZFxVrE1G2uXU1mw+UfvWThAn9NWMdED9oQ/uH98QN0i1A3+1h4z7bBG/NPiGcRXob822AIM5Bn8jtz4zbztESSuzV90s0v6uXuJhGlbQKBHq8OpiiCkHy7CV9hTIPfYOyoLXt6MbCcBKQ4123mznDwlg7RtmiB7vLMvjv72uH5LrfoooEFvJOWDxjImlwnr8hk/OfFqz4EPlRy7qiSkt+TUeRakuBWScunAjlA3Wxq3Mpigv4JpEueIrs0mAE08H1jwOfxSL6oFP1SHicmfH1O7Oayp2Guep1V9i8XNH9JYPnRz1Sq5K8z9rBimBFjLGOo09hp43qfrspA0dq2wEGu2G6Uv2LwtDjFn23ZgA+f0yfBIEBlvEaOkLrLYmvOfSlZry4FPxmLK0Pw0GAXOU9/AY/ch4OQjpxnOwdV3RmN/B2ACZxTIlSvQ4eGAXzAuwYxI5eOksDyv3u5e5Wj/Gfw30D8etYPi3etrI3emk+9wdEIhwTBSWZQFTw6G3EnqLGPF8eOn+t4tMdUCkR7hR8+pxqEBG4fE4LL12lJpkIJvyo3cRUF2qmXCN4RALkh2WjlZR7jeuD4K8JALI6fafAMbP5GaXrgUT0V2tSZUDMrTgII9OqClE2jb6gsHHMtOtTB7Go3odbQK665HX/QO3tX3ppUezyskKQfsfc2i1wv6HqG+vmI5JpWyFLvBoHkGlLrTTgXPnVVKaP1ppyG6+kHa3nkz5esZSMt8st7zQFXp5LHyA3TCgpGEsomzoZU3bL8TCDSaWc9xsZIvK+rpReZkuvrOxNXeUrMOrTsdIgyzpPa9lMK++WoSY+D+ZlbQJU1H4DWFGf4ZdL1TydCQjmSjGnwal+Mamct2+pk7PQoG9BV90EgITdBSlVsKCrLJ5xUKlNbFP2l7xavBietDbBx2u08Jtbmp6xTIWsayREeMt4xDRbjUgQDDdooLcAnCkcnrRyZW4ZKXUk9Z3AgtlzbpnREH8XIsx0dO7UwphsCht2cMFFyanWbWnk3+ci77CDWuYrO7wwXQ80vSuQ3gTbdWmQgD+wycm15KYpku0q7s7k9azXJo8PCqjI/2LQ8340IEILOnbScneZIGWQbC4gAmCkxTPA+iMYhzvSmT4WI7x3393mJ8RLGChA7ltX0BDatBdrTnx80QoxEW8an/9zxAJNzq+94CNSiTpDVYGadYlwSFnwSgWdHtVGxFQ6t5kcl7KtfUalU01Qw6CUqAQ6TQSXYvzUmeKEkG2SuawiYk3hHz67WaVM60LTGeQmdJCnpNKdXSnSblDEUtMoDpD7URWePF+nFajMQNq6WGOwdtT31zDPfUfz1/6VFih6LeH108nLhSF30FhGj06K/t9eqwOFOWhf5O7AvtT8rRKvevWnf5hTs+WujPpAGr56R8DZqG5rpzAMCJuA+Rdzo3BhghAXq5/tdnQMXhBr+3I5ieWfqXV83/MzNL30QTtnYOkCtjNHS/RXOMxtNAgN7cu908TvgrY7GiCYOdsrbnwS7Rre5ROM8nHpmVgxj4mJUUr8rTsbDNEbjVj7rIimL96DqZ2v/t1q2yoNghKV3uE1QZno5rXmJGyXOplW+yIX2pAT5kFei5HQ7zFUZ1QN1NHn5G0nc4Cp8Hg40ObNUi1QXCRLwzfu1OZT4g6wfJYGOhSytUIHeEQVjNC/iMylXJkhEWFAVHKsN7RicwU/Vn7Pc46Pr/xE0b86Pxrke9I7gnVlrrPc9tzU/XzeNdgMc8hD1BntFiff+Bg8uQkxaN5KrAKjTaB7x/gYVAKMpIpbaoqLTVH3phHAcothN/KdHfUR+Eib/nxTLQtwGFLY8qGYpsshMjvjJ4IWq15OCr/1TKqI15z8tYjfCrsJXwanG1KSvF591FaJD2EHf4cAAaQqXmQhgXRj+oTGEZXcI
LTgpsYbeb79ZuA2e8KK1ROohvfbdLLSLUVg/0bD4oA8NKp6LKhzyQW0d7Hfh4SaAN1APh1EKAU2T8V7TSeouS0/ewBSUQvF+zcifsidGSoxLtf52fJF+JXFROtiyholisNjKnZUYJOhKmpLYA6GYdVAg4478p+tbaq+17TjOI+5pAT6aA4GTDrLkSeexAHyXM01sLrTsndiM+tFmIZnbYoP6cSuLBBCbThyXDIljetX/6jOFobKssYJDzzpGeuKipELH4d103PyjzXgYj6rmMHl71z10mUTSczZHAniomN1yRkCcxf904ZZolbNgVgKY1iLoBTwn8jmU5GZFWc22SxxQ79CSKOLlViyGJ16R2cBSMrY36suZxwUB7rNUHCi2ZUAcrwLyoyEOkozP5Wk9B9c9yLHcUXjKHGFDRfxgNBi7EuyrSEMeKtNUMpabxRHsM44RpZUCKTOZUi8MZLXreU9qpBnb+e6LNhCP27Lk10NwY9O1xH8piKfPiZyK0O14vOuM3zJHfcgEx1L3tY2pQtCTuYAqj9e89tOt0rJE8UgbSAG46O+u7kqwfobqKrK/y7FGV4nGW7UMUlcS6duqe4eTRXafcyL11YN2OBSlq5JDwCKzAQDXgraLycLpgW/05i9p3I7yIhwQz9VWoV9sp+YSd6ejhm4/kNlH5mRyKXQAwJ2Qt+n4jtoOXsVlGkqOuJUGhaKnxKYGirobVrHDDwtPMhgfyEvzUJu+ueIm/l95Rrn9iEIAMSoNiZ7x3ErQElL7o0qvOZWYz7WdeqynbaExX2fLbE+nujfwTiNC3nzEOj2fzjVCC5nCCtQ37Dio+DvvM+adfR9NHxh3Srxw2Z8oDDpolBE2t9PY3DJLgrvnjHAPOS33PmiYFPbYq1cWUj45q25zFdtmysLXeKipALckJL50ZDzzFH+D7JJ/Rq0bcRNdTLKJunf/S9f9LOhCJbloMZfNV4KBrAxG071fJ4x7A76crLy2JzY1z00//ICTVXEXxXISvbyy3nPEKQqxBYtYcF8nuKPZTB1kIvV1p7qh9vzmN/zM/XT+1u3GoTKNNT4HP8Z2U72lUR8W0QQJw3FAN0pEgAblEza05TMoqLYmeTpH7+6Sz2bOm58NECgTGmoG4nsiL9e+ZIsmFmZQ+Ot7dY1RHYb8r2n4QC5/HBuByu0zB5V/zXhJV5jYvS9e+OECXufksn1DBKErmFqhCItp3+sSli113t6O/q0DuzVbeK+MF88GoXaXE7Uu1y7jAjEuPIpyrzUrvA59tvcPqc5A/LkKwQnvCOR4rw6dA083J3v2XMh9VCvV3xRFP/DLnHGnMJpUSNicxkX15DfKj+WW6KRi4XyncOqchFJtlvTQDRKF1ZtC/cLPd5FV0JyrcZ/gd6zUvZSUmlAjq0M2bVH4kHXjhvJxP4fSUrvlNTH4TqTFnxmIgHMNAh1fZ+8SI3OQy1l9BLg6YKCMRw/hZMcPpI1teojMMd1KgAiU2SV7K0QLMh3Pxfi2AozzOako1ouoKhCN37bALCFW+iT9jcKRNQ6YrWoVg6AezYXLKShwW42vJm3Xc7uZRES+Tx9TxyiQH7U/IhTbPXvST8uwdGoLUwD09gZKXKkjjv/s5FVW6eg0KyDiUbSshHlldINT+9xYkVlAuYGuH3hPwA+BmM9uepIYBLOZkLF5KMZtBe6izO2aArqY+mUDhuiGUFa5nDRoLLWDnIdEWScjZXr2EyuFBimYXZC33Ao9aMCsgMEyZu/Sp5xbjf6Qf+ZUlYArNQzHezuaevq+nRpdM7L3h++MvZTeKaidmBjRyCQBn7jmt9U1FYfmCKHdvnThOTxerzNo04cytr6i9GIT7AEl04602njRDQPJ8bkXLjGouXrg8njTugEKAD9/rl9yJ6P16luBt0XuvikzecXckpf2ileIpsqfljHwypvRlMEmMbC4rt3AUXXsEvWmzA4bHY4RIOKsfMFrMm6rW45UsHC6njvU+b6PRdZ5zHd6uQtN6+ZighZaixJSAiRxUFMV1EiopdKthpFa+mhQaOhVgdAFQnPrNzNiOWFbAxHqXicJ0hgQy/7MM9hn5KaKe+wzgqy6p4rwv6WOXo0aai54u/0nnJC9Ax+SEOCn0+rqkzD/hXDb7EbB5NgfBGiFDTjDf9RxTDuGaN/DUIM6d1AAN4Vg2JyC0a8R9p7fxCi+LIz4GazOGFCyz1tGDpjDDOWHM7xz4LtFQ00TxzIfCdU4V6qmiiFn2TJg8uNbxnFmNovkRXtGVarfGXc7ebgd0RW2t9jdjUsD72VoRT7kHBKyF0Nu8qe8Jwqfi2TN9caR/hCTj+rNz2ut8a7oYFJn4wUdf0kwQq0ymvzInCbU6opn0AVfO9SnF87h7v4xUod6HGW4AW0dmehE2zxwVLOJMcJFNIlO4a8kLdbvEu4sQDUYDSLfYminC2Dk4gJwIBXBfm1no7ccWsJok36HC8xBSFyY15YkPTZFjtzgBD3v6riX6VwkdSkBqOUO+atuQQJydHI7QBmIl3dgS3hjBqpZ/3gByHH0e03XajGWKwvsz3MGnHTpPOx2GyiHz93zIt4k0/lTvSa0Iy+woKxCo1avfvL+bdyiMiDsgxvjj3EgY4jdATA5y/EpMyRyu/u7a2D4rQFyw44BEPHDtiAQdL9nybnSizSSh2f5wge0QpFrZlAuZSIehZ50XyaRQ6nB9ghtQJgP04d7l6qCcCBXfqZJugk8BFRt3UdRtbAn1A5nBZAOsEcF6cRVePlfBYE3ea8kd41Llj+mpJUnXCXwERo6/sCtdUT4Wtc0qH+2nhdQY/0UJM1BFbkz3wrzUwUDEsbXil5NEKACs5iVI6oTQMKsD4qWhSOm3sk8Msah8EeNgJNgujE6nE6MIwuC7EcJ/65RfdOhTmoEXKXcJ+cD3w6JULVbtW4J8qitNlzS+Kdv+xGHeDJesp/6UlhkCYxTlqpADEPO8koSXfj21QhRK9zRDV4M2HG97UNOHUDPoFVFqvxsMjzppHAtmiXruVrn4lFdvwGoOJCXRYTfZJYHSJcUpe9i0rt57pfY0+dOhFCR2EUtrIeRDjhE71DyI1GhExQkArhzGXVIjKwcw2iA8tM7WodgfiZWsSOj0TeJkHB67auEP6auw8dznQ1qj+Fd9iK8oo9zbOGoCPzXiLcmCevy5AcPb164JNL/jnxwroODFTTCwa5rQk2G5hIaEp2ObqiPM5u09UjTDn7e1fDKTL6lRwXvEbpUGM6TYSj8Nhx1IsE0wXP/JYSvsvm1kcr2ucS/1TTiLWjhxWdt13Bo9TaLM6qaH02iPICCmwrhlka9qj+y5hfDgsf2+rAAaXrASV8iSSlA6PvUVhtOeoY8bu4pN01intp36QvGshSS7YadWpZwProLnlh6fOnVRToETjG4oAwQjUzHdlgC5FKfQkfO7aQC8w5GTTfOKK5edl7WMmertDr7jRFOk0ysS4AFZKqdFdTKBD8l1G4T1Jj4L/J2eqoYdibB8KAe6szkRTYw7wsOeKKsfXaXQF8Uyaa7c6hcIFmma8i09+S1vcxwcdv+bGIX6CcR44qBZwHlATFoG5YEz1NnaDUAprcdXE+u1GMWvv1PjGUT2ZDppTFX5TR8qoXjVZRmzogR58XkAYmIh1AODxcTAS7MVEFrZebJJYw4jx9G/EQEU5iYF8sHbKyPDl5/slmMJp2Euw/m9iV496F950fOk+9eZxeZU96i8Y3sjdrrSl9eNmApDfAvKLxZLhDYwnBWdDPEGpXyVP0NgYnC0PSCSkdCRBeIk2o+8BjozFY/JR16Ca7BYjjR2fcX7fUcPWSREY2HKeMQQRunmrGQqVU/yYruDG6XlZNSpHYex1fL41mWNO2bQr1FNHv1LOtpz6hjSdKv0+HdQkNJ69zQCgfX1lIvHGyOyRN1Qh1erAo7GpwdtItK/I0X8tQo+GvKIf0kmtVFJaRsjbHZQKAJ2z2zCY8h4ZgtDvtNToesw9Xw/XTlku2MZE6vlsjFhcQPxlJkLBPyL6mb3fymmwrBiF+Z0CJJsx1EflZ/bNPOtvEyLL4rPco+oVmR0DRIpQ9UnZvtX2FIQbAsjfA9KAhIFYfz
QnP8dFQbUFCoXxVlVGPeDqZv3mqa29tOyZaZNfqOvnlAlzUTAkTbJtzFyU+VO+90Wq6+TBf4OaFLDY8eJGWUFO8PZ2RzhLKeSxxWz7h/jICN9TMUXJkW2rq3xYGDr34ysx8XrlxGsPJL5Ubse7iy9dzbjPY7qVWHS7rIOj7+NJQMeW3uBUpe0Dqj3FlHeiKqb+VI3Dmj4lOseeoSwhC4AkB4TlGAHLM45QRwWD7ANqF+RepzcOLXB2hw3VG3lg9KymtmoIQ04P+Xr3UoNObxMaapbHDIMgMeOZyX6BkEneyKElEekWHTh0zIZghGIgJV9EnAFngMQw+FSNmUL5akqMK2NB3LbaZEYrVqzf2cJJjyViuuS/XN2OGGAo0X4YkCOtHf3BGEjiNS5ZpQMjtREAxoDJoCovuVa0fSxQIGphLus9A9MoV1/l4n/fMeBk3k7GhdfUXVaXrtEatSwGDi9PEgI2LoAfYA7gmSny6OOdCkdugkFy8LGgJDizpNwyP2wgk1nicV3SBrjwgp2vSiijmT5d2h+pNk1sBNSkIo66DrtuzsB/B6pZZACPzwpKalFEzF0sSFrjN5iCj3wYi+FF56e5bh8kY4epUrmoCD9UfNDRJX0XgFWFrwCuyVq38V8DUONe4TIfxLm2RRTX6PvrJXGHZQ4rhQt3c1R85JsFsZ+nbOPwoEtUsWMqFurCKgRO7GP7eeJIHz5DM9cCZ+ETZIRCsHeSYApOywbNU0h76WSJio5V8D7YFh54ya/J7XgQKvTQhDtFwYaVGE9g97Y5EEyd/kFfb12IZjczWlgEy/eYB7SGVehp1VhHSGRJ5u2yMTmGuFXn6gGFp0bFetYFtkKLIpc8u0yZ15IXg+RFh1fPHQdUhkkVNHDjp98ALViXR45Z/JvuUeS8PY/J4ie8GirVvXvKx2ljJf/cVQ5mYLVpsv7qlO3reJ7QVkgRce+QrZIIADQyXkk338mdmj8N7GPaO49m++IbYKGLdVGyWfF8CBOPbnRafZisMAbSuFuXZ3H4xlAd0rWYmHQ3xuxymEiLP3qkCTXZTgLKtfPg63f1/SMAzmbvw/UQ1MXevVtQk/TBTIFoTHeWSb9vw2xViN2qMCvrhyroqffYhUllM/zxeM8ap5OIkwco02G9xb7/fET8+jNzz3rXTB2YgoZopkm3C18w9wFFBX56evilDj7Yv2lfShX8l/HF8drmiLxSAnrAnJJqMHevFFqjTler+hO5TnD7fdDbKeynauklxJnnqn4ppxf3FZcxliWbrtofr64HSdk5kfGkPGogcOmEPKNtTEevdb1xjb/oYR67Agt7xV3HuuUdP5yMTaRSlJYqNvq3yRxl02towf8Esh5fglwoe5AwryjXjloN9S/LAXJ7OVcx5Txed33XsqjvFw44ulLxKQboxngZmgVaRjNNkPJeDXWTvyx7tFip7oX3cQIwgBoz3glneTjSwyNj+tfYsAvVJ80fP1J8bUgTVkc4nC41p8yFkAl2LR8zRMjtVjSrGlW9euUseLW/HKtZk56aRtLxz3RsBE/eedRVkYDyfeF0AJ6xGqHcY5i1Wze7dUVwEa2W8TxK2uixO0YbrieADis8EbGf6svAiDZEEavTJ9rs56YWj5tO9L9xSE5UeqZMcAKOHavMT8y2xWWGWwkg7oyqhUqPJego8jr51R52vBCGG5i3P9E3UqQvpyV7IU6FKinDegJFgHxXEnememmu9KBR2KedFGaPzinwvdzdy4hbD/J4+hvMI6VsnVu10+R1EgmjpieouRqtSB5pG7HlvzsHcsH96Pnh/vVu1jfkmGvMZPIeKTeWHmKI8wTEt3+eYTdvJn8hvqXQwRB/JG1kUoB/AMX8AHQHQ9utVdXKjW4J0hdr+GrDl5WaX/EyoC7Wo5Eo7jfgjgnpAvgaBS6t9mckftMifTVERhcSJdVfyZB4d7HJW8d08H0vHha+5pfUxeSyOc5NCAoLkKhMcb1pEZLoAM6HBcmz+r3G0ToRYuEW/lQCJ/h4f2NM8n+PIQ2TzQVYeMmRV87CKCP5xY87TdUslljR4vUEsBcxfUqiglkkX3vFw96ODLttPcGUdqRhP9dCNcrjrOVjfOik97mN31SwNqqxd6OSt4VWHxV7ZdPliW4cBIt20SUYgHof4SEclfSbDEO7XAzvRGneGaWPF+cX/v1vePScdKA7wZ3AOdSzH7METGszbpYBGTp78MAHUj0HZYmtDHQTjCCPez2N91ni2I3yf+clb2yUyCybppBy+fz55GXl4YvK15m51OhopgO2i8Klp90U1p5hy7ukEU3NZ13W8VGWyt52l8y+3bmZ5e/Bo6Hu9Hyij9z189T9QetGUtnUPaqcy7jZixDmNrX2RC1GgQYYawc+A6/PREK5Dp0r8eJN8uGFWb0XgHUIyLp3BnRSqU/DUV64jTDWyqvNjSzI0ed74Q3M6I/jS8KNKr0pyVQ9vrW/tp6lNtDNY+9b5JlCOYUrHib5bKlVR6E3d7Y/IHoY82K9/GptZk9muFbg8l7SV06srn9uCV5/PnUMRIAfBa+ci7I5dglxdbLSmalJrm4lZgdyUWxyTkGh98VCAcFnLxpLibKDRluRCy71nh7SSIGGUUkRM48V5EKU4ySw/9KkAsQO/PvWM0lwIXKEeuQGYNhyHrFgiM1nWGUL8luWi5KBChxpWjM0t83NWPABlevhvoK2FDtpPtxjicDmbkuIY7AjWXH8hIoKH+z1TbsA67bZGecVD781ZIuq7gt+FuYfKXJc0zzepGEKMvq52p/h1F8mGff0ZhhlYK3EhIyHL8d1kZUOCmIeWW5PElb1DFKV31kmBIthxLmncXsbLntJ95XEbc0RZX5RkEUBe/FtYk7x6RFO94v1z9d20QrvGL+xiLyp5d/IUTg8A3DpIAYP0KSxwyEVXbsaPzHokT60f9tLwHDAm1BQ4jnF4qoddsA8aoA1NocFzWQvcRS+9rY7N+TMj9gyhGwj9EoKkvLjr0uQ9TGawN0DA7X66qsO/xehMjrYckRswBgRx3txxJ08vvJNIyDACNWj1T3lMDw8wsx6IbRLQhzO5xMLq9rngdRpncSlrOyzIvPM6QSK1RVlyBG1jYeAg+ruAw528PUygwomCpJM+Wu0SIYN48XTM+lm0lSn4UIF9DUJrz/KNjayW5LiXtGiQ4Jzm7yFW8i8wuTMXY1j0j4Qhi2vAbkfmntiC777KFf48ak7NmCEfK6AAOtayAe9mFMm1shuNkvvIwBmlk78eDpwYdoXV2whdDAeO2LBjuBHFyse8I9/Kh+4q0sbkg9kQHr/MtEzfvqCN6ky3hlgcIPaanOq4kImrWQOe2g8QeMvkZj0PS09Ih7O7NcSHvFGSv1PlzrN/8clnxqo4OLd0c2fTlWtzSCYW8tE+9GhUAkGlAMq/+DrZcGBfh/jbqewKLMGt3E5oqfAuqeXbQp5fQ6PWNXpzfpdx8jgi5e/0TYTmEVwwi6bmcyp+VKPYQTbaBLN/UqZxeALrxSAB4HEAyMdp37s5g+NUK9/xy3gtQME5wR1XbrOzW+MQs3XKL1vdiyJkrBZfLCLXYVCkqhKEQeDDvvGEm85WNRQi4mCJ40vDip20FIlv0+dBFN9mrujn/dPguUQ9X42CJhdADqIK74PXjJfDiWllbgIpR9YWeDzQIq4DUiqaLdCZ211UKUWtN6XRVng1od1BVA0wmhO+Y04bByiLS+zf32vZzAgxcXFKCYx/MAPOLWdYZK8D3K1D0OQJPhBQTRkEueuU1pqFM9s7ND1LqZZqfGbD3l8DTKwQ27FeF01ti5eTziagEz7PKE72/8HhdwmfoTyTMQm/zitvPIkqzzZXoqcqOQcBYf4twiT48w9VfhamUMr15R/6dxjzloGis85/I9C8EiUtAa0rCKv2/jQV+kpe4Sipgp//HVWfwUtEBy35F2mR9rivoUr8F76xrK4/qP9lIBBNW+eOpd1exZmk9C3x8iD0TQt//2m6grt7Q15b2W6dP2+ww3TbfGyuFqzD+5QjC6/iNq5a8UoIym3UtL+Jz4KHD06dv7u4E90DbQeXAWpIxW4JTXT9VRCyCbhgVyhoz58Z3
AqycAmsirwbAYjevUFAMKS54/7B1bdwQb83b2mqF78ZpstHuUz4c0BB3uP7gt5RF0FCi+CBTdG2vJSy3rJPT9A0GoWsEpyoaPF64BPC6yDETs4Et4wPbilSlg3jiTVDRQhHcJt3v9rka1b2gFqje9Jray0jKHK2fmJIW9Y+Y7E/mDJBiln49OfRqQlp5/HqUwaR4Pdw/enXgAvdB8GXlHRVXMcFIvR1UfU44Blws5QK3wZT07OuiNoHWwVYZSdpso54iTLDDH/h5DMpgjKCziwE5cmha97MCWJnzJAtg6GGsstzUbfDv5zcJDZ/hFzVXvzgBCONvop618JHM0RkDbiP4AW4jHUvfd4/XvJccbJO9lzvmzVfmyjM7xO2dAOZW4HLZYT4JW8Dt42ZdyBtGDP9+3CUbbh7wT0YcFeu/d+i5avUcX2pecc3pUKTWQ6bMIf1JkztDyyp0XJ5F5benx9rgjglZxOSyzmREVROpr0zz+m2GFITtMPqY+P3p9jRQVZgedD8uahaj/huBTNrHRsACNolFLWcqwlWOIDgyjh0FKbRPKlUIJWYnPYOhfRarGbMnG+4H2oJIDnIuropXLinfHUyyryQxkpWfdJFZnYBNSRTU7ZTHCkFHULwJWZARe7CKsfNT0mHgTfqyKBl3X7jXokI3Xj8owwWil2//Z48s1m51beKCf+BX/hrEYe7m8ppH15o5e8qqsSIq4ivmEKOrd4h9VvBtVXYtLc14xJAfpCWbVX+K5AUyI5uaAVAm/GpCMm36scABfu3dJJC85y30XTFZfKbEymwnt7t+4rYekMaAFNrNeFkzXTBoCqpoivD3SqFsB2Xh4hLJqlp1H6Bzzeg8ahq+x5QcKCSIybJ1NR72vAlRRPRpvZQPUcsAX185RkO2iNzHVEd3DIikKY++zqXyZB7KDbM2PGubiFvBCJjl9xD+pNDasR8PtZU5fd7jz6oTLI/yDA4g1gvsemp2kq8PBlJjC5ZsIoyKpTKFksCOwOi7fA9qwedsgRHWmmAdn4/gkUWSqqVR6e6lYMz+UOAZOXwXnZbSMEPcUeF6DiMQ6VAPOkjtWmsAK+D8BfxnfzHQEaVcfph9Zw14mj0CvhIloKfj/p/En0gak+NIK9zsevoCFftKF9GtAAHhsUTTXpYCsJFfhZ+/aHQnOG8GE/pWXpSTuc2r+SUVxsQCA0fNYz59YNHtDgrgyTPJx1Pj8hw62Itt47xHv/yZDGmsAVw+zQdks6tCffX6GWn5Avn2xspMeIcd8ZzTF6DkpzwWdBtY4T725RWTHuDMdryoVEXqDXPmSOgoqfq4cxzqiYSw88cr7no0mboOlyWfIUKuY0y8jK605jIJSKbnVDD4LoitCCK+U1A0PJqsV4ZD8RsfKlS17q7HFeKzgR/2jAKhR6IuK0Eg3ypI/gXXU8DyzglJuy7HQ5q2y3+vnLwJtNkuxbggmdmpluey4cdXvhDEIUxZV5s2NT24QPIsiMfJfiMNrAw/Wpy6lAEMEDDVxfFbdAMKx68KmXJJDJl0ZPhsRg93AtG9AWPQsgRrghFtaJgFFv5BkVg+g4EneRI75VdFisxgIsjFd9wHVBYbwJ0DeMzWTpgZNt7Bv3UWUw+Ia18fs1zkLN4F0Qsr2YKTSCem3XAmomHoxC/tFT0eK8WDWVkmyOdUV9CTqjPDyVU/N/xPdbRcl9xQX9L2qlAtVr0tEb4PH0CY9RCAFsVRpQSVwXRaNp0vHXWNoTRZHNEvVioBsH0sXrCCGDXkOX28U7qKUqv9xbs57H+TwtG/TdbJBOprM0UqrcC1Zviiepw73k1OjEXB8gjoUfgHIuUgLYwMbyJMkkE5pm7hX9VdoG5r65qYMiykHaJW+9q08sYygY6UqUwkVB/VLzNN4SkE7+guTvc1+FIvHIIi00fLmcHkTsBCHoVpPSdJSdVoP9MGITLdpiZadVdZz5qcVqeatgueWdNxslGbjD7T/ax+7CfQZ1nBPsmNiNE2dTzt69h+Bvqed3UpIKoRdvT0uOHiIsm69QbKa9iYzfU32q8e/jEuTWYoSU39orY9V2sH5snm+w1zVHEG1C2MDon2RL5Bzbkfs5aTPOga/xH7Za3A3fp1o6+BvW+YWnNaUPh3RVApzBcS7PVt8qBcgf8tsbTVxQ+Otkmf9nNFZMjMbFptDssg3cJaQH5v07qRe7DggLN9QWeVPfj9npyqD3Efa0ExkiHwqgLwL7/9tT2o7QMIkUzPErFXKJBQlHKaFGvYz2hkoPZokeqEf0JcbvAHL5tx7f986fbm61+gM4tSw5r8sqZKvCfmhAjRjWWK9v9AP5oFNZadlSC9CahaAt7Y+ku5wfVeTSjlS93nfGeYGnZQe7O2Flz3QAW6Qhk4fer/3PnEyTQeaPSBm8ueyFlqaCD2wayCDnXpzEcQQTrf8o0tYsVEZhmOtZ6DeT2kX0kvYYnKwI/O8pjR33gX3VqzGKo0WKdN3KfoIZwDLu/8Tm/ciuI6EhuTvRUXemaUYrv4JFEH9VbrT1rqZ9E7cZDFBxcrEh1AL2wwAyWrvTlfonqcOCjujZeO7Wz5y56wcYHqaxp4ek6rNU1jYeXB9bZ1GoQ+1Iu9EkhmgOxRcRvf0kLMcL1vMAr6ews4DJCAmlafBNENlfPfEDCLTD3vyssdT4c99aSeNRn086KpFwdKTJwknga/e6+V1617MDirqq6ohetudafKtzBVbuPAGXp2NQX9L8MUedtDRk8z6u5jp4LFHMUWqYeZ60f43MkKa9GJQ9htK8MXblXDzlBh3cipe3Zy+5eXNj48262BpmnMfkQbyF6pSrtujFTTZ9YWq6lI/d2dyZz7v4Bbt5k/UDVJb3h/IpGBDiztt0pgbOwu69/MX7MXlCEVHWBR+amxUW7STeW/cnK87LA9k91jlwPOqxAQPED7SBixyzKvvpg7oH99dRg2QKAQFHpC7JfaDQLe7OunzamjAbllpiwZ8+waU2jJsFvh6/Xmw8+cyc6deM9ocar5Oxhn9vhfewvMIekzExRj1DSwoqnwAjj2TVFkT+ayiVwQgjx0zgiamrK8LPzchYnOG/ysRKdsXnxEeLFO2uJiwqr1LsZ3VvvOlulUKluz0jiAKF5RTn9NvX5FF5S2lZAHEXE6ebqfR2+4vXWHUONworrp7kZGXUzm4BEX7B6EA/iZ/MfrufFvyd5Jibz9zldhHzbdGeuDFMihy2IoQkyO0tiTDewrcLRfWPIc6ZgAKOmkbO4bY6eh3sSoXuBUMMa951bqWwUquXMtgH2MzSziFXscCbE3RgAjC0n0AmYZrmd8Kp1cyH54z2Z+9cWpQqir25ZX5GZ04t8gow5HqRhARkUSiwodrj9joCYPCJ7zyveE+cONA+tUMkW7C64lt0D5we81nkmZ7p7PFR5NxvPV7CtxBgX6AoA53SrKJfYANa/Ahv4mteLhig+WVL2SukprhTNdbuuUkzcOfzaypHhC2mS+JYa36Sv/M3FA+6DW9N1Qd1oRtnj8hb7cIcezxqMiVsApr0CnSAWbpqUJ//7heYxAV9HxQ8pyo2kqO0xk8NH5povBmA7cklYcf9GBDHRwA1dnjwUJ3D187zbihSswbrXP+0BWf94d9zp+iJpy19yOWOElErkPaA8hNUOk2VmsRDhN2j8FY5rkJD/sNhz00Sf+0jgeLx/UGCmsRiPW3AW0bRTex1mP2It6Tbtuhqf+u1gNEScf1GhpoWc8CWIhAcOq08V2LyTl0BEXgQPMH63CQAnh+CUcRCxhq4KhsKQkWzrg9Pyq/+zbzGNdcz9FQjb+mLttFusXe/9RGr6SR+3TVOkagqxz8PcsZ6SN13WAZrhZQli2wL1kT3n0RM1L3h0LAaLJ/AIKPfKWaI9jb1oaZCLHdT9wBae3ACZaPzXsXi7mmTupcZ1MvaGzXi9bM87Wi5Oi9D8vxN8a6jUufFMh+7k+VkEH0ITDeAeRO1Y7MAxv/nns7HoWSAvfu38UbPVpERXWMNBW1aDkc1Yg5qtpeZbnobjaeUrADBZag73FD0OqzGFFG5Q0TmloOthm4Wm7G/LxShLHZniyt7rlF01/q2RpAi67tb+1tZQv
iHMgzXQavo8CpsNhLrXUMvAdjj8JyN2+nc4p/PWwjhLxrwPhH3KS3tKwkGtkM1kOSZMQWEn7nyJ+tympETwMAHkSMVDtpHQCcYXAGbdqW3/
EcU+4BHD765a5X3F2K2kcZs0dHVYdmTkM0uG8wb8gFl7B9XE3+2xx2bYSUu1ervbh8jiqxq9XZcez8GP0JuY/bfiVmPEq2Zgr+wUfRUbO7ygfAOY30YgH69GgEZrVxX9Cp8QLM2QQ9fXDxeYeU5NMKATYJNMJk66t5KG7xo2ox7jBZH1RQabkqv6KFspjKRuzzspaLly/0vLndd0oN85I5ZKrjRw05J34XyQb7AG0kG33KE++Vcjbu1eUsQbPvUtDnXXyi78+OL9PmdqB0q6LcrHwOgLbc1FTVJk9lsyjkwrAvIBHKEH1ad+KgD8CZoMtwhG3grBTG8MYTFuUs4PZhnFv5qBltIlyZXeaKQKU1smqi4ZC51rX0aaGtKsBsAVtLPZRHqN4IUB5X5qD3WIJ76BV3L+YVMEIqUQfWY3IUm3ZXMVbBWSUsguUNKOgMDnFF38FOhBAkLWAR7YUn6kw5HhC9C98duqM7Il9XGqNiq2SN+AEC3XNQJ5KPTRtNko2o55hgTM9LSR6w2ZSPILV89VIJraQHPyzyPOtwHq4vDziMbuaeic9BrWO5WikRY9/0+/hd3UZynMzQW2BlO69CfnYdktFBp0ZcxQKEDgYyi5Io7P/MAhe11dnYTdbFy/EXLMVRsKKH85qwU9LNc2sGfGVXWmFYKCKateUJ96HwX7tBGaQZSgFSJpXat5Kjuu+axmacBGG1EybOKSE3MOPIFaHFcu0IKWFxd1oPEs3CQvwgnBPzj3c95n2VYKLa8TemBegCFpAw+U3KQp5YVL22NzJaCp/wK65um/iH3cn0ilMF1q4+5bAgWL5zJbsvFPdRT4OwT0l0vQjSEaOnND8RzsnvEC6/YQ0Kryuy292FInW5RjmFCP0hn8RzsHKtXnC2Qi9T2myGwW0qJbS+LPyWB+A9D8xse/LExuVRX2Qwsnq1UlowbujQrZIKbkiD0tusXSPrw7mFLkH53u4T/KRNgpGyScsO9QBZjH0TMVRpunE0DiU2iP3yklxUXIEvLP2LN9gps7+aO0rZML9OqyJVr4uZ6SU4L+tBZj8SIh0wLYG1+VFkfV7IetaYpRaFoG1cjMbMm1O6BF+vs5H2jNfXbi/dHAazaOuVxnyK/80wVrrfNE0lgo7vlrnH2dKvRhqwrGgQlSzrQDPMQWD1DfvP4ii7MHYJjZVEO+gkl8Oy4TSboW3cBa1kAeQ511V5vChKXTwsy+nLvJ5v22icHyUJKpkCUw9IEa7T0kBfIcE5KkIvb222xeab4hpu0rLFeG1IH66WJHiuJorj5zQ+H3gqSQCRK9/nCs8Ir9OmACxmh/4Het/uGwPxHHYk+qg7p1+pL5RRIAFZgLQ0hKzbAvaxZjZI3VdVoISfl3AmeLyBi0iMXufniNt1ueaoNyDRR1WGzcRkTeOUW/o4/xg7Ey4oXkfRLvXPNev5ZnELEeuJ5s+UZe4JdSAS63tNHPiTv4wJyARXbitpee1ixKLY62F+ci5uDWaXveICIxKUttIdn+zXxev4xbO3GyUhOcpIdp2pHWZ4vq1Jpwca1fO9q0iB7biXjvSNcnJVz2K0i4sJuMljIZUFWc0M8/ivtJkf4OlA44vD58pUcrWMu6Z9eAZdQfXe+FoFo+oMVpAcgWE3xOOx/T7xrhUTMGUpPTPF/zj8kEf86tAm7PcRVhPmlky6UVTIAq5LVYwrawYYmF1oRfcMvQ7uXSPwEYgIX0ovNGGg6Q0wLe1mZGFKxiRKzOpgdl+axWQ02Iv+ZaHrUDpcRZt2lkDA24N8YuIboTu7Zjs6cK5grYHSZGi4ML9ifGJuuSb3IwMfgr/f595kxUxAlLkVk/UJfvBBzg4PeQDPKdMNbVdxfrnZ8s8Tu/Pun1ZjG1SAgMAR4ISooJQGD2E95Y34GjPE2eJB+PZ+RdIP9W+h3/W/m+7R1Gh26jKOmBAtUHlYAUgEZAkANvAY5FvTuqZGlLuuyriB0/Iz7wqgLc1RyKgf3vnmbbEBwureFua7Qj2s4z4LHW2QvWzoTvl480sWP0pp8/08QhWIU4FN0xUFJp9YVvBQ8rRTWZhZueZYGXDQOC9wcHsga20zI8yUxyoT3gtsFd9h37UQC35NL0es85Xs7MxOdF6+PyHkm+5GjfyyvBcZdTEq1UgF1tu5GhCQ1yFYu1pilHUiyTGqqCAGBhOWY1B2cU5sIhJkUoAx+797XALiwwU8Rn0yZnHVmuSZF2BOPgF/vbgVol8Vpu8Ct1lFUCqeju+8YVVrlUT5bTG5Yfdfq2gZipNfQBe++zzycZrUYquYBSqTQhc7laARdDMgWxKsbw8PBSHltadpZ2kE55wvjZC4TDhe7mDo8Z4VKp5URvmSmXlVJ7TczEhqztzmo4BETB/SEfFXQljur55m771lViDbMQgAIECaYIt7hqWpG9+s9jV4Htf4DPWU9OWNm+ZOBK2iJxJkWKi/7KQDbHxHsk/RkxwbXWjG/6BK9UBaBpHsWJyduc8JNo477hh7vwyhNUIhnhoMWQk/3zwqsONizQ3YsUacG7iWNQxJd6vK1xi/R0UQIJKp87glTmemaYOocPVwkYrgRAyh2VLGFz0nYb39PmwDEXj/afnkdx5U3W1i/0YNYekOFKle2GF/ncDdTPqCs7loseQyWdV5R0mcFDCCX9jlIduy0wyFPDGsXYz+wt5ztd/Tu1320Mz6zPtF6rxrots/zYZe4ZBmFCsCI7Sk+HdbBcuzgZt4iF5ITPJhsmtV1qOCGDZQEhsLZh1QLNRPBkvE4wfOTXO6DnwfaWN6rQEBcyDJ82qJy7BKSI2Vq4khrvJi5XsAcrwLjmc/+/4fV5vif6VW3JvwQZqU+1n8vNGJTsGDxfdcWPo1UIyoX3VixWzXFCMYFrBSBLTYc6H2PvPV5tMFNql5SqZw7mI2c6YYubauBkjObT8YJ6S/w2u2+eEEAoj61Xgtur5QY4UyffkgOQGI/NX4gTGw//OfThLtyngfClyGsUxEoudDdLbcmMGp8UgVoU8TDMJoPJgSKmqyuinuyxt2X6e2NRAh6xA2o9UnioOHRRqSXI89o751PVA3MedPcQtGwxB05V92syLweErKcIBo5WfKMYXlGgAVN8G3YVNfl68fdJWuQVa+HtLFcnLOmJw+J0c4D1BvEbhI1lTbyBlmaLAWRZqshb8YMSAn3FuxWMAD40vXKsioZGV401YEDxjjVfbGCIblq0LI5dxG2aGRQZDSn9ZT5VOuYCLSKYOFfIdyls6TyCv+QcbH4eD7uzMgZD15zDSM36Lxjqxwc6FCZiuWnZnjstHxV5JCMpBjI0OSq81oeW+oF73KaS2uIt9+83d1Z3CkPGhW6zlAGNR65oboxbEHkBLTBNQ47RHboQwJfP/q/5Y00Dx9Ysy2Hj0CiKYrMJs6jQJUPoWxO/B8eAyJpcKZ851JzptOihCNM5dBwGHTmBDRbmpMcGIKEUKdFwIp7HtPXyIDF/QP3IAUU5edlmhIQY694lNSfkhPsBfi9pbJEJ8HcIJD1LOA+FZoMTeVZ8FKG1wUBLm0IfRasuTIw6P56Zha5jykrc/KMQcG9lIuDgC2EOM3rDHDOuBmqWTeViXH4ELOvr8nEHGsCVFOC0JTStEtF7LFxERqm6h1a0FbZdMTo86OFNz+jWz7Pu6EAbtRqdFY49HKb1u4QZFYbY+YgTzbdurS0C96VtqJi8lmJi0hb+SJeGE9L9W+U97ceoWSTfEW5w6/Xda/iaEd8pgaEzhRJzVhgy6FKo/fm3huf9jMSoKL8q2SUpfSe3YO66boTEPeAZkab/Y8gb78Xl72/G0ge8Fo9QyeFC5xjhZXnU5Kp7XDuU8FpSMt3wnTKihaMX9hpAXW6u4sXYuFWMhH9EUwU8b2pjh+ZDdDIWZiCOWJnZ65fc0+7e2KoM7/7BAGJelWOwp6lbrDmcQCnX4+RF3esEbqqG/ugqDKO5VJQkWspXUXyYrRPgLGprsIbf3KOPL7GO7
J0U1BFZNgusbSKM/vIR3/7zzGkNnCsvAOYUpGheYuVvOAezNFWAANX1c8nObRKPBaLjbc2KM4L8hElMDBN2+qhh1Gd3Qt4Y9/Yv5BKzkLzGUBrAk5oeaxUZ0OhBIuULAsRP6MiDlCLxgalQSLiD2sYzxaxfQ+7abfWX5dlpbxmitdaSr7mXG80L1Bt5+JGx2QSEsfBwTp21FVmcGXErEcSnqunspnxNr9GJ0rrXJ4PswdnZEL6D7Kn7Ele3/oUXCL2s8d5VaOeNmHuKlw8DHpMsHFaBlBZQoR/LA+w2Y3rzk0r+MKrcUg1ID4YP8NJd0AQp6n65ODANy0Wna+TLeqZWbizdOCSp3mOsCnTMU8XM14bQBr4kdpEr9JHr5m2asUZ8/oDxl0dYqSiIzzb04VUb54v+DjJgq0nS4uISbUJF65z7cjrqi5tSGqyA5Nq2Lm/r/+L3L4oY7U1aOnUPnUUMikPSo60pBBveqMNwZBr69lm+sRlJG6REOSHyvoBT62Ki74JHYkpKMjTAamKKV5DebsZr7QxBBcA/vVxpcMvoLN+4SLUvaXuRUepdiCwgILc6Fy4h9v5h10Ungb9Eg6iVKk/ZWiapB9BivlgnMpIc0zNoMlhHLXNvuc3vGNupGxNypjC4cXIKqJTnVUyU1HuENVG9n0TJoTevlYMQTtkf8CV8wFaeXLUYA2JwPbo/vXo0xp9sJNNGHLnNw7g06Mg89lDdghfxMk5tLwSl1tq221Fl3t8mURqtThffDUjghjWlCknX7m43Tv42mC4FsERelHok6p0xExkwpkyvHzvZtbuRb7r1ML2OMqs2WqkTKDEvXxhRS2deH8UMJMyi1sWZzYCzvgfENPf88q3veyKzudtpBBSXqcjRcMBtUYiz9qJd4iITMchuTx+18AVoHp/3fMVZYCd1ROSAcW6pi4Bz/cIu4sg/+KipU/R2ErNbzFLb0f0Fqcx1Cw/0WDSFgV4+Pr/ARLYa9IXvKHgmuu1bpjgehXGik3jGcO5RnC8cbuQIfYkUC0fv6KLz5ybfLFts26FubALty6qwPR7zFucnK9eLhmt+h5kT42Omul09GNpyeJit/bnQukvBHUxT2gDTflxPzx+jZbxIyP6gBua6wYCJJodjQ56H25Rd1plrM3glRoqUFccbFwUl4cXw+EQt85NOk3xmBO68Wh8H86TpwYgF4kwlmeELaN9r3JwvNtV5MkT/y0cFlaeE6SoUgmTH3Yy2fqmYy5sDZtshM8mTtEo/nrhzRO9n+W8RmEpMhJDx9yF29QGndo8GbWw5g4xDpD18+8PTNlQ/fyABoTlS2FY49BBLzaxwJzZZGD2BCXriCCZS3QRKL4PRLQT5H/C3iz8W4XWXgUK56apOkxWjDDt0/xDa0YRvZlHx+INcSI8pwV5onvlHkVFIlNU+5MrIcWDRJfKrbckT+S+20kNSWMlCPWy+RIFoHUTfzkf7eIVE3Y7W4qx+rNflRhp7zmQeS/KRtgUDmN2hOXvmxiaJ+63ef3B3OOREKJjKUedFoOPQvD3Tp8ehecd71akiPfFqHREcq1T334mo12Si7locNa8nw2dWYmz/LnzAJFMovbjmUISVsINZ4twVlyEsy1zRTfMvggf8XuOh/fr2/OlpSaJ3roT6XeU4jwbWN7lvMG7KHjQ7x0L3qFe1M5KnpGyAp8n3c11KhQod2oy3JgcAymJocJEkvWRw1HC+JB08/hdzGieSGcFcAcDf8h9o5MmRBjjF8JdOnWIHJSlScETDSNfyVxuPe158xN8HIhncxYZsHfp+FJdEeJYvRzjW44FrJHilghq2YvP5+lSUQXgUExM7FD3GM+Q37XlAaKpHbQ8W5STlwEy8AV5fRokLs4H0uA4BAuuMgOgGFEUUq6ECNUcbZ9oxTstV+UTt6cBw/bwACZrmZeKfEvK8jummyxtgcRR+CylNT7apZqGPZJlZD7TXHLb0YWlEy/n/oCfJNjas4QxJpEOtuWsgrQabO7GyUXbVS3cNVu5yCzBWg2BAjYtBS9K+yghBNaMZkXJb0rhjlbHYq7C4KW2HsuraMlbQhFoM5akR2b+nK8JgvhsiCQGafzxso8OshNlNmPRPkM1oS6cFLTlfEbG0s25hIOvaE59gChH9q3FDztnxnskBPerTOXWur9FYT+BM0v5/eA1g0nGVA6Q+PChTwT1EZA6y5/8wWwJl3SjI8tef9EvWmtP+lNQ1UeO7oL/ZknNgTkV9TsJdrFhGa4XXbz/jZSSIClDavnNH631aipQOJnJt5wP6iZDaTAuCwM1Rap0hKIuO6gVxTZVzSaH6XcAk3LWwRD/AxNwMRi+52sTlmlAUSlPzJojyJH7uwIqnW6g5Dzf93Irr12/VunArMNZsKZdvZJIT5l9PvGbcYQd1qVmtelB4A5N+GppxhJTjoIWQZk7l/BwuH5PBQqck1pONGkFgXh126mBZLcXqindPSvStzbmPRLeDEuo+tFXmA5ZRBNfmrLGCSXkaVL3GWqapSe6dlO3koxhpmtAKOwIhMF+uRSjcW6VkTddnbSbj1vqIrgdrmMmEhmx3dLpQRnyokWrI24H+zEXOWSPsiKqBjRGIu6h02D8ZXb+05saZFoHMiqYbQ3UCD5+fflfWi3Sw0FVx1MiVMYmRfju4HYaNTktq+fa5Rb+B7nJbm1buhfVFw8ExCCNoLG4eaZalQsxsZE5Ib35xVIZdXj3vNLilXXyS7rVLaCXSN5Jlw+7oP5HUDofEu2ItHx33GD6dKWf22cwsTdc3DJfnhnVTk/wtEWg5j0xnNM7hsyJ+sLNfPKeRRwb8BoAYre0RAD7koVMw+qM6ZLKEAR+ZhBKcI9PcxvtOvhBsCbrA/7eNT7UXZT4PlttJhFpK04ntznW7NiD6S4Dro+w30w7oEqMtalGNxSY3avUbBQhuBBUpR2ClqBU3gg3zPJziOkqdJL2DM8xOceKu30S2BVMZy+50CQRHyhCFyhLHO1cmG9mTqoqyy9/P1rd0pqgMChCqsuDF8B6PKJmJNw8h5ZxXuN6z61NK3+0vvAr1k3nM/4Gyq3zTzMvSU/+8deBdPBICLXqzkmViRoh7xZAHBSzYdQrafIqMClrHVnzLynodn7UlNx2EnXDlD/TKSMJiQWQf4XtlNEseQvuFvcL480n7E4/qfX66wJFWIvj6bUNHJE3uRJvxXLgPm4+hV0XhJkAxnNaXe1uF844g5o3mk5P96CVFl87iH3aEpLrJDQEJ/e1VSLHthIcx2Iyog1S5trwCXQ2FhwyQbGVKF+hZhp259G0zj1+yotwmSkbKCyQcYjwYGJm+evr/aDiUzDNvc033qmG7e+hjMhKCv3lLSFh3gTBtV9WxemE+cbn0vc3NVPTgZAsOBtfu9uL2UW5cSOI1r1r+dRSxDZ4N0jIU/bWDnBfuxzSmgg3F5KLRbwYkglAHcjsa8CgFO5AagLg648BO0NLXZLsKtD1tti+Dp3qEOgTyyZ5q0LthyonJkmYRPYK0eHLKOcr7n96CM5Pkz4vLbG/IRmcQMFQqXq3RmWNyA2st1AzJ3FmiYTTGZ9d6kamWlr4x0MEJRCGNNBB4PzmYRUXfDdLBZr/oJrTZq1qqhocGKa4deNaSbIQ/Vu8OFDok1+f0JFJBl6sNL9g8FbHlaf/BBdYCb3ZrmbhJF1QjT8uJGhNMHoI4OTW0UqdA7BXuOtYhX/XXB+Bci29RqYaXdS11tFiUJcj93qu08oBJTHGJ4bdSkOHl4U2dwLnvdigLZ8BZ80kp8+ax5Pwg6Ihi08ZTuKya5IgzKPJBt61hnuRjoj1OPyNUBsVkToNEaHomsZz3KLZh9ehKcvoRBkvIREGiQiC1BscOgs6iM+KH+2QFHPEwxzjApMhQCv3/2w7eH553ycgvvuvwNG+XCKrAv758uYbPEOMWfwojZ9lrK/ATGLoGepu15m8ibRayHFamqdl2l6I+Txi0wORoeJEB1XWF6jFthOqJHcOX/Tytg8AZ06vg4GswL2sycjd5qcp999zZU4LrcbKxjMmiKJ+kAMKQx8j19KocWzzxOSGI0olqR5oo5M04h+D+rga5xLwXCdpL28dPy
uzBs+cbH7JHSQHhhK9cyUzTUXfUl1crVMr721ck/WQUpmIDydVTtDWZLefn3Z9TVYyg0lP/SISokZWDDOVKOTdeiWzZ/hIL1UY8PaW2y6nAPpHFoysZKgkE9FKaDMSUHUnVdp2L26nwklViaV4szai0q+Zg3ggHb4uXUvgyuQr4Rf8rONvPT5SDa9izxAx5m0knfa5bglFAOk2L7x5BSmjf+7faL4vKtAEQ422BkrYUKduSAxs03V/lD5/mjjnmILP162l8AMftL+S3x6hBjkNvLzfTaKQ4W5HmUrmulk3bUU3cVtFlgeJiIaUvN3yFkBV1H1KBdeYddaVfKGw2VdBW+THfn/0Z4tnlqqNao6sXDwqnVipRZbuifiN2eRyefMjAqz1zrRLaIT7O+HDR9oQ10wMKnNQleCNcRCN1sQIFqttaujlzgU6yJ2ENdtmX8ce/7nVNUDgZGELKDS/XrFGKCUvYNzDNT3V4zPJhZt8bLmuNubmQQur1hB9iU2H7qXE4jg3CQQOmsEhD4YCvLdkpjuTe4f3QKJfaigK2jPbHHdoKIBFdihMrSu9+ROUCzb+JOL+MIhdHtMPfUDqtO8PMuDpFHlTCih0gIdfjygEX0H/tsigKVbfQJ1cDu9cA5CP/bXNemYZe0FNSvT7kD3kJUY3B7DDgVuuOE4TEgUV9K0jdYB5/uXQn17bquM4mUnLtD8wMiq9bxLksNPttKXdHAywPpgR4uOSl0fUnTr+vl0Rzu6wBRbXIIvlanckyD3C6jO8dps/jmrM6xr18BzR+Ue23NwocsJpgdikpLtkJu8HbFqMNrTgzDKxMnykBjWxu9odpy1hFU+G1RNUfgYE8VO5PPiF6PGivf3qVMaXHmjD8RMqg/3NrhA5CLIBTWNMveLkYuxHTpz5RXKVBFD5+5mYFrhRkmRlWzZgeUOwT+z0B46MvMeLW7McJpH5KUD623zswWpmLR7oKuf2G9nBbbgryoQoFNDrz5sQ5VECkdpFJLEuEYIJGFwYMl0O7lOl9qv5uklfVFLcExjeFB1lMWqeRWZ1dfbVBjS971BfKOS/KtpQr9ZrJyqDTBcfeHOdswpoRzIMFjHh3YIacUsIiTTo5al5qx2szaThGvPqIByY9kBT7ebmRgWK9O1ycPki/fuE+k/XuQQKKQ2y5gjpl75jKlkHratGUCyr3cL61pydm7M7KVxj96jSoaMWRNEqLkUeSmijTbJnK1cUXyb3gdj2Cvm+okzBmnVEuiJPHh3WZV4Qd9bhyZ76wrNlDOEl/cnk2nBryvcXUwqBWvcaD1IdSEdeHZ1ewyLMTA0S5btf3X4/Z43LpNKJgnx/FKKfpf6AMnUCcGhSj52GEAxxfbiNgIEpGT0S8fgqM7Rpz6EHK0Brcjy2QOnNeqtApsw1CumoGHx1M1TxcZ1aqi7a6XpyVoTR9vRWyNPlIWA+IeuO7w/VnN/fEcCymARSYOy1T66SL2t7+i1atBUWlo/su1t8CBEbaV9R4ZVxFyu2JYKxXl6eTplmkbSql/j3Ycw6EUdSbvQLgoIvZscxdAynQPlnkKCPE7qA+xkfBm6HOjM6a7biOejaFdeaoS2mfBI/A7UGhb7M6vAN8BljBIwd+yiWy89mnTmdU0Wq3sG7EshAcOxeKaJrstFC1bBe4E6SLz5p5hUeDehl8mfdtVZtdByIc4TCaJTwgoAYWjo/pYKKV61XPbDwMGZ5T8sGzdKNbJOFhtJPLRH5BtEI6hXj+Hc7ebRhWTVMY1JrYuf9aQFX9R3nSkMikpks6P9l7NIFic0HoQYJM2A4l2jf2AA0FTNasC003Iad1MYjncQKgbPJWMsDfaQWcmx251m56PNMhwapBEppyQaqmFYK9SwWS/Vk/J+gwTcpSlQpOOVlTbImq0B+u7xk8TwLKo5mfXGxyazba4bsLsh27Bmoz0b8KsBGa9oUkavTQnlw43emevJqwM3PTyQuDY4KzdN4w6TC59XFeRv+w8OVROzygXItyvsQNEkYzFDuu5WO/20iZG5DTyYn6eNl4HYLEGvhusG4HtDGpq+IajVrdW7XjXGoQSoKZ7JS6il3W2K8z7hj0MfqXWsrRQtF7Xek/m5UPgAOC2MlGZqhkOmE9aQdqCogm+Cqc/NcECIxwhr3oY6bsoab7tJctWEh2B/dLziEZRAmhE0UDcMazdB1DylkxvirIYQFiKXrUHE8qwrQHU8mUI0rqWDuY/9+QtHVRQ7TdMQLOIevQVeqe2IMJx66UZaf93Dj1OTfBztcHtooiWLWKN3FuwWEO3nUdFKA0L31BQfWAJRjWWLimQwLwh7bJTK+2XPEUItUQuRHooULXszuEmo4GN4FXM0Y1iKlo3OL5tQgepwcNUwzHweR56qpe8uyResU0tSyrEY9xcuOTciNSZNB68632+hslvhti+rvPB7990W/DktdeajL6aFA2IJfLMuxUuZ0jXzy1SSGQYd5ASSzLomwvmePFwBIFD34fKNTG5KZ+IJSz0esB149YMo4Z7d1KdM7bsT7BQDFGYnb2R/p4VN8Tof8obrBHqZiULtEKYUUgzRlTJafztFJRvtXGF4pULSAfi6AzfR8usaMNd1QgV7DEKQYPfyFUmxu/63xE4HNDLKvdfhfR3ezEPuAasfHKuuaFGi+Nki0mi5YtpgUF2GqpVsSbfG9i3uDvjSC+d43cnLByxCtjHL73SMVgX5CmGhcjuVdvIp+ZWhUC/QIKBs74xmqjAtMdHTvv9La98TAPGSHYyzJZEFh3g8TYqucFqJV5JRdTTfLr0UzDd8tQK2XX7yv3j5xSODm7qNUZD0OKbqfLcyUgJdUNbDMTm2oji0faud87VDHe9FYPsVJwaKvr7ixZErG4aktrS/YG3BG+f/xzFZWg2gz2khCnciq25YosJt5jXjWJoV8DjsFX8J4EcM8VNS3RQcYWjAIOiWGj4zOfDnzTstdZlRQawcKBZuAut/ghkuYspKGWLzNQ2uaxVTaagYOUjWgErLtpXniElxL2GtBsR1GLQi+KoLHt6o+MOuYslZmlUW2oZgfEMv863FruSLM/6x2QbpVYcBfEg2z6q98k43WKyl7sDmkfPbx23xyhn1gNkUtcNuxgs9BHo0Omk9ydH+BWkguY93Nu8u7WtByHpS8t7ag5pWxOtxnlqcFRfAmnRJHUxBQzdHQSvpRWNWpOgsJy3rZjbUKFIo/dOnxvH+uk5xDWqbQ+MHyL0lYW4gx8XNd224FQzfqj3jb4biVUIS8ye0RXGPU2GBtUk1NOpbX+RweVn7bD0vutZeft2fO4rbGal7iiqez86pmWpcDY5OftZNXPQ7BjGwFmEwH1ltCmu6QVGjSy+grW3kV3jayKo36qSSXpDZAi1F+DlTY3FvQtvT//aYYFzLqz2JFabpLNtk0ZiXjf+kzziIP8pe8xVW9fwlQ+K/c+whppDmtybwt03W3ECimMe4p29T0UqeFRZrJ+f4Ld4CryXaRYkHh4CmsYEwvogn1fU2ku9eYAw3B3STYkYubEGq4aOw59v/4caw0LTa7OgsKpFs/zOJ7ve/Vy8jzflw5oALEvFR3R6H1fE/su8fTl6aaBEVsid+BpbbBVl3Dfo8Z71solwDqPxkduetpARVT093fR7GWGMXT5yB03y1b1QAxsJA+xzPxZTzBB9T6NpUO1UEU9CF26Lx6wUHauhIywaIxsGE4a4GxFmfWAKCw3qUts/Dq6PmtU7KhXAehvljd3lk+wIOmRtZU9zBrHVXwskCoGaFZmhbvcMWu3nZSDS8Bhvjl4PNoC/CMRzNczGnDG6n97S3g7bstj1zyGMpfxXbbAqKWmQB9sQoDw5YPoYRfd9QdM4DAJpp5nA6zrplmkc9pKfJ6MIQ3inY52aNlfXG7GZf0dwUZwNAUHPL/y1TcfgAr7ZOm9kd/TTROI59IzGYEhIUSy3ymXmaAIxr20GYrCzzGDTDKBm8iefwLXgtA5duTg5Aa7m9RWaP4QvxVm/AlYaIwl70Kg81wrJ3HB19OlwTKCJyR5UbTfJ2qu7XUjLcOoIiMkCsys61flzwg9WH9JLE7MIx/2xYSLnXkZvD1/n0WQwml48
21E5BuMx2EljNLR7clBvuf9fuoflG3hzU+VxvQibxPYZRVBZesLBkwKp715Mi691Wk79xfXWqrHdh35GhjhlG/HokeyfWtlllhqrcfFxz/I+2KfnCfC4+6pUHdPfsBKAgpymaTX3k9CL+RPGcLcPiJAZw5FZQokLItYgxWuNohT8sGdLz4rSzOOByuq/U8PdN6y6HkLOcTzEjX0V/SZsbBqr4xKdpdsZpkabW/gKtWWTLAm9B6eHitZj290B3R8qvEq3pl2CmdULNs7I1+pk1dYy2OP2T+8C2SHV8QNFnFoFFveHhpSveYgPssgQHAP3zu7nqaYBhVsU7atalmfyY8Bv7zWL86JDYfqIhepnGyU4ycaDpwcxOEipBs9irLyLiWDtIIaz+GoxQO58V81B95KcjbkZkNM9Xrc4NgIKyGykqqJwtojjkHr+FuoRBGY5i4/hVNHcqoW/6B2+6qNX0zH0YcNh3KZnJDEp0ACo4pbZK486W8lonfyVGWEf4PA8qUpExvNXWZz6a1CA7HHvg2E1FC2q5E8G+vHmfQbV3AHIK6DjOb2vUXu01DIOnml/vgasjl6NIftgTuY5uzmxY2vyJlC0/KkVMqMqAaPQtpySvTtBkFQS+y4EZgYRwF2713ZnWRwKfR7/aD+3qstseZK+ZKYyeEieBqRunrCJDvyhploU02O0mYNr1FuSH0OxjHW04QypqcLuSmH1OqHqdHrBB0w6rZzo+Q2G78HkvihJI/usoC6PqGA/DZWWVCBlzVA2bfp6KgqxTOPRaDYtb8PmneIVUoAADqraOmicWw1zC6MBA99NOqaIgdWd2yK2aI1/8SepxykL93fGEPrKQvXzPBtvj++j1TJJwkvepeisEr/NWJRh+1aDQOr5xDaJ/lWP7TNx81SJPxT16DJI8IocA/eGbU1m/dzlC2TM6N/Km8WeMDCQI/5/fuFlRjWz1IWMDRiJSYKZLGpBo1Ffy/AQMZXXc1dOg1pCnc8uDKAk4+TedqnSjH9jKBuwxQUv5/iNNmEuO8QDuQTZxMxCwOQ1jvm3fgAvAgMZXwMk4PXOdQZKHkv+BxvPgiVIhZYJXAAu3sTJf3AIIMHI/cnNYAPbclL/MsieHm//96YqkZ0do5pdraEZcOz7m0LTJxw19k3U0426apCEg1V5Ren/GyAQ3EljTqAL3Zb+UNFsNNvxIKqQWjdzjG/7AijMZ5gXGJlCFoonzLjaCYfbbCWHBLYtsoTiwSlVRiD1un4XL3b4K6h1LShEPa1tOZXMbp7zc/bZea7jUfsJA3ojgRq90aTKbD4L/dosrnDZf0kVnQ+nj9GJwFLHvePfjr1EvLSH01G/W+cSg0XmwD0e2AcLGPwQd7OS4HouDjSvvl38K3NhWTjDGpC0Mt0JTrAwX1BfxXgP4XN8TjTQgNHwYxu30qfVKeS3RT9M5dtoebfus+KRksmL00JgvBLIjyAUdgSdlFJ/BcZJmavtuESfsy3oz7xY0ciLC8QUIdHnxALkfTukrmOPsoBeh0zJzEog4UdGFA4eR3Rg4s3/uunaSet9FOG/JJvGTpa05tE7xo+3oJb9PUI6MJ969VfGOb4ulgisT8EfJC/o6XvhzMvLzL75BeoiF6VWaQpXRseMplwZRhwSZDo4l3mJHmnnLEwR1FwuAmyusUGuOBK9XlQ1ejBZ3HyxKXaMTrw/kAzzcxW6vwWbzccejrLnzASrCt9xCfZgxkgKci7RCimXSTzQ5xDNxztYkWsHy6qRtl9EEFx41K+2D0mAN+Au79Yx6VJvk7nwXka/SG1rvsxxFTac42XFr8C0nwM7WeqXTz53zmQq8Nn78vEI/bsR8ux6nmR1cKkPTc4hRGzZ7cHOAxLdqyTLPu+BfKa9nGNjyvGdf/OG1AYKA5HZwL60VbPWC9mbBxcxFdWBNWXmwEmEqQiuKelJeqI4ILm9L8nlDxDMwuILN+NV/CkuCgZWKvnPqNQ2pbmvuZtd+k/98/nFLorCfHhdxmngL+nQxsDpTPqg+jW4/20THUKYt4e9gBnxLWnjsxwkm0RRjc4g6D77fuZroLH47yfV0HXJv564KZ7nVKYtMIky9RnIoTcxu5CCGAYOsqXHKwVBQDWJyUTrk33uxZAiYgY0INDymxQ7bsohXDrH//86RvepSpmNNgqvWsxsjQkO+QLb9AFdB00NKrXQP9ehb1sm8EUw560BQkvlsG7FsNuk3LAx5eRTNQqIP5yFlSDm8syjALczDpEBqZLqh4uo0xk0KcSd0hLCLALJ7ClDE5neZoetM/D8iT1mMHYorxjeyRsM9TRSPibR6h8e+KxBoA5LPVQtCizDolH7LZetCsLmnysHKhFDn+3qk+YCbZbtUzr15xQLco+hBMXcW3dVh+AJzrvE2nrvTUHSI/YBX1PORFggfOyOUfsCLB+WUR7Bn2YbSw5SZSrKQDplayf5CirqIfrDmNmbGE3Jy3VQRQUIoNkxsQDeAbaKFbg6Ss9rzKRQuxjRWRNkOJjFArOSr4gI60OXHrZ6Mag98e4WNFgR2Pu+auFb1ewhCUpJV41Sz8Fqt+CFBuA2Q9HZHSfio5rIgsN1gKToZwRKmR3T3CVe8MK73IAfb/FxA0FREBUye+zo1gMKP5naFtsEyxhsfqhpa1YI6MYyC7/0EuQaifPry8vdJrQPWmsDCuMrsndTQNGjPf9dEs5c43KUwbfrDS7cm/u1r/um7AyVYlz24KiDXG/j+ZCI07meF7oA45kSPAVaqvPisartbDSxNagtOIdMN8T6YEfGnhIj27F9ADAbgnHAJtUemi3yq1oEvid8d/HWRT8lIMpc2hL2uh3HuLyB/yzTXNoyLEFcMhZjyi3HaoqlfnJJlheBxADV/YooPY4QvCqLPPWaQOl6/3S+ARZ/gp29hSKyXfP1IfQljD5YZOCjA9zM5hvJS6MQ9lFxnDXqB171nMS+emYpy2K7S11ajq8YEn+nYJwZZQ1IKb+ejtCNgtBlBDNJL349xhNP1VamcKNdaaxHSSy4c4IKI7c2HjnV1UrUSF3ilZdwvZKlrr0nDEgLxmY9h1nDT02x0BoLlRdtTi1HJgOVyXFKLaa10p0WEQ4UXGuBqqYFWsuLsyan2BkRP4mfCHC4WpK1YyKNPn+VxgWP3V4qXmzQr209dG0lwcX94JTqZtrN2X3WvMfLYHsQZfO60O8IhNYcmQjCrBNfdLknWUgCmIm2TU/A3oZYacVCTd6FVyE7hPCy5Brjn6FS2KdDZGxypMv8wTO3xYsdFMHvRHEqWiHC+gCt5WPBGLl63H+qb+9f5XuzAkPdDmaXPa6QA8hMWirt/ztnopGoyaa3hc7AB37f1/UQGrA+GLP3HHxs5WVoV6/cYR1DgS3aicirRnlEasxg7TRr0+q6XZ2GPiKIprb0IzKjfnyTLpwJV31QVD/j9TrQKjmBsj4+9x50Bbll2S9S3VUgLvg+5QXEjvSZVvbdewUin2sE17+vrgeIr+wbPBuA0aSG4xpnV4L+hG+WLABWK74DBRSHRFe+sZ97GYe9STWVpHdFjvOSYqJRmkkk2SYaee+yYt7i3Da4EN44he1ST64xxBmFUW/My6pLV/Fy8tGZ1HstSxX32LpBfKkmWVffUvas6TDC16NAve29XSxYb/JkAzU7mDrVox51AdMmqU6qHjphICbp1wpCpwCFx5FLVybq3t6DP9sw+/baxFWlucSu4rms7O2WABPOFy21877PZ5BZMlXCHY+jy7P1FEc1BHBL3VVQg86SJZgEjjIGtzadEpIX8044gBygCj95qE6M5ZEpU0TJQyJt1v1vbufjfPsrNNRt3QKwdl/o5fvKQkvG6fNlQh9bVFwMBCfqMOTPzv/kM4neAgS4DopnnqLPcPymVDdalIN0Isl5Dxtnw1qMNdMj6lOY0t0LQJQcug2zVFP+VgTM8F4SNeLanOYvCnbNjPnoC5jeFWfxVznXiKw+GJKcW/0MAXX2O+TrgbQMQb8VLADEFlYS7EtrUKeJHRiOQgMKEW4qAU5WXsCDYZ5xMIBVf4on7JrOKlVdz04iPHzWNR5XY6pw9F0EwJd5QTTWdX/sGNj9PrTsBTh2
XzHoqmwBLZDInUosXyj9/T3vouyI/3+FYy258EUg8HdrOguz80zNzfdU4Jrox61mn/FJ4As+gOyQQn5Q/F80/5RjfpGM3vUPJ5MhtTYyKWomj/HxCCP5S9Ns9d2WEjyAm/QxgnETvf56nygDwPg/JPDFNwKBwf/LjeQ/6Rxxrb1OBMqTwqH3bxYe99gNAWfiWzzPV2xDa4fnm4dVbh2P+UsO/ImzNGFeFxLcJqY2jUo0Sg/uEvKg4+YnK+q+xkEOe9I1db5794fDzespZ1eodogaZ5jfCC5wuT2TDyO3r8ddOD7p1u6HQkKoQLZq056W+GpFQxw/wAToWiHY1okQqfcAn/Gx2DGZiOfFWmp+xFjggH2gnS73xc0BI5ARo3R4TKucwf/vZn8fgrmMdtvoKOeC99GrZk7UQMBwv9fnSsbgAeQEUEhXLPfqpa7fz19GePxDj/lo38wwgoekF6FE25Y7vQMt7kAU6C2pLF/pvkuU/uPn31HwybD0DrpFApTCBKjJ5n1+SAcJROn786wkBss/uqh8a0bQmLAJM/MbUPfg3fwn1YP+t8gU1jB4qqV1wuyE39OTZkEl1JXLUfVWLeXi31N5trWzys7cSq22YBk6o6rgOoLKgwW0AJ1VM/hP3CsmIBiZKBiDwjxrXVMs8aatRmtClLLBGqcXuiAXWIDWZ/gi8OzoaFpjYHQxaR6TSz0C4oHWkpEnQq2EtSMcBCOWNBaucY36h8lNr8ujQXQW+9UTN9uA+GpMh6vF5R6SVn109Rrjf5TjLIppQADjHbXw9fFaDmPe2OJlfmuIn62Cb8pxwi7cewXFwmwkuRg4D0WfjOVE3gA00v827+WqYM09W5lOtGnC95SLqiJ3WWzBnquitEodTOAslIkVnxNvh3P7hKwsY4AVlaH+Yu6cb4Y0QTColR289gg9mhKaMOns2jOXoERd4xhYZJCSZB1XQFVk8iZQ3TCfSaQ6ko/XQDkHIBtq6/9amTtybBAE2sv9sXmvoCCvj35J3P9T03mEPA7T6tPvH3r4dNIKKsxWAtnV2RQFSsjt9X5Nv1ma5kEM8uQxby3T1i+hJOImsGiT/7hZpvFU2c0kOflW7SFsCD+JBLwH6dWy42U6ywvyIjj+5GW9ZkpBUUqX02LuMUpyXzqDkvoGdU0y53XMvR2PRAYM61rF4Fcrk/dX2n93nvB6zVTCNvlltVKSMacBWdALiCfRiCBHtjkypdxsQAv4/xEHoRyMzNNPMn8LoCdTcbhT75Xk+MePtXFYTxAN1R+sblbRWoc3F9uQBVHOPG19eNLPuvpp3ux1vsRPWu2T2K7Z0vrBm6tAy7Bq/c2abrNjfC75urSTtM9HgUK5kGFU8vs3GOmm54kIqIwae1SahLIA4guDG76GToj4SHe2XeqqLaGJ1j/VQxF56sHmenEcyw5f8WRT6UV/hR0hPADKxth3Hh4PMhZ2OA7sKiFZ4e/S6/FCSfxYvBdpx56IbVQzh2rLa9ZL2DDbKidmk4tOqr8HpbYZbqfWA7lvHkWghIN7f/l5MQZRfKt8jSm9v8tVmBoX1bWckzYwUe2CIslERP3hBA4MEjxkSo44nwVpeeKsxxHyoAQPUjB3rQzIryNd+GoUPzrU52hqokBRqIsf1WZjnGVYyrR+X3Rt4HonoZwOo+PhoG3f6uUhngzB+2H9csaaeFwfYfuswDGqNgUX4k7D5zktNBpxGXr0YgyQvks/aq6ERJwTw4Y6Mnawtv1D0dIWd6OSPYV2UiYlCQjNVpsbN4dEZm8co49dr2W5d2xlMxji8KvjnYU2afAa8n4oXrVrO2Kbs5hUT+nacMqVdHcHdO3kaetMXkwJypq/i8osYtin2oPAj9coEclH0WkCQhPgyvizdDqOjYB5BrUlLbenNt2mObjI3EsQjF9P1uBk3HFNVd8rPaxFWFKblcERIwGMIAJ0vgyzA2kv3KejaV2QwbBT9/xcDKe+AQfPuKr7tKpXR2mIoMfMyU5pIPf8XC0PQ498ChC9wUOmeYxro03b+2iE1CAUl4Tpq1WY+RVyYfBJHdn5A7FJwMk0nE8Lj36rtQuxE157A1mb4C0fauQ5JzXTJhMwa0DhEAuaVk18wjBCwn/8ag0232ErSUr6esntX5J6qUgK2F7WaKWcufs1uiClnXGBfg4xsbvxLW8XuZJ52koZK403IGzjUuOMwdqQJ7OsjCEnrjPcORIY2vRqIy+Ci053Lx741pxSrSFDmyeOayOkUlAt/0epjadB2OZbfN0CbVrCBZlzJcqRaOFr5vGVEKuXWpwZcBgaw8BsNftNtknDS4kV66jTExhDxC2tERxFyT7FFLW8xMmV4bqfvBY8BfjJFLZFuXA+V/h/a4DNOfR865THDE3ttla2onh9+mZuca+n/6S+OuWkCilegWSMFgFamEaEPEww4LKJUlOclKHWN5F4CdIBU5f/8wqtv2QEudvHyBrGSi6xm9XQKLKN7HjiK3pY1CHi6/99ecFIjDzfpBlQbHTWqnlSnXASupXQDya17cScCI1XfpDqLrDBAZlr7XJHQAEpzWgzOQL5jUtQpVTNtrYTlUR9jydz2lch/zLtyCmFqNvdg18+A/jOvZvvHrZKIUjAvhzmdraFm49pfKrgHW09A8KHM9AnYImzrYldbQuKJ99TV+7FswZA2PZu3j+3hBVZzOyjKNPUrjDblqUSs8/4LBy0fXYiMZUCP+48Kl74DgECTkkV5NeYdEtmLf6Jwz3BORZF0SMvhxG2uqSn4okALlWSGyEdTiMK2Qw6iv6LnxmqfxDEvzpbwNc8W9TbeTUFcIQEjs9BVYO4QMfeUMl/FpY0/TNXdg5uMUbbXupa9JnpyQEUiHeql/hQYdlDciEwiTHLZhrxWRSPrbSsA71QNlM9bw+JVkYYKYJPj1hEP6Napf424U6kZyDgEM+OjssqvU4ugfhRqTU+2sBadz4Ce3lYai8GonD000DNFlglIlfptDcdyfDX1PFBEVH69+bBPYExaAIyYF7pbnUU5PcuvTkoHcoSRLrSLJ/KCaDe+kOm8XzW+g8h5/bPZSOSVeA6euqmQlnRbYoXOBbIIUUbK4gH3f92VsvvrBB3NQffPJQXJ2dQMid18gbjQYLOHnT0ynn1HA4wTgz6CvkK5DsCsM82nGO3BeKgY8GR3/zuoXlSRkuAUPQmJ1hQD1XxyXTtSTvC1D+dPThrUqtn1/ZoTEB/jKnN/TM+1BW94uskdGpdYYUrovcQ8YAL/xoeKfyLGn1g7WR2qod8B04NUSJ7Lj8YKEMdX1eL6nqGqaYWBHtvalAmrxC481vgA8cb/SxmDC/7TIBaXS7IbCzxWQ3TdKKQlWLdtC5YhUQaIWbm6fOJ+AcoBkC0ECbThnmWgxl4nliEHpYx82QvfR5cWOCe8MUGd11JyiVnSUuK+ZBNY1VrJ84Sys8nyw5O17Fuu88bD+eRY8P2+Z+5mpihgyBL27cU2Y3HTI6/VjCce7+ewU+0MUj/ekVslMx7zfKXK5sFhk0s+glyHwf+wcSZEQUCfzDLa/JnEDhWp4Hf4SgLv3BbBvAoVvwCGPk+hy6m9ERhnLY4FAZQJVlDGDyjPBlGIkJVVDgS8VafbWwbofdDQDqgos0la5rerWDTmLf013PmYtAiM7G1Ji0nDAEvAw3GpPelYjsZZGe6pWHQFWCsLGLeF1B7hEM6z9QYe32buS/e63BDxjs8XJT77jIZR9yQCD/EvX7MYDaxo5yW5abq1laijilyJ3a6wbYma9wjeCxzF7L1dOegDmv3/Kz2UvEU/bc1fD/mwprxdJWjvHVEKY1VT43fK/CeSn+aVic9ynqYNiCmnaGU83tOTltTAG27DtBTxSmrPVHHX5w83m6frCX6R/z5Y8KzToKHrsOVpjxDACPu4s0NQGFHIgPdwZ0jFMQapvC7EYAlwcs2XuTqpEhFwXpj2VL95paJ0/YbFAUwqY4gs4g1b6IZ3G0fohlpMfvXr60TUK3G2Lcd9nXb7kdjRolyWIYctyaMl6Ksmdax715Eg3G80AUQ+VX2WrGPllGLoehb2T1uUoFVN2kzGrfXTjRTMickmZ8J84XgBgiWgW2u
G9VPHIYPM8P2/Qhu0UPcZAxA27PEA9FNjUG2vZGHZIyIhlHN/+TkzTVh5Eq+iwVcxncnZ38Ps9z67ReXNEgKVguGqDOIV/Fqjb7H9kEQs+wDX3DKgXklIVO8ZThWpxb4AV7b5wtgs49CUPmNoBhOAV6WRJJ9b/72uAr2Cv+Uvugz4pFr0p7DSgz3+5AfzdH2dwBRSECwVGAdSj/zqtLo8RXvGA1L9tWnYWNlihqRImRXc8/2pVVGX9R0sstKAdr0jQnytIvD0yzD6fK6xO1IPVi9VXuJngVuj/dtzO4tDms35j9KjN0gd3CNGyS1DplqQBxA6G9Ar0bXEmc8tHhly7R2cdWRXp0Nhor5RHTmAXc77G2NnH4LxYKqjGELGCAxUnA3hvMEva3wr4HcmKz6r3mVcEDWtuzwRrFS5QokHTgaNzXgNYTGunPQb/w/gadPsyp9oZ5xkzk8FyL+Y2O5AF5pK+tXOKl2znSBeNNylXq78WqcW8zvx9x1UMr4Ey7JA8jm3xsP4qCIxP5VMPycHKK7yQwAXRIkaoj+0122gWZBKxMg9sqY8hdgl8+cZwDS5DUyLrzJV6PEYS4fMRCZo74j+5JObr0cpULkzOU+shpwJXdIlLCtuiSWQyjz5Mit0pHzIdaEyII1NFgb1meKuyqIQJukXAAnx9a5vv5ZkaSCERckRghK7kRRQdUED1r7n0wxepkN8KWmcfDkUUA9rTY6LuLE1OeLdjAbdYh0PBdVpeXAzNV8H0qs5tKC2atMhDofcjNwijZTGtfjku6aC/QOVys9hs3pntU/U0qmAa/kVSRj5L25ZueFH+4iWt6UKOQmmn77qKs5UbZpbTkg679ylxDOYBhsnRuQgI9TGBYMtmDnEGhI43v5BiaQzIreeqdUaEZbF7QcbFFHjVITwO4LdBY6wiqu9YgLa0hrCxSDmHwIXpOKqOoio2ovfl5PjnfrojrbJn3qIdSmKbc5zXfNn3oi0hshDzo/ROOkfSdGrOztpuEEqaPq7tLpikyMAoD5pXaeZ1sqjU5sY6i4t3HzI2R2lQ9m5ebI3nMU2BWSMaisFNzKMPQL4J0SybUiG22dQwHqz0lnvd2YHjVjrxOG4N3Q5Il8Com6yDP6+UtUxTl2mjyw9efCs0TszJjcEvXD2PFOqdWHjKH+Su8PTa2gzKEGcOlKZg9kBmjKozKh3BFA1UFqGUPMOGgmvdwSRWN6ifBig+x8i9UitFtdHwZNyVvGhBfuJYMVkV4mekKk3HOB9rjXBdtANZqlscnCqtNaXbqYwrLhx4otiHyXlyz9euGMXglHJDO88I1+p0+5L6kw2Y5T99rnZp4uhjp7gro+K6ukSIaliOMfe8ewvqiLkrdj+h6H/Mft+WDDoi4GyBL0xuxFhugEx3z7gBrWqQQ+2siG2FqrIy0LToOEswywZvUxD8TWQHmO8tuQo6clY6Sf4XK0sT8pfBwVKjcgooK+NnZ79M7X3iVUbC8zrFRwSi7MXcGjg0cvuaC6KwQkksNAWOFd13JidWw7K/xDsG5i02tMTIJyPLQHEdoTRAGzZNqFhghEvIfWgrm2ENJBP0UXposf1h/6RxFIPh8mqaJPbHY8nUeW+gxfgr0+9u0x6gaofplPF9fCorALDGbR7QhBoEvMZnNpmTpin7+lmaephfBRo9OfxhQzPGOp/ib7+nGPJ0v8+0VwtKYkomaSFwwF/xJPxa5kHIlgymQngXxg/HQF1QFKApiCcpERicPtXdutaMor70ykJ4D/h40M9+zljOuts5CmE4LZ9PKvzBVe+kEdr9RB7QJsGO6eqsZH/3hYTPIS9hlXrW53HIHxviTi04SwUqEnf+VkMuSvKycHqzN3kLTsFiH8faWojWew5d3RHOLOWcSMkGWff+46efQsZGZr/lqvDGR95Pn9/wEf1CBgm7Upo2eH16zR2+KbQFMm3nPmEwd0zHkyl3TOfzhBkwbR4LHt2cpsuNHc9plTAROA4GyjjHakYWt8bk7tdBs5TpOLa9+/FmTV0GvBKJJqMweyG0QgJmHBgiooTXpYcz+xU+vHorjKa1ujsyWerheclprcLZOgBVf82px10sf++da1ncmXdStTVCe7SLvJXZ1pZN+3DzJPnp5RcVnmCVdBuXQBCCkLhWUAHfimqUEYwZbK+BXOFYVdoYYJ98zcf/Wz2LesYOUBqTxx73xtBLwx9sDd8Snts4obJqYaFnWG7mwOD3J2AWntVIi2FY61Fse6xMYH99v5Dc1K9piqFMC4SketmH4nPtNW7XxRXXtMtcC12+LlvDcAS6KvGmEnaW4ZFaWhL58QXw3vbzEISw93RsDZNsLh690266+5iQlrtPMyX6mHgGwtwZlWXnlhU2EVctzGI280Xo/uX6b5MwUUYAdFLLNFEGzLrOcAlYSyh3aUU3aHs75WpNrZAJ1Ak5QXa9MaahDwOM5X9Rzb8C4FpR7FDDeQwRmoMb7qJ6RUhuMhIQk+uWQsn7EaRFlH0+glIOsu46lNW38xnXWqMOLbUfY/HBhkW1PcpcU6qB1LgGJp8D15ZAwaCMbKKoZ/duTtroobskjdNuGDkujkt77x1jJwSb496Cb6W0r8EhKubEWnEeMt/2OWxKGl30D2xHC5lnS6pKIkfQYbEBzWc0ZCppimnoGZ/j7aJSwU0kdPVt6ov6OjbkCxco4eH0va8I5hIygF+NfcjcWwZFEmxsw+93FO4RFqp5dX+h8Rm2L98HwoVOnhjOuO2YS0qckLFKLQkeyFshhtB+qy3aelO6/r6cQGiGdqZczCg7eVG68Mk31NKH9NhbzsFS/fcW5lShX82U+DUf/oVwyCS/B6JGiGPAeo+HhNmYmsGlayuyOylfiELvvjbONSgaFd8U49ms50xC38VAwAb4d0thJGlVn16BxV4wfRf0vlpfx0fm17Ki52v+T8BE09U43NS21lOqnHSjU+N6HdzTiVx1x3IHczhjwTcWhVcfQ897K/T01laUlX9cGaGOi95lg7FmtaUt/ll1s7iLlJV40zIa2rSiEJ3DF0lZoy7bpPLsWbamZnrovp+4IHYC4hZuhvAQE4xqLAlzpu3xeFl3A52yEZrPStFras+W0RQXvXslXfyrDfAVBpM/M19X5mh4NMMrh2EczjNCexuTraQZeQXhROVUTFKkm4fOV8Jj5Al7Wdj4tq/MWYeO0pCRAuWN2CoKpG8ae6sjjZg0qrW9oyKMegCDLssZFx7W1NhJpwNfeTMGeifFZE3VfRHEnnl7kp/MGPsYwoxRdR1AxvCoamS+EDB7QwOubUNHYHWMC9sN+AuEtOLc4gtGh4tagv3YDDctRPnsHQc6Nv/IJvwvUeIf8CQ6bFp0vzidHnW56922heIB0ZHPxuZMzP0sNLF21Q52OuVXZU9B8jnjCKSvj+gIMWylRyXOoOt3Lugo26aIWxaYGhTtEu2CFrxYC96/G0KloA/CHEW4UX7SkPQ6jmlJUcxjkBW1m9ulknW0FoiQUyUKHzF2N8Hq9SdgUDTW+xqKxXM7NfXTl/4vJ1RFpLBMaD4wmiDVleuFMHFABKfj4wP9uzQcy02jnHIp7u/eZbVinHDs9PwaXMmnG20tpTpUKvZv7PrxLnXLSRgOfn4ek5NQoI0DhgTamRVbCWU4fJyGh2pFP6w2SqK0ykdapj/Dr8qdIvz8gJh0A/GOs92UyREPqoAvfFlxxkh0hWJPPYDduBWdrcPc6xsByCjkQ0nSgahgmoe3QUHOoOQzmoM1smIt1Z/d+5maIAGnlS+sdy+jCAILr1dHZYeaPzxxTzgPt08gq6/XW2JvdM/KhaD4iDMEUNafKzbsSuQpVZv/J9xcibxHlHc6BZ+EpV207XV22/QbuMmCPXCrcNuq6nMh3+w7kuAddpu0bT1EfdwTz+JFMxwcY6ehDqGTsTwGLwq27TS3jSUxvj69Yfs1VYsakErZWzYMfoc5Wuo1mo8iYTomP67cNCSTBg0WP25J5znACElOxbunsrLs29wx7ZxFX79L/mbbEVnZF4mm1tEdLFsH/vl1gEAcBrbd3cjTB0DcAb2jIwTjXOZg67cvYUf6Ssd4uCRto+OdwaIq3+AYHK
EUwwoQYPab3NODSfT6bMazM6P4Z5KmP1IpnR76CROx6SACo6ss3uXUS5qIAoe1eGjwIxC2ADqtKGBThgwL6Tepy73fnwP/Yfi3epm7ujWLgwhX1EuOdln232kDwPWPSlXTVwiM6tHtdEid+tc5WkBDbVDJHjPu5xQ9q3HEhvmJX4lEKZ1ZSEOhlwd0978ipOedEHi5yEc9vHKrUyGosJ7YQXKHSfwms5Q1eIWB1SHiqiJy7YN0SFkZUylUsGttNyf2HswfPnJLlyeLFxZ4HDnSc8fkOts+G8bkpn+EIhWtYy4uGVXlk6yBX9YBkvX8n3tGNt0pNrZ5amfScilQpXrhteQnLLox/K3jOMMhUJ0jITVFalcmP1PFKSAMwwoIRFB8pUeKHATqDzC6QGyTVHYZ3ArzLY/JWNP/RgYtE0FczV56zhc9rxQC29AFXEIt7+RA/EGFhZWB4mwfWSfdY8c/j/VLjL7x05E4m1PEzVQIQy+MU8BAQJ/I6guiwC9clxkusYn6sWhHmdo6k2obZ2f9yAPLTCTjWvkLqsYiHmD65R/1HdxABRXcW0gc9hPg98EqNzP7FC1/bEUg77PfztzKqIaHsEOBog453t5bAuoD5NqnjxG/wrbEDn5ecva9fatbONe4NrVB8qq0LHeJso0dn3TTogSYWDZjenM9k8Cl5DXDRnDYxVcQTE4zUKvVimrUkibQHzYO/UipjCaqOr3YkauxQqaTTTgU9asqKN6UjmOp9WsMJjnU/AwxMM6lgApn3k4sumlPKb4gp+mjmNEMKzh6lU5FSfq8uG99M121y1Fkc/Oi79DvBO8IbNjdRqxyhTJHJrqbeW6ICQ5xV+L0H8mt7slOoyO6bMf9Qwheixpxui13TVPWKDLpaa2K9lVwDtjE1ttPOlqbfBCCK8ANhbaeucgyRQerM9PHyoaNTX1vZtvs6EfwQ75aUso9DUC1MMhgOimF9kHhU4by5AAAClKE6VaBwmIKTHI9ZTTPJ2wUJK79ydFZGuXgMWPJ4RTxhsDipNgnq095HkkRtDUuJpfkSfVwEvnzMLmLLTmizL6pheKx4salXaUMfzwQtuOaQ0FSebN6v16/EBDoRo6UzjOMALWGxNl9lfVv2Vrj2xPSjY//PZVUOFCL6JgQKb6P72UPZxj9VdP9ET2NYwj6kU0/u3BwF+jID3Q4wEV98tVYYf9ZuKW4+mP0SKIJm/XwWNZJWCgZdMMxX14c0qcV19SWjOlHGiXAZJOKdqX+qCJx3M/Fr7jsSHtG6pVcT8k4oTr6xShP8O894pDa8sJd3iRu7qobe+X8tFbOG698jkwZRwLh2Cnm8mh6gide2L6VIgtFi3swJ80Q3rRJGzaakery7WvMSnuKG3ERyElIkgtyBuLqFMM0ZsJIAOnkk8cNZqmV4h7cwCyVDKJRDzRuAj0Piz0yRVvN9TQkLMqShsEikd3gikP1QYfBjPqE6IwfWsQArSZaqLPhjzUHRXFdgx3OMapwm6aURp6tkp5i3Tl+zj02na9IbSnyzFhvfPnWp3fIfS3HHbxJPnfgDsQ57eY4HJq3mOa3hSccEdaKvlgkzFdiLc3UMTYeOOo73QZ3/o9iV2jJ9vhtCGj/cBoK4C15Pj0dcqYXDI80JwXCZmLfF8xFE5TMdvoCU++tLkHwl8q+v/w3qxgU61yxReU0GdMYirRsGmKRDYTqzcyedyofdDyanOnu3ZfqW2q+/tvpu7JXrPqVs7+URMFVVD+c5y8GYHzh/OurTNNt4JHIzsa2HIZdTLlNSSI7ajOGEN5gCwbQzudTIrXa2wJOtYzbHfczf/dzojJKNm3FzVh2oHxR/BvYAqJPRgWWPjQCvc2gpesjLf6/Vki1qJvzJgAMaxknM2wFY5wwvMexQzKUDWOoB6Kx3CtmRThc8XRj3DLAulqQwpbOrnFPT3hqLJ9PHngHstqSxcAGa/4OJD2WiD/Qb0jreFjmoJYdaOgvajdNZqhYmC2VE8PGcd3UJw3N42OCYxkrpTo/dg/k6bn8vF0UwTZnGhZzOtiGOwH3oKx9J2607F9XUxH/bOt0yGWGy3azkFW929yyu6RhDZv4vdUwPHqrhVFcaOyqGk+0T2JPwPMQZ9jqaDalkdcO5HBvJfUMoJbSd21s665ERmxK55z2Uudm+H+nqnYQN9GL24Wq4bquMdY7crOe5yBd2gGv5Z/fAPnp5UY4ee85SsSwG60/uh0zqqSmXsK1nXRTt7nhXFmWA9dA2UTkOMcdZBKswA1Dcz8WNrqAkRWQdY+LZeteD9xK/QMIFfFQ/UQi8MOUUYQOxeG2/nP6fnmbL895N97e+ID4h6B3+RoC5Fz5/HP5Jvttiox40CXWyWA3/TdzNQPS3pyjp/c3uwL7Gli38L0hQ8uZRudmVTnN4vaJ8HDbRMYEL+0v1FY9FWBaNpLCAUEMmt9jkKJlYYBTTAn7ckUl7/Wbor5re4Ajq7pRgTyWhkEMTQ/QlbcyV72wd0jSUsvCfduPS+Onqp7CtvEKmmTM4mUEakjRvaHw3sR4vhGvZCBXEFj91F1xeO19tD1iKy59iiTNXSZgTlmcckOxMoESXGujXeCVLphBLyIyKvjT3dj09N/S5yKRvwro3Rbl7b5BbEs59TYlpaCBkaFxN+jVMYfefdM5i6yHg1JsCTSfed7yJ4/UV5mXFDNAYWjQAUHLJnYEzQvAcycxfKpxt/wQZQi9FamF8/AogKAIcEK74bpEz5os7GsS5EgVbbf6NxqJRAxZQNQzJowW3iYM+719ntU6WeMVrnqAZRdPtPv60dyYIhLqpWFvFtN8q94Kyp34+aXvSRfZastlp/NMn9rNS8CBmc7scALTgqWu73QuQosvuDc21tI5jwN+W1F7+K7ZVipt2KoWZ3pioduH7Xlng6nvVo4T6uNGiQeFqHs5zR6QPiNwLNCUF1yd4ZjRfYM/IOTDRKrnMxtkkBZhwG4lthGvcrdObQhU9lT4xSNQs+pKneyHjeLt8yXugJy7PnW79JfGHJkX7vl76OEovWAo7KPzIEZxpI44eAAagum/Xaa3YLPOMlbnJYLa9tz1tuttgsidzulaGkUYQ535ynb8RcGe0jrSluTHrfvuGwabRZJsMGnxLMbYlTIRj2zz3dyllyVxVzaDSPiyTJWpMFvYP/o+LIeZsGLa50QG4yFxlCEh0QRgA2y0gZ2rVi7a4p7Nix0djtJWoMbS3BzBUq8hDVf35J8vgPJE9sDJiEYeGhqESmv5Zdm67LWNX5olgawLWpfQIheqF9MOB9MY1PUo8SEjeXdjQWp1uPZwwXIS2xJn7w3dsHjA+Stp15dKyS73+jfMmlK2zyhxZCONPMrv1llS3L4Lgu+Xyg6EHbl3l+8lj273hieHb8912HdO+4oFa5Yu6Tp9oSAPJ0WNqLry5/x/M7o9N6DLfoTk+lI0uQQ2kaCtnlbZUolOQBRZmnoAa9LON4oTZaRbmDsgk/59LTCNJImjcDY1z5M1IUq/s64LwGpVUueRUd1Dxi95aEy+NdFG2ZGZQzUr3xjh/vVqZZnheO4YpGPWP9DCcZnbffpJlkuByG3K9+Pua3tQvISHTGM5qvLZmmMFLYPm1Y1n0nriO/KDWERsEIJUC5ziSMrjaiKt/sFsS0airI1bj4TvWX1cpsKyoGcXhg/b6PBtXF8Cf9idE37g91SBXJn5t7g++hRD6CA03MIzWiGonjwCvhcyYslnRmBzhyWCz26ZUOrtF7n0QCdLfCFDSMrHktZVErvHbOiEHQBEXc55265EVhn1EVUef/mLZdfw7LdjYPos0rhDJ0+3rlTy2G2pTM7BILhMLLJ7iJLxUL1m18Cn57Liynoy0Y6R1Cevn9z086tOeakvh+0ffDV7kqQc4dPxSkU0HstmTxkhDsKWuNeT/6oJvX4lG92VbHNSVN9YVdy0Kkd0fS94c6K9A05yoiIlMBSx59BF2eOSf7Pmk1pLfb2WDRbx55CAYWKvSqUITRRZ/M8iLaZ2EJ/0OMLxD48YmJlNomhpveCKruVihJNLMvX0VxJYa+G/xTgOTjv7Nu8LnFwDE7e9ZFV/X8P+TLY/1CHy5jk7WOZC8+
vcGXZirLzi+ByhRu9IypimwKftzRbMxdLQlMcArZ7bzUQew2xX5YbLTqBwqQ7ZJsXvY5erKDpwXNA99n7dqUEx9v9F7bJ0XjqNNfv/ssQ3naRVTgjSPpRmpUe4f2aJDD1rTVwhdYpWoTGtmueOhE+PErMWIXp6Xp/Ln0i1I9a3o4x/AM5pPMPwkQqTa6qrX/dPKqwch4Sya8r6BKN2J8WfW8ZT2V7Vzz5d8ybn2nUVw8MAOZGPXv+xnlP8OBQ8C+FCa6s7at4i8x1+GBp7KCHPsLlLGJv/E65Rv2CuSdEilogS6OHee+Oxoqm4Q7w6W7ggPkwt+ML/PkyDkNzLzICyoM627TebJ5ATaCYEbCvZJnBNqnTVYVrJ53MjsZZA04iUqGWlGOJ3S6O1xTNk80kk9hEJzPUvxnqa3rm3j/GRbFYx/ABR9BGxPyB0Kpz7v9bvCGKJh/GhVr0rFWdGg125u5aR6sQiBwgzEyxtAbJQEga63yGhGYqVNWHgSMZ+EKumDNxZOtRJ8d+9fmwu1PiAKmXLswWOHFk5C3CGifpwRJtQsyoR5IowSt92vooiu2XvfzFTpkWcaf/fYUozjrLOgSVI+WWHJJMNSf/qJFrlQCUe/WNkQrMOBu9GrTnCtp7gEnhu0tPq4QJTOrtBBDxurxJFuxqpDTsCRpUZABcxRJn8PClPbq9K1A8QdBoLlY95haFQODb0hRUaqvfxA+Hv1kAv6DoEcD8t7U/tveaJoRoDO31lWMmIJNx3y74U3EY+kYb76H9OaalEBu9ObgQE7nCAK1poswPXZrxeWLCfC2Bz24py3KUHuJNidxDAWCMpuGDszFkOfVqsAsqjiAHiOh7iduOUAVb82y3tjhhvuYfbE86NNJQYLqwY06Nx/50j5bdnMZjp2lvNLdzqrF9yK+afFBR/PbmWX5Fg287picDLdZBJgG9HMB6vXID+jMvPZMQueatHJZj/zCiKnOVd9FdUBUhOeKV45nV8bFQqSvuRW6bbjQ4zAHyE9f1AbOybkYNp46EmyTxqmtjn+/mDmk+i6yfmVU29rpvUUsWSug31r+WFtbdAEEryBdNQfjoJ2VkhwpR3Jl7grJ7cG88YNSJ/SFWvlq1GU5uBPz/taJrA8ParO833e08wsDyvX5Bc5zodTRv+EB7U/TfI7wzCDKdX+7yxVP9qoe5m4cvrmuFEVyoCVBhBhhzh7iIF97AF7uuFY0/Iou3lnsbZVxxEp3AWVrSmw5IStIl1C7notbO9yqxzSLcLn5p4mTHVidQ+npp5YEznrnhe96g7wjyThvGThAQJcJjYuFjs/k/WYJhPpAdeJqqLWH/3rRa5waxBMSES8oXG8qYrvKBwW+eE9rA0xRRyrsA7NZAzHslkqZ/XJWRk5dopcFu7dRTBRbZXmka7Whxl8zoCT+Ap/MkOQtIns716t/63ODUXVvS1ZiVnJpCkEB6s9Jh/4jkkLw+GcDCf+aWMy+IpJk2PsD5mzFlelJEOStFr3P/5AGqBEkyQFKzGwWpYH+GrP1vXPHwGwbBQU6wfPF6pbOImquza4pzyFdDQo2b5f55tL0KYCDUqmPOd51j0nSIipU9VyDP/laTYlkiGl7QPCCZMLClcY+WX/tdDyQAHZulRtg8HracbAWoRW+KoU0ExT3g62at5NT9hLBJONPOHTmV9mwosgdldtbclEquLRq3OywlMBeuU/hyOQKtJeeScJIDwOnTBXa7mLW8yRICX5E6EboNuRtyjssoEfBbivpnU8w0UfQDE9b6Spw2doUH1cHpSSSA+fgTCwPS7T7aDKOpg4ZIjZPvyCfLTim7Zrjp8k2B55YhA/BbBS/6zYZJsv2dkPtpYaXPunV+B6piKc+VjEckcSYgaGQrqRCpjZSvQRojcE0Ox96yYiNDUt5+L+TPc+GFO0wSQVjXM16neNoRNL7zPh0LYVVSlR7tlS+E+d4aJxPLPYgReSlIhNkFGzBto9tM4dJKy1ypxsdEn8X+4fF8iVWPCu4+hOuVKvjQt35PFTB2eJZJRo4NZHV5gHgNpa571NozGunmuaWdbZm9WzpPrKYriYjNoXqVuY60t1OGvxTR8Oa34LYRK4PPtAPsHs/Vi7bGNBSJSKwxFd+Ji+9idQ4vFCYGUMxAnw6xzYAzbwHDGUXTpeqMSlEE72PWDIVCPutIZBrvg6ny7s+wHmLit5bEIVQZQ6364hhwPfesVQCCzwR08hGTbzKPdH8bhFBu8k6CPTHgE79o1UGKDFEdlgW4BYp5T/xJktTijFpLiX3foXmrBq5pt9j8a2BD1wA9cQe8lzNPzZG0vLyMghbCXsTWDchX7sOr7EcVJfXew8st4nXGaWGaxzQ++gekF3lzGAr35zOSWi73rCDTjWwh638k69Z8H/qCwfQk/WIThD19Dv4pTgOif1cyTnIIZN5xiNlxdbX9oJrP2cm7HZ/74M5PoSrc6+IneRY5OToNMxPzw0m1LhIuOfDijAV1BOu/XBt94tvqaQ8jiQ4tG+O2mSEmliLd6XH5anXp9IKEiBkq91vzku4Mcjn9NCFOsStUarOV94W9B9ZKKq1SWVX2gvnf+Js6aH0OReqzhf5a1xkalUVnQHOzpfa1ty82GvLFruEgJ485rR1q/52Z5BgjAO62hfzGNWJlYpkVi7cIc8x+QxYj2jitxeQmVt1FQrmOFuDdei6V3tRgf7DcvQmPN5pwxoSAV+vd8bWnJ7G7FaXFWnnnCVbygakO4Rw01unzs+yenTOwnyPJGv3rfO0ZA76CBWKaxoU5bkyeJ3MJ5oJVaL42uhfMhBvcM39AZsW5+Mhs5iZqlilB0tjU3vx5983DauaXLhX7Ez6IMyqDe/xhNB3T9yLVjvQDnFBdQ1GIQwx184TD2O/1hhIz84kNHLNRj9staG7QmVAjLPSEtLeNwn33SAL+etSNTcPjD9L3dOh2jqruaJ3UKqShuGxrVKVFi7n4JjsbIFfIDmqZwrBBeU7IppqQ3t6uBXnk3bhoCCuQ/5S6AR/Tw6ULjFMjl9HLWNAcr93IjFBpqGTpf4iIexficymcCkDbB/grtIvuC4srbn4OZhm+A6EKVsR0nhuc/f7rrjaC/gXFIth5aIPhEZmCf21gwzkP8gM4Kl/rPxrJQems2fWEIUjm/UpJTofmgSWGBUU9Ppwn4UQU+7G1De26cdozAfYQUd+2T1C2KzAGv98dgpIk/SB9uPVXbwH/Q7CXD9KUNIPDC9pns8fvug8eQDor5sutuT2pzH3lv7STWRT8iSGfIuj/76kAwu/FRbLmi1Gx6yva4IIB4Y9FC9EAT9tUMQiBqzb6g53TT7mMl9txmqmPUDpq6EEgbnVJdBkjqXYUQduZQicgDStKs6atsKPn47mNoXSihQA54um/WaAiGIMCe7nixZdp3KewMZNWQfa81cKgRPCLQAedhD9Fix5SVoAOGT3fnYncqEJ3n5m4jUpHQE8nJmchRDvRbb3nyNdnsBukHFF2YwWbr7jMOItshzpeyua0CCwQ69mHr0SD3zCUQTqtq6SKrZgJQto3QRpxst6aE7kwCrHWUDlaIVUeEtrqpFLzAAFeGzwotYikCH92Dhf7uTTj1fZyTN9JtRAJyC4nxXy8xzK0+mEEvFwypDr3X3OaXF20cC/a8OdzoGi6j/ag+9C256Th/rmkSLzkq22JOpGPZEjABK0yWPYwT8AIuTH4QAknP+1iQZzjBLmth6ZK3dxtjUamPEmpI4AnQkU8NGFdXgvH2XQsd7tU8UGzlg6orlwHAzeSEUfY+Kq1Q69bHoPK0bjRR/3nY6RuHBJ9D+H7Nm1/B1K72siR16fg1AlU8kuebBz7tqX8C1kWij83Dq2s867GmbJAfCED3uJfetN70pzZElwYPEGqu2Uos8cfNfR0u4cz+5GGC0Do7LfHg6panbvC8QT7Y7S8zTYOKybymn1zqnAs/n3aiF+yO1yhshVacbci7J6CLpk0a9DAhcGxNRO3+terny+RWfja1iVakdt0HX45DcID5FRa1hq8i+pJ0XeLDgV3BG477j/LG5ZfwKFVIYoyuuS44+Hs9sGkJsr29NFaQcotKSnoXL+r6Zi
KAkp54I2/FUkT9DS5Lkj4ePcYuWcXgETsAQSyMybl/+IxXmFDXspwBDKorG3jcIr5uOdfelDjsgkDYkJc9+r9SRXjvokxIzVBAK+M8dSUdwmpuimA/yxTLxjtqQf1b1jdgiUmtlvUVJuB3EHvPbQ20tP21dWZJgmvvXmD/QSrTQXDik+UExYXuS366pfQfvvXHiNzs/bJe5ZKylFtY9APjeKCWULKPppsadeBbs6t/QvPOagDY4/TQj7/J8YFW1E0XgtZI6YlxCOtsnpMEh5+ntUjmH3ajgd4woloxRm5FBnvcFNXWrENJpJNtA6bNyej0wLg1KVxzMSbV8DYquU4heMs+oTErPCXU5t/Db5mEltgKvVrzaYTwfEMrRQvo6ssmU4Qnj7UXroNuGnfHbRw8vnI53bhdUd8x96rZgwVE3QPZYBp8qbDbe1PAM5S/Te5zBBuwJprG7btwgpjq1PFBvNWqToaesr9G9tGCZqDdMPEmZbmfz15lRHB825o9Lsn/BA1L7QL9ZNs6UXNv4j32DjTu7l0Jf8lDu+ajFZX9D36Jx75i+rDxQ1/Z3/uRARlXdTWFnDzgjT40qrA6ub7OO98GGEa2R9zmkdv54nQHGftBvlCgCOzopqLm/4cr3e7WnmnXdnGiBcfVCzmqeZ5cbibpxjSISWSHHxHaa+j0YWm8jmUKiwGj1msg9WsRGP7eCxqXdK5SOPxYmYa3m083S3ur9Qlpj5xPdjk8aM/yB8lQWPwQRLGOQqZNxvqRLtvyvqKj4s79WPYk8yWvplGx93QzS5vFQRtWEH0tw4NlJWpxAZHJcDyn9geSsoAs9i7PKoFFvEW0RDALTUaH8qK1sc8cvErl8kkZkr3uYxPKgl13wnabCo4aCorNJtG0iMr0x4XwdeKmAtL1RRoCdlOjvRXavpMW+DQk7QQ3hU+KNOKdP0im8HEDVIAPrYFGbGR+NCPi5LuOH1CYZiJNRsDbsK4RCw9gECftGzMcW45vClaN3hTHOBcOHG8qMuKV2Q1VZqfSO+q/X0yxcpIF+ijmjiDT9W3jlu0ZPKm0446i8vZ0Thw9iv+JupeS7Qw7S8kK+kK/PDW7w/60qzJD1gz2UuNsY9NFx37Wi54K1Fw/YNRbTTjIWG8mj43P5xZpWJNuuf+5ZLTRkb/eNct2LFeQ8fhPmqRUxmC2/66Iae1oXbN05taZZkudUgDixTCY7tmii9bAZNTUGfjN3KJc47zal6D34iVNSo36KobIwVWvOI1DvqD01xaNCG7DaTWMKzhhGqqdGKAchjwQOK2npNsKZ9Fq2XI4Lo7w6KKIzx/O5S9qHYJvPQSQlxyHKp1uzz8IKaT/5CHyPh3ivyGvMp/khVfImx6v+Jvp4Zc+0EzXlcNIpi/oZddFPBFDw1NZ4+irNZ7n5L99IzWDxf6c8vGiA+i18SaQbQE/jcLoVIvQJwNUcqn/PdB/KZ5lgvK2u0Una2gCgRp17WvARyVpiwgaWe8GtQoQoaRRr4R84qs3qER1NC7lrTyfbJTPMzqdz1ft6nrQdqFN3txdXaO2TBkZPDCLekd4q3xtbr57pGKdCQiKm3R0nefqtSweISPrG3UkGFvGqz90Hk/DeEDJMw9zpkI4VCSdz6KJWpg82QpouGor+i+FynMfwGqjkYaJn6PZxmzTORD/lwAs2bhmL62HuugOxD8YcU/H5yxla2BGQefeTrhDd/DNHjKEZYLY/FPMkFpRosy1fIBu0wrqn3imEje0yVu2ZqOOTjV73nai4dBc80wfn5ehAWWJWOuHNA8FU32allPrtQFcl423ZR2U+MJjbE3yMcKCz8wZpENB2ZMpPigy+4BnYGxf2QIAxpwylzjbOSrSaw8bv41w/k3y5Z+uRpagXfpbShBE8PNYAmBsds4OUY86PCjl37XnIaLwvoeSmXT5x83EzfDaeJdv3BnfSsfEVR4BqOQ3tSJh1ymlMAXKzAfvVVMkO3BTMeZvKuUyDk6MdhWcfuP4fMd43D5YSMl2aQnSobE+IHa45yn0rWhDd5SaqVEXzXSsKg6hROR3gVHWdkdHpnDqRuBrlbmFao2Oux6YaSwgWG50gfDk8Oe71uJEfhhzDIBIBT2kKfjxJqi1CQbcr6MZM4ShGPdBFwCRtTltzKrhBvtPCIK9iuCpnAMD60vxHY3iJ5wv2/AiK/RlS9ZjT8TJlMpqcO53FcfTZCKPyvrbskGGLaypgpECGunGQ+T+cCSOp3od5c6bx4ygeTQmpjbC02rabBfuxXslGO63YRh3f+v/cio5zb98QszCtSzbN5GQZZkgoeW5gDe8O7MoNeWEaa0dBC6QeOV/dc7KRMnry1HByPDooL8Nf664X12aYI+EFgKwJkTrm0ciHOLcgoPzy78cSu8mQuKD2RV7O8mM/JL2zi0deV5C+FNYnBBb7kO7eiiVlGS/zO0yvJMHH/qBArNTtb0sF4uR3Uj6YDWk5zaoGQTvV5iSejm4Y4GJxnv+N4NTDlze6bezwrgFUUEAKfSvo3MjseP6CSUISK4W62Wx20eGk7br8wTJUxUrHg8uFIcgI6Jfm25r5Oi7Pgjdz8446dcBncq+c+iNGt9QgGR4Kq0/IYAJPDiiqUlMvqXk+XwzPkpZmsm4LBwwgwX01V/kZ/lvJqO7hUuGkUyeIfufPoVQlGtOk+/nmxmJ/aamcG8pC9tkSr9xXB0Ht9tjKw/R+UbcHSr8h1cehcYqWD4VIzpN/MbCzB6nhAHMExA2VsKZ4B/abNGfaF5753iRJXoX/AXAAjL9lhS5/EVuJvPHkgGt9DH3hG/9UQNNU4snOqpp66lQWXe3Gw2Nr3b/78TNv1PmpdNwmlML0onCSL1pb1nAUlW7zsfYlLCNAPIWf5zVvk8Z27WXKCFSXM/yx60xt47TG4Yjg42jZ2di1BWgiUmR50q4HXni3/n9ixmWYHsZ3cndkUOK8wYFe3+v/HihJI937mKm+VBsNPYBpGHlnVcVZX3HK2R8YqW5cwH+velfDf+yRgbn6DmXrEGQ8XEaNJ9NbXBNBOd1RZudwFnwA5qRPN0v0sfXa/jeiZ52G4z7ZJorev8xll45pVyweDAxbKP86fTl/6k8/5L+be6vsqFBkb5BBJs7qSNvtdtXkErQp305y3wHpU9zFMAvEfD+afanULz2J5wJ8/kxxTleabs4bhGn4oCx6AezQuYcfcX9hFIzFV5X669cjWd+Nu508Zfnl1oYGSe9PXQ19upMqn9b1zrw6oataYj3Z1g6eYDJLrZA774XkkZzVgKu3tkOC0O83uo3i+GRMIY3bbvXi/3iw2Dkg4NGCFP1GgSCN7u2kI6h1itPkYh9Pd76LqYcIcNTULmNlNzUuSe0x5LQKAFG04dvi2xYZTkUm3rBv7vxcHJ9li4HNpII1q4j1b7XI2IcSyRayVZGWCNQkpyj53FhB/so1/HgRH9jtq2kyT7W9JJMiL9WVGPURoHcPgkM4pNpM9xUKGSLbjP7bc4C+h6AJINVc/gdPQzckskiqEtrkW8wkimRCQA7ZHSXOFeHC6NVVl7JtWBVOrNYjRytVrPgy1mD4enBzqHIFK3NxVJ72yCUQJ9o4pTIJlcb4ZUB6Ls1AD7i7HncnDW2Xlgz5NoyjWSfExmiMLrkqYxMwsQmfinWIMSnWJ+Bm/K3MFDmvrGUGw18TsT8S5HNuwgjhvRALEJRzoSnKafK6fMD5E/WVk5J6qYRyhDCgLJNof3PE0D1CFdL9C/yOpMJaVpYJKucdakRuHA3XNql3cuuxrClCC9vobTKa1sisn6Cuh/lxptMN3rypUw3YBVTv5iYuHg9I46ucPaArKnc5XZle+EcmywMfzNAtYkC1F8ZgAc0/PrPks3qSv0iCYuP/GYhdD8jMgsipzK7xhNiLiQDgq9jGH8Bfeo0Yk70768Iyp5Rn7vKomvRzf5rDnOlkic/vpiWlKSiBHcTcnDtPiWivdBq4A8qBMPcrKUAIC/Ot1wPZotginCUy4NQQs/2BvpQorwU5HGHoIHmD4ywfv34vzHoFg5etEjd6nwOvGIvHyyvfwuucXxtInHtaCa5fLNYCLvC5bWSfpPX5J2OFK2pDh
2hIqVIpAYOH8AsEJsQX7hFqhNoV/MCCN1AX1NGywEt7XcWrknDZcbv3mdCZjBzuB4Sxtk/iaajwuQlCbqBPyQryxxZDgdizt1YQyj3ABdFVZBNROvl02ff5kDV8A4ytmMwH+qld1IStzOBY++51HxQ23Soqj9iIDtCQfSvZiGXHnwYhWp09qW7s70SzziNYEaz+dCWpH7POkc8ffP45h7Dbe9D4kZpWj4sWoGwIN/e0NRmmuMK85WluMGtwlfDWdKWT6eVE4J47J9HxYJBLl9V8cYSYsDD2FV2Xxp9ly0XoYcABtXlMpbMjnjlDNHEOCQKywKumDFYic2lmVeu6WzpMo8UpGZCUzyy3yikWn/G7l7Kry0cSnA5nUjPb/fiaQBqOFzSy20ritm0rbY0cFt880BvEVXWK1OkIWH6O1lp7mEaCO08+sPy3XJVHPqWsXSNjVkjb276PIae3jOEwxRytR2h88C9zaYLTSBdQvJ4RzEbjhEWl7WbTEnnFhcaGLVcwCb3wVEfhR3VY27PWuHRSnAOq35mnV2mPDTGEKcvMnHd9kppUqasDuHiIv4XExg/M2PQBBCw2DNOnkoH2Gx1mJsDDV3fm6DCtvqvjROCAkyV3Q1qU66y/frXLXJAY6nAUoJfURCuSEvY254auUJavEf54jn7A+gSvpPh7bMWRUA9iKBqpChh2xNvgJLGRQi5QDJnPLN7ALV4lPu5Vo8vv3vHzHsremGkTsd/ndCstAxxkYuFdRdj8G3X9NOAOWI9Wet4RYyt6TZbH+f1XiAO7I+srVtuER7o/dsq5/JEnsGPv5dC/sUFuGAfThQM5QktWyjxR5zBSKwBLimFp+GcpcqoyrAwRH3wbYSnbbhma2BREzkWPz6fQiZ7bI76MPJJa57/Y8afJ7QHxXEzzbZL6hG7oOJYibjlyy/XU9OTZb8a6n+F7h9K0wDUMV0Xv6gELeTnFzt668pZhrmHNZRafGezFlB99z1ukHgIgcHEhHCJZLEW35CqTycWeeNEVRExJmVhcoS9tS8EfasB6qtNNfFM5BBdH40YkgzssNuKzeoknv6uluxYa3XnkSfMJlhQ9ZLFKqE+z39QSinN180hh09Gc8ECaty/Y/gTPe1GG0fXKuIjVkcwlLJpjr7TFtjO4i8pNZOwr79PfnnVE/QMWCAlNCM0sQiUjdnNkDW+x7/uXYrO9l7wYrB8CrxayWPYFRoXbJHGdZCnAHXoVelx3cgFpzNHY1b40K3FkpkDocjH1eWiP8j2CM4B3GOVAMjSQXXJ/rS27v6fq7LK7OUokR7DVw5Sov8e9cnASekW0fdZlJNnPaR2wyZrhb+qk/gPfyrFFBM5eFz2JR6McLmacXcKfy5frRYqJ6e5DYqMxoDIUDEPBB3NjmriZJ5NY/YrBXA6BTZZ/OK4AY9dxxqRvK7tkUGqqLVrTsJw8183uW9NovZNNmnbGj3nI1DWYnqUt02SyuOAWaIFb0r1SEeMragINSonwdgBeci6L0P1Vft43wnDZL0sXQTP6paZCKjMHZsBNQ468gilq/ua919V61y2wDQLzpHQSj15CCgKcYBGq9SGEXXRfZIYoXVVAv9HNDwYUP9FA5unBgjPNrXjwYh9tb+TnX/XerOJ+CXfDVzycktjMOTFC1ELAKwAVc62YULGHvfxleGgOU6oiO9YYR8pQfoz+mkjzxeoLsgaiEXi2g1LRDG8DeN9W9aHP3I8WIFWu5nuStpjowqLFNd1yQtqb31RhjHbFX8kcagDWkfZjxa1NrlkeYV8/bGtq5DasxW7AfVeHca1TZs1XWSIly03gQM4FgoVPFR1dk1JcwUvon8Ll/+L6l6fGoIZKjmoxA+40nMVaBd5MnyhwZo4GQ7UOhkv0A3YIUgV8qSF6ZWxneBeI94w4hD7auZ+kOSrb8mHxjT0pZJ2z/2gQcLtXTw2Gy81Ht2GbBWoMksYfIuzrvw7HpQlGHNOJf2UCKaiaq9yc2ZMP/ig6iEiLKFE+0GJUxNxvIjHnf6nfJYJk4KAEB4S6LlXqUMzSQ00oupbMZNCwhkpVRkbBWss1EeIV5FA/mi3DHd1RLFYYbkb+dynCSXqmGScdZVVLSttC+I5gIuliPIpnKHgOHY8A+27H4g/vgWRUorrOg4GNU+/c/2wBj6fOwXslX+Ngj3Z7Y7qYIGNzk3HIhSBIq8qp5IkyVDpFsyW/i1OLvpIOFbNV8nDwW9W1/sXZrEjt3YqFqmEKpDSQzNNo+RboSJIg4d9Ezexe4Ahpr9GO5iWuSzxw17Uuatk7LTy9lOPQljhOWzXAecUhnfLbsJh7OWOoaa11syxXmDR8yD8kkusW54NDC1P1b8kTF3oABmkpr7ZdB5ixPulI0+xMv0E5B7MWui5gctZ3KgBIY4cpqvxoD4NUPtqBIciHrfFqnR2XqX3t9c9WJPVqLtpcgQOaXeTUl2h7xfEunnowUFj8acR32d1xLT46NhB/cfvlbs/6FWmalMf/dHN0EnOq63g2dBJ1f2twSRTx+GZGHoz+xBCz3LXfmKusJxu1m27ugKYavNKx8yMAj145QzeC0Mk1Pj4NxumdXA9uKPV1Z0KxYbJQE3Xqd1M08ITtzLGxJFAJgNxJbmhbj1N67lZGCILz6MhpUmE0GZwTdiEZxzeWABXYr1vcXHvscWCwDwd1Ut8qxm+fpRLynKIuWYGG6MHMPejL2jtpPz/UTynRxWNz/ho+t6iH66P/MENJ5wkELBaE3P/6CohgYsV1rtP7JzmAZ3mFnTU5RPJHSOdcVN5QStj/mjdGEe6WQ118pRBnhHRTdOtXFqwF4zjHDalaPT85OobQoeYdBK9702VhLLjiF1reF7rGYff3gNLqjaqYLlMpayAmtU+ILCwsEwqordEGev8T/oNb2trFha9MtsHOZq5MPqq9Y33NWEr5DhQE73IJUhJO7mOsFTxQbFEr2tXoqD4rBLq3pRocYJLlvCaagp++qU1UqOvKvIHuTd2Nmv9/xGyOPZkfSJQxmjACSrEsg1vW9dlg7LYCIfA8cXchwpiCPJLGpK7S806deccpr2i3bP5b/Z/d4olBv5KgjcgP14M+U8bLYcCiV7tNFJkBckxMTeHpP4jPbCQq3gC3TymyzeMVWi8G+svgCDFpj/Z0okGVmCZHJc3WIgR+nwjo1DepLq8sDt3f207poxTSui8kqaHyfptMxJCPoFdjBrb8wnGH/Pt6hrFGACR/iXuSogYbUKw75cSz33MCAvhubarym1aAM2ZfhImGtE+5jbQFlr5de3hvSjUhavwno1S99WtQ6Ar2e/7jOj/UuGu+IoFosdNZFqEzWv2ZQNozt6vlRBw+1pjHodEGBC4eDgP/xAhAxKSpeLHRN/isDPPwKNmjfLIipflfc2LzgHL5PRK8gk1XNhQszig2glieGS5740D8elN7HMIJVFH+Xr/yjTitmhmBc/Z3oHlxLEIFSZkqKeBv4eadUEslJ3EFJ+Ql5i6HWQCxkAcXMdAjJOdFTs65PGm5Lgsv9b77g1rhRgb5cl44PvYSnbyCBriOT8Yg8/oqWnwi661Aepp91t+TuzF34ZZ0YIDi8zrMonuWjOQpQJhK4D7WJzfetRKVkpMlDnT4U39YPUeQ7iCOTaDlyOHmj3CfgGwZSqckKqc5mgcjw812OM5q7Ox6StOUuks8ZBRk4fQ5oBVveSDLFz0mxClIAET8H/Hh3V1szqUXcdbh9phJDzPMlCPxA736kQDULfw+PLcjJv36nAvvydrIH7p4m3TKSeP+uZkKreNvAEoF0Sc3yMYeOtIEqb35mqa2U/7bQcNm1BwvlUaqKUXezvtOp53MLcPDEwY7UDFfYGgsJTkqv+emrVQF3z7xmG4hab6pkAewjb0fqxnJOinpBU6YgtVzxgsRKB9nvwmGIKpOiUOBtGRzHN/BkbRZVqGkaK58cJWPfsOTCLTUPpVocQMjhdKe5OR/WPow8kSnGhdOO2PdbaBshiH+NRHc3P1fwHfgR5DZB9xMIoDoGj//uUP6pYqlg6oScbv41k/+NE13pAY9Ykopa7XiqqnHMhfdbXdv21HVF23moPNLmOsucsarPlCsU
ypSRVTY1AAUB2Iaw5SyEtqN77D9tMma0iqXHgTLQfD7V8Ye6s7+CiMeWCHyPUKM/Z5uLrEE8PDejz636W1xEAloMSfQCHRRDhQ4R4U3TAliA1WWsOpFz7G2WompMXZeoPjpJdVWu5lfosN0Uz4W6RNMFwhWljy1m2Ql5QZVJ4bBn+f2TKibHJcqeq6JDUUz6EI5DDxHHJDLQ0Ii5stiEU2aVuuAQ+vNGqkoiW5kDuk4ilgWu6l1qIWS3g+BoVR3IhGWPweTouDxO3+AIGY+XpVgPF2CD0fw7uuiPh31Eji8UFKpPTdufXMZqcSu4ZN6UkeLLocwvbpQXI2NKK4LQyMx2zFxgKqiFxH+f+nhP+ljVMLtl7MlF+D3SGqUdsVFnuU0g20sgBR4Y9Q5gLTNKp3WIgBNZhZPlviXtYVYzuxnmq+3bIopbFOWTASBvRaG3yVstaY6KJhJzVUz0Ed3F1zcyG+SE7BlbyHX5yKeWyRJvoM/Eo4qZZh5aPIVbbg+TcIOlnWvrL5+xPAwynwbrbvFxZWGaRUzf5MZ9W1QxsGNM/gTuRrhn75sZCR0AHmrKMyMjJE41SXkTLWoTu0bgYy/nAlTnqjBACE4nFBaBQNcE4UsBfP+DnezDsrjlS6ggZXHSyA9eIjfQPYiQd4FPnbu46NecPzh7wPQVRSKkmkAuIyGEjxcXh1gZFLN1LGGp0n80UtSLcs/vewzmiA1YlFXZPgn8o9qrOGgkBgUaCbpYA0ZhgraTi9I+YhXy+zcAsaDDtgzWmBJGZmbDiLsDyXz0iikTVy5X6uDL/FT319soOu5ODW11YK5HZyVso/oZalEzRp5mANic2v2bEzSay6HPRapuvWPGepF1MW27a7YLg9tfIZy9vnt8WhrEijER4Wk1K+GFglbdiuKWObV6jwRWd2SS8xa0Q2qtN2f4zgmCRNmbDT7tAEan9EfVr38X/axWkyY1q0AARTngPp1tLkKVHoNkLhcL91npS2hg3LpJRBp33aAcQ1I9DSMQZoOKwAQ8WHHrN5CtrHVRMqKpCI6+u178W+02PQZpxe89QQJ7gRHUR4sPqyMcvATGp2LPzKjtYtAV3FEnyZ21piFFul9adZ6Wql+tjsVrIYUgXQ+V38UeKar92+TOs5vi9fbpVspvEtv8m2jQyuU/2DYZprES5Mu2yL2QADT7yA1Xh5DvS/lsKT+jfk2eVzVWEP/8KYk1UWjYGbcixkV/q37jRtzoIM2UOnB23p3+ou9+Q9nAi4APLTCsHqoeQL6+s3lgM46B0SGxh8HRed+mH8MsEFkbTjbMzeNWa7nb2Puwjm61im3b7/pJIaXdxxI+mbwNEoUKIrFF9gSWPVLdearY1fN/MZmfjxQcNZcOCf1JXzdgTmsx8pNkNf6N2fBj3aoutUJuniIRqnZsUa1GGorf3GF7p8rvVZXOkxZo89VFU+ADl2/mpU+NPjXI3lcIfTEROjCsJvAeasMl0flnKgQiQYUcvYOoksncD/Lt+O58FwcrQBB8dHIk5cWLskiTjhcV3o3W11dGK1lBrTv2cp4jjhFFAEd/WY5K/9sHauOTm9lAOlCSNK/mV74qeQfE+K0nxfvg5riVcZehzim+/BTHcBvMBc0rUkTL76uJjHh6EDRyKFoVQX3gA3n3ZLNPfy0C2/K0s6f6K5INR0ie15B62NoWrC8nDSbWLd1zvZA4fE7pp7mkRzE2cVOoMpW1VEJgyK644g2ltUnYmP3nMNUHNsVShUP2Cha9+IJgdgd1rBfN6V470B/MiZWvBt3noUZFe2zPpGMocrcdDrSqS4KiOKR+dxxuFJn/64VY6hwilRKQ0fulb8JQBlD647dgLlOKePuLvuzVcizmZ0PtvzOCG1+Q/usTA/eUCoGDIfChRP7EyeabbJfSaSqfyeVVqF8R2KNZ+tIZH/Z/CjwMXdjqBdwHKhiScgM1Jyy5ipOpupYpgVzo+dAseCnv/vDMGDlsmDQ8M+F/vAEYEU8NIVVUqwe2vFM4UwAYMH7U9wnS6EjjcMh6773EPX9VqtlfDrb/mMF4O/SyAUQ9vVldzSZcW+ofj0tykPUoVXLwhuQkD9FBjDKUJ4JccisgzQGt/7JLl3VXndNatTY/meNq3Onj7Q+P4FtNUIxMqSE3fCDDeeizO3rwxiV25OsBKHruFaxu8DhbpxPO7coJMySF0uEabz/0stzxZ1/mN1GDrddpuOqJ1f/B7eTJVmcENgXKweddLMhjwMCHqibalSsJc7Zmy2YcVti34PhdAhOfHoJJtSdnAmtQf6JMpLDnWEnb/6AtOGHtGkrz57MI85VC0KPqp1T0N30xtzPt//Lzi7nsGxZJIIG7iUPhDLDzdODtJ0B8RzuSCayWGxmMhWM7HraBDbRTAK0ETY71fp3Yw7PEQVfs8W0fFh9T0TGcf0SlMsx0h/5N/EV2yTWCQr97wStChOMYXjamgmWr0854S+slNfkg8jZ6eaFFgQvd8tXOrF0TLG/F+pJtvUYHCapEPXdsW4MY9+m94eRvnFOalaLK09CzEaSlvjUEIouXG2uIOfRVjIIcpMcGODoHwYBk+DPPN/Rs6cRBLfKODNUwO1U0+ti1n6yIObKXzdcNohAhZ6LXLyen3YKs0fC2kHKa4yM7Dlt/qSyiVC5u2xsfaFMeX3yTz/Yv1rs05F/wM/ZIdAwcR9hAOOsX+v2jIO9RQEe6u4O5Z5KD3hH1V8CMvywHS9p2ALByIEL/3In26IavTb/sYZK0OwvT9bCqdDQy6pl01L7TjtDxoYP2jD9nqwzJ8herW5GJDASDFKo1WGoJELNoXSNVseX//sAuUEQ3Twd4on7rlE/a83NPCwDRCJzPXdfIUWdPu7GgF4NWFaHsG+0loqKjHAVVOz0GM9X9HtPrFqFd6gd3oagq5/7JOu3/uDPJAnyUUgXfeRIAev+ko8wOUYQuUAdNmSzmMfcQoEMzbml2V6EAGD4QvL/vHB2kIsFmp6Yjdr63GiNsPCz4t9OICZov9dEzIEMEsINebn903CijiRb4OCZYD6HQqFUv10DCXCDNzSHDhvVffZgFN6ud1VvH/jk3RAX132GYdotAtRvWWAai+fHRuU3ro5m98zn2s/uEnHvHlXUyOKGrqOppwWXXPgLl5GQV/cCURNZPqmHbVxvq7HUvpZTmZr+vUBenG8IpkO56eY2Q4OpUE8KYooFXuX/7sLCGWwxZpCp4K/KmMkx1btf2kQzfu/qDefvCo9h5CnDM05i4E3bUE+L3FpZPuszgB94Cu9ada+PFQevXn1WfnNA92OtEYNjt3Y0YX5P7HKswl1AdGf+I0vnXnZmdpT3LiOpl6mMXZ8mzt8skkzW8SDrEXFjlHc4/ebNV7yIZEjPqNTzzBD9TLfAleWPEjr7ITbHlWGCSeLMy0y0s6GEGNGru7scAvaqk9gq+KxXdkN5sJhnR7FMTjQXh/ImRGqfHa/bZziiPDjwuQYViPQI/oNgCdObLgjTn7wcRsfabHg854/Ke9dyTXb8Ryi5vUqUeptUE0+y35GlAuElM6+bHCxy+c3Tiftk+IBuBAUSZFyVVDdY45ZNPu4k8o9SQHIdZP6SSwAel+QesKoDGRaiQGTjiL1QMvwIjDY70ILa4IeszieXIIqNDBd7T39U8Z/R0ceW03bcbKMptDduBDfmO7l03C2FqnvHt6NRFmHNsCyPutgJIZgVABq7ZwDKdlEJN05W/WpOJq1TmVAHNl8UWxFjSazEEyg1gjUoE8Q9o4iwNloPRk6OMGEzxo8/Pf4K7ruEFDGrg/FX+ts73jcRoDRNzyc6vQqn/qzCCJZ/jg6h+Wc/iKHou8iaRsMYN/iQUfSDKBplroFGW/zI8A84WZdJdbjdZq3XbqN/U0oxN5TZWrsW20sQC/LuowN/vb/x0yYvrrQNNxNdsR/FfHiYZEEoKFal2H6rdgaHNV4WuUEA0xu9E5xExsDfrkpzg+bQpAQwpkNH8U9lpxonxssO8Pd8ZGzLcvmHXIb6aYZP9Je4Cmv0sgJ+d8KTeh5XPJy+Zcw1vP+8H03BbPzXuaz6jFshx0xvmIvJQQO4tNwtCwJjSXFjPyqlCEEWr
YN8rM3wC31n86HXpj5zQ5Tf08HKofuAD7u84Se2dcLzuDO22vrdWsNj8rkOwoBZ2ouab1/lOUtoddmRxE+vI/E3rnu7Y97GrwjKKcba7Z7YmylhsEInMQ0g+IodxhkMozJ+08uCcV3pEFUw9truidJDXUWjLigakxtaBJmeiJRBcC+McK1bY1lrLBY35thrR4Ua+/HLJvbXtYcw+z6QV7WEuGJ1AwtGbkHCWgkNOwt2WM49QC1lliujVnb9Qj2uXRlfCdsf+rt99rCR5t3Veqf+IkgDzElgegEnMreTDY9hhySPzvTLfwXDK+1FVg1bd2pKiCTt8pZjGA0JZ+d+6q6XPDbL7FZMZHWAbtSKmqDl9oKFutzUF5adbGBT0FoJEfF1wRZSPTypUpxXqFAca15AxgaC6psxTz5tpsFUXoCIminRiHzSAIOJFrHJrIOIu0D1KWVtFkNAgqRXqZRKn7azfTqTiGGfpIYXRfKKPGhAnSj8QDAH1czx1gNWAYeu6gaq+/5+Q2PNPgULK8cKOmj9aNidhkBVXPAmACgjoJrrRhykEp/FZa96+i8N0t9lDbb4bwnrKOPwbmMg4P1Kv5HJlibZOUfN5vQNRJWZ9ZsViXWMtX8TidGn6ItS7suZv2ohuAzrVpHKt7qWWnBjrfK+tKKWBPGaQyvVMMiF6EUXJpCDk+CSK1CLSlTlo0qLasbEqRI7XcDWdkTv6JZTzrEyF7oXDN13HGG+Mp+a62hHf9HsHL1Y5zOJqL43QexnnDFiXtcxi/Q7Jj/9zOAm5fw0Aie6Whgiovj38Ha9dFB/wbrAkRfOjUlEq/1gQwjkd51spj/jpEzqUjxctVpd1d9XtZU6l4v3qnx5/FkTZS5nI+iQ0ZaKgfyHFo/QgM/e3wfN1IM80sLc/yNf1P2r9dut+7+NlG+OnqSyx1aN+uDkGNSOa07xThQlQP2riSTCmvpRBsqbbNBu9dQ3t1drGKhyPYCY7R9aRnIhDVoXVXDicrFFDD3TgEbH0cRPvy99ybYJ7KGt/0y1c/OsOuzqsaBsZR+igEUMBGWZgRqPparO1cSHjBFPk+2pIdPD/2IDCqe9CNd3XgcuTVmcGJpzsovVbrxKTkBJCUOUSz+UYPHxV7WMUby46jGstwq4WcLA4SUKWfdUYCIFbx43JkZVn+ewYsBFFDlIBYrx3RXtQvIZfigkClgvfhcW+aAYpugs3rZ4Fcz7tZgB1wT2obd9sB4t/S6szSo184pqvbz70GAKJCK9dSaZTrLM6RYylsyTEHUjVgy4c9mhVqSPrIXUxp18tIZxLNMBZp8JX9Tb9MFOsl1mWK6KheqewkYbEK3ga4Pla0830kSd4G0FpMhSSC9aQ7hXcVojBAMYy79Yiqxrpm0Oq9GZE3AkESbnRroc5vz/AlRyTpPCJhtS4l85yT1xCLRSuEgMkwPIbysFUty79alwKBzT9W6MBoMFTdapsLZHNsz8bRoJRAULJFa6z3ltodd3yYVG7/BUaJVaObqQdlvSFsrzVwAcim8gs7FddxJTQhZmV1SDNilM1PtlkCDHbGfUsHwWTldNsab5evj61KWUxq8E7R64Ag8eom4DZ3mr5wznIr+0VZ88YkMcyv5QlP3WNZ+Tx9yuSPYx2zc4pKz6kyDrhZzUVpu5zaejyFu3582Se6AYPLwLLCBFDgzufBbbTBdNwmCv4ifPASGEpHJpAKIlom1Yo8bdTFZrAgQp7TedHv127uBVXPTPtxafEGzQ2GCCY8ktPqrkmuy82ggHqIpKHkxi7tKMxddnQi85ga29N5dCs+qSFYya69Xs50pp2XQPvk3SfSiqXWVLsg1H32ix8AjMLTBiF1gg3c1y9rMl71WiEwLuo4Eb7gaZjhM1An/IF4botcHdaFJ11lhFH+DlbJET5Mt0Nc8thCzaxTASuSv8bpiCqEc2feZk3cFEM4XuSTZ/jwcc7MH5u9cvO17ryR/OLvR0bXlHLrDks6gk83HzjYvsYyZ/E5tacxUgm2r4lHmW9teutVSzWD9xMiM3Q8f+JSeB+bDzfsrsD4nLnruV5jTrClnVsTZCqxYEgwMski5sAZC0ZRrUOnJNJld4lhM7QCKuhCip2xv2oCywY21VOB6fSMsGyWTYGb+mwORboVw4Em/JHx4pLXZo2lWVjpeJKg/C4nxlUYcymcE3hHyAkgqkFJmFUNliOVvN8YHik26Dwn4iuKubcWUrJwX/hIqHDt2LuYBuPS0uIGZVNo1NFxp0jIjhYDPz7N7sxmye3h/EdToiLe7aoGj0YfgtSLQf59Vrzf7LQ3Dj4ta0HmcH8G+ol5LQbKan3wmTwstbO/S8876ylj5pLzQcq1LifpXm37fSDj6mCrX+PGefx2y+AyU81mf4CWdNhlOkPe6Rddc8L415tjNptUgLlbawvkc0s4L11fBF/gcwXHPtdf7+Z0tli1+q1aj2hxNEeg1VX5qVy0bpWLvEzrgmo8DfnE7HdyuwZydQxi5Hn6L2PyRq4YxBEBWtbTizYusQDV/IcBwyEuAQldoCVX7fDKoIGHabR2KvwsFm4VgODCSNBTJ9z4BrkCR+BQ7y0xCumfQUFVLb5rVz1weUkOs29Kxg28VIl+a+0+yt5QmWw2vTmXKdGjZ3CgA9NtFjx8KR9hA7HA9XI47ne3gZFGHoJlpFX+0j0p2g0yeV99XSjbze9vCqMlRhgOgf5yq6cJLY/VL9Y/+XopCewpONok81aSsTuqQS6zQyXy4CqE/YssCLvbQ/29/x5NgoSxurh8ylPJSP6th2asTyMYhRv2f5uIjgnSE6JC+aat7bF5KLwSCtX+GFePWMnA2ESKFt1F52VRZLJlpcl7ITKuU48JXiIL080J1/TA9qiLnlnAD9KwKu0h6YREfcoMy/prnDj4KgyfjwV2rDDdcDLM8SdL26J99u+4e91hqPt4AB7LoaeB1nGvYcGyqkmRw5NNzalez5HsKuJiB7s5phaXp2Az1OLLrvpl9bYoX3xqfK5HwtbH/1Eg7mQ/sKNIjtnKnUBVoc0Kifw5eJG3iKwga1dVmYqLQbEVr8zEh7Ci8MV9gKl+6JYo79PPc7kMApj5Jn8N23eIPpWGbB/MOG6/bjDhnkBJ+6C3YJIfgbAdCLepSP406244ELDm47GPZpz5TNJx7yIk3WNHq3h7HbGU/dGY3ct+nhixs9HrKbpc/S1053Bi0nsnYxFYwlQNra1gK3oyyOR6Kdz9OVPyHPn4mY6ETDFy3HlHnrtd0yUQtCTunw5t1tTIJL1w4qHbVkfp/5PaUB03EJI8wRwFIIFN5rM+8wLM94Rr8vI20pX8ktGdDX9W6lIwW24yN8CBAdD4zcPWOW7pf4Ueq71t6YY1uaaYTkLzloTRrhGzGkjHipufLVAgMHXX5wTImIqGp+SVL9S1jyZlsFoHBv7eN0oQmUHtYgzxVWUOgaxD4JP8ijjy2mJvO57fauK7mrJb81uPkhYLDA1WgMT0cjMs3hqtK2fhzjIkSkuW3kyLM96+AcfgErhb0Uf4/7DhrtdGMFOTJ+r/XJU1kQau3mGYvcr8y6XOBfSMIS9w779f+xKsXWvIM7qsZVlJbffj8s96G8eKv5WGz7jPc1PWDRy/N/9f7wTZJGVYDlwQ14zkQbFP2pkStoHXldHFrrsMtIsu3QrrhxJ8gN8xTPHMxwmk8m1QUAFWyHb0K3xAsethH1F2fg2/TLDxswJsO5JI+SpsQohCtfPW2Sk1BnXvfqy0vFNbPXpegINC55SpPfKYAYwy99rBUEXkAgPcvl1TfI9fzxnFiscnABV/iab9oeskRrsqtq9n0WbgVIaoW6lWJY0BpYVPzNGmJdnMxAVCXOwrWY+IJL+dcJKuA5zxfdUPlHBOkGQFcRPPphnSjD3jkVgwk4s+SAylD3ZHtthTtADtC6CAHm7U2e3cQNXwqV9Fob6BOzOcSgo74duxu9kkxHz1GGwqsfSDtfSze7StBDUKUllaqe2NojgkxI0MRW29pYg6Y6gEhUxsKxSplX2Oj3hAWzH9WSHdtbi8eTcOjJ8C4yv3wSdE7De6+2aPl+WoFdg/cBQyLn+arEo6GBbykMN7Ojl
cmI/0gA4qaU0rTEQJPaz0k71tKjo7udJ7fqk+gvQoXv2PHEUcsb1FcZuxTRiEHi1T1A12bsJzCQAArwP+C1nsaaYjV1GiTufbi/dIEY3iANAJv6DpzAYLovmHtbIf61w8pWwzaKXvm//EJmC4KySV6hBrgvTUX6JgnFs2TEgc838H9AiPsJsSDd96chYJe9IMoAQYFGRq0/NX0XeMjVCQORamypqvd3OGuz1ccxV5VWJPhymGWRBJyk0d6E2bAyU9MdO9qTDRBMvCZ7diSoGdsbUd/BNeV6iPzZHX2B2oA3YsxCW9TIK3op4Gc2u14IBjtmlYts7A6NOO72C9s/WRaWh+cVzg+om3m0JYjljqqMHpSt7osrnE4s+QzqlBv3DzsqFG08k9Mvw7nM0qbJLi7sOqujvEG5tAET7Da18k4O80lNpDz4Zy1XTvPnRO/QdsLFoN1GRi8xFTizlq5GHC30NSLvd3dEVeB7s/kQ1GVovBIWtLpLNFg2BU+sWzQLS2yWb39hiqLfiRIatdIwqrhi62lDDYR2W0K1D2CtKtgxJmaIYSmcc/1jPYDix0cP1SFgsJUPF2HbLjxvsY29sG5qmTxuuO2uEEupE7JqEOO8+WcRjr+PIRt1uHJgex5XGDOLS+/E2yDQkkVA5UT8pHE9uXXkLGwJSHqVbtSvsapw57ELL9rRni7m0rt13L1M7kUmV45wL4Ry75Cq4ebesF262P4Od7JTKn1Vb+XSOtn37c+5R+lcjed2WoYLr2HhsLhxSILdrmMwRrkObwv87XOOUzsbwMxgPzQO1BMIL64g1+eDUkmWIO/5qCJuGnkiisImS7KFbr45vVrwjtyP7OfcNkzGzl2LyImEGFP2x94ngMSvIlgVLBMRZDLNYfIy9Oht+IGrccbTprkQjnzrfStXnlbT4ebRYgN86WriTURvaCjs04ztCpoLBHu6aqRtybwWLwUjXTCl+S8YqcP4jAjuL3hgp0Q4cEjJhqqecRKWUpi7vCgwtmQCe/S+tn0sEGUeQuvEjUdNaMUwwNwDV1M1GozAuyOaZFRhfY4JjWcpJQNbR8RLIPg6Qhyeo8CWKwgJOMcJxBNvAbm48ppUVO6/d2FSAem4CU/A+LPKQMoSF+FqB4nD6bcmB9XlaBLoi0zOgOAR7z+EfsvPXMzniqC5rSvrcUh3tmFiQTRSDF3JYm+7kV8ZJ6FJunQ/qUE3K76SLP3knEVRe9xiajXSH//aPbD1kSsZUB1iid2db9yx10EHKcCGMJkGAyWtzR2y8KLlY4ZdkA7w6a0A2KEQXTExaSTNBf36HVuoICoY77v1JZe5OTKi1HoupyqGpsJPyMQoRNh1Epl1ZYoH3SMHGkU7mrZbv2g86DFnUBEPAhcP+QwUOIQw3QAGIkXjP0l/6dXqaSGP/K69wGRo1ohoq4vmm6wsfXxeubqwU9DVRsqx5KnNb0tFXHC6ysKNToGSFtusTzVpV5ae87XbtTqGWXF6CiZWyGK1ShKtV6uWrbocQUBqalxVoDRrLgx1owdVV3fNWNfRuhlA75cXzLsE1ReGCG3DO5eeTfGFg6UAkSW2V3L9Kzx5/J0wk0tnPRGFUyTOc2evVoBCFlEo1jPsYP+t7h4AF0w+FLG8u939yG+BuvUZj45WJsxFM+Wvzlq2FuxpJxzN9TCE8Ah+c+C07/8GTxxpiJb4iKHOWA4NRhXZPvc78WZXce0Y40wPwlUYUWxu4VUic+U3IuC0jIrZL3nz1OS04AVPyB2pPWKVtTURKaacsRGXxUA8aKJVDQstjk6UO3yog+fz93RJeKg81SKzjrll88cNNp0jGxT5j8fzlK0n9/lqTXIifkotAgNgAqOVHBt/15vAHrrogXxOQ3koVmtA5DoYeQu0Ytt1pangDUzYVsjz34DXu41GowDlooT1Xpu0+zpi37q2vek0uXDGpm2ys6b0wMla94mFmqVPEx1/G94LUsms81QXp82886z+7otslCOMupSjyIGpCKgfVtZwMpUIVe6ITlDQerHudoIv3U+h9oJeYzoHhsNw06K8A47T41D7VAvrRcL2s+aNxW4FyfoWi5qWJ+2Li+2ejZTGFBVelY/gXRQDCsnPWlNVsoGWQU42rsCQ7qWiYOoRncV32dDG6jyciK4mWf/5TWJoBk5j3+ad7BOGZSZOrbRBWuszDGr1RR42KCgqBXTbQcpyCRfXwCTKuCrRNvi+2thTceF4wErR7qlt5h5SMwig1EIps16TBTrOgjvFuPfJghV2uk0Sz2KGCVuAYXMvLHmotXrGc8nePSk6W0rWOvYyUI9uF7E9oAf1Q3hpZAIOySOxgR0tamRbQ2IT2uAZnMGXNNDK3scGSdRSMrcaA10JN87MyPJJrbhzkckCeEQCZPwK+3ksez9jV5CPdHw5o7A0xEkSG4cclWDX2TgYAMmR3Jo7eWTONX/DHuvHu9ycAsgC8icIE+7z4Tgy9BAqiEe8eB7Bd7Xh6UgwAqIguUkUOwuqNNliVJ6HKQhI1UWEfKyUIo9yOC8IjWwofWeq3khYMJGjZY9R2lUr1d4GHIiuWDomQVfVWDxn3KDpJP0fnlR5/4Ef5JsV1Xp6gIhIqRgTXx5MoTGH/kSKlHFU6Am/70H6loWh+W+kf1DbgOn2vEI1NxCnk0cO5wASTd/KtAvk8M0njv196A5reoQNkbRi4zl3rOOoHik3X/KrmPAcB5eFK2kJR/rFdoMmc4FozkYaCqE2DexB2+7gfeJCZFI2sSCqqZ7X8UBAdbnoL/lxm5ZLyJ5yX9iL+Yt5nBP9Z0YF7c204R3HLwNLKYEufGF3quMWObaC1EtJwnAUnB0mR3g/5vbgsbzx4Acy9CTVI6tTpQCllchO7kIuL4k25WRhbEPymQXsYzj5cn6kd1ySWjke4Xbg0SjPhnJrIZAGGu/guiAGdParuoDSnXBlhJZwp7EHIK3Gxk8fXgBF8853K36srjd2UVdz5nsAC+PdXmUG5E1lBmDTuAyOZ4smjFkLtgZPkdWYHSpjGKRXlqLAO82MZgDBOGCGmf6nS0zyniiMMClHLL4w84irWGWXxBcqAwFohCX/x/BFNba6Fetw8nfdD0sIH3zCjePJWhexL/1hu16SxFY7JONfkGXpzOATBaGwhewRwahATCg3j6Dh4RW5aDoEQYOwTzk/FCILU5DW7ygbJRvMaNbTwlpMyMfdWc22czJwfUCIthZhW/wp+PDPEbWLr0939wAskCw0OrC6gCtmxhoNaEC7V2Oka7ntdEYoqd/K5HFEl10xkfVmeUF4FNX9pUwTlMGA18C3oNVElTxDxE9eikG2SKIl8hAOj8+QYRXkTzENe2ZkiLCQaf0YFZrfM8btv2xmlHm9vtrcOiOnS+RuLXrQDJKG+9eNLhLiptNUwYaGA1rkALckUrZ0ywTKrHNsk/jMl8WviBwlVdcTfiAyOmh7ahkVIKoplq3kr6VqRxXHCDq2C8hcro9oQWIr6TKkCoTmDSwbrCp0aa5+Nck/DXXUFi9jdNqUsnp6LgGlInDkE4ZIkog5KKg8VS6OgOOtfJrdLBjYAQKwuO7Sp6jRpwcJZSxd+6fh2il/lhfhjQBmRdpYz/pj8EQ7DbCnGgZ0tCEpyukgRD5YTKck9MRzNpC2/jpjZILCFgzMCxFOpQsHyqIT0eMOvB0vDSYrn8NllMBUvQ+TZiXzq+i0/JP2MQqeRH796x0JMAWYjvbz+pQbQxZ7wKXRsZI+3nHP0Wfg4OqsGCF3TMpe7VvXQuGnuN9TQZ9ifGzrBHQ6Q/44lG8j1RyArtKFxc3mF+JFlJKMB9PjlpY06vs61WbMI2uiUfVzkgYSYGuynkjbxcyEsAnbRy5B5C5ndIUoPJqOt4g3NzPeN6Fum2IrIwaaS6H4qvzESCEPanG6fJg71ccjMSnKTmx0y76DpOHhlxOlRmHBnCB6zHyRYBIXz2Ol+Ox49KnzFKcHV3a09dyaibiq0OPNTKkVUViey2Y48IGUJTi0F71BUciQdkn0tw8vxhkrOHfHWKC5NPa8Sdm8KX8FUyw4OEPigGPh8MbNurp91B+3UnPuMxF7geG6iVE01Gi6n8NWz1uxr
QHe5eCMV1mZbcqjD0ZovxMjuQZtSO/DN8gcpjL07Ui8kAPqGmwLDqpZkyUga4cKZZ0n+Ns8QPsg+HRLHfmsmJj8to68EWop260dFF8WfZ45BZcv782iFg6DtOyanATOPdJ1eGKm2cLquj0zmf4Lr9Dx4NQuADsrYJcxfBW6qn5mEWCBp8ah+jSBBaIJ/m/4vZh1VSwfVA255jEamISqbgQT38ux7qy4JusGGnV4dILiXPrfjmZ4aZwm6LtxP4PWq7BbhGzDh4mwRhawFSn9XKm2pJJw1MmcuR1g4yevUZmErgfCOZ2SxfQQ2jJE7YvHfiK+9jWjvlgoI+0CfLYqtblRUstEdQCv+sXr6lJaxIwdCTxmplMXi3nq875GVXzrEiH/IRPlCBktdPFJVvPQU1BJHLwGrqsSBmQbr+0d/Lwhn3ylkiIEF5jGL0Xhfe2JfL7rpd02sbLuSXZfe7yLLZP8Q8qqcgoqfSIv94X2lVtdzVS7yw3YG8pMa0gtRy3nnjAYKwC/asqJ6grwBlFv1hZlVGsahgNhQFZhp7hFxJXIxT0ik8w9ufOZ8qG9D8PMAE5mbvW//0tD/ZANCnBgixYbujkCt2TdkAZ9wn0b2ln9CKZg2fnKfZxGHcJmGOiJwUBHFGLOEaYEibb108T+IAlFdak+H5eJt7g9AJ/2y2wd+Ct9Geiqisi8QdBiU/I7BE1WfoH3eVx9zD7plJZmeM/rmla/YZXRRWxMDTi8bapvUQuUZ1OQ22Ak86H8UAx2AOdTLOn5KQqompzX1eNjxVFR2bhxRpt+vMlh4Ig3ZNrCq6er70QBNfv6meo7o2i5/LPWnASopSi6clFjup/6g0qNvOo4B7sbdqr5igo1dXrjJZh2q7bHvw32QaYMFNHWKW7mFKOVfbJwJUi4IP4Rzgks78fH4GKDkEb784YYUjy/UEMQ/1KrHBuBVItNiHnKeVeA0ZUpebQO/QXmITnwB3Bwid5DG2RL3yChPGYVcCBQleFDNgUbBsZpej9HvKsDvrczOyxFnThlF11IMqaftvgoKaf+vv5y3mtnV4XxjIz2pMcFq2BM0BLydvcRz2E3l7VPAc3uS6tZ/HaOe33mtMSegmsEt4CklT1Np03GUCqmqY12K7YQEK/y1tjdnqwG4cAtWowjwsAdDByf0m/IFVf/o/Qu0cS0I43Tboa6+wI+2UYVMj3mrXZrirupYBFiemrfEa3bXcC5F0z55ToiXevOijAKzgYecOCk4pPhbgxVrUBxXI0aXuPkDtVZnPdhvKNKfA9+OyO20aWNACrcFPMcIFsBRmMD/sdcLhR6OzoupAXVlQlrwZvw2Kk20nZDOIjtAdrTON39TveKIVjwQRHKnRWJs0g7XGOgLyqqoCRRK7Lrfj6BkS7QO53X5ZEXf5kfAodmj/y+zMlq8YSI0jhFaO8dDZU8uwzQuwwB4DdH6MpUHC0e03L6q6wUxChbIx5FTd4OX1UwmxFV2bJzqFqJh65nRR9KtAbpqiJae4AusI5OXDKuotXW5vdfXGKM3JENOW0oSGjDBWgTK6Pfs2IEYflCU+FLja8Qgv3APe9aWjcNZ6E5inrDHNKvKeGEDSkPNrvx9yBfXFtgFKM/qzB1DvUJ+jGcEU0/pMuY0k4nVsb9URvUtX2kS62Fmq12rrNoBxiOe+vULUf9g7G2Kb9O5+8ldzr9sd+hS0J+LdmQfI3TNLen44XMh4eHzW3iVnR1MJpZJRMAie0mIY8F/CW3yrHFZI6ML+5rI4oX/9klo15eYQAHhZh3Ich+ey4jmkJXvSjtrf+39qGOIxBWrKYzWLlqhIxvCxtcIUbqN2Jd1+kHqyOEHFzymjnewu78RVVTLYsBaCfdQARJme45QPdSEXhAdI8mRjMJ/lW7xibOecjTkJXE4JIByI2se6NQ3aPvjNN1PE7/OxJKKr1La2B1YDlhEnBgwc2WGvZP+9FO0+M5oJxa20nzMRgFIb1ZaPS8DGBmO4rDD78PNBqL0w7EH3KpP9jPPWebErUwEcs5W5lkzxvKmFeQYHg1CVuc+4BE/q9k0iB+KGxUsmzm0xPYguMsgVYNTM9YabiO/ShwhewBf8A1+IZR2BG8k0t1AxDHy/v/cWHNFDA43QY7poaoNPBZSq3/bXfOtQC0qJRyM73q7eHhPrGFjdChgKnJNdT6cytC/JYxM1bahyIUmCKJSIyAgd7ABBm5lWmP7MW17/Rg18dGoXujlT+tf9yV994FRCCnopeJgPRnUjLbD0lu/Hpy2fOp/zVIreyEY6J4uqnK8B0l/nsuQVeqRiKckR3xxwS/ANS8JX9N3/3ev8F7FooCExTYui4YjwJ6zCuDMzDjn1Oe1VWz64qyrdancOqfU/relM93tg8QD/hnyayeevDUaPPNDWrA6uxTsinXwvmZNnqw5Q/4cfbOMEYyZzgS/PbDWSzeHJixuZDve8F5O4dmTb249hritpsQCS5aKhcwXUfMUBheNPhtqLMVHvqjrlMxC/0MAYJq8u7G1qvLV4V2380ILniIZewF2qJHnUuUbLDeNDp/OOGWYc7RMvRiNUc+0drmmqskmmbEGwvZ/XnuPdK1xk7JX40Vu+x3GYFFLQPGpXgwnyxagmdsEWqA05le8pEMEDeE1idbO75Rx+StcYBjaduLi61QJ697FDvT6aaJjW3b0Qc8cjTSYAJE+oevIdsJXqIkB1JEFpJdLxmXf6gIzfdQ1PoUl3gdrKOufy3CBo0XwPCF1nri+S/cO+nb7/ZPDyLci1WoYcG+3qtokfTXZMFSYKlOoEgUYpmgp1dhM6Pf/yTX+ekDPxinhX6gQ3nOa4rF2xArJPYYXkg+Qo4JAYtOjDiZkFlDXich1VOSM5qh8JPRfBueKvIwMd29c3eNLlSWtE3n5nrblxww86IcgaLGN0C96oprEnw/GFLhWVikpMYtnrEanjLVRIPxJ8MRKAxAHWunp6PwkYH50DbEl7s5EyDqkPx8TxFXMIzCx0yFXbPGLTZVulsYgbrqzoXfHlAEbbAys+a4i7V/tHiTLc1O5Spfh0MPTPak3DjzvN7OyvsqgVQS3h85WINLu6QkJXlaTEoBwXo+a06DXc9K7lEKDzfoL+amKxz8/HWV7vKqUUsoH71jb+BuhnT+wijTcFXDu72JkciaP9750HNsHTh6LtawWFrw8gT76bJ9WrsWc6MUVROtoV8x6zmmJ/r7cP/BLmNuHQpGwWnwCkm9nqS17T6JhNSs7y8cjyP//nqRDXJIQAl3HoRpxDSKsUnvapq2Lc/cJFP5vSmB/GUigqdynMgAirwOpq3Q4PVd57i27O0v8/M8dgX17lCmDPkLnwA23k2ZYsq8xzRDgHEZeVLSw6KyZ8bbpAl5DAgQZn3snUHpumU2i7K/AIjw95yeJFlLXw+me6PtXR0NyPWokfjt5DMMS93AQR3YVlFV5gBXVJppkdKrE6BiHAKOaWa4P8essqAFsIRM/9wGdxDU5fGC0m9tKDpAUAj0lO2OHJn5byasMnJvV1bJygyqu5K4UJI2uuM1tjKro0VyRUH5wG+OYA8gwgUONIUAm6E3ELSE2GgdHrtElF/F1SVfjzm1u19ma2IH7CujstDUtPJOlwkQ2PjqBS1tH8AzsSr86dSK1GWIu1oR1rDxBWuC9rwvCih0tw9iMbYp3hsdl51Bm8hbM/LVi5pk+5o5TyQWUoq2l3/9+QGbL0Xhbsvf1bNnS4YkaqsVYRln+JKrbmFqexroMqNXxZ8jD0uKnxADhDVeArKVsTJ3xNHZtc9LYeoZYVeH7AmnHzTdIqM7SAbOTMIICGirv5RL4X0Cj7LM2FvIMsS8WjiDkc1SMYqWvhPRZelXwCT+MDAw5oekKBgMFvYJzJ9/8Gj2PRtwWOd9sjeNz/nnDyEx/RD4BoW6HT9NkOL1sTA0KT6ajlVAXyo0E4rI14Zs6x//9zx9K+w9/UDCfBZODZVIXo8ylzB4NQvETcKnfjz8lMBaPNpKdT5TxJAWtA49MlFK5QvyTU/tmzl2a5ELO5x4eebS1IYFej152ExNa0QL8J/XJaRbTBxnJ+S1+yW4YZUdGQ95JyqTp8p/mubcXnin7
GaHYVcJEMpg6w6dq+mI7hwfw0jMZPKa2sozzrpDmB7J0/wbULgOF02Xeaa26sXjLaBm4Kl7tubmTZPbBDYgD9la7gWUcv/R2wAmSL2cWwB9r0zQMBqPnJNEXE4+FlVSKeu1MkcM9Zkd454MmqNBac66d1QiKv3R0srv30mcyE1+8PX4m51Sow+Dn6q6M/GgAllthfIPT5NYwqoUjBYWb74oWMiHrZD1FuOQo9Oqy6E/0c9g5ukEaGOwxLUTuUeRCUAvk8Jipuvi6MjvOBpQ1GQZTAzA4HEr7NxEejmYSGGwIx37RqTdS10vgp4hg/lU7sbhOGQ3Y9x6Pg8u6D46pr/xVX7UKybU6o8rYSS/KCTv0jxdARxRpbhK4FqWePvawq8kqkemQIyNKCdapFtN7mS8Fwli1nG3k9yxpI3/jHdCh1SFfEqSsG/TzsDMs/jq1v3fKBjFOduv2aKKBjykSeTwcv7hrHJk2dtOMjTqPgyd7vYUjdHWLjV+NtUuhkTC7clUyQStytSZ04+KmsCFYAd7WEoFD0ajxfnMrj7Hx5kjHdxx3SFiy0QcqtKU7V5BJfSXZR1REccT4gdmivxSF/PFnJ+FYwda1gpEoExFQ6La0TpVyF5x8inOo2s4Qx+oQ+cCjIqa+p2mk4jsokDbkT4kr7SuonQVnIxIyqn2H5NYVpmypsyHHvrHI3wF1VgkNdNhlQcJeNLKhJ0o0INULHuitCxzTJTpYG0g+cHMAwzdwwnDDSFqDJoiu9PJUSxUbXpSluv3zZXnPm/03DibO4cw9nynjX08aZ716UmBak8tEZdLZU8kE+d/BVTS0elrM+5ejBbRiLydWISXYEAxhPUtGbKpobjgRzHvvBFvAfMsM/OPhgQHC/P9/V6/PnjeC6+fZlf5TD7EOKB7qQTkHYH6fCPOXYtBYdCc5ET2sLQRdhuhxGQNbjX9D1VapMrYt5j9Qk2gCMPj+VWmNarhQdHzZqBPta7mdJpkIeKKlO3M50Ktsbrv4O922vUVu5YlFQeABddcgTbdW7uqlIlrvFxdBn8IVdjjIuZCwOcdsj8l2C2ZuPmnhvXrBVsCdI1rzTiGEZnkmK8szjziWC35UZPFsSAINBgRjJZT2g3QvRGLnTgpc5ksZENb4/yYuk5A0W39+AJJfgm8WgD0cRGtFentsT+QuUQgMeDBD7mIoMQK5MdbURCDqgjuHscOwL1cLRhbQ3Tg2YQdnEMz8KN45/gEoqOZvHdKl9VGcXyLUj6APeYQiwjXTEUvp4pOdbaexQkkYPdt0mdVBnX0tHJ7nXU5lkUt0pQR2CBfNaIsqoaT+8ljKAmGrmXXt3D5GpfiGeGObJQ51HNcoLNc96snbOLOCt5QmjFD7ul4zJZvmN8yMcD1sc5WjbxbttEUIB8NRZx0vPvjxkUOhhGfi9uA0fKJeDaSj2qStW4ckXKDiubrz/WymqgLOcxNLUO5c53/OaV1WshQQb1Nta4/FqMS68WZ5UiTU7jw6M3VPxJSWbY2ReCKc2Pt4oUERvGIU0T2X+SL9Ty4rqE5RpRP6MQPEqu7Ezbo+u8zqjUdKokKVM2AuZZkhFBTWC0oPXKPZ3i2bBQHn31mX30/9L9aZhF5g/eOsVNRvSBaACtnnaK3m6U05sTBXZnZltwkIdUT68rPggk1/3Qh9U1Nq12I9RY2gSuRjLeGD2dvFzu2keH1A7ATIFqgjeufOXKvuzDfQm3n/00tYe9TzEDPncuJJrncDYIxM3ECohLeXg8E2kJb2IBbEFt2aFiXC5A21WlRDp5rBKaO3XYJS480JtLNEem5yNUgW4vFlJ779iQ9ZeHEUkALzrHwoNjUm9J4C7+MIx6e5uy1n3gy5WuCioLz4cTbMTJ34YlLTe2PfUSXyi2Rd5ZggsNthT5V3jyhCOZmHh8H6xSPutqrd3nSN4ynF3GilNyHchbD2GCf2TS3RDt3vhC3pVwFYi0U6t7aLP79D41c433/KVM+U/DKeakBVVk91tP5mpjgTdiY6A/jE4MwxOG66XB/pRnd73EhGqLwFwMZm7/AYX6Rca+5V+aYcpZKzM1QoK5HzP76a5QC1U8htVxa6hB7B1qSLX/oDTgGece0bKDZqIHGCfzF+UFy9tqjMlYIkVh+xPp7OxXnEWW5WsqVyTtZ8X1Cnb53fasLAkjJ8kLelGfBF5jBMsulZDeiQ+iJa4njiu/8BeAjtCKW8V7ElSZb0bHGqdNj7MtWGxK8jPtuBtfTOYwCDM+yiwybfMLwXKEHGAUIQFZBRjPfamvQlqdvaYvoKtv1yt5hTKM4YbKvGkbRpIArptfZY0n+H/8ibGrvA3EzXy0XR5EakCSvJIkjuwyiDuN0XnW8qWcVHSIiiE9ObobUvgBmQYtLHxitEuJu3D9qOwop6Ob8Hnj0Ydz9bm1lSFSxqajtSuTcpbeargCmgHdQBtBXAE2cFIEbbrzmGZ6A7tNEHFkaxmI4ZpkvP1UiaZflNKRxLddJJ5LJ6WSDJqihvEKGxYXkpkDAmrsJorVGaq4txqbFPdGmK9Dvcd8nWaIITD+u71hdSZMHOUVBZJmuJSjove6Iglm9jiyiJitNxUk2R9fgknzoJQTQtBiDmkEcv1Q4y3vNdBdJMDNLBj7BwEAb6MHD/Iu+5HTfzxiSCJsseOYaO7fGBlLkEXi0VEj5waAJ8K6ydYx4yFesCtZG1/CtW84IvlqMkvsEETzh2i/H7l2bTZ4MFx6BUlACV7wTFVh4Q5uZ8LGJnXzaUCiJ/L9VR1jHml6UVCXoY9d/Dluv2NmtQq97mEuyVhQV3Le4lGT+cf4pV0BdOy2hudAx5P3Df9RfoWXNfG+aD09M6udvpE80aFUNRI+ihDIsQXsVsKO1PsrwPMWSUc01AHQzg2/NvNF4WgD2WDc8mBq4LcLTb2tNrEHb5OT3eELsjlUv8Vu9sr61BrXRJfsTLOmvkwidUEzT0w9L7BJ9MkKyPlfbqM29ybVNdtaAQ60zF3Sf/bz6noRcKfgPXvDW447ZELpgac/OVxhNatDiMW4UPfvc7II26wHFPC5WlKppKX7WxYEaFmiPrj+UTPI5XKiae+/2Dl1y7CIgPo0NqKXtkz37xN2SvZbAGYK7NJusKb/BDCXB6Fit0dPl93ZaiE0AHvjnhJXAKzPT1YGO62hk1sjTi2LBt0lzoScDox4mA/RWJ/mkmc6tE9U6HvIF0FjY9nVT0f8/j6AkrI+Hx2zevyI8feNi44finGVegQfVw6u2FycOf3ftcKe85eTvqQwREbgNNtqrY4PPM4gPa0qcESh+nLnTpNaH97+UDQuTUF9kyefRdE1bYmDgUNN49spxo7GOL6Sq5nqqc+NuYjD5eAaklnuMI0pG3BCJtMdOclNPALxGzAEoLpb+8i9lnG8sGKiBZHTWu+kmK+QSIvx9bfqEPHuQjXoxb+BbHv9AACj14wY6/DJUc36m3mr4BcLlXsiZZHWJIZrK6oM0nKuLtZ9P9oNUjxH0w4mf7pgEwP7PTOY8aAA1SEl2HI8TqAN7JkXH2SVm5gIpv4t64IYX2S2HIzdlyOa6+dNP0KJTGnBRFQAjLL505kQjXNPIcSog4tzkk1ZTJRmARHSp/De/yT03PFWu9uzrqRXty6Ebo83YZAKVq62mb+t/nzbhYOVhfAzgYmeCPMBf13iSEdJRx8bhWTxAnSiKP06zXVxGWTxRIUnbXjDJDkoR0o09V9XBiWu5yMgoCkIxuYb9StQfP3Y3ei4nxl4ykB5qqK6k5PoQBbo6PzbyA5+VtcmfkVpTdwjqqAbMOi1er4NzrChWHYC8isK+MsV5HaBgcXyFWpbe4YrhiJzgkrt3c7DmWYrR4WYXWAWbM/rVvZXl3yXN+BmNXkejAisbWQui575jSK/IT46qfpQUU7c6bAwR/5tPSD9d+Z0ORfbdBBTzF4mY+SE5R0xQhOgy+mlKJvaEdqKGyxupGy9xDc9pAEf81k7paTwe6UjM06uX4ZQlRrFcnDyhDXvPLytrjE2TuD30T8L58M4YWJMU0/1tlMrTRQ7Jie04yhd5Z/oBs8vbzZuUaIqIBTXof/gNNMDx/gxWZCaowBpeBeZGq
eU6WtNQ9sVasA1kLFzhqZF4ajX3jBdgVXCTYidANnj9IbLQthgL+SKwTPnkDGEvD/qgTLf/X+Kmnc8B8s2gNgZ/Zgi8puvw/hvShlfxshfCr21YjTZUe3HUVtBsYjS8pOdbiGSG3kU45Vx+r4rjr8jbBnR4dyKcppF4HSBt0np9LwraUZfa7V083VtVN9an1YZRRin2q5HgzesEolizzZx1KaRp3+97BYZaaoBB75EwmLsZsXwZSjuE+FE/sTUXtoZrfARdMlE3K2uMmCed0hI1+P51BnyNuVJ1pydQ9aU6Smd6TT4AHMo9U9QKCkNYYEEdDq9O8ik62QqDpLHURrjLtYH36f8TTN7HY84JerXPxUgkcQ5RZ9EMQFVO+eL6x7Y5enBwy49ybSGk28q1dkqBrBb+MA8fi4LYl6uJotQ8Y02G9XolbQy0w7A2BF0Ism9IqiBXP8qYyNER3BXxpXL+HtyR1VaOF39GEiGWis80muilGsLAU1HNv6dVbYHTBeieKYkj3cq4en07OAc3b4scw5fJLgFHeG7TYiIrq8vE5lpdhkm9Z7HhP+cUe8F0OqOQWuGmZ+rZ2qspWyElZtRoFi6JN/HUHnwdK0QDasRICcczHvCkh6jUFCJuutotJsMY07GdwZjBTnyrtc4VGJOFN/W8BvYsau++uTgFAcgFcnfDyUl8QgfyEw/myVNH0YgddEl0BcTmobQojaGo8L3p9ptldqHuCeBj+OYeRzOffW8wKLgcU8oFPY4ohSzHU6DdP1p+Y7WevgYxrFKHJTAA49ZSPK4LkCbo4aomvHf12tbCTbwA8aPMGXM79OwW3R81n4Cd7u9/6XySPZ1dH9TIdiXz8Ir6i2GLTqUfCtHytPMY1DNlmCMt42ooUmo5yMu8d620nXPbrMJfnj0RBOB65l5agbhSPATNep5LBykGp+uoS3TEhtLSX2cSeTpyeq4NQ7wi9QD7dbx/rDcXeKChQLxQLIEW7WcDi9QK2PsYIp+5INZ2iIahIunFbOnDAjXAb+ku8XZPCLIB3/O15neIje/2CxZhE+Hgi4BAVTTOzujU35M0IZyh/g3W8qJjvUdv7JZDUXl83fAgcnThmK4+Ui6lImKESbkzVEmRDDoXPcSiIcDTWbDmQFR4BO6b2oQ/8/RV+2/4qsMtw/qib8jgAfPyL8bpX8Y++GkgIOd/0Y75WpiFq228x6KI6ksa8Nf99UykGPl1ZmL7IK0Imlcu2ZT1yi7GKj44cyumOgYRVxXBLrkJNnjOlWznDK0xN/4duC7gugGcuxxUya4UpQjxoL91/Cwb8aatJdKAv6duMDDUVxXM6nFVaEWOyfBdrfSD9nM+dHEepIfLBLuKw3NRpVKpkkyuyDuLQOR4nkldEsa9R7l5m9hpk937cWMsJ43GbaKrn7W72qA/bTpgtjHM1QJVXF6quBYmmyRE65bXg/bS2k/qudp0srccPn3+5ks/cWWzirY4+U26PfbAPPIkLppT5YFDXrY8tJVY/ut9pFekifbPflmYplLp0oVb6Gshc4zUELCABip/qThWTUBaJORyl6qTjDhW9G0GQUoArrt9JssNcYCIGeRatAFAglWMYXvoxPmQjE/ExFPyFjgGqQFQDMZYnweUDWuFpjhJnJ5dJ+2ivyp8MdkVsDh7g6E04h3N77BMO4qbZ3tLsMeaP43IlynWTivnUhJssJs4CIR0AKQPakv9ed4KV1nBKJ8j/tU24KwBfpZL0ZVbdAAW47mlOvbRMBwncEKJr4M6eNhTH9ngb2rBU6rvWERS9Ey2IBfheGMJRcSYtmqbnmm8opeBG7l4VjBlx7IEhffCZiPLq2+CV1W1lacbtAxLFrOq+5vIP1uWfvY0/elY34OAz3RGTXco/QF5rWVS2Sa/c9mcX/bEEWavDAqJrIdcngjGOq7mH6ZVk2UYcDqjFmR1bfasNnz1t9nWEPZeghAoyuudx2A5lBPDEFeDNqw1w5oHk8Yb/8sxw29vrusXdBWKUBXJrCCnk+AIaXzyuZHBSiTQhlDw4Qw8F0objcemhL4vxYifqpcjv23Y6hZTluQAwmVpKnyCXB5+7VnVJErAzD4fm7lx4cqnhtuWlaru3BeGoozyG5kR4P13BMHYdl8YRRXmu4TlBuTyCmJetIdT63+V5dRmTSZA7RH6KKHKPOJPGOXerhxxCCY80GrXVH4VRAVx5ySjw9+KitFBjuae5jYHgwk6NYdC7RRkKnr+CHOupJj9EEyv3hAjr/+RJJIzrUl1vRl+HvMf0LhOASOUuSTMiKKC9Dka3Sdk/OeKpR+TtJIcoJMBjNjekTvEJgJprWMSGx8D6GrUAHJhJ0evOUhPudQeqLJLFDSeG7JgB7OpY1mvkDG971MqEy9e4rFZbJwAC5/LhSmk5MxF1OCs9KIIlprgRcAbkQSB8myaCr3+UUeaMN0c2GWToq7l9ZYsSekI7O9v+X1LdBwiKdXM6lCOsdgcqXC377FwKiK/nIpUsN/8YxyIv0hLCZih5vAA0LIp4zvCXr1kY/UxgJQEHgIr7fztYvnp83auQe0O4dNPwGw7amTXAebRPq9BGhDRC4yaqdNiW+JLiu5G2NkzOJzO/0rXQEESFUtdq3PmVt4cnjr46dH5S7X3SlI31Z0Tw40b4wnuXoY92OjsCodhFkjmAmTEBkQiyxYX4KuPBxhKjyiJ6ss5pl0uuj7McUWCQwBXG4Mi/Pydb9J6M1llhetmGupzcdes/c+iUQffUnmjZYv+AWcSrWTk1xsVWym7oe58/aweEyCMIZjdkoroFSs+3DorpqBQ88uwqmfz1qibQ9qJNTiemjMnJNK/vcE49bvdOd7DYISWDYownrwNOb+nvg6D4OgQCxmUS55ogEgiyWb8q0ImpLkuCYr23j38+IOUgVZlRQ0ijM3fp+5QXsBns1iP1K7Z9nu1IwHgU+oZ1Ok7UO4Irmf/M3hl5W4VhPe6BK7dcHfq/+THNNedbYyE3QcjLdNiCpVLPve9ha0RK+8YDFeYlIVWV4Hz3oE3alLU9Q1J3sXHdzZuhQox1xgbQm9TUCCRL7Y5ms1F/3XZTAuC58bAc2YaNBHOxwyfMtAe5O4plktA4t6QaX4nsCFMZ0mnTV048WhKrVVFSsU+Tl3kufmh3sBSOY96MhOE+ywWAU0DrP87OSlWkpTtFlG+U8LA8kkyUtK1DRnUVXK4jCfvDXh8843UN3AZhHDPhGyPVr04y4mwukidmUFuiYT1IfGfEL5LQ/LdNMFW5NikmQXtKlDwAmr2AC3pvlJallnv1S8xe1W9YEfsamjF2Kzj1uJa4su2nFQSOUeaRs8DbJg7WDd58pr+NFd6/0laoNgj+wF9WCLapTFqOWRkikCnU1vSkpSNo/fgjBl516kwtRDTVT6QPaTu8SsSKU07zZDHwyE+2fMwO3QNtCja/skGM24btlVfvp8RRShTYVWB/3iPk4mKF2oc6TkZpl1pZJ5gukmPWpQwt998lgcZeKCV5jyerT7tqo6FsJVWDU85Veh1sTZVkDp0rqFzslQM9/MjpTscZEcJ2GCutuvvtJAMQxGa604oGRTM43yuxQR/D9MOrpf1t4zomISSOIBZgOeSC1ayYCjWSkIPJcnqPIz7sO4eKTmbUGndNo+DaAaXPx2125XSQt9cJTYwRZKoKNkkjub5G2RONsQeYu3VCRXgGBIx19TheOjGlufyS5Xqr4uRm9a678clP1OOV1/AZILVmNPGrhiHgQ9kIe+53gp2GRPzgpCsZ0Dp05Jg4Dd41S7VOBVnRWOx5kHb+hvOFsBI7oThE/jmT2qaMlL6cGLXG92RJddoUr7tDYxT0uyZukLLbxBc7wv+nUt1+EHvyuVKbRiD0OyymLy32RiY5LIh3aEgefHypyrBHOrWDDQpxP+LX2951US+0xwb/4dZe9F91UpFeiIfJ4KYOjbtOhwmD/0kWavQlxWdghHgEAcJ1e7Oo34aDfLNOkbJoopyudJcpC+eoLF8yK2iKDIRPnBeMoPJimegVePc1tyfUtCFWW/A5RGmzdQatjm1d2ry+1MtXgU5+7KnW823CYZTl98yKXEq6Vc/wqlgimbn/
g/ZUgSHvRlA2GnDvmRa5xsPNTdrqaC/dFJ+eu34SwFE8VpX0flnz18mymjOSUVk6nHut0cdjCjlV2qCyWBlamAZFQ7swzv9v1KuS6uu8uRpRr0ZvBdtm9f4w+WRGZzAxz1qBUGe0QuuHN43A7ciVvqCBbxFI9Ei14yPc8HFk3wJB+f1ypcSui20aUubHeaYpgFcygan3WVMzzauEAAcvLp70dNLYqB9n3vnKI8bwiXfB1uSX+zkJpdZlUqdQV1o/UloKhuIuB2FOtRi6qazOJeFKhG9adc28IlXWg3akxe/a3+bEtIo8hTTwzI1ysXPQN4IuWgIHoSUYPkYBdQ+hM08SXJWaSQToMGWjq1VsDzl3Giv+tRLvgVUKe0TjeKtCjlTDFgMsFyd22zPhtj6ykajHA2HFkUSiajJr3MHA1QTrJ45TsRmzEL/ht11AnUN8LWmmuTj7jOxz1Kt9HV7IkvQCHcygQmjba29E9eBDkim7oDueCqYQMsZUoMprkOKOJ1vr8+a9wLEnQzfgPumYwGa75j0NiJ9OELs5mya7YYxAYcOa0/KL46dRxJiqRnFGnW2D8Eahea+cYuZoUm0Fov0xB9dODrxnooFaA8czlHkONXMxmgOKDUivi3pUhbSkP8fl08jDZ0hiet+nKAK0uswewRuTKpZQNPwv1PJbyKxOJQ6jrbVB3nRiy2/RGYfSZjH4kggkhRkmy3hvKngsOt8Ius42G55vc4ZRgTQ1hgPDeaf7xSk8KOedV/D0CW6mo2BVCG6StKXxRI8Eala9Tf+2VSIbH26kqmAgv68aZntTsQfL6J03Y6UqjRBgV6w5BseP35tLBJYNMNFjpWabnjbkLjGzy0IUkn40JSCDW0iRXnpxEV+7UYNanrD8IrTyEURI+8y0huxxNDT8MAUDSZfNeIaWKfuwhGz9roD43fYgls8CBYNRfeQBP1xdvB8M+yswHX8Sy/LmPGTzTiRWlEy3P9l0ukAHe8UCnLMyc66HJZbRrBpJNazxCgYX8fm6z1+UXRXlu2oNF4i47oLaxHkbdjP10K/8iL5Oloy6jO1GBXhPgGtDKAhJdidQXWaupTgAtsEPGKXgf1pXKwfqVfgSuSSUa2aZ5OZuIGRh0auLVSRPLPq8fJDf6pT3RJdZXLd7ujy7zwYPK0YlDk7ZJpkIiE8o8jlmStZSW1jjWSgkVMBU5pV/P8iHioLLl4ymuyFuiLomn/nFzpO7DrIED8ZKi/Xdj3RiPg8IpEl0XlqgQ3jRdzXzsd5xg/mjIkqVRY/01eb6urSzubj53ugOUmpB5u0aVprjtxlFmh0JiYc1ZgEISni4ocNV8rQDonlIdJ/jbQM18fC29N3xWEW69sAjHsQk4L0AyE5wG//rcRVDrxEMMjUdMgJxD3GkwDW4FTekiU9Byg3rgQXLiK3ja6EvsMF7gqh4ixTecu20f1wQdOsbOfwP5pWtcob/PKCvWP+55YfUMSa++PxZU7q0uiJMz01yVIDhiopVPiHaie+uiyybzcGmcCmGE6KPum3w0kUExXRQo9ou8WIS3/L204F/wFe262xW3tGDFkzHBQ2QXAKOLUOFu3oBGKexj4klXJlnOgOQjAARohM+LRt1YKg+NN7aJRlp3a8K2qOL620ESqkAehOmwyvL/fH8DV/dSyhcII0qYf9R+HdPh+Jedjmy7AeWBw/S38kP1qPOMT+CIhYkWIZrT3/Ef+qXUslKVqI6tYTUs1S242SDeAZIgWdbKBFug5SFep+wK/Z9+NbmPLY9KZKr0LWeMrpJaBjpditkasQPOf24RROiU4HSCziKlPtpfSu/Bhb/ua0RYrsitcd/1EDz7TSOUrbJHvCF9+9n+c0WmL0v16dDKA7ktdmxwjCFkvw9paLF9a76opdjRs5Sc5pJ7RaFp9UszGd+TzpShkMEmdPgZLxunmvlPi7K7mZkXamz8Oas2761/AmBpnFdy+JjW0maSGQcC50QkrOdSDW0jep1JO0S91NAj4OjbL0vORDE7eFS/N0t2LG+cbRfCQdtiYUEfSyDVYcBJvHHHm6IKGqqMdcARDOySEJWj4MlIv1znYqWIjzNJPVkFNHn69gDyScouLq23O1wsRxdDQ6RCvwgzGGsRN1IlHo5gUhTDMxCJdRG8UZOymrOcfd/m6maWTxYFRZfwLtC8atH9Gnox0erQUvKXZ3J8oee182jFLyLsOggqmiaaYMSp9HVp/W1Dc3jo3YjwfOLTjmCJJUbwoPtqW2owzP5AV+qXpU1Q7HZSlfOlm2gfve08VdQmh7fTeP+zLKtxZS4vUNB5kyWPu4/Dh1ikt7xek2cquhEqr4fT0tdCchi5BVsi1X6yXywRZzEUfDaeaYhjq+P+ul8VpSMoggEk+u1bi9ndnqicJ8Xdyjaw6cBEObMC5u++pToGgt+iC5OP746rAJlaA9g4/qrDZoT788YRmJ9jgyA9VqGUt8u/Si+4hT5glz1xqyXuX3d+XHzL+fLDzLt6/pAq6/PZ4wWqsx38DImu9DWq7foCDooHXklo7DL34aGk6TgH3jv+nGsF0juEEg3sIOHdQ//haTB1iuzAx9iVrJTxbbDvcRKBBnpmkke/fdoqjjRHRhEVHZFHcP0rWpEjq3sW8l3ZAMnalp2rQDA3d1sjMUnNei9dwzEDUQHUXVl8qnoidW3EDcP8PNQl+t2mLAPHQAVE486b1bkX8UaadcaK2yAtQeFrQBVQk6u0FR4H/cgKJFQX4wp3x9EqItvusPloAI39Jje1jrObwMvhwtST8tbCzF8/aC4EwhKT3Eib843b0qj8xxo06FpyVPZ71myzh/GQif9s0CsnMNTvpQ16lGBbrHnSIkUVKwnmaD4auHXGo2pTp7fGKmHXt10xai+KOqgKsHUQGvwkHAvw8kVhPT+fajjwa5Hj0NZVDWZds40KlYM9lSjjCF3sGuT/DXhUNNbdI8Xsg8IZti1nW7vajOyN+JvTP8lL17F8gq2VsS5yFDs6jaIASaEM9KR/Fd/+K4BU5htLooci9hIEwaaTP998AWByiEtinLGzQ5Dwyw2ptcFoUg7oBEt+GyX53mYllls6UYApCc7l2hEonG5/SNfpjQcGsuy6ISHYsLu27KpXC7yDWF1E4eiFRoyO+8GbjseN8tSjJz0Mj8eSTChxIU2CebMi9Ekoz62vOK7hKDrUbUuCV+/EWPemHS6ZyKv9i+XX4uM9BV5n3gnMrfeB3FFcM0PsyFNk/0htLZcknhbsj79FzSFwXpn9IMs0bE5o9k/2WkYeTkIPmlZE8gJI290/teFHZ4jRlwegLqeXFWjN64zBRQ8QAvt080TDR2txogDFfGThf37UzPRys9lCJwmHqEsvybNcfgF7x0zxZEUF+7vps6B7T7K/HESEhn0LTf2y1MVIpjbf8ZGr2Fad5ta77Y3D5fOJmpNzf+oCPgKy1D4SlmSkdxx0zSnddo5DbJ0pmr+gCmXuiPmEY7k6k7L7ieUBbOLZn6kKHp7FpvRWE7HvHy0tQaKtlo9TI1HBYPg20P3dZaRsADW8VGeIvv/aiqdrVlJ7e+5eeEoyopQurOWwI7092aI0vCHGx/s715JXSOscT9RUXfOFvV08DJ1hRkVtjxiACZxxC30ioJKMOtyrbMI5/v9jvyT/AOvXKr27YnLLc7PDTsueEf6HipWE4WOvKVCMJZ5ObRT55eEQNLVgITWnFd4EOTgzkB5HlEd4XiXF2KBitCgBvbw7IRAGWsbpPxMc7Qvy/BZZ/B31fASAwXH4Ezay6WFmM1V9zyunt+wobPrjrfRcCBemUy5fLQ6et1f1aUvJLn6v8CSFKrKFNQ7ALnKD4ilsZo9mwS/gjXoJUTEvCq6OvfCeX1jgsCy6KAYvpEXJe1/8bJ2OuJR2lKyC6lvedt3GVKu8Ffc3dpif0Jinbpn8MF9eYeI4onf/3yxQsH8LMEKtBoWG2e331nwu8L6ZKkFwIwYBaB1Px3J4nU4csLVmI3VI6o6oqFuMPLtEJWmo7xnIM6nc5yt91+13SIli+RR+3haPEvdUbJlfhsIJPk/L/OSTgT72i/97OvcHxrg7JhSMQySnUMEkbCAOEBa
PZfu1OLZL0fOanQ+RO4dhP+On2MeJhJbzaDTGlKMrx/w+wPgd47PYt8ongxZjqt3UtqJmy9C+Kcuk8PAo2aDyAqxeWLIB63ugTjoY3MneQMuUn3AvZdsYS3elImzbg0zDOcm9abYwK1T1zZZUx38OMEPiUQOK4AoT1+6etqZW31hQBXLKiGp+sye8k2cV5436fo5UeoqbT+ciBNXTGHWiZloM88pDvzG6OZY9k/UBADm3nKjaZYNf8YJ6E+FYF1f2yp/87XSu3rXGaBENl508EVhPTujL+H76fqg0p4O/YW4Xykycwg54UebWf88fNYbCw74JO1Tumeub2J5EbYPmP1JKtVlByLKXkf2iAibc6afVI/m7Zq8cxw+W9kZ3BcYyMgdfbFs4IV7ovU1jHK07fPXsUS1ophYzklG9qTO5aVfzl0Oeo18UEFiJHkqYUNBjJBgJlwi0fh1u1cMQ0Glx9yuEtHayQ6rGdIAjSdUVJ4UNBZbsXCk4Ffxu3hCAIuNFEtCWXph0kY+Dna0cfAtiWCR2HAJFbliRYMlOaGgcvTQfQTMurTuVV1acJkKiT46NhvZW2OQ0SeMM8oCK/505NRRSg82KvW4MgqYdfy6S7vbfpLhSXcE8jEENzppdfB//6NUAj/P56+5mAbBKTQl2KhkA9oTg0b3XV9div+FAKWqMJk7EwJo3UT7RH4NBs9UI/awFotBXj7WIrsQKzhP2NZEXbqAfMciaqQE0RHXMfNfLkm9CzKWzKSzJJJ71GBTfEEobpMHKRH1eGpsvMfGbOPKNAJxl/FufRNBe/uttBdSUVXZA9AWrCP6/AldHK4cIlzEOSuqPAzUQFLgweo/QjPDzZ/j5DEj8/Hs2X0a0akNPHH3EWW8eAINIVSV+Viecav6eWnPqlnMK+41VmXxvEx1KqoCADZ9RCnkZGGeuC3SkoCQ2XTYF4aQ2kEJBrknMZVmNVnypCDKnZVrzJouFA5jAWONrz/mtR4ikM+YyBrp1iy/VsgypBtlHwNGtiGAhooSyeDtjazlKG3X4EzRKgpwjGWk5h2TiVkst450WG62wvSWkFJ0bK/7YkC/bH9k6U8dQc8xtEilz9OJuxVbE5ocjKntukdqwBYfOPIdLXuspS68mRrMhRzGeP7mTjb3NDYsFJBRoeJvnYc11hDtq1HQhGjV5RkioPhCVn0xkDmGLjGjcjz2lS0cT5JNQPyrN4sHB6yshqgwNmCPRgZbzeVO0qggCtJnWV+JW7iCSCAiw0etIiv2q0HWxTO0vIkSv4U60apep+34/OIsG+oHY4BQoPtVRdlvGY+puPtEMMKVWx+NV9uBMBjKG2fu0Ma8qHkCY2erLbBhYNtIJPLpz3d3RyA6O8WB0cyUeTLXrm3rTPJLEDGez1iF1FZYsTAyfIPX8dBJw5vnjZNx3CIkZoMdgjoJNWOmQCwiTnipewLOA/3tvnXJavMObktfrXOtMSzeig8dbBtLfkj+EsuELkPcmFXR2+Crz7IAJZOYWsNsa0ZL5hVrmimrTiR3UsPlvWPGuUV2djKh6AxXQRTUUCWos43i/8dNGhH30EyZ1xA8uq1qCV5RfpUZPP5IJDpqhy4WQyz9LHQNZbd+xBvgywih0SIimJoXT72Mm+WrX5TqKnScsBC5JUDrO1NPGmI4rgAvQ7WBA6qdJYmZibP5fLl0CeeGjfv2zmxjr8JCv8hbS9OmDHn6qdl2r/J3y5RzLhJ/XvJwgcESdjP/WKSli+1yG7CRmxeDtRKDJG4eKrMJU1CPP39ZLNi8N9oqer9t/0BXIWkvB9/ObKKogqYRkBJQAxCWD2aSFYiuw+ar3FoVArsbwcZHf14Cjg2U+clf45hneZIFYm0fZYrmlbY2hm8l9l8lBEGwCewbKaYEG65s2giMDhuIR6c8Se7jkY/YykPWvXUcjs39S/gFP9Wn0R4kuYXfztZcMqqKwZcc6tW+l9fwdUej7Chu8c4KmUH7Xlx8teX/EK4GReKMfzHbEzwdQgkFTybxwolED0WRr/kyQZtE03kIIOcS5MeJdyK4v5ALErs/Kw6OkOV/oi5gkFnyibZ6kGJG2bOCWgYhFB4r1k4Q/S3K/qTtaxm8jAw4lJKbGJEs7nRtmg8pFjRxmztFr8wX1+W1U4I4SX6GPBCfDtMYcV2SP0ffPvu4BjiYlwT6dQCPO6dEPrnmhxwOpbdFJgRp5YPuarpeQiWm9emSH9gAce8U1xEn1CH0+NTSsdbmV0RU7HuVAHqct53JPSbbmHd8ta1RgcGdHKfcH/T/YUQZgHOm00IBPqn3Upey/ONq9OE/nbPwZLGf7Oq5E6ERD5p773saJxQaQiy5KH5oJ3+E3++RiS/PaXq4W6K0ziYCqyhfBftgySsuRnKK3sEFtkVtPitdILyrD5656omyuixEg3qS3+HsUGEIe9Pbsg/aB8ldyQ2b+6Te9hgnKaFG339Plsb7ClnwW8Yh3oSMcw1YTa5ST4jsuxEYej8FXoMbIdC726khVIRxJRCKDRCyzeb9SKc9Qg88ba8Cip3lQ0QXLddvGgh9hZRMtKDmKFtAqN6S9uI0qRiIwLxsyVMNtQVrTsMEWebT1Q8Lf/qRUcaaHaRNf7DA7VRqeTbcngogW260zqBWW1Dkl0kWD9/QydZiU1ycwx/2HCk1Htce6thEw/MTgN4rIQwpdcqgK9iTcmhv30NopgFenJGwevXcltUp/XzAfWYamNET4azWcI0Qp08xJK+5xsUPKa5HTHtIbj2CFvEd2obYny82QDL8xtM0LVPk80AnqI/s2V7VB7XiAxI1N9LOginA1MORpT5VNd8/Rwj9oUuLG9JKZfA+aB8CS7VWcg0+vs3Jii3soL7pKYkgdrsDYfNfatKve4n/S/xAuafYEGHuBRvD92e+SAM4oz0gvpC5beGtXf/Vafn7mK+m7YCZ4cWkNfqC8L+J7wwBOebcPhFacTLSQCc5HOQuwojKKT5VLLLpFxQF8pUBY8amQcofsOI41l4ZUk1HXDyPLqs5LYTyzwd33sdHTkyKMdkgHDvWrqQ9Q0QzZ3s3pBTILLULhFUAcuPFpiOUDmEK3fzCkIVJ5hK2j2dWwlLr1gfI4TFVlBSly+EDrNt+GQCmVLRCYDq3zJRrJF350RBNeDbG/coFeApgcV8/X4nbNnPXnrvOoyUONPD4OjP7hADDN9KWJj1MEXxL0bGC8NBDxtxs7ozgQIAeOd7HxcV854xRfhRT0ltmbjtAVC033GvvNsfya1PYBrr5w97O3jszEcV44XpXclbsKbi7KzSFryLzAPbOcLIneo8+ycjfYwLkF+6IWzs6iQd56Nt/4Aj7sR33sYMYpOD2937SYvokDCa7OgTN/BOtlmV06eJuJfRhYvk65OWfxh56kTvVc+78KmzM89SUU77ouFMQxrsaoHc3vFAu2oRloYzJ1QibPTYO7/DpxR/e+vj1cbA+bWSZF1NLX7PS/ygKIAYb28BUycmeAxLnZzPLmdBseLMnpw2jkG6kHvSHHbs0VaVofSy51P/kpDO57RD/AmxHjYPK2mok6koS2RFJh9hUs6AyGy+4WbWYwJF6KB55dC2iclf7ZAEY4btL731C2Kpt8BmxB8jKcGQ+tH4xzkfXuDPwNDDn4IzrSroqVvVS3jx0n9T8OhJpdkujzVIe7vSZZ+X5V3NcIxn7MCl/fQxwo4Bfj/zs3pDBOS7WZC0ANeUWt0JXZOw7K8YmU6y8KUlMapaIz4d5pE9MuREuMHVAcLAp5QJAf6EE2Kupi1xG5lGLssLna4AxM8Ic2rEL9NI2UuCIJD69pLS1hd2MxgIYDyucMIULEDRWSiIy/F6eGPF1kOWGtvcIaSW2SMpYeFnO8T4TkII4JC/VsQdWqPCat9nwA0Rhf8fxxzFecTe+aip0qd6XhFi4FjwvIJSYr8s0LR8ubqFqUwUk3sAYRhmjlqW2mD/DCIhpSYIy5FPKVXckSJyrhxuNsQSN8N9ax6YLXN4FOBWbLRqU40XXcD8cu+2CgxFju6gSDqC1QKrrwUBZ10V8FAAECAwMatnM2E+CzCGy2wR73qC1A2znT0TwAV+2oBhj4UsPtDIzZa5Y
Um4eQCBWNyhkI4THI9f5vRk3hF0ZomoGgSCN8bJJ/HaTUI9RAV+vvFx5MM0sftjUzTHhODq1FV9KMAS1S7izjKF7Z7EiWKdFPOA1Q4mbqesaha9jUU2J4rM6h4Q33ySj3ZlfOtI8FoWr4tbOGJasYirK5mBuU1dHv4yl9Eilg62/W46i9lSb3SVDCbDNohX/2I8Vk82VkGuR8UMGAq1fzFbT0Lc5/6LmtUzrzbe/WH2J/1QPhY4gmJomFahJoriUfZiAT1A63Xyv+vvRpq3LL37irrTTpOwGMA6/PFHd1qN28hgk1d+QB/fbA6QldVwMU06vOr1Lmue46tbPfnFxAFMA9oTWp1xRUqAtw67/riIirN/Fd3RLTuU4ZA8k7bA0lsOYuWVEfF+zlaQnnRl25Hev7HRHLZxWo7wMEgZQ5Mat0SEPEhejeZTs3vNgpBPXue2sc3kT8VqXscJ/FvCzvg/UDDH4pX12l/KAs6+9Yrt68u2Rr4isWtzyENKS4Mno+v9oL3Terztws67J2QHBLxiUzyuj4f4VxmSMmTyLZY6DnI4jTDAm37u93jmgYlZZ9+J8nH8qmlMJYyRXKZLkg6SJ/k1+oc/6FkqBB166xDBJet+d6t4xHgR+0pQWpOPAASNMkA+FZo71L02FM4m9rYCAYysFP4PJHyHzwPptBrA3W0i5JWD+06kLXo7/qoDNzB6pgLJb1t0QuehFwJt/6KrvpcL3wOIimIr0LNbkQZMvQj2R50P9gpysgUPg67KOSCjr4YZs4cm2ToK3eAiiGZ0ioFyx7a5wkHKsFwzjXPVx+ZHk7fBKPiuNPviwYo9mHiPmZrw9KGDrLExcriRtvNsS8vayqIWQUa/q31BOJPMO+DW5cF0ZfMgsdq00eI5QmeLVkWbfpTT8NdooFg3cv2F8RRTQH1SCkH8D9fTWYput5XcVY9NqQn6GMpGfBt3UAsFUXAfmglUCDfOuFTDg7ON4Z+XVMUvZ+MkLsaZNOFl5TfQbipn/i0txHBF2CumK+fUuOO8NS9Jb2H4TMWzDzI88taYR5AxApZKuOZ9u4vkt/VLBiIMCUtTgD/igGLSXvPJ7TAh49Sdi+ASXRk32RT/dnof6JY1Mx6N5VcWUdgXmLdKEr8Ck93k8w8BnhPIWYBBgIGfIJklujX1n10g4A+Tpp2Fq1yyNIRZSFuKhZZab1Xb0BlDMAwjIfb1SvYaFUgN4YzgYspJHej2tQE5c27uwOOLh6c1mXt0og5lFiHSZHwRAeNbUOomL5iI6fBNDBA/lB42foVhp2Aud0A9KKSUOBkKYoqxCkjc26kDFtytcmtixRY2hvt+f5tMPLbU3Zu+t1IIbnzl8KJ5gbqfh/y0cv+7x+URxpgj4ywT2J7BxT/fUr6kbpQetKZ+9aBAuJfTyUBZc+vuvBjlhM1w2+VeZazdwqADq9qiG5ldoDxtFddiUEf22GxUONDfzS58H/Cv08g/WfKJ55viYQb5egHFZ5BwsefudSsgGqHSGuiA69YGHLo5iKbjhZnhdmL1YY2PPp4hdF4dhtPkQW+e2UzwJE+cKjyy3TSQ5C/40Nc5I7eGUBaScFWuSdSNJ7dt4Y0T+DHA3FKpWk2jdHDk2NStmLlAU+V/ZmkyRrP/shh+aF4hthbdNPXFr9d+pPwTMuesE/pAWJzgemsyyZy7FZ9UCUMDf/7Jnbh2AvBg5M1hVpLRiVMOheMAGz/w5Tn3VGp32ymnBRvRCX0Oqoy3xK0/ywufazJDHkKdSkdfDcZWW5r/IwtWBUQIvJKckRVoYn7rDpAhtTOasLBxoxaPgIzURFQJfZyeCVmKXiHb2M0hbRwq5i7ORSTXi5B+ez4tpDEoNPwjO5uo+ktGsFfYJ1r9WJpgb3ahWWDQVC7YSr3pCXJft2B2Lrkk7+fINKr/dKL9tqi2GEqlSgWffB0/jxhkQeD6BrmpeT4gD8LQUtu9xRWP+lHO7oWL09dIXvEZ7Wrbnt+lbsKplzwb/AdXIPPXspe/ANU5bgkjM5CaVtvhmfLtW4Gjke+R9PD/LJQl6T+r1IaeipFzT5yauts0mRN37U74DJl7OwidO4oj+QeHA+F5d2gTKYDACfWBbWMAJUKCh0M4F+Yz5JMkFnI7WuZDxM/s/AqaDIVAyC1M7wx/CwACPR7cbwd2BTBEwuhATcEM0753aRc05Xu+G9iFAInOPSsTlBOzGekPkpIWcJhRsi70VRhl2feJ7vlYZXEgSNJLEtyWeV9NGbc8lfpZzZykTH7A0DUV1/2YnmlAcIFC1gdBS+dNvjZerlWYyZmsmiWM9vKqALW2rghrGGtW2ZcWSifg2ifvnEjphVWWfOcoI9ZRD1gfej0JSK2Re2Z+y8KE4Obj+iyH+9JU4aOXmHyPdWHLGhscAgkDmunf1jt5qzHv6EKzxSF+FYgYul9e5xOBlGqIVIKTQTeb/5bSdx9nZkttzgVRV9R9hgJwR2VpAd6AFUw/DoXgr9IEfd9jrBt5L4uxmI9PZoz+HXMqcvTb+wSyC6LPHBTlfDEOU3tiqkXtAb4h90DjfoZapw/5XoVQ+Rtub+XTRP2doKyVu3XatcXQtLffnPkFUzKjcAv13JlnZbD8ndu1N7zeGoOcuGPOxahVGt9j3qDYU0Q4XPHkXziTGj90AEsab3S+RpYn2PE0LBQqHx+qR+fQYxsXyd/CDRnHxFEJeBfyi+Bku5N50d+EFn/1rS2BCzy2Vszxa1NzFz9IU939FXmyrrz6qU1VroGDtP09OQ5cYL3ny95GEV/drDhvyWXhkvXOIFShbmqiILQxNe1XElY4NSp5cwX/Cj11AGwNnxkmlP3Ih/A0/mGe6NOmfdmZMfFelAu/QDHpdrirXgF1BhYRac7by96xSQVer2j6EooGzVX+G9Xh5B73XxCDybNbUqByMD6NRQ+kWN+z6zMCnfvWoPsl028Mg6ocUAICpcdnhFFtHdEKtkAKRsc+j1GNf0FRYoy0a2PUzLdo3QcFeX0fqBZH/SXVdl0Ek6hSvAoNiyi0nBFoGJTLn0YCARnUBaMpEUBswaED12C+qOdLHYITXUGZEdr8il6Y5nixPY0DRSXdL+7mKgEJp5lIpfC3O3FiuaLnTnOpGz827ywx/GNwhoeBcyg6Y7jOa9MTYmR+xzw87Z2BwXJ1jxde2ZX25sTOFfj6+JeFxA0o3keSkWa6VIDpmoHFKkkmCaPjhviAtBg48Er1/nMFr9z6b/RYUKl873PkpCbb1dtFN9BGttstFt95ltI99ec/sk+cR3X0YXtrCIM+2XYXXMoG4Dmsz2HVeB+guzaVuBt1hY6rt48G+62CgQebry1/Yc+w6GyYhTscJCiJ+03Th7MLNkiS3l/jngkbY85omeKLPUbwFkVtF1kXhXN+KZG+QxwT+6tOIhQ7uRhgK0Py+MlTDJv7LMEO3MDRE5ysmUBsH/nRoiRtjZhHNGXM484orujedszNI77+07g2QoLUdU2PgizFOgy7BvfeuoUBxkr6YeSmWizC/L/0cUM9gaSajWChIbwoj6OJErETEeRL9YRlbmnDzVa1dzrYb1mr90HmmV26gVhZ1SREr5jizLdA5oJMopyytiNrK/X1UoqyQw2AMP6Se2Y0QQPLTOyDAA5RqP7itubI1mSHk75Th1JGCpRETFkXVVuFU6EFLben6rf89wtakLpMRD8xPZEZZzT7OwDsZh7V32vJ9PwyBQcG8842wJgyETTsxn+t5ZfNomjRVYCvK31PJkWL5LSD+ft2+CP9Q9/FAM3q3OAbtTS4YX6cLLIw+aNLVnS08/3qQ9zrfP/e4IPJD2F++PVWGOarNtlc+K1JTuXIDp73fNC02+9EAOSEi01dxrp2dExa/gpUKU7K/VGyoHXW9pL4Ipz1k+KIaVED/iNqy1Ec9g2heW5oCxLjU0x8jygxoJT13sRs41HCs7SpoKySpq6Ba9kJ2IXIB70LE9jKwpqGfOq0Z2oULJPGemcEfJ/uMWrB/eninpCOdyuj+SFYYOrQqhKIe2Tu4xArRe9y0PAcADngCV8QOinEG1m/v1lczwjIGU2Cfmxu1r9gHCFFv1yxTk/NHByAP0Nj/lyGW
y7n52on5K/8Hadh8BgKXyMytE7Js80+esnfBXgV/tkEfV3Nz4rsClCQpN4mwQe9QWJ83PGT1YquA2rYz9gsfSxO79c2Egtg8za0VVfpruWtdLAT29n9yiedbhx+G+SXxxNJfl+Bw+9V9eTzZqJPuYl3XholETTTiPiIK+ONzUKIAaKqs0ZAOdK9798T0/JtGI3jLxWhezYsIR4Ta+Z/Fv7tXsixawGg80WU0U9gS2qzgBUSxKlVdYBsp/AFDBgldY7hOija0SzAOSuyJdJtLl50xAWVVw+LV6XLlI+fBEAuqW2XBZX38ezs/Y8prP6FUN3vYOBosn2GtWUATLJKUlNTTDsPJRqWTa5fWZ/2PKv+Sp6AAfWb3ElMOeBU5ROhQKVH+iiIjuu9ogsJf8oZDsmu0H5ZP50BommvfH/oJUQh/yymrh/Vi+ACvI61RwqrKX17xDF6Z+04TKPk7DrHhS4NEqC23Xj2BEdQsHY1x4VNXxXdcatGbafznFicf4WhEyJPG9tbtoIrNA9fuGU9xYw9AUhGiwVE/TF5q2+ASL32VcMjXjCKImUnAdLJmfR/ykBgDT7k6RZOj0tt/YFzlf6pwLiDuh63EcNopVBQRaoWIIkKNTOYL6Al73+uILUdB09z5k6k5g4gxwiSH50jy+X8TSYb+ndUoYIGBpG+YfCaEjcFJuiJp4gMQ3iY9vKzRA2NkZYx/NDJWveRQtzrov8fXl1OSfkwWe44jRdqDzWKXsVLLkT4VQ9feO4EHDxFW3aSiuiPT+wDiLe8vNV5IX4XS2ENTQ7lsdZ+fpMQ30zRDdioQMiuU0xPAImTSCkSI74r348ok1bCaybep4NftTK55Wc3iGPQvbju6Qsy/PjwRd45tRq5K8i5ngtww5STwgDmDKx/26ZrP0OI9w/wAhlOPxKekUrPJ7TqgP6Y7ulkREjKmyRJSD0VSr8/M7Mq24oKlR9i+gW6ou01OXwa5ST6smZzTcHAUKvqpRRMkExzz9rMZ48gz96TsMA2eLiReUUlxi0hD2p9ousxqXK1g/to6e3042kESixACSk79TQC4BKQSl5myIWGoZhaJacr+eybNh+kr+QTRhSaEq4dlMnK8xZPT8A15VmJrskvOlZpTABBh8Ay7yhJpwiRbVZcD+7h+L2tW75Kp4qLELrLyS02o09WyvLVQvsDPJk8qmxRS5Bv6o/UQAHRFAcVW0m2LyaGsCG5T2vp7LyUlbVD+QWrO9RWQz8nhA2CV4q+vxFJxBdoKyx+ef9I+DpQ3uXCs6/w4yzk5SfpuTOc6jA1mATc2qQDyaMyglWMD3MAGvuESiP6UNVin7WDFfWQlLO/26/ZqXfx9oKuSTugSkZfz8bw4lw7L9KTxDm5/Wflyo367L/QZ0+MejDd3mBjoDMiqZo5nMOmI8wSPd+e3tGF5LzX1LnzPIMLC1ZafxFlsxu8myCfx7fkKn/YqXszuDCbjCxiqyhm576zfbhhYgscXvuPEXQ1cnn9O26iQfi6wpm1OY3N2zjCK6rmJuWZK1ZMatAX/8099eClnCpUd6iCxKhWNqH/uUV8mdMdLHuCbGxOUPwyYCXMXN7EvfWwmWd3/PEjHTQHJlaoV/n3iMZtqGf8Az8+nf6CAylwUct0koYij9cPLJdRSs49oivgHDDNkBztxq7aQfXG5se1jr4c++5dljTVPR6qn2jAsSL7HrbfIH5irmW5huQjG8dd3dL5w5bYBFaC0yikMt/OuFpm7CGyd/PKkEbIYXIM01GFRq7LegTDturuEaZoYLfqgJNPrTcIxQKgOXlnok3M8trbQMoxFcp3xJbClbusNSUS5F+hW++g+zkDqxTlcAoZvyrJClfqUYKZd6lHb+fnMlqkd+g9LTNnjriR+CVC9BTqhCuW0GNbfCPUGFSK1JPWGQNGItgQJyw+tOJYy/RdBuQ5USDUJNOTwMiteifUqWmlhYM7JU8xGchrchAOL3dPFQxMOnmWe4phvMIUER0kbdkwm4iIHCTq/c0N2sieF9eP1QC6w/nhCyFnDomyHTcOnPUYvUzLlGGHEaCZRUUL4C/I6WqJilBS3kBf/VkuECevw4f4rpdSSdVgmOfi7uBzddXG62ayHLCOyU9u6fFBdiYCTCV3kdugDIIGppY44jxfRmktjUGuGHJ20fNR7eYvMxHDnTZt0d7plTETQLwzcoUGu1uPn30M0hivk5j7W29KbI7vwUdePi5YDguUZuM5xKlNa+3nKLVM0Nlq3aqHYLaXjeF+nZUN2WamgfwcWV0sXScV5SD8zlXs8KXd6RJeVW2UKH4m9HHC3mygbp7PF1QBgWSfsRsajDg2uC/wRIatQ1HxRLmnWF6YCHvl4HyBGEcQkrh/zyk6Wau2oVvDY3WGtfB29b62sc1/US4Pl54swsf69d4whZiox++EaBceZp4XgHGwc7RuOzmwaL9+liVEPwUsILvpuTXq4RTfhqUB+iE9y3M48wppyeN/erBPQxNzrandIiMRa/NCFC71x5zxdytQuKEiDtqmqEIDGXpNxAn1V+Nt3hzSY4rCqqBgNk7VvJUZs4Gj4ZRPgFwwAfHy6DrpETvXBL7ZEbkSBBtAbNt5AppQKvooHIYR6LTMalPuOoUYA9dRwAolbcNiBUlP6jDs0NaH7Na+35+wkeM6OVQ3pf6vv51PrsF8g+5i0l6xWecP3AP9YYwssfqxlDaDjIxjqAvDNloSSxlVPc/5kChpsNjB6to/X/TbZsTY/PmVC64mla34uig4AMI6++ibg/839w/utdIVB/1hHg4jK/FEvCTjU53+QkPQ8+ikc+q3qYUTdcVG4V7/dmLVNbbTwi3nOe8B4vTAHF5hORqEew8jcgiyeGM5tW4rFa+G4unFqBeCnd14xXUlO1Tqdl11M28I3A08+hIkqqQk6edLGxI81Gzx/iuMOJa8UGt9pdWZu9eqh7mKd9CxawESzlePL/Phk1FcFnBlNEePKqLXB1vRrGOmNOlT7J7WIknT/h9ApH2JJ/CDVEK/QLmYRphTsOnH95uJPnubeJ07e/cEhZluRhnnb7yQLIS9JWw6mMQGpaBEds1izjw1HBcNiAphxHP8mfQ00chrOMksmCygalPOGurPGdvtpYemo2wJo4E9ZbgRCSbu0At1A9Me6S6Ns/bI6fDK+1w/3jgu5cJLuuL0sya+pJpmfvR9ifF3Ek00a714DTwu7tvBGvvaUg4WxLw3pUhIxXNYuIFkQHjOk8/0kZiXTD3XbgRHHO3F8cEsuXEC+5+M94ntIV9zVPTxqB2Z2KPkk7yR7jbiZ9ygBBE15Dw9wjDqe58AOJng5IJMAAsJVi9cqy3TlLEeXsXmSsT0RGtT+JCz5oFt3AoGyxCmVXc/mdrQpLjeVtrgecLFZv2WgXntuGQswkWhEH2cNH08ws6xUSY0QPlsyDJCAEYsSX5z3PDOOXS6anyY25Mh7/7s7oaoap73uZHssET2huuwTO7WfP6rKQmT2tea1GemAjR93F6cK3zY/ZJS398JNTV8cLkx1GA7jYnc2aKShPEmUqmedqkPrGm1ApBVjaef34JalTAhV9wM4+g+ZTZqDKImXFcL2+oZdEu2nF3JV4LSTI3IOfglmORomsMj6YdWOpM8p4fYw1tms6x9SxUUKy7OLkaQsLvy7e9sfJy3xh5nwJsMGMIgbtsrDQLcfcT3ham2IU4xKj2NWPG6TnHI0853G4e307oNV+ej+GazvG2fmme5OoLqm8zlCsrkq1IraorB9wh4CZ/Zq/jlcL6HbRjCqN1UmVQoDbIxTblSjwGB38XdFam2qF+/baU6InMzPyjeKtXimTXoIvQqnJGmxomAsc4yGZJC/bCLUX0K36dY7crH1LsMCPkUfUVfiAO+MItP6eQ/iVX15S1bwTeqO+Y5ca9aW+WQKFy2RDcNF+88FEfXJ5utzeG0fKKrECsxiVk5HjQiPtiKEJ4PgpmbynvAd9kgnYNa8j//roq9zsGPGnH6D2OiJs8QBcOENIzvSotBh3joZjCiW5T5MjxqfsfKDH8nWhDIXzP3GWDO/0rsCFA88KciPZuMWZa+52IdIILS8LHwfKCbL2EqgfnnX
rAKz7PDed/bvojlgh5qociaSyJQsikKy/YmAaVmqqhYg5+cYHIdZUNPMYIFeJe3growXnhZEH5CAjG3KmfoKs74UTtAlvzh+HgET4BaqkpvYf+pqzYDO+VOkNpRulreQZGVLec0NDRtOws3P0k0Z2Rrl0cKIszfWhloAlhiazXuMl2N6UIUMpRYNYZqSRO+IEcU+D34aDS2sORiReur1qhhxVWRg+bsPmI/E3vBulQLyFmm5zVkMxPo4JFyWA8h4UEtFaViHH2QK89SOzsdTDXpIGUAunh3wvzJ7fZTm5fhEscD3QcCSoCkZglSxNP9UzCI1Ls6GDUL81Borhjbk10h4NoJMWwZaHTFyoIMIrFF5X+u17RhLg9xLGTtybIWnf25yihXwar1KMmyOZ2D/4wO4Abz0nXQMLFknVhVfByf+n4/joWX4O53PkAnI3rweWgcKrO4pZXXVc7nAz8OKFhsNn9DGU7aal/XGBYebnXMwCtZ/7NCtGuzq7bkSYw0s5stHDoCGjJleMw96oyd+n6TC7Tk/9xMwr0I2KvjPC81956yotCVPZjxr/x/n0vc6NIWAMFAGWHiCSTqXDAOEr2SzCDIuIGp0YD/CV9VgocN7UKeVp/Xp8NXDRNzPFpaOFWDIkwCfGyTYJxMwPTs6v5zOs7MmOYUslBDgaxIo+oh69ytPQv1YedqoQLoeSsDzhHzdJz9xfgvDUOugDqSY1DKdMc2lqUgpcXeEd8GNJd8v9m0ryJq8e5lKBIa8rkM6XlpMVMbocETUvKPNg41yw7vaQWsJZ4kHCSwL2GF8DguvcDQdw5HPEYWGiHhyx7yNv2ZxyZeHbu8gwu+GGxX+QAgd0Se+qUk5iHu0l4oZCqaw1jHETQGK11wID+qq13HyPsq9BzrEvRe2OFEGfXalJ1Q1G0dvuFWeFJGTS8dctj19ldQ4tDVAmVbql71NLR5IbmHWgpspyn0ebIEodWqluRHWiYTDZ2SKwjJ3UvKRykjYvmr5phdIP+aZJCy2ilU+uDTifF1dgrbcY2nwquBRW32jB8pvyOnhX6WPUFWMLuY6g+FMTQw8hYepzj66l24nnJQp2C7q7llQW6NX5N6tq6CjWt9I+2hXclgVim5DIfWQOkDDH57Y3z5XuKvwTWH9zckharMmKRdbpPn3h7hvL2WvaprfpU+LXGIEBX982Y4mW4vBo56Dy9pRjFq71KQUzA5mZ5d3TBs7A/7gEMg6h1KuJ9MhQZpKmKTbBHLF4NsG5188n/xViPdf0rlTVho8EPwKyt2cWKj5nJUwOyou7KYCeby/qh4iiQPNZlmGgX1vNOwVPF9TO+xVLy84UOhn8whcGvrYaJHyIvLZiVgeIHEYp6z3rUU8pYbhLJSHYALhqnzTpdp4P0jvR0dxYodUSn1WAG2rCJ3No+5aSN92e/nU6sSYR72EqwbAQrc+MTCvPx/7n/fbPDXBcKz5P8bcrZ/c1e0M12x/Hr0Ly/4RY5Ix3vqEBAO1/vTHcqoepwS+NhTKlxyjlSJajWGIAGvWqDm0hBaJR8sBbOu7Hy7u9YiBW+w7uXFl0Ohi9mA81sOKToX7Jf6q1BsVEsNnaAte84fDMXDAVjMm1lsx+tr+dzMrQrJTHMRvMv8a1uZDn3BzNhsTZyDm1/0QUhFAewX4Yd9fSmLLuNELni90wHLB47xFaZzN0y+DztgXOGn5WZ1RN7eScC0PJSUxJ6JU+7kSZwM168DtVlbCIfEWmT916IGW1zt/1U9t2BH1r/NO4YTt/qkc8rcTYUyL73FCfuVzoQzQyRlLrEnIcRohy3insIwfW+5LVuwuXiQoah9JDVAjdTbXGcikg4pjfCpRNNA861YgUJzKq8LimKCyPVccT+5Yo0k2vsqOckRxjHes4xHa420rcII6JHY5SDQmEAG9VLRT9LAMm9ai8Z6f8+10GNmCTrJSqGo8rYPekAbt+Gox1WLve1C8qDGr3gjCeliMiSLxsiE2i37LlUY1/yPZbmfjwJ6Q2fEHZxJyHJl+wrU5AeMwhTzjuUr7v7ESxbDQ9KlWw6FcQfES7PJfxVuMHFs/1jGAOk16TJcUgyqM6t/Wzk3rtX/KhU8XXS09Jk6rAWfC5NWLF4gofSHZpMgt4/pelzOFqvuRHTxl/mnh1f9eh/JlsDMw/sjEPkoSGmvlytPPYw2aybSO7iZXHP1Ne1H9ocfAizMllakMpTwuxY2v5KVApGVuICc6/LmJAI4ybhPJ2Oyq4z1fB86RhesX8PbL6UQpbDlxOWH2bTpD4UJv2/bcgAgOUbRDQdbvW9oMjaG3qBYnaXmBKkb6GugQ4xzGTwYuIU4flqfVTs+Q69F0aySZoPcD65tns4yVWAnaF5MDO6FgU8EHDbdHRSCDcH01VqNO9kzFihblbwgznJ68q3YyYCrWdfiF1bL/DAUH/37K4hKSiXfpCktiJJ41SYql9lZ+CMPs8lh2Fd0bofxV3QWTjX7EK2O9pTEMvrtRFmBQ4vSPr3dgARB06ZMBOQs03L3f+1c1VRSDok7aY+ZYIwwm8qJfLis9kH4HZVrFOYBlEO14fZp/dk8Vm2dRUtP3LUtHaObsVjt7DfNhYu9UmQgNrRVsSauLmfAHNZvrvscnjWtKtRKFdzWB/ejQ4f1EgyBHJE+qHpdSJpfsBYQ177E7NXEhN/oSvla5Gmo0fK0cwhQ4/N8DO28hnkaOHzDD9LTjAeuein+v0wL/3BOHDd73jBUdOlLFPqnLILtY5aOjiPUT6bjG7b3vZBUKgD7gLQ+m0630zF6i8Z2ZCUm1ytgSdPT1zvNO4dX9hLJ/a0zVQdOzZIQYWZQErV+1ri86VVXJw5WRRZgAU6RLylyMKNbcMTFReW1HTFjdeG9kAcsL/WGqJyQ1eMLMdjZQpIv+5bgFvDQR7007Jd3Co8wspZ+cEEyt8fynhhrHj7CG79pAPK+UP3rt08bqHmg3WPlGSm/FqhKMRJUAhqxwBpepbVocj0kToDKV/PZvdZwf+C4OOhoPe3Xl1tvtXeoILxZzZ+zTKJ6L8QnTgbX7xRQhxUxF9EEsPWDeKbjrqr8ko46l6pVUSKJHUnL0QpIOR4BvOBFypyW6D6az9PLbO63Ept+5nj01/4RWZSxGt09V7bRLEUzftEobh8tseSvo4LMjoW4fos6FtTu20u4wb93PEC5BqKi1FYQ3ZIOSrpuvoI8HST9c4gWXCJzQFNhse0XwGYHF1cOSTJVYDVxhcunDXIfkOxyg7rJvFLdRMk7KKPWdsfjDBjvwslihSL7KExPo1R9oFsabpAl9AVB5jzTewWKyAAEtctSSHPxE0f7R4dL13sNJJ/882/UD1gFU/r7lEdGmQ16sT92k4jY+vuBhDDTtEpTKi2Oszub1aJy67CXqPDOBgNwgLIPaQTPNbTLKKSM7jDj1AhWiiPoewIxo1PRJbzyjS7tcxIZHEwsQd8g9IKEwJFwUY1bLYoX0089ScyQVW0sBCOtyazYsHyHVLqXg8RsD8Wjk/8AX68B7yF/YTEL6z0uEGDIp7wj2h7aOGn4/hWSxcDRjLlSfv123A/fRsPOACESSSqN5On+nXqljaFF7tDUo8MwTOd9rsBTnoiM0KeFZfERs2HJh4fiX5uXUCWxjdU2rUttbENAnvPtLXYt5xskQAsz0yocfWKkVruBvRQAikyC8mblgkVbz/zv1mCPmR3/VDxd99bvqhjLY41m3LbSzbvgvZUzSrAggqJvTHCt5iQZvKIuAu3pVU9j2ht3HwklE09wgDxUu8bBRj/D4+DQNjx6qo5rHtjLYffpkw5JLlqZqQ7Trh0GcCHF56nBd4IAnlnlNTr/K6t00QgiueDbg64hvx77gMA8MnIVxf94abSjuPb2I2KOUMZNwPPs6swa/QvpmNYIh1lB68meRj2lSqM9msckHq2ugDFE8UFHzug9QXCXq9k5RBdMXH6Q37Aly0eF9fSNuMwMstKBybwbf5+ROYti6ZkhHNgGhEBhrkhEzHgiCYHc3t59sGHGkGgeh+IIEkwJ/C0VILY42hQcfKm+FaDEJFZhKk38WZf26n5DmzxSCknxO5VB3O0JeAFL1aP4Suhb8
sXjcBmgqUPBDs7UNQxooo9Lx84UqoIhKNXN6CHxqjmJj4z6bVHwJt0TYm9HGVXXZr27icG4LeQT1CvcNxNAvUpzxdj8U7UXYlFF8gLI6Jhtjtxvh1AyEsmOqaMz8TJK6zU48mDGjgITozDwav9EdgzwpHttHGCGEKEjO2M4D9WBMGp+I38xxJVFii6WOwEkDiZ/8ZQTqUWJD0+D12M56XWSa4939DZr6dbYJA08PReOSUgPug1oCX18GEBJpNY9bydvTiPGRUmRVBSmjekEyZO0irEKJ9RB3qIDtUBo9qrkLomrAI/2GkAnQCZft6MHzjgGjaPjpHVYoA8Am8GRyGVH9Uv9aUjB+hIvfFGWMdpEikww+B2qRCsco/g+siwriu6bAwTlvlilmw6YrYwoo5v3nSUVXEoXyibBoWkOs1EUHo7jzunI+L0xGIY4egcZ8pPruo0hB17GPMo0r8oqpb5VjfXdgKimfekxy5Dft47uzQZLW1qOFNp6lXgwRA9PwspJowmQHsPaDKM64SsjY0NL4bRZ6GUMK3zI3VqXXKNGO4+8Eo3mgQci4phZYy7ajxhra8kqy3ik/GkX92Xn5aPC5D6V1VLWlJkGDCCbIG5NwqB7ararIUfJ6yh0qwX2kEFvg4gnKGaYaTmXjs0IfDFvULWErbgXIGl5WY2psX9l475+n7Y2WzgMgHCiuhRoZv1U0s+1Tq/edXPiVABH4raTleUKvbqeZV7C53SwGz4kejTU65dsXn1kr9kDBD4v6lE8YlX7sUbVQO08W+BpZCs76krH/uQFpqd1zN6ia9fZgXDPIyb+YiznVA+3dzytAfgMqIMOKfbq9aRys5izLqgsy180kKArFjo4BSHIRk5L/XMChm4stzdBh2NC3ADHLhz1j3Q645MBctZ4T0aeo4qfW6ZP0dcmWIhQfkTYKwBgH0ZPGliQyT7iNjVPo3cm+X/VNOC64fffrTOLIp/76ZM+Xhex4va50fexbiCAVWPV6Lb2u6spvbgROkRS0MXGlWfaS0yEoiATniv730qC3HRBkp++NzodTblFSIbGEnxT/Q6cyvkPq3IWGwt7krCmq8JmBJL8P0m2VY2CzSU751rRNmxpvvXEKdWuej2E+BKbijsP4kWf6EA5qxG+Cy3fS0LqRy+7P/FTbgluSVzRqPgsOXMKyH9j+0kNcj1IZc9L3KoXay9n1TZ2kM7JkaMB40vmosvYK668kdQQqOw614JdN9OJV3h9b9bOxeNe2UfMEoQjCNYoeuvcYBDCD8su9SeaVD6ZQ95ttZF9vvRrxFsN9jHNqfJnX7pZaNZiQoC61q4cRePsMGvypSGpH2PG+vZrCJD7gfZu60F+5jpq1YDZSDfCcl9dzkSJJsNRry1erpP+yOV/p75DdQ+frFcbKmG+I0uWUH0vN5BdUsHKyojuyFmHSArBa8oF3c64MCxD4mGlfS1gzzWB+EyGHEpWuN3fcwKYDERuyiKILUrZqbNQhBYH31Af8O+ge7B3xmL9R8KeGrMndRPnsi2gIPD7gjdHzWBaTRTnBR/REjuKz/rymhKmYD8fmKTmmSit70tBgH3i1/5JBClj4TN/hhcQ3lPbv+XQ12fhW4OMoMP5esEl/3OXwWVzDJrQeQDVfJ7kh6tNd48Dqrp+pnLnUQDn1UNlLo+hW1UZhM+TvRYu6A31OV4irbAHz4E4v7IB0KiNBDk6lp2EMTg3xLpo9QFMDMMNS25etzD8M8Q/j+VlahWsUog8qPqiI38lsRENDusaHCT/JeyH735OzEGIQbZbbA7aix+N4huTFQedDmtFlUf11dXd2ObCU0ZfqC6l5cTUMSYWAsCqaVcXC0V6mWaIvwiSt7UDu2IgXAFTDnxIjIC5rfJmdVuepYkIgGbv3B1ZgBe/y29H9wHJnf66m76tbAy9XkiflS4XZejpWjRqj0ZFPPCsRAVznnrsWxkiFKOE9QXyqTcvmpdS+1tn+Usz0zYxIChpvKjEBXwNcwz+cVFoAXNlAzqEg4RwuyAAZl7xQVfz6VX4+jw6hNHSATty0HO1si/7zh75MAh7IiqvDM4UEeOpu4ocPttO0JGEO43SRhVbJVa5U7+aCSWIDX5mXQDd4Q973s5dS5+wAueN/b5uM8NnP+Fw0/ydRSRpnxvuowGVdYzm0diXvTm3FpOPX+8OumOypYQ9bRLpuwbbXX5HoEzkRKep8AQD6bWm4O9bJS4Co7F93A27fTlcf2MgmLsdPV502m2lEnSc/wp2HVSfUjKpv28BGNnNGM0NSaEiwTv+V3CnNCgUUSut076Mi0t/WC4z3TAJ/L0W1Y/kTu/tPQy9itIqMHIxIXNko2aGVDLxoG8tSEZxw00Hv/FUWCxvR6SH9A7vaHD8xT18JmhgoXF3NKRblSTd7bs4Th/+iJnnGenNG9ooFp9pEIqrenNiz9DY37bo0tQH4UvMRzzOToDDuy7N6YRltWXwLduaCN9kEMIFUsPTBwFzsIr3QajJN9CCzGdelgwkNkkJoQiAq8R2GRbUQeSZjBUrsSKqbcFueGniCixNEH1Hedca1+jqikSPOsfqkNoZyJf2a8EqGpr/licD62flB9y9FxigQ+SnK7hrE1VIVyB/bvQRwuS6XRztO4p7B/eOf1QNh6Kd60/THnw2zsrgVJt+iINXXK7sPA4zJe/XZV5FRosbnYrE45Eg/PHTyvVwQoDuosVjF/REc6GQZ484M/1Mqk48tHzbiJqWm2XHaempDwTzZO7SWEeJhPiSX9oIi3vih7lIdcv+C7by1X/E4Ec228mTRcrCx9XMVgoDfj0nYVFJ3K2vMXHp2qk4yaj7QFcP1C7ebYUZguQyuEP+O9kVNarpRi2nJ97Hif5bDPEO5wPcPOvyPl2nhF22JrFYXu5+2Fi6BIkbeOVXScpBY8WF9P+y/DUDW3QcLwT4QeQoMM0AilJOZ+V4KfcJx/5Ey4tyJuhziLQX6YhZHBf6XJt5T6WcRsoiuCUzCXmhUmN0fy+mw8pV883lHEy8RrMcOjK4OUnccT2Qa5K4BBxC1nvZOyRXigvMtef6PdIUeg8ZXYDiEnr5DpMBAVEFbHCsYa1q5iIk05/8T3fgZIA8TFmd30zCE7EA+fFlkePcg7g7eZQAomH9rj++ibdo1s9zapjBxXtmxEbrHSC+P6wj7cFiE+KiWc4YIg04cvHDbzbOUbLfxUBxPfNU1JdcPBb6FL5RTEzdugpglMgvWuFaI/hShXfED2qwsz48NyW73z7JK2gCO7ZsvcAKNI7jFSjowrOXzDkNs5FwJbmPdOpaLz7Ad4p7uWrzuWzeVwXBP8bKt5i5kwmLUanQC30+uoNmsxyO1o5KVWmMG+JdeomOeQvbqyl1qZ7GFZTLsZG1IzNiyoj3XaK9bzLzM/p+1MIvloLY8byP/FFNho1I+NvZ34welX74tQNgp2b1ZYQiGjFtkq2nu+NsyJkuHsYATcEkTqfqAWdzybNOE/Fqjtjv9WKsyL1rw+Esu0apc+AiXTI+HJto35uwzPSM9Vo4R+ys2NzvNL0KL9C94prDTpziVjiUlpuAlREpC7h7wSeqSktiZCI0KAd03ckMCKeDghZHJcrUH9hdY+2X31ccQVjZW2d20yFGfOjRlI454tmnyl34hNDpMxXrHOCx3xTUIoPp6TbuoBniMW4DG8Fp0/E0ElmRn8a9xpFLmVH0dfj/Uftfpju104MrDdAWq38BkdzqCPAfLf1+DhxcsWUcLh+4H9SsZJr4QUxBi1dP98/vZ5xCr9T5e6wH87ucCHjxlzO2DO3jF94v6j2QroglKpDeY2H9xrIBglTduhCLYYtRpDFX7f0e4599EiIqZvhUpQLh89wK04+DrWAVCI9+qNeA7OGXn146mQ1zriDv/wBIC+BfbCw79bRklfMnXXukT+DmkD1Tat7NtmWDIjCsm5ecnfRZyWv1SA3vOLwMCAt5E3od07zNtp5VZ8P5XaVrv/W0TDYtLYeNE3WHAVoyhW6Q2454PoeQ+vQ9z0rALqIWnmYgQy5zVOcFQiaW1g6zvz5CepH/ubCvQCvqDJeMuboQY5Jzl3sRop3H2vf4QlDZiwMrmxGET
TPmbdzqDAIKiY3d3Tr2srWrbtk0Gxf9os+7v8dYzb6GchjqcPMTpv+CGsw/Jk4X2g+xWfJPOnEgPpNZfjpRhcGvmorKhYSjtq4U2TlCuzqnJkH5Wf0BoFO6NmKXqwquTi3y/SDAML1k/PKPlLxwYK6bmmJPfY7v/clc+WyBCkbV+bZaoQ42P8UKacCCyr6iUwaxme9hTf+7NBI/JW7nArjqZIw03EsWNrxStfYb4S3QfAOmXNmsnv3C3n2WzYeo7e6XHrvbj8EXsu1RkIi0fgKhR8zxhufxAd4slRLvRuOIFIJ156tAN+UkLqQWwj8A0RhecFcbYodnvcwo+8xYDtNzZc8reowXDxb0dq09h+smxjYZ2WEx98hgf5abE6GbAiXKmOnILcJ/7Iy29XFw6J+uWHKj1vOix3afsIAic9wHienAMt41uF7DQibBtCBNUyZCzovMtGLKEHOlCasoXCSE/SMZLCC4P3llTLqq3vONTpEVFqec1oIMwwmRlYizdmetb/f1yFWIjczjJVBqzvDtMJ0X7fjQINJkBgvsDJg9/5Ub4ZkKxcWzuGIXHPEU2iF1HjyfrpBEh6jA3gyxsxGa6u54zkZGJgoPWE1/QnJ2l9tvZMgQYfRHURx7uY6X/HnziMG1IOAmvXYTudo+rasTfveduRmOpFja0l9gA/VgEn4uMa55MlV56yKwKSmhui2tJ1ZDGIyxRiE8tqiSl94wqQ93vtrCT7AlWu8iS0GPk+GMYoSd8IVITrNx6WAIzDJkwiHQ+Xa0MtkqNmcRAvOyPrv0t9XLimnJ+F0yiV0BkPwipc7Gd/J18bfI8wmauxp1jd0V/XDe/YTA4J1puWZsAsOUvdTDCHmJg+f8fa9wkM06IoMO8RdEjZQIDn623rdG5Y9X8jB/cXOVwyDqFG7EIFWyyXaY55PxadJIgH9DqbmZ77VhV1jKs04zpl/znvYjjJTW2w0Ck8yhyLcZYKKAmZnJI5YkUYFKK8nT7taRRS1Ut/g3aV0g1DhPKhYzunumxCM1N1IZW2X8EyT4uJyCoq3nijh4tiAlGp4bYh5+pfi5+ze514s37zOD1nJ8RyTkkKwo8BWh23TQ6UoLlKhk5c+tB/aqe453ciP6X7CD4ji8qWlv+Sp1q6zVX5wfJWGfpkjb6/BsHpMrFbXjHMJ6YxF4m0YWL0qFNnY0AVtxzjaOCrrhJfLp3kVXu2k5IjYwxMLcq+Wh4PUvlauQWUnqynUER6y52Mkv/xNQBvc3cMGN+e7xgGeEek7YRAR0r/8EP8Tw/G0NsB9QNHpokM0j/7fXGGg7v7C6Z1VxouxHUAa8AuHXGeI0/KiCeAqMVIREyqiDF1zib0F4euwGQilu8c/KCjdbzamcXt2H4NR9fQR0r2EghBcu3L3DynW9zflhJAWJpriPUVyU7Dh1Ho71oyBc0fo86VyS8AOLFz2GpHTHHVRmjrveUU948ECYdIx9cRAPzxnPLY+bVxyEsyOfJxXHTKr/PRzhvtC0OtN3tsVLGcbUAbugfqJ1dUjl37pwKrYmLVf59awolcHEBdtUtgUFkmwBHAQHnRWyrrZpcd7M8PUskwJeX3gYj16OcCqj38Dlj7m00xHNOn5g5bQIFlnnl73FjmqDUdPbXKcMPRdPl4VO92rVUuSL5HSTC6sJv1kX88Jh1H0+E02yWRfSH/EP0fhk5zJ2CK1+aHIhtw2Eiy2Yx8+m2XBAl5BSzrPOMAQBmUGjHh9oh4pQM/sQSDWexsU9JbAYkqChLO0L7hrWGZKQ/fkJTKcuvuhkVZ3jzN4D38Yd0VkSznfmTnvKJpSPSYu6BT67aea/8VhQLFgAXxan+eDBDqDe199ROk+dW+w2l13wK6TgMNaiEfVUeTSmY2iH3lVWs8g27QF3a+dUh6QNjxWI7LEy/lKkIBxlEbkIDYq0QymX+7ORhiyodCZQLkC7hD54v7BM/3wtWO8XS+xc1PpkLXmuYP1O3GZ+aVpuQapTwgTB92ZqyXlwbOqujWGsI1+tC+h4ojxLpW3TwUq8weTgEpJG45myLBnzm6lgPnsQtOFFBoDzAJEeQv40VoBUEoKcLaT3q1G1nSpJMzNZB89YelUIEEV5Sy4Bw9ic0gRog7fy7MVV+LBppOTNYKMBnzQxeuM5816jB2FqCyyQSshCZ5xicUb5xp+Ol6TB3qqriXIszPjjdIqfPeZqL1uVnqwmp8s91KNFPJ8W/pmx/iHysiDFg8DjU38W00oI8GsZklxnyO7EVGhV8C9kPApDV1im4RmgGQgI1s3gszEsj3nhyDDRNZBxurwRXasGPjGjGG0QPxpITKR6lObsphbXRHz2PfCF6ncgwI6Hw3wOn9TuBlhOu4P5qZbWGc2IJIJ6/CnUvFvhmYlzenQr29tf1FYzKzhhDqjFMhkok0f3vbsBnJ+oCh6kPZ4K2Kgu0miRoIfpYsb5x531tbSo7t+dnZl6pcp/LqsCVoZAHfBx6WAsPBPQl8s7QBIWh20FxSYOqmnUeqshDTdfkdLzt/yu371zZbWYbaMRY6SYmNEzC5FEI40SiUXiTvw/qGx25hPFJqiHUNmm9RXQ/ue6tWjq3vG4pZV3JMIoFBpU79L7tBFUMUtvxT9xcuvpszSH6aC+yihqv8RZS+LNB2f8I3Y1akW7vyIzKsOFUjJg0xUHkWiT7BGSq4uC+gYsT58S0RxTdtzkudZOSgwXzvWwZvi7kdutjlcjaEWfVFGKmtvVnuuWsbp9LRpK2fRPYfJDrHSg3qdcz4SgY5hDs9+e8jXHm/RL2pad6yo7zwzzlvV+WkVpF4K7Jje+ULPoG3ikUtJQ6PZMGMFH1nhl4ZVp+WYmPrmNh66fX2ifMJjfUnUorQwZjofi34oB/iO1AetOsScn9I/9aBaV/oR4/qlHdFmD6pAOzlLJI049CjpRu43tIXxTJeI/1zXydTOTf1pF3rNau9Qa89y1koj/rYFMpK/7LYKHj8B9mGs/+Dv6PsRVQdISbSogJmskbkyLkFj9ViWK3QSzPPGCIwMa/ZXj6LXUr/LGhTATJus85KTbZsCmg1fExO9oM0fDiWC26IPVyfkGXISz+OrruC5yErpQZUgohJJOkno2WKdvUpdthLNBz2ye19XxccG5DP0e9/Y33goujf6NOSptEBgSeW6Kj72iLv8V13CUlPpZh7Xzkb3HPrmXoy/2XFrKiAblaTFsXc/sOvKwvH1BZ60xIWVbwZcHuwpmmi84CQ7fjjvvu7FryCnBcVt2/lBa1Zvcd9NO32QVTal/c0Ka5dZ29QZbJe74eykGfs0rlSX+2xtsUAQ6D4hai9fWcvL28uGxOKzJlOLM7LqpAqoQoJ9UQqpvmgXEh4+XjbjlVOehAFw74Kan6tEza99eKYI3+KK/qWTpzRrTbqQY7E9d+FIt2jn3OqAByLAN+RDt+C4ZJ/VIdyjqJfqa6gbRuu7pKa9RW8eUZJibRysnLeDHqDw+pR/UD4sOUaQyHKEc7TJRFtgpGtl/js1cDn+WoOWcrKHZXHsfoAKaiFzRU1fPiwGxsnEmM0+byZaeEDRkkgYHUwDKwrhe8pGfBqSUYKsT5M9x2sJrglihQNNMkOUJ/uMscRjP0NcN5plmFPbsdLxVrqdpywZz66UM/4shidtdpzXTOkiygh2tBG4N1m44ikqldBcGiAHhEc1gSy/dasGDyxQaktKcXbDcpI1SZ8cojw0w6v9KyROFrRFzXbXw/xiEbn7pil982RZyL52yBSHCunn2P5Teg5ZpllbWEmYvwr2HnP3b7DO6dJpRSiLJ9mUoF0S2i3ETHn5FNFOaESRZf0pO3bTT1KDa8v+9RitHPbC79L5D6zECxeEewso/2ckQwOOT1rJND5GWH7DipeygY4lWsKZiaICNfTPGOhKYBaCZuyD2MSlwRuMAW6Lad34MHVQXP3Rm9/v9gnfz75lPEsyZ2g4UdSk5aPwtNS5HZNAbMpuS/G6SZ+z/cOfhrZYXAOKk4+C7Kgz12K2on14BLyS2e1lbs0pFWjqld9a69pblj8LWb1pP0FcGzNuRzHa2FYDgHeP87s8j5RoAPAVWc05A2xs8NtbgVIy3i1MB+
zK6r1y+qc3R6SoHyVGXNQbhCe+OQM3ZeLAjt27F94IQYo1GO1eBLyREm4MkKbn9wDgbDMYWxgCkebb94jZsXfg12fDFWPV92ELgiT5ss/cZxE45KVg5mDDEsUjIHs0755BMJOTYY0R40tN/CV8llcML4Rn5umcSPibqBFJ+18++BFzzbl1ZDIC60Evp2s+WV7B1pTOSUlEpFTjRwHciQbeutGl2iqn80hoYWYfgH7pN9FhvIo8SjUVG+TFwdGevlakptrtcgqBQW92nbTDu1E82UO7jgSzzM5EF5skhWiFd5ctfJlc2NfTlQrAxyDFjWAgfcsqZ0FN1j48ClUCn+pc0Fyb5NYylyWOnkXwecMrrKsXM3ul1fk5dQrwc1hY21rAE2l0m+SKd7ex3LnDViS8QSRKSfvFLmDrObjY9IKuLxtG7g6MtdPi8D39JFJ97eBvi4QEgRKCPHUqzLte+J8bwMQGf1LiMIm6KlDG6W6txkSomQaV0JrAgxrwmEX0oFt5v1PreRY2Mhp/Ulk0iMswLSvKKokHe3scJy1c+9jmWAkm/AlS9CrHvNUzVqUUrn8Fm34n/UzRC23QbLgFyBvSePO9YwRPF8QTCo13iyvk3bXTwgrV/iqKGM05qsnL2q27Ohlyl8d1TvET6TtZSOKfzo5U+XHDDX05w7WU52onyTVxdZtk+u3tBhducxU0yIJcLZd0LAii91Mut/jbRS6iu/7uYfB+vYPx6w+hCrQUE4nSnrUD9etXWRdKhb+M7Nltb5Z2/9XGb9g9x30GD4aso71Vc6pEZVenki6lIIX/TUlokvKDne4d1QW+patC9UzWgURQh3mrOcwoXqKeSXmFc1sY6m/ETillq1taq/o2WwG8gjvCkS5jBKOd8/BuIJYkGJXdiYphz/T8i+89//D1wXmQFPnrDMHrNIZx/QEmTUyuUvzOrq+byIDW1mPxL41kIRnh3xtKPJDW/jzQumrRxtG5BwE+7+7bVIzX35aFovk9wQH75pEmfGqxCBiNd8Z3a5t5meFMse9bOnYBaIYSF0lh2BsMAjr+P+w/6yLg6lsyOFQXEFhKZ0OLffKBzN04HqpWivVCXIYgDc4+AsOhsc+8jlgq8AZZmanvOhxmyVCvhcUMfNcwvzjd9mya+diQwzQ3jfg2US2E/cc8ouqXAdqk/fZxW6LHZqld9N89NQy15ehvOz0pn4mMpyx2wmxUWKiSfo7B4d/ioCVqEX4VE37TNkNRO5uYKAmUg5B6d+tq8sPDmUfWpo29S58VyNjWqzYKbbcZWylLrUoZdDvoxqrVVnEib+9IFUzzZQvFAl/p7yguOwtmm6Ve3xcQ9uNyzfoqlwuM7MLg8ROGR5wl0wZJW42rlcCLy2RRvnNfMeplEj0IkDU+97H+68UjfRQ+HREhj/qkSoTrTccdSqzmQQmhrN8QdbltywXExwyGvY5OP7gUjdlBBoPJQErnN2AIPBF3nV7e7wae1PnEZHp20Nbz9WY0SdF3wMiu7y7t7cmwoXCT6XMu4UxkOfpMxIOg0vjP9nvROBRBrx7ogYQ7/r9IWjhZW3elpL2xTxot53VGDNuFmmpDsFnnF/RXavaMIf5LoxB6vTTt7tnK7kSt2vOD6epKHEJl0PJgj25G1FqcCBztKwpdhQ7vmA3HK92tEp02wo64hwaXIVwyvvXVbSaYzThhyMVkwfnogkSZp1TErMMwHiKjmdq/ffp5lcLil+m1ycg1M8r/+aZKdpW2nG1JY4JsLqtd3TUzQ6N/OFvutfrfoWtsYjiLSMO9QJjkCiRvsYnkCq+Y+i9NJVidTYWDwiI/+VuicX3S9jysDNV+eLTLlREg9dMZhRch8Sl16X7kYQVqfa/13Gaa8hS+qOL3wZYymCHajeJL9jvRtxfs7ArVV9ijBnufNmF+G66+v+4z9eaazbZfGHYVIA8GoG14Nq+bjqBhIjnEzfzRSCqDMcNQg2XmJDLY5E3yjlUi/F7vRkl7jxjztxa5hazpFL1qu8ibEfODwxmQhYDHrrLLCp99+X0aTwwkmB4Qa2IfhyV0vSWhfjeLGIWIE0sPDGatyqX+C14uVJBAJDlgWJLziiKPOOFtTJhmRHo5uHmCRjJuaWPjoYireWkK5HgDRi1vycI5+04W317MBN/dI7M3kTpRL23cRDSRRLAkV3BeZIyCkl2MwC+TlvRc0zikevLJhSXiNeU6HCnbluESIABnY14EIAyE+CnQLEmL5n6NETea5nekXjJf1b7C2kbMlAQHIaF+NbVG/Ix4U2ggJPGecSqf7KU8YV6EUTciukDOw2el75VaVw8ueFuCPdnwv/oN1KpBeGxWbQc+qDCcH29j8H+JLXyRqk9Rq8mTpqV+OmhyOa8+wV95CabuFnQiHlMZ249JVHtE6xIY8TCFua4vhOcstRZnrvjpVZnLrbDM30KYFB9tg3k7rvHOXohLnun2rpr1pqfpIPpyZwX5N4WtfCME6uVStnR96Fp+kMfclUJzEjZdhhLr5Zh4FXhrmOtq8tIi4Xqq/bVz5ATJN2dTS0rK78F3FcDeKfNxwPFeljdAYitAQn5s4C3BLyM4SkSosDlYFWj2MuYyYxAJemn65sB+aJNT2hBrFPBOr9PCU0nu4RnqQgIJnpOMXbizRNrHAowPm+zbhhgrM9OjJjekYmcb6rxvVveFQ+tCnfPN/RYAjFBZ+q5pTmRQv5rBNvmq9FHcqJJE3EmfC3eXmhUvIpfuO6myIBHgDJCRT0ZBy0BGTzX4sjemSwcfZoTSe6xCNqZrH6mIEr1lcRU2rHf2LaGJBZVAbxNV0WqF4V5pXP/vp8gPsEpwLUspO/f0b6joYuG7tPijpPwUDoTycYgz/PhaPnEl4z+5+kjXju1HxdDWXiJVZEjzYylHIjJY0aRDnmoc+3vtPxoWTBQjBBp0aEcRAjLUf7T+wy6x2bxBFmFv7MhiNaYiJihV43T6UOrw2XuMTKKZeI6OXfiPJRk2ePEbNcksajo2bO6is3ATW1O55tud5bGAc0LmzZHCOD4IISo65L+ugcmonZqwXVvepDIPZNlIeVtd6s9dI7/s/BJHsAzMo+OVWe1u1+/rnZP29C7A1m67yZ+FC0h11v8Pmf8OSfjTPYfoDwz+mGk0KLR/Tarx4JjAuoIn6P/IpRvnUV1Wp+2WPGR1deVqjGG/uYoHxz7yj7ZB3c6UyHN5k+VbgN1Mj9b1+JMoBNV1HfB3cz0u7nreLaDR0cDf13VFsKxCBjbSOWLtfzDUwYMntn6F7CYr+v/gErxTruPz/yYBImHhcvS0u9hZkmd1zMfsOSLmlijWfAFGdlLgE+vzqVdkt0+M9NrmFObAmPF/zzmZa+8rpqttrywrKJCmUMWnOplAXsITDt1UCipy3HCuvgqPcfyKtCgAkm99R6rUVOdbZBjC/77ORnjt2FGof6UXeP13FpvIly6DyiBjWo/AKhCDjq2CB7l1Emrv7YLVfBhWgqsYkMFX+taK1uPBntMQx4FS0VkftzP+zQTXNTlhoh04pDTFH/y5rsEOCtOwrtYpaR9wJpLGTe2NkXsNKYhhft81/ItUEE3hL9aDlLfyU7BH5nl0Oy6VJn/dgvzrxe0zBV9UHiNYeIqa+3dHwD66vMSJcBuWdG0ZCK4KNZQY2OCtPOEzYNJhwMKZNHuidwJYw9tSyxRHJ8gY/Dl/qa5K7g/kWSu4qDGQr0gomYnGXoiFyd6prhDJ7hO6wOvzEAhMzJsHs1/7xFih3e7kSQEtI0xsPHGi2uWcYdgPrEyUvgMWBhQIk77rtkWPqvm+VFmHnVGPwbT9FIJYanPhix8gfh3upwbSYDPkrmgDvTw71a1LtObBYtYAh7gXND2GqGv7QMsXW+qxpz3NbBKpjL4cVuBChvNgJcJjOA7htVonCER3qz35g+lFdPcAyxQ/RG/Tp5Ua5p/DxhltMixpB6m2cOrOnQ0uj8Y+1seh6HFl22BOOL3TkBH3YimXhQ0QCR+EpJdjst32Gk5F9wGR2umkeIJXSuQpE8bQasi3zzvqfqPVePegdPlLbO20BQDVgsPxDvhLmnZFCBF8i0TTos66PMY8ETVBEWFaAQcgQ7
FLKg7obRVNGBVAXzbacc/Oxqkf3s1tYk4Gh5L0lU2zyRHNBt4TatCBBm2ggtZ9hAzPNOwkDCkTqIRW3bh52XVDT+r/BVYnSW650QZx3XpK3niv6YgMbgkUrdIdvhBj+ap/lBRzqekuBZZjmY2ZnXabI+WTn8JQrDibhJ4dINLCvPPLFlL7yS0dOIBcEy+SlnOWEzJ9mHZS2npzP3QB2VwGvSttLCl3GmaiCC1f04EPgQBAFjRfabcxHOrzU65ugK7VFmu+A99ikRgI/j8ak2YiY2kLSs3FGEHpZFkTHRR4w2gpziKVWBt+aida/yn2vzny/MQx1v2NxEasztJNt//RpMFIazgee7ngI9yyeUq0I41SvEbScBB0064/mV6su/kM/zHKu/rSqDV6P7Ba46mDTG3ugtRn94YSuSnFL2+tzrfuTKplyCLBHXnK9WhI2gQ60qhHQ0MEVbM0SFLB5RHBsbhBEts/J5AGV/TfyuI4Wj6eeKDRg5j+CrJAuEH0A++VtMeGH6pcnwvWGQZNsCIRgrU2iw3DMaDOkjrmNsaBE1gmrEr0s22dONMHUN4/ZTmasWg2+1g9Yjx/64OzpYb8tKVSIUOWJzQzYgc3/iOqZLE1llSolNtRW7urmlPOSI/XP6+9nDHx0LDFzZ93m0OX8EYR6gIQon+/zj+q26rkJ09FSTPKaO+qw9BvzZROYMOfOCQey5gN7VnahlMUES3ZW2Pf5UMk3oxPz7X4C22AEU3dFqe4VbXWvj/OG1v3Uakz4kvkFh2H+rv+y5NC2x6B8hGdKzbW5xK3ddlc47UJSB7ip6zsxWf485W4sCu7zCdDhp8vgYhR6YETb/43/CU1Ro+TCKH2Dj3Tiwg5kga4g/z0qFvEEutLf9GLFgUGRa6+1y3pc1xqiBXpSm+/JVdLFyItIu+YseKqAOYCsv7ojhgld4cVnkApVVr/Qz4Q96A8m96RNNmBjllbdgAJ52eEctsJLV0S/D+MP7UmcydQaVzEtiQm6UAe/ZCjzNFEoKGkXw3igHxViCNTa5UAGmdoFmAl5YL2UvxFa/Irb6T1U+EXHr7q6EBS3I+QtTpvt6FagajF/wZtFXa+M9dTBfdVJjp81ugxYE8Nj0UENnk1r8qV4etImwdwGu2f1yIfDamCpeUqLXbB1UBaX2URSTp+SrO55MeyEy3poBy/qSR/P8It42Z24D5jwTThQVj8AIkNUJjsiHVvLb1rh6OYz3+ZEMbaEIXVDqCV/TqyzHMeVcJAjSm2Vl62/+Nv7kpXKVhidxlHdF9InuvO17a/nObaTjZlumCf+Sz1o+Tkri88whKTQte92HS/Q8HxiROcirW0IFbfGvAz280jNAqfLKuEV4lSF6CShA1FsIXOklPYEoFHC3zduuDM/8BcuINUwehYqgj/Y6KrDzjOirEQt46hLi3RtFJLs4dgHay1g3JVAOtMM+vM5cakNOAxSDvBGJ1H3Pb+2/0bwlE55vYPH6STwYEVvCm4px2vzmoUW5ML8Fojmdz7PtZ1Cfgr39TUKlIz7VzsYMsa2HtmUjV91FI3hckWL6c5t6bpxxn4Ew7VcQk7faWLCHWSrB/tsUXQzkxdVmYKPzliIMmrL5QMgw4WvPYajFxje51kV3zAWug+GgRj2+lWg2ayqmNN+CNL4oxmAeWFADBLaCiMTVh6q3ojqUzVl3Jx9ICxqNIB+zoN0hp/3SRvPRYUW/l6+iEE7U0Q+TZbRUnuTAdfAH0t+zq73+Gr7mEem7tkyLfhWqcOWbRhn9a4YL0HWlr7RR8Vni4g+YbRj3g3BP6nFVLzkPXNJiYGT1DG581G7eNyiSK6Byj5g/T2pUuXkR3v/gmOgvZNfqg/khS81UXtUDajwbIP4V69g+30y7UBvfkwFZCA4dM/HRnynX/atDGIDUMwzm13LTpNafNkW1lpsP062sBtfoRUxnCPzbTd5pfCcpKwO2vOuR/aydsNaTMYTUfLtxDQCkgxtObknJSrfSrZIVnu95oaXhFEv/d3nr4OZza6powifk4ync6fnUfGM1sdVxMxT9CxS+qcXDXZqWIbYR4vkCPTdcHuJjZHIe2OyC32e3ArnXZOfOk5CctpAIcsiEhiTEUTOszBHDRNpSPh6MesVKQHS9aqRw9LQZu+O+/IQ+cVjg6yHmsLL9qLJ7Pr0ZNaNf98o8Yx72VMU0bp9iSWiRBNTzEHiuispEXAa1IYpRKu6sO/8RsKINCck4sSYt/g6aFAieAd6N7FsSFXeBf1/YFlBzC5nfZ9aU9DqoGQuJCijmyzq2v8eRwfbBEq/3YJUs+BggIqhZU9y44IoULZEU1InH5vmE84h9Nrbz6Dy/Q58KM/mDqsbkgNVxFC5fwyd6a8BSav/rdMfLPBFWOkUrFD9Jop3M5D/4QKA/jH0FmQdVNDCZSe3W4yFSOJpYw7Sj3Dh/KFt8gbuSzXduxTb60CqLrYf8g6+pQg4mws3tA3mUtG4oWgqpO/+rXfXmsfjM3JFLeu1VV2uXLaApx8aJjfqnjVun6m+mrNUQKT/RpmlrvrJsRxEFoDWOMQDza4vm6RgqjstHkP1YCs2wNoEt7SSm1YpoB1aeMRXKKY4fvJQnPgLRQhz7tSgGC8H1N9UX4ytEDh7hrDTdMLaop7w9ltea/VKUKzkNz13Afi7XHreFAue3TSbkBSEp7qFd4fNpbi+xVDqiiaxBu+k3VXU3WdWy1Z0gCpm8er+R/A6rRKpbLxtXWQ8XQUYqj1xZcWGX42JxXW7l64pAQuMRBjV5dNjam9EZvs0QOM9dOG8vm99ps9Cj0p6DYNl+mdj0fatLDK6KHSq+B+po297qMNHqTpy3i0d3CS/FR7E/ytpSWZADs3nNYlwUmYNDW6kPz46pVHr4EdOr/1F1WFBVOaeiaAPPycWjxNlA6GYEaMAVAc45y2YaMikrINDFW4QUzX5wYAQcYQMK+eX6J9N0q0QnGKz7aD2My1dpj49lpjCiUuNNpjHshd2MeIx5j61hW/9YdvmsBtB7RKsPgfd/x1rL8A9BmygEDePqHWe1qDQKoTg3kx2woCc4uGY0/P3ieGhn/hQV9SAyZ0YWvbCaDFQrYVWj8yp6S7YhWVtXTZ0xo9T7komP17ruyf/Warg7/FMsGrC+QMizjnZLwlKm19/p5XUTOXsCd12+IxhmdpMb0Q/t91fQIfQ7OCE1ZSfP13qh6/9fF5h+1NXW4fHOPRe/EW+JCOqMNK39MALeUYA6vqARfwTChyhgVyJKQ4MSTq5o7j6Vf3Mfd/72XgwGl895R+wa1t0BRg3uEQTSAYenCfog019+Kg0jR5qsHOOtRCatBIXMHPBbj3FGpOAXR2wAPfw3BCstmpsMVFw5gTRwnqQ69al9NqzCTe4eCme/NLZQtCRjBAgDBjhuyHGF9FFoMeu/91SjUlXBS0aSOK7SyjSL0FLvOnXrffebuKihXLFEGqiY7l0y0iGpdZAYeJXb5uWr72hpGM2CHJV7Ufzw75Ku709JPbUu6v2rHgL1IkrQF6poGgufcNhpB+ALY92Kiqit6sL1rHNKgg4K4gagYgdYBMOyU3EzGVhk8wskbSKFt0YPAQlGHPd/ixH/Qx4GnbRklyb8qkMckKUn7dp+l9Tkoy9YOiOqoGb2omgUeEe5l0C1Z8mU7OgF/qTGD1MKAQB+qI7Lj1pATrmh3NEoEMYxVmSL1SERlOkxAiLnssbPIqqBUdLxMiiwFq4O3C2Wi1VPGreQxhDwY8J9AZAD/uEHTGWOhlJDzrVOYyuotx9S7Syxc2gv9vuu6rnAJvICETwz1/c0KRGCBjmif8itF03EC3BxJrNiEuYLSLetpNBLQVMJtO/eO8XitZl98KCAvFHL//mkvvkdamdMxnhjIIbask56XKYzQboVyiHCkQpr066CjUp9qUJXiVfyDpy09JE1gVVmUdHPxRy1tZU7wRmduWVVUwzices9w1YMYGTEGRf3GoX4S62q/u33DaQhKHd2odmMdNOSXdF7A2+RzJ/jAmiC4/WP+1rp9XU2BxOovQU0/jX7VyNicTXXm5UZV3x6oBZSUrO9Fyg9lDaxXI23nO6I+gkQ5b9Fi0Qa
T30LbQbIAiTkuiFQwBr5vcyvgOQNunM9pf+wynUBjdNLP4asdX9o3korqWoPbI9/phmVponQc2xlnh3MTX85r45QFUfL18+2/iTpyEh+W13IwNHWGejaGFLkBLHBZwgxzWSVFkuqXA9nUD1aup7GAGyhDK0/fkzjK0fQeq/yfd6wzdXr+atb395UUzmBGCFrlnXsXRwyIjSScig73dgOnsksu7vh849T5IWF9fMNPMH3Mdz1PEqkCsJQkRlU9h4lijcxHvmiPi4zp2zQEf1uPGpDTjmymn2xYywIPuIC9p2Z0ySNEeBGa+pL8KZnlA03+PCic+Y+vL5TZzsZ1z9oGIylL6Y03v9diLKnkMIbr9LlbvxD/8G1hFmqXmbluLm5gF8Bx/YIoxC111uYh6j6vKJZd10gfLozbGmDVcZ/5xXsu4vgq4bWBHZ2IIpGSSio8zEKv9DZ0gnvkUUB/Jk6bgRe/5wB+3qswWDr4AIFtq4l1r9oRCh3PY9XYjC+Iwzwy3TWnWVfrKwovvHiHoKhKGjssRNuh9PMGovHYgS1GAFBFPlFYm8TFDvouL3Z1fyY6pgXxOVyhYVdRY3q0ztNKHQwp9tuwQRbxzNuGqXPZY/IQqEAcfdGZHTrK4WwANfV6T3TerHp2mMZUEzdwih0sH+0cb4609AuCc1Z54Cdr5mCzTKAMGEYyATMHrpEjE61blrYaSC+L1sdN1hqlXWoho+9Qfbj0khgTdRKd4i/puP1G4ITaxlBfK16GhHu+LusuAld/vceFDprBnqr0urWUgz5E6vyNJiQAzyY8WT/xvji0lsBDDwMlYy58GmTW/1Df5f7KNe/aCyl44Br0VrvXqm+UPiRtUFFyNFhx3GuclMECgHps2wRJhGEbtYBlm/X6bShT6pnu2+SrjSeoOO83KJ/RENINAikQ6WVqaBX52Swh5RefpTPeslbz2IW1m+pXJW2aJ4EQ6VgOsWDkyqzmWOAB1OxtdWn/W16yWdc368/7Z1UAEltCPtjqdAkx6KOD4lxBEkj68rbWDV0pUeim7RKVAMRJXAKuIEo7xpKEu7IF1gF9tbkAFfiCZxdbYzwyMJktpiYzo7blaUqffZCbZebKgZfyMAGdUovRob9rsh4AgNdZJLM514mOIdxZPY2zuCR6Mo/RgTCg9xlCXHJi3Cy27BHZ49BnWXABYGzRXSILLBzKPJaBxxX4A+h43AltT6in4PFnv2s3VPu70ppz8tSEDOayifThVT8mF29PqOLyfuNoJhJ3NOBMPhuUbKM5BE6IzOD7/8BRfSplYkDZYUH7kSZEe+D7JkPN/Si8W4NzjVX067xp6ETC35zXgqhVjhV8+Q/JVI4QG0uV/d3YRHHFR8q5u78Gnkg+aen48A2GtJDT7n3qPa3aQ8QcsZW/zqbJ2TiMP78Ur/5kWyBbDCwlPsWED/Pzk1gnh/qu3GQJmWi9jkTtVNPo/4Hh3NUgNcGQ27H/90VJ3YOycqW3yzOGP/eNaLOPr4rMEMappYW0qIcee/VOgL7sftXW7qR40yZdaqEDvGQnN9jxLcYK9KC7B83fXLo8J7PLkA4SwSaas1Wwu61sMtu4gbqSteJLAU1UFD7VQrjYsjNJwixyUi5anTvcDOMVhBaUaZPCODCIY+QDOTUlkus9ZauH/a5EDBYq2G5e9dshc8JHtIW0elEjJh5kbY4oXMFD+Y3uirUi3N9nY2oSaCpOPVsqkWFr0dFUUDgU9j1fv7JHB4dZO9ODc1G2GAV3mntgsdQE+goGRkdHCnmfwwa6JCYECPGeWS3TZHLtnv5z/wJDGJTnl/gFJs3kWSSkRNbWaPEiVKk+NMdbzNYMEqtP+Pr7MzBIyHrnkHKuzMdo4Tc0IMfeZItDNHMKfEN3nnmmx414j3IT4blAFvO2cbJBIT9GgHQtp7faLqdHtwXDKS/gPII4RD+y74whmcNOBRIHVx1qMgUK9mkvvVkuIws/4kOnK9zS6iQM4lQN0YeMMfNFLSMF3lUxT0NgDwHvRM+tnYaR7Uk05jgNWBYz1avDm2rNnHMZ/ZOOfCg+768Tl6Uo7Yvm8viQVLA1UGCUoKDWIGiVCFoX/LtzDDrgJSsj4WnQNVl8+qhN03axquahXS90jfpyS5vqGTZFITOupkvtB0ns9ESaLJA4Seo8eATPaRLl7MPIH8AUGVegcarXED4ibINKyGIIlO+DWqQXdFVbvJ0RMVhzfs0sIA/fX0EA7vTMeWXPCg9Zl1S5DGVSId06K6hCeSHPxZnBQBOhH+mTwWXDm7hzWiuRUSMSAiz7IKeJIrnT/1i+MYulKdI/7y7Jd/EqwUcuBL99FieP71vXbG6H97EIb5XFuwNB0fxXyoehc4zfCOTaGu/2pT8TbUPveNkeg44I6tpbImqQjtZn3qzx1jePfo1b995pVJPKORJAK3VpUpM6qd8+tlNfhHoQTlT8W2FKfMVId+sVzXmUsu5uBxzoymXyF68OeY7bV2qRvYULtajup/SsOf6+WX4f0td3aXP++FegIdQsN/oKkbChva0cQQulPvajNSiYYfCpVn09JdTgi2+5e1Q2kWg+3jLmqnFBVT7C7jtWNanQHWMzUr2ozAo0m25sMabj1IkF8jN6QCNy8yd2SUajHRy+A2MN9qRFg0vwqSDSIevBDZQNjWN170Rv2NIywPKUfChqzzwTMcgttY2SwNe7ea2RqQWlFZEx7tAYSfYzk9sZY20BOZJdLmKogxYNAXhyT5Yd/b80Nf/myJMekbWF64OZpQ50iMMfEYy7G+9z5hp0c0UXswV5dQMfYogTrJvPzmlAS1dZNlP+1bdXTg/+AGHZ5gMxNCJ/K30R8SFOdmhgP1wNGeB93GYQsD7fMYCfnaYPdIPDCN/qfvT0Z+T92a+GJPz2tc2fulwI6psffhSBsdCJR9jiMAb84wiqWVRpedI3rRS+KtoFjjVIlSs7gNSpwtjmnLmg5noDLA2nlTAG3Z7nkIalU14JuDKku96UMlHmtpmiXfgbIyQLzhIcjI0WRPWn3BoZYN1e4doQcGpECsOfR6xpvCg/LjIwfyAZEugWtJ8AgcYHE7mIsKIzBKox3kFXBAwA3vR3VrvHRhmJ20uIoaG28GTdhhqbDCAo7DoG1lzow/5Q9eUJk5jkadJbi7RU3HBD31YGQ9RbBHrG6F3IQMQ27ZN7E7ZT6ClTfIn1ZlAX9kDtPPIaBQ6XABUvXH+ElBIrePYdc/uFlJ7DElCZsL6PawrjbuEMXiZVcg1whHv2Pqi9s8FylunoYGC0uZSMXAuX9rFu+o+iQhIg1GsEinGJ67xgC6ylnFDb+2PKeadCBpa7SJuAh0Li/37x8BBszuc1Pk5cHk2mp4KZZquhRKD0hGyUsCQReLydhpKxwd8fTubJgiQ1RsyPiLfFd86fIUXiTj0OgIrEmLsn0lE76kjE4Jy9WKB0dQgTHMS/oCtdUD+1R9WrtZCeTvk4RcP293UEBwDuvin9z14240BoXYC4RmcyPMxWnu220nix/F92kEHQ6NmSIsK5ql/ewevVrWR7HrYrxF5lAW1iWiW4w8p88XdGj3DOTjU/ev7hOWIuYaBTmjGfaKU882xpjuvOZhFnkJWKksgvvZeMrjvxoc6wWIWuMpfUXXWoxADZA7roamsDWg3vnoZCz2nCQkiUrEsdcQP0uudIrc4OpiKvDtFPgiqfJK9s81l2zyl+lRTtXFwYg51cxPKPOlHlSR1Z+FBOgh3VH0Rqzu0aXzOw73vFHR+ErIvCi0NC5knV207s3a4KH7LJNcCqSWHA9QVo3/9kMScer88obJcv599cbGWfoFq9tCh7Y3oiS8MDbl41jMT5WC7Vt1mxj0AyZhH3svgaCxnRPXwSjIBDoUo9doI74sTeGuYIwchxMfXawqlZQg+W8FQCWzPSGtZtKPaswp4kv2bdUmfx4nSomaR3WrfFiC+BptHRcDShRpTF2douQSvyEc6gQ973jzn9MBVfp1lsc2YAs5w8gE3McihhhcIbKkgg3nzx+0qztYvJTnWOOtc5wLbrIIKbTz1btbMJ38iUJdA3MCZD+jOyTYFEYddlpaE4Vc5tHZ0OtKJuw2j
e9pE0lwpOOBCIA611NMOeQkry53f+CblgTbvCOWMYy+avzJdLuveQJV+t4XubtQVeWBt90aB+fFVdyxCi7g/M7arqyLeQSJDKmy2hPdJD5UDjXwNxwNvjEWMd6uWxjAcCNgcNTnovI+FshvBJy/zriksXDLsuW1mVp3H09jFY8U+mcO4KZCAX2mCAuN2zE7obd2+LPVgV2J6kGtFV/NdAHYlVTetCQwMHf46LPq1oDdUYwsAzVd/THDF9Yos80O46orP2l3A+BlI1P0AULI6cbNSM58c7a54w0Z2rzLXxvoUPgaT/sy8emTswqMtHcAimONrD3n/r7tYEHgrtyWq7RVTctOLPKQIFo67ghzaoi6Ji4uXYVG2MwK0SrkU3mBNw1qHQdRDOaaxVMQQzCZybYpWHDXBSG6MAXlaZ2Eb36khDpb4dzDu0OeqLLmcbmfLro42K3mgQKrPEA44Aw9adDUIVGO2fzG+90drAO20OxAb6yH7NR9f+T7jub1uNdZrJNKn1SGgd5XmSpXa8EBxHBcXwqH+NN8998CrHCH9hRB3fgbEnzc4AtSpx+TolBOrxsuc/M/520ZM3ONXVLIqB2iAYvTJY0CjHQdHcf0fr7PXenHxzsPPDbbO7Ce9WLFvrWZLQTj4ZHekCUjLN+mzDnJf2f8AHkqx2hofdgEUAkdzgTeipWD1kIRNVJazF5DQLiscUtnQNo7bjm2SiqOTHPCsP9i8qtnIgI0wW+3iX6bxlkzCxmvG+RH5KGx6w2702icgUDFtA5V5qV2OkX+NL+7hociv2jcvMjc9uITfI/HeZT5PHI23Log7ZznAF7PpTUd8teCj712qMJaWgnQAYGFV0sTf7Eck2DlHfz0jSusaH4IJnKXw0vXuuf4yavXrHmnzH+tGVm8eI53MiaADwm/I1u+ojxk8XEDDhxjJXeR9MWxB1Vqhtv/d0vM1IUfKUI2hyyaebVeGn6544CGZm0RSkdAwZAC/7zfBHTtsVSryHEDDgBvpL/fUfXaMQKLBy3tGBUmyMz4b/J69MKIaIJ89hF3lz5BSAhHrCNxzutwAZhE66bxj8s47h/wb7dQ+X2gX1ZpRlHQwkmvAwmHAeiiO12HunDy4hWbwPWxytfa4/9Ycbjj/+nGL8Ngr9lQrA/Q3PAKMw1gZEUH9DTwxmc0WsPGeFP7dbaGHpsyyyb/GZyEIwlLrradfBQymnwkuvkGi7ltTz8wBm3Jugzw6GWW5QSQsTelCnd/PNsAvqUQapduEodRAen7YlB5wBeIMb6kFvb4AvV5DisSyM8UaicGRllj0roInsxphuce3Lzu73ThiAHD4ywL1VgrVI4Zh3+6ZL9IFbTtEgv/TGPobcau105CPuxje98pX/dv+keClPzAyo8VGANr+gyzhMz0cyMDXeMRk2m9ra0JMrq0I8s4C/y1ObErqV5TMp96lvDp3R3ScaLEzSyq12ph4XX6Geo10dYil14X75h2DszMOQDsIhXfMG2FPTsA9NjrQLX/pwv/Z46dENfYcEqeIvXs/yyCYfjjLBuGO+ZDz+I7KfM4mMizYJZhsJ+J02BG3lHmW3WtYOECB65rrDQiHp/24IK/r9NWBHFLYkx89x0yPaJcGXtmTBD+Lv69HJTzc5OnuCGf0AFIuhhRUN5E8/VucfdarYlOsfWJNRXVZT7P9Jgn9aS5LgCemYUFB9e1UhXQ6C5p7XS250dVcPEy8Gr7jLJnayudhApilvTaqOoG6F9aCpkgvSW4rVEFyMryR3VuqKQEA7sWWSBp2t49oMG0+JJnNXkhyYJHQTd2o/mY8Qq4D0dkwEQnOIBYFZOn5xOzV7JBY9367NGSUFDnC28Evzc5rw5EiND2l7fJcXc6/PN98QBoDwTSDGeWeMugZFY9oEYtkertzAMHHfULkQHGHkAvOroa/EN1futkET7lZ3tqXO4pH873IUa4Wu2a1ZpzArFJW723fOKe8sPa38BdyFhxnUXagZsxMjRKP1omYHv08qbUCvIKdgHnBzL+wHlXYb9hkkyqqI56KB31+b1vvoqGy6GQkuTGIBmnipBDh+ytHSoIY2ATSK9ZdA9QbdoZR4tkJGaUjskW6ak9s0t0JYqp/nSXn6OGb1Ga8J3+tdb7QAAgAJ3UYTkppAnXnGcCnGY3xcaTgPiivKZgvvpJgkSJuRzdkufduFdM+3hZg10Lvm5LkZZtKLMtMyG57stnofJR58wnh+5ttr4IOl9JFYCChtwgaPBwgll1jmcW/fJkD3Q//Um6xayta4XUAui4Xuh2WiYExja5ibc3T6rAn5jK0fP7g+PW7aUoaES0/jRaw22q+dAHSPNE/KyA8Z1guPh7uHlGwgku2hyyJrAM0zs0C97cYHXhbCLrcAlIZYMDVPx5q8bWabj15E0HVUS5x+24TpCsunwOkxt7BegNvUqN6VRj/YZb/1CNQN79OpMifZuROTQsj92qE4LyhEJDCFUpr/WZfX97EB8v/MTh7XBTw4kbfrfyec6VPcM8YBYdLci6Zg7hwfOeBJxmQfBoQXus9LLBYUQ6gSrMD7YPuPisuCnqIw/NpAf4MfmFwiP6XKyOnUkGjHDfdVElY+kD6gsW8m+k9z59AB0/OP1XohlZ7ZmoOH+4mRifDJCqQZZpgF9BUc4Y6aO34OdFoa95PTRaiz7boSg3e+lAEAXRC4osZkdcBGDeVlIXTI14EejxiwuN+aZVHypnH212SSkP6oTxPgGKSeZCEGMLP4qoaeGMnssS6hbd5JOcr7qJ5sIe7zoguQ88mSIz7GxKaphnyu2TvkVdUeu6ZbY/Pqp4dYwm4wawQ7/VPIDHtK8tKh9E5Kxxq/W+FW83lcUxrO0d6k+l4QrDjm0RVcvU023uYS82nds/2aqY+JNQLxQgJ6Kpwr2sOlBCXy1G7bHFtZrjnGzWVfrFejAwd08EsKYrEd4fNf7EP7lGuJQaQJuOkfC3wdqTjl0Bv2rKjdyhSj5hkRKe/H3IAIBUOWBJsLKKfTXpyDCQII1gq/c1J4tfYg1FAUG1C0TbqNsu/zUJ7uCwAxMeDPo/WASEHnb2Z3bhkVnIkUEfst18b0FXL/XedPd7NbXBnE7dcmvoVa0oW/t/znR9XO3mZ+nLD3CDTBXmklChrfrEukMp74RRvTixYvgUxrqsY2G8HPubBPz67WwdqtniwHrrHYTEACL65UCFuhio9Ya5HyguL0oyDIXfNrh84gwoDLzsZZ90WTRm3KJKF29zEeOaeWjv3GfRUS+Ntj0MVcGCZont/s2+5cUk/e/Df90lo20ubkeyy9lIZzmvWn0AOq57CZr9sJvjWwZHq7m03zZEf7fO3fyy26BrEOF0mZNxj2R7KC/HfF4JVUWVolvckq+K+P5XNKQBe4Tf/awL3+czhH/TwZpPLvKoHLCEsZpP7bygM0ngXESYoOw9CbxsnfDA6LRf3eJluHZ/2aqWTS00DiGs3TtDqi8ialjZBLO78mSAKjZ84zq7WOSTAC3OKewKAVCK4FLEJqOTySZJZKy1a6TTn9peyK6WzxRw0zI7zepJhBPF3ibcd/xC/iDQgilG/siRgpckWBaQ6eiJE5qBEt6CUQbOrAdlrV4Lgv9fnP9I8LnyG2txDoLCAFPkLvU+LW3506x1iOuGcHaDOjFAajIHpE1OXbglCspYKHfzeoWBM8S3nEWhWS8iEnkg/E1f5etRBMOvszFzsFncP2PLovvpLON8vAT2ZCSQ7KNyX9N6ig4LP1SyusbqCsXc+zXOoSmRtB6Oc7pwZldHJ5fM9aRy/4q1YAgBv+Kv3wq/Nj34dDCLFHg1hbS7VXWLeUYgve6JPOKWcWxFonp2WBfpEU6qPrwx0jajD8AE3UWG6Pnc4j8MMRq0quu69CbHCWnoJgxZI+u95gEJdckbUG2DXa01VscfioPeB6dUBOCziB27KBTo+RE5L/sCDFEhZ2FXBI4/76Ny7evxLlaHqriocKedi/1DEEi+i88tg4I1PkR19Vw4tD5XNZVpJIhxe/q/a/IEJaOa4V5xiZMYxcuU5gaO26Y06973tuJZ3311gFHJs5JTEYx6A+26nm4264Pe5r0Fdikg2rh9Q
KS/31KD7BvKTZJvGXkJ9Mv0gKSOP8z/NH83QmtuRE+EzQJazo+RvnPxFg/LTEpru5IW17wXtk5Ya5iBUDgDCANsuBtlEoL8WiI/x51ZW/Q8oxjsjPM5k4X+IF94HHPrubsKaM+t7Uv1aboYRSK7qmW0YphM+rBRhjbZfeJI2klsxQKXb7DqYEuaSv6bGKijor4vVspP2BIsTpxUIyGTzbD+MkIvZI1ytoWIH0QTS6C512ROj4IypUQXKCTlPeRAt4jGiRQcNTtvaGRwBq/wLe2KUaE00/y/8D5VCI1AvE6gUEOr4pRn2K5zis+s+zct5MTocduSDXJmdnU1HOag2vTfuJrofRbsSULhMBMNfrXtzPeGELiUdIUiITAO6vglX4bnNWkaZ4YnUOA9v54uk6dSQ7wTh6RJ/ILz4tAKt0YI66F1ncC1fYX1FPpwIeDG8KqPd7YWnWtYUvRXBJBcCtZLN722w185V7jpgq1J2PAF90z2pdPhu53957TWiyv+PjhHcrcI57Ga5G94rcRLWbdF6UkMKZqRIITXmbnz5DPCWLHcyEdtTdbysxwY+hHydRS5sbliIYvEy+aIch5WNa+oFRrvId//UtwuuBj1aYmyUQMz170RpruW8usiZeZaPfi92vhEZcT3VuRVld94a0nL2GW2PbQpUvjpbc2/3HG7N7a985dVVf0xqSsRbPUmAzVrdJhzsnK5U25p4j2KPnkWtgDU/kgjCnVEuGbgOVq+/SswvnbbDwiiBaZKOzvksGEaaTvltVbCCrfFRto2TToWEmXX48LKPpOfgKWnym48QRQMOJjTGwVVsIwZg8OuY/zUVLcgK3WRAEF3fHJ3/lSspD0OlrX1IYLc2pcQFmXd/BrMxFLqFa0n1d+anBf3bBD0lXVpvC9xqsuq/Xe2WX84RY3rvhr1wNHHvpat9ru9FNgzIEd78Bq5R6M/yjNexUp7rXh8SvhExCCQWzHopdS5K1uvsiIanbmYlxgxLs97jkHfFQxM7gC83uc+0SjsliHFmhHw80Ub+Nq76o1xUVzmfbZ12VxgtloCj1J+0Ee6LgPTfzwUP/zsAX4vqpS8HtEnzEHBJgQVy0KfaUFgaxVtQ5X/Z8n5CA9P5iPmCSKB0pOBsdAZ0T9JSLOwC3f1I6j8LsCXqMKJO3zWnRSWmRqAZyAfGrQrUGMI6W+MzWRF9wdAFx0pvBgJHt8BSRwscIDwIqd76JH2ovyLlF9qbOUeJRTJJrsDov1qoasm7+fpvuoounIOi9BBuOOPQHOJhujjkAkCIDZ39cZe6qjThOrX7DW3VSxOBJS8ZT6aoHUHPXE2p5+YF0cfiaZkAbY5egxKwnI++IXVOAoFBF5jAq6LS/0yRbzkqlY4SdXXF3m5hv/t8XRAl9qTY3iZk6oKceupaG3QJnLNxrTadbMVl6R6QPEHfJUyCjHQDP1Y005pOjDygR3oBWWfsipbZ1B8uBcPeK3ys+JaLPukGo6HYvi5RHZ5/NhlthTw10XArw37haDRy7/px8KeQ9Ez4sLFRq85lr0z0jWaiL7gEHvNQdwEtHtruNUKqNv13z5DK4JP7mCZCABaT0be0WPpAb8m+qvTGwcI4ZYUhffJwDO0IyohiYwsrHP8dqfCDNVQYCWnWYmh/zN8akpL6lryH78jXuUFEF3x8kdCHJqArzZlM1hz9RHHzvjaWF7Dz5vcxTWRo8NXJphODZLg4r83pFhsYHBG4fsv6jgM7+ToE4CMfdAbRLXJ6Y+U8IzakajZAVfHS6by7NbaQMLcCkMkMXmzgK8qadpmDkl2k0l//f+tbh+MNAnektZowTj17JBcLMo7CUdLjmSIZ/nbBmWr13lYaWHb0tEAYjN0e/Ff7VdTeNUlk0UWTl6XPfjjU2mOSJd6ejtfafC4j1Gw9t7FiH5gdwRgeJdub/RcXImdnF08m/apFcnIJDikyGmab1YlsoZY/ZqIlmTfmcgZVwSDc0gO03eQ/p8he8BjtNcYFWq7sHE+jvAW3rE+3sS+qy7YfqqP7IT4e7yq6AhmRgZpNWJ04sDEIgADvNw48J5KiuCgBziEL4oPp035r4zd5DAeMrawPybECNhkNyp0r/yWGdLCmf8cB4Yo6nVEqXeTNpipC93nEynuIMWI57/8/EyYgilljLl3wjs5t8wKA1mYVGblTrqAUklHmzWEMcIXl+fIwrhYGvC5pXhV20KydM88oTNe9hQUdizQ8Twy+fiK6/Y9XJuLMZpp9Yitd/nUMrF4R1J0033jr8bYDFNlyswDbGEWoO5RGVtiMbksg9RBohzuBPhdsdldSr0G1IwuQwGTXy+Y/tFNs4PqVrOfi0qD0bFvdRfcf3obLX+g5B9+EYiSLjrxEQjHeFCDBtEqLi7xl+hCCv26PSHbbDAICPN7WOxw7R16z7CC+pg43p1Drn8sEYTY7fBZ8m568zfawmsyTJIJcpWUtRpKQMNXk8n8IDzwiH2Yh8cfNBiKtBiouD5cs+P/IS9+M1CbUa1mIscW0v2Cbfa8qHJ73lRYnU+iwAwq3JNDYw0Xu6MJF7FOu18AB61INraEsIWl5R+JNEjIlrDq+QkoFrir1rFEM2yOckxa1Lfn3FQNQ2Xd/YtR8dEg5ZRNfo+HBd+2Bjvwa4Tqoa4lgzK+Ugw44aYcUERX9QN3hGqGXc2KlnV9P5Y7KiXi9aYjfch47RzfFvAKEZESh+tzpGErrMktoBGtWtzsaq4weTeInO/LFZlesylHLVHo1STcym1iOf126DODCkJ/7x0+DcLQZD1ZSJfkMyCEJKtzNfTYw8yusNqtP+XkSlbeUF2agv/joY4ouYImwocGVynLBxCoB4iEbdbBk16WRnVbz5ug3yPBVKh7aFmT4LuwpYdpZZDlLMF4wDrk9NVNHdP7dvfrx/64NRNb2010H0Z7yxuP7dhqORQR26JU6vP8YQp5RGm70DoE9vH9ySmsgBytSxQQrdxOobr/bQ4dL/0h50azeCE6/mBXalDCoZXq7/7V8zDc/qqIOV+bt7yfcfVScekPBSKthS0P/Vfm3bOVSglD4Nep69B3Es5xS/Ckimp2sfjOM6clRq1QKPKhA1PFJ59RXrM9BKHVErPBw7kFK33lY5RVMdJSky2+/q0J9XjdCeMWnR81Y+GFXeuI/jCKQ+dQ7Wyl7JHr9E32COQzRDCJLzMEw72rI2c279utf0CMhzrLOVDi0ytlRZ9JiUk6tLm1aaOxRPZF+jKW8yD3HrrkH2iJM31Hl20Qc2aJl2No+K1m3wockrr7D/3i6HZIsgIQzAojWc/puB+Tn3pqEQoetUxGpsUFR6I3pkvKSHbck7yjXb55Gs/ChTWuHUMqVCJwi2WZR2WzzpMCTulqVH0vBmNSW4+ygkg9yzA7JaqLCoqjCfltCNUjnMQdv2h1m0hupl2eepKIVRdx8Yw4ZN93kcb/pgAc29YMlSCYxsCSanFurE/qacp0eZC60osdnr0a/tcZHQcMIJQB1NWmvuncaIjXl8fWW8+Hg/Wy0Jq1kazqNjYrICLGUu3faOEUFNfnq0fuV4wY4Tj7d1gHMN0gjKtoDZs2OM7tJzvWM52153LgVp1+GYsnzckpVerOIItBFpFSBk7V6pLCllNyS8CIr9XaBgPFN9CaCDEt/IFjEydtY1lGR98iK/oEPzs5xdfiibMokL7IBVJ6e+6b0UwNd3459E7nHNmoRfSNUirVtzlOapj+KA9FCTmxaRk29D1U3DrhUDCqX9hhc0vcgPo2oII/t4HkuJjboj3C4tndbeM+VK4c84Tp8m9aPn0ikgEQ7NqHiiJ7VH86C+7gdT8cr+VGlHyQTifAx9JmGIHL8+Ne4zUGJgTi3CWJojk3/lWwHeNOBaS3YaeaMcwt67OE5vwqbTS6vSNTV7iF+zmmiOX5mfWO6PnuoGwImoB75i5pStgJKmqJr8/UEgXY/rnmOpCedZiLQ6GtKQcmK8F/hIbEzJnlbo50XB5DU+dw3W5d9WdN7qc6D9VR3cpVkmjcpbNhI3Kcmhx9XM84g29/ZCp/hcOB9fXLdKJA9MeRqlXCgSALbyKxyBxvfzTQdMF8EUWgnIin/VwjPutTx
WhE3kOZtSwwyCH5ecCltgJTYKc94YFrETc0Npk7VZBtB87TeMVxMYehVvksn9NXb/qj8TKH2MuHFg8hzZuWO1iJnr/bdCx7lfmiGe1hDNz2pOdujv8Y8mSicUwTCE0DFwQ7LDLjRlbQB1Ha9V66EvjNYTGkMxib3jDGeHGYxuEr4hWcg2G9I0xa0gvvq9svg9jzLnTYbCBgSz+1/2ygABpS5H2bLZB+eCQMzksZxtIR9xHN/9KGx4jCqrYDuf93bAyt6R7gAH+ZgdqO93nmJJ0lTsKkdhgmT7cm521/mWCjCxSLaIv5T+9c2cKPDaJqowvV/l09ehpOWeWkfZiPFoM1e+1Qb8BigKtUn4ezTcG8xafa2FmKoDW7FBBqtLISd5l5Ky9Te5LlLq1pTtELRCNtSga0zxfg06QwGe14+bp7EZoUPW8JMWLykjS4zYMAC+qmi1BfR6WWJKQOG4O5u4eJMJYtvyTsJi/KCd/ygnJfD57kGTRC/yjn2ZHJO8tPffs+Vy4Np6rCCkfA7vVxZbR9n3gxhzWvrKh2/iMMSPjOvFDWqhrn9b9YKhFWM3Dbp1R3QQKDxpc0xUxgh3jOuXxYU1MI2ZdA/Q586BIDLfscQYTajKx+p2LHQLHRL+VdBlFbfvF42ouP+8DjbmUgnFxm1szc8mMvuJSaD02qZg2y480+Xbs6ehkTKXt8yBP3dIGiAwAAXT/wEhHILKTAz6Ylmjoi3thKaYT3trExnbOTXNZhk5AAjgjJohAOJCVV48mkOjtObmHdaL08YAVLeN9teNx8fHpCeMB7VSVuU3Oxu5Fy0fPloYIv+lcIfvHjb6tSy38A++49b3Qg1E9PaEIhuK1HbtmDJ0b5QSYsQmLepzD2iAJEp2n+8WweP/fcQKRPdehlBsRBnw8zWySlbJAc3RRkadrRCbTjReq6qGxmhSizlnkgCZhtTWJ+iSHVvhaxeM1gwluYMwjXUGP6CDWNpvw/F/JBOW/QqnapmHTG5o/w3gMMoGwI09F3PZDNSh0enOt1qffWthjcv7QAdweoDtlLzqd44oGQQ3YSSUCiznJeIJGdfU68O57Pryuc68mOF/ukPg5g2v3SyWl/ialbZpbrQxKvA/kLybRVci8zarW55aoLUGGlcnOn3D9DvzWUCNZNch1DmA4m2H0xsuoN+8Khk6buydecRFEyn5CzPoAm3J4w5tw4CjFaFSwm/vvk9Ekc49rzvrL3UquqzB+HF6LrEqp3TfU6RIDdup+fMJroqSzwatCfp+tXW5V/PC3rZdYamgxtCIZncYtrmUHErlOZxNgdJ8sclJYWVcp8Wn2I5KoQK5GhmqEYVdnyt3A8CxzgrNFPjHIEsY8W4dJC0R3owm1i1/RiV2H8e1pz6IFLTC+vY2k1ESPs4lo68UG1YdNxCfeZvXCE02UDhBxu1dgzHQPrdLoVGaaREfXhkxRl6PDDwIlO4aX6viMyRMYrrA8T9x9xWb8NY0N3jlyK/+gsILBZo1RvuqEvCZmIG7XcRVSzof7KuIBIO7EESh8PZ4FANsSU/NNmQOkM/YUmIgebRrWPdiLwIpvi2qjqhtMgrPfiJNPE5V1g0lL2mmSujbpAbmyEbtz5F1mriys74keFboAAFs6Pu5OhP1fqpCwHH2rnm7eCWQ5SSv5zR+XeQ5EhSIk33kOTMB62OQWhPxz94iI84N5i7RMPUIJ6oAevFT2UvxJNI23k/B808NeavCgO6qIxHmm5DSargcRWFJeHFNdGUdX6+eF5oA/oMVlwH3xQVZVWUpTKcwojjdjAYmIkhrHfhTEdxnI6IFbTZ7S5W4OwTSvk6ZXIh9XE1P+1+MW8BU1XsG7qmTC+HYISGhtLny0ecZAOVHwxoPDc1NWQLrIbpEShAzdl9fE6hxOV3Dp2bHdkxGGRUgc8TAyWOLq3J3zx46T3fzgMNegtJxiu7eOJmrvI+2iV790w2CKWAQP1YlK1r7Ruh/N85xn6XW2vzi3A7TynpgkPmUhhIN21M8f2jYT6ksf1qr22z+XLLmpT9KewRuTlQt3aT2zAS89PRC3jR49zpiPCZjg44QxPVLE5eDqWoV78JEtnkaLHK0q0lXzMK7BchgdOqpd2mpOWDwrEkJhe9Gm96MlvW+HVeDFSVCwDtv0NIjP6E0ez8+v066gm7MHEmI8eZ2bm59kwcg9g4rphGlXBy35zHYkWB4bnfuEqMbs8dU39PX7bYgyBQcbl82LRnTF4NCf0LdMmdz8lll+xMJc2jmICB5iKOMSU4qZPzUnWdQyLkgO92Z0CTF40Su01ggsOcZsKdhani/YFZ0r5+h91qIKGAWY2fawpl3GDWwkhT973mzTSVuTUuF4eV89SgLo8YhJGNJuL1cN7lVmn9pxiHh5wNdXGxetmo5T0siuchtuDfTLTvMVIGB13Hyzgh63vzAC/eXQT7QKvK8fAiVQgWH13zlM9d1jlEKTopuG4EcQ9nGjJRdcfMpUTAyMfF7GMkrIH3bEKfoSj1egbOkGyLASV4GOkATC+domFjvEXd+yY5UTeVyKbGUmkvGhBcGylq8SWJvxo0oBj5Hgm4boUx7B4laayuJjQ9QJsB4dVEAN4Wi2I4aHSDP0KpHTrZKcmagPL57U41F9NbyB94SoDVmaLKQNK2yNBHusLropdfc2Rnxw91V4noP11otik0itzcapUnE4yDkKdhi03TX8kAQlJX6j772B1V3wVH4nwtXsIl3lJfxI3sa/ZWPLD1D8gi/3xF3GPQjCu99JTo/9R6s/+cfLWWvIAwK4koHCs4YMlxF7TGgY4VjOWa6coXhdsUbMl8g08amuMh20/HgxtjOSCAYBv0fD75FPerK4vs8ZnxkT4+ZCPL689MzZbnB66oS3l2Nnxeb6sONCpyrshxDrZNa8rP3/TFjyAu8sgJugs1IkJ/QYkhTQGFTqtjcNt2H+P10VOGPz2T4hkQgsU8VCkodgmCASwZKelQkh7J5F+Cwjghy4YBzpVgMOBl8NoBh8IM0bs4RML3hLNRFpodV8C8Dsws6pR0SYIBuMypDEdbJ44J/uGWT8KICp/LqkspPHPimVuItuVhCYMphx9N62oXcM+IVHq7QMgK8SjJHCPc+apFwjx+RwOAaBoWphiK7OUsf3cZx3fGVy21WP10u9oURQ8vVKLrdUIInUzZlPJPbUJO0F/Rftx6oweLwgw+nnuAVTskiUP7H/tOonxWOwsnMC5mmW3E+R4o3fLI3jelMkQ8ikK79wiASYXOcEBJgo7QeNMQ6KD5eSO6w8BlXilOJFfYb/U006/lr8d785KdeS6/BIkCqhjGuT7vDYIgfwE9pryYKpIPpqKBfNEFm1R9zqQMBofuXe+HlFe04jN3vA6TiTPW+b7JX5nIGD3nWHhkBLAHIcwN5B+Ci5GCou4u47ODs4AHlufDRV7tGmxULaEFnYpc5EWD273ADQzsfXIUjMWAnUwKrOOnU9lvL5YT4DIAT3znMz/23fB3XcCVGxPu1mzUR310t8XHttEZLruN1XIYl4wtHXtNfAp2YLAQSO89OLVJ2hTl6bdL5Mm8kUKyTjD6CJAkIFBVxJHeKMLZkMmQhb+ie2QuOIPrnFIWOn8GI0gW0GAi92gZdB9sqkWr4oE9BGljpOfSZXEEwwmUvPOoa/Hcf1eZq3/Fyw3KmyEZg8DFZAdCW5PxYzIHB/djiUu0eVhlYs5e7VyduvvsSCTzRUwsJENXl8AljJrYifQfdytOXdbnOWm9BgYnAsStetf6rOZ7uIZprEKEMvID9CnIHRIIZBhHOoazCLA4bgsr9qO9JbiJKESpFjEOD2JsTzBqYhVrkKI1alPnNJR6nGeqI9DsWy1XzGko5Eg94U4Ejjv/OSU2aMN4TlzkNZknx025Oz6r5HT6FGnasIInQc2grouodWJCm3CnLoXudjGoTBkEuX1kbUk6eyY8tETj32FUdYMf3iokXlS7aOMDYxG7XyWdD7RYRXb1vxBdY+0ii4KRlRhyH5AaFXEYCbIJuQIrWdsYwKKgDnEonm4C54pntAvsZgXyMw+xeAsIPSoqZ7C9gEX/cdrOpRQ/V7hkluzvnb3ODMEUaWq7
g5nVr48N/4LTMzvIJFWoGjlLVLmTiqKKptgYhcMH2c4O8FRugEVL5Vp7DeCTe1XsTFiSsTOHECCwxvCvv1E/9x87CqDJTNXm1Xx+nwpNPkdS5kycWFacQSHS0nzXAyVqd4wv41Bv8oCa7JEPrGatcmQ39m5LV77aU9TGnJYBP9v94fGWtkJFe0ssYyYuw/MW4K/mjxazYw4uSvrnpUQnQ0+D7ou6EYaJv04F+D9MDKR/2YhWpfpOBwh6licrnjYP+dGahdn5M3LUdzaLuFj7yEgADrxa585BWkzIrOvAEkKdGElsdW2zZQ+qr32CeaMEKkSn1EmdCojDElspJx2NOp19U+yc/rXzD+oCvHzpkhFf5YYYcnAWXJSz5feoVPPklNgvKPMzyaZadXkN0VGfI/fBGXKcTjOts64NwGob98DyMrsnH1yUPprp0ODWXWh2NGjPTPm+WWQ0xRMBsvjzLNEteo406+mLu40Rn8x0YRxJbmPsDA4QeeQhyPsb/GTynF8SKwMAbnd4EanOZa9twa7DUL7W4v3BY/0J15Z8GN99Dy2u0jyWuVogWZPwHRfk9hEd/B3o6yri0PnYy/x3ExH3HIPpMfHTP8VzXoZhLtUQEAz9ePmcPfDKMJ86Ll5kAXPqvXx3FTOon0yFGbA8FV0TDEjpYQaR1MR8HXbH97zkgKgHBtXwnOgeLbmP2Xcvd2OSNL5fIU4tqrbt5mWVKzjzIJMwJ0V9qJKzUctjMAlkVQCGlkv8kpSJTUyEbC09ja3DXdhvjZiFSvEXBmdpdzhl6KfFmDKNK8BetLDsJZr2vJMatPrX1t2vIZa/DrUhU07Gvwi7/OIvi4My9kpnw2bk5L6q9hHIVx87Y9kNYsPQGkWUHi7UXxicJLFbs0Du4gKqvR8v07zbBCcq51uQlcI++gMw8WPolcwg8YpiBw0P5mQleMKEjtUoC+l+40hzVrH7BMH3u0kV+y5M3R9McV/rwmAsqMd7YK4hWLV9vFUF9Z/X5pNCtPYNtVoSDfNDGNFsfj7yatwpOu3eMAEbBJ4DvKjFKoEUN7si3PjjNFlpL5ArTn7Q+sT0MH+T4OObsreC+0xVUkMozFLFtZem3UNpFl6i5DTYuVApPxc+gXr/Eo10a/5NoYalv4mWQyYlsrzdKeQRbyFzD+vxCOsw6cLYRe+bPyAAm9pTmHdyYHhkT47jc4mnPUghLod7UgiqJKhz8RSs5Da6JnC/mXWmFiETsVa1WsTabp3RNAEAAj9/14joXmqLqVmsuMriAuFNMt6urU0X/X5sqrTNDQwWQmRCg5Obd5ICAzbRQd9z/SLdgxK0tR19ITyUTsVygSuU3mYbcsA34PLYb6O3/A2gmxWjodbQbKsTlG6yeuTfltsrKxCNfSPmXrE9mcfIbxtqmqEf09sjBnQdiCJ6v4xfxZRQDZ8Ozih8Ju392yQ2awIVAMp2WgtLC1JoIYFGvEO736E82AyADG4WPD3envpFbK6fzWMkwA9zWTz3JfkKeBUp4FcfrZ+DRpCjYZk50pIfyo7fyqhytZSl6JvWvO8VV+vW+Iflog3Puhbd37kSEtifQbvHmwhAo6S2V0ScUCJ5msr9d5W+e4vUlzkvZ0hxSehr4SeMlZGFUzR2MzusaLSQLCRJdRM/+2nmokBru4B8pfCQfcNDIW3kkbYfE8MMC2jGEhAk5EdzAKjj2r7DkfhZ18M/us3uxpSto/pITVn9RKihLc4wSw3ur7K/04crVNR0GQ7kuzlMoHsSfRFnNIbUBXbuyeLPHyJGZ5oSz6cOiIz6hw3hF7p7YDZL5Q6YdNLPf4qoi79SN8XwjUF1tSbJml5/Sj2CY7fgei7LohEXn3VKLs8cdXOGSjSKB1yP00aW0sdrJju/mj4OAfzVgbN/3OQy+dsrEmxuXJ71i0WdgZnIzq7dWO7BjXw8RC/4Hd31JHdHuNxslC55oicrlbWvErAraFLUrgJSE0kTeODtogVPTf9YBVYly326/FU7hx4BZeNUVLXGxlWWjkZ18AuxIi4Gw873jYcPH2Y3IPxGWTJxJs/3o86n7PiRbejgbuVzGwmwD5ZHQkviEkRZA6aFGZ29VbZ27ClRZFbiPaj/bfyDcfTfd7H9GxtjRJ3t27M3DoKyKA0oKQup/JNgbF+H+YnIyB4QPmmYxylsk44qWb6+VFZuaqf4wjbBWejhWexFV4LAWLGI7nf7dBDMAsg7BV0t1bS4oz2Lfd7NoTEOg0gt9rDM+wKu1gjZWh7fJRctNWCXZAgUm9vHOvEGQxLgFLqKbQjxoMKjMQ50g5DLY/8TpTgm0jBnmFjD9iM3b+L1GDG3RbQDSK/vpK5NQyMjTQhKfy1FkSPBf0n2iHksqNUUAR5p+tXtpUgEJOJ6DXpo1OXPnI96ZG+8skW73d1vy1cvcnbQDn8tPJ6HnTX9U0+AJOLWvG3A+hOEzNlTMBeewj9myM7QBA3twK6PHMOQAu5GprRYMw5oyu21fVZNegvgO6otzzLPmfASyCfn/U49btAqvYoX8pmi33t2e/3+L1QMeKibNGB4BEhUL46zCuylezHiu6Xh/0aFIuzGfeKY56U5bGYMA4qy+qDyUkSeU3fd3gfyA90vWgS6EVV0OLE/9KeJXjHYxxO1J7tkWzQYe3wghahGD8zjU2aFlKcc533jboM/Uk8WvoGe/ouun27wGQfFAF7IP218KA+Zd8XdfDRWrj6Tq3SrOgDs+b+64lTO6QDWanVFu8ngVX85YKMmV8pgu2NHQLO7PzGiV66HyrXCcn9GBAP9rPdVRnEkr/fg6ej/DBiZHZVBrUgirTAfH3zOgCE+wKZkXeRJjhZpqDQ90f45+NRwDd3VXtWGNhkRaqDoBkT0Ahddh5U0nwkOFAV94Azz3HuEy+ufFvarfmu1KlWwohqW2nV82iHLkimmFovDEOZc11DJmV4jjFkf1NTZQLfi4GD51zMYZKPbI0xtIt4Y9FAyc38vSAEUraaN8AZSoO0eu8jOlNGDKDSbk0Y6A4pqNr9M/zhz7r3BL2MdD/dTr86Wd1QBkuH9WHOtx0cmZ7pzReh2qIvDmq++gS7133AUGURNbpb7KHSzOiPCngwaBIZWRKXtl4dMH/2u8XVlxfpjHO91OLvpYFjANwZMuR70pZGobFhSinRSJhbCSR21doj2Z1VWztf1DHajpLPHS3GwxRpPoFlBzT1TB23ooL48jGEvBv3OQbfPXnQ/vTWH6z/fjeqR09lz3HU+Xmcke6iu5jedHXFTJyyi8hqRYZz+IbG/2H436jv/O4bSoue8NPHKkjqaDtYeH+nWbsU6WX+4R6HQ3/xjWgGSh5IloweFnntThcQqdkUl04zP5lMByNYu4FBFfz/KoErhE0OtKI2651itz9rwSofCO35CPfaRI1bxaC3t1stUIfjIOw2FmvK/dfvYcE8hKS0bwihYhsrpWXgqXtu2dNMgHf7CjVpiWMNToTB/I7evHYeGd70rai+5tfhtu+X9VwaPQoeckICKhfpbH2SbZGGEe8R4ny+e5cdu738wlnuXW/Xes5nO2yJRqPWLPaNXLNAskz+H15Z5Ghj2ya/X6JvYYkxXzwILvvCtbi4Fd2iTnbZlZE0N70j97bRSmLFRkt/yTf4srraf3ntjTIikkO4JmykXqgFbuP9gMEIVIV0Fo0SkkO9rGjNdc9n6wfIbrkM8857ixVGcsdY/Xwgq23XXnoLpBjnIA63hcG9Hl3H24cOhIbp0SaCG0ChJemRlgu0KHAE3bDMQZoMa8J++qZF22vyflyWp0Ni/oiiEPDs5vRm6EYwe8dZJHQr8FWkfbGOuNB4hbVKtyK4D9xkLmXRP1IB+MSbuZrN8xV4V34CF4z1iHS6jolvmj/h/7fXALez3cQTenlVlmtY+zr3mJ5o+qBiftzwhBjNYrmn/q42ex/PtRafx5m24cj2GgsruZ9P8knrRYTj3sIC6lr+hxI6MbfVTdNogiK53/jzQFSR17M8+HCR2VGOF25tCsc0LTUb/DT0I/wYm5Du4zbev/6uMw+bfkZXsY/9V4aaM4t/rY104NMpwkhLQ0S+QH/5UoKEg8gMpzbLAgbWSOY2+
Ree3XrsHdrUr1hyo8dS602H9f75MCznCD8i6lnpYZNSLWt8aRr0NAhlU3kjs/F3r+gO2NJocssCz6hHe+Wtn7zPW8veg+KNJcC1uVMLbb1jMi4QIMDMTU28BUj9JGKdt4XRGyjJYvOqkVl7rRzrMpg544ti1cByhHdXCKz7ip87Xy1F3Ht+IgYP/2Gyn1yPHUf83nR9hCme0BpXBYGBdoDRM0sT0A5DN1egNw/s84M2zh7gskdbhURbc2JSz2FMnEknmXF9h/Z6Q9CVqyvDYGEp/eS7DWpdhtKuK1l2ul6MjQjO+y0zUJiKS7VTuVUqSPN3Z38joO5byVXQzSjqF0aZ3TuMHyUShNWrtRjXdyfHfAaGTbGwOdm3VhlZH5cyj/4nKo5l8+6Ok5ekn44NhLvkEq8Gqv5NigGOV56U3eGFKJ1Xz5H57LtYBsebJZNGh9vKmxlNPe9sqMcbq3AIijgDi0twMjLfNO/oBxvVF1iK10Q2nMzsD0Og+E/e5cg56aNyOS/7QHF8stl56I6w2LNSIE5kTx5j7ZDg08y2hgBaqxZuS5QrLClEVHyUrNTdTHvnvNnn6VhxAHHju/X2w3fkappfZF1/4wQfpUKVX1Y9L0uADO38hGookuPwrzG1/7TRWwKItpTdbrOrr+sUaBn3F628kvlo+z3pF49MGEtodjxiZ+xDgXlsY5Hk8cJuKvlI4+AqZ1wB0HUg8Wy0CyZyu9i5ZJNIY32Um2thqMa1GSZu+Z6DXBTcIBjiM5yAArTg/SmRKe/TRyObkw7SoBDaNCm5nsofMmEQi3SksbJ9axtMN/yIgyMkGnPnlXKA6+dw+0qD5j6a9qiqilFgSUwXwIoAxS5Bt6L6WggKMUMk784gNFwJglFH4r7eI+wFgq6VzBpIdltthsBK2Td9O1V5F5Z5T3N273ch3sZCH/qnszsULFbApJPwr6PuECQq5HQjOg6Wyc6eXy6QWLsr5m8v6c9wWSgsZ8j2qL4gUFpNaLiYV2OIyGjBo3i/dyuzdHXvt1hLPTHUK25vzmzl84D799WpY4eU3gTvD4DqLTvIGq6OMTQO1cG9ALXTZ4h7vRn0foGSMWWzOrLTvFiHzfmQmFSDoyyF7B93dQqvCtrvvTTvUuyVmeTHBVJ05t6Xar7+Y7YiDyxbZhzAKu9BwutSIA90s/hQM7LBLxkSsGZKs3fHKLWFIGKb2pQVcwtkvj3fhZvqSJBh88PLq4C5z39PYyaTwCLu2QOXCEH5G+8AfsDojPSQ1UN/G8VduakdxggzU23YQyaZgSrsVEHvP15q+z7TyPegITuoZnKEkv67ZeH6+JYMNZDfRt/nlPvzPPeIvICsFOXyw+6TuTvK+c9WGAvmsUxPoOUxMqv5PTvUQs1kh2x+SsRKO/QmjD+nSzNKvwWdhVy2mcjfgFLz5hKmbY92JvHx1nmHn5IfQUQGZjfG5gmKQT8HdUtcnTcoLTR2as0tmNKs6i7PQZNwJda+piNU6z2ucfKl1rYQ8wD9DDRo8BovSRzh8PfYGRGGPDNuWD9cpMAsfTUFliSNsJKJlJ284Gztzv0jhifs6vC59NaEYZ9LcYlFuu1YKiB/sKvjedrPCP3hwBl3ZH54/iIYCxJ1tCgFoxFAfz05fArROlkePy6Z03Lj9m/8PF8QzOBzasnoOTbae+kWVENoXzZaz/6U5DGWgH9iyGyIHpPYFAMh9dy34m90ZVS3euH1pMSAap4iXfZkV3GaLO3vDexRTiviEZ3eY4ayU4u0IARaMsA2cDk0NR2MAjaR6U++Wee6+1qEne7c7Ky15UDZaqOmLG9gfSIsDpdR97UtY1kyRm37uNHVHuMDng158oVBwYjUk2IVK3MIkZWMAqcwHfZZ4G2IKQMDRy/AN9MSrFYF2zQeVsCAnMhEUBEgvM77fqjn4ZVxp/kXEB8LBZYtGVzdx5dIEkxouXTtbSEchFfEQthVjZEAldLsKVMHPpmSgUP3i6+ie9Xb8WH0ozjb49QDRwOjam+nSFyi+32tCmy//MPfSBnBfZ5pqgchOvEEL5e4D0SMvz8DZbyWdPhoJOHs+4GQtbYF/Jy7Sy5wNpv9yZ8b/NQtn+u1Th0m2SO+OTM7YASDyu68V+uV/kV17rqKwBTQJ/va3Gt82yUiAaHBS/d1uBX3RUUVwspzE5I43kILv2MNLs6v+iSX8ODNG0kNKRN0SlanHMPkxRwegBndh05vHYbmNtYquCWVXM/W4LpZq2nkzJZENKUlItKys8gdZwFfvXUSWkl86p/C9jfxOfW0+y4H+sr6jwk3LqpObPNGCfV1fZO1xGSSnWuJyEDit4Q+mfhkDQXzDIYkrZX6HlSJv8jhoLocloNZwY97J3DXwPbqtkvKGdVcdNrxHclIPPtWSRFCxZNAaryAdlRG+I+tUiz7rpZNSp67Ww4houbscCyfqitbr06QDZp88is3Ru/cPUKnUleHGeVbj5ibMbWQz5CxtYpn20dGkFIBAocnNUMuq7AihBzdNRhdLkioyu14p49yDnHzAiPVRGH2CfNbjAsHXdytzuo1PCwyFVIZgbExTxIfKCJWCBnG67le3i5usyIzPS8ROwC2qrmIP9B/c3T4hfLQ6kcCmxS4D9w0Lg9VNgRYLC1+h5xTuxETJ3RryQzEeeDfqQME9Lps3oyV9htTvr+C0QZC7b75ZtcN8dMf3sNddQYbtDrQaHIBE0M77kDJgTpP5jSvSLWVsP2g6HkU5OVyiEMEOUSYU/poZjqf1jcc1TB8cizUGhb8SX/OpiVE6JoSHDjYSufBaE2obcXsBps7Zy5M6qb15zKS2eEZbFfSLwa+6nYazPXwbK9v2NX4YdthNStMX1ITa1EapW+f9GcsN1+gZ2IzO4dIZKYT5cAFlw+LA5GoG1aJFWOfrAQrunEulSVymN7X+TigSh25anvF9iSxDuNlmjVT0015QKrty6dLyHZIK8YkEfzufLvGWWBg1DZpOefXpEb2l04y1bulRxJbEJ0QjUxWoe5kG5NWruFDA3dTf7KonL/gY1QH4tnoxkCvICrFL8WOsgtSONOxO6WSUGvIzQNAb7kht8QL9v73iwqRuH+czhEM7FHXx3nOzbw/aK2AZbiE5cG9BD2mx/sCaArS7wNLLjY1r4DfOoOB2uUMfU5hlvrYqgMU77MUxsAGHkVrPnUep1U0MIAEQ59rYvcyWyoegNvyn0nUtxBXnlohUHYfag4fgPj2BNAa4yEZgp8NOEWN6Gzug0V998rqv0XBMeUmRzvCV9ZADN4mm9lNnPKuna94Grgoxx/UQD22X5dkHgweIwjsknalGn7Ymsywoeb09gvUC5L2KxuBR2JekiMxSxRvFoeg7Nl6dLjbDqq3SmgZf5ObP5pd8ZRRTiuAXycMuzZtofJVcX05eoIie42I3eb8SZbQs0PoOYPE0VvjR5ifdO7JFVBQL64Sp+AL1aluquhJfjp3G3JOwqGq7SrVQbWOpP5Ld/jcvg8+w/pDFKbXDVMq1SbdXe/91fAqpGUhWSfUo6S+yEcgEpzOHb4d0jseboZlI0x/irwOA8W1laGsLf3eRQrZM7olnlK5ffxX7+F+zoMPD0F/PyL1ruB+jbxQf6+UwVmctC4TtuLwrOOUB2/RaUGW9wvbdcr47gAn77EAPuXSVZHTmORDxPxIbzTgvlC35e+FJVB5L1zJ6vBpTYp3hGZQiz9Qe6g0MtTIhpo0o7aMYU0gBjr8PAEwqXJ9Ohuz2xx8k+bWz8Nf76pKqzA0daPNYr9yOGM4yRr6p+/hDINppq80ALBnLyv4pcjk/GUcUzuDc0k7eEY096Qeyq3N10B0uHFUXCG/shMtHdERSx633orsfHdQwVZ5h2TVg/vqxeBzyMQTwkmxL+sECTprzTGMITlRRdF7Tq1UE5zsAIuX3skPfgrz7kmoaCcwpl70j5gvWGllEmeZBL7Z3ch/l1aAqCpPmjJoFcSVCoVrrTPLqKnFjWMG9hbMWtJoBNxbAN/49m/w8r7w5EmAbXqkAKq7UWy+7pd7+YovRHB82KyBvcuNAZzwlMei1j6PPjDfMXd5+hcAEMQH90CceaKKi/9rWNlK4VrQs
mrHBRihEdL/3oPMr+O6dqMeZSseUtbHpLO0BA61d/J0/A8Y3ffISy/V645pGWW5NoK8hx3Mkn1918KOxOZAx6q41EGzaU14u1FWMu6JPQJhiSJDFwDjbIrEbZX4Dt+4oAXDwdQOOfTJRSY5biL5aOZwpn0y88OjzEthlcZN4k6f5VhSpUeia/hF4gLh3y2dA8dRfKGgBaOedyHhBAYUIWMQtraLmbfkjc7TMIv6AmWEc2vkotuiX4EmQAcgtAJTzgXEsEpkmpp7d46CUkJVXskoiurZ04dV6gEESJh3gt/+oSxPOs5K0WOtB53n8YdDsllO+08z+SSyXX27a9uz37naoV/BabavjliS3v6pw22QVmhN2nVZtEb9RzKC+yEI1KBqozsyUPzJMNVAsaWyLyGa3qU21f82d68q9unvPcbwifl0gUYgXrxU5O9t3E45JRYdEijFPCAlsq+49UG+mKJEsAqIjGLQVYJOl2kYRTMTflN4AvuS3/Bdfjpc4IGr9M0KokAtqolEvIrSOlrpzvHxpeYZOBpUb4L1fp9Fqu5cx8b0K8rGPelavymceB1HMq5OilvwOPyt3K6S/wy46+jDcjcuY+CNqyP1xQy2QeYF8DwmoVlILOFmP9wrBMTmTyl7L1rjr9qgWeMBKrsVs8pXQD//c+zJKRQZVUn3rQ8vyF269AfrBFz/L6AK4/C+NZALzzVrbTPn1bMfTkKwlzsptz7ob2O67Udi+zcRQ7KCLaXKJAx1AXNtMtRm/uYJ5NX0AA+lPwOVqgVdeP55LnJNUswFRjedY1xZIi5mMJq4iGgI4jTGJFMDmNCYUZ2LRWVca0zX5RCa12CH/mDJpsUKhlI9RvkUmMW8okmCSE3qMtyTuqda0ztXQq+kK70U7eGW6/wHL8TZ2ZQ8UvcBUl85rOmkQF1JnjU2npYnYUHNSJDkUeMb20jfHxZT3niWpaW54uIPvOmZuf2N8RA5bEVZq9gTHVCJzqJidvZ+Coy5CBzTyyf2ME7TGz2tgF14rMqzw4begOYc9aJFl1OK69bWDbyT/Py6zLyMLecIqdsDipCU0KP7QM+b9z0yYFvz2Pp/1RhHiQ28pqSCxpdLIscG4mX3xrTtq3HCMz+2PjljfrrQ0QjpGZ8pRMi4cjxuVSuJrHGO3KpRkSoi7HkAKLwF2wT0Iv7ijfykTkwzvsp4WUyWrw6eGCs+F0TcQ9f7cZs9Ouxx5x3XNsscf+KxEABas/hE7Yabp1eXNClWfDDi87xMzfqOB22f7/mPKMp1VeG42JMHbAEqEJJTmOgPwoK51O4k9rIY3E8W5Q/NgP//uzUXvQ3uAc9IyTsopI1SV0f4Rr7N5meCkOpUwNwZvm7g5Cq80oRwnQx1fHlSoGn5NIyljRtvEqzc283cMeNVmFom4oVTCY1rM5h9kNrmTBkj8ryxLS9j0E8GuIGvJBQyu8k7M6W0ljoqi1pVTxQgiFMMn8FF9k8N67Sr+tKAWtaiOWXDJHL/W54G57r5o7jf8Emt5nHut5ZRmbYjnxLX7X9OVUuMB5gGVH6meWfPKxbbAmEz/8L3+JYb1CM33Rn1X3ZF92HYOXDogxzXt0ADtrzf0RSUI3tQiueFQ1U148vp8Cei/KgYUg6hTPjPjUDUuGd+1rplMX82p1hdVhejeBWGXP3TpyNzd8Ve/jF+TALxK6hsaLzZpl0Z0Vy2xJ9ZJz36QQ8iTP+29EmUeMNoIQlyC3YAOKb5rabSIyxVyhzplRYq+Ec31v6RAqlPxYSfD3nXSRn0pWQgPwrWo2tqcQpXaVTVjiCHlKzsoXxIX0hFRw7YVtLnF4bOpX8+LfmFykU3cKPxR/YzpM2nb7HOijZjjzaIZCPDHOM212E7t2G46uESuw3HAjZutAcD9o69HtXrfFmd8lktxILV/xA1Qme0GnOMJOG2fq0rnNVesTHxnVNa6rRpbiGAXlo4hHx3/nuU/YsnCLNJorLsx5+I75OVupmo9RB1hkSIo6osHd4ktBbLczmdm13eVxUaCWSZkfO7jWoTY0Y+zpzLQ8pCRwbyQAlm2lfOXshLPMIxxZuEF2Kn90p2KsNcavFZwKeeihQlZCRG8G8wwKZZ+2qHTrvRGspRrp1+gV9YkUKoEZ6tpGJF7yFV8m0yPYq8qdgxurCfCT+ONz00AaRKj9o7Zy/UXtHcy+YCb/+pvS9FNQyQ3cVUcc7+AbwEXWUFmSa4sBkRVKQtujAZgiQaqxGueAtbBGeL3ZnMm2w/pbxXcF1IfPaMnqkEcheddoYwwyECajz9cmHqLw2IT6M6zhLznY38gzobHLG7hFDZw08TV7P9B0tVYMuOHsL4RWZsF8FyoFj5hhIxBjOr0dBOqAwgHq0ohqsCUb22TD+wRw3h6BXM/y+Jk0T7GJzt21P/tbf8ljcc88n134b7TPvphjEtcMmq0e/XE2Y1/3N4XC/4mlz/VIN35IyG9scRK2OkX8lImxtYxm8mTI6SQVjJ9VSrF2FHFaA1aLxah0D8w4ynfOVg5Y50SbdolCd0VBHWsdVsyAj+kwHoqag52Irv4DHvuyuCABGlQtnoypFq9XLIyjRe6BFVqDhopcKhnvbWaZuqTn9mq9TdSXVIvxMwfTns+ShSHm8pHA6VShgGKh3hPc4FLINxwxqniFvMnxVCZQPYNsPiaefov3JqWdgN868n7ZuJ2NVoJ3YY469cHewkS6FMuB8FKRN3j7UlSwi/f6E3lgGxlCc4QmWtd6GbWrqAWl56E+mRKW0czekv+GO6oJZNHl264nvkFuW6lNEQzBNHvPWYhQYe1u8gHWJp2QU8nJ4py2ccU0QZwWQTHQghAhL/SeUqlAXPORPYMpwTpidx/4Ymn4qPFG8heW1BykYe1PmWy+Nh4Q6I+NKIhmUniCQ6Y3Kk0j6B1IatL1e+O1Bj0UtKTSricpsgFYlIJ0LfcrfdBSSQKKZCq3apBGQMhdVox+Rd80Q077PmRPmUhXY1vFqD9wQJ+iJt9CfhxDlstInp44+Xfg/yoyGLJDGlUJQLxTU68SWRhc2G489/JmurK6utjGyoedO7hyqqCNnNe1FN+TZg/8lyqO1zh44NVFjIfr746Z+xdO/Lw7xSlLdGZpqG4N0NU27C1xvwUIvHTmtiOwAu9BCllMFGr1htY2jZlt0hu6yHQflk5cjPOp2lHufupEe0PPKZ/YJVE2xlFFQV/TAX2+WSaPMwHzaACwcEJV1ku728TK85yOvEX+MCyv781Xi5ZeUJSf+OuhvXeFpXWBfsvI0Sbgj182Wopy764yid1muGdjw9qI368oOeyRp6T4zKsmX4GV4d9a/jQDVLDPe5mGTKBIL9eY+91Njjw2jUy/so+hajYvPH09k47/j1m26rGP+GsGf78kVfV89F7+IDpvW3b1/vk+slX71t7l1l2vzbPjd4Uz5Ycu26ivL2hUKVckPXDGk2uQlWHFiNDSjo3UeM/KJRto8kxIQU58us1kbDRo2KOrru70GdfLfy3dZipMTmHWj7dqdqZ+LJJxqZM6ZblMOSI0V1x5rIRR6mgxxUcGUZrVFylWZjX0FVQGT0ZRgjn8rtkLHMqQu2Y40C2rY49RIt6bX1fjTqHxaMtYnEheJ+CcUYh02NIpiGi4v9/SMvBoqIUw+SbDqNSgJ8VrTofoYfonmV9JdHMIGGOBOLY2pM/2TsHNJSdYmGItB6Q6E11gt9J13jC4WSms1sWGwo6/zy40jGKxHuz2wLFG15k127HZq+9N+69femAW8Vl0AnprnhLkwRqUCJxldnN9OuoVGUSyTmUss9feD1fxyzOQuOSNyoTtqBdsIfTC73sDRBJRgGYzO5vPCJxi9LM3Oslt2t+RcxqFDMhw0shxkwLswifiDeV33+E1kmAT1g2WqPYkD5mu5UoSiBQRhkNfbLuR2to6EOAZyoQxVmB2esOu8rVy407f1L3epA6AJEEa1cPhW4SuuxuWsrik+xGpsKLyiKi11RjIV8bB/iZecHfD+rIDlJY3pv2hlE48RPmO34MZyE79kvoJ4EDGOCBEB63oc8VSu/Ni/zEgH3QkwYZtrfO+eZ28NncsgBdDpDFj2OxlVvPJEmj
Afip57fQiYI9H73UhzQKaR5xNOkNkRfNGo+5cjXRHQkBWM05uG1OZ59wtCOIhKy3n/8IN7RUdPKLf00gk/Xtf4F15Nh15f0rvokuc13c2Cysiww/glGrTLFZFFpYTsI7UJMj90YqxDwNQtweYQCZf5gp/ppivE+8b/okFoLHVDkgU72huHAhcfZs307x3s9Dzu7ZFqVHu55MirgkzsyxWKT3tk7JvZrIrJHt5R02mi00EucGQ0wkoiyiYd40cfS6qjYmDT+h6ouzPVmXSn+I3DVgLcXyIvq4LCA2k3HTllEaWETQmgauTT23egA/oX4OqC6f5c/jtZV/nyQ3zLrUMxkQGpbczC9tHx9r6dIctyXUavEPdYvYWg9hVEQpccxvQuP5ieXWGRMC4pv4dq3EYpORraHuw4/9A9uR2s+d1OzS6Yu4+SU5aPYSAmSpTW+QY7SjvtaJLD6AWZHEenPXfeFfGKbCej89MzRQKs4pHdj8gFrzxKrWSHOFR9gUgGLDEU9DV5nrkHxdd9yU4qJ5St1vkDYiD/Wzc6hzBoE2b/qEoqBqyn0Hp58LYFjzRrQZb+/PAWL0uw04GCrGV3x24/8W5L2ZOvxg68tPg8I/j2G+i0ismWixKIsRllvoBcks3Bw3K8Sls+miq+jXQlBeHkf+NOajfqshBRJBOQCokaGOeAgjmH0XF/ePxwEpxi1idc+hBy7IWF+sY+NULKi1gB0TLSkFV0QPDGFlobhutVvLrZDW3Axa9+1slSAkJayA6ZISSPl6uUdsjuitk0XP7DPYHeMKZvXD/4KJtCYeMm4maVeEbh2eiumYXuyT838umPDanjTBL0yWPpJNzzCCbPrPiZKDJXWh4xrDwGiVESheHBqqt2Lv6X7RiWWSUac0UVbBMq9o6nNOZ9bK/tSauJATbk43JOuHukOf0DQ8PAqzfpWSm/MRmNw5yQPMpYuNmzbN5mko0qK/aBL7eb2nlC/lGnFTjkLOR6CZ0PxHEsbAM7POBfhluEgRje5WOmQUjOuhMJn7hVNqMNPf1aQTbqJMpK4StbALU27VQP6xlw4yutX3T8b6kT1y2GYTHl1DfMNW4xskAKcWT8RTn9EUX+OnyCte2BG2nuHXxHfARi3qoc2dnpj37MqYWSPXR1N7H9d2mCB9zGAlLSVOvy91iAQ2RoxiyhwpNP5tLfA40YdJoeDIbKe0YITD0fKmyXN8JkiQO9Z7gKw3sDuET9qdhByhjsgorry+VnjL1dZm0YIQ2qfxNS4X+aCMzBHbpW6Jl5EkU4kTGEIhTtPCfk6KIJIcmPxKRhW3jJSVoeXbQXbhdVyoQv29bEhhg+FUblNXZhoYIGUQB6VxUZTB1vMv4dc1/OGfpzsZ7zGErDJt+FnlLhvV8D8O9330Gd/7VTLWoY8EHx6EfJD94ofQElKw3ZgAQDSHqonaFr3goqCEw6ZmrSRUc2uziDvMXau/ikkGl4dC4751ervLIL6lJdRENJJyVCFE4E8noL2oDHAWjFmG5rjXoi7bdmWN6V2W+AMSbOq87IdkZAYkPOIU+J9i0mNpBGLZ8Q2HLKvu7RDe3Wrd80ptKBh6f5OmmReIMump9bGX/nU2uXc10Sqm6GEiZ1QEf8w7msF0a4d1kYvABhP8yA41d71DfzSNcm2/LIj8kBT266tJdglLFr76yx138pYXgYv3frznWFaiJHUHMvuX+JtPB0rhVAzNnMQyiRXlZXYlxom7vyWpf6G8fPv1MjLznSwSwgSgjkB6t3VxNCovaCWHslAaeiakF7FjC+LlEv9t89AEZIIusDNx4u2SZgDnyt0fzpdGcYv37X/L238OhyCNfIPGU+uH78twuh7D3J8bK/GRJ95Q0TWqP+fOB1+VdibQ7ln4H52vf8lhJkQudoicyHPTmSeR2XZ4trY5KaiQ1jGdVLufsmG78lmIpZcm2aFFtajp6UlXpXb9BxxckzLvvIHbB3tULLBiuDTeNSqB0AqXnEmzNxXvxS0bvb311P2MxCZqPrHx7apDA8mHeE8ScgsrF5J723qjrGGwYX6QcIsDSo/s/B6pFWSDtLrgvu+QE/1f3yUJNUHGFw4m6sV13ycXfdlcagVxK0wFL9MYFZlyGmT0ykqZxp3s7Tmi584idPShVa/rsmwK21C/wXf/u6g1Gl6cCJHqjF9KAKWedHVUjHx+vdey1Sut1a+lifHv6zrUpzYLui45bGIfOsWB9Gv56NMNrpuCd6nuESuyEtH+kmNuX1mPTteqOlQIITB638D4FYSfaYoYbHFdFxF88903QhIs41wuvqQs3huj7UtNZnVL7FB95MPb3crQkaW5g7HzEgKnMPRdmw1rkqZjuFo2/rXfudwtBTtmFyHHZb2uahz4slMgUKNjQ1jZ9iK1t+XvEQ6bTQVazhYQIm/frSGoe5pn5zSt9YlIkk2jCWI2F0X4Zt1DEtUIqtu87OA8y3YrKYJ61hyNCjAflKT2VckXAMoq2ijtTQGGcHNrCnZSmv/7poMikjuUCsIp27QJoATgJ3m6uJx/py66lHSUyXTxP98g4kHsanuiJR6x9idX+yMxyuZtkSErcvnXewV/nPzAfxcEoYw6J7Or3G//LuMuZo4idHz8yaPLmLndMo0wA/uiB4335tBUfCKyECBDc/ZwxD5O7udaFSpzI5qUw/hu4B/Ng7PIwfjqopXVmdHvxkYx3llze8E9F8Y+VkFgha0AbrW+bc7pbnE3+alW2FDYBW9d7O1sk7OwAR/FNlmA4ILEKzq0urcH1Idu8rYONcqhW6hOSsk1x5dOkJJviSMHlJb331iHQ6yK06WMCZ1H/MmUlpijBZRAXyhRZQ9Jmmc5+V7WtLjbDe8DczK+n5LlSKffGAXY8/LrDtY/+G1K2+TPRoA2VXJ7i6l+g2No+Ro7wOk17Pp5j0uD2VWynYelpyBlRpw8BPLmPnJCQ3HFDcEKpSDWwkGZEm4YiXKbNpUUCzUNHnlDgLnZomr/5/RZbR2wXIL2O/pFCHtrRWpJPyrxu0WYNEZb4vM9VHoIl7qWBduT10gDfjqY6zxYlNRre63YbdqJqikBGaGqYVmM/vxzkQ4rbIG0rV2/w+DeYiASf81L7EX/V7AJctYAvSLY+P1MMIBTIJzo4sLL8o3NWhdi5uB6EkdNzgE3KwlM1fRCCgNm6y13zUM9qlzDRA/T4T14REtZ8yjPpQCfkO9Hy5CYEUaTYK10e0aGVzXXWOiRqz05EUp6YDKZU0dtkjNDEncBdmcgGjFeoX6X3PMFVz9qnQmRt00vkF89Motb7sFEdbcJHgGLBxxyO+bT7yH2+BYQr3hwJ2lPcCcQJ65NFmMN9DPKlSo/qeEiEaqaP2bi63Fmn67PbtRNy6fT6c2dv3ZSsZ4sFOR3BQMu56o5WBblhhLJyy2f/l6wDCkkLxBFU0Mk7bYuTEG0SyujQDn77LOtKtG+lvgs07LSh0EjWYE9VYI84EwdH1Fn0LGZd3VUI9P+GJ7Nx1MhhhBFHbMtMMC29Xe52Sl2I7NcBpyEd6gIg5IwDGjzVjqPgKE47YfNXSYqBqSWqlJnyIIKR1DLB/0H8APvFBgzaqZpmvl+r5b3OxO76377ZYO7z17d/NoEoADdOznkU0jdlGhKTwgWRqW04Qn0dpX1RKwmdPpLX2yZV2VO4z/qelfvxe3++dYHkGk06HaSLiiwGGi6TKivjUYwWvDRApGVcDZcGZjtbLQcvgw66hjEfikbN4PP5o+zp5brCVmfsw7Spnnhzwugu+H8En0fdzAAc2/dVJpac7vgdta6XJP3IHPVCiY1Bfj5GAbzJxfJ9guAutjA2rKuMBi8hHd8CHhL4wWfk4kUj+0GIaJkxXLc94de9kFDbnurRm4vC2LB//xGjXZwYmDJ0m8nz421A0reEPoN7DEfexooFqbAeFkfgcBH8VJCHjUDAPQonQMl0BtAVRU21HDmMOZF0Bmdo+04Viy3OgWJ/Vi2G7zZvcz5inSCf3xYft2ehzt0Is2w2n1r+GqPIjOhTewpXjkr3uLeSe6fPH+W+qoICsYdC/hNyYFp0xDJ5DObD28E2BJjRMkP73WSJXzPpngeFRICxBnI
ISbWwCf0kzWUqyyzBXouCUyo0+0llkfDShouYudnLO1ThHfjEyqpuESlBK3Wjb9ok/xWeLzqeYC4eFF6F1qPB95+XFNfbDDIOa4RspJG5j4tBWwipaZfjqdwdkSbyS3inffkKf2iseJC7k1H6DI0wJPitBk713nKbECzxlJHG+w1oGdd7jXp5VgBKN722hcmEdwzQQP7sUWy+Sw6zwCOHkvuLtabh6tY7t5G0d7EFxyGGU9+/NRYwki5QYJmeqPbebljMgH4uWwz9JX5q5T2Z1JbyCiG19a2NyTS6GZJmyii5vw9naU6ndbaPWncWyBSCq2kpXCIYkPTRkl8NjNeobsTMzK2X/ftUyzsXiX+7vL+XFEAiyXPevFiumRhs8OlIF/BJ+RozsbnIK44ToqVQDCP58ji4qXCAUmtXBI3j5oLiRvn7x+5BsIawxAnjT+m7I6JBTJJfjgpMfl1sixgT8tmd5U0HgsX9AXlL3AypYtZolJj46xAjqbhwCQWVS6AxbgtbZAvM8OjxcrNOtBUkgwMsy4DpzqWxmyXaH0XJBZyruSlWoVFiolI/2CoFR8PEODep9ddvY2lCZEeWmIUQ4Yxprk8cM7ffI/KoGlS5jC4StSDccgIGzaFO3hYBkRxcOg5S0P8lh+VG1Krx++XMxcuVNzDVtlG7ONY1pR6tImINFKmMHeN973iKQCUmcBASSBGWAferzSN4ZdKWlfi5uxizwOOioczSV3PBn+nHE/FI5lm2asD73JfkU+VVlXT+e7DINiHf+fYHmt5jVVpqov6EwNy1gxYyp1xLulOjyI8tXzBRq4Od1cpH498RRmYIqkHOkK8EWX34hgWD2kK/1Z7t3GBrmmN/Wc7aPoUMH8C3XmR9ywP2MIi9jy98Hj88X2QOh7mio2qJTuRPr49SwtbmQ0XFYEtGpZjnGxLNkf4PauVr35GWsbFLFaN1XAA2PM4rYnonFQ7t0R0vjpEJ2pZxQXpkUnGkrPHQROy3jsbrDGKJyfTsx+I7/m+W9ii6Vybyd9PzpwjwCqCfQgQEeOIeOv93SpcOVpibYyXsoITLA26CJ9A6HRcCUqu6cudvx1QA33gOCUb1hVb3dcrKYqCx65TvttPrw8QjZRmzqM6CdlYmyPP3jbN1ijdY/rzHnFjPtYnfOu9baDfFDtvKMCsyuFGZPOXxfqkrcs32j2na8POFlV5VAULCVtNhfWqp5oCKO9OucJvJugnf5iMiRIhApS0teSeDG5cGRb8ThrSQKfLMjA/326EKXr6rHCDBPF+2sK5DJB63/u0xk/ndqczSmLl82xWm7V/y/dzAMVPz9YP5i88MY6zmDo0tLPKwmPlXG9/zQL+92NRwvKuCB7TE36LNKOz39VVKFQzSgzoiBHIcJ+lMwBxZpxGPP4xUA+phgpV6MBqxC58u99XITSDMgORkJli18H/OkhI7lHTG6bCMbNEKpN9Iln4SaN1TIxvB4jaIa8fFGypbNrDvIlnikDqr5FiNhZdBRX7mx8JTLxpHhyVA0gBDuO40aMrCb7Okz7nK1iLIHtSbQX0TM9ZsqWS/raxiqRFnEwlfy/GpHvWIyW/rAWjFs/DuSAuGXgfP7cYB3ctrhAUk977x4pBwfY3Oy0KPgWVIkS0XMPXb0WCD6y147YIX9WYkccjVNeQQ/80XXGkzgqCoJbWI6p/C0NKSVLwoAqBUuEHeRoIupZCcNv4RwXdgeTHcim38+yC/IQvE+OjfoU2XL6kFpJvGx76KYKH/PYeffjkB4w4E3qX1CFCPx6lShcmm7dqmixC+ZfgX1Umq6JAk4hd66k1pgohaJkb9muFj0iGBF6KDHb4FUBtp19azQHQ4p0e2ClOwauYlObsHdoe74pYmPJflYe/M0Jwl0QEMFrhqtP5XEkjyGrPI0MnTMZ1pgH3c9oQZKi373B2huNnft6eeWrWsY4urZ6huiVo33ER8CoOCVTs6wAOZuJKJxLwiGMMZqh5zPVOHdToi+aKUL0r813ix6q8hiteczr55I6xPK+YWAlyfJtsM2QI60Zu9s172XhlbWvPGqbUX2IiKsOnzMBIfE3RCc5qwxwZIZZAgR0UfPf1FcEZ13/zZ3LQ5Ravd93TPAP2HRLDZouyAdbFTjUjVzqVM9Ga0yD9yFuqcfp7+VpatNj1pXS/j7NzVTL8rVsUeEhQIodxwBASx0arbZisQDecNuUdg2s2aGsT2Vip2XlDZu+jwKM4vfIwAO3MK2tNEyanKPsfVbEyk1+344GyYDZ5i1ZqYFsv3RHB9cXZXEKSmBADAOBT3h2eN4OQV5ersjyX9OddtNbYvOWzm/vvnV3NOA0CxdILWD3WszDDS5tLam5Rtbi8JSbqxyikYu0e6MG9dih0bbxxYfpLOoDZD269fY9h0BVVJuI2lRNSJrQeZRPSF/141VEeLvKaqSKxqRsUsa3LhEM36lFxmFh4nm7qdZfdnG7EaNaxAQL/jw8+AgP8kHvrVpn/jUKqWH64qT/OvqvmRrmGaLBjmqTO02XjjHllUcgM9JpPR11cZi9uSnQwav+4Foi4+nU1rjn1fnN8RmEqhfj7ax4a0jUS4vYC7LPHTg/LVlfo7+/5UBi7ZuZJevu+YJksJv6Ums2CzrPe/CG2Na9srZQixdKNYlP4c80fo6rguj/0gIJqdM1ULRUHsoSaNV7tFlfZ/Ryi7Ww5jlfLgyW0aiJ4FOTD6GmVhytjFOrHX4kHZ6n3khm5HR5JNpv+JJrFM9/sddBJ9omALHuPk5Cv3/blaJa2MubfsCmnKy4OysjdFBtkzgvJ4ZJTZGOfpKFg34GTMfd1fSV7sR+ohil+8FUhE00KlkceQbKCd0brqFrRHl5LGTL/fvPWYXEgD/AFFvSmmWqEx4HTUxoMI+TU+sIQfwDSpACKVj/1q9RTkACFGL++flOMPpu/jDlaVJO9MqdE1EarK2a6HKE55QnsxWX55HZiqm87v2ljwbGLTIze6beGYf3sWwkB3rPJqPlO1fuFZoUzJRosQmKyHrRmrZSCx5p2kmUiEcfuNewU8quR6ElrOkHLyILOq8BFe5CbQlxSbRl1U5g2JMj1SvT2xlSAxgti03vt6uxDvKkOJ0PquQlQEl8pTocUfp0l3e27jZJjBXh7Hl4vjK3OGGNF48GjbWwmpr5cBGOnQOf1B4ULZLqUVoRO9NZcV1lpn7gby5ml+kyTSp1yr+WiOP/xTLwmnG1sA2orll2n7ypD/pIii/8S9OxcQnUyKL0qZmGW5+7mO1qVnG9f6J/g5EMBLyGPMANECIvlKdgXCwPkO42mYJueDP6aGd/PF1+lbyp9patnUWKCIJKT9X2CTuZ8/PSMF8u6r9GhVhrVi1T8Tg1gm7q0B19LM7xa4ROYhM7tAYfmFhA/6Ntjapy1ETyIAaTxZRB5vRtYnE1osCQP0/zVW/gHOa8JkPoA219WNOnAN9ept38rxGuGzkH8EcumabYN8ouuMPcWijJPQ9hQqMYx65Mpo69YDZy54qdfzOPrJjTFd4BOZWMrZy2ReSgOwPgLpov8HA3y4pAUMYqigEEEQh6Dlusvs4UQ10szoLqtXqZ3Fj3AezR54b7WLco7n3zguruvuj9bWfZj3W235Ur/MJjgr/niExRRlQpM8lTPgfTGsoD/+XZ5CVcBXl0kUmaZpVBs60bZBRYE/40CdiVW4tqQD7Hu9aHY0RNf1detQJBeGR4gvjyY6RZT61fDcM5UNXyJIw5jeBvKcIhy2k4LusmfO0hX+yOE8v3qxnVhq9htD8wcWb/UmLQfq9imlm+Mu8ASlG1qRNYLCBLDStgIdluZbQNIqBE1BZ5RFh00hJzYyn9fnw531b7/o7XvpQ97tPf4GwAcXFWuV3OPRQgmdU6IVYFrfxp3gWbOR8hHK7ul3rjMGMcXGxn6KyCM44wRkTvoEzJ7if1gXtQfN8JL33/ZqdfFIBveBU+uDymBepdye7l7c/jYVf5shlpDLC8PaHfKyTTGIJQeuR2Th2uWiBTYiNbAbDx2lCqnXvb70iSQ/4eSQWhNnZzV5/Mo4g+6b4vpXLdYEpyEPkyd6vBz3jDheKwOo5iocXR5t4AM8/vF
AHTBG4Q9U9zXoBAZHSdXfyDiRPWx0UX18wX6ObsYmYh8uK2UaC+XYlQBx0WsmWyaS0DMRBQUxShWp5srZwTAZ5E9GcHNEzmxojcsWaVeQL1sW2eIYqcM29xZiKtwlYGlUCmFaEi3HzfM5uAYFSCe3hlIUMTGlwB7bMxKKxh+AUEp1u+Q6QM2H/H6z0Z4/B2Hvcbw2HmZJrr+Mg17zxJ95MO8jorymB66/DwhqyIFpPIDiAKT4dXhsyxuc6QUbjeTsTZjGuZSZiKNFCGWpphW6nWwU/bAYbFlH09N/KiRWIxvpGz98F47CKsKexESYmr8FZ9aj2Qq5I+dGwYvxppM4xT36pE33VB4FwBumnQwtdcMCSCOCAsGsveIXoTGggwGvyJtYQS4S/lNLXp+8vk4OtMfmvAoauKejLx3YwBVqF3RWk0IlprwzJCR2WOfvQJsS+jhl/6M13Jf6y8fbORLkGwjEbSjMwOaFQCKfPD4ZM9+xl8APjdK/CXSAOwLi9PNq1qKpU3jUToh5gz0W9A1jmbJgYbE78qJN3FeZQZjmXTc+m4fugqnldnVxb4Vcmju9gNtimA86z0MxLfsMCbvowLsBbk80hnfmMbgbUu6Cjrb1frrM4eY1n/+wBoQbWeVGP5pKE3ermna6JAYkSdd1RVvqRZtg1/hHdzh1RcTT3hYcF+QjiQmeiSVW1I9ifOn4tyaIBkVCopk77oIliUaZ5+Sk/MlyMhz5/h1RVGp9gk40yEkr+qhYrBKvh7zkxRNi/z7E3XpOJSsRXjKlwRVQSNsmJxEG3N+Wzv8HrzMsQO86G7RF15gMx4oH/I/TRh0uDW2Zfa80DLkKeU6ArOvpvcCvxfnsnazyhOmtkrk7tmLD23aiuuTI2GFrehnih0cq5QtlzV78zNvF0s30z0h9vT2/SrzkG7AC7jc58XtffD2IydYjvrnEssMxggIyMwMgOvfs+X1vgV78+C/K09zZ/3be4kvivBFZrzgQ0hcZsJFZn/eoM05/dWph6bZD1AqSFR0AILHPds6yWvY3+h+1c6R3l+yYeGZc3I661MmHXvUwbqBRXfUfsz5AaMULUwGotPnUa0Vchgc3M4F3T33Ty3HaoQ1fdz65y/XLfoaY4JZCo5n8S1GTVAqCDdrV6UgeFfOm9Q81OCvQJd9gK+V0Xi5XAokKe/OdSSMoFrYminY68crE1jSu3IKRKHK/gC3MW2jg3g714mPuiQvIiGuiophV12x8lcKVC/z8qRHGl4Ugaq+550RqdxnUbl9GcdFmxiz6e1+JgsPoKzRuwvvmQ3xg8W36M3Nd18nNnMo3HThwheOJ4X1y1Zsq1JbwGPncoYMzGxNL7osG46ZpMiCQC2S6e0DA8zTeZo7Av2rGRzDCcYcbnIRh+AfruYd1/Zts7CfXJJREWYXo2tb1ypCsaN2qpTd2k38eV1che/Yo3wwJuStKjxjjnWjF2A1kD57c9oNagpnJxuT7aD7euRc2EB9l8JjEnPc4e2r/0KYguNQPy/ZQZsjRwDB8/jfivnnsNCU4i8ipTdzPideVfGotYEbe8+UqIOL6tMoDhyAuyQww2t6LIq63OtY6yaauvAjCmSGWKl2G2rLSWj4RhYWkntZC8rySwW8COoaDwZ3qRJlLrkX5Wz4GGYypOXlP27wcEhNIGaALphsS4ubuEz+K1Q7KHY52/aHQJV1CDe35m9bvj8c94W6FChj+OPmisX0cnimbXT8NayUelPf+JOBCb0CB7NoiffSOnHQIW0jzdNuTJFztK3AHO3ZiH40+quqUmMSxY7g3iewL9ZNdO/KQMaOBp1nJmFSxQaZltvE+gMIguaeTPGZ7SXF+MREDnQ7plC1qw+yWhtLVDFCCSRkmrt9tucQmkwULQ/IoZGOVIoE3SUJ56OprD2Tal9N4GEv1RWz4gLabN64IgYC9CiGjggUmpnImAlb3f66qxINoneOVzvsgMZQsFa4b3YxvnSC0gDZOPPNC8S88R45tkAS/ucX7vIVm3+yRyHRLTaJEox0i5nqj7IEkYjp2BrKbxOtafKCw88V9ZMrtGHy0Mzvnv32Xw26y6247yu19INfTwOpl48iOoBtsA0xDR9wgbZsxzKO3WpMITmsstjHRkh7JgCOIBBJQ+NEAhxHbK9/A6e2KWJz3AIvsTNPikr4AsKmFVOm6DgaVAtFc2dnvm6IopzL5Ah4K8p+WmsBnX/MCw0nIaaYWKA2xGQbYoZIp2vOpqc/03IiILVDT31dPbY4WOgI4/SPEai+lNQDpVO3J62mvgrIwZ7optR4b4FP1DlfiFbyU04k5xz3aI3W4VGoz7fO8guXLXk5YV2m+cNrzeSXQ2tuqkOlBBMAPbRFG3QxyCMOr14TP+iD/bIqnxwdxbmugqdhqzTU8fY1Tg1IKODPblVzlx8cF0sVVCWpl60p3XDI0PLjjXneb+8cb55itXP9wz2EK6wVfA2KU1ccUropTQGzkAaUzkAStFlRZq4AX/pMikLh8OsU6xiTNhGf7CjHKsvf8qQGTkGS9dwSpdCADqek0Z2pfV1bjEnhy87ah9gwLLnHCWX26HBj+IwcMsq+aUADKvFou6MF/bmCoxeRNleu9FPOrkcszn8RYIl4HUWWeFLl01KLvzpIvUsfVQlLOCTXLIUggxfajQ7IipupBCPaVsvLs0gq0/JEkemrDdKr/+9RuMdH2seR8xe0paCkkBraRUtfp1Oy7Ve+ueNCrsWHpcRDDU39mH4NNhG7zRg7fFvMpi6NixXWcfTg98KaRDD6rZw89XrRAcK6uAnCyT0xSlqOeorCfx0rh1xrkLAhukYrbfsKfW+cnwGqi4M0nVRz0Fjx0FKd55WQHkV+wFldPs+6SJIaVzMmFJSz8SNfVZz3RADHEggOI4FP9ofOZAvr5lgcY8X8YkCkEFgdjx1uceor9wPwVb3FYTYUJhb8MUyel8zCSOFWZKeBiLOnCoVAgLoRaGZZaDp/siR7FZ2bKqCRlk6rP/ru5iTKR7MLKaRrdLmeLrJsbbPsjbi4NBh5Js6ANapJ8dnol51XDZrKLic47IjK+cMEeDsBKIYuFQZY8C0ot+z1RXjMPkuLorPR35+aCB56NmyJl75EI+7IBitsQwqY9G+tQZla35O73fG/dyuBO8QdIUl7srTaMFZmeJO3nZJVeiRGX+JUm8X+DB6MftBw2nOLIHfH3HnmXtNrDqeT923UWQU8apBgTyfpwf3SRTHSJXyq/KypvpcrvTVF1OucOzJ+OKABdlM8yS0dPX3ILBkwZFEDa8Fc5VpIEYum9yM1joz1/5/FNXAtM9Iobx3HT1qUIEKylmr+xTUBRbwQzYPBKRb+eHH5G/kjhmq7VEOZQe4o3vLkt54/hzSSWOd7haRB6XVifXvEFalX+nTeG2yrZubxvgtatp3gd/ImQdpOaXgQBLjVbNH1TF6r4spg6d/t1feMAIbMdWSkHGLX5VkzCxw8JeOBW1Fz0CYTBfIj7Ihmig6yzip0qqY59i46x3oviY9TqvlblDyc7YqhblsjMvO01+hfiEOe2fZm3YWFriVSzvaQxZF7krsI9LQhuASrNUE7EFxXHaX9mD4D/XmYo83yNgYM+g+cOdWs8mZZ4YLVCXHZ8AyicT2/1I1qvCXZIUJDWkf3ESHQNxpUZlPFWR6AW9zcrtt05KUbHljrEHw0uX6PtEMhCP/zPJLDnU+1bKOwvdJL87kfKOED5HlvRXYZgbQtY+vifOyO0MPwdJ19+E+uRMyvMw8R5Yw5TYmuUitKFyVq1JDCmVcz3P9fSjcJNhYQnNZ+9uQzOfv0xC9FWg+VC3b0udg+zSN9pG9d0hh+VK3M47ZdXotBa3zR7cUk5Oe5DFj9DsG/9/36/G4HRE7uoQwFwAH4voXJYtCS2E5Tyeni6vijchUf2sZxFoZyRiFGslegRVas5dT25IGBe08QvZEMQRtKWVE6kXX9ktMbJgAX5zvFvOHu9aZ2YuO4dmGiETU0znJ+fh/QjRTLD4dbeUqmjn+m9GPv6nBS4Tai2Zek4MYQfrkSR4IdkvIycgrH5R/RKSdoe/3IznhV0mfNcf2JMjLMzfeAoS4dlL7F
QOyeE69UQssAWuidZeb3+pbW+DR7w+nmWI9GYZFs96nd2o78xsqLcibv0nngfZ8B7gklk7Ze6tSCWRIy1AZHA81WzJaexzePoCjIM5c3ZMmXG7Df1FVqz+b+E0ojl5Xp0EzCIvrrDC07FzofRVzHewPQzt9UGPUisX/vBsf6TMLPLkY7wv71dRAMJkz6G4dkjxJd1uvoK5XDCVnLezhQfwZkb1A80s0aCUh6Ty6AuvwpDFFerOyKeyIloP+h0Ag+h23qX0ogTvxZ//30UNSQSJs/Jtj665qVMFuSq9jmuH9QWrpUOe/1jPwTmSm9ES9w6nkmTr94tScqRksq4vBcS05TvWKMIylRvLgh2GexIl4otIzss5TRJPxuKCkhyeMQniwY+RGR/NUqJZooXiAw3f98JGsmkC3QBIsuQzLPnC4f+TXeY61eS9gd5UmMAfaD8GydJnZoBMg7QdDSFnmdaKyq1YLD1kAffGuK/VRN9Zf4kKbEoCPCjFGR2zpT7m3K9FHQxAb/Htr7yMfG1EeXbkCzQ7jNqplESDdxb3BfojlXuBr5FApJA/goTWtE7RlKvILmxC7SRJfU4ri4DRtSH9XG1vayoCbwDTpxuBm4ehBNjOPRRSKXqoFZ0PFU/T1UGSaCE8SA20H1n/PRBwghnKSpN0xC7uvdv644e012fIz0gi6DwC9hxBeccL7Bqu+WRsXxsnut2MAVmHdkKeVPDNn9xO0V78Y7cBji2c479647XQKPrWlBtyWd9AAYtAJA4BKqpksjnTPBib62i3WS7E4Pd4G/j43tKLSjEQJpR8oqw5r/6Y+pDYoNp/i03+XPXSgd+fKrjGYaVfmoZPFzdOBxyuLdugILVVy1hbuX3Hp6qP2TJkWScWhSzYrWYHbuAb0ahSHr+XKNnjzOxszdFbzBlo+vZwIad8R2Xu7uwdws37CNL0Q+Lhv+WDJWe01ZRCPrR/gZ4q7pGpfRfR5PKyY4xTEk8WD4XcQMqsyMEBNtrJrwcak9Awy8VC46Yf/pMnwLqSyG9dPkBOUlbWiGYpF0MnOkLZZeerypzR+Fm/VZ8SxoMK5ZeL5Av0MJ6ylrgo/jCLfOjY0c6atpTWsW/+8L67g8Ubb0rBMJdjRiqe4me/QpcqdJMFxEU0UUnw/sFe4Fon77b8LSKYEQMidB7hly3uhEEcLvbFOTxilBWaBT7KzCfskLmHxgEwCDwkUD5zuoLv1cw37x1p6kmmhVquEVbxFnqqPZTkqaCUYVHOpmuuy4TcMpQ9g2ZCAl+8Rg/iEOEB+7Q0S1v8TJiGxOsZc+rXlgYIdH454tgFIiUx+6SmaPiqfuAqn7nQVa4YU3vhSzAgwj+W8NdD3WdOB0EQr4IdvGAQQgTLMTHYu3sKGT+YH7NogFlCnCyzCVkV5/Y3PYn2UigEINw/Cob0oq9o4mbKzIdg0EWwDJo1wu5I8PSsQAopuOYAnxliePuYZyVgv2DqmYZCJfwPyaB1TUeb8oTRmeHMwiyt7Oos/dGXIDyyUcgCoVhe0xo+EyjOuglAED5enIVVNcZsmZQUytSO8r4WKpTQ1adHBZAoyvz6gnt0VK0Zwt+F2gXNRme6pNeO6B/Bp+8pnGndOW3Is9RfL2HFZvZjsaYbLY4yIRRV1ZxLbHXzI/DYrmN7hUwDyAWzOjoZEAtxB8cFZN7O5XWOBG0g0LWYuwNyh4ztiuO1n9jwyXtGUXcHmXJnLTdtCxeDrhMr7Qjgu0RXUBJZgEy6SIC1Z+399g7WdAu6DZ3nyBfp6+0y4Vmam1idUfNxXFxAPdgQ96FQjsVeI7FeZfyfLaVKiK6nzkuoCdQJCpmENfODoRZD8hM0kuMrIY/a1kZwevE6XTy0vCMMM4pCYHG8a5T9l2WKhTAC/143+TSp44J954tq0MrwskvNjCzE26ibnw8ev4wmxE0UfwOzvhYHR7/nBvImwc3CZ20RGvfH5n/FdrxA2nYqYn0hkajSNmNNX6ANQ5G941PmaOr/aK8gUac0q3kuhWEIw5izalEKjpNVwmc/mCknkMJhyzkmEfcpA5MrfThniBZ4l8e+cHdptV8HBg+ENahpmhKVB11eY5SslAT7DPJzGExaBh5jCNY8apGOC85nQYCPyYHd2TlBcgJSa66BfgAjWlFonKSblLMpwLXL7GrF+fYj3Eo74absH9E3HkVd7mjsnGXB99R/Rdq1oa/ngrljAMzcMjX+8sZM8LKpBIA1ClYJN5qOrw7JETy4Sdw2cCLwhUXsw4uW0Z401pPsvXGCKcAupQ2z5Hr7YOWi7rJm+OM+eyD7/lm2GLQk+fvb0PUd/sPiHa0F4+GQv1chFHmw3XkU6RldS+iuSJDdcVLFGbcmJIU+LhIdx2OPIF6hRlgLZl4I6+X6yro+N4n8DFPY6TT0jBOXa89EZcLYPVN1+pLv06Zhj1IL2mU4XyP2qi+mHpKhX2VnqQakSDkjukAidwUqnCy4tPWqUXKz/wtlvcMDcMTDixpq0LebdDclxcIXKpUtyKtNRvI2pVG6VyGSMCcgU2KwTn+/9XZQ3gXDo0co0iaD1Epl23M6gqF3wVPUvNJ36a6965ofHhn4DrwGv5ofW3N7uldNUJSs7V13Oiaqsrc4gGQRK+MMQRRbZll8gdvA8xQsm/W/boK8nqRC6w1IGWHTrUkZ5g9WtuGSK0wd6SjAEiarWe1zoIgqtCMXqPAA4stIHSJ1EzTJ0PQUhhWdK5eklF/CdR15eExztNOhFflKGF0eNKeQks4kX0/aGYaiTRasUTtCDXTQ3c64MKmgnma8DVQsPf2dI/0hmOgPaZZhOckdy12zBLUBzXaVxwlu2wunTLbsD+/da5W05E0gvH06WX+QBDlKOj1fm1b1AbyijLz2LZJuptLIVefZhnqKkj177kD32Ar+/Ezf/3JmJqyisAZqGg+I9Z0Qq8dihUtm3WHyX9+AG18VbPCjsecd81c9E6P7SWeX8WAgJGM2d5JDW36jgYPsk7T3Rjqu2AwTETDTTuGVVw842x1NMQy+ZzNRWBor9P+puoT9/n40wtugl5ruw0Wu7JUqkqE2HBNctMhvbxf8RADfKjmpFzKogdmfdGwC6ClvYOAbIl8syvYhoHK0eg7YTkyZC1cP4w4+8H/yPtVMKrk+mZbnFoyTx75iwCM+3GCNrdcdmkOKYapBcBpSlIwFS2SpKbioMbwHIJrLatu+c/0z3HEOqY3EWzc6ndU2HSJYIs6zuGCl0VkeEZ6cj0qL/TD2Myu2byHoJme2MZHJ2nNT39kLF4Z+qqZUcrrrkxl7Bwru1yNSWGfLJodzBzi0HbSASvuDkkQVXxjtbtCaOQva11kV+9V7PbRHCkM53YIKRns0FR1O87nhPWb2aNXGr3sR92+YWey7LPUWfPxlykYtWTxSDh/VGZF6XzLZ2Udu4my4NdVhxw3FD2CQTMJ+VHIhqp4WvL1Op9W0V9TcId3/FErxsMluePkpZg1oe7S+WjTJjbGYHUhrTFrPUa/FJmtjKlul1Q2YouW//owGtCiDiF0mEdQNsaNGuMah2uVB1f+BuJ553Y21oxH4CgfOK+jal8YPSQz7YXNSYmLtLfMkx3LThwdhkxV3zgREUKMJzUbvgGxSW1mg+lqdkslsax4OFtBGJj6KaHS6xN6iZihD7Hbqw1xQ8cufwjZGfdLsf6/E8vsjI75HiI/mijq+AkS0smdbSOQ5FDBZpeVnBkiKvNI/UDCLzJwBmFkYn0nb9A1ysj+xhGznmA6zrbzIlKVeUzRJsL9dzYHTmxspm2XRz7wYIwzKeABegL6NGqtkZKpjqNH0p/ioGA8WASjdaXVo7F1rHHce4kROEM/vPD38ncvVzwpJDqgDd9t223RwLA54MuAGOAT7oDubMHChBMgXnHVEUnT9wnaDP8sIrXLWzq75wwFkad3suddFmpY65qm87l1xun/LIB4YVw2tZ9DXh4LSJLFVOg1rxWDHp3muzRt2jLaWfbburjAVzj3y5c/u2O9x2Uks3oWHgPj+7kUvlKTIw7cYAs8naGVjNZj9koyADJv7b5fSLc/j2qqGrug2fwHkAh9tXM0ISX0bbKutZr5fU550aH
40rLnQkALZGLpYebOj6d4/OpwWRA1ICYmO4tr23KVoQUUxDjvAFzOMHjvRkVWta5oyvupyI1a/B4+kwRMV+0Q1fJMsMCv9CI73oYbL+QvBMnGqMzp/KxiH+2LOBaNAf4jwy82bAtLNYwY3wVrbb7ayFm9ulcHEUDX30vuHSKyhha+Sjid/QnC2uSckDpGb6pyFUJHP+fXDW3OX2CpTn2F5Mbn1ONUjo2YXokySsqecQO+L+bGtSVW/+UFCccFhEBsUKGFmZjhJepbalQX3H9YHbF31TYGODiwP/OIPAx9JyhqoPDTQlsdHl0j2YF8ktTm4Yav7iYdFf9W352sgHlrOxGoty4N0CU5r5gN77FOcZ2M4qLa+LH9zMFdv9DXdfkClK0C8fKdTuBAo65eRc4VxEbLB4MQhsDmv3TJMUs/Huwmooibq/IOruxDlP3F6TilaK14rrwHdg4mniDRiEIANOM2oQd77r+bFSQKbZjvftrOF0GFRUXjd14QQI1ZkQLT4nKaa9+8qbMroFpRyfSA6J2iQFV/wVgpgJ03rGD8pTgNHZi339KHIhzAI6KAAugOnoD3BfVF/6K4HuZXzhPUAEkVT1y720ze91C6+8RL1dU/fbkFnnIilOtHI91ppHBQqe/bBCBsC3FVRGf35jP8546JcoDUd9cd/PC/sZh/48m9rcUAYRG+GJ1BI1Ruoi8qXZ/fgWb1asMEmQrivs0akP6XhHDsTA09lO10ERVhraY4KBFGhGqtQFFQQUevL+Vt57LZsTbzp/awmQEt+6WJYkLMOKySnolzx6ETbBwqvluxlNQ2W3VRaYfZkZ3kP2ARUu8BoGi9UK/0laOzcwGNR/3YTAGt33guk5M9/IpP3cFnBgwcY7zcwuHf/JDrM6X4tzcMtmpWdgN1MmGecI3/5W/GT9d3WDLIieimZOlDEd9YAp8IIQPcgPhp6/CDydTv+FF5S6Il/BsoSbPi0pNNwJ0wLj87N+OLsN+jqb9Fdms6kCPQe4IE0GIChN9SHH44SfZ11KBXUfm2Nv4DkRfZKeLXNRwCyvMgQL/q4RXusi3GorxbQLT4CFrNoo0A9OL4ezwBjejLnXWble3DJ+E/zPUe1ron/FS9n7kf+Vjlyy+DmPG9eUwtMZ4WlYNHwr69u859hxwLW9RfeG8bLRUZnKYme7K2QK+jerpdqaN6hyeSsks1YTnW8/9JJnnJa5ZZ9uAxQLT6x1gF5CDIABgH6gOlisxUtg1WoLM8sZfBqNEI9p/AZSgHT6HgtZgo8i9cAXI/VtDpLyMvGduVFJVf+jpR6heTiOItU/fa3LkSxUEi23QouXkJBy7xvrmZj0lHSgAnTKuUhXMyBCLLWwnF1X8BPAxAyIzS8fh9HzVdlz583Imo+wnse1Z02KltUdeN+u4TPir0RtAW9K+s4BnJDRAxX9macmVRtGHwN40reLEx7+ZbhlVmxOnR2ZXZVuHmmP3Iir6U+o5v29DoKzWfgEZnBId59mkzsD2AsfvY+Aq8hHg3LJjCOCKvvNqj3evHL/tC0AZpGi1mhZ0cagkwK4QDTkkyQPuI57BXorXwTBOabwAUoe7E5S3PuxIJsUgFF6Y2nWDcy/liNcxLmIwp/WLfG0zRLT4H4P3nBB0Gx4hF8LRoQ6WrztktA45XHhXPBfrGDbgI8qge0ZJp5ZlYWghtKki2KabsVI4aIeToqvLLBAJN2EylCzEjZSFwyiN6/9oXznRdv7G1k9nsTf8XbrkdWBmBqvDFX1Aoc1zFYIddfBy1SUJkrsIoPsbCxOtEQQU4Vm7mKzZgfVUJczdnOkSWr/4G66LjR/gjjpsy49D7pRDbNuyYVyu3YWw52dcTyki+1LKdlIqtfGrQH9EseTXgSSRd40XJSSrm/fiT09iBk4nrgoIN+goMsDOfpifHaWTzevDUWqdExmSt5iWWyMSPcLnSKl58UFg5eb8nyAnMSVC35lCv2lToifjcoru9SGqZd67nZ2zGVFRttNNtSY6Dm/+ViDEOO3HknTbB9SICOUqwKtn6r1Je7ttuijDliAYYQaLgHvY6caUFEzdW2Sy+btV0BPtK7WlZ/qURXr5LC56vOIYnn7TLFnBxjH0O7xkV3+N3Z6WFwxJlWMgwAARNQuQsAIu9DKJBw8Kz4/n+Na5YP3phAQbBmKtNt5D8mT8+uDMIaHvRtVtyd+SUSH3NfjatxChHrgh0uE7/o9CxmaVRn2UY2212+edjbr4fQc4l8E4CTQesNk/xqxzuetd0rozpKHx/NzoJ6DTB4sJFWmxHEmcqUdInmIhdeq6ruswDv5GKEGLajiLAWS988ipQQi/bUWqgY496BN+wa9NL6TPGZKP6jB8YC1Kqv4a18DJkYWWwGBrGw/v/XlJZ/c3cdmroQ4AIhECWrHV9i2CPmd50f8YxBM9buELMDTlwcGHb/HasByhFpZOLOWguhJ86B4M6R00+dBWH3lh/wFcB7oBuanAzXMF8oV+tHtz70P7obbS+ksjToE3NJ4k/sm8A9YVx6Yc6G/jj1ZbzK0r741irp3s4s7KK4TdDBayEig5EAdpbIYZPcaNnQ1+n0RgH7qCq/k37U06qglj5uLxTNrGlMJ6wjANfAd8Dmf4GvEM1XTrbJq17RIc/wpp7jCVeZxNPROwgrG4h1EdjwjSpCne3N9OX/fj9k4bGPt88BJmbmOBrCp0bv/GeDU269Lffd/nr9e/PncJ9XZ5AzIbWwRlOn+axvXZ12p51ThZ08zeIvE7L3+oJ69OWufSatyHenHYR205dbh0+wNyuLJqP7uJA10BnOTDlMdlNomV8mtnSrWzUOXFsYnMY5TBR2wm527ldErQF3NCXvkyWRBVGh4yKBEVPO0ZwFL9mfHO9m2w7EcVmvNRQi1NLMANb9/wvYZn/aLnjYuYyIlxH1fw6elbmR1qvJZ4lw3kZTWnIEXxV12xD1Fi1/dgG73h2t+wtRakW82nE2siSFuxbW2U9+4DCuK5PGT3LO/ZlP7UHqF7p/P6SFYNox4xe1yB1AIKCsrbk4gUCX0iYbpWoetDnYmrObu61bM1zCzfD8E0SL2tfDAnJvlpguaPo6TlSR8JgU+HXVLgGIhp7hy7axChibaiViRaXk99afufLBPJYTdKidZpptlaHXdOweajqKwVMJMdRj7ybHhgnGqRJDGio1c6BHIs0DQTO9k1d8C8BMlF9BjKrFhDdUMLkdurXBwZPye9ZRkxIGIHtfJpCnMP3zeQk8KFWMS2W1aByZ43YNqyb44quqvljCpq0/Sj3CpYyGiqT/llVBMsEBe5LXtZ3wlRjSimMFj98qWoE0wZdDrT5w68+764k5Tu/JJPpfYnA0Nwbk8jJsnQdyTAZ+P49JthYBJxseF88B50vPqNA4qM4Z33PtRtg7msewy1LwQ0ZV9fmoA00PRSlEW9lfhQ8TN5qKlC8jGg0ONhfTRQeHSf77X+Hcb1XkcY8lytnUtiTZ5y/SUYHYLeadRdbmGMuv3g1tTVuEU25rHE4U5rd9a2g2djqBXgfHxJB7x3Kx1Ex7yrgdVoQ9n9v13fWb/9vRb8h+5uigmPLEK9XXrvox6aTuYQ1Ub/dmjC40ApgVCrHryNflS82fTYU1PHiIgUaqLVinBmbopzbp9FAa2lp7DhGDcSeGY/JxmdoecY8Y6pd/wcfjPmjSLRdxWzoQrbbUWtz8b5VbxC2Ahv6q3KPz1O4qfgDXKcqXzFpRXLUbgLcmJguL8YDK1JKW9v0OzEHYXCJXcgQLouM9UhRQiqO4IgjA1WuxehE8hqjSQHU27NkFte9TR91PO9KmjzPBJ4TEVycKBIU0FTbwKemRRVuQ1avMLjqdW899n0wkALA3wlcjvipp39vL3s/e2XDs+2j/7jAtD6qBlnx/9aW4zAribrFIMh/IgNI+doQy0uzJQXwLPGawHGA00l3xgvozcP3HIxfS/drwDyD3ADDml469Ae2GmHQ6/vEeJLAi05HLxgod6wQy3qL3/P5qya/RLb17f13sA8/xA5Z+3xsSaFBswJuXMXAKqxWmO0R8jDdMQeLjqBPITvVidOONpYDKE9sKm5s5N61ndai+O+x1zM
pPONsAHSE9R+xImRFsMvYHr34mhfTFK1yFZGwAoT3I59km89MTV9s9VMOrP9TnEo2AlqRASHH+EeibmcE0WyQFiVGgSyUAshxCssCvQS1P593K4oVEVByWPkzhCC+APZz7E8OOgDVM3B0LrcthlRSHZA8Ph3oU7AOyX3UwpD/9sEBdyekcltPBRbbNiujzRf0rpM1LlFsoAPdOJtOS/hM8ymtZes47B6SXP6AqFP+GoMjIF5AzXXhXp19EadJsx+kQYRt/GI2Crl2zjqODvjHiW85UQqrq742NZ18CSnJ28OjpI6axjHZfGNL11ar2Q0u+vEKF4v2BOuFv/4GWoRb+ynFkP5DI1vwC1GohqpieDEd7UVwAkedZtoOphXG7FmPSBhZ7NAGeG9qiWjG4JhVenaNcoSrFX5xW/NTcPn+rvBeevxKYPNrFAV9CckAv1Zmd5W/esGf2l/Lg3f58Uhi5vhrCtZ7S8KCzq6Ol3V6fx/qfCFKcThHHOZocrqRhPYFKMtdNl7Y+Tv7QdlM0rqTUVfZUUTPewej7p9nMy600tyr2fPbeEova09/Tt/iOnyZJwxIjs2yogTdp+QiXewq1bzEEwLNluQ6vxum2KQWdGMuTkCOspySVOQKgX4sT0iA4yY0gJJ/e9rv1PFsSa+3JWQsah2jejbOtwZ9va7XPUfMu5mHH3gOlZadCMxMzZcR47QhkBAgkEesupmaxNLJ9oyguSXOIrOp209h4rUNyqrWQ+oe5iI5pArRGmb/DpQyAYeyZcmQseKUEm3zZyihrrCYptVPaUiGSGn0Dgt7xJdfLYs68oRkKj9AmXhmiyM1dI6WDn82pdr6OFcEOtiUcT6gmFaDJNFveiFEyevgC+C84I3nST5xQW3N6s9EX/o7rv1ThEepHaa/qNbaz1diYMlHmRxi17ljlpjfxDKyfYkXmEgG9kASY4l7VRru+AfxTSv+LQ63pbB6c08Afs0ekGQZaSeyWNcMtY85AKu5ANHbb1k/a5ciLENq65f94HN3GzSHaYvwZIpEznmEeOezuR4Im5Je1IIGET6DLbBzCc8AVrNKgte3BVcOqQWJStvaM6K7EO7eBoFhIUIuNU2xlGgDUN5HZbRVjD77K+mApUvCvlyDK8hMqOsHNGVj085PY/jggNz25FwC277kMibN6ZyZLqgHZ+EfNxR2cA19x857bSTq8+d9JozSTzX7ST2P67Id/uljKynO6F06vFAoe3h6YWvep2Y0mAZWHuON+M5HIcibLzcawsA+CzU4B4hZF92Y7kwBCUsfK342pbuhCCVtnJPUXXXz0EepvkDdVvl8kVaE/bB9ivyxZCaJ7e6o9OAMoeLU+a78GhUf4+u1kBZ07jJGpALhTPH7xg1G1VWJSacTUqYnOOk2rkTiikFSS6bVMJ+bU1/z0ohPgI6DB2p4vLCfYspTYqto4s5qlmQkoN78QokA0Pee5Od/777UYxeQ93Wf0Qz0C5eMcCNUBYe+2qOHak4imZ2lrFHfDVwRfKqDTRO1Ggknu95iLgmEAL/dc5q99KOel5O+yC5h9aTCXGSUpJdTb8SRdSdynrvyBF++FOp2z7G6fVavPAcAt1U7Jb7lcUUPgZcUW0ayImvMENzg2BeZ5kDDI+2NJkL0Zmqz4mJJAKE+yo9MB0kKIeJ9JTNtaMeqBrc7e66SKqxjo9HMFshPvA7J04CklN1oSEQTIl5MROmPQuJmhbqUXZN6uAO8PY4YkdRthaW4j2s4IXz2G3iTY2jR3PeMOofvx6l2Q2IBKhOh0YYjm5hx+0twH1Jfyt9Jq4P0O8FoD6wLAKG9pyphEwy8rOf8Fzmwvmq60rVqWbUYVjvatKxVV3U6qnayjoT+V4wig9Kt96Kjx461+IGCBq7Bccc+cBVq/teZPHQfPNAT5tKKxeZe48fkfRhNQBWzklgRBiVju9sm7peAI/1HaHO/rC3UmgZ8fKIQKVTyJvJ8HCUFrXQXuP44e6aKfglrSn+0IBfoaPJoMZkQgoFc09WMUU7piPvy48A0DxhdPXoF073yqEVF0RLqaNKN+Q1lNP40yoIwXC69MVLp6zRbSZZuPZfDQ3UpFfZmQohF7DEAarKCpjArZNewXPndvOJD9gyu0aILjdsNpKgoNX4qLMD6jlIOccIiIW3kjssVbPhkyBqfurZhp8i2BlSheOXsxHdrgxqPmZcUuN8OGg9PjR6fLU9+KjXXiXCnQQ9lxYKuN/NmgDwMNEfRtV2kaxsU4jgMwYudqLPgGLbLmawbIhfXIYvgjANuE6ZOe586aMadNRugJzPbWXL4SiQ93sEpF6rxHQEXhnE05a3F6TZ1woucDzm8M/0wiPxB5xMGslXlP8DNDdPnNTX9lazgBJp23XQ1pXvK8yb/up4iArIEZ44iss0XzME3V7omRpcd9wKbsbKkU1VqbZJw3Dc6UlIsdwdCa5+eJXLbbEdJz59R3CvdBCkiXBH1tBKRzfvPJRFg84+lpAhawHdf6/NZc7ysW4PWgq3hCRWpAYhOqa2pf6ucyRVGQ/0wIWh5oKyapmfHZrfEz0rbEF/UpLKhCfMUvB64nz9lbOqpMwqpKmUyeYEGJLcuSpgvIhIurAmQ/RYkyzy529o4IAaEOjGAU4l0K+T4iy1/c3QUqKZEQiTFxWruKYBELLzNpu3U0u9EJo2jb1/l2VXUG/Q4muNA+bg5neYdCHcN5DDFUJWH6oxDp6VZ6WN0tSyg2FrBpwLHkvDjWGjfJPxXoyT+KsVhWVfTTY0gbRZ21rRthgU2f82XQipxKO/L5kmpjXPbo5GhDRRDQYu01Wr+/faGTz3cgSEBWaw8jaXtnkzWYC9pcmzyzKbk0DeycSC68SKv7N2yzRX0+1dE04iBWhGnIbDD5hASiiN6eB75z616sNFgve+eKuLdQruPNov879TIUmN9PrxiAVU6kHMJnrmtI6u+vfjhbI7s33thYUwtc/6LX84KzfKFg+PnkLpcLYovY/ydglB4lO2VvIIlX+hMYVPcbcoJNMJNGxpW4gL5FafgeCVk0cKEXtYIMxOGo9OxSpCp2/T+wCPpPkwARFlnJe3R/UQNJCn5j9byhE0vwJ/wITgWi4+fNwa8qtk9QuAyybHsd89Hp6LMfIQkRt0Nm15b5qBf6fiMcVTJUUtxuJlz953u0VG480s663Gh2hTR4o66P9LwpZ19eIYXHj7JFG2cl5DH3xFxsjKDDoPk+3R7CnXn0I1xcJGQfBxbvTsH+phHhO4oyJEoZsqPeVQIljrtoRVmDDDAnbfFe6VcvdJZhucIMk8X2b64zV88aPdg/ciMpafiD9Jw964x79a9YW2Il9G7zfolCLHyuw+zFHIRYTShPUYiBZJKT3KKPTYc3XteeAbLT/IHrlY4HkjWYSxZsrYfas654KmGN3fTeSFa9hz+W0vY83dPFG5rUrwqKm7ThiMduewdTEfiE2W+pzhbPUL4LP1pZMyPdUTbLLSej5Pc0wX4/4T7TU46RqetaHrfixFrBsp3EuI/dsdS8tlg9EsfQyu/9ANGsY9sEJW/JIxtYiMV82dcJKD3bjp/gLzyZwBmBIkVcQRK3NxQsWdt0lETtLcU13hz1ghq2YV5lbHOX5DQdpgjXWS+rSGrcD571f4IqxFHBlclG0rj88oe+rx893claIJclQigp5iya+vIdwIQ38ZbJDs/v2dW1C/eFruNfcY+QWO9KJsamHY5gF26h3jslyLrXr84FAuHZ6iKxvu1yCsie5DfHEZ0kA7mO6loIPGvJJ32ecP4TDhjhTbKErDFBMXh1ZxBLtBswhbyt587EsYXoVDwMdyerR8P282Ihn/ouptX2UVy9OwQ9nZH1PXaxANjWVzYCycW/BS3vtx3K1FVPcVRuSB1n9Ustj+AMlyWO7BbtPHFQ37xaJ82+oYjfq8hHdpXIWvJXC5GujwkY+pBJrAvdPN5muUIYSZYBF5HKMOmuItuysb6KAVGiwVXI8fuZalnFjIMsUq+utChhzH3jEkWtFNGwI016KNQeDkyXQh2dBRini+zz3lY6L1wyKgy/73HcNXB1JD3z737tLVGId1XTinZloouTcZ2ym+9F7C
nvmPRnJMSkyfT/rfJxO7mrupMuB9MfmiSToRrx07N+ewulZIi+pcDbssm8VPsa7/b7ZWDwlPOahuCRjw0pBeps6slBnOxrz+TRLapRIJOgOv/60d2vqTDdUejaUaB77BQG4glMvVFOoDiKwC13Xg56LQnBkqx7ZHXFNGFbvInLzA+HOSKLXIkpi1doHyUKEjS5RouNONQuj083l2G1CF0TeML3F7fl0Q516YDzBgGSA1v/p2FTugq2T4Nbp2zdYjS1XusSI5Cpt0t0hYWlz79RCopVnGomq1cWTzE7AWAFRhF7PFtpronfJpFGBsYNhFVnPNwj0fcdOYB/0dPxr6CyZrm7ia3Uv7bpKg083BXiWz71U6FFTFbq+Ezspp6XokXuY7XP8DRVbUaaBNv1P37J0m1lYzdNw/Zs6PIaAwF6GWheIN7kUrtgrJtrhuY51xQOJRBQ24w9LEk01zqoSzeD97ASHY8xSgZkgo+3nD1cG/yitGl8JSBjJ1VGKGI+kkK8/eDxU3mx3nhKHZJWlSfMeAh7Fz4qqGhw1OvsByM/9k1vuyYtfBLWnmhQOnxgb894zh62gQOR2ZOusJsYjpBaJWxUDKZUaXI0eHpHrhR9tVfr+WA+3b8FJBndyuCNceO77iUHOW5vDjDziXwUUBc5D9EFtplhlsX8HBHywwyOsYDARvOkhawiGxJfNt9MKs4y3M75D25j6kDwYGdXtOJNNCOm2/wmXiUjzn6lrYh+cf+XKpxTzmaDwURDaNO/L0jrpmuidkGYyLpEhYHdXHFBYuzMrDKhlfIFCwudsEu2uGJcKDkKxH6E/W8iOWdpPngOgT7Vq1RiyHnDbez9TU5/MxYOAVSaGwsXlfW0D6ByP1Z45bGP33iyobWVCnYTyIq2nEvCFNIg3uhEwk0W2vwpTV5vBqtaIgrDWInmukGN7Of3E1t+Ws9SIFhotHE+vVW+trO5OQ5eX8MHr4YLlFpbhUStTQ4zJFgxyN2uM0GSzx7bmYCMTjLdd2CXCEFAhEf9SKlucpAWtNi0iB50fpvPb224LT+5OHGV6fGtCMQfAKQydQ9jRWuPq3wmKEXBS8gQPbZSwpjvvdiyVT3cUJfnvLlOTfiAhR2y3xvwTL3qqGjLnUwlBqsPFLDIeLoPKfoaAv0dxL4U99Fb8ZkVa//fa7PDITlXkd+TtVQ9k/9ywSQlk3mPwLZ8Y4+Jr5T9MOxCmB+yIX4CQswy/OW3BRIrMXpofA6zdtAZvr90E5QKHIk9zxocuzHovU0slVPrKix4QxBCynBxLZpIS7EYn0S1iS+6Lhi9NHDZNTLmjDUgKncJ+wqTEreKraSSFqWR+mraa+2tsEkfYSXMoHoSfwsyltWqhA4QqwFd694wiAfr14TyFxrFkSr3qbbzUoqNp26Y7yKo7pmg2DZ++bQw32siWOHxGvq6B4tavSlMw+Cb+Coq0s7wCI1TeQXFF39AcWpKPTSIu8Yh+ojMbYrsqSH6bd7XkWrRXiwLzgl4pd4qsjchOFIqSFydXw9NzwoYLgk+xKvh/rzS0J3QyGbL3IvI5wWdgl3MjtcrHBVQBDYztn6JvLribEdWtErUUfHRAdc7eVcxnEhigoaWrKvCTIFIY3are/HjugxmAAHFGZqPdIpnBJUeU8QyP+H/dr/yx+LXoT9lAuUre2Y5i+80X4sbMKcpu8SepeGqvbzC5+h2jJT9PG5qFB67xDy+5u9I5FuQ5rDVz6MPSAV+8Q8hUcnH1J51EYW9OStwn6KFlrA0v36zhWQ3rR1Giz6OBS7qSP317FbknQ1OEc6akJcUvFuYueQK1wMvGeOI0AjJc0aLShL0qhFzmDTK9ru30gy8rBfL4yEHpLa+qo3G8k37aFaVwq38zZVqImP/B+0K/NWBvIjDbeuEpEH2ETE1TF6wv8HLI0D0Cgu1PygK4W8hHTuhBn01sHv/1g1y3DxULYR8mfFkx40GIz/SweAewa6anfaSkKYi7KhTgp0YiHA3/mPX2Qt+dzMkQcbWLfVCf3JQMu3m7c2yK4pGJxb+ZjbudxNlAd5Qu+QBzVmy4S79+4U2MBYUZ95G/1lKamTKkbjPLIyTktYqW1TAeO2BoVojAweFzP2kGqpxaCcvXO4gylrqpg/Xn9AVgbBIgdCRU3DLRwO/pQUrgEA+lw1rfbXTCbJ5qGm7W9KV1XLqVT4hdJbZS0TDmrJBOwKaEximchHz7Vk7hgLMQUD4SKE0aAbfO2RX0pwYUG3IoMK8DCT3ASRVqw9kBUwl8dtRnN2VtS6nKCz1qisj6THx5rW2mG7h7zmZir2LhVzLC2YDipoXIkX4w94h7TyrMivb66CyU45kavcls2KZ/SSQwi7XETWoaFXm5Y8KkNMnoUsmBMhEUse6FsIh0catkdEw/fo8PnYmAIl+WOU5XG0TAFrnznIx49gyW/Lr67rv3OuxxttRcOlWuZIQaHS0kTpSisay7KLWPNm/JUtg67d5Y5Y5J7SuTgWumdyUy5vcJgCSosnqTBQSRlhryK4J8C43PR98I9uUo1cvgqHmGel5eIEA5CMSCzClas8duMcRWsfwyaa0MJvbIOl6Hz0ZkPcQCkwm9wkELucPdXTCZhh5h/iglSIyBh/FixLYdjtnQigVQ1gPR3ECk6KOODd88sQE57UL1Bnke0uCBuKPFjE77YTRx8/LghItAyyRqfkHucDp+fFUGBpeRT/an+CMM3fweX/rb2L3bdd1ahq3N7VD8RNJQKsaqog8rDPo3q/MnSNyetG3X2shdWbEdcUjIU4PpelUHAtsj/foEBWEXYBNG8lKgxlKZ30mMu+4/Y1GdpN1cPwtn3buhQahJ/Eq9TURoBDYy0XrEwLdzJv1gKl7jtzfeqN1IlAtwuk2LUCpsX1zQ5r1u6utkq+pahgbsHrCHC6cf+YcaOPGmLFBRuZ8aF2fgTtKmsfDdg1M4puC2M6dq2ap7WvKz+7tFK3OU4v2/PMprjT/QCwf92GFyHp9PdDApT9SI3I4hiViFNhiUWVKCChcXsVwr7byHmHNDhiC98CtfiDc9YrOmmoBPY4aNijpb7hT1iyZu6r0LM32LNJGN58Hwj6qvazhBsbkCZQjx1wVNqhfmdkAuzMZDqPek4yGKtqdRfb7MTO9iPSwbiN+JFVhJNbyaikUDiVCKbZ+a8iJmIo0znA0ST/xpli0HGzX347lJ3hFfTdTf5KVyNBjaWUn0VK9RG+jXhHjzOZofDFrNWmEOlvyGB46AfYB2cR1g3usBZ6vqCYDY50FIuxdPaKclGwToSO9tRJHX6F8ZmW/chq14XxTU5Fm1HXb/IWgm2IsWpsCCATNd78n6TE80XIc+LoYKOM+L5VXUiO4TihTHEfNp2YqcomBQleQpNKsLVGEZq2e43XV2WLXyMZ6QcYHzuzxh5OM4RI/BU2IAyaOxdynGCbIdTzOsy6TMtjSTj7+tWiPm8ZqBGDDTLwM46P4hqJfBI+z4vYpu6wZ1/A5wn20BJLbYTemsKdn0yrOhKsgVas7u4ksyzerj0L5oYmxV6HPgMTSAh2PwzxtXIotg5rTxoJ9zQA2Zofo/pXroECjl9jsTHzZsZh9KmQENREnrpmM5jjWK+1vsVKgqf5kfL0/lSZz3gwyTellp8stnZ56p1e2Z+R28Q4yy39Eko/TM/nHWWONU7t1C+iDUQouRKC4i4rxAh+sE59HAXkUikUpxxFRhSni11A6VLZ02nIJoVvdYG6PflQ7yyZIRpqe7ELME8PB6U2f9dBwdBffxwuxdv1/yB1xmw+jhgVKl4qmkriTtDunscij4/csFdLeaO+O8zTgi/eVWobASRyeAar8fcnMD1a0QmE4HYsrA/FbRnr8dd4NbpfB4hI7Vr4GgZSQ1/orft3iuifn9g0Il7MAlkOHkFHiEt/pbm/Rgi7f0w2VqIK1mN08E0cetCemMkvDyF2ZOp8KcEpI5JlsRjyTA6gHpswYF9D8s9pCW+yyJnsWk1f2QcgFLNPCKltuf38sE9k5DDRvp2YA/zuN01KHtQ3bFoHoJZT3wD+W5Dajb+voVFLL6mJ+ET8qkIUlfwTgsD8uHQCpLDyhFxFLy8FLDO
5oqseQH/cLN783raggl87m+Wl2S8sflUBkrFMhEwDU23SaBamB6Bdo1Q2JpVvynmLcDp26joHlXfpfY69K1ljuFIE9edEPUWZZ5rtpZKnkERRyWYKG8qGhP5JWq4ahcT7AvmMRvoVcPKUchjR86ACQ138W6P8PnfeYjI66MZGHfmTnbzi+ZnMXHE/1C/jHJ5YjyheEiO8bXNZqmTmNkxuwQCfKmx+Hxg34oG7pm0fcdqplVbJYDkU+3W4AhsFPCVEsvp67Cp4zYaQ1DcLICWkPIRO8lQmunrjhW+qbm+lbbmE0Jm8xy3DjDAOJh8XbCza7gIhzdx4KA5gejEE9x50JTkmk4q8PFGzL+ihL3wBQegrhUY1PfzrL0vF73e7yML4TC7CYnBm2Dp34oSLfxF4DeXKUxqJvxjPN0ba0CLMzNLSlj4EQvzQmhUCmuFQ80r7oFUJQp/vbT6+FQt3KcPyZYQp5XuzZDk6mMIh69ehmEBOyo7cUDjazPEZfcDtCDgOPg0b+aqvELG7nS994XOC+lDfOa3u8aRwg0zynU/FeHonrWrsfXnGfHEZOwz+RMaQYk5nwWNYo4W/qY+RJZULGLZ7eda45VB6vs1enlkHu4fQlg8qskihtBCWdcxHgOcUjNvt3alKwmGQhkvGVGgDhJSOl0hl/Z7Ud4EeDCje8WetLMho/2Otfxv86s9Y72HYfy5TZDpfEsnIbMK+0zzBAOTtkb+gWx7FKiaEy8ZAeogjrgl5x+EvvbtQy2FiMCZxtgerUbPcrh//yN3CUYKeQLuaGWoCGxQ3ntlA25dHwDs1C2KJTPvmQb/cJHavzU0ASHan14dV8Ni7Safvv0m6IAjAWzGCL8C0lxxnNRyjM8Ddq63QuYsVO8sPGu0iSz3+AFvDJQdJn33eoLAsrCr9j+a37aISFMFJ8ZPFYUYPvBmiWeNw1Et1pj53e09NeAfZf8qUAfDB0OFjYQEzBoyyBryo151YTStMlDcANFO/a0YhsndEZDYBAtmV5/TX/o3A+3KALmfuaQXAyhHsiVzRXzo/XKseNcsR8zfLC1Jvk0d8zh6mHTDKjdLIUAldM4RW+KM84DDeHAJeTLeXgEqD8cmfLq1q04IqzSNo4bYywqDzvXI+85wRPkBbQt/MLojXN1qY+ht8Ud8zf8+J6DaMasC4VGd4BLzjo5IKK0YxhTKkMm+yZM8VocoZaWq5rvgdRpmBHJjBpF6HXtKNaLBFrZ6n+A1lNS7OkqUmWaOPoO+VRc+pkI1PKcxxLGydRWT5ROdTDGncL2ZWfMOb5LjQMg8ur5o2taOA2lyRBmYM5hKCbgC1s9CV1eLdva28fjhvKRQDi3qLeQRecvHwxJc4dHRhkdQMRmJ6kjM2CCFUtgyYh1PQu9TWcMaEtWbKzRaPWXbW0tpTCZYY3diVAIZXhx9L7zuTnUEE4p/kBoajMpVUPoE5idrq/mIU4tec9hw3orB3gG+bKSP1lYlTE/hurqwlejHKpwMj+suG6/h+409WVHBmwj/L8Bt3Sv+6/USALjcoi5hkhcn5/AiXDvl29vBhA06/yvpl7yP+yasE7Tkus8LOTTpGH4GRTV3MC1Scbuv4s/X18LGxEZfYL4T0M4jcADPtA0VE970Uel7g2bRU4LvoKUEnLckZLLsV6dmku8XHJu1uPyRAqKyeC8aNA1J0Og4U8GurPmkEqE03ZCKGtpvKniZ7cwzHmuegvatTg5F5GvsAolrO6JlOFbhvPDNHsl+A+202SLzWLsQ7IVWUsHHmzKDslla2lxXaAkSS9JfwzIVgKENqBSH8xNrpd0/w4WWZo4iAOq0uRh76mnZEjdVFXn+06bNvm8HyQROL67u/lGtdvNSHWRVUboqOmv6juVpnuSFig5HTSD7/4riwYO6Y3474/pTCtlBmwvMoVADPBE3YgrOzMyMS317GNjl49z4sxSt8+Xvmw16WPyPcrrXMWr4DZTbTEKtn/daZw1Qy+CIzmWtVt0FDhaORrWgHmFhUCg0/gBLkxj/ncc0jNjgEvddSy/k+ZGfpg+NXubp3TtrDtyiVbg9ekRv3grgiHII0+HgenbDBHDyGXwK/HYWVZjB2w/NdYUvmdok8WMdJjps0J0w57Vel0uQSaWGx9wKGejD9KTxt2zocKJBRoqs1aX/L33xTXyNJ8aN0a+IOJ6X/S3aAfpXflS99a2MAdvKFQalip7pEOK0ee0ZK5DjSdT4s7RoW+drpZxsD+4mdP1w/FTaC35fcj4xRLI4pZc/upNZCBUSjn3/2Cn6itmUBJIeQZPjbuc8+ilxhpZghU93epT92Q8XhcqnetD95Nal/yYWPnW8zhk6RlP5EFuxBqnl6rEnedGHe2eXuczWVHQP4DhpP3FQpEDAA5Bi4aqdXFmCcwD1ZizdOStqD/eequ/nk69JP6jMWdZYLULsbCvrrXYUY6ud6j/Dk5MmZ1G7B+WpJA53z+xpq3M/51h1m1d/rsalkr9HEV3Hx7g8oxyh1yiy8s07ZBo+sGttv7tlBfgilV3Vri3VNfKRIJqEOuuTKLDgEu+rNGK8DWYGfdNNIy3kWDr3wOL0AmYcu9V/aZjCM/DUmslOnMZ0eGLIXto9WYlttoo4UdeFzV4XLixGhP6R7papLLuX/o7LN+N1JGwZsmJpe16okLSBhJ7DqF3PBFbNtwZ84cyPYTYpCj799YGsTEwLHnIL5/sREilKZQ0xdeVXu73/2tLNcYVP9X+WfvXO4ymyNFmNNbQef/NvdEZh+mIMuTVDVmwgiEUVvCX9o7YVn2OT0nGwFgDyuilvdQSqyDiVanAmBf06WSO83uNPPtp2p6L6SBTxoSgfR+BHEE3w7fAoXkW8gEiC3fBpl9TjwlHKvCVp9L6yJqcTPOm6QMHMl227FM2GYkOMuMBtKhccfRxr/4+9/0bMIuSx0brHGJJcVYHCEZyG86I1DuEv6yL4rmGmf1m+hT8v9Z4Y7q3RVsiL6lszTW7IKkqiFY65X0LkZ6mRkSwG5X2BylpJI4VPOknHrJ/Vtl848H+qb81yVWCPdBPIBwtc4DYzJAJfTQMioeYFuGoypg0OupfGqdnqBVNtVzS36H2D7H/9h1AZJsYfP2wovZhBB9iHPqqQxYZf9ndn0NLpV0WubAHPl2OP61kJs5GfZPI472TylR7EC9QZHKV5KfPupgyozBOvykXoTbQyAp4HeDTn+JlGVIVRsRCMJQ129lLkjCLQy9ANdWEH9LPnqgQwuD+ObXGNqOa0zuMNzOEA2q8L63VrAw70ZDbLkzLlThFrIGVRhaD+ms8/+LM36KLYSvI1xsbRYBlHrQgogljIWFEx7F4JqrH6FzXIOMm2ItSHSVQo1/dzeSOjaz1O4rBMFCuigoomfmYGq/O+lMXVYJ8Uol3i7tdsUJJpeOMNiyYU1SuqCPjrAOCaX7zyW0a3orN/yUkDTzBMONCbxOuS1Nih/tQ6UXMvvzPee8Nfa1V82tATSEyBRU0xrnTfOU8vfpMizBqKxW+qwyDOqhfbbrp4ejWwf1bt28IcfO5h+8UIDau862pzO3cQzdGGupzHOvi8TXOSfQlFLp449JTS5VxgBrwhYm/k/89XK9bDE6dwSyNQuo2yHUb47ESONduays1JyR0PJNvqRzNiB1Ygadjwyq53frucsuFazf+tYBbGxsEWVYm0VEOV8MeYLcpWgeY1GcG6Of33P7MNVdyD4OeW1UtmrU9bHb0ubLZwzDFyzD54iHaAuOEvxFBAScxlfTNKVdAKTyLzDGaXqLKvGR4UwdOWnCx3o5ME28xyS0aeuMn15SK5v3rXCvuKuLsG+f57us45c8ZAoB2A6JB8v+trMKV2ecEciG77GgQeFfuG5WG8+zuzFugy5ZO1VfrUTA7t2SJWRHE3rD2iXNt7nyE3/4a4DmViiVv461OOOP7o0DcMzYMoomPLHCtMRiD+K+lcMGCv+tGRsMBa9eqKJT2Hr59nyNPPMbj5m7o3Of5cYr9LbufrZPLqb9CX+kfRJV2suOqpw+x0rxYRCPX1AXcB97xsxmaHm1uX5IYF0fnOz1gAWk+Sms/f2LagBT1wjd3OZNK8cIJN/TIc
6Im1U7Uxx8kL4S6vaF/y2bfrkDmGeC2HVwh46eQtkgY4t7asVr+8caQXt9e4lkq8FNzWIFUGzbCKi6YUme/gPTHvnjyxktXpBt4R14Pcius4mFqnPCyU3qXSoVp58c/QNW5BiuAqo4FUjntP+KSw/LEU6JQj7iEZ7mYAbXaGys5UtH7zREsHjRP3QGo6jYhOyDf9w1sunpL5jDzciDkd8Ahf7ZjYB7rEngaojTxo929htOYBcXFv7PlsRDSXltC9AB1qhTBzKhmk5+tjMEBWsgnCi/hl6roIaVbJBdazjS+hQmyYtxaDLSqyXkteD4u4xBegxFcsXRnHCzwE99Rmj9i3rOUUg8WbgXY6rS3+vOMe0zwfakcIPBte8avq07IB7FmVb3+d+6dSiKG8BkNH5IrpnhLGZY881HIvgNUBAAaBY2uSlDdsx5nUZyMkTPdWfzi4A2RZ17/X9fOhkyKtXoQD6o3jdkYtVGWgex2lco0prnB8cpTHUYaB9Gf3WPPOF/yZC0RKRImC+DjuzNllUmwAibUIaTUWVGqlKVlRz72JLrs5Iio9oD2fvXfaxwRunB6u7EnaR/WuFQJt69wizARfO3fk/YByWok12FkerCpwY5xFnUddo1QZHUEkkvFfonkexj9eiemfiLEytw5uwfxkuBFlx36CAYeZorKIfMa3pABQ+ALd2jg5AomDu/g5XooWsmGbGN9Y/h2fgSE8bTqtYVsvNZw0Ha9agJ90i7jV9LUN3yREGFhJShL6Ap8OYSSXt6hkS6zkqYNSddpJOvufp3zpmHZHcGkE5mrl6RZyynoyu3HlJfOAaNwOrn4G6BWHaD1dHXtQjAOEG4jyGrni7JIgulltkdZZXf2kWGWY1W9eZ6eGYxLPXb10F12Jhni6hOgum77rjiaL7s7cbtT3547vYAkU9vJnjFKBR6Iu7seVzvco4QJVhEzUKQqZmXx29NEfBNwutnz7fd0hq62hICBVh9MvqaCc9c18e3BfhOkOlUYQxI80cXjJWaABWst/xBZssZAWk/pI8w2pS10tKh7U+V4qD49K+p0yXyeUgk99WDse/HfREWJsrYFzYc59GxC97r+ZwV/j46KBoJ5ROSY4q2o22qSILEqamLq42/wi7ihGH/udKo/2skewAQb7O2OMRPAQ4WIn6zgNlyoM+RUPbmQbz9hnGF3M4tmLYBZJEVdPq0MgkwyfenhILpverdIHKFu5m1dZbqRBBJ3x5HusYWakcplu7+4XcIzxKzAObfp3pOqaZ+cs+aK8VbuDv+JFEGYKSnI0ZIa6YdFKdv055baVv0cAQFAgxHiX9eRN1b66x51YGFNLeLSC0NDDioU9pkmCjAxddiY5RJLPEY0XWjNnzKvifUhqNIqf2IC9CFX9V6ez8pNEEk1M1pUbRUO18T73U8nm1I3fk6JtT0X1kAKssZ2FV8NyUavmxEQsqS4zGlkQVh8n3Y06FHpX8aP49itxddxjZGiXKaari4Bzsns/01a+BNBgXBwM8F+QrE66V/EueOlmtWUI8X7c9KAgH9DLNIKKXspwzeXnOZjuub6kzsoMEjPTXsZ7ntmpS+UOeVPhC0nEgQGf4DT9Ooy+NSTEabdbxdj5ePjwBSi6wi+Qou2TT3hfx1lEaIohMm0yRYFsZ04tW3uy2UdblBqxI9sdBPSE07E3USREnb5XnAtXpUzIHMo0QkdlJw0YneluzPVv99IcU/hKPDvXBGUyO5S8OJubC5QfQJp2ZE7t9anbhhdTsHSTr+euZSzIg8dV9Vt2iadhS0ZrnKszrQWAM0VZuQiNwMkb0ONPI+mcwD0CI9+tdNe56jXIEmsnmQmTw4H5ENdWaXU0InPlfwVBoabT6O9+/C5BQISb8IxjFNrkhCRjxmrN2tD5ncRpGkrgF6qCtK63elW/eO8JbJy8AcZYnhWVIQCPQXm+ejg4t31ImaY0ELE+7kwpQahhLMv6TeRjF/MA6zvlwbyXtFcxA6p6ls+BNm40e1BBTkq9uM+LMXuqX292eRBEn+49dBB9RtAKlAKlxW2Rb6T9Hw7bOo6Asqn5Yvfcr080QLGUgFp0d8kFptuS2rCl/50M69uYwUi214Di417DoT7LfQzmbML+Ndk0G0BnNc8y6ImBFJJFe9jIga8sAwaT2G+87IDC7CdnPs6SWyeAWol4cRJ47wA/PYR8XLps02RhpoNn/rxO5IERoccjO+PgqKAa3+JRGNbu7UwJNcgtCMqZFi2Bvmr0TxQ2KbiB98m29QO1LLeaYh2y3iD2TostjfYrWZkaCmDKXiOW3WEwaJazpb8TaxFOFoZMEr4k/Z/4bIz2NQnrVipT1we3exYNBe7Jvo1RXeo4gXe/v2y/+ezArxrw7SXAhDlkccI6Kd2bPAh8yHVK0gFnS5c/X57rmUBwZUCrNDfDnNwFqCBbOPhiT2jCWwRX06GcCdzIBZj7tIeA1eSgZ4UShr5R77DvMMFJQFhEt4vlQsZFAp03hvxjwdyx5w5AN+fO+Ek3GB3KJjeIS0ICo+n7fS6t7kVUSWkgZJht5txmXIF0tu5E1pGdjStPv9/JuX79aN3MkplsJMZCkTJXKc3/wnE+hmumEmQDDBdLsW3hG+0sP0TxBRHbP+r9HDmjmVi6wMHLSySCpTTELK+yzY1rCfzknZ6yXwl+zKW0upH7r/fdryRqcaI34yC4O3d5oaUxEzjEoMslfb/6WDD58Iq1BdZIn0MzitmwM4e7G7+ircpQsJQAdZfMOgcGcgJwvZE7gh2ohJqoRovvm9p1UAvSRBRfyErnTokLgTYsCNWKu9Y692WHawhTcDIv3E1ZyXGAqviEKVYs1QdMfEDOGquUS+XbriygkI4NXwuHvASt8bG4QD/goz1a49+pGoFMCNGXzwOFA/yq5HekGptXs/cMqGnYxca92vF3Rv571F08PWztlIjy5aDym2k9Hd3/ZvVL43/Mp0w0ZxprFDQjVJYbKyWlzZi8Ztut8rdgIsvUlkUDO9pHFY06ZH6l/pLa+/683SZ44VhEOt6eNDpA7ovYjgVd0x4l+1kzR10DPcmkpKldIeY5npa2h7qB8V1uMeDoh8/1yCu4wCWKGMD2jOEr63ysZCOHjLZgzrNbF3IMVn2XmaTIVdla/RWoFXGK+v457+/FgKAxPuOIS9072X9SS9oMBT6+30sanLKE4GzUeQV7863CH3/0OxOcrpdDLJbEBM+5hX38FP5LSgjIKCqMNmORyfBbZKOqPMhbDbsqXxQkKzWYK5w7WFtqkP4v8yqxGGK0TwNpBywqoVW+8mN4RqX1Z4GSZbjTENsxQzBF2JRgP2lQKW7xHrCrIpYWsAS0KDoQX7HboSkHFdbARgip3MP7Xuw8hqKcbaTmT88S8xz84/6eMBRfeKfQlQDvsHgh0igebsXVdH7fu1X7kCbYmAD2J3lKjCyPBPBeeB560nXeHv0EuAUsfBgBS3AwvyeWo+pkWKzfqD6iO+crl+id+zGQ4uvyliw1U0dTI+egYPspqYn40TPZaFWyb5lzO9nDEAqNaZPjs96vBLJW8dtxMaIkgHD3tPh0svHL5540bb0uVavpAML0O0IF9BGyl64mTa+ZrMzVjuTWZz9iqw7a25QeBJ95JJRB716Ie9J26BbAY3doMfD0rcS8Ut3wElX2q+Qs/Q37pNT307zwUqG0mIZLReqCUb0aKwjiHe6o34VNb0KpgeobYDhd+/rQHRMA52bk4wgkNWFu84XVuk0vjalCJGl7+xxScq0Sr3s+c8ALoTtVZavGX/Sut9aTv3F3k1cZkCY0G0OIdkVnSJj7MPSrmq2186GgvmDgi/v8O1VD2uBjfzPKl5tv103vlcs6MrXnTvylePvS5x0L6Z4Wp3HOay/815xqHVWTPkDj2UfjhcWH2NsOumiklTG7aJ33zEPx3ok1BaSIVow9DdLP0doytfgvaQBG1a5ZghsagiH6/aLnAi2Jo2Nw0kJvb5AuPgGca00gp7bVhYwLqE8rUZfNt4QOQHkMiSZCX8QXS/DMy8sLrCyCSLy5bqlRROFzTFFLFCgJVhYqtGgjkTs2JiLRDGyG/uQdlGprd32LoeJ75OSU
3ErKUd9q9rUz6sm8VgXEc4xwgLj4fItQKlRGU9TwsPdirDSJ3PYM3iwqxeu/VSw+DxKIO5WqChSUE4viJgBez1sxIepV+03Q/FTT+UJTRU7d5WsPa5J+0lnCwZaJwA+RaUo/VjOxDoH1xx+QcMEn7lW124KXghPGgqdMQfUkFi+Xwpokoh0+qz/bxjYjirr5tSE3ObJ8KxFot4rGM9huht9s0WV2LFCnu5tc6+mi2GJSy+V2wODKACDs25hkbu+XQo3smMmTSQuCH7iFR5oYJpVm0dEqyRCE1E9Kn/0/9zJ8XhH3+/p9x464eFeSsMRmncErYadU+kVYFhOjX484N9QoesZfYXE0MbH4EHWlt+9rgF9buyddCUKH4HYGM7TGCGPjvCBz6lZ+K2A1vB4LPRQhIjKaowHUgUw2AXxMRJFO881r1RUFTJcfoLfK0JMxkaw7SUAyORQHvwr9jMOmxrRZcU3U2i3Boy8R4xgoEoGzESD9wjvUFHlXUtiDrqWiwtyHIiGlTDNbsTJvyP0oG10bxHPbVRIHFAN850ew7L1KVHl9AtSvc/FyBn5JY7RGx+WWGBh6R0K/uO1NXAipU/oZIjwCuHfC3YymEeSogS9E5L6xKOtmkDeYvEMh6o7Wh7x0LMwASK05zS7IKzBN8JQOIDSKmpbq/l/fusStfqXjvZ6EOYgS+MC3dNrSc+HkpFcQCw71XfjaNVMSu06BRck58WtmqQIyB9HCQXF3kh64Py4s2oseYa1PPrvDIYTkxXmar9CeuLrEEAG9C1XYZFFbOj/Ev3J5AcguQhhYWsNwToaMa8LDv0jX9qT0c9SsMu4eee5+Sg9W8j+0ogL9xniAr6nW6MwYMFID57xyLrQa1lkOf6vT2L01WW58NUFp2mbMnnRT6urGMSE1o/X55yumI+AXHzkn4HiVmQkrSd+g4L3wc51xgPf0puunC8VVY3X33qLyAZCPmuFcOd1L7AVPH1cnPT/UpxgGR141Y53yoqKTPhaZ+GWtIafmtjbIBsJopwbyOShDLfmbI0COqrqlElP8a8Hz8kh6OlZ2WG8oT07O8uk2S5lD8gl2RFyEnk/WzcCGhvSG1gF3gnVmbiny1YShcd2FynxGdj1UNDPjpNY9ZDASXjnxgtlQuLqBBi2WgGsADq+cotLK72fzYkbe8FkRrsMAfbFZM8+fmL05Xr2kdwTSAEOG7eZdvtPHU+Y7jt3mPCserWuGg1LvhdYpWuZcSuw0zoUF/5JXm47chFCzic0mB3zhV+E9IbChg0t/syYuujcfcrEbmkR6631gGdyF/vpqoW0lVY3th+n8waZOmug8MQ0HZNDZW0cV2KO6NTZt7d18N3MgcIOoljLRKMJpzp98EOO3n7CSk/8ayukpaabLBi42m8SaN1BeGRNmLKs6I2Gz1gqoY2P2G5qYIG6A/8DAgylPCPwu4dsFPVUsU4yXGWEgk1IGQb1Y7ZbNvUQu6ibuLy0yi8R4ShEye/bCmvXdB34ujd8hGPGkWxk8/s4jt/FNO0Eux6SHj1dkSPqRQnVEvpKxlmtGpqDLlxeRX9NGWLd6yDJESBFqxgdhoHBoALVXad9AWlahSLYhqqpDlgYw6YDGGpB/Kl3bumzW2I6ZqGIvrLUhrLuQJrhVLtSt2YtY88ShGdqa/N7bc/RPypDz1odyx6x/TYthcsmD9LYqP+hE7iJDoa6Q2PGspdubsHt/5fjQt4iS9uKGcJvCt/sAe50LBL382krxE1woFZLXxQ7XcCrziv7i1sjSMrGGXc+jJGqtJQ8X7cmglN4bxVJJmTBVfQhvfZMHw2AivGxE+k4uxC/6WdO7jLG0o/fRStLxK8zSJxzwCaeWu1p6k6B/aJmZdYKzuhwx8qpIrHKBxxLQhN/cthzRC6833h/xW2ZZba3CtTzYcKE31WJ+7tIO/qckXOKIlOfYSSck2HkQzf4rQJo/fLu5fwUUfUpHh93zNIpGwWP8DkbG8sL79BiAOj8wY9apHf7wbGPvU5l6PkEzUbMIZID2NsyCJzUFypDga01eS+bRfwHxMx+Y2mGvisaBjhHNFdeHRe7kaP3xR7oPgAelzPNq+qI717mlL6ESa9/h4wOgT4UAo5DJME1RjVH8EFAXbPlKzyIzeFPdPjQhpP8UiFaab+lUw5ciH00joQ5tdFnDVASXcFzkS5xNAqU4QemxV8N0pmclQ6/hqQcbRo49fLWG+LmIpYjslzy2VljPh/JPKQzAAVOuepSu3cZgGYlFpnVFZBGcB0S4uOJE+FtvlencAqZ/S+YImG+zf31SSvCohpfYyRbgNqyfrk9RjpioUb3O7eyaSovaY6mq55P3imGuvUucYDbLIC07KxBFdz+fjVasPGpiY2p9ZqYKfMbQE5gUZXKDElHfUvlllEgykF2opaak9YRQzmVE7GG1mf+Bh7nP5Zo7jfuDRJxabOU3cY+GVrLfV2DMBh8uagnhNlwCmRw14y8yBoXjQI6NqtG/1seAPgrADFh8AevJHoR/O7JpeS62oZMqijlIklq/3+bcMB4pNlwnd9pPPf50hNdCYgHpcExcEiXe86KQhFoRrtyLkVhzDladMKsJ/2fQYBkCoHs4/61N8koebT7crB+95P29crfUl+6G0nwQyzhDRdoo34GciouBSI2hcm7Jw37o8XZekWtcEfCTzbxKDl8Zh1qxTuND80LxKtbsensej4eVfipJCQkYsxGYk77vMulGGPbO3dFYXzkGs72v1r/tTohyL5m+m1AKcVctiWIjeIX1nh/tS8yWiOAyJ5ibC4J6t7TXxg1BpKKE4Nn6aqyaPGs17KEqAJc4wqRtwgcK644SeYBmiPdagJYAkab/6GMWRRJlljWgZagV/qM/bqfxcVwwPGiHCEGOGVaymrdEvRU8I9Q2U/t25AV785i5bbC9/keM3Rn0NS/PIk+TiIy3w12G6a/UOon7LkbxR+4rXqasAntvsTcibmEkMDxxHp8dDjlNyv6nHBEZX15HsrniNuldI1eMhPuIMbpgGTFHNWuoR1cmFFGFepcJ0s/IizVicoNBoVwjlywrg8d5X8XGIQ05c8O2bjbSuHfp0V6LwwvDTuec7+owAuB308Lk85cXmY/SgVE2/Al3DDf7wVlMfMAznqc7z0j7JrAGfuU5wrFGhFBvzQ1Hq0mze7HPMTwHPz18ji4SlkYQblwqwXsiysjc6TMsWJYpGgwFsYHYr1UzCHQBiCRZh4/ZDQoozYgQtcUKe2U/MM7PHGIoRZ6yi4DAQT1a1+mVO9YHCIcVb4+WnB35aC+xPoUaNCo1NZA3JkRR+i7kLKOZOwadrvhQvVdIPcludpPiuwTr5QiHZhfre/i0yVE/94Vtar7y4Gl3WRhyFVQ5uzLZDIEtHf+2PWVWLVV3vCF60wUPxc4XyS10w35qkMvnVTswUTZLEDIydeLByNKXllO2Jw3Cvwp6ObOj1WvY34Z1WheHNlUK9YvzghWG3y5ygWL/W5KimEQOrWKSKRknAxpO3YTtepphHMEvBT97pjydVazOPo219fOl6ndXveWIs7jWhAhU0LO38aVkNjHrRZeZJLRyw7ZAtoGd4NeY3tZtnAWoFTXhxW15M8iMqryd3qUsVji5hEJAlexrDMk2FUrI2LjOiPsM8PqLNXDt3CNoLdGe07b/pbX84GA2f1C0Jl+OXo0eWGFVpoScfEiGshm+lyztSsRuSsCt1e1kxNwywwjIS675JrZLnE1WFxPF0SJTmCdVFSqrplXY2W/NVF3ZzxLM0/gBVcpX+YdH1TbIuAQ1ui7ERDbzWX/BfE5CE+Vf2zyApS36g+Xrk1CmieSlES0qZTf5Hh4l2ziA9qhPqvxk5KYK+2ItOy+j1boHgamNPdPfPxFq4NEVys35ZC55gMFenYF8ENPBw6oL51gqN3a5ayLyz+upq0KkEOfg1PcE8Ebsw6VBHupnXUD+0XPm7YtyTf6qAYPdrFqkmAf/AKRhEuYTPD5wBwSk75pgrOkLgC3hvsAA1NQG9+iDnQxsFtmTv4T2xQwn0phw8+B7PO1lPncjhyU4DoU+ZMOnfTj90EUsPDgXvbHOUbwolT674O3V0xBs
y9TLud6C+2lSmFFh6K1hpzh7v0/Av3IF2Zfn7Rwv7zmGgC5JzOo1uS2j9bRBZGy/53MFJF1ln1Z2KnxBlbHafyZdbgomRTzDPIvvWZSPmC4WhzZh4VrZGx+wGaLDbTAgd2T0CAAVYqlG10umX/9C+b1/5U8w5iOLOr/TOzq5kaWZtOGJpacVIvD0QYe7y0T792XEUXYJIPLOZwnViAecEgp0GlIf8jEdNOhub7cU4hew/QNaB7LYGYJ0ZAZOGL1qktKbGctJoGpkLhppkJjgPj06R/afYx1X4C+lH9BA1pgO6A1OmewkUwC+im15CM8v8QcdmQGIRa1RJntJtgMdI7FvvokqqiuZq/1l7O9zMJ84EjH456ON/d0Xj3iighlI2ENrED06g0IMmETtmaF5Hv0Tnu/0TchJiuw2LgNv5rbg3SXxNhWo0qYtfjcRn8F1H8pYP0bbWuoPo0YsBDHR1j6FO35VWXLOPbDF1VCWdO0qGLx+wNbjJjorhbpku4SiuC8pMptwHJsIE85vdRkJUm34fYs7GdnG8q59ziS9+YNE1OXvSEhGsAZ+5vfSsTLbBWx6m1tHB3fTC0GFyD529diG+TAJCojHEs3HE5hIWSyNICYNUOdRqEG9ufM6HbTheoCdQLBIrVQqBZ5K4PdcKMyWA+FsCjinxgbN79DWMiRlUI2P37sDUlCkuyOlo9qTlz/i+1e13xg5KOTEy3VRkE3ad7SJiz3LTSrpAd4Qv+IrfpTykGmPZffq481NckMqt2eMmYqzjGVtAqdVGPboSeQqt2k9ex5NqhffgiYPkka4aOf8qWtd9zEBn6Ms0qoOoIbkchQcDBEy1MuzxJG0kFxxgxwSYU6WOyRdvOL9bkY1881PKZZMTy38fo9B0peYW9CnUBGRfS4h1uRV7aj9Wq5UBUCSIQhWSONh7cBjOarZkalVK6t3V2N2t53fU1azyszKcjga1dWjedmyMHk/6nGSPF1HQCMEPPG7utB7ksBf4KMXVk7yUq5Gfhup/XdD0Is1yqn1LmgebP4Qvyn8blOK2Km2FY40WoSPzQM/Dwees9lX3SUK7W6dgJC6rao2pEn7gDBjbaC2tu7l4xihEtgek2kyydJG5rGrR8EZVSb5bT7z45E8QJjQQNFFRXwL+6ftutE+a8REkg9QIuXbDxx8q8DPwiwJlL5IybrVKu5iXJ4Tt8GcwectXTtZM/n/Ar3EqBVz64LMkyi6DDge0Q+SMXL1rH3IUbGGGGC7jDeAnhQBD0bjvRi+TLXeddCJ2zy/Zt4lOinnZgONtJEXBpDY/+p11T7d39dz9Y4PpxCih1mQCaQzxV4wq0yfr2u+bLp6dfpd+K+PXMq9HmefWxzGkmd0LJ3huU6HngffYUQ6T7bl3gsYBZtbZjEVTSOFiaCEQvOseioI8G8VgQkLHxd/k+lEBZbrX19uWKjxGIzV16SDqBMtmpBtXZH+VwMzEKKXAa0Bgd3C3CIF6YFiNoJYtY6pt9dRZ/P8XET5pxgOzqc408fdsq0o8B+oxH5OtDFJKTOFva24Vff7ADj/cTvraBve36+8wboRTm5hAbv8vXBTfkhV/6acPPwXvUshUv/vs8YxzwlSyp1qCpPUGpnf32DRFfmKmEcTbcFP3NqWXxnJuBRpRLCmDwDDjqf5CC8mlrDFTw3TVmHdmd0Ma2oOnymPW/RUYID1/dFLTt6SV6Ur1pLVpqATpehqzcDUlQmmWYzyFUXi3pa8U0JNZLbJVpjp4fHeETEOjtf5kgN68DlKg1bgibG9lv6wN13CpTQhUwjRb6y5ciJhe1kBgQSZpNIQHlWlBbkLt6DkKqsQBaYRzvjG/5BBn4WwF3arWS0qOogYQSQdLX76dTSdy8rWvJ/q7k/p0zwP7WASAjp9nuZnePmO78hBbVOlCfH6ifdyiTY4NDA/Pc1nNf7AP4Lj2k0nvJ2dVmLa0HOwr9v2M3+K0FJ9Ys+Y+CqcjhBz/tV01wO3f9TwYxRGkO0eYlprAvL0S9THuNLqeJ4c2Wqh8Pxp+xYsiXaz2sDNUVY2vQkrj3fjifB8JMjvOZPzeJIJN5t6PAiKz7oI+d/lub1z6fBItbqJQgh+NqMxiGe+1A9alDWxY1J/UQqQNEsetnndpVsHVbhyKHjC6jSEp7yynex7j2MgCMqP2kG1t+/6pdNZYBRIqvcAYNXQXsgeNAodSS1W731fTqTOR2lelYVbSq0Wq1AWGgfHuaXYu3WL4PY0UmJ0zowP4j+d0bcApAFYwZFV3g/aGCOzlSU5iYULGisDGDFbZTh7B9wPypSiJ+0vLQ+6jtyfM7n4RyjLtO2HIz8cBOnKfwc5iXW10RyOxtXaN4abR243LdPd1nSQezsPK+QwB8rHzPQ0rkUoUBoigmQ3fOm9xPNcXivja/I8x0vKE40Cbx6Ql7jIkhha7FaShrGUw8tEIay6g5AKCJFPytVJfQJgQCq3UQ4egFHx1x9U9Uc0c2BsnnbQ413uRsSAeCVWcDk1cebCzlt1dgRMspAsOJqvf8/AlIZ2ew0j06Bx56biOEt5vgoSNI+OYL5yJAMl9BP57LpfJXp68c2zBEmVf6MyGcFLsC8lTDoAcUVPhH3qeFwzMr/rq2XF4wpxcPESA5vIHg43lxEYrTjuPieH127/IOdcfItxU6fpAf+EzyJDkzLtR7Pj7hY6FTmD1LXDOkgtcL/ype9aaa1iPhb3tWPyVWxvRSniBmG3sWVCBHTaunXcKqTjNM1FcF+rTg2q4oVzLzKCCBY6QZOnjRZtvrqy9TrSDzB5TAyikSS9h8sOsiuJcZoV/oNGvQc1Hq/MU1BQMmZl9E50SWpx11IgTwC4f5BFqZw1+ccV6FTiwBWPD3yPopFXuFw9yYEDilHoSrQf8JwrXG1DW4MYGIc8g30HyTfhoLwCojpXcDeSsVcwrRs/n5dqLKKlHOnfAgF9QZx7j9CJjBmRX08ks+KFnnPg9WVIJfwlxDTjYS2FhCLo+3Uvtb0uN0ugl/r9CERTqKEjGdzaDpavUsYdDF93aZPdfgWDmZfbz7bH3zTDLSs0r74v7seSmvUmi2nlvnXWwROG2wK223T6T1heWAVN4HpiYiEuVWQQfrxNrX/bJyU6Hfh/NQjxhqRFd2ODntHWffaJFwfNOcvXa1x2Ml90pSmbRgNJFV/BDcw6g7r406Amisw9NGpiWbzfR/hUW8f9Fq/G2LDGj7+hFhzlvaWHFIvm0TkCdM/6MUl/dUluvtTiCj88t0C6x9cUx3oKcxZEY7N15Q2GrkxAOGK18eWv6mtzkZ9EJNwGvzKdjYDY8AtqQJZD9tIZI9QSHck0Jix18jncXiiZNoBsb1PPymkUyev3eg7y7u3KCigR/6LVvsyRURMNbMEPrujx9piJY+xqkTi2pbKgzUHhUdSeQ93Uijn+3gncEo6lUTOKS2o3/wVvck/I+fXdwo8Lu05mn0gtMzApooDN89z+YWsB0hknABVtCtTbGd7lR5VJ2owJaiNiA9qcwSdc1DbmG8gcOKYsHX+2TwrljsXRgnP3f4SJD/b5PuWVjQErLGIP32+TzTpqo/ptrA+HdwbCpIGtqRaaazPTt/aZRuboRsIoKMS+zzch+R2sxB0b6WskDYhVS9OybhIWrcpsQ50OAWST8STIXJUv6i3CM2eCd6O38tuyFKqCFBKAc2p/koCapZKWzvf2zzM2y2ik4jy073kNXXvFpPeoDsYamkNgXPKGljYHVbcy/tmt8fSeMUqa//OmrOdq6wEcA4nVBnlOvMJQGTaYKjVrsGz5j9CGwJvPjuWlsI09KwfLer8+x/rAEm/DouvqdYKabN+scr+2EgArjcBFnvjBK2L1deV5g7ejxpVxGqDj4mD1o2HNI5HWMiuQzGgbKdFNXOLHwuNqV4+VKo6nJFgyGGftNPqtDouoB//4kkPIL2TK269owdvOhqM0TQ/B7SxJaEZaWlH31WzMpA2owepOTcikW2Ebtr5WVOeWJY1CFMcVsE4gTYuOIOYc5842CNg7IoL2k3+V91z1KVN+0HTLfzUpJ3S2Vhh0Z1E6lvldpfXn8ii7h+x/gRXsOAz94J07W+JYraVH
UIn/sCWnnRYdvSqiq3r5Yd/mNH28CFwqNU8hsWszIZA03+rArriZ+W0YFOXLXuDD6jf2eLmPqHUNdshu891s7mFbwHXuoAh+9YgV348aDTIM5odmx3lRUV/oku6iDytxNZ9CCEHUuF6XfF/H/IUjAqrSQY5XAsEydJHB7ZBsiRvcxeNMjEbxXRbMxd3L3QgilJbnOxbP5koDO7FK9UQf0AVEkVLGj5UG+Ek52KVd+XV0MtEvqaB7WYRFQg+e3Mw7xkSszGDKfRZ1ByNqVPuzYz4MLhZumLPw5u0kJdm/ObjIDd1H0XqwudZDeFkroDPVU7rJA/LmAn5EYMfQodDX/XbrJZyB/EFUAKt3thLMDoZ0EDlHc0qa3ovgPxIKNcdfiiUEZksD/bnUw23c4cGIbv9RRSjkquR69Euh/C90AjVEj1S4PZiiAasOvSSXy5zPW8tlK1R2hPsFGxUdiDr9SvV5MU+WVRJAsPJzg7rKj77FRwayTMKwBiKff8jUTcsZBgmSDeagvECA0CMYnoSFDKpmIGOWHsT+nqQaxKFVtRww1r9SqxCpRac5GRY4Pl+V2Rnc0Dmf6YOCkx0u2JOMA1+R+2nKlCmfGGE73CL3XyBZZztB/XeJcB46hifNL1Obc3KlY8MMiZsT4qtdwmnLmq19uLCQEWVCVh2Cgt9BUP5CrFG/6XZEoQiabGf5i+TgE4yvhzON3JUCOyk/E6r3F7ves/GV5kt241ZOG0PEhuOoDi7eZLzFVQEvPIvULNOoS8NCj8qrUU23W1094NoJMzKjgs+xhw13iKiqomjtM7xBl3aQoPCqx8Ef8gg+Y/tgP9lnpEi9C36x76QfykiwKsdwCos4fwJt0RxcjNLdPiYk1f+iRr5bws39jwhRZdq89i0YZdnz9SXjAobzo9IsN6zU7KGhz5nBstGFsyFYruqzhkdvehgzVnIiCZ8ZfojROlH+jzWPCIWy9h3hxeci7ivH8bblegt6GZgDTVnZiQ/a2iYc24CKq7u2WQUIA3MJ0O8l2QIPVP7gRdBsnXPlDwOBNWbbLYDr+YyMA+8ubzWlGwRNqCjo1XEetOIrJen8GvGz4L4DmMiLp9gUeZsYlNzRzwFAG5dPOk5gpwtPDCYfLkvMnXX8j3ICutqh0eTUTu8w5CZV75MPlNoov2p5Ep+OOMz6+CC+Yym96awTuF/uRqQ3IPwtwKksZsU8yEYO37QgI+avLSikQZAppENFq1/RYWZwljLMN9HDRjZyIlQTFZD0f8YaAlD+ep7L1rC+5a0LQICUTPiz34hYHyumvKdSz4VepyEMjnz8QpFG3Ec4A1zm0XR6SdyQvw7Zlh+ddNBhpr7/Sh8EJcfDsDPuIPY7OAKmDhgyVJtySKbcuExmrXpi+2aooKJ+M9puf1834Bf5FQpfbEuDhZk2809ebiXsnWplDUWFfujurmeji4E2My9YAiMVay08Fx4OMYTD25jqUqgZFpwWrBCoErZ5px46Ri410ZqfehFr6k393TtH+vFUn1EFa6Tz3j+Zabqa9DCrgPE5hVVdn4yzZ9AyW9g7Ww/a06MLW3DYomBUqRWipZJ3nLTROBFuaA0Mi22ptouwEkTuXIucPTh8tjMVK133q5LBc/ndyH6c9csvptE8c7tkJPfxvthsPaYkdOW+5vSeGYR+XEyWAb3KkYx4l8/Q3wpbpZTmr3gQVjsqwGtCnsBZuD6jZQC9qLtVF3WT0Lrdz23qWzisbDAtO/W3zXaj3D2+nVTczENKh8T+F3kQyqxM+jztxyOf+P03waqjf/3gNSdelew2WlOLn8ConRBTIE4Jewkvl0Q+5S0qTRjFQLEY9j/McCmS8xbO3g6VqwOovZbq0iApsuCJ6GoxH+eqPw9Bti5SYiGGiD7cV5xMLRBxzqUvXkaoGLIdd8b1M34ENHDlgQ6WaqzUq6Mk1w7Sa+eY2u+KCpVjMumaHFYLF7wgV1lwP2Twp6iGHcML0777TqgM14cghzY35RstenWxWiZ1fy8YsHieRkopPa2Z3NyxirkhaaMn4PG45APds6Qq5l+keAW0l/r62pBW2A3+GLzapEvQDobD2RaDW4BLSRkkVx4+gB9ItaQ9M7SiUpKAegxJ/sNC/tYmOyPKgsD0+OcLQy7pEmHT7tQHFvIcExqMtJYssYhIsOOOV9UYjU/qR16lzvD7s3KDwhTlgvcWTpt1q+iifIOrjTCzZ455BuDriRmpzMgawibs62uVsFfUy5GpHJ+gluaxWxqu/DizqjlFLX9t299po+FH/HrhtxTc/7DYm/23sIZTA1rV9c6GJDIOBjUV/Rlw5OdCy7OoAEUgA1EnJXnZ2yoa4frjfRu8fj/+hl0Vn8GlbqMKYtoastHGdao/ngxbA7cQq50VrxVMDLSdvfFKFDyBnBTM4IVtOLBYkrIl7LhnS8DKRUF/eNIEdiA6MYdAMonXaBaNLHdS+5duPvxL5uhYQ+PtfWm46tq4X9AtHdC3aXRkFy9vXxymbmCh+DhDT2/QIXcjdWiCr+299lakFpnAeRog8iDtXlU3OiYOR97XHxl3rqP0bTZlF2rtH+iDiu9y2HeA8F7AL81xvBfKy5wPZa23zDABkbW81krvXl6mghuaRuVkAWtIK5hKo2d18q1615pjCzX4n+TdESgE+pcwZZAMCyMaQCZC6gqO5nTqy0VEXLTUsaJsu83ECtHowihnkU3wRf/eyP8qbtbEIyRYneuhOhu4w/7ss4UPqgBI/0Uzyr7Fb6FhDVxPNekmfe5qT7SD+TZoT/0iJHBPf/Rf3WQ8tM6H8mMUYilzFT19AO2TlGcDdHamCkX5mMUZgMdk8Gxj1Tm+h/0GsMJnhB0Y7GoG7bbhwrrCRcPPgOyvbGP2XMT75EBzelYSUZ0pPMWcANNicm7Tx7CubJoYrZT3hQo08D64UmEGjAxU1I9YwEztroVw5pUFUak7PyzlyGb5lhFigF/13zHTuAmJtmS8esPGuW+FQGOq/lE3CfCzm8+yXB5I2kcTJ9NJJmOG64+Vu7ZWs+ucH3IMhr2hQ1TcbAa+z+ly9IASPUDHADLsI0kgaEm1xzp7FU3KTYtzGPbzwGM5yQF1V7OYAPXnFs84JvG461YJLomchVHEhNQGGpiNkbeWtnnypkUydlDLkq1OUbaTWcBRWT5lMwdACEOCPbYTdN9XWeS0Eq7V+SEn1D09xqx2+8XJ41JYEqwY6i6+fMuwtoGqk90+8MvqZ4QMIQTJrMY+GbEJcMRt5SpWUggyXOFETj5cZRQiL68sEZ6mL/DbI8OzZeNs8C8agjFWlbYAxTS8dNI2ediWLyQej59bhST6Qh5GX90mTMLL3uUVdpobwsSgcwD/7oalc/kvv0pgfFvomy1437sHJhkUl9CvZWSRPcYC2zr7FckAPWBSSNMTDtfPhSnGvG/GWBgZbEwIC6mA8l3uEW0qqxz/XpC1VPfAK8k+6XK5Xidi0xs/GpChjJcSX+MBoT4MONml1qR/SQ6pSkaRSOXIsfSrQ2+FkSi93Pxq3m+GPZv2iL4I28qWwgMG8/lIt6nN8IbNmfciMUAKoGefrEHgPRkxEbMCbf1BKswckp07sR7t/q3KlEILr7eQ3yQx6LT0vZfDuVSpRc+W4mBfWDENnVgrEWEktbZKsEFNUGJn86UxZiDDNuTJtmpwYHHnq7sHhlY1iRvNY60BIfs2nnEphCLGL6Pcwx9wBGbzcB7qGAiRAO0P1cDWiJVaYuulg/GGRc3It3x8RVwbTDEatciSPRoV36A014oNwwWZ8KJz4MhDG04EV4KaZgyJGpUCsAFvbdfi3mL6BvNNwcSONWmiecwSFQklr71Yk6Q02HObVOb5OQ6ZkdJf9IL241lHeVZ7UTZQAhCCOMsVh9J+/igZXnP1KcLSj+k1IIocXW6i6UMjM2A+iHQiplIMhg7BZu2ZNJ70C4XRpEFT/ltxHtf3absWlHCQqgBlbcYfYN23utMT8CZOwXdeRdZVPoG3iDdSf0O+LpczAQ6s4vglwIK/ybuym40v815bU4J8Ys9fe2GY3jClkqVcrm5+4QVhdC1nMmAS/BSHa+wjO8RxGHea1yLosuNQ
rJW9PhGaXxahztFof4gdT3lyWNqSNmhg49osRGuYN/lrx91/WOm2PDa9xcpUCkcm0jv/yeafGQxStV49Ml9num28tu21CzUVUqbz/ocYNm9GkSdNEfockcxKeOHvTy7Pq81WIjoiJZsVGpSlQPWVBorGvm1/S54aKgAxYzjckxi9xKgbonboS+JkYNkEPO9QcBOQBJ3MrUj/+/fCEVLCnpuajDX32AHQJDXXYZKDFKxmO9XBwFQw4Tt4bNQGZWfUG2umnCsUUPnVtRwF2h9nF4Zz5F4vPWkIk+cFft0BU0//IKko26DNwwU0AgCjRH6v1j6hHYli9TSUhODJsBXBTlt5Of49ERBGQZfkgZLEajBZgSNxZztGvUhmPUrc08yK9x3SILGNBV3AYi5O5rWVQPCtOova9chr0gcfWIx2w8PdLBZWZT6V2CyBvArQlL21KBB/PzbihrYc2DKsRDmRLshE0095hCCLBn2spTtsG+hHx9UWoe7X9nBYYBezbL1nUi7l6clxVB26GeYXgI/pSg6syGKngL8mK3eavbjp4mk7XJvtmT4r8VMKICA6SqVKkOlQY+3u4d/I/g/GL2n05B2vuXLYh5MGLyUsTFf/uatYRUO+NSp0vbrx0fQq2gKjqGUk47N5rCLHj4+RrySxfp0BrYjfm9+/+jkFfuY55ytPPayRlUuBKY2pBLCvtT1Yy7mxOixsI+w1SxXMtlD2R1P3z1+KZvNC6gqOoihv/HITMP01I+zC8gPXR8LHCO8x71WYRa/y+frTGDy1eR/w7eBq8LZ2BQ7HRiphCeY1Fpl3crZQU+N0UlBNlUoAsRh+m+9BTh3TqowzaMRW2/dUJGVRAgW97/hAqIWV4yo+NEYyfsLiCr/pYFzRdwKFdT8US5/QctNVhiGH22FBGzD7qjfCqxt6+xdYVknBByzdLBIrzPHHTZUto5Ergp10aSFSu7+scpNcu6uVN0o5xcL9eawOgCM/kuLzHGN/PCbQ2yC6P6IKpBTO6j7OamY72lxo6zLm/avsNbSX3yTnFX7PD3Wc5JJr4QhdqPn0UiODouSJCt8DXX8RQHtM3grijs9vvS8flUtyJvJi/ohXKKfQ5BqflYXgxF6zo7CUutwFfIpEpmB6yBbqnZy8EiLzE/L2tosf0iueSgo74xwDKXGYhAMZeGvjRv+V8CZxRnT7u6WqLIHEAnpdyxV3Ve0qlyTNEmQZqJ/ZUaIi9+ZOxHtDIVMF+wlxzKazQmhBcgPdzuIi2VXZEXoIlNA2I40ne0PTB2EMNvmzoSAZnLTV9TEz+rxI+wMB5Wad0RhR2UYIDSJ3KxN0//1YKt+tQxkS79I+Bi/hXxaN+eBZJbdjs/bBN15EbaSRcvg3iIvb9YLxYt/2pRD3Y6gWXOl6EE8V9Kq8U4+i0Q39+YP4OT6Kkb9rgUvj4HPusWopfQG8QZ2C97HW66SLx6WaWfIxvji/I3b/3hDyk6CTGUvFXPmTBBtPFkjV+3AJYvT+brZYnB9jMNdSL/41emCjkaf5kaDmct/ccSvfuNN12PZ4oS+lfmc9pK0m0Vrq0J+zUNnSsmjdwLsBzP0P+Nu1cxFKg7GJsQmoQTWGvWNDsKQdKqWgfB/jRPiDpyw7ZRtT6pCScZq4mxE9x67tEikVj24xGAeKpMXTiYF2kr8yiJoRmNd949xSG0qdq4esF9JrQVx8gKalvTI1ACU8yVuo/Uw+zIlGWe0kJ/4KAgrCDFs/w3pP43H+DxPfMP8D2LD5U+rTRNMQUTqwC/9oKypnrHXstc44uKo0VqC3S1RSYnGFa7wEN+A11MVFh0r/nykkG8g6b+UF8RruxMlponZy4nXcG4pBW5eeQMxSxaqVpVNUZ367Ruv24bBPFpaeUtVgNXEB+WhMwf/i8ipI0Mr5n79u5dutCh2QDMYvIYW3+Pbw2LQ8vs6CFOhDP0RhFQhm/sr0+muJhTGLqIJ8x0+hQ0K54ziV9LtZCkg6N0PC+H8wSIu8O48IXIHwD0V4bEXgHBhRnkMHyIv2P4EhCVa/4M4D0+Jbj5RE0Vkrw6ztwkFoOPmHzFHcY1LYkHwsKGb2CfEHOE70SG75xZLMBGnlIlMXcKw8mv+xSBdcKD70M5F2wcCjBY/HyO8xbUismZqBdMdamXAgdO12Je2MDYUyEXU+lCR2t1KBpwc37CmJJsuDeTZdKk3gr1uyjCldFRSvXfk2a/mQcM2LY66hu9NsocJl2qzDtUA1z8iQX0gF2K98k4NrnIMlL7D+0MFWz40zE8GdAI3+zlhnCicZDDF+1lRlmKOW2QdtY6ebphy8kAEWaPpo0mS8XqjUgoLE7O3yPUKQeY23N40aps0hPE+uigKKW0IslQMXRnZsXi9iTdX6QCRJncZMmGjJviaB+9qqF6oa2YQHg1+kBE1wu1rsAzCOY1I75rLhTVECXdsdeDN0mBdh6p71IrmQqycISBcpQUc9O3QLuwtlmaLCK6NRjpFJHyVbaHrD1njZPZPojWlQwjjfUjbEcBn3yS3giZ8xnDOU4mdW38cgNY/abOKH3mJnAQgaj4+Vu4tLLNU677oOummpQWpzbnSA+oBMYxPwKX2K/bEFfX1zauMwhJbG2aRyKpE+J8XmfAEehF5WLr8x5M36Q21XHAOKKr9i5FFRQY/pcPf9jkYUXF0ZI86YvCTtRruX730kevbJnW6MSStWne5cIlZQU4AdkjxOGbULmFp5HWXeHcH/jejaB7bVzWGi38GdCht86dYC1AayOj0qp/b0t0MT5GccCNjP93eFn/guIYBAu8VJHIPlzZwuCiPeHr3GYGAYmQ7HWT1o+2OdMJPvBpCJOPbwUUGWgNuRaHNGI5D+dNHsMl80oILv1VqVrCvLgM5RQWx4dIfuwfpX9aAU7AzhrpKkhUM+4y3BbBcO/VgwqecS3D+8r5z+HZCTfEB5+0MjeUtjECETAGX46ieGO2uVCQoUziZ7LogU7rNXGxOTs8x7fPoT4ckLlmp56SoE7/EHRQEo0kfJBdOmnfzTjhi1YzooZn/vXmB5CePRrFuj7Mg6mdLVFiaw5ZcqCBEbkzyTUoE+M1QOHZ4IAAlb87a9CcPJsR2Vo3Y1QcG2mKxQw+wFG37nQSda9Df3uDME+c8BlU/JGnPkSrOdRmzqBO5li7obvpD6swdHbebyxiEQ6aqREEI8eo0IZf7e2sH0FsPCOpI9GzLuScuEEiDVRHX3I7jQBsnOL73c2rHWunazQzxpifAtVhoBmbw8URHGvrhoRWiL0yuz6bSV62L2tSnPt2XM1FCxi6IssH8Y34A4AZyMHUJDrf6/bN98xsGRmFmBeJgkPpWt97Lnk2M23QK8jNm20pu1mDMLYcSWliU3dnCCRxR4iPgbFHXiQL1OmWR18ULZbpyWcSNLJKOlt53QiZhxEd3GqMDRA1Z+a3ojBFB3/o1d7O1vO/EZyNU4hUPElBfpFJ+Jy0MMk+p9ejAfzrMGBc4MkaQ3zoIq3ufM4jUS69othweFcUJbZvCSvQb/kudi+tzMa3UOnqCs4Y2igzMnAGajYVu8siaihO87vkQ3O3KHvI0L9XDV+V+SNUR2qk5lhYa/ZY3TivkFr8MZr0vA8efCVEitlePPAvc7yaNsXx1uAxFEeXlIpfcgBs/Z6u2NeEUspBR9EHHFK62a0ErMg+N64UCkUceXPRJG8mIcE1zJ4lQ/S3Qdxe25jWKp3HHE343FIhjk3eQbsKqUZZ0X+K8reQzr7r42EeJRgVKYfDToljYGM3cMfv547HlNh3jkjzUmZrnK2vDMQDLUDP6QE0IXxlpOGmYL0Hww1VpR0xWmpEtVnZj9LO4j4AIvbv3Of5N5h/I30Iwcl2iHMyhBTluo39B8Z2CG8ZyWqg33a5P+t56u8yi0DN/VJyjiSrt9FFXdmKcOJnudmPQfZlYr17702+VJaptk/IiBJ/zyx3jFj5Pp3b4s4gIxjRtWyMX3BxmuwiZWS+o6jIQyiygOccgcd8Yevmz3V5DB570nAZ9G2HNiRihziF/tNybnV7GG58T7GW6BknMvIUx0zuvBmAe7lqDGTXg7kmskIqviAGac5VsPYAxsQgai6lxY
0vcfz29ytqp8JlCqiOBRSZfr5oWjBeW6YDrEO0oXwQby+JV5WuTFcBWcjFwqN39OUgwzfX7NtsxpIwnAeG4rpwVjzCq2/Fw3rDFxVhn/HpFzj96vHIKLa41YEhg2eZKDj1iKWm9Cskv9YqdXpJWaoUhat7Xm7HN08LhQOdndUereRXaBOLvFrDTQsdAkTPOai7L7Wq+PzHpjKSEGew4xTDPmZVcfw5VG5GBCwcIXpbo6HlQKGLAFBAD5o5pPNB5yczqgflqJi6qWi7GgNVNV5cucZ1kHGhA6gRoPlW2GwxgF8Gg9Nh8MLNP9YZZC+kOYgxwK23iauutNbWVBvjBKPsXmZaLk9f4v8xBIBGf0PU7ZB+r8D10YQGGrNNdZlRM/RlQ/AameVqJZhcz/luflcRmXxYTB4y6SENC1mjMx6oUxe4ob9ZgvQr48dJG/R8NOjvBaV2eYgKorEuSNkVMrxvOikhxpQJJAiGO+GaN2wDnLO5Ane+yUyOLpSjZXniOmhGGViG+eTEm/UI4adLah+d/UmTmqArfveR8w85b3aM4S9NKc1XszE2/LZyeMPGK7HPu9+6GEUALbbJ5/FPXEQOTpTUO3/FZm4OySdNJoSikASZvVAK8dHXINiU1f3bh4tZLkURwcwmosBSV7wtwoxfLcQTHwdMmgtAT8UmRxERNkXutfr13v5ofL7tbWiOWsHs51x13NWgO1ZozDJ03GND43vW9qx10ez9P2vg/xSnRJ+gNy3q+IzKJJcYRfAvyO41wBQBoqyNQlw8NbKbXBexGuPqdnxYH1Roezs6/YFf1vCsoJkfDTp7+VMOYgkLcYhG/vKLo74Crgyd8k9IEBbQ0UJU7um+zX+FoU+/hLcEGbvQy+bDyN8MpyZq8gz2Fa9oum29ebJOrGPSSxCQR2Y8YfDEFTjQLVH49blAJ4EcererqiMLy8HVBqolX8sIJ2epaPEFUs4gBK4tya/rIia0NgYaYmOsUxUXCpnooSEf8mhYMeaVxbJQvemmypuhA/ww8lTqwsmv2ZrdR23ZkPMFhOjKCJy/UOt2U6hHq9DdCyQ/uQK0Rxhl73pLctDHPM3ne+PjvZTgYWaiBrE6XYSsDJyCNKvf5afpwD4UorUqv0mP+9nfFoL6PQ4qHJbjrZx2yz4B1V5T6vYBTue0TNIcykd0ieJ7B/0YTE8045ndzarDoj8Vlvzhn8k32zQekC3fAXRqLBimFsFZIG5x0v2CtcwQYMHu5ZaaeVhqkD9yRGDqmGtuZkNsgOi/IeqlFPYfQiB/oYkn7ttSTCDaY1bmjHM0xhkT9ZdatxOmJtZr2sVCGm7F33ZlAMCYaf3GFhr9piM7q4f8iKZZdDzfcmFeSFJU4bNS/34r8mDfolUZJr5CBlGK6rnXVkT62+fuSskU/l5Xd1Tuf3f08BAscV+paBygdLj/SfAw75eH74TdsSKVdCazzhHab9Ddwv/YxsJHqDIiNsK4cxRKrPWWVEoUL7J/SSMytRgJBcxLACrkJwpTpJ4VWe6iqZzkoFJVxVygZHQdT9k6+F/5mkGZ6M/HQUah60rfFbhthtgHem4aHbx649J74IkGewB/494SFqvTlEDTJ79uzSbSWBOf/bto7hytShIR34cqDpKQppzCfh5LqWHSb0AsQWidlN8x33sFavYIisAKfPKDb81K5BN+PDs3yxthcsoQnU1aaIW4g7SsSrDlZ6tyuijJcBiCvogvy2dHqpI5xzPG+AS2dz8JAkunWDxbMBqKL4QpLvmBKLPvcOxOX3uL8OnBeCxjxZwR2RHcJ7+CqEBrFxfy/JWhI/FiuFhsP0CwhW8Ag0Qbr3PMEPLM8wJFDcRyJ6GejgNOtcNm/qpZnnOrlarKGmr9SDLpuYqlmMuoaK8DgWU/Tg8efBiNLu7TsoK9F/EbGsmdLQzZJPXNkxTKGlZuIy1Rv6HccnQ3AzCPmFA/6Q7lDeY7clB76uEoe+1cC/KptNpU3OPOxMf6fBp3gzAEb7xuRNNk1Y35OMrS31Us+WrtOB41TMKBhVcv8a7aSt6K70LDAwJQMLBOQeoO7HquvHnrpF9DJ/CdTt49h9WJaKKSc2BwolHEFnrGz/PsadM0+pXjmWvrRDCZvRfrL6AHeQUS83gXmkiLxQ6u04sC/O7xlIy18faqQqYZd7WnEdLfWQes/IfSV+N3+0ZaQYANzAE3uCcjvPU+c2Px72/ovOhuFQILO+ihv5ZVUyeDTFd3N6rdplf7Vp0oiEHVkNDodQW+39LBT0srOsO4/UCRSdz6AW/bU24R2CC3uhs6O71hxjPiyqFWgE8Gp1KtbhFslPeR/Xv6EsA3H6lsNgQJWUlDFlUmhsPzJl6/jKFjVVuMn8NZBKEupJiVD3aNtbUhgO9Wq9LJLrS5T8gGXaI9lkvf/DbPrnwknp4Nrq0OXFwVEf11bMIR4024s9TjUrO3ywMiNpE7sNiJ1XFuMcnFFaTqEpPxBbLm4HtNTx4tt8B0DLR/gH1PFAIYuOhSlaTC4HBGXToN/KUrcYkiOmJWGVqdFWxJfQNeZPUlcO99WI+01xpBtdbpcugJ7tfKvxRTPUfQTGDemSXm9TRJLqSa145pCDIizo9xVHvvO6HDADEVAcQUHlf532uaxt4p+SHqQJ+Eqjv/rTj5ibhmg6PX4+n1k3oE9dG9GEQYLLHp7pScHwie+lUBnDOeE5efzfWhhbgFSJJjIKPQMq9d48Ly2uGPAyoBP88rWXBFm0oE1AOo82AiLbJf4sZ+BHO/BHRbEv8pkI8GLzBDqLIjt1ehqfW+gfklXU3XtbJbkoy9fk02uqaBnYrhYB3j4cP/yHJWYNFIlbKBR/IZGMrKgIflN7OVKpbJ5P9nRyi0WdASOcZ9OnEG9FVKnOADSRkiACW93LdLjTMmwnyFKeHJNU1y8XvEcEJU2wgTuMaHcReBMNy6LmlPo14gARCSM4fuY4AnfCZLc0ZFhHx5sfKY+u6b7zWMrRXiZrBc2t9A+Db5jcEi1vUXcfKB46GWoazbAMWjux/8symA6MjhB2yXNWPCc436ijj19ZFArNPOuIqQ5LDcAK2PFHWdv4tJO6OxcelGvWgNMhmnGQqFFYBs2JqMpu3S64zcI7iFSZ2hmqn/R1oIOUSogbv2xksNYiNUCiiUmR1tNIypXyOsQTmh7CxDJe7ACxHIdbPss/5msa5bvur7cPtjC5kAHbr8I9BR+DTjk6aK8giDlcbzBDbzoTfr7ZJdJT699KlyurVUxtMtNz2jYJLiQLR/UZi7m6EdAOE/hdDk/77CwszxEPteXs51JUM3DxNxjQN2Q7KtGXM47aQKLpL1Ih7jl3qXxqNf+xYIGEAAGNrSdYC3XmjCOP+a75wekWJEEREeuE1TdeoM+9sLjkRVKYe/GKKbSt2TV1MFNFreBQCwTIfoaA66HiHSduhKyKYzDeoDmQzIf7vpL6syaX5iOwaVelUPmJCjIAI4Q9w4BjYmNDUzL61MlRHafKQDGnzQ2d+cigCnlVSsmFMXdNn+NnktwO05X8/BjT1LrYm6ERi5qPoWmv05M6XSJHGWbP+4ERh41gyiK8f3RP0/FaoGjF8XEXiwDb/IBA4JwAF/d5uPzwQt2rSsoZ1rBg8IGAlb/IRstHre6e1i74SNDRM52EscwGoPrhfbaKNK/ppjgrTiOBTbf7YdeUvVjmRrg32777Xuz1cmiGgxUSKvv981WkCv0yqJY5BRTwCsdWJM9mha+kIuv4R1mCJmuBpNPeBhO5UaSLthZAAuAc4hR9emXsMALwj1lCJToZM2cnTKN56uss0Mwv7rm+NIrkSuKwJqqTyXoLt7JtWD9LKftxoZ0cP8DBjWfIo8waWJSgknJxURE0dAHdPN+CfyqJ31a7oqe68kYw0rbF3X/cU6MxWQmNcE5KVMiaBrXG7S0bBMltpw8EPJaHjUUEZ1QjDUwtGvcAwQ2nmoyM182UevrNnSw8spdWTq0+DQ0B2Aght6zVznxJAi1WHqHjyVVH6y4IM/54JevHU6PT4x4bSC+8k848tAfzX6LeRGi1SluIiXw0aUT6HNrjcFESDywT2YxJlMxL0Aao88SWXNIB3NAb
1G0InMjXSz9jSjVHeRJvziz0yfDec3QiyXpfQ77ab+CjRTBdptUwzNBjxZBgfDdBco3ZWU4DUlPPqiVNMNobSeZdeGvKoz1ay4d3NiavY/fCrIhc9FS5wmmHFRjkabUMGApP6Y8YQK+N6nndxARopJY/RRKeJbjOq22aZXUAxUzMszBlDPh/xJpEX/qWEWYKRW2LxHV1o2NPGg98VNxVebAT2UBae4VzxyT9ivoj6GIH25gQI4bJ+7hhReQ1WSb1ZC//fdiR3Ctfv257JVi7gBUhNw5O3EZPdme8wf19MQ4IXcYVW5+X6qqaQtYyERBEYhOXg/laVgM+7leuIzZ/MORnWg9NeC5a1829kav4ZL36a5RtxyWn46BAQQMKxGDys+pkz3QdKLxJn/7mSLA8wHWfyWyoj/y5eHA2CBo8i6fluIUPgQcAD7aUp+0huF8uhApNy67hRk/5UUS8w5YwA1nnNp+i67DqiQEQTDtsrCf14JgL/B6RZNT4J+9dUf+uEM4LXfetPGUB12bSLH6CjqFU2TTgJe9L6Pn0gMPe8HqAA6H9oLLtXj1jO0RCIMC1u6DuAEDLjjvzbJivuJVLnRD26d6JbrVDC82JXDGgLxJY3BrGOjoiyEmVoSVRlFnZNZs50a5JEtKV8sVQ0Q3jTMB/DkiRd6VV9/+OBTFyXjyMrKSpS9uGeBTryGpAea2VkbfX+6zsir4Qcr0DswfH24Yw8aQc74Q2qCI1jr0jyb+Bgsx87thJLzEuf7BQKJyKyHRSwBqgKK0WYpFProrDW0faXbx8skWA2TYPknHqeKTLCJNlIi/c/Kzdo/vyKYxfxpPJeyD+VwqYS2uL2S8NFtLP5Cu+zmMf8uFy4te2DCayxNgIsmPyx1gm6x/PmZ/Sc6I+AWcx0efRIdyIMDmNBs2peQouWyqokyo4nLR8uFE8KgfT4KkRp2Ozpxn13oDioQrnHewi1GWqCNiImEPmSHAVh9HDOI0zoJa6A63RbojX6vZXy7XuOtpy/8nidLhgwib2/M+cgYiGgaMmXsh65uSOlqGvUn9rgHawX2fV2nriUXdC+LsIS26YH+k3AuZnnxPpHW4rFEEYEJwEl6Znp/1YzYfSm69PH1IuDEaNXMcBVpN7E0aGlOJsYc7YA3fFXZ6ZTScz1v1FosAKupARai1b27Hgwnxo7XBCgSpg693ZQCWpeYLYe1u0tPa2brG6lMy50f/8fIobUoNoDHXA40jJKaufdPgAQgF7rMiPODPxg3kjH5nL7hzABfF4rDeWUEGBFtBCoRcGgR/hesHHbMGno3VBVAHNFRns0rPtFnwyDUS5dSdUEC746favY0immvD9RWm4c40UNY88tyGJ/d1ZuZZACVosr3gOMWvoLnB+5wD4AmkBBUY2QmnbFK9BSbcY1Dm1IMIHu6494LDWvmNh93gkfBXupryYudV55VC/OKsP27UiO0GK+VIEG2f0bsmgQ97R0NhQt9K53Hap/KSZ0H/RJMyB2V5m3gaduuSAyaPTh3ZkWjLttjkyw6Ak8YF7PsGEBWJqfmNQw0PTHOSPWP+MhbYkTBf/Kg22g0ov8DUEwwzembdOtDznIeXyDjMwRs+kQfODvhSRTtqS0pEnlwEa7KcDkbcKHFaxVT7um7o7q1q9iolKR/5ccYlQXWS1mFltoM6IE9PhcOQnm1OaXWon23BC1QMKBjfGveqe4X7Z4er4XKsYk+l7JSa62ZX0NEeNq3CGnjCWxSfLrSSPcUu2Jyamz7ww59w6fFZ4ZjycYhf3ojPcQccmtZ/T0I+cGyHStNYq/9G8VvCtaTAUTiSt5hKOcuRfPqq6DnsQcXsSvVyAZfmNP4NHmY6namkmflWcUwwXxz1SptKSPeSBvpb7apr9bqxdi+CRaOG+LYSnFDZtPYjZKFPWtASxpB9+XehqWodxn4GcqMlfHs0tzG/C94dNvlb/GUmTDTPhEi3+G+2Z2kvH+QyAvSOuFGmMTcZkRPegz6/O02/yNUqdBzx5iUdGcZP0TqRD5aQum6SLixZyoM7ovp7U1rEqEw3n4FE8gy+vYxHllax5DBwncWEpoMJFoWk5gU+fQ/YHrAxTJMI7q3vOTa+/csqoI/VjjD0H7Ox3zJhgC4fqT7l8H7zKKxdXDNJikaSYYkVAAILcYeguzJUfzouZpEySVabp9HNLXDCbOji32Ao7cr3fFJ97pOHpO9hKgGRcWcRmPmq3IzgZxt5Jg8ThYalgHgdv/iQ9zxz8TeWrygbhLrTMzlqL3/FLHEmXv/yu7nWm3bY0LQhlltLe5a+njJSge3FeGLHEeHWbk00j6sgs8uGtEmjz7IJvdZJemIOt3YSrmOkGctrkCNVydzB3SzCk5uCxQv5gWoU0ns27mCA6Q10g7Ku1h79GdgIv7A+CKRRz43JPMS1Rtfxg0TmlTEdtuOXGCMCD2X0gevYz5wm0Lu2ulniP3SGE2bfdhO0z6Vcp15YpvxJi2AkBcKbJvSDGRkhq3iSR2ygt0ZuuZAP7XwscrA8VOCagwedJ5L0A+j/KkP3e0SEQvtyQKYQj+6uLasb0oivgBFBVTzt0Wbk8wjWmN+y8HvdC1lkb3bhHqpUgce8ZQyKoJ+yLryPzSdRd64WOicjRo9kc0+dY+j0J13vxO/YYZjhNZ/VkAvGuO7048zrN1MivtYQSBAE50yNNQmc0EtISo6XmqLDVdup5b4TvyKfasZ3JnAQoQp1zg43bU6OheEiUjN60++nvtFDZq1sDnSimtLtJzfUDP8Cm3Z8rZECHRLt1HuFf4GjWEcYAmNAeEYJAY4SMAj5ZVv8gK8iNdg6kuC2EBdMvNB7ScFDFX76PM7xZ8eM4sdPRNwRqhtPHdw44MD49thEhsf0hl+/oJZecVVX+kZ0TUr2GQcOAYMro0SQbpnVZMpM9lzQsRWAwIv+4RO125HdfKzTwFKVhucna19oSD29L3I6mbnO/8l77UafXxtd4+69tFPVRv0MZmoJOeWgnOJWznh6y9Cqj3hQLJop04Mc4qrkM5PoKlgH7AgiC9LbxUzKgudq2lOK4hrCXg+6OW+oQIUXj36wONCW3u2ZIyYEONlgcaBGMsx2z7iSykDttvoGNe/xkqUkvFJFUpScr6HHlFM3q+ZWO9j04FuOyyP4rsGgwrB1BBlR8fON9ejANOmUE8vWx+9JH+FLUlztrvLyJiWnf6CrIC/+rrVw6wrFC5Eh4cLM+oWXKFqZBN3NUG0TTgf00D81nW1tTmRxjEaQJGZBJcaY60JLLYVSGtX1ejjOmCmsDXgtY2psXiDVr/ADhOKE3zKnjizyMHBAJlmAhXxvlj8DYSYc9lYcyu+UOX6JSxKEpJdnIAQWwWodbkMBhFguyLRLC4M6wTP7L054l8XkgfK/bxh9KrAL2lZdz9JCnA1gi5fBcu15n43szy+piNoevCag0HDYOWJixdpJqd5mvHFEvwD9fjQ7UwTWlw0I9xIqEozke01cCytwha1JID0OkUgDkDVV4fzH87NfQbrCgx0PVdAHuNH5kOHdTxjTunLq6d+CJemDlj+AZFgV65m3egxdqstW2jdH0Yq9hWRVMr3bRLHWv83iSEWQZPGC1XCrPes90tp2wjwZ4yKmqRCmnEyeUcSFZeQzc15TGvXL+KlPdd3k+P7HwlQWcIIf4tn1RBVn7HWD4/STULjmvs6wYIb1U5e/deKUU5laSkdb/V0RjqGc1ody1dEBXwVuNGrTHsA9cjfUjvQcjEt9+kkNhX8+wdt9TWP6j5Z/TRv0Y7kXbWUdnnKnHmc4y/eFjz0lRJt8BuYShwHE8iTwcqZTrgpzu4DD5CaJBLpV6t6bML8O7f/Q/HnIbcGwoGk9ODhx4U7DQyqJzJy+7vvDXvd7tJgJlbxaVpTokH6OSZ5Z/XFq1mQbUDylc2y/X42y7w4n4FIMpqYUd6DDfgBXql7uYqJ/3WTqtl4l2C6gqkt49FfEd7cy+h5fmgw5ilR4dpCrXxyv+J0y7UYcMn/n8KsACOqDUWN9cQ582qfH/hNWooJhB+fLj9j3ul5/Cbru9DiVoYOSVmsAxBgQntjgL0ozOmzgLKvhGMD9ON66xTLP/
jDPfO6m0AXpzsx2+SmXHZCZERQzWRNC1/+T+SdQ3yAdJQpg15VuXruYQo0XQwifLHh6V2PHmjDuJOgcr1Yd0/mRpxKokhAQnrDwknMWQGc5H456++t4q4VZGmFq0zSjWS17AqrozXiLYCcjAz4rcHrNkQrzDsasTBj4fRcNyygSc9dfdSKP6B6gSgqZGz/au0jRUYBBnjAuVIlTAsWIuHYo3UOjs9N8ltiSSnTDAhp4zd5jzSETM/H7Euhx5IofYOVxpTaPdSDtrtfR1W4tC/0sAtOfJIlyq/+y4aN5UR2ukMkRCTwVu+5vgnmuyc2rUMbsGRlq/BwY0lBvrYmpoaZ60Wu3mY/FWaxMS3ckB0LCzPdA0HJP8mDxsC/T97H4oavLZrKteIIsdvzSobxbqeDTOqbi/u/ZljR/1omFnrn018BLBJ6ZYe2y3XMmz8pcYLa7BQaxSKEMoe9xQHpV2nS22EwglRRajTz4yXkXYJS1AR87kBeKEn/uQ48a5ylkm4oXcus89NNr7/b8a3sR5ZbUSQdOdd+8OcoXoJ7SiidAp1UAyPxKrvLxCJJO2ey/wfBlHQe8uYFMRqB/gyjdr917U3lSQpcILDizNeZUsUxdbLIBvTG+7I1VyhKXWNtwsrI3tfU3IpBfXDFUGLES93Jg610br85u4eJrCXVloLGpEvsi1nwRd9aeYhw2g0RNGJ15+A7Od6S8CTCrK52s3t8YUcCwsCgq5ManwvhhIbs40RVdu6b9Fmh5WuWIbwlp7DxQoFwdGjoXF3dVqkaS0CgskeehLPZ7oC35LGs9h3rFKTZeq4gUXUIxMTsmrZuhSYfeR9r6LDGrTRgIgY7+T1UixjvhNuULKs9Z3P5jKKqYTLKeh2wM1kR2EqnCDg3gBVw4HL+428Qf9QBt5SmJCvS4JsbqBMrC/VC12fkMu9cbVQjXiuPEM+mq0iYxPxzi8mtjOy2GWWZh7xCg69wPfc39+cBSnXlE8slqyS7PuoRNlo0W8d5KV93RyghSb3cRTwhErQ8+n1MDFx2fUZouzoFZZsV194f9PEyaWw08bV5y/+A1B4QJY88k1qkijo5MCti2JvX13MOFoGnOuHHky+iMD/JVXV6LKvJzml/bO++scKXWVa554wtkwp1HGXKCah9RYbDsnmCvSZZ3NQBeKR8jHcYwxl/2yMGCgbhtYomOj+5MbM809fchPyoXtqLZxNlJq0lsz2TuUvDDiCqxMCVqFI+gUwyhTNVcqX5djZ8LZeDey0/if5eOdIwAk0MVYF19LuKRlTM6VtB6vff+QUHwWgdbImhj85L+imi/NealstgfnYXv8GmfDElJE/hLssMe9sbQKrJy6zn4sCulnNCJCq8InMb46j56ibRbagKJhFPFKJ8s16+AQnsjG3D7hg9d8H/a+hsECRK7nsyeqYrnGDSEI0QhspDzv8nBkv5PXyuKP48SS0LzcIIFGsoKNNIPElSXoE92TaRU2jK4RUQX7B//YZbb/UWfM1EjmGSuYLqD+T1PGSzPIPmwJP5VjqypYcIk4J91SmUTUs31eZdktzgPKseWIVv8PlziJd6yVt9nk089gi6JSIdS8D4dLuK6nLtBil2p4Xh/Me8QapLGK4v/3rOwkQEFfqTUA4g2cAeMJCJGwR7vfS4tkAIxtqJ/GcZOog8afJj+vT5cqOT2sUEviXq94o/wuuZQe4PvvSCstcEa7G9UWcGGR3e/2gMOG4rRc9yIA/K76GnsTTV7WseaUqNJPcaMHOKatejKek4qZcIEgLgIID6CFz9P+VPCeS/Sf2sguOa5vyGR+o+sEsGCS5v9YrH711fduLnaiiLq07Y61V1ZSjMX16zReErgR6hOXqSYz7vscLRHbHB0CTv2KEOysn83YkdMkYF/zyk1n7HUtHn8QVFXKye3PpQpbZn7LIF07Qq+iHL7MD+/gX0Po9ivrHYdmA7O2yD7WXMVsaqDj/T22wh+XSkewfmD7F9N/2BJNzK6Pmo9JbA/Xj3GaisnQcWh9Ap0xbQmZvD76yCyQfPXkGt8bq9ntrplyYhUqvv8j1k9nEL+kr1WIlS4WWntWFk+kLb1woOe6KK1pHuWjq1MuA/MSXYqJNwivMmelMCo5uDPO5FmqxDyYsqUChor0QZmhvGWwP2wM0UDZ2I6SlLDPS+t5SanrjtvCEa5om7sn+xsglRVRKK8Nu2CB8Y476cd7AvGr48uFHCfl5TYe+sd2kfxytZMeDc4qHscUr60os72vTTAUpNA98496HckYbjyoOpGnsE2vWc6YvwyFfniZh+dcItpRDtSn52K/Bq6Fw7qGKC8OGnG5gdbEGbpd8FEDQKgaIPQp0lmck5ulcnePSvjwcTJCW8j4FD5Y7j5LrGzhZPKTr0/1CtNMPGcG99T52R/yciQEDdEwDdtkpHTrKYiKdVXOnw50k1BfrBDxmkH8E+Y4XD3X0inAWme/QetfNy7h9orPsaz4ifpupckVcf/nunKh1LxkB/P+g9vwweNtk9xLOyr0rkPhSe88SS3ubBEUXu4UJkYgesrHdbbtMnw2MjrCBt6xe1h2jJy+pjBkeSGhp8pgDidPjS0Gqmcn8M/16INJuxM2TVBkS5QzK2+T09P64ModXkS6ObVqIiC8JRIyZihQoBGMCL2hY6kWCPs5FG3YTsO2XAfo8bni4yCoo0EDF3WHaxSu/3ZxGY9LDIiDC8pNLvKEK6X2QWxLq+MxdUIq++4JfsD7TKfnf83sx8TSFfFFSzbc9qBoDasD0+w+uUjJwOGvizlrza1/XzcpXunU0O8IgQxaIzQNuc8IPWb/A/X66I2tog7n1LMkZ4PqzrDq4c+PFHl+rz8UAq3m9HWQEEZ9I4oxdmAWoLWTPhPjZaMgcRA79NtPDRjJBEDUdiCSy3VOqerJOanJ0lf3rXrUfAIcn0PMat9hNyN+t0k34tf/3Vc3QyuglzlUj/IgLIJmF0oGXgyVh8aI6xx0dYP35eHAdxK9NebIzsX+4ttVhmv+u62PokwmcoxP/rKOnfJsC4AXbx0q61HRGAZ0unHNwf06+cf3rozRLfwQII1jtSroXh0sIPVXcEwAX6TIiWgMPSO+udld9pJ852PsHGeBKqtnc+27wZvgDBztqT2+tIBk4GwbRjqCujm1YttRQjvCGwTGpB4kkJp+Ft2cqWfZEzeSwhr3dIKv9gdObveJCNnjOvk3N+lNItDTSoJEzNTsr9Lv2dFEPcmY2Sgp5GhcAFw9/8v3N0TmaoUxezrjyEIjeaNpn0eTioq49koR3QM0PLNAlbw0e6NVpen4TdhoU3LdGTK18yWMmqMWqUaXOlspoxhP1kdchVvcysovTNF9yid4T4sejgHf0IEx114+wfD7SHgzox72y/tEseTRcXOMRTOWCam5fg0yol3ZrdnoooqcRRMMw5k2Kfcm6bRtKyHTVY9wtcBkHIhYqPMtecGJcZcTRNFLYRZruXidODebNydSw/GgEGWAdpgsNz+AxcCJLy3lGL/x2bwvzKET+1DUVPyvf2A9IjeIMtb/4qIJgKAx7fWCve34eQHLtK8B5AmdwNJwbO5Onfpfy5sovjHHKdq+FAh3EZP+dDZlV4Ljgf1nRvHDUvGuhQy+PFxppaYIMgz7Ucttyp5UyUbm1+R8P5MOgpj5A/XGdyFKwiXdd9OsTpssMXHR31axgVFq5xwxqYSnY0QVrirtVOBt/XL/74tQLp+3nnRw3nFAGTslt/t6T83fUpdmcjdnwZ3pEUkbhDI3Kq/tRE0cwu+lpj4SY+nAm7NIdGpb+MLbx6p81WiNSylYHH3gquUGBqxbChvxfuRpjZhvl3Cvjs9twf2ffPBZ93DZlyP0aIYaVd2VMvd9n54AC4YktbmAnla2vPWPp+quDx7ejmiN4Q2wPglR5PwK7pgfkXRT/b3AFkdm+V81wTHQ4NK11RX5gURbGM3UBICjJEmqwjCtDI3LLzaHjW46AooCMF7kmHOe/iXbs0UZXa2+cHVxiLTddHI2UCgDaWDRSOwBxA95P6oAvzywsol5A069pXckcDR+7Bp1Ytll+GXX2fxZ6SysffBfEe3Erw/885trmw0/H13i
nfVjRUpFhNwhXvCoJrYbPHCMVH0L8I3sIQMN6FJvfUwyfgGGXHfb1BMgghptqTzCpgal92/iqeCs3Mj8giaxqGyjsOwHpFpty9+4RtGHlszoPGB1lJvvo3WUlGDGiqKIQFC3egNmEu72qUkhlHQpaFznBOREj9QTQOzEcpnm7MIZLwd/BEx8F75EcxsYDPPWMNpX/XRf8aUKhXlbvyHzQ0+QeUnQGctI8WqEjvUeqhHl3CPk2oFszH0JbVAp0X3UsqZ9V9LDugtuczLM8QXi2b5m0zNCAy4+DlEY4bdE0vr2NCHB2c5LGCzwizzPRrMeXwYupZgc2zTweQTlmnOFoWgc9mLQvA6Y2P1Z2nw51xL2weH1uRRdxu/zOCgvGLGr6ocSVfva33I6wm3GRH2NOWVBpee9Tp74g/X4EInwxjSigQw1I1mbmsshr9S24kffzp5iR3Tb/xK6oYozCbwNhSK7QJ0RDZG/xe1o98xNfqEMx+VhLGSIaJRmXT0aQh9LCoQ5h1dVlGueo1NYqATwbIiVB18ElMEinYV6gj+DP3FWv9r0iac+PEj+L30yXw1qUZ9X6ac5XRBrt2+EYpFP2sNxDLn0FXgpEJ54SFdzBbbCx/SYx1l3wOHRv4U/4AARcMs2gdcd5lmFgmVwMIF6Yxl9c+Kn4R3Os2L5gQNCI14uXEWDEeaMizQBVaNGCH4AU1SYnXvaS8SDAR6BVDY5qs1csDLjF7L+sjqCSpUYHmJUQImcyc3u7ChViWY9lCssMAx0P2yuaMa4B8Dz+YEohZ98Uj8XmZhUk7tSetlZ3g2Leg9x66PiCE6OkIM7u2CUFpJoxc1vc4S2CJUC4VftrOGcLMmNSoWRlw4h08QU74AAvFJhfoH91LVJSFzvC2MJfEWx6bu0qMTXBVG4WCWTTIF8EnE0F0ba3xID3fysegbZtQQ54aqX3s7WAuFf0LnJQb4zEHCR+dJ0qTYyhY7JWbgS5bVkpN4IBxrjiPHEManIYuwQhSHvXau9IxfoiaMrIxk2qtjkRbklkhq63sP0FHQ05EUi8gl6CqQ3dLCkBu5AjV5LVUHyUt9StxDZiSGW8mXv/CgBbwg9pKLRKgzWnShz+v4NOMSXiQgSLCLWjJEkytGKnzJDyJkfpEFfs9WGkz40Hwt7Oy2iznwq2j9Dq0dVDVYIKhX+6qEmVh1HRvYpYMEk0mqXBKN8eLnmazy+jnfA2uhd7/NmnepstK7neCqJ8Z3ZxiGGk62iZBN6p82v3eNQqXu8gNU/rsYrN2KRCWlCVxTikVtkQ8xyFct9CZF9004ZskAtkIj1LJNJgO3fS1+o8SR8KR1sur4i5tDO5kZ9RowI0ilnsQDNaNZAqDs5fbAe2Fb/EMzFEr4Hyl9dGHwIlcLMos7lskdWHxYEANPuHYoZJTpmzp9ifz7+DlBP95zB/Jeryw8NOzW31xPbDrrfumun3au+TOecDfjvqk42uNPcaxZPvUAGr3sCmNBF4bNJQAiw6wZ8Wn/Jx2d7PiaOxR65Y+x8MdzYnNLGQK6yUiC8oA0nf14PPhmjPv49n5VRSQ+GJPaRYFChc6wPEBGBDkGZshUEAHG1bqIDvfHgIJo/FejQ8TMXB/Z7/Y/zhmIkAnIXBaIZOUPA54jc4jzupuJv2j40BaRe4HFv/EnljGy0ptGROJ1gy2biwc9mp3MSw9VqlSm6bjRj6FF88XAgX5Dnl3RCdMcWYNzVrOkNi+VEsBTLxrM/2gn+CO71RauPEBLV9k79oH1BocbUVdxcgWWLVtEGiB8Y4cus9rNbVvYDywntf85ivKX5CrvyJtCAUdNBzL7RbCdyrA2pfuqKms0OyASay7sJAncDEte1+P89UnZwvgViXCQ4OU1j/7g/LdfWL02fkd9el86U51DlTTGxC1n12t8l+TDKvJpwwp0vh/6YM6T0cXdeP1aMLhZw7eKmdOST9izPjRktRbl3G5MPRD/iArnyD0e2f/NowmBDlJQRtIW4JxuEyJIOK8pnbNUwDhb4Ihik1/U2zpgSXOP9tTCz+s0yc8qZrZAI6SkMA7Pap7c2pV5mfzQNsLg1Jq8IemqCowRFaqw1AyaCQQcm1hU/qF0LjJ5ZArV2CyH8jVosm+Zofg27Jk5HdWdt2Pfwf6tiLuI/PuJsz0fO+viTDxxm/68qAMKGpmBSYzEMNblhlEdrxbVO6//g53yeSP8pG0B7a1Rh67HOPedByJGa4NdS0OPjbRd9lKygK0Q039KbcAI9heXtTjkSc86ZqN+gP6eZ2/qdHgSm91Vt5kitMXOEWuV3tnB2FXMVQzZx3BMlXG9WHr9rjDYN4UZ71jw1SHrtXCiuptuN7udKK1YZY0ZUijURPLH7sQpUtqZ1jNdCkIyGrLCpaCcNoju1AvGnAbyzVlrumdRwh2eBUrBEVSxDKEQFz5meIKUyag4xjeDGZJjlthdkic7P+FrJ+35EETtPpQv1O1BUoOxO6HUz2kHugSf8wwdJftT8W0i4uJ1BQsjnuZC9KSa7gbzUJti6nKIKnTtMyfsW3VLa4bSd8g8x2X5n70STXR94U3rm5aZ9VsIprVj+1OteKO+s/80amqso16v//NFD+cdiQ8xQE4AGIfdpS6GasJiC+PTzB4cgJ5tK/lVtxR2GPBs4unOFo4n8NInaO5DGB3P+MbltnC/qmchnTse4X4koGeE6qC0rJjWxZzILzHyHD0FSrIKk+FvV2a/IpmLMnZzQ/LNE6mHLVMiuTWBeULdAH2kIukZS77PnFdgc21YpacCg/oFg+GpH/S+2jqMeBhMNv3IYrWQTo4JrtixjkSq8q/iO/wti4LroVum2e3djx6aavpq96jMS7RCxVRn8Dxd5zD7WsBKiiz6UY5w/RCsRRILkdREUVUYdO+3kBH7V5wX5kSRfTUBuxExWifpyA1Gn3KecWgU/9T01HUmNKu3C+wgnTP71FQ7ie1U6FmQfj5gIxBXu7WrKnm0DzMK7Z3iCO115WSsfA4+94LUkbAM4XrQg0ilrkX5QYwsLIt3izuLlf5epNxbIsTsVB9ED7OF8u/28JbI2FSTXobuYVfTrSYxZZLWaZivlicKgQC0OMFEvSGqRg8kW5Yh4QsC+QJlRpYqgN0ANcosGzlwT4VLxk78z+OYmbCYm4rEdRfobCbAuGV2rafd5XhNsjR7UAZQWy0qo1Gm1ZzOofjgJQJ8WyMi68le3txSOe6DDf0LAvLtguVf/17Kem6yxYr9CQJPs4Ukgpyy9/YvNvp4PAaq4wpxvcheg8BXdtyQxTLBXJdyO1tiZGSKnJdi4ij/SjXd8PM/2yRSKPFMYmdnenqNP2dN76jqF2XdYrFCDNv3MB4K8QObRCnh7QPGetMn93yUdOnoDINdEdBPfbI3Sm+Y4nBEKkR/tCgaGpQJ07hbWAVffelblENPCClTWAlsWRDL6wKQ+83WoPGFQeH2Vmf7rSlek72bhhZKElrfcwLgY6yA4zGmAooINDPsKbLzq7RDbIOIojjK7m13jhVEII9TG8KbTY7T8u7oMnjZmOhFF+THDF6Uqw62EHwwTUmrtJbmORSDRiznaInjlWVtkMv8yQEWyjktyHuuZ57WtXRCWqjaEyWmPg4PkpEmwwFKBvra1BadBM9blh0sxUZ1W+s5HBekqVjGrHF+vDlXIvtd+ToJuGpGi6pB7KnpRSQ2tcNl+BT/5T4ThlmF1Idm3JRcgRE245nKOoOLDh+UvykOLXKUGHBe7g8iWxd1zoHtluy1YjAvVhViT33ax19ogSqGDHTQv6S1jdq3wJQojyQe4wBxK5CIiP8GZbX265KZFnPDlG0ea4CRBBp2n97cR29RNuNscLW+D8moBYInwIoG7ups1Gvmb4wfvcsfoHbD4HF3oLqQKoMNLwDwRsbuprKAackgf2SdP0JwE4koh8BNJSiNcD6cStUgu3MiMRBhYzut6hmKrkbCYSxGQthKGxAuCol8nwy2yUOPVZfTrQ4/+tOQkiIY2GUCxaV+4O52c5WASgtprPNbIfaj47kVqz3u3fwo0bYLuyLwjFJmoZhUKvY5SKhNQRIbP3Lp+63EAUpA4FeYm/jfMmQxC6GHm
NmYlTwiRxjANu9rDIDYIYbty1v7IyHsTf9PQRZrEKg/leEMdjQJN7FIVoHrdLrqNnhACHRlK4pgk9TXnLMe93mJsBnv0usr4BmhAMVZEQcbOIrUE3j9fKPSzzK9MOp7HRIGqjyRsFGI6B6VWxc3jdCWl0VmYjYH+mLVH3AhXmuJxnuMs/HHQad8W1HtLo/wxuLwZA1V0WZHIZXxRW6ojhI/vF1av9Ic4OhpOW1pwTDi4Pq7dqnErwu43L7T0/FAAEWJq8KAyHEEOWOVgUJYnZlWjFWLhSYZmPQz+1Oqg0V4Vuea1LhCs4nvNP9Vu0SZ9aaNxRP/zd1Q4D0uBIavx+UT9UL7O8TCaBmlXhcGmzG0iameaWQYxec4qQTT06+q0yQ7Bd1J7MyRaY1iJMx7EnP2294j9LBOpCFspf/aWq/V3IwWpTLGoCdwb64sYuTSz3JM5qhFXj+qfy6G0Hr47ZYrlwdUb+7fhjIfbiPj+pVSkuIoCT96Q6NdaTM2KAMzUBTJfwVse5BCu9ds2RCWXEDWUnNvfjBbADCwHKCOplTVvSVBPvE9j7yDyQvRCUvUPovnTpcKjnBGqmr+6qW+o4wxJyRHbweWvl8x3nNBsTJ7hD2SuTMbSxsxutKm4a5wR0+5YkksxflVexTXs0YH6ajRlOXk9NupEYqjVcCKyEKwiKObZtzQcz/KGwZN+uyDWo7bE7jfH25DV9OmniPA1e2mby/YHGMzjwlJ+yWDE0scXnvjLDrt5APpg54w82bsnMgo6zxUlebaDoB9g+Kww0SgybI+3Nzc4cSXyKvZWUlhdqaC5/R9KAfXv9S7me0wnjruW3BOP4YUlq4uzXjTivKCWIxIVRbaWZuRjjhxFSQKNxbA1pNpx0SoqJKijtSJU9zR8bBI9KLrrlQdX20jS1KEKk65YoMZjMu63I5BbArWm0DAOqonh6YxQE/1uX/jQhYPq3b1W0MlLOeuh5gbAD51PUNKj2iBxnGRKqEwzqBDzYLGa/VvYZPSWqsotKJNqV1wkPa+HIhMx5Smj2HKgZbERzz5lqTGwh6TfhGIY9/WHqxEw88W2TxCEYvsbQF0ugwcQFPkutaaSxXKLMyHH7pqQ6XYuTocr596S/ZjivfVx+c0afbmxAY9zwIUuyYsMS9rQ8gV1e85Wlau5vNaOEuRx05SAbl16t/bDVNBLKOhh8V+nEdsgP0Qg/7MAZmyyeOFsIM8WKpM29ZAUwU5hV7wdiHCcd+0QR9O6rnF8GfPjQBMd7ik4iSNxrCgv32bnEoPYvd6m9okmaXql+YTwLnAilnsaXJR2p5B3GSAEh0af3+tSI905XXGFnWI+Sb/hBUN9DVtIRsb5gsGwYqnCPN7fhhtsn0hQDMwzL7mkypJZaZO4ZBCxbQnXg/iMWURG3R0r3yymIFJutszJLrU7fggdmTdggixiyQLMOSkbi4QKW2hRXUvFcGGywLMdaGt/8wVlL8RGtnepH3qI6CKyRxgDSHMUZPN3v6GAoZX2X3OssvrZykC4lhWM/NemdjTKSAtkI0wRDyZbq81v3kbId7cJscid0AZL9jbEi8rvdS6RyvAdX3d1SZqj3sDNezG7cmXbUHv1wwzH+oP5NI0wUwfEIyWLvPEyS9e+uLklsxe+cs4AzwexjGGUbjbi/xKFF0D+tnaafW0PAHcvdjLwaAcBIajhePj2y4jTbJ+s6Yn0yRn7gl1eHVD6hJEKW2/Ke1LIZNcq+1pVQczeHas1FWCT0W9VGbaSi49XZU1Maq5JvKJaVbORrbwAHB++Gq1c6rQ96wyQx5rvepJpaQFh0yQsLSRTn4jOBd1YWsh4Sdy7MeQ+w0BICvZcmww6ri5ZwD4CR/H1aiNGFPXYj4vO6WbpdHpgr54181PeApwabAANnUmOYgpwyevVRoLLS+hBBVOAD+akDZEeNVmJ97uES5Nna8lr37W8vgnVLqliGUyGkpM94o6j4WfJv75kL0hL6w5kwe+RRbpE0cXb6uai0yJGRMAdKHuTvpvelmxduMl/3DD8sBMP4w7M5tNOojsfSu3RNlJnqnJ3zyp6yxmAIE+8vlwCCp+VKJ6u1SRnfhKVl5Js8eKts4WvpmuhVg5E9Io2h+qp4Wh1nb1EG/JcgesilGnQK6vm3beETwtN/AusW9qIME21xK2b8cMcLq9J3n7S7zO1cSyT+fY7DWfkro8CiO8XWBEvWDo53bgpEqSN9onj4vytBNm95h9FmXTad7UDnFqhNy865c4tOKG9Yzf9adTjxTSlIkjx1LNh5hMQ+gZQwM+Aiu9ZNGiguN6dsf+dbwCxjyran/Hq1XgCEfFVGonfr/RdgI98DONAqu97VaIONCED8pHgATWX1wLtNbZaNB2DP313UltaWgn73Dvcn8euZWdaBU/w9Tsl6eqZQyFpG5i+aiQ5FhAmMySo3U2iNpVB8qUZ/+YLwh+psPSqwOljavSxdEtUe4s3k0AkgVSlXxJuxtSJ20svHwb5euCXZVMU9DzI2oV6sGcw17X4AUGXq4f83I1x+z7LGqrJAko5GkK78tpUejn4cxIpRqvVxHNZhPQ32HIiIuK0IljHEEPqdLiO1QyCqb6a9Kyhiia2sR0YaXDK1HZDx9hTLobOrbmUJpJSDM0WrOjango14ILIcDouPGysTapUOQdDZkVoFMhoS0DjTqLYLHa+6uhudw1j9hjInzCaGOfOaj88b28PQEWPpd1jLDLov4+KzFZuPSIVqhaor/XmRmixdhniBElJPKYaTgR8rnUg39hx8ovQx52ngSj7J9nnP8DDWQsxtUAagJv6uKyujJ7vbu+TVmLd7Co+FiuiCDKwW0IrwqZo058SoQLcqh7O7TNZLsY2BFmMvuc5L5sQKG0n/Zce+CrHEaWuVomX5KDZ8LVOoO3dRUZg5xxBhrEQrWTsdlBPkUgSs21VNK9pFUl63wD+G6jQ10IkrUBrqNs2RoNboe5LoFzn+Fc+Ry24lIEPFlW3r2jlbIGFtrQKkOKB7HbrjXFXecJLf131YqcROEtCHLbxe+hoheIraUPJFIAqVjuJD8CVwRUz+AfMgmqRJJyZOnoleHr6fWFRokF0IcQOZUuLDzAcXl4ShjUXlCnoGWV0h7MRHGJzcODUXyAVcrftP00IZ2E+0LVsJmi0lRtZiuYWWRFYBYigLOb16i4kRRZr8R42eXTQsU6fTjhWDq1CJZTLjcrdJTdrAU0YjyqGYhCbHO9mexxoW5ZkR5w4FUtTKb4eyzUo0eMjwsmVvZ0jCYucuIuKQ4FVUaXxtWBNC8WCmK/POOU8AlI6HA5mJwRjl0JyCe4inFhbxK/0G1hyoJLjLbYaP8fbaOTWxUuJUK7k9t2UQHXD5Rq/LkdUixnyNzy774hVe3MZs/Jfai1walU3rGYYzF7DAfN2qQOvPFCpgm43+1fVW/81J/GfL/SKuIK+3clEA5rCsqXbK7WJ4z3DJbnd1hFyjkTnr7mXqgiW/1SFyZYeUfOVVuOQB9OmoO5fLMYbnahPwAjdw5hdmkUzKwfA5UXUHJ15sSG9I1UISEWEvtgEIwrvW6ZJlQuwM+h2qML8HsCHh6v5oLavpJXyH2W3jhCKufKD2kQqK237t0IhDirqP93YBOqcN8BixRR12RyTOWyFcgKbvFmXU3RzfLExl2n5Bo5SqOGpfv2i6diHEMwdy0BCzMIdVchNWZs/VXvhWKg79QByzHw/2qpqzMbag/c6BIexezDgwkxH6QzdQxf/2RJvLq/x+bEKcts2MnhUKq/r2lwgVr/T33Rra8+dglPofM/SJ8GYKyW5Z0Kd6T42ZYRjrW1cduGmOzBnPBHYCgOIte6bAV8Wp/6aSvnlnoal7lhRH/Rlf93I48NMCjLLosQVwyO6W/7kW1CYjzcL2KVefIT8NiQ3AVOB6sujAt0SS62nhWkzSfrjDZgDBOc2PYU4IypPVuPrnD+6SxE04BLLnFvgipZ1mKOfAhqkvmZdGeia7cZPNCQXh7Kf9/jUyncfx+I9xyEYhHMI0FHnlkY1bK90ZhuTQYQ3nIAK4Pc6ln7S1vHYdQe8bgQ20/++cbYcaJGOh3pzOU7DA5PxeahAVVxU
zygSJkpTgseocQDG/wGJ64OeJX4XTt4U/Ic0tfBfYQJLHRQf5Qp9Hh/+fmw51YTL7hWlc3uUhVQ1Aq3U5GQuoXrRCbu3ormXQMAJGP+QOAxt2RFEw3evK5IOMVRQzn+RrWsyQ7HiN1QhWMh2gajd+Vh28qUepaTMtK+bhy9zXyA07ACRYWGX/lQmA11ALnvWJRpSv7Q9Rzn8Y+wa0mStJBJb7VJCZvmIeVOd/f+jewV7nRESDmgW7t1dtdcMA2IHnIXCn4NbbEkRkvnqgBqrlNGpyCK/6WjlJIc3QygK26VmeWrceymbeKjnUwMaNpdPY6jgTlOdg/yZBQlmvk2DjxXE4IZ/r9QIRhFB4nHWU0bxCPbfPRKLahqLBSDJr/l1ydr/rO1SEseZCB+3YQHGcNUWoMIpeZidsOuR1nS2UEbgJSpkuxhUM+Fdj2RVIusfG+hDBNaWTJ54eZAiOaSHxTjZBofLgWv2mRaD6dLsU94eswmSOiPTXIRn0KmxQ8zZrCVBo+ntg08rGbCF/ZEwD/XdEDkyG4sKa58Ehh0oXSwl3pzeh4ir3dRjbQ7ftwKf3U0Xwia4ktmfn+IVFcERPeG0lGEeftMUv0/5MWTLe8z59uahuJ9N6cZMbx6gat2U0WxvqDAtLaLPJNlfh28uCZ5JXsL6n/av20W4vgQDohaFNa3KYVg7/ozc92I4ETUIwjj+35Myf9+0DngfHc7cWHMR2Nle+0BdEYkdCGYn0A7w9QjljZY7W/Mr5ezOIj+zpGw8cJBShT3RvjWNLRDudL/1zvU3lyRRWsRnsTKKmWJbubtUr8+4hWq0RLNTcAcxx6Y1zWY0H9XuwozNMFikb6D2a0xNGJ1t4J4c3HN8SKKyNSZSytmpGmsgpcRG/vQ4/p2QHjfCrJRP9cBW5gE1sPz/pF8phUpUQwD2i3x1ep1ylUpsDSpxyOmyD9uEs3mEEXIoxcaxsj02SLHGN9+vIaPz+s3cRVCOLHqyYVjPByjL5p361dEB2e4LgjgCDMTkgWae0nQ7/xu5WQ73oaO7vBt7K9/eozUuwh+IpIGNqODDdFw9mV7DYLztGOEQuXO941qeoGKqzy3+TByx6QYBow5zV6pRwH1CQxzY5siOwJTK2jwzCgq7BpKYqzd6dV4L5Dye31tK6K9SnO/Nnk7lAR/HkqUoleRiF/pWt61TXcslkOIZP1Y5Y4hfwn+8jM7OmxxKqYr6ZDMELc043K43PqeKBLmSEWe/C2H6NIlcZcey7xvWJiEoY1PUuuW1aVwBptySHZH60MtFYaeVKHkOdU18eEFqm7Y8agyyXCsjVyezCjyyAj2SgR/AoKUuVPUd2F/r4zVogcBhR+3/jrU5JTPZXwVG8erFHbNZeaegBEiYuxvvMkKt8YUe5y9alJSHAA8MmfyhsiVWSzhLnxySgdn48FFpQ8fe1e0rqkTa2fvd9ZwiWctjgSQ/aIA5RjrSTTps4KRlBv8E0OtRZ33J5RVHpeSZ27oVaKuJNUJVRnxV+YkvgnUlbjawMuOMJb5Mpmgecn49754LiAYVjp5vOqRwO1rkXmfLPAhOmdudZ/gUAWlx5pPmyAekM6kCzJ+uYCIRNRg3quYOC5QgaEYVLZumnuBY7NeGcOef9ueF0A+8pNzfW8g8de/aD6N8bWnlP4bQ/IN7T7x/jhNUlkT4pggIQWt80AltlL+Su/QyWxoYop8DUZ8Ua03Lpj/8Wg0SbErfdN/B13DSf0WrFMwWh9DnqURA+7+AKw4VFjgzGOzk/Jx4q/+dbpyku+QKTNt2Nn0ICT64Ma7ULl3wy2zDVDqMZAFoKUzzzhLPn49opaJCh9+Jl2a3l/ZgnClvNddt1/kExH5mslc6PkBu5LFlq8nZVm1+7ADsTm8ta1Vl27IEQY933Jl4kHjPJoYyDE5UueFOqg4UA7yTI+EKCjpEBMo9uNBFSaM/G9tvUJLwqaZkof/TrjBTWZadBDTZ/kQ0LiXHThGw8qSeXjwmGsLSPZqxPGJGPx4zA7uSD/GYI9907z7oaIvNcFNhSeu3SVNvpTFz42hS2Tfn2kq7e1Y6m1S8JE1r94eaNeqOCL1PGuSFO1gk322nxdX4nN8AP4Tvg5wJkoR7mGE9v5EWIzJhy36olQBSSw1FaglPvPhL7msohJ9Ocxu9+LVf6qJ2rtTsQ4ilCIsfLIifTyfovEZzstST38MCTwXdcjL9UShL/+WPo8vIGco/cOEnNHyDIJO1PHn0yl9yIhqXqPIC4aycsDOjQySttMgcDqeiXrQjTp3uHL3WtP/qm6SaUnUX5KXQDuNfU6L/aY0NiPOtNYIBWXYKuRFhrF3vCyWm7NB8LBJ3RzsM0jCij2HSj6xKyJvCcwtRq8/rvNNEjbtdHp11Z0rqfKQ4n2E9XaCAt13BDOxpR1Xj4g07BPfQLrRHHvzm3gFMm5Tsry091Ia1NmWKzXZt/MqzbAV6SQLEsVGt1Gc/cvUCSfrT5Jf3/aXcMl6IX5f4jTkskjk28OXvJIidYJIlBrdaf2vJu3aCnyIhRJsTEie+FDEBKmhwFELhify+pmyW272LT59xn6knONt9KpaT5FeyxiFve98RJ3DvieLkIeLz5DkNgJQa/YWazuhQ9iNg7nm935Jo+LIYZI0UFfH9EuapisZdYiUs1JEN/zRgUQhcFzOCLIfMI7b8r5NRYYtI4wSH1lunoIRsTlr6sI6kidHvGysp4HjSZvDqRf6RIdNlo1R7qxfdSdvUwCRudbDotyHJtpaUhqt+y5X1/ZlU6jGSjsFX+0HETWbYbbvhiuiI7jRaRh2lAVEVcfqLJ8klimVqWkN3XtjyN5KBwY70NkQHQaPDN3Gp6Vdpn+UdOpS/xV5RDxCth63gZly8J1pJ1TSm26o5aVOLfwXRoahEsmWKju5SR8SNyOHjFDN+7XrdAvvhLw6h6fAUNKAQxyYehn/k8MWuvsEvQQn8oqZnk4LsSeJ6teJHyKWfXG8qdeZvQ/KOisbrHmqEvP7P147Ou+d4xDi9qJNagEXWW+WV7Rvx10dnz9kQVtb/wQ0IepR8M0Zo67ji+qbKT94+ff76b+dduyookxF8gmKG0u+rkb9TU+Ra8deE+Q4McYo+8hF2TRZNOAJc8gWOqvD9k215BqfMabX51nxqxr6p/0pMlQtc175CMDzWvFsVBi3ZxfGWRxGn2yY6SaJynvqu4Kri41lHKTqeh81sFjgdTDM0PJAULv4SqqcJmMTHeGlfd/blx/XxPuXOQg+b7+eAuVYAKm4Xn4vIw1PnbZ3OCg79KiRTEK053jqHeVL9zuU6WzK14MZwLUatdQDhj0ZQagCY6CA0Q8hyUKvrpLs96m8aK6BpqKJU06bGCuoa+FKj0yaWXOtK99nZup+LFOSN6WusdBxTwjLTl5rDaEdbb0cUabNOQ8XfCMbPPB4dQdEIHytUBNdp8ZXi68v4Nvdgb1jVu8Th7v7d3xWo4VTTbCYRQ109T6QZMkXyKMydxf2XWZFC5syk8iYdJwEqMwXaVGbT9CvAY05qD4ok1K/WDyD/mJhSKNhXedYqyTWjmGfZjJkP9tvA5ltOkpOHu9L5ryzSltuOAk790GrccFv9qW2u2nfAFOqfqOx5peVDLnrb6q4XUpvSupaia38LiaZIODqCXtFmnbd81LE5l1KZG1cUBzyX0EpS+5xkifmchJhFJ6odEqCCrlKiakg0op2+GrzWra2O9pTlN6/qfuj1X6Ds4bt0DPNhZUsxrZFJJlVNO5PJ0xZ6eZN6y91TzAaF2OJhNPZImiW4qNUz64EoKMQxDLZ/CtpJ2Bim8RzyYu7x6q6rvZSFaitzaOmON6yhDG0XC8TEnvTLNg7xMBF28kc0Z1XQ033W44oyVvu36B3pYoBOsVDPr6avrzYQSleYnSEpTK2B/RxcoHgS+EVKxJhd/UU46PCSWjRA5wgi0MoVoYHGN0MbcFjcc9MOPcwlbttlsxWyGrjPghoXe/vm+/tF1egFkWoyTTaywKLSAvsPCzTkASyTLMUenM3cDoUdqqIGeS5LzzSgqyc2uvNsUFNok9wj4Es3U2v0hIrp5CzC5W6Bc/eNO9sSPrY7BM96
STmNS7VBcXA9/PkFRiSD509ysPMi2OHPFybH0VjQ26yj42oR/gOzwfDS31SKlaqQ+cPmHphvgAXLIFPZYGTjHxfXbWgP+nfokHrb1v3iNk+Zql60OQo0f7AErz/urVqxPOuN7+ppeYfgAzDmMwTEJ1cQGjfVxPN/qK208kjp/19LdWPwH7nZ0MRorENR9aED1Y4hbsDjmLeWtPjIz1Icria9QWgZlo84gE17yb8Pf0oDt2gvDgrGrTSCmkVgPlfpuBsw/Hr8p2Tt5NznGobk44kfyU903liSQOwI1SI+0X1mMQeAdGlf1dw0o/yOa57CfNhg28It5I14lSFAOgoOpKdZ4A8XUVAgdERI3I4u5bPoBXaYzMLw3YeytzlNpRDvo8lPeoCyennLSzi8VDXp15ZIA8d5DpAMBNCrv/cit3KLJitPdUpo3CIaFsiVD8IFwl6aJ5hbrzAh3KlMhEbksVl+Kw+RDGo/jWif6aS9plLLbeBJkR+JEIBLypy1yVP5TZmQo9Lun9CsIWgQQydShPKPVUcTXcj7ss/6QAhv39UkTnmi7GeusavUPmf8bjSEdd2xBvmkOxyvIRHZ8EnU5QAP5di/UYmCpPe3fYAcaEqM0U9oSlR1OcDHjnzCUqejFjYttteKG/taYowAWTmV0iL4KfZCxCgaGmGpjAaN6zZnXPgAqOtntJRIVztGa6pbTUPPCH5mLURzJuN2pLZBg49STTpPVrdXLgtsilH0/UwJk/TOkloaTz1TpLDbO7SSUUg00OIxbwigWj5t/5L9rt3yAqg2QXi1/5a1l7KrOVFWkidX93UinvFr/2hCJCmjkpAjGunTp786F3mliYsPswUh+EwuKO10QAidtYyl6uqL64NGyTmJx6bcVkLjAawG3yWv3Nr1MW7iUU+zVRZ8vU6sZAIcZ/WqAqLgIUHfflBOMpEf5H0UZf7/OT0NxXB7+QS5S7TFI2kc3dh0653rH7dmBNddTMihtk244YnvmQFCCmJxD8vIhwacDBLcFz0JBNqsftVvsoNhpenb9hTsNOUnRKmR9VYwFqchu+E1iozIeo460NrctPCYNDpY6pb3knPwtOR0+vfCTLq/xE8e3M5t6zs5IJMczFLT/USuyGebrAY8jDPLU6OP8c9KKiTJ/9p6A0LY9HsBrMw27ZhrXT3XzB/xtVy5hixKyUN/SrZ6eC2+Y3Lh3W7EPtCgVboD4yCI0yQ2XaDxwHgGfGmuTEmuuKXKUGoNzgQ+wqWBoYafZ/aXZNJisQkwx9xJI14bSAPXn21I1oLwtfXbrMe7RZLLxwLpmZtkBrHl5yjzDVvfogLlY7Kf0mlNxS6415quk18J0Uqxk8KB/TBuNU3QYN1Dr9dryk+wf7TmjMgdF2UzahB9lFQxcvtq84Q5tRaJpApi/FnvnHmfw1TBnwTcVVk/+kYE1j6Ny1/tOCm4fq9DjSvk/9GszCcmLUSuQfTNpS7JZsQ0O6MNZaCqC7UphIcXvbRRePWFdwj9aAslmyouvnf3uSquNXU4Pzih7hk0nbCuBgJMIbp8map6O//E36X6YfVyRFbUsWEE422P2lA9ZyryvDK8+0+2Zqbxr64G/smRmH2BlKUNczUJdBSyz3gKVLvKcTmC27Lbx9JJ4vWKt9lprsEMYFKy6lEeDGFF+4Ic3PPcF5wwfjsB9XmlXA+BUR7cGwz5YxoWcDzGhRgy6E6Zap72DVrtXdFmOgueLvqv5lIB2WLP52H3hZNAZ25KhUs1HAsW7RFcWgzNVknywtjXkzz77IDRaXglbp/OMO6pt0NLHJ/AE8Rmpioo+YXmE5p0XhhFz8ShDFqH1cuAwQe9+Z7YZXwLYAZjhTB4i7cjNXaLoFMjoQYMml6zYrE9Vj8Oe57vj9KGMxFmAcmcHYE4MeWirBe7xg52oQ33xkZ056pxAODv6cr6iN6sutgjqIxdgJLa8i0E1Q8KDHYUIi4sJoGSIGWFvW1MM22Qx+appUTHOoV9E1hEGw6zOMKruOLEAR2VxpQrqf8lzQNGw7x3XjIHw0riXgCWZsPzyZUxmQm3oP0wix4v9GlCdr6+k/8BACKIPzDHrzBjSL+5nu6lLawHX8avwcmIVdieogWfyd8Ni+mhjMb2yAM+Vmbk555dLcObr9PGQvSQdL4TRkqXtoh5ZxnCEaWnTPPf0ud8AZv13TMA+qZ37c90a5EEk1jjMNatd3lCDaoX7Ao28p85NKKglbl1uy4c4CfoHfPH/X7zt+VkRS21A2IthVi48pVbaaguaLWT6bE2uTjlsatNkpAJNQegoOuYYhzaOStf0eLEepfmnxpvquwC+RqG9r6rtqoNxT6PQEMxi+7rxtAnXykniQuOBqwEl0Fk93iOwcNzRU5ceInYR0cGU2ohwVef+u5/R4mEPv9TZmq+RjSM4TVOob3nt0GUWWk20cE/9VRZtiOVsq0dqEq9Qp1asSaJRdxdPVlil5bXw5AnNzmYIXbfsVGv5hBMw7Gc+ciJtAX5zu3seATxsILmRr3C3bzOwj7uZGqF55W1qjZgeroJ6A+sibACsoq0Sbh5xBpghHecu8UcFYQ2wP7EBv7qN3Vt7yVBiLx9+aw9DirO0vGpDmiruCxnBk8lmryccI35lLGUFR4OqOBoW3IVIW1ss4CJSRcOatuL1hpYA6T9WSvk2un+N3qr7o0rZNFgK3zDKLIwE5gl7PER9PqZ0yTn8E3V2ykNLCdfH0/k7e0AMQ3Tod1JnkSQzVC5OEVBz3iFphTtW1AzR1IoWs5AvjampD61QT9Y6bJUMuliNhbhhys3Eplb2bGpGxyXx4oVyERm8HXtRfGwyV5FwBPLZ4pbiZj9aNoXC2Oow0D4WVv+RsVrDBzCSRnkughTUI7IEloyY1YUgAu3OhKVKaoIyjQNg1nAJb1o+zmwWJiJUgY152bN1ZSRu4kXBd6LAtaFlyhZh9h9cNhhtacKgS8BzQ7+93GahMsfrNoBwYtxOLRzo4jWa8XU0vLluyvU64l89c/iolrxTxrHAyTIRuTI2RxQfQu2DzOn0bbyb+joNurMf/O7hgEep/2rzMt4i0JelV6eI2pVOEHP/1ODDgiHRxdmGoUWvkX6+3XWoP5osAzmm27aLwikwkqDSYAdRCNeF3kTd47vE0VoRcFxJguF3D5T6gJHfnW/QhSPRhR7pOXJGi5+5GTAls+CGZEa9USMQuIu6HARsAj8C1qIAaBBRnhsLXocr5gJ1eJJDZzU98hqUulA+0X120e3aovEo+paprAAa9XIc+Ef7n435TB09T4p+l6CLpraEc5QqD6f6ZZFpFOk5igXer57Nea7sf9JEuCAi4pApKHk8/AQaUmsbTcK7JPmdtj2W6bngU2l4HHh3doVu5u8A+/gtmBGMu8N64C/MUk1CUGoe7XzJJvaTpHqm0HAyxka7u0yb0Rd8I6r/JRlkGcKjREuL0WdpOMqY5SotAaILeOeOAvSZxnXn5oPr/z3C+iLhomnV4J1PzKEou89D2kjUoTDZBRLfUfN14RuaeFQexAnY2ZYcfWrdJep/BQ2L5gjqs5J2+kxKEjDuq/Avs+Jg/iRz6skkFUE+t7Y0Cqt5VRYSM2ycsid79z2ndlvSDtWudYs/FXgU352GZGrFwKxd7AI49NyfsyFPmK1GOouqO1tZ93+5mK0NpEkXDvT+tzvHhaCBYZ2T/MqupZz8astQDVkscP08YL+RkC+G2mZJHmsY4IIoiCj2mSANmC67SaHz7zUNiRu3HWvDhC+XqZnF3s2g0+Yigz7rfFjSKEPEEIehy9pg5GIk016tIf67In7UZvvs5+FLxqGZBeEaGHrIT+1Dyy1cMXIgKXOECWannpT6pJSkguCJJBN1LQQ5lu/FF+VNXRAp52hKUU5y5oV8QPKUJ3jnX/Csie6N5N4QUiMLpnV5mTA5G9vkO65iUZJa+ICdlaUiP6s3lI8UzLV/bZ3Ugwwb+4u2Uxi6qOl7efZOYhCCvF5NJDbYLea5PzbjgabNVCHaOzUOTBKU7oYyr0cDatXtaScN/aZYpWA/8NylMcwWRKrEEN7Tpj9s5uauvpABWF3CzS4B/1hsJEk7oUrkr9RI33X
PRbdHFSzUMDSLs58dzfeYWe5pQxvEYpQcSzT6nHw3Fd/VbmQD7AryQRooxJ6+/Y6TI0EVR4Mf7JBuWaHtI/EtDkyp/xHWOD0PZZfsF4xTu2dTvh9BwwZRn3cnnIjQRcwHZRQ4fTXQiz6spb4VD+9XN41ze9JaVswxS6NZG4Z+Elic3XAe9AvyoFoOc3WyvTf2UU/Rcy5AcPeURT6NVjVwuutfkuxoLpOI6ofZkd/zE6XLZ9MFWlgjNktaxe0nUgyPdXO6aNuByGIrzv2zefG8Gt9CzIRh16Cw9zaE1M9myRSsWEdYs4qPaCCkRHSEXlPeVH/+SIYxXHKEYSt6eB0Sd+q3X5hZONKhR8oJe4LuMRgtU2BEsR2KWBEUbJRYQNj+wS8tWNWRNLdZV6ZMD+6dvTw4XlVcpn+cO1BomHJQV8Rt59fe5wVuBfAfM6tfpdlVpdrcDDaOpkv0c7GgSxWtj+nnmXKr6XVB6O8CSW0QkJ3KsZdgJ6Ul6uqep2EjwuzobNVnxcTEDkulvEXkUfCucFBt1iGkfxjMO4obx75Y/A37EpaORpOEPDNSryVexTeH7eAtSot9vpA0wWjsc38Xaatz1+x7Q/dukI/yRM36O1R30P48j3P47L3XwibFYrfYcssuXv0S7gQ9OJcO7ssz0phtmk/M62gZ9W8MrJUXoq6tUUI0aqTMRogSqeHKaYqwJsUOU7qtPD/Wtobw0L+sj0FNJirMWGtbi6BkYwOR2SkQacwoHz0c8ERAPMLJK6OBEBaLlUxBD6g7/6Pf/aI+PJc872guXII3eCq2ad/eoqw0e4DaS12A8vk5tvDGV5f3ritmatVpl/MqYbZxLTpxoJbdtkg8oCN2720LTqJwtEPRN4dDROenBbrWoA0vzs62HYcIcmzFQyaqlcNTECaWT4UTQ7/g4mVJofE25P8CyFQQeT1hD9ol22j5uZJMvneUxFb8gnPQLiJeHIaFOu1g1oVmNhhnbSlme/+JA2BgnQFPgZlxV5+VjWD1FCau4mQCbLcuZsHoYcYevsPU7vz1L1tSPDywBwtkIFt/YzYGQq+ok/Qk/eW2Ag2yw+7c2pTcmB2sxmcnARzxRs/HrGRBSQXeP6m/mi30Vx48fi9yqIXPVdlKJpMMq9Y3I1QmD3zaF0mwamVzB5I+Bc9MIKQgPmUb2VaxN8gqEsTl/YQHENMo0FGmVtRpuqBD5wL66IejoP70tIGVHI3izwDDnuQsSsxn9I4GC8G4/z+IuBs7NlyCx/9+KplYbOMohDkoSm7ZxO5riZCyM60gimc3CeAHib43OVty1ErXokZ89uW4frdeh/kESRq3SiKx/WyyC5ylvHafKeR19dATWyVeUOtWkr+9hSuAgwTHut8Az603zjgIp4/YOI/AgQBVs5RlAl213tfcsda7U33upoBM3p2nTJpwneQYvFPYZBxGDKucp3tZPMMrmRlX/wQoZfmO08Jl/6ofqB5xvChZQ2ZRrVcfYK0CJKck70MxsWJcP0bZouTU/OeFlOMNzb86T3MSZJ9JyBaDgcPixshcHCG/zwHNj0kMAYYe6qp50dxgDcfLU/m+YAmzKBxYR2siYDGhrOdEEIWJ3Yfh4zrbxuKVP/nqCicq9zQw/E+h//V+zwSiUflAsR0S5yuNQNMjemy1+jWU6Yl+6dXBCeWoIoADMRctspF1RJ6WioTF86o6A3nTA2aCFB0ycWPYYTNHg7WXvce05mqDHLlyJk5j+/1QVRPz/LSeshChKE/VmgWJ1gLq++uzT3jKRnRDwaW26b3Jmm/aHyBoksF2KRVG0ua3eV00JB5jymXwEj3IqI/dd/vl0xVYzH0/IASp3MoXWtE3nt2uDKDM0ZOqhIpxS6JHUhTDTqz9hufvYvzoRBnKrrQsaOsnEt630dP3DofdjUt4cg/YXGUQt5waQNqI0vImyYqTkuo+9XQDlJFCVPKeyXR0wtZwfJLOCD+cjNZ3RjsQq4nILanxn4oIX4Ly58BbPhWkBuTA3FB2Ao1H7nioUHM9BE23Penn4CzAzzmyDFkHa2vCPoVJPyvUDQdPVOXg7P4NtYXGn9LPRmHD7ixNp1xLW383hUJ2P6XRfCFwc5BhwxTg0GlRocepBDQketCRMNKqr9cZaftLHG7eM9PDoqxbz7ZN1iri3qKxqECP4toZI+pDLQZ2PcMcbxyR+gLTEZlb0/PQsz1ie009ZiA7Swr/Aqv3MjLDD3H4gtIK+QYfnMtwTnyen9M88sMxNIjzIQxgTF1m3H/BCoUDXicS0ksKPasfw1N7qeaxNCo21upNOuwFxrKlP/c1BwIkezh18X0rFLwVgDwmC+pbR/tittB17YutZZJGNxUyMm4dbzpSgJgz7ma7vr30Wt4F1CI9khIaDWzh2tUYb7cQt5/30HB7hGq/z8RRSgWubHWu4oO9o6jt/OWW8NZ4LutXU5YheWyYuvODoXpPTxqp/r+5l6cKlSFaeA3maWwO3a/BfoaHe9IpopJoyV0MCehTauaHlCjxHEOx2jiGQh6v9n+o1tRj2mRiNlYdochli7E2vqp19BdHGRXGhuR6r9AbYEzp06/JfYhFHjnV170xZ673ao7r0028q2m96G86F+pGNMxXQKcM41a6U9YPcjvidEOq8rZ8TmijPGA9VFDXC5bumRQD7CxKQkJslr/ocyfqRJPj/B5BDYMoLujFqmvV95qfUlQzxFWpBVgwzT+ANMKx8c2PD81t+xV0JmbxKm+QNV18tqt1R0TwDyJ+1FFSm8AMP52Zb5fbT/eYauc/cg3FhDa/DQZC5iGyGgD0OfleSyXtwDrWITG7WYy3Er9Nq9FKxF/wlg3uXfn46htbzTmVnNTgYXOZ9cqtqjbU0/EEZa/7bm328oA8T/5WScmsmjTQ58pTMNzkHvtsZRjBk+owFACrFz7vfVqJ3dgBsTo0PCe5cteSoMfm/JGno6loy+GbEizP7csmGU/UH3wt6tIjUM9WQinM6yIOdLi6gx7JiM4YxsBaPM3wfv0BrtPXHbxxQckjFvM9vX9s5LCZUDKTK6iUJaqyd8LtddzSMurE3HhNxthzL6z+30FBDCbKblq0chkWdOy3FJL0bOr7aE5mgt6k5n1BRrOSD+d4qDvIR4mteBowQS49yB/WcPD5zj2UwFPo7qVos3d2Q6A96vpjZHp5HLMJJ4rKbH5YcqSM5AcIevr2culmjf5hFDDbyXWxuVJr3gP6ge5n4vhYOx47EZkqKFe5s/HYblnjXGWqYio6Z6dKkvVMccOSmN+U27LoBsoAQyCf7TP0NZyZC2UdewpjPoCl/zW1LjFXLpSV3RBKWZm0+6rMMsAkpp3Xivo1EKU9HO9/ZmsFx/87dMqjnY3NQcv+CiSmn6a0/ZAUjsolp6pV2YjpUL3tGfnOLflPMu4qXkGPckMWCdQjHMM0uUXT9p/AIeXBjDdpJdodTzYJjhNISNVoCJbYu+wBTsW04mtAnE4+tjaThkUzeuIiZ0XYqgQLHkTbU/UnXydTM4sS2HjnNRnJRCjU4eQUMPYjCCOYidmt8MRWKV7ZWmB5Ppdh+V901IXwuHENX2zfJhFPag5zyMKywGDBJi5w5JrNaDAzSV6e5lkAfPzjtNt2W7GHdS/C30E3XoQixDsCQq/RGn16GTkxAaW7mjWuYqygJ40wec9ZLdcVcdw0+DZv4Iuukc7Bm4gQcybIZ8ROMslfmeuAzIWsw+1ii9jSlw9sklprrTrvX8meEf96zbDZ8xC+fzGxaCtDkRWYfjbjpIacT5ox6cbvAEaalkxFg82nxQkCmM7jbMLyt84vfXs583s7xMpDyvNPwo1UnNIsjKqYj73MxZc4iRt4SgqjrZSGEKf2XP78ySRAo54NujC3cNQ+hz8j7udxDai47JBBaj6biioFQOLJXCg9/5Tvk/TwB64+71OU9jopGkQWdoJmwNEOW6uXqRJAalaOxV7DZDUXqX2dN8XEEuHdIN03ery/ED5EtelOaolPAoV4U66E/Sqv36d9qN/gKcZDB8r8jZUXXAaLTId6DupqXV+8cfWZLMgONBYJm3NZhZPqEECdLCeRAukqsVWGBnayIr0vxPL8Jt9
0iLiQDE5jUqV1J2dyXzLcBfzccXXhnS32hiB95zwyjnXBTK7OLXKymwB98moZpHHfy7yvSY4N1g+356sSsJOXtT4M/nnB/xdM3bIrX0KPwnot94Q29Xn4r08Nz4p/wTR2OWzSGXKmf7sBS2sI/i/eZ8yfdD5zRFTxq8ieU5ffuibAIO/Ckq3Xjrcj1QrYI70V5+Aa1jyX7D7DSZdYHX8zX808bTYvphoKrX68jkKvONYgQ0OfFwzRUWsfcHBOeGFRb+6cd0Uzu+jTXbwjDhGDpyjxwAFF5F4aTbXuEch2contyJZ6y/yb9e9gd/PMTgrioOkQnDY/mtuq+oMiJU9UOJu0HK/iqsd59XpEIrqy/ZMxdRShJfwwBVrlKrmjv4RRC2qn5CLXksmTh5/3i93m2GnCr/Ew6ny8rPS2MQvePl6I2MsBm1g5QT7pczmJW96E5BbL1R2otZfUT5/GwzSu8vqt1EG/G5EdfnGg0aV2BaPiyZsEaeD9g6CqfW40bJzpohKC/tqsVa42PFrWgx375W16HkLNXyDxrSuQDW3sgAJEYWM/Xq+cMRUpxfjGcH1XGCO9W56QucFb3/ez1owjWyrFAqSvyPtoShYGFhmbZoruGVNIV+JS7sFtZqhH5a8RRMtOvvVXyo9Hx6GiU+3YVqr7CkMta6J7CNLawQvz+0d5+EUCJIFzNHMTjHcdo/UU0oMemjqqeRWkNoOmyCVB45NgywuIgMEZim4+dmvMW4MyVy0PCxvOZbmupL4jfE9A0MPyq8EQRvamIvDH+1ayJEIuZLmvVFnVysDTibVpMXlkDgq0Cz9gQboVKnatryNBOD9IBV/evkWA5Vr9qS4+l+3vIRCjc/I298D23L/2a8a7qzy//HsQeT1LsNv/lbCPylbh5Mw3OlxD8qbWBk5uEPEfZJJunkFK4EJ5c35VRm0z12f23YvDBpE3b13YcFZkO8Hwg6Su6ci98tVX5vH67ZER3WcZracgsi6LEHaqs5R7l5QmkbzQgnc8VzntPudTgNX5xJZLQe/OAWfQ6hLVtcYO85U6SCd6X9NmXCSCaG/ZU++uCXgMmmkxIVsYrNxmzeX1C92NWK6skHiHh92CIbYfs8sVcdsKJqDess+zeFUugaXuCZgWlUfFI5BBIDP+9iwjEEES7d0mdR5ee9zFxfz3eTEU7+kZDc2p/Maj+ieIcpwbogKr7rVfaKQrdEvFuBbYC+KoiqfvP/NAiYCGbZANVWEbXbTbqUWVK90JxVoliXofu0nsVFmVMrTT+xWA/jNikyxzH9C380c2P4Z+YNJgwEd4a2XeN7R1czAtArczY3Mf73sCxGWwrlmIEWpPJIJZ+5UFx4UBEjH6XGI12r9eQGq9rJfauzqM3MQMxweBQf3jETq6lQW+HRx1pX+1ORH1amuOGxjZcyzd2qfSfGZ5PCbiFoNuxp7ILUWrJ6egnP+GSDSBEFuL/Ka1B6CeBhicBb3FCGDo7t0exG5Hz2gu57il6mLv9Wen9SKVg+OrUzNsisOUMtjKoBQh1HnVyqFzB04Pa8s9wExCl+SG3+3wwEvsKYwpUbBr299LhZ/emE1lK4deFbVUQ8vzxJUhpOK2WUn2J/Onc57tyRSOtwl57PO+bNe+Wj0dqA8dZTNN+aqFVGl41rFIC2BrkfKKPrY8Cz1ZxCwVlx5l9UMsC9cIGrejCn+Q3nhqywuvEwPCzcySqK0nd/0AIMyzKa0RW+QhrXHIVuBE/5NKChQvpO9COagnzUjTX5HBWcnWE+bWmhAdesZXe8Xiv89zSswZSTZnd9ZmR2zpETdRKHIl+ROjzMQTS7vO9eKQoQnQykHpqUxWOlZIeoD1pOKkagjXSEfVD8D2AD8UBNOywnXtO2eG75FZQu+NuI4A9sjZs6SXXBJyiZm0v/CZvtO6UtTbcSpe2Je84fd9rGi4UM9C/MqL1zlHX8vzXES1/yjNDiPLuxj2BrUgB0EuuqhwS3+2EQATq2rqE4NWX+qhy1ksQXKF6W9pGVzJvi7eUustvheEsJsRX4+OVF90/W/naCfbUk90aL4lrk5bvQhNKXDkl2+6jvZjWZKtpLpBxK2kaR2m2LRrGJworhKk2rVDRXk0KFBFh3YJOZFXUi3C9a8yL6ZjFokaFbZyEielD5EXEcAxN2/kI34wKp24p16Zev8oLNYUmafpAYqIuflMhLVIW8nYwOGLe0J0zCIdlSkKKl/c0ZmDso3DxKLqclze4LKSFygvCvQY32pop5b5e8NyHixdXpwa/VgU/qw1z+CFy2K4kxh0xPuuMSvT4L3uu4+2kHpHIOw1XDBooZn5/7tv9ECKP5pdgOAS4ibCiGqNuDLFrIJAqn93oedJtX8/m5MWujEQ4pkpqxIDvB67DgZOiu5RLM3ilMQucpcfLHbZg8SFB/i5W9u4V+jC6+Q2VCmmgKE2OBcvnYeAkDC8IFyRR5nW7yUxDX5PjmApM2RNA/eOi8EdC/uNw21VSBHNHxtMG3KWLrErhShE3VShT2A5Kcf0phL2c8PNaEgoU6ysy9FMKw6zKYBdZMnziSukAFh/JPrY7cV2AqTVskQhMcIP37qS9BgoQegO6KEiW1MMJXgrN8AvMioy8IpVXd6rI40nFCj+qgyIchj5X87/q1JeY8mB0GM0jjkpwPV99eAiTc9a1j4aI01OPXd+tTjBECNERiKq84mHuxpcMmTWUjnJHVF8/98qH1duCYUOQKfWoNqQNmmtGHsSFvetXidBSPjRPbdN1siRap8en8oJHK2NsWYR5TgojP3FXfVPLyGN2FmQ6cPNsKe+GpD16HrDyCmDQloTx0WYYj16jKNmfUk5PXS4skSM/PhgXAln1UURbJDLSKxj4pHOt53s3k+0gD2ZAJp/0SrSUgJOiaPK4/4fruAeXuvn3F8GoZz6fEDAkmw4ek3RQksdVCcpL+I69VIXKyPj2QIW+jaZuS8Gksxs4sDhaDeGhr8id1HOmhLIYCM9Dh2+d8h5Wu809xKbtBHjou41yVXyOsjUVqo5M+7O+5HgbQYmdkP7EeOhsUKyfOKoKLHakOrjpYPMjMJKZPc6kpucKo2ZZT17IaeQvF+DN5lMZx3rU/BZV/fUcuJX1yWflE7gcBAYfpNVGqqSFrlO+0fvvhHNQ2OzOp1tQBcmtzXAo+S1eTUcajKteDmgDhgT+xuxNeUOl+S/JPdkw1wchgw88x49RCVL6bkiLja38fPI4VU/76N58wcF6rIDh7OnXA+WaLLJLj4zbrPBD8hGk9p5nDIx7gQFqTLqJNoRi1bB3qCJZIh4W+VhenDjNhJUVoKam/KNEyDU9izz+6X08950Ex37U2EChUQqJPRN+3rH7mPZHIjGt2GK3HBA5mGtKxrvg7eTMCEGhZM9xjux1oAa10/yz5yJoDY/tPWvFJW3rvzehh/9WRFQc7MkzlREsg/nzYBt1xIAyvsH0IJXyVsHryPvRCGozUpM9Okg0RgzDJ+aeGUKUQKphBSbFdPK27Zjkmuy6fpjKM2//COU+0xDzjJ9J3WnYXNhVqXiRPNr6tNA+NuspZ2pA923UR/7m2l2g32RkDPruZyIfaqg24MLd5phCFu5cfizstHnz8/eeyQh8wSLw+eUftUp7LL45eUwDuYcxxQYiFdmy6xGrQjFb4UwLPDWcvw09ZVWrvBWpTsere6S/sGPp5IFP/g3gncZHEVTkOaqYz7r6BQWB8SO/dTBQ8ZMmmSptf8cU945tCmFehySof8hmPVlEeCWsqMffe8SyibusVpPk1HG69IjlHanufjOWnmzyVbObWZVEp+xLBHHa4N9zRLYfk8omynhhzhOjqWTjTI0ytyIaoIjJlI69lQBQjGsqlMMHEoJp2MjipQO4Ib/mu133RIVqPOid2AgfEmQHst3W21BG/YNSPqhciREAZaBfXcDRVRmKacu54qhZk9GWeHU2XV/xTuGhz7n50EC8ws0fiTtFuRzSZuiLzKzeFL5X+Q27ubU95kWqbQVqYLXObjULb2XVb4MxLXPhbdUQ7T6Ng4trOXndcWH4mzk5cc7mIGc6m2VQrMhFTPBqltVgkPdSv1+ZKYN4pTSxz53FsgqD8h
gcd0dy4ZloiFl45yuAhbHmciqCBC+/jqti9GG32MpkCRU62NPeAFiJYlGMHIkpphVt5/mNXlqfK+v8OWsYIX2RF4cXY79rzFthKoLNpzWr8mhf2RmPJuFXKSjSbgQBmzIQteAkJG5undcIXQu0lEuVxTyoB727ICw50FDVDmcZs45KgQl1OC6pd95L3AoiFKalcj5XFb501AzUI5MQunyj+vYPWlP5qAvcCVGaocs/0s/EdPbpW8T4POMYU0AyyqjPGA446+xsiYpKh4UqQo/h7LSN3UB4WIHlfjvGSRb8uAXFmyTVATGZ7P+7y8Q9HbfEhLZQ94GBm/Gs1/Rq3gTL9LIBlo8fNryK/YFLK3Ndr6aTp8VCZiSRrX16bXUDz0EFJcVaJnjYW9a8L37dKGqxXoC5RI320PbPZ33FX7fCfwX17ByGVKIIM22yw0KTS0IfZTk0KhToX4DwPId+9TutMZHFprAOqK+u6xSTMqO+T27qHoKO+fvJNPb/MP4w3x2Xfm//3GLm3Z7/2KysUeynTUWuWMECWvW/2tA+KmfPtbRQJIVtZpCGjyMsx+P+MJ9OYbN/47lwFQNi6RrvtsqptShgb6jD43EfNqR3Ic9GNVT+I6U986kn8BQOG7d2K88Ssv1CLCAwAxRx5WaMBdCG2IUIaJdNIj8Le7VuCSvbLuDTIyduwJ1iytZVZvP9SrgBJhgEAyFl/VYjhNsRe3sLJHj+u+dXExDcIlgUdFVWDuP04mM7t2NeZp16mg8CDivhx+UJGMdaXi94d7alpywHnMQ6vxvBAAR/3N9f+lj0iNpeKWnnwqpy3IYI5u3dxON4JE72oglodztoTvuViZ5LxhIWCa3gQJBWJO+uZjj8JYbrH1JbOpYpvBm4sEnQdFb3nVvGrmGsIH8jmjydQHLjgmx97eb4P61/Q2+bjllTt4sw1/VDv8XBWRdWL4RzWr7mflHeUO7P56Qmqu6ojekH3kVdbrt6W9UOi7TqMGH+dufuTSl0lHGBEJherU/JPzTVsvieDLdqL70HyJzgqHc9W/0cHRz2x/ezyximIpZCQTBxWRjr7+U58GGmo48IEofkd4p8X7ADKY9H8k/3hZ2kRKay1MEC689Hih1bNBspju56VOXQePXcIIcwgNpIItAgV4zNaa3qApkuOs4pbtUOeaZiUfirfPiv3BKXlq8vMq8yXadj7ixJThwWcAc5v7pkX5t1mKeulbO5QN0sTK+rIAlsuHkDk7vmusOFMEO1pLB+qJ2YHKhVzmfj/F8c5hHzTXiTIPxW7WEHEgtUwkHaBTrFXoG5pPpggEOmCdJTZwubh1KMnbjT3CjvXDsjQKdBruY8gFWnvvnuOg6Cnx//GdIQ1OeHMHxweUZ/rDmb4pDQ+7buhpkVYjMoDnmxnVi4T0yi8Bet4FDDysUtIIstgyeCIPkhUyD7FtRmJT6qjW4uP/Pb13r5r9JXRYaeg/bnvJUFX+k6SNjMNXuOcyd73TwWxNQ0onFplxi7jTjlnpV9o3PKTeJi5/zSlp9BAPRKO9av5riFDzcAgHUPBAaYwRJsxoj3xoP6neeVHG7Wk1SbTNnPUgzDx6fntOoqdF9lbetfJHLjhqqlZbr+8ddpWil72tmTpykeE8nfeuqNakxoZMPAWJsaFcsTY1fe9lXHpqab2YumwZ2uZUihCGi27aO1DXCcITTzAdaqLxQVQAi8IbOMW7PewSPrT8xkpaVjf5kakDwM5x789nQWWbr1yGmNATc1cB/cqDqpdbNelSqf8QbYLE+S6Q1xrj3v4v7EvIy0KiFr15Nq1t9+tiOGidAB8Kqxxwwus25P2sz5SiB3l/5Unn/Y4JEnd97VM2dpgzE6Dto7cITZNinG/IrkwUdLKyKmdpLKnqnfTncYRH4YTz7J4eoANAIBQA9ntyZXSj5vzyKd6O1E3tzPY6Uxw1zGuILZ+62ByBAaprPJqtzvrGh4yUaU18VPkQvsS2XMPtjgcxt0SmrmUsyO+uJUc9x9u5aItCNBzwTgaHJplpv1F08PXZPvMwmxJJ50qMfZr1u8if/smG1e4tv+sSANxJCVxEXciIxK1zC0HxtETfoJl748yhOe05AHC9iKVwLgvMDf57fq/OevcLAecdQGGTQPCcRpyvMkQtgJAQ4VwHRTmlD6zVjoAhocl4pZR35mYgNx2Lh4rMJr25kI4xSQIWaeMRbWoGAaQjd2OXlDP1/JULBCAw8xWE4XXwD6Cc3beLZhgYSMUG6hckmthBjqteY25o3TXu1LQc4C6ihKswup1xzRAlxuOgwu2npgHwq0sCbu0eCkeFvgutF//o9J3jgJciUuy0katd9Vk+IjbidRdYaOuoMeMsmtrVhCkG2Xkw26GUsg3TRVcziauZfisM2v73LK6ZYGUQp35KYrwqjMB9lbfswUyAEA/eypA75ryrw20FIJUFvEHH6ZuksdVtpDPRaAF8s1riYD/lL6D//8kl0mdASOU7zRYKlkr/LW1xy75+oJ4iB+1ZGc5iCyBljV3m7+AKmgH9vn5xdWfpWfjmZblvuwcM1TYpd5LrLu2Fsg9p5Ba5P1GdoqZWdDRnNWf/RAVAUc98ZuWQf8Y/j6R4RqRnMD43Cu/LiqS5YhYQobbBlbYL6WRVb0Bf18EVLn8Y7cMfzIkfWtJczvA5GADKG1YmCI6iDnJ4voV8dFQnAtSVsNVOP9V4Fyr3JchJnf9+Vqvt5uTF2Mxv7w+HB8frb346NKN9O5Sbe0QXEQ74bs+Wv4uO5Yr3QZ0zWvhG1y1rilC0STieWiXlSyg7X9PHwnFlhGccM8HEVY70MXXDA4U0223gd6cwlMc1xuU50Uyg+gDI5OxkVhAbrL1iXXrruk4Ru7g6I55N2C3jk8VNp0KxT7a7FmWJRC61pGBeONgbx3JH5ZOBCvaP86Rxs2Dr4l+C8ekuytBYi03UCIDlomT7dphK2W0thsDcOeKYX/kTdKZRlgueTFuKkTVlnVDXmme2JJ1AZPjOaI2O5kTROkSPraOSTyClaic32CSVkcI+6WccmN5aFB1DMYa0tvv89RDCTKybBb5osiyFM0Sd0/xXBb8MXo8XnVlALE7XxeWfraIsz1CM1IyokZcFFoEDJ28EA3WaCYyD3QGenZts/OZf5z05eHAidh3sXndZkNcWwY9nLLpqlPfF1GF38wN7L0ril5yDK1lJL2yRwgK9pzCI8GLsZawGaIlIyir1koIVPGe0K2YvnTf20HCvkc74b2JjsWPJeSyEfh+2X/uLiCcMFPxohwcH08NeXHNi0JsCx25pKExHVQjko1XwfDH1jbhUECf3IYyHhKf4Kj0msDn0aDbGIdid6QjyHqwu6Bf1NM2c2e5mFBoM3OldZT4HNg9gJBef0M+yw1lO2WNuJrmZKRR9B7lvjxvn8p4eGUNiurOZIBzjhrmOL4ZEtRSSuKm1OgEvChFYkFCJXfutPUXQhOae88ovsdrq5U+3VTeVhMBIzkUMp/eJKIHgQvZ8glavA9jqwVu8mbEH+59Gu0SdGW1pCbnHQhiE8SOyVBRfWTWgdBHDIDifIj5cZXibNiL4TE9RsQkK7JGmysaFgl9xDFOyOUS8MaUprgM+G3D+ZKlVkkytdmBAsXrdFtVfQh30oD24WRd/RwYuNORUjSmp6DPdQXnSm0mXvzflzDsCdXyFjB2o/etEi12jePE+y8GVq9mOYnOAlV23e+AHZtJxAVXAPTZvrGCTU4BR79iF/udDcQu8mxmcBF07/ovG8NudCvsadfggTzXaOMT2xYFh5jqcAUUfHzo2mzOqGZnFuUBwhx1g2fF6ezd5AdW/zxxzT4WcqT7SL1zbT8WhZxMYchGVRryMc4Diu8+nPVdsa6RMMUMAN0u+g/pjsqz1LaWCoZbtfJ3wD7n8d8kAQ5ZfDsyDc2awbT+g+8gxdPBeYeoeL4qRhlF/dZln+rB+qhSELrq4Ae7r68Rb7+hG7lLE2Sr2yyKbJhmSQjwPfDZ9DRQ4y5y5FRwqr0uoFvlq1Vni+O/uhM5w9hZkI75rc8viszdFlFgF2lm3pX4SM/tZGcCbtQospBfza3FUGDe3cojsQC5JH6n5NnuV
2d3B5+PY8YChviO/PmCuqg2l6D3MXk/B4SUAHOce8oy5FGaGlIVu1AJXhKKhaEW1ti5ACiwnpK8sLsVx0NJe7ZtdC7Ch2A5XGwA9ewY8z3/Lf0uXJV4wOZEheAMed2+DcYex8+9lAKAhOWDCVWO4Vd2fCS4FGBm7DD1yEdzvgwzhkrOu12loCOkJWlJAPT2DBjz63EjFTgvHWFgFLwx6e5yS1Y3ckUz6SJJ1oFzPgLALQ5jMi4r5cCU4hdokW45L77qimMBGB8ErXO98ndttUMD+KaoD1kTDqoLKIoo+aPl4qaihBmbBIlBB/EO8lEEqElb0PxH6rRNtNnY0HcmwLxYRcsF4mM9akeEUmEQXjzRi8TrXvHvuBlWwbugILLWOW+0ViEQlwaYjbkDvArlD/l0uBKAo2z9++k0lNxzfZ0xjPha9STCqaWsR+PdPVi3Fw+Db9neJpLKc0YZGzwguNtfK8CfG9j/1cTk+ezOkozLruzs71ocuI63IyK8A5PpPkcyFgAHnzT0/RrHp762PptikndSj0DIb+37eCwcx2xLQzHIQMdk/nvJ6yGjTREysSKNi/QNpMieCVs2AEM1fJW2qTfB+SmrQzVNsvjG8MHM2/jPJOnBNDGar/em9glzw5JgzuqLpUSFFZQv0vQoh4fjj9MiOelREybtZgiS2An3QV/i93Eq0tl/nQlJGNQYLXZhXGmkJph+t/ZoI+909kfm7deOv73A1hFYybZLjkZmwo5J12GpQ6I1zJ+rWWaFe0EBEJFt7+/zMIdZSx0f+GJElTjs6lr1uTEWmZS324ciTkSIiGkXakQYsuZgnW0YxRYKR/KG8dyMGVg/6009gdAnIBQoTRKTRzBtc6NEN05W3STXmjkpQhsBw8hQB9/d5iiRC86tiL3bgrKdbkcZcW6n+qnO+U3H/S4ooemalO+SfQMBh+wj9tu2bFeNK939Um/AonYxADwjycFtJjuexy3kEr1h1MmCav6tUofuFlVOxm6ONxuiQaBw67yFk9xO1usSWPG+zcAcHKKg5HkOA2zT6FeJJQ0+6FYMUSwMC6jy6rA5V0uinphCcDJHgzevjS91EAJiPkJlJN/9OrFGy3OzfxH06CmxHAAHLTYrfun42Pc5CiQi2eq4+gniYf4gQ0J8OkIl7F3Jh1mZ4sUgANWYgAE5r8GRkNH8LNXRzYqV3u48VoSCGu+7owT01nCnVsvje2vE1Hz7f0uzNizRk7haLgF4KUPFJu0kTbb+1pVGhen3lZNiazdjz+sj57kEZaEY0Hpf3g6MMlOqKrBuZpKcPdyoDCbqkTrQpbM/HKI4NY3JB3Wm7VmGmBAc7sm3hVIbzb/FpxD1vV37TmIkofoK1vvfrcp740c4VEOZxdcoOm5dx1i+msTwWQwxmwG0cBWfwV+6H+3970IMPYOOP61/nc0rdNtkkUw/97ueySyvZFHoHkbNntxHCjStXBpOaOEYOO4tXmEIvnrkFAz4EfYS0Vc4AsP/Zd/yOR6bX2QA9+PSM8krfPQZKClBzSmg8YbGTBWHj2h6OZNycx/BLe5IQ1XcIOlSGKXZzKmKZ1O3IZeSsZaFHv8/N/ymldgAAsAxbuEjFDWM2TYkqyMheyZjzSC9/cHnbFfvFv3k+jFTdyqtBOECDuupTmy+5s7t0OAcus2P0L2u/rgXJi7IWzUlzHTaIExW/ifYOKHC8GYLXhucHW8hLe+tV1asjTdJVOEHo7Av1m1bqSXaCJX+IxGJ5m65Pq5y+ALVoQkq7Z19S2cqdYOBQMRyJKnErqqUHCeHLT6MT+i5XcA5/CQznDOVJqjSzRBm2H4aFjGK8D/SvoJIbEo8cLWjeyVJEzMi2Qrg5Uz5jzxbp50qkBiJd1mVOaokqvYqLrV/GLlrYDuNn8b03EZA/ChDaT2LkV/u7S8Y/QjB7fjHYSkoUX2RCIOcrpoKqWISdGwIp1COrXK06QoOLwn+hN8HwwB9mXNVC7WjGXBnbBL8ZefY8uUgfY8uKJmqH9+YZ/pdLP56Aqm7MyoERMIg/ZTK4gXdv3S3+SF4RPlj/Yff1lGY7dXeNtub9mlE0vrEauWoDkc0dX+U1y9k8+1i45TSmFCnrt0nAphEMusQnsYtpTmjM+PYZ/29BBGSGDq3R3KhwKQIk0bIR9eppm6dotpIcRPCGRyAGfbLKLEsKpVIlhGtDJ33lZu39/8o4/LMi2j/r9N2ONPex+FDzSBoQGacMngoSI7XyMjwfVsuW2FJDJudFSICyBa4jzYSw4s+FYPi7DYt6kU0I3MefFZGnd3m2uOaWAbFht8ydtQvQ04LhZlX1a6EKp7Ho3mjQP2SFTmNOCCevDFZpv//UfBAohY38lPnC9ZOir4uKWGA1tLAAbQStElcn/U5pnL1OdQ4GgE+1r363uufW78yceKwBAGWoIWzwHsyh5uI20yrREw5AeUEG0OljCJVmvU0vQUOv8G1giEPQfC+wdrvXNfeCmkXDb5jnAQXPU9i5ocX4qLuvAstG+G4nQcs5c8/i6gOBPMmnANlhO+jfLjwdpSWX1f+6wGV8xlWYBvvMMnxJxvOoUFNmXjexONO3sojh4VINmM4YSkv8WdYjlmBZjOtr58VOYtFP0mkLROwqDbRAz/cTJFBLxjNYa2OG2qKeiRMQ/BdNO5I4msnZREtQIKbSNvpAKsehnZkWzHaxv3IYD78FZqRQj/VB3kPxVAzu2C5Mea6GMm4jWK2P2zSm/MYGmQNX05f9IhiSH/cz1UlZ9XPtLONFFMU3beh55UDK/d3BJNg2BdP6aesX2431FG31eEAnONAeLqFhdi/7dXbvKFGtMfWbfNm71pB5ITuC5DdSMF09OPMEpGq4rWa4dRehbkOAa3Xp3dp8M+vDBAKRe3EPrzQsqmFfw8Q8Fg5yFNy3Q9LBgwyZAdBeTFmzaShPaFpflvchNUjg+iFjB2Rjh9pGOV/SiWJ4xOVVLcfEtvt+lwQPG4GS02xjgVTu258UIXMerGSD5qP6zaeaE9VQ6W3jHisfk2f4+aOKX+aY4JiDEQFoIchNC5YpkPjaeBWtd1Svprph9ODl4dYZPrzWEzuaQ1dOaAFboJG9o1paxt5UEPnx7D6G7IORZ72fHi2PtzF4Zm7qDMJAQR1JEiwLOJm/OrphNGGROdXGD8WhJvwn+MXxMHV3w6P0/CYiafKN4vE8rKpMMpSYQi9gdikBVDuS/df3XYqZrKUYKcETV5Kjsmo1/fHqAVs71KW/oRvcb9xJdVn/lOO0N0FgLASyUkaktHunaGDic01EBrERyJk5qfp+1/umMXJEZy0yUTPN9uJfKbVEVX1PDuuRgrW/quZZIpy0BASjOGhC/JF8r5uXUVxzZe+chfGy81X9uFk1HFlh8jupiLPfdfFsKtPcVTyxwC2JcmW79Xhi1z89p13VUunQjGa9Poma8jujcva86iQ9LW4t67epiFo4ze40fTK26mF0YsYs3oEPNf+p+ZsZdcxxVcbAY0s4Oy416C9s9XctVgUtOJLJElzuvzZDOVwErKBlr+egEZ4B6Ox19OE09YRRBzGdN6jIqSBBu6MZg/iVYCMP0AF0t9+saZJEUEqGqn5hxb2IOjOWoGMuRFhej39FPljTkAlLCYM8bbgBrypC6OP9kt3T710OJDVeE/IgiY4eOxdhtyfB7YwQb1cg0Ex8YsqVLGfLMSgdkLQ6ZGGFXQWvTKmky+laW/MFajFa2RH0Z9nhUChwD72QwTtBrk7Q6A3FniivMLzpuDpvkaGuCnVhgVkHOu9kGYf8yMEJjIBtSQhX8OQ0J8U57INwKBg31MQnZzBeEd3gDHJgAfHCz67XE2q9MIrVTiJRjai+yYizbvvA62XBr8aQ/zm1EOATiNhE1qAsZ8T5/UeZH12E/0FA3bvMcDXtVaIguO11mxu3W0p+FWgmYxuRL2mMTqJa8ENIIBTsP7PfWsCn+vEVEeIeuObcCnQ770s/EcMCAJDainay3JLFWwcVFHLpN+DIcWJwI8hnunslrhglykx9BfYEzoY0nvQsmL9ocFLDgFiOwhSblsfJdaUGxkyvCIj/AALEiJ7MguRdHkBUh6Ln0pcrXAEL
Lil+vtFdlb/PC5MLNICu/LJzOzLKLeAIMjpbku5m3CK6Z2zDyHCu0PNUAaNhp3KGbKprNtRnA0PjK//QSOjDQu21qRvzF1iNZ9rPy4GzcX37ikEupqoSctOuE1Dw1jY/LildbJhLPPcP1o5mFGrTsYGKHi36Lv5XDFSHLdfHAp+7hXqnzMOXhFH2UjqEZm/dUBhZgOmA8GM2cITJZ5z2G3jsx9KbYvsUJ+qTWEA+CoBnIUlUw/mL7AdgnUP3AjsFJSEO2WL4hIt4Dl4HuPBo71/UMl7Ocqkn4Fjp4aOfUs+8cQSL2XamGQkRVRBbcR0bLwD/mCpcBlgCWhz6HFYefG0G2lWcWma4p/TKjyGhRdzUo35otKKY/mHPp9HSgZSQNzIWAU41eRBgO+Vh+HetsYqMopGjkpmec9NPQhejX3cZvOyFM9zPvS6eWPphGEba3a1A6Gie/giJa2IAs6pzz5BgV9KoIOpO7ttPKeZusnHwSrWcHPlK+vr8EDAv356gSQ+idbGptdbK1Am7+ucm7gJ2W3cFURwHxeaKWuXsoSDAKYRpI0frRl4lcq9Svi63/D7HLlfLzxNM2d6uKlhHdkoJpb5NaZPd/FfJ4y1jlC+NRgQPzAccZ2qGMeyN2i5Lj5zYgQP9kECL4zaK9D8JrMthtlHKPbuDZFshW9yQjRkWahS2mObsMtKJe/blx/P3lRcEU2wcJzBVdIfiOb130T+XKrfGYVCFRSbCErlTe6pIdBSsgW9x0G0ajX+SbYUEkitBW3aO7InsUzdJC+jYWfd84k/11To6gxEfsghLOLVUSE6hDSo82Oohg6X9oOaLLKKj99Xo0sABAUo2FUSyNvkSjuyUchTlCfmeuCritU74heSpyVqCltrFbqhfu+xGwOUTHGJehGC0O6pR3LyLmkvAjOBjty5/EEvIY5ANRzpMTd8dHmd7nib33ck+8M9bff3zkWeNbAS1Epk1QS+hvSWloqDA4LuMiL7T98OxtblCDyo8d7uq5ym9MYvboNlEDte9mPriTzF+sgh4sfPx248c6Fi7+EcM9zJxo23bfRlQtIo89u21hVHayoe16d88jb2LE4AxXvUIGyRURp2e1d4dTeInj/NXIVErCV9BM7uY5QdvLvW/0mlVjE6D+iw/nbyQeUirM9PCNE9JLKw57pdfbEMwhFXI/H6VWiEaxHh4NSCK0sqqvzfGPR24TJYM/wCUi8UxxVGQ9hBCOr9chiPdD0q1e5RhMYdykYGn8B+asBdp113AfHUohIZmZmNK9yCTPGSaWI/Sn/LIB/cGe4mxMopRI/753dn646DCI2o/jOSTnibv2i3ttaTuFfZ2RqDaJb1mQhE5EqpZXxXwKf3nLwK6vt/BnzybMyptxCb70sKbGHRGnB3WLL9pTp6UQ2JaKT5osNmcveml0oYnJxinf/rWTFxt6zLL1Mw+nFhjNm7kpRRTPUr/8w8tlUMKjlo+KpGr2JIGTJI5ltUvZ+lGmuuw017MNRlQdGPQqLLcsmIMEBz4o0MBvTNCGk8vky8fdyS0SQhJHHp1L92B0VPML6EoB8/lr2FOn52Hx/zIFo5t9kRe7erbYuyupGBe9HMYyDkS90NNErtlOPJFJI4c4oG0vdpIm+ggFVlnj57P9vnVogk+vciL9fVIMcjrR1HOCDybqBKyQA5dua5mUCO/fjVq+9ELmd/D4Fe/iaXseCVBDrxwvMaMmuM2jzVY6Kv/WRR8/39AxSIxst60qeqVysed3PulKZSUEd+F5qDidpbJ6/ILRRVPdhJHUwhu/BZftNIWA8/f8+N1vnw3ViDCTCFw9q1/ZD2Eljm9XbZ96Cg0rK/X/thFVwEJHEuX9Q5AkXRUD1RSWx7HS1bZ76X2AdW1z6+U2evRz/DcJaoXlKvP40JPFZbTUWqT7P2eKvm7G10xJUZIWCRi5SXmNoPaL+Slca67qXw047CaUARuYWjAhTZnrnVKPvcB8mBRjsN9iK/eHXWLLWwiow1HiOrAgrK/Yx1uHu6tjUysjMSqScpGPv286n0CutTnN7d8zHoPeli1imlzFgVLn5GuOXxoOx/QYQoEUKyjdO1uzHqn3OKsTdMySpO/a67gq/6O7U6alrU7ry56CC1PuPBA2Jmyd8ZDLXXMZLt6DDFlVjdXAa+Uhll4DZ745qkVX6wt5tmnSSqe9eoRRxT4rInjF25Ab8qrPVVDTsRw+oY3r9rZILg4cNqpVnR8iXd1tWzL8mwZnvucceUfnFOPT7XxeRBh3o8OebmBSuja4ws0Teb4msTMs2i1bHHMbdQrIoNw80hRTwaBAmCk3+2rPTGQoR3sxNNZW/ZM53iNwfvv0Ct6Tn1oc4AlnlMWceJmE3QkXGJ8i/ZQQkce/T76/n+9IhNR4p/XHjvlolBluEETRm9GXJb/3LdWr+09oeIxXRkDWB2JQXfFT7VUFPLyCzWptA5Xh5JX/yMujI1XUCUGxhQ16GBYSplAp5y1BUjEXorQs5eTt15y4YG75+9YIYlh0LyYpK71KILXXD+ra7dWDWnqcWNyM5Bw40XrgGTrbLGMbVoYdq4TxnNiMPzaiPeLQyQhVZzPm7J5oR4XrnEsoAS0re/P2U0BS+x3cPfP1tMw3i76tNih3Oq/UMbBHB6mUEapq9SGECeLBybK/u0/Sw1Gr8Kcd51pxLejOVq1ZPMSNbTRGb397O5VgSP+ZLvQIZJZRd6UnURgnua2FRfDCmmwXxiTfLWP7BfWQXH6tEUNkRoxgn58+Orp547Bv99Sb3DEHuAYbImAhh1dmjka6Ip+to0wKm5r2U7Sqh2RKlX7RGhBn6Xp9jy2bRGFAjJZJZvwqz0TETNDDECbwdJqXTuUCUodQptBVZpwq2zsOaJRATimwrBGBzawrsNurJf/LKviu8dHvAq3B7HnT/+Qae1HHA2ZfOhJ1m6iKGpE2DFdgFMnVFvwhnzBXmsiC0dH3uHgit2Yf/PBMQ8ZPTB956Rv9jpRvyUZ3XUseu9IK2hhn86qL3S9m3MOz2zeZXASZJhbvcS6BknJtTgFN+HlKlnq/vy6egSB83SrZFethUc+NCVORqQvyXKowCr7Y9tCrhh6wFls1T1as0awLIp+3W6FtLGUuESHDl/EuuThhgNO1Cq0xnJhivN33T/kdCy1EyKI4NnmMi8PY+xMjvVv5GwK0eh9eIWrjZ5KpG/9ih0TbIqG4ZP9dZvooRyOLRuOqXSB7faR2/fXfVasBLCfFgpzZvdabmBOWKpr92OXuJl71lbX7md3x9QqhJA1hf5YvfMQbtLoASXgkFq3TpQNIDJFACVkHe8lpso/s065ws9O5OPynrqHtr7EyBXNnIgDma119VXzL0+Ja5pbGpANFuJxEk0JDfruTi7NxgoUn4+PeMsRmIxXopsN86TplEMpJH55U6K6+mY1RCDx/5A2qedBiV42BWdmNfFNvhyhHBEXVMPgeYditn7Fg7AexSf6ldhJ2y1aR3WW8reb3zbM8ro904kX331GtzaeVLvmPJeN/TstIZj5tEiwTWMva7TgvWz8L9YQwdAXEQgUah1VGhq0zCn7qd1P2B22M4hZHghcONvmBqqdlWeMFgy8TA7k7KmKnj4zOGUBNDUEgmbcThMOcMH6f5o7sZpai3HUYxwEymRm9a+HwNum9+uqwCr735dMZwSxGGotbqV7OaUPBSLr6lP4TP663sA1KO1RBuRvgOVZsxINFX4gt0KszLlbdgK8ryXB+Nyp2VDL8nwcWb5iMJosoxrrVBL0jpou4l3ptqzauNtuZxnli5S5nj6CFW495N5EJayzSMyWSDhjpRCovB5rYiUIlpz1OkUWtLRYfivgTY0BhFAO6DKQVPqLozo3fN0R0bUHb2e+Ktq5KjtdhhVk5+wnbqKY/I/ukEkpinZp0pGcaszx35a2Z/i3fIrdVq7k3Bm0jUZPfMpuPsnB+d922Ug+PIeZmW8Akgl093U7Yxs2xlSh5erfoGxHULALpPKuCdEicWL41tJvVHWGxoy4F+xBatJpzs2BaH7LGxWidnHFAKTPS6RCtYibMwPBh6b/qMseIWTmcv0mvnrQ4YnBi64p/5xa0e7R+b+k
SyHju4Cl5KkvkzdeP/2eBavZmL6RQm3kf/8J1mkXjmR1i3OpjSyTzF/uIjdi8g4S0tV1zje07F/mxKa9LBg+2DOW3vyAizUGC3K2cX/R2H54k029dYlv6+qQ20ArrtCYYuqu4gG0EeUTg2EOy+SuVQ/mKo1V8hYExe+UCeL4Ya4TX6MozGdewCqFhYI92fsdT2Jn7c6FvBXABlMHYH451QkGojPLCJ8PAA3VX7p17I039Uw3GasOsT2mKY4hXrwMrLBPHRiLJvQuLQCj2GSqvUCNLpeTOf8k5wjc4Df3FCmVyfzNmsgKw4DcMdzwibliLPbcSVvLAgVkwOBxyCp4zlYThiIWXS59IJxFkkWKcggjXWWBPWNRPXtTonY9G1ndwQEpruN+PlxV0SGVjoRMVzOt3o3RkE0lxRiZ4WoyIcgfP0/e4qg8vYST5puPtlL67zvl1UHyfX7IE/Bb6RI89QOvSmDFJ8NwHFjtVYMJNcq60pxoZqPLk7IajQ6rBW6jun548N+25hIohgXLaGphDBqaxcFfdXHW5PzBq6ROjplYO+DUAuu3XGJUPabQzdQa8b/jz+fln4CO2mplFhm36cp06pjQ9AjGhgi14z2EOoL9jFUoinY7kHbpi7i5L/DLY4sqiEAwLYV6zz/SASPrFMGR/yUi+u+HEH8gAo7ydQC+kE6FjqwAp28HQYgBFbScBZHurC+O+wBy0n1LfDgHugntzSa8EEEBxPkPvNmYlcxTjhTUM2Q5m/AjkNUcTwyH2i1tsDb2NCqbczFt7W09fMg0IBCt/AN4RvrupTVSdK1qr6cRiATNMmnunNxDr9iaDZHh+Un37974OS9sRBCpLdxM1sCDS0alEiNXJXMth4HZjr0EIhXQbku6BNQB0KaySfe8Fg7PyFy22uHiGlWI6qLoh5bHfZ6A0hcEFf40H4xh5OIWIoZv2vXAqgoyPZEDULPSMyvVOG+jall/CUFSQl5puGZ7v+L0rkHYi2Oqkeu/F1bJxBmSFY6QHqCKzf6ThVojCcLdl3JYDBQLzYOnib7ygcoDovtkPnOwmWD/vEe8QSe6FXUvgssq3dz0NXx3F+RTuH6nk0YO3U3kit5m7L5MzCycd0KGXaJSyseoviKNAR4OGnm6flEFDBtqHMzoS78gHNdpKjbEgzrHPSJXTHMJ4mERy0n/QVG2XL4co9ZAddpqhjcKxE3H6yne0Q/zVPuyhQaZ6Ic90fZTsqHcOJS15yRnSsJsvcFuTLygXQJ+Dd3czFP9qsBat+ULJR/zEYGmkLFsqmSvTyXekZ5z4IsW8VPohcb0XMrpjc43jR4ZXxWu77W5rE/wgQLgmGbIIViUzIKEh1LdA3+OePOrOeiO3PKferspsZp2SkyzwVfgjlRdOaibYMQ49gY5tTGPC2NUjLYg4DiEg/ctc+1/14Ppx8dalUCH8+2bJenMXHvAmGkCc/HoWYCp4QZs6kqyl09fgNFiWoQ9aYSCv9DsnOh5SPov53vNpS49zm3BR+Hi56FlbZpvumPbzstm9I1qvbfY1UOyrP4OxBFKvGACWZjaBl7VJzYhkoe0HZz2zhcbohNz/54YqpihRPW1fGoGC8ZczHsW+C9l7Z94GZUvFaPI6uuSx4/d0lwf0LriEWdZ0FLPkdgBvsWu7PJ1DMXAL+68zbqTi1636xE8vMAO1dTd4gJyD9nH4+zU7vH3m/l034+jt7U3iEXTquToDC88oXjzGExhvp8SLdmDEovrM3hbZ6r+pvlCSVAfFEFZ9tSW/GJoDJTchKqik9UhspMaKqNARF9NFEM4NxQM4MX/i8iym3CkizMQSPuOjPxZth5pmHWi8XF0oK76t3oA3fVEgQPY3CggIqgEPiZ0nxNDbYRuJG/0fMSWUI68vldDQE0gL7D/Xq5oNolrAVTOo2QW4P+AxYTvXSvUTOcB65uv5RlLtzdHOYPVK403VNM654/gGQ7DLqL/roIVtUAietZkb3XE9EHI4sSvRFiwS3xvdxE9hbmhtuVuMJjNvQIP1rbZCMKA+ZkpwGxNzhgidIXxU0CXzGA/GNPsQsbzA2S6GS/c068v3py6wRpeCd1AchyzhQ+t8d74n87dT2fWyQMZxMyaqYYrNe/l1CKIqoA0jOvp7owpD9RxfFw0izkLfX8mKoK7dAeCoWD/1CGNn0QjgB53lWu3iUofZrBoZtuFVo47PaMZfneK9mJfo5zr3gARqDOxUZTWHqnVhFea3Q9kgESWYNl3GQLyDH8fdn6EJGpoShDeACBv5pC2Q4S3SSckMvzvmhs1UGZONxyuBTsf4r5hI25eHdnJpUaoPqvpdE00LNIz/lCXqZtj8sG8XG878c4yLfza+fCyl1FlX9/NTA70ilFvU5m0ClAPSvsqS0+lmvnT9cDVFqEcj5gFFKcFJ1Qou33rYFHZZBh1A0CCy4n130axRaISKzREWtxK9x1imphy8Xae+wOJwgAsNKs5cVPioE7jQHKKCxjNm85YtUq4hm8YC8QcSjK9OMxHOGR6xvtKFc8QU2huZSacNpICUIzEISVLdodi46HqfM1YcZdRxjQ2bYBDG3M/oiKrLgFxiBOgFrnv4c+uoQehUI41yNr8TFoXji2RZ2Z6C92qkjobyrLEk2tsu3Q1YLaMO4BKYCYIknX6MIbbEiSzhPxzmcPYWbY5dhWI9ciIfM78nDH2QMezfk238cvCUBzbrHujETNzLB3QPMglcJQn/PmK+j0xPxy1vnGq12tFLfAhKTY8XE5Nnw6XB+GA/3EcIK+FfEHSuU+M4+FkUugDH+NqswLksyHlvmb53cR3WMg+6QBZSkHrq7SyEK+QZ7Ig1AN0yf5/PLPWAcyZ5xK8dBPualQrGaSf5kZAJD7i1SMTWBaB9PO2J9A7svUFW6TMmDAh6d8KrHApops6au8qrGIMjxJ/BhqK7ti0ioApQQM7uEywtFcCKbnNyPQKJqa08Anqhpeaz1XnKdsbsGjNOWwZFo+SD5OShtrCdSxDF4nyBXuaTk7qTGXLRTKh/IJM3j+RfuSxy7P5Q2tuWOB9R1qhcZ05fZcvxzXSRTmuIeE4SfOxBT3tlbOQjhEmteiJ0TVsHofnBmAOzHon1wdCBrZ21ool9o5SqWk1NP1R2g4iEZF5rRHpXEAiLmopqj95NF9Gt5DSgw/iMId5ZNhnaFCIw/Y6ZU4PONx0cTarAGgFxxPxoHaWIUl00rQln5lSCLeCKgOJ8qfTPLO5X0mQpnZ4inu1N3fl3fP9hsdoIblpi97WrShY1F6op2fYCN2IKEODmpMnyK9Xh1Yh8+YT+7E06lO99jKvckOTL90+jSMbh7BraduSFTtt+eo9u6SYa56JggSrUsu/GrN8gAjaiOcdM/+X8yMGtUjxnAn7NXy4woQ3u6OJdBSGxAPNRXrsxXseHhgttZPh/XsfeIGvEOBbi9yR9A9jBhumGvZTU7+CErfmGw7+rYA4lFpQd1OL23widMCCawcWuD2Dty8zXnGt0vEhTe1odz2ejksCOYSFq8VgzMVmN0CuYwTl4I8IeUceQL5Z3oPCE3O2SWOThvSxo5P7NNqCuBDPWfCl23HBlvQAiRboiBhKVTyX9985X55ewk9MzHsS+iqM8L4le5znHSUErbWEi8Si9wq0zNbN1FcuiEVnhpzG8nU4zKi4yuEh8Pdemvchmde5OAkaEAB7TP86XNHH7NDoEQzviVIiPxt6aOJ9CAEvHzDEsfTclm/FQorq/9tP+qIkmsPHGAqkDIxazvIQnAc2vQmToYnYNSiLTBng1S3GhN6uS2hnzVeEmVDXoC4igHYkG7Q8FEMnIqojW0A/A5tE0Z8/QyqO5PHkw2kHSgqGS7cg4zG7JStWxgA2XzBWuYUVeR4ubMxqgxxittZaLzHwHNI6CXAvIf0sbzrqbY69COeFJeBoNgRZtSBGLyRMcgmDi/FkCVxtKPLoyXaa97e3Emkfmyd/FaGYVekyCHZnuSPvPMfCW8/Cm2xIgNEMWs18hP0T2QSGlmISiJiRydgW1fTX5HmnNT5QtuOP1rXYgWTd+lU6jTMaOX1Z7iB+vuoipMJ+WzvaORlEuXRIE9OyiP+U7saT
GLyXES26sBMRr/zd63YkbggntL0yvhBxLKtC8QUwmZ/LbuD+imQziIzzDTwdLS2RAUuPLtnSpO13EFhwHGEWfc8OjQ0p87ehkfEVHYW0pncmPw1m5/aKirYzntFxscFbwNzXFkKkAHV78DkHmyINgO52Ax7uB8whI3MGcplY0+OK6tDXJs2kCbaBbvXffWroNl6MYHF7uYzJbIctsDj7OvOy1t0EL4Yauz5krRbZDutgI/2/rjD4rhtmv4s/SDD/abB0Z45C+SR4Bgd7Q0uJwGiZon/ITZPVUzT3zuyi0EIBnl7UX8cB1KTkODhbVUcVY0C4Rdxxn5H1+pxq9N+nHGQ3T866wdVfUk4V3ALoR+RvPsDwnAQgnwjc7bXPg2aM1fFLXDcDZ8iFkITNGPA6fctfm6uNZnVPbW2wwHaox7LeA1bR0B4byf9zSIQDc0uQTjFClFaiXEl6hAqW5IM6olEPzLrcu9x3/typ30g5nIPmhHSqdSXm/lq4kFxJsYVoHwoyscjVehmtZN50jg+sNE+X3vPOtzCGW9AdNisJIBM9jQfFewP44kE2e98+zFhZ9MUwPCGdtfIxIaLpRnuRxUtzIh0Cr71WtfFr1f4Et34SoHBtq3Kq7ZP/NmVWaQXPTqCnYB9Pw5mlDoXvkGUhCUQtHYo7bTupdUbgS4TcQsy/NQjmQFZjEL4BRCFSIcwDPxXYDbaHIxqK9Ef2sg8FKpKZOQ+021zv/D+fRQUA4woLJoBrIIv7zjWiRHJ60FRuy/w/EWzVrrhhVWwzgeZtJfXyUtXUFTNrZJsRUpDGKznr9G/4+VETPPiW0n+zZo0be/v5mGg7oAasnfPtkEhweTmF3qrXrQVyVrvXkHuRgigCavwWL8EQcahDoXP0/Eycav6MHPzPbqJnswdrXtJqcrrStSJ9HGd8QMi55Hk8Gh3SW5f6EJMYjKKJTUIzIhrCYMHlWyeXG30vdK/AFP96il1E+JGJThuFn1YTpCGdvlbB4iQMd8zUH9Safz6CDW3ysg8X4R9z39HlWb7U1FmqALVa6EPK8tMLmTaF6lQKaVteVdWmw+6uIMa5UQcbj4lTPWn5b/ku22iRg2pw10PZj1Qu1CeLqGHo06DfkkhDVmERMuY8RMmIzHhZF0hStNmmZnQ3Uom7kkTU5gS8KDnJRLzIHsBnHwFKILqFpBmio+NllrsXD4RpE/wsvCKNp/IVQnFH20f6tpS+Y9eMwMQ/uRgqnFOxPvUM89NHNR90G8UlctFnCrLq2vOvY+07eC/kCtc4EmtnO0q1t5cTDji/ynUW5Mg1EsICvWXCe23nnHSbPpsSU8VhWAiCrrFnEEZagDbawz62bDx8JvblspiNw/uj7voyybO57t6N280CAPN6dKygExBZ6ba5OcDEcvrgCs8itxSlgIDdDtzyjjCovFHx+LQ7c9Wv2HWORxRKGSyabexTSXN3tSvLTn3KC6dtMWVmpAN17/p+ktyY5AVpstcBcFz23fBA3WCCjEK5ycZfka3Tb4zdfU+GTMH7f4hReAefmpIDtmndtyj8qBXAWXNPWsecSMw0/8l0pVHzB56FgCLflCKnVia34q64hbIjdLCeqIXlIy/KpYiLHORlV35JI892DdD8jHO+MvM/xY5rHpxCqhdJ8H5A/hYeqTYYxe1nghr40W3v5YwTZSqjLanFxC2n2x8/kGYh/Us+hJaAa0Lhlv8UZKxNPOWf7VOINvmNCu01sAbo/+t7SMmXmJbMlazezDtNVvj5iPWqL4JPhN0Sgfi0XlYY4y1bxp7Smvz7hcTixAo6v1x6sNz8O6AZaGMFXRIfmdvGUNx0YqyDrCxcwwQ9yv7l7t/EZV2aMDkXIw7SDwzi/SwQYrstG8V+qzco86/ca3jTyhOcJ1LcqzFAFVkdq9LxZtNnPGsdoX2zC/WMdjQw7ytg/NCmd9mE0gELPWdHeoizjxyjK1I1aiUaSKgyPEz/lepe76G2ALeK5lhoBXSL5i3IPxyERJy9C4ylcb7U+bcvA56mRJNXesn2deU9db451ur0vbx+wuqTbgRk1lUEu2k2Az9SRV6zEkrQID3lr7Grqb92AGc/pNwD3VmDbuHscioe5zTpefzeZmAvPlHrdn9/8uSAvA6MZYC7En/eW5n/vZlwDbEeXAajpAIpr3vzhGlFBZODfZglyYKMr5frtCU4rsZ0CmCiYcjJOtTIi76LAvJ21bvIIpSJzMFABjtdtGvq66OQDGYWXpe6y6ZAPyocvZ+VN36/lg7TaxvdiwAODeuhH+fFfq1hESa2GlI7MpmWysucqt8FwzFf/mHqwC2taorYo0UtDBt0SopPSV+6WLblACMSoI/XeVgO4Gq40OaLLWvAWXMqmnlQA7fdQAsevQrW07x4bL4VHYeXVsMCmZnWx1XzS3oK6cnDk1s4W2btt2QNzoQHY0HjkX+NtMOhQLzy9TNG/P19DgGKyWMzDkFYs55OewOZmBfRtWOBoMS7ME/aOegyfl1uTsgIpz+2fUHeVM/1n7iHt88mcTxTDt0qDPkoJDYjwMrJo1V3bNkHbJNrpeEHPiwEx9CQsoMToKoEQY+jiXMwq40w4qW/htFb4RHSI1MCXOXPy6mVVgGkRm3eULhV59N4f4T8lE+kgO/Mj+qNdJai7BNeFM3ym3l1Goqkv8h/mlqslC715eIh9VGHe8Fc+Gadv36nkOCQVr0hgtfNNEiAuHzcxmozgT33RKgZqOnoe/clyVciStllD1rIXSRwmEVSayh79RVJvDPCHU5uhyaOsuVP/XzoH4xrFmbXRiR+sxi2vWFkbWaz/ovHJhbv5dT0WW1yPCMsv9HS31pqjhap2CfCnFY6Z/ko9pfO7aUEeVMVteqsypBaeiHuM8wlymmDctyCKKXUQxRBjgc+87OcmUC4vy6VnExQ8ZWlc0qm7U3y9yn8q94RqGR89w5TQSxlhwcUMZ1W4mM6pSLGcDidOeHdHzVi3e+d3q5WAb3ePQLM99XmA5zW2TD45nlv3JQ4FhJqV7PRFLh10+I7D5RgpuUFqivS7T8KREeKhyZq8imbtDDoD1Qs6Q+98RRrQYHzi2vi3q3BO5VYzkgyYR26ti364JLXpX4jLb2arML4waq7bTc7ZO1mLDtijvyDf/Zk2glz88Lb8PmfCJRFGQAaERJRN4t3G9OVm+GvZODAJ2EHn0hVfAsFYxb9zS/smOqhjkVD4z7dQdKnc7hbunT76/2/IVSmDLyKENG/al7BIYqWd0/1sH2e4b2ODzSJyd9blsiR9I2CNZ5yHEn6Fcd40XErje2zkqJ4J8LklFrD3VqHI2Gchf12rcxC8lnjZargIzdBfl1RSMrDbXsTqKuvzl92QE16GakTAGheABHEbi46z/UI23yg+1qOUC2gWWpVLltZ2XMVcIt6oPRwlGpXn+HQ61e1o0v9D3TNf2cQLklSk+bW3YdwH6yG/VlTbl9S1+IXPDdjHDOwK/nAE33q9KTyPXwzGhO7kkGNtOAbnd1TOuOfFBH9l9stCAqj1ZJ9ky4OZCKiRCnE/ly+AFeALM+OrKOSIhd6fx0InNwd8t4C/VP/azQYAnNwbO0tnDup2K7ZCqsNYgNvbbpOm0xujKrr0srDc51E2hAcMQRCCimbX6vTGzRpPYdh30ug9Tw0LzNrX5ixO6GkP8xXaCNWNA+HxbCllyoTVdNL0sxep4JuvePGVEX2jWA4mYbdUB+n/cCbiR0EJvwEu/c8mAWo+M1tG70vdZnq+vsZMV580GRG7lL4zeI/IEt9fDXRPxdKZCDsMXDJutCmIdcySQZ8Xa+3M5fntyG+kjSRQFK5aTEt6OAFkDpKPp8qk48Xi1h6gsfQUnb/SnDlS/2MLZhCNxW55gYJyKkQpn6yARGr8LH9iFfwHlVi2hxr7vDEyJWoLSlffZUK8R/CGQanc7QO8CXrUajbOrs3hcZdD26IEdIMyGjGuHjvP4/j7aFFh+EFqjzQs35HGCqWYOVxugfvrb2I939fQ0M4O1SyvMDk+zRUJ5TM+JUWE73dEEkXWCqrB9Jn+o7iLoYXJd3qJL2SrCmViJk54MQybEGv/xm79+l/Nc66Cc1RDWIT
ABfwvbZLeQ8nxB6K7hEui5Fo/L7V1HR7Xla1tRXi/DX7taiw9cdpXjiT/xfXGrkS0mNs/kJu+1AF6lNkmY2s+6K3KA34/j3IF9Xj3DLkTHINbM7BuRZguWBrnDKukWt5pGGA3lOZ7TKYC3eesiXbz4ZZOd66UIwVhGcpCbOeFHp/aajHkqad42brfuptKoOksLbYV7Sfu3qcAKWNA1jRYfkikBpMBIx4K8QE2/x+pt3jaQ2yx8e/mreyYnCoRQk9z6NBs40biLR0YtRSa0hzKbEi9PqcHjvlltDn9RC1M9ZLLcm5nATHjFEjukR67AwdSHFB37Inulbyajf4o27AGtAukhJf40BUJGqhKK+tgiTXAkd4entuft5Bn23gGORsFD1pjVnWTfq0u52NWCUuibv+LvYGU67IuUOtfR2khXv7asooi8Z1P6GWPzHDp4P0xXVvlVrgBn9xtEqVXV1o/CYFm6B/XzuR93qU1stcg/kpngPWxLF/IX7X2cm23TU+lxnALPwvUyzYqS9JxkBMcf4sULZzc7QLUl4aMhogBKtE+hSSpihk4e7MxegNGwjFp4ga6E1FQedRQgifH0NXW0HRMc4R7WOr2K8qqYmcnZ9/S45B7lwJhepaP1XfTio5TRpTDOYgZchf5puHrpI9cJjXu0syn+9/lntyJ5VDfTeaAiNOA5ujjR5P7Koyop3PM2VLLVOueUMnqKMODMl+Sl7k5TSEKupb1ixMyiyyLLPF7zQU46CMFQeQw34LgJ08IfwbHwmmbN52DTlLbxLXF2nP1pbsOkuIBJA1rIYaNNnxoM7bSMpSm/wRpk/qJ7sVql5G3NRVyP1CnHELbI+vpbiaGhFDlN6uc+rpBhJd3x2psdbW7TR+tBtCBvdRU4+1YeZVlRcfu2ueArY+escKtsZC2X8ohuamu50+wCecfXuToeg4J/VKJN0SJOiRREasE1ZHXGhzltBdycgWdtrPZfMpt5EtXQ6vHlIzmRXk7yLtQMtOc6UkCJVFNvjsNGkwSA5+/IindThwMVl4E5B8UEB9QIdi8TA5aipEKZ+y6AsESId05qKop0jPg8QCLSCQvvA6KGy3i50b/2MVISg1/bLaROKc69MJpbpkzwjVo6KFhCz7/mop9INsZzj+HPjSLYGy9d9HyZf4eELsWuSgynXDHAzf2gNM3p9A+D1ou8p+U18w2RL1YOLQKKyzZusWuWctP7tlGCSTXluoYart6A7zkdAnXtlzRteOtvMABvCpxIsBNXHe6dmckAQ3QyH9ZSC+TlTgu7oXlUPsQOy9Qh86HS3y3JKzxyS9IPJDfJFvmcbb/HP4u87m3w9LBbUYu7RrDRthxTttpPSS+nKOl1Zu7GCZknPmH93CiUtqke2+lriZCPIQ5SKVeouu/KyWEH82Yrc2IoOdImHuCPc2MC3z26RiUXzZTphXr+8JXl3fY95U2lZMJra39DE0MECKi26gFjzdmymT+E7lmdVP6WXS1cxD60CDNbCuZbDpkFyy1pLeRdWqZwbHPP4D3OfozYOPJno+2uJLN+S4Bza8wMskNl1LEZfBDWLDz+2Dxl7g2vW2Iq5DO2WtUc79XMaWjQ83HRp71Yw0kVSTmDbR99OPY3zPk1DIam3u2N+OJ/bXxoxwXY6aAY2tT3VGQlkOvXbrgQJz8EPYyceYlf3nN1CeVpjRgz2cTHNjrxd4KsNOytbzGz9NHfepMq4fgbPQoduIP7U8OGqPLIooQ3N5QnJU5nfGDAiUFKhS0dlRivHmgPwGM8js3C/FS8WFI8HAQFQtzh0dEvIJSs4tmI7OUJc16HDc5Qfz2+qbM4N+lXFxD9PaeqrADps1TCnJqAhJ3hzPBcXRi2WGEeUYwk7V1g0n6rwWOaB+zXf7Qqe/vmjsSWWRv45aAmW6elaltBrFlicQXmMyGCFqNDdnpz3RxMZ3d6OhtNab11QjX/EjDUNUr4ilbTyHZyO5xcaF9DC+HNNSVeq2pBv68ZGXM9bmaUcwBqjI/fZ9cFZtSn/xATO9CoRfUnnCEXr+tId3vVSsHJQEd/VSK0fsu9JHTsGHPZqlTbQKOh9vpTGQDK/i2j+KOva9kUhfxdhupf9ulvBArtjFFcYcJn37goK/dB0ASAaQX+djtlxolVlT5PAdACgPxvCDroV7XVR4upK9Y7d1atqt4Tm4hn6jhng22YlqnvIoD5x/L4U7t81veS1Jr/jVJH2k//kYITvuL9Bk3zpCAPfxhe0oi5WRTPwNOOUEoil+DsT0wt7lws6hcgLqvmIeH+/l8Hse1PcE/4y32yeUbxgBdHepOapvC1eMq//ZWlEOBpala4lZe88AsEtzf1f4E2en1FmsFqmdcpjtjwVD63MLdssiZsEHFPDg983L+U/pheWfJgEN7ihPjEJcc/ftmZtnoVpYOtJpll3ai6/P3KfCFJX0AtsySxpWDYIJqBsAliNbwmY+nFrvRoEU5+mRBpVj+AIO7jraasjBaUg8xFJE1G8I+baQiTyR/UgDxI+Y5VyiuESBMHctd38EGcnXaWMaoXexCjZMxHFF41gLAJD8QKcGzP78n6K4FX+q4xaOj7gO9uCfVk15odX3ZqSR+mQk5ysqiCzOh+lSSoIjk7srqveAXXYCqqEyEnBwcMvCM3iqQ/iWFVaRKHBNN9MfBg1gVYWxmGR66WXgblof64HDPNk1sPVDgYRbiGj2/NK44CzHvWNDg5LZ2cebal6tYyzix85idbjqtDnC8qiJJou93CBebtrRxep9Ek7gGJK4gNZCL9UQlvKP6ZtiNL1nkj1EBz+mmIeT7UHqbvxun7qqd0E0DZ5hLGvBvlAT7bNP7OXvbQ9QkjF3MT9qZD7onzYFTVLV+kG9hVyZq65Mh5dQfmzxrMy+QcyjI7ZzNXte9+LjquZap54BO3DhUVcJ43n79Z/+qqYMJ55FU1Ont6ESx9SWJj8vnEC/8Xs889/bzW/0PqG29uIC41OSAOYOhkWTMxwxCodjJHZXHIC4HdLTSzp7OTckSyT49rpxJ+yPFeaNAsyutS6kbyvUlPdoGtbpkbjzqWP8Q3lxm6yuFGUZ9A1B7GyP3ku73Q2ffjeoIC6fteOUGSYOvg5wP9T5ssMTspbp9RA2tKi2mwywhcySlV29JkVsuWxahx5LQkooNeSFkCastK3JcD92qazpaEprfC60SCxzs+KwooaLKW7bsci5hxdTmnmBzMWCXlM3WzhSFyPWMtTvvAsnCI/jadQbLq5g/4YDkC8MWxtyM/7FvVGbZ7UgokjZ8zZjhHX6QUQrOE7O1kzct7W2ZemsUQV4j8OpDJn9KBYOHADuGIOYXmOueN0NbIPubGHCF6ef3p4tT/y/xScXHySbwJxYWSYsxvC8E6ascXydvhvhS8qxZ51Z9qIud29AT2wrwJZTKuLWN68Cn7NLziMvBSAgf++gx0MBPtYfIXpJSd4/ycfCf+tURdQ5LO+6oaP9rC8PGQPU9AllxbMuAngPu3u+Yx+ROMiwHo7D56vyK5TwyON5fyjlMXRAiZfeTFengAkLxMtfeN1DPz+KYbEjH78Fwj2et2P7mJvL3NdF3fCe9AEzJfHhAX9vPGrvXJyotIKxtnwoXoUe4dvYxw/iHxELsPzJIAju38Yo6N6pD2amzf0DlZuIXKqAQlHs75tEI0zq3dH1dtD4L/eMpxVc5Gk0d5DtoONluRTSJ42taCS/r5Jp1sxVFfiEasx3ozIxnL7IfhZgPgYlF7+x/Q53my/N90pyPp6H4oEqsoBMl098yWa7DPZvSFsyxI95IdUnWJq7HKD5n9yIVCkHPuHPQ9DHPcIMBO6IN74TiwQbSMwWa/aBbEDTRkZkT9iAIMrflEtZUfmaxv99PKQ3rCcTbCmpFeoVf00qwXjXwMAQE41qAr4hr9O2UYy0/GJmXKVJhk+6epGP5y65376O0gcwctcPHPjSkojkUjWWmzuQdTryNxDRPxfbhF2FJ18ZS1w+e5gh7l91/uJLCfgPkNpJ0MT3CPBvIGq6xC+1rmvebXfpQCU7zfjN1a7NKHLvIGL4jzo2vKJgw8f7PVEpj98rYSu1pgEqaE776X9BSU7RNih5
IOqjxzvZFpMRxwxXUQyAT6xoAI1dn0ArEdD/Uq19lQid6tFKyCXblZo/Wpu7L2br4LJiNgOgQP4NtMOeuW395+jpH+mnGrAkC1RlC43aCYPqHVPZPd08WRYSNrFtaHtTaZvEAcAyW3sk9SDwcdxJFl81QCLy73dBZfsqyOK7L8b9SKwJZxRP2W4XzqFeozVFJTfLS19/5hhsbWhU0psQ8TGGP5sHXrR3QDylXzMPtE+z2dEU8NrtXxjCsFG9ycp2ijQS/CXxK55cgHzFj6Q6TiUZ8pLauNGoH31nm0rxwxXQ7fCeA5tOT+7fJQmXcELprc3B2DSsjOsGJKe35qdikALr8vzHe8zWTk+UKbzgr2pRngkfM/yUK6VsVS9YRpBZuZ6NolXm8pMOzfLl4M8bHJZPcJPxZlwMkI5ObbMJVjixMB1Ghb1AB6bbArGBiqe8It/cwiEHYiDReA9B9Qo+GrOFZkIHOjMWGiEEnQeEXHpQPOfUaf0MuxPAGiBTnSJYPc2Ajz57QXNpZPM+h+i7RU5sUR8amxMJSXtFY22VSJsN2Hw3sSMCaAIWQ1ajWrcGFVyP/umG+9r4bOQkwUk1/f1yat628TmjeVYd1FnilwoWEr7MDkzoa3O2n1NoMf2InsBfWNnpyahXW1dUshZ4yy7AYshMNSzEdpC46QSCZDNG4mw4ydkH7DyJO9iV7PPmQNEJJwUeOpHph+g1zkhWFsRWLQIPhkuxuXocF/I9UgCHcJAn1tNsRhCQyUJ6Hrlkr5gqgyhbhItR5Yf7T5LZUJ80bykVrWfSGtPPLAnCRfJzpfcq5K1XnGdc+iBWrqWu8HM9Rmi9VAMmfHWBRLT7akxu8oKuABmQ8YGlLYm2fM3TfLlVL/F9YCcMC17K4Tsd68zt1x8g6hFxeLgKpQqmvq0VbrkCMNx/0KIzcSZAPwID5Jf2XNUW6QDylyHUILqecjb1WUrn5RATAHUDKN8c862EHN51KXvS5Qbmymujyb3zG1iv+9oSIzZH1/kJEfca6W9z0HGyZQT45yHla9tSW4MkX1JGVyielcc6iCMUJ1UsWiCrTTvc5qdEk/kb8NS6xzyyxtnFwiDLoZgXoAW832Uyqz+h4vBI6Ch92vh3yzy/oPUJ2hl4bhX6+YEqUsUkzDSeezU7cFxftfmiAy+9NUakOUi85buvsJ2NIOtz0sAFxL+r8iqEAsB7Dq3WBm+smcOasAWpmNknth5rArhqN6EU8KXhsTrb6IHADyJn+wJrOMO55/olj2Tb8w5jltd+reknUyC46W1wK/9QztTHhS1XBNlpVGVH0CPBwtm6bSJLsoyqg+pPxwa0keUDl0d8e688f2xacKx15wioiPXIqPJ8nN8hXbTKBCA2RgaIixBo7/UO1O7vzstOpzW4lY2r0B4hOQYCnnnYbQ6DrrOV0Bcb88kwATWJQbvKz2lfSnH12tvr7z2TUsnIN5BPj8CGYqaT8FgPwaIslTRzpKSeViZl5LoWW4IMlVu1oFmc64J8V33Hk9Nk84CUqK1Whin53k3vwz5xv8hU8U+WblY56tgLl/dWZPAQhrXqe+zQWnXXcDX5khEbCGAfOJyBS2tYtvN/FEDo9b6zQMjF56fxpKS7p1mvElQNLKfrodgqCiaTdwjnsaABRoqSdwIE4XlKXMFnNMAa90jK32xcyCmr6eNx4hVi4iDIVB52aXcWk5ZmGW9hHQJUh7PbOEyShqPahq2/nLwKkXuUDqz4UWBbPjNkSYwXeysMS0wHnRotISQsppw7/DQMKBoQIxEIxfkAWSlcN5feg6s3CReDdR8sMIZSIoSpbyNQxi/77aSXoa0Bc71Sf2WzNWyWG5ACUAlV5cydWn8fPYZCyhyUvNbuILtR76mW/de/AFd1rSXeRzFIW6sB2v0WmUVKtDdsvS2SpY+uaNd2cBzH0bmBXTqJPe0is3Rz6XiJc2qGmEHhLhtWmKkaBgRTFqgD5Rg5NGHZqVFcm+zPp6+4a0ozevc80vGiDfUQE4R0fO3R2vKYnMIrD6FejfNABZ12vgHQ2dKa/RQ3ureKzgwq/6FmIeG6ItAZ/MpyVSmaidpkfaysxuPSlfD38mmedfsm6YodGsJTNN53yTdfdgwmNaielHl95uwlt+aLxTfHwJFwetOZOiwlIpqHw3rVFMUKSpOCOTp94B5Ojn9qj1rlyic2M+zJvDET1JQRImhjNoJ4WxmV3dBuBYJcnfz2SaQZl3/w99DYMCApfydmGUXqCWjZsfFJMbPHclsCfpsKpOarxwKOf6n+HJFInT6jHuwDq5ojWUHLEXhvozR2iXr3BM4A+kV72Bxl6xNxpKd4mUVCqXqTQRrG6KJrYZmLVCrlyX+lA+B9txL5nmbquN9RVcIsO4xr5gYC3nR3XLHiDHzPRbT2vEV8LPl5dKIrGF4W4hFKWAXnFK6syg4qgKcDKEyT/QvgnP40f2AaZRoqaq+iZFW/d9dOMdbyK1cP0wbXh8cjS9CbbNnUE9eZ3Zw1UsBiQ4/pRnZTvLs2UQeMhBne1lQzGSBx4hEBht6Or87hDduk7Ow3nt1kmX4mdjvgadEwZBBQfNpKWyqZox2D3A9FEcpYZWi6VNtfAy4sZvJC9PEGIh4toIkL/FH0BZScW3McfSSMoKPeV+89OFx8Y+V4zftH7ibCAqqpaXA5AbDkXO3kxRWbTC9AcpebB4kcfvu5MdN/oON8mocEjE3flysGIj8CAmuGpNcX4fimVDdWfcYcByHg/ysaVaQwvymfAkm7ULjbqIv7H95LGTEH6aLbbPbfiYDPLiHbdJyEdq2mOblg3Rm6qsUkpUmwWeMHUSDx3NpROd3aUnERauMRft+6qabhiskKFgPbmDk4Z4/PhXV/9fdZxTl2jC3vGmlsAGl9Iz7Kko6eqNjye/Z7TcEsKCivfLNyjukEfhRBlsEZMqXlDBOPWmq8vRgyxt4i8pJb8zYHNKkbwag0BDYoWe/xBATABbQi5VOC04Jb5LRy0XTK11vcLBth5lP5dcEWAM64SZQ3Fq6V6iiCSGSqXVmgPyKdAAj6VmxPTATIGb4sulwWf8flHX2nPEoMv/2NT0h3JDxUf/Ih2EYXY/ksTC0wDOnurNtdwXk2N/Qm7BY0BbqikXHORDhwLya0RX7G3tCEWUaLxeBDEmrxShOJiztPmgp4Nw9Kv0O+oXKyqXm50hhvTxpjAKn/svjb6LlpB6aZL8+Q7/2wfgSmCD8b8iUIFKiJs4AtLUPNQX5665/bWhBidkUTa2VyfrWAS1dGpiKyvWFOkTFPyhmFHlpsZRXLrE6wJ5SM43Bw+pakvYaQD0xILN0V7CsfRcT4xyfH17DlUQtDTuHNWjHIG7wjjgBcM/3xXJRBonnsJ6ut/iWoNm0QdUPNC/ncqv/bFqcxiinNcJUmtHLCZ0RkoJLid9vnahYfhTGqb3VmIqCG6CkIUQFGqqWXNjsVVG+4zjL3nyOk8yxyb3HJ9GwLx2RGFXwpwsqTxK3bzVuZIbBdpvLOq8AY2CksdvzVfjTUQuO1AOEZ+UnyR48RFr6izMMO0a7owdVS7YwoXUBy+Fjgdn0DDvYw4wV1hbwqIWfdUg0I7AGVovoiLd0KO5KBbuh65UNaccQ1t54rm9YppEOmdE0rOgp8EyWyDnmD1V4RKx39330umLMGUvPDObphY/n2j6mbwakHsqlbgkN94OuBK0rlzMIgvPq5HQWANNltTRQiTPdMU5WqOF33RM3QhBLsr5sGQx3uc8vHMNN9JoOyZA1OYSGEBWGlyWzWLl1SB8rJe/8Yk5vQ21twrAeNSeWZUBZHtw+iwmSu+9hz2uye6J5e36DZO0FB5hm99VyPN87UlTgLoO5QKO40kxkHtL5knPUNr+vpWEoAD9O6+DMFTdgWIoXjLWNOcGB5lD9xMEv+2tQCKEQE3hqVcoA0z2KKCrSKohmN4tmyHj48Mq4GEBEU1fvv+yTnaIUy5cqThNp+kD747UBu6hUu4t8hLoIVT1ytb5/3fal7ioD/GtA7dm5wLF8lAVX2ru5ZkNRN/AwanKjDNGwd/jP9rT6TiWlQFuKxvI0lnXkmDqNouslo8qY6VhqJI/Ke
i/nHLZmPyP5sLXTb3JKBvcdE95iR6XxGzqd2FHXJzO1dFsYL4/1QXxGDjj6HHVgEMO++rV2WUvNtKg+ct+XFKNUsx8EungjTrLmdsShNHfh00zGQA5mJYhq/nIzQJsQuC9b9Cjt3JS3KIsZ/u0FOLkqV6/SSWCiF7L1ZmioXfOdZUetas2UfoiPZpVGmVLxHWLjEkr1CpzA9Dc8f+KZHn47olznu31dr6kaUzp2kt92WNicrbmC8AI+XX8ogwF2Q8Y/D9wsNqeJsLBE5GkgZsI99X7QNOspphfvD/FNqvEAatxCsnBtrJ/JJn8w5b8Lqv+enAYpOqnTCdW/bsn9iTOFv5+9I2mYs281glmSMeiWwan6JfJfhtyeBy9fukE6bxrWJ+b48S2bthLck6Lp1h4ug3ZddT79MxPw0y7mej6TXlc/l1T6UGl6Yg/H+UpCYLbyoclL6KXqfiAQixregQtyZKSzFiZgwi2imyHV8XZ8Jhvwh8xXwsSFvBhrbjT/96W+uINc4LooaShqP1h6rVNKOJ1F99v1JKoVvwj6S2C8e/aaZrgwqKR/wR73AiGnP9gj4JsARsEFV1ig5sfpgukOkpPrJX4YCyT9dKCEYO9g1vJcNGDu7ypTeS1pwt7XAEKCtPBExymUojyBjJfeUNWL7p0HN3hnPTf8axTnC68EwN8s8MoxN9M7Y1hOpIlul5vCZ1yVB19WAnkdKP/hwYPnDJWM0rYuM2ZAgsEumOz+pBjulHVZSQ5WnqxOT7S7S0IGePY/3lx0UUT6jA6rNRYIXA+ZCs9AWqZWBzQyjNSji3FEizX4y8FCqfvqnH/kIG3KqPaedFDovDZvqXMZhk92alXpr5vdYUWy3FUKkjmJ1Ue05xeIcuGMLQTIMJ+TDSRpj+cBSI7gCRCH/p8I4wn2a0OY0WJNX7XP3vcs7O8c/VXBhLr6UfC0gTyVLO0wGHtYQL5ed7E/tg2WtDhrPBAyRSR3ZndJACbb1nD4w0EaxbXDqk+Y3GKuNpmbjFYbEOOhLFre4uMEi5e8o/noEKDZYzumnuJ3/5bJTA99OHuGs5CIVLW8b3sBH7b8MU8xH6XQo48Pcb+ErYW/rYduar0VorLTmp0ongceCjuZ8zd9JO8bebZ4zyyEiDAVT4yutMFJ5O+DVCY2fiukZVYd8QOAHm+kDKE4/95Isk0CnWDfDD4n0BuDeBXFQWhV/Bh/cKDZ/psW3S38YSyAMz46FtzTNUg70UtYHSvsvrxBam2rRpkK2ihWGq/njhJjb3XX7PiapXfVuaEMpGQsLklYdIHGstuPzmphOsXChFWesiCbo+rB1rGmdj3TL2AN3NtlgGCwYnJ8SdlHGG6y5DtizDpUwluLqAsd98IIfA9jTp/+dNXG4E2pJVkIoFFR9oURratEHc/LkZN4b/kxoAkeXKCeLGaG9BthIVy869Gz3ZLg/8xKVOpwArrcyrakqGGV1SpmVyQPQZPr+7gejSlSr7nPITI2u7IyqqT8yI5HkozeX7yZwV/sY/fVvO1vegQJdr0OJd5K2qxFKsbYlRrXhrSX3n5tS1HTPa/ApFIkC+QTgQEMaeuMGX33ZZMZZ6UJhoTcr/gqOdX64ICfkc4CaTGsbt8CHOlFFkapJBD/3dBt6Qs2LUEeQGIIw9qlfOO7Tk4O3LuI1Y589dEr4Gls9Qn1rUtDk/9pGkSGSTADJ5FKob/TcOh7B+HrIKnAkBLIl56rHGad7MVHsIQDnOcDDYuoFgtx7Kw2vmPinTnmCKUr7Hxdq+YTfHGrwUe7PgMJfR2tE37hQMn8CTIFmGhF984p7onupWJC4V11VAs53AX46t58S1hgB8KO4hQUd3l9os6oP7Rcur5+L5HEoQZ306dNkQEt/bEyjNB9lPfK8ALWRDAgMVYbnVpkhZbphCGXppUND6J6oioQvyE/e1MXJJh1/amrXdPGrHFy9a8QiMKmUudu7zta1Ehl672GtmTQzXYVZzTrD188/QNP5O2MnmNXkgDGlhNnB045kEsHYXVKbxKhvvY4C46XessQcfRRlY88xYiQU8RSbgEkJYkyYcAcG+tNjRFAdpBxYdycpvVwIGGnv/XBWvEgwGaGd7mplmPw51RlNhfxnK2xWY9pOvrI0lHujFMFxqaF2vW6gG6ve0mmdtPw+s8J/Bljwt0cpkYjVjRVbQP//GUbokD7su18ikPtpDr0Cz8VKgSx4XqGbxTeHavjGOQeO/hj/1jC1rn0CYUT9xtMxyAI9cWQcgustr4SDw9v9pqh3qk/u49Mf/P50FziIwmEqf5QMUETK95G3xdxt3IDkvWukR/75fpY4L6bf3uOMt/VmDn2gO3xsH5Aaj01j6/iL2XSVT4HhQyU7/97269hsFXSy3yr40zQtO7LVPSPurh7xwNBb3Yxxhh90rKFqwnBN3H7yylwuuqqNGVVPWhOyoR3nDc+DqfCQ4wyb8L9t7WXqrt99//DgzpDU7+cyIlq8fVLIUxV6iJToUH7rKl/JbWPYr3WiBcOuMDD1Oew8jPfUUmv25D+ecwwy10BGYzLZJGgsj89whGVMvtyGlA+HaSpG0iZUxdzc4A/KLXKmZ73Zm2uC6TFVzu61ev0yULdvXuR+LU4lSVHJ2GsRaE+NRONE7kPUaplHFGV+J6fF2wxkCJAVFijFqBehTtuMB1o8qm3KCo101eXcgmVF1w4GckIzfLCDLv0ktxV9tjVFJbYWXPKTM5QLVihNZiTpo/8cwnRXnWvfsANHlr2/YAU9MO/ETyIAhzSq916SNA3r6nB6YsFFcQ3D4M4+S5hiR5P+EtfCOPR0KPQHiAWkD5ChAvCijgtXBTDKU3aoOlqCP42WEziWd76TCtEA7Wl6SedMZ6rOC/PLk7TcpR5gEe2e4PjiNYpONmA21gVXaXX6JDRch2WYh35Jh8SMGoc3NvxxCouBBT27hfRCxSt9OaBVDKhbEUOoZ9s15brt8bMsIPF724i9tvay2D0p/pjScEtzixvA+Ner4Os4FzOFbQarpRkZLmb5daHY9mW5eFcB9v1sMRNOtOzMO4Ijx8QrqDeWzU4j1Y74pYdfZG9dDBRKDFnlAsB7J2yLinl3oOMFggpYIyOzK5/nKZuT/Vk3SfJ0lEd0hzDIVvm0Ze0SV+drD374CNkP+UbOC4ssnq282a0Idk8UGt332USNtBSZzeLEng5Mhr+JrTtVYLtEIqsT2nqUB2C6KBeQbO37LIpxODe8if5lRJeXd7HsPz23567ZK2Yrs3Yfa9/SH4MvQpLb6fDr4ejZR+oikQjonplOcyric/yaid2/D0PHPjolvbmJ7mnRhrLWETHADW87opfIBSFLkPPvvq/ctE9QebbkZYDRkGUrMxmmQMgXR4+q8CTUe+mSBf+Uv+QdyDZtigMDu3v4E+zkj/VlwDd032jYYo4HmWC77EFOqwjmHT3VMPpBjn7YckCEjFze1K5cQ6NUVluzxZ/A87906PqzZcLW2fyjfPkpgbDYwQs5mCNniwe6t3gEyQ/VWpFdhxaDxi9sbT/Lom9zXol4FueZYwb6pjd3fkk/ZpWNHTE2/ZnbXWcjFFn4VT5U/7KJteJg2aCUda8SbWkCgoR36nSgRRkaF+0zBKcHRTAf1uVPfEPG8sckFIW9cbMGVK7tPOOnn3TCms/C496sSypQPHavaWMufqNwimoJppS887MTbOvPaEnbxp9ni+LfSgTuGzG104UaQrE+NabD10U+yh5ccm9mILozAviPcb3Fk1wc2CJp0HY0Zfp91pKcFEaYqIzGb3IRB164n1O2xWODiA3T3QbrPBei58282NTUBglOq50psKDbpof6+9hccrzgLa6GH3deCQM4BoA2U8KXT9kOBc+kK864CxwGA17BUWKrmHJIHBs/rnSlYHDIwzWEmNHCyI07OtFOn/GUq7ewIROeB3e+E0ZsiizJo/iPpH/OjYB0lUL6lnC4LLW5eRH7pvCkE+/3XBBP3d3i9t3Pq9pwRxmpVAFDBWel9kffFO2Ru+WKu2egEUYciNtaG1MWe3b357b79hb0SdHrYbcGN/S97atUM2YisMC4mRGEybQyLyPbbHd8TfKVWGv6
1W5Eno8VjKfFvFNy2YunFx0tAMyQoitRkSPJJpcOknWTrnuBDjMm7klagpCM8Xv+KkaO2HqHKP4CqIBEZTNIpPkBkJthEYl/GeSdpT9mdMlL4iiMm/CU+F95BObnX014X/ZZe8lyXi4udd5AlMoi21dl7NRqBoIodXRvDi0bmqpPhH8laNoVzo8bScZoMyMZL7+swbExwLS3wk81hg5PfgVKgojs85KVU2tWk+dO7wwiWzDYkHsXGObuEvRv++NK0wWXgYyta2yRj6UXDkjqavYBgfk1tJwoEe+5zS+LYPbtcjyoYMU8KJP02BZHGV0BcBSyWILA9/qBioGB8xShX+MOctHUYRrYYNRH3vZV2Y8ET/JKIpH5km/O26/nFNe+W2QTlMslvv514gksAFgcG5wAKlBNAHoYQtd29JvxlI4I1eN2lLt63C8SGtAAIZwDNLEnzl8uy23FYZHjc3tkKGYCNtwv+Z/Y1/2NMnDW0dXVN5K5S4dnxxMSn2O8IUizYGvL2n/bQcluT2l4818QB+cuLUNANOnz9asm2gBv/5b9LPWW6ishP3BS0ZA8bTAiPDj+ge9QlvO8PTM+TQcz31/JJiOmp/GU+OjAROVqrHb7pUUkaUvQWXD2u/wWMPX1BWumOM5s8yM00gNPuR6MpQBnVUKNiLth1DWI/MWsO1bdASGSOzb5Syb2m74cau+ZcF/cHxja/egre9awAzGx69WOxN9qB5C26hT6TGotVXTqEGF/Ijil5gV57G6zMzPa1xbXYiYBMZlP4kK6sVnSaz3GSZ0WG8b8BxKNXAqgKmK4K0Hyl92bQsvd7EwwNXHatQyjqECNvuViapEtXdprF01E3r8XFw0BLUJnKGY3shaVvTNmFeocGD5S7PCDl72q6VBzVcLjSN59tOM7iYAHuUdaAXadpswbn3upTHdy3ZkGdacWSkhxK7cdIZVeyT6bZ0ZDZwIg1xgMt4KPLt4gX2CPWgwEnrFcLmDhtf6MPA+J5vt5N7mTt4EwJcvYqJXKx58oA04HCcuq9CO80vMAVUSwkh7nlfKXlyIJaI82ySUVEmoFEJLlRLi6p72sfBwueIX5+dDpHBJzfjwgkCQ2rvF4wOKmV9oJzLp5SJpkqBiLNKeWZJ+A1rHrBQPVJExHZOHTogHnEBDsMRj9VmxBKx3GO+FsU1QEx+a4ntLpeRe3ybvyIcZsqbyHj6Q4+UeG0K05633D/PqYo03PmYWt0Bw8xZlZHQQcpMcA7FgKzqiiCs9KB3TyRXcV7NyPZonWeKDJ9D92BpYVfmqOVRdrKp3Hhk5Eb7Q79GKDYjRTp1L1apsSYrkxQLdJyFZQSRLEkmtsT25CJXjvCy2N9mmZTMtjrkYnzMiFFwsbdzAtLPdlLNy6yODkeFLpLsNXn7K4d5ohEfnZLWnNqunPSRjP3KYzDJHzpw2Ox1TXsR8dFT2ui/BGdrtI6B+zkGpMI52gHVVnzBd0yTZkrMrO/n5LVZKLcxsT70RgRoMOlHDRGlQyELtNEAJc/fU3G0vkAp1Fj99Qo/Y3cSvFRphDzTPzJYD3Lm1EjKdB+GPIrPeN+8IJk7p1TTAA4GotPaEWYspbb7t3ZBB284S/hYKlBv0X7GEwJlUaVIvc1f4bXiAqgeyL4cNPbNyNfOmb3ZZwhd1MumPJQg5ujT2KOdLaZnj5epoYsspnR6u3eivYb9VeY89YtAZd0BxizpgEBxO/FL2sDwZlf7ATlqvmYL14KJCoHLMN0sPSZL5ehXMZf6xB8q3aMGn+8R6CuEwQ5cRNXKTcC1wo3NcbEVR9HKSLDeIUNMPm0g6NFiglbvVDe6vnhSOyUdZnsHtvboTYausYVjYaedo9Muz0VhLsBmjcwObN6HVELAkajpcVO2u7dzZvmWX15qb3L0yUS79doLKdANZFg6kcBQr7sy7rywtypX05C6r2jZdAMmoF8gqR2Ucaz3LIujJRdLOpLsgoh2CV+K4t/7vHB78yNs0W01LbubLaLssv65rNmVauwapFPg6GNVUEHR7/RiLei5SlMWJgUfvqslFDaJKmIGTdHOXNYIdrGsZX86Ul1u7Xry+Gm62NrtncOhGQMqzt4S0GCII/jmNQGmlSwstSx1loII9JuAMMuE1tR/wQP9UBLa36BbSXmckN005V95zruzNy0bkQ0TxKF8ULJUIizu+LlBJJi726V+sOsPV78GpSr5Nk8Ff7ooHnWmQFwJ+2lP1B1PyGBSoyjCiMS5L8gG6uKu4yHDzhYQAmjutb/49KVvN4ft9HOqyJTyyYrhvgSu8ZtQOMoiT92Uya7j03cxldgokgCEHklGFN6juZN3hbj4MoLV9qx6nGifaqUl0peLi2yYGus96O2LlGvOaPtsWZtYqrOIDYETSkYgEdZreIkePR18feXnEd2Y0DXrvojtqQZMle82DlYFRJ99jioLgWM90rBjBEbH0Res7LTgnAy0wDYvki8uWLarRT65mtEEJgt1nxEaX6QwYeHwFKGNkY2CKvpJho7W1nX1IBdzBmr9qzgbZDu62aWuAtg+q/TErQVYlNWEiXNYRqnilwM3G7h5CeaJ1c+k/jlZKTs3Yqr0ccRBKb8L3jeBXiAeyKzkwWGIiYI/20WcjQasHbZ3/1aavO/GnC/gzXSPC/yIDafEdL8zuALVj2AWX94UXwi4cbfzIQOKP2r3FaLBghY56wCofLAwEJPOQvsqmYjjEAieZpVoZiHZwFhVTk8yQ0so/PHeecfIXLDrfC7WNmpyiY1Qn3oIYhSjhwYDZe0JSBiXsbhTheqsyZwaC71JvmkMrL1DbnxIF8kDBAroG6sZREwThFte5ZX+cukWDU9ij8Ey9xsWQ84qsy8tuksDg11OJyoM9kAj4RccR5sNQHxHU8ofw0dE350qv6fNIMi88525P1AMfK7pNT9ZmJedjQQuGA8E5zAQF5nPt5qgv7CFOrKvmAx43Pa2NKPktV0p/Af35veXTLcrt7JlJ71qtredz0EpMzgFUDEJDOx1DuLZZrr83dchcJHWnG+im1OGw9njgxgjFq6AeeJbMGynttP9SnPC0I1zVCmaLITwYpJGpDfxk75d6O+6GT6vvioCLl44j5e1Cj4TLQP7GfwMcYWEdnbgcuHvZ5G691pOkJfZqBShBuBFi7pVqefDvviee+87oulomvgHBqgXWSi83CSb5qHQOtOdEh69mbBsbIBFk4H3d1aSg0/dDMJUeAywHfjxnXq4fmzSkWDGubBfdyMJj3GQL60RoJQuwwEucxmXu9cNsSOJ5xNsKg0dek5VhB8SlDAim3XSI/qDQZvGR7x3iXUSQCrh3PwKhWKV89CyOqmQtHiMJt9UoguYxWCfivQ5BaFs3WzgVtIt9forVe19aqNx4SMtr6LhPV4TsF0kCUV7ywsnpqliDY8SQZ1vSEyKS6oNopvT3NBhzqD0SuJrzDTHrrXjcARXsU+tXmdftor59ufvqWVUH4OmXSQpX2kiXC8CnsYygyW5Fq+dqkyQmojg1EnbQ4SHQxzmiRXhOMVVgvju6ZbOKhkwFiFGKD0ilwpoeGKsB1KwPlV3n/6RKjaNZsbCUdCXi6cL5WS1fbEeV51eNpRGeiHm7x0JHYrxUMAdvVsTcXnDT7lmjpoYkYcNaBi9pDcWWpxsbwUK29lz2zlVSuzTj9pQ9IXo32l7q8eAh/8y+VvjZD+TYx50ZmhDndZ8Lvs61dNz+q8B5sdhQBHNBibZKCYUc+OO0o8PLLGYGz2iWW637ebW7/wsV5EnWXrxtXIICgAMNGytDmodBwW3QvdJcHb8cVTlr5Zxqws8iBx74PvJa+gLfmPxx0OygIck+bx6W3k1UsgBAk0vjTQGF1arrjxI6nZodQMdsop5mOkQyERYy5ZC22eF8GNwYM0wWFEMTDmNo9dWdVKW0rk7fPd82f303hAqnt5mGt466CK5hMEVv5GvUhTjo2qKeGJctaWFwyUcIIkX3ll/0AYOI3IrIxS9OvKTT6T0QXF/txYVw/uVwZgTDmB7UNmfELMCXPaAoSbqakf6ZDUnh7MjeORTQl8qL+s8XOZbTr9W8tsSrf28lkuNmBoFN5FUll0B2S
XitHT/LkDpvsReQ+pz0z8o2oIlLN/B4alBIGAK4/eix+5u/c/JdiP05pIljCXg4N3wl26Abmndx9IlDDrzwSfhN9NSpXCrIHBdg6ht/FGgpLmzm1z9wzzIKT4qpwBJjKUdHzRgmR07hRkntmJ72nYu9U8DFtz2bScvdQdjAIEdbcPzRuLFRBVkfaHXx86KZW20u0W8bUuHQhrPT2EQW8kfq65IFULp/BnbGQVI9AD+9iC892WapmCSgcpJxIvzyoh9QF/i04BFAXNmTpzKO7hMfQUqpinzDT58phjm0E/NXJVJ49FSTEEdn5yj8uPCuYYJqvi6JVdnIx66VGqKX2SvUtoaWF9wGMVgn/3yr55jkcfssjCQCIbEKwGGCVCHAvi4FZYD/WHgEiRJ4RxKhRihCVIzGjDaEt+QJLzvWT7gkE7mNARPmCAv0MKK+2Rug4b5DLOe3PSmE5D1oNwbF0y8lBP2EPZu36HTgg0JX9RZY5owgERW6XLsnO/QN1l2Sd9dzC3oLblkH+f974exWwpSug5qqlnp3rC7hR8Y1lGwcP/EIaZQHVlFFIb1hAc2xMaiTOOY6q+fI8ZdnjlYJR43VgPczQP3zElFV50ghubFBDDprH3+AIKwpwIDlVMmyTpdUHS5JH85EbNRRUB7KrViObnBk+AqPmSqVuOnviKXxueEoFLeHvs7zC29oBE5/m0zkcH0Z3i5yb5PDJGg4/KW3ynzWLGLdYY2RaxAsPnVJDSxLbPCJxH8o78hx2ugSpAXz+dBxXH3x30Qcig6RT4lrw/lBQ8Tq5/d5bwIUJvKyOD+fFHIjLgZlWNC+fuuvCKTkCOsvignxBAf0xB8iszrdVYNW+IZXf6AkY88gD2ddq/qWy5zivhyEOlSxazAtbjHt/M+5otcB/ZdLqz4xWVXdfC0eTrFK5t+4cMuzujoq7H6FuKLDvza+9DsrvbSZU44LKsjocX6bSCy0GXElvUgm6o/bTSOj1j72+9Wa7s0cyt+NWS0llLmJw9pyOy2SKXn/BhM6vRGS4cii9lt5dyfMAybS4OY+sTz319ojCJYL9byJ3bonP3/JWB7DMLuWbcc8ViONLXy+xDAu44MI7PFN1mHDje6ogDTwgyeVP74/QvY47+GZt21Udof7ktmjj1xy4FkykK6bjDE0g5pknKEJi8A29uiqukLUfofgDIob6XDKe+xKLCQpPL06BHlMOOimosG83Keg2FXkFzVO0iXjZc76JsAMWCIRroQsTRT82c6sTTmtDpsDfdtP5OBtQu4otzjO++RAfvF42fKZKXfJUQnyH5HgYhVIUaSVT0Z4MM8y+nE2aIPyF3xPa4q+rW9xT0gwEdCGYeL5+4S/TBIfCDqrO279ywTtzDK9ds4hDelEwVxB2D4+7S7nAhg4Oo71BXkyR5BYasLws7k8GBEXNi8lfdaoGvYNJ4DkK+Pa92XSv5uRFBobCqmJB1gLazW3Y+G3UgojcwqDuGJk1FTQDjsSQRBhL5LMqSgPoeOCxoZZKcecfYRseSUGTkOqJwyyKByj19AexOKjN50kw8PvPAChu8cTaNY/vPdxTjgENbaH48XI8WMoRK+tk8rqYM6FnzlckL4ik0k93sKlZkyjUScRja17fR5XQCiItf8uEJC8yydIbx2buCyHOgtBwv9Lz+JMDezPrUxVLblqjd6Fn7loOpIuTq417owEH+q8t0X6rb3oWTkmTRDPGkOFhuKfKv5Sd9olSITqToL7XGWQ2XIcjzY+VxUBhcwvUKfCmQ2xf6AMAN6oYLEtzbIW+F09B8ka+5pR/HlmHWGVcofmx4hpnKMFuG8UpF+CnDS5B6zSpn376+BDXrSHIwOnchZceBW2lXqkL/NZfM/MQTBaX8wTVMBVIvXMGfQL6GqHZ3nNBLQ6ivrCGf//5855lcNHAqG1TGnDtpIqextYW9DUeq9eRn8G0n+AeK1uxe1f6ZsSWB6Jl0cGKHZBGP5bznOUYqoS+ADaTppLzzcbeX2akmhggX+U+PXFIdRA006VSEP3NCB2zGZZpTEgQfpnk3H4JigGknjoC4VzN4AeREiog2rKekSuhT2z8TlqAwGlW4CNhMKuS2BzDWYGR3MHP2Exa3zLjspntx9NaGRvS2ZQtT/hLQOjH9/JhqgZ61sS9gPost1hxrXxxHJftjHfboBy9+ELwWOAABTIZSfmUduronXCppocgfRBmtvkcRDlYheVY6+7HXPoX7f6TECrlU9L3DwfF7PdEdk0jfK7t6y9GpEZyLCRgW06sUDFm45cp7ula0FKQeA6sewKIsCXmfgwtaxJmh30HTbiy43Gw0g+mlZEZou5eTAJVZ9F2KyfPkGexpqXVUDGNdul5cwfNo9n0BqfDAoUAwBbKimFIQhYDfvmKu9lAnuH/JqlozwIHurZ4KwriZtoFBrDun0HxrysWF+vloItGmBRPKOqauaedjkupex8rUcm6bs6hqy1TtF3KCBpKhGBeRdFkXOS25mn06EAFinZLHWTxOLulvO70MS3odjEI/W0VYRzwPOIa3LLHTn0PX83ysREVOgU1S//KJjYQErDXREa+CdPP+1CvdkdCCSXD3LUJGhQ3vjDGXuzZa7o6P+2pWwMlkj4s6Bt0ZzR0UVGKC+e05unCOZg2ccOWJKdkaHM18JBbAv5Po9ZhWlLLahix7OCBn/iUFytvPkna1oW3I9qHmTKgJf5vjsD+PufluzZqGPc/gKAz5lm+bjqljiqQ8NkLGtEDe7R0mwgk9uD80jisldV9A9e054JbadOqWfiyGXxtvV5+oxAB2cHFJu+ZA7jai8wSoAonV/yldCOHMGNQp7g/cgG1FWtdqhuunowGe59wAYEvZJWqIFwS2/t94trRnjPo7+FCkte8D1Br4vjLlu69mOQli7DW4uRqLzO2AUcUXLda3diuGVdxx2EwIY8rOXLWACwgYHqoEj/9G09HPpJFs/iuUQ6OvEgtHSLpoFtBFUaHcRskMls2IJAeHSnM1u3UwuslBsfD3h6nQUitIo45yMQIpqHT0v19D4AYoqNKFaT3wGR2w2xBAmAgeF+MO9py7KXrTXCA3EWafxnsYgn7SVcWXoX7Y4+rA+xLiFvmGKzwX6e9jY/KNvzpZcDmjOx+dHonLv/3ayzS3HkzWuaEPWSl5FjYuzCvrDnLiExFKaw9oEwSLrooxnAniK/s/+VAxqc7bplZTdIqzYGO/3EPZ04fnjI7CIE3McEoWPpM8SedBvLbx0V2FOcTahB91WQbhV1s5Z9Co1EKlsBuS5rmIq2JPlK6bFPxIHxBMaOG0UP4U1pfu4ktAyJ1bXSETbcB+oRxCxEClErfMQ/aak6Uw+MLCqi7sF6nL4a6X/Koj8nCK44F1OPDf1I1qdHLdqoUEDdHkpEhClQ3okwfutVt32I7mD2bSKKbsDirs7sy8H6wgqAlCDPfgYwbOud8sekRkJxFKrAC6fuwhmx4dss3m6D987+eFr1p3JXbEJLR3tPYGqbElqVxQNYEGy28icGBXakfTwVhogOFdcJdz9I0Lk8E2vcHs888U1meUgXGw2gaV69x8LOwr7yXwnWydz+AGzn+34v+dJcDUq6G3rVyaxufHmWMf7QbGHC5UERfOPCNw26QBhzZix0cW7ywtXdnxLULCtex8yLn18l+KA4aU/CxMDI6h58NeovfDNIiKcEdavFZqk4RjL8GeM1ToLURV5CCye1QL4Qg3lAUOt7n1LFuxXW/OByOW3QlNdSh/ejdMbUj974Vex0sZvtA73yNNK6WDDfbeQ5UnbISuXRyNZHc2qRqZN9tMRCVi6zs/wIg9cj97wsHoQ6aO9wjJihsCICOIrWtK/v8AkkBlu3yPFCkcNcnTyxRo73lm1lzoZO4dwFHqOOaCymYkMrd9tEycQ4FCHEwWjrBJf4f7+v6tOfzfCwnArCkdvA+yGvYi/w0iw2jsU8Rqvv2+b4EzAnny5ew07Po9fvFwYywHJBF9yoWeZIubrkKaHPrbabUdQdJUiPB/4RFX0yNQ23et6XyJUMAiP8cZvIifsYGM3D3jsI8iUirkdTs8tGIwK2pzVWm4czoPeAi4kU5m7IScZYi
mf3hM5eF9mhb8UBsK6NxTdpE3pJwhacnd6mcz3lg0p11YjMObGFT7xz1fNGlj3Whk/t5qs4nKRwVv4lT5Uq9xTP/qjjY9PA4UBZYCjU/rmEHI3q0JklBJvPhSerDHMpqcLrdvP3Y99mZbDKofFCCEz5NXy2lKWV2bH2P7vZG8+IkgiwfP1lQ/wgaxXigrf8Y6Itmkwpg05Ce7wDX/dVHjU1kl+MxjDSBA0bRKNA1KjwBI+mm7OizXyCtLAslfjfRIlknc2rLVnlB39/Cr2pkyZwMGRuJCHpLdf9gTLGS6vTcSjgrya2Bx6k501FfHt+096H1zVOiKm8NYP90+O9kctpIh5glFwyAmAS4pfmsQ4bRz+Hqndfc39CniSEeJn0MG3wDB80uyFq1mw+Umg/C3wYL37rBTx16xYrUb/mLUDtqcKCo4D6Dhu1htKZKOFfWBmebeeBIbtN/Y34/mWGqFdb8kwce3yncFN66h09aOLNZi/ueAAWWUTR0TxyGqayek0bn5Kw1ogULymzaLU/6dX/mDX8FEWws1fRph2rsNPIFeKqFujiZ21nmdJ8+XBB3L7FE72H0q8YL0l8sJeNE05LYte3QykKWlEZhG/gI3H7Dg8H5pHpDAJipZq87IJWBBKJDDc6/c1Zql3YLXpnT2xkYafS3ioS8K0CnF0Y7qgywXoh/xbLJqbhndbR4foWdNmKeBTf1UYsepJoDPN7IRaH596M7Q8apsU7HUDDTJ98t7IICD5nKpgL5f2al7TZw3V3ZxxdZ4NhxR7lgw/iQKSWsjbBsR5oqDIR0z7GMTPvOCE6q02qX1XQ9ZltoxF9eyieyUK0OgU+USlG2Yu8aGfrnkdm2RcalVdkUTpRDP9TACHG4+15fWmje0d+g3ctLi3A7hK0+mJc1kSJkIUPPChp2618CNuDiwkr3+Ui/I71LIHYH5m60+CjNo4zvdYQJI/aWTRsVAGdI8+1L1S6ITylLTg/AxytWFcUaH17MAP7mRgzKpS3jCMP+IWrHjNjPY+DPx7DcsKh1Agke2I43ToWEMJkWoeqLLCDjnPXzj3vn92VusPQBE1Cd5l8vaBe7G7gV3ulS64Un1qDgo/EkYaUURBTtXZ1DMNaYNPSWv/QVzIPtC/G0HBs2nV3imRRd4kVTJgPrta/DNpIOXgo3sPiTfHuFcX+YB1Q53UFB9EexN775nFsh4skn/gFoN2S2zvGBdvf6suoDrnj8jQMXAfEkpVvS/mSvPkwFB0QthayeRzavOxKsJ3+EZklFhmaU5zG/ARSKIy9zMzxmC4omCDS3S/YrC9qRKj2pDnrDQv9ULSSaDAZ5RpKS2NLPK3tmYuXI6I+lsJiQ0+AA91vrCm/7iz8OyZzGmu7/IDhcv9Kj/wwRB7Zu0djxRoEmTIyaayi1+HXBhVIOvpUOLka0ddfbkY9BMsMoIzXDb2xdIiZJ8MSHStP0MOILI7chRFNvn+Devoq6bPONdkiYWfc5OOU78N4DINy9DMNsKzk3M4vf1Vd/BbHfdxgR/3FcNxlFBxPdyY5ebcBWwgXc895L3DgS07kGULSSeEaF0J9qhGmbq8eOsPF4iwoWBluFYUGvMS48mvujK0litI6uXRJodcmr5Uv8+XUhegsE4flKtV5QJkLmEhY0Bb34mtfJP0P9KJz6uU7TGKAUQFKAOxARtvf3dmjynjAEqAfRBPFvySm8Q0umljv6EMIi5okWWPyrEer82TG7Kc6B4zX4uJPa0WyNIIf7yPLHvTKJnsCpIUt2R/6k8TLRqF4su0HXfeig/1baq37I6SpS1cmS33WxOoODH+S2osGji6keLo5UGoBzTMkMFUieS2cZuWV/WxwMLgy01+v8e37jiYrJjMZQa2d6EpmMjTMgJs2rvcF1uOkmbXY0pHZzfnFU9PFDbB4hFloevxfOSpgtHZyBAoQmRHH2buW9P/gAlbctec4nkjs9zEevJ6sUeR9oJm3SdyFVuuma6uoAGGON5T/h25NoB6lNcD1XlJh9w2zfY5ZYYXkILQDZqM0ylv5ZfF+/arU4nSG4XgPTkBfjphTFUvddJBm0qJM2u0+HKDamTuaPiecSmkaZBbUafNZ0AQiC5HmLkeEVhDnB7HIq7flIv6lN05nSDNCjBDXNZJpgL4kTF2aNmvkA6d7myjmhVAT/2KKNBWDCWMEh5OpRw53+gwtaLYIrwrOJRarkhUIAxnjnW3JiI3XGy9btf8A9HFmhprtdcYPddmDx4BIHnUl5768imVKDyk7triPUfVjcb2pbbsk9QXMLV9nsyHhO+yirshRBySLBm8E3anUBOZvJ/8fCp08b9UsiD+icOGyY4cIbMBcOB6M4XTq1aK7dBcrMAXLmuAMKG99dBU6h9fBXWvTx0rO5V1n+Loea/D7mS4pWk8+nBsWZAH8GFFYvVFodwAW1i6bjEMaiJFw1LV6jCYowviISyDbrhyBZdlWK8kYX51QHDVNztlRR35Ht9Z3RxkhJWRyWbyFUdNQ52egkO9+ynlxZ4rU5GCfJb5NvnESATsDpmjk7icXgzY4rgGcNGPwdIakz5ZiccCVaslkwT8/da/RyYIVIZ8n6sB93fH8KC3sSYhQ3WTMzDaS3nJUWMgf/WkOG8CqrkpyXStzT0iXn6yWj0RDm/H0eAPfSY64ZzmZU1raNzag64hBbVpCG8pwYeOUCkxgAoWbBQiCVEfP+1z9mnmD5fkQ650VeSEbELqKOFcE4A3zvOH/ewfxN9fWxSejjYF7g0WjtLExYavt/6Rrl2fQp6kmCruX/z7uvkhWsURCWNAFTrpp72AKP7I7NCyB8s0+ely4qNS3jiWq1QDdwT25jmvg/bj216KW/txp49tVjqH4sZFkDXDXU/3EMighm86LBScEAStK62C2+hKr6LcQtyAv95uv+O4d/jCythWPtubyHm7n9p4eFfWZf5N6B9z1XpmRhaoKcRaxtE9mcdg8JSijL2wyLCszwnFn24pYQYevvZQ0nx5qrfALSumEyYPyuYN5g5ZcJHbdzD87bz3s1B7WrrFCBCXPAjkqli4/A3Bar1DvxkWszbDaIDykAvY9R644GWqX05quDFUcDUfrEnJyddZhkNpDQYaeYHikmIueZtGldil5tME+LzPQDME3dsG0hLE2xSj6RpcCHHEv0F3KlB1q6WK2IiPA9b0e+5jIdabjufkdqcE5X26GIZYjYg3tB/WxQHJRlkBTfqa7/Omfqb5gYf1UWG0ZMpA2pqHRVVMqqHNBe+rzDMVMC2RDNxnkIOHuVygLPSPIk9gDIcksws2Kyp++22TrcvkEsl9lEXBiEZmnmhcTx1tF9WwWUiq+LGH7e53wLTx80XttuIndU3cdQTkzF1n6CWJZpaOWOopAK8B5bYU7kN/DCHE9s5tSQcleRCPdTWE8diGRzbyv6ptjaVUauER9kLXEoXgAbIuBuw+NBMbNlZY8k025fgTVwvcTJUf1TDRHbuROIpwadKiVPGW2eAjW63YvhvQnUqbEpb4tAsjj+WkuoEdhfo0E56lWOOsVZXnYJM0Hh3MMmpB+AvEGuJd27kdS15O4rrtPLlerObBTZI/UA+XCReoSAFAtbBGLiBVc7oQEMmknJW9b7wswJHpY0vShdo9UhkgoYPpXelDMpUKqNuPe7e/MMEaHkJ8gccAQ3AwD+a4RJGQlLmm5yx9X2PnmS5Bdz2Qs1y3bWDrx67njl/V8+U/9yHbq4JvznYrRoUK5FIhkJErU06FIUH/kis/ZZGE0nICEu5dY78hxP4LeSLxEWnydf/t/HSnc3Zm9FK5mbfrQjKsuyKfv1tTjYLu4k+bPIW21Jxz+2upDz1nNyxprS8YiI0Mh1GTNrR8JQjNIS3TvW9M78dPhFz+7unoPa6RDKgR9WliiO4seasxrgCWC7jq1K7eT/6fgf+ZTsYe+UU7iNjuUU394cgJq/cAtr4H4kEuUWXKppj7BsdW3wr/Pw+V54mw0RpV3Yv3mfhqqOEZUOFgOBZSU1CpAylhgmRGFa/wADIJiGQwiJi1AvgaxAp5+cvwXP4FLM3VM7Xpj647FwWNfU2J48uFInAhg5b9Zx2qYTB6BIWus8
8nUZoYoVtlGGIlPj41jm0B7rK3G8Rw/SaO6zkJi1Lqg/DKgJl/oMHMd1hKykpEUeGmmPRAsA2wp8LINi6mW0wQ8n2inl0FwsyCIhkRMa2BXr9gO2EympvX3cymb5ritai1zsXJdPpycTGrnaNx0WogK+nBguso3zQ2dTTwKtLtuD3HVre+0hgARrG1M5CxnZGA+dSTMKSIGpurXG86gJ4QBP0ZDqgmId9R5AktVw64WUBuoxQ8MnayF3q4dNslRRpfUiJqR8J81DTW8unbMrL4pvIvI70xKkE4Bz+W45g/2ZTxTx93xstF5pUMJ/xwvfNLQ5jP4yfZaTd3QgPtVIRXOx+PSmx5F4nsdrynGkr8w1I0JjU0sLsvDGFghxNKHJgxSUU+T4yFfSSJfLq477rxpbzTnnfB+0Hxji9FYuUPNnjUoZgQtbg9y6/BPl2bM21A70tj2Lvbnbe+yt2MhHcp8e5vHP09LYMtI8OmTpzermMOHUG0wArd/kiueeLMOMpHASTc8GXLq8u0IKIdLgYYrXs0NpE8nA8bjLk0GTFP9qKv5qlShzwicJ9EAR42S83Tfw2SjyOvVxHCuICsG7H0wDOvMTkfHRmb4KCM2TOZdBpzatnh7sFzkaWCGo67RB06S9X5leVSIhohT3m0suSCS3U53gC7cGdGpsQzqs8GlAEspucMdMvpeLw6cmVqea1nA4Ln85M4iIwG4gE8oAitI2xetidm/JKXortvCnhFq/xJ5pZtJgkf7Io8UFHvKLbUrVdisVjf149uOuJsxaoNe4qTOyluD4b8LdrZ8EwLxfLn2BF6ZE2mVXvL86iUyUmbcJx0h9xsLQ3gq5NTQ5OkpZHaO/5kXQSkbWkOTtfPyh4vCBii4jTl011bDGWR3pIV9gpwoLW+e4esDYQbtUIjoo7O+B2QAET1iEr4A+24uYJl+QZoctctBG3XMBoHMwhcHhs7OeqwCzYd6bzc2mMPfN49wabRuQ3sryvMOamaJFN5Pb9lnVIBOHSWXDRwP1lqggIYXtTw1h5PdjGmr5QDey3/VQmnoZJIhblCM4Sp9VmGj4ZRIbAiljcW5+nz1DyzHwA1arsrJeCcWo348yJweraRQopvlLMSUQTnfZHpYM9wbbfmNshvVfdChin+XoLrqiAU0aHm8qU3ii0km5uzyABYl95BgNcc86xeb+tFZvon24Eiar+f3wrG3asQ+RvDG+S3wgQFzfD+PWt1BPZYGLW4PckhLCDG8kah+sjlDDU1yX8yD00/L5JYMSFzzWqIOmVsILfmKMVV2vEJlBPHwj0Q3ZJSbC/5i0AqZy6k7tkqCxy7dPIyf2aS232zBHaLTV1Sprxv+QhCY0/gZpoZ0ZStQzdX73A4SeozdPeURu2WjzCChqJ/maNovLSSa11OSogAfpBR+u34wNjlT10pi1WjRN1XZUYbN7yHUS9uaqFd22LgjURluzWLN5H/C9FOJQJHK+buYBnQciHCCqdF39Fqp9EZwVkmNjGyMOsVn2UHnY3piyj0spkVh92V6qdsMFO2kE1T7jv9z7wPc5pl+w8GZKvl1TXl0SIPagko5RahlW++r5hROSSBpkv2exN+oXue74J9vOqJnbN5mGBSd04OTEHFNfxKlI+LMLjClAGA36vM1tS62iamaFMP1m2QJjGvvtlOnI9Wge5PcXs6a0wWy+guz6aiBWPBp/xjbbpRvHRFGIamZlLuDGd02ud6tnhCoD+ZfVyH9qtDsrEjw5/kFco1NSLcbCpKYGZRUSFMEqK0VknV4FoVZ1cS1q2c2sl7sOCbpJm9ZXSZ68+Ql5j9+A37GAEcb0NeQj+eg9SpG+EH5ytYpknm2E9+2on3n/lC3OVJ6sscohobHUZOfJj26gG9OE7OMdq5JjAyljrJUVOt68z73+GKsO1lXA5tuJyElaasecqe8hAcIbqCYXoa5v/uR++S9LNUoKY8LJLX4iaK7bRitLadL3E24/RKoK09xOUZKPhJscNk/HuN1UvFGjCfql8PMDlcud+y+nrmVLDoP164Ku9Taf1p1BkI/lxZJVPQCRCqICsmGhFuc8iP3aVDMyvuVWeKSr86BiuaIwNLxRDLQn9WOKzZxolMrK9tSojxYet0gYwbdgYeNo6j4Np5X2YKx9PnRTsfm+sg7uD0o7KkKyWTBD4+ekG1XrhIkkdrnSxcjoQWzk/YWINac0FZvYeWGz90/lxvutsj8D8ofj22r+PcBuZ0ymMn9RjWyXKEjx2EO9MP0hIBmEGIa9OlMreUHFDDU/LyYqxqeWMq2TTM7ETSn66aDnBOzgNhpQ2pJYDlufmrY0j/No7q69YquGJNyFncRRP4lzu42z+YC9t+y8f6sUcSbv/jjEK+MRCK9AlN3KhqSUgQUD1ceKi9V+XsWQ7lmUIuPID9vWjrviNE/g/7Jt3xIl/bNnqRpRZOLJWkSaya/5Q3Xt7wkEaGsjR1rn8N8N12WbwvT1jGRh1zxkdYAno+kKkO/fq7QSfeitbJpom15VYwoOoOvHjcTdd0fsIgm6yE6kaA4plnX9yhjTGM3kcTP+CR2m/s4Y9uEmKNUi7jQrV5Xv30WKRz5USb3Wk/+dj+oTaOm+YCtPVzsygXMHkXqgPQAzUT/VUi5lfIq0Cotz/bdyumo5/x9il6mdn0dQIwZhnpfKtwoYpMGMI+J5PutTKOPNlA/lajNTlxOcizxnDaYoaJIRaY7MX1cTQx6HH/RclpuwSAe68E43R4K9qjBoDYr3sak33a0lGYwfmjuD6Ffr7AnsWJyFQPBscUyMREEPJB3D6usWbPHTfVt3vab7Dhk4lx22IECT7KT5H+siS50XL9ik2kXs+JvBdPeQcMl+vMl1mkGZjvMdily2fq8IUqpbhAVgJLdnAIxP6IdVUgPCCKHdnG38sm01XTC3ICglBxvZ+wCwEbG//0LBLzckThJP3KgqSkQrdJ7ugv/fBbw1ag80f55fbbLDbxBsa9UFxDWgSuQo0Rh8gc2bekxfzuj2y8f0fRiLbIHxjl7NX3qtpG0f80RxgG16TxzKTz6tlYN+bXhr/Asco0KGJjxp5nR1pN9IkcqRUJjwuILpQA1y+qT5O4JnvvlWHgIKoU5ZbAzwhsOJoeFeBDmIT6/1ps9H1Oh07Y9ubJ3UN3ijotIMndZAEEfQlP2g/L55q7bgSrmxi1ID8SbiKvsypFu+WBjn5guWFD9rdOlCeLCElIXHQ/nbQBwnt401RZBcIpJvyLBPHv+0XhvKQdjzBD01Z1cZ6/+RYVA2L+bEQTzk2C/0CNVOyz4nlRrkGhBs6U/zTDu7qxxhjR9xu2JlPdtwdUO3kBoPOAKAg6W+0NQmi2n12j1asnVnhq8QI7eKGq3B/ijpPu/qZ0ny0lspEsa/qZuMpMhfNQEkdq7BzGaQhP317gr2C9EGptg5yMWAnt0J7/4O7VVGdMDbW/sOLUQkdvICf2FgGsebYCSKPG0dyxwM5W9OrpxfuG34CJmmjYFo/SyujBjueNbRZUMM1qCkrINor01HLPTiQaC7vqoO/xoOfXc94Kfwn8LwUFRfg0KI7nbiMm+uET5y0JjpkEh+ZkLu9iVTDnKur6xjG/4cV4WI9B47KEPNJIHas7zmA+DwdKSfU5RjLFewz6oVvia73FmQuhoPJzbbeA649n55WQXFALmzhkS/YCFUuc+Br6+Y9gqiHvGQ/tpsLDooaWln8AMOWCGO3O2QVj8CoQvzurUzpS1/rJeWkwCKKwfn7Bj8NewJRPcOIzE5sL/OD/FoZIdyJsLytcMzyas4ZSJRrpfe78+ve44nh4uxaYzVMIZPcF+tjnXzeQhJmm3U91xXNrysF0RmfuVqGy5EIXGOo9TIYWblt0EyznTVtQrIqNo+i4oAhcIrFro1bGKxZBzCJ3mGvV7GFk0Xk76ViIlZdzYbFh7WrS8d22wYNod6t6QFKGLgHzbY2QyxHyVrLqc8VoovL2qCO8nIqbjXzqy57gUFnZp5Png2rklywG2tXT6puQKA7Xqld90EJFDpzo3HgafaxndDJCxeTYGn8Jl2+fZdwoOxsC3pUZhQYB+HCiCikbmMPNRC9Zx7OB0p85gB
Dw9eq3aH0h6LlqwY7VSThub3J5CA/zcMX+MbSl5sTEUmkbkEvkN1+T9AO605umAXAr99HumnnUODCwiIj/+okOEnRQ4wimA+jYGUm0RYjb+PyspiWMd1qGnvG9lT29FaEbTSxniioYsFiFcELRTNWZmWk8m8NQBP5T3DAL1Vutkp+cwLv7ajfRb+aTLpGiW/gJDruYQojyx36ktlTUfMU41h1JT/8x/Y0JCii3xDf7RPykFmAmPlExZaEXuSKwtr1b67iRZbyzIeJzpRwF4dD1Sec4JP9wnDL3I1+sYwK4vxkIrmSFOrC+k/WREycYbOP3oj1Nwu3AhJY2ZB3L94T7+H+lDYA/uRcBkIX2xTcwZDakUGSgwIN7fUUxKAY5lZ7TU8XJNAC69l1oLNxQF3r01pF/MU062zuRQTUU7JBNqBHaccMOqJOT7w+JlJe9uPjPq7cVbKcrxyB8voKDJeL+385N1H6gDhgv/vmbn2jjNNYEzaKcKTNH+uvg1pOoApAOsAzTZlRFlK75TCTWeqWUSjDaAyGooptdfLEbHLF/JG4KQkguygBT8iYYvS7THAsBM+fCvacqbLkuexLQn3eiIiruK9RpvoZIbyXYZSUz/8ggaLM2KwX/S+bmxswSfzxs/Qwgmbc3QkIFlE9OqqHrCn2vT+94g0q+J9j8d/c/mT6ti+kM6966PETckEtjArShtrZe8xn152igig7H9C4hNWxIhGegiHU3xqREGuxPthNFLDzhBx44mmsHgXrj30EtrNnbpH2cN+kx5S1yZrz67yQfhl5B2KRm0zOL7diwgXNS0/ZCz3lj+jkB6lB/SxniH4LYdvPhej1FOzA+ag2ix3hsf6xFW1jdX+MEf//j2lTnq9C65HEtZwT8qemaeLaLCVwG3hNzUo49CPsLhHLb8ktI6B0dbso6s9tdyShgRv7aDKx05HNG9QxfC/IbIMXhIZgCM4MmCSPX/aJpyPz/AEilu95XRgIPq0JMqwZUjz1QZlDgQKpGNrkK51RateylV0+dKsuKORFkFamY02kZtBrAsU5UJHs5fn4SyGdfsk/8aW+F+gMB6lpEX1wpA/4iwbKukwXs5S+xaKz22vnTxO3lbx7IXpaw5ZSiQvYd3dwDTzMHojAJ74wP6LvIwlA1Vot1EXPC2xeJkFVaORfBmbeDU6W30IYWq3eoXwJI3kVM6/Bxzz6zGjZjzHkcEP3UhLTEHfrNpz48aerD6sW2RVg548Qa6OBfDUkvDmSWzjIDGOKAf1bJ2pwZaXCyN84612w61YbIMey1Coo7tM/xZJJUJG9OF6XWVlUJEJxLdul+x3XfQ1lLb2sK9eSdo0YLb3MTAH9jyaA7RXOemoMAJKkRpsmzT+G3an6iA71ch/3V59MZEXPBNSeDJrjHHjqVBwi38zUu+HqfdSZE8loR7REnx2PdMOF4RBJt+vhE4ptsIYkwXQD0KpXYJnZNzYgYUG7oAFxDZx+R6iBRYprc/Xq7Pscf8QvqiNBjg/s7sWAbu3F8e5vH6sIr3ox5oCbNSPGdiJmTqYn73miBGlbqfzANjyrOz0EqEvvFGZV76k6S38MZY2RDUZsvcwTwno1SGrb416ZMD3+RD0Yh8X8vHg8U7+hIbEnn7Spb6ZW5d75H4Gq/Gwx7iOIuIPFaxXDdA+tGA8ESpR3drF1EdcIOPQ8utCAQ7Ywz4Kjyj8dodoApIRAuOONFTcxqx0soIFVM1jUaQKrzAm9+giJ62w8xr9ImY9up2xi+tWOIdQIPxOUT/knRyowWTx+w827TO43hnWg7N1SAS2yLMZAFKJkowhG/bGs3ca+YTuLhrIxurHuyOC3ak3ZHbAqyBhTkzrL+dNEIk8Q0GpwLF86N0dCtDwpNyI9BiS1APKCuQC1WcFIHbPDjPV1z5hru/iQqlVwEeB0gIj0gIwxjk+8O1x59peDwWa2VHQJkU2H4e0cf69Cd7Da/jOy3Tz1rlPgY38/Ah+T8KLVZqEEV7MdDIuCVEWCqcKN+llX6q5z1h5gK3RxpyCuaCCpaZXItqPM6tT03K38zGPWj3oNYa8OP/vPKqjsNK08BLk3ZA8KVZa/PrfSimxHh5sxqZMbnCMots3rJkTTUyfUrFniXqFiKSeCdIp0WIBxnPSnAef0XlnNV8rLRwLYBUhGefona+2iS0cIY8/brUw6AvyxvF7IMrMlNCGMDkbFJFfPT1LRyNl6jpxCGm0FUh8Cpojnf25o7zAAmPVVPQxV2BFdAtMKtAvS1Nuqb1sjJiUMXaRT5DiBUidWRBlZS96glvlTvc2m1OAJyCN/XvRM7jf7wFA9T+7TDKmq83fBo7LpPtPMbpvkovdr0dV0J7IA6p3GEY+kpvj6jGuvszCxlm9KPHG2XDTlfUYgMOA3kk0KuYz0JtL3Xah/+OuHHElqY7J0PWzZ2lk9GYotmvy/CgGGB9B7oWK1sqbuw61xrwVBz7DCCBhAACtrdHTkhYda+zMWUoXNzxmb8huKv7sVrGpoRQwOPPVaAUavDBjPH1OhaqE7eq7kifbs2BBdFRx7Ptmnw4gFEnmrKpYtCOsIyEmZAqgwjXvvoBglZh/JaKWtvZKDSvzz+gwO+c9r+9K3Kx5T1HHLFCbAZdHnm9kYf4hSovQU0oxqjtn60waxsNYvHdbhr9PzTDh4WgPymH7vYxsQG6B4BbeTBzSyLQJJJixuffALA1ugZIPk9yzl9MClswjtmiPGHXQ1oD2+9tEHrDB1SjjmAEn2ndchqz6BB1OzBhiYXA26jYzSk26dQT2NSt8TTd/t1QId/OMe1N+D8KQFbGiljL7qupwOLRBBvnIFD0Xkjeh6q92ieLU3q7MgDmZ8TRXZa5UFYvNEc3wk6TOcxgl0KjB+0FhHe31iQ+kXgQa2UqK6Q3PqmcIdiOuaEjAdKEsW3CwCxJ/cu+5uj4bdJd5NSAZvfa5WPqBRihKm2x3YyVfVjM1CvRVGuOFOLtcWodajwyXkG2U288lKTlvkofkVZL714dsJvfFEaclE47kRXL3lQwvPXAGm7nRLlJEzM13rZjaoJBwcodwy3MR+lzoOwLMlobaQ2nLFD/E3qFYGRUS9CyfCjKPB2uom/gHWJlhZjD4OS15Xt1yGdjcWe4fX8iI8+UXc5YHRcuu4ZV1LNkoq/ZbVRlyZhYwzmd/Z54A+rwihZY1z6Xm/y4s/b6af5/QOD8oes09wy1prt2x0m2SsD8jFCZIiC3lbyRggB9pHTmJkG9NICwuBfzitoj6L//xzLz4mocLN22B59Eo+4h9sv2myaaOhxXo3aJ3Co2+bO3Och+hN/nQtHx1v6/+5soeSqH5Hgoe5gAIwb2Vi9jRyZ7Gm8Ed/8tRzvpiYD6/A+GjVTdC/SqqKoWbKiq4T6T+BX1NUiUt1EhMaC6OZb/uklwtLUooen4cmoSsHD2l5ZuHuc8cRLGweKYc4DHu1CD/UH2uHl7S4c2+bw8wvVct0LyCRcB61+emqQihlh/ESimSCVDZW3GCGrFU9PV3nNQ32AyQi+dWL20F6lpFf0bmVGm/sdlSEC0fxDDEtet0Nw1+3Ue3ZFU2Wvjk5pnnU4qING/SwuyHLKgUPLfXRagSbVtVW7m2zDndpe5lsQrK0G1CCioVKu9rBAfmf5Y5Je6mKHtrdrWBTMa2d8vhd7HEdZeEP4NZ1zbmJjkzOFtTxEq4QcPrkeH9eJLL8xlgsItv3nOJngevCgGIZAJPDynKY12KoIPU/nLPZcXotYs6Ps9M3FExL8aFqjG5d6HzVhsTCmyglrnMVrRfZ8cB1G7h9hlxMRmyr8Us1GP7s9gstwehGhVYFIZB6OwWZPK6QtjGg619qwUrpibbi38Hjll7zzMtgDKYNViRUuPhM0k9xX5VwSHR6L3YQMgH4lKSPhj4inPoyMVyJACK5Jo9lw4xcvuquKHeG6IyZaBCSN9TQF1i82bZvckNHavOs0JvDDvbtp16ZiM7yTQ0TtDuk0e98WcoKRJQMSF2fBNwWW55eHtPa/EDiQc4lEGoWAr9g1j0uDLClJ1QJxO1X2Ay4kTAWl1iuung1s5TcbTxSRLrY72T3rYeN2c89YBsaJKN59jX
MQZ4g6WEgoJiyyoMoqnEAEnL6OOrh+eacCeA2bdnJmKKD6wXnG52QSjcMLWUhSpmrfksXkQasRViUIXeKC8qBsYzvQF2chLM3fp33ryWFmLTv254CY9w+YH5fae53qyuBq7xmgrFm/Gm8CFjZRuNYYiKN8bntLdgUWlzMgQYIrhrmJXk8bQELfk2en9TlrYbvVICVBrjRKGzMtPO6o39jlB+DoXmTt5vNmP+7dYHN92KU3gUNV5V2tZj0vWIrY+N0h0zziD5X1IDEW8Y4rQdvR9XcrWaGTv1ne3tNfscGyd7v0VM/1PkIK5AswVHwdEvJZcoPuV5MrPNNx4LQrUZHgJ5vj7mIwDA7fpQn5Pv6E8pr63yRgjb10/tiyhYjHInxNOj9NzwkfVolJHQqm0BgXCWRrYycmGrKEf93nYZxFqnb8iKwzPCQ63toE0uByS7P4ZCGXnJiH/LGVpPFo16cf3CFDU6GYf9UhhCMHQmCCUYWB6/eB85yYUHyVNpp2cz1rsdRuGH2pbR8y/qtdIjog+2Q6dOUjQNGuAfasmVDY9s8xObJlwAcBAcNEUF8HxxLeCPM4AiuDRRtI+MQ0bv20wKOsif4LV+UnhnDi7UwQN+7Tw0mZqJZ0P1lhvvN8ZTyxJqoCPO2YIdUBjwbmWgwvMfz35QijNbGY5JZvkG5oxasxAzE4VgIINvhd6irY5xc+jCz0767XxFESIZ3EVX191Nfz+w+a8A8+uu36lrE8eIyBwKgXxpIyWXd8DzJD80u0nOgM2OFZqTpeIl5Eh9ehZnvprv920ULbKlX+4hTSlBwUHJEfQG5AHKkzzxGKMrdzx/kgDFjIqkJFiYpTHQWtTNn8IPzuciA4Z/PU5lftbjMc5CXTJ2JZwRJ8gFUDmXU5Urd7fGMmvSo0BfJbVmNb08e7zp2wBpqATeP1G3lluIoNpN9dQVDe/vpPoOB+Qa7Ix9TrCj8aMiss9ZgJzxYxEJgOzQYZerB32acKDkmQda0SRFfbRtFrOBwvklqrCZ3dQlh3P8/wkHFAw7xCk60JeEyqdYWqCCb8K/AhImcYVQ/6+o75Abvu1lp44h9WRUX14xw5BhUwyF787d+0ZXzs5F7grE54J92GMvFyeN8j0Iv4o/w+A5defm42MZwztq2j5fbD0PG0vhdCIDHqgKkMi9zg/8TtRH1qI/hXq9Qz9UJOWSQgD/yrsc4Ag3ULQRftu24S3uTielL3UCfKVbMes0EAIsuaE2w/Bz85XiArVrZhxtnOCOWDGGKYg0JlBreoLzI2bPM5vAxU+XyheK0JV0CGbop6Mg96oWXRqn10r9rPZkcFyEIbKrtaqxRxQ5+M0LE/u2kbdTnwZ34/OcL/j4AeTwD3zzCBMkN8u4e3RJ6u401kuF3Mq2qOT2rKT/7khMV3RVRY9do7eVTzqIWEsWPJC+/K7EubU6d3FY2ILSa3ezvaFEI8Dt+wsfy9oPe26AB9Kan0IctEYVCXuJebhxZ7r+h/1Jhmmtfc/Mh/JPRtDRb84BDhs+V5wgd61WivkyrUWARKRN7fyFw3aQbLJxDx5m/sFxACNc6leTpaPb4k4BpmXIQSb6bOkUS/xPlHRydoJ5dKvngo0QI93SZqHPVTSXkpxOuPxLfX57INPMxZTk/Kg5HUVSmzP1hm7Q99CbdSI1wFiF7yqcS8Q/h1zXlguhyePt51Wfj+tgTqn/Qk63MfjO5ptm7zAYqSU/XtR5zLa9sREGYxYODnVm55skU+OabZVyKWRlOvGi7oGM+upFld2YLJkgYSTIbYloo54iMxEQrjSkxj/Ey+9cZDJP6GL1OCGLmcmAUeh88AfAjbQKu9G7fjclN0mM396n55AD20QO6QqsBJiqe+Ibct4z/OM7Evdmhe/ZFbmOplvQWhVvd/kpr4cq14llzBqrTXynPvXFDSMXrQnVW/NguZBz4PkYVkCRtj+CcYFwN9IuasXeedF6NJtcTA70zyG672VYGe0HZ3VW5oMKgpXKiJRTJBJWDeK4S8q83Eu0NDDbWbi2DVdJ3oZ1UABdo3LevuIQZqB33+0FCZq0TYt5jnMr1Un42mBqrWC/hJNTof3K8vZMVO4+9Bc5MQGXt2PJ6b8C8qlopyvDvWpXiEGw29iukwpMhB+N9zEiZrxeAl/wSugD2+ru9wdW0HleHQZiMKBnrWNu2JZrcIiuN95tMmD4vn5WYCz3VnfAKbUxGN4Tkx1lnFgk0k3YQkS38LIekXr2xRuWpnjzUpJAd16rGG1dTvIpwdJ15STqB+9I02mn6Ou5V8NDwqfS28qudJdAHJrlVrS2mpJszMxIK6YWE617cEjoOAowqo4AfnhphVGIXa8GVIVPWnAuD47KKbas9XPoRoeU3TqQpKh6wvyoidDM9YdD5Cpc2c/Fe5uCBHFZHuvFEn7p/yhrJggzXDvWH2JDTiTFgiTIDVBQ8BCzyzYCHlYyxuEL+bNmhPrNyc1CTRONjE8iUEmL9LUl2s4ka7oZqNd5pzs9RZ/KWNhK4pvcbutgJ7iRuxVxFnXkiZLGGB0YR/emMc0VHapNEYyH5WelcuWKuDP94sbW72uysb6DyiXk/LLFpn2k9FjxAr/X59/jxirDKciX1AYLN4knn7KR87uVSgRHCheI9KWQOYN8u9ClxUCPtiQ1Kc7KQh317fP6Rm8ixGggkr/RytyhRd61BNpAfHj0DK/NSv3atgxXCzI1Gr/98OADyANzRPi+c4Xp3RHzRO3bA8eAzAatAisHIen1dfnNC0qK5nJu2WTAF1VOA/XE3ZMfu28VmT1d/e+xFvUnH7mJvvi/Wp2lAaUjVKzFUN1LpSVnZVgyhZrPxy2qEkcrJ69cOp6U8QlEA/Jm1LKxtwIP6qVeEU32oFtUqVz9r8rpzO/6F/vyHLR/GrhJlzmWmfMfiyvynbk/OqjYScJd1BNKTjPOuM7mc7Omhjc08kvKBUz/6hch0q/YhZRQziOc4Qvi+YbsHbRIjpunnXNP1yz5ghM/lkwvqQ406iRP+N4tYe+A956RcayZ/hsjILwbFdIfk8nYBBNgYV6q2wmeau16Ev1U7DyQ5M8oRXYAKYsqb1FF4wugCfL20G1S9/mGx4SC0ZtpGXcxlHh28vV9FrcZO19CAMiFOyCbEnc+P99eWy6YWv8zSabANPps4P2fMijN1AEueCrqPcz37faElSg7tdcN0u7ooF89Gd8MtdZnKSdof1J2S4Tu7M/E+O5Lnd3K0J7mr4RhioSa+XLx8cDo716yXtTApZfW5fV7yhnwiC/L20IXhfnj9QMb+Mxny2OEP4xksHUKgPxul+zRDW9G4A7MjOdttYgqZ5oW1RJCtcsL7aE7BekRWJFjG0pdJ2QXWyLkBO0kOAPfEw0Q43vIORDiEBwbYFfP1PdQFn7ephwpfPfGVJb2ZhNSfoJrEsHsuX5ChMUbB0wkZrwcw5sePi3GzD4WkGakdJ2saMjjQjVm3rtC9cTC+vc1OacqXeSwe22QseBQAOqA1XcdyOVDqyWjw28gcQMGncmF5C/Cb9HmuYu8YNntfV9WCzTyLNkK3eTbzgYG4+uSru3VxaDz+NolWdSz3URX6QmdnmQzraI1JB8KtZj4SRmLYBao2EOajRr47FYUHZIalEHOck90aP0ecCu71B5go9gIPc+j3DK/VvRy1BzaiKZAxbamX+6Ayl0+yYOd8gfBksWJ3DumUR/WZf9oRcKEJ2s03oidUQbZrmXJxWXhlDRaA0wbC2SWzi5x4pg4jiKAixZV7oyrf8qSaGaho0UU3UcPQ1bSPuqSWxCFUhKubJIz2OP5AxE3ET1j0JTzdcoGfC8N2X1sj+5ZfZyJvOBV0QrmU1ZY+FO9z+JCylhNvxQuwWzcJGqDFluLvaBMw1+nazk7USiPqL2guVm/65SPjxjQXSmi3rZ/WOY2/4YVF+JPxjalk+dIR8DsWngoTkRTv+e7rh5gdN07ftnilkU2HoG821ybrK9ixkJ8vcz5Pl8Pf0RUUlxmVRwqkz2vDoDv/eerDUAJm1fPU3n3xgBssC4giDR/a4cickTOUUwNs1q5eay1uJ8B4Yv+Ix7GQMKtYFAxeb2a6az6kbEk
LzMk0sAr5G2bGCEN2nG4h2hKn2w/OKe6WE6EZD9BoYHHRYMlGFCJY5eIAYEmJFkdyIaIMgd2hAcwRHZhzh312I5/zZgd8gErdgkDzm+EBMixcCd6JKb1+DshZdrRHvsFdSHqX5AYF6Y1sjuRUX86ldyj8uZ5EG21LPZ0n9d9e7CCEq6nXbsVik4+7ctkMY94jyqq3MENVaFXvnPbbcsQIziEEr9k/dkXpDUMCZj5WX8Zpe+e72y58qC495qkbD2CD92KpV4dTS5QTmjinTPFm8tny5x6/zraJilN+3AK6Vc9AKqcrUL/v+OCqTRDG66PVU9uGOiqB/t2Tp3gpnigK7mW/c1jY7Vksrc4SAMx3p0xjNzwNSlH+WFp05YwM6UIJwgw0NBg2nN/O+Lh8mK67ONjHm+zFnoVn03fUHOnY2pWFZOCaiFe8Qij4rIOotrmm2RZGk2v9fNmfFFd97LSs8sCoVROiQomsXJ/naYqx+4SRWpGTixVvf5KoVBEknCDMEoBY+sG7gZO7aXc1nT1KF0+iWE/kAe4jqpADl+pqeb8jwuERYmW5QW6r6JlaKblsMN40k/5uzzJZ3kqp9k2rGArG2iO/e7v4xV8T+ckCR95KOZ/0C2rqgXSZUCAiocsphwccq8+9RGfOkapKeiyevPyPdrXM0rgBwPnH2qlclj2rGFysbvdp1lXsqMbYzo9vsglYZp3GqhooNKYk1fkyi3RNqmBz5OY6aj8F1JhwKgQ5RBoGoA1XwwGrdAXisNqy+eSIuR9oYKGOyhoGRmLYUps0WTyTrdtp4hYKq1GcN/K5e42k0nM8XKXVo6oAwlrz9n5iNfc83/XcJTqBvzG/nLa/ttQBW/DOwFK6fLsW2I20Oqi8MJypJiWWMIiyDMQSzRirl1SWqXdf5ZOXNp7PzkU1O3wfNWjd9Fj2KdzcFUcoo18pwFAep/8qb3oMFToWInnPIH7Jrj4OdYI5/wiicNWIyLjqO7xlfbDFAHb8TbxMnm9FZJ2cJ+bD34rymsquU7gQ8VKaAqlQP+Ux62VxrpdCJzLTqXr8IXm+EtpKezo0PME/vp1h0yvfJnCCJ4naeoL0gsbbxjYZGwtcEFxTUNkxkdtwDtQplz7lH4qnDRyfZhhLWjd8P+svetSy2EQ195DAdeCCecEQBZ2XZVKTR3YDEzv9zv5uRo/M24xMa5Gqae6IFHiWwuLb5Bcuf2eKtVjNAAwxuxFIqn/8zNGFz5+yUYFZS+6cGAUbM8gqmRXSv3KOvUzRb7dsb6yvDYeoFyNou1d17g1d3/imNEgZ4SD7XL84JViI2q23bxzz5WBtyAcruDYOdvUfIOJzatF404jwMFqh+g8jw0A8FSm3xE7e/Re2z6gTwTDLVvr1cN/MEEigiVZy+W0l5i9BlMXbGZixh0UbWK1+a+mo6Cy7PmrH9uU/iixlPYjvIIVhetbcgJl8ssPPDLYKiFmg0wnfllXaJ12UscpNnBn32nX3rJmqUFih4WVM6AbeWye4qPhetGHJ+Ofdzv8vbMJVRJpntx10nvdIfAsHmXlgXIfhyR8WhJ47lEn+de3FyEchvSZcH5kKMMmPwq/C6E/n9atlc4SS1/unmXbvFMOTs5+eM+l7oKJia1XWW0H6OnxgPHbLLPCLNGYzmikOHq9BQxOphcm5+fLAfo0SKOrbYMMPatraamnOEY11xZ/FR05FDkUm1hSpUAaYP/m97kRoVNgT6r8amkNbv6j2y3LJ4o0o4Ql5uq1Md9u+anMTBGxXhgSBdsEt9nE67m4QMHtsGj7RRxsgOvvX4AJMgH1+e9nmLBJCmQK7MtEC4YS1K/OxlKxyE0/ARUtgOWflEKeGbWgCm1pURLDKda7cXPS/opUwfqWhPIz+04YCn6JDuG1VaZgBfzGh+EzAFUeXeBvrgHortX3Ni/oXhNg6uK833B6rF0LRPwoCO6fj7ixEryii7broexuR4PJM6fxEohPXYu2z9v1OfP0zxhAMI7dkt4HmODW7+PVBQ9nrUzgyJIk4UsC+5iQqg63bv2qufjPm214jo3pbky7Al3K2gSCHW1NhY7ce1ww8uHjjmxDe8X7FMVIXbMvc/7wjpAm7ZGBlbfT2ujK6t6n0A9mHqfPqYRYUh/UbGV8Q4fQBgvdjX6YTGliRdSjKq9W81ww/QFktV+RbGEMJ/BoOuyOQBF/ciyCrJecK6YY5+vcPHmPq14QmSAgwad50FVyNwiFuJ/SpSCn18zJdhZJo4FjwoPlJVbHtB26H9gfDUrjwGgGUr02nNSYYCysY83ggLfzoTJKx6bqYZgQ+WKABb8AFgF37qmKh7hDdf/6AqqT1W3atAUj6F7KbYQ6B7qrA82y3c+LO7rZJxoJFgyCUpbHt8R7ALij/fu+i6XG1KEFl3na0Op38W4WIiG/BSLK2sUCqJvjtEmRaKzlUIz7aTlQSIaSm3tBi9GGqVVgwgv+RaGg247XqdTChEf/GS34WD23irfCXrBd+Ihyd7YbneEcHVgR644hzlHuZSVLSKVjiQmWmsl655i9n4BjyLMWvXAnIjG5zlU0oaSzVZzZwOsKmmsRUqK0WwydRz/9EcacD1NmwjFO5hJqlzj+F4I5ozK1PJrnotMS8Myc0gGPMYjG1/TRo5btE9B7cMoWDBN/ysMc/HZn/n2zT4GzEiwzfmvOMgfTwgY/uXwbEMzgOGoNhQRUMx1n/vN3tXqG2Itf7rUFhHcYFdbEQz5sPfIKVoP3FjqmtWzZnO9yzNq4Dm4qcG63iNyROQ+7G4xRHKDBE2Zoc+l4p8bwxIQxaafIxLljfEhwuURgCxnlnV2tc6zPku2I/fcJKK3ZNQzEs+nncGtP94sz2WyTXfkQjU/uFs7i4xkAwkzFo2vqjnGz7ixN1MMpoSy9fvl2r4Kz5HRBkQ6ryTxyPK9oGGiFYVDXT+Ze7FNpuhMaUTznCluyHkqieZ5YyGtVbj79mAg5WWHkoqmaFpO/oW4il+Gdu3CSPgFsBRrsQmv2tu89kRp24CGc6dfsGbY9IhmjvhYOEkgLemElhRPe4+yZNlvdI2NAHal/vjVJXV38lQQj1L/7ZPrq3pKUDhoZERCY5oYu1SjhIfUdGibERVlhEXBEA/R6GFsduhzskZL8jaoLnPbyjQasJ3G9HJgVLgKIN+uQnpT6WzeTmJv+R7NkPi4HW7TDhT2bnutD8jwNDEIWSXGGdDv09BkZx5USCZqOBPJK+P+KE9g1KwXvIqqxlvrAyKv5PZLc7oDDk0Nw7wUwJNV12mSv4rf8r6TaogHp4wdRN6pPvAhP7RHaxduQtNZ1QwyhAXJKZlvD+7Ui2hSuYZv9gi/7WAV5OMedITAp3T0/OrIRm2R5WkH4QYqfmYiZxjuLj4ZG5ZBblC5Gfl7+OpRHwXhWcs1vIiMWqnpBfajDLeyanx2no5JdaOV6AA+rYf4cix1QEEour1fC4z5rfoz0O2qYAixBa5RdouswUp7fWS0Lwmqjlqss1EohAfixJBk08wk+yxKoXvsEXEpi0z1RCGGvMj/M/za75Fc9t1WxX9vHVrRyxeHWTfkO/ZFGHq5Wcj4qGTrBosMtqfU8DC3cFTM3MJeNFODwm4DBSRK2MiOwSs5QeYm+O+gMGwvf5bmS4FiWL0l07zeX0CeI+rTXaS11llyZ3KUC0zqXclsFQjvdoMTPUou0sFL5wT1c5QGxPdAyadlNJRFi+zMjxGmRWsAaATm9FJBXLsFBxUCrIJYG7Sm0ggQ9cqBR+x4HKo9w4XGhL9w+8JXkYv5ZLUdvj75iePKLphWWighdOCKPE9rK89s0uWXJzHDDxib6u799j5ucfaHTkAaCGfMW1ZW/IU5SXRrK+t7IFfN6O7XHXLkhpRfuYnIEO+0csbIvOKnR5G4Bff4G/eUyNXJ9KNe6EmjcsGawPXkfDGjdo5eMmE98LlENSU3W7vwcnywNllexeXJqvTKed5xYw0GZg1a/AqCqq1B3O/FHYj3tQv4iw3cgBeKEQnicrot4VuOsYxMWU+c+rF5KxT/mfQI4hIz8Oi4KR+JOtx1q7kVERNiRiGgmjhDZZFSjFGAQwrjO31nulci6A7W/bSMo
l6Yhlf/7JIGYs66xYgNwWiTqF8yK25MPCDEvIHROX8qBukAE27gqQs192qF6eo4DW0z64lfCQ85+9MxUI5L3L1u7NZahLls0n/waT8PRa9p+ubDa+1y6XUOdd/u5FCobsdMOQ38bGGZzytN0DTErO1GEFfjBfyhaanSq9Eizk8FTI/YQ9QtyXIsMzoUAuC/wwjqoBQFm+4bTEJlF7meMRNNX2YMgUBfENI9z0HSZgUNgWC2TnvdSB+NlXBKp3QTHf2Q0EOJ5Z7bVfN+VJA+lZ9oG6QcYFOE0Kfke/n2kpVO0TOuchJGgJjnui8r6ZOWg0omDVzzqGmhczDpq4bo0DQIJkwFU1DrO1ztVhv+uATaX8y614WVcUahbc7SupFowyfS4DRGNNy2HH8M0WOlvs5KOqoam901VPmqxrHtDbpbpb30qxVBZ09plk8V3QTsYQY/IVZDwOgoYtm4rUXhNo8ZmK71uXmjTNx6CGY83ms1cASWF5CvV2CVL5BBqbZRGWlg7BRzyIZVBIkxt5MBZ0WSx5FwYcYmQnhuheKflGxcBrxKJmlLzkd+mROzwWdvL8oKzeijn9pj8qPHShUdQWO1dHQzgmRBdy4y754Ro2l7H0qFM3UKcArASfqSZ7Amnb3F/MhiXRKWD3R2gPwYYxMXjT7HGstXWhJqmRfTQ4dn4bD2FleuBA/3cni59W9huc6XRmJypPHiAXG4gnQKhquEPCd5T7KxdD8y4KXdUszlsfQh8/2yAV7rXplk+YnSuAzeTm8qca/Tr/C2OBJSYaMeAbbBX+JvBN32TZVvXuCla/0meS8yFXx/V9ZeLczcJq8oH3PCcq/jNNzd4XFPIlYTipJghKMNZIbvMd4tD6VVmFyAcqPxmNTpXO74NBLSHdCS4ZquEfBz3reqMEap91EV9AK9ibU2UAC65uUeaDxUBo5YV1QnuWUHnW+48CV+9uYwt2Mw6gLovnIGBdZ5EV3jZX9aMObOHuNmn6OtUGU3QY1RiPUFw3Lc7FN3VNUJTVCQ4Llyrc1h6nq0rFbZo3KFGeJDPv73Zi0mpqc+NA+3rgkChZWw2pFAbMLlnsGLgWnV9h3Syc+FOVEVs1b7fd73oAviGsongz19hj7QTiYGFAyHjjVp2Pm0RSftHO1WwWmn94c+obUcHoyBryym7X1nbjjf/hJdVv6+sSJhfxG0AfabYMUQUNufV//QvGI6oPV3xy46Z5zIG2wWIOUD+q/msO9Zq55xQxHO3FeekwlFrUVRFaQ186kld89dhzvVuRwwpJBLse9EdqE7UQg+io3hA036k5fyd48fxtA2M+D/5iyTnxoib2AstERN2LCPnuFkPgwVndQsCakjcWaW/36hUys7w18BG2nsoNO3LWCldAn3Y+3LiWpE2jH2623N2htVoAADl3hLzRwWc6eqxyPvdEFeayIi0ZbkC3E2yKvQqqvEh9Brzfk509RFyy8YvidhauSoPp9aRTgihoCrqdCqLej+P7PkoJMucW4XQFH0+WX/5XhY7qtxvaYC/AcF98cv0c5vHpjHeM34V7Vt5rRhj8iaOzZBq8in9v0hx1w2ztcQSde90N9yWu2myfVscUTCZbUkiLU8k++wTVKkuuiTjhUdioF+lDhZetRSJU7LcHjJ+AwY0tFHNdU384KxT43fiht6XDenPxN554fFueMrkGK2ELCmxzg8Y4fOwzTj3nKze2W0byp2brHC/0ZbgoRE/cL5oQKFVEfalq8RlzZIzHEE7l5iW9DgC7S+jAFbSSG3I2LvRJqmcfepgWDbCAdUTdFvBTHnMWRODnIxA1eVKOHVLkcfPU7S57Pp10tmCq+H2kmpFY9Tyc6amRzACVOehDIGyL5aLwe4lgB+zoG3W+hmwqQPDccCBJNPr1CsULm0ksLVUkI0PtyocU2hGDL35dmmj/2o1heXQx/H4dFBQdAY7G1hJBgTJeXas18Ugz8JWLzvpOCo+LPcb2rFsKt8InKRGiP3UYOG9+s92CSs50QPt6EXX8fhQfDsj0uy1Hzu72M6aRWrr2fx/lAmvYrPLa1mWCFcOUxCQwRFm3nOgbPoloEPgjVGsFC6YAayzHxY+JpTLZ92IpeyAFDl35bqIN9MJ2yW/hues4jFm8Jed0+Kt3jYyhN4qCzrLFfZZAmXSPgdFWUL+DbjR8DBNdBUt7DOcsLEZMekfdymjqQAczXn7qOHI0xDqjMyEpPZBtvr017uUPT5M9fLxHksvANMDh3VerHC5k+MsgKL3xiGTnbir95r0bfmW5W0TQxKWIwRZhqQ/E+LB93A+oBkdIzxrQJxaffSMf+W+9wzB6RluS0J1Z1QKnHTDrdwW9WMxPBqxD4yMHD0zM43ujwLeZeQ7KcOF0aXRWg1FBOgeXnOXtp4tertcE2I7Amx9IWWayl0t38Y6NiwE0FSt8NfQdTEyKzGjjdVZJmAqzZt4BPAlODAW57WmcUfv5NKbJfLvw6rM49uCe6G9qGDvLgaaoLpD2Utuyh52zqad7c3HNa4nWdPCFGXojanluRRucpoqEupPR44LITFLKo37RYGKfIVSuADb78zTNSMRj4R7KWkQCmUKb32Wa8JfsWaSghgXx7uIr/qCA7ygLvJ+MYLLPUsuIpcjZib1I1FXMxknALhx28cK3xsaH0vzMXYTJadhPrU/06p0s84gBDatweOtBKLZoeCuxZd3v7lYkphV8+XDohSS4qBjjZfWj/VMr9efdYEiqsQmB+8/eshQ/o5Elrv4f3RNDxYc95R/pIdqx+dZDv7+pbqcmKXNhObTvMS8tt1o34pgUb1uXUl9RBo+IYBig9XccwhGk6eIV8JgmxvyAQTId2phHkZ9UD12j04A8vQMhGISmv75FnXCBVX1J88KEP0n5pzxWMcbmffS2fn4y+6nNVHn5eYeUtonBiqWhhYEUu7ZZwAgmxuVfjTyaMeWh6M8Cf+RMXFvFJuUtTNzU9WnVMZx/CIoijSetR79yX29jMMlBODUxBlGv/T6qP71qX9EEmPts8HnNmE1Etg/cCTVWXfu8YUn3qcwtAmGFgqGI9gS+fm8X6BmYQUQY3J+1rTON80ePQoM2oDaMsoeff1MV1iB44YhFN69McqtIFtXGY/6Y2TAY0WLxPSsXaWkiGd9H8knDXmhp0ohDtE+rws6Kfyf3qbv6BHfUGOT1MJ79/i8seeVViFImZnuUSg1CsyMyRieWEoI+HR7hIVFeyZRfNp1dybKyqZWTRv9T3EIMXH+N3ObJ0OyCGkOYHRiMTdrBxF/CtG5U70srabmGImeBTR0QQMFhfQd1EJRFZ5zTY28j3XXHXet7dtGMeblz8EF43y02riatdkzA2eTj59EAKZIC9fF/4HKZptC9kxAlTEBr0A1MPAbfx7ZJ22eBuZViXWM9gK0k82DshKIgKBxUjTNHlyfR88B/Z8IhOH5Flr/vhU/kaISG6PwIecXwFhejatgyMEzvXtm5LQ/9scgGEqa6yZ0ioqZ9iCiukPq3RkeksUqDtFoIzBjW3DO8ds+R7votfai6KU1jwA4S0g0yujtEngnuABaucXc1VvmxcIFmoKfVy97yKZEGKLeblPowXs5JWCuy23H7GtxWo2NQP40t5LD8KF6XL34jklqsKnFJXS2+LfvcWnZaHVZHUCGF3ZK64K3Hz/vyaxKfW7N/QSV/hGoNrprrqftjOYexglYeGav0WnHthszw+aEi7jbNfKLyywLNcrHv1IG/zEkPP7nz1DCLO4PMfJBqgx3qj9ups9JbelykAXRyGZF9wXoY/SvBwXaI1vvRCTu0yTOgcfR5fwbmt3pYQfYu8AlXjciaVVCCFOny8mfRl7EsJHzDUjjavrOB/oKDMyohmpONOS8pmoeB1pA22nSiDGxYpx7RLhOZGhiAMVV5BMPrA1IQ+i6T7KJlhvijXg1vt5hPyzKhryAdkPXLJA+c+cdWbEUPjYLSuEc26CxOAKWkAe7ILUZt4DsrOVmOGSXQjG0kKgx0e9JJVtpChaRcXDl840LR0iCqO593YmqysAl/nuDkZne3rcA3Q+V6KgeFFQxLjYlIHQYMwagKWRl+ppUX4Ax6Zg01swDrqP1
H7D/trhhpmiUw9Q9OwfsebRF1mM+/62+mhLY/axcKG6+IMfWFG1thbRV1Hif1aPAVW2LgD9kqSlc/FPv3SOKjUhmH+k8xSzKFd+XbrH1wskU+QwKwMKk9gZ0VCE6uFoU6KOWUwXtSGafalnK4BlM1+TvvpMZBSHvo5wBkU8UeS0b+ztIhZNdMYCzuW3tPAvh88aaS2VB7NudlTPtALyl+0Qpx9302McH8hJE4XUNI8lo190PfNHsjoWO6MAL3GgDnkjaEBV/J7o3hdMksFtbFz8xyq+jBoktCwwnZw/P9+4K1n9JrWwercLzTOhcEdHZiCCOOiUJcggt7BpW5B+hLjwf+mO+lp9GYcnxGcqaAmhFlxOIBB20YHfI/pftT6Xd6jfdNIj5J7jHsUt8y3k4W/FUZ6nnZCMCuHRkF4rLhETNcJHuuuNOK15dzJH/tbkH/DZ4g+TpafSs3Vpe8dGYG5UqDzBkIEA6fmQvBiLeQ1xYeXz09TxktpqCKoeC/YomKJrkk1BZjiN3N1lUFSidt1PGWc/jjE8nqXSb6e5VM1vuTjRXhv+OYZKupkCcHE1wThmQAFETH4oyivMPKByoLppPK0yyDFCanVW4sguHbrHftuGhlTVihBRxfO3l6kNp3SgV7P42WTJ8L5D4yEuLCiiCBnYb599uBTboCnte/7Cge7ll8WxyMGBlzy8m8zydkHNwIxw3J9a/PwjGD8LmwTv5OfvjJQcMKqV71E0tStsFUTEWpi8MVMS114BFKjA+xPQjq3edHWrmtMs5K09eT1KPzaXsqZqSTOkhXP2/lPeyQgTEQSbktsm5WLeCHJQT8ZE88vM4mH7Nw0RimRIC/KKzMb36alPHuGLPbnPGuJBt1cyQ4CaUO7dq+v902XxEojLyGtwaLZOTUngtSn6VOo8ca29OuvA4r9im49Y+KtDfpa7JQJnUyJveK08DJXeGyDUi+2BW9XXgo4ftFfbQL2+2YaWWTlWbDGpdf5YxTWBpEHiRQAveoLA2ycYTT59MHvK2mO+Zzhe9x6FlY8ZpE3eABiceM20A7Lo6Sdb7h/PjGiYb+5lFPkcaeJ8firiaik2CWrnXhApKZXCApEdGn1rX1HGCBqFx3Is5D/fwTpsva2KmLcoT9a53DQRKR/hVkjLDLoOOuQPSairjoP8TkHUOYVlEcBFhrvDsTKmzaTec0rNDz9fVksmlXBkckIyc4b8laOzvZoOaFo2WNZdPLSOsMmTG5CQlhIKfaRRdU690yIjb071P5XQG+92TLOKue94KeMXg1w2CvybdUkI2Cm+b2INCnYLIU6RzXDZrpht+Yq+L36tE14Ru6jb+MyIYwXw5xNWv1lL4q+wR47DqekXRjH6IJpXfhkWhzARFsHZGord2l7COv0lo2uUW4MrWwZk8vdMcG+ayO/0n83RFQCowoerEwooJL1xfbo5J6LI2lPE2AxK0yMhV5JUr4p6WCVJCgvJSkp7gu0mAYTCrBm770eAvYZ+WXDLYEEv64tuRSclLZt/pcZSWFPWgCHsznOXUL5ktw+KT4sv5YdP0/ZdIyFPkeF/zpRFiitTbXvuHbD/7MbbdjU9RZUK/QCg/LNZjA51UiN1R9E98+T5EgzBdoW7lWWLPzE3podbSSHY2dDAk1sJ7zhZYOfmloawzB7ru96QTN+Bpy6Tj4VNYyNWBBrtHJLc/BlksI7AC95XkXauA4VH5z9JOwtQyIrFgmcR64RvXS7Cde/DS3Mm559wnU7VrZxMe1UecghojYTNBlQjlB73bdmcPolzy1sPnK5FYarO37A7IdasZUHctTp/s3l3DT3hE9WW/3251D/Ra/RLIx6C/eeOb0pSgfSUcUW0OphwfLI8DksFmuCpDu1r6K9wygwbLSyPhZdWYpjJRMRvJoU+MutCYio8ve56yHCIiZ1hfu1jc03bQl+2KhjkryCcMaNdel0hX6hACdPOMxtsPw5sDbfgF0ySkLb3GmN9BvU3JB2C7oqjKvkqj2m7nNwVTVWh16RVTePlf2wT3oVNglVuFoh1ju5sY0fWSE1iX5NEXdusFmBLhslypx8mP2lAnsHUKzsxjXnAeeqAYXR+nJ/c/zt7zWvip5CBHLZ12MIcll575qZ8Rl0cMabp/wiSxik+Mmk5pLy+YsiOjROWnksTiH46oZLSLa4F/XMXUcApvt0WPW1hQGw1IVL2f8sEXyMT1XWh+4l0INypRSA3L6SX+4W/xPMNOIol/YU0r9D1c9fSdBwNl5Y/2yujBCC2h6G35RpdqWvaxXQKxFu2FyzA4WyfXA1TALI6qPdy7MWQYGLpiZSL5IA82olqcSh+NMGHTAbJGX2lHxjRhisi5Bsp5IWqc4KqwE0c6eY3iWbI+KKRsIelrCci9EY8oIyyoZ2PKV+OlwvkQhNQ5lhwJCNfslOVPZ033rkgPC4FHIP9W3de6OltVw3+fiyba+g+xN3VZoNEAXgt7CeOYFdQ+VhQ1MLGtq4vxI38QJOdfJurFkluOdNS3WUCucHeL6DScdKhHLskxVTEa6Slx98M4DHPRyF786bnmFI+7cU4nCgvoxwrSbKsytZTNAWIrAuLnjPx0mkcoGHt4xBzkziPSgm9gabS+Ti+fwut6WYM/vNbYD76UFhsGuH0NtZnilZQr7D60+a7XcYI0AcWOqqRnlJjNiLhWLKoy1ZMYnvKJkacVdVh7io+H/v8IOtHBzjJg4bknPEGUXqFv3LDMEsazBb87u/R0sLJFHo5/BLAQ0jExeqY4Td8yycT0/uE3SZhgJBt3fIHmSbyPpfRC5cgDokAmTUOKYBTA7G/OzrlJ5SRwXQehNFyPRU5cNZXYce++N393gJTGa9lq24G77w5UXOqFOoo9AgRccWh0M5U0eyvdCoOkFL4Ika+z0PCHFCr631M89h37/ma9NnIQNfmN/FGDshHVuq3BTdRU7DjNHhTDyDmJKvqQ8jnjFGIZpEpaICdtOk1no4nmX8+rLHLfoj3lfnsjYi+z28HYEwYHAHcPbWIcXFxUvJ+qUtbeaXBl+oUXkS5Y0++eK5SEqcHZKz950AwDlMLlUNz3SZmJdSsimJjc3Hl/dm34rLEDu2+vAn8mdjKhmKNbrEn2DUuIl5Tt4mzQmgfIA90XpSnlxfQlIJRMh4pxH6tfo2i7tlD+R2RqKViOxWM3XsPTtOSwyoGLhTSRT5CU7Q1ktpcwVlyC9wGy1vkm0rfG6KS2i5bMa/WdhbdlHhpbakvcNsIws2sYR87lZ5jCiMfYX2MdvDnDA0IC5yDRMbjbaA162kv9U/PTvnSqV5F1ex7a6VKV3U9k0etSIBjSxtaOFny9EZUAU6uCcqF4e2SHHyWOa40ewRqbNq8PunUEV7+3UChugLQS2DVEgsF7tD2Pj23KJijNNFpabn6CFP3mRyH9uFTgkUBtKZsweyvc8xQ5Vae4c7WsXJgGtyUh2Z5y5yQ7H3pItAPmG67lKLcWNjviW3EV38NVnqz0j4pVQShaO0eZmHVZMUrFTSNRJ0fX/SKB0rsTlEi9Fjp0wh5hUlfC8mcngLV6SxBBjKAC7aadIjVreMdvMJOthMLaLPb4GfahaZBpuBQYCC0jXJk8TLDV1gsJKRQAFJjc9Q8w/jpHwRcgTPq4ZZG74OV151W7JThDN63X395MndhPqaxximjat94z4hb/6XHZFVpOYrWtlOq/22pLU6qF6QvwEKcZ0MVk8729A2U7h7fCNPe8f++FCMfBty377TvrTmVMIYVssyV8ktjfBnPBjVWt4xBrqGZWgDQPuR+1RaGTRlBSuSVj+/7D6vA6e6Eah0exKJ6ubkKUXtaVhvuItK0nSnHEn2HIZyaNHw6ectpDJX8AUF932pFBjg0LviqFhnn4FlIuazJodyfZhNZ93qsOVM1xmu3rCgpvW250mhGUGMhOBNQ+q1VfuYXGGC6FcAm/QDyFaL2OpzFguCrq9/KpGH7Ca98UNiHdmOOK3NfJZTKupL1bng8Xt7nmwA/jSffrINvqvexPjhkxBhOFg7nrlMR6DxZ3to0k0F10Amhw50E2XaPA1/4EuXQlCtLN4NBnBkSXgniMLqr6TKqMEGvJcHR6
RaIr00CIyXC128s45CO6b/NKRPTIhE8+sj0CkTqykGfsaOAoumSBFRzreAu4X5srfPnNAOuzAI2l1o54jnwhj9ytceWqj6/rbbk1qxS7GRWlsd3ll/4IgkTuCIuut2boD+6EUCopMZsEH7W7yEq7pOWfio7VOlTssML1o5UBVQKSWaa4F02zUfYTOeD2vraRkym/hYkn2FwB55qqxQ8PnQkDmkvJcziJ1L9gFKe78Lp/MeCrSFlgqICNwbxZoZmRg1OrE3+7A2xU5LsFSrD6gd6J71R3OQOCevVwQRi461fA9qCJupXhzhu6kXeL21d1ntDPktKT9BR9/AzVGxmMxO2A7AqeHZXizHtSa1dduUj0+JxO313BGb9Rao5SS20ALprpzabpN4xXtdJRlaIQDeuHRbU/PPTKBPMINeZUr/70YfMFHWhUdyaQa+NcOfi1CphVPiEkkFCHI3PnN+6ZTSNMMxPvZD2FOKHv8dAvJdSsCJBgUWmpTvRhgYvjgdD5dQme3f5Pz6t/kfkFrqtRSAdWln3Q3bQxJwIi6hv2L/EC1/JpAo/QFqpsjJ9bgFvz1mVTc0QPNq+kMIce8SL3cFBoYOM+ZLi2WaSz6+G/IaXCFE1HRfYWsWWj967Cu5OSkEHmZVYioxbwRs/uqSv8BJwOdwvXuL0WN9GhXYviwj9tvFC615uUCjuXVvrnvUXMEH+0Yn31IeiALZZo+Glw6Aqb+Jui/tRxyL9w8LKYdqUWoNWVoZH8spO5uAA8+rer1iphW1XAAMaaXOzG+HIf2sINiv2njjDi0nN1G1+0Zv6znmd3Iph4vCT2XrxV6R/u1Ny6YrwUsWeBlLVtl584WUF3Q65fTA/+cHzSF+HysQjTJM1RkCkFImmwGeUaxHa1g/0sk3Gm6QySzogk/4WaNwGJSzYfpbwRjcRt6nnmuGEDjVT1kdGx1s5uNpY+zDgglgx1q6ZyIZlH/jouOvhG+Gcxk0zt0YPvDgp/2S/7fRE9PkC+gBrre1LOm2tbWE3v259Bj7FT4IvZAm+Eyr2amQsYdiZ7R40uXshL3RKHGleOi7j/hR1DDL489QDuDXb/I4j7QsRTT95QQoHM5ondH1GOh6eF4mzvzyhfepNPEMPfkM5FY7B58r5gygk2koc6YLnoBQ0LyDIFVIeQ6ckoNqi+Fts0lv8+/upI7F12JrIpeiJ7p9uwdkiS73jAjeoQNdsi0UEkSeC9JYG2slywdT8QUOzVrP/7CyeeaGqBICPvPALAD9Zu4SyZ2xMzahaIiYZPzTQcOLqgnJNpFk8A3YNWFbb+6xhmr8lBdlqSnt90fO81p6EjTtcRqradv8038bL1o5WwmMJL5DaUcjryJd9zlileMfSXsk/FmbsINWXxeRy/mQVd9+GHY8SN32sQh+G2o6dI7l25cdkrvvglk1Nd+TCIdnNKw5F7Nq+gn+09AS4b/iPiJ96/CvOd5Z9DzMHNux6+jGrZ5Zb6cEm+8JvmkTDiuF23lfEEONO6LQpD5f8HTwFd0QcDCI3E0gZsXM60IFjxCpJPa4xLHOegZ2j9NZOhxGvIg4GZk8nh3l4Dkxft2CiCugWayiE7uTBZFWorp8Sp6ABBMGMT4q3FxfBFBFTVX62LSt4W/PZ87GlSUGl0Z9wuhGRtjGhuaMpBlNblkXizKC6YTAJ+jn9XkRvnU8o3FF3cZk7COOeqReYJN5P4ZXPELE8CdHx2WezdPzcVSFwXZQ1WgruwecU4pbRsyIW+v4rh9/xctA05MYFpeW4cC7Z7T8fr85xyirA7265Ok1SWeiUTRv6+Dgm+Z5YSUNmp6GN65X5UKVQC5AZAcIdX3GeL/IRv3KiuRm0MKSNi7hSEQlFmVUSI5Q1Emmjfq54pXPF8gN65Ys+8g1cJpGIGihk9EqM6hZvacS55tE23jOH9YEPDzmm+yDvUI8QLAu85viH5S8DyQPdZD4zYWOpHnpmMKgH3K0b4svURRqLYQLgxW3/H9HeTx63izpP8EdLDWTPEi/LtuuFaxyHYTyKKBY4IqR3L2NoWO8zJdGModmQ++VCILyEgcScFHYk1ggtQHd4KXMfQ8iu7Ox4MVlwXqulh+IakE95ZO8dVdnOBFeRWIeO/TcPhD3jrrmypMNoOSue+Pm5GU6FDY/Ham5Qk4bpPF7odVDIqhevFZYCYsnKMJnNBNkY8xDVK6T/JND7kuaQ8b0d9MbFtY4uezYEZ6PPLMgekzGahkapWAJ+gyV43oP6Nal2PV4aCSxO89XLB3fiHOhd8F2MWnkZvD1iccaWfQxtI/mkpG1ahd45EKKbg52H2abmExtiWjJ3DQR9vrJZNly0O2tW8CupLxynq/NqMLh00AiK63cUH7DbNMvsjHS7FAq90ZG7T0vsnJE1y+B/mu0WWzURMx0mPPQQ9dPfw14Ia7OsIWs7svIiwlq251XAIfY/31Ki3YzYj2v1j6oa/k6kBHetE2F2qOkXkgOI24QqCmwPOLxs4Ln7IpNhbPNZ/c4ewCU2I74W3uTc1g/AROKcSsYL3Ksnvqqm/4X4VRrKITaIrXUgg25ExXVcCkzlSUpmL2QkJpeR3fGFoA4aHXO1WfKZJE4b53bDkq6rzAA4JTTWK03L35zah3biyHdFK20YWMq5BBxz2fROjanAervpMnkso79rSZJhq5ILpgUV+rS1y/KE2G0Kf/L6tvvN+U8twdMHaepNeNRdb1f42aRkIwT6P7leAfYOdCiwegZzUJuIO4W39O818ybECNNa2BVqBTbDlltD1Upwax7rmZPijFtbAd1bKCcXDsTqKSCEaI8LoSGZ1BPJf/w35DWJuiMrp58pGkp2vnG+REml2E6vL6EVJjUn6f/2zl9zyZICTBXiqr/oSkTZsEmqVNC+TZDvbAcNnl5cgulEyHPrNBwKYOWp2G6nnwNaxdBkSGYt5v6OWtY9d2UTsD99Jdubt76bvSG3YuNupXLVfj9dO+4+rJtOMkZV7NzFDre6Xnh7AWKkEgSbJ26GDLadNAIlr82fG327JPz9ZvqvD3F52bStiFBAuSyk1qf9FVZWIMNpG36ZanRdkSClb03dYKWaN3b3qzNZ4Raz2aO/L0vz6Xnjnt4FYE8CiYCsC7Yc4x3akLp8Mp+3kvSzCJUpFZ8kEyqGlAFFLZ1qU/BZYvY3KMRTyDOPE3NeoKlWvS58Oc8BUOvpfd/9ZP3iZhz056RktszbAd+5YXv21JkQynMBOODWq9flrgQxS3+cKWCfKhspwmNFxylMBf1v3qti0LV9BgNrNEcol3CXx1HF8EZwpvX3vIfn4EvMR7E3M49m0VE4YZvvGU/LRhGQ2a5Bj4sqIAM8tCJA+qbb1v4tlnIaSdg5ZVDVQ/Y2visyNOdAWj5g/SnxBKWAkRqxnt0bad+B1dcrA8ClBlaMornWA/ms9phxrvcX/s8h+Q7JuCT8rstdJrDZVPVtRvj6Wa2aDhlFZ9WE/aK3aMy0LWRZ1qVCJmh6bJIOBJUatMdNkqMQ2mC9+5in7G588lKUkIWSM04Fs2FR18WnNKTFUBzQ/yz/R07G+9d9hzhCl1CshHXwRxenAXLKGHGvIDTNKLqsP8SY+7ZAquNZV5+4VdHDrmRaMQEzGCyBeGHmqXsYJEbM5ph+xQmlSerT56G/XNtCSUbheZRgqrtpqf9I9ULn6ODMimZ0ro82znIQMFpOneO2dfuGqAPsSemrR0Rg16ifFEnTTr5fOuf6kUMxPcQBHVTYA0k+AIFH8rtKsw5gSrxqgYwDj033qiMkiWpDVAef0r9KxaCD2WvkSGyhzE1RuNtIu9onQdngJPA7CKw477YiO07QkPBACrJ07ILlRehraUBYOc/7sB+G2n6tiRoOy/9iQKkDILuKUB+BR9LKvOqNsVJaSIdUn/Orj0RKIAfars12qtBWvW7Qu6oBD4qK5Ocgk6WQeAOvu5TGDfjWzwFiAm1IeqH+7eDG1gO9HXdyFTqwoyJA2sZIcvCwI/IAB3Tf+NxhYNww93vO/TXc1gI2NlnXOT6e3fKP5ACb8q+yot58mPykarhVWzZeqXb+LI/HpjGQipmBMQayi1QsM/nX7Pm7e+sfNTsmz
Y45QNGSBrp+7dalTtAwpug6OVWKv7Ikp3Sw+sg3m8IChL699JMLv2vaLnCAWlfj/kL8DMJPLA17eUssuocd/VizO9yXHkCKcqSTnuIN3k601n3Nic/MRX1cMIJuvOq1NZ1g3+mQo2nv85G2q4XA98yf74BJ1KoPUSJwwEjFWstsgC9mf13TT21G9P09MA7S5Ki6vmOVs1UGqQeO9xHR+1wCS6BUs4HztrsBi5UYoF5GxkIFXRdXnK+Q75Ox+4OaEmry4YEEpUpylAObqHdoqy3tdQqlxGfAskLhFCTgVYVfjssJIwU3qXWoQCQkf0BvnWW2puFB2PAwQmDdECCTXRbHPgQxoqKyj3kHLCucsVbHIX4CLf9pzB+hhjyc+kJkXD0VhlA5Ui0RUNjkLpo0NaBOyZe5oC/F6juBx/++c90a72tJRvUSUeOAGpf40M8OvoN9YOVS4of/mcNXeuEf7/AasaGpC/6Xlzl8OCciEtqsIawcRmD9pGhLD063aPbchfwPCOYqIGTtIV6omoZVUW9eyP27Ma8l1KUVvVNmR5yVzE8SfYyy77xZSQVuqfoD2VY6Qo+ADyTFrItf4QwGeZY3XztZIyN9za3X5OzaPAgy8uPnJcGxih14FHLrMGiEIxfh8eief2nP6cMNIb/OXt8O+/rEhb0ffwPGUXzhPDnrTZF9W9IxowZ5+BUpNi8TnfzVsGo9tCKbxfHbw2wyLIG60Rd/gho2LhOOP65Wa0M5AltDMGA+pNooX6Lrpo9WYpv8OF5qxwEB0GKCAhNREym+QDpzLUgudUIWad4vNAMSK/wg4uIPU2sHxjFcUMjM2GMydolUDY9Xm2kdjWJIb6NJhBq6IMNlslvB78O86O9L6GxydP4wY4YmeRnC0sOKqAT9LO9/ey4UGSLiqA7WLtjvnaXlntySlb2vyLYwRbkBIgMS1EYwwUZXyY1pgX4u9VAyc78qagVplZXSGs8uqRIY9sriWwlWl5AGBkxTvhf8eke/KtltpGg9DqYH6SMeiPbHqcNPn6AvFC6r587fexR2mFC8SZI7LyT/7tQSoQjRuYzEMpAMFqyo8gWtyXyQ6CjPO8oqzRrnIG3r3sLTdHbetB89zUl0xLtg0vPFd8/0bsccmJ8XnA/48DbEa8a1LqbJqZZH4XK1mm75H9SH9mU7ZQzPBe/2b9mWzIUZe7CDBHgZ5DEJ9D28TpibY0kTb5XuB+FAAipKWqlr9I+EdEpoB170H7tFGrcv/VDIWHQU1lYKCI+PFnkr18vpCoDpqeM3Ozls1dXo5E6Xl1Gn1gTAspGLMflcO+SvrvebT7T2s3YXQTZhkihzQeLuAgO8IoRr+u9bdTH8wUI+2SQ6y+ar4BWgfimymDp6gKdtQgd0KM8ILQDswhhHDKOYZ0dEXjgD9ndUUQLctB5x5ivHI58ePOqCwwRV4xTqucT7WiyyThEWEVJWji/0k6U68RCJWSQNyK4GjE5ekYAj3FK79B+Bjkg971D8V/cQqJnPb3a8AzASELIMwh75RMhxXIUEykkNopI+GQg9PIPqh+w9QgQPTbxNM/okxcSk3Sn5O4PQ92KzjzjnXkhHzk2x1tGdweRqdqn3kXY4GeytLnnQVJg9BL9/G29tAuyy28TUen2qlSkfgFeGQMFlf20JLF7EzNgxXRMdWRfjRiRePpiGGyitfYc2etNF/E2rnF1FYOp8vZguICTylgSAQ9qXhAGVxbTPau1i1kHVceUXwX9mmK0JSaZ3HEgRrPXQ1KqUGZL6qYtlJHg8tRDkoKcI44K6KwxZh5xEHBUmlWP/3c6phEu0VkoFwl0GkdszW68xNvveLueL4FuVXEQKU2NAM9Ud3B/ixPhCG2PREKTrDHRUB14FvOF1PvkKB1f9ccLsWQzQCOZFxSaRba4BI612blgDcPlUMhruUEw75otnm7oiSI8TFit/PV9Lh8zAxhvY3pYYuJsJ0AmdAYDpsRErGHaFnyhMuglV0aCCqezapijQyvm2OUNeX2tQfS0WnIeTW39IBh6fnkylqWhnV6Kr8qIAuHiPbDlvFHPfhUSi1YQW3xvym4C6RRRYWt3x08tWIg0xawLVgXEsZlEiVFvl27fxXLQj/PfJYmHWTEQRZ7932vwkFSrJkbDIMMX2diRmsA+YZ5GcILhylDe3JUiFg5jTQYD4Oqo3j0fNlDPsSDE7hrYETJ3pFVAvPTaM/AmNsyBRtBFbn+U/p+kAi7jtG16fbkdT7BzMpEaJUOZhbG0exS+VmVmTEwBnaXYkWzeKPbvxta0OHEAMI/nKoZRcpmbw8hDFvY9qvKY8mgBIN5wNb7q214xaPLLXWVQUcNV/v+qOfGnlkpXsQEJEiquDWWnzUneISeby3hjpOkbsMmv0l4MWCrY4Gh04GJwJ0YeDMSCRSE0381SmAUavimsy5L2VbbxLFmIxqMX7qveABCaIZ27sAwU10MJ1NRq4B6q8wMW+kre4BcDoCA8QP8bnjBm6e4/b8DSTHithuvhc6XwglnxnM4bD+VDEcmiAelm30dgl/epUzIkk7O37V9VUp7id6m0ACVQIF7bPI7/xjK3ZgmVVn/khPMdCA0K1YuBCx9SOMEPanZWA0s+y7Uyw/ym4w+dnJxcnW0zle1tcqGCJtjm3blgogNIY1fbfJM1/exqCTGOdV3i9t0WPg0pXaNiWCYkbreRygNulBroTeOQ1NLIH9bgpIK79GnfRiuEgts7EwCTpHYzwJm2/2vx8FmN4xOqiN/bSTRckjugC9+vB/hDt4mB+or9rhHYdUe2BoEQ2xesmWU8+C0Q4opJ9ChFZq3B06OA4bDEaKlzUimpMeqnnf+6+6UNPqtsSe8WbV0869MPEdpzzbK96jrKaNuoVTpDjRkkWKeN8VbQuddC18cpziRIiBvmlHFXY9Z9bUwTgkDzLaXbcxXSGTWHVgI3ICyKXZAQrPr6YCj2oUTTOS+o+2r+F16Uqkvm+kiyU14dpkW34Fk4aVDjiilgxSSqwjOBDR0sKRS3HT+oSTCO0UFr00DxD/OKwdlQFTG2NuWoZwd0Pgn74aR953snA2wSYBUc56krYoeRIRurJON5S/5FqeGQkEaNhZo4DFIyiv4XIEVJhU4gm3vPhKHgK0iqfas6FsiocVrveZ/ptLU36Fmo59zc4bDDjx/CX6Kr1TIMSfIKoysfDv9NVIMj/6MQ3AQDJmelvF1UfoMjmOYpBJ/prWvbGbi14DiNznVhNd+uI1nIyChWwTi6dbgw+/wCZn4RkAYQhtkPbeW5irT6Otd/0568VUyIGVTgUx/VAOFf9FL7V1By7h4gCLG+UOKW+JfCyjfsKadZ3+tLXpB9O2mxXwVuLIJWvsuZZnxscKgIJRePtgSXX9+74FIPlgZ3k8U94WK5o7W8YooGBJi5l1MFEXmfrQjAvLihhkuHhBXjzVvFGallXumnMQ/rHmt9PV2rUCGUeMeoxubMD6GjvTAeJkhGj/gjvvbj77R6ckI1++HSmqxshCrilQ1U5Xg3LPQIkXRt/876VImI+Rib/U6lw0why8u+EGE06GuGXKimf2N247R7G6VO8Gq3UB4o90ea5qyEHFeTBtKN7HfsEsnOCFW++dQOzLhX//UBVZBDDVhl0ow8qJvq++fFb3SQCfbJWkdtllRMuNTcEgUpT3j0wsLulfWAMdQiJaYRFLfVVTp4BFzl9LJXN+YcUok26X3SECIKx5FHnY4Y44GKR2CBSIEOXAwy2qg0cOt1+qhu0i+iRLoLTSMRbg7S63kRU5OXSKscIAQPp2jOyqJavpMGz1Otyk4+9flGzArv6SieFYLV/JQO2lw3qSTiG4Ay/YKC0PMZSR/1z98WDHJSaGWiOnwhkVDonI9IW17Fv3C+peuRBV7T9USoGmmSpAGfsvuBiwQFtOyCq/icnpKGuUa11UViPIDAtrab11mmj3gbll0MUakWSBmdBPqMcwgZ5rZ7soFXaeYuShQFmIIEA+4rtY0jACI75BpUD14O/vzLBF7KYXlLZdASMKGcL8g+c3OhGFaUloVRpTs2jyo9Dt1UBScgj9ZKcBFfTTq1aAMDj+WQiCYS/Tn86vpK9cS7Cx
L00pqaiQPaOIPdFk9V1m6A1ly7En+tujkAmHGC1M0Yzf2Q3JllIhgjtWGFwa4jdFDefvDDFPowu4of9tzhUV27NxKlcM2yr1p2ZbqRP1KXfzRmiFeGpoo2VMwAHLE7U8l9Y7C+bAASiaf++uP9Ooq+Wtp/IQyAGJ7Rs4Omyplwx/3wjxvC9nVptW302eC21rnRtrDy2Px/PqUoSFRXlEAgFVr2Cfs7J9gEdoqArvgzx2MXzVgB8RhBWLfUfRD9+RdC3Wz3qJDn2ejwRtCVOk8If/TmVy3VyAfqLq8hA0W6DCuQaRsQwEPP2kHMAicovwBHrPn1qjjO3P3LNQnKmQAlQqNCN/OOfRm0cSRo/1sAWOyXzT9DPu/s5q8WJgZYOedaybq957xwBBLh59HLSOiz/loISca0al0KASSuch9TaOoJKNMTZaAnyYVD0HEGiKC+z9+jbA72t2MgZsoCTWsMdBXboJgzpRBLmaOMRn+CJe9XHoBFrvIN5et1Wo/3osDu02TNOuiKXdo9UtTToQEmUgrF7c8/wFkSvLDcACRxd6B7/NYK9FERVuUfxpuun5k23xDvIPNrj0TPwQHQln6v3dP8FhPg0C3B1GAsnnzHDBFngOI428zt2ejLd6aza+2mauZpKbgWDvrw7MTZK10NcF64vb7YSXA4I9oCLBQis5kuh2gI2m/shfM6qsqsX8jlf5YEVl+MhQa0/bnLF3qm4XVYPVgiDOIrfdkrzRVqHgqhgYHX8eqirsgn6gWr2i2na+O1+6pIB2VSyDG2Ln0YLop1upBWlLvhSceL3jpLRzJfTzpdbazujbXHByycDZCuelTOtLf5Bqat/qSGwgtPj8hsuLFaguNZ4qCBbdLvypmioZh70Mj2HopZkPpL0y4fRpNqaAwJrFVGPQgFloIdb6dymQ5VxixaxPK00sTzXYdqZcwNGWX8LkOEhk70U4vr4ALfJCbP0HgeS7BUE7xq51Py26crxpakAcsboo4qtC3XS6eY3vg9R6sRLqnGmfmjdb0ZDu8u6btij4l/Ztiko5alZAY6YKjq1Oa6bYay1KQsDl9XO3NNCyMjGs2LgMyE3NbvdRaKBGHHKt2jGakadkQK7rHMmZCV4jYsVzRLF/Ia0NhWz/yan2m/5W8HA6m0RSSyr9FFJTROtMBs5SuyELdjCrzGtGifhUXqkEEWfS+f4ok6wWI9x+v9SKiwBIou+Ye6vjSYqPIdaFRHtGIDigYv9Gg1gDlxk9UfWQGpw3kDbQAjclMwC0OmtW0bIPb5HLrc8EEN3ag+IdUa0Azz3Vd34GDpFAXPfi/mjr9VoD5DMNtprJlPs0nmoE0pzQPe1t1ww/DV9ucLZCJMKVI4+Z2tjv4yYLsLtUkk2IY7I6cynd4Ha/P89QoXhJEJ3ODf584gNAJHUuWCFBngZifDOBvO0HYjbfg8vdxtOLEU9cD5cG3aPOJnZjWPuai2d/m7kdxiwbzmX2bxD0CZKr9hgMb328bRTjAhYPt7zkDhuaLchV7FdcWtm92L7Vgf/p/XR+J7KgNdyPCsw4bBQHDuBovZM63i8ywUEjwFclCLsn+t4A3vxML543ZGj3ORfxUG49QGsJQsFf8pwxAvpXcAzvoVXvo/tk6TuxRlvV8dfzG9wyhOYcnYh+J+LydOTMp2InBrk482mdi9beJgMlV6wnH2B4hYZAp8+8C3aAdmUkYCFXR9WnUM1wmBnvurSQpZvOGg4TfSOJpEHWe20X4goGQPU7NpcKSd/pO6rv5E7gWcDNRuXnXOaFc33Bx5Qv+HnFVLWPriXo/6C53mlpC0bIIkNFRLSvlvlpl3PhiSlrsfrteV20ouEplLHXhYXrRA4YGw233iVRHk3VU6DD9NLjFKDZyMa5yNc3yJWdep29aod6xWfZ+S70RNRNCipMKOjVHbwxtpxqiXJpYAth1c2mJm05TOH4nQ2/XYRHFOh5nnm22mbv7S0giwmMJkiYWKlBEg4yS92ZhEP11yCCw0oPiUB7Nsa4c5pqjaUXw9nixbfkB5zsVBbVVKB9GsE6LVkuVi3W/uUx0aI6OHtINCu3rmuo34Kt/K/6YCs2OO/yKmZNeFv/BwVMzbuzBAFGJip+kB0gk4OkDixCpCYcWskqnao7FJ4dUlSrmuo46tpt+txijwWEj9B0hgRd6igSsh0e8qgLeaobZoUKPMIfY9AzpJeDAc9ZcbSWF28rXWDBpJEkTIOHvLTq9y3uiaOLvxv/zxDAO9sB/yo5G5gb/N3OXyoxXpBg8WzcMZDadTTTNQQS0+xaJrc7t+akb6/N0GBp79nlpmrFyjDJC4o6NPylcTDQ3W3t57SwteRc5W7JwXBBHJJDvM0ELV7Risn1Y59GaZl5FzN6CQ8pkXCQ24JJ9segaK4wHoODVfVzfKVfB4u/DLtuUDd4hqJnK8glbUz6lP0Z2lyoor0r7tJcF994FzQ3dqVWhztJHzSOvBnLKIt5H2Y/5Ry3CoY6wWTYkPlNXUT1uNdI72sneI+cFzgI47z3YDZoS6kNcCiwPCbbjlYa7nntz6TW8uCZjdZmWayIKhrFOsiqRdGq0w8cndYPPiJLVyo2DGJ4f+tlMwf5IXAvpfqWeUNU0G1CTfe9eFsBFPi0PVtvvYGRYUKxteoxGOZlWsgSyCguMTsrbHc3gILu0DPw4Bb7ZEP7dRfd3Uap+nHdOJpDhHCFC5o9udShumUwXSnRiFjeAFMS7CbrlFZsrRXP37alIWmWL+Y3uKfUHkr2y4nUAVtykdHtbRHKPJSeil8DjXTssFMAnBrJCWOdd816ax+crNaTDfY5YIx6gBESXAMfh6ks0HLFpJPlVRkvodh0pEfa5nQj1YlBbzQkWiZzGpABt4pbCxBsHsshiJrKjiK1vvnsDdW0yoCRyEIYL0xq61hqN/LcuegHE7VrOdsxOGTVh0TcJYoNeOu7izMqtfw4bI/lDgCWBc9qnuYK32D19QLOedk9MuAE62+DOTI1iWAoAz7uMe1LfgmwWY0E6Fe2JHi/Lx1NzlfInacL097UedIeE3kVS0SwU1nyrnmFqEO619j7ofjM4xnkKcDsC+6E6TPHE5ltX9BSac38hPRnADt4ghjZZUqYzSDC6fziVk9llmSE6tyJOCtIgrL+fpltFG3dN5t3yvapb9f3boa5EDU6MT7n5Ntoj5U0Fnz7jb7GEaoIovxEfSEUHcc5YxghgKd7gEwRYPOzFYsp/I5IEFagd4mHZV2DI9vE5hOw3CryWKI6ns/jQS1akVBhp07vlgsLaNmxXI2GJdhNUXTJozZjozy98hKr/4b8xVDhXzP6lS9xko+g8cm4F8W6mO3V1WxayNzaA5z4sOWBB6ouJHOsRJayPDkts1MQPV8ZPEm2rAS8G8OxHkOmy0MVPAc58DadQd8UiEPkU7g29wBLq5ynp4iTZpRKZpa+9XAxiCR/9WvjxOBoEP8qEpwi1nxTVDR45HWaGFdl4n8Kw/yBMODd7fz7y/AZiPfy3H84OHAk7ECBZX3alhETBHMziWFPKMgVmo3WL/2x813+OTgg/pwhBobWgoSJfMIotzCYuyqERIpXyNouEFQFubB00wFWXbPz+J4tnbv4c41DfKOeJEuXKRq/f6kzIFQ7KNqGk4a+DmHxbgB3Ogxj9NlMjP99hh+1VZXrzB6Xh+29MKyx2bEwu97FRbUE3tEEYQeA5LmUV5cu9u87ZgeoYtTTIZjYC6fGnTG1rgq3mrsHX5TGhe8zsiZdYjAKIYZ6tM3TK5EkbV2oxUMED/yxKT2v/aDWxnUhGek3PjYFEL4cIyiYFFmLmM9y2V+2hEcziXsYkyznTe7RJmahSnplGb3Jrh8a9q4cY3WmWQr4/0rYj0KGa0f0d1XiKM8dsY0aWaZNQ8h/hKgRMKPUUH4m+7UPY3kTo1Q22PatlGhRnh0luXVW8rnpW6ZA+qC3e25Pb22Am2HpMwcHhvfq+9+Gga2qOjyyqMi4fHOpeoZiULrYeLdFMN6pb/ovJDHy+GIxvkxNdkVNrT6FmFuQ253e5rt5E+HqlylNySDcHg4iHWVvMGOQhiATiPhrOYXr5tAbyFg1Sr7PpzlhLa5o
9Pu+n9u2LX57YyATVVcAEUI3A7DFYmfichsrao5osOpVJ3giQ9SeOJTuHHVmtO7WwxUBzDxnQXeqe+7sj6yL17E+wY3ePntR3NZV+t6OwxMgpFiGySvEHXSPgvFy6HDFS+oFrl2rWgwxComMVvBSKg8SjcOw2t+I+A84Y5gttW59YOL+nL/D3olVeHUPKMDwBGhq4ZhuOQYg3vVN5orGqJXRH8pjwleQ2rWfXT51ZVXcbMwPTbeWKveGCghIuhUhml6/pF6eP4GfZ3dx/CBqH9X42NWtS6bJtPj+IQtB9NlCjho5kR03/n6/EcDslyKBLEXrUmhmn3yZnmOs9+jc+ILQMsSUbw1kwMOJ+p7GiFVliebeeBFDde/AmUl6PpGtsPpW+stw1agU9eF0tyfdt6qWpdigjZGI9k9HExMh5EPlqCsrgfRx9jTHaLADqjlQ0zgogQxr/XHGJfViiT4dDCmS6vFgRncBMQdFL8pMOUPzQ3UL1+n6utxSakq1f1GfHMQ/PbRXHNNHgA8F5FVAbQ+gGDnxwA1OoU2mKk1cBuGMo12DLRuth2Tg2pH5IYI5cDynqb8hwLixYuJB/eK26YGtKOiZYe42Bi5GqfHE9ApB/1N11gJiJS2PjjqgMi4IxGSvIza5+9MPSG94Mc92jUcwvIEvt0c7/wIxtO6R3NWWb3lYhEph21kB6EzjP5lBsmxFxqeGWtCOa1AeN+R7KA8laOZI4vhoMeX5vfwHh7y+plGWw4ZJzawQJGL/iRP6F52z/pZnKot8Z9alGTkD2tuxeuQlngAZowe8JZ9RV5dkr2UcGcqGpCaUwQVf7G3TfOoXzxrM19ohbk9TNIUbcyJI2Xh4mM67FndT0xOyCbYH53CThlA12uIZn2XyMInlrkuzFjgAz1+gyKW6qph+EuN/nf3j44m337YL/mWoyZ8IghvFSPp+EVQ57Qg9wpkF7CVkXzEGN/FnV1b7v9yAuiSV5chyUHWaXKXa/rhHrBtfPTNby7Mtxy5dsbax0YY/z+iAa1BMFXpMmXygTd2WX567lrcQ+OVR1TyDm12cmpJF7d9qDompiUUt0mEt4CblzGpUiKTkSfpCG6gAE/y/4pvV5b8heb6tqyjHiHoi0Kz5qPerAVbmiNkP8dhhPZ/5TV0thVrmCKC6bv7sX+0cVEFRV26g0gKqCIefy2r2fbO7hdVCFdCjw8gwbKtcpCoNyuBSaiEHqLdfxr79OsYQ32UBmrqF3lNDPBI1Z92HPZE48ofhYS1wFx2qwMvE1hCbV3VgX0hiPMawgCXpMDfQLH3XHgJLafc/cARs7lpXk22AgJrBHJZjwS38nmLfAQKXuRN9N3JaQMlr+RSb86Vpjq5IE3ULjMt03lDOupq65n42Qii8H4Lb79mX6z4E1hNzS0U4LKMFEqEzgGMjD+Fq/pILPSrB58a+eRT/JRpNMcGItS20u8rW77aWbzldjfRV/eTGcx7pP1Yf7SDc9ycMuE51VUGrtt60m6UlHopOV9JBic7/o9n3IKNU3ox3TBWb37gfcbUT92/uHs7uNCggOz32jssYjHkYfZCXor9zlg6qSrrpWYCcxnmKOJ/n9pwlFniZbZmU9BsRChrWwE0KWsV08Ig+9tcXwMJTElcxMf52P/sf0UAzjEYRp2+SoKvDMftSp2+KK2eXx5w63QKEakBV59Gs3TA40NwwwlllhA2cnH7PWfV/vYHNpnTynjaCSsuQ8k2E9nZyxAH/yA/szAK/g2VWPikBSfSYZzGfJrCnRTMlSApJudY//cIRC9m07/mwfiADcOL31EG6nud8lCGwLBBcQhQAgiOCtA/F9d8Zx6hnSdoNoB4nNCf4yCqmuzu0soAfosFaO0lrF4oe9RUCpJ51lQ4V/IigBUnlRFV42Kwb7VWlx+NPtVSng1Yarwuu94zLQ40mZ0IFXWX534JboRo/VO3XYcgRNVITI9bQUnVVi2ZbjY4P5mnXgB3Lwba0CMjxOVQohUt3VqgwetXxkbLzj98JvOBHFpqpFBDRIn9UNt0rJ77QgJioGKBW2wGw7KGf/GNGsVjjCnqK4EROSIiPREQGedQuf323rLMol7dqgG0u3dEjJ9pYU+jA1nN9q97qpJvk2iu6EKI5/YW7Y6NgQ0SKu9kybCJuSsNaQ2MoLj9QgelbKfF3eN5+EOLsLYmMljK4jnEr9S0mSHrgzzR4aBwhlF/PjZi1D9EuZ3RP+mH9RUIsZhC919LCZI/zdvD0k6ajbg0YgvMuVhbDnNKZXuXxzG4avEmcuFmbBuW/S4vRAOeBLGqC9inOttONZhwk7jLXrhwsO1tq4RWNg41h2Jk7RiZJ+tUnDgkwCbh3iWUagflJeQK2g0EjflyDJ5UzRv7TkdwzkkGI5I6c47hV/pnp6xZnhFlGrsNLmEL39ibmHNltG6cpl0xyI9aFUtUf27LBTGrgOmFp+lfY46wOGfXcAqIn3ZDmr8i20FliVAkNq1JF9r56uz6cMf44gbUE1JzDCdTrED2AwsdnNQ2OXGDBXjba08h+Fz2rxVPl/Okppm7Rqydh5mxGPQwb1XcH6mBl3Zpq0u2c4IViK6On56hR5IoRLktOHinBc+AEkOZm4oEHzxR37T/gU8HUmvkQdTFG46wKWpaXvo9Dj+YaMlqIsKT2Wwet5yORlEu8louxzl3Fg0gy1ob7NIeEsx1Gv23VZbho6hCY85BJpBfHmmzUohLg5giLWVe1neVHKaYQLRD6GifdicHpHpTlUV1m/qCgN7F/+SfjX8Aqr9GSbvQqlR1AAsgJgsMU55imZ6ZtuVF8V/dI9AJ+QX/dFHeOgxOhylmZ4DRGQiRV0kR3l7jnp8kteZnlG0OTDCg7kCW4ZNn93Vei5iYyzvFzjloZrrlueDTiGPLbnhNDJng67cW0ZWAv3TngwMciOmxRrGdWtQwGo4FRDPIDULZz/s0iX/kxKghucxxsXukLUW3jxZNPtBW8KT/VbuN/FYG7N64pKFXpBNj9x+8FwFMPrCEqeYZRcjcIn6EZKBex+SWLKUpfxReTL4Ek2je70DA+xHrlRNh02YC4AAsL7GfJpdYBlCh8I3Qbfh7FxwUoV/seWU6X9YpT+ml6S1RImaIne1TOywjwCeV68ATOq6heYbOPf3725dPHE5chkru6aAQDDP03X7fVIPuajM+akz7WNZpbP8FSDiSUI87aiVuiVbeqyE0wNzULKXwqEFEMBETysokQk/3YLoDYDDQvU67YP+tOHE34iAiSlnqhnB9sOTRKeEXFRjLphnaAzKmTk7oGyQ4jjy8St6nV+PCRNBBQcQ3Ds6wlrgR1YPcaIPRIIs7MXgfvmqUsKK83X7qECEuGTBSUj1NL7M1ciGdjnq3wCQAfS1BiMv6NGFIdWd71hix/FbeCJDApgq9XgiaX0GqY0lINq6tNAHz5VtyJs2Zz3mDbwrP2xO2696hnuJRib1wLn9uW3AdYU/zrqKN5XgZN6T+QsGVmWGhhTEgHjXwKDqO3N1dmhwZJD5RCLDwCEFJCm9bCeY8Hiz/HYY/l3c2UXXWRHE4Tqkd3yb0JcO8mm13QN4a2QaEoMb42lefMNR6wdFD+VEjPXgotMsw/l3Zeod8qvI5gLvrpI3wZGZjz6lO9D6XGWd35QOBoPLSGCsGJNv2P61UBqcnBRmxEI1mRbK2nPixQkgul/l1vQ3zqINSq2lkRNxm8iMkirtKn92GHgrTqwfQkel9kVcfrIEEBHP9/RrISvwPBrsFPqeqRhkFHUr1L0AtSNzep3wa0bb1RC3+gGV4afesindXwBozC18UbmJczwVhs5I+9n7VoB0u8gMrGs5NomxL5gmv4qv/Q74YXA6Q811rl+TUWBRbnEhyHmZWh+691jheeAX6DVVI/x58A40gVJRhDs8AT2eIQU2q8hA4hKLE26oFGTTAOEdAA6n2ZeM8Wv36E7Swo/F8Py1XGaosGL40nl4xRX0npnftk2WroR9EDxWMaX6FGHr6wlV1n9gvic9Uus9f3VgbMP60J3kQM9HpuQlPe0eG854Nea4n5HosVzLVKrgEknFO5ahrij7j31rUDcHy3v63bsFWBv/EpS00W
KANq9wn3iKQQWLVfDN2/ksw08XTk1eimmbKxjqh3zpbxjG/JeDFK2JgHGc4Rnr+7TUnWLmlghl+bzBLqGLuQkuhXvhTS7vrlNtzZI26v+ncHIVzZ/OPMOuLN+W9UEgFkvwItjJtlNu1GHvLq6XgcDDO6+uUWtxVnQDkNqyMewVVbWvWzXqExq0TQsEFqWNjD8EzipE7/45WoOmVpCdbNZHgXQ5bULFVJ7GY0+22poKC58my7zGLOlux5jumSEQWBIBUNIKxznjh6MfqU7aA6bqC3yqncpSVPrtGZTXIYDOLow3+bzVNNzp4wQPHi9AxQHBfOpGG5EK5VniGFhiNS8P6kw2JZNwBu/j1YL0AKGt/iHoljfmFlDCkeUMXy5bEAzGUuK50GhOAIsxjbQpnttc4e7+OeruN3N8y+UDuL+dDisepwnRZRYbHhcoDVWwBSyIheeaQupfC7a2nR41dVZbfCrAtHuo8Ezyi4f6oqrQa28Uytn2JGBdDAbspTotRR67E9/RbY0cBf1dywN5ElMjBzaNsjjV4ewjSz7tgeD2zVzijXIfgLbLJgu4T/34doebAG4kSJRrNCUFGURalqOvVM9zfB7jE50HVvjMUSgnTkb70InguAsz+68Rt2QpcRwDgDMWZuFuU9NlNQcpncGfKpCzCCZG2BDjWP9HsUduU83CVvQmf7StndB0al41w8EQ08Sn7pd+zoUkz6cA4VT2o/7lVdkgM6dcoyjnZAZTTIZ9OPnfQk/gipFN7t9vA16dqxeuRvioSgnnHIlXYPczmMVn5U/GRGNRKZ8gxSIpjLGKdlsfQsq9yHJMTrS3Fh/nVAACn/QXQgzJ0I1MOQFMxStSKCwg7tcPjpUdRc0pCWXfgN74NHQDAFdR3sIycoc6bTyRadPvV9X3syauPJMiWIh0/VcMbXDvwhIeRmjVkAchUgZoWAfchYmpuBCFtzyrnHAc7+3tTN433OqLUc6Ygmp4jaiXonp7nrz0Fhd/ZMt+lDyNsgIg3vb7geWp4G8kV078AGJW0QhB9LG06OogCmTpX4jlbdQgA6uxDiRfFQJ3SuZUU21MCI6H4kVV5jTboXb8wQJvpjxyVaxV1MF88Q1KbHKO0VfQoxQ5nwmqeOesG5cv2RO0xTC3CPQpSJKMUSIu61cAUl03rCzAV0aNVDDnTUn1TP2qIJcNGLwAgMQ7An0rJ4wAnr5C8qCHdT1X2qfGQMxITl3Ev9rNB49N6bBRcSHJm1r7UlbqKWH2WjRWV5q17l+WifMXwfk8gz88AgkQM8HD41Rpz9TkLPoFaGbU0C7HDSChgtWEq46ZFUyWWsb/VwtmRzlVccKcuOJoRh7qSbI3ENdBjseYQ1yBBtg05ESMikWRNtWbaB36SJtlCKnP0n2F7uJZTXq7HVrfxzmhSnrqoHhrATvz8/pU7Vj+xXj1egY5/7SQUVTRTqY2k+Um63sHB5ni5bMtjyHbA/YAiGAZRfD4I2EnLTLvKHgq511Y0a7O6TpdAfxpoxnWPkVGcPDZkEqF3a5JW/S6JHindVnDK0bmHgPCNtrURHeWdgTSBRbbf9IfxfhXZaby2Flcm5t5tuDBPiMa6unhyWZ/OZpbR3cW3kxr0ss3GXG2MwvEQqjSm8i76sY06EIYA5kwBI0BP9OvjGuEzSZ8wkK7AfALMidGBppyWpHNXWJ+dtkht7J4ixLnbiXDBNj1oX47JEV61r5AP6gab6M9RWvktp1H20nSQI9/pCs0fzp564vKa8v8JN3MOS6rVoc64zX05P3Diy1nIYctTqjYyFLacl/nQmpkIFiXoAjORvIHufBtSmtydic6+5ix8Eyx9/HnteMG3gFVwQBDlMsBZqbs5IPS2+ZGp8WlfjEsH/D6OxRTYEkXxM2fHWGu69CQ58ENxzttnalrCJIIcmKyZ6cLaLMkcyifXUWZaM9RjuyRgExBuuRmhNgWAhGsNxEUbfLzV/1F5myD+4Ep5iNxdVNVeWYPXlBHMjZuOzO0jr2lJB7zfRRWB/BRn31RqHNpsjPwz0BBQiXjHGeC9N09lUteb1+X/s+bnbiBsLzg7Z5jjgTdv0TNpqGMB1lGrzy79wanAolpKN7eBGwfdOL2qOZCzqgsqdmKLqj8JgH2XXBcmiwP54+rF352ANv0VIC9lCFKRsEeTyPSKNhOpQu14NqBMX0WWAXqReuRvILP9NCN1LfgXnm5Jgp1IrpnaPkD0w2huUmPW0LOhD2CrYjBH+t5U1Z203nrTxPE6DSB+ATlozJyuovv8Bmvgi77GiyHEMrPkH66AlFd3kPOHz5upfgFPs1pfHU3yqDbK5fpU1Cv3Aq3RcwYKZTL2o5SeWxZsZ3wfNYNFuX1U51EcIS5FQrSi/e7OZ4fh37x2D/92K11wn1w9dvzFQNH6EEcKNs1XFRVO8tWvFhAcOunx75ZN3rpno6WXqc2aXfYRrsmcM1cF1yVJDI3FNsnZt6AArDhlkbyXGMHt/P/xQNvQQlU02crO+iu55Ym5Ro91CCR2nsfCR5wIRVUtgYhawBk5G53m39728bXLoEFnhCCl1SjbAM8+7FeBASsslxWlr2xnwMW1WXoGz5SnDT77uRrpIBNkNKIJ+y+gfssEvsfnn8RqvcPl2CK9tpOgXfBNnDXZNxV/xIsutycn+8mYi5C6i8otxfkAT/U2vsnMpgzToF31ITm+jgt9A1AWHgxU9N4MZmIz5hSaIVvdWIppfDDbuq2JeOG8ElNx/5WtY+6Sk7IWz3o+5uOYQItxmNvieCsAUOHcADXatEmsln2fO3EAP7XRrKdd+SrpoJ5PMCmQ+Kj9JcV8Y4OOea9oSUwxH+LawfotI7qx9GglvQ+PQ5ZG1pPm2jc2kMjEqqvEdJvaa1USE6W1CQj2ZsuVt9QCGgGQ4jHXwut0VhgziCErrWDWhGczEYcbJPW9+F3Pb5dZzWpd9cErDBR5AOQHOQZFzEdz6IqKagBEUu7Al28So0XDmvX3AAgiqRcKzS0lalpHDtS+QMdHTsFCPy048xFGn/g7eeBX1d0/yPikETC9LDtzn1rGY+qrmijyL3RALnM/k4V/lr0lhYTdLTtazPUYWlCwXomtqCLBW/UCHvJu5vGTmx6nuwfzdNP1+1V8L7P7sbzRN2vFdE66/m/zSWWMcxM30Z+WZqtC6uu/ZWtmgrhWzqqCjvs9cssEEq7JJV7VuhVzh78Jwu7bbc3taC0Ay5mQbC5fOcWkzuMKtv4fFrfL0r/Zw6bm133Sf2rkJZbnIavHO5TsuHteaoeviTCNmoFqXOUeDl+l/NzMC4FyhBtezHEWoFnzTHHjBrk8v3+trIrT2G00MqT460QRoZ2bOExrJpT/07MJixpXuTDMEf5yf8hLkVHDpwRbUdoLWyjooGjl/f5bpAjTff8d6Ptoa1J6r7x6o4hgnrauQ5H0rmrzKocgZcwqPXmNbZsReuCQOAMYj3dOAPdZRCmTm/r3eP06ks+ImDmwoAFEX+kV5IxVfuFjds8LM0YXN4u9hKwShXTEAAhg+Q3Aw48q7qxgGKV9w1elYfkvGEhGYQN78hvrAhAZJCFQ6FQZWp8YePcoIxVjZM4h4FA/jzZ8X17v3gvSjz19Q4RwwggLStxcx1OQDbOD+Jz/XuzwzIxlsQ6XxL+4yeAp5HGDGPeKVKiJ3cHXGcyft6VW54J4SQxAFgHLpD7rHRVQgPPVlgiBkAkorin25nmXp79D8FbQYauPbJ1Ul0wIrLYmu1SUZtvCJdROaoqbv4fPVIr1IGCR4kt2UJipVHYgqNG4G7owIqEgkvcgvFkDd46tHA6o8SaJyKysehRI5zDdzoxfxNUdisqqKscc/eRHPdDm6injAQqKXoDnmet1yFHeddIax14PFfuIgY/EdrRlz8zqMsrhzv6T4gpUGye8E9tmbdFGpzAiC2oZnyA0AOjDbHMPka+aQBIIVC768DxBcI1E0/m2xhGXSSV+jVTNAYpn7iaHbafpI81qGUgIHwl3c9+BVgE45aFT0opgcyBNciQ7sqK5fcViX25MgKJRsscOEecgDbKxz9B9BP1/x2NRpK8n8u4oDIkmWutoZcB/Y40VgscH/JTEs
J3/gjJ7xpnxTbWQS7EiEcTGZO6xGIHBnBVoaFi0EkrehBiQI25Y1Bv+qjHRrOEMusm0QcVKUOt47xbhgo5a+J0A8iA0epruo+SRYulMn4yJZEJEycY+n/+8fSagiLhhC1dZnRY8bNIwG3ix61H39tyV7zW46H48HB8sZn195CEHDfbLDMCrodvGetNXYGJWX7OT7kCnuI01SAsKCrKpefkHfBFKM5ZJVUZKku6HKuRj9vsnAvXk597wBBDhMxrKy1khBwd6mX+Ic3hFKaNordnBjrXOOx84sH3vJoixAruBDNXUfGHjfj+ZfKLc+V43StM2V7H3aewhFNwx0YblgYs+TLIkCJGv/9mB61lzbYK35FK5hDVsh+6rCM4zEowroqiwX3dU3KV6/zSbxa3HxaRyjgnpGBGNOtzswrldCZVGuUeb0Zo5wEMV8NTo8MJrSwas07EV6JCFp0drPBckqP9E7auuQTGTG+Xz284PeLH4IMo9Ysy6Dddn4A39iT0H2vVtwE08NMkbHcqBCv9NCvJjL6veOF8zWi5eOPV2N3l8/I5eongjUSYHGpKmOEP5jAuVvzL9wFxEiU59x4bOPl4XFazH5bJIwg0VQunKHCwvUAOGhz+igUkMwRmQNIvcG1NDRJT9wf76HzKQe3LupGakxvxHQfnN+moeqASshMAxvSNxJZrO7v6rxe79CzqCX+5ieL6qO4a5KbGFD8bHPf6qDWuA7ZVfOosZbzXXK6DR2HnpKUYGGaWFYQhtcHKXfWY2UUN2jxLvKi3fTC7cJfSNfKu9LZs06VNh5BzsyzH97YuQoRV3ZakUfo9Cy26ku5agiDPuhJiNms9OM6OZbRjSQmLfrwYGn4ISXLDKbj+pBOvSpNpSYqCWqbC+E/DffI/f7R8G3Zpa5DhDDaUj9oQRMJWpo8crM/D1t71dwWaVfieZLrTX8BuYjbRrXjZXuYJ6UP4bwqj4qEbkgasXl4YeUgm8UD08OBx93q81XC7o/ToqYFbYGY6Be+XbQou1AHAvskNiQRJJq3B2st7/RwTsGA+nMXR1UTGPAkRX26jpibrzuBnU7Fc6JTjsG3bLDq0YO7Bk9JRVbjVO3ANWJfbW65lQeWaMipkJ2z0cthnV1+cgU6Q0xnTqsgBBuHdIBdAGx9PA3Utwq8n0i0YLkRBnnCwAFPTK8uF4BnJBJxfaE4MvfvWyRpSzx52WD8rNf0fRn4ixibAUG94h4dIwpzzcuKS0JRZSy9Y0L5j1wsNgTW2jKE5fZy/G11gg9gaQ5JvsIPJRGNQ3hl22JHE1HMX7oU6gZ+QjRgqfFPw5y8Ysca9yT3fedwVOKzdM25AJ6n4fAjrItKLDKo+MjL6zefojtxPSH77bcgsfxKvd+JJyjBpZkppDTei6kqdlrAzfyAEQbks9GuarspfE6lpFQkuF4T8Cm6jXWFf7MYq2lbZjmGWeEMEalu4PCA9Mn794Z7XTbcPb5BW8IVx2RxEPLmMo3fHW5ZgF70DDHWG2oozd50xISMEl135E7sg9zGDTF2CbXaE2AEjUS6gvGtXyoOoVuETGeiGLkp5spOPFXr1GVb6Pj5zYwu68xD9jvG3BMgUU6ezoTeQx71gaWETUP3ljOJgDIq/7pzxOOrByPrd1pcDy9V6d2WAyyGk9YqzBXWMVakg9yD5CvZNruOZBYm+HExnroh3s3J4M7jcT8boj/kDZP3qPDL+rYl1vh1RN7KKxcBqdY8GRGAgSBcR//Etf0PkQNeRYjuN3E5I2YzQS/dqzIGLgLN3/J3DXgt3M7PB9K3s1IBR1LSAtWB2Foixb79GL3ZILcVN/HzLxaJO0OD4r5ufZmv0uu20dMQkdEh0BzKMXMjx+4RssVqK0y2fKj1DgbEjMGg1IDNQQeUTnF3LA0r7K76iP0d9UseJn0Agv/wDi1d9P2VomZy5y8Nk00P4QyJuUIUC7imV119uusG5OFqSncLVq5uyRPfjwXwINnX48z+e2cKXboIkmc5q+VrctmlPMoxJprZEgGZd9QMM8qBer3Y+LBF5UfPHlizsxsLLkzdu0ptAL/TtwPNzFSdjjR2qGP8HOrUOK0wbdmzkmGNBjWyxzWv3mWW8SdHZTrGgb6wN9GEn2jGXLvt61e+lCSXFYBpKJAMMpUHGRIgOYGExlrg77wd1WvZRBLadJNmKKZLMe/wT+Np0EPwBIUOfaje0G1uhUVm25S5qaERB7wonF1c7/61DkkgREJ+0tmsJ46QlStmMUJwGTXx5MtSwCopiXytyQziQXOa9LYUBM5bIRAzVG244zoEa7KrmSzKceMx/+IZMB871tWbyMRSSAH1LtQbawZll7Ccq8ds3cbVzd+SbOQcmyXej4wywXRwXKfK6hUWZMXK1ycbHD/hw451WS0B1SJgzwhBZ1aX7zoCTVwU88stpJx/zYky9AjF6vn4G6ls9esFXfqAFnV5fyDFuowTJyq/TBp8S7zeGzjgB1ZsD0ILvXQ9ijNGLVYy6qSOXKEkQhzNbJk82SQJnB5fBrvQYNtigNtgyTzaOPQPdFbLyS6aaQFgsBhe4JSfPtdHL8pcRb4GlUxFRW7oR+ietM5RUO7kWmsT0Bl+sMXuIBsCDjPmagnXzhjtW2t+dpzjeZFdEYzxCRBcFrCtCoEck0eRGHDKh1LsGJAAs2Vnk1tAgeOGbfs3zWMZ7ORSU1mZl5oNMy3qiBAijg4bl4eC+f4GQAoNvKRSR+YRtybDVZpI9ZRsbyOkYBIE5RcxWL0j4LseTSftOTiac034YnAnPnvTRYGTAbsuTNb4BpQWehg8zLyiP9CAWGBaCj3MSl/j/M0Y96YUC1NxjTHJqEHyj7z64O0GmtthBWqFYODjPZQZVQDNpFnjQj0Zr6poDBYc/UuZPRyain48SeNssVVKItNKK2cvn1xnEhyxAnXEBVMNDhIQ+Rt6ZPRmK+kaXD0gAYdPd3D3awV8EnZQpNDzZ2rcfcLWhKJ9gsMM26YWYwoQVsJ+myargcrcgZQkUEeXjgSGssBojqfzq3BvRpcEIaTHxv3v9ZzhfkbZzLrIUohgdiI/Qj3sm9i6p2Y1EDHY6wGebtbucpw+bmDgv0IFamiLE+DZhrBo2XX1DeEr4UlNtxVEmnRt67BruI5OwJ5fcxzWQh93zH46rZ6YHR71Wc3X+pZwOXXK+s8xnYD4Unp0ZwiErRVoc8Ehbh5QoklVeQmDi9wlKL5vAmAQp+ZC8eCjqRFS7YCpobEZs3/w5KKHEcguFKDxasCQQNIBCPZUKRvVQ9gujSz4vWmffXhVrh02SHZlS4wQFBIWpmPfLpvkHNlu1se527skNObDAhtdC1jjRxZu6QcaxrJ3ES5eOTSPgv1SYKdixoPDQUgJBjX9PhPQtDbuP/x/eIzdJn32oYKALOdlMFKB3RkYNMb4hUsBPums9ZsyImHcxY0nDyr19+vY5Ar9AFpm5JK3Rg/dsFVuJG4pqUITY9Du5ZMoPu1svRmYoBP7Q4kzBC0O/9+CecRPbqmqu7y4qLIVnhmKJBNF/5XglC5aFXtbz/U8BoAuSUFLpy7Ic8vUNF0fE2Ap6XoBuiaXAP6yk7FZ2Ex3daRY3gP0kMN4pZIGY0SkqYmcHHkOW0br+S4dL+/TEqMctsGvlz4XJjnsS+yhIUMaMyubf2gzSPWed+Toi8ogTsyxyAJxhYqx8qau4tl5nsf29KRfQI/ZHSjlE2EI2PtFDRzeX4jcj6+AOr6bosYIzjHJIp/WDvXVuojV7yeZSz+LTgH/+rR9+mSyg/o1V6UNF1/IS2HwYEV2NE/qDla2CUcXa61fAK9KT35MkIF//eqLMnxTLB8GLlszQOXTBlmYpz1cWfpsCshVPYMIEoewYbAtxiFk7r6riWddp11zVkh9vWZcQ2tDuhz7fgKi8AHEhRZwroWvt6ugeSmw/gwzAmUCj6n9GEvJYNKboqlohreQX4ff4HXVTGJjWv/+6AXL7s9qaQl3juZlElKgxHG6Wu+m5M1SAOEJAUWG1szxnMkgoF4L37SDTYkSXHjcPXAgBtj5Spa4cWgDbJoUaV5UL6bmk+9VLHSYyD62FHEs4wTEgNq13cMuQFN
edgTtmD/fdqj4/AHYypmkl6hJJRRweI3i1hfrifqxM5gHkU0mqqXkkIVIXIh7wy8MNm710TmC+KkCFh/jQs16/jQtZ53WS/Ei4Ma4OXNWI/fxgnbk3nzfWB8t6/S/rJGAsYZSarHdwq08PvObfdZu/rMDzNMXuL0nDoAM4qmbXGsL76huSl8bNzeua73BTOBoYKKSDgyYAtmoRcGUhNQajm033EKb0VIuN4rIkllWiBMIlcZ/lgZXMziZ6EClVzXkAavib0LCXsKC0sO/imGcjl+sw2cYH4NXl9Z3PHJvNYxOp1RDGC0Vm5pUo4INsdm8/d6UiNk4ssChBV8b83AJeQSXd3GOw8zW8EaNIFA7P4q7UVpomslIvm3lEvP80kn8emD/C90X+E0gI7N5ZXcNt7HrDeYOEXDd70OpkTDjOOa/4U66gqrJfC/7ZQDJhNrdTZlRI8hKwryTJCezUCI27gSWs7cQvZR1k7262Rj/miQbU3LGEiXdHRVZZQAUJs9rD6pOZPYlabKjLWpd/YFXlMBIY/7mWavDZAVUDDnob8Ph+v+zs1JeqOlSrLmDQP8wAe1LIvPvfbGY+t3dTbmu5A78ktEdeKzsP/EPY+jFHIaoka+vzGT++G02KBMLelPRCjDgvmzwI9265lXE1krJWX0zD4ktShlDmuJ4pnyN9es5yqRor/2mRMFPRdfO9FX93qHg+2rGx8bei5vL6TXL+XgB8yp+LsVCIBfenBZglG29E0c5XJvvcYc4O0Nt6OgcfrQAM8cuWC/HtA8UBcQPmnCNC4nS6vOQfR+vpXSYuwMKtADcH87bYLZUf3opmFXG1gAx9T2N+ZTGtzRCI7Aoa5sLyi0Gt+mbH3YAlfqcXkExkNhf4Eo50NY8I/9+aIIt7BJQH4nyQUQafMLruUfu8Cgq8m6C5ILUpebFOXEimulgcAkXWjIrTo0iL6XKmwJJOR5qTTQo9G+Mm7s+KPpvWHPtlnNKbC7q334Fvu2AfBNnKWE/Rv1oepcYhJOnNpxNUQQQkWnzM5XXQLLacoHPjNagXoN0GGFR9vB58CHJQIjfZ7hlCrMZNByKfOc0/nfunIVGU6gzORGjebY0xOcXLxeqdDdKEAh8OZs6ghIYHUSkcmIkGHqpjPpP3qMEIHsHWkTVZyxTbLMlBPIAKE7f1ty2+rWsQTtW8KAsknyfu+VhXxhvL1JmjEZ2VQ+fzXieMpYLLLyGZnpCMNweYtlyskomRTODpIlKyXartU4BsqHFQrrzvllAQ8wepUtaWgZbsYrwahDJX7PBYJt0EV5RxUtGn0S51yfI7AZ7P9f1b3vSKvIPH8SkbVegXmbASa5UutxiFHfeXVuOD8eNHQd48t8gonXK0U4DUGE9UPJhhlVwIKFjdqBi9WF75H2lA/kP08je1XWDsiKgO4/iCCBpaVCtfT/Qn7L6q76AqmjDix0GXqFK9Zbj12ASIKSQCXIhiYhclu8OHFXG24+mF1rHaOGQ7pXOe9scjt/qGePoNHqx289/LkEo+m0raOE/GsT9CiDUw3zGYaTibTr7skq9QzGJ1abDEfUNcqMHJ2+r0y9a8p5gVge3U6GwNun3d6QIORCM6kbKhXR0Apmg+5HfzBf2Co2TSQhC6Edd/CIoFmSONi9zTU4I84P4sDJg5g6aOLhFOCylSHzAierOAfLy17ci1STYb3xzR1z2Guh0zCUDqgNdAU7lOPG2Zk/RIDROiBxNt+ZviP8dOTLJWZtvqOYfftpX4rC2I9f5vsk3WNXnAjvM9l4+MIBN/oJrV53n/eOeHuh/FYYGLcwpEBRQZ+D+RaBPfdUXLonEhDnlpoXjSjKdVLXGyYI7cwDWJTr9M/ekVkb8ZzWKj4+IA3Fcgc1G1mD+IhBO283QHKvl37CY0OOVKbyA3DRLRh3ST/jvPKIZGinHAgVW+HiV48t0lZoa5bkfpiwuffLhLtT6WezsDDhoIG027BjJKyV+RaqAp6+BbLAjV7xnYtYDH0ZIA3kBoTWFnsT414RqX88M+CQFONOqhBwEUsqQ7ZpJgQZHKe3mwkaBlFHzf2WaPLNALRIotuDvK/pPekPd0P2xDnkAANclRVFeONr2wEmiW0ZZ6UrpkDAYwECAmhA2OSqa/0kA0+dfPUFqTk8OQ7QMwWk32KpL0/cRLjX3YpLbRoNeOfNxC2s1p8hyE5QOCDkC56YTOlVjj+vmSiKk3TynGmteTSn6gh0WTRxqhCpSGU/lVBecMpMSW3a09MQBnX7R8nhq/rOkXOqogYIlZ/BKArS7M7lfVUPQUVQpkqZz38oZIfH2MWqaIsLbsMbF691Te/fpPrf7c0rqYmJVffIwL3XqwDj8YvDNUJxR5xCK/TSiNaHiGizQVZDRiHG7Bl3/YZPMBQAS9P4XBkpCxmE+vbqUsTZMiNR7//0Lo3Wq5lQu/IJ3VM4beRE0beA7yEL8UBmqOLNcFmdfYb4JnC62z9+ODU1Jaf9ZuE79F5i/d6y4OTlKeoL0I065WE1+E78opbfMGgD80dVameUlaT9Mp1a6WvkEck8You9BCBnKu/7loGM0FMiLYpEfVLvrlYIYpVFFUFxUloBCleirAeoD316HiIsnEnYVmopH15bMpVykUFByEPtl1iCqg8V+z4NlZUgyFsMLcTwnD9nl6suSYM1VufcrMudCsPDen+euWdGx0y4lqbncOg/oyFstWXybanc6bPcyS6Kcq2M80DPn4PyPhLfzn+Dm1Igh05mYz51RC1qaXv/POYQvBLm+RcSXv+XDlY1aTy2BdLNYsrCETEWeD+Ma2c9bncEjUIlRkmVE08ustlrhoQcCi3OojsyXn9mCP3eYZwKjqbPZNhZ3L7q0ynfY20g7AGSNc4InonvyBaRwzaaIV6Jg4OGtdv88wFo8q/QkftW6TYxw+xlSq1hq360e1s4/qD6XjfAbz2AM0L3qm0nQU/jhIFK9jSbhj6S4zcyg5tBpWGAU0c0q3yNY5nid3QPoH6SjMQdmmluuetQg9ypbvu6gMkPWIZK0wsq+YmAKma2WI7mZQcCVmRGSfxRPBmmX77vqzSIf1vjjoR22ISRhTJK70d9t8Es84c548jASvwIPc0mvElselgcxz+1QOCQGLOMFeFBtHIQruqc08D0WygM152hGh+EzKJX94xh/CRaRPfrg5NN5ogVJ/J7C/BEOJbFWFhSil0LBnExLBhIvexTk8VW8aE0KREZrFRIVf/ab9lG7xPflQOjpHuujUhHsEqmZpnPWA3wCwCiWdXMZD1yPrHY41ALN4T5SU6Vbc6RR6ai/ABWFhpVCuCANzMGTuO7TlijInoF2swpnrOZXrk+d8vd5E6s0hh6e2oC1/f8+Xz2ZOZdNolwY+ZdYAPY0PZq3g4seLmZCcBRqeaqm+xNYd4vWHkSCvRnWgw93/rCBXYA9ItL6h7PB0dVEuuDpanHwF+v44qcHLqU25zvqqCiHHanrQuwPe92o25qVbopy9o2GJOxEgZyVLf8Re/hYGb1/Z6+5z9s4l7WIEFrrLWDYvHLOjG2ou7AF0eLCeaWSTFHPP/OKrG1Vlf84eTreQzK5s5MG+uzAIqVxmjtRy+RBcYaV+tcU9cdTSYil709dK/fNJtMG7Zhnd+vcgnlWcJByw+1ZDCscsBLnaSO8zEfm5NGf4Ecq36RKGBrgf6CnjC4AYXSMJTYPQ4KfJi31TE1+pXaBKVmdQOzLxAM89gI8/6oa+pqDerVOW9a2hJButAdexxsgYoTmCODl0v9ptZIy4pop0tXpVxSaPclynleut6ay9WUwu8QFd8uA9cR3NbgRYPIfHcnce6Bgt3W2bokHxLX/GU6U2nSxpRjFquI0j29Caf+0w/178oB/GHgco6ha/fpe1a9B4chb48mNeDI0xL9Y2ecUJAwekcer0n47fvQQG+rVEHOAl2d1y5sWoryQACok7VoHMS3VKaDfjMNtLRvYVFtozQ8PZzBBQCCoWBQc4RVULtoCNpu6oJf/B7ybMcLFN5w99M9zVIlaMI+rkBRzH8Q1hUIBG0TQqsrQAF1eqm0IPrLiTebLyqAVfhzkAPSBfGCtSrsvrk8SpJTR57qxfKP
JauSZoWCgJppWPeqF2JQoTpWSRQgcsXfH2Xg97DPFSpXvDDAG5dZXSwiE1YsS8T7mtv1OZjpDkg7KB1dQWKgCWyYwPnfgoaKzDpReju6PTPtVcUM48kstlsomJpqQ+bcRkgsPPHjy1JR0934aTaXEO8RTCWVZ5nUO6WbLgYmO8Cq3RqPLmDucmMrCaHSey/fWKwlUpyTbgRWOFRZhkq3iyPWqp8Q+2vQr/58OPOjvAKnGLroj8sSLKEXu7DrQWyOzEvWNMBzwb21OoD0eMcnP+1gTfDsSLcWT/4220C3Ok7h35Nup74TeDu2A2eGi1I4jpw8dFjtQ36BaClZk8N6LXxEyycI7fpE+d1hiqq3yX2DO71XZWNNmEtOlIZvUDT1Sz9O8s8Q39l4UuiGmkz35LfvRBUiEJq+9hgsGGBVRKAYD9W68XWhPm5MubKNQ3aSwF3ldYogZQfTH/nqhVM0NtwDeumztF+n/YRESCosSb8/SmdZHqGc/zKudVOnncJj1rWtczMmPcxuVJgUx7UnbO81nd/TAwL6fGxE7YS1+rBEvvtOw0B4CtHPY56N9xjnUVPJamiRbe7hxmieiobFvgYXa7HzlNyA33j+lSOpEvpEo9xA88e7tC3unvsSbABudpgRXX8srj/3HNvgKYhCmgZSdV6Dj1N2+wB+gUNk7tYVnCHoFPdv6lMah9snJXKSOH9Ag2zw4rM7bnrlRyIKrKgAkQKstCI1Mo8V+DH4Q+BuW3pNUO2s0cXeXGA2jHXro/1EvlF/rC81nzYa/Q67pQF0nt3e3Or3r113WL59QXmo1hDKVne3GSvGvcJnoIlNVi6nX3+Xlj4mjsNSzOiITmtKqeapMcA26HtHY+Onu49rXx9OpWiZpDIAxfi1At2cLN1qSd62slTUXVimDDN+GjtbxH38IH6/hWL/CNzlAigv361w7T7U8kELxW2bhqRGP94ato8Xb+OCLAm5I0p2v0qYc6jjZJPDjhUOf02HymxOVftBDgRlWd4dCszgoqnO3VOfdqI++NGqXlqbe2huopOlF36rJn0z4+UTXtgwg4Wqkr7jniNRhDW07BuYkWqOB715WQ409EbaMX5Gi0lG5yP8JrQFTVPKg9WvihaeofljFr1g6stAwghZX5OjKH66/Uwq7zWoSBPusKPP7nrwkEAv82qwcnywmkD194HMqnkXNFbEzhNdzt3PU5/mW8JEPs+uNA27eYq3vBMzXu0Wss45MuI/ceL+roncL3dc88b0HSJo3vV5IaYVCF6gPbaEYPOIiRXcRSX/ZNvjMGkgA0yE0+rRntYVYddMgYPiVaRGHV2osLaPteNwp9raZ7z73BfO8kQROqGXOSQRnvHcOCnXIDuQl+T0HEezGWUFhtwNHthkeqB4IscHa4+4NAamgMNXo25+BDTmDAOxy59qgtTAH1DGn4oXHaWWGpQ5ByIaLH0+p5qREpETACbagg2fJXYtTPElN80jNYjOejIAQWY48T1pVcZJgRdwqTH3lYde5lP+ZUwY050c1OuVLVrkgqMUbCgDwUZJUizpo6esY3qf4PS3m2+g4hQsWjHcmNWrqE1UVR3vr+XtZWLbjQEJ+A5zxtchCr0CjU9t/CAtL1Y3MBBF8tg8X6b9wuYUVALgbz6l/BhWwwg+9LCglTgx4zGY5s9+uTssM874+UhlAwvBRj22gAya6O2dkzWbSNFLkCHg5tH9COyPcVcN0tiDwsG+gl1erzcJ5lGKnoWF1WUr/ea9LRpfBd7fxPm7HqWtNxdf80X/LQXZqRwDf7K+hgR20crjkisZzlKooPHVo9XSlNr9anNTcgOgtf9OtgbQl1Ao5h6wQbs4p4Ixg0qXHIT6ZPZj5JsnYv6qsMgEQf8fHXYaOBT/k3/kYnujADDSdYtpa+fLFRK1CaHYipKODHvkANI+xRSOD8K2LDRBaLQVgasQyfNKMa1KZETnRmDNWpWauWk75jw+c4D+PDqo90Iho5gkEkeQaMUZGotCHbplE2X9j2NR8N3gqv2jfi7pFJ0dE1V7fyDtlnP4R4gx2vF08/1CM7LcoCq3FJSPaVB5a6bQzcTsLrHjK5yKi4KW552LguXrwq0N7ayTrTEb/K48j7rJTVkiEOS1xujXgtYL5zkosd3/2MTtY4OrbXnO7mia74ZwiyIafyPINfLexCeeFLaNs33XwakGpp7Hs0Ft+RM3lTqkqP/onQiCXyVke7orpteZ5+orq44g2ikPl2yb9cgPvrXfPQNw5NdpwlxAAjK4RgJ+vQ1bJM7SEgEDVh7j5MRREsdnjIkCuBmefmxyrnIlMH+86oaP66unC2V7MLd20mQqt9R/rOj2K+IkhJIYlIXalMAUtwVP3K/uCCLVNFEsJFPMSPh2K6kRBkG8nZ6Z2jjwZLFE9J2HXLaOLXEEuiBpZ9gcNjBggZ8LJinfFsozjTxYTgLxEVxRbA+mD5C7PNWvwvptamxT6iGyWSZ9/dcDfLN/ABTfiYfRi6sILJa/RNF0jYkhvS+Xx7WjAPo57+3iZwdC/54x33Eyxnr2Zj2uEhECr+O+d19XMbQxM5R1X7Lwj2c7eLOvttdP5MxzqhtwIiyYC01aaLGlBgz3FMipqyQWDmAKGLFbwhY72Ln99WhG3Jl79XTfQDdN89CWy/Uq1Yn2S6zWQnHMvLppztA+LwyV1VW5KggOKW5z/RrsYfOttQkahGm+kQH4QeZ+TcS4IPvstHcCd6BEmj/SU6Xl8N7sbC5qonCI4L+7tL2GylkegrBBSMO93/cmm7Ar9NU48u7oOu9JlROmzyWLXeOl9eLSUGeC2z0BidzXGLkKxipntUwjFBYlOKdUwFq9WdN5i6MwXt+gV9b/p7inoSy69UilCKPRmUcCQdseIIFz4RIF1K2Jw/MdK/f5b45b3nW2lP++yi/s3W8kEJ7wmVNEU2dNch84NKgiugksw59HISAF6/nBZKrfy9IemXAOOMhdq5wp+06MmvSGykAW10XpLkjMJ90eCInQ5U90DK8OOeKJ2Lc08EC6Yukh0wSJVB7Pj8ek5ijPNXx5DkJc0Z6QCLpTGLVK5c5UFqVNYbrVnFRNkVqbumbh4W3sp6MXLXcWYOjfQj1b8xyZcknm09FShRWcaf5qkCZvF/SJmw9or5R8I0FiJIC8mw3Dz72whZNzsZpOWwt1qmsYIvGj1ZtWhTtPjwbxbfMnNOHFW9/M/9Px8m/O6vhlRyHQO8msElS3BylfRMKmnagkcniRms6LLziBeC0DZPBf/IJlNsUGFn/CCmzyzvEI0dZviYeOVHYdP8WWAoVhSPiQBcCEh9AI0hj2GQWeLCthMAdMIbfpue5LO7DPr2qJg/EDnPiPSd0szr2Kr5aqLwzQ6wT2/7qC99xltEily8Q1yMw4GLX7jt6PrdF5d+YOz2z59DpG4hcRCOawm5tqIl6MNGu86gi12n6oTWFXkI18uWcurzc4871pP7FXGjBNCdCXMCJuPS0WRlFWnGJb2GdOkyEsRdLxYIdWOEJWwTOu6I0gaMhpxF79cCTS+HM3H+MrWOirYDnhC4qGLce39GKG+UAAmPmm5tEIbqE0Nt+/jDAXNlRxiCcouhVRW2nK2o4zYOkZC+W066G4h2T5HCUvgLiru4PvQkMy0VXxx3Y4CPpibJgi69Zyj2vq7wA01W7epKrO/TZ9uwVJn+8ikwO0HPF+eyCVB74m0zYT3woijixsgkG0v/7t5vKm/y2Xbj/8mwyHaAk1WXA29ttzJH+APdLgIylQQ4GUnLQbKv2fUKIb31KNbSh0pUp+5nBl4PlEQRtNfIKaU8hzxzLpN8h8rFu1a7O2RGWAJLQLJ8+kuqhNRjLke0eZcEf3nVHE2Hq5QqROvW+UkLyNtXSskoTz+Sf5W4ium5xP7nvULSTY5cEBU+yGzO0tjhQj4+Jjc40DR5ls84OJhnAZ5E1WND8oDRaA06r4hK4QaYl+DsWBv9NExOCpp6OqY/+jGlfOKJHeYvtVmLbeYr/WB8xIf3+7es/mHWYMmCGWou8SqsTfO+ZzTsb/NFepLdK7QMDUN6sR4VtGpYexJHIq4Q6lxG8r/hzJpjqj0iMd1y4bamZE
JKZWCTkNDbv7i8ejYUhpMto6ZV7FaAtfL539sEaO910Xj9tDOqKSz9145JCeNufIQAmb4QKoouCgtTGsOCtxFbDHjlr4qe6mjEixyKDwawgjoIWn1rd91TbHD5+1SyYML7pA8nNof3MXp1RxWDtRCqKLzfMUMeaY32QlaE+gIGNLZ9LHHIRZ3aHabhcNwdxT8Z1fokN8MEs3VgvmCuU6saykHJTIIPI24+0ugnmN68tIFL+X8YiykJAIdF5Wc0ZPdIq8JXbzPgBqQtGqqkwzy5pBykWDHCSLCh+hIOePvG5ENfnmbZ+WerAOziKiTSz49mDbmWBiYZkFIpUL34DQBYhqdheOPWU9JzixUgu7zkoSppAHOBMZWF91MfqBGghT4VcZJNTKYE2bUv6ETWpe6LPH52DsOy4YC6XWR+YoxE8UHeZboe9+LwPcm5KFE4zDcooBPAHk0d/m/QrUMzf8Ngk8lVCgX/za+JRRD3GTtt07lvy8pLjAT138x+OWubu+0TRk+A6I36BILG7ardEM59479zCuCQ0Dve0aoVwZAkjjMpHxgOo0NgCt1skTH7+eJhTbMgsTEdDfzI8eGd/mAWK6YCGyGc2rDlYERzWQsGcXxvW+4tOXaTf/1pLTlQrWTLrbqzxLc1nEavOmDaBmRlolLDe3qTO3gLKqwkk0hiOH1Xt/H+jtyPbqeasYy9W4Vcgg+mBbojEtH+Eo3ozhz0yMOk/lxRuNZ60D8i4nx2+28hUuct3oAicabE92vz20DLC7uKy9F9jzJk7Em38kjXBFydBulczQ4FkBsGuL7cAEUaMqFbraj/F9xW6JfTgAcVgeWJpVIFGtDeWD/XzebdZbtTj5KlhbTVsbjuvkgdrzsgj3AL9rgqhOzo+uVd4P2r/Eq5lhAOfA34Ld/BkziBkTJkwPLAK6gZLKzbDA8Q+osi25sQrQQrvhIh92U+pZHDX1n2jxhXCIbKRmILJIUTgG39uW4gY1Z8zC6ubPDivRZYRquxJlJ/cIcK9DwttXbRQaVd/I89zaMP/u5ElyK0FQszU6SuEIpBqnYvK7Go2Lf1EFoDPn1HoBfQAC2NhKN3U+YQtL9Ldf0oMVrIsplhUSTXlEzmoBckmC3dXQMzRt6orzvHEGp26Zh2371DgBAwC9RnDQq3VNDkRWo+QT6vWCME+6aAbuAe4h8IziLKCtTYpBYjv++bXsTQ/Nz8tgAp4qV5GG9AW1ggwA7WnSQ5+Z3R51/AhvIkYEskERH5KkGgHW4NXGirKXcuDbx72kEV6uF5V0aQe9+xUMdY75fH3vuH25D95qOoS2OvwO+/lKoIWkll5WJ4mz+40bdDmk5Ayj3rfww2/WwdMB9r/pBrPoXzWTiUDqgQZobV5BrdSRBPdzR09ay9MkzQeyySHx0PqxThqoFVUE5X4+n/hSfblT9YypCO/a8G+DFwf5DT3LV7e7fJvFcR03SuAJ+xRYQTbyRHdomCTj4mJCsOtiFNzlUj73kCgy1thn4ta29B66RNJsJRNpTAN4tFXwR7WJX7mhC3ikBgA+z5QY7euEMN8gudWytepGZFsMlqqbJprWf7EbuQS4kcImD5PdM4dRXEwxB9tKaY+hHuwdxD8inR3cEB2njrFbm2T4wIE68DQ+ZnPHfeqStnVR8LMgRO1QsJI84wRwGpOuaP6GOHNzS6Wt+mDEbKQVryqi7ffhfuP8zJIKL7B+z02ae1rv8dus9VtsmZyaObHXkinGc2JE3e9ul+w5KewAEDPIEEW1z4oS5ordiCh8XPthVNBBDJYPpO0kaz2je4AEITNwZvHwkZElVyFVYw3oXEBs6H1GcAMdLvoOlfS3c8BQIcriIAEkuSb5Mnew8IFCKJPOAPj+Y9D2xH+/A/+2w3nk7/DiFMhyINnzXTbW8oIf1EMSMjarFuzAxJl8q90GMTOlUX7xFIFNaOas81D5OeQJ21QNvNlQU3JRyY+KXdgnV1Wkv/9VB6L70HMyGE7FHBCiHiKgY3yXQCD4lj+MC7RsOkiXjcsxUVzPNWBGH7PzY9BzAwO8Ve5mvdZkowY6BMEYF3+df/gHOZFjy0Y8/NJCmIsOwLZqB6agbwEQf22tudtkKQYUlVhfb3v+yx1zitO7sW6gynxwzarCQ2wHyhckwaWxsaNbdDUNNbsDAYQFVsUTI8/nThBkoDbPgEYSTzDA3A/j1r4q9Nv/mESV8G2zK6r1eunw7PkqxPBtboHwQiG4EhKfZzIXRK6j6lOTu0AmUfMzjJ1sLdTaUMMf5biOJvnt6WRyEajXRYQIrlG1C0wGvngpq+5i+jIjCrbry57I2EtJP2eV2rTkvR5ppjy240qO59gJJRB1x07JlAzEKinhoVMhtHE9GqVtDzwp2NWd4aZTl+creFtfGyQ5iTJtRVUdkWHRLCwVjJ4eylmClzC/GZV9KgedMxN3Q0BhlLrP/TK51TTM+31PcpqtSIb375BQtc8KEqsZTFtMC47JTD3cFOPLY0cSf7cvhheVoM4ibbq+FdRSkKx8s8W5GcxylhXjkHexlOIalcCTtCc6+F4aeLB3G3YrljhX0YFtMuK7OA1H3MUTCbp9AED6q9N4/fdxXfnGSlP2omKYyo96Dtedfv0lN++EJgTFEFJ0JdNiuMdpnsNoldQGHUskOhlVduTDlTaXRUUP9tTzyTUGIdHaz20x5Ux0r/JDX8QSTLR4yBxlScCGYA5wT9jtnU0s/9yGmIOM5n1CsBINMPh3A9k8tCbcigx3TCsAcel3p4KonovHeqMR/PmmCqc2B4mhZkWkTKRd0thyh7+/g9ZirWovXeOJQu1KXJlH8vwu8aqjCaoDSey+EGTPH6lWbmlhM0cxcXtRYNuOj++AzWz7PmLn08M2xS8CY5AAhhqX+P10EcBEYyyDcSXdjlqsCjfhWc+EnRnKMFJ4gM0uoIPgTnxfJCJFxcoRpqjmEq0wR5cOkHO/f5CXCBPJHIwJiPGr4UktqBo1r4cnQ0qm9MWZyJZcGymQNUa3ti6gOFlAv/QHGsYeXb+/Lkf8GAj3qNMYlwjv8bQ/bPD/f9Ckhh11DIKmRNcg42GDwgDRjSs4ihviLfV1MkXSmC2E8uphKdAzm/rC7/aIHpO4CelRE7WKpMXrTkDDTlH89YT8OqAjAlfxpAmq1rB6+jX+ZiMaR4wGeugzLJNiPO2uNmH3iVW2xXdo5/8oeZ79IpJFHcEYqmKwqUp3YJNtJnuYIASlhAxnJcNqQcWchn8xfjEoH8SkX+6Tc0TdJB2ejDYHbRcd5fvRKyxO8VOrYv6mDjA4RylI+P5AW9T7PAh5ww3lquOQhDlA15JWMXOVfN7yTTFBz53ngjimzIWP6iqSTD5EQdexOVqGKZuEyfLvuKbFMffDkTnk4zV5YiXiw4Y9OFJysrcsSkMTALQLmdzwkxBg8gDC/CLCgjWkJ+oXjUrSe+s1jbApQ7Yf2cT9ArnK2bjARtJBXzs3eys5Yq9NKfEK1Mhh2oXIqUn62svK1EgbE4/Fg9eRQak5WVjemt1vGkGtqUlvkbQEG/junXWcSm/5msmh+uQ05VqV0OY2gFZ3mDne5j1OZjfhI4J/E/7iKoy8wZJBQRtJpeAytys+k4GTVMyubN1rx3kkHmqwQuzCdjQ6eAJ2mOF1iMmsBIt31W41hfXh/+hdGGZhAYsKvLKJ3VK8+v2c/6o5l9Fy02ffQap/y+O1xZ76el4RjxqDYj0Hijvwqx1uDo42pWoRcSbhO1Cu8S0Txa9HSmNGmj/aAfEuEc/KpLzZmCzXHQ8Cek8oqJCU+qzvrudhOrJPxDi0Whl9fPk0CVrVpWBGqvu99pNLMJyCLUGPJnmEpoPxzArSr2ZufpecXZ/002nQnNiPojJtqq9xRXvo6p5F17pgoSbZTYWdjtbwFGAI7i0xAshGasRfNJ6jYQ/IzWyJ1SQheeuX6lydjdv+Ihkc956ih3dHTys5ChA0KT2Z3zs4JInZhYc1eubEj/e15HoazE24DWE1beFh71lQG2mbr6UGUJuIuP+nHhQ5iM1oOGzXzp+4uvf8cNEfh457w35XAU+wi0Lv1EiAF7PE0Ao4SDaofdbWtHsCRsOe
Ge8SM0etwC6ziBXbEMuOpmvlGI2dWuanfvxaXuaZ80Wq30klghuLb8uqLuYlE937zvPWolKqL/VEm1kAp6/48dAphejMM0fZSpVEGiuJbCEzPlhqTM+iXuNiOsdBAAhoLuw6s3iPYqrbfHJJdwGmAIpeBkc+sJlcHoE5qhBwMnhPozExBCJAUp3sjMeKnA5VGsLJX/tDhqxqhtxEZpdeY/7Vm79847eNfwjNvwAjDGxdMMaP2ryGu0YmoKHusSpNp8vXAYI6Ck483A2sQz05NLCu4W1ODldiDKc0hudXI8buWFKIXPkXc/ncZ8li7dwSFZn/zuxsjfQvUHjLaeLiBV3UEwbjOplsjRXhBlqhsJCaFwjG1f2ogN7JmeIjODQpx3GTwob7jr4oI2T8MW6RosbbianEflkRzzdXQeBezJnMovQx6tMXX81HcjJvYmxQC92ivrHbUPmd29LLP65vBZUZCkBLuZ8ST8ZnGmuaN81G2LbRJXBEpVvRs41Az77cRkQ0lWJ8KUu77PxJZAal8xqHf7ae2elXGmJu9mBNizoL2iXimM1DEw4FX+G2/34f63eMlg0y8T0uwNJADyu6vU0IWnmyFFZ8smmmYhZRYuX0GF51X+t1L/pBJiFpeMrApshQ5T8Voled/yvHqhh7FHV40TRfzyYDFdsJY2C1QS493t4lX9pAri/73ohKiQlyhADbUIwLSmU1z6LO4QELtwj6i+7sGhvxWHZtwssimtEzBpKdbDsd6pIYgdo2t626xJ5Z+q6017SmGcpNl2is3YMjRiAsqC7Wn1l+ckQO1yISKA3ePxD97mdoMsM4glbDjbvv8LgW3abIHXRO+6LSpsgRd/QcpZltEUjvN6r84moAIjjz1cEcXQFQliXkMwi7LpCvU9xZus2JugWHzwm4ynbtgPehjQciCLzZbrZvBcUP4ORu39hIbtPShe1iVxL21blp4KazowNS+i4EAgBm2gTEuDIw1DMjsy8YmlN3VqL9lCAAmGoJJ8RtlDbmKvN6KrAtVqD0K1bUNRsFs/u7de/x5GHBgaYvBsWAVrZJwiRuWdW86n5kRQskJd1PAQnx4z8tQEf9BmpxOq0H4l9Yfz7EFl2lYzuUbqQ+petWXZZOdmDraAkhA+mBSQm9b79kqeG2UnrdYBzWZ8+m615/Nq6spdB/hjoURGfD5W1pB3y1R6KhkKQ5z2UKtKSSZGh3Z+KapsjTCBlx9Bpz3AgsSv7hs7FixGtygPkVBoWZMWdP/oaULaUTNyGAXPkVYI6Orj1pAlurEMMGK+BoavPNlmT7hv+nOyYJFqWY5Gij/C4+T8yiSDgQDdn7RxW52bUoyUZJmXsEuD/AP5zccPn24BDvqu0fJGu0lsjDYUYbK9dl4/LCAbhg3INCoGtzBpjTmfNhWsAadaRsoKXhJH0sEhSRIdSbhjfK0OwuXPZj1YFZrqrs1RnVoaodesRHv9W9ChIU0CgV0+s7IDy0VuhnHHQHMgkFqcUrf9sooWA9tL50hlZEK8JP69Boz5aBf5di7g6BgcjeQUqseQa5DSEpkROIf7LeO6OytGiTm9UcBr55h1Fcrz8TjnKxIELW/QySp+SR8wW3FfIUCX2z9KPGNHB1S4CZrsFwKzqbjsb7SSIrSsFEk6KsXsaj9RV9Z01Poz26uWWVsgzYdbtlySublLC0Gg/nWSvpt7P+0XN4sf/cVjj7WeeAzsJLBdMHNCky4wVeOH6FHmqjw4OcrEHVzibuJOx8sKnjEAJVyA24921vWbyOjmtfWLFtx2ubigFH7w/C6XyDa3hCAGSrpVOqMuYhVCGwjYHFKDMdAPrTSOOu8zkHg+A0R2LPFTzxV5NrVud1Ffnzemc/7oHzhh4dIN2dM+T240ly2XI1xnQJ4vqWpbWav/ZJOlS7wFaR4veLf2qFxqUV2THriJceMrK4G+f1yvguQSgeNhR3RfAFm+KC//V62ToUtWqjZcAXrvak4wZIpH2rHOyZ7gUlpoo94Ru+hP7VWCzcQ2HdPQL5HvvRgl8YOGgWrVEjAhvX/WOKZYFX/AwbdYp3Y3gDQKwZqmHyg15iqN1/ESE3Az7kriZs9j1pUNzSXYTAENiVEKjfuudbtzxDnL/A5xvH1a3NCgWRclQmCTsQIW3FCo8NnZfiPMLIUVT/cYNXNZPY6NW5Ar/6HpY6Ct8gFxjzY6f3fdNOm/dQKvL1FH4LpoXUPwm31+JHubwBq1NC9D64iKVWZi+up65NjH/lOWdBHx0R2grIidwTfOMZr8L86jsCbuDoTxKgGMvBjS4RVOah09WncnHhJUoNWTxjy/0ZLLyAMwdKktOLreo73DLIhu43g4gzRZ+3RLsAPefI4BdpmSc+WhnxFUr6Ak8PXvScCYUFNGl/q1gokG1lM/hXwjrAj79BQRxxWgKu9DCPdcFKDstg4zPoReQDj0HR9W0bJbHCC/4nc5NwoBuupEgNtcL/3CYK57yrQjYgVZX8G5WTI4D+aTgKzf7gnwkYb2c0Phzixtztgrd4xV02u56sZHyP+ugOZXsy6FI1OkGiN6BTOyC+Gu7ExvGPN4553gUaKbCz8Ie9zMqdHuTUt588foa5Qux6O1B11w4RbgSxRUKG8Z9qP0Y7S/ED4P/U9Pby/sOxsLpAlAQYFG5urXh+cWgyfDjsuu4So9IEdSBRSILwqQGN030gkjM6YU/fSGoUpoVXFel0G9a8H213Tdhiw865aZphzM/dbmWPUSwVJBIRXbbYsEoxCq9GdmsL9Kp4D7Rq+by0ibfE7L2mFuxa7hNoE1QhcIQS60a/9goa4wcLt9ukKRx6TQFXDRw10t7mu3vbLNtS3/YLI2XnPBdv9iKkeIfXJiPAAlP/OeXiy/umgTNhFHc8HiXdJpdvcf1sMwmZU4H63uxac3qlec8vejUrkEujzHQUTM7hZ5Swm4LilT2zsG85TwfAKANlPj/YEV5DAsZ/BMZ3alQLjDYo1IJct35nxIHwR/fzzR+5jf+HeA4/axH1FCOZzEll2vRz0iLsdg2CVR/UAtsFjQhwDTFO8HtCecu3lzbwTs1BAwXJlk/TGR68UxD/slRXH+FNbuVTGq0+l12hSI71b5R1T465lRe8eN3M7rQmFQxtQqRhks43X8WR+j5lx8ly2ABtbPK71umzw3OinDrw0AF2/qoSAuuCcnZ5Bk0Vxl+rF5ZnsVYRs+God+x04or0BU2xL5fsl++ItQkwxfJd2k1E7fBJcAg7b1pFIoi8p6RVj7sf5wM+StsoHgPvUnIzVQRvjJeOptzZftlpKqB0Utpea18pYIySBK9kEeeUqhJbSFxa9jaYZhxFY2eiBgcTyJuziWgLBzsQ2mIILwGtTWGfa/uquV/VD6KcCBbTXSSW0wghfoXYwZEbBxSjLJCsEM2kONJRNnq3/K6ajnWn2km5MNezYUJZT/j50gbCPY0RIQl1vPKn7EfZ+O/baKCH3e8j75KsqDOYC+Dox0qkrtfm72aAvxYfEbLlnJYNhFJ4bQxfFtFiMjUAv7UkPfPZLfU8v4LdJk2HqdSwLrSIqEKCprIms/Kyjz1pbnWyvgkAXiwXDNu/ygyyk67pkr7GE3nYXBkT4hweBBTfy37zIj9C7czbDgzqZD2Rb8eQifGTV8gwFbtIzUt5psK0Y8zSl+jtQXMkF+TQ4zrMvxYf8946+m+9CiRTsxXg02a8fzU6oabNBcTonJxpXBxlDQfCi7Uh4J0eoOBKQb/aOWLh4ZFUKawAbPZix2F+T/aa0fuzfVD80D3ZlKBizsMsfIg8CSRZO+4nWuZnyZcgW3Se7fG+Wsp/OOm2S/NA0qRMIzeeamOaxvDZdYpjYPpmS6c5kjBqCWznR0GKdUD0v8/pcT0fbM4shJkVPUsLiBQ/4Y8egT8pXUWKOjoSyafdDkTEpRDfyrgpsiDIfekvXQUIZFqSFnEY+n87F5NqfpTIFR++KP1avI1mT4yLodv7MaG61GMs1tugW1N89cCnSH8GTxqd8cCBzR+nVNhjAJS7jWgcyVW55hPM56QaifYIPhlY2K8pyABn+MujYtqDE00fq8gezp9WnJtZvMUh2CRYKVoZN2WNKCoU
whHfw3bzrBv7n6ArUij6WVjImZD/x7DVJOH5vlPLRdVXMnVqg0gya+z4/27EY71EoIRd5qbYt8epVyKKXjiHqhNWqhIJKIJULQiWUrLR4EXuPEFzyr9X+MPOlDW08uc8gTtvRsrWxg3I4iYbQQL6Zp8oRy8ww+gmmvFFz0kQk6wCTjz8jm9uwFqrdbR/m9r2fDDw+QOHx3fJvH7JFhcEyp5VApMQZpFd0hA8x3DiOc7CTfnzFkJKJKPrfu6insPZErl/fondewhNkxER8cYErTJrbHjDO3rL4le82hG6laQuLgPxJ8Q02hqn53RA3YDUTU4B/nB8W9+nmRmptUYhCPR4iPMl692O1u3zrv4YSYI0a7oJy4QVLuqCMnMJSTgJlYnmgaY6sf04YY66xYtMDthAC/kSY+Fsj4CBszT8zJAjYsLPWluuTu+2x9sdFdmJtuaqx/Dsh8aLP20JuuxLrJKzu8o502hqhNSRPuMMXs6KZcN78SMbc4hHm8ukOa8zQlzQJ4B7MkwIvBiNL3g7ycymzsLyA6+oCOp3oKUUJNJ6fsjfOpIIQp+ilZCU9dm7Jf5/h+rty1wNCgEy2JHNklvTjPau/PW8B5mIYfiWyziT/F46JAjzBAM66nJ2WrLWlyLgxLIyk6wmmISWeOPkgUhpyyU++dvmPlU+PAx0F/KjmZToIAmkLozXOcwlfLbXTl4BqlR7yTzUNnbsLm0SIAQwG36raNR9wt4obc4PSj3/UdZA5etkNoRKdP+CHdedZHQ8OnOpqzEsRG3+Y6IxoAEvUEJ1a3LAnz2h3Ludm7zf4tWXCkA0c6gi5ew6bLY0nCSiAiJddLUkOOYSdxHbT6dk/yZI1YD/QjoVpM2uHCfynjR1q0HTleSTepen+ubx7fsSw2UsKMlqFey6YcmPRi4r5/k2WeVsKhi525797wx3CQR6zeRsrleKPrPz5Krw4dXsi4G8T4RTMZjMAqD/8GIPMeS/yxzbFXbb295aijNJoXs1w3ApFPzSQvZKtnJmCJVOyalQt2jiwJZcwuKwmPWEnkg8jB2aGWpKGni14pL5/afI32b78CeV4qQGQ0VzICpcD16YkIRRY33bacwdTQiJgZurd7aI7UT2i+yQMq8BUMPD8fCuzhTrAs+wYpvSrjNgtlGJd/Pg//H0EkGXiclX5rgEzT0/NVgkCAvQhQR35sdc7cG+IsMNGPJCyyvubx80XOFy1oxbJtnWAxvp/hpl8FR7XQET1hI61u+yxx4pKgd+rVZ5Tdm2rUhqnabfODqjBBz7kE4fg0s5QsONdWF2UVoTMEOqtWSBDBXgeCzSMmDPbMsXpd0bWWQ030RfBAs76LOxQC8JSsS5LE2EaacjfJvHDX3n91eNfQZyMwOgmCS5MwMuO0WVaTEWQdEwO54BvZsQsKXDCXaf+oxvKx+37Vy6LNy3n0pzaL0gAg5JswBgqrGw7ux5Dv99S2sG9t3dQPXNofC8gxPG+ynIRG4IO9bZjKGyBEmHt0f1jcf5VJi0O4hL6Zr8jMCxR1DiBCP8cILqSdm+RXQS3K45rlrpU2BDxk9MWg2PQyJlU7f9VKmw9FxWDWEa66RxypaR+gsA5lQiVCzEtuw6p2ZTKOn5+SBYfdXQFXjFr6xyurn80EQH5cgcm14OBq7d2IidrBizMixIlvMNVGeU2O/Dcc5DZtp8xryLmHBIA1yNFC5RqSymWAldowhoCMlKgiRtejLAi/TqNKS0KbAyyqJp6mnR3cLbG7T1R7DvIIxG5jCmiTlkZqDP+ca/NxuhC1/gJXkVK7Q/kQsBmmcegl/yi85gtXzasMeJfMCp7uoW/u2M7MNN+bRAgKR2TKK4Wx8Uuu7EO1se+DsVQF6ejXu8irnoFv7zXHx1oKFXSEoVqQB9mBomiylay5dnZTF9l5u0W7R13V0bzwIa+QD9O3/cjgwrm8bgJFTqTl9KFaJYLIO5NOYrcPlbQDQ9ah0enGj/x8510DESWpLkOG+a6HofgAtrIWvaTWRsFkjhv0GkkB1vHM3I8Brl0L66MyoCwAoPRH36Agv84zS/1LKUX2zYZfEk+AQ9uqE2MR45EkT4cAGxYcoWeVhpJ5AwnJnSfUsj7IXK1sVI2w1SnFZfTA7AtGvkUqJS1SmRwNhi3y/cr+sls1+YLdE9Ol0xtfABxoR1M41Pd+C4KGIbZWX9vDEYMz90x6xwdFxigOh3YWYfykG8qZvR9UAj7NQ7G/CJFwaHmZah5snliRfxJpcSbhiQiB5Yl8iT6WI9xsgi2m4i8Qi8TIKbwboflnGlU4w1U97PoVqrp9HAWAIkbk51sxIXdVz50MTtTv0s1qXWyTg1HCS9odXWf5QTn5N4h5G8t4BS+2Z/KBW40rWdU31dAdCHYGVuRc35Gxz6a90rYsD9iLunZN80eQR6X5Tf5baWMemJN/0gam7LAtzWKEMIvlZJQtKgAD7Vlz2mstFNTA+c4kZ2Q0O90yllhB8869ORP8wO7JcLjQ8s05lLX/OI3+qFoyqsV+Ntig3sa3aJrHUSfRFg5t9puoV5jGceZgnU2bhPldzjFvUylXZU8wsYhv+2M6PcjiShfDtIlTfv9+/n2ecYebbhfP4TusPbH3xf6vR8HX9ioI1zPH5OwhDZGG/ES14zmlWkKKn0Bo/tImJPtsNhT38WrBihMTyYYMh0PVv2UzZVYLUCcwA5jeg2D6zHzUlrZZCe7ewgHk8jkEhpVys0I4WH4LnHIs2p7Qbxve8GBKcXxLRsXBgGUrc+J2VRQI8Oa1Cs48vXpGZi40J9Xx7huw7tVBJixJMPT09/Nso+mYYWhnrL6KMkhmvgYUcS/xfFY8ktoCG8L/RFq3TK0Y6gI2uaYotlhk9qM+OYTjEgEffPiRJLQpJh+Y4J+C299wBPSezzwQp0dDTA12eWhg9Vcn271VrND35Im3+kYpqsmUY5AopAzxevfwEaL2f66/RuVfkj+QeWk2H/aeMc3uIFdEupgw82p3G81CKxARydlnvw/CuQwddtq6ANRjA6SA+gfzMA1SRDkP2o88RyRTrxPUorfoKMnsJVsBTqHOYhcxdexiYISQ2a3cA0/ddBR430UcozjuL5B/j3dUY2yMpk98hmoD09cCIckIXaF/b0tYEvteCHlZDKIOxm3qIheG7neIQRdgKrLh45htREI6XBtzRk15YUqJFKnISoqzfD5BtzjxcES9b9sZpXfUL/JNkrFvN8Am8/IrkrR9yhgJGsHybq9NU4tpDLOcqImO5fHms6pO9c0cSh5NXe9NGKNxuDaxjburSKZwaSLVMfUSLUb70P2A1JlxftTYQsO2hA3VufLZaf9rBv3tXmxgFvT9PbEPwMgFgHpVcmrQC/CHE26kqq9h0ZrnHtNOzSf89cHew+GDXvo/6tWm+ialy0yH3bfxnpRDHSJk1iRNsL/jjtHU0B4Gw78vkiFFk8sVa75i3O9rQy+IiTzfCz5LsCrgcTVmhqO6XNOUJAvRVE9fZxROYMB5bzS7Xm50D5uMk2a1N8WRXOZwQsTbUKYIDlh6MehxkD5CtR4KsFBgbGI4TZ53vprOdH9fTThnFkxmascghSPHsc8FTFgGEiH67o234uViLuApFLeR9zuNLoYAz5Jv9fXvlIyQqiwiLbgHv/ryUPuZLVBwCEmvKR7WPqcFsL5gCrPk6PnjrCtTL12+RFxgvhbgbz3V068mAQbKO+tMECJMbXnmIFTT2BUJhFP3kxparmkpLPXutsAqzNkcfJ+s3RelVFstmN1+V2LhGFAM0UHxYjmoLoO92kiZ0MWu0w1ujPVWV4jixxMimxvsVFFuIGr4ojBbxLJG3SftzB2jjdQmtLHXDwmQ4iQX/YbafoMDng9a5i3N7DIZbjlB1rstk0wDxth6WWtjBhb8jwBvQJt0mzb48ADdCsqQ1DnlUggCE4W8jSakl8GXdOqqfUQ7NXBzFINb70LSx0/7s9jZfN+KypdEupEo2lT5fdUZECsPMJSA+1G1LExc9D96pqsz8GucEuIgRZwxa0HMNVtOtaSsAz4Maas35PGmvPsr+6mrMfUhJU/7bmZrTfrTBeer6E0OLADYsp1xzIEEXF
IJFYkanVwBBaYRoZ852nv65CE4mQxUU7hatAn+jcfmCq0hQ+8NnRNTqMTWZRFv0Z2IJlkpA6+9AHw7aTnWQuLZ5RHsGvpy5RnQPJlVDjrV+zWoGRY4u1uS7z3uo1JcqfzZ0Jv533qNieeQQ2l/VsgDi+AKT5W6XOZKGKBW63U7h1LkZtxWwn/0iTjKSBAS9R9o1hHt8pxBEhWGBrKX09xNhxvDz2MQ2K90opjhYzm1OZfw5F1jpFVPD91WCHSCJyQLu/TMjv5fE3oicK6gMZMWbK7+2Jpv9x7lDFSJ1CVhQUOvdzQPWPOTdgkOM9Qmo9joLv87ojbcLMW0jbi4CIr5t4iHFQ0IaEyZxoZ1Jnv8hh1kkzlWNldVc79SfVSGKBodRgl6/WZ3ofVwWlH0+aUBz9YKdqLyq6bBBC1RfaEa0tYsG51gqdFUyr4J8QKWER+WFZXTrccBM7nJyxkrUVvNVdpbvV93eAOTd1XmSkdpVWauLUEtTxhd3yfWKlQvko0gbqspQW+eQsg7HBvtahWw/QJauXDmg1jy3LqNco62X++L1/dhUqHAqgl5MHjyUUJelkQH91SsQ6YXpWkTZYEfVvT9esK6V3LPOT1FfGwqKxj3WOdYUiXyO7xjj7YPZ+BPIoB2jIwgiR2hF26+CJPDPqr1xeleTU5UagyD4qtv1d4IwFisz8TUciygM5dAxGy6SyfW+bjE93c+XYJsVZ38fDLiZbQct4Ouwjp2+z6sjzxNvBnTm8TWPnuVgJjgLLdR49JKsHU+947Y1wWSN4+s2BrBctq2lBYQf5j3xtpN1/yiQ+X3DslF2TyJphdlwOrHuzauRmL6I91wQzSjxbBj6OmbqXbDLpPr+wwQ1wbL8x7EZNvkmoPp80a/E8Tgq28I/QhM4ecpUM6z02GNFzHHh2skk9De+J9+oJ3E8tao1ELVSSVf1oZDOSn3M881/3XpwXZ8eB8ybC+cV2AtKodQYVsS3y9cOwtBdynFKx2hGgOMX304Y9Ceve6MLNL29hmhFZ3SYLekz+MPzlwInxVLgKSgbi9oCWxaFVszRwqZ1nhctALemCiKLEEds+9dKHTvoX31NlLouNqx/WGuXpKPjTEfO4v9RQHqYAayx79Ta4p6IN2gob7KDruzlYXMPlb0VJbFfWdwYj3JxO85mfgWQcaPK5Z6zIq18Rb+YGfgUf5bFnEFNnvVHFbP//kscFWIM7KWVTooQpLsEaXfOShvd9UleQofT1Rb2yN/66UTVe3U8vvi5ZG8KJM3qepxuwL3g5OSBMJpfGgiXR8Toxk0XKSz3D5MkrrElS98+P32ot009xExxMmvFYx9hsj1nhRR1FnGHgkddvdBYBINZh2+M4ObHMG+ccZkfqmoO7OuK4uYadUHofZ9KE+FEh7HW9pfTJAaDYwYG6FyehHRyXtz4jVp29Vl+5V1pvarGIBbvGN1/OjK7Xt4Y5G9u3R8JR9q84zasyzYAuFUyXJttL6tWG6nieEZ8abEraP+a5NvvJIE3O0HD5DuQCm5vbvnx44nZW8NVifBHZihXCpP+Escf5SsjAduQhN5rWaq6H9wm8e+bGgT8ZI2Mdmsp1m4XAI7xRs8vauMIMWyqd/u3qg9lTT1Ozs8F1tOQFGLND1HgFw+KURm7VwcaEVUnmXcJYdAxD7e8cgS2BdcKhhsVZNCvYqDSYTHpw6Xy9Sl+bHx7pHSLduhFHm74zj1eTvTtxjzhH1fzTtD0kVUYLEvD2vKbqtcBEo5skAS7sAtG3zQYJXzswjNXp0GVYFakmmMED9gaTy95vX87F683CyR+4CDTAhYgu54A8PDrkDwfOU15iSBUNZsx//N9pNyZRgyGrMurJa1fufu6gM02pc2w65TeMZuRKPVtvpNrTMuvbcZRTI3GEv8R+lO400S8B1G+BHkDCq5l/zE8h3MipKxntgJUEH/GneEHBrv9v7a3PoVWSEtmrim4+5/m9SnMy5cARRZz23GROvSJ2YvDSpTspzar0OoU9XjZU9f1sVyLOVw8LEt0wYQdR+d5RO7fVLJMdYp2Wv6i+5h1tqaN5x45eMT2OGFV0yi05WNY+daIg8J8hJQXyhsUXjnopjB8+wHB30EcfMtvODX/9xl5TJSBPCB4ljQ+aHWY2cLkw8Fca+DbqAvY4hqP2NFi2aKcScohXCMeZ0cFm4CnO9bGBObKg3CADRwOGx66eSaT2JChSCxmE10pm1pYdPrH73xmPRY053sRxybTgJxn/sU30fKUDXMtHPwv0QfIXwvlQY4ynUj53RCJXRHbfy6uEavBXGywDBrG4UejaryY6TtQB9gQ+Z7QciOKkuJ2MgvjRuBjG2MdHPHoiV0XgwXuSCspJ3iZk6lltf5OJrab5c2Dc5GIrvkXfc4oCefKE7blyoVQyAu4DQzeaKadS5KaXxscTp71zKTt05WFmeHZGcfBIJLn851eDBkbGVsENXvClKPbbotU6Ad9QZQyWBTST28D1XyLi5tIlQk1QDMY0tQyjZBeWQOx2bldKd27Iw/kO+XUkRWb5HF51LHAh0MqPy5JQ/Eebk+5OgR2ZoPzulSEoN3UPYdC4FQPh8ZNRTXfkZpTxAQMkXGk3Mz8Q7rWsvWoVHQYkJhZw9bTjURH1gCkhq9wPaIdugHpsZR3+ey2fsbvXs5zAF4dX2Bt4KRRLgSv9mZQlHcM4yAsBKAqRMN9M/E5M4znYpZ1vTZ4jf086EfWfWvDsMi5PSvQCwEYvFYvTEVctCbc3073VvMy2/TVrpJZZHfTw8XoFewF+DmZRsTuk7ppwF9fHmg4bwozg2ykLGQfL3uO1seNFbgE/VMZXfKeztGiz+3rv5REjl+LzPPIwulzpB0bCug4Pk/VVnaTJnI2g4GMsqTF0u6oK+monwe9RET+kQdOhbcL1329RdHXyDDzv/Xvqec07AuRzn2ZRnPLse7FQW66B6T3dY78QQ+JfPPU+bnx/m3Y1RsbW3tYvkkC1GhxrFU3Fo/stLoPjcSRdqmVY1HQMEsv4mj+Kh0Us1gtbtnDzByS2yyChTaJKPb6woj+vytntXgvfNj3xpu5KfLBn8zylB8JliRFZzgRrrkQDcbQ/dKKLFn7yjvPFG3JOgikRrEEXYi3DWP5pztiFm2q46PoSErg4jGekd5ZNMIdnvVPWljXonLX6SVZ4CBeGbuADCGX/Fl6s7PTr+7kQsGkM5tS2rCwkeXK6RjQMQujPdBGcQpHPkColWWP2wQHXetbzbr6V2SAIAr9AaNgnlHSLAROeqxCL/n2UCTYjJMmxjQrELYNjPmTq0aT9+mKuPLI8tOHn/hxvP25Ssnod2en/SO9vSGwyMP00cbf7C50LsEgtFkyzNcPuLKradHp4scxAbrdsWE8Y207j+yFgdnq+lu6KXBayrhQkwPbC3iR7Pa+hSOek03O1VjNnwbGrB4wKbhJh1ryrazLgxYfCEcDwCrpFFaMLwKgbQrk3m0a9z3fanHiRIlP+HuVoyRkOSy/c/1olKqcsHBJ67NygqT6SCx0yZiGX846EboVyTDqZwycEtgtmZv2VxbrkouO8IS8/YzERoNsdcEkS0Rk/bjXVQIC14u+k7fp7BPsD3GSvtD5Pql4iZVOaaOL4SzDhaQL+LEC2ckuPWfMaczhR0vuRfjiMYN2vyjM2xGtf/OnkAIww7CSxzIRNWe5b/oQio00bZt72nFi3QJSXwQH0v1bYZfb/1b/SUriwrwXHM7EyqBomqUliENzkUDO7lYMgpu5bMwN6YzgUyf07+qFjbFyL0QAY6P8NBD9q+YxYZOa05FgXeDYY38PZITVGdP7sj/rF1xznLj/1UKwaWkr5cE6ddBVbcOB9zy3xDk+8c0GSZxxTwDdmSEtZv8V3qaX5d/O4NuT/x8MspAoIPjJSDpU7vULLqRck3HBZKNpVWb6MCeaJmutV91D2uFfdPSi437/btRNs+T/4vH1MAs1mpOV/UEQvKy/vXiHkV5BUZyJRUo7TytTD/tzDKQUiejPC29mavja0SN25Z/pPzOVV4YCGqX2ula3zTEDZDL1MGzzgydMa4KYkXv8qPKuT+8Y8oO2S+IDmMbLcl8Sz/YUf
hVMARyQ/sgqWZTAdiMi4SfKBzSfFuG0zuOofyJ5brp7pAny8MRUUMuVpJz4/080QXq8hrzM0IE1Q3F4HyGJIoRnHZgrDmq5IzTHwZxE2E1YBWWwm0K8vFfoOZ+5uSL2YU3y27FdDqwtzWixOJ+zvJyO7ccMS6MtpDj47gpbjng9HIJk35OVQkwBzrP9qrRS0ZJHGtZ93g4TYfYvVSw7N8ntqSVjpqHlmsEAXiKs24bn/P6WkKJf5KRVJJ1wY2nOsGY+vpF6rYR5LGaU2PHtVb2bR2FnT2Ga7xUIfOeVsFkQPnV2rtPofEoDAji8ma6mmDJj9+Bst1USDeIofcO8rMPAXbW0lihbNcabM5LuRH7vQ2FPLVaV54jmcjDvYowl409hEfBVsDzo3f8ioSjvtCDvUzQgsOeDxkBumUxj2f+QoCKlDGjfE0qVXfPT69OiXXP3jNjsvAXyycEkGfVxOJjS66WuLyofz0yq4FGXTXWDNZ+WHzd3cDAnkJiBER4aPNUXA5ajg2e4RfxLBnWyzlMBvj+/mGswW1Wb5O65TFBDvLFS2Km4ij7zKYwx6l8/xIEmMwq8y870VykI4SrGqQlhOpFYKAq8hIvdM99/eEaG6bIuYMzoUC9j5cyjHfgbZleeojJCcCYrVGuhDvfSzREzKHDFByCsdvkP13OBqaq8ooKApzD9AQE9bDubmmNrnQt6bbjOxYVdZK9EOavJfgF3uQgF6R1YyOY2/OsA4Gn30CdLHXNizAVSLYiGQVclg/TRIGwT6/u9Ff29JtPO6qf1VezPN6nThehgMq0tlSmrx6yk8IyT3A6OgYs1Cx/WfnFcqfWTfvmQgTGf/Zt0ciWpzcYyPxFvrfeyL73cGTThwgMEEUJ45plAHZMjbkp4yLWR/T672URXErmgSAq5FQaADC2ojrLsixROpKK9jyUeKw8Ue5cV9ivIo8XBIUftHb+3MbUvYrwmnSPUKADouzYD1wHX9bIMlEMG1/KGkJRgh412v4xZcrN1sSuebzM1brsPChmcxAaP9lRAAjOBKrl9Bwj8u4zcq5ooSir59r5NUdhJBJGvuksETqzJBdftY99l656THvr7OpYTEWqxNNSYEoeuGsaC7Sjlu1tq2FZBpoNiddHfnIfetsPS2vca4Ks1Wq5Zxp9B8R8hIrlEiVib3iLN12ypyTnnVGhKneFQBymfMahniYl6McYUTB3w9OYTZnt0ia4hGWpbDZEUnKTqJ+ErPjPoz4BWYdWdBkki+aJLxUahGAjMZNggtwRLOr2AJcnCEwfJbUTc6wYCqyAmV8kAyLk86k+2/zV+m9F3eMScsLdgieZsS4QBlQXFZIzEYLtBy8eqPmn31mlk/nmCrny6haz5KkCZKp2jco9AgdB9O1Dw3ApwXWPv1mBWiwDyHwAZ+lVSDLfuGtC2FXZc7agEgSV1f8WezvZx+QVTmU2sQm+HO49WUsNapVOnYgCRRDnJ/BdO3HIdfLoflrBaCMq7CyCjNF0/AE+bKX6F2OTd+broqSOoTkn/ZgPaJF8s6p7r4C/bQoZcmUKPv9E4ifrQsF6Bp1505rSAsjSMtNKbR6SYkltqU9zGatncj0XsffWXCeFtIlj58zp1DVZQrKRuKfuhGq2kQD4z7STXFhwUvPWd5VJLXz+4lPOlHXRGHfxvmerqIMcIqOrQ+dNZ/Ephg1D51Qjk5NDxt+gZZurwCcnBM0oT4vDniEhHhVOA3XkQxq2prX/G1pKTRxVB66sk/FxjXdHdFL2jKVUU39k+RpRZWY1ezgsLkmfa3xb8CH2iX+fMsnjlZMjypQxlQl5Hr6Qyo8t1ijPyjlIS2rJWi7uikd7gZbNDm159hzugdt89Eqr5lBACNk9Y85/bEUZlPragBU1aUshe4NBo/LYAZTeMSBdqB4s+nA0h3KzL5pBcaZO8pB4RWOsiUp3deVkdcjd6pDdWW1LvUHJFVtqfZvTRrsb8JLfaHmm+w+DvQad21ff55S0gqM9Uv7HP2QUAKblmFTichLwGaXHRePK2PUUdyCaeX0/D0ocVWXhWrzthhvOnrC1pPIX1tnr/aC7F6VNecL0s9CIv5zTceiqu3wRV5yQJOyX/zA3WhAHGwxxSFIIvIDuU4aE2ZoqkANVYbrRhnSu29kBgn7s4A1WvJlgfgUfPeNYm3l7fUEbu669C6UkbzrW5vXTeEiES6hiFYPXOeed7M7hp8k7xC4dfzAJkPnEJxDFJLbFSP25e/KQkigcDSh2U9P9DP+7AZqztLRNMME7p+hOtat0zkbuQZ432+fZp2ZUxraSOO84JxuAvs3ae2b8R/h8chata7hLtumXmTHkvFliEYKhr7egZ0K/6ZX30IG7h8T6N9ZLazqN3U8U5edCHcwT8WPtLF8PoOFKrOn1HB41V0Wq6ek82w8bsVdyuZCsGCXzlv9xqSkGAMUquFMEwRbjyCVTN7ktcynvXrEhooCMvFexjOZ2U9xhMAWyMyOriXyFpj8YZvgqpJInGqefYYXrZX6SBHgdli04kWq9ycKZicH9J3aKLGYCmjf4Zd9M9fiAmSWXJxXwhs4NhfXT1il+96Z7mIiYWk8+zJVXAq/Y6Weys/YEcoptizY/Xfvuu7VYLenLqwnBk/z3/VKJrlzKa2OFXI1428SOZWVIkB9cYvKWYs+C3tOSE8DeoQLbwFRcXhOXxzpxt+0hmuzQsL/7TNehEmDx4cNQ9n6nbWo3eH9hLPp0yP4WRBet+8sAKc0J4NIVthOB2BDsdeTSNN+8bs7sGUuC2kzdZlZ/eUeFxYXBbjAZv1MsiJSoIcV339kvyVGkSxNiLsOFLcHyn+hsX0gR99v329f9hrW6d57CCX8nyA8x5IkE4PDhTWyZyjEaOWSLOU3XmEUEpf7pKsm+UeoGImGwJoQ5zaXiLOGWHYLz9m4v0+w2G0lsjz6PH62XfF/leHAOlCDV66UM8076Ii/ZaIDp/SRTIIvOA66wRwUZvk3lbRIa2te466LicCO0a+wBpXOHT3Bb9rdtde2rKyxd24/P6LgesAOWFCtn+Tgl7mZlKatAZewh3AWYd5CPNijOzFtRR9XKJrQSunyvt30whsdQz0OLNnhVyNvrSGEfRkQmGBWKstGPt4WkDOn2I5NjCXI+fERfuFqB+0Ud1dvjPkTSSf9+PCzrkpA3oifEa4A/HwqjUIggpRhxyx/qPhyNPJxqTl2jLmNWKwHrs8eD5tuP/NASppS6uw31nwFBLImNzRFZvMauMDlKsiVJ7KfN0PwyIdeHIhD54UzXtY/RAkNFu+Q/cptkqv8kF8S5wyS+TbsOi5jN0SUxso7W0GDuqGoAXmp3HqRfG6DnVyegEUXLcMmO2wyf8k/AIUnUPJ0xKgpf7rkwl+ghzRPR8mjWfDQtvybR5vQrSC7UvtzGOpq+Ii9zfhFTgRpZxZzFUxDlV4KFr37lzYDas2bPIcWNlF0fFd3OGeFVWQYkT33OWJFwu0ycuBRmfktPlV0LW5PQlycFw+AslmajlIlMBt4dXU8uZlY7TfAGNIQNYZbTRl7sCx0Ip+4Ly5p8hLU71mWq6ViD/fMZraqRNaVwi1Nws/iNzBJp2zWq/D1l2IdIPYVDHA2ioq28mKe48KUl/tsaiIdxjUAarn8y3ohggYykEratLS4eR/NPPR8+EnjtZWCHbTSpjFlNI9KCByd6zusGjuLKwgHXSO879ryv12gwizeFkzfqRPbndCiQwVrLbqHz5Y+6Qs9zaFb1PbpDUgxOKhqFrtIAPZ6ZWiXTtHthvVwv2CuHg894r8ExdLtaUQeMIpynp6fL8S/45ZVF0diuARkbHiRilYO+8gnNKirxTS2gSG/8g8Duzl5YRCBZQnRbmaHUH57jvxaA/UHAq2u/2XFINnLQMkSHP2/6nkoimJubwSQqrr+TFafFqw9kisKsKfxGJ8a6kWVyOWdHwaWhnfUCMDfk46X74z746Yht/ElNCe2wpz9yPRDE5AxWOvOu1EKj0DkUDyytX2iN75hxS4OUuWrN72S3BHn7Dp2U4ViT2EiwH4UK4EgXR+9/PFbZ8w8WgyQrRfJ3JovJpCqj+6IgR3XFjcu13OQcaL
p6sZk5wS+ip2tHLw/OE2TuVwAGFP+2kRH8PTvrQWfbqy+j3aopPYidpfKr9VtG++o++kI5lmnwz14PgkRvTaRQa1HYkMR/581MJPQGD7qohEYjQaFTHGaHkCRZriLYCyHQMR1ougCtLsTcNdg9r5mCIE039ME1Kz0ztDsj41Fry5CO76aAyt+OuHYY21g0Hz/qxTt+tTOAs9u7UcLIxpa3U2HsLvPEHr80/LUjAFP/U6z1b+Y5iWAcmkmqEX8WVdCeJVAAGWXPrEBtdVPQAAPJjn7FUOc+QormhdsRzq430b+PFRVNLOPS+X47UEAazmYw4TfLPnc0Q0qgXIjZclmN0lVdHx6Wpl0AjPlxt8dzm3HZ+6Mh+vCfxIJcRBl6pxXrqyNPk6UNq9jP1RGZdgVVopYdvCjQFzX8hNUf/05d1b03KM5qZvGi1e6aUizLyvpv3sLz8XIbfk+UMfr8Mj5QkR9vnyHZM6lIvF30MC7l0wKIWOUB+QFF9LwCkSz/3LVZp2DwlSGfSw+kcGj91O7N5sE7vT1Y5sAcNOtILpYYeer5wWtOMDrq3RPfly+7dtFcEV/FsAT7kOfyxtfa96z0LBHOQVGrRgHrDg6WJ0HDQeJTCSnMy//JlhFrnSQcFz3+lz00E50HRqIHA7fAP1e99mocADID4NcBGKktzN6dbFTgPC5WVD7j70S3F2FJUyecgZdCldJsu1X5bvq2pSfZi3PMfSR3bCSokGO21bCYSfwxjV+jBbyeG16+rmh8tTfWXXhpbWdp2kw65R4q+IyaiPdS+nNAtYTHGz2jr/qIH08hvLcKGBdQktUsliODNQH2UpxBd8DQPKh6+QcsHFQt2uQPL6tCL9ybWNEMierkW1EYwyIihxjeqjmhAr9liiQkSJDQoWxkWH/LOnnEUsHJP8nurcP5Ck91A5zLCCgm7r2RqLx4hcC5bnwfsFALc38yoY/aHMvzyRrL3JrZVlehb7zLaZdnq7Wv4BNSNwU/EWSeVF8c4bUS3/9mgwMKPYsmBld557m6BnQZQEq/T1fE14FcV4uW20gFFQb+2mXHq30Ra37rOHmBEqQhNaZG3s6BBJ/3M1kwv4ARaf3s5QFcPmGI3onYsTJHlbPjSc+N62ikb+KnCHeBXWwidMMu1DfWWhOxFR2oi2LdiOyGQVky9vRyVcjELnbIkMcY2Td6YqQWl0yFLkRxk9rLu8ON3tXfnsaTWju4mMfaGQLe218OoRw1uPl0nXEHmHHF0En6dFFIhbvT2Ubck9WEh8IsGQHYirengEb/dxHAptVMJePNF2ynbsA+3c2s1TDkImyh7WeQUXAEB+cb4zJaSAyECMIpxNWsKYzYH5wUe23vuyLrFn4jfiV31HZPCiBicvMOEqTPHkQ2iU3+IXwSOaTzgnaCs5mMFaSbdw6QFIdZYCTXkzG4ZCQmzuvWm6cVqfIUeviCg8VjmXswH+t/QX//Dtn5eDQZhWQoVa4MoC33452ExFFfeBTc7BvDK9mYNhd3JAZR1i0hufD058k5knq/e8Q4r+k10K/hoSW9LeGxLCtbW7Sp4P6SGgdTTcCv8yXmkJzdDxokkZQQ/dPZJfEh9dNwbWrbyKvn+en3Eipa2eMBBDEVO3fn34dr+tuaD1a3WrzCUoXBS7Gehf4/MIAqb8tEWCnUNv8hwak+u44tZi2RsINgagLbtOcs5x7EklgqAQN55fUDpOFVMd3tO1iBLDRBLd+WJvmGUsgjp8FvrUdDCxzg084+5/mE/FENJJKIf889vSf2nu+ReqJW/irYsK2p4gFmtCdfTqi1vUB4BoriWoKmQ7qLVgtV8TSdWicjIDjegcOOl/CRtUh386GffWG+1U4zYs2eifWRSb2OcaQrb4yeOk8sXIv0tmRTZlDw6/FnKy5IjlTCxYL3z3A9wTrTCcYwy2kajF5VllrrSCw4ze+VR0hZJVL+QJsQCy4zwGdIOJxjNYF5nROe1xznzt6bOl2lKOB+Kv53MXZfPFl4Edgi8GQc1r0DzVsAo55DgMtZB6u7Z3ernWix3cUqVPpPCh5dpZ4hzL6lly0hzWzkPKZKRtMJSff7D2MGPDbK/+bS4GgZijlq5WMf35h8KqM6hu+pdLXTfBtjDPAwG7BfvAybh2HBSZUQoz9+KcPsweTPRDQzdEexVKcRZqtEDsD2BbySyNSb/43RpcT9hXVWiI4cUFKJmll0TGFXCnqDl5iYZJh1wS4BFhvmzD+UKi1DFdFVJQpj32cZFRCCEJNI9JaQRC6UxX2riVzShQZhqrBxthKfx7H2KCU0cmH/D+aWIVzfm11pYoEM2qdTLag46/uwVyWW/WhJ6fmrRFt6ITtk5drYCa6hZjQOjZLuSKuCsmao8e1Z6pQ4DyWzSP0Ui1Hsto85QbllM5T5zerdK5Yq10hPpjuDi/CPTGBkkHASEADBYlB+rU9RcVTuRD5NJgPuaEh4BGZVjsk+uT2/LHG5VGH74hc2NRJymBIyFdEnzY6DYG3xE8lFJ7J2w1P+r75sAK1kQ96ZgUFj2w14kyEvOsrfMmPXM7PFe6F0mfE5sYoBeYGR/zP5cMUJmSdZ5QsDoSGO+tV+JZyy4anWO2JloAKaGpFT0Dqa85XYtZUgalxMoVfpY1pGIMdZuhaYzVL/RbaAyXNI4kAwbTBK3K0H2r7mKNO4iTewdfriW+DeTCNnJvXD+FIthAWmQ0G5H26uz8RsBdGv7V3HmbX4uxP3rVukzVrpfDcpYZ8ajaOH2O/jLO2GaNpkXXe1olVDldedMDlYr4rjdSXhYw57AliI+FyX1/0z/5zgf93RGb7Arzd2t/Y8aYiiIbW/kfRC8ASk9HOY17E37wTflnXK4jUyScsOiRC56Mz28+JC/5dEZP4JxxFiMHIU/owWgdQ1Q/gbwCcqtcX8xoAs/eipdq11/FkYXlb94iOi/T6IoAkACZUZmqFgfcolTLFznnpZ5fOmzFF/onijzT6wPNjKcnavli8lXgGbn+RTcuXHXPnVx05kNLCFKCE2wlaMt6W3wh93uA46iAo+3lzcF26vjjRTS0kQZJULhe8hlLP3hhlxrFXYwdYppzUkfEnrLJRvmkNjOwFn2qIGMuFZkGvBWtIqpoQX/3M0QVdOtDAD47eS0bAZ2HSYRNeZJ5AeMgbShw6+AllwoSV2WYqhIZODK7Ghct3lNV/OTR6G5yw/v/OQdvAqZnveD+WDQ5lfKkca68IvAKfLSgBrCb3Q2aHEaDVRa2VG1OwR9bTgDDXOLz2SRbu1w3clc11c12Fn9b5q5AtFd70Rk2wv8freVaceMzHCakng3euDXDVZM7XEyEZYgiuW51xZTKY1HsoKUOFiFXInYVAN+2lUVsBgs+B+gcIZgqIwmqtl3oU9THZYNNHML7YbeK2Xaifh6Ml+Nag7tNeVkrla5jj1nVqMZ2kVCjPXSUdZ0urrMKXQUDy2A2aegJE5uIOvYJcUxIYbi6cnA2GXnEBfRRUCx4epMlETI2EkfcMRt+XKTG62G9a0A36qiYdDOqbanzxAWI3jcyEgSdzDoyT/z8UDnuJlJySz/onBHaTY0UpfGzxDqlXNL0dVdtA+M+JpaM1hnizbZ7KKp4f9sWFSHiQyDaaizZ4kBlZSHTp0dygVBZV0p74dAVO0vywgUzIqFvuFmqVFHa4bfKVPZfPl9TphdIgwt1mOwxcBA4IpueNZWc1fAPZipL5EmQfO/V1wxaczH83RUSSAb8bC3jCkhVX1mD0SbBGh4OP1JlBSLiVGp1X9P3hkYQyu+23QNd0igbAjZ7mRrtiH3oxMY6BKF9huSpdiENzVjzvFlOmTAP+op1d0l+DD75350ye57Olb9KIOQP+6ks/+5FDmuhAcZD5KSSzbL8iYeQ91Vwq7VscRH45XEeXrXSGxza+Ou9ldB39AgslMLLGTsb5CumtVU7Vqx2YT54xqifWV9u9wXboF8vfZckAAPJucoNs/QyrOFpZf1JlYSmXG3kZjpGKs4HLJfozYr57t3Kguaa+SwvSGTNoNn82P0PlKXPN0T8MrzwM7yboTU/2veCLcPZBi+X2HYpCQusI2jBe47mv9ZjSSvJtf/z5Fhx
AQto6fx1IbVyCe+azW5LF5YCcd8G06tZHpNPMhuYi0hoA+7FhqbIhIAaoNlP7hb50f0DvWaT5FXJCpCOVPMGfwwHvXdrL3kM5/SXpzJ+oNV8yccCWmSmEMU0NlQUvjwHzBRDMf9n7mGeCO8zYriVaWGiPnZ1yFZplrYy/gJI9lPtFD87Eh5xgq6fm5RGxs3kBBz94Naxxim/wsg61lYsS+4/k59JmPjyPb9n4Is0bOQN7A9V5Crz+SwGyq2XFI5hMPtpfKOZmuTopkJfOUOwIzQaTg6V0wlR+QwYVXcav0yy7sI/hKxm9efU+Gdi8Y3SpDZJsINSzVucbN2v2TUyKhymwuiILvQ50Y/tXRTG5hNu7Dy2pJQPrIgSahm1/gOmCjhbQaOBPR1PecjQA2pvQ8zEd0awmmJtJE+zbABCxasJNHfANiL24+4VVvf7EUdIHv9qFA10O5HHHvno5iOOK9RvG9jaxXoBzZe0ayiIkFvXF8hKXs7FkHIU5kOGjG2vbQRK5077a1vrPMcTQVMdirJVYFzAwsVU1PwlhlJt6OL/lgvoYd/mLN0D2Hh3sRScGjCK8IskSNH07fpS8vHM/Zm7FEOm5SiknGCwwPCgx0rgZs4HyeEHEY7S83+DjG7/ivtZKdYNgNBZzZ80n+I8kzjhed0HFrRIm2mBceyFUuGs0i2JcbiI2XuMNWREJ+0PHd0ZFCEynZS9qTSAonqSBvZbu6B6tG7v0mux0kop0k0gDvbmUhIfDik9RyoMeHWlNNXyTnPe6dq3thmnwRqvgZtZfGrXK/4B34/F+GV29byEVOKWVAx6TPt76SudY+RBqEXCwgz32sNDoGqYv/mpMYOU2qgv2mZTC6ZTeSDZELaX5n/jjlNxnq5PN81uPFCYpBpBWc7sPr1pUtkOo2r2x/ZD7/7uBB0UCYR7ierojHl0cL4MKgCFFrSEXaYf60aNSAzIOJjg3ubcEd8r2z90eOwtizH31eWlo6QZKbt1zKfqJixFsYEz2Iwd1Xm3wHcMKzgrnC/rk0iFnJSD28/LYhsA9ZooYWPHzdtvmlnRkBctnsRk3OrAXBlhuW8TZp9HQU5mqD15hrsUAJOUU7Kq8DNSP21kdeycbP2elMzoO9f+wn9pJCBPAsAcEm/CKRIHax3zUNp6onLZPU/vevfxYHa/dsYbWWd96pVLJBYC3tSpzsNi349DMqLXrEqzh9nSiObuk1Wn54LKxnh+rQJuP1YO3j+91dt5sY5u21TYu1268wgjDZ9jFLr53nUHN9LZCRS7tDRdUHq4LtWUeWntrwJGlXl3xYvfG9hqGnfdreNahRdlXFCIhOpizlrnvaqjsv9SLGsspmSy84Ct27f173AVlznCSjFUTV7AelzbQ91lu1Ildc1GToZ4lFESLUBGEgwwcW//iY3BkJ2T4R1upcr6FcRVKZHdee7O7uHPYV00CPW8Z6uy2P56uY6oKwlEfwkvGj6cMlcu6rJe7OZ98fAz+leVn/W6xVzsvvaPQ3QwKGFxILmLvz/BbGnTFTmZwb0uLICwjCSwmU1fP22r0K/1VZbPzB/PCjTFwz+lzx7didwcJJo6XF89ys3/vSQcGftuPj0UI3OGuktXodq6sYLpOKa490wMZ620y0WDgsBW3vB5VGUe+Iavco8Zy3RITLIUZPk20l5HonrZiqKESjDfbecEKBitMVZk0pEvJCOfT/02NnzwPbgc8ibnBAyZVv1GLE1VxAzMZl2rd2eByGPSSrKyU6uhquPZbkOq+NNXJgrynmkCgxkjcR/IPxKIT60Z9mASFr7RNVg+VGHZJYQHcsP1OP/kXLsf0TduTSEr3qpODaTudk1Hl8KlvqGR4kUm4xEO3MDqEQKc5oUEQLjz8TvQMYQKp+93pMJNnLG/Bqad2AZZd8MuczrP+rC12Y0+ERvdRLLd2RjyyGzkfaH/YNqos56mvBTaHR86+RxZJryMX6eWiUTsImb5BaW1e7giTzWCpOCxOp4/YBRXzq8NWVZ5o7KT5nAPkYBHp2Iel6fSr9SXTr8P0Sv7G6gDHw+9L1k1/UKavl+GaJVhnLOaqeXjBqKSxMrGr/KjG2HcpMBtgDvJORmhT2wL6xSScbX08V2CT3Li5UsGbQGewlFwgwueVpyVDl1+mGULYnsEhuplG1E4sFrgXqznt57LLJ3wyyCdKpIWvdecOkZk+9a6Ta30DEgNj+UNX7DQxW3dpTIuaj6ufVUo4o4w4PaSAvB5mPUNWQTo6fE7zj+ujdfWPku9/oGREMKI+/j1dGI3/vQ6i3jzU1rYmQ80jv8bxpEbZ5vp505ojT9KdeXpfmDQAy5sIP2O9jxKWEo26FrnGgzcl0sctzZ8L0HnbfkFi8Nt1zFdkSe6rYoX1P3Xs7ltGmqIiG3vJLxVK1vJVe3c2m5WfqNM2jpf2oHU0LI77jCUaPK2ehHrLupOJAuOq1wV9InRYYZ50jvCBQ8MTd/56v0JF+bsiBXaW0qQ/CbjR0KD/If5GEYeYE1EzPQ04Wr+XspRx+t55zqI2ilmtQ62Ey25IB0Q/6IzyK9KxW0SWo5ZTqliNm5iGD7nNXE/VRDHCMohPwY3VwpoyHn1kXocYanMcxKEiOPBZNlQTxPKrwMIn/BK/VX49HcoBVLeNmCxakXurrlQpUAjiF87o0ePtBOMJSo1/giVTU9JfuGDCfGhYadvR6WsoBHue0Gmb+xrmefoDJjLSJLG4xUh6Ba1/Kc18a6Fx4SEFmYk/vwFnL/ftTdIZBiGLZ/hM4CQafjOkmOLwL+IzS7kJdPUkjRk4pwFkPoUGBre4OH/tYBNT2GLngijzQIGr1pNWHnrm+lLU5xBe4bcdtaLLimFZXrZBwD6xreTVwiCf+7+lPmzmtrb9aSanPaMFZTJDkdCa0kUx0SR0T6VunsvLHz8jYR/1dVnccyC26TkEgzTWBGGwGAmQYw45r/BV1diVpi3PNfnwX0tb/aO4OPACtBfpm8HRH90W0LNE9DDy1Ni0beWO0HM1be7cny1o9Sf1OdXwOTwyo2KhI/hgPpGlnwVEQZjPeEEvbIkENDK0i4gphHa+xc9BGBGO3XEb50F0eXhIhQC3tkJMMS6R7xVelWMer7+3cT47L4mRXprmqY26onVtW6rd0oiXX/PNf4zpGvl2m0dIWCgwilvUmLXvo4cPjGTxF5fVt5EfQrws1nFDdJDL3GFvIYrOZ1fsHOMlD3oQi2jW+MeZpCrJtOueULPcuaUOqDoKVAeh8+YNiBBZs9wDnaAMMfKzzyc1EV6tSKxCS/hgCqUX9PjdEN3G0zci2LT0y2dBTVZYLMYuGyhltumVyghiNA+9RrGtvQDSVgku+bvRVTN11NfH0f9yEBI+49GzET6fJqjO9enjSEb8K8VsDK/tWdDBBGjmV9xq4wspDGi+/1DAI03h4D+JsT8BGb+T8kVyStdq0RdmOBq80iFAjIM7V+zG32Mu7wUiBgU8JWE2Z+P6ydZNPbzE56X15q6AiS+vWgrJ69xHVUdBYYvXQ5Kjvfagn08G91ODqBDr3L8i/8szAzF9zN8AzTi2sXt0SIgBwUPLais6elot8imzsCXQaXFjcfRNu6fjkFV4lXXTC0ISSOxDrdg+7K7XRmDePNIHF2C38Zbu8LE+566rIcWa735oDWd31t5LbTrVrpD7UwPTA5tv9IsuMFGDyWyv+xtCYYA2pDvIFgHVFhLiq35ykrrFI6dNZEcWgoyp1V+W0zj+f8Qzsv8AJ0AuFcdmhfAX4nRYuw3vvNZcjW0ToxHIqgA3UTr6lXT0ChrDuECRjNe9EQ8R8MfJZlyWzNNuIlExO1S1nmg4cpHb/EMVzIl/h0YoO5wxWC+Gu5+SepFMKMTZrFwppBvNVbRW/BtTy1gxcFey6E9HOSa5FvQ+7ef4U2U4hazddcB9594YdmywwM7y2IE1R1RxbsunoiRUVYTiyuKRt+Q91pa/NhQ1mxH6yN/mCXL7ZPzFD6GJQVhNZZKmNK+ukaqiYaXTySczSKnST6nAYZ02YQHE7Kurnu1cUGpmgEeurzMTN9vpGHkgF5lxvZe3t3eRRq5AjYhV0fDM3Jco8i/4ysm2OZX
WBf8VIzDi4XdvzyYMNBnVniXs9ReysM05jJQ0hTaDcXV/Hbgykdz3Ot/jk9YeUY8k3GsBSxwQ2ZmkMbTOqMidrqxhVWeLndjwe6WLkZw8XJAiYI5nDFz57pbagIyIenC2XJqevwsgkc/ma3Zs3TYa71zhEN73FmpQv2WN44FqODmxPyjxh4zYrxYDucGbfXqjfUqRHHo1WCXXrglrW887ElJkJ7B1opxIPM3Q7H9OIlxpYg6pJ74CuGSBCR+v5vIynA8sYdcLD+BTJ16KG1UcXQswNx4rRHabyAWklJeJkh1bjQ4EnXnJPBuiVmwNj+xWDZWG9cAG28rLmS9h/ukOsXtZiGYJMikbObGPfFu+BkhvcIe6FOOfYZ2QgnboLL+SkO/z4pykhbHob4p+AKHp4Q9aR/DwAJd2nioU7Op5dhd1ik5C4TKZoXtVLkZb9ByBTCSDUL9u8SEOKARb7dI/7kuJ4QB6JY8Q+DUdUbjocYvUT+FGqN88YNFpd83hpArMgm3BOIoK36ZJrqmgDIh7919/Xu0i3FDgx7ShuDXPxINYYR/GVZ3WiVCPhq2nZaKv26SHahReLOPI4P+S6+j4vs616i/i+gyqjpxpleCS5OYd2kG6SwbHiB2GOlmSvQA47YK5FRC/tuz9/glyM4CIwbpWxrO22pKSktVxWpyXdcYj5xjovLviecaiuGfIV/GBLWriKx3A2ieoA8QEgOf/BYKSOiBIHDhLdmkhn8mnQtqHpN5uARP+3njvWXJl6+3mSAcPte9riPjCVSwVZcNDLwqyW24/QNH97IRKt/+a9qncqNGqopwxvUiEVMGVaucsrlMZC7lt654i6drI3Sba15Z/g+cRwrWDR4fA1yVcmG0ZupTqiVlmtSsqFU1i4x+PusOxgQKQdMQZpfiK1TmmUPty45cKYy99uX5UinVaH791+ZNxp8m26nKQe5yVYfmw9YG7N+4qsN6dBkO/c1ktWyVIQ/rCwUy2/1ZWoIDvA89P+fb3e7Bj2VNuanuPtD9VwFaJABaqeaiYWV4nKjojK3lHgvARmaolbMii4apR/6dTXv7iuSH29ivl0ggprBq23Uw6YQzG9L84jh6EnSVaxO5QsU80vOh7KrzE7t0z5lEPcvBelQvXAOmQ6RgcZFBY0hdJ5jo89WeLt4/QwREC+smJlHmtkWmQ7R1N8xB1+YmA9DDL9cCP0+BeCex9hp/WyRBuacYDv7PpoDTwyhZKTtL6nobRFubl//JU2iWCPP56XB/Zx0XZohN7TTDK7UNHvRDYpRejLiAjMZ482QhOXmV/Q8OrhjTHdpoLZAtoDeYQSPi/mjJOZVth+obh+TgjOK5wEoe9A0tsPURZtMgjZ1mERWiCAY4Mczx7727uJrz10oDRSb4w7FA2bHJJR+vTu/GDJmq27geE8in7Z15rdvsVsuFjb9hpvKb9oPJ7KYCl1Fg9PtvzlKAbOfuFSGX265dkiP39qYiJvPfqzewQyit73tOEADYuMIskspze3EjsdboohavxRDdl+xFmaK+8MJreXZVuTTEhIDhwu2xTJzbxKEAOvoBpKGKenw9jyRTqix4TgfCTg0RTdd1X6OidukHRhEfxZpeHDt3NSFr7mqbO0CIymNkXaitDiZcHNgcpS3yNIGprRBsvf3YSsYxYApDNVGgvD8woIWQcQg79HImE7OiDMhQpS73PQhxMSjb9zYu0qG7THXv3SwOL/r7unhkgy5IMpEtTnDGWI6zNPRHEeN+rewjYXZt3Wd6IQsdHig0c1qObb1UeHz4DNl/5c+L4eQQIxOsETlzi+7Me8e6xle9ylrQ07ybCkxewpVz33UM9hAslM55v9vnfHSC1XgSB71yNO+n3Cq/jthEpZvgSH3KP8GMeKWzkZTxcYoP6QEeKvLJx0M7/Z1OS4pcExCOJXxAmuKZNUGDel7X8HOx39vb6cWCZL7BtFXlefgCIQKlfgYmVy99Z8eyZwB42EJVC1gLi7z2KHp6xK2owneUzkh7+zokQqFPbcGvSFJDaetOzeD87WecztEt6ytefvyy34Ufp3uiUh7YhoMfFqXPkI3Zr+W8pH913EgRa0zLPDrnZURGxH7K/W6Hp4k+BxN7REULYdldmBCFMtjIgwENe3q+5kQhxUHzER0VX1HlRMHQYJ74r2xW4JH3Lck57smuBlATd2Y5RvhfO1eB/cHj1eUi4UaKvwTo7Z5emawmJ9/I6pCU6+jWzRPgte7+/8Gg+VvHbN5xozTcwShanSLn4GHFeiUPPfQO6eqmY8xsqqrKBn/nmR4VdALao5P2dLloUAqTAiOSCjFL1z7ZnLybLNBiqF963nFRjeeljsxpIg6pVGWc6SPM7ticNpHPgfF0VSdBiIyMZNEiCjLR359YI+N/mMsuDrkUlt96Vnn5dojoyhWcnBoTcjwx4D76sja2b/D9z2y7F4tBsSc8YiA/PP9y5PiZaeSGd1jwRABMMM/rQEUZJqJjXbV9H2ifoO6ZbZymT4tAWicQSQuQhik/cfd8g18hQ0M84zhovJi1hr7giqYKhDp36kq6Yz4a4uuPxv4VCbi0HA5ORH7RdpBzdz7WWDUgoKwGN3/1RZBGe926OmwMlhT+4gY/FzStzVZ5MdS7NaTnZfT3wpC06IAQXAg7lRPpJZ2qzcCjOwtFJYARtZNnxNAZmAc/WnKjWtKC7b/PZ6WKW40W6z5hj3x9w6Sq0XB2CwxjZRViBouYoocDUAbqZFYT8RyStp7lJXE8xntYtIPim/tFM51nu8Gu4ZbChcTnJBf10z+8uPULVSSf9QPWb1+ihwwIKFDlkhTJyziQ06ZGIAJU5jUIvOvsdCnsr3OiDExV4qW6oLWunGW7PUfCfr1A5stOUeOEpKkmmUjO0zuUoQ34nROTiQlIyKBQKDgMzI/hFVHxUPewyqON60LaWvSwRAne0mL/04lT/aVcipxXBP+/AyIzq+9a08jgw/7q0Ce4OOcUUohxQKITOJLyaBfctm+CjYxOJUJJSOJ0FxZsydSoWl3bzhkx6KrdZGVmIvudbLEUw3h+P8MLVX8PoxveeBp5B+LAj7RF+P0UoZzig1veV0/MEg8q6H51o6rqaiJYqBiZAuNTskxFnY/UsD4fSvX+O42q9u/4r7ijS3u96yqLiCjvvZ4nyCcImSIjbWYpFBa6QWDvw69nrgdh0f16qeagFWyPHhq7WdaoMxiingzwr2jMG0qtG/idmj+FO5fPjrZKhjp9SsSJU9kfnTtgTltID6CCwGPb+f9AjHezj7GTzJubMeDvsWRQGalZc0ATHtBZVICSfUul2dzho2eRS+AIety6kwrvOsIg/E/DihEoOyMpg/hwBL25eUM8wa7j86H2t27Ikramp4jUxjuFxm4z/t2FP5gwKvEicnCHO7PU/+5GFvLcrH6m1q9S3gMurx0A+UiTITeL/5KI+AUxc2JvPDJPCNrokimyNHMl6klVcUbJhzkm4HDedIMnSMiqahrIjZMuTzZgevRFi2JNEOYd21SrAc3NahvC/VbU5Rso3NgemjmRg/wgRTsLxWq/x7bKRYOz2u6t4UNCPZkr6z76TOQg72ujdRa0DHK86DXjyZFOUPFkPZPZBbCo+OuvqNqf073yX1jranwO2EmOPTeVdyI/C0Nr4gImxFhmAxG1p1t89wKYxocUSdoXDvrFBysf83Z0mIUko4lN6iL3UVlL4kCxGQBbkV0cvbnTPF3B9ZVBs2Vf+7Mz3ILZeyw/Q1wTfvOOxpYUWs6GnFCpRVo4qJDG5bOCsKAe4hwx8oxaNtJZYzzbVexwljf/fsqI+Qip7r7Vi0v2FMmVK9BumUfljYKRyzJUEKZKwoNW9BwVNJilEix9yzcOuLO614wGCsPWk7PPLlG/iurC6trpqwn0M55dhIG9kuSvf9/MH4vfftAl9+sBkukYgbfKZg/E9VDpOWeG6hZxf0CbeJKas9w8OmhA6qAePVI16oC61sO6rISh6b7YARaOwf5hYz7/JJal2gmvzS6iClGIYL9p5JWPMESqkJDXK7AzdnIob4BwYT+Nr+zQACYFg1scbEhanEaIIM9gcyJumc3apH3INJkTeTEi
ht3kTIjxAL4qsfCd6TQYvSWixVRth6oB+U/x9CanS8yJn93dBovK/E7EFzGPymIiFbncBZ4GRg6j9wvxOBhuV33gdkpqyGVeAS9DPTKVYrKGo8VQ3NB6rRgZmST94d+fqdIIYO1IJ48oemFOzPKDBGcvudbjNeaBxH9sHwzXf3ccwSBorrp//R5LZWGPktoWv2JObD9/WhfeH+qqyPnr8A2Ie4xAVVqrOxMGMuF+SnVzUWPGHCwT1qbL+LmO2dYjCgpl3nWIjIUvyNdRK1f2fQES9GJIbil7dICcICgWsD6vJVdcBPvnLOagmXUwAw64BMN74xe4YvjwDMDGjbb6rR4gq/TRyNlJU5bT3LnLrkKaiASQXccehEN5dnH7LmrtHUg2ZUzCfpRv3Rx4FJos2vCI7Po/9CBOWAUMqTd+T3CgHbFzOaqPi9LViNfgpvxUDHSCLvkRBzOsHkcAMs0tHh+eVGF2g17t8MNeyl5bpbsgNNqHu82BUYgwGYN8g5OXoduLdydCdtZn0szpMO5omGfgnk5ZGwyM/qyPI2j2H21SQ6QVlPckW54xKIPawIEIcjBkqHuyc84dzgVyhV/E0u1eLdPJNMExpdvJv+jwZ0Hz80tsx9tn8gQPmPA3926x4q2JAo7Hwuz6T3SIA0oVWSLTaC6MRLaNqNttjHi3P4LcbriBkisanUh9wu/a5pbtPTrZ2RT2Szvm//B2dFlAZ2ksVBg60asoaR6FWglp3PJSCQruGqfR35mIqZxhvBVzlip8tpqcug5PHKAwG9g6jKG81igMvDP1H8z28ElCbcd3110w23tz7X8itA4n4K7UWy5dYjS2Y+8w0dZg0vDMMNlYes+pzP/MDPlPB/nvh4Wq1DrBp/aP7hqm5GYMR80xULvK6SU8kHuay+G60M+aKyEEXajlM8CHsD6iV1PfFl9eypFv/7J3viMfmiDQ2OwFqmBaXva/kGEHzRPdeLul6kE2rAflDCh5CJROzcUSTLJ67yiGwp7ikTHJnALOC+7sJRHVUlWjNpwXBf2OxNaNR7nFjpEEcSwf6RWCat7ilSpz5a6Jiqk+DsJ7aPa8i/XWt1LeL/5sgCd26krZw2URMNYJPecA9TCfAhgnsP83aQJzoykbWcLM+cU7S1p7BJ2hi/2C1qTKsT/LUbs7cZyq7VK6bNicjEhSf94z8aYd+jXDjrOKkedIB4WKIEmwA3sgUciFnPeLn/9f9GZCelN6FVopWGqQG0PnxbAWsqHij1wbESmdx9eOpsBPnBplrTzkVTFyH/xU3mO1T6zN9aU4HlNksYVmYmhvsrgmZbWPYK1aWI0RNzJAoJWqylhF5pHB+9fwrs+N/siUYGfDU4kAzQuHSe24XecP/m+Qdak2AMGB/DpabT0zOi/kj9Ws1zv9aKmD3WTr30+h/e/bqdRUKz2OWp26b3rN/fhDEoj0V/cm/q+VNy6y8ljhLLlwYs9mrAKHF/iaudnaMIprIcVQOHopQBGoLhNTqZcUpf0auQCqeXR9eUiPHQjjWNMx381lTseHamA/ljTm9+SYNhdczSOvC3DZ1qlRZ9SdKOdPQYYoXiHRjxQWxCDcsIRMyhjzmZJ0aMzjSU6fbrPl796OGGnTPXQJMZJpgoYRzyxCHRT7ulhfkrHeu2GfMRD2O97ly9suiIDZZD51kpbkmDFZ0MNUqkQZuoI4kGXUBhNHSVLHq2+ZUFZ13krVk/z16igF9jCzKjnKhuCQECzXYCpv3MssXHuptK3Oishd32JZRtffWWvcaN/7S/3eUtGaGhIHSr227dl6EgPH4pIfPu6AQWUiYHa0/TTDrHMXXaA/Tb2pybmaQDagJoPG885Iy6nNv3npBGVjBjeXawjtssifUNa10kNZhkkLdH8Cpc4k9IeQz6E/jR813sIxuDga/JBAr8v6XhQZWcdyA7LBctv+BXHY+FuEpNzocfD6BB/jp5SnQDBzBdPSmjOm04pNVV673np6477IIx9uPg4z0dZ2dRcpTZJsvPsWQyLX6bhpuJ2A1jN3gvjmR+sWKwkHWZCwb8d9tfMCF+UhjPqCS/fDB8jLAKQcUphZ2RMqx5BGYes8SjcOivBsFd6sDWI2kbNn+Di4IgqycG3dBvoEhi4VlMO0Wt1zj4wildF92BxfuOH/9TqRIej/SQKlnPvVo1HjtdF9fJOP9z9ncNEkiOJ/5BME26WAENRz6bViiTJwlh2HrNgdc5LES1zr7G8IfW12kYBNGf2Y567aY7uu+bKNdcHhVUQG0RrQsqIPt3lD5hVQRjcJ7Gk0WC87OyEXwHei1kSn0XlO2IZd8VogvcOCtRvKGM46VU5B0EApgy/I5iAuOOlHPTyIwW1mpBDfA8AlqJN+2PPf1olFCf9/Rf7v90xkAg/QBtm3De4cAYAbxNn3m48++otPQG3qDZdSwOv2vXOf6sgXc8D+5QBVoVSZRj7FYzmlOCr28esIYhKQU3W9kLFP9goh95+/tGMaTBTg6ljiGZ8zKzJQ1ax7jZYKCB5S/HwA/rVplrBRrdWZVL+MbmiJ2Yk5S59dCmUWRt0NIFMMPcxGU2hcRrLeH+ylA75OfT+tuPjA9LDcdDmDyhSJpC8nrrETMM3FNpTzWAVCMIyU+YOhT9OroBAk4T5ca5bezxSiM5LWGpFjR8xkE9BkITpMtgld9R7mTHIpudO4jPBclOHdeuiimq8hm8yY9R+SBaFY4CnhvVEx4zvJ6j+WaBWmdeYhzUcWtEESVUGoHP12JyVGDCL/8469Ku/jIE3zLu6G+V+8MetsOYkvgxrUH7Otapia9cdo5bLON8UQkCihZ/5FhUlydLETDNt60/eITwxNrfJfWXQZeBaCVJ5T6EY8uoV7G3qlRe7M0QY/qgvpE/+7vCJDCfJj8JBaVjjZcUhaOWUdKBe2d7XyQ0JCiHaGR7R8ZPE6MQgnhrSjiLFAJ0qSgi2HrALwHGkFCksc2E+9VvzvfgXqtTTw9TRkto6LA6i38GY8gnXooRM++qiUsd30o+jAoeJsdj7sKdofQD2Dn6BMXdaN/6asaCnwBbyv8OumPTkANwR6czdFEYOBBJS9JIy+ehi4lE7xGQKnqIBZGItdMpJ5KiyBhzA1KYo6RCirn+PRgtR8mJJ9R3rOumfEFQAX0rdclOI8d14WfzuzHXR0/t/ruyu1Le0W6lcxeDdRmZ/Gd4vjTI+sgqX1UGL37k8Ctv2cAWSasVDJptteWs5kEfOI9GdQiRC6mGJ5jpTqH4CT0O6u9o+nBMsJQqs+HrxsfnR3VjXclCupvuM+g26wPs5js6WzN9ftcThBDFd/3vmBlSZUbAOotbv4FLRgw9RqfHvyUTYaMM9YKwGdR2+uGi9TgiOFqYCSyVDb8VGnNsZHA826FFfOtraZCPQXTrwp1zEuOv9y9ubsGo2sakM/+kPproLIW3fnLT+hpoTmK8cWdPa/DSVxWcgSiuHehNDYdOzmsAbSvqJrlBkQv6uLytZsOzvyIFqZiVxcAGLvxLMzCii2PPQR3y8jaq/Bz7BNqbpgSrUUmW1yypafmbTCyV11c+vwvr9saelvTb+Ffv8UZ6tBBqjM6KyCxai+LP0Vge94wG15E70x/BFuC+1S0OuMg4/GlY5dYuSlPvUnuuLlIvW0t81AjG/3DcodVrBsbm+0VHhOUOLbT5WQaF8GQPhltJJRU1J4T29fqwsK/74iSbAY9jmze/E09HW+Q6pDsibvSB9ZLzpChGCJ5BE7JsCRIijLJ9E+8YCYSCoL7QLCbc0gIEEDAqCTRAdRZ3mZp7ni00qlQ1lFRchZu6qkiBZEDc1iezjS4WLZvkmqEUDxtChyTKjyIB9aCEdGmJ9Z149qlAQ2aa6wyY2uliciXw4aGl27Knj/eOZLSxRt0IGR/bzsKcVPOXPCmIDCZgTfL8vwUhy0nYEwCqQhZlztn0k54LB0AdsAkuUhdEf27ku9tpK9jw6xNCTw1IDQ/eLHWpkzM7HfBK6fQC+jcafpLiDMXYjynVHWnPzHrhnGDXdgh63XS7icKqZsWm0/+9KQZoNKGXjp55h2JYhmOetioyDaTrTDPGn9MB5mv7U7V5keeoaU2VWj
pGtt6rTsY0vmnKjmxydL78dS79Y/h4vzvAE9iDkWnjnLVEMT42Kbo8QMo/arpSLgr5RVGb7fLcefaTIxCmCRefO0q2CXIAZO9lpwvW3Rtrzm0LIggInnlpUPD/YkFp1gruRX9SMkZDnIGD7amVnfT8ClOksYSmbYD/6P5PQhRtwhMBTeVt/rhuaWSrVsN7ZS/f5FI2KZDm6mGUS4PhmRx7rmyKcjaEDvXjjG4dRzLKFcF0w9PYIMlqfqGmvXdIg6OY9/wPBTF/6qZcz55D8lU56iuabj7i8UKwrSSPSPyrCnycaJ/MpKnJRyjwpOC2Svs0UklSewc7m8vuDMwlJ80JZo/4RJQGNDimBrHtZPuZzw24h9X+iQBvENCPJpEYVrr2OUunLSWDkfMIPlZpF4gXPiiBKjq3GzsBW7Ba5mZxptMBsx+qkw3NmZWQ+jjY9jPRIS26zbqxOROOcjOieRbC1p0044Q/wPBLdI4J4XOHJ8mOXsvVwxR1eOo5amA0VFROAyaQsQ+WRINKC7RBzkN4Gnr9h+8d5fKs53eSTT0fHFvhQ87cu6bVZvTWZz+sp240OlvlKpY2ztjdcvxoD6XDgtGyLIbawHuZA8kXXv5ABrItwENnyznIQ2DnjAlgcrCy6t8rmDuDcy3AxYyhl1/DqRbtvF2v3FecVt3m2SZnqUHtYQyEV6CHpU2fUP1ilTbBg5syHGcbHPM7Dz/qnFiEEuldMJRl8GON5U16ZTRHad95PM2Y0isg4SHqb7xGwlOVG68XP1uAAUG+ZBsJYu8SSBh//KQZDE1jsDQ3MEtOvWcOeDD57uelA1Lrh2VEgEgRFm76vn+y59z0r9t98OGNjjxnpcYzGbvArHUly2YMX3RSjFcqEOQFHwbxh2nT712Vj+7wx3At5CSa2IJ8kv+Mdr2IfxHdcLnfNUQ95botXZWnLfMKf8UXTZdgGd2vdR3x2YcBzOSBPMYoiDjf5gwotYOeYRR7MrtUa5mKXJGLQf/Xr+XlKG24zKGrSo0RZV/RlnkJTikw4ldjVMoODmqno3VaWrxC3/k8tPjARm2PAWVBm7Ovrb5wBq51VUSxt0f2l4uXXG1hyNVqZzwyQaXUg/oZVvtcTMh2P8cY8jrokLVF6glLhcav//MRAHpaZvCKjPL3pkHnzw/8k4rr29mPhwhUT6/Xd+vkG2kdUnD1Nyy6BtJ9nUsGpOT6IX5w2uQXb0ZlCe1lZg9k2BpRCIn8H0cTWZd7Dw47zneQLEFXSKAybFUhHlsLzPtJ6iE24hNo3+KgkD/aPXyrCct9INTD7f2ImyXQdDVxJ3J3Ktusv89EOALYZmglSXeBDjM9u8wKDB2+ewYxLiu6QV3FeD74fcYXbBgpE70SRr8t6GKpQQsSHI42/CdnzH3NUb1m0ZVTQCtKbmPrXaAayU/enDJjcvmHOxj++ZqwlnJ7++ep+KmWICrYZEocpuBFWeBdAQwO9vG6wXhhQjBeY/q5qPmQtKa1rVBA2SD+4kpEdo1ozJ8SEa+XOs/w/YKZNkYdeEQHeB1Qiasie1cCMO6Ny/Xszh/7VhqIVETRHMwgzfMmOLvI6iY2K18qFBJMIN3i1MK2/d2zUVkPWvJSl9aEpB09bvNrFHkry/wko8DEEMTX7qjkYlkLzXVe4CU1KzKINh0RAXKem5xpPggSCl3x2eHDkGgNDM/SGLrc1Rh3Y1LzJJscuCv7NFHzUw6s866fyO6Mf/oJbJPiWg94f9lVGi0Ad/4GNh0wbkkzHnGwkGGh99v1+RSZjA+cwVwiEi1MKFlVgY+qsJ8ZGA6G9hiWIztR3pOT24ai+yRs4qojZtGie7jixNqzJPPhEZJfr+JNy1vkbfGcZSx5zauTtvyyZcG0XYJOMm/mM8/U5RIVjiqIuTp8sJtVkUlIDxzYjKTzqMGAVqs9h3FvOx/YoTpe0Z24UDHPWkcw4PakzmdAoH3Tn6jhvNafvFCe5SacLiv749iFxfzwLTqCBgpjyUpUcziuhOGdo9g1VZ8jlHc9oVRYnLCoB/a8oMggPezyPHJdRhOAv1RwdvLszjdCTqqzAWDxVeuLhRoo+seew4uuL4+t3vRyQKj9lgcEipoTbDdVjVXAWynEPXLPXWrq481kzMBSPbmt5V0TcJRVrNTfM65Rqrlk55dcKDRpY3mWVBZwOwWRUWr3RGDdGo8VpY5ZW+G/lnNLDDKaUNKcUUXeRK9dzapFB8QQj6TCJVQxCgULLh6eslfODzMhqjZr5KxHMvYtkiv+0tn7e3UmP3Wu3Vha2fSpxHcyUeB4id+R16At0TG1OEBKVVWAoUzl2vvPdfpk9c4JWC1sbABzo5EzDHTEsD/DSnmuYKWzmgYpkrmW8lisOeWo/w8rqsO16qC0yfcZQt/4OxukiYLrhoEC79rjNke+WkkQ73z0+yFtdKNNRr8ft3ptJOU7XOyK1LCqRdBCPCu5sleSrDVxP24LDj2YcTJdewOtKjC74Qu9MdvAzYRJdgryiecxpGhmvXX7r2BgSfO9Ml/+yX0geVo86GIyUtZJdH7xt4KsIGwuJlpQ8V4j9kwhXJdfvRGQ/0Fc2kiFsgxQ1P+0a6ArXRlUcYUMeLNNzPV8s8Hlo30PL5dF7blbpGYSAc1D07rQWKOFX/mXWJa4wpr4tAzo2BCDfZpfq5zTlOXikUM6E5HUPk3K4RJ0rZa3NjewZZFfLxwbaMXAl9nWdumiHsDg1EsJdlt+7JKHn9o/kEbb1ELUvLJ/ip5CIW44yoDiAy8pO4F6m8UTmdyPehDtQyaEjmpFzAaAa0AvS2NTbWiaAtCMHHbHrrpO/bcq9L8MmEnZ81FQ7fnjGFCB32WDSTTPhNPAtTx+2GowgItRMwLLkesS+oH08qoWilwEv5iloF6njn4btwGaEMwoDzy7qz6Ttv1UNnwZhSTv5WjEXYSaXhM0vmRjihwDmqBMTegIXkd5si7CrF7feUO21CcDif5m1DtiIdDEXMZAYN78Hs3RgIuKUn8eQfzImz6/ex/hEY3JO2jchOj+KuGBC0DF/5IsW4Llz1xAu+vP76b709IRZ7xvRkFjME3akqGcbiAu4/wlBj2JI6Z1wcWvxWCbPANXpVo4KifNk7CrIt1zdvJV+lJ4+EsqgjBfmpnZJcFHWWq9e72uetuBVPQoP0aC9D8EgZgHqKqPHCb6VJWa8RSQ4Mr80vlc3a+p20z3y4+W5sVpjgzgTDqISLTQHINC1HF3H93+HcyaZDLO0Z9IxXuXwS2YmD0E1Z3+S2JkNx5qh8P7PlwsydycSUInz5XrBPYM4KJkEySTTh9yPbtSUssveHaDFfRELz0UidCYVcAfRZ1cWHhojss+V3v0aLhHUXzJQxMKtoQbpULO6znqyKJv0m7Ew1EAqktqLvUXccK4/6g/ADsbsWqd/lNZ5LObRSqwZbrTk0uT1hdKft5NW32bL/GCHLL7LLTvoAnkW5u04+SI1kRFsDgnxeINYP7NxI8cDjyeIyrolndCRjsMyi7uCtR1vSc+cmfDd7KhlcOGBUh73MWt7FXqWIHz30QeVe6kdQdNyb9lqLDfO7BuKzkewteaon8gU0c/cGQZFm+VEFwfWumZsIYZ7EICu85Hr5lY5go9PTzP1fc9qaA67oWJ9Fbbc9QNVnJjH1LLxtOYrr6NUK0a8SkkM/Bop6y4naHwIwfevy346+MK1TRJIIzwR3GD5GPs7NDf9GhoqFLf1Ts8qEusaBSxQeNhg6II6lnE0mOWIO1u+aX/VE/lZvGzLtr0ZmNZFTO3qVBiI6l7FNIdY4z/MgPXvqso2EqVyNVU6sPlsRoP6AeLAPkaYmSzVYpl3HHLkWZw9k6U152gXQe9LIrgoBCBFE6s5Q75Zmwr3iqexd3WwTghML9gslOE/ex+4JSoBNzRTL81e3m+V6woKK36DvmWHBPKaDH2AnWG5a8yDMig8idw7N8xxwDjWPYkoG2UDkbNqR1tl9ivGlEls0+eyLEaY7ptHb8678CueDkcqOBOkB+BpYixl3ZJlFwmqPuJsrTWD230vLmnqqQmOWgd/tyc9LzAxX+e0IvPxwii/tmQ8DdG/D7OdwLw9UxYe20m34
UvYOt7EPgFVfm9JyLpSJ8q4j5fqdXfLSGh4cAU1wXMj7FtMXNsaSRhJanShqJqQ99aJtoNEJQz4Et3SKMPcQGabHDExBlgodLGHJwGL5vRWj3oXUQ66zHNmycKYGqUVyROyzcWaGaEKr2qBvhMIN8mtsz9yPABB3wUnMD4iucX/NFaA8kbEEon24k4rslHEZADWNkD+i9K/UcQ7y/reMWLDHsZHRfHPPsQj9qbCRAMTCej0z8tP7wyrsNpjEhQdqqD/zBGpqQu82wt2DETIscPPvNnoVR8OTQK8DDXNnH1FPoOioN1EMI8u6+IVvu3NeJHQzH9BFAU7SDlJUeqA6MQXEkb7jZax0A69wwytaVOKPd1WuJ4DexaysoutQf+yqU+kZ5BO1dAsdlFcKQiyEkRdsclh2/8pY4quVlf1R7JgX15YAodL9IMD/U/Lv2s4245PzWVckgmbbGEXfLwKhLHbcsOdB6X2nhItc3nGxc4nzSZNkDzT9jp/sIivFUmmTHexabNPaS/BTpjHsNkTE4T3bM3zlA0PYuoy1D2E8QxX7c5dO5JsDC8WbtvwsbXhfQJkvb2UIysiTAM2wdSKFyGBJ0r6ArItIqxM+r5Rox6ZFEYOBBzPJTallh1vXeHum3EWwMWYZSlMyDHsYNAHWsA6gTvDB6VygV6f32sBN0OumJtkpIv14GranoXuzzAWc9bflqeNwhCDK1X5Z/eBwXywaCyp9ETSp9+p8I4DPe1UP+ujWj7ENajY+ZN6Fh40rKmWm5PV04W4KSrZPGGJevrsV2b0dtSwR/Gv1Kg3ZSE1Pwfla7Uo5rhcWPbZeWFQe6dLWRxqhVbfXJaFGmxaoObFfiPu0SuTovm/AjEJFEzvVKYaiZfBdzIAkrBTRMBGSjERzjdvMjAvrDIDJLQ1CrbTq13mwV3rxImI81zEf+EbvPhtvoVR4qEfmjLAwq7IrI+Ce7Xl9Z019bkwSEik0xdxgJh/ldW06NVhTBxZp5MH0gVCXkx/oScAuXGpl7Adi3IfLtL6YVMlCcM4QRbyUKAchKIVfUgZlvBvPEGqsVp2gEF+ICuAGsuO/4pZIuGgbM+bq2rr17XcuXB0Fqok3ZOe5uh9Am/jmWAHiVh/rSNHlk/OrbL81arqlAw8jgllpxz/z947ptXF6+05EhmS7RSwqxSQ4NlrT/Pn3XstTMhJcuX4Of9rud7GiIpG5cjLRkOHMiubOKeaOc8f1gRCWngXxUjKK63RAqyV1SCwakHsqfBe0MqhL8NFS1tArZjBuX/E3bawS6Bm/j3UUCpu6WjnXT/6pldua+xuZ5QBWiz2MisKofEuowGIsCYOJHT8eggJ//S3ZGUxWPlWQLVFLMYTlL9CKeqzM5OEQvuOzeSywTHxWrpDlEr/H573HT3lXrHw8Va1gApJVaatcIAzqoGrmsdR0gr4QCLHjEQD5xV2ExRn2jT5P/RpuoYu3KTISAiq2R5oOC+0TatNsRtSbTsQRITDgoC6u092wugo1sygLuoB1euIgn/nWEPoCJEybQoET3hXgAaVzCs/CWSk/prMoUfcb85z+TzhBSJXLboRBWW55Z+0AS51N07tXEVbZIZfZf9pY9mg/HEyBtFA75eX7r6hqyCMMlNXSTT0RmaFkYRW206PT9jMEQq1cGxzADFBnYtB9iLaTVKZ246FcHMuican/kTfbtyaovhmggGu9GfZY/vSMNRgjqX5qbNuH0/f5DzXN1XHp7zvN0KvKeEMr1TJ4/bSRMC6GDGGVrTVteyOx4GYfngvwJkeAxe3SuI2rZ2UOKNHDH5CeWLni8GJWZzovnAU3s8VDnY6fwocL6x+OQZxS2yCLUnZm7wswfpK8I6ZD7lBwaPZJJAupM9tjztNbKaY6CfVn5OaIUHnma3+2ZNcn1Y8Bo6sKxenK2FUHMqDqdkqTJx1Al6OlY2f3oqgradFhpyjBQyrn8LzwRnOgeOgBru/ycMFbFgzPGU0TjM+RgW6EbV+0TGFUq8+B2SCE2Plb/M0AijJIOE0dszO86qBZ6WmsTb7lgP+aWxCQE+HqGaYJluA7Vsz0VMDH5cAT6QdunKBV372ekU+2Sev42T/teBVMktJbaX8Y0UyrSzy2QPFhiHd4PjV9PIjYLLfLzJ7qBW7cPxasvBqx599sCB+bh6iBnwRFaRIVj8HjxX/K8gu/PtYzXGq+OjEmSt38Yb2tIiPiqVyvfDtWZi8Zk6jcMvclS2YTtZqrg8tk70du5J26bR7AvjbP0zGx+ZV3JfMzRKSSzBftRn0AKb+OPpnfxliePLmZ8IYwZLCZ+3SosnBnZjRSqoX6bHVNqCLWYFC3j+DcB0PDVAgsJ4ROLuB56VEz6iYBIzUZ3w2i/ahXee+4ZeGguIz6kmO8QSxZzT/3bg6hIftGPgpDb1TRUh58+LKlgqCd2PSyM+MbPFRhwdo4VPrvbs7CbTecUgZKIbtGwDFaLvyPu6CmNkR9yrUBoJ84gUTwlp+c3Kpx/5TnDQ+uRL/9/lY+3u0qapOVjUrYd8HtPvPTuORKD576jnEeAaaorUWHBmoYBgsLaJZHs7XRg0jqR3VPQLEGiKxCxXZbGFOJq4rdfA6tz0ItjXO+BK8CnLxBpBaF8Lc6v+wvkxRlXOwG7VdHeqPE5aZHSBzdR4taNIBrVzCnfunNol8MQJ6ik3CoER/u1SqsswW574UtQL/qQxIT3/+qvykN9MQg3asxkVDeIgoaO7c2NASbJGy6L9lkAJTTKXAn42ekqNHnRx4G/oFRW2+Pnw3t1et3Pq7UuOSr62yaT+s3IeKDfbOP/SkmBY9SeBlUQzWAmBoMzrk7Rh8QGguQvWJY3XUBgwu+i4w+rfB1x3R9gFUaoYrAHYJC/IAhQn7re7uov/Lvl76T6/dQUgOhVDoOILAnoTYRKCw8PR+hcCbrwhYk9p2KTABCqnmF48edIlH+8tyiyLQ6DIfOh2LawM9IZZ5qhlANW/hnGzwL4yDZXkIPilZJ+hNkFXc4rHLk/09IhyTIPOAyI3q7pDaliYXljBrORB2ijEZmGL7HjkAplRprf8CBJ5QeFdVVdRhW2XRm5YMJsKLEA1cH7oWsulrvw2rhFqtplFhND+dXPngrX4V5ReIcuPB4TXWPlsAVy1scnLaeXeryOSENI5IabzTYFaTf46s0tmbRtewZnG7RUCXiEoYzWCtn0tGL+ceRhrhR8iOCjjn26ICkD4ririfQrR3IY9uLHS8taSMJ3b/pdS2HgtcW06q6HHp3+8Yj50EFOiDJ4cfnuoZgR1MipgVuHikq26Vt3aWkPw+XMdk4A1rRuhuaTFJlk579ieiQ4tAUopEOEYffY+fdYSG+YVt/IM9Y6j34sxDxwvLMOV8eV5CJayDFgtTpXyjrV00sn23MVxLkMjrTEV407/uoe0jFHrxyhG5va0g85XSRg7MIO4X+h4D0I8+dVU9grkutlJq88bSzk1Zl4GgoYgT8MOPuXEKGm+ifliS8pdm4tY/GbC4UuOsWSV37LYSmRthICAXLhXVnu4r9Ppc5dzTvf6sik6ZzMl67RZ+pzMyugHkCQO79XG4cHK40IiO8SCR4hSLGA+KIxFcFFlSVPWvSvcPN3cX4L9w7ScIEoOm2zU8gcobNpu81bQzY2ngJgm1bNPMazlBcilgTmaIyFMioeZ1IF9x7crs5Gm916biBtcEDtlA8knSG5WDtI5aoOcDv8JVAvfL4GNieXi8hGv49hPhPnE0FpJQer9Utr6NV5UGMwrFLeBgCuYpjLXwrKDluTrFHwNg7GSVr3K1rZ3ld589Ofh2xbh0A1AQoEwGNmf5g2ydqxU/5x6KYqsFYcIvAZ2zwRBHsKOSabIRmlU+VpqIEzKn94lFNJvX8g0PHszqvdcIN50Xskf/qjzM+Y8N6Jnofg0WH3C7pLrBjxF5A/SfiRi0axsfcC1j5X+ub4cxRR7iBD+7exX6RQ38dbyPrviy3x480/Mwt1AIujUpnZzqnFabc15X8oW3lvITLoEEnOFHA0LSO/xJxmrLjLnHWAWB3ltwXMo26X7B+GrbYFKxI5WYlg7jWXGM0vrQ9v3ZGuLLgxjkzCe1nmb03
yluuWEo+72alpvV5z4iLEvo0Ex5SEA9vbD9pC/vpnUxl2TSz6Ryykxnilvg2fo25Z1kp5uVkV9gwWDefw8M0BXuZhv4/RxUJcxKsxQ/EWmjYxVVILsgcXybFVYULC7TO4kJ7QyJwunBKIVtJe+EUr7Tmmgkphsq6n6QwKxfr+flB3EfiL2ng3zadVy1ecGHCApqSkd4up/b1YR6Pn/gajyAtGfPKKqSdoeY9ihULMN25xpQJcMrdFMpp1MvrtsUcEkOqOgBJJK9pE8HT1FDpV32Lc0eywLVxr2KmLYOafaWf8ixqqWMCs9HEYq6fVlVWWNC0PO/Zic49tqh6IGvBSTHHGxop73DypNTmgAaTzpiUZjyUmVV+D5vpFBGpgZln2kU0j6ppv89SlhLhfpZvMLGN+zUqVw+fK3m2Z4Yv5pl+jtErjKPzeFGHocT55KZcADNxWg73WE2IRyydjK79h3rcV89m3i8+HHVT/hcQZLgcQGu6O+bmfTXp68FAQhhLucMWEnn0uk83m4y7HzXCBlZ8lIoF+8H+uTl5zsI9QS97oHT9Q38smrXKu+LkuAIDjLfT4I/Zvnsdm/vM9Z8aRI2AFQyPiHzkZZzTneIb5QlfqsDIPv8cS6mp7PFSg7p0Hcs1jGkgvcRIK/BGsa2IR91J5FpA0EnQIdWWuPJZDPsH1xAK5wsmb6/seiS+QEoKknnPEJd29Qgn4op0HbtFpzrm2EUG5Z4R64SYO6Koo6gc1ms8hqqA7uj18JWXjvTf7k3iALyeOhzbmMotPzbK+sxkjh2dcTktRBlFR5JuVw3U80hWoSXKSfPWmS39+zcuimESurkzYkUk+VWfxhSDV2ZGYVvemQfgLi6lux4rPrdYlcCB6GPpOpreh9cMCyYdaD1qeI2OF6VloUo5G/yHnU6FOGwtoSmrmpsDEggwdwufUO3sA02lK3TXqUB0Aw9Q4iqsnUJcHqFEX3iXBUsidjraMbShWX3NNW7ibwpGwVqqo0gEdJIDssdK/v0fzpGr40y1WXmdIs74RexzDUXWs0iG3AFZAIYOpDU0iBDPrt0Misre0JQfzumalA41fduSR6b2W4PsbWidjV3CTsjdi5lVUPXfYXArsv1us32rKhmPLNPreUCyt2fkzkUbfabTGfOEAxYhSzgKpnbqIEujy0pPqCrLkY5Jtp3VCoxm1Y9TZuRsuE5QW+HMBMRJnLY/DGJs9J85WfuCurtF1vQxnMTIBH+ejrLZoUXZLEkJm4TEdFFshCOwRd8a860efrWMRHMvyYi8lmfT+b8sMpOJ490+YaJrSKUI8ZVNJ1rfV1QS1u4EVqC/UxbuJi6EOdg0MXlbUJz1fA+NHe9r2Zj5TAo4jxKiiyj0ujBwXMgeXt/CewoqqVkuyTxVUj3KJxJuVLm83Sche8zlYtGUJ0lDL1it0PsDFTVOg0uEyrxMGQM8O3EbO8+QAMXDSYv9OtFVU/6XYtHUr738QoUOx+Fv/rpDRT60hIYmMLkMqNSJskqND+jP7GElmP5JY70zkH13BLrUqbQrhelXn+szGUREUF279VoCqRc4KtO+vPuLisE+nMrdCaT0K1FnMHN5g8ZIUQpYni65M3EbYXVyVlifo7pLeulibVmzsCObMi8iyA06lVdERP2fy6cGg3Rtn17QFpwpIy8H868o0rX7qCCH8/v3QH5syE1CNwohRvE1JhVuX+Q9M0rFMWHKzFMqR3jtKoP+7h1cELBed1sJQBNWs9DrKW1MYgKVfOGfe8pcIc8KbTNfHRBbpHzTW47K/96mlqYQ2GCcBU2vlN5KpsH8KnN1+FR733MaNJ/FdSwn1F1AJ+ZusnX3hxJ3IAGxpR2ezZIpp741G6dBUPveOrf1n4wxiZeUdJy99ZBZRnhtJzd6GypEyppFvwb/4le56y4AgJdMqqmKIGTJjhbdUzG6k+gpQkLcDSfANlm+n+FmFoA1ncr31igR1Xtq2Nf63s0F4ejHG8yqfiWW9HGb4HzOon7fYaWJa1NIRw/FfzvnI7TmRhaZRlfwUJHGpZVwNqqceD5+vXkdrKNVPc3qWMEhwEuZrLQu1pQTWckd2iya+a2WIHuUClsOjENsV1o+qPQQrIeKBMjGyQaHEiD666scq5lH2Fa27E66brltkeVebapwRvUJYCYAGd1979DDfew2iGZG3k4eXwQtCgWNElknNXbG6/cY2s795Cwtz9AaZHyOUUilrrlEMPXk63xyt1ipRZY0kaJ1dF9JKsVYh+0fPvzCAyb6Tk7P4A3sG/o/wUwHyyYTL8g9D96+h6i2+UUf3SjSZHRR3XVVhYbL87z9GdPV77oczUV7BgW7KlUQlNuXiu3xJpsXGkr3hFR9kvmlUCL+LiUyfYAVPR08TlKebgRePrMnodcZPvGN3pZF5OsdnrmzkrJ6gxXoIeF0K4C3CAGdxdIzNAxAJYuxMOGSJ0Ipxl7oNRbq49ZVm4s/37yebpv4w8CXkw1GcC6mVybbLbhiASm+SeoQxXthQ8gvh5U3FMIgsMQ+Iw5WmHzG7sfjdDNwfzlEUUTbQH3EwZZADL6SepIlBWNWZosEodzTlFMVUfJocMKviy/WTJ6qhAMMt1Iddtcx4m80SXGvHWnfeRG/3dm6KecSpmIuyjzdNlo53VI/uVb8+sYeT4pAnGcIisjEDk068ss7nmBdsEWio0/5wxEdmtWvjgTAY0r7uo9f+e2fbZ5z9afMoHQXN/NhPlba+DdUMtCWr/UZoEo9nADV3zQdBuI0JAwDanF78WmmT2Touyd1QXcffZCRicSkDCdEg1j3oD6jOIszVyUbns6Rk66xcULFcmBSOhzukBObXg7acguuNRzzxIgQYy72B90p1vgF7w0bk5BuH4s+5l3lAIZ2aQsE3RsbHNtzma7VR/aQ/P0QoU+Wrk4KlQD5vQmVZUnsUC3to9pSTuiJkMKkPZj06U21BEZ56lAycrEUuJMdVA7Mysb2YfBXaeFBUqL6Ohu58FMZZDnqqqb/2VDWxwrK3CB/wEUqto2uhGSEW6UuNtLJ05YmuvcG9tvu0rbxIx98WjJUOktrrsvnB3nQ68SrOmF5asab2zFVak79w9mqTKEhD4ZVlYMQ0n0/c6PEd+FcTMigLObPfJE1EOeqeHmYzK8yXZo5YOkvuGhRJiLBln7dx6HhRecyYljpTtZBnS+DR8SP5hjbglJ2afuXUcl5AQE7dzx9R/sECUcJQmE0p/x0G1oqaZaXL6VQpoUGjkGhmHs9mv7keZ/lNxiy/rqN9TByEp7mwwkuwBcmBKcu9xrLxGpEm+Pj+LUiLwykwaY4/B4rUuXe5tZoC8rd05zyaHoXwtDLeRNekCW4xrRAIoV+sjcOUKMyJTo4vKMhYysLYrcdEMvEHjLYNGzFLr1THyIaQGa6psfjKG4ATbeN6rQS6jkHu2Dq2mmKKOU4twKY0ogNeRnSCTv8pE7YdVkjL8QQn7pAvwi8zAzfC6+rZPVcWSEUYSGS36XNJpF7ls8wTC4LW0AE7FK0ZYP0a3d24MGwwgrW0gVfEacIrQ5mAeAtyRXPDFdcKsK64nuBB8j0ersgCGolFtK1dmfJV5JWip4wfBa4OhoA3cCBWXsT7KJ24Y//ZXanveJB1NjDfCycNiy0Vpn+9bbBCCjoZbeiZrusyH5zvpUb99x6TAC0lwa1lE4VTcLbb505WPQFCxY/dFO3+AP1SxUuxX7H2N2iFio/6V03m8nNGjVUTA7nxvVbtrajP6ZmMAMGU7Az9llzDw169LvH9o5MRvNrnVzG+je5QA4reWqUiWV2QfxIUswKmyWXOStdZJTLFsa+58GTAGqBc+yOc0xLO3qRupXSn4zYckwNnGrRLQ3g5r9cwb/kuQ1kt367pbb7MnxctK2P9giIwp+lc5QoR5nxcc+xm9fXDgw6mZ8lYkL4vN2QdMaIiqxfAd5C05aTd1DunryDfX1v6KyFeRABauccJxqKTeVMkYAsRlrKzWG73RcOY+OoQMCeVP5eY5C2f4LW/15i8wLou2OPVm9lCfuEVU/E/j8JvG/imV6lFJzihm6MnrW5UYLGTLsnSzkTENUgbpeqD6F8xXw0Fgvg
1ysttYU53dQSffXAtQ30scySQScOcX5U+te72U/XCC9H/qjZG5H3gXd6ZhiIulQqeRBRJfz6D9qg9vTTL4QzNae6qQQV4udoLsbVE5fHmok+9fOVnSa6MWettajJPsv/JzuTZzrvfO04KiVeiqnP1mcL2e8MIYHu74aGJXjE6qgannxatjFIYnaj3D5xsA0MEuKWm6T28rCQx7SP7edkTifnJbj3FhTdYhlKzKX5YaROs1JkQ0rWXjSfx1r86RyrYNP/AjI6oIUH/X2ZQgVwHFQ3Cd8YTNGZ49M0UjgEhrxXw1qtQG5iX4nmwIedAnboeo6JO4Y1J8cAXXV/Kih0HQ1n3DwogNxbD2qto++my5sDMVbXCzZD9QPtXZ5djonQlXPQAB56Wj4inVEDYq+z+6QUO6unZCkPzpUJz7eIAkjfM0iVU/Jg5L0M/ltD6lNJyY2hQP3ZzHlUgWoFU8I7niK0dZ0IISXZ15C4PlsXiRq74lnqDEHHr0hNdJf2tBFyQeAdN9MaO/gSgWVPwFZPuuwzkvT8mEZWGHLNE7kpn8t9ntREToDm3Me4KRW7pPG0SupJd2rihW1YVvq6fSgjWYoM4MB8PcmmETzq4REJexMTVN6ZMcA4UjbhjHEPUR2pGFV6VgPHu6azFTDNmwYUZImGMJeCc4qNa0yRWe/qZ0oCiyOUlKy7ORl756CTzhSEeV+M1KxuzdEHe3TTqVrC7cG9j9/7cELKWoGs4KZXVOWmKU0+vdzQD2RYgGppG2uUcdD4WcQ0Gb39WtO/G68y/7IeJgxuodd7kbWIlozycvAf6Nb0lpqY3xVY7PagJIwileS5mwaCADSm6An6sTuRTPL6lVL82NuVw81vtO5sh1yBNnL65Y5OYym96Qc1opiON7Erlc0ZL9OaZgcboFjx/yNG9g4xgpdN42FwvHy4gqcgtllxsD+Xhy1AdtVIqcsAQgsfALlTBTRXmo0K1p/xooZazMy5Zuf9iS/gObRbDDtWvHkXUQIK+QCUZ0ghKUZR5X1rw83fIySTWMJX3ssELWHQtKmYdpZG+gklw5WS1IZa2/g21rHcmumKQfi5WsTShDBRxCC72hsFcPezhnqo2oI0sR2fN9zZ03+p8H3r8S8PU15qtmRm4kan8xpdVCnKZfUF17QCArhSgLiwrEfDy/wPak/KtVBs7N+iB2TdAHVUz+6DWg3NUBVVeu4iSl5bzKjx0h0+vgd1lUeZ4bRNekV5Ou8VvYErsPfkqVGtcX+x0tV78tZ0FBl04gEicYFaEz72Vn7/VVHSiySeF2ycs2vKiOJ6FoyNO1ET2ddPskwOTW4hAP7fKifpEAVVWCYCKZNK3mb0EudLLjK4gpfm1AAkA7dQT3CZI8Sd6iY7Y2EGxcpo4KukAe21HglDVqJ//efclJZmXmoVKW4fFEO9mu3uiXVsPhNSNobDaE38UkWNmXPyHbS80+FwYuUBT65BleFc+wnkodWglA3XHgAOVBTxQ/USTEm+do9e8RbfdUvGrTC7oR7dtBs8BXlF/tA3g2sivkJCCwxCKRG03cuoZ5BSt0UUal8a7m7ZcyH0KUI9yCI1fKVpFkZLx/aunFxBzSqqunMxYVJ4Culb3RDIihtHjPm4Pt9cL0ZfHgzmYDI+0KS4q9Q+TcjNcxYvKkXIGTi3DDZVOAGBOwdoUhqcooXgEjcRKu1KFyyBJK+07RwWQhEYrH0bnc+oW8e0s1SGwhsOe9MNph24fwstEDdKU2JHgw6GcslZOhDPALdRuss6IHsOrhmT82VpecyAvkN1vrjq79XW9O50r73nugqNzrO5utwXKADAYx7RniNsTUS8baGCxMY1/K+ZJsQKuJSWFCKZ9pziHPeXAoHECYH4WUgJwcz0+t38SMzx+eMG/mwZE+o9ayh8xBJRrPqapjsv0o+HkprByqox3KYySUR/41tjOuHwoTGVBpvQK98fdBU2BvINoaOMp5XZPo600hkPuSVC7P9nQGO5O8zBOKSEa5fTPRjzosWV5/0KV95WpJohZ2Ty5P/+3QzuEJWEbrzEL7fwc8hUp7keB/ktv0/6JFXUCkwtr7tarsuFcpaVtbB3wHVWsdCMy+s+y2Lfidtw/h7Zt9t1YinWzBdL/Xa1bvVAN8KiSl1qHj6MCXf9Cr2gic6p8Up9xSbzcRKtaoKDyKJ/Dy5myxduK+HtuYMW/4Wmb8z8JD/9I6qDda0Py9353CuubQno75WBzjaQm/ERwYlbyvaiy95wtU9BtBAOi5LBZDf+1a+Mlh9pNaPlHUP5wT/0zPhmS0gCW1Sa/K/MsX7rq9lbG+CgXbAgZ+qkEJx9CGqNScWkvvTc614QrUcgkWyKXNGd3Nx5TjnhXGNZXJSna8p9RN2J4r2nrvaJcHne7LmV+3CNeH5Xy4FovnLoV/MF0v/H45Z2bVQnYQbZuI89LKB/5hkU2H18eOY/wEW/J4fF89yUJTo08tlb/BCxvIS0DO2gK/jaiUTjesKtwxLvNuGf+w9PdFSJVgjTkovStg2SzuLGCOQZkVMJa0xfuN0wot+NASnoqqkfdmhqcABGhiV1RYqjS+PdBMht1J2mHiYHvy+tUtwSmiCCYUrqcZzAy8Uhq8Fk/IbY1qpwczk3KFjX4Z+gHthkJ41vjxaz/PFvBsaZtf7roTQatlwMSiJQ+GRGmCVdK1At2jlHewu4MTgNQNgfZct8i3SnrHB3SdQAoEI7VVwYwnXD1s9N9dCL2t319ny9YkBNtOENkkcIG+w2Vvj/RpZNubU99mwWFi+h57vW71gtQ3T0zGevkAZLFG1WznXXE/+KAaWcgXqQ0rJdJkqTFm5qq7r6woU8Sa5tRWWp74EI65M+n3DY8BKn6AwbStyRfryvCONLuPP/Y9Oojvimd8KvA/DkuFmdQD9TAUr45Vu0vKvPjS63GOJ/10qeuNiKiVl+IAX/AsQGq801Ix4PU1/4cZzTTidMSb8pRxlD8n4fmLRiqlZWwquQJT4hiq6TQ1WSY4ms3ayQgF1+m28RraFwlzOX5CyiJj5MONTqBrjkeYh78xppYX0d/Fi/P8nTAw/xyx8UcUOWGsj1kMJBiSxP9ohFDHAQy3+2d7WFsnmjH0xSOwKitpeEzv3DQXqBCKLGuqbP1S0QN8Cvpu6OBOFN8T0bgSW9E5x5bK8/k9loL+UOYjkZn3gNCrcSfCQxJSmcdmN7etiAUasw4def3SVcMO1An+u0ARIh1bxFQYsoEHX5pickKc5HU2OHqRpkEgzpMejNs3cAyAVI3v000u/S9DU1Yx2ugnt7RrJBNuXCL6zPAb5PmIQlel2KBDfaV7MlIEvsnzw+pXlNJA44YHoymE1cmHW45ocJN/tiRKM4XGh3BWbGXkN6l3wvJ/0G025qQebHSOnBwACB9gdrbqbXCjcqAPQUGJWWbwyJa7vUOrRkA4N4KM7XcEKMvH9nlaEFr7j0GZwM9A1N7pfCkpxkLMXyZAfuZk8vrmQyjaEW4HQQNcrmK8cm37FXE+733fjop4kS/DsiXqt+wFbmB44Wp/WfgZiD5Par5uBU3SpxQEA7ja0UiBWV8em6Gy7ILVcwhlkzyprWpzldy45eCqcNBzx0GwxdLHZ5GX4DUB2fWRXflVm37BhjursKVKJATMcXqMIiBLXp7fuHDX0qphn+EXgFL0NolA3kxFWfsz6F6yVMV3MlcY0IRKAHdMoIqG66sZLVcdVxR7SCTnsxRr93yVaazhhYDQZWFb94p9UoSNWhkE8Lp/geQ6gs77UWB9/jmpLqbHe1gvcRU6Uwl1Hg+b9hB8rXeBZ0AF0lfkdvqUa2hV5jRQyO8Qw7DPoFEXZDAIMoGYVkBzBUwXyuRvCqMgBeagI3JYehPKDnxWn5LY+hXR18CvQKodViTCxw7WR73NEecDxw+6mE76nLNVtu+WWayBoReys9pBjMgqyn3ebd18RFTbkCfkX2P0lJq2eNY1+8vEbhVSZ4j2E7s3uL5TYGVyqog4ZAqlrRdZTGm05NtV7XXNnrl5OjjxGkoE4wSXsbWcjhustSJ6NbZAauF4q186D1eaOif1qLwyynlngp3AEBZ+um+Ai64IgT67w6Gs59
mv3+jz0CKCNxC5WVG4n4GfoZQuV7vyrfMQxrvaq3Xd9nm3bQ7ZfWVMSmDsETQDk8nxxCHm8TY/i6hIAUO7YFbc0dcYAHKwCOmf3bhohUOq6mPTsnxgi/m9JZgtnLF40OJgt/B5CMPq9LkdZnZeN7d2LqjGg1dJa4oz0byI0QPydbIGlQsPBXq7lykidUrzjDDXM0p8+x2Mg1iTVFKyFCeSBy453ApUl16yEGUiyZeZMFIAKebYVx1+gpZWqqTXtDnD1ygwMRWWt60lJnc1jLL05k52wYsNGPWvmy7QKd1+XIPWPBxRKe/wrBKxSPVaDC2S7m/oV/V61bJsB4XImC/sn8HyRGjncX49Bx7MS9eLUevZc1C3oV1+XYrMKwjpabf6pQ8Q1Nos/fevCrHXz4wOF7iu9fNUaUW99hKupOFYsBRr7arW/ZTvwAOTOd78D21tvkrT7dZwM0EYzf+9kjLjF22GxABxXl3hXY2tegLSZytSTHxE/mCrX3LTcSiZn2qKxAGIaOCzbxEvkdlhgv3FOi7i3XJnZVPMl7ZaEerp1bErIEatBzG+7RTCPxLM78s3geFDu+Ym41An1wg1Kw8+pPu30S/5MalTLBzOc2OCr0oNXm43QXqwyHt+3WXfp15LNLMHwahvKVu2XpIqQwzkga26XH1OOJtf1p4DR3ZgEAi/F6G6DiPg5RHawckjsFpYtK6Y3AStdGEP+oJb03ToqnJrFQVPY41T6ukY9yE9DDbJj3NYWRCVN5n8N33LNoBUmKqJ9L2WqrVqSSLOJrY2Cwqta5OaX+ojQuNUx++ehvW1kZDpscGX8YQRAqc3yXj0wKQto79eD+V8icFuAgg2FQPGqERG2x80KXeVLXQ0f5NqgZoox8UaT3TV7je3KV3slfr6nSl60S1MSvKMa8s6chdRKqWd3FhBCHZKXgewOVaq+swZXteNkszA269GFDnFYR6CDWbtEWfy+0Z2niibttnie1Zz/W3eHeVhej7a8I4bW61tctOJWhChWpjUoba7km1ZBxk/+lsym1VmiuivQohMj+t2HaNDBgmaOhPrDefqNcGV5pTpCH0kWhHaWuPD1xeG+V8O+CYh/0x0+vK4ZkHVdwRqZe7VEDVIMqJtsMfNsnuQY/ov8SU6tG3nkyJjiubauin/0d+fS+gTT0q34czgSdNsjEvuKWaXQCEo/4Im4gv6QP93bglfh6I7lWZg3Y2SzadwRyPlMt80mEv4HO+6aUv0qvmipEVhW1/oIbkcsvI6XTMdJNH/rv8/jvrGCRs6ltdwTFGEgSf56bxOfVnDe++4jzE7s2+fmvVERcfav6UGJRSDqjSND2xjImz9hZuQ2EWEIcdj//xALtRmDBCwtspmz9xgatoJgr/kAGw2lYKCMxI/PoGMecXdnV08AxBsvTZnPOPWa2I5C60YU6pwhtft3UlMyttIrYQjCpsJDzSH+YuWFIR8594rHq3881p6LTkQptphA0UbS4gm6jRIe8POCyqCSMMC3Ck1gjSTwlC4cLqJxTRXAIpv0+HfkDmxdQG5/kcgsYLzPPYyonNirHTN0BSSbeU0jRdmQRQA/Rv609xDTlFwSnFsUWIRQson5FHadCScN6ZgsJ2DWCT6sZD//Fh25SCCSbcVuutRm/VjF+V8YZ+SUGXRyDhea9VS1PRLmq4fisGa5HZcLc0Cms10MSNWcvSSnpg/7Ct08rKn5ZmT6lhK68ACryh4dq+ckxxM5BpGfxTbzub1RTHeaMLqOBP69S7D1IdgtfgXXjCWbxC7C8gNYxCKtujD43UW1quyzgnzXedpdR/cWskac+/8PoHqoFMivZe7Fs3cMaOjhRofnzFV0VDhQi0wjCosGl4n4DjQg6zA++UHWIKy/Q5wnO2ocyxxDSC3J48RjFxdfkgVaFeHWYqybaSJzu0qbf4JjPJG7p2ZBrxbc788ItneJtQM7vN+hvg08lwpLIBG16MYz6HG9M6nz9PaHn4F96sE4n/FxMIlzeBYzjysy6dsQWQPWjLBujwq1EvIztufkX2vSS1cjCqLpzdVq7vLVctoYd8qgaNk4qAke6sBQV1xUcrYtbTk2BIcbwBjlsUsSt1ko1MO+5kQ+HgooR8T59vVyYaHAsyDo1UmA+XdjNvIMsb5FvGQbaQeAL+iLLuB7xls3/qv/rGxRzDs5YV9IosK1bTVt3wx7WQt9AdPJYiS7rH33RqjbEtJi1kAxXWgaEG1Xo1Tu+uyPxp1tKbFBkOaOfprbafMVTZ/u5vpyf+fvG67ZbkIPMJw+BGEVX8W4xsfH55CqKQk4C2puR3h3HaYT5f1XeDN41sjAw7tAZ/SgkByAhQf71yJ28T6FGwJHRCr1zM4v9WPp/8qqgvaZHq1fZXlHTZP3WorobURAqMOG8/o/SZiSYr48ktcyXoWIzHqSw4v2m3KMf4xtv8PRlJYLDmAvufVLjFTnygsruZe18zJtyj2h8iaggrbos3DaQxdO4FErVlOME/HVNWVf+j/15w6Uh5C47i2UAHETa5QeeIzWN+B+sC08IRDVl1elzr8oHdJCSMX1PDVHIR2xASDRt1aaSz/28d+cQqTIm6uiPL7I++2F+cqB6wvrJR1j4+V9b+59DP9eww7z/+SoUjLzBqjbHt8xw/JCC7/euAeekL54dKQGqQuC/MTuJV/h3DQhSMXr2oxfmGUYYhPZPWfnVCyoLpLcGfLVngydM356oSleyqwv17/QcRYOH2ry4FVo1Zy+02yOD7Q8E1Smyrm938CYc8OOGUXa+7Xt7xL9pgVzEAB+uNoJ6azWRW3jfY7kI5VdXM7PMcU7P6IuMPneKuP+nj9XwfLL46/agyRGik83q/66UmV0MRwEDX9OdcaCIrT9wfrAkSaUTFLznWUmiAnoDtn2o2/4LzXbdxSOsb2Yjdy50Eq/JrvIFh4xF6WnHmXivCTUc+drR/4bOaCxIQXiBxtze532NT0eIAw6V5q2CTlnhyNX/e8z9C5o0j9f05m3yTEo/HSK7ve5Usf/O+O3ZaykxHIzz7XYpB1D2Ho43WdyGb1TEl3wosuhzGXdyHxbaoUZBzIOqIta5tB0K/3M6IHEe1XRkw8tcv5V8txSSJeskTl1QEF3HmxmNDtbNlm5KodJfRwY09arZnVlTgAzYkCvbotq0FHcQVFDN8ld0Pw1HKNOp/IopN46ErmMpfcwdN5jhpBaJbibESaoC10EP3jnckqoMdc8qNtux2lS/F5GlhkEE30HtMoU2Krk5ZSUE48/DKmQAqOm01/Grh1otzYR5LjOvLiHMexToFK0v77uJZJu+VMOd0vQarNYn6mf+bDrkUAW2jRg/ENEE4PnDM80fw1VJHQ32E38XvB6o5EerUF491nWknF3GPuk91Pc57TwOUJ4XOZMqmqY/vy33xI/KFF9lhZn2MyFBFbrcFi6zWa0hsRC/uK+wbJN7zUI6rkVWslwYoOTt6m5M+Hhmvxc7VxOP/5OlJayPfKRiuY2KqaffEi3nEJSwY8JX+1l5I5tzILOHodU2BqKkkSLkh77+3nPV8qe0dlZQNBnZ7hCsSqMHn+QstBBun0mJSfWbAxxadZgpFv9LBtXkYqRVhnlLkQXT7sQkkqkE2fm1pe0CtLV94+aPJ87ikjQaYtbZtpNbtimOFvQhVPy35sv48LOXutEIIlTMgF5k8dULynPpoFZ0Xx2iSoY4qpFpT0S3kXYl8vl5FhVwJXlxMikRtIUXLeGofzxPm14gU0adnL6sWgM7e1nZ2IZFpLoszDj3DYIEfPU5Htgk5+60zx7xJAnLLkhnTlyiUHUkJbA4so1qhk4+9cLrb9AAds0kzFrST1Nwxa6jhxw65d+VSZb1AqDzVPOF9pDxf4PslsUqipoG/TfnpZS1+cDBwL3ratQb3Oro4Fa4uwuyBUF94pYW2tbhnTsYJldkYI4gzti+Ipoarq6aDkqsFo9yRjNS8WHKTd5bXGflfLhCEoC/09tXo6nr7e3FUuwmx8f9rkZ6gDuEFRwNUEaDQH6fiUdpbBA/dzt3xAj6hnEj5g9HnTgtaXJnztk/AF6TdK2uJkLUncEDP7Gc7h7zvxX8JtYH3Uc3dWkt
LBUsYOzsyiwYYR2YkAxRyv+e157/2yXm2By5CXrCI7h4G/74nXywZX/pr/AOCzqjDmPrmRZs1KLspSVnz2wPS16jtjAm76syyxW9Mn1eNyrE68zepl57xk3hCz5xdHw5h4Kxx2CAYmrs+wqaqnbTPWBobkr4DtMWnammHJIfV+xNMu+1B+5ijU99CLH8b8v+bxX1KBTtZHsb0aOEVhKNnnvsfelsPrMhbaQ0MgGseY3x25mdQJ9IR6lDfkCMhpe6MAfQ80n60mMBLEsltCfATJrZZXWN7vsDC64jjrGxSVxYsMyMCkqVYGigWEOTuGZ7Xc9WoWH/1GunxQg7bvtiMQnphwD7EpMOe1m7berli51jpK4AiHh4h1xKKYGEof/+iklJdcNUzqfLdttTpbVwvzica6JWOiAuZ8jrbloJF5mZZKXoikelPblnP3RzfN572Qm5Gm5m7ZpOzcO6UyWGadiz9gn18k9gA/F5NPNoCc9yKHN0Tcz8BWAGm+7PDdlLqUVHOGfxZZw9fofaJyypCoiiUG8M6MpqfQ5unzoze6cZO/34KYCSy2snJoEnUJRQmrU3ypXMX2XldzRPHKz4IIVcQ/yEJ0oKnkJQBxcxZY3HjetQtpndD9GkZgGEF4nwIctU1HSw2dH7H8x1kYSAc1lpBOWMoK8giatSMAxAUcDgb3vvgIq+fUXx83iHmxy5b7iNpcdHaiYt4JXSsZtfVEmtZwvOb49VQOqSb6Y5XbEzEyud4tAp8UVYpOoOYYl6OxPMOaeIxCiD2tcAbTVfcsKA//jWcryYgIigpWUT2nrHXCYZZ81dltuPyccXL+xeE70Izw+L6+TbEhO5QCSUEOu8MHU+vKYNdM1IN2USuPMJYJZ4hpPsElxp4Ny3rghKgIaTeQUl/ZIv8x/I/5W9AWKheFRoUpt4oAwI51LfLdeGx1HutiUi/EU6Pq2dEYK3M2A47EP49bAVrdZ13+sw+CFV9twAIzOQaa30PN3I11WfHduTyxTMHTtegRmYGmLpEmrUiNDMDLv/0jPDOr2//ySicov7pEAEHdekKiF8BeNi3704Wt6r270ZfC2DlOupa1E7Eh5zVwSHGhjFVmklNRfHNwg7JJJgSpv4YfMu14ucsAB7hcvnogB31Vl5aj5twGZh8XK7nONES2oK9CCN3LY4XzvJZOv7dFCwlRdw4noQYCrPmjPzLaQVbsZ/j0QZ1YgdMzP/e9ff+tCqw7SJkcI8QsnMNSPltKHBgbGyh0WTnEaS+iaKoxylNnFv2BQnSp6GrJgpDQ594i4WFJVRfIz4zUWb6CSKYJYDvBt6Rxhiuc3uNhhZifXDN819sRzmuZQCUqYDk4oZQlGcXkrjTBPBQxTF0FVIuALna1RmWTrlT6XKdW+GG+34EeJ8/ySxjkoI3KqbBW5TZXK5CeweWKqjk8J7gqWtVBAfsFUYqrTRlU3zAOr8SCRfcrUep92R1y/4BclGZGKS250UG6lfkn/P5/1AdezjJsaIXHzxPlVWyLFi/PNV9LdXoO1cSfmaShpanKFSSpMTT7vBkuCgXYnpGuLr6sGhwQEuMc0S2Acr53X59uOSjVsDjDaJF5gYBZOOURkCk8Qsmng/DKnldPkxj/tNt7MW4vLW+QP/orn7AUhmSdETIkO42nnYPCVQDYe/jOY6sjNl4LAaeV3sWkcRLy1N3egcPQvBcUnEgJezARGEjhF5gF3+ZsgN7f8qCR35jafVBqNGz83Tavhqk/fE9IXi+s71vGQcghpYWlkLuMyT9p6iCsHhiMdn7BBByyMYpN+AyPH08x8bE7nB7EWyhQ9OcM9FfIW/jbFRDHz/XRalnbXJewDVDjvXqr/mJmc4LJRP/WX4xffiAgbd9p7wr749PSMdpGllBF73oz++8wXhY5guUA9BeLHnva0IXg2y+Hw4E/s8AARFoUwj1GV2q0U6BowdSy9UlSb80D2SsTHoBaj2z8InXXWmQHCJEu0cioO90uzc3hsb2BVWmrFdyY9zZBxXtfJVBD6RGQVjS5xVSQAligp09vGXXJyxiPBdEJ3m3fYWv0K5kIJh4SYwV/xk7hMiLqT7Ss7Xc/Qukt5i6nrL0Sy1G5WWjJp3SfpR4j8jBy4C9lEkt6Z32IZFLEuyTNenZNXZSkDClYlHqrCf3jtGQmRu/X9HgjjtUqqjND2QdWzRYHJR51D2x3zI85a+u//S0903iHG16Bmm70nXkVBSWtfKHeYAhRMtjRTLdTXIaQOjdup1ayRxEZaTfnB7SsLBc7liWpILOW0DA4T10t1J3M9+3bHmSneDI6r7AY2KffV02yIWvQoU+WYfS21TUvlm/Qu/16EPqv0YpHrkAF3e7mEAVB/IRhSE5fQ6jrCRS7wDogv123myV+1q90Pd7S6ELbiJdyZ2iVJZRZ8FLL1SdiOnZUw3TzywP2LqaQ07zXlopioKQqEHgKSr8AzEBM8ojdnX5FQecdzTKfp96nSzAp3STEqKoTI8f9F5jaoTu6Mo19yr4Ev6tvbPOp45YJTuaqp1QS3hFFnp/9oEPb1jvTdOAkm4aKTaNp96xCSMO3WpraLnqXWhz0M+Scm0wsaVdKCdUCLeApVoYHnunXKi4NK8wriXYdjbUxIi7hZBSTH3POZ707teGJimwwgV6Pn79smAQz2QEOzd7MUm6yq4C36LJsA1K8hWjSt/B/MnzYu7nDZyo69kb6olvpHx2pJQ1LH+Zt8mOnmI5vFSihQcs0fWD51hrevkHTnCH7ZbmWHkic8KVQl+PyT99eFwy2MwxeSSJqiL5sBTytHHcv8tVcaOLFkjU91WWxQnd1AH7dJxlzmOwHf4PFgIcw6E5TG4/bKQ83lNLEo9VuuS9vdD75PgCMo0SuOjI2NXjiZSi+nHpQyZkUQTToB+ZKe0Wth1CJ67Jjs6687KboqSj4J7d/zIfMqBj3Q+16mNr6W25T1mTpB0h9lweJn1Cs2+m1IJ+zS2P2E13M2DMaxYX1a5jxS8apluEdQF95VeHUVRTrBvwe8n/oY8uQ0ChYJN2plo/BoJsbRXYOGYWA3CVvDMiZm/oWVNb/hC57I+umWBnG7hxuOK4c8nJBuvR8QRpwL0uBbCaEL2DwKdLNzrxGh1TXG+Q+jygEHhvTRCTfq/MCATbAevsMLB2NPQrFARLupA2cVi1j7muPQaV7ei/v/ywmFkktjsCFiiigrBkO5n1+3ajKHcUvl5cp6OYpSpVhRV7gGPaFKlFO+W7HBumEX8v0/TWhzoq1ugonmhaDn6bmbVW8dKfptffRuHb/u4d5nG705jDjyp/m1m39TQV0WUufZH5NDnCFGLm/lThhvzzlet+Xlw5yDGxzwnKQr72dEIIcxb9bVqgnx8K5fP1IuWFFmcG2muAryy8IFFdDVPgT3dXx7HVGc7PzEsHcCn1xh1qIKZ1hHTb3tfx91FXbovGgCMLo/jY5PaX/WCsbNLKbPFkah3HUCdjruUt9IBvCvizeiZ+KprPs5v/CwC4DAyCm9eSL0ssGotj02QEDooGLpIfFZkIeRDtk0LpCfVVHDmYvo7KjJWrec5c51pI1dSRGeFxAG5DjAN7Y0iRumBfY7WA7oTo4DZ+lEdpTAardhsnNoI0AQUT0W9YMbv7szayq5jOGzDEj5NF4idAwaKZaeDtBlIsv5LbWKZR29Ty28cgXkRaDy1eTBLR+/rMTJ8xhaUyE5z9NPsacx0FOjbuF6VtymKdb+wFuLBncmRr6PQJLr9BTSyJ64CdaW77eAbggh4TEVfdfJMjObHBIychfFno9JBLsRHmF9Ht7MT6EhnbEBM9pee/HciPJ1aSZbbZaqbi6G6az6xt8joaLR3pNKI++71b+HHtY1aWIcvSdwpidzjBTongZpkn3tcZjodYn8ZwDBEy9SuYoGPts21iCFjv8UQ4GkLvwcXlRvTNf6pIu8eUE1JeCBn/iIfpZnML0H67FaB0nUkCIntQtfyRDFNdisBUTDeOsn8cGPvPu0L4CJOdKaamE65TgBktdJ0iDoXxlN/QgMdVl5qWt2K4lVhS6edf+v+jWbwWWmL4AZiELf/Tj2+TY6y7/l6bWHBQIWDTaoovLSG
JGyBvL7nGfA4tSDTQ+QC0h+NpNnSYIhFSN6rlzHbtsIjLhE/eezXrv0Jk5q8UPub1HX98jO5R5Cgx7FC1ltri0lA3iGFnG80My1zHEA1DwrSWRaRRlayekGHiaLA4CTvvXCGwuQxzup9/iDNAdybu1DxUxGpfIgkHeLLBuf8RiuHjnLBBCLmaEKD0BsFfq6eT7xWFXgTcY8d8TuFCAA4ORR0Zes+HeFlumznqWL73HFRgh7Dw4iKiaJkoIcOVdTyNlGEVbgUskIh5dCswx2ulwbUR4zwhObMUvVm55he5NB8QipETSbsI9+bE1HWzEm+fr5FDToMpSgtW7j79k2asVbQr0bU7WHbc7JMRF7YddM+QGgfPvx3M+DjZr8Vo7015zCl5IfQRSXue/cmf1YTI33oO1MlcwdQOaJGrHoxBWHna1P6Xvym0ZX0gpf/xGbKlGEtkrTaWmd1jXL5ig7NgR2q10LDbVrWvT509uRHUBJCDxqMrkrrKJgE8wFttXElcYjc5T66LJ58ZlNZGz11I7I7dQ/xv4KEPPjnI5GktFpK3j9wNIerlRD83rVuRtGTVkBDwOHk3CfL3Ra4Mug57qqE7Mbv29OOsdP6gmykwr62x1kwiM3rvR8Uy8tfyeuSF+p+hRSiAXsY0T/yCSKKCna8RFPa/4+8C7ug35tGl8CMWj+XktHmkGo/AO64+Bg53jK/DrO0e00jFSJqJ9sL79diud1SinLh/zhHuY41wQEFcoPnkvMgUh/6TYSZmcRAP5HqYOYr0VBa3UhQmGISipn9pmoycHCQk9kXA1iHHxN4CbpJ5FHUCeh9CWCuUNtBou5y9q6lmHxsYvXLlF0tZ58MEWO9VyGVibR8s4AG9WcN20Ks4QJAMc6Xe0AOPEbfmlxd8zN8/ht9dXBWATAnXjqtPr94Z8o3OR1xfSma6HFG18oIor/NqGC+lqIhXgT4bmBqoebsYfo9MmYNkXlnhiTzVAxpi1nBrvCqyu8QHZY6+XIiDFpXs6FqYhnF1aMkOn+YSgldAHLYFgPgUExUz/282W/gZMMrt9ST4utfaGggmAW3WgIax+vOYj3mlKQ25dD+kFSlWTr0/5wsx9tAdyip2qpspVgyUMSyoBx6u/besqlZsuml3UnXLGaMQ58EvVJkKXQLkNqdce/k3eacv8aAKvj8fRgXtkWYYEyQ1CJaLqNWC/bRKP/YOXNct95YyalIkKwVRP41zRXFVlntGb1Qr9aZfeE5/wJT47RmEQfHCjL8r0uDmZc+rnJfhvEe4o5u0ZcXzwiJ7OHyC5HtnXv5uMZxT17FRGkLgxfCbh6QvvbtUv606rd0V8JH7bJ2O9xmGWye6x/Qm9RDRBA2BTClICXNtgc7sqYvGe1Ts2N/mj2bnRB0c+roAyvaBpG9aMerS1mSR3JwAt5Nk8e6CAbN1zdnUYs9fhh+NK5OCyYoW87uiZuw6ojmFXkWpexV4q88kMwEbBHJ2FKk+oP9Vem5Q80lAFOPyGpr+nYpqAdG9Hw3Azud9OEvFFuyZlCnkYsPiNH6qtpMh6f+XV7Dm5x/dM0hSUHf5/VoMQXvGO3e762IKpXBFLDH5lOGIPeQLqZwRlq3KN5pP44lCICopfwuZcyYQte8v8IP2j3KSCWQ45WGyFN12nIm+3Y+6SzAj7hcJ5cPdyIRrpVWMZj0FP2R1vPQxjQYKqlySakaj9exJO7uAoKe3/cccVC5eFy87dSPmxJJDfxkwzLoQleLPO1656lD/02+YTMozGdpxlNzmnrNmXk753LbThPFPx4hq0uvNMW2aIWMHuoZTM83Zklqw1mCeuXCStUIKi450MNiWnPxuhJrNk4Iwe7rHd1uIuf9okCtywyh7KkSVxTuLCm0HaBnW3a8JNtYEn4CcyLvhO1mdPyL4REg/yWYGY1bqOXTRcmShn7pgswyGhNDQarUKJO/IDsl2Tsl2c02AB2TNsJxLZg2ywH1vkZyzt7qhjO3UqapUG9hPS6f95B48FbEb0W2rUkPFYvXeUi+0zfOTAiiGQme2fDpwOJceADXC84FHPIee7mqAD5yD56zxZU/O8TecRU9mjK0vACnd1kwj4cK40qlJs4suqyWiKIi0HvNuyQ6wo3LkhGB/fR0jiN98ia0Ut57ueGcnx6A41CrpgQXy6qjHjyTczy9VTCZ6YTCqtbHT/oUT4V7KesSDjamef9EVfw9CR7pdAM7C0sqnSVc7TFUKe76D9efzVdduQ9WlUn1M5cjk5GUrdKul8h4OyqYQiWkjakYb6ywpBwB9gf4LpDtGPxCfeSborxHQkcDDyTQ2DdORhMah009jeUGcueuphZHRHR2lFtL9htzfPR7QiQu3ynNJj1f+UFwm4xtwaevavbMXs7CgxJJ4IpaIgSaP381DskYhGgPejOT4kLfHNgQ0oeuRVH22d89S8n1RfAvOFZywzMdjU5S3RuOR3MVXKhCd41BRpURF2WJ5Flv0W7EjK1bz7JSZqsQfV3a0/aG2TrjEEy4acN+IAjwnW2v0EBiObMAq5av6Mew3o0wL00gsi3ibXdTa+b/MpFfC/fZmAoRm6rtHZ9j2JZT7fN9/SFufdgnd/OzmdYlKRZFVD4x6BYKEO0A2/fgOfA+6Qi9WRzhzxuu2sAZW1/LuYV6ubna4emFEzcoEVNWYi9Yp7jPHuG3v4yaDGN6yB3eFV06Xi1HVc8FZUsOfJ07TUE1+h+uIh1ZwzFGFT1mNB9gsvKP/fobew1DNWW610IOXxtosBgcifi0PIIEJZxNb/gZaTlxt1chGqaHlLDLAo6vB47pDWyj/xdh1NxibcS+RRD7VTFB27QePE+KERDN5zlCgGHrLxg+e0iyNXXxrg/OLWO+l36Z3lpMOQlo3YSnZ9EtgCXdtgJAdJ8SOU68IFv0VpUVIxcEo6f1Pag4jV0+1OW2hkjmVBEe8Np7NydN+S/y0lUiQfQ4D/KhGpY2LLqRxeA3U8FPzbOPXi4kzcqJCd08YIoUS0umlQqOvRoq9mPTP1r0R/CCmHwCMYYI8C9R/oxiqMeKZbNGBjNjiyVfgPXAhN0rGil/rZVKXV0CO8fhlD7aG17iOREYvfu7EtTs6QO9ccTZSNaWIngAlbO2If1R/9ZhKzdrtwZ6/Ip5jL5xST20tQv+JKQCz6pCrecwwje1kuJkB9+fJhbTsdTzOuvnTWkw2dKVzvdjNSLsD/PEfgV2u9dyx+vHfH1ZjYCtxcgJ9jqqsNoK5nAVPeHat3ylaIP43s93Zrvd4spinNRV+LEXRFsgut3jmTNP8MEa/8mq2+kWc4szyC1htK//faxlS3NFftmwuSalU76S8ja54yJGW8pX0y/9EIUbmlMvsmA16RrfbJ5quHV9ZJDOdUXxUi70yUI7qlbtrx37k8fRocGERzCVLsPa7acfe9XcaAdaQRqdkJWQxZuZsZgn/FNEESAXQ0DpBH3z63veTuhTawUogKiDd3o/cMRXPMiFMcX6FC7k6fIs2eeu/DbE+RM2Bhk1juDWwW7p46tLXKdQ+WWU/j8YBsFWO/l/FmcPrb24m4++bm3ZHGBweD/eYWeEJGQqGPz0VjJdVAV1XH6uaRoFiHOc2mGZeLBtHHVMZ803cMOlaQCHZy8rovgDOYboUkuRJCPizU6Jvz4ciLOH/Kq7IFV0ZlEeWmzJzF/rSwYf1/8YPSgU3BdepolmCCi6N0vcza43cMVQiNVhMTMHIzhwpJ2ThXhE+tADl+RpKqGEwI3xW46BZwGiXL/Wymbt67DVvYR0BvWrJARNR8le8qHgq9dU/0ok/piUFJUthczBbRvGULrmRrx+Qss7x9asvjYCdnpm36crO8KKEmdK5sRXkScoV5nDhRX6IalkJMJdYxiINIKOE0uTWQLcQSur0o9NxABk/dkIwZZj5IsWkYQ5L1HY90emJXTYhpW6wg12NHooQ6J7jKw824O84SvyvnzgEuhrp0lVXdcsmO27hawg8DeInBzW3Sj8s6ft0GCtiBMopZphY3wexYNz0+jungIQbhCjGrLyRVKHx4yXoJ25Nokx9lZA5XVCISGRy/F+FJpRTbp5Y31cPm0v16J0CDt/ZZ7ar5ia
aIs50W7QMGKvhHEEDOK+m1xL0bxKUz1x4Pnuhi2m7gME0wkcxIMO5aVWI04laatacPLwXKD3RwG1xUWW0WW9BdHa6bFFVfWh7nW5pnNAp622UPO2XKISM8OcKhmYWUP9vGJ9Deet1+zaHdITm31LG0XQRGSiq12iTMU/vDIzr/Mlhw9I+oujkSLd8l0D8wfRgOx0Mn+invHF1yNHUx8SU2xhfNDvKdlK2zpWOjnW1RH9xVDeSC9RCiZ4G373aHaFw/joxUNwq55U4A3yYptohHDsNIf0j8ykTUsOx/ezGwkbp9KysB3YTm7/tSjA4VJxgZPCkToNOieiHLSWcYfnUvCMWVBfozuPctsyftUFBPN6j0lgQjl6bFsMaxBBIZdUUtTwyde8VMg+9yE25W8dIasf9SVwsVnQJlw5XjRw5md9pjTwMGx/yeRdqj7ps9VIwlRzY1/CcST6WfN/XMhXnisNDWN+wvbfhGD8gfIfnMKXFUoDaZDqsa8ZJuWwAsGIQnlivf5roKDB6wNV8oTsRSsmciCMlQb+P4VjECqDgKEiXt8yZRKL1v2h6fUP1Mm84Bk/qlk4/CHbmtuxpaBcOL6Xhuu6V7suCZgLo8G4kfTtsgJ+/ub85vJ9KsHJ0Xwia2Boytxq+umR/lh10k2RiXjHfOQV4FR+HtV7//RiOi0zRUhmkgaHiQT2mjJj+Mrb0kIS7OPU+SjdKTmT1rgw+elMjjvBQk+TddpKUGOd2rxd/QVSuxO2w6E2DKpaeRim7kg5j8v78Tvq4gXeWWGNA+d8k/idsG4JpVtDjNfdNwjfff7nanFPP34RUqlJO816VB9J5bxV9bG9GDXSbqUxZFDO5pd5I3sAty6sX+TybxeGR0beF1meDGT5wUu2h4G6i2wzq7YqFJfdjBXanFFIICK3TCkK3RruYgb5Aul/AgJJ9z1aX8wMnvwVn9pdIFfCx181R0Ryv+VX1iTD3nETqkCPNu4WAroDsL2YdN0ZcmPNz/Yvl4Ty3rLZacbncekb5sNsIQ8klWcF6Hz+YbqymFanruJO0Dr+j210gZGujX17c53V3bFkK/m2A/onc7xD5oSsoiX2yBd3h0kTWb6R6vyjeWLykA41GmbgutZDedF2bp3g5JhMTESFVP6Ze0pTIokteeQUQRLOPKawAiH2z73OW049nCcNCKKGAxX4cQVpUubxzT6OPSVdQYpAPaO/Wr0vO+ZIbLzi258Oiub2fpnKfwcHE/XT+Dme47NKemGQfOhWqPPt5wfwZObLvXBR8VeOmkifI9G7UIyTDo1xfJMQlVj2z9d2pEH+zGnYaEyXk3mfz5O0kaDgh46a8yK/ktrmujz/iWdjYS8xqDDREFLDu9QXRbc2VRvy8NpBQvTouQ/on2QiaSfUf1WtOdfL2bPov1dDTexE26GvxmgpmjZDUFg5HjYMgZ2qvT86ptUEMER8oaunDdMYA4js0pM/ZBmc5WIdEcO7JOdPXKfg5bF09rtGndF+VN/iwS2CEAK2l9+/3bjlIk/Bk1F7FWdgRD/tHwJqPYY474OAmIBQZchmDSzBn5witeAN2hVVnmepFK0XCLwZRuzeI1r51Mhl9DZ+8nDB3lA59RddGLt9hVDyznIUcRUocWA1i+B3MAEjJA2H2HU4dyGOf4Q6qwYsCj7G6+N30/Nhe6eF5piY35zMt5+awve6XS74cjKFshSsZAlwyfOEeEPozI2DCtekfuf/lkCzWH3yGOo1fTepONq7HRG7i/kmnherMEQgq99MJjwjTqWfSms9dn3UxthNu2jw5dSBZyPMuUwargQjjHMJxX494dSgGguFddjW/wUv4EohGU3yvp/sNNr0rIRGep/LFPekiTrGWfnPNtAX7FJZ36ns2cmGLlnNfizfqP/Y6BidO1ErFABhJDSiYb6LREV1cG0XhohJBkmFR0nfknP8+nJ1lAiUlANgCPdIabzfvCynbCbD5i9MH7yPzTRQ4n5nIMr6yy3vK8ESEJfgdGzQspvE9lnNIZ84dtQze/ge3p+khag1hXUU1J/SWdsruMpvEj5Z1eyrh3Pe9u3AenzOw8AYBe1QRELqvZOzj1LOpFB/t5nhKJjkL2R5yvgbxgsTuxqGvXCtxMs/l80t0l2JnL5f70db+LGpJyZnoD7nr+EeqUgUd+kim1JsUV9GIKG86JtJZyJcelJrCtVSs2LuMTRFcwmbODc/f5xVNiQuA9BFaxvBvatke1PLIElLQskspBYLtfRRM8iLf8oK+39aomMxreOIWvoZcRm4ZGfoLbpgjsgQZXhD/bDk8IhN/sefZflfQzcSrc8XzDEyufMg0wNPCNm4BWguyVaMCUmKSn+TSnHJ1f2klE7Vp1ZouuA7IEfBVK2U2HwHvVCi08MPWXijegUXmRX4LT7pl6rEayJVOs2ApjK5FbbCE3DevEaGImLHmTCFWoER/JnHkv399yj2v8LPoUVcRGtM55k5/xFGB67DWj/RjFJUeEPkl4ODGZtNKTYFfJpnY0tGJEzB+wvuwHLSW4qTV1a96j45itV38jNegVMVmAn1K1mp8h/2e+gaAHdfUJcLEcrN8C1ZJ33pRx++Hh/9iI+cRtAuBTyg2v9/AQab8AyV3ptiRp9szvQ2Ibcp6730/1lzfEfpD1YbFgvR5AopI9Es3S9CgpiaB7EQ1RPbRaAwB079KTVzQ4NtKy0vrQ2KjnFmgnOdyEOr0l7PU3Rgzbb7IeANqXRIOY5cJ9eMAnRKdrP1aPqXfBQQw8TJHczShX44rJdV+L6hDTvGj3Qahs+xn4sIicl1ZMwTJBEeU0ZfbAvd2RcN0e/5IrpOLUvg24O+3Sc73DTjF7hiNm+gDPjDeIC43323vOwkaW5aYEeVuusRZ3sN2rUoBiQSaBBAvj271ODwfFEJkZ5rcsaVbRFacX6u8BhYEaR0en/S8fpfIk2l2XiVqyEfSozMJpY1vMmuI+IpsmHFwyi58OKoDYv3dyBPql3tQHoH8iKEZoFsyhjL30nk33jh/3e9Yo4uE9CQgJtr9hDqmuZqeisOIaITF8VYlSZo5LJ7kjz9Le7Hp/vQg6ajgi/NepqnEUYvkErl54rchE+rdLk8eD+jbRui56Bm7UpuW+uDi/7fAmeG7D8V7q0kPmnRiPSGOktwF0gQ9H17Q0n7v2v2vjUlDY2kG1gRyRdWZlGTkgaHgZ4RFeQggp6/97Q/WfYOx5IGtVQUQomhJ4Fgj9Qk3ymNSKis1gILJE/thI5xv/KZeSPB3YxPPJWbfzZszqJ+rBQRhQ+h84lcLWua8z3HOggGIfPCL111d5NSeCg/K86iHVCDU0HVp0MjbV7cQP0BP/FphyCVwGIhbuYvPYdIjRkLmCNGobGW27Z/pygbR2F/U32wnkcitvRpuh0kerIZuz2Ngm3FKVR8Glvj+08d1I6VuncNY8oGOJssSA21ePEhux30oTA0+E2vBIynlZOjbmzKY7yaQ0K6Ycltpef/J5XHLUkzqfX7oH6dDT6ntpI4ZYLq1iSw56ADZBJMH56yjTsqRUwIXa2l8i8vdTb2omDhZMjT9HWuCi+gzVl49q/2L2hC38jXjz9Ql+6pT0onvJtfFzypK3rTvAVAbvloykGokZkCmSzQDppg6bm6nG4LzJz8bPptJZL9Nn+ZjLQIZT+znCtTVv1YV1SU8Xl9NXJxRiPoao/flcNpLQb6+o4HjrwOg9B2H0USVucn8aIhrCSRs38jhSdkB+1uWa4Fq1/6sIM3omr3EVD6uwH5l4WFtdrI4mwKgsQxbn/3nYjOzYLMc8kOvKlmZv2K8/vDhs7P1x+tYY5qwIHYwdYn1OWbV48H2wmD5Je50tFG30t0JbZ1KFHuvPO1s/vLngdIXbJXgpZr4CeMzZMbMnorA6G/3Rd64PzdmReAlpfae/bruIZScuONZYdV6gZa2XAWSMX1/rUJFtalf6iajKFcUs27dnB81YCkFF0haF8i3aAY30kVogA8uozRjq+ZVHFgEq49aHJs+r7qOLoR3Yw9xQxeO55MQdJ5n1wWhNFVvaTPzNQ2O6ESr+jsrT/xE2iERwuWzO/w7F+qT8DHKbTtq4Jz8AnXwlKg
+A2A5Bm9m5UbNsfpVA4tdcFAYzcZStsJOUfDIUkbBcN8JhvOPE5C/nFlm2BbTA5sQ4aMF94h6sn/ovujTgZSYXfpthCnZZLUyl5weXlXDINv2MvNryTobkmlmqj7tLbAnCJx54HdotMvBUCYqv7xjthInoUBS6Nhh1nzyayg7OaPo6pMrkQsJGdeC4E8IsRy0Uiv7QJ8LBq34+B1Y9FbnnPLplBM10OQQKyn3BLMCiRHFQnngb5t8W9FwlLc5TjWyVCFQN98harlvBQIEkctV/jRAaBVoh29Ru1IdVVZobU5CEprcZ7BKNYbaPGaLBVDeaIBF90rx1nnarU0niw0jgSXKlUsqxh5NMDTuM6/8u94NbR58F5LomUJlV5JzTzL+0VbJ5iSwhHNj/106bNdNfhPOTGqsWAeIsI3qNapdyxGT26Dwln89646KfdKkfDxUlxrlswqYDBTVPNeJGo7BUXn0UeYd77dt7hsHLo/0Jex5GQ4Sgx/QF/mSEqlCO63dNeF26vZb+3iQrXddBiadUx5qaG620fp0zsOgbYTCzIOpG5vzo1j6is3Sx8NAjD7gIukbdPvi/FcyH8gw22ne2V5X8C6rny9Avu0Q2WlDiBZuP5RffmqWGsMqZCKwILheWLKaZvojnjXq1JI5saMbM4SUVJLROjnt//ACLicWeeztuR/dvQ5RW8GKb+SuDa7G6BJCsrqUrNkCj19DukoSQwnjteBah9fOaAnUZDbs/QDLJTmT2vIERPTltnbYYFHy9iuXmouqF2/4KbGQMn1XSUkbf+1+73rCShaCaHSgfcIfVgdUq66Q2qT68RWSvZvykes9kOmwrIPo4JKzOTTKw7A5GXBmPm0ce3Evf7ZCIwMNqsgL/lNtkGB7TIJPgB3QJmc8tK5Wk3sqADUwadPgLRNRGu85gtxIXUb0xUQnbJu471ZRnL//VziGXIyYPcD6hHpeq31Yc5PWBdKIU/RGBgAFqszMqJ7A+mXI3vZqe/1CwGMU3+M5KviQzNhAapsLeyQrabRD+fr7rBZ1/ioT/nr25CFhuj3dZHdB+rsG9htR5EGgW4eGm7nY8L49cOhwV5Ah6kduotN68qZmdxIS2wnRLhkXMYc8PbHqGq6A0oFhZsd08c1lTM0qHMtwyUUzvdapyvHvUmSdR3avCqqbyVWVNXaRXRkMi0zKOpBpVM2LJN854t4HqGI4jepOhTDkhW9DGsMKsICvhJZbKd3H0WG57dXkl183uPZImbTDyiYSqCxOnoe4iQVVo4V33NkERroCDrQZ8e0NjpBzPGRXb0RxdZbsigBfW0Qy8n5Y2FCs+UWfE1iquFsCwadX+KvtSGQPjJPO44ZV8tsHxQ+1XxNo5Vuf054y2eSlIXai0zJkTijR1OgJYPr/OyL8SXq1xPcuKhLqZXdvo+1z7aB0MdRoVRye+Ba3W02ASNQwaHThEztiAuEc/xHXCh4QtmBM+P0NKygfozPzeZPfT1/jOjA7fKJJE6pDGyHgEEhSiQ8hWJIoXqTjFQvdqt176+aFjsTCemEIYAYmdirmPFdO7xxElDrPb8ZKUr+E54XjFb83L1tRpFT3s5RdPz1DA9hX6CUS9wQmFTIvVPEBovUi/lgULhYEzD0lPPXjf8njXylLtVnM1eqLslwNh1oPLMqk10aftDIOfWXVjPT3tjQJTxDtFYgaU7CYNGooO0rZyhDb8JslN8sy3eMWxuf/lKMChHZmGkR8NzI+dTfoPkX6P4/gur0vvvhDA9acDnnyi3HokncM0Zz7KuUgxomCnPyFOkO+nhUaWbE61cwq0gICBFFU8EdIFoF1U5eT+ci2++VD/9yjQuEMKaSk8tl4NQ0FApKhBjCmpgA3KGJdJgCnZbikhSebMhv3y150Il29PT8NMTOerDIZBoR/UXhl0xhK3zYv1RNi8pA2w0Z35XyNMlgv8aWn8r/URsRi+2e0wZraP3trrMixa/6ULhhT3YW1w26b1dwTUOCMUhby9CNupkesaHaNXRHEdYBqEFj2gGROGHsZsd7kdp7Cv1FPqkUINqy5Ssfun32jRgIns19aS1boG5dhM65AW6m7IbVznSl12PnjKF9+gCmMnT8rS2yLoBnD7yG5V3FAE9msZZDTUWntkJwNgGjUVblNnfwBRRpHhSI8pGUfglWpoRZd7o4hXKnzgvAVWuEfjWyUhXR+2yQIxdsPpSdT6IA2An0hLQXTEy6Wrx9f5I5XHQRcwJrmUkoxhkZUJ7Mw3iLLHgUxFRTEdKcYrl9wecJDI+TZ233HRrsCxqzl8ConP90651HVomEmA0BZWFYnH30aK5T8uq8QAxNonebO54i4x+vAc3fNAjw1Tyw/FYw+CFEUZw0+CxkM2ixAK/Q6bUHRJ9zlqgO3EANYdJ8K+579oOYKnK7KtU6dKPC4Gc/jRtdICf4Y3buiMXSoPok38muppH7LVGj/eZaZAjZWCpmy/sStBeTdR54G4kgEQAm9pl2QH/KCEu8zI5GZZGi/oOvNWMX5VmkRnWBka5q6ZaU69aAuKtN0kWHhAhH5xoEdE1eu78wE6u3e1JLRzlQXwViETwMt0F8+e3cCQQuxONZrQAp8p8nynMON48T3IHRk3eypIw/Qwem69Db+gEdOng5nqtiP43OOvzjWOuXCC3P9hK/fXyLrL6WfSeUF0RdyKttIloGbYP6uwMp/7IYxtW4paj0geATeURJ1HIlE4keJmZuUyW/HXvPGtQfrOzsBBu/PsIhwqUZkLx8bq996eKI1Oq9XR6/32FuEJ9tK0yNviiALfvfioJ3JEZ5xiwA1nROFCh1hw/1U+UdhyhZQLBax/e37yZoVFw1zOYh6mSgNo/ZaXMFohk4ORDoFuONc9VqgOuWrluJhq6IyKHg8L7h47DU1Om+MnKJKrzYDRQn1fXMhBdgbB1/JlWEJHdh8d+hNs7TWoNM9FqJv1g5oZPj1sCv1lrsuxOeTPI38R4dJu8t3voU3hRIC5gkTG33Kyv82HGP+hk2t9/yTmRlyPnReBXVSEG+wriHbKTCjaGRv682dwEUnZqiFOD/tYBpymEpOpv0deKHSKIBO1ImE7GTAjWC6NftPyxpX2hwKt2D7FoYlOonRGl45w7k5flAB2lTIliGDV3UVGbLmEFGmbyeUDr/BjRX3loOkuaPBzEIqlR1AgnwODdY6hSUHqFNpi+KiuAWa/VFYVjtByB7yQyTW2ze3CH7gmJ8Q0wCYCEVgLw5xzORfoyvP3zQoc3dSDTBB/pLWe2TPH13cxHk0g3HLJ5C8qX/TI6tQHQxOAsRe7czpOc9RjNPKhX02WwlBH1nuP36ZoWeoCkzb/l612aCe354+mBAF714FKahaHGK911aIOiP7Xc75gJ6BMwrBKXyqJ6F0gVWTIlInhTZOgzC6bzXubNVv9ZMmW5jKG0xMlC/+b6zKJfl0rDY4e6TOk6sJPDD3qkQlSg/zaVkOb6BjZIEAVTXFeazHGh6Y9fQM/hNjBfsazGDrjNxOlxMqo77wT2bwklOACqcxYmr5miSWTDRTnoKJ4RlwcX7cWaD/Y5RsgFd3hfgO6EvTmFR5ioLImdrpcHgXqT5JPa+oOjttZYkz2orvE5FNlJCswlnV3FLzwV9S+tBiK0khvinPxhPz6fCtUjbOl8mPbW1nIsSMy3UIvYJfFzpF/cMY4+ZWgbglluA8yKPtLOJpKbZXLimOM2TYpe+6PEevFWKNZLrFfXw1Hkf10FjqffY1ViAhILB/QGgB5XqgLMdT4kMi4ntAApBr+w7QRu/JOAe2zi+uH8hnWAah29vQvoJz5sh0vQH3G9sGFcz2Sn+hTIGsn4RjVqccMAXrC9K724spFqA1dNO1M+VnuT3IRMsXJjF3hkjgVxhNfW9yO72LTYJkquOPdE/BRrM1TlANgxLvEm2kxNB7RqMEEw0fQN66FYcVX8tYVaNz+P6drzhSJ/qwgtTMLmgJSOU7XDQPy4CvfknyoDd1SynZIZE5RhBftyjYQH0gFwY3A/YEJBiBXpmb913QVjAZ9/tukzYRJrPBNriPkMWGom8dbDbdhS5/fWczMK5UTCAu2a8XjDyCA3oaGiYc8Yt
IajEuximTZ3cmlt/msjw+69kPp0seuqKoxrEAgnbqWSsSl9+rv9c3+K28tMTaRAmk4urSNVg3GoVDRPrmUm0f72HRK5hg2961cJnAFkx2wYu9vSgw9r4sw+UxbIV+eOebagg1hPdX2HVJQmu73k0as2EFc5qng6st7cwfh4BlM73QCNXbcNuV4v35jFIdjoNdKXWY4pvP0/nEAzDpCE3z6+k+9zNU5rzI0rg32/cG8eKg2gWQSzToJU8KEq9w+vuQPY7JKJsnjblr+eHxJaufZH9Up/rEhj6Y15bGOlakJFyJCjE1ty69GqynwMDwlLgCDpQiGuP6QArx9MNR1nQYOCJgU50FGxwFxjutfuWBrIMKlju+ZP+jDagq+MmIXBX1AhQOAraFxrYsJfQ0UVwaYLMiqfSTg7BYcnFDH/i2bsOd8tOQeV1kw7051qMm7YuHpCawVsKUJgRp3Gf1l8fP7T89WPYfmB5mWtzfnjOgILLhh9DtRZO84qcnRiHl4ubL6OFrMxQeM2SRSnH8ko4SNyFO9Xj6qwjGiiInhvJvFFtpBmw+z3XpkCZwJtWQ9HDc8DLSDlNbIpzjsM79Tvw06K0j2qA4uRDs8VSkAkmtnPfWYNR//ccng1JyjSXv2I08s88JKMZ9s9iQIe9rHRX3y+KCswYNAb1AbEg1QmC7ku6OA9r+kS8Wao9t+J1vSgPPYu/tWbRgRi3KTD4DJchry0W7EkETyV2mFpcjk373kqSA5elj7reGKTkTD2LgsRcqlrazJ96Ug5SkkoQoscrr/thvvl2bwF1AK6EvKa0yVO6uVzM5kIwbWSA/f0AVaUVce2MaS398q+kviRrrAelH8iVVC4/1gCMNj8DZubYMgEiVY57ezekVrGH/XB5wZiLl4aUSJIOITvhxHI7s3suMwi2pOnvDYEWKmmGeOsoAyKbSI93e+pDwHgq7wP2A/qxcMpc35imQXMezqJluIGXRp/lD0T1vcnUMDMF2T3HNz5goh2mp4o+dAlWh2Tkzy0WAQzcaAuR8xKK91X+STC/23Rl9RUvXrJkTBmZfH9ctfZ+bx3h5qpbEgNVfljOM5j3RRABhZAh9spWvVXZj56k3WTT8d72OwoE+FRwaa6QUB2AMR028fGk6Kwy8Omih3jANCrMTt5Ya/bD9NU3qqSNqduDV5bH/f/1E//kl1RUOCWkQvEeX7jd2FU/MBCbFp/TsoB+5XgRKC8RNr/RDQEeJGIxvkg0MtN9Z0WoxAVkY+t+DI88cXKpFl4DJVCTCdUIq79yUNpZJPBdwoqurm/D6fxvKVQ482Sd/qmgJgH6ZhLxeJ5tUvnX8BekzDPi4InqMXWvFsuMtxYD75+sn0sxeP9lgE82M0XUCCeaJr9XNmuPppfLrcqY6xB5lM376ezrWYDX+Eg1XNLvdQ2omSXbJWtsz+rLr+7INrcYGdl3AvEB/OCQmjmDGYF7Mk5WBtGKHzqplmDxOzLEDAtk1JzUBvTUIne8H5UsIPDMnERaOnQ0Xma4IH2eiTRxoqwZUkUmQQ/cuAAYtxWEzo7FBOeKZcYPHdzl+DqNVPaOLNwHsT1aDlGbPvNYvycHF+Jp66CNOngPiFo3ifdp53w1GSSqDXJBBBNlSYMdM44j4DTPhG/EBGSpFVZd3gwYoWChOfbZhfvV6G9OVPduB5+lImyDW5ibp2C+S8saC5LAaO3QjdVmZPzKoGFsSNmyHBW2uss71uCjT1/9znW2LA5jnVL5u/gxT6YgPm2C3dI5l0DV+sQIfSaZx3IDoDLpWM1Vrtq1mucFk1MYQuJnTZb/xPWWwkASuMPsu3wf15owVwsK73DT/2ISKN+1RBcwEcW9VK8bVIgyf0ijSuVo4Mjoq+kWFefqEVpo4Qat14Pacu0Che3B3gGOTh3vsrFjzEIbqAUBT5kIAlOuC9cRX1omjkMM7e+lkz7kibIbK7Rnt4da1aw5Ba1n5KS14TYgEFoXoEuWvbyT36xPfi/eJ6prnW8yE/UCYcTOw5J/EiLaAwxEwpCNUYHkALfRsJajfqUdd/yKZJNvmlThlnzKyyFp24+K/wTeJChV05UyYRh6cbeHAgJ8cSyF2ce3EVEPKJ+QGx0hL9MJsC9GvRIsfqRi41+MFaoCvmZhs8DNoOvREe9KRuWT2VYBF9Wd1Qh8ZJX+a/tk+WQNTXwkoFQB6zKW99PjOWp716wggxirG/GUHN7lGzLtY48MHtqq+C79fCzW7LWGV19sG29nKuUIR/rsTnYY4Pn0OQcTkeEM25pAK25c5FRutMeny/YypwN/MM3mqqgk9hkf1biGpm1ad8q0HL8DIpLFamiaAWOmhl3Adl6ZcPnjkE3Xp97L8QuWurm3+6LY7CogMO1YksZO+MBelwbbQbwZq6Yoxt9c2xH+2m6XADKeL1lu02ODZ+hrxgFRuFpIYlwSBUw5dq6/7jEJcBjvze/i50o06aDE7pMWHKcruqKTXA8u9n2iFmtg4CkvGmL0GQEtWCpEOFg8J1IbMP5m6thNpXJy4eby5uYAlzoxL/i1EIZu87XGdELZgreUWQkbRC+MredK6s7+x12B6Z3F9ekKqAnBH4dJbreMZfr4R6mVVViwnWYzsjYAws7YYaXXCaHxyFIyxrR7FSgGDW40L2/zhOdkljZClHt9Cdim0xwkBrKNu/3Qi5RbM+Z7emwWwvrnI7y5DPXAKpxi9iM0SYvUjWeVoEEwsHdad14zIlYoNPVXvQmnuHK9HuiyZz/tgiCqhelDnpTVNr9RWevJRtQIneMwBCkkdq6MWVjMKEP+sLbqBZ66uZTgWZjOtbebUhn4pjBD9feQgndhQvDaP9uhzzflBe26rFt2IBjdsvwWx+i8+uiAlftE7bjORaUY4SnmTWAgWmPD/PDYn5HhhZSAH0txWsc/neCfoM0jj+4ZO2GC8+oCm/32uG1pW8kQHCwntRVXGpPo6RZVyid69J9X2l1WNOz0zIP2b9HOmkt1h+aqXqVbRvR21j/T/Mt5VQTmQZedsv6qC/XItcbWYtLCBV5hswpkYCKetbT/mpaFRBjG/HpIOqODl3UlZmo4JDf89RRNUUAqVRlddGKSimmuSBH5ywk/dlvc1gPWyN1iWU5xzf6fczgYzO07NikZG2lfhUT4gZr0syUYd7Pl7iTOXJPByP+FOqZtqKqvGte8R2/MsedygZjs0uSff56o8JT1M4aeoHGGNjhi/HAj2KbeGGqN0MndJO1n3Kt/P/VnrWSzH2FYW70eOYw7PgVxJE1zl61G6BrVfzZoTVYhIrlpyqgL7xDIHYl4Gw9t5Zdw7m6CVKOkLq8C92qhcskUCwwrOFroTWvKe+aADFRiJBUvov/7pudjU3ao9wD1QvqDVngG51ZVsOwg38KfT3a744G/HvjaiP00Z4SFy399JK7Q+udk1t+fKtn2ySxJ17a8ixugL9TT3tmuP39ihAmfUmAaMGWKbzcHPgWtesGdbB1GpYwH+6Rgm8ja3TALNAwDNfySOraQkQY8pK8IcskcrzigBAttHJaxhIkHmShwzWzlt37CIbVl+ig4OVjcOsXyh0hNJniwMu8fwXI9vch5nefb8hMfUfSNrAqhrTPJ1egruF3vlBYy0SHLaDsUuka7Nx/2s3QKomQLxX5oEwjKxBmQat96zHe46ebbgHJydXesz6NVEBIVEWwQNvENMm0gG/BTwXitJNVC/9sZn/B6veIBqL7oo3xMsQbrhwpikfjjItKgY8dutrWSRqpCWtg3oqxTMGkUT+j87lMQUHdNhG4uMCtZLbcMkz2IX8U68K45DJ0Qx/0VPRv6QSHhM2rRuNOabjndmLrNoObLusp+CxFGv82TAYjhsIQEbin7HIIIzPkAuLtlfC/REozs+rIGyB+9OdGV//eY11A+Wqhyv4wYAaKacQ04YOhD7r64zQvLViuNgaIp5qS8bs/5ah8wuVZdOOi7ce59X/K/55raBXrujSe6NQ09p+XCaJhzM45joGkILZL6rb7TxO4H55IWe/62hqmu8+fEjKtYDJbkTLFtO2hn5BK5MyVALqkdLdKeDEFuXDOBhRrQWKR/53h3SmZePDnrnaHues3UJSz5
m/ZDmA6jmYNDs5n2BPfvdXIQ2lvjGuRhwAAiwlqu2U0BqAaO9FVuo8kS8agWbsIh0+VKzDnw4Qc9N5HLiThCgXW49OXxiG/Jb/z5OT6N5/PhosJSHrWD5jfpVkxt9e9w5GN/FkkxnHJ/OF/jBVcLdc/n5iEekHervVktBH5VP1M2dqnoKKMy0axjqCEJoJAl4Wgq1PkvRpD+RBRHs7XCDr+qoUGMSN0L6C90nlzTRot2uXZeSgKT5LzYXdmn4/4EtaWLlj7uRclBY3Rm2rBvjHhS7GnjdAQDGrixsGqJrGge4FnNSPt5GWft6dZpeWBgPTRFbNaAyei6bJDBfEwaZR2vWS25dcJ1/2z6F5OafL55sF6ki+LYtjfcWp2FtoElJShWhqDlzGhNmbb1Msqxza3lyD+BLR7iNtHKVkEgqao7oLb90bg8gP34Gz3sgpgLhGPkestsQZ9ECg/g9cZnr3om+6FyBTNUmamHCnIvnOTpVRlRZexpFTTBHWay0I3av1GeiI42AvTzKH7xNRXGtDnwc/pZzpbeV15Icj//VkTYyJjGX4VxAzjWWVWbyChtYxXuPgroUkvOIJi+EJFyhEZun71IKZ7wc38xlU7IYvzn5b0OTer2dnVcV/1NjXVdjpidkRSlz6wmQazfAcv5TkYVA6dPM2cpEEmQDnORuTZf+YkyFkxC5anVIbxA6r2DAbtRk0XRP2DGw9I8fPCC0/wrAbmZ3Tab+xk0nKyTUuMzC71UNDLO5uYRUWuCjZAycTfn06qjELUdLuXJLanT6fsB+PssyS6Ia5d6LeJf91YSDRfrx1LbJdH1f9ph4KNFe0yd3zSmOBGmQ/Y/Urig6fbPMN1+wBlur7tvW1qJ9SSowycvQUUFcNN+11/emfLXNYmQaJG/ZxymI9DOGF/jvJkNEL8sQXaSULNejC91RJY1pOjDZVJEtzGK8g0ZAPvN6VeyF7NQs4o3To8Q06wQsbxK1pOLQ3jI7FRy+IZ9uqh6aves5pmWnvy3RSi1TjYsEufK9evxnGM2KIdOFbly8LqiiLs4DeSF39nzXJHrotvgV/wtc6M5W4aSAgR84XIHuvK5oIZsoFbpjEb4OKoSzc43VUYBsse8NZQOxs6BkndrWSbOdMYefrdw1cCl8iBD8OKB/qyfPzwCkZ0TuQIokD7+PDxlYHedE6pHIsCJAQFAl0skOj2E406nQsA4tISplKQnGKBIhvsazA4kXlfrN+OuEqEmJWQq9lUckWfyGQFAJt85HAYpqxRP7MF2oaryltTE8p2n3cmRsvoCZHROrXnI0o8MijDxSFtCXhTkA8POPeOtfvRT1put0tiMUDdv4gqNHufqvad9Mbs/WzfGI74yIm/rQmSxltak77BLo4BtsNIvuNxn5tzJdywqnzLCM1qQpz4ovXM9Vp2zw6kIJurhOKYkQBNAW4LjGLXnURz3yYZuP49Q6pGC9FLBoWmoSN7xsHh0rYPR59pnpFUi/ZaRJdzS/HBFfYaBpTh42DZU3xa0YnJVNvydPwa0gEnha0t9AA+IvOnbfh31Q0zDMEzhpsfTKtt5bUVKJ03VHh1yr7xtu/hFm8Qa47UzexeIHplFoLBMLMF8JI7jUC0hILc5gziIVdZZt5lUI8GC0rb2KiGzvi8C0uOc+dgUGlUflR3n+wYRYxU9Kv63qI048bElWPVqItI0r84QV8iV52poVkyjPpX/xmYC/Q5X2x5wYKiUgY1yzedvin7VrVsnnZHlVpSAzVKKQX2oA1XqEQ6KGNXJyPUPiTUqzhRQQ1N3L2h163cEWBjEUHniyr6e6HQ2nXeyuGYzrGh9MVhbgLxjL/1W9FL8VAG4dX20Gt1VyiLWNP/L9gd/ajqrLKKlJAtyRdjFeDgke5lwxSkj46DyO3pR+cK6efXh1avq+rVfJy+7K0rAY3xWvLADUG5Ufr00edeI/Cjnl4ozf0cKkHbRjZHJspreGpTDd2tDuNgDrl8Fl+ugwZZDwFSixwKipWo3ZonsSuaE8V5MQ4UJvfAROJQjhjfC94p0MKoVHuXLb7secmsVIMPXRGAI+dm5fl3Aqsxhupb/6DCO1n+kaPqdHd4LVE2Wpn2VJhbtAi3yF9Sci0sFAEvko4yE6Ym1yedkit1CEmrLqnotw4wU7zRZfIOG05JOddFyGAZxOU7f77bPvCEDfqVi0iP3b2JuVGcHhNPXRSZzXPUpajygkKfp4LUN8jpQCttlT3PM6zurffsyCEBh3Uhg91Z9GV3zk4KdG57pUbE7YAVLDuVq7vgevPJT2VRVM3g5iFEotHvLCxDjTbvTdqvSA7vqUh0rrtmxj/EUXJmlx5HHGkbHQJsEVyuQNKbPOmLCj9FsHyThS3/pIb2CH0gvbke9HbBNXme7YXjMXX7hlMKdGEGXEtViDmBfAZjO9lGVw8XqRHF2hUBQt5MnsBifk50UvcZT7iiIximXA2t9LnUNOEbJVicWz4/bRqiHzXQOUNKdreEzTKB48QxUZsM2byNN6nIeqZaI09nRYQmmJS3bzNxZZ0NORrmxPg8O5It3J4IJs7rXbdpe4SCS49vXRL0ms347qzMXi2fV9pkXuad4yqxflhyZb4r+CMpi9RAaQ/ISIfblhn7Ag2HSZz9/0sajg2wbf7pEy1hbIyyAMKwJCdN2tKLNr2nzt/mqYrmfEdYGU0DGyGRnyf/UUoJOiWEFDgMWZacdHwAPkXYLoP7VhG7OqwEBQG0Spz2tRJjaTjUFrX9ueoryEKhjwj42ZKrqdkxunEoTiqnTHTwf2BsmnFupmcMKvekBuMU4ijRsTRBj5gNyOwhx8p/K3CwTv3hz2N4vUgDzb2kXRp7tNwrsNNTTJPrx554sXBQqi0/70NrNUmZRa7fGo3AmrzbVvjCALeaJEH001NFxOPFSfm/AaLb3ufK8FHhxOEYnJHZpupQZc/ALW4O/puMcfvrQUirmYhmWSZE+C+MNbfaCiR9+u0DAVZ/yqfakvCyJIORTBwNABLec1lweuJPCYzF7wt11Hqp/T57kcF8ZMQJT38IIksjvAVeVR7vrSWTHqBcQw/XTX8bZAUw4vDJsCPMcrwGpPpDktDIFZItrrAav5UvADg3KSyCqZ3VgHNtlKVsYOawgf+lMRzTiUe6uB/LE+WWG++scPEEaq12GujC02bLz7VfYLEMjkAIWqgm+HUu8JZTUg1r+Xc2lWqqcprHYI71WkhCyu1zoLgHFt50S1jtrxCUSAQslhMZFEIFVXSg/lHxkTo1hJ7yoBh0lMxB5QWVx9Xl65hxSvuT2fLjz2JF3qYa+GflDGe0/khGrizXAG/F5M2K5q9VjsKmIUkgMEeQ69Z58nH4GyV4iZx24AcPphREsMfZ40NDDBsbHH2GB4kb/H34BI+CQ+j3AhnMau6LvXhJ9oVpRq+CTvAM+kcGgU5mBPAlVzQ9OBD8CsOxgZ5PdOpM7F7sV7m0SVnf29tkbM0kAJ3Ujh10IufrVeZzX4bn+Skz+cNhCWCF0pwt+fxPxdcX9fkwY59kCa2ttqncFdntVfw8MxFPHpyofGTxnGLw8FB7UErLPNa2eKgv6P6bbY6aIwoVMVdHADOWYjHZ7CvRhBKJFweSpeJW0RyZBnWIyUhhFKInDB5Mtg+055GYQZ+wDkriezLqfEQ4zfrDiGJxZkz8pknCWfRqXk49I0jeIoUf9KGwA84Vr04BnvjnS/S+m6No8MlcmVO/63oruiTWP0X0I9qTlGVUWq+iETVpfMrnD9sABPC910hPJWRVhL2nhL07vOK01vn+4k/k4B+TZGgTab8vivwCrT2R2qiZRvAH638DSW1KjW4g+TQ5xEpQk5fRfOqdKhhPxENk2F8y1u/tANWvX7XzqORjgF1Q2MQpK9nBYWyyahBywUNGHU55Zwr9Ks/bJdGRKgxpcpNuXQP/eHNYPn30cqSEiMQrLUzEb7hdkN0wQCd2irm4bB7UNt87NoYkDPygby+miI31J/J/P8DzOZ/CZU/5aI+dzGQ9qPrVawQX/CAFDOYzTWk2ZW5GAQ03eAXQCPAbFamETZ3PoetVKkDStTwilsCXDPk9D90pAUC0dRnL582+bWBp2
c1PAjVZ7O3eTZcYn3zeYSgSKnv43WVRixiVspwdbib1lgvzTUUCJci9lS8n82Da4vLx3ATkwcMbyDYp7aGIWVokTEDpHunVUvMwmZowBQZOtokqoKLoDJVvy34dIBXty+XN1V6Cdv3LTuKmuepYZccFxZ2vSoc69MU1EfiZ6fY+t9vczgd7dYLnGpjHn7lhfH77ounhTjlURIH0EWFgPf6TGXhers3oVhdd/UtXApPc1Kl9Ji0lLKpxZ00XYU/DgbPXhCKxCLn5DGFPMAmaaZPWCScGwYAMSti3T2imDwJiIgDePFMR5eeqQHHn4K5xVhY2uz3sR1fgV9JrlaKKR9Z/6QLto20P563VlKyKYKJfSFxlnYBgVCSPdFn1WmbeA3F0fdHGUoI637KJrKf5MM8wTC32IHCkaowAnWTo8nvOysTMaYSTX8yHeg8kFB8LGDHpsIc7hGRqEP6iXYMlj1TlyfZ1qY5wTSGPo55c5OWgz8krEsuoR4bakGIdXwZ5cROjhSNw0AL1AV4Lb1D81A2YuT+x3kdIihg1EswG7xq7IQWAC9LgwZ2wJxfzyLgCw9V9iSNrvVwUXTqR2w/90MA15Vc5YhrmnrFA8V78SgUv4ZCQFAwV/Cnp/BN6WidAusz0QGHxAfxb7uoYL3nRFiODwehmN70AQYxVQ0d73Mzy3kHxqbbXLfFEtsvFj/Tex0/43JHp5VKDqay9KYvpi9W0H4k9OkILOSzZPFxjVOA9MfkBKbmL7Xgx9sKIHfhVkaurYZddQZtP0TFKpK9RXdDQhUKiQxlD3yXumwHo808FT3WFyeByX/ZrPis5Ifu/qHPGWZ80SpizorejLkvrqYHpqxgWI/cc0mEG/+/v3DGMC6NI1/o0j4oyqOSYhAXQe1OZFItMJ/9a7xnkXwdZy7YVu5RNBmxU4Sp2csv0hprzqZfjDGhziL9BKrQ/+HPKr2uXs11me4Stua802MYjvK3cBBdIsBMUIebPmWMRe0emgcK2OVqQDau7G6YL7lzlAzeBc5bwu+u1E8QYs7vl0GARLD3SkDvb3m1ewKRV/cRoQ3QrDfyvO49J9vw+mReWrTOXPhRj1bNNR+KvVdPv1IAVNFeCgChwHgJ8Bkcz3AV7U7ftAjjePM6nENOM+WJt5OziuanqeSsCZ8hO6hvjXdkRx8l1YapOHeVTg5Jf9YI2Z0l8WbA5S3vnDMadw7hO8Yr1/hZ9fnX0pkb+FrvbsqxZH4/Lx8YkwCuT65gKQVJBrpuqz5wp13uIMc4YsC6PGk3KvZaR4IFA3/mGksWtOYLHItAAK/e2VX3of+t+rekhJ2sQaUCizMTOTgXqLEACLmrShiOXXtXkJwFsyNcnxt/ms/mBD1gTA3hxP8rlnhu2Fsz0NEIX6ck2JO7bYp7Km4ilcboCmHKhTo91eGBNaMdtKGr0uwKwBm2m8yJ/LV8zA/OCMuI3vblmc48DQQQjdQD5JxjJ9sQfMioHKX6awWnB3HPx2zyveEWka5DGOpXM7PoT60kvBVZje29LUQDsgyxKPE54QnzDrzfNHd3vRyG/6Oiw16ivYkRNYGibpaqk8JlMTvA+ZAyxK1EoKc5fIq4alI/+T6+kZZAnQ6pWv/XnPQpYPHLGMcj/xW2bqTy+IgUxufkg9z6rJjy3KCqnQS2LpJExakK/LdObpo82tTNe4fLFzujRmKjd+Ja9Ngz1aqjbQ/jQhMUhBPP50w+acMzZ1umSaXe9RlO/CJCEFg6A2ylrkU0KqB/2MK25c84PyGTmWd21mmDR4gyFEJg+9HdWWirLjGa4DS0X3ANVlz6R3UwYHkfhtsQ5wsmARdER4hGBJ4o6QdOig3R7ralg7WrNpz73ICaIRA5VIAGjU5RXVOK0GoASm6p5eJbQZ3kO95rcAa41FnJTHGhQIySuwj/o/jYsbSCK1gXdYrvfMn3bHELnRzPISI0cxYv7Q0AYKi9TCQjd5o7uz3s4dqDoY+vsdxJ5JsKiqUgTrNquGJplIagsk5V/PbYlNhBNDn8wJZ87cgFFHFQKGC5aeZyghVUJleSklNnLNQ8fVLfvSl8QUh2duktnvFbMaJLJjjkQgu5SaPMfXKGZ8ZexHKKQ83SUAujRWxDapMz2KuicAgu1NnOALmoItX8J63pug6wsnSx0xIW90FLRKp7WkZHMRt/7RZ/yeD/E+Ivg1Ss//T27/OlR3p47+A2lE5W0ZKe/kCW1iKPvmExNyNG+RrL3zYkuZsZqqs5cxZUzdDTMoQ4mwM06YWh1eOtWvA2u+Kmjm3aqSTBXmyX0gWmmXkZNU6Y09aT2VDJRfYBCKMloyZS8BEgTJ2xZLToVHzK+HI5SmTWqPm/63WVLWv9fn1umUChbJko+Z+ofxz/27/DbqdL5JNfbXJxwhL3+UKCXcWhzWUj0FZgwLmQR1WiFChurJlEljNEvabmlF1KXQ0RRItPiddqQiE9UjrfDoE/bnQWhqhSnU8eqKqB8ybCocGkO/7e9Bon0ihe+ep39VKgkRMeIcM724gr4qV47sVGXc9ZTziz2kZFEjzZ8souCL5kkupU2100E/KHKY1496QLeFkIQ8yvLIoFkxJX7hGn+5NqNV1FYSPmcAnhI3RE6+7QeIxf29QVaFNhO2nw3WwLFeef91IJcVqiCfDWwukd1ddrz9K41YtNv4dZyykfAc7wVpc5txqMWZe9NTiloVaw0z4xSRue8DYnhSNv5zUoEzd7n3+dFOVFD03dHLWA9MbpSzWSkhyXNNBE5JoWkzd/IgDao9QYQthtRV7XB3IyEi3mAnMe6Xi2/nibpGaUBucOxkF35nwcvg2X7xGUg28z77kcQ+tGrQJqLEb+KbPok3XQD4tjraUzM7ci5LxIZ/nbBUW71ViU4pxyxRrFUfAaP4ys7CwTZIRuE4E4aKqsyr+FJKEF1a2+O0z7gEfRZETSmHi0A105SkKqc+tqFHSxs1UWKWFpoFCB3XsCMK2ceHXvf1YZc+4pLo3mw+7UF33GZHKvqFmt48FOAV6pkTz+u15lfnXeT0Wzhk2IpVRTmc6kATh/hgzcc5K2Ay8XncHOmyl1oEMJH3WQOtSHcZn5d0ED+X36LI4PTxKonAVno5AlxXqqc4v7IDPThDOQNWr0Jmq0KuTJN36rp2Sc6RIx+BUocWWr+DlS14AO3pZjCTUZil+Ypy/7tgecNcD4yKreEINjZ1NPT7yxxxHX8T6SKenqpmeDp87cww6HQXhWqI3Wz7oOFOWmWa/+Ff9iUSYQNxQLkJL+DfxeVQaUA/zfN95zEldBwVRNSYBVclAkH/gsRqlI0WOR6FTFO9hHjlH8sdvEKNiGx/HVp82uqq8E7wx+0beiQh+mSm09Z5qZTc58+K20G9XyF5Yak1dUITm0lXskyXnML1uw3lwEK+IuXVxLKNyw6qu3P8dmZ1hob3Jhi+SMO0C/ZflhbFnkXDmzWr8vTqIO9oJkLW0IOEZrE+cOfJMGDgn5Li2KMFXyl4n7WWT8VfQV+8WrZfE35U4fz1LcozbepTnOvFJXUXen6hxoMvw0ql+Uo+ZPWSq8yUOF4zNFOepczYPtf3nK10iJRRmhBpFhol8NxRNzumGeN0VjPH6gdmh2BQWfesA5kHuMXVLGKl2dtJOCgCU3j+bjyEFyLNnbE+gT/QbrjzjIoYXRmy1R3N1wlHXpUW+/D6tYENUV3XWDUfx2k8lPHau4qy7wwD0YaN+xTKpRWmaNr9bu+9w96+/f7uOr+OWOoXensWOR/erN5wt3P0mZ5OujxCylju+lQLatvv+pg70nygl4Oj/dy077Ac5j5HtQhKG3Vkz7otf6mFlKiIaQhn1kjBZip7zmryoqGUDCAGKDg9/Ajj6AosnoHrqr32NsjoEoRiIS+nx6UM663fQRp9Gxqgdjkzhs+oKWSX/m+imYdBnIZBpHM0Wc9Ga2TJlHaY0kou33DSAaG9XGmv+fT/b9MFbrR1rnkepL6wLEWfJM/pM84+PPcjFcY+qnsu1fO+MFozo37xYp3eaEhr2SytTRk26saCje/h7CL6C8SAbunbMsRixRZiltx6/ibYTxeFUhG6P0+/ak6wEhVpaGw5E/Ci
vE0P0R444gfIEorsCQ5/RVR2h97gLXeUaID7sw+DQdvQFVNPWGY1lN40Oxg7TwHuBS2O8DIa8szVzmXGHOkQWemveFCx1dNe8BmHCsuEoeYPJd0ZFK4ZkUd8TD8w0JCLMOt/LG5bZIoA3GFFt3ZOjxbLKL2u5dXYA4I0JRDChllFk2Owc6T6I88vjK8yUX62PEVF0T9pFnLiq1YHPi/y5IsBI47jenLlMQS25FuM/dvsAQHoMPtfHUqQL+oD4d5CqLWfM8l4fg9tQD+1Fa+n9LQWSFS2RY7jBWX0AtmOubVivSlJbsCqgZtrfyBgNz4n6ZpAMdyAMBTBfyAT2M23NjgT8m8VrR7NUuLZSWEDsoHSIws+ky4Ufa9QlsvYFsOlZnsbFua4iYsz67+6JHL+uC3cAiN03k4h80TJ8rTQ/5Xcc7sWz90LPSu0BlUMyUvb1KOMCJwBQ8BC3BpHwDtdGaqzjGXAzxizvX+J0qEdoweHJOna0hXuE2qRqExlAHhsWdhvXt+bYvP+ysbTx+qBgc3xD6fbuhoQ6M8j6zWECN2iyACGaNH+YCfOo7R8woJogtQHZmrMBkLJff4DMxo9gICWKnjy658QmWjWO3wBSvjf3MkvKQgrdJrqqnjCmz/DGRFTWz7vzIRKCNhXX67z55R0llpqHpb1OZpfXF6I3mVEKNyfn6cfwq0vMTYoCEU3ykDYv+Cg7LHOKQT93IQzqGh3WKU4FiOy91WysHuGcpuJ4UKRc7mNETlF+4hs8OH7x7jDeS3pK6EEfifRxbLpvt89972d2QBiwb7mPa8mwBLPyfokSJJqkK0zqqNvAI+AojRNL4uOQmObgcXf/NBr0SRe04DyIt/70YkyimqXmcMdxI/7l7+OZCXM2+HQg8Bk7q5TLEGlXpDr891XzifHZVPYfcsFvTeIMfe4124XNMti9synUJoAFodc5zYBrobObJ6WSYT5QmxGKD8CXzI/HsdZrAas6UgTf9aSn9RddkmZM5bd9GtonrA3IeN0XdyvC6SewEYATM5PxLERHsfkHDNjGBpeMXtRX2a+HeLB9X2/H1V7w67bP7Zi1pBjt9plgR16aqzhkyZrHYO5N+Tdk9rOdOFxPKuhlh2lNN/28p2NB0D/GAh+jCmof3LlokG8xPb2RCBrJ0Y9U38eITnhpuNwFTMyPTJP+RhsQrAWjQPQqNxZJ+7grTq7V9t+7ECdIU0jlS32kxQbkhEaXnwOCdmzEiKCYtyVH+VPbP0Ddt+XrxW//UvcN28sTxre8ISPQqQnVwYMlXtc1zM9/snH4pJWzkek+eKglv0Xtbxi5cr/vzk7VOLojoIpfx030qqTDArwGwW7ZnkRf+TEnt1u2RGHo37QuoRrkGlAjFtEFuxrH5zsbvtDSwoU0kEoWV+6tqYhWVrK1Dh5eOtCVsM29LKgogeUooBJ/ooFVqOIGepaKfQ+XCb981Ksl3KbWYmXHf3ylfdn19EBAHB7DZxmLJBExJzruWlXZP+ZS9mNSlLkN8WnpyKUSoeqHisO02W5KTXxCThxZ8AfOaQ/2bnU7TPwDjfWQx0pYJIAhuxa/FK5c8d6QkAXVy7Nbj8hdfpSg9lrUK01BRlmMwADb1GggY8P1Slpm1jlvwWvtiDBL01McW1hx8agb7Z7EYgZD0bZF1D+oq0GdAwHRlGnapzpmoBq9FDJ4W8epiEkM0vWUq7UGjQeoAgdpUdY8qR7QyE4See9+fsG7If46JVVqBtG0noBvMvxEjdrgkjSjuh9fIhdx+LuxdFIYHENCa4b2TclSXJUHTigUrPC+5MVMUHeRFMi8EaB2tuxwrxKPHa5U847MvD7NLkbbcJNE50D5K0ob8vegMulwcUsvjkNLapMicgJrKVO69dcNiSx6AZh9M/ug+/iWSuP/isRXtOk1EKUQT/vbXypdwAEBnEZUo44SJLnOKGp9yV23U7eJ61+NgwPGPJf1ZmlcXFmAjgSxLqsHfDeaNp6LYTADfMsyMgfFG2thhipKT5c2bH5kv/UQq+dzQz+S/NaSvn6JY/kWz1S4jLQjmiCUO2wjQWsLxKlhcLvsXG1Epy/KMHivBayTiVvvpEuKLmT3jFoVd8rEE8KGqbTJieFShdKBP2mBOJxnbgvSI5aweWkLI2Ji1Rt+ffnN328wMjWfA1YZFz+wHfr4tqONa/TTXQ71Oor9ueqibQ2KaLRidfQAHJiuaY249fHuWSdPc5rMzXAC+K0xNkvVuVKnxhGTk/6ykKrLx1wmN3SKK1DE9PYKqrDV5pu5QMWrmg4VJ3+V48zb6IyXeDv+UPl+sj0xh0+djiTxRHpvSW3W7TjN+zkz29lq+YEoQ1M5KOiNOUHvu8YYO7kEeqRpQmsHJoaxOb2CsGKVPKhSH+hdgc7WzyuUfJzj/pZCIqRcCb8tBHutnMkyl7F6x6GKIB6A7byVM8kXssNjodTT0701uFiAXHaKRFGEWqmW9vTKZmD7IF0UFiUXtnIjyxOTjr0krq325hvECb7vY92doHvld/U0i1b2RwoaphopbYinSBfSgLxCLBn1ozU0Fl9R7dsulFg+fr26QtUp+/pEvhkO9jVNfkCi2i0lv4eESRCtiBNM7e1Tyd2EjzMA1XvI3lyJ4I8uMAZvCwxJXgwh3uG5dFdUSzoL8S+frbfKan/Qv67ak1Xwb0YWn0K+1/B/XLkGN8nwJpxRUgAEC/+d7WnMZdocXBhBbYTu7gW8EvgDCNj2F92pT7e3UBKuBTR9+6b4s1Ra4j2HGplTQCVpp2rsayRKGC5KEJ/jNhATDhVMDi0FqpKHtRqizfDQlWQgskud6rzrP/0v5x+mQLqquqMi5T7ispLGcDJcMAAEvM8/uv+RwDIiirKt/GFdnVe4me+WubJz93O3kl3lAN5lLSJU1/REPmOVSMoB+BUGv0gGqdImsLKIlBIUY0lEm1m78m24YQRH6Nw4Yl+pfifMIJq61GLxmJfKkiBmWvsL6d4W2zIV+HzMWhV0xCRFN3cMphDq+oVMnkJGaSbGL+Utw1+iOJiW39XmIlOLIioSyfYrR7wGPI3ZrOFm1K8IQlHqhK7NOjys2B9kLYnsowftB9F5kC5qQUVlmmradzLebvuUQSWKtfGySNUB3mZY/AyEhR2R+8xKEz246fqM8Lh7CBp1IsGmio5+8FK+hpIbDdChatrLdHqranb9dm/xbHXhpy2soU1VU1bQlnJInhj/OZoyhsGaXpwR3HB6HRt6ejzJxeHdTl9N5qYN0Ql9VZcaRfXS5MEyciexQuIcxB8UfdXovXIZ/Y4nw3LnCUSRnaMdHN5Rpw8LkvYl9uCmST5nwgdjB5Kx+UZ1BGseXNQcu2aaWDWoaWV9EyKl1vlpVB3p+AImEFasXHDTDIT4B3PrLPutPHvvTB6pMVRP7A41tWqj3eyIt1z1NAaVzWKIo2Co85MmtUF3caTOmW60WD0EhReEoWBdv62DZpsTDKoIUcxROpXCh67g5oZ5svIIj6Wz7cIFyO85S/abT7WnYWOe9qFRGILJG1zzilPFOL/ESIlWOA4EIgdnXDJEFzEjL1j6EZ/DeLLHzoKwv/FjykXMIjtk1xMH1cMYb92+RIIDsymIZLSndQh9gRdsz8wqjmqXTW5nmz/KF6ued7ikRE0AFWNjLFFFiJXo6+SKatyy9VfrpCaws+N+LdcKk8WoQkQhhNpBp9KPBq/2V09D+rySX11sLUzRwlsWDncc9amKGkoI6HaHhI+iQ2NpBx0jHYq6QnsAE5ipf5WZ5t0eUfg0MY5vAd9z3gVjfOJVSEgSJR/7CCXEozTUoATSxEV5VncfMMXFkOP3oVflrsLCCX/k6OaNyxuG7gLH5BIPp5fmm7UwSRV0em5cbkYmLTxvG4cAVDhAiJ/tZUTPsXVT1LgiYleaCHMeK8MaR0D5Xe2nXiFq3QndBQ+LgiixqxCau11czj3mmYGqetwcf0C8kHh1+vu6JY0hjGgmN7UvvLbRriRsu80Ad/hNmTcLpJH4SfvVHxf9WJI93VgDHKB9/i3vMeG8Tk+IN6TF2paICA7ejMRMa96CBruMOudwST10nTH4ORDU6QUbG6rKZClRzIA
MyqBjvKcgkueQYyBeY1tfLTPeSVM11ldCuJxtz3SpfnJQSogXQJWL3CqIen7OJwIds1uijPXiVXb/aihbr+WtUSU5+NpBsGUoEJKsxYZInHpXvBD5R18h6b49p4WX6cABFKhguJD5dFo7u1GZHJDicsRkkt4Pqvzsldo32Iku+jMj3hG1h6BnRSj9OaPEr4yj50pNUhTThnRvPq5ySZ2ah3SC4hgnQFhLlqZ1fld5pqM5cADHl6Wqf3Vf+pqi98wBG4k22NqiDnuiPib+g5gYlPGS+Jld+AGXHbqWiPDaVHk+IcmBfVLsTRgir6SlGQdFdKI3KmSIXuwTJdo6Z3AM/KaHK64BPc7W7w2i3k0JzIBmP5t4BcQdzPu7QyI8J5eaI900wCyp9ZF7PUhANN/g//rFaJoFV/llzhxWNKds4QTVifablFV4Z9N908yz4lbgh1LqfEYUB3sKawHrorXLl5PhumKXA7J0RT+Q0sB3iPsp2p+n+endNP8BpLwKvzBShhiZaiWyXwK8640dWXODlUPLqUFRHqJe13mJo3UPObH/oB2qKR1a8xqMV5FwK0ZWtRrUIlipE9Y4r1aTw6ZPDaFhSkI4ePTCm+l3LdBI4pn4OFcm8FEreWY83lvmJasEdQFaKXpXhN/uX8kL94OHNt9XRkwV78k5Efoje2gYijbxAxF83Av/eHqgUT/BoAPYECjrGQRTkwo8jGVLgOvNQNnLeltltX4/qFz922lwBK7087xQ25nXRZJc6yQX8u/OKJmMyafHAeMzTzedZtEiJaQUVyINZjuUyhJj0yOx3yZgMSUtfnLlaMS6JCdN5PAZO0mKsGFPY4p+UJwZzzNG8KxoUdk8DPC0pM9IQcoDyTeywJP6nalvtw4b37I2ZF8GK0eLBj1s6q7rAk4RRnDs0VuvrR0ijsnipCae2NAedv1lXPoibmOEbDl0WwwqzN7fMDcER+H08MjJkQmM6LBSBB+FZwB+cdlajwa4n48OmkfXQJNg4RL4oTDFL+ob5b/I39R5vZcsj+5jRDVCA0bDICeMQD2ZCULSjBxqcnzJd0lsd+rcU+VmYdZ+J59nEWB1Np4oW7OGhLL2nQqYhllgE+hNmxO4EZciUaSzSg+jxiG4pmC83LYgSGjpXMMJ1fQsh+tn8OFI3Y2VRD4iyP3f0XD/3ihbtK4xcyCSL3hl2g54zENukMkcQPWl+hz0VMDZmuhVEwZbySd2Mayh07CURoGm1vMOq6G0ED4LnSowY2hMFfa04BZyL7oUV9e6QvmimspUC3ShhNIsoP8dKDVEKB/wjls0YuZ4PzMGFw7yNEe8Nz5+3WP7DmOTS80NvC7xiCZDG5TEM1ZH+U07jvWXwnqppebwclbfrZ2Z5zBy3pR+XK9ApaCZqIr3s2UUEU1mMYMc9+7Pkv0KWJRRbY6u6JGtzvlFrfGDloFQ2eG948eKsCQ1Gu3gdcn3/+Zrudap0v3vTJhOEx6MvSKuVX8mqYVLtx2UOsn09gquEkr/kuAx+46KYnlg1zCsqx+wZH8VLNKuYk98+cP0cEDrS6PU9QEgBTb88rUPBJ5+jyvnCvZ9sWVD0g5LVNmmEpgWiATQqey0fKMjApvQxkqy+bQHKD2Q94bzODU7VsiU+3uIYL9fJ5Anve2imfz2SK5sEeY+Yndfl44BGwmQzsHngs1RNyl/SlZyxnxYCk33gGQ60q0wR/1jACa7AeL5FTV4S1UF+ycR6ngmfKY0lu3tTh0QwFRC4pzYfOYNOxVWJjrQkwgilQzZaKVR5m/mgGxSqMHV3D0eQAzFRX5wSvts+01/I9MSP9RViM1mARsDByJlvzlKQJ6c4a8+32M336UbgmPcSzBPY5VbpppkoIs8nxEmi63w/V+QZ4kz16xV0yoWdz69kapEupDBSsjo2gn8H0B9ixjLpavp/m6grAf2fXyGSFjJx39RHtpBt3/FUWETUgJZ3Anbp4icE/8sAYh8/DkiPvTDd9X9Huw5O2k7tGqTnrTN29AibNIy1DSCJU5OCcH6BSiyc2YgCmCjSNRwvQuJoYf4u8qSbxSVRemMXNsm8wpwOYgulCFuMe8SgFy6KWiMqHxeks3Up/Xa+3xx+0V4QjJeKzWzvfuB8V79XEdD2B1EOaJqns4IjlJBOrpAsm5nIYh4MW2iTG3yhLwhqpA4MDDuaLXsw8ZsK8Mnc4j9qzu/VcOwtizIZ/VAK4UCokyWATNHpfDxWabnD1tHi7z7TU4NBzn/pRx4ib5KL1zj3iGwSeIkEE3E/xXzgN7hXIVIT/+ntPfGkt1P8wcx2THx2X9l+8gwPZXyNY8JBOOzZQywMuvMi+sIJXYJZHabq64GyyJwL4p1MrS5U94SgSHbK+f+UpWf4eXi89RnmjgDcWFeMfgPDLc5s3j+mSObDRxWQY1DFOYaNAK3IrzUyRemaRh+a0tsXYuZIbQxpOGhyMMMffv+qBZb4+dePFTTIW+0n/b/I8C9a72/Vyb/P5zSOxt+r043f+OSKbQAhX6MIq62pEGyi2nK/B6whmbMR8pZ/0aeaChBRf1Aem0HvPc3rcq6PypaTGSMxxcY0EcJSWvQTeXbz54w4JwqO7nsWOpwp663T7DCCvkQfhMgwF02IHJ2ywztFfAYDXVH/z6R5Pk3ct7hO8YVvyXMFh7VmwNziGViWI2sVkVybjfIseZSWPwyHTEQMQnVH+6k2XaW8gIjWssGbBv00HKd9u16L+2s4eI1fthZPT/wOOgFqnuG8GVXSOcgCn7nl77YuSKmtBIQGjUMH7tOBrwA6MHTIpFDPyqfs5lO1XbLXF3YAvxM+0liwfYCqfvB5VRaqZHVdR/KdBO5YjXmfFQSacJtnJNzIJeQb+hQeVh4hCtwFdmaHw7q2UwfU84EVlRobzbg42Kt7O/6K3Q4kRXS/n9L+65WD19EnettA/6HxnljuNA21aJCoG06DTNbOFXcVUlA25UYCHWPvlWMs26kInUvGVbOCuGK+cMabYtn4SScWNUkF6VNJmvb8+n66licYokgLZ2excFRQbZKSiN5LUxPw985rM9LBcD3tu7N6Fwqc+j7+Ux+MYonGxiYtxx7vxjm1pgpHOEeHG9tx/CK17F64W0jAWRdDa4FMQ191FlwP6794usUbeoh7extHmKEbKf4fys/GiLYMV8bRE9QbU2/C84VOCD4w+GjYQpX7QpdICweFXSBOU18Guwb2A4ws0eJuBAV64qxyD+Wg0nzbHucrDe6W9xBP9YdsSfrH1xZo3tga9JCLsfYGJEdgZEVOCxyhpACYAmj3fXwCKSDo91pIcZEwZQ10DmwiaX8KXcyYK6LPhVfbwrVUn8ZRyXTyoWr8mRBR7rHXL+T6hQXMMqSv8Ak5dWmiZev4hHdNLmuCTcPT634FYrX6g283KZxPV9e6QaN75lpve6fBIyxCvSsQLPOlYov2p5EwgoUF6pLVOBeyDg0T2h7QgZp+2nDtEUZfVRdrsttSaVJkGJPiSamCydpVPR7Iq6DfYdqAb2UGdxrQgzqZq4sivfWD9A3go7VjzFP08/ZVb9L/tCAECQ4puC8jGJx/qvqtLIvxrabbVCfymDzbRRqe/j3rzFFvi1mWxQ8PG/3fX7TiyVwJeOBTA8kcmODzt7P5Z3+iNmhrhDnDgJQ8b1ahzLS6kvFBD3+B8pB1R6b50AZWDc2FFaj7rBea1wOf7km3kK7gZn/aQ3r53kzTp94wC50A+HMms0u19Sap4NMqW1KTVRnEAkZglNqvgSpqjKPu7xmT/0vpi/R/zPGWN2fND7o/dll3IHzOEFcPJ3KjKkw32zwdDkCFcW3qoy1A3XBooNjyaJOvwIP46vOb+lnO1EOmoLAP84J6jFZto9uWZyvjLFM9tGCzVcZlPCamtj07e6s+v4jHFP50Apnp4m7H/oxKDado2AECQ+VZPZ4+peUynCJRCPg3BMdKOE0wFUXQgA/ZcCDrX7wUzsr+/My68Les92YuMWvIY50CApJ/WkmuGO7bpy6i46FNiP29SSq9yFVR6KkYfqMnS93oZruhsxTMBtZj/vLSPQMyV+XJC5S+5tsHZ5aptB6trjDghxaZIfeP2WqY5r
oInMFpPRIov5z400I55XoZmzcgUvPRfbDiqxF5idrWvtkuVqSLKKJCDUGo57aPcuEG+HFcpTzXSK0wMUfg7KGIZtZxCZPpug45V7N8SIOW+D4Xzb1ERUxcsoK3GicWt5ziaMI1blcvsMwOfgUrSLf7dsuJB1BK4prRwFt//CcqPA/51V10lU0exjI2vpDA+fnm4IcQPMnm5EU/zwYQfS+Cv+OGov6SebeEFdPQjIsneVGq8jIHM3trTco1w6VuyA7nLmFxhLyiWDPFov3arK5X6vlVnppGPveSAI9O/CVa0z5R2Ozs3iBDkze7EH5BX7XfL66sDME0C1NarWI4yIQSRS2eC44zEcvQ6tPY7mQOlg4M4hPw3NARyAxeN7FrIvvC3eJ/PuB2fxVWCGo21JTSq7pY0QrItlDE+4IKnz8Mfdpxg0OogMK0Skb7s18Ukd9lQyO5YhoDXsp2R21LNKoAJgLOV/gRlD9p7YD+jWdi+BXAj9F6Y0yxIO2MRISVVU7F9PlEOXQiQk4b+inZ3QuOF356ATdrbLVEuv4x4ovN4y9e/1E5ZHX0kyzwDyi5ZBOSV/7l1ISQH5qz+ux0yNG9yD8QdQMRAeF618ab9mEuJJkkgAzd1NGfhgjccc5J1kDYt4y6binrEBK2XZrY20yxpNed0yHgR/g3y/MeiBC8cCp11NWNK1KGDmKaZDmQiEFHn7Ngse2bSzrsYfaXyHjLFZMjGXoO8sfnx0tO8IyELYXpXA9rurrg95gC92wn0mIB/T1p3Imfry5CCD9sJffLosokoNG0zucZ4khOwSfOBLw7YjZZvOvS6mJnKF2roPFepszJb+1krT9+P4koFO734cSDQbFlo+3G28nnF6I69NDiqpol6gptdMH1tZNktkhdW+xgFNMFX22oYjgD4tY/WhNvv9POhjMvvrOQQTE70/fVkYhV+GMHsCtLKNWuASOpDXi7SiI/3js1UL6Z912PdAIF3BN9kMy8oTNBs5nrsk3SehCr4WvNKMZz+160WlMiCENuR/OD+PiwEjP00QhsbpP+2EHElHQE2ljJWtfajDmUvt0Dc472ny+qB+WCJUkci2yH1w3w+lKCAXrsd4fXbHTyngywZv8Zzxw3EsW1xelDQDCKJqwPp8t0Ltm7g4iXSY8eD/GVtz+IqUY/1EGpzdt2cnRnliVONnoOL0/v7l9lpSNRcL0T/mSEhixXZ6vExBH+Vepe16m8ceIILdZFynSR6fo8V1+muuAZz67FLaQWwQid/YUhVV3fbceh1iIpQ24FuK4j5ZA84m6TRrfTmw4ybZ48SW75ZOHcBGVZbZRRhcLGdQiyKRtAutVb4UHfqYlxCDchD/JhTI8bxn0ujTx05nt6Lt35NnUJdSTcQUgnMV8FFiw6hCOsP8Te5Zz0MwE4j/Fpzn2OitUhrYkl0Ws1H6zxaY+aNTzVJqTE2F9sZWdbwLzvoM/j8yzhwPAsuH0DJh2mXzeaCR2hGmSMGnKqTlY0MlLH6t9l9YMDvsVBZeLtFxLw8HF4SLhJovjdb2XUEO9yrqlSmjaYt5/on+2Geru+iSD4WMWy63Bv4EDJyDTZbesRS/kzospTxHzNEY3uNyD34xa0qF5lq1wsQSwxJM0Fc9HAhugvJtaGWE+EPJ27ydqtouSsrfSycfrEA5mYW2GTdB6LiDiARGMALouwsTcS+q3PQBT2Af5awIeVh7S/ksjd1UuvOBRnjYfsBT3nFCnKTl4eFl1b80XOO7Wq855p1f/jawNNQIjdTb/Xa/uWy4n9zbxDJu6WIQoKrJ7lKslQZvzorjNV8CHzIctCRJfQjVhs/+kORyTqMeKD6Nb/lJE5nlMnoU7jtWeUb/dp8tqUoyr3Zi9W5nY9uBt68XgkKo7XwkSFM15v4caRgBxQnvjrPfmDTF7L6OZ/nGFQTX1h1ZLd74tvJn2TL3wSRZkh81Rj6W70GIhb/PQLnbhstQqZRa5OgeoQfaCRfvVr9PWgifriwDVKnFMOIhK6CvPVUkjmZyD4g5J9Yfm1I9ElJRF2Qd65dYd59VFy7ADAkcaSujKp0sbNfLNNDXlw9K5vuEtUDaujzDit8YJl0vu7sRcPorrFS1Ty4NW8n9B+qsPAGpzZc05ko/GS7l+F8OoVdgpPOylaGEt3kVfuh3OjoAj8vvLWqYgZfqRGaiefp3OBwoTu7HgW1aUlW5J2X7b0e5c6/l99mFzh4caWisNHkWWxeA2tpIxgsa8+7kDZhKPNoNJlowgTAzyDWSMo/ncDOz86PtGUBalN7TuTk4NmLiSrcydOOCmOoA5xaWIF0ZGjXcNpdlB+jafX1eoql0ucKZ+w6xogeSQ1I2IqfCDdZYv6a3SxtZ480f0W4bpZ0+XU5UUUbFPDYOibopnJnuO3YxViXWh/zlm7rd0MgvtC1bFoliuSfDZ72r/29G3+UZgEB7aZA1WTKt9RhjmdaenpTUEIO8a3NLD47f4ruOCN1QDxcYc2ji17lkHMm8WwrdLYYyHGbFncp5TfvY47v8LWiHOApVRKOoTX7fVw05+1Irlj5PuOrLwFkPjZpEHm7zCh80lQf27/UTj3Gv9mrmzklC1Zycmt5HdDWXwn8jEzyvuFhQUOq0Mr1P5N5xIEM+Hm+4Ar5FX2pqJZMrAU77s3MM34b5WdYQY98L03tGi7Dp746y34TyUbKIPn/St5DZ67cFz5gKAN6Y/w7cx0VKVFHv0HIQMP2cgZvZ+aq8DYiZgHfIaLM4UcgqtPitrOsezsheUYU3HFlhvsIvXQVv/HGagi0pr71Ux31TELKiJS/K4UqdTGi5vc+eXbyQQqQjhaiiHt4pj8z3azf03t17e2xFXH5mc2R5mWeuYuccBSBQbl6TdvSNvcLjgB9HZ0CttrbqdIr60x3ntOzTb6P8c3Ig9g2QYTZcFJd4BMGXf0T2T3YrLOUqp7BmisUcDviQO5Y3WiCNKIbUcCeddv89PYZAnNcEP6EMHn//lOzTLbEcCXQbKtNsm/Nwc9/PWw7K6OXQzXri+/pLC4y/aeKnCN3QK15lUCtRLzUxkdCvBocOGMQYpYi1XpapBWMi4nWHFDdD6zkyJR/7FEDk828IRA0gEQEycAbDv8CqnjJKfNqVXY1debxBA1ZckRkoHbbNbizxSUN6rn1I9iBw59UjbE9YfpUIgggAcELbAM8WmaC4IjsK5Jbvd9xD4JfQXSxuwDIuHKBhN0Qdo95SIBbP3s0sOfAnSQBFUTY3Fo2vWcdtpGASF+4XOqjcF28dJFWf9QUHMOeQp/0XTL1BGOSn3uU61/ON9TAm1cU1s034saZVmg5ody1xhpzV4U0Kk9i6yzYtIzCWDXNjY0MsMoMNz3nLqWIXvea0bim2bZCu4v5yfdUxNvHlUjnM0RKNUcg+eWtx4sDo4wF3HZa0XbzFLGBhBYQE7WLvpuA/Sw6owoh7abJnRLPddjDsJAIxKFEh3tRhYF6pwBL3JpL10TYQciujSiMDiCiM52RcLIVl1jkLuVsWWraFL+4o4soOuYctkFW+nEM1Sm9fOFPJt5CinZFInOoWUhDoMsP/z/ki2Pmq8AmRMpPFHLl46/4ggLJzvXROEDVCLM0VNChZ518wWXltMDXpIytZM3xCwAL7B9ByS+4wHx6OgExwTGWryQUYqloWkgbKLDIE2HP0hATJPc7I6AqQr++GGnj//Sww3G6sctDAXPwiin9Yg1yPiiS0KTUbmB4LuN/fX6rrUqp0dNAdmC8gaa8Dp189nuj1NcWG0ZsLyG5jtkR9JXscKmkpv+si/DoM7q0dUtoZfEaC7Zj4OiZgSivyWny712UKt4cFAi1/o+34yY4s4kijRk3SBqeEn4oRHSquFEO//ZCFOfRrxs23LkWv3cyWELBxBZGz/ldNDcXjL6E7LY8QsbLYKO7tLYgBCK0IF8q6Z46pLbc1ZeegpXdmATigYkX6vsxC9Bfx3btk0hRKWEYAeLKek7vMKwVgTSRsMB1CENoyxEJfVTYospkfg6WNNyLukz2gyOeFagWzOWCOb7QUlFwyVhM3hS0KcDzLnQkY8OJv52FFBnbuyBtNuu7RYXCACQT66aSRPMUAHT/6
EdmUXTF4Cmb7lrOspA7/8zajqZ9xm2ttlWsqI1C502mSSJEOmb5D43LDgLiunNSmvdNmMKe3ZGJurHawnmTLwxgK8UpWJA3yv/PRWXCDWXDPhFkG6n7BGP8oniJ4mLGhbHIwot86Ghn+F8o/kQKP+TqcUydgR5ykMQ/Cf1okwcR4rAMq9MeP0quLGM6LvzdarxmUp7VuFluTw7U6N2SWbjNfg4nk+148X4ceFjkmjF3I2GcRPnqV6qYg7k8Gov+KAjhfwXDQEh9HTwe8/m7o+Z/VQHg8CW0JKcFZc9AKRUQMAzywxbvCDnlwEqUM49HNtCMS3KlLGtsZAXJSouyuxyCp48M7Bi6U9/1FFfY2DLVegd5iZl0yopoaHnCJLiZHQrN6Qj323oMi7B5pBJhYqjKerlfpdjrtOKOz5avCLpEER2aZdFcuZOw4QAfhacFNou9GrFSyBcavXU9VCeZ/YY+KvGEUhQAo2Z/9aIOHJwKSflGjGSV1AjJR/tewe9cnXnIW2H3B05vTqd05B+Hfs9j1H8qP5gfA0mPE2YuaYAdgW6KpargND5sXFUEvHtp5Hl9bx6Hr/Pu9qtFq2SfLzr+d1KokH3zk7urGngG+Z9AN5PjPKM84Nc7ycJNLZ04zWH5Q6iFycYdzCFbvhIPgqxUrGOMnorZY7Bw1O6Qqy4zuo/SaRMLNTVq7QUm3glz66kvUA1qcUF+TpvZwxfMFYsf9G1EvcHxkXCvUx031IiwZ41hXDr1fTY8ptyMF8spUhigaTbJyJf6l+3KHL6bD8hoOyInXzRIJlFhl4u49un9VR9MQKRcjQD4wM7E3sGRL1UPZbLaeBxhklCtyVeK6K2Xx9wzNklXa40LuH/RKBg8cqf8s8ggAsz6qhZM4J72WFmpDXbAc0W2XYOhxfFrDuG4kk+8zjQX9vFPk6F3hA38yxkVMvE7daibvnE2yfcP0cGpQeP/3JXRu19R7FMkx0VgbH9oa3a65lRr5cgnwJQFXW6VAqR7bimOptCxnmSwIUdk6uWJ6ZgV4YrJPMw8H9o7Dk7o+SiDbfPF92qZBmqCO6bh77bzE+/BOpBpMjvPDzGN6PXVUFxZKPYCXrm/j1yWk8gnaLra+xyW1AQe9Ye1lA2MDE1Xbj1IUU+QwqsHarTQ/3V/f1ZFOPjJz/46CKwG3ZBEFS0woXYQQMyqcPNznhSNgqs9NXOX3Q1bQdiKaqiWUSQiCHmZD1GGXORq/jvwUhaQ8OC/7wqoohKBAU8nch3B5fEb49Ua5XMm82OYEuPt92SaV8aQfREov+I8bShWEQSnYVvUkzSXnMbjFSvZGh39P4+LD4aBaYSNk6Vr5hFE/7DZ4x9MVEBpE+sJt2DZa7kY9aJIwXaPBGj1BKWC6Wr3o4iLkQ/O7aSU0UcXaKUrjBrvHhlhNIK5DU+y1jJuVuUYh9Nv8I/n4Ghm/PSoOhchH9WxWKcXU0FfzG4oPYeGl1jqSaqch5VgCt/F8qbbU6Bz0ErytUTBa4opQy8BjYVBFgnW18ZuBF8P9l86pHDkY0CfwZqE+GQ3Imycrgkv57FMmNlS36CEnYpB6v0jIdutbC/nMuadXIcZoKb327mvrRyYOp7LupnNGTSrp/wTu0daKGBT/FCLxXwvIM5Kb/bVbXhEeW3nDq4cn0zFsYlQQmEpc7QMTgBZd/f+aRhXMVFJxPecY0IEO0G5LdnxrrkPXjXhL867dcqpXz7HIndva4E6dHAX5rx4NppXZIqBNZjwwXoIV/aDEc/Pcw05dP6dpSjUVePUsKu9V3+pytNgH+3gjie7Nh39yvZ69BVwv11p5IcAUcyBMrdr/AT7IYOm8/C5CZ+aftbbci7QWD5cl+PRUkHt6szQRyQerXwUvPEOixIoARZSl+x2d12/7vp2HXpqZ0Zg/iVB0e9FDtPoh5eW8vov2M2YIQKrWua1G2HDHZ9kIHq7qHH5YpVzjqiFOqtc5OpBLA43ulxaJBxXQqYmAdRseBFO/Z05zsQh0E7py+DUPexTVYr/P+yCcpFQuv8m9ApKdINpYrITGMOnk/agOz8jLhlwTY1jb9Iae1GdKoAkLVnnqUPiKb/nTD7x+4+A7nmS0/kPyyO1OCV0SvsS05qIXXo5tgS1aoGDWNyj0VOzlJRhZuGvlEEG916LyGcdStogWaLtKpHwZgTrQAL67n6QTPGGRHJ01bpbZZ+/f8SdV/8Y1OiE/2X/fkoqt1svglEWfeyZgpiz4ibPhLYHwGvulZoZa4eOTm28eoZAaTbbEvawWBUaitXs5GyyrciyKNkZLQzxJYFrhhUSaDuYhbTkdZlYctL2w9WWuteWHxOjCyejTHefs8Yos3sGhMVP59ddSbkh/w9HLVU8iTLrErrYCWEaELUDxbdK+/Y0Jf9kc/8YehkXuVZnyn7iMhEs8q83y6gjzKoPVWO6QvGUSglPZESbxbMsKoq09CpeEz03iX9joj1oz4KFxgWYW7y0T8kajX77Y/EYK6BnbhjaE0vRJIO/oPgK8GimkL1EsfdPWJLpxAXrXkladkFaA0s5E+/KE3jTZgwC7U/KyIyCnL0b2QwbOGOcF69vfTi2wOgBlcf1gajZZ6KX7SRlVWz4jpVmmhMFynkze4jReikKw7sdQsOyB/RqcSxaoYPcaGqwI4kq3OPVURCI/cX9J6ksSVE2uWOPXYyoARn1/3FXKbGP02i1S7Xpp0VelVjCay5h0rRwe7xEIgn/A/bLk3ii3AftHPg7sl5KW+OJH1TCAPwnzUwn8Y8gQMXSu182ysfCfGAiLQczL/PVtT2guSuyg2YRyfdAKtwhbw+EwlGUtEI33eOGRem4V0HrQzLRjWSAMT/EQLG5NGLUkmSGhpbkuKio5fdGqpYqGaTxNpgXOK+nruCbwSIs2pFztKb2iJ6px7xZlDpX01aA38x/33PPzKJ+UUmgMucf2bJ8gFDE54/VcbEB337unNRNgjjiuj3urLjfGSS/3qImb26MSvcAXhG+SoMCsfRaNrYQHMTx7jK7ZwssTKVpM+/H8monBY/VHkW4sV9lsIs0PIjEJ5pkFuWWnWMchHhMYzS0NTf/4bL4AdOWpkmG9SYHhfFsfbLJZPJSbLlwCNsPCL+irC5T3zLoIdcUXO2x/vHqgijMUNiaTV31TBKfWvHch1123Jk6Vm7p0si+TQPTrs2dM0hy0lyfZRKJnNuKUaFmGltFIIrWj3ui7F9SW8tBcbESbg8MCB3x95hxYl+4bY+7/KlWtsX5o1p4bxU4gIAtpbW8ylhBm2573cPVwD1g3td/L+Bmhk+gu6KhGq3mg5dgDTyHirqZHuZdB/U6CRVgaOvpd//0FS35GdVhWs/TbmoHNpV0qNMZp+NoEYfuM4Ly4LQz//ccTM5x6U/alUf6kRamTxQOjf9jsk8vojj0gikPBquCl+dp/MLALUCgoJJrCfxAFElDOMQF+K0DiLnYp+pq33Q08aOCsYlaREJN2KkDmkEgfSbJV7efJ88YOrufASZyTP3CViFIIMdE3pzEcM+8BHP6sohTMUWtIHU3jSlTtxVBIy71QI08YCxhHjVXUTAehK+Lj+FwTCzo9l9DDYYPGmhihZghPrkvtuBNsQyUAbsk4F4uZWQilqvYtC+XcZRE5eLa5qUjVWehbJclSc4B/EcoBGPyOudcyU+ugI9MxW3g2mEg+bJv05htrqhI7FK2QzfFeH0C5M2owawaTXLjHdWCClRELa36hGO0xvONamnN1hKOnf35QfLhtRNber3Ljtd5fjoFlIMa3VfLmS+aAGajf9LLgZ51rAFV6QkZBuDMXR9Dtoje9PNOu9S5AULhSTA9wNBoXZQpQKVcogivsR/4W40bQrIEK5B40eHEQo6WIyJ+2MXl4YRlIM289j45LL0Frjt5Ar8L1PbjA8LZ4od6EwYr2/jOlYGWQJCP7rdk20kFcO2BjLypyHzLXf9ji0ijwNgWD5FiLghYXpbPLzyhnVjbpe3josG3fplDocv2a25CzS4Gt29cOKOfV6dHmbkzlyMkH9Z1lrzBO4Cmk4I82Zc/RFcNqjUvKK731SiqM4RBtPNUAsfkHN+2eP7GOjLzZPMryMYl2
Ed3FAc0hrvbxoDI7jLPkIDl6DtCVgu3PvpZoPe8WAix5ti8wc1fpDqvna4k3BQ1r59ohY6B+reaCcZ9SR2RW+XhS+O2zZW69U83BWiTKODEvZoo2vbSRl6bZNXXJgURcUgeJQ1ASMTiYc65DisG0vyBl3Y4g2Nd6WEc7QnUV93doeH/aDWKB8ydrQbfJ7c5rQhn6cq9Z4zgx1AD8Srooa1mtk1dpr8jCiJLrgUUd/5ipyAn88Ru6V0n5rhTD8MjNGvY/hdzXohwjRcz79dv+9vAxMgkCrjeAdCdfSTkSI7Drkw2Ye+zxa7f0s2xh1qZc0MaQ3qo3tuF+uig8z8Gfu2ecmljOc9SEGtS5may8f+D5w9bTSucv9RVEcRpcvkQ9Zk5SNtCJEJwy7nofUmdZpDtuhPWaJskvQQ8AkGgQBCSV34YnmsCpWTT3yiuu04EQr0pmEUTa954mKeoXryqF+7NwcdALxr5n0eptaP+cW+howMCkly0k6H4XSWjQjJrHeLUUYimAPOjGBWrFYpGsC4vREfz/soDjFZCzObhGnp0jHYBRpbX4z2XzkKQyXmnAmCyvomO74dKfaSNQgOnp/Z2ocaGwH11pKlmurUvxdZZQMlGEYZrWqdIUscei+ks7hxBwhDRLweE/m5qC1KTccps5OcKzC9BEbXM7cwHvD2OkAgqzLLwSR0Z19qh3H+lwoKSMabH7ubrE5Jkf7ws0GQdgb8y87mGVgbj71ggQEURwU7EBd8CgjytYEgP4josdT+punbwhI3aGzaBt+B+bFAIXi4bQNdGH7ChF+VxylQ5nOItbAH/XpYfvlWPYddekgfQdYh2nBEERdWcyQ1VDt2+Pkyxqy1J70MnTGqYjJaQjC7gSJs0fwGXBEq88HpqWCqT/xtISQa2gF6raf12yRvZzezrIn3bxMrwYlE78mnA5NKNadZ1irWABAGfn7c3jFmmAI3zfd3HybVd69CZATZN7NSk8LA7GeapnGC/s79WykhtmZDBISsRR7Jhhx1m8n+dosdi6FVoOQIK7RL8+wb1+bCwvJm98e3cY9YpgWCwrY+xiGoLza6vaxaJiQGXurL7+R0zR3nGTJbAPE9i9ecAhT4Zjksl1njRYbYPo8L899vE17/O42Br8IcFle2oXwg9+hr/khXpzbnVbyD+FqmtyEZhkTnrQf6uVn5uomRoDcjsrCnOk4FUaf+CALM81UCAOADN8lre4QeHUjnmZDAnOpsSZI+n/yJk6Gu4dhSZnOgNLnFZJdc9wrNJ+qH+u1eCdCTrMUL+xnIO8NaWKoVrpnhBp6RzuX8YCo7NuOF83O320in/APz+ucBA8RluxzcjBAuNnnv//xw5fpYNZ5U3+Cz8xH7kEfha9FXz51h8lqRFjveIS2K2502/niXbsOogdR2HnRmTlP6GmzAuT/BSbl/VOkV751SSIwFfh/XIS5g1T0UZ5WIOmDKMdnehgu65CS/LLMCjZ0nBroXG+xqtifQrJSTewsNOQ9G7Rt5hMZIx0UmI8JCgEkQpPTCMMxSIgCZVntom/59ZFGz43/O5CqDmGOBMqCShAGaBStG5OFWiPfRgPBnOCuj7ZhJmGF/dlp2Wd/w2ZYkLkNQHyZ+58IZ4C3TcCv87bjar+6Fgg1t60KWaTgZjKlUT1MP8wY8lu+VWL6Lo2AxSRAMrbVZ75SPPlETodEbCmEEV2g51KiVd4VkqSJ/rUor8UqLeWcv12gzz4Di5AofPQxJYB6vnqAdmnpUFOMxid3PTIVZgY+AgpQHDM0RAjbULtmtvzPXpo9fLbgXS0NmFt54/0TXT4D7KSiLJbJ0NppERHiAgElr8fSmQDuKdQsvgqBwf7NcNX7nRpuqDujDlq9PtHVQBqnq1UZhjisdkolkEQJJHAbfKaMQ87tbYVXMuHMf6guVQ+widnDfAaLopHhzsHAb8mmfueXWcfa9COJZE8tfPrRTij2e7z+Y8apgHuugPK3fvmRS0790iKCoqXB1Xj/m1n+WGxKMoNfc/XDATv7tK2XJJXQ2jrB5dSiMIG8E/Vd50rC6BuS+Y7QSmwgj30DU1sgurhaCHxIGrs83ubKkhmg2cUjxw4/ElsE6Kvgj2XZ+oOtEJwugPxit5pA5yHJ9oANw8mnGoaSrmL6l1aOQbMPezkfKhVmK8FdEAmUckmhanAfFkHHqNWm4sfSJlxIoR+WlbyLhNVwNpbbHLRRvDtJWP1eukRq2x9Zwu9XSGUIppLDVEYn6H0zxIOAAjQzLs9/t8k1MOttavBSLq5Sgbs4IzoKwr0OdOVYBN0zbAB26/GLYF0GmgIZVqvEqVa+2417ycZGucaan1MTAJLlXYd1lz2S4wAE5rz3lhEwLLtKU7DnwTd4+n9u4F+NctRxWYmzTAc/E0+aKrBblI5mMb5HoILEAbPeVGp5cJUDzp9xX64UGDxA+ugvpjZgh6VwHL43IRX5ihvN+ANRru9dTkFjFHCqN2kTADdUq00Wk76Sv2aREmHKMInIJKihVdnyV+L5Tg1M4EkNb84pa1HXcvF9ndz3MHSwChxbdl9wznsg8GZEbk6dElscPIlEIZLigVdDwSt8tDL/kdiZtIy81T+4wiz45MX6SP6/8Yt2Q3d0Xd4SP6NtNvbahGQ5YPuiozvGuo7E4zCrRsPSe42ld4GkVjB7pP8urKyqZmuzkNvHVNbVYqjxKCJGstrJJORlxnTEEdt4NY3TxFyoMuCCMFsNyAQblrnUjoMpHifGGGfSauFFZ2YdT8gThdTXGEI3z9BebZdbFXtAXNd3ilMorrQh65JC8e0T2Ljf1LN9VqMJ88GnNpGcJqU1VdQVOQ3LEYJ0M0rntfDauTL2+aD+CPWyvENzBd030r2PkQ4UPL5LII9LTN9QycNHC+VcftyS5uFNfj87ZQIO8d1dgwWinwjrXb57Ou7hmrACFH84eAws5/40KLUdYrfgXsF2zKfePLwTzna+nlz7Ffz7dZ/8Y6xmnA2jyzFCSW8EOUkmmdhVP0b/+qmhgX2hYmHkvgao1r2AWDXs3nMGClMz7WHjQQFX1JPBe0X93P/8Y+QLNbdKfjjSBQJ0nNk/5cFbgqSfls9IKPUUhBu+qFhxaig67Nlogze/nfMISY1eBQRkCSv8MNsqHGwEp1sxCvR1FUN1Z2P/1FxeKJx88kl3ucrjr+5Noi0MdD8DLzR08l8kw7ELMFdRwbCgjh2zKvDgM7HGqLfSarWvW4jB6wmmYPY094aPO8dXaRSYgnvUmqlXWJ8LJh6KJBNjEEXw9hRqY5yyn9AAdiFjkpP4lPBmdKID2BKXGRv6Gir+pO7dSVE4gUBnj5ZYLeoChBEfbRVPJoY2mXQEmSD3xgNKlKok0OPB8ROsTORMjHkmLjyobOrSr1c/wpUl4v55zFPDyKWiJA9T7ttbzzhCVmAZDA2AvdfJ5CjerLTANJ6jljnYvMofYmvLVsgp+NRD/WC+DBuemmkb+QFSF58mdFaYUj2D5UbIZjefdW4igicUDpIo9vwCIJdbUswq8bsxDqFTpEPjgs/3/0ydjfn+If6k3K7ZsXx3YhK0PxBmxz6/oRz19PnLw8JdJcX4IvvmQgu6X42C9cd/klINZZ/KcQkJXjoh4TRSM3L0RPPRs1d4QxKY6Cd5O5O1UVteAf+akC0TCeZbff5HedKwrNlS4wa4Vc/lKzmN7AO68PPf1pBwfCM45/lXPOCaGQ9qfYNgeSglIbHfZPIbN8lJqocyHNs52PA0p1QCt8k9dMnuM6S+SsCZyD7vYcRObzR4T7i1Df1wRWhTJski+UONdr5dVOo+N92F5FcE3hqLow6NPK+rrReEDrpw56xXDqAxgH9vrppAfCjBwUN0DB61eHNckpb3YJ/vzReUU3FybPtZUkEKMOsFF8I6jS2Su6Gh9m+Ub6g5/5EtGnRHGXQFOY9n5Uo2hUWE88tTtu/InbqUwONeqH+Af4zReumak8IbviGh5cqaLUdHYTfjzhv2chFvQJL4oGLQb2mBFvliO3LKr1Z39r0HFVqv4kd0aEkX1Qjgtmarc4Kl3cxm1ON4OaUSZTMgRXFXVNeNMxB81W/p9ywLDcYjs7+YJwI
8/MxFoEMp7BdAhQYiIZ37bJp5KMFBqftJQpZeyHKf7yj8H1UNiae1yKbVRG4H7fCKYry8FiGBnXuKlcyWfSjYuUfk51MaEl59RAPdWbq0O/8/9txP1zFiM2qqXEFC+wucmAagNV4Yj1l8Dfbz1WYn05hISEZtU8l2P3rv030XwhNwm1x8dp+XlmCBWTbVQKko9TuTwIpxWr4gNRvBKNx/QqDtJ6z6+wk5787Y6MmQsdh6zjiP2SGacEVik9reXUHjI6YssI0matInnVDbUZC03QNF33Wre6Q6vk20mOPH1O6XHfDhfUdTHXwWGI4MPuHloSzV1UBOkANJy/dMbZTW/dqYrLsUcPbdc5WLs+8NyxlUOFniE8mOuRb16iCgoD3arwyAK11t/Nh3aybJ/uzjvqKyyjoxl76NecJ2AhPfdfyHtG70pqMmZK3NBgsAdnFVrbObGFpuWIuJmPQHjnPVkKkfDxObHc71Ft8OLX2X/lIJJ6yql/2UGx9nKprH1H8UVax/jXUzHbBaVAlFiBR8vYjD6irgPSzouz5W7wlai97ZLXyzG9KDJThranTUz7aDEEJxtaP5CTLGc6z6kGHKBLKfM2JvrqtZSySS8+gW4XtUVGEmRHi0PhdSE0EBSA75t8H9O6Lmvriny02exvsBJLUJxWIXUsKtVIuWFwZ4mgMfbdH/Umz6+wema96QGq0O08Q3uqGwGrapmnLRi45qzJpR9WH48SdzAxkO3Y4IyVDZmISex44a47DFRVEBJQ6JAQ6+0wi5hk+kAQMQxFKunmzwad+ZzVgjM8YO69leaAoxN0zawoZIHTBrY+B68Xp/ZUbr5gTLLTjNuds4eXSXMBJqDvBkbFYvawi0d0Jf0sei+cIkB8tBW4KBK8IdlcJe/ymh/Wqm7gX/4vQy6XylZ1W8GEl8L2GUx7i/BA7qsIKrXKUWc+wQBwJLuzK+7NURKrbn0SmRJLZr7HZOEuEkHR7f0Nr7kUHNhBU8kbbkkyOerv7hTptcZ3Ywe38C5Pig8usW4HNg8gLm4FD4rNiaBaZKLISRmebOxrIVyThm3QX51NWgu7cNExAfsALVEftI84EH1kHeOJJlvrmmBXtl1JsNaMHc5VlRvibx7WOPah1bQuaYstfPSAYIuYjRmMGfIGrM/kQyfZkNJkqBswirBUP4oKw5NE905V68qUPPBgfkcY7lE/O4ISbIYRxp64Dr5rs7wzJO1RYoSe4tJJzegO9TJ4/Z/aGvu0k/XQXv7/67LD2sJCzjpiAUUWQ4oKYWvb3OesnlbmGOkoPF5juH7pgw5rBXWXzLCCvg59/cBuA+J8msQWbuLJDuLmxN7QmdcQXlZQiJgw1k1mACFlLPsWp7SA5KKKXHCn0xxtyT49r/DvWR3tIPp4hVhoDc9hroYp2qR7SIeq0U/ZzCP0/5KbULL3FdET1hS2aE/5b+uC6F4mWRFUoTSpmfShqzSKPEIVCZsY5AuvIqrcBjJ8qRUISh2OOYxSra/efupQw/wZsf3KMdGN5lk2E8dEFrzInVv0kCl2gqIBnXTvQSOCJdMQupmD4bexO6rtc0xdHmdBAIBmdOywH+LnJGFhPPuZ/KOlXEDleZpcrH4Bk3yUIRHOwyauSkbRWla2w2Daot3FrbCu0uy2HFxezD5vGtgWzF7CoAEEUdUN810DLe5hJP9DRP9QMLz3tVFobvD0rhSVuhWmB68qHx+3UX5jULLvgvNPRwu17Wk557v4B+Hnv112r/HMg9f5Vge3rmYSrTra2aR3ja+y05YKu92b2OEY1NWVlicWmpYczcHLYBJ8eWmritnPtpYTpBE1yCciwHQUUcu80At6ZgfLIyipgqv5413suiKR7SzBzBPIlcPv1dANMZ7Srcbg5Qw2dA0N6yHCNBPkhIREcUPVH/6Uw2lB/d2tcNTRKsvjiS4j6p8tZavI7djJEu8gJ0wdq//XourOdrf7X595XXZwCz+XzJJVQyVKoOXZrnHzU9Tw+bsdi9rU3N3g7OX7wVWFlmQC19ob3aGHWnX0dqIqBBQHsK7gq5o7gwPNjwnk8MBfLK7hdsc4yihdeLQz+i9rT3HfUGTQ/Dtjh3X5VbupCCfXZjaguqEP1p7Cbb1uc6zhj4Gv1+tS6ioZeMiBnoTLaL5+0V8qoo3WJ0S/0IaYx5b9YRFOzEf+ROaCvH5Rrt41ONylR39oRCe2NHAESCRcZFM4WfMnpjYj7nb2MeqEU4e3+3bT3VwJTbcMUGMh9PBG2QmtZVIiWrZWA/TnCRlk2JpdDEwLNmMtffOE0MhpUaCtbOzAiJphtyML8wYlzhYlj0BsfL8O/73n6ALD94tJ+NMVATZO2bgdFYAvQwkLu6EOw6tw4tcBBypDDe4NOzWtqzfgB//+C+5O0SuqKhNfyEKGBmCjGG1f/ikxwTdUNS770+QEp9eU0tJjfyKRFBUxH7hdnlQhzB+d3t5Z60s5nT7HzKWrWp+KJESfNwLVRlGM4SJUUPycr41FbfYU5cCdInpUpV1wk/EdP6dnu1PSEJEguU8TUwPsprSYgGQzvgtPZvn2VRTrMztZmcyWsxLJl60QQOaVytEkHm1FE9diB96GVAIDd4DNqDWgzrqQQnS87nCPAisFbYIUImRpTt4KwWCAVHk/7ZUGdlvcXkOERroPa3fvu+NELwjfezZ2xtweEC9d6ZEq1MtRYNj7IaT3xuHTC07JCNvekOxyava2PfQfjI69Ch4ypADXFuHGf/e7lbk8TjQj8CzEHXybE4rQ1tBjTDdObyYN1JEBa4ViAe3VJo5sxH5g+bQDK8+ynvWTkM3hFd0yro7BxLVR9PoRlGLKNxiPCZLGFj95TsfFm6gkRET8bURDpud1A/KKNdmvpdNK2fcKtCYKxTlZlRXhtZngmbVI3XBAkowLMfKJZbad/mz0zR8IlGlkvqtslcPVOgjYF4CCFrgxBKcpu+1ngli7LP66Tfp7NKboozKbMtBDmkbO8Pw9olwBQazRKgiA7dcicCLh0fXxzmi3dqfOndmxmYOnjQj70Orvg5aTOaB6nUO7Hmn4Au89NCKZncn7s/doI6KcPKrCMjKZ1sAfRV0YhAouG1bUmX7ueR6s2MGDKFUMnrFl5TKdcJH0RgsyBKDE+lbqwIkPxBKizK7uFDThcm6W4Jjn3+KojExlejX7R8kWdvs6UgMh0wzpTkZAgNOC9ukY4Dgsa8yy9JAt2282w6buSJDKGB1+mxDnMe/plZZ4+xTYOW9RBv3q0H62PCw1C2CvF7EsUyN3XW8r9D041JYrq2S8CIgtwcPxEGbr8ZRhCZU/nMfq+hD7hL6wWvOBm2fU+31fzEK2ua3w6B/ZJPJCO6AxCDGJPU7mmNnXa11CdR4BCZRPwHEsJ0lN1ie8x3/Ihb3TKRfvglNFhzYDGeZ+sJpq8dVBPsxZa0UHjOV0SQNJKFahuxrvnZhjcx8WSbUMQYS1bTVL6L2k7UZNkL5h7CrArlTgTBTnrn/hpsMoquwWV/MDsVzHnffR9kdajw5Zw/VivRfvBNjZonAZhhwMsm/Yg6w8V9QhHuPjt4Hf9Vk5bgbeJe6QcFEEpgvGOAVtUtlEbH8Hl2OOI2IlDKlpo6UDGk9+gn/c2sBaWnadgLFvdUMRtnBHQU5poNy+UlodosKlTr7/jpbNx/RI173JJgdxQVgEHrKSnk7d3vwbXoyQfuku+WbDoV/Ts1RXEEpoUBcjb0FGL7Br4jGep9bFzc7XMT9RvdcGg+F8oAQlh6CPhhPrWFAtTZka+m7/zYGSW0XmeDDkKUNFgU+cAkDjYTiZfF2lzcdpyDW4dgv3jzj7D++OIAU+y+PNirvQGnFdRS9KQfe/RiQbt8gLqifRQ+CL0fIb/hEbtQopbw0DlgZ9nZ/PDBCPjxXrSH1/go994JpNxWoNWXym/ehzaB/HiSmiq9QINyrGf4w6j+BceiwJxztfD1AQuRciIAePtuVSh8IY3D5XSnztmItJzLSufphv1oOTcYSPP8ultWONXx1cFKAtADkp0jwLTGaefPLCPdOrVprGGa6LL5WqW+87Te1PPSQ1sjr4ngjLIOROjhf1Wj1PvUHZfvJrp2AmK
6OSgQA8SCmsOApWL7u7maQueslTaGY8eIfv33+tCS0yANTa1utwY7tlKqnVqP1PwOk49uZym2da0QfJfFFxpk0E4br+V+c5F9wWmbvHq7oXADyOJpjI4IYGBaQ0GYr9d1d9Pa7gJcrkJE0A3Bc3/YB73vDazOqsZa283YP84gdcaJTYo8h0vlxauvDxe4BtHpGxH5rOLDzOJeH8HrBNODbeWWRr7WYpcTTw1ytezvrV47po3mhQvCiHt6Li0yKu1tKVyrXZT9wi3BLiwF+e43YVsnABNQMnnSo+oZZBYD9toKhx5ow0oApiwyW4vZF/YLhxDMq1WQIiLY6SQe0q4YNVhIf+zwK7EGTu8dtVDF9eEGtvjFXXwO42gLU/4C1vFxJlQLUxgHikJXRaASF/mMPSsO4FJyNdozsxP7y9aJ/6+LClQzTKSqrQL0if7GdCzFnycKrAK9V7qKRhpkrgsFTawyl+WeH23qxtuYEsewHtqYZe4pLtkRPZvkl5s3MAedwBeANENbQErlBYnEZGnfHS2Fw6FpMrZv2K5RQZLt+x/K2T0gdGtMrgUVz3NdKgkUnNo0ZgeOO6aF0uU6P6qLXwU5vCnwRsXF9FTqOt/aoEihePvLwlNSl0VQ2txnaCXXKeIMxVs6o61z0NJTeEhkiosIptLGcIKWb34cgnaCxbQA9BBY9kfwKKr+0/JRVg/Z53OBVp9+xk5Ruq5wxMULRtCmTbx1XWLRCK4c58PNLTzuE+qHr6l+xNWk0dfftuRevCt0byabOvnRWVWpAi+Y6ZHCU4pqfh0rFL2FpPilw6b6tK4SAvOYZ06BEMv4dtYxZcDper9dANRPsVpBQqys/iMXdgk9020hYTC0cM2Ext8KOxEXU23qp1i6J3t4UVcW6RuAmOM5Ap9gVVjANaLjDsYXKo8iSoyuHY0dkPHmf4MjiM2SbesXjvRslMAhtrVyimfmyD92ruYnQ3EP56bhxePUalfMfcntk93b56ua7t+ICBZALrjFGU+eQsf5xkcWHfWQriyTVIO3tlg3JRy1Ev4hFVo0C47YN/k3AkNnh5/qw5/Dm7DZO8zoKFV9k+xsw8LnSj9zUoYapfTsge+5MOQNbz8/oRqoFH7vFnMJvyxQ5dUY+kfhJgnXCbnPhsO2NdQ8Ylu9RcNja0Dk0QuvOV5wI0HICAXcLwhOWJdAaEA0dP4uYOMFupVY6nBod25T5aCz1FMdAZcsJUgu5Uetw+oPqheYSoXR7IfVyUWMIkG6c+obszOZit5ACosGkpueL+0RS5JcCSOUlmB7R/UWue8Fm4qRX6RX4Ugv6f5Wnfz6VxVXWZpThaMtPnFzczsuJdF9yYmnWWMTxWafqi9sDUf7aBHuKPnve9NTM8tsc2XA+qAZ0VPBPYEjQZU1C79ZjEbZdUXKNglEAhN0QXgM9LXkeoOiOsjJd55gVpDoXs4CHl96pEEBZBVFfcr6JHS/JVIhQmMwl5NyedZn/wpz3mQESHf9wXlwy3tt8Ab98swz6srjeA+EwinFP5R2SlqhBAKB90lWc5J+eX9kw96mIRxSKn3Al/RpIuNsgiVSIkk30tyNvfBQaXYhbVYsbfNZJKNNkYWRXuNdS5AiOg5aRZ8872+sHb/zIL+qf1+J+69aQL+6Jgstq6NHPBipdBhfuuFbK7OT3079WB0kojosRw3DcYUCNerubuHF9qETwg04RIXeH1KDnHEMvmPwkQskVrejH3YeEs8acC+3cQS5hSKkKjnfSA/mYOXbvJrVx8+zWHugwakSq8kgWuJU0BMGisqZsIFIHa7L7TeGXaf2KKGGjyu3NpZspYbOQ9nTrSFSGnuheJHwPVPv1qMGiEK31TTH/z+dfBhY97zjZyiOGOLWwERlyfTAVybKlZA6LfY1A39MQ53KwzTFyuuWPudyWy9afHItsoAd5WgreONzK8nQafGrKFF+DZMv+86WAG2a4tA+sy07hhoUZquYW6+yFlMFQWGTUn5W5LUH9zq2t5Rr5V94mEqftIzkPsukcSSAOPVwRYo7EpMSJlSM189l+kLiSQJye6RqCll/j7MDWWJrMO9bo4fpGiA5WZdR7Bu6kkJ0p0fr+vUZ6po1bwYzGDySA3HhD/YZvxVswkmn5OJHwAlUP/Hd8hqVL67747PnqF6kyqPbo5HWUd8H5ikS1aymMRME/+olZXujiBFHikuNE8wadYnfydgS+/s6BrBzW2C68ve0lK96LDV0dKkmmyfwEwz5U3f1mBuMjFTLSCUCNf3gU7pZJlSPd5zatig0DiCy5sJDrYmT6gFqVCZWjgUR3YI9l3+nlIznsm7aOzS2U3y1fIV0S9VUMpo2XrkS7/I0DhMuyxK/rbooARDULrLw4n+DffXv84a8eS3eBEzgyV5HPtoCbrgO5PNP9rEMNrFBCGmVMCI2zu0eCjXIi8RAB1HPWTmr96xhKJtQIMAhi6BBBuniyZs+MlYVuEEpBs28f04rOCR8wfcgX+IOihuSwr4osxwPYRasfhuwWqE2ZHGcsbv9uyxjRKLFr+z89x/R9tNP84q3IBxTMP62WRtuNDzmF2R7N2tjyTyNqB1vu4MTU0+eDaMUpCMBxf+4lg0xxnU+dC4DdZFXRTeOEwaVgeq/XODb45qyf3uZ+8unhPCdDegiIfyA5udbuTFRGNdus/xhGc0aTl9oc2C6kGmKVHgSioKHrS4N0rFEkjdKEHQcahyZXKD110ZwmXA54KzNpY96bEdfpjRlLfK6pQ0xQoDdLH0V7IVdjaiVfOO+DiWNhRbvvajH9FvrUSdq59vQ2qCV5hfTvC9hg6kBYC4ksCzTRz6qEf7t6AMfqhUMPvS86fL+Mkt3vyiNTEUslxziwaOrrdDT8GAfqLxsmCvKRM6W1T/+o8S8EaVswHHg37Dima4J5fuq6O3Y3vBhb7goo4Yqhl6H8Y87iAJLydQ/C/uJOtyf8gFgoZ6+zu2ejDhC00nEtWhsnQ/FNU555fY/Bgx6+FXZL4r7O18h87Ioy+v7wproTizgMaXoXs6uKRnYDYTphSL7xmv4bkmJZ7e0SKizXl1I5ueA6DqX/C4IPDFwocWd2mnCKuENAITgyN3jDJ+73461gasRGoGWikbBisKHoyiut2PynVZi/8EVi/O6q42d4luOv3BnfAKHnU3lRXt9q5zjZ76udXU3e/dUDpQqGu6O3Z9uRzP4mu4rDFlRJzUHzOYgbUSksDq5WcZEvCPmcicvjwKv+L2hC8oeHeFYI4xj3SFLzrOKNCZ+6vnn6A/cvFnxH3oCtJ++Owg/2era4jUM2au2UqKtKfgte/iT5/LFdiQnumKSLDO7CjIe1wxPHpL6bFR1lxs9HrPcoFWoK1VOpd8hNrCeS1je62AWVfeJeMHrSvEEVxA0qtmMbY4ic8g/vP2cVl2FP9aRpDjLmpjYVStOe6idEMQTX7c7ENVufjV1nAfWKBk47rBBspnnMjJj4d5EZGrJ/o0DLHV9DaPJiWwTCeimkXUq7xbwfhsXz/W6thTQ8Rsh35kdzCkf00QSctYDDFtEJPz5M5rD1LVobk9m0Xym8FBwj8i/4ljIK2vX9YpKPw5C9nT/MKnECHgzNrHB+9TNCio2Zbe6GbPmkA62gjDn0Nk3lgs9yVWRonGzhq2ptgZdoiGHpaP3R5Wvn2Y1TSxQ8+WnFynRNUi+zWKN86h2X+Xpmof97NUnZGnNCoGUF76KM9/eOeMnhy8rbB3JMcRQctOtwNUnS7lW/dzJ0OZYcZtMC2eb17dD+Lt1DnKcJcxPSTDriQbo7T+0tO/QT6g9Qtkpmzprk4qldiQ7/6qXyXRMgyEGv0WKDFLSW+zl19I3rtR8JNhUr7LBg1amDMu2Y2D1It26RDOJtUfqeug8zJv2E0rgI3hnOspMuBTsv01O9AHaynCuJkOIY/gnqNVrdVwB/3/7SQaAKGNaujQ03tftwjhwlkBH6seg5Fx78zGcwMHP7EoL5T4bQI4QUzTvvH7NOuxsSeOr4SX91GJKA0Cu+2nv9bAlJ5UhoKO/dyJjHXmIJGTgyGOepsTSe27jtR097TbZaJnLRihEoBIboofWg4ghGWXX0Jb5q2m
en2UwSU90SVllZSYMl+zMOi5sKG0vwJeXQMrkIPa99FlJwp/8tXpiiaJ8zz50aGX9MFPWiRjWaCI2hjQa4koJYEoEY+5zMSvN6dRHDTJnixjB4hHn5uQ3sosBj6XZTdOc+HiPgg7JnpL1dulgXoakORRLBPod5q4b4UeJPpxIkQ600THegTjixm0DPlcN9g25uREnnK6Umm/3p1c3dwQ3ula4qunoS3+5B5wy08lcgwy1hutNhPExwnY/MnoYJxwtzeVkQQdqiDhCADnKLvH4aKZSQKO/LFVEOzwo777krAYjrnDfrKOfNTQ8ZyRK6p2P7fIAfba3gnWeR3iyCthdcumbfWxFKQV1cMcu7lrafaeoyRFvsUK7xHLFvxhhrBoJUQ/IZ+wWYmvIk4J2tzW5HWtFQkroay5Bd9N+Lv/cpX/WIsWn4Xkl+lMeCzDyzRVC1Awr08uH0bvOmL9MR2pHX3HcGGFJlevOBeClcGfxG+YNJ7lUrsLS8L1im442uDjFWOTTSM0b+tBDZXF5Sik2WdVvy2/9TFKq4u2j8S693QU5iPR5qCwQP83QCbraa9J6XnUMPubf0XSqEGMIujcMyHvaSXh9ODdhCOSVMvqwavVqRkiCE0ArbvMdgCOklxzC2wi2vefuXNMCbrzUAqMukmUGZTylIejjehVS80ycjWAmjJVu1S2WTH4yR8bB13I2Z2lTl9TNupOfWvdPL38Rud8K/MZvH2wAi+dYErNzva2l087SXbm9Y0YlHoG8tMEAKDi/Yr4MmP/V/8sxbR3RnBcSeWMKEeBLmLb0D/0ROQvybKau2gNZ5pc4+DkGLn/v2usFhMemTnHe6FIxjYnlV98iWPLafRlxJlam+4FWISxQtlhkhkrMFRJL//wjXmWz4Evs9C4pdshkWkWuooO59kXuXhxwWoEhEOiefyEggsprAoq5+jtf0d9IpSK/cfOSEoM2OH/kBKZPqeMNhUTWz2bQgqMNcVxzE5W9jvMdqRPkXUkXmypqhsN1t2wqOTZnM35TyzORBt5zZHcCMsE8KxBlLiqnnQ42Ic57brOLBPoLEMF1zxKsap3+g1uGQAaDn+kHwnJ6yoFQBf9hZaFmwoKsP3A/w2j8wK+dc4dGgnL9YT1BobM41WPSqT0gl/UQzPmt2sKsCKETqkX1enm52TWVvwRKueROTainhC3yKyqfdZylVsg69NuenpqHyX/JOTrR1HbfiCP7WbIx9e/jTB5N47qNX6g1YY7XgfwM9zvqxRBTwV/S7Qv/CJrRVE2dq4eBvW4R9O/fgR1JyQGfbZdEJK5Fc09H3B+PGm1aoCTIqUZh7sd/p9lYrGoRyGVJoMphi9GvzN+9Y5XIF6tOYTvSxT/L8Gb2jz5kEW3bdsryX9d+Sr5/b5ywf9oI5nHnVjfHYFtV/MjHLbnNkY+XXQtzJgFyDAXxm/rwPbqMpCM77cay+Rducx/RLqRpejW9xfTLU0w4o2ItsjmuoVvRXG5GHDhpmXI6Up5My5ItgBQiTk5svuX/FVCHQi4jRNdUYuRts1JvIgwu+zrHF6gP43AcmaTD6Mo0iZ0mJ/5wY8nSmLfBkpf6RFZOuCxqODYNkiDsemb1GDn5+EJD6Fra9JOnhv7XEjTlVakT+4AWHWf5o1dZ0iAiPiCFYBEH4o8yl/cJotdA0zTFEBZVcBIVa0rhLmfKitZf5PDPEgxJNqhK3g8MKCNyndOOx1Vf2Kh5awwvH0EdiqMXS/DJK9EmMdT3oXLlynu2bVJmYywNd5BpTJKJr+ef6QpQEWhHUYC86nxjRCat1uJP2Q+jOVpVQOj/WTuvzIu4EpN4r6j4jG69dm+pAexqnKJzYSScq3GDMl1kLauBQbMZBo9Z5VGigBN4K7BO+A8alR+s0NsFAELhN5vIfVYuRq6acFj7amOWTJ6lzr2nkUZJ8PGSu/R853Xjc3WHAVNWJcMDxa3YXROY66wPqbGD8RW24BrmrVIx/EhIOKWSdK+WzIvl/Tk4lXBCRHfGNUlchyE2Ll0pUp1g1/KzOBf/pBl7cH2lbBXZDtoaYi6F7DrMbThrJJMh+EarEJfwG3xHEyTfNsbngvAOxolL0lKXLPby4dkpFGDJgM+vaagvNJolZOPh9ouapVHuuupJ2qpUyUo/fzUVKFUz7V9R6uFaG3+fFRtVOSOcOgILdqQQvD2YvyRDhsGDQ4rlQWjUGLBrEskmvk6hYsIN933W6tt6iYZ6GaapBCmbc0VCaKtrjW7etwa+vwFCXzfoeZWLOXxm4Wm/Zy9Jsor0kGI/ykyRo5v8RlMjXsgJ88oT7UWudhZsDrlCBec9Wj3EH/oWgB8fNyoKldDvNOm1fbERMPxCPw8g5zIyQCQAtsyBs8IBarmjQAX4SaLXn8LSvjph5r+gFCXrrgEUlaTwArqx+aaeaRHTlagi7ikbaqBFIUmwbxTaJUzUJvGLE7esM6BuBJ6O86rGmciZiXIuFmSzwfpOXg9LkUjJh1hULnGiJLXYa7RZ0Zx64FV8ba6EgdQTope4egi4y5C75754H6VvOnZKkwBjQ3B9IlKy30ilQhzSqw96Et+F2K+6jbMhJApejBmgFjClaAFeqj6rYKUS3YeY+x629K+S0pvNKikwwvZDS3IiRBruqhpJW/GrLz0dyLTfRtMb6bDIazaeYRlzLO17VoF+8zlSRTidmQiiITO4kQzN/SN9MpDPso0vrbbRouhbrTQPcFEvbBbmcsJCscGatzUY4QBdpGjwxIn9kHS6gOnMvsY7ZMpKEhTxmU1K9SDT1kDenkt6GdT4eIWGCLxdep9YuETYfi/FnukZe3PML+5CjRO0ywOHB59Fnm+yBS3tVn98vGJqPJPDM0Po2RBE3aKj1k1nUXAtf+x7UzRgLuYKvGvUP12Biuc4ev68fcYxykT341x/f7iH/AptpXO/8w1P8N25JkionBcDvWrgL8FjZU7QGWCZxKRBOD8LctlG3PAwMp17ReQUEjzPaL09l/0uKufExjHDqurC43e45gFi3axS6wIFbpf+hbwIYyvOeFlX3y4D3Qq912ENsieEcaW4e3y4VMjwXu3RvDZg34EQSaXcXI+Kh75AIubau/DSyJVimAFdRQ/FfJ5ETZYe71qL/tpvpGp0JU8fuaBDW3Cy/QnA6z96yEt6TZ2Lqn7H/E5Wna7kCljqbhhXjpBe5is8aw/QemzCM/mOhCgBKhMgpsUBZuZOwh9hLszEy19U+1g9UdZ4lutPEHtySz8AvW/k2PNYotKwLk+fxyauziI7vQ+VaoCFF9l91hWQJDX5ZGtNhxL3ddMe6AmKsBA6ZjHYLJVbA+zUrE09635nRhIyl4LqODbuSkduahXhWvvHyizi7J7v+AY6FDc4DSMYXPjpfjFaxq7Jn5rgmQ7/4K+XdSCoXJyX4CKQv/xvWWTT9d6bjJr88jQvIuEGViF3jgUahxLU7ncT2Xan/tyfsALnYaxUeV6QaozbEjUHnx2Ynp6/wnYqz8aNtlCOowSk6KVvQPMhwBkiOFvidW+R3xESn+MU1moY3lfAIgRAAKytKK0IfSTldrmra+KnV+3FNdh/WSr5nfkHjUj5y3yQM+tHACIf+fOAH0BgaPWhbFNDldEiPFRQ+WqOWakXmV1gpZS4wMZ1++RjJmrdlVN/ASY2gT9itgJg62RqUDZXyAnOBas6w0BCiXVStRjjOZQv3jEamd5BLAaZq2cMFWTQxLwgHQcshQ6nNL5gIPBUxE9pl3/DClLEmhWQNsGga4e3xo1fA/LdZrvuwT8cbXIWOUOTNisZqvuVcRIsSkrJ2QTepBccJowVOSVMGkgkmS1xi348nacfj9v5NQ/51b4rYZ9yax0NesL4XAPPdWGpDmLWEoY1gk/l2ugWm1N4P9i1K3NAYbE7+Q1PNk5s8iFOKxaeWB6RESfnysWA+KkJInCdedJlc+14PhqzkhJ2/oHU8R5Dcglpa9cQMydK/ARv4yCuu3Fp3HWch377ZXDa2NmJQ6mXOwaUt/zPkoJHWTOWOLQzdVPyNKy2dpVM4q0bTCQsOdi2R+DzPb/bgyiMAv1ssGNax9N5JpLjvtTu2Xhel8sxvU37fJN
1CfcAYgOioxDsAvu4L9o9KstC9bXJGmFS22SPIEI9tHjXmaj7fNjxCR5iCfsOGq5TBm9w3dyw3FGNAFABn25BAw8T0vANDFIunugAvbVpmXLom0SoOhCDUULwrKMCmYXwf7NIhKciXEk1U7PjtW/7NbZJ2IxIl1qqwf90ytyHEyekm1u2LMTX28mwEp7m6buvt8mjz5yOfOZUF3lQLfODLbwRznoXsXxEZ+tCFYyqIOSz1cTs60CPOEF74NdQDkg6DtBxg1iGvPiaEHeFo3oxoxz3plKVRxSfuHRaWm1L4H0tO6BKw0y8zyKaYPWcJvHbeKze+AkwDRAEDD5DM3/h/02P0NfkbhbDBBzITlc/L53s34eFlz7Fud47bYkndPebEW55fjm65UI00XWImgLk2UZ8BBgOFDVJ9DRdPWh++pTWGEavDOnI0BZjjZnKNVk3OQOdlBHXOt00qBFTH3Yj+5se6EspV0yiERifV+ARQ2VHqh+JO45Ikklf9IiXV00HqpI2J40iUCKN8pv+RmE70lCy4AM//zV3XL8kQiq+hO83rSyIl0ZSbiuLs0IPdRNGPhSkIKMzHgd5LRF/JN2C+cT4FS57tSs8qvOdYC4ryayG9PUOy8eCcnCW7ub1tfFjCMd4pR2HfQcD8xaL9kDI/o2GrWifwj4hjLDqT7njaVzx/Q95o7RDxhowK/sUt2Ik032YBcM0xCeg1fyypp+ZHtQHROYwRvtuRifS4Sl6Y8yhX9JMWow7qVwSKftrUhuNOS1ijDY02ZqW12LqcMNdihNPZv0BNjxBC5/XonThRLQtNS3giZqXEgIvxRtantxG/viqYooj+ci+vHpPHXs4cTB/Jvq1g2RW1EQdlN5PgZz0+gM7sHq8H1aPAqfRo9lG9CasZOuTbxg4791I8ShBInEcv6XXt7faFKPom9zeOYbLrxYSRiLR8AZHRbl5s7mU+NWyVRgSv3z9NwgtkTGSmLHqMxShEkQ5tDGFPPsmWlr9CvTiVe7CkZSzLVTqyAroBn/VSoC1UKOfS3pu/+oS8L//AuiFnAHf1JFtDzSxv477tD9hzfhMyWV2LIOTCTe4TcCv03iGwcBR+1dGuWaVNNTIqjW3q0shYkehcaovIpUshKtBWq1vyghEGXe+Ek3tL27FT2x/KPnzxAeMYYx3cbYtPUEpYAjRAp/faCuuGPhgJpH2Bzq77yri+hK2zbJn8HHx4Q6PXmx9oezUjRCBPuaAreYGsLA4sRk70tyfXp9QfjrPd0qZZZ6hwHo7n5PHBwE9irBIFAGmSEl6FDskFsQOR2v5/2YEu9a0dVf8DDpgwYRlIbcUbUOGSlaWIWnfVLi6O3Dd2uB1UVWtZK5J2DpAObu9vLRKksmDauf/2yAryOcy9NkAkjazWVp6THuJ3yjzYNxF94liGosJVPriCaH+l5y0LeXrTHbIcF5SE/9kFfzwePmpIghudCgMgGvmd9mewWsKV/wR7MqxbUt+hFudzfZ4vdaGzq0aT1gxWg03zCkoYNpFYZ0iPEGspJVDILZtN2KFiQUhO3SY0Q9ofaTHstCx+cpJVTrgDXyz0HRRdPicWn0lLV3CW1j8tYNFmgT5b0u2OH7v36dHy0AzMGsjm8e2fB87wvQk0lGm9anlNeDc3wzNzWvgjqgNRp3OFaaLhdLi/r0VZKVTZ9iTAeIFmTjA0ZP6YWtf9PX9klJzaEnJ6DMwMaho2vAhY61Dlv65o+UIAJoaU2P1mwWgYEwW3CCpnL6UjCsrGglmaVdLU/EarlEHxbowx1PA594UIYELjDnWdWFmWVCRkw+twioY0saitl5scxmX6iBz489otFvshPGyxPxHpTlAZvUxEM84CbJv8YN325h2yWIte+LcTC/Itq0dZTHC+338T+uznmixXXvG3GizsTx3AMHPz7Y870t0fRpGE5RxrIPK+a2+KrVeiPS3kz1i9UHGOJydVgt3w5lKEbdvJcIqbTwRImW7MLkSgiuO8MHcANa2GOxEqSxAxvFklzbnYmrLelpL1paxQBKNy8QTqp/B03bzd/7Rz3m54ai+TFMJKwQupqpA2uUGGHTl/gQAIPNdmTZlX7DEfQXLJwmi02uyIsB0IBbrgh0IQzIeCLiP+enfBK5FaJ2L6oOyevkRXrbNLoDLuxsWPWEuonLxu2GRVJDDc2oYWON8j12WAywr7wol/s86FEfmviPxo6MOrwHzvY2zeHNpVoNn6Z02Vu6MOREr8TQcXCBU+5cXXnhkr+MwkOUS9E9+75CGoLHc9/NdYX/VRnMuhB8VuL5pWfjb/7IcJwSo8qezKNQU3FY6FgPKn9G1Opp4ZW2TEHPovSE/2CzJpekpoGp3a3UYyC+u81kVykeSZ/+u/baVGL3FGdQ2pmUR5OfWmYf/EQxSByNr/Or7UhOnUlkagnFIq3naz4xEYsLG3RV8aUw8buQFUiZ+8azdIM/KjAw+rao1p+z4P3a+4yL4Q/DiSbCdqWoP6+ox+6/nvukW32wEsarx9c3/xY343LelWbASC94CgW4WJeslhPOum21Ku2vUkvOyvksyj6QTd6MB1fRiM0wB0naFf5Mg69TItyjOO77a+BlEgmyQ0jCy8Lg1zAqnjkfDgeWsALFFBREV3hyazCWZhOzvifymjeDJY7YViyPgDmHbre1+asqfHXCVN0sTItVmKfIlWAmodsnH1KfzHw9v3NjVeoNos75eA/qGFGo3ZNTqSb/Cux44iRyGXsnzlBQxVS6ml8y/mOpRj2LKmZjS5l0TrBWkeiMe1X5t5oHhL0fzScnSiY//u+/cyvFJzJ4eayCw9jtRuXC601b0rLIMiBh8BwUMesUj9SIjpDl3ErJlGUamlwRw/BiU9W+DuE5v6vPtTLXlCsV6LcpkeOHVmP4Qw1u1DFgT7fK4WIxkRnF18PDwFPj7locjGf+WJZCh99LOIGj/jwjG46TAp88g5RZ1v78s1RKUiOIrn+BmRxHNdtO9Fkdu8EceM+rah82yQBUY57ccKZsU0Q94mcfz5OohIlZYyf6ePVetxtHmGHeJHtXN4FGj5tmZvdFBknSi5/TCJ8nQXwoteykIZJrsSfX6cXz6lhcdlnEMcYJ43DH3Cb/fGyIaUUZKb56D5kiS4Z49SqJsu4R3MF+hYyYJepG0yk29g8xoOwDlO6/rOo2UxhS3P591ChzCiR85mQn2B3UUYLRNvZ9EcrZSLiQSycD35Qsasn0uRoxV/zwDdgoWWJ/s52j9xBBYWu/L3DSvxzU7kzgxgeG6NqPUGeYEN8FGMhL74JHkuCI0nxmdcBdn9jwCL8Ax+BzDJu3KJ43LTt5QBAh68lct8drryeehPXmK612mSe0y76mvoJMuwCk8o0Med+Zqg7hBCs3gc87KFQ5d3E3M6RitrHBouvlUgjrl5y5cM7fvBuU9VX4eAk5+LU/ZIf7fa6rWHw8/FLZFVdwMeobPMdjDM3nA9NDx8x8k6tkARAMw5Wxv7yHuNqqdRATyl2E4o2kchZCWnvJBiPFIf7ZEnEHyrJqZef5HR2jG9hCqU5MtpbrfjiG4jUrYJ56c6ICBcYE4JxRpWqSASs12RL4rINTgL1EX5BCQcQjQNvRdxCFNPGH+qNBRyJ3dh5ESgZd/tYLGn2plUVhl7ePNPo73stOIPSWdk3xmMIC9QFea1AFrBzMUgHDRMDAuewm7M3Zb6GeORdre05AyKZOQGH8des0SD/R1h+qe6+qnAOKzB9nHFvSFrRscOKtuu1lEOx1oB0Ewb6FE1WRLBkZe93BE0un/AkiNtDBaNjBZTJHYjYGbrjQjprNNY3U9AVRJw1uCyMnaGGPtNQxk3a8hRL2UIIiCYfAuZagAYmmGaIPqSDGRfk1FNzfVjqbMzdZ5AoJUhpHpXYvUkTb/gHD6Hk3rTYnvb6NFjoCkHPnCHgf4B/W49D8fBkJFTIiN13ey7BEEnoLdHH/2zPxUiW/AcOjDCoigpchx+kB1Qlc+nozOxbskDYt09z9qYKZBH4T1060BwhrwEJNBd8c4e05RcyM6ZDNZx8Kqxt7iHuTRJB6Fm+xAr2Crh5xruSIw+yNsjU06O3TajkOVyBq+Bz/
ArwxkxV+lTFxuNWX+jGZpE8A5LHrOU5QrervBMYs+VUGsR+enT8mRQw/jYzn4GEYEpzxp1x2MyOFV1P0rEgOYybEJu6gQZEffDkHX+WhyhB6jos0+xuySm/bWi93LSeRFxYSIIcIV1DKS6nBJRHjK+hcuagbP9p3QWlejUWtSBbq1R7ul38fAYAEeC+nXAjbh6cbnB2ZQ8OF7svA+OmnQ1sLUt32hmltjnWZ6aqOg9WONLwRRuGcgaYWh9gm9JumfUUa+1mskw1q5c6E5IJUOjqvOqTmWC/Iv9PQvbBn0J7Actpw3wWNtCUSpXq971RWV7ey6R8KbYHySukN1y8aVq+ScizUwEfQl+gxPFf7xdqLA/eK0WOaS1ATzqNhNXYVWBthA6frzBADVxd8g0ULvVzSn6/UgFrzCOfglOi6DbblOOosH6BheJtms8GFs1o9Croqh/K+t7nHolRNryFvm8imFouwwn7KIDJdDPVVlGRLtY9Ofl/GciLnQaHIie4idJcSwPeztpVQ50vaeE6oU4GNXXbwVFXA85nEZ12AY72xNzTsMyP8NkOwGUJ6d+af6ALMfpvN73oIvtXF9BbErdXxnM9VxpnJRoLy/bvpgFQQ5XJCOmZFK5L0eJs/ZHQqL84ABc+PtFqbZudA8bIW62ZkYkY5GPqO/Kj0zXm5Dbi1zKKKZyqNrCwXWghKVAwIRKzul5YQ/ZlQC7NrCayaIQNPEBOf9jBIKboCiclZokqSLp2QbKoDlIiacxaMegcUkBOXzzvHRdp1p+x1GDlng7cDoRkIVmbY7yf+jIHaPQZqqawSxe+V0JrB6r+O2So1HGb7kzxfFCWXbOMyEvxYTWqXC8wAeaFyBExd18i7KWWODlYQw6+GEjG9KkoJRsdGeqcBypl5FQQ4xVJNzjSzpb449HzgI6xFrmjS2w27V3qLa9V5k3DRc98PhRgCnLY/zouBFAsmEhPX+HRLCwjO79K1mVixe3Bnl/FdzJ0kZ/ffMsFrluEa5AGGTCGdKwtrhqPFjaA+ODNIV0myELJ8RVkYhiKO+XiEr8T/wljCnsGjX+LcPGgnNW6eCAzGStoIUgi2VNvAq+VmcammykQR1Z8Ws/0qdWAFSZe5YvwmhrStMPc0pzkgWcQBIRtxhnVEaRuQ2yhiFE2QNjD6KVuhhrDOhNSUw46iWnWYEMfEL3zVBUse717GZzHPNdtxnfMJfD/Z7Ro5q6xSYRFioPQgktk+uBjR2QsIdKg2TNEtFcrnHj+8rzMy1QTI6AouoKHijkj0UuXS4yDvgQMacnm8Kf8Jmyosl16RSJWMMgHe4c5q0kzg5Kc4MZ+Eh39mJ6l5wb7nnHe81wMYoF21ze8M0JQUyoFsVB4z2lbWxxPOWknBVm/HwCEpUpaGQGvMYL87l19vbJIziGLyW/X6iezZ+L7xD0pIQbsEyrQbZeTyMghAiWYTQztThIKqhQoeOn3eZ837V8tSohfTTOtBGiC/l+0rrDkhuUGgmHValMf+VRwhFKAtkYxc/N/qhPU0joGGCJw+W1/r/cngbHjpSWo+2sGxZ46VOuuHprUzi0htD3qCtsCAV9p/LIwNzAESWeQyGptqRMnt89NzUKnmulPqueQ8kYcDt7n0nygPSnpXuyCwIEI5yovu4Dygm+DM5lI1iiiMrnGRuFbrZZi8qA1c9gdCZkBQiOfByLi71YfDHKO5V5DSw3jcle6caPVf+3Fy0cgaVKXB7zDo6BjkEP6Tpi1RwdL+bPGdm5JIfwUpzUMj7pwf84QRfMsVKE8Le/QBYxOdhzzCKOZJPW6wFM4fRg31ENxFJdxCMkHN9OcnA0dwPiIjpNE8w04mt6Hlkqc28IoMDLzMs+7MDNELW4MfOhDRWPakjFrseI4lY96M7eaF3uDCqDmRG6/Y0duaRvNJSlApa0lrUDwg08UvjC1vTmU4kLdegdySBdX4hBlnDmN4v2zWDmEQA/DQ6zhWZmpc5W01X6ciQlvlVISpUSsF5mawDQ7u20gGBF/3+DHAcQaae6UnWIdqv2LZbsNzSsxSb4P7aWS4wJXR7/AFsxNzWxYSVi6QKgYMhxoKgu4z4mzZIx2ZY+C8fKuiShq+NrCXRg5dLVxWJLUsWgTdFlAA0TpYChYPdjLmoVFS6d36+StKDxoAM8Xkz9ETCiJNfFevl+DXjaM9AZKGFqMk1Xv1ygHthN2RCDfUZBmSMkBqGE30GrFNyHZ0Fn9WeXEKFJnZJN7XeMr1tX2A5X0mSeRIQX4j6veQ4o5hGV0kaobK0sOJ9m18rHekVNXa5idCnooO3lKnGnWN0HQeiHCOP5XrtoKk3MyeiHVrz/xF/H5v9VfZJTD8F7uyLZ0eu6vCOGzhUzqnMgAIhPAilqS9i3jCVLYyahDjbe2eqmDb2Y7rPk2F10w+IsZPF9UAaZICh7t2XtzS00l3KrXn9ylfUU8+u+JrxPU3blRN6DnX97GTuT9Q19ZtjvSRui80SpJugrJWGWsVeNoLw0vOYiGRUriPWaw1JEjmU474gemUEE9tDm4aReaqllzXIO/OGpzD3/DYdC5ekg+HwjebHxocOuQydcwNgQz73zR4F0UkkNESp7mPSNNW4SbzOJ7r4AUNv1XoTr/f7ofbTPZ6BMj96NttMzB6LusV4mtJSeXPFqbAAeJ2M+Ur8l2KPXr/6aq55ZqDTALMafJfMGepVIXAWJg+mptqbFvqHUyP237xKdWd5eNOvr6O+FesM3TD+STNfsXx/OOyU+97fO9EkQ+GSN9EauWPvvCxZqTzVtRv3OBpvPGAJ1n/uGGTMP4fTVW85HGPpyJOgv1hJ9v83iYBMHmcAZlWV+vTVbJ2CdeYiR6La6AZRzwlH3HrHXH0BE90xKJQ+rZlV/HywhId9yIb7MOeB02cAD3M6pid9Po9ZUITNjAJNXLzBszD0xpJdgV6t9oZGyJ3ZPiTSAMS5zQDMxpZ5Gds8vLd9JCQ/eVs24xltw+Ldy7bG+sAovAbhHpxVpqp5y97GabhRYCV9JYRHiVPqIPIVfSp1wYxwhgLzbCsCN2wkHzFrhab6p97opQLQ4u4zCGgy30mIT/ypw/cQCCYcNGg535NHPSDGYynI+9gazWh2VN1OA461txvpwjreKUSoYGRES/OBUX8P3si9zuep2n8jOjzYcl9uPpUFK0DO3TBS+ecAuWCuM6nlUzLA7tCOOywxVOzZlQ3mvf5N6yaV7XKOaxzNztGe1G8/UUCMcjN1GqzQqz+OuugapjecpVBM/lxxOgnck6/gg2lHQLgq9JETMQqSOOpgRWL9FlRt6QAKnrSmUvL515GaOSIlyJcmfHEuZZbKDO5CiaU5Cjb4iFb0NaH6oB7zUZKhOZipQLzJpBa030JU1542LNER06Ex/3uH2J8V79ttuSuMiE28+HqPFlHZzR8J9zXgzdozo5GI/XFI1o2F8HqY6JUUjZ0NpYg5awrUYOrlWjtiwEMfGlxuo87xZfrvgnUTlP1ohBy2mhSTkaijkiY6/iPyFZfVJs9PpKHWmSnOOkAWYQGbcPkqQSITKKpZVonKnS5Uho4KzgpraYbSak/GFazmd7dp2Xz7e6Q9rvytWE3bVI2drUkIo+sGVKP0tmGzZLMen3L87z2Vev5l5IWVAmIDS6Wn6GEBafiFJPjvYBDbvCv1bP+31T4Q+WXg3nlG4U7HuAgIuSo1QV4tLeEzdi2Ocu0SyQ+fe07g8QJuD2+4AwaANpTAoLHyTSiP15mZ5FYVccfGP1AIXgwR3oDM6sFfQZ+0aXgqyIumqFnLg3NIqfsOAZH7GRShk3XnZGqB3QqZWum/m90Z3NptR1lfrKT7rXXsXjK+/8LMiUnvsCQPO0C9wPYOOzgTMyCRQVbPMXCYuP9GwBq5AQ4ZFlRIB4CkKhoQiyjoETE/vJI935qsnNzmsFLIqewG+w4xYN/mf7b03S8hKYa5P3dYyhWN1u+fWRXvmBvyof87Rk5MTMfSJz94h4H4E33jc3v+e02LEJJL3THFCRkfV+tRAIreZ+h27HK4WntJoyWN2s8VUk8NiNoQmUZHb9POCILW3AauOJuCWCiVk+eGVq1uV7KZsojV/g6
rKlNNS0qnG8GIG+aR14aKhDwnrYZFLoq/qFWgRRT8hmyoVuFQUmQonk6waPPsd08R+bZBR4TVggnisktRRdg352+nHH9pwNXatmLlAxj7IPtABHqZOFa2VRzYZSMjmytrskz6618ERfmHcXPmODtvL+Z1yPzR01I06NOVOsC9gZYlfNouDi8tR4a8HbhCeQYidceAkCeFcnzQXZzPfjrNLrrIGaXWX6qVWZWi2xQtw0APu4FeA4IR3KAMqzkPCUJnRCJCJivJquFPZVZOS3RaUnWWJyZniuCbHzefVUTCgrmo4GJTsJkAMCHerS6UIy+vnuoqCb74edBUbY6zPQEihhdu2AhDxS2qHoSekaZPg3/MpSPDJPlDH/VfD+Hj38g5koTayk43v12Uqi0lKJKZ5eW0JHqJqgOJ2fg1xFseiO60dwrJ3wsCBOtIn9VYdou6PcgcrM1pq3+NXcByYMqGb+L5jWrEpbTp3TMdWlmXylP66lpxNaBg0dKX21aZQGBEqQnAOtiOHfL1Z8C9jGsbd7UE0xUmvCpdV3ecjdYELDLO6ptE1hjBY8GUGID+FS+HbI548+/eU/s+qvJDEDOhSipwrnqT0eJ/T1tfw5uM0NGnctLToyBnHN21S9eWOigGv1BLC2f+Bz9nxZwEkeVOkw5q6tuHcPevFt0zfYWVnpkRsoriEfII6AW30q37zmJS08tgkyZM+j/rfxkg/HoAgul2dcmlnDhk5eK07Pdp+k23FtI7OEa698yTffqiPtOpUEDUamEcY9BCntbnWAxc9JrTeOG6fliuSlBRP7oX1JTgFdrzwvC6Iunc4IhBPGdKFAQeQfeaqqWfEWp/ZorCsuCYvTJ8Q2cy3uqEJLhsHnRutJekdLCjW1DrFL4x91jbT8UG/8rPirUadUr/i0duZ2uTbu49++vZTBbx6O8Wdfv8j0ynx0wLpk0TVx5fcnXrCHXDEpQraF8MCKPuho6fteVrLYDBjW4QMH/RLKnIz0NaPRzfCDfTp47+D+idbB2wUFGW7txbKiilQqDf+9BDcSOsmhqCYN+btNO7W5Ra5HHwsgNUEgNd19q9v8EGip8TmQ8EL2eyaRrPqW00B4OKMopSmOPFQRu1oEakLpJY1QPFZQujpk1rCiduLJ1EEgq6FgkNIK+O5ijeySrAekBW1kIvI09JsSnBglj2h1tWeYj1WcW2zTh/iq1w+NcvHhR6txc5M23y/OLwsPcswmGxqNLI2dAJGhyl/mSBDLHDrN3sQ8F0mo8oU/ZlqulmrTafDmMB6oSb225DQkfZw5Cc8TsbWE8R9IxaNhNXTUEFP0VXq50AHqfiX8tmNuUQkbcEEUhLtvVD8BGnJlBbhhRhg1gW0iHsv5oHUNO9mNWjzABavfBZBFHIXZzY4UkTKxPT5fAMXNU5ZV+73sV2DzXHcCMhbhMbMB/55ifiI9OLuBrKJxp4es+ZnR3mpyQmEcaHLbU/gB0Lo9Yta/pcwvK+cjS7OqtPBKcxLcCcJ1HgXsyVfXiXqDFUPwpJ6STBof7PqVEycj+537XPseKwJPfQuavwmRMON98Ye5nFGcZ7IQEYAjjLB9dvZnPPOHc72/GGm7Gxpn+5vWAvMm8XtXhcpoOmwy0J/iFcrOAa/vimoBNEZm3h7eoyoNTZscgn5sX0DIHOrr5IJctnsDmsIChM/8q7wk/tVPuejhCIJdRxiUR9JGasqOQPzZ6iAKdrDaJEMiBL0a0qnHJqFYI6s5nkhHIV7bd440tD3sTquJyBwMvwYmZ42QTPB/xLBdCDmbMKWEXGfLwvASuV1YN8u1m08yYfXzn7J7Ms3H3zHfqsoSGsuNfthlV3DOZJEy1ZnA7kp3jZ77ll0KLtMf0rX16JcV587FMWXC+UEALkfvyVJ+qq5nk5RGk7eVgNEM26bK/2JY0Lt36jf4OHFn+RYCgkk+GymSQ56GUJalXWO2RCpgR2T3EvUUxXYQalEUD2/l8pTmU3dH1Xy+vIc46OkwinDvN3OFwtlYSWMRH0rAmKYRU7gRjNMh3wv7keVDnrhLvHFfWAdLz/zqxyxjpvaUTpSC6V5vb+dK/oj80tt5qjaNNqmjULYR0fe0OylltUx3D8NXPaVfCZSvlGRnuOwvaXzwbYFfVOa9wtNZv1ScBoGelTYiVyoEuiY9cJnoA6nuLmvCrUoLjATd6VAv4wnreCFtHaPbvGfQj84vrtd8HXG8Lnaqrh+XcRe8eHR3gtLTOA+vsA1xSwG3Hj8iTE/pleEQu+nBuIUwLORNxjqx/tbgNxKlO1Gu882f5ayis6jVJb9ASut723elyIjDCx4N9eC4089lbY8sUZpM0lYGwLMKbwi+Nj6nhjuKI2T9YJXIydBK6F4ibiDURK8uu4iLSnnvsYfIybDStEEIEDhSeG4uJrNxrV4ulK25C9E5wTxh/hq8wDDlletWcsdJHm7Syeo4JKS/QVZ2//0aiPW2Zck6znw2jRZlHgaif2qq9nqCGTRNfWDun3g/lxS2AOT7dXxaC035CAGBhVfLtOTytA2h5Ogefsr6akra3NFn0D+Mr7PejOSUTZVb2nN+r7EUtMVcNhGI+lvU6YNGCskRbgL2HyPIq153hMqRkJAZ3KOZeRQwdL9uTjfOWr60fEjYBSrFm2nmfscXyna6tOUMIeOXsSJxb6ue97JKw3iroKP9dd7rrh92t80tV4EZWRppemEJeo5KWLaPf593U4adrPl6wpmteW9TMN7HmnTNmXE5SSoH+dpLqbgA0rvaU61pHhdcPEXlIjgRwpeTTnR7dT5Jv1lGzHTc85Un2fkmfjk3AmS2If+bQWbS81hS/hUpzlNsj27k5o65KIXC/y99TaxX0E75MYQsRmP+JrMFFbTEsimcXwIECZrUB3LpQ/2O8AF0/wvPIN3lTNJr/md9Q8t4MB93WbghiTgQrkCbg4XNRDX+JIVneS5EVCossfLdAUsCWm+70KdXzcxXvhDgfQryug/j4qJfN9Y5VUR3+KgsSp4KyTNNKkdWr2gaflJNvSsMb6Y3XOFZNVx23hRPkptVODmJZPl9vU9pozeH9pubisejvZVORbBzNcPJoEWPmtWrQMsU1R2NU72XdMnTgvm5rcsm2ONKw8A5nP6dh6iVUw6iKP3PEijMLQHCs/VkiA+xKr4a+pl53mGP0uGdf9a7HwdvKXw+3QR79InOsy/Q22tRLcazLiJ4lNEOCb5vwx7HfQ03OFZfUzJLaIg2Hkd3CfiHhJK6bTlZWcTNJ/0hbs4R7pyA8tUZjYqhiIRWkTXGAy1EckhzqV3P88gj6t9JL+kzKXYHourjOUMsbQx3/CuQLQnJ+P1XrFw6yb4ZPTPqlA8+Su7FC60EVEoXx0gX27YM4GoVBboe7C2xUqNymGQ8PFziGSS/3WyJkA5CtetrBUZNQQ62vAQ8rISSXEGutAq6kPPDJzDSF6w+TCL47MMUjZQpSev7yDvU9X9TAD/YmjqHzY9GQkGjelU4tjolG4oZBIzkXLFLlHBm3s+erN/+8DEQfmt0WVjPLfb2Sez7W0y3NmNlMkeOq7y66nrkmIHKhIfhqfd0hnRKgTxsW9x0OWtmYYJSpm43i3NvZfT/BB8bpxTKvfzeM55GStozfX9imoQKgH4qJ9IBfDDlirj/4LaYdRY/Lbb1106EifAHHQ1FsjNDSbAagJeJlvZBqbrdDXKODjKUXQD5zOGiIqq6gAwJtgtZbrj2CMB8F1lNRkn7flzdvatEjUYWHa+Bvf6OC+LBkeE9V1MxoWoSHHaycKzuzUhrPuqZwnCRQAhQGBD4iKneBmA28aapDn5UbnuF0zNDUjNyYND2cQqep+jnojWn0W55dFdECI5E+J+kg4AlJ67UwqnPbj9HLybG3aNr3DvSq9A3kXHSjrffqlZGXofn/ok/P1m3YBAvXdVdz2mVQXaaxlpy9oh4/rccWZ07o4TbGPQP2mgbnETb9UTfnqc1VAToaTNXV24sRlMRzy4e726pmjaR2KbZTBOPbf52CFtp7XI4d4RgNiQXzcIfGlDflyo/hyTsxSEK8R5p4R8gWhIUhhsRk/0DeaJNgDxC04aOgtnwTCIaX7mfw
l4Gzdit8goVewDmhBtuQkCeW6fueaIiiVgphHlPuN4a77EjMYZCyKv/9HJNBCNCv+VtmHvP95vT6PbO7J2vQAsUctiOji9gp6wCZKrJQFRRDP0anc98QtGUPzLlxCKItEbM6Dwb70085UEiPhaPtd1BmjrHitFWq9uckmPhS1eYqemIOjkycpO2AoTbHL6+T14IRWsLeGL93O8umfej6kt/8ozFzSfjyWQ6HuNF4Efp/4pQcN2KT7fq6qgwZAfnHLjgDnreiX0G5YiBgPcibHTs/SDqWOUBqQ6pB3Yfm+YylyTGd+pFqJ7WOVX6h1JJ8mY4HarQJzrqk8SSAHL4w1JAbxnFl689At7nkBWqXYy3cCl9R150eF9T0jsfqGDGCyiZLlXmeabvBodYy5B0/zsBJPZMMmNQmwMIqMokjSWweL0xsQMfGSlkZDbTm2f/c7RMnGdqK+LeNmhPbaHwpV0Kpllq6zqk02XlrIPEnAlElgZ12gfK53qcbS1OKTNsN6te5MIwz4fzKGwdtEwNTOVXAY+BrfogR5yDJVeKNBkWwEyHn6E4mJ1f5P8L/a1idmddSd2qohLQ1XT/VtKLVisl8GA/MxJo7XvVcjYooCinVJb1HS4qVg+yM+RF/fE7vvkzUts1+ovjlG8POAMu2xzo0ksSAwhsORz1o7TN+JQx6E8QDjIa0GSaTwZXU3cwfcpdSyK4bldYWz08AHlcRJcNcvhEVRJfmtAWPLznCglgN4C8CSrgEoKtsuriNHZE1V8y0Xy2ZijU1ktQwDJdp0mWcZfsMJjJe9G9W85lIxmli+JC/E5UuuULCYI80oYf43ONze7bPYt6l3Sghw668QCsolvnQ03/8V367eGQpzprL5jcTaVtar0fJB2tCmlbgPqyRnbZUKJLLjMS//tQmBFPCQ5rO4H/kAUFEuF5ClQ5vZ/U1Wub9/eUkOuWvxVM+Udse2FpQdr5sMuobq33kjNH3Dny2aHT680SocrqQAsOj18sfIWgUW9da5GeZjsiWLqEfPl5GV0/SSOJAb/dVVYfyiqLhStuCadzoLtLBO+0KRM3Bsi8CIfTxyCCsGh83pkPNblwVzPF4afRJdSAyHskdeKchlrG7ldY4Dtvgl4uYd/tVHpH/nQAPxghedznND4nNNexJ/rzEFxSBPandBxkdONEyCDEkQRMfW77QsDKyNXj+BF0NEMNIJhDWyz5TrcLonYIygAT71Zn98gkDEp2Krw6nVIKDT567soPs0kWdCMtKCyc82cUalPsvtRWW5Mdo/IWMoHjbYcQcn6iyACP1AQW2EL4OuC51a4mCHPX+9cWEB6MKEvhg9rDXplOHNObA2g3FYfd60CCuvz98isbXgZqx7ZDwNMzyx9R8bxjqluSHtDYEY9oZs7E06xq5osg3BNjPsx471ZpHMj7WNyDRHfGuaJaeWog09l9/9m4q6mWrv7CPabHi75wwg2a6BfukKonq3t71J7YDEzjP1v+xwHy1/FUzI/CjwDKpwreWBkJA8dmoJqqL0lRuyReFViLpCJcxuOMhkE74pYc3/C5/48J2Ioi0iBS6dlTo/qe5sMkKvSkEmSyhub5JGpq8aZ9d2Gd5TNxH7ydk9JB+HUxoDdDd70AmkSpa0DKM4Y4aWTnmrI/ubalBfQMW7DKqdGaFG2V+2O3P6IKF1jYs12sOypE5K/LZdCuvDLrGDfEGqMOhQzjb9/RU9FBcfyz5ovFNpxspNuK6Em9zn1ldeN3mS7fZYcQfm+yul/ZhkvhHJxhqUmOqaT6uurScH5E9qbW5vmSa8rvnJN/CRcZs2DXAvHlmUf024/QJ7orjF1rFFfNuIGPnt9VwSSdZFwIKjuupY9gYwo7/IpjFTGjx44Agpk8HjkmWF1nvVUWGMta3vZ7lWKSd6yIvc0okVaz9K8zd8YGW0pOfD/5pw32u7QQRyLEHQlLyOid0psmnvb81QsosQy7zNCA+l3ZByT3Vgc6F4PuG74vHN1VaHEBHwRm5RPQULHidajv4m/tv1z7oW86wZwZJdOoylGLNybmjEIJoRm3q1ALObyUWBseA1kat786ZJcPxIEpafeFPvir9E0ZZtG2rHNbcwDLeAnchuFWIzVfa5EQxxvATpa+xNVah4DE+7T4I2BNgH4tznz9GIF4MirzlxlHpxuG/ztyC74fdnXeDTxCPYyVNLMfdY5YKaQPTOQcs6L7qlXeeHvqxLxt79Z/EWWeH3I6rWVFPH4dH5AtYVSCti+l4oERD/UZe36Lqi4qxTgvkNnu1ryOKQARAf/HuCVIRVYAs+2+CF3MKnNaF/FHWO5bLl3zV9WYWmNRzE7IoRGaF0nQWIsEb8gxVuDqQHEsti+Xd8sNwSW+3vX5ntYaoXG0EFX2RRTe1RosetdjW2+ICt76AOHajkkLViTp+5aShWBI7qdgcoxfankBstWBx0XMqpgUhAuqm9DWskL7LYKEg0GEwK3A8UHmd93n8QTJ/n5b+XisEPnNmAtTVVZW4wOACGjkmrtChv800J5e00b6KPfzWcHSUAwFxEwKuRwSiKKJLMQ/nJ8f14PkXx8Y0DkLEvVkliGuRAtxQWMdaTNW0yNLTj7dMgwbtlFXO05VavjtT8YHtn+y4siVf0DQHrA69RI77RtGDzDs97S2EyQ/YImHpsXE6vxdcHjUx7XBd4Bcdz635IeBHP6Bim3Ap3ynB5NlLo8osE25TeQtLJKKGsjVOHvwyO8AocKNZwqbE1M3zQ5mXrwC3dth2eMVdBdN5KOwo5ONRdhjiuwPCBkOTNjHUZAyc90Ua0zh7z/1ejyQ1niHzqJyqbtiNur8FwGw+37p1TBs/jiSS/ZOM8xqtAQozoXWVmcC0vV/MzSOLkc64VVidJFt+Jzn/TOhO3lGqjvun+f7qjfJoXFTJMYdW8DaaeDXD/J3Pb5X28a0F2BqWo+NSpZLbJhYlVwwyrJl79rfXjiAdd26+4Mkh4ZlHmEkzJ6yqWRhlfwWIBpn8raNMDgwBj8YVqN157qg5WCC/F9ufFZSUYv34YQUn8+072W+6mhBJnQBgMIVlDr8yeqvfyv1m2I02vXgrgILA8tm4C48VL+os0t4zfBpbJ5l2iG2MwVT3MDaGh96js65H3SmbhpBuFCfHlK9n2aGA7fUoPCvCryVLBUM0I7epynrbP6ZUJ5uehX5GgPNFb2LeJwwMldpwANw+/E1oiY9DYJyReDz0oAMSCwoyVmLtoLM+06kAikJN1q5X6XxcGEtBJQlfRLnbFDVkmPJyfYFOSZ7eeHPaY4Ao6Pte1Gk818ldB46uHa8q/t5mxrahGR9LsewrVfD6MBbBjggek0uxjTXOklgtCMA8vohhgE0u/AhAiKXraRnwPHXdZWAhO4R5BIfNwmxNF7DM3snMh6gDp4kLt14+8j56m53FVE3dD3ULGNnG8alpTnvyxjeF+de01dKGcnZQMulS5PVAH9BZmLshhdEzjI80N+q1vdir119GbeS8OwOWIRXe3jKNZhsk013gs1FZhLzcspFklGmTkduhgrYobkrVoQmmXvOqecvA+vs+NmMIdnsnwEbZGxrngBG9BQZSq7ShN2qv+6/jF6zs/fiD0kGvpV0kjREXXbPuTSTcEZ9sk8hXq41TZ3HnKbf/0qdIcmVHB28qwvHXDF7eAtGZ5YM99bQ4UysV3JZr0NEwXUlUgOsMqlEw5M+gatN3TY7+011DDoyqSTaY8NcvOh1xUvGBjxdlHuMaPvzaWCvk3AjyAtlvFa5Bmafs3fsGjRbkHw+RpOEYutnGbVwbQUDKTGqreu0tXmxDQWXqJ2/uk7RvKHj69OFuDDeIlWcjX/NiruGcoAM69SbtT47MA8R2qL28h2q2w4B+yiWskO3eNb0NtE77L2EZXU4sFpFpECLm8JfnH/p2+v4UWwbXHPbSNmK0tqRuOEezUAbgzghBE8Q+ODi2dYIR5vgruzCLg9PZ3gBkisxTAbJvh7mznE4bg0WzKA+gsWgAioG7rcOF9HcJhAfnZjEAzLReFfeYAeRPUZGwGjNuMV30syoTad70Jpi1yoVZxtsxJ3q8GbwVVMxgNY4+bpvZHApCn9zDoDxi
dAn8SVbMRfx32B2DQW3/OFpFkb2qKHSoo4MpbDTZWTnuMYxkTAyMetEnrInN2I1Rzi/6B2ZXNfoub+cu1vNiXhhJXHL8Dkq+KjUKPeICI8ysI50aCvgkpMD7NMitZrVdyfkUdERuV1WWMTteergViaZUFDKvFDHJjw+jeZka46yG2akNxNnOSKfQEvHk2smsTdkCG7P622rzRdCbEXo2sIP26NkzQpvggyXDKEicP0EMffU2eomDHRFeqQh/WLrSQppP7/3XGlO3zKR6GpLso/tmBmztl6Y6rZfrlVOOLo8i+XcFkDQpbCtAJciqsJHQRw/4h6NbiBoT6wmjHq2ooxhBoaeJF1sHv39hDM2Xd/7Zi4DMaAezJHGBYQ7ID/MR/YlJnKKbCpmaWabVwT3F2HNN2b/gl816ISlYJHWBzI8kKgdgh3J/mATC8T16+1ZSEeLNIn6yXWQ19CG+C2BWovR9nAMreloM9FV8jg6/lRWwJRkxKQqcYj9b/vU02y5DcVVlwFT5xI3ewC51Gh7+a7SyT/I5Alylnwpb6waeJZCRZ28yum9Ha2BY/Z6Xy8dHWo+ShzmsbiI756wk+G3kGKgNGLQVCDRSjNrk1GnNBjrKvFtyNHwhClsdU0nInYqYMf6IYrv8PiVfRxCC77YeaUjWw9eWLyCmmbO0nwvAHdvlVonFVe4DLyrbSHSdJHIqegonX1vJXnlYY75jGSYRtbT5qJH+o7YvxofEtkUk1j03PaaByM9ir9KqVHnLy+La+blY8J9uO/3Nus4H/ssKOThNdjYsUqhutt4O8z1Np2V1EHWMNYJ2v/+YI1oySmJvV64LcF2f0iAUQ/SgIvDJVw0aL5JYm1/IvISTppmzgnXwNYBuiwcA9PM6qiU98LfwCOGZq0Nm7a4ooNgTRoXYjjBsNGG4kU5EsbYMXf20ODBK11LWfjbncAnEDuaowaJxxxrs7v5ECgXjEy2sswskbpad8nPSd6KHl44NFoHgSy1sRXl0IE4HlJ8jGv4YFNJEm43SHWEvov3rzoBa0k2D/scPKSTXagSNbvtOlKxQjRhy356jh9TdiMA+pZepnA+mYgZwvNigSUA3xs9nKXcWBfKTfX3c7MoEtQKimqKJNvSD+7jhHg3adXsLE0aXbc+D0BCokwLUIFd+dJyr7QeOs6LfEAam7rzoz94Y26eXoyicFLm6PHSPr1QRizf9p6mm7JFKo+Qnoq0M1sFMAs3oMF8uhYqxesk7a4I80FSTbDbmtXwFT65PbbDij45iSBhx5qEVVc1AxgNVRtvQ/6sTbvDizalRW2qagM8xWkkDweIgdCHk+MHHGocwobzHhvysus+oOma+n9iL8DnSnDcFBnHzuk6Rw06LHXsq8fqnTceZhRxLAu8MSDyQIL8fyw9geZ7JMebdHFlG3tGZ/6P26TYj3ZuIJSE/WYAa51kq0dLwVuC1X9RMlxZcxHF19mYWi7zToxNZGAHcwCnPzLdYD4JjebeSzQlAL39XvsK7nDgHnaf8L9hf03bncuST/ANfIK04KtYUSg8T/CDc2bqeaGDncE37YDoWd2kjpUqa6oaALGEwYzAE6SOZMLFYPpGPDfTymdpCKx5Q+EH6VfzBATzqSU5hQxYYWernfSRsIURhhl3DgSKcAAqsO/FVVxBkRKrnWJ2JdJAWBzNPaNMoyrRL8uopbSXrPgZOgvftdt5LeSjQXdZJKLQzG7FixfrcYK8ZmfH5USURUsd4pMCPLgzyE7wghsMGklDgugTz9qrNtfvEYZbcY1SwLxfT3CTrQPBjNcpQDkaETJ8BwVBeZwPyKZkgN3EgOEr6lJF7YMPcNYEZ6Z1QAAGulIl/g4ahtqD6Gs/etAgnBop9xLPoGR/kP+x9eQ9TGTD38yqejpW/o0UbojW++E0eqWRreid5XKmSOuQaauhS4iLnYIeNh7E9b1omx6Bvzzkkvl849B2rNe+OAaB/lKHcPxWcZaqfgmTShId2Grzm/PNdv4fV3lMkrDOT/ahbXVbprsEGygYa7We9/O+9LxlJ3YtZCsK6E934Kn3eU7f5c6QknRa4e1bSTU4gBDsR/JFSMbajBFsibqNOe2lqPe4ZSh+z/f+3rGuqp4z5I7rSwGPrgY8JeABrDxEg2DdlHiYB7Qo1mMz4ZyzNybbIcKRLIg3YAf76KWwz33PiTIZU05rYHl6+zcWloG+yASHtcb7HeE3xVHt/M3l8ousVlkw/5JgWy8hS99XfpzDCVSPm72Rup3XvxEaVp5fWWDhpL/I1GPodBN9SiABxwpI/4FJXNiBaca/MmZ1t5uvMi16DCsun4fxoIUAtfDwXcDYq1IZxH0dcoB/BD3EuR/3/XEmO8FAKbcLK5ECvslGfCFKlT13qpWEcHr6iTu7ucd+MaHWH3NeZJcrtbjgJM9YPwQZ3VXLVPU7H6OjPfmwhhfWnutZjXw8QfUkXmzjj6mEZHxz+B8yWkpgupinXFZlxsW/TG98j6bfuEgCiDRP/eh6ThaMFltNqNfmC7p6Lja1VaurMsZDzUy7rqNtP9/w/hP9JCc2e7nxt4dADn9Gtk6y3SM1jyY79b03TfJW4UIm67uL/g3kQo9B6ZNj80QBseRmlacgCm4SZxVD5aC1iz4ekhfetWUvudBDGpPsol9GS3/1hysNGeGdLsfoT+0FlK8tf3hXSqY/S89Kz8ouM7nClcu1msos6GNligk4kd1O70we9y/6tbAQ3tOFZgJn+MaHHhu+EyuSLhZ1oyVpf65odT8AGajD9l573qHPGfFvmA9WMSW78OtWdjMUTviQrVB4Ow4JpTJ98LosIhs32ZckEJ5UWyimVHC0KJ8hNfWWTJs9f6TZcfdKO245ngx69vTCSN+EQpKaRoUJ2I14qtZ47BU/Is9rUwcvhvyzsowg7/J9MLTIkW3vrL3QuzdJqV1aXSnLjOBdHWWYbPkOoz6Jertf6Aw8cg9mbLQiFNtcqdbIYhZJ4OzfMndpiU10x2HJFZmSM/UxOvTPDEW26cdaZVEAb2UVNjWKizebhQNy7F7dJ0vvqy5b1R1lIUlenTeDaRb87plzZIj1IgTk3wtSSDoimmWFu3qjoousCAb0q+jAFfjxZU0Zb3K+hGgqc/BM0yPIE58yRkh4dnQZX6WqtYwFKa2IPvjwRY57hB4eILbsowhpGz70vf63J0jjdbz6ONp/1TMP0ssANobFmnwnPRh4hNMBMx5grbemrDEA5wUpBFsxjq/9vHx+AKbix8kOSH100WIJoA7yVJyNYQBxuDFyAg52Tn1p8lkD5xaYNGXvXVOC5aSRyd1OVl61rwJVYKXWvp1+YB0vXjaQReRkSkO4bQ4LqfcA082SP8s+ePAjYQ5p7rp9pDQnxycUH2C1O/AviPEocE+TBpRocrlU9gQ0TqdDeE8KxyItOP2uGijd52prSi/ZfaXLfhINBVtdfeAd89oH1mWDoIw01r2UVlVNNllNc9jLMow3v3XJUggZVV7OEJe6krmS9b3DjK2XzmEm1mRU/zadd1rEVbi5bJixBqEedDl3Aga1DTwkpIrUUg0xr7eE3NmJv3EdZwPOIHk1B7YjDLa2C3n/B2ExGhqQQ3gnWwfgVz+c4O6VYvC4pV0acPy/HDC3zhyQPdnpCezEyxsM8F9/08KBz8sJ15NVIGb162et4rhswVftI9EiqAm6oZx5xLMwwaO9aKfVrO4XylHEGzlp4ZnA6srNYdDsVyMUbkHTdAC9MLD71Ab8YrEjwQHnxOekFYlUlfT1jhID85M8IwAv2rwjkB2DlqGrsa6IW7/vGgi4n+jLLpYn/Xqwsuw+6LJhoxq//1LJLT+jVTUIA2J99fM4JhcFidSbHbO0+jwKhDrRqNT5dYqI7hLCdM7WvD0oJSWthZmQSDAsM6/WKGw/Mv9psec99+l2K1gBpmxVu6vqTyIHYmQKyrD4OqFsomoq64rHPHn4OEJfGGemYHMXYDRPkHFD6PKWHUXbs3aRGtJ/ob+mLfYz21bcF2ouUqQof3ipvTSn+j3uW4jT+qc9mATQWO3Aogwjlh2RLKgAd4eDM7zo5EVSXiAyV4AwF3eKG+BEzQYqdPRBHV37V
JDF0105TePH7rK2X8uih1/T/3b4g9R0WAslvqbv3lFNWTJ4gSoSVS/Guq4PTD8g1nHBh42qmSobXZnXSGtO1KcpThPkc4Ob5ij48CpGDh8RU/Wj/nrF65xZGnbMgBHshzzQETIjlMKThrzdAV1jOyJwiqxWkV8nGR2CvUnmSfMTFg6E8QOL7BpKWEDBPfCXbKpPrqRUE62ve8PE0ldE3yan+QIinR8Z7ddTD3TZEefrDRlj50g64XGD0esHFTJFcsbThni1nauEo6QAboJITeggUQBWFnePmvRA1XwkwVVqZ5dcHtWy2isJGN767lWEBWubd67TOm3ix59l37TYejPQV15MzGCig2VYmyKTyVZb7X6pxua5pz8N1/ez74kx+CtKrG7RIg1TwzTKz7f9IcwRudHeg6Oau7nTkxa7XlR/9oYMpYLBmgrNBuEZwaUgXvqVh35pySrRVmR+p9iDA+pPIQwlO0vQqOXL0ndRFt+hQ+p/TSgZGvrF3gZZDOBJdk1VEJz+2foRsOaRKqXrC6xN08Wws1/lLeYkNEKqyfK1vtMsKrKTyjkGJ2KDgkWRPFHgmNEldEpi4n3HQg5oYCNLCnvVENV51cZlRqY2sjx1qRKplmK4HPymqzb68Ii4cqUXbyLQ7jdx5OpylO+iYi7tGVmaccz8gC9tBW96AtwY96LSgg0x/CaxavayDhWF49433iYaQO56lkaCh03V3weznLcnlMypE/EV6no0yrpkvn5pPydG88WRC5ILvX9Sx50oacLBFPQR8EqjZ9YUQTjoXPnKz3B4ggVvSOj7Cc39s5yjJNV8e4EABc3RqVa7aw5apO3BQTLNqUmD1GRZZC9gmIF/Erhn3odz9Ib6oKwRVHybpXLmnF6Ro6IZShq6i8oy3uTJNPto/X8FqjjssX4KizNfhJ/N/E1F/JGIfyHrqKhmcR3Ca0jdTrlQYWjn4vAjG2+pz9Cncd9FX9Ll1pCqJ49Q17dUYElx2PlN12oL9aMSqHPLYEij53xoHeBsP9lmFNtAMfAaJMuwxzOs9zz5wn0OrKXBTknUMjC6B7jCcnLzMzE+GH99hwRZojKI0tUayIjAXNPr6TtKPI1pCFiXrxniut+uJy/l11FoOes4ZwfwGJsn/bfNm9x2yyrXI8biMkLGJG1mRigY9AuiKLTQ7hXaOniOfOckwSb8+pE9LNqaUmyBsF/QaVcWR/daopoGd2TTFQVCFd2OxJCWgR7Igm6t+Lc7Vz7Iu454yJtM7RFtYpQLatXp1JYkpxw13+xDZGe3ZAOCaLND+ARVxybHvLoZv7ZTFikIakrWdSlLRoL0vqU4taM1GwdclIIZJEiINvD6zlUpe24kLRSFZmImeGZn3DgIVKFrtxjaPjfqsPmvz0zGsHfyy0zeBnU4XS1CR8ukyNcyezQtrXUN/E2ahiRdi+/IKCQrr5jrMaxXptieQ3tkuRZVdJveEIMpUQSOFmqwqY+i6hHG1xngJjTHX8VsOMkeGmetxp2HbQKp1X9wEEAuXmABKUyk7A2Hjegp2Xx5chfN1iAYndFPlU8vbSiZ7kDGLizc9TCciXxR3/fM+/xGwx6YiWOTp1QAASR7R/aLI8qOHbEkOn2LDL20SsBNtbcUKI+BlYounAAIzTdzaQoOeC/5HjIiLeIIcVAbe+A/UkalKV4tcLqgNZ9j0DdPNTWqngV7ERUCNq/qsCzGGuk0ojjzJ2zbMDnjsK2m789bXgCKezKjozvg1daQzjGdLoJ98ANzXPiTi0we5NFJ+9LZc5MXurgO9oVjRNzQEMdGEKgxrZsQQQ4ydOXPcAjAjmYY2/s/uh4FgDmvOWMJPsN8bQjNBJMgDRqv4MFudttw7DOSTcRTrQvpARFmJ03sShzAOp0Sgxobka8Eg7CmMAYeWhx0nlSEQwyf5tOUBkuxrqXNd3PyTCu1QxifxLjsCM1PdOuWzBAS54yuHTvjIpYFE/jiIWJeWBv6yFiKl5koanPq6hR/egdog5KYKqVEc07p1U+L71MUivA7R4zXOszahfJIYaMlTZcZ7AAO1OI1hlJOzQ0UwVg6CvXjr2RtVBQx0ne+0bwpZo8blmv85b0zHN+VtICwDVSd5tvKGCzlPm43WZSqK1XN+yBkQD3K9TLHtkX6GNxzzaJli/z6Ap+omQns2vdNUg6prO7NYZdvFjsDMdI28PpRBbs6ATBQxnxv4toNPDrSYTaQH2p9b7okXyfQLDlhYgP0X13Wpt6KEM03IPSfZloZAdNC30Y5m2A9betk2Fc6C2K5qKa5h35lmSK0hPiLzhowjCwUJK+88dZLISuHb4YfLgzemLoohISs3yZaQ/IouG4PHACgLbpDYukD3ZAqm62IF4thC2oKO8A/PB3qYSTa4PCeMS15C2UGFExwLEJ+K61gaovS0A3Ec5c7InY5okfojryBf7NwzSY4vZiyCce31gCfHOPRlVQNHpBKFLhofJZ2Na0vQvjbjBW0l5hqT28jd4JOeaNj84EMauaAAMx85ROdIwEQkT4zTLtBQiU6v1frG5taPm+E4MsrfTGmx9LeSkGjWC8cjMgzj04wdqJPRluylhi+7jYv60gmGJXgfz3QQqoWOXKdfJV7KDBmyhtvLt0dRtHEoGIZojQ5WvYV1d7opNoWZpJdq13d6yla1SU/9rSFIMxqM46VtUj+WIPUuM3NLQgIdO772mL/dzHPUo9+D7OmdTyYMk20hS7PFuMbfyeP5FOI4P6SRqmrwQZ6KMnCTkEuwVIpOYRMt65/X6vc6nTmpM/a1whLxJtYfe067f3mII8jWSm5EA98LQXOFUY6XEaaWuwWHmS/LF9UPzv5eWMiwZuu0uNaU1OEfEU+wt9Az5SVXsU8JRNH4fyXErrOKavFUQIqVvTKvxS/0k8jFvnTIUZjRAvhAo3p2IctiaFQsWl7uBXCFCNOBwa3iVP/WsPPa97POuH+LO/JqiuWGCc3CLyzNH/Lc77QQ9Y9fWDFIFPqiACkPXw4e1xPn5MIHIp23IBoIc0e1ziGuwsFq6+ED8EbmMoFly+H5LRKPCpcKyJ8x24pvSj0bw6dw5ZX+MXxvJm5Y+9doZElLQCt2vaFO+8DFRnG6nDx4YodQjjpmTpSaxrOTSz10WFM+UX8EN6d2glpU8Un3W6x4hWdJD8fDTQ/5j68WQL91IE3nG2rPA5gkEEWjmyWzeRDDrkMoFh7EjWR31XE5gYxcJThzql67d5hAQDCS1q0ZkzqRBU3qQyyE8LjhwG9bi5+yE5RwloUoF4b/Fb+SLsgpCOya0aGsUZUR95nBhU+4JPsjKwPPVNgaillje2DBzzDVcDa0rRlXPuSTIWHzpp++0BAZRJF/6WN2pQ4wzVejEFmE7x2K5u54Caw5dcwn9oApWLirbnH2em70jfguCJWAkUuL/OGrc9aAh6sOjYDUrGZ+7qLf9+KrPZpkMj2dZjP9r7jZ0cdQ0Oh9YL6+jvrHJZTeoz1EaviyFeVdXj+reunOjzUiBnDoFixKOCxp7zA4TKi8/wm1l63JRW/jwONr30og50+B6ols9ok1jIANBXjoYs4RwHh0XEgMXoHWTZVEDFDfIfYtj6ya2WYhWpt5JhPZzMwnpiaFhCY34MMN9q6ThSQJTf2KN7WEqOxtkYZ5jyWXSnJQavgIN9NqKatvjTwiiC1Q4fVjHUE/QQlaqjCwmBJT9neOvziPZi7q0Z7rHHCEPkiapEfccqOdFbMWBjgk0EeJlPU3oMUqoRJVimHP4kjiIDYg7LBLg+7kEvmts5H2FgIYDaCQ5jSqbfZJyirmI/2cZPqRriyBY/eU0eoQ0ZH0K6dIGswI0Gyh9PjOas/jIkiWJDVzobPaDLwDXzmZDomnUXPTQAciSaHXMRfbKt8Vhbyg6xSYRFV7PteVoxxo/agUXqnqiZIORuEQ0V2VJll0KYMUYLehjmfskQ8b/2H4cTMFRniXWC2/+2fpNucdro19EZYUlTu/7fk7A75FSh5I+fCllCrsxwVlWEVW245axaeuFxVKKXcnG3NvwaYbwHl1cVanJMQPtVOL+I/6xSzCUZaEu507vWoPW3xduf5Ndnq7SBr/r82evpvZ
JUfFs1G0ATwNOgIhMukUfiEfk/+gGXHuMzKb6GmhU6DMl0MlvjUKIEZfV75StdLT4MYQ3yPjVbnOwZTdlI9XqbnbCj3Y0RKv9vrMJ0Mzz59Qg4zVr5DwQga7Vsuy7PSV1o2f40esbbb4n/M/J5lDb6jrwSEGRKyBAHrBOr9ixtNTaJdVFbNYXXurhgTGnBmOECNJ7u1uHSYgDzgpp+i/hpIx/xBIhJMPMO4MvAvkmXUFasKuHrzfZ86jwgx4t1E8+D6RA1t9jrQrIxBZGzPVfAHi/kOFwgCir4er2f1StrDHqpma+9bf6880+sQXJ0OxxLF75OTOqCvqcyMp0C4AJ86kj3rw7H+NBbDUS/wNsn0fBMeOp827RZT8XCXs3rVQuo8tFWYCYWOymgX4FBm1cB9tXAUdbg5/EWlIUQfVf/3wZDHMGZQc6BT5w2/yJgg5LJC6VkALeRehQViySEZDuJ3TGlHfNxeYRAF3Qz3B3Y8p6Z6qkdWqZuFB85bTaNP1I55xz1w3xmjTS+P2GW+En84lWEvXjGPqpyb00JCfY1QqASycz0J1qJ82Jd3m4RF+m0CmyDT0jOfBRuKoOtvV5wXk0Ay8MqxN3WgnaJC68WLdwDi/QN9v0w7FvGt8wfvnToAYR7JtMzSdE45DJy7amLGreC/Gj5Dh8FFLSYRjs5Yv6ZNyc92bJfGEXCxdv2+Qn1et6aRiG1g0iXYwM/aqb54mYufz5EtEHqVgNCkSizFNiK7tB/qfraO/FgYyJbAWYjqtSEkjCH1gN/BVZd3T04nX3fi3m5eqK3A2YkyzxcQjIlVCfPf/hGpT1wP7QHeQh0Vj8scH/q8A5vxgMMs+FYl6bqDeX+KftPhO3PjJ4V7q4IUwVoFSQ0zOivtxRU1H/vZq/IoVpAGen+X0zcjhudnflum1bWodn/iw1oHuQ1JCb3hA4+k2qGLgkZsvXNdjnIJmeRPJvv5nzUA7Hw8WNVxAaC1Yx0g69LjxzaeHQSkStRyLwelH0gIB5vaNyi6b6+HieRt3eiE2itPNoebGkcemb8Zkoz+yBLaver3rELru6lDDTCxKAkJY3AiLL7dSeZGsSYyW8J+cjHhJDWvC9aTBgKAFDdBXKImeK9/YmypYH/4JVlfOQN+rEx29+rjGrZ5Tatn8zO5ROOMKVG1+i0gMBZSae6NUB5hUs6b3Uq6VS9FBybB1F+g0u8rp5i7MC4p4dcR4jdZgDhuvfZ9o63eGQoQ1KdpBMqdMSr327U9BmrrsSm9aasQegBZbRRaQssPC6tWPO2R7xyVmZw2xVa7NfKtzQxyB1Xx/wbj9k5FCCRTvQBzsc9MEGY2gqS6unK5214xeiIUM3j+nKEgwVUCDFpoPcJ7yqtClm/AGvJm7rFeZU44zL8OAm/5GyGHHMrinAoYesDb5Z3ivvD8leC4cF+/n/jarqimzvghEu9u7q2G3yFFzdJ7QsGuVEzTEW24V3UQA0oZ+jBkUSmXPr4slTKxJ5Qmy8DjOYTzDin4DUZHYMEd//S9frzHmuYJcRZYAIQAzBFlz56WsdG+jMcFcaHLXpUzqwZ+TRU7pi/Xjg8vDw4iRvEq0VrsbMxE7DWNzNrtm+jU/g8XZ3ZbHFjR+xntZBemnTG/5X7g9a2BMU74VAFuwW57AoQRdhOQKfKsrKk1rVUgk1bx37aAym4ipA5JbH87mzEWErNCFDYnB+3CHda2ROUIxZ5VUsNSMuflUPqXm74URcDXQCHQvMJB4oFSIB98czyii1ESEKFXDtRnSBw49tKLISt8KmC8L77QvqzP6sbmSwaXVPF3aqkjL03MMISmMUGGivpG/AqYSHzZnGDtWBHpPU48CPeAt0b++yAFDDF4e8QLKQPYXUu4EndUOuqEXuse6cfPSP5VXZM8M402v7y7MDg4MAXi1X1SFjVYWF55Ht70C27ocWqAER983nxPeGXKx6/FYxPBPWdWBdTK+sVu/uJjjAwW0iv0Pp1OZJqHC0w+Ed/uh1tVnRy9lGbcg+HCskwoK6CRaIq9huofCTCfw/1B/Ch2rJ+30bFE99+r5WMyVBPnDoauGOrG3YUbUY7Dor289LAMfLxbBpDU8vqwaWUFkh75/LctB7AldlFQTss3M844x2xQw18iuloZAAHBGSz5YuiDGAJb4UDbY1S/jODESeACZeLqLR8wdwOa53afIbnfPc7yrMEDmBdTYJfJJ6SyjGXo+AQc5dgS1G8EKWEmok54b/ke/0xZkjyri88GVy0X8JdOnHFM6S4huqnuD/fp86DuZGbv54ckJovpTNZBlQfZCf1+x2B4el5969T3kzAZDLaZVDoU4Fgq4NjxqMdGIxmsh3lBNsmdnMIhk7TYGCC4l+bbYvfGocJnJUNOBP6zkrAR3KV6TYbT4p90gPYGRFkPrBHnYSeBIXxv7VfiUt8yV1jrGFb/jjwlCHjfPH24Th815m4Xs2FZ6tIxg5aACCBlsdPuKDRzXzlw0VLDCl3FPdvMe0otXmcu5rAUk5dlRFgSvbcgYqAvfLoDCYQKoWyB17e62zTC2neY3Z7oWnO90Chfljm+jdaNukc9C1QrBsxcAO4AAWAr2s05f9OfvuvtSlFG10lvt2O1FgzXAggGVSQWtUTShF288UzIDGsEYnYjEpgh1qEb1MQC+x6+L52ecbA+FpplvlDwk7tGAq+LR37rdnPjgmJJCtHGd2sbjtF3/6uFxT3GDT07bXZE886TyWycY48awre1V0lxUETU6Z0S7RJBB4JXgkbI0CuXqxtEKp2vVxQnF7bLm6Sw51KXOZ3Aqn58Spljq58qONefQ4uQBpzTCkj9KzBSN+svlOnKgwfY/+a7EuvAf1ftqvqipGQ3bHbgFgXlm+SzByFTAbINV1/W2l8nJlVIWd3W5I0Uth21ANo2RI3ldaYr4pILNi0VCryA2WsS0B8BP1TU1uWb4wIF7DSrjEvMU4G+3shWWqKxdAcF8XSTZjQsLiKhmPLUwVdZRSJjrhW+++ICHm5D8NxKNUsdjB+lUW2WpVLN3+uxEcaoZ/neKlamHqMR/SIQHvSRfr0bJdqlb7Vpbr0v7sJiK4JwVC5rDgKRy9jMXzAW+BNcELBvDtTBcomHcsP4c3dZNjOht4WjY8Exy05nzJjsERZGbbF62tqOYphIv02h13HvHdS+dbtlIeAFhgmcdFs8VgdMB35G0GqyJhgVxsFmy7rT/QC44T6eiPzXeuMKgPk8xAq9nRO5TSF7Kh9q/LU9GIGr4ujDgTD13p021H0yOfvlJWVtnz2Q5iVoBXRcW+dwPf6IwfjsU5xEWuLyqKURSVLgORbqYOacY/1YAg9rkjtT3F2Ew7Q+HEFGkUFvrHjoiECsWrbKKZ4YVcDScheXw5BgmqnWvCdKpfk37vbHSsoO91KFcXiE+q4eVKvhVxFNc8mSzOCZRgBpb15Hr7dYrCvEmxM21u3Nl4VobHDYoBQ5NkR3QefK77W0roF6rBsDBlECcfGwpat2rCxU9iRdhUUBIxw0+euDlYE50/YyZMB5D8bYzfrp8FXGd7/hCnoccq8lMFdQKm+IOPEwqgtZRxAIsSh91wFkO32YcZwJwFIebxK1IMhdKN465SOTwjFouJ+zmpEwvXKKzytiM4F2i5yhFyb2fc1imIk28V/y9AxSOwKdD30IPnO1PRkKLfn0kkG+IZOVPEFRvbv6pG51QaJywoaJ9TiGuWvLOBJVvtKOXUWKbT778a1y/SvgQwpVWYSf6zQ34W9zKUuYnGqN+jnnd6O2ZqvszUfm2HgwZ0s9/qcPJZXP+f6aYNnsQNY4rBVdMNnbEtBZbpbkw88UbgTdIZ0cp/wb5Lna2t4xAK/Bqi8/RaEiXtX+C8iHQ8eUJXqZCK3oH5iYNAfkND9gGqlhaZ6df/UwhF73ydElcmF2+2GcigGW/Z7/JSIH7cZJjWskFCdedOYCBRGWbaleybP34SwWYNbsSS9NWXWKr312IRBD8dR68qg6bmQ0OyF7LgCclciz2ZTUzS4t0s6tQpx54y6lnVBka64ZrHlTwt9C+QQyVBT0HNnbO1S+/Kad2OmQ9nQckn7p/qFTwUrH6nzvYdcEAj1qu
rzZdSgwaEv2ntwCdv6a+H0T3GPhTobufTlyRFcct/8ZtTxYOlO+5PwjkoyNPa/AJHVzWtPjzuXwhPpFk3X17S0nLB68GrSEwGDdgnZls4Lg8pGM5HvDh/qTQU2RENKTyyrtNzJZQKN2hGAX04bAsivcQ/EjaeU8Dtj6uOY/YtAZr48YuKtQa2YYdilerImGnXMMMbW7wZs6BVQKvP+KMGPxsPX8JeC13H/AS85dCkIY4/BX4Jg2BOmzQcA1x2kWDwHe37KUO1//cRX7+HrLCqMNW9ho8BcbIXmWGCEvH9ly3xSQnSD1oPCacyaL74nmd1ccRGAyCW8DWQuDIjpME2G+2I9twAMFI7/ePRUQtK9TSy36hKABaZJfyEjzhD/ayr1eaWBdlfeeUAsm07pp4Hk+wvVhUSkl2EVZ2in7/LtEGiV6gO6fj4vlkNstVRk9qbPtAAouG3qPvr0upNrjXWTD0pXz5kM6+lrXVwnAoI6myR9f0fe9V0Sswf+rkHsrPdDG017PI+dnLh4Kb/j29/pgsZ+53AxnUFCtFLGpqWzfdv/x1ur5SUzUID85oOdW4TY5tNn+OnnT/W6ooSdEWTzYetBVHaA1ird3LbG8eJ8/uMM+cWYzScRlXktzW0W2UtTG7TPPpDtxcGd/lsQdA4VshPrH4NW0TusNVP+ZXP/xnECgCPotPuVIaoOeGaoa8tnNbYewGFJZTCDbAQexOlKhHX0yXd5bEeWMU+4eatQp8LcOF0/HXB8nCFE1wnEr5Y66aEJs4qGjInpri8KMYZ4Aw84YhrWIEfa+gQNc+iourd4Ou7SeK82M/wGpVHV592gbqkkVpDQSy//UezQ6Oa+Vk5a9jOhrVFSQvJS6H4D3aCOpEFx+Ghcb0VmTryrC8qJzRY0zMSng4NSrJT29x2g5f44r4qW/1JTqizkozZ5UDC5ZOL/N/Nt5NNNgvDR1kSYUmvFYcnbneqMHalA42649HgJU4yoefMUOZWIKD+muotQZ3ShbfQvaO8QvobysjpK1W7H3l2cvTCw2dxtkZr40cKvS1QwNUno7MbKSeoN2Mv1mESnJAS0+wJsEpcsf7bu7yCxtdP+akKlrv5JKulu/a9FHtCleWV8YEy7ZDjHfqtsr3KRkk+Xb/KK128EInYX+DLzR4DYYLHQh9N7qGHfEUzIObYk18ehRAEoPHP2cqJ6YaiDs4CWR6UK0dxATY5srREzlf1guk8QGEt7fImPMDGoz2S5QqouFIG/nYod5ucJGJOnYwGMizFpfoptZFQgjasi8m+lOQt1/QsxmBXe6bDgkcbNBUry1ofB6CXi7DT272uOM9ybuuoJ9bjeGRdMeQ2t2GR+T/mrpoFbB59BYc1kGq9zEp8uNyURIAWnNOtwRHVUPE6M+rk3lYSFJoPOlOQTkXTbF9tHm3MqQY4lSzs7RfzsR5OYUgKv1VwcwIKY22ISGVkuOpBD0/JQpfSX4AGh/1+R/Hl1il091xHNoZgDYRT0DBqB5d878wt9ku7L9KYd2/f/TUSqr1WGccyiQ0EA8LCqUZH05Lv1tbYTb+zq23jA1Tzq07YOO4bkusywaG88BKx431L4cr6r30avBw6QJDT8gxmHRHw32zVkJN9RWtvimXQ3Exc9ArFl7WcCbA72ItQHcdJqxLjSrCBNvEE2PyjYzbPv2npw+ZG5t4yoXSGkGyhEKxVO/lrFczW8g9/Fwurml879QmuKoc6CGaY2D9iwaXGv5SuKBbtjpFuerYBYWT0csZyfQqWM+rFzYPQQk2jQFTse5f5nRZN7WVhXprNPOExUUmQstMD8MSRNr22lecLcCTB7YhhakzuVKbrH6JgksKfaeM45HHuL03BAbozhVaa4fCblCb7SFdq1ddF4SUUvrbqSoCglG/DeA1pvSG7PDj9EgQUfkb56Y9SDbqPOiCcAQAxHn49d2pITLjYWqaSAhbI7yxiNVGrIYPVYCndiBsCjc3zE1LmuQ6/XRB1THMd0JDps7A2Jg9wOgqCXnvEkDPoy0WQuaTShYbrOwCO01dzA/+UpXXH2UbI27kYmZMrHT05TOP7v/fFYtOdfnQMA5VvotoU/twR39BesJGfioZRwuKH5JN+WEf9P26qYVuv8F43W6UJr77EI+ldd6k2XB0EAvjDA2yjcEnrUKHn4ELF0uxT5rO+cb0IuZhl70A1XCkSbNmEU8rj8KryTNm/TI1Wryyx4NJYLY9E6ACgjOVas4kiLuCpjVxzmjONO+oTUnmF79dxnHmq0SBBW6nMTmry64QKnLETyFqvARH8ne6unOEK5NmJm69qvRJEFdfmMmnCWPWtJX80VD3MhDuC8EzNqbvjNS9pxccAg+msk+OPn0qTyJotCKDiP5QvhOxyowgcBFk9cKbQXK4ghBvFwExgQq9zPqYthlJoTaPBLNLb1ZU/Y6YY2oyTn+w55UFHzW/b7r/O4e3wye0K4hRWKYUdeF2vyHhFSlZPbmKDPzPjOJZdTj9IweCCLalt6X3Mrf4kyMlyZbmPIWKaACym4k/G0V1RCtruWHzvTvXFVid2JebyzpmovFQdnFyBVDjQRleom13aozQpbUkNR0bLHSFi7UVDDw9DcdHWegZuyOG1OHqNlNUoaqq1UirfNeNH2s+AvQZDCub639OZtXJswcZFYqynH5C4wrZWCw8cEGPGOTIccP27ZSoqwq0YDHy+1FcDzY2u8T4eoSJIFL6t0w4aKdEHZbXjwVeVFjxRL7v3ROESsEiF8ZwJyMI5ecY9rHdWqGe7celGMlZm0QHsds6KpiUCRIq6WK0tkarKnKoIiDxX5pnoVr+iOS+pZ3lZWYjahlIWb0/KzmnMp6snEUV/D8c8mJ7HoK1hXIv51iTu+4z2doCUFP616OqkKud9fXZgRKBueb464KTgWICqhpZmW2V5CeXh8KUJkCmSHTijp4PTFv+DRG254xHP0CViAH+sjDgy+zvOyCPrufe5Xvhv3zUIa0hrPTThOZ2x4x6Ib6W6wFAZwXiTsn8mDwrx7mu0XmK8ig9KfzfEr5htfZOtT10tcwfALFdrS4bP7KlCexLi9vPAkYuc3E5ksJILIlXnoaa3AvMFF7XKwtOTFLJDQdyGMYMzwg8H8qUtiekDpUybGTf57YmtA29Ge7eoWYWQrvDHX9BGiV13kw0PMRDPlqGZOp7Bn0cJ0iQ+a+o0UCSPMBZnlzlpi6Es5vbxmLLZez12dXGV1sn4FH42GoPkEUVbwYNzhbvWI4qSLw4DWglqzXko3+LOoGQizYDfD189CjEWgKRyu8oNAiCiLL4je37vEsy/4Jg66YP5u0crpVHVvTI/7wd4DmQIG23FetLpKICFidCPhQmdWxJt0tR6CeHLA/g/42g+PFGwVOcy3dLMIGpEivfCXorM8iUVq1x8WYaV0SvIhe6BDoqFAcGwBAbHGT9XIOzj2PA2O3sDTnAqMdX6rnR/WqDpf0Oed0PEF9j/ggraC48/Ta5zZGS/fE5ULjJWvCaLsl0YAQ46YcYfFUdwri89kDWcqYz0WbcFAzf/Pl3+6o87itAdst4mxDbmABHSCKlIOMIYl6g3lcqTk9riQOWP3KV9dTi3oItoxGhEMzmHTB25NAAYnhCAMaDG83apUS8bolw9/7zYiPqbURMH7h7oqucLV6wdP6LNpyz07WiyVvFZrHdQo4soYimwNsfxtWmTsxAyXgH0BNOM3dNcNHyIOJX4rD0L5QcLqqSYA7VO9AnOBmrXsUR7I8Qgc8cA//dR1RwIig9TLf2InCnwKFUTrvHw34Vnnaj5E/PgNwVys6gqBB4GbaQsIF5133Bd4rfBjpq/Lyg+YkyTHheSVMBl9OgvgmLxXh7HJ+Ycxr29pa51g6Qjz1LpMIf9oXKbZiNOU/IAyziqozsfjQvE5Jup5m1ktylJbwu2JnU6hg4JQyscdFDoCIKwq+nhgGycSiJhtrUkjN9VDRniS+RqCJkiOrsXVecejBZERBf3DMGfkuyt/tGOhuEUy2QL1rNQEB0jw0kszpv8p4Kj5M6/41t0H5QZr9xl5ulLtGv2qNJInFNOfEuZ3jpj0ArFo5YTOZej4JGkfoQgzoTF8nm
as3f7hhFxYgkzPmBawCnYjN1dhGhHdOdmnZqNnN3GVrx6pJGOUe3VmO/dQNl7rUQB2kX8KmnHcFJrECcwO6KAgfCbXx0oMYOwvw70XLlwkD2eF7cWbnazLSfNixqtJzHlAB5blhXsqIThwMNCtMU/hWT643IJHVsryrLBm3pkPpjZu2I5aka1iDf7tk90gaLQzXz4xdipE7v3wYVLx4qJs3u21U09X8k8kpsWQP2AZQ6SzTI/bP9YJCf2q8uozcnW3dFc+p3R5sQMfdFAJzBQShedDhasUvOL/GfL1P25TgOicBOmT6lMSWquQmnLjCG86Uwl+RAdq9DEctUw0+/yHEzu+e+70CY/2K+i1JzzudLAWJODNL572UcP4WmNH+NbywrJctF3sGabaCPbmN/1nipoOSAhK9ROzlXA06F7TuGD3ldejIAYkkNqzko11x74RQ1P1EBBrJTBz4yb5NnSrGROG0SeWGxeXWhkq1XdTD3ayRPfonkyGCCYT066hZ9Sc3xbaextDGtcqxzYz2FYY8CXRRs2kRnUB9yoR26TZMLdgg7NNKF8PvIJMNAR60DmxpNybA+sRtc9yynT6XP6fSzbe1f3f5B7HSSycW0lPxxXHodW/GSC49A5iajlANm1RhXqs5lY4l0JJjz1g7MmYnwkU8DRJkJTY9BqlgMXkAm3g8gQfA26r0UbP9UaTbqSz58xTYvACV+raG+4Rz/gT+Cb3G8fAr69n0k5mD9h3W5VBf82EnzTzLbiUyy83BdNJ3QcisBMilHrIqCUKiYQw0gddL8apz+iIZqvQu58QHbEIBKAOyOXoTb9tdkjvHfQdSMIvByku6Vzb8m8EI8sDTtjEgcuWE5FNjIp3yX31u49QXa/x0WVYdfZfGkc3FM8fp7sH68BgD19MRL/wsCDMD+6CKU2GzKMtlkgGq54d+UaN+ulmaT4l2QYjDyJ9Pwlq2e91J2s0qt5LaCvMx26PANcX1DPQ6/jOx5lXeSVz2W/eTSMCNO5x7u2Bamlz4KTS4yA+GRxcYqti0BACng7bA9Hmz4p7+zeM9PJqlvyueBB+fdO96i93BcBNwCwxh43YxqCRvhVF5KjGNVRMGih21/vU9EHg/Yp/HzeFvfkkDulqahDH+dFerGwNDtaFcGwBPT2pzdGRcPEalR+8r4SagrV/LCs7ivVr5k9PHPw0gfy1GWbeGRnNkbALq6F7PNGltiOBWxV+9CWzN6mKCmduM1KaKdvfwlMwDcKhL7Y5QBchlKKZHyYHZL/ouWV5k6yoiugGGs6KocT1DDfHHGDH1QdjUypboLrXer5N41JG6YhR0YLm1igJzm9/OnQJVDJ8gCdMAhHz4rohGAMxz7y8+UwiP/Cif/H1VHLDB0MlMm+Qfo+utLvq8bQAr8sEd9oW/K+Ft3B6t56q4DZsIgLW7FLR1q71v78r17KtcjsiXZjd/GcNRoqXw3uw9WBkg9J1sJYOJbzmDEvgds5Y2oI2BeP8VQzcdbGz09Ty25aT0cjSJHyAhVtMtbzlfpnjPW8z3D4M56zHeCI/1UqOIXrzjPaIp2s2sNgzVRMQeXxVeNgKel//sdyn52DmGGLbPV+D0CI3ebXxn4tysGvHrIL4C+QxcBa0nb/+xyDbTNsIDGfR/gH0tAbbzsMSLNGkVrHtAUIrA227GgYdqWCyD8HJk8x7fBGUFXZb3G7Ahi3zprRDJwMDdMYiQMe4uc6lBqzfTyUR17Fx86xuyom5mQKFSEqRvQLZRv8pnIRbXtLRaRImJfOsBLycESZVp9eBFJ8Oed6Figxvq1/1V1JyOdxSjfuuWAj+HQSJuzAGMUiX6+lmypDcbr/IEjDMWB5m2h++T/0EzhOwGhnghSUXwAjE4kG9qJaGSFZx6Cp1XPjXU177bGLRnLrcJVMrB2XnBk9CcPcNOc+wNcxmsg/xGE2bm/xgKViY424nEjHYt7JAQzxlGHSUi6TBwiz9sKjsSi8WMklEl/oxjJ6RVLBMdhLLbQPWi4uW7qOVpxVCmC7NIPQuiWBnITdgs23puSb63bScRSZIpkiQVO2vbng1ZYtakte33sYa0TOI38AsGNX0+emMb7TCbeEsZ49cQBxxFICiUeDoUYc2hsTQWAp/csUMz5kdYfHeUi8PThqRDIn1MhodKy5/iuQS4xj8k/Bz7st9uQtN7wCJmtVRLaMFibW7yof7XlZ1Q8imq20Yxce7n6Th0bOgf2du6FKzBcwTJUn8mraMV+H3nf+5M5IhLta01UyXNU3YQSiWGqEMckb2fx9ngnACpHtQ8AljsCGxxRSeEmRU95ohs/0O8EG+NF6iUwS5OIZG39+tWtVVApzZFrWFE+lGCqcnyrsqVQaYXWvRSDzEz10JqsPpX+CAzG1bsGOmYnYgZq+sTHU0k5n4KHlD1TeU+97bOdws7UVRiPX/ac5TMh0GTLH107ZaYiyNlF/2gwHJD4Hva5ep4f1FtE9htEX9KJBp1b3/CCMnqQibgLuJ0SIi0YP2MFn8nK2ODyaLuolWO1edAfxokilgsbHtCOD3CIdu/3/r1T+4+FKJu1YhW+OwkMm3lSceNzyVVqlI7nt99n+ANxpLy4CIhMhvM1BbKhnWujw2l6DjQDpU66Ar+2Y5AaVKOL6Hi+0cX8hbsXcphbb3N0n5N5M4u2pamR6a9GoG1Ia7nBGhMJwO5aPrpWR27HEA+1d0nHa+24r6vTWb5Bwi7HoDyCugEPfskvA6kbnMntBcy0YHvDtrRExTulvbOh/antVKPNxYmNyWoPGwxDQz5/BxhstM7obIHQuiP1xkxv7J6L6/gwLEnnIlI8xv8bZijjzL0cWm5ahGF2kAyj5oCmFOhdL+xP9GecmYaKLecMDzUL73egltNtju0RIEno9ESDVLGSAyP/Z3f6bgSDh+W/iSyjSyxgJ5HVzGbbYapyR/cIvi84ynW09k1bMngs3zzkL81M3cqaSItnlg7IMToEvHIO44g27AKh6i0Ho0fWZdbdOxdl/f2dpTHd5bcGDWmEtPc9RSfOAPT2ZRCpANZ7MeouJiqKITQA2SeOHBI5nayckNPdS1Sb3LRhIUgwib54hklmd5/S514JD1oz0oI/PPv5Q9dYJ2+ATxnJ/gBBDnJhfwKGTVB3BMtF8TnZ0Gp2WsrVZKWg1g/FIiLnFkoFGY1W8pkquUVf05S9oJ/wTqRC7WbGi9KTwl+8k6JKKBfvFvyG+vQupWi2VFIu38FAQljBRLETIfIhklCxa++OhCLyGI8fIV59z2ePfJP05LjFu9srSp9mdX01OWCTIpaDLFy59grqrIQvOtwFQkPyyCYidrSVJUk2NZmMbA9a8FewTeXlTJm8H6zkK6BsJCbx7mm9DCNszcqbM8rkDExLxKWZ+UtdL8PmLP6AW0yT1l3W9mKGDlZdT7ZhAkoKLhPaBNXAGM/kejslqoPdWhxHneWVC2+Z2dPYMwyHrxbTk5scyqhFpfnRN0TSRENc8CJi0+LREkD8cdlcZEOqEAA969P6H6xbHFJ7N7gtp8fHA2I8cHZkjegkxg9duIz9iZOjcSkQV6f/+XzXwsJSALjxtvk3hy2TuOuDb2egV4RGLxgUxT3SGoZjmosQPAOCoBTSO3ETiduZFm7B5HmmgENjncvrS4LnN4eK1yNyHi61CZpFsniUFviTGz5oPKGBCYkewzJeWQ9uPMjBvNGW8vhVVKiiZkc/88tkfLLpkHyx1tQ2NZ0V/ISXXE+JaPCuv3Ws0yV0I/bkn7D7Inr6zLae13/QgRJAQVO9Lb6qfrvIJ+3kkiFoatvoiHgoE1zb3Nl4YDvgxCB3nzAbcl+wLpvgaI9bGqK/HliHT3Buqw7m+Jk2/Sb+f9c0f+rzx87TwJRBp8C4weqYKQUfaTkpGXdv8LtMugFvKBW1JaO4WwSk/9sHjHAENxf/2F3RaW2UvN7bjibgBxS+UlVVSWoW4pIZ0/AtrtktHXmdyLxhaJQqSTXQgCQzut70GqTeftc8Ss8PHlPHVQaF3CwixqBUuY2dBZjVBxU/9welBxNoDNX6QZuxHJljUOfR4kcQ3KeOpxGO7DLn0HuLxGivsxRlbrEnngH90Acr
B/QtmZyb2z7mknl3FGfS4tELTtWeOvxNizZUZG9ZoF0JTsfNlFO87+SAtpcdg2lRlu5tETRj6QGHSR8EBa/BzN+PUxRKpoACPqvoKGwrjF6SKyaoWFxeiouyovtiCY0nbUX1IY7WGQyyUMyGIXCaQGk4UJwRlbkwxcsb6UwW01U3esC/o7DC6b5VsPaiXcUg5gIQDibxlRirVZIPd+AHNGcS0nA25aT4vBND41MTaQHvRp6pPLokQyhWEnH4jZcWlBlBxo+fa0wVeFt4KmvEsR4hkFp5oFV/dyH+dA94RzAHHMwRmqTEE5RoF5bVTXwkkfSjD+H90O64CNaWDa39TxYC2Pl9yMCnlfPrIhftM3YL6rLj2FR2Q9dwHVY+TYRukx4ANHE2rdGkaiTq0E6IJ7EvrgpH3Q1xOL716A2c9+sIooOU8+p2G3V6+YgXlcV221CCv294VnAZn+dubqSXl1QdxpWc30A2rCWhOt8yEvMXr3UU/ErYKyBAGzdVClEAgeKY2h/rDtG1WP5jidYmnNlv2yRwutoAXRZ8P57x/7Fby76zrhSGswKyQh37sPJCzh2pKAhViwHLkFC3aCCZXznHXZa0FJlSkP+Qcvt2Ma71Y1LKrH8OIOOhwzlYcCvcoa2hAFnwKvmnpYjmlYCfPyROE5U/D2Mox3rUl/+PVZmq4kTWgatykt2a10WNijAe4aiGXNR1k0GXpL08EW5n6O3ZgAfJPFH2GzP4RmCtndQwFvCM0T43QRPtiRzAR0poz5fsppC4XTV4tWXD82L89jBe/cMSDHwZXpNtMd/24+V0SVx/HDrzNIObH/WEF1i3cOvp1DH2iK6s4F2V/0ZzXnZIgALro3NfIenv0ai29B8d9obHq3rQXhbT7DrZdsMaPXGvg9+Aa9etsQt3EfK/snmlioyFieY44UaO2ruIMm3QVnvcIulZf0X2C5xQWCOOU6eGXbZo+utCysylGtAzaKapuBrcp4mZj7O8WSM6P3/Iw0v0TR7QQ405pWc7O9yjL2EoxB7PQBHgPw8JpDz6kulsIAhMVyipn5+zEKJwajWBdzZzzow2Ojqg3qBeYUxOyQw+mvsdgaGfNgq2sCTGPW8SJJCl1TagNklP4HIpxoSRypfpX9+8QlbSGeXO54U28Yzw85+PP9/5jGOjj9/Bd4vOBlyA2i1i2+cg/bzWjyNsNH27TjJFQL+j2wWloZvyRIvSZnuk0yvLmtxRKlsykvRoJDjx/CJDqgRVcF7U/FpKVClUVJsQCPfRoseBv5e4dT8OApRxLBLR6M2oTd7VTAPo3JjzVkOWvZ2w39NhXiNWsTB9UO1p5pan7N/NkVfDwlLY98H3fWUBstof6kVIhZVBBc16NGn/6mv4wVVyp7e5HbODBxiOSNjtcMvGFdCdu9Hx7nPPHeixv+X+rV0cHogKV6pz7R+AvD0yMRy7TK9MCwUxr7fHz4kyhbyKIYe6WNu1pjwU4mMryS/JNx29hJU+4pJdMZ1xiCzOLVVGKnI0O1Fjz9LGgtifVWHzbk2/Z5fJUr393/s6d6hJhZ8PCuLkG50kThEsVku7gEB3kne2hDcHuyArEBb77P6sU1SW6w1J3Wow0D7bii3nihVEQxoH+lw1mDviya8iXuPzv7H83uVbkpSPzEvmba4HpogSpUmhA96BKSvTZFcLO1s1wEls3hKqD7KCdP6bX1iK68fHKlz9KYUcvGE0lSBQdGFQbz1dSC0HM6tRxts40pJpouNH9f1xeR9yZQFxWQzl95VUOYIsZVrtt43WrsvVqHoj+x8kK2NksBGHRG6yOQizVqWYEagRJLNNok89ThBX7dzMywTcwEpmHtD+Xf8GvE8TJnNXRKqipQkM35e23YtrN9Q2skcsg+ie+1TSTTDfeWnwEOGwpSB5x8am6ovnm+Btk8BntbPXX7TpPwLn0g3oiOQBzz6ciL8SuzAlDgrMXt7yaWOFLAXHX2ttqmoQwYivKaAeCeF4WrxcJoEBIi0lU3+bHCR4QO6/0LiCL+YL3FRd+NvlUGv4lEi4FHkY+nZis1oNt5zzkLAqQBUDbdCUzVEDxfrnUZre/+4xo8jcFXVINzsyBGZdKGaY92rRtTRVDDfCc+gxLkY63C2THsYz1AE2cvXEzb8x0y23gIVnzBxwSgZD1GMoQafR9qVcqDOHfFe7NbEn3YOPUCREctvqj+DGrqog1WhC17CxrU4w/VtRnIFQ/vc66RvPjmJId6uNLtuGwvUvzj6A7aU/dNy+35h/nutA8GvbsnA14tcMKIliEwMDY+jGt25k3WyPdsSnPvBt9sFycVsx0+dl20AeB320Wrva1aF7jWEEibvEXOfZzxHWNMkL1L4uTwFM3rAnHyJDKueOwFcCJHB4GWcY3/tpdNi5a28XPMYfrVTVNdHDTYvo9bQ+jkHDU1DZfz3EdbAsVxiIVipOIGHO5UobH3IVL3PQ2PGTOezi5kWyd7Zs03K1HgB6S5LRMVE1enKFvibwtMBj5VKLQ+IivoWe/odKzp7OLHELEfxmvTaC/iIIfPCxJYQf2nO4OoerdAFzN7cZh7TtsdaLQ92I8tDyKj47EKTJARHYPcidblADwXrBsIIXjw+M6FB5XKkeQsfCnXW53kzLujwtxsczdVeIJ3VOBOpbx/Lhvk+2xAe1/UWpZ2U7U3zMyoe+0K5HGCnEncgXr5egwy6q8mjt2FL1j0YDDicheHcRraphgAHufR+p1UW6wh5j8/jhxOtiFIz5U+hDGxwlHhVyb8Oei5JXB8a7x0hL1zgj4BnR/UeVyqG4eVcGkuGq+yREMvFETNJHpc3j/fD2g/nH8xN4A41HazEMUdudA1HvsUaqG0bESfdf8P/1dctC2vX6OUfBHv7Pv+Y7LOuRt7+3SRqeyNkx6Dp5R3kHwkjzyJjpQofMfhDUwlZWS9Ym2PA7sbbwNVLyuwa7afD5i58TH9BV1znWB9ql0A87SjIF5n/32bvVh4E2daVXG32lwpOEsqPk/NO/dCDULVf8e4XeDS111krmH7tCyAgBSq2uB4gMfSCtD/q46ZsxEpnS1NwxlrMMCMMISge6w/+KAP4Dsq4C38WdQUfCvEgkfdltF33j7r0xQ/SBrg9xYKayn9ppUJYg2L/F/CTJ+35QN+Swh+e2gn9AWfWXelcRZLdy32QQ0Lc/GRh0nxUPN260QwpD1wUsgK/8JZEmiTU3QAE1ergzCCkMq3S5PgDVgHnYNFzXbTt9+IAorDBqfrA4D3WaAcTLD65cuGeWQCaXToKIBIp352dnM2dVrmaNCJHorVauv/YC4TAN53Hzjt3xmJMDNYPAyLkNyzb35Mfszrw7MmensyX28um/YUeDgrtkvIYWLOTIlueVFfgKWQb1tpUIyLqtorVr0R8qQZ6RfJka3JwrellQ8yDK5HgZdi6Hzh6kYYHGwLCrLV34KsAH+c54UJ8i+wbolP7xzekdjFJ+OTCWwXqaWhAkXgn8rf2ARPlccLF2WXD13yyMu6Fxu+1ZKdW/U+bxVfa/OWyIkdeweC91XPcIOAFjXSKb5ZQxlQHVampCUGbkT5pSl9b5jDB2rRpKbUiA9wEHzlZbzmD+SlPQaKqd6SZF3Tfcq9BSQ46Y4U+UVGnGHgL/fO1kXedj2AwotXEJu65+GYO8EztsjneXV1apR/iHM1NXQjd/mu97ymIgNGGiUw7l0FzRuBHQRjS2VrZ17pInuovIM+wstXF6b/AYFs+py+LDbbLBWS0gOJx556wKIDAe8hn8CWpmCVnUXw/xi/zp43UL8m6ZGXjRWnlbO1D9MtQSTW20+WRaBTTIaVs9B6vo6ZMQtW0FZvgwsbj/Ee7v3qYhJex+83xFhlwVTUu4K7UBLQkFEbLL4uP01IgeeNES40veujffeRYWRkjG/CXsVERqR/p9EgZneNQ4U9geqE6m0DeKwA9FmMZEJhYwVnH/E04xxy3LRtrXAebPmQ48oN+Q0pK2QkwZu7OTyHAEVywshnbAW3n7lW3So1/A40TmrQ/im0HUaCWe5OdpMHybGAs4zCUTInnnrzTRGJq+1+ofksdP+eREONRy3KDQE/Ec8+wsxEaoA22AToJX
wA/KiEFpu39Tk2dDIwHP2yqPgZavmPXofdUF7HBb1YaXf5ZX3pAa883tQ7LsebrmKM61Q9Tycd3BfzQXrig7LckwbX7zqdx2ACX+sYR8ak4PHODB1vTPy04ySeRDZ8Z29ivsC1y2nIB5Kt78NVxE1yd0eDZiqh0QqjQl/rH3guj911L7oEU6hSglsKY4Driumc3RrFHpbo6sXiUgCfDBeIQ7Zuj9J0HfTlZ3LuqUV8jA9Ld9vqmpdu3DgEIRlya4hEaH2W5er4+grBwGQvQw0bklyXGADhP2NXxZOkGt+qzMfHw8LchVhaty+94w9RqDCwXTEVqis0YOWfRXRwWgl3dGgccqueWoqvgd6j0lvVQ7YVZQvJNHOCLM9YMuo5g/2ST3kMn9i2GdSOFvQJQP1gXcLkSKLbPOcm+oCqzl6jA3W/DBHFjKwXW2cIzRfbf2Z0CD2uh0duxdKEpfHVbRg07uk30SpnJ+UZEL/vJBw2TL1Reokei9p9HA0cN9V/gFaQbCGwqRB75Oz2D/Kij+rztXfst2n0Yhd+w+ziVYI0mAc/zgvApggE64hducl1mq5xjNXbcJkh5j9KS4/iyGuERLAq8BjhpnKXKPyHKXUFed9qmChUGOc/Xego1q4dtPJ2a7eZDRAcIEfGpRaolKFHtBYHCkITvpd//Ui2HTP29N7zN9qF6Q9l4TCMFq6h+bbmq3luKuUX0+uziqRLzS4qg7cf0/AhQOiW0SGyHkCL6cXKK+BqWBs2HAYdnbT4L3NKV2w1/z3lorktqA3Kz8+cF9Ui679wh7T796bu7grqidlHQgkMatdnLf2C3V7OssNYlqt2K/u3D03YQjWSXj7iMEAaVwvFYeWvZ1h/5RQYjYI1WOvCwwmpNuFuVLhfU83Ub9kYFS7BOjDdVoAzbm7not1TvCSNZPvFYgiWY0A91sRyffC7pOOFIL4nq6mJ2Gu0BaImbFT6hEOZ6ZAchzW7ieyVTQhjpGRFDZn8Rxgz4czmnBeQjv1HoCcPhysIU7uevjK6OQiUYYJneFhzA1JkYv/d49puMokE6mhOI5o0O0sooDG6a7K7BXZKNXn4+ouqiB9dX3zfqPJbC5hhT/hmg5ofjF1TgkuGEHrSzBocd+1Ws7bmVO6k1GEUgvKZmYN2++1akBCbDa5JQLy0Th2xxCH//l/emraZ2oMW10WXjN7gaVVJGNoIZckl5lnMlrqr9xerpallp7/Ni1TP/rG7LwVE/Vg9QOWArLjoJmWeSZXt8fvmiIKtUvfD+GDtq6f7pg3QEeqHN7FFEj8HxauJ0kQOs/e6jXsjOoEJIAssQyEswrpCByxz1nKweExzwbGh8DxPpP+hOfeli2bWYkMqrmXziHN/J0MqyvQkgn5srJHS14XMXBOpsWR8rYBJHHEoFRDbT6WfawFNVH0RRP/USHgys/q81ETbHWVWZDBJKvirL2bAvKNenYph9oxRC/c8cvEFAFfgc3qLGfqiotvt7ImrHF1tuX8vFNUA8J1UltPCdqPDf1InxSRM0XLp26X28atPzzqiyWatf2oKSLgkFJD5lBDU+COdfUpavo83qy0d9lxEV23buot7jidBFsuOYi/6WGS6E7wKXg9pNTcfu5mtqUzRebGAphShNg2g+M5SWOZ6xLIOWpzKaL+x2kX9HslVRV2kzF7NESgNxz9sL858Aj2NUkEAt3YzAw5Dp67V38L5Y7FPsZIhdhIeribkzkoc8WZfPxjGTb+KoDE16uetYh0HR9JPPAfpa3xw4pYKKYXIouZesZPd+31D9TGIxPZHYlmZnK0xb34p4MGp3uhtEDCjMmxvsnkYPHNVYgM5k6v9++e3KENpuCb3AXOBYToHG1mzpbdgU8wWIzl6wq+fXeP034oPzngBEg/jtmo9Bk/wFkmx+ozDWfg9n3bNp1DzqDhmCxFMltfIqVzWNbPqBtHnV5UmpS4piBKGgV31Uep+TXrrBVZEBuUNauHRpgyPHRnAVQAjyoEhBSxHsCMNMxlaaIKwcFWLByAbKwnkxs7VFQHLjQ7KJrfluv1MrQDN/Wi62Zvboi72f19kp6aSH8Np2t/MeForEeAF1mX2e2WG2bIo/ACxGVsrvJBC2YTnfb7vXX7bgd/zXBK+EYSNEoxMvO4aj1RnfPFpM2LRbC/KwWiwG1CxY+jQKyZbqQJHkEqWZ6ZH3VW0J6O9L08fcMs2mtnNEnvZ2uuCoMaN4drsHiXEMRVH/NNnQhLRPKIBQCh2mMkCNqoa5yHqI1BibhD1KvveA/kBuAF35bdx3eTD7op5zxWmHFRb16AfULhr3l3jZsS7v3MHGW/LOKQsw9fY2dJhUZNeyA0btH2MBoIASydRoyNEKb4jhtKD63MF4Vl9xc/mtX8Igh7eFV/0pHK57gRuabGkDTzZ/OjxexInUAXdji/E/55HibkDL+aMo4ip/MFZwRZcjnOZwjjIvPEoQ6com9HlKUizxfYwp2wWBTxv5+qeBWiqPskl5oJB/eQ8ij4O3eLu15G+r8Oe0HRZnA/392q4P+ohKSYepnIU9DnsrY1Dgi2DWf46b3tsruMK7VdOuTSM/Yngp96z/oqHt7b748HetuGShuteqm7Oq1ZPzWvitDxuF7XaL+lY8LLjK68AnAQyzItim5bVOVVisB1OllWxm9pH/sdcqh1+Kbfdy8tNOjwiYHyEwBOU1UP8zKipySXwLExgPl+L/IpFK0v3ulmeDeR1Lx7oSreL8fyA1PhVtucGmnQPsgMe2zpMK7AaQaN4YltQD5qxQAs8W9ArOVRWYNV6PK9JFwq98P6k0uCUxA3lUFcmeYyoa5XE1jfwL52xoZIJYBUhPNJpoigckDlJ7ws6GKev5/5vGfgoUcaoKsqwwkSQ+0zKQ2JCgV1Bfs8Rr7r6HmyCc3pWimHnHOTcXZbSJWaRsDviNlGPuddpxUkve/KJGzP7G9mpmuURMH8GlHF1/sj4H6ipBq0Tahhh5bu26viq2tIgvaOsa7s1axGTsyfQEVfFERjCweJ9H4OUPAZN4J/ZI3EaA5RsoiTAG9XqFHm9BnPCdBB0U4jsJYVESbwvk/epn048cu+q6dAptyNl5rOge9zZFd9GCZSsxaupblApHuEjEbXRCukqcmlGKotWnccqEiS5utH56+jBRSkWLkibXPSKazei7JzZh8x4eU2QIxkZjcGT1Y4Ukx4IWWtKfpzpcKhbT/8KgnyEgFrMIA3Ak4myLYcBWfAV1pJ88QMCN0Q8peJ9cxbtAR1JON+/HIhWrQKxZ+tvTAflix9yMmuNeRnHrVDA/xE+uUEZYnCju3IXUy1IRIbySUenQ2lx6MP45i8NIR2ESemIXamLtRnBUwoN1dGcbyPFKsNMGKbo1WDOa6PRTQTd/Z47sCYehLT9Z1Ft/iMPXlfs9CIAVFr6LMFsCmEMsPGxCSPpUdi8uK06mtHtZkmQ1cVp/JWxGxJZIikdKVR0CVbLpBUF6WYAAK1A3sH+HtLLOjipjzoq0g9kYLGbC3+X4KRXjeg2stngYMwvRHwHab5qnCRAKzfNYFszjWHV888WD6zpEFalt0uuh6+fKesIrgSTMtWxv5qAuLWF7FiJf4yyp+syqRKwGAfZXnkcytTcMpQ91pPcHdijcTGwpCYM6yucLxVxoC5ZspTIBEcgh6rkk/LKDbIifwN7bx2VO3aoIcWvTH94FWj/wENv9x6OyFE8pNTAeq5nZFV92jwiv+6nm4Uu/s1Ods2kLH80gMMqhJTuK5SemfaFPnheXD7ccsLtDVVjLtBdDo+U/5SoDIla5ohSH/FSEKdQYBQ/hXKzDB5BBWM0y6xNjKRbOmCc8CczS+izDkPumrM0I8Q5xpcC+aypKFiwHGB7kLjw2zJiAShVtQCeCJZ2ILK2Fu6sYdciVwUGuuCA/AU95Zk43+fH2tej9BwIECYdA8QI2t9df2ta8DH7Dl9z4csgPbfSzVE4hwpYrduuG0YowNSv2iUGestnUP2KK9Gr9/0iAQsC3Y3bmJ6MSUjqMqGNjFiWxro8Bd6pvBR2SX2s2h2UtLcZ6/y99fNpGnzb/drLV+SP8u+Qmc5pxFEexbi39XRrW5EUDj
lKVT2q7dP8XWONxqO3vuG3dmOvTqgnpjG5xdlfibSpt9KlfeYxBGksHf0lDiRrnXyhau3ZpexBtWXYce8IeHgwe/tBtGvL4cNdgmwsSbUwgaEVCnB8tkWfMgVEOgj8fmT8c3OGC9uh7TyqS20XJ+jP+fBOZkkEM1q3JsvBO+MoDu9Br6tEcjmJgRB6EBg7pGWluQzbDRXlVeXLDE5vc02spSet04oBepzYm2MXUFsusNae3M4lfKjSdCUaHlAvLmpdNNelY366KieLgVclJQC17eL7O24OP1QBnE1fohqElYxh83Y6SixIClIGKiS8Gi380KwscdQ6LXM95B/SwbLG62I6xRbuIwYBB+xuffVxGqqyvhVAsKy0Bxus3IXtgNC5s4BF8FD7ZAsBSk6xbHmIJuAnB6NdM8B5bHrcobfFxWvaQ4ug1vq6HUFnSPIb2PDmJJyRANfej9ZD9dvvAQXaSYmymmctLJmnmqD1OgDeT4lO7qsT2Bcx6WhARDNh25dO4sZDZM+7hM6SAEoSi+ayHmzpXPTKgBe3QZbCjNnqeJMowZrp0Ff+9aSvaU6qRvOZz441qeAsElwkQag3Uk2wddl6+MFDHZf8K4N79rPsd43RIuvoOouPZyfAAtLeeg/CAr45SOi8+WGlAqdj23nbiYzxIMDQFTk3Jm3CbtzSPVJjKCER55aN33HraLqDmYL2r31CVnkgydj2cM1BC9ILFFTsQFIGyljN0oDkbSx8nVGM8pqx/AAfuUFmGz46gqGApcWhc2/2nSAbaDy3MP6du3Xja+A9YtMKgQVDFmuPjqewOGn8TlCbUPmfHjFlqeiJgJ/Y0lJue/fIH88Y+e7DgH2C+/nnffvgv+tFPX44ZViqIVGAEOm0BixhMhPljnz+IqWOzSoYxNvzXvA9kL1GVXw6YatR7vgyilDq4UG1KJ1H5GJJDzZEj8/cRSWxNI+L8AmCr6QmVprfk3/WL/rBCHXZERXsX9jGfqzsK3BUl0PCLjGdruL2AOJWLa3fcVs7LW1UBgPYikfTyIavi/qw8AahYBvDsZU4UHiEA8u8cPuX58WZr6O9Y6Ke9iVYPGHoiG+4YQukX6P49pEOzp9A28ndkL/tFsyyV4FwiiuMJe2jN7u1gjd8jlDhFskTG7CQFDPF9gN1EE1FLGGUb0JDM9C62WyeYWm1BZB0iF6gH4onQbdgOaHokCDTmtdno3xsiiD4WDmh6zjrPEFhE7DWrnD+ybDXDCiUsR0J6lYbRuiGNrJN3ekKP5/SmlG8STr64VSoYa+E5KpIFeeehWmfwjtMiTemPaRvDYTddroWGMEbx7wXPZE3kxPSeqvbZ3ZDZV8FGZ/bMvE106WN30LX6QNgSln2hRlo6Czt9JI1x6NDSN5wfExZAoi5wDb/IB3dhDS8/aODBKyPXVYUCiQzPsIWTuvIpOIJMH7eGT6FI/JJPz9/O6Tk7q47suwVu/1owr3wXfAx2N7tWrSB/g1OB682P1d9Sjwd0p/NdKKOH0/53I/z0FVlMgg7Z4aspUEFIO7H5yfJNL0d4AFWZG7Y4JKuwMKk4uDNVE0ZZvb7Y5W6NxXkYcDd7QKqyYxaR8p0tdf1K3oYCDbbaQ77oAsc5nbzZUy6TfI+MHq/1jO9sBpzKn4WPi4Mylnicf+Epa/wupdDQiHv4nUJtKnWISQVGAuq5mUNhPEeSi4PwiYgJ5R1de/A820j/GAKfuXBQzONVJMzbim5p+dFqxAEZyk5TzzM3FWNsLDU3ncPQ0JJem35W0ineMv4uYfN9gl0NEoo2GUK8IO5kl8DBm6XjoTddSMUxZLMG2M4/8RAaimcXQWUyjYEhjYbcfSxw0+xUZvf9v2GY6x2VqToi+k36/Dfa1HdAu/cgrfWinmua7+ChJgHYPmOe9TMimPUvkHBe91lQ3w/FOH12SZEdrjA1Lf2qz/IHCC9IR7S54iAaoRHjTocRQtpioiEzOQnnEzEvERMZurIyhUIbHl9CLt2XR7RI2Ty8Wi3W2KzTjZ96EJVD3M/aJYlxIbVpY0aiuwbtpOLco3+0ZndFoP3RlKaXTbpvVucGqvO9rUyS/QMaWtzcay8XxIOxplnK3OPD9SS4oba3/KHWQefox9CDjLVsTJwmW+0yivqrDE1tDiMa40JqijqXr3gqNYSF+O4a/6U658IrjMgyvE9E1iz8kZQ/M+C6S3cOt2Qe2M/W9Jl8S6FmbE+vuRlmiyGULyHAaxDKmPRHQzbqhtOZokSgFInTqrc43kS1ke/WpNMQadf77QkLLv9ofiPpenYwOHXfEeW5NiBxR0l2XMWLouFpKOZAZwBnNC9uNeyAydl+79SmMrNy8mAbst6ctwmwpnNA8o42++qO9T//uPxt435KGUFd2JS/TwKhEBA3jw9D50xFFd3IARleIOTw3JPoxCjpNevXb0j1AljrMxy873Nyz4sLULo4455bVZx1E9Q/C1SHrPsbG2d70/wDlUMG1t6oUenlM8NNrUGDHHEBZWNi27/KymRHhKsSZ3ol4LEt7oLTGhibcMby0TsIA+5/+5vzlO3rd960dvkPD0X3ss9P+mfZQ1lAAca0CcqJS2WKtjXFLc/Erg1hWDdK/MEPOC4+tuoDtjjWDOOZyXvnPObe2NrUB/ku6aR4j6PHHdWIzZ7KNvGMLrbgC0+S2P3ZyQEkJL/P/eE7I7BuiUR4KyUAIa00TNb2L0ZULYONB3n3rFDadiA8k5kPJkozdMtNjJfcJoB2nIsy1TAgfT+hzBA7yW9x5OiXtDWF4ciUcMX/cJ9WJJgUYUI0hTmBPD64wu9tfKJUvda7kJKEaFOMcHELY7Ge4mTq+nLjyXyxJCYjPocbkGFS38BH+OeCrZdaCPKh7NxOQD3qUOTaj6WM/mBMHugG0TKETn869UVqPTsFanlBjo0HpulXdhNBNCeM+rSmWq3Chm9hNfZbmT7eXlq5ACrgedVToP/RLAQKAD9SfBP4Ri+qAsO6CSg8fsTGATTYSJINYQ1Vi9Y2uvCS/l7nDzIbYsPhr6gkQmrhTeWuXpSMequmowqxbSegNKs8/pQEWDWJbWG3m5i49IFzG7sbcGQVB6yDQyMmGYqsr7B0Prk/z4JDxghmCNWP3r5yXkYDrQ7Yz4/MgX1Ad5Xe/YyYjwB9CSVCoLMeFM+Ul0Dx3ugyv1KzYB4rExdAuUg9YoSWYAf2URrDdN6xNd7AnpzewmjJ4ZXvDCoAaUfqiVhEzheV+frnhkl6pNhvn1sxV1qXEz+AuK+NUNxii2L/Oqfsw5iH13qqtCUCXpHiUgPq2jyzi8/jugLVvrN+u3NYTsxaGlR8RUsVEk3VvwfHnFWJsemZWk3Mj70AmGq3GGmXfMlPvF5A+qS4eFQ33UpvC0cOTBAyAUz0CX1EuhcdcoTlF3+4o+0jca+JAR5YCSzrFQSNCLdNBhceqIho/u9kpGgqSMtzh3zfI4pPwhNYzq2lZ3aeqNuKbRjDdDDnv5UAQN2xElZK9mBGDr8RfnJWCTgL066bywd+a9zIH5R9XPRs4nZjFkmXAefjUJylONv43XYl3a29pyYw4YbY+zTg6MXVqK56skogqjLYERYWgNvetL434Id+tMbNP1a0NBHBIlSuxz+bmxnqQcvAwGR5NULvoZEHYxAM2eKWCNvX5Cp5Qor58p82QZxpmDCKScDW6MVZhvctUzVZSj7v8aJaPxuletfqg0Jn+oDTepa/oZkvJpnaFoSytTmo104u3UYqo3+pdEE2+c+ysrMlh/LMve0fFiKiJkKgT0qxRrbFmFCOdA/H0xhndCQ0Rc63sydP2itCijM/tBCpKGzSViBo7xpGt3CHtJhOJNeiL8umWtn2pHBNB0gHfzJ7mZ+juuJ8ltXz0EA0lIQO34psBwGZ+j70i+53Tmt5/fnl5fuhMUH2bIrynZt3uoqM6koaoR0KuSHtMFupTmbfGoJ5lpaXF1WAa6U1e5gG0ezXKXARJ/+EfpgPtFxskpo9M95D3H6zp2aAhqkvS7rE77Z1NdnDt19xZqwioOqxqeZkhxwrp0Zvs+gHVJGBp/+HTS4ac+zO+OmIdLWFpd10yuF9Wr5uVDPIkofHQ
7cadFrh+ABjh38PO0LQHfDSrtCS/jq76ob3sloCWAQxiKQ22tE9ZDrCOxFKEOaq86RytOY1O0s4FupogdOcTPEsT4W2hwrb+XLG5lMY9pcNurV3AgWjFlVefBKDKEWIz+5/d7kUnPOgcLTdn/zfBSKvq3mH3r8flj8K0xPjzMyDI9XYq1QBVXlqfLELPExCniEE9PBKbJY6H6lqidwrAqFLyu0BVfjVGSjTVwRf3ErnlDdFphi2L2+FgboIrt9PK0boZoW7+TupB+Ja+5H2AIa9nPd2To7cvcLklwOe52TIbGlAx9Im69RLJ1mNM1eT8RHoAHY7tLOBpCyA88txugL1L0ZJkj+Vic91YmXtT6hAsCDS45ZLNfu9fZcXeI4hbcBPBzKeRjB832xGQ69gmKwlDocvYAi+ghuWVpYpJrvcw5OBdDPylfEDOJnR0f6b+CVTM3zrt+R+LhPMuFfP1AGJLArSZJ9rrqG/yJBlk8AOWhuf4/FtqYYaDv0P1ERUIHDHnziaTnzI+12xArqcCoxeziJiv/rN+PtlWXVRyTKD9xD6JlPO3GxxykH2PiWyqseCXCjvZ3kdz5885MMw86tTYUcoELPXFHDC6zm9ZDkYe+2fRQk00kxcl+sJluqKnK8LGO/k+L6bgspU8SnfzZf2eEnjphacR51SRMDCH+6XtuI6yMyM5n5Qn9W6+g2JKUw1MwQtcGUV8xlE+24SBGeP2LfSG3HBDMgze1qgUWlQUH4tBu5bdHkQBKazDCqcGYVp0ILVeyuqSjQxbA3uIHawuH2MNO3a5JMCs4JkDjRv58j7RkdM6Jfcmy/xE0JkyoY+L9rEzkNNcEboMS7ZPirBADLcA62VPT9C1UrOphuimreLQcayKu15rGhNzaM/toXdvLkWRf2YmL2EavRYdXSsCoYX5SNohqDYcLXyXnbwww3s08yqKmEKbyGwBBCC0/PE6zKTi6iI05Z+eeGdq05Xy45aHcJI7Tv1o+Mnpkg8xcTj+hjC1QUdq6dVbuo1auaFbegFJ76fbvdpb3lXi8vI3I9Yx9+kb4ASds/cNJnLoKEZKHRaijuvezqs8tbBExbdVXS5oymSYSE2BAe8/yfpFfOGXfczN4mlZlRFnjP4lWgEEm4g9AZ0g9/eYk/yAnuMtYs3fw94yfG38IM1PIdc3BsCJNDT1ts5J7BYFAkmJqd9Ecx8s4Jbugv4zEf8f2QAuJAoPIk0KBA0T2uOxhZphpuaKLyC+JhuH1ItUbZgbxW3T9wS6vs0Dw1oRAT2rtufKjhCj7ZbhppZ55VwLpPw7OKOjjyIrkuXCCZp6Iio+tE+3ah3zxzEEtEBtTNQh1gD4OLlyHBtrQcJJX+DarDnHNloxGfYM2aYDBZb5xfBDxsHFsHTcK9TzAQDyO0hjHm6Amb3tWOspYDgoFUjGbPcjaWzJmLcnIlIvoffnOMb6MFV94DlDFXsvkMSFyICymzKE+WWftCPx3ngh2Y0FWSo8VpSwjbVhX0bboFMLZeTP2NleXegDX1vY2ttdBQwlMC4LT8tY2ELZQZcIa3ECk1dVbrGOoA71JuoCWzTPFlmSq3pixjo5CBsBACIDp3dc7KZKR6wosxI3KTKPrigFflDU0hBAvr917tbpdqzCs1O6py0d2OrvEUc2/EqY3+i7l2Oy01+m25i4xa9vzpagdsXFhdP5FUSNBdMm6h1M+AOMCgj7twonZCY6C62E/HJ6d7OHfFBq0d5+wV0oNe3JT+OSOTBDSz0L2DzsQs5l7YH+L7P+rGmmRmoTSGkqhurvg8YaO01IHHatlpZWWI8InJ0KMZnMMpPulev4lIzpVNZykJy3ZR6SM9GH1kvFkB1ht8QOtvnJCQZQnm/9fesHkB8gZRuAyfnoIdDnyBAS/v+2uzSDyFJ3/6U6wrdcSuwgdg5qG04Gwi8hM1asrGrO6B4R52KS44o95YhsYwKW+/syeEqOp2UU0JANdHNJSWRvOIUETvSNFNVaQ/p1AnX8aVBKsn46/boTby/D5kHXPprZQ0I5JVCkuKbUjSitE5CKoOwvfWEES2wsF6U3OqDLqAWxFtYX8oJt1ddBwL+SB0BNDKezMHy9n7/2oCUc7TxKExvJ3JJiKErSy9lH5SmPhUchDLWbi02Z8fHBf/DcY2d8qPt5TncAuB3gYggm8GdLmQOGOXrU6+E9F0S06EnF2GrccKfUqV97EfL+uhZRG2BI6PX7rZOwZ58RRu5Bk/Z1kSxvlDFI+T2Q7j7joHbPNKhPH/DTpuUozT7v0hpLD6qE/FgoLCmYEVuFgRLSQIUmFqaykmTXwkcIK4qZtEWLoxCGFswceIZlly2n2Yg34MUXv6fhSfr8eKZAQ+JeRk+/yHrQEHVW9E7ia14YoQcJ09pd9T3V8b711r6P83a1we64MaeVUCchPRATSC4CfCsL43wjhWuI2x9n5wNmBg1PFwc6Ji35vC90YhlU54RZpA4VJKU0SvT1zBpTa2YDSBRaP1iWuWlnwIWGSH/T8m01Rx1RG+eFSVN/1w8GDFdYHhEkxWzjm9xBXQlBYNmwqMrxJiTrR1yLm40JevFjskG4+KCUVt3WdED7AJd0vpe7OFzRyRdtt0TM7Zx/A/g5xv+YnRxS1FJKEwU4oqXcloDfN7ZI71QmLuhmENIw6ROIwxIJ0WYJGFN+fg73cXGjiod1t1E7feClz2QH6tMVZAGuC/lHclcmrYvd4lTYVahBkmsWfwF0nhgbfHDxWRj0vkAVBacLIUWHgOzxyAOM+CHjzw1URbIjMySqxO9w79a8dQnI00R2CxCNdUqa+bbhSRcXhmMh5y58GP2Uh+RVGyoTnyYf1HuvmWEYg3ic6j7ji1bc9UTPIvxRhAjn6b2Fw1IPqu5gxQFrBj/KTTcZ+o+Q1W8JSfyQYPvEo/p55Z26DwqSgX1Z7cV1Sn5BVt/Fdzzg8oJqwISZEAJcni4Saoa/yXMaWPOpAr8+TfB63uhogVrfd4Sl5MVV4DyuBxg0m1ZTC0q5uOLXSRZdQFTGLOim/3y8gvaHRlZ1exO7FCPKkEM1I8O26HpTkdMGyKSnM2OaJkSbFXKZEDWKmsXxLss4aAcBcZcOcsgz9z49OOGWotwJ6J+AVjRNLR2fa0vusbI6RUmy4+5+mmvOYmE3ex346NbZTPJwhIaA9PnKXDYhyjooMAe4LBbR1dBru+hv5ZTsuzX6RODi/jXLuiKGxkvWX+DsSrs1g2cQZXtiMcHryw0ztFVsJkMdfTkMN84Y8gzC3dIzAW26Zv4aU1CPyVls0hXkibENEDFukoKkZ3l0+FbPP8cE3IDapGD3PE+HTML3WNdvH+wk5JVcOTmE1DrET37TmQWAZoyrOiXYOEPcWtGfWEZ/9RYyWBPh9Z0t/jGRNolLaBRjM0S8rtf46J82sBHXOYwMbWTdQA3lw7YEFhbl5qYfxus+Atv/8sBf2KfnA12imAa4PiwE+Jrg2UzAKgASLDry2blh2Tbm+5m81ySXsmbGqVe+3LxAfPDvr2yzpaJFtiUUds5EoXF9rmipS9WNkx5NVD7a9EGZIlyHolJVOBveS/PdOOdzy51RH95Pq7aOXPFKmxELhjv8TXy+tX/dKA7Nk26aUfIxf4+PXTyxXXxcOy+eHuodC+FUuBRpixk2iopRfnrXO+0Jm/BXO8xRUZzuWlOICoAJ3bmJcwuuF49vRZR+ZHVY79WqzTU/iP6ri7ACSXs0JybFwav4IgyfoLzNURwmnWgRyG6w4vtoBvUL/WmlAFoRGestbCGRW3wQGkvx+aA8iJWE0o5UL2/Q4n+yL5J8SiH1HUg1Ro/BKjgOzUh9edmyJJtKKL72wS0n9vk8+Kpskj3JTL6bumgSZE0rHORw9z28KjrQgKq+s/uwVcaJnH7SKv8HaJNTWgngeXK5HDVx3nUpsS56UfBAwsbMNgOrb6MguU8ZVoiVSxfit9BDo/gqsTeOC80zNOKrsqzfJC8b36zFGo2/1jvqArqt++VcvPMniriGlsZaveWlPDWaVpHtYJO0XczE7HUrKnuhrzndSpAI2wbxlWjxnSkOcJA+TdBYuHU594r9CRZff/1qunVvrcRRkQUR
vQ1LB3Tpr4I1IsNjeqOwdetdDPNq5n3hatiVAbfcCHKaPyqc1F7oy0JFIa4eOZYcS108/cm5aAVKQT+WcrpiJ/HlkFo4ZYIeIOIaoSEpyqSarxPYGhr7ds961GciiXdXYLFG7DLUlDceMBfLRbPwLrL0J8nwG5+g9xPnBOhLMONChLv/7C+xrF75/8hSICOaVYJ0Dq1FfwR8OH6nMHQiV6ao/8xKlv2M2AgLA6mEI3jExUaxp8heiT18tlwcK+weHz2Y1J88/1NknFyW+zVCZobMuc9Dlu67jbdYZG+vmT12WD3cGR+SrlFoDNUpDqW6ZSeyXTDI3EM0UHBqlBS87KlHXHXm1AaoO3+QAxFaR4jhDRyBNRyJoxW9lvw1Z01xZfFplmwyMOc4IS8Y8JYfgkViRxAs3sH4W9PgCEgRENg08pQhYp93IHk28iwuMftKDEDyHN2qQilmlHdsUp1b0PM64/yWLv9BeKsvGt5crYDmd5lYLBt+gh0nIgmY6F8JGyiAu4AdbW8rAKJj0gmSuFunelsXeHj2Wy2LiTZlynoAPePKhLanDUeB2dHSVFxASRt2SF8mic53FnYqPDdfKvbbsdaI4hTeEnJIL0IrF9N8YxkD4kCLO8gB4+3iHYXY5zGZO21XzAlrPrcR6Q5kzx/uOqh+DZP9kNlzxN7m8R8wmEQ+ymq3BmtcBfLOkk2SHBLpp3zDXfXFI/6LFpM47w5ViA3hidXeT7dARAXz23e+yLKSpBd9efPxq/5B1rA0dPh9dBfP4i5nDBzZqTI19BC2UriT7z89XLRbPejwcpF6l8uAtdXrQBf1Ox9ZfAYQAybXsJDAnMZoPyeC4KXZGiKUWl6kYybT/FbILTScKuWA3bOkIfOqmjQ5Wq4SNLqKz0dOnYnK/6MApj+1WecORT2g1Yq5Y9m32DFJ09tA9ii0I5LJTMswH4RMxFQ7p2TlCsgHF4Magp2BBR14sjPJIgF39gP778w0Q9AndvlK4Pfv+IQg41UCf3jvHeBPGq2zlU0/6+gJ4rabTIYHEAVHa39gGFNc/NATu9iXTwozJuzfUEOGuS17kLew2hqJoGvv/6V+4YzSzGLQMZZ7sp+x0M7vfmYqDA1CbHsZdViY8k1JJE9lz9utLRfzpZ+5x2cU8oNVx9YJZNE6dau2bFlCp6AJSlG68lT76EG+VrN+qlCmqDGotoWy1l9H7nZ+tJ4qyzvidj/Gm6UkiOedktZNHx5xLSf0ZOezaqmwHDNSKAGyJ61aX+k00Rmrw5P8/jASb/w1iP4aa9e4m8aa/EGTTItC+BoGJXs2Ifm1EHzE6dgU7lRppo4xXDdUsIZz0dN3gyh210ZdObU2XSb/GGZayMkOb9JyMg3LcCdXKM30NmP5Grfqm3pcUNPq60zwVuQfFSRPbgYybAa34wkQUo/C7BZW2SrcL2Uo5tFQt5GdHiKRrXOvsldOZb/rGi2TIT56V8zT855K5Wline8LWsuEK3wuDfB7cKy/1PR8BZa8gyRhnLcwyWYceifn5DMJW3qKTonTaNe13vfHsAMeeDoV68p3KssFr602LrxkLIL+IWjYeWjoFkSsA5Qho1rMNzU4ivf4Olda75Q9wJo463ZdIkmZpeg2Xg3u8OXtEUKGRHyXzVZ8dfvOuc3joYV1VffJpro6y1L+f5xxSWIzRc2ZUZ2TaBD6t69IuKSfOGUgqh37lcQJc65Lr4bz/xsEAxw3yieSp2K8xVYkeh0Ijbid1SKude0lK/nkIX2b/Xfh55Pg7Ee/ScSJpb0k+kaDMeIIzotMoPGirJEULhOpJtSi+YPRamspBJ+BDExRjKNlpQyzNJcOBFdJGCrp8Y858NTGPziYxMXYHMc/gkvcAs3tLSCF3SlFVwNhvJBPoO9OUCDv56xZq9SfBEnE+R1F77/n70chKUMmgDkuKWWMPXdmYuEyMoj6vHRhi0SvGPO24FUqZQ5BGkrmEzinqAieZGLBZbHu3pCQAM4XPi2JlnhGE3+fy5q8r2fH+LJ0650yVWDch+o/pA2PefwRToxBLEKqxTMFqIkLey0e+Yq7VduA9xlkCjeFPISSo92wKQ+IIyY04f5zqxSv4Ag3oVTsK959WX322D6UmCZnsisuKBVOTraJq30u76zqOAM58AJup4QaPQBqsmvFAUiQ2UyfcFfqO7q/9Qv9VKW+R5vZnOTcyT2pF02baCgpR3UIPirRV94m7xgDMCHJPoUYDcCHUk/P+jJOuZbywiMiAPwyxv5k9FAMKXrheWva8Pe4UuBabELzBR3Y50C5W5J0WJF0A4BBCQHqYZxi/n5m1etJnknah6kAFNJLdPUQf37sXxFekg7Kz83AONSOR3QHxKZXEfV+tuyG86Su886wIeLIFpEObEB23k0VvbiyTegUUqzysatizdDRL02+0fXXPAQWgsPhg1af8WKBa1myjAFFo9mVvJAM1n9j5slZbSg6fAEb71L5rfibU0lGcWYlwoEs/3WOZkedJZiZ1P/DYADcWM/5IgwKd8+v4y1lOvTEuP4TRvEXCJJVuQkzxcC5RsOdD81ZXaPm6wZ0eXM6TnbTqQEgLrem8MKGPP7e81oDlHEOZyo4inJJO1Ks6CndTJ8HYMYTZSG7BT0nFt91MJtDsT5PImriTJHkfgti+a7x4+8nJUQKjXt/MLwS7PQN9slpS1aGygxFbS2rWKf1BEsknqs1puLgrZEH09sGAbQ+ImhZUOsoKLkG3y+XMoR9iqdqbQai9mW+65rDnDZC/LUih0nJpxwv0sJ1gojWZtY9+7kn1dsZvqQEmVWCcuoVGgHvMqmNikudqLXd8pvSMvVRqOc3F15omKbb/2Qs3VMGPvoJmM9dmRfPxD1jF872HuWEKFpop7EYMwAiHaLYhj8f+GR+2gAHBNRZtaXb7uuucQgGLUD+aOGOSa8ucgwtcJGY0p5R7K+Bz5S/3WBNhWC6iLjRYdFY65vFTwN6HXC/mCJIseYLzRnBrSYp6PExT4bERp7xAUMVMACstB9gchIA+89gouEmDksxSNSHx2CkU1XOZnhabvRWaYOBGLQYY4hRc77Fk8sxTsf1Gd8WZ66EwJ3rei4g05XxGD2ogxikyHTPmspFTFuX7GF2FbnViP2NnbgP4QxbTj5p97X10Yvh82Og6AoE4Gjgv0rAUO9tA31QjJFWkqxNeT3gyDnWs+Fp8nPJSIl4R1hg6COK6i8pCXh2tRGCWBR5sW64GntJEZJl9UGHjGLD1pW23hZGxqLE72n5FRLHTnLeqcwZaKv9lN0xtfO0GrwXDE/+73qDSr8IgCy3koUB0EXthDhexPCguudx2OyH3J3Z7bysxIXMxSeKyFhdb6gSADlBptvstEam+pdlcgH//MAZaaP1hJ4s9SIKAkQ4Y0FEBYidQBZ7PRzM3JEruEHuD5WszbfyRMp330jva+Yetd9Xtm7DbhOS+zj4lxs17vWvojr/GMVy5BcASaGMMkmP7q5523zPIQKIdKWaCDmu5ncCDo6bPA+CSZPJhq1OuAKB65gNZWQiHYEJ7cd/eRlgqJRPawjyeSqWhtupaulCtExZ0SY9Z3szFa5By+Hfl8BsmRNpCcLt8oyVnWzF4AkJEt2Odyr1LmWoOr8LtktzaHs7nPGMft2vNmLITXJwnxgMTkQ+B/5ZnjAG7hjfQ4RWYCvvQoN9DdjZl8M0r1RMxiGoXXVAyDPFTKMhbQrNexvQB2YXZvm9DlJGVLuSmcLqewT9bi2+yIPr3X9F2aX84h81hVbnzKlp+znQGETxjxHxFgQNG8f2NWHBEXo8TBJeyGJFZZXyqt+BIHnndzC4kogxlyz33FakTHUfsajL59+OK5eCdvFPCo8atQbd9HWfNDLPJXKoM6w/zg+9e5HrUdtD6ZdTY1a6U3IJ8eMivdBiVz37Suai3UTBbl9bUR73Jxwxr3H1xUqLp54USqBvV/ETU6z4eewjgNqVL7Au8MMKDOG4qFNiOHIY8dIPjigHz7taFu6mdAZ1YYM1Fo/H8K131COLsuOX1z+cn2VOUEkZvoQgmLdw4E2ABL8T2chgazmB92/6W183cc5Kmr3pyBlFhk9nP2x8FFZ+
WhRPne6LLbuBjAxi5oPh3MrSOTQwhNS8jjV9OqIcflFLbu3Cxhfp+brZpNG3f3hmbWZxEEWYcxJfXDMelZ0uv/6X3g09joMDQC0rbj9bJAEex/R5qyRCbLbud71AFwW8xZXtQr+cn2ajzG3Rx38AYktgo7JY7MiEKkv1v3ABcV3u4PxIDvtbTsn8/226ilJ8a2Gv/mRH0vcrW84hcpsPT9Rg+GPg3AKBLqn+FP5v0Id3RVghGc+JgwdVBdrXDSPf8L6VJAVwMnoXqjwWZBkMzS3cxCNh7VsjDnH/vsEA7ONI/uEQpVWs6ubcEBZgi9PPWlltqW4lNZAOn3q3NQttmYYecIw4v9Cy5PQVttcolakK3jNbUGT66yiP/14ZWYm4nXGob7SmVvb+N63pC8rDNE2d+wuTLJuQ9SzeMNox9tRhdFw3Y2iQqYDUJBOP/TFlZDv+grobEaNb88hLXMxdm0g9jlWOHRTpJiLKvTUt+e3w8Eqj3dd5Fdrl1TfCl/5AO/G0WSDd+Boj0r1jHpC2Mp2A7pSsPWWzQiE20fkIK2yk5gQ1I9lWOXl7OxChtQegNHdiGCImf3XJS1o4qiqLCT6suG5orXIdJ6jNCAj5r7xEbwdMdNXb4MQX3cc+iD2n/rlDBCroYfkX7+6oP2lhKxuYz6dcz4IvSJFscQisQz7RjQpEFDb/PCte6mjGGYVdQsoEwqKisBzDx+AR1csfao26YinwP3TThsh+nUCaqpGJiibktH3Gf09phTgm62TlfBezohKIJXcOnGzc9t0AmQeICBZ3sFETpI8v+Zpq/+iIVccFQqKTqGp/iDlPpbJXF1DYjangszwfAK2j6gVOCYmXctbSs94LyMcE/tA71RNweyuJTlPxBpskSECjgS9DSge9DKBhI1OyNcdwDYGza3q8qhtB6YuUHV1mTlLvj2Di0dYrI6Qt2TSk01kp+9wzMnGtxUh27+0R3UmvgqZhLpwljlDNnTJbSjb+SkKPYd4wCrmZgR4c0z0aRMZMjjpXenVpKmbdIY1LMeQreIriWmdJCZ/GNVUE1dFU3aGowiPC8tyMqvZIYVutUCJyTokp+MPyFlbx6bCpCrxZjeNd+7J2wqkXrbtQHHJP1PJYMX4+NSUYLWs9Tj2r79+JJ3kIifavzG/2NCU4uAYcDAHTkhs5e3Cw4+4hJK1NvPkgVNrIeIkjgeFzscupbjATeHKn+haIn5SBmLJZ9nfvGaBJW0HoB3knDdTvyyw7I2dS29uk5/ooDX2HI4AwOYE3uI7yotfGK7qMSGgv482Dt1lK79kazTXZ5DS7h4Msga7+3n5aBxNVrSvyAFUvGl021hVGd2evOw2Qdvx93i+dmUv/UKJeKCtR8zmhHQnK3RfLB7veIanJnphHeyUF1FKgwBSVN+gbH8cWdjTo9svKNGbvhdHzi9X/6JfivJuw306hyvWNoyMyjFDhTyuHcltkwHsTdVnluPoSWdwi/sk2lDXbLCf+2FlvgVLkUy7TQdiM8GAS+u7CDfJYSTQn1nNErNTHCnkz8sVLXcr/BZ3o+VYTDyjI4fQ6ruxOfHuDXHfy0EBaZ8Cz7v+VYWRYy1C2RwpuIOOI5KkP3PZDnzc0jb7E04vGEqlzZnrq1CYFqaGafdC4UJq0xp0sL20wG3NjtIcZ73sP+4JQr3kzcogmMcR8wULeItZIP2TdJTDvsY+nFGmtVfHqwIa+z+vIroSNgWW82x1FeOVFKyVD2ONl/xXASM66gdJSKCmCFqjv360PJB4kOG8ymoMrP28Iy5w008aLPJR+7PAni//e7OMEXPX2uvW9aI4A0u2sE7WvNjdYQa039h5ECsiuTlgrC2uZelMig9XvQA57Ag0KA6vPPObzdMH/G+JRPOevjrgUDV48FckEPq37wtBpvr5y0FecNQ6bJ5QcNxBLIuHHH4fzO6aR9bYkTg5+joiIcAPwMkYBjMdDHbMQK/psnquvkD5WkSYUJeyP+dT/HWJelrIfwEXD5S9tKmr/fFZE+ZmNO5+3Xrf3Tx9cSPjtuSq/FUd1dTB0UX8lN/q+EMdRHr5TYkY/Bb19B0qNMmVA9ft1dAwXNlw1r60YhcmMkzNeUppKvwbzGE3XUiQlzQgu0kyW6yfqsx15cliFx30tTEuK6c0YrNQSb0vYL+PQIr1JKqT3InOF3QgLsQrt9pt59weWu++/ZFspjGkxvmCYIGXSQ1UlsYvmfHtjk/7cqNvbFvnzdeZmZiW8xFUJ7IvqhfB/TmbnczFrwZxRa8oD6WITOQj6Dtddo9mxlVo+UYk2qEnRJgS7FI8Snt4tP7JxJjOk2Ka1u+HZ2mTmVyQki3hK1lWJ5riNaQqo3MIokx0T39GEMqmAtjbiNL/ox7OuYN2QPCkFDxtY6D4pWBCx+Zh4hf0KbenLhq9DOjl5+wpMl/00xgCYejHeMnY9iF1RpU8XVFg/VkMy6J86psVN/IU0yGUqMGRj6VQb+AMTN3CM34UGUGjEqbij1IoNRoG58YFZPqE5ch4DmOGsSU5EuiNnbFgaWBdkQRMCkBKZ5Hf/1YrId3gXzeGcZZ3/OsUyOw18GWU5CF4y9G2VHFiieISSUOjUrPrIw+OnUTAoHhoCvbln4MeMK3YiT1YrXe+x37gS3kaXb5Ksm1g5d8Um729vTVHJp4VN0QuLb9qVa0p/2r+kfUbuY2+f4CwHLt83/3ZHFzXMSvyCjTv1yt1NZmC3bFeZijmaedbGnWVn6upAvKiYv4L/QecAeNtJgEIHDP6C6nHsWF0rCYeOgV1NNGH5ktaUc6E/xrEocPX3LxDgvSKocxJbgCixIR4Der6mTAO9dcpsG4yHTGqqpWckG44GpjIGl2yJznxh/KGiDl2hqt14FsEZDYrPcwblwYs7GhuhazyrLqZJdGxu4cblhjW2+8Zf2ON2DL6xxPcmCvZPMg5s9FnAX3HFRNDah8enPODxW2X4vmoyXa1OUk6jSEGTtOxd2DHTsTi2Qa7KMzUrA0cBvrBMP22f9MNy6O1kivXU43pXCwWYU0toEfKojpHpMqKLswIfPuhiqFUBz/lCKiGtY5mkIduz+LsFY7nYgdgmQZySMoWkv9LUgDh/bTYPnFzLG0UchqswTMyV28aTmq+6QI1BMV8pDS0pvyieA858BDPH1z1KE5LmnQfWPgtw8bnNIFE+sJmrNjmt2QYk1T2Adlx4DDj+TEl2uLTMu7FIMp5vW6r78B/etmA9UYqN4suYi2cqUNb4nvJR9M0atjWIwYMLbTKmD1T+oOb27uKL7xlQCCpgOR+HvbSa6bwVW5qiF2lThiv/SWEhtIMuhLBRLJeKlblMf7KN83VfV8Q512NQmdMQ4dwYViAPKJ2t8LeBxueMY1uPM3xlpiV4YJlA/X4/S3DsoO+mywuBeLd41Yq/Fcyr67dIu6rhS279+SOeN89S7koIw6aiHELRfZldK4aWOIKrk5ACHrh4lgYo2jgzNXXCAGdhCbgKQ/9UQ9hyQUL7aHvRrpxaXpsFM8v3MJG+BCAdx10FIMq7kSr6edz2QnJOijVBh+Z7LLoB5sTtzhux5+l1uRNhGH1DVT753OJGCmmzSAD1zSWUJK3XZorjGTkQ3YA8IeIZ6ya5nT+Ey7vjMPZF4UqcFFO4qzDx/yz/azC03/uuxQ5eHjDbxQ3T3GhPdd99yy1A3UvkfbambPQ3d50+IL80NjCdEVF+tNSlIiPIoUQPJfMY8+prUeofSvrwGHhh2e1jIHnF+pBDpbTYb1vKdUagCggobWO4t1RbUgzAPgzxTNkCMq30oYLDqMIFHpWIu4so7oIi5f196UFEl4Hsvvf5PiNQ3ao78VuuQY32EOOz1SLHq9rCyhxK3Bz2v6wq0s3oSQHyds8IpnfNWbN+cbWf9wk5tQ5uScc4GVBMCwlBnBGnHezIDIpIv9+PvpGY71W8bP3i1BfgfxIvXcDTxYAn9bnQr1GjMjAi2j04ap2jt4ZqL7Aw4ARxCMBILC85KUaMkG9XcmgDU322ZyqD7x4PwLtq2F2vZJmoBZUgXDgd3mOi/jcMukRRUnaEUKI2TVTCRbNcL+3TecqymbEYTFBu9oLOQLF/yRxz
wh1+Iz8NnXvYM0Wnd1VDjfbxudRPTmH1/JG6jXqIiWAInLYh7txC5DIPYCM8SAjkrU95EklUGE2wmRJEm7aKMtO4YjHVu2vQ+FHMrmshd0tbCGUQMul4JKWGs43TdDrx5ThBZbqP78WbVPjJI4J1pL32CI426a0y15JWzlGMBzpH9FTr/b+HxbKjGME9GgG22M2jRTn9uSA6N4DumwHaGmQViflUiMsdGsjaHEPcBy7dzuJFD0JSOR9UpziuEKxVW/FbACVLzXxUthCJVOm3hPHG/oYOgg2D6Q1+ySzG0aT/nlPppMNfLF3QKGtt81WFSaAIZtKJobA/oTDc0QcFZFpAUT0AThmsnzAaxjKrAd6Ci1scXIUanOu7EVPdiVQEgi3zM6eeH2F+fuRW8y6jOK68eA+s9Al+YZwDbtaY+m4W7yBsjBpAzwt4/v6xdFBCxIXhQ5tKV87lxZlNLbVWCT1COEVXUjsjczg/cBmtQ6wMK5Df2wlM745mubOhtAuuXQsaF308lPSF3VpjMq+xuRiYANqEr5FOCxjIrdo6VLy+xtamsQ8c1N/2InKm/0/U5cFup1ZnzaRdvCevdfhB+wgnLoTAOl26QeZk6l4vZTtpaNOUvZvRT/Bym/1AKvz13ePHfbgu4HL2KklHVnvoT0HbOvV6255q2047N6i9NGLHqQyyPaqGUvquEl4TG9ZzYx2favLd2Zfl1+hZcwtRbcOpIuw3dPVUZ6nySE+tovgpIyztFnuV8wIeWiTd7Nr12j7XhDTq42WnkTFkSnPxTHT00a9NaoLFQfwjJNNwtdpuMNl3/rRWp5D3GrfxEgsFMGPSQxUc9SRflxSiu2oCwhRzWw9AHsrLbL3CMMvekingcO9euOBDHCw94Mus7l2klqQIgeyM7ix9coiCcdgTHGG6xh3VABYng4Xx0T0lwRl3LcThKOW39Ma2dcgoNLfV2YlHnIK4asJLgkVcAyjvTK5mxYEkUe2ArLhPbiHzgRQEqvEcycELiZw/37SvaUM2HVGMzgsZ95flcXDC1NxDRqtQB9/Cm67i5dRZBMVmwou4vFBdCBJ5gXhf9pp1YAxFB9VEdb3PE9ua3dk7+bDw/srIxyLNu47XyEf5rXuDe1DxhlrT1J92NezfKghpby1gZC4sf1rYOHay7BGH5HCG4ydtjKOLvqQyOvVhlR7IcpekmCyvwdmIRU6mfJmGX8zxZ08ubnfIYnSyjtq8DLyf0Ba2TB9kCdF0h6Qg6jiV3ZCDhQQLK2PjbEBl5KQjPISpOI7boLTU2LG9KX81aMX22uCqB8P0oGgmOSDNNqv/I4KnSHq/Mw0uonXqJOhmr+mBdVsAQNOlgYo1vjeudvztPZGgyaxMPr7dfuH2HFkiKKG0GOXZVKwuBo1uRTMo8scW0q3MFviIOyxxLhNMb6GNuauGJ78x+70JqjGaAXOeNDB0YeNKRIPR8ol+hcvdmPD3FHKeLdRk39O6K2UO6iFeQkdb9hq4NczHsvENrCVhX/Ytn3h7Q/tqHFXDWCwW/pphzQTOOFJIJ1vzzwVBwiyxRijiFgURtbryW2CSQh9alcCOVzWpPco1eaXYOUgQ5YLT1UxzZZcmmJmgTS2HIAUDtkENEVkC0CaWmFtv6tGPTfyQDoya4/lms6QvQhNoH3eR/UxM+KTgxWKfSOp9SHiz0CjSMw584uygCFR3painGGmC6ef9PRBvOYVrYGK79uioZVt+JN0VT5WQHqSXXrAH1bLrRqpHFzkQ95CCkIh+Mn0XaIIDlfmAQ4pfLw/9ZYOSCP6sQkUktm69iEEL5bx/6oLbrIuSK4qvpc9dXyuY9v8z9ZoPEQwxqSLCznf0tpoCzR+vbrb8v1sVxnaeAHqpiAhTrFXdvcvsFRrBr3eY1+CQCjqGhkSgrclpdRaIKMOE5EVA3jeVd5LZbqohbZZzeCXbZZjy1tQFkbWpCKjNNy3UIvNrJQ5hx4ssEPq8bOYfratcIECKeEuSJ3/CZ0pdFxHnjfTOEH8pLGiYGB2KcmKnb4XhV7jaTCjunOOlgFzcpKLIaSitqaDhaMHAhq9VnS5nXK8At1TYnjLYfEmjZlKpMLCd425YL/Z2tAa1S/Bxh33Hjphobg9tA+eppg5aGi0DdQJeGq9TUEVM7snhJWbi5SM/bInu9BVdEeS1AwnjmdwgTGVyANCFlray/ZzoGTzPRc8jKCITORrv00U56P838rtGXUWnXg39N84+NkYr1RWNWaVWMgMxhZ8IYKQWxliSb6ZW7LXaA3GqOat/bqYki8BUkWaYYqckP9xLKQ+OZgGkvxS7KrvihAw6ZTeJmeLunnBeU6DnknllqCwDGG/5fBlyQMqa38/ZpnaQecUHVJLFpnHBGHcUaNJ7oGYqbkjoIKni3z7MvLNlZ69uBE7hL9E+lsOp4XI1AJK1WmJN+bueq1ugLQm4gOI9/mZdjQFcbU8Bd8QRNwtPjaZpa9Cu5yRvkIBa9pX/16j7/SPwmUvw4q/ItVlOhzjERWbZQWEZhuKcSSeCpfHqpJxNpG/ty7Wo0fN7+XPr2XGUCiLe1wRnNSV77b0tz2jES9xgRd9bC31jM0nml+H2qKWNfm3ofY7Y3EDDiSEXElQNdIc5xnkROOr51p1Ulr7lvtY1gNm1lZIVIRGQ2+EmL62tXFaXUjDfBWwHG5BwWrWKhaYPKDp3u+N9XWEyCff/p4DGxX8Cu3FCK4oAB3OVyOmXJxFG9rc7JEvpnuEIDVxg0K7WdvEJchlGN1fTg+r5i8i8ea4P2JqORxZqkpczRVhWm7EN5UZ7w6Da2n/U66sops3ahEAdpcwm3okAXUOnvKRG8oeaYuaqJs2v7V4bETsq2zVhtcN+PrNfY+75r8IWa20NZDiuETBWoeVe/C4jU9tNTKlJAkgBwNQ8ADJ28Us3/KkRsWF+eBen1vgwuMmc9Rtj5TPyy7D5ZtuSI/+Q7evGKDDqePhQWC5sxQGXYC4BXNunIV+pk4C9Md5voFJL6bHwqdkNTO9AamtD/AsciGUWYZwVSrMXkdy437VQu1gh7clKpn4Xo9UVABb9tC4hdIq+Wn4Cv1uRWDLAvRARyXPzYD1cExF8ut+qtBZ6CX5+kadGwqfCEsbcCRSwzPl2Fe10oH4JebFYUR4IK6AhslvY0ZRGdJ8RP5DcvTnWbKEBIm2WHFDbhCSlBCpv3XR3xgHfj78n86Un9qzLnwGu6I75ceS8guj6MHJacX4DSQGXJfJ564ef96qGhV2xhVXHc5otjaVdcsPt8C0enNuf/QsptAINhxIkwJiBdiaQQa0Mfiw//jUBuzLyqmDcbdLUlrq6pMapFi295RO05zGNY2B3oqp7x6MI+q6RfH/WQtQ4gRvvje4CYxwfE1Jezu+VGuPM1rTgGL6Li//UVtuOKRftM5mkvOXsqpeSeSEvQfrx2vMHtK5GVuQwdAd/jGPz0F0wCTJkmC4A/L5rw67dhQCdd5brL1GnXLtp1rbPEiJtNphtayvSozIwt+apRstufH1XbTfPVXFhOVmEQrwlJv3/4SGou3tfZdtIXYuK9Vbyw7jjcmkWlkqh5RrIYtNoojK0wWvGmh15h3oHeaFdLLRQ1T5EQYCRJ7NRqVE8zzL+zSTdeJvfXnV1awn4m8+/bEezbWztrN9cDY8djnFIL5U/UEQ5W74DgBhv9qpjTrLyFilM0Zb4dng1ESfBqiXs/CYxA3bl7KlJmvwF9iD6tCOf2PQxilrGooUmZLSUMM/jN/ZuOaLZYKncQWCnDIphlsT03xB+P/hRPHBw7ywmyIVsXJ66lbKDWPrSKjns0fKCjNQwHWXMYE1HZetnpEQuEcG48HdfWweQUPLRtgORZsX+twJvkV73qdOtz2bOWr5LA6V/7oLir4A9XW+0Tfc442qJnrGagu/FRSwxgte3xsfYuUTLKq60INztTDTmx1DzII7e2MfgmHSPJ9z+jtM0bhaydeecelPAEKeU33BwAbS8NUAUQk8gpRoI9CnSNJh+ULUwGQf1O0vttGhfmXA/288DYE2CpJ2AtJujPUcbI4vI9CgC7GEyPJApdVM/Uk3qye2EpDsB4lMTwHrpf2NpHgMk
9AYwdI/aXI1PxqXlUmW5aMR7VVqP0KAszKZHFzDRPPU56dN4+If36OoRSckAgZsr8NmAKSpzpkDonXh5sopEKVFqN6uCxMldEQDfvrJtWqRdc/E58iOLEZRE/meBgZUGLn46hALTXTK4onXoWkv6Ow6/soc3muOs6j0mtYH/WgWlPfJ1A4fx8zpUy6Orkm4AJD8pzAY43ie0IYL6rT35mYDyEQURcPYRmN//KgBbUTB9lNpOsKQSRmONzsvjOoe6F2mq7AI7iV3XvkJWW1gTDVsUzvWBgKVrm+JTWSRFkAPTaKzfHxBKnxGB/YCWGo9+hl8TLN8DQBidlKoXFEGnEND9vjqFlKsqgosKqx68mrGfEVjQDWBz/VPFiU2O8I39vEt19bv8mc902yyWTH/L1E4jNONRmk58iE8ByXYcQ6pFDf+OLm4LgfhBi53OwLLpYYYpRbKvoDHkAKxhYZ6MazzssJRz18W7mDOj24wFKyscgNPsUct1tle9sXSd+U2SOi+MMRencpMtccjR4aY98+3bdijEEH5AsxdNA/XwAIRpubCqKNCz/XGXCsj6hFZMLV+eFuy5ehzYvQ4VuLj11xKj8ePu5eYsbNorPV6kFE6vgfIvxXUx5zDO8wf2k02kHnU/jPDtT+OWUagMAIwgbiJxMXKF2Ww+tYYJ5kdizu7clmZIkKkHcUPaBFJOVQbSGo0wG/xKvh1+NL2LlUjORD3x7b+XDwyQ4Qnjmyj7aktTd1gyUX/85y00q4luQj8ewZNrIvP5sUQalm4OwsiPa6amMEscU4Ry/DjeRcPVBdIiTcm7yZnbMl3ldMS0RdHxf4BK4oH4CANmNhF8WVT7PQRAp12Bi5igO+fgb/VmB5eOCEh1x3iG4mOdxBnMYHA003jzsQgqrV2WR7UqWrZURxvDFl5rcq7Us2m8q3rSRnDrYtEG446GrNcrWzIAX3EUA3C8apKrnGwMufvHvYRcVI0Uy76NcvPbRX70iQA9sujReIEj0FMrvKCTLidVtkDL2grtp5LxGue2WE1BGjetiK7Nmo8B3FA8ySMq96wxuV4aGBpOQFwASIH+k4ai0RHBvVcpn9Z4tIuRdnrOCP1eU/SPxqOPQSvkYer4bIDp+yNG/2Do6SfsE88krbMCN24njTsC5Lzm7hjU1mcndTtZxI+gCVwYIJA5tSneDjgzQSmsJazqLWsTjqf78/vx/JCmWOvU3wnnqMauIANTPUX1WYzjVG9yjlYUVeXI+ARggGl5FJOTDv6Wg/b16aUF9x5+h1+C2sS8zXHvEQEFboHnqo8GHbXmkH8giQ6xyujIch++unJmhIf6jYbL6RJ8R/tO24A6fG7FtssKY69GNouJHO2f2UQ5HbyT/0ch4f8hzfU3u7a0P69geh0eg6JfiiwJCM9YgcMv/NGwoHRebFEcB23c+B9Dyv/XAA8cS1cZFK6uoM1gxxszkxB/Hag2Fy0z2wwvJYbOwgL+Tua1oV5sm4C61or/CKMfLQ32BR/+Nt/f4BlJ2aJXUXSjvizO+ZuPXbfkxo3Cs11lY05QAhoMC9OeRgqCX/5Q/IMYVYpfBKXg3eEUD5L+fOQ0ocyOB4WoktES97zJyiqO6DtXS+bRrgpimp+/WJJVkqmPINO6cH0P/Et3BreWUyHMQTajdlaGPf2HCQMkwWKuPvZPSTwBRP355WOfqQ9IRtZ4CrL0/vINhneSX7UQW/w6BBHQmKYcqWRtrtCagTKPh43WMqVFd7OX00xVEN/HYzzGjvRymK6YpZD1JFVboZurT5rZBzTk+LkoYvxtDaDsvZF19AtCFkY9gCu3e1mbB2m8AbzHo7dtEQ0cMy1Uc6WndKpv5p2VIxAsRylvrPQME32eveH0/9r7h8piKQj1L47PPQLrcYEPjBt40X9l75T5igu25G4FQ6ghF46mA6t8Bxpmg5dKk8WluXGeRWE26BEvghXgmfGgGTSf6HnLIy7xqVxHC5iHr7DGhID7DEdF4vRMi7QCzgu+/E67EOFAUA39MmIkNOkXOLTNO2xNYupWgrMya8SI5TT5xCBzttW3tvOzfze/R9q0tm6pPSnztoHeEoTGUDQo2FmuTddZ9O0qQxdcsQfL4I8oQPlA2dckUw3NK8X8UcUj0PaMuU0Pb0xc0IxCS/IvFYfn65MikfAixKePr0F6VOsvqqoi8UVa1QotQE32WAj/kCgH9RE87I8LsB6T0bGdWWl7KhD+oW6ZNFohbaB/xs155j5laJBOaOc2eyvItKIzlTdP45CFENco7sOUDwkRrZxHQkgHs/YjggnKS3FU56k2pfHG7eN193yZ8l5nKcH0TnMAZ/oUQL/tBuKQOvgBLno4Qz6gUVrvppvY1V5P576xfpVywaVos4wUgMSVAEx91gvMagbJssBDdnA0HtTygLf/dsG505xkFzNW5a9f9ZpJRYdUstXlsjpdHH2byJpDNbbqxptKe5W6SMxEgnvkwjUj+KYtxoY15LW0LooXAEEcGREj++cCm1R7MvKPNrNO3aLSI3cQ8aOqnRR7CqizbYorw7QUyMeUJWiyzr+h9RJdcxoJfl/1xuH24OytxcTEQ80xuV9A5zaNRzzg0yfXQ6YZEi0swadNfyptRoqSN2cFK7bXI0fBQYA+1eVTaKRPkmh9Lffii2nRGiWRBK+QRR2es2GdXNCm6r2eEFT4+VkEPinYOyT4BjHNk0g11wZDWq9ZYdwn+IkhoRVRi06iaCsocD5Zs8zX/vVnIlvYy9vEBOau5btIyIdX2XTAreXhworbSpaK396s5N2mw0JGGJzU14AHxeM7LwPVjLvWh6H5fIGIdU0ZGZziV0pzftyria8MK7JUb+A9141LmpopyI3PUiojbImJtXT4VkFO4XpTsBKcADrXuJsdazJGQyc78UjJvyL9/4bYWYeNpcga38/SXu+3q8ZNnmpm6E6QxzZC3YF5Lj7u4fvHxGzZ1Ax3NRn7JgubJYohsXahMURoV5RmpBAUN5WBd3xknL9E4XqXB4AqN7sGO8B2PUpGW8VhWi9ttWVH67egHQqoZAS4aLkvHx9YK/xRC1n1CsxLuHpV7Z/JDU0KLZI412LfPfMbwIQezlNfEdxHkhjOnMMCasp4RAC8djQxJHepfcasS3H5ZO1C0w0sV7LMK23n+I4ckgQiYBvdy113aBZGLdecl99f9ufQet4bBYRwU6wW2Qu1wEkgZ9gdNhTMcs6zTEmGao2djElBO/zH5ydnEVGvJ7tVVQH/03cHxSreCCns4DY+ZDIVbVDkKbbIrsiE4F3bS53RblA+7ikeunzvWL4GegCBbBU+VrC0+SiaJGo8mf99d4oLbvT8Coyl5pO9OWSe/7PiXXK19IngdPkG0mbuunaGdKG+bas6vWGr+PlAvHMygc1RfY3XP/Q1YSr2gi+U3/kJQkIUX+HZokpMX8qzz2A2HADZqdgAw9IBsDN0Ibf6+C+QLUQ9UXHYPZHxo78OkUm4YALirJIDh1npK3PaMcMI5eSvSwhMAlXmJYhYR7nDt7J4olS7SihEPKDAWYtHCM3Z2DHNifu1AxB5S0IjONZkPbzzxSI/mWxxD/nmzjCFNKmg1vuqcL44VsLNHAV4MFJi8Zj9q5uYQUVzjWTa8Tf8zrLad6N0eC0S3bMYX8I55D64v4HGqNooBLGGOYkmuKRh8pJVmpkrDDlGgi9J3Fz7EnG8p2E68rYP50A/mQ8+p8xnLxwHsWEEI2zJogXvpdhKCkOUY6YAvU+NZSphAEVFDilg4kNErTVFLulb6JRU4h0ajz1Kiz9vnoy2BfEVTW107MJwJIVZPM834yNav/H5P2H1RZ866XkjuFeT6wwsQNGXYbDWfq4MIVu2w6aO/7s329P9b4RUumxXUpEjC0XHsFM2Ck0eBUFPnGqubDwF7tnzTOfXuuC+JBJ3EfhTkFEEoZuRo+aowulggZZWMyM45MNyV7uLSno8fjXMy3+HO7DeYIonBKbOelY6iGieLzGaE5l6pzQ2uTCdYtjmPNb5Ajd1ICcp/7MxzNa6nv0qBUwmKi9pu6M8ei+xmWb9xWNckQABwaDSIAwurMhJ4Unxl3quAhERUDgPDcEP
KriLw9zeXj8KUpraI9k+CCk2TGvBfUDMxngWM7GJDOuZqO8xhrWm+4mOSKPUcBCq2XWYM9Xm8fgcfP3mkKK4h65rI2s5/rQDukDK59qKgS/SvawjQL7eJu8mO52zOzwJDk4PKtXXocr44Z2PRaDrNLQmg89pi7EFggEkzqVEncIfMCaryf6RtRHwGDALQ7+Y1GhhMzEgt0Gq/QG42bo+0gts+zcr1b9DcO7Y5qwY9h7rxQcjVgqZUvezdOtOrA40jtc3VVOG2f0gUD8rSkWxDIgrHDV8JuaTaN/QAPWALDbx9s4K04ovIeXghD8OB5Tnwj4eSJrM4w09GUpX/iXh/TO8TvFdOxIp52YumHQANQDM3HTeTYOIJEQ2fxrJh3FUgwQ7JyGd/43mzhsH6hnRmWZrDMI184+ynPfhHH95A7qxjkkJYEV4vqzqa0KTbQjuM+L5duPXwxxbLO5M7E9OvCVwefsVWSEYi7S+70EXO032x/G9/0fjpKK8/GTObRK34ivu+yjxsvvTbiByq0JOE4zClvNGTTWRrD4zkRVK8DBXHHVs2s8oQUrualq8mI0qYWZBrk71UeyNuMazdvAO3O8dtSBODarTtWr7KEK5XyoCpNEIh6E2UEmeZssAHwHUHIqAvwPXDV3lzVKNdEKyZAZyPGijyXYMb/m9oIR5Z4zmP8UimuOsGQsi78+wCOtlfuMrRoyLzwRXi9iRpWxUjh4oZ0PitKsE9oV9brB9CEf35KVyb3AI9VPPAlWoMjVAd6RzCDSuruZtfwUi4K214pR4DP0ufGFk2swGQuelDKkbcWexHIaLgOjiR5xcVSl8DIGfI/1QX3HsNAyp5VOOPbk+wTUfYJn4HkFNCx27dAw9JvWV9DPPx+A4ahVOZNvX7Is7J66lQOl0hVOPsOfismoJvB28ryfKQdh26mjRTMG//fy576fJoSPRH4rTfHGBLw5pTZTiF2sTyYUJWCJOZg1cOdizRwCpdAY/Z6zq7PnJ4FGASsFWtCOt65f4ZmTgMn6VlrJF/0A90/+f/NxW6AOb0y5fR0DHi2hhHjsojBo3bT6V54PTNsoScNHUv3NPKdJwjEvsUNdpkXP5FS9iYS995+Qe2Aa/MCDH6zKwYNfqur+zt0MJ9p8ngxNV0qA0f3mwfUuixbvTtcP8ejuwRe1p8Fi2mOS/9LohfwX05oomRWTEyS2oUg2E0CrtMd75tQazXqwObxfkwTp+jNYtV7R6T9UR2TYKUU58pTTzKGygfL+qpeABoW5j7SFHbPRCy0GoNgUSdnNtj1b+6jjGeVPR6uuOXGbBrglfF+mwVGpNwA23KXeZDG018BOfgY+Wod3a5rpxPsXveNHPZRPRwwLq+RQpucaFOvwf63+go7o7tucORO7xSsMZr0xVuWGzr26iGhiz4nHmu8UAAUtebEXXQ/Hk8j3DdfCw4XNZK1wQQwpTfWhP8upD1RKFNUKAfLxmq+J9eig+RKd7OWnalNvYuPJ7ZrbTHW91Cx9R2WXCsiPjCDefOvOWe1NnnJnPD9kM2Z3Nzc4I7E0f7LOsZmFmjDbT/h+wEp26idhBV70iTNKmqdh0a1DSyd9zXvZH6jdHhZRo0Gjo6AMCHiKcf8d9Yb9BtIqd1JThxr0XbqTnuS1PFV0RaXvqpo6ysTuCGPZn+WSGhK3xPKx8tGNjQwQUvZiXHiF8AKUVBlGZpBfrpl6vjvQotjtX1O2G7vPn1/Nx2YEqoskB+OYXPhaatvV1/1uYFDLU4+zm+MfXC/j7gQ0Mq/YJ28fLHQtd6yKuxNEFPGcKtpqUiWpmH6YYPHKggP15C5xW1PJhm83bc+8NLLjQ6FcW3MZEokp6aVGfgGp75VI7vPiLvpYWtza7LVaUwScyVSLIhANjgBpzejdlZ+V78z2iIYItRtsl1H3CSGsIbYkJVcM/YS0HaVFJph+5wwgpm1xBzUkXpyvDiPceWTYr+JfYdxJ6uyjxwlQZ6WlSBnyNjBSCLuYthzhtwAda1wb5t0cXrZ1+06LMjP3TDRns5y53jZEQW+r8bPSEIVj3B3A0dHTlTUuzNntxbVj4bHU76oB6Bo1OosZUpMFF5FJK1+UER3/a+Ex4AfB4ii9LzP3t7/q7UcEfGr8EAA/VeuXPvMKTGbGGByXHSa1PK7PNZ+jMhN+a3xnyzyRVyeALVA5ftxlAz46y24c4ErdAoa7SK4Xq8rif2Ox9GtRUGmtxLckrVscMR/gHPL2LfwOaHdkWOAt9SAneI9E1hCAfqXJexjeMbUi4uuYCB29XD68RGNwv09HqXulmdN6YSJ73LCnKxxvd1huDoRws3hnpCRGrfZe/acyXxQ0eaBqC3eA/LsrRgw0RsxifAs1E3JUxxUQoejBCZHc3bj5aKRA82JZBc4+Ldt2rW9ltrwhlSch4wVqqvuh5YfwqCCdccFisd3fK8rfrbJXAeQWlC2arqY+EIzELZvwwz/rAN4WCj9QVe5OrcDK/PbpS19BXzA2nc2OWJ5KGSwjREHqCIrwXXibco55lCa+HamrKykiMXGw/AmZ8DQb3VQqCb2Ny3ysFm2iLF5nbQuG86n2gyOPoB34OXFL+8iJ41yDH8frAssOaF1ETMHdsA57AAsk7fvQCmlK1Bhxgx8xysfR/vU3LhNvxa6KAb+N2WQcmnbix9CWmyjlyIaEI4RX7h62nEdvhRBcYdosRxev9yX0USNO8pdgbi5xqGXd3oDIQm+CkUs0rX2dNvrrrNwmp+e+qUWRmm2lChapMZE5lS2Nyz2yVfjmG9lYg8klYbpVrg+6Kv6/Vp/MWWT5w6/ipd4u0T4IT4g/b2KeRGAFNUfyyER0dggcT59pP+1ntJi/3SChVqnP0l2ga3c5LsoyXVhP/HBNLDlDux8a+TTMy+XNOg5zT/cFemiZDrnMvvV48yZ40vgBGMp86DHcJNxI+4HUKPW/oiqNYL+Vg7xdEM8z0k0d8Uggg5TEiVs99FR/+uIByX8YOO3QclQrs6rRdTwFC1gOxE3LUy6/HnYB4nfCvtT+AXcosOAhGzMWQfBguqKzhah28iikJ6Bskg8nCjrG6qyWHC0/4MoFw1LSEmRlH3eAt7wyhAznhxKUHxekoecZutPL9H55WoHwhqSH65HuoWwGdvdAik++aGaCZ12SsYuW6OpKMXp6m269EuhpY/2pqsIaGBQBVKEgtxOwQXLMwhZENtW1gqNWhTX0eYAdgn2Y0wcgz24zVo5f9azkVN7dMYGWLC5Dk9l971ypt8LZviwWc6EkcaOpajYmRfIYpaMcryaik6BLiLhd9JT97m6/4uXJieALZNbcF7UEbZP/ULh9cgR9le1EXRAvD0Gt2/qhfmyJILSy1y++z8Yla5yDZeQy7C+NxcAK5BXwQr8FKudT4IoAUHAgc9O1WP6Y1V9mSxykXT5fN6orEFAbRRcy8jReGOJ462b/SXHU2/9zGE5sOYIDSg17lJ+rhQGCyFpdIamwRIcAAnNRsOWFfM0mvmErpeNFoK6ATVeMKWfFYqNVmacnU+ShDxcgAcUvL+Mox2otUR1eOdXNy6f/jbmsiGGIj53xUu3Djy9GvyJ2SWpiiWgtxZg6YZBR66ZfAirKTqfOp5a8VpYZc1kpLfeICq4ZTZ3z3UbYzhM/zuSz/S5TnQMMuFjeKvXT1rQXFQ7piopfT744NM5+2Wu+yeiLkyQAtzKs+oqH3EcHjdDqFxHj/EY91ea06rgq+Sq7OxYzMfPu0km5ddhmOYnJXPDZAl49d7WVXa+1Ljss7EsOOBiEDZNAEkvg/vjacfe3DcMIpsIN22TFz5roYIrRoR62PL8a/A+wnlbDJc9ivmgX42OA5qKl9Uyp8RH2GRJUEM4ANfi+pzXFL1IAl7v9FOUrY8ayKaJ8n6eKO33unMv7qS23WC6h9u+urhyUr6N73YsAUzUYsComUD62xbanIrVfLHwsox+kwBzk/iBxLr90YgN9dFzQIEYRunDTcE82sx4ICBNCiugkqmPF2wVb3HEWvXA1y7MabIn3GKgHbrbG7iYzPLcEbQLGG3ZbKMspIZpWbCJL/B8mr29ZjRTQlGgTQizcXkpVf+dVbXP9ow+wd
6V8KIgMWt7HS4ZbIw0Tj7fqqF8lI8DjYn9mEfX6NV2zQiOz8qI5TbRAk+a8qjl0eELMBztpyXeYsn6/+cW+k1wyZz3LAnRc8/MM0d36pe1lCh2iCtkdAJlwSAmuvc1VJrBJ2RzmP83zAfwo+otP7Qk/A7xJQGPPU/m3hGYp0vN3m+2taW821+l2pzHeBcgOyc8RtY+PrY4TLXqtDcmjpEG36JZYNadi35lTPp+VMbBkT2JypFotg7rPFY0hlTFqCipojMBWZLQPoEPPrUAJTTFaqv217U7w4l1bPG4EC9cmfgJQFmTf9g7Rx66kgIHefUOjW6ZMkdpPUeQbhDpMhRVFMB1mC6rqZqp4NGVA/r78Wq4uWM/RR9XKh7Y5xSOhkxohXLtq7+0Pkwz9rEvK9iiBn1+IrsAhTCNAsYrAdnDF+Cl2e3XVvfFSwW8R608ekm4L2PFYkyEJE+71ll0UkcJUD08AWp4+76HPVKTsU8F0lnE8mndee8A0/WEewSmixoLmSNPppwWVSlzUorlqRFe97dBsMEE7RhupmRWBUD2gxAm1ellPnlej1FcsFrNnlx32ulwROES/8ka09fMrAqHDLIkaVG358RFYaQG9hG5VsGmm63/PkfBUqq0bQQnfdL8iuNdEhiMyAXHcW/ROrR82fSliepAvO/Jh9/pAutJbGVBTjrAviiBkGEYThxo/7sIrvOVbafWTe8D6Wfvas7sVBZBaDT1xGSFSypr8jNxM+Z4fKplGyilBLrdzwoha6082/Y7mbbJCxfn9qG7OJh2U4M4B529LAK3bUcyt5A+l3tJIBizh7ZeGskCWsVyAI3Q8kgEp8Ni7c7Y/MK5uK/IdvjAej6spVharfOjjgBXC1fuOXyvHa697TIMGRuXLCtpmdaQHW5gTCPmIfuJiawoKYhnA40pzLAP3miDJs1BRZqXRWEeiiM8aZYuJAOJvtoT8SzHyXZqCdie9J48bJ36M34KTI2P5Xx7NnMRlK5ABrfPySa/4lf63Eos2SdjC5tmYzKtp1WXSL3oeauab8LemXZ2jpBXvXECEPchECflx2G0CCSxygZyCcDDoF/bx5jZxjIQEoubMvNn+YHAryB/Gmo645n19A4Xgw2KsQsynG/uvYYKzcy+UaF2+vaE8KzUlo2aQiCZntNeeR4WhSZbshpVSjVLAkUDyVUpqxv8jF6kHItbbagqoSw/K8k3qJ9FGRKbIb9TfcIt/jpF+SEzGCY2dC3fcwhqyaUO+KbV28t2zI5MrFfISFdWNHN7AjJuYpSo4gv5YCZT1a84gA61TNFAQuvpqE+W5UR8t31rtjF84gupxDgHm678YuGOu/k4HcenG2Vpkv83cPMdJpwSFZ2+oTu/+2lcA3FXSdZp68Zq8ov3u6LR4CvnijEhSMCZuSj4UPxQPCgCPqqJlJz3mO8tAWnavI6+GVCs4EjHmSrXLTsyyhhh28xBY7enK56OQ0S/Mnlpo0ljmS20ultA9Emd7CtLHHcrypNbnzJhBOg6JcezyoiSm2M08WckCALpglWAZozwimSoflyN0sH7ICyR5tLa7qegtP0mgkxum2zTm9pPFjpNNoTbwxDs0IJtUSnCGS2kMWrFV7VTsQkO8YoPd2razSUkcZAEWkpqkyVFlTHMdbTm+Pk2AQ+nwo/CrrHTrqfif9qvhVRPg56lKZcquH9sJnBtmtdvn2ZrM5gmPUfsmdja1P6ycjoQL9igpgdBLBN9baRyU5Am8BdhMAgBGKuPd+yUGrObsNCzixukkBtDtHz9y+LlX7NCw/rIexLGZIbsaP1rxUQ/CmHOdmJ5LhrHcwh8/RqwQZIBRXTRBA3Gkl0sEfr7aWZfoj9oZJOW3O4pAEKBHhYYkGC5287pgq15r42MQdV26/Xn8kCj+UUQl3is+ZRl6ojmUWmZfdr/WMySSXUvETtmiYFeMV3hfqfjoX1kwlDPslBRfpS8gGeVfeeY0MmD307FWVfirefTZ5c/6y6gXQ+XM8oh/lWWYbV58SiqRPyQ0+Dx6yPqrwfevcRse2ewxG6pPXeuou4TMWzn1cMBF6bbUCy34LnSN7HtytQl08Gf14OxRq+Qk4BImcDZvfB5b2S38oRsBqdw+wqiKXkGDkL0kMIRrAdazHlYzktjHZ8qB8OSXcy2Px8j7dzkyYQW+ruTQIeZ7J15betVAIuq7uCHDeiyWJQZ7PHeFS7bwZdmrhkaLjg2F/kpAkIfYeJcoJ9ZntifjB7d9CBj8hWoH0eifGAKyS1pySBxki1Xnt2GJewlvtWigo/wEDUQPvyHGSWowYSVWUyFcmwHoTbvVHU4td0KzJ74knzgOUYh2TyoJAlHoZTocHMSRm9MbY7TXe/8pGpxyeKvja7lDSmZxG7N13SS4PYzWEE6t0CbYt+4WbVqRDHi/44B/C58LR8ra/A1W1vaukn8zuYjGdcWMgeUo5K19nJezBqbG6sRqg1Y72vUa6h2vniI0cKUYDOZv6BEXV0xsPLlzrZPq2rUHP6wA0nkYpl0Y2twIyWh1qcwe0zGPSaQ+T4byKUXNn1ywOkFnfNwVBmYFW22B/H7/SJEMm02XtWdhxEcGKEJb+jcFf0G4sicFocHBSJ/qjsgciIjuv0B+N4w6zt4o8tNIkiXSO+SNZM0/EmvOFR+zVc39GxbX4hpAxc90oBYohebd2c2pAFTs3CrJeLFJhr/px4/E10Dxye0tC7iiBzTgCp/dZlN6oDie/R12/10qfJItK7G+FZMIHcDYDVa5r/0HzVwh4TA7SFpbpVxj09Uj60EStI/syRCTfHll5uF5+tdpSD2WrRB6u16na6bC/oqgcMGRGIlyPdWOEBPncEJxnEt9HL6uNuVZCf3qSPIZFQYgN8rx/tP79qzA81N6Zz4KgA/cfDAiFssoiEOkN9md75+7Pnbc4QMXaLiX4ZesSLQgT8N70s1Bnk3kywNDwRPTGqaXvsJ7YOWikiUJvyjGA8Tm9OymYl16O+90w3rQtrStcZgqk9MmjKHcPfPtcZrt9i7dp1T8PU+wrHmvMce+u9xbt0sU0InDPdfAI1Uyhmt50/Krt8GxSosi1laPPwgeleXCAb3/3v41aLp6w2NOkCsdtUb98bhpmDpff3KYHoAx226f3vaXxhrW5zBR6dlDlxsSB0iT/sOOG7mZc7N+l9nl2Nc1F1kSPhQDQNSFgO/PGGvlZuGnT5Ix6Bor9O4PKgI9c0T/h8RdAw89n2pN41MZhULWPRFIWqM9T0YB7hLWdwMlrjXIt4O+Z/r+wF1yiiH2PzpxhWDXNv6svvfK7N/pyWa7PEJgEaZWGZbJsJxTCsth6Yr5K69SnwNiA/fTR5CAasjiTGfFe4XJ2AgXmkH5xdMlzGmh4IKFyP3OaFHPZZS/0LQstSlR3Ed561kCt3Xm/oHRdd3gfrs7kZwj+mN7HgwbmXPY6aoFF90WBgXExg+gSu7Pa0qSeI3vYHGXraK0phNrb/rt+BJu419Z9UrezHnC+t/Hg74SP2NNckP0jWTeFU7ETxryDoiK1Y2+/QoQCrkxcCpugR9hBz2PWy5P9qLmUH4kLHYNcBKFkWT8Hm802O5hxpI9/nzKb8o2NDs/pH1kJKUQB1y4jPAFgQRWrEwCBTzXuPfemIRrklYksNrRmCJulaEPlhxKlzGg/jtGIWuVsCaA57m+ydCMRNX/oAlv/nlR4/ji9qx96aLSsDJAw2LnVuiOD5l1v35Tb7VjUy5Fjp0DerbeW/c7OP+0TVCpD3LmvJB3fyyPPFtNkCnEMBDnp1K2+zr5+7ryK2lLcluosVVT2pASGD0DoJsD+97Qrcz1fNBDh3p7Hkf9xAlsk5y58BVefdRVxSiDzbIqQeot2o/C5gFZf77+oKtZkIQQqaLyDgJamSYgwclcmCj/mKOtfamXsGkaiBIYcbS7rUKSOcxh9qKUkbECExSqFc3M3+Hzzjk5GKWojsLfNpDxK+wEhnL+Z4XeqxYJtbedSWcQXusyoNUtUtRLfFceFRlLMUm6cEc57l2p1ESQPbWxAbPx9SKzM/04w+9k8oxxs4Qln5u0QiCh+Q4tmdIq5Z+qgWgoXopW20f6SPtjB+Uah
fRhQ3qhY4k7/mKKZ3s1yBB9WB4Y4UonvSqPW6RIHWj8QKoCHJTUK2KoPzjltHEBAOzm5HD3vf7vppyD6cev2QD/f4iWV1cTquh6sxGUiv7wzLTmvIFwpXTEMPkssu86j8ZDoB6UIyhbuljM4+MSNf+wdaZZ1ikzdTKf1BN5qHuTg+zwwDRYV5YfjC9fUjC0enVI9LpofvhL+LxNqbU5p3I8gdtm93R1QzEcL4j+x6m4SFIQdWu8dy6G+hP4IOy4Ypv4PvHvQwoRLrxD5hgsSXZmWRptOK6YrGsz4kSVnGEBRwMIzZArDsxL1wOUt4FAy3POnYaN7PtqozXKLyEPAk2a8Z8cFXsVPQnj2g4z46INMqF+iI1Y2uXz9YQcNZ7BZJLvYLFj28/XaE1KicaJubsP0Dnc2SSDkHLwwD8h2av9zM5YmS0hhGw2xAk27K8l2abNSlUY8os4/pV0MUihBKni0GKP0n1pqQG4GD1A02nENmOkxIhn4RLJOrYzp8E91qSQIACJN5TaDaPz7MIqI26dR7fezCaOqXxodPibjkzI/rzR7r+DD3z9QJxMd9hVQ40K8FnFYvEgR8SAJyM19+mDr9hfZNtZ9YejpF5auhicO6jEuS+Q9kJ6aDVY2cEv8NJS1PQS9cjtAwOJY0zjJvEZ32zIawgxvL76pI+99fauLuqUqT6URW3CWbcnDbU+H+suDc7IIT+S+2vOfc39CVL9kcY7C4Je33mIMyLdkR/uP+ORt/Ksu2pEu0TJJ2LS+gzvwXU/Gg9IuT+3QMmai9+xjlQzHC2jELhMhejNlUVeLjg1aJajt+dtGVJyNZWhf5GGrewOdhgkpgReS8pW07SwAAoQqHVNou/ZQCUI7MZRMvg+JDmH0TZbBsphcbTcmqR0dLc16HL0PV68k1kbsBw9z62RxgqNJf54rjPYerRebYFyA76D8nbWWghTWvl048aYzNq45O/Al99E1C88s3F9mTvrytldp5QSuQ0zboiHhzf8pmD14d2ahbzMIDI3qi7wHZZyodRtILNYmWvT7ofrCaE3aHXwwvVAwMa1/aw3LOBShs6NE8lVTVN6hvpry9amuKaJNWTJOy3L42JoMH76q3DkAIXHsFPAbYdlmB80kCIMpw/MjCa8uiYtIl4wza+PlLUgoUO+BNMMTV9UzmHUOMqo1zBtUjD9haHMzeFX0GkHkDad+n3lkIgjzCCnb0bsURdYitb6DgbR8HWcNFM+xgfJEHcrLPVFkGwakoxCHWzZa/VJ3oEtZYPKdqWVOuz730fyhKXHYIS4bl98rEf21bPPh2vM9BKu/sDY8qV/a1DgQRmxHMl5bqm54u2fyehMnpyjfpaJJOucxvpTUMAZybEwOws/fHpi4Rcmq/PVz4fFxQBqI6z1QMFUIcAYVI0ZJcrMJTO+RG++Bd+Y0IukGs1weGIV0rVSGvbsU6clqGBr+geMqeCdgdL8/wMaXpyUzaxgsx3XvzhNrZW8fjJYxDcGyK2gydvaB4BNqxLzrX/uwFqRYDrc7F5ChbdJKlIobfUiSFk2lW0SKcJmNGuMUxkFiSL1BPkNua4shRkbOo7l/m1TK89pxjDCce0wUnPnsCLVzLK76bm3ZbJ2Lw10izfjz2bPhJWtnphB4VrCTNWIOda35F0dY6WgHY/hMsWVPirV9M59m+NDMuZL0AvwS/EaFDAh6OaHyF7f4dE1q2Bl37KmE0Rkh7zy29N8R+L3qtxDf8Enf/46WA7UdjNddB+E3QyEJdLkvkSEFP7T8+13DWNMU+yz9zA048WdcqCwLkw/2TIJUWxc0Rk/aergQHfOoNHEMU5I838N1k9zhXMZNCf8zZXH3KymlrqsiKUCZjO4hMkPUag0eTmb0FeTlw3ZgGn7BFDEHE/t11snqWsH4TmVZEz84zPsb5Hu83JnPvzkNAABOZ/YCJR683LrBlRGYL3WYCOx/HhrBsdMWFOIpoly9/n5YcsgHGUlP3n3RdxquGMohh0pMbDrsWLNFOAseFX5GoP/pmNysyJfJVkWsugEPktFedp1JbJGIOyU21YrKPutWaBXd2YKs7s2ayNaTF+RiNDgjKxoyEtpyP12lWdXKPa+uXNJYlfJVaFr/YHepsKmtPbSWIevjFc87HZbHbcBjVS0z82IMe+Afy3RsKAnlxOSnPHoHLer8MYQIw1xolHqRR+0X7p9eyW2j1m/cI9TnM6ZZf9MBE4GUjv8MO8CIVih9FiQOVV6Qrk2aEUuwbo2Ok21DCznxPDKraFzdz+Lw1Qv+smnpcXwjZObx8M4iBTBtbXUH6H4HXisYX3PbSWBUAhbW42MgDD7i20yHLLdqr3YM2L8eayC4pqRwZqExmmdUNuHbHwCAjtYG+PqKo6HM2+9KM2CuhR3H5aqzdhpyrZPa3MDL/rRrVBvQgM63QvV8nfap2yerWIJ+zwgbObo4tI2dqBrfBdUrIUlLnMafNwuOu2tTZnhrA6q6QF2WhUJqGlUbt8VXnS0c1wy4vH5KcdRMmFJk2XFKoSOLq3xm8p5CaeqILPeZ/ZGG01kFtiDungNfPumyXpyjcpLWLZ2RRKrHsLGWBTbIG9qyDE0eKcI8aPmCoxIvGmxBThNRvcMxRQ2piV6AKgXVn8xLOiWiXvsRoDZsy+IZHdr2aY9oAdAi/jnmYzYtMJzTXGG9iwnoBcXrsl6bbp/x2oWJT3P3OxrRPMAI0107rWNzCB3kxCKRX7Dsh2zVuItYV2m4wXWCUjGp0QSa8c4WdMMBTrgL21qLEQIDQQdlX2RafN2MAjqJVd1GR0C+sdQEhsS6wYAl+JEvTRoPrGmYJThspIZk6avGoofiBJ9kxZJUB8S5oSJfS3mP0pHUtXXIzlR3JzIag0S7F78gPv5crnOhALS33pGGCcnDdVBJHgDPv7qft+xgFy2PuhIYdhN5tfK36bMEs7wjBS2TWsEivIiak+1g3OXPOdaAjGNjCJAo4h02YB4g/V/td2URFBoUHLM/irI7FOl2vlB3n3//Yd3GLHkWKOHRDwIExfFk2vrzCMS20M6KuNryRszSmO/y3cL02naZLYntyTlhLmtyroItp5Od+/x4SlAcbHgX33J1NGYWVyKq7VfJx5+bszVhyFoQtf5E8/LvZQRt2hUMH00imNcyo5I+YxmXAd+RSP8hgrz1XLqkbl5uE1TcAhI+Uz0aXUm/qeKAWRZ0lS8M9hTQjbycJBeXWIaGbavztCRBiEBTFscbnAPHgZ1lGcACTbP5UIeT3gMGUw0Q2VAuXif0JjUiDTsD11TfBu0xAPZzUor3E4S3ZSDUkL0taFn08uelkz2gz/IssN3bfDxFItHKc+tBtKUV7IeeJQrVh6y+/0uqFcFwZ8OaDVj/rVnik46mOwrOZ5BSUPbvI3gWuIiq9AoBlQxWF/Glp59ww+KvbbOOG3ocPH8WEO+DINn/TFV2HN5kkpWjeV9yyKO0f0WBe5qTfqXvSk+DN/3VNQ6mkeFtAGB/XeodDjTkDG3Lcx0VUq2J6XfRISxCaxMoGaTJiwHP9uqiSVnnht6KDduRHPOo/y+C9Q7ozUvcxAqc493Z/hb3RNeaIJ41aTncHb1ppCFOpyf8G2c3IZbO5zDwB+IgXh43VbCIaYQCIJvEtzDR6ctoDdFOIV+/9ryJ1zysmeURbKYbSuXnj7nP3TSMjiAwfoJ5lY1dVOQzW77hQGddwdcHyzkII4FjQJ89/dABj7wo2IHGuQIWijEzFiz1fiiufGEn/meCpZ3Bw64BCYZvcvb5c1gYIaFA1twjtqQbboW58DeSqDaqzzlz24hStrTnpQ9vZ1i4O1PdjtBcLqG8UjHZmPS3/b7ybaBjTuMHC8zRsmUSI7p2RtJ1HAV1QycHK9DbLoSa+ltn79eKWrcg5WXmNabk3t7fqbYtFJ+eol/PKA+jBjzhjnzfbCXopf2NRMZSUBDKXlqTh8c1YeWKGGIpxzxKX9pTjIKQa/QGvtDxujF0QjJbJfQ6k4W7nHIEFy8QOQ8F88tpiEOHXh1OkDbL2XL3vGjxzbH3fQR4GtGuPulLX0aRr4BsL7LfPaJY8fvnf4z+aHUmprxoqg0OWbw+V2kvw96y
w1vJm82yLbaMWi0ONpMj6uL8PAwJCGFBugtVi5eWcu14h8AJVl2fUVc+TTSmj2HiXv+32aGDCbAol8r+HbBKE6B1D/14GfN17Crdrnufww9RPOgqXOV/j1XH7+9CBsJfPLXNhbD0CTDFLfucReqq0km15RwnzKqyta5jY8xN9/uqxmKB+zFAbxu0MdWjKL4QZqsM6GqdrcolVzVyatVTVMGwld+wPqXkrI+cOQmL97QoQz+L+ZLP1IGwfeNkuIBz4N/dxl48K7QniOIocyAg5hgM1dERCpoxwxT3fZyr7kIscQdtw3b0XhjFoPYR5cbO2B25opiIpNIy532pQhtg+7rHTRfcNELHsjtIPATSRz0kb530LrakbnUl+BzW6Xm8yf2roAammGf/+a+UEyUQzvp0UikwdbRTlEUXSGgnY9t/alMUQK5VC9OxXoK8ra8tQuX2n1VOJlbSMdN0YQP72U30ogyn3msKkPNXgpREzozzw3OaDK2afAqDSmw9x2hf/dUEykdq9cWpTmKKEPXxkBfiu3uSJ3YsAetzKQ5iYdI2y4RS74iQdtJpl+5fNkJ6kz8Ra2+fQAW3AGIfw8O/CbFBNlpqncypnb6fWKhdZkfl6tL20qXpqq3THhtjmopsLuI2Q7hI7U++CDi9ao6AWAGBHZMG6ODatBtb59DF245k08P7gF4uriB8PMwGHl8tvXkLpS6T5SqVO+Ic6Ff6nawJQQIXwRyDQ1HEY+htptVt/uzE4SvUoUuO2kDRhA0s0gfjhHOdEq+qUOHwdn5TXGgHIq82vJmmDxW/IMQ6BgOBxLQ74jaXWaV6JM3CIhh0YyU4DPxlj4Jowk6MWfXoN3YFkzd7h0VX0jTjVwyjZxZh8TYcAXrfQUC5KC38yd66sZn32VivaovIA0AhYrMr71roZN1yO3DAld4ea8reRah6YZ10fHaUctybOx/KDVn+Ywt6BaTSnuyc0Xj2mu/liEOnYemdf1t5p7JA1C24SXfH9Uu7GAUAn41WXi6/a4TvUXz+VYhhsk5OLXq00rkUcfhOqOCVGls10d37hhpUGxTSZ7BthuyApxge8G2AFLWxwJ/8xs3Ciqmvegt50HWCQI/gXawAkrQJU835eDqQ3e+wmhRnEhRd4w2jECqCDGDzTCs3IAfyMLdqZekby0N2mkG7IyFG0+nMM3XVf/qx1GrWMnUM+T7UImW0ZDMLaSeQYHokk4I4LrwNbcmRuqAgDmSjVgYOZ5sfjNmNYRMVoY/FMhy8Z4EYLqjDStmFoovfP1YPNs9+Rlri65/DCDbqU4j8FBAy11b8q19K7/NRlddYP1ailMGbZB0Nxl+QuRaA0TrgC8lmrS3/U2k2Lk9h3Hnb829muWArL3Q6qHPC4PMqHcl4Wt+YnSEeZxf98jPpxGe/+qddiZsl5qwz7hTIgigJ2DdOYOo+KNO/Hlnx781u4TZDey+HyBdxrV37k3/00uXC/aqKT1E+t6telNlADNl6swmCOcR681F3xQeTczgiSlnjIqJ2FZq7PIL+93MzR2YjVszbL9HzL7LP8JErZnIZNdtmoAhJ31cV66WQVhmw25uXl1jYTeFnB2r6tXOAVwjwkAxk8vu8PD487UqrJfzb3/e0fmEY7g+Uua8jRhBuwe7YwkJ39MqwkOiAbxQf6AQTrnvUonmOTBu9u7Jcnkr6psjShgy1xLUBHUhUwNcVZxNMN7cQbEEXO833Rrmdw6UpIR++mPBEAvaDmmyCyqiSuZ45DzQ/Ccs4lWDaWllyX1F3eTjM91gIzxvg8uQinuNHghAb2ATx2aDBBNtg4yoDCwW1gqtWfJeECOTW0eTvzKixR2ULVKZU37gO4nvVtyIP2BCcMXdUwZY5Lr2AdPIim0fMsiRSQfGO8PbVC+wKv2k0+gjQcs61Q6nuen0j4539K9ygO7xvQxypK/2bi+4UnKsMrYfcX3I7RfbR+PoSG3qSoORYT6bTsCJN9W8clwuiaJpu9tuxfSuZb3IIvhccsV+SM736R3zUEG0FkyJ2c8RpgBxw5BudW7ihSnQFFutMOaPT6RSo+n4jVgidesMutZPr9Dtvfhg4le3MTTL2krOrz7eEPT++PWHBtGqvWQXNWX0+Uhmu90IOHSXkgFVI5Wxg9T0bbHM5rQxkxpvnUaY89fodVMgfOyn5Nu9aZqBSm6DmlJgDGtVbdPVTpB6JDc0Q4yQJIU1fwzTW3Mdy2NDDIiYpJSSmw2GjD3Zj8SVajhdgmYb904yDW/YTf2MdTY+KRnso8GsNpolejsisuvgFAAvvytDAehdM2zRX2/M1CHa4PEIxZRxjNQn4fKuCav9r5JLDWIv69sjdVC/J31TBv8A5nty/NcO49hMMf6pfr+/Z7gkYGc3nPi7Ixs7EgfUL2/GqaqS5MiFhwn6h7br2YQEehAzPqZvYq/8YO8zEnsS4bowRaIf+u0Bq4ceHaPoyBkJx8fWey9kbUAMkL1nwdcELzFf6QoywfvU4sGFcczgd6OclSf/tO2rLMWSSfo+NrsSTRxj/4/bCJ7853RarF1APLhajZHNiKo3MfxbYplV+nnNaaCkOaGCaqOOpR1V7PGNmgc/lhYd1BjJ4Fx5KuZUPKfdsKFWlM3Fcz4Lt1zIUu/aVJ3YbFDC1Y3VNdkDlK6c0rOjDj9cBIV4mJxPQ/6fQO9XvPYVFzWxzD9QeAyR1+j5Xmc2vGmChRLDZPqdnq9v5yhcYnpeYXakDQFw65FCQxF4OThe1Pb4TrvyP8SH5Qkmg8i2ByliqtNHRzw1SSGesqEqZ8S1mVNfgJoDy0vVy494jD2a3MlbNzyWS7HrCbkKstqxHjQRShOJYnw3QvYJ0F30OtpiWjo09tA2IFppZ//Ayzuu8ULH1Ve0BKaJDkB14k46hSdLo6yaAh/fKMqtflnEtKsxZm9FBlc0+bey3oML0JoB8YDetoyDnsY7+J6r/UnLkMDCyx0QPEyFJ9Wu7USLnWOVscPtoSMlmtpmlXi70lmNdliCm+kT5zbAeGfm6tHWSt+owrEGOdNQ4QKVZrf+DsQWeQmMp2tHJ3u36aETJrL0P0e0UJB5+9U5DG3mBTSctCC2qbs4wiwWOqZvfRToUcTUYM1rdnk878IcNQiK0sIlfLMUaxCpRBTxGBnXB6R2Zc5oFu/q0aWWFvdy6C6ENBUVv5qlJHA/da5GreEiFC+vNOgJtF6YqwoObCGqF4Akj4U00W01NtdpL1+Xg6gJ1Y8vEkXJ9UpOn7kY1VawBJi3o7xqVWR73ogoUIS1pLqh7OxcWGOH/dCs/pWnSkysDCgWwxoxsBD+jvWJwadDJzB3agXg/QBuGxOPjuZPPuYTASwVNkSUec6OK3EDYWUACqVgpZrJVuSVwJz1+WGyj2DWP3cwvOLa0VCAstdQeRwu2DbVTVPlSEug6ETiXhJ0bv1uGjBsk/JCWFsV4HRDEPxt30yNQBEbYrKtfyBro5f/DZsV6WOYpdR0LF1RGR52ZjOawVSDE7GG0U8dLVgGBRrVmDfi2F5vTfRpQTWqGQ3N8QekiZrQ9V01ZHhxtIfq9ztKRurPUYYdbKyk5dO9XsDy7aUKpfJBj2USWMzMrUfdFBpKHDvQjHElrnUEHkOwrHkqx7XCG1RfM81dfiPxXfeJfh8cOA5EUE30Pdb0KW8bH5Wem/0MjsL7NVpz3L8xAdU1TDx6AuH9sHsXExD9W1xZaNbHkU8rPdyxN3bj+/ReEG20MTB605wuElU2Q175pWxStvcqsTnCidv9rfGeXqZvp129LCcvB06mLJblIO9A9ToIIH5vqOlVwNvu5ZEPA+4YpE6qAo56u1XOj3I185r5pzk2Y22v1BnX2cI5eL0u04BswLIiRO7SCIlXOtlk/wWpgQB9pIL1Lynr+Iu3ZTWe3KrZlTXG9WhGZCQWWrXp7F4Z9YAxFsGKHYuZjv3cQVWx/Qja/4aume90mir1lZTdFdD3zFqDv3Rsn8qmRvyLozQnvTVFBNxSmhtTlpt/wi01NW4mKDJNNK2XYcVL32lvuR+NZLbFCzdb48EOYWC9rdgmb3aPUpWFdJO7bHgW6yeXl2+X682b27lQigsdF/kW27Dwc
0Ddf4wqcO3x8IMEo1vzTV4U8hjM/jQp+z3tQnb9HRXGb6x93bXWaeLF6SNqWhn9/lFgNrSIe5JO+4rBuw+ZsBSVuvCb01vA5CU933icLo2zDdzB/AZCW0gmD8RNrAkoEqIf38mP1WcN8rKoeyMqNCg+rEtZfT8HEytErbmDaqK5CfT0FRmqgmefNDvro8kTCQY/rcyfSoyEoUwd2w+Ab2YVZeH3ZVv8ovTsbWw7mLA1h7o3GBcj/rMMxRrN/fHEwAuXL1vkIRPp9UZNYEk2Illh4L2ydvxTzkS78gg9VowPB/zP5VUFlS8MU11vY5fsdt9XJkvHiYA3LCPrHFif9inyLiOQoqJMXG4KfVah1XX6eHb1BQBKjrL7NBrPVgfEWFC7EeG+lzdndMHFHnKrpIMNToxCyP/cAmi5WCLVZIBEOk4xhBNIFPKwNyVn3/yodK1FEOmfduhSF2cIuyj4x+9YZ9G/kNkHatMOqiMwOSbkMxqa/pw5SsUcgvQghKVLttUE6RLHiCJm1p1arrF3M0iQkTZT7GBZ+VAY82sESnTyPCaVre8vBXEquY4h0YZX2Ib1cOj6nMpm1Ln73C6M0lT6t+cDl7NWIfjke46mpq803gT+oLEnkTbLiCaRqbBQG0KAap3o0VCfWevyPJqVtUM2niDrN+yC014yrMiBNAUaId14l1O2P2l9J8w6s6MB+4NZ1eF98F1QHjood2wcpRRFH4DV77iP8la7IDTLjius8NBxyeSO43sfHBGtmcX/iJCMSbdXalSCGowFrXsfhkJ1WzU3kYXtD3HDVdSZ3RsMhzpmlRkWXBqaYB5ntCtJXYvq0OqjfAcPiaYGpJj2Ks7WCUfmiVC4sxbPWEdxVDhgU7Keyzm0d3ZMZTurRCa4ET1I3fwoFSZBtGuigZ6+5FvIYTlphTO9UeJ2JRoSVnyK1HKiPGql2sMh0VS6BLx/KnvFt8Afxf7EQWk1nn1gD1iRtKjYuR/ODfnWtn+K6Y4qiuHj1vIBgNWibwoKKuX5kiYpJiDptzIx0uy1rYRSfss1CHNHZ/y4cuFyhGKcLhHQAOGKD+vurb4KNI2rd3elv6CWuw32bs95xZ79+7sYThwV2U2I0bWXzd6gG0L6uFBA0F3IjYIdGO9Z5o7EfvKm1Y4M6U+FdCIk5S6eQk3VCjSZMa3lJVD0WHcjBbUQzgmN7SgQ1j+f+ru0m/yBxJ6aVaf6ioG9OjZN4gioVd+LSCjxFUaT3rHekaEte/t5E0U/MYkWMeUmVv8MGaKK1hAFEN49kp/mZwwgD4Yq4tfpnh6EbIAaVLPJnYZItjWn/wOjxqgwd+cZofpi/zvlCTsK+1AJTf+NQe02VH+5td7ZPO0Yh/G/8iU6/kFtKpFQTVzNXVQy5SzF3xuTTQt6JNILAZicOoBOrCX3Q8SwfqLS0HKsTfXOJyHQ828MvuckNbFCRmOJph2TP185n53qjQthUJgZ6M8hM+vPUDlzQS85sZr5yNM75QHBAn/I19i5Yeifvvzl68VTkgce1u7oS7zYCvZPCSdEPPZkMI7451G2k2/jeb0Cku9IcLFkBU3wvFmW2c0mjezI5oJ4mCMuQUm9TlFoz8IWdAFKg/JbgKofSooN7XohLegsZ8bcQlIsrw7OkpNwPAyC7IciVwkgEBEfdxleDvrDHnfEeiDid1edPXBt3BgOsL+tpSF25G8e7P8PmZldbmKfWEeZxeEPKtLNpvTh+Vp0pPk8WgMN1ROpah4NDvUA5CDtqYxDPr+/BRm2WEEUETeMNj20SwJyZRmfRZ/mmLDtvkL+JwLH02sBD1VqvfC1zUzgjqy+QYsGQZNs7WRcLbX/Fdb2pEI1EWInUz+ud4RrZYvt+alCcaRu6jABRussfLuThGjlHVlolvAT3CzfHyEtXAFbG7MCDqKCr2ZhxzokQPM6gRmqFnGsZ0CTERYAm1SB5H4txVnEiYGshh5g7oqH+7IjeRFfdWekOe6nEjGFjQPhJdpTVujBjBIi4fTeMnVEw6zwQxRZmMpT0vlelTetZua5e8oEZP2bduKj22tTd2DratDbnUTYEIf7fU3AAtPA85MiZl26Ku+bV3foa9kTJw0hMGrW1SeT70kYVCO3bR8Xdy4kZPupz9U8M9T6hHao0EezarKQc7Brc8Mv7cYoWkrfKJMAIK14fDpkjDT9+u0fR0xWKUCHtX2brpe2K+WgGSec9+XbdeuTxYGf4PRsaOpAvIBMYQnEeNzovUi/6gtJiPQp788fLVk+ecsSO0UxcgHbXyuBnZN3zIf2ETRgtq8iDl9RyoOmbi2qLnvumvArLQVYtS8ZCBmB1pibZA00LBpb75KnGnxN8zyTsGQ7JCKPwDYYkqX++C/hfkgNMcjazZpTN4eRRqpWbBZ8vP8IKGW6/n7mVCIg4fgyJt2MovS3a07qiQ54EhBnkTmpWtqma2+JLySEBYghPUXxi2nSksanzE3oT4RvKLDMlw0ksrzziuWX2rZGHNZ7dIuJa2WpWvnZB0hCAxVbazVB26Rgfy57nEQDVNWFm9z3AXHIkfXPtKjirN7I9vhoCJkdwUvAwXs2w/QOYaA8i8c4LHuw0CG7TsP/jtssiU85H0vgTyg7rmqnKIHufisK82ffiLte87Sxc53f1AAAJAvnEHqxLuJneGCxfyXY5Xi8PkimA6MD8sblP3dYlKctSA0TzsgU2KwzYvVfyNEqyGke9gi6UqV3NtJ/P0Y/8hjRrDUCCfIPT1S5XAur3prz4Mjpo5YEiu4qIySlWiisZ2A/5ragE1utqmbo09n/yK/q3k5ladCJyauXKNZuAdr4ZJSDfbph5rfOgcOu1OoZ4xDc+AGe5BlqYExt4z5bdg1DDbR7f0xUgMBvExDzUsMniukAtaQU24f1HBRnrdwJIBNLPJQVib7gOxvHQ9AJuYlebaBgkY3vVTMqRej1pR/xn4ixB07kHJ6DZ6Tuxgosl9jGD0yvtIeRNYWbMMLz827wmN2TF9rgysQY4zfBRX1mM0cQtfO8cRsDnBriolkZdD3X/LGU0vStkac2dvToT99PA/3xImLfi4IaDhMYCwErxcSxBOYo8rXc0wEXA+2WEqX49WtRAoILyG28ywLGwrzVIA3BDn+5NG7a00N+bBRN5F/GpXPYNIZESpXfFiPO6DLv90RiDs66JYxOuXek41PBVbX1kRrNrv228N8s8LW0uCDtc2n87YPSz5sYb6gqRHqN1c9V380uvxBbuks7Ai/elB2/iaDmX/W8Fu3a3LKnQ5UItZr8w2SneKmBMWIIBkTqnjDQqZ6mVYhpwOVKhbUO0d7TTnVgpf31XResPxWtkVuyvmRumtaxnTXqabmhL1e83pjUWQ9VRGYDJCzPXC3YkBUT9i++ge31UoaAQqFWU+JLnvDnEWnuM9iZ8EGAsODTpbsUUZRnb4sno6GHUT9mgct9wkts98/lnvPImsEuBIcP8TRb7e5LDsTPUoQ9i4Jcx0S2aBmfIkSpZYXrv7zbhWDJCsX+f8aY52wLhF+jWV84qXsmY9Yauw1VSLLMEpxzXBKxQR7VdLZzQ4degqpu03fWLW5k5fICb3IK3eWWz7H8RlbmhN9wA4v1/S9TzejG4JvY+hBGCXkD6FaoAnivx8I8LzAi8oEHIpLpYVuZ0N4KPtss6Re5xOqxpF8qwzcuVSk4RDjY9o/qrwq6tVZTkTqgCoZ9Xnfcau2jHxyCN3RVHz+T60Ufr4ur316w6IqAyGoFsACPkej6N6lX7SsqglCVIRstCsw74ExtY3QuJZ80oH4Sum4iKE3KB+UErO6tKrovC/M7bekUWM5AhhQL29sSn81790OLz+mfH1qRTgVwaJn0YOQS0S061t0z0eLmB538FSPuKrMVyEAUc0U0xLj62MEJn1Fb3u8l55N2CAuDBNXDD66S7PlW/jut76XJAaqQvJi/qIHR3klnbmJ/8Y8Pv8RvZpZ6RwCdxQ+Li7JUKCJjbnK2a1u3xfPXn9N7CYMcMK5M/bib7/WVUrW+8swyHMwnRNGMsJGyQhlp+yEMXyiWL1u733vb1/cSAdt6LK07jdl9mdSIG218dol59eX90jP8+0r7ow9Nl
pa9m2bWkff4ZJYAodyK581tOSjg3EMdjSasLgt34IYhOwdc5ZwLMATGxv6LMGdN2R/NPVg7wQIU2srFf/vSKElQaeitVsSSd/B19W0+jyKosyLmc+aCI244KGPUpe/VCYcpO0HpXljIcmjOaMFcb3H2G73+kr67qK2G6GZGfrAfAqh0T7vAsTwhOJEMgvHQH8eIxUPFKzAXiqXVmKChYya+7dbYYa/bNMFg4nD9P7RjN1RfC2pJomKHjuwKywcNwGu/2KkcrdQ+SLLucoz3sgZgmEYr2/cMeAWJS8djYjzZHvP1VgzhGkmCyaxRsacGxWrudKzAs8bCBE7csUpLQyIW/z8SMA+k/og71XR748nGhwkPfzO1+NnSa6k7ILpilTkFrtYUaq37FEB2/8sBO7qrvkVQzcQ0a8Z1DCdgDvyeqatp0rEWQYUvye3dk1uA8ena7Om6KoAHOQL+iFmUHCdj8z1e/rLm0/6qxRV7ARTSxL6uaEj5aO4TsZ4wr25j3ZlMr5RefunCTSlA47Aki32s4olvtoAb2kKmIddWNU5GauRaKKURxDDUxb78qttkw5oyeCz3oR1oNzajJEOzhksDaKpgCUkcWDm8pReca/htvDt2BbSh8oVzRz39us4YZksxqSzwcGlSE7syBdGeoEEfIIvCr88NYa72Z+bCNrQMKnWjNi6nuVxqYkUvWrtUWtH+cVeKXHzFj9TBIeDLVWq52BR1vIWvH+HPBpuaCaJQk7XygO6kwXU0rm9kpWsskgbPU/lAmiAIY6LJj4J4Lvxnz8swmc6kVdzKH9HhurseVU92MhPhgdbpy2aSVJyuMzXAnViKAJ6ZBJWOWg9kAaX8YjtgoX8RCuDKwe6mRk7DkHhN/0APHrqAJ2XVLCGrwCeDuFLwQlWRpsLgDXf07/kaqOfYYoBCWOmqZy1HEriYQHh7A43MzzBwswOZB4MX32oBCtycxICeK3Fkta/6Fw0jyYBsDOiEs02utDXsN5KC0QN75ZvSDLkbfzpuXQKJSGuFUiFIDOvWtv8vZHHQMzP9zPVhn/V1yJfLxnFtTG5C6xUKqTPXDfg/OFeGShx0gw8BjvdTQ4Qlcghm82nPqixMTomOZuJejAALkigStgeAH+8rJj1Qsc4+M8TIKP/sUOHRkNA2aXnCwgjxebIgWjlmoxpmYg1L5qIegoFMWuNZ4nV4rpciu5mS893wx+H5hAZNOvtPWkKwnWqe5/UTzeaZVETHjK6pdsGvfifL2uAHHJOSkPXVhiKBPsP05O+5l74GRGzDzrGvlerJzdrJ04KaIA/V3+51eQpBG60u5INFCD75fkRUWdDhs+V3UBn+PHzCwTJc51DCU1/mAa5g4c+H/0nftwhb8Us0a4vWvPQAXj/UIXR5Zfd2nfYnHw2VfzkuAZUfcTYx9ZuiWa0gAWka/6oriDdXs1END2v9wj06aEzT5lKz8lbsxn6K24zUFVWl31KmprHUcJtbunwtdRFu6nRqUYkRDAN7MLTsSilFzrOt+TfgGfwe7qUFCiGZvUveDBNmX86QUIIIGhC5Jd8LhY3yOpcFrp5+fqpRFdQWjitKO2tt/jA0M6X1tNw5fB/zR6FnPNaPTOfqR9kFdXwcuHTj1awJVCUzWXP4CseEKsGgDiX2g1I3hUBg3ZLIomg001xIJIng3WEMpN5ZcU2lpXaXgUVYgOynDT1uQQQRXvUnrS52nM1+5T5LebVSZ7RiG5vwkdMoFIbc1ND7t/4KjHZUCXk4FgW8UAX1xlUCLAeg90fZEZzx0Z6jlSzaMIxYA28U9Y/GmzLEc/K9GYChzHgPPazlmBoAK324x5VeZLoy+Z3WlSFXOpnmo/NWUoxD7GM/JXOfWFr04NgaytqEn2ejqYdW8/tyhziW8EOn9AmbtK+f1ExB15zSLEcGAaQWFq/V6lD5AjS+ydow5dBPpe8RvnrMk0KrVAXaTrshJmN5p1DjkYZSMNfdrBa4G0gFgGPJX7hAlBLzzTgH5deciq5+UG7Y5EeM72TAzvA7Z4mLLd0eVy/nVA5UfZpBF1hG/rysmwuxy8uYUmV7dNtOyiRzgjo7a3T+/teC0VQdt6Rgwt7JVGTPzkF3y2cQUZ2tVrGb2+nMPJV2WhNXF74iQqxjrtZSKPR98QeaGUVSB1ze2IyeGyThQ2TEAB6GueQzI9M2DHEdojNYQCrh/0bjS66OBji2+GRrExECoN4YOKp7buf6dfk74ICx2jU616eRSXucVnQ2lk99esOXsJhssMszRt/ncv0XhmXjlBy4qBcBuUlnGGZbrqsDPuCEYlsOIfYQcssAEOTBu0RpwubzrdATY5spMSt3eEhR+lzuEBmbEqY7KFfgXorMSWQveHqoWU9NIjErwRdJrGDAyzv0cgQvlu/5y7oZDc5qpmNqKburEGxbONm9b+GlEMHx5ZGi0cCuWFNsq7XOmOwmA4KOvYRfn/8mDUjvjyz7MzR9fhRqr3CBPyw7BSd5Hrw9tKtEABdtG9OtX752M2c5uqcyMymB/vPkg4/kJiClfIIA2gaSd6Qcs5j7SYUVQSC2peinzS3diYh5Ad3lZoWj7UKacOR39P4WCGjtYejvvZGC6rL5MDXcK2EZ7dXBSthMxDGyEtOpd7jLr0Ibem4btL6N9zHQEi3zNEOfXWQD4508goxnK+sR5SiH2+wnWysTWAQdwsmeH67J74ZZBnD+YyNIrVaF+tNmgHKbED6cyDhd2u6ARq77qSwLqCsBAkJQLSbnBRU3rrQJs+d3FA2sAnhlyP46AzjQLNr2I1wyvszk+zwuAwQcUl6lILKNaH8VEnGzQVff+5JyK7h4muXHYYbvCbWOCeMIawSwIEbXWrQo/Ulrc6MeRsRRn4YN+eb6ntj/YxIvNWz9uh0Axe9RNkl7H7Q0Y2Nn3Y0XEw1+UJmxIcH/4GyZTT8aUl54OcoZwthUbdLzZzGmXg5MP9dczoeY35iAWvy2rEqGWaxdio5Y/2ZUMinr5LJvklm/Q7HK2aNzWjwrTY7z+NKOkcDkHWR/dELei7vHkqq8yJCUxzA5Jswhey3oGFcJ9N88snHP7Ah77yLFOUbW/Om1QZdHUUNLJSx21aGeQyExp2Dly9kFeSTZZabi0NXyKzz3n2rKw2DOIT88DdolZrjbaiNA/1AKfxlGGRNP0tZrM38pDqcGubK8RcRIdCPTjQ8XDB719PQduLHBGIv/6Zuf+ioENVKbJ3zCb0de+8K0ZZf3+IjQIhHILO9DoGIYfWaD/TxSM1sEGH/4eUCZQKXxLFrBU1LRwjZisJA79qwS8OzIPvdpDVNlcBB2LZ5/WloOkZENSKkPopCZ+eaaha2KFwkusMRjvOJhPvwUkuyJ37Nd/YMgLoUQ8KJkJ//HCuj4ywxNbI9CkTecunE5me/afPRes6NjhuJwTF9XmsaAdSFUztYD1AQlEqpqU65uuO98VxiJsTFFZDi+IlG7fcBF2L0fqBDWxxDxqOZn61OSSLZUOZ6bhBs8hbAxCQ1DNsXRu/lvKPnsPfltmo/y+GoFCcKoYJQfEOdFhJZj80NbnvnwgSmGxho5yhlh+K/73uU7Bh9MWNrGJyTsqZMTJSyRXNtiQ/qPO4uwdKrjYddlY2R57ktIBOYLLmFObOP9WBWpSL89DAq0yBUOYjLfz01WpgYfGcq2Sh5GAkdMJY0ffqrebOWhS10iHYPdx2fJH5BOXpsAS4MWbkwm1v+CC7J2M6akfp1gtmWexTN14WcfcjaBpeYDKOXFDyoiyE+wVORn5vrC/Zv+Cv+g1PVxKidtZ/bTyH3Nb/1dQsLRFL2F3bldBRh9jwDWgBjUse6DF3GehdkUgofGNHgJ4kn7yrXoUIcByAI6vhLp0JFCAD+hTxMOSx04kBS6skOqxYDxswE1wlzKG7ftkPwNxf+CHGMcPextTRYjJ+VxX5PIQHl94Zsj4vJq1+lp+Ee291fn7C1bp7OW0Ph8DQuYvcsNGiVPXLmMO/3uoQE+Y/DX7C2rz/Vmir9ZoN7z/XOB6fPTY3SeRFcBEKyT1qmrfDdP1wQorUSUsvpDM16LEPNvjx6CnifyRm9RJRpbRVCoJi256a6SaYhka
D9X/LrdR5JScEar3EUbxbgxg5oaRsZKSoUdZ7IvXMzNFtpFnilOlBEFETNCJPBklf5smGCzGBmksEcd1aPRpF8yG43z+Nc3tRcCmXsCb29stS20GpeGi0d2qRZucijZydrWKxkMHi1pL5HGIic96bMSn1e8mxcu+YBDENIZ1rhI67smBGF55qDKpCJr/AGnWGo1W1lEhewJVEh/s+bv67Q/C7aNd3DRHTEvgKQP1vSlP0+2N9H3Gb9O8tF43IiqdstB3rcUEpyfWIdZs+Ig5mxxtogZPgbg9uMS1gp0r7475fo6cIMtOi6x6/xcKD9gZNh84KwPW33qxzxA1rb+BPCrUCbOL/yH0/78AtuMJMWLRytCNGxJf3RzMVhp+KuYQ4QVLwuNinwHi8IThODNGmNnT+JlHStT76YOegcnbPSALl5E57Yrx8PdQY9msSo4/6zdAM2IxV2nsQ7km6FSncJG61izgJ2FoZot2cWL9h/bWYsLEvVi7g0N/OzRlduMDNApcGjlGAJUFqulgypwWFC69ug9PNt2uIa4zFkv8G88JRKT6PorLSzVvxtgzI1lj4elQKzonqcFugf3A6S7w8av+3vtD+5PztLNcMAM7M8o7kry0089fsJnn6iddNt7j4sORPFgal9OO8Z0/RFH6axl2U29Fyr61Q4Wb9XiOQx8xlYcGdhldH8JpyMSGjp/U4JoPUvF2HcGl/hJdzw3+NzVBQ7Y9IihcrJiUrRr3BdMU1TYYzXv+dA1WETgBGhCj4JX+D2T6UpksxU+CIScVfIXvZL5kjjHBHzFfmrrWr+SECwNzy+qTWxsdb5oBpQZ3WJrNNKW3FJ5iCXJEuJOjgmfat9KoFBxHApTHSdTjzT8SvQX3Vi4Gdk/6lYlO6fGHG+JCI23sS3PEvJLxW4joqFNZvOdK/qkj+z6aoYba5v7fhCLbBt8Z8w+xGnVxBXdVGEGW/UV/cbDglu6XdwcOFjI0tHy5EbR3qwG1v1j501oOxCe0QtwBBh8yQqIwqFflQi6nMNYkRG/u6xb6VbYhP/JDKf/Q6rUVLEM1Qty25gScZ7p2AchV22rPJEqYBTXUr48wkXd7S2Fs7UY6ec0Jwy1pqbcOFE2e0a7r7LSaAVdLYrRCqr8YN6qOUQnXjvM8R0SoC6e18/4Cji15FLynBkK525UaGDtKvQDdgTMTP4nOg/uy/K6M6e/NduaXS3p9TE6rKhYAEibxuUgrr1kMMO9ZQ5mrBpWng6GF9X9ZI+Fitujnn1OK/eHGC97MtLMqtwqoBRRf9y0UjaeoKFj4EcayjwjCFCk98JpexnsmoZw9reDwg1wkkp79n6vUPR7CqlVdbuyTWePuC82kDErdcTWsA1uAz4IeA4oAaHGKojS7K0LMdQdZfghAfIHctVJ72Iaaun1Nyc4AIXebmHiqKHXnmrMVkt6nc8wa0hybi/QjAHlpoTXT6ixAmz1c5ArH0ULgOOAitMkSezpyDjIUXb7am2mt1YS0ycFtW51HNfYrkU4wghy1X5aHxXPqCkILOVuOsjQ/VjLlriyjgtGSBwVlY0CnQdnSdDfwQNC3cPjn7ss5htF6JfyXZSJbe8Q15NeOiwnZWZFtG3V37NlmiEY2P/etNGLZDnHqGYB4JTgY8/V2lzcZ3tZtURs41sQzEHhT8Z5JqgQpx7YQOMiRVJHfT+si7CgWjOEU/paZBtLImm8xGGjxJv406gdVkTKAjYW2xQc0gzKSl9nZ/QoV9mE3dNgJXl/cnM+pvvClGVbQ4xiXWzd9lggg6uE9kxPUUAbXehv2CwoF446S91jtdFYEmLDsYeRVCzgoChKikArfNXJ2a4287pDXNOporv52RnYPzlcfJEX5poOd9Ut5q0YGZai80LZNw87RLviJGmzBLyW2HXAMIxng9cRqbOSp7bH7/1r212yhmTCn5+AhEbFZlrYAG784jr9Y7SrDcMFOJmJ1cwiCVuVHQhYz9gWQz3RvtybnH7frtd0MUarBTCK2zaZ+UN8bjDLzg9TayoyH80i+7DAjVxHd1K770Gak7lpKJx28VUPWg3zloanjL6NOMqLqAm12ohWlRuqfaqJS9ZU1fwjUk09FnLHk621AmOraJVfAbE5bqqa/wTs6Jy4lMw5jA6l3+tOVEF6pd0gp1g75JQTzlpwmm+3Gumb63+T9Kcx3W5LcyFuewdHzwSBA6mWk6W0Fey2qBpj592A1l0GX5/DYCZw1FxiS5+Vp3Cc1wj51Gef0mNOkQnk22nxx0gHv21wukRkl0i/144egn2xtl0OKzVxxFkqqGeHwFFdZVBZDTy37Ahv35YU8jQWfyNdt6nsHp5jfAUwvtIaQsX5R3Q4xKaVvB++WJFFT9BgRCdDjEW4Wm2uRq/XtwnQqzRSVehFW4QdCTshqM/kown77quIFwcdXlpKWvz6TWOXGaOTPuHz65+Ki/JiZyTRC8O+x8ew4mf6k2o01qyEQ6/JvErD2ZiTMF4V5+Ne4gazfAGG8Q1GMGKTRbaGu13fXKhsE6Am+MrEvrJ8NBXSpJBFXOEUx0rKtWkbjDHz+iKAlvNYFImz+zy156n6BDiEqgDvmcxA/3keCTy+wAV5yMRgDuM4M5P0K+b04Hn5g62KeFpwpwflccYsZL3D5lDGwqZ13opmX1QQUteLV2/eauJOYAeJeTx38gPLXCULQWYD+Qz/lPQDwRQPTBB9co7n23oUm82L1wwg60D/EXQx08o6d34xwTAJZK1yKBStcdF2OTgkp8qnrnBgi25l3I9c0DLuzWhHSUJ3TZ93JYE1OYaXi7RLLYhMO3BcLc+sfw5y7ozK4qlrJ0X9OWykRbZIbDDZXdGjWdfcPf+ZETnzSChMgCeVFY8fLtTsx0iQ30ktyJJ6qLD2X95SDYxzO8r3j/d/BoDuEbeP5Zxl5qZlTVQByotTfUnepbwdFYmApCKzxegeul/ZnjO3Cp29KiibTiUZbkY6Tryv1IdakaNnQunrUDRH1Tw+juI6jRpnzRqmXcekSCTqGYkO0GTwAXLxoA3FBz5ZIgospRmXM+nYkgql8ppMm2GUdlnz36bkeHWGl4LmgbCpcTreJBaPBVeWHFiLOb6sCue2oWxFVWRJyh08amw4xGJcXEjD/o9BBLngrDqNwNM/yLNVp3/Muyuvw00QD39PqKzHOi0hChpN9ITMyLbjexLwnZa+U9VtB4tcLr90GuaX9CKvAmfPBCkryaqSRrQAweEXqepPJoB3aO8zLIXSKcFOR5UWPARIMJoWqaF6sqPsl1hlk3b+OB89b5W2gT0/VWx9BllTfKsdERxAQMoj0VWqFmLo/mbN8EH2vTgRlsAtxqYQI5JNXmZMbgDNVDYjxlWxFxmNljlCZ2jdhB5z0E5EPxqlMt0m5bgtdQB8lw5TGUsZeMWF9NXTzOMjOWdhmQeIWUDYW8pjjKiDq3NNMkkAIyDkVB7SfRSB1uVB4nR6rJx0HHriY6irhJVU7MHiLznfwgqz5DbcYN7QlZcsmnDfZ/a6vydrX6dzXpOn4L4YZhhIglccM4ItbZu6L3Z/0WUrRdVHi8SQpF26HKFcHfGJFnSVGTOog61wT5otLZKhvbrHm51l95bEcM6r607nQ3C1MCOWdloUAM/e6fU70xK0fDdX+L1/bq3Z9IGaO3SvDqHtrHlHhnuRHKsrHXF8yxv96gTRVEBep+ksDJORzCQg2QAeFs0xnoQJzoClIW14r5CYUlSOmFF/QGoRxe67B5lQJLnTfq4kYlOYR7yED038UAAPdqz6xg+YxgbZcj2IhRnqjcY87eUdYcQ7bsSsKV/BGU1rOH3NzLK9/6BltnuTb3hX9IWmR8gatqfWWFipTdIJ5WqNR3YmMejKAlszKlRzg7HYt1t2gAaPZ+9oRoB5EyM6395KRbOgwxIgKIqm/Tx4AJq0ZC7cm1AxtyBmrrxBjJrLMsaiSzCz/I0HZrW4tiS/xrrkgfmT7XgvQ5JNycyx7fz5G71vscHs/7gsEcO7xqQ2yTjGThssqRxOmtE4MYFuTrPQ+8dDiCpC/aL8BNhFoeB6IDkVccfrbjtRqh2/gXidlUZdjRS49rSFzj/fH0+kOpHU0
31jVWgvpsMb/2igpgHrINzseHa2OaXHtU1b2EoY2P6uep7zRuz9fOM9+sKuSOuMDZ5nUeqepjX5A6ECYmNn/oFz4j6ioGryDS2e6Zpaguc95jTiP8IOcq5AbCqKAAdOxiYdjs7ureCRXKBrG8nhVQM7+28B2n40q9LMObnCOQ7TBlzcky3fJbmOktljj7yoOkg7tghK6Lhx6+a8vIWn2NFB40BWSU8VYY8RR10KR/pHxl3DLVuRu1g9K8Iu97n+D+Zl+14lFeFld+B1kEMFU/F9qvycHl34rjqSK9TDA059hUy+YvjyotGFLSyQqRN7Isi1SPTxnT8YZ6oEdN8QCJBSfDdssMwcc5mMsXfqqWcgVYYhHNeeZPziyYNxifpYBzQWG2NdkAE3KBrbNPXN1gcrhdEyLX3ut5D3/gF0F43IMVhXx0QNZqtOPDMjrtLn7Svp3G7GtR1invefVddwOwIoQX7oBLS84tqPVob+Wg96JByG12qIFgj5q+VTHflsPlMHJ/TSu49J0HJkBuQcfuWPb62dvCp3PDf+jwl2TrS9s2A9nSeL5vA75Ldl3FtwYVWhTlfcKFhQ+Z8cdCoZrI5foWWGZMGqVQsmWI4EwnokD/P7ReVE3CLLw6lopp0UL6L98ySn25+2u3GvNaSIPggo5LWkc97vi7H5gBdqWcDYVpYeAQSNInbAzB7xlyLhfplTe7fPZusVL1v1Mqz/6xUYb67/GF6Y8ijqu1bPIw+lTMBrLL1N5QzNeHBoKPsE7kHbiufdJzkLZVDil/xoOczt3ntU2Ibf5nRnEB+9oQr1xS1ouDSm9j8pTDUaWZsb3mZlJ/pMWisyqpLCzYAchihFPhw1OYT7XCOlGIJw0KjkeZBmG2Jv8SjIckhKZ4VA1luHZD1sYigJWLZd0KphCKiCX1m+3kGQMsTTlwAYswrgonAgP+PLXvRcnCdEUrG9PUurt2gL00BC3DP4RlTzg/Qj0wTZX4A72o8MLdYZPTPlj8tWy7f22GUScpurG0mu+7xafnxJPbYD3/5ktPWRbr4iO22pQUocJK8j5UG5OfYAdVf/TkuIpy6mQvjmq4xnkOhH9hOy6gwpo6E0Qm861TysdiOvEdShcmrMHXfcfx3ws4FRCTO/dQucIv4USvThc8f/3SCYilGzJF72Cv8ZVgq5kh6qgqqxGLV2pHjYHxhK5IODRirQl0O1xDc5MqNAMqsGROBFDsIhhP+oqqg8LDBnfBPQlCVBGU3Qj8q9q+GK8ditg8XFjv7voJOw4Oy9o5GOl9zsRdRFNE0FEXaGYkqjwpFoihphG5shVnXQaui1I0r8p2o1JYoDOS8FIOPvEICfdOqVlT9qjy1sxbqFCv2QBA6iJh4AHrrqS443O8iSMywe7gbtM6CLbQYxGXS7qWIrgNuuX2QG+rAwS84PLyfYxCM9XYdtB6iCrdhH2KFQV24jcWSZqgTm9R4i8K7SjEwNGVmRNcAmBkGBWw5Q7O8hQYLWff1z9+hLrIKs1NQeclrn6CxqUMs13VS/U4b1Si0ePK0oQGJEAbgMLFbOSN8e7wPQaXOm6mDSmskmFv1dd1z9D3uwk7ZbAMXh/Y5OmQMrzYDDmZhAPkqERWdRuI3fQBg0D+1bbX9A7/HmqzjAdBILBu0+GEA7KPebLY+VqKojGIlm83iNi565aaJcRc2u5Rg9eUHxMOgWvicPBXiG4i//szu5G4ZLwKJvakr1dEG7Ae8sWTC4QfdR84ML+G8O5DJkOKrwIPzwdVHZObTuCM6foF/xpFIYGt8OawEBXtGB20YFp0prw0GlQXZN4bkvykiS+b0gUK0DcwkTxSQshRZYMmLOe3Mm4YNULLV/qCYOeC4M4S3XLdnHo3i0NUK6pLhs+vSxUeFfHnY0XItFe8+7OngbPoY91jEA80g9oNI3QAKoQeDVmHpbth7YIDBr3E9qpoTjUIsehOGpmICNq9TBSaxMN51qJbnpVEN6WzXzBna9v3rne67dlvv+IgvHC3mtKBxMTISYedsRAT7IVP7BdrN4ycWRxXgdaoMfDYZoJmI1r4DuE8mahxQ0pPhNpEEb8kbwIaHWkkd//7TXG+xawaNrVRh4D6QhrOcDJnjRwNsX3Tfp7lbk2nNl7luGzl6ZoM8KsmB8b9Gu7UgynoQuSJ6xKRvI6zNax2L+vxe6M2vdaSQ4D+VR7mn52zJ9KybH0aTj6DTHPA46P5S+6f5T/LKN+Ouu6TVtNb4MYi9Ty+RfvGw2HP7SiWTkV+CnnumeRalsuznmg5W5J+ukkHeoZNQ9qJeELVl8lhP7YF6JVxdeAODYXVokT2/xgB0OIDe1xkbevqJ+1UdCA7G7a9Sxmx2xEAn9mcFVqN1wAiP42s0RE4QnJ4AMbiZBNcAraCUbWXE/EkqwrqOAGbC3MvMcvp8V6DVKjUiG40zB6qPTuQqLnEHnJoosVxrZvmEqqLTgxo3QCIoSVpSG7u+51/uz70LCvuwZasJ0UuKjn+y9T5hwPUnFLgzhlcrap2f4SavoPYymtAKjG37V0QEb15OqJ5sD+jVwVge/Ea8QHnvZ82Ig8lOhQtr5ytc8SNXrgdMGRiXPSOUoNuzTfnhgsUgDXxwyNQFOndaHM1gxeSUMtNHpvIp8LIkPhCxtO6EWBgfnzVVSLoDHxCyznBy1Q2ficV0G3YWO2e6juHwNtKzWOVAPVES3qC4/GxE+Fj24Q2ewtgCR+Nv4Oe7y8EDJ7+0pjfoAcwGXYL3b+xEnILxGIdbsHWPIXXyKwy8VQV0+1SjHUGiGpU2ov3zpmvMmNKRCJ20meJLV/qIRfxW3pVREOothcJBuBUtS16w0b/hZN5/mAemO5u2uxQqpaAE1YNW5hbxYEVHvsjp173NQhq2IcTRzZuAHz7piCo/j4V1P2lfrIh5WCMyqFzqn/1Ihy78pG/tBkiCQmHydTmJitU7CIShqrz2yHnAD7pRqKhJCz9C2mrZruoX+53EkhOs5nSiHP+dJx/fZtCeklVvsajUvExKjMLcvv/yLpppV2+36Q8izywm7VP0cOh5tKTT/KnT7+LSwtAc72vVnkb7OkTVbMzbv5cesPpYXQ2DNJ6vR1duSm+PWGHxmuUnzscYW/rgF/Wv57SO+IqO92s7y1sXykFItkbke6sfAhiQRp2emHYgN8ZjB8gQMgNxSJ4EEhHfBOYMUWiS5vPDkA6tCUfYFpvDR/Y0fspSZQzuDo35fidV62lnZVGIjotNjL0EXhpk1HUIylXCZlhNs4E57oAGUVOAMm4zVkg6AGn+xVJY2FwZQtVo+81Lx7omuwthjFYKH+LRzEOtkJnA0z/HLiBAFm0mhUhFbYE4u8VBLU+DJl6aSyDCubp4BAiapV6IZs3H7YlbHtcRfXBVLSXobflFDiYWJZygmB/rGW+yUOkDQzZHdCougQPxJYH9UFTyrUkZHdY3C9WFgnbxLAwutMEgwhmDAiMIzTEBS+Lg3dGxi2ufV8weETMoEB1xXophHlHp88uDjAzn/g8qnStA6MnBqiDHgNWPu8frCyAV64AGvfDncybTZW/61KmLPqRCqMkFZiDNO+ZaeQ2vDHrjRVk7p5clUHQPVNV+a6sk+AMBCLz0VD10PMftAVXXLr6cZ+Ng6fjDTolfiP5D+2GJVVagFjW5hnY0CVvn9NAFc/8ZMQ5A6Izq+0p3QmboUsahAuD2MMG7nvtMfhrejwM/Wgk6ECU8ecMrYPtvM4DDE84ZYPTLAQQEDqAwxNFxZ/wFtG4ClQpeQZG22f5jJPY7NhQkbKX6X/Wo392WAT77r3KRQk+lt9QadEwsroY4rt9MArxEQD41Xt3aHFZTlppC63Us5V4eX0wFruny6OTaaUfzk+ThhmlfXWNqeW14fKpORx2hs9ZOblTiBgUEAbwhCxB48qL2auczXBfLrcaoG5K8ZgiJdqDw94Z4RwFCR0QxabDO80+qLyl9HQuGOovMUx7Ui71xLI/4v5iBxGH96BMd0KjM9R4ZDmK2ySCfmu2Vin8yLTnQCCfE53CEAGBpkCvx5inRIT/QGpS4jb/MfyNeq3D6YEyyCvKl2Cdy+qLOxISw8Uy6q5Exu+VpXhlD9y
uCJyHFO226zNL9LmBEvD/85pJ/W1/NWmnlLXLFMHvgtQ+QQnyEKLPR5NxXp/cGiX6H/wdq5U/56C6nih3NvmNt2huOKzeRmZtX41T/Htdi+d08C7FDotAq08FGHh9Kr3PJWFwrn4TQ78WjfNBJ0JRp2dxxU4OLEljUAF8wWWPaXnfrnra9WPPznAOprbKUwjeMz8L3l9sgdpdK+RcfY06Podl0zqTcl0JtCeK4ZIwcqu3Xw9aOeVgeUJsL5P5FFwu4xUx5GuP/aSvuDTR7UROWiA9AjX59K4/YjuXzs31mKCuCo3s6hFEnAsr9T5JihDnrnLb1HaJW93Vh8m01wactjzgc30N+MwQCxkQAHQHJTt8SET4zkc2AiPK2YVlBYzJqt5fisDwtyg6IUVQPm9tC0pxQBx0c/zhYXUzeVkjCIO19O+kKnPE2v5GfIeeHZN6GaLw3N7hu9Wbuoe5PfIG7lrbfXrWnUke5JAyW8D1YpGaYEjBJ4deYHvWkgO2vey8EcfI/oWJtShqBkfy2k9VdkmfDc0VZC2h4aHcAzZl5ZnmK8QS3x2SLzfSk2+qWVWgvZppEKqnNEVzPY611JNV775rOK7O/e5I4Jny/JSnWFqlKpYIaT7BbGSJOWRfUWdeCyNTx6lqTOj8FTlCN03DZH91I/sbQosdzCtyjJHTMld51WpQHnjjax5WH3XuUQoO5icKI+rJ6y6dCXY7wtdRSJ3M/3gaT71nIcAsSrURB3FEhI+tZn5v30AOcUGjlWZaK1D+Kd1Ym5U6ATfxBTrqnO0ZuwfvKm6WZ63lufWWag+PXcc4pb0YGM6+ziU/e3D3QeyeEANZtjV/hFR6fcnIAS9cglry8Lo1PSJHjsqe3atnaiDBomZLJHgMFdcZrvZ3thAkFB3Uim57dxT9vDdKntR+muJchwRkU0Yw8/H3+KJTjdkuZuw4tQ3wY+zoRlS2BAWimFqn7Si5iyf1+x48xl0zFHX+KTvMEGY1zY9Ty63LKRsrH2QAr359JTD6Oj3fbDDWEvwOzpjFHcz8dxiYrVhpwM6dotCf4PFl/BnqBEdQk7obGEt8Rm4+bjbkKYoeYxP+VaIytZ1g5AukJDpH/gAQRiM/w09hv5OIao5Rjco2nEqljszjipUfjAtjZARR+d0+jjsO7F9TfCSkddQGsCW1e0qM4BldAEHj5jKwWZppe/ANTnoX1TOeba2LZMNOExFAF63QfBm7gDnkfxQ24KLWIwdoAJDEARIXmygsxWXLFzdGiFqUF8Jo5153ajWdJAdvlEC6H3tHDfqxCys5zxoR13/BqloNLO3xlkMF8r3iY21ZCAal0iB8bf/sZ2kngYsj6K/QXyxP/UNEzSGeBT8dpfXA83MPWwShaftR8z+Q6w4+s4ek4yQIWqUdgH6fiQQ0kYOc0l1t2bxcAGzp1BNdMEEm51a1EtsDPLMyFbvvBJwlA2751Zuxe3fo6ihH18x/7Xpj54Vdh3hrtYBlXQbqiC1zEWo+4bd/9CDsDQPAtrjFTHd1JmJAEKxtcXXa9s0dQD4a1/0VYlSyxbBNQEqcLM9EwoXTmRF/iphZyETEalNkXc3VDAc75LYvgIhyg3bVqkxwmWUMCpF8cFDa6x/jTNwLzSfUOmnf2p45oSuICMhMgRw1yJFMuIfTyeOSwKpAMX4bRzNIOQV7R8ivv2/Fy1iuwVmf0nqmyGxwlkaU7HsavHzaL57mckDBD74Z9GvvU6QmIG+iumqj5DvxCtlVgUqPRIjW92A9yX74TmVLTPWQdY+eiTJCLRoUnvES+KXaH3NnqdpPhHFnn3gGdn2T7NUyJIPY5tLJyAe8Vdq6qJHnInPZ6M2wIvCGajqS7drGCIzh/ixcXLOJ4UCshSQjb9h97AEUhwxmNamvXIGPsH74s9m0bVCfUpgQxx9Smg1nMETUOukbccFyyT092YwlXVkcfhhBzH1bGXRfWo1HFCpvvy/XhCvKUHbO9yKHWRp+Z+kYEFmIBNaCjbvdtHSIZDI+NqMI2RhlnRTn0MvOqxFa0VfLgAazZOjfo56bxunA38/6MvQ3jKupaRaVgCAZpjYTYqF+Uoq8IQH5kdoNwhTcX+NaOG66+gjvsYtSSIA6KhsCPfD5omkBICHTOC46IgVEIvPZo4anUFmtbPVD+8BevxF8tcV2eA0Pr0jEOcxT9Ll1LrMCyB/TqItOJHNLWFgsgK+6//K0gzWGusRmT3tV/WF2Ub6akZMLmjKPqz2iJB/TvPXy4F9fe3jpxcXkjp5uRXKb1go9e1vql/MGKkr8zdG33TAnIwgxvQ+PWGmR/R8WOAQ42iCkjAsIhLZMpn2UL5DyGgl8f4EuJLGd8BHvH9lQO20KH4xzy7+Eh7byLYXPfZ7TtKD3hho7mgcV7oIglv6ZpXrdQILzovIrCRrd+NOHD+8KX7HyTlYsL08SHfIOod4RzLHYMxzvpMFyYuQV3XyuH/GtwuUpKiP65fFa5fZErY87lo2LlTof8w/wZdWBxER5Y6wVfJtPLheafbwz1JObS6j4OGrMkxtOafBGBgJbXKOzzW+T0zrrvsfZFgRMh5po7XGjpjQptSDynpkjCX3KSY1d/HRVelG2/mTpq9rXngT4xRyGolYlLDQNf+32/9HgF2nGG8iXv8arm7/hStJEqQStqwI49mhlOwtjsra+dJm6znq4JOpd/x4isuJIi/Q9BON/L95Qhc/91ejidqQvXjnMpPVRwMyrxKrCOm5d4DAj2CZvF9YKy6HnNej7X1ETi1soNGEyGmTOQqinDMOboIMKCAKeBQb9his/tr8GiOS4Oi9IUIkVnxvWRFfWCxJvDVq4A/4L20qiJiukHYYhukhqI9T9ksqS9tTUPlU5wjvuq4ddPGMd00FDISWAVePMN4yEDA6u1v8aV4YZwdVhriMI3Z/1awBBhqC/T7rJdwFfxqOzlC8NwZ7ZPVs2FEzWPDq4Z+LeBL/jfgslbMkte4PN5Y+CTXC9Pu8AyndrWBDlXkQUfAjRMCFQOg9VuJ3PdJ3oY/1Dj7N+7OP0o60KMF5HaCr9OAC1TIX+9wKYaacEQRYSjkqDRJ+oftorrVOYExlWvIro9Fh3oL7N7axKTnOOwp0ZD039Ocl+R7/RTlndB5jF3tRTVj/uTTRitVC/KagEktsExo9AxJR14UGye+ry2UTFMvKoldaQ1ScFGkz8yYvh2+o9u1+wbLM/fU0Rf5VeOAGIWa5GJFP13CGf9p1mOAamlkGeBhbfH877CCZbF5uumTGFfumqE7lidTCisxKNw9wpCX60U8xd6afZkTMPV5RMFVDllGFlDkk2+E8ZQ3Hagm+mnYOlVWFZsRd6F9MSDL7pVIHVoCmtEylhnTdyC+HIkwNy8FERRlGDr96aYwy5ezYLtL0aIr1rXMw79uDM9l36nq7Y+rYSdLP+XmjHHVn5hcBbrqgPgHecqmgCeujk/qg67Wam0PdGwWhCRHOpouRYN6Ku63ubeIuBi85DB6fqAYsMJKI6X6eSj572haUECOTHr7sHfTb1zGVCfOF+G3pOqzXAg3cpuEVJ/Iv41uOesU69dRDp0ZMaj4VjOjx5cGrJ0UifbAHJ6OgmAQNwzqKASbZPILQ1hsxcbiyHLtx7hcwTzwROedy4ge6/rEU2p4CMOSGro90Zs+8OUjOEw1txpCSgMAU+Hnasvt0WjziFtPy5HN8wb4T3040jfQ706dwM35FHKVprfEpLk8aX5U3nEkI5OlBWlNUhbJjmhwVP6mkN1aX6/ncbsssCY/VRIYawiAT4lMeTogi7I9hJL2zPqEZwmjFFxz4srhTkZKCol/xP/uR5kjY7qtW+ai1k4I5fzE20BJPjQvd8CIlzH1TvJVNQLFW4jbeu4Y8tQ7ktkBKF8mZ1F4ugZ3cHO/o8oHOb+aQ5zYXBK2ij1vGyg1d/Ua55s3Uwj/35rXzCAwsXJJR79D5Q23cZeUeLTeEMpLlsNBy4nPtdBAgMrAR2ZTwFnRvFQB2bwuaIb9/V7cNGtW/meacRvwbdww49wMLU1bXG9CMilwP4m9V+f8FyUjln33T5EOM7khLCqjwztr00hgti/+aiSh8X289KluTw3JZ
Ve8WzYve6EwkNEs5G+zZdPwvpik2PvDlsWby0w2jK5PorzF8ZGfchC+Ad5FPD/MBzLmpKBq9tcmMEqIUnBgUVL7d2zdJHGt2ZYAJWS+dZ/1BrtuI2+RWcGofTclI/9lpidFBGBmR2n5WmnmeNpgwm9UrzxfxTCA6LqaL4bBy/M8JLZB6w9wHotUNKYdPS9JLHp+4OMZW4hQ2m6/umKte7v4lw2NSCnLEoYNXdpp3wLcM92OzOeYE9irCTh2Asx+10ePxgbe533rQ4YdbkJhcVxH19Vdy3JzIMQK+rLEuWINv1XXt4j/CC76cO843EunnuEtrKyyiWjWd/y+osU8yIz3+0+9PQ67rvj12Yd9drse0CpzNVF2iiKqZ1s/smfh3vZs12Q0jZXMB29jlr9SESAuRiLviO9g9h9CE3n/mPdvcjNJgLT30LAH9RrVxdvBkLPdDbSDD3T8d/n9O6mZ/+Ekx1uHaxPJjgULt3GI4DyaOJmOiDrGvdYGhT1MsuEND+Vk9tVlhQNki9ziBaRWZ8Zq/Kt0AY8GFMZn+qzcPjojR5kg58hcloHZQYIruP0UAZhT6oHfT3HKWNtEQL8mFlyjYXayMONjHT4KgCyW3BFlM8nxt6PVYoZXXsLBT9eiIXfSzWNUnQNMulYH+XMrj1NK/We+61pyEOgsVYHFtfN4SR3w56SGj73ZKPz2B8Okk1lCSq+WGa9UVvj/TFpG3zs8fHUqWS/qd4s7zfdwYojEC4Gn/mBFBYj86hcYi04fx+YEPE7e/bUyFK2SZoQceZh0l/7aCl1/aNkpsHTql5Vs9YCfoTCurJPvxvw9fry+fu9LY94xWy/9IlnxCcRmHKC57vJlCLCqIUtiwRLhn9vbN0hg9XCRF9zKbQ+CDt/FxOV1+2ZrjD/dwqkWq9zWOV1ELYeIIzA/4CZGYlzpI3bnSxktlkMuNh58BuZZHe2ftCwTop0+n4XZ+xuEc5VUirQualedYKniMgqP1D2dgVHOIqLSvZg9+4CxLfB3oH+Apz99rnvzyb3o212EO+xIoW2G+WYfQSjaMYQEJh8nTIvTLdDSIEKUGLFUTW43ggGoXnZ/9QMhvWBhnVmwSSLs+0H7bLRvMbSwnVXDraLTYCVhBqH53v7gKepoUNMoyjM/Wln63AqcCEWA4mHI9i36kUvGDa9oH9oKtlY2zmpb8+DlVTR2y7+/frEoi2amaAA10Hpah8/SitG5bXrOyBYgdNv9Oia4JarmIHoL0IdKm2z1mEb6cjeo0B/X+xoZSb8FmyjtjuJa+xqiLROdrXr56N8xMeyEmpxP5JLeqiDNJbKebFgBqgFUkhRm5WvjGR0GeEE2n+VXnZI2vZCnw7UB34XAxV7UO4hkviz01TkgN/rSKrs7q/yDq0DJQ0GezWm869LryKJyPImEWA4F8OcWkr95SlRJW1V25BCk/V5yp/98+ooivUVziCxLXy0q1uOsnewKPQolcahMIR8wiJEGymMu9/dGFFwlDiU9xXnwpTuoCRVpVOwRAr2ayAT6a6jmE+WjZzYFqxy8nqOrwOiBy7WGd1P4oNaed7Xg+n+9QlrzXRf1uUTukDiOw1UCTpCu8NTcaGoD51wFExi3doA8dG765gXx1BTxBL/Mh7GexpqFf0/FHupr9P0KhRrkHHPSjX2ljNc1T/vS75+UKh2b2ZhswEv1UYxL4j5yTUbEtZlxU0WAkj/28xWWcipSNhDLDabREINXIHpVLqKa5p2wUhUDAuA3akrMCG57VPpt2P0mgFJuZ2zICzpf2YMMhSL8eWF9BZujKl5u1TJSaCGPn+KNUcALcCO6pRxQhTeVMzLo4JYYBuQwluBPCmFdXRxtb2/sk0uIa3YN6rGgrpeev7gNYCixDBMnKfpzOUhS5StDtl5a+k++nxNYIj7di5sUFYKMP0HjT+UKZWztzofp9fZ5cqSGoJoJgJ/wxDR8rQPC18RX5sIRa77AEv2akAeQA7WpzIhBsrjun2vw15y2F1VOZ/DwursSinpkdRFRlEWRUFrve7D6ObxsfpTfZcQFoJjKtmV4tqmIaSx6ufdtjjClrEC5ZJai0evFmvrcuvF97oEH3MkxUqxiSyX7H7p5pCbsiIjA9Jo/ItrV4ys4KLfdKQXulwjmWI/nn4o4W53MKmEHeGoeAbAsWEAMc1YWw+2XaaNlERY4DbAdPJOmn0W7dtcaqa101UfRJRiFvypp3xINxMMVxhmVHxq55QcwF8JewhbSKTDp/5nrRakqFqRcIgE8k3QRymYzVklvAEmKyYa/4nn7TwsO8f98ERI9zgzbbv+ooGvjR1HH2hUhXekB4PqtbqiPxaM5LSw5jp9L3UY4SyZP6u0kH7ggSTEJGssWWFO3LgUqVdNnpRdWdWs7cvLZDU+SSmvy7PuyoZsi2r4skW2yuqjp+hUL1JqO37sedfD46g+4ddr46wmGTvck9UGJIQRkg4KsuE2wV3X9V0qAFezWnU4OKeh0TEVvUFrkZFpjolTxkNMs4cD4NMdOi2DGnlnU7+TasfrRHpnc7OM+TvtmL/KGdzrCUaM5WwWlDEoZ5/kpUNwPWUnFogrR1ZWe6jXlTYTqyDxvoHg5RR6qNv4cuJmTocnArwvSmiEvVISUt35TCk3EzumeKPirmVCDkc4kRQ0ADfMdFoU9cjO8zxRcKnyAA3wHawt4VAJFcL2oZ93Sj3EXILYjTgeSEh8erzhDekOjygYXnDV0oHsQ39JEaVIZFStZ5UR5ith9LugULLS6bWDQ53PqpnfBV3skbw7iWqq4R7RjcBP0hlhZc36kB9C26hSSuccq0fPC88s93+IsuFZKg+SqxK1fLFI0YKwRYJonKHYq/63/j/9YsRhcSTjg9Hn08CXuQeqXDZRgBL2PdqiEW4QsVECiTcEaRcMOuw+UvV/lqwdGw+30nVFPzJ4uVwdJDx6TPKxk5potI9QO4Lk5rox0aKVbsq5QV8GffLMxHyK6Vcvne/awCBi6t6Jg7kNGiFjgY8mSoC+R9/di4CANMn3U2Ryu6xn8ubZTSHQ3IY1p7Ou7hNBAPxbdMPLwxxh2k9P0cSqFfaVseaR++RsM6LLnC064nSgyFUzHkJl9NpCOWYYE1Kj8CyFOAay+o2cdW1qpcruwWaOxD92etIBTDQpJQjEVZ1myHwFWxtQGFINBdOil/+/BIc3xcHVSiDZBSxOq3RrshflAL8UkyRjIHWCoRTRO6H1FRL6Ke//bJUn7aJj0dkUxdzKB4iWmc6urfg2mbEa6m6NfEnq4gOY6x25EEO95cTosMqcvBFTpS2IEc5EWj3GVrW7rHndht5JDbwHyBMRybx4SOmmIMeiiJHXeLMv0UuF0uI4O6457ZE3pWmt6SwcX60i+wC7054X8d9wwK9h8YuqFm01GnmlOb9A92LwVAmjeSRIKu3eT3qPUdhquNzJxcE1pP0vyf/4PJ2LEERmRYQq+6U+b/23SfotvYu14R/8ItWMTfCYg5qwmYa6ylGws/+P6A8gExa2+1BO8MeOebEPfFY718Jj3qEaKBRVtvQN/jOVGWqpUL3Rxsl+7Li/22GjWcd2K8/IG79TBQ0gk2I+Dkldu5jn/yqkh7m5xD4tBGKruiJgvkQkkJ7Kwyw/9RCh6p3sGTD4TodeXCCUUq4S52eWZqa4Yg5HrQV3EEnPZlD3yCX3f+ThgErsyg7CzlgvBKp4MDQv34eH1GhHaSEOODr2+ocX2PuVBDb8Ga7dSsrUSdutGwnuEA8ZhVkBLnpSrKaws8lYu7/F8dKslYC3rUARvYVjuCq1AUlZGhtxEgiD48LiPlJR0wgr6u1TPtk+n6TNHnQ9LA8Uc9asvAJfz8mAG6rwdByhhNeY6eNK3kbCQespMWkUD8AP6SQv9V3OFD3MFcKkoyMkIGhqkOYKVrIRUzjtrMZghq7eaEPVq8mc5vUYTTlP/vAeL9Rb36lbbq49/s4y8fnDJfEl0XqFfPX4wTAYStwpFtJ1Fao3aFtEVniX8KJiC5A6e7lCpPDch4kVFbwJKv7GIE4pX4uhylXrplScyF2l6xIlJDIq6qCxA+PTkxicY9x0HK55XKqMrETspM2ndm8h64
+MOcVbdDpGxF9YomkuLptiwe0Kg5jmrpOlYp0bCq0kfXHJ2Tp104WIflg8ULSQwrHu+/tSVA5EPcx93K8pG0RLP2rgjt0mqj8ElUDcImnYOzp7vsWJveMQUWBdCsgLvNUYNZqZXEz/RVUdTDK8UYxoT7io4vMidcvsw2uaJMOsQQOdbYH/U6IB2wz/VoIMwS8jE1cKz0vyDyE2o2dVKzpXYoDbHErWNIdgr0VRy625+hnoxqz1zWym88W2r83fUpY2VgZIZXpYH6XxDCruo6HAQcwkOJbrUWZMc8YeTJsDvq66pSNND2aztFaY/XQoqX56+Z/p95Zjp/Y1DiV2Ai9U5t//eJofGKCBrDB99LUsMMmrcUYKn6qR3n0Y5MIuzZgvKpnUe+XkIyFO3bNhHbRdQzrdh7/1U20rrrxjWGXgsKtJxXjTyEJigjj8eNmhtppLHIIO1JXhHiBDGz4CftBRiwP+MeYlN6wqclJ5E9pmkoYeGEcrqe3JA1q5y3fbVnNFZrjoe7wtPYkyNoXu8p0dYzlQQ9PYGrr9J34Pt2YL4rV6FSVuY/IQrhJTIsunYVJDdiR0d+ehEOk15+YTugw5bFpkuQZn8fJG+2SFn6yRtqFjZZpw3vL6YUgqa9rsi30sepNto3IcMjI8KrK0V4uAdfPj7glNXvu6R8BNV2Uo1QrakVSTCpTKTelzcMiRB8Bhej1Ovym61xTr+NA13EyO26+SnT0sC7QnWVdo3zCiqHyReIWkJhZSSkCvsOkckrakQ9cCI6+a7YUvo+ErD7g1e+tCdMBMiNGJwoRIA9nr49gtrc+Vx35ks3CxsUROasAswyKJi2H34Z5TsBZ27Yp0V6Y2KicBhKHUjvRCUxwFl/lr48CQV7B96rj/18TUzFVNFTO2kPvT7cV91m+itxZMuTUTzhrbSLil6yhusrjKMXmIILan0R0nqP0fexyGxHNWEfMfYIW7Jo9fiKfx1ORERiq6oAqSWdr0s6IcX4Z6NGYU8JbQvaJgeDwgD8qYCfYtwlTlL+yNBgt2WMrMoci1aD5ZbbpcBB9GXye88gNlCnOLrE124wGU34sH25vLTRerg2m/OpNxFhIdwocuYYTLUqbW/p6ZNqQeTWFL2gaVNVCDojDDDAeqSqjarwalqrIkB/qiBy0CiGPudWTS/cc81qrCadXS3rNk3IzIZorUrlKqTre6KZuESZkgI/Fj++ytDXS+pud0qOkf+8psnb3JxroYyOyXGGNpmcc1FLJP12AtIppLjThNhGL0OdfEEutWk2h5DEzuui9UnS1qnXCwyLQ4BFLqbL+K29xifQPZXttsYS5WZVquFhrPNREq/ngGLagF3nUN+cRMDgQE8iXb24Zul6vU+k7CbD6AF4ndx7zHY1s6FkMQui1A6Q1WI9ikyip858uB+xbJZUKkGOwQ0UXLLkGtg8BrUjVA95mK+y4UaygBAzO1CgigXRfBVyjK8bHG6moyXJvKDixIit//HUOFMpb16Vf3yw1xUYPiNZtu1U5MDEuZyl5O2KYbzzugAJw74+kAjw+0gyKQY5ASyCzVrWIKlZe5YorjeNBe9kqplALsILWZZdPFEi8QIEp4eW2kGd5mRt6hrItwnsIEU3+xzwmynjz6CLKsgVLyLTBjk+aURESeg2Db/ZlWoVks4FdFrEGLu3YLRMhsEvSimrAbPK/LZdqQU/yUlBYUB13S4rhVKhpBvW8t/IaOK2zOuoTsQSbkbz5d9G3MAVdHhzsj3PXMRYUjL9c1nQ4GKWPFIPXeFM0zPebTlPmKXZ5iOAza9swVRV2BPIH7a1Xmt5Xoawyefv4eOKOpfZL1TvMteSIDo/D4OXLacUdeBW7Zl05LdD+/5k//UZ5npwNVz4G0yV9jgp+hmO7kao+s4XkHVn0mCxDwWB1cI8LKcjo9iB+TiMm8WWG8qgJbftI8ptd8sHeGUl+SSxglSw7i0BivPMIjwi/F+JNebzgYICCdHVsEgyB8uXKj9HC2y72AUk3xysdbC+KikTejF7op+xzTYKKWeWVFL+RuSnxZ0s1aEESGG4cxMtKaK8xk7/6ddgWnDQ/OtjpdOxFXeuZo0Dv/b9FXHd6s4QNxDIM7f1TsFMtmM3Fc107DtuiJBMPVGqnVY0FjkVCEmTuLi/wCtRmEgw3aQfx/J/4pc+IPivA/1qUSmsUczmHkHxhDCLb8N0lRpl3sHYmw93jVDr4FtaspSm13Y2sDb5Aah/hK3MOGxIJpE/oAtiEM/iB7qkMgC+yPj/9tRCITfJaj2CM7k0DFPvp/mlXFooOIG2Yd6HF03Ls7ycwd1Dl0MslMSt6jdowKYhFFpRyJmahPS0HqHDEAhgcz/840MwzumOPhVvQBw6/FJi2+EW4iFz84A2/zEY2wvEoaBtDRwPyUe0PwPu/vEE4X0H71GOPP+nMLpA82lkXeULxQI52A1IuCPKumHoIKRcqhu0Qv9/bZ6kx4CI2INLqNZpYN2FHuvPH3qldP7QuK/9RP67JHSTZfyg8CukrUj5I/YzvCH+a8amIPZ6PyAP/lnWnGDjICUF4mgoYAlRxwTz6f21SEcuwketfVYbEJKZRyL6KPImJNQbd+LauDz1QNDDN/5zpsZiibcpAnfbfeuGe6awM83DYpPNNToItn5AIa6aExNfci3FjkcE2hWXH67nlW2I52Zw1gvgfR6nbFJq48unrz8sb3nbpdqXVtpBXGuRM9okxzyfmPjcwb4xRwwozLgg03EDUbhah19QgTJeajxtKn1uER3Hb1gQuAeFLrP/jPwEl8kJ+6MR0qsMy5o0bR4GYQRbyy8HipLDPzsJGTo1EIXcpzliRfpmvfiNol1D5FFMMlxy/Socw73tLbTEFO0cUxBvHdUgRYWB8PmGZ1MipvWa2vUKWM94Dy0A3TKTutgMeBPu2o6eCQoX/Cpp7gYAbWnW/9552xDuzQzTUz8Ssf56jXMonV0Ly5hMi6dkuZjc/U35BezYpbSfW2MUUoC6eoqCk3xjRXmNAUhAomPtrxWCoPul3T06Jo6UWWlifLLzEwqXhJnWF0nAMNBgz+wNG1OUx9c3RrMxTX6g8iuzuOAcuoNJFWmEToef+yqXfhGn9T34nCl+huKmgE0snF0yg5r+/cJ6otHnZMTnWizN06LqvjWUDKGVL2iUy+CSv5gTFB3Q99NmF0Vnq3kdKfT+Ux9uEtE2GnW2zr2VdJFq30yodKXHjMowAmFw3drSw5ZCOFmjP3CeiueMWmLX0fG0nLHRFnHtqJ9+D9pvvVkgYpBGuv7pdB5CykZ248UsI5c7n8pU6KbDBsm5U0Z8XuIt1q0GpfmTCLFSbDAUF9NFGe71CFUqK/vF1TEkbc0aD0322uiA4MYWqEKgjqaqax1pZIrnZrQzYfjN0ulSnxzO/iLc1VwPy27p2X42CHpE+2SDZ0gQC6jjKuocnqE7jtrXsoRiDk7HmVFGIOJb3cZDh4mGAzvdH5EUPoPm70yGFbV0rx3Mg0/UFI9XHq8KGvYmwhwAht2R5luf/aw30cA07+dF7irxyp1w2BB84+4+POtt/mdnQSnMdJYiCmTYPHVeGHRJLhD5SdD7a/rYqVpiKhguBkbFsUk342OwzPncrDX+WBcXHGhVhpNIpVeSq6DmH6OCuvV0dATRQpfhj/TAgzjg4XHV56L22XwnKoOgIoX/Jbrku/XI6M6xT17o+2wjMDKMlvaEPAf3oL1U3qg98YTroGC4q28omhmVD/BCT09xoEmJu7cHp37h9pINh3K0dYQxgCADumUQgoQJMPxyhpjN9WJw8NHSL34zqRAQ9qLWIvQuTjtXhvyOM3bEbPg1ERN5NGDjqa8i225HjYs0p0AU95rHWKAIDONMmu95+d43raEGBotQz41R/U4Wq4SHCtetRD5uOBA88sYxwB+4P/zG16tKtHPmNYs4CdxcWv2Ue0mRphVRXiozj2txDvNOOmyazQolp/2kPDQuvbbX4AxO5TlpyH1gRRWol+/Fd6+RyxO0E22vgvaaEiXJn0JENXzQ2JxpANb2NqTeiieZp7mGb1gKuZxaVD9I2JhSdUMyamHVzFpmpo9kJrNmuqvyx7NLtYBS
iu5faEPwomT30ey8MBnsxZBc2E3l5dxC0VvS9dLCq8pDVUM1yRe7fYseuoA37ltcF5dQQBnP5i38AB6Yu9HXRjojVGgH3RDREISlflW91XSDtxU1pRPvRxDNZiATmVv9ya5HpD62B5hDtkTi9/5hLYTjzD876mcFyBSffqrnKLf9RYv8lzEfDpg+EtDeSnpAKHTtkXZdp3964XHmokNYogvjrNRI5iHzaV9N+chXLJMpJjcCyZtyTgU/wPJ4ciKCQJsW+Fnc3JtoAeUn2R5fwczSNxB1ULrWZp/pzzcB6vMZd4/AhyhfCMlO/m1RCOEkGPIy49hdVNxxHANvV+lHfsAHrdtZMiVn7O6fxvxrGUJdMSsast9nA/rO69nw4d0Qr7B8aCaQaE0wCHJXHT3YCwLpsc8hydjXwKytdqY+Yvr3oNEmH0+f7HW8sXXjTDJcxkO4gkAFA9TAC4Vp6ld4KP0CBl24uXGG9zRgzensIT/c3sL1xjsoZGSeA56NaIiVc+6MRZBKm/SsRVKj/c6b+CtmUa8LOGFC8QQHnOvOyo1w8SJCbjRT/4h26gW06i8Qjk6IMBv2hyU1imQX0qGeS6iNOZFARG1ask9+TUUj+HeG69KrAs0XxTEPV7x6uhnfZKAplmM7lYm0gwqXfG8vMfiOsGtCXJJMLeFl8DUpAMrH34HNvP+eTKm1XWiyV4KgR8TKuCWo7Az2uhkEAjMCnZC7ctVGqKlkNWDsE7I+S8vcU3tZmzU9KUz3avhVrqSN17IVublZLlA+9wDG21+5DNp6VesO30a0Kv3bkvCaSfiaYSe4i5VAi5bNzBzupQCOofrUmfTh9D8G2TDcKY+kQ6eebrxdMsqQPEiiEBLRuXpAQmJ1qEGsURfEAWquAdEyaIpjI4LujfXkTPYUpZPhBvPTP2q9iJ2NqjxQc7NYNJ0iqm4m43EEaW/EkNiGyFjw/JULCwgQ3hhET7Yhf4QkWhUKIBPQNSs05oQzalBivNjjzvotLZbv5PiblHm2YdoWrxgeRwomanrzVSbIGYSLtJqavCFO4a/JBXp+OHFztMGlYrziZb2NOZOJBQSICjx9/IYMsutLcq2H03u4cXvMY6O9fYVLXMvujeSjrht68ncd6DCshKXrGFUTlG2xzG18/8/INbXBA7WtvP8bIN3H4mpusQv2xF05Pm0PbdHpltgarKNJW2iCNOS0MWUTItRQctu8Wz/AsT8fP5NCHWw4BHKEHrkXnIHMVmzX2ya7WbC38ULzC9qyVQHy7mtCHjP04vVZpXffUrkFuO8aY6FpzBnVDjbouHPUrP8eIWM+04UPfYoZR/rScCilDR4AF6jziwBv6z7NTdQj7gsLn7uHpku5XLKxxfYE39xd1Cq+GBag82KvnQZ31ZLrazKGwuWbpuP5NwvszmvzyF1rkOd/4IG2v6gl0AhFQBG7j3l2o66pVAGbcyOhVrRgV9bp5OZDz03N9df9869MoklGeDxjCnUxwwe06OBgsOeBw7zN1m0EAZczewhFQU+ZtkOxbS69osKv8E2YmiMsTPRu6wQ2fui1NsPrHD+Uj3B8ssqAzOXemKgPi3rc+RlDJqxLLKG7uFsFp3S6N8DjaxJztrzOcFkpMQMLW4V/9PMghKXYMxjRdckMRbPVu6F6CuprIGQ2rP0bJR75YW/kqp+4c9M/GMGiERAijuJzu8w63rxlkaa2nJD0OH++sBan7bPHXATic9+gf010rRgPRTEYZ2r62hI9InTpR2eFiWfFEt1tiJqVe8s39rD4V7JWD1oF4+n2n2iAVQWkGwYhWkJOP/u6sAnchXDVhv1cHYPlOIgaim0Y/LQXT1TazOhLQEN6vzgY7dMh0FB7Yo/I+5CmEbzyg1bLJYoejRA+omp4F1NX6R7Anh5jXCXPMigVqe4GI6CQB71utc777oFsQMGp4ehfZ6kutpzu/8MwsQ5QznUazDTiL1kMwPHc+wttnMDj7H/GElZIEQFZXMQjWiRlU39ubKRx7X0OFmEYInfjf8NAZqhyJc3nmrj98WOZgUikYyaRuqrjc7lJtFPPUJKoP6KxGsKgp889Zf9g1YXMfqEmLVeZd+JiHgoKPvx/a22Z2y/6YNxhqqx6Om633986B0VNE9eVSaZUvydnc470HqKX/l9Y8v2Vtlh8+WRoRUujs1J4zGRAUWAbcjxQGcUGJgIgGc9Z3FpCTbBVsXxZfIZSU1YJngLL9B8qLQ/xMFaAKL/ESPvMYlurUljD3AL8qxlILG6be/CGEFXTzkxiHZ6fstiax9v+Aqal/eraM6Ns1flDu62DR+MdW0BTjnP4BecHADoxB7aO/Zq7lsHr/PVeSNmghrMFVA/ij61NGb9yZZWdC5DGck/OV+fPP7zaQWLoIIEfTLLB6eRiNQxhvVBI7cprhFGkspCcq6LtiPiQuIJofQ/kWdj7Iwwlx41CptY063t79mjJdG4jAch4gQL0YCZjS5aEXqUc9XuXd+JqOOCMRDfdZrlWuGkMA/fK0/BhYFn6Hf0r3YEj/R9TxAJvlf2QvBbAjOWJO1o389qvlYJm7tNUwJs5PhQlp7qg73YZMtUVZpYlLKi3n6mmz0XqIByYHfpHztc8C+2g2bCD8rT+nJ7uRTrGp+G+4oHfE6pMk0pc/QrBEkx2za/7ju4WKfUvEHBJvTbD1ehNYlu6//WjM87+6ssGZTcNDVJFj4cXeTYBIWQimtggJf3x0jXrTsn8ism1yYWl3/G0sAs4UbTkHgsV2YzrFn3z+hTqzPwMuEB+5zo5CNktUc5kJiN/twxTNsvxwnJlPYdK0fAyEyVUjug6F2sQENzNjt2iC9v/Bo1chExI5+jSuTXTfS0vemVQXnEgdpc0YejKsB2dZ4CdQkeBn1ESz3ht17qV53M7MF71cPdhMgf3nJQcKU5oHmuY6424Au9MC/pqMy4fuW5dMZ/Wi/tbx7kWFPfj7d7FX37P1a7m7Ft6Peq5d/1f20JTLU9alq37BtoYazYSSW1CrLHIuCGkQuRTyy8Qlv4iKa7W8ttW+wtYe88nc7rxWTOdTqBgwHDkVgWvA3XTany+gu64Z+wcu6R/yhY7z+dHpEaX0/+i1ILNgd7Fqb3nXb9w2GKxmFIRoE9z0jEsIr/jYFuMnhdAsDPROUmBHEGuGFJp1kBL64kq8DdMaYbr1DdFj3yJSP3HJ1RJLsnzAlzo2zUPQvU/Rk0txFwJeT1hNYDd7SdHT1USqYhaEqgbM4YRlzS1Vkpvb5RcXKCNlk8m+kwlFMDTEleKTDxl/YfYpJvy+7Rgn4FwpoIaG5fGW1X9Rbz21bkAVvG0QkdL7fNYGO0+eSYNZvCylzLXOrwJzImRHVQsJVHVe8Ji/JWIpOQynCbbTir9orHTClEsl03PLy2y/TLYFR/4lj3SiH1+WUsN48M5t5mm/xCq1d3JNui/D1sbeUB6BuJFOqc4V+6+KndBnCs4tq+ym9OQZPxyYQcuutEbHqMRdMhLeY3dB4Kg8QQ8E8Zyvokog2oqNF/r6fk2oA64rvQBxhOutwdrGdQykpxcqY3Bqe7oJJV8w6t5kGs8FjE6XiGNbi5jA+ETaQxWdasB4prISsnFPbjoyYNrgkze3RNX68C0tFHJBZQJxHp270FxuP7m6V1cDJgyH7zIqh5XwYiUjJceaMM2NEEv/MNM/+YecWkMpr4gE2TNSh7E7xKLVndyxrFUOZbEcYXepaPznDuMf7sbjCM1erg1TPuNcxS4CsVkuJDXVjhbNjxQ/xkYmXVX1mO3MKXTgnsniNPPbycRmlYXUfnwceIXDXw8H036KmrJaZzD8HYQgQPgLFTiW9E/1LlYWZRbz8GgqA42pIOIQbb7gamEuVaw8Sm58fkBQIoPKQNxZXPoZiZeEnWY2u1fg9Wz9L9ngUuLLYGr++X7Hd2YldIFLCrd9Xm+1NRmvl+qosJLVAOxfiqVScD4rP1FPNJKI5sVzboHsOStlhKYJCAAQNFUCd6sPSIqpoifo3TIF8b9uLAd8iJ6FHYayHaZUFJhY8Fl0s/lwv//da0MZHdQrJ+GvOMfeEfAXnaQEbtVx5rTo9VppG1WZwO9AiICgylOhh2r
vypc6dOrzr9sklSGLteW09Hrswe3wK/w56J0F5Xtz2D/snmNrfFIrnMnN7QEiFMfeu6SJBZcGanhN9MUdHhlu7INRQQQ8DxmrOJSS26zFGXTRSzwbEsnOKixLPbyKrhJgHTHPWzFTr0jypcgSq4iL7Ne6S1maV0IeAzzvYXQ/9l4T42QD1vM4EThUZM23+dkq6qV5Rk4vdGCzA/kaEGPknp3WeYte6m9rH4dBMBhzRHwQGC3ZeYW4M4Y3Bm80kK9fpIzGzpepKPgTJM1v2aMJsNiP5hTyRvEr/v72cm9iLeAFMJy82IOV31YMicaDlRUpdRp/xCKLPc+BB59B8gc+CHMkQuQs9EAHWf0+RCuPRj5qcmaJtpgjDObjSS/+Laic5LB/BRG8bSX+JMOnvYKrqRwqpt0M1hUuc8xkjH3KknmnUICRFl01MwQhSdJmuYvX6X6mZoT97xdrqhz9CLKm9hP1If2jDOm7ICRn6jbZL/MtkEpR6BZSWwU+vqtcV1Q+25kVhkezUbfS+txrMeYemCkJ0z/RPAHGnglOIZiWPnikme/+Ejsz4fHZyUv/MUAksL4ujB8QNSVhVqrKba2shmaf3qlbn0bjSVnrp/OdhNiMJkeDc5piS6ZQiwpvbzCGAAdxYJe2obP5KkUWModoP0fqSLB5kMS3H2u9bexNg3orCYyam1iCagaUEeFyK8uzUZdVsUrJCi8ZDbz0sx/xT28W9ohQfy+JEGusSAogmcmWYeOZvdLba4sUFA0087gI8mK2V3Z4gac5ZMmGfe5wjj7hQHboZ24wF4/y0+0qLDj2UXjp+fbyzEqbK5cSb7SEN5C9AmWtxySv3p43f1hlejVMejhoAZU71BLJ6jWHhviVPTMjX+laK0DeUFPbPL781LPI+JpcjX+8uAs+/+dAh4MsutNLHMT6QBGe8n6v+fHqPnxYN9kcdiAeITcIVXdhdn1GmlKUNxUZSCZSFGlz3cWKh/kEFBdHEocs1z43/zTZEgsd7M4MEm0lpafCODcJ59nj420HAdvcWlbZ0ORWxh9ILaY5blGV+1k2hlAQRYRbBBlRT+f+TOpFvOzP6baY1GBnb1H2nuw75Oi7FbUKq9gL4VnQFWxu2AEwJHg3I3urC1qZJqSNAHxHy1F+Q1f9GPleZ3D+7WxCcsh0Dby89ARMmwqwo0Y5Go5/vWklNkOkq3v1osUlWvyPctAmms0JYb//eVSTgU7gD1z/uUde98+kkzBzDPwiy81euJGKqbl8rC7q9nJmOmDUnj5A04E1ffmQp0U6UbCK45HxLFPjQF3pGJrxClnvk+uAeXbCDrXlLVQGiqtxutFK0Z78CbX0BsHgtTZFvdiRvo+1QeiBSvjqXEWfhZworbSH0/xbPyRUeey10BXGuyM5FRU6wTY+hhM5ksG9c9J4wdAnSzaQYkUYzWNPn9HAYWxSXivLJwMVvdcdbAfXtmnS96IrDSNUpcYwgvCeLeM9yywIxDquHEFAOwTruXis61Hponeqf/67DENSFjOYPVsLhJzzvmaP12s1bNd/tYrtOQbXN59YAXpKYMRpToSczpMkV9MoYRXXXkXdXwx2rRsppkGADA+aKJqiM4bYnc1LYpNmIjG0TzDYrVDsCoaDeCB+1erSumLIB5jqI6bSFn0AtnKQj2N7a4kbTcCKMdUldb5jDGp/iH7DOqQe5pVmlNjz0moUCmsa+EeXrRrLut2wYw8QXH6iKt7QfWF5iaSv0NNiPXBXTxNcoYQYuEuWtk61Zr8PBM956FTD7IZli0+lo9gATcJXhZT5sAvdyWvibSb0KiBDAdNS2xTQbK5HVQ7UApWA93fMfynvXv3794fFPDOOjvHNUNtc/3BrPRC/WY9LDzr3rKiL2AUk06klLcY8k+026Hvn8TKp8iwXY8bcZHj+mySRx1OXBG2fr85Ezpozz7o7Hb41orlLu08Zh6ixXkrQKJInZex3xcWSIHqEh2ZqEtwmbHGQMVhBcfDO30to38hAnnw2tSCM/4o5XQW3zjN+TxGTCj4heTZiCHD3LaRp0FDmpiZL6BTHcQRrs4MikqU66mb/OMAZ6YFP4OBN32jXwTKe6cIV7SnJ+dBoNe5+kAraruwvz8LBla41YJLem94FKsSIzxP9fOeFFV9t7Z4NRQj2P4wvyiYKN2I9FzW2oZKaYLvlFE0DAUFbfRJtNysAtAaf3vcN33Mk1jyur3+YA+NMNq1vKOShbWEZKrFrEwkKM/nzkIWPxBMp7KqzNPn0Mn+omFS7Egm/M5kd5juJiA36417rIU4VVfzufoZ760DcWLqUjg0sUKK39BFW+0Nieqn2UtBN3HbN5hfok+ugko62YxKvGov1vD31ikQlVRhEAotjKSgXdogZ3XbKcl8mQttXuSh61QreucAPRvqZlJK09Pr138uACCJ2/OImh1lkaxioiROxS0TCFJz1wnfFZC5jjxrRy9piyHz/wpKQnjevaZlti6XAUa/bXKP4yUyqv2OcmPZERyaRjly8ufwr8O4prCRzQNA1CnHkj+fmyoDAO7CHr7x5/A0VwgHKG5o7V+LZPurolseyZd+Lu3sgWBEf3MksHF+/0mKG+X8lJF7UkoJ3iI9PxGE1lBTl71rZww3Fh/+/A6eXrcNDoiG0/gecrDq14udr5yDzw+MX2KwC+9+sPn/bqgsz8zv4g//U0C4yJ3YTTsh7QH8hdcQ75FZikqdYjxUs2gGI758R9ZIEAA1OhhR8exVxsWs1A7FbQRjzWHYUdGsoL70Lb1pRNwh+wpCxuWPEpOqZdwJF0yg9ezJj8+65JGjAplUEPb9S/ziFGl1rOgSQFNCZuvOOxqfMNOANKwWSGbQg26ItV3tHLvoZ+dQUYuN4vOvbiT3uqxvzBDGiE9FdkefnP64JymgrYEQKgLJjbOoiN4vqXCkgPXFHjAuc2PqRSoqcG5iTrziBwQmxVVaINNMTYaqOAue9RGfoPRcZoXDy0GO3De7I/czY7avuYLpnWsyg7GD1ljmRnoUV0QxeyXOMVCovzBPNexAm/pk9ihAZ/anOT98UvRIgvVbpM6PGqyejcrrjdM5rfprPFnP+TQYYD9lMAWgdC0ZhhzrvnGMIPJ3Rz7xCZ57Ok7xU9HMv+AY9AWCKggvJN2pq3R3sGnm2khCOlxcrTzuaPc1Zo4RyVOCjT0DGeT1szRPcOdQb1czvIs3yRtiw/BcnKyuO5Qjnu3p9q8gJZ/FzxSnZ7einWJE/pAVjg+2n6MQy2QCkjYrVOvD1c8BWrKksj7ukOHAU7LpOh+9SK7uhz2v40zx8J/3tjc/+FpYvUnuTZlwSYiG4zFapNWILa9NmbMNOyCMVBD2FR3XIfLMiBra/gd0NrjL9xYP5mUbzd9Fst1S0Nxzn8A7p7gWnJ9q4733EkbRT0gN7Kbx+k/AR5kycBh6nYZcBdhktAwlvJNp4uXCn+SE5wR9yiJvee74krZYueDGl9NRQOKTiFBieVM7QEbfTYm0k5JWmx9ccmWBC6f6UdPHtmTm7kavEJep6D5O82SXjMUUzJiR7jh1g4c9v9bNgD6UrSEIEQqgDV4NUZ6ylOCE20gBrY0RRNplSio8axpzxxlPS4gjT0YAJzJiq7WszYhFYBnaVPDBmiT/Ke1QdjTfhuvBZ+rniAQbPXxUGDBkzQU0NnhXj9PvuJNkGXFfk2c11/gAALFnkDDaX2rC6tUfesUbpE9MxfNGkFy94zW6tGaI7a53P3v9seCtAxXYFLJTRN3ZgK0brYZ2aKS0rlBTgncU2Frwjf2agLLwi/BlBFp5b3u8S2w3dwSwFlQVwcNFs7QW1sZxK/GoYRzDawRHJ+ruSisLYcyhEQHdRRfvzhKJZso7EL/iyT2L9jtOV3B9y/f5hg1lsITSlEzpd8h4olRVAp0F+swAb2klbPH6zHF6lqa+5D3f5RopU3yF+KRjeUqumAJH/KX6BDCI4buzQ3hTnzGp5mzyZRjNhqNGZJeC/77JKwdikBZTbTo67USTXNAqexWoxcImV+cslbXSPkiuzbMn5QHQJMF1Wngc5IwGCdSmhiA9CcV0LN1hn9hKKNP3FDjNYSlSuQzMuYzPEHe4
VJ93yu3GEixA/XzDUfp5J8ImZKiSz0+PNPVhVVjQRbMUtDwby4pcL9oCMQck/vYEd1s6YQZDVwaW7pihz/pysWXNayTXj6K93BhfZcas8vXt3KZlybo6ps7ohfsq1TEgLEG/rG6Ca5VtXW5x0GOz+44f/0OoyEjgCZGiTDai42Fbr6w3LdkoDXnNC2jr6D74elOfZofXAaq+81sIGiy3UMF92l0nsFG5XcMAjPzu4LpQthUtPP2GDz15sgwfGWilHY6+oLPOlTGTW5Lz/8uxAPeCpi/K9msYMW7+ttvEJjCVVKaomk+GO9j8SO9nT7dTOTV4fDUjV5V6P9lTJvN1CXyX9+KbWA0VKlP5swu7t7R+TDyUH28KBJz547boQ+GuNX1aZigYjTp2N8AwXKXWHdScrST8UbCIR2/mSwvuWQoPge+s7N+uhqQ6CUQwyaxBUwNN7nkJjeDyH0XvW5Yz3u+SGotTxd9GmTygk17blbjtHI5I07CUhZoIF7sAcVsdB/PJkVApOvVB/eE2HGI+O0DowbW7/aGO3bptsExTOFw0ZM8ZphU+Ci3c8DuI/JlQlkGEZwYJMbzuq8PenLVmGhFM3/AU79TJSFu+4ML9UTqECyOZ3LoMIBo0SfzHrn3b6q1cIkoWo5/valWQ9L6cKPzqeyIqWKtihQgljTTggMhbP1FJT7TJ13aPW/3FbhJ1hOTLOxUr6hcJD0x+GjXBSTdZQnEg1yFndZmFcDBQSYNGCB7js06w18mVT47E0bNv5UWcjlJPf2VrhqvEnxwFd3nj4LPEkMHKQAMs9YYEDaY4WclkIDtUch91EiNaysF430kG7YMjtIWz5jAzpfkf8jN6aJI+VXPPBQRkI+ToPy4nUOqB2ECauqpmam0R4WZh/eVNB6rlx01yurlxrrjnDc2y9pgE7i201MWh6vigkAd6I29uuT+5U+MUlNFvOhKU0hdNoy30adBaj5vTpgMzFcOiip2l3H7kTKscIf2DZ2p58v3hWvpZKuxmbGH4m0bRz/LsIcIafvtJQnWPSzqV7cRcmgocZ99zdduE4QaCxty0Pi432hYAlfdpqKDEoSTYWCbDsAjsnH8ZuFmlttcvrPzQylpM7+Gi78H8ujOm+lWkAvCY2BQ2KT6GzT1eIszW5KYqRJfPFp2+kqK4w9jUAGKM4+eew9MyOAgX6Z+1E6LgkyWvCa4nubUrodxLYuX5x72XzcObXm2Nt0cg7IzqMpKyQ4vC+l+iYiC7GlejP3WV3YE/mfx/pqbyzj8Fuvvce1rG/nYV9PUwFCozEpxTEKkMYyJ5w0IcFgl6C5VxqBCzn4obWh7gvzgczbFoZMIT/ZYKv5sUNSNKcZpvZ2TBNxkXu/5bjtoX0vlV5FAJCqca/hSf0/RHGPb6HBpswNcWJVmNK/y1rixOBs19DcQUruiHRfZTWrBSAI24Xq61zWdeyOmn5o6d+z4xJAYK+IxjoxuppBnoJs3oELmLmMiFSAXdggamD7IrJHddda3+YrSAAuZkB0tIUQ7aZIxVrhcFhvQX386XQMZBmFzlXALuSByfGXQO2YSQ7Pfbts2QlYpZWCbJGGSU5CmMqsKRg7h68m0BWT7RgoGw0M3BCpNE+VbXGsn3w/Jn8p7lpqT1zy4hzUFYQ4QEiHmvTDq5DYY+bGfBbWOEDRRwwCKoBHLQ4tX67lzdQOPYBSsQ/VOTCZju9oFer1pH+081yITQBli4pbr517OwtDNdCQleojWx0u/aPSNBt5TWL3NKdOc8kLVYoBH4vks9lTvQH0xUclWhmj9xomgaL6L7/73ZM9ZSRDsSNkInIrSYMjwhV42rgWRq+FZD8Os9QjSrj6dGZ2Q1Gdpd/2Rf2VDrKdGjAcWFN3DGTQhkc2CVs2Sjqm0nSEQHIA1NtoTnGJ+6+ihulYerBlhQHM++J8W3jHTJZyddsXST2txCwq0FePbOFSWnL0WfotEEou7x4rkiBL3zC764hMO/SNwb5N4Ndawd6p4CugZxq6Rekj7PpDbe3GYofC0KF0u0nTyZjStgfkrSGjhRd5+2KH9o/MZ/k1VRTqkHmMJqn1Cn9ZbEqjgFi4cg8/qFOHwEYyAl9XEkr/DMUSC/Yl7aMeSXnvikF/Psy22Zb4rmZVKCZVRPOEIkupEkfGG5WcRLjHLt5thvUrSkhgQUPipKKaVbfCy0xBE2uokTxxoNkAU/RaQOu4Jrd8veMLyB2Jbbw/f5rE7M3loqWyQ3cCCxRMmU+OEWDv1QHINYKufcJ8UDZfnzOpB5xb5wmMkn5L3wp90kfwINn5VwkLxoNLkUVURHqzT1faW36eG4V76acHgyJhwqOGMJIIttOwmdY6IUTzx4vFW2ouh/EZaky0tzlGrOgxn0cjm8gQrAn/b9qhPSNci91luNH2mSYXdWZq32CGfIb3+mB0Oo5YlcNemdP8kLJLwN3lewS+lfgqOMcHLk670hL5MuzEftfBo0ZAk8ilO2cwusJtmeM9BIefDzUP68BD8zqs1bwgV8PrIN7cgDS2OIeeiqxhuB2efdNzsoXBCqpYSk2pzZQwAzZ6CpZT9sIyxWlnHlMRcTihYLGvY0J+hm6ss91dAcIIsAWBvkB/4yUn7ciygBYgaMqA1BmjFFPFArXZrq2lvo9ivFv9kz+rKl1+IzFSX36AEaAhmU8LyOCF4H3Crmr7YCmUsxd4PfSB2G3BAo7QeRaVHpqgoRF4D6zBqTunUhGJp9M7/pXttxrQ0eDCLvhjZni6klJ/U64usiYLkh8tzcKG6Adwv5f8fT+AXeliIQNvdZ7zkIS1+URiwaVeRq1fMQjEXr4QS8WoLTk40f6aixW3mXojKrc7h+7TLjOouLHvTAlF8i9LZDRGfo9Q88kJSTommba6gGlXE54niKZK62uqPL6wWZaAmuWocj9sDG7vuhHiUiy8703VRyAVTnuy+051dgTfMhKa3lYN7ycYsX7pCew4cfzve9aN9yIOU+hedwjSczwAvlM40HF/gM6t+bhc7DmMpgP3HMZqTmT2mPvEj8Aal2k6ZUWIC5aBIcHI4qJo0vbvLzG/rR55iSUsRhJN0rHh9uC9SDsqC37Ms/i4IODgfxfvKsi1fjojtDJppZJKzzWru0fQvTEWyqw8PFnKqXQruVw1fqmeuVlRbPrRlfh9qOu+Lk/Da7yQq9DCry4LJ83bTKhtMsvAum1fRP3OibxYFmTegxn8Jh0BrkYgApNFsf+uIGA6mGUkvpSd+ZDyhEtlIoSzhhU+RNftenfSvC5/QsFYOvv06j/KYpGI18/yV/fFKTg5DF3NPfptzTNdL0pWPFsZAKdEc9OmEry7axr3Ud1iAmwEJk6N0nRra5LQoiA9WtfBbTJ8Qk/RHWOdPviWWKMIdlm03vUaT2JW4F86lDQyVdUQOHr4wXwmu8ETAfBrjbuDkqpmeXKyROTkJNZxpLJ42B6o8Zhfyu+JjgSwakWCtpHUCheBNOzzxB+FB9NAg0uFisYIN/O4Tih9jN2lBLgSrC+auo10sEzo0/mv8i8h1GO6s4RfJR16TTyxoHa8D93iZq7Wh3s2iclCUF2dPUW8XAElWzHAtG2LGbGRvNRWsNUpGAGBoZsvmKBaVn/TTr0OT2Iq/XhkZHeaFp5g/+u3CwnkCxpyTncmk6+RJ3YWJpKIZ/Kpzq0Ah3+2WxMElIZcWStjji/MYkB7NGDnc4+Xk3N/kZmPKzrNA5FTXsK3qGP16a12On1RzxFjrwL1wEkz3wNrKB9C4jPxfNDWE8wx/V5oUcnXK84+pS+nBP2jVAEkGjKFRr+b/rElirWM8zk7zR1iM74A5uOuJipdZ9TFuzN/gBBpn9SVJNvsfuFcW25wmOTHBhaGdYaaOQbdHmno3MXCP4SiRT/tMrE6S8woVMw488W7svf4Lpl39lpW/tnuHwRK+1lFy3v9t6XY1e4VXoa0WikLe5PpSReU9riWiQxSH9c+NbmO0nclHR7PAW4/SwE6b4+oFhCoqlFYDBiL0juLdo7t6jz7ycYy63HVpdDIkAybfaJoATVDaXBJQ0ou5Mu8Th9BosktZeg4EzUaaolUk35I8ocuVtfj1hPQcrjqhfl/Yz
qq9+Cq+LGAceBYNsenRNBSHZV6ZrPiytC6n1qYGSFDEFIij5GzwvfCg+I4gIegcKYHBglkSl4zvuuecELsiVY8+VV7VuDdd5PBDHpLO5kGYuLPxy0/SprvLlhbOOGWOksJ0NsnGAeb4aum5jIw83b8AV7O4JqEcnNhvJBhZS1j2IRmFeS258RnPUap3VRm2C8yguo5SD8LeFMy+eyLcCP2L6YqGZKlG7nViP3Y5h9HqQYwkAEZzLy8atgmrRYtYZ5baVVAY/hv4QKKcgg9TSK2kUbjuMCGmPTAgq2m+EyzbtqXs9AYrm3yiG5O3RUUUlMrgB4xs0VwLr95tdJqW+iPfYx7i5EbJCVhgrUjSPP8GmENZZhJLGMt2mPFUKXh+qRNueEBpPF2/3gjH7Qzo/2Wf0HTj5kXpOY/p8P7sc9I0dR+1XUvE/Kco7iGt+KaIOvSzSl+SIaWrLNcL7uY3lQ0/usSw0Fl4aCAZGY7XGYaIS5gf80X2FDO49nu8lp05sf9yBnw3B/jAy8F4dbvVLiwnUsDOjan54BavT+3FMc6nxumdtBf54336Ts/xNcrRfAKoctQ/0cqByvE9ZjIQa63I/PxY1+WLgTLg61/jdB4nq9Y5H27pfDIYshwcCP6ndh/LRqEt0BKIwitKBZPHCUcCcOKl8aGVlkxmlKpH8UnhVcLcr98VxK1gsXnuDQmQ/oc8zduqvMgTVWSNhzKomlxRislxNmDlZL1mbBhmth/y+EkpZaqFTgDtj8/w/5GXdbI0+6WfC7fCAgzgR1gCG+2zY65N5KckaBtKGUzE9hT9XMjg43ABEkYilcsR2fyzeIjb9N8GhXFiDpAkK8ec0afC2Yzq0rorZOrpnh8m4FdfJsbBQCOcLa0EhbbQge/34rKUoOtOt9Tl1j/ZIZ7Z9W8elBePIkp9dBX+xBbPElr1iyh0JFlXKee7EVsqIaEFXA0LhDYEUmP7UL3q0GqY6IaXg5CMl1mWgoJloW+ccvWaU/qLGeoKvLG4Pek3ni2VVpJBuZVJeb8pW6U0+2v4CApV1htFS2wtW+OqbhsKigoyv75PItc627Q9VTUMh9dm7/kxVj4uBXKFSXSTQT72YnP4Pg2CC9xV8c1UxGWsa3KWM05+iJJayhOeKRieoCsGT0EJnAl5M4vv7SDyNq1zG2G05ewA8/ZRFgN3bf9pI6mpWW0Sdcq/4TEHlSXLIdP9guTSaR135mey0DS7UaU5gmqKqlOYg9DOWO4MrHxEl2pB0JBsFEtNX+SW6ocuXUoHdKeXH203mtC5p8+AHCZHLnvA6H8CRVKfg+SY3YgZ2cs/Rc6iKMt/MbYIdESuiyiSRumAh0pxbanBphKn4H7i2vxcoyZmAnjCYDg7OidfEECVLpKdfpl0jxcDsucqeQHc8QNzt2rE9Ox69XhxtJLefhKJbIZct/BYCSWKcflK81wmnF0FjmGtrAXYSjSf6KYyxQi8V22+NINh2XXBGTsE7BvXsuy0cB24O3VhiH0hiJI2ZWoIVMg3VsIyhvzilyl6nYOkDYHt/taR+aMQcqNaj4WOGw8N7/EDTlWTNuhVQ0UbOSbnuRp0BwZzWQh4AdnLa4lv2MHQKSv7OxWsfkAUzKHSPBGq1st4r7c+PaLuEJACci/zyLfly/Xq4KB45YvzacsstLe5lm1GBJ170VIBp9Wla11R1X+s0ncy4I2x2DWB+Gl4/mAqIUrp9xrcYsr3B7BUYUmF3AbtnXuYD+iuU2h1TBUoVugtsHD+k+euOD91REn1onZ0RgpEQEmUSpd1YWhtDATu3X2zMtQUnJtVoa/c7ctVE/q+VpGiAXt52bbxsmBpvVJHV4Efn4eBEHMigPHIoea7xxUnwleMjS4ewuGP6pxY6XqHUpBVkPIXDDHH1gHWQ2p9YecLq4CDvesg66bu4lD0pvTolK4NP6EA+SyuUawT4mcpSp5PILNVmgi8X2yGxfsImMAyCo8Tx45l1jN3T5ChdHAGqrmYmdzsDAPuxZ8T7/lPvInlsnjsG87VS1b68BVqaNxMwkHzBLOddJWFn6Ffh5C+Aw2FxU4U2+ZFt846BTMnNz0I4DBmeaTqRXJP1njhUdqsd3zAFZ3xOaksmvoOjaVL826vslQS+X1OcTNfjwlXryA1ALfVmUf7joEYggl+tTVoBJUE9c0sNg+g8F1nDcg3b8LoaNHKFXVVktBee6JivhbOfVnN8ngGoBHFPVqkhKVk83XaFjoMYfS7Q63ne9DGyaK1EGEHGs0aq8YbiNsAgn1OKg/rO2dW6cbzVDzhYQ0Diy4dyhh0lcr7OCMXMTgQm6LMR9dCfyZ+gxJZAi4D5LiFUzlKBcB0CEafePY5h5lef3ib03RRBe3Sb5c5DvJZpAo7/nEErBnmGV7+qupBXBywq1doAjV79LJ3QkGghxWCL3beYSAXOce+Q85FExhHbwkkaENKnEo7n+lLE9Gh20OO9qCD/we9UhYRkvanmP9ncUYUOF1lX5S/5HPWNBT8kp0w+XH7RgN8Nj5qZosYQNMq62Um9kDAotAn/SHouyNT+EpmNDWv3cD3Rq3r/PJpABtpbCoappJ7Yu/Xe+QMIH5KeGW+dKHsQ//LU1jyKHnog3GhYTZPy5VvnOv+n/28CEAX8RYuk2tCl59WGJbG+mTVwZesAjTgo1wuGQzIkDjuRRG5uMjOx/ORGDIU+ZT3M7OY2mNM5Gft612ZSRRK6G95H4pQhBHNNGBYMMUcKS963miF094oI5aP4C3Gr2fV1eVAhXiXn33j4UGWi7cEolEF/bu5lrtDBeEaG0AGzvh/i2+gpju1Aei6Al/KhYTP+wBdJTbO27AIBsrENHNp+ixwOWF8K2ZNskDO/f3byWjmUJ6jr+vaZ6Z2V7iJUF5XqiWc61QjHnhglmbe+Y+iFdnUW5YqeviUOdgxSlTIWSmZj4/6IBoM3YZHkbBBioI6dEiMjgUq78m0A2ZfHXjTBrCSFzItuWXKriilTouU1n7Zqdm+nM/m7BWcxV+H9UzneK9ikHubTJ+ksNJvbzuobnuT86r6IU/gKjbkRTldxmiJ3vZYwVBYhu2wEMQfRylpJqt64Xf0B5h+hdp1PfBAZiU/zSR0SlW1+nv86wETBPajc0x0zdI8uQ28blUVrtJGMGWax652rfvM7G+v++SVvRmHqwwBYSAGaF3uT474XJtl2HC003bkYKxIYb8pScSMEednZlFmgJkQF4BzVjCw4yn6RBe5Xn37Stqy8FqH6TfWc1/qJceF+OmYcWVzaoCw+665a0LhnKHCfinJsWTRXvYC26TsgeDSE7NMj7vBrawLKR/luw4df/Rtzn8Jo7D1QF7Ewz2Tn+RT0LnTWW31/c6Z94vrcQ29qi6MNk1WSdmkGM3ZdX2AuK3OgmRSX66yDaYHQd5kB3zUivIqRv96o554swqJWgg05xgB0IcKsb+3FkupCldTVJymyiw3UpcquFrJYvE99zxpDk5Nu34aUM/aQvDJvWHWyyXkoYmeLXpo9J185o28S5He4FRy5DWIRVPWTLbh3t1Lf9bTYU1ZHQ8Lru6zro56m0R2ZoO0L7iV+N8FAMVEctNyxOKK/+BDxJgtLK23Pou2eYXKgrUW/YBFSWljpQPtSsFL/UateV9SxEMFpknfBkbT9FOBW2VBKqVknMD9yywmLBU+AmlP2Ovg9VG3u7wqW5yT3mXEHcCjIPga/JWT4oW8xH4/juzX324Ywq5ZMi2S62/icaOFlB8U9VC5vWSzlIYX6ddhLPUxE6AQFZkE7+GrVQqPBNrl43bx6vZoPcbeXZEtJmvMrsPjqO89d2bxf0a1tQNkxeAwMyRFpfGf88Gd5Io/crBRXPD1LqSy96c97YjKfNJJ/SlbOVRtG86f3KwPTIFitD/VNMdpLZ2dIe56u9YeYFcfo7t6n6MHRRsEr688484mKL8xZuQGuufKdI7yzMoGExKnH/fSIf+wQo1homKNX3a4BrO6ooZj/cO1j9WssPMmUOF7QT61wEv6uRe9pllHOoaB/fqr7nW4YoCObx1ufk/8ehgZ6+XTHKFHncJvSJVrpkIS+u0Zog9K4fuZ7qWYZWxTdksoDm7Ls
LynzbCdIuGMHpDZHM39kj7ZNPAPQpwBeZz1HyHSMp1gK8glfcLCBxiyJuUCZXgyMMFxO4m3hlYvQ9DncVwBQdddrDGhsO4a8M9Py+XDuMemAO7OhxNDXiFMGY5fZMIt+ip5xaN2NVQsZzXT4g206UtuVenk4fGSEKvsGJh9NnDggtQL4G6uCFXUZ+Ltis/BAeuXGdAHnAPTnShdzCdFI9av5/Htf6Qhn4iDo/lXm1Tc7kh03AeSWDxI+rw+J0TWT7iPjseU3N8uaXCh3MfkICQIOVe0fo6IFy6xCOEmmiioP1e8Fxq3w8OcKJTvHjrsFFsTrX1BEr/Q51hCxBVILLhxcxX8o4hJ7X7q+gqY72Y4+sTzGTHcBRNM0KBzcg/BoQfTcovssmgS0JZMRGTfy3Lwkh42oHJfcdGIzMjvLsNaSIWfJynLZSIRbZ0G2VmIXTHoFXHMO3aBEYOFL890U1uBWsoBXRC1sjY+ftoZD54uuiowgCmyI6iSeq+H86l3k2cInbSI0tyWUw8P4v5ESrlfHvyHORaJk+8jpOe4ZFgb5REvpKR/sy8pmKP0r+dnnB8wvN7Ysv/L2myuL7O22up7i91Hjy2HAYFM76/IwhrP+Ro8uXp4lk9kbkL76iiVU8TYLTPr3tDoGxIvk2tJhkPWqg4TP66utsSQ7W2lcbQDnnUd1RNag1SFJ9/IEyUeZmUUNS7dZoS3m1r3cxGKY68zc6aF0DsrCInJXt0QQMQ5DoEWOV0HfPiywJqhBnoRvqAy3Z3jEh199NSIQfj99Bijhs/i+kFsC8MspLaHUfStdNnoECQ5Lj2cKz67jRo3jfErixoH24gqAawxyTNyylI6Gw6kE7NWT+WbfTyphubNZlD/0ZbD3pTRBUcA5Z+R+3UpFl5GqhP1Q/LwnFQ9x3x47VX5vw94LB8KmHfbA/pE7bVtsWPtOK/UQ2iTHdgP7AuQo5dlhvSBU6HLQ07kN/GT6YD3v+MEbKaF2XKquwHZri5U5gX0MdBFCCvgtgsv/7y51nWB/8AcfFI2tXDXnHyuY77FaJ0z+mr2Qap+qK4okqqj9VZz8HJpVGTNsV63JX8DMqnDmQMzOts25aj4Lz7Bm6enAnhq9qK4Q/TzUTh6NNoZFswWGBylf1LpGdbwenPqsHds+Rw0WsYn0yBQMOiW5pmBRzG1G+eFCbQBS3JyW0MRIWFDybOrTCZJMYGpsk6daEQJixnCqBMCrKJ+1jl6UtjeevMn2ZdY9JhwuwY6O91xMIRceqdjzxwPgxZA97TaYLOjZExO5fzumF/Nk/5koZldMBYV6jq78rzfdTKTGPQPdpq54ld4OXoQ1j2nIEeRG+mvIgFemq3ufr9NhB8UErQl+GhLnyE//PSpRPEDgl3Q6BRmQxkThzWlf//GHxrXftUrcYx1t6/N7Aa9qCIeP3S3t+08nRioLiI5q063Q8eMExWUGbQ8V8fxe8E1pMd2Z7Q7ps4r8w8NBW37BaAurBNrdJiTzKKo7Gw5v9SOpsRp+7KwI8OW4wL3/VRcEQ+kHiAZig7uODFGyEtkNuRrL2Dj76w4KMfbdPxIrXxlJh6Nic0WmQQ2IibgewkZHl0K+HkxYm4zeKW39EnKcD+hUvPV2x+m/mAqdb8Z9mR/++i1w1GFPUF2QcSgByMkJ4c9a4HE05EJfj5PVX0f2pQ6gJYZX6ua5wm05Y26ccukvHi/0Hby3++y3fUMv6zkhQEMdztuFotLK63Dp+MoY2yDCkj8oEQ7tQik/G6uRxSfwneOn1pYEb3B1aam8EQIJDgrmJ17tqr3Fx5hAlQRVnt+vj2FkHg1Zj3+TL2iTHtstJY3nvQfiRttRvDKhy/U5SKHgdBDLGvrkKINxygZkmk0r+9EGiXhdZJzZ6hUGMFkQkp3dd+G6hZEedwNxwfnCXRaefAZY3UGzcrI8Tj1LwLaGSaaGhJoVD54bZhyHAdtW4wHNqBX9xPloaTdX+IiVQM75GByTkPb+XskM1qQTfunKleVuSgZrzzHPejMe7spVKWG37/ObMpE5VzM06u94lY43bm2j2ymU3Fh1DP6qiJv3CIJVOYx+Nkt1pScZx4VrAcjFGISZViSwSs1q1bWGJyfH2vtGBrWl4Vd7sJ0yuaa1Qq4swF1C8rcFoM70NyMuirx3H008ikBNPuCdbFffWmlFP55UYp4ioNuv9+8QuejWOKh3g0X3BFNEJYtQA9SunOUPL3n0gO0EhYp0ScrypSrvCSS2bnCuaC01r72WJ/0Me7/9Ic1YEVuo5TiS+OHZYbkjaq4X5jRCxI01YYIYOc78cQoLzOQYskxwfRPZpARPFysJGSHYq0ew+ZMXOhZ/vH2Nbq5JujxlbtdkIpkvBReMLIG+K7f8CC4AyJFyXtZWyK/qBMy1t8co7EhN4kzK6HJodPv5u9/4s1MRTmAkpUQBX6sfN9mn9ADQMYsZXK+0qYyJ19KP90FiVh72mnm+bqh1lf8Vbjixjd7AP21ZZdC6uhlqlmXavIuV9uAt0ItzYbfwgeS2pKcUae+JI4w92HzjmZGcks66MiMSZoDzT5rDYcJNk3suBRKtQtETUjWYMF3Wn6UbvxsnJFAnFsyUTEB+ArpciUsEbHTUHmlDigCeggwbcgOUtP+kxxuCU/bForzQ9lxS+/JnAOOGcuB7Afu4iMgkevXxbD46jojpj5h4rd+TZ0qIkQl/le8v/i5je8gSYKnuM3c8Hp9L7u8b5wAbTj0x0NYUAXFwi5XVinfGaYzE4GH8XTlMfYZ/whoruv+0AOTz8g4fN/jhX4kUXBF1CXiIsOvSRjHb9Zkmv8HHAx+ACBVFiFZFIezipxXnZJ0G7SovwzHjVrbfRyhBgzoUFsymZA2fnFNoXgEUHBeC7ByzRE6USYBZ30p7OA+5Qg59ZqNWHVIW4+COqUNOIlt7Pm9Qp9jy/tQ+7dSp5LTQQ6c9QU8TYeqyONm9CfYA9rQTWue6VdpiS0zGyU1MqGKzNBMFph4BZuEOOCc152tpRbbvGA/AKip/PO3okpy8RzFEVekwPRWyNebOBNVTGwc1mQsVnyCULhC5yOeKT+N26cmD8y3XH8bryrhMKG4wW2WkO92PjuH+kLzzgg5lPQzf2Wo3mjNErTE79H4vOuTRprxP9kajB66kp5X+HW7T0ksNvAT9Wp1VxePlS/mQeKpAOTQkPIiQoWGJtgzaZUFu0zIX2bft6fQdBQ2sRNaW1syz7lEVruFRkQZV+ofGTCtL4F/Lzz9ghBbSBe8N9iETLfxuZaMIWmht/zQgM9sMfLGXWBIFIhsVCnsjcRepP2lbg5xMAdWZxFsALoAvU/C/P98c/48fDiavLHCjbDWFpm7klyxju3H4b7n5MxrNQsNvmeJdbwFVhrz6wnNRt8ab8TBYMrZxhrU6B5n45eSI3fOdMcJINO7xkyy/GRILwFthMHzxl+xXnaP+f55G4GhGEPpSiP/KopX6HzcwamYh55c1eM6n2OvSVRy4uSOdc7+KIRLOOKGIcMX1Jl11Cjkc0b4DB5ZPY40v+rJaVNbsmSmQhVOpMnY9KI+IHPMsFS0muqd9WTqfsIDsPq0MyhgasAuKwhpJkwbdDOPMiWwBx/nhjNZ2CFR60KTLfE0AYKzdDa8NAG3xR/pXbGCgUhIxcuRJzS7c8Wsy5+I6XddlFOhuiVb1Y68ztLOk3im5BDv5qT+tXf0joaki37sBIte3eLE3byL+ASJOO6Ncd4mv/O1tZtk7FwB272KHIFexcYcNZ5gYgsZOutysA7xNDtPiXOrMVjoyD7MJ1uLyEhJMtT4LYvPdwuvtHD0nXf9N2u+Wbgdw6FhsHL2SB8VQImrl/jKXpSitdBTAEmaccPFM0YWeNPaziM7TFMHuRNw4tj0U76sfGUnimIUQ9lUq7U9XGuGFNWrmlP9cVEmewwu5/KNdn16zpwVtRtfL+1mUQRBVNxuG+7F/6Zn/vmNqjFBq+7OiE8jwoModeZnpn7JwotQqWTrni7B9ti04q3eDAFT0sdOcbUGsZQuaPkPPcdf/r02+EO7AMUpBB3CL3wClikU6qfAqEP9bXZxBoONicVOfJNcJXfalKsYlVFKR
RwhLIIDwGr4feRZB2lLK4Qv1oYeGgdj5xLzcKj4NuNMnEnZYecdRhxvR9OrXf/LQkmcTM9sRLTj/0lMhyJiK2XNz/4yi8tb92saZDippss288IddM53pMn7Xvo4BpZtX2LmNNCsa9Gx+8oC65bs0+/DSMHM/bDm04Z+MM6ZrGsdK2sNp8PdIMq2vSAUThDcRxwCuD2++qc4DlnlSRMTLHXMO2r8BlutA+HF8PwEe3tDbc8CzKqrzkYqAExDvhnZkBDO1m3K+rY9ouTtgKlsrrXAgeLqMElLMoN+aZglv3xL5icOxdj0rBh+7VvMNWsWBAUq/ZUlFY0JDUpgFPwiYAnyWGAIeE1wSIRCBa6MfcwN3RfNNMzRtEr5XXsJU/Fb0R/SXf1iMWkGrEN/ac8oyQphuPXwHMLmWl4DDXM5rAHHbEI5L8wxlhOWkvLVoFeukJJgwRTV+9uA/Pn7soA8ZG0bMUkpjjaQIPJZDXmZvYRQzZwAU6gzTU+IpMgE/Y4QsEI+MO5lrURQZUtbheqah7XnGdIrUpWL62W37VB84KQj5Hq83UvvbleVduJwc55nuiWQ0l0fQ70qm796eJhBYnIggEoXBQGh5Zd5MHm/iQNBd3v0Y8heLvy+vd7HIC1W+KMZYsGFXn/8ZGelKITw0GhlEW+eIXf+Vqe8gToPZijeOziGHgchiz9tL1fdV3vB0vGsFfNme2fHi9DoGRIk2bvXq6vt47kbUz2lxAGiPE4BgXlDEYvIT7g+X0IqFmqzOe6ThIe37bMtujMx5JT3W63SUzwqGyh9pAehtG32me+bKhhnXsi0HzHh0mitTFDaW5KnNkLdk+kIeNvEqdBmBFiyEC2Kob9ogi/iLJI/mkk3iMpHiDnorpFpHEqVo3n2TyWxDvXD7FQ4kNkO086DIG5M5d4HBc2AvFuAerkby0u9o2Y5UPB7+Uq8xyFmPyhnRMh5yDet8I//CgtN02/YhVC6x1S8g2fVhEHbcLDdd7MjVNv1qz/y0YU8WPJcvkoVi0XGu1hZlHLsTM99B6rrBGWqJANr/W1dJlLi+Uq2tUc/cB3vyKakPDJ7/4nN9Bm3ySSSLWGskaip/no+sSY+JZgH79w4e9bF+DZrAcfATQOu/YmH+4ryGiXFPnz3vyntTGChucUBzxOqxdzlHuhqorw9aW6f4/lf74QUAhKMN3VEhs2zw6dwUU6Dbj7/zgOsrT/yl13FZgp+XlbCeqaDZOR9zSAavrSRCebDzqtxnJTPQ+wVbGYkTrLP0NMDMybDKnSm73rNl+m5GBG0LapnOGZMvPnwe0lfLoCeSb+VE3rs57Ugq+xsjIJWdKNTU6fPK8oCR4KOih6UudV8ZUja5RptiwY+D6V3OcjuGUJGhjZLjTFUpDW9VbDUhsdiygFmYcuEyWQWcEKWZqFk1zaNzUegx6c7UkCBKeVQXnKPLGR9gT8zSiklB86VriIxLfWu0x8BZ/MUyyHnld6coEBrZneMTA7Jt1AdYhduQ2aZquIAN/qRUNaSwkP2JdWvDfHOw7JXBRv/TThFUgw9E9IeyGZJ97c+Zv7HRoaq/U0LhDilqDbxWC/jp4YYR+Fsjp3kiQo5d7gh/VCPlwdMvjBoqN7AvTzmJAc8rCaOfxEGuFskN4KScGNGtvjtz2hgyrTgS8y274VCl9OZFrbmmY+VYKxzwH1qbP+adqFRcZMQrh3Cy3STj4msQPavzK6RxFIVWuAVw3gplBW8NYKaxMSyyxTsEvPSQUCMkHkJ6NqAvR4RFbxn+sa0udkimY73aj2qbBuD0v4hvLD8f8Hs0Q5NTuT5yHC4UAxQLw2BGKlglZOdnYZQlcYbiLMgsILAKydO3PowZqT9pY65OC06V5sKhoeLknFXBF71m9sxMniShN+LU4OmEpt9ADSXVhsMkaq/L3Mqsg8f0XiF2RevGdnr+XGKk/fUy9HpCeGw1wOsKrDjj6AqwONTt7zT0BBLwfFnLZn0LkYiZczpUMJJZkLLQK8ohuxzf9WhuWuVODOOPfF/ohnXxAGS7ulVhaAhHVztyLJ50n/n3f0lTVIqXdKAQlXywCvdxI0kalJOWdJ0ZmStc0boB5UsbE+6LTHXifPWABbllPy4oTOEv4FQw/oqFJnzOzDPPmMT/hF9fJQ2ER/YXgyq8R7lsRdzZAsNpGovPAXndm/6FLLGeZ0YCCBWFsGDo2hMDl/UJJ1cuBdIWbPolAFWkjpKZZxZWhFx4oUmGSXYdWEQq5LjeNBZyacKtSq0setwqO/y8Vg6icpXermk+UWvhTCiSKju8vr92gb8NYaanNXzr5V6KWfdgOwmt6eOdqR1tz13bcGbPjX2CqrxNMzjsD8rWyhyx7ThsPUionxOi5NnbwyDV2APHXBzuaPN0aFUEJ+tAZacnDUAaXfqtN8ZmXE2JAWJLRxW+wOzvCORF6RZlvwtvHBysmxOVirRN6aXOlIwQf/kBa5588mrI3UFPjDO2vtX6bAiF6MGK6/+9WXjY7OR5pU9rYZSvSPMw33tgiezv2PXbYk5DsQaoYTvI0SOhBxXlUhWXJN1ELhWlo/FfezxQXUe9586Dwi2i/Aw1IE176HFo3415hNUnvI50TYAkD/t44rynVzOwf+I9LqcauNmNyt64km+sqdGGtIH1ZspSdudSprsnYz3qBueXcPW+cfhtNa0f7oe1yoZTlnV+foBH/VYjGWwsUG1GgjSHxNyaGrGapqgdkYarLQTpB62sO2feSv+NmvuQJug7TXszu+zcIqk4hEMLVtM+iNUbLyhW6ICmTNxjqbcBKxhp/o6ZPa1EFbv/2Bb8FTGBTikZbxfcarxPeEAxFMeULz+lYmo1R2WvpTUMyCitEpQdxSMpg6qZmfPlqEuPyHLfpyPUlluzNh3p7FpF/SSF6/oMNSxbG7vaDGJpypHCxr01bdcfMFujN55RUrn4+erMLKBFC81kvOEDXh1Q6pLwKRNHEU4MF6FV390lwmWH4PdqMUvwd3lItZ+UP5/CKc4qJboGlkzPUXE+nxzflaYGYx9YxFJtqL4dZF1eho2umVN/ApLhfrf9nICMzVTrYj4NwCxnuSvkVy5jLPihd9t5OsJ1jfWi3O/bAo9P6/dwDn4gTNf8605lKF1ilWVdqYqbDS+sFRAUb0KsHDL8c3u7GdXEuAnIxRVQK0z3Zn2T6X6PQhZA2DSu2TCTIGZQnLf6VZIHgmibuE03MU+YBFizvmq6IFXfF16khiLsVexF+exp8BlD50Eskg2Qw8NafIPtCal6tqr+rj3r1gxzwWMVw6KibENgjpdLatOvzGSokFejQ7BIHgGt8HxRW0WAC9Z7/yqtx7rJtXMxJAJ3VyR2vlgfsgomBfT+YZ/RSKvYsCWaUZbYg0INrT4klti18P4bPVWvQa4IXkjvNt/wvu0NYhRq92v7eWq8YPcbNZ1Vqke9phj2DUpWaqGjLetjW2NHkOoTKdC2hP1BX5VZ15IRvCmN3ReioAz7DXc1qPi56A/VPG10hzP6BemQWAHjSCgyr/qXsNS6Ya6ywD0e8t+B+k9Zz5/OshIoQbzUVWI88RbWTF1x70kiS2AcjBJVF7Y4qdgJwPvmozVooUESrDxJ+xnsE90ytew0rduDO7EeK3d5F3vBfLnw4pEkGd+x6Kp5kVyBgE4II38FpNP4LuWTCVQIJZcX9J8yoIFVLVYgbBkTAPMskKFtuGJAyT0qoIJPhcBFnkYsNkaW37Fi50t+OsSiQvQPFL/rtyu463/vbnMkjK9YWysWaBeIZMN4o+QACdn9bCaGoKRKpJ/Dapp8pZ18H2agJchPDYBUQqqh4uemPckbm0f4APEjMMYVs0gOANvSL4RHdQJPalzpZBbSm63anXx7vPwiJEqfgVhz2W2CNQik6YBbQX/oXwI0ajCfEvew91kKFtt6CgoEXXTsC9NlzefLAIP/Dupdz3Ny1dgyhwUYlkcu+c6iSFIfWQl56nhRWlbLHvJYv1QqMZ83c/0yCCQjqzL2EwgiJa175ae8Lpsecuhn/IXBtH9DkQQEst6GV9VfD54Sp9dSmkkxesC+Jj9yqK/ffFAYXkMIsPrJAWMgW5IwdLvcazwt
IanDFoc6L0z1Y7efWm+CAWuhD/glTtB650nB/vciviw9/6DpZMnkoAH66ZFJz+6sRM6CawA1QwRpumWTQOqR5/X4mvXPJdK20r6PWwGo/VpU2XbG5rCbAEgtIn4qqXrj5/F6oz42eEs+jK/6sogO24tbfiLo5RORk0zHUXJhmZ7WqqWOHTs2IhMKb74vGD57fNjxyk85hHI5oC9YxOWMO+Zj95kQ1LJz7buW/rmJhSM/kEqL1E17OhrviOQGFVbHqfgSiU/qK7/k68Q40TJSv0r4wHnKyUUj9QCOEPv5tuivVVyWyvUS+Cr5BbNc9WKTNf2uVuFQKeW/6RKCiYFTEfWK8FvlmCRH1xNBJWRC2LKUeqHxPZ+Rq4QMpDajfeWjh9Qhb78KY3wvmsTomupoDeIJgn6DlMoMTyXcQYyHw98TpKdrc+Xy3G06h+oCPnAyEdLC0fUEPhWO8GA4wuzxjz9lo5QBLxgVFW7DaNmzD24zMbK3GhQOxfV5QYelrwhL/HoMyjpV0+Y9DbwOYqrEpFqo8c4MDUJRT1i+ATzVhUvUCfiwH2DitkUZfTrEfsorONp/UpG1sBi5M8yQW0tXHWeW7BiAMMbnVZ+H1ytRs6P6Cf+eSUnJnl05kACof41biXiryIlybpIsezrxnUU2TG+DxRpdrARKe/NGydIVzpsp4axhPXV/kjejolTxMtULYCthlp5Lvi45ac8PzeX+kQBy3/03JHyftOK3yb7P8DXcTp/wDLtKiRjKQhsJAhj0hbLkeb/7M645JnlgNHryYFxCUVNBy3Zg4xVCB9SccXVZESZlcPzgjb750yq8lN9Tlez5D2PG3h0SvZY4RXwJy5dPFJ4dLePOgxnOfg/BI8U9DO2wF/Yf8+PQjOzxCf6F40YqkGjaggSDLV/XUbXT5q1OPN3ER27/EVwf/pobYRVu7c7JyXUxUWiXANa6ZYrOucILopLWA+Pb+qXec9Uz0qJsYoegEQc4BT38dxFU2f12JKC0N8aCz5z+rxr5Oy7HxROx1bHkRSe3pYwe4QYlpIyQy3h1clDRnHkhvIuCgPgITLbpTYTwvTCS9a9iT0zPgNND0zyLvP+Ns2d/NmI6inSCOvyAiudYmyXODPpk5Qv59AIX5SW1zqlU1IVw6somPV96xxx5ZM/0o6jaQAr/pL5XYU4dFXXy1RTflAr62HJ5VLfEQDpFg7md9MrR58R7aFi+aMNXYdP9h5ceFwSHawkyCF2AQi7i47wPUfea9dc9B99gvdvXtoUtUeudMN4O+kRHZEfDSrqOAk6tZn3A8a/dEDY1EPX3IcUH5jRUKAAiMWXIuONGJfbKEK9FoCrqWvVGan8LlM5FGI7ZRrbIvD4EnRa+xLOiB3GwvRgYCz6pHNZ3itXoPpDAUOdhT0Fd1G7vh70j3NKGnfl+O150lhdiwJXJvI9x8ytR6cNRXWt8XpbQWq40ht2KvVMLit7INpeJmIWz2lyBDok3onWQHbsE2SbyLfXXZwcBs0WdXT58KVM9PdRaPgU86ehREDwyIr1USNevrfnU/7FT9Gw8LF0ccQ7u+9HL5tz+dJJ34Vqib4+9AOVmcDoKUdA7hkiJ6PY3u/qm3GB9KMtlWMVDWUN+X8Bftwz61L34MHeAI+as+U7kZnBUKz8ebChH/IvA54AfLAM2+Sw2C9XPhkfuxUk2NiANqjCwm2VyBNA3gT2nQujtwh7pMPQ2xG28VGD0DbHRNAbJA+aJYp+KN/Mp/+2yP9bjpzMhlffm1muQQX5N8vNHtqnCYFJy5+Kr2c0GdjYBJ9TDZDlqwc7EchMCKHB/c+ylvog9uouHoXf3adGBUMw8Md9B0W2qKbBYlYWDShaYq9gtWiWys0ksz8+31EyVy7sSeaxM8Sh7caz6wdMsLrTxwnbCkAzoQjfK7hkACVb+DfNNAv73SQrIBurkSmJu0boqxckrosMgYDQgweoqJjDT6zd02g9CYCBXiBAahlaWL3mUDtxKNNc3EpPeH1Ws1tmTdDiORGjeieTgFbDt30A65Cdyt3x6aUcC/v9iyaItet9JnFBva0HwoXNXtH0wP7TyZ3G/HxTsczBVFcxP3dqANX0HRr1b/UTZNerBKXeVRXPfE3r2Yo/hFLXAR7MMvY4J3RhoAcMhMs3zo/4EfF2xAsVeoax432vQWUwNOINKeJ+FbvQ7LsXrTN5HKvDlh12Hyoeg6gDvshKYGIzH+b81ycF+CWqcz8m7LU3K4ATdfhLWpVKgkwRRz8Jq14i2r1k1QwzgAi7hjeArl0RZIUnnerzdX0F6cwfRe7dk7svwQDRTZ7XiK060ltNfnCkY9dpZHy6DiQ+yHzAa6/4catxR/PzkLP6tj2WDdEObBRN70QBwGW+GETwFMUEQ4HVDI0hUfgcHix7QSSNKUeC28i19MIzTOBJOfc6ooE6D8WLXr/7JrgcBv9ZMEwkTTx1S4lAxsJoIV6JGQJiZAtpnn7M2Tb0+/qMOFOjZJ0LUZ2zP9CcMYB0LAvcg4yhMOhtMlxjHPkn0yGK65/JFjqR83QByK2EhQ8TbkQDANmaSP397A792XuBLy84fxKurPK19FqA9lmV4dBeWUgsaMoZQA+dm5JbcOoO5wCvLnvyXd39lGNIpSQGT3m728CghDsYCxlUTsrLP1IWEiZkYgqjS+BjiECAo+g2zsCOxX0Cs5f7cASwCstQmA7lsEWZpsVpOLJkB8IXvCPXPgFw26kyVBzctQNu/SoPXEU2LdhUZ17ge/4DMgoMTy4iBn2PhzIZmYbejg4chjCB7LzNON2n8qbWJpVyKGRR+fVhvV2NS4YguXYe5FxpYW+UVjmpv/XVyZNSs6v5sICTpuxVq5ulLSN0ogo7nCmS2dBZfFXHDflHCnlaL3cigpvRjSMp4qbNdAG785fT08j1NLrsaA/3+7saaxVK8GV5u2kkyitKxQdUOHeKkXxQkXTp3488krEMocpRundkvrRl0weR+V61O0Y66vliCPYCutzogCROA36AjJIgCkC2Q5m6CBN3DT30zWtwaXjS2F2YRMd8OuAt1MkcBaZ5hy+AdehJQeO6SwG+mrs1PZBbBeKkwkF5XV8cIREExScpA1XLJ8z5Nj1/vOeVR2PumTzYbjSr9GQlB3LUn7bBeevh7pBFJlNFUJuYBtLLiIrqq8do7uXAJvzaJnWdKLLMZz88tZTKLSbvmGcxA6Ykv+4Q+IaTGXvXt6LB4WOgmcByrbe31W8Cip7Z/1MigannpOdP8igo4USL8OOupdplNJ0+ltAS2N2eKoq6o/sl/T0Mo2ubPn0Vkexpq/rylL64WIMD3ymsq5SfuvJcMlpK3qdqrJgjFys2CxdBP7IbHj5ksIEvuyzU/6gCMhJjNmtYT64KVCN20ZT38bXwwkcz2ntkR68G3aw/m29JH/ZqTdnI72THntB1bG5UK9C+LzBYL4MHuAq1E+P0GpXsGA0jjRnpTtD1Un2rUZVS8YNkkEdXdjPAokS2ZV/fMMN66WlzMopZd7NHtg3JddB1U5ErMURG1ly2HhnBJoVC8E19rJzttz3FULvrqjyBG1vphB1N6UepfYG5HeUwsdfkjl061ytIAx3JxtNQe0/GNQBQ3+xOSFbAOiTPn/a4/c2d+jG1Pr1TKlh/iSlSjkYJOaoA372XNbKyMcOg/435ia6fmqB1e00Kc3P7u1s3DMHUPHvCAjvNhrMeKavwrUWdCOYmEZvX2ujFdvlPy67y2ZmGvfD30n+i/8YcWxGJ4HFUdcNIjv4GHwNY2GgH+Apr/KkRvWruJ7yE0k1hxslwrrCE/jz0+7jOjffHrFs93/Hw4v8srhCnxvkZNoIPVCO7w4HzfgF8op5/ShxhTw0Ty8MGwSgVteTj7htxFD6Lr1h+wKDroOZD5byjo0+2KLpvzoXLIQAcekMbu2zfE2ebc0lTo2bnIjj3sM5d9lGjw3v7O2awSwmPTCLrHzM5ptfdoCuTnk7WGNftv9K4wsMZ80THgKMMUE/hhAUOqm/bYU5LmctswnJtmdz3d6h6c2XXMchUHOKYXe8kl3uaQ44q1iHQk5q4gLVGmU7Wx6UJ9TWR5XvO5gddqFbaIZanU
QqjscTWugWJ/QaE+QzredrFMCoViYUlyVtWSVbE+rHJlBlID1AUojllIE2sy8TAX+T6uxnOUxuQAWHeAnYvSeWQXkI+lQUrqnQkYJsdBxr9Sc7DzM6Joz3IjhLvNtlpgJ4vEJk3bEU90bQj2v7GXp/poqPeRoP8EpUfYpv7AKsq/gnIXHF/66TVj/bn/nDPpqpDR13aLz6Pz1qjvmbxDhZGJWcX71dUMSGsjaCHS3NS++yvUXKtAKZZqfHwodnSQ36aIu8vwSafarJ7iUP9Va8BrpQMOC+CEHJeYEq3PLye7kiOxB7lyKizaxR5Jw7fk7Db5tr1VMrqtTpSviuUfdl0Cnb5BqkDryDxFfAv9bQlfCV2utadqBM9GYS7JWcbneqHzqA32AjQgFFLsCbYUn49HTjhcfLpUP81E3ujCfoKh5tajL1zeK6HyJmf5LLXGCrKSSMHvRR5JOydUOsL99514NmON3WqyyznK3hIatMa042q7w3+yIq2+e/VkVAQTCBhcqmjMNVXZ6I06PiZbxvrls8D2nhcdqlbggoJVsUvD1OKELxnjJ8OiLDxz8vi8cJa9RwH2Y9jKKLI+9O6aB494omgih7D/oY/eYwqQJaRRUBFWeResvsHYJBB33yx/oZ0DF/L3En5xMkDubzNlpSWyUh/J1YCE6I3UxvaCirDQ3uUrK4xOLL7FjKJDbspq2UdbjCgmCq3UGC+PKwJg4b+rTFkMo/2UdQxzJ7ghIdLtM2BpAoC5lt5pYP4/AnUlqAHOxhVlcjosfdNNgCL4RI2ZgDb6LCNu9eStuXnC+hR0ummI3oNTyTR88VLxpIz9xn3YeQnDLs3bfs61xRFc5dlY+/6Ys7SOqIXDAx/TJrV75+2u3PrCvXFm3d9W314FRQiOEbFQI4uHAyO5SIUHHiMFi+qfIGaNRI4ZAZ2hBycSZkN2RgbjnVy4xx2KdZ5csottX5f4zjac0owxdCBC7M5v7Zfc4bUJJe0Pzt8GzG5cMM+8FxiIIB56KnT48iGyEeBM4C4eodrcDDXeB+AQ+eUiKnkj33G43IlfeFhD5U/PVcsTkuc69eSqBCi5ifkKVzjRHkRUigvjxnhVr1VzQoogRLm8EK5LHveE26kjzwFg4Ab11BWeKaEc28+9c3Z+H9tPSVcEDD501kHap8ocHFtr7klfCrPjGBogyEHcP1b8npIuIm2Nkk6GATZ2GVbtbEdKTy/JCwsrv1Bt8CGeoiAbxHzo++Jgk+ugPwTAOBuvJg5TqNN8Fj5AEGz99vx163rYi+6z+C6ZTAE46iYqODohoZ9I4apAe2Mi+wJQA4hizat0u4vHs5eNoEGHQG952ggtR/uZdNM1WTroSLKJ7Ra8y/tv7Iq95XaWct+jEAFm9TA+pqR1mF2BrOcO6pQm5FF9NfB6iy0NGuaCVccVzKp32QkIegFsTIYWG9uyNyCSv4ryj62CVkuBVWDxLu3dYN3KLsceSKERO8FjhVGEGx9xX57MZ8zUYe0iHfGfWh09GMug3hdXgq9GSYY4Tsj2cF5YwxS0vJvAu/d4inD4vCsoi2WIkHjiRL0bOWbO3VHdVgj0JD+z7zjAxuGwRILfEP+aqcr/XU8lzJl2cta/fV14Bf8CYyt7aFU0wxpYvH/F9pOwI2ah0gwsdn1ap3MX2939mu6Ozs4u2t3JVR3oUwCTfNwAh5QEx0jed5qYeocb2jE2L46DXiDOgZWcy/mfRxoyGTv5HH0AELutaRKVP8rq5GTql4nBrFydFdp1QPgETzKgnJ202GjTMMNrLBZG2CRw1qkFf3wixW2UYZz/eg/LMMI9G+HjzrpAFlw/A73VjuwA6sd/3LG5+W7sZqmaXGYQ5FliBEwkbCbp8iJ5iC0QoMUBnQBYcIVm+02xkanuqVCWqpzDH6bn8bUvXIvUHsGlyliCtj9KjKwoHs7aLnX/IABDEz0D/knKIA+UmZZDgv+aPhq3hUO+7YzM/DXlKidSCyu+fqEnPdKjKL5FK0h3g6wMVA0BzgMpn7IGJEUiD88x8VHaktJ8XvpDfPCFX1v+Um6YMSEw72MzpymL/SnABUmpuEWlZskc4voUMXTm2j8np8OBVbOTpO9dXCZt6huSBtNpQz+FBqPyPbEQNXURQB97zMZKC5euYWFobHshqdCQJ/RCO0DvOGaQgY/NBqoWooH5kpFnIdHreZHwYzlelnd59ln9wQkMwPmzp3B3HER3MB1mB960LNIYuS5YpB9+PIlZd0Dkxs3PSdDH2iWta1LKUV8+R7Nm0qB/Hhv7nAZcvXLT5+MjMYGLjCk90VrNNf4RrW44ccqHcO2bTkCUqVlD6FL+WwYgzGIJHP94hz0U9YNWJ5G8o2mBL/hGL8UA7a5ftrx16KsnbnVNPAav3rLoNl3sQLTta7bGHhrxFwZyf3qUV1eW10IXZAUgm8EYFdMyjup3OK9r0d7yih/GFH7QFAagD8Wbk2CQpLY85qXgviheXa0EaaqEonp96eNud96y6WnOWXCNEl+hI08ZEkH8bn6tSXpO2bqlOXKfsA7BS9mYzUdV5cLU2Iu/5oF0kCnDjuMiydGToWC6pJHLNUkSwsa76VtoSwBbIqjywrGYr0fopq7Ahz53FknbN7XWNcc2DtNjCEIWvfsF9i+aNqQSkPap0Vc7c9zehCLFPB1zTn5lJfVgZAn+P7+iOoDRCpsgFNQ96B2B1Lw26YBu5bFX83SUcj9GedhXa4j9Tc9Bn+NerZisbVwxwT8kcFIr/9cmJsZIRYdNZ3M15TGu2Gb9kFvfXCSadyg0RQnFNYKTb9T4+aVOy8qn7i+xtMy/o0FGYxNuJJTIuSJ8KxaIprWr6vPvZmkRo8xEyakMnKYnfhYzSxJepVAXJiWhcPd316v1BTOK2UtTiX2Wzpjur7p4cKxR131TUOJptIsRqayjHLqvKCZuFNGr3o52rBZZOJHcLThs+C4hn3MQnXzJ/YqFLfTbxr0gz9y9ZAQOGvdjED0If9sB5nudjS8GnT27GDZX5vLqHGGtOl8TZb87j4NejCCiyzlfACmCsNu3/NFfKN5kb7BKmkvWGZO2USQtv89gMKy3NMOtCt1IZKE0w0B4ys7YWokUpzfU7Pwo8qLsvtyvIXu7yg3hBbcXSta5iQnB2FfleBjREB1tT4IBrwwLtuvyR25vW6pew7JJyA4tjvPP75pqx5Voc/5Z0J7vbeAmS4FjcoxnUr/dunv5OFucXskqy1SQGMfBD4sk8V53X1SI7PJqqVbUZ96aRJcTmykZRBn9AH+Oi0hyLgL7Cs6OInfJUPREf8M8ohYX5CpM8kg93L6j8cGAt2qsUvhSuaAwjoXlS9eVHMB6u4qm9pFLbGrKVvPW4lKRK7kOAQrHZ8TQh596kfdEQHESkGdaZB8F600N4HvmzRKeiwbmvhQcCkYsl+f3GQodDl22yRtcSYPspmmfELXHIOtcO6v+nXgk79X7NgOuPMZQU+U3Ci6ZcUVlEluqfVCZYWLnm25LB+AIf43NDdNYkrf/Clm/9MwXEGStfo4BI90AL+OQYuq/jd3zMGTYaFJPX5Wpc6lytKMKfpxm1o5drWp5hT/b0aBI+ULcGjN2I9oKsmezzlZa48FkxX8weYZiKQU3FFwbY9jZ/wLRFP/T+5PJdhB2FkuOW3i+vkOwFIiqUuw4jFPZa6aLZJ/yrgNvXXmDMBzsB1W5t3JD/VuDaoBveMYzEEUn17YQFnjMKGncZZPcBkW9jwEdfK9bCBVzNUIg5/zXNN2lgcaytcznwuhqWjjMG21q+7ZHJNfAvjeNVCKgQd6gs322ft1jKQpkwl69c/yH6DabrCXXGvRImBddrIxUkgNz2go4Q3JHcJseugNYJoeh+yo1jy/m98Q81nwhb08qk53zRvJ4mjRBLX2dB1xRvPwxCBdAn4trP7yjRhRdEact6wUio9dmm2AjWeJ4JZQbau1th07NQhihpq3VZ908MnNEr/c4LM684PV6ihfPY7xbXTZDsSWgdecNXQqhzrAsT5DZ82OoXPjN/pt/B/GaAfK2npJ51Hmtq7s0ancR2JfPpBy6dr+U2prldhLsx9rkDY1purhygdz6iBhq
usQSaP4Z4U3vRHx4GDNFWpNrU0Hl/tQpAuagRFU7xr8nz68q0OycOf8QichrtlB3MUiEP4csbbezT8PqKU5dVsYRDUT1tqyIsOomPm2sCiTHqh+7u3pnG3elkhS1vPRKol7SLTf0v0XI0w34MtWsjC2dNA+dV2Fg1RWgYruw7ulC1MiHJkQ8z1iMBwPf+K8qqlT05awseckE9b9lLevbIDnVRZsCQ6F5gmHtY3OAXghKPeHZHT/LDMU2DivdjRIX00ocgQaB7MHhMFEKE8aW82pkreDPb5wvT+5mr4cxRMZ9lN7od0UgqCguaBdLCPBpzIoCa3Z2GO9M4RGGuOjr+jA64y9izKJD2N+NZoHd99mkvzTCeO5e5EOatWxI5zKIYsnqhMLAsBP6ZdbyI9rXxTlhSGcXFXq0fj14btBewUMAl0yX7gU9J4QDfnfSK5XwC0eF1nWTxfp5fJ81W2Gc8l571ARambHCW6idXTW1Xi2MARsSZxp5IYk17n8LD7JHyNx028yreoBE7dzMaYl3CiRdvFuhZ2pT5N5Pdkat5wbAtJwoRpb7gwTFTKUE4IFDRC13494TipjwVnv6RMSSUOYsr6BzWjSq3/OEDcBWUeeDiZR855R0sZgYhXIhZIky2tDKbz9/k1u8n3kW1kbu5CSXxQZFr0whe8BixLjToBhW3Yipe/8/Y+Os618ftCFKugwiho+TXY0HglRcm+c5Ui9hRh+4giR9QeqGbKFlHSuT/+VwCaOjIqmUlxfych4hgHh3PAhv4ydokgDaIuBzpU8cyNpx3GH2Cx7LNZcMHap4wt5bUBsXF1Utjia0gSjPnLWJYh36A6zZr4mYOcAH7uZZeiR2EcS7J3ZWmYk3OfKinGBG1BUOQgFh6F5Z2OPrSEfyinZpf3mZ30nQXsq5pD2FO/PhmgQoE4yiI1POuFh86A8t0LPrTYBcakGd6Pi1FFU3LdQ9NwgNfFG5BvpHN60BNFKtjPbBuhYCqbjTgmZDTU5nqCrdedr5qnpibctycq3bBGm6du287x3Vy8GAgUkCHNelnT8iZr2g0kmh1TbwlqMzbTON65oLwMisjJp1oJFKNaEqxp/uF15pAAgAUf7acLUDnEKiZywHPtwV9HTQ1UI2g3ysi+RKContGg2a19tXn8paQtwWSetm8z2ZuI94/RzF/CjqzaB8ULsB9tlFWi6fOcz6ZBeYUKgQ2n+zaGTfQI6u/PkzaoCH+VQ3CqARRmXuz/4HZzRVVAWPPVvF2btBoFaW/33Ow+6wOGWDRL+tcdZ26TVHgxcAlqdMKCW9JV+jM55paMKN5OZwnnh+om7cvVrmcyCRSPQElHVc0m7OJvfvMUoB9xQltBmnIC3bH+84NzV6W6WB5uKKe05upCnEwglwWQm1Ua+VH5DVKj47MT6igMQX0/GpjmIgoC2JPAeI35KKP4I15/qWkAKf9UNYtmPpvngIjerE3cHNpE+eTrsQacpFunLJ6a2p0T9h4vYcKpBnv995siJTPWDDrhsCjlLM+fyopiZ5VNYAfA6cVZE/AMKowOUZkSGTqCxFztGG0TaA0+XJbTcJIr2KJ38KDW3U2MQa+5l+6GrlWPEh9SOYandk2sZXM1DcWumJMkgEsAJhi39tK39AucqnSs7vk0KKG+RL57aCzqd3flCZFrwGm9XuCdbJeMT9lVf8KLPe62vz1xyN5vIuyiYKTzZQe09hSpm1cpKCy9iu44zC8tWvLu54D48ZBaALCWulozjjHbiDl5bzhDtp90kVO/amSaN1xEqoIxne5zhC1oS5JQXYbklanXpA4qSanf/5GKaIl3200snO7yJWzykQ1pLw15lgU7vbAmeWhyHCtDKstrGbfx4LdKA7RZU9E4/PDFScSPxGsm5yLNyQt0k9HO6F4gmUoognXF79tsuMXpOU5nzaMCxZCGPDk/YIPNIrVS6xfwBPT7goe4VC4wnZx+DT8b+dz12Kb2YWZoI16jI8WHs5sI3dn+ReskCK0MPsdp1Grqg9g4NM+DX+F9EiXB4+MXtpzeC6xLLX2OVV4cxC1gbsKo2PG6/ozSJOyMy9SS7wLK+fs8d15v3kLlJIqYDwPAQWljfyl02YhCTZ3Nu9ts8NxUUGR+8wO6EZs/Aheoi+GZR/4b/jhPbz2dw+Tugf5zhvPCyKbb+sp8ZpkEiARgxVjMWwvv8fzDzKk4Xbatyy57SFCjcdBq/6OnxLGs1+or5/c2yA4nOtJoDneLxqsg5HYRVCOEu4nK60p0v/Orr18fOw2161IbDFrO0sX0OyqqKyV8RmlPbBvLNU+iuUUDF0n/YvgDWabnvEKei7IetfGjc1CVKbZh5BGfMefKLPckvyq+ePq9JA0bnYhWu/n3SgFjUi7ufQlIWmzinkAeG8GMrXOI0YZpIZ5Fm8x7xP4xVYhMli4v5196/QiBCUACl1e3i1r64Pj60IP8V4bswXLtPGSV4LL+ZsbN91bp1GyWQdqrabG6/pHwjDvuGH8xbXd5JfVLaBllvcOtxBM4PH0ced94BLl7IAsldb4laEr7RrgTeseM3ZNoA8aA7qPFpKXcuhJzSZII458eRu5uzvuVzVBblHgKe3wFNYG+30vm5iG/yauWCk+9vWgcFolIQ42N0Gv5J1kHf5KrOO503XgmQB/bOR69JruNAnXWjwEB5M1NwaEpsJAlzKlTTShhRRbr0pjGIn6vRQUJ3tFlP9vtrKGndL+v26PQ8Wa411DR40OAdCqsrjIg91CP4OGjw7JBPb4gr3fG+vbb8c0fchAvY4TTdw4HaEl9RS4QPMEu/1BthxHthSIUagtovXALefYiN3U0mi0nV+Y5XZcKiL0KrSUvakmPXsi1jqg/FXSwsws2TzcSxLu+dmOPykwYqaSMBiObXOSaOr2AAW5vkQShfxvahA1a1s8S3JE9bzBqbK34I8ADaCwFg8n25GLVx26TTFgXmV8spKRWAYMO+SQ1taPUgMP7EUeke+nSeZESXpDiYkNPmI8HtQxITiXJMEpx/YHJzHrsdgX6qHjRcYNoKb676/PIy+B6rbA1M9DIY5ZIOMBjrVxogco9Mnr1PXFjQPW9PStqtv96AvlWEDjgB0vXnJVrBERLoL5i3ff+9drvOhBVs9VV6ZwOMMQLqBMoLgPdwCHfzyT0ScB0qrmePiO+/kEqOxzUSJOWRKzx6Ry+qNJ3/ys/rM1gsSGzg1Cw0ZiL2RMt8kCqUZcMplfbQKmbe6BZ7Avi5wUMfLLU3BZBGK3Mxp1sH0SLC8qpPEJN3eRlWIlfMJyz+iWsPV2wCcQUw3L0dB2Lyu0F2NICxwVRKeli4yupbmG88vSjCo63ouNOZozTrvk0WBZBVhDstJBL5odZEQLWDt9MITGErPFlbhn1Zroe3zRXF6ceylNs5goNaXx1zWAe+QXtQYF1Fnx1DJcZJ2lQ6aiLOzwiHQoTJhBQpz9ho7IFsA42k2Torw4XWlANwtIXBcs2RwfFvkgShdfEvNA4mUxm2PgO4Z3RAcdRDHY0Y34Lu2EUDZ3GHC+Ydy0AtkwSt4ZiLclgFtbE7/y60vijhspdRWiUv7zVCVdwISE+duHdyd0qw2+fD4hxqt6srn2qIUKyhEcoV7ffBTuC6BXy8sQhrs2g0DNCXyYepwwu3TYEN8QNgh49SHU5C91oZOAuj2uxEBW5X87/mTEHfFIG5bmmF9/U+plI2UQI0O+dQAXWbCP9IUbLF1QK9tW3c5TcVc/+lnZaeCD6qw9xx8tNN7M71JclGPYzYZqm+7Yj05tagHKj2IV/BON3wKTJl2CXb9+EvOtQ8SaIzcNFnRt4+6bDkmKxfvwDsVZLeqGwUa3EWf+5T3KynOWan6hrdm36t/ct2wm9vfY3A8ITXM+WUWgGR+mMGn2bwmhLcwFVTonEptLr9gWkjSmFJy9xwA1PvodtgrFxsUnA/9shTpjOJn5ol7Do/rU+mTmvU6ZmW4PdJ+K8rkJkDB2+R3J1SuGieDETifYlLSApDHDIQXuyJS/dnTylt39yUWgsZCvkA01LJc++0F7jTh+/ehEcLBWfHkFTJ6Bg28mP8ROTEc2yf3nfgcSJqOWC8pEOF4eG3u
1rKqKqwezDpq11eWTryXmg6lF3rb5VH8dDR20pMwivVQWPsbRqmz1iwRqox96XWKduQnsY00iSWxMNBBH0tIx7y7HKB4GjjfjDWMUzoiOb2mxE546zkmVVvfcU6hU+caV3YZxK0ir4n0XiNsX8XwORHCsE2r06qO4twIfnRnMsLtOdV889OOOQn4ChEVz/hRRb2ciwX5hCJyoCvfxhgIdqCeLWtbDp3rVe9T06Lyz4AL4ddPcF5ddyKeV363U/R36epYYmOGTmZkdlYlRb5cH5XhEFAbu44bAs01RVNaoUHmxUQ3EvzPCw6KZ7w9zx2hQ43kOWIqKsbzH4GhNVLfdwXCV/fkqidRCmBuQUVvFO7Fuf+l6Hn+2sY2KQ17oBj9Bfe5ce9SC4JLTWKrHJrvdw8egrBA9U8ceMr72xJWHzLVJcmyTXFv9njWyRpVEbY6lDhXTfW/5Xy0GV22UBqqbw4WqnwVKyQDd0p5y+OKvILOQRmCBxQew20leyczIaUgipxb8xRS0FkEq0ryL8iyfiGJQ/oq7MnaKqm8Ub1A1QZE/7+dqIeTE9amQzUy6djT2xfhHu6ci3Ylvkf6OYf/r1T79cFNHPN2rcPDZrT6dsB/eZECxG7xH0lyr/rtlaVSx9zAWUNDoJxEv+G1MaHfnGZoqhwO3WVHuKBVxg4SXruywNVF/9Nogg+wj9LCrz3Da3XfLv3jx5sw2BzEWYNteckT8bmSdVUywXIx6OIWsGuQbsdk+n4iHH86tMx1GQnsniSexZTLy0Fv3dpm/hZocjIgBiwN/Eu2R6qeva2YRR1Lg3zbHoVTal+vsRmiXj6+oJDpy9H3YWGgsW+a0t34IMRBEUIQ6etaOes25wWyHXm/kz6ZbudA46Ro3daHmWHqHd5DglQUmgr3NxDmbyTazant9Kg7nSsLlyVuhp29NCNeDJjbTeCxioUAIW19ycW89dvJGlialFNeBCRqC4XNAeMwixs8rhOHxgRvRVI8+DMlxtFbVp7jQDwdNb2z8bOvKT2hZqdrBwKJ/T99Jd1Xscm06Le6wEYbfR9Ga71nid5v/+8u/VBo7Pjwua/sOKhTm7GGIMCv+uX1/dLLayz/GdXW75wUkxRg3dvbzN1/FgT6NhFf8lqzCs/n0OvoFfPEPFJdup4Qu9/njQpzUIlCoLq5Q/ZKX0BWuwyzMUXTcMU38d5qiXIc5eti8AmcOCV39CT+tVq9YBDsccoyHpVgziQ4Cj4O9+ERFXoEKyirqDsG1txj+AUoJD99SjgGNV5M12/seKL96W2lM8KMGsWtLDH/9ecG7xGj+vnk131A/bZmExSv/BV7Ep65X29nCXORZnTmXFX7Jswd6DwjMsBsyqNGvvlZTXmob61/Qk+h7MnCb1I6HXXwdMdRofsDdzi7ijwx5eIoM9xAQn4VKa1nMbJuvWxOzR6hgala7y8hy+e3cWYIrOOH88Bt3lIQBwQSDRTEPaYv/eeM+s14XAVfCeConULZwhvy6cUktdf8cM/UrXu9Gklvr/uiQUp+0jEIScHcdi4rTe2ZYv2ZDjp6rrgX19KynuEY3OCmFFYd0Q64mSapGzVNvMStuMhOG3T47RC6hmf8DacBAscYWCj6JaNZeDTrcdyo4fc7gttMEzGbS1XNB/4fQLaLw2hONOqGjbO0T4i+XYE7dirN2tQY3Eet0Td0+SbWBja3I+MSQo1Xqx4qC/yGXhljkSLdOvIQTaubJWjbiqfeze2zOHYD5kGbSfFS+wro5MjcgGTNlNHhTWeyirf2AOEffE1Tnu8IbSk5dlwjXBnPG/Z+aq7/6ZhP+cQcwqbcw2mwE1MkJclqvwJ0djbVtJfvJ7UmREj+RO8va4GX1DHBwnydpgX84+2u93E4/3IQEy1C03hrqc9BeVD/fiXT/h57ZBnB3terjnNp9BZCq1W3ZXdUobDCnliLSRylBg3SnFu1A3w02ciaAfmTS2K9S2qLJs2PlmFW9xFK8yionDwx9+dTQsGwexibpGtxI3Hbv7f5+38vVWo7u/DQK0UPqmrHOsz0iwb00aS0pzc5Pn9gs0zyfJiDPSyoQvvRngifJYHG6bxOJbidz/ZEzTeRByqmXJhjAXe9ajy3LRRdsjZrIWLdxOqmHoylfjIHSDI6md2SaWdb1xJLHHt4TDQ6d5Htv7bBwiwnPiX51hNS7L0kw1DfKs9aAefucV+CYZOLQLGlJEcM0bE7A+rcFqXixeBKFttQS7Z85s6PiMLU3gNCATvahLDMyKRoj2dHzi9M3/aNwCyX36BlBYko1v0f7KKg/R6rtnI+B5RcBU0jeChpwdMzQQvQuvwasxzc/E3BUXbFG4xqYzRucv6gsrX9+cCG6mjXmkZNFV6VF4l0h7iS0FTVaDEGkuzI7Brrm+0xRhC5SMrYFlGQb72FexuDavoFKnXsTDFiOHwvz2CCLUVzWwS/+LQ9llqsIIMgBpqY0mvuNY2wobEw4TDqjKNmlTA/OZ6u4kNZDjCVMsQOdSzJ2qHofYSmPMmfOvOQEtehYvK0QegmdzV4CHuyyGIEpDnHjp2eajX0Fek5t3/aF9nSsZOn4Ylr9lJUY/7g68UQHhXpJYgCE+JvDwN2Pvym5KHWtGARThfQwdnJwxtDP26rBHBaikSHPIyr/VW9FGewG0TCFF0NgoKAdGz8H4nZaosZR4Qawcto7nDmsy94iuPrpywWaRZdmziWVZmpY77aqLfRIeKtohPGCyuHGNgVJZccb/xZIzVfhBAUMQxMapGJkGO/SYZHazKrY2ktWjNLhQQZrM5cGg2R6djMz77xzi5rxgMCziE7OlRAdHXxH7mjfRwme47MPCpnlA+jwIsfqPLWFAFHWomFVvVBQMf+f0wP8l9zaPHDVeIYu+xKFBeUBIQ+Yd9Rg+X9jVyPes2kyKEsaF5nnZ3yiN3vMMeF7jzbV3LIWbhfxxkMFSe8WJU0NIi+CS80TzUtdHLp6f3wnrHK6R+sG1ox8jM9d5KrKe1qhJDypqzoVALeAmtCILenw81eR7Sa3yIbmbpBWFhczOEQxCnKP2UaSyg5AA0Q9IDHWbilfIG+1w8R3cCPaiFtJ/H9bGgP6LH2qYAW4ZI9K5EjJZQ0/EXFU15Gl3rJr2HmgcPW74b+qUe96PhH4+v21ujLk+yf0O4y5TVco/rgMtt3O4RukU1bmOdIIbjWXfirKw/wZKmjaimazivPw+5cxWc7pwAPOcZg8Lwu91GjxPFmjcZLvrW/kaL5y7oB5wZie96vLQe3kGSwBZPIMr8y1yLnyO+1g5wdJEXzm4ihAivEk2rKSgaqajkfJ5rPTZCx5wNjurp8H+o/deQzoHVKtE9506Lu/3sTyAD5wItMaTEXdEyO3UxtPzOH14VHIdmk4zudZNsANpzLks/3MHJ6bolN2qVxt2MZxUsbbJEfl5ne3A7JEpMVw5cKE/llhC+T/RdQgG8atnLzi/UxnVC208PuKXB8D44Ppb0S8t7LcCn6mqQx594dbZd27XmJt9S813/5SKGbNWIOOZ++92P0YuEiPp8o8G8GjOj1MxKaGoJk+G/2aL5Tnhmm3AnjNpobkyk6m6RZpAOTC/0PXFjXai0R8ruaScaNzgdaAQnOkGcxXNV03FeWXCzqN7HCAR2gbIiGU9fWIlOmVbFX+nCxBOpFORNdWfgOOMu1wUdLtBNjj65vWaS/TCa3hdKxgSI0wOrl/SZil4OWneFiZVG8RGGfVBnl1diSHXHHq9f2yEpuHJTLXDmG6NaaJI2hMDW81OKq0qJx8TNAmQzXdicjyIvoMvdwYFqdbHG1ZpryXSh/9HtH9GzmH8s/AwMDP9UDMf+eGcUC9j60rP5lulk/LPsqdsOhyaclPXZDV4AYHi+P/I+CBUhzX0jGRnjqon8MbEERymAHYyU0+uMB1ZFw3RkI8WBtytpPIZihhOmZykZLE4l253USK8xY4bMKE2kn6wXEM01LjRFRljHrOdr/4wDIMwawYkdMP8cwJ0Wo6c77NN0BSPSYYFajxaeV1RkxrnSnptFsphfNnY9kAquWVubvtLRHJC6uSV4/BcrynDTSEOdxxh5ghZQjkVtb8DZyo9AkkTFj
L44JDau6SpSeStmOgsRIAT/Wv+P1iJrACQJ4QreaomcGPZcRkFR4RPNlctGgNe5rVFvlTVdkd4oPKRT4qeGtF4krqKKM63j6jKuHMOrX+T/Ya7n9OTiY/zu/816pkMNgBoRqPFhodw4dMkzROT5rLhw0bNKu3G+ARagkndFCoCYve0YVJiLLVA6pbthjbAmWSajuTLfZr/49KpDjE0DL0tzfWg4mqwImssyUGxF8ncP+A4fZTapqEOvsElD4jZc1nwosoTkU8jpPPGfFfYJi5xmCDGmRdH6XGz08TH0VlgAASYsmH1c1wND4p1u+glHEz02tNfc8GHTDH4pfgkTRaxBayEawRZf0JJ96w4C0yHhSePCodbBDfh9EvWsoAfNCLrYwlkQi/6KTw03vphVjLqqYdHndefisAtZkNpKhiDlPViAWX22+eZwxAMv9f5E4eeTzFHleCAnwtTmX0oODuUz3PaFt3xZdLoPbuybKxNKdFNsQmHjzdeR+dVx/nxnGwzKaELRFSsVsmPA3G3ZXbsWtOvpoynIHkHD9OAypyhx5OD4W/NB38i0Ww39fvRXxFKk1JPDkl+6f6J592yEPVnIPUiuG4rnvPVr5FcBbnXonlBOXMTKSHmBLOrv50uO1dQZTPxjT3Xr6yYUnfO8pCQKLmmjvrs/KaJ980W6ZSUn3gakmWgtmrRJVt+nI26nuYDed8mDsvFTYsRBfaXBaqAEsx79nKX8HnGKj6uwedSkN5NCUDEv2QB8fJqUPwfbn3hEwcI+qFvPRHSgSlngnBrgh1xMwQXjIx97sunISVheT6FZVAm8zYCTRbubkSsRSLy3xLfHnDoVKkdWygDXeRcomcVDc/0A6p7J4MruFtaMn3HrOBlVcCPxhz4juBwKqDXZfeQKqZklhyjz2l14bmRnvZeGI+077qRXGlVPIZ/F8KHWVknBs7bO22tKCu2maDLwdhaFpBD0TCGoZI9apRh1WK9ZQLLIRNhnfUIFphdaND6BkIF4HrdcSpOQRlDsam7EY/uVDly+jR89KU5Slhzz6R+oLGYPuqWkgF90hoTYJpgT1jW4VWBafPvWwGv7augpWWdJuu/zFjgjlz+BjhNCz2MwbgyPGxrrPl2I3ntM98XStZdC/DV3DGgUZ3yS185GdRcnDHVYZT4frHtmobjqG5fXtJVB+QXP2k20csTUbhhWn0wxCUSBZsFQPulISbeobttDNYAArPfxzsoTY1XoFUswixyr+DFu29SZVfNdndAmARO8jhegNJvPoG6oc6qBjTm4uQrjtJkqmwJAglpY9kBcXDQMbDxeIM3CT9cXX0jX07g9JkvzoYWicnTzg7Q0gizRy5aRfTKGQhFTSdGRvKaftb5LstYSwxP8uyn+1L6f/jEV2sDB8VqpEX6J6z27+t95ERogHq6sMsjiVRIUYOI1YgpXQ/1Ghz2FpDphimWTF1XSB7NP4NidZsCmvC6DOfvrsP4yrF7zRx6jMKvwQgTBj07sx7DzMEDrFAEAakewz179qKlZpNXMiQkz2AfpUp80gem1Tz6TMQHxbMExhvPmdlrxite0l3gG1PYrkEtodcvhmkBc0QsPwn+sQbbf3dWxTZRxNB74Q8kZ1WirQBSVmNSCh1/SXnaAS6thql5giqRbk8T6umZHFNrEyRGmUpk51OAkukh7o1A8XDB9z6plGQuC4c8av0YqxuAiRQbhL+NJq7MVZ9/NAPFEtlyAmbkRb5MG/Wth3+xV7Gq6SUbovg8uFURhREDqISRfObNowMQ/shTmzWnBBwHL/EodB/QuV4ySoao3KAezgsAek5jLhx95Tdo96p2RrdEbnXa7QAhSehF6iWKbxyw41USk110J1z8aefvZ61dX+4PbY7od7Q1jQ0LiU9QEY8ldt0tTx7btMvC2ip5Hv3yrHNb+lOqAKqaKELvTWCeD6lFVDMMcaMXTkMhmEiIo6P/uvA0ZkHDaqXOpNE08saKRqksr3+UA45jZuk62CZaVIDbGridTlT4Qv5qqWTgRlawXMM/Qz7fiukoiZaDSIqM+i66AR7ki/in9SQPiH/abth43glPq7zqltZdKg0v9JEHjxE/9nRXZ5E7FuVC2iU2sSRW0aw+OCW0XtOemUpRVQx67c4aNeJW+7EmK9leGA50DlxSXCnOew09XZBN0bXalOHalVDjqnA30lB2Al3CV9730AFyyXkDR5sGM8pVg5msv7NRFvEuLMRXuSJKWMURdtCc75yvMtirdJ8E4PJSdfrIzbY9wpnHZnaF2zdWKlL2Pe4EVGbgHFSR5IfagrmKOqp63KeTz8LtJ6xtgmcud50B9DcjCPhipOhqxzfuC6X6IkFct1LgEKd3c03Qc8FboaIwdyZnGMNUFb4BWD9GFzkAAWQext3m16ay8s9eEytRNtS7JeKUwmKeYSyaEkCRWgKy8phYjR7gP2WkwZU2fNLMKccMPFyaEGzrhw6jNHxZKKNEfix3ywiRmVyzcY+v+6g9D6ivpRCy7428Bvk8Cw0ugMLGCY76B56WHbYPKp4r/HQ9UzGjiO9fhdcmekllDwC7Bo5LiqNnqD7l68Q6leNHwsRhWbASTfNnGMOC06pTRIX9zrQ5RcKLS/SQli0skcmc8rTqrfXua1Jda9w0KmhZt3JV9dQbAmyJBdyQdcZJ+YASkO7EN0oW1/0ikQXiMGNyJke3kxFoxDyWWW0USQ3+OBsJYMJ2z/VWE+mKaz1tRsJq92o7K855tYmdB/jvbr+ibCfze8X0N2tKEIx93lrpVDehElQstflEnrAvCbPgK4YmI40T6LbWH/Ri6DFITz4AtIz7jmf0qEnvhyYofHhAc9UoDS75D3FdrChYXx4XdqqvzpMFndxD/Lr9Z6okDl252vwhxrUJfhgkIg2/aQMSWjgYhirRT/3CVsd+swX1eng7pOYONenokDkicM7eDGKB+MU8ZXVESmNIDoq0JoL4xkPw0RFR37D0b6isiLBh2ruZYDF4OVb1GDz4ByeiJusncE+pHn3x8+NwHTBYcQ1sSd3OZcmrRpNOK+kNR5mIXyNc1wfDNoibpktiH2pToQrExvaMpzgW4YzMdnolnzJtA5ucHH5dkt8s2cZQhZoCQxpGB0kdUB3TDQgfYB1VuxzaIao/XS72u4wSIQ699RW5w6ksHN/t+qQQg+epKyXDlneYAhI8rutFjcVOxfv3YpH4pN8WRppiKHb5Ya6IZYmTLo9V03U3jALoJn+YkEQGgaj0o6JPvBf2reF5lGb+NXq0V7S6rgDKUg/dRV8N78EygsL9ErZ/xfCCBePSqGhxIswKJ1k3LkZMWBfuLouPI1UDKh1CK9Re3xkDTeArkL8XJY0nGZpmLnvC5+Zn1TjRdmzHgDsNPnYzuC86uuscxnbIf674ZjZko9VDfTAbiREbAQxMg7LJy3JcGt/Be6jHazqzX6lV0+v8SDHJLJPytDt42BeHNIEeRlk1MdDY75mZHSxMfxTtXSflVUXLanQzeqtjE9X1DUdV3YpDQgsep2qz0pw06NkvFQvfH6veocgphO1+1llXM007Qys76/dMFxjP3u8hlSEYji1KMIzpLcFdTpcgT1QtZWwVuUX9lXRYOREl05NbYFJ/7JjKgDFhsR1JHVzMTNt5Xm1lt32e+sggLkxjQ+WWB3RYbYYPcxmHXQNk4q20riJkeA0y26TnGVr9+DjkJY0DIXESb2ZeAj4UuBmE7ahVmg8WpPa/YcOOiQ260OEshjGBF9rSQyU7R/wzPasTrY7h/JBB2+CoA3hE31QpygyS5RRBI8AlmqMOjb8yQwwiNF0/DclXKj1BV6BrgNamTlXPhLp8OZxWtztF1Wkz2v2HDOMqmQ6Xhgx+Jygyk1+PMHmuftaPcwSqoNnNGOQpBpEyeOEYm2gMcXLPmW4YE0SW5MownO4H0Mgb18K/jnwM/eXhXIHwI2LkkEvYbZ/bVkaxT298sZN7BJHRTkS8QkuDpDSSvJmD7WxwxzbeGaQuyXove/qIHwE9NMhlhiSRt1WjWV2qxi6U+D1eWnQT7iKuueuyBEgsB7w4Dj5GzLp1TpvgD1iloNmfqpkitlL/5FJ4FKCCmB2Tu/
otfXCud8mvEN5/XJmw2HxobY2wrhSfEN/tgUIdifpazkMTMYCb2CNVYpNtIIZAvHsd5bz6YNSy0z0KFXh6iyO15aznU2g0N1KcX9aHJTiI9xP0vo93+fZ9tDiuBbzTL5RK06aM08oPUCuHLyERxXm1Ds80d4GEX7BMdj19qNVy9gyNQNQD8HvY8qGDJdKzpYYEyZhFj9C1D4tUt85zRfMJhyp88QdZnTHoSVOY6TyYAOo/RS30H2IH1vs8kRWEPRXol/mHS8TMJ6hso48+sAH5FH0aPRGnSMI483B8cfwO/OIhhjdjeaIYI+F2a3TyYmSjHnNwKJn/EnGYtgb9gHpzcPTQkOSU19GXgepN/K8CoK4pC/O6bU/uqCi9vOLqyncXMg3bwczfGubXngsOaEJ5MnKWH8M1q6i7FxJDVzSgk0i1RBD7M7CzjxrZgVYP/5ddSoM59QI9GHkanyBJfShbT4UAIy5JEKnigNwb4/tGZRve644RJjJN9nQJfRmS2xXAi4oMe5UxWIv6xGjaiDe0LbKOJ1/NZaHTSVzUvik7yHPGDONOr5Cl2CYwFovtK7HrtwrrKjLRCy/NfSdnB55m6FtmzxpvxRxUeHmbdRnWUj4jh1d0Fxmoeym3OomzxRDfM/bRLx/ADyZBG3RdbM0AOdkCrOwQUetyO/9nyVw/nke/Fs6CFFibMgSVDBoafQtAmP2bHOYEso4A5621yrjXh1A9nRpK01p1TWp+gTYl8GTVJMOYinkjNHZFDEKQJt4M1NXqfTJkfKvq8iynlHxrmNQvhg6uH7qoia3uwgVC/5K2wOQSt7/TgimqVIzWwQ08SR1yystVcrPUYdvGor6gPgVtOxrPmVCOzNIbOIz9rsN/Hp1WFIFwch35BJd8f3Q4SOBDYQccugp8CoE4i6S1s69+dN/lOijX2ofjCDDohry/Zyiu+mt5sv8j70KjyVtiPU7MO8VkrIQNA+pgeiblj46lhThCnhQmTu6JNh8WExA39RjHiJr0RdnOyrj/7BgOmkoGETR2wLT4Y9ZoMO9Jl0DF9ltvxNGk+Wl7XoIBD15RB2NAmoYWv/MCelPVIWWuS/PN45UEZnqkzRUb3ZgoKs3PUFuqib8c8BMvN1dG2PZ8dFs7+NAH1HpewRzTvkTew7H01B4gk2FDyIUC2ODi7TWUeqdGJ6eGP+nahZxMl9ms7ivFUF4K4nmqPwngIzL2dGrGA6MR8apjdZR0vLshoN6fePrNtSI+VxtzrBQTovaSGNhfzsvA+TZRzxqPRE6bLLktwYzLCNJv3+Uo4PaV//TvRuve1c9daq0Odu38pcqNkmTmCXAY4zreOvATK4dgVwGVAwSEL86PE/IVPC0lZB4QwP08eMmrD+LCMax6rve8qYXoC09jlNwOoL5nEWhBopHS6Yz+LABAdkimdaOGcZB9rl+UFrC86vUBrMQpp2hgy4zARNHn2fpNroU5oPRIdcdTtaF5IOpAuM3g4jcJnncOv0ye21q24oX2szozLubTdz91+kqh9AIW0AmWWhRRwJ4uQDZUb0rylpEDzP0i1XNiluaEx0Lmb03cI9+yMuN5kQb2/GvFvp2eb5peEBksznxOqoh5E9C5/R3Ftz2S4iAT9ihND658lK/M1ciFIgKGEcLUtu+TT7vRDh8pTYf9/iCvWNTCYkEIiEF86L+yyG1INxXVVJD8E8bFI4lJQfBh+zLeV8AXQRsWPSSTZcpTCe6LAxs1129s80knnRH3AbpbjT/Ktu6elY6IeDImm5A6UAa/E7NdVUbGSCQBS16Fxr5aBZra0s6gOCIsqMRthsUvFv8zj/kPXZ0SkUoXibk7eicBm8repKDbu5Y2wqBt/oH515a0rAsDO+irlbpz4uNpA9F5/QSZR+MTCzVX190m5rypyli8c/nb/uu7uGOSzJWblkIxyksYNdOc77kBZxMhxy2tbT1+GlN1kFSH9asySrGC2hRqTj+2+dQnBEQQQmMdtqiCaR/vmmuNxLNUKosWznVNqlFWSFItpKKdjYneBl8SNlgHRQ5y9dWCu4W6bqO5GkGfvs49tmNL64AAbkwCYxjhQOdI3+wKf/Lvp8al6vwfYcTe7+FwADkI0ns4X9rS8o9cVBvlWbPUVfU+12KKjGldxCHwo4Y25Recrs02SE6URvV88BzHVfgJyKq1mC7mBEjhCqK4cbwivzNBVn0iERlAlP71BClLx5vZ5peYMLIejHjf2qCGSokrhjTJxWVhvzP4J0g2GCbVt7UeSh21z7NQujQ41DTlEI7Fkamal930HUL821tJkMC/7+2vw30QRsIib4xTp8A+m6pB4jT1srRCCQZQHQKcZizKdCCnJL1EmIB69EsCZeQ00ofpAcdFz+W44OZofGYiOTSdSxMpHwxCiOBFWDOxSgI1g0zrF7Fk5om85fGJo+6SBak7h/akPy7tH9VK0rHTyyFRuE+blFs5rMV+qYNygtbg6T5sAOqxhDoOue9WpCa/IEmVrm86QCGEjNh43Nk9f8AJXgJTfjQb9lQc47GufU/E5dI3GSuv8C68U0cKHUUORAl2eyjxvHQ0yphjPzY9UAu/s1aUn8s83JRf503IA1qXL7alMy87mKNQpE+6jEZ49g2oap1G9Xe87wQjknIAWwLOWTbtfm6Md1SDpeP3bjZo//wYt0MgAlpKSverLq6bW+H6YVQotP2ZDiwVqS1SZ3Gk9PQGNCli07zI/VTUaGvuyyayyj85EKO8B3wfuhEgXS/3UfuODnRjzqgoYldvT2btmv5zXscayZu8poGn2pas5gmdvN7isegEeAb6PoaQYja/T38wVaS/3dIv7UvNIjZ6s8JuYEOKypqvBwEgq5EN3nr2wMGbLaSvlZ1MUiubDf3+HTeVSafeQhVsOBBELhZXmzD3FoSBqpN4DGXY+n52j9p1OjAuNwPWciMJAvk8/T0R+LFX98SSW8YOiutKdCEc/p0IJuEQTy35ivgXDPks1/0njTmA805U1PZ33sbiTzyoy3xGMmVR3570MAlGhan/qctvCGQK6YdW6qc8rhGQeNf/0+CwLXnhGIHXmxLj7lP3KvncBWLfiOrAjiSns3CDQUGLL5Ti/QZCAJ6iemXOt0wXzazdPzcV6mHPvKAUEv/U9h5mhnnwcGbs/Kq4dE+CCXJPLZYITXMNsykcHJWbnoLmLme44jkmQUarZw6jqokazwXJwEEUJ0sJ2h+RByEUMfhd/T5Pb0BpeUaRSFtKWJwCIfnNz7BnKRb7AVzrJWmN8ZZhRVYNKks6xFznImuHCUD7qWqaoFWiJ8IfrBoF0mHKZYKnmVtbMPf55KDggIEplw3/vi1ZUfmK1YEihnEIoGaWjUZbyJuL5+8gUjZtjI8xlwNgIXxvv9vdlybtzRJNwoZ7r46thL7LXcrp23Z00C2J6HR1g5oqh7YV7gKzP5EdBqHk7qAhM5aDFY/MYhZszohLqOLjDlFsK2/YU+LG/KgbkPwSOK+WS9mURTgCieuvgZJgLNk5IS/PNc5NbkAWq4dZh1gFLrR1Fnortz7Z4zbq+dY+6dPIim5oaB0amK1JPLyT7cgAfizvoXGwz7h5NCA/7H+nvMelIf05uUCRBD566ReYMUaZxJLVw6XlZIApEEE6AvpiGqB0b+optxdrxVBPFHQknr0Yy7vhrh0Ox3NC/RAQUnPkvdR/5d5mtlvEtZs8JItcoKKun+8olN7oOR5huF63l+ZdfnQjWztMWjgwolm8KZPwoc0RZYl33M5MgbbiL/TrmMg5ubSvxxbdjGeCkt6oZ3r3zLRwiNTCo0tNe5C+imAPFFp/HP5es2AWvkOha4vSIOw+GxYHshQX2fY9FZ24j5ChE5ahzlemG8OlEoE+kHeM7lfHgYQxwdkkZRlpji9Pu7cDc1Zq9BT+Bgxt1c4I1hRrlYwBvPYC6YsYbOLjEG39sviGUUZuaw2m+NZaMpIJsAuja6lozEWpmEqg9ej9lJOBwfebcl6D/gmS/JgW/7hRCIwg4n8NRc3JIIKka/lyvXXuvi9RN3C6HKVZ84GVL8LFpQQUg8gDIt+6xcXRf12sKFii1UkuhUPLqUj+n6lt3gpkfIyqCJ
20SZMvohq0A+Up5SpMsyRWAeAzKyYiZUrqoOx6OVeMrub6U5KbWHEjL0kX85pqJI4tR3JPphG1b65/JyJ79CSVzb1Jh+MMFaOjAB4iFoB37cSqh6WRnKuZNVK6pJfxC+wSYVBm/ZK6s0PrL3gYU1ytDR7rimP4CgOywQVV0gLTF9aWIiG5/LK83ia4yrFMMrsRrV2mv5qioMD9OFYkRqSHW4UQUAg9gxGbTp+dT3JzeMU1fvxqIbJG5XVUXA4GjT7hm0t3onsN7MolqHk7alyFHdZBEsY0e7AQ/uJ/Z4VNZeohRxWYYCRB0lZZtgQgYUshQ0zFZoD+AiXQeuovzjN+HtUh+I/8yoZmryGeweE02flT63EM9JqKeMr7uHiL0pF5T5vCDrsZzgYUq94Erfx2CEqQ5WYQXEZ8cmu/1mYOrxy6wDdXyb35e3amA/TvrkVj+sIEQfREJQveDJohfgvIt2MS//Ma8fZgcU2K/4YA/Xz/4+NxC26swnVgS92X8XvJt7aNQ/Q2/tJvcMZdGABK62lKMEZEHWhnyA57BGfsOIuo4tZ1DkzaFHn6VWGiEdntTld10FDb1thStCu6ga0EXlKYxJ5cS2EKYpiFiqIuBp0CzwUfVYYmBW7uE02rOcpX6oRd/tiVe4o0urlZR/+1bfhdmmsuXVs3kBbAwee3Q3mZgKLjdSZ8/7GBq9U4O58VdsIH//7vm23GGFfTUqsgwXYoq1uLbq+oi0YfhX0xnKQz+dLZ5K4m0rNOnNC+NFAyEa1xFbZC3pDgrb3GKjJJjhrf7Y20UQW9aMVtRtLVFTsanBIPnVHdgd+BG9Gb0P8YuzrkEl7kCV67jdZJkW/SRVK23kcEX0jkFP8SQgrFLw299u6cmkj9klTtIZtLBAztTZQR86P2ba4l3WnzFRmZsbfWWaTxBp1+6D8zo5kXBHBC+QZabFFq4T5cgQrTELv7utAqNInyoD8TRtdryBkxiMm5zvZ/SgpOUhujkZKHpngBDsN7jdmsv5uwcb2y77qdDlmqyeb0klDDw0rq7KbftEgZvsTkDsF13aP//3SbgP5mJu4/EwhoYnMRmnH5qYa9zt8gThm2gP8gKa73h3c2ankouc/Zy5EILrij1PicG1iTOqdj5voQ8JCwpDiMGSHu7Q4HggEEuBHF/HfNcdPn6ydaU5oMsAWm0lxDUNHN15E2U/7W4FbVpLvPTgCzB9HM5zed2n0iH743MHOBp6bDqzm/tu2ztiKqXb7YzpDWgyn7qRHFkGm27u31fadeuviUYcCDqMAkGxc8sM61tUC2m7jeM80nqkt/uBAXzTolJpQjXxUdMhzNICTQ/eiJ4P4dxCljgwuPsIoLrQBGzXEAdXarhX0iGrW0s+nyvXY/q157mUwbhpu/Vxs0a9ypy+AeFu/o1uK0yM06oracY9lsRBwJfL5t34G8GMZF0nJdU0BZBRNjk+OIWK/sIIFohq1p//2ELb5+WL599RuJqUJdQxM6qb93nCFdU+e+s5dS2fs6eHxSRf6TQkw3HjV0wALPVwlNX9ndOhF/mLchFC/6wDYUf9v7Y143wSKEEvjavxw0pdjBEEgzJSadXtdypP3JZWDshpMZX07g4v6/UJ4npq36RTAQTzBBFwFXibcFocWODzJDThgupxn7AdiKOinMqSk9tiujPyCWFVMVVwk+4iQb2mmpmPtGETtIyPQsRwc1Elu4XRxudb0xXho/2PidzzSgdHlAbI22I40UsGu1CRJLhekbFa/cF/eZO4zZXhwNdPfPbkD6/a/fVW7WPPVfq+eHXOKYA7tJTgwlzMahzHLElfOR8wrKqUOI3liZO8/cYiCIw0oALAuAcPyMSAXYPSv77fq1h8JPZ9cDGiHFoHDJWz/oiZ1tGa7EiF/nJ2Ju+0W3PooZ9EinkehnPGHtzKqX3ZsOU9zrHR3beQ89NqOoQZAK+Ds3vHIOenbH8ARkg8hbwtchgG9uiHpqG1eri7IiR61a/J8kk+sUC2OgIsUhsSvUWOmFSmBLgXMuWO48dXRDtNRHZnRLyIWL4UKrRL1kDP+t4UqaWXST+zeMe5JvHDrWhZfiPgfE9D7BXJ689mbfqFSrCuB4ld3ROuECgME6VYnkY/mVB6jTquAr9T62f6fxE275pG3nJwzHBC8mEorKEndaraVaFaHnAure6I1EsU2cfa1zW/Ks1xno/cDWx6PYE8wovlRj4G7iTgibRzqCwTTHu/cs1LJEx+lCbvzkh3dqh3oa2gIL0/gpJ5s86YZJnHM6Zkn9i15qadcQCUMxKPr2xf9reC29zL5L+UMscEeiX7z9mMgAsqjEkWQvQrOOugA7o7Mw0DEYhIddh5ZM9a54ipEnLHzJ5MEv9FrOg7o7urRUV+8iUkCTJXNCXWhyL//OcF7omk8Vt0cHuQuC2qfLsFNe4XuVJ/B0LemgN0bbfbEXaioDLZxsRu7R39dUGxJwY/75PQj3n8kjvwWGeZAuo5G4hxttdMh6z1HDI026Y+qSdn8zcoUbpeTmIVi7aSgZXUrAlF9XN6C70m/XFS2d0FgQjnG7giIFppoKES5JRBejdenofsUG+UC7YgkSN0buWZLRHHkcb5qOt2l83CYJoPbQx5FeHkX0/LIT/Z4duKABAiUMPQce6s8jLmkO0s0PIi+lkhR8rNJP+OE0ar1wBVOiuYZQIMugpYC9ijGYfsD2VaKKIeR7/d/Amj68vTRPgeSv4sFHehsEdULmTxzsre9I0cdRtNnMdBi3EJRq2yMsYjk3CHRbLepQG6hJTGd2adSArlFw0VxilTyf0z99qsPlgJS54HgejcDfMu9b2vFr/bQBVnB7nXiJ6Pz2MgOnvOoatMErkXHgbBxbZE6+Q8d7OU8Q5qPJbhyNIURIfyOWnKhUA2gNnUORkhsU87XRXiUuV+IrKNhV4Qm/AsKg4PTHksQk8khwRWQzCjcqqXKE/2pznrtv8bCdMYTR8ff5Gp5e+ceT+fg1nqvUcHOFzkEIoRmDUhkKsMM3u2A/MGvF+0Gyf3/vIeeZgUdkiMmDKYkulZuJC9pGFeFa+c21lM1BXHcgz2xxR1OiVgpS1lUzf+dggJQD0hKTMptWXc2hAiEyL/pVXKIrKdviUMnFZ4e894hD85OYgrSO+eT05FF1rQH5lNFmKFxm+EDmrvUkVyZ2HMuhxqx/Y4rv3ooMcmzp+dh0PL1yE3AMnGEKKRct5ugF4Q/exJHX9p5aXQAwLP6eePWqnjaejDstoZVCHAw0+Xbx/7Wp4UeuofdztlqsDvyezukDJiSh8Xj0G0qlajOXdt6KdP43yr7G2ddiO1AvixGCkI6+i6AAJV5l0iv5moVhe4BaKJd1FFc2bKXRr4OmhVBWF+HLnt8fbATQPFfWhrvZGn8X552mur1kySTQ4CcTzwgkAqGWILYnylCpoSvXH/B43ofW1znP1H5KJXPClMguZQ4zB63qUYZosxxIFVemka9+/ijVX7pg4dM1sSQDt1eja2TMjb/mJfRe/WWMnuCUqnNOfRk5OB2EGL+5GhUIDJpmyfXymGevmc6QOVNYleowfX76EwqvQJWB/io1JmsHPvw4BRUGNdtXE/LShiMfCvLlRynWiOpz61D1A3siwe3+orOWMAVnootiShiRlMZOl6hDsE9J8I5g7kOKhSeAPtvQKREm/snWT267s4CVixcqH9SG54GGdbA11t0/SAeD3HYCJKPqiSAOkJa8cvwbXuHgQrNyhmhDouxFu9rX731qEKOad5ZkqA8JGHlBzVsouIf3SoqvZTSkv9IpCt5KfqUqP9h91MBGIXR8zSXBKjDVSGKp40is7rYQmZXP3+1UD4TULKlpf1+F8wZ1ZdN2FN0VaaXvsV3su9B7iUu1bsTWzu4YCW5lGTqTZOgjsh2UycgCLbS1oVlpk9rjE8Gt88YTDg5wvkKrm3GPd+uYBpa5w2Bem8OmUzg25nNy9FJEDwIRyjcoh9B4zShVBByIG16eAvZnJoaCutBJj2Mdi7CnTcLGrqQ8NzxUPt+97gfkUtk3pdB2C7cooh3DlFKcLjGCy8Ap4eGFzd+y0TuZ+5NVK6vfU6mKgQYJHaN5A97WYi
oNqodh5apotTOm759OAbN/t2tMcaV0gHsvZ6o6UMdYgk+Ayu5R5Urrd39ICWeu1m15vIJ8W2gGcuY1e0w8+MN5Pd1JLWdWEDCBe0neEFmndkNkq2GxGjRiMf46dZEPqw0IMBjJ+D8BPDurSbxYrwsDsfQnA6I2jCqlbZ5EAUuVPclyUzQ18o2NWImfmrDZotkxDz3QrWus6j9z8PAnADWEtyrMZyE5On99iapcUJmHL3sKlyNPwTijKq5hlgAuMvvzxPWpGWjhgOfREPHIZUrE4YF2kJ8LYhCGpO8kw2l3jJiPl2EMcEC9Hkstqmr5KtarSfCoebrWLQ3qZrH3AFPQBX7jQB402bf52TqC68PSj89RPFmL0oJuFcBeB6dZjh9M/oQ3xI02Gdj3zQyyzfmEV+Tl0sTvz8hJlA+B/BZgVNYZ4+oyIkf1FBvq8lycKJLqVEuvbTOu0ud/DqLbiYRIJt2btJUSOyQaGjy7F613dysJkXVozYgdL2R8OYXtBX5s82gcpB2dtwMRTl3tThNYrbbdI21593tuXZCWzCYIaR9n0kNHRZUP0JetzwwiqgpbTXbW+TDyVT4MAENygFLC3ZcuTaIeCmI7uMj1lZu8OlEt8xX5TXHu/cPlRpCoBmxGWV6IK/Y3YMNPEdsEnFg07bmCbQnLZZdUGpZLsdXI/wxdAskE61/gztdJXA0nGjLlBgoJI2+iQagrA7RQ2+yeBqfufxE1wNHvdi7el+TuHFGLmDv+3pnRVAR1brTAkcK+eDHqHRXI1RkAv+Os4Vw98yUhTHltE9Gaf1VGttNIfdxjfMU06tGPVABzLuWcfYD9TaV2Pws6r3TzQpPtz2vYP+el4ygJgm9Ae9vIHCbGzO5lkwiHm+Sm0hMJr2KpqrZPNDPOv2LgzBOkY787jQLjF6DidovgWJrOZIpLED91nE0J3Vx4Ja304VzjfrtzggIFodZ6Q0zguN5EM4KaGIZJxSCsb2zLknC9zt0wvjJ3CiSRIS9Dp8NGTwncjKJc+MxgLtofxW9pFvyinqYG0GnWcXhFingXmbTwTY63whmzTl5WaeLug9FFIMjAClQdFwq5FWWP2EIL/jviRbdtRZnvm1QFeILoFa3XMWATzIFaTO90EAbkl59dRSdAxE84BLKEugV5TqgKvpxa9TBVOGvt56IkIt1xPY9h5DRDgxsGNNpDqSUpU9kPK01pdUh5q2I1NHjse4+pQI4Ltp0X8oaXRdxRW6L33aT+8h53wTsZQb9OQcDcpQLR6K4PlTDQQYig4AQtEwqwcp5ccsNZP9DhiucJPEGCs/pu0N4TVIxXthMmYCfxY1V42JTULpmWJGRyGHHVbntfeQPo0gLVVZm4Ai3fP63RK2EEnPuoAGU99x/twZV4uR/7x7lJIQxMI6BFiYIwOBdsOkZXRmRQqesTf2VToVp3i/H9hH5x7pwviDfAEDv9N2ka9JShbskwVZP9iag4lolTijoYYLKCxgfjqeKMbfiy0eFhCWIf3vqbzWZ2ebFJ3usKtaGPSuBhQmUp7XqGsK3yxfHp2T4+mcmYLsjRacvkxf85/qbty2I3MhRAFeOc1f/A1m+3EBW79/KA86Q97pamcNU9wxQCjDZhc+8zJu4z/b8SyiGr8yuqq5mWaJJDElBGIEAhumHJMP7mAMJj3Dx9fj5OVB2mXYmaaaoxBrHZM91iaIHxE+b5BeJ4ekd91lmTRjlgDXVgGLaWSvMeYyIWZK0HTMnqGSgZ/+ULtGIBkNsD7jNfaaBMX/JsKmKHJoXlO99FUoSHJk799xM1G1bjYO5FVgG8AACDCetWWB69RUYeVXy3xsDzJ5ubChJKIEpF74ckmPOxKsz8wmeA3DSpby+cCFjud0l42pqwe+Xfdn6DxnzGOYdMgptWjNQFjTe1wcUYi7PXAsdMyoXIJa+s+gsRIZuGPBQyOO0v6jrKKS3Vz7yJOhj6QjWcFxFZaiDmnaVVZXvN9xkFCBcPL9aJaf2h+UwhpjkJAuw4SmIO+HCLVYGck9qNxtWwrd1cHovUZGA33AR2ES8Y2InpSePZUAlctlgt3M9dv5jqZRrY9HmBgAlXNCSYb54HHOX1CkKZ7+R7h5pGhrYJXCsvgDAioE97sfhJXiQNdt5yQpRZwGFWzu04KWFxUXRxmxhxEkATtpI4HzGZ2iEwyUT+HcCIDSl2cyD/HSC0VCJdINRmjxrW4cpbd7I/MxBvs73MPrLc8RU1WMwgVlNg/QlIhR3NB/msYBC/c32L//KKXhrJ47jMUNzFWi874dFFDVQZkxqF4TRPgXCCmmbVd5bbnRi1TcELREIE29ipwWt57fXql3PBgDi0XHXUcr0ADAbHqyLjL+dnc6R7hB3B3zoz5bFyZtz+TgmoGBvI0YSctzM/4W/QHsJRYrBNrj7PZVCPBcIb7CcvsMivLJ4hN/BSvcldUuDsilEJafXGRhBOtqBU0Gp1zNKvE9spreU/VZ9JTznL5eA7Aj5TvFsJR67xspUmv8MMWUVnkd6rVqQAJ7idcBpuyeUPT/EgyMo4dowj4l/hL3vylsLs7OiBLMnp11R6/E9hZQiIBm6Ty5JmrdPyykLCAKwAhhW8UaT7TXzOTnsPKjvL+3H45uz4ENY2gR9ory5K9vbVKIV7lpJ6/W6c0NVIfOCn1uAUvOiWkjq/wugCX6ZGPctpJmQqI51Ua7tYRPg9NnMS4sUZ2PdB6TMZ48J+dexYN1AjimocQR1fbuuU9iS0LVCeNijCFpFRuTdxumX4rr0vTaofd5d3o1ozeesVmXbEMTcwPfinK1OGnVTO69iQ+vNGZeyx5odPJPDI9F/n760TM/WgxlcORbqGTUJPEUJYyu54slTzZfzydLlNaobKjATun6ai//SQsb7YrWQ/mq+mg32IZrxTU9rfsXgrgxGLHphMsyk52XGxQJyxjOnB8hKLczBhZnCyWjQrUBFqSJFyRdOe6rHQ2AJ/1FHJ342Od7nW0f/rHw7D7f1Ph6h8Obsma4J0EOGiQKlXKTlHspKtoWMZnZcn1zCElwnTbli5U6g8nJM08oAk5l+uf9yEHfzOpne6obgOFhvcjBbyXC7TW41l4pMEnUa2a25/Nb+1ehIgQ6Fvxfpj6mnXnUUoWxdPqWxtUlFlTiIQBZOBysIY5cdDwj27/KxftbL7bRBwcXqJ58DsuDG88eYPzpyzryg+6D6QHc1nZrvdXgEjJ7DXvJx8NhVg6N2421d95uUA91VHFcAxZYqFf5kJVn0MwExtjtHE4bm4zTilQonj4s4jNEaHQSr0eXcRpFSmU+9lSB9+c5fVGPbhsMJxqUTx+8xjkLberoL98gIjh4oE8Kxjik0cIHT5VrpYuSW/9zBDMKtbUzMnG2wbBBVQi65DL6yf2d1ZAEL35FmvaKhef83d40h5/a8dHxhndXwrOwAzcUDAY+vbLLyQL4vLW1tBmxxRpkO4JmBOVa1zMHxMiHjTR1EYQdPqcap29iE5DxPa63sQgqgo2zISL7BmXBs8/ENF7LqME7Yf/if2xgOIf80P/2gd5YFFwDz2rfJ6Y/TeVoS7fzk99bMmQHxZuqfs0wo7YU9JLwfXFcFiCN4oMsUM8+/OPInPu0xt3wRzY2HRCfrOt6a8D+I3sKwk5bohMs1wHTmvItg/LJo1p848NHetShIxiZpRFZD5V/qIt/wPXsYs6jZ9IA/dHNdFfxVo9sxOTYPqVJNZT+oz0p2U3o8O9XnpQyc/lG3Qr8E/eP7gVbbi7LwtIuNVfRxNx5xKqFPCOi1W6jQoPCy3qgvm4zAlu7v+IXLyjHsBB0RetnNGIWbFXnRGlgSKMrZR12EvXOnRwpMXja8ZBFiCbVkFpStD1KoR4UtPEQY7PYSI9PnZjinAMypMhxnu4AncVDWsEiovtUNLyhY3p7rfc7PdftkYRcSI7tNxm5urW+Lo4qXw6HuRxDYcNl9nt3wmGGr0pnx75GfqDVw3dzvsHoqhTlwzcLNdpFcqP12OvYEh/XJ4TKHC/ik3dBWfU/02v6/HplLPM/+ZgB4F0BpQty8hWNRGi/4chlCZlyY+laxGQX32n9iEMCvWnQjJHbpq3sWf+6fbSQ
jKfo/v6owI/iWD3uIU6pbn+7XTcL1b20La0tG2tWgm49IKJf9wi9H6OkRHMW35x0fx7Csn9QD5xMfQvICRBWFTHq6MHTTXXnbNwzo79+BK+k4LwzE27lh9GuzkKaLAdnIOVn65O+IzMnA6Hv2g8nW/qJ3SLZg53cToPr0PE16M9oQYEZNm80MLRBho4ugSmsXaThWjFvRugd6Yj9/0KJrfu59U49z6nmrylDTzvqH9j7BlD4C0gBkI/E2RnpqZnWl7jEFLOM+EArAxV80cu5+GjBcCvKxCRI+xj6ZYCh8MzZucHr8rawv2b0/7E5wmtite6HTdbZRfyuu7U//kokK3HBscv2CP5eufwtolJ9vhwOTczVz8OnolSMeA7x+d+nckZszT0pkpYHzmprtxre2ipeC+6ItlrSYPh9JC5cmqjHD1ePt85vW6skdsVh9/Z220r01/7P2zmIzp1mye3pEW7jYg5ouoGKawuwMy7so5v5aYiiGDIe09bZTipLGfQxyEOJ/PRB1LYo+xcVB8333CJqoA6ncFv6SGDJg5T1tOdj28uxznnVW11lcsv+i4beAlSapmrt4loUdmE6dyJE7n/q91ONbSlH6FFLOHIAQ2ZJNOgALGannaNfPrwN4S2xhsVpJG3gVmdfemyOl3LttgUE38ZxVyfRV5x4aJTOYWHdPw1HXBXps0NzI75rF6oVqFVvmDGdjvqW9sGjNvU33+F7SZ7w2XZR9ooy5lAf2LlKvC2Fg8vNTyIdue7UjI6u+SXRp4gKtTjzS7ICOZnYav9KSkfS9N0hCXwUOwJSd42adZCP4W2TXRkfNPFIaBlo2VwATSIJ4EVXza/w862jnPxSCi2hPJDt5/c+MkL7zl2U49ld1NIEXF7CIEp5/B9HZEO5Bm2tsiihfOXzNZBwbjqkmSAhFpKhXrcsxydlXHPLyl80d2whbCmx6YMQfR54TQ+A8hLEzeAzfjvmC4CVqzJZJLJOHuUcaz97JKgYCnNMYN9e+SBV0gQICjyU95v0laTPsQUVPzX1ZsJZKDzNRdxG0EV0LXc/46F2zxN5S+2YpewK+4QGs9ss7GBPm4ttir+xOT5B+8+u2RoqVezY+fsLCR7MD0ENEirWrtIZKn02TqW10N6iXvyLyTJCNiGk5kkGBxQwHbY8XdjHJgaIryrLgotxzam07zu5QlP89vbV1itIYplEffuU+fI1zrj+qgWvYTlse3+SHAbO372sux1fn1J5u98m0AVfJmjhrLsOLIwS1HWf8GBRgANLvLLcEBUDRt1I1kiXMG7cQf8Yxm2OXbQx9SuSus/gPM89lsEG2HesOlnQKEGuFpPwFLVvMm9Mc135oowmDQ9RvHLg4KOI8ZjP7EPAfxt7Td9wL1kvMJUPblEVdpxIFiATsvPa+ULSYOzrB/nW2xuMNdJ5LxmeVVetsIyRI603XrCbS6eVne/cH+pc97La1XYDXt/AtImy1LAdw6oh7WWqvGDs21Bm5mrrzO2TVlSMyqEf7FPkfYpIMMNIQp0SadA9L2A0vL16n2+/EtktRyFiR01cc8RMbzYmsr4+9p2efMCxCUeyKhFDqvHcffcUKIPGfu81vUONBjxYj3Dh1V0U55+s1IdedywizD7OG82u8BVEyDNwGfnUVCJwUuKi5lfP7GpLA9DN9UyfeoeVtJDy0MGEG9xrRWXyPoB+XoQgRVtUJBFS4gWQgv59MIVsDzpi0gW5MVo/cFgpOD9aNAcyHeIy9NdCkM9707BgSLHAaO0mQQzSo5PeZML65hQA7wtYfA6B1NjTc3lWsKlBB+J/fgAzlr4mm/PrdO8gPyNXSg1l9Vv1vAQPIQxeJAJaNNNkrPT6b/sIehTQjSoXCddq2O8vzIqitDj+5GY1zxcngXDkd1849j4q6khHjVbHTndjfFei0t9dR3dY0FJ9CJiBIb/Ea/GH5gr0d6UZXfjZTmkzzyL0VFDtZ6nEv1zNLU+q/2+yH4U8aQTZHIcvzeaV4PLoLwnva0RhO2d5Q02OEMfVfZL1CCipfX0k+lvDmy0FyVdJgTPIL7ZMFCoTW2Z5oXJqYWCGShxk/xRfVeYRiyhLBg+qUtI+guJzsYoJSCXtQAJC5tTu2tjBkk8R8nWBJj0uP9m/WFb3MrZ+N0VwzlJUDLBlOT+6C8vFlQT8YFYryCof6HyAeryDU6aTja4dqFOLVsl4S8C7PlTwdxCC4RhBCQROS66VMtlo5ppCxZj/xhLY4RSQy2GEN/WoeMj0YgxBbMGLOgbd6Z8mubqKkC0kGjNt9oAS5sE3EohElq9OCroOu7zYxIFBvqZtb/7u5TnC52Rw8xBjsOFcC+hNVk+TWNepRAFn3E9xIVmsFz0TdX9FMuELooeSo5s03gRrRIb2apA/vhsZBmyXOpXD0h5ZngLD/tk1GctjscT2Pxhf3De0Yctgyq9D7yFTaADB7gum0l+i58jzT3oZyH39uCYZU9epDYFC47wfhzIFOlhWE/JS0RqoaanZ2I0P7+0y9/2MztfNrEr8emmtTNAgjAYCIqH6xpwqv1x4mWayP1TDSvRTK7gw09QG2bYKPEl4tghdSnzP9UI6OTEfTcRu7IZCc6i8ZWzbMCjmr4smU/sIWrsX7HZLbNgn4BnoLLsavBwwrxod1wfxs+yM5yfipEa826DCoDvIjZ33i+vvN1buOf1OKl+4FKj72nU5J0RGU92WZepWs7OH7cfQg8Qzr9OWHXlsNBZeATeNPpgeRy3WWQdI16AxAZZJJzJy1+yQdWGIMon6FHyMrQefP/fP5wjTgR44ce6HoDbiIvZGmALyDPqm3Mfiex2LIEDkg0XNr2SffpGj5fRPLnk3bNhSf6NiDQsjOxmiGulrMcOMv2nKdoPPR+dIQ6PgTd+16NL8Gg9S2DsP/dq6+5krqiUhcRQ8N9/we5B7UthmE7mX8y7Gq1W163a0JywY/gzIFY3fQgEXwb9oqkY3goTnWdFbtLJL0pVXaPaLUHf9tshKCpPBOlFE8PWJZ+m20EFpxQmH/RSpzmCAXndO84Bjnrny+g22Ccvbn/jKdulCXN+RCQxiXHyVhZ/DDhE+QjfyQg8PO1zKYC7P6AStiBlUyCsYqQ6gxWS0XX1crkJIgurxfM81NG5qCdhT8O8ei31mJ3NflQd9y8S+v6xl1CbTcpDPubfsW5UkD2up+iJYQs3RBEghMpFsCu3VB+rVTVGlFILPgdU+yE4XCGhKOhvqePct4QcZdZoq1dkiK2BH2LkzXOPnHYay5s6fp2gDVjvISzioNktN5DnqmlaJPyLMM+JjeIeFAqokC2Pe4jKmIusZd1RBfO5L/aFi40fqUFceCWqc4O5wH9qpdULASHLj2U58x8y/toRsUkvy2DBgqI56h0NkwLUPzEjKJiew+dNU/vQIf7lvFZWNQx/lpCKWqWOWGkqd4YBFy3wS/nnQ2kjoGca2z+4tLB8fHAAgrs5QbrvhCBe9ybLdIt0+GbyWsg6UWDZjeeWG4KGxnmKNag18IGkQiUEO2joKx3o+FYkZN+p1T5qENTaLy7f2ykcyf6/Jg1NPxtEntMNBToRzJELmwprIiO58SUIJVzSkeg/xIusdv5kkGtA5fPRoA0OAnbz6uiXsfwctctvjU8SQLuZaAOt8NhiWI46rY7eVC/slg+sALup9HhXXw/v6Z6jcNte36p2xZY3j+M9PILUrtBmlSRy4rMpT8n2rmDhTDklzGKEpZ2zXAc74hez5q/V8dle70xoVB8JPBWf7t1gFarsVYlZplQSXmo+KYXzR8UQ1FT4G7x5xg+EVXBsRWpORz2d3Dmu+sFPVhzzeDQQ0B1Fbrdmd5aqAnB8L3Y0Oou6InJ4RBSynX8RBUQtu/qaw9tasUSxNYgZsutIko1lYcjV8nK+aDew+0fnDFsB/pj8G3W9coJ4Ig1h7BLOqPZxInnmInjQIhPSZ3hGBYr+os7GUPvUqXPWCP0JM90mrEPvvHzpq//9RlRQ74v9brO+46Dk9RQvlnd3Y9rBxjGsGo2c1RLQLXYjC2IZCnxfC2vc2AM90K7pWJWqGwtmC2w2Yoq5dzrlDoAKkIQRxSzOVsOdby2LrrADl
D1RCiMLohJpH/zBkE83b0148/SQAbcUREt5vV3nBuNoTs6b30zkf1QHIqpOwI91vGhu+zn1OTbP8DvujGvxTScGtQ69iBGQEmyBQJmNBZbX5HimO4KYF682hO9Iy5+WmIlwUj3cdh9F+FQWiiA0Q82apHGuEEo7MAw3aswLyB1JFy1atFMtRwnWqvhPgL4qycJPRSYAAT8UA05013vbGv2StaUY8G4lIdaf1/aDe+UZ2lv19TaEWGFJicT1ZCZFkDZcscho45U+ZpSyS0JPhI8FQ0wEckiigNsKNLNOe9zLFx9ptkgxTfrIWng8SbkTRiUHIZzN9aOmSSX3Larj6wyHZaqQqOMIVVTY5xHkwpFFyr//fF82I3HziLgHEsX2ykCFe8o5NOn0c7wnAJN1iKSGIDViXlQ5Q25VJkUs3c1HvaCwQJcMzohqUzCD9bWsPh8eelFg7+1Ovs2zWc+ZJzwJYMI6LfwGdPkmwNoiDsoRqMACtSevCUmyswc9VN9JCjXjppIx89yyB1jifPWLS3vkDzpQWWzilLckm2baE6v95E59TOsQY1Lmluj2KiUd5Ks9/tRjj2chCWAs6OkdHwvBacH8sZe2wMWI1w5qzcriYZPFtIpcKimhfz1rVrApt06u9hcY/LDHRMOcZn7f6QaLXz3evK1Ey9ao99HRNZTxyYf9iHR1o+PxQqUhmjgoDBb1wNl+fOb+VFhGAGkabA0TJfpbvQOy/NUzBt2uEpQpItl0+n31Mpm5eEOBC8kGFC28i9Ia3+WGr/L9qAcJGmcp8pmgNf4a2zv8c86WN7NRRKN/zPPmazYgTSYzPP+6Lvssest+eJdWmgX9s1BfCSNkiSKfzfKG2tFJwKNiRQvG2mXhW4MwmAXdUcSJCF0oZLVioFmd/yx8sDXsZDaaDS9VGL5SieA9schAgwau+G1J4UcmscuJ8RFuF84rO0TBEjsqxU5iHTtHO7HlF3ZGWzR/0ScWSmIehM3uo/RlqkjQe20FQS19GubXsqDgx67hTWAePS8K3BdDTj6zXtzNH8cxf2uAlHFHrK1U/nreJk8wGGk2g6kfutZNBHOX0Tt9IMKn2nsIw6KKtf5TSUh2DdzP2ELECHQTFAQ2YND534//2HzdIpo4crdK69hUeNROEQ7axzZJ8UJM2U547iAa9hV+ZwX74n2eK7YfKCFRurN62Ied6TxcI4Q6vFLw0YVuwCbAh5VdRRsxq87s59jRSRc0o6ybPSX8aapMkdTzMn5VAKSfV3s86VwImf16o6ik8Pjp+NxVibu/43WLy5utEGqljw0cY37VHL3pJhEW2IV4C2GCGHmuvs7kTO1RRNAxW/e96/kxeOdlKd8tX97W91UEdsAJKoripwxKV9GqSxiA2TPsaWJ2U46yfbEMlT3ueK0Uvn0keEqKXGdKw8pl5kja//eIjv87CdQI02KaT9PTKX0x1oHWhbrKfkeGTEzn7I3TiX5OmyauqM33/WxOmTO2ZZVYtocSCA3NchQG6qRcTjBgBVz3gE1Q+tB2u11VCA2fNL+hWvKDIBOy2h+l1HkM573ovIx/QOlxOmEmMwuwrSr1BjkFy/XnPsXcuP/IoFMyLHJ6tzx8kyQLvQdC4/G/GAsqo8lw9/zj1udFmLYYxhshCpHGCD9tKRbqb/t7kVchUR4CWrZmKZI1pODEgSmrulynuU5wo/zTfquKkVE5h0Y4c19M591672HeTFE81tTMgrU9TFvlVl2/q5CL1XkjonuBB6DSSWd2zZfCliMXnhTD31yVMpzUEhKkkeMUNZnhmDq7a6kK/a/oTyN7Bgjrr2sELC+MXzRkqn0jQinVUi0y4CoyyxV+32D5wF2ZbVIyXUDHw7FVvtPYKAVXlxpoWVNH/3PlSVxphgqauIjY0pkIbZsuEsszAP21ZrtHRxMG0svkvQdGuwMBBC6+2N9dgytHPt1s7Lr2xBui+Jl63RmWM7ogXyn3ll7pQKxtEFsg30q+ytlpK0UOaAea0RlJASZpv14J0qwqOh3czYo8IP0UWD2aVDk4f0ifYiXI4Akb9jEYFHPwVsn7MuAPRj8TChdHsqFG1bRu4Q6mN7+JebInp+NYF9h/YiQPG/clqq2y8ZaAiaj/wUIXfD72KsFcKiM4m6AUOeXoR2wdXiS0wjs6qY1JBpWPMkP+nHie6LJWWhACpMrfAfgwjMCRll9X3PzwrSM+6A5AbXs2wtU4clke0A1MdKlGCtrAB0zWowSwQT+LMCzJ7R/7qGXwauL++8Zf2GhkXy6HhgCnKuLqZmR3vfV2UgPZqUEqDHQxwT85u08Me0N2FjIr4NXlnFjbdGLUd8ZiQ7LxR2aCIN6sJhh4JFn+Xzuezz8nUUrC48lrySIOfVVnmD3C9QgveMaQ7JBX9Lu1EshFcciBtw+nQLc5MKl8IQQHuDyauuAARcckSJsaxYKtL6wSQohxgzpOWM59/yNnhM2+4YgdXcrrOHScjZXKfj83b12ANkdI6HoNK6wdojQbIvhDnfaP6Xp3uAawjXn+atlLA/kMmj5/g9xn+lN6wc6aVxaS6Ngme2y9FNkMVeeMIwunYbprj2bIYXN9Z3qlSYIkEKg6cebDeulGfRjp/tGn57OI4a3q2X4pHLRHe18GTj5HEYX7RXX7EC7uGNysfOkXEUj7m5DKd5Q0MagMJ71X9g21vzSe/Ebh04p4I0t1Tnk0Sya1mq5wwQOasRXMYsB6C17cOYp7dpz77JNBeLU24X8V3ekchIqGTmBM9edj+upMbZJSYHUwdSig1eCbInjErj3H48yHQn8WC1WEquLYR8nerIUy4unkwgdTgnRrnkaLFtNKpYZ5gldDCKhiZ/9AdGzRLoC+L0usuGlgamSuyU9+rkz87kcvrC945FUP269bSF8j+ZB42nAhHD5qfviDJCx3fFPNbEye+JRQ2Tce6kaObGsrthXRb759xIwXAKdISQ/L6bxzH4mKmiUcZLi8fzWZ7gWRLU5YNNEG/cWMTKRrGZRy4rYOru28MLjj2vtOtyHnZpUJ46D5t5H8/ZROAQp9dd0FfDGfecK8wAmSat8QJ5A17X2P76FdBSJWca9GOKjvilF9efBMbhU4A+pgBnPTqIIrMIGFuxGuPVAY4cD4kM9vZTemXKMPGTt0CRVH2rUlWGhZ41bfeD7HttpHQxZPG3XLeI3WNxho4oIv7kXe94HloGUf0AtqssHf2ENWH/3ckohg62K7RG8uanDyQsBu5cXHZ8ssqkT2df2Nzhm4ylBgP2rE89jxW3aMH2/eJemXEalFoCsRX7UGSL9O7gIVACqlKYNeNyPJg/tuSu1ypdFUBRNDYUtdNkOQZ70OanPdc0M3KIn2U094JJDU/Ocq0LhvmDkVqW+zu0PU25OdMRbC4E55ZMaa2kWJweq5EtCSN2Dp0JwgYXyk71/sSusruDEjQv3mCnoiLojKHID4D6p8vOzz6Qx9w+MAE54DjXMzPDrwXF4/ihS9RHVR0dwX1xuko7WbTLTcnoGPQvPLGw7tah1WiVBH+v8AD6kHzoA/4f/4VECG7rRzwhwmk0807D5CCbhB5NUnLYGUbwlzDxdrYmlmBXq2yjscfpXTyt5o1/yS104W1x+Jr6Znb6XNvsLuKUidlirlcOxK+2sbmkQTGJLXZIvF6ePzuBLcFoCt/bhOy/eZFMH4JwmMrUKeHMuqzVeEAFS76Uy9w77gt1VTPMT4mI45sn1j0yX5cMbL7QYw9BWTslG1iUDSFOX1jFHfk1IStGT/0Yg+vIHCR61S1OInsWQm1RN7bOWzRMov3adPL7sgXx/dtGzT3h/VahlQk5kzb3TdE3EA6NoU2V6DWoDk6cCtD7GcA3kQW1U8YDK0TGGndwqKoJj2LwEKO1wUm2cslzoOSmXPTEdtKRHb+c+xBrpmv4Qf+0GYMWw49h+3Y3BL/2po/wXihKCYXvsrp14QPAtPG8r4qRreg9QyIMLb1zl8gn6ssCY5BH96Em223pCY51lXdGk4vDAKgLu67YXMvDhQ8Ij6K3DRNsmjf3D2vUAy/iXH8UAabjUHCZCfYUjBm6Gzx3LSJolav9DEjSwAJfZdW21i0Ym33Bf0w
kDxsmv7QtlDvkPHjpMEfl7IfYdlNWH9bRa2CfzXi4TkLXC3Fvecwk/J3W7B9hgE3H2vqxUNTZgZ0y9xYNfTJviBosuL9Ne4A1K7WR6Vart3rRGWB7IwAghsHNaaNKm2QyawUPm+JPRiYFY/vEs47Nm1KKhaoy0iLeAYkKAJHulDgHFQbDPpB9WWR24nQu3Q7OH4G3iBFfm3qkmlFkyTne/xpbUEbjXE6xymnZ6sTVWY7/xmacvVrZ902Cdz/2RJE8cCqiuoxkhAd45IkVOq81+0sL/WMyohafKFDo9TXlwhs6lzEqPY2bfiIwHdKPS5RXZSw6hLREdI34hVxi8HK8XGwH7eFlKni1M+12htcwk2WzhEsRZBAH3qsgY4Pca3kYDdJgNH75PlDj2s2OfKs2cKYsw2MtI01BTU1N9Flb1fTORY8rnjM76ttv8BnOtyyUnoYy5KcqRM0mx+O1r28vgLsgzjRO1HYZrs1DGlpJw8h5slx0F19Xf0p/7+cbG6M81fRuLoDx16/bNLEUQggJDAdY52w4DmOKKr130i078f1SxyhE/m4qfXtwnABTD+OknFwX6dmmKP4pFZm4lGPUkMz4Hw8RBAk4OZ82+kG8l5ceOJy3/V5WjqUw0tPCNFyQou90qA8JSXHXM+kNFG2OdCKf8ClnMJqcutmBt9GYrbI/tJbnxGbukUpS5bbx/SWYSleHW0hSJlLKUgJjTIz9cIWKUTCgkxIG7MRc5OtwAllEaq2hl/5NzkxGsps3p7tGsbwkoFnd9nDNGDg89xJ+TqF5RvcynYuihIgDlbFXoNcb1UOMPYMOjGNxlHhOabnP5Y2wenp2Yz68Qr8zgMG0v1XKPrI7ntc8gVdY7RP/b01CrEJfjKH5X405ldp697hkdn9D6eAHFLY3afcYNJmGHt7kvC5tA/a5Ho0BRPoBWEctQ9l/vzGRy0g16DlJwhCv5QbSl43GaZ8tmMYTc9ltrKPy+XgAfIcminC7mC49vaPnjzTfn7kQkyjo1okgXJvR9ifNSP59ELoz38Ww5TMaomx918BBLIbjP4FrzvTqHfXEOcA8R+16t/42LhL2fLIqecwk7v7CyGAL7Nkrq1atOnDWinN9ol7JxfV7WGQxmOQhzYWJUEY+GClb6I0Dkbdp0kYyLo+139Q09hrXFLOiSQUGs4XlCoatABFzj7R763yzxZOreLYWqCzpF5Zx+HeJy3Z3DwzXdRDTmhkoXER1mLZ500Q/vGLtkF2fWK60k2LcFuLFJmCKtupHZCy2mh0O0nCMOVz0DZadzCPGOntVDJ36NXNUlG5BR1LcHhKSu3jTYvDw87KVYqKfOFpXXIYvYt/IErhlfJZkix3JfVEV1yMx+iq6TJ/8tHtPAchTLIOKip64cVnDdooX+KH9/r2M45rAbwV0LbvFwaRaBVdKDQpkljf+ukXdPqudiLYSbCIb9whyaAVcU6y/uwBnn1NmZj3TBKp4t6ebMYhmOU4zPLirTmubB6at6sgj5zeFr24F1G+FH3DAahcKOqtv2f0S6Mq2/RMAjPV1wVx+aTWeCnR+WpU7436dBOSmr37hRNDDZpEeabTeFjFSWcf3Ez5tjWht2SGSr9D899j+0+OA4n5zEumFzUeoK3QwdfiDT2JToa2Uk+YQZrs0tlC01aDnKm/6NNDCJXmNJilu/+j/qy5PLdY4INjTeIbMtYWOr2WkL++ALr571iV7phQHxE9gW0EysSjOxwNJXZG2AJqOYmw6EzZaU8otpYnF1Vp8+LIVhpj8Z/aeXJ+pdEGrDxgsq0IcizpBOLuOCFw2cc6WiQsVpAx3806KunAtFVtnpAQj3tWnNUl2WPnjvQ82XzhMZ8T1A4ILvvgPbGq3gMPIo4I4/NgisJ8jHkDV3JXD6NlKsOKcduUAsv2m8fCd5IR/K5xUOecX9KAvMT9ztKk4h+TYL6RGmqoekaW4WrD45JSt3PxbWZ5PBGQyQUahG+abkg40Yse7MqggIBL5oWU/mGw8qD9d1mofWh6nIM+hqcO3GF4B1ZKnZMo67HOTkTV6R/f7ZfuHqLibClRIKMDUjwNhs/iGgk9XytHLryAdjazl33vuNgVufmfbQ5NoT4r4Y/E5M4j7jxzo3kYMLA0NvLLw3dAt9DVi5LRhBwCvJMtsK1syHx+SodMBBVU5HScyQyWxxotKr8BgGNQMeUnnDNlwQVx6/oHY9UlhyJ/AmnHuZl+rIwTAL/afLcJyOHGZy8PZC6dFFw4gML8S6c7N8D+mDpa8+h4da4dFzbXNRTBmfhRFB42DyUylJB+Xb3rMgYSUYOjveo8xzPX8TIc6Y0q8InlLWWr2nkT1FR9DWj0bO3MpX0giyRABFpVYOWVOdwrBN3jISoAp+6M00Z6qPJok/Ib27of1NZuPvWnRpi4eraObXiFiKEvUJ07I76xfQXyTjm1nAN+Lw4yDPA1AqvRIBTGqor1xZ52zUCpZy6Td7zvjHS5j4jUdupiuUEww/v+L+OgPl03te9AMulwC7C0/VHoxGhbfu6o14f4GzeAaHYcRi6tvprEzDdNBTxM8+mpNtrxnHldc8h9kBmxMFjjhvgeghCg2UG/IoFf3wD3XJkJrml2oKjhpbo3wgzyyJP2Vr6aqW0CPW/V23j2C7s/62G5E3UZRmMINwKH3VioQC2yOiNgLzvtsscmw/QrvEjHXiZW2/0y5BQikognMUzBl/b0rMPswuMJwy0ixX6kJyvgxAEt3IAGT0SgwSedKAJpzOyzpsQId79TZ0nyvFaWYtFeaVYIAXumbzJtCgFNNmg7CSSi1rdg41h770ApVcCJFOX5eNSVsrQunyhVy46XPVoBWj4JAX49D7N2bGjJKsm7McDTCQZwQlbE1Pod0O356dSA45qGIjmceNBUFq4MXc1v1rpHBXBeILwDPimDdT6gmfjIP7WUIfr3kxzqATOaOo2ptiatGsNiwrkDGdb7slPf2Z1XaSUM4X7eRE/oHzkQjqpiIUP5Gh7nEdV94CzOqqpryhxpW+eu6FgwqJwn7wI9AcHtpVJlh8AD2AsH8XMCFfuVkMxbCAAV6G9G0mE9OENhBqd7m6c6xEbIEeT5grMJYeN1ftpIiVOkLW+8ZmEXpU1kFHEPLu8v5Z/4zI/uFL5pNFvK9KNoPakdnQsY4jyRj5Mak7KxfBNnZp16VJIERgvYmzlyHrSTus2Fy+OxE8oK4c6Kc//i2BfZMkK+FgbGY/gadg6oZvM/KZeYHvv3QyAGIytt/QDdvSZonUADnRGEWwQ4KwjqZ5d6+2k8W3Y/zAy8oo48wR4+RPIV6ctNFK4s+pwkWQxtNRmdkEQBT3/quHqGEfUojGUmGtJ6dwYZ2mlEFxK1hDwUdiebLDGWBn6SiWci4inIc/3D+9aQEuaBpjHjB56dgPV/4Gtw9xlPN3L+FuQ/kYPLdeJixb8UiLi6qqODEPheplg4YdER9XJ9H+pWZDnioNRBDzjkbbFGmKOZ5tBpjErcy+FD3Dc8JXejxn/4UhIkVMDKF7Bm6UwBZDFmPPv1plm+T7I6tm34iD296CPu0sBjk2MaHbvK/uN6NOv5Geow0jcg2sl2ZZf2Zo+9l57uhIKGFRkU6WIH6vwuVhkLJknLL+v8ijL08MB1QtYo8I7gi8M7irY/na0E0NjdmK+JbbGdj6y6zteGP7PWEzhiRQX76GSunK+8sz90rGLDW62lYynxGy8zcciWjeynGtwXqACpO+FYdPHtOyKPR8+vsfVjdA4mx3uhKfT26/nr0g8skpZbp7pArcQNbF1dn3ooHeq791pXak+s1ZnrEmPmu9mxgMj/UwJOcM8PW2mbQVj01TFS9+Z1EwQjdCik7cYAg1Y15HxlS0doA7MJNO6z7BWGIj0WmX59NGRIGqU4cZZvj9RBIhTMmIK32tvQ3E6LeQlWh1/lR4gzhYHHBJgmmuT/XM4L0TevrojtGMaB0lkNe+DKGVRhH5lg52x38hnom2MKeo0wYFjJYlNFtEz5sL7E9gbCHELuBb2bgQ2wxv0iBsigkE9rgaZitjDLY2QZknHhfZKSDne5BrC3n9s7GIacOkWALP4CGdvZ5LpkiWQ+OW0/
7DB2Xqood6fyCFU5hq4b2IEvA8Y37m2H8QwPfqo4syy/Zwden8r6rCO5bkGti3pEgIyVhpAWHLw7NvEgDZTU877Io2RbK/uoOPIPYYKH+8qoSqf/Pm6xUMPI9yPm3HVefNuJQIbJzisVSBWGmVXYpbVIcMAASk/6FG88w+8GYGos+mZU+ODHPLsQ12LE8rq4Kqy7fvCjtAGIU/sYCoW6s70gI+pBAU6ciQzk0qeYG9Bh1VQHhECQKODFGQwXFhmS9v0QipPA8RrlDvn5Bex7F33A9sgjp+L0OIjmnEwy/09i0AI3E6iwb+Db/ldorrMdqS7B5trqKDEU3Q+yA4k+w7gkRERqW4xNRYBEoFKjFc2LKE98xtWp2SA0f7vo9x+wmEbEbgNwPv2iYTD8Jwquw+1WHtpuW/IhcscZQKY/bWNji8eVWVhfEiTwSScxbuJ25Qy5/NU42iQf58lmvx3XeHf2Q5QAo7GlhTvNSbKGTrUdt+EouyyqUl/voEAp0oPAlpLCpfFCLCw3sV3OBBgCEFWZbSq8E8tnHoDzdxX8GyaVJ7KRPEhmQprPgcYmrUNIVcIIDKiYz5REZRsKweMSkQT0/XYAPZq92DxfLpD7bPTb93ya3Fog+ot+CmhCz0JH3O553v/jz+ylGJU309qEpWCQyVRY8LhytsCL3cgOM+syUvTr3DXqICtTMG0kyJIhIaP4mbBuwUovKrBREClEz00zjZfGPNyVwsZ07xSfL972oBTWoQN3MgeEtwf9jBWhYKjLKPM583pMF8Sh/m4rcVwkeo9vKxVaVw/4UaX5qb665iVu4fei5PElefHvPlNU47OF2IN7yCAA9dWSYslg176dwH0WLmDfL97Cc/kRPzUD7dDgKiKN+4/CchpfliW178eAprCG7xkbwSef40Cwgh8iL2cvat56IqwZZq8FPC1EEkTW/MyiYO7JCDbee2cerV1YA/C8rx4ArDRb9qO3Ez3UoVytP1iPWVq9Z5i3N+M6DLtUaUq6kjGBKBPzyYee9EYEQbYVcoMHQ2Moq3P9Ca5BKvpAg1VqzKHJiT0pP0H6z6dzi+VubxrDwsbiYAP5kWM4bS9umlDUd2ehnWplsBejtTtdqD4Ic7fudnL6W91zqEsZD66A8RyYbEABRYGlU+H7HxO1ZT+tSPS44Jvzg1lpiSeHXZUpglPYfZkroWT3fbTJSA6l36XxYfJJvCd6F7ywOGSumW6RB7SfYfA+r80Oo2i43ZA1eQ783pieLy5hB66RB6bGiM64qFrtTbNqF3i9JI08AB4kLTEWPqHeN6OrXDdON3sJo1hDShhqVjQMn0qD6mbyMipHzlVSX01XSv6fDESCAsJAGGVGTTKZr6uYA9yz4sZzU6+4//ddbmCBOq8kRlFRfrgikpmYlHrLxjzHGqah0N6VtmI3flxaac7vYlrMCS+vP33fK9sCFPN6Dpr0gZG1Os8Skjc1l/c70ch7aWOGOxUCSz5JmMaiJyJYGbtzifd/vfVzXTBbzfOjFB4OTx/IJNOAN12u4gD2RjsAxSQ/cilicID6VVWqN5KlU2kigAG6j19QIZp30X3+J8fJZuzZuBR3ZVlVOKWHC62SnbZ+O2zFN4QtjHNU8yfzfH5tIIE9N01n7uA6R2G+RLn3bNHI4N0YVZyYRJgsrdz3g0ov0qzXYaEJRnt93C98bzxmflv007s/1t4Dr2XbpcvkEUL2eDR9VfDENYDNHosmZp966F1oTwJOMsWKWg0rJjtkI34BmiGP4dLj/SfL2O8cOQw6IXeam+LgIvHY0jtj9ZGe08tPaZF8uyYL1KsSu4TisXtqp0LppOU4ntWBJ8yeWwfmWEmPc8cT8dmiIlwVtOWeYX0tPWqntwX/qxcPPGmbFwHxHE2NxV1NO92gk17/ydWMfL8XU+debKQIPOg2Dnuh3R1msCtVEaCddCDdSI7Iy/TYLp4ZQjP76kHeEgy+k6pGM1jbD7Uszyp1ZVtH5cHtFR4wtduu2SZu++KJqc1VWit7pCUq7uSlj/cKpz/5LoxyNKM6/DxObJVYAn/w4cmIQsSlxrm+pFuJgDQFCDU9AGiizJg6bJKNQNOId2V+qd81SRnaZkWLrjlePeA8DvnYnGEjQPpc9guL0ZrMnHJFilZjG03Kox9siX/RtMVmak+TJn8u7voe1vKEsHNhVvJ9BntiA7OEwVGciPA1n8k99kqWM9ig3tZl50lSLsFxzTVfQ/4Y7yssCpDe4GL2My/uXOLG1vGrw8yQEuu/+P0L2PQcflwXVNf9pOZXM9oLZDJ3YyFg5UvG86C9PJPbSzxbXd/pepxhPZ+JaRC5MxlQXv6a+N3F+qp3/K5sMaynLvSW2TqEetC04w6feV3eBzZalGiiVBs1ZGdB6ZIb67b9zCWa4Q4icBeKa1jtUd3rf+IX547ZLtbPSAAvlBzTym/NezUG6b+xYvQh2hY1F04boUCPHGCcsck5Mz8gbqg8LfBy3QREbbkz9P6VF7SaF8FrrON1d3IhlKyB+RGpwRMcDh0E2SqbVSGVvGD3OvNJfW8KgY1/Xy+YJ4rEcyX6baE+/OtDA1qtzcTD21kvrid3aoSGk8iWvJxbVSMKGiAWVH4eu89JT5O+y3uPtgpVibNalUZsYl5T9dKtnUedmLrHHfB13qgfaWcOLKG/91R6I8/ovwuW0PBmBcLx0ZLlB31aRQ1nYW+3ONF37lmYhMQabmr5WRz4c7TFCA3chkS7a0FQXIJvEGT/zDPPjRyM40VeVAOLtwECst9YMa/l7pQfmZF7m6xG1kamlTsIP7tjOZhSxdYX4gUWABpTaYSiooBGTmz464hPHrja913qHw2Kg+6/Dz8CUX1d5V9Y1s/QwRb0su/GR4LLg7MxWbSPKyJSsPmpeDhOjZv3+bGXPC5q7SCwLI8HE7br6w48PRR2Stn/csDXaBl7o6/e1yhpg8vM4S/Qv+H3jUQhOdYVEzxYuoFDWERMjX6aiK2MDP1ugKVCB2SzSgXE5gSsqImp+OpkDOlVbA6fq3rm/mfYufEh4gGGgz9Ce6uvhwbOcseq09AoAfQW17ZSstcCCgm0ovxMjeuL4R9apo94Ft5yUunYGCPvhPOLaeUWDSR58iH3ev37kIHtAadoPxCpahm7NJmGyP6YRVvSqR1pjUquqqe8UYalLCMn2YpjNhfKYW1HGIpUJ5EdYfUHuO30ZTdpYKmKUGpcMU2p5x40x8G9HA3kqJ+QkN2iI4sqbfBe7THCY0Vtd5/l41t0/x2/m8O7riBWj9dFMSfMKtL+LREll4mAsfeH1FWNZlRgdwcZ+xg+7OlVDrfKabVYhTH9RAQxXiStHxWtHxcRcppfDBfTIJmrEt536/qFX+Y4zp+gDzpA/N8apNUp6H6/ktE/0qikX6TOdaYqN5nFhIRynYgfOUJELYum5m9K+Ft6pnOy+KPIkWPblXsERiktWPO0/LWgh+/iBqR0mUdnILiyYUK1aSBidP0GMt1y85m0coiFH3tUq0ZMo0uj28YtqUnGclhlQE5xqJsrTXLuIK/LsymI4Kx0vpUmCN/189IIj3hOuO3LSr0DO0B9G5pnTg/j0483+MRIcVTRpMCB6yAYe+w7dLrvD42pPxZ825OYkdXj6PDftHV35UqBtGBOWyMHp/N+8mMQTTIiOTCuY6+jrvTD4BfJgPcERDn+kPHX6tPCebjYSGVe6HXGCTMRImNDXghYiIlqVuufxA17m/fllOEiB5dXpQmF84kKyALuwI+TzebFHsxWuBcWAv1IEEkdKriATbzCCJvHqKMFCUpQR9WuDZPpb2Wg3dhfElLU78iLhonjFXpzRBh5UYtXorqo8IAEhITffyCc0Oic9IETiL9lPxs9BtSHmEmr4bvC/0tI0TIzl05qo+BDxWrlfyWTqZ6di5J49BvClU3e6f3wLhunA04ih892N+23faGyUtnum3IUAMW2TZ6liQWzA34w4pG8HstAz4jrNl9JPefDUy5MbG0Erd6G0/8Q5m2hu92IZWDLb8K/dK0FfKOZt1YJp/PpzlRCXjVCdBE2Xvt5+7MgmVVlcdgQyf4B84jMhU+OS4x//4bIMwg7YAhJZRIP
YRRe9pTyUu+GuCiH1xU9z8AO+QpUU6E4zkLwla7QOUfTXgX9z/OnikAHMLEVFPuxDA2YWV3f0Zr3Ose1IWqhtNw2Rc4J8d1lsznsGv1d6bqS8ad3i5ssHUzezq7qhN84jWmfvtnpdfnz5ki6DHcl8/+FDsDIAZyfMzYd8AdsdffaBhjpWjw1iAleFZbFtCZKtjV3oX2MurU0m5oGUoayJnDGrLPMB5PA/fMNb2VnS23eB1WaGTIe0iCSiSVlUnO+0LstqLzDAhX8+EWtphV7cMhd13/cwo8sWdQRjV5LO/fSKNi01kII6rxOa5fhqhmRyS0iy/ZUYmgbxtO3O3K5h+oh+vpw5oORs3T5K79UNCR4VPlLKYnwl46ZE9MR8bttdcon+VXsaqQRF4mEqQXMbZubLcMeGJGht6c9Hb5DHPVs6UAYi+zHlyybAK/0vwE5Xt6KXiCJ5O/mMDG6fzdR05/rkWSyGKVeZuio8kyXQwr4FAMfva+v2n7b5RKc63BdmVnIHZcJHEKCll4VHijtnJefUd3Hobt65Rri4hBGiDBLUPnSHRLnyz852/+P59ga+x7rCFvKH6dG8tWbo+cPNv3Zxi5Pof7yi8WKf96hILjXHVkPLNCZY1v5PjnJqtPJ4Nv11wLsNVHk0tIkghi+RlRw9LeLUaiI5nwOT7FRlWKBLjDwPUsC94BwgCavYBtm9wK/GNFemNvvBUlPucXCr78ry0WlhKmeMhw0LBfORvv9+uoC2u6ZFBGU1pK18tKAH7L8T6Ko2lcWriRNa5BL2utx4OGJHCKGspQkncfAmHcvKnb7bHb9ci4eeRqJQllZHa0At+nWCWg5orNcghgUhtV5Dwp+5DdDSAEaT9D7TIvgDHTNhKAl9JeEp2zTGIhk4JQJ185cvNj3evSs6oh9jQ8Ci2EyxgIcOQNiZ3muBvH6s2K1wSUSzGo0666qt4cqyN1aeEec5XEbiDzvSRyrK6cqEwGW4N++nu0A6OClFQoQ+4m4n/TArXIVYcVO2k7ksnDuhfNnU48ByTk7HbtVlQ5roFuu7f8IDetfqgplcSI4kq+/n1JrF7m3Qxurc+ItwknRO+kl03GzGLni/6cOE8P0LS94cKQAyUq/dNP5tkYfiNfVjV4Rb/2GiBaG45TbZCpwSnvyvbY9WydpOlaRbbAygvedIgXydFIEcXZP7HD4KEEoLqbo9tytzQaacEuAl/+zP14Z+dw4rlEPtBkq0K/OtK/YKboaCS+xrzEz0NJzESgwXywjBWRfT9Px1sB/8HHWG83Hlz9dQfhokTCYTXYn5i34uLcxquwuOLVNmBCQXs0OgeKjc0C6gNPQEKi25NsbdTyXj7efRL0LIA1HDDmvKH+w+EW+5Oo5LW6+W/dPOtc7u24UpAUePTjuzFax1lwcEZzk2leHbzvRItVyy/0/4TjY69qx6QO+RfFYs3sHifSm8dnMKnnVRdKvZYugGD5hLbLWMfI65Mjm+sSfl40RqhtFKj11w+4aTLYAVYaa+FP+k8yli0j5y3A3yMoYaNbKZ/xFuWzw7Cm05sXNTTOGY8EI8MmTqerbOSdzCK6vUF74/wezjp8b0+zLF27z4Hv3M76cGztdIZk2oUY4Ve6+7d2zbhjPT29XfiuBkpXpWMCTZjYjxgfZ3ZjyoHHiR5dSSnlrRc72tG9ZYHZARzovnJLo5D3QXkyGHCoVR0GgPOQ2ddhILB8b/G8acC1bivgAqz7h3RKZVL9jQh2uL/VVE3Az9QI+4SH9z8M3ZqK6+Z1xQ+hro8iK4NjA3T6vs1kY7HHAktEIGmNMrMXadP1pkyxJtCi4g68bc6Ht4jJbix29CyGlIGftAc/oCIDkPpQfLbhMAHl2QEG965wmNLNzgCK3WvA6PXC9BVFm9E75np0jsCWnwMzJ14FSzwgsEqUWJWbqydj9iVmk+4uEKgr4+TadpZ/GcazlR6tSzSckG3YlyGVcepjqrKQlH6YDIqSYyrDRQlBJGOSLYzH4QkGmjE1L1oJlNs7dOCHHkvl6Uy5L1dg//WppYPTbieL0Jh71v2HJSZJa7n/fIWUAWcY9Bml/k2pWE9nZj6lA/uOiYGeK7CXFhcqgd0uik+QKL9yDnYQNluCDAiP23SyAOWH2fKJ7KRL3FPe4DKBV7gFgIvp8xijwQhHNJkxJfntD1JWwofgayq3RqWPwYd5QKkGNgFaboVnate8dpWWHf0EMCuj1R6nSs3/QHudRyI9ccQG9BlCeOE5saHAfhyzwpFbCqJ4Zef3NZulxqlVWIjhXFwiyf+7L83VGGfQgtkXouqVymMZpzV7Jm8kyZYrxPKN7r47aELe5pyM88j7Z/A5c/fmyZ04B36rRw2zv38loNNBIEITaI6EOI5zmwvohn3HgxtVu47ml5SrMzvV9JrvqQks6phvGFBG8xvE2mi1xRpDOBcFEhhq+AXEt5ijYlcuD39dLipb345xFo9wuyyAEboYDgnJLNtrPjUGHb0qEO7bI26jESADUVtCakmkhfIFfuSFUp0oyHN7rlJ/OPuhbmo0lZVuPQnQXAQYvtFjgP8aPM5D5DZ7Im+k02HzhI/f0gD4chdLLKLREYvTHCv9ClZDJ9Lm/L6dcKHm6+veb8ocNbX4trhnxE2+tH62NaNPoU3OfakIJf1Sx/CdNk2AxbE+jYL9fwsm4yPTaONDkRLUzeSo7jF/XBCJwYdsWI8wRSw9NkYnGJOONJJYk28HQ0YBOXh90qgeR3+ResOyfZzNg3cBajZcsMUys13QdgPRnWoGcyaZSaKrWYp/GBx4S728/trqbE5pFHnlL+Xntg5D1SoVe4UjzDK+rLv2h7zmBrK0iRFhGnFGw+TJYjoNbYLp5YJkQ5AMoiMbYqiAZeEtR+VU7NUf2GHggnBRDIYYcBh7SZTntktku/uOZCehORJAREAdEdkD8BjMD7k3NjjB3Dpq89yRpIVYVZ0ynfCHEs3fvVjgCMRr061lAehKg3FkmwJ2g/6ASgIK8vbK1ETMJQW4unJvBfj/5KzHgJuY1cwTgnvgLjpX6gBnXvEI8VFDPui5l1kbYEjZ5Pjqr41xxo+WZ/OMUkd6gGIheQpCYHbXcGorwmZGymoatfixpkhu8bGXWciPe+PhVXLo8p3l2O8PueBXtmRsqEdu4q2QFT9V3Iw6zjT1CY5Fk+DxagrMPcRsfksmBZkKT15T1bNcxnvr9Vem6Q4u0VrS9e/c3GP/dj9nAiyKH2FTeCAwELNuzVd3r35KrQvhr5rVyMYhBrK8cfXjA/DJwBmY81gZ8yIPatfF+uADWaHCJdsboFfvLBIi+KZMV+Q7L47jk6K4WkiniaIlEK33Fdqnl0oPmB3PeVPAJvNzoMKpZ3g6JtrrcjmCRynqBwewQ+pg1uQ+UocvlZLCBwSQQhG6XlF/M3H+hcXoC0omY9dxGcHv5eZn0ER0OJ/f59Q1Ne1uNLsAt7is/4Xkyy0Vfl/kUrpjhyxXa41aQJ3/w53b0VKn+eIcZ098wjhC46I9AZBdB4X/XEPajKdyY2z4xSVX8Kww4PHEQCcrUDdktAI6YO4jzAtPKe6wWgXhoxSJLvIk2WeVhhT2eg9LJOfpDaoxlnZWAF9zYf7C/rLPX651mfLyZTbbYJMmfSLt4ItF/FcbJVy4QGgWq7u1sc/Hn4utdZcqhJQPYv35uRplIYv9W+B8Ib87kF1tg6laaPt8J/wsO6C4mHl9zxNHA6ewQDYohekrNtc+W8oSfEII8HzU0z8kJLTEKrMwt4GUURIv0KIf4NmQVIvfclfvg4NKtrL/yJsLWRwbM60AID8c6a5xoy5xzwyLWUBmHV9Kjxv7uXQiyM3PQKTS47+rNUjvRz7BLQax2yDEf60WEb5aexs2lChg7ofMXEQZ0YbyB1YGBaFUJAjJD489OAS/I5+TM1K88x37MOTNpyugebFYuhGTw/DtqSY9BZ4aySb9V4v1qYUTT2P3V1RMQJRD5qsQYEq8HVx4uyLO6eFBTffmCmO18hKSFqoc2zF+Ksrcldg78f1ghQ6d1hCsVfH+Rgd4vryAee1gPC9l+Gf/dOQsKwGX1yglhzC1Jd/IKHX9u1iGh4dZd
8/qVtsDVttC4VArVeJn8vlY3/E25AYrVfFY2+2qa75WPg/y3MaizrKNjC5BoBB1cLsymN86Ds1OFiYtXFIQrKfsk1z79knWi4YZj/CoH+7z18QUyTGsgkrxW3/hLQsllMdXyQqPZ9tzVcgRY0xjV5L0yfSFsM14WFyz4SdRUxnxVGHiclhbr5s1UVYJYT9KfDm9pxCts4LxhTyv5vw3Mhq+jKqKb5V1wUCUZ66dd6Ka27v8rkxvMHfrMz+3MHW2ZrjPqYcAOiyVIcR8CWynvB3piVSqfrwAAbaDwvBPnMRhM3M/8NI7kBU3W140+5YK6nA5SBkUS/pXtw02jt5GfqwXkuhqDPPFgZsJDap2wYzNbQO8bvribTBqJ3+RfqSBnyZUf/KArN9F11ytzfkoyvxtpf5DG/ISWg9d4BrB86Jc55qWFCoIGARUA4th/vA7SYyioIw/uvPQqBpyOxsfojRBYRcgBMkynaGW841/7zKWjVpiZcIIlXspisqvFBQXqhGubrkIVy7lgjfXs4JEeXhcgCsPWXXsYTCCui4XRg2NH42vuINfcJhlvWF199zLRLZKhG7nAYd9QWPwArExUxi24jGUxQDCA5OaPvwLoQP6ZSdANy+K/7jObZ6IlgWvZ1P9Gi5bboYA+xHpqaBDsaZEBbrGDb6oLSpA9dcAZNG74iRJauiaKw0z4NYrx44uumzhGq5w77v0QcfHw6p4l9vsNRN7QryUj4g1LBNMXy26ZhftIjEUa6wpYTjPFhOWAzmoJDKujxsvSAntG2zp6Q8nUaPX7Kd4dkPxtpOP6LiUIhTKu7/o+HvxYSN55MUIab+peV86+KStEGaGLCvsuxwDa+WDZMSk1k4f6EQ4hpW1bY3Za4AnsY3AXLGazJEElYgAwTQ9z0T7JGzIJVE8R28pUn1zDm64uxlDPf9mMuQ1JK0G1p5rJ5jVRx+6AnuNU+PNNI/bAy7IQcnXZcWbD2WE+lROCBiR4iA357ZkDzN4WViAxuZcZSv86Xy5XFRQg0tlXWs8caew0mLV4njx/UnPglNmIu0DdKAilZOOj0uQgCrMeyR94M+9o6oVWPaGVSPB9XPW5975PCo83P4/IpfPeU6Q3ABPxCy47XhWX91fZRfGpR+MhslgwmEjJL7DYVa64D9LVCl18C8kAqiaBFITPswG7jPNaIyUTn94rwlM0pqwL99pV8anZA/ewCVYssCIJJB7wtw1gW0n8XrBuf+WyxWoW/Fkc7FVyg6O0yAPPLZH1hYYGXixGF4ZJv+beh/kqari5zbyTSEtcCkS0M3pKeo+dlqk3/SNviYxf/Oxh7lVKdzb8PZkSSV17Iub/X7oIK/rCw5uMspbkvBzyk8cuJN9RsOAZ0haA3WcHZBUvQ+fampp4Uh61uvWbg4egZl+XiSCb7eFo3Ppc8wPa8geuhFifbT3oUIMLEm5HbPN9jId89vDt1st6b/Cx4+yzULHjZZKSExeGi58iEZb9wow/lm5vuPBksn8JuvRbENOl1LNhNlg7SU61BINI3jisRJnVY4O6nxEP9pm/bbGXtFnb6UWN2uCX7HXFP/2rqLi+Xuzsbjyxb9IiEf4QO1JacN23PwbZqUqeIcAMZJAIvxWG0+J2iQFPlLP9rleUR6AwjIvfsPLXoOH6QRudUbJk6oDJEYDulLMsZDAblpkAXCtafmQmNhRL3l5XeB6OVFNijV8pF4tkj0M24UZhnRXFdO+zAKm5qavQSa7/mh3jLrQ6UoUoFcl71K22vo7ZrGnHTzREgaatQzatIzWtblcoIalCsjzk9TtypCjCudIn1CiH5uwCdQ/euck9vrfmTcsNPJxBDBFbBW5BYNqRrBzJVTKi9lF6qJxsH+xo9fQ7zjo7hHisB2xbmeuWShiGTl8N+dazFH1fVnIJABhR0o1xbeETp0dtMr2G5b+voIe0KAIqSmVAsh0vxqlc+0FM7FW4vGjgUgy1WnEVICyiBnSYs+7zkAXQS3mnh6Y0C5u7FMzzeButqrI3vulYzNLSsh7Mwjvwn3L0FLiyM/MmfEOcwUN/21vtjBiLSAS03M7dUahUtBTD/345UL0/gaAkop1D/4hrvbowL03ukMY0rzKDknTbEst74xtpqKeO2oQeQ+6vPKEJVa4urU9CrLgWEWdZkSTwmy0BX0XG9hkkB485/ntQOf/9PMMcJEhSeiMX0KhDpiu65ZAPmbXQweocQoVuC0Osk+51agl4CPi/ZvNHNfgRPRvBxbNnZpdrZ4oaooUbfg6C8T+heY9hqyEowh/te+8NgcYBLiIc1VpE577qtoRAoVqDoeG2oMjImf9i0ys5cR6wk3mY/I05AmBjGZ6z52zKWIRztiO7nIrcvkJuAwcLh+RwuiVq5G3cVsF1luvzgqTZ+FM9rDBHSMxBv/mE1jovPq4oCcs2Iu8xJX0KzM35gS+SlYPSzADPTEbZN3+seaCXKgfXsEego/1FBcdr7YeTf4/auhFpn503hDwfr1apP+KTIXu7jTu0fGpp41TkmJEbpgLyDp91l7sSdXV+m2B5UmIJ6JuMwvEsh4rbrpKUGTg0lyTuRXIDkqqFWO39I8ecX2y1R7qm/qO+Aen0i0NQX0+9FfkgICeNgb6hDs/HYOyiFQz9Eqi/aAdMX0kmgj8qyxXI5HHS3drc++6q8hIfHnv5fdTjcM1BYOuX4mjG/tXLlqj6mQahbeUe8KCDhflNFeQ7WvZUDccrPp5ZZ4voxNojOuYUEZqC29oADQ0pX9TtZfzqIpDAv9MYb1ahlxCHAeTszhqSYudsiMb0NHHF4EMcNPGirxoJ1ehD8ICfn2JIl7qJDbsUgnmu4/4d/z9EairwYxgDjom0+9kW3dVlbjl1JMZdvf3fBzIcKhMxJ9rt1Mvrz3BxrRzXRNKhHMh8myCNc6nH3wSWeJhUmmKaps+31FxtkDiRoNILvaPbsX1MXgdFXvsgYFaUC5ycyrP7WI5yiblY7O3XYQRuHXgIOEQ3+Kq4/Tq7XOaO3lRpQzHGWJhqes6Bk0BJzQaBbtrB0xQRp7Y9vkmh/HGgW6fFbG/DBdCP2EJyt+wb0z5mABNPG3MIU2XcUExJ4ZqOaizGEYFkCgYq/dnt9lPkC7Au3O1JArXkqaInXp4hgDeHi79sq2b9FL190WUuRE4xlS7DfVhrNhj4PwJBPdS4RlDRFbQ8F0xPD7a/+3O8AyLA0nisHQWCibAWJiJ39cdYvdGanmTtqydAGIHzRiTHvuBW0dMAte57qimgQ3OXYZcnZJ6ejzOcCmoQ0W8UB7CbejyCqLasxn3qK9Y9IJ/8PDQUJruNbdt45xuV2hVqLmRg+HI3nJtSZ+7DM3I7oYgh+kDonwd4EQjzgf9Q130xvEqFieLuwv9AOAXjPl5TznPT9Ne0V9kduvN21xGDnsnulmbR6ROP103hWhGxuPOG+HqkdkuoGxgP+xKpbPWU5RtmR4lQJqaTh/+4R0AJ83V8P2iOkCQKcgPgqiQwfudCEjgag6MkpyfwkWa4NpQIOiWINEKpS9JDIayCtK/Vol0n2hzJxQIK+M48sYMy29vdIzrwSc/Vb7AIe2Rzg/lk8m5VzuGpO8lCz9iQtlH8Dmo48TdUhZDLMWQ+2YIpFtPbkxr7ypsyaCi51EFncXVau68UNj0CMuIOULhqWZEbFTU8hUfX5sxEwo4kOEaPUkDvJUCeTe78k9g6lr10bGfUtUu/B9FgfOjGhofSo3fztJT97ueMrFLXXzfrOwpArx9/+oSpytaPM2jJiT5VIwdhqgCYSNvJnt0674XdGS75wyqEnOOsd9VKIKjfGdsspouKAie9zBeCbYQYgavaDRb4HwwSoYDPyIb3KceFDW8zBdwfU8iZS/fVfncOUYDJjGXajeSd/HVplv+NQuMY8da7breGxukltLhzDOdcS0t3TbylYZFvwC2Dg36t0clxjPuw5vV5a6/ZJgwOGxo8r29tDeqwEO3BEuG/vYgnSgJzPklSWqATl7xOUS8V6wI4KSEGIxoSN+g5Ik7AUrph4ojqEJPEZO1+bVkdm/7n57XQYJkEJxlC3c3CPGd3hQV1caES++LQoUG0DS3rKOWQKm3d
g0eH27oUqFxI6J2f+MT6FGP2JDrNblKysShvqI18ASbdXw1tNvfj/5ZetX+ScFfj4kIB80tzEzdTWuPGsn2PuaS6l7DzST6Vqw9sWrF32FWGeMKBDfXPm2GGBrgwTThxco17QH7P5FslMAkRxFlRLApFxXIXZ7BicCy0f45kLMf2QO+iG6tZg1T0XCFjv4Wz1M0dBSSKtWTMvWXSqzmKmMNiDug5tMEKtUoxArUnsnpRcHy6kOP+LWFH6MTNYEZbwfNEFgFsFubgMdH2OwkCW9pfDbtlDFtQPPjkp6lslvkt6ysDkLKhrqFbG7BRT1lwCge8Zz93Xj+g+wqOaQec2AnX75kQvgk9tc0iTkQqJH5I5rk+n3UmpRbpDI9sZzt817Pzk1RL8YdU/Qb7v5+ipsdHNB+uzGaYy0R+zOzPh8ubz1a7GWPNRkXnG1PN1sNqqK1KuJsVLhXx4NHzRBnuN+i/9PaOokydooiImY7Wjtbqa6D85Nn1e/2mQWuu3AMniYiNOPns77cQfqnkcxQ6JOwoJpndxF8zdNY0tB80pGzaUz+kk2h7HUa+75eUCbB1Ikoudwi6994uQbxGQ78S4llSyQnHzXiUfmEtNjQqxnTWv62ohiKpHeQefK6Wmz1A2hRS3G6ArKHbtf35NHEinE3zPz/gJO1MW64PQKwXEfEWYPWWsvk5IFjO0mmx0O1WnA82T9soebE2w1GlG5usLEA5VYqfK8jl8NRIKMgOIleWjk1cxAuParOGqd3lva0hLxFjRwwgNljKwYYv3j/R+6H3DW073YYYR0jsX7FGuJoBiJgiakcNwyzA1ctyKL4EvuCHr7NmVGSvtyLa55GUnQqNyijgRHT6Flt7TtIIQS83Q7NQmD7MquijO68MUympAnu7Aletq7Tbrn6+IL+5yUQmF30pGtrHNVOfYleD2sTuKP1nYToseN7eQu++6P++utUxG5RKiwj5587BP9VPLgYj+wE5e015+m92HuSiJJryIYOw1k+n2jqBLt1U2pyNCLWo+89L1/CseLPDXrdglqHapcvcD3r7ncB8oQYP9XDpswzNdMfoSWDcRvLHy+ltJl0WOEyd/MNeayCCeREQTZ5IBUnJ3QHIUsd0LQYYZ4nFS04/8G8iRJJQsO4uVUKj10qxWON4E1QE2ENA+hi5DQA6uTHuUTX3ZloEZV9rxJ5zY5/QxQY7WYB8nDypHKDZrlICBD+05sS0xk9Dj7bjyFpswlwX7aMWPIIgTqAemJPz34beYVL6z6lnhaEaBd7OpsAt9GJmbCE+6zksvkh2NpRX3T49p3ZQy6PQ6TbE13UJBu61kHJZmJ7emPvBRdLnPwHgnZxhfw48cFKuANPSbe6OS9fAORlFLUO8r68yg9KExQxK91rgX4CGf/tnMsao3t7Y09LS3UqyQSNzT1nVp2Zu9prPWx0+A8iXHMZIDjVUEQUky0B/QRoRsOJIPdGR33bhSF4zTRkm8iESUnhIRk0gjPeHBnOIQXxh7/El7A5V6hjhi4gArPDzU1+yBWVgm0GX5KJz6Sas1mVcsuruasJyrRjLThELNdGdWiwUi321jwtmNHHFBRjrRKIfcAVrMl8Pz6w3sUqk9QO4UX5ZGNbOVaW5yG2htcDQUMwHRYDEtUln1te4en+BQvf3wGIZS6zA8TzCPRxlErX5g7rJzw1KYh1WeHBjbQQPTvBlvYBRxwmP+Mabfjd1r6IGxLohFsJLh1VLfZDxDug9pqPLc4Ja3xwK90semKf4XeSYwXkhhbg00BCoJWPOPFP+aaOqn/4rVapKlIbEWaOKuH6iDVWF7RnoU+wAkwb5k69CG4cH0VTTHFoU5mIutRY9k1Lx0tQoEp377e6THgDhoNXz6WfByhlgEe2tMEh6b9kvaaJzAWK3PITlbbJrNSji9FMxVbItXj86O1vS8x/advY5ujwBxoJw/lFtTA5J0MB1qduv1med+h5VY9FwiFj8iX8On7EDEJoJ9s7+hYHA/fk+nDOcSle73AIm1/ZwJYasPoxpaeHEuB/gHftnCGzpH98Q15VDnadY/P4FFRTPKC3/gxyUkO+NT3Y7v7gdGVGHosHqPZh0LfGx1+orJowdrmuDbbySNnghbiJmjzq9j/6GOWmFKcsuHs9fjUA1cx5/iZg4FoF9KfxoqNKN0j5tuVkvKKYvuZGh/vzTwziFOD1lW5sIlyMMJV4fkexR+HLSETcMLMnIthrh3+au/Z4ZrKfjQ719KYPRbXlPw+c1GvFb9ZANRVnVWnnEyGvdFrEmJVTo1tqK0s7b7hHOpbTdWi1wYmdJED8eqxkqK5Cfwbc36uatbqImX2YQMyVZ2u6cxVjShfQv5otELhRRBCxIwXn6KT8xLNX61csaVk2Y9bpSH1dL3rwyG4SKGP547v9IcAtkk9y04GcS05LAjGMhycrg4DtqThL/KsEYUdOqD1JijxoxZ/SiD+8nYPEiroVa/MmS3ZePdr9lMoJ2Ni33FhczBdMHiVkN9ZzXoUpUy9rTORxwYqqRUuch6S8MyfgKnGFT+kbMOshQrIRmNc1Jhf4K4cA7ehzhaJuqEh9er4yLEYDs7sMlFsrso7GjslvQEYh+HvvXGgHH8SCMxNvJnq0rM7LDXZu3/5U9twsIjprEpn5GzR3o9aokSo/UMd27TLuuMzsU2uwfMiprK83WP6j+9ACxiufZSGTN9nuW6UMhUmpGlxVrfAlQgEixs+snoR+xsnoovn77+uQYcOnG3sfHLcm+ilasiwUXzt99KxMzotpjsIF+Q5TzPZJk46Dce3Vscgv+8Gz7m5rJj23/9Mq3ngmSJ74Bwh8riBmvBvl3JLHmmW3ah1EJ4dtZoa2hOJ3xcGe1Yzx+2yrKM1z8FEN3kK5Srk6pTk2oaRMf7bOv7E2qSzcsMb5ABG8aWPHsLBcgAnjjKYWZlAe0i9q/QTxZXhfaDE+LIXcyIvhUBfwYaTU2ZH1E5hsoFoLRKlVWJ6X2SjXiqNA3rdxwfn40OXCm7eLtFmrLofwHlgROry+2N4Bz14WEj13RjiGaMgoI0236ovSn9+eDFn9ZNgSkj4D5eJk/vYGALkmJBpCOIq5JaqLfgW8Vq/FSKBtcxlph8E90x0VgKs/yB/EUh+v+dgt9oMDfdzOhrwqWSNHkAIB/Q0RE+9c5KTQ8tWfKcrSa52vEykEWaRJ8WIxpszvF39eZn0U8DOZulp5Vpwt2qEa4itNgwsWxq+UGvlAUOHRh4+MYwtNTG23VXHcGdr/f1TLfNm0xM4nmGQN2WH+wgzXB7dpcP/FShbjaQsTuuLdbglfu/fqK+Q8IVkI31xXGv6e6gRE1koefnNwiAt7lPDVsevXhr2nzPjnj+/zaJywCmJidmV+e7PaxUxVHQnOBsf6B/LHLMtIpyjSpeYgTZVdRbrF5GwmPtPs2b7Bnc6J9xIHR0IMuY6Z2IG9Cy3yLdxzLSDmJJxtQTx1qw3thZCoHK5sPe6YPfPU7Sigxgt2J6PLFwS+AZBFfL/Cw4d8VUmiA6kCF7bJKjOJVGRkrGwG0ZuZN96t+AE8hwWIzx5dYicJmhCu+OrPXf80yl+33Kv+wAehKaoX2+r+EPT8ED/QcCGiKlpw0T4iwQWhDbOb4WXfw+9QE+X1y1K3hljTSeSP8f88aV4gwQ64M85HkypoHZPZt1NsM10jwAScJyunCbTjUyI2LaDsw2CF/DcM6V3dMkrDUg19XzCvgfxjM91UplHUyp3dUwRZuer5F44kXl8baAqwCfz5wWE0JVDN4wLhVef+d8jaOYKZu3ztJuU1GWjXND/0qN+XX8DpNg1M8hBfx5TuudonOf99cAgVqnYTuTarmC075WUovlYPhalciiZq+4P/9Fr1TdJnUXXpu+PZ5qaTxL30/wsZlHJN/Q+lzP1pFuS8VeVu27VHuiO+ytawBGbJhSFGEf22KY3UaaTMtGcnPBg0hFjaevdME+v0PuszrbFGXqyS/3Lm6WLgIP8ZWJnyjUhk5+McsIWpyZ8/65oGnBTQyPuS6ar55pRSHZ2/PwHgmjWHaMkO48TEs/4bfPDqd1gckggliIkN0B8RIwlcS94N/Dnv9XoDWGkIX
41cDhWf7sd/eXAJnaRz1zKwFNuFkJK9Q88cNo9NVZV4VExtFLRhdPpT8bgtyBcvqY0XPawPqAvleovcB3TARlsqfzb/EKAknT9yznUQD1WE7+2PjDTxa6IJXD9L/2GKHtqT8JI0Y6/R6/a2/XToLlhksQ1k/l2n5lq3HrcnGDeU8FAOKKUl6bOsiF/9uk/BOetaXlOKa2UBKJlMlGee7grXAgEksr7zbs37V9+n3mxGLhUNiSdt/hy5dTuBMnM0jVkgFutv1gSX0W6co57zAQ90xJGP4q/6PnO3ubzZiBU4HmA0xxsQa13OJI/3eQbWisUnJX7XqwzS5KkiHrlXZbm/GsU5SDLIlEAHwlJ3HH3Nu6TtJGludD5PFj2q6mN4npZIAiQHZvfjh/p8Hk7rL9u3DQtLN13iZrKlwlDmKPCCSpYJ2wtt5G/c1SwyToN2tH0dv+Bi+BkkM+PSruBV9fiIWV9TLv+q7RKcnXMW/1VPt8nhjyHWeBxmqOsChaz8hwbus4phOHeFoslhnIKf7yMEpehleBwjrAxPittDCGCEfjS4ANUzJtWZjNQ4jzVYBIJhBTaC521OLqmBxbQiDYtMCPOsi3Bf6B4T946YPb4zqKZntSIk+Cg4S5uFHa/BtLnW+TH43VG28DkdNuZhvf/DxKIdCHqyP2XWjzljIp5DzFgH2PqGXfYvdk7zAqZK/tFKtc4fdfUywEgt6Jdt/LTDiAfay1WhTbAK7uY68OCPOzGWTHr1+xzcMdCWWa3xxg9yUKPvXvZtA24CU4lLPGUU7SGB4kRb6Ut/FRYE+xeldAxYLjIop/N01O585avP8aYlO//bg+QPxMJBEL0SFF29Y4AEaABWcKkA74FehHLUyuf93seQNP1g9qxmap8GDUhUjIuF/nkmaTiXpWMScr73Mu5iINn7u9ylUWGgOm8x0LdJHOH3NHgW7D5yZeeuPoclQNJM+PoSuEnUR+Y6KxZ8mDxD1l5s/HuFs8KJxk8Y4ubGQabp6/yvl6n2QECxnfv8UUwgFINHWv+aLLVvNcXWxDrmuINKOagFjkz9p6HcHiRPlt6SoaWc7wr/oXlaP8VPKLBjegrNHOK2R4gD5yMUg0luyWVn3rp23L7oSdHHdIQrH53YeJ5Fsp0apFJHZUefhZvhnuzLVkVDD5tMqSTw6oUHELnyaBO0slGW1XhAXWPqU34QTfqHDK0YlfvfyfKKPW4ZEeinQBZPNR+alpJuNTwscSnxKwCNlI+CycMLmPaQPrwCIK8IOpoX2w3++k6Dp02x9S/FbMN/3kNHVPcskt/j5MiZpaM4JAWnWzLz63DHqhBW2OIMR4yalyqgvF4ijJJvC/GOf7yG68iutlqsTGQEtaasT+glKipJYUfR+0zw58bL9VUA3rkiSXWE/J1J/+5EnVQyvW3d2+T6mQhcQFPhbeQMUUmcY/XGDYikPXI1PCT2GlRLrgqzIzX7bE+uhDNGN1Fn/f2j7W8GWXfdPhuc3VSzrF4zUXWmeXaWHXdBqt83AGhUw6LWy/qNhO1Y2xz/ZlBoxXsZ88FvVMB965YH1SIcE7KGo2GiueqHikM+fqq5ScE75q6S+9dIfb5P3hzinzTpHSJ9vulzB51tCEFNGI1EArPX7f0ea3LYZ51FR3bmUhn6nWFvRtto3o64vgWBDSAoX3KLNCNCJFLjYCFCqiQqI4TDue62bH2WgfgL1bzscgz4RsI0Pzk+ND7w1UhRUvMYlwGcJdJEyHE+s9z0lMrdhXDeowzqJvJc7HeYI3yKoDW4Ykdc161QPJdCR1bmgD8nLDeW5E3GCONsFsJNEO7p3gOEmhOKTLSBGT/MhIPB/K/eVDw1z58lCfS1m+RP/9bW5lqtF4xrcDzCMJ1YJpkipiYC54T/XocjEgn0b7MexpGf0aFqDwpuH9Wq1WKYCPfLmI7UOBxHPAkv+IgyqlbpXjYO2ZhLPhc2nm4nlOD2ze2ktEcgSUJS5sSiVSV9cq+XrOpuZum7zZTFkhpB6wMoze7rjErKO28oGJtvysMVg0yv21Lpv+rjJvjNoyJYdJiimWceti4ACVTXrgzGzNnr/4/L5+/FHD3fvpJV2JALgGtYuh6COBvKLIcxYYRe+TNfjupTEpt+bwmEyNhM5dM+GOus/gs6XbslZRLZrrp8uWdzbwoktsrFTuTxICU2lPufU9coelsLIE7Tse/WxoYKE1UUZHAlj0R208abBkA/LhsmoffmPGFYYTKFqpHYaviKgh9iajXJfXt0l67VcR4VNAyMbJaoy7h7V6UWx8s24YEhrIMQr5eF/5Q9Dzi3xNNk7WT97OmpqFKws5ROryGMLvl9sW43/DHqyP8SwatppFJouNqiPYnH7mZU7BMHLYszAxGuyyxg/OoYRc/+4+f0IoSbMfjVo7Wd/mb9dEg0RVA6oiUnl2Q1Pet3f3VIIhIdnWWcs9Dqh6R4y+8RlY1hJOD683JmnCHon6WlwDFk6VpZ33jKpQJZky7vwKUODg0+Yy2PY1U7uoppVS4F0uXj7jffBbwJfFG5s9C0UaH+b8U7VuQ6qv/F22qu9AzXZjTkvl6UolXtEO9ns/dDuetWTV9mGQTjz0Rnk+wNznzQO8/XYWh7ABJZqqlr0g8XqeOOaynKTrSkhx9U3cNyqmKErIsMiKYmvS7S/PkY6Xc8MdMyI/FMC6V7q78djHoLrg4fuGTcepnETGC9O94L01BSebXRKWsVItEshq4m+Olhvp//kPlEjGWbCoDEi1J5l6VYcSG7co0JD+qYCwmNGPVwJeTBqR8+ucGhZLfh/woTYS7cvfLBVROYcuKAWspwneN5o7k8C3Sk8DUzo9vrjDAjQbMFsgQv9z5Ul7hePoEBH00/ILNBufM1RpSVSVqPXMCgXrNs3prSUyg5YnN6kSOW0odCp4gjFxh6w8udPhtmXJs3KDEUxwFkQpB842RSIiTiciTG/pGkPGnm9vhxsHTZYYcA3EVwgcf44YV85C4Hh73NeB8yWuWOfYt/ADmf+5LWLxNPJfKD1XQbJV3Gm+Sv9TmEuT6Y6lPAvVwIbj1/xfcDSKfNvTslKOdVmarzlrN4Jq8Zjbdi+RXEttfofXoebdfDrrKxUtLjkl2dEeYY9p9JQ8hOHHONz1wMuT0oPMZVQKj+xDGSWchOaoIOoKtQFPjm92k0z57MampMnNConCqq8PQFUGo79B+2p87QuOvY2zAIF/RJs6iGZCwNZ0LHAMKXEN93afoAECEyBO+PpOhYeMn9E1H4QNjnHypFoWstdGC1xhGnc4oAHVYrM4FzfJ6saztfX1DJpMUrM/gcxhXyfTOIo5Fk0F6EyDWIhszHq0zudmE00MakkL74QtEynJBrODPFPKDEnqeJ+lduyKVLyUPw085MyXzcDbP5gEzNlCQgfoB7cycH/dO2SncMp5kOdgHesCp2L4MCfPJImXjBPpHzhw79juldfa6QX9Mf21PVu/9QQ7t+EnCvrgyo2IHHazUGvv5XRMB4fD0awbvvGJxQLUNb+B4U1nRlv4+44POJRslgbaqcdk6YMf5xcR5zbDE0Tb30N2AaIa9c5baVTSwu0tllTOFgnVeo162/+wpSraf75E2kB25d+LECpToUTjzVxLr6xpFXkTjt/lk9/d/KgTFfcgJATXLYpza+OwIblh3G8+e41tJcQ2TvPBwn+9uXCgQopvtddH9M46SyC/gAK4FMSem3EVxLe4KhQuXCKuFsRoewnp6RFfOghC/hOiBjraKFaKWG5q6bfVVFlr4/ifKrNKigQJoznMNzfQqbGYkTHT7gPkrc+6uSe8NuxO+0iQpgxKGjrMtif985C95Jny1HKFzDlCtYGcg2d5H9xg/Qf0C+rxvL4dDhGpQpivt6/HWttcoa2aJ4OpjSD9GRcQZHYfKJxloxLsqN7ri+pv0k69LxHBWCWBMoOodTrd5nUcJ0L1OLZwVYVjB38KgQ+AbZVTwIQroQePliH0vipKECyWGCbHVDbL77RpoWW36RbPu3tffti/m90ywSQU0LKp4B9LzRlITwKXEd0mwCpRlBOYUDUzY+b1cEPC3BP0PsiQFVZR7nM5hHOzJznOI4apCOv
oAm2RoDNWYg3Q5sk2IOMPblZxS56xWcnecoFMKpb5UCtTCWffeU9Embu5o14NOxbc1Q3Vh7lYO/2ZE03vDF8vLiAeKguRHn5wqkkDOIehASvjSaUaqJ7/YtzOOUruvEPn4E8TQdnx/Sukx6TJj+lyW0wNrFYJlLkffuHZsdEIpdhu8xIjDkB5fWHmw3zMXzLb8e7f3IqaQK0sfD+xwSJ7qsEp/UHYIYMye2JG93+91P32cv6y4KAlLqbezcRuzUqwyJ0pzIWXZM1xownOoADpZo+xUMoorCIFz8j+2ekbTGGqe/U4649+BLjNQH/PtLW6KvFLTlmN9gCSZvKmXiBkxLdfnLax4p7L9FlPF/mqyvkrtbBoE9Clo69HrorFQIz4UA26RtHM/02jw/otOK040JodlE1IaDCkKY6vvq5Uc3pTXzKgigVIiYR80jh1zFUCwoQaLzOcBv8EJ3fk7iaOVRfAoQzB3uKEcd2MXhUquwa0WF6mDjiByI2fhsHzIdRMR/yatLJomYWwg9URnvXvPaAlEPzDRxvg0plcms/e1aokWVZ8YTPz5cEWf/ycr9+htmZNqKLB8AhAJJwMSpGfRsx6iBONy0+JsacQ4vp5aC6so0r22Q9sFMhhb/QHB73DSvsbD0DjRnjSMtgn7NO9g9LWaJLS2a3Wnv9/+nW1HnsLEOXQ9dLMPBR48K9HxvCe8WYe78maVBbiNRRnSR4oEvNXhWEvOHdlbsGmx7KnAzTeM7J1KFcr+PIB+1hz6jNbtH7tvFLc5eDN00ZMj2HIzXJ50Y2Of/cq9QO6bwZr2rSSJShLGzJCtPkrRqYlUCKkAU2UWnGZqwTIW+IOlOPWhIbT2hsOvSAgA1KjmVNXXfmQxX9sKk1iuWEd5xKUAQjipvusNgA6VZSawmxbd8Z3z5AXla+tDz2/iJxqcQ2Ez2PkCM9R61bdXafoK0mBzns+tmkFbawJp0iuiJcGTifAFMkUxPOylULAVj4eXThlU0cb61/94RaMw6buWGJ5GSSry9upBg4bPYwq1HHCaFieNShSY3ZHchxIqDKVfSuq85Q+6bM6G3ZedhUxaKt29DXnNGX+mtz4vNsqvJGHKNUWbCDisaXR0BNAl39nkKT5DdBM28W6wGB+iPwj8xZ8NUs2b+leZmyjQG00kJ1MfiHHHM5R3XdZEflujhGgrrPmMMf7jw0+gQ4peS+nmG+Z+nMKNvMVHxXiYZZF/bAiFNLIdX5V3LyuT8SDzPPpqM7GmvXy6cnb2pKlF8FJr4r4OnlSe5jL95XBWjYCxkQppncJkJsc/H5hCBlHb8OzEwu50ZqsqR4T1DdajbbPOVkmRu/6ASwRbr3+zFtGEGkrKNtYDKx4hl/ah3TnRIWcOvPF1Wv7YzNgoc26JFZGG0KgXJVB4cXGE+PrpID7wKiLbmol9YbMcNX9ocTY8lAjhxE0pOU1Je1gnEhnYaoZIQcD8xSsztK26G/Rc/HKAFRmspKkG5KK4OQ17z919LFDAsKEaagynuZCugp5xfdaHU52zoEm9xzDUq2PYf8TZYOgnFdk9d+a8SlhqWS8fTsFuxvJzmQrEfZf53J0QrMaNNBJSLxMWe+hqx49VrVyCKHbm/pVHqj7xu7HBQqAgiWKclCA9nifzNleJBmkv2vbsT2hkXQGxcLd4pvIPXfOSKaPrGNEmHM609ktH62MI9n3lNmmCGiakGBO1sqReOwCX1GIAqq0eM4n8jwX6zJ3smN8nGxJA7ycy/nqAwZ3g8owjnaq0+aIWcFfD9DpIk4ZDyk+Xu1EpxChUU+Mqbc31ivYh/2HHhG59BtDr5zL/o1PXRWP7EEAZ3I+frgabWgeHKAkTaWiQIr95ESoDjzrhOAUdpNphdawvylENu2+PLCLZll0IEKg5a9vLvZaR0nyMyJ8wXuQd5ha0A9sK+b7OpmcTXHtvnYidYQmUnfV5XcwotAlIf1mDW215U1HQuBlIz8afSge+Zf94tgfHLDDLcWT9LqkV9ntgMRVzN1sBuKP+fsGfn9Kg6UxIn9jLMaP2zKbPDfzmc+fiGXrae5tBlh95Yi/LYQj0ENiIkOugtbCR/XchsnG16uoQyvFvhQuPWH7FfpOPk0y954wciLBtV1CDeLT32TDHmT3F0K38uTk3IkZhaLoK6Pz4etCQsqR5tbqCegERUJ6zbO+RisFuAoryhns+65uXY3+tSGsmE5RVClhgwmK1kX55WXnsdYWEY/uMm3SU01GsEufwKDWzZzXYXUOKu0XzTkhJIae9LciLN7cgDt3ch1KIls/sWncLW96YhMtCI9lBGs1gcMjdHTs10E/0DuO9iKxzIJQG27AMFhJp70Joo8He8v6XohvcsBJq9nAjs7/26NZI63tq1rPa/OksakR5M1qUjePiAybWbY6obzrzwVraKIbPlrtO+izEI+AAYQXsHkeFMINFegxxJiKn0Fhs5SeoEgQVjAM7GKI9anBh+IaKmPM5KNHLz4BPDf/YpFdNRxaOt/+N9mj+SgS0i5IT1exwtNUJm8MBIcMoulU/+rTEJ1jRoyfPnknvNaaTvlq+5nQ6i6BJN3nuOOnYDQvt9ef8WxlZi46kOhet7UYcwLwxTgZ2PdenNMgyNUVz6v0M3frpngMu+OZv9EFvOrfVaaAMvvxDjCCQyEEVCLac7hy+mnw6/qTd7s+xc5h0x4swxxEZyXXGUkjMeOEKieStgiaGOhdJh1mqKCYw/jFarYRCms2oEdWWvyx7GKNckZ5EyPHhTXY+Tle9ZXSA02zSSH88nET8cI57ALUnGZNr36hX/SzFQJsnnZPM8nMsBPL5pw2/CWYzxv135LdHlAQsjGqhFWnUbDoiholEv1yPtWs3MnAzdcc38NeoqNjtt4Or4yUvc0Ob1W/xJ9yApFJRDGOYzHpl0Zyq7VAEg4qSiH4sdvaI0g89CxhZ/fUfJ1WstRwr/pgnBZuYe3VcabXMTJEBjjK4p8XRLKiynl3QopP8LYvcCMLZyB7fbabqfd56Sc8THCmiXcHLMc0v7af+c5LhBvkEcGEtFSul+TJ1ln0haW2doID1/oVdi0qWsR48uzbeCDq2TjgRmn1QGgAyD68ujv9n2t/p+6SlfyIbiWyQb6JRjQIH1NQURvnFhJOZMzmG3F1ir6DXioaLn/1SqQcTmtyO77ONH0jhih8nTXVzrY8sEIcoCscdCR4M1235UZNcbLI+4z+LWnq6XfYkhVUli1Q2R05OYBvMET+IoU/qBdP5CXBuTtWe5iDgDNEENLCFQD21rl4DRRUZXukV2hYW7MQI5y6MW2mtWvHi+Gm7Vv6yRCsKgi3HyTTpW1Xty535haIWw46TagUX6JCz+lmHmBVnxWTDUcvlBLS4UEQmKsTe9QKokSIDYmeao78MYkxygP3d6KurUVMcd6nR/pwZ62FZnFOwNzr44cryIIYE+doR6j9ZAOt2qDESIfvYHzByQolCIRBHIO2TG5IH244hpbBisI2i7lHzrQTrsiCwI/SOR8FLoPUmh4HMSZImjTjXPUZ3x50zaeJAMLDAj/pxTVGa68UcrvLD3dhPlAt5CrFrPWP3q27g7OZruvAsG7Cj6BbudjLn0772CFcfnj+L04WZnfMKgkNzTeHRcS+B+L1tqC4q2TmwMWjuej+edPaE1lSXsaHI2seUV5rF4pEUqdx5LQnjSuYabqOsAKcQNOykAOLk+NfkosshbpC3ny6KRBomJRkV1zBe9ku3Lwbr7D8UjJotLOi766okFpXvLkp7G+bR9Udzo5rSeb7QxKwnIsKf+V/QQfgcpjcMNb/8HhSMkXkWV5E25Sk5gq4WDNk7l0r5WQ0ByzwSj3/FMv8wsXPu3mpv9LyCsoVFmtr6y4JvCUe3BhauNc8fKXGQ/8of/GrO3qdZVYMB0yVQl+nAtmorVpu3m1YRlLncrTVskMCqsBr4pam2/Bki7lOd3f8zML/M03pAVKzkqokELkPJUY6/FfZsmjHVfe7ssXvjMN2f+E0cQqCbROw4eWxXz1ZqfEYipU2/0ma+9F3kCAeMz1t8IBY3GsGJkBlwiSlTnZMo/+MwOne3jjAcxxrrT0UqVjPCAdkOc1
mH7HIMHS+UwZvIu23eXm6xTfvvO0q4VoGNCj2JLeRwqh6z/jq3s3ko44shySUujjrLndZ18YlH62U9wmXAEPJHKZ7JOkk2jFKPx01irktaBnLBYti05C8SCzqrBOKOuUn+32xVPXP0oy9j/9MqdO6/SaCGUmwWu3oZCN+/Lu5Kf6X3LjKDcz0+GuCUZIng7saeEd1rRh3TryYbS3GYrLh+TbVDySqHEcSBvy1fgIScc/YqBEhqEP1JaOnEjMeQ0BrIt4vB2e+tz9GwHYxexBHM9O6vQeAVi5C1W11Iw7ocHz+KUPuRjvLLcPb49C288QDsDAAM0wGQi0WLEhCoyqCwaYUbUojZdq3uiTUjFFnV1Br27cyXsRzFceCfc42Z8NQQrxNkycS1VtREwzH7t9Gojb5hB++61IVUEQYoGUtFcTsjRtGNgkk7eeoh6YGD7j9ubvZ/FCqPTk3wyc0rVUnSwIYSJ5Y24EQ02s6fD1nXZvMCSTXKuG88ATgvRZYRGsgx5mYCV+jfbeLXmysBaAc8KZmnufZHfa7oB+GpZqxX3iHzaSIUkb/KAYSwHExjmgmo0D7PK+c+sTA7e4jURq8mr6qQPokSEDnwg7Z++7bcAEQI/FYAN2Fyl4AzVZZ97bXJ4Hf0H/bFxg1NVkGwRs5//dLc4jjmMiinMv/kaekPqqwBgcaR+rZAzbsnh3LLjOJ/7Alpe6hMI7lIyz9jvherpbM1T5K3Ur7DKrrc8wEmemMbcpjTC3cw8NY7WFIMIR77N51UP6L11S7KvycgpU4HqPx03l43yhQEDB3y10fzOs1qc+J6D3mnZ0KvK/ZWGYCWpEzTG912q65A+Une1uR0JBt1Gj5zYsSi9B+Gx4H4y9/J9s2m8ygWN4uE27rNZkm5hw1D3H/gJS2SFybLaOJzOee3mABP9JMX34Wfsd3oZUh0MChX09UqsZPYaJYbPgsMHNTfoE0c7XFhyllisf9WJwipoj8xXybMKdmP+AlaWdKhETpDRTkL5gSZnPTEXT4cMvcx7FS649ly61/NJxlNK9MWmaRzrJntqz/qvgUSDXnUIv1T++y7tMVb5wKwYQe2XlMaqW6l4z0pKQz0f3yHckj5THeGkNz+kM5xz6pj6qA2ae08DrGr0tjhUDjOhPnXilklbCjLY8nzbWpRvsp6L29MXD8uFtsHLxCmcXyq64kHPDrTI0D1GqM2hauDk6dBuz6dlUNk065b5mwuJr0vy8ohsruYgDMKV+voaA+ka+lv3GYJ/UMjT3ontMBK5rIeuonT9ALJDt9hgwscXCnqL0CRRlT5H2orx5a9hU3U3bEW+w9+xDcTWwSyDQbZoni0RhR76Y4YsituHJ0t5m9EwZt2ycCIhdX+1Qv6IDXti8igIxzCK2NFyR30pUqW9JOcyPLdiTHkQhSfjQ9f9kyr2FOxrpA/egAlUOySw5fCnTgiRCPwEKmoLa3nLxwjzvAmLcBg3ySZWWn8XKa9to0IvfhWwd2z9qVnExmojUJqFi29hUaPATLJrkufXFKEqdlUxXCT2t+yQWaXR4ZkvLK8NCOStqmZbSXBpkTyj6IRhWVxKQW54e0AY02myB3FFpYGW1QR6YItfkXJT7GwfJIG4V5LfeyHkSDosUlZv9J1JbitEbT6QfN3xFTPQaVCqgXPJHTURdozjJPwfxOnHVRG8dBHIWGEmLtMSB6kyxRUAvYS8fQ6DPCIzVo5moFCeNNNR2lHA4K+5hT/XDk5CkWYCrUh6NtOt17hraNh/XmYlxuHwMQnn7DkM/ltRQSLLkc8UQv4R6OwEUQ64Uo5hsjT6EA6Zx4jwAJra1XxNDBiahADr42RFEIKfWAdwgH7A2InSmBVtN7aiNxR67g8sK8YDktgG3Qw3hamhqThFs3ftpVRtdNK3+wW3xmfsYf1a4ZNC7Tl5gJSxtBFenIZwKzzh9ezKH5W/RFKhS5dtJibL9dmJv7rmW8UjYiB8K43tagdCgCrn7ZrorIpY+39SA1rtPZCLujs3PZVkAH/4+wsQhk/ym92B7DnQYP17mk6rasGHJCw43F/UBU1ASoxVWWhFJxhdkQ6XD+rbrCzMTLRvinsa/gV+O9B7zS1z97DXTr34TYd4gQlJ/RxMh00LRdKtpWksQF1+Lxv8EZPiqwk5xx2RWyh2MSZC7tYUDyBwLemKYKPc4tU6mWKcP8ODFUjceG4kKX2BZFHuwEg6+tCNGwRqy+5YnceBRY+aD1QHzMnRBc8XF5vTdeO6oIm9hdEGQJdS4mDnQiuz/QIb4876HH/vYoRerlHLrvXEQwC8V/iTBFUfbTRCn5OYmhyHmRfMpV4p17T1gpKyJF+gh1/g4vJgrLPPb1KKAs20zkNT4cX+8o2spvYtjWsl1OjvywKwjYf3lhAB4sCUocNtGKGnEU82hta/aKuw1JZooiChRDPjh/9+o/V/2X1PMVah5wzqkpYjM4uiWNjSkBlWWYLEjj9/VyXtnv9EQlUBPMZqhJpXMYZzzHkk6E27Msv1RkkRaOLDzhglR98e1PNz12mUfoKr3bZDK1Q8vcc85NfVX5qk614dPthRwAoPFYQ3y573HeEJT9IcdbBIDXbQWmrRbvFqGKUqF17qOZLypL75srE7cao5o+vv8B4AqJRfwkfelCCaiDjwB1m1jWzs3FTlH8ugcJ3OjT/rwrH6PljdRQFjZgrhOUNRT/ow0RDUDg/S7PxB1iLbhiV9h7gJ/wnkldWp92jtw5Pg/IhgvXvNvhgbihNm/KPn0lzWTQGXE46pNxP70D/lxGsqJs3Ov+OJVVArid4Im5bbXkvzVcsUr99J9fKvSWYQPYGW7XDlNBH2Oy59Z1d2unhnoN4EvFWxCD3N5rbZk0d7zjBvVCeF7CoXr9PzjdgKfGdF1kIEf+ckLwxxKL9ExEoA+KWkMHoMhXg5VDH4i6UVHZDc+oQSYTbYMkxZeP5uYIwBXIWwRePMmpvl5OYH181hqJMtDvUIntNpECjEIiul9c7/ELGbgWGY2YSi8nM25eJgzNYjPdtSfa0rr0iCr967xA14ksnfIOasQ28s1ljPUh1bQlquCY+OEZas+DFk3QX0JwjdqPp5Q8fHFAkUyWSqhPXlFMmLLBdCnuCDAac/ch+VNby/ziXgpHndxxy55UJDhJYusddh80hB1GvZwaTaDQncLsMrdtD/UjIVpZYfMUO6bNQBuWBCyxvwQoVMF47OIxSwHX91LR68vrY/uurSK/bfO48oRZt+g35PUixE1pycaDOhYTnZFzMWEn6p6Vf6ljwG/MfI868L7VBpa7dsHXiu7fPwW5sm6KH197MHyRyD0umsvoeMf4aEGp2q3Ox7/KQeyOLPUQnVK+AF3OlXxENEHnErgusgxqioJbkvllIhJzFq5lHgyShtDkYlBQsUlmEC2MxvG0RZoinsiXwtNYN7qeqKVzQkuSneG3zFfQYGqyiq2sB8ceCxuUoGUr8L0x+mqY3xchw73wzm7pepegyV4GENPaCv7//N2LOCKJeHRYM3Ba6gs2fzgt1Hxxw+bt4rzy1+DpoB07KBhqMVbcX6ot1ZyS9EjVORUKgtjeQaezcmUS+h4CO221sBjwPJ6DB56mmWbTkK1TCfHmDKXG9vsl2BrA9iRuJIdgqIzQMVgnZvHDscKLaNM8oC44xp3q9Qj0akkvEhUQQNnJzkQj2sZAdczMnYuAbIwDrk60n7mcfiiSfiH+Ak7ADDQXzZyHg3ChU3LhdHBnigvFvyaZUbkacTObbUjn70MuBhioZZfFMsObPLl3uz1Jf715yRHlVL6S0FoXucGVUVeNcJ/biAj/axjbHLu2mlk/0dt+a2d2PScfg818tGr0KQFKrVCfMag2gDcnNCqWBf/H6WQnYxAli1VRlMDbIug2iV7lrwVKczWRsDqEs0fqR2oRtBoxt7rntqxHvBhz1hYoi1NAGHcUODDQOkPMZJA38cZWbGm6/guzCRj89VQBRMbzEkbNK9nOSutYP6aW3Wt4X1CFByliXMH4UlZXduGozBuo1xin2nK/H+kiyu03UbDvEw3xR9DCeUDC+N5RQL4dhtOIhp0vrNhv5AoTm/4ypX/geLjXF5R
tUgUYDrRkZUyNYgfNSt3qL6FwJOVwkp15JNrwJtlOm9apUgIQfTMq9oRrE55RacNCBLWJSJgtJTPFOH/5LDyJUI3bUfneVcxD2ZPOcaEY5mL0DJgioWu7vCbnn4V1EHcLlybxL1hCpUBgJDrHf9+mlimVh00pqTM9lgDtBR97QddbbCwDOfPyTYhcUEltM2NfcA/PbZHJqMe/8ZwxKH1noa93EfNsQf4k4Tjpc5G/gTfsTLVLSX21PWy7pB2gaXhHY/E+iNLhMODSKdToXvV74B/gpNIlNU99qCGpw4/5Hr9s/ADD/VcaNAq0v3dVzS0YYK0679g1kJA0TrdL14/oPNW2mwTyhy5iXwsxGfJlB6iA1wLWyuSHwxx64nHyQAtUmD5fEwgG+zIKxbndqCgWZrsE7Qmcw3313e/TN7aogCJRGh1tj9tcsoxEGNLe/iqozO/ANJNkky98GoOqIcED4RFFXDPUv5qNBN2i0JYvI8BVYLN5yrn0ivJXWkrX1NDMHSqIOlJr5KzYpMkiWsCMmiVsBM94mWaS9A5XLKX0rmIM8DTE4oBZeE7x7w1MHKMhqQdbycZWmBToElQJy5AsydDFzBS//ITra2Ys0Evn48Ozfi2dXl7eP7W61ZGv9d77uym5aDimFPtDxnWCHxWEr0vIhsknY0KCEGOtKdjGMZMLq3kFF76OkRRMZuoIzN0dALhc3sO+99b8TQA+jSIGMGyxgNdbeydhonIb4RuZZAeAZZ8AHvILC7m2l10XJirJJFp++BW04rLDTv8KNsaCwIy46wl/o0RkxG7ZpR5rNmc8jGi82FPJGvKUVSfQAVb6mikO6bDl6dRt1FPkgtNfbM48ydF1LAj4j9i4G0kZVC9/mSR//LawTkP9z+9o2TMXnKh6vkdL7USw1+DAJk5OoDaM5OOgSW52f6dznArzIFSxaxoxNL+dZm0Xof7zUis4pSh37m4fXBpHTXlWzvIwYdSCaeKbz/IWgNG3sEqDQEZwXrfo7hHcwN1/iZJf/YqA6XhswzsWGDeDjuMgdaGAhJa6sPioctTJghiihPgNNrYoK3pHJoerttCzRGMuh0p5ZQVbg1tHxpoZR22oJoVSMdrqll59YJlCR6cbRUnzygOhUrEhhGqg+K0H9nZOvCjutIKSseAHH2UqupaS6HksQykgyXy340EuRvRsP5RgAVn5BRPv55mdI+2yEcRP5elMu5I5m4HwU/mFVKjgt9y9MfANDe609SM+R1LHSh68IyqJ683w0IWCxznQ5f9OPUAAlRdX5I16tx/r6pam2lU/O/xG+bQ9xas+GPZSkDrDr4VNOcjSZF/fsMkmUc2hLB7RRw0KNelHbhm2igciA40g/pjOv3ll/32vcoUBxxMHkkuBEZy+sTVpm5onOXKdyI1AEUDwwZ4PrdnrwJcGvqpK6+VVJSuQzAQHodErVLky7JGDoSpgYXy4w/25DYEd7Ou1X0irvXrUDhPl2gQ+jWWdE1GRZR+miUtLLPwV5xGWSqzitBYNnBfT2M3RX3LeKYxGVP2q3fNnbj22OJJiiwjWSIkB9kWaG0NXSzPAMJmivURI+otNGvEOQFiwIlPXiUyThsiVp2HPYjf1JOvvekr+p0Ge/NK73WZl1XSxw+kZpHJD6jCP5symk0uAnNkD0mpppqXezQxEnl+6i8UQFOs4kbhdm7gIPDh4NgC2qD8TF8pRsYQxQv3rxLteCAingRln7r12sDnHuJfUczBR8n1vX3If3woGkfy40qZvEtuoPkrOq1TZJypMfBxztF01Ue/Gtujc/0zy3c5YAs4fQBHoAExrSeGUGnE+NpCxngKBZYseKom5HE19ek9YNXiDtqxssBhZ1tV2SlTEuCcStpw3SCA+TcdCGSgjZzj/hrMCBJHtAgJfwNZKxflmpYlnFMDdJEq6JsPfwQA14urIAFYhF2kVuE2ouOMbNjwYpk8S1YC78bF/3FJ5XoRdarGe1vObEXOd0uLi4FixKKscrWI1uVXTfcBkJaABpwXMFpVtCwMwGHHcprgHHCZcE7OnhRO55lHFThA/rw9KgNBHzjkqybzNKHXBAY8HKouk2bzBZtUHRpCXAv0O37B2eZa+Bfp1PxXkXZUtW52mJ4W+VqKoDYJcRCdUtRq+qhxhUDlocTsdeMfEWs9dZk5gXc1ETOpItcWLY8apsKrhjc1wX94dK3RC09xELKkrII6/hI7iGJEYdYOiA6zhg9A21GjUaQeXku3SdNZszvLiz/vlKFdNUWeGVTgowthMSPlL6VvQFegopQ7UhXJVFp4o7xpzXvyh0w23FFrHF5XvIZ/AeE6fo9xHaUxPT/se3KllIeZ5qKZabPq7dkUS5R9gTUqtjFxszJsvIVjT9eQULJdNC9ejV7VSpJRSjEEZ/wo2POqTbIIuSU+DHRNhjE0CkcX8S4+SjxPCrqiVzj9VN5oQargYyQ+LhDYz5/I5c98+xOI3mFHnRSjwislnlQ8VeNlvTcjso8iR3H5SkLpD0H7wH14USu5nl6m86UYjToooUFRsQfnstYMpxdkMoLqRCeC206jCJgrf2IMDWxZF8wMHokHvYZpO4d8zmZqbGvWP3wyp+zFM82AQt41NBs3Mjb8Foxl6ND0GvskI0VBP6HnTk0+H1wWk9oQxljPNq9LK338h8l+z3ay+U1hWaQ0B4oXm2ZJl5W3nMKnaEBnAfM1r+bFgOq8W3mcVnU+xIDrpOo38tdIiGeyEGFdvK+/lVu3EqajwCWFPbb/2Z+6/qHe2ZIQ83IzlviLL9FwHV2EIfIr79+0yF8FSS/Ty+pAAxbF6ycCKuwGZ0ypASGE+QbVRUSJBgEE6PKgZXr8r7Om18PxLneG0pWEil9JjiU2KGohifn1kxpDSbNum/Ojk33+8jeuizhUOfCqHZB2BvjWMDcskgpgK2dAlU6qHFj4Xi3OJm3pPsm49PBej+AOm/LJp3lAxDWQ09AoRO6ql/sZ+l4WcGsFuxBDf1zr4sA0JAi8D4rDVdA7NIRIg4LazSTdekr4j9NIYiZ7Rn+Jtwvp3+RB12jKFCL4sFNk9nXSAvJXw/UEbhja2TrVVeBDN2OJh0Dd6f91YmB6pzBqirHg5OEavqnBotqetsjnURKzsvuij91MWu0SDDmF8cpAwVSL1GVIuuihOWio83laSbfQRbAgoLFQw0XHFrVZKJU8GKx3dQfee/93FILqF3xoqVLFgPGnG6BCU3KYYq++z0t8Yh1svAqw6W7K1ZNvjxj5T2WNCaz9UDvsXpsiVGmXVOSNjR4BAiYvN1OmyaM64inqwW1F8Lo8H3QY/WgEmV5b1VKlM3kju5lryNOApy97j4+/kDcsShwr5Y+udynyDudYSwkviJM1ylVOmYfFQJcE2kBOaTtmbjKEeyaKsZf6RRemNjxpFgmIxscXRlQR7v6MzJBQ6V6HRIIIZxVTs3kgvIszDz+jnCrnasibfO7Re4Bu0DPAJFzwJL4lkFhVrsn8zALY8MamHxeH4XzMbxXylTdxHsCrV5psuPaYCWfEu5lR4d02k2MbJQtN/eH5VImLcFCxYPucVeSuzv/83hXn+mU8zXD/kMnFM4Cy5UMxqc4m9Lx3tM+rrrtvuEqxugMsKdkDmXjByV7drxHtOnMpicI78FwlWcmUM8jqkgm1+boD7G52I+JhR2WpAKb3HPMNSVERnjZdoGJtA616Tm43p9GG8yEB/8wcdGqcsIUg+0w6EsmX1Q4fYtTIq5ZyLu2dhtGElEwBEKQ7laO25gKXEIFYWbikWykasZktu7bbAn1rfIPCoTv8DeuvRRZQZszRX2ZHipbj2J2hwAWQGH5xB+nL6C3RWFwnjGBqCAQXVTMBZPjCbmYcjk79HQUKH7cU77l51NJUfyWk/6SeADadaVJUQHzhvIDJXfWHLVo3nENJ/dVd9w5nXJC87c13oTtnBvIbc1k3g8dKBffrqGBKbfQ4IJj3hjeUteAiCKRh/QnPSvmNGOeB/FiQ1GMX+HvvdtLr5szf0nVDgPALi8urP78rxFGYSTtW4BS0gzyOOrJWio9kqjPIiDZUICXtEVuIFdtHN+GZFPaq3ggOzsh0nUPouBK3
CXmGq0TEs5U5nvnkoMI1T7cUEiudeCHKtBOu4Rvetgp6SXV8AoPjlF6PLEFzF32mpGMc2zLWTRAA522KmylNwmpoDQ7AWzlbojE3zevlM0LiLEnkAFQfv44NsYXzfjvnIBLninfplqciECvDmBo4Biy8ML1Y5Qi13CsPAHBfoZAYS35EDawMcueViT7qBKPbbQIY283VwYyZd/quSaVTRC9+85IjGReSraleAagEy4fXR+PMoCckBtUiAoMnZLKrM+/YVb4jJ5HmBhn2iu4rbrvpkXTVquR8AyzBff/+XRG49HcxFV08KmlAM2BhBu4Xj4rkAxGYXekN12EWjcCekmE+5C33TqiBkfoPE5FkWlbzOSEqSWTEcr4JE0pI31/F9KOlidMjo6CzNVXgXq/CsrmY6G3msWdAwW+g0ejcSYq9e8niXpk5MxOCN9Cd+w8sEPwtBGBSMCbt1zuB1sOaI9tXYBoAFlOBi93G8R6cCuS9i36PMk1m7h7K3xYzpKn49EdY+1gHMmRw3lA8e966QB8+OQpgCwpQPAQyaiQspt9jyTILXsyr0tEa6c2EtPx7Xq4vyjAPJRoUkQEE4RpMWYZTbD6AJOICvNalT1NoEOOW2nyuJJ9ndadfTY2CRvalnOu3n80P9ITbi7pw7ISPr7h4cfkrXL9Kmbib6GkAKw/cSYWpv6j2fAEiYdzfQYFkpdcULRSH0k6xdRU4XFNj0kzMjtx2YB3LZYVolaw0FIJhvyx/iM/mdgQJr6vmIHu7nXOcNZ34gcyyRk5ZmhYgjDnMFPFEtjwjE+N6AOK/ye/gIpEbBualBhcAedxp5L+AyShZOstE3qD429xVr0NIFqxlV3etnlfVfB6slPdqdsd0UNzQ1Wd2h2LuLZq79iMgoBagC9yOyZbY2zgnwLbA2EK43WnQuSYpJl5T8EcYjTD3ConYWBG2VD+iAYNNn+WBCU8D9tTwA1uzc1D9NYJDLM5vME9X42vQ7YFyXypc83PE6cVEX/uo5Zyc9VpgJ8rU9mxRNGVSwFeOkIq4ViXZrwADmTph723D7q+F6ybZ6s4KJoaR3ZSPXstPLnZzMEYCqnwo7Q2t8xv0szf3lcaogZEYSC1emW+jFM5pVsVqiBPprPUIYmg4zD39DEIRitUk/dK0cijAj5w1Lm4GLbzXh3pvjspMenjcg2dvxprw7gBAHGjI7/o0vtKMbbf/flePGK93QqAwhMvDKHCHUlLoNX0J8hwJyd9fydmHQt4fQreKveYBSP4v3Hovj5pminsP4bm8SJNUPzu9lF+cIczz3yMtgo1cRL3hk8uWxEwbRiCE9jfVuFceljGSeJ+cEUyWHCNOMwtSAxKl2B2nO6xAoKIWuXHl5nK3ZFzC7tI6jzm8bY2IO7t7qjFr51HKvbkcOevjWdgWo59v/EkQADoytIbiJzFA1OD4hHtg6B3kLY7+59wsRvKd1ngDItYbdq3Rcm2EP3UTOmSQQfIOG3pBUwOET41P+8OjWcWEwfHY70Z4GGELcrwmZlB86X00n+RwoDUvleqIZbEF+cFfQyvSxHkJUvgtYntViYmeoBM8om34W8DHGdDp5vumOk+n6mVOmvl4CWPbZPyp4ZGmAb2k9xTkkhEaog/eeX4wQJarS2f57bIllgzfzOph/i1UtvND8rDyU4BGgK3UcqpWaRwqEpNrSDXLGeWyblvkqKlyxADdkFNtbfcitaUvidd2lXZgNwwtkP97T0qxYn/yU4/VmSR3Jlgd32KAqWm3WlfTX/8fEl2IlBOvZ1UntxdYstRVzSxuvwcU73tlpFtmXZEGyixaCG4YF7R0lCkadHOvdimY6Nottx/1H5ajNFb0jflEZQh0i8KYNZ8UVl9/8yQyfb8jKPemCHemeO3hZ3FN25sFaiYVy5LVsyQ7j4y73TFyrF1RRTDVUKR3RaQgGVl/iEpP45LKcVn/G6buDs/ca8DNFi6HAIDcrXYR19nm4t8j4Zegoo8cutXbs3dQD3Pg+DZuuLAykI96yasCZc4P8QerqpqJIvJT705uC4ZwowFY3wx9q4h98S8CEjmHFSsm1pGN+ngGwpYNfly6ZwRdYeMZxsEKJ3+BbxogIKIFW1V5sCfDrXct1/XDw6fVr/FKyW4NFyCj8OyTGOndTK99O68pg70gPyeMXY/x854pzoXcZOWEAi33YtzuKLiDvvKSrs/ON0E+7+JnJBKvvtXSpnKEs8mN70kjgysXgxzS7fP1Bpnh8Ks9/wyXW+akcylf/Uip+6QOEQZT0RQUBgke3Uhb7szyvUjjViqMEPkEu7ED5hQaRPZE7DUKv07AE56dJsNGnlyGkvVZJE4bQVDE6//MrWxQ6e8CmZ4FjcAC2uUYBeRkBEqhLhE40WQ71A8iggj9JPTtHAxpFLQ6TZj0jtD7xVGjmPArEAPQKmIbfLbrFPkSQmLCXn6+KfUy+U+ZZVZX6D9VOGeJ713QUMQMa5x42FTUckL4aH0N+ZFixm7pp1y/WcNLIjXJ/jujCJfMXswt5aHQcduI3I6xottwT4E+C8rRm9Zta6cIl9u2DdakxQfOgZx+sDHviq0THoH0YE0nPtXL+H8Mz2Fhb238vzgy28BbnYM5CTxhevJIZcPYlv2IZX2uW9Aa/ju/hdiiq+tio1L5jIVMqPKGvceV8cBX2zzx84EfKAxAFszJqgDrSBimKjmYHdu+uyAZohxi57Xdvh4OyN4aDjS+Mp6PTq/kcmyUbGV4pHo4OmiUjTZv1dKFf76nHVmvGCHeuqz05ZJEaGpe7j4edktFNG9u85Xl/u6eZ/zfgBDlfQHUAPVuGv81EBi70GVix/KsrOvwLP1LEzd6dE/rcypuyGTNlq7sYQmV3vBtKHpOeiNic/+d9elOvs9yPg5K2+ce3paexfT6oCQf2iVftnptwYwM+anBG1uEVMTylaTBd17da2dAl+zKqSDL3wSQFbK5zUBK2+f46tWII/q9ADHISDmiEr5cDl5K2NfLeEV3grieA168E7gaaCEMtNoSxrDBB6xWz+JI/ZrdtEwad2xAa/b9SM/5y5qaSHbP1aC8a9nyi29uVAr6unCzoIftcYf2tSRE8fGRlV+vPxFpjM9NeaPN0az7sccoSfnzmFFV/gtrKAD4EqSRa182Nde4vz3Kf+GgZwxH6+72HkMTjMGJXtRJm05z9QDbjAQYfnda2Wba2qUnHbrRCChCACE8T+1eItbUYXKPT5uIs7qBggdMsodgALOvXeoj9UrpMEsgomNyQxdMKmaVUJeilJe7vZHHh++EP3Ek9o8wK7tO9cS+21TjsY0CvY5hzHeB3LNxd334AtGbWh3NfIRVSZjEmHVe8TaVLSSaTNwFzDOEL1nBD6EwkXvBUdGGLSRtt3PMEPMAbTeRyTPq5zo3WFSjQZnBPbmZbGZyQcD8xs5g3n6RiKbOEC632D3koq60yVXVYFXfu7qJ9gCCBdEQOq9BvP9VX5m+FVfNEG9yQbLj9bu7ZtQJA5ld8sCeCnyBA3ReRNmLjilrDyjF4iCoUyb3KfupCQBKffdlt6sQ4Alvwo95rHyfeizqrw9Sep1fGkidzDNYfKYic6h3RTEPL7XNIz6NWOUcUiYADgpL4iywr0PbOLrwYyYrYLLtzfpBdcA4L4YdZTqtdKN3+yJIylu5RQDNJhqLh5MvliOMLT+VL0xbsF+LPaCj9bxmXGuU/P6v/meVA5nXRUtPQvvWlvow7JF2AG9ee9n0pCSQNORZpjrCSV60D2fccg1zgo/PyFjLEq5b8JCvkGC/vvNmmxgk+ADyiOLOMjNylXM6RWlZqFsbNEOAL7nIUyj6O2CoAsjmBmn2hKzHCFiFuQJ3jfKOsaTYGA172sFSzH3cX8pkWeNVJnM7d/1dyBRzIVtGXj4tdQwX/a7VXWXZ13bzdrpXYbQ15wY5bBr4TfDHNb40Mh4FWpioO1ZnLg0ks0QBnsgCt+yetPnMEQVxoKdyWubpJKgxrmkxD/afjmtnjPM08207mef1nujWXRQ11rTwTCGR9EwIfbv4/V+rwWNRZi+kaZoMskc7eecLJToH88KZTJ4M0TJ3ofw/xjKhecXFGB5S74QDjLGE
+M5LwjpuT7d4SmTyOzO/Go9yPOJUdNS2ZLkPKpAr17sKkFqHlZr1TKPh97mknsk4ipt/8IBMrY2mm5zrrzras94/JEY7fIgFP30E9+XY6b5a0MU9NxlszC+4Po/LbQtHF4jub1J/kofbRTaXQqkErBD4ohOFP8B/O05GWe6kbX1qrIeP6BuO4+HcOn+5iZLF6+snlmuv7Odb2riXXm3+iN+EoX3AB5f6l7nbTRvDdQ5acix1MX5N1tBMCdT7xqFCAQfui41U2x6uImKbLLdZh6o8fzLfmX4sSnKLb0HpgBFBymDSSosOUcBEEJlb1ZarwpwBa4uwYavdsGHqw//jjDXS2TtdxhkWoX20nTyroLqVpsqOPDAsPcraPZIOuDe7xRyyGpgSuppTj4mf0BQcufkwi/OGCixSUNNkFU/w6J4oAiVA6J6xbkAqvh3YY4+sWiE2gImQkiWSxdVTIvWG/5dKjZzvsfYbxhvqTORnZNk0pgeIxH0UeSKhlF8JKWn36XYCItz5WfjLwYRGuK1idjERy+qRfFkJmL66aOlAk9c8eHG6+iNSOZ6xhlRvkfYgKMZF8+sEgUiCrJWE/PRedV0kiwvauo5MDHG8BGMCRoFy1lqQy/Nk5+tY6IipDNQj0gkCNnzSnLj24LUiGUvI5LzxySsqoTMohMag13AAU7Z/cQgyeDQ/ZxC7OJ0o54HvnAAZYxiAdJ44JG8lrq9y21vDq8Y7M1xeMUPqy/CGLKake6arF3GGSVcFToh+VYPy26355xRd3zFdlAf6QU/pwF/rJ5hpv6tnAL+CjtI6xNmgGXzm4J9AiIBbfwVol7BEKd0Nd0JggPAbtk/KBNYVO8acAErvg98GNagoaL352kkbsE9rLC2KqoeDV98XOhTui3U1/6PQ58I3ptWmuZv25jAUX2CQ3BJzPrZ5QGVQvhkkclvvVtxZzOCRuo7jQSE96X7ZpUZC0KMXgeQe8ahxHYo6h1dBsIVFPLusIMxbcvAgjCl55F3VSo9ESAhvZ+BoScMURNSao8exSeSv8JOeqM+yUpnaKB2eKp79IURf0otGdrVAjaNflAQ5fb5Q3OVVkF3CUbkxhVfECOim3l1q9O/5hNYcBfl98lzBGdsXK+pDOifhflFLH7qHJwFqOlxccNlz9FMbEsFhjpO/1Kv8MN1fgzQqRIdhqObXRdFcpuvcfoejl5mWEa4vU53m9A3L+q0fG2ZBcj9as7vnPYzUqN9hjhpCjx+WbtMXbPOsOOIBYHqgMJKqZeERLCI8jMlsjy1lCOaPoTaP7VVDBD9XXeTWNdaoJv+m10G6tRGYqddEDV4Usb9uI52hEqW5ouVh3F5zlWB6juHfciuFSHhPI8s/DJvpYUrXyazfi65bYZ38sbrTfRZhV+P0JmEn5oWAsD5F4zJq7GA2enEgElPUvaKYkbd7XUw+6q5N8RvqdSTesE5bCw8kLRTnOnwD4RENSsquHA3Dd9jeK0MqHo73xSYRgL2yB+EbmkpYQIX+k51BMuJZO5iM7hVrhWntHg63Uc6qDb2qzCw9Bd9lsARsK3gKZmLddq0CZvALQiGIU3JJuYAZnqVFGJFQb9h455XuQvYg8iNQSgwwKp5ZDUHRW9NWW4aRto5OKlU/BK3Vzt/iMeVdSNJaLW7hcPxz2w6t7Jpg4UTeNFY9BN7nomEKnBKEFmnKm1giHaKpb+U4t+vDimtzuW2hOi2/UGFxf5+Xsl88ahulroR20gHzGvRoXzaMoextuiQNxU6CLyNfhq3XWxsEqHb8IOVinalWtzL10KJ8p2wb0AwxGR3J+BixN8KJJmvBaAPwT72Aeyh27A5/mc3z089neMjaxPGJcJFdURDePksX+nFE87y+DoQ4CXqw5aawrTbeDIAAd4MzFeI1HvteGR+XCIWu2lDTkKQETISIu/wuF95ruezlO8JfjPfijy45llgMXyr8B1i1pNPfJQPsf+OUSJ/6MMu0SXEXleQ9hDbrjIoHk9MlVvyJi3flPg7l5TKI/0M1Tg9/ABM4WHKY0/NNGvGGdoYD9KgI2H3PvJ9dkpPQ08bCABieS4x5fMj7hjjZkQo0qEa4kWyDvmCa8DTDWQVb4XC80IUiSkZXzUouXM216nYf6UDyqjCXtIpihYzs/qz0U8apXPIBUXzf7qc3JQvzfqJp84Pxko7iRDsanJTMBf/Vdy0GzEHvgvuY0vcExDG+jMXsCQwe3KIe6Ye53ol0SYDDjBILBGpKuhSbxdOxJ0QewsiAdtWnhxsexBzbm3TwqQAVdQvkUe4PmsCzvqX6hzVOBxl6tFEy2nDCDF4lUDVvfqDu/O3xPu9JG5TzURdc3vDVhVYZOURxCG2vneCuMizt9LZEmtoUHCbdKVb3muKZQ+kca92qSCCpOwGV688kAWA0eeHdb61WckKFK0RUQ+wtPCSuFXUONFuBxHE1nxbRf6ZyyyRaLAFYA8aCR62WFqP1mhIJfzYG3DiMfmusITOkCBWsbD3NJPh7d//JR1lJCkaAQWFdLgZ5K1aOsm9P355jiEPm2KaU/4gI3YbEnTnA3eOK+aBMD40OOh7QJ76GyAMsgpgSqSHDv+FGRljQ+jSrJRXudP4c0imdpvUyqDBA6HxhMIKOZRZoiUzyveqd8kz1oCEdJTL3ZEkr96sEH4oDa5DRWKGMkiscR/jR2wL+QTWrGYWH3EKxZD1Dzwpr6AazcOeSD/1bgJ2Jkgk0ZtK3RZiAtz5lKUYpnIFosmjpWUUuAMEHaw9aov4Hb9HtuR3zJQ/EP+yx7ClByrsr1uJQE7cGka62yMg8AvFqa22tJryM5TBulTqAZBvaOqUYFyhjzlhnpmwDAKn+1ZgvFb72fUnQzpzPcxx1ozVTkHpQ/S4eVKXH71S3kpcj+eN7P+ty9+nGMyBne8ZrsTiRwm8T/RZMclgowPzcJEu3nq3BTaoiJMAt7bV7UcmsZI/CjmNTH0owoEZEkxPIb0eGdjMjJtL5S2FKh3bmE1KvQUxf+DcFKIDXdnYNApjuesYPWS7EeHjbRLpnxZkrFBB7NG2hMFEcyv5QqEKjSDvzXfZ/hVR8hQXcBsOD1rUunwCBHQK6iXSdn8cS4vzqczzOhub/SR0AnxAQx8bd61wnDCoXYEWaIYyuxTFdkQsbZbQzvTwYXnaonYzIWGahJ+0Gn5hkcv/XFFuT9/VBT2b0mpjNnIU/K7muiUoR3pq6UK53V3VmUecx4nGCsWbfjFSAsokAbRaZV2u+0CwfQjcoLNplQLDj3HML8xrtqQj+i8e9eAuRicI5PmjNY2cvFAa4gA1jxjdNIZYrqh4MTQy5Vi5r/b+vZDe3U5hXF447GH79U9W4ha3SIXevfRvyQnpqHwLsFL4tYoQJqQNj9Xql6AEZXLRrDurkGoGpy4pwlGxr4HPb848B/ufgUFSVRO3Ysn7jVq1bYrPt+M+ACFSxHY6ZYllkpmtBKXWHEX4XsZFPBeuO6G+4Puu9lbLSj/GxR03J9GMVhJuk4/X5MithZCQOXH2tm0YdbLvzksoeHn/fJ5pccjB1JPWtGx19gDgPWJyXV2B2Ai68n1Pou58iKTcOgSJ0f7iMsSlnSE5kwWM8pTO0vEsFflgQQ3n53tUXFKT00wSqzwq4iB1jz+unEoTxEJ/a9NlyMY6EXlzNUhvnQsa3KkGA4/PduXpw44qlT9XVVTwQVGPoNmb5gKD5ETIUYOpb6BikZdYlkcmS8gjAkhJDzR3++PjVAoM4qHRPvVqsevrfufFv9jwdCla/cKyIDMWbMzMFWkFKzM1HNHeyuEy9AYMOSVyKT+AnZQAOG0VZBKFQJ+u39rll9poN3X/oh4LTKTu4tGKC9A8ASSemwEjJ69mOXYPmszBPFcfKtTG86FUCitBvsk9c4erEPRkHfCuaXA5zroHRht7kHCd3QKgwZ0Xy0dIc0wH/wu987azxYJfq5LE4AmWPXH2DwwlTLYl4+FN08bfxx2AknW6nTOfFZdWXYRlc3mRawdCZVwHEaMRrfFNZFLYaJatLgMZzDtR15eS/aaYGijfTSiz8DJPrUxbEOtMxfTDJzqhgDe3QF9oKoKWtG4G6Xe0oKiGNbC5r
5HjB1pkvgEt2SZKbZ0/4TcsKs4PtC4L8LhGSz0piPFZ+ve6yIzjEtt82POx/L3sBVZ1fWY2QSqlAhXSOPo6CGTGjEfZmkmjHafTmi6Fvpj/7gjGFknchO35KDEdosUGX5DNojv15tGsThBD/vP86wDpf17h2YmTxXyGR4joC5VsYdZcO1ZKK+JuWzk6HSo+Sjk1yVrhFNazG9wGYHkR4bXM7ye9Ly71egdSLuufzIBD43RJZP1E452Svlkztijag8B1l63h52BtntBvhgywKqDyINk6AWP8sY+yGYndixSQwk4O2PKg8hBWDYaQiEeem0auiNb2lQ6gnzcTZjzRCTJ2+/Q/vBpgOoyVc1rIO97uTCQATdzsn1Qnulyd346J7Ku8++wvH4WywSJZtlevKPIXooJ+vdKdvRFW8x5H2qJn7F53Kihntdpa1VPr2CBrl62S1SWjGSiY2tdG9CJcr9hgDnrjelFaonYPrSr0BScB8jfjHzYrIOrqAyg7Wm1KMS8R0T7VuyhEivsDFif8Caa3wk1YFrkY8+CnYwYwAoPi+tAjfC5jZbuzoLIhwoEk8GsMBHKSEkETFz+hXqmIwNqAwaY8kbEI7NACjai0T3YTKzbu6aNZSom2QrRqhWpKFW1DtzXaJ3SDI2Z+tvTzu8WT3lU4zn3YMMkjYEyOejwtMyLcrtyVJ9VV0rXcBktI2jUqQjUsG8W6qR6GDs46qSRB1K2R5/RfyD3VhrofrQ/5zFHqFuLX45b6VJhfUlne2YiKN9ZDmVid9zOmVPEHCyqQsPQkOOqZsyw3Z5uLtlG2E4kH08gmrOM/QmBxg9MNlZZWUyF8lEEwQq4DoGiZ/Kqur88CVvU+cBwEvv1YgCs8Zye+gTPHFawB59jxXt2vMMT28E5Zl+aVca3idOnJBOxymedmJl3VA3wiQwPPPOtaI20zVKhNI/Nwv33rm3WL08A6a4bO7mHZ9gwY/EbehnNvXORUps4+cXPHqFI/LXCr19VatvUjVM55pYQBgbGj0c5XbKeEBmYMxVp9497jeE2ug7HFYwUZDNbNbpeDGtP0g+I06WpV3l3+MUA4ggDtexbLNBcND8rC4Z3oRkfwE7XtsmFrIfb4FBPnWfwChHy2S5eCg/mFLbyQbDHdg6QeYWGSaBY1a1pt6TsHB8CB9JerpsAitbg9/ESVUw0e6F3QFnS9hf3mDUB81Oz+2kTzTI5vlHeEWVp4M0GvftThnfGFO+kGzL6FneVVFP2bgFQiV0sTWe3IRcVeU1VOiQm3Cc5I5PjBTHqr1gCJSnG8LXtctwEMwHogMPo+eJdOC+tIaZ1h+BM+smrk0SAp+ZA3CSNRRuJqKyWV9XC8BCR+KcHkLQ4uVXHiWiFleOIJmgj4yB2+VUNN/w/QRuXje8Ip/t83+7TLPVzrkWgRBhEUhF2asYliA4mK/OO0fUhnI98yIKBM80+6q/N/evkk8YmoDpV42Ol9tx6oLOOesmLwCJ43wu7u+VxMT/l7yhjIDrjaO9PzQOO3DKjVOHtJvQ7It+vDc/CrH9MpJ/O+BYTc6LDQ52xPPWnUGUBoF7oPoUjbJyYzN26QP6p+B1e8IXQHirKkpziUfihiVZz6uODcfr2CR/WKvQnNa5SzDyjJOYrBdVkerSzLGpIHurdwDWSGUzsf+YN8krqhq9+CBCl1k4ttcsVqstv6geFTXpvR4HSSPANDOS+sI54eVL5PiL7ZO+n/J/WsTo8YAehCWxT+Hq4kM3MjSJRt9MRflU1J0MTUHWSrpdrnhbfF2NgPmKlmVh3TVz2ZwlGPIONyfUzaRJdCSo43daDAsFjXojHNCC5aP3VyNNfk041KxUbHsAAZaZsb6ruAeTo/O3AffBe2qCRYP0d9k8LYJdIcwf64zFArLDJdqGtCx1LIS0zdqi5EAxvEks5MsjniKQcN7RUmnMvXixOq1WE1QUlVPIjIgfvECGgzIcYw2aKuoHfLaRR14b1x8L4ADRyDo5pqDz73tK4Ej7MB4oEa0uCuF52KK7IM6slBusr8LHkdOpq7cX7+IME7SaUv8HbsY89OM3ni7R/U3bYBXU7GXo8d0KmtVNOFgxhxBPqaqB03keczU/PX17XmvJuwwtzRCC84hvXTlclIpeyE806Z0f/SWjpescJVkaxcXtBlER/5dRVffwF1PGuPtA47Ork3HfJLqIxU+nvuQ6+sR4KqlYSR/7TdlRM6PB/FfU4dkYIHb0OorrKSZElSr050rV+/vl6sz8RojqDnpgQa9pVsxznuCu3yrz0muiI9eQEEFju/1lbqInCbNGFBOeeYDHTjjKI3MSxKx67AQ1e0R0Ia/zvuFwG6AQQFDTMQ2pSwEEHLnKIEB/hOts2m+rBiKr04SGHVGE+iWmBiteIeDpmjGbZ8rA8JjUQQC3OxNVcl+rx6jsf21b8srxkUwttUpo1TNq5jbVfFpRbOLFEjT4HF3pzdBZMgPTuHDaW4bjjjO794tNgbB7T4uz6iN4e5TsBum/Nezk4BpuB4Lma/d1hZ/bKLW0soRDC5eQIhJh/lit2ynDSd12FiRiZJROB/N3ZHcFQ8x/cZlNRxikwHD2E9RbDnMiZVykqcE27jFF5Dhl85oby6wourrSYijFpzHqYUcNLYzDBwWNA8VERFqYF+dbMyT1qbtb231qaT2vhBA4gbZGSH1YDXEM6CQirVlyFfDILh0Gl+qtWqGzHRtC24jc/Luit9uMBgHYweB4egjtgAHWxvuQzqGnFoQzuDCRlmqabNPmzWyNlnhBrhbr3NS7fFrpdd8iRaaWsdqnZgevmw9zdvgSf8vNFvAKpZzzG9wlaMSm5gm0PAYDm8n2KX2c26KsL7Z48yy+CD+S/URTyjltpO/8/DiSLv6pClxHH9rBViWZaELRPPRr6tDIaxFRDaHm/tr6eODmVoQ61SiEFM+Dh9UNTFltpQ4NUaudQ+t4K7Xu5sYzq9sxFRNyFkMiuHC6+nv5inGNNVMTZ//k1pmwMApWpqDIa4YF2gOKymsH4GPL/hmUdZhzskp1vGdGgOSZQowy0G8PLT08wo8qRFriZv8HMS8PY2g9GCxjlgwJZHrkt0xS/eRSiAja2/Bkm35RhBILXCVR+GK0MexxY6uV6TOzw/PZB/80Lr/Y0zPSNRoulC7OJy1ewAPLNsQvG7UWMekM6E+v3DA9ugw9ugWRJIM+5s/bTEoXMQUrXLFbEEffMPiZjSOctr5r+lZrlAZeby26WjUnFFkh2LB8n/FVScBwuKXfx7eagEYiucKM1tccyDKqw2SVf0KyEO16ancDNSAaeF5MOlVCpOMmc9w44q/xZ9ieFFDsvdCMOO2J8k9s82yBW58CsbCzC1lNFJtkw7IVbalaVxIOWxBCklBC6xxuHzQS/xmw+iue4HFrt2oxa6FjYtIBuG9vNcoPuTMS8085ZfyKqTSKnONb/WQWJ2Bmi+zwhgvxa3JNAQyw/GsxktkGlnp83v16ZN7QEjTLR0N+c/7WyEf/LpGeF+2kO6HtU4n95VVYCStN/31iOos1sIAnLcPbI019XRRS292rMhLidPf5/Z+nVintJVamKDAu8iFcjgRGKWy5nh3F9oAnFAnCfY/HH519ANXr7WEGQyTAK59a9yFUbBmfCQgzvxKvHgR1tBGzRhawSFKB6HIZhtSNLGHMnA/7iRbkpdCoNJ2yBQ7xwOCjUfzEAbUuZOdvDi2o4I+cCWV2gG0A9N/DsWIcnmZw6KlrW1Omlsc7GcYTr/BU0ltqa3cqbV3UPhVFeGGjRMK66ZL17ZACfzqEsik3LEdVo7CfaR5YBe+u/u+yWv81+IzqMBX4Eyi4lXGL5uioffnQbXLHBDaneKhyONiMo73eHxjqyyewN9J8yqW8c9WWI36/rFcCK+E5lYoPTkNQbUdwAnydDtBeBFS4qvnFQeRvx1HFeozD9z0BoD7OMRXJK2Qo27e5ic6HrezN2JmzNZ49MYOwkiahjXu04JGtnT/JbFT/C9tyDNM/ZzoynkiBSriRJo1utUkQAkSvQg6kezCIG+sTIS5HwMW564K3cEWi5ZhhVw86hDbBx6cCMAjn3YQ9HTQnDh0gHbzu9R5
Kb/AZ19ihB7qDj4SRCHjnL+iN4Mpko1aEowdgR2Cv3halHWWCk07dVNOKkkLI5kcoxJ0M18et/ZpRAVuw5J1BxtsFkolQQuQxxdzY9adkvpZvvs5lDB3n19LRYG/BJNd66UQbY3dyJaHTsutyWFxTf4vspGofmXJepRTpTdq0F7nMHjUG8ZTFWngVD9jv+J6lIy0jpiFRM4+D8Xm46Mp2fPY6Zvl5eVnrbWy235PsX/pf+OdLxXMPHPFuQhf+gBu07X38fKWqUrcFD4GbS04jwGX6jrYW3uAe1XaAaCZCPDvC/ensopY3NhtBolOeVSeHA+fQiZhMm8xp4ZwInSrx1tWthM73sEn05vuF6nkPAbK2sWbibSm5cpoNSsEVJjblaRIXy9ay66ksa0FGfyiQxw8sB6FG666ysYo4jUN4iGnB9GCseJpXyvY8JQf+J9oe3jCNjK80xRKImvk+oNBsFPWIDP436HEle4IGS/IY/B/5Stvk0NtO4uj0/3hhiRwyFjgEI3hancD+3oR3Cnm1kKDABIWA2K++tGmG0upVd8mRf8Lkz3GN+dCgJe7Sr67108d0FpblHgEhVzgXZ/NfCcdTCOrW94+UR1Gvw0FE9Yv2y/MrfImnjkLByYKYVgwORiAf4feD9FcEkH6hXSheQtqHHf3FKga5yIJofR/opgW1TDkt8aRDAlou9MyI26h6IbqHs6r2x3/xXuXBKqt9Um9zknfD8WA5K+yUypM5/PVy7D8Ab8foAa6JLzlwl4YkXwGREmU6C/MJpl/K+wZJvNGiFAHwKgPCAW31KBtcdwmsrkIh/rUoDlmKMnznC2y6eHfb0JM7vahJJx6kBfxVDqBf28du0e+9kYTBxz3awN6f/+kiL8CotCIFZax++3JuqZVJfbtAbkeEhtDW4ZlKu+DnZCchVbzYe9TdiLHsHP48xsPVTnUfVL9EUfLFGaYl+0inRklKDBaoyVHmcdc1JoDp+dT4GBi8ALkE0uhGEBo4ZLAX0lviMzGvcClzCU6iEgxxwmjloLsx2/DtBnc5MVT8R29BUM4YR90zfeiNIUaebS5LIECwV54guGcHuVe38VPOvA3iU2aSOX8JdiyLkR9Zy8xbjxxJYfALBGcLl1BniMMfc/CbvzHQwy0bAwHhZRu3VpVtMU6TSSPCKIgXMzCG+1xdpQqN/X0NHS12ZI0yaZpkT8SO70pdsg7S/jFAc7nVSzsimcF+8gYqXBwobeI6MDDWLRGieDmP81Ctt0QzBOw2GLnzS64TK18JWhd/YjqRCiS0GpbAVHsWmHuzvVhic4MRTqtRzZ2jQvez4BXbzKhEuZHzy1GAKxP3BqbiEPPogIK4khJdVQpWDxOuudswWsazA8uvbUJu4uDbDkvwYvSN3CTrYJePlMCESbO2v3uQDpu7x7ENxRO8zjx2thga2bCNzDLmzdi6PawjCLoowB3Pqpy3NLD8IEeJzlLzdUhBtMQ0/F6cr/nSv9HbQnmgU12PPzl3LGOwltIvBkY2c89o/YBg0vXAsAASW8+o7UfCAgnvuxkf3iaM1laV5r5chkoa6YLCk/Mkvtkk6Jw8OruOWRTO8pefoFAPn/mt/G6NnIgSAq8pC99vztiEgpgaiGrwVA0H+BaKheMRDGhZd0FvYx5mepKBQrtcKekCC7NZ50JnukRcCsq6xfySewejfCnmdMLG85MNbie4fiTU5cz05BqaOhEq3WJy+dTdqExiCrGSGP/6zy3jNvanByKff7R7D8j0pLEDdR92oNBl+ovTWnvhZs/ufzomTfi0TwEpeFiy37zHRCWQLRqhMzn68T+E6SjRtTtk36DppWLoMDC9Bi5wkX987EymHVzXrjZcMFLkczCGizm4ak0N3QBHyiWyhEMLCRcSO9A8r9pcfnsL1sUWByRZrKZ3FlfM2qPJiqi44atviii+HqJ1vlhmv/YHheZecen+mE7jUAvp6Q5J2gZO8cKW+51tGeSoeXTvxDIzJCnGBw/I7jotDm32sjMNk2soR2EtROA6ZUSpPpPHbl3I0mIdgIkjnGHGPSAizAUjdA8F77MkTeR2EqH7SJkau2S8yGASsLb++8BBx3jnoHoQ0Q1gS/MLHy4kA/i/OFLmTMejp9wE0KPy3YpeopdDYy1NtNgmdj2Xkk1wU1FQMuNQCMAy3d7KS+cCLjR3zBmWVIqJS4NFLIQEQ0Bed3JJuB1BLrM9IMipjvU+Xl+89uwrXiJ2643ELZqXzoVGBQ1ommdZv3G59X+Qnrb+oDTIEb+8qNZqEFrNjHMlieWaHdBiVUecF1v5et4mVAFuKrVeGQiXjc2bX/Vltf4OuG2zWIVf7GeWXZ7aGXQ3LZd4QdaccP1H+i+4IeaJEkALx+eMnUqdQw1LSKddzO9npDzx60PWn8e6SQtV89FG+13qNccbNojdMlNa/1c9NRlAkBh6f60k3EHVI5YzA6gfR2rMg8Y0h67XUaUDoCNMi6zU2wnB1MPFWhT4u+aZWHg+UQ0dT1xJXMngiwcChznzt+IDh8irq5ioSWoFLUUo5py7M1IUEezEaH1mtvoBd9ZX3b6Hm17ROMnFIBqndE56ePgp7GAUKTaiCwUu4/1CNP9UtlsqHNIscuU6gWxnzfu93DmBLN8mdPf50dM2fBp7aes10ejQhRHfRQsyQjfMQqRnBSHVYu311UtJORiqi3LSlA2UYk/ZZIm6yR+tEKkvLpDXgjwvdV2MgGeTbz+zQxrDez9/fDlD3Zta6mW8Lv98MslVxf2/glQ2cl52kVaFo0HXrlkpMTRf1++x9HgLGoKR2xFvVFL3VjVWDq3VfJGfOJAH8J0ziBfzmx0D/NI25Wk8g93HXs0ZXc3dni6NTGKYF5x6kO2out8ogodZOK48dElAEYVJ1jgtldzfbOgaMv41Z9xp4PhTdOftFh/Sxo59/rz8XeQtGKyY+KzmUK7TAVVKWfiG/ggj92lD4GfwVw2UwunjB05mYt7SNoQ898Wb1JQ27grB6rD4cG/l45OFDL2zILu/fzkYbpsGEHn06S5i9dhmDxYIY1XlMPgQ/6mXsX17An/DNd36vZX0J4eDxdzHQWMjRBNFAUwA6Dz25KW7tdatJ4JYYfnb/KXkjRZj5X0uDEt2pqp8e179+UHMZWhqlZqFi2ibSfKSLrZ7ZQfKrixYL5lLJu7tVYtxrkYnil3zGFp63NnjSb89SgfN7fWpnIOAmRWaukyUclMI9ED2wQXBkBY5XN3t6rrDLWNtICv6jlMgMEAN3JCwv7emkQLWzG2wTA31CeyltRHBWj35UdLl+I82K1hrCruMJUrHuv0i6HFLb1ovwHAWcFqmy52Hb7GJNM9w4a7P8Hf0Shb12oanlNNBYAoEn1wvlEc3UiQZTgc/v9w4neYGEa75Fdcrn02HOspnE0tpVllEB2H1aJl1I6KxBGxcZdK9+8ZhptvNEU6+MitUpvinekSPdaXZRPeNaj/6nqUoHIdeQCM4yZ8gZF9huYrPH8zpRO44tzuVxeyntopBr52CMSZYFgEw7WL8P7lLs/3wkHBcy0FsMBThyDix0w2VYiyfpY6RIpwvUlUxjRnP/Vt35UF3JOqv1t/TiYJCvEOvmbnETotcyuSI71bBYQfvR9/bamOyNMw6B2BMtqVBll/YYFPBfwXBfMutX4+FYfgXZKJJaGjBCE88oo6mrodqx5jjCsYfzpOK7ujuNqcSyKbUR1iLtP+0uExWF3D4pMhrNFYhYHg+93ZPLaxHG69kfwjypMbDq0AgKpElAlitOnkIK/u8aEstF+99kigqiNRJYSMPsvCrW03in3IoptKwtMhcX8aOLvuw1Smx/F/0N0pYrOu5wNFKwZR121t1oRca+h6fWdDLYoAK4uiJOGhDjghzFEZeVw8YzP06jISmIqKXACHNFlosKlXsJJpxgMjYaQsQHz7eN/PGIDx858A77oo3QM/3fexxAYkTVMFHHQMcoMLH9Rd6120doAzuCkjiOQO8cNmQ43Y4Gwqm8+FwhuDGT6/ClHuttffQOjayajWbWZVsNJztB9BSrN2Ldqd9gshOUYA760wQhVTV6a4oBAjvm7+7uu2quyk+N5GEa9n
dVmD4JgE5TUCKzH2dkdW2fFolTUj41BdnSfIBzjdL3CicMDZT+ioF9YoZEqWn5wnmDD6kTYpdSL/V05oP+4bUsCYo6RULzXTcZKSD115iyxkFOhrw9CwcxOzK8mQMbLgm9/YCDLGeJ2dsugFlSHXZ5LuXc3N3RVvr45yrYj8L15GP2RIrT8ASnH0J6r9iDljcjsr1po0C/2YkeS/iuyX8p5mfL2Cm0OywEMSG2t9LqbMtx+C6WmHygtZBkFKdJB05KX54z/qb+e1Tvi2dfjb+9gBi697C6EM0Fsov8bnfW1vE+F9x8IKCvPO8C1/CWpgAzAN3pJ2HV1q1b+qTc8vlqP5HWSRLMJuNfSMYQ5EsXXh0ziEdvTTvLA9Rx0NXlzmNtKmGTRZ4wiacJEKzZc3+xcuNusfpZWQphRO/01ADwtpPScktm8jMku0ey+UiE9q6xToGHEn9XBDstjFYEXZvIl3OYLY6g5TtXp6t9cFbGN6qQWXre8ig7Qt+uKj/naCYfG2ntdiPNnXRV/JWLNkiZVx1LGjCghVfJWyB+0AvLk+0rctkxQLmOliimh0yqVHuMT/kkV37qpWr6bEqSdRpUvdwlDrdW1y24K5u7EBjA8rw+e93XARd5F8rzhbqEsgCDR5GaxdR7yAiOSWyAbV+wZqjTlky5g/xHG08Lz2dZ+K19IR8W4rVzsm3bTtHbWDjbTlFZUtGKrPswlC06nrCFfiin8knu/BBMbmy8gs4oLc758MU4lHkFKsDUdtmSHGDuxwfFnDkIaICwM+LjPoT5+jDs5shoKTfrZ0RuqetJ8FPih0SbtBpalECDDKC96IbF4gKot3rPXGCKFVjVZfA2rdl//RLkxaoaW8twvOdqvLLkTEYHoQkHWCGV13TtlDgdLHI2dW6ts7VEq7z4CHmF3Z0O1Hf55S0IWi0hggPcWkyuF1WABoQI5nKpVCF0bUeBdRluou7unnbzND7V7c3sC19Jba54CpUGiTP2twNzjj4SeOZIm2ZD8oQWNScHUVP6vGuqVmMduZ/Tz8y+AiG87T6wx1Ha8syx5mLgtl0MdkkjgmpokocBObnj0ISPWDjzbv+1BZF+Am8g+cpxVFAHR50t1S+CMVTPi1I5duZF4hGGX4u0l/vzYkOOnIVMTC4lahLoq8HzZ1/MNBz73zItSq6FP2Wum4OBWaWCWDub0NSWh7px/B297wJCwgNx8xCiMUUAJNKEhMSQ3suZH/hbvk0oYIy3+VyJ8EcrWoM/MqoBrGidxaiUvcRk5K1pyoPlgjMLceGkn9J5Ct+hHxO5l3exVZbkogv2t1/SRsTTH3PIqmxRqH/Vd15NFqxQBCLVm7K/p+nNklliSsKj28h0jlX/9EjA6pMM7ietzHIlyHmPx1GssjFeXuMSnwAk1OhW+Iv75IYMyUUcWUavnwiWfdikv5u7k/PY/pmj/D713U5NC4TOsmR0a2isk7O/CFfspMLb9YO94BrcshFet3xSLV6or0EwtP8ZSpmwv8U6c7LwE1HGVzAAP+05HHUCigIpb/P5yUF0k18TMZimAapaGgGddYqFE/EamyefEmfKKkQNPd6k3Z+h/HwDX9pikag9rcSRthKk/6Yh+c3rAu1hRg4QqNlxKS+i0FS7Oe92XNZBH+ex4JOrkHa/4NMFnAhsJ6gSngk/m3VN+U3meaR9Lp8p9xf/Jq5qHOjSQ8w9qiO2srSFtJ/40VHW6SRadpA8pFh+NYK7KTDugUBx3qr9/gQr8wSPY542rzFy4LKPu6l9j3/40/sSn9l17wcd+TgtHPCJSVWTHLFlBBBpl9vwH/t8+eWBiRgAw+gt7ES3UQXFB9xioP8jfhELZ6jTt79y5dO16cev3UXx7hOzOD2OkWxEHY5gX0BeWMteftIVZBH/MlpTAFhu9OmcFDh/aD8E6ghllqU1TBHveuwU8aM7MpTmZmBewjWh4frefzP8sH+XKy8tSvJgq6jwmZiReS2r4okYa2trQKI2Q1xHhduTFEJPMeFex0UWDz1ZlwuPx8X1IEYfCJqZCHSaBC+F7mxQXdz/cLIsQZDyBtyboLrQ2FO1cegtcoud+GcnHUptSRhYohU4qx9nkJYDpDMinWEiGvMjFPHu+vfj4DuvXMXuhKuljh66f3G95xkkALpTvWy2MpEfFvtkeSMSwMscYC3ymc/ABamFvOSOG3rgha5LOdXwMcdRexxKhgwfPYVsVNaCMD0atpbegAyT2Y7cXHkbhIeYi8AvcU2ID7YWnJ27LlW+OWfImW1WtGe6/27mE3rfP8qFiJi4ti4ONr+dPyHDqlwaBt1Wb58UYY9KoYwlX2HDDnCkGrt7Qdux+4TiB6jPUjbiuYRzhnKFfYDvx321QBS/KQ4Re4KYL/9huZMoJO5FLION4AFhyMIRbpOFSY6NX5VZ+lS4L7Rg1Q/SZF/yuPq/rNIHRnM6ULBLtLrijuAs9QhKC3CHInXTaCttqSAcN7vfrmtWRm0wl/fwIFnYjhyumIqpMobvtU8ChCpo5irkOhDiG2g90pAv2kKJCqJroHx64ARgRiSuuWQUR5HbmiR2Z0RVQplrlxLjmP1l1ZTFm1YO50XGe8oKlZAGnx/XTKITihzfZk1j4cwRetAqPX5fiR6sltxenxd6C73t7tK+VFhOkQIRYnXYsH+P3Ige7IYERu/o1Wy0oexTnnPoKBoAd2dSpjcVYd9nrLd32U8uIl6QjmS5/UIzZXSxF0NcsM5r8/1UroAp+76ju5PQIc+BVcR6yunkeOcR/h2y1HpXbzTs7mWoUVMBpGr2VlPtATd3vGOt2WdGl+pbE5WubhfAylJs2fLOVZahhxyMFRVPMxh2bnf4BEzZzmplNi7Spz7PtIw0OdYUh4mBRIStz7HGGQHMtLb9PvFdGoH//cCh3IgxU102gckwLrSl5Vn56qMdCTE5C0TgKkt+HlWpK1wQwUb4oRfa2pDNvOARgSFtiXi/VIXLCFXg6WWLBUQlM8DiXsKRN9Lj7sANMmJ1325bZBiOCP0fIaQutepQyfq39uwc8SlJ8QKJNO/KOsGGavgK3b2Uxqxvp/8r7fr7clqbi2AyiIwqXfhuhiZrrKVLadAoCWeVxsUaFRWHf+BLyjYhVYr1x/YYEhroTtxMHaCu6biAGVZoCzCux8uo7DRWcbk4cv/5Kifp8+a58IAWJwKpJzTIYhVY1YWht5OAQybIwsXO0SaJr2XZwSxtPss/3ySEMZV9ZEvSQwUbRerjWHQGi+fyDIqNCgCB4/r/n5j/FCIkD0B0IdqGjQ/A2Hhi0reKigMBngDasTDTeQ5+SBsUALWVY4rwwz1ekNX8a8CFfK0RIhZtVo87Ojsf1b+YPkQpQAaKcTU8R9PxGkPrPxJmxZGJupk/TyqBy5QZzsUy/exloYtcL3wsKMQI/wyGAa22J7XAJMuNXV/NN+x+vzqvC8+A0KG9pn9iN/VtH1KYj24RT3X8426+W3YH7YY4lqRNIG8Hrfw0/1G7d+Hp5GG0p5MYXXtb231/Mbr8zlwuDsLqOZheP1ad5BVdSQf+kXCJwCNR8TCF0LRwWRk0ILC5W5OZatV6V7tTxBPSf/zFAU9nP1PbulkFlm+ZzjBfe7sNT9V5GBvMz72093RmEGoqTeCqLiT1UORGDhA8bjeIZgTf2zCBygZt0eH/2QexZtIb3LXvT/0uXYdS1FhkAoeG7I2WaiOZvIa7FKC0OGWyZuw8JDemGjvlpKFpcAO70nVUsl/SitbTwL1b/dzYaURcZ6ygZ3bTE6mThdIf678k8PTtI9rORr3+5iGuuTHUQR7WSkmS2c4bu+OmX6siqrRkq/pEOZ61pueEaekYhiV0RRVyQ6P0quSIDVg6JzQpgfJjmJkWg1pkBD3oocoiMifRP7U3wSJCZc2QKsbjd+c4heSYEinFXDBbFJNn9F7D64DgGbtPUo4Qcna1Z2b/Bu5TaT8GRfqR5f49WL4XLrxWqTuRmwuPi9uLZA1O+UJWEO10QKPx+bMKwugZ2EgakB6WCAFZj5n4KhbLHYnHTUr0KJdAzHV6NSfbq2gJ4rB5lnak66GmHn91lv4hGE3USOSS3a9bLLnI4+RlMC
11mUap1x9lF46EbbTL3Wjl4WOKIOF3Ye6vDBvmH36AL1tt0ZaIzLk/MXLmoFreIw1NBMbYFmyNHFm7fcamcV3Z1DLnIDIRvYNAMt+RyhrHyCdDMRagVy9Y8MIvlga7YNgOTK+5xGYLredT3+fxDbDFzTfgNQgxPIjltPaR/lm9AEnxMyc6NCMRDFBPfZ0xuGiEnDiM9bhseRYNnk1rlU9ee+5Q3yyYZlT2odv3Fq7huL4p/9OjJjTVij9UcKYirfZqDBu8+kN3zdczzwaqHPVHoTO8d6SM5fHBAwhvc5ZOtpDTPN3JdJBFnf/7SjiuQ3XdpKMXC5LhGQPhCIBEX9ik6cgejfrLixhRwDiPLsfRDzl1HGrDXJJ0VnjuLXemMvD+j46MmkZ1MuJWqD39hVnWARFlPl4OKTinFjeUWa3VVWvgx+yZekVLlDBuCttCOaq5PhNO5r6xuetNUwznJMb6VEJTJ98VRa8IDe+jTU7bNeqlsZWe0+oRozP3r6rbvoDrYe916aFD7ON4APYS4oofj5xPRmMabAAUwDdhxrsQRBm0t81Bjh3m60AP/nJzsDv5mdxft5tkdocJmboi7UQBu+sNstJbgAmZ2sssyQtGe2mvB2xENSDG2xO+icHoAYNTklvZiyWQkeiXZVszudvj5KzXEA07F9AwlMtSmd/QIUwhHJ5LabSnPlIqP/oxl4Bvu1NBAqHWZ5x92s8akWADUiMDA4Mt2kkRfR0g3SMiogE3ZzIHZ4+CkqtUouuIM40uBcvQbgX0d51ErxpyDz2mF8ty7dWSy8JGFr877bP4dqp3VFOgvAzKhnvhbo8opJwDuWY7DIe0wd6eTQXl2c5JnT05RmeiWEDKu6KJI0Qqaii0zXEtgMsTCfApB3X+/h1BabtcXe40bgTjeGSDdOu9NcBMWASWGuYFMBlC1p8Ysax6rQxYGxZkUOVvnnPFJ/JFh4KZ83f2JTcSY7A/fDXbLU+SiDKO/ZfXNeAWvZ+UE5C6cmAjttPoac+D/7ArpWYXdWfiRDVz5G7Bw2+92BPWBoIjlebZ6UZ2QFM7LEIzZ8c/ScrKwLPVpjwNC4HgqvctUNSORf5X2JBndsgrKPy1U/KhYtVMEMoqwuXJMb0umt/65RC+/BwbwaC83unsYavVplNbwBwfGWEOgORdhb+Yl/fUsEGgzMfLLUBhPlE7t3MT7o9b8vLRoXsWjAg47VGDqQbpvhP3CwFH7uAOlczQveDHRZj1i/ylQGgrSNNdolDbOd8YaOaVNQZ2cgn95gZ9Eyd9+tdYuWY1uXnYBpwAb0OkqbNmcn4TPqEwOwdgKy2+bulWHspJG7Zhfty6vDrSPef4o4TpPwmg2A8+gny3lwlwYVBQFz9DJZzDt8gG6SPpSS04mWksyoV3k7cRH8cFcdZKxf8ZOiuccmWfWY9KSSnBJ2qGlpfP6r6of8GmYIaG+4zaqv61aHAswWQcK5M6i3ZTiY4dpYZpZWh6GLIJt7077y19M4gV+Mf77avg1o1Yni7j6miUc1IRzCQZZ0K1Dn+t0HL2fE3LjQn8tI1Vln/8UUec5QVCNX26Val2SaRTWY6vtwGetoLVlQEzLEoaXhTgw1rFixb8Ktuudmdh4RlucVhk6slBKe9QHRn3ttxi4yn4kRZfDG7w69I8pjEXaLuSJXAfi+G0TRVSyICnEQ3NUd2EwUFtZU43fTLoFTokJR203s/ZqHFv90j/TmZbqsbShwCCElkByVXaf2a5croX0fvZLYt5jo8jFFHvlCEzk65Z+6jGQMCJZ0XMf+U49tr1vbYYfvepfyGjH5TGD5fcH5VWoHkyllptySzAiksXCG7xYFnoSxXjqP9+fuGBpcfJ+Fh321ed6IY0iAiAtwzX0rJdMe1+snl8fyT+PRbBKHJX3+kfIFnE7JkUA0NwtsjGfe3lY8lQoT11l/IcsNdhsfEx47ZLryJ6b9AuB/mgdPt3b1B2vxrLkarOC6PLczCLZ7eMx+eZOcUqvwz5jj1cbxKfDTAHmzRTt9UfDGHLNuqIRC8dzdxVPlrjobj0XURK8RzqkSMxsNWzL0kBfwnmddZGvFUFnr9hBc9X5/MEyyysPied6oGkV+iJyUAzhL6SjdBOS4vsxc6oY/TAwdG+pDA6X//2A7IVlyZQV2ROwOUALprSIGxvvIU0PB+SdRN0AyXKyHA8h32l50GBuOwAQkYRqPgvV3OZ+ReyIbucM5J5Srh+IIV5Sp9NpEIOP4iSr8fqUC9wsOj7hI3Xvrw/aJAX7vAA+mJzQf/mpaYcIOZTSfDOy1ExJy2ZcGp+omL2CkF8FapPLjBVIOCdwynMxCjMO/KqQAEUEnPcgDFdN+e+BiaTHUzxY3h81EgHHyCn4yDUOXa1u/SkfVLZvg583vUKyw3minxgtPEhZzGbxq8A+K7lhfLdXM9zUHVCelqwS0JDCWcn4f61am/k9L4yHzTTqiZD95tAC16Ry1taATG+/UXDQeZmW3Ip+g/quAZ+R6UpANgaph9s1b2v96Z5zlKSb/g5l+c36z6xFa0foclPyq3pk/PC6oLg+dzV70I4fhka4C92Dos6ABO0J08P5Uh+3WxoR5mhmJWP6Y3sm6YRbzQdP51+oj5Ma1dbChxftDB1kG0xp//yKEUyPM32bNXnpmKJVZlEmPPdCkU+Az/M+SAVCxX4IitkKJ0te6Ji+bDVX4koW0WDwoUMVWnMyE0SDdiAGh5f8e7S9aImcqFFE4hpBKH6dNUJq8HHkYdt2uJnBfBwy2yidYI5hQ52/9iHbD937/3X6qVPuFQM00jOhjz7ivUbfHCo+sw7lRc2Di6aTqeSA2chogrnLSNKFraynAsRi+5ROFrgEcxBzmo+XwVRolTK9Zq+1wRwtWvuSSZlDrYiltxWDpskEgnGRyIKiVSxlirQ2VgppBEw+dc2BqhHUHwAFoDnnQGFcx4ube+4IrNHnlErCGKj25BSKgi7R5swHznd3Y0paqcI+Vr51/YB2ro5IDZjiZpVwZse6HtUheb+TAu7smYvwng1DC/xcGX7nmjKnwwu0IvwnRpvQv3ijh0G0t+Z8EV4AXHLTxcF50CM6jsqGt4EboM1z40Q/ruA9ljWSYgUKQTu3JNU7EF85s41ZIugiYjUzdeaAefPMHS6hKKohBM1d3uEs4dD9nUXEYLBa1t8d5MpwTL1Uvjq4mG+sgBalILZuvJf7WKePn3eb75fYhRM5vsJst9xBQ9FZAcYuFB0GWKVboQxctsZtHOcYZhaMMu8jNszUlSXfntk2kDX29z8LRZvGHzxwlwMEMyhKPVGlPdWySOips5EKcqOJZD7ffVoJS5xBKIhFm61Yu5S/fVnsx0Bnq38b/9KHSLMAau+nr4GQAzC90mEyQYqUfl0XGl2ARilo/xcbHQD4QWzzVzstULRqXLx0PtPD2GOQmWtHMCzqFWWiATWHfWXktinzxkQ2UA6LYuSXGN2a3IjRthtlbPVIK3ih8UMKoQIpchPdhquFvmKFkyMgvHweJ1oi1WlXSYjGKU4VSBPm6ENtppak0sZsjXK2LXU9LwYOZl1GvzsqMvpdmtCPfm0k25ZiJQlD3mztIQkdz4iDwUANJoAyB5IV3rBcIRUk/H2jJ+ADON7Ovm61QmN+Mfuv7AZQ2az1W2YrkrIBxDa1Jk2meg3Kr1qdzQVnyuk4ZFenQHIsCH2XSlzp+QCKAkt2cMY9NUXf+JvyyO89/GmWj3CORjichRKinNjnA5LlE+6L3aVidnp9nBTp1IUrNNKsHYF3xw0rVVgH+lx0WVYLX7AavZmjV/WVvZOVyF/avE5GKKMA3fuHovBzlTWb+1ou/RSIk15VZ64S3sgaFkKpzXAT5w42YrxTJimDkaTgVlDcVle+/p0gWVqxKi3fJJe5YdiorXaqNDu6nbYqboxAw5CW0/NvIk46NrkV4XOtT1lexjRo/v8avPBWm6JXDXMHrnDl91EpKAy/ux6/rzaEt9l2DUIn53IeOunYd/P+/yxk8BX06Vv9Pe1KQa/XrmuibBpkfXtFSXZSokVUuGBDftCl/20ZmN2sRDxXKgPeYaRFLct65+S9K5mAyTkwLg8kzzEO3
QosuMlz7SWsEmahXCkocXG0oLb/sHNXETvG2m8q5XouZL9zSrTL6wxyDzCB1gbHrqswG3KaaoBI2YD1FwQXIDQSMnLGCzpBmMjVwI33we/qaSMrpGyDM4yN5OJ4OBxi20RBqlirGr9fykVlTmVo6YmjhJoVtHBtK4THBRu8e9EgfuWlVqQBQ1Z53ed9Kw7w/QMvPkhsfqr7V5EcvUkLfbj+o1Bn8owk6mrV99TfqXjiA2BQW85HvIvwOxtYYf+ZRz6CPv7B9YVcQwNbG3M8tzynF6yaRpt4xnfKaiQAkGt/PqudJjc64+9EvK6bS5sEUZBZs22AxiH9LRCVRSbZWPWGUltZBw/Y3ZRE5htASTk+AqJqm09OFcms6YllQ+rB8plRHjb+OOZk61I6EsmFuqIyngiRkNQZ7lGqg4yCPY+nEumB+TnKgAPJcj8z7KJy/RmRIeB5dq/LHCJrFqWdZrtJ41oLLNRAamjiEek4X04GF+t1cn+F6AL15brwvPcCn2zHBxGLAPB7dQFKmXCRT8g1IfkiE4HiVGGM9GlpP+cZzTihIXlKwWcRu+lksfyc3FLkzuRbCBl1kK92yEj3xkrJdzgr5r7vSO83vj0ut2rSGRweZMwe45gQygeQRs31iz15dvDK2Qz2Hf7FsRSjV/WdS2fdj4ISEcNzwkQ5NeP1tedSAmA1AFJzV4k65eXrhOtSymSVyzoRKyrhRGqPhR3jBpZfE7Zy/AAgCHQO/+lBpIpLgxYAP7QaI6Dasu3GqzEXSPN1JIG+GMcVsySY2BetoasdkYurgoO0bj+x4rSDs4E/UthuWZXEuLl8BddT+tkz1eoFHOZuNxayQyS9h1YcdkK04SRMSua5vtPWWCReqwhxYfwMGo++yx5+D3hVU98J2qoyAkMZL0UUwNjxvPEyjrKKBOuawYRU/+ky5sSFuAPAvl6Sw8mwDU8tnaTIRRw+Vx6XLQgwZ+XTw8Tj7pfGF87b+wt3pTHgHSGEgFXLfglYE/IF9LCqRioEwPGHYYfVnxM0Zfn0kEvkgVQKjPdvaxMq03cJY9VriPC5Q7fZcSaMqbtLmWs5PCkGf8wPCMJt7vLFNR8qIgbtqy2C0OTOeBKx+ezxLQvmB3+Ui+1l+FsAgvURhTIRxWhvxN4tkVsu336S5LveJZgFHyweoRyQQtfM4VLYavpyoIZFG9o6SzMdAclYa7UHnT6lKmXi9PqWKLiHyq6WM03wu2xY5E/AHk44oUQWFsIj69yuzofHRwtYe7uc9aKplcNWRBrOddRw1uZ0+XQe4zYVKIGuqez5RMK44YfnKfGgkD7A2NKJFtdtNdSua6H4EuO9wWCQHTbxg43O5ZxVLDz/eoDWWsR5svznxaLXlFPmRFLZOR2HcQqiqqKjjXsMmyOpfszoL1MaUrjN3Q2gzBjetYrhRqKhKFDWTC7opjuvQ2lRlh63knPiQESQd44m3BqBPVkgr++ut1611pn6CBjkq6W2uMOq5F4tP4B/ZUdKe7WCrtzAGNztL2KR9QLd02POmtzjREzGN8L6zUoByJ8eWr8uSCKs/IspEQsMQNDVX8SxBHRPMB3tdWi27NQTvGWaDP3bU3lwlZVrs/w5G2AoAEP6LOSMsFcgBLufkpgiJ7Ob5xNoYlKtE9ux3PKugjKTza+SWrpTtWmeFFv1uiprR+aZE5XPwMjUXJBy3qZVsoNIjD7QkgVuPJUP8F3PolR+n+dTmC9JSbSJGGiEQeM/H18ne36s6U6PIIFZEhkyTneCxhao4V1wr/TJgEAXQy7UgT1eUiU6W38w6y0Ct9jFEPlgk4WoRheWHMlx2e33Lyx/2Hr+iPCqu137fW5abQAoGFUNxlAgEMYlrJjaGLIUjLfr0IVsHiJpBGHmNYUpF12EBAuEAQImw+vdMl0gh0j9nNqL+CaubR9uuESPh9faejjf5uDc1+ZCL11NZnhVmcxZfNN5ivJRcnolNfExbB3WGQA8qgfrznm7x624FVkOpeCBwL4QAvwy+Qi5i6j33d2ami0khgBZsbiiamis3yhAB/Y9TOBZ7WyTirQ9esKVuLRXvc1hNyj2LvXafrMFN6I4XsCfxZUUdqWXiE861RPDAtdBKEn5wzocOl6luyzFUb3yoMm/PKEB+NW1CwIZef1Ey4nfZZwq+LImor5bRVgx1z5F/ueedrVu3gA67i4DDN8guac5pC0PkpxJARO7IWQLRYkH5JL8pyPoBtUz29J8Pk6R/UEre3fIj/ahyyx/2weyB7s4FduqJYbm9SBgs95SIvw2/eUugHkECQq4xOKK0DkrezYnzk5ac53ZaTQ/iQyn7LRWXlOgM/OePxYHrP2Tw5Oj7r8/oEXrFnBgOonmQilIvPZVWO06hSNZdZCgt0l/fYNF8nz7bX7rbqaBaQy8il8RnpnNG9PnI6Kmk6nE/Ovp0s+Ng/WSnbpZ8dyMSGMD+OAcClD1OOHzRco+I1F51f1v0fTew4m9WdLvrl8szICCt9BVwPceOB4p+83Rpvi1GOudITxtpQlJFvqaI9pV9VK8mQUSG7tQcTFYsrNuqYdYkfTL604UNvpTKJYabJbaeKiup4w+9XjvDYpk6rbSv2BeBQCRF5OM1wCGlLhAHAG3SZb6zkdr5Zi55r+Ch8VacMvEmQiIejdm6kB+aEj0ANxViz88GiNerCZyj3EBtde7u43tzNL9AqM3AZbUPhlIhd84RCrv713JhFPPfIiM1h06mfYfbEs5kyb+ipsryoVTbmeAa3e5MCqTciHTGLU1vaJbeknT2P1LI892I0Haoa5SfHFk3I0T0hmqiXp+32xGv7NDqqgDCC6ntHBAyjNPc62dqbOh2/KekG4YMXki8irVQhDjLo1vKyHa/8GJayta6DHjsNj7g4yEULf8yjR7ER3hX705cFudWIKjvmE5LLWIrgnBrbDmw9ZcINrGoHOkzMxT6jeM6WbPbU87fXU1Z2U57mB36ulzrkgcf/2nP+IIoERU2WAlGiGvmlydL+DJuvuP589PO4zfJuh/uS3sQi78cO+1Brw10qIXplKtriGfINbguCxas0V8YVkO8OOV+EJZEXUoEK5+5j2hQHvyUeQBpFoN+wPNxT2WFkWR6VQIjK3U/POSSHiTVNO2uOOZcA+CnC0ac4AxuJmloZv4kJ7AmGuhJRXg86lLNEyiVnXNlLhRVHyESNzKNQ1U1pFKABaRKq9cThxathQTPkpl2d7O2Nvqwp347xxQQjcC1wsxuDDY+jIqTJkWojdN1Fni6gQNPtJX5F3cF6lsWfRnKhsHGVv7jdEvSiXoIFNPsUf+QIL1dGu0VhrNwpsHnyRj+VdKxh0jh8Rg0HzHv2LRQ7D7nATXv8M3vH9q8hs/VN6L/DioTiRhJIzCCBjog0NGLknC0WAusYW6ptu85AkqiYWiGAW0BGpQ1CroXFfiV7P53hQMwJw2gY5oAZeTJpgx+az8Lanfu+F5g+wfvyxBvxf82NV8ClzQIdA0Dr8yHam0gRuJoDm87Evqe847ROOAmg2gZ1su+G2Dx+yYkoGb4tv9MTUHJ2RZMeH+112NKm4HR/9LPOVcPYySxocVKpm0w7bvoPNmIOB4CE+u0WJc0pgUWXqBU9PUvnuAQwpCS2Zacn9uXLnSTGtoTxkdFPlbBPnUN0Gpe82jMXUiIwJVCjUa604fvbmEf1hM8+3WNNddZnDrYfWq8mG9NpaC7mamQ93ZSZk7sjd3xa8/uvll7KAOZOK9Ksc5F58ozX1l/YKPxxBgLO4NKFzv/bbOv+2eiE/Y0kknMfM5wP/PJOy7Pz8yLj2EFSwQmcqvfYSmOF7iWDCjH0erpowa5jGyLDy5bC5VENx23UaB4ifS9hy6jCKM0aKELF2ToNHSmfl0hTcU4ZAyo/oRMoj7jbwnfqpZwc4mHiQN0eaYedRGi78Cwip1XtwkhmdyQnMjadNOHmT4l4VMPjM//VAcH+0tan3jxt8QGoLH9EhII7IVsLm37ohbFR4ANxnpzRL19nywD1/fSpYDLQXW0PSrum3zudPqkCk7M6g8beLOvcPuE+9uNXdeH5UfQ/3NcSYeAL8d7kVNc2HY3QaIXHg+VKIMXyp0h
6i8gt+2wjoeG6VC8NhKMjMKvft5jvGjx1tymQWnnLkPTfs6ulnJLyH5PZaQk8JxvMzmmVwDvVb5iik9xPyZLUUmfT+JUuiH7R+xyttWr/HwxuuJXcMnOXSpoStZ3z84IKMZdGpJrYoG4LPXNxfF8fw0HxPkV80SIKocLPJRnpGaOypXWZPYTZQ4Ocy97BsvSU6rF/+B06D+AoyDBA7MJT5dD3qnWGAH1GCY4yb24YnBUBfaN/UvuAvm46CMk/hROl+j/XO6qfbyju1hX4FXRwCZm1ruQiBkSxNTvEzCZzVy0USuQrilO8E7lS8gbUcvLeHb/A8abcUckkP/qebGIEU766H4ZWCSODe8yDGKg/qgMwoc7NWCfZ9RZAdSmR6KicpBUkBCtcLrpT2SO1r9/BBa5AeuIVP9zvg/qTvvP4B/73Yf/uk0sXFX57pM2gw4Xl7JzF2J+sbry4pxRXv9zh3TpoLpIoild2TG0E0NV7CwwVWGg9Ctpp1MeGsW81Palqo+6ql+XVOSt6/bHKL+kYLjVV/iD2GvZCOF/ij8DGRklGAw01zBP9C5uJQqlqd4tKG9uVPr+LTcwJbMBWBOmaQNj6t0G8//8Cez1Thzm2DGbrrrePivwksO5twIhNZxTR41S4K5d9qmor0kvwlcWJ6zUwnfJGh7oPU86M5uDlht7kwJBhtJ9UOkdjNkWH/sA/qLeM0WK7zhaxrzytmxW1G3fuUi0fa3s0hNSIlOAeP10BRoXD1CKbYY3u5DhQ4YyIuNjXyFhMdJsNby6LVNROe/LcsNPSAGWHXa0aule3cp4QynzehrADFfisdalWpvQYqWMsRPMJDzLSMkp2LdAqSOfRd0gDlVyWKH4YB2xtMOSxvxCx+HYUE5m8PjzMIzz9t4dbBisUoUeWXA75IpGk55bFRcaSiyrz6xp7gvAOTmCua3hDO8g4h00k8fuE1+DFX1OKdKO+lMLoE085uZORKiuGJKFZ9c2tOE5hoH9Tafy54OseJcJZESeKEzZ/MC2eTh139YI5ulXwFGVL24tqbOLaxvSmi4gv7a85URr5hLd/WxjyUxkp4QlYAY1TArAVoCYLN03ED8aPYcl+s/ctbpqrLPg2lvjD5yMIuDE7311wnxMTaDEctxWGzYDa5Dc/o5XcBUvz1j08tyf9whHk7KFWoACE4nh3Vwwd1M7o2OzYHtUWvLi2WshwG0Tzm8V9o5bLGzoMWKpSzIqPkIfsFABDfoTPdJyh30vQA8GRCCi78ImtbycFzALgBz/qx9zf1xtG2wnFI4gAe03umYv+amy2PusNzklR0SZE/0Vg3PeceLWFys4NUZmaIbaFWBnk8E2VllkZoYCyGP/nG0rGuUkEB+4O2UCagpvfHUMY73aMe5lVWlaAZ+a1nB5Cnjlinih+/umeBEjLJP8ZytOWXQd5xea6DbVF7e2jC7wAM06bnMMkCFZBbfl2VObqOncCJnwTctr0biUMJ7ox4xbFfmllZLpMFmYzVMK6jblR++wXyLkXrQ5bkbSZeMxzbLvSiQBGO/MX8tKUvqaualO9JT2saYYyy2BDcybwaw0v2W4E7J12qm5kagXz+EKhYEA9SRS2mJqFkC+3Z15MvfkpaSjw05JmAZJOCIeVJr/vFNw3rMRInedUHnhmg8OZxI2BXsKGJO+iwUogAswN9qCkwaFsdQABbKM8Z/W/hQL8AYU1rqNnJ/vKt9Q62NazMISrDe7jllrccRpUhhE6o1CJxrfQ39WnOMZNmHc3q2DPvhPdDeSkEe1sNKGUUJLPBfHxz8KSxHE1BNoPHJ0HdUOa/lW8bmLY9+KCqmrL54ungGpIXJrWc5JWxYLdviBPzTn36k7IvGWi46z5VwGA3OeVMYVnJm08onOxM21uoq2JpLbQU6CeBrj3Tq/JR/7Sb8zHKRz16TPeX8mTdjZmCCmjGZExsMnEizAorL40vyK+ub7/FTtP6l+fUYCxe+g2b1paRqns1m9UX36//UloE/eDt7XQvAPO/zVCI7AtIkbvb4Gf9WJf78pZtE0L4JF+OTL0ZYA0iyZnJmdIwURilnHzSLzZyruXASpZ4cMVF5Dky1gsjOO5T0js6fMu5PkOsxcX4e9xseJuAiDleinT7OPOHMcH9haWnWjBytSiRm7HC5E88SOTAmmay2UzZSzVFfovXAGNk33hSkA0VNEtIEllPaBxJex9dPJLUCV8OcpXzHcaGaT2S+EDKq71ecQIkEUb/9D/ZT2DcenlY9dhQg/QASrIBcKORy0tFvHj4cuXVP+tuEMSzIILsecPLC6pGOKy8I6tXuIjMZQQSRvxErD2mDRT8tf1a3RKtArzIvCDAuqZpynqVLa2xtrthQNsqoxFuu+WbYE42CFyULrhb4NvudWNrTzs1eSMGxwma1atKS2g6pCeNMSw2pcVjt+MWyXNZDMqd5QypaSYXgniQfESeB9jiKxCLM0kZABttIVa18kHM4bCnABzZshQNTFlYcIJXOgmz6LoXEyJ1llT5swa2BDWcZm3izY5wGsX6yYzu82NtGrxKqx4czh3gN/3WN9eIzXz2kYg7CUNvn8H63XG9+Qgl1qTjEU48Askhvl9RszLJXthRC3t5nsfug9eNlKIwnhnhjyjgK7BzcjefK1e0Mxw1cFbZccFkouP637BwCT/5uujP+VA4iq4Luq7YD1P5ahFym1rh0uVFotAZ/gi3pMvaH+iC8X5lQZy0JEsdLWbWfvY58M/5Rf4CTEMSY7Fr/4hGn+8ETshsgQTbRX4UIkMJInCN4W0Q/fbS2rU/0uIGTN+fXelH9qnda+nzhVN3Ar1SMAUmc3hRjEhZaR5MW2n9BdZGz4SnsQIDDweGip7DYqDDsrF5R/5yPLgw6U6t6bu3e5L/gXarftQi2F3nGsuTc4tDjIXNoPCLl6eqmlQiGHZWUFplqFDZsm4yjkvBS8zOoqmTFygrCGy0dmqSj/I7IlLjrp6nKSDalF2Rc+pwUvcya4oop3+Jy6zmVDussgD2qr9v7In6kdeFIYoRsA3FZUuwNhhRShiPwj9KFKOKx+YRyMf1flYCdwYj0dts2cUW9OgcLsUbKpvlsECP/sgTdWsHANFutF1+UPG0q0+Yus0hq7E2bl8u8LA6w959QSgUBL8SH/oBRhBhgreuTQs+LVs1qQl0lt6jDCB5R2DJ7jzShlU0fmICywR3N6HP9OnIit89eWk53U1Lr9uu5gU6Nmjw+SAJEb1VqHxEPNg8hZMP6inMf3sxrCmE+wEdEq1/i2B7EW+cUgegMjDNUjMo7BJZSzlWvp+adOHaM3qw8l2vYSVDfKnvtaZpq0e+it4NEi+NXFv+8DabCasAKEvBGtl4QuiaqW4xoc7bXqAKswmuZLTtj1XGRLNkUh2ugaK7+8QIatDNtU9aUfnkpJB30zARhby7yzAsU4HwR49zgCa+XLole0ql/r5aKTDkAwORiJ/+MYJEr5PoVQpdytgZzwwwYzRxi7SMkgo2zs+tdhURUtuaKBzHJ4uzSbg/xl+iWzxdfggdB9y1+bGj1MV/XAe2M+RHT4R8T/DpTeQoJrPhUQBaHY0MPorhLu/GTyomz7IF9H7RJuwm4HizU7SQSyQ/0U7Xytdz6+tfOMon9PywfvTb1J6uzPalyeznEAFwAD8FNOPt0Tqq5amzbmVhuHuZzRUcSSJcIfpbY7kocA7gkVtibBn1n8h6K+QLwW1iCXzKZOHfd7Iy19HC0gWMEAy0d720Nbl1m705w2eJOoyxGzs2y+TkH0BAvWK8lAVPdaGi3FKmpMAt7bWToCqBKETo7ov90h1fuWWoYAQTGWfXo/KwFtZKmCdy+QiCat2PacV4ImcF3/yBv5F0DN8KYcGiFcfgqtNf9779k+2bv5lKNeEYvVhQF4xquEgcIY2cjuQ74HDpdD8kfaYfvRU2K+qlZ9DwcDFq6EEaFo8+tvr80QKW3Nowk9hmlkNrIUF0b0vojJjp9KP48Wcb5N8gXZtm/qYlAod5wpGjEsRgn0JPGhyeJiCeqfvQ+//EhalERYP8KLKWK0YeY5QgIF/KqaFDj/2ulSTQwqWeWqnMUYnsVw5EUUt2NznsJS
0qWpqG87aSZiWbmN3sveu2Uz7ydHBv9kFdYD80rIUTlyIdqSkOkyBwKmF0EyzbSMxBe5FQRqZ0/wkDoDEpoqXV1nzsjjCHSfAmuPJ9danofV4k/e3X1FVmWu1BmPXOt6uG3/U63Yyoto19cVp0yTtyDY0jqSthfoTKaB86a2EViuFqUFIBqxdhmqqP8Jh3dWsL1zvrtY4pZlGYeptKo0Ep9+khH+13P2+bfYGYtHDK5kzhj+JmBkHY2Ji6QZeXuXEibJ7bnNektgR/Cje/anexqQuT4ih2tO9tKIbkg9+YVInpkRvEVwdtot9Gc88gPapxwCy5bwnHBco96b9TA82heqfGo8auMrHGMUUEu37TgI4uNM//4N2cDi/dHLhuJ9LFt/2Yl5UEjqhllTFMdDGUreuCuswM5K7u1GTV75oM+CxRPvYRowpYrt8r9gebpBpCxBJ0nOVVM3jRSFCk2ANIf1E3Gz0wu2w9ssnKWVvG39nombYUKgXAvG252uqo42rQQasS2VGsmnQzz5JD6cRljlUT67UwDqCbgPyfjAYsFb58clSRq4GeV+sddYwbGBx2yVXt8zdy8pUEraVjrBS3ozUu/UgA8+1jkoNAPRB2A0fqIVcU0Q+cpKdG5Bo6wV/KDO/JNeQTD51XemiCBVatPOoXWAN/rORLN+gWB4norliO0xU9qtJbLToUJKTa6XNL3mjHNELf96WeV1veRZSPofW2asLidtUgOie67T9IonEyA7ns26HeO6dNy+QiJ+iuwVfXGZ/WfSHpq/SiNhoYc6gZUzl2od9U5AEQYIyWArwigSBUIhMW5dOVqLuhQe0FbAuXH1kiz7AGyHi663tHPa0LyMJVdZcXfvRm8d/wdJ6Vv6jgPg79Nly310NTVh9mwtbHJxQmlajalTStnDTpBDtKJwDnPSwZ4Ael6K+2j45j+cbRYzv4Q812kR3RG6pHFHpiVevUjdtJlxfYtF8hS2L+hARr82Mv28ILfX9BBLN0o97zIVGqUGxHtB29LTwIb7SOWpCbcByzUkeD1rLLkgRNa2rEzW9/TLISqnZWRjVYZp9vDHQ53uktLY/4tGKzvLac0Midbj55Jl/XpiB/83nQvkvAqEfB8N23BYaOnjxQmgLC7G9Z32ym1HOV+JentnXRwc1Sf3GOO+q2nfIYi6JXPEYpAiiDDJQ3wMLFZLf63nrtDgbkUK0BcZ3DFh3TGJAmZlNWdJJNrOkR4ZhDCs9ASVDgwrmR62WlpiyR9Z0OCEn+j3NneTUjAF480tpgCg2xRnjZDHb5S10R8HnQKzRhMnWcCC528rd6+L4KU8+YZe8RIKpBADnrdd7RpanTuAbWBaJTp7WyhhwuvfZxCCyA8e/w1eIbPzsfjVEt5VyVdI+GpVK0jy4Ws867KtpiiJSVcG6a4P7iorh8oGgp9JzdRDFFrc5uTXbHWERiQJOClcN4jcx9KOwo10HAgVSXH3W3mefxskH4/Q9gSHnFy65wddCI+OQA/kdXXd6DpEteznn8te4CNuWq17DZbJrcRLfpvpW7RGLlLSQkQZntgiiHG+o9XGMtv5bBYn5vXc6MkGfaVum7A2mdpiYoI9ZPUY/aKdWdLs6DJYblv/G+A5sE1q/dF9QXFbFA9LlXYsqBDmkBFinxinf0RpHJ7iqMH65G8F0cTDvW6oExJ52HDf7e57KzVpkatbEOycL4AFnXQqEe2nFhIZ0p0a+L5J4gVpnAoRuCTcPyWlZcQDWn7yOxUWdUpPDXBpN/lIVQ8BMg09G3lcZ3OR5k/XShUv/PGgnwUZCpdv2i/EYlNM3266w1qVuFJjCMy2vnAkqbJ0Sg7MtpXL2srwkISq//GvbMyP0L19E0Er4KcImt1jZrA7bZpmLs6BVCaeS8CvviUDb9I8CdrMDKVuuF8Lhz6R62EnHI/e92Tnmje/A8f8y3AHYb4q+7CNvWUY0ouhObTmD/qmvDQsaBJHIlcGPTqAnz9/1qPnL7XFvy/VtWXoG64B7coCDJggKpPGXHSt3OTgmDmcn+bqLogwjMHYUeHrvNUX7SRypgln+CF8G6Tlbl8qNHNLyIUZDKdAceyy0uLopbBScEts3UM2/cc76urtnqU4bcKM1a7lc2VRKOtUSh+4dxX7AIg4X4jwlcgsXorjNi2hzmtkXVPpUjBeMtNTgCXcjRtZEN2lmC/kKzosywo0nxXyTOpaB0g33hkYeCqfAV82GNsLFhwmOjhi9graUKecRh6YaY984VDb2S2SfS+OcdKGDmPzzVkvlrRFJxL7KG4t1sh3ljP26Qsr5XFZ57eyg4w1FR/g7G7693kQVxbs29c4iUMUhZBKQu1MnFK86vPR+klucm1igkmRdcqaF1A1pGDjunj0y41HhiKQiEzFjxHPVHJhpRuCTu8VTAN9juw7nVKgWyhPbaeEJ+yzc7c4HNkvOG+6MSqjlvmLLytoJJtTMs4SU8YtiLWWI2Jg7K/uhFboXMnhy5JSZXHLsqJo9F2V6OWArnXQRbM4Q/REUwsWJVZ5vlmXrqCxC/ODnSESUbjGCOIC0ogD6V/d5yw6rKoYZHlzrVsuJEFub9yen5uPd9KvfaTiBLi8jKG6/msPGoGI3bbL2mMmAP+ZGANb1e8zlbW0NJAT9Gu86nPI6usrS26AxQGoIbcWHNP02BzBgb4DkhmQN6VeDFWplpkHDLfympUgsWohy8DJ8APdwg9Mw29U3Airkt+htaoACx84X5huxZvXEfVfec1bXzE8/dpI7/7/dwFhPRpT8dOlEmj2t6kHsNHtSv668NuZGW43n0DgTYTmttZ66eAj+yPpTgCWEDcAreZaKc0QIAQiYCYw+oKjBuW8N+MQIJXvpPM2UoLvwoLQo4GF54FR68//EOhrczVBXkFmbstTvTdToItX8oHbv/9cVvbHRqjE67DkSLdse/6QLNsxO5qFF22o8zoIGsElevkhvPNGEK/ePAdaOA3P5fQx88g0dVZadfPJMxaXAPrIiK81VUgAvE5XKoy5TOR285Be91f0lCbKYqlsMQHPAKiBuSpxorky/WocHDOZaJmJL6Y4aRyO6LAS6Lir5Y4ZC5IPXNkiZOxudfVPcg/+wl7OMoU55gfPUF9KkOjB4eqwQfreJWEa5deSziUPsUuQX3McHoMlFyX0WcSh46mmJWTQeDn784Pq0Xq9j3iuKFjLc8RkbFW8alQIqvl8BpoK8S9DrAbZDRgWW9QfV8E/07iWoCU3lS6LnQlDiS1vRCAZdEPT/KQFzLXIcBjk1BPzhHtEHdJ6XXnSqfU2dwJgtATQSY8F49sNKaWpbuMLJZGQ87rWnSeShP6VY6Rc5QiZPBjOS5UyorZ7xa3DUnuzr8KZyZcdwvB8Bgcjo7iUx0TAAsqe8ogwTuFhiErHAeuhTZe43qz+iRfH99wCU6+YtLdNswI0pJK4RKSEogvc7VMzMO9u50ywcUOydo15cic3jLgjrA7ttKBj4+H//nDUkLSJYnhlZSIG6clurX6mZ2aD5Rhw1MqciTHUe1CIh0BSW6Ls0eeLHV/bLQu2qat4TXqYsd3jkLFUsVtVJdtGeZJGcd8Z0Rp976iIyM6ljjtCCWkJcY4SoiIMcOINkXc1+HKFxoH242MxCk0KyqFfNgVVAC5D2nzlkP2yW4WLaduamHQYVCQrhwBBJi8TXx5I9RLk3YklcsqQ433gQLyr9FM0F/5rTeKsQ4rwRKypn651KvLGL3bN1GugankZ5sl6CyvlRCLodXio96PYAEyfQ/mDVdFGjDLVY+0jQIph4qMYuiCcuvXnVDOLuwCOdUeJZxobdQtw/4FjbuN1oB5PO/5q/Q5N+DbX2nPPempg8PE5M28GaDq4S93ZWMNwC2eEeYeCv8jUcQt5WyyY3nuUvY1LkK4AgkkFj8P5JC4eVoPRQze63xi0xaUZqgPVCy66P5Cix1l0Zua74aD6uBROw88LCw3BxCp7HxCXdeXslZRKvoRSitoo63IrypqRSVRuqqLAnDhTlsZDQdC+J2XXe8Ybqamx3VN49VISEhKZ0iJNMgym6LxtT66ApTivRniGPg7s0WPjpP2J+DV0S3ESMFDUJrEDhkVq
1/2kQpOARcJKlQbN2zPgjNpnWtzHkWV/+u3jA5uMZkmFQyrg2fHcLxxNK2da1V4cL6AjJouPlg00680IflYLTJIwE4ZqeLAsBYwvUeQ0TmNIqMZlNz/MXP/tVRzt184psYZOLMg3KSHmNLQpbeaGm14BE1bGwJxFHc+zHGlbm5Ko/ra5M1B+KqqKJXPpDV7wUktIGgIo6BQoNAFTFRBYumbavj/KIeThjb10VTzR6fbIrXIW1Fh0GRfEur/qaGpv7ioFZqmemBsZqKmb+KjbcRpcW3ejgTiY1lO/3uwUWgKufFXEv5B78NWZbs/ayFeEG/ZR2Bo6L6tRtblqVYUdIoJv8HYCOTa3vsVfXQ5Kr1woWDD2qKzaAutIsLmgp7Cgk0vloHxav3Wvcs6pqEmSoxdA8LrEcnwNGVWXXB7AkzYRbwhdKW3PE1p2ptABXH4T/HhO8FtjtYYR0eAd+RdWcQLRLxmNNdamvzgEzRtRSex9+/WWSs2+KzFgcv4z3HeCPiV4zfYgHuAiXoDkTFKgWo5nK/Qbyu+nxcEg8No6CthA7HjtkMf7RAuoUr1GWFQh7G/gJ21+9IjXABNquCfHCn3jwpkURGjxG2Zc8unWoyjgGJPM4ICgW7lEZHRWiSLMl8bIWUaBpgcsOnfWnD4YtKqn2EyTBXnz/HvNtoyQzpbNz+3WFX/eRITl871ECnM2Q/rA17zEUUyjKXhUBUJYdf7R7Wh9Zj+R0bxfzCMQlhZ9uOk6VFxTMBlA8f6jKE64Pzit0zbu8c164A1WHXCHCqycIb7uAb4TMqxIu3UevOvwxDsS0XwYbNfrtTptcyfxBiUgr2yDGf+cAktGhbnQnOzfL6x0JXK7PKI35EYgBAw4F/AaBOx0IpX1oa6Kf1/LU/uJwdFwt4WU0ZXwmixFGbTkCE/gAY3pGyKKAqsPBujMWZdGBSStXRLKDIVaKHV7Rkccv2bjlCq2DepAVk7zBH5/eMkDNzAdD1GpwjXMZWjX4oAWhjzKi2A1DsMAePtOHCOSr1nyf3yM9IvQn2cI/f+M7ILPN7VFqykywezFU3QnPNS1C2rO/6eqIssa0XYYZN4Ti4KgF56nsBG2k/xztIBDSENfV5fUR9Dv4r5wc2AXNnrby0guHl3VNomVBNEfXwmv0VswOi2NSKOfTR5W/sdzjkldtZUrGKzI8Ls6uKL9/qKUV3gV8fnXLNXeTpPMGGiNtD08YfeJ2cvelr86WwHgCmmDqaAVcyGPvE9q2Q/JbxKAxXP8h0/ifgBMBIczP2Yq74q3FzMQtF7mNU8K7MWyi4/zZFhtCVXZoUAqQt1ARegd5FdFheQ9FGecm1mvY1VdGDvXLFarJxWIk7QhFha9eqd0jnGly5JDyD47ijZVVEe/qwkf6feDFZXzWOEM7WMNjvhQiBtlSs4w33Ty9UtqLBKWpmw5t+nyOyRTaZoRJCVRxNsfE7CGyEG77Xe8e0i4xuGGIydXZT6PwzhX9xb4IahdaRh+hfehqRgTHQnJKvEVgk3a/4h6OM4Iq1ySdQ1cqrB+6LLxQquj1Roqk0v7ITmfdrwKqwg0sIhkfbcO/qvl/EZknv+AluFfLBs/4lPSQtRDOH7ebz/ZQYtpTKpW2o9HCPcciNgASFLezk6j4GpV0WJAfk830uxFOWtofeKZm/kVukWANf9j7jvv+TzZC7tSD9lQ/Q7I0rpXZAklHW73odLbn3J1WafVy2vIewgPehXQ0B8sym+aysOHrfJTNjd52V9viGwKKr4DjCFc8FIqt2trvUnFcDTF5k3We2ABdbPENtMzi8AZySRWD6l6VGCaBfV7eutPezN4X9+E2WyB5zRAk5gp2mGinJI9mGt3VQrYDKJ3/yhN0bk7j82HvJeg+G1mV9a3JLUqaEZvMOo6wGC26ZiEiC7we+qSc9umnQV4Pxh0B8kw4hekglR8ceqgqaeJHVEMbYEYdd/V4H2RPxXM62cd5yTnzxkMVqyeONtEgAN+Rnfyt3TDPhwYriJqtJLBucNJjznxujAcGPsqhatT8BRwpCqA3des7WjXFHKdtjXCBE273hV3l7i2f0KJXIIsP4Tzf/eAmNL8czD+wAT4yJ8stoCcS7eQlrG0D0Q+G4m0lIBouqf/XS/6i3VGSu/jCee6FCQY4uuLI9XIy9kgn64YMw8I5eVF0CBkMFo2mBpEzSGDB/VzwzUYG/zl9SNDtWWP2/9i/kCiaaB1picG5/QyUH92K4DnYftdL5s3k5m72XKpYN48ccfOKnHFXsd/EbBuVBXNxb1EyVYxS59e/nQhU8RLZNZgZgOmG9M9pyHafKvsSYC/lg8Pef5ZWfi74a6PKKaURmLT2RSgdOhiihctTIAkWaCYuqGFQDfaLWvLVRGN1IXcQTpRPlEq/8QRlhpe4PT+IdolTDbfOeNgprmKhGawriYvItR7/AC393yTC/UqG+GY3Fe7DQ3hH1dt3JNn8V1m2+jMphqNPrSOD/VVnANyFphXc+tD62PPJ8/iWkYrzvFu+6yuk54bFrG4X7qGbAxDttXDixQbnu+tBjO1pWDFLqMtqUPkPpPceDLWAfoZDixXDSPHgn2N8+4pMIXnlWaF0QU37wsUzbk0xIUxzI6E7xmgXkXGzn44crbBePoJV1amfOif+92oVPE7NFDk+TUTf0DpJFcjxr/ZLKwqCY+j+X8xaNuJMibW6f2tK5WbPecamjTJUbUelBrx+OASJm4dR1s1S2Ce7nmAqNp1tENcv6MBVCAUa205CssbEuLt+QSW7DVOlUJmdh6wKdFaGJOARRC2fKW6ER/w3S2Ex5CcrbTblwm2ysMDDp+ByegIj0tQOHoXBoWgg+bny0RWjCSYAGxAo8bDL4J0TraMQBvWkT/Q5NfP0fgmUESo3hR0wfOBwBRIASY6Adwg2EoV5KVAT0+t0rw3dZAASHxg8qZS0LV0WuMU31x2HaENIzLmORs/jGuJ3xIkOedOQICzmSw2+dDzIJHWMtSW/4WDGGFYK6NaJO53olozs0p3tBWtkIHFJE1zd771ug0ziAuDT9zSX0yHRGT/tY8AszVcGtW7Jr2aTs5gw4bYk4OSXcqAdTm2oOnGbpu11dJo7J0Tu39n38Je+Go2XH4UsdVgL152g4lTKC3VI1k1RhwAtdrV9ws3Ia31tWbFTNsU2hlQHq07xoHiisdaCOa08+q6h6tlbxbZS+q+f+rkeJf2O3KgkuCMgCzb2KzJY3Yni7zQk1bl4P6RR7GaMP7VZldvkSMZ/JAlkYcS0c+sguTrxRtU9NrJ5+8f8DF+30RwDoDJ7OsDHxvNXTxHHZyUX/VztXiUkBhLdYaK7dBAwNAYm/r22gXT3lrKKh9voSukvDT0kxCRAtiMGVKdA28MFWY0xlhkft9huUtcjq3MXVMAnbTykRnP7NgsJpjwg74yseo7PJad9NIS63fN5IetWzvKTHI0864hc0NeKaLnkd0UCCqudWondLxXyro3zjMrX6pTBMN8LuLCZVFGwW9HdD8V+xCqdJmFa99/O0xlZr3LXGqfkj/1KUooi+bdn2tEHTQ0z6EoGQVgo3CzCGCvCKXumOQfeFzFSap836pbYQBBZw79ZjpBHLQVwxdP1ffZwJdRN5DNBCFu1+pshnjKuzP+Au3PzEhyfJ0xFg+bCFvHPus4LteOuIy0kZqhT6wLBgzOncA9uVp6SfN9BdFSRPUU588wwY/lcDGLV7y5b28R6Ba6ZjibzTOhH2z8SO+OaRdmPDcZwx7awTu1n3G5y2AWs2FwiDW0TAeQMndLFOJEK9gmihx5QL6TOsXi/b6VhoJ9hRFgadqHLacvzw3dLK74GfiizQdnNhpZrRbSTbPRz/clXef1AbLemlC8ac1TrhQ3T4HLGHm4LvYgD7OT5nA+oHMZJHLEqmSjv2s07KCVF/D0AIAN865tjaDIhia2n3KfB0hMGLbzjKAiRHbN8HpzMKIAclRKQiTraJsai/rWBILdlR+M1ovxoiBj9WZk5wedZ6NhuSw3BGMPxzX2UpIBcQE6G9D58e6Ip3sbknp0aI11ATOk1zmkrpCK4OZhO7pSB5cjx8Sh2mfRb5IVY8JGIfzPlLAv
8UF3Kn6P3RZg3VmTwW9KMT5HlR00RjLLLplh1xcDODk5SaaqfYeHdt5VI/5I1jGVIzKiSSvyFmbNQ2vfIXcNsBe4EUX6Bgq4y0VZllwWAtpiLFEb5yNeQlHLw+prMMoWPAy/7r1qcDI2NCrlts36tiQ41GwwR2sMaTGzTJAl+7PMiyRriOY0NdlBdgEa1Qfqfhdmx18CuRKHYODolBLQAIQM5SPCuMIdqeRV9z8uTwm7aawqHChwqgx4FI4g1lcPJwIZ6RTs+wc7khGC1foWyK0PiUdrNZFzUVuuwug0dmjH05p02Ne9o9ZubrPRaQWhnR0/h904LIM2q3u1o6/sGo5tMhTg6MeGUArZ7CxOAOfmhda3WFbI+gMFEjLMxcJ353CP7eZfFZMyL+MHGJfrskxdsg5FCbKkNJRDHDI1uc3uYffSaiQNIHeRZOzd3eZ2sJdWJsKAUC5UE8qCfsuThyGQFoOFdK3tsW77IGABm3k1wgpU1fEXe2JOs9kyq9mepHh8RpOyeb+qf+ac94VO5lnaOKmyThu7/txBZ3sj7XY2ACyv7bzL+CjFgxB8L4wGRRzNUvU3jAqD1KajCk1x2QD3h/Smd2XGnmoGvimIHHlvmCTjBofKKu9ZUhb/NvsxEQMgei9sS4c6xvufETZq634KRHORU4oRKOj0G97D+wVLibz9PgOrITcaAJ2szstDrKvLiSPBZN7GQ9pJ/FN+OUkbuDnis47Zx8zMpibCtVGYZSd8y2XAMWd4QHTIBu3eSNaLpkw3XYlhMfrgWQBDQmlqzhVS2VyrzlDOZQl9bIVsXeF2rlvJcG5fuQsonlYxCpALbMBwYLOIx3CTdOdYMlvxyhi923hvBAXW/W/VgdUTVJz7n3il1q/Qg3zAlUsJnMttbNDsMV29sBRB08ZiSZVuKG+EOP1cnd4o4wVSiMd5WrUUG4MKZaiWldBWUbKOCT+UO045q5yPYDHQDasKTwG/EwTtEn7RYC+4e8NqBAhL4CE5Siwjq+32/bBw8of4NPj6VAZ2kbcQ+6EndyY1sESqDDcxJuPrwzUjSuO1DlSkU0TmNPLAfIJd//LWDMQyqj5J7ITPr22NZZYGb+0cIHzjkg4hipLQDsZX7hby3VVhrccgzvUA5X3Bp4S5QWNcKwZ5Cr18PSXKqrlEg9SK2Krc00GHYwz6iwTm3WG0gI6YuMkBrr3Qf6cXGTi4eFb9mK0MBwddrCLDUGFCmnsRvZRErHtFi2QVH0OxkfOWO5JJbR7o0DqP5bFMmHrawrh8nQnFcE96TRbuwe5nDTSqjlGEa/PyIW03TQ8L8lqCpGKyFDvNlrJ3owKhCBZ0EdE19oCjrzZy2jlaE3PhxFSwrc4VqRulWmsvWVI/I7q1my7yKKJblUXDxjGi9Bn2k9TuPt8UghxXJi0Da1dvnYV4bSeThRZIyuSNaeotf40qoOBSPIT3pSvWCqglARBWDj1Mbk9gQkuqBckFeqPKtzpvqSKjHPHx6OcqscHmsufflHlps0TKkVVGpPIOC7LW46R0vhy0s41geBBVYVu2/xTk5guF9Lz/bKfdysRyNwG/so3u2QK+G47JdRlPMh1955C3sMGBbE+CnXZPVlYsibgHCNr7dIPZcexzGp4EfS20Uqy4Ze93FFD3T7FvRVA4usIDuhdSKoOODwfwfOzlf5xIRgD/vcDHuftfPijIprzybfkgI+DXQh1lIie8nuQksyMaIk8rPECGMq3Qg3l32AcXgUJBNUBXTwmPWvW63OVhpZRI//OXLGsU6M7UCAI2Q4h8d2tTmD9o/r28wijY++v4I3NF9LMsTsKY7jYAbFzeeI2N8LdukMd8Z6ZtEoMSFA4XF6QQ/TIiIkzM7PHyBoKQDMB/Sek9gfhaXbgYDwu98tDLNh3Os60DCr7J8zE+e4LkM+6mis4t+tNtHV1m3fza8l0ODCgPa4bf34WSHruUNyMrKgBjUg9m6SZqWG8Ny/HXI8D2x2DKjRj5n96lesi2ceTDxIu/N/nPZ9qiW/8ckijVneWGdjyW9fxmJZxzi1TPTLVHupgdcH9A8tjz1wlmCGyfRVfnN2PMj3kdIPC91gSeOJjFHY9OFHlqJGMoibNpsYF4DKPUv9PLKywsvSbo9l1RLamCameGMQ1V9N8VUyuOW80CuIxAnmIgy7yCH4JRdNT1msw+fJDmGvONvaNqnmuTGuEB8XIckfUMizyGcK60FWYHQlI7RyXsEozTZUqCrJKiJv2gmGkbuJUbww8PYFfXs5o+SgYKRV/q+JMpGW+7G38Z4K+qFdn3I8Rag9G4L0Rl4J9AsBklioca8kt/wCmgTWj2bRXmwwhWxwhrIjGU2rvBy1Y7xzG+OjVu0idlC51g2FyjsaA2VtZxbatyJ8iQEzhByBAJxCMUBh4AeWkEKF9RrEB2NdgNWOMC1WSBwUDyeu8TMyW1OXhaueYmqoDPB4NFjbO6N/lWa1A7Gp+V1lKwndlgHTKgqta7yUJP2gUKwaK+6UYAEG78yVLBCqjWazxc03Fu13DFHjAGQ9pdnjeb/MXMCGQ2BWcHlfxqhv1ArP8fAmTUc2AqRhVPjwZPSz3YocpyBesVD7QABWHA2WWzgD1WrAS0ySx+lOlpwWCd7krvHlPGIrGMT2lipDW0OdRzCE7/HHNIl/Rl7AWB3nV9cMfjfIxoDaxZBXfhK2Qy/DNcEaXLAdf0SaoLHRf4/PHXYDz4ls8huzAIFxCtnAsSftHp4x4vb1LdgJtWRSbBj7Zm80y1HjI67yp0Xbhuaa6cUo/9r0L0sJV50Sw88fF+IeMkJNCObH+g/HMpeEu3//R2bCSu7I1cL4T5MF3iZjh947uUezoHTyrOsiyX/XzYYBvy5J7GuMUOMksELK/yQTtu70Ar8b2mcdSlEIrC6bZyDFvl/XiqYsLA7QM9BV7ukMiayvEBc/4S5kRComDVfSKld1+ci1tH+vrXKXzAhnXpp+R/eaeZ77p2+1K56wkkNQUFg73peyHbwBM7TqO2N+iXUG76DsY+5VY0R6KGoLBH+mx9zds3sBlxKZgpVBV6Crx/8qv6T/bMylK1HSg0iRVcb8FIjXOkkjnK1GobAXNWrdahzh/jP2bEauqyp1I2OXcxBL3hmHqAjUhE/KR9VGpETpSCT/loXRVq+BSvp347NFly915KhHlOiR+09zMVObnR0NlhaUtB5C13D9PWErsSdyyUPr9yT/B47jaNkfS7GV5xgqkCWYWxmssUHLt4a85OjbO8fcHzJUbPNP9TRWaaThrz+8hJMpIZ9kcxS5+c+0LzuI+pdqeMra0GGWwGgLFlipQyX46hKuCgLizwU4Q8kQbzdNRGvej5RnZ7P1n7QfxirK8roNl6HcHSwW944wZZqEugsQJ0bivJk1k4qCbvS2/KApdw3MUDggU/Fg1/ALKtubkqs+eIW387fd2XbZJUKd+pQwXUZUgVX5Aa9na5in0ujt4eeIhd77LiQpZuzCOvw5MxfS5qSalVTMW6WEc4B1mVKx1VKWJN7DvVCi4O+ME1DL4S9TI/0vgEPGsK08swa6dGNDkEi0nBvfo/HTQvcwhHuQIfWSDt/HvJw9shSIQyJ9rWvThwGEaBpP/M/zlPi8Ea7XY5xU5T0ofCfcRJZggJ4Mh1jbaLO137p87yToUCc5mN1FR/90d6XwzdKycWifpRyf6NislfQZ27XIr4w7L9wC8jRZNKxjVRu3mtDrGCRGqR97xy6fG4I+lYKONb95A7DN9xnZ6ZVeAuq+lEt0zpjmeHddQW2C1My9pQsqySuEEkuoohrZ7eR0dohfV7DnEBFdei/xh3wh9zCdeSUiFmVox3G25Lv9m61V0Q6NjTmLzh3I9LRLKkDojaNkDeuGikUxgMK5Plzlx59ZhNGPoJ0+sWXWF9By9FtwpjUcHxyHQ9kyfV1KYEbXuDxCnjkOtlNfbFQGc46SOfReKWNodhpn8ort9bGJ3GCjKuKYyBQCVAYac6MuGfix8RS6qxOeyjy/qPotnyG81hO/LbNkhkTh9uyjAHWJc0prHr4yJ7WBGp4hZhSQhsZqkdaTkhAfXaN8sHsY8ZYicaqxTeL/DhmsjBFNlV
My9Uu1Mb2nSkr1r9Gk+w1gu2v/Gf2EBItrpZ/DqdTtJ257b2J48JUEKyQ0937+A2kHSdC7ocR1u3eUmbnGud1Yqf9Vn/YvvlNZe1sSeGO1vLsoLtxArSRq5BBgF3nYW/O5Gj/R3w+NscJUSltMg84D45L780dGC14F//FZjWdbQYCJYOj8KUilQVP2617d3U1PbYjT0oPZco9TfUQ/riOo1Gi8P/15PVcK/FTrE1dnAKOzpQZm0IhJt84mVTTixMx3eOEGervhwB8BDvCXZs+OON367nUsCiq8vLv3M6ZXdr5hoHsP+QWoPFH4SLoLovMV7aEFLdGs1Wh84z1DV77KuUmyj/4nQ0XOO6z8Z9cMU+nuo5hy7TImS2cWgPcBGWpmuyy3q9VlrRubSGYtm8PSCj/FbpRhBVtp3S0Ql/8ZOnbEoh4lSZVIEtaIKEF5CuqkzaqApjzVBvSaVGuFUlnyinLa97B7NuxiS+X5sBh5UmhuEfmx7y+L9JvkcnE+UN5eSb5wW7xM9OlX8LIKSjhi/OxK2ulY4PwW6bS0nuXek49ZqH5oPYa1umr8rD3qmPZWZuouvMheh+/rWiBG/iVtoNMvjrbLlebvlfU4jKCPBBz1axxdwE05ZPkuE3xYSj+kzfcgC3TFjnNKLUI2AmGaWRYDvrlKkSwm8Nqxaq3vFxtVF4/42KVu1rn4DXSk/mLofZqjTzq2ma2HPGsVpEsLyKIpDdOoQZ/3SwM/Wpmh903ov2D9V0ExeI0Vn+6wX3mevCMkAdAQ/GaZx4Mrhdn+a/KVcQSPWMFdIDTC2DuqKj7jMOZT+MUpmwo0KZUMOf4XF52l0mXn9D2bPR4q0NQ2NIlpXUpfkFRC+GzEbTnAlLb8wz2RYBEeed7HWFeeR3VRDkvZZ0Mtii2WL7HPRoyBsLO/gZIIj2pSpsx/usk7xPzB/Z/hPJXuLJfrcv/kxKTmrdciZypc+/ZK8vRy6JWxQ/2ofWWKY6CBNaxvddxPN0w9fVy1aH2rhNPfI/s2Q4eC6od1O5axqH4no93FAHGzSQLcgjoIGMgn0n8Ta6RM2BfWvRE9GShkG8+BNw77J8ejfr7qTGPN3gb7EmTDNeAHVQ3UTbOFUsd8TbiQnM6ZT8UdMqDiMIQ7GKXcMYWQexesZrNlOCIAeHlfr19NlDZaeihCJ8dVUUyYefDtBj0GMORAhG7Mvhf6UeUhLMRZWz9OYmWcvfFtH+DFGkrDcXZKSxAsvtf9YphmNW1Nxb6uHCRl3lW9P0f5BJkhFUD31bQ/7JDmh65cfHxmHL6mnrI/xReTPJpo3MzUblSx+5HKL1JAouo9xt9MAoOs/XkMmjJtR3UO2UMBDldTfoQdP2pQHgaiFdfv8+Fl4WYNAJZ+86y71oIn/PjpCIHF4/QHs7cm1FXtilqp0g5Z8LrwERXkTaDk+70umirrUAEqhyZvcscnoR/zAYI8wg3BAr0tBJSB+/vY1ufhPbBB+Zp1O+5FRTy9i8ec8z26cI1mxSRf/DBbzSa2URnfztrkM2KOa0DCQ0CIKmx9P3pweMDx5oA61wjTkGSL/WN2bgworwM4L67lqCzIoUTevxREF3WIkSiqIq3B6dZq7M8XEcbYaa1VChAXKUOuttI1jP7aU6+lGosSkUrFg1Gmah03COwFG3ndud6RXCCYuiW3Vm9vFrY9KMHA06LR2aOsovgmQondfLOxq4lcAoMWvCmQxctLsK8QK0BVHPYaxKoH/vOyXIW/P4eWHHHKbhKzuTCCeBPfoXtNqy4qzyfd0WeWeKngmCJIRyAPjtcRTH9BACacJvLpPftcO+BAfFy1QtlHuJdFNR5UjhGkwU6c7K1z6lda7nVZliz6a4yNrO4udxfd4iCcjl9MlAe07N106HpvSLwEKT4OYZw7275gLAHsC6GWIpVq2XBR4NSxtLsZD9ClWO8M6I0STHTWMtjbesGZs6OD+UcW2G83IH5elCKyq8kyvCETD77Vr+0DY/HPdzNgQ6IsBzLjzFHxR16Xw9MIkT7mqiNCK67isakBmp8I+dm0YDTMX5hmXJuBGIT49aFzijaSavHHn92D2feALCbg1JKSxhYfUIQoZWw+/wycQmzJ+xFWUwPX1psX3Pz+xjYF+QPQibL45XuBD1XV1jVnwxDfd9UzdXeT3aMH7VwQNWCK9AY0Jm6UiNgPrnNJVqQ8S4yr+J/eEQytuaKtQ8YwpEmnGB3ctXl5GtnFSPswA11RcmwmSe+/LLV/DSn3lo4UJtGn5UX7pa3/mDU/Giju1wFmkpSEO5jV3itJkACOopp2IcMom2AI8m3u/j6J+kOJk9pPQdk74XQ9fe5i3l2Y477uTv5NCTV8fcFzvALwekVi6Mg7GBONGF2//LuGS7BB1E7gsvmG542RIgLuhY9FLh9yhU0zfiypnfw2tI1JQYWKbAsEAOF5OcQGLdspa2ujS8lKENSkwD4EwZCpGkNjbOyVyh8JtmeXWmYJ30S5Zv3noi+1ejNvkBMhQP8+pym9al0Rkmw00yEruufYX6lBSFZnjWMSkWiD2Co/rsR7XS7T2nvKFv3Uq5lT7gQ/nIbO7RgKMOTnqN5kOlxRmL6l5c154sMeCsfjoM2/x+vM4P8e7w2NdnpehkXGZRBAJUAXovM0iaQl5Y5r6odcq9j5vcmELvV/5f8oNUXVsLjSJOgwe8GxtBU1+2g/09o717RRD29jhVM8xTMskgf0hqyB4o9WPjvCBSPVTFJA4GxZynIrL9oE2LwocxmBOflsyykWgSH1DZaII5xMxIibj6MWArAGkkMlsMCkWyfL0mTxDI4+tKOR0caS6PwfmgavekjGp5VLbKwHZlCGJAYrE2/zymw/cM4k1uiU1M4fzUm+NVkS7wnUIvrUHLw7QnaDCHzXW7o90/PmBepojE/2/Scv++Ubte3S+rnKUNxfKtqrOW6HE78U+GnYL7YviD7A/KDn5gNiIV+9wgjRELvljdvPsXwtLLCbIHjALKBzbCeMNHbmhXKKrLaXIMZBylAiuZ+AiLPP93ogSI2eZ5M5V1KrOGA2FYzmpLN5lPFtQaXEc2KKfRH8pdqPwvppnMHUi/er2rRfLVee7JxGZv912TpzaBnYQID0sVDC+pblu1zU44i1ZbrZ899onb2t6nzH5B5AjuoOb2tFCIXwRVZdAUs0n1QdXY0943pLpjWP8vjaTUnBcALwGWu4jAT+mfwWCvPhcKbzmgnRSqryFIhVk8Wg2edrfBo544Mo98WYDiWhzsHmmwK1F16ITnQyqQC1EbNZfQLIVy1JgGvlIWepH52WQrv+AeamnTV29Roz5VsGRBfWFdrNAAEnMdRb5IxMUVp1crkQH2K6VM0TqT0tw9mM4XgC3xihG1NfSZtjIWx7LA68MoPWLZ3kvXOKrNyhVERsgX0xX7a+//oH8xGdCq5pkZlbc5LmH5jf9usQHExbQbH/zNK2yCZpQEuqFb9ZF2VC45wEQgxg3dKXjbnFoASltQ+j25yXELOEOz7hWpU9IN1S+5MiWAs7XUg6zIr9bp+JLkqlrPYuytWjVh6JhNEXeGKzzv6meiXN1qJzx8IOKFUf2lqBzCZemZpzdeuVvkdBAeze7L+h+nWGf8fYAoNuH/k6Z/dn+g082Atm6KjA3GnEtK6iPQLVY+VxGaFkgoLpVxkTPXCxVM6CSGj0FsHSAy8IIYKKcjsQ6m2igbuQXN8Ntb2ohB1rX1YvvMd4/Kw+mdOFfXZ+Ter273vSukfS5mJPHz6EoGz7uoqyzrmaxYFTV+oju8qN8XvPG5a4QuYjWVk1kpO0n6Pe3lFRctpZSjbMe3JjI3qOSzIw1u1+cGvmtERDCDO6KBp+148ucehpiTBU23OxAKXXefFsiwfqOLNI8ShTOx86bCBpyHRvofcMpfWb+hBRzhOqUSpzamRlBim4i5zGFpPbXwf3Nh/seqII6iFvqLpleajxQZbc7yxXul5nUOrS0jm27HWUHzU4NQEBKMX2oX+UOacdRPwy5Jm35it40ZftW3AdkCCIuSIq/d3SVN0RrvPptzTiTgcl7ee2/rbng9XwyHnaknQF+N0zLA/II/mSd08HntnAZEcL+m
Ng34Wz5Nm1V1G4UWKdDumVlrKFR0oZMHllHcqtJZ5NM0NB5o8WjIIG6Ws//N6L9MkEkxBEpUdi30ehe9UE50Bp7K8ff1XwZcjjUwqjDzgyiGyArydKAIElhbM4XCJ/PQzv70BA5vVD2jxsUF9/AZvzJOeOEhnVucQYh4LR/XlAYZEVbWQwVX18JJbEATDgFoQthm1c8V2NLR8ppPoPxnTSO85RodHJgLilSFeqhYzn9ScbqXpjDXhiwH1VGXH0gNDxr6WZB+YBcrWXLwlNGn2EX/IWwyDYII1t5cyplGHQTkdUjXQqKS6qCiGkOnq4wFlaPyO3NR4dLe+RoAfO8ES8RmsFehweCpXFpEjyuJ/yk7ZHEhCSLglgXXNxjTAU/M5logi9FK0MGaBnfltQOrgtTshdl57gF5ncgK9fSpeI2tBiPECKLA9PnTr8RgGWyh26vUP68efcv4if+1dZwK0lOTCSNWcdYSkv6AkfPCZ0oS+ahKKznllgAxE3YGRMuRJyNwXdmncQI5fOxx1tgDfNRTi1fBVobIt+t91iUCavaBH8k9IE22bGa9ohR617yCmwDb97MH+0JditEho2uVaTVPHJ8Nz8cVMa21Bwe7EsrzWjhcbdWiSqqPuaNLpuGsUs9VEUjEYA/qQ4xcvXE1nNynMXb2PgOy5LadshGa1rFtiLFiN7rSW3/PEj1COdu/0BvNPbn37j9/PkwMeq+AHzar/cmX30jyqczfOI1x1KOvSKNSiDD9kUMDS4/dRsLPLG2UJl1HjGl4yCth733ZrsvzbPqS/KYW3X0vE8WANzRQv6q6f5PAbGmecY4f54i1HyySmjf2CrHUQJWRwNzhXNWAllSGwGN4Ud25FmxUYeDeGsfy6iAQpkT+O1XWRYcPAUuP+CFqNNHOgckgNTTyK64PrromfddCtdGmzjmzsxSLVpnqJUhoFRixNSGKxV2wNGY8/Z4OqcPZhmRjym4NCkLe2PcWcmI3ZjgcuivvPwobBsxhC6B++XGI3YWBqHObyOolmoUHKuEKqL/ej5WnqdvfceZnMK4glFL1aJXGsxjTNVgYoL/twaE++TqKSQLCu3k8IzM2+Z/P2LD/0q71XSyjC945R9OKkzCihKfdAZ3ZyC3bfukh5qMzpvpYb5Uuj/kxLQ3Nth97trzk1l2QH0Dry145mOR/2wNio0MYJbzdZbNZykhp37/CgY56fkaYX5PRtWXQOdeObTxOKJaZwOTfO22rxqHH/iPBFtXOWBglapOI+J1LGFBKcHK9UuX0X1SsQpEQiOxbxEE4Tvuco5Q1O48AAxb245/h8gvnJySLbM/lNy2MlQA1l0rBZxNYf01baZ7wG69aDcBdbZ88N9Qyv7aAaIx56hPf8Fi2fNkqDDywAM0qao/b9gYBsxf9IHU6yDMtppLwkSy65XytMs9uvsxaBcIqZBniJr1uoyGCgH91mlLAaYfAKnMR2Z7Y4SfUtaqroOKlnHkky18L3OGCSGbaLwDOPwozLxkthxOTjYcUVrP0cxVj9Of1jdTY/tlBOORjijp1QLgFk1mP1et/ZNBZ9VV4Tp0haEYK0ki0T2phtwnowySk1Ru79AixeFlS4s319OH5edbB923WRC7IQb63sGZ0dNx2naj7bBoYXw8fO9uiQKPQl/casTRYAFcsEl648cwzMsznvpgzGMjH1Lwtu0X1plsCqUwSwhT1JiD6lVlsOHwNHr8plIMHOhghqONCRrUWj7pRRkXWaFtK0H172jqq+zxHwTSwNj5CA+H/WswxfxKMR6zk9wokaAt5YY/fb42Yr4Nzok5b0FTFJb8VTJWsv4HkPhk4kAt0qLeR6lAmz7VVeJSGf+M1ObhrerpU9wgd98Oz5dtqZ/JGJ6J0Bx4kJiwCclyl35i7Lo5asl67QH1bJhd+1+px+q0REdNvHD8OHN4MshZ0xVX9tQA82CNo38Bw6TkThFuiXFcojUMAY9FfOCgy1jJqmZCqqE7t2kpTriUeCgKyuErUvDnj+b3M1bPKYFOTyd8EGIeoF0ZOPhC9dOx6tmsvB4oSbD20A0K5POxPC+/X8CeTBfpqIeG9MUclnH9/INI+de4gsa2fwipTsZFbjHlEoFfSjuvXtqaspgNxSwJ/ZTj6/6av2x2eV+/Fk6PHLrGsjW5hkpzpV+scMmbiH7YLBNdNyz+4LZmlpwMnmLr/L3NTXvZFguJCsPj/cZHZn60WbwJmvYPAkkhNxp86reeddLCn96ipRcZJrzZc5RfjUXgG6oJz0qmbIt4W8lAaCYqfAzo8yzbwKSt+DqXpsFusm6QDWxHDNY7lkNT7ae3uqh3lQG529DFewsZdb6BrPdUOND2L/DW2mtw+9GyaKxpEICj+Dpvn1mT3+WaVrarObDLCIYqAzbAleZzcGKShG2mtGfF+awHn9EcyoJEG/pagCfkOzTzQfjzs8VIcJ+CwbxnHye6YGzxncyGkI83pE2bfTyFANSpL5ugzvXejhieT+SmzVdftZKHKcxf/JFFjlBBvHR7LiBBxZ0A0Ic5ndnwADMHwaH3+QP1sbQw8V+bswj0RbP5dgJGe6+HzLxPEPvuJDmasvg2nBqdXmNtP1nUgdrBHnlvNak73lBZAkYDOQsNDlKk/2KKgByS08yXoTkqSH9Kl8/xnTTCkpOkfJLq/ULlXItLu6Gj8ypdQ4tq6M/FSmfTpUU8Ho1AT/X8riiE+9P6EqU3u69R9Zj5P7J/x8UD4aUvz/XrBAs5c/hsiKdBNORI00EsOBBonDxe6mxjK/kUJNleZmyJhqmIzMpz4uoVuT4wqG41MJI7MPnSxK4JwrU+jLsC7NWNeD1uCm/5E3GhqL+s5u1+vb7bhT67AXXBuUzIHOiSKDL2uTy/YP39AII2ggme+Xl6qqb/cnPPd9g1bQEmywxkMRCsK4I3lEa78t31qqHRu8NJlAIjy4jvPyGwYE4a87cxi0+SUK8BNs6LynLFxG8XUyIy/PKuaTyz4n82LhoTdP+vHRj0qoSmOHMBjx9pOLv5E0Rcvwad7rJX1edVTv6C6Ooqe9OHuQGK5eSoms+j2HRwlh2Mpk6PC2syruW2tQKsGbsmNc5BaNCzQWMMfxXtOvhdEERHAhWU8JudY27bNi00qfjtOq7LNQ7sowlplkpUbB/kuRlOwEWAzhlkH8mdkARHDtMhq0RfxjiOxy10K5SdT7T31u0WX18WB/qQRf5lTcBf38fTlBW9PX7BPeRbNTJNNnJhhmNo8RCIp4V//vhebarUC2WUq2LlKdD3u1McUG1uRbpgXpmEpJDENzFCYa4R90FLd3Bp7wwscGxxvcsHRYbhGoCKW0368m/WmN9vdoWx45EpYEWIqDja4GVyUASiXr4rj7mGg1C076TvhX0JwV+7oyyJL21jVbGEh/9epuG5wBwSe56qfohxT8iBJpcF/XKB+lVg5KWnL4BgmwB4n1zhIzxzfJ3eBX6PWpgcIBNcPt+Gnj4J6Js0gNEqk2H/WTG5vnEJ9kvaBxLJMcCOjDyOERGsbUzo0dddAfeCp0g2ko1NuVMLEkTg75bMCsrHBaV/WW/R2RJ6gyPVxsyr5ggRr1cJtA9GbIBVknjvSZ4JeuO1AEKmppvkHZhH3709LxpiKDYRh0LuAmTrIHlhq4rMgh5hLzQkQK7OQCp581im3QcGJCPp0UwE/TfFSYWeBaSnHBRgEPmgwQxoShtzwv28Vt6rWWY047poE9N3ZkRSeR7Srl6R5WsCinXGmaR856pYPvyJ2yOpZ3d5FcAZA5hGsmHr/7IXGAmQ+14FW1kOSlLJBUeLegKqSIOy243rTr19hwvn8WTvG5tFZiv09SwApLBtynC/uAVpcM1cMDmiJ441mz0aLbx48Lm+Ub/MHIbz+4yKnIfxMBH8vLyu9wpgwGK2kB2QJuC3hnLj2nKsWmD6Wi5ALEQoLVKpHixLw8o8Xm3UU8a5HhRYShBGG5ttTyZTjhP/ruJgAqibNP+gcfzBOS/Ag0fZyGMI2miNjL+9+VAbtD3RDDxL+wa9vRZXCrKBSCYG2e+V/zCJnOgR+fmHkNVIUmhcWrMDFBM8pfS3/Zz8vYNNgTNzPqs5eNqOw
zvyuou3QLXs5UyuV0cSMv9gkvsUuszr9+WqBUhswEmZrG4U4kc7PG6ulAEQjRFimDQ16oZBWZU6R6s8QStOmKrSqO/vdBacReChXxJAzQAX90ElH3jNMg4k3w+piYDMLGXqeTuKkp5TITObWKFcCWAHdxeO43eOd0ig946zhr9BCX18gcHWzk7DbR8XHg9QZUVV3OOk34LKVxcb9SQfpSNOYDjQBLcfuQnXAy2rstqX636157Iipi/gPNSp3jGoDD6Ofd+pstt/VV5Ub2psl+SQ2FjutDrXShoADTYs53qrMMsyfiePQrHs/87jN3rMewyg0tUF4ZNQsx4ATh3Wrd0mxIErKnnd8V8vH2BcnNHnOaoO0uEKUEck+hyvvVGQFvDHkOVj68Ilvar44alXAfuAeGpV3NbTL5zBSr2LD08DRBZFZri8XpxIm7hnpACVEi8oTHlPQuaKXpuRlO/aJaf0veR3R6K8VudHBZtrboUzXTYComn54GnEQ2Zv27iEwj85WLi15uR8od2mygIIBVRCmkGSnZZtkffRhFs1rZzYkS+4qbdLbBt8U6uc9bNDBk8iwenqLU5/veN3rwTXVGm9f5bsT6v5gp3jT9TkNiQJmp3yfmqMB+VShuMA7IHf7zgXqps2A2OKI8uaSVZN/NvGm0kfPK0TzzXiAoverRJrb/1eAnTQ+ugC/4sv084TUcVruDcNdvoVU+Ubl0pDGgS0DmjIYiCFQdmOmEIQTNVH2ZwKcIHsAZqFvBf1zwEQTChmKy2p/rViZEMw535/+Db6KrCrtPZwq4zKmEjFaUFnYhhZLZszCo9P4PksJlGv7hugDAgn2019VziYHXERG2CIWmJ6YscVmXn63bjzDkAy8qKi9iwpwtGgjQ5zp4IXhbNaXd6SMJ1Z/MuGZCbTorpI1BV4As48Mmt3wLpduYJ3QwKgp0XOi9XV8inpDeG+WJGHvEwrjqp4qse31kMiRFMX1vMCmDh9m3knHgxlo6ho0izzJIlwS49hnBACtD1GCPq5e+u4uxxgHgbIOdX3QzUkAZUTmTSyDxE4zCb7kVVZjpWhumzs+8Xrx7p4GfcS+SLliLvKa6TUMoLlRIk200aGFD1g1CrzCrvucKZ9mTS+1612G+hx9liQHU/9LSnWAU5kpU1bvsFSiQp8FLMB5fsU1ZzaKDBxpQSeCfu3Nkc9sVKzfgIa32T2GVai6Dx8TZjsJmF4C4hIxkVWSrSW8D3maDUpVwabmWMYOxE79pdY0Nz64/2mOXm0p4r/yUPVmbUq1Vc49uG53rampmIrnumdR29Z2zNYbnnih+HIefqjHrEc7NOD+CKTuevJlggGEsL/Up3MclsaofHE2xNrIS/TxuoXGwbsz3lhUc4DYjQjgD2RF+KOem/8w5RxCYaK8QJoosuoS6nw6VHf8O2T5C0Dp7tZemZCYtrtzbSyZ3KtCEmUf9diL5kt2a5SE7H9Npch5J+Tpwnscu6M19bhGq4P6WUeeVMMfbJt5widx5tmPEGwLAgjDxFRttGHDiRJtXSK36a9Tts118zypekRzgP+ZyliJxhSBHHVoYx/78VOABWkzM9+7QdxCVlZh037ZwOvXgu/yuFETPuTp4hQY11ZcCyVATeGt2sfJWf/YLy6dT6Kh7/GmZYVOrhRI/T0OlXaI/PYK88eVWPZQgFCi56qmxC+Bs5nybp0FK+dhDZsWSXgbnUkb/aZExKwr88ZEiAMyafhMMgSTwTYGFwQoIp3z35gUS4BfYOVNBnGeKpua9DnWDF0CM20enTY7MYLzaCMQtQosX//W9Dw/EN0JoyMO7gBxs+NZVIJdqRhRRvDlvmMj7+DrlG34gwOw2h/GUwOpPeKNyqQxXU7bmtECeivAMi+dvJ6m2iVqAyx+f/jTfuN5tstpbxx/+zLtIlrTN2wo3GH0pH5K7wCkAOsYB7XMTvJrrx8FlWFUlangatS5ftAQVcyW11OTa89zHAnK0I1Fv+tbfy7kI+tdLlgpGxXH3gUSJ2kE6BjggweGbibE/sTOwFn+VjNLuGG7qxjTTvHFwj0T5uisK3UgglWH1eWlFY6PN2mNHL/vTcSFvGfWwSUDRwFBgwFI/nBqmIECIxPkBhLE+OvJajj9vTvRE1aU2OTwsdr0ehZxA0r5rFQT8MDAFA2awhgvWhLOzn/KeVq6AYrLitsQ9IF0PEj78LWLyAayYWMFVMCSoN3IebU1E3lClO8/3xQRedlnQNMt3rcu05EnJZM1mIuGSRvZGoLQFd4BLa4kryyAcfFiUoZaRs3g9H5Jb5DUiKT/zEYozJ0ovntQfFhxQDjx5b6J6UiLlP2IVJyZnqiOXad86xbPLIHy5GXc0OQ0+OEAZarZ+ji0/7CcpFcBHLENxkH4NqBur6cvtzq5EmBEvZ3JGXOluJzVu35D0+7H2Y8mLCbZzB7pw5J6V1B0oDg1XIMpjTIhiSQef0igkgqaO3rJiVeMPNyvtWKLLlUgtM4ALT1ZeTlREgG/3e+mYyGTl4woHm9uMIuxI/cVo9bGuXw+petaxfL3XW9PslOpvvXL0tlA1SrKyWujsMuJnBwPenepuQEp/NqKgupLEeAWupzWCh05g3US0eyFNvvyR2PqfHyk3wutw9ds/IDiErZ5W6V2ecT0RgEscGk6bK07QC6Hff7WJlv8JXUdulymh+uInIrQ+NS6/jXDCWgY7hq02rxJ0PSnjKsEpbz9OP4Lh6AzzJA0ypl0BVWTxYu43xaLyQFvShmPkzzSrHrWwz73UUeNpCtQqlt1FGKFW9yqSmwFyN+i0ZJ6S6zV0tUv1KspM9okwCsRS1kVaiwHtnsbtPtRznTEKDcTJfm4xFQjIPdh5AkyIEZ5wmvER/DenWTbiE1TbyoRqZMAu4k4KH2zjaYP0XvG4MFYCVijjrhLiga7ggDp3h8JJo1qcv0SUE+xmx/tgMapL6I62aBTCkDbOm28+GFwt8I/wvXozVbkt1p14bw52CbKksP3L+0KggBxkC+FOZc5bolYxbDVwCr359IINPtYA34MusPzXL+I+rRVydkICmuWjWre9a8Dv73w7abmZi3GXiBosqqaGPG+IcnP0e2IF6m1nu9z/kpRzhmZxglrv267x6PmpkpyFIN3teSFqYSgI0oc8DvCwS5phD8Nn4dIErJjXq1XUYjr2FLbHL/ylAYJxno8Dsr4yOepOODvId+0LXY/zjmd7d7lvvbqJzw6gX+0H0iQvLUf62DOW8s5VUY5phQxtrwhzpn2HcEPGVJJcCsks/rWUES0vL+fDE3DXoEDePrsQIE1o62Yp+gQC7mrtK7t6nsvr5jtpozKEK90e2qQQBrmmBauTGzmVCpVfNfuj5Aqj+ft/MDSD240AylVs6FQMUZ8HBZyopCFZ3ubuc8sATglBXWVesIx/QzrFpRKcANziJwPbK5Ez7NXJE1wFtyMQ5SOWQ/4NFlelIyxWCBSY/EtBev4HLxcTX02YfunRoeEVOwE0yqQmHY/YCDNtTiA/YznEZj3Y86E6XmeTL3EiA0A7ZaXZu1vL9+BBFK56f5VT6SMHp/Q+0BmGaJFcwHNDGVTIc0vRQgOGG31Q7vrHISoQBf1Cr0PERxAoRucNvZ5cfxJ17hQNbGnsp1W8/tCatxneYfZnhZF7yaFsutMII6QkVReT2YqivfB4EzkLuoIaCtBa+kyeWgCwOyTYuf2AJu8+dJuCjIa60ogrbk8NhC8cfp36UVp7iiUq4xChKuMF8ALO4fxoPQdYn/2/gzZr5zXHdBRCI4XdRlV6yub8sktrtS+oWuLctT18XBFLrHD9uPH1uJetuZgpHZ4YBI3qGiseALvGQh7qXFS2frb1TCs5a+L6lkwi0Fv1zMn2qmCEuCaAZo787k10VfZpENTfVbZIdfbn7S2Lh0VcCwj0NUA7YRmNvSZagCztPtcKqUJBVpXjLB83oEFM976YF0Z4CVi6fhG5ldap+Md1TyNtCLomtn+QcCFlvt7lVDmzEmiD+hMDB6tbnK2hZvEkpBYmKTLrvwDe5PRcR3yPlOboPcl2LD39/IPMcgy4QtFzJ+tQ9Or3cnPf0pHhrykANUpA2c8RGmhTNC/
fqrOeCpDezx/5/meGgCES29TMl6GT6ANk8GW2jWtPL1giQtXyRiUw6jO3qwvHBI5pwlLiMwlil7Rp1VtG3lupQtWi53g83m9Se0Uw9axFW0NdhuQ7xpCkifdQV7Y4B7DhDrg4WKv5zkXPnbzaTK7nz+a33a9UsKqz/bLlHzRP+d17wgPPZrvK4HUdOPNQAcewXfqe8C0OgmGccAp+q14FJrfBqAXD99+PwH6Ui7W6A5kndAdsnlVDC6rn6N2jrRzMG5MP4IZMW7XeNVcp52J6x63PnZ3mH2vPJmGfE9QPAf3xkJQhp7yr8jsZ2Skquycdtrg9CX6e7xpLzlK5pi8hWKY3taOxRODZEltEK2xjRCCts6QMstPZCwMOkbDedApHb5O7HIhEIYsFUYhz38Rj1nOyrgiHjOZ09vKMcFliDlI4Y9Cksgr+23SAYrP1O2fvEo2G9eeIBeOXnFrFCKzg7HKzNzrM4AfsQeDq2iJr0isMw/GpSgJ+bMxxibwDyPua8g61d/LeATGqX6g7HNpbgmoMJzPIsgk+I3RBuiyqra0rbRMoEidCJxNGcwwCBdyxDDR3G9Z6E9aLhzIlER2LHg/K7pMSBOhcFu/kjmESR4uazRLk8qBA46x/N46Q0K3wFdRuF0VFwOcsOx85A/YoBlXMxJG/CIQziu7LAQgZJYcnUPG1Hb/fEwNVnQfeI/V4j3Nc0mdT2xPYjz3uykYZjMSre1uExhdipEMZJOB/mhY/J3Q9d64CAgqkZDSbXvXPudpqHcA8SbwBpz1QmDKanjAmJo3XLEnHRf/CdDMK+aBQv2vyoQ9AziTcY0ILDaJDnTwL8PAJXYUxhmP5Q9LveR5DpgLdyYczK7Tjz97CpxenTG2L1RtqOEC+J3OKuEYRJAzRU+ZB8S+SDmf03Lotm8ULVZbqapS9tbA4oy4jUsx2ZAjMcpdoOQRDpYCQD2QGVI8FqnKmB9dkPg8/gZMjRGbMxnwfM7GGpShbtEeBpiOG/a/gcVsGxpjnaOGNPH9hcIZtO7VMNCOwFdASqAslhX4GxGm7/TJ5rs0y0Daw2Df4gNxrX0mGiLRiWiMZiLF6rUa2kyD6oV2YyxaN1TIrPaRURnJDAeNSrgfSc8JPNy4DGYJjbbZVJKKs6whoA4VpnW1j5geFwuPc8ApPs7ODCT2KJhu8lD6MOrXr9rATbXPVxv8YEh7+l2tetUqwn4CY8y/SwlmCiU4tMNOgy4lTkv6t4qEZe7MFaOTwmPW2gmvVhz+4MCsMDfBymqzidJDPTMijkxcWTc8WyZka2C3tBfIYyaQEAozZtz09JiIXaOZtgDaAvEb09uAXE7guik69vQB7Cu8iEsLKLE+J+ZQFyNFmQKMTmqG2Flft7Oz1meIHXLfkQG8l7InunZ6fYO1TxoJSRgoXxCJDGD5c3YIcFsJjG626gRW7Y3tTUmnAadjZ94X4Qj7ic0fHXJ2MFA4+I8+TmLhls6SOP+9VDKoUW0F+KykXmcdi39ZPrbq6eN/vRsFTsk2pD+RCyrdcTVlW7xKU3ZUjzJPjpQS2b9O8ld59l18/laRAJtRLJIl/2VHaarCJ0Kzj7KM/I+0an/ZZnE6jhlClIkU7I2bqzLGPbCXGUs5YcyblAtypxP2nuQ7yjljbFK2wTTePMI0tHVriCXielAMCg+tMNLONhkwFehj+H2X0CjN94KZ74Za76lndHiNFM+8TBbLezeYXxessM1HddU2RV1YdtQWzL5MCU/U77LG1r5XFi9WSmM30GA33Jsx8Op0E/KxCq2tidSJY8gp/j+QekU7ntbW5bf42PUCHdtvM9OMHT5uQZ9iao7lITrXg9UxVXQDB09cVFrkTgba6xepnLWG1QyDAjwscwa18lV49RiSLhDXXW9U4o7vXpOS2f80VY47kI7at1NT/2N9KVUgqtD4PuREd6UNSwEqky7mHdGzTS/Yjdimg117Ga7mABR5dNDNz3qOCIB8WGxRFETYNe+CbbDcYXE9dyZdFzsPH0gX1TdWuUjMnYq31hxWfJHH6hmonOqGu+78sqCrGhF6ejszlW6qvV4mtstLfIxD/oiGTDRXZewv8+ySFk7bbl7TjZi4nSrUF8++TI0zyxFef5uMs0fWWjHfP6CeCQ8GaHwI1jsbg8YSW/tlFjap63CVFtUeTLND24ZajlygvU36sYUAGk7y0hjAddR8K4PMBx2yAycPnwxYj0Pd+Q4peYP5ka5jRNe5KLKIRDKTS9MaS8iDIO0xpnzbYD58xhehw9fgyVKLeVyvwGGCHOe6CNJCLEzYPOl4nbTj/y1VCrPUL3ZrewCT6Pu23uhv98xMoAYiZr5mC2Fci2uIj8z/fpxPO/qPYy0zSGO/iyOV9/YjGhw5ww4oYGNB77tE+jHFDw48Nt3JCxXtYZrcdsvQp+f1OV1+R+xf9Y+NjfLP44MZd5I72cbkYm2Dbv7GdxMlqiuhKFxInFi8lSm61gtOFjJ483nD0k+YDXcyXeWWHFCysEWXYyEUmaEyGb3lWXaThs7NFCJzkaB9tmF8dlpzxHk6GDbC51VKk1wKTB0JmTmdz65tY9V6XB8xJrkVMA1SKJzyVza7rryP5kKEY22XZVOozZ4hERzQ92pVXSbIPRi6/uwyX019WO0IiPv6ntj286qjU5KJWqYGmTUk0jG5LCyG8mhMAv5A4g4hi0SxCjYkuyNLzco6WC5jVcrkvqHQ6tO6spI8spi5i7QFU7OCPYzDnoDzNAU1va1WCHvdCZ1lsp7j+8f76IpefcwCLVfgGI6arwaGQ+DpAHF0yJiyK4T+STgeyjhpJmlh6cJrb8d72BM/05lQCOVQ/qIoQZtjqtY5LDnX4JUv5b7LG1mcd/Qkqn+cWAPZobA6g0gdB613umtw+9OFsoY3Wh7CNRK94Ow2J1O33kIv4ktA4dGVpZ6dI5nffFz9RLzegvw/PATO2j1A3KSCiFl55kGIQq9l70r/oDOs4cAzZQqi9DV0GEcmNaERwc8tOR24I81Zni4qZ9k5SdqEQwk1Pz5kEfJpKnWrEpJ3z0ZSDXe49tPtjOsKfHYpSADrPvEE+Lqkcdl7VUG/40jCCQiwArKXliUY2hXh2ACk0qoS74wT03G4BTh0bcr9mkHMGaiqJGq6ZsRff+hc1188Jitxr1ZKB0kHP2Ey9TbW8mVkEpEy1i4FpRmokZRXc4v3Q3erkwZW6JxjeZIaXtFdhe7KVpkS4mDCBVsz0EusDc9jfJTA4rqQA3qScUrwAQV5qJsa1h4tLXZSo77ob9X/nyAggzccKHA2w1jxRnxc90NrFhHrs/LacEmDeKpE2qC0MKWjEVzgL5+/PNllK0t3HxPEuXhXpLe9EQQ6S7sdK4pgDmEzNS4zZ5JiJJc9HO848DyGiwBWXcoYl7YFVKG9tOJL6+wCjIR3k9L76AwLQByM14n57e6wH5b0tk0x8wLb1GfkBHKOXbKV25Iia0V+kmWuqXFqgmxYFZ5PvcL4wfwWEpvFdYqehtaVhUZZJ13P7pWfFO96/fUkb3Nh2/whgl0y5vJevi2PbNOKFlljqXRJow786oDs3hBx2OowoCWPpGvlQ40LcSiuGd2yNMWX//9l2LlURxq4hfgv5MhfE5yhAcg0NM++BBOfz1uz4MEd2qUBqV0HgT1NIyHLOJZXvCmT4nuhtoxJMbYKTddhLitceJMk9CPr+WPF+S1IlStZd/h71SK3E6WCLqE0k1MSBDepls4j8nSF8cuZaZLLzGuoh54GLu2w2JI0DUH8xkUOsQG/uhgnybTctDafFhARVgagnCmUJcBfWzqKANx438L2r75u2MSgEJ3KbIW4Az8S9sKxhL/OIOyKhZOA1jm1OTbxomrBHyZW9u08m7s+hCtnwDCnu+n79X5shAWN7ULTfyTh826Z0pGPqJlJhri/tN4Jvk+IsyeFW8U3YbXBrRtiYkbMbw33tympFSkZ5W/ees95rZcZzVAqezB+w+rPa2hDUCh4MWXAdL9Z9eeNNFwhRXXcaLCoGhNCjeBjr1vp5Ds9++Lk3o+nqsMjUl85v/Pv0RVlF3Bf27L09kpkd765Bdy355cR7vkiRNDX5gGiB3iK
1lrTXBdaHgQxgQV1WrPvLEqampzlr8twlln1x/DmoXVOCaIgbFPCSkXTITtPp4laMh5vtFyWMmY8E2fIP3YkeDTL2gzg/kPxS1hrRLBhx4zn1ljlwcMho/XxY22+rJG75y+egI83MkyUB6UOPXOjA+Updkf9m6J17EfXTcGKLJsJjWgJ3hOQqRGzNWUoj8pVzX0Rj36w27FvG04fMHX2HZF8Ulv8kFhqfouQYedCtuUzUjzinW9KiNR2F4lC3SS6fusLQhXXt2m+R1qoe70GdQKDVyXFgChcOb1Sp8LVEiVk/YPo2rlhyXcPXgX8yawbqZ03lPyDrJtDbTVaECjjokgpewC+Itz6uU6s0LEVdFpd6jU29a3Kb065lxZ+qzMWvtLeSKwtb6EHmfZcnc/xaImu1/XJktulkeXWQu9UwKiCUzyUq9Ml08W28pLk6olGLw9Xeljvj11R80Na2PWCBktpdgK3fqKw+f4qz/GIFFz8gyFa3bG29GEpIwe+jipHHn2kPiaL4C7ct7n+yKM2jN5oN8IcmXiMaN98tz9R0zO3qpdYH3cvRDtaxfUx6UqqpQUCzAfv5i2oiGZJNR5PnzoTWe48N22RhXNCCqtKio9zWz9OFruWkUbU60fiN6Ji78Ero8q9JB/FcvlbwXw7uEzoL4UFgJljkDTks6TPDKVLfTpDY3tn1WLgfHq7bU8toSRWZ499OevVjaHX8kSazQTDOiy3w887C2c2U2Xy+j4hE7l+YSFUnNe7tqJA/aFgmrgyJYwa4I4/Q8CsCj7WUZluiUaSRZ+S5Dm2pnZdYm1jAFtI7mTwkke5MumgA74pyuIWKwcSpQz0+GFq+B6cLRgKX5vv+ihwrBhh7SR0TVwCTBBitgFodkjMmZi/hiQQujL5fj8ghAza3n/n6O5sU6J+AO2Y7X+4EKHhO4TPW+MKs3tOyoxVZHrh9bO4UQAkrQXwDsDEqLbkjkEWFDDVxtB2ZBmDcbM4sUKwJFE9DhT6jdOC1AUZ9AO+PfQhTo5Ry6gWwAfqRwJjByaqYD3+Q41ME6f/AFbgpoDMhV6mlVOvEXwoAaPjXtSdgL6YCjNxbk/2KugIrBSLCKl7cxWkupZBpYJTuxbTJ+BS6DwJ+ZwJoMRVLy9CAUlwgRvKYdXPmyGnNhvpfxEMhGmXM32F29vylPUddQpBSJBAVpLbzItOkc+zhPMDeSIsmNVlG0AW4+pmU8ZrgoQYiGY4ndIE4wSoqD2GCQYMXznY7D4642k/Ny8rOHgJpuV/u6zdznelfqt0pOEPpf7riwymqmShCifnEsc01kEzOH7VPG4AIKKeO4IQ0WhwUVYavUA1m33f3GIXii9qtxRC0B76nLWIZvWaGMRDJkgbOliPl2FCbI3Kze3FvEONPTSPN7p9hNFiQD78slYUiWPlLFjgaHl4FnbPeWccmMOwGnv/f6qs0VxDEVFzNPtMQZRHRDI5SJXxpNeRYHDveNuUaBzChaqHXedIyAhhTxt9xZLxKjsupER/dfLf16aTOET9Q5HK1de8fj9v75j/vAz5naSgaDUuw2Pr1r1nuTtWzkqPklv60ZP1BQgp/Hk3RpKpjwfegoJDTo0hQDa4Tio2szhaIrsS0hwL23mDsBCiFWMya20I30e00PmTZHhiCK3RG/OdyFfl+t0ssio8txCWuwuCT3gSyGVaAtMtCgmn1WJEERHcaoYfhmbGqEwpUgD1vzgcvsETfInyl2rLuNoVfX1G6cXSpxhSBCb7sOVrHUsAcoRVys1LlF2f0QXY6r/8qkN38OuMyMm2pvhUYU/ZG+3wpTIuRzA3C1V2l6Ob5qym80X2c8i4hInFSjks2ROMAsXiv9+gIhge3ppE/Ohk7wfYEdP+oFiCetunIGMHmNqnyaYnK+BIH0pUCXXrVqE4yjanvP34cD6v/BcMmU2IlLn6JfhitQkyKuY9pgeYbD/OUhHi1C1WhXUcRBH/waaD7MxuCa/IUi6oQtgy7IGGJlQtdlko0Eor8EGTyY6POYJ8bpb2BvvTDEg6dTS0/OTCovSgMYjAOos4TcLBroOGaRpdxlW5KdqTBqlpi3Tz4uwNQHw3qhbQ76NIJICNDgX9UxnrPc3XZb/biHiX+Z7rg1jZSKKBmryfMZtag0isZyoiMw89PAgZ8MqtZvSUuwDCHlxlGhaXtM3yzOti6M/2igVyzQxNgl42d5shSBV+d6aKPzSbAwML/pZcP5ww5W+r7dRZRBzofMtj5catEMogpezQuxeTipvOuOTCVXJ8wXbiLZM9EmzYILFz+3JKQh3IpK/ONfDxC1J9WUeMlLME9XjRly+XW1dJPgKxIdioNZ2BZKWniSbG1h32dAss9gs4fr5OpWz7d33YodlFukMQSs8wmoLbXxy6altBuS71wUpFRc9KGNf+lEiIukB0JgeqMSCelt93J9Z3CsdXXHYAHXNLzUnLxhvO/KXlAtsl/0bkTJaKNNIdVRwLpddZMKuxNSIb0PR9JpZCAoZXzilDb7RLfyVTcRTWaA0V4JcLGB9ts6xrOqoKgG9gfnpPWhs3G4oYE+0joSmAJrkXOIcj5Pnom76q489BaapFt70YNs8tHDgZnP6qzA9Up4Ih0sw5OSbJ/gLVrILJwt5gcmCjdf6YyyrcJWmF5Dh0+EekD46EYLyrra3s6WDqttZzw23uw11I8XYH/uc4Bz/xKGOKjtkjwy20v0f9wofPdh1FdtwbTSzbYRDsLhJlEbyeKcUvMuF3ptyaB1U82xMg+dLi61e2JpZkmIK5XDQcHKHiN7Wmh5159Vk8+ko5YeZJ5ILBYJH7Gi62gST57jW71kgYtKDB0RNVlPsP1mDwPkHcxXubH6axlFi6xW2zOP6dezS5Sn5Lu30iLQwYdTp5fMMlfz/Qddb3SAVVhzVvgktZ105r+vVlYUK9K8i8BvV/dmaTkVkITNoSf1CF6ItE16s4VAEHxkBhDKnV4A8PXjtxRN9lPuETYh2vV9NwMF4SRQBGtjoBKq9K+Jwnf35n45CmjClgIDbDNMSxyklwgVY8Z2dFF8ohxmB64994EcFC8CYrG1pq2NqDw/76+YNJ3+ap9mU6Htw5nWq9zvJ4MZiXXjI6zXLXzSO5Ozi+CC6+1zCpqtQbUArJBJQK+c6uR4zdmY0OGgErRE7mfTET0Aer+WDoQbAxmBRYn+Zpe8qsa3+m3kkZ4vYOmuS/klw1CTGErbvElRxdHRJcpfxTTiBaxFKPw9U6RHGmzQQNFYFekQQ7qqeUQbUvliwK5pZmxRQw8idBXvbZDON1e45xjVgdF/i4Gg+JAiA1+wcFTtfnShiOCiag2Zs0OBpiBwfgv3IRZQJ2fE8Xyx7j3w0d8HS4evjc9JPk3DMj7ykfY05DSHal2blEieN6QFoohZN9rWJdYGbuJ/TcBr/a26uk9sOXVninp1vrWs7fO+GPZmJcrEAQ/55L2wu5fie2uVe0GLrxPZQorLoiwblvcrNUJtF6YRZbejMsjVaauDlVGsf7QpMdPYe0zjlRGRJzHgvLHyT5dE0hsrl2IKKBED9RAHcqv5KyQ0/fjgsLmxv0tm3kEfI/4ZEvIyUOXUkif+PevGao6a5dUvBhMDUkjxcGOhIWcuJ5sIHYHTYqJMvb2cUr0uuI/YWvjLeXUMdW+6m171aHXfb6Oiodwtl/FQZI/X+XdXexIbddQwoE+U433rKe46b01SU+gtT44WCk6rXZ1QlkmCMS1bN5qfyJtHxUdcb9xNCtrfVvyw11EJDKNl0R1cLTKUWRfM5DSISj5/4xOUogrYHyv8ZiPZ3/g9AqqyEaKzn+sEkAiM7GTouXnGWQ/f5vnmRq3/nlrOb3nSHfjj0K/+4Q7AQIevYx64STKTCff+1tnQ+/vPL79XS12DTvZXCKXVGTKJeDCb3yrJt00n1lovxu0XHaizhjKqqLxw7csQFzRz4W/2orvXPcFEjmh9fhHbUpZS7g3Yz9Gic3zEKgmzIRLH3/2jquvMKZAR+zyKW8zfjfdTINMNIjT/LW5/E2hFegDR/Z0cVny7H/kO0TZvxx+QjqIFzb3fREhaV6HrtCXXrn2cf/j2AbEt2IbtKz+6ebXu61
kzI3Qa/00z53X/cBCiucBjXrcwo+rLll2/tKJ0WYlgh0HvgQXQUhWgo6MezS0Qxnpo44JC2D0qUPbG8vFeyr4wnD7XiYcWhja4p9yDifrcY5puF9kDcEKVY3dJgJv0e5f3nNl3xAbnsJF8vyAprSbFHRyD53gReJkFE+/+qz/h4sZ9HIyE0T/4+NV0ly9biHc/3eFzheADrw8jA69ctt6rGtPYXuOp3bDl7YgZRYHF0Y5m8TJ2fqNb/xk7RtuPKPpyBEr0+WiTjCczNOrfnsBV7BeSh04eWbY9w72DnAwr43mgYm3JDNs2NRHuV4gExA7evbWYZ/KFCELf/T+9tO8F3pid8gAl8w41Uc5whqm6mn7lsYeUTzzL4fcY2ZoWXaCp4HSroxBPoBRAlMM9aKG3R2V3ldGugI86rw2ar64qB6emEN0PzpwkEIoPbdQbtIppXgNzow375fLvKDW3PYO+4GrhoyzwxLZqeoCYZ6s14bix+KQz5DNmc735/7M/tgcyCi/ClNqAWVQT8DVT8nKl/k92CxGoTULfO/9drPirFZPchGVkhv23XtAhoF+1JByimiTkk/PEDg1kU5emXQY7JQsWQDBWh+AxozMC3/bT27NTX7Do8JhTi7JMvBR/z0Qm0V7zb/T178YMSGK6+6mPtk0/5eBDYhrra3Cr0d4aEmmvccz3bt5uW/lThiksgz7+XSAYoky/JO6HSIir2PoAyZB2ZyNWDN/2Q46jopxR0MmiABUmd2aDZVvtlND4S86p30VhQKbpPRlc27w4FZiyvXxTgXWu+4MGOAcAlenDhkmNRBXE82KMJN0xLo4lrW7VEGR37ZkN+25U492ACUeYeJhWXln5mR5JiUrtFLsckCZ7y0Fc/GqmBBIXNe4uAMQJTFTXX15QFO11eRbs/wjGQodg/w/gFS7Y5mK9GhcmNS+HK7CzfRvZgu0iG+jBKehhb3Aro0C5QdcqyPspQKOLNbpKUOBuu6FeqP2176i5MOIwe59Tt8ZzDbCUfeRrS49VdDmPZnc7cnay38rFTU+kiJiuu/Ox8vla61i5DlSuRr1KUcw9yd6xz2aZbpSnYfxSVe2+cKECGMXR+5a7BLlW6YC0ouHx2jbSudEaZI+xI62ChewwBOMw+dhWw6P+Sok31yMlV7BUcjcCL1KxbSlm2vledgFldslOI1YMjCPqSBiT+VzXB4hdr7K4HEe/UnS3JRGnOxOwk408eusRkyxxtiNr7ZqzciiL/M0NAhj5u+NgbsGra0TiM6yO3uJzJuRSSbWC29HzZCf5XHOV8K3Wa4IUZgp/YCEVX3NAOSQWij9bofAxW9zOX52+FeZq4EN3cqIQDOgxdcDG1rXBjlBLndDypWWml/KwBpdQ1aESraZ26cx8p30avcshe0ha0aX5JWacQH0CTU2gNtYLYc6RvzgFdtb285dA75b4OLNUw9quj6NRBKD4lhiAL95z3SSBcCnnTe7po4H3gNIIxf0TGy1smRmg5elkjw4FkD0xnuENT4wnz9NtTl1IzBH6ZwaGQ0o287ynJ4Lx5f+8Lcs5+Ba2Yz1n+SEulIJeu96EuhWUOjJMoBU6aNVqs+G9D1y4LZ6loTMaQysVySapvvS/uU309joeSEFUrmbz7d4flC8LTs6gitUjAaQhJdOgXMVXRzsr2DP6NRKUMFV46G0MwfzUrFVEA7T307arBcdra0FWzaCoGipDUpk5PqZkNgz+2F0Du1hE3l5H0CWIwBnd8LVSGmkRjtjhircV4gi8IWGKdF7udvp68/4AkwT27FSSY103HG5xzH2Af+SHcdq7bedoMhMhhrjwocHwfCJW+iRhKXr0GnsquH/DEd4v4ghJAnEkL7i8OkZCXO83EfMJy2PFxnFFRssULpJe2AxWy4Y3GoUGbCuOScnNdehA+UA62lBskEa5eC80bLJZ3K7hC8cNSrBZ+uVU9Gp5u9QwX7pcKYZUqddchbMzQuLHEJLlUGNp6cGjmUSD6KDgWVAp40FeABuQtpOY3+8+GxGa5s3JYtmhmOhOH0Pfu0rT8orbmXThRttaYWJr602kAaoSRanjW09olkfSMPmmEr69uq3I585fzOP4vukVnYX8Yw1E+gVWaZBTHoYyxwifP1QlThXv2L7Egat6vdpjFTY2hOsPFO4UT1sX9oijh8/2oIFoLrZW5rJKpK9QcDXJmrI62g0P8y/qjGzunyAjdu/W6IXsctaw6DduRXUWLu9tj4y7uAwzOwuDzgDzi3VoXL7EyheGg4hLiIqTkfzH53evBk4jxnMmxW2zEZZfnuCausf9O/Iam4z8lpbUKbWKGCRZMHV1s08x/ENSyKgIEgeTnWRIkZPGbuvFsaRgEcdtUj25mhctMTR6V/1XJzp+mAj61H6sj+pjCCAYtAmkx3Cvo8yuNZRBX3dh9VPrWDZ5FKx4etz/PGHqZqOMH7SkS+znT4cbuBSo2QVymxS4KF3uPfY7nqBYsKxzvDJdUVQLeeHh9pYqVIv/Um8KDzmyOigCUDWXNg82pDxNj2xOAeptn5Q0zJq8L3i05sQggkVLpEfKRUTg2ACsIGgyhTzKS/xAtRIMSvkwCHhCZW7pi7GUzhIkvb/BbxtQlLD8uSM3x+1+sPRYrqf0BG01bXwi/4+BohfwEib6lGk7ezYmm3aBG5v++svhO661hgmb0OXtv0Yf0QtCBjNHqZyiG8KDme6TtPQ3hUbxNJ6q9A6hHvbn/b8C1FVcBvqks67TKHn4CbNQ4IvuF7vlQil0nhQnXc3frOSPzjtF4NoAKnwHnIQPlzdjBwPiiY8Vhc8wMgZ7EdHAJuwJQkXKujnU4xOtbouUZpqi+FtDh2b/tEd1jvt829gyaST8U4BXYAB7Og7YcnrUcvnT8WITepCDvYOzJYoJD4gXcSshnMIURpvbx+D9ULX512MYlzf4+HNWS5UKnAiMFXF3VwcojiJY9wOhdh1qn7zUvPxKLcLJR5x+Ypn8HkT++n1jPwQtaieizPypTsLFM+aVA9lkWT7JMRIJ2WJ44e1Ozas7EUWMgy75+S6H5LlXEGMwd/xaFVHeU6zQwQaMxNCOC6p/E6QE6ROLFJPaPhjwgHmML8Lmww8SX2Mq2sZ5gI2l7IY+56/nsmnVhK8D6K6lmayVRMjqBRqxHpM92kAnK09/pmjsBc5tM5kt2rD9FTJwWDaANO180UX3lHbPYWMlkkQHWuUylaplLiPzvv3Fb5wSg9p/gcfXRGVIOR45aPPZ5dTdggg88KSARDlBeEkCgchSju/Z3UgWPIy9m0wypSSVN+RVrkdNEjQm9UbpQUZgYwGlA54tS59WU3l7zQcVNs3u/HDmO3C320H3Z4ofbskG/uWn/m+Kl3m8mwhm3mBnnCw6jgRNeaAaqMcQ66cvurPaD7+pOb9sqBs4Hy3dSS1H2H2fJmhLQxoYI7Cgjb8XEhpD+pg74uOSjpX9x/rFB+OaFqeVB+g6tTbFM2VXU0TU9YbG1pNMJ+4yJaTtUXCIhAE+24RlDgeRyX2cDOLcPlEk70/fHST/JwVSKFhER7B+qXXAtozxdPmODJoO0sHuFL36FgTb3T+C9yR9wzC7RMspnhhSY73A00nYuFSOgBWam9vAo1WrGJqzDIv50J/aMJNHkT5C0Ax0CgGaW/zzA1yzLY50j6YjGRlBMAYP+xc2MpYzTl6S7pI1D9DzilQfA9aMPDPGukpSRvyIM9j5Y9NJf3DL1n2yd1yQtKtg7tmNOQMlxYNwEZY1dxP6L06v3e8yybEISPckYTosg1vQ2ejQCgPW+5ehl0yFKCBvNbinCnjaWwRUOi66A3GHec6DX9Pzsn8DJLu87cCdR+hIgTfzwGAhxkyoxi2Vnu2CSe6s9RVONz7H9rVRSvnf3eH/QnI/MFtxP9muyn1/lf48lBzK0cYSBnojd8DWiixABflXh82Gwjv2sBX5KeMOEzqFll54yZJMHYCLc8+6YKOv6Eggy+wFXy99CgITISZF0/GiGrsaUf2Pu9x1MFjCcyJJJhmxYhX41dz9jy5GbEB+gdc6P6FEML7SbNvFArM4AxfcOG4uSoReP3ftNzmDRe44ZXJP5/MacflSgJ
NLaCzXQT6NMdnBfkFRvolJ9PxYgcHNfQrxAl7gD2b+ZXIfbLWHvQprqcbKmAXf7wE+p4h1yarqshLmC9SOF/Ptt+6yEtserDRLGwvpDxVwGEt4ahCezHhe4BrEDaIv/2DDioxLrMXwtssnCelWgr9mhH1kC1U+PfKKGZ52C0Jm29t85qo2hux9p9ay29bwdaOTHGirhtZU7oKGW7IPui2zZIRHIgnppXom9ep0d48xvYXzMVmeZAUFKW0UPw0hDVrv43hJH+h18bsf+7a6rbAdhga4/7eIFxGW2YsFK0BmRENqw/WypssobSP5C5Yu3jqjBlhFpPXNpk9kvY3huhM47rvkCcandfnRLuyJGsddYHgIg/KpXornSIx2ITtjHObJBjVq62JYd2HN6v5FsBi7Z2GuDi17COhwnQZngD/6XC2nt5Ai/JziZKO7Wy49LsMGbjUp8/LzaQv+tu9fHJ0EShJXOvihpAdUfo1tgEqYhYsmi+7tcdBd/wLka/9YIbcjt9k4GAeiJKOAPwhb54ongoz+VkZq0f0tDb68MW1f7dZK9gxoQYywyVL9CsXOi2i38mNk0abCJB+kSv/DlaoYsZU56GKp14o4wF2OIpMcYRsRF6lIZ5OXc5qY+N2ptSCQuwh8XCWO+q9eZ9PfC/q6hsnbzEt7jqGxGaI+iKzRUZXXHioZQ9/Ysc5QtjvNhs3lzTmeceolIcLhhLiXjt3RdlidrXQRCPjO+ytDAyDvs6N67cxrffhg0DFXmPYJg+ePPtffzTzGt6Xy4o6e0bmvX10jFsQeot6ZS4uL86JMmW1oaUTR7ldhnRelRCjlyC4D4EvJ+On/uSmdw3GKrDK7qG5LLbTN0qToS8OoMuK1vnrkyaKoX/I9lKffkUS66Wn+Wm10olP+F0gHfNhSCz3P3XfotcPDfsFhkh3tcElvaVDwiZP8laVTAN3ZalKgN8NInZoFTtogwyNE8te0bJ5aIZ8rsk3t6aDigtNNUGfIMRiIDJDyU3adzFwvUVkgkxUWiE9pMNzjwSddjdXPyet6MbTLkY0TuLO8T8Vpc6UwG6T/G1p9BHgeAcysvJVfhoHvFwYJf/GuU11M6gSXFB+DhgqTXKbvWRcnuv+qFjVwL5jc/jynTYc/w5qMgarA5N8KfaRlB+j1Of0NwDja0W00QKfsfno5mFWnCkpwcW0ZQcXVSQRKCFelhuRj6Rz0LuilQ8A5ijJSC2gbFpyLtYH+TlDe6JIG0tdz++/XqGGPT2LVenxEs4Xjx4tmkQpWjaD8IrE+vJq6gC6Lk7eBDI+k0gYu/NelKiyhSoWGuh0MO8PwuTUGTpO6wR7FlVrYxWqSv8tE5rjwdsQ30aA3BpAr0davhHfl3qxTBL6Vwee1+LNP7v8qNVNZG3mXq9j5cc0OqyIQSE3z1jDF4Js5B+qEczQwBqFBXz1mOpKA1aBnrf8eFrmqyUsSe3t2w3F2sOQmyYUFG5I2RNh9W6MKrpzk4dH6BmdrZ8U/E34bJ0h+JFmneeqNe85+uMEif9udSM+FSMkwrEmkSSrGFAh4IP7ESET5ywm66FEh96x19l5MdEoMQKf17GavxdyhUCjkbqKjUCgyYpAMeoiKq+9R359P0jnVlnKVxd46FfqzBKZ2A4FFpP0L5zRM4cpydNzBmbuLIGMxN+AHZB8ipVSqtlQxRRMKAo73xYF+Ds4B1k6aU8/nbLQLQSjqbIJk94IDXwrkaWZkv0CxrNcx6nH6Dr+Z5obzk4uV0Zn8dnGtKS94L2T83HMCs0uUm+SDjd/w5jkg1yxx8MUueViereK916kE6hQ6pGp8nVcedieeZLOBjLl4xtMFrK44f4n/R1WDCu1c5UlCdU++V/GUfdpvQFEXh/WAYChMB4GJYq6y4bj3VzRxFzpMl6WKlMVtWoJgA/9zRoWs+rZCcZLn4m57cXI0671BvWH9PRH+2FKm6PR59L8zTc7hrVsNynGxuvbvuDdfBZ0vW+AOXshACagZlRtRUMyzwzsAjGkPrlV+JqlpSN0W9mmIVrkaemF+auttLw7ZzZAgqvWPfJ+WT4AM67Wuwq7cm26aqAI0sXp5+Xp2u4ljM7X6IwyK5jeFHcOUxV5tyEM5oEsua8E4Ry18+hpzCnHhifgEYrasWHt3zUOldJ2rj25hrNlZ+gWE04DZwYcxRkfABdfsj3y2QqwjiHMR4wl+DFMQ8jj4UQFyBb3JE+1MtwNxPWCKa9uwwCYkjUCp3bsM44nzIsUWhZZhAENJt4NaR1gQqhdG46bUGVTZB8FhjAI8BqVLnCIp0CDfK+62TdlrRkiu6hLG8riQAMNvqXBAB/Dr7mfRuG6+6mn6oaDbG7iH7/PIZiYDfs5BooAD317nCHQbW/pCWxfu9cpIQDjzPVHZ/RJi+Rz9UoS9H1OHY5qRo57KGEWI86ChGGSd49ah2xeL12MCihBcqaxObkZsmt/Tw4OO6Ne2EvIzQ/y8FF6PktpWxsXGYgM3G/hKyz/eumoZ2neJ4sI/rzcuyCkDnU6zqQ44aFdtADZYlAXUpOfWfIHF/REgHDjWJJ/0H4RXQubsa7/6WFxdHmEmNxvQ/Up7csP4EDUzNb9HtRtd1a6XXxbnQfUMQ6+j68Or4spqCoemKglxGNjqJEUpv2pASpuDWwVY8QF8yEWEPs0zVptT4fKmRbdXtttv1zl+V7B9r/Noa93Na34RM/vOKVXYV9cWWTs1qyo01nZGX8OdxnKYSrDfZ1k347nLPI7P+Cv2l89TDPUjYMm4Afzz0St/rzT/+243z9bvJ7EL1K5qbo1PWr3r+xMPusnRjWJfUesuQN3xZQolKXp444wxvizb47ck5CSpa9le0NJKU914tiZtFrYVTBf18QDbxAfQ1Lxsnq4FHH04MYqYEFvZCU+rWkQnXSC5XSY5H6kYxhcMpIvSogVOix47Eeh6w6uErcY7YAxmJbyxSKQcVTrncLyoKKFv6wjaLjXIA3wqpI695Dd+/mt9adHUgvl9HCH3oGty5YJE0qqHHJMbWVcmPE+y3cVqtLHhS9YxcMjUbYkatmh2hOsqjtW1Jwtrt4rG9lsvY/USZFQRjAIxzyyGajjwHWQTpcKIdfVa+QAc3fW8sPTGbBoCaNl63eh64CUwUVmoiplHroX2kuELM51w6tSiTW3NeH87h0IguiF+wB+Fx1jTMVtbkjTkLi36Sfi2oygknhXyGYr1Ra2kt+VmQaN6SXrdEMi6cScGju4ff53cL1Oak8ZU/8k6r8RsOHe5HxNb6SF3l0ZakEY4Wa6oE5sm3x1azpD3x1CQK8RznVzgDh8YY9SjdKAByqRAo2ClUpUm05GKNFOLMw1opgzrB1c/yY+jaqKPcD8ojZRhAcglet5R5kpLA0aYT5x3MmfzBIjfuxPGWCjzVbv94pWM6gij2fgQysewK1aTosO0R4QWLscY/4FvDAO4BjLm1rsaaw/cLqhM+nhmse7kzpGuXzhOMastTkBK/sO4s3asy+ZKQ1Dowsf5gs8iuw3/0hAu4m/ToEGMhisceBfpQewLVwVRFDPYxfJtIs19KM8DRXD+Fm93GS5TswSt3COVJPSlbWc4hJAxkG3Zy19YzxGy5eYYKH4fS3QEB6RQMm2IAbwfv6TB47UvkUqHfWLeL2f7pN+xMJvZ0/VkNa+R6BKsKeoTwVM1bVM0G/0mHZRv+ROhFRFhIJYFI7G/lWZFIuBldMHO9I0eqtNWgj0yYx3er22NpQKaONqg9yt3y34TFCgR/h2DmTptMFm2A8xnmv45WA63CC+gciq8MOnwKxWdaG8E4MdL0Ky00jIXi6wT1hEWKH0l70i2KNUzZzwNHVCBouf/sl/k2sRz50+w0qAx2B0Y+gy0a2TFtomBt3Y6SitVV3x/QDRH4PJ5QQwXoCuJhnB2cb9I7yZxEduy78tfjKJ0XSqb+eYzSKAGuvoIlHCx5m//Gcxcl5XUEf+VSt/zpekTSRlH6AmNIkco5dycUMOOf1OTZhaK+M0FG8TaOixaGQKczDdgPqu98UlIYJn4CZZhRG5UA+IzSEk1/1URTJRGBs9nhNRXT/WtMqat8mJgWyNHnEyaqpz4Hvf6og
mXO2ea9iKxPLZqpMoWBOCjknxueqAEXMwx40UPJLK3atESKcT4LLKpRrddVGQwnzYudgSlrEY9O8EBumEqAIQ6H19UaCXNQpgOUgZEmd66+TWXOnM2WdF6SggZwgAaafvKajByAQ5EErwCMQWudaRJCGTzWo+l++iX8u+AYpqGD9WEBbZgSxknN61mW0z+WJirHHobitXEq26b4IlMFBuVE0N2fv2ZH4HMSNkERu5qGOqmhsDFBVPWBpX2sgahnxArMAEUgGR0NfE6p8sboEQIX+LHskgqOfMouWz3+F1rdAPv8WcdgiJJ0oX+hHHHvLREfdwp/BahFT+eEXZtRJx2qHMZazukpbb/nIbZyDu5FoNN16UEmRy5KJkr7HfVtd5wsOhL4oFOQPhETweISdHuUspLuwlx11+kn6DP87YpZim6GWge+QALMUD7kXVl9JsdqC9ANWBWSSYrK9/R0Uf148eeuxGbLq+BP+LSP26ekhu/NlLBfxPXJD0KYVjgpWVXns1dtd6BRQnwHSKQnt6dfoL5v/0ixQijv2+OXKiKhcuzZfONJVzujrJT5nQYGTwliKAkhU6Q7WWFbL6wx937aL01LQnQw/yacDYPzbPyjMdHq5DIhwjT7HbPT6uazgusngdxqzYMvh3+rNScLJwqUInh4pggVYMHuECrOAFMRcNFGybHVMlzacsjUKxY40GwnJEyb+WLsHwuNc7LPSrH6h32HhgYl7sBWZEqIbXZPd6VrvSjB4IZ2gOPskjYYwEhKiAx1vpY9Fn/j6ZGR3mVtzgP2Ns+r/b7wH90PTOQ/62nkpgZMh0EsDvQzSMWB59NXN6FOcJqun6llqKcHWWWdr74SEM/AM9PrnlPRxAOs5fnNGAIoRaniVSiSlyGJgQeCeEwPdB60CJTTULAmo67kLPmP4Fo6TYF5V9BLorzy8PdRQm15pBtp16MP0EE5cUnBbjdYGaPREB1i2nHG4KazHErfSg/nTvV3jy0vBOQ0RZQYV3RIHzbIDLy6bFYjypUyo+P5bY6fRwWzKZcpHXz80r4uLyhVvl4idIPjJ0Fim40AACwa3z5Y5N4WY4KOXX40RRgC1ISeGOR3ikWnHPHhmeBu/iARfklRtvbMm1RI5VtiKMtcFqIewJmKmVVg1IsopBEKY1vgmP3kT/C5pQNrtlRZkbAmNlxVPBfw5NlcRizx3Q94SqWf/9pZkc1wbYUUa0hf2DWZCgHDjthChNbMNNYl02+3jyrDi12ym2/DENMOH+kfRg7+rUds1L9AlAtutMOWzp80pBWVfsquzIldDbF2H1aC67PZIa/S10OIw3/7xUWOBDUQajTwPsH5laDy7hd8R2w2rNB0gQl+rnaibCPEjFh7gZLu0cWiBm8aP2NqW3WCp0UDumq12NT4i4tGGWXYXfKbcdgxnVoENyBEi8Pg0lPeLM+MSB98nyBYokVWtNYi3uS0Fka/gCyBOLKl9my1quuZ5AfMq+aMt3+wXFUqBrrlW5lCkhQo7jmUpTtroOuUCVdz1YRjx2zo56bpWuiA8jhO3caSOMfF1k2NMRAToU5R17VHySBhXFPdX/Z2+ZMnSI9vyTdZpGGsMDR0qIc5CY7ebIzayOV5ixSOm5kgZhRz9KNg+qoLYNJy1VtZFJXEHL8GHMYy+nnGHw1IXN07uACGmqQPWD7PQfa7dhWK8QpY21UfuZOQadR9vXAgcbKEdvsf9fIFqS7cjBM96iaOfqsT8jWwC8BnsxjhJlIF+JYUcVZENwXhw6k7fypGtDmUqWzUAKNC/Cvi4KbxafLxXI9eO06KWXW3JUixZH6o3BnFd84QmtmUBa+f3yuIxZIcT4vA7rF8/WmVL9iVwBe/XQ36H1lg7ZN5FtL1qNS+ciy6PIHxgo6f6FjkShCaYdVqdaU92t2fPQmvAhKL93E+WOUuU+C0g7PYgL6bipVOFLEIgN2OPAK6IOKc0O8WWKFhH3xe0y1q127RJlcWuqYfClpCqYgUq8UgCOF1eIySDfJqqpUOTrgpCHpvxmK8DoVps2AbnEV4rq+jLbuJo0Ue4fedhtOSGdwudU+8NCbI5QbIxp1xIOUjWNfFSfju7afKbUa9o7i0114J0IErtLPOcalZHvHzwNOxIU6RDImH2P+Nf8PukbUoBh5nNYjXlgG9P6//l4Mw8mtabCsKz/ukYfaz1ucqmUOCWejpjal1p5/qvb00jv9PvvBtdOkomCNJmjmRgbW8MsTGygmy1VZeshm5J3cl1521n2+aXUaxN5W0t4KddzQT9Q8jRsYZxGDRXf7do+wj4mbhODb8eigmfBBRIkSkTxhz3trwgb3YV0reXZF5fL8s5qJ1oHbdyOu3bHWsH9maIJA4kLLAc1bldKw4WVRaKyk0dslXhsfJm21yjJCT6dc9Mk5ielKJV05n/Dsdu5UcyLYGpLnjnTE6jzWjogGLhayF4qhFlcTLcHDeWNZlSWcAhsVo86/vrpgs9jCVlSPwRqRiEJGxOPsHUkwXXbK6ThPR0OVOdfsdk4mppwr4JfSRcszXCZQlnIzJZRlTPwBrdC747uVRPLd+e5X91GNAc9dIHPSsO4xHPTTYQQLIvnrQYGhi5lqYnFeZovBgVj0eEgJS/YBYWoJNFGK468aSqqHMxqIuL3/OcymWJy5hzyokv8WwekWdsAHsR1jcq2TzEeXBy1mGU0Hfp96b5Zo74j+Vwwm5TzxRUZtKHvomN6v/ZVSo+8YSwVNQRD5XvtG+EFBFDbkYI2zSpoPRS1TG/yKGe3Ni5hCB0EAbC8wBZhM59Zv7RNGOt96CRKvgg6PKzTLHLKf4UQA1p6P6XmSjSxUnzeZDK9uw89jFeAWSi2J1XW2h2tXQxyTxXoVQ7WX6MOu13RSCdH8s84SbES1ZsTdrfrTV2MQF07umFKDdmVn5TuyYuS4cpb8yao/U27o39ZskDFsxYQvITMujepjP1dyZkfPmljae5xkDsgG9P7lX62Diqro8dYKoVizgtcjyDh2tKiCZi87JQLDqDqe056qKmTF0OTVB7jI8cIth0oTvgsMnK9fMDjkHXEv7xNbrcHsEkCkTF2TB7Sb6hFL6YFoJ1lv3Bjvzv21/Gzk8o9He576+mU+p8v0k72NL+9kI75Ba5q9LjUxykk1TI0yRgip8PeqgnTdTvH9qtO2wbB5jqGIkVwZsNjWJL1pY2WXIHI0pePXSBKzNjEBwVDKXi46RmC9NTNrateAP/v87sV+ZNp1PZbkGtlG5rJ+hpMkq16DyosyUkTz6bTsCOeBHQbX4V6OylLxjUxi4MB6H3bnVVocWQUPjYlaDohGtvdxspVsG/0yxoymJYs8DIohiF2/r+Sn6ErUwqtKjHuGUSMu1M4TO4vockXp8/5zAvHGxUXnVXGtBd3cJoO41Cjy8WGpa3xXmKNM1PkXEmj1A0g8YAvA+jYlKK3arwwisoeEW5ByPuDn+GsRZvPkC7luCR0rQIiJZD1qWVzDUNPN0E3N09mkv2vgSRU+WlYu8zlMBct5fh3esP4GUz/P2LuFCPdakvCOhrVAXXCPjyfSTFpmyARg1rLWWO0p/OLDoxPAnT/TjzTxCKgiGnWnljKUIC9rkt7KEgNDZcNqKBO4AfvtRcx8HhuXiDE+VNRbSI1QqPFNCVOnK4p25dZOVnIACjogTyO1s0RnQD0hjYcsBX3XIHdZSROjqnnrwQqdSxDtXDADL1iI55vhtbmrRrIOw3D8SddRIWpjamPqg1qCzpxkWrF0W7S5TahsQves2BPP1SOB+yM4Hd4bQa1Ap1/85vfo0lvNB7Jrg8sucDxrbTeNLYvi9yswSp4G7L/wsWguzRGhBsiHK/tIR59JP0Z8QKb77Qh+mW3Ziqmir6q19Yzr8GAtSPOec+oCyeg7yZsWt7u/LezXod8RpGns9Y2kIyyEDrpN5hJOCeVMjTeeStGK843GHj1dAFCXjM0L3F4odkQUtKWnNVGu6yN4BnEXKJzwTpc1iLytn1SsPMJ4qiddieLTKjKOk3E04unRqPitfFljt7g/ltZM6iXKhzTLu2FPiK+7Rd77kY8K/+FfzxhhrSMoraqAhxqKYGgtQtjuB60cY8
6WvrVM8ZILGM/qjpSEnq7sPZEQmxRcmw8O6tHYhSTlioyFCocaMOuk/xEYVP51KJA4vF0CxL54Q+K2hdoUPJj+CgkARVr4yDnFWnT2fVia1+9sJLUCLTG20QU3p6NyVmF+SOz6kih8Lq6PPdeCsl7h2mddJqgY0j+yYvznhmT7fKk/UrZdHv4dDk4djRSvKO9CiXa1R3rlZUsSSF1TuNbUFibL6Tz6+NDqcK/GfgU1VgSWWJHiXsFkOZjP6/QbQLiGROBy2TezyBZlaYoIzIQqpfmjAkya/q3IQxq3T/KIH05wdOlSU3vFCY+dvKaWGTzwOuYvufCKn0iFBLqDT7bHfPRRPpmPgdcs9vC+Ee5T0DxRo9QSx9M9k+zdoypqEZq6Yqtd1PZcvWtDFmHcJL/kiu/Y3L71IoTqbakGLRQvunZWkZHTl4XLp3Ewq8L84UrA5wHV3TLa+rQ9EfxIBPTI261g2lZrpS6hniRusQpcl/KlgiPFn6cZGF+06gl8Q9Vqo/O8Ygm3kSa+dsSHqxM4vD/kSedOUN5C4YZj8tv75b31FDCyXOQpj0NYdMUTDahZ6Yy3HnLV4QUqocib3Md6Z3pgb5QmxlSHvokmA+7b+c7CySNmWModbl7EaK8cMFpXYHt8Gr/9c9g/Sn5uAQrkf4+8mSHJBa/y/s6Q6DWy4IHUFn/DIs1Xovl2AM3ZW58xw+2QlxuHYpj8iS/xFNGhoengzqJARptBsgNXNoM2YQ8eAyTJhRRvRb/of2adYZ+VhlCtCdLH5Sx8j7rj5Ssmx2npmJuABi0ncX/mSdoWmbYmb0YjMATZrbdTAycJzp30iHBTj+1YER0PsIaCSBtN69pZZawB0xoHw7ObeYZcrkiAIgs6am9Yfw3msJ0FVIdXF18gBTBGMAzVapkeR1o7lcikT8B4ReOCSbUFoF6rHUW4IlwKlMJT0Qie8G5+DYiXNYtxjrVZafEV/F8n/BXEEXRo+Llu0RpPTJcFDwNpDWEO9A8hMFocya0b6owCy38tOmcp/5UX9bmErzCyabNdcHu5m7TgQMTeEKZ5X/UWUybf/apGZ9ngqysNMUR0J8p5Si3iZxdWI6qpy468qMfyl4j5MOscvykd+Pp4REH8Jd09dLMxHaw9ZTkfCMaLAjmgshu0qVbK2lMB3ESMXgEKv5NW/EA2YVyFvqxmhMP3sxRYyTwigweyYcOxadX/6U4TR6+hovLEDzd9BdcjizFJZm3OpUx1fa5xmIjqCFPrHIG02yYfbY+cPKcwaiM9vITHZlPWWuu/LazapCereSV3vQZ1l/RXSJ04kYETjd6zqmoPTJ4mAR7wZ1Kcw86lvD33VoA+7xFIVEvGlp2Nx2O+WxF2yhNRrinmSimkHNXeWbxA3t7Zg9SII81ObToCe3YYTfQwsTM/gweWHVViwurAdJI8AOfbgdImiHMB2Xiy9Jqgh0/uaYSWgS7MCHAcF+raUngyJarFuvKFJixY2N3aM++QUVgDOsj09GuuoGUQjR3n32VDqmZsC8UbBO9qBU5CxuQSC/o20Nkpk8KM07HcEx0w1pOHaF5Q37tNF51eom/9Y+aq4xUaKu+bPhIQBw000S+cfHTv8Qc/CX9OZ/smFN/3kDVc0NxlGPrrXycBdlCyd5CX7k/XQkiRGmcBPnIB+LZ1n+EQP/1ythgDWPvT8jtil8H23yJG/+ybgS3qc91ng0RoAuLu6AODKT6CVhcvVzTiwD1M+mMGi1GRkeq8ajmZUApfHB3dl+njCCaYKq6b/Y8ULeXpYKS6LIA6zv0NryOqRFa31YxG04m3payLhC6/sYkxUZHt2f3gdq2u2ZXSRp7bfpmHSywOfntUlM/x5lWhYLaK02MMJ6wTtdZxjxNzI12xMB32slOJYe+qoVbVFK+FCcUG+KkCyhNb2kj8TwLut7X9BHOc0KGkdC2YLv9TaKKimVqURwjDCvqgo0KJQXXuGzTFiKVzB301I9G/DTZLCHCEwLCeQW2m95zixu+0yaw1P2837DaEPc0COajKJq1JuapGOoeNrRMl4+XEYpfsOPMlB+Da7ONGxH20ax5chLOnfREfroiuCiCuwmWIW9uT4sIp0yjQv2CS9hT3w9eXP/5kuhAgCAZns2224qXvKG5wHpCeRgAdwsYPfJnxJay0FHDkeLxIdE6Jwu/Yxx6EDm8BspwxhxQ/yHBJAZ8rA06BsAQAO62ESgC/c0BEvET9zPwscoeJFqgKYjLAG/gdote98u+xlmkk0XeBNWGm3cP4J1vL6OWHYrDabIhIBaoqJHcBqGX8J68DebcsAUpYqbaYHdDzaIhIN0/jrFwLgmOd9SYYgRGQ/cHHgvFibZ4p7s1V87HEy2buWEpgBLKF+UCn2cpa9YuEJqYjemEomT65On7aAJdGRBRn67Ult8GoyaE/g34aGQAOmGUTGr/4boHNd+LLK7IZVlBG6tCR+MndMXu2AUO5oJj9Hm5h0nCdFDiyFKFNG5RVS+MH49siMeDTyspQ2g1RX814ZCnx1Kri/oUo4B2We5071uSerIgycm/Kx/4elj8RqfS4cWr7ZBnI2gW0OfiYlxiObWERigawotkV2B9Rh5gAZ3QcgNgBJAMKa2v6kPBGrRXLyHotcsgtNWp1bf6OCvl/S+6bGFM5XEUnodhbz26RdN4N96kfjU8lNilvd7yrtcvX6N72fEt1GycpRt9KBIAwz/0X23XQ1zcQ1Zs845DVjgCMy0iKutjzn56AZqwNtwlA0BHoVqACn0+DCbw+myhFXushEOFdnvBisDYeUp76N8XyO+2ytD51cpfBVBKzfJJ4s3RK5DxhWvcnTx3GiV41dpgUbQmmDLgg+ItMPC5/c2oOINS3SpZLwz3vWzd/obfIwVLHgxkOqFgF4R3KXXo+3Sjmlv/XS+JUJQ4yApyDuLR049B/kaAFD98fncBuBm2eY9VxQ2WADXIQaWbU1T4tuBqGe8CZLkh1WgWKUgXWJM6P/r4m7fJ2/cyezjgCRVInsSkkEu5Xq0nAa6Vmx63qYpqD17/SILIAPt+VcY4Bmt3RdDxJylXS5103lX5Dmv0h8K5l/ow+rnCgLSFuXPz7eGjgxJVKv4roLfU7no6o7U/PiuJzHBIeC/gky07oxd90K/2qloCpAY5Pt3kE07mpUmW3hrsytof/IdruQflSKKnrG6qhyfq0fpwbFwol4ZgI9tgpF8Rsjr2u9y4uPryAx08bzYLQyXb9pgseePVs0MCcvyclyd/Ri2ywcRSwcesekNYb5bka9yo1H/48gw2fqBU7L0w8TRuaMdTYtGE9kzQpSt1OwtoXsG9dIcc5lu3cWdco6ANiIXqBXDq9qyexGcprM5upVG5t7/ypwv2oU3/uJNe6mW0Ozqn8E0NbRUQOf5hx6U2z8A7NHdxDQ6CJCeLB5avmcqwK6rX31wleoWcCxbeK2int4ywJlLUzc1BeUIp+Lb5LFPepBL3GVBuIIE38jjMNAbXRH5lvlEG2jCNYjF1svBKqnBpdyAEgcd4BpP/Kxku83qnVb7BaLDiP1isn3yP3/HOFCPDRvVIpErBBsgF2x0z5KcqoRo94k5L4dwAYjV9rb8xl2CS3uFkBe6LLHP2/jzijpY/kiL+wDEgSomA0a9Lm4rGoLAksPUkqiPHFuygUjIV12v1LM3VhNN0krrwleWMDYkzRmTqjAAQ/FL/CLLsNjZG5ZT5CJmd64fVKfeLvnMLzI/m4WLGM+NMcKFYRZZBSppH04vK3h8jK32vznGU8r+kpIOdBuTPdtkIOFCUAWXsVx5Dku5Qnen/yZt6VT79jeIhVzy0oBwaixS39aZc8CFnrXwDrWSiNYxqZ896HbXY6Pu0d7r+h+0CvjqGCJDVQjqOj6wsy642RvD7qdZIOEqYeKMxARnf4OnnLVqf1CQAJ9v/UtLoI9gX4/MeFu4ICc+/RDSQxsC3SPyxyJGNqrY4kQDwcafsIhkCqMP8DENXePRJlOoxBwFNHIg51NrbxorK2YHcIBbMm7br9m2nK4z8rWawDRnpGgSCd4F8nnrHapTMSHJYL19ggDc5xAy7Aj0AeHLVKD6OFUzzoKLWoh3ZX4wjaHd
1rMhD0QKZKU+n+K2n4NanH17gtYjEjOjtOb6ly0kQGn6InqMXVLrOe1oJ23TQfq3M8VYi/K4wAusr/bWc8dGHPC3LrAGk3AjwDpPAB1BcncQ66YZX6sApqAx8LlEHKhVKxr/fJJCdzkirOcVUNUy3evGMD3b/b0M2aT/rDJzT2xn3G+fFeoZgVQ1yku2tqIqIhy8M9ljDT2XIQF1IYIgnWplZJ6DFZJoOboFV8ItiqS95qCNdqqE/9OdAMEeBY671EQW/PbwRTN7LQ47yA0v/HAP+bcEUC0cxW8Qk45EtM0HPFZ7mxeCGxFROzVWdwT5A26SHS10kbj009nz7MnxztpxehUTer2auzuvK2j2ZNPN0sNNmn6LWj4Bkk4mOwRm9TOXciHIFeG4qbtdh3i1UHqweRU1K+HrFteHimTey+/SBWHB5f43nXzh4DmgvTKFBg5plJuD79brEmDWAQdoxvGH/J1PdWtHtEovny3zCDOjitaIFlScCuGRnIL+HqDb1ZWSqV4am+YZHnGh1kYNChsda9t0MPjPQLhnxRtg/ttBgnK2Q8ns2IKO+q2fWWHLMqKvPDV+QDIKihcK6T6/k1ujME7gEVzA2I3Y6m1qMd2rME+FFEy9R1cVKjnqLopqP0OR07UyTLnIb06in8XZ9RRGUAQLMqIlIm4HN3O+DYULefbCXJRrcfOoRJNv/7GRLnP7Q6gIyFFaWVvmsfYGJy7apE6FxqHzaUK1semyqMBTbhDmmggyvNcseRTFQljbyfrfWHMr+i9kEjPMyse+B62BKw9IGfkMJSru2HKODU94b6gV72MZ1R13OaUq072ow2j6GpsBFE+gwp87WNH9/E2t34/2rhLPFdeFoKgIGey2pBOWcEBVUc/zQbZXcVM4o5G0RvDeqnfqa76yomBqqtSMVBdjrx+S/xdyR2Yk4zmwCKh1GgnYJ8xoZkuxqKEhYA7fhmMhW34EwjlKeoOvMkEDDN3pKRKe8uhdcxUdVtuneESFhtloBe04RxVeoNl+vmtSMY532BivRZh3djCY9Y+VSjDRuduzphP90gyb4tNxItXQJVVxmFdZaohlYnonaQ4Bv2BvK+6yC6ze2B5fuzmfJ38vTkMM9SpNthNP2bZJ/deCCiLpQPIbDp9MoSY4umnSKJX7MrtT4zjWA6q0dczZ5MbudYvaEutSAIylADyMyXQuC8AMNQc1jzsCHyQvgKiDxpEZ8tcXRoEjEUvhvRsnORiFH3zh2h6ocPhyhYO5YdIgt6+PKyd6eKCUR/SPsR1UqYQGqgHJA++JXAuQ0TMRTMpoSFuTK4OPIRRebg9UjLdvyvtzZ2q9PXgzM8KCASuBOaYxBJxbMb2P6SGJdAxfzeKnfv8VY1E2sqFCVTIipd9AvI79OxEcEz2vDxggawySkfJMO8d8h9G1IkFUviW6S7Xj7OIfBndvZ/On3fjz6GUMf+jlgkTIf9/4R+WuDRlcQoPYNC75tGk/lz7NGP93f1wKXU3HQC6PiBgGA/u/ZcL8ZZvH7ZIHlLqjwV2pDGKXYpCeLAH7V8PI5wtckn3lzRX7av7Mfas7xgyVb7cuqlV8Gbus73szAWbTD8Ydbgb8QSpvF5bJO7ZLPoNQLrVM98jKaQ5kCfKCDBLWximHq5ntKn5CvQIxMjumXg4HYIeldOufkzysyyk9yg+e40i2e4Rp7Bs90Wiz6+lTbnPRYDMbQ82xucOTZTfMZby0DCUVh0iA9k8jVsOpYO1K9izj106uRT1HGp+vKHKEmTBiT/CO7x+zUIGczvnpFmUdLtTQVsx8+8LCR7+I2qdne9rQ3ZQYRcsxMCggioCEddBdvzeKyKWtFXSfls1UC0O5I7ij2HpJ6OrpCsRDMI1M9U6NFQOThXdDNH2eNsUellJKw0bmYwIOoxELlVrd972nlhu/bL/IJgJHrbyGXWrIonYvPyg/1wKIyeoMAqKPRqYF7FlAzNBJIJNWXZZ2o6u4klB7ePMsBEmYFKxT3Ts8/RyiJXfEPRs5xIS2GEBV3eQTlUK98BLkUgGWEmrYvajvYx2qr9GIbBKKSwx7AXRsjyp7C6NdSgXqv0uDx6NsYOR7EqtZ1paPBqpoB1wjDK7UF1jKTiuRVPjJQkFoHpEdkUjSBciLEmTkSaZl7DwH4NmR3Q0aoGPqlawMRbX6xXVObhZzCphH3HvRXDsJT9jhAjNZcOsOrd8IT5HmRk25j2LQJvGF5fHx7e2W/DHQk6rQL8stQkwbCHnhXUWhfXRdN15FmVD3FYQq9QD71REIGoSj6VuxwLMm9tBpnDRBW/lGxDK5LJcXi9vE9hXu7pJzM2vExPxE07YcpFKsC6r57fCbV/i1drFJD0Oa8uUjAiRidIUBr7oB87aFrzGWfBoI0/M5AWr23EZKk530mMtG46I3IO1P60vmJfnX22WWbPGVIsPcWy2ICpckEzOGqOyN/B81gUOK0WR8Ol/AwfG96XYFTEK+zEFpVXfpiThmHI1pejjEfxKGmZchLxGZWSR3zj+VXGuDNWiDjt7ksVu8zvq2t+BB+jDZOAv7jXflBIjLttHtrM+6kHAd4OfkpRPr4c9BxLtM4riqELtihqvLv0iIeEAGZFpCVFgxkEN8/PWvBqhxyDiJPn/iUVGIuMz9f220n2KGqOnM0I/bEODELwMuPVxkqtdIQWSk0efTXlPVjZ1M/TWPE1jivnOz1hETjMeN0DgVSzcUFU//XZ4YGLPMoJ/L6SZtosYRWQ2w0GQo5YU3tkRcb5oiIedGGas/EsrUbBfJWpcAlL+/GzIY7aBTar9iVx/eGSrifcAbfKj8s/ius0ES8Qz++SScnMGaSIeYJZ1/aqf2fwh+ptVxBxnnjJ/2aOUUBqNdqPztxCnYP45WRoaMFkT84GuluOMsaLTNs9MVr3Ge/w2JmpozB7ReKZuYQVt1QO1/uWEn7lVJNKTBF+WTyNwRs6Ohw+1VGXm/UvmH67GzBXWnsB9kB4IjvyTQIbYBoT2RuDtkwVXgKzAMBQUodMSvLdjDjmFjRSsY5bQ3jHs18wZmXyLK+htb9t2eXKhUB1l9YVYvf1q8QUh71y1cIYRLxKXelkTc5nHLw8/fDlHUBgYhEfVuCeVUlM3bhxuuYUhiDKndo6pAoJTgA1/723GtAYuyoy0SV2JUgDPKGFH1frcBHIOjXHOccltXaU/KidaCk7UeMqD/f79x2NwPZSShiGufnKnCWvu8CENkJhd/3ISDGv2NeT6AXOS4P7WcVjFWuiMw+r6SfphL2b5F8Uh6v8169Vc0yFpsjkZN4vlSbY8Fquw1qapSLRhfYgsXcpXr7MUxnyoriNU/A/tDIRcoYWMj3lcANTRsi6RnSArTL6u4HNNAp8hlmiU6KW0fpDfAqwJO3wLVvexVkaqi9OIudIFBpsTKuY9QrCuDdigb6NJUYLM7Rh2pZibcUmO4rEZz7lAm3UrgU5CV3HgFhvn4PLL1ztOqo8hqn0XiA1PGPu8xYkSuvMpf0LbkEbobnDkSiqqsk23MuQZ8ywn5ZswQHELraWVQipauqpMvkJ+2dMyvj96qAfFXzUTk/oOoJHGc/fgW5qtwJhNoSEU4QXv+q1EmzV5m1Ihc4tnvX3HFolHU1bGOqkK08+750ZrJLRYM2rgBZB5LqmkkNKZvGrFnGeM90sT4njL9hH5u40XFKgNxiUNkvyFX7Eb3zdvdQ8oG/X6F0/VAR61vpJCHHjysHOzIeAex8c1f+fsTgwyOnV+e6yz/h5V3NuKfqa5/yCgOOQdbquOM9hZ9I3kks0GF2q/VJMxPFyW6206WIoRuY6eAa48rUO7yPkkCzcx769WgmdwDy+L14mOpogf12pSzTgHMPCRlk1I3guUjH63ZbNC2363zHpuVePCuG9UJ1HQvgP9lmpt0Vg0L8FZxD2XE+7pjrl5KueGXjF7vO5QKdme3iYnCFF0tbEc2lFRvV7Tiv+Ilm2Pni7pR8h0s69hefV+hE40d/ISy1IMKPES+uTLpn3mFvQufZqwFnIL2LLkLyN6q0NY+MeGh/hN0N7gGZkwYUsW+Qx4U3YsXRSOLNtAH4md5DmyuwFoeaBoCMkmEhSRqpvi1
cM5twTs0Xz5ouRd0Ky2m70sVK667Q3b+Pn5/3jlSJ+HpWkh4eJqOCbn+ahTXyVJoMx4UCCYU/GIs0+FOBjwOyjx8hxGHLNwBE7TmlnIVgyFNtRjbVpdBQujEsCnOhl3LSmqSvxw8gkPdxQKfjm1ydlO8AAkvXOUpvsubY3lYzLF3LrS/2x1bcc+wnrvNbLFHDdZsE0lvy0kH+lbCCS5ArKNJoQ0UU7chYEYt3Ano/sPHKjmkkT0qMejkw530KSX3gdrPrcwIR+r+ePMaEdQ6LS36ABjZmiPxmgyPx11DEkiTALPzacplLcQBjsGv3bdWa8Objl+7cHqpQWPk41CrB6vdZWwGdqLbHSUGqcxOMKkFu6Kgs65QwxeJE7vdc+rRe8G4r/a+WRacf9BkEfpjgZXEdDaShmxCFfbLKSliEEYVgEme5718HxnNLsfAaKu9z44dS6DJjsvEM27RnDfxU9Kwu0eoTk5aZ9Xaiy00+1uZBabgbEJ3SPgJUn7ez7IyF1yiC00ZR8eBZ/FKBNACJ9TMAP7sYyb/S62Utda2xc5937me6EMlQSMX0RvbikhKYVOTM5Yah8qWhKEfwFoDbZxGKpHpMWnodt1xXGsRa21w1y35v8drw+qUEqRO0b0XbEOIwGwTdMQFMWF8q/YxKk6utkKbez96fvNjtUjqXRu9hGhBd8LUIRHaTFUbZ9s9Ef38fcz97peXYPrXOyItyunl2+qPI4It19Wvipg1c5chHxGWwFqS7GtDC8SlFdBAd6nVwERp1Ff5d3Ha8v1e6xK9BOEmnKzBYihgeEI1iqG5GmCY/skGFzmcDKKdrjsRGof1oYbLrooeRrWrgZb0I4Nwmz8eBCk8Cege6duM79Ib7deHQlPFtyCFGlWpGoPtRwyLMlVgO0Wleb6/mRFeSG5w+kA5Zr1fgdwQw+WjMKyr8AkkBBjGce6tsWJjYVJ5ryfDEaRttJ+6W/QmVmgI9MJs+rBZ4HJe2ReT3DoN95UnpDRy9BU7ZNSLbj3aivP8kRoYp4J7ISWqFWW/ygoEsvSQ7QnNJ3VMibCx+rKHmMGbCdwkjDhMd7habPrB7UnF97YRjUTnVtmoqPgewlYs3HpewqlhG3BGS7wIP0C/mMU3UoXgmOw8dqj+MTOURb8HaKE+kA5ZF3HUEbmelJo5pbHQw0RIofIM9lkbEhwiDtNYYhwVIqUTbB3nmEaWq74gzwffctdhnr4HiRlu5CgfS9weqPbgv7ED6rdR6hIW/u8YJDBBm6f+2snj50eLWWlsTqf/E+2zX4+gpMLxFIqed0Xevx0PkKhMW/bd2wVlJtayMX+hQ7XlGOOVn4GuKAR3GXA8JlliaXdJ+IySSMoc7GhxRz9gpqVRIdfnIVStDLGgIqUI4x/w6CG9tkY3dBBj9c+ykVFmKcTk9grquAjL5E5migjI3f760IkiBFBDoCWszLV7BpS7rpm1hqdKL/cJcymL1DmBgJlvSJD5h6gqQtnUca6hQmXYMKG9mle17l9psVla4v3AhRZiX4WIYoYCTZciEmHZoJR6IwOXWguuV4eThxpbOy9MCritLzKGnKQHorHZKb3zY1FQgtaaVghbVvqEMh3GiTMUQm1MHuz1NjNz5OOESpCs58f9basewd1dMrIpotcoUUKxEc6b+uvSPF8FjpB8C18aJ34EoRlLSooPKwM7hDtbfULIpgIP86u1utdCKKQQqQsE9dvbr1o3IpYAnGV1bIeKKbSVkHfZjgvm8pRKRK0MZooWzPNywNxw7d9BklNidH51nY482Tyr+dOLQygmVkwsbcRs+0dUNPP03puv/a6NggWCQtgHvOd2nj22Nyf4JLpyvmLKvpRsDygqCFJs25ZQrSenqT/tY+kP2+7RAhB/GDzah6DckpmDV6L9grFdJNioJp6znX47qbJWefmajPxBwyRTQuNYRp523M3fS/pMUX7x9Mo2LDr4UNPBidvPlT7PtXEXXB5Aro+DhUtTS0VW33cg66H17DLDTqxqdm/z8b0TsekF/WMkZu6Y43Y0N0F2cWz8/FxKZS8n1u6z9H0sH33ZCs9goa2pZWEeDmVvqiQopDZ3RoQJPlwzQCFTIriAZPmktUIWpOixxYCmShrBXGboUiF+EuUNoiOi9M9nfEa3vS56nZ1FbkCm7mYcb5aDkuYRu4QQ/mWXoKwbxSXxfTohhKWTp0akZuJqap2Q5PVVRLPWWchWYBOaaTIfAFhR8Icj7C87CKpvGUOupAFF8GWboiZdiMMBTBj5uVBkRfnIQ2hiJB2oQYsWbFypX2lt/YitxoWzR60ujRs5zhGovvxTVyy9fMPu9Whsav9vBQ5IBP9qqBWoOwukbAEuCW/Rihsq6oXoi9bispBjPd6Lbr+r418cHSWPlFq35kZ1qdJ0avsE2nXuvCKZd/qKeLg5uaO2Pxsx1JMzOP6wOJq4MAZz+SJTVWdrUfvAEQbrPe8KXBuLuWbGNB36R38AXCl74l9J1s2aQ4y/adxkfbdzM0G+pE3GhPYT39VIdJlryrbBimNH7TEVHwnzf+hfj/62q5Cyrv2UyIGLXTBkbQuhoUkuyo3AQ6O/pq8wIKvyVGRqu6JYXxeKnIJjIn8yqoxp/uNN8PzlxP/PqcBN8EO1boto7slUniXp6fksR0MusL/eU1vclEJ8gejmaTUPdxJCnpOvzEohc38FjXKTaLQiNmqnYNwkf91I8LpmzCpMnyHpMZTrXgMqitJFbCwtBsvrf55/+OSnFEwIbVT/jQ3POkbuM+Krp3H9s68fwS5/dxtOTZlHLDztlaOVJNFvoQJ8YXLxHa6ziXrgVzqqn/+4NYS/z17GZAThJT62wIy1gYlIHCagI6GFDHzJZ5XtTywCKLv3BwhtXg98zYskmRaDkGdlmPC7AiS+4E0mjcbZBoGd0VrBvSa7G4AuDTYwL3GpxqPDXa2YxLO5b8NZOgWCWqYyZ3pEeKuKYzOps1YPTH5XgUpRlBOHwMN47QxZFeP9nV/yFFhIOLy8Qg0srFHQSjtWfOk0di5wLeAFpK1FdCYHZpfb7WRp3tyHjIXzR+EMe3TPeqsbE+pxq1DtJLcqi2Uiij04/hsa28Z4/sRJMi89O7DBDYMRzSTrwJ96KiKDaiP8eqnX2mbEz3l2aBZVUj+mLec0jYKja/iC0v6rJCXd+4fhi7ToDxlnoajf4ub4ljxpdGALtQw5yorjn5SCOZBoguonslZUarSC9FOIv0bxDcGZ47ZfE4117YB+gkG4FBExW5UB9/+UAMviYul0fBDHPpxx+zRrf/n99tik6MOyaw9Q0UdMZLM4QjbHsWU13XIb7BpaGVZa5RNc5FspAH1F8fDvl4JQ/sPl2opQMMoC1eh5Yd+lWePF68VqTvMvOR4jpKKSqvuD80DPYLmVxgM/6eTa1omcFCsSdwSWHmObvNDbyGkCzgK2MEkheT4QCxyaJiIF0FGjNCu9L/FIJbKG0zTv0TOmzt0X0AaE5MinIe9hebagftFQ6yETi+sheEvEi0Tf9JFgsdrAtao0RVfXHM7MYE92zOvE9GMfEx8R5SlkTaAQiR7vRVfIT9eTDRs/G0Pz1KLR/8zSWvn9rjH8RANvV4aw/zdMCk4edV5+j4C42ru5cUCEf4toQXosjE1VjcxBy5GLIBTVY0ZsO0a9Iibzq5i12zMR4n2LL/2be6YLM9T+lXlHvlkV5p19RJcNmLQairB7FHgkv94svmC8NgKIkFY5x22Lho293Q2drTJc+pvxMwYn5ogtGQnLzztb82KTzlyNtp/z1IRg9PumwVuTgh8FW1K76lEZU5Gdz0VRxm0p6Od9u7tUDlKydZ/2vcSL1uf3OaY+5DslSxVgDy9kNZzrXvAj6xRPdqtan+QWcqdiRx/8VT9cIR2MdVj+JqTOnUnpTfBDbBlcEcy5MV1CRORCglM2EYcTizgyw4yv7VRbtAv5kLByl9AwaeZefgbn+igNg1cO8EiWx5r1DJVyMm2hapV4pWdS5Mi9YRSeWr/zjUXQrp+H+iiRJm6boR/W6wB9FT/gn7BBpJzXZDI91ce0IbkM54vyMdlMDzkxScMSaSJQviUQjW/aFp59A02M
cubu4R0W5VQTKEwjVgjiKBbPV/6gFWhSSXMCxIGQBKgaOfSgvP2ETeMexlSUZ6qSk75WDBc06ciyShjmz375t02l8SQEj6LIcpUM740kte0vUMLD2E2owymw9MUjRw2IOC8PT/GvnupUVT6TApFuQFTH1F2Kuiletvq+aDgHZ+n3Kf7so82Y9T8uPOsBHFm7MECnNmM+gKGWNP1CNx1d0pMSG0H+ZyUYLCSTEOYhXAE5t2/pRnx78MTEYqgOfzuGZ9U3srQVqaBfNn79oKi2GLg3ayECpXA6gWD0J0BKQ1+7IaTN/EQS/Xdx0/1ChtzWFsDpPvvaDMnsW21QRah7Nj1udvqlVuhhxQdLtwo4G/RpS65ZHhjW6Z2YJgk6haCqHE8GLDhNPy23BWQlfByziVxmFIP4cFlZ2UVNQajQ2kPuMAtW36myg/qj0YWriUOtLlIju7CBfiP5jodiKNJSg++KzcosWnLw9VHyRf1FT9FYGOj0cQv5TQ5QAfrfSAomUp0SIxeyE2S7QsJhG9RM4xnER2PCxW1dYsP2Z5/yiUDenZURyVYX9NF+7ItXrYJSUifIM4hXELzyG7x9CwU2zl9MtsG8QoDpZNu6wmhEeektM8r518bhgDpd70tl/bkWqpRsUPjM7AoTwIfxSnZyeZEQSc+/TAz92XTK3viuRGkUfhssYrKv/OaXz8JYIIy0FB6FuF0k5O9pejcOACpHTyqwfyOZmiLizB9+JPVfrqVnCQRtI5lHlqTGW5NoXnRPKo9uyNWOBsh5I+HCF+BfKFxk9dH0nmbG5S28kaD0NVYx5M7kiKzQORNOmHDQBxE1qXANzjy2ps+9g10oxK0Cl0yTjRjN2+kq0IiMGqQNHlK2jCYTlUybgs1SEWNwo5555k6ynd6kPXm/5jN3pmLTqs7MFI0vKnUZ9lw1V1Ea/c4Ta9HHe7LJvAO6mjC40LiTkNnGLBlTzwLlaWwLXioBEs77EkxyrmPdE5xOg6+Ngt52NUOLgtZHZNc8fcVTOb+Mdj9OMV1BnOGo5ZdSE98fKVUBL+1zQMo564p/rsZxqIZzdXcS6QgBxsBNdvv71maRgs2GGovvA5iDfrI+y/bpJagjK4O9mQcifj3lp98+06sF/oBRB9AIkdlIiQBMgB2uSvvGJSQ7RAu+5LGCE9K9yDnqf6/3ngvTs8CVFyNQuiQNY/knYkh3XGy+djw8OpPSRb7hbRyRSQBtnIoB+j95rQCScO9KwWCd+iQffKDmyJ7l577TSVRHXGTjlZ1qvJ+4dUEsd5XcYgoMCfSqP83IMtRUHGNVir1bLqpfOEpeGgpdomUyviNr89oYSuIq3Zda80w19+EgGLko4dRdpGOvconBdxzgnWbGrFYxXh8vwvHO11zNByJWGih2cYbJ9q5d+DbcL+Mnano6yWo3m2dj/QI5+ni3NFCXMr18RFMkqiyUE5Eo2akrMN6l/42I/yxcIU3H10FMRAjPWPtPu1zl+mhEQ1rJNhscKOxHmsftC6TtKNGopZLpYyl+4duLzov3czU+1O2Sr40UpJYcHGm6f0lKOAafczv7gqSIxQny2c8+kgllPRbqvh8/KG91jfapeC13qI+5EpQlLWfVTLu6T0Hyj468NJijURdadybp894VdBn3gU1mSwDA2VRObS2CAVGEH3E4Ab13++m3zgadkimYUCvM8dKsvOcFoGy+Yierg/QHfp+5CDO+93Uw127wYWWs/G4UALAz6+NlcHta00hFcp4ciCh/NXcR1ynt+n3EWbzCRu2+xacXSfTSyRBpkzZIs8NR3Vo06KCDbieKGXS2NGAIeS4e0aOzIenYZjV57CUyT3jQ1YlSRhlQ/w4Wwrtzlc92JGBCVeWLi0UsesIA6okhdHmEjAsrErnnHtsv1FAZSwIPITgm5zTKcY1DQeV9inH2i2LhnrstwZRksvZclrxEhUyJtnW9kR5H+bsRezPVBLjVEBpj4CB0LStlNfRvs7cr55/DZWCtrXMOR7r266w5jBBJ7DyuTTmrNRjAnXlevo9g8Eu/2uoX8DVhoBiTZn5QdcJRSmIeHTC7QJcJxIqdjlJYRumMUqPnQlQXKWtzcocZ4dUzajsMeKTrjPs5k2nSpsNJvakr/YZRWkZjgp142XWP09ufJZXzHs/ri8Wbs6IEuGGFM4fbDdk3Gqk9dqJbMqq4aNGtpXdqHczXeIKuaIKMqc8NXmI0F03b6czCMI7gcVe/SnkUBBiSOszoV/gsqNCJxGWmo0/KB253MZgpJuaDrkXtcEcP93Ue2EebNHYqE6czfF8/fBQef77Y+JdQm/0KUEAc3WS5KEtG8c/h6tEyajpUq1d7Tl+Pbs/D0cqPebuHixWjQTI4Ix8eVisuyvoEQnq9YcW3hywjCRaeTyTZr8oOb81NAMhXX30JfXTBNVVyrXYDvp0APQvw9rL2Y3S1vf+iSn2cUaQCxdbvBYV9SbD/04mcLSSbti8XPmQ/Yyh0wkq/2U/apUr+LB5aHijuT5JBr++SPITU7azMtblDsrZ34c4dZfw2X8AqVKM2MlZbsgDuEXPnxZDUDyQdvammUZ0vJMnhXyaBQeNsrlIX6bGrCzv4ZcJSuscGB1M6ms0QkNdzF+huvdVwvzzq7M9vhl95BsLVbza4wsQ7Io9PoUUVZ3B9PXXphwof0HpJpL9MJB4le7PUqiIajuos2eN3w/OuaALAMHmqRR5eVyQ+ytCRA3chuY8Wk3266GnHfXmP3VIdDrMa7pIXDed+e9vD0Ek/mtTpthWcUgMceIP9AnmzPNXoGnccXVRgYDGm1BsuAlOFDUzOMjVsEqEEcsVzLTj9DKYh0ELKt9nitlrt5SduCZRlUgKBXddosnT5ugCvOLspsmuW4ML6+pyluP88qrVoli2pTvVwbzhtforoOmcbwOgSz9uPTB49zPMHXU64+vSACBD4iW7LUu/Glc2AgrPIVhU78i5PpFR6/PQ6QpvPdxIERm/kIxkqRwlxE7xQqo7BFVG+Qa3Dm89I+9xHyyQhRJ+x0SNo+LACRjtcWaKhMfz4HZ0VXD41FAKSmflrHwjTwjavqEX5eGljre1ZNDxlodHbh3sIP+7zVHwTHRYuGgl97CyavPPvOlaOcfSiiJkrnGUbBsA2dM8m/DjBNtcXtMlZoA206437S1vPXoYrhnpS+gP8ApxMRpVCr60Dzm7lFo6OPdME60ytgaC9NHEs367No7zu+u/q7o0xDL97XVGGxJodEjYtRSAkZouxxTlREGUBwLzJTY7iiMJEvUjC2gwBwJqE8pCXugL/EMNkg5ygkzZE9qqVZamyc5Evat+o6cT1cEQtYDa3aSkWcEJs/k0ObnzhN/AJqdW0bkhTYm0qsnHQiJi2WyCjriq4k2SVCPEo2aZVTxtTpjOdKjRM1/pjPTYJ8KhRmCRoqP1sDRMCSZvN8sE4Shtlr6Vs3sMHRpjPgPGf7cxTQkfGfuTw/tJDWp8wJvz0f8gdqgjdwJRURuCMi+hyBtADhn7TA1unU2NGKhUs/1nIzVWly0L18wTflV7C8pwaul1zFA3KQC1R+ZpmZC8DLHd8ofTe9c/tNVGhvUZtKTuoYfskhsucBUoDUIHbX6J4mAbNkZCOTg6DDalqnYNuA8/9TBKhYyAW9+8QiMFgEbJpg7fKC4mT89SVbhcll6KfPoTNW2oTV7D2thFQhMPQdjqx1MveQnVibbpLqBlp707wtlovlUNnlMENhXlJf3LofcdJlXZ+zVDmTg8N++DCbSeV5qBuD59NugXRHWB2QtdPcNOd3YSfaqarGrP2J1LsR+wrblROAEpjCPzFJnzHr/GbFRuUNCn4bTxSWzxym36307zDwIEdQYdJ3kZG4m6YZIaXzLIvlYk8OKay9ReEoJyWJ5ZLMb5vzRVsnkxytHjUx+qnRK3awFQwi6oZF2dSJuxAKduOWdA7WZucg7tfHH0ky6vYUBIPOzTHuTl36Iy5UE6xpqyGKBzpDHVAhECKUvxixsqncYXOVjVB3XYk3fdcnroGBfmUNd+mqFKUbhEwnLUpe+n4gumWpiONJvq3fZdrqg3i1XaiJBfpRcz7/QFvHypt0bWVxaEg
/ZOaE6NCKQLYNLSkDEF21ewTh8zzvgRfJirXdPjevpmqHilqkHnilZT1DTyNXqLr0veGji9MXKEV1u+zinm7hvnVXnXaq+oWYT8FXaK8Hrb93IS7ueLNCr7VUvwCEWDHxEu1qc9OxnwPnsXsbe9FEfPy8zsAcWaT6KCIfcZ3Z+77x/3BlJdzkzYQSV6DrGml6vms/kJTQl0LScOi5HRdvHwWlEQHaPvBfWqyszUi5fpxQifLCQ9YLjBLQTSDxWG6iILrFHXvHkip0wnicGTq/zLZeOq1hqpAqpSAELvy02M38G75WTncwmnE4rNJdKjpTYHqXI0vSqZY2YMo664tpThQYusPLih53ZL9wQ82U7xb/Kh6YUzBB5tKcnaHt1LAfAaalUuRkHJO6CUqeM2WoQY4xU7xZHBToMUR3coZ6PBDw+29OfCmFqX4IbsFeoVQElCCvHAVwl2K8o0vkBltyeKeIi8aYyMTienv5F5HOw4sueAESe1Zfwki045tWiblQlV0qyZR10ZsJ5FaEOswXGorE/ha69fPBzpqBiAPuNCWGwQ9ivCszLikxXYZS6ZWJ1bGQz3iVg7NQchlKhAab1HGwG/zYWKW5tXFdzpTXvAEt5dpck2oRkeLeV31ZSkkI7xXNSGGpAim8m/RO5FLX/Rd+HD4Q8mg+2WnG2J6gyHI4Tw53zlrIuYcKYes8w0QXvyzXUc48FsqVYUji5cbmYmtkbpCFbvuTZAIHuIuFiEaZs28Fj9kQTmAf/C2bEfOJeTqBnUsu1fovam3aMfq3G1+mciLTkq6ZurijgHeX99g0w0rwAwJ+06HkJvnipGdOZgXn2VnU2ZznS1fBwi6BKGoJ/gx+DX0czvqapDeTNTbMOfd98uBoNqtALACVZP35WS+OzGaCFq4hr7ZmabysDEltbfkS14W3wxs89u6C7gX61OVBhz7LmPSJz0ypRDHXVen+udG2D3RYA3X/9ADMza84/i0pJPTa2OwKW1q25b8KUXbT26RH2MJqRBC5aDb2DCNlIWWebETuluVqZsVWZzUyCzxkTPgNxEuNbkFh0sZbhXMcgFWpWtrdNepPvMh083iPwiLynifD6yKETxK6T5wsdXUnbBZuVhzNWWRyv8+tLCOqvlJnh5O5DfxDWj++v0W+1dwM7nQFc0+jE0p5Ne16jgi9FQzKVqDAelIi8O0S08HZkJHSPUkX7C1NNw7skbcAKJp1XaU2nuVNdc4SeiblF3gv2EtTQOB16S7Sx91tR2aDhZaIQiQfvXjokvgg6JoI5c/nnPptJbTMEk+H3NbS2wytPWydcjxnk3r9rPYti5yt0AjSXIzuGAa05ivf2qVaR/6zCau9kEc6VJL+QiicmSAAPclzYvFxvDHIlTDpzikurpE0s7KehvLme3rIql1PN7VIQq1i5alxJuowwTN/j5eK809Wl7VQHyx+q2ZiS6HUMi9D8MF6jQmlKopgh5YTgkxDMW4QDMON0kjZBWJ8AmNQjlGYu2UA7UZtx+R1N0gAet5LOBLiR7aU/+IzvL7Is9ARUHoWamdOpGgK8J5rn0t8IxwIagOrfxiFGRAvw2Mk7Q+LJaCmJzZcEGS7vCPQUrFnF6Mz+PexTICCQliGYG9eSr+Y8LwOAy2whaq3wMT5DyLk6+P+0uWMWn6JcIeQVFTfNttvbAb+wmLLlcZ334Blw/gRHypbsCZhjs1A31VZ2urDOhZxsQkp+WYh8DV4gzIdlTEzIilUt0Qv/LdggRnQT1wM56ZGR2BiPxDZk1QHYRQ1Lpb6dIsnuH8tUJ5mhcQmGkLea8lcj0F0zRcodc99wTc9pLd0A00D3BTfxbuOOYr/gVd56GRHeQPxlvK584nopZ1Z1sHpoOXNrKgEpkfToNx5H/T728QP4bYkq463Bc+flhw8swD4x+m4i3Qr1rPTrepHhV0j3NUk40uMuYE/t4RrT+NY5jKcLIl7QgIB5N3D2VCSKFm9QseFWbhIQSGmYPAaP+1VhvIqOVeB1YHNnjO2f3gCDHDcsIHa3cUXVmxorKd+6Nxg7CliQ11ywUaEuOg0bSSCpP5/2rfdDmGaPLBdb2CNnPseIctw7gI2mFwbltsIazDpjaWDlUVU+L28K9r54gRsNvbCxs0fl8My4vdIsJn/MFO3CRFFmz1rpNKW2z8OzkkFCGJsM47LxxrwwVolytiWqSe3FplKd+z3mnsaHnJCRB7lUf9LaU39dWmxAXawRUpDWckZL5AZ11VHaujja04EMNyZbsiyoYy6cQa/6Xf3vzJl/AH/b34CYCeRnEiqsNCGyB7odcJ7OWJG5l4TuhBdgtTAzfF29Jkn4VPjOfmPYgjfCDz4vfGMLojlYzwSjJNHQBJhZnqSPx+9E61gzvrYR5oY4QJMbES723wDly0lBlhOaX15uyOnNVMCav/+j7WgOzX8k2x4omQBd+t5YD8W6iqX2WyuXXC0C5jZmE+Wf5xJrxDgjAzXnXuw+HWDepu57fd7cdjTpXGSlE9/Vpf2tBWGdnfEwV7Z+sZa4bqFRW/nfXjQiMTiH5F/KHTx/BXHgmmW83E0+HOGq6BtIIjadwpLKAHWy58S2pGaQtgTN8QyKYnY0SoBQktwNz+nzEFUN3MCqUxXu7KvlLX22P/lWdNJWsqgKGhlObjXnJG6zC+FcWwaEM8Mihi//ZTZ6zOHs6mX6L+cl7NQwkF06M8TvEunIGpKhCoHVVyzR/pMwM/Wvl+Y7JG4wH1i1+uiMp1YZ4r1OLOPdJaZYKkTKVeIMBKVYv5tKZ8APRscZFyyFzR2D35vzRItKjKirb69+ztADC/19m/t6Pqn6MivlV0nW3HBjw9nDZiPOoljag7iwTOciTBq+gPsHC/KFRw20Jm6puY4mv2V/79sWu41zi8+zjEyfZ8JGyseeHJ0PMkmB9nZFOei9qhgI9BZxewBaQXnb7Rbf+mBx15hwloSWpqe+9OEZjV+dBkMqNIw6tynBkt5byxSnWuxHONfZXHhK8SNTtp8r+BYznoqhMdJiTeKfFtbUaJDj8jw+OPDqhsWpltwdoMA2xTFZ+AYOU3q7X8RUy4jK8XoXuxEn6wwSBBPtCJaFCSnr7yiJ78c9LZzg1wk3Wh/81KlKuBmwSgGPOSYMch/w8FmTkmCLD8FuEybo7pMOYF+hlLEdN6wXk5LF3dzWrw2gNAdFX8O0LipYPBe05l67fCSYnxTICI999JTe+odFuD/YQAnLghsTzA/Y7yYbP7WTZ6vuR2vB7AOPaJpmD6ZTRlO5I+BP9c28enwYTQk+Fygpz8hGwhAmPbpobSJuI6eJaMaAjGswSMpIKC7kQeEKp6T50rXZThMxjFZQHKuI+ql2NTkI0p1ItTB1FxJ8HpoWXuqu0zaG2y93xeqUHCLVRyw6a6Iqhs2tdoDEiq/Vtc1uyRbnhph6jMx1km5xkufcZeeW6LXdb7tssw/5zllxuz57e9aIpJ72hUOonsyKhi1jVmbgxwh0BukUHYrYTs9lq3OSd3yHQH4F9Nw5BKd7zCZdsAAfCjgimDfR7Ch4glYbsyRGhx403CjIu6zL3Oj1sSVZM+G/xsWwYtSXPRny96YRfRLm0BoUz5NDTGONqChvJqFXHK8EhPTPWrrshjPjFl1hOoYp3xymNeyCOSQiu5AVvAE/26URFcZL8xERbjVAGZRkzElIemfbkZ1Ulknu/VaczB9PMHRHQ/Yzy7lWTli/XQZhvFeC6SPI9IfGKyAKmSo8XgAB3JDYci8NFCbQGAIyv8g7QlnfSImMUYcrHYXJbVcKlr0rjo1QZhq63WdgtqS3C5DKzHkR+emomaZLZNneLBXQuyZRnf3DbD9xalyuOz3M4ZG+OFBQLnfDeg3f2UMpL0LlPxJJO/C+DIoGd7pazS7IFe8Xb6LFmt081sqiLqchb43idDXW9AU6XB7SjmHAAkZte0tRkUS4xvt/Wr6W3Pt56NxGg/McKJtSzEW2IJBzZX8R3ujFwDHIOrJyluo0EbfW6EptceP7jVmrna5UMZuxzw87ijI65j9PfIPziccOkXqOktDfHFipx8lijKVh9nM8laLEOryzVJNPMmDMYvjUTbDF3AEG/9
YdVr9uyr5S9fjAxWay39XQbOMh7dKEVlQhc3fBO/2zDxt8WmKZessIUXArXTit7m4JdQ0tIuTVZ8tteYjxLMMyph/jtjXV/g09srU1RkPmV+B/SuAqS7OV4fms7O7MnZlMJJkcBsJ2seO5Dm/4CBgbadxyxZiXrV1rMhQ5pJx+kO/3sxyocgB9NZPQ/+4cLo2Eg6qf5G07eCIQ248yVc9ER+MiDD8UIdt76F78+lS0q26a9qpKvpFZJzPzrExsILc6ZahPRwmq5uJo/hESvRIcKcr++/MiuCGVKg6X5RkSjk9w7vcl/4/VSMDzQg8Nmz7YXTYPkR1isGXuLEmSagmi/V8/XPw4ghARY5v3v6EN5ZndZ0FLdZU7NYCh2WSQGTrWn427Ek5qVWXU+VeBpaj1KlrD7OnXSyihZmvnhC9g9L4qy51OF/yBu+oy8jjIu00Kylm9Uo+qvNpiW5bMtNvxqHn3PpxHDjABhK35q78g6kYqEEimdRljVMR/fnAatPzFrpJ12R/f8+LS7s0oNcs4lhsQWUKaHtVsJhZJujVl5EHI/v5Yny8jcU7Xia7IWuKz//eebh4UkJ+2S5Ft0AKLcDR0PPh0xZW2dM3idTFijztsRGhHQGMeIjZXDdrMgmHHI/fe4zPpKFBMRCVF9LX4UqYFUqazfC2rIPIEpcbG2uH1jNCtOaIyCGQdmt6HqPfZkr8aut7JVbfuX9XzCHkCJ5hLt5k7WLl8h6TkuJ6VkOD/NbLxZSAObnP5cK3R2QNGY0CeUOtoYRzp980cepJNqh6QdzIBuoC7BHPT7BxX8zEH4xn1MxAIHaRZeWfbHsMhNJytqqBjdB+aHbtAOs21dP614PMxhuQN2c/ot7WlrAZthYimjevcsuaM7yfeaNBLQ+/bt+1uBsoDNm1A1u2Hwm/NKNg5T5EHgr4JwfDwct6rKq4EGqbtvGbij48dCKbA3k0yHkRdeMbbsJpRq4mgqjqZ3su7pUstHcBbHL/hz9HXkHojpP0EY6ZQKsWpMchIdK6SCnSn6hB9Bp0pJ/kMld1d5gK+spJJVeiSed7EizTm2Mrib/jMQLLp/q4ee1/oS3dU3hxWM11tJ+uFpddzjBAss6y7MZD11x0iwx93kr7QWdoslRzW1tXIm4DhLBJQRG99YOR1kNosSkoxI4+XcQGJ87SubgWvC8sOaQJ4vSme2OoAQWhxnRey+Pni6Hojm0ro5P932SV+Xm0M5jEgwsbuMf8BGZbsFxF6PbJ6SEMj/kaUhojyhdxUH43z2rLE3lKAGDOKpZXJDGPr6fx1SPER6nxW5TEYtZL6sgdzlCLlNqYDOatSLG2Iiy5TSCdQ//NY1vuzN9wtI/rIvQBg1rNrRPZNSutlcJ6dyxq98IFhgRPh3fHvZLhWEkJt65/La+TBy2nHCwYGQQq7TXiHEXtchycxChaMT+J0+KQLwMGVx6fRVQEZ3+1omN5x7cGfM6Wib491x1rklXQnUSSi0ESNtgZL75BrJog92qJ1cQEbqqzW2shEDmmthdQi8kQVaTGPJigqTgxjJ/4QL82dpgYluawVynT8sY1eL5kAv3XBfLe1MMJXIYo18rmzfCOwhemxE/NoLO4Jklb4lC9Tt/0L/FACls2jD+OSuboS2gx4APNt0hIA1mjS13vqFAztP0PPnGnbJ7/W7Us1DaCRvmQLq8sgV/ttQoBQJi6stKa5ogxX+ErjnePMrh7yFM2q5BYlqzfgysgf6cjky8QsLsnF4Me/aargJSNWzSITFdScsuy/mLmJHnSX6aiQ78zzIkuH4kKTtLljABD9JbCOXdvgdoqQbTDkwjuUkUdR/QYWyf288kYuV5Iu9LoMZIYuBha4OBnxiPjORfPurR/sbKuAgBma/5dkIJ8H0r+cd3Tck//4hqtDP9KSRiKP+y20xF+gCba5cGSh27BFiicwvYUaDz+c65uonPvRykp/iECBMgncd6wZ2hXMlqg6QCN96Arg6yED3IsYFCXy5WFjT10s/2YNoFFmpSuCDLG5j9TgzTK5kGG7+K2GU8kkfrkKy7s70PRGS1K7MBldkT/M9QE1Z+Q8/0WDO8K8Y/ZvEJXIntF3GrWZOWtLqQvluPxlFWS/6XfnLdjcL4uOfQTf3WUHw/t+NYcKtsdh4Rqxfpp5j42BANGYtA+XA5qqVy3741uTaFZwIA8lUAFEHMYSk0jVWCIeE9WPvBpjcNdG3ZEZRxEwyitXL5Uc0TrO10GLbUzODxDUIoiW0b4BjxcNTPwC6o87dR1VjpadIOGb77ut8rnNfpnuKVg50jqkSqd+DEQ+/ClHn3W6N4lmV/Pb+ky9448ysTenEfXyWlaK1xc2f1XBbcuGH9RoO7H960Gbv0NAwXf44+mQq5cXNXKSkh5o8vExUlIFVLjb9/npxWj5f4Q/V1YU/FwtyMXDlyMuKl6Kni+AAvXTYmxnMIVqXiCcfiHRjE+FMzNrKEH0aaNUdAH52SaWTZsZ3iyoAyBaacqE86J8ZDXGse+wQROzNZj3UHxVEz+uspisFy+/32VnSpCoPt61EwQlbb61XfzpAarOCCOkcp9eWmqIoURZSe72KCGt7ZbBxvWLhhR412JjlC5K5g0Byz22oIYcaX2dQHeA7J6Z/vanzIUQPyxyertm39sNTjcVUUcov1huvBVUnVxsNHduG2HSlff5UINDF5OKBEchaJ9OC4pM/dTenstdF15SuMmioid6n2QRqXEvG63MdclQLgnpD+ysX6ZOXpcUEU6qUltqFLIVkcDHENVXKokqBr5U/32Tocbq5HAeBt4+fyiTJYn23NWeh+3n6pp2Einx5njwLZZOIY9PjpaK60YnIjl2gP4tzG3uktl3KYIPhxdDwLK3ZamrVuDR7X5G51/oBPh6or06DJe0V+cbuuIo1uKFdsqvi9vR8TNSS1z5buBwK842RX99cg6XMKVQYem5bN9bq4tXB1hE6/N7YfUjFA61fnSkUT4eJAzlaFjgaWf2AqiInV0HH73iwuE37wNWt9qmi2YSk+cgX1J0YYk/SoTQoWwh7Of5FochupvBLIDU7v7JukTs16KOgt3AIvdUZRph291MJuFPsLqqw04oN4QrJPZQbVLAu+0gHfg71vp4MfvstSpUQJ9/55l65RGgp1aIvumEcnd6lp2xfNrfZWYWurpnBX+JpTYgqvVWPvx/ONnLd3YtqK31vuRAhOFU9lSLqK20m3clGhPj/C/1/WCIZFZFPsQesUEGJ4lZIZgTm6z13QjdUlC4+pcBCEPqgAll0n1baWNj+Hw8jIRZSJ1tGvp8R/Np/UPNw07FDc/UZbZ+A8/w+w5CFmExvJsbvE3+4sEnN1Oin+YymNLVcl2w8IhoKhz/BKj8ODVFB/fFKuFK6rvVkzsfhw0ZYdljc9rkR4XHp84nHb2dBlrkoUcaaNcPtBV8PaHXcseOmnO7cEBZVM4JbbpeJz4XLiDleHx1LEPXlO11uyvn4pj95K46hm+AZtgs4f3O5xkIRIk2lFXHy61AFNt3Rpp/dca7Re+goEUzCB0TUfMxOjeQA26jZrCV3bTOkZpGU8AVmwfK9cNkpDWmMmVm8Jc4mu0jA6aoqdlv5Uyno1DbgNe3qE539jjAw0r1D2xepgwolAHzsXJIiEP9e/DM6vf5R4Nl5Duy3P6fjQZazhD04ZDRARYZXQZocy8+QWRuDZdqqJNV3GYlchGgEydtNZRvlkpF+2mqEUdhdNfADw4KT7rFAumLTWmg/60kPwV4iKT/9s3gXrKH4JWgTLa37XjKoNaUo8huQDwdVxhoq2j/eCL7XucEr0ic1NkwjZ3cJ2wMkJR8CVO4JzACfnWG/YoUd64KTbYrjc39co1kh6X7b1hrmYIv6gHYOyB9ZY0bbQcMi8J+/jpvdeW3ZClb7zgodpnsxMP/sWF6rTUnKGDghMyeT2GD/dDAm4etnSh71MtdmvzqaASgXH5a+Xpf8zLMMzgoX+xY5Z3Po6HV/3Z5wD2jKIOZoNOaNDjqBTxc6v2mZaA98KBlofAgbVV2UmGOzr4IpGVO9xafGVhSe+UvuW53srWvVv5+Esg5yXS2bRp10ihPerzwrqlAja
bWOAEaaz9thdvszbqEhqsAVp9sh4y0Pm+G7eAZuFkS8MkoaGH0YPXsN5Cszey3dci8eHAGPsrZGZwyMOiZRZAmNPfO0eKQDD4ZMJXqkPEEI/Orkm13Vgfe7kFDeq3haea16kVB6Xek2gVy4Ts0m/78EBVds4LBT6wW8ukEW7PaXPZjOUCttcyDewhnQb7CykXrT0N9tAKH/DKOxUUMUSnYvpGOFZgzV6U39xc92K/5RaduaBv7DdQS9om5HhqMTiFAW7ZIqos2ntxP7ykuNjRZcfwr+LNOHsN8iJvy8Pyl2pdKMsF5eQlGGNwAASpxr0HB0KrlyRJScaZaZtxbCDhJsi9BP16aHCkpIi51eXh+LYkQbIGTgVYhpL6m/rCSXdA4umVgdaW8bpkismLFeXUtM5Cu8M3hPOMtz78Qz6KczoOsxgkn20YlqqwmkJWBWOOc+3siCH1ui5Vwg/cR0JU/sqVdoVt2Q8WNX2+Ud7Es2SjIhCEtoyHfaBQrfZLox+oRjQxkHb19w3NB5CU89upuMyU5cY8zNVj1SZF/+OJG0ge6LaU2W1wiZ9tz+mVNC0vd8tSmRRdw5EuNGW6hZtynQNSDEnmnnoxkBSokMd2gJ3sOVKiR4gvvzIkBHROwaohpdBDnh/niWvXaIwsJNMEZMErvIb7LgHUizyRYA1KzjixS1oyHXrJ+KFNgeh+J9BHdCQ9jNFTfwTuQQxPTew/OQso6xflFA013BnySzvztSW7vapqHlxh30aYmbIgaVGPEVLXmtVZ25M4xKqBpg6rPuDDiQdqfb0VXiyqVP3TqPawWO+9hBvYpdbud3NffhCHwNeRVZ2igsNzc3sovQ/9URHhh/fcnmX7TyIOMYfKWs3g1bXJrLVb0m/7Zf+n4Bhqmyn0nzOV53EaruaiIRB42ew9x8OiaHB00RGbVLCYvu8VZI3RiQVVIMOC3FeFhnNyvsuw5zeirPu7KMojdPtTREoeoBI7Q0OB2q3Mp1p3h5sDyIjiG4NPgtnJDJ2UxZA6pfADrr5ZxFo+LmSL+upzmHJPa/z7gxPyRqNoarhjIqF4lgN2lVO9jnXC07RzukKkIl/vON2upWNH9WcrPVLxT7h/1SmjDk2zFXgMxkrzl51GM5XAduRAPDsQdqecBZKpW5TlYRZjrill7hHYJccZcnIaFaarOpr4wr/qt8Ey3PVzk90fLmH0t+eZ4mg5UlSeoAqQ2SCAaXxe4QjYT63H6ZWfR4W89XbpXuIQ5qzCK8eLCenl8bz1FgSQ8fSeArnqbgyljFYZ0Jnsf5+7tbua/QEwHxZI2c5g/1SqMzNtvvQlBdXDdKdD3TuaXUkzB/R3EH6TcOStsDxDMABKMZqjg4n4uDEQp+fJVoSaonQc1Vfx+aNoTFU09rrujOKq1+FQj0rC9wAmwnPvpaRblD1UGcN1fissBSHV81ETJ+dtSmEHqCPRiYYYcSjDxfWl9s7XpMVYrcddBznDiWSBk+oP/5x0A4mapxMU6QvwyBEYiEXbPYgjHKQvcAx1s3tsrtHf4hz0mrK0wVBNaWuZEj3DXEOrjWAT461hSww0yMm1ISgOY++9tQ0Q4KAVLFuGQFM05aAv2z4prWF8fwvptd46bxeMHnsNJlG0rn1FGfg7gUMR2eoyrYeM/DKDA130oXILSKVhobOfBgE/kEfDWa90Lv+YihIzok/B73ScRfWUVXvAoQ7GxB6+9ThelYCcBFo0WJSwz1OWjH3T4VutFSHfMW0ZySnmy7tRMOeHw3Qyb9p+hRXKVrD0D7eURvb/TZRnSAJmuV6lLosTcJgVxi6yEHT3/A3uo8xpNtiomg56rykYzKh7PJ3vIWhwenXf7L0bn6/vY4zMkS4eS6UwtmumFRSDQBG+dZPXHXmM9fthW5PtVQjzv/G5xPD7HLluxWoAFZsFzgJGFCI/bXdr5z/eyVXzVad8n3P8JzaUTz+yiJwA5RUnEt3V708Lx9Rmu4UU+qFy78zi5GN1xt3iwYl1vMbr41cWfNR/inZhBh6Okop40Ei6IeRnLFisx9tZRFcYOJPdHI2B8xRXtmtY/PssNOJmJaA/ExYDzJCXqo1q+EsxTuQc45buizYQFuerPINEntZ6QcaBVaXDmcB5kjbYBFNvRtc2aeZo8p3UucaUbvcDUedJAShRJGASUDNNHLXQsxOz2RGJHFo0JC47K9NMFWtHkM+3OpvVtx4OD6XHaYY6bAnDh75uHWrLjPKP4VlxCybGRdrViyg/STaYKpLT6IfyovoBX68Pu0sJ3w+Oj6WCBozKIk2ImYoNR22ApoCd83/4vk+y7Xh8uoSAWB44/mBTwBpHsie4Xvty4VPy4ioDCS+zaIZPY2luKsmg8P+Mjj/en1sePvpEjYyV7c6xVBXn591sjIVrDtM31cLV2bLpv8x/vBHSjr+rmSwVmPCYf56+XQjfx4zh6vOPdftxv+VNKJICbaTEnQc10BTPwU3RiGN9o2sVMzvccAdUO58fEVAEKpfFhVjbea6dSCX1V5t7+9aWMsJS97Iz1Dz+l+O7MIj2rQchB5FlVHrZqA6AkufwiMzOHYwDjRx33HJaW9xymPpDK3IuWI0TIhlLAGAz2v0+01tw4z1yxBGEeXptIZP7R5hjX0p2K09eOhuOUPsGusc6vCRxH8QsIfjrGCU3oyGV7SK2qf663rgv3IjOJgK62Jw2oALXocOyrrNa+tJxXoAHmARpS1geHJQSbSnZcRXKHOCxx5WMfrymeZKxlHNvjh4uBYQtlCOHzH/ayWdnitLE8E5ApADdxKI0qeXH6UQLyFR98OPSOEEnLCJjcFTIKaOpML8dL4AoodR171EPjsnYKQHj+oR/2LgP9hgp6pHiU4qOq1xcb7oM4cB+fHTOYsQytoJ7W8A9S9IZnyC5PgGcDRsmu9Xj6Tqe6kNhsu4gAqutlHUhAZE12t13ni59XLixMc7W5N80k1L5/eTz3DvM1dvP9cMdXagG2zWexAIh1JnzCsqs4ygqxNiUG63q77Tzdz8kF7CF46dXkG+nlRjCe8HQl8fpzb/SVJYpgEu790pk8+GtNAeuStiQhIrcTcCXb1cYP5anTzFn7P2J1IC3eAF4Y35TqSsqY+jaIJ0qqE7N8sMYfPyA4vOdmCe0vrnPEhNis6OrtY0kV/IIi4giOpatUOXMsTIdQJVXA1T8bsgUOB5U76WdToYOi6VUKbvokqbI6grUAjytk4nXdeUTKsyscn+n3ntKzAEv4z+jYRaubASIfAoQCH+EX2xr7FhKUH+qkmCN9YNYE2hSjLhCS5b5dTcg8ajDPeBB5kMd5TFwgVfy0xANjjrAp3HydtVC5B4jVm7FLY5Hs4+UcunzmHzSlribK8CfIWZZiaXOSWUGe+/tcUxbdtTA0w3vzlWGMuGRQJcOvYfEbFipyq+nopmCBGxU03pnRozCmZyNbcHivCEYIQgYsXf+L3bI5jrlySFq7o7UxmdFbFEauWewCm/Gj+J/cCCR77HFjkmWJ3Pykg4Jz77zWQ4PZr1bdHXbYBQRmeHZkJy66dpvBo6P3Zbmicu+5sBTxetzXJCQ03mhLEdvGqu/PN5GVrMTbELftL0+Mg9Cu1rl5juM3e3mruGTh2WyVcTP3BpKUzrEmNqYoaxJz6R0YCovNZCCUx5Z3wA9iIcwOVQLEHtklGCnQThwcU2YehIeyJTB2CoEmFRtdecCNNOPz+BheymHn9nXtsigt7+XOdPJj8dN2LKhag/K4Th3IxgEETRMNtg1bYTqg43SWzbcjq+54/oa9QDpkMiFVlcgfC9D03yAD4ItzSXRintP/uQArBtN8JzGoTkZfmg3HU6rQb8s95bmNAEHZQBhXOAR8JXhhm5eubITFf5okk1QV10ScSFIVPw8MyxKv1tqj42L/vgwGxalRoDFxMn60hJycKwfWkhiEFnh+Qkyj696EURqtNV+OUaCojJ7GFs2Wpu+HiOb19m2NorKDy8PYSuLydiu2cZZ7LTk0M/e3b8CPCLcM37L0YfhkR8TLf4zEDu2K6H4E+rjlej3xkhohV/EmkttFZLc1c4zZB5M2j7ypTqqtPpnc3mlHk+CDYTiPN3mtLC
FzWE+HHFyATT/0TBDeyq6oWWrcx5KcG8qN4upv8We+HyCWxdAlhW1FLI1yPU57CUPowxZjCWTq2cnwj9rD4l0C4rEzMCrKWR4KhQfUbWIZt+6J2d4FB3Nn67IBE5DvcEA/SpuIXt67Qv7bhDCFKLUfSI/0rdThHU+y6zGpoheN3P5SOaUDhMv2EzhJENQFPqVT/jDYXEY0qGCsu/oONKoCAPODIo1eFC4/FGAXto26do7iwZAGn1YvsWpx5lUIlK7u7EoqS6XfcEItlPFAE6GLElIrB9r3n4CMDlLLt9tkcNV/WHclsx6L+T0WgULmLifaN5yN9pDLre//7bjf84ChFiGzU95APjm4P385hFSfZh0AEaAc5q4meXl/NuvuhN7y84vKfR/EmV5njkpKAKdLZFgHvZZy4DV68FeBw5YDO9otYdTaML3tz3LVUoxuHK7tTgGBaYdtUdXiXfA8Hp3Pp4KWfS7IL4IVV9K++Z+69BHxI+/3L7H53+QpBxgPm1Tb9Ika387XcuCMoyq5XgfndUcNH6BWPho2F7sreQOBNubvRGnYsdKlUGqLhCmqrCCl92WEAG6EodO6M7CXGjly9XHHzKuSoViX7TuhsPE2F4WzXyjXgr3yxyx+P74XUHieB7FCoLhP/gNnlmcXjwzk4gcFaGMLh0fR/AV/aCsl99BmgYcY/dDpIrlsZWQ+PfEUMvEM2VYZSDLs1G4YmfX5KjJYDq9Wwn/eBzqN1BMkcwW+CQreGMt6kPaXizQUeGyHUqxw0pnzMkbxSAYOOJfopz8Ij+gNSEiK/xygURMVELBGB/2PzlcNMXuSRqxhDUTN95EKmKA77uM6XVxhg/K1nGjQfHVvu/BaJI6cHgzZVlovHl7LzqjsVFO71SybqqIGMskc3hOx1nHbGVW6DQmVJ6Oh8fvZZ7d9wqbwHQIog0TBLVHP/4G+6a4qRwrAHJzuNsjWWJJGIQwNlYviUNkkDf+G0ZyY4oRaaP3Mci/09Wwz84BqKpNNuw6qM1wTNVe2gK2Gy/O+cDls5acbS97twaPKNbCIiHr8l84BOuLWCvrgXVryRfA9n0Iq85uDkN3XspfC50pC8vAQS7wJ+QU5GgInzJuhV+zzUo0q4RbWiksKi1BEwGincRFOp1xKo8llQbsMMW5kw1Fpb+BdrH79p4nFU69QrtNMaqTDxXv5h62W8Y1LfLofsAyfXakzhkh6gpNtACoHmyT0yU5ChbTmcbENFpxqQErKZkYTPpbP8tt5HT0TcBvhHDDauM82D9IZiQSzWcadUHXYz4Ru5CeF9XlLkKIv6lPi4WTYrXfewWR/zc3NnhNVGIPJndYB91AHGDp78zZyJG/LpSoJEMD2McGDauxJ4HV1xRESTF0iebXmeIYKyaiS7LRKL/iVP9RoRxNJYJsXeGQohDa9LWzBnY6SG1saFD+qGHJlOVgAY+44i8tmysM6lYlLQtIJV7vWnQFVuA7M9zDAJGcwQxg58Xfz2DoHprxy9sBZR3QNkf0Rqk9PIDwTVrkbXFnpptJXnHDHfavET1mmC/Xw8mReerQf0t1WN/CuLNJuI7/YwyrNZYN7UD+3pAosmgw4sRSJ8W9vE5I1igtBRzB4A3ft3aXmPSO6+tjNTTEdJNxCeZI2D8ba5Va2Xpgj0o0JftO25asaKEQVEfuV/J/g+vCwTTCW7d3Vhpl0J/EsHmscEqMgyj8oSh2m43DfjXb/cBqFy7zcLEb6WaxSX2FI2B3BUf7iNpJi/5AihTfFEeIAMjTKjB3IE5pPt1IJg+NZeZof9Q/MAODeAcxo5qT//ToT7apiR9N1c3Dfnvl5VqEvtIX7vwCGsvdm9jEpAsBmfObwaI06v5QyqvN6L5L4ltNPJRH6Mk3kq6ip/1tPPW3o9ME5kDbJ2+d+n1HOtVMlc/wuRVP8V3kuHdmiiot4iC7hp0ZIFZls8anLa/L3oNVjiztkuAJpL4Au/fbWWQcPs0xykVTUGJHKSELMuB5bTOoU9J8Gnuz9SSdOTFz01dXtVF5QcgvJdrD2R2ML2/r+Ywo+3OfxhSmqv0S0/dF6srRX+T2XMfMt+Zz6aapkZi4OIG1LUlYHC1YUFDsfwBL4j6p4Z6MAEG4+5TlVC6Hue+BT6um0o2HHiUMdemVacZK47F7+761/ZK1p3qZRAh6JDoJM3k9sm72osRJh6k/nC6f6Ls8v2bsA8BIiwxMhD/tVmiva08ZQF0UeQEFogVDagZmP98/zndEVn784EfTuFBfE7re8QnEbwQdVgKTEOlg570v3+IeNG/VNQSIvjWmsam0qdkf7FELGxXbXTx1ZrWza5NWI+RkhruoCsZDKzjopo7nXDUtop9tlHlbXx3g49mYCApG1RuBNBjsiHXpYy4yrKPGs1i4N1bezQ7k7oZsjGRSe7fwSNAptRVTbZ495GWGCktWNd+mRBICiKs25yQHVJ77jjiG+QWPVuagbLmWHTjh2IBjlGr9G8wwCeC5jhUuCLqiq/LU9Hf2Sp8fgg88h1opUcJHKWnM1h0L0SgazWdgW4JVwhSuW2+0Lhj4rKzpgE1AIf5TucAkt+/Cjq2sLEvHCr7XKC3SVPD3byOFZkP2FqOdCikTwpkY6af+TuluFZXsDDfg7aMzz1m92n3VwMNJgjSVsWlZ+jDfco67cS7GhDJUo+p2dl9XhPqGm0Flj5YtygFaCjbSeD6iblKel0Z5scjppQnzizXCMnJ5HmnWzoZBlFRFP0vcU6t3l5+wwkKvW4Kmvyvsz5wDd9WsUjQPczZ2sdr3Kd7BkzzUtWLa9uPfl9CBlN1Md2B6ZCVmvrDMc3TYcIMiaSYkNG8iDb3+XRBhDsfe1NDAmpseSLoTlppoMCUw+LVSYdAFdUusVTjwAWI3YW6T/40IcDazowWqcpsc1dZ+vTTuShVuH2C2NiSe2/DqnK19hpr9vHQBia1tddKTkvU1EJzJNFoYGVBRZ60b0uPMo1CouH4zbx4cvAvReKXLHMKDndxwc1EhsASgVx+oW9FEzhlTpgJJoAQFiT4w8mVzZgw1THID/1uLNVaFXK87jHblyIn9DvVQjl3BjKzKEN66UHLKbDDEqkskU9NEw6gyJZZC07wRYeY0GiH+Qp/pVHoTBM1b5ac3Aw7NV4pQpoeWTRVzrRTQHR0D8y/Xw2A8v9eVenrBU69Xl8sp7gPkvEj0+URs+sOksg+tOpeROnvcAzFrwNl2GurTozMRGL3JCqfD7S1YbM9Ope6Ii1xRO3OOVqOocerhwHqW5gGFSnbXFQNzRdRkJDWjQEe/sOQyzDgjm4BGuPZ34Tzs9Q9BKnoskz+vnIapPv0HaJpYm1EmlIxNVyEM5ms4i+uYydT5kkc5h7bFqO/33cdNw0YqMKR7HVb0aWQagJT3cJdEogvJNxk0EZtCwyBNgCA/IJnlgqBeij5XQtcUcLWrQhmSj4qyGJNN3NGNwzLcsedHvRUaZ1G2Cw3yZMGDTyJTmLayTkTC7ZDtEPM0bJgOSeoT7oU9mhSvRI1AX946aUd0ft33AlVz+w0yrfo2BxL14WC2twsMqsnIEmIyVD0UH53y6ul0HzPILbFffBgMO9dV9Xs1kAvUF5pRtV4OEUXT67EXXPvXfP9DnEk0H7q5A/eFw5kBrNNpLYxrAE0vxaacC3xCnascShCqHfcAtrThjWvA8mIjliY8/jWF+cPjPBtFbzdDr0UuIum/mwLjiHbfSNX0NmsfB/urQ1GNG2K64vT1V6hAvI4xbbdC1r4pxdITTEedMdtewwV7bpiQYXnRjMjw3owav7tb9VtJqmBo8vWmbqi8c+JrXMOWYb6ZAunIOi3Y6Z9hxb4sWWlnn5kHeoka+iP2obbcma5B9YjBZGYox6EtB/kyLNlWHwXiaMZYyWPjZYtRylGcabrCVaJZswl1IkQ6cX+208VVlUyQgbctkkzfvKjX/kGxR9xg84xvemcDxvikcwSi5Wm1DG1xUQft/CcSsLMXdxZNJbwmkcafpz+WdoWSn9DEkxhRlFF6vBsGXUhpm8zNt49UvCKsmEyF2NfAuEp4aTFH8UKdyejiTMIrIx84U4IBR1WEgGtOiv7KAK7HtoZ
BLKMJcIGIXa68+kDHGYbRVxBToFWtKPj64PhfwuDQ86dqoUFaYatZV9M2YdSgcoxErxAy8cb7fBOs2RSoQO4p+t4oszP/ECqaUJSOwCuBX02ulQnZnBwj4Jk1Z/Xj31Wzuvo7SRFtWc+vfxYcwAuV26SMquE/N0F/+VKjMSFzJfZ6YxXLNTvrBpDGwMPemVlddJgDQtaMdLnlg0VAqeFxNNOvxc3f+LSYuFJcLeSlmmcIaFqOFfozpRWBp5xfRJcM6h2PL4vD0u3XqozKLufUy60Dv8I5Wh1DnBJe00KGrZvyvjS5GsIKfrf+ss05speDXGsU7n4QAQ+mYcTDJm+TbzQverH8SlESxWKLwYKVmHxsRBT9OZXj4gcHT6+MgTLtvOj+c7v5UoPJ2++JG7c0QaU5MjJ1KUFg16QCZafkfxcgEsKrqfp7MKNLyG1OShNUju8L8NgPZNtcIOK/8QXx7N5edchWwptEOGTAIIz/I5CBApnoy1p/klImsP0rnXcOj4c2mao0AhVqw/bcjSnqIR2THjlzGn/Yl5GYp//VUbPTldrG29kenZAZ49mFFFQi+7+UB3oYkj+ZRj2OD3uiloFJw5mtKReDsIupJUC6hBMD7i7+2xxiQAZHaq3hXvBFhggbHZX/dE5yVd0Td7CUSs0xNBOutryZYMudZqD5i62dvUu8Z4NdmsKSfKxtenYg+O0hINZQlpB+X7hUrZmp1WQkaL//OX5UpX/7AWAGRfv8bfmDnfzPU4hp+3DS088nEB0RNAmtEy668nwwLKq6iSNvr/b882R2yEUVf0p1yhxcRzA2hi10/IK0S1FGMAGG5nXhRFcdfJReQ9gbYPamyuKHf+cwXi/HqFIL0knJJLdjwSTTqo88zVs40wXvv+QgLpo1v/NZzc08VVoeB/H+oCmJ1nSScuUS3fHL4NdiVh64RjBwRqDjOJRNNPSf0FRxfctc5o9bUON1oKLTTv7RZqhL5il2wpqSRmY9bykM6Swa2mSK9dJ4weS6NSOFQKDQJPmfutdcIldeA+XFgthtlxpoKE2+hPd8NmPCLxNKB1UNoTxEY094V4E8Cp66Tm+s6Bkb+1QzAqBkAWTTE6zadoaSBj1Pb2Ze8x7Yl8Q+ZCtLVl+Y0Lpqx0OgK92XD+Xn91B4NYrxYE5iUVkSpRswdrDxlAdHnY7A1WNRXNet8uISs4SvrW3NVXC7AEjXaAYXmtfgdS4BqieOOD6VRskWLHA8SBf8uMBkYys9QVf8hZEPYYxBwCopXMrtI1BsIrJn7SaixCRq7C5hfoc2aHSUYZrDnD5MHFM9e0sNlLfEgdLL7jrfY7awgEiMZDX/+8PMFUw3hq03uUJ5e2SqCOV1Mtd4pLsfX4QlEtKFo9Kw0qH+5lhukaBqH4lnHcGRiBbH0JhFLNydTElDY77aZEC+xQfYP6LfTTA0KvE1xKh9quwNYH2mYeOBzk0aOVoueCyBnWk9KwV69115/vTfMAhOvkqvlwybbFwIGOICzj9iBzh4Eq6pyDZwYPP6TPX9Kbnh/emlh0HerRSBkBvt6qZzo0NEU6TbWM5z5lJByjVLEGNar28RsuKqIf/n6vxQVUYT6CNlbVkk2qyA3/isXWCES/NONs8R0c4IwUgqLTl92SQYJf0tcL9litg7WFBlxeKhmTCb94W+Q/QrCoEGDjnCdggD4Im20Hn4AGIYBLQzYuMiGjo09sXz5ZgeTk/NNX2QdpvF78XGPYN1bK4i5OS7K9blW7V/r1rdN2CD/DcoCV90BuSmXTA+7wlwTYNoSCx12bQX/btkHdcdwlNZb+ichl664fzqurCa3bFlntbkOmO1wiWtATVndhDn++vqpkHFP9aHe4WKixAVmpgH5Zzn/OmP0HMx0fb7TAJGGixsujl8bggqmOYA+lgJRSw5AnXMvHOtObAZgprPGRaimE8IipjT3FaJkZ/ZRgmsfMh1qfViQX+AtGSvyoCDtLS093YagFqkJuz0qmKMhby5P5cDeI0U/S1Nlyh8RUqQiRruAwJ46hsSaiT+YR6pxze8PjOHqNz4fPJ6KNsXWnPOvPdhefWACdC3UCFdsEsvKtSmeVOYwIe4bS1yBesLy03PDbP/Hz04SkwhVjElkX13+zFLSkHt7qCenMoFxf2DgE3Gw8tALPjrXU2Q6ymCys3by+Ayi6QSvV4EQL0TiFcl8NWDHQX81cAJ6ydnS+LJZwp6GIzJdqfXG91gcCaV6b9b1PGgM6AzTqtj7mJCFi2DP2U/JZM9ZoRl0q8y08buZTYIfnjMpPdovt72S3O71fi0lzkSg8xgzUyS3NWrpq6lHqOvkZzh82TOgrv2lxi+fkWUDC3JwTauOR6Z8CZUlRHsgMc7Rnxv+EFPhAtxxWojepRR+faxjzK/l5BFShnI8U7c281edZMTVp1BcdR/Om0cOHoEs7cNzz9mZMtX2Q0nX3OAEXGqZqyjfLvp9NNZ5jWKNi1dL0F2pKDxpjNYEj0X33xiarL+8JP9FroNUP+FfWaIQt684qzXH7Ne3rbbiUc09p9DAVsrXY5nGJ0orMU+IwaOCUyz9IJtVOT8jBG+N2Q4pjTBCExC3kBsQdz5nTvt/e44cbhOnq9TzSGGjXyaau8EKh+U+0z2bJZ0KmY3+P/LZPd7srWCC24qh/AEStSd/hQXUOBMUsfT2uUfOkih+lYDL3AdrflW3Gxbk5RUbA89JgSFbmF02AQJfjyO+aONW0DWVHnvvOTASDkCXORu4vNgbj3wCqJp3Gk/2EJwdW/a9wOovLMo7VCS8XuvngykCI7fY6P0saZDuWLVDsi0406RynM+6fxPJl5nb6XJgxb6SakySKjBOejSKlGexLVFpdwl41cJlfOMPpDfWPC/cwNo0CQ35NEiyLg5DJbpYrYHHQpVx/9VztLl2NmIiXrUMK3X8n9b37h7YmrM2a3HBbgLAjamXM5OyL3hznRT0FmzPqAQzswPOP+OYTi5HWlXwVG0lqD8ZswnEaYJQuA65r1E/5cWEe61jfrtQanBUP3Ac4SUdqVPWlonzNH90Iw8xZU/S9mispsWiYPw+JEorBjv7rteKhUS8Xx0qCd4kdu1CsmHKhXJC2KjGP5jcyg6/yg++6/NTVCHMQTos24Un5vAtwJ7WVDbGuGkigI+mq2qmC9YV3EXaicl4I65TLo4nN1AjpAgI8XqfenS6wm+KkpEI90tUWJaUNvp15Htw8DkSYSwAD0MKVLv6gpUrYUmDf5QsH+9RsDmXBxUP1vTjt27170glzLW04F65ie137X8tAfXG9mZx2tIkCx001QVEHldPDzJTct4hy5akeZ214iK3Mxe+uZPSguPmLnHuJpZA+pyvM40Uu53XYff3q906E+wIpV5YjuSJcOrJg+UtQ+AadZDFXB1kNdXDKcf7n2bFVF1gT8bhV2vtBLlPRsRujoPRvInm2CwU04gTc6FLBBtv5BrWIBnACDcAmMxrrybW+dJfE7KxgwxUC17LAxBZPGMQ5Yw206FI5T96p19DvCn+n07ngf4HCqkQQ/vDvpgvOKWzh6gKL5nn5n+riDQoZ1gmfgay1eKdVVb4HStz6P7+WgOOv8usxFLLeZuAKrwFNUim+4syshcaoxhw4XSzWjIIZzr1z5tc/iS0/SRguMMrjBYz/AkRly8AZf6nmA9+llkt6JrbjLDaSB/r9CZ7jNw3rnLBQa8jWs6hB5+e3vzlhrEi3hI4mNxRzWVbS7fsQCd775kxmCB3s726bu9TGIeyKVFX2yaUNsueIQ58BBvvWWhMRN65okYtqfBEjifKDt5z5wnZH21JaPeRGWYimnjfkf5IMl3Un6p+TnYmsTl9GZCXL/Fut1MHErkaddyDpAFrnOGGHBIKkRbYnEpvltBLIEBCX+J1NK1woeUdnmh9JZARk2Z7v/+6A/Y4LHng5ENg/70UT+MqlKMQXZzgKqhAVNqUtBiTCprgxmV5FgUeha69IUIzIenD1b+JfOhfPa9w9qImyHalAlMfB/MNvIE1Mq//vdIXW0N8pyx9w0Tf25AyF/03ZZ0FN9kiLl2x6EDoQJNq18vwvjcqmEPxTVaiX3Oj1Pd+LTUM9FgHZL
7Am4v3nNuxMLDgrjPTXsr1T3S03tFrx8H5E7ptiDMAmlmta0Ibtb+CsUhS3NT0ZKl98Hf2L6N6GOQMueEzYyvoLXDbCU+5NAK5qfG0r209BrWwL3cqCdKtJg0incCNoPC/pmkpQPjXHnqRhvXCTuhfCznu24zpDtObCmklCL+TAjusZIvAhs4KUDxL3SICvPfckA6xpR16LFaT2TowR4ZDWQQVpnDETdc06i24kvjACRL3J7hc8i7tNSxKlcFidSTBK+bFr9gRkxNeEb/yvnoRitgzco+xyGzbGwnKkAEOOV/z/VZLp+3PTSAaHDR773XbTVrERuE7w0LjQ2ZRjkfCHGh1Vwp9hmIvulVntvZ3umTksDut7W03ahd/BuT99Idov3HbIGTfVtq6/IOUc5uWoCFJI/6J9fxB13Klg09f9nDNuT7KtzpFN1pMfCUk01vGVZpizf2hEGIN/uhSIJ6Q1UlPC7qBX2uazZTJwIqnXatbmxSESdlVknbhkveFvPG+RbJLcrZQycfIOdkFIrfJMU6StCa5Nrm5Q2Dwkkj7gmu/pkdcCYLShIScuTFrj1pqFCRbG8Cj63KRYUWdafcASY2tKTvOrSul+n0cHgw1CR53xA2BaEfR8zsnc9NN1QP1RJcqIVEkv4eIorY/DL4OWudIKZNRjZU/kb9A9CKG39+Dw1AElKx/YkxJGvQ99DvS+ZxHBYgkDLw828REJjIekryelkfX5sd86ETRqai4avMvdSvmeUeXYe+YMToq4hE2043hgI37y7RiP/WbbWaAO+E/JNb9nusQ5KTgXlPYEl+O4TY8dDhmxO3p2wxP6puJwETb5mM8rRGAyxivIe4V1cVwndwG9bpkKGH0vHf4GQFUmT+597LggAf+OVKOKNeS3aN2inwxGjVkDqEjtpokqpP4F3jFcgVYSAngG7RX4d+k5v7/vEnyBtHa0zJkBv9Q0JksMeWhRoJIFBB527zJp9DMa2tA+qOCVDLFHecsT44PBK2LFFcYesqdltjUMuFTDT/Pzh3rJM8N8Q63KaKdKo6N8KRSn5rJrhs71TKaT6o/PxvzDUckO21eSLNGTqfrWYn5M52JBZGIjzmRhQJZUJIVXUDPdyp6qnojfY8nhj+9a052Ji8rleED3h8LU/0V4R2NX/wlGjs/INL8IVucWl+2LSOwOKZrKyjcyxIK1ENomCb8Wdk0KQCdqxkfSX39fXqdnfPtARuE8QRKaHgtMhMNnqPF/sobRzcYBDTDOLYGeDjUhiJNXs+GKf4kemOFO3G9E+JP5GpMXUxUJKLHbmvfArhSYIewp/Q2mKmy2W87Jzqyolzhv4FzqqCoCnV4Mk+yqiXXII2jMh9ZdltFg5qRfpAoOF6H2sjfLQtJ9ly/7nQbn1j8jgAzQznJzqeJOuu8e4NQ3ih1zmBVzZPN0q2vE/yOg2rb+IP9OGybxMypJ5LfrB2EsnAITXC2uHLosRluLgENBP8r028pjZVN6OnbDQwLioFyNbJRcs87iYmkDMa1pux+//Z/HfmtD+znOA9/v1LLat/oGnG2Jhre9fZBPrMdY9CAcmaow3vjFZu2kVhKJaHg3AfYWhOd1LbOmWbHJ+2pN7u/W98PkAwHFs11wYFRhcVbxQlkJnaP7GqmuP7b3Hgca5ZVjSfFfHfjXC8OkNmt3BRlwBXdAZJW5YM8KjogAIbtKiRb6ZY/3wBcQ6Eo0mb9QKOQPOd6xJIqD4djqTikW0zSTz/EuLT4mphLJmun6ieuIYuEXuZRhK+/L/j1HT69D7fvi3XcbZSxzmoT+7qDK0hzjWj4AkW8aPDF3Suso8LvgdRdCvnzq/NzS7TDHHHJ4VekVilA3erIEQL6xjFFTX0JEu6bazzJKOhFF52qHRPUyEwrdtaB7KIldnjUYHMO8S9fMVhIRpBQAMk3o/Beq2BHuwftZycJrELSDcfCuRbRwgSvSvPJAZB9FSRP8TyY8D1dwyGieAC2vWJ5RZppqKYo8lIV2oVFEyWt5yCj/TUEKcnN+jSVqR5aYbI+5l2JTQX2g+12RtA9h2GZvIeHpD/b6uGcMeSk7TePL7XchVqMfT1aI4sT8XZ+TTjTnWSCnenTve1cKTRPzIsEcjuFQiUPuVgv9ruJT8kUA1ZxX95hW1Ad/beFqJY/pnLMcn1riJYGtRuOofeYBWCYEIb0y9VwAB2rtT+erNWqniIvThKeNGMTFexS3Y/W1S9Aizy38QJEDASN8EofU5qHmolUJSB9D9S/v3XC1O0rje+6zOMTJdoB13AtfYZHOem95T/8Z7ncdMLV+jVC6JYCxkUKDnj0zLBItBGUzdAopsp8dc4CF3kWU7I3Cu2UU6saMbm4+e6P6nJhaUR3AXIBZ8ascJMuC8rUSlHTC9+NDJF2olXCfX/ZMniPu6uTVuA5qgCr6N3ZHk5CL1DUM5DqdGwEZOu7rwN6zYT1dVWDprdslJE/LKtXIaHLafCC1tyHZ63CjYKmf2y2ic/AM5o0tZdFc1tFh1TXHBwJOlTQYvbJNPRujSX5PoKcz1ZAwHZ7PBdRS5qE6WfBGY3RcR6lJcRTWpJ+G0lPoRrmYjeQxx043zBwGZQVm856vEbzS3eGiiqrSyRcCqXAUdpHnkC220kyhDu4s71Qc2qXiccVAWaozwidbeSheXc/p/jDnEtoj29z+EuWSobefv+Eae3dI1kvYZWa0UmqoId8wGvh6KYyFgfkRJXGxLpKoICygpQlvgJS0lWd6d9cA6tXf31E4pUihMfntOC/gTptqJjlrzfEYNh/skuyALheIFLqf+vmJRLvDy2Gn8zvmKvuLndJaEv7bwzc9NeQGTE95b1TKzoms2PyYy9eMibwLHYZkfD/go9DnIlxdjcKPCttff4eKflqtJk0H2mFzBfLKEMLfVisiy5c8Jyc5ueRt7ZoogJ3mOKkOcHldiH99EEK4wME2s8eSZQEdsDNN3yRm93WC6my3oUGosR+kx3Fr+7IP90zDozXJRDxBCBFqsoFNcIy7VkBUBvpi2CP3csMq8ICdJGYtaDToKTmM5m91zU1/Hzd9eOLImv0HAK8Skqd4vOdc5+e05HJ6QcK/yZKGof4ntPv3h2iuLncN1Ru17x6Kw5yt5stTQuDWKI35gG//qMRTBuGXmZqxfIo1qbqCUwjYQ+6ZV2EJoSHdoi5Q1I31iQtXhvlbGH1hP2BmT+1PEEikAVCh0ws7f5LSF+dnN2IQIEYnFp+X1givPCES6se4ELelgDgsfSzDbF1ecdaNMgRJcLAqO48BOm26adHU40KulDt6GOC1fDC/Cp8TgOkztzyJbFV5Mw58lyOR11EbIa+zHaptVvr614RjBvS5vvVD0P2qXIBggN6lRJt+ymey5w7H5X7qW4YEOlRbfwtCe1pp+CWAcVyCh4GizSjysdk8o2/X6UHnQSutka/HMsgiiujUkAg4LvvQGw8VWhc5Yl7iS+BOHJYU5RcIO42Bj+2wPaWAsrGMOV1wK1A5253bOPFs1pZcRuArCZHK3RfCg83e5b9Ra6OLM+aZVMpl6nOl6mVhvacntGXSXfx3dU0D+85fcNAhr+08jfBeS7o2RInE7965NTddyUkdfe5TLn7BNyXbk8/qddZHsF1LLRd5i3HHmKml0LDprpEqGMUnWpbUrK2PaXRDNZbgidyGCfNsaePySl+QE8+kegDXHr0daRYVCKav/tSgidhrKiEPywaEcrNYnTofN9aLSlhvE3Ic6nCduILdTRbqymSU11wvC5oRYNFyAdVqN8iZz7L22+LfkVKj+OxwhQXJOZhDcV8qy6qcf+0eViH1C/PpFe8XaCEubDxgse5ih9cSvBqTNEp9BBvfNB36SXCeUtYUXn0QNQ21mV90zut0vuABUf0NVEH3AZUj60KePBGkPIMmipDUc1n2tEeo4IgCrgU5T1SNl3SoFuzABvUk64WBdFy06t/3J5DC1HGthXzvUVtfmmm1a4MhQTIGvFaIFbcNkIRI4m0lMzTaGmHPIy3Qny6FtYgVEGSLpW+n9Va87gmIimIH5FaNVS3NnikHEeiExnNnKlsRYjm4rf4aVRbBRghi1DN6x7KtgNqOo6wj9
IgrS6gIAZMrFjIH1S3C3DgAwmCsddqA56r42JEUQ/kTmsKx/lNqVPJlw6wu4NxGNjfwf5rE8ak8tRzXnbdsuIJ7cjZvS8Z7XMPXiusCxCH2y34IDYBr0Ri6TmSlosfhIIP69cR7QTjqKb9S2p0Q+nViK9dgx7aEaKHGxmfaSh4QJClba/0zWQ4vO6xmPX4vv97usDn5ULQj8lPRp6QHv953gDuMtaeS0oF597JbgqCfv3NE3RnTFek5QTM5r3fAkriuOyVxRI9nHjabf+d5ppG8OtUPkEBjdGoA0SVodWrBrgCQ+Pspj8IDn5pgmIg1w0pdKesYKxlY+X4C1A6RXbrVyjFUMmgT247w7bwaSSUiahptU2Q+V/GcsbmW8IpyekbTuoz5fc1heW1aBFkr55/oxvI9e2uZTlq7GOxIYYLX8N0BEPqEgzZHitLu14UEpRiQlAt9f/r6rICdPjQoxbjtMLaYYMDTahKRLowBj794sp+t2bRAH/E6h7H3d2S4MpcOpzDXJtMlqXjIvlYhok3hOwpAk0z6WtTEbyim0oOl008JQhX+i8WEWPWyLnKuvEiS0n1nmLdDhmxjXk29qmI+5BwxOQCGPXmmt80ZVpBi+g+SRoDPonKHs+tFeCN+Dxf2q1U3BCp2BEHUXxrnJoYoL+uSB9V4TQavJZNuC3bWTpkbCLwR6ZUHCbrQemZLbrDmpD6Te1K5MEaWLV6GQ+dQGqF3ClFN6a2yBO89dRJ9pBLJngs6QfhzhxnMNFLak4soon933C9TrEPRkv+SlIyNybPGZZeApcBNIi9v52fUtbQO8sBtpR9NzG3akPQrja2TN1ZE4Qs2cX+aFeuD1YkJud33r4XS5Rh0Mk20WBygvuc2iMKUz9dVuVwo/rRA0iE9Z2m5jIlv+6KKyrYf4nM49iBvAgFB0D8HhLaIPJGVnm11hGJ+EzZAUrrkBCletyAOmAi4SCnXfpY3ACPPBho8KJ55FB05VU1XS53VP11aAzlTpU+txFkoJFlKMkgQsK2Fx90WjuZmBREqRnQ3wUwthvYVhKaBbR+T4bK2bQ2FbiMLNUKWofpYNaoyUOwj8ZCzMmygKub0c2CcYXLPYX7how8daDAXAg+g+LVq0WaRi2TL7NuqK1BslkTHG65NzI379ogpAZT85t7JMyGXemG8zunw7nphO12bzTQkgYBUSEAu/29VmVJeELsmXu5J7E5upqHk+l+Ukv86hdpPnAPhKNz2Dl88RWeIVYSNT/npBgpecU5QV8xrs3I2gnF9Qfi7qUdpvfn5SpbQjz1nyg1BQEereccDxjTuMhaba0WyJxtWLzZQcbYAh/Cq5CNL+tBHAWAsCKKdZ0itlIjR4qqTDiVnfmvDKdIAsJEMp75Dgg+EcoAynDVrJKVKrqixbveie3REwyw5rp3veMI+3oP1zF+zHZwyb5hVD/Me+6QAFLGyFc8xIWsFwXgzbZeRS0CzNi0fvD1tmAqMhUd+IVHGkkWQlT1ysmzFe8Pj/MCnuaEXU1+R860iNeuYp1pfo08/LPk/u+2xGhR5uafc+XL4MIZfx2Kc6yGL68qOCrCa+TvxVongQZUHwlbT0WSRoC3J8zO5QgQwHtFwdGJqHjU9Ooij4K61MM3W2ehSTvZWCyaGe+pZ9CctkPhv6sR8/OX3e9a8X2Kw6RX91qisDUKhlx3Malf0c3/8tqwsjW64v6sAviQo7M3n1hRMxq+7axbo4jtc5ZRyPREZn2tfrV65rz4F/jViqbBdSh/+K5lOR7xJVLp77+GuVeEFzFgvjbXsfDqhhi3LuuYE9b1BfNJf6v9wm97uWTp8S6quB43kh4U51dETbqDTs8RfF+DGuysLP5CSieFRyaIb8B3lWWxcIDX7p89mlL8wHSi+JytmbaeSqxZCdR9BqVCHjaFgnIJI5Dwj/cEdCr/cpUjxtObrVfdjcOpc6Dx72xyxkQcy5YJquhnXfMtOibRMtttWhIt1xZ8WJ4jQ2wIkiZBOfjD5NVU9I9/r9e+YkVlNHksdZMETHn05CMsX9QYCLv0JyEpzNg5ULJg/k828KS4p6yU12F7px8JulDTo6I+iXqzrRjXvzXNNBo56HUVIPtaOgX28YVEJHk53lfaAf9mnwHePUkH835YEaPJaQskHNYJ5Gl1f+lkt3fhah+uKRi5PXV4OsrWaJD1PLZ+4nbT/yglK1vUtYYYP0va+MYaUXX9UIjmsn+i0w3axIbQU2/Cghlq7JggdHeEd8CW8qzW54rDvWdA17OJkiBa6TY24R2UZQOto+RNOT4w+fepbMhJVf+C4URMAwR8ATS72N5V59vel92ZHwkQY5CPW0mtP244hB9PWYLRKz1B3huMPca97alaZponj2clRw5pnNQHVgOMNQl829y+otB5ofRXMCeHnHCFSg4Wi9rvQvVSkuMPx2Xi56HE4UOXWMLzxex+ekitElxrR65nvci4fZCiyN9UXrLxSKd9Iv4wByr0YEvAWwwSpHDRWVYzc2lOXHxi/yslmc7xZHU2osUJZA/2G46RQnL3Ggq2a2unhv2kNIoZI/q+ru09zhWlJwmFrAistL0ZWhg7DdeThrftHQM604YpkYQnt7Jsl4zqramcSIp/tbRA9yGvVhIP2RVSWYjeYEvLsHybudMJNC2C4n2OifKYkqgasmRK/UaJ8Amn8p++yt4M7dLoJ+uyyPP7ioMnpnFN6hkJbmTo2nxpPF1fk0+q1iLUZvNtIJ2jily2yTY098dVCi7XRqHSF2NGfdyAA5h1pIWw9sm3cHP59xxhy9m9u5np/qXdaTjeKkGhXGD5DCvGaTwnBJQDNcDpysXTZfEyaXoSNndfraoAKOlFha6bgoIeAh7ItJ720bp3IpUHxqnwKw+HIkvWmreZE9RGtcn6URl427dhiopYULO2+HFzXWtB4VVjSI/ZK/J1gCA4baR7NmXpZ3aKzjVxXUcoJUU2AAw75pJ4QZsqd3GehejkTWPWB59j6E4VG/upwfOAXG0a6N5qrdKBqoWwjY2ukXPMftaHllmtkBt01QwRg25dIArBZD3/hLGz/EGsVxGriX1g96Rg9QeTevM4LgEFkaQaRk3SYdMmlk/xJ/TVWw7eb5Cd5FfA2u+9rqNfSI9oImy12xDBj9U7Yn7z37niRgBeX1QaKeUhN3Iv1Cyaz9//Ff4uj7qp0VzSRK/tR2hh4E+LSt63ZkX0GDOi7LkjNrWjwhvtGURIZsOYSt2pdBhRg8q/3PF1YPuTo/zYC3NT2V2K6g5sulNNkebf8rX3wZ36FxcqsB0Pd8pgOjGJdwr+wAeUwYAF7AoNGPyrQ8S4Q1foWke2EJaJzSU/08eQIjeYp+vbejxYegxXgqNwYqSfxCaWPMufpnorJsQu4UcLD2KO+qi4bZWz5zneJblPNBKJ+goDsIuAQYXivopqOSWaVCM/Tklr8lePDaq83LCG4iMM9i+EQxMi14Lg8Yq4cNgJFmedKeZNXc6Had8PWtC6cQbveke0ufJBEDPtI38bJeGBc+iOTiXSb92rRpL02k8UwDMqzo/j8dITTW0qTXY5vm+cr02Q4TJ6UVf5TuE6YJ+hSyXVFfbrglsldWVywUJx5GqJD1567Z3mOqpwAj8irxCP0pTL/n25kbF58keJtSQudJEiKPACL34EqzfZH1EDA5CXoCpWGiLToTkoXUx4RS6RfshFYC2A51TceiJc7fLDVI/vGYJf7E6vE36EgWjJUZRP+devt7SQj86WJz5puUBoCdZ380XSYlJxdnYwoVTqClR99Ov2iF8K7UZWdA0QWuNz0MDfshf+dO/bENfNUJhIGyZAx6Mrpv+wLQNVsRN+XdNCHwFy5bmlFPI9PzkVFyJ/sdTMbT226ZL7D8ZHCfYCYMDN08lbXQnZmwy6rR8FCcSIA3VpsEKPxvGjAKtNaLr4NccJGManLQrGr4Chz/Dnmmzagdrc8df4lWJKxem7KLGlQdepGMoR2jtLjWIL5E700A5w6uZuZuWGVgv4MElHicqGQwUaLU4i2vcLqNexSxOvpL0soQ8BaYOlMLijxMsR1Kbs2fOJjZ7Et9uiDUNusJ7Fv4QMjuaG3TrZB/
wGBstcJAwhfZa9qxQWGhTTKqXxdyx5XZ2ephUYF5fRjA+0wFvk93UTQna+U92hwPU0KELVxyR1ij7IURSdKOejUS/sbj3NRWQOauA2cyfKu2hy6fq6VsVHekeSYgAQnzIxZ+OC5stmPOTYZVmL6eDRD2Dp4a8f62bCc7kx2eMmU82m7mp8Mlt59f2ipbIayl167msIpG2i+R/bv7o0pl8TEMtdRlo/GdRC0XKWuI6iLcgWrfuwFWcmDrCY//PeYCs9zqSspUg88HMovzOhteclDPcNXGSYohdsOseiLSaZYx7DWz9QkBKT6Sg7LKO/kGTRqCkLjngLxhYPbCKQz70Al3oL+KWXwpZC/tQOwD4DBzBqS+0l1KgyncZdFbf4x0/a1vhbNk29wn3pusR95CpMphKtGMgZHf0pzcMYyz8nI2qFo/bl2gMB4a5yygQIa7cRHi1UjdFI3U0sWK003WPlk9DP0o2evUc+EmcFeL2ZRzYGwLwm0nw8xMF4DewJs54N7g6Nk8dk3JAto5vkrCwAewyLCs+rSkQRjegPXDUzWbWaFXh7w9sQv81h5ZilGQ4pxG/sVeUqoI/GxSOIGR6R+JdLeaRqfPNO8RvkS4ffcK9ooUdKUyIvEJb25K8uiKPQfP1rNcT3K+gbZ2DGPvf4NZ9ViSKGmzh1pmPZjOqbIJrbs4X56Qyy4gCrhN6h1MvgyvlhROEZYDR6e3hynHWXD22q289WhX89sM07pS8s3vdCRd7jrrgnNFOP1i1psf7ntEuZphbF644DYmwAsmkaJuQD1hbyspe0L8IzF51fsgCk6Xv5z8luRCi5dY668iLikcdnSGMRuwwnInjTEdtWGZppZyRKgHvzM0gv/XzLcUMa3TZH9CGPoTjgIxQuo0eDELju2Z/k8s5AAB9TE1aK4lTH3EHtG7fE/3hLAIyRAhwaFeA//prvLBf71Uno9n9SJiroEs3iEM7ghE3/KumMPNg1nscNztWQHoj1EIEGccp3SehaQ2tgHjXJPNAAWrRUpyde93U2UV5qwVc9gGGb0wfl8jM1AUMD/EUD9WXJ2Xc5z6Ko59+WMXgbt5QNnvqaRuv4fHkWNgItlmOO0mq3LPpeQtN3e8GB2TScAG8+QEqzZiaMof2x9HE1gXSPEz+3PzfNjRwHkmHsP6k8nB+x1YBC0sTUQT3pL4ChGcQsNT7ZtBMWCWac++1IPV00RSzE+snsw8yyMXPZN0YJFHuwF07Rw0JSBjoJAzPdopH6AKMO7S6jSxAWTP2oSbRwAnATeuHSo6GcVYTsom+RZmws5lQsWwZwluCSZokgSQ8PWpFy+krGWzvNXovx9TYGe8xc/Z9EW7nhvQEs/8flewqJkNl2uyShrS+KahYb7Xsu+CImlrGLHXb92WLq2RLZm7kpyh5KhIe7xdL8iY8+DQgrteLEr5/UNhatAYby56PDynUDDgJ3KEuzZI6PTYslMVsHnhCcgGAbNagDGPZh2qjeL1jrgMv2lMZ5fj0PFFBoI0R8M8ke4uKjfUtPOQnPf6YKJcap7GAuVKYu0c7NKtOFB6KoVnOixCsNwOka0ZP582fCk6MaOPX+rmgq5lITGLa5qqxwcw+s6MVMyLDJjwMWfC79ICxeuXDQamsl1rtRBy1Gj3ZhEHCkRa1xdThX4t7fByL++uw9BL4Ns2vGPvV1Vp/o0U8EPQaiKPK0SEAQeO1jPNXfdUOJfA83x7Jm7lyDwE9kqykzglblHnI6YSx0Vp4F3JnzC67VUCta1jrwlxumqdUh+EiP91Nx+2manlK4aj2lpu3n88/k8Sh4Bq6KcgTa/dfkaLYKNawvd9bNm+HSocrPjzGi5LBQwwtFOpgtfR9tKLn/up74xWZnb/uISL1ejCjoi+heDW+jjQ/QYfEqRb6DL8j+iVJAlOvFX6qzrZ+0K2bP/yAO7kgpK07jVe6MEWGnaz31+OLReHZnPEpivIHrRHAOWPRJ5kFhViiTXSkWUKi2gvMUt5MhyaHZ52BAjf+0T0oWfno7kpMT2C9qGvnCGoEnNCYZz1CNGS4AYreq8y8XYox6nEzmbhlflih8st1XO84CmRJUenTXjFmtz/MdZge9x6cAHJpe61rSs2Snkrq81ZT65vexewBSq3HH30hKslbUJ9HK6COZ135FUc3pjCukucZV6naEpt/qXa5tKRU8N7b0PfoLbfjYL1gQrDzvjyAbMDVyCfVIXlFzrhRm4XArX7llaAL9QDIB9pdeFG1aKSNGuApZqA2owvT8QfwoAksQq49l5wQFrqS6Bz+XJaEY5emSlKrxrjvTRvPPKwqnXNt7M/twD4wHiINdKhLxrTDlLCzooJ2FdcM87eDJIhI3dlp45+WtwrFOGDQ5nNHRYH3KHzjr6aZfH30LBIEmUz4yevYTkIH9o4gy6qiBOS8pBI3hb02M3or5m8l6lnobRMElThXv2/qaTNJLXUH6mwX3fRUBsKcTkaBu+FCww+/VlmN6Y7ECqd6kEMluFJqgJjm0eDU0Dqo+v4RmC8zQeOnH6vYGSbov1qx7V+Y64X5dVTSe9954hdfrgbSCfsfxgBqqjJ3mdR2jN8BlZgc64oz5w42s/P54fROV3/kWwQFGfi4RrzM5Rr1tNoRdyCRb2goCV+lWN7h8FYbQVfNpHozvKszAgCliai2xQUbBty1wHJQ0Yt5MtALFBo60mjvUzcUY7kO83CyNx95aK41G7ST1I6vs/yUhTA+A8faaVENCsXBJtDnTMXPs2QCBrkKK+KOJ0ojmoBo3hWySpoqaiC8lSvevOd6T2ZA7xkB0sEVs/Wpg2TeMXmZRFIjD9e17/HYKeSmkAd6T+FxILY15J4od5dQ1QqDqh3LQvXHalUoXlnwvt50+ThCkBNsGazgjxx//DMB2FWQZzGOt2IbhRpihXq0RWDn5NXH2LU5Ta0OO/TstsbI/2p9EDZqBHwtzhaPzdUn7rmOOCzpQMqtbjMXl2dNQYsVLOKicpMT73Pt7ANZhnTHHDkrxxco1ND4Bxzat1pNIfzTCV7RMz8guwSmA/Uq8k5+ND4KmGVCoLaOKtuEkqai+ExAfB/UdK2dOQ4DdfQTXKwwU917wzWVzSH5dTq9rJ89McVc5WxaOm05O51+BFVLL9z1g77km/3oZkxCXq8cHKgyqGx/AVZiLaJms/5x2fC+tvFoS1CN7U6wli05ZW/XK16CqwfQr39NcTAW0ghi1WTy9YcRd/zdy8oqvwu13XVZw9RTXsgBCgAq098zNa3M53De4Lnmnc7wJXTxcjC+Pmhd4voK4F+K91/A0J30NwDF405AfGVCUUapd6Q8mki1euqViUQzsmNrA76GnAm6D8KtDspqg91izgZnqQxw4GNLjbPDIcXLmOKURcg8djpDUxCcAi1m7PnG5G3tflLPnVV1a1DX2ZJlQDPbJ3bOWPgYiXi/u0Al7/mWjCeS4M/MPMsCm4iMvWBKOnGChtj0Hl7LDRQAppnayHpU5YRGyOWeABEfeiMB56ziOZc6C/a1parFUjvuI2xCM/jx7bbjJv+jcnm+MNSAhXsTVm11L6wCC/A9+znImiCCBzhdhTsy1HwCG1PQC7hbD1jQ6bE1M15mMrkXxozcMoR4D9U3qwbBY1LmMAAo3VbI/E2zSjzIsRBdLhdlilrIice4fEbe9ZJCDrGLSe+/r/vm3j3ET6MBkX/SrNQA8jnakUCVJqvTor/CMaF09e+4xvUDRFPr427ymHH7lfzAiA8jVCZsGrkdUpIfDIxx/UGerPpBpiz0QNw9B/epZymIJNiL656Di/gBaFsEtWzSZXYivH9ERvDqe5yVKqgD0kF0Ga3UQWkt9ZkImwm8QvBugVlg0dzJmDHi128MhVAvXD2iBuLm6o//1DmRkvIRJ2WDiXrtocFSGPk+jvbyy8Raq8aBjMwmIBVNjZGwuVLwd00woGaLza7TVZXTRDxWyBQHjTDnFv+u1z3me1X6kS8Nd46vT8gLJpqAy2wGE+9/ZgwCAtIwOkLiGe7gXxY56hr1oM1Awy228pQoU3ZA1YOeIihDYS8aEZKMYbjAzHWmgP47OWGfkKLWiSN1cY4M9RhpUqX3ul5M0ZB
nSs3isRRmdssZj68W6GUD9mtfipxw28jRAznYp7PjsUElT8Wxnkj7KvucYB9LoIgBHM152qO1cYd0Cg8mddJEvp/hZl0LJKXTFrxvP3rqKNocoG7M0ruEF+hRkBn7eJq6eR8Rsa1HN/QZlMMMY447BPls4HbdkEKXchn9IngE6KYVp18wZy72keXAlFR09acCXbBctzpJLKt+mwAFHyUlq4hiOQ9lUi1II1QWROX+6Y17MDsfFhQaDuMQwKGpht1JeLgO4QNJl+dTSW9Yjb6WME2WO83MFJ1ctC+l8gOylMjACxYTO1Ian5Cio0PgNos6z8BxWY8T527IFbS7hbDTtHt0ySiMjdOJiP12Rr0fYAy2sumRF5ynbB/hJgJGJzHMZwzARC0pXbYB0gMqLJx5SmsMJZYN4PCfiIXWiPNVGnhLdGh5eLjilfRNejcyA78dKkvVo09VQWdwUSYnuqkJoRb4XKD7E0qMqAyNRaZwJXJUTWxtYB7E1zfL6xkYBAPxz2GeSeYz81k/z6MMS4gwoIkk22iLAmyuaOJsH9c5dB9kwALcQfbIMfMA1DKSRzA09pTM8A4ngy53lbar8Fjes+BXe+z8ECIXxV2Y0VV5u1czcEjwzjVUcm8FDXLoO2j6afkahtgdqrO9cuNw7DZ8o0k5QlhS7LhRQgsVmGP33+pdGeQZsdZdGJd87I5hJ5LlOLSj/yzB3eL7EX/XKtSoFA65CdtvZc4YcHhRfYT3s8O5x2nFuQq6W1CkfHcfDCqDWBDwgqzfpXr0esvxzle3epgY6vo05x4kdpaXjFnZh58hhC5Y3Yipyjg3QVxyCopGyDGt3raiqW6RDmSMLaU2sqEpICB4sawYvzxOY0r+i/SEvhHO+9B41PN69rY3ECdy38z+4bmxvGmt02ccyLnW4++izWCTpjNjmaBjpE1vp93HS7BmopgAyRILTKlJKEdfWVjlbidWdklqiH4hpgBBjjf6O25AkeB6qh8tci4gkyxnwfuv+TOjsIA9MNN96HRMnUyIfqiiiVTQicbS41iLcFf9oOIiVVGumHcZ3rk8r8dnlrRVzC1vp+Rehai1mJ8RGNtEsgRiNxjPOqz2UHY+OEdhjdWhXqQTytviEAsmEar8Z4XVF2GNHztA04IhWnFpRlSfHGH7tts9CBL1JvP5VzS5xbCbsz5mWEBzmkLc2/Gy5I1peWprftb0wL0k3JI9FigWudNNoFEpofRfZtpwurR0bOncd2qqwnwa3pQOBZfK36IGtZ05p4A+N+1V5/2eW3wr6gTwCw22/IGJi2XhUrvbVOltk5Yup4TvfkdY4IUQgiLEeLpNminLxzQQt+ZlhRM8H3BphCQxW/soY9+0699LZt2UnXKXXHOjEffnshjUarMOHxGQWEMOKsHRZ88sX5rFJxhzSZ+se9w3jNIdKNVHSzXMi/xXGmA68d23Ndzn0lMzEJHu4qiS3TUbSPND/ByRPQNsIYmPG2M6bkFP08wQ1g6Dhq3Vgrn6AxLCgfuVC6epQHWg0dw7sTSOIEEDuce6+nSjRAisqM0rAD5GHm+2YuCNzxdQr7B3t5Yseqrgb8w/wwzQlXgqwYPQT499uv4vZcTsGo2Fu5auEHKtFqVT1tuMn0mRYy4i03jtPTkSxdxbBesl17oCbuhWVw4dSEPL5pHlvsNEzdw5G/MXJX0/jdmOZ5vYnGIE8ObTJ0DBZUMoxdTT7qTm6i9ZlTrFviT+8CJHcBKZEMWmqnem00aN5I/GAFrE97BzdqCM1v3D7zTAyDl3RJkdsYuGiBDepiTMOz8gSvXdFnEeKERnS0GFka5OzQsDyS4e6M3yAce4/AOXqrx6sybQf88+Q0aKQC/kJFzA9psabHVyQOO79EAiN1h5G/f/FScaoFYWdzKhtuGUZSdOujXZwoVEbuqy3e03o9gamIC5YimwypH9ogWB6WLoCFlL8MaqWelcU5MPMBe6V+id76VbQNGLytFqEj69+d2LQNrRBlWn7cgCU1POFsUjbH+MFmb8bTkncoKEvAYAgkmxucrHXebpbuVBH7OFdUJyhAjgHw7MH+CJY+cAgmFBcRD0+AV5kOdTdPzTU3joA39lnQhCVcrN6Ak6ztEDH1oL6Pl5UZftnHEYJtl91VH+LtKycr3ZanGBEK9Wt3YtHNBskMPrTEQIQ1MIFpoZ/1fof4t07iS1yKsX30cEgDoiy7rpo1l30SayIFdqsxg+IrXxjGjwL+vQ/oA8Sb2VGjrNqiHlsYILfqeI1oEdwi6CYkN0NO4TFYsUuJCvQKFUWnOX1L+UijS/Te19d7byW/ItSw5toprFACY+xDlblMiKS9XTwB4uet94xyoh3PZZ2wZGAA1NJnReFRRMPHpJuA3/Oe/bhXWdSMBNTR8i3RUzy5p/T/faLKN4N362jX9Tk+DCaxaLheUN2x7C5nRjG6jArOIMokMgrdBEgY7gYaURSm6CPeSwXDbXMJ7PzHp8tAT1+wtsmLuNPZWQGSBevwT1bjyXOjPaAJSPhZWolOQGcYX0mMKv8HZnv83Ykhe2AJSlSY/CiF8l7uh89mKzjlZsFeLIstRFg14y1yNHsBhyzgy5J7F47p6eUdI9b3nNyGDfgrqwD4CyvuvzFUu/EEhSd5ZUlev3a87+5YECFAKZnh1Z2igCjTE57KZHCEZ/ec6RH9XwLUluN1zpjlzI/TWdQVRCzw5LaoaKIhnm7siMOJSXi4hvnnWtLYnLDDDfQwcM/jUYQ8LzpmgueMR4rPa8KmIaqwnh85GbjidH6I2wOGt4asZO/0F5W1hbxj5PpL/vr0xJSd0jcSh0nDa3DCXIluqMw1eGl95Tau8eEt06vFek66wTTUgXyVwF4OUs09JLM7KRRKyH+g4AZgJa3j86oXKJhRk9Oyumajk++OtVEA2bvpfINOQfX8Ld6weB6RVK+i2ZkuwvIM4MIDDw8w8MOeu5z758RS1tFCUSX7ugH3nNpUTiJOgqigYu0UuuNINZBNO5CEgDNDWAQ54O+D2Y4bA29jAhfPyf8YYnHByZn2qw9hH/3xjnZa4Iy/PZysq0/69fBWofUBJpCXClyGc6ZbQ2iMYys+dik9TbJbQhHUDZ++g/WvIql7TGGrKL5K9M2ScFJptkfWv4RZAVU3LYhZITcNAz3y97YKyTFjOztWaDtRRTL5iQ7PodgBABnqOWD0bf7rFRU+VU84X0gm7SXs/Q+tnpkT/tjkNS64Gxnqi0FXtdAJ55gew6RoOl4f+YwYTN0tQrN1iO0QX6WKtRLNDRjhfX/cs69+hOLlskcE7bxKddropWBJ2Ch5MheXxr+IiQOyU3Eil1JGQxv+cXkad4mYOhscz7sG/zsUnw8EatXkZ3tsgYdv8aQd7nw3ZOIsfOar8/EDQh0aJQ7SX5a1QYCFwhYC0lqixRVC6gcposA6fO9hX3Gt15pr7WCEa40ZhD+qlr7mtTahK5ztLLFTgYqmGMRw+riH7dFYa46G6O3WzjYxhDO6tlynzxTudip7jBN9qN5mcEK4R+B8R+XI2mrU7CcXuvnWVAz/t/7B9gubFtFZuyjt1Jm6qfzI24ECwlSw306RrMaXl7JpHDXGOFtMf5FwQRG3iFjCWhQLwfUw2FBq08jppeJJsIwnWjnfr03z/bKK/USSIExtlEsOFIvd8E+d07BYTSzci05AZgEDqJqIYNVLYrcdxx5Uc77pMO1XRJln0AHSU6kQwmS5S4u1WQFQ5elHKJlCuEZV98YBN8Ik0J1MzesDfuJT2XQjQ67EWKCONWtVTWxAP8RqRG8gvIiJqtN+6u/Rn9s7kclUQ9WiKKBfNQ4GZl+sx7KKry91FalzrezuLH4GxbTKkVuc+C4mx//TdOFFeSyCbd7ScajeOZKjX/zLymGP0tvhzxNrDqzzTJaFvmZNi9U/7Z8rMIEP4FyqctaVaU5dML8m6KSLN2WuIKknywr4fUy7abyOSITxQRvHfAe5JxQPoxFrqsenPQyYFPqyw5/92xOFQozAd0cz4ib6Hdo4vS0lntWTNft+44YXC//5cAHCjbDXDpVSMXN/t/H2zLrVOfqyGAxvT27WzD4eOu+b1QVC27kR7pIRk
DCoyvegb0SDRFmfO+9CPRXc0OrzoqzU9ggXFgXK13IGn2Hc+/N6cuCUL6wHeGFwsv8BrNwmEVPuf5MNpYmEr5aw1HCSn7sEm0szzeaJh0YRJHsYJizhJMZYBkXmIp6unm+CR8IC51uqzK4k6V3EL7lj7e/qETmwRC6Gko2dBZAvQ0IkFrWALeK2TuZXPZx3Cu4777ueaWFNtRzdURBplqHswuZI8UVCkiTj2w6+j6DIJVwvmL1EeCwcCL2y6e0xDAj43lUBa+nKApWP6IklMsQijhqJIlQIb6adGm8j7ZEaF8QJ1fFHacY70i/25JTn+48Q8jr12wKz+RE5ASsHmbLm5pWSCwVfDB03LBOuGO0AIsBKzWWElxRS8KrUo9z+dmzPb5qQMVqFcmv+Iqwhh7qw2P6DhjosMUsd/KCz67wSZ/zX04GYlTHI+uPp5hhx/qX2gjDFvBcnChyVAIAEBOPJZxx9OqiaSBaOvam/ze1MIh06zix5DYZbCfjz6urmdvj4kutoE4jQ6L42uuDAiyAzuBufa9d2G49sHZWfTWQzMwZLJX5hsiIwcsghw19T2bqb9x+sGXNcR9jDxK+2OnftdpGxms7xTkXBszdcqPsuK0FlOUP8E3i6TvDrikXorv6NH3ZjC5EfsHhOu7/nbdr40R/NJHUFozgKaJBCI28xUO9MhtMxAmK4ycR7LX+N9/PqEiwavxev8aUnpLIWAzAab+10ioyFLfSPUnM7hHtw4bO6lZQFHLSo/qCmUQIIxV3teTAwG2tZ9uXpiItHIynaPwIVo5hcHA7DbW/X8mPxcfK+la6f1Ta7aRZIeRDJXaMyZzuBiLATzYablaoZALYw9biLj0h4M2ZSjZeMK6AxJRF2Nn85x+pgsekyf7O6dTYnW+CH6NUyFQ3+cYX+iXHpuS0AWXhMnZy6ynRgImd2NySIka8ov0rvhEbZbdXvfsqt5GXpxPLOpgSyWQeskDDvW7H+Ztk4V7fNLAd2yMnG9dKUway+q5BgfdMJyncgcibX8fFr/jgv5cbOcV4laDllXpt2cAxMBERxzUBkxEmklRltY8dBt4CwI2CVby2uqbeb0qRqHCFAIW5c0xqIXLuNySbJNk49ce1pUH1iD46JHLdYPBsXlU1NDz4jFJ1ZK6Fhhxk1ol12MaiL9qpZrjvV/hlLwPb4dwMU3ddTbPKglbygSa5NHF8O0FOQyug2Z05m6S49/BDKA+GJHOac4Djzi+KhHUU2kSijNuzgKnXK49L3MWm3oNl08RzhEaqqoQ9CH5pIplp2A745y/aMYogY5AoG9MmH5ejZ/bV0HJa7gm9Z1rYYPWhS4i19329zokfWcky/IumsAVaPSxdfpuFoc7RAOR8tWjW32NeirGfrzun67Tflx9hWCFaM5ltgf0p5vqGtb6sresGzzbqi32iWM7T3bfToRIpYe7CetYEZHyWfDhwHAeFD9BWOoajc4Pc90PtoPJrlYoVEARFrVKHfePtotfLRwCmabQbR4HJACUeRgYWCpfu2Azj0/PsZOtAXfUFwe1P529NCs6gJJgQTItxuHdVhKynOKSI4yR3eHEBW7mJtzTgMVhtx/L+s2C1dBiCB6lZOarf5mAeR5TIhoXM8LOyykAVPnngc6pafTdJZGAyS3tWcOJGPOp0kVVKoEyBKJ9sqn1RoY58LN6fBUirtjsTRfX7rdngIakJzbq7FAgb+sVCVrMkeVTjq/g75ZCONomhTANz3cDQsUuZLGmeE+M+eLQwcpOyTWGg5mLzuajTAckhAPyG3iMA0NJ2+c+/sYRrcltIn0Mh1f2DYvUskbgVgXS4p1kNnbhCICDkQgIjMBc1mwvm4Rv7+CbD6if4Fspa3DrM0/hg31t74SmiEO2V4sttg2qPczE9BOEkXBl9H/oTHn145f9IkD4t4nKfb8bwbJmaNU03sPO6zpSfCCXShJ7TCkYUB6tmixTwBPHXPnRT7d6O9+kOeCheqOVCYnSH6XwbCq+hEySV2r/XmQ2wODx5fALPfTk7xJ/qOfNCvt+MHBnQG4e62w6zXUCjQ2u84qc40ESpamoJzQEvg842ZPn0axsXHI612WZRR+XOYnCwEhbMtGDjvkOkVQh8wSvwBwjBX/PVWfzGSn+VPwemLOIUJeR/wKUxoXG/RtoPvFg8ERvnpn6l/c7VXm4kZ7lsRLgk9DjLs2+UblfFVA6RZkN6B14228cJ0tENqLEdNoUeDnis3TiDAWvT9rpK/pO2tNFpY399ZDhWexBo4+jbV5E25QpirCfCGcCkh8l/CX0GYEISUuFuv0WHj2QpMIiSWwOmNQ8wRxOhtfIZm4z4gFW5u+/kG5PNb6ObP0Nq2F6KmZ7Q5oz8UaByKzABK+ua3pcOSTgE1iuy9fhsy72zZguRJFOEoMDp2iHSyQdo1yQKf8SazGbbHI1ElvriNDfQszK7+CHRPZ8x7KlQP1mbXWD7FjqE8UhF+BQsmOUDYMUpXk7BGXZKNgDdk86UjZFWcOAO44rKJy95OZU6H4koagIDxRvdUvdOEllUREijeHgMOpSVBmFsHObjidSgq9Uy9y+MhNwu0NSLNPV0O7FGqqeSJhxOWVszGqE9z882/b76nW1fRCEX/5P+46yVKwIINs+WtWZk2RU4xnoVA1Qp2ec/hxniaqUac+05geEp9iUdny3YNhW1gPzhQ6m8XV1pOZC/uzFnkq5rlG56EZ4t+1B0CZNqek7rgQg95MnOoURgYYn41RSlHQ26+rIgTtMPg+AleDqEgNTy4J869NjG60IRwWygBZJ3Jbpy6OYBj5MIYB0KxzsnBRkxbel5pXJsAHVhbKz7sXQ0XDY/x44Mdqhr2+EoBgpimPczN1GNLp2u6lTOsEf2ev+SVJRpArp9ilsQwKNqkKvjvvQnjU4Hc38rLVrwkF7p7f7Ov+k3OabUGq9pvssGtblEozfkB1zSibXER3Ld0+cj+oKf9goWzZPIytp+gi8cYm6kc/Sgi3OUn8PNjO3bfmKzNBSlaAv+L9MEEhZzAmin4pmRpiKv+s5AemghJHCRFGzSkxzHXRyT+cW5XTLbCYauYg5h2nGOlUAr5ekg4bHaPu9mxqfFm8emVyDevcuMIZHaQtckOZoPhidlRhTLWnFBSigq3kqpMucNf9WtqrcKTyUnoa9BRCSQ7SZwJFX3gqxFtjhe9dhiY38fNHAQ+7+vsdOhr8kmckOHC6iUEuiYjyLTl6zLDZAiZSeMQADZwsZ2N8P34IEqcNq+A1rX9K9rBaBb8QJZ1uWKGghFpD0ZFZlBHuNC7zca/kD81mROxgM3faLjEl9025GOsrCD1ZxpmatrUM5W290pw28+kapGB+eqVvWL1DYCgxWmtKtw293sr+VoWoSZ4W5ftDTA4NsPBnN56V4WvYo7lOEKw2Cm28bC5McWHD8lwo7rpLBzkob8Xdh73baUipoYLWX85zEbvXRtJwhau/2mPCaDHuvUISPuB7onSyI20TT8drOOqBLYMuIFwe409O5JnXglTG/Hnv2Sj4RLuBTWjiAhuELk+yf2SE/PgLfcE9vnRx1a4O3PCq1wQ1NmDiBDKW2uYRTLxsXGNB1/rQPjYx7Juc4qV9WjQXzmRZToR3zyHq29OoAgpnaiRaTNhExEtuT5I9gyfgHhG3xejk6ZRqULPk2wcE9uvLf9ki8z9zdrrsDB1xZL1zRWrgwgyUhrDptZDh5SfAlVtIaUPea+QRxMN/rruJmNdPCLRJj7sPLErnrExLrdw62EME54NFJpvMGLiNpyAwIPyIg8pR69zdsNxo6H0Ar3A+Guge57Irw27xnhUVR3bk5Cvi0QON8uKWC8jXEr6uohDuHJBKHpkn80sDeiESUf5+Cl8LE3Fd21R9ZN6/lMXiG42k1odQQ5lfmFZBUpX1oB8gKdTPpyXr9gwr5U/xcyhXTAuvRslqHPc/qjax0KGRH/STQkOjlYPkdDLq4w9nqlvtsGcTViEVnQSprlkGMIeU5eg1MvpoI/O+0vKx9YJGxCxW4ql9m1pPJ0sJgSOSIF3qQVm1IY8vT8GJ66Rub8QMPo0yhgJbb4E/8MupmiMMlI10stl2AH0VcXG+
KLm+sAMFjfmYqyOMsT7zqY6zaRyAsbO5Cz3Mf3z6Qoo+W35TcFU6Xifm+hvVySKaofPlCt7SRyVeUwAFuT/AIQF8txsbQkGRevkRCGQ58+aKwgqomIOa0QolUbIP9ifxSMaaf22JTLvoW9mSEfv+h6GCqe9f2kU+EzcGiOUuaPpiX5suJpxOcjFAPqe4gzu0S8CuNos2qUbBkIWCxpMOSq9w0qKgMDBPvtdxHAaNJFsYWg8faT01M2ReaU+Kg/ZPx6fiF0PjnUbCt0JMO6s7ucAwDcVM9LduB0tYPNzLXUPOWCgzMX/x2HxU5SI/wXm++N2ggWaS67AVSvLqOyPakbBlRt733FhlHc4+ncR+OYy4Vyif57rwXhW3/KiFdw4qKt1z4hSIr1igMgoEi7aKDtuCTEi1UhFBnG0jtJLyYNNjL4QsS1A5nMhGky2PUg2VTYQBfOyC/P5eRe81asWws0SmY+zsVwegnorQnwFgJFsGD/rE2munUcg7v+PXW3cMHQJ8jySFgaIq2bqud5rdtQlqxEdCTlqHgRjlDNsSZBvz4tf+YayaQsLbVX2Se3r3A/HFCi2f17Xl6uNN5fopDD1caQPXA7KzSOacKfJebVQhNvgsbq+Bn7Bokf4CiKMPLjZD8kxjQqy4M3zDRrUxUyeSLWMcJ/ZJIXjWWktVVWrrhFPDnn0oNZoMrSFBspmQ268Ix3fgDz36DT/h+hA8BZLWCeI1t0GpoLnbSP5YTJRomhM0BIt/aw4mpn0Jt0cEL8K8iob53mdr8hJMmCApfWShEjDuUJUSEOb/C8D/SOWV30uMytsqDrmnbE4MI2HtnZHpN7c//yoKsg9TIJ8NFxkqZGRMinv+f5t3YJRWToDjmThKq1RA7y8463wsljUHpyzNH31zEQECsGnBJdnA2YvFQqpFunYe3euYkKTZBPRoAvOxSSUTySVLEgFNA6pzcF06fkaBkaSo0z1a05Jl6di6QGCWRJnnp7hVGcr1RsbJ/GdHHSIWimcVTuTlGiV/4Bj3YLPe2BB/mWnl4nY4ArP9iKr7Af9/9+U/cimHEqE7/x/Xr32RqZX9MZP1UQDm8KlhbfHEB1L5W/yMLBu+cREpQDmvTjIC1pCd0Iqrvkmme94eCm1dpjxfB62dzk7uMoc87EmZE61QqSX+bij82EBinhLFx07FCvkSGLDXpBrhdl1Li7ZmpXYmo749WXtTjXWFIDIgK9J5deTy7u33mVeWIsIS1jQJZGYZk3M7k+kJPuvFAmfSq3kyaL+BFKMePqhISUizcFyhsgDWBQdDL8eIRqNbdlwPFrpDEHXr6Ijl5FMrj2UKbJY2TZuD+nf5+k4aXBdCUR0KQ2wVctuhg3pXIoq4rhKKzIMyVO6oYMFiuuoxBIfbm0sBjTzBaxt/+4+vUBIkUcPQh62OXPFJ5V3Ar9we6CKBNcDKbQ5+eV2g97gnHPdIcqzFhdqb6CagsCvNKfy6HonL8zIaMVScckKIHflhdQP0v2o9gqEmreslsNU5LEhrQ2bDSCE5df+JsFFZokVeRKdiLUXxJWB7uKpwjsYZMOB4gVf1vnMk94AlFHoHCUKFVdj+hO0zAYNidORyD3Lk2Zndk5W/n8O5pNGRCIVD6cNz0JJrxMtRqsokTIxje7tbNztLt+y3HIuUjD6rC9QLR7nA6JV/iu9daP5iCwd3gXDZ7I93NVwQH9VWB8Nv0/JNNQAwcp1aWtoJaJWzEmVRlq9J2wFMQajiCrRAbaWNJWPL5f20J94hErStNflyTX8twd6q94mQHM5wdzd4UDqDEyTESVrcdvWN5QMUklblEj54MvAeNUI7sf8sq06NBG5v1E+I2vs5K1oAmokADooHfvPlmNhB5pMiBt711XYv8H8osBkg1yg7bYomouzXtu78bqsvmk8voV/VncBfXaXD8L81ISiyfyr04XFsh3EePaIVIDmQNk0RbQK/Hzn4YjvkpP6T7cEb4dvroykNt1wAFGklAlyKrcDgCOeJuSpM5HbHQLkf1hwqxn+lJqdJM6S5obDgPHDOjn5HH15Eya34RF6KOFn/zRPZ/NojLiLnx65ytESc1ZqiL4KFw3khcHcc2GDc272N+8PoyjF/Cl9DCtW0zhvy6QXNwdS8jzx2Wuo10nOWbReWVvhl8ZC4Hs2fkWq3EfseAcvd9cAtQnemV3wJ/dxJYnO/NvV4S4WF+lXK7NiOcPjUC5KMtUoQPv3T5yAaKZqyHzpA6SkYuata3rp6noTcct2PMO4wqh8mqcuMvGR3+7JpSOotT4n/h5QRB+gQ8dUscV9OgJlL7N3uHNq//8WcxPSe5C/MWLWV+IjYGdQk8P803KWJws6CRl6qtGNz1E5RZfjC1FX9ETiN0vQTd8OCAQfoPJLpnghIePaLrWqmQRQUhL5RI7+EIEGzA7hoSoWYtZXUdI7kZ2UBoVkVtrWar1/lleZVqOCCq/j9wAIbtPmbs0eAuS7optmbWCqpvE9k6gglsrv8vrcogMDgtUfnz/goeLC61lu/LTRGbMUEPPXd4TcL0sHZ6BWuZBuvs4FcEii0wUV+Qelkd+IcZVuMNixhf9dM931NcUQSxmb17w0ADqN5cJD4vSP7jvMIrw5q8WvFDcczVdi5XayxrYYdfcrgBk+r09nucSV58CMLp6hzyRqh3mfvQ5uJFkxMAUmKyg8Ef3l9lTeEcQQOyqn0Wagg7v+n07RO6+wSY7INLzQCLzCwIi78lPc2ENl+wK7ZRbMn1FeIT+BTiR7vbhQR+ucHqTldfXnRKc1paYOsX2yiDlOBZ/uIOseFYRByoRUIkpn5TkqnwNQnIVyo3wt+bP4zq8dNaZIFils1mNxb+PxnF81z0N+qXPmwqYoCVXRJgcgeaj1GMB1sW80AX1H3eI9TR/36v8MYRSlR55sviD9LliHhfLD1sKkpjaEQJJZCl9QIQ/rKb8NZ8XimG5xtqQiLD80345so95Y4jPY/pachU7CCLfwZtPNial/BK4gAfn00BIB82bGuLB7QrXhzPe3n046DlTbyToipMIyJVjOeHsGWQoG6YoQy9sKuV0OCAGeRm0n0BxIF80GNS2pTO7CkW+ddcbk46wWrNaAZxKdhVczu4Md7JQMXpzhGXf0g4Q1ez4+9TMWlSoQzJ2bJNAU3BhE7fNOvlAP3EejluAkUhi3h9zZuwvtpv/l147RLWfEMREIsu7bWpRb//qWMMXF8ly2XdmMQ0OOyR+lMl8tMZ8dhoCd3L/JSj8WuYTT+if3Jqs9n/TRwTn56VvjhA9WGB+urowTJf92q9dH/qh5NGlfFB2tfZgFoWUPv4SyyNzqanzZmHNDPAQV4ICk1Etl4kkz5mq4U3ih9vEHdxD3yk46SGT+c406ue9qb2mllPgN4weuk0DpkZ21nRWuSq9d9wszSteIe+lr9A/gsu2evpycDw8p2LUKnPttcMtFUuPReVBbMUfnARJmC6HST/fSLy7b6WjWiSSAtKZI1JuPwAxUIdPGzkTUDItfofqK6aTwK9QErEBL+uTqCoH5OPWuO1Piij2s6FvdMu1ZulvoqKn/S4h83tuWrbSoUWvYC3fm9xpxGTDTJDO7oTBS8uGkWcoQJH6PSGMpFPZFrETDcLkRPoGdSOJSG7x67nqNFeBGSLzN3HPgCYx1PBzeJ9Eing7Jfb8iQ7B5LUBrBSvV6+26+hzessuelQy6LGiOgJO2s13dBmjq1O5X46Jsg9+mqxjshEhc2qI8dg2PcwAA9A5Jt6cshUx/xEq/NByroHFw7DC/FqS2lyJkE5ZoWHegZVMcdLXvdljDAw61MMV2Sn0NsIz2NnU1YCdq11nhjJqvrd+Bq60SX9cKmhjxQWQ3mjAV/Zd8ZWinwVKiqRZpawdDAr3XfzTwiTwTvaS+bWKP4PlAjBpHtpGe9tA52AICvMjKad0VCF7GCe/pYSE2U43JooSmTztYVY3IWy2nFZTzMB4rMmq6YUIJppfOHc9ZYfR2v0iiwIE7IwCUsBzTmrPdBv3qfeGdA6wH3RUvde2YhDgo3NexgcY/pP9832+XvIRDkogFRBoGpl0AF/3mvkxFnVqIAfXVbBLRg+pkX3XJR
BxXhWm+RUdmYdz/Lx5bLJhw7/dIVG1FZMlC1lzzPPNBB2shDpQ3MCiRnLMhq7IDAQ0R1ieoKylYGbXnF3qwgrMPqZocype6KImKlnVf3oJLqynyh3nsQ1alL/+wn7iH3KUW3lf9utoOP0R3grMp2btewV2i6SxfNUqL2AhlF4+iHOLCOqjud8xK3LvCKdMmK/fc8XjRwm17OMwJgZ0SCGAeINcTfkq4n64qb3kvv42VBzgflr1LTgmFOcf9Kvo7NLIjdYp6EzFyG7r/NlgHexmzqTpW3//VDp8qc3xcLLMhjDoWux6lDCqYxS8M81m+SLvO/py/G80+oUi6HNQx5V5MgqNpomHam1LDvRUBjNV6yPL7wRqtd4MmxeoyhxC8R3IzxGBegwfML3CY3Kak0EqBbLi67156Hj66wnoBuiCrn8vGhL2xZ25s58wqv2ADCR7a5zySbSO4gdHyDlOItrdyNKLS+yJm/FlYwPkvq/4AwmHIKz5qmgocLE9LES4TsFqL/IUhYSawKOtmBLD55FZYAsbRCAd6sq7N1hVGwPNXKsGQAq+MIEteBPJXfcnO0h8plCR9+8BTxfHQsLGN6xgj//5syTk+50k9S9GPhwrirUOhMRKH31wmQ9XKdzyNuo7tR2R2vB8LtTehr8pHPBYjcxKFt97Npl+yC2jmrZ/pMmPyrWz2VFthLVgH25qhdOAan7KFMdmZ5cxJuGzME/NeiIUk1q2NGKNli8y8LvMvHFup99hOqJUKvlG+fCPHWpVf1Qq6z6m/YXRiwiNFWr+FbZ08nOzepeLYUt9g9r4tZDYQCj8eQSuoelyidGQ0BeiznuhKetbQoD6bPT5dD+Hx2Z2gsC2gCh4eyaBJhEoCBF9+Rf+u7DkLrNx5MprRogVtxmzTMj6HzVd8h0ci3d1oitNaN20A2qfCgUMMTvzlUVGEjtsKdOrW/GD5VDQ9Np314YfYNpM9eQkWSoCerNfoqopKFkuI+sXTbVk/+jwSWtdORZgCuNXKEyvQWY/s2Tsk7e5/JcDJa5WKTp8J7LUO+sa17agwGGW0hZejTHijLGTZlUnxWOXdO7xPj2AETKpb93ju45gUuOaDxEpuWBK4sAxOcChClLKIap5osX980RC6lNJBBUMXT/zEuDMWemzU7r6h971wjxMkD/yeG5ZcUOl1wm7ZODTJbK2rWelmqx1JJpNL29P6ZunQFaMEd8RZpEoNE9PqPzjAvzwmOHWCJDW6uRR0iRCPGdc3GQ/XGlTyAqQpR4w7CCf1L54Kcx9SpCn3hJN+GhMmDaYudRl73UAUNja2tGHzLf72sWNU07mMoHVyB9ZDM2WULZ5NfL4kigll87wfapsCKi2rCHh5q4j/GxnXFg3OAMzUhuJO+OTJDvr9yxKNgMDL0M+MUZ4MV87bV/l1RdtTZNBUR1hbAWAKh4SsWvf6U4AdTyAu6N+hMuerw5fuFff3WpFwcwJLZK1uRTGpk1qvYn8FAeN3t3E8jM8qTgZ6NWmNb9jQDjao3wnCxoYG706rnDxhp4GMG0/TCFziHuRxtxlMxRcqcYPoN3bt7SkMat7uYQFRXE2DOhO5h3SKBl9FLWwzbFcByKQ/KIs+/YF+OAHEcLO7kRGNYGmXdrY8cddJZH0BKAwfNzsWYV6stMA29t3frf1AYlhlUjQj6jN5Boy2OOq3ghS4ESnyeZP8VAt70QIHyZQwRXd+Z8/o5mXaAObwLECp6zlhqYzdcXAGw2R8vcNx4kIJOoATowsFDh4G76+/YMaf6d+cgaY4aunE3gs7XBQ5H1+vbzs0mxhGR1QUAcC4+/1Od8XpBbxi9Q1jp85O1u6oaj16h2GIq7n0GnvBHFI3bcD4IEilwtz1j0o5LhEsLzrhY+YMvmfUgI7eBXZNjFOxuFbu+0jc5n3GqgXJuhaHA3oaaroV/akao6Ezt+qENMBii+ImWsaxf4oG2itpAxyMaxarM8ob5XHMg3V0NICgRMjRystq5pyeXsQI4WD5HSutxcUcKmHX5SPvfM4nidyKh5eQAqGklJG60ZlsjFesfbNmjVFhV5lA9z8u2omRpVy5XhHcz7ptPI+jPhWjRYGHAUFHQ3NOMDxF14l39wq4mKvjZvcgQHaSmRj7L/i6lCMRzEy2pEbrc5im6sZlDyroMxUDN2kCwo9z9m6yr2ytPEa9F9zkk+zkrFypBoZa3C14frKquaUYGPg5j69RM3Q2jc7W3jRIqSS9IFxs87A2ft/uZmYzaJ6V64qgEXjIO9EfA3mDvqMnboqlkzAPAxGGfi3n0poTpmoBjRP80uJhe9WnqMIdCX49cxBy3mk7LwsyTKkZprVt7u6xWqx5Gkhgvo1IwvH5V75wLXuvMny2FQxZaq3OnK5GgA28wzWonq5hfLqKFMrRWf+5jw8joStSvT9t476XMPvzQaoKDUaMpU7bMpbvN5xahxiCB/BZ7zagvO+jLMNOJZvktPdf+b2lae75SApp/IfgOD7rYahUncVQXK4s94aqqlXwIIkl2CjEHAUe83e/kposf7glwIj4lMkxsdLQYzgK0F5DUFTsBgtbW7wSWyEu1Hv1ZSpgpeyN3x6qpvz1Ku669Kg6m03A2RO8KXYErUUjHopmrtz0S7x3UjFxRZS+EoWdyw4ppb3TQ20fsY4AVnTV57TB0hOk7TYQ4FgZVGJMa4U+6WiQvjpTuo8EvYEBA7AtdRxubdZDsCcIaXOXuSpAf3WIlg6A3OcozhfqKBWo8fgktABX3cOW6SQ1dcz21AjNxMyoH6jn+dfIzvTLg9Zf5nTPtNe8bBeh3KulS6NBEKvhELjQpUabctln07oA+lux4AfIJ7pen0mYBnvc3pa+Ob573o03lFIfuY4sbicL7LCOw/0ceNANlbK0R7uA00KSGHb4Uw7831zKgxT3jue0Ni/9zfW3MjIQS8SsygAd8IZztqJtAQ5s6+V0D/n9wjYQGD6wzKeJdzcj9pUYaBpkSAkoZ4LYfrkw5TD0J+A9LMb6uwFj5FrpglopkkBPLmQ6Kf/sCelpsYjkMYYwB/EJ32aDFSvDQG3mOu1z65NSPjfHGPgkiyxrzLLG1Lh6meqtszfyCujRAReJWUqiDB+YnAV3485p6MP3w3zApri4UynLSkE98UA2BF7C9be0hh5HSGO3R2NjFUSJW2s0lac3hRrSqdRvKSpUEnAwC10FAGZAGRu5wmvrZjdGuJV7nu5X+Ms3v8ePK/+00nPtGg/8s7vQEYAlOCkLisBjDXb9YMb3+j2aBmfU4okELVp2XnoJMpYWzR3R6BbajwE7BOjnCF7iCIUOVbNj2mqiaQNzjh4CbOWihjyyxOzVY45NBL8vsW0yBPzpx9Y/ALWp6O26f360Y+CFCg1svhqsYNeDCKLeRt2LuKhNjOETTXU7edXzsY/J3VXrGGcwQxdPxswx8QtiooQR3yUZtJ020LpfyoBb5j6VWuq0Z51UoqJxrRnINHCJDVRWNEWUw+v9dd2Bn0mQkx93x90qipOxVpA+32qt+bvdAFQcxOkC0n8YDrkEtt9dcMjqXylhp+lA4qnYKp2Ryi+V9BHur1dQFuLH4Pg3/xeYC+Do10gYbAHlj0XDy5fS6W1uKv3/aNhFvW1W3pvIlQ85sgmYco55vf5WaJqiAAk1kGJL34s2mqz4887Fz7QMfW0pb4mjt+BX0CBbivS1MNK1kqFsnL9V80ekHKHLrZ+kXzwsZw6VeAB+yRH4+cn0CNboicleyrmAqVPkYIpvTv768dUWn5M0L1kejZB8c1US34QGXIOX95T27Jx6sz2qPTjH74vwD308uitpVXwKLv0gNqXZKp+gq3e3gy3+Lge/WTuvZ7DArXoXkOOX9TjY2kIwEX/Q53VmdO8f6bMx3YdLrSZXVTF+FMaisRfYRmiWM1I2srDukPm6XV0WI/f14wTOU1TKLEszGbk5fM2uZ2WhMpACGRJUOM+OeI3MkBDwzubayLbwJ/oU9FrUEp+fv96/rZxc3T4LqQZrCo924BbTsjwaZ5I6guqjkMeAzMvNN1xfDh3lQj2oJhIdhDI4nqT6yuT7jT8bTK27mcUKKA1XjK24oZNubLH0eSuU9
GbPhtBIsOF2VA2hXmjCTeycIocForljaxU9Yqa2/EgZyUNI4/KpJ7cEzhToLUFTPCQi5q9Ixq7EhyIAymMpF0K0b2ihhEMBu4jocMEXUWz1YTIWsZ/z7VtLKTfnuGopLC38WMrLFLhTfowXb//PyXuOKD9/+p9yaJCkvdxn2iTHg72Vc9KpQNJBjh4nJ0hD+h8lB67BZ9+/3OVddotMVYL2zcbLFcKZ9Dcqmp6AYGeLMfEavzgJQk5nEGXquF3CdmMVyxEULc3wewUaCFFjlTtqYWkY1VfM+Q5g0qA200jdEgKs4Oya/SlVsCIKIlsTloKFgduICzQhyyyzHQBYMdOrx7xZPGnKUnK7IbdR0+Z6xFWE5xnzh19uZksGJkZth6VfsMeH31Pcv8h2gT5nFNJMZ3VWrUEy7I3jy19lC9gdJuhTnh2LOu4j+oyEFQ2vE7CyVPE3nFTvSuv+FayAoYYlCQpXk+8OfCVDdrnL7H66B5tbJsGZTcw3SCOt9noYczfVEHuJAdhC788LON7SpqYAJgzZ5hYU4qdf4AdtX4pE4Wumh9L8ZuLgHS8mp23Te7QWF8jdHZ6vbR17c7dXwYL+YrKUBtjg0psNWRL73Nd5sfK6SEWkJB7MsH6X7nG1QAH8J/RB+f7Kyt3iWjMXcV2LWWNeEH33Oq/0gfnI92Qh8RneUAK9+9Xn5sAHI42xybqxf3wznYmbzDjl9SHAw13zDovdFB49NPHgcJ2L5yMvRNreogfYGaYpHszE3236VNDpv1zOtSxqZwdIRGnsfpJ/lQzX4dJReWxKayZ3SYpEMUIwxvmwv75CD6S+gjpzBhWkx0M7ULjqESNFZ7EJ+N6plHwRhs1XFReTm/RBO+QV/6OpDfE8zska2pMM6cy1WmzN8JXfU771HYiQ6jpvGEAn5qKu2Mf9VtnCysxOdvKOt2Zp44h25b5zrsGY7tRWMQhWdpnXi5HmCnKJXRPNFD8Yq/HvDNn9+eMpTqvZONDO5XIH4kbA05uQf/GtZDfkacyKmMnIph13RgZLNhtGMTetFZv+px8FFXxB+W5FTr1lx3jMMWNhyoRNZtrqOZ57gN0NLg6ooFqvA36I4xJ/LIHLcl/Ut1HMMXYM7H+rvBhq1sfN5Y+d+qHpkA0hkr12KnQuktr1nkwZdwJyNlBNBzIj+iblhK6XHv6f8b2dEQZZZjFTMzfEBWvpEWKamAWV0eMg9bd/x+uubDLpX78DHd5tKvE0bcISPJqeQJAVRk1Hhif21uTBB+7XC5gcQGbMPlNPTCIBM1UrQJJLTUNw+72649zC48wuTpg4p9qgaDm8/nzNql5JjQ/hdOidOJlAj9mEeMzZW6kCN9gmks3JUW0vMGzNi1Ee+V0ZR/sFOqcTQ6tbLdc/rAEQXUiqF48Lhhq6wRCxGYdQV6IwfkcR2EG64V4ahblUkWEf4WYAzckizijvGYaQO5J9KtchZGhOP/3e/FnvFCDrL6/P3MIqtM76tjuXsib5VSP9VGoXrX6sKgXGZbPmvwSmhqMikx1VfH37w3+aejLPfpm1jy6lHkA1zLujK8S9OgwewKXxrGpUiUkAqlIOTQA1DY3kzpn/Wrmg3+fVoWposgDLOVUrCGAa3qtzYNFB0uavSGSEMRsxUj51ehAlRogixJVzJ/j0OgR4WCrgn6P3qUtXKubWauvzR+uLWwszRoxvFcM5lCz81NtNdzeNJ9D/rd95lTAsmXpLetx7dFPqzHhLu7TgUk1fg7xgWKXJN/ftWbueIC3cPMHGfYg3nDOdKrA6WF3VD7CPVstBXFey50zmDXmFgmIJsjncQA3IlEzmuSFMVX5MPvNtoMZDQIkYBjSG0TF2dLUWe4YpFYDXrtEMFkyGxdWSEwpAiIdmlVaegnuEJp4FA6gCwoCRNNxUksKtvi62Mn971uJSCJcLliHU2FOjqLrPUbTYrZT3Ej5TjzQA/9ZvC6di+MYr3k+XMx7PituJgET8Gi4AHEPY/qWjolE2UUf5uStdtTfGNzq0Pyh6muvgLaswnTi3Z44XWPGzvegvxcE/ECa6+26ILgtfVTEptCeiFYtqWnosuxS0Eyj+1sOX1Kq3Yatp7DrIoFb2+YgMeoMyUsGbHzr5ziZ7fZC4pXFsAxWBlN/1BhLnX/u+2WX7Q12V/9wuc+ws7MfzvdD3rscJMkYPb/fuj9xzP8Ig4FWLo37ZnaKXGMYgoEVmEtdQAh5mZYt1P1nXZr00QDdhVCj8cZObknBdyBO3+UkiAz40lLyKTZny9QA7Rx2dJ6YxFcxBbhsIGkoHqf2Hc1mhsqaS6T2Gh9B/TEPtBd1I4zHgN+xI8E/KrUx7oLQSlLYeX9eg2jBeK8SvCxGBV/LiMoGqmNDMdo7GtgY/jMiDGGIhToF48DjLSpBbG5QB8Z7EDDdGrKJdfRzl9VlotKJQahij61yoXLlp+t/JZNdggOrnksaP7S3GLVHo5xgly98ZrNgcaJoZjTnHqDQAA5NpgG5+y0aU6+CqG8V9J/Yhmi9KM5AbtCxYrOWi3Bt6Xyr0fOwjSSotdqfw1GHeiAUv3hVkAQLvrAhmOgxsZAQ8MyXuJncsbdP4Araoghbbe14mbkW6yIopJAo109bPBE25Mvtnd8n8KdGNiJHhV3SdXGS/O9FusZ+3VDg5ffqOOLv6q4LkCx/VSTIFjhf6DhS958AnvBZ70TSJ4KqrOhNVHFu/+Ndv7M/mXXiUlRrntuagp2p4Jf1BGVnbUnFLoAKUK5js5APQnJ+09RAX2OJeEmdKFXIK0IIdYmawK5xtF3xnyobSCjZR0E+ipPaavieqICip05f5lmtESxSMe4LzTbMOqhsNf0kj3wBuo0GViwDzl9SE+AR8zV3fnR/UEXiUa9bDt861AWv3R/6r61RLIHOZfKs+efmC/9dBvvXkBrdmRhCd8jpTZk+No75M986KHYiLCW5PYDQz3kv3Yi2Ko12fEeZygJA3j28LgCrbA4ZKgjynDSPRXEXBdNGMQZxLbjiwPJyE2N0fX5IVPIlludwqdPYPi7xCilGui4RpWmjM+M53/UZgcqlrspABGlrN9Nv0iFlqjd6gUxVZmSMQlMWll295sFaIE3pnXkSbStzyyB/Qk+3mpSzDyCZW41IM/oyOVeOq5XI5XLDUpYPyPpIuE5jak4MJZPOdBibTylK3ok7KecYBQ4d+WT91glnJlr6DIGOz75bNj41gJXrnZSFim0qG0xRktZF0Y4Qrj2KnGBMgcU29yMjHDnODc8SXjj9SBDv9sP/1xNlIsWvpNvbOfwiroetVh6WV/cFHJ3aZ8QdW7tUFciNQhZMxmdsm8jeBJ6LH6CrQ+WtCeJJIqSOD0M/G9oErJ1iBFDLbUemflbPyVj666ASNjXrSkwvNZ9oNkWM+hbdDuE9hun4I6d2w22OMPLrDBJ+pEsazSxTiFazdGPzybsB43NHYaOrTvoBbtYf9br/5b7xLRMzrng6XeMoFLio1cSA1ToAST25k4WS7a121Vr7GXJ0+YKKhsAL/QBKJrVdeJ8ijFafB3EEWAdv1Vd/GIK9szJ6NgrTnL1EdGrSrZJbx0lGUTDt0+TGeH+Xi7M+qQRO9cpfelCVlxKumI3jvni6SS5LhotYVDxpCoQNLfQSI5/UhOF3MFSOeZJDX/oaC67oZSn44fF+yZw/zBeIw/7PX4BY5uBMppKc9TciI6LQ6p3hMlLMRvXkK0E0ywjEtv5B/1014DLgE93Lw0KpJU1+U7gjqF8PGBYE+6Y9iaKNRs65ZZBCMHXwJTBxeiLJzXSc0ZAlTzB9fL0xNoEMy6EUt5rjeAggLAntaXv+qaHckP+OTYigOmg6KP8vKeMZYwSG89GodV4hN091QD6CZisoZ4rgDY3BDUN1PwyByjq+r88jQDxy2RAHW5uVV3t239z2Lw8Ku/I+c/0phsmZU3pVxtcHCaj+4IIL1mrRrFaFH1QQT0igOwh9r6HU9sK0P2vmDKqpKVuJcDfsLDjiTOcKDk67GhgCsm9hx6TVa7CE0pkLcn813BrQ90CmdgbYK4mPluyjYA/zlOjlqLGT3dX3lh+oYUC3GrXVi9XyfGdbWaoOZ4tM/D
XDcM5SxWQPFJB9HayBnMncdzrYQVmVDv0a7hnTjrGWo2OvNw2dcuFBmylAjVttodhtnvnFgVKbAkDxrxZ3ZD5jaM/bWRoxJ7DpKkQmMRPkDtfFW7sYE8A1lk9l8jBpZtXFuCWM8pDLQRV7jDiwGlaEij9f7zklhR7pgabJX7shrsaSO8urCM0feRYytRSe0tgaQK3lLvsPuN7RE4it1MZ8ufLFhxu2292Z9HPvg84tPyv8zmCTyYpf6C7tAt220t4RXhLf8iUT298Y+F4bTJMQWf9Q4Q4RYDVT7PsRb74ScdrV8PYhAOf8adMM/iuLPP6/t2bYJrPe86rXXSSHUNadMD4funLC5M/81B+1xtAwCN/tDM2s9Vl2GlY/5dbuINqgCIkIQ8evJdRCaBB3RD4CvDbMcTQbE4uOzqbDJXvVnlohQxzZqi9QtwjIJp5wZSnLN8VZWQ/Xyiy5mVb5la0vpYVmJEbPZLa8zoYFBG3XwfiX0Mwkr4w6DG+Mk17VlU0A5AgnpNdoiIu8jl3WWIe3C594izZUnK6sBoAhWPxy6c/TEKw+mq8zTGZmCxPSd5tQpz1dLbd0WGPlpXnVEzKBuvsxJVTLO+NGZIFhrz+ADtE4C0vWHd4ZTofy8iCQuKgnXGjCFUG7ldovLM/EoCQZ6aZokOh3wla0yK2FBXyKmeqbwlnWE/BoblejmaZgxZpZwy5GzhTAO6CQuWe91PpqVXo9Sabjwa7JFvV0A73UC52PCaQdRb3k9mmZ31+LHdAIMS1nwESkrXRrMuXKodVTkA/9lR1mTBo83NchLj7Llepzf73DZWEdt508ZnzTRXzmdTUXklzyqyfH7sP9s/W6K19DmaxowYWR1TihT67RmZ/AUN9IXnKtWZin6TsL7KywId1HVwzMngcDEctrFYJnBYgbY1lAz++HhgrGAlujBFBUCX68jkiKvJbG8UTJWw3chqbnQxNxRcsjXZYdCD2qBcEkmE1WcREkWYV2Ds7mKNq7UQhbA8fzC+rb6uDhK9HS3eg7b/8LdjbwHVxI9jY4ZOhwfK9y7z4/3HjreSwMsg4cJbZIreu4Szs46Du10YVnWQkW3/AWzrlfKuJ86f8gynNlgAMliWm7McVXTEpZkis1xXUVWXsi4p/tIAAApz5/jq9lDvE3BLcMrOHI5h7UKtPPBZbe3WDmBs+PsvRH5H8lvT53db+9souwknLYVq+Hixy4fSd1PJcJbYz96TmieoLFhIrcFRvi3cnw8jOOZGRTunGn86QrHR4pCatmvgK4f8gO+v/cQb288+2xXAzuobFuTwcV7x2NCcBUAGm2bEV0xiYjNtOdaXpKWHL6auF3QF+hZN2Uhk8bWPJROfdkDonGhUx0MO/WvFjZWDX4O1EkRcjd3DZKXMc9oyTwixaPyO7EXe4A6FR1lpAvTGOmfG05JMlt4satsCEMnEfF4JCY537RexYTTQ+nJFWklRWZzxa2m53gDzIFTPUrV4b7w6a0YebM5ELnv+fIaAFnU2RJbQzqsSWknQvry+uvSHp4FvddLGuj0nNDIs5oZGjHMzr8RJVU4djgn01X1ieZ+YvTVnRsWkp7S1U8MIiNKdKqGtF3T46TXKJfcLmZfx4ANLXi226hZNHOu/chqC61cOUVbYN8D2/thSz6WZKlFWadSdE1mZVQiOUKoycdYZ3HazEuM7bDfre/Orkx+NmwozrYy+rOCqV/p/6Tf/MT1o5xTaHvoqIH7hyPYzg6lINVSeF/T3+m0GPx3S6BtpF396XJW2ahCH0xePgrO/Dkl01mW5gUTXHBsiH02uFNuyz8MspRICOAT2FtxE+hS4hu8OAG4Bgg/g+e1T8D0Lew7a74SeLnDaNnq6VeFWdPu7y4LSJHsKmg6XxJ8vzdPryTzN3iyLTdpGz5GTOLTxxbsdNiHrXpzNnx3TvFm9jfSTDsHgO+mV9yb6CxLYp8RnRq4MPhiAb63dgWWrYXzIbFpR2NSRPpgKRYHdRwEJu+6/PGe2ynqxpd40RLik0K+Xh1TRCSPhTD2h/PduYwP/CxlJY1vNvhFE7V3fKVpyzRiRMnRiG5GZd6hnoO3jyLcNdSYem0cc9q5R7gl4L78QyrXV3ZmPm7x77qOZ08Wd40fK3gYJftsJqBbOFScORxEw/scsbna9zGgVofLpSlasL7DBKf1Y0v3Vgor1iTmsxy+inVUcG1n44s8M6BD/HTG1WQtfTOxAzPbbxnNc66o9jQXOefGOiXAO57ZVBbfA0ZhYn5gIQz3v2en5tanFTqO79LtSI5zVW3C3VNzAHz1RwUd1acxuc4yt5s9nCJQOEigXSg/+OLsydEA07YK3WvjEHxtBASyC34kGE/wMEx6lZ8/TvLjooesKDkxeCWTkWsb3rV9xXlh/ADpejSUdTCrLZ3VplrE9rVjNUj5Qk1bWvcgtoLHLqGHzpk5mcWssgzqaEjf/wqeH5aSGwa4aQNy7IRTgDtBkkYYY6DqtUoS1xnu8i/wHCC8UTHHx+9fhAYRlu4VEqh70yrsVe4OJMKQNvLHrUPX4h4dK4LlUyiRbDpFwDlvt+MElL6wsToCuveZXAbCkporxwsF0WFVMBVFIh1nPdLeHKzcJYkN7w8sHQ7iyjdFu64wW6I7xSR1dCtaLuagElldzs4jflM9PIc3QZdBYUp5stpHW/dvtnnwIpZumZzdou2yDbuVrpnGGRUywW5VgL4CrvHFhr4qlEUYTMEK8MhAKnOqfv2FxCFrFcVd+GeKhhXx6qNpl0TIPA0v8UA4QNYZV4GW6sWOhEXRvYX0XN9o74C+PTlrgORtZZ8j+hLaYRLWcGhXL/kpnHC+AMtmieRRqrNvHB/9WA5cFNc5KfZywsXblWGW4sa+jvYa+CwppL2Q/XZVrvR5tPbgVvBgMscKvSxPQAQTCik/g0IEsPjwb2HE/7lf7Nl2qXvon/FId78bBXsG8c9l/H2fm6Yy8b1z9KTVLQPjbov8hVKsGtbCd1gMUe+YW2up6HF3Dp6aqNNfvENEitNjiQ2zY5t1OG60QuB/MtGJSh3pAAVVtgiMHwQfGIbqMHUIl9/WY9mqrsn3sT8eo8XC7xGE4bscUwlB0uflc2ze80UXum0/pPkCjmmyy5DeQH5Ce1XgBnmjYgP1Td2xaS4om/DbbxaasCbIOwzWz4DN9qLe6QBdxL6NXmYeja3NnKdvpJNdBXVAsmWdQs6feP/LMr3F6y//9L2muZlr2vmL53ehbOJx5prsK8W+3/5ie84qnf11szmQpiT6PVrALZUEog5/3lrZYBgAdCzyDlmim2DP4JaoqqfqFEc6Yktg0Gds/4dF0oOfJ0mXoSrK4IvTWrju3OgFrAO0kRssgtVSKu7+MBoXFzcANrPtf9Nq9FxVhpxcFV5XHkmjeyg6rTIAAv0v0zWBRHFmL5IuzhT+oQD9CVWxoAZzG8P8Kwxgh/iVKntzgTZSmIytoMUu0vwk9PDqNRNogqEXTp7fZLnM0zGg2suYAY9n/BYj81HlX8Aiw6vUeQFmckwrZkbzLdmPPvf4CPhRI7iTkpPYMs2Gttj8GdjMPOW/9oZYPbie5c0HRQtaeitbhnO5JRQG+INllSGf0ZEt3urHGE0gwDHs1FG6rXnfa1nwoK1iRbOFhBWhdNiU4bTyRzeoSUAtbwD0/NhIzRduYa0FOZZrx8MEj5RXr/gNKwxsngehRn6c0tD+sE4cTKzxv5NsveyCXAgfRXq9zzRewfcme2iHn940w/cOWlkIlKqT7hTmaBLQ2knLMnCdSbdg8xC/jqV7XIfMgKw5Z42EsY95EyanzuiylG0KWDryAj1nSiZBWzEoSNBGV0w+/KRsJmssR6NWWhDsjFjM5QXLgtOtq+sM9F0jaxcQpt0QhakN9fYQscq+U08XWM2X0ag5Yv1CkN5qd4MU0YqDLPpB46bnLaisSnOk+FKuj1Ghhx03unI0+KOokPj9pzUt7bAgE/q4GGbEd24ciShhCjhzPRoTsZy5w/yKTEL5R+APcT+mcCHhoG1QP7XA1yorBM44j6sU3KkU1WvE3aiVhfd/wxvZ9ZRNQSJ82AnRPsAPYtD0jfet4vfc0e6aSNQ+e
Yy4NmR+5quBBBKmjcSy8YMNlt8YFJwJP15Ufov54xDPEJbnBxPqnV4qzAPI6Hr/LnsiWO2ny/ye4vQen62l8m1NLAF+M8YoRIYCuTmrrl4vGPHolMO0hD1e3I22vj9BaLI20C9S/tMMTk39nEIxSgePTQc97RFDVhrNrr7u04WfGcxtRE+co1QuG2bYPaYwMFayOn9v0MM8VbszxEqsqeNhPfTkWXGfEk5vWRRXdMUSbFwHRV30NGPH7204Z69+Cn7gypg6wkgkGaBGe5wAHsRAp7aLPBAuyebEyrenRGyZMAiFW1K9yhUUdRycBU53oUor+bcJvH2jFHJpTmF0Qs4LY3Wd/0Tjvq+v/EimK25FrMo3RXL+mcxujPKdYUpiaFP9M1i5nuUuTQZUZUSGgNIrrAeMb4v7tucQG0PrSGbQyU5gS9+CKg5nuOfNbgUYLIu/FtJOA+fCVVN6jyhJYp0AwRVBZYk4qAMnwnmpG9A/FEiuNn2UZ9y1wr0cUs1N2hzUqjZxDDUZMpQQrSBbXtBTpybipRyJzRbz2NE9Acg+0JdxBCK8WPGBAmZx2S/ENbhbTcRxmujqj2qxMevw8VbTJAhXJdgjCNjwoQIkorClQztFS+3NAGGqpUuwkwxkBM9hlqHkXtUgwd/wD+HDXNAKiuGgXbgzhodc2c4QtGH85WD89O49znVtfrjCfHV90mhH+EZzO9pWjfjmZd/zYZ9oTVMvwRG2ST2/DUdyHIxxP24QwUSpbxzmGIFTea/33WbsW7K4wNrsXoERiuGMbesJ0yWsNhkO3WXnPx8yFdif2RXkOMAG8XqPeE9uGqAnM6yhhxTHe63aO3m4yUjh/NZHbvPrwrUPcURxaThfDUdvwKGkHN9W8HxqDsWWQ4mtfFpYZ+9w8e0Kg6vVLAaNMiaHjT1zyIUSBibOkoiywdeyKrMCo/C7HRtCb+/xU5/sUJHdBIKzTVfttOwQvUGV4u8pBbdJdDA8a1fFP9ciJz7OG2LFPurktJgqkkpFXMBMsO304emkzUU2kngxMXxlrSeNE8UyM3PTelTDhNgMP85JJmqzTed682wAtm8hVxQ91hYS4O9ZZAQxUnAmya3d242X93ZF8k1m1BVv2rjmwYallKOZUpgkIsPUvtUg+IobWSBF0/PBfcckxqbxO4SRh5WwwMWevcR5Il8Fqi3RXyEi2ySYG/b164UKH1A44qwvkG2u1By6HuCGrC61pYPDkvxokKgU0v9aQFbHfuu/qPWNIXiZ9VY/qCJfV4vY60tlopeSFCDD7zRdSc7amzWsanfNWX3Q3CtjFuqkfhIa8xVuLyzHah3SXUF0H2Xe4OKKFTCMK+R9WkTPHl7p2/aitjesgjk4RalU0UFRzSeEGvYpwFZzyPOG5PwUZ53kSbXPTt5NKBAfzpJJU9G5G4FK12xQ7UU5sOcj6a9AxgyP+OpkI/rY+HdqMB1fOuzakz9OUkUOz746oDDkaio1WPdC/RIPS094ZMhkGkU0y5tc3WzzKrFTURsyqBSqRMByfrDWu+OFyFU6OFDSLcEQaPWOqo5oH5Yw2hya3agbs/OOlhTJ8J4qi0+s/nhhcNSMlWIAa5hXZ+3QAXrAabzu/fTjgG5cnoPIMa+Ox1eM4RTePFX4UFfk3CW5ASb7GqI0zBGJxTazrJWA+HZY5HMJ+dpmmjnmE2U6RtWbFnYTto47E6+qTlIc5q5uGnWXFPV5qnTHdxtdeVh06ehnQCamEQy2wr64j+ieTGLYJRX8JrVaRVtG+Z/jI1qdx+RMSUWrWbPZRfrWrlU0dhYbaCv95rpDJXdOVFPS8rVMAqR1G7q33B0PRht6cdPKoED/GOCvOkkzduk+8LU7pqwlgX6Zb6rTXTNkCII2SLmKg7nnsTNw91Hz3DfZlj3/cyzSqktDfHDhHLqTZGqPNClZG77CK7zOYCcE0/DhU0yX0ne1kWW1ik4uqXr39lTaWSHAmzu3i4J0Ky+jjulp4rqhLX/l/SEuvFpZ2tRslOXrHxIdd0wq6wHG0FDqxjGykwF3aI005mqfIjUmYYQUPaymKIPdA2eBLMqK7VZ4+4nSTNzagx/xKBcNMfI3IoFTyXtuiwqaNBJAOhyttx1475O3kpWwMNg0EV95q5PA5XGKpF2CQaVCPh9609XlfyAM4P4ByyJOQ14B4tVUzoJunZaCA7xgGiCZ+Bg+Huvkx3eggv8nTJGFMyUm5fCcSh7/vMlTUwG7JKe86uR8Dg/tt1vOoTCkjTqJKpSY2uvFCiqhpSjerSpQ00JA6kXhhO3QNfWVHpLZ9OWh2u7w864Mj7Iku7vaoAZ/4aRp4kvH2uPS7bCmmRN1vUjdmzCJlp1bI36U6lON3oUGJrLB/5vY/XrwYvX9Y5YJlt7KFX5t0k+NXZD1t9wtllX/GklND3j4ybvGiIa5ymJ/qvITiWivX9Hua8Wn6AxLFTclSr7BrQe9Jmi7pjWGfbGrF7hUKATMqHgqIWwZ36POYiLLwXaTcYm7hLZVgxPh9MPNJsbkrkojoxSbTPN6qZQmpbWMJu0u5szqL7WsVPvQvPApEKInbIqYDjqdEKB2HKITdarSwMeGBnATFFLQPtWbA0fqBbugqb6k2CRRuJUqq/88afvcpCoQLgeMh52u5JgKSHAA4ArA8WBktQhAWWE1Dkp8KUI7saNpr0FGbvPfB5lWgmHtXQ82y/jOfzF0b8jLoTHo7dk0J1LQl0AlAjlN2mpmaA+BLgmjzKwUdWE2vlGZhJCPGMljtYQ9GJsUOVegEP8wNhIzNDpDNQEZsJVimmt3MYLbRV2N44c6VN4W21RjoroFvYEUNtys5dSQ6g8Tq6e5QEMqi+iWrp9dLfOrzkS71StoHPws17VgwHjiMdXpCPdfGa2HCkdpkqMNM8b5S+UvMdYmt5WUnrJ1XXnwchHd0GqOhvDom4l0irntNLfsVYazsgxhg7wsE8Z5+3opNTPGaUWGMLb0sG1mxkqyqd1c0BicX9+z4y7y9CPmzc3KH4mSH/ZXueh5C1X8+/An097NpZGaa5sYyXFfIYleUzNn0C5Saf4VgWT4jYCx9SMQjZY2ZZXIc1G2EXVso6Lg2MwHRdRvrYFxBdV3fkcYPEO7K9qGwz8VdZc5e0OCQaY8pg+LWQ4zGpEfBRRoliwrcYerKAeF7uz+wIO3NT6bw5dTaJ1yaiPee2jEcVJHsVTi13KLpUY+vBdGVDDfuzpeSTEWMbzSmX4ZxwTqYpiZhFp0St0j1Za/tPFAeh5YF8buQMeCfC06mqLYGvxSKjcZzcUKv2U6R4Kg6KtcJbIST7V+TjbQ0rVItr5psi4Rxm+W11Lt5h14n58AQaAOlkv4tYjmgBmW1Odn0TnadnA+VA4DIBvoYAKQhW4g34bKAP7RUXydUwKnOXORZKpl/c4svGZO+al+rYmr0Q1oQ/9Qu5sEwAIzzA0rk6SlStXIiktGrsnhOpSAmKwnz7rn/9dKGuVf4eMS5Z8owsNA+uiFZgDIf+eJuzGcbYwK0/kSjntpA9YTcDmpy4dHQq7OzVWIHGkP2ec7qtOO5LHXNAodpVFYTT0Z8uafMjoFZVFPl3U1qxVqFOKcfFKOyRKjzFidIFEy/9t53wSIc+A4s4pNmiS88AXfNs0+nguScVOeMKtDzSufVv+xFYfiP5I/VDw/oLNu0EjRV49ta1Q0vF0yrB/9B8O4clFRaUE2LKvU5MkYv1Nk+hKOT1U0Wo0NfM5XsOJeKJa9SYE83z2qGkm4h75Nfj5srv4S+LaPu9HnyYtN6q8FvxtaxmqUyKBnVYEPuN7MgpfHuT5pbthkjt9KIcuXRzPgiX69l08ydnP+RM+ER/aCxcGmQ4g77n9ImR04JiB/WPk92tjKOSBEKyJiUCEBJyK/n5nef6SbuJfbtuQesaYEyQ89N2RpaF87lawP40esH4iSGu3vPHPa1UTfOp9vaoJGJaJt14LRDCu7B/3N+YbyLcbRjpE3jYR/ETw+XuX8/fan4mgW3Z+qVH4nqzNKXKOorivGAWtph/M5Mc2sSSI3nzf01D/ihA2YRfwt6YIrJ5GBSIcBWDWI56FEhm7to35S5zkG/G/TAGiP0
kuTC4sCcce/borny97GynwwviPIkzAHPFhnsNKbrUA097Xj5A6xWmsd5Cx1+qvcryfS9RlgN/B94Mpp/WGgqsiyFMVhTgAaVwpytsPQiJleG+GDy226QE2vNszDf30O8JAVXfNi8vp76dGqzbazcFlJRocqhw0s3CIlL+to0g0/ywV944NaYnkbGPfCnFGfqUCrj0Vq/S69s5F0eeCUHjOi2+DFuBjJhqila+6jSwbEeuXyrXKYPTBUkYIAppcxGKPgHhIwq+b4Cl2RyL5+R5tLohl1/cg/Hyog1+QXPp4UyxPBnJTrydRN+HW+wJr2LH81jMI2BL0XkpkU8Np8vfmvOUvlH+jXgqKdyr9UL//pQ4narbMIyyYyW6eVJePI+pWtWl2AdNrrU3NhKbyYZPusxGoKNFXeppLCmjZHSdcIpebcDsqaCIlRWAuR2oqG1iq7Npby9Btemgf++aeZuA97SXQZFspn5fADg6bw1OelivJ2hdMipo/Ddk71c93hB7pDAVFGAlSGMGC5OnAEXoun5Ua3pZO2/P8jVZG4bQIRRHN8L88SLXDsPN34AUW+V2F/Fg7DbiJXIVDUeqze6sRYynBVJ0YqdSAXAUhe5nHC6K08SOf7kD0ZV6LlplcjZ/QEGxfXprXqmkHQGVYXs/BXI7GcrBm3ZHyS0AAkrbBKgPXqKqrZhqM4OzDxk0lmfdyNTbr9eAbzJXT9v9byO1Kw1aiFvwpSvKwbso3Tz5s1u3aqYPvyb/DpzGtieoEydk/6RabinN1CjK0wcvuNjrVFgNYAngH2oPAcYJogjTVyVdSxZgMLBc5q5gl3VU0uC2QKDnYUf73yo0DnorgPs3tEpRYhxujt8SdLWCZpzXv8/mVrp/K6MbJ10CnrcolVwdgJB+c239GbUk+j/RfeeA86MMfcVCaj817GxaIkKDsO2j9DFxUjKRo8gb+CPTVfadffi8yjlOrhWKlRYTRl11bSR5V7v0+fqwf/RJsNO1rOI6pjj+ZfcdfD50sysouAxaFtDvkrPcQlwd5NWlBSp5vvPgZCxZULZlkyXfD1nbkh3jwNn6V+IoSEX1wc6MKzcp0qFiQtzWcGaZs6BqnI6t0bUl6cWTdnt1cWjO/KYT8qegh1xVa7d9JozMko8q27rgXOunU9vg+vtyco++KJhGyw8gXSTOlM8ziulEhyfPLZf/hGMmpjqXzzzwJV8KoOxLI7LryRdrJyfNSobb4Tv2Img1dJnwb8IhBstmu80myq0q1srr5lW1AHVbaZ5GfglpKdx0f5R12FpNfKe/BA0scWDnSR841I2zt81sBW+ft3tT6VTw7KVYkbZS6HcNltiKYqL4XBk5anOSoJPbb0jb1kiIb6yC9g86L6G+h36yrxGNhaUxT2t/RQP0Bt5FEhCtJiGsyEb/f1TxMPcZshLtm+NyTP2pajE+qr1Br4/8ZEABN5wLF4934MRE3vMpVtFO/9gl+sG78Ory6xquCNjSLYsMUkSW+excom7qLkm2qttUGOCJae11u+xqLCZhdgcA3uMsDRlOaGJolb0HqM8RjPuqBP/YwcPA6mZ1NWnpXIkyNnxFwI2if3ueSnjNf299ugpIHG6r0zVK0G+wsVhnv2kEbXmBDIKwQ8q8MQaBEgJbyAtDxOlLqLafNMD0ZzVxWLi8CBJljqHpt9/zdnBdPuwS5dJrS6IdxfjonJewujqJhHnK5Mf86jgofbgoRfrqffnk6YCr76HYV7TmOzg0wEmD19Lp8XwgO6YwgpZCCwssR+6tWfZ31XLzdelS1hvt/jRlEpjmHQgq66XaS5ce1MlGM/oEkxEZpJzabaL8KX3Dva1QRxYAY3Oq5oBzXRZFBi7k31PnEVqjZKxGI1uPWg8KGxaLEhxjJxqLKlpy4i0agGk42eMWNeHwwWo/mrxDfqb6yPBoT8BAWFk4Vcvx3GODxjjZtnykYmwW2Y1aA6IOPT/AszVK/wCmXKARNyge22nfaMT0+UoWEzikm7ROzK8fApYZC25cHK4tD1lUl9vawkj/ptC1pw3Wb6GEMywxvzl/4fBI8e4G0nV8c1sy0aNA+CT1UMeWF5R8hXr0i5oSL5eiLeeX/MP7BRmdf59xC+6M5mjOstq2l5Xruex7evRLBXdgQUoKE94ulvGRbr6MHK21gc/lhAfabtumjqcYG2ozW82IK4XLDYHPmWSJZ35sKbU9Wflp/iHj4yDt/+d5Ji7KCP4rvxipdv3ZfABOPvtdJMpfO8O8mK5asnDUQsmbRBLLa3N8UfS9xNcwqXTW9+j6y29QrMrkQac7u9pIC0+5wURMOME26NcNXu1ad+3aZ0+1o2hy5kFa+kuXH4ueAilpmuEez03/kRpr+AtzT6DpjxA+ofTUppAtaY3/iv+MW3nOvmPKhCsR5XeLwMFkOKFOPtezRxPTe766BPQCEMAtLa4IfyoCwPustFKkg1w0mXJALYCEAddFb3PMoZUCCT5+1gA+dye6pt3V4cU/Og80lyA+qEjjVWNHlIGLV1ztlD6Y+6wMhbgYmJ68a+iArGNoGVxNFMZhsfKTkA7a9buVNzXbUnMCns2d0UkZchW8fza7xKPLvNSjxQ8zF9N+jOslx3irz8YY2qgyaEIruYliLAfbYitVVu6gkhNL8sh6f5Go8XohuVc1S+wlbHDxRX/90vrTi3gDoiGABQPN30mCWon2nvRbei5yFm1/GzISwQ8b8PRJ8GucZmUlvg6QQwrdRWonpUgEoLDs5BxZEqVZ9RaK38Q9CLT+09VQSo4GZgr9DMp09ugTAi/UB/InsYpTkg4cGo9A75piGYTfIVR+yraGQO7DGsjYJxhJwhMLz75keBzOdafdpa3yP/iJgBLBh23c61RZ0FWufe957nv0/kYLo8Vz81RCbswT8/vsSFkfDHnldGNExRlU1YW4t2y9kImw6eNiQ2/BHDOfmTvWiHXWXeTYoOCZxlUSG1y74cMd0FAUTa2C+k0H5P/jiNklbmA/x+fVk+BtTxheeOV0R4XhnIwWi5L99hostFe86P/cmPrgkfy565svpBNuoJVrPsP7olTbqf4cR/deHUmsnJapWoCjpEC76AeD+mlGX0jUDDriBPwYZzoyt3O4BvtSBjFF1l9Y/DBe4PPtvLkF4KxTLcEc0qBxIx1Kblb901/cRLkAal+tzMZGWhfp/5BggNh7kkAMXHZS4belUqUCOrnOviQ7UTAmONZ4DOLN6ZZUYBjNruMhmhVGyGwADhw3/BX2AkysGhL1xP/ErM+AVExVkoSqUWmyPzgkrWCb/XZEGQBXuRztiwKpxyz7KQdbVrqX9frqKtgIrrGs1A5urnGvqPaY+3gF8sNZg1ueXLPs03fHlfpW+ZnoGPllbuIUazCVvhytZxUYNj00lHlmgzJrKCIEQHEGQgALN8IO9ReL9acIF3Su3SZQHUFtQx2us7Q8ueh5WwM+hSkHnfNSrgP4wm86bKc+uTf5ZqVk2rnj2lCpjsIgH6zoCUoDQIUZiFrAG7GTZa9FCiPkzx3cHS3Gboh/2ZrrIWUOrzVwTSHv+Z6oM17pwUY8DuiExgo5t0xIgsWD84ZylKIt0Zcbv+/QZWNRRPRk7Dfg1FhI98qg6bBhwNCNissgbi3MjGvwH7kXNIOGAbKCijyvaeFHOwxYoljYirC3LPrBAx+D6LWWasxD9MdVl4IwTNJEZRzwoU+Hgh7hTMuxg5W8KMEnC9lf5mrYWkqVdQebCYx7ee7sEGJk4TITN2ogxccXJvS3GoTkbqPz+nsXfjkNFm6PryLy9zYH5TKKqtnyIo271B+HN+pKT+UuJ23k2IiGJMW+2/jFG574DK7G0SHDG53cRjCgOPNPu5c0lNvaaQmSK31jkyTJQpg11rYLh5b0SKxVTf1EgfptHEPrVDsk7jNcpFmNjI9QYGt9BBbjOI9vx6/sbN0mnmUgB9MvugKDii7VRPE2mpaCGn7Nhpgw5Gce5bho8nlLJSkH9O2YvuBM+wu2Es7Vgtn7CYeBLnPCZL9ghOXsKFV9ckHcXVh8axwuSPY1e1XMpmI7GpaQTR0Y36w2OoGWkhA3W6HCysFIq8t0NqUE0Ub28VZpzGc
yWyzc156OhXM8NQ7ldadDqfKyocmRJoKX4EnE4NMu/LwRihQyNtevj2rTDCFivIVAls1I2oITcH+X55WFPptmWJQxkJX7szZFrzVTTHBPA4W0CfJbxXViBO9LvKBPT8fjVky//dLxJWQAP5RYqyDWC9oqoEhqFWgdl2XDErvJVP9GW7M8AtcnhcS5DaEQtQKmqoIk6ph7qLSHJq+PPnQGiM07Cie5wAh+lh6GO+fcWm3Q632tP3g9vb+FR1HggnzqRUtJX7Iu9eaHo7LoljUlte7oU6rsSnqYUR3TISWazcIZahQjxbmz9ulig1X06ljITND3KpRSUY6zjWy1crGNBN7vNQrYG/5LPIhvWfaw3v3/8X9QFwd9yaUg5o6gHMasrKbEwr0tDus+kTW3HurJF4cl1CXETkcP8azwm692dZrAJUrKXbzoWQwSlb6uqJuqW7T8WbZu4XaiupgbT1nYjGFhwyagB0X0mE94b5k3wTBJFA3taFRkrWZrqYnEuIDeyjh9m4CCP/9CMFn93q9kM1dy4n7IvrmkFSCM62OWznqjeolcp3oUvPuZTsw7fN4+UzVIJzD+hLbzG9W0yBUTPcoksfgtORzAGA/U1DwNZ1nnhBi747XvwCGnyAllZZGrMuEXjVwCGNLw6Y9naKhwmGspVc5Ilv5FgLdbCwIju/PtMS9biR4J0RpB+zGojvxsnISu+D1PkfSmy9LkQGdVsz3MccqdM+ZMKwKqlCXK1YhqWvJlIsQ0uoJKIVP92f79wKA+CbIo96toga4v5m1dRYh0Gn10PNDJBrIVakVN9DvY+seZgh0hNAQ9z1DRp4rppiSyhCaUcbDes/x9S4SirfOwcA8ZWRAx3rwZB8d1Hkkqe9EYkcA4xrVf4p6TgGJXMAW7cpgm3HhAk03ZwcnLrsu9zv0E/krnMAfF8K0hJjsTF6SLueITCL/uzdyPJ1veoS8JqQc1J+u4C3FkiYPEMoRuazxgNrw2iK/egpyl5e078KdSA+jx0+CSZGr0+PUyc2udcZ+cGzaZiOMaeAVJljtqsl6oZVUHfM+Bb3rg3vRDVKy8EFW7AD7Vvn1snTtD2YzyJ+wGSAce/T4IXM4Vm6h5+LXGMd3IED/0P/qASBZfwfO31uKnjeVuSa2ixAJy/IFt32ioqwU6fnYs9dExM9oGfQW4LB1K0+WUH/Dim+DVK0ajNy4G7NIEHAcAh0qawXtRjE6VHvy58ejRw7lJ4YTQmfMGizav6gektHgJtraYsUMxJD2laK7Ed8xXKvnaL16wBMzvHgfmW8fo7qbLipPd3tidkc4DtR1L8/I+2IhHiu9s0wxuyV8K/NPy7cWIW3qjWgMGX35mIxJy+UDFlG4FS6y62seKzBRhG6CFUwhaIB67iGmvfaPBGx8JhTklyb49SNtZOSuJ8dAXy3KQ18v2XVAucVe311UW6M14gx07vnaDHxpSVSgLNtZ5AtkrDkMZxq7fS8MpJMUB5GZbnfOe5T/A6yKkInIPFXQImRmugsojgoj59mTFg2AbiirOH3CrCq8UoLYD90PJFomG+nuXKPZOTZZBS9uXhlEdlydRgAXALCxy6vysuu/EKH9B4l521qUAivuujT8syQQdXge7j5u1vvoDVHh5oiS9M3ycuDmUUlfD6P+PUvFyfYQ0sLxLMc6Ni+TjuA54nMJhGqVkGRrwsdurPy2rF50MK071dAdDVlMA17uNFVwU2nTArDHNsbQQmoxR4XAehp4CdVr9vxUtIBIsBRa2mJpVAtnswCurqu6HU1f1SYOdr+a9INv2hSC+N/zjqit2x+adhXdi9qqC6761KaXCL9LQM7mi0izuAn5R2wrVd7+ev9YCbxbR20/CmcSBvAhNpuysyRkJ/f6JiVGpC0f7OP6S5FyVxSeOG3bBaMMPpMavCxu5DCwt1A5LSvwek5+GQvtvwEaujsr0OwrqzKi9lnQKbcy5BFCjjwPbx+wUOMJPcdGxvrbs5UVeUOXgwz714vqGA/4kNGKEswhv5H22NSbj7DV+xaXoiXHekQsR299SdCyaWwBb0xcnei52yNfPqf+fWk6HnNoU3TLS29/mmC7CLxqKDymLyX/OnAh98IO4CN2PiAU3lT5tIc3FJIT6ohwksxT1eD+8cwVYUKZuTRk1y4OgDQLfEN4cwlhlEnHvUZwJJppBt4GWNvV7ebyU45qaKqDsKgVgtrljE33083HKJMedbL/ibAvc+1zFvPC8kFpfnOzU2yQ3sGlShHrhxuLzET3Dn4LD9eMmbeIleLNJVankH/hBSllo7IH0Zpx7o31LP0GngpIa/597cVECK4CbtKYblkP4cKn5uPwKSgUtvwe6d9TvrX/Y4gKcS6mo3IGDo1smC8Mxqq3wWe6OCcfeCZLx9CxQCABekpGo5B62j2RZLP9J/qooVh+IEDDRlqNBAQatN2rXrEnuBHqepFf1iJV8mxNllmyvOA/GOOYk7HsDtJqWeIyGvI9qErDru17hQhON8L/W2WJF+oy8hB01MkgdrwUeaTYDxIS0/ySX18usTciWLjLQJwvpadrU3RXOsA4gnE/XaYCKmm6W5CHl7ZIqG4iO1iUEHO//G75l42uylR7nuF7tLaLYz3sTrvuU3YhFWbh1uhoyctOITrGxJTsuRetf5GOEIy5dHOXoBMBAPDDT7ReX/Rcc5RBCvuxovZFLlQmd8eTiB/At6D5VpD8Hnqn3hmRBDk1ABRC/5Kcd3sEAo11LhbjwMdOk/LuarSWB47SgPzOXRqd574Ui5VtkDVVcTHdk8hzICxRGmUxHMW7CKfulKYTL1d7ALYKgHlKViq0hb10sw72g3lxB8Twt0K86MHExEPybZ9oiH6OqBgMfYm+PJ4iatX+yxfcIiHxd1JKkV/UeHcwrKLrFGQFnUdpKU+q/vPiy1Sh0sqfTy5zry5IsKJzaXmmntjseXG7OXdr1NzK1KUaQELhgxcCe2APpcHfEIwciJCdjs3gXZtNB0v1bk8HzVYtZ28B2g6sJUma5BJ9xvV2n/QnK7XgxQeLSgfyoZq36M70JjZSkC/1QhLGd+99nCWlO5b3sFz+JAgEqxQt67jmFzKqHHXXMwSDe1K1ROi2Epz/4xvABU0nO46nXy5PDBxY0Gb/fqYnvyZvPwfKLLv0daHcPeSiZ9DYx1I/1VVqbzg9i6AiTIcqXO1vS9mADPfo//L7JfOTdCwPInovG1Bh0ETYN7pqBEFeJiyM5g0OIAcVavZwKJib4+Vz0Oz0gzeC4CTsKG6R8PxuRQT55iShYEabWT434MIRnD/F/XNohadIBrv54jdhivxh2VxQr9oOM0LKphQNDnHRZUmmzFkBFk90S0qofkHAV3aJIK6+A4j6U5ZI/8PqJNEMoYlG4Mn0qHv3cSJ5AyfM2t6WRRTooGazLqFa0fc30iV0gH+8eUrPlOYWsyWUAQy9rb/X4w1l5r1J27UjeVA7FnuXL9h7B/sE2IUE4I3aWyXb2OHIL4b/oiyR9d5HgJbU8qHejX+L/fKzBh7Tl3tJexWvXewhC0lyDTbFJkmYbdA0uc0e9WCqFKWzvY3a7kEwRF/f7AyBHi/m95PBiEurRV+np7wWtY+34mCgMCBgLK2SI3wjzbxuRZFHs/ldbWdhOss0UP1mAXwF67ISkoBxewBBnNWqgCF0O8SGLYoAvl94tmO+ZtVFzKjjX919Uwz44Nj95sApnNEOZ92z4el9fvha0aq5vTmp0hFnUtlKkw2zEvIjyV3GPn6OJtD8e3XojTAVwLAwmRPaheJ8Bv8El/OOsKUNYBUQ/7zw7I0eVQCA+4wRkmsIqNnCBNcbtknNCH5EQb39rUwFDzy+eL0oObB6dbnb7fEEMmUXcK9rR4Bg/W45j0JGGDbSdk/Q+V3ZhrjVTIC7Afdp2HwaDDXY2fwPZ5JhKUhVFt7ihmSb9o21BW9Q/mhWFQE4m2w59xRkUzj3qECxZVCIatBrhqFj8PLHJLdGjmn+d57AZr1Lz9rd45jYpmmsnpcvds7nW0F7PfY8p4QToOEKcUkHdez6HoAd/WSQOrje0XiI6XF100pWrBtmfnYJ8C7VS1RZz5hiyDlTXxnA4O95
Efv6F72N9TYB5SgaouTMRnBywbB1qcEBuphr7jl9qbDEIkuRb03JYLVW23nkWX2T16dxhqy1Ls9i3z3gOTpslBkL8jsZTQkvmaxtlirBkfNGD223Uj8p3+09FuDbkfEJ8tMJqMQ9PfOwzIj7R97MoFv14uFwfc938I87qcGiQuGX/BbgAjnhtGsU2EmMloNg8wblu1luYPDL1q7JNckB8ZTgJ6qEH1Oq/CYZAuY4vRXQKCZUofzgWYwU8P8qGAFrs5+XdAAEDFyLni+Iyw/ma8ucHHX7cUP0k9jRz/z0m86VrlQpbGWcdFzebdqRs/z70QVJA9YrfcGy9s/j8gF60y0neTH4P0QdyD4zaW7hBFFs2M2u3sjye9jDEovv6ZSZP9injRD6bofE+2zjYdJ3kaSaVfftR1hLOiBpYVFlOju51/rgkcvqJTD1WVuPFlxw4edzacGPTo7KeD3rv+M8N3qmv6Pdt6iZXnu+b9DavHretFXjoMMbiLSPf8Nx3aGABd2Y7JNaGC1zqAfceEAe2nt3SU7q0pDteJYjHLumhc/TebPtoobD9YXmPIQTKpbTkbkrU9DUUYE8rdw4VNp83yLCfEk1nyKFCrFVG6NPUgnpuN70k3o4obtrTOCwN/OtLwPCMMTElSiBrjKJTP3LE/P/R1OhAZ/CQEl2VzHf08dBfXBx0yGTH23YFCVE52jW8VlY7NnBB7zkXgHr3OJhlg67c0Yk0Dz2nFXzST0xBbqnoEQrfLgZF/vg4bQxspOwjqNqOP2QqSrf4FaEoFyZwTob8bX/IByLvbX6A5NqWjdapIvDVvMVML9Hs7ypH9dLok9YM9VSWipq9iuBb0IMbPkTjXSOhmy1x2jp4Zer63mVA7+qz6oMqjTyVfT2AJ7jU+sVi+KBOROWP/wJ6ejIeuip2xGqlsOXcnGHceUIK41E9opwtpEPMS9aieyHag6YGorufL/ZjEDVQ7q8yI7cF1cgQtNOZWR3NDzmfySzcx+fSc4ycAHBdGBC4FIwDTisM2rTlaxRoAkIgfmcP0tgTLpEuj0bAMkUM+7pcdk5yaoDy8YAH8VnHFNcakY0v2T9/sC0y1cKv41ox8gIgU4Ji5U0g/Va4Hr+Fc8aywsAQNzRwLM8rYSIItm3TYuTLNF844sDipoVUh7RXEloTP//Y1/5GQnJo7JjTGnsyqXWHXMksXQtMC9tW6rJ+Jw6MkzxaJFY2qGCrIfPr3JJCVv4aVRYMLcEYBWwWhCVslsndxHusha+JgMMY5EpWuT4CdAI3nVqzJe2lgI6IEGXXMjNYeHNzctV1GHNpHJ3qy+CvMiNQB5NN8s619mHSZZamW/jp/xdmLeqfb644lNQFfkt6YGtVDw7Pkk109UigWW470VqhiPGz+I+noxknr3XgLqlD5DR7LmVJ7ghebqGniFtEo4t3mKutQogC6l+z0crYBHE6Mr5ltMm/fdkZ+tlXtUi9qvTp3y4xIZKAGAHy+Q4G89ChQR6MdrwDFfx+VC1ni1MiyV0yo5Swfzj8476PBx3MVVOo9mLhFG8uOEFe41lXfjV2/TOk8ziO3X9VFsviMsBYgiQjrdVQ1tz7cN6nEypBDAr4wSzTQPdB4nUc7ehvOMo0xv6phaKucaLrti6vSilRWf4ioScGJ9hoWTYz71K+jB3Jt1MfUMq7x/2YHl9Rzl8cwCMQjEZzq2jDeCyBTOqF+BCmE9F54Cg9kFEH6urKIV2ng6Df6YDC2AT44gAU5uiW4yRxyQv5pLyBBqhNNn0juHbbGRiTiCfpDM6qP5j8hH5TpWnbzIHvIp4mOpB9o5mY8VdCcr+saYiC8amP+IsqmMzT9aIe3+KAZAYXz++7dohT8Bl0LMdKxBfl7FQWUZ++Oov5wjr5clFkv7DT39prjrmuVwO7VYR0AxdYTFlpYnBbZYRwJUh+QhamZUzxAyVTEyjqfChbjbfoJkMq7hL8SwD4K6B6P0cezzJL/wyDhfp2OxpEZBtcnuvCjoh+QZiPtAiRp773P3W9Qx2TVyW+JtHegEKIwE6P9kpJinofPmV1ImrRuIdEC5SFrwaTSGtg9xgHXJtHl3X4kAJurH7SrlA0d6tiO3RUxwYpS083ItZgSxEPULFBajYwXyX8K/JsGi9CJyML4OIRZvFsHqFQMWIIEUaRcLCp3djZvCSChS9f6VfBrOArExXZ8cIqOHpUOdVeIPKumr8EfUIjwlEOcRoo/qO7ocbaU/RZflscHv10blCMIYjsozcGFtw3fT7j0U8rZRRd/mO7beQMWRmD/7E1tayokO+WwfaWAo7Xz96fmcm3epParI0C0LI6YrMPiZTv/OW1SANPYYopvIRtWr9+QH984Pqb/CiDwu9iQt4iWtTZa2PEcLhuE9CGVgL0Z7/xqW0jOhkAMZtA6+5Y0O5ysJ24tPgZ1cktlz+jxNVw1bzc7Rq8SfXMOmYXfB9xsIP6kv1bVug+CB4tuSae1Xjx5M3fBUK65jMzrukC8OJEvr7rhE55GblSVtSsQ6P18Cb7W6zEN7xsviJppZcCco6ZAxI6u/QnSfPDRe5JedXZXBBy2s8ctd67lLOmL+MT3Crc1Jsz3Xjrb7Vn2TS5z646UrdJj2OR1Rn1y8dU9ZPucJf0o/J4s0/qIzrrMzRTOppcxGFOUxLyDq1JabxtgDYV0qg23dnPfHERCmfC0wmAuwxdyWozO+zyBsq0fLdet4xRMCrOJSCwRX75p7CwoC0g7DckRWQZs9/vxLlDJggtZ4V5MIlWzJvkOswmwAfKIHqeYC+PSsxcSkME8HMX0+GKpVfFfbZAxKxWMQDKcfxpgAF+4DWhYDEtM4wM71TTocxQeStR4SBHxQ226EuMysBTgp8vpst0ShicfT2iGYR55HLGAqy/sUEEwZFp4CZyaRWAvZ9ok6ikgArLUI5Z5ZNrRm1WwH20xEVbChL8kookGJCkmKpXEerLxDO42X45Bam8s/XR/NXsDKqlMqLxTA2Up4ptyeVK98CQ2ANVgzF+zs78VzHdmMiYgmWDSrzKspoF/07MHQLEnZVLkomWYWhBE5cdDPhI+cSfo7Og5IqOdqVXNJMQd/fUSsBGED/4HiYYa3y34J6SEN+rWbCFMoGkhVQi80j0NXdUHE5WEez/veVvkcJhkRZh41Ndyi4NHX4Qt5wUmXMEBojlwS1jO758xj0C1d3uEo4LOeicLlhBqjHdVbkL7N+PLMP0YT6uFATBmAJ3sb6z3Bpqn13u41SWtatS0OWKzbw+/qJ4ZbXnUZ67f77TNMEmKqE+qVF9pwK/hni0mSzAFqK/tVjSZD5unWH0h7RB9dLW/ewjjbn4q470oqee7gyU3ojEl0LyST2Rjxk82yAEIIA5bVQqeN074p2eGQZvZoYiql8AsmaG11GsgzZuaq3V6Om9eTtxMgtswqepsezZh0OksWN16IOMegpbU39MjXd4tM5X35mSdzok5KLRC9WDikkj7CPRDjTuazBAsIxyqDFoNrxNeN9WW0o/Bco9m3FhObQ89V+nyUddXL0r8ffqdW6TkFBn3CQMK7tOmFIJfKa9FhxRWfXQwX2T3z763NQAqznFRoD3jatDMaQKmdfgEFz77eIIZcZTOrLs8A24+EnITajUq/kl0n+Cn7whnNBLOyJQb0bgRNvAOQJfjy8VJtoauJC04yJtIHahOne9ozH1BSOBlm8hhoZR5/ow6Li61ukqBmgV6tgUPmqIM/4qJSuipbvHhuOrsUgTkiEPFmKzjeQ0/PuDby03UtP7hO+cclN7fKtRKKyjeOMQAPTbKGI1U+owLunnDhJh3CC8qixyu8ZN+d+VV9BfUeEEdr1NOhD3evITpbqnmG3B0DC0eKm/OIA0J9pnbb4UUwo3SJn7+EoGRDuScn5oL8ui4ofAefVA0SPcco0F3nQZgHq37CbR5Bep0F9rirqgeH0dMz/yGTunvsVfQfQs0OMMFOVWH254Ytizr6GfbRKGm6d0c0zCCMI5uzUjmYowVX2Vg+nvvQsgC/9+XNxHBjXRcukFGHqtDKoUP9JcO1B6tcOHIifzce8L1lr7mqc82dhC548sw145S8+HzKwPoU4lBtMu18l
cYwN5tWTKAn+8DAQ7rACSTeM0dT9Hc+vlE32OWojfzICR/oEcBJqv2pjzhGNYy1YbKPOPtaGBcJ4HB9eylVFcJAmKokoPK2XFtjTl8jSNdJK6nO+5VBzj7GLOJSKVX2Im9/xVVJ8ZatdJmxazfGMa5FfjHiiIWRRYyNKGFELVP1oxteMY5MN1oNNzpTeCm9cJRHM3bjWNR9fMwr4Te7XcPyA0Vsv/mngSrA6XGODC/yXv2mrErf5slG8Y2jdCh2bu4ly8Z7ivbSiBPa09Q+lrIAZvxE5Jr9Hp66vWj5c53nGDFQl1EsRYlVpzpi6+eUOoUzTMAfAJJyEEBmZbXQZZGlTKH9OEAqVoLiipII+1but563mz6WjWguQoWqoh7l48J7N0hcX7CTQ7l96LahswgSls2LS3ZiMzsqTCc5FTbHTmIItgYtGaFwSCnYj3Zh/VnqDN7gm6GlzQH8+oPn/SARTD8ajkuAAb39pEJheAaLF9+2Y4ATShQZ3mZcg8ke+mfFFo/O+w2/qkcDBxOvP/zoOAD/MI558dvxzqL9fdqtN6YYF9BFECfPq+ceoi/itJtZ9ybPNs0KAWN4e369KOC2rYnM5Ec1A38cZ+IEjidIdU8RIWUKkMP4KtDMoJPdD9eYQx1CkZ5T8qL0f33GeGlfz84P1zpjvgNEA1AdYnJ02SXBa8D0eamFaxf/ImwIbErZ/YvNY5tb0aDOQ7zvF9aw4rFWaJKqh5Mr3pur9yzt7x7NxI9c5DES3MO5cXJdN2+cOaXwty0cWJBGk2rCOYimHmifrmwEdd1bZ6ogbh5bwq0ndRSx5c8Ah7qlens7BqXwoPq0sxXEPewTHmlNnfvgRlqVqH/Bhaxp/ufaykE42nJIIYWM7IyNMmbfMrGWolsS1NlUsAwytgty+uZZ0Yd6w/h6BbkrIL7XzY6O30lnIfL5Pj9/YF1JrS/3TFf6YLu0cEcY+6K5Q6fk5+HAQjDAp47WoQBX8x0NryPlOshbesrwqO1qwudPtrM3Qj0dvlnlK+018Mc0qCIQyRNCRn98XMYA/k7vsnLWMdwSHy5UqFqC3N9WQtViEb4BFuFhYAbwQj2diXFjpNe6PeKEANxpwzgQCs5h7rYVKNluOtliRuSWFmnaMt6mTTSa6si2ukCOT4vFL2b/YtYYG+Hj9JWrIqnOlERP5RVCWIViksM6y4B6AI6aLsdcHIB46VBN2EGpIusfDBY3NUcySDRiXkn38w3I22RQj0C3kn+TJgS9UcXB2FFyGcnB2BLvshjowHL6zx+lC06KXoUEEtI8N8oU+jMDoEYcPOgAdM6sJpJjBMwMs3CNw2LXpXEuMxVrDHf/oQ2ux1fulpxdihpUZZG/ZCCe6c2loFbJBarriJyrWjBDrFD/NlDh+otLeeC8qAXw0qbu95D4X1MeRhmjFUD+jmdk3sSGiNfgIqj3X3TgSZbG8c1cgRBiaf+v79NAc99hrWJpa8oot/XO8cDas7LIw3b31fzMoABfzpkQitoqgUAyN8O93hjz/Z0pKRXy0dxm8YgzdK97stk9IB45mcFBBGDIgBKIckAxs4I7paburm91mSkUNEttHez4eKZphD9o6aRJR5N0E6Nyg87UX9LyRpmBKlS4uffta+XRqriOkFwQ2Jy8XcGy12qMXil3zCqz2LOviBpuJt1OeCVbhzkioOME8Ivh/3zusTN5y5x5wmtRKYTzpYjJcPQvsZUp1J9EmoyKAvU50KYER946ONEtJZX25+MmsDZ1GMw590rx3qfEZrFT7FXTLQ5KrNevD53y0h2o3aiDmHKDKjaJuJCHA+agzB3LSfbcWv2rm00ICRp7lkZtiL1lAmPfmwjNf3AtqiYcP71++sjZ1ULYY4aKheAP+vn4QXQDqkkh6Nc9nxIfcEkmGttliqhhTyjp3VdaRHkb1W+TTBAXkdOp8pVFMKlpXjg01K0OIDj44QgPJYdLrf+vg5mdOvP694VzMDcAo9L/aqE9Bnc7F4JjJLNcwKWtIIQVzIYortR1HJUc/+rXpuaIAgTjtbTeLac3HIjofAraW3M3AieRJej93bPla/egYuCI4+czKiQcZvUceeDecwHF9oCQoI1Ixx2h6YAPFSElfCud6ac67FdYJSQFSfOP+qF/qgH6k2u5nhL0SSA/ZSgBa7k1mCuAQo8L8WDEt0bXubuw+Icg0oSDJo437nGJVr859VRKkV+dnA/f9i6z0ryAIhGmYpt9ahkOkkS449CK3ZdSVt788FxX0u8Eywp54e4Q5HKiZIAUVTp6cKrGtwpX5Q2tDhjKF5GbSDb/0sWpPklA2+d36rkC8gFtdXGDLMyRIg73PhBUkjqOEGsYZIK1kx8PJ9UzFDLlwf5U2tIqlcg2fFFcklYJMfoDgxflFG704iLxLma2ek6oCcBw8qdyKHE7qUj2WoeUEjbNJqRK9DtaFtBDp4y0J+6L5Yje73x2e/2+nYOhyRuYTMCX1Hwmb18v69WF0z3UVpOIFNIxUuGe6D3nPxUqP2p5gKAVGRDo3rzshDexe2BCTX6VbiI/GFLd/efMTN04LeAXw5JyzALiSmhUunyBgBdKKOcskBNbkftf5s6bZjQ2NMQJQMnzUe4nvkM33raX5q6wcjPIjDgF4RXReQLweXCqttVBVXWy4aSnZ9vb822MK7zfGyH7AzmTOB8ilj18RNxW1WMe4IKr1G9k85B1A3hro/wJeplk2H7Ux5J0cgzZDi3WvgHffHmFEggbYnU1FVPi/cqZdVurFuIF+Dsd1RJJ6V8TJw0BEVpBhsgExqsm51NJsMS4h069YVisb8ja6HbZ6s6GqywqkkiIHqV1IvxyaZj6eMtEGmT+HKpiYcbf/vmhgXtO6Tbm+ZKFQ7yFzQW4d1OiKdTvQ0Sz2ApmyRhdC1Sb67wvsGXrkd6e+KV7w8ROMXcu+76sNnDxq7Hyowqiu2AR1w8z2DDR5x24LpeecV3ntNEXkprR0yLaCX8EK9eAliBqT/hbp5WwN8wXHi1jfVLlOcDmmCCedEMPsKyTTT0704tPvWUiQLJx8xtyWnJPlFkdGPUes8GRfT7ZPN69i0LnKpP0eN+GEsiHByw00ADcLE9/D7NVPySEWBbX+igFMTVoJv6hd/3TMcn68yimbmsUzRvqdveUzS2owOUMZhhlwbHhngEQCKqdBqDgNQXzP7WzGNW79zToDI4Ne0Ej7Q/B21gw2govgFipw9lIkH5C8CUrEW1ODJ8oBRh/kLGb+730m2vSYuCJFuVI3c/gv0qb0542ikPsc7wpNCPKkmg8Zgob7ZImSsSZ1uamCUzIu4oHRZtzqTf5MWVjT0gfLVKfKE910+1epFQBRFytWN0tSAifkb8pHD1RthTntAMQpXC3gOUeirBJXGgv51sedUGkxRqamD21+ZC/PjiITL+7+DMzWC7elIMEyaulY2hgDoDSBfr25TXD/Ss6XLAIYJsODtJVXwXDh8eyvy2I2fMeYFMEHXQkA5XfYjpmpb/Zc8cX62lo8VS0vZuYZeQSlRUcSdI8JvHZZq52kyPXhQJxGDvO5j2t6FHNz6pKloiOfYhc6tqoA3z0VsRyLg2lZDwGsOPa4n28HbTb8kQZFAZiwGG/7hBPC3/x8KrDNCbk2pK4Ku2aAaIOGqL1qBFwQUeHV623vrnWmJFsTzfuZMO4Me6Q/1f9o30ZLSFRkDc6AKwuPBV5ZfGXy3D1rmorK1rxD/ELz8SmWnaHnVamT+PaOKqTyHygefbUCuKxnPuhUqv6bWDCl4MLLzIG3xXvjWCDBcLgVBmfwnaLPiThvp6Rulcs0PAc5v/y580V0rrF+nu1GVE7ahiHCeKbIJvnkrLWljfVFIzW98DfxDWIJfCd6FCNvJ1att9CWdSVBZwujtKarKhzsvAcUfH4k3/AIu0DrBP5TshpRA/yBi8BpKlwm1kdnjLa8L1iwSds3c2IM1lbGSo/yLe9YGiCiFXsbcrOI6u3saC5H6miYfMKzFqSnIno5t/YUL6l5ij9vej+gSIub8RVO05qObpBYRyOKK9wbtteRFLRzGmJ/IG/Bu9RjnddlvKmIWkUyz7TBaw6UpeFijCPwrfNRGBMR
RgWu4wsqNB923fsTFYalbsQFkJQhS6Dabx5CHBaPkDHpNDOTqHc//Ccymn0X6f4+li0Q0ERTbY0iNA0dQUDXsgv/bP35OUtzs4oZ7WYHqGwpoZJQyeUU595b5B3p7cXQLIl0vZIylh5fsScJzRuApLOwuBJphvniXpTjS09FW0jCs1zK0ikeObHc/ooWeiOTL0slSi5s8rR+QEyS9LNwKj/APdGS4+RJv4gwR2aZECJPZrFLoVdlTved0dKLSGqE83vIiJxk9xP3NNQqjQoDBo1PWfuTE4fCmR9+Rhv5bA82oa9ZnYCrJp3Oa6uWXb6WEy18zq+D7HrSxo3rQzdOLkqmohiKGXRyWg/F8PU4um/Fy7lywaDLpYT29LQVlj/QiBTtvgWmuWsUQhNqAJkLdYQGxiXHMQ61tq1Hfziey2JpofwYVDTASwrqzb71bm2HVIiLn6LWoIPTEcbUk1uMA0j3Uexlyu9mDVdKoGuh5ByCIyf6AJWgk0bP0MRAxvTR72lyFDFhjeOcY+ZXKg8e4rVlMR463qNvXxCMIHbsuu7FuuJH0YOeJNPDeXkt57oSRPOgtjJS93rtDTVf0BO5c1Fqg20tpL9Cvx6u3ye9Xi1w3F62yns9j0mPSwfzgL9d4FiikMVVaVGEJfneujzaqMOeJMJ/hwg9mlYSUrOaBI0A2kjmgEzJ/5khGNobUkfgFrwSPd3xG0MJQydOP8Habo2IT15bIeIKLfpE+pTw3WZyAyuDcbLoZGrVKe86ZtgOgcM/ht10l/5p5QJFM1nqXekLk2uqv/t6+fwpDJXnuso8n2iu4UKLPxDYZ4kerBGQCPYuHeczGALwtulQPRMMUNb6WxCfkOye6pJYIvr2uVLzPgK4EjUWzBa83e4B0WNI+HOw5qeR3Rjc86zQc8W9THASFbQVHaeziB+S8jvoIy0FFKVtVUVeqwlT+HXXxn35y6ZJPZ7VTZm9pO3MtOKU1eRtStW9Un/Fvgn2MTu08OyefZTcUk5MmxRO7HyNELzGGgLq+szMZvW4M3vWPVk+/zPZft53vgUAZ8sVbDDkd4vqsXhFK9Zlp3vn+8zH1CWZqhj2L3qzE2ezFts3MVU28WLDiJSvccp+w5qer6qdc80IJj8U57+fKlVVLFLuqXwjq3aYof9XqXE6p31Yv1EYmtbIcfV5sxNCiNYwJ7BfBK5U5ohNGqksNbb8R63tXR0YYZGqGgWsmkChzb0V6Jn6Mh6Itpz8UnRllSVymuTPk8kx5m+4wpiu7vLYwMHlKGJeUO0kptqhMDMT2f+tW2TEmWcmYTkKscBbFK3XTQ2p7zqFh/puJIf8Km1+mdaS2lPBM8qLU2DLfG4+4dexP97pTu94Ihufjqkt3U8YhHRR5Sv8R3ebJ+RT17iZ4GMcYXjs+9vWViYS2N01m1AhQZaqNvrNrNw1SYC+2zaq+s3VDQSG4KBe85SCM5y6J9+M3sk1LRwXSmi2tm7P9+1GPq1uXcVs7WTK4oDZwkt7S3x2G9Gq4yVIe6cjDgfiBzO+3YEL4Thvhcj1QvRGhbdTt6xuJ/jlDuGTykjrGUE5rjIUP5eTEeAIk8lyWci3Ux5q5taDZDfL6dXmWGWoKlew1wh3J1UqVdoasZ1Rk9GVPVHJI6AuZub8dwsKKm/LM8sK2wwRVIjHlEv2xZR0/fbC1jrvdNvkBgPsQKmv+UqJVJxQzSIkQ0JDOF3m/17qHSLeg/J4iU6CQ/Hpm37PvKze4Tz4yit28JC6BNAYr2kPAaGnfZtFwr5R6MXPymW58pX1/sLubx2l1eS/lCs/PH7Mnllojg5E8FSOZT6EneBkuYxIlyrs5izWPI021IwBduqXyKVzZH5gOqeFd4/cVMGB+pe6WzhW5z9DTHNZx0wHcXOp08c25pFCLpYlJu4yerAE7aKZnDuu/LJmb6swjuLjDSYxYyfErcucmNEK8zBBjm73099iD5bQdIuUgJZmrcNbj7SjBi3Wk85cQ7N1fLtVDd/5WeBTXlcu5D1jetYBrmOYyoGEUJPsujDt4tNr/9TiktWPUDpQa9bU+e0EtlftwCdMF34nDsUHzkzYkPGG9b3PAQOYoGzomqnmj0h5s4o3yltWdoRFPl5esq4syJkfCaQtaIBweBkVjJw7V/JwGo9QGVw4sDmByWK3WZRIV2seFQZlJRV3V4/Q6hv0C5DGPsvPTTDyZxC85o27+IQltCYcrkgSy9r25lfs4izpzB6HDLUt6NzLSF79Pbl31nq89nOA7/3vYJHGYmc11Y+tmXKyja+ZQiCTXv5nAHGX5wSw8/ZcqxBBeXHpzJ17WBzbAX/UUpKgDDcVdvhNCPH1uRQupsTv7Kn0DRdduQ4Ie1bD/DtHySBRmJ4Fj8oLyM8Tz5k7vdLhMHVWUgGXLQUgJqJNg57d7IVfSJ+iW9Sblc25HjvCgh0rCoAEGrOg170NE6/xVqaIq8PMG8p2+5ENIwFMKXRIQYwmLTQi+3KJifbRyBvp1F2zuCwj6/tkY4dGj55mcV8WLpseTfaFoxgJ4gcinEEPTx7bYvZqv5Vay8N9TN28LnrQgcKgPCosku1c10ktuIcS2uSQRQ5A0bnYV26+jKLfRTsRHiPXvB7JqdsgJtfnrvjfzfVe4kWdwg4aXtM919W1bwwwx1zdRyDDju8GXCWR84p1POUiMDDjjEDPXIMm//U0vgJm3itTC3lZpWxfxi0qC1u03L1N0oRy01WdjIwD6XHgJMOt+UeF89vz3JTM8bMvI6AhrrZ3FoayKnm/TGnNowDGeM8a9nAOg6bt9tPt+vh1GHtmAD9aZTTS7wgSB7CZ86ztvKYkcW0GE4PVYW4kDlTAYxQBBdpHmn4RuBHjTbtLGcfXdOWvAyQipGuR12K7dFtKI/4trr2gcWUNO+l4+ln6ryzp0Rmxy7NndLo+1EJavLTPqfLeMdk1uDIDNkhsj8/uk0RSpdwZ6WxSFmH80t7AeglL9COrfjaMn9NZkStZeusYF5xKrkzYTC8Q/SnAPrx4NwApgmsTQBble7CMcWQh+Mgm6KOImyuN2B29Mkdum3yyR9AZ3jxth53pAH1faWsv+iFtp26RVYvfNmgqyB5PCU2VRaiCmOt3dWV5N8RDS+HQZVr3X0kX2xE6/J3neUJem1PDTsisYcbdKOgQWJsNGUEQ5y6ezEVksyv41NusFGzFk7d68jp5zPspYPILjiRjV24q6wKdYi4jrG+/qJuMK+mU3p7MbDt8af4L1tDnnsPLKK+49JGP1XkrHSD1n6ghP3i2cNCNOPPwIVDkQ8ij6qHJbEbNSlnKXSkVFBF6BCiXL2IVcvhadPn2hZ5xs5srfAxbyEepH8IErxC9VCwnUNswjwUIdFPmhgN6Mwq6bqdovxR/s4sZn8cCnbtB/OFbfvTK5qMdwV60NyzFXJk2uhZzXsHjURwDJqEzG8gbuvLRhLDr8CYuNweiNVwaSK/9fi1sFtJU7yl3M8Uq38DO7Z1PchJRVpsj1Vk7hjZr5+otJDkpj3MqK78eNJDOMgZdwJXOQZHXhpHFVJmGmajWXup+Kur5NpPdnaLwiZEi701Hz1WdNPeZsT7p+za4VknMmVP7EK6b2AhD4zRIVDwJlIcm5rP1woAitb39mQvxPVNTvqmEu/mtAQ0UQ9TDlLGoDw++ZOvVbi1VUBKcl8p3uCKuDfheHZ5cUhCDHg5yOZ+xR74tgUphKX9Enzn+Je1SGYI5h0E2KxqVr0kqkQJRREyN0cmkAp1g167jakGYYI/0RSg/4IDc0gwkIZOTXIapf8W9g6dXJ0j9DCQFOzSWvWuAxM6VMhJGwyeexHHS//JLkZyPacpQkwNW2wZ0jAnrQ6FJmcqmpqm7d/Zw8wZZcT+h2RVzZ2bW883nVwjXmsnMCfIc5z2au3m/+RQoN/HPS9QI8OsSN35YVA08HgKtghorrhJ8MYDkfkQKjW3MriMwzZB16XGUlGWrOqi5mBKLmGMhDdLAFBDvaxuMQFhmEwPjNmCE5XRXEBA6QfaCSnZlZ2KHVDG2ke0cnLvUwZtqkM+ky8TWwsrJGx3yoAbQ5QryIi/E0ipQuKK13Sodv1oHZUrgbeB19wOw
BRh0Icd9+D13xPxp+beg3jb4bwv1rFvV/fAIJDjoCVmg71Dhlbz4SVGsF3TAZf+aZBMqpCy8rk2s5jULCr0a6467JihmaPMB5RHXSGMfffo62mnk+Fiau9+jCXgv4oTT+1NcU5T6TEt+BB45Bzl60oCwl10szHQr3z//CVw1Ruy2DyEfQao1YHrP8HTJLO1EapRCvq9zDkLmURGOd+CUrGEu2+qaiCGUVhnJflyD0ObYv0E+bSl8DSDph3OTZ7SiHxS8itziie9SKc8ghlh/1Sw/LdVRLpJuNS0phwkfFyv2UDMM6mKIkrHkI5YfjYWA0B+9Vi7+YtDOQrXmM9aY/omsZN8tokA/nOUaDebuinolj9cKpKkV8zkMMRWbACPXF1tUH+lOmzUreVIyq8RfHJ41JnpT4qhUTJ/lqhZe21oRcxhHX5o8SGaEHJTIHrUGbcggTFPvlKnFAxGecEN0AmGnOMmcwoFo6uGot9c+FomVdF8v2W2uEZF1Z+uRhffL0e+iTE2iirCQC0zHBRoQfepb+sGZtGECErGKhvEkCuuUDTQLBjOKW6nvJymyIguRU6qNDVfNuen3SvUYdqcpU4YaEbOXmQ9igJuLuolieTget/iYWkTUYykCSTXhySpmpN4dmQRWLSNQjx/+RJt8SUaYxLB+zC6OhLNpNzd/jNBY1T0m/dotdXSyTqGbOpAvWCaEw3M59L5NgRYJQJyd+LTn/IHg80RmHZCvrezLKzQqj81Sxc6M1clzyKi09QdlVsY9baaQs6vCX45E7WpJuq9BvkNEGQl98VVQLeVysoolm4PSMjwDFJRUQWNxB8P9hDRu1CoPONkw2RS9WzW8OK3eektGulVvM4x5Ryi4bbJJO+ay4bl99pOHVLJWlEbiDJmf4Wj3YDgkS648dxSkPN0vXVVMvw6+UY+eYbP6DJclUUUv8hkXAW8tPxdl7arFiFI86X8PsOt7b5wRdUlCnNj16yIzTW9GCdS/wugkqfO15wCVPZAgYcZgOqYpxkeGPPZqlnrcwgLwyeCN9J++Fj4S7BDAve9p/3Tr8D4q1WiiUFl1DiNSSs9X9aw77ucgTwdphaO3Dhz6X603nlEvY+NDqsjRJkRrGf/LJPyIjGMnrUJ51ybbRNO2BVFHEXGbIBPfsVooscGal7p+tndyAEedbH0yQ8QlcNQe8JVgnAo8lxqcn2o2Nak0teQHXVkr2UMSoJtncu5XsGoNfuFkpzFl4GfdF5Z/ieAwJT7sKmV5JR+eBsY8rhyF2Pr+yuEM7EQgvp239O7KYL9JCVB37Boqqx4DnW4mrDb7L0wXBTGhXy3eBSGj3dCY/4uXQX6I4df1TPWU2BrkDeuw/0qvtlT0BeeLGkElNmq5tv/MXpCaQJbfMiHZtDTCoXhHWf5K896M/ROAcRHyrsVLcd5TMpcPfEbueJ/xj9SwiwkuQ5iP9JPhlJyO/Oj9rnABoRYWxF5HqlWXCXPZYY8vvqr3TNuXOKue6n0cUqVJiyEBeqN+ZHkSXDSSoIxQ7rGMRJy17A+goAIhWRhfPucvecX6bRy1ixViOQhT6yOhJZfx/l8smEo4E3Tg0vRxEKSMrCjHREe9moK9wiA8zPoAe0XdRk9CbzmCJzEJ6B1MB3GezAj0YtEUzzPVhIGzbgaK1yD6RkMIclExBTrwXYsishKdo1/AZRpGNdhZpw3f8c8ZY7vzSWfJWf1gV0gKyYnNx7wJDPppVvgTx7/drewc4vDxML/06FvSuDC4JYkl4sa0jWbh+NCkDLiBFjqg2P/yw/EYhCTdMb2iQRsaqqoEaJiTu9+LI18q3An6GCOA0STW76196p3qdooUkU+FI7qChP2bkjhhjujvY6A09TlywkwGQjc/VB/PuWFiQZ0j6vIldlTO7kbm3MV28nhYICaM8xeLFLvQK0H1VYQRrDAzG+O40mYtrmXsKzr1DlUEMcT/h51rsbE2yTMX0gWYach5KfRxcW4l1ZWtmW4u9ID10NwoCalbLNiQDI0Rd4mc4holkdAsxnP9uNEhFFyQDNiVPr/dd/k0mp3K+fQ1bU23x7S0B7n8jII4gdme947dubM5y+8LQL5k6HIuZs004Lqk8r9I7v+VeU8tO57S9ByobxW5MJIOXG6A0zR5i6+Y5JyqfHk9zKYowBEOflFc/hsAaHzgDi6iaJFEcBDytMlO3wAW2+jg6PnuQZIwKYy71RefZN37caUnACtJn1Ox6gMBU/6HSU0t4VUqN+Xq1t+Vz2fsSqH6zp9469LhHlzBNJmvNb7GoVkgANSzXSezMk2Hy/d/J2RiJWvAg4ByHfnEr7yiATv1gOKq7tCGufxivfvJoDCDE1g+nS5sZQG5Shg1v2UJyGXigwBndPYGjk4wA+D0UrNZ1AVQc7kvYffuNywhrANnRhe7v84xDUWtzZ+uP0RPLfPy8GSy97aZAZLKOPboE+T5Ci+O73RTtB8UgkDAUsa5v4E4RL9CpDGRs85S+noFM+LV9kuoLmu9uxZ9vzFp6B6hBg8hqo1h5CRGC/HPBoSRsPxOEZlNj/p6LFJBckVBX5Xm/hDE6+hkxsJF3QLsvnwE4fKjqLLZF52+cz+6/5vlmNiyXXWD7MA30kZl8WVDEGSyivkesBOO6rShkDbX7C19I6didPxZOxyeAY/u4JhTzb8jJTNL3n0Wau7GZSbOPHT7LdKYoloYQGFTN2GMbB32GbbBrToOsmZsRu7fn7h8L+ywf5DvuYGauj6w34MH/q27rUYR9QTpHpFUqucdAJiahBnPvDmgNuDU+wz3ybqgfl0b/uOriy4+TCdKvj/zRM9QvX0Qo/rNEhCBw23MGvPUbF2hELaAuRhduISkkhWx9G80V17KCgHYIZdtjCh4hI/Yx585cKPrJ7G6RoQAFeGDDY8vEqQMj5cN/+qwsW5m4yMNZDws0ceYQ8x/Z/PgRVlTL1cfJAbBrCtFjb6EykeEwA70JL22+nX3MTzdZSS7SHOvOJ1wxz2zDGEIJ2J0/Du63Vs1kzvQihNQZ7p/S8BmW34vqmF4yZQ68trbuAAB7zyf0uBkZaQ69XmarO+XYo9JgAuqdELF8I3YCQiGtC07l/QmjQ/jOnX2WnAY7+MkZS1VtNktVIvi7f1u1WjnBlzUaUYd8cIm0NTFQNvpPQlHXGL8JVAPy6IHd3y5sV0jODSfZDQI5yaNwe5O//79tOjqqYNQV3+7MizkdSI2JXLQO3D0XsuB63WNF0t21WQv7tpaWWOK82SA2iTlwMClFSwUA596jfxxgqZb9Ki6y0N43h+/Hzogo5gJ/XNhCYmth/H0Z9ECROO53OELhYl2pVCo21Q7GGLF4s80j0TtYiPm+ms5NNWU0rcHLvhRLm8V7GWFHHQmA8rjqoatRuEW7EVJuijZzKikIP/AzlebZisCzEbZqpglnaXO2h4dmngPbTO9AJNpOKaBLRlrAHHS8MigOiCXwgHN0NJ9qOVKKHMIcPkFnpfZySEiWAoAu2XB/9h6ypVpmg6iRLT3dr4WaU7+KQECy5va582cploIwFFIOKNfgfGEiggs9ggjDSE7Bear7gIXzJwX5pIwsXYDlfDn+oR9Kx1e76GmYC4HeIaACrNavP0B2I2l/nHjxPjdrW4A+QePaIv+H0s2YROoM4l0LxaKIwXA8rDKiqlUOhyOGojYXYFdfKFp7WXJQXctS/61CAna8zlDiZIUy9Mr5aPLh6fLxqvpkwSdRJIcu9we5vuY7G/6gBFojwC5QcMNWfdAyU2XCeMI3577SYoQAXL05up4v2aMmU3k6V55z/dwwmG5cMfpKXy/xYEsO4O0uiBsBzPdDfel2ujuxzlgMbja/tn1mXa8CM1kSFqowlTUE2HpF3r0ldkeUqzKTvGgV7l12ujp9ye03VQKoqDdJ91Ak8F1LaOJCgmsJUPjal9Ji6/82+pKcSfufEXJ5b0UUVBbY13ltcj6UFw9I/tW/DhLNAgauMrxT/FEfIwuEbkb+XjwYOnmGWeCJmyi7w7MnqeiX0cMxrABq+7UPIO0GNi0yYdv+SxzFLFLMRGW86KimatW2I5ZIVTVW2tLgl4/OpAI7eivnIiJ8xOZTJOb
imWvC6oUXiU7+KTcUlnHOqOpQzoibpwB1NR6viszbZJp4ZC5EO04FMa2bGEyEgXiGkeY4b1tw0icjnpQCIgEq+tPX4Lyph1JGr7hXxOmeHRZRm/fU0QdPFm2Eo1L/zea6n+6dOcQvJA+3dMj5TrET/m40PLtt0GuejeOI9MWEaLWW/0z/MiruEi6H+CWXUw7UNFDQsPyG/93v7BPIZDN+OB+wxGySlCt/ZaqRSYCfNAGw4TE8BY+bo36F0+JTRj3tMkFcL9e0TJpJx1ty/U8kgt5fDLt4fL0P6AaMVa0c3ZXQgDxVA9m1gp3cWGPdjvuviK/c/emu6+wHy9q/O/O0roiyk338AEmfGyDhfqQhGyJSK/lYZljd4YjrLNQ+WuI6R04gu/UVhPOYZkc0/+oaJgPfZP1fgPJB4DeHTU/dwXvgNu5S6bq/ve/fQCDjcF9e44HFlQ5CRM3hKUbhfCUCytB5j3NjxWOxkRslICeznlKaDrSEF13zpsOevui9LZzsSVGu/cTvvevut+2YK56AaeI/lsmZ0D/JyHS6zUXWsgsUZQ6NEAjlouSPs+1+eaE/lgceGGg1gBIfEQ+wGDeEC5HT9rl7IbIPoCqW7C1wf6C+zgbQlmA8c9auyvFnd6d6bKtBKOVbqB58qAbxvO5R7ZPmq4P6bGg0xTm57qbQxa9Kt26kbE4dUyPiGLfHR4jZ6sMST5Tw9JII8mLJBA8zyNWz9RAtWj/WUlZY7fQJfwPqp8PlHvwfNhm2NUzV/L2XmoTjSEo9FOuH5tC9OWxaJgLJYi0WLLifA6aQDALJ79X4l4IdVUvVYKzT6SkSnxNvYWfH3THIUJ2pU6sk3vRs/CtfDUGvR+MIgJDYfteHTfIPWVeOZNqYey04BxOl8GLncpHCnjaPrQMFJDaHA+tAMZU8gaOR7KTsGTfbGQjL6+4k7BMlLFvabnXAnZiaCiUMAnP+UIQybgS41pNUNeo74GevxK6n1dvN9qK78jchuLbsJOoTl45+JWxqKT+VFfoUcioaoEUfbyq3lP/t3du7zjMzH1OOmQNPEI81i42TsjNUYac6VWw/fQxHmbI8138r/im+mnYzV+4qAWk33kxbRvQMlKoQrldoOueD9yV16gxco6dYw969BpueDWdntC86HyqigxHBeVOchWRXVYHWadUslUZwfYzFNzn8z3ekWxpRQQKk3JJDo5T7SKdrX+6D5tqEH/v7BEoKartMxNX7wKvFu2FOTpIyPoyk7ZyCUYDqRZd+H34oiZolxOuIcHl+js7dGNkS4R6bEWDcyGgEDzr5GNXhlgMyGLN3xJzvH0HtHoYBwQuMtPcRXmiWjxRzWHGz+t0MjjxaRVcAVq30rorAwhozhbicW9Li6CG3/tukDE8xDHIzptoNOfDNsROvfDJMKlZnVxqidKlybQBZw/pyB1iUg6y4eBdBP+wyR55PCdTRUyNPceBe/nPWPetgihBFG3aKxFIfovj+DWLpZFfuvjYfqM5zFlFqJi4MT1XbLho1DtHDh1srCn0pCsLISN23F7y4jN+PDYb72/GYgqvq+IiESm5Uafd5RsBhBYf5CuYDWRSdHG8zClZ5V1NKZRHIlbQRo/vRc44jsIvl1D1nlL2mo00zFmxZsrZOX3a69g1g5r7gGcsTuMDlfZ2cIoe+kevOtf/sNhyPKq5FAi5KZFW0a+vr98JfXL0+uAHHLPhUwFvc2Dj2nzP2rtjISRLQJUnoBKSWaPut3X/oAs3lLR0iYuVHZU2Tk9anPFNADdVOueVAcRKvFCCuPFv92niq+6rokSMg1FKoGFsAq4/SC49XZ7XzFd/UjtfbO7fzKvUpH1F2oRjjbN4sHtsd4aOsTdOje6n6Py5p20PoXK8T9h+590Wr1MBU2820KKazNOcne7EjM/dWn2vVTOiySGmfZUYg8rzNx/kqzHWXO2FSKQnn21bNEcqRC+wUYZcBNcjSJTiOS6RK2zF5OdbL1BbuhpHAdaurWrZDvjFveh98pWsCQPgA+f0uFmM0mocjWZZnkJqq8IBCFAxwRyaE7oGh+Sp/P1WZRFnW8XjJcl7luzLRe0V41G/+Z+mTCb202ulEb9CoTwE91thT89JsheQaXeMyoSI9ZbTuZqAS+np8R9lKrkOjJMNZPRLS8lR8AUrsnrcGq90GmDH4sOxC66Oosm3otnGdC4+xBqg98TDLsAJYKAaLcB1JPAONehxdCmq6KvoBwtuCiviXhDMq+fNiqppYu1+L87MzNRYJCzgX2quNtxi4dCsaLbrgvr/AkrGqKOJ4xQiiTsBA4kUZvdLjqLIroSnBafwJMgCGUWByEWucmVfnyvEXh5Ouaap8ItDlizyzjVnNmHCvmQDlh0IrpuS4ramjSEdpHYO3oU4KFq/LPOYgOc9wyZOE0bzZbxo+H9RnJtSMCvbIahXOqo8Y3orYN+BtMS+6cd93AuMvcEJkTdECG5S+qXZapODbnwIUitHqHUGzNws0DPRLqLIBY218GAbUGu54iwAqT+8Ll2DlfhCYUP2iUMwoNlNm2WwibanoEpszvJ3feClXlvi6pfiyuKkxyVF5b9sIjEhwiqD7pGPJqDlIgOilPx49LiTZAGz1ylNjkL909eR0dFJkpOLY4IqHoTpiss2B9WzPdrzE7IuHA/Z15HPep+hQtYWRuaL8YJRUOjkvrMKyXXXvnrUoIB69gH2n8bvQFfpCx2VsvlEseIRBGvMzdMn6CV2zKVVOYDp0XU/GWME5B151+KUCLgU7yVG+xkc05devFyh84Ov29Fbyahw8L2RZa/nMU8GUeszVQQPoYw116oSDKKsz5bAr8G4rPLV9ZWRr/fMwwMfKrfIX3xHx4qgCGYb7ShNCMWuxvY6rDXfclZYeHaMnUa7QGjxcH3U+f7Nod3IXCBjmfivBtvrfvoY+Dyhtnx/IYjw4R+5QK28qZyJk+mWAAA8yhLx39eFSS7eBUQZhLH3ZcpQiFtWIX0uB3keecgdNTwsuNwJtZJOyoS/SrwK0bcYqR+SmvVmXhiqyp0TdI81Q+Qh2Q0Bp1hPPB6okYOfA6Nik7DunHMC6Owyki4EQjQOZg467zal40OzjK8ERAKH115T7BMczanxcZ3t31vwZwgMm6TrtHBL8b4sgvYRsJuOM6M5Ozo1FyhqmwkHfUkG9H/0MXT+JBvur+gM6A83kl1kLtCfxOgPyZgMZe0eCw9fHGpNRVgHMug91UeMmu4GNUA18zhClDLtv4fLv4BLIm3ExyRu8q6Lll85iWdIJKJpI8uLi0QKXk2WD37N2hv9Tt8AOqu4IJljW2NfswqDtiu96hLJ6aZ+2fhbhqUdv8tlprfY5N3BpCzwNnJsIIbeiQHvMVfg1WiZTaouXznAGlBOUCSFr6IxXh532n3AOhBnIWwezJEVHib++6yhkNRY/q7oeUZwC7DYHa33FQdWcq22mgZ0rcIYcOI/R/aFnODMJafzr7zn5isZ9hSHdir+theu1sGWKWs8CCTx5ompwYK3hLiPWOlGkL8WGiepUCS7yENzn32pvdcS1voZsyhMxhvhGCor0KzIr/2QQg1A+EIaitEnAYvhfJoVY5Jt2G4TV+yzjEg0kc9EG7kGZdyOhwmcjgk2ANnFyGr5XFJpm7JghLT565pWfWW19WHe8qo3MCtv1Fc1jrRDD7pdrnsCTgUfv5Yvll4wibEk/5cyOmwTFq0c+sIOBk4XmtkB3JKzGlePqlTaoM7a54SMU17LPdXPQl5nHuNPeTzlObSZLskEWw02OMsf7Xtb5ShLed+/UYkzc6nq4rHDWOfFpJ8wL1y1M55/Sm5GCGdkRmg9HXux+GXvSs5xXcTbzVnF8jTSlU7NpSzPExwhrxx7RFe7l4P5U7vOEe7gsem+dFr2+BXc6LTKWfPM4+wZGmX+1QWpmZKjNlyV3xx4uOl+mIK/2CWeG2/skMWtP5kRjSWkncyo/p0UVEzvu0wlYjTLNbQe1HB0dMslANFfn/N2NCYycLwpn17VzsNF2xsi/5jGX9SOTWpN6NqAU/OqrjHrIjrfTbcr3oHg3v0yX/KxXioBra3J7/Z62vcVD9+fddNOMG2JHzYRn+1Q
oj+5Rv/d9Mlnmc5x3i01UOO0tF/2NQ+MkesferUDrzNc79CRyw0ADnw0+t9N15RmYAuwjJyNZ3MvJFZ/B8EuYYV1s+hYm+8HpyJwPSIvGafoYuZtS1T5IekRKEw+ZB+MXgn8vXnoN9O5NOMKrzSqJXo3g5JerrFDvcXkC0L75/GpGcMBRlst2q3F91ZJ+PQG7fxS7p+XiUtXhV+nUxac33s/lDu6aMnb+GyLLxaw7KoaY5el59hs71QOQa6PiXs2+vDqzWENkL0eh2lmzNgqADTlbuLY0d9NhNP0M0UBxJPNppLqBvQwER3hy8ozyxA/AFJ38KXDdtJCHO+Cfo9El72/c9MM8IlnbLHlBhfzyffqTaXv9YKGmrxydngIU51728RSpH3aiT+XrsU1zziUAbgIhffC+jXyeMz1ehT++cOzN+R4ERo8biDvOwxdjqYh0uue/ri2N32M2uO7Ts4zfFK19DXvZj4pB1abORti8hUrPwsMnNQ5etapx58jWr+kefc+4kdFqk1wBNiCfTZq1Gwkd1QvaAs7eDSo6pOlhjbTuO3ErLj+SuyKxL32rzY2oRj31JaiA+fHT8cpD9Wh1p9OUc4bTTD185wWTsYY5SB+1Y6nDOc5z/ysONvrA/5Ly/ocr6XQ3FnPMjP/+lUxSvklA5+GrtM1A1yqrW/BNeQ245lzwzlw/mnWgR0tDmtcI5Jdilhyps531Xvp7P6dN6BZM3Z+zrJiDnK8stsH7vzX1zBISjU4tMfcnPOxgdN2p77YAifKMTm5eksVf9647LhMupG/rsminkdCCDqQoHTw4DYG/Jtuow1wj94+s75iguG5Oxk3y0wJAzNVlgEp2Hcn7oxAoUhwldJdoz2nCtJitavb71lf4suqskFIlchlbIiIHVRbkPw/cfVMAbChn1hJc/VDW0CIenoZfyv7jTZ7XOGsvhC3VrmdzO58IWdqI8eN1ynDIS4zW3EVWa/KdAgRMt8kxWzctE4qMR/PdEnAYMV7jnSdhskYr3ZWf7NSNKm0nvUAX/5nLgl6+CllqxQQT88ONlaBUx4EUo/NGrD8a5EjaoZgYklga389RxrC0TCcQ6eMM+6hq97SztYe0SsVKacP7qGAIzLFc19hDi1YBdQoAl8G9H9roxf3AEjAs2iBVv9A5V37TzFppt1iGIrr4QQLQ+Y+Yi+yEgtjic3EPuMRy/83HQBDNkCHIpjlgdaIO7PQ5Xd//Jy05GExBhDdjUrpGSnI0hW6Q6Mny8MGg5ERqkaaGIAKUb4Jqktb5iWCnzPbpvpeOefQZqLyKDs8oiUD4713DT+QJBPmRn4DnTL0U6Lv86uhcoabKXGyVk2V4XZS6ICyT8bhOXDMZfIfLEZkzdnzuZrPyd+LQb4K7jfO7xVN+wY7v4vE/Nn/s9GVmLrL8+UrqyFXEtR5pCqiW10+r1atc8Y2ZTbyFO5ZpybB0/aRgt/rW1WTn9NRRxaKieFQljAbUW+eU8osyERPPkICCNoKNT/Ly3t15k81mHZQcYzNYnjAZIqkOb23oPRLMumN+MN7BS6umoaFJHKXbbdSW0lMrEIjp8zA2wwkv4aqdnzwBpip49crNezxVB6ikJSsEbiEpedmoeiNRTXh7QrGlI813j2Qns5nl5rw/NxjjoR+YHXa+k+66wBsa9P+IOc/fVNF8ha5eLArUtnhjQSF9SDDggtoZlvEEfvwZS3R6ud3xg6Td0RFj7dpSKsEMYGVc8Hxt7f92LNGZubUCTzlVvX+2VD78jzpJnIjXgpESQUYDshGi94ACzFJMCVjFjoQ6XNV6s4V0kIK8L0FP22RwCGRLFX05Vng8qQQxOXg4PeTehbZO/4juugkiy8v8eidu/DIZoGzmJLYyCJqU6pWDU9FxQgqAMdRKPqM1U8qyqeFUF/xuahhTRG54IILuJ79p4xcnR5Tl/tO9xtUY6AbLzB2ALX2n9RFKQ9Iwkc+5epjQ8eUZs5iIrvo7L42sQf3cIu63UX1D23IlGsEfS+nke933ZPqryyFOvIgZd5Xqwm1OGgtHfBWawrCXSFXcjSSduzCDL5cL/HZrwDmd1og15AgjE+vI9MeMpx5pKah3S/7goRfeOEdypdcL+Mz7/DYXsniQpmzAl7l1ckU9qBAdj2pb6NIa/0BpR3YcW0pz4w/75AZ9KDeFqdYWBDhj4QpSix+5TGBVefriwqW2wN62s7T/XuzpsjUrSa5KcrSSQoVHv7ob8w7GJIv/BEZy5T94AuPwT3gWbh+/sJUK7JU1hkt1GCEKtoKEc6mwhiYH1loegLSHOJ3QNMdVF92RwG1bFU81J928wzYcYosdJ6lQ0FJ2jnpNfldGLrcU6K2NZXaD/G2pZ75wliT5Lfb29RJHQ1GAQgYlgfvlFkibf6q9IFVLX+WRq/I9U9wpcfbTUr7Q4FPt3NqsHz9hrZwyb4qnBtPsOfvbzpiSjfXeJyJI+QbAmjVc7SfTla5ka51cb+nvbQpeKqP4kss15lvgkhCGOkJxfy7Vx+PsGRWOfVLtEMrIS48S3dVIOUqiuuxLzr3xA+te2lzMhYNLUgWDm3sEA56mBsAxuafo4D4gjC3bX4uEyTt5vo6UhOUfD6i4JXgzkkVM8rs9+kZbjAmVEnh36oZtEIUVo9kP6imBIcOiEJ9+w3VZB4gMawiaMJ9BCs+/x6ufi7O/ztqLLjiov3JY7otvTTanbDCZT5gpk0Iw9d1NnT8zjb708A1PxqZNpD3NJovJ8/W0pchgt6NAe9AXZNO1emLOAUQMpm8vG+I1Walrj46zuNQQTmkcRCpbc7hXOyAUMnQMvJzAoR1P6Usr6CickZ/9Dr7hynaZlVWVpbAlU6dBJAiZACMbkFaby8+6RWozQNTOjKTnnj1sEKnClm74qBTbFTsk9h8mi7G4aymXR5t7yWTQhtKbzcl2D9dzvGKNUkPzEByYEUgYU6Z2n1nH5trQx2w8o1PkRh1H2ZuL+BsRkqXxGJ+1x+mhmYyve0CRZsJ0TJyIwt7iuvne0Syw0Nx380Axwn0di62uPjx5QYycxssOLJAJ3mM/HKuexX6CFdby8VDhtY/Bz6bhsPykGIpl9h7xwIzin0KvVGn5n9FW9Ru9ChpadJRW3fux/HUPM/MCRcLPQuxd2eFP8pvTypDJv/T+YFGPzyTgXVpyWGCTBxrrW/CLN3wlyCRImJnCTByjNqeuXBC6hR+OExcrEExEOpSn78gmzTP0I4filYujZac33Ai9XPkLcddeU0Cw1Xz+2HPdGlNamjwihmAHc+jutkt1W2hvyc6OHTq+03RdCeN6pDbhOOFpQO630Fttl8UKlIS03NiJ4ksprF5eIi/9vIIADpsOFFYREjMraAeSy/DdXOO796NSmBvshOmaz53Rv2yXUTXnKkbmEm+CG1gQ21NsJ/ZVMfJiEzFKqHTdZU+M+6vas699IphvYYrS9ReKjPaS+ovez3fnh215gI8NM2nUIns+Aql1m+tWANiaejo0K3hWpSqqFXcosMj4GqBxzMU/A50o30qf2cDDVdBNGhkfzCxsXBNsUvHhQ6rwMmOBFZUzTZgarwv/2sYscUalFR2ZPuakoFd7mY0TPmFuCdsYlW/YQpbGUIcBfrbdsybfElrWRGD8rY34cRzixDM8mSjHihggKxNDHCPJIMnCPND58PmYvt4MxAsE7+gpdxvc2AeJCZ++l7MfvoH7RIpDTXa/Ri698RHc3NMH9iU6EK0Sw+CyyzyBN+ylqZBOxGVLHk3P4kaESnbxc0Qy8pi3UCndnHxGJkWpfYOLHHww751STMWTAUnshUJNz0a47+s7YDMnFHvxyfqV2dUGY1ivDXuRcvDpNfoCmLc44JtgdJL/aowlcDnyrjBnsHAi5USw+wksWX16891vHesHVKhkOiOu3AlhqcwnOVl1pyYLmN4GF5at0n2VkjkuaocQRUfD6wCDYvi62I7PIlG0vtvT/jbqBFbGUnuahpBWAdC7UhbNzx8u488IlxBIrqI/CY8tadyG0w5WvOnPVN6QDt49gm8AkG0B6mHgzfY0q0q39d/2CFyEDJfnwQY5vh2RcAoN1E4hK2YaufDbcdLgmkJ8ude
QZEdB8xav/wmFxm7DUU26FDL12TYwGGSTqCcHV9xpcvF059ZgJIsK3Vl7RK/6PUE7ZLEcjUlf9z7cWDcGvVnAnn1UQQ6SozUkS33bgUZFC8CQI/AyZC8CID3pLMfGDIgLWtA/lVLWMneAP4T5uJun6ID9PHTLoa5m4011sldMK6/loLgm1oycESx3gHrD7VUh4e/163b9BLlkvhAUzLoEUZrJDv6ReEuXlcRSY0MmItYCL+X55nazGsMR2FDEDy61pFYEGl1//EOCtTQuxeTNhNqWmlpffSkZvpo6dqbJmkgXwoxgozBgNBZinWE0FVdWmTv3MQy1kfhciDSjCRhNedUJ2k0YgMSkJZBu0/cLrytpExbvh08fSo1FUYqX9ex3lHqSgamA9u2knYD8zO+LMCh6d5kYGf/EUqa7KArrAlLFNJ9xVQgqs7D5YKPNJoaB24xdm1IP51/j6rEMqpnvYHSyinTS5sQ9OUfFNCNxBT9o8o++Ac1qNWTB8mEHR9QEIgGucpjQoA/rqnQ6vdg9tKAoHuTYzdxjQvDFuIjQRMsUYZZCVsqPgPmCyqdmguI2fav0xn7/s/r4lO3LAhIMt+6OlKSRjEejKHi/oQ83aSIuOZLiE/9v9EjyEzv8DLwB6sixrvhvp5rtXLgan/A7lMWCR0Agzo1+YaPnwaC3oh7pLl05oEzXvtDnB6ViALD4d3coPLlWKgoat+GcELOjPVneAc2ki/6APzUzUdIvG4ic5oUy8uyFpzpA4/SM7+NQO1uGzl1iQJqqlbWgS9I0Xyrtl3lP+5RrM3MnJLbh8oDWKeUVv+qwulTXQpuvaKYco4pc6M8N3yLMvJkVD5vTZDNyRrnWIT3nElTaIKeRNddFdwtdG0H8gVukQeFN0d3oQBB4FrlIem6PMvdGHpfFJI6+w37euhZNqYY4jtNYfdmKj57hHSyy0HDuugFi5ZSM2hagBSwXuFnaBR95HzeGUNbQA39cvJIe7wDwzEfEqXUHSZTiS7Amz3LBTSIg00P3XLF62HHm2Ukl3bAShg3ko67Fz8o0bmwj2hiZuvbLCdde6tNzLh8aVLMvtOdqctPSn7YkHuWomh9+KIn0Q43jkJ5EpP9Hw+VBZ0ezLso1IwiTulST2ssSAuMELVi3DbntJ0gqu84PQ8Key+W+ut02DWDNtIWgM+mx2m9fhKWa5F4cR/hvwhPDmLkJxCQ9WQuau/IB7cYWe87SVH6qJyv46RnLm1XxWSdgfgccLuuFTvIKtrY5e5RH009lSE5m7hF+G4qYtrWdsdFO+rpfbNe5NmM0xZUl0ldJOwF+rst5nPZ+cWFDo1Xk7OFr9V7YSnFJRujwZL2VKkLnsbyZsbBqFNZUl5SRss7si8AWGH/ku96KfrrYuZFXrrJG9G8zXQC6nRUfQYOPR62Y87IWyKNEM6Q9rjHzl/KPrw43OzdtNoArmLaSWc+ydlfwPs4P0m3ROruCYqSeZsbc/fZ4R/elR29Hr+E6W00QuDDsULn06NZ22ymXezXVd6V5F84h/E0psyk6/wg2wjvWcEPgF70ClAzdsoLlFjuKw+hFz/w7jPplnCIp8aeKMXO/+L5oKfCsKrFyXzOGuV01bxH78ITkkSyby0pFZCtKRdhvrSrAKjG9pB5mCzEZYgVoFKQs07s1gI9DWXmkZIPS+OW08Yhfr+6ULXqHnH1P64Mzp9nDtOrjI6w7Qed9SvkicdPg4nFUMf33F9etrqJywRq8o2SsnWUVMKMnU/yqdeFVMJtUA5VKGWGTdvtpS/99OQlr34YV7VfuSKnMKYjehZ94Qp1L/hGqHltR2f+ez3X7Pp6P0aD5ELaylhrzSJK7xgSFNv8bTOxv2IZ/dCnz1vBvzPRVK+XEwl+aMqRgMlN51koAjaW8tH0QqIE1crk9AVcsMgilTreEw2griSLqlZIJ6FvU86WluAmAZ1YHQZBsBhViZWYcVec7qQmo9lV/JciwMcCT8uf6LeeWVEDnFhhElY6LRhFJuuCtzVAxiaB3sVqo/ZLeySBkHSuPGrN8g6ZRYIsRd5tOW8rSGtntoGOxrDYze+8cNJO3UZ5uY00vK5FzHQucHtXnQcpaJlSOb1TkSXYJ0rStrA05ksRHFPS6hzJL8oKQLWxxFkuVmP+euDgl2Ckd0pP44Rp43RZiYUWchwleS4xu7kvdf4ctBjMoaBcOhgwQJ8OOo6X/Q2iolt7UIq1zYMhH7QZlg1cHTXyku/J0WqP+iw3Plm7XMBeGq1QVIwTwi7RSz2ghu9geQVQ9EWYo3GEtPwW0z/UJctowbyGiK940fPjNWRokBI0KfeY17KLsEMWtnusJf+onB385ExfJ3L6EKwY7ONNMhTgDcWKSfUSV0jbVfLsI/SfnyxAauTT8i3Lf71cjc9CIHZUZApuBHUXEd/3WuXKZyOCpk8pJRH6wlS5mt9X7olQ89HbusCna9GWJM9UBUetM5eESnmYH0Vn6Uryg1PvKLeC6+XEtje/MV0ZTPcizlK1GTuxPJLyk9/pNRI5wOJDiATQFz+NzsoAYDijkxpAEZneubEbEUAg+G9w7j/n1R8mIHd6j3eLY9dJ62JCfPlXSfEIs3I+C79halLGLlG6QlkoVD7w67v48JMgzrR9j5/kiYo0b/q+1pAI168fnzigcmOLynwsZqvH6idjaCMWPdxNfa/tWqjm+yV/Hwd/ib8bFcMJ4MkKFRKn3F4Z08CitRH0uOohPcv7KM8iaoAQ+pbDT9VUpsaDXBqRnOGchKdoMTtBARC+EODoMrVQT0nx04ni2DJE0sEYuKnXaB3Mnw7w2TL3L/lkd9Ji3GgnLHKy64SMADcLdgkmS1V+k8If76GTUJAYRY9c+M8oSzWg8BPr+h8+iVrjulAGNhB2eJ17FNgE+h+/4SQ5V+jXcKhvw9HiLO7i+fMXJnOTuo/8c0HGAYeb9046Gof2lV9ri0Onb3YKm+JSTj6SI2V2LkzJHTrUgEZQMyfBGo5wNXQgmqUX6Xi7OtYkNP/oWjUinjQK/3fcCji8uhSoX9DnNRM8F50tJdvTvxmkesm0/mY9QnFDBn+KK9Pq1VhJr47qi5AhKE91NV2vuUuWsdnnZlNs4ghQOnc0q3YW0bBAiuatpZeOwfM3T7IpU+daG1EOv4/dXvLIUHPOdjL3KwYcAkqVIoPXz8tV/C8ayeWrmp0NoJvfqED8kM1hXEvSc0rhNMkcdGeA/CJJf3D9ihHkise98IUxlY252UzY3lNKgMtrLuyCSx2IUdUJqVxoJ8JloMwZQB74lQVrZ7GI9Sr0ctrt7cQDNk4kjYgGTx0RzAlBjza2GKYnj5wQ4RxE0v+Ch5s24n5TpIYlAM8C3bfk9eeCajL39QRwBLPeexTXQ9LC9N9SXXlRAKUz+k07Y9rJiE0fAulGIJvTYc9C8p6uB4QgP2ChvyZm8UjAqblysgkFCwh1POvRpSU5t2Za4G4id3R0H/VNt3ur4f+OvSiWxyNAy7k5nyxNItFqTGcMLhLNdIYJZIujj5Ef6OyuHbr9ie2n6rESahbIS9LRjXukb3B7qL6CJOrBl8tSCoP2eYpe1vu/o5bD+6WaAoAYXrP1aefKDEQdDO7P+tOQIikhBtkJTtJTPLWUPRE/vGn/USO79q2FoEBFBbuH0/hJTcONK7+UGQ/z9BqfX0seYhhgfR0FudBatDr9qt4qdhExTwHVmTryO00D6y9WsjcvLSopf9+Au2EmZSyqOCDxDlBoioCOacsDLlDe1rd59Rt3i3L2daiwySrCGUvkqc136N2AfNOOBU96hBjm8oN8jbR1z1wYBuXmz6S+JWCiDcWHeI2TvWexmZOb2q3rifK41wpF0/89z4PGSzJCBkW7vtGDt5DDMBenc5kKN7z7j+3QsMB41ppqznmPkIr3qQcC/XIXiueXK0ybsJiLyWAbZI5Y2SOz6YrsUF1Ddv/Dd2+8keAkzO6m+8y/1BvHweh6Nwg+GNcs0o4X/I3TjqKxudoWjdJl8PlWv6C7x+KAun13hbx++J+xyuOKNIH6kHa+XvkEvfY1S/dOHkaDVO5odt0DHtAyPzL5WcU4sZbc/IHgW+60/rzX1qLM
WaKcn6EVO4lkcTO+O4Sjd+QHYEVqb2IBX9e1FmNGHoEfPFSgOR6FQF/DLnEHLRIIfeVlInkmeNgdWTMEP1DgIF3y45PxIi08ufEgIRQU+mdEV7RVTtOgBVGDsppmX8M8aR5dDQzvBjJJ6SDyw5PINRQUdNO8Kc97xmwYKg+NwVrXODdjrceDg44b2/GomY5/2saBD99EN2yiCRuQYwqS99G/OsVZ9FgzkxR1z3oenZHmHAhi+syAwFmR/HlWNW9SzALlqK2iyRUBXiZXqjINRDepYlZNOemtNCyoKVjZwmy/+/f8BJj2a2QWW27jsmo3XAjLr2UlBhveqBCgPhdNqJi4wWfyA6YqJ3Qc7CV2cmVA1FSwvXmjjULV+I59Zp5gU2AcgKSPHJD75wXaRTZ2sqUfbqmwN44a9WVK9Sjn0OoMcP88UVLUsyWKStgvfKL56Q7Ysy+pcizq1YlPhtFHwl60QGbqLeAxz7wvhN/G7rUf4xLGNHiho8KHpK1P3bzBV92KN4opv10CabNQ1htWZVfhWdxTOsi4KhKhe5UftEvgkr6gA0Xbc2PWPuG4Co/pbnuPCZrca6HEzgQAKSuM7FmYeubnRkmFrTbb3ANcFHvT2RMCAaYm6wtQ9diHbAuNpZFWY7bbE7EDYtHV7zaAYOrCMqE3EhhIgCvMHIPYtR2su4/DHub+iXHb3qplDtg1jG/A8Mlkdj7IIFe1M8pwpsWG3sEx8zitCNerh5RdkMwuuUXxtRAWumPpXcHW1OvrIi4xX+BCaLWEkh2G8OyIsxRZm5yfQUAWgpHHUng0ef+xWcclyx2HASLJ5g79yhC8rWtqBnhoXiqtgAIEJqnI8pikiB31VOBvFQxfODVGQXpZrEhlL5tZYGDMtcQlbVDW/tc/P0QQvkOpK2q6/g0NNS3ZN0ExXLBDwykD/yUN2BhUb0yI+9rRKlAK2qyZaOMKDf6Lpixao2SDeI87SVtMlAq5ogVV5sf1vburRAPcKthGLm2wAjci1NjUIBC/h8ILavnFS9a8LaeB8mz+w9Ln1Qyq2LL0WvpFPqvjqI1/lN+B5ssrFKbvOxJhukuMKVXh39O4ZFKZnSZxkmIHXcJiMnasf29QJsb8R9kv3fahQBfVMygIHKgHlkgIazY2n81nJ1YV9r6MJQYwKyRjyK6fPs5pJcjHgMEPkgAyescidoUrcBfurimrQ1DLwhzuc4B3psuTrGIPcdmFx5inC4UYSYGESvkTsjUCpwzeTslRte/C8loQ3a3zVFcVtsjZ2HjbmgNvMZRf0+HWAmrSZDAGdK4NEndwWlTeI/Tm+q5hN3pwykCBjp4/1yajOaKuSry9K1uxJjAHtZ5rmHZVQzcMLiq8/dPnOV7OxZknivVOZVKYFaFr4KycyQuUlCIxYIuHs8yhf4ctgkEwtnwackLqf5HazkinmOvA4fIwHEL53pG7ARjNil93BJhGAc3DiH14LeuOIlKxBvoqTuDDqap8VTbZ4D2979eCd2Jed1smSscKSd8Mbz9G2O4GTeexUAffhMV8UVcz1ZjyT5FW41rC7gwyv8wgEhyg6IZ7Uj5ki7gLa0yUNiPoNvs3pHh25ENIar9y1LpgqN4MbjFNLdHAc/PyFbFbZqnrMbU8Yd7SWHTB52GYkd+MoLhks154zG/86C+9uQpEk6f41GXv1NdlK4ldsvy4yIlGjvtG/56T7IKn4w1DVrtuqQDDVr1vIFv3NwXGigS+ipCK2kYKR/ugthKeG2tRKMHgkQMzgd1e2unDIMUJBiF4l1MoTpKadx6Vb6ZFuwEyQb5tdAkTorY5QkApy5yDcyyATmWdFP3pWrP92mtOc8jQDKmxbFEnVQ8CFVGy4A2OaFq530/L5KDX73rGvlBxHihZxjU2vowaR9UkMjoD+RaysPnGSkKgM8dCj80L+hYKkjlgre8B9ZjvmCb4oYefHMSRhRuEv487+GvuZrnGIUvIiZizMxPWHX8exebN2wJdasTabsFisZQspVAleCYbz0zNDIT9Y/SsbswkWWueqNl0O2rIpDQ0MxDpIvZOq+UrmsOoBs3iGW2NzTnwg3LzREvpoVKB6+1zktqiXb+vflU7659Hy47BD6XdBuUlU8sH9ndWhBElmQDWBdUUeDdc8CgJ0lC7NUwGycK3scLywuZ/cL0RxNiHQJZmnHn8C1jEsFxlB1AS4O/WdiHPgu+RiZehK0ECH4PpAJkHhGZlQnlD9aYZKFktCDA46b6RTJSPhZqZ0rRYRe1isS+RDs0O5YyCOZ2St73wXGNnZWaJMuGUT5vf76vtFrrsNF4Hyj+hwkrXPX5fNpzaW2hrpyFQiaiyRvy6wyjLpPCEYhScwU7gSEcQmTozUqYtMiW7avOWQLIjPyLUVpT1xS9QxE7kNYZM0Goog3bznn0eW9koRxMey/UFrN+FGNrFi3UOaDSFQaZKfOx18vI8WNgFH71dBxmQuQgVKscFmcQP6foOnB/hLrbPhdNa1C28tqDeLd8yw5YpHB2azUq+sx7RWBOxvmrv/B0VpvtTFyX73DGYa90VYlBO0abf+MgkIAz4ZmOWjxVEGMeF4OtXCfd9++Qsym3e0ihvB6peVNcLEdAhptT6Mbx6HbpHH5Xn5jucmE+/qO0bLj2NCWI9MIZ3BNtXNNoO8UjiJnmcFexykTUHYB74ew3BBreouRKQIRjvW9f8rDxvTqRlgH1av3oOXLjIL57sFVMJsB7/R/yIZNVsStAnKn04DJU5OXm/in2aSVMRyYs1fgfvnsBPGbOsAD1HAjuNjp9AczwAgaFSkyyj9RV6/MxYiM5KkxXFhY3OdpoMzKnliWVAgl6hL3XF2RF9K7dabOvhi+dQaGYPfNzIA6CEq4BxncYXeDFGUsN1dpFNImIWYFt8Z41IvS5VwC2Ha9zw5LWKN4dsJ6yY0NCRooT+NEcq1evdab/B/6FhZ/ikqwpY3QLDJ9SW3A8jWJMx2QTMfgmJireEXAOGS1STT3WeVuZCcLQciU3KG7wkc4YFGiwsmtJuQv0SvtCpL3vOgXv66YYBnWLhnKvP7giK7MnsG9kFQUVvkqkVMz8tGpNUAO2pomXkKnNb61JPqsSojAddjmPtxNXbMIyqEemJ/+q8ZdKQUglXgPaf32eCiaHH3hfjVmJsNs+45VbTiqMeRg/aU1zK4TQnAfcP1/BvXIsZZbMGTYVD7GDueah9BO4LWzLnMd2NjeaBWeCdqAgQVbT4OgZDhuddIyIYnFwsYXe79t+F3+uvxi/pEcqe0B5TRWa6GCAboYTMhZI2BmDR9DDL6X6RKRQl5fdlwGSNO64JLPxMpAvcASD1mVhVLVpiudw0/SSJZ3900B5MdU4tlaXQYorND/Ed7l5KPBpAgrsWyQxq9nZDdnlXxSRbH5QW6nsi9uBGZJZq6U0qMaf4J9LiKouF0QVCMq2L71/pfR14m73vrcbA3wJDWi+jHfEUJXd+WFS1HQFx+QUiz1UR2FYRNltXytt6ecNz3P2mqjbSbyPVFz3GgZxWBqF7RyevZ11VLHKagiQL8ViQGFzurB+qoGe9Ujm93MD516a17pnGDuccbwcmMGX0ayAWaoX2c7/lfrnCmRcXzM/HFZdU8gh8YSLirOdWsuaQcHyGhAVwDvDnPMz+Jg5j0eYSWAaXnc0s9j68zPygwdUdtYke62L1n/Bgf4JNRzRd8UR/tLE0zzPufn//e6mJUVzYqfWUr5FmMaa61kj2lLujyEfHP0oqHO1G0j4ZvMHBxwctavlqwf3E/xRWfdT5MnEfO+eMATJGOrR/7+d0+lJT/kg/eKKQN69vH2C3foCHoDcCJ/g9/Z3uAFrFTzvk8vJnkQBCpY89xGwbYziYo2L4XpQ+hYm3rzhrNV/fpfoII38496kwYpvjxHyoHpeKyDr4fQDR+TP0j0rJb3cKlPcmWRpd0/c0dywReg4rizxpizdsqN7kmBALud0J8hCLJmqsk+EaITS6gotAQ9JojeKG2Qh4OPVr9+04GTVKuyGdyX60zv/ZfwdknBnZfBLLFWbU46U3NuKznWqW/Q4ih1rpKSQjsZo4XT1GuOcbO2h3cd6km7OjKvaHH6z9FB6D
Vu29BJqtDAcQdro904O7zsFXdETJKfJUD9ATTVVE2rZDTJr5zfezoxYeNmKsWy+/AzAjj5dvScW7bs9XnJ78uFdTpQ/l2BAXsfRPvenOCqLYw5cbJteqNqoE+UiMV5A59XRlVqx4Q95A8FI8t2+3208Cab6SzxDSptPfuGgaegUekizUljeNH/HWlv1YZcs3pPAfEGozSL7sVAVvAqJLoYSQnm2HEjVD4zImOdLc+3Z81Khm+xJMgcqlmcf8bc/k35LMLMUj3G2QxR1BjzrdMxI74FRnFKGg+VjdDb5hpsf94HvCqmdr0lzE43UhEPyexmkysd4BqpKUlJxoQNH9L4nM1qQXrqBmy7FvtNp0jaYLgUPGz5yv2DX4PBxPYMQ7InUKveDIy0qqifYVcUkdRO/OUdCU4KjKVASAhTTTTCnk17IC7vzeqtkxWGNHUOL/i1ybYPJD2+y4hFRIKoAyFpllLOk96fnQFzN0RBl/ndJsnoGPYztW4heUuMHMnlCQT0DUtjD9Z6f1gnpCXaq7txc0xHRerAEq9lXKQ4DotUP8T6pPo93fpoLcmsF2TdcmNXmMChWvKN5r2aT9VAwuAOopfnXIYtP/raUPmJ8iIVyQXgyOoKu8L5cHkZd5GPwFco2WBwHHFA9CiARqdGn90kWjzxuG0S/IiuqFCGIGujpweta+GkhYwSExJN4INePO8wCCijRyp+J+k22IxMvugrlrrRot1hn7+3kiqlGhFglbBXetQ2aE7eYWIEqUFb0EPrh36WqMk/y7UXso78bxw8U6tua3dEoNpLfif0hRhXebAmzp2HGKzpvZRUtRnHou5ZLGlpx3cJCdOEHLv6MoMnoQkk8UwCk1WCRSvdWJfCspcypaW7Bdn976vEPgIsj6ci9ZPhzuF0pWM7DuN468Qfq6B3WjmE48wu+mTCX5ViRp/j8KBlbtD7q/QsyxuU6HBNR9EGfmlxNsJKBjarxokuIcuC5x6UDCdRrgfbEfY981Q/n97Qtoam4qUW4+t5v2DsKZjJ9daMzLhHU2eWOKxT3xnXmw0lONiJBY+rJlvxsQXBwRhpWg8ZyYSuipxkVatoQvFH+hfHULjoBOz4lhfvKYWldFzpcFn68qLdDrMJKT/7P4zOxMoYDF3K+4wpnDK3MvGelneotVcd2F83G2Lh70TVihMOmWydnMYSz9HKLQG3ib3NaGLURRFHj9PYgJHlhzqYUrcEFrfnPLNIzMA3vAAq1YIRTmYwfFa8ChUBpgpGs0lM01hbCwFhPLmv8d46aK3YCdJC1yqHG8IdxH9grhHc+o9eIs3s7EO+77Gqog9iBP35aC2O/HXq3KSgGG46kz4xlNacxo/BYCJYcUhpPHbWGX+hP68Lm5HAxZf8rJ1UjpqDx+5Y7LwbAAZm/v4Yyyte0jY+tJmwo508j81So7vRfy5wuSa5IXDxhJG3QIZgfapDrqzmD2ixLkb85GSyuGVEeCuQCAiEVlNmxTzKp8VypBZ04Bxxnrvp6fqQ7jpEZmMxpZXm1PGmcAMzdoQNasPvKs/d98Gznrue7fYqjnNiAa/ka4UtiixoIC+OdpDNJWIEmhy7VyPhduaPOsEYPCjdtrVkkDewpof7jwAHlV4PVpaCu7BTCRC4qOpGQs00KDCORq2kk0WfEFWuoENhMvBzcfSRYfBNHKsVZ4T/ljm5ceX0ckoUuFwLDHYeh47nexKKLvaEU23rWAYVLmA41rLAg48GcuDLGy9TQD/TmHdmREzNa5m4Ti2AkpP/odonhsrtPWfDwbHrxAYPlUuqq8Sc1XsGydal3uP4lNjybcZHN2lZjmUSJgzxvbZiBX21jZO6+/aB3VOdqj7M/5/KCQb6yV4TnYu3zfbtvsInvMnPxTKtCDHoWrEfqVpQQQSLFEQ3LNkohKnpj/epzSBbkgy2Ksr4kg6ZBvfW0aqrlI9h6bUa1eFSSKNbKjG/448MahBvwzlyHGRIobrBTaop9NHT+76Rx3InIBh0Ydnm9IDL6pESftMKcRBfkvmSmwps30DpUzfFbrLdroKRFIyjAW+wiVQtYGgMovYpR8svvf43exDAB9fXibwK6qUubS3w5Y7QG/YeiImG0p2/bL5kjR/6g5iokNCsZJ8Hg1LxuVIQl6Fs19Qu8nrMeM+1a+QKMpEhEdM3v8Sl/7lWBJ7fpVvRzLoOPjL1VrY4SmJIinUi6NB03O8EqchKkMHlpRdRVEb8PKZP6lf8X+zW5SIOvLepBAhJfF9tm2ismkhEK7HVz5KXokm7pvJMr6e2sGrN9x9n98gTotCAV+73aVKTQhmA4vktAlYDUlO1KVo0W2lH/dRg7lTQbCrLm1A5zLdTiCcFlwqGKkHTmU/C9QcUupIlztkkireBaizqGMsjwaceTKFcfWhH6w6Q92XAtMSwDqvRaGSG45OWEsOcacvvRB06Bn5pjvimTXrOhzVSxx6XJ9UqOHgoyhaWvCcerxdO8zA2tRawDYkpGJA8GloGg2goQvYr4fJcgsppCBxeex6KFaUWAmxWVO2KqX66nm8v/6f72tLHeW7RKPFUP4Ewsraf3r7A19vksqPoX/md1H1BgBK/iKuSDs0uYaw52r7guuvRt7YZtlsmTNGT47qRg5foIjvgutKtEnVnJls81VhvK46qQa1y1C6WLtINPXTipYslAbRxWYEjgYuBnIOYubGuI07wDA444p8lvReyoEWTh5qgeBfIoQMXK6xdmncji9eXzZG/TPRLQUn8oWKHxQA0R4tsbKsQ1SvecqwQKCuZZx8FfCl0+7/ldygYiRtK49FRuuH+QagT4NBN3CRFNDaX8Gsmu64/bM7REHUg7M8xC1JZj3j1VSD0Qsh/ejbMQ02ZdSIzC8uM/98t/IYh6rI6HY+91h4P14soTu0XKLWFuSpVyrMTl+mva7gsTKbQSYk1JJSMrzZ1TaTVkaAn4QnTldeGS2FfDPsnBt9hVtofof0EfU2bGN7uBwxoW1egjj6DhyvwUtlqTgSD9mPdYvTMIteZv1Lv8u36v/LQslAYD0jf19NA7rpuzRvJxoIfdjnOItX243aGQU58kbC0+KfQh9TDkYYehnYvz1k1cXKx4HoX1gPHS1u5bRHWUaSy9gT+DSySqjM8/ZFBMLFYXjusCSQng+IbaknAzq2UvrvmO+ypn6zmtV+O4RUa/ILM6M7MQ4eOP9gWG4tUNt3ddH5Y8cgp4dGoTotIWulshIWxjPfHKtqfQmZA8X6g5vSh9bcGLw9KIxzz1C5JVCMaiYFQSaUOCT4lHNXjbWbGe86/oEYRaQg1VuLii0uPmx/N9gasABhXdywihjdq22IOI4jighFlqePOo1Fk9YRa2ft+ZJXYuzLnyRQMedBuje0CPiVhy6qZzCKKHQsrou0jh077MFcYqI41k2j347s68I7z8ElK+KU/CJDZsmcNrp/XaDAeHGZOTAoKwH5qHllNycKFyH4UA5yZscj38FMACzv2i6GTRmNh61e8I/2LXvlpH0CuXf5fBJNJAdOvB7ohcfzm6kdj8bwLHHbd4zNrQBj272dDKXQ1tucIf5dBvg+i0fbc7LIa7Ml9Oe/6QNFvTQNTAlCkToXay9+syq9nxRVfaNGH/pQ6JFULJ8ky6Fl5JL8NzHUkzOxBc5SP8aSzifvQO5GHe3sZfXrW80CYHlMpwB4OL66x3de+mylAvIAyc2Y49m0+kfer5WpWtx/gh0AqmKdAh/Wht9wAECVnn5NLPYVfWgoKqOKa1iQs5UTOUGluzZlGj9q+mVxWbcEaWwL2ahEq7VjJAByWeNJOPwH1VTIuaqzzqCbwTCKUZ8e8avdp6wCJQ/RAIOf6Es98wXrgRhlLYnJwe6y2whIxR0pKU0HcK5+Xt3o9tR7HulcyTa30sfQCxQUF5/2oCxHupbSx5mqnZuRqguyZe7Ak3pLcuQ7D8KlXw5WojlFQTzquILxIA1jKl/UR6VrTSoyGbhUBvRWgim/Vc7IN73b121Dd9/qlRIyQBw0cE6BUGOFPXMUE4hH+jPa5JbXlfA4EKYpjRAsBAwXHLaApy4J2TXTRANwgEk1pSjvE0eiPeJOCQz4UqxEngGOO/4MJbm
pp3MVMg3riBcuFT96L9AHDdY2JS3X+P922/gJtHM7e33JbhC272a8OZJKTtORO2VIKaEX+6jK5Cm1ms0KQN7pisXZebRiV3NmiC+U+BFVJRn24iwc76qzmeJeo9c1lvIzncb0LSaeFXMd9wZRHZ+ATiAednda3dHUeWabt3UJ/SzcCWG1jl20yDfE+u0W+6wP7tIDBp+pnFpZvHzB23yuczQ3mVkrzn8xG5gXO2Zg0pm3BBSSkXMgOVGecckpDfs9SpxCNe2qN3/wef/5g2dS2H5dZvpu75IVdUI3goz3FdLwDnYPjZzUYJDlEifotf0x2sDXt9dAp9FOAp4HxFoNRi3iofQ3y/Vw0G2gAgArUNdpV6mgsvDV5JBDuuMd/2fJIo3akGff4AMXMFP0qTkXcp06nDI+xd+xaIKBGsRhL6l9inWhZok+/5JYAquWKVCRusdRarQ+EOejV+ZyMgZsO0E7Vcd9CiLxt/YHMel8Q5/b3M8ZoS1JKcUgKyIZjbNesITiBqFGaTFRwWrExp9+5xOPzxhEvCZUV6KReiKshsNjwV5dVs+tzpYqpxtbCdxxdlEts2jDIQAQmWc8idRci/d1tWwkSrTEs5SZCPZmdXCFrvc17t43Fu6eGuQjrzjqQoAwc9ECf0EnoJ51lUR568tC0Q/1ioQbfYTCB1A5CjouCCm1IsJ+4E0bC/QAPYH1ErHqhm5YsA0AWgZFZHJYjKIExPhMvEp9kgchEHPTY4LpNvlVdt4SRRBNV6N4g3lVGnMfeMxkZga3ZiCFF9qVExe5ljnuynOWV5IZ9u1NHG/IW+LSd2Adqpi6HStdqPrO/OOUwKyPZrZ2DBKMHpmQRYLAD1YVgwxMQmVLgtc44nFl1jjkw7Oea26PV/l5iFRroV7Jbb328upZVavSECNf5aKP8OzFwuBfPr3ypwEhY3R/uS7XT+KTloNCQOrGgInOFEnQWThnDqsE/1avHE4Z3a4+iwxlMnCwloJVuXyZEsfzl+B7Vcv2eVTHzc11nUif9xJo8fuWUObRuQTnoqUdfWGfzhP3WnvCMhcBmrkTc9nCvRtIMwAUom0u9gdKN87W4Ek2zlUm3qUv3D4a+1Maby1dfgM67Rxbu+jkYKs90LlNKWXOGwgEYhQgjTUdJ/yDGMpBSON4W7rePxgblSIUGjumqbSn9pBP0zfgbYm2YR+zJjYxOm9dOkq59mCOtwseq7HE3AHWbRtyGCdA+z2BF4q1BNYci2Nl5LaFDaSNYR9eFnMyGcB4NfRdMMk4Zb4ZhaDT+LS+bucQK2C/8sJuHnmBSeZqQOBWl/1ffxlpgmQauIFHVMLeJlbol4tLJHxWsnW0DVwNEAnXfEl+uyEwjVw0dbIx4W7ztwcAmkLs/DE8WUQWObpPeyJKeg/1E4GHdXDWBdqT2RmVmyzv8bMxCzwJH/laX3AYl4rDrXhsDado0EYkwO0dDBVR5P9hHqxGdLGT6gfo+ql+lKSg4hYo+BDd8EDMaBTaBhR3t9tJcZSQzjZWlbsCcqAJwj6NtOUD8B6x05VjhVhaJUQNUrtKzaXRkXY8CKbmKOLj9LDebMXA7vUnOWFXkTkyHcgBwxN6en8Xc/NQkW2vw8XDzayXwof3rmKIBpXqYtqu/P0Qm6b/rL1yPzxdapxFOogTz6RA98VJFoTvropnySoon2yxXoKEAq6DaF7rQZ/0jcNr3rhpumJf8JskKA1hCwWtxVNnlcB0rk1yfXBL2yH23Z5anY26QLrQPMEvMU1Gemtc0xbPMjzYnH0FPUg1ltDI/k/QQTCFZqsLdDL8FRZqM1H4H3P8f4AO8RmSxLKRS63Ta7X7jzOoGgm7ej9E1mpd2trg46/vMeTfVRgsWZKh5QLS2Po1//1G8ub9iMEKhwvkj7SPYqDsOUgK2ybzXXBf0ve3vYIjeGT+BQ5vM3v1IfZbnHZdQnWY/HDBxmPkRpvoCCIlziBc7OpTL5SqoD14GdbC6j3EdcLXCkOWU3g5Gvc6jHg2xzIQzdJ4F6t66LbKvan+nFghv0Iss5hrG1tCYVL4an1rUI63o0HiRWhotVZWHtoMvVkDa6fb2IwASFK9e0UffIxjkpv++LLBo8OW+LOkJsOxBu3V9bGXWqgop6HpHCawf5egmBktvOcWZgS7CV4pXntPPzUWG9/2xcWaPjyejcumuYwzOgIExxmUfAoCQmoWHUzRjg2rG/2MVNueeKX7SP1nmsKvGhajTdk4TrghXZO5mU3Uu8tNmmzPr9F//2oDLAsGQqcGvcTZBA2K7lfwx8dkGDCgQi8fmGVoTEKAar05RA7bXf1fBTTxIrjJUz9/Bj1PgS70OUl4qYtyTV+mecgp2kcbXi/ELXCO29+yskfkMZGR5LiYz6+zTAdfMJV+8XwRDB5YIBUCnCLEUw+4GJnwS64QdnsgFjX9wgvS+jHn+GbPerDRL6CAeGE7PbKeO033MnU09smzLvpH7KNKNpn4bS5E+m0PzrxjBYpd/x0EsHW/B0+a1USfGhe5wcmRsuALYLKMFxZpdBJuoRhhdcCZmNLB3KgxLqOY+pl4QEktgOuz0ylSk8A52gdcw1alPZuAHJ3QvmCc6ZVyjgI7VOQgLzI9py/dfTTqJ3F5dtyOkDxeAtpcjLRu3DoDkK5TX3Elz+C/FNbumEH7e2bL2/k8Tot1tTYMeltMBtk89n9nTrDFlIShrU/2Og557RS1cK9H0a2IA0DdOyG2wKD2sxoDo3sEMsSe+/4HJdxDes6C8PDrYvHFTghJ8pLR4K7UtjeG2IEOCHJa+XzKUB3tU9a0xUjdki6tCczQ4hCHMeID/KQWA6bBgXsK+Z9kP6E39vzgp+mW5bIMKIJn99qx73Du2oY8qDlkeU9MlFDUznR7FNtNQth6yQTcYetSzZtPcniLMA8GVjyeA+5rEiGbPLQHACveKsjDlFaXzsVqadbvTIRBt3eOX5hRietskEYW1GEr+25pIt7rU02bSN1qmXSTFhz+Rowwi1ksQ+f0m/WzFp2Q5xN3Qx/wrdzpeqlZjITbLxGcgZ6idPtJ5X1IShoTGSLrReHs5Fh9gJuNJpb1Nz40CvRgUuFnxy6frgfV7ei+ThhP4jtH/MYMq61dxR3IXAf62dbaH0FVyzdcpQufk9R9tDCklrazU1HVtrzdwkNQruLuAeqiJ+apsSraBImD/KCfbBH4IPhi00YMCQfNO9anmiV0U/1V0RVYfSMFeR1ZJqUUonhULElFm3zEn1FoKi9feqpqqnColYa08r1k4xahTBFvJIlxMiZ1nj9bfdUVH4f4BQO4zTdlT6FI2F3x0LCHooxANJaIZWTRnOOYQJo5EdloT1V9UDWmDL0UpUJMwwWvob5dSI2KrTEoEQwv1d1clt4d6kGeSbu+FGw0gG7aHU2k4bydKiWJWI2mSrMA6eXnbs5qOvF6XnXC/W6Oy+ACnICCJe99RhrprVEtANFb+r0+H2WYGA5xi3nthlLVldxlZL5Yc30UGbUXlHhQD15kL+YXTerp0aZNQ+kLEJhG+7kiTFtKsTa4IY/PtyRNy38Rpys8Et51OW9YqAKcTpeXfBX9B+5LBhoNBnF40WF6FN7Tn+qQwT5G+WUs4TdDxKY1Qst77kciMtBsIy8WqKuqsFfxmehP4W40qw8RKZ1AKBCAbnwhVBwEMoV4pM/9RI3W6X8+11IeReIsrAEi2q3hGm+It0z7M+aQAgnvfX7ALc8G8E+7PstdakEwW2tZM2wi7LTwvNaEdM2o58TL9Y3kvQFBM0WlynptMhuPJ+uqSduwR0NwoZGzvcnScQKep6eg39hrGD55dozUbhvYMrQuYrPE7xed8nvYa4fPiTMiGyphC8z0PKOT7xaR7M4PE83yctHsmY4Ad5kELFc5IHyb1wPjWqdkCva7ciJJKauVsWpG7+c7yNmmgWvVmuUz4LX71e6dy22RmwT7atZ44jyfyGEitVIFQjYX48LhyyNNUkXXZuktBBirewx0SUzUvyPD08h0YMIZIsByDmpvGC/fCafDI9BjFPpFZsxra7FuJ/QxCTuNAwubcrL3Xy+EWMz/s+BpYdbF8DhREV0w3xpJC3wcZ+esziH
wFRTdba2i26sHz6piRPTkUP5sca08zFWyFhnxjSpQ3bQsNneX3HuQfB1/wGzmn1s/8CsyKrb6X6kqq5HFyxM3tSJ6h8BsC31na0U20Ci2bn6x0uYPn05W/3if4p7Sz6+mqhB1EoZXpmyOqMSuTzbbQFV30ltHB6OywZSuA20QsUwCSXmxoYFuTjN0wlOUNoEWCtGbLXyGnCK6j9uR/gClaf1qUgFvl+s4nvvgHOu/OO2dWP8H0z4AVizFoeX+0VSy4s9nTtQYtwlPooptxJM2Ay4KoNmUxuCsKIiX3DMuVH/DH0aiK9EeDMlOPhfyvcVYTE9I4xSCnqCS6G/v6wwcJq0Mn6rldnTC5AMEP6w3il0vfNr/Pcjd4lLj/LUZ+YjW3XdWyDl1R9pAUg1XXyhQ2geRazzlUa5XN93y/UxyMAEzhSVnCW8siQnlejuzMY5ZBq2lFCyVdviq7x6hVd0VL7/u35G1NHv9oKkFlyWUV9fpRe7XX9ffQ3BJHPpaZVXn8FAxLP5hXsiva+2lVHWYFqEPab6oooLiMX05jDu2N4qCdrW2sstjyYw9+RY05iNuYWgBln3TPNxYJcGF5d5obJmYWNFYQlIINzZDn6YYoouFAUqZpjVeN9n1+jXIYfdv8m/Ax1TrmTvGGcyhNPxyZR0IUGkvo4p8nfl0Qs5sS7X9CymkKOAee9PCzgMq12Jz5g+2ktWdbU99IalUeSq4j3DzvhTHMravE6a+zJuB6tmLCfSYlMbgPU6b/ZpC3QEGT1VJhfKuIg/FuVKESaHe5RY1uJfjiD46iMe9Hyo9MfE+PRXuy6WZevLY0Oivn/jfQO2/EBfAq3P0v8K6iR1/qh/ffpGXBWdpG3iTObKO6d6sk6EZxVjARBOlyWxTE6xGOBjjMkSLhIWr1bHz/R8lTCFM5tnfDMUhOTLyrue7W5LpcZQkUAkecL/Vcp8YDRCJCWRYN97NzN24uNNprLwbKf9lBX6GMjhWr/CcUn5PTYQ1Dja8YojlOza6cFgBajBo0xYUHnsumkPQt1Qj0gExuruwRqyFchgyMWDfiAE1Q4KTNnrtKHc1+8oor8jWfs90XL+siP8oecQ2m0TIlO5a7+hwcSraAHb+DFCG5pFEs26//08HKjfr0FqGXLmAyaQvB549w5x+yTwctM82gtiS7rQxElnK7bpXVZnoRVOq8HOFHcq9LWcmOVsyy5xn9M7cSnhcvsZtf0ER/TZZsahBPQgVaGDTStkF09Ppw63UGKMrezHfy3NGVVjGE27NXW523oW5DMxlCNAEDTg99NrxTZDZND7wU4hKEz6VuCGob8DMzCwLwhkqgON+1W6RfJwxVInNLuNmFNL8LUxUNWELxh2MgxVMbMzPTIiooFwXygICE5CsJfooGKv5PFjzvPoyp3bqLLLBa5O47eumUR+GLc6yXyIKYA29AibUf3V0nvFVWtyUO96+1/hbsnx/A0gTiJB5zBEtmMSbdk3sFdI+dKtCKpFSi3s3w0JJi1O+IrOQicHxoeWI68rfyTsvO4IK0poTx9xw9gpXK7KU3o2w5394emikJ6TnR6K1aTQT5ZClcBMHS21xWF0cLzmSP04+/qpYWLt7+qTAU81zTRkmDfSU+R4KdySY2J1JTyGlFdgnhFVcslkK5yqnXh9/wXnOcBGbrUf0MXVIOtt6AXCLFUIxDz4uWI8SgWAqF2Wnrb9ybNzHMe42poxA2YRE2KN8xO3Oqzpd684CIppobzs4F/2MwSMyX4aDKKoJyH0iLXVmqIrBlP7gvrAZ7Vq1c0Ga6+VLeVuGz/ALe3LNYdFnTcc4t9US6D/OyFxJA2iGFco//RrV09PLSwjTUt7NBJ3+GKPteR92wqtyCGUHjualYv22hNvCJooUk4k+EJeVKV+sPCpOmm7P5bA90nMQVBiyqQUTVDdt+NYB+D3KFr0A9lxItuLtXJHvBUWoI8GA2/1b159PMK230DTnZV2cbk764Qe8tJCzV1vKsaRZrnEn+OGs7b5f3AhXyQUkBriJiEXItVjrA4ypiPkzPgP5dyprFwm8+VDoYszKS0dD/3CVnLuAvF/9em9umhfA3lRk9WN6XanxGq9akPquIVAyC+zoVxXecX4OMY6kw/TuYJFaWN4LgGGMb5eDzibf+TPTDqaf0s1BySbm7OoZar1YuqdoaxxA5JaV1x/Ip08+eemd8zPvC3vteIfy2rFYheN8paJqzk0Yw/bzlQZdyx6u1JGiisQTpgPDcKvdjMYZIIZ1wZqVIxVyk8v33DVv32kC1w0FMytx0qh2ax9s85IE0+Vajt0H+Lai4buF5rv1JGwLjHWrtBg2rMJu9UzflDzkmZupzU9aSoGVEQ8uPM1tFt8d+XJECHX6Q4M3K5naR6FnQsRcfaK0CHApBsEs/k+rEt9mqLxaK5uwWRa/ipnzU/I4JuRDz9qnE8uOhqAkVgbYMnLFGKA81u/IHS56/Z09NMkDMkkKZUoanVKwvxyG2f/QaxktCaqBF7ZH1OY/kP9cEu/lbZe2pbJytNrt4apgLEEtpnnje3Pc5yCsuSZj8cdUoP2+k0bMb7Gz8ach4rG2DBfTJBUS5//Hb7DGi7fxFU3UczHN55KEJWpm0Vvt6+/Tzaab/PznV+yziJJqRp19X1ca5SryaAnBbSgVUX6ZloWlhU6+Ca+K33kNzpaK4gaipjQJZp83Exd/XSJg4J0Pp1qNlDkBQCvIpkhHIbk/nzBVGzu23HX+inWnFZh4lWPRr/kEX8YOmh473v0URzpPHSLzBLiuh9uTlw0TH+o7uwKOfM6bYSKWCI7LFHxwrIZFEjn612YqWEm0d/phOJX6ne15aC6IT9ltnifr8tIZ9VfzJaQ2tdfBv8h0Pyhxa1vBYvNqeS+lgu+zjR6LoeJ+b6c8LOlmaDo+Hu+mMCTAstWBjzdD19Ya8avGTcWXcK4ww7gcBtWxiAUUcwjIVxNgH/NCexQ7aXbKBh2P5XlAdBf4BpJ0mI1mDZ6GGSkDhvcykzzxfiU340N7OtCeGAbb2doFQZ/e+/MwXFkDs3hcULmAlQxyha7syq6mA2ITf40FWoQFiXFNnih1H4fckTSv3NwOGYPoqRLebSCn6oeEgHWi8QnmwLNrtljGkgkAbKUw3Vz+zzs8O3GlcpvBzL8V9t8AHp1mMPG+CJSSC6CjBXmU2/kEKpGLnHSJS/w5khtPM2IP6hR+Ox9l4oJzlXjc9aEHDLJzFqrbjyPfKDgafU+mGxad5shLTaKB9naafzTUg9VMHMkZyvPxyoopGdrLqzBO+GdBYotcakH0DUzegVUmz4MTm1ofwBo+/jx8cUOahAtEtQuOUE9wDh6e4PgvgUGcBJcQl/V2x0Q8Qme1sloh8z2D/D5Q0AHr9S2lg1EnkuJmSCw8LWq8Y7TSPM+NSrSjSrtzHRR3yzD7qHgILi0t2gKcbM4AAwECvwX5GucWlQeUgBDpzek/x0xhAb3CWBosQ0a+JvlaYM7PDKsrAReIK8IQi+qYXJvR66bC4kdPxEck9Xow6c2O6CcVtt4H7CT4XEk7gY7gD1yInebPg7yti37XSUFQIxf12WvwiETJIte9RTVF0G3Ia2tEtajzR/r8gkxbUI1tezjhb21ufonaTuFw3j7+vy95NDPbNgq++D1uBRDP8TXyFQ38pN1elx8GG6QwddC6F/pC044Zw+Ci1vzjNDNj9ah532T398dqu0LTMFFRHbgd6Agpyld7VM0lI94r74PlpamlYyyWnRI9m8hPnPwg5s+u3M8hHEd/mooXcP0Jqxy/nmqdV92eZ92EX3yhPkTEeFCTbSX5/6lJrm1L/q5IH5eeLwj08JKLe6Ut1XSb+nxXJFk7nMefL8V0Gy6XTNW6ZQXXV0s+TgJmO/FbeOsxLqEvWeivrAvLrWdzhvDDed24RB3VNiRMF1E/BPhwknt31tZ8fTkHjPml8/83hhBdQoXF/PS1G9CwRESPJGikWVsAvHvHX/5YN7/rxdBxVP96sd/e7Q6bQq3Y9oIgi0Al5vT5uknUY8XxbjGVCxgmQcU9F5X3NdLCbycPNNbG9LXyGv6erWrPp71Qwx9QTYdcThJ20jNPmWM
Snw6bNmBXNlmWgUZHG1yR5M3bKwwfXhhIFhZ4/kwwTXJ7t7e4JzroG+kjkpSRtJYwXjKieodJu7SFWADu0buhEwoiNLTSns9XHgennFIc1KpEOaYAblPFSmxSLH+qK5sLyAWIGtTnAB1Y5GxQvCYSVE60VvsnSZTUlnBOa4Tmu8ib4vBeDfe4wp4LFDFDawND0lK3DJMKeWof4KVsVRgilk/36zxDYCENZHQ/L/i0mOb2j3EvqlBLTVyjo9x8o3Bt5fCh7mieAq7d9J/KyoeIrhWYCrhZqSTdP2O8gE7HvCAuLPbakQkYbv/FqKrOpNBDKzv5apIArSnKInPiyIgBGV0aBh7gGsFvJpG57OWuksCxrw5/ccLyZVCGBVyiRulup62mFvXkS1ljWo9JdsSgzNaBWD6guYi2VxPJWj7zdnXhGYgr5rLIUnzxplGXXrZzFklpBBi509tkzz3McGkQTjPdVIJmqC/83qIJbMifeeBbuPUwGbuOnTD7yO9hcng9NaT8Yh3LrLxsol0dyKLC6s6nBF91genswv8LD6VDm7Hkuz1VyOHrfi07fhnk4AWz4f9GfFYSWQ305hG3lxopJlL9hvbEiNgjSisK9+VN/UQ9X8BO/VT38JxI3FpFXSmxnbCQYHDi+Gk2LVCrlmwDHU/wYhPTepi6+xNRj7ZGwtT0OCtZMssk8H13F1vgsfjtx+7oF9f4tADxCIko1w9O20SG5luaQRbPlHVpcCKcwH4W5/TQDwjIxhkF5MqYB7HWoI1520VHh3nKHEsY1WLa3PmHIww1JsqZz7duEPdqnMGPCmodhGUrjVuOpCMS+l06VBKmZqvc2ciaGH068Cm9DDavelZ8q5ww7QNcz/Zc2qaYzjGF+CYn7AHgvvl4NiAablBrSj3kx9SJmdQC6d4jtAOiB2azs+8zRx7CEdU5I6JoDvgjq9PYevhMT17+OdE7fHunyJiLtxcMPxpVpjdx297JY3lxz52D11Natv3hvolzBDQrRWzbjWZEf0+jFzIX4lmm4g9UrgIoyhvjcwjphtADuSWY8dQwcIV3616q9zFSKOWUTMZByU9KM5OZFQhtUB8Ab4cuADO9C9Ul6LPan5st+Zb+bYJYzUcLiM0CYjtyJ8trxddwd5idlKkv6vwKvCuTEcWwPiF5LkQVI3J3GDaVn54klBds8Qblq6WySVDGiwOWJkjBPijRjCMlmObIMvkaybbsrJRIV7jwEv3vZ31SY1C53kUU9pWI7XZlibn3sjIVtYnx8pfNop7l+CdFiyQpFPuisDvjVXE9jtLZueg2kCXz6nJDfxUX+H31vj/zcrQpsuQy2LB34n4LrAX5n3Bl0dfWTpWkTJre3+GIqVB2S+YUB5ulGOmpb0IfOULrNJSna/27wCWZLlT8AQvhHpGsr7IjHi9u4fQj92vvDqvqB35vMTkFhGo0MfFxGaKndzutF9c6bMpA/edimtiqxwUNIBB0SLkPZe19GyIAwF7WN/d6RR9j3HOT2KzUvZSigBWsuxWwsv+ey0IUjYX9Dmovm+OsfP+RSSIEr8hte+8CrbFvuh0GMvgn1HL2dyMaP2HE0GiFelGaLjb2XygUkYMvLJdX0ty0gSZ0QAakH48NQBdY9seL+Casxjg1PKs9LQ0Y66gAP5bU1i7PJXVx5pkU+cyG1LDW+t6r0CxjYrvoK+9eaLi5FW8Fow22qleVBRAXbcUfL/US/mmUrbROhSNH4FUQTtCL+HWfbyzApSuxmY0Z+vyAROn/RhTvrouEFiWL7CbwctaA/Lv4XJHKo6yTN6HDS/bH6sck8bo8VyqeiLMHlBsrKIGOXETo5mTqFCb7KP9+NgxBMqg8VGwng0gjZknNT2k3uuunhsWnjoZvYBIX5KH16u0E2ZrbRb4f7bJ43kPVS1HFPZ6sF9YmxKefIdhz0tN+BDiXCxAoBpHUNvcWckNFdYfSDHX3E1trh9tAdEVwcjcDuiFTQ3b42Q4WeV0SCsTmYpaT+jqsH+JKz/GqDtLnafFwF6rg9Wd/xtGauReJAQiQOLSafrNc6TWMlX9SJw9MomQ6kS0MvaV9+Czu49Xg95QDHVzf0tjiRMphO3mampQrWaLAx2IEcxEs9a7rvwXvvmxwmKI4qkcdrBaLuUbK4AEemv1aDkwFd7lZgW0Q5XungxfQ7HRYjA7uWrmRT1O0BBaOEqBh86bPnF8sSy4NcRKx+h0rr0RvULGpxknabuPHSs+R5CUx3eKngqQi82pnp6BmGprCQuIGV4BFhq3tWn2xnlAy940F8o5lh6vt5tD/7k51ZtC3GIQpGI0V7hJgSkNqSrHb4Souysrpywb+Yp//iCOHCp2+jrodSdtHuRYZWkDVsFT3FUUAox5BD6NF+acL37aJE+Wx7UfxTDITZiFGjoBstTmgFyNCeNrJ7RHCKTdE7fy3vmDG62NEN0zjPYsImzXJBjEIJY+Q+r/rXZnnfXNstlHIPrZCNiMBYpMutX2NtL80p+bGzkzT3cKDa6PrSTfbmqHQCMrTYefHtSWxsYAHwRXgElSCLIg36XFhDeVmmPTFTpANvQPPYRvvLC2HFJXL0wUZk9bLiv8D3Uj9a2Zi3uWoDOaYTss1afXtYD784k5x/NauIrOOcz/AX2wVqdaMSRomvuZazFipAjSSyitnQ49GQFxSTu4F5hKZd+QxHHhBUUEjxWKhETh7bDAY9LP1Sd8V/t8IPCtI8GCXN1N/ZbgUnmGmAGIJ39JW/NaWkn6tcphSNi/RDaW0ZfitGrW0w2GBMAVnomGyH3/+X1T+Aa7zHkMTFrn4A9cNbcR/nxlDHAhoW9CkspL/gwLBLiZIqBQjkwkZRQKPAZQAlhpgnHIDdga3thcKsoRJrwKjlqkFfZ3cwj9lmd+y0KhVc+W7EAD/F+Aujxyrgd7ZEZ+0+fayPyGXAklHpqPk1ckvRm5XjMi7cHhpZuLdIhenDbPxvdoqNN4Ki5Y52PFiGq+xjvDwznGUX37kTW8iHPZuuSnGW1CdvV2UrnfkihhOIrAof+Z9JmcA1xIAODw0Ce/6LCaZE1JjJUyhaTVBR191eeMn0yd2RFPyYACAiYjSyzqVJsty5vswr8/i4SIWarU+l8txsJiC5pcEzR6olitqLlHlqDxAHe7UH1Dzf9+4jUeCalqPetJ2mYUUFNyi7DJVy335vdbni5cxpnAWNjwyl08aTRUTo/ietJ0KlV3DZ2XdobSANMTLpbslFwNPUy7EGroaAzB5Ohi6nVnvVUpVDbOLIwZxogc+Acsrirma3fKlfzbLDtJwutzef4/LDw7Xy1J43KOeVSOSLIUm9jUFtKnO2PkWxCYabuszQGzTrqyYa36AbZBI2HuTU1Gshm6iQZBcey1J0TgAhSab8UIhCraDeYEWFDQ/Qi1sasnH5MEtWlJzHtvRFpU/wt2XOhc8TcolA9Y4Ob3nR36v3hSgqZ3moK7unBaON57R4y3Fn+HOa5jkqcGBIgM32WNsffZTJ4BebSx1RCE+DMP3RPyIeEdWaCF2P5lYV7U51iu/0HBSbfjqifN54Q1QLhfDVsjWvpY9FOSwhMo6dNQ9YvnQ+ruKlakEDZiJOiYxfDKzwrXXvqOw8/s6x8pbJ8QJ/Cqjgbqq0HCN/+6MYiTwqtnK85uwTul3t1xSMhmoz/DBLCQad72Rc2K+mUCPYOVMnqskvGxk5V0XFHOdFbja/joPwrAsyfoOGumgc4O9pcD+AHNNLMY8V7bBsR/VJCkXJg85Br2r1zeK4viTMFRcnyXsx5ysn4n06qnSxIrn5DejPX4vQwszM8SpL1VlZ1O5+ncgNTrkXkm9lfb24lRq+zv6p99ZVVNqVMEF7ocWHpAnIHG/iPFxdWDgWOv5wmAI20a0hwjngFwUZT+e/oR+1gbzJ61votEWsyDHaUIEBOhDXU4lvpy6wVXVWT38YfML+BVLywyXBSdjmBR6yO6wHtZlY5crYtnCO36I0T1zUAH+iED0FNjNmGAeUq6hVBtaWDv/dWVJEZ3l8cZH2TdpLGDzuKb2d56bYquJYq3I7SOO894bYdeSQm4Ty7moYH4MbnrtVDe4fl5SkeETZaISDUUKEI2
Y/9A3BMyAbTTpYSjlcpQNF9ztPTPVDz9WUubKslHB+rod03R0W42wHxS0DuLk+aTS90yVNVUY/vYWdE5xKJ0Q8NC+MOleR0+8HFPurNRnRQgv/mjYdlyVWZYAu3uLrs/Z1KS0e2nVL8DaCGATeK7yLhc5xgCbuVZk2BMY8iu9PmCPEulUPbZ+HaOKfLJv00v8aKt82atElAvW5j5Sfk4o6YNeowNvNLfapqY3RV2Efh/PrNyoTSmmYLJ3VlxxrRN9sHvRR6uU5Zi5+IIAt8+bI/PpljG6SSfmE7gfTvjTs2dsALu5FdIzhxx4gYMLtqrBKU/As/9RGzKj2QrVTcstN9IdPBFne4pUTd7PD7AB2StS2hbjSpG6LDYcYmp+YFxnPYsbqMUyZY/Fd2keIy0Mhw2jmwj/3CLVexNPMhHcXCMYUI2Kt9Mi6yA/ayZl/6NwgVouXRklfaTIvkFUQxxUrqEjuQ5cw8QbSLV6032KgU95YiiUGouBo7kawVJQM4v/KLem9hDTm2uZKp7fEs2q6GUV8PnLixYQfBwKfFowMtTykFttwvHB1pvaZ9yBIHklLiWgi8lYRYgcW19Rh4EfBRstrKAoiPLTBuNBJZj7YLtbBr99WMg0jxKW895c5jY99500Lj33PZNyfu3QXbzYrVS4P1+zXzYGfR4XTwmHHWxTLw29i5fB8gqVtNnierjs97wDFSrTx+3SEC+VbfiivjnhHsyoiPStOOnG22atE8xjzGoOc8SmWXc4GahfatGB3Rva6JScvUaNLruNq/lbhyhVCZ07u112V1VAJQo7qgR7uB7oV68ch3hcf/g4YsUs8GVcNKVrMIQ0ertbILU1D1EfTDoddn2uoqE8yYbaUj9kpK2cdJXp8XfTi7enf9YXhz0HQTbQymiHHV7FCyqRBlPZ7uu++0kS3IvIW6AxFXYNN86hT7d+nY1e5mUh/x7NLUPd/4wWbt5gSOPs1EN0I5sAOReGmLYrY9YvBhRqKb/cYqARO8+nRNDdNo89o6Rw22goTFGQl3nM0Pi4FkKdVhlKeYjtAx+qSKr2yR5tH3KO6qMN8USB6HnDl5/SnJH6nLNLm1n/IcQI7U3d1n05YQt3BkCNWEZ/NnuGzxp5AsHAiq1wkhRqZOER8xvIpu41lAI07LUqml+zJdIfw08BrHr80T6XkIAisBmK4p8/5dz4GzCeDnLUeitbbgfgSlc6GuGP41Xnk++jSds5DbLAtN/N8J0Su6ECjCPnVOBJaJlFBS5JpnCYUQ0H1+lJo6/OcZOTX6gUPTykn55F4/xnq4VHML8VmQe2fkPXfpvbsg2kcYks40aCNtnpCbQJrkIHv/Ift4dk9/WMtGrtrYoG3Vtxn2xGKRBecvPOOnJm6xQOrWyYpoSbYK3I7hm43SEwNGUe2l29ecPwaDoK7RoyBPW1YK6USn4MRvr3DibwC5BHFCSZxl1KpW242qXQRf+sZ3m8P1izVDjxpoH3kKPgqf6cPxcP9qQsoZAdFGVOVSbIkWTD8MDclDHgb1IZd+EaHroDlYs4zBiVjZSwEA17DOMiGiI1ZNBlJhvBZisWo/YNus5FgRJswwfOcrldz3Yd6JNY5CbBTpY9NRmXxajsktI7ZuN4uPtZMW6TD3fneaCbIocWMw9BvzVJmxThsPskYEW+St0olCXPLOBJ1owGZY59BXMAff5WqEVzBA5Qv2vqowfWkTq9DTzIZx5xnA5V1g431B1z6ingTgcexHJaNMqWN+wTyfTmz/zh6M2MCY0yi0x8ckFt7Ua5m7u6qvD5ayzoiH0fs70meQ32rXqgasrq7l0AVACAIO8rDlHtztPBnMI+aqCCR6pBm+/oDMvHAO7kqfDt58rucBpYtqW7BXHcRTLNwsfNzwwLtL+76Nd+mt9sOsZN61FtfaUI0W8DhZeKPAxUZv1IvYMVnk4HA0KXw6Jgy2Fbeffu5XoVwiviAkxo0+ApX9qY6HMv4wz3YD26hQZa1OBHawkgYyEodQ5ckSioslHQ0m4vqoHRdtRdR5OfiidcR9A64PX4BiIuQhVVFfhcA3s3FOyj1OwkzrOGlNqsC+7UrU6JfQh91/UlwqYCmMzmA11GJOwYpe3YDop4pI34gUhwlsJlxOVtwrjZczbKRK7UnX4P8nffe9kVuryHqQztm4rlYynirCkezn5UG3lFeri0DEWofnQXIw++L744zhLjsJ3QSJrFLzj4pW3RCSChsZZmVtH2CCSnoe0TuvxPH5Br7hA8wxupUNIKw4wvDXtV97KbAfRrwLTwX6VgnkQjGcwr9NtG5ysZrejHMjGazKs9gKzqMckamMyY1W2Yfy0wCi/Qmmf0o06E7XH4LKaBkMQgiEnU1sFjSWCiKnOfsL1tMnYt/EuxXS02aL1hUAmlnr8LnCiA2IKeWQu1rVBmw4KtJvzo+mvQ1VsPbUz1SNe5BCDX9IXiSp5Vj5abQ931sg8c3t0pSzqO/9S0rUEXcyPGJHFB8rJ0p9HqZMxCzGWiOm5tq/MEvRQuP4PvPA+tZeB995etCO4ieomfD6GRJEoNeXRRiGzqChulsnmAUs0OfKKPJLaSlRTfj8iDS0BmwybRFBobIW/QpyWyyzxu9dFC59xJunF0RywsUUmzqGqjfo4AOCE/1rf1SXshmCxmnqIuDQd/Kpnadg/leeJzl0ZzsSnWL5g281cSomSBK4P7960FXwQwAFrP2t16SkO8jVQ6CDYRSaU9ifoEGk2uX8l+MCzZuYYCzQR2V/1Pk9097wGr3mBDgsz0VOKNmR7IzAwinaVKj7WKPcz5lTJLCP0FpRrabEGO6Jua5+WAb0+Wx0yRaS7rxFQ6b9vsNhQC7cg85MSmV5G2sEOKFqcD5vrheqEP1kur50o+tNrIFUJ3z21SqcVuqL79CJ6KMu6o8ENZF9BS07rfEJm57QbBz7xGrlgllkSrbAoRdu+yFzkNkwiyZVeEAB4HFQ9kOP9zqgP1JoE/0y4vTvNe0L4Uw0QfEg8s9QIz4NdIT9iwDlnnPigAuQ7we4amQUFP1rj3ZI39qj9rTbEa35LGKrZWVwjwgo8waOPvCSVOc2FqLWCr13keAmWwKoTsqt5a5HjsB6UXaSaE/2oh9i5il2eZx0dsIWiUjNTkblosCjQ0VFsLhHsCB7JayzeRNB7R4ZlrdaHBRzn63FAD1MIojkxtlKA3k0h9LGDWRW6JT7Sk/XicdGBu5WxYKOmdl7VAdhFYFge48Xhun0xsZ1Mg9MI/hwiLp8tIV74rtPExawvSJL7rEhwY6NiEP1UzGER2eNATl07MuDl6ilWTorTgjN4l0f0KqPr1zHUtNlJlh+Do7HAjiMY2cnofjOrsHneWeX2MRd+EXcVr2ErKmGBG2wROTqwSBI8LYDa92z31FtBb3gkg7Sp7Bf8PufCJRAYxM32hv+V8ZgzkOVwizmPbgKj6LGsmW7Tqw5f8M+1j4vWxmHcIwHDhvbey5w63XFn9mgTHlxMuU3w97/cWg3bHBcY4rtTUP4RpBFO/YrKxoDtXtzJzcWoHh1BHYfz+UgRthfoONSOlYrCHQXua4SGeLeQ5Numb0sjUztBu0A5PYHM4kHKHa3EYqIZ1nwr5zSCffVv2Lb58uTSgKX9L8wL4KeeJki9XWv8hS0Vy0seCrN8q3qjyFE70YFkxFN90CfwlsZP0/8CRVyXOc2XJbI2XWTLPleYwKbstnvJmKFNwolpTzayrI55EJFliDJOfqSEz0Ro0a6McgMwpThutb0UOnjxizba86KnZ6PVnXE/Hn/5LxPXPJrAvpyB5k5QScwsEa+k9Ld7Y13CHxs/vF9DZQC35S1erRdWWtdpQdmNJ4D/ZwezlRo5juba3xycTqC1HGWTOOaBcZJkbCOzHpvFT7bZokcTQ/XE9rMiMchryEIDVNKB9erjw+fRktOV4tUKKRngOnfqSH0l3sC6kyqvGaEVmyGF6l0Juv/Ix6Y3ZUmntX1A7ASrNMD3fl1no4aDBRFWxcqQ6MIc8C7BLkOa3RdEkGzLPTjQ05Zy1f3RaXqKx3yqEwnemJWe20gLe4vnwlO2yGTWO23yX0dhvXTpqF3Vu+um1EQtfWpl
TdYZZu3fXwMcRcL5Sm2HFUC5Fk89iXo8CQCk5hPKqUhsnvMVC2/PKalvga/MV08N+K8/34qEoMWJ28nlgFd/vXr08WEiXgT01EPUkCAtUg+LZmd12BefqdTtmoS7k/HxKADlsM6Qsa7sbjumE8AzzDrFquWy/KQI8amEUejViq5zt0sUTT7lLh9O4v6iBFIwxFEDwwDMXNC5s5+IlZ837sjPiPwQBo4w2a6GMbtkGYd9TPWCaJ4BSjsYF+X2uiaFMC9cNl/WgndbJeUpqZ3y3lG1a0NuOb6ieuMePjxS/AC4P0dwQi5D1oDo6ZJ9yQB7Xw9StbIfT+cSIZB+/64Y1j/I6kpk9oHgxm/q4xdjqziblifd06xwJdfQdCxKMegfjTOxXqkiNImJNVK8/Xc1Lu9ksFeINxvKaMy8DUEuKv4mZsKwDTgZ1RjiT5f+D4BfLgMAAWm3aj03VfqJ0rmm+Z8rOLhJUqPiAOpUflsLdX8jCYgDotu7shh0a203l3CK4bMyUQeD4S1SBDP6Gk+U24fZJM8ouCRYOhagXY7/eJXxcrDg+KfJcA7dZ70wMQ9xx3i3mIMnBQAsHpqxH6IWTCNjbRj56sl1OfXOjgyofcbJnunxUaTMVzjl4crjV8DblzkqATPt7pCH6WY9+S7icENN/Tpc5uv/iDpfwtmQCsjRAE5fZD/hvq7DG5IXX72njFw2Sj8ExVuZ7+AiaiWV28eZxv7vNpAaysAHlggKe6Uuo2e/TwKnIK5km7ZkeRqxgByAIdOQweU0KRMBWlmcGlYYVm4/Edw4Xo5F19m49+ehk8pxg1KoxQpiyKqNHOMU6i7zd+3Y5x8HYo1LykaWtZh/8lRZmVFo88zEYSI5RqgcRALCVcQOgPk7M59uZfgof43/WxQX/h5o+ptYPWyy2OgLRMxWvHjVeeF4rm1iwOcPY4+1nE+jOdn766BqiA1nDrqfkZQzvGD4ersb9/GYpJ2OrlOWb60i0HIJ2iL725XCQhcwKC2K5znLceLgmzp4W5ttYOxzDO8rtM216E/pEcuE1lARvjY5SiyxyctR9KHyhlDEw5MYMuncVqeJ3qeLeoghgTvjQRkzjWV4RX6axKOtH/8KLjz7W4o+MzbAXC4AxlqRavRgV7QJmLHYfwVRxJ1htlNFXg0E8rj9/JTpUrmrbb3SnCR63Ps+U3BlFkDKcqihnVGrg+LWNLVodmt+2bqOAkVo5vhApvq8mD4Ysn5Y1D++NNSyF/gLPIaq0p2E/RZ9WN6DnWbJQyqSPLmxvjAdmcziUy+Nz/K6laFvFd73Hp1FHs0n7cWugLw8jER9Kj2Wc54MIPyzAywwHZhr0eBihLuo/12wNvjRaDWuMwNgs50+CLkaKxSz4m/OPjUqqfGIPj1tGNhEGsZWUelvwnuof5eWZlFgPyGDrm2hEAG4EFh/VOBXkebmtwtyLcKTQ9SDFZt89diO2yZLou7Fj1CSgCoX7anfo/SaDHMth9vTWKhPphRjQ8SPO8ax1GXkoDSIEmi51vDswjBC/WjbFXSNd/1xLT/Zx5SZd+8l0pDPNkSWQ6i+FEm+mpGQTF/VT/AvBLTKhIgCcaLWcAZsNzggwxRAtalC8RCRKMuGtq1PuEboZmIGxXIzPD5G+j4w7DKeAPpgKbp8JwwtOszVkNsvzl9UC95sCSpifbphLCSLqRlCVML2wdfukL9zj05PXadWTLqOKyhtIhBmK1z98u81Z5AeIO3kOpUvaSLHGPMPrAf3n8CxXU7MXJnbKWRJK3NnFrHKfFWF420U8vNUg91YwglCqV/YZumRscRHD0lYqtcSpJkF3rZ4AU5kZmm8pjq/1s+ZsKYkVUp7gsWjUpYExAvuxr0T0N/o9MBY4XO/zJ6VYWWv9O2xTvOIEubnuTBHOSHuamvVB3F5uywcQQq0HLtFlduirbnL442Bp7POfUsHcZwPTlop/NzhdqjYB05aOTB3+wPE7PX00nOuzR9FewIDyypssVyfZAQXoRcUdm8Ua5+s7jrarGPZCZGuy60754PCQsRFSsNb8NrjVf7/Z6mKveapfP+dG+I+SQPdmfQJOupQEJkmjEO4QUiJHh9ofgOuzpmRrcnbjVD2z9n/hAqRS0oi+qOanoUOaW+d94FDtZyOnLY0UH9hXpKgm3bIqKC2fTjSR/oRGT8/rkTxuN0J13LSqidtedMSd6dzXYNdz9aI7c37UiCFThrRn2cNovVFLdNgM78ZT4X2YMKNdBVgWBT9eOZRXVnj4YFe+J2i3uIgTAO9U+mc8IepJTNZYwbKYMBp78OUWdatHTODQNWrC8CgJlgoG3aHpgt7JrUFeryxEUyfKT4QOIdvDdrzq3weGkj5gY1lgrP08NP+6wVaKx9KbDg2Ns3qHsjcnuMVeViDlV8aTkzWtv3YlCoJ+7e0dnWrJq+ERbXXr2+ANoJ05DHH5BdOI9KyC2qs5gONTQgUSC1BrhyjkjM8wI8OP/sJ6QqB+bvMSKzZksWCsrJBKAN047tLhzzAYYprUR/zzfJSrJP7Bi2c0e/fMlOQQTp8cCtF1NpeOBe/Ow1ywVBBrXgeozfXlPnrGm3XE2IkCZ5z7wJ2g+duep3Fu85QmOwzUM282KiwP3c/asbGk1llp64qaF9DjV5pjhjcVFtTfLk3Db6DbSGnxl4LibBQQl92nzcx+ktPIxgW8dNjrwdXqUDTskB6VbQLol1yqdXVPb3JD8+PX6XAJaoGE4WvJYHpoRacfFO3zPoXD4Uzy+22eUfFGK2YASqtRffTLWTyAlvkkCz9MEbCrCQXVP776OQ9O+Ci52YLfCF50IHZ0/VuC0s1CK4BIMbsKeB0Dq+jGUG43M/z4w7Q8k7JTiPmzkaCi+CC7nK+nSnzQaOOprMZmmzPvvZ0okOrc/5eSVNgCPq3tIWrz5IU16GuRvqHtNnEm4/YO/QX7aRSyeowXzD9SsQJSL9XfxsGgJO3JXmQROwhP9RJ4769UbKMMH/GHxS7pFsI9J+6NtQeZdcLsrMXu6U+l1WyKuGu8q9/mNYf6IjGExH84R9uMAVTVAuBHKOsmwCGLgn3r6Npv3J1IYO1qE+1Emp5L6YyucUy20r76EWpsFikini557YcNHD6v+P2dnMKFtqzCuSnR7+1OMLBTprfq3J/mURyIUIugNBP8x4XjIs1LDRGHO4L/yz99SRp3ZLo+FvoMNcI6TbsfAc2hwxReEo3lZMAfK4Fsr93CKWVYdjc3w2NwxGPUroqAOSKEpR5afs+U5QEcT0McTGy21EbVPc1rr9xuxYaK6I5i1899zCvXia6zGKnGC2FilvEJsagRdlHxzHFtpzah3NJAn156OTh5otGyd0qGTsQJe+hGf7Uo4ShH8krkeYbjvFIbM+0iL6pd+th8Bkj7UsXTeMieWXdMvnu9MVtKxCQH6Grhtzbo9oxuij2tXCBghEQHPUxI9xXks+vfc/AHN/moHm7u4jub6k6/6PPVoV1rWO7rtLXNd6OGJtofjziqsAUXbArfphqNJGss5ydGxXfLGZRyNv+aEXoHeSqEMYTZ8gWQgz8a06iVFo2nPxFWumV1nLHI8e+nuVZnkrO4iM8eBoesdr4hfSeQEX8TjmkCdr+Q4XKxAMqaGRHbVthB1rSMLQOVfIkocT8oBLCPxAg/06D1zSGFzZcKikj/bw/ioxMUDreXI3ZQFwY+8idQPKupVTMzPelq+6gmvqV1ECNjfZIRKPXLf7pN9mKytpRD0Ifmrxo6rd6KlQglKhM0kvJ5+2kLOSf37yjoMQTC61FnvnSQlW36t/zBdsMFnD34JUWA0JFAsLdTuPZobCslgWUIUZkelPXs7F111bNvEboxsncGKSMdTbzg3uJvbaYiyF5S2ETyBoB/+8fLmy8LkEjwc1hdWtfLqF8YVapWHQlUnovOAfE+ucbYDcYZPVlh3FBuDKFEM5rMMmTg39asWh2IsOEyG4GVTxIXR6rJCJxyoZO0cXqoqk9ZzyDML7bIR2iPJ8bHjd1+UR7bHDfT/hNDSyIEv/vj8leJv1aEh9FupWjZy93VWNSIIN2p10WJQPRaf3wwbe36b2lhPbycdcX83zuGQRWkz17
SRBDTp+BfXJMd71N4fHpgnr5jzF4ABTXPAFsh+DYzek3tuGaGCKfUYEl7f3I46EoMkXnKFCSWUulqpjPlBVo5TfMXZSCnm/OLey2jngGeGTALjoocU3fJ1uWDPpt6mBkaJ6XkdrKYRK89HkIlrJykbspslJCBHFKiJltif2VgcvSe2+i6yk1i/53Ltl8f7+lcRRE+VjB/ibVlP8o2h5NbuSqxNsntkQJrtjQv9cmbLnsSOTIaK+Jpp6T40oQIE0DI3+4ahkC5cQ0c/dXanZ8ZiysNIGsCDpPpr0S+SNZm1QFOQInooA1OwR1OUi0AU3tuKHBykyDyOVkR43zVWWwW/coCVWxXI64AGebHdmyPgZiMYAVOXrZtQUaWzVSfAYreGzVFNKwAD33rzPH9x4zHQgzcL89/vlzpepDrW/R7TP5E+7Yuqe/Re00GiiLxJmJS8WY7LM09ublYNuRJI29GsQ/VefGtEx3yAPa4KQiww/2bgherGPp/x4+WMc+DfUqtW0UG+BMGkdiqMOnMl6HYCXekcf+ViSD9cueDyBtJXfEr11hYh2Vh6Kg4XhgmBvRMm9obK2+TudjOD7dNiIcDg3p82TmwcsfZ802BMAvE2AjV/SIHdFW9SOFJArfe7q86yNw1QmHn42OqZxSQOL/OYuHF1TwhlIVvwlCxVhkZBuB+ZG4nyCrdbtWLb/nOCJWZ6HiCy03aUagjWrq0yQGqYb0vKlfei8hG6FBBL0nVdoIUmCn5dYsX1MeUM2g64Du5Y9dwKkXlyrD0y/cifIAXXLGmcwQ9ZiCCWgqaABJ8xV/9XZ+9l0t4/h4bCNuHbvYZqA4LZpIXZfC8HZj9zesRKwV8RXctjt1RtGTUzNiySG2Uv3paPqWH2pFaABDBi/WAqBBl3KIktrOg2laCkBPGbo2tFyTMb9tGICHPbmRsDrHH246QwNtKuL7qU6CsGPQdjfySwiF9UU26GEIIe3A37e3XOLGjRMVj+ko48zJKcm6LWm3H5c5wODh+MjwAY1U8tr1JK6v9mPQCPi/6xJ3IRiKkaMcWtQhKAG6LA9bIsMeAFaQOKD5ISkFUud+Eu0gVpfBU8TVIIZRpV+knigaE4emubxYN8dCel+p7vpMhKDt4DHAUUYT5AcFU/iaJLSr9SvSO12fdDy1kr5v6bZp6PDqnR8EP46nk7q3P/Ja6/0ybYiKqTkPLInN2abA6EsMMslvPAqF9+UCOJByss/tnqn3ztYrZOfwElAgx3lMXrpB3bxzWjjizLAQpUiDfkcbVCziyFPoWlky+8N0SRswEZmdgKoXNYvl18u/7Pe/qR0DcbsKqd2wiKp5dQqqN5Er5/D9kix7S2WQGrMLZGKKPB8WZeR+HaCG9jvcWyLkTs8skqeYLzaLKOsBFXYYNEareWAa1ybkbjpXFsJGq5RShjYdx1wJJZ2D1a+TfOyi34nTIfaVtZZmmUM4mOqzC5aXkMXjca8JGn7alVNQp6+Y9aE2UlfRTdQK2mkFMIJ71LQYy7DMilDeWjbUqueNb+PzBHMsQj8a7Cogbcl1smGuJ4E7Jhk7qioS4vajlkrSemg4cvW/ggKFWy+iryWGsKoAHaj6jDDFp4KsQ3EvP81znMI4M1uf3iBUfpDW15/m9xBM0rlORCc9ryS9eVMtS7I7y5YMFqlsKy4DhZI2fAOPocSX5Fo0BLv5zOj+NzZE2fpKywGBzDPVcCOg4F7YBuyWFRKq2zpUyDKoPhUyxKUiuFE3CXFDDKRpgycTgSZZPORHEZde+xYF0MzLZEaWrSVwyXO3ZE+lj6BbUO93y31HwmlHQuTYo0svE7cTNliOKdn4i0XDvX6SpV10Me/Sg4rw69VZ5kZmlbDr8EKVIVKA4P095pIRIGxW+e2RjWsyI5V6E1V2KzvCzb75SP4Mg6rBPPtXqji9JEIFoVJZkJeBjSTya6Vr3jlrDr+MvWsfyKPZzd7/tEu2jV2HouYnk3HDhAjQsBJnRWRrVQgupTnOkmYfF5oKFdxZnOq8SRENr72dGqIFHFHdhIHVOokN8I8ynWWu/amVT6LoLXjrPOy5/Jp/Ts1GxEattDBCzDjOyz/yiSqqSkNhv7t5tQDrMsKkSlhbnQkPQjaXggDAywsk27eJlSVWfhgmyIggExPnQyOaFzzm54bWuTDo+jQ0cScCw39K6JWSdz6O/tyE0adcQl0A6/eVoY54051N0v43cV7vFZk75a+pIPt6sYVq2hIiM7h73WenoluU2lL/gfSQCwSCvTgUEhRiFjTnpDulskmLPzjB1YX+EDhasqpFHmUV8cRsN7fXtIjev3f3qWnXkTjNEv2ruXWS4F5jsmJzJf+R4MbkXNrrMmrAsaPQ8F5MpfW12qvG0wVSMFj/ZJaKhXOpcOotXEgzsfWbwaS9L4GhP2fhHVlVeS6mcXI4IokUiCQ/AH4C9D/SdVHKi2na4CnDqG+C5q3ofZwnZq3lt0XE80ti9/cSNBOagXt8hj5uWxFwjZ7Fx9SZwDtxwrsSPQuIP0eKgDCfVL+Bx+068YA/vlT6NhXsRB1hIdOqseD7a9krfOrF+n3ZwtmQEy7EkavlY7KZGBl2HKK9orN6eH4atJ3y9/h+CBPUoYK9iGTNXVQ0YgJsM4benp2jqzuHREjTfiRedS50ZOTl0PBIpQU29/TOINwATzZGmGf7ewMGyzfN7MfUxMr4rOXTaPoygwyujccpY4BUxz7uIffJyO2/hxqomuIu85CigaNxeTyP+JjYLE93zhT9RBYKeHFjchLPtHwWLxmOg4XTJJmpQ9pdcrIeB31pAjNxXs4KRE/P7bZJhEKYjW2DScODr5mnqR8pUAgjKfaY2DgxfUp6g2Rd6ob5bLX1sKCl8Pz+QvjJYMMeOog69xB/AnJ4E6baVVuXkUrZPbxivMU2psSx20eFlccJ9Lc6d2ZDH3sctHAn6VdB/KscKUqyM5we1uMKLrZmqcbz13XxOBv5C+9sFf97DqRC8CTc+NboMp6w+xlzC1Xi2/+/xLOhtMj3ETvfGnHBEyhnsKpZ+wJ3p7LJYv6i1Xp4Mgv7Esi8X1k9ov3Wn+9Z7bcap/gWDfvAW+x8dYZm0p8mp0tj8r7hdI5LN7hPwNV/YSD+ZXbWDlJXLLTud8XWKdT7dBP/NVQC+lxYO0z/iYtgc7nG8/lA1B0oOKg12+UCylY8mg8VMJZqdNHGWiiEHRgD54DM2nKvop6q3TcDQ9gFsqjBZYGeWbtTEQ/b8tBxVQbkNzO+lX9H5mlvJS0D24N4akTTDDZKKpsbbUs+YuXV1qNJPBBqANUAY43USCdgG6QNt70dEqxDqTYq++RN+TveaHYbpiy+L9SETrvhx8eFgej06g8/wzo6cktLsjxJdzAlhnS311GlomniiSHe95yS21tulRnIC7kYLx5cvEVevQInc1+7fw0eRlj4LFi7O6P19NUT+THmBQdOJaWeXsJuSOTsWnx1wJV7jO9GFfrhJEvkFQucy4I1zxSEe04s9gwsfk0fID6kh7FsQNEjAz5/nNrg4KBNAfcLgVMx4L+HGEiviZcSDX1Ssmd5r05VWTurkrJGK/gBVzHCPv3z7r4rxB6Pnp5+fwOxnJ2TAL5J3/AYJhbC7l4YL9NXdn/9L7NjcASDe0tp6S3Y+7BZF4If+29muBwfOfPy6Hp20Dw1u+Gbh6PM731UqhNBWOF0ytw0VKShFJZ73IdqBuMvv51JJbpYZso5focIc3wa8Z1DrbHpUtublDTMWErfDo9qpkXW1wjIt4Jl2fG1HHjijirIu/RJcTpjTd/RRZTX3R7y8t5xZDD8rxDbVtq6BgsuQNETcr+lTkx2sklJW3zsvV/v9iBDvX45l5dG3hlCssrNHxd5mDLVbmEYhFV4dxDB5NErQ80yYWHByslxdIJ9+HfvIbtx4Rq6AvgSYkN7qF3kYxaFOB4KUSuwNb4B9kIsZ5hOQBVi9he6VcBFoQJl/hj/S9GC0Wgotr/2fhIlV9Jrt4Jod6haxjZ1Occ9UPW5HhY5adfMFDbNGDkhASZLB1YXcux3OP0lfRW9ulrDFlrFwsHSAHsSz64EHG5Vo7rpKy7hkbbeZxdqP5Ik
C2V5Pz1+Ala3ANnB5PqcNEscH5ElLV7yln8zDXsxvy58WSA3gIdc7oaOuSAZreyeT3KLGHVF+L4GLcAzd/52+gV87bPEDGjtA1a9joufwc6oNDc3akv70oHEHE1pSIkHsqsIBa6B64Te9QEqj3697ANqnbnfK0DChseTh+ByTAddhdylicnruAOgvqe3Zg7yYjNg+Kmobk98uMKcxgihaSXU30YxF9UjxHC9KRuQOn1hJDcMbA6GR2UtUhXfCmXbimFHOWqiO2dJjN6qzlH2tWGQslPc0Rz77oKiK6Sy7TXyMETeXu8f0QgWfjNj1BPMq0G1OKnUUcmVTqZUW/+EgfIJNmNjNxkRwh4+ualea0RQXIW6XkURCjLjIfHb4tkS6cOEGkWQ6sGzMQ5QIaYHwnJkV4SlH5E4zVMZG0Rwu/VxXIvxs+H88OmAsqnn8fG7dbNxWcMmu8+l9IkmJ6pBU32867jkgOeqUxWOKtq1Ujx2qYqcw/GCAD2K7wpnKu6bBeVriQO1xAbg7sbYMZVHO1GTA3p1+6lIe9WOfzYCR9R/JUBSEdwcRNQ2BoO5VaJjEB0jxNXpzmsbH2a4REEuAJKLchpiwtzgaqV6CD1PDMzAJUDUPB3ogn1Xdbb7L/B9ILcsGwtk05MbC/aLnph6pxsYnyKTt45z4hy5u4l61+PyQf8MuG0MgnK/GKxYv0153wlzFa9wRPoK+fRRvk98bEpSruAcJTwHs2Q8AukU6hdWwP9kpiFBDBr5nqbEh/uozMnQnKOv/RcX5gE+r7XYxAtst+X+z37/7hH+rDjg+1LexudwL/Ef0Kys8WOUpUYqpIydsIcLVeCXsF1sJvFpiy1ayDJzlAw0P713SXagpK17LlggQLrYdyqkeeMVz31tUBHsLCGtIyb279mHvmt/JMJT0ZDFSvUkP2L8vrd4TtLBMZVaXiy2lStqC4OLV4S3th5OkV67EiZu+3FsG67OEYXuvxUMkWbe7QGRlyWAicXjMSOUMqyzSo+5llvZw0cwKYDU2rNCjkV7Yn9EchhiRA2AIsD73AHQeEfC/0+2KLAZwqZvPMlyJlU+3Uufwh/mf9jkLhHboxErg9Iy6bMxPvAZV3rMSSXf50W6La1AMKHS6vbcRvrc6cSX4556tXbnvIepLslxZN5eOmOa77T3TO/Pk7uosTcwlkRMapSFNQFScbo2pOlzC538rqqjxb2xrNP4N65pM92nSz45VZXBYxHQxBaAyQxjGDN6yHsDpGmr5ePkgqjFAMg4s3E9ExiZ1rkPljJ40jwgkIGLqt8PdNpaPA+mrKlY+Jnz86128ljNew9xOJ+i1bz8PxHrFg/Wdgl16SlPrUVwjLtk5mJpVYSQyml6hY62g2Ttciwy+7A7+WoOt5WUJwGNt7+BM2iVwF3xuVd0gOO5bEEZ7rqBjdT8JRMqIOj1cJKLhTlFJdtqk03xVQyPJY/+LDUO+9w8V39OaogpDQ2K5ESItThF6eBqaJgRQtnItYivAVkMYH8jo6klj+FVnkFq6DvtK01rblOodf5gAJ1DzyWUa59NhsLEfJy9bqcstJrwV/ikW6wj+VCZlKORG4aqOYSloN9Spa0poOm0pBjtCr78nxZQKkJddWyzToBAQje4CsRgrnuyt07eTL3Pmjj75R0697gCJXmo5gLGZrXIHmfHFM4WvlPJIwrN4HtCcd6TKIyg5IsbyAtTFOdKqZjzEDATknnW7akNSY9v3Ki7mdTwhapRWj5PAZ7ZmGcTk0iNDPEzrKnAogYEnXd/tka2+cIJJvFT+WD6tAGr5gSv12RPvQ58oQaVOE1/PL7CgU/EkhIIDfonFZ+UQAY6pTs2gya4XXZU3KNcmraUpqt5Czthgp4IG67sfk2VAVPwNt5vG9vNlgn8Ak8wPSO1NCOT+Mj+D+mRj7u10gjM6REhJpZILYuT0J+9L2KEJJQfvGwkP3M07btn/aj9nAWojqbo0QAUFXKynPHc6uEBj5cYdzFTKCxD7356gmtP9VhtUyaFFQ6K8d/vxzUocXqqEPcRGs866dhRKKz+1AI40iOca3zVfUfW2tgwf/6/XWrwNd8yboqMV6q2AePGooczfx27PB56vzP2z6Vawj9SWw4rp1Be1pX+rER9ntNu7R9X0x1knb4bBl7jepB03XMEAW+i8hAVU6tvzYB70oGnuzFGbiB+QcnGeoBsfyEb7jU36pgYH/5pa7QhlAhTw72qJc5tCjTQPgeoO+HxxDEq6BingkbzoxHSmRkqgFl7q8562EBJVdEusB7RFelngQqpnJr363YjIv8Ef52oWLbRjpsIpC39i6vF8D+1xmKTZstxaoeJLXgpcVLJ+kriZZty7RTYrAPtveA7u7mefnvKWc6+hCteZjqWnfrkVvc7c9b1kzoKBfcoiKybL8IQ2Plkrmo5JobkKRDBAizfq+xm0fYZOejkhotydIUSjGJ3LOCDBfZKK9elSJ6GIAfbb3AeOSnVE/dd7PLgrUGI3TpE+W97b0MUIXITXFZGPL2JeVWTHxm2WEm2cEqPEh5M4JVQpOQ5j+llbi83is1y/iMfckkqL6mokAj04F+4YqZ5l0KbtTckka7dgY32Rw3yguQTrDyxxZOVBrdi4tWwxyIVsSaMi+XHAcX/dlCsGs/L924XDsjN8GXPshGYEqMXEH9NEXKVbx6DHPQ3qwUdVGPk7JtPhfLh7csUl5HhxX7kgXS5KHGMYkU3k0oXdr1LcEQ7yFSljOLes+dCBPkcP03zMNXFs0R6XS1jyOTy6y0sU7HHVyNXaYBDIGoQF48hXLb02YfYQpYy1NjsTAat92RHoXQuLU3qcWypLXUkyM7ktwKCvHUTBE4rodSGf1RPDLp/pD6dYS2QMqiJi6o4TvSmCzGZ55/rSTi42ZR8wPiQt0BKdAu/u/VvTrdCW/I4sHJK3X7uO00OOiPig/JumoPIc75kZk0DRZPoMmGGALUmhBhZgullfPcHY9/Ss0Dva0+KUD7dRptHIrua+V4MeBQ/7HF4Yaa0KrwsaNDysBfadApWb4tQQnNYwRnhwbrsH4J2mdQJbe0kAMSN52zkpK2O3rWO30b72HDhxvB8VEQDk4fRYihv4GMEhbk5/2Fg0AsnBYT6tVbrreF0UXiQi1hohwmhEXHLC5HJLiRiVrei97cPkfynErYngK87jY88doCWl989CsdeioPxfUea4KkIlNmQ/dyRG1toT9nYrS75jtjgOpbPyehzE+PsM3lPU9GtzHXMUctAE4EyKZFilx1PINfAplfy0LdJmbavEwuEJvuiKoLObHmUapguRcGbGnjXaoy+pLyq3u1AyaupBf4ho/znj3u0Mmx0kAWnbDp2UcT0d6Y5wZylx6dw9d/6498EDp0Jx6UvDD/dyLSQwvYvuKNV1MMHORpdqvwKEPxu8AenV7kw9vP2WomHiLQlycpK/GQUb/9EwEg9ai/z03yyLU3F1G7c0NJGPvIFOMpnyuwhcXzCCjFNCRYG4Zpete8059oTZNfO8kmJ3a0nUHfN61O8sCkSnLOrMLm5dVNfiTxtWi8+bdJy/Y15IU8P6pEXVBU3vBgTywT9n+qH3bNB+THVB82K5vsD2KXnaqvToUGvgkvMmgppjetWm9PaNVZEHgqacCC0X8SzkQ5MDeahbtqrsOB18CeHy9Cf7ZfFj/dN6f+17ql8kEggI8/yLv+4ifpQ9UrOTubfgRwTT9TF2pQ0Z0B1p+GtGr8uTuZeaEeVOHwHl6sSGXiFw/IsVTfMz0iHjaTIa78rsSlk3bOI6HBkDS4djMkLWN2v4YVm2Ixdr7Bj4ksLFylLUJByY88+2aeKkwHi06cAZOUK8Ho+qVebMWpHdvc3ZNpZs/LPhyjS+2bHeFY5WSW0hVkvU8Nj/pHyU9bmeF0aGitQnJtl+cL+li0XZizLmfzyzCr0q/51yjXuEFmIB70pHL4+k/igpPRuki34srcQUXUMR65C/HSXy+cUzaK/bnZVJ8kDWXzm/K+REsuv/DX4vrLUCYyrlyfJ0D5qP89AfKgOr1A27WAt+JsuQ02O1z/IE/GrBG8T5BxYArS5fCNb5aCqZqqcgxrcQBYnEbdT
n0WgoYVuKek8eXlTvu87hKvZ7MA8z7Vcy1FlijBnt4nDXaqq0EHaFX2/a0q08nVHktx624EJjznvvxt6U/4DiiJni0RMHL5RBSkXNF/C2gfZosFGmBs8cVyCzR7TS5n6fd7T9qEUuYkhBugrM/BdEl0W+6nDwcPMWb+jYxMpTcsJleUvgyRICiDZas5vUC553ktL54pSKwzP7MHYuZaoykuqaathVP2ALf1EGDH3fVWud7b3gGL+Ks58RIOZalLWH1s02uLmaTLjnlNEERd2BF/4h68RzUBcG0S0dzfnsI5ZdO++ReiHFL55f/9F1T/mKu5QhOu6p5Xqvi162rQ+xANSXnZnt+IPlPOs7UWgD3k6LVDhdoMAQfQpJj4aECq2iiJKtj3CLHIfC09CrIC0khyVDjDhZum3PQp4OhXSCo4sdFG+69QggWAwkDQctTPzLnUZ+hrdIu2NQf4NVR5deFtT8WEWgBP1BY+inpnRSrMIbgrVgmVlrU/2Cp3E6OXnTHkvOrXeb56voSbdTLuJPpSOt5XCOGFNquhOaluKsL1r2gWnL+7M/hEWaff/JckL21+GtGr+2OdftZDK+GkMMIdXRZ0+YeWQYiZvzcSP+EXvk3iUxDjwZgG6E+aoWLBmW19eANMXEi0K1mZnxESO1FmwOLoOjkfS0Si6BDJ2rDDNLGuzmhJngHeDAm3PqxOM//QUvELFTjKAHAnMYlgBT1Mw25046X0V4qn59m8PWN7aPwtrL+FR9OPYas21XpuloZwbPNz4jKgeivTM39iszpGhXDZ2DnyIwqn8v/DaU7u4tXyFFgA2bO3G1LCY2/LW0Q/z2HZkNAwGFm3EgFK2RZca81BKif8ljPMsOC4IqrCr95EaS22W3Y2jm43mVic7BEU5F2y711CDioAMBa6/no6RBYwq6qlaTbNPRvL9QYYz8no+TQj2b94qyDxy+Fd1QlWbzUzj2J2LMuLIJj2gjcKDG8gi3q+f8Lh8dAG/Np/UgfnqFJDAXWCpTNrObBbhZQ2DcyMvxS4cxYHktLcxXg4H7iZ13Q/IT7nu1bXMYs+374wwQkatrv14KYrkHQzoMqrck2CZVNMJjOzzmHH8Hm7CWWF9/ZTNjcso3Hss7lMvYe+Ud2V6n8uouWfVEEIcDK2awYAazEkMOY9PUHJqSbUWwD2tYsjhU434Fz6xdzg6R7b8Pt31JKzELFoxPzfCN/CCY5Nioh8Ie6QnhRL++erUFCCMg74Gxg3dXarYYTROl9QQuDQOiilMCFLd1L5w/pw159QijvCPiuvAdcfnHdp2HJC7qU3AY2PaOc21/cQAZN3Ykj5yp2iG5xkP8ygpMHJcMcKUMVQEDaO/q/0IR8SEe7mBWxBc3d7eEWygFHOYmnB8Glpk6QPe2b1Hbo6wo7IfjbBXzdVINCSYnKcmu/vUBMolfir/hCntowXrjTnUB196yKvk8gRRtREbRI+lE4zevMi/3w5y3Wb5HXq12Owl2TWYFf8OjKVJkAyHC3QGiXpEt1kikyRQkKH02E3H6plpNF7+relQAqEaky6kgPOFeQErF9NJyI0qCCJBVElL6z2SmA2ONtIFGCUlwXYIJItIMjnNaL6csRXSuz0JByc7wlD/ZaXiI5eAYbtVnKKuuHH6y8mt3sgDod6+VntoPQ7OBMYBPg2RFRZ2BoQJnf3v4+LGBPofC/26hDOzwO4QUDldgKpLIJMDXeF0JjyiJamo1TlhLAksrTKGJjJYA9Bc4EHDFEw8+w4cZib47p97anSMRyA7+TVYzEkNESzmNIHqYv+T++4kbEsrM2x4sqT3MzL4lp0cZOYFPmFyTX7auRELIqu5JqPrNDVrhvmj1ISk4HIAjL3c2XyOQMs1hOSPxOVJyiCL9qP+kJf5uVwypKEYIT/d3luxNVft8syg0WX5YhC9gneq39JoOh0eyXmbN1veDYTgvM2QP8kGLfKJw78u+ugp/MnJRiTPhuJ6xUKDtc5OomEL3Pk4X8UhadMGxpsGsAPhbCBY3ooC/TZt20a3P6ZixoMbrOKpINjnN/pnGGFY22c5bKMuoUDT7yGqB9jRoIemqbozSRxD/HJRvfgHDghkjiBa8ou6UJ+A7ErF3pL+htT6/4oiX0ZCAQOqrUZnrTtdl08waSOmiBaVIisStxFyiTf/4uzVsMuzV2O1aom1b7wXgIBl1cJwUckdWAO12/ULCf6aLFIhm3jrY046nHsTh1nQ/WhN8HllsazJ1AiPP3piMAR1JfVS+oO01gFgF8lVaPRW7X30MJY1DU/Ykqj6A/AA6eluxgjIjYCu7cevt2cl+L1wAlC3cfTdHk6K8m53cOB/sN30Ps/x7SdRf12q+h5RB91o7l+/g0GK/RfRLv84o6TpSVXvgZxxc+7pEEVlB1ie476ldSsy7ffNhsMSkCPxApcYCyGLQbJTkDC8AlRKbnyw6Pog7Afw87WDkTXF9TQimL8LD1Gcz/ZbfZMRQrBzEG3KOTjhynjlly8YpsxwIf5+IFwqrkWVfJKZAuACKNsoE4uD4GI4zVfiu3I1HPRNmLUkWvAllLG68d5fZXfwv5QIXqDrwINLCiqPypJMQVrDDiahMCkxDefYHrB14WecrMNNYwP/8Y0jOlukTkEZthIwxo/CMBlIC+3iaWwtxXqpSs0ZSiX0c6//KvVM13VkEGTsPKplBA1it16SzGyUFYl7dQWZxHeHZw5OvLOGVC8CPFgV22qSwad8gKgnel7Av9aW8YbPyEJTJnXkF/uY/sNY3SdDpNAJqQH46TZ1LCFK7juSifIDOoeU5QYZwTlv6Hxuk9zE0bLFjOdoR6iysSNqhitQP1+hutuI/3MQkyTxuWq0s8DRxXHfhhjRqXsJb0qdlFDbZnyLWpfuU8VJPedSizdmhpypO14reYrpSpww+zx+o5jjen9RWperPjx50zjcQh/4vGgjlQ0Gu2sDz/zjmFlOuCU+gw+nRIIeOeAYAbsC7Z4wDasVOnZsgnnr6fH0XaBbXL18q2UP7enjJAFM+6CowvrjaKnNEqY1n/ua3pUr2SO7w6lMPP06fsIAlUyO6FjVaOW/YVGll1lCpRmmCOXidBBQUJoXNstAOKuo+jjRdhx43k5qFKE7IXKBpQ0V1HiYS2esC40tYA24ujAfDOnphfLW/0NL3niYMqVBzVSYj306Lc2+3ePaRs+OXb81tN6ndfKGiQm9ZgNoqxZmHdAyxy2Lkv36iLoJdW+iAw0kW/ZgVUt+fz68F3yKmt8lrFPQePPcy2QvQ/VLbx1KBTPv0xj9q5OzLUddm695fsXcWFL5IQ1sHE0CHiXlCKpuVI6yzwEr7bMB6DGkGwwoMy0hLR8ZCWSKl7VUZH+nsL9AauGx1qfjPgR4PekudKiPsIpGykMlYW2RxrO+RsktcT0zmHZUQG7CDvyylZquLkqxnOsK56OCwxT9NyS0JUjwEMWpsxm8VXH8bkf5I9ruz7QSgoZarcLC5d7pfYkhYzIrVrjVQIOZBfb8b8dLKS0wmS2FtNefJnnpE9UsC4MaRTs1zgvx5DbJq68rMmKLKuwaVKbNBCi2yPjGxryHgTHpR6dXMiCs68P0mkcLFw3SNgopWtxEMeH3dOAAJWT50k2zTVHsjWEPbuSOWaCsDqodcrlJdSAouH2UCGHU7M1edOZ1wZHhjmOcxcco9xV8mBORse7cjOsY7EwO2XiOSfzhAm2S58yOskl6mQ8MCk/0sAFS3h80EvKjNkyqJcx6ZHdvcgOY66XuHYfpG8xpz6WOV2bF9erV7mZ00fYv835CSAgc8H5psNpLjsWPpQmurzHjeB795WfCAYqu9nMyLBn1SlhVy2B9d/lcPkMz3oZtv2ClnKKW8X/WmPt0dsDeZ43G4HJxFSg3kGwT38lDHdilfmyNgWundqfG3mUj64V4MVJnbsGf6F+gSwbopskjgvzxtSSZ08fGVytHz1Ho0bwI5j0vlsDQIPQKoGZ8N0oN11h4dXEPwYKvthQxHRDuJAIAD6KgYe6Dgi3KTh0mWVJktICpWcGGE7qYZ3aznMWeP+/zuBMNRE2uwqFKDbqk4I3/Jya/6YO+Zta7+YdXhbCxebeL
NthQYWnho5KNiUTaUdsWB1y7+62+m6FY6r64N4gFJTAYlcdgtA/OlMOJQY2jJ4VZ3T5xvcSuquvUcRY0pmR6m6o4K+vRNxmDUSJayNbrZ+wuLQmH3HeeuBqnzx80HkY+WdPq2Yn+h/p2VZMh4P0tQ1MudxWYN4fcy+ggGwodu+QT5TYjH+LmRBOD5Tu9VPi1FYq42z8d0UyGbLw6cQ4mym7217ZpannQBsjnQem9JVXCZKTDq2qYuqlpbJrOfz2NL+RNpFjC+CIzQ5m18xlUPc48/mYxPe21VMQWJkJlAh247VgRdZUmoQ8TjcOVHjm2iXPlPZCgUn8Tc261NFaofie+hSZ56jN+QwDzS/n89z8/82Ls+G9UfOKUAtpG5izkCtLFrOQL/8qPk2w1lP+MYbxFmtjjbjQQxCc8kcUg6vrLjAkdvaN+kDKKbGVtgLsElSjT92pUeH1k4zHp04CvZ78YuVcAFNbaziNMuLScuVRPeg27+XolHjF02ZwHW/fV5wFeCDkwImkcYSaPEs1w78xHEZqQ2dXetP1g3Td7MbvsdSF3oAZCwUJdfw6fHSq5M4jvZ++hu5HW792Uz5LhoMWybPy3/U6K0Fjx+/830N57uhfyq7OHVZ6Me9+ZyYUlkoT+gbbLLwJXIqxSxb2D1Y3InaTkwY7PVoSxK6arcY7ymovNPFbWqM0DqOuPXl+WAj6KihedYW+ypXn2rwH3QOMgwgP37RbvfBZ8vWWDaTFQQQUkitb+jmmv60vov9B4qeBgVrFVK2SF2NJeTOP20lFoYtv4t4Lveg8yooIprcbU0dFHUEsmnuB7saox22+eZht7S4FOkScNzEA1ZjSWFYwtN2E+SBXtY+WqKf5OAawpfGAn/OshQSEg0fgfd9iGMmravT96wOckZBQl4r5e71qEYgZtF/KpCWk8tTWNOldoSZuWhMsx+kdEld1e9gMrTojOdflpMP3cEgxsrXN0uVpjR0k9xEp0w540VebDYntEQGJXIhj+zM/YP5884+dIoY7ntIQVCpCrYM/B30+iuUP8cC8bLxQRy25mgKrZNiVNVbeMOxIKxtbZNHk3CnRS2u1Pswn2UzmnaPACcAm+Iah/Jvb+6JFhApiyi2Qtjf0Xhd8BDRp7BVwD80lE1dnIrlgM9KaxTBZ7dgfNgawCRPqbNJ6cKNtldCQouFzJg1WVpyZ5FMmFKd/BXrrF7fo4aifs2PmXNZlGMWjphSA1ATcGrjH/E+FOlD9yK9jG/ANpWssN26yz0X2tcGqRNGMr+iMxL334zApaO8lf3Ef7oXqaLQtOsBwFs80pMMC0ZWowoU5nQdx3eDTsaNInsMf1QZKbnLXWGxI9v2bBGxCAAgRRTaLNhIx8HcDZfn5tIyQL+Oi1bxTxQbevYElBPyJjPAtj/dpEOu0PXEHzGx90ixEJHsTvFp91qPdmepaxTjb3q0expcqUNfGdyYWMiBiuiM9HjXbJCAePOD5MzcqvVKz3GWag7vYWzE+sE6GccWQXRrjZVXLEHZ+7QmHZYGK56L2Uchsnpe5hnPCiQMjp2okmezbc3LX7QRsmYzVrOh9cuFaDnpHQ6EV6pN3abpibJhxOsbfJ/lldA5XGcizWTsDjNGOiDK+FxgktZsvVtvkgNKcGif2opEN9cTUHqYx11yEH7DzK4ahQidNzf+XqPr5book6xv9mllIrGR6lVcxLV75X1VTYs4DYL7147ebiMwfNAJ93WsQ6JGhSd9PALvFd5jMAz8X8Kf2xu1B/yWQIrWhIqn1OIpVy9LgRAzYhTgiv0KK1mpGVSGyvLAyogIhU2ptSyuJ2GVXIPUUP/SEIJKkN0fblRbJs4SV+6a1u1/DL+ibN+RjK9a6DYr6/eZx6I1zMf9q9Fh5rtg4eDZBbbfDYUKXs+4KDp4uuNIL3d0Y3iED4nrQpDEgW5W+kM4RoAVUYbww7fizZUctipNrOfeNP6/yU1wKJRjajUlBdi9/Rx/HlCyOqnXdM1Foj4CumkXSSRzxpbRdyygnwPA5BgnZ5FIAy1GbEq6fXkBWcoFzUVA+3QGJFX1s5N3GDCCFSpKFgRrFtTIq9k618UkExA1A/oC7K/2tMB96uXvAltFcN+odDA4d4NcixBRYAMDL0dGDXCycscwDC8/Fsw1qREEtDsA5z1p/inMYgMJfXAz9TjZCFlvauQtzcl3itO8Yl8UnxNSr8s07XCf7UhdM2Pu+jRGQB01PGykomUvdqcUEdXgI7sfGFBoulqlzhzGu9sLLWR3Mt3vpI6ybxcAl3GyjJIf/oKvlcdeh++HzbbL3w+suHd23pyM9E4GFAjIJ+OxdVEQISUxt3o4FxWXuH08PoiOQQXskRh+rqO20BVS7bC7Krqt1BeMMc7Q7l2NF8cc2yIz5d9Qx1cTzAg1N3ro3BIEw41MU7LRmpa4RmsKZKZlxTPm7jmdJ90xacr/SyxZYhxilBTNRj92OK3QBQgrEdGvuYkgNotGmxfqn21jasxGLb8PsDyhok9ac6oeypAufZQ9jViD/QwtlzMweh1Vnax1CCAkVewV5siVdY44BpAdsQXQKWLMJkmIoEaLXIqZiz32fXP0l5Iwy9c4ZM7e5w/CQrOTLTYtGxFS7n39nwDQuL04jyQkQjdqNnp/WD31v2+HP5+XtV243ItJkRR31tucxlx4gTBrIYMfRSwqR/jyg8C6RrGWB8z6jPNwooGoYYCSxxSgMjT4k59bx5NK8oB01E5IdLYwM3/dW6eXkUXFCTs2E3q89TJJZpPT/zY+pYKixYtMvl5KUkagDXvNZv/C//TRDHP/F2ZUfzw1wkeTmgeVuImPWl1qf5n67cv7+IIY3lCc7ARXiSun7QeDMFQW2HZxD/v0TjD0ZZboB4/OYBGMuET8+whJfh6g24DVYJK/yvxPtEOyN6A1mcQR8hWCNY1IVNgmXKYyiFKN5NyQaG9wMXG0lkqXRWxOqT+Czx4hcHAfvD3cqRYQYSBnYm1ISRt4Y1Ke0XzkmRrFuOiqJBRa9NHiqpBjU+6Ihsf18qqkm2ZmDCPciHC3JP6/6hlhfYLs2DB/O6oSBP3YdJj4eFYiFs1MJ0S/zEnhaHyHMnEXRVL6f+tlUl8+en2eYrxIqD1Ij0b3szYNvnCy8u+Jqy4fiUiOoLZUowkkSXkQGRqqrPn4O5osODgMaxqSUwUlb6Ew+92gjTDFq+GnTadz63a8w3l6ayY7dUSFJtnnhiFkiJUpiBgz9KwE4dCRcHdC0gOLQ7Cx8h1FjEN5edX8mmKS3fJSjWnS/JgaPfoDym9Q+p0afr5r71y2uMICJrkJLXtRzmStjYFeONnOGOpUnLu+kO95yXdjlfjXvuPI3qvb8avcmu4VOs6pRO6NOsMzEtQXqMpU24TW316IhFMex62OIp9j0/UUCsasy5pLS/haE25xD8/mLhmg+7gRgoCmpvIHmf9jkWbqKkrPkwVyyhpBvTQqjbYiLGQKkwFWsNAWYINRLVkrY5PNioof935jaJrpVOluC7c+9W5mZo55Vj3J2HBOXFRQ59RWh8ug14iaR3jsAgbLPUHFdGjhmuPHiqbDUrGSGzcCCTA6QFNM9vysLDmeOajGvQmR/5nwcJXg9EOrUqMpoNv/bssrPKqgIO2eVlP4egQlgEBdmOVZecsdqAo3QkTKnL19ht/BoPtS0jcigIlnQo4zDc8e155cehOxlkRyPTpwsS6lStlzG2f2uBqKRAhYUcS7UAuBOfjy7IbC2jn81zMFqsfKJAfGSuPip85TrqgG9kwyMAOqsQoMfOi64LMTFwmp0tNM09p4Tlsj6K1zUULsB457Whel1U4lPv8tO/Fo7q4FJs+6x0yosQm4AZ5G/2Jbk7SrfNO+4fDHz4qk+uGC/EPx9NdgCh79NpaUcn/vqZmJz2kiwCJXkuyKDEc6toY2rvMMjww9pcBF3hIAe8m5r0/OKi2cpNPZyy7xNy7Wuy7a9CLY+x97/gG2HU3+weplHy06gaduU8LQoK90MYwDEvxnNH8zOUAgU5FpLhgeUbXQry2IYfxSPx3Aw6E/uxym8dt5PMAglZU+P+FcQim6FXvBcZI7/bF/FQVsW/hH2I
D9TUglrfcKfYU1i8Wg6Jnm85fyaUDBv2yeo5oqvzg8rAINcj10KQBz8EhbS+JX8WzSs3GtzJ/rkMDR6h1wDkI/ZiZfiOAAFHTd5ovvGU1vk/Z2v6+cPNzRfCD0UZBJqwoMLA5I1GYBMPOr8mnuT6G64EXGREC24CXgd9EoRWaUHqixHbmbb8ClNxvP20qns5CcGoHC8ghTP4RllFEhZMMaq3S8dZ5fz5k1obXzM88ztFxMVj2wofMXkJZrCh3JMJQFI/jKL2KjYFmQib4vPp5+t66RlSYbm+bkhXRDNMV5M76WIz17DYFc0vb2NBbfsV8HlxuoXDW0X6Lu1IYr4n388eZvS9IlG8MXYh2Bc36ibXH0XoDdu80kc/jVk/BgcAY8tDnNVmnzR52Eb075b4gl6/OifD4Bb0316L1pUdRcMhZqZYdeeXsnW02WD46F1UzJC0zH1Gsn2XKLjfbvl3ZB+sm+6JzimK99gAKS3Cu6jRgDh6vX5KxisnAYUxyO7LzuVyoxaxhiuYWXxxB51wwBEOs5B8jjuWarkC2xFK6/il8U5jMJXSG5OJlPluSAVRnek8hDvH9Dgahl4g0UpYH9Ld93oapt7VisGUwAx2ZK6Tm4kXlcMR9xVVdBbGlcgmJN63Bd/NIUhRcxbsCWiqJt2tKxBJWXRtZgnURw3pYo+BiCjJcgno5oHoLHRSYrpuWU7fPFgMnNvlcKJzCWU4polpqIGezRb9BwTRuBboEX9bPuwfGnFdTQGeT0oo84R7pgwwha0+BksHLalgG+y+5SdxqmhMhDuSwolY5FZeGB8fmMF2kXcb5sBLotcMU3R0pCitixISACswvp/+RtBtlv+ziyBcH0mP5oWOX86j8RAZWKE9ezCYO5vTudmYwxoIvU1R5sp0lFLm/XdtXxn6Drn3BUF2Pbl16Rnn5L7S4JIKVzwp9RJmCQSUJ5jLtdco0BApGkgLhALaJe6HkBxQEb9cE2mXtnvmImrn5GQFRktH9uW0yuQRNEOgH5qbTi1nlOVBasS6ULdx4l+fbNf3VUY66wMoauctUQ5wJHl61gVZ6H2lGE+4dTubIj7WHvuUUbpzCsKS2eU+3v/SAVMMeCPZVy4BIohEUUuwafnOPPX4U2e222NpfyWGMsZ12/omQTEjiKqQ/bOjQAud1TesXtydxfdx2GXkz+j4gwWTP+ekOUKe1TFG6IVoLqyZ+XZw0+ihRCjKKf59QG7QzK9WNn8vQ3Xx753z7QZZQyy0An1siImrYd7ynQYhqXB7pjv2HzuGhJmCVGyEnKrvk89T6Vc2RAZD5kFgcU92BUXhDmmjV9KCYL7unz1RD0sBxHTLWXOPZ9Lj7dfhHWyGNdcyCW3Y4F9eY8H5S57vH0JD+HNhuPhemLfDhy01q1iIv9CJOT7NTBd1sIKQxxElQkGIWErTcyK0/aCyFIfglQ7svXJNBjcT/e9VG/NJfmjwMgUpVuuhkzIbsPHBKAuK5rHwwwsQCD94baB6vXzDdu9HhSUHxw/aCUJjxDW1cN7NoG3SwkwUnu2lb81WEpOyNqBy2CHxZOsbDfDmoN1OZ3IoY/jt1c3lF0CRTqKZSy4rXeRfxziTYPtFuaemgfEP9U8y5ELuE1+w2Cmi2NOD7ew/3E+9lY3tJsd+ElL4GXT3lxQJ4h0ZCJD67WscJ5z8I3iEqgwqtDyeb2/EbAMQ70qGMsJgjQyQhNzfKhAn6wUi78WsElHztfkp5TXZFre/B6y4F0bMOtrEeC6YKOCKEyIyEiOVEwsEmlomJ9HgLZgytpD+fXKxYO3WE8E2fOd69XussZb1BX5oI3p5tg04eut4qGBxKE04gBz2U/WYSctiVAIoIL3PtXLWg/G/o0PrplYrUBxcETpxewxc2ftld6YzBJst50tCxdVmO+JA2zp3CmV1xVYpNR92RmpIRijB0fO8D1vvDh+qSzGZBExKHUce05e7HZAOLQd2+CcIw9UmrJiMSVoBb+v/402c5uKrMXplAwCzSROfGpDYcCWjkm6FVnClxxdGr1OQ0blSoQ4aPk2vLq51rp6hElTLzoxsT8G+xTPXILu9edE+ZvM3qtYbbZYtAIRA3BkDwpZ73D529l0Xk+l6Zq52uhfIroau9az9s5hywG5Dh0euvRRinG+TgnAJiE7WGfokJ4MBItX8Q5v77GXnzn7H9KT/NLXGtO00ZjVuiv5qTkilQZeJ2QK/0S4n8Z2p1rTRFOWMRUDsKVm3CIfcc1EWHxAvW8zGewRe/qqvLmnhz8w4HI9U+qUxrC39M8StbPAVOkUNHH7K65BGEymUMXPgEA5kJGlUMCw9AVRoYHzySfCuW+UCMGrjCr+cAsPmNS6tB5jWpoZqGC5m4R/1qOxqA+7QrsDBn+m6XUYdRXExpRfog22wBwQQn542K12VvGMYm2D8MOrtsDTUDkKDLIQavYKaJpdszYiCt0q2b85lLM0x89e+4vHG00aUsU0emOFR9obObdcBTUrjzaFp0/oBQ/ylQKmzNVusaIyxrgHxdInYF0S5/253K2Dua9Uaf+/7KP+L64oBLc+f2F90474HkSnfEgRhP6FGpSph4/N15RY3UyA0LB9dGNsxCURAvPS7VWdiAYL8wy7r9vkNqTDqy+bA6uWRKvjFneCds/PSowFLfCIVka/Y3/mM0jWZ9MFu6gbyM/kW62rhSD9WCUac+EIBc3+b2X1Y8JQ76WFzvLjvhMBwno+D3WTWEGm4OQ7l6jrHOLdYwsj6BH0+9AB6V/A/maDnU7WiIMSxbWN4UZvpS9pb+QEx1XaKRURFqzWvQliaSTz6IGIPxtnDPeMykcAEFKzT92mw9DFl4+fX+ABJ9NPZMnK5QdX9wk5U9z2EoVRWdVqQLG/QJiGimXzFmvzXstw/if4h4n83uWXrCCC8Qgi9WlKpvZRsKcHSwBZlEYqCYkMtpIDKV2voKqmGxF8WQknr9joFqQQilndhrhBHfbXUEo1MlaMiIoqaIIZicYBiod/OEwx57rBh7vWAnD0+bKlEF71b+Spu+WrWEOhAPwy5mHYgS1DExFRuhPgYENlktZvXtf0Nvee+QYLRG471SRvtHSjjhf96PQLP4QTNHTAuH9MFW/1iB3vIqaWAtRhlzx+K0kdrtSmQu2r6WIJ+pwzLeqOzHSjBH/G6A6X5fmig+r7nOg5nRaR8iim0xSEcVf9gVpdrWmtXboOCfucKwvd83ouzJPHLWCub/1/1RddzwzyKvT8kHWKexY1yHNvcW9gXDIibHphkhrqtflERMDzppn6ASMepJ7BhB2Ma6hKxfZqQ511gwnAVhQipKhfwHux08IEl0UU5/7oNWzbHdjU8GglIZb1RtFHAj66BzXVj+ZdXzwkF6/Y5n1Wd8gDfIEtA8r0GJS15DHn/KPf1cFiwHornc7qHJIktYD8ruCF3qXtl8DCYWXNt/ig546I93X4R8tK5GNPnafYjo+tK07k6XDoppkSlG2tc4mCa01IvhpU7j+0+wZtbVXp7sBAfoGH2+0M0WdRk+ONHzJh/ZxS59umKJChHpTlsak/VncdEOB+CNbVvYnYM2mNLNgeFEEcx8a6gqwj7cULw+PAS+bk7scdHJFqttvI77Kz1vvy8ZM3kVDLwROj2VWVKkHpW4wUGE/Dz5hRbpapRTiG1/7UwWs7oLKnaaMoPZS2L3HuU9+z8vqsRE1hPMLDHwLrcvR1JY+n+jRtTRcWRwbxAJUJ6iA3Di/38ewFCKfRqS9kfC8LyzcshSzipdua+wkUB44IW/Wjn2kMokdfPYOEJI1F6CsuOYDHr0l/gb/vPaJSgNMzY2/+hs6OyJP41A6bZy9ryMMyEeZwJ9oCZZ3PQyv+NbMT9TdxtEnboX6a8FRLpcv7wsBERpJnyoy67wbCCCMQW6HhIzpOmcL844iC8i0O1TprszY6gUc4UhkO10TaanCULkSrnSsPuu608rXknfIKcEtMcaJIh90D0edkbYDM7witpz1vgh0vpWYo1yRtajlIuDNwm8Q7tFup/gq+ZcbzD5qjVyJr/jtChGC8p36+LnZiXkfAK9mha1xGvvObphnlch8AVY3IE0AUX2aKyxOSA5RG4
dfVIy29MQVPgWGcKRe4KharR9BhD0Rc99tpCUxE/4hMyW2dqIkFeSb/++cUsJb7QTNgsQgWe2K9PSo3JBiOX+kFnvv97Ap6fh/O+astrFemwYHTydpp1/X7nMpuiYgzpKHu8llE+jSR4X+wkam+oKVwLP2o76twjx4G8QygXyQ1cuuPvq0d2lME/0qC0VgBELktt0Zd5nktmTaO2mIlGqXobhWKFdqT2eWtA0bG8T8wOwvj2mR5I5Y1O0gcLlez45mQhgwcetxjbsTDZx8Rl2E6jp7JnI3opLxOZ5mtX0h/XW7V15vpb9q1RLoF7+7k97SctYyVchWNLvpNljiTrVjYHdQIaMqq7/dDqRm5JSdOAIzo5no+xnduvtIcbGyvOP/uG8yXv0B7+yoGrxU0sqo2qYDpXrfcfmpbBRJl5Hp6y63oQmxO+WUmivoZkFT6T9BRffX+mNqv6BfrbfvVBeai1JjyLSaeYjTpgblwYUS5mxG/lzuDXZ0kKT4KntSh/BaTLhHGLCJDL96LKMJj8VXDAw4JLBN/xRZWcJIX5X1r6YLp2NE2dZdm+Jn60Y6qVps0j6KmC77BzBbKICijuJQ82ErPtxAcG0SESrYJM+3h0NaTID6jmce21birkaQMumlYtpvZZR2nLRG9SgNsDcZxtoOQN1FQHuqCIfnZDxsmVZwIjvZiuw/Ht/05WpyEDv6jFl5t4uy8XMw1pEWwOyrQMjTP37j35Bm7//I+uX02Ix8EVoLbOoDUDKp+MqEFZFimn3Fq9Ld3mrckT6S1Vo18Ev0jO1FOA5pK7asDEKmATAbR6rIaxAvXLIoF0lShlkfzs39m26RX7P6gkhMYXFsX4rCEmbp68DpWSaLw1ELyjlplWr1UZXZIzp4kJqJHWwEdlMdC/KUBvyCzj0+C+u4NL4Kg/FyFNWtP+XdnCSpYelcanmQuzpbX5o85zwyLRIIFjB1bjDDPSSGtzN9DrcrnW7IhWqT1iNqDDgv66PMoBaeoJPCcd3z1Gb3PX5xtUvmmDZdiRz8LjSl9cRP6nDVoxqDm3l70TuBKZk3LQdRaEVD72Hw/AbRewfmYzacG7mYh5tEJki1VkT7fX/Y56+n5WYjyEYeVEjWzMIor4QPyVJMlWmkacfGjWmC5uSQ8dUjxU6iM+0Y59UUT5FMR3Le+iz1H+42oQmE+zESaXPvdKrJT6BcSBdjSbL1Q7d2Y7xNA0pQnmco/O8ip8kSm+bqmJzE3ng53datXRMPTva0n2vbUVKPYGMGNOyTM/34luLzIvCGAbPKnh92vjBsDCQN+QM4MatrOwHh7t8MTYXGrDKIyqMXWOoct9618kg1Yw5Wqu7WeomcTxkcCmryewJ384S0usn28aOKKyQxLWro0j8DHimAa/Kj2o3zCesfhU+7uhAJkoaT6SVkqwdgpBhSqG0rEn3TFwIgKioJTrX/J7Hp2S2JjqkHQyP6GwsXVJkn+3glbGksXN0NaXOHNBEqObw51picHvkL5eoIcTVzJOgLI7CPn4iUnu8xUM/r9cpVPKDZcSteuN0SjYWSPjFnhN0rJAX5YBO6Kfc1lbgzptKn/c4hk1PcM7ZUYEl97nK8kKAOsr4koMbK4q3s4aBHIRK6HQyFoULpaUggceztyOFrSj6iPYyyIAHCrd2piIRKajkJRP3KGOrxUBi9JRMucLIlN63OMi9rPORlfKAXmsvgt+ecj1vdkZ3rA8elhNp7XB5zNX9rkuta/eWcBV7l3nhIMt9h5IXubMPn1lD8I+B9/cOq0IIEwIQsNiXVqonrWQWr2+EuNPPcOIdo2gUHy6bnwbNSRW0UbUxahSXMCzdRoRp0zLErGfGxw4kTkx5Sznti+qsAd926aEZ7eKxdpkK3bHYk/7HlwTiVer0q6ZgtUS2stbwCqYYxxT4rR+Zw4iGmJFxf4jXgwsl5IVQ/FW5zmUtLRbTo3NZoGT3i1cj/Jj+M/xDBwTUxOk+rlchVMaqH9VW3W2LLXUXy88YDXba61EijA/ZU4IYQGAKzcbfafw4EZIEQSwHF3/GENDKv1D7UTtBxh4dd0Lw/js/7nJRjdXqEfaSEArDBXQ8LLuKJcyAS0U7TeqCptVF5YXeI2O0jQTjA7uRpq39uzrYHe2SA+7PNnuF1Hb5dYS6ovaNKhYlsC3W1VLyvEnGh7jz7hcrnNxLuBIH30Hr4fAb+p4rM0frR8guKL3S1CcPAAcBsAvgM/RfbSNN7FM2rYEr/kWA8vgmq/tfkmGTOXc4UfUYlpJ6PU5rJihF5vgvwPnToOBmf8UKOI8ieYcmYHmfEU8PnwEHFxXgJR8aWN6H7RzDNScM+aBnphJfbp0wgLKJqAJbir0O2wazbe5HrE7tiSWckLy1rQJCe9JI6f3Bw5VE2G917E3cE+LSa+R3v5tB1F/TIdCc3kmojwmUpwj6xe3tirsS7OkmEE8rRmrQZhbMSMXK6eY2jDKItJvw1raRw6DAiGDj7mrsQLIvQZtbqYBCazh/jS3HarJ6ECozcfS0EdI9iskTDdP4+vgRsAjLEaPNXw+mn9TP93YqOK7bYJEROInlEZKwL3leaIB0hUgOxlHASrOP0ZR0Jy5qj1rkPkd5s4qF2gnp7ZmVOASHPLoOttLW3GDxOtAr/6Z9MYas6QkAJzdyWl067b3H+B24qe8nEndcMi2+nFxAOazoMEw2/76B1wmfEfGRnzbbvvpwXS0vsH4bUy+VfEuzzuY5XXcPpwfSNI/79rt05ASPmUGpdPxrP2JHdeGuaS2aKOVfxly1UlKh52ceZxajwFJ1PgRVf2rSN1tGsnbC7Wn9N5sbMZ0PlEWcGw852bus+yjbKjoY2jo56piBu788jFCS8B6K8svNHCa+B0m8ZYhNVDqK5h+zH41HVeq5G2qN9gFgtA30OW8UJ9UlB1dz00ft7P8h5zdt3RLnN6Ff0Jfqvc6ZlyTzC/iVxAtGCymZb671l2YzeoI+en1UMwkJFINWGaoYFRDlUahpkYR8sGOqxU60ZxIvKq0UDDS11QvZknYoBb2AUVKlj6C+Djr0sMORvxtNu/jpPCuFfT5UhBupXdq/Uve0MWgmEtLwihWQEEk8cgcA7jhWYHnRNVxd6+gCisP7gLda4SfJsf/KJcLi5ADxj3Bn6ktJOqP+AU4ank96/jB1DCSCaZQm8nzufgb9mFPD2a55D5HfLge/YbqKJSjrvrOukOgoqJGpDpT+dKgI/lG/fZtckqZEhSavlffjwLIVEfPVfuEKlFn3yEaTNMlXI6/W5U7aanj+npUgXWfPbYheJQglJmogIYqulUCPv3wdNfoPTyRukCbbMUqdWOe26l0JdhpNrho0RMxeES02h+957donEFsj1BTzrkgiexsb2z+POMfTTS2gu4asFxEYAcaHXhFasf6+d8ZiiwOqoftuak5ER4uGyHVBkt9pOG0yNZSgsn9OXTX94vzQenfurpykxGrP8LNMk0u9FQ7T2kbJmMhDg+DXSWpDJx872W4cRouofhx+xmjF1d5U50OBWSRp6Sa59KU+a+rK4cKzmhZoU7+VSNH3uRTm2Kkrct7iZoXl2WOGHc/BJoAiip+rxE+1rfkpb88ATYkeThxUEFQB/bVWeqSP+ICvORQFTLt4U/CLDTHOfP3cc/IbKEJY13Bkrp0VqZDG8aJCjhUrn6wATC/wHZoGUP6PDmsy9qR7Ahiu9AVbyuzzO+nD6G0GMEmd9mlR0BgDqaO5Rgp0vRSVA01hdVwVwvC8RuCzh5U62JMvSdb5iQik3JKcg1Tz/Sic/Y8eWE4paX4PFuZ7Q7bbH/12c2nNMFS60qStgMZoQ2+Chlw0PkS6oAg1lAOtVue6KoUrY9vYSJuX4Bnrn/dY7shiIxHeLQDTThkr+P5SHyBhHFQ2lyhNXadL+LYq8GZHovbxQMh3x5xANYgYqXo+fmbpxPkepP7Xf0QpbKK93//LC8kHUkLsdDRoJPZkGUGIRDdrxaPag294D86TDwHcihZaOJbvttWGIasZSrW7bO3QNzMtMRerynorSp597FhmJ00NhNkjkrvWf4vJkCiBPau2zLhX6PbT3vIq8d1Awji/1rz7qy5eEJu
c+eLRNijXWHVVaw8Z4ABExT4IMLo5Cblx5mSha1EdlXwLQ3+6AnS6uIKkrC3MJuKO+2LpRyO46zdGNgM4wk8ArUM1oiG+0NPpaYyOyNZC6FfSWkLMBa5kmT+INZnO4CUkz/bJ+CfmdqTrJy/bbZsKSsQtHgca6IFKWNPRTA6VRmT5OSqcs2i4IXj1qS3ujsRRBaiYWE7IgUXMwxmR/G8pzdqEg4n+tU4zvl+frCGHH+WnzP7bLxAKt+z8OrdLyrPtAM0fcbl9forYm1RAT/wSxribcLqbxNZB+xu2Ncw3jUF5AV/H7PNmfWbFphzlXl1G5zj53GE+lWg7civcLYJB5Eqp1vI5vGffZ2B4RohfbiAvmikqhzl+be9OiDNTlcqIpVMt8AV3Bp3vo2OKaCBQJts+0nwUgvhQ80yvTYSBPH8L76xqiMBahcE5GoEgtRGC8pPFv61EEGt7Lnrz0v+UkYK0khvreuyWmAn8BdCf4n1rrieKPQlRPlXr9qOAvEBVTwtWAok+leSiisUEHae55/BPU5xNOM9taeU79vhDsEmU5VmBSJ7CgnmOJ09MPCqksLvJIGnYchV9iQeRE0PfK+0VCvTwH4rF+NQhjFAjBuG+gykfTSUPwJ3Rv5kO9bCdaI7T10iuO85e5Ebpo/vSHov8A4VJqck8BI1lym80DYJqEpiE4HXfC6m0NEYf+0hVNOTtn8pMGk8v3ONUHkLYzmj+jrkycvtKX3MGOVKv91eiYN0+YKHsnb4+a1+wSUKEb0NyUb1KzxoPNUxXIPI1OZb58HLj/C/5omnoXmwp5n75jNsSdn5RDZaE07aicREfbWlkiBJRx0bku6ypiGJpClnHopXvsBhxRcANUYX/reI+v8BgzyEZvAsTn3iHhCfu4pRFXrqXAOhSESXQisyzlw2LL/L15gwa828S+kTz1s+YWagl6IgouC2sphHRGM3nmQRZm3MW0ck3BVUreDoDqVFGEojS01BCEBJWpgPJFMKLd6g1JD3LVnKkduh+5SspoL6dsTNWZg+AkQdIpmZpmrXS2i5pebu2vSOSD7ia+MvXiU//ZE3xw4K9FrdY6bHA36FxfD5jbQk4+Pmc5R87/hoFRAfuxqWlN62Jvww+YbVBgqgAKupWLgfFpLQb5Z6mJPrzaRo1P5SBRtLXUsZ84o8oOPnv97qujcoLbWqHiasO80Gi8TLn90scqfahPagjwVXyJA82CipJ//PtcheQxB9Z9BnHyWK26YI1fZLtVexrf/rHccjtF/7+wl1ojGYB5AA8cmxVBUmxLkl9h+d+8DHnRFiZNjFJHQqpwsc8/ZpYGuchsuconViySkA8f0DihlxfNjmrxtR+I5+MfWLHM0AhCJzS5W9u9bSffv7hab3+cjafCw3ay0dVoDjtg3sbRUIl6n74BYPQqNXzl9Wfz5dMYI2fET0dx1YP701RjU1zRd1uUMICLWsRaZTD0zh5nT1NUCqDwr4iJSof4TYEtaT53fHLo2WJA3uumTbKKZhYohGS60UIDsrlw7dyqAGBKM3yFl63qaAFy43gx4G9aTjfpRjtp5aC7hKoWCHZoOAPYlpKszgXDmx3wZDKVwjKGL/EA/sZ0ayHyolSOYF4SkAKLMmso3O3HZHlZihPqvqxv2tcQwp1crB9BbQOz4rFuy3XqRD4gbp6KFi6kdi2gASgJja+XwuFUwUAT85vdCoY45GR2maNB33hj2mmwIQ7ShHxbE6G7kDek6VGcUQJCufsghFfUNyNWzMs40mnvqkyvi0Sy4HgyrHO5F6BO08lS4DBH0v2TOxDebeOBKtoVguJU+0mpe9S7GHgP4oajtFfwmI8D9eSa9Gb48e7w2pfrGwvTv4ofV9ywV3XzlaxaL7IDH4K6uqptZ/yfiZxyEVVtXa4VXuWLigO3VjZNRwHK1NjiEyxNwIthZt9n49Z6N3LAoLfEKMSkg93loNQJFjLctKtu5iN1jSdxsw4pYDotKTbNEpuPrYTuEkwhILBy+5hLSa8ElhoLB0mNaFPxtsdv7owH22Ws6a86hUofmJnQwxQtOMCzOXn52j/Bygi8rZe0quozNqGJrkmr51ZGBjI8a38AqnotJGT9aZZ9W1kpTLPSgJz3zwhB72KTZqZ7n8/AXmjTAf2VQxaoOB7hxUJIjO5JAxY3MoslRHw5Yj+Ny18KAK0a4lW0uEbK5K2wJgH5oEsTxx8Kxz6kIyp034W+YngIJEp7/OnvK4Y8ygwipsKSrYjhKbQQtvFzuqpBYDvmy7xGwihbmKYtJBYj3ltZdKm0ULguRMkgPkIVkKQy61OGJ9+POksfFQkzjzPW+sLB6R8JZOPecySG94iMwJb9CaBS7TL2dHSqdPUB+wm3ha307gbiBeqD1Pt8mO5G+dwqvFsh9/SCzpnJnnveaVPL2N+SiiCtalV0nOSEFs5jBr53LpP5IRUejEP/22lTDj5GyVzgNFUlelzWzhxyArJqigBl8AgMPbnyfFVBOS9t32XwgigTljzqOEqSCp4EMyyhYY4WfgdnTY6Fvwo59UuWTrgw5Q7z7M4so346OOmEhs8aNJr3enq3u5HDJYfIEOpkAs0ZUw8c8Ee+N++dgabnP6UAmuq+0xcImFkZwtDuwOLdm8/nbA5R4wK5cR5lVF21twhDY+slCE4GRuEFxn73VAsNm6F3dxaIVQMsoEkVWVjRyTCLT4oN9wajHRj39m1vmIiCm01CU/eewY7xsWesQGItFZ/gTF8w8mvSTRs+yaClCGoosDKgzyJGF1+yaFmEBuu3/mHiOCW3ivJAtd0NiIRRQ+spnQLyQbc0YZN19+pngLUObPC4mL/UCkHjIJpYyF8laGU2kJaRBayLk9B9jjqoSdjKOsWwV9GE6YOAu4FuMEYk1i++zqxPg7pv7iF8us42GuMUtZzMviCLfWw7OQnV3xPWnv3FQutJuAROIS6oKr77NyC1SnW1vXU2Mntu5UYayIswKSBj7+cvAwIVbrqn7q04EOKQfpISkfJbtBH6v07YD+qn1zxD0ldsJR6LEhU1WqFt2XTjSJFgVEg/xiOirMKrM6oPIaOJswrwYLwrMyzMn94ppcBqDMNmc0pBR0zKN6hI8S5Wz5SrwdhRhsiUBWAZMQz5VafNwfxgtKEWn2wBUY/wSomF1qj7FLPYxF03SjrEteR77eeJpmMpC+ktwTgb6o8eP90hvdb0MRwZvYLXPPmsIwPaCEWWUvlKbJGXV37e0GGxn4Bm3Oi3/9v9gF+MRWrhGkaZCKFYKbgu1rHnLwcsPAtnJMmu69m/dBtwEARprwOdkNqSrmXJKK0AjTbk4OwnL4zqRxehS4Tyy4aCsdUrJ8jqiyHFDZDU7o8E3q7+KUFJjv2P7osHtcrHkD7/zBHjH7AuOEPl9BvtE1rnrUsnGAGxIRrD6dDusMJkfC5Ld7OfrhK+MttrINZqG1FAUK5ylCSZyS7C++gBI1/NVn57aWz6zapTjLoBK4daLxDye2AnBm1YVLIEtgtwnMhnlnCJfLQ96QUUZBGLLrmrSuIAnjwwIlPdLXS4WYjstf/L99fEhLVxUkxYFzHiOUvmZekAp96XcCqH5SZbXE2KPZySJPtx44NtCVf2kbX7sJyaEL+dOMdervtFW3EnwPFomEWSCeqniP0xpOwHKEXTvIIq7pZe0WY9hJPwLB3dm+Lt1lZenuwXjB5teUSl9AT3AdJREhYGJieU7+Veel2QpB1+N6W8oAQ3v/SDdBq8OTwNBQucHm9v8H1/HIZNbfqAEQ7Q+SRJM63Thl9Pa5R5Bad7opf7Zeg54jDD5AJhcboH/WYTDWXdIgMYmek78gNpMPJQCJbnYF2OnItOAaKVwhOKHpa14FcTS0E1fViEZBZZgGbhtXzjnLYPjpFjaHo13AxmmgkZfBAHJ7Vx8Lpq6IPiq9DpAZHWZgZ24sp8SXmBkxSCMt/siy2Lm7HqN0LLXCFZftMWINMNUd8I7yVEB8y8BB1h2xQYTEwtl+IyAeJYk7eBEhoXnaIIUCSwx+Q5ftizZ3OWbKbmgtoEZEUB4CNXMoTGdY3ym0UU8V/h9szfv583uzvBv9+JpBeIOkYhhuEb+wD+XP
ZI9KCzFmShmBDf1e3Mswbi7ZH34MlEX4LC665HhTfrpxNK6/rP2WDsy+CtwVsSBuOjWUOZjvfs85rricyJ0pREDjDoCupT2Vyqxd55rghD8MLFa3X0Ce4PjTgSzjb0xLYkYh6lUEjsoSzCNdZE4+hMJBiDKVZv06dp8tsr5e2CLFW3StbYGrES7NRTJzRbIZSTIOSD8jekzo5NB1Mrvp42/u2dnrJrZh1pEJOHGW9b33kuYnIPgt7jCeELOMcqcCiJu+k+om5OjovQz/PN4hB2AI/YrFv1cPeHSoB7kOHJjtATwbp35w2X8bIBIOkOGN+pQ4CtHkbsWsz2Oa1S3nSz6Q4o9trnLEARC8LL+T6utv8C0U5LwPmKVUQGyCcKtYGY51VTX1hzJr6CCcXSt+Dy0ZqSuDxghkHMybjW8jWxCNzcp9vKVAYGT2IykjYymRMnWiCNytHsyNcz56x3JTqN417JP5s4TphUPjxZF7HP4RsYFY213gNXOecD+8HFZ71AiAEqVbjGP49zbE838yar7kCSXB+/nsb9DzrFfeDy62n0b2psabwVYZURgSPWY/TO4hyT8DxcXSh+CEKHCZm9UJFgW3zjFreKjef6pokRnpX7Co0Vw825t1IE84FXnAeYaCcT1MkOQDBjD6euFeXBeLykvMCr9A2Y7v4tUJr1Kvi8hffuyFTEV8vdlm/U7VZ54tKjIOZtX4DZGDmTDByxvJauSWQKkwYGxI2wexjkF8bIJICpRiN0v2HBuvsYeLMQ2hyxnH2tl2DxdfB9sq0YVtUKNMtBi14VK1DO0KzEjGaZQ5OAc/5fB3V2VF0AHfmfRfcvXS1PRrwSpCy0TaBWqkpoTcIs3FlDySDFGX3UP6Sdj0UCx6xhz4UwhRqDiGVj2CapZeoXFBF8h4ilEIomrRud/GRpj67w7BqAFW/t+sTAfbY6/md4julTiBLBxcFuzRwsEtJ1fpcyz7RCDdqgA+t6+Y5wXc4tmYaGaHuiZBAflumQ1WAJlIOZPG/H58SN+M506QLBgeaj1P87Rbb8zlorTfxTQn2k3tZaL3/aEZDd4rI7HbRnHcjWj7fCoGuNeAfOtxGW5CdnlUYr3XiTPNtUfaBIKyZEBGJC5dG0rZ2Bo9hKLEaLVN6RGpenopMMavOq5YoU7NHvKaCh6LPw8PP/VpXXEuCYza5IQtCPUWKlFs2gRABsvgZmeXyJ3IGZZAWXcB8fS9s1XahcrdvvZdPywPNUZB2/6Z8gsvEdtWEzON8YftxFC1PsbAIyMQpntoV8xcbvkUNifQwCKyDMXZSFmxwDcbzakzAxizZaOj+1Dzyh2tvAbTSnETCP/iCzTe/dRiTHUp5A30SD4nB6RDFvmsu+AC2BAQLuGkMiY7P12JjB+g5J6+xW6WAoo1FgZM/sbmjZH749DLRn4FMOXy+vz3gC6VTyh1gl2RthQpsrtcCSf+h6Runx7rSId6O5gU3nfNPd/cjx6VlncXxTbdVIECn7ANPZk6iwaXCDKkQ5aahSlgq9Q6p7AS0VBbvwcrKeauVApSNo3S8vwfNOhHITlrzubieAaYC4KFOMLGAcEevrKC5o64Ddfp4IUanMhFqSN6VBCXWW5rxeMmPgm+fEhK6HOffLeG0xVMPMSyu3tUN9nwyq+N2UtmG+F/W5YCTzmNGkujxGaIxiw6jNLrs4yMe5jP++rxDQwfpqlN5/vH+hwEs6mmO/hW2hmsmImjr2yCKKaaqJD30Q3qSbbOTZx2nF+rXOowDZI+ErrQF0MoV1JaRd4uO2ja6YqDNSJTZGo4WkEypVxZqyxFI+DHhVhKTlmj7jnpN9qQ69S+FFEjGMwSbKquLkt++uQPOPtYh+rym+XErVMw94u61Bk9e2yeVym25Mth1cwzouKhT8tvHuqvsHJifb31sTlA1ycjt6eDbttkNsZ0vhvE4pxVXafZQN3CJd0Bv9UttAuXl/sR+lS6moBU9zax3H/1F9OhZFN4/7zdgETEP5gcCpcQSct2Oo3XYqeNrvEAaySZzby4HfH1YRfpxFG14xxSFH1E4TfdG2JKMnFlQG2eIIF1imVi3JHzJ9YdPt27pHStqaxcvRVPO0AN54GOzRFwYZcA9BNoPWAPnwtMzZpblh3CQjNJjVfDUAl3BuwNnCIreREkwaMbpteXjP7C4zUMDpLHwdkuScoipRd91Pwigk328ry/92Tnt0x9cAFoBicciODIkH1XNgdZyFomkkke+nW9mJkjfUx/FxLui6ruBJ1ih55M5lJe+qKRvTA1BlXD1B2D21fK1I0Z0eLXpOnHjvhOCpawAUZVecZf/3LdjsDFmPzEdSktISgKOkJY02FMGWlyU71TK7O5gEBISHxFwEgsy4y8ETEK16AchuISz6glaybQCL4j4uWDQ1ycXj3x/APL++wYrqEylndoVdGOeLvMKtfS2TF0hHyU6jBly76T9E3KOCv0tU8GR3+gp/N45Tp7TEwPoghht5VkvjWkYUgPIIsJ4h7iTJF9X5xahwT2fY+00v1awDNLh4JaKkfOzxnQtDGFo5VbkFxAX+rA8MVqtJfWPY2fSUS/059MFCmso5OPU9jkyf4XFCcxpH/pTVAN26C+glDkXPhuKyVdfSMwy8dZ1F3K2ogAz5LFm2tjFFky/YnRnFf7tMzbzpbJ+bA7DDxdwfIh7QMBQmPENQ3QH/HddnYb2uTMlcgdux3ZxCWMFsHSEUmDBR2r2otOtJrzIJxZT/TYf3rYP7En91ZBGqA3ES8iKU03L7J4EhOWj66a8Y3AU+jgvcM8IKmCrTU9ZMS51nFSJaTj4VXOH2ulpAIauq9urGXIIMZ9eZ08fdSlklvkUcMONzcmPn2flzmWTkopLHNfczXK+rA171P3l21J0fT/Zo1DU2W3P/1JrkYann4zCBkUzZFc0aGgJZqHI6AEd8kr0F11AVE5Qpw3n2lLRRWXQ0/jJOCn3/TluU9t4cFnpFY2aZ9iRDxxD1UVT5UYMA5EGleLpPxZy07k5sn8+ftmrG3YKQzJKfA5vkfBXVrYfrGnQ75F+b/EvZNZWZLBN+vrph6Jx0pcJr8uQHJ7lOtO4PPf/zX3V+6/nmQWrFMZnjDS4vts29VWlx1X8hIIR2YT4nSxznXWQ3pbnoYzZlzPAT6Jnw2ls5i1rFr7sF2VHJu87YZdmbpKjIiRzdY+NmNT39nhkc3YHlyFeUaNHSDrdb9oeyhOophlheOYcyOZTLk7JJPjzBdDlvH9IbLihuvEDZDZ5dcf0iGFHzTUytPAEuB8ZvmCHWUH7fwNZqOL9fIVY8mCsAFAqaXFmtOuz9dzHoe016bpkPnF3/yj0qrNB8Ex9cUsMhC/i1wd8QRQlM9agDvy2KOK3MbgQ8kgoMGhc0QndjhWzu9fzYAzqBMjYV5xKmIlz76MzBOQLi04jgj5oXQWgLjx+OFS94uuiZEBlps4vG1zKI35BEcMFdygclaaAH8Fx+AjpsJ4lyScnbDyXYou+F4V+c484hTZ0KxtQX24pRSy8TB4H1NzhjbSiEFAOlSE7x9qoqNVWaJG2Q70AinKj/bw6piLd5I0EzTUMXaWBCE8NFE8pLeF/33q6SQMhtvAK7xK6u1+xqbn41dDkuIqdpgAX2NnrUa6gHGpHfcRmXj+eA2xjbw6ILYqsQYDAYhRTnu3LKAxnQS9k1dsi0RWBa2q10YK8P2iEngx2JTbBwij+e1hFpvMyfrHpU1/xnW3KIjhv5V1cUI5j+Yx/iwD6Jf0YgMrj2ZqbP6Dj/emFqEmz1MYP/ei+g+NN+YaMtPIBXM0pUENEr4b3ggvGtsZSuUZsrVyvK/UvxS4KSVPjwmVwTbTIuGRkOgirg34RdFPObUtLeMcDM/eVAk1R80LH1lDRYYRODo990fwM4uHAsepHes4P6vjMakNOceGKu7DBz/GRGC9hoB73PQtmekI1HLhlLn3PfaJUhYZX5la0qYbcee/DIekF2jzLQWDCCTDhuZPZueEC5iRbKPbXuA2jNgJiNzL8s+Q8eNYA+bUUMWShIABU3XbUEj8XKElnNcmWU7cn9y17KqL5CYnKNEQFJAkxj59mUn6W8EI6MWk1PPr
kYbwok4oPLGs34c3Ep+QwWJtclwu8Wux21J4vzJUfqwb/R43UKxNi9rgdkT2ZoT8QRlWoaurcQK1af7HqdDxDW5Ah/T8BZF0N7IN6DbN/dcjnkUGsmIWBiTlOTaR7ERpKVWXDCK1cREP1fIEaifFLmgoy8oZQZ0qOrpfYtBFEYtkl2kuPFok4ACsa7NU0VYmao4KKsLpRQadFgW3xPpgtnvZN5d0XJsiQTwa4lrNHKIih7pybE7PVcgazxWriz5Sx9cbwBtDIrg+4xRxR+4BBAHyne+ecKb5Pjny4OGrpIuxmYdoU1Fu7ZXkVZH8usSfa73zSNvlHb921zvjVfY3UznprFpmELq8y5rL3nDm9S1Iq8g5hVgEAvlgQZWNoy4zeUFJsre3xRMExzzbMZe4tOQviVr2PzfHx4NTdwubayzQ2+D/SUDhQZ24fH2FGQqSj57St/D2s3GUV0t0hPxkBv+73mKxFIAnow52MsWVXNG7+VxUhV2a0kkbN+Q5Q9dm/2cmCU90T5h3UQLpW49GLTdUHAYMnFrC8pgtQZIguc6D2SN62uj1kZ9NtQEwqzvIIRsKSAcc93glRZsslOLb9MuPq52Z9xFpmLwXWjuTWQD2BiDIEC3BNHqg0+WhBMTVmeR4UP0hh7kn7npriJqSBAU96j+PQnC/BT8b6pRp1VbPCmbDPa+APbQ1BUBbpDVAZzf5AJWC6wmGeUq+TziosOhwwpIiB5PMwYS0aYJU97R6nSlM1yIFkfHANgT/EKzqaUD6E25Q9UFc2cHlboUxGjMNG/A9DVtxFg/dYPJbMfonXq87eBXeo6jGzTvPEaeH4xsI0irCvfRx9combqZbcr10vI8A/igS+1pPRRJcjwuejbsepKNjgHBZWwXJfr3dCjy3rJgHDZFdLNt82t6f1OLneZGHkGNXyuB0pSYvZW2wlNnTnhKZQRV9a/p5zMhzfuVdg+Ig5WzczuOza1k1zlNYgTLfXZbhPNnvU37UO43iEjETsZrwJ2ZkDFlqUEn7168R+9+TzYIS4PRkfAGuHKKFv7EhIo0T/UMi1j7hU2v7TKjYOswGVdoHaKzxKeykOwdkObsNjvRX6jaQ+DypWZbLdWFjmNB/pRAy4QRTKUQxztNcdokT8nAT79brYLINegJekPW86PcKWJz0bRtjTXFlPS4G6z+p19mGXFV2V8Kpgm/NZ09yHhKIgHiSFacPWEdyN9xTUKvMdd9aCYHa1aeQC360YxNvJd2TjvgPZ7p9rufoJjBxQBTOYu816kUwXhzoybyr1ACePoyMqRkdf7bsXrYAka0Wq35/04UdF3aHzYSrol8DkogNxhGJLhg3d4YB6eNT0LTUOq1pOX/Qp1WT+vsGFtCDwClgU1wnb2SgCxujIhKJN5oVXOlMaABAu1Px+q6JC+0n5K5ng0gTEerq6I4rYrr6FJTO9wJHVH7vszLwokto2ODz8DXCvuEbie2PwmiyQXTXITdGqmP1ulIy16X2ORRdOlMt5TJkIIlKgRRuffVo+mOK62t4bEDFyVN6BHwy9XNp84o3r0MP43cxQFW+3+V8MM6zZrfPP5eAuk0nCW44Ez0WD5J563ZaZ94Cjbm3ekNjDTLeWm95mQ6kq7d+rN1SvkPFUKwjsxFW1Tv431KRdAb5Ot9TJJv0gbK4yFwijuBRouhy9d06NXUNMVTuMP+WM1n4pWevfGVyrB/wyJ5cNtV+1tOzz6p1OwqIR4pDyFcPuvlwOZfvGfpve7pDTcN8R+pnFIih+XHSac+fTe/NujMXa8UQJHLACXYBb/nWIJjVPMFqqkW2bXAylOPHqBl5dRCETQNtvAEwpzi1lo57+fzWWNJeHxa4fNdTUqYoGVDrxTYiJ0TgGyaYP+IBokhR2koGp2snKrEgf99k/bYD6ZIO9tzL5BtbDKZD2wv0LOV2XGE2yeezb647jiCtHGd32ipyfT0rHR5sz4U5pOzpon+T+we+VBgo/nlEZGVDcKE1iJDQUKvThkHkXEGEwYxoL4hGIm6BPdSFbbtR0hg8j4nzdnn3n+NJbyq7QkAiXKr/KXATFrBCC3bidUBMlYa2aE/6zSsfFnJNtoYb9WNpRaqqE/Qgem8dylq9SOciOVTefM6jwoxnYeMtctLGY9U6dCe/sWUx7XuSneaJqELTaC+hPgrmDL3A+CVjimUchh6buv7aN9i69U3a6ayyv8TjK+ugTgsVqTV5FJgTqpukYquaiA3FPlOGwTcny/Z1/iGI9iH8XgVYVOJoBV3oxIWG6t5KBhOr1Qket+I3O3TYER8ecyJimOv3AJ8ozuMZJuJ4Wb7hTEidCGeGhqvrVQxp2EqzUS7l77VU0/jvLLE7EUg5cUzJwx7OepZc9KUlZBRJfiP9KDmlBhFjduWwlzDP4gasPDa3AIlc/nGlox9TTzzKohPuEvKvjmUsfd/ayBFi6T64RkFoqBb3kLEqOJLlFZrSGotZC2FoFu6ZUf9P+7SRx3zhTq5VwGhJpMmk+Fjzxh4EnD08Nk2/Jsq9HDUUI1eumnLdG+lIHB9ewin3pfEHSW8yu5DR1GHIeOB4tTICpHEyM3yskkiTG3xayFBKPqbgwKzikpfOlfagy6DtEeBPep7UDsfYiINIvX+Il/oGfdRfNbKhK3QYaaLIx+RAymOW+qX8qQ5SfUOQJGcO2jx6T/bT0GpIaYUpYiCk+g2t27nUtlD/zZnjTQu9dfsoTqsOamZtkGZ0ewJd9NzMy+XDvdmotUrLe3jNmZc3kUZSgWKFIeQ15MgBe0nH/N4wespjhJkZxkFzj7xTaqDn3KqgZuu6jDp3Mju87y4p3iYkqPCW31J9OeAWHJ+X70yYMP2OsORwZhYR+ZCLvEDZ5uSVjzMXUJL+vmy1m9YVJbxDHFNU2lHEqkABbT0d+/EXi7dx5dOXDzojEjg/C/hKao/QX8vnGQHWxUwFKMARKYZoY8iyeueBIfLS0vVNXfw1ZgSH33MriD7kLv3pXcBlG54x4615Wuw/3vbhmlGqc4YniKSdPWS2OkwS8SC4506Fxz7rW+7BsYqVxMeap/INuwoonOkVOH1vmid6YseEvyjtz9gpfXVESnrIEjRJmfN6P3ebW5c77goVmrBbrK9LevI82NMOK8bD8DHykLTHHOTD6s5Vm4Krm1AZIVTjT8x4COng/P1VnSq+iTrLkt5IkIv2aFz2LHOk+GuQRCq7O4pU4ef6cJmdmtqCNrMHl9ngQGX9waKoC/zjqDugGnA2MHYcf2T8n3ZhHAlHx88kAIkeS0a5e/m9eO6c6xLfFnnJixKCSo1VyaXUd0pwJrORK79VAxk4EDX1jElVWxEiD1ePxEAfIDWckpYwnmYpmW9h96um0piaj+Wkf0fb1uPew5/qyUSiaWPTQKxenRIdAbnp4iU/aPC59W2I0sDkkcgRIDH0yl0ON9fk0Qf+MVKCNyAL5lLy5LI0LZi1m0rLw1r3yMgb000i62CxW0n71xxeMrw4eJ3Y3GmxR1U4iY9I42dK8l2+z9JzuvIUn2W1cun1gPRV1sjM62IJbpLiNREugwd++8/lguximTScHC6SgX55xyZpYgOjr9OJ2UjiqdPMXx93p9tbDTZ+IKd+FR3drQCPuYG/xwPWf1+NFm/CEJ6Py081DnS/D6X274uN+ya4UhYq0jBYMY6Fc47VUZUM11Cum3FZEvKRb167VYx9X6ZXoNUTl75Nj6GXmMMOXE7bPKBZV4C00/WGk3xzqiZ29dGax0/yEeNUOvF+6/RmvlXw3cJOQIDVLwzMGLniQ3L3NtS9jcbmRoIX2mzYXHSzNNuwfNl8vv+Xu5Zgs4OloQ5btkJnefZPHDWy/3KulYz6Z/UwQ2KUQs1BucbdMczHr2NSqlbL4rffQDm3GEb4gTm8N2LIFT7ORVocOFjmxtQdu1O84WQuMjhjPVpLpi8Cc4TNEwWc4Z8XDy9yqDhNjNxQ+anKbWbCfsRAMMptOEjWDROczFUBpETkKe5DEPevxtGnMRTgXaLP2qj+oKy5Chr6sblcI9mf0fvzvt06eGYf9C009qB1AOpgrkTLB4VzH33Vl6e1Fxlxv8ou2nRxjSOC8zmN6p/Y
NK2Sc4HoKupZuNSMyGpcQzARul1cWXiYTTuwZWijP8hJoYHurqxfGC7SG5HHNAgoekuef6FEQp35TcS0+LMoA98yeS+QknKeqsFW0ekWfPG58xHH+eUqzc1iDmVRv4R06dBNkePNo0547kcJ4dIz1+a3XOVa4SNdjpyInX8H+6FE8oluRpkQ/AW5BRvK2ux8av8ztaLRSUgpidlVHW6mqiARm6ID41boTBQW1loa8LywvEIMx8dk2PpNZ5mnDDICVZqe0Gmb6eZ94XW0ba6bvYhoe66RXzrZms9BH6KbTHr7eluJMuw374+HHxJDz9jmGOHeZxixm3IQWerxIeAGJiPULnMXKoa9x+NaODmWK+338YQSrzqYCUmqfxVKS0LxVvhhahlMT20Yky0CC5q+18Q5odbkEWeHqnnYCnE3q+LOrR5OSc+bp3NnmP4W8nIptRR+P0YOxkZUoko/VAfd5f1gCISkTGQJVsKZipJfb7TadyTMg3ycr+HYnKQ2KOHaJ7L51t6NvVtXdm+9h3YuYwDsqo2xnAvOp1ujekHEN6YfM8ShuthbnHQWAjP/KSKs8Ggf+ifTX3C+qluctylAY8ePcZ6nTlJxE6EL+yF53rB4CDDVZJGJDvoapnf8L7ZMnbWmRWqgFqkyMcGadqTR0c1YrOmLqrkW2IidMd/n3+nUkyb8Fd8c6EgIfScDKiLdXdrG6hlWBZznGR2iOt3bnrEHv0+fwmN539pAXRKAp7pXQbTiTxKhq3LyurfzaUwyekTvhSNOUM+PUSAGuYQTL//nbUKuh/yCK+NMWWZ+mHu/jcwzL1RdjT7s6t+YIKZFwhBb6NwX59mmS1XNwyfusBoFRIGgzKqc2G7qPJJFatq53hNCS3oiepHlqYr4XGYa7p9EncYV0k2E77pEtp8hr8qAp2GkGOX4I3xWPgEyzfufq/bHa0Rwi3tZk49wTQVaK8dVW4h3xGocgR9uqxfCYoyDLR5qmxBjY4PxlccfDTS3FQ9uH0dRkqceFbyyywdjY8FH8pyjED5V+47lUnmDnrLMMtPXg3m66hPgRU4KFoIQ515vxVbu5UxXgT13hxEUPOR2XxhT9LYU+mwGmQoxjbo4Os9BOfh25/sPeIPfaXWPuE4uud3mQL+SSW81VbPXOuW+IcvPAI+4WZaTGqYuZ8G9dM/M3+bStA8x55OewhBKRFWGuY+DOSXhRfGI5DU31XYZbmQ1MjsaaHQi2Ff1mfs1+qrl05Ug5x/CDuCpt/7QBFWBMZxBuR6+H9eKf/Bo93faKvGWBfQ4Pn24JFi3Nv86hJiNrSwoH8DrO21w/bnX2St9zjyq6l3Wif6ZUv1wVtAyQz/AlVHbV/NIl85W6vjyGX/2TEj6czdJ4Jbh6mZ6YKveatYfxg6tBWqaudVjhtOu4tduSHPLopQ8ay6/1pK/1PAIU1odcYXKWXHUhf/o7FPp01fk4uvsa0ltKfAtNKslEv3uStdIpfZcqOw1kf1Xohgv5zglIaSpf9+zpNpaAQnfCnXksrS1JnuYHSHXCSkpe/Lr4wLguktBu6AjiPRmQAVe/Nr+I6HM3FLZVQX8KMNOEF61axVeoShe1YGdwYv+jxHui/JHTi4IKSNO/IcSb1G9qtJFCAnbVV1+WDsf16jPzZJ/1XYwpwXZZfx1RFA6a+KEdI8GjBo41Kv8iGJqmNS2ileKYCSlisUT33N41jE8suHV75M2mIYcLlaAWCLc6l91An0YWlx4ofE4gO+86wVxCajpSYHy+xdcYXiSGUVtaoIvKRrcDOv37tm1VkfYnCFzOPksf3kiU3CRM5D8CwV3Mj0svZw88Y2bUJiGQpyrtdIxr8fOfb91Cxl273JLkjVhfx7DdCJ7skccecY7upoUqFTv+hvm3+V9Qcu+pqpw+BANb6+o2Qc4S4EzHD6AUQWo+aqWrc6tb8aYZ0Qd1YpyNQKVIbjPFL7ddflFkOEgmDvTj5svqZu7XanYm83QE7ArOEp/+WQKmVqGgT+/qgslQdD/Du+sKuqY7wT4ET4Zua/mIw2QHxyD3B0SHHqs8hE3AOL+VGXZNSUHxm/f1M1jT+5VRUvYgodJZFxaH5N9HfcKwIsiTIIz6+88G7MIO+Nn1rDq8dLj0gTNckEEXwzmtDQ/7n7RIDQjA1N5Byh+ttuKFysEHD+v64XI/bmHooZvC6LvxaKRWW+BgffSOx8NGhBXLlyk/B96SqOG8cQpWU2bAJjjm4Emra8SDpl1fVYe0uL+1I6UvQWL+ASAezRwSYvqvieIcr7vqaqv+tQADsGBCRx8Pc8Ein4p8NqpW/h6OKVZaOEhvWxoy5eSR7+e/+XfGj3K/Fh/YGtsV68v2n9rM4unhLPTkdCtgCuweINu9aZUYXJOEYMQ41ia9xd/DwgYebuy4eZeDCUAOASvqmFS8rf9KA1Zs+S1CRa0tlKetHhc5vootLDzofjWTAwzQPXcuN0t5IwjvJay89I4Y0pb4//gmmSUwi4vSWqHkkyj+j38otl2FjhsvHfXhVyA5k6c49GF7A0Mnz4Nf4Y1AiFD8GpkzLkLqisgaVfYYAGF3GeMAKpea/6Vt+5AwP4sapTreVkF/byVfykMiwawlw+caQqxrUtwSXpgg7Hv4i7Jd+Az5nPc+TClTKaZI3SlgBhrokta4xsdQe4rP+eFoEaNisG1LbRyicH1Vu1lmArsn6/s4C9vwqJZ5jtkloINCEql6chbBW//TQewmq60kEayNaYTNGI3j8T3xNu3r1NM4t8nAfo4ctSvWVP2Adiz51yO798psDTVUZCCIbfv+4ktZEcXgubD4PHsNH3Dw+aaZKjETkzVGN2kqbyNQ/3nM4UUGQ4PtB2vC4P6QlCDkqOUDjqI4fCWnOzaej3KeT6WeAT8j8MIfe+RgQVhMBZTIYzW020Abhb7+jfZLE8TaMUEsYNXyPdWqa82zbZbm4smlbvsvT0OqrlTb4+H/LiqDnEw+c1icrPAnulWBv3mgig0VfH7iwpBpeedE8275miqAP3bcaS8gB81SELdvfW/IwFE5viBrOH6mnQYt+qPj7OvHOdZv+ZrTVTAYfi+Xludbq/ohLrAvmtVsjxPCGNTFp87P1vjD5qzhQyaPs1XOI6uk50RJFotln1hfkdZXu6NdQXB6jPhUBuY7k95nAQTURBx+/g0X0C+OnD/n2lZsOD6xIPHMNee08z6YdNN+Rzq6730SvtP5SlWPQgSVXt709azeXkf9M8HrfSH8hHIhSvuTJpVsHp9Dj6QYtlAgo+jDt2G+N0nEHfG0JU24q1mwHh2mPnQ25VOeWUk8qsW3OSAxdiLnYpapBb5TWP8q4eILOKF77MfQk4UwiJ8nBVCGe9N2zj3VGmBLy0ep4V6EOBvGn4zHh/aFFwYzYbDty8jUXekdqY4LoFt8n5TBdeTea5lb9HrO9rpnHXopwElOZ/wIEEineib47/+hw5tg/y2+gpyNlid/zkvGDsTSpdDBtNy4PVFdAR/1El6gulIB/7CH/Ajb263eHO8m3oVjZwZ87PuwW0RAOJPY7F8nyaA4JGTjkZjGFdW0zBt4QZJNQnst88Ltl/zOSiMcNFVBKgGVxGJ7/rtC1kB/SVHq/Tztpe7uDc0M+I1zVcd2S3BJo7i+8fhP2wgrW0uSCYlCLwksS8Up1POEQblgRiMqf1VO6vqUkSxjQQGs0mcy194nxWbIpWRi8nFsHIGecTIpJKW1AsSM4BqPjjn3Ssc+oS2E2X2FaG28ntUFP8g0o7H0B9drs1537kYnnoc1uXfF/UQ413/5FPf4/5FncPXrgHCSs0p5xoj0cKiIo0fLWbrQ2qz+i/ctlUw7gByqzAMS7v9uNVu07Y/0RmCevO/PuClKrS3CPeMkiT5s1lsTJbzwnUBvaC+vtvEn4iyKww3IyMn3YyjK7PiHY17VFgDhZ5x1ijgQzWKIj3O4gG7gtWAZOJAPwaFHxYd3D9KETFotF0Vr741B/o5krWIXNT+LK+ZQANB0zdz+jnegJ5dPHBRrjm3Q3n+tLfiYXoJuSp462qkAK4KlzqCAyuXz8ekklnk4CHHmOSg8gLNf6wwhayY/BzqcU77Nq7Us2/i
KipoLs6x505Dlpnt3BHHiLV9Q23z8e7yfDRe2YTrsAUzd4il8szvsUmrXwEd//7HqFr1FUyxflxiQt6uNjjnkDWW+dDwvZCIfNvQ0/ls08Emsylw/lfDlAwSRwX0kQMPqkgnNIyB8ElAqyuR7YXF9yfe13rWpXcw+iNvhSYZyRFeiYohlREcGc5SStBQb2ZE/9w3rWD1NPHxjEm6mUmraebg6xEbm6Cq22zgdcG4sG6DEKlTd5P+zSvVyXVcrRtV+NBGbl8Rue2HCEBOnVH5VYZwRjrKUwYkW6zJeZPLF1uA8Ynd6tkqlqPXxfzwX8dl7Bd+1jCKgwf517jCVv2H3UWnLB8uScvzXyLe8Cj4k97/PGIigX4Shx2W1iPrJOQaeaXiHUuhQgfoH+dcksahuNNTpg3iSxpIGR+SbeMJ4gTCR29zhWuAkseOnoHd9ryhatbVn2xdAdBp2Fx46qTWn+sXNg6a5+vgsrKrQKOEAnc15BAab6yFEAngmaOVoFQwp7Qog8BcesYcOWVKatB7XbT79HlT1mczpShXQTAhCfvhKcnsHjCmBygdzAEFXyW7y8SbNQPve5qD+/9Dn8y1mN8WKetjum5kApmP0aurZL/ORhwqVxCUN3+rYHO3+qFEgwKyAfurF+zcDwHlpO5mS9mgf5lLCkw1NlRUgomb3Wf8fYQ14xIwcoXPShnV2koy9DD5yfUaQtxcYUsHQtPGqCYGtuEmJKbJ3JRzk1GismfuHg7hYAoVZhn+O6QyC+xXu98jM6av9aHW3Poh/YH2Jow/rjdPewqNMJih5Jq6WQq3VeUpe0aGHKyto4Qc9XQf0G6S0C/Kf4QqwZMRqabydo1aOg5NHysnr0BIQDrfRt4nQBvjeT4luPYG0EnMdmJCmt25jKFwsB/TLa4niMzoprjfPCRriF/pIwE0TCGE5M2oPmWk3bN/E2+dvVLwUiGUTYXl8pTg/mQw2yaipJUofRICTxwWdbK/M0C7vMkCtB5AMce9Xpifxih92udFbzGJZO0dQIfbV0lMDCMyHF2uWBBC0nzOPsN5JOnob7fDndT16+wgOBiL0/Nfqz6cmS+F79PvzppUYeie7lbSlZN/Ko4Rkm+28NoWNs1Vw1B626HaZ/gvw82wE2Rklq/1CWaNdFBaNDWWyuyOIHVgzf8/DcRDBuxhzlzb9aAWciawA4tvT3OwoxU26RJqTxhBOKEuLxpeIWls+CggdjU3gcBQR+M5s4ehEw5VUTEVp3Ejz/NgQ72dGV/UvjPX1Ojo9/J3uUlNa3nsqyE5STMVPebH6YSXbjXvZpp39Si1YIfKDPu3i8Zk9+/w5Q/UpxS1/5BNeFk1Fw34oem7eh0sE1kAF/jWBD6nMUGnp1fxZQlK2LdT4ZSfFxSEGEFe4eVaNqadVZLOEg2PMP6LyAvj5OOBwLGqT4VENxdlbayW0LOAxjbZPpa0rYyyzmElSkcx+60F6psX1bCg4sneaz61hcJSKLyAddI8XdciA3xR/9UgFmxfpLvdJ4VCy4J4pPZBIDWdk3kfehh1X92Whngp7M1fuZrDMxEoJnlXzKFydYfvVPFWMF8Q6lOGtIBZZItcsCBnl2a+z7sP+5afCegXmpREDa/l6v3lUSRSmYv/HJ/n/9iC1fEI7XPl4xkqCQA4B9MVKIw8xe4bWkql/AhNzxGc8ZilERpBuIg4hFd6u/Ap6KXe7FwPBJdrl8an4vNynl1Nkh36g/ibEIE/z/qWNMWxwoKtnyLwvuvXRLFCl1S+xa++Yg/Z1doxate9Y22Lgl0KqJ3GvXLmRpHL5GljHuXCUnEfHbYu4QoRj4ms9EQR1E5UVapM/OJbwwrKQEKBEgE0MWFqWBWOzRpa1lRKwnWxxG0uFP7Qu7usCvotXQ/5D/2rrpLyknq2XiiUr1JdWHX8eAB46Ii9GG1+b3g3ts8Lr3ZmBMFwUwmuQhw9wtig84hdSNBG4CeioIkPnGVPVYqRkt3xIqvDkmMD06JU9Mnhbg6OV/YuN6S0/U4AW4NdiQphs2fqm3qSwTabsgwYOpxaNPdwYfY7YseWS1LY22rYI/kpYarf8GUIzRaPz+zSDhWDRRsuvoffrAWGHmaXBmV7ALugY1GouUZCUpFtWaJ2w18jlm/kUUzMGWxfA1Jch9NGuUFZ/gbsDWfv+HySckGrH9LqgQmBkUh9PKTmrAsI4YyDKlSgvrIW0iqwLgsNUQHz6h6ZlgeYwPHPwDlELNGdgEquGAcCmftWLUexH5Fid/M+sDdET8Cq01ZOQY6kpBOrOFCN0E1Yem6dEFcqk3Ul+ZbBompQby5OYJgDGO7uich8LgqJr4w1Oiq5R2zFEuqk3n2KbfXn8K/XPSecpZFuk4Q/ZMgvRpX0Mx1DIXvz49ieJVtkwEEbQ6qumcUlOkCp8L/PTXrGwrY5EeKc9rZWFjK9MBRl5SiK3H5yCh+5z0RMPcTxH4J+VImkGP5nVPqMI/avn1BI/Nj9VzvTV6ZoeBh1ZWOPMCSY0QgWj1WdeI7DlZPMAHWauZjFoM328F+bG5tv/5PzKl9oJ0JoFcZBWcr6cVqDjbb4kbBx0bplWYktfZ9JJkr/PBoJifhRmWC3h0pzivgxv7OnnA33NA9OOzeKzdlQZ5ow/lcGYIwK9i0nqVg0jcAqylefAMiq1MwowV+1XUFySJ0VwTE7ia0PdGeDW//bLR455lDlm4254vk3Mb5qo5JZDE5xveUtWjTVSzXMduDz57aFMfIN7PVMK4UeflnUFfJzO6EhE9xnd+tH2kAtyfUdl7ebO438pxJ9PAk5UtQvwNW8LU9YniAvo6ZiGe74reQ7UrMRkCVIym6FdcjqHwNOXhASAmW9qHO4OC/SffXbiuyK+mxwoOznYbswSiXAR0E9uRdsX66kokikVGC6jCbGJi1tdJtzEhXE5lLWgR/KVpFmlBjtE51Aoj6icFIBO3SXeIkv2nBm4wmnCRZKIvm+cVUj2Bo0i73UZc/V0SJPq31bwMQZdEWjMDvL71bwmdfTcgbqtqQ2H39OEKJSxNnRMQxTdJECI7OlXZlq3rsB7HlbNelK8x05memIBEnFEsFYdVdEqV6+NhUqKCRWHCwj7rdx4CA4qqOM51Y6GL13DzYooejK5aFUx7AXRBXKOOWjFIkUWxZ50Zv1RbRaZ2xURGACs5LY3Vxybll6/z6KSEWAWuGuMScLbUyb3rtQY64NxrzzWRuoqgEmtPmpaBrvzsRLgXvaBqiudk2OvXFIOBiNSoTuMBNcablJxci+TeKb7rzInitzuF/PpIYCHmmCg3rcn3eUDdbw9iVLl7MXtzrrxEg+bdIBWN8iFiO1g/DMwiIbxlaUPFVVS1RHkfgsCxwKX+tt6fNv74ddT4WvSFROexqhViPJgW9W3Eh3hUj+BbMox3HKncFbRG3X2JwkNFaQag2pI5V0rJWJabKgCivROCgJih7BlQdh0tBs6VEVKCMpA+6sAtWahSVJHF57IJt4FQTINXEw1qrr8F4rbh8p4oF+m6Od2RQE0i5c46YAiTeMIF/oWYdBSmIem5RMvpGi6rnvj8GvuZdlCV6NYZOKG6C7iYrg5eUo7uxrpqIdfgBas6Ee2mgrmAGII21ympFKEtRvjCAhXilbKk7QbRWgOGP6Mbwfjync7jnxPvbA/Eo6xVX+M1r0WfHkkkqDmtc5XUamz6N3yoWKHL1MO0cAyOtWRlo+2PGa+1yTYPbn8kmmnx6TyzAy5fRWpSyT76Xa91vA8EgclwotmQt72bBfBIDms+FfNP5+STHdxQ+2zeMpHTFRBAsM2hTXR5PsjWYMQEhBwjNy8jND4tCqXUUgkEYx+lv05foiDfPTsd7HE0JqUaTZWLcPcM+MtQTTlR0L3maOVS8LXtGfaN6M1A0ZtiDdXsIA1Au0+YLqfejxcVfp4KIVz/FiCmJB/c85q6IK0X6hBTjwNLktuXLFCe1rJxBbmOeEG8+FKwTYYbxxZiWy4QsKkOxThYujODRXCiZZ/FEOeLue0ZVcU0nAOsbwrs6zezT1fkMwq2scA4BOb5hiVvzGYttuWWQyWiWTrO5EpL0Xr+gI3D2cAHBA6A8/sLFCXKaQ
MalaBX1r3u/PQC8hMJWbyc/unsPt5sTeKSIHLLMD2NNB5YVez6wVbQOGpkctcOITHKUcZV9o1pzDHGNy2bXPSb3CRpQ9uy35cTDDB1D6HaEQYVs8CoktzFkgFAL/tRokGEW/sN4OeDmwQ0SKrrsO32a0F5JtEWQlj44VmbdLsEK2dfBfVKVXVSvzNotyPxZJ6UYguRMswHalN0WPH+vN3z0OEkNR6IIrU+lT6NIDfoTEiwZ5TnhdxLJRlZonqSD8FbEDrE/QvX51NoUVbuQtER4zTMk4VquWg1WOUlWjcrdm6B4IDEsQUpfhD+lSaVMpmwg20jyaAlBIbHKi64nj5PKJiGfQsPwPGSHN9ILbJVpLXvT6XfheOG8tIOaNLDs/Et+QjREWUSoRUmcedVK+RVK6R08MjceWdmy/9HrfRZfhsGr6Bu6DSD9ExUbtnXtNdjD0rIbzI1Nupiu5nEE1v1xIsyF3Xy4cXT9LB6p8HJQ7HT+TNGy5fwtvFqW0kYHYzORWprqpGc5pUfvyqN3CHclf2HJ6TfZCmRcwngTzofYu9QK9ms3fK4aDSiD492MA+pwjsW5EsxzlYzJ4pEK5xeqitroF20bn/3+Fxd43Ml+FdiRoE73azDK9iULTNk8vMdTbxBRSY3MRKeJ7JFq1fyydPNDPp/D5RW3WOiVtkZIy84iu2e+4irjhWF/iQGzXdUW0vDWom42mqhikCsb2aY5K87395dETcuUmIqXPXUB/OliPA25WU7PdbXaKxfQWaoikMHW9BvfzAfzSZAxEv4OUwncwj80HBwE65Ir/YnijH4MXx3sgto0tVeihaeDAFM6FGuypgOHi5HvLXgSnhXyy6UauNFFhuQeoAlKuwdKXjy/L0d45qAETeOjfwFdkO6xKxA4TBfOxw167/OpN/vGVk3m5ct8AO27HcQ6HLS0XVywRluJK7Sdfz38ItFeC9R/BK6jab2/d7tjVKvSImy3WiH82jYVFnnVHWF8PSNTFW4wRXOr2wDKKYfE9DNs/KT+QSB0889bBFPYmZ7lDYriNi5uzlMkCF60vTGRxVMe7pBxZQLIQOnsqyhDAlMWdXjMMCnGuM1HL88FgCMnUcAqktxq1Kq7R3vXO2YQBuGAz5ckqWIOmSWowaxGyjRh9WhQKddQTo1xK2NKqAMjQvjwZVizxNzc5mAVz7pk2fZLl5Ea+jGTa59hdHdK1xU8Y98cbcNglPBUxlXf32xFkGl1z8YF56Bs0CJRbSvvn+ZcpZr09b/4afkDj/t58hhc1LSuxymgVCKl4M9Mqke/0tDKrvxcDgMhSoFgkWZQjszXswMAAIsNGi+toBr2vraD/XiuYKhOTRUOVT3iuAViLySjW1T2UQvT6FjpSSGdlqWN8Gxaj4Rh7FId3f/ngi9jlYMa+Ct86L/Ayrjzz5amNGZjLNuJEamZhmdLXYitbDakzROZbOmwkT1BSaPr8SyNViEwv7v7pKJmHQwV+RP9kfEDpY7lTeJ4ZOrrJzoEkQ5XUQ4SgPwdZo224FUXYmq4ErBIEMMPBjGShcaRebTeujP6P/Bjcfoml0LYM3wtD464Q3m94FOIcNrkN3gy3BZIBcoF17kEl6qqjaB3gr85g5iTUllFRM7ilzTUmHnlR7TdD99st6Ni7mz/Zv312mES6c8Awor28K/oXwIrzN3t+rgGwLLPuk/7nZLHhUGnK7oeyFTxk+LZpLSsCOrrmaxw0CLtKIE5KSSIa23QbHiPQEqRmcrdW5wFnAjgesso550uNJUo0a+Ao4hcu8dvAdslB8y8B8wcR3iKIF9LFhxHuo18dLyzuOOcU5I4OzUxZ08lWW2K0dkouLbTJBda54MsJ7cmO1wktGFQWbvqsVapMdnrAm6E87WG95GUQ0U4k3Kl8VOcFI3KyAr7iQUaBWCXwLHsqXCkb/M19lMb4ZlgAtaYBUGqTMinswhkTpPK5AS44zSd14Wpl7M13P9h+x8HwsYNfbFD50fkR1ZTxpp+GdguJ1Excjkgj/iISPIQWnDbWSfY4hM8Qdr78CJ/ATs1l08965/G5HPcHvnm8RPkOO6d9/0Q27uInDrWzSBLUTAAIjS6faFws6SnNhq6MzFzaic0p1YBvjYvYVzkHKReqXylnK4VHTsqQS1EriY/0uhSg947srm3LjhxUgJIKsrP7/9IcevhYGcb6JCMzJQ7YOYNYGi2ttdbnLQBwq3H9FCFxpTm5CsXYUMhSKGGsoSCLrUbVQPxRIEqNTZOCOrUo71awEn6U6esixZWXygFfN0jy9xy9+gSPdpBqX4rcNumH9b5wyJaR7C1ovMiAHTZjecrNZBS4ENy3+he1+/o5yxsQSf+42+7BP1nMe5qGIFAHtEvbkUxGbbcBtPKYkwtMG4gfE9f2VzdEXzP4ywBZXk07T7rwldZ0jdrtWK6xIVvYwL4kPxGUCb8f34VTkMaqqIFrkO+CyVlRDd/za3Pptz5sTgoehwQcx+n0R6Dh93I+qhMKsik4xd4+5wQjOEOjwrB1PHDHbfMv3Kkm7hovTay+s0fLiQhQ9H7Tt4o/u9Y7/24UXH0PVuXjOddFCmhqhy00jOOxeH+gjVudh0PyxfT4BPx5mAJOuSsk29bjqNcK9/D29P6SIurnv/vcQ1riNoSRvPey1++mbSr2/GtkZ1m9s8TDp1lHXzc54aODcmpmKkRt53j0fqGbvsJYa7JDikOKn1kVrLbVoDW31zLdpL5qzj55yKoc5vGI5kqbsNbJIfU5d1crAQZPU6h3LUBjQW7RFiK3bQ9ytHaSL5P18mXevelXFZLqv0HD8mu/yn8c0jz1nDMYSV0O2mgjIuBO/b3KyDgMdChNivBCpq0ceTmEsGkvv6eVJ92Xz50g5Wub9D+z5yhL/Kngczmr1IpuhhAx+5w9dmL5He/1PZ57fMmnEaJQXMnWNhj+zrt2LMLwS4KlSGEV6XHPYmop6vL8mjyNbNRE7qJ1FcTp3jOvW8YHqHwtiMZQCGhHUEXb8LhBCbYHzUhJS40GjCvDcIRoWVujOgOl+28Dl/Cn6MhYm8+urXJcATq+2axwgyXXXkmt80OsclfHrmEtDZNvBbOQrgwXWB0TdYbUGjaz9aaJMrLoDgLfnKjCarHg9za5qupi4r/fnTCFA2/NMKnqfRNlLLQbkHD1r1kMd49U3NnGzmxqUg2ZW7Wa8AhmkzXco8ffO8dyVNbhQ5onco9aED66Qsy99sMDcWg7uqQkuP6ARABzsdNuF50MlRdyokLVSDMIMEur59e348/J3bvRia5nrB/TC3hDndKmb5GcnN79ncEXdPQjN3V88EUuzdIwFTlOWY0yxhVEqtTeSp4RdSvuc6QFt5Dn++Kn9vU+t2JudDrGbNzaJGZ+7ctD/skVfApH0ve4Vk2vChYPtl5D8fKuFIsConc/UOw/482rlP/5E3hvWmzXOja1l4Prh1snqWAZVWJZKbbysMqkueCqT6yZn2nIiDINLUeZKezBwSJlnbh7yKD/BeHhTLigPTpNTQ6x0XBj9HtT51LQp47FT4VFOMURP2uiqUe2b2yx4lDts1aMZ88lxbEXybm6NPs097n6mh+B7Sf20neQoMwJe51K4LkITs/y4J0atsiuSZAhgi225ySrTGuHlfcnwezMLwglg/rwcvq7mpWOnxu17wZY9wUPxR4A7GBQ66dEzJPLcQyPyRXkAuYRUuD5hFW5WhlWIIA19sFhfAddBxBPFDUVGwEhOppkZJHFclDezevc7Mj+J8lV81QWRsRT188O/yWH/Tu7QDkNxsufoxkOlTAf/hJ2wilvMso278RpvmLmZdsbrRGSAF1SGs5r8lffayGxYKkpU075zvkyKKDBT3xf7kGOeYzeFma7ITzgUA00nHBEih/shMpGabp5lGgpe5Cd5wPql+N5f6ZfLcv690Az9cmu2i0BkeEU2NeVCI6izONfYBok9dc+cB2oQJqhQ4lNOmWNIOG7WG1gVFj4yemkWiD05yELjPdIVBPoCGvYx6vxX0Whj+HFtVoZBR4bKWhJb92M0buK7WAeDHT5NFmsgK6q1QhiK+jywnI7NG++xsyl1A7NdKYQqrgXNfW9WbIi
PsBwNrEF4mj261sc9Dd4APi/RAui9ylOU2dEzcYnEyLlzT3jcGQ1CbgCg9ts2DToTGAcp+V6CN/OofAaegKR5tqD3MjF5iVJka8A/VzbAHNc7O9IVL0IB9MLAR620mWbBqT+hZCeV0S+pCp1uKTQaYHxyIPxyaXLPw/NwOhWuXE4gc6lIRarD/zl1EVm2L74C5V+2xlu5uXmyrBjf8L0fYntWJXnbNYo8P1Xa8FAj1izQ9yZ2c2PPeqAAjsfJLkDV+5CCaTMrdJYIRWQ63ekjVBcveGHudU0FHUARZ6KDA51RfOq/UPjcHqiMcy2qh5awr6WvV1wj+EWc1OTYOY4oU/cWTzZNpmuz001hrS7gqgKhrgdsAypv1s8IxQnEtTY/K9csml4ftfnZZp1QCE+QnhGrOd6wF1V/ZX6V+1XOHtvU9B4lSNfRsh8H5IANDfRbq329ZuMKTUEJORGSuiaTzNEXcdv2rU3ISVvLsRwhfqQboouG2FNOZuBi63o1BlBU68BIr1+qPstiY1oBt0oWpoZrmSIsuXDW+87ExmBgWmAY4AiyaoWHRr8x0J1TTV9wteQaISeUjfzjMJFprw7r+RkDg6D+cASIC/iE2A3QdZHpCNsBFcpPRakuAW23ftYZQDplQfH+c8NhG4TmzkFZ8INGUFq8pAKgGY3DeENWJlji0PbC9kjv5aQU6b5AtgicsovqSJLKoc9q9jhMh9CRgHhHPlLbD3RlUSglsvgXTDZlPJ3bAde9qppA6LoxC5Ik2dK2eAX6akQRNx9XbQTjSM/DZ2SxXc++uyBIbuXmEMBG1ez7GcLMgqXIQkvyA2hPiDaK9w+XCXiHWivyXS+fzSMEttUj2uV2eKFEodUw7P2LYNUdeW3Gll6tMiyEtUUQvHLfrewRtXw47yhhDANOKvBEICPQ6P85ZY3Jru0j0TCLaPqULJrn+0eUIgG24MUj9SXak85WHdnj7qj0gl5ljchOHOJ614MYwSMNzcVAlxFEaGbyyXkn5uGCl1cHLaEcv1JxDMWwLwo0Litx+FbkSuGtkqJfeZsoC3npfxEH2qUepmeIoePgRd5pEgj4Q1+na/BqrJk3pbPuPRpvDj5r2edLQG09xHytYDSDjCltm+oRwf0riZw1B1qQC/KwuoSNNM8/XmJgSWbA4f7xqkjzlrrJMnLATeKuU7L9KEJwHFR/TCZ5LgvK/9OYddmkuGlFmpenvLPXANmpGLZei0TmpZnzFfbBDnQ9Ag2r28KuKq6BONyLdlgFDsUT8jrYe2rKdvPupnpANqjKKyjmjHU41Bwq5mL7VGOA0ZqMtTT7bMkRPG0/Q4ELDgpruh2yRGWlRYKLCUK5iyv+cOmocN5u0o6+1BD1ImgkIL/G2dle/brq1EqIsdUJ0YxTL72zxtGzkTs+uImrhey8yL4K8P02k1fhDfZIrTw1uMe4imtUMB7YOAJjUfX1PmJhubE2YvO7inl3fkLMoHYWHmFJJCP0lm21tdmZKkJDdv5H2OxMCD96QZLW221z+SdrWvQB0aiPelzR6v/QbS1mF4r8V8VnMJywEKOi7GQ3nm3OCB8IgwvoylXaZJ1HBcnaDmFzeqOP7jWwgXxOzHts8MItylFqDsubifP4NYtIDxcU9BNJXjs14qE5sLOQK6dpF4vsy1d1vPT8XKTG/h+fIPzA8KQgpu+UJcTM8ceUmvSFaV6RIRtQ92kujklyjE6XherSvAM5ZSYc9XkFUqduyCps8MQShFIwIuC4eEfzRaXOU/ZgaPFc8pUndZf9N6bJZKYU8xRfkWfTLJ+WqKsZaqvF6A6CcMeY53C/B/hL75gd7vt67TvCMuj2Omt2wNeCul8k2SeCPi01ntspdb90VvI9Ef8uRCAhSyvTrw3tr04eeg04mImicJiLA7kq6HSS/yx4olrCcmAX08HTBZ6gbsIPs2pVCbjEcnrYBkxVik4nyebFblWYuS5KICrIS7dvMY3a4JKDWZ2TDM8Ig4BYaaicWhKZVjUIGpS7dN6SqGphnnB07BdayOa7+qrZgUZ8oqkcTzEH5/0kx0WKqiduSSNYfSTEkySSL+C6AWg40tTNxSBX1TTxk1/sjeooWA5/7ORUhMzItAynb2nzZtAm2UT7kV0rpXMT+rOqsdAtTHn+v4WRyMSpUsX9rreAF46BH4wr59Kbx2t5MLyZPdxgUWRJIWoD2w2iS13q3rqf0OlPipyJ+YD5LnBgsTMukNYkjxM3tzpPMFxsHxyIgjhYBKo2bTiwjwRrqZfQLRiGKFMaqL+232YOF58GaT9Ojfloiu+8qwA+ldE4LGBlkos2e405HlNHJ9O2KmO12SXH/moW/FqlwABlE92yClE0LJbmSyzaTOUJWqURFlqDxMxicy2ighoT93kzrfsXNeXxG5Om9LNaZAC8wpqo2vNnGGa30U/njT9O5NwwF9gqarUJWPLcBD2JxmwKvx2mImlIMAMgBYp8Jsye2ZRn9guL85y//U0JOePu3VTclAzggsW7TDV8/UurgBpLuQ+L9MNS1p+puAQa6DgKvlmjnBTSqndm07Uvk9NAT7b16xTj+T7vyaHYG+CQzR7kgi1WV7BAbSKVEgfb3n0m1xFSqz9g1JgA+ir5tX7aegf4hvpe1SWUYwZoICz8RlItJ8riaSk99NiGCAC1ipWUqyAKicvVOar31NvMNgenmerncEsthxRASPceTmdKKZyDusXsC9wT3PThbjCYiwt+YjmrFdyLbCRJlmHFOYy+kPsxpyDeWGAz2fpEO9MKkB8ggvyB2kRWgrETMO4HnDSkqxXtw9DDFIjR7KIQOuEgpEXIY5qOtq0ykGjfLdJY9KF5lyAzY6NFQriJCZOEQeZFEWeJJSEU05KpeZqxwNEw0tmmYDElvb43C06DbG01a1QbNDfovu1SAVLCRRcIHESAvKXgZE4EzQQjtZS7v2LuRU8fQT7YZkC8UtGZ5O44ShLN5V6e1w3BuOPD8yGEtIFlvFtet30Hr7OnrnCOfN3BdkqPyweAO2IeF3sp8xZg6d7YB/0pKSAJtxCWqlUcUgjQ6UAA+1xd/3kuxZsaPKwZRzhFYZSbqHxXf1GWSoHO1z+dJmKvRKrq2r1rBjXGJSFEvJv+0mUEeyjXfvcbDZpJZ4U4dKgaRZ0cFWHkFfOjnlLa0B7dHOSwodke/2LmmAEuDx93ysqzdwssnRoviFQee+HMXmqiqRDeD/KT45hf4qwnue/OguJ/+xLagG2JW9jLZmWMUNp/cMs22F9xAz/y372VV5jHyyjMrGDRwX19+H2n8fZMzXH64az+I4MNw+COIeDXN1+VQByS0MBW39UxTQIdCy/cnXDMU1uKvRM6Fn4b1AHyQQISt4ZOC4SLrbHUYvpszLoc6HFDIBSwTolwJRoPfHNgL3dTyRBNljvNxn+GpT64hPgp1GwhAGRA0K3TsW2hxFzwRRgTbm3tl0NU0c+gmcQdzuSLK6wiNqDhnhJnjNy5myWYOUPVnfqzMb8AlTbuuynw4953AJWPSrsHjjoU6xStX1bM2GiSfyckL3PtmECThD/1JDIflbCQKRIjSlMYKBJE5NtlM0UqtKKUQnm1zF1uRtdc1Kw8dX96smgnmBwZf4ofNF/kM5VuBdlCL4pm8fv7ZqPSa4+MVOpZxrVQstFCU3TOLt0iWUbgJMeoQZvdTTIq3Z25V9aCkUbUxppJ3hmxQa4SQgzjkKcvwxTuDvLrl+PcxNbUHp1a+lOkLRxaqqs5FI7VOKrbcy2zNXaPtlHU2+5TxVj1H5epccDbKhYHO1yR8pQknCdQSko/USctKN8neFMWwGCtEirGgUjFmofbKMBMjcy0r+3IX4kC3WgL01jLulPbnMMrncDlHqsodoDTnTWEosBe46TfxMRYo4c/vUAGJjZWKMBHsL+eoPZaS3SqR2wdHP+Vf+SdpqM8KUiiNyMtvuPJcuRD+zXjkvt91AmThYKvZFaxs+9FMnzXeDPNwHHYVEt7tJm6AQrstR+LswMJvTFV+mYqIH9HpGDjwvBQSEXweN+RTF2/f7u4ACxUya+oUK3yZsRrtyrMozrRVkPRxEax5KfksaVa+RKOYvAwQsjMcLe
FPJoiozaKR0h/LFwcMbGkJGT1VHYIdyBcV69Ou9bLk7eUao5s2T9cAJmmItCYr6+hE8Tl9VEvlvaCCtR7z/alNSBCCM/XwUx9b6bT54AyH5NE1X5hGqnB1k3kqftbSpZ/Cmk6jrTaWnCGdBSD5THGzSHR/zmOyhzZ7OA0bwXSJmNqjw04+e9aD5ImTTmL13MoKv3YHt+q2vg7xhu04/w5uLGa04CQUx63G+AYH92M25CLdmkuIuzRNg+mnZZA2tqrE1c2uIfVqspczPtSnLDk8nAy4LlHN70CLsWagnpEU/lqwZibQdIvO1USWbv2HGwppeVmLnViPZuKcZvcvItqXrgaBvOk7u/tuYxiFoQlyEAROv6zS154mlxHlHI/QfEOtJQVdGNGkVNbzuWxDHcRrmOrerJwSATd0xUconSxGiIhNZ1FuXHuzJsFdG6rAmuEI1VdfMYwSfDN7PVnoC8G16NfN+ctEOc3tFckoij42tIHDstotzgPVVUyZftelMPcpltOfmJN6ZA58MMmOltU63hUoIBrccN5maaMpLbX4dAY4CHydwQdxii0osL4Fri/pk793Ut9trxxw72VPGPQ8WRa90Ri5Fo5FKZtSwrdR3wQz+lx/BXVyS7ExFR9mD2PLatxcswr/QGsUznawKuSiFkYUyedOCZI0Ps4wYNR1vUT55mBqZ7uTEthipKPPpsdL+tHL38CpaXoG02UDMsGUIJpQ++WMQ3chKDG0vE/lOtA9dJedeGvHztM6pVZLU0vbFWb/w4wC4M6thMt+iqGuzMRqCpVceTff/2uVmQyFS4u+d2WiQE4Vm2a0H+ruwo2PZzG4dww8YsDeIuoAQqX7vBZsQ0lN/l/dJHQ/HcvOm7YP1QHrj6uC1R8NXddWAqCRygIO94mof/ynY6er56+GKqmK9V6oVBrY1yA9+fgn8A4qxPj4V6nbiuwpcy5F9vlDT8N63BaFSV4Znoyhqx/jkCskSZgOZ5UImsW0rDJf26D2kdcdD3mv7ewZ0nhE8gLpwloaVXdgw4kcVuC2qE2C13jvE/79X+1JdpMjAu/RKL4/+GTKxZ1ClqyXnxtBpzLpkB+uOenyiXynpuknIPP87wD1kKc1pvs0b57LKqUwt3h8MGg75D5WtC9AG7yEB35rCftV/Zuv6Yn1VIaKMhUd5yXgygcbPlAD/QqDMctmNbVz8w9HUVeHqSyafYOU5AGfP1s88xfrwyvI0bzig/i1TlePmWtbuAuBgqzPGkmxke/IJgkBAdrSREvadvyXHMxgzJotuX1gutFbKv739S2hTRc3I/61U2npm0fKMwkHDdJAtnN0PxG+R7YP5tSaBix2xv5s9SLsABpDjxtkwI9qlZo9Vn8G4amImlBBe5fb39e40rde5T5XKyXRd5IfM2P3SqZYcAPNABceKEsWQZgm7qla0oUCC3EOp3NPIgKHh61AA4xsSuNdJtkaHgy8WWgp3/aserZoe8axt83hH2beCc8VzFo8aUL7zNF6NTgVq7YIIzdiycIaXmZS6pynfNZP2SLSnAbGIVVF8rShNXFsmiwAq3f7zLHFf1xS9Whysht3rVrdWvwtWu+yTLV4ziWa540Z82Pe4vduOU48x585r4LZnMG1i0K/De43IHeW+HHI/pjSKAeIcr69HFNTIo2J/yGjmK1QZj0j8KpG9a32RrChxSmqxqahpYWGRs600bimrkWnhs8V+nAH2UzZnT00chcww8HlPEtpt96SD4zKd2PVMC38K+EeDfj5dTBwniHCZUZ6+WzPhkIFSLPhaqURPAWseQ2brNQNJYOW5OzmAxQDZcp/kqRI4z9aUzgYDNEJNNg7cJDHWZECHErEAZwH81zdyc4acfQyqczqt8YLjwBXuMfqiGRdmZ7nyqZqb7uvCpLCYHdTyNMR8H6ci6RZNOTIxgRcDJ0TzWyn9ssYOoCyIURTmiCJxoMRzVp2t9ZYltwwI5duxTUnUKKqeOqPT8zqUzJP5aTe2stue7uZEabfmZuS7cFpFqHbDqF+N+xu9ZdwrIjXFlHPZt+4Cry/iO4XE+NRELOIO3ZQ9B0BP2pLJnjudYdNi8iIrzQmPWfYYGvixI8gF0ZNHkBcsYqOMKOlDG+XQGXupqPGTusDK7jL5FYBAW3AQph4YJxMBSF0hnDXvP1C3NCroMaY5gX5hUOmhmzs9OFWDTvXx7MWImb+68bvhZ9f1WrJeZH7dhsQY0fcoO4srw2Ofvxsnj8Qs8H7xvmldN9aLYKhVRGMGcwIN9KV01FdRgY+3LchFOZeM2tcbh2cz6rML/ARHCF0elnm8OGbgYtbiyIAAho6eOiV1p5M1M/U/OAgdyxAYD60e862zRYG4qkMzzEZ/qIy5Th8Ir9FxNyOGoUo0pA4xZQjwbjP6+XLKJ+taz/xgz7VE5w0/XCmub8LNc3NJCfqnC3mayRuoEa5PpLdntWGOd2shtlmmBnVe4kWLvOXOtRQUYRRTM+fmiVRwgfV4i8HVZ98iqK9S+UUTcDuInS6BcrfAMUQ1bXRvWYcOhqWPn/aHWAePMnejKaQDVc/Ephm7JgRuQv2XSkcICP3JiMe7oNGe0L2Tfl+WIN4SKtZtVO+t+DdTzj2Fj68efoWsSH7CXQsFNVm4YRfG901gWARdaigddtiJHfoCGF5GNdJDNcEEC2F+QqOwzOxfbkYRcrMRGLKH8up/EtmskJFzRxi6RQ4qFH1MGkAIH4sMQXJe6NODsdmV45/ilT0KRNUa1DsTrArqYp18Mi/o6sNqfxeD9OGh8ZMcWlXZ7241SYLJCt1aUMmerUAbN1tOAkiHH0fYv5R4qDLN9LpjOQr+mQZkgNye3mtKKOJXwWKyxgJhQo46BUG06Tuaz9tDwv4qeCEaxcTXdVaIjlbEqQA4HLVpJdIuUTJ/YxjW57o+kuG8gtHpF85qmT1qmiWNUt7HOzyUa6T8gDomLkbKlzLeVgu88u+zprV4DNjapMfbRuOL35wk04fjNBnN1jOkzBXIz9yawa3JLSzdHWXdmpGySn6jFYSJgd2VCqBI3f9kNuEDqbaopa9ifeqfkXEH9Dsf6a3538tCCyBwpWxaI6W5cTmM9OOgf+JVLZ6QKWirIA/OeWS4n+MAzN6j2zQrY5VSUg1Usi7Us92MkinWThvZSUzqdfXk2rg9JDZTloocZ3ZWihLsNM4ZGslFC+r8Y/9QWy0rQ0pz0NND4mwX/HVQbAcp3HJ40wZndZ8+pNGXxvnS5LweFIyWzi4DhjKig4a2HQCSX1CfkPcSy96O66LrFqTPxWA8wO3MpoIFckTOmiPxJwZcbeuOv9zHT85Y4Z062I59ko6JGQrHT4LNhYUkV6ReLphqiza9UFH9U4dtxq2ttt7s1UU+It9B/ZrmSEHx8qqYJxTMl3OTuarmhM/cYWegKwW6yKhChiVQcsKRwotf/Nk9p7oLm0Lf1uWiewi5GJHFcakD4zPFVEbKOzub/v1PvWEVnL++qXqgXIQcMxPe+xJIjt6f+FzyEBb36oJQFKTt7cvWoUeOeD8zhNFV5ZNRzd6tzdYmtm9gnru2B3VOdjF/g6tNN/D2a07Evdv4qnvSEFFmKN/aWnaNuqJ9A3NqulOB6eoKdGqD+qSfd3xJHvldwBcZuvs05Nh/FJ90hXTvfISExtW+TBPHPGAV9EfObTQaaUTgmJn9y4ofxmLEqGgsSRmUUCUdY8zIYbFxBJYKy0ci/6z5uP+XDpfBUz87xV8xrWkt2Tg2ItS1wcGnLh820FQ7W2UYyT6wHoaL8jYIdkFdwqP2rnAd1H2xPw9ClKnTTzdfNPzt/AeXGCatG5Q5v6f60T7WuO652xVf11tDYYb1Jw7jN0uNcMfusHT/hGkxEX/r6oARBsa5fwR4AHll2v0Bb3zMa+aPvbHTUkOuy3lgvduwCVU79rrASDJjJRqJN4J2u1m59l/Xl8852dtuV4a4ckGuD1oNEjk+3WL4Lp9LEAgToPX0LBj6XHHGQHvUmQ4+bQeZSWPgFy7DYidf07BDmQ/rb7XQN4zVCyyYeFqv4FVG8INJ6pIIxL1KTUgM7kk9Ocg5ZFDI+OdDJvfJn17GpBwP/sF/T+28o
FHtX8gijGUIG0QRSPZbpLLQq0V2M+8opTR7WEuc85O/MgHqsG8hvcuvi5VB5APjugx99IIeUqwmYO2THddq6CLb1utsI8oMragtArlpVA/sCXLq1LiSr/jRPlQ7qtJ4iPlsbuZoXoYeTzAOJqOtrRv9wOS6gY5pb6zyapGcy45lI2FSsl6rTV+Xjzv5ID+KCvYCctufjFeWZ4fF4J8dY1EIHce1PIoRiTAutAx/vHRAXIjr3X3k+I4HvbjWQ4A+WM0lB/D1GzNRZJZUugTDuuDcC/8Hmm/KEZY1oLtq9S+bGprpl0onzJwDeHhqEN0B9Qe7pwHfgZ2RwiKE+ag316sVr7OK/HadzM673BDbMdGWPSt5lITAHzVH1Ic0MKv21yA5XhMzqrYZ7AbXlbjXup0AJbbxph4VquqSCicn7SWsKHkniDhoBUwyyTD9speIsUz9uyY62C/WND9lsIZVOSnvCV+D3jNxywADHIs1jdIiQU5ZzOvK+qemamShMDHL/fJSe7c1lR9RXdPjrjFb+vEdN6l457ptc1/uzJSN8NugnbWm3I+CTP56Uf+/uX5rNPbUGIgAqLcziVfyjvVHXyeeanWPK1RrG/uWOZNZYK2Y5d1gvnzMkiQmUusKyDn4+j6hco9kXkKRXEHLCO1ADAFJSiHrWRl6cg36O/Br6mmZXlYa8JGJ1trCXyv47LSrXwB4TJcWG7x+k3JqPyTZnLOaEDE7ekTrpEUN+/54ImgY+YMs9BEdRknixaJoVIYVGPJnQLylHuoUSWxnX1ea/LR4Y+L20ScK+v3Vgg2FCSGz8XnMYIUkYg1ULiyx6OINxKb9cCvGvH6G/4+O014PDuZkbVjEqdiL0EABmHuLenACOzcInQzZUe3SypRXqlh2KMIsDNYZzc7mUH7wX9D/xfnblH6jY1yk82T4qIXJ9lG3nlVEK0720CDLVEUWrTPRcFMJYi+ndJPVRxXSkpF7tDfweEm7YVQwpYheqMDTmaQOYxfsPelZHCjRTh7ATDwVmjyNEyXshVOScHB60PIM09S5uXWZUqG+NXlbRLdDlj3YjAQslxwtxbn24rM3pjjssGKY63u/K+Zh4Fn/oNRdJUmwYX7SAFnbqaDG+5MgBclQqLdYYF7NEQwb56CMpGZKbiMfiR7uR7gTdISzc3E+RVc4ZVGdlANlwGLm24exibveEdkSadaNNTWackawg63vLfN5urlhs0ilBiCvB9Zr6rQ4G4qxao/iGq0+6cHggnX6yVI6TD74a6rHraljwJB1VlqTnHigIJVDcwm8LY/XQbubxyeqMPWWTSzSrxKcmyM6tiVL9k8o2CGxczH/dT3B23mABgSuTrL+YkKZhd9IpqLTZjooYmr93or7S9rWFwHJhgOCxZIedZq6TmUIjf3lIuoa8Nh5PYbdUcHGqsm+fXxJKISBi3i6Bh1iAlnDcpAzwRUutmN/8if9Z9czVURHGJvxPJjlbkBNkm/wW6ZUl5xTro+iOswGc6SzJttT558TW0cwcgfXO3hodmh9WUQtPOs73KzMcIQan6L5Pbmtp+zaTRVZ1M4Q3TC+i145bkXdEkbibm6XWGyM2Q2zh6DbJsGvnIuCtXzsE2M9+rs56FtjXWem9paPC2Dy81Bu3y64JcVZA/grhbhddqPPc0vdAijo0kX9yJ5yVvkOrBU6B4oR3WYCHrPojWarqpki3Ug9+oVb6Bz3rRrJG3OUrnx9n6za23MB2nzheL1s/Ix3TFSdIFiZ6LCoYIAaTfbxvHWWJ9rkPhpoG1pA62rfb3msXdUPVt737THY89KDcSIFbmRqSl1H1CcxsXCkYRgAkQhuHD88rUWG2h0w0CU7N4My/a+pYtV10BGwZUl0IQYGmkVnhaXq7R+hWg0guspWmq/8+1du+cW6g6/AFjQ65unS3reI9gX2uwaf3ESlGW5xX0sRrvGG8/EFcXm/haLZ0Tnah5y1G1I16kgkcvCyal2DNRAVSfxkFsHkIBmzVK9AAPd0SWleZoXrlC+m/Yk+/AAhwHXgZfkRSGD4PxkwtSvmooKc3UCRJ9oJLVuJTEz49osULgD6TFlqylZcPG8y6N7+rFqBD0aIsg6Ekr1AzvjtvAp8GVuuMW6T9+IoLZd5gf9pqb2P0cKT2VV4mvmN8YzIvxKMJchGu2UP+D4Mp7rv034Hg1V+Ku/3MHeqenD+bHtlIsOr21WDQdpSrnlP1e+wMac8ILKu3zL2RCvYloUtPaS7z3grnfwlXBVsAAuTMuBLmkcPKVdAd4s1+HA6wTeZVk9U2m8UPnrjFy8MkbhFrYKNUPjX1qqa696FjbtrE77ycMbhrswxdM/3euQOmldbIIsJ/22CgQVcEG5XBK2FHZP0PvoFYdWoKd8KgALo7zPA+NXnAKePzgf/EBNNUPU2lHFcXGWkRxccUjrrEp63jbwIGWyWRmofK3MfN15XYQLignySsToKq4yYk0KnxGXcXf+K0t/OuacaLzT/RpPKc+HQlxXrjFDP7JDMDg9u2rWjcwAqrg3m6tXcscYG88mt06NJPn1eIJj8tCP2Sp/s3wA0DtX6jPH25rFDIcKiaHHq2/Q/3dzSoDxDfUt/V3T9fTewJGtGA1Lt4SE7ZVqfpeeEyw3sK0pqrL4FZApTG5kiGnhmLbLDYhrbIwSJDBnGL9miviJG5sVgCIAE/aJIoU3Kuq/+wfzpDbDloqmTrXPAZAsY7U1c2c48/ykql8zm77nosq/5RwOQwgBgcY4QKgSxW0tYxKenv+RFcqFXADkSrx9WIuXFP6drYWxxJE0Afyf+3hAfig6bCu4ESsVVmAnZHLROqll/3RWluvjhs0ZzEU4CBy/sfdGrAZjysKM7tWWrs8gZn3MrpmvRNR8ctlWIA3AT2xeQTeoX26hzzRvho25RiqcV8NdjvPBKz0yQpQsZ29fX89FbLucVUh4Ny+SFTIJTaX/cVOJhboCMoyQg4aV9kZrAxfbTqqaes6aamL4jwDiKZha2r+waDCXZuMemTYBXPuIjRv2uqmqxnkpFJ67tIUFt6fCqbvQP6DeG/OHnuc2smWZrxrt4y3j0GvcWhSQ7c3tSn+PmTcd0oPtvvdP4dgu0n8NZY679xYbyU/OQXlkve9HjrYDmruLIm2N3xBV2gzffXKgdqURJQGqlO2lltPxqIHEx0RozYjKTpMhUMyDmg4nwL2Wy5KD/80IzRhfkgtJiTV8ugLXyhckmDspDsP1YjpIL+nC+W+brcqe50hoqwFFkBmFYR2lKhrErYkmpfItslxlDB2O/bFxTM+ZxvqPOscu1J9EgUWjLKhBAd8fO5hx490bgGNcl0rJ2KPhGEBDSnoco4gfFuHHu2nNtA5PWEeeIAhGqo7lVjrDZtX7cblOZvrXDYqekQYSsub85se3tAwUc2nutRaO8gRrc3JvLuyMqJByTON33laxsko7WfDu4indFehKcVh8JMStUFRIsSPTAXPnDp4htDqFadtu3o/CKMOOEaexkionF/9dxWCuMjZWrAsKRKGllh1+awOhs/LLeAroxpJ32vxkpBfKGPziRPCC11z2394fKYVMcy+JPwm+zhIrqYWGHontSvrGImpIUpKqFwRTFEv7d+tYIrOKU5zIh+MYA2M3o2sUsN0UjdRAR9Hcn0GoT5HMHjg+gqgns62QdfoZGFfVVl7zyxKrM1PTlk/cUY0MaXWU8CY0Q3K7BrHvgg5JFNf/6nvtonaaVxSEjp3RtSywRAzyEb08B1EODP3Lkcd2qHO5X9D/fg3r42GO4GpTohqIqZHDLxQavhn4968XmGErzx3TYqa+siDXpp4J4mVjRM/PludpKqMxNZmvoPtX2XZAM8HG7rEVws4P3uuYydQWGOnQJgg36LrJIwWO594n1JvEuax0rOvqWun+iBc8UZFJxxkogp3P7+N2n1B4fJ2WNLOmASyq/B6BK/SmoTQFh9Hg/lnt4UjwPn9JYnlO8/4ZYCBMarBXRMV/y6A3pS8ezCviaT/dIPoDEGVfFbQbcC4nRwp8i57zrQtnIT925I+CgIUFsPBSY7knGje7qiDae55Sb2GyT1w3EdDwaBmMwaIcKXBMd+cGKtmF0F
/+HJ0x+YlBv34pG8xmFB2qkuZGSwBRjIKBPQhr5R7TNjEok0PYeFgkrm3dviFksug6TbybB0jehEcFiSFMZTNZ6ShY/zXUBIhNvhRqj8s1F59+e0ta9jVh7kZEU8bXpdP8EANHl0/xxwqtQvlDK1zP4/+PSUtv3eWTU6ubF1lhlTu6tXdFx0JDG8psrhhaNEh0pi469Z5itmsko6ZARbAQTSLUlenxAfkTA24m6dq8YObOhybfIkA2CmQMhE9xdSa2YK9h7ncntOMxz6Qn70DUNJ9rRyM9oOvLPas8eiO9dnpiFyRSatIua/F/JHeJEcY9njfa1IFUcPc40xBXyXVoQPjdtcXzBRZ9owlJDTRskJuWizcCDlT3CMTbxCIHQ1VsJEwMsg+JVrUsa/uzrj+7An6+1BbRjbS01WJ12l9KY5x3vmZFzY47q+6UIGAb02RG32fxN4BcUKGJrnUUzxBo3TWd1RiRpl2bdyurPW+YNF87OHfcjR7bnmdvGXhMQTaAxf30Xn2ZksttwTOwv1BinUtD+ZQaSzNek3Mu6YgBkh/RZypvEB117T7JRN83x/2CK3hXjMTB4ntsHQHCFAz/JVQXPhJonmvQRUNWXhiHu+En6+iYwLwtpR8svsAqf+k2agS4wYN4TvuNhcqY+M9k2u6e9nreSUZPauyoGxdNqKnQrMBzhBfZ73toMcJH7l5CDytr0+clyl4GP+M/w8w1VlUDWcqk57/hAxgpapxtPl0q83OqHBbSmoinOlj8EotJMj2Vwq4SCU+KJq0gDKRoTkck5sisafW2n/2bK6XUgMi0rfS7GV4pOUc53pIQPjOwZpWp2tZgJAiRdzPTokcfqLWCa5vLhDm6efcYENth60ekx+AG4DqNiO+CQgcgMeOPRyPUWPI2iWyUDFBygrdJwlgAR1jpiHbFtzAqbfkYu0tGtppGfEREZCUoJffEG+sa6D+/IhYeiwrWIXeHBxU1L9C/eq5bX4T7yMJJVajSoYD3GIGhzkDMeOMzlxzNNnb+xlKyxtolHz5RXS+I1fw5GnL38/zUvwD5Z41XKzICj8f61J/gAyQLZGhmjs/qpgaEOP4Hv03H0YlPjD9GM3RIEVnVpT/hTCRiFQ1NtHQ10ebYNrEP0wP818cMzyY+Gsr8xFwLTIJJJNK5o97kgoDp4riF9swW3OZl4rzpPVI6rdfANB+RSIxI6V3Noml8DAbmQ/li5603pQdYN/p+cOLzStDWLlAlLPcQmUiXobyJVrrq8qKyLsPbHtEvBoaY5iB1N/z4KOijjCERj7VvyblBxCTRCeIt7FkmzUaSY/ZIXODngZBmIQmdp1A2VUJC+V2EkJLFzykUdkN/U9sMfqKhI92MY4psPGVXiEQJIDqkWEyvGpT2ArQxV5md7HN4/VHSVbq9rb4vevFdc8j1kpAmcVOrVoM/o+R2joq7m2chR6uvUVICxebeci9t016eWZ05Y2Myfkjq5y9kO8tvnhhRl4aZlcqCb8ZElr1a8g0R5GyaI75UOs6oiBFBgxPyl8wTBprgemuO24DvorWagSk6aAkN/wlgAcJZVwofAkCIXSpOqXfxxn5xzQN22Mk4/vx06tzKiSUb7ZolvmO69/vXbU/u0vZlTjlhZR7ZDx83O7BXZ1hpM7RNSi4XTAjdTugxQ8s2DtMrKcAOitHM1f9jnnQYrVeQ8el9mQg0h8m/DsNImD0C1hQUFauAT30Jzy584nvnSm+QhGRizX8VAlq68r8Jr9dOAl6mUlRZwY/ztoL0S7hWbtEay+Bus1vg8Iw5PuKoq+YUOVy+63sFA7r3a8UClWf4mm2mOcmrn7+6HqLfFuTx8NQYjeB0D/OGh1nxdgnDEtHaE84WIYZp2BO+LlEaIH/oJUgWxVF+Y8xjLMmlQP7jE8V8FEtzSmz2hJWLRuhyOku/3R8A9dXHMYXoLux+0yQRLt4BsdnhgYXqgQjoHoH2uR0024Vx8CNm8lZAu59TcXAzyisCdtQt2kp+UQzWyn4XAIofXjWQ/1ML8JRVnwcBNquSVxNoXSj/BdAcm6liw4JpRrn2eXsNAA1qK+lT0BhlBdH3D1d3l8j5FFNkBYfvH0SIM0RnVTUMvfINWXP4ZNPGs4wHkLzV2VplyzsNHHkGBaPCUFwsybPss9gqLees94q2u1Yz2oxlCEGTHXwp7le87fxKbWH6W77xTBIZiQErC6G8UqfSHtQ3VEdwZW/aFbrCmKvxFEUgtEEIs4gcszcJN7w8l2trlG+4xumArS5Dy0pma/qpy3MPQriQfAbCXhHDI2Q3r1j9kEhAJREHeo5ub1ODq+bUhsnkPyW4RPumGW2jaDiJj/5b8QXSF0hW0q0mUgK+I5qZuTboWnwJ6J9A1x/UvSqjbKpkNRWrbzfRoSrT+jIwGtqlPqatrXpmp8BzgFBKP6kFBXRL1t7ADbMphCZAIrdNqG5gH5tqVGLyn8t42V2h0GPVbjkVmfjbRJ9vit4FyCfUQr68dyJ5irKkFp0gtxdUKYzv4gcIiCgz97Z0yFIchkvGaXF99wsbC8i4fs4jhfcEHkgBnL5rQa/sJObPESw9anx/AAzeGJ+nErelBoJDM0fqx2ahmmqZhzrGSjNn8CBah1EnBnrVnOxgUuHgewr0IqqT+0oPmjxbv+M1s5ZJbZZsmNFmDkFPPSKabCra8gi5iqCKsrJ9kvr58hLIdVLy9Zi1qlsrg7Yn4HdG9QwGxG0H8/dQhVO6SIdFXByqnFVCbB3lejJpztBn2MVvoJSbagiBlh1Af3x5z0J/vHxx2M6kBSGDllP84NWOjujmhzSZMTOhPi5CeCa9kyWn+5iw8VYhDup/Ol0orUn+TJh/e8as1wYLVPLB4kCET3Cs6YV1flZLTSZI+XGaQLNV8a5WOLDLE96Oye2DaF1wNeqX6RTFOfVw1JfO3Awt47Yi5woetDfeESmuagVmGfs/lH0bDkQ0x1qsKIPXgxM4lBtYQXdFGTODDN74QnJ77KxWciD8dGAfOx8EC+yjUP6rzT9eVS0xW9BIEqua5MjP+IYWuJKtS4YWWQriQP4gNWPUYlAb4irS6QmkQ7jA6YTCzn8z3vGlMwbm4FcZvr9dQk6bJ+0RrhmhXOH0JQYl9B26YQqlxfxkLxCpF+0RyfZaMRCmDopmevV/tqhg/sQUy5smzlUIZj4NKFo/f8pE/n54513sz4QAcjp1s8op1EpWXf+eP3422NvOqgSnbad6/E5+K0LgG//tp0YxsCutVvJN1LE8u6X/JxJ4Ah5xVExcOXZUOa6IRijgYkmENraIyIinI6KhpJPX/LTDbWwAC+Yks+QpcyXVdaKhZ5s8U0e17l7+ngzenmaa1fKESSzsSSv6/KlD0QQQGkB7Zt1+WP+vKtzgEQRxPsTIe0cThNzZeLx9Cgg5pBJm/S30tBhAA1r0fsbfzvDXcfeNXBDAb6vVf8oRgj/cQwk9dW9IZ47rDPNj/LnqBoyyxCC0BHdRZoYs/DN6Fuwk/MmnRiu7SW0I/jSLMEfq+a7rM2826SuqF1nCIpWYIw6Zv3KxwvsQ3/aW9qzHqDWOWNEHS60y/c0NYdeJfIF906Zg9nXghNLKLYiDqAqEeaBCLUb07rZIkgOSYBgqpfx+T2GdIaxqGINzv6QllDDaxoTdXPlBnJbEREgZgvqp9p2vclV6zWAG6/lshtx7lPjnurwDkDutF7lbs3ttuPom0QHicjN/katzW8m1DA1d5EfgFkvSQDKTT4gpR+nSsHK1zPKcx/vSEl3ImXlx1e4XoSZoyIrNSukQK7FcKf2ZMSt7p06gcfL+3Onz4yJIhGZLz3leTJeP4zeKIz13zIRM6oJbefK6rshwm5jGxxYEvVK6ERiFVa6gzyGRXS98irIEYU4AxySa3E3V1aL3Sy1IseBfYu2qEfDOUzJB6yDRanYYzmFmdqhgNCwPzHx/vB1t2+QVOQLa48M7uP5wP+2j+DO6kQ0F6n25am68D0uKqClelRonR6n0EYjoafPr2Xo/zFXKwVgSBWSDn79Cp+zPJA1XI80XlNLtdFfiuktlbwRrhgBSeE0AmSd7mK4jyqinhNnBDdk33G+0AlcCZZ
a0lKvWXCCS8qhvmqDcN4hfiEm1Nj99p8FIZyrVNkdFXB+oYdyJ1sKkG1PhECtxLovSjimNPLue4EsTImnCkO1Z0dxR0k6cwjHlTBJ3Gm2Rv2ATrkGN6ig1J8EuQtDUN3EGU7qdxG8bw0/o7S0UqfEb1rpwe8oakrvV7T6VIHYtfRINwzmwSiK1rLXybnH4/pkRyTg1eow4PvhzjJOgQC0he7LHKsdvbr9D0m/cBlCjfrjLpbX0ZJPXX6iaRLX8rDu5rQRKeuJ0NtHBHrmQpxYQyJlENkkaE8SEX9BBj3abL6OmWhry8bMqSW25w85BCesYaOLvDLmWcxfxcp+UrRbsG1AJzUeum/qkevd9a5Mo0yq0ojLPCOicnbDv6g1aNTLHa5xQHjqup5qF/3NMkmIeyWOvcBBsBmfmXsDph8YujnMWPAYzmekcJPiWQ9AMTTOZH6l2AS6hGBjy4ZyHUbl+UfGeW9MbpGRYM9snfolHFDNgSYsFhpaW/CME4Ep2sK2nEVDEB4DvkCmuQGMuIBDEYVSaRQnLJv6pXDSVfRpvPZ+au3j2Fhep+gib+NoCuogTku3FBzbwuW0QAtSPou4QHaRoxUmnZdiN5p6pVoJpbfirBzZDlu1ns5PpgMZ3RMzVOIgnSw6z2hfoFEe4/gia6gqmrqkWN+Hgb1InN1qjLmNcUbxPYaUypWNs6okmgddhxQLzaODoRFbghuFEIK4IvCKfdIjAKI8pzlfoLmHqbY7dNFKpcVZ3nmJrK2M+VNcBE3MKByAwwd3lrxls+Zc/23DcFkqKmczloM2OliXHqvsTJ8aca5YpAGwprqKYG/otEryOJH8CJVC2+3JnTP4uedUjTNA0oOluVZBE1bBBxjrdXeX/sjiJlE5L0sKNKlqxKUdzEC+i2lArXOjcuxZS4teAv8R0P9yYNu0FeiSRJenbQsOPG1w4GVCgWeiHUJfwgFC18QrWB6cONQSdT5gl8QQvn/xyn0nN60qhr/CNSJI1oPzaMNya0ZFC/NdE7DiGyc/cJ1Cz/XsjeR9xbq2wuHlUbAdSeir9CijM3JrTthDY7nVJiaW8ExBrsuhDFXMaq/BzowaCGVNoJf2/jlAMMXi90+oXeQEC97FHdStpu8HEGrPdELG1yRmt7mZxfxkCNZkyc3YLQj4mkkfTs7wphf8JLRvf6P8u2P1iE6n7TtVAopZ9dMIQrEQqvpYcydbY/bivaTCEnIqQlytRKrnfjJvEe6pd3olDFmSYwTUH4LY0/qffE2QnTFjZsZgJeelP+X+oamKkseRKhlhswX85p5BmyMYdv02KEBCeKXy0NxstEmwtXOcnLsYliwluR3XfueVqeKSOwundEmFTD1n1PAnigi8oZ8ZNm0aU79cg9UWUP/MXHyPTbLnf+gu/Z8mCTSJeMAJCOHqadJVb5PR6xkd9+1NqG8ldsOOT/YkqOTUt255UmEWLYBsVUHcatZSnxT/X5f7J43RIXQbqTsk2D7b4dJvhDLZMTCo02HWIUPaiiY4EXIPg2KbQ+ZL6AXiICvnnoEOxFWRM8DfsJIl1Svk7BiXhNmcl9VmO04B0LDo3mlRDV9xEU7K86q3+fX+iDetG3/5aEoCPA5yARhtwkTIFFNUK2JYJ+t1hhrfZVZbhrPiACwdihZLLQkiGamZjWJB5vGilVDw5vNpxCD8SUv1DPB7KjOXhflN4Y5Gh4Ncg4u4X2lMZH2B2e/xUtk0MRxQr5uZbyGjKDi/k79AaK2b4sJB/eShgPldVr8eGYt61JAfvknhDGPcPxtRLu+nL/O0ksfOkx4J2lguZYlFAJFenP1wl7Sz58cdMf3wTJYcrkQqy7F1129Q9crevkPXTX5sO+kecOTWA/tgMdv69ZRDujXSifntHsS9wMxSpoZs+Ao9ISxQ9Bf1fRZFZCVVFroMiDEdR7c7UC6P5PhEXprR1Fg03IRA2ka7QoMvUjVGhuInxyqvMOs/ZKxrkLedh+PJdlelWn8vI02QlBcEBvWd+N71GmThlqfAVI9fYGhIpNHaaLzftVxoelYWr2bh3tgjdEL9GonmYqC5aEY6ePkcGzsFI69mOZ5QVcYzfH6qFXuE61nzR0biZcle6nfDbIJQaKYYieTSVnjukY9inAVTR94bU7JsxSbSIIKcn2j5AtRzOsQfY3kuowkpLwma1oklVdhUj8dPX3W+U8b/SjCu2wlIS2X4E+96qRJo/TRWa+buvERzzE/tvkXec6UQutlPJ28F6jumyyncO8wD/+g3Fzx3nHqGRlUKW7JUss7i+KPiGqp17env2Unthx/AJ4DyM3bNIWwH8Rcwu0Z69EC1TWt1KWHkqHuTmDsZhMPUzEF5qZ5QbzsSPSjKu00vashlamCYwxJZ+DD25HmE7UufRJ1x8EphiTgAhNPs2PFoR955CYPv/MDZb4pu2RMwKSEUgDXB0NXCdUa1NpMxUCOVGHncGa3DqRq4+aGUHufbptVYNqy2WEPr401yhHsAGptjkd+EA/UB+A+dhSotFHT3Pi9DceFORTpex890kcWT5QrxuRy//ovnd+03D60U+ua9WVswhLhOThXj4jtByMLpB46gCSlzm6ayWVkvRHd7vqPRZTl0tDlFJXUSRIzTuiqTx0n8+C3Wv7d58/LiC18WhlErQzr+2c07dcdAAoCWfwmVegU8AYfJ9bCe35kFdlzWEyPEPpap6Z/SW++w/E8/yTMYElxrK69pGdhNUblHODP57qhERCTQDzG27YRGTRdWmj+gDU6+lA42m0egIGAIfjfbXKiqYtemEu5V+a2M3hijYkNjyv40cmL9xVg9yK72hgVF9CZruk0NU2Y7oi8Wmgm17cHvNVxROFhF5RJTAvyjZWoMThOy/fnbGpnKB8Var0+xzxzb3eHbv9toYaEofzW4Xw1rMQ5IoobGoYHMGGqLBHerstMftPr9prCk2Otps6yRc6FMA9v8DrpHh08p63Qln5fRAaaixtl8IVdXGGTvgOC45qcJDtGzc3egWONqH3CmaVKUGebZQEdqAHK8Qr2DAQkLLa/rmCOTztZRYAZAwIvgKiRi6MQuR4Nv9fp8c657YasrWQubE0PxkcS/nbsQ3hmSuI+dmx+xqD+wQQzNUy3qsibGvuqhWsQKY0GxZ3s+uSVjRgpzP7B2hmWiCyrdv9ikC4GGWtiF98nFnDSu5v8AHObblfURIw7gLONsv7D6Gk3NI5VA4R9Y/hhD0A8DV60W/rq4DG5O3PF9jmR6PrrfHV2yfqjoN/iDs8RDq9zUmErBBXWFn49LBYBcvt9xxibOm1QRmJ9+xwpFfHTu/GAlAgcmD+1JQlLihMhidL3ZXoPd2f89QzY4RIvgODXshcjchCNYPi+4VLwLFWs8B73qTkRDoaU7xLi3AOqicukB6ufa28xSwA1qBm0JDrcX5JONOCCzc79vRJvlMda+T4yNVRe+0FNh7SVJSvsgt8LykCQqBXT/hM5jizwiN4kil9rxi1y/Qoj9PfeUvuEqinh22dhiU3TJ+jayZ690pINeCSbfTBfoDF8YTxWKrnl2Na9SEu94Hp9A2Vr2JHKVJ8VI51gBH/Ojap+5qOmZK59QPVDawoU30uwSQlbOrJTPsFO58MOi6J159k6wX3lyHsF9C0WWo2qIDvUmLkwL8diVnAuwmipKup65FQv80ABwW7pjAbugG0lTz1AKimXwOQQKYKmzMZ79/PnUSuqoOICUEtIx7+1yBaXnks44wPEI+4trHx/0J6v2GjGZ5St2HHo6/79JjD3KYQLQ4M+a30fEQ3ZWyG3ZCpLpW1WA7+ibmw/hfYUpS34SeJZ6bpeEmuDC/5jbcHFdxXJuyds37L9h711WWfF69Kj7o3K8CDtaExQds+9h0ldsrzUc3qGQtM/y8uxUyD2mSlq+Vnz3QuYNM2KwfFKv2z9d7m+zQyHXjoPkV+s4dxFNw7k310N8siUBBCm5IrlcCXH/tlBU0/Z/5AfvNOeUP7O/bsN8ixLNgFZQpsASAQfFCTxUtJkZveA3CaF07iPDM7o6mClHWQp2puqWx2ffR9mqgmd1a2ZX99RxQEwsiSRAfo9Az+4seApFrX0mxh3fobj
cpOBu/aGjDGHgzf9flv6lD7+WCiWphZHp6fN3Tn1WDAea0W8uUy4Xs7A9rKb5S1Shb0iOkW0CDeFY/aCm7pe7Fl/3EEJArpUGtH3RDtP7wnwuswvg2lbQkU3j7PqusbkOTMmXWsV31Vmr9NLuvZWbhd6PteU3k1Rwjb4tEowCxYgRMnZLCpBtnWdX+DKqwyzChlpF9qza9b8m+WEXzfrfH2bxA5pZGm+w6X/rLqTrWC1vixZdT1Nv/Hc9RKjnoqCULnlqxz3Bw1pTS4fPaYP+N41PcqlCkI5eKCoKM8Q0ksZHxH+kqSKa8uXZix0QkXBbBtKgVry21iUpUERsI5fNSmmPIdbZCJjnLSYvJe5T9/xr3C1rxLldLUT0zARJ3bwCZyWCiB9+KH+V/MfKA0cJ8TyQYDN6FQ08aQoPo5sQObpq4CjGYqpZBN0r5u8FMUrB42p+Rcu3t1e/96LbBdnPlZRPXcU5mBC4EmHAWdp0zucQS63+n8ih+Wle/sucXPHM0fDeihzQprgtcGTcoxGC2Xss3+DpjOS4JVRU5UaztYZQ3qWS2475F4hg+yO6U8defZ33Ft/yH3vNcN13MJnZJlDh+PhvCaAGyX3kI827uaoMZqU6VVq876rtv7xCuNNZhTsuVycBnEJEGWpjOcRhTu9eNM/s9TyDXXILUqXL4uSmWkaAK0SfkblBParWgsWlf7Z3zIU/0xVQNeS1fB9lU93h7Dgrau58u9EiqKbUIyWBCbrX3Vh77J2ju+ySIibbkqVTFJQEKatwwFdXp7uyC/K7TqOYVqPs2AJyeb3Vnv7r+wk4LGsAdjRNn+OOHg5FTGhRgTtmKUN37PFvwJoU5ZySHRgcqRJ+/8UKIKTsHzYZ98ppKl27iPIHAhv07RuW05uOh5pzJK8vFbE48JRrf9bBFAU0Z+oNHDqHLHFFG/nQkmqb5Oxk/6dhMhtMEzJ/9QUSpjXj6f5DIiuLAfDOqPmKMrKrsbXKO/T9TK4CqI56bIoouCfTYyGUkCPOjHPqThUv6TBDMMMa5aPgExYRbb0+RJRH5/1q/6rLduTGw9K54sXmamaaqDJ3xWYMVBxHTt+cwBl3lLMtCQGEGc9Kcfv1hGTcrOYwB75OMaZ7tBersghP9jMQt0D4qsAPo1NcKhlYQpFOvNBzvXZFwMBEA4jlasqruB8bEse4h0HxboIDzs3iJlPtb32UB2TCE5tyl+z+eG4vnYhmplV0ANQUUH7sDmTgV20+ZDFy2Ttse0qZ1TFB2i18CxbfiJgJj8VcfPRfBONbqEAjqRNPT5wdRv7nb259O9FyNnY2yZsAYw2IKy0dI7NIf+A6JG7jfUa1D+N+Dv90oZeqQefmw8292HEngueN2j9vq9w3kxKuIAnfKt0Zq49amNCopsBkIf25teRcAoSyn5gHZ7oD+TERxbsm4yjenSdH9rEhJAaSlpyOVrzDK8HpkO+tZmoEScpE01zmiMRJFW5z49RVE6vyx6tfVtCHrYjxT4stGjb7CNqoP8W/KvRochhL55Y1L7Dng8vyhVKfz8VXA1LuqIpSO7E44j/xR7BRBbd7T/+Fr4zvknAJhtb6AiFmbZXNz7y0f5FzNrdUIJpmbUXrK/W4JMMAPc8Tf698i9cq+Nk4bOpgyfbTgeXKdrX93/+3P9pRuI+hzxGaVKbIVM81ravpciB32wwy9Yb/SGn+nVhuQJwTcah7X3L26DAsrcemRioM1BT2Me/ErZ55l9tk88gbcrqZuAOlhBAfG/fCR+Pg9cqDtxLrQr9sQVF6K745RP+3q0TCiWFxbZu4hpJbyF5PPhAhktu8qUsPWdfDO7l7y6WCyzE9hgs1xXMBMNvYSQNE3cDcJq13xa1jguxpzdH/El0qVp9wFtm6xvB54UhFxZHm4+/mjhbhyn+ilNgx3mh2Ijeh3O5dj4AOAOI2hDtgzoBHIv1AxQA65tuykwiN+X0vkSA9Bk0idgMg9Rz3hFit3b+QnxifXT6Kk9pfCq9Ev57q5n/RFdXeGU+me1ljqb6+hj4CdrfwkbrSzjteIqikBuwPBK9HFO/sfm+LPszfzm8xdoqAiGW/43aJwHwK5KwP+bgjj/AcR0PlxS5LW9mw2ccdxUIrwL3+ko3zYcqWfqV7FqpfzIRQ3HwI72rWmNOoBP2cqdRzn+O4d9fHowq3DT6ME+kdhM7Vsr9w0wZ99ZYNtWEYmj+8OVOElqpkWKWg5WmIckWeruaGnsllX/9pl7QJbC71SLga0xx/0A0hWuiptP+WuwfyyLF9aYjuqhh7CjABJJ4l9OWoCiYlOZkMvFiZB9GiPQhn3U/FaY9uYWD9O4gSSzqI61qP/ojOlbZq1/BL2v77nkRmt03h6AWM3O/c5FVeN5UgrgLKRnbOGiGm91oxiHBU7mVJqEToX9DrQqnt5+VlnGd+JPV7TmkGXPmnQ3DtSyMsmFI6HaydPDZu2jiz4s9Wh+CRC1w/VZqkQiscleLEL/wjuFy4b0Uvt7CU/anXWrgSxT3MVUmizNYzvE483+UOdRW+ZZ9BuGcTnKr/uZp2WJvXCyITK7CX32ZpPdA8kQSbfsTx/tpVRh6u5b7lfkX50nBvADaM2d1ngFaOkU/pmk9LCgUf/zT6xQF0iSQujRKwl0Ue4y+gi1WycTzP/4R2FQsmn3gcyWzH6yCwhEQ4oMiMPiNEFmJ1HaW9eoqPKr18vEIVdk7WitqSA8Aq9RiLOp2PHgfWU6jzdEdZbiNVhkZyqKOuZ9PDN9q+aq/NeDnZytL6m/31fuerIbvw8u0jGQXkhZkf33l14LNROXd+7isNFXd+8XL3gIDn1TbRIKDAiEc/4gMAacsx86Lm+LKayo89o1wQ2lW2SXbbN1r6yNNJHXXFdsOpFe+G02kjr5PzLK8MWZ57mulShDpGGgTKqYxRyh1+7dr4Tfx4m9RXcWwfpByRVJJc81bTvfidzyvWhOCBM9h145LMpz9XxLkMNfHrsWM13f2YdX3/BqBWSM8psXvSEU1xbSyw0NO/FTMwnqAnUxBxY2W4xy4rlK5E8w666kMUroolw2b5UBM3MyLBBEch5oL51iZL2+XE+NJ90N++gyxRNW256Q3nK4WzqnXoV0RaZf27+vwjjUH/mGy6TkFbaaVZ8FBhOs+4E6k+vEplAJX6tWwY6VnFN2lMjCfGVRFUdk5T9j+qawXX1ADWx/FzG1QHFeQpr45SCuEY5UHDEphEHAUp85UJVdeObLM+mDYNd478a+ThWpfTXoxUfoBP4E1NHT0gRH0l7jwTWZLKhMNQjXfx7ooyEuJk+JkfkwGfq5H0VYNNDcILaH/LHGjYVsDRCV82SA3B7u5Q+K5DPSvkhmH0783zPIJDk38D6QB5fPN8t7LJjycc/kuUE6o4Zlid6L6BvW1n+4Eupzb6WObajYiHdh4KfX+YQ/nuHe1LmpoHeiaqVsB4dhRou3EIOkEliRwBkSRhMjG5USy8WGvBhDJ3dqrLx6gUex39gsi2lfMNpiTrgINteCYhLHSEDupdjfab6CYXCriJx9VlWbmZarjqYlivkUvTekVQBflrPZl2Uo+TgGqavz3DmFj++xB3MTbJb7SImKhXld4mf/I17J19zb9o+LPY+Rbxq43yANVFQyFi+l7bZuoLWGofgBgG7B2Mq/nX+egZIfN/GiCkLnRRlrl14r4xTNanASfcmAdFawYkzFXcilcs2OdarrgYy+JqapeGQ082rBYLomTAl+T/j6TWJ1S64ut6j2H5vxuARKYrCl35HjK0TkComd+RLjGzM64po61AF9Wal8YIRMVTs2AcR0eK+w6psWFP8aR37W45jHBmROTjH3yj2HjwkBFpZMIJQOR44R6JdLwyzyCk0RZlfLAI+GlXA+BuVX2s17c8cRjllH4SupQyi4adwUp6CMiRyJ0osObyVA6mpKVSDFCSNRRPTPdGy03K3jMqiYAGn7nE9q7U+Y7xHcJSJ9r6f1zRvl81ZzGLn/l34VxIPbA7rTeiKgqWkpFJwywt+C4/SP9gqTd3YiUU8i/gdMtChIhWCLXb0iOL/PVGC5wwDJKq6lc9so/O+1E9Hx9PjBtl7YbaECBeIhxMCb/
TWB45yB/jlyn/E5yWxZDfldzyzIUuNVdXnE5/JvTdyP6xW6hXsmH3+O8mdJjUcYv3BReRRX+04+/zlrYReNmZn5ruGsn3xNbfjfcFxemYm2Xd5dcLTCHTsWHtJmfbyM2LEMy5SSmvSfg48ARQtj537vUnUXa/DVYCNZbwjmzPGRwdnHZA7K8RMAgLvZBAPZgNyU6NcEeYS7ycnVhtOdLCx2qWNJM+xROEnr1prEyTaU5JCdmOgCkeVqztxkoW/j4whHCVZmzSCF5DyiOUgVMfssU2zbDGdw/P8fQ250q+UFLLwE34G0y5Zjx5u8C+qJe08x7Ee+n79NStbP5Y5Tnpmob/HU/kv4DfhddTZWc2lIrEG+VzXAdec9QwjXQF+rt12pxlqYoaklvrg6vVnJDYnikdHoOx6JJHHuKYNvTT+Bv4TQ9AwO9UR4iINL5ziKfYaPEfLyPkOL1D3/S2TZ6261jxu/2C/wfc26Ugytd7BoI0/mVDIRgM7GxEqphI7lk611Dfn7hFRgKXcwUEbcyvB1AissxxoW+UPk7WMCaKsqRx4bKO/Mch5WQIucV3B4gx0ijSkehLBAHD+HFHLzPW3DkACZ8KrcUe7FXXOspvcW778rNWicXudbskb7IsS4UiQ3nnk7i7uOcPPSMq2NjyCs/q8ZqijOGdak6Fba1zx44fQHpW/gz0OwZd8gsGkYY7oJegg80EYl9+Dx4dewlfbYURU9cJTPQzuySVaOZt1WrIEQ2mPwR2GD+eJDNupIC9kqYoZdKd8+Th/odDHrEa1j45fyQxVKD/ekgb3l26md2fMhqXYQ/RXR+VCCS7hUfVNluYYMMiGc2yYucL3DaOSWqzccvyzhr1rjL35qCB5hm3mOOVhEjw5MpepXgauPcsYzpFiE9HgtPJlCNrSiotXNx/36Co0yzNQ5nvXBQTMaBi/70Iuehnv6I3dzIdT/shRZiczkelvm0wjBrZ7cCNLgfX4rsRyNoJ30LAIeMRE6wlz4lS9xs81S7iiDONij8klAsYKJp7Smz9vyQQDg/Mw+kupA5ZV5+qgvAatLWFzwASz1314gHUVqXyV+bdNRR3EV4Le6limjS0Jnj4K/p2E+DgZH2eIyHXv0hUgyXioQxaKilPgk48mrzGF49WMTnAo16UUdQVycHX69KwaV2wYiBKtfwBttJOHHd84WrVyPFwkqkUx6kD4RW3lgClzmfCGnTSBjJfh18CmQvn4VMJQ8GvybDtmflHUrVTHuxhnl7EqLd+Tcf0THDTDIj3oCpbHj+cmPAHvJGqrBtc8F9lhPl0+PakbnlYa9ahblsB5DbtcYE9vaeomOmdchpnk7RPQgdmFH+Mv0GQvVgIyAUOFVN2aD/8vJRoujK+0wYvYpDM5UNZuhR9MF3CzJ3Fs87KqZwsaeQpfQDOi/7kdliRPcs+uMBqvaXsjJXmlXDqhdCE+mEsNJaOcOHXfXQyRw6DLf8ba/UrjJgZ/EGiTB17mHhVGIt5Vi9/lBa1LdpZwRuVPRotdGRWUqYR0llCHWXmSheFIlRj5mYs7NWyhnrdsNVb4TH5nN3EzpvxrJbK0Ids9n60rg//bgU2+WD/3D6RnphU9nR/Hdv9JCANdjzbxArKyuGx4r3Kz7xzGIoFF/uePyFxGjrewKN0Fr8qv+OIx6N9V0FY2Fsmq47MSDOxXj4lHR8OqcGtOK7n8aerTOxSHTQqEWhT/N6bCEeSkP5os5hDkrNIuTEo/MJpeBvCpfwP+2Nw6xfnzfRvC5ZUgRbsIp5t0jaodRlf78rh63qTtiXYG8ewBAxhtzx+wMBcnXPeebipShqleNRj3dAapkS+IT1GmgGU3u3iZnREABU7P1mZxW+eNnwbOF9TFtstwfg4NVuwMwtqtfNXnDJFZXgQtPc0Am/RqcYaFYtXRcKvVIQuA7fjHlmlfErVSwNWGBgt6l9EeB1DNENIWP2HB3TigsSDb/W4IrVCNRx0EZtFFVznRNmBH/SwToAoYvPeAQ+OYSVWQPg5lCRweiA0Od8Mlt9QmLi6kw9+IxfPluZS57SzbmKWf3EaZdFngpjGsx4v7/4P6p8q13PP0HrS03PYV9hgYYHVbJpnrOPk/EFiRrpSA8d4KV9SZKbd9GRqVkbXrjceW+fHT+npdSFj6r0CyWxzkTwRWB+5wsAvPuYhUgcSc6M+Vi8IBUmoVtRJc0eduECZ3yEU/2ZA0tWBakmy7XdzmdFGYAHRd+WSh9kPlWenf+xKmR7xcS1zVnyTjHnVmQy0TIMnRdjwn4IDtuP0PJ2Mr5rE4rgkOSULY6PNG1i0rWlzS+wOC9uVr+pax1rRc6LybNGvVKFbogyyjqiI88nMwiShqeugXcCCDdvE/NevMOB6Ne2TwsLli9LuFeNhXWSogs2Lt5Fa5NjDeOsAEZufofrufTS8yVQSKYhdAGzG8UZm+dAG/wmcXbIYiZ6MtdvSJKqJTyDXcDBO+Mzpt4c6CGjkebITGPHt3rSEw9Do7rDbOj7xhbCVIuMiz3s+C9+4k4pfIg6+4IQ3njYkZ/0zgI0VxfJ80CBKyseTDUpFP9gu0nIMpEffJEeDb2lPGr1CAhaBa6WPyxD8ZpgKbQleU5JLoZ9VMhfRR7+r9zFh3IXJFEoZWJL7p9fbBpirCQuPMZBpZiGBdiGPZ+PVM4+VT+YQyP+slBiDMTdelaMOhmQ+PbGIuOY+s9pL2GKAkOt64q8qyep5X+e3g5tkuMnVTMuZGKiM1c5ov8x6sgKnFbvj/v40C5j8WPnwIqU44XQYX1EDWET/p35nmsAJ6rAycY99pj0j5O0OK/3InwJ+YzAN1ZsenOOettYqI/Mi/xHA9AREXfZCf3FPu1JPprbfZI+iU5pXxHhOeh0ZokjKFT1Or4cLHsNTA24eCfHTs1grVcpVSfuxSJORFLCk7ILqN+oohyk7Nn5byjEkoHDagX8nn8d1vXXnrFUZzT91/rRu8wCe25CKVI1V2FJBNUIQjdirBZFSjmKATCInpqALKldt7JrJQJW6Qt7s0w3WJlS8r7p1N8k5z9TZMe22siHFeq28ajfDJf8RkslBKKWJdCDkUloA6URS1MP3wu8mr/mO4zxz0lXCFQ08PzZVjSuV1s6cX3c6/DSi3+8PLGwyJURZST7z1UQDusgQGCi0c+NSA7VeWhPaJ4M0kANVbCkUUZgTAF7J1l6o2UDWVWIG7RdioLq7fJ3w7HsiRF3X5jzHZA8oEhtSYbp7n3I9GtBTQv3SEbK1fRIAFxQOeYngHBcyuhC0whTzZ9g1gBwWtuEUHbh1MJGXDQIlJQia5ilo4U8BfIA+FvJdIeGc0O7unJZk+vGZIJgLeXLXfL697CDOtveQefWHHJmNdf1fp466LHVeswDgY+3CwkWCv0BBB1xvzX3qhkPQq32TBvrkVh/suXAALLd9miiStmKVL/wy18ufKVrR/wr+Va4Tiibp5mnDn3yMCJO6y0p1NAdkt45EZ5b7tJhZrbcRRUuNGQNL3xYzDfETloWpiU5nd2nZDZHtJiDbTzbUJqYxprU/62PZcdg/ub8vYpp/TZioxySSKbIQJbVUDJVgJ1wdd37lzAxePZf+X35gfzJ+AmygWJPcXef2CODJ58zTy9GsHgL9rZsYHt93G9n0J56hnFPzmET49FFJcte14JXHNQ3o0UAdj7ISwMOknlXOApD0heIc6q3LiDnxwH0etfCnu/shqDSw1ZdFyMAZq0kkSSf9jv50gHpTyTbayCRBfpsWIO9VL1j0UHhhy8xS9SIp6VrgzBHHm8Uj/qW0iEHZKFRLNVI24yJxpjVsrgeS9mjYAqDg5x21oLrN10iwLKWZCpeirPBLZ/zxGUWzu1uFcxWMidxm9Oz+FJkNHPIcZb1yAiIBEuxTc/kiu8bwF8GglBvwN0LcLRVjLR6fdjbaYqgJKNT5BZKZKA2Zhj3UvkQgknNamhFYixKGuoCCnuUYWOyJhAZAf9yNO9rm1Ks9Yfoe/cbfMcZitKUyY44EZnpS+ECW5eNmAci+MA46Zsun2iwKhLmV0b25pzTAg8/ycVV22SgJu7uRyvhtGDABnBj6524gllt9iYjac84Nt1J
auP2vzB5WArHbrJr9nmXkI+zhul7bJqjVuGFs6y9tK57vzr2IqeEa+EMpOaEnHt1vuNJlMc4qCSPl2AuQgUz8OeE23/2dk2NzItZn6a5oSIBM1CwGTvtHEZV0ZphClka+8PciaO04VSkcTS9uMoVhIlo/sp4ijkfl9VQJ17/Maz7Q++rAgS29hEaAtuAC8zzwhRWAv3F2+05Eua4xHuLvkIfSQBQ0xyafNDUe0PJU5qhk1W5brEefop4ag1Cu+XFQMXFAEuNwRKDOM+O7y0RoXKG781DC3FBpdn87sJxvTMyeV4yi6PdZQ5a5NUmG052kNJTTychduzQt3kOFzMlaqMejEw17ERimpe4WrDxAkmwd72YKWtMfNYwJ4GYtFeJAn0H0OecSmpoZZaDys6BsxAqe9b5K7OYF5o+MXAw6zkDy/LlKcBezOeC2S+2/yZx9VYAwHElKu17c64xROcQNE0OrSQMHWljbxr92NfBr6qwSc+HxxNcEvvFP7eASt1t/ft40vMD7hYVoeED2wUWF0ozr3/gn5R8aAVjDPIoAZQWbTCV8Zp6QtekmSoEAa7PXLfJrGD1bJVe8sBqrJ5e7UmjyAOpMh14nrecZ/axZR3VCHJv0DAHgwr01Cy9oBrSGNLL3ZRDoaLUSN8trmRXyASLGsDSykh9JTNuLXsLW/v4OK9Svytw1VCdxL2SaEXXTDlixu4TLvwvNbs7e3ovVoufpl1Gud9RT/JhdaC61pz7rxFjTXLEhYlJN2civ0mMIoMEnpcXnvD7U+DMTLSK21PS4SRvtEsM5/UeiOlOp0lhHnlrW0HdRch5bDg/eYh7AvvdkuXja2Cap9qFCi0O73NxyT2+8ScSh43IVXniG184UMzdEuyxmPVVtA+Ot0xaUWSp4g4xufjJ4mI4fc0+9AtN0nOnJ4eJh8NCHKMCvdY2Opvb3V9jD4isiJdmUVjWwjr3PxBl/IJ9ozTMUNIyvJNbeSVNMx5x7BqwecTuqSO/LEVaRMoGyANxvr8Ol4Nqe4UxYIvpKGIDCNlvEtkyv2jo6QtXxtNkdlxfQQvEu7DyHKvpWmjZI5kPZNTOCCB2mnSifh8yRTbztqmJNrcXtw0XhMmkoqzevqFIzMPxQ10NTHua+3NX/bi/X9V3F8Q7jMjb7hweP5XOG8Ieo7utoMC3ujmUUaRMzvTL3xPVlQEmomoeEU1QVz5IAKK9Q+0NiGWUk6tkGyotAsxiBhcPYv+nWX0iNuTS+O1Vvd42j3c9snRZ1lkLDh6Amqt27RKZpt2jMBbCdtR1G40qdo9cjQSdx01VIO+J2SpZkt6SaFDhjxdLI89uatwe8/gkmHD91tDMMlGIvUmvBnCRcbsNKVdvuU7PQXIOa7ki+N2pAJRAWAfZcLfxYovBH7C//UueKmPincTPwe6GAnu89wrr+8FXPrbFifefiRhA2YEaYy1T2DdfN1TBKgK7bhM/C09WJqppUknjDj4MD5S8hSPMkvaTNATtqX6lubnCfhnyFwa5DI0SlHCLFOLmq47buaEkvPdldFhxu97YeV+K+TRJRSPHzM/txYb9eUqxuiJ8kipSHBEQd916c6YqrubwM7s7+2c3kGhNkWh1kmflBgQtfm/E1pcv5kCG7+GXO8SYtV72FzLw0Ne/LE3YBWsAd/czjMxhUSc/J2tWhaMaKIwgYQNGDelG7R0YHct8RkwJuKf8HRlH3ktLnWQQleQEnhyfKjGHnjZVRkalxw2V1qW0ZqeCqtn+zaYPdTI0onY5vDyYJeV55E9fY55FA0+cQj4MDepeSkazF0kn1ckD3bNCZcyuuwsthgVNMzXTcRybmNvynE4NacNZAt0A/F99chjz8bq1JlfYRqyGOYOhadJPpYNddkvWthqsHJnCyu9MdAhT0HeHIfXYtM45CvtkQw8Kibu6a+4+2OtmIlXdx8vgaT54ZDDOjSOrnuhXzPLt5zo948Nu09s18R94btyOkwOvx6xFTP24wonuTcB2Pq9L7XcbZQWVmMVyBxwHhQhfHoREysSsW9keVKm8LQr+TUxK90GLlgOWb8Uj5avmyQDyTPIPjsQvfRW8zorK1B1n5wiQZkjA6d09w0yxi08IM0N8Kp5MKW6V0YQ/DMwX6zv4RVOBW0lrWIZRUl5GOYMfoJPOXniHP7dwYnbMCB7u+oL+Y9Jc9pijGrVGuvez9emeEb5gFzKOpaGr/90hUc3zwO0NNQIQFZNS32x8gzdUFphkHeT86AbZ/8HMAvyyzK6Ir7p30Kc9HUTS0mNBwEd02TORwPLSIuMD2ayvH/ccA1KjQKO6dEBDGu6Q0kNQwVb0TrJyYeQEoHmkFQCVnRLGWPLt4ZTGmM8JryIM2vafHiwLO4Bo1x7YIABa8hnX3LhJC98aPF+OKaVlQZtmpmasFz7sqejJB80/HSNIFiZn8RCL9b3vgBuL++BYd2HeDxio2ipv6+WU5fF+6hGafSRrhpDztc1oses/UXrXYyi0Nmp3M8EP2r+IGwRIMxA1DJG7hMjzOeERTH0ekv/X6Sa++RsaJigedHxytxwpqb6dQk17Omesrx+OQEg6wO1hyf0HpPw2W+oS871OAink+ODBBFnl41E+NIS8hNxrYTfmOxRvS0iP/kD/lDP8eKQJ0cWT/ut6Wekb2Z0N4hDzqP5WxlLLEKls/YCA+kClfgpsd9+cDduEMHuciBLyBsIC4szBpnoOuF6AB36kSDRaMMWtGb+rHWR4qVyHtF7KPanrFUbnr4t6vpZQXM1l5F6YoqvB9IPR1P7kmORJyunk3MibinEsDtl8QGAHIZEDDFXflmv/pTVMdaGn5DUQSuxayNnvEsIxMrARqZt2PI9Qk8w9Xpha9vvibzcS+9VlEd3UYcU8Nrev8ZC3Glru1WnFlAcokRsVZ3y12zem+rVEtfDAjFE5NNK3UY0O/fmO7gG8B9nA/8GUofszNv8Rt/sUSaadQhtEhhqpN9oIqpptlKDtfGP7eu2iCRnVd4wloqmh/kp7NzrQRQ0rEb+sW/GxOy1nTi47IfTwb0mJSBAG3dV2eiznCN53KC7rRzqX6oXE3gkP+POrxeVJ6pgodYQsSCJsRqc3C/fzxlWwEwpOek4xk0k4viD6kOkGVk6aU8qUP1EepemvJdDYMzDlFbBtWiXBr9MrLrJNwyOFHsU6/SOYVmqIpv4rZX0pOzPDGZ1mYG/1eez3TQweXmRk268WOhv/xq2ZPBKX4i2dkF7oXN1i1CZbcbQPul76nKCERn0ADzPQgbZ5zaG12LlWq+1TdULbYD7NbY5ub0iDNXuadj7IVtmpfKWuzCGeYndcaBnA0UDCkauQoBWT1/y7mypQ1p1sn+imgTX3Su16W/Faa8ocltQHYePaf0+bB/Lfcmmw+7BCESYftgzW79k3Wlo6UFXqJzScWYlkPgRWL3hIFGQnYKSA5r1ME433UVnsl1q2kAx4ADL+cXgDI6xxNi+Yn4vvQhMbD6TPps9JL+TXeN8X43VvCI3f0YV+LO8mDXP2YIP411rEqWaM6aQFiUeR+mtkvYvNVgYGWLMZ6IlupUDwTv6oG+/v0bfHjV5eNCcqRUSsl3ac7AVx8LdTbwGqZBz0fez1y3ds9ZUlqHqpPLIBRZhPzX/3fkG70ciRUC5CtXj5FOYTirh2BTVbQQNo/GA5GUPy+CcW4FeWpkmvi5kUxWDfsfVorzR2xoDe9AgY4DEcpdFwxko7fJWC/G/VgzHsuVtQ03Q+2VGuqKrBOfvBgIFBR/xRyk1Xcnmt93qz7CSRAvcCyi9YvDzooAvmr5JMXyl03PneYL50j04N7zOJvWr1cN4gwegiN9ibn2ySU0c6dorZbk7CdDAreFKRVHmLA9qSXrOqT0MfwJ1beDfMV4UyKztPnZFcM9jANHCJLhzV9Etf8jfGSKT0EOhjSE0Iw9sCznBaV982vrqvIfH7btr/Zhq2zdh77IwWCevv0MtIfruBVGTYqWIYXdQ0lKoAjLkPGNjhI12+OxUgjzDpJOzQQU70K1j0V5/Gl1XZgLEfrk4P7aH8HyiVS2LMuUtxz23AvU5OWvTvVLV3zB982A84ispF8vrxZaGJdmnuo+X2
T0kxOm+RuQ4IsSnyYdPS5XM44P8rv5SWe7H4My1DBT/TRUMsNAmfawC9qlaQpvj2wrehEylOpZCbKbluf9+zAUgkAmdz/pdFrqBDVmv+akmgdyITYUz8WhYfhoZAEbjxC5JvRIDYQqNzLpASWRFiz43vLAiZf1k1TmxqDd0GxOalsB51e/iJ/rPg4rmpplmVI6FouqXyZnG5G3g1cuHXT+Xyu6w9NHHwaduH2/qGWq2sACKeQkB752pcTVI8mH4HQ1eXxduccroh6EW4iThNobslbivyvCEVCcwv7L0db6emnC5MP3Qpf9AfK+ZcVzcILAfpjKG/47nIadk1OaTl9htSANIv2Zkyk3x6cU22SF0v2OdgAdT40lWPAx24awQ64gbyTrNTERACVeqjdi2G/lh+Kr9RCx4/8RbTGItCEemC2bTiJ1TVmpx/rv+pJBpdAcnu0QT7b1KmCIB5Jbv5wi1irOkEACVp4w+v765DnkDAUvyeAW+44Gw3qNZoivCGRSlJUoe7ghV0uFgim0TMeZhPut4KXV98GzEFkbchCd6HiXAH5yVpgu4kmW22PFBRuch/Ja7DXVcFtkIu0kSueOr1zhpuOHjvq8j9gyOd/zqq04bBYd4ecKmK6aKke7MYgCVN90+YKv86Yo9OeICY0LpDgY/B79oTF10ISsM4UuCU9cjGdG7BwtzagXUN75ovLN0eoCfs+5rzj4XW+HG7T7OwpY9LVzJr2VRXHkbHf0xoqaqN6yCDm6DdZk4Dq1tZkAliN4oRuBw4mDcX/2PLuBrt4TS2v4h3/C6+ILYz8VCOM29c/9QdLeTUHYhPJXEKMu3tCXPOV7d/4oo697HkIOd6VC3aIFCCWvEfDLcUdLmCuotRenh4QTDeRgtQ40FwxWwNR+V0wOO2avNqTq3RnTbeNnBmym5V4DGyDpA46IlX125iRqj+9BbGebLj5Y9mzDA0jkV2yk/fwUTarv8kO4YbWf1Wv7Bc/ZrvoectFcujqR1BsitX55CFVAviA3OBUu3m9R/KNJynPFV+GWgLdx1frnQxL02Ioy7hsJnneUg9VLKRr2XHeHhYuggA3z4Q978wBg3/Rh/YM8kOlTRSX/n9z56P9i99kR4aZf/ShI0yh33ZsVifFyinHZspTDmkRZHKFyd/RpHYmU/m//nC61rg4fk9VmT9GDKkZNipPm7jtIO9XqvLXmaKW13ALmRvsq+FG6i6VTOqNLfTXXRbNjg0eCOrklMo7bHd9me2pztY59NyMU2CM2ooGmCwIRnTTy75FVIi1x0NgSDMEbBEDCSa/9Q3H850uKB28EJtq3HyGOKQBybfH1upJe5bREr4QoyJx32GfkogdQEisxBROo3yDlZXl9sJ0bYLkU/E+kKP5CoKHk6w2wMBFYuMPDoLnLhFfNU16EzQVhxXwZcNX/j3gRHS7DzVezTItaq+yhzNjz5lLThhfAduuKbQOJlfsfZQxSXEQUt1v91uOGVfv9hlwTQwkZgUMrossxIDt+dTy8ZO8zn9PQbdcn53raAfBvbBW6kQW5t9Q0EcCsRA/5jCvfrW4b1nGBWQz4V4R0ND9VA7vTLVFrjJEYQAcId5B+P35kRnMPPwE982AVbrSXvF3E7e/eH52fZ1T97H1wKhOeHd2Dp9MQFGDK11nG6l/lcFW/nx3typlDlBIlE3RTiQvYoRVrVmA4xM016lhrPTzpOXYAAfqy9iUVT9LgawzZgEMTcLarE2BMGsiZ9hCFRI2N/xUfPdjfBr2XH1ypIE8K81elkfWmSEe6Sx4SJDfVKD5CyWAPISU0rui/8ZLkqdaccaNMJL5LHAOJ8x/FYaT1trxzl+LKG3MIzkubYDOY7L19JlHDdw2261H8gtK4mw9svyN6SuDUzebZMTg4JXcKezittDSTrpbnWspPatVyQGQMLq2nL5mccqB0WOPcvPA4izmXRGKQmTMCw9tWm8GlyyDVZSwwqA32UmA2z0Qhj5U8zjF1D88+NvyVPhT6BoskqALSXTjS/gtiIfLIs4w9NQ6ZtmxDgdz8u1nsEEgJ4/d5Q+hQe2CvdCf73xXjvmyhhaLurrN6n//KSkVxldjZGTQ9koSy2w1t97VuqlXjOR9KKY6oxhANERy1uj4gN1W4PaIJNO3PLwORYWBaMRZrVOYl0dZ800Bc+3+/nYOkMiOaQUIco865cBFG0DiJCKdWQzeTkmjoJ5sN+tFZhfCs2Y1rEpdUKTpBuByIhpxfB+n+MAan1olTFYqizRGqM2+AGxF9jsHaBIRp17lA9FY8LYA11opEdotdQV8Rf+K8wpkaNtO4FMT6jY2P+iXrzhe/x9lgf4PhjBL8I4tNHL6YPzm8y5J8sV5IJ+TGyXiaxXTytULwaGbH3y68lYQ412pJDVZwg7CMmMlRaW1k+eL8zt+YTETXg74HBPftkPTt3Kt4oJ2iXWZysp8Wx40XU3CoNtjcO8/95UbidJEU8XkGFVWrEffhKfGKIU9CiQVBbdxd8aHju3MqAmwb8QIwY6NthhwQG0fja2lCm3E/bXuHYLUbTQPBUqtVFMyXX2DX95tVyDgWOSlUENg8Pv5wOq9Zrbr0jVK+WkTpw+GCd06PbxTUCU6mVLcpfVKRkM4DO+ieZfdJvSSuTwNS1SISwB/MWpfrYC4+oV1Bas5xnMX5FaDfWxTI+0Dyu3Cog6+iz60l2xF3yLAPNrtkFzJnhYr2NQGladmqu58ZFakU2RqQv10jbErpd7aD8pUSHQjwvEWZpGrK+AZ9QdXX+tyxifG2FkhlA3XyIHBS/fUUf51UU2lh2S6gCrjWCFgYWiE25rrOyR0UizZAsU5dDQdLlGudGt7BxQbHOxDvFYrf3B5zRKh4bykCi7mUk8pccnYjsFmiJjIG3T/JV3p53g/B9Ro4dNdlhjok36FBeiNjIa7Yk605Eykv5zVBvwum5pvEFuwMub6SMhBS2J48gcGHhPwLm+cuNV8hkz4j+la3XiOmiNydvtzgSzerfpIxy03VKIcG92qMKLzmR6/8fYWEg7MyibjXcBnQy8BTi4M9oo/BYFp9a6DxASyU6BjQBAw8hYY/4JBNGsq+gs8N+q+Q+OxStVChoiydI/lNEDH7q4jmRfJTkfLkxl1G7YxT9/9FYr3xUzohI3fdHSDbk33nkcqAh8v4ESX4TKHBQY43X/V+NSov8ft9IbFwfAg3onuTwqzavSaTf/g6dJfphfes/IU8aJeA/62gkPNHxE0u/Q74LvtzG2VddR89G/YjH/cM00r2HbdtB5dD3L4jf/IdlxV2YfVoAig26ot3R2lrJSzxbC2qbP2Pt0vWmdg59dOcAzNiUfJdRF3gSD1qErhuDEJSizaQtn41O0Cf0zxkM9GE5Z8MVjY9VRkTXKegwGix7nbvFH/C8C3CBQtVIJJX4wXTPtDr8RKDXERUK9p+RFrrKNT7ho/1wd8hE4ADOgQRA7qaxQ3VMulE538XM62jZT7zE7fODZXZ5KqW9uJqLHdRb38Z+bXEp1ZMKuKPU35EmI2LvU8yMU/tskW+ZBIs8M1a6eK/8CbdAlgXJ0/wTGoo2lK1WHri+wDTMQORkMgcBvMYmGlRElK7wPOMnZ8m24sIrTsRrybwszNh7Xh2P9JoHNQxRHNe6/Om88CCXKDo+IVPBeJwR8JnbRupG7WT0yJ2kk46/FDOCOe8iQfr7lw9NmoOXBBQ1b9h/XQffZjKiuYrexiK/bXQ65yaJrTHxtmsWBpHDJSmaQyKui/9G49eBmAi+97FXqmqpOZu1ypM/NzoliBrNBAB0Is0fWJ/bbwFCA10I4tpY9Am8wFAvfemTNQtVHM6XJOb6A7XVoUijnGORKUbgAYQHF096lVyLWkF+aOPIv2oxkZwpJpLgRGC1iaayUMPWcm6ZH+Kdgq8BslYi6Q4cbqAhYclP0e4xRUJTNcnF4NflymYV6HWDknTtR+6kWOE3gTD9LRSyugQedSdRFOG3K6Pu1qRjY+1eJSJ93/kO2kfI9sIZOCQ3K+tG65Kqeo9Af5+T+ZXPtQRu0SiGnZs9YOnGDL1p+hByBEIZ4eohs/KY7WW/hsUwPkudiclXevPpeU9u5ELgS
4rq1kramjZ6/Mc+MkXy3ZhRYqhTO7uaiwBY1+qu63fur5ZCvAk1P4U994Qta4el7yUuiQKg5oKv41zxblgFPs0fHVeA3XbizG516VigJwxXJHh/G0/iewMw3PE8koQ6l/5ekArjANTP3IdSGMxoATZ+UzKcBVqUBQ3NgCc5mYZnn/evShThnt0ETWorzi8e3UwT2VgfqPaOgeVFCvHgDxpGWOD8svLuaf8/f5I2rFjziikEPGNxLpjDRNeiIqFJboywmw4T5L1tKBQrGzotKVMWXRuR+o1epYoyWQJKavL14vo20WZPc0k1t7KDwHQWzl7tTC+nVm1gAmcriwexxmF6upzVNFihqCydDq8CJmjAed0SPCQKjJMhA8zOZa7vsYTKTnh9S9o1v1gExBRYCAN3uBJ1HkaCN7TVx+w2NcK3Wj5BYm4oD7K+Q9K6JgcKbMGuO1EWVLQTLw1lMoS9tbssOrE4LAkUaz0dPcEVr1rpXglas0uEBOEUBLAKoQFe0G5pOh4KLvKFUOmIhe5/FYXBvWmaoyElJGNj2m2tJbCh7hCu3+LeGlh5Fog1SPExR0Nn3kMi3K6uuqBLmHVTPAuVhe0k/hMdqDbNids+Qe2ovj1Fssv1iUYk+9v2139aB6KZfwTcuBQ3mnZdab5nn/bmiHH6eBnCsMYY+S8+EowfdncWlYGzJRUYYeCC6i0HFk1JalInm1stUE8/MnqA/G7FETKlTN7J8yw4Zvx6pqpQZTxfs14TK5oQpvdSk8nIvgcb36+VCxrW77mVPDHaWObMFpp508VwpsCOawPKKZLFGK6sZC7Py+oHgC64Eg37fnG6etbi7+8buN5C4MMWXyKKYOtdilnYbYfu9a4vUfBq7BP8XVtp+R8XM6qTrgWsA/mcpObFlC4Ll9q+V1a9AvBObIDHhba16bYEXQ3vlPYORsRLTfiltCxPU/hD4d/hKRbmC4+hycbhn/Okb3s95UwgLbRVZqjI4u0/cXrLmaDgrCM3jAi3sONgBkxVvoHDRPMz9oPiO9Ttz50lvF9JqLY5w+R4jIVmU49M0nMrVO1w5hnkv+XSHRFnNZBTWtJQ3dDQfZY3XCjkRByL2O9dtG37cTjDTQBRjRkdzThc9jXiFglSpD2oEY3h5P3MhIHBWwRdEpOWEoupEA7hPvop083QpvbeicXUnK8czHFzk8zIfCRDj3RZ43d+H61vR6Oz8c0ylMRnimcZlLkgNbfvVBaPjggHK5nyLZIjjICOeKXYai9mhrZx/ClnKGwJy4zxgVAllGY8AAu4st10I5UeuLgADgZfQsioyh0L+6m5xUDNmHko9JJPVchuek1h6J3/JNvtP3wbzSvW5ITZKlX5viVybe7Rq8N4IxH7YItskkkuxzzTU1i3ge5jHSU/jM82mgs5TP2xxXlNLZ/KqD0jdRuYpTO2m5224pw+/wBxz3x9bB1t1BxE7UEqYUJWalGxXVcViq88EI5cF9bSgjEmiXZZkPic7lhUjnzx1LqRJqNh/8BHJy/lhmcuH7vOthc79STazgbHD8qYxb0CRofJ118YrH+h5K2XARq8bUU+refoLJxxzBQg7OxWLBnSrFTsQFC+PLPhbxeIL6Sdc8ZqK2HPzT0xE88wJLeLaJQNgl37FTIimcWtH5BiJnsccNdLxE+LYTPZXtKlq5/ihF159G+jSzDGAeyNvxWYeRTbb4zMR4qmcNUBY2jRbsann7g9xst1EXMQo2ymZBF/G/7CDvhpoQwlwutuH1IMsO3yX4HKqI3CVb5mpALtD9nBSLOlxvGtNj9dWVo5N4qWD+n+OmfcYzciXSMgteS0gve6q5fRgVj6FwdbKZcZUcK0d6s4dyjvEnyESOc6WK9uGiuxFXKHTELmB0YI8/MxlRxlpBUXSD7p0uTdMgsIC3t9Z0ZrHTT+i/7RpJjXRdz1LCrgn8PPs+z75EeCEDBfV0N0qmxEw1qTr9s6heHw+4YM/38HEMSTt+rxUVzlbJDQalT/rm9m1Hac3S29t2Zs+o8V5J9dYY1WRNvgYmOArwt9wUvLzpIr1rNAC2xx6o5xF4nNE2Tu2ZzGeKmz3vbH+3gazZYe7Jd9VtQSnClB20WC7a9lsJoQ90rjVzpGrdnSJhqWnxxzxAWsPsz/m8jiDI5SUhN8go7npWJrql9s9pcZko3T20TAzSt7BMhfKT+bSf26AJzCPOmeJZB1BZdEJYRnThW6JETVhYA4u38yhBNOZ+cPbR12nM9hkBXFngA/rwAT+ofTZRAufAJwYTcTnIZgHH0ce0jdhdcKA1pbPbQuSaPPsvHhxvawxmi4Jnc8y1zE5xvWT7S5frmtVUgtTputdbwGXEGV8dXxP6Oa/dLCK/JLMABYsKJPo6LUuQlc379WDH56jwTprLflkT0U3rfjCfKLi5utBNjwxWkwGL9OlffAx5+QpxhVOU70Xehzu/hzlsAV0e3eRkvH4zcCzV4YGeeHFbIVjbaeiBIyq6hqSkxLV+EQAmz7il6RFYTL7UEexpH+qeFTdrdwLDPAc8B6PH/hVAAmKZyyUYxj77IeF1BX9Kn0z2ba1jY0BhaJ7AwwvLxj7gMK+E0dcwYeUOS/Re+KzJbU8ECMn7VfuZxKLhCOCPqjlAeh/8C2cd5nVQ2AUQHrpeqKQzVykWq1p/CIyH/mNRcdjh7gU+fgQrwl9crZiM7KfYayH1QyzaNMcv7sajTLiIP4wGRLeeJFHwleQaMArrkvt0U/Iuz0/tEaiIknDolV1KxG+n0JoruJm1MPv6bgVPzkLDj8uKrh5Ei4bTyDbc5hHan+edxqtSYIY5zCXlcRSeVdROIGvhRhzN70B6bEw8uH84iK791g/AQa4nk5TE02/7dtc4SkJQOIm5U6dnTrElm4L+LHvnfL7Eg2xRrOZ2XrVcLaV/tGVQ1OH/V1CenzYhugwM0QieEUPjM/zfINQkgfP6ZkfE4YOwembEbenLVHXrWZGFHbDCwOUS6cdGpy8xQDGer9eaeAmO5E9/ARxpYqVebdn2UVOsefFfnvOYi4GztGDIvc1NvzphzRQnMa8cIRMT/b7boN492JrWpiGQ6qB060BPfiCJjNiry02HheQnIpiIuAKi7ObJiUZCEERVKQo1JukXBhOMAA24Yvje0gfsibpo+Ea3HQsqzoisspiWx3tjSeyQOIfd93f/Zmm8uD8DUFA27En7dBF60YYv1tEaaJnb5EXgpKTFJh2W8TfjeI8jxh6Vt/TKBokykcl5SljPVk9spuR+zRATFoanWMDbfiywPPYC2gu3GvRCWIvIExgYE8nsclX9TDF39VMa5IHyOwTPPSqlCnJf9fxQY9nlOEA0OERIP6GWgUaLlatoF2kKrYC/TS6plkGt8HNXUGYSTV2OsaVn7kvGzilcMyE/qtlTuTKDB8FV33Ank4u27hVGbcSRgNn1sCEqY5VOxVhcXh/fnZNC/htxqip0MhCoSBYTk4RLxFIm3Xtq2usWkiRyXb5GfOj8XGXWAV0oSxJA+XnPeKeC94Zg+sQmVIrHYgohyRNm0UrpMHhZCh73nIDnajly/JU8gf+X8rKRLGHjL3HPX6zzmlZ4D8pUqgA5dQly8l0e/jvvJ7f6yf7CgflJllexCYzwKXrCgXacSQ4DzWe4XNO/VluIsEjhx2PeJo+SM9DZZGoHHtiWV6/ZgQDNoay9UG53EOD/H27ARe4nQng3JdJ74aYbPe+pzwSC9nxBzJSKxqL8PCL+7AAd3DluujjLrnhfvdUS7e+jhQrLliLD1OHz87olb/XJ8S2fJyLseooZWeiPcTZmXU17JDuPcp4GEALUJ2sbg4kP4TLn3sEXytCV2a9/L9MlYoWWquRheiGgjSyAtt6dO9w4Fn6wSEltGuOSY6AAPCaZE3BhaaZHV7jJ7s44yT0+QUhmEoGqIRresVvXGobLYJ+jlHsLP8VAjXJ2xSbJEBnaSyKGe9/89mI1IJ8VTRMMgHGwpFweED/8iOT+ahosMg/DueX1OrbYK3jZWwSJHzYiydi9Ej/aR8rDbZXyU4hAvOvA20f+Oirkgh7qN8J1b3DddnVZx/qfiORkRAAvjeuk9Gf+W4CQfuJLlb0
j1EhwX7OipS5DaK7rTAJ/wFE7oH1Pq/XXUPwkNwH+u3XuKMQTcpiYp0o2YRFu1EwYdCRN4CNRZwhX63qJUs1LBuuvcyXLQtRhzL/OxFFpc8rw1oJZNWAYUCMayPo/LOlZ0LQ8Pr+Mm+igoM6H0UNW17JcLUApWHCs9KIk9tf1gmum2ypEI9Z2xu4B96dCl0GpYXq2E/5Y3aYEIW9CDf0byqRwN2c6khzPuMma6ZqtBm+9Wxw+bSToZF7fG5BczeAfum5ql0BCzWy9YFJzLt9YUT1n8rIB+YAJHdDyzxlxSFBy1mTs6XqzGB0oB0Yv9F8uDhc34ohxYdDIDAtlfY4p9wWIrdCIJYFvAjiHXEJ3mpCJ1xqorsLN0S7gUEiYQhlHw7sN/opKUvJ31z0rkJvbwIR7MkN6kNNZfgfnhXe9rY8053bemCKS656i8b4jbldLa+Ay0JfQiY3oRXyaSTwPbDj9HXaIs8RwozVXulb1UgVyw5KuGsAkkfCPLEa0mbAf6plkmo869nK0UhDuYzLYsaQ9MOdjpHnf5UA8D/8z8U0cvIPoy4MRp1sEgjhEY4N+AzWI6BtkFHA2NCj3+6nLK/Jq4Ksl0kXBAgLm1E6OUy18SmJinbOtjwlTSoYTmOwkK2PNc6X9Go9wlAFZSfDRuFHDf1fe10aQ8DNh2oCJxM2vTBhRM+zfnLUxHswfb/6h8v+m1YbPbt9LTazerVTuuShWC5B9JRLb68NuGgagh+kMV7TTkZE+5ZGUVaUhkLWGM2+TWU+r8pVeKCdifimIunVxirBIRGtQWIN/APqtj1pIncQaZ7shzfczTCAgoc4q+CGxsktfHIL8ngHTApb4+17I16RfzlYTJ85j7olzlvTD8SiMtrSRlbBiX54huTbUAounLLrqWZhDCmYyVqM8dHj5PQIX9S7CZ/nlQH7kjGE5OIfkWkVJAT9fckArXf4x2mifq3vfAsqTzBIPAYmRv4zSWgryJsq32zllPicVtYaCg5mEnisF0BF51REfH31ReszyFPvAnM+HfslPORdLTs8St9x3QfyOoumCCkH0S9iTrRS+TZznzDKF1XUDW+ILi8mVxhdH/FwXbKtClHSFzwKYePLzSdnzpqnkfl7zBC8z6uFTPjNCc1J5s+ykfNQeeFBICAqjCRIZl0JOWMzLPvfGkIsmBZ513143hxjmyroGEGt+OXsN4Vb6UgsVBc0wCAZ/P9DhHdmArWrMVeAo8uLeShQWX2MotW9H4WPR7PxBO20tHVtjciDH1jNVhq5STP6eUtsqeVHvrkLRQYWtsqG1d7PaKpJ7hBkVXeQFyWkVM5dIb2HU1MIoySjRSkEq/87MhgQcFH7PkHE9cnnXpAPQtXm5vXOY7IW+2VcytGwiblPQRwYpjLxEIHIyY0oa2FE/Hms9YAlj3n410pC1mbngJgc+At9bFiT8UT67yRKuV/mXgyUS23AYTlbA3K/qhLfy32AR60A4a5OfV3GpyDaXQNhJz+btqiBuJ/AtK9CsuFSPRUF0DoQIo6F/9E6gv2Q+PwMHq7m0MUsOlOjn/C0E/OXyrA9ODQdiiEWQIUNPzSouDHPu3ObKnpjdmafBoGm+GK9lif9nyd/HIEiCQyFvcZleiIZDJu68tVcZhALqABFIHlukt8508wenVRw6wJal0EKPlgHZNZdGntzIdt+lrR+sDwaXouqgJEHaYDE5Bw9wAP+fvjb8gfIeH5zGaREtZ6H/QZnnL2w99D4AOlsFlzRc+r/8mlasWZknvj2E8lAIQWKKW385CVThuTN/eWd/fTLdbzHHskXmI+YH39wtgC7e3t5OYsTQcW9+RMKiGWwsxJDVFAHBGzPR10yPoSLIx0OA7oJHEJYghxqJCPK9oKirnAlCT0ZoD3eOHmanjMGyq+glSHExWHojxhiM0Jypemw/wqxzoaQLYUn7Srn2QlrodqbQwuzSuzTPOd4OOdWhrGgpF4ht3gv+UYU/FE+5aiuKEQpjKUjcPcu3SMukq85Ij64Lagb9oCNt7sXmkXoadNaV6+QMVyKKsivf3wtk2rMK2Nmq9jIc/c+8ohrFmcpvGiat6+eSx2R/I/PiJYd2O6KzUVUFI3VvPhSIuv8fOG2ABYuiBkvRDheUQ7i8v7WD+muuO4f8IjdMx0l9gBDkUOxkvtKJvLK2keT7nRbR3vPVGwOEu/DaAjw8mdBS4hWMKIhG4+mBVZtuTQbrwaUIpkCBCoKi9r6XNem5gOXAPYUxT6ebywyIYCN7ZibE7wyvL5ZC52ogl/Xc7zB2PfXF3EIkXJSdpURzKe3Wr7owRuB7TM0zqaNx3z2lgz/750QCRqhvdwnRS/hxZQ/m4tWCw08fI9vFDoEr5l1sn1wZewfwRrQO9EUdxwhlMc4gboCmhS9XlOcsoYe8YSfpheijIaHWDKA+U6Ty6QruNGmPBYuoz48rB1pS9jsEavuCn4JJJuqXcaBhW6xVaPKArJNWEqLl6FhyGzDnU68TdOd77UkaDYvkZTjNGO+oKwfcypcR0HdC0YjnPG2VjNL8HJ550w/3eP8LQMoTg/lChXsde5HaCw1g65XWOtsFWTxIzONURrkrpgQzbK7EskyGqnyax8vOzkS2LcOo/kU8cJR16DinIme0PbcdUWYe+CGdwCoJ0kDqRNyJdysURYU5bg9PYVtwNTz1WeaGd6z7zpJ8DK87GCQFTcCXAlu7oKne5prdc61W30G7VVIJ/j8ZiEc9Tx4lk9k4G6s1Za/jXvD4SXhoG+ZIcjBln8/gmRuMIC6zyOgqNjMrFP7RY9JaCIwMiY2kEgWdnaUgecVtcjd9myCUAw2V1JjiYAbaIHer1yw+a1/2/tfhI1BufIiAsXivDdN+oO3EZQaiW1blD9DHburAqLyNGaCU63+N9CU14qI5R5pKHFiyfvr3v8B0aseNDPI+D48T+rnZ/6GHe2wcmIDzRlxHl/NKUnHHXY16MiLODT19BTq1yO6FLBlWqA/vQAAVXqHpSGKeOxd6O++lj/Fvo+TupnvJDF4MRS9PJ+mw0ynBscz46+YGqAcz8esM5aQyOe3qU/vK4Vwle9OrNUgTT5uaXD6+BWYgLfmzYTCuAIz5RvTeLIB5/RMarZ40DX2dbKyYVPPDwG3MvQEtJRkeYZmlLo0xKXToUn3mFCBygtUB628x/nVrznuF03CbfinuTmO4wtqWpRW+9wmqhqAQrTwuCZmG39neAtbIBBHt4e+X+zr/GM2KQh7QmckYS6UNTIFqtLbULJyQ6Ls2SQDL8dqg+u+AD4M819AD8vNYr0HoNJcl5IoX8Dwq0x//ziAtxIBbUxNwNxxP3eNRFRWwKz9F8gCxhYidLoOVgLgO/Gw46HcOHTjvly+qZuX7kustMPOn6TfLwRRDVMnhzyu5wxUDZhB30RY5sZRPPGx44q3c/aw2e9FM1+oW1IT3Bd8L9wzw8C07Up3cgZFPCgvFcJ/SeHDKv41gEaXXl3zQpLyHYv8/MZubhM87oH7zuy8spljBEH5zLoivdCW5kEcAUie13Q4PhcfWuf6srO1veBOtKaeMFsKca4fTa0YhN8lp/cbE3uEtLSk2V1Y2lDeCT0QYwccnP20eeJOmeCiJliojDa9q0rcrqVnyo03cbtitwgtidNRkbMSBksDAp4HJL5EVnAtMb16jaYBpuSXDgaXSgXhr3p7qphwKsGLbDvkSg7XzU4l53PtRJZAn5DQAmnm+GM6TiHVvm/6+iZOKDpFHqQjDpkjVZhcpBgoE2r/SDZw1COjRvUOiLVgQkBClMZgRTBlLEruf5VhD6JuZH51SJFAWBb2TuLjvyBADCsHPFSrSseny3XeUWKL1pP3Ax+WIoCJpVsYH0jhINSwdpl2xKy+9Vv06ruDkNatjgvWZYSp7xpbyo5/5u3Y2u2ZOBFvhSu4MC/VZAxRJfINxh8Zzm0fsFTofNk7bxbKBCHYC8HpVdxyobT5AQyqw4+KSqToJ+zH4PuD5tqkIPoEAMchu+WilcMbZB9YmkfLfFzid6MJew3/einhOMEs6VBPNmWboGesn56G7/j7Rnw97wwHtLGOTgXsP/hLJAKk+KZ8yS7LcF85Sgfl
u86J0Tnd2madMH5QIkYQSP7UyyMPYayQ0ef8fGFGvzpr29N4SQMdxtZhRrBVTO4suMiQ4TSrpTn8hDoJUZTqUCvfkiOcOqc7ue9S/jFzaFbfWHheaPv5dqvE9eV5OBDAiZ9Upm9dinxNE9TncyXDLjYksVnrYhBumv1tyWFuOBDWFC1FsKoKXbofU09HVRdgYh5uqAAbhsfyHSBE+Cyij4RTNIUtGYQLc+/ocAXy/bG/PomtYQUYhn3OgXs90S+q1CBXQw8D0O9XWkywtm9/sIQ2/4OqAusjmydOvVcEdWlbRZuDhtabpGAmjqK4tyaETQrc2K6aRu1h9VE3IY4dz3wosYt/zdhN74MvbJ00f/LAWSXGespMh2o75UKRcG6IxhuoyoN/y1Z0bxDiFdchOrFPCeiPznJlkUjEsMKOfhK++Ukqw5biYftv0lUmCypOOrKecqYvmXy6vUQ/hnvfu8gslq+7BkcBv39T1oFYDvBESTC74cT+uwXiLJDLWM9yrY9fyRMSGCegdDakiSvC56WcDTAsGxK3hBuL3sfoSiRfSOX0MF+5ai7tIVIdgfHT7Npj0LGU5DL669YntMao5KSMXVbV3lbK3lI0vy64e6LCqNJRisiF+6BfrB5BC9Ngs17l8EkXflsIplZeWqloVGm6yC6QsYcM9TAufpjtb1gLGP4QIFmsr3lyNuOLx2EpcQLwrXxeqLyjDWRcKsLp290poMgx2q+MO4riRb6gVM0vIvOs+QPFNPpRBHidFeAGQoppvJJjtbx1WkdBfgdaie7JVMDU5CZPNMb2FieIpFk0At15alVJw81NCafMrR1B2u9+bk6oHf9PBWa67tPjjbxY/1nRaP52p8Lb+UYHtQV1Am/xzKAnFkmpVYjXH3foxNLpa7B4VCYvfLXwCRfWXhRWGAyIfppgSBFzVidh8vi4H0R2bNzNBwZTAVKSbqMm7s7OF2/K61RxrYcL+fyCVN1Zlpumsg7bx0Jw3vd2Ehg4BYBDCtHlM9rBoEHSu38ys9JHLMpqknmzBKbHv9HkCgcQJM8Zqnms7vj+5Zy82wRvEdiO7hbnObwNK2Jv9IIXkR39lGeqfQxhPdKPTCh6+E8wRkIjyxgtKpiRe41lsu7L7DrCytHMrkpeRnDISAddK9UMin/nsfEHV+g1kI5Pa+oStxy84jlCS2F7ZqhFun/awnGlIyD8uMhLEU+YE6AD6rLRrQ7Fe/N/ofE0HQMyXSa4R9karLvhP+ejZexAobd6Tv/bHu5LLyyDO0F8Yxb6e7FmD7nnGNkCtMymW9aohJT3tAPaN0OIX9cR+dR8HP49OLAH2qCrsPt2N+V+qpPwhM5lMgPJ/rviFDfPvF88IM6JNKqMrNbwOumHyYYxHEcUtxRCCM/YVKaKsVzTvVIZkHZq+GfxNS8ToKW0kcwSfZXy7qaq+sWaYdPzLKBZuEwHzblFv8JVIbt73i1YYBxau5EpviwdxFMxYWPKX3hp+nzXVnac3e2IMfmpAZiahCT4CLgmkfBf0Ie6RddoZS0bnvyz5NWv2850wPBhOZhkTqtEc16Hj1F0odzl240elocqGUHx7rEe1ZKVJQiNJ13fJ5E60wbGf6rrQFBV8LAndTNhGDqbFf443Vt+pb/aD6b5mIO1DdeZZrdKjFRmoj4LCEstrgjqTLBXs6tfx7jggv6EGd+oVdxaiy7w2fKsrvT7LlSSgAChXix4Pym5Op9UNwmmafLtWeSGqLaPlcee5QVsjZqbSMZHXorIc85jdvcycGKleV/Dbk9p4JLjt4GGdOjg3Jexn8GSN4+IQdJ9BwF1IminBN8Hl8RtfqNH5gaelebIbOgkYNR5eeB9RJlamjHBcExcPPMHw/YbtihfX3XI9eKejGOMY/tPfIpTv8wQEAovsLbsQLNtW/u+ZKrA0TpWyZL0ZfVzrvBgFKOUinPqlgHwUcN9FOe44Ej3mCBlZo+cMCprnwfqSb40o0Y24l13RAvwKIRGHhA9ydax1Sbi9vpTdqZeaYbRVzBwcThOHqjxE28yo0BinKO5LKtUYxYjPf678fU8uRM47zf6CdZsMEztZBoRyKa7+YiDPtFJHB4CEMaiHXYAXicm9DOVVt20Ah0MtTSL5GnlGv4dBpfNHqWMWJAPypViTLHcSFJdpA9tMRpqLoSvRQSEPzTWgVQKfSTOfztceCSGI/IlWqu8KlMcUDdwLN70UpnokD797HXMydYT+sAUAAhhmVi6sRCqz+HACICozyFBOFmGOyT6oHRz6npqo6AyEz6n5o7EKetPINbkpJpL+4/tSdScwzT89PItEtpyjFe/N6opagUWs7X8R++vz+j73dZQE3DwP3uPiiz9qPftSENYH/e5JeJlsks/NPWY9yr0KQaY6PMrQaK0sw49ZsMRpxXy1a54pYp6tnz1Ppm3stLcVuLgfztdfutzUKW7be0u9Fe8O4H3pp28hBwKNclziMcUS7kyvYS7wSrruoAw4gkiFKmtulB9m8eKBU0pefhhnbDZ/5aNGCB8wri+UxgFTanNG3z+itEG0eAx5c5uN8EA9YGAWaALyUkNhwyWyzSlGqorwz4m8gNNDANqI2XgAVzaB9tEhxM/bIKbE2qR0DKJ9XbeB3UURhY8mxLDw+DS8v2DZtXEAh46JBx9j8QprFD+VtNT1BoH21wpm/DPIwZ7Tvz18d1HesQJbRFx1u6yVNrHA1mERfkA8qBxwBj2sHv7AWfqNt1v+r4UIsek7NnOivsIuPXb5/K5gktcUQJ3yHn90/E2EMfARUgHXNnOx4XH1zqwntsRWVtl2dzvgkY93Q0juuKPmdjVw9uPzoQOKSe4sYoVpRz6Xc9AtyGNyqwCt9tURz+yrZODI4Xl/aL2PD/CwTfHM/N5N8wSeqG3KEF4V7UG+8nVn7IxLIIRx0SJIxlonHW1WVKtzkQYXT8f99eSG9Rn8yNFiZ5j3POFDgPdxFeYiXV7IRVlsI1S61iUKAtg87Kn11f8jV6AwhcKklLyPjqhsLcDKKd3PcHLsDRfB/ZBrpPHbzwY6ZNTiJ2wrPcZFcQfIdaFnn3sA6JQgI0jYZTFzim1yoSdXH4ikO5+RevNZPcJrZAvTlurYdLIZZ9kyd/LopqXO/QjzS6CIG5BjROxx4XpuEJzIVnbxoh5XtszXoiJWuk9RCfPs7ktT9yfHQUR+8ZSRAfyONoZy5HHq4lsggHj2ahCG1ebLN9SuZUguK7SDkXqZK2bKSgaB3KJKEFqI4T4Si315k4/qF3F2kfk9qyeHXLwA+psMrJgrhGT3xzFfe5YG82Lx9QVpal2tx85eDy1/l7OMpyxFETJob5/r7tkqOhRVmOH86icb2XnYVORy71qjz3XktTUKIHMYgts1eovcUtjeU0AOZMJh/4bmA96gC7vw3B4m6GEPNKH76VaSKP+bYnaV9UanCcyx77VX20hOaGCjqgddGS68FP7v6ChlpEOuRPiVYutZO01K3F0FUcH/C9pW5rA03hDVg9VN64suzlD5MSJiEjm2OBzUr4dSqOdNfLc1webaI1+s5Ac7SBM+WorVaQF4PlSLgAJyURv+KrUUIOMyo42uee/v9TBHfGK8ZobC1S5y8NoZPYqAZTqpjpEELIvvi7uRQMTv1P3ENWrwO2a9xzaYrnTQXd/9jyOlR0otFJKSmbWVOOjdjiMHHPxieF4a9BauNCwvNDewSgJjqJiPnWuhjJ6fdnM0OSlW+80UwlhLqW0nIvD5aG/70ux9I1LZlocGJV2fbXT463qsTIaTsWT8AtMcxkjWPS5KDZK0LtlGvG+XXhBb9qZZY56f9hAf2EYMJtJ32aa3bUp4g+eZLCtcCcFlersg627OTTz7kLpOv2luxE7PsDQhT5kcBG9SRy2T6NP/qhgL/xI13Rdb2Z5V/TJNt8YuCSmJtj6vy/0D7FnuhTQw6DmWnKuWv6siOZRXM3YwTl8UsIPEWtwTGxiRa7U909cqqBfirHZqWqeCNBVVu6nLpWdEI68dVoSVCe2HIzwOqmiG3OpdvoWMNEz6y/TKjAvhzvsMhwP/bc3W3YxWKQd2Dqa5fVVzkK5EVkZH186yuWmtQgXwF9NzWJv
FiH0mNmbMPz3JcjlNCyFyhXxcTaO1IiElZNQtpADIF9eg/N1F2Bsv07Y39TMk2zn8jCajgklz858UcnfaUTWjFBvA2hXPhAswgTk9yh2JADcQidluEXAu1j/jEYtdI3bj2hvXkg+6R2vR1KU9ugzkn1XbZXktL2S9PxFgSawdgAseuv4lm4DrcWwt71jEXaM63G6MKliTtYrbLnf3RXlWt43QbRX1IgG2C/kYpuLI7qsl98HXOFrOK01bIMFcFcYqcy9XY8mpFuHhPDIXRWGalCqRpLeg7hWPDcyvWhQFnT+5CZjQLc35c0sCEqnduXbcNs+ktLjhtY2HUoyWNsPNLtojDsXb0qQLeQ0IbiEdoI2nh7Dx9IpPU89qtVb/cVY/PVQFOrTGH6qheC0eA6QqW3nWMQpJxfaebtdz0OhfAWWlTABVMqyPUOQ2zYuJUuNQpQImrWnPGg5Eyi1c/HG/+6Lz4I9f3iGtWNqdZQEc/okZJ5LlQSOjRPqd4/8RRq+9GG+RZLj0sb9B72p/m9is6ZOgYvGRcp3zNwDCkJFGgqxIDhkDVVdUOJpF2t23bvyr8eKelPKA21EpahuINlJKmpTRwwKzwS1mQKWl7i7tpvnAq9NsnJ5ltXcx4FxIbJowN6jGcVTmukdYnXwgoPy8oELHgi2dGkRcpBkJrOW3qUWHK+G3hrQ0xRaka4LJXwigcAHtBQ2T/bctWNvDb5RboURGaomjYzEZ9VbT8cgTHCRLnrzOF3HbptX2OOMc9BN9YbyH6xcu6616qM0ovakcBmgVSXHtInjMzH/cSCNzaEkFGgOHou9pjsmM0tfSihZPnd1REaxmKghae4HKOOrpEgj6Q+jTWBFbkxcrxCfyY+2e5o4VuRdwmlesN38sqoEsDkClgFQjm6Uy6W3Pr9IwpdrjKt8rmnvXaQ/jARtrfNY3N4cUF2ztF1TBS4kvP1/4LlpvzTqrQUEGuu6Gde0Vcqe/sG8KdrfPEdY9IRq7RgWzwo3ojlAVYE3nnXbv5K4fQ7g9xIxs2D619Q7eWXte+xq7ypmRXREwt1t73uPLi97k5W5e+5jehp6vcqFzn2PtzTv4RgGVA5m7w4fZVAWeQtplWM0XTKU1QkLWD78bIG8CCyrWzW/Kw63+xkRQUlXVMtLLW+IexG+tPpwWC5+D6YR9+BMRnb0bmB4+wtDFedUZL0WFleWuqdhpjl1KynPY7Kvf5LlBMoQe/4lSJZsQSDO4zjcOkvd408q5r/V7SLa0RS2o6eO8iohr2GYa+bncha5z68PGe935w/KCUxXjtJZF6hMmTQTytNeaN6GNUl/qXM0udF7csWSjN4rZQ5FiGFvly0CxFEg4EG1rfXXxBTJRuJl4dlCW3sCj7BsfS9F+jw5lGsLx2xOTgh4ggkw71AnYLdAnQ9cW6TMzJUZafoRJkKveHyihUQfQtraA51rjVn8dBLQs6MKKYsjZMYDS+l6eHcwBRERbkS6dQH/6rHJG7683VtIL9nIqmFUkT9mNtB1jKlcAGezCegOXFgFa9yuU0CvfJ/jzkfYsxNAnw2SE0GbMpJOKT9B9NNHs6/pF3JAWLsTYj5boy1KPNPquxR+96r4a5gRLSNqVQjCR73bW3zSiwxySoEgUEMKgiSI4XIxbIw8q3XuBBfqihtph/wtbMF8dOujwrvsr6bCqNJnsb+evQMGMNIDSsGZxd9xUE0Nb2j87bae2VDB+EyKlkf9bWJU5XbkCJy7kp7mtfIhEXQ35dapnvsGUPno3uG/DLzqbK1ozYZu9yn+rMaUMKUj66ZXL3/JV8MEUAHKrEtSp2YgZYT5aBqcGjnH8IOftAqclAILENvjmq2hEN+rXsv4s5rCZ4zJhRE4UnCIw0lqDCxK5EPBEpD5MPv9KgrPKtPmInBjechdP1/9CJJrcXfc7CXTrPmlq6GYJiwVCPAf4KPIet6/NRLjUDiSl3Xw0FGTNBjorR34pkLBxOVVAUSrLKLl3FHXPZJPWWZUEfBEaU62j2ImNXaXtFtASIPTaKvTQ1RbqBo8xetuDTqEmQAw4wmicMDAjbxxSM9dqBHdeOAjWM5xBJfTUDcM1FBqsXgAMZxmeJfKkO2rsHlbUolI4thtt/FKIopzQ98ysJ3UVFBBo6LvvW11QT8CiCRaaqlLkmTOLneGxkAoKN1+EEqS+qemGV+ld2xJkj6pazGyZ6KEs0gUHgZgJJgfoayUmGkCYREa0hs00k+DjXYF0Hx3SqYCtnFRou7MRDSwXEO2AkMQTv4V0kqwdm8xUR7hQatGmb4DXYs/ynjMZTGgrGD67rSxel5V4drZIB5PaV/C0XYKT+6VeSl3tbSw6CIagnePZmMOdMrckhq+D0n8hSI03D58XHr/2vS0hwMY2fe5U0JRT2MlytcIdg18DPP44oUU4OUOqQOGSg5XhikcNazekAX526x5s4Mpuj5hThl6kM5DS52SmP4LGfnSEcVX5kDDh5T7W6kZXZzdx07jSaQFlc1Q+c4q3uvww0N3QAfFWqpoYur9WE4G4bK8H8FAyVeEkn+MbtY77o3Tv6jyZBKjTw6zqhi8ZJKmgtnIbqoKW4JnyEuJCvA74Iv7meq4L8YzGk5P/h4rqJqjLXhfYLf04aBHtrSo2wu0bUctBpCSNhay/yrwXNaAiimckVJFwdpl5kOjybkT+PPkxO/EUPsvbppVAmLzixO8g6EmMh9OFl1TqOTlDBYqHSfImCJQmhqFHMtZB7+8rxMKM3xLKJbr4BokYMvCsTArO2MonovnbTABZKPos6KF7Ze1xFs7dZyA1l05+pxQblR4a4vkFmwO74/h+bHGeb/YdcxjPIj9jhwBW8pRayB+w5/zeKl3VKDkx63ZnYwMqsA/awKtLTVzKrZMC/Pkxgox0pht5xKDf/b/NZSZ5F6pDDMJ6swE2QGAht51DTcC4tARcBe2wfVxznvUKx5tbhWnhIJOPq+ZDssu0Jw9ZCf0VYxN4z0nblDim3uae9LFM7qrcYUpWHMDrQwqQEwwzmQgzZ0MTuBDrd8uiePoK07fpEP+ofM4GR8gpKO4aNX3x7rPqE0LkjZn9PnwYW/Dsjf8Fk2TX46303XURu0WF3Jz/WZdUNIZe5vcVgP6/Nw5GW4L/GETm6HloA9xm3xkcMkw0P2Bku/445R3gM9TmNhSaFH9nwklgetdCGrZmLEcGc6w1ph83cDCV0qyVVgb3V64Qn8CkqfwdLboTPGr9rMGJ1rtF3fnYtPCXh20U3mjsoQjpHQPZC7rD6V3HKEpWO3wrW0tpdyVcXG+6TyHaeQZL/VA2UAm9vkzdysSmlWshaxupLc/h6ktXN0cCjvVt5M6pobXXauXYiKzwVSsrka2ZhaugmdELvUcc2lmBcSCGb4tAcDoDibg6yu9DWQ3xaR4Ei7rLG1+Av9l62X2v2dwoXBfx+8Frc43xQvfFio/bBHx04r9zC8q8WQh0weR7bKm0rweA0qbj8rrCtFKqfXQDM5RXH6tZXFPmyYvMN02DccABraWKg46G6BaWeNSb0+4VAAXGmZ0KTXWG4/SBw6DcHSM84xF1dJzKaJMuAkSiLNDETMJboy5/IdfFW5eE7Ba8zshJjyg35PR69ot55r6rNoUGubiU+vWH5dp8x9leuuKKdPNufj5hiFFgVcuJMOVjWRNiFum7gT2r3GtzRh80sCgHsq7px2eer0QriXjhXXznc0Y6AjvEDeiJlWw6nQtM0pTAxYVD/3B/uU4dMW9AuoPawQOg7+JfcM8+vPaB7kUMQghaEc/yyu5wZb8+iwuZY5yBhRc0e1khP+NZglkZMg/MRhgkbNE9jjYMM6DS+CvN8XTep4cKXdoWSvjwkVvOo7b+cs0cOxElXWUbNJnbhqca90o5TbGICJyKHz3veLBO+4lDbkBZzq4ervbvuWK/yML6EVQXlNJCh8/U7TcusIc8dW9eBYiSDbD2zU2EXCwBbRN5zgihsivbPsJElayo5OZPh40tHFGaVRnKkBd5M9+FUq2nUkiEUe/DWypLb4e3lE+wshGoz+6UsXmO5Qt0WVp3ZTTIWhFX/93w8ZAMFHHueRtum/OrSO/88uQYe05CxQO
fUmYaEjBjeidxmISifEQTSyW6vFO0PqxgEgVjM7dWTD3TGq98AB8OouxP7HBps6NzfTkKDSIS7xThfmcOZktWOADTa0Ur+1FVBAIOLYpmp2fRWl2SlJEvTy6YvyFM+DZlMgZu5p003yETfwcT/+09zYhsTz2WITlm1OF1xdf90x1z1VE4FNfntc92m1d02D+rSfRoiLxAS8sYPUQn5ksOmJJukn9BNuwS2sLk4mjw9CDcNdkVDfLDPnkbQk+pK0D1xoGcw0170w/6LtbxV/tux5cSu5TjDrW6a/JbZYxqn2v5raMsiCR5f1tQ1YhW/9MgKIkkzkaJRQNA3jlEj+h2q/0lRPQi2x79YC1Y3/2UW7WW7/EprM5SMk02+aTUE9ikr8hbwUfjJJoqYLOGSsBVXiQIB+bh1vP1BJUkaAX0Ms4aTf0WD2RotrSFDG5S6qnglgLjPLf8O08Hxdl18y33wGaU0NttF565lSZNISjos6eEPX0GFMIoU1MmLTz1caxwaloLBHitYFmhHM9EHsDQWEE6r1cagallhFRXyeKnwODHAstqGIuwUecg8QTSYvpYM79ngaLV1hyZde8bXv1/TPP87HZFx70SJQFPBxrQpcOOdtKAg57NhLbZBZeMWm+TTFmCF2ocOCbVeKng5v+tRScQx1i1aeVUz9ouu90onj7VrIkff6Eqta4Xy/A7qp7N5EgUanj28MYFdJ7ob27L29SWTyJ/fsrvDQro56XZ/Zl9YQPz76AeP2xB4KXenMKC5AlFi9BxWZuVceg7i+Ao/Kn9w3vuvEytYDq4R3hIdJNG3kUphhUrdl8bkwD5ge6EwBhdhgwf9p6mWjL75lfehbpIm3+yiEKfCKl7ljGoxhE21TYdIjrNj6QcAkplRfe2p7chs258+l20Y6o2dS0GyHb6FT1s+EefOfvDhgFaRsXMB2XUrXtTqY1nmas/dJzehUCOqYvlykHSmvOc2ewL8MXoc6Nw+IDEjyQLYU3R4O6HruRL4DCAOrQ1FM2Bjzp7KXXmMruLmvj8zmB4CffaFh73wPikG/lpBARMQi/Bf0JGm8hy3psLmu/N96EOY0+zX3x5KsxtradqM2F8veVHehB3u49pZ0iUZyS7QbyiksFuBKjwr3V1uPbA9c9SaKgkXa+g608Xw6eKOLRmvZeR5y00PovvXG6XwT3N+Tsy8R9h8hkVAW32JgJLYGSP1+xPYK9cf7+P+Kx7V9uE9fZ9fpost02sOH0EKAfvLXlhh2v/opc5qOCP0pKPZXaZ2DhbK/UvbeSV9uuffthjoOSffubIMbVoFDgJv7Qi2UyYoQZiNguPr91l70z+ML+beGb5wpYZ/WZSKQvWKkoLjlUw+7ShN7TvkjrQnltMAW4qQ/RnDpbtv09zH5cbu8WGUo7I+yqP35VQoI7lOHYzQT5NLlefnM+1Bw0+zKKliYI8YAiVV5xHssTus0qpO6kTI9/ZOO/MRerbGkq9vqGYpJDbvNst6YDjTrHj0Rzp593gEnEwpImhO1ulhIt16t3da/d3p50xX8YQAqwI/MhlA0bnc5k2Cv3yMtkal0P3HxoPHtK0o8SFqtkvcXkLdj27wqoZbXoy/B1EGYMzPRUA8LW2yD3ETrFnMG/4eCsvHPmxermcadMUE2Mguj0yyfMR0SAaz8q5/jjZWl32GOrgZwV1okHgjbzXC01rZ3Fzn4BWSfDgXuN0gB4WH1CqRMi/j2P+Jo7amdMRfTeKcmS+qm0qJW1PCId5+uJOEAZ5a/1asjONif1uAbtSQMNWj7Mk0W3dX8jRjqk+OgrxFcdqr4kqEVnu+ZCNPGOD8rC+kPeBrsHet/jXcEo4VOoq1yKZNMNhQYg7GnB/Tc5JKmt7HC2kg42SicBfEP9Q2wb3ysWeICEFizPExliq/2dzjBE6fx/cveoZDT0A64WZ+T8yX18Di5esWj9kPSKzfGLXxpiTfLP9H7+EBDq9cuPYhPnS6JuaiO1PnhRRYPMPQ/qS0/ma8axlKdHtzUu27p+vNLzvtf2ISrr4V0bH6iX67D/wRWukllYMVRYrP16G9JCwFlaBsyQ6MBDqZqAHS+vRr1aZMwdq84gDVG3fuMV06sJTcNHFYJoWNohIEO7FRK5aTM5gECuLTtpftrBjp87O6RFVe1QJSALJ7t52MJdkEXWLiTP+hxW6xrKQPOXjS7wj1GB2H8UpWlyyxbFK9HM3sAp0QGWE0zwdGh4l/brMHYBgpCODvzvZtDjzdo6wX3WiTHbmFNPJqVEsKWw/+Qi+/rXz5jZB/NJGPF+LnwGdYLZo3nOqZiFH+c+fKrvwA3iM49CWS0DxIATAgJ2SwjeKaVvK+yvfEwIUbqmGuuJynd2Qcpe89nBv6ykY6U87e99+2mgzlapDLko5VENijdX9jO/cXyvsiZzqiJorHORbRGrwwSMZVlrjTcR+aThrD4WtteRhBgp3IBssNzEnlTOXKQajwAMUouautlwjPcKHpd84pe+W2YxTxeRCc9zoTWJvXdnN+Gumh8D8tzXI5oIQ54m7LQJ4LAJJB5sN0FZH2n9MqD6c2Mj6Wr4Aoq3BExYkp6knMtaYzL4TsnbaqmwJ/wYNzMs6IALvLbBB70JLQbv9uJbWDzSwrsE6S90oCLpheTv0+fb7Cerw7jb+XZquRYq1TKmC8rlUfsT0e93BrnSQSgPkJSUsa5JL74wnNYPi21/qnlMJCmgWFL71OJ3PlvIdtLxeUTTHRDDwZBI01kHQ7el5tocxOX7G7O+TRPyTjkIrZNEs026ed3yS3oZ1Ll7BcQWtUGJ1qzQgytq6S5UeqfAlZM26BrspiXI/j2hDIBe9P9AWC6VEIA28n34HIbLXpsWBMEkOaGwD7plPoeWjsVk16+/XB5f0c8Fhtt9NNRDHifp2Bw+BpJaQDiB1c4mcQ3PhZQXlCYM1hk4A/8asULra7dYnuhQ869R0yjcbNXEDqMlW3uJmROBJ/tZ30JidJJ7gpddM4UjXmwCbFiGwkGfiY0/VjWrQrMCvUXDqfaX4uz1rq50/K8u8fpUhBcF4zFfjbNxv9ZDif5Nne6ftjulyYW7u9y+l+NMtd3+eMO2ATqEYY5Lq6p3CYFZ7+huZEDJtxwvKIaV8L5DckcJSWhv4uX81vCkaByzPqoNwM1QIbc2NQpdD1Fg0C70tjDYYlGAHTc/s8s2UQbCqhc90xNRSDqnYkYXRHy1ZNTZ7fys6Yv1VYlQkrlUh1eG5Mg/CA5C5Y+1sep9XMDA31RBjTtHFDhkoES/5mFZUou5ARN+IWNMC2hWsk7TjA0aPlgjPwmzD+MOQhQpimm1VLDwm+NHC5kYKmj10BJ2nBGgaT6E7EvhzdKb/KXxPsbPzuDfPmLmyX6Yfga0qn0RIsBEeONpVCobqQWdGEizWwy9HCwlr9oopaVgF/evWq9feXSJkkW9y3N2M404wUFvOzW1dk6ivoKrloLO7cTspiGZKb7W/zuuswWvMumGTLfKo2WF4dHc1j/uTRy1V0cvsbhVAMu0+g/jxMnS3QwDy4s/ecSvkQwlsYeHvMcyDv1nvuvH8SC7xNN8A5ynwRmlq9A5IoEd4onDzN8EW6m1arxmCM/Tl9iIe009Cp2GoPg+Y+VibWm3+iq2kqSwKcMPR4UqhddIV7sIczGiLa0InPt9SUL/0CgV90jYVoatKyvwlzVLawWwsaheDvzL5RMT5UhXaDoXccy4Dc9cdwG3F1gHTMv8gai8qtOG8qfA0Qb04toCuo7kmtJCvpI3dQGJtu7FJUjyBTGgaGMq6wI5NJcmtnKfhWzgEaWYeeKHalVlJVklPuIiTaLDuAyYHX0Ng8THCMkmiLxxEbMRgttq/ZK9I+VSpEANFVKgCMyjUbVQY9h3K2t2OjsAYS6u8xhoPCWK4uBNBvGWr96Eqcfv2SbSwynsmRek2orI7MpgVMk/dcGfS5vQkhhCbvjrzx+VF5/WZNsoqSdBeEAl1FjE9AmUdIyEM/aJVDh56dEro9v7oLu5qPZqsRmS7esHlryslrj0k+I+ZAtgiNxVoEDJs/UI2VWkZ7DJ862yyShzoVZBDmLFwemvKvDlzprtwc0EyjKqKZw2
6f4pZBLV7b+IiuqOKjs7mEzLm5DymTYJiRbsUSmrOGMqgg+CwrNqg+JhtIooTV/Bcjd4Vivh/+INeIRCmDPHHxuEGwF0GZoCJDONdVOlJGR766LnJvEtIS/ZdqmJtNamNfXqsUFfByRdtT5k0JwKw1I04iBwqdurRCSYkthF91lqetAYQXRzcryolvEuYjNuzYpGkNBvh+TptyKXfg0b5n0rh7INQXDrxqLVeSlInd/qtYshtk78K0uk4RCw8Y0hvOd+UkIyO5f+5Gyy0VH/saGIBY3S4cio6uR90lw4bJL23tQrWTjszePWVDuN29TQEYDj3LjcY1d5MGAVTZEJDv6UokCBmhYCx8K8oGyvfCgu+hhB8LJFd8AL/Cq7uupbTkzqg+wZ/477wqhosZ1hRpfXvunZtgbIJzC0eE2K1qElKzqn599BTVSmahR8pywmqQAlb3G0WXvKdP39wzYqIfNrc9yZ2TaIdIGSRmk/r71xoPp7PBe4qidVlcWoBn1ToktNs8PpI8KO0c+rMy8wiRd3cLJOQlqesbl5lVXqwKt8fNZ0WEI4wmwqQsXTzlZO+S7oar7lVu1mVbJ7UAxzFlnlPswzuhVy14xBVoBvHBh796Bc3WTUlkubs4zW+I0U/VLPtjXcuYepr++jF9OmJZRcpPbvegFKrFeSiVmkG08MqtK10y5Y7el8HnarhmuSjA8mZruYC9Uf9SxGOauRdH2VZkJ1slOGaU1eq0Yhb25+PgL5yHneZCENroVeOJw/piCGglnDNit0lN4ylmiz1DVlnYIoxPXYYXQMZou1N6FqYg6CAiOxPqryEMyxjDXu7fBvEOlplSCZkmblKqSmNyDBS+AJbb73okR1phufcodrFhXK/dcApnXuvycGoFNXgzusgVLORB6JOFZspl75Vmo7VXuTC7+d9uVtmu1yiT81K9Bpv66Xbm1QXT09A8Z5USTtqmFc0LFSR1CGSn0nXijOLxknmLkc3P6luylCj7uky+b5w2d+Ej/6u9m4U/Ib4O04OV4fN2Pm/PB3C45tz8Xz149Kjs0VK++u4E/8av+m8nvpGhUY7A91fjmcP2Hpd85eHSqD9ppk9wlw/o+jx6Tj2nJQoqCuG0QznuxE7JLYg5bZvVl4vwnEfjG0/wQi/+HkQTTpWXdDKlxWE1AVI81TPesTRcuF1NQBMYTywyFG06ewXuIOu8uLMEL9I1W9Tdqykuo5tt5Ij4U5Myhi67XrBvUs1aoYoj5li33iPIVQQEFj+LZcJS5ZZkaLxAyXeVvqlQrZN/i1utN4UZySjn3/SKrXy70AuAR6zlKfqg7IRj1itxiFX+DWMZeIsGYzxdGR7+e5ckkgDvFDVtCquwwE20zKGfIsygl0/0lPfoFPix6z0DpIbBlylDcZsDDofUl/0pkea0mx/uDYJvAWy75GsG40SvqYoYEkKzVqERbFK4hqcbnRQgjJV98KmwnjmJO/V+sWPtQ/qFtPih39lsUZ0LFFwiUy22U5bp7cHh36m1FM2QnePoJIrMO8xJhKHjAefmVINbXEGIt+yG2D0luRJdRTHYfSf2sif00xciBpAz+iT8KWvvW1B74tnqXkE7WK/XLynR5XxSHS1QGZfavENGRhCinJscO5Id1ffXSTjVobSms79b4I3C8RPuFnQib1WehxnctXjws1ER2Ihqdpkunx4mEgsEc+18KDRL0WxCYAZBc6JN9mS15UJNdO+qOwnkieTAckJ7JluXKa4uEBlrH/hChCQJpUP9efjulARB0dhoABlXr6yS6chbdKqFwIaIehVMU+K4jrcmNOc9zoM1kv9GP2kMqDI4C0fIBPNaT+5MIa7BpgOBF1goNj9U9cjGy9N+DvIX6D3BdhJKYqHTVx9mtxISD3TV9nRMoSrjTJtfuV7r1CH4TxJy5eTOXb2eJzqqB073HZ+1V6g3waG3HabaP/es/yt+5y37zkSIE0YwTWHg9qHOWJ9o9LEg+PcOcfENbgLgxeiN6QQEDMfJrSkafjputSmxEGB3UXnJMY0stMl7RKhN6LkneobeRGqcqIhMNPXX8CR255jsXyut2LPIO1Tw2ZpclfAm65CMWcGo95J+Vj3Wwnoyp6shhlT7a6flTTuIUJiYzSSEU327fh1M5vgzHkeJfhpmV6ZYE1sOKTqhpxSGdIJDOOelgBHM7HDv5OBs/lrJDrm3PxLpB4HMz/xySDveZ/D7ZEhl4CMTZ8InUkdlSf4cjCu0gSMdAqMW44Ax+AM7s6tSSXyKV7sOcPl5ydags7E2yZXdI6Awgk1TgCniYenPUJjIZTl/3AAkZ3vo/+jOhFNemVQ0qUGNtJR92YkiW+tj5Fy/ic3q6BZePQjkKgIxRBAmlLUduvfTp3DtFMj8gtpswLJC/Su7c4C5FKSfhRKAoIbjaUoNnpSPYDTMXs3/g3/PZzYKIBjOVMTmDP6Mol3sahMTAwF4wkV1ChtawdEuE3TMDhm0dOskKJCxrvaZJc8SRSan60QMqHd1Y6wsGAYV10j/UeDF8sHV66Fza3NA83MPc5H/gcT9cOdhJkeT1ZGnrgNZOxbbOAcbPXrmGREzFAzx2hKIRf5F63C9u37EjEzJQ+VtFuKtvFkUr0oS71agpMtryWANcqAzpfNAuWOdtvQrhGz2jYoF9vWxzgDwPTLsrF26rUqiY4ZEAm0YepHKfQPbw0Pu5jHijaBdwlO6SrI3gfVKSB6shDjMmitoDktESpzgmuJNtXgT3aodcHaU5Ow04u/IAE4SWOCpmOFfNLbZN9q+xUvxmAwnjmldHBjmO4rZWneXsqiGqohcbxcRS/Co20icjcVTE77m8xhECRTLIttnnnMhMJbVALrOIeODaZnrCmUIw8yaADS/YlLUFZjgY6pSoY6bQqOOYR+mD1Ic3FTBmtBQ4FDSjEEcQxt3X1jMea2W7Otl6WdiX9H0uxqvZ+MRWwqF0ITzjOwRlTaAsS6bvwQoSNBHoqpO6OctU3Xh1Eq2vTA87JijpKQeWvHXuqYPA/IK4NxyuoGMWlzACpkXjSp+RZSYHpTjRHgCfgq5U7Hkkra/uIpNzMxiE6J/cnswZbIqVDpsqIOsmLq8oFTk13WzUNB7Bg11UJadmMG3zkCbWjE0gju9ifTwHXl7Wq2Mmidosiv+99HTtnxF1u/sMaQnX0Z+sMqRP3kVwYU1I4l9wf0W0xPlzO8UX8XDi622BwnfB8/PyqJFdx06/kLXVP9SS4IuBWdU4DfDSvdxdZjEio4P7gNbhqulyeq1UZT2vcku522leix4IXxwvykRpk2O2g59380IjnhO9za7oN1cb0kNbLEwpIrIDXzfcjUMeQCYONvs1LnBByJ5XYAC5+/BOPr8M0FPnhnaOeccez8L6mxSbSgEl+0W1hVJfg+2iyPOg5TVZfKH0e+LTAujN3QHSC76DcV6ct5z72MvclUJAWUCwO0OM3QiZUPlWCAcbdcNGNvpPTDLceqTOMPk5e3yuji2oS5M5A2XkuDP3a8GHIiS3bwYZNNefoF+pwBVr4U2+wk5Yk/yHzDuXJZhINDK3HdTM7yJz3VHonw5uP//yJ+zk18Ipf/GyrJAiOr0M37vkHUQI/xJHdDqBmNVAe0j60vpgPanYde030hPtXdCIwfy8qgqUOq736tX5EmfNTZ39Zz8nU3XcbaSmMsnTJWIdZiDu98Ny2l5YMge0ZjyQRut2XN80r7ez49MXtezO12ILRKhdzrN4UY/9oh8b8hvDrohk0nfZehBOzY6Kt9vxMHy19b9B3sXedU3C7m7mmKYzgyWn5Qb4PwewSIcH0vc2WyGLhF8g6BvqfeIEHndd/XH9SJIchHuKtYIFpFdEB4kDsyFgmY+7/MwrtjbWa8WuBA4aVsvQmEbzb/j6/u+MvM/05bbphIMkouH+iRA+fKu28CChl4EHLiYLnmYwidsGIxuvHgcEduhus4aDzd7Xq/g6u2/0ayrHRzkbAxbrqXO0IvaXEK07xUkga0KQXPdt3MFj5wyH/FZ3x+3DiMB8HULaBOch5xuugR6QC+S4BhWULjxjg5FpDtGT2YkuDUi+2yIyL3fkUZ2L9uE99pJeKkaR6iqm5
rRQEdbKshHYSTc69npg+wvaG0+TNijf8ejtaCtZdyPSw3pZwDNEaW3XtfnI6JToPpzomZEJkrlPAIlLDVOKpiLxnwnBKeX8X32doTU6XAJNzPMe9O9WPYRMOcLIPBAunhuxYKuXtIEhysEp3fVcTvSJP3bSh3rzsn1S3sAwGWv/9cUuZjQ+M3QI9JPa1HyXoW+SnEPN4mrYaN3Nyi3B4UWj9L5Qe6GjerQ91GUtbilLhWQfg5VIbu9uD06UjaZ1C4XCPlau32IIHaY9Wf/704musroX4GNxV+7r4w73lgNjG/Wc5N+M/AkdebFX0aUFUfs5ehCq+qJeFgIckdd9d9L7GFrKi9wWqjEkSmtMVeds4T287cEZ8COfhfWTPmJH+pgLz4R7hLev4w01TuYyUOz9NPBuWQtYWJZ9s8v+CtKnvPQC7Qv18uM+hE7bStefMGhkSIcsZuaDqxHV9nELgnl5NxDg4Gt/MB2+DJW8edDHJ5OZvxteJ9wOU9DY61WGxTzwQCpT4dtKbI0KUsoHw4BSIQauqUAMDhtr4pciYI16USN86Zj5RQeEtZHc6y0G9dt5DgSJNmrTwv5yR91XU4lJzChSVqwoQzCT3urrhJryftGxd+DsnDbvtNvxMpQPyA4dzGtVId+utDLOfEl5L9f9d8+w/BYOblI18jiqpTuMXRvc1n/aS1W4WJs8WxJiAKv9LhKTChZZzEfSMl8hBvNpgD4YIefpeLhVAtV6teEpIXVrHQvBRo9qd5CkQDSv3+x/GibgW6/oaahTxQHjsIZBa3CZoCeUGoy4VPJcxxuj1G9oAVcgLMT36FlDePA3WYtrweYpAcqWxCDyzuMjyGJxSxkai/RymE/yxhwxc6iw3VMsDPXZg4GHPoaSj89oZ69xPuTWt/G+vELMWYMyV4eHTV4CAj3rpzOrP3rt0/voP3kWe0CUU0PIbK5obMeR1PDO+zuWY5KyKOK6QjmCE7woE7EOy0i7FveWzkHDsU/zsmp5hZ84/dInXPmQXOCsNI6Zq26X0kAhz2CHlMfyVWpE44W3KxMu3DBgsQSZuh51+FAIYLH4DjhklTKNz5L8Hrrcd9BuOT20FvTGeq4wf7FTrQ3LdZoUhx7XqAo8lRfzcLOy5mBY9jzcSnFjrZbc6VqT9+7v00wJwM//7jbF4XgTC6Py8Az8ol5pmmAupGabHRc8VRPqLRvv5jp6NXU3VZaUX35J0ZAEX+ZtL4iKQbFzOAbVGAIBkiqB9DUaexXgbgG0At9p4DxcU7ZxpQiB7DyM7c8rvJSZACI6JbVw5m9rcMBa1G8mLRbDZtcMWvhARF+XgpFYyn2BonKIMqvf688rdaL6CFIWsbdEQMdhx8xdP3gWwmBsEQmrVowUcY/xCuV5VlIbjnyN8XK8hnfADaioqW7EoTR97XyLOez9NfyMbH7ke9k3SFJpJoskXqAM1Z0wkDJbCq5GHAImfrp2/ie1HErXRAdn7vhH1wbCZhXgYGxd5ZY1eH4XYVs9KszeK6LKXgITsgPFGOin/7FPFDWNrjRMKojQydr0yhu4KKlFXGs+l3/3oiaTVxgiY7LpEKf4HEQ2iy3c3iKAFNZSm2fQj13tI6p6jYeq76SIsfErYsnL8iqO7PpPI2/n6U3GFb2JpYPxfuLPXhzVlH4ix8Ub9vmB3O4m0pmAB7OJ7bw27ZU9mRG/Sej/dn43JdQsh3URCVJWeSdXFyLhPMGHKt1aMXwAWVMWjWIDfPy2Raj/1RLwlrR0/FnmD+DwpZidHZxzOL5QhsCScf67wLuluI3SadEiEia8K+rk6nuDOod7EjPDgqHx8pR6CPqd6PG724Fem3+tiJke1k0MqVx7lSlOj6BlACde32GLbdMyhpUH7liM0tYOGN2G/s9SrMTtR7IGguIrrZJ9WX6MKMdB3Tq/J+9I2VXfl/AgIdzV3zM+swTOUK/S5Y6Yanba/XQeFpMs/iHKWCm6fcyvGHzEKTIjBmvtsLNMGyjtXJZyiie9HMvtMXm/IfeFGmnL4qIaeUaxtrNeVGB/abuqUgQPJMZedMKFGHEyQDBvGx/khkokdlZV4TBDzxlDcnYM3iXa10YYH+HdqcOzrNGpFMn0d2E1/auNbdUholV0QqEq8VfaMQIsHmbYv/s1S88QWX0uiB8l+LUf2CPp5q5aKRPQpXJQRt2oLZPerYUZfH40QcbpOg0nG96fZehztbM0tuPMgyR/c7MKDZtkrst5dMgI7Yd1q/VSoAfq1TGY5xU9/wVlw7XohiT3ZSPPcCJBxiwlrVo5mRry14Z3moWslKDQ2y06y/6X+NnPhiZv1Q3hiCSo/KF7BzDul/Fhpv5eFd+10+EXkD6z50UgJNieOHk49dokuWaIEEKGE3t9V7PIaj+SkiVQ8KMQTv44ZOGopwhdj9G+VKGfs+toIya102MssFtLf6WkrJUxzDIgus+VKhWW5Q7LGwimK5dm11GI/yNP8HmIqkkVy4GAD6zkqDSaUutViMAKMsvU3t6sg83mfsyaxybLO0Xol9csYh9OpXYJ0kWA8qxNxS8244VD0NHYrP73Zg1v+bnpv4s5TmfcddJ3G2XLD84ofQDRhVL/QgzU36rD9qQUSwZC2+CJZOIEt2/3Bels+qCqRXe1eHeMfl9iOnsfvfNcnDxKZVQPVwPFeakZ0GMKQJehi+9zYTdCNYUYQLaM0ZjuTeo0r/j6FcsjcFYR5xfBow74MXiV5hUyOLn67nmOwtabD22eKFBaTgVjaRI5O5SVSXZjQFXKqfoZDBSGso2XvVEt4Pnlv1r3Upx3N8IVzHqnyZ9iVh0usYC25t1HfeqtHdHWNpmt8kJ58uWUsYC5LC463u+JA2DwCkvcxWdXtN7nedPmsT/qb4Z9xMTwVBw6rRGUUegwj05HdIC+Z/iCacmlYzg/WXJKsS3lLZzIb+mloWcsoXpJlsTxcCw8lpi4Vr3Yz6KD5lmkBjzvOzUa1FzsOkJCoEE+bDECqlg1V28EeQu7yahJaDb3Ni6qnIExd4jlunbjNSxpWJJrhvGJtD5LHBdUup2/v32Il7dHXdiU90MU+C+VCJXQfGhuoHOk2KNsNeXV3/x4Z6MpQKiXlNjuP6W4tZOW1sxych4hIwKdGCuGzn3f5h7jlxBQ/DWVLbTngK2dHsuIxN6q6r0nZdNMLWAhe6r/fywZh1Cc70STNLf/9FDPARo6vUNWEVze4Oq1cqHJMk5459mZzIo1zPo0yESeju0C8WBdKLPmwkotrsDpHYNqQ5Db0wJIHMUk7TyAUGhIWQJZCDHMkqqvnc8t6wWMMhK0VtmbnuGkzY7fnf6nCJXP8hR5CPF60mOnOLe8kIvq0tQKaGiVmFXSKSmx/A5kHZbTDlgfpuPyp+O8hqdSMecsQeCI454O3hhCQFhW8sHm/FsYYrFhhpHfve/07OggplOfhvLZVY9qgdpZ0UwPaaTTlHQ9i7Ez6fUsuZqgSdbZeT0ouGg+jSpR4de+PwWMxZUGXRJ3W0By5lj/eQa92rynpOIzw/FQvqFPMt4P+b8Ru3BE/QKpn1DiQzFQSD+B6FD9TBFRQezQG8Bmx5tJWt4P+C1dNRpUV4DUiB0XoPeJ+yrCtwXGKx+HYQDsbOj2N9ew53IsCjO48mQlGvDbdacaRp0N5hjeXewkxlKkQC1V5ZlIEI+Ptw47UaL8JApMLwsU6htloedST7VLLC2jbU4OVD8qBLy6LDTkCUt/glEh4bvLR+8nDt/4CUH+OrIezn90Utdv5/g6asNdWyuNOtcVriMnPrSj3iXFYwOULt2TKxj5JrDpCZUizx1JoZPOtYXXo6mXKZxAask/J4AC+Li8QTpYhyOziwjURbhu4Khlxs3Vd5g0jvl2mL8YU+Jw8hnY28dsCvMyo0rQB7TAcMWJ10TZe9COXHIUKTETzdmY8CAZGrC6WPqHyGtosLLs5ObDuCN0oHnx7a0k8mL74ctSnpT+cqhpRY7YWvT9DvLqkFd0GpteZKHgcvdcL9gOgsvUwTYl8lIDzTI6pPtRe9XKP1BCbiFigNf01wmVYKpZGxRprV2j7G5XNRezRmiS4K/pbPHBrM+DYdktaDCrHcLZs
9MgD6Omc9KA/bd/iwu7mK4QH11WSigDE1sAX7CP6iulbl1n1EFlkCixaaffTPIsujUAdEJZ6o3td/jmNG2PbVgi/QLpQ0NA2xwQ3luBADA6VDURa+fff42Xcy7Av+NxbRYWEk1u29D19ccNgv6BZGcIKsGJc/ixlJgSiGmE5LENjieXxWrGNe0l9vQ6kxoAc1RhJwKg0X8TDgelCWpuTVniH06FlEovrzzUqUWETOZ38QZWscJo6EjYDe0gnQTTyL7OLLWv0VgnqOSUf6aU66DOB65pddI4HH68x6Z8nwjNkqBjBGDnmKhWebI6BL2FDbkoDNMxdUN4ziAyCJLP8A7XQw4XCjRHSCyxnRhfZ8IzLxaMdopjgWWwkx9y7fFWFme1aRuq7FSzmRSv4Et4jXrEFA8uEwDwq0a9gYoylirOyd4//rJm+mQhGObpDUXWnGXFnpKtghpGf3uHOlYrtNoEKxodaJ/Y/bMaYMHo3v/VpBu1tf0uDrJCpm86oR1VBKpnDPztnM+4nlH6VzCKHddq81zU5+XOsu1llTJdj8Gnqy/yr53NAaGuNbir8UPPsKcqIag6dpaVB7PWIjRIvuBfdH1nkCdaqE7emPpI2UnE6ktar4WuXJnp/xMvCgdg4gTV3GgpjiouY3yLC1f/8Un2kyoWbkXWtyR71ycpu312scyoT8OHBRfMEnEdkbhNDAFRMZM4KZnpn/aUjV7ZTuYYImiY5CzY8MJgrjc4q81ovqRkHmgOyiNLw22LB7s1Mu6vFSANQSVE5/ps/LRNayS26mrzYFkhlR93WA3EVHEU9ydSq201DRz/nf0pg46xjjs8w9tKMmErL7e6yuM82YQ3N5FjSc9ZHBjokhgdqKRSKdeJIuZeF86CfyNnMyuauxy5N9eWGy6qjBB3OZOo4pxGX5YxBDDuch7pHAL8/H7dhTJ3llNz+yYgxsfgXzT24DPuZPlAhW9RS5KOJZIpAngAcscvwhG4kXmD11c1fHt0vAQ9iYs4ig3c7jx8xvtkwDyYz+wlgtxVSdOgC/YwNqcUU9k7vyEDR4MdLEeJCzIym0DmB0e1nWY1gSb29oFPPQ1C3rqR3Gg5KRE6L/uVtKTNpwzzJCi/US3V763Z+9C+zvu7T6VCUhNuUrkiCAgi5TpkB24VP/S+Rt+lzF76ff6wuznao7mmLKwZSPky2DOFB3zboURHhcpJIOg3cLvuDUuUfaAv8lCOA9ehQKT3JUBDcwTykvirummFIvMIvCXaDuqa7tndLehwh6qqjhpD1Q8sXdLBpJBnTf7XnTwlfGLf8FaGv2ApaESX+YIO7P88wMhZrLYZn95Uc/aykd96OAbtXt0nVr8UThXV7blsYIGI8t8JOGfcQ1c3wzpV7DcO98eV8dEUoyICnh6QcwAVRjpigeMq+EHJaTlSfQ2zRiGS56yc1wQauhMbTtsv7HfnbxkQuaruosx4zw2YafDOYjb7OKRN1xXKfcUYQSWXZ0zUzWj3GHsJ03skq3ZIATtKbZb/iMh5zGCbREmkA55OO70HjM82zda7maQyyll0cnfl2l/OvAWfk18vWgCICkjHwwRxYFshU7LOvf9jw67o9/AtH2AGFi3cw1GnuMuvE1RaIkrgugpDyOvZiY0Qat5h/OUg1rTSPNCer1s+2TXIaCnZpWH/O4WhfacFP1HT2FqsojlloPlDp0ijaHViq+TA2EKliNyORrfPOsXbpKjJoX9FQWW+itmbFpJQC9imbI8LMGdFLkJNEWSfVzeAxDmdsjYTl18ZDuxP3eJNoOk0/6ci56adSEliCtxeWuyIMdaAr57a3X+vzbCY2H1wJ3++kJywVwDHZtuWXki/l8CCKdzM/zh+td1OL7qsfOgbagPB1cfh5rXn+lHJLSjE2GJ2ZnruxZugySi47AnURlwaSqlEooUuDm0oTTN+pd5Tm2WDq5ezd2OsI40X6LQVVG3jNVSkiQlOE4/48OrKfj6mTeoc4y7O2MxJz5T/33oqBLjJ3pOs4sVD1mgdV0iUYOPVjEnYNMvt03eK0QRuGjV1nS5JZLn2ESWa6s6XxKb9+1VI5x35MBrvDXuO3nN1c8YjbfWsuEdZuUJ/2uk8nxMfMGbfyJHtM67B+IKBRADPL+gSygAX+ptnQBwQezd4nXWjSoYyvKebmSfNqJqGPbyU7eXlVvbPbjVZNrxvKa5tybOxhqGPOCzUcrPrSTWbHZlYQE+8+zu99jd08yU20c25/4IJSRBWdp/PFcU9fq8N+JlUXtBzYlBlueU+cOcMp4uKDnBR+zyP7VK1kBI+XwnhqB99klm73k6v1P4PHhCUmtQpiF7Q8MGD2dTvatUKLGQCZYChI5iPDQ00ZyRtUuyN55WfwFGFYuKC52KwcAOg9nBVxKGaa9Ht9YnC8rJQ3txSa/6lgNaL1qg60bzYrRVQQ0T+evswq89mlpmfM2kUZ3H8nOIBVg7Gxc7AHZmlSc1t9+gdxwt7tUoYEMhGqREwlfxqoK9flvRCtAD1KN4tUbF3cMlcrPyoYQcG4dwujqpddsLHyvjlrdPvfc7tzAm12LuG6aAeq2ivQ6GVdbzsIOxfx/ajG+KmOoiQcnLYDAHr5X4iZS5oRdEy6Hgp9C/KXRLlhroOElYk9mHWRH0mV29J8CDyFL9qEwKf0p/QsFkH3I9b9UzTCtg8J5JMGRlEz82sYXvMbMbXRPHSm2FtOD6JUKBLs7S4Xmbu6wn3vDpfh09aYg8mfCSKTUrIwofStSovBAZMTqckqB8IqcArTsvp9vNkCJppJfz8rt6HNwrBtYKQSMMf/T/Wy3YuUVSJsmzbV2rHVjN2+PdZ1QqFbobzIqej70ftkanyR0O4CDsvOtOCtl+C3b+mVRlJfv9iYG2Cvi/XLnA5PgMKOHoPR6JEEJ+Ose+qdmbfCUXyBHCXuB35trS76+3SvFmv/fM/a1acpmATUubCNcoK41B1xM3zrHY6O7Blt9rBGOd6XxzNinIeUO/3BssARQ2umJTJeR2K8Pkr4H1KITYaFhwgEwbrYJlmRJT7oSuQVarjm4WA6RUp5pIxKRD1Rm9aealYnsvmd3aRewMPD46L5h1kh1eZ5xm1yeFOm1NXh6kCmrbGCvOeRw8dMTuRFatSABgY8fZ/l/NVs8BXAmkqRno+6YEWWcyuA7aPOiCvlkaGBKXnD8B9miFGPScKkGJPEwSeLgYdmigEp9CoWFlHHHbA7kEuuqlQ1v+y06qCoq+PfSnbgU2/CX3xhm9mBJjv0vfPkXnoWSAZmyMImkKzmgEZu5r9IR1VAz0r8iZqDwcmUMphEFQUwzMzzr+N2z8tnIgAJ/tPbunn/BsZHLZ2MjvIMjKBdFSYYENiuEtbRqQ9dXXE1irntg9QeQ+0DOWh/YIbUpl2hDQX9gsPvCxLr4IsJzSniMUjFjtvF1EmYwSqvvdijfrJP38flMFsoF5FVZSTCIkqRSxdhh4pkJeCOM9jIIdHagNL73c+AYoNBZ81Dzkg58bXwviqvDjF9w8c7vQmvqt04/Z1dHnNlkcTKZZ/nlaUdWJiSVv7eINaLIj8aguSlllbk8JqvH9hFdYoPj7b4A33HneoJ0dYRDuFYa80GYFrmYXrPF2skiY8EUbKvz9vkCh0Ui4Qj8PkU7/Nt+MoXcvjChwL+kBY/Rf0T1IHEZuDB2XHgsCda1/d31iCS310z31XEoJoNlVTpP5KOKAxKwItI3XbIjbesfpek//NTx2/KmRQcmAFycDTAFtaTXE18CNXxunisEKVzna5j2QhsTakpCdjgvBe5bTCwlOE7Ke+IVExWpQrNEyall5mtQVkM7e097vSa5hv96ZCHP+bVcvE0xbhkLwPKrPVz7Gw2ashSAU/t6D6n4n9gkC/NX4mVEiQ/ypfuT8URXrOYjB3t0z19rAsa+lNwFIQam2tRTn/kTS6r4gU/Shz1ls8TPbUBjQVM0Kosv1FWp+3ktScXYrApSXbXgC2wRbuK0M+APNY12SwfkXDxP5vxBQgapVdspTmsu1rvBoTUbs2/H7EptdvznEnw1xUiJc9RiJQeSlFPJDfKuLSIl9BTD7+qBCRqVworlFQNH1OpsUgyFRno
e8iPVgKe3GDDo8iFJUcU10g2FUW/EMOttlJtHp/aarw7aHI/gHmGfuLW0WVL3z6uDqdm0e3tRAEUuRIBphGToBhPNk4HoquZwvxPSjkhSHOEO1TEoklwQeRzI8SDVj+EGjPuzVUi92V/F9JkDTb+otOb7/T90rA8/mWHmeiPOg/C8ASbmHi01Ftu5FgnlwAuDRdgrtuUWWR562QqCEjw/jeep4C0x7sob21MXRZwSj3PYzyRnuCN6jGeqO5JRRnNEXi+VjML3wR6kJv+CZbZauLnQ1b1WDDzLTP7fWorfAsRerQOg+GT30jfG9WJ4kCnH/44TjkeYfpKwitAOlm7b7keCoWy8SEerWvbEhX6N0iUlS6KgC24fJnpX1x6PwqZerAUoTfk0PdLUY38SxspI68U2wDjsgJIP38fYz/hzTIl6JmscSpY2kKK0ET4E8kHvHhlZiB+RGYpeWrK6hKOpDNrL1FsE1KjU9DL0AF3IZYUKrvhWThie0UPwTIz/ThWNIqBEYW8HwlFiziJbRla6htnmEayolX0R0dc20ijxQ8hNvaF3RjuTAafnfTRX8hfrDS5pO/HrLBVLZYdAI7J9TqcbXuoPM4U685tPxXp7EhFDTkS9WuVxAxeKZd4fv4GiQZJlvnrfwsmRzpynSX294Sct3TQ7i1SpT9mJgi8EoGoJlkUFmYbrlShDIOWzZDGF327DSK2LLTYHk9wwTyxyBnM0ugIM/aPixxSmq5zLZjPNpDQrQnG/tlk5y+5Jse0KoReG59O/vL11aDvqHiUMVvr6Dm+lKpT/OgyE+Lrp5ySMZRyJ0C1ex+DzobI0+j0ZEM8c3q1nE/rt+q/wybFMXBBIpiyqJvr9abJO5QxJ1THm4f9htbrCwhW4gxw8ivM7fiFB3Ns02CNhXIVpVtaA6bl1jLCilGERO1QVz1WLh29/5ao8U4ml+XrCekp95QEfv749B6J8rXRsx3DjHOjIbNIwpHZvDhAb5HpCOYExwvjiUZid8WW0A5pX2lvsB6n8LlSUcQU2HqpBxhZS6CWERL/XyNHT2yNS4DhNE/iKpCWZPKbwKprN0cKL1RxmBDnwgBVn/K1U5rMNcBhrKcj+M2B4tJ15govcZgHKjV1ZfVs1am6yDHM2Zzoi1Wp09n0FaSBkx/ICO/pEz7DNHsc58V7CTiphRc4f6mRXZkxq+Z8pzEDfzTcywBfql4mQyhdMjmKHi+I4w0l+sDmazzP1kCH3GtNks9ZYXnp5rbeTKE1ODzcgJmhyDR28ynoK3vxoy8lgsUMkQ5joDO9nZMqaA8HK9khuwYL4vZnuSsgSdREar/WMC2SprPAhvFLNAC2J2SgQ1fYAHzythCqHljWOe+cA3h/s2pUPGOKPBGcSkpstpQ3gJu7FSEGdVMv4uuQ4MseztC7NSK3s9IxH2IWw+dghsdi8/1jmNKpZvbSzR+z6QvKD1loXG4jp5MErw6/uYKEsLLhY/LfdeimzTEJQnvZqVcuRYrWVL2R3msTzcDoZM8Mo+rjylbA7lnkpj9sg+i2EvIzbFSxVZ1LQJ9pFo0I893VdMF96CDCCGe7HpQ9bujve2TvDzJ9WtVuv5ZQ0kURnULFNkHwMnImtQLgHamTpx51Ce8XL65jHOW6Xxi52rFSBnD7s95qb4AyF0oPkqJj4QoqhjfvDMbewVU7XIB/NdPAHGZ3nFGN9Uahd8Y7dB4rL+NjcH/Rrxf/ZC7P/D5WGO1rpvba5uFykOuAZkmaISYVG7NO45H5ZbsD1GQwPzXmHc0QwR+BzekN9pmOZ3GpkHW0UYXMqOZ26oxbYPnMp5sHH6bsoputbOu+WehEIPubW7k+9L5UKt+CFQpYybuqI81smLTgJBt8Pf8Dabh6ZIOiaasIx9M7fzPU08XoRSjWlnn5313jp1f70vtq2KLO9BNJT8P/EQ7LZBTFECzWZrn83re727AVTY7MfxATR7L5CgS8BN5i+nwzksj63zyf7PHLSOxFl8CqhQFMcTLTzKKFzTRjp4yKbv6DskChk+mJUO/t7/USF4LLgEfV3o2n5L6cgkKBicUKVm8JYj/b4Wn07B6BMWxTQY5NrptSm6C/9xMpviRIh9zEeaJsDnC5oOv8ier0fXOXwK6mRwOj43MgugGQfq+BUFAT91PQiTu5aUIVpcPPlpe63EGPBFPynWgfD4TJF0ge1XtQEobuXyUFtaMor9j068M0JSgZFPu9MFBTAaNBygsMZWxAoa7BKFxMKqq6sZS97vrByMy88hLE/qBa2l1wxRAAoKyGEXGcZO33KmHvlkLaVI89SoPo7mbMnhn1IG9I+gIqYtHGzFXS0Igb9yHW3qB/BNWMqeVghEABXOf2rhirAWiWJ+tgsgyaM8H8Ku5blv09y85/kzFl43QuCBw1gGtHVDNV+NS9cqGj1b0a6/AI7kA3n2UcEKQdWJRyQtNREf811JDk1K+EmlS1AA42olXKcgATBb/bz3EcaiRD9QxQNbDXukz9gROi2ugTkMe5vY4+CcbCSYUpWl+WZAZhFSdOun1Ut9Or8eg5aDsgK0VEc/T1X/PD1RdWg/h3DD/I+95+3pAgX0ph4zzdclaSUPNXKUVeK3a9vE3NvwBHdcxm0sGulDwCeTyaPf6mlk0EZVTDJ0dBEG+yXC6HFFBg0hYOZAf2St8GPiikVbVwrQd6GJJKpYsb2ORWf4MWCs3i6p0pMH+gvcRjEggRt1iHXtrL6Um/efMzz7mAgkBeS19kcNJB7TF7T14/opvTFEY0dBqyDZFUGuWZS3jTQqxIkS0yb+gkBxSti67scAcHBCklXsJP/dg5J+LiU/370WHcnIOduNKshaILxbfNkVxjy8UQyWClFE9KuNaFJO9d9ql/i70BPmYLH3rkmS+tV8S6PClAl423ke7HoUCJm3uQVzbfWF0QMutVvhCVX0nGKBLOpMObNM2hoJXqxwL99YVIwDJ2siBj4QAVNqcXR7UbFHXc5MjhlUNDusH2Si1QZELs40CmsAgpRwqBwORIuvVkbvz7INCLPFVk64oGqHkcq47yuTYkUT2aX6TgyrMmSWR82ODhmSRawgbWsEikAUrpGcldRwJorrxowZ23M/BIUanw5Zo9eyYDPjK4nVHH/NaWIX29WELnz7g+c3JL47gquGKYjXqi3L/oTaz4T8qANQGFjmrRyoae+7/V7M8sxlr0lAGTomex/reDpltb5nPc19B1ZH2czKZRZp/2A4XOy8gkf90DiHkiCcA4H7G883uLVTj61Bi8rMR9sXDw82VmhUeNSAp12TX9BIZC7PFOA8GRCT4d5ayxeWKR1G0tq1Lr0YLNrCdtKOTc+rjlVP7W8AAtXJGmDNPaX4KxP3JB1nN39gT6JU1UfuC8hWu2xpDFFuDjgmLOlSN/Fycnkehba4UErPw5DmWxsC71sDgeLras1NFxHdve7LYGvkGX58VHfT45odNdsWRUWwHq2kKWEKNPTyvYgSRiMCzUCQuKGwoBTnbj4xYydjC5fNUb+BUr6KuH4CJwRwKwLLIbXjTk5po2mPwHQUgcDSxRAQ1oPBNkCFCEW8YMiiTZ9B4mK02AH66FqR8ExYmrxvKOlKi2k6yyru6tNGjFUS2LZBZdjoAug2MkaE9kf73pIWFEGtKe9WEEvTx4EO1/LDvLBYWgs8AOusfA2QhN0WlvLFpGVMVntmrhVY9vZBwTzKShAZLN11/yJt+5+o8hsLg5H4pz2u2aIRSJ1/CbaJxuQjOg2Cld4V6HGapmiysSDrmHdCt/5E2FRJbZ6J7LipOPyk1V5g97jQxILLadAKk6MuOJBIYs7zWT5Erg8Ia87batW7xJit0ULq5jNH+ZgNrZ7PmmgIgtf3RwV86APlhrBtiPbxjw0i8LsSN9paKwNgfgDK8qEJi0DL3P1ctCb6rvzqn7TcYdkOD47/HH7FTUZsS/sFlP18R3uWldSxyX+9BluIgOTty8tZPcap00GyMtiEhQuGavs1FgFoHK6BH04AP0pL0lO+ijn3KapRtoM5qHTrMEHtXjkuo/y7xx21LeyczdeVI+wbLljPwu6dzYiikQDUPO8ybfHs7pybnlKrNYAFyOblW9
vkjPFkCXL47yITnR71138Z6APq/fcS5k+QtRYkCnsbwkIWySsVPDWgfGGcTNWPwP895ej8AKcyd3fuPv6MPLhkoYJwxBCzzhjbg5CfZMhtFXVhannkn4HtEYt/eKcWdbM0cQIpF5yIFRldWw+giVbyRm1Jnb7FaHwfDgZliDVPFl3gBmljbBpflYCNhnyGHESRL1GptLlnOBE7PXsJvNDu+jCqi3yGl9ZCBIOu+pwjPCT7IPOAk1KniDG+a4zHNnnWltIOD2DXa7p6txFJfYipGduIyY6axuQ4/bIriHxIIIlNbkBxIrGBhnlbOsstdQFFtrIM1+nWJ3ZDhHougR4fV9XDu47DJiDlAzQSix9WW1JQU9Dtg/QuLUO/ia2qsp2q1JWxphveSBvvivNP9M04UOwejkN/fFj6GfQkmxlghvEoRTPks0sPase176Nvy9ANjFYNHz10vFi87JbjfJFA02p5r9Q+LSlMaH6oc+c9pTUZyXVII3AOJSVR5J+M7FjKRvLzrhpMgxOW4KGKVT3IY00mLdaQUa3e/Ra9/zg7Jpwx6NnHDMagYS+nQYTs7VV+YNVg07c1koxtbhL4qgULTxMITkIi7QmoKBKiCoiEpBqVrpzzXGIFc1pVX/SFSsUQV60pqp7zbN2zYr90GsGLYfyMcTrJLAdSKaMeOSJGdvE/hKbi7RVxDSeA0ufSK1RLzilvFIf3su98dzrNl+yyAml84RnFI6vxmf2CiycfJH7KR8hLGPhaNU52SbxzKMZXhevdt3cmsE4f2/V7NqKExtCw3MQR0xGHYqjOuHG4Xz6eFdc2RQ3vsZK/uViXlxOHvvKUU33WxP1zLK9/r279J71Ysv9OC6nrMiRInLEPYxafNUTxiKgerPQHUY+om7/m9lXs8Tspo0BvtauTLSbSV4Zr7nbwFZiGnxBqs9ZeEj2WQB7uurSWUbrHtcTxVCzr9wnysZQem8l78K8EEzXBHX12kDBI3dL7AbbeeVAveKeWdBoTJravMqdWjge63XV5z94FOG6O+HohcK1zlxPbd3KEs3Os8t/33yFZIee2vSvSG3GajstRcyfXh4DFtX4+PGNP0sh5TrNGiB8VdtPTQhe555/DE/OjeUdm4yM3zA3ZqedSOzzpGfuWfUUqcjbFcKxwVM6FqWRRjDjCPnkLHRjAX/a2Tj+PhwhSdQUbEB6/39VNISwo4LWGgiyoztntfVrak96jF4YdZLKIKqTn8jArW39hDQDGpZWr9JFGDsvJ0yA1GrOJjO29ArjZaRIslvCs3OXG82e+nUC7X2CVYSbR0TVj05ypcpEwB2BBbQUZnLJrKQ2S2xrtlLWYSyQ5TrocPNKvkVnN6AGB8vCbEguvFDNoyVJIt9rCS35awVZcjJXUe9Fv8pNfw2zM2sowO/aDqVNQqIyr0JUSZIdFCpBHQWkMPZCJ94ud3p4p+gJgJEu0IqA+sZmY3s91cVGyGLbhcA+Y2zGuR/fnkLCiZut4AiFt0Fk7U0WZHKx4SkW8K1Eq+FWsSrzSN1YWH1gnjaUW+/Z2B69n8AqSgJ8yVG/0DEbeNjqihHpS0Fy9D/V5/x3YuudWf2pV+RKxjPoMy6/MZs2I/CQLODsxVu21RQcweMxGr8+cr6cML1pl0ZawPH0SoKESLVA2FBddkzwL89rzg+vMjV6jR8P1AucE4VAaKRihW3Zb6iNC+RyYjeNyVFivRARGK2C9wVxoGKw0aUlHniDxvzUqcPoV76sjkNcK2xFAoOl8nb1PLiOaxm4jKcCeS4Lc4ohbDVfC/s1ueAGEkMzhrWOj0BvJsx4kywXEMC0a8Ix/ypsfsJxSB9H7F3GbJed6J0akUaOfptv4Sab9deBu1Zo+uRLho6kmDp7aD8sU5YANWUvl6FgQWiYnk74YZN1rEbYBsN81P8rvOyi7b/lhnU4uK7bCIcR3hTAIDMj2TYKcpqwD9anAkFaC7UJiatmWHpx/0ge3z5ldU1DdLdDbasZNawyX+Ov5xmxP/XAzIZT44dRoz+HI/6yDAuas88pdiqUPKZ96h8FRiKUkDPNyEZxA05wnkZm7rvRSgZDZ6nerFkNuCAj4gbpx/1m/J5Pk6NBTl0is31QMta69nfEh6WufsX7k0DOhKot9wCS+XZumLuZPPvShiWmFj0JB8Wuxj4BKUOIss6dxLJp/wJBGPtQWm6r+hl5OXLhZhRe07rK8OJB/D2gPM80tFzTg5hg1STuF4fW/mG+YaMJjTlNIugl+RhXxbjcoaytnjUQeLJmkypVmcn+N/0/sGB2gYvZiwMQWwIOBgZzE4qAJnFH4wYIUPwoQGXl1Q+wkM78WgAtfuENgrsxDdUJsPaYRE00fJpB2oCkaGFqjLTpFelqCJ5JqPU1OAvTj/DHvLQXNS9eM83Cz/VpXWlEg2h9PKJTWDwHKMJHoHwaSkrUUj5K4iZmF53pn0h3l6ctOFRvEOWFIdH1o4n9V912kCFaFJPrOt4RX+HG+3YLC7Z/13gV8S1ugmhlhHqmV+3YbGXFlZ0gIbn0QqWfYfrIJLpEIQHrDCVacNBjo4cQ/A08Bf6IOtuMyM+xI5g1Q8k2DaHvj02Zi7Y+8X1UJuhHb/g6SyyRIwvxCKaXXShw1ltAF9LjIJtK54CI1+o+ntZdNH0NBMJgfPF+kwR4va2gjPRxAG08c6PppN5xwKvyWjnaR1qzNqNkTM1bxU5spHK7GabFZEahU18T3/y/ajGzUKr1TPdLa2wzXABX3x+F9g9XaZ3iFkuIdPJjU+aiZxFA0OxB7S1uabNyfPGYX10TilKVzIFsx+F+9ibrB14c0RoEjw3tWvzbXgHGJWBXVorD3T6v/a0ewrEUWcTL+iUx5Qa+emhmIgkKutItfRRXED420bl7G39QuxRjT+8oaqK+Jsu1UqiSohDpCkNfXx/n7ds3CSHLkYmB2a8jLCwkX3olrgCAdOUiAQ5X5wxW74pxp50BpFQBlkKcW3kd44qJormxm/4NzZfUm+MZDp7uGEg8WRmmWTO+y304wzOe/8VMYN8bxRycpXHcSkYHJl4yvEb2ap448VhufgfKivT/U/K9pG4zyfSs1vr76jcdKw2U54HN/lZ4gHjVlMHZODPgltAffWvJi9YlrwYmSL5MwE40A3ae2/wTmhLQsziKnE4e+QKspcysMFj3mN55cZzuiMP1cdm6aVtkzEHxiStfLVwgo/Lb7UrumsyiPAFnymcLdrQRvOM7Be5YsIvQjR99Y1D89YyrcOw3YFjT9Jb8m/iQ3RhlOzgntAsKPdo4YNh/SREM/bsOA2k0zZsQqJRetre4iLdvoysxlCUsI7DdN9uBOipMQXgL3t3P2+LYHHUfEm4L9E2wq9gzTc8fnMjJY/4wlog1EydD0ONAfKpgGlKI4Xqs4OBiRFJyDXjyBRnr95+/1Kmyou82ZUSQWte/B+ZulR/CqelJYMmtZb/jjZJhbmx2U97MafRdOP7KscuosX4AQ8ExQ0vsFs/ZGOTsrmEV0gojE0dsxeh/OCy/2TWOhb648LWyZl/rxTcmGRkcBNGzXZiKuTrPHRzfv5tC/fR6F5EIerBINUMk6gGItfK5DHxFHuBxXWjYkI2Yypz5UTeiBmGfE4tMbIX/+qK0Ng1r+fGljW2aatF0zMiCQt4kkGQf1WitY3PXrsfupJ6BwKKUkkW51NoSSfBHEaAITcyXKEQeJfdr5Zr7D4MSfRH3yfZagJHLIumm5ru+QN6PQCw5+RIOR2AdTDqRyJsPyCBjYSOvvbDvTImlzJQnyGk2KgZzU1KtA4n7OW0OgVROX7UnM5Md+Z7kVO6gsy24O+0J1o/1mc0IMD1HfIY4wbvLpVhYY/kCVsApkFV/7CwmbYn+eKxEOXAlOB+GYHzE1ip1x0Pj5NqlhnKIiGuYcKWYPTohOiXa/jNRXUNeXIQHUkCKfkLSZ9T3FclZUHwRBzLXKCTTKGlOoN3FVpMG56fy+R8ci5AOq3fTWW8FnsIdCS0aLlNQlQ6+Pda7B4i2fe8V2D+yJUgwSM9N9UjEzMEomOZhCpcZFYdGbAqDiT+3iybQ0n62z4vE+WHRkAEFtaTiCDiPkgSDNFwHuxT
uH7aNBxm/O+n2ft8qsBd68YRtBSqeYwWSQsUDa4VaNfhMvLrBptAID2ZbcvvLihZ27TuhhjQopiphivaY/qYZqGay7q7fvbSvUblq6ON7diZzjStvwHVsJUSDRNDnxpy4o5USaQ1uCSO+pWSZz4tAnTGteE2uoAe4AoSirrbQYjeMvSWiDDR3BonMV25avOiK7SX7ll9M2qdFT8JkZVFmsg0mITb/B2/bUii9hxELiMGqIXDNObBHhUs63XJaT/tiz2ggx1wmxg8o+rZYG35S/PTh+/6nU0R12Gojc7rceTOP2SkE5gAHTt+mUDHXCxkbCEBAfkTyIc4mptUPdWkze/ulmaM+uH4JVqJIkTvatuQoXaSTU4UT52j11cqCxLmJqN4JoKcSG1P+5Zqi4G0bWvdMX8Yck7sMTPwOBO+jiQkNWHYsSU2CzCL3RAKARnf/SOfqH/DDqk1olizkvAXkb/dfROWdegnrmcHlXOfkTK7+MvcHcn2L9i5EijcwP3kllSv6cH+0hXT7UWcg8yHmGbq7Wph2lFZdmXBssTq1CksE9CCZKGbLKEK9Xlpr5QlQiGsLxgPs2Nc6OndVwypfuP3ma8p51Nx99mD+HmXTrFzWgtS17ZZcXXUcw7coBLDB4cpMyZdA1XtJ+EwGAhbQa2+7znsxxGcnD37m/7g6FRL8A/t4VIot2DmmEI3YOlF/zbaUoZQGd7y7I0VrIk+Qao5b8ZlWbIbgfZtexaNoMCQYveIra72r0b4+CalqqB03uA/6vpO6YU9VNj/SQOQPfs8c0t8BFZhH6a9RU5CFUI9ZSrRO2joMUagjrsI0JPngrsGgi9x7xcOHb+Q12rhkrDnjrKm6pmibpXGdp9LAF1CqUF1STQVE4nSju0xQyaFr1e4VTMwKWridsvDtVHLw8YYuIrHEn6wKr5lqMRh/mGgedMA0wkyzf700suBc1AIcpVyYcp2GbegLt2XEYrsz1bJmR8CfQ2MLTbqjI2oSgXHZ8cOll/aaOjXS3wBxkYA3Mqx0X+1NPtB3rgClGNHs5ujQ4Gep5qo86OoNXFX9vvrhGNmRSM+iCOyLJGt+6Xojrh1SITXDudrtxqIseMvOdHJ4cJ/xUuaBNdMnSQHCXSzeH8lmZmLEv9GMt4tLLEkiICCgHAmgL7JGtAoNkfg6G7kt6xFJthvEn+hRPRaW6/6v51SdCQBeAkBqYnzcAzuqsM0vm4CvbSTnTudoN6arVoNqa8IduNVHC5d7Gp3bI8KP2r5+qVb/+2dUpV87rPxMFF3L0mT8zNiOBT3AkNBywqd0thUZ98lKXVzxZ61fdyeTycnctfno2nKzvNZsbZuaOg9jrS5LGm99Erob39w+tKwZOOdv0uHnMnOYgGcdbPnMc4452jMXEvHf+NdgUSE5ecnhycNaawF47FfjbJtby0rJ3QWnRIJ/kYStHNJ773rWMSgMlqBk4sZPH38rhmMAOdHinqzhnt7TKWAZrCaW9c4QvbAB3ealySMHOic+d1Gg24A4dX0kIPxMMOCSola0i1Ec1RCE6PxYwYzOcpeDYdCQOIUKjSejHRNJz3UJVxZF+vi3j4bD1arl+D/Jvc/2FNq/SbL1oI4RBuja5ePXK7Z9+7ZKUG1DJrrmh281+KaPTTztvIWQDPAfLMmSLbJZ5X7UEeB9RK1rcxvlGN4jvoA8qjos31O6Hj2BDr0VtQ6dSAU68m3pqC7RdSNzgzFb7dD1C4VNRBC0XJDVblywv7VYXGMV9SI7BcwFtHoJJmuz+5rcPD/Va60aICyRRkqBT4EHuDmPljzihi3d1XDrXxVY3PSxBpZxn0K9RPHksgAymPWJVMTtDiocAPlgxNCz25GEvT9d71D0//WmEy9H4Rnn827G8gxRM0SokOw31x9VYx9MUzNn35nT1PTuXDq5XscJGnr9iiQkU21YcgIERBKAVpqLjnta2jm5BsnMtK64hwoKex7so8utX6jrf6rgXvMqFxy2DEack6fy2GMjNnJLLfjJJJURXG5e+TmkLPFMJv9V/jeiMRIfkY2ePqFSzsg21oSXDP/lb2o4c/O4T4HKnvC6dVx6Z0PDCakL1GJmX7WnmupJPpOrNokvEO552AcCWBbwnCFpIWurirjTNbeqTlZnrvowKq/5dThqtCyRi1xtdgb6ZFG03c1LpVSJ9T0yKBqKKHXmhdUqwYxP9Z8FWWQo0fLrXrgtdf61L5KbE2PV4S3yPBYSx2k2m4Csld1xblabpeKxtUnGBOLUTaZn6t9ek28RtxvgyHup2th6PN9AXrGLpHm3v3aWz6vccYBRuNyZmENhdRjRei8pmCocrDQ60lbKJhxNsMjpQLSFlaQ0peOX+kXQRUu5QvxSTHvUbScQq22wBdBHP8LflhJfM2jgiRcwElgR+3Lf9V3fzPu64jC/JzNox6AcnWzArR5w6b79VwQEByOEJGRmAg2/6q9HKihcSiXhbJU14ctwFYr6DOpp/4ERk8d1bcfrwWqLHYMo10AhG0kC46Qe5GuEE3N4IWGvi84TwnG8EOVyG4cY3T1FBkGhMEzf/XfBEoNJFYctpSiGGeYM2M1Rd9bH3ecw8AB20Vt81QNG9grfZO7hr6bMBwHpqgJ5YFaUXGYp+6whlm/lMpJu42GdTrEDg6L4NhqMQ9MwOu4nVGpsc6RKz6PPMEf73GuOkco1UzmWTd1mqTq7FZvHaNo3yLcUaVND5YzYW7jg0l4gizl1htY6HCvOeMjhb1/vOqdsscxwq1Px3XKpkmxQ1W7eeGjKJ8a/SzQNxy8b9eMiVnVXSRIfcZll+pI/Lt2QtExxY1BPPBak5ag8MzJPzu39LkAOjOFVM8d7Slt3+aRqZSY+jnKydXn8K35tMtRk2ohI8wPI1UOCJb3QLdSo0anTQCBmxaCyWgf37b6cUeKP8crHtueneG/pgIrBm+QIIYIq8A6HKxaEqI9s9fTxe3ncmdGC9cRsoxY3Ny6uHnWKEqFRx7kN6F27xioo5rmUbi5czzSC8HnutrAZnfbdQ72UTg6dXpotFDqommVyKsTs4iS3wbaoiHzMdd+XeMWlmKCe9WN6O34MlqLF+dLqZNpcjgmvzC+nrNdhXih2UNGiRfkQiwYdvr6sGGTGk5R+wTDyHurx0rryU+2yGTdt4kX7J1GHrVkvau+vUpXYe5GLGvJ5ampEq39061to1cdkq+el+LtMo0VgZfyOpJHUGJAH7F6Lcu05MXn1SC95LWDSgWFFH23QP5QNoDTSDw6LbMt65j5is31oehvwoVf9JXZBlLj9aMUfYsobQIs82Ew4N95fzDDOVEXeNalTpbEhutkdd4QIt5N/O2fG70eqEx6bPMkU2xT5gK0jPS7bbKYu+Sk6S1kmpR9MvrGz/rJa9wAuS2xXqOCDY6T8Z/fxgL1fLNOzTAFserR8XOn7MYkVX4+W3egqrMDpNsfrlQ0xMTdMmRShOq+oh+JAdi+dQGhZLipQf5b/YD6kg7Bu0M9S2pavxYFknhPqqu53BkWE13slZpQV6ZNidyHUsYgyAp51q7pPR1Mxj+nuUK2F8zkDocOrrZ/W5B52/i5QLx3ZjZrQ+vc36LJCwuoVYDxTYlzZujfxRbFGzOIkNs0YlA2/onfxXJOCDrI/bkO+C3jbVFR7ulnJo1OgswDswmPTDn2k/zHuiejR1KF10IpeZmCPMZWB6s+Y0P+xTaHlo6yOCc7USEXWKjB2iJOvdFvj6EnWRayH1Qwy21KHC/+iYqLIFoXImDz/vou0Wxekd/OcgLKzLnZ4bXa5ObtSYP7De15DhS2QZ1qf4+o/sZPIgmfWoFUC9RfDo4w/9JLOZ2lgkkGRd4D0G5iPI905IKSsEqmPqWuQJcZ3ji5PdH7WP/p6jRbMHPRoHGK5Vp4zf87oXNL1A9CEBu1Bg03H3rabr000x7IWOSH0jPZvit9nf2So9xg1XmlBTmcBX7pma43LVa9YI1BivsF04Oo49V3diEL88P9UW4v66iGT0CbzmlZ9IkeF6DDBXbo6DJh+834APaFqkgPWDcoKR8QvgVJrPlTZDLCPHsoI/wPOaapXL2dRAH6i/MyUQ7qazkwWen9/6ZN
FXokf4A2maaCU6PCufr0IUuE9DI/LdRQfKldpmxvXnWJkYbwR5qpGBxJ9vUlTynQXYyklCjtDYMPQofuHGLR8on0KwVs2QZ9HlgvcF0zRNn8tg0QL+mSgmbprcPkjQi+TwvBImfaCT/MWYo8k5CSOJFceQmCMTYI6WNJeLhdUt6p+js8ooEeMmZf/jioB8IggZE8xUDMEoGAJRrIIF98oaIZ9+oczpYQ+jFQ2cA5f4xWmuiCHcRr3BrYdgBH/3bgcmwL+XDMmpLaRd2yOsfH4lU2/vbqv31FvbPQu9/zofre8Jo9u3crJrtvJPBuCxF/r42NeTRV5Kv5TLJoguWZ54zMeuOnH5eBDsOMzIrRk7PjhgRLGJVn8+JwizYzdE+Md4FC0kYaqyniupUcxpN6lkm0e6BPrmb3p7Y7O2FFqHxZCbPmUu5ATjhFGv2415Nh0fvTz5JmO/2IRkh36pBPRIx918s14mTKbHS+6uoIMcshF1448sEWgdnlVfwpjz2clDIVQ/J2/4JpVgWVFoCDnxQ9nNYXFO1nJs9ZzaAOjIDMsehaXjsW/5cFHvtq1+5DY1q8nxXNRvxc+BzbPtlcpP0mNmxWFM7rcm00v1vb7eE7itjlklD3G0cotEjq2TaT7aW71afA7KqQO/pDhGXodx9j7vF5nXaM1+SoOXKZ35cZg/tLOtXgJhgkIw4tiF3r0crunzyObKC7likAArVMH5b4Bawoj4RwWRAD1a/dZq1U/wn7ermz2kZZc2aQn3bJeVJfVQpAget0xHFZ5mPlJKO/bwXv3hDUSmeSZj02qeRgH/cNBTV7GplviMy9nuajLiB8jal+g2//+EuXTT8I6IY0E8IAHvJUbRfSZR0M5SMOhpo1Ual5+cEOhIpEZf4X+emqpKV+hea2k8WhyPJmbrkO00zrAIR+ZPkZ6VGkoUPXc+ChcZGfGk7KQ6G8WYaeH9LgaXdzX0UZcgtib0p0KN5iNC9tZggGguw9OKiW+B5MgFXmuJkupAYYcb0wXE7/ocJp+N9qLMvRPkJC2yQTff63wHhWWtMNTHeW5/eO09+d/B9wp2lsGc77/SFpSURogvIpglFl3Pe8J2p4kokDldnmyIteObJ0NoiUCpNPuRzv5MUE9PcF1zzGjpqKOmmkp6qvISLfIWgOAk74RDW6c4QngSK5ksWl06IcNN+tdOVCG0T9O3Pv1u2NxV9uhkNDrjeaKJK1HQi6q2WSEEVsdiap+yj7T4Mo6UvlRaE5F/1C2bwHADgogM6vcgHAfWkdcaI+o5tFt+FkextQWFgpKI2PWW03ZUd4riHcr+/U9iFyBC3ZvcB1fmB80B8HPXpEpLmlGC8V6Dg6XNc/ZNVUk/aHs6sUpZakQE8E71HiUOt7aOeU0hPFe06yEAoLm19dg5JxnPAWn6/23kIvD9nyHP7ZXGtcU66IpEz0LFvc+thFPZv9V/jq09WAPfJZ/C49yuIjsqX1ON8bK9s0TKlMrQkGk+JEIK+vdhOqQUnQRGY5JIlQN/oMNtlVGPW0A0Pa21PlOKdVIZAB0w81XBJwC1mAro6gUtEp3dO9MNDnvpcleCMROYfTkC0XBvIqmoi4UEhqAh9/A/cCjsNu7H7dgbLKZuPwU01TmTmFtXxNVGnFqFWmNwq46dQ0VYHw1YmwiWchynaQSpYscBZGtY2ddnMRzZlE4wVZoEj3Ahj89LmLJDDeVH1yM9SdRQzTvO1FgNzQlQqKfXqDUMTu7FxgGIRv1bE7L7WFkJlqiLC0rDTfct0qAbsTAmN1NwvTQBS9ZfWGdVL8T2XLa+fhjVZ7pLmREXfQDpFNAD3uG/iU/8UCaKPEEgSxs0QoxVHbW9IhYVap4qBqNTJBCHumhyMl5padYw0PQIzQnmHmzYarkMADK73b6b2JTcML8a1DLBOUKo5rn9qpykHy5bcn0e33pKiCnnKGe+7RQ4oUXOIAn8xKxCrFkvlSobxmaQpUqJzl3ryuxgJF7V2y1KBGbPyDRT4ECwAgrIZ/5dgAkORx9AagG3s1oduUyTdKoE9G2M054qRH7igeu4iJV+bcKH2zxnIZnv+EUR+NhuTKVyLNs1RUpa7u70CoLeTEVV9Fb6FT7VUnKuF8B0h+zyACDfY7OLpNisU25foI6a524i4aTlvDxuUig+BWaT2FgaFUYH1UnTMC1OwJghMN4MMQKHI4nXSGP+UfMmL0HsRCnF/uPxONnyA83uvwDP5JJpGKd4OHJBUOQtKK0UhMFBYm5gLLjdal338E4fARZJzgaZwdkYOFr/R9vH39CM6uDDA2+PeNg4aTeR6puyqVMwL6drnYVdA0w32LXXbK0PIHImADh9KOPLU6Ef1iZ73S7qdzzMPJ3pKP1M9IeIG6pTHVvQF9mDFSYdw6swFY6LMUbICv+EUVzpEpg9huglD+1tGPg3rmcufBFVZV5iPLxNPtJhohWf2VB0l8TK6o1l+GTN9morwZbERv/i/uguADpCA7tWMgGxpwIrUlHAea8AuaXlXfCcbRGyKZ7fIaq7pdzucDPdLSb1ByWAE6JUfXQR4OmFxwgI+jCk+D02yEyR6Dos2i435NtAWbm71c1Wf365fJ558GXxF+1Ph2pHpAFapay3ZKPa/aNoGIl53BUv643rLFzrBlptHsCJms3ySOwLgaibrOk/iUzP5jGGZHDpva+F8WsZnOIDCUDmymNMxM0ppVJ7DidI9IzweKhLwtqs0gZat7pga8ObElqJE5r2AjiFJAhGv77US4p6yUURBHQrE8jQr167fRcLGkYDzpkvjSNemmxnapUA+P3cTT7enqSnLyQldl35c1XiFcUhsEkYIXAdtjG5KaeypI2tbzLZi2lEXZ3Ew9rJcpbEhwt1cg363JE4zbZej5qdECdHR7VZQ4vgvSnvCr4OrNZzNCUYIEPiQCQ3K0FH5UPg4fZIPXM6VLjwDsbzPc8lLnuH91uQMo7t6oSgiIDh3+cWxnedUgAELCQK/uwV4TR+KSEit7mykAla2YVZN4Jh9O0P3x0P9b7Sfv2um6YEfO9PtMwGPdpu0XBW7yd/gYxnUy9cohW3nnCOaMfGOuRzFW7whVJn65n8pi8NO3DaTZJPGoHXgTVq+7ShTHDuyrvAY+gV2UxBEMlPHswlUsVWihHmoY5nMvTK0VdetHHr4ITp3dRnE4+BclrmJo1df0EZj4N9K3g6yUHvkcpSwuSDpgkhhWAuUEgacRDScKhxS7v6ElLajisuXW28DnoAUb5XR5qNlHDKJpLk43eu4T/y4ci396wl/a92Ctck8DGf0Nt0bfCufivVvhbPaCMFu9usm9nQulXzSk71GkqyTIy+cgrabhrc+gYw+6IZGXUqNTgig6gAOjlGhQjGtjI57Jlakn62F6Q84a9dZ2E4StTQJMbemeWinnqiwtXzYgZa59+L4Xmo+vG3lgCJL/klkTbLzHqXJ+cy8g2wNLNB/SxXv8syRkJl9pHh64KOMijbRSkrzDQJvY5otPKeoj0etgXqshVZx1zRme5uCYkG4ADKZFvP7YYHC1Rvre7T5rh0HpFsTFc2Z4NYsRZn8g5EB57+eYAJm7GfHDS7GWGBa1SLVoIWJbb4DIt99zgIxf6ScULSXb9CenEVma4IaYond8m6lmDpgkLnWHbSK1WU/DvHmHRi22vLKdeBuhSIAKZGqbT3GpL06wMvnWescL+yWb7z+miT0p86dmH2NXwajJmNPKIh+5vUCYlvQjjCLwA9N8zN04Xzhvazz91AM0bjGy7Eb40JAkfO2NYGWDdmIHEnxFO8V1manHFH+O8J0+tp0Gkn637HXyFsvyq19n9u6Pa96U2nRYT/omGuPWiIKkM3oZUEeaz65tfiYbDzrtsLumbPTiBq2YqBH7SkGbrpLc341wDb9Yhb5q3UvjScR7SANJJua+ePCJLbmRmb3MiHbMEuEqQ60+x7E8V1P1ymxxAKo0cs7sehmQGsP3IntWLX8dKPu6EovuSmmAOVD2zx2i5Uq1GUMv4f6LipgEb/Q/N94XbK+rOPNwlp2ONbbkzTsloVzFAfv9dB6MyPUt/vw4CD2U/q2vorRIJPzJFAQFQCGyJrmv7VEB
VzW4pcAsle70MMxBShRswSlI+LIIIRBhKrzt9ZjW7FMy9XkRGZID5z+aFMBNL39nHUn8qVW7xhKU/8yBasPq91ZZLWhdaxI9eh98JcXm0PAEwho8TeB5JagKaFmyn2EGwP60SIbFB84wYKJ283fvJoydaz7svb9WxxLo5E/aeEvqPNzlSGKiheQBPeEdnq2V2hfCg+b64FqIoQz+x/qfEoTC9ItD7YOaO2GiYI1MA0VK1eI3cwfvxK3w+gtTPBNu8yAN/BJQB3Ke/jCSr95tMmn+KuZeOmmIgA8dO9hL1wfV9rqnStDMxKbN1zH6LtDhy4AEoS74150VJ/cVIUe+OGb5RHuEcudGm7tR6XpbWiddJXV4qsyBNSDbn03n+jcFpinMHZJgiSdHbhPZ9/O8Wy96Uz2IKbPdcoPF6WLD+eKAOJ/pBPYPMA29IiSTBx/itUUJU6kGQt4ARDlrr4fkXSuy+rD9UB/g1uI3B138PSe7TnShWIbRjbMZ+M1L4bw4Iu53vpBw6NEmXxh0DY4Wtn3lwUDBCqfMqkpI7Arn/S+gK+5mHMK0wXol8fa7M98ZfYlBJo/JzqSFWbgFkTP+qCavo0/jFmUcwYY4mUOWN47GVxzZTNd6t1OcKUo9XsaSJPGEuIG54can8qNI3azfFJqnnk8OU/l8W3BCbzQ7GEWMhxcAlImbGs9A07tIRs4Li8huhIEPV+3B4dGI7Hd62aFyFGuvf4XVXmk3jpdAAZypQvkeIUDvnYl8KI4QoIRH5hde7N453Qe2Y9FNUhI6/6OsE65MaA0sywh96A3fqwbOPHZwyJXOmmBiU14FfMKP9DL3cBUSuWMNpjfaHoeWMDahsjIbTkKCSO5oUH3NSSD+gAAICFa4KcGLldIc1xxPpnO4oEZvcqlzOHeziBCgcIs66rny216xjUxouoaieyCR7j1vECGvWZlcrSQrw+9FAS99KfvPz8FuRMNTtg41ru3LeGVWY/0Fln1uxnC3F+nTY+Mhq9MowpktBIeOP5oDTf9P+y0v9CQKNm4EubYqhyaHSVY2jsxsBPYdW9+ViMUCFiUFzeI27H1vzXXQlMQ2Fl2yl6CBtrSG3zayL8OkzXuy1q6OKJNAcU9i8ehQTdZ48oi1QTEILlUlivNTwfPZOqwgVOgM9d51nBrmJuIF0PfODafFt4in2eRi7Z+F3IKOOekIp3yHWaGp71KptHpVhbjPbKx2J00vyBQ4ahp397gWUfNaQ9DoR+dx2yWkHbvfbJ3UpCAA8jyV7fd2HFZgDTg2SO28WRcAnKGsivEjAB+zR8P2Z9oMeO+uXzMxo15Mqu5uocTKkNgO/KdERIT9MHEPCjKbWUXtgXjTsOx4pc2RrKt/zFfs+2UMKH/mja1BrYQDIrMr01UM6lgDhxQsn9XtnLXqM6tOGHN1+t/hQREocKSDYBxWWyxH+/fyxonTagwbuaAdNcGpFIwHHNzbY+OuYHaeGWuzOKZwXaj+OdSTg/Un0Thg6pd1ucZ1D79sAOWlGugHxzfuKD3eYU/rh8oAEx02T22puPm5o/wMdZIwuFxgSZBju9/K34ry7sB//mH2Q8c1A+sYNEd+ivF/IMNGyAQWmPf6mMf8fI6oVPcC1cjaHA1VLrA9axLBccLoKUG3Q41u3NjEmany4jmoFoZOwMnPFjN0Z86cxfGp/ya3M5tr9XYe7+bNC+cc5/f21Lqw4tIVbMbtMHiQQYIdXTIwJIPS+tvRTLr8GLTKD8PuytsRcYJlJeBZU4pFoYv73bVUorBPPPVC7RQ5J/NxPS04dGJyjxXSeDmVgfnjYmPaTap7z17gr8z7Tchwlf587cV/2KqtAjVSMAQy/e4qMJ/hcG+zjskIxD0i72nxifeHDE/fSEgEjwV2T1i+HjSM2UMjvYnalWdtKqeO+2B752uKwHFC8ontlb2+9eK4wO84kWzVJC9wvzVQ2ufnsb/Eskb4OVP5QEO1LCj57YOzolR9xHqTvboTPD3tn1h/VzxTVEkryMwwh2bSaBpz3Wrs4fNsacAxlv/6KU9yVv10495dIG1fRFRCekoEIYEmQ212PQcpvq4IDshjfOwoI4m96dZBTYKruNl40ob6u773VwQnwzfs13BXl8RI8AHMp+El1rn5ODbqWWMggssNs4XWi1keLCe7ZA+dYPXIqe8bGMqydhMOQhPRupW0/N1nSECB9gElE3qJ7+7rw9zR26Faw5cO2irwAXsYcJxZ1l5MF0WUYr6uN3kJPQhk+TGHzFX7viajMQXRl0P7q90KsO5e1D7PBPmLooXV3PrnHpi0NmasLT+wS8wztoHNpP+7djj6BkVcPIYIuKu8XM6Dpi6NLqK6YexU88ATdQ/FSEnj38rsaSTiGkjI5ZBV/qOsUqBBOz0YqORA+9601hKoYPoF3z2kSzqjkFS8r/5V3JRVLC1g8K1zOkEtawsNb5nDJNqqqgX7/Z/NDhwRelcHOt8BsQpEmuzoLcHTlBCR//9MXBtOvxOOxe/PJRizB4dIMx6aIr/1rIHhOAVbtAUyc+SE0opCZiRDaIQ4+6lL58mS6dBfjbz9i5a7jBeJQxXsyYQd0TkkHLtS5/U/M59/w+docZhqMeHZYSJ0Gdt9hPADOAziZnBeLUxHWizdxrkIYyyLq95g7lN2youeHzovkOHZr9rO3H9vTQaSntfe0OwrWqW1Di4yiRL/nMbwBs6D6iqN8A7dGL7uiCpZws2KBX9+oK6Lzvni8mIGamFCbi0LaW6WKkraMQ1sBA2VizOQyiu5Ju+xTQ9SePqFfUfyo/OMxVS3YlpqSIdDrT5lUHKIn3pEJbcF/JOaV17ZvV0CpMwH65auUg1OgpT3N4KvJjFZQLFsFIoGKlXW0EGI/JtgCzXd0d66cucHbvOlMhxNf2vmr+qpg/xqi1IkRTQzYZn+lEmEEKwCXbapS5SguoF6SNmVdi3BmS40CmpxjSEMmZJfW/Tbw4Pv3I4CRCv7Qx92TVHHdmDbriRUOhTqNgeLgHSWugj2xwyMSp9uWxqqnLNtXebSR2norXzi40fGLCVPNrNn3PQMbPEvjsKG5z6WmnO2t4VRIqcqhqGnAT79wuEuqpyQE4sYWBwMndZByu9YOCQkhl5p8VyEuKJDfMYQFrvMzlM8SA5haHjIQnnl0RtsevcEDFuuMOmVp0hPwR9D/+GfG6K2bwYEv1SJ7bmsFkkPdRhgAZVUQHFvxFNTURuatsEt/Jj1EEWmr4KWg0plQBdAw0luKJYT8MINREG6trGDFCYE/s8kzUgyyETUot8x/bToKPspFNyGMKN7W/CehqJqNanPbeUCUyO/zAr4igA0AaxPYJZpFBJmavMGROVZ4A1wAzthgNxIu1Q6ffVJVfaVtdriZr5Qdzfya4yGjue5LXQqQa3uEZN0Xai0LzksEP+Z+Xj61VYTL1PJvO9hUvklfI8E6Hj+TCutQhUO2UYqn2hYkUTdJ8twN7sakX1h9Tyhmb6NuCSD+ZCzni0/8NwIpypSz+PE+9D/v2H59H6M8iHvvx5q8S+uH8Kbzsf1gjJLqt0qGo26/UPPW2huXj23YLzufhjowafVr+5aNqtArNTo0MNivQkHk+JuYQQmWKvgreUadi96u0HMFjoVesAuZg6331khL8XM+dY9/H4MIl6n1YFcf7CDuzoSViMKB4yVa/zoW+gDi1h2PY7LEiaZO+9RQlyTiA0/K5JIsn79ZRCEvfRi7+i2Tf5qK3IL01mF8SM4KXjsSD8KR4mduA0tTgeNWJQo1OGJhww9eQ6ssLg6VCoquM8sljhd4YDrHse+9OrPlvCtAqyjL2fA3zaujDfkYtTPWHZVClKanCYGluHc3IU6jGQKQvHGhhc40GOL+tUG9ES8hv+gLNhLTTNrXB9j6t3mtv4wjDAwJTEChFXOtk4bQV4FBsMVQ68EoZOQAm51jnjob8kNDb/Eb0bV0JFK22Ury3OlPQyptpHaUJO+eQfRrscTkXl6WDVip15NxjeSUZPKUTwmhgMf5h3ZzIVmsAVv/JgRoPwjWWOeb+D59JsL5NG4boEDcAvg0WVtd4Eq5t6nXvXpgfpaAUfmVUaQ/xWnPOkxISbm
QwslK5zjtK1G9YMHMpsoAdt5Ovrx6zzxBdk8zxfYuf4EquKs/Onntw8O2FJbuCczWKJouYrTz1U+avA21Fxa2jYI7DkWJDB/B1u2YAiez52i4bZ+Nc+YZtbPAlz8Bylo36lE78tJ74tdkl6Cnot9Vov60Cl4QYw381urXnTkx9w1b6OWN6zo/r9akFo8fQGZBi/6lVSpBjDh6JqSCQypU8hGci0QeFLc23JEUj2e9NebVaRLUB4DNQwQ9iHTb5P4lAOxAAZopZJ1+l2Xx6XWAHUjsSxjOLLQCRGEe6lZYhOCkvP6ydlByU1BSAOXHsMVltjfOy9VlkmY1up1jItuxFl5/50KQRzLTPQPWfsXu44H7DI/CUoFBygKCPGv0dHkzGvZZ9qz/IYKQETTyiFhfYBC37lvY7Z6G04LsmolaOWOGv+ucrhdxgu2Awpng+5dRRfiUTzLUMH858Vf2OW8Ja9lC9saRZUDrUV3rDuinGYwrjQ0rLYTOIugwc+kOIs+LKQEED2KQwCB4q+Z3IzLlKHbw/bB2PVlcbZwHlZ+NRfpRIXQjpIfrLmV2GrRqRtaqzmW+fOYVGZ2mLrnxXl/pC7RPZ6vm8QD0ZX7PfYzj5mTb2vQgsCXnrnHnKIDRTNQVWGt+8nfirPlCvD07ybspNoG8MvdqTFubF+r+hwV8oa8g0l82iOUOZhzZY7utlAOKNBjJpyYpaO4AFUwNJh7Nds8bHhjeVOSUWP6z9EZEOs4C74UDileD9EcGdQJOh9jKchcUanKbyaqiVhz57uTh35Xc2AsGEC8O6lbpAwdSHg2Ycpy3Egb3v0QKEjRsTMtCWNRLWp0bj4oqeTecMmlYRxPZ9kE8hrWQLBGTm4AHm+/Z92vw5pL5qzT0GAKydyXWDPIeTJI/hYt37U9jrVuYkAwEWGljDdo+fPB8OlyRofsnKXzbFHg1sTKvlvuXTM+hWkU8V2883+1WBzAMBWkqnjgE6QzfyYYX+z6Gny5m7Jh3nC5Meq08sWGdC+4c4em5CGl2UCxGYA9yDqulsXOvqJsNTRPBHkSmxr92Y3t/NIMEocsX1zGEmRW3dioGHZfHBJblunNqovsWkHhwjWScar1s3A/fzqQg3KZ38QN1ro4HeuTvxiOY85+uUJbbZBT7dGDF+6H0VivLIPgcwP/UCUtmyEwYlxZ9sCkhljEDOsRdsxw86Csk/nrgZyLaidGfMF5bZ7BFf4SepJ/vdWeIMU3LLa6wWVvc6TI0+EmFKXfKmNz4OwAHhn8hnT+B8aOGUeWfZHm+ib1p+rhaOTzwX+Yd2R0Q0rFayevVHevdwVxyIA8tAA/goiqXL6ei/qjaO4OMqKndvPI9ng7ep+Zo8zS6Y50OeIulPTcAHojtbdIQ2io0Xi/ZdYEHLBI7PWX9ZHLAD2etGFTq3BJ08XQmrjIeVuqBqljbYCzBY7dN3XyTMeoejdrbU9vEdtAgcLRBrvcBFfsMV1K1b+6mwQNtWa8sfH7Yu5iYeB9SBQn1HcENSjJgdXvkjteN9fhCB1mQA4dEHSvC+LnEMO1jVKsl/4AX4dx+XrsNUvmm83cQ+GPNSiJDBwLay08QpEt+NsSRn0pYftgCMr8Nau7bysXd2EkqMqMPcqtJkn8WGoKa3khJVEKj5OpkIT8XA2YFwskdvFReVBHyUie79vSdHZUAIw33D1POKlEpJ7w+7I59bJz0dyVHmp4N/EIEYRxErYSdjjRXKUKliVB+a8InRFXAMjl7Rdvaw4ECl2CFekj/AOsu0WI7tIGAhh6hBJtie+GttaesuOtsyYHiaHepO71tGmEXsG1smP0e+Hzznxh6fLlbEeBVN8tkq4JsgcmntLrccFIk1QcZvXaitoserAylJH3WqVFS09cGpCSmr4b/kNAyunX8oy4/c9EbfjP/Ti6LlBT4BvVDLAN42TrkX8zZ3t9Cxm8w3Di5nM1inIHJJyE2YejGdPLCb5eDn1iR7WTSp7xGouwC2JVLXn1H+eh58wypGMWyrPLLFwfuRpu8FdBt+t5olsO9g2O1f5tIS1t0ho91leEz3q6XHmGantVZrZHoq8+DOq2FwlEyDelEWl3ejyTohnivgZWhYbc724LYRNHL60+LlXsSwz88QA+bYncCMikt4D/iFoNyNxLQw4CVUTKoVWehHgDQIqbjldviByjM7nq7xUqpa/GvoiXNxt6sX5t1FNwPL3uq/3QEiT5KbaPDP56yiJPomlT2FA2b1IBhBvPiXsbPWOBDNBHzPXQuw4pRqfLTNgA52Q3zzgiIU/N13M4l7lBs8SovgHyB+d0rV5wjE5FTjYdZV6XK5t8xhEqV1HaO/zUx0HrmtFlZvVyqtdnas103MLv/I9jtYuQwFHjxEhZ3VAI++6Z0TYaLtyI/phJYEcC3E7FAXutYv4fU+k4luS6mztTPdrSdK2Ym/fWKIxQIWCt8U+9TI0oYf/DiFUcxjDHQWys/2SIN+fRcKq6LjLb/Us2huu9c5BMnRvJ+8Z4mSMhNdkfvK2m1EdtVAUuLwi1RtN6m6pgbsIQI2j4USC0CfcHK94M9A3WC7wJ9gmmlxsziViUBw42cu0F2djRdNCy/4Cl2GSjy4hKtu8ri/I38T0Zrx2k9ktBpAfqh0WnPEWZTdY+8AErxBXFpQ+Vu/bWWB1ME/QKH12NchycEawy21Wc+2ccTYlA/w8skI5wWpItnnB2AsdlGoafalogG6+yw9Ayi+zNY1DTkfVhPuUPZs1tuWOtMMpZRI2+oMyFQfxu/gmRGEUKiv/Gjg8QEGPbwAW0qXFS3x/5MawCBU+qnOhqSdSDpII21tO0K6hZjjZh4mwGd753nsEeGCNng9Q9AzEFhMQTyalJy40w0S5AFWZzk34sG8mNDtpBeO+gQZN7z/CJ5YEuIXKZDc4OYG3prmV+HT1GZJjcybJezJvWGixVX9XZawP1STVtKEYZ7LwpMX/FjEty9Yr06mRHq+WsIL1i73whsXDFWKyEokMo51YNevBAM1PYBHAXxrJKbMR1rXPOTl0HlA+IJvp1wG3VmTHdiScjJVThrOIXQ77aSqguPW6qzU9cSJ28Z/zF3wEedHbpDFeVV4T7aIORSjlCaUuEHbc1kunPo/KQlHrc0gabIq5zEBv+ifPVc0qz2qKd3l4qJ/0VjUngfKnnPSmlgPgP/iEwFJoh5vCihjTarYHgfhG9VdCfdq6KYBTaaPtrbTHzEenENSEpzFr/24NosHG6E9qQMGGWkFW6Nrx/KJ2vhmTOv8bzMy+UBy8G1jw5g4Bg13ipwRKi5BJ/sNvvhcGi1YhVIzxmZBmi5NJkUGRIkVyXInYBiG/2UqBTi9ws/BTxwmtXtgLjMDN8AXcL17i6k5zmxoiLXxMH+sqw9seGVuIm0Mj2FdkS/hjAm0GEP8Z2EZofAUzeKn4FMTUkmvZkG+AUKfaVmmKv9TOM9tl1kU7shq02GrASTYpxqmV1RrjIDe4WzV0AloQ3wI1THkByFuQg1tOi+NrbBd2oc6lsXnqidmixrPpUueLuIN7ShkrXOPxzOnTe0FYcHH5Yj4MO9rFRcER9s45GS6xJ00DbJC57c/ha+RFjrvqt30cEPQLDtDCMu8EA+t29nKG8jJ/o6P5TckYmL2obKn2jIV1U3+6gKESu9DW8HaGHxOF2mxuTmSWI8VGo6BZRFLLGnVmlcsUKR0DR9R8uR30LcVBWKUerl7bzxQKdOw2yUtkEiRKOEE5uy4jCKMyiiSDLi/drp/q1mqXxTxT7brjjkV+ofP8jMNmN1JsnbsOIcp1KgOdwbv0rJgp+6Hwno06qJ2ObHtZi55XCvyNG8wW3xzdW+M0QSw0kS5LB73fX8K0i0d9P/6TDPEEBD6IMU/KojyUqiJvU/qesLHaWaew0jOCDwA4YVuZrO4SBWqjcft+tJoRO20+NbkeJhwI5xhnPzC1gIdZRYx2PYwf10pyvgx4oPqdlO3t1Hwq7BTsGGDxdZ9BfGOVbrakmqNzuFUne3yY21CdFZ16GJ81l1h6PThnNrRTX1G4MWu0gFVKaraY0ikNhS4CubivYfKuily6w2GHfQZ2+yiro/Yybs0HxYYRcY7hy
mbxZwMjT5DVh9K7r4d1SPbkO4VK+RzCg+83j2Q/vrYDMj2av9CYJhKw3z4Kjzvu7ZjQNBnuQdEWkaeU8o+xQ4SY23K8puQot+q72ELObd0qitbwaTB8jIgFUbJEBm4zMvwyq2IR9gIDIdG9ZoGMEXc99X3sxOIDBXjYyJ8GFpIhgfwtZKKnY/OTXndLf1ctNLskTO73WMfIiN3QcG64O0dXUTcigLCdaFoKO0vTBXHYkedCIgcM47iKc+/hpj8/sPbfrztVrKKHqLP0aQP4PC5uFjB5op1eUssgsQ8ho0Y8jGfyiKt7ixqPQqUtcNg9wUZArU1SHrbaNepuIoQvXoQ2tHAnJNl1B5fU1N4Y4OFzh0N+pUQ8VmiNwWuhoeOfRPTelVUbmLW7fJ/WKFDLZjRNoqEElGwd5wXlKEe3tFW5BzuQTHMNBUYd6U2wJLBxGwFDmDNaUcYz9L+Jh5YGKC7kHvsud+kCGaILx7zua8c8Fnc0eMK/lYFb92hBY6IG9Zc0OL5pmlKLY8oVYbjH0DW7MjonpPn4jp6+QueHnQJs3vvNJPwWXCC+jEFSde5/LmRJcI5tCW/1n8bbMcstHM7kGyR5Zsg79xRdSCEs4iF3gneWE53pODXvNC+tOFXeovMR44m2XMGxlRsfxSTBc2dLGsIF5yL8SHwEG2H9DA1ovPfzSd0ODYVrQo9jXUS4/NZCc9fll1YXgB3yXVEDQMDx0phFOVsJxbe+5xPIT8MEhXa0ULsurllWUayseVTrD/eVHAm4WeRgEVCQDRoabwRIg2oM0b7d3ro07rwHyJI/ZUmXzleRJ/uY9H8lGBYAZnRYjjCOwyk5lDkMq/wmT3AM4zFMGqBGw/HKh6NKMCkSQ7WyQ+AV+KrWWfV/QBIUlRLKmJ1qcpkZsytjmSjNO0QratUC/+1qi2yuDLnUjf8JpcmM1RN3itE092rRTfaWY0XnTQZbDtzVFFcy8K67iN9Zh8VituIKjB7XLZfZ+C6c9Mhj/a31VOHOI3rig7Fo+VPuWrA2XqWuVrIBDq7kvyI5jlzHoPXwUe2GKobtBXZ5grbT/3UeVqDULJzoKEpAGSOd1VWlLXndoECnm2QiEBjBnaAwmzkIh7gka2wzsGklgLF30hFf3CW7xDEE+ZYtdLXU2mRjHhBu/V312Yc/k+gnZtKH9FcVg3jyOfhaCipyeMTyBIoyRCaos16UKE9wAqOX9xl6ImjbPcOMqdTR2v1bkAwca3KPjKY+irzCbzp+W2RdfAo5T/K1+Z020LeJEXXlCq98BZniErT9O3Re6Oo41fvu7KneuO3PFYsF9HyDJgZ1l62Ij6FUaFlenBQ4mj6SAyFCy+znh6cmSmnHXgMsapB42lp0YSjFJ9tvMFp9ZJ74dsAZR1znDiMKRmiq39NfH4X+B5Dkr4qBlb0zZmJ3bmAcydu0hID02wp6N5dXQX0oRe2NlD8z9bPJIiHcdpFGMwB4Sigl5rmgeZYIBdmfxCwBY9WH9dXtA64pfdsTnoT2ExjrUnU0UM0SDxybLgLYo7qQXuaMr85Kf547ZSiduqoRjEb6/qLXGUydmg/JsDXQjowSI2WAOc8aoi1az9WskiU4kY76U8ycC4ClCLe+dC9NpuXcc0hGGC9/2l7hULW+02XQGFmJ/3eAp/GGLIDxFEQ+RqSGVbUKpwvqFkHvegVybJMCQaAkbXG5t4n2LGwjkkCVebHzlpNLTxyZzxh1q9VlFfYqNRhBWKNtH3QsSS81XIByIg/yQGJKVK7yuyzEb4AvSo1B4+LQyTrv/BWMtMqaQwnh1Mmi/JgnRl2GtI+wIx8qxfAFstuDpvLYqEn7tuVpI8gWH83hmktpE9nsW68+X/8LScTQwNkdq9j3okrQ9VLWB7AdJokG+OwqY4NZjjFdNBe6A0ZpfQdEuIFCZM8lOEBCRAsLnlgXGqn0S+6Y6AojK40NY6Kc/oBB0bBXXzGxylPdE80itHkOXXbBFVjBt/war6an5WcLjHxJ+nCV5RhL4JIXZX6nvhg9On9S8kIn3+8WyIPUDb15pyg9MK/QRQOOsYc7loy1aqD9UUnX0dB5YhmWxESFW85wabEcEwEJZylOwFZpthfQEFhSxXqmb/1sKb4TaWVgREW+vkQY3jxMbwRHcxeJfJYihNebpGCztxyQDNU/BAoIZt+44q2bP0/xX6RM6gEK3cFmQsyscMLuD2aJnTX0CSrklJJWrL6wWeOGH0lzukTWyOHcHDihH9tCdt+D7SJqrnOHIuchPlO2p5tzw5enYi+S08a4cLdo/OZxuc6WzYtGFRSzuW5nQkih9joanNaRdrIUTsCzrXSObLWW6tjr5KopT0scoFi3YECieonT62nhr3MqDNlZsPSS8w51+CHkW5BGdipgwxcBk02Rpo7qLNxrm6QUEh2W0s9CgAvgFctDlHdKRzjj88nc90v26eg8PzcshF4INfECteU4gxHHiAQ5HMtAORN6Os7w6XMTIboIN/axMWBwv0I+y6KDjO2sM6N9V0IK/muak964xurFIkfhJ5cXgdP+jU5d4vzd51vRKxUJWm7ji4ipNVHe5aUUpKGwP4kD7R2nLX3xCLTi+HUcndpbrGukXtX65b2egr1w+EAyYSAiQ9UzYBDsCuVcnQPqNyRV7MfOlON7hT/5wLjJUHGTc9RxAlRoxmed53vDp/u5tfBJzsUTDXOn44G4TwW/vEjUbeafsO60Q5D21n9SL3D4PdXxFmWiWXqWo4k07eyF7eICOfj82UXdizcIfAzhpsCogqqeF+dx/z+dVthHrzFXsQw+uDcjQQe5v56nQcKxW8b+jGITCwopNz6yaMmPtuySp1XpjjXn6gV8aTq6DMaOMq2bzXwj1LZSNtKEp/WZblLmExLVaY0HW0M3WlaKShSPNgtTpsGKca6DJx2Ii0vbv9OWkCpMnWvwndOHjL4iZCcObiU2OU1RZLqbZBlwR4ybeM8cyQakTCJgGFRV3McNdq6ICxXNvH/CNKe1dJCE2J5WkPoHXyq9bDSYt7dt8S+2bozmCZbizUBqIot4Ir8ushFCPogDv610Pa+HnQAWlPvIj/7icN9+1f6jO2LfdrHHX+Aa+WrbQR0eJujjm8fxns+ACbnhER2JIW8+aqo2bz9JrP22YM8aZ5qmW3r9iLeoDOceVyYseoYmPXLXAFneRqEsBLEDNZdy/+uTO2G+mRUrtCaUMyWQ9FgUnHx2svSDKohYAR9SPTJY4DHl9/tEq+hFJo6VAjPr2aua7Z5lPLMmX9myJYm1GPZiqPrcVzBhr31wdIHD/tgPl3qtzbUimBSI3AY4anpOonllA0i0Rtxx3L82ltt0UkaPzSTJZtwmofnYa1rkq/WnT34AoQTJ60PbX5AfsYEzzYQ9No0BBA8RtpFwmTF7JNkW+N0V9tQBOXlZiFyiES6bWwFT3psiH2Q4L4ugKFs6xLX1HV3yv2hc0XyrvaYwsTXCkoqaafEA7E5cSfwmNnvV/FXopWnZfZquFC0SlB0dIxoV43IG0Y37r+cQs8c5VH3xM/z5LK22WWyo66/lJHATxkq5f9v6q4Eefksh+BsXhbmnKz3qB+/uomZG9WOrDIKVG9BaBsrER2P9zcEdJConHdgSQrMn6jKJc+oDJhzr0vhkxVzHwKoZXiXUtbajLG/Qpe3uYGVBzbpjoZM3l4gWRAcfiM35UvAwYh+uz508Bs89D1cJJO2yua/FKwZXizacRyEsOtbOF8IZUZRYjOkK0FqKKJRognSCMvnzSvFx3gvEJXgSWbL4XTRiwlxci0sXOsOpKZSJYhav4nMS6ZU5lI/tUphioSZ2NV/XC0+EBELk6+KLhe/LdHpR0iZPSFUfIM+lG7I7brNLrKJju9FsCe+ZX0Dzw3YFXd4xGzI/C9yIFChLyJMda2CQPi7RMOnrBa+uDN6Fufu5ZvVIptAjf1zhDjIKKRTtU1tseZBl/sR5Wd1GwHYK2Wkof3CIv19SA6pdVorjxQkYRbnTNafy6kmC6LgEqTeU8TarQtG7meWeom1m+CCE8L9L0j611h0u+kVr4uCVppSmtRVtvQgCyA0Iu0Zaq00HWYTOIvwzYH2Vm
FR5buIRs4eZakANoCZsvwC/s2Iq8fMj1sUXsHVajnYfUy718K7riB5MLiwzrkTgOr+8t54MStwzInB3aSF6qGTsJgnoaq58iRz7Wcb42/LQWILwvLQvvP2zu1799MQpp1PyePJcyf6ojt/qDUqMWbGlA5uYBphQGeUOi6Hh41YR8zma8ffkVX72ZdkUoUUHCQphySiDVF6tcuVQJFFAY8L5CWzSu7MyaRk7qM6w8tnEXhJIYewT1Y4RV9PQtBvFXCZT4OtPTuKSJQ0WvQ4iSUL1iI2SiF+ANVT5XYuCRuDwUbGCbp10iKhqtIYl9bZgGqgbu8y8WfQA3lFhXN8p13Dm0TflM1UsRKsKB6EleJhFb67btl8yKiiJN/wVCRyo3JrvFwwuSHLnzDY4MEXxT/6laOerlw00GgeFOIoNk/ibcIDeHUoEi0RjoJnrw/nvJUq8w1ST2cYro6jX88uXplTvV8Novpa3PTf4RFQce4TeEMK8hYd2mqC4iDdf8+0Pzma2PqlbTkG9PYKKfILFUFD1Blu4TUxDXt013ydDSMQrNvqR9G34rPS4pHAwkPnTrBi2JJ2wPyqOFp6IaFVTiVstURXMVTy0rFTpXZ7ilnk64asbJMwKjys7wswHqg/TiCm6SgBPbHbebmHxe1bExE6vpifC9TS8fQHikraesTdsRYvwfIYVjE2fADYkfbFGqDpWuGqYEFto+DbfY23vE1JayQr4ter2bFBKclEKQUeQ90p8T88St5w9NmmwaLlq/E1EoF18CkNIGPsMK5az7OoI0jYXduQhJqCh2SQj7Sx4Y/h+8PPOvbzxfsdU5qIEOLwq6ZTDUebSa8/X+lPS54ZQqFaA3d8KhdT87eLgjgjov+Xq1sH/EdZ3SijrXRrqPQ4TWH/el0V2YJGpy7feKv8+cGlNo8EAMPfrq6KApcUXTK9/n2EOxG9+3F9otjnIGL65luEB53wxS1gvnZlywAMMKKgkP5uTZ0BIg43+SMJVt68HaK5r2AUd8K6Uq3VOLNyZ6VROGydqqQVCsFPQOoD07R8S+AL2le6lUESkguSn/8tDmEoCJ1SCapE0BO/nay8Ac7XRT5sziAqDiNA1ddFkK3gIWRAdWjiSUgJQWIi/m5fZ8njSNiKQipbPC6fJGcSPdb1j0toUGzCcxymQbJNMNt5kGS3Ph9gzLCNly9nPkChk8dQt2b4EDNoj1GAY46KAn6ySB/GF1rMQt0xxYvgmyk3ZCb0qxcvLCgzghSGN7k4USbRgn0VKJLSjPqplyP5d0y84GQCX5A9Nb7nB3BfWydE1r7DoOZtpZcjjayxnnHvGBJ35BOjczZLcOcUvXHYT3rzTkEBkRd50hrwgZtkKqEFw+eIBzcZ5H41YbSkZthx05wuCjzo8okcnbuQGEnJSupBufBRAYsbI6Kj258aCwaa4C9HXY97dV3reOsRTuSfChWFdI4IaCnicttgzcETiKWqCrsbqzX1pWfYhmgTbTaXv8sYHQWCxGusc1Q+Y+OgtdDu+1MBFpjnFOYd3ljyjluCYqcrHwgrGyrPBaTSsJYoJl/EAcX1hpCfQ7fa89czIdVWdwA1zO4yt4Exz3eJy5ysgp/sIEZ3b50AyaJ42lK67YWndVOUYeQ9X/AQWC6oQoRFklMYGZp50h2F2SYTr6NOThc1Bs0ly4UFRoooEaBSV4r4FkuN76xBDbI3p7TTDROy9/m2+V+Ol0iybK+7Nm36MYi3f1v4Y5pULDbsaWrzNbZR8Aasxjfif4nFdrMYcJuNmEJdzYdJsY3F73XJqQTY5cuHZnO6w51HwphzkuJlBlhZDNExqYDxWhA9mZKGXRGA5xL6Vb16hrA/mwPeAilRfy9WhtbpbCP2fXj6JCC7KI0hm9xGxWtjbR8wIWukpkezCRsEJh4Qmnz/jKO2ZyOsft/JO87l/B9TYe1Tki8thxvR6pPC8y3ULQTZvhzBFPlQotxgA61Zpr1MOgc6IiVq2HCshRXfdqYRvBhZTlw5B2gXGWh0jI9QOeeSS82rD7bkzPKhi3XIv+Qk4xNR6wL78k6TILDTap7yH302p4iYlME9TpQGDvCgC1utR84ZbyMWTRvqkuVSCQrAkTJ/bqUqMF0kGctDOF+qwBmgYLET9a+W2XiySsahaJdkr3A9GWPL1/bnioLilC1u6SpBNLi6rwdro9eg3PU13BJnpYJOUjzVRC3YxZyZGOcntZsg/qGKKWq/RWNxdCcsUIBbDCwLoPSjNQuvRzte7pA0Aw2N7TLJB60eHeYegCGU1MRNKO8YElEqwxB4SSBWpjrIT6k7EXlDs5oGSArIVarDGFkOKBqNI1oeHWW2bJ23TahbUGf1LJnJrgX2Vks8diUOlQ7G521G9KEza/NIdGT+kro2tsQCzU8iW9FD9WKqgop0eDMVvr6MevWqbzFeTqnO/2i4TzVP1XHmgbFIxlXvYVFdxSzLxnOpUe/oWDrcpMakuT04+woZr9o7uktLbvAonTI99Qn0AleJ67fgp6sHhaftVaKWYFWaESVSa6NHtO4O27qpQuJLPyc2KQQ5gK8LDWeyc1CHApHqXSkG/qTjCZKq9I6QeMlGoShPLQpSoRxjxHY1mYOI4hxohUmOBxbIRCslokFXZCs+6M2YyX/2gvaSfYa4qYpnmtOdHfkKhHk1D57l7Wq/H4rBu4BBPSB2CW5hsyUGymmtlN1BeTCa0uy3Jdmgy38L8AMdD/G0mX+9QFIej3S6Qg7iIgmhLTXPD0EKqV9o77Kx29Cgj4j6jaBMuLWlC3TtuPZUZzhvtE5RiAHUR5yzvjlcuKidBy3HkYzgYrT9762sYK/azCro0MsMC/JGJXJjcRqcrJAB/oGiUgm9tCobXzSKqk8IYMX3I64YRZnqeGPDPISP8rfpr861qcpE1rWsHCKgidaYBRvO5Yu+zbI3Qv7evgbhf2BqCQFq1batjCIoHVjdgr0lrlMuHV7+WyRnoTAtZ0nvigkfu4hMoLIeNna/oIL87Uo7JWZuEqa5ltPYEMpFcJ88RM3OjmX3N9M0OKZT/I7LP2H2mNXk49MSlbhApOxaZbd0U4m0kR8yS/I1Uk0WA4kuulgDbZaS0MCj8yazV2q4wGY1rc/OUQAssybt8VwwWz74SVOknvSRj5JH2Mmyh8JBGbFQs6mbiFK63FuhUQKSeuCsd/GQY3mt1lQpILEnyx0q80U//4xgl43Sbh6h3SdLzfZj7EHg7nb5ZhY/6DD6leDDTRQQzQSeBaIhOJHEEoBvcqUldwJX4VbHVdFnhiQvFUxn1FpotDZT/o3kru/vPk/Ta3Mg5UB1+ikj6NiychdDfPIifHL6Ga9kzE+wr1Uc0PXpBOO8bT0SHyLnjyTXdd+rL4qjTIZUl31iQyt8sfCz5oAIzA2CAl+Bkg5/0z9rSsVlcwtQEKKebg42YO4/WqBv0vMz3U9EczQDx6QMzdoySjYZektbfJ/ps/OUPycxRfQYY10I0cYV768Lat5mi3kQ66asMVUwvpSuEDK8rVU8L/XjGMH9ZIsS8ZPY2H16W+juZ8WuGtRVUP/4IBJj7Klukov6ncaE1rEQLUqJOc2gSQGdvHVy2nHuhfvczjdnsAx8SCG8d5dZNmp77AnT4ZhghQym9JKmyw2FJozAfKH+B5thH2Z5tgrmgMh5DAeidBuuynjhxvS6izuRAW1DLytrv0Feh8XNHfIuhqhEqjQ7amoXXCGisc1F3rjAwNgBkQyjFDY+SkoRZIxjLnmPRLyh86OyZiD4G+QZgi4alv38jfu1ZTiq6pEhC4/8GipugivCzOYThxc5HVkwzpUq441B9mxlKXwKdGSfcTsqcJIIwbU65qURc2df7X3tBvCta+cA2nt6Rc0grovFtgekYBF9+Ti6T6au3mefi6yaYbFjb/kKn1yMV2z6k03GXrrbZqxoIhn88OUlYMOTEMiEDMWBkK2HTp2kPKkHnS9zLBCFSW30HXu58FJzrfjeaBml4ug4+yj8haxzOrJxQ51cRnwhFUm7jn4G4iveFPKKC9xE8spSr2e9F+Rrtw/e/XLFH5Inp0e+80+ZVeSQbxCTqInouKvZXqkjtx0Io4NtVE
dVeUXivMKH8mjiNIo8VYy9E0RC6w6hjfKuwvrho6T+TZuv05WRR3mCjXsjz1NaiVV41uibGjA4oSQKDOsAh5LLd/hfUZlSTIi1Pmz83XiVoZs6paR2bvVwkVJhOL8IjV6hLrbOrJFkhL+aeWs+zAlV+h7MlYVA0LdF3Vmw75XG5h7uXtzUNjMI7uEHzX+tK39rBt0NGzgRUj9Mm+/0g378WTsncEQa06tqtc4g4iEahlhB4ql4F1IFhZqoS26/IfOltgRh70P9b52j6vmUQOIA2Z8dR/2bOzUXAA8iI6Rq/1roTHJUwjQpkQOISsGdKJpYptCWV5R6H1ftEBshJ3KxexM2e4l1tYmqfILrY1beHwCi2NpOnMIpFXQjGYJgtWaqb75UAJ05ptAXS4XC8OGfOThssbogSbbkNw9zu6epOkgnUoCJzheWyYoptcyUdftTwJVYqjFMEqmoTlROal3wqwv5qACNTlGT3Dl7lWRQHunJB17olRDILWkv0GOwWLCWfQtRpcmyUJSmYQE+QBwTV3sGJwJ2HAHdPJJT9obhiLpvnd5jcSkkXDYxoNZNzpP9xMKMv9/JCAxiTLUvvYjxOUHhnaWkPTgnl5qSF1P5A1OZm1sq8AKcW9QBxAGzeui7f1s9jBG0sdCY/KaGiS5EFJg29ue7qA0Ou+9hKfMp9GC3pgdeZjnJdlz115ShCqHACjPSFBHA95isvWShSWNVj29ryS9AAERkcsFw295BzogFlMfFSF7y4TjKOB+RwyJwn5YsbpIFLRFnE8o9jAJf/uysFuAXtJiQDgBoEgGqtaYDY/c3MGKIcMAehe/eKFbogRiv4R74q+Fx5PCRDYhDK5GjWOOA9a34n1i/0tCAMWuj+eiSlqfvLI1ZEpCX86PpY10VqWKOmRCv41TRvU70PnFfPUjrk9H0Bi9fNQsAb0MdUYy+HZ5mnllC9wf4VbUxoKbvYl9IT0YOqSSgA9Id2M04Mku/+3so3RcaaixcFCPcdZQfjUzXgZ6IY9X3DT9379nnzpfQwC1xaQx6FdytiZr3KUZoV+QsSHS4H9k1v74v00IKtyi2e+Ux6XwrPTW6HKQdvG44lbvMeJMGhjy9ABB4kYS316G7PTz3e0pJpRsYIxQZn+urHfBLydrghtTHabXagb+VlWEbSqtRyB8r1ntilCpeqEoGxaw+suf/IFZcGXUgrjH9cUYAxRfCjskBIHAhLU1eD8fbTKhoZ2y99Jj7odJTpuArnA5CM32wzw9feQs+9u1xlhv3UdwK7+/NSf+83RJJ5GVwsVHsy9MGvtNmbnNmnq7GZAa9phwSDczvJeL78xNu2FtS5JMqoJN6bxk+F0mZioCQBxFopocPWsT7dzn5CThJPTUJJLFSi/zaTYcMGWod4sBWgbLJrXuCJA/4tV0SYhEIgQGheprFwWDFOFbV2jZfq4i8p3bK8rg+7MNmwNkvq2Juc3Rlgt4PEXf+aE8RGlBDtVFVEqXlufzI6ePxxatPvfJ2guGiUqceXdP4AicHUHSLUk7lQgpbFgtKceJNlHc7s/AeUEUofq9Wh0p2HJ74rjJ1Mm4J7SBMWtxUy4zCtSYVBfqBDU5LqVdZfgYToVk3ORIssUep2YzxNPenZdhhj09OUBn8eq2Lcn8ouShn7YrTOg2MaXjgzVhxh4Hmxl0C1TxqwH9oE/XwvlOArMjSVl9rtYSa6mBziBWJE3Gqa5zOHglPWFLZk196w8W1etnqG7afKS+i1rJaIRGIEce+YOkrXrXGy4w6u3yqZppDYMx2FFtGAFtzPtpmjHAGJLzubcC1mgPa8VKz+y83casYKsYTH96VqMOw0DpiwqChBSGrrv94bDi+dGrmE29gK8yO4jPgzncTdqxV9aUU1kBnp3dW7XME8Cb3ZEejngSCqOW6zEllnwZLshxNCMK8pWsUFnnogFqL3exfhAm4vmA3ljXX7DQKmlFBMuN2+bwcCfe7cl/ZQlLtcwVnncMzAIFurix4kKTyBG9K00DsXBrwA2QTE75gI0/AOHnWtpk7eB8ApzjfY4gdhOdJO7dZQsYIJK0xFZnDYv1cSH9zkxYWGAhX8S/A87sZLIgTODWAZQ8sPzKi80JZJ3D/ob0fDv23Nqf3x3hXxL9n/Eghm+EuVl9XO9qRC+9Ig/7anAybx+cgYw6n/7vyfkAvdUI+QA7Uyv8XutavPamr9Kp7VjwLNLJzhqxclRcyhFRUf0h1O7shi5k9erVaiEMT/RmYI385U81fwJCk617lLtkEy3cncbJAmvH9/2f0NYZt1lpx8gikrtewpHvnN1v8zfXGho/ZviY0piJ+CUupdsF1Z0KSWMIV0Ly/Qm7HEpRU2axY+Rxl12Ht7j3GXsTo01LSRLPSad55utvB7NGJJvtNoOvVpr0N52FUM8B2VyLQZILrk44wSuSnd2/Bn/u0tgMOzfnV6JCjJ9zlDV+yBxbnfdsqhXxj5hr0zK5CBnuiwYD7shgQgBWmRjNj6w39EkToh9E0lC9vHTEpTwurQaHEMleYqsg7HIxaW4XBniPSEpE6uJWdhQgHCQGl/SIyS7yUwvcF6RArAh7QspHabv2TU48wiK8d+12z/zD5XGXT+i77qZ4Z8qfJIj1kBmVhQEmmpGMz9qkfQkcRKpNHBJ/Iw+iFVQ0gg6sPZAEmqe9Cr70Lilq1qt7S9280XCy/Izijgtpab8B3zL2eu+/aeeya9K4OnuwF67Ar5mO7IB2usOxWg6SrEpOQFZaXVcSMJWC30pBjbwrOwQxek0huB0iDk8Tl7augkIyaYrP7jrVSnzCtdoDYPormHnPBpXe5vD/FZ33ZMRsa67GTJM0Y/O4VsMMlGwcEFyhoBN6+3haNlTQ/1u4qE6kevzPr50aCUh9y5dPBWFFh5PttTU1e9uROG4C5De5QiPgBINcjCT3fXKe6SsztQmr0cuH5J0hP5wtoRStkoAcFI4wPWkLiZl3paXCKLkXia1/+Ln8e7H+89aBk5Z9I53XkUsm4TLrZdAzLF5fSNBPbRSCnO0jQCD1Po49gxhewMCyFp34TjMDF1qE7hB6rKUc/UC4vH0hRi0P4LLrISeAluvZuKd56g552VpmXumBFw0q2mKGJGAC2xkkflKuqczOHjafQuuaLpgeaTFYv52YtFTfgX/6eN9O/VB2q8qnTCAKqD0qQuOWLMQEpQrWk5YG15e7giEW/uRTi8Tcs1DDkvZ2nS5MdmfJGjfsy3p/zZEdbAJKxq/ATy/UEL0oMD2VBa26MvbnMaGmLxp6ID5MHTTpMNLV/2MK3pY5Op5WBahK8J/mH3zQIFH9vcKLyP2ee66kvavvX8v9PPqbOquMTrs5Eix4aIC6iJMVj2C8Mx62+GKtl1VHYzjbpdLzGQDztRIL/uiF3ku3vqhjb3Aa7mbTlT08mmrKeqaa3R4zZpsW16WOpSlOYWBYXbB6QAioKNQzcDvz3QdEf2HPU9j3tnzEbeke8JwpPSmr56h/EGgQj1yHzf5m55v8uuMuKqFTtUBJZKe3goBNE1m6Zqdtq6U636pWOChi2p6mxxHUvX+FqKfdg3YwN+uCt4v3yg1kG7q1SIr/RdtgBKfuxedzYZ1Z9DlPtjO9F9u1ufDcRjVNfjCb2fKmfWLuSpvf+4Wkr1bx352oLpv+2jZh+hnpN3KiBq0hJKWjvkgScB7kV+50Umz7qCJ6C/ySQmH7OK6JnTUtoKqPdLv+ZcP926lZux4hNXp42TCOL2wZFupPSVPaM6nxDEjgZA8NZxf2KWuWT/Jpku6tCOIjZh+oXAv0wl0FA6ZvYUyhpcsiidKDHxSsXrHCB7Kz0/dpECSkIqAH7YdMqz5ppu4HAH56QCOwg6Ki+vJKjptOUXDd0pJYYSPm3JBw2O4pTx8HeQNgVoAwlFeoKXZqJU0O1QpTOQ3mMM7U01d2OwvY6o/glex+kgw0p0YrFmVZMXjE9+7+kFJuRNLyWNDY4CZZ+g64onjk4WpwtVaPFVmkBO5PEXjw9HklHuliRsihfVdzWsrfYgUUqaeH2MeDTBWGL2zIohgBizgABSPLrkZtxN5IEeB9Sf8ulVtHgvJTCr1FXPN25Dm23VG
Iy5gjO2mHQzF7WhdTtcaHhBpJf3xFdmcVG+C7xKkjVUcL1G64FucVQhkrwL46LEJUt7ZpbzsKsHZ7ln6il+/AMwdDAWxEhZtF5Cn5zSXv3ZOfD6kZG+gmeDUOZhS407nN0mT66RQyn+RDl1fAZREOFf3y4BXdT1l0784POwKusHftgEWsFj90BImGCaobBtXNd4/0sAYwa/AK6c9YPT4VekfP6F6yn6xdTPdhmSHewnHEbw8enVKZxeQB+Ije94Br0kDTrQyE0hjAhnyVqNpbq2hxehbn9BLjesXcT2jkZAJlsxhND2pHq+61ze71dteJASDA5BZGXK31NJq21HHJKqIWJ/8IMr0Ie5EnKSgyxhKTxomGrEnQIKXmC1GZCthfj1mCBONSh65ycn/p9JtwlB1Mdc8NCTdyxDJGwfzJKCMhYHFoRwUj+N+rEMqIp1GhsURXSF4sci5Q5rVWsDe9nBQ/yy9Du3MSrPHMomIkyYKqk5muEvY9Ug8mihlKg/ZO4RVzx3n6FbuUFU4pGT9XldgYMtmVE+nNLXlDf3zyPAK4lacPmBzy12TnVRjcEAITohTinZUlCEd/QFhuNcP0UQxb/ESGZ4uVYToRHxoWgycSosB/KBb558lXq/YdXUndq+4LZD8ElFh0RDHG6TWjCNgKVneSnHKNpOBUsLRtTNcJ9Mr7B0kqThUc5iE0yQFRb/3D3y0dxwhrMuAgJk3JAK5roOUBVdF/jETF36CE1KqNFVrgcJHioOqs7xl1Mrs6w0n+EPq9xYX0n11jip0tKGeP+DAdPZd5eyWgqSd8ED0SelE6hHqsuNJPm1g/p9DkqQ/k70lWAq8YCLn1wgRrZ9R0IhYPQPkiCKf7jTCJZ3lrY0paMXxGDjwFoFlVL+YsBpoHLuUTeYCA05mu6I06e6kvqGHAfVXhrRn5qOdaX/Y0dWc/lH7iqmI4+3bjzF9LzwDcGODVla35xgjBF+VcmZbhh5RkGuvdcDUhoQBp5njdPzpg9DXrDGaqls+77+bCS1I9VWbe7C8eKMsIWDi19uqXocgN7x7d4qfsj7ASEBPtOl02YepD756qzkBU+OqPmLmD25rVHWco5WvAXXL9wPt0pqWuqdjZ5U7IEyjCANC2wonE0PSpqtAuBdK0WdmjFSsK1k/RJ5VYMBXyrzF+dUrOxJBfhD5S/DwbOqc31HF+oKN3TnGCJw8J2vqyRZkGAmX4JrafiHD7UjV8WoDiB3O1IwbikpQDOUfNE9hgiedPCLKw+ogITyYd0jJmJzmyxbOFSF1DPhq9VIvfKZjHIglTySEQq9Nbg3zREjq80ztRWPcNBSjO4LMS7rb9MJfZsBAaOI0hchFmLyVHzcyfUCYBU6v0p8vbTKoB0vnBOypfF5QlbHC8b57ijc4//dXr2e5vDTiAOtRYhjXj9lG6yHXVmwuyYIvcpjPu+5/eoVyM0GGi8/HwEN/jb7RUI1u3ei4vg3qYQZHA17HfWLYMB7AUpy3CW/BEDI1Ru2E8/fghdsd+e6t8cumQkkA9A98SpAAgRGoHXIFMyEDNR9aSA2N5fLB6eaUpkdZqgI377QRpLz3YQeJYcp+0CxmC+dvb7j29cxHSbkOv4/P+Xr8Z68sF75gzy4owVAJ+2/x3SGH2Vj7tFoULxAKLpAoe7A6dk90r19Td6DvL3m4QaUVVG5RxNvVc9UahNsj8EQjL1r3WicM7l/AzG4BaNj6xmAL0/ZgocxngfEtPcjn8XbnWuBizmlXDWkwRHaNQFmj8MoqeXOqhj/SgaHhXSc9hcnTsByxJzI0pOG0zT5MwGTpwofZkGzHws6W9JtENdcWFeRx6u7UkOQnb9PCv7mLX7n7n7bJP0L6t9iuziOEB3MzTjqwxBhnSH08keN70NM9Ycsk4weQloxd4aDGgsAAu+2eY0o1BfokHdl22MnZie6AWjf3LcBVxTsvfYQLS8yAKlLR8mh9z5AdBe20slPj4+S2NBn0bV3PfSIL1O8X+LxKEl/77IrGOAZjvWxNCY3YaKiuvW6ufNVsovtQc+/qConDvx+2YWN8OJGNOUSawPm+d4VzggQsU+W+4SD1Vrb7kQ/6IC9zmoXkEPgPD2WK2ZCEZug2BSWP1YViEW/yIQXEJO1rclXEgAqkg3wgnnH6U4eztODUYimEvysF95ZoHr34tXXUy8xLFCNhucTX1lWV1dKMqnP6SjzKXOV1MTmtOAkAeBOePdb7JqNi626HVH7t1RvdOQf4izm8flhcFcHvbts+OqkEwj09mY8rDAucm/UuTj3O4HFJNr6elTxYH0XJMX4y/UsQfDGmgcCO4SdGOSNIeXngWDLhww2prieAWJjFWp+utdGTwD9DlZR3oHvVBKUWzcbR2Ut3jT9p97MVYSA+KscpKaxRkPqXQM6No9UcejoqZt4AowfKe9bv75cGaK7IGBAyo5JOIl75uoZz676sZP6jNJHLumn6E0ECh+UXR6QqJtW5E1itOy9aejVkRA1j1OjdOP7JHeX+uNEcui+mZ3gOq70vNDIo/k0WwCFv5FKOcZa0xhQEPbmcQ1xwlZmSHfo4zmv9+Sp7uLffxqrxcVfHJzGh6NaTWwz2aikXNHnCPu3TB0zIm6jRc1jAT8qQSvYTc68NuPjrHSOI2LwKnJ4ZCQTsK43/s64TVhRuQ3t1g0ggPwkwrm/hAkzFiVv0CWqMUCrLABkcpuv+YB+jY0U/fZvZe2tljNYyIFXcZeZFC9bOYq7nroySr1a2BOiCBTWlO7r9PKE4GNjiSequ6uCWf0HT8mSfZSBySCU5SPD9nmFPvbHCpU7T1L5V4Mzeb128mWWfhOkZCfLWggAssdTKsfuTZ3Hi9OWZBU6gQeAw2fsXvQAOihL9NhUFBZZKNAcZCzP15sYRELjnobMlon3ekIirA+j+iyQupN2B4nkv1lmShoK2rWusJjxJtf3wBwMGTh1MlG5udQ03iOkvsCUyGMoqCXQR2UIsVvMKR93iOWatNjc7z0ni10rcBsP62zG4uUbhZziIFT2SQJSSG5sLAI4dGtkXeS5RYmpvBa6zkWjL337fto2uzOagswuUVTfj/OSPvq7nTH/2y1XKhvPHbBaW39pjAMC36lUpOtjs5kEKqdmB0YjuHBhtNsBZpP6ipFgx9n4Kis7wXfXMIViI5tWAdK8kJZhinIVjG8KHmsOpRjfM8JilurVCx1i37HcWyeZ1OPvvSJvXsbzAINaB6jbfJ33/dGaPdoXyB+N0sayQvlljgC4EDr1HVrWIa5kgSFbYbiKzziGdxJxjtPELJHarCggTudFfM0Lp2cIZRg0T4sTh4RDW+nWxlEoHitV2DIlAFkx5nTZ9bDTibUlS5nffGp22NV4GEGytIX/qJxPbRvlmRwo9brASNHcpcE3QQzRee4oYYqeNHJtGMj93emQdQ5FKXzG8w0jZioyx+xSXXC08gtFYeUTWrl+8WYAo3tdvRlQrbhtiVCYF1R65NJkR3j1UAwhFcmyM7IHZMSZBlo7Tmt2gOFP7/m88Fa/SF9jBSBTy8ut5N7hrjQHothPHstNjtZYxtv3snOYyPJuGTXqsHwVx308zxcclEeCtnfKziWwDUpQiENJEFo4lMykhWr5BCGiGx1f0R/2IR0NJg4mOIu478npfbxBiNeLXjUQpUOWRCtRj3UcKzvkZciygyll+fAPsvKM4Y3UNGdaOu5AfNNM+E1HvaYYrpLypaBVVixy8EEbCAz4NcVtjZhzHVFOPR1EVtRzANaFsbVOmumeEGGXpyroicnOHoGZITlyqBSAL2Wisv7fLPBz8LL7SHBwK7/XO0le5mBCOZGM/V99mjqjbDowunoseimSp3RMzXl8JuCjLFbp00gHuhULxIz7VIAIIPLDrzwyXRjmaV0dH58K39wX4vePkXXyGk36VBBG67g005yDm+SSCi82nZ0ZvDQdWqyBKAp35QkVT0DHmixUxqtIBTBKEwbV0tkYtfDd+Pv3JCbOciuxb6lemxV2s+YXV0eKTWBn5DPm6v4TaL3Wfh7n7Ts1SNtMJczqjcH9UTtjLZpeizuiZcl6+6HbzaNzeeacTLUSOolqID3J76dRuyp1g
4nn2jdVXmwRvk3T2HGzCJ2FUhXROGuxcMyZmvCuv77hTy9iOr8dHGkp8to/5lKX7wGcLXD9BbOv3sVSjhhnrTtgOcMWI2bBxwGr+plGcFSXQYb/Z3tMF2nV3leXVk1FjwYKxq3fL6jN67Ah70ZT46dRvL53Tj5FUD+cbofrhyTwow28Pgb4rCec3kFueci5Z4tHIh8IpEN8krF7B3w6pMNia0P/GFE3BVpT/66IReeJMhCDnaf0yGhc858Vl8LnJZN95SDkC6tVuHpPWJPDlEQmsZCZcUHYwOufq0nZyVx896P07k/mT7gUde3+9VmXMK0rErVH/94nAllSHnbuF47oxk7F7UxczU3Pww4TjqbWIdK9KxvmpTVEIXzSqUYAaujxiuYGo2Af3/BEnMICh4O+YzPKSbrdRQVkOkWsMg6T5yT3L+zZrOQtCiFoMPc9c82pPPcOXa6uEeAXllwBS9OfI2Xc1pHowgLVw0ag63OqN8aX3dhSlzONXkHHGMHh21qJTh6z9/9XZyq/CgSwjYs10oQ4Sxaii2D0n+i2eRawZdvVQM15jdr9RBBMl5P3eJBg2syUxbwcvQ5CQVZoINlYcf7BzK+JUGdYvPQbil9vSwRZ8E+bTgd3UZqZ9gmopOmy4RYcQyEj/kJnRkZIqayjIcDWNVqbVfCbQ8ZXdB0YWVEcvAKucvqmEvDalfAzlUTVavYRdSCL9kWT4AvlXXvNL1lD0KiJBvq7eTN2cztCgU3yayGwk260swH7Hgg/YGDltwiGcpKqgbYVIYU5LP2ZvlpdCjHlGhgO8xFhSKdbLb500NXmFcdO4X87bqIfl50NKfynOoQ+o0d55p5+EZRwYTWUnQ2+zIDG++75D8duViNbAo458kLxuuFFciTa5mVl98DOmyf82DZwKSV029cZuzNetk35DcE4UqG9Ew2/AxhDfpGRKHS8QXfw+9rHlbNfEI/mGMlj81oB/GH9nBmh/0tNlYIgVSK80jEbGmYbASX1Tr33zLCBMODnEm8oWB9OpR/KN6zSV3Dmxq8h2TPuKRM9NqNTF3mTarOjr0Gvcfr1Zs6wVAPAtIeqwp/FiJGgR5OL4tmRsMrvjZhPbSiOg7pYDToBDtTBRyZ4rVoG+jkC+Rv3uSi5mNy+EPXrhFoXwXCLizjOIYZkF8t7nggaaTZf+ThogGf8c3JtD2Vj05tyD6LVcXHeSpJLUs4efP4jex4Z4pIVuXSZ2xe1q5qYzz+7dcKENWeLrVaUBkvUq1JmY0eGMDxOkD2tkqqSHFp8ziz25IkyH3lRCIxjkIbmbVVw6CNg9sQwn9hG38U3kCHJ5ThCzx6ECMkhuf8YkYvIsK19U2F1uyEKZ4TQHSdZd287Iy6HJ+ewfYyJ+Xa+DlXCrQ1VEsgg+xSL9EGbA9fMqEj/228Zd4dtqAKLyRtI49EDsJCnFuoASHf7XkjQuy6IotRSOaK4Yse1L24O4Kngk5Uoi0cvbH++xsjObJxekpYbLQ/tQvFlUfrKE53X638mwkMDWfT3Pwl7pcMD9k7CcMSA1pSOts6yyqMbQLSJeJf1SMEmLooQzpIl7E3mz47YTOmpPuJtF0U8BLGPOGo6CWLPxhpzQ91HYWzBMErVLrbTe0b6efgCWf8gqnHiY4/PZt7LDDpSxugwzPoCZ91jsGKCve3PZlBbGixysINPxdny1YZAcExTA1DhCYY+J29VNnDGDBSLhqpzdLXRhe6Y5c6Dv2zoQyZhvNRiO0nkFUEQLIi00DIV+zQjmuQC6i7oIcnCn15K3RMi8WJT4wWsn+jvBwSmnPaZw74u/ddffXFUbiNi/eg3jvyq28o1BKn8oTfQ05FL1MZKsJXpadhkWwTJav+2BM4Y7PPYa7FBi+5YOo5xgSZYRJlfS4gHtTw2XjnqL5V/FgXc8nUQEcVfG5LHJNTLOnG3aZs/nAYKJBkh5vlqxsD2tpU8MJSWDClWsplEf+/pFlXnkoKD/ZLY6kvvhNpDgAJqmO+2V4lJKeESBtF5niTrsKzILT4jzFWcAugZ4LeOz+MBNsZi+icEHuw1trrH8MdO7AzAls38Br4eetcjl+OupDrLlDgHsUIn0Xi2tuPKpf3IEN50tEtu+eLw2YWmDgXmyO8ZZDqu0TwW62/dFM9QM132XeUQqsPgIlYJtx7dUEsPw4hzcSO5UkpPKlY4iJ5y/W/YdBOYueMaZcDVhyTtBKmen1P3sPFP1gboCpmCvglsz71l5EM9ZMmQjw/5LBhUi/eVnDuVpFw4AmYUdVQWuic/wwAVYEppkEhu2CLOI1fpYTPDjvmyBTMoljlIgn5nVFO0iLXUAMSkBtncx8vJtoJKh1F8NTios5U6BR41Luyf/m8yBfrBCXbS8orPjtTb6HcTb1bY4pOoNF3ata0JV/oZRt7rMGdWAv3RPYFYGzT141KSgNIE4us6DUgRw/b6V3dfrgTLnMyOaamX9Yj/i+VW21lB5Pts0FX6CCxNjTOOB4NLr28q904XwHlbcLVVXghB5w2miJy2KDPA9ET1xFp1KhNzCv3mj60y13NdcVn/TPK1gh/Gkpf1y6mzD+dBbA0khM7rBkmvzRf0ut22V+trDRp7fP1sRS0S78WRRQd6EqmiLMpPl/iy5muDBgW5lAbLIly2NbdOVUvBNIsPKARYWzqY+M6kvOVX2zf7l230PZH2qBklYJAQNIjWqtewg68CS1VmQ1zHnM9anKzFyi8BpfOFhBImrIcAbG9BAAWirsLanOwZHmT+B5H9uMr7Hat/1CJJsIRjiQXMqRt9xfhpPJ2GEe5VGyuvSUiov1T4oUNypivfTsof9KeM9ZPwpV/yl4b0fMoTDE7hel4YtolywZ9y6+nIVS3XCgn0n5Fw2fac/5/XQ7l0f6rNKOcbQLYsmLnusW8bp49j9w8K4ZWs8TBL+ogshW89KNyqwLuBzqgUWrlo8g0X1jw5/TEdLIVDhoM+SnxpRkCNxlhDwYEwD/voCzgBp4Bxx73HfsecWNTJ7kkm4SyRC7JbpzN4UFXoYqFpKFejmVNNC0ga1wLZ5dkygn8vn2+jlAxri+6f2P1OnffgEAk3jfnaUEeyXXQ87NfssPV2+o19Kx63waGQNpJN6rd1ytbeZcIMCntDjaPStwPAUPxAWANd5VyvxQXik7mRku0FcGUW/8k2UL9INzEh9Bs+z0aIiGxqepfmXAwnfMBIonO4NQiRdXKDdmeJA/FVvG8++j6ZU/Ur9j77e9WlPDAQx3fcwz1BHW9iV0jpqGEbTBy7ikUZvN4JCwRY4DXK4NPDhAW1QmlnVpDk4mhFwOeR7IZGaJccRshzoS5Lq7t3x8+GfXgf0g1FaGx3MemEBPyXHl0HSr07DOE9e/Flv5ggD8rqanmwJadRGWj0BpeysIeKRqnUNo+gc6RBImLCQO5HLmzTlkPn+zNuRUk0q3xW3KP0hQou9tDjpiS+GGWfEBBsDrfgr77mqTcrsPCkukZaqx8ACRWOvzI5vzUkS7ILIsZujj4lF+PBHjXMH7Q/1Oc2IUdXd+JPrfga+9sq+2IQypxsziyjyr7Mi57oBvTN2BLdyyUgPi7jHf6C5q+oj73VVxzj5TXS+1KT1IoqH+8bulYZPNH9ttK3C8R9NKP15BAwismbdmUPyOPspKcXOLt84NxsC9m4SScM5i+WaF6bjlkXrv0sGX/IWm+gxh2fjDVi5cGMoVZTl7ucQsqvE9zA40xSyG9MkLfWN3J3SGSqN6ga0Iro3YFFFS09YEU10RVi5hsXm+Wt+PBEZl/Z9E4S4tBsJkYsvxGW0CuwL5+nOiN1j5qltOSFAn2jsvcbjGF4I7iLrM4Apm2ezrroeO/I0pFkrlodL/M99QZH+G8sIpCB35bcKLJbeSXJY1+Fx/AFjvezPHDEvVFXB4CXOC67LgRZYoQvnWAvyC89QYG0lAxuHTpjeDtWxag/O3+3qtnHrBYsiLNJnmqFNJJ/ofP+7uyj0cuHXWc7tDlo4RIeZT+ppuaLckjkJgsWo7qIHHaRBE58jY7+QWON4U2KXD8BpQMghLJSYF3NBX7Kct9Nrj3z3FU2cTCupOLz1B0+yYRGEpD/iKkxKo+Vj
ywmZeUbDdqZcvGkCrrAJwC7cWzE1lfbmqis2+TFeb+utwM0KF70kaXhfzEYM3owxiHTw/DE9EpxyY8rNt4E+dMTf8rBNtAXCtB736W+EStKqC0veM1fg7eDGnykYzRJyfrSikyM1i0xS91q4hsCVX0yDwBtG11q1bq/2r+mfNl+Ku3kVVJnWcjYIKwZfS5Oy0lyZhmGZ1sOjqBkQ1eP2A+vWYKgcbayXYGnNW36z2kvetqHnFp7X36j/GYryGMQfFXyH7/Jl/eV79X3lLLVRpw1Zbaos0reF11OTG9ONWNuks03JLty2YJYUNcWnRgbjls3bCIVl0rDWcpKiYd2kSNwvuA9cHlhSbCTqjag3QQfxn+bmbohpg6zJKTGnv3kyqFby0MVnGgsyiTeV2mbo3gZVoOgGTxm8t68YwUPSR6oUyWdvxqnjTn3m0XEU0jOsch+tMWtjnoYa8/qzRk67m/1k4shsExFCHw3tsRYU15YbhzaccXzeSffnDYWsPyWJu/ugqacjAdUedKjkXdetwkSqQn0N2Lv5YF8H3E2kqFbQwqxJKZOdNg/BX1+ArAQL0dARK8lJHbXARYQNJz23PWB53cUkkACeoT4lA58RsbWPgaWqZvEZsbFujJmv9aN9Jg9ZqNgZ8LsON4JbcPrVH+vnkHdWdL7ibySftt3Gw0i5vzTGh4VCul4jAL6YQqbhyR2mDyr5ZJpA0wH1q+KzsMkb19KbJnYQ0blGD0MSBzuoMH/MbfoDAGFN+S4WfIseFL9Du7hdWylI4kpr5U/3CA5kuyCd1N/6jfhRJPJEqHVc6jBm0UCoJ/hby+m6zQidxIGnFm+HVOna98s5IhTqyWRVopukEDLOk7gsy/S9atxIEjFG5awXzBZuLur0JnYQFY31iYS0rkRrvQiEs0retrDDgCshm8sofii7eBiJ7N4FqtYI5kwIf6D5ZK4LM3AkbjiSymvq/eDKFrNlqgjYLMdcXCikAcH5gW3WXkkg6sf+UqqJ+OF+cxFPzQvymaPdgi2Uy2KVKan7Jd6Pb1KkG4a63INlmBta9XuTHecpctu30rffjk2mo+Nl1aJpV0bGi2RKE51MXK6mY/endzmcpWrlHEqJzqM2gpIVAMX2CuGNNP1Gzdknu+cwZQgK9lHkedJnb8z+g22h/CKugSaygGTSJeB7LUhVPdeA0iM+ZhPWhdVKp+T9ATS9h2X8m9h51wJbsdUlsdYQxnnbx97hwI0RRlYhu9xxq5cg2vhf8X6qoPS8yjLCEGWsuOb3d2HmPvE6FW0P2KO+hrAQVTZN8QMI7yNtCwXI2FiyLzCTSOaLc2ZJjD/W9vVN/6xYC4zmZU5/JKFwGhXr1uHELR1I9Wr549i9joeJOfBS+bbnHOqsT8fGWWEM919MmR2F9eZgEDHEsSdAFPIdsa2c1iEMCI3W/RPpbCEYgGhczyupe/fqcLj/8x9x1BjWo7e5zbKeoF2J+0U9eU5REa2c2+SUJ1nk81oK3+fehugNktH0DqTInUiS4WIAwyfXhicVpBXRLFOwhAtuqdn8t7R2ToQ8Zddy2Esfhi0AK8oyKhKpr67Nb18eGntF6ROsI8HjJyPkAGdxqrNdaosPYLHuiBjeVBxz7CkzZ/TrFoAeKQhqrmYFggJeTM9OixIjrXBmI1ycogSsNmi+wpDaRcdkxttJxHQGXBjFynMkW7epSIdkHzHs5ARte9Zl2ZWbEaOrf4Rroy6i1RJKlWmaQPwCAb5f7JHqDc276eDe29tvFcVYwiSKVwLLnSUHMn+8KhdRlBgFEBTfqSAblc+aohR4ofY43TenTnx/pH5pLVGy11Qfx7NBQ3iljGreIsq0pF0tznvPYqoh6Aub/61aC0rHg8DITV7hnwtm+rs+LPA/nSRuBSMP2MkpljP6QAUznoxticTm+2uj7ruozTg6xmiVqezhxX2/oXwAhjQlcVFSp0mWw0jOyTmtTyb/F+my8mGsH2W3JLDavybDH02pQ8IS/CbFSGR64OSz/wd2oTpgNoylS8t1Q2NQKHn4i7UWnjdH2xttBSY8a1UlYzxcXwiVGmQcFek5+zZcyZuhVp5FWQXAMXZ0t7ZXZTK2G1UA1A4GxeJ6cLIBJJQwq2Dx9QQhLfP2W4Rtf12x0YFceoOTRkGgitmo/rK/+hrEifcfNBRhroFYaThfewCT+qdp6EPYg7NRFcq5JjH2d7Ml3B7CItrKGOGRYuThbnE5y3RvCzcqoUjde6vaMw1mqdblVmNkwTrPq/ZB6lPMhvdEjV1L+uTdTELt6nZiNB7bTpJMeUf8oLtxhMM/PkDW4rmGlS09Q97TiiCeuLbBwB2xH1OVaH+LESRbAvSi5ceKxuh1JmkW5Hs5EwTuAuulNKmJzRW7oehUucLqqiALfJSX1wl/iH4MwXUEDecVRoMBPQQ6XyCLrNoI9FeM/RTBjuBnurWQTvL7b35nMbUSoIRGgM0/q30B3k1kI1hySsD6XyqqHn7NNUlJ3rpCjd+296fx2Mvh88NUCSPBqoTu9EIsWf6MTH0GhHbShc/Jmd+nGbZ8VTbKfY3byc3gY+LyM5E2J2SDVm9K5X9a2wiyCvAVRlqRabZrxb+hbSB8RdJvGeQp0aJEyTgRfgnBWMwh32tP5G+5iMrY8bIEYNLysgYMge8GKgD3AQbx+ZnWpVCnspWQcuuwpyUu2lV1i3DoOROojinrhx3zlZjMUq7TTIz20YrxVBLHzl6JPVSU8sPVQ6f45OYWPsdftyJoYy5C8OV9D8eOdvL+8CDr8x0v3zWVKIR0hNjs/wTKwCrmuq9dLPAQrdIAdY+FpSZID6eDG9reiOk8ELrtGMV3hxrUSBR4OVqGjnViEBCFMKMKKE9BMQEluhw/n+etKwWJ81ohtJEDb5bHLR+zmInolw/4PM8sAXUk02HVY2cTb+JHsc689ZpzYjLUVpQ2/XBPvpEFilkPDAO7hSiZMmzzYgjEj2trzqKGnuxpS98TKTBPXaKtwH1YFcaKRUFcNe0JalLxTTHCPImwAak7Fa78rnrtAV8a4MSV0rtB/7irJQiwLhsxj/98q2U+A0297huVyCZ8kSSkwzPKJBKv+MPKsBqiTTjIt1bgEudWWyJD6CoJE3rOAG77zg4g/btqkErp+6/g5cZZi6oRvD+CNJNvfjXZNX07YJKlWm61OZO1Fy3dHX8zg1YogAqg5mlSe/cgQfipyKQpl3FDnkVK8RFTmt/kKGe7P4hgBidbEZUP6+Ep+9TsFrF1ob1Cb9m691N4FUHtyzc0nxjDEZn3qITzk1KQdeYVT0E8OiQPGoPPp8Edn5ZYMo2ni1n2B1Mt9oHcjjaTMsrgVkwLT1ARQVfHjdNkLzDMy7yGEQfGgEb3YfqTsMfFXnoOipNlq06zb0k7w5BClKTlR6/Rv4UUZhJdPpD+9jTxnp5nUeVBcU48Cz7/vXxk3x6qH1LXNIQ1fVqyP5wEP3biZo3BUD6KlAgrWTmXprjwUIVhKKZjbt40KkS6wfN+AVIITFEAetQp0BtjWkFg87lVCcfWVQLUnCHhGuErSSM5uG3qbJBKvBG2ACk5vP79pr+bSuSdTuQI/jsCce2PutnPA5diQ3EnQmybmb0/18q8bePS99GYLkvtgLqkKSN4slNKSWT0crRKczzMd3BlRv8BriSS6hpObBb+/PWpo1N5V4cmac/UY2ebQqB6Quh7kAg07KvgsvWBIlm2lybpUALSsKMivrWRicefz0XOkp/XeuflJaHef8qy1jcqmRyCJhfrLfbUlu5BMkQIL9kD1HC6O646kkrIk3+nRZd6hHvUQV6zX9mEBbRsZmVNGq91mTnclgQlnxh+diciBj8vO+b9AaurbxVq3cgy7pBdTFPqj+sWs0xFZt+qlgyC0YaUYMcrESBiXsAYYi66YBEtEEMKAZa9Kl+YSEd7ps3Y7z8MeB46pAlJDiL5VxYbBF3cFmgdZyIp2SHHkm5F24u0QN28a6k9bTH1IIPwLWUDiHfej+h7YqHZsypsN0qUN9yHgbNUU1wZiL5eC59J+Z9CcFMXL17I2wkeDGogL+3KcDwd/uTOvRw/YBMcN6WsDqKpBHg3Tg+9o5X1
bW+mtI6hY9cGXhUTTuTTrhzW2Ph9sM9OVFUm5Dsak31s2mFIFeTorzqfiqzXzv0xfgbl6eU5DpiA+8HNCt3l/RzlomfY83XVuPV6CjToRyYVa4NobHDDMdr2VbnE1xZ0PQdmORrjdH09JBgbiQ7B5lJjcyJtAw5UjTYdnXYDu4IvUq1UZxPUlf+yUWE4qeR260d7ZKT9/ivYi5+Y/2QriSOKosWY9dlL+MyF/N98lTGcpGjz4jKEG7Hlw+3fEYJHVS/guBqop5XRHzxTAEtAd4BhjVPbPvocWxKxeYzOYZBOC59WMWbjzUaHH3v5CsK8evHuVWIRW4sXvDMyXtVDyNhEzIfs08r1AOqVT2hdFv5xMQ77mdh9+V9QMzRb+wXrwVteZJINFZSRDXV5jZUInEf4AeqmuNhsEqXccHRUOOtuOXsfxS2jebySPRXuYShkzYppGqOU7V+L/gYvXjVit/swETY2kcAbTu4GkV8YhOCtGbvOGxHuYrnXuv2202jxgOtPL90bqzQHdUzOQzdnWya+UqpEOySaF+SiYQ6J/q5FMXJEmB4Xu9FlJ3pkEAP11UjpdgaY4vVslzGdFhWSOVNKwH4IxanCJf6yHd4aGmwuYSTnsNd3OKwwyFqqgsVhaJQV+41q6bdTowBN7RTeS+hPqJ8tVUgcBz+XjOXyUMiNDa3rkHmohiEBX3hqK71WhEHiEKmJ5pvj4zZgcf7sJDQNaJcAie2cY+n/lzzhmfD1kpaVIyT9CirpPtu7+FIstJ3F4C4QhzewhA4qBwtFvo7u7iUMp5COhkUTbQuoD0u78ur+KUz1WELCbVKTjtCyeMUJslyfQ1S6+u+0EAeG4D5eoJPrnDG4xcPVeGzMi8+NzcY6NZv76QlrSkkHq2zP12Ol5o0PeoHtA+0anQYVSl0Xx7iXquTgmAs6RWCZsCBiJLv5F0xMluNECpmYDaLREng+c880hLPLSpycsJVtJE5MYsBqGJw2C3Fi0xqCijUCoYQBMon1Dey0BKWS7MMQLIp81LJFF5hg5yo9EUAW/Y0mUHQzXn/8ELrJ7cPXKkkfkqoT4/2Brdi0uV7zGTelEmLWs8RUYYbTexFgQvzdlnMLa2T/FX2JwXsJBxnLDaHdIjp3SJnq3iCIEoiKfs+Qs9aCv7Pkf93SqyWNe3BTj2wYa81Nt7+4fZxU068pWj/0VWTye+8FSqOI/P4qjqAss6fGm3LrPmF82cJIabt3rfUeIcGWK/B6c+f/FOoM/PbQn/HUXnRWdkZhiCOo+Fx8mE5VVWjD4uwFMhX6+0Fu/CXIYXVqgHB2Qhfb89qsJY/OmHoENDQFwhN0VAavHRs9MLqZAjnJ6xoZours+PrgGuxb05sttMQwwVvSln0lFeV/69uZZiTnhs6mya3b6K/Pwh02pV6L6tK/c9GnLS4J/EjMz0xuI0nV1eOG3EwTNOgcE97hyb25ddBKz35UOECF+HdrCANzl89XydXqpmLFnwA5nQWPgj9dsfpvq3CtezufmBrPKCd1XhpNAopUHCfDEDrhM3SMbl5feisB6H/A5C2jRtf2v89U6Gs9l5EQ5LoTPKaJVDKIYVKyTlrNGER9FkCBvxvvFuDEYdPG7vxQW8dXba07w2vHa0zUBkauCUGM5BoTk+vuWjJQOb7UNJT8tHLxWK1dYUCbVpK5AmTI5tzPrMRQg52cVzF3WTrk4TPbjB6OdFvkDug473JopLh06Jjx8eJXQOCPlby6zhfX9cPGbFpLORdLzrIaBUWM8CipjIJYdSbz/sVIfQWX7abvYWcyiyD1UxUEL9FitSPw+O5zWWZiQjqV9bVIMfe2L2xCEtBDMsnPqNmtXCHxYXs48Q9yes3yyMn9iVYO7q/g1F8oa3JLNkAZN0nloRveDYHxqeTaKnfrG3PJX21yhF3AlT9f2WWMAXMnYHUG2TEisYDXbBF03zBQQ6lvA+T5NXtFtWY+JC76kYU4Omnlns2jspiUqh29fRG7MRc6l5416MAuUT3Zh26m0F6qb83P8Q23Hpr0DFWXaHETURlkEOgeNOH+WgCf+WOceMzu7hdTidh/byCwxv9nLxKJmKi9OEqTqMNF6fHQ1q9wOnuWWjfUNgY4iD/aBUzYkkjcDJjugU9m9Dm1RZLksD7o9m3MMqPlcLoepmE8DSCqvcgWi2mAard8n0NgEUw7Tuu/pkBN1myqxqeas21I5PaqXLhVj31njCDlrYHIHvBmDeaojpviD5bD/I18/TbGbyLOZ0vM21KgPWCxZX49nKGvGyzhf16EyzQST8V7s+WUYl0KWHiuzWaKhAhHYnG+GzWz+znNv3iCbQU4bFEO27Uhn7R/kHkVfG2niQt/eRXxzMcDkoH++NqGG1u6kokF10Lv8fobw4yVZeV6kc3Uz9EZc++0NzaigIS1XY4Z/40iLTY1Mp4ILnId8sqjq4YhCHPTFoyfWS8Qnmr8V/ZBLV0BCh0aLxYzcH9qCQQokIsD2yz1L981sqpNIm0NuSaDeTFYstcPWby6OF8tMerNz0RSHVbm1o0qpoY8P1CblpGZ8sAqxwPPF8b1eYefFoB5KDu8jzXeiiqYLM7XuIFAt2rViHG3BiAl6OfczTu7CAzl9gBFfRVTkwCdG6hNgfPtEA9VGGOQAH5e+wiM4mpWW5lBMk6WMFuDioeDQFigLb9w2qI7qWBEe8m19oJcJPPOOrsS8kqZykCPPtm8TEvPkF5S2Gh4FjpDnZ8X0syxd5IVbodNiu9AmgrAB8NmBC41l+qsY1OF183a++dWhbhNEChtJ2ZOyLzCGK8pPakK84ib+poYE2AAi+4M6UFPWSDhR964ooYdDSBthC4UDKVOGAzekWHfSHP2NADNp/gVlHk1Jh1EuX8Uqo5O2LDSl9DrCPImsa9st++1PoTvzpUuvQz6MIPSRqulY+nc6jRr3tiNmj0OMuqufpa8nQQIoXm9+GbkihJzg00e3Lv5FZkXBuV37MlHweTSWGVanjqmBKUKg41+rA6bNYZhBtnSq9P2jwooIDV/RouNoisZ1EEmQdT+CJNEtw6PwcbUaj6mVXnrqlqc+0EEanV0TcPrYTn1n0c1KuXrPZ3t2xkl8Tv95goLqQudVNEcgVBBMaByH+L8yGeaij0RHQC28DFsf237xUsF0p00Y1hMqz+vJlWcMcPJT1GPgGT8SxJKy7GYO/gpYIMtGypf08X2Y93fM2Btq9vncsJ6aDBfG4WISzFcjTraHvW5OmusKXrAmSETQCSHt/GG1m/ANBQoJBcJbOr8+bHvpfGan7QjRHbXl97Bjn4RNmpE1MTgIVC7uiIV1O6X9zMhEeSYqQ3lETXJD7owcoOt8M+U1HOr29KcRUOBdfOnf2oqejMT9I8zjh60WDD35DaDQTMpTudtLdO4D5/WqXHxM394/Ht21SEobsSO7LcIO9k4TB3xTqpuIZWYo4mRmfkspafunHP3YM1qxd3bMwnpgXxCEuynwwqlPKvOgzUnmOpCPORVPLz4fCrZa39Q29FmgbGDtQdAlNOWLi4+Z3GEQvHbJJccRfY0dK577EUQfJOp8NivWe+gVHnyK9gTi9kwpOvUzgjsnNrjhCwY25bhZOSN1cj0EvInrbMKZX7RIExvAteOZzMSBEHrhZiBuRbNnnUiHsP3L9lbscaAgqDOhoHrkR3e2JWvohyCkl5v/hoppf4OR8ENRZ9rzviEluUztB9BFF3Z6yj8PYJQgtwiBmnu0zx7mTyzq8MWnlDq/YLAE7sP72m0yKWThNZyXzeR2V5uIaADxv773iqi/Dm+MPVzirZIPAWkF1QFybn9unpXcydjvAFaRn/iQ7techlidPkxyni7XrUc2I5R2H2ygL2XvVCdkey/wG235eNJDBv0zIVtUyy3xj3+Y0SYaJC3/PtG9i4HXPfbRyXa0QD0VropTdEKf+suS4dP5com9mtpWgXAq/96Eu6o4p49QjCYClZf/z2dKYF26CYLC9fLEDJFeZF4CmXHNV6Sed7AB1b6RxbDYysrm+msyjqUidD9nu2MdEQ9swQGMOM2js5RAsV/Y41sd1KrLI6JsrkJymoFjOe5iYWFa/+DBgMx1sI4fTnD
LO++9Mev1i7J5gOpiQnUk+zaZtUEFpzclT57o+8YcjZg9+iH5OctQVNInLh9wcH4e4O1G4Tm7zN0rNIAH+QY7FQJr6jcCrk2NzJ/GHxl+eB2dc5+F/2rU4NRl6EzqYWcQbvlC07+m4SYRsAfKcd/w0r1CXwjBQ1JwMdDv1RW39stcKMFnYtQXxBjAJwhVeWn2KaMF9jukbA26Wm+2ttjgKfXnvNwNIMxc9XQYEFdn26IiFLn7BfDKYNs7KF9BRsFPbZMH27/vKOdOmAx3c7CgvZvcsQsrId7ocMsPgbR5mPzFsTWtjrbZn8NDtuRs9NUNa+gt6fzKhI7R9hMfiXssVkX38q+QP8q8KWvBODoyIiRPrqidSzTT4W42m1uv8VIlrr/p3nGPZje+bOIxB6klJukc8CpJ2MzEh/mMWghPNFLHMVW3FK0+K9rUHHPE7ClVRYwnKbEGizvh65g6VGuINJzbwan0QOcDmN+pJ0EqEo3Ptv1mssSDrGXKupV0WM15wqMuNtVjcHn10c7wGV7nm21iqelMK3F/15D3ktpyLwby/ovtIeLh2nqdtfoX6F9IPnAuIHRkPP5CrKVv5gT9RK1bu7rxScnUisd2OimB2PlfFXfBqv9mbXipnhgYY0e8WcETMJ/cp1k2JxmLWyViCXlPhI6xeAfPsc+mHFoP535w+G+ghrOP9RBXYrXZ2Ri0fqAxPTjLAsEhTUo8N0McPgi16Ixf0AnVDRnHsnpReADdI+IqX2aBfCAEpqNRRXh3Qa6Nmo+Eeda4WP9DtmgE6cNLAB+xl6AJDZAuqRvjFLvYE6ervRRMpjmp/6wWsTfYRroWKIr5LUXZAAK2JkhoWPHoL5oXKUGdFoQNEGLr6mWWwCYB7bZeHmvDE3r0g4PZ8v+v4/7rGCVAWacgfpgnOQGRlKoBDFnws85ql0t+Uk/bwxiIgbBHc7YFPEVqzg4BliqEmYHWcxtuG3nazz2TnZRsfboKvRs4krkuLFT4tpnfAyOU1TKqafx0M2tJhYGUwj3O6LXcnKr13LN8PPmdqyIy8mcMc2HKnXEDgjIrDJUlPB+XO798Mh0S3lQHlkKZY6/27/A8BmX5x7FqUnFKsAc09Lkz7MtBW09+d/L1/IK8EZyafFf6Hv+Zx4h74CkLDD1qDOaXpif+9TwrUubOl2QNitjDNurrrhWvZOE78rh272F0G5CCqLIMIbbGOqLcykGhxH+VA0loI1q+243cQx3BkNHrKNJWFh/kanwK6hQyPZ5FuYqhN5u1cTekX2QlKRCVSMiZFS8ve/8XaC0iValN5HlWjYCDrMIxR8sQ7iE6PvyUGfkOzY7PbFZ8pzPuRdJGoVgxn7tBFvprziAm75LWYisrWaXVdsbW8i/oWP1taNCAivfHNhP6+KQY55zv9lY3FAbWblE8FnRgkwci8Qwol4dOScKRuz0fZw9JeF4JW5KYYkQPrk9WhU/YdcJRF5rYCFaIbBCtGDHiRMk+wBAWwP9SdZZT/RZK2wqcietei9skayGUNUvKZPX16ONj+xs0BR30Hki3a7q4TLOAMqiNxu9lDnR6r0cYMmJDDvB1ZcnGW78msCUWTTz8UY28mA/T2+JVKXo3k28N9MRhX0QTmImxShQHo2DFKhOooSas6qtqZuQLW8ej5jjV4uPPVYwtecv733k5UDpSKXWpoY1UHxAFxn1ayKXAykI2x3p0gBi6vV0tFk5Hr+cySXDqlyd2eO97rmMNCUOvFrjrpLhsVJ759+KiQDPYAmqMxXF34SqJ/JK0a83+C+HgqGqIb4+pnwY0ygIi4WzBVxoYU73CKYtIIT4JBqq7Dw6WAcaR9jaDpK8dM5RjbM1s637heKRJ/1bAU1K4MD+9fRN7zMFmt14533mlz89Cp+PDutvwbOVqCO5a37E/qvC8ywwX8M8GYYv+aiXp99rHKVsgaX3/FKEVqT8rF/wRHoj3oaeh4wS4XgU9g5Zk+znzUJDm2iY41DLDjqO3TZYeO87F2wFk8BIpzROqNPI87ah17EKjdNj8icsVXKEoM/3Kwk1XiQFWXknAlwD3lxLi9Bong9NUBB/8xQ94R503z9UaFazvvKCJ7v/yiTEg1e3cX7+bsYjvQOC+x4QJhUdCEFJkMRvBdmhXn16BKcUe3zjV2GvQ9SlAFB+ZgajLZll/LHEVoHkniXAnyZIhjn99KH43YE68+QaDXgZFucFd5qcoQTZEQrvH6ZR+8+e/jUz/AfAbKtLWQbFFSF4Q48M0ICErm4vHgXtJmbLx+k+rDQnEfrldSHa3xhNZHeqjptCjw1is3QegYqWjxBYf6ICL1vahMsN93LkB9BBTa0p2QrlrGOuUgPWheqag1s+S/hoKaGtac/mOi+JafeaooJboc32teQj/6z2xXbvg0jwSaswXE5EA/PcCIX3Ge1R8+J2aRS+6dUy3uD6ssQe7Xr1AYxqd4tEIfwnVExFj64OFsH8gVdwWBLH+C0iclmykuQR/lpX0THOSCz3C7kwg6TS4xESxuNFAUTAuHV0xcwaobMlImvAbvkPaZVOx9HO+5d4eB4ZpMfIVRt7N9cgTNrh3AAifwGtcQS23xc4XSlbjIDdcqZvnaN9d9z9RhevYOO2kAC3BUE1xVOTOYOQk6Z9AAQiGLerjXnGRVn6KLXtTgr0NZlIQvOd9WGfBozz1IOAAp4WlWTuMZ79KZjwvAWOdEhUBmmYcRH8wPdb6Josm+StlZed+VuRZn0E9STSh0OgEX+ZnuPM9Wbm33wIwwyOD2mI79e2F2is03AZAfdDXB16TNQVMOV0tfMiPobC3TEAf/JLYWMDeI1nB9eFjuajWfRJvYw0nmIbd70nbVIFUuBZPuh+cJl73C/O0EH2uevA8YBALcrjGBVpKiejuXcudtE0E1c3Hiep6vgGNa4PKwgzKEp9zlK6HZraQsBnztRzx6Oez7HKhOO3frBLSzBpfYVofNs5LaRNk7VNa8HuVME2OmmRGCH/LrLsj8dfh2ZNB9Qzf4QAmXwk3Gjv1hdIPNR6ZZQ0956Le0IuZWklD8xkJE9jWHuPWVuw2JhObA/00p4edYtC60IS6oTbtxasYT3OI5V5uE006/bjQOsViVDZ95CTzYTsbtg/qxxhjAH/OAtxee1hzPRuYTpU7FYwKMdDxDq4wb6T8g0AGdhl2XxLHhPB32pAm6nmXX8g9amQnR06xSttR+BXaWF7pz7Yxkoi65PDUNeO8urLOUvI0XnFkLRbDE3gKIOp0GpzTVUYTWkE76wfFA34Iw9lC32zldJ1JuZY2MUy4ZRXWOPf+yXoWj0FGublyMrNNkIxWCHZh0Dpga64TyKUCH0fIbF6NVAfohspDj0H+ya1jLkK4jgiN/0YceyWU8oAHvcp/JMefMYk+gZQL59JYn12Ct3j+7gLWna80wCj/lARkznmSIninbhH/vo6FRAMc83/CKGW/g9PlaHTGod2u2JS3LEEXAr0aNhisSCCo5SJTKxVyDsgAu4VieTUh8TYQZD+wiY4HMS3/g1Hb+JXRdeMBIW0Wjbq38iR4lrcuvjXKBHabRNS3WV7J4xMvWgYWZN7xAnNFDatvVCaNN1ZCHTRcKTU1mA6/E53gdHEekhn6pBRerS9vtj1kfVBDLWS2ba2o7tNOJea/zWcIs4m9ZL9gZ2PShNTCsSUHqMDwOwy8beI+AcL5O3mUTpKCNIszSB8KOZbrrxcQ70odlJ4Il/5GPrCnnQZTLVuhbIc4CFiFiKnYU1BAtQCUzZnLmb98dra9DLkRe5OahvGFNMVyDEm7mK04MxIuLxr9AEMUdD1IX+G03mvLd4RtNwxxyDl7AOkYhzsiJI9R8V31gkjYZ0m/gyeJJ+M/+7/E80OOGCJwxaR3Yuxcr/m2MzdoFbYaXsfN5az9L5+EqtnWmhAyE6miZpH7I9Sqs+DxaCPCu9L7AXYdaYTSKUUUHQTG0vAc+oXwqmPyThXf4R4SC7khj7A14Uf7Ed5CnL3cnD7SinzWIZmtLlVpRs5lR5PT7ahJrb/OxU9nEiKPFto5VUFdGmL7ibR2YqgOsvSmhy7i3UnS2kc0iANENhHceUpXI/W2PsBmPm2al1b
rVU9XN5tldG9mSQQEeBDSBNaqYsGTh+vrH0MlpHQU/ayr1nGkSoa97PaZHoisBeP6S7qWPCzJAKFcBCEhlgpP8n4u6Z+VozLpEwE5j/xAPfY82PoJYEDjpC3iFERULd6rGvuC0MZQHKw0Qt/ZMpfZVWeP/G4tp0Gd559TM98yg8UD3pvlUtoiHYWDm6GoU1zP0Bk79HV1eapvX6gc8IEDHAX//GVbv6Gzu9EnL/hhzSW8vlUK7Nc0icm0iQJNTmNGy6O5w1FJ81E6E19I7ggufTHJqtpkPtpHXlPPG80udTuyLEcUFaF9pw0H8cyquwKemibq1j2tAPzqkeQj0pYb0IxYdJQDV27jbU4WQTkZuySIBCngBz+kYPYuf7bNAeBQPQnwfKZ9orEkyANGIoJzDSGJHETiIYi36Oqk85lb1jja6wCkN8F+wT+k2Gq4onER8cjEkMG58+veJOYJOYp34wOEydmzJIBzyQ/r66RCzlsMc8omNAJnaAPHynWgqm82i+zS9XdwApN8cR8eTPTFprh++OvciipE2yO/qfsKQgRejy75NZTvRsnxTrROeyacTZeU52Q/E74BR7FwT53xISdDjdlxtnk7YfkvEnlBjOMxdtuj0Yc/64JrDAlEy6Y8RpJ2YfhDg4nCmYg0MvI+cZyyz5J1F1BcDRk2XZ+RWNXMacGxIWoSLLrpASniS0Hzj++eQUVAgPLCFyoWAsg30t6DW3PiUD9FSNYl95A02tOLw5ZExDv0+UwnWHUCuWnfcohDMJHSJobxTC3MY1OhQmmoJ9ZyVDwjcoudR+q6ZaiLpE0b7MbzUW8QXAWSsBtjdcHeQGY3+pT3FyRz/R9W6GWRG+UrnUFvXaZ4YWy7Tw1Nzhb9ZqSto+Eu3DeSE0osfrKZsVFMoIouvYOJ31hkyh2utEnXW5bkb7/QzSL6rLywLst1R8FJZDfN9WdVbq0HvPyYA0GgRGqbj1FQmSqfe/ukGKfVNrxq6GcXnOwGgvZ29Ka00azL4jZayTkHT/bTFceKUfrsdmFdcDtBs4+te7aS8DEPQqEAkssIgVpUXoaay1/J3ZGgrQh7eex4kSDWUONEACtSsTsRrHFJzfB/yDRvwrVPWFKJnc/5GXqe1ULKbGLAetzWNH/tuM9CO/PuJ6rElWP5Yn+Rn+YoMok+0oZtcKhJLSGzB8dHJpCRu0iaE5kArw2kT0XuheMQJNplqyF2JaLWBYjGa2x7ROe/MVDyCiZXTncmGS9/pN8s+3Qs1hdOxNONQ3b8rHQvEGKDYFFRwfAVtoxyL/t8O6LVEmEheDQm1T0sFoOLGNQ5WKGPNLpZtNXIaOKejy76QsPCzZ665d5GrwavTbs/1smsh+ghd2UfHVsIramkx9//Vr2Kd2HXkTn7CxnCYspiBEedGBqNBtwyBJGMP/bzzhcgSkTK1i0UOtgiFaYX2i1oceZdI7uxUd2bEoda7XfqMHNcD7MFr7YETC0aOjw9UUJ9t1DjiORlnatubjr+/yy1cUyYeQtLK0n8XkRz3oKlmCsKEIhLOvMPk4oRhTXZO4AFDDhzpPSwb51Z6ZyZDobgiatnD2O0NQdTaqTCfbq0m5q1XOpSJX7aVQ55GpGcXWd2jueYerAc1SjtRYAV4DZn4Z2mmUHllyJuC0VHWp3ZESQVrkPEI9X/NG1a3E2nKphMLzgvVJ/8Do43gqVT9S2NBh1VuVDyHQ8KxvUmRF2cmmRLa0iVTnlG1iLNEX/YvxJ1bLZgmzcWE3R3HqTl7y4Ubp6KYXZME89FUGH6nXvFgAwa96/cOWn2PCUBS67NjcMRu3vW06num1kifQ61YWlXkw7Jm5jB55y/CC75G9H6eDOQPEx1sYn+TIX13PjtRL95t8cSMoygCcFO49AhrA35RXzSc59lgmRfYFbvkkDn+muF0eB6sgAmxNLiKvMTi1lYy0FBQ2mBdomwI9AkBnnVT8i9RDd1UpVaguDIioeHj1povkSRZZGJE2A3tmb5SwFafGZ6a29KqT76HfOuTdXzmQylXWLM4AA4cvpeaS/IMCtFJOEIgSEkeHBs+OuRshbdsSHMSHss0LCRLXDOQiAPqGt2vxVU8qSGJinM+Xsrr2cfZTEr5qbwtSjBv5yQqusF1EtHLBsXSnb537aHhmlonBXow8rorCig2pYnAIINrPdqpYwiBZqcHCQJau3F0huz+nzByFr9Mtijc0I4CIaxaLLv4CqaeutiH40RY7602EZ2q3jtFmxDDHKR3x3EdsPAKkcyxQwPQTLRTfWYYyqjlDaA65QcT8Rys+sKZEyb0+qomMaTphAwwZdHnS+96j6lpguUNUEQ8Pvr9vE76E2+DIjDctNb2ex/2KfJqSR/Z1UfvFpK6x61ekwsqS7dprnwCfVRMMHPNMOCek/zjbrqJbFN8Hb36UUjCdX4Y9UJaGdGnU8vZVG4ahdMPk/pwVEqqaB/wR5/W5AS93M/GMSv72QnGFRF2g+cH9ZINz7TAk6uBeaSZouFljasKX5z71GzHYiTssLtcqnGSLTpiLKG9Wcb4hfaqy8rKsG8yMSkUP9+QOOeF9Cdr0TO91FURlVcv5jzFDyknRLho9/GUuk6HX5cqIiI2SUfxAlC8ssqLAJcZQefApDBGsykzTPjnujMX2/qrTBzEJlPuu6jsS/cEIF1t286xP9BAPyr0f3IVvJNGErh5SDTKu+YG0IDWSDR4SeF5oruein1SDBpCneRODki6Q/c9ImnMJ2NY8xcJuSrrF4WoI/zIYD2z9I2sytnQvZFZOFmgyxLOPZvdmqJCjqK4Hvc3d2duPJQY2BNSBuhkLjAaSuO5GwvUYT7uAgijCT1ZDjKBGdX7LZm53GSnZmrTucT0kbm1ueYvruM8kZKMEo3KQyjLmY1ngpIwXpi+Vtq+o17bIXQX4COIeKiIwWitDvCBf+PK1x2AUxz56aeny+Z9jmSH/xH9ARu3cGMUXlrPYy5ZR2MCnC31fR8FuaCpnv644S+dbHA+HB+XyCDNAfMxzZIHqLRfFr/E6Ajw13f/B5cb8MayMbRm4zHDuFV/bmmcoGewyqKvGYkxvwMBGeVID8XnxTTkk0wwBbguvDvfQib3Nqo01i1J0MHHlJZpB7doOJJvxG6zp9Eq8suOthiWpSnssg1Z5HSKun+XStLerSP5Fe6BDTMT+2Vw5P4taQb5T+OJBkmkQSBAJYqo1KYG6TI8KEWW2bmPrhgX9JYsGqCO420Kw9Ek02yGOujVnI45/w66VRL/Bp18b3vvvOfrvWOYSml1rMpJQ/cCvpjqndFqeRdbinqs/uAq/TDEnm2d5uth+pA5wczu5SK7WKhP0JPxZKrMxcmHvpILBcS+nAlW2C6beUJLYM466/dYqEypM0nk86qAufLsK/OzAP+YoODhogB2xwMJgIyj6MTA2MD0DkWYik0PbgnTQfU2QYqPthxf7otmrKiX0z8ZFPdMHxaZejIzQvNEyd5qCXUpJFrOkHOaWSIMFxBOsQNMWYO8KrbDYXgLenpLXlXwjk3M/7hwrFkMnDi6R6OeZl0+XyXRwxPlIZcmOHa3NNf1KOj1vFfXlx8TWHEsFeOLgl4IQFUgu4Yq+2iGvbBH8ZQxGnyutudsaZNMznqTsAnTkPs2GnIEfwFCar94GvYFrLLz1u3MvZK5r59mVTDQl9Fs84nPQYRh3L65vkYxZsKDMEYTrL6GzV+pY+esW799x2f3KYcnE5AK1P+I2av0nSbKmqABY5nafooaMrPInpfYGXtcDdoPHlXVIm+6pHgI6u2s6gYjS76xwaZYMnWQBNKOmjh8B/bzHGRUlqaIZNwVXSi/3eBqDh6wetiRLsRsqKK2kgNbEI+fhmrRg8I+HI7BzKjQfS+HRvr0FULXpRYUrjxsdsB6JisayKWcM+ISg8zKtfqfh2ZyOXWQb5vnNPIq1wcDG4glr6ErSY12YQJ6Oapzb+TbvRnXDQopCyPAsnlJT0OUYoHUbMyjpjthjbwrEKTuy9yo/fZvkAmS0iHw9RyHF/yXVedAZLBez1r6BWBC5ktSr2AXfF/AiJ3H7S7UiwA1Rzg68hFTjU0iMJHGwZZFJCJkBnYEFdwu10
6cVjKE5FE1Uw0hyZtRdfMCVHMe1ZGkniyIzBH1Mv3DIRPKieGLt3XwXXE+vCBX/A28Kzf6T/lLKPAOeh6BjiLXXcMg8FDvYhCtzgLJuPYn4GsbbIb/c2fT7j8N6VmaX/1rH3M0+bdwiWo2rSOqVlVLYkabObKPIXqtFpO87JVnFNpxzJ7ZEIJR4R9zI8CCtiRTiHOaudP7g7kfjwq2eT/Fw0H5Ku/0NM2HiMUtCOxAEqBg2a5DrO9tbxgJQZLUy6BXWxhN+iydFrfO08EQQHPX65SJAd5dn79DPbFrcfQ0vx9Vd9ZX7F+r39nfN4RhkfkpqeVY5chKUj19MCMOZZeGUq6CzkigrGaLKMoQKcgcIoFyU95tE3K+/dBpIP+kQUKG1WAWiU11VbnCp56v2zWWnWoIitaBtm9GOTjWnBqX1xSs3+J7fkaSiAFu4Ud8BOQX7zjvWkoXvsWVNDQUoSzXc2N1IdPar5UxYy6lOUg/MtDA80xPfWq+mEIcpZRP5V8qWyu5bO5URBibOYflktuW4CLmfhVSMZvZ7VNJXqneHUGxe5ry7Gy9chqDtikqVUerGYxLF18mvNw/eVCDbi1JHPeoCyZMmT4aNsDKHdPPElordIkfvCHbYeLYG8CwqJL2cCOLXcETa5EFJCbIFTOLEaXkSFOYvaxZ4lWl3SMGW1BizDUcC5yFXEsiiInMp13KsT/2kpQmgZ0KVNpTVuGH1og8NMK+2VzDSycNBL37ZVSAJOc6l3ryexuKvYU/g8LpcugeM4UhnrIDTY8pcg6vDq8tilIKyzpJ+CcyBkDrduxzJI1MTrrEUgD0Rmkd0iHrnr3W4DKiDzgI9qgrFwTnw4hphS3uvI72QPtEtz7NhsUROWpF/Y2w/27xe52oak9n4tdJoDVBVhgNwvSjWWWJLpevFctM6a9h7oB0brI5LPzn22TqggPFq8VQWuyFL30wVi6asA+aM1lA2GFP0D8rEFN3GBqdTJWtWorMvdxqZkAU5C1Xx/8KNbdJJ7ikuVXwekDlCfS5J3PD2qBmUxMfbxUnpAjcoDT97vucFw4y/cpRZqvleO8y0aCGiehJ0VoaDeIX/drErcnj2jG2Q73UHhAtzTenm1nYkbbO4dADPzm7ic/oIsYowr73pVGg26ub/cnzhuYziCFuxaKq6aIoT+VGr0jFETRra4dW5Yf2J49NzzPrYvJGTFOHxTIH9L0ywQ6PrSTeTwrRXk829d49r44dTa+37KeMVtMsc0lU4IssvoH8IUJhDhSeXBwFw1dR1P9ZOMCppeXXJDBrDYkjYO6vLzgn88ZJZPxXSgj1h4i3T3kwhVfrYt0d56zLzKC6jphoqRZsNd89QsZmJCPuKdTglRjR7OJODbKbkbv/Ti1IqDy/Uoku2p/ed7hpGCWHAtqFi3c9sAE3ONWHe9M191Xy31E4g56HOLNxDKH2x5n6fCBgy/k6gBbv6PvndYqHj39y/oVlNQQEHl17EiFRuOXbovh3JEHWVILbGmpuhbfPR5Rv3+EaO4cGS9h0VvmbD5IgmmE1VC3uk9JeLINfeLo6NbJHsVmX+PKVplqeMsqHOhD6sS/HzRGSYobd/ckRqqKzgi4c7a8ZJpKR0A5EuH2gHLdSZMfzkBOnenKJz3XO4QOTxHZ32givTxbufMnulfDUMC3mXsB3VUaUTURs2iRTBkAe+JfEfTPS3U8A5pFRoaw03c8pfGDuJ9rzUO2Op0yQhJYX4GZVM9r19QzIurm6EuhInm+OmKwSE5vZ4tQBew+INBmIt63NAEj65YMxkpxG8Dy4qNKg7TXjCLIXrOM0nUuhRhyI3b7flIkuk9uNKVtlp8rKWCC419VfVQ8YkCMpRKm3qJKkI581qM7gmmDRml1NPljziuQmo5pB8cB4mDgnoe5Zp1hBVkRyWDM4IwxjPBU5yeCfyzDhqP/OcWB2PKDgXG1oEZ3MiTAlthbsf5fnqZslfMQoWD/ixdFJzBSOrR6AWKcF4m4xgXh5wThD5OCJO34SJDS3O5caqCTji1G/66BGjjeuyjDsxS+4m13qngHo+bh834ppLtU2uK7bhGdcYgsZ7wupGZWcir2ofWf9f8HZZQeE8aQRq37dtFLL/NoxJhebjRzKP76GoGtXHyykJGRdyv1n4SaAs2PzcnYD63nZyKUzpvgt+Fp06t3QQPY/oAOfNih+5643qJPBT5BpV3Tf6SJAcK3o8b1Ax53GtHoH+0Vrb+WY4C75NKOazVxJFAR3p/JvjYa4Zxx5zE5Xyd6ykcqTgki2olbvBS7p5IzorfDKoo8KU9rpMAoAGe+EcDvNIjJWnWOKhnzIOeqXYz0xeu0PF5DigAsR72xiNf4wTsUnYk5xFj7gw+JUs0/qMAtDIPLbgTADqNZAuVOwN43Ugb7LSmyxxSvA3EsjbVlYaf+h/mfJufRGoNUzihkuu9aOYVuDWuhXhNu1qql/UNnePUUCm55Is83Aqq+fq+ofe+Q5y21uz42qi8b3W/nA6P4bT3b4uG4IJ+Nf6vhLgbZkmA4npKaNOSys06ckDUjRhH2Zke4jUm8MSPF/YbeWl61pBFVUXuBduvUe8MBTH2AuGqsOk13dTdQppmbl1KiKZ0s7x/qWUyP2kC4MQoDeJ6QPDY6ApddlkPF2/sA5QCKtxAriXCSnDcfhIkQstmpaB4ykVraW16a2pX6Xd6A+8+mSgljF4ZPnELA5qFdpulQEc4cUevrh2x5gu1UlZgbcDB0w839Gtvdp5PwsikPxz0UNJcVXGG0HAn0tcZHl4VvwSKwfzJVVxVgtrjac/v9XxQmkysIa0K3L3cmQWhg5NvLqkcCng+wdVguAs4GUdUR2PJ3Td65n97cyeGrmr/LQcakRrr/FoWYK7EEq7bWuOQAoiXa+zGLYoOCmho9SQDF5GSSIa+MZ769Ywc70Nm6IcvLbIHv6iB0o29f1s9vUIe0KHmOI4TXbjfzxryOiU5OwAEiEQp8VIn5slYNqjkJ2yoTUJ4f3ZnJYDokfsDhc7qWIn+LOWvMErDAYOVHYc+T6rI7+z4PmFPgPgCnoHAg8gjulvD1flTv1Nykpsj7KpguPl5hlKGjn1CshMYBIEaXxtCK0RbwTflxMJL8gT1Af4H7Q+M/+zHvWDXnFvgz8z5boH5q/8XkogwpxBW7OWCxK/zBHPxqPmjC+T6a7lcp185mJEGtG636DTHSSI4cgoUlsUNzeM9WZoBqCPrWvgr6pSVQ/nMTWp0HCaoA0pH0wCQdNhI1QbMGznjEEgWKmto8QUtPLBuDR6B0dWljK/cWuHd58LLDndRCaQaoHg6IqoUn8elt58PXQEMUK3S8vuPH5izXVnagCMwUzSfI5NtiRyp1xffDRbk0/qjs/jVkxu6x7jOAtuDmBIvcQANCy7ZHp1LHV/BlMvuz/yA1Q9/bgLNC5fWOZKWAfZftH46q6G4QS7sUap8ol6djrSHj3LgB6aNp8cUKHhPSNc6qoyiuBId3BLpQ937h+p6UJzol60DBpOqffMQ+WRgJxtuLsJzWRyBCQxSTWrDPvxaHx19FLRlkt7GhEXIM2oi4kgs+0hUH5/LlcLz5W1hSIvueG77sDsMtwHZywA4FT+MLG6f5TjzFP91MheWwmwXpW8p6thGGTNuqF92nHnGBhPFZSLQXvuNMcAAgd/Wf9sYXwWzoxfgx39kAlv2z0XtoAlbgQQtzfjkNkqJqhs0ZphGzWXahy4MlFjPu/vzbdMJha16erPQ4nHqv5UJUxMr42V6lwnHKp9IuzAmOvmgskG5g9gYQuuO6IvDtDVulnyYi3Q3zgBh6BetAmelEtgZ2kFTsIXAmBdMgB7JXqDIomG0GW7llsA0h7JSrZ/HGtkhlpXlzB1uKik6sElzL+0nAsaJIgnM7iu/ae4+4YqGfr4qaC6T8rdrT/p8O+vAK/tju56ZUinQ139v9QVVZn8gZ0CCDVzzQBlcMY3ildcM41DaZ46Kygnirfrc//PNoMQZatmXAcFDKnXwttfM6YH4X1o1FgCSzKMnBcG4wS632wJp8hD15aKDy1DNhSQ1VZ8+kHLAbRtOqznwIR9+sx2ZGyTFQcpDhT+zRWiB
5Jb7DwFJnprwc6VOq43LKr964WV3dx4cA5JDaJzNhgNoMJ+0MykZPqHDq4bl9Zm/jcJ+w+lQlCzZy1fdt9YwN406FY0x7SuMG6q+Ff7IsKqSAt3zHZlWr39jYW1eokmbAYGC3NebGjEz/9I28SqJfeNKma+wm9kpyR+AB1xCu2znWCId97PGGqb8AURlU9/oms4gJ9nbpifarzdfoedx2FqpUv6f/Uf0ndBScyIyG4uerRSGPc0EKUJxuOYsNcXQIZPPEmQ9iWARryVeqGSjTQh2K7APQt0OjLE80hvNx3tuJe5pqOvC4s74MY83iJtX+o7UYgKvQThaeGMOKDcvq/VnMzoYiALCYGw81xhIMPfC/8uy55syVQ3dpcGGVEQn8DBWMAi8cB5bAiQhzMQnsMazUFPXI1RRSxeXDW1CfhetpISc4IVMXsBi+iKueCG43WT5khWabwDEsldzR67iDvop9WVlvIAww70We2M+vgxu6lc51dr9PCvRLSRnzB9+Ir7dMoHw7y+XmgaIGr9v4vIamBGGPgV+k7b5FEIGrcuBXanvIcbxBHW728U1PJs63pCOO2/yovFclbLwbG8W7GAHvyzz4FFnIsgZVyXRi6pxAXNwGcpzYA+XW7ynWoP02rTe8qviQXknHBiYbjBMKCz3hRcwpb8Jtl53xGzXmIKw5+sjcUra2R3yE1CFVVKlCE6IDf6vLckkk/wY7L/kcx4sZwXsqRCixerKxd1u0gEpz1N146i/3DfLbqDj+NDd3jdE67UNGqrDqAq4cw+W3O6kmdd8TZaH45p8cJ7uO0E2Q0XkW98rNunAALz64a8Bk317zzJHunAG4JIPYWRkN/eOyFjgi1HKfUubpUr8zDYntUYMfP5lIb11ajg0Og4jV16qBuyzwDawmxljBbuHozqu/yMbygGLmqcJoITe1eHvhc8hYvL28tbLlR8jbfNi5MhSFbgLZJLNIVyQgSHp3AMOwxs9tWXXGUEtOCbx0GjXNfGIr2M/A6TExQ2ljeWCEU7Q6bhKW37GWMSiBOrg7F13UM3Ae0FD8oXceQMfNFuFxrSd03d57kjyvMgScJLInFrdqZJZARXHilkGatCES53kVgCw21Pu36j757gv0YRm+mTMaxOz9WOuygl7CVutoojvtgDQM8s6B7dPVPyFh/0krZfE17GGepCPBcv71V8JIY3fo8fbk8DaMYwlKEMvOkTSBN964ueJ6Uq6yro1hj5pkw4nOxD4yZFbMVMAfYvcooFoxJnel7J+5INooD63Jb8UOBIC0WWe/aKiBKopmEByCgJoJhkb0gHJfI6Q3lfdquZ/me2QAr3/7noWGB9I4zhSXqkn5Fhi4d6WWwXcf7DWVp8s+7VY+/LUeyRqlJtUkahcx8Un+rMQxiY9MqFdVvQFlilbRMoSQSx4WZe4eThaxQ2+pQNroG1JuTrYRMGbKiRRwISHezFYPy2Y6sjt6iD67X59JEcw4Kycbb42iiflAZUZshG58wMVjTLOl2uv5wSyrgwYKhWs7mShZrcD1MRR8q/k/L4n1nYHeK43RofQYduuoygPocWIzKzo8wYuJ1W8/DmqZ0MLmHyQzbh8whngSPWf6FsiJrbV/aFoKK1HEmVwSiB8XE+YoshTS7367MDNX+hDB0g1fVwauu1aO59ZLhve383uBgeFLOhzquIr5c7s9g03OO9DTLxgQfDKWPtZHsUHJBkrDAUdMsXIFFAix9fc00w11ItwN3USid7TCZXlKYYYS4B2qJL1zveNcEUVGscHGl65nQdbQFZso5+rngFpqff6lPEp98wwe2JO89LGn0z6XID8xQRkm8vrzb6GyW3U1K/ggTrHxSI3uPyPYAcwhtDs3KqGQfDvJD5Rn4xTnaivCt6VnTap6op6P12E6nWkzHeV50Uu58s4MbdOVDY2Z3pOzn6eSaaBCkltz44quaDc/VwMlDaNRUQ6T9tGedDpWF4dXTnXGyupc9KszrlIenfxEiVCg398e5jrJLb4BbaQsxmZ2LY2vxHHhl4+n0I/AlXj3MHkVl84t4NG9bdJUJbRYM/u4PTxz19eRoXD39cHOW4qSSByulpBHw5OrD6brsyVIiuGEY9lR7YDbTRXvibpsacJCXkGkVOsVqgKNuCBCen9XWKwvs2gpdHnskayDhOQS/fqiK52AmwCOYUCzi4eYusKVHeR8hmd70Fdy6ziDvGZBv77z01BMnGIAhZizJWXXhgQz/9r7xuw4s6a44GO9PQYBCrP8NxulmR5xkwOF/92wc5pERb07ASsqJAS5nDuh36U2/J6HYUSoSQUqSXJ2Vk2RBlaSXgtg9rjEYJ/2f9qP20Eec8I8ejNIWV0QNZPLX/dpNrRv4AUTIyQN5ewZFB8Dwio+1C7KKHSVEXk2ifjGvGVVpTRvUSKzi1Zapiao5HhYs4BTnq7tYv5Yxafa5Y9s3/dBzUvMRul5D7CXtrHWcM+QmujL1g40bH4FYUhtbeIs+oKEYiuNCMWQMt7YkHciFJC+RJeDLoiDNQUFU2gynYwzWBDM4At9riAaGuIsvbX4LxLj085h75mofh+zshmeokQtDkbDSkoG4cfIF1AqPyXbDY6LsbtSfuZB2B3Na/3ExKsU+/9IR6kpepKIpYn2t+o+KDValJNpRF+9B5HebhFM6miSwEJ1O3rGruFo17U+gH/9DFserg/6ytOfMq9zakv2kA4O7UWNFFgPlzf/u/+nodsv+iLP68zLrjonsnc7KuKtADUcd44012KKBq7aYkLBVYcHDNH0n+6oJdr8Yh87gj/F9oWl0u5tlP9HmunXVeYxQiZ7Nn2Wvaw/BuUGXooDdJ/yaVa7L4ErAuijd+vsX15JTEQr8J0c0ITLcNiEszgQGJB2i56QFBH+Koy7G1fv+J5bZ/wJHimUR5a5peAiTFl7ymXHE70xuxicDDHu3S7LKfGD1ME0ybXgNoyikij8h+6FxpiNBxkAJX1HW4lA60QHKbx6Vm1kUAdfWPbXv1Tf2YNRBtb5EwX0XjvMtKwqbFeCdViTtV7O5/NhjQ7NgdOKMhsw37mEdVNzr26d7A5gA3mYkIoK+cyXjqUAxVbta9c7H5fr9llF4m6ZPlvwDjRT3qP87LpRmd1iO+ZNVZfX/EqeXcZIbxl7P8lfr913R/FZvSa2RSiszzz/a05aRwNvdxbOHgWhMAdnMLsYdt6yUPTtWqlsCB3dDhh+wRtXqRbZdU7TYXzisthF/GFgUTMOhc7AWDZLYRUWlyaFkpuPtHdKyELSh4kYZKOMSDxqhwMlt4ilaHCkUQWvZMVOGvxtSIciCgX7oaloh93FtqzTm4TZlMu4HTRYdY866u+SdNDnJytO8q3ruhcclKirctf6T5ok3bLBJrXP2gUifS/8pjPuoaZTi+quOY1Gi4wuzsTAeJ9OK57OOjykwTiiioWJm0td3kWwuC/AWI4hlEhNzxN5Hw7Gv/dEKRXfodGwOmPAsPULOeW42Ot+mzaDH1aJA4wPH5SUzaTDqgE0tqys6mAYtaudI0Nclmal57y42vMkCRutPWzULLG1ePH1j1Dvir3oIKqIqZcQNPLMNdHhr/CDthY4wrjMq8Jw7nyYdI+bARrlgVHTd+54rVYZVGOw27mpb8OvsBcS6M3tlYm21JWhKIbvtRT+qCqb3OhDoPpR6zwwhQSFkI3t/bSCUThBpVQdvUqaRtkHSFNbBeGfqJRaWPDnVnUnJDCjrsQsdaQg79p7+BVLGinbM5MhNpZ41jluaDUAmb5F1Z9pz1e18jADX9Ld73xTwAP5V2glNtTsgnFPlH8+AkZRmj0WcpSqCeQG/F7x1DEl5a4DvBd+aRW77HPnrW9olFOD9SWoJYuw4Er3N6PtmgWSxtGAU/Yo1zBSV8nqbatdditsKhsVl4NyjV79st5VUbh1kOqLIJc6FCG4DhWSJjqUjsCbfff8/xK7Dy0oGKMpy8FXSJN0awNsniyRsv6aY5iqoCApXc58V6Fb+3yiFVQHQAHDIgLBZbJq5nwswLuFoAP0nulleOJgpmYrc6jjVY25eoYfJbo+EtIdIXXzjyMT33KBiY1xT9+KQjxanIyO0uaC+rA
R/ERCZAhORIoLp2fBhLUUUPFU6AFWzkPDGo/BsfiTZiSIOnUvLZMmygB/QxlmfQ+vijHdZX0Lxw753lWUs8Wv/19d5+MBXykHNjAy6NsyIokysO46gwA3AdDdHKkK3CTixZ1TUrgBRIRwtOGNtv8jz3WoXoaytMMYwhl+JScDMW8XoI6ZedW6aIh2wlba9gPxY6RQC5Djtuj+8RlDm5VWnA0qyz26DVz6f7WO20kG/A4j2QefTNvZbsGobmtIytyuoRURgWmbwiRkZivKvO3p9UHRgC1a/yFr+YdgbpqI2ROIfNRce6M1E1cmy/dpNLg1KBslq9fUIZZZQ7D0XXAacxfURSS06SfXBi/Jf/z1kvB+LexBH3dX0YmMyE4j1FyyD9cMSfRNyfcOOaECxxD0gZ1vwB+fi3/frz7buEBm0iLHF25W1cKuaNl91Lw5eCFUMMOHYt6ZY5/Wp+a5N45awp7heHHOad9T7gDMx1xKPVEOHX4rcY0E+0eHOG8FtqcQDBnfOHQGNr6X66eCgz7HwBpI7LJEuA4W0ST3OBFVQPPmWMAGnx4icOTV9NrLVwGPmUTUkpQqRjZ/aFTRurOXXjpme8uYV+Pdobef6zJKdTb6r48JurMIiJ0cgDOszFKAdN4sJOpToufaUn/9XAbNsd52Fc/zxZN7g5VN5MNCBfVL+15cjLaKSCj2aqFZgNwGMCMHiM4iiSCjey8dAEAi1bsJsqCKaW5FAWMl9M0SvDQPx/RG064dfmUWjB1YmDMWTf0HHFbzjNcb0cmVvsU1qOWIyOhJuWO7e6kx8lM1QzzDHf6SREogmjVYM+lqu+lGgY5/fIAgFXx/kaqRkGBYDrdZ790n7pvwcksR9YPtV8YszkwueNt9rko1OPI2aZQY8klLEIsNwGbhZwA6Oh2LYfDTWpe7GzIoNsdJBokX7Np2TLLlsvQ+N1Tmd9kS1s6SU79ip8UE7/77CdniNNDtWTHMUZ8v+XdGk9fg0kftxnPu3Q3txr6Rwfc4oHmgRZOVXw4oyDIzFS1yYSW6gIz3AjmV1UZoMqHn8QBiwu95mrRkBpkIztPN2BrSXlbn+DAQCNqL21fGAmt3UsOJBnX0i58ZbpzC3Cn5kCxUucK2y4FMXLxQ0ezhJApnJsttopg1KmdfZvV8iEw/cCp/jP/og050KY6bfm0ZMpphAxdR1OXnjPjggK01odQwB61JptyHDyeeIKMtXaggW5sepT1NQO4qZQg8hefp9ieImqbxDhFvaUMa8fpw6zE/lWO6/GXGCDHKoy+f2K9uuMicVEBGeRydSfASnMRIcMdIV/ZOGI7qoq5xMMH0v0SRMdhZ8QkOIm1uV8Bh4vR9kfuEzMg/xgnD7dhdpZXCzmsUTcBhXPoEPpk1v6VYHBUZHGbGos0l8ZbpbvH/mN0RKHd1VjYh0jKwROeq6d1iXBP6uI+ipjM9ctueJ4qYetMyUtKUYwKWawRvJ/6K59AFAx0EEkI1EYdBS1MQ4b8ZQxXTTfiN1OqRnLA4fkpUhTKr77EO+g8erYyrnXZUv+k+5UdJ7EOpUVc5ruZAM7jQLBJJBSv0aUoiUthyBukcxF2s5qtrnWpwn7uGcwrBxNJM0tmarGsdBM2iU16SseHQF27XrZS/EtGQJ2v7fqtuTKZgnBCkLVja6/VjXBAkSQz4UqQZAyRvZwQQ2xIQoxrSiYmcpom96Q/yTWtB7feErsSx/Z58toDH7JtFS5n7csJ3htwYagg5QhkUfZaXZG+1MJ5SgGEFNlLPotkE3fmEuKmB8JnSlbLRFF63OmOKuL5n1SlcLJVZkD/JG9UYYkKWndhcBkf9chuhluCXf6nKHYwEOXEe1cG7W8PLdl+RSgR9ZO20n6TE30Y62XWW7ufFTVUPnil/kudRsGr7j95SljnjteTg3+s+7Ri3A8PBEpOK19nJ1RmdwBYCwe9E55BmON6P6JuBuwmyTlclDZ5Pgro0vxus44g1T/xlmlXmPtg44kVTS7IuREFCDKyVWQj5jFs+ju7pJb4M9Qbt0F7F0Gyj3Fo0LfNNaaM8cM3uOasdwzYjmwbxZOtIWZq+zZ0OnAP+jsF8I22iWHqiS85ARt8pOzibwK3IXF3j8rTl7FwwDsFzJQdvCNmJ0eMy9DtjGb5q/jtE7CX8RhHcXFUFQnhhDckfSXYmNT66iyzFiTv50necRkTlGfmOmpZJquoH1ZmhQ+DJBGXql2NuxL6Pa64wtGCPeTq9klJbp6zeT4FbHmzF0p3z/PPIsJK6hD3O2uskIVHVKPgNtSrUpJRUJ0IxNujv8t4fl5QnN+/5UZ8i10l7dTtvD9+XTy78Hkg6grk8xvrHftwwoGfTh4ImgM7ymBPqpuSjd66so3/nq/8sZH8dMtwG6ekpmRMy3mnKw1pT/7RCmKS6SZUDnBZM7Fonsgs6lsqy7uGP+kjcGxx/WktNBbqiZmRXm5R+NL/CYdzdYWm0zmucq0wJjNSSpvH1GHpwKmo3mQ5q3w9mTvIUz+rzZoT2tGfSKKq/KPT+sLzcbakfn490JoWl/XGY3+1eMqkA7bLOp5+cwn9l0bBeQtDHaJ2iKu0XUIjURquBp65oZSYUd5rV6YzZYNu7d3OnJ0iZD+yH0SIVqBTskge2KDx+G47/dnF62Q8OcaMow4pD1RyStK7JmgM/fCUkplVi9pexXQV5p7Q5wjhXBfgVN4pRx98j/yKxxJK9BLrFbrCX3fCYQgX9FKORbMh3/zWvbTRYY0ti2Qi1aIiqAodV+fjfmVgDMYY3OtFq0K6Jh5L/Fh+F1/bqQkVRa82iGD1J8GzZyw68fG4NRWW9DK6VuOuZcuEyhZMbWO6uRBPxMQqNY9SaoPr2AyT4Bwmx5rZfoCfrfFq+KAJ+XLamLXa6T7/xXwbJ0RaZnfeHfuZViKEAX0XWbqZfaz/mePYnBS8l52M3bn5OLMyKoQvl4asj/wtlO1LDg1ZVLZgXQKc/L+mSNhX3dXGk/ILwJLTG913UyN4awWOxui9dehzrww7rE6kTER/L+gxfl7dC4/gg1xPaHKxlHeQehH/ZGOnHbhPv7FqFBGXqNIKjFJMTNYctTej28vdSg2qRuAQ1pM9k3yYYC9LXihfg7HB0giK/5fPe2ZItj7BvP+St7uR3nOXMgoWrkB40hyNdBgjBmi4JQRL0GSjOERvZII4T7pnS/dLg4FHt/4oNR+l9fJvmsLhh6A1BRFB59sO6gUW4rg6k8rblXuj2Yce68oHHohuRTKVWFIURxVd6iGtZl/Ux3oPT5uS3ODBtnHiRqV+QNdKmoqeUElS6WQEbsW9Yb1Sfss010JUt8I2qmoUe/5PJ831UDxUQzexS5ina5QDgINNZ0LaCza0ycCdrdRn9oXQ8JKNFXM64rZaCaXA8C8NTCUA9wTqFq4x2Go2DxCGOt4D7nKAhk5j8h9E1ifWuNM7A1IVSBs3DDHeUYtW32Vjy+j121+3x2+TmFS2xSWZIZ0IOmWjz9d20rBy3QzTHsazQySxAeL8QKfEdIZ+WUzGsn4zFGmrAGn3jtFa4R2nVQm5o5f/CVw9wvV0cWt+PVfegM6LMSLKC9vaiwmT5H44wpZsrU2zAC+wlhjz7I6e8IhrfWFsqs21Psw1LPfFgAYWnIIj4JXOkI7sf+1oFgbRjw4aHz/CgAX+PgFGL1LsisAabysZtfAuW7IQX1ORn4xSlpT6HDSMtM6sti5bNK+FuDSngpYdBx0JLPWQ39cb0lE7D2A8yjLwMrBuxF7RbnzY5nwzw671qZb7SVqobA4OwAzc9deRdX6rqfIXAM/tCVcwGEzRiA29WeBXTrRL/T/DVKnD3zM7fUgqJyylpshrtAphUshqj/jl6NHqM0dfasyjKY7LEGil7Fuqyadb4FZRvXgjc7PG12/hMt0UiuBZKNJB0fSJPdNr7fQ4MP/9mRKMCJN+Iy1ao7rsADdXSWERhpYj2VK+JCfcVZx5pGzhU3ta9EPEKmXhsBFAfJMP6S1R4ivHNfT+PsHIr8EWA10QUkYQCsvCLFf8sZu1PBEUh1FYCYf4AtN38hLWb/hpFCWpCZeZ/a0VGewPaCHV77Ulybc9oS3mdp0H
64jDWXSA5OSFbLgT+NCRAj5/9hYyvT55BFVXGV35yUsvJCUgNWMXydwLb01bETizMToYtQ+aI3xQVQwPGj9VQ5QYwdC6uifCyMiLzr364p29BGsJqt7VkB/N/EwY5220KtKfYfogoF0ip6ZvVp07n5YwNKkgNWA8XjjUdzTTvv60rqTkGw0vbfCgndLdx3hARzV3rmsCeqnQDK0rLE04jXHt3rQin5M6cqovX8aWp8/xDT0btjYDbSa6ddWc68ODuqwPk9lJgI1lIU+hPvH2Ls0KEm+ONXn7cLq3tNa8eoXzeidIlHxNFiF6dlZOlSYqipV36D6TcpIZhfvu7UZcBDtDAEUCUxVLYSJMDgWIBCQo2InMSEjJ0Mtoge8Lng83/oCBklEZDB36q0ILCMoerYAO1OdsNdOUhzx/mzYMRhsx4YJLv9VwJlcJuk+lVqaTTbSIFJnv1R7lemQWJUKeBRIlmgWSS5+19j0VpacSMEnX9AnbWGGnvgSbflZMjDanLva0Ih13Eog09+sB/92Pc8Nrt+dvCwebuTO5/clQ7GfPd9bOIOCiWu4GFlJusDheHteFPV+V41bw51/ZlQBV+i0LVsCG8AxwH6QryiHdtcHsGORCJtfBecCVUfXcoW6VH48wrrLBrnf4iwkOBlwWAV/lzi1Jg8fX2F6cXhfsdhAzy7m3PFi8wx7hUj2DKWMQW8wuJoGE7HUe/8fRJ7Zh93MLZ7aABtysJjRiUeUR4Up3weV/gHI34ZcAwW7Ou5I6NUD9Peqe8c/tTqUb5j3kInavUas6jvNuX6ahvXGaGPCIBT/NYK7J0hBn3v/c8+2oq+431it9nA4ysyl5uMP7n4OsWBni0RPK4whJVck5fu5pmsG9gNDuFIe0B6dDOG006OFcIMLZXgt2ycTEyBR3GIGYZqFep7aaOCie03wsQsErCiOAAZpRBMCGD2xPj7Ii6Yl1X+l12zYDTyucI3xw20A/vW/6faRhK7t7SYQTmVmn5sLGE3wSHex4iACUrofhqza4mp7FfI6VXePydfZp01XfXU97ZlSr95bYcjQHaM5fIQpe15TAlZ/by14YLvhyKN60RFNheyOJOuZxPSB2u/vP/BJGUaADzRe1ko7ETZt6/syQ6K0xVAk9RitDbYLvex7ULb+4Fd0sC1rZ6kUW0usiN28w8crYJ6eZVgWxqVIL8SOrIg7cpM76Y8aebh+1S8VY0x6XMVCMQgyCmoIdqa0LwvGwdDzzRK/IVtZ1zxvgOqPb46OFYUXOqK5Hje8VXqGubiyQLKqXXw0mLvB6tEj71czzilEGIwJVfWrjNe+5TaRc8FEzjrJ5E1R1SYSj6bIfgCWjZbTUGk9KlTiWjSSUeiupkewcDwkXchHt0i5gNNAtMVfNnNo4enu4TgdCmfHxapsTesktoywrfzm7xis77FzffitTMbfVmYkfK8j3lLBxTqcHDsuKEtZM7rPmB/wDHTCl+sgvASIGFmWkiJGP9C3JGehwe/S3yQ/GohqWBPXWV5fSHBf2AGTQBKCoxMw42Y3/Unz05ADZr1NUD0akbu4PZTJ+JNjtyugxbWKf1Vtf7yvvRL9uMJxPWgf7WZH508XT3gH9ey1XvYo/TcEqvojFAm8nBYKQgwRh6QAK9NcL7JzcFoEVp0uzv60JvLZmerKtNV1xphi1MY4638yqX0/lngzTjPQeqvSQoaUirpdH7312hKoz0gkMArQruc/dC8ZcODQoegPL8CCiL+4F5l6lrJ1OxN1LF1jn4kQAz/KqN/3O2OMgCQGqGdVbmYhKaCVGBCkBXpHgB9LPpPsNfC6QsHpExSNKK8UbTNzayKh4UIBfcsDzF4mALW4Wepb9q3IMW3aQZnL/8gXYFCW55g0BtXjHjOLJaF1RKvbW58IGJLy60vA7F8rrqjoRoDL41Q5KYjQ1Gb1WJiOV+s+PqjY0VIKY19CYCYtKtie5m8hGrBK+b+0iss1QFsL98vndAJ23s3dh9tSi7ji2YthZrUeUTn6ilvR6GbR/SRNKAPAPcu7YgHNz2A/dEjWMJaCAar4lq3DmCCubE+0mEhvPAIwWLpMpYz9hMtTRiymsoFVA7P95f94qB6iZFE/bj9Ob5cDj5uVxMZetrDHg+YnIP69PlMPx0kWztkQAV0YnIR7XctCTQ6ZWA7fE4bhn9bZaZUml9j4ot8Dn8IaRLkTXJ6Ohrx1vUUovrrCWLkeD5GdM0iEb49nbEwhsa0gsdyuPK0b0s2zUdUxxcgAjFVpf9xdzkN0XaM1C2tC04igmOnzzgpXtMtzQfV2UZZ7JK2WnsM0TLPjup6O46YR2uZCerqQ+1B+paYs2BmgnzolZYI36s+dbyqE/ZZq5rCfsm30QuIKgj9KHXznebjy4fPezxLmyLFhvjQp1wqGvXMuOGB1mvZdYJWkzSPmPM0Ygr2v90EIff3qQYa2ZK8egcGX0XzZA2n5vupo+j8w6W7rP7CIxGYmUmL+qqcPd5wEw+fgbLcwi7rqtWHyOuHZ6kU1ZdjbSrvNRZKzVri7Agi3QUZjUOff7kgfSSZkvx1GDrfMIG4Q8mvMjny1PxyYY+LhELBxrSOZVOXHyC08OFQPAHRyCJqIr19NdfXr4bwh+EVLjMfpLU/nBxx+7NbF19vSQDV5t0uriWe9UpWqc0Uw05fCharimy97ngzYOWKYFd6AOnJ4dsKFfWCWi951+dvHTRvrq6dmgznVquijvxvyYJ9fH7Kw8BEX2F9hPUDCFhJj0yk3pL1xonYiCXNbQLeqzZXDWazKpHulrIaTyOFIVcJwrQJ5XcccJ+VTAV7qyV0ETvg2tvNv5uv1r+AE+O0eKAtvNrSGY8qpA0U/ifryH8R1sDuIuhXV1o1YE8Epl8CZViTH70dxXva2LWRuEF3pxBJBDXA4Rbh99yt/w0UOKrrZViAwxvjijM2PP2utv4pHzqgRq4yTy+LHKtAqV4w98toeUxXQR5ryhQoncJuXtumuBMJtn5/y8ssZeoWc7w5odnQFTCtXsiapIuJdauKnh6IddhwZoOZOfNwVlDKPBMTICan5mq6/FAOqo9OvQ5gx3j0J+DW4nI5OmbRqCClJPmqJ/dqRV3To1695o00bcoMIlxBzGhtDV8UmPEP8dEAKBCuoumsMkY3yj4FtS9g/lWlzbaYIqXDVw+/I5IDdnKf1QQYX6tc6s4sjbhsHX/tUrroD6aMjfRLJYPdxM2UYfPlgn/MjS15Qf5Bef6SzTjoY0vfdF/YccB0RcXWRMUl0DKxOH/sD6BfujKZfAMgrks7qJQYf441ax8d7zpXvOPw6PgySBarz5twlxMdkidF+DSb0q6lTkjG+N6TxGdM7OF+YYUygawmA0xPYOVsT8XOypK+57DtOb1C941pc8B6zKnr0Ho6mY+vW2kEkQIUIZBbfoLR4r7TLh95vzYTmx5XzkYTYTVT/8h3mGUcF2cXj2njZ5OYhlxhGStQ+ICBFefGAUCyVgdkIUx3W+i0E7vwmvj5iaW9GtWk759dd4+ElH2sCm5MAxvHrJP6rJ+FYb3EkMmHz01pJ8irK/O9Vf6xobY4Hv2jhZ9m+YboCSff6hmD0FqqxTN8GNTKwTi6m8xQytFfxZvInVydjL7qGT0TdAxNF+XGcoOOd7SvIC8LCS+ykuBEyJxr1dSiNP84FcKJVHyPDwtnH1ItrFNuFprf8ZcASb1oN8OpJ35ZfC01b7y1Jaba1/sXy1ra+1Cxs8Cs4iVIVqaIzC2mHk4Z7IVBzUQh/oKmSF4dDPRcmKWKpGUjNdEQWNyzTBugZ5lpafqWcLTO6dtx6mFCI+KKLlqcIp+s74WVPW0sp564OkN22nJhWM5bbJB+S8S6FTNOPZf+P/AR8yS0OcFCXR99ulEew+WRhIxbDkC+huWiXtoMvcjm8apSLODjrqbtT7HpOcUN8Jj25bcpXAVHIPFnhRnp+RQq4lGlmlxn2o7KZ+jq89g5ndrN2Yt6LJQ1RFfl9jsQ2h5+5XtrRYKQ3pIdjUneO0Kt+i491wYh5u3XflorMqVOKYbTB0ZU4njyA8ExfuOljHBfzwFhlyCRBACcn+nviU0ATztDHsjqvKSLg6
V0l/w52EIeUZbTU3ht9ptUewigY+g4TGG3Eb0EaRd4V+FpKOUr0/7LoFaX+/dNFNPi10n/ca6tlp6Lj54UI11hvHUSVC4tyfwp715YdNf6jh7e3xA32xEZ5WlWzKCZt7KZDDeeqJD6O3y/HejHIpKi3tLkULKWH5CHDeJSSJdKqfH2e1g9zMUSHFF3ieEiuDttdfIh7uRWNwvDfIiogkDQxiIYZ98c7OmQXLt87OCtgJqReKgBdYmsUMT74qEIjaf8JXY3/1XcR/HTNYP8mlksuuic06H3fbpsmzkv0eLO6GLMR+ApXXOvfaHFMnB7YmxkyqhLV4A70+ye4aRKZAzlcjX87XoCVpKjXcSUqOZgbuXODa8IqJqeBTmpeoYa6R6ccE+AN4GvCC83QztGYF355MxdT9I2q2kgVBMuTD2xX5pFAUGHyO+uqNNDMHQmdom4T+/UYWv8D818cdG4S43cMuOg4HcrcY2fd3cj4M+4boOhHK9bF9T6BlK419bVYrP1xne1ZzhRJ0AMoBg3QxKG7KXZ1o4LY2YuZf8Q1hRtW8pymTKetRqmsC7k6uCPVyWWz81sKeSPtxeBbRZPD9V+51h2ojq16ttTEWByd0SO3SXynO9L1+Q+cKTd4RYNT2tTR2faejc1SvjtVAZE5iA7rWO7oPpbIXbrX02xFqxJSJtD1CUZUEGqR1MoDxemHO02HpjIDttVF8BjGnM9CPtk1iazWVhBKSg43RQSZ7MIZBzeVwI3801Snq288gxy20YM8o+QE4IgS2h5yW8CAWX2bLW5/tVbz7pc8kF8ubqiNuGOFOtSD5WheSOjnm1oXP14EokxzVWwSvjB069MsAi/h8VykA6Z2JTt0v0+4mEwfkM+IbTK4xPSRpXQyOBdxrlJLABkhXeH2T0s3dD24Rnh+S7anl+kDCFBARiW6cLO1uFVN3IYQy9RV/CUXC1HSfilSOujvxvvlcHuhnMt0PcRjkm8K7i9H7VWHeder+GfS4GlGbQLntLGKO5NoUjTexyneWLKDoc6B7Ufot7qLOTyPsdzJkNjR6uMJ+vWvB2hoMlDTSzqycCe+Zaikb+Y9UetHrrF6R4zbk3AURZQQUeQOTEpM8TFFGpOOgYX2Z7PLlVvGelVhK8dKZ68S8qf+nqkh4soVYqrxhcy5FPDnIpCIdxRYt43hL7ztUD+KNY3EMCxJNK9zXKg1+RVnBO8umOKTqlaoflJlpozLGgTp7otc117ydUPaJvQSVx6wWenIfnWbvwgYRpNmhiS6YiDt61YCG+qx5/L4B72LIYzNrtTZmFGXxkZS8Z4uK7gjJD/kkgSk+blXlwieoHqROq+tc5HG2UA95nVU8/lqnTK2zG65xdC5Sx708NXsrUeP/xLbrfLI6RhsPDabHi6DauXBIp1bbb48Wmfae1jJZnGV4oLakZoZbvFaGC5HWNJ0KKZh4iGvsd6UAtkt+l38ZXpLsmo56qT3J+JrOmWwnL1/h3nsGELKrzP+c7oUltPhV1HDPZb3RV0V3AE2BF+yj5QNyGNfZ9KuyRzFIGH8pFzfK7DgPKPlOe9SxevF7NhnXu3BqRmwFI6fnLoAP9UUC1mDI+/d+1h2C/YgeyYZjR+bdl7DJJN8gDZrPeBW1KGCWTkqXavb/9GFdGkDab7pRzaToP/yi0h+UoVYsD+3TPT4gLQgFieAvZ/E6OfrKE5b4fhnHx35i1UV6phLaJ0E1/KC1XNQ3VqZn9aYXpb0bHpMaWlpdhk2Sud/MrlDhxSJyFFgvO+YWRRN4rF3RIHnc9pn31r4FY5WBdk8cpOw4Vlxchr2Vd3oyi26To7wZUDkWbsM6XNosUzAUQFQUMmqWey4O5xcTlEPjdmNqeK1S4Jw4sDT5hsESjsjztP3uVD/8gxo1oKxhXpHI+i+aNtQkMIYGzdbLQDw1DZXKoBWtqcAY131q/QNSzQ3QVozGo+BJceQtvsfpkV8kzGtUvLqPmeuKE8uIjlri5t4TZocthefgmF1tqRwr4JvpajLp7Mq7GEQ0GWVTFwcqujTdlE01qziIgJINb2cvOfx0DHYSXe0rrBOUItfCbXzSkI9ifIffDvNJ9HFa6hxN0qaD3th5+6+EWORV4YWItwsVTurcxgshd9IeVhB94yTmX/QLeprHW1sVLqM4IVvxxo8JVpffi9ZCpFFXuQMWuP2aI7Yem/OaCfk5yMs5uU+/apCM00ieV2UY2iuxhomcud8dolXr+0ok+QIo4imoPDxtxMA0Wm/8rM4zkAOzsewRJufH7WYzwhT5xLQ8g92NpDo45j/M/PYmZv8pZlyZfCod1GgOo9ZrKxYowQTqiDvE6kGh/0VW+ywgFMynnT+oJZeTB8Q2yUFaj9QkRhJgW9M5yGOCmzQt4X3g1pb/vCwVb/xBq5U5YKUPk1K+ZI8OnIbv94ZDWp5t91+P+/JiNmWzzn8RqGEyZ6ZgK5pUX/hZ60k3EK47kvPPurI6DxnnAi9i6WsD/LqZk02m/ZOWULPnCUpmhPvcgP/gp5BGy5SKiVfZRduV88Mfj3GTDRNPp0HPKYMgHMCgy0xHG5+cxNOXSmEY8j8+7BynbvpMo+oXCWqUj3aP0hjlFTIWPkqUsdeEJti8NYTeUp6yekhcxgfr7EAKecklHIV3T0Zs/O4/UvAdTLSyKYrWftDVn3S+h2iyGxLaapea5qKljIAE0L49MKb236WhtlUdOzJ8SsMbZapWF9NziRSsq/uqNwpoguYJ6T9zmeuzA/rI+vHRapQUSBmFZHqgklhDdvz+8AyOp49KiF9kYkGDOKVfZAU2d1ksUNyzcWBZYjM69wNkbsUy3XOaTrlWfkW9IRwo2j4R6yFILYKk+ln/UtLi0kEzjXYDOEAJxzQqGlBa78gjbWchHEqA4ICzSfawlRz9oYey44F1Gd62cvVtv10cCo92Ck6+l7EphM6UxdHlIPbaWwm0uRoo2fpx+UkkaZcztck5YarV3y7kV+4JrVV0ipiIlNX72xu5DDWLFcVJu5GWiReG0VJ1SjEew1FQ4lYWlfCycE8okRbGXJ8nf2+L342TgrqQd1XcDHzgOlplR7zeAaJNsnBaHfPpsJHwzQZyEhvwLdhjlTjoT339DxICR+dRAVdn5BKgh9HGGraj6yj8/LfZzCKEVqtvc+WTYkk9sOQlTigDcrggf22iqHILbS114vVuvkemyya5UTh3fLAYqoOSRNuxEYtU92DZAXo7Bvkca1MKwaqCpi6CxpwL36iOFClfroBYRJa4m/UYjdCmEr/VeLMTsfAZqCfWoqaiVveQFY9dXAJr/bpu8cIWwTS7iPOFQSzwskBy14i+RMyLDUIgbTa8UCPd2ON+hWJjiUNXgQDFr1UVk3SiJZxn9T6xOwE0g/0o+m/nSJkFQRmzlyNFHjRZ4+p5U7hqaByARdoAWMwVlQX6NQRpXTDjyKR3X2hovQkyCjdp//3tcVKL3aOuuKv9ECe1+dvrh80ijspo0QAccHLaDg2qygsxbhnssZHtC9BxRVxbPLlrKaWijUOM7jyKcd3qcfImp4huNNC8OVf5GPf9bqIeqfex2f97hMvZcFTt5+/R/y7hn3HORj4prpkDQ67udVk+w0md38MjqsaTIX/tQw+Zpra7MPaImhkJ2omNI8/ZVa3C/VcYQDtyIN6iOsVpDjglXht+SMznU4mOBwIQZuUSaYyIAzFeHf9BW2+/DfdZ4hw+Mw/b5MJj6oROxwBlDz+i6zjDhTsC1tebouWtx4FJM6G1l92pUURWGusQ76Fst9lWOzYi0kIhm6UeiyTNozCh3ejE0nY+7u4/ReKQ282kgnjP7teHPKg3X78Y9Ckb/BEqc9zaoauAKsIRVwTVvcd9n9HD9vMdyKldisHafo/+QRqCrc3C6Ozw8vZtxw2l5RsQ2c5GG3IwLNwy1utcIgq5SFVNj4gGxL3R0IqUgLEHdEdZkLAOaLx/5vmQQGBR2rDVwFLYClD0RkbO3jekk41YhFWBhJR8GmfZg6QHruUI12Uqdfq2TPVEDRj627kEXNc7gK1q1qkqmZg+tkxlOuFRC2/07+ZpO6o5saXfRq/khiq/u9qaXx1f5JNgWX5O
cape7SufcjLk0jAQ6/Z1VhAm9MX2kaVipY5ZyOYvI2SVQE6eYgA2UK46hHIowWbpsZcQMGqyUUckz6EXIpn/YR9Rm0uWpo6a2uETXsSa+9xJWiAx4q5UNjQ8Bmf4JUdJ3VaTYl3wp6ZfPNFphh6G7BumaTOhX3/XWqCvKKOFbILR7DzbmRsJpAJFEijaqXk/joPI6ojR+y9dGi9fWMA7qFNokoi4wVazyqxCKHY0BceNqmQj0BxmSA9MCYOvctjVcyNCLjuISopfmVMhWyvf9AGSYpx2Z9upsk1vrmureZ1lWP0LptOuy4E9Uc2fb2Fv/h+mA2xto97M21cVE4d/uLA7Ji/cAHOOckKpg3gY8sJLJx0AVY0g3V8k/Wrl9xoMZEGPkRznUAdJIuffRFHe2PEkMHCaFq0gWQxpQ6SD+M1GKfFVVjUVA2d2rGE9j96NuKMvPjMsddLzjj4rZDma4r4BkZS/XBRMFsWFCgCg1LNSyUW1qrYorPe4PpbvLR+Dlq6RXJi4bo2bkLFureXQAEqBZ5CiCx/ZSmMUenwYSh2D1IrFS6uYOHcWPbcP8kWwyZpA0DEWbP4XSP+hnPNqBhj24h6Na1JmR6vWWIFJamr1boXaDDR4+k4b1rfSihQCEknD1kQsOuzbPuuXCzgaHKY5iEZFhAGLsM3qM3rsj+rOb/aD4uBtTdZlNONIrsRpj/Pszl195N/AsOybGmSmzoldY7pPpPunniPya1BAGo3X90lHfYTviRbmH50uh3lQNGjkR7tiNFGrbjN0he4E/kPsedsyh/OmVp54W9pZeCEYPetY1+umrXfqWzXaPS6bsHRpdPfaZzrK3KXvmf6hRBI/HKuSXTCLpCzIy5ENVQ+TL3aW6SmQIDfK50bytMARQhEUUk5e2asFjOe1aFdxuOyioHSlrP+x8cvifEcNeGkJH6j6B+34yXVfzTGWLG7QqKpWfEW9H5RxX5fgKxjGneI3y9SiFicyLiyU5ThZVjkHfx2VeVgFn60rJCv4s1xPyzzLmpcOtyvUUdNBvOoaGxI0G+Lxg1elijj+1Ej+57ACErhzLHCBuRxfBih5ABMmHHtVhTwe1emoHBUqWx7BCGDe91U0x6pPUsoJKAj3GWSpP4UKFAuoQwMnLPqwr0fyFmq9Zu7dyyUt5vYF4NGI+RFCuh4jN/Rv/4I3heQgHY/FborA8Wfp68SfTjfsCHXRmtWXMP02af4/vjiZ3DusHceA3mclM/euPdHX4GiUUjaHWIc/clO0m7Yt9oibAoOIlOzYT+UaHEzvxsSVrge6BvcVlXN1Ws1Ny3h2/Gqkg0eLzgv6N6kFSkeJLf3sse2TEg2ueu+KY43dzshJ75WhCOJQOAvMUJ/0yWLgzV4IQlw398Oiqqk7woM7m01LYhgYkW77ZPUn29QElrth2u73PcsnyU5lnLmiShNt8d7xwVKr7EZuhDDbcsqSXeR0xoXCGe1fy/E0VSfAfRO4QXq6At7h/y4gfEe//sNz+VOzwi61hDVBD8CJA1Y9ZVdL5LgyjZjpZWUjPYWYdFhTAWwnDD5qtTuQzX2g9Q5y7nEnwjAVCPzwXgrbbjsEV56InVuWqT3ND1wDNV7iF4Hlum/hJnhMyCdxc5xCpAeX8U8CFZ412PAm72PkAQ1zFOTP9MVG0NGM7/j9mbQDtASUwFi8SropokNatmSU8DKKfZpTyc64GiCC8Q7AaLoO1UVke0ocFcuR78tsyJ6ujn/ZaEAOMmo319HPNAmsuvSV05fu0wfh3p23Vv4YJdVtL0cb4Hhqj31sdBSl2zfaE63504vNBjCmpiKN0kX+Tl6wfQdTwmwD8zTfYF4J4Dks2Ow17tpnhqPwqdo62tV0C+Bkwhbgwy9MO9zhTrKlHS1CE3kw5kEx1n7OoP7WMkW5eaE1TFr+m/vCCRKAhnSK4Vc0BoleTYYwXUwRdr4c2yAWRmRhLhywFSfj1PjxRm3s5aZdugb93OYTRtNpFZfJDiskwfOoPwByS2sv71vZ2q9dHsHn6/7IkaRGLVNYKARid057z7ZjQoLAILOxjHhQ+7TkMnE0u7LDxzyl6x+DBIWrRwKiK2fAf3KueHeopP7meJm2qZ/R1P+3ovFK1CYIQZVw6NJyGCqHxUjZnPmbDhY8TBp3rtQteMqHkI9fch0ASDbE45IT9Q2a0iALWbOA8ROKvyKZlue2As9M9NlGx21iVQ983Q35wfMG4gyBQdYxOjPhn3EJ1WijXgF7UJcMIPzyPgl6tikL3UsgkQ/SzmxnYqu+rRjBIO6LOYenylPjqpDjNEkWmtk2aHLVwUZO5pBD2VE7YPndg6w9gQh+cZVqc5h05Iisk+z6+TVeTTx4QFrRFWfHyEWwm5vnvHa17QqBlMzjL9MhtEQvuvS+PzoM1QN7YOkPIMM8YU8ZznTuxhPAD2IXqsmRAOf737OazXwN6NJXpejTcSv7i+kCBWmXkLz+uWuh2yGzUaCneRYpEREB7lYw1rnyCTk44eEepa1kcC+ek2xP3aQDUrFUap620KKTDI+SGZ7GB5AwzSzrROjaDIk76d0K/FllXU9dEyZowL9CXaz3SCw93XpdS1iZVn+61616jHGeNRFInb5RmHq05/9NyHjCl9s5bAPpRsdrfxW9VgASzUBD9H2HIEIQlgOckh2ZzsIn1kQrqsBSS9nr4yviOlr/AXdocS7/O6j5RgpI9efHtQelh4VglPewHbRDhRzCDRPboazPzNsX7HNJj7OgKaXjC+opF9cAyk/B3s89FVrYOzgylphQiJJIR2PKLfVzjMNfCx7bH2qxx3Xrs45ZoXnA3wEQABmtXY+yFJ3trZ2TyVpSyRXApGSOQv+P7e88YF5agdP+XTSACMkZWg7rSS5I05GyeurVRm6VPnYegdSmWPZdR/NHqU9iH0I5+ZeIF4xonyTorI1dWzU0I0N4l1yPAIWh5NcbaC+Y0BFSe0xLhrhbUk9WpYAfYQ0kfw4dWGXxh03TSScNkC6sGmkreVZjAQsOYBw9sOI2PRdh8TAgyPcuN+bfZ9Wu8QOdSOFYsOPQHXfu6tErdAQzOcjnHzwy3Z5YR2GMT/BRnh9GrIsRwAuxp+F/5MS5jbTPScM2ev3RO6uTNmr6fGL4MoUEO2JEkvhnoFUDBjFUuCQ3WzEUm+1CNiBSF3Ec/rJHUtD6lYsu//Vq1cG8vEjAxxGrhK0qfkC6dWYdHf512J2hKt/gYqYr1X2BFCqEXijj5QWEwOe/VFaz7hvM8m8O56zUzc57N3oIZ5O42jw7r8vWr5JK8u7OcdRgRPOUyfu8o9yT/QvJDkpmam53qBsSlGfyD3wDhawPYF45oXMXx/WHYX10PTuq4K0gYqSVrUVSZo/++eD22dkGNmg0A7ho9vPizSwlAoYl2wu+QGrhTXYACwrvnlNxm0L1cAmjV/7xuE+wZXjxSmkvxzrbGTtAxFGRUn9bR9FRU8NaDKNQCF+1sOhJSdqMxEVz//f1nLMnh0OSt0X6iD2oP9utQ3dkUs/qY6DMQuxHk74RY/IZS1D98/IimdCo1EA4mKl+XFsOhvU+yTmENgRymqEA7Mn6Z9td6NOWa0Qbc5vgKsSqMNOMOwk4PbRpPRxBnl0DWArGJNPainAbjgt9nlOkqDoOwjNf5DVucsIMSa4U6cCaCQIgSIIuAihzey7h9AMenVRlEz2qchrkOxF49vHvOG/Fuei5Qs8+qJ4J+7putKFvudsF3ivDF/zPR0Fo+bcls9GCpSd6egy6pFGGzroLbEfHT5PcaMWsPp+YZTJWY0cPhQdQn5un3AwdxJ69is4Yn2R1jc/tUeTRqrbiyinxOIpzX/rpQK7odyXf9KNOM5ccCZadqd71+haE1HZ+Ehs8tH37hbeXwmWsZSH1leUJrDgQDDQrfLZ8hOnl7JanDdtiK35OKKjGz40YGxAol/R2Zra2hR/F2Wl4Yp8uF7HGTSLIG1XBnvuVV8JccGGHTacJstAMI4Cj3Ci7l5ICfd28v/fYW1bb50zT8pg3bPCEK/L63JnoHWPCHo+ML3cx/PTXQfBn4/SfKMCQfFqUaaueBSO7ku4r72vB+fS7hB8rsnfOQ1tC
hq0K4POTb7IGHzsYySzso9+TF1Pznxq3WwHNesq7612MQIr393HAL4zRRYXJ8EMkzWhWMi3OvXBqWz0aLHfmDhJVwouEDVuJPwPUb//I0sXhWRHE3HH2Z9gZAu4kj5JegfY4eXjgPfhYEB+Di+rm+xT3WtjcpnnLeLKh+mpWJPdPValG/LFSC8+HwtAQGrN5giJSE2xhVPzJhBIWbIPVtqXPWd8LslnF7pSpMGo4CBV8lNJdUBmG+hw/OFWdQ4aIhAbjPSZtXHPunQmUKfy4TYLw/LjTz8wuKzNiYytzI2rCYvqbvGVcXyNwQhz24ETciXRXApYaT39c0iDnOxnbEDaltwKJFwcOMGWxb0t0X1zqFtveV+J822bVXccKG7geQz/z/pNlI5qc50GaoJ1jMiJOYcJTIgAEsnt/woS4hEnh1iW94SFITcm+It04dWy0fSB+BysriCPgAUgLBPEnBgnrM3E/W5bNChDB0vlaiCh2GijZhVL2kYrcltgjIFnoWEGEqaYmpwisMbihWxcPaSrHC6AgHbLRoiaDx3YKSuOU+EepGtgPIesvBrjDYfpOwsWQ0c/6VBVCchQ8spV23y99kjzFhoQmSpmmx/IXmzPt+4MAc6KPfiHbm9DsLAh+14T9+gGWh+wmonVDBzAha9QYV/qOOb7kI7p6XN63/eQgZ6KpG+iyLpgraY4CIj+34Q7uTCp5UEeJGfqlJevy8InC4zBi4ThNR4Le1nGkS/12jmR+JeiH3XH9cQi/uREa3LbFW+UVbYXyQXnfkENd3/JaizVjAo+bHensnRZuEFi1syUf026vo2leCvopqwordQP4goSFmMVQDRl6TzPkaNxbhKzQKipktJA8x1rqbhUHAdiWbl40muAl3NsbbbYFh32Ey39ATNkvzfPJ1k9buCD03YoykKv/P6SV/k0mrfZ0L3zAelh/uQXlKm9fAWAy53D6yTNa2ew942WyY2/6G2LKC919a8T75qOpuEKwwoqyelPt384EiAUFn58g3SZ5JhcFSoNKQOJWuEfBdRZnVsO51I5s2gukj/BkbTmPxbyDCpiU+zoqhePi4hBlbC+kIvLzABGY9wgOFh38vMjCe1QMdOh+jQDtX4zmpCvY+Wi5wAocw3XpLz18O4A7H6bNzANEoyPSVukPOp7zmvYznEKcad3xgi77Pmuh9LzPbDoZmpZtP7H/dInwkstBA5VkTOkNi5BAHDNuFuwGt2Dle7nUGQIGcPrAL9XDctGcA6NlO+vhndzHoCEdxN6akAw5eeeJKJ0cadqxf9UX0CAJ7AJhCNQIJtjze0IbGrihJellzSCEo+7HT+RVa98rMW+MvZWczFpg5NnbRuOSDozskv6UkZYjvb79QZi8mPQLDGulnlYeFMqvpys85elGOAWwrDUBxXSjayDC+l1omzR4VkLU31PYAQFQqNFPDgfeCBo/isVxT1ReDof+OIuH6Ol7ArqPFW/1kFj3Bc5cTdlzEs9Sxtr7J5e2WDnOkU7cT80gT2qjL3CXM6ZIqfzTFpVBjJkM8uodbGzBjfSpvvwVoVyXbjW120u+xoZQY0lS0KAsga5pzfntsyKH0VDqxIEPNsiulpjALdWjG8nNCQiSQt87MbG5Q1NwEwOQua2LpG4VD7NXfZ88MEAV5b2Ld190PZdgeCFD4G1pDQOvy4SVWKEJErrY8/snjOEl4jyoSHRHPOBMJ+LFkKdcj+rAsyXFOIi5+Lq8oNOkxnIEbNp4xF8KHMkIK1MzyGhQFIksNPNSAWlF6E8+LpW/jUkGQ1WRILnvvOuI+cFcrsoqBRLr/wPDZCeu9u7qxc0QQAs795K8ArROWi3pGEb04EI8EHN0RM/WRcoiJX7pmQMjiCZ9IW7OoBqt/K4HBNMMcMf/POiZ2CfKuWWixOfVdSDLXLuvffhuNExu52fUuXtydqUSThQbvGt36zKDsdtj+4dfqMo6AiMfjCUE2570UpZysXedPP+6SPEqb/ZY/ZMmeMsMMqNNQwfos0IjqqJAI75n4CMMzOH0Xd9rnqQpsGiCViUM+h0k+uC1/j54dXJwMlzU5TmzQd2d6FYACMDKf5cJTJyQji/r3X9YnqO6Mh/5sPenrWMZEk+a0MWmLRF3xHwovQWbEmr9u3yf5z7QRDLievsDntmy/u3FV3WxdyBvgfAqXoAmQtRnSgfT2pU7gBVvfQndz6L7cR7lbHLIY2HLAzeXhKTr8IBBgRQgJac+Sm5W1bHsB6uM721ZLlCD5SLShwIIHkLeJQpJNrBu47RlizJqSiOe7Vs2+y4mqddNeP3+0Z+hWGdeE1kmwGp8BBs5gwUluCxNU5P47hftpzMWzb9Xb+eLNJjH3pH/W6cK6vdivMWu1rS5Y/lvKzxtfkZqZqqT229CkJk1yhRy8FMiwUf4ol+9UwS6u9SoAFVhkfKeuSpFEze94QlzQM8v3F4cuhag72Njhwx+6KkiUoT0M0l6BQI2UQHrxCIW8BVIL6brCXD/Usx7Xt/dPDgX/llGIhy2GTvHaMd67J3igw+9MtZ8zl3SWCkzRnRbar0aF8JxwKWGXMZn7gvu2AkF0TL8vmmk32csfnnGYpeBrSTgQBbBqDLM5i5ySxCwyhdHCXvDwt8na2LVHV88dWDsQHuPedgY9XJkwwY0FHxdt0GFm9VhtdnP299D+aKAPCaDKJ0SzVX9OOZS+v0QmkRCzjdRMGBaEmamWk/2bp5rlVYoO2CLSE8gW70DdpTKtIvrGnj6lYYSqn+qnvFJPlrq3LaQSYJvN4K4j/wXo48AQCrh37UsihxmX/G40S49V7mXVjnXcg3VvMfOsW9jqVsmkac0R/DbQiA5def5AoL4EkYb6n/Q84KA3nmR3TPUY1g6J+vitEHplDrPzQ4aNv971q6REIpqEJn/beeDqpewaawzAPdVYV2N6NZ6ygqD8JwvR/mvsRvVW0gVyjzwMZIuw7IwofhoqNDjkbs5IBy1KwT8iT9SurXKRDAkz90myGQ3wkQ736eWM3g6qGNLqCaif0zqamfsnWtWr6zyaUy+iPo4u8rCifnkeUDAyQmy54mn2gP3kT2mUxUbCsmC1dho+ZtOVDAVTnYBvJbjz88f25tcQkSyAbgKuW6xaLIOHBL6OoT0hd91wyunXU663iRGV8hEGPD/h4e6WapNKANFVouLiJpwnx2erwYAIDF2F5355MupFqkv4FEA94o/pDxvJeG4Sk3g08zTctWtm093AAxerKue6DVpd+vSr6pAVjO70XZRwfmpI9EW+nN4aVArEexn4IUN8+K4sGeYqXwmaMdqPfaqPwu+MctREJtuvuPfbwxBM2o7M3Qh4Ei662AHeVu2L2gUBm2G3GNif/utv9kJQKNDqICzvVm4/csUWQraeGDe2uJr3EWpdW4BTgrMEtf+C8kdVz+oWGjNKfux0v+T9S+Qc2huDh8vGI/8e8u3GqkRsu8XOJtRNWQGUu6nrY0nOgSg8Z8eq/tt1y1rOqJCtH1gq5LIRUVaIA+3GFtL7BdDxgkokEnP+FNotHAA+MFPyQkkm0PVNoOPxNJmS9392tDDOTdKR8jhETOxMxaJZwkODU0Eqn1rxfNDngd1zthYrWGHCYIA0EMOeOj1yo8pkqf7INtnx53+tDcRoehq1e/snsNWcfq9Yf+LD49HAee0vJiQ2usqdol5ylPY0dbggfSWi7oNv4PYKueuE6cPlCX567sX6RyiVRvzdFcM6+WCXKKodNET0ulaBqsEDrhRtxQMiYylYdi3UspNMEX9+2MCutuJpBN2uCvM7KJwp1NuWjjkFNHhUi9Pfi4UoxqrBQWGfog6XBKoY5QmFLnPeGrfdl8l/5RBJezVGIpe7AWasW/HB4exVETLwJToeMib18EflUX/I3C25orahjWeA+/aiELE00bUCDyVj2yqoD9gLiSrEmq6zkd4BbsAgf5knfOaz0hHrHr9AupIc08rU9foy+X7B51dqad8vpLDp4rNjL4r2D3kykY9Ho72AgDgksz+Ehj8ChKdF3s/UL6wWg1bajNiKTqWBefpsHgiwCl/wLdrn/mp2D2vgGeEpGLDwwYQ2AHJnmpplWfFPIxrh5C0
QFVIIs/hEiKW3w6qOjpz0oBUwzmqdiJQnUM5Z8VL4vOxupd+yoKj63gpN/Ps3dYRDEF9X/la0zdvkTjTjfCWzzQJd2/bnecjmWoDjWsw1wJTH1okOg5nJfcdnbibOCeQVCi3mvTkaBHbosLXTmAeCT2kNcLPJQeVewAMTU9tcBlErxkqMtccj00zGErwpL4Qgk8oYnByroa8ZPJ6URwc/jPcJJWTVRXuVEO2RPHfhF+UuhYhxWyTCeb9gqD0txAeZj0hhbEAGf5Ok0BozQglrU/6CBB67jerc0qn1bUO/Zc5Z7aHhYAk5GoU3gTV80dsipRzK0H0bdSgf4HWI8wpO9ATKz9/LRebIfFAbWnOc9us6vz929wyKXCIfKYRYgiWNB4P32lnlb1JwUqpNPry3WVIeBXsEWjdaoDILbWVuPapaRK8YmCfiu8djwObpIpDFoKaOlVQ+8CWRdiojPdeqQlbQczdtZ7clAjMW05ipjWyGfXAhT71cp6OseN6RrMid6V35f/FpNjIlMKRZuH/0NQDvla8XFow2OrSQSpGyDFHJ9WA8hbexzLeFcNYIrsOp/da25wTnuZaRimjhOzl5BZigRW2uIXGrqbJB2Tsfp2cUlOuikpbkAllRSWt/7NcvOKsqo9EC7Y+9Ryx0hvUY9IxYYX4tLRkU7CoKkPffX+WqfXC9FSqpf06nR2EQuosFiwUtUjWn9rgJK5AC5KjODyQRnXfhIVWa3NpU7GXbTUSlcVlOMavc3/IVTX3EIYzo220c1QsrXLo3KCMrbcmwwYV44isADqfbNwqtYa/irE4LoN9+JZWlTxXVMGeaMZ1cGN67F8Qpx6DGu4IsP4sXqqjj7k2b819MtnntvwuVs2XCD45tAe3wkFvEjKgLpPnB1IUkZ/XOeFpdFcAplcgZRMklvtF4mhPHMclg6/CoLJu8C8AAnYBw0TOu+8JVw+DGr5q78F0w+x/usXIjIC5vL2CXlhVOYG3+vCOGellHz465pNRQmNH0N30N3AUusMle67YVl0pDLH4znAhBF+ihWAiW0D9Svp6hiSYbz8k8vz9sDb7N/frXTytjbmP1bZHvBUNlquYMDPff9Bf8ODrNvM11UxwSz3paW8OlLUSwnlnfijsenOwzxLwllA6cLarSbZ8usLiuHK+uxl/dYtiv74AHeyn1rbrDHEib4vYbJYjMTLS2nWgLVKtJaK3gAk3v6JzbG9yAvRuq2wExChj9AYcNjP5xkUogBSMWlbS/MKYOTEPHiomFOoihnFnMZvIdC5XSpkDpmmvtt2ebr+sDqWpHW0Uue2dw20HDwb94XwyDzLZMqJCODy9q2L0ecc67mMa7izVWl9ZSVon+TljCSiaWr4RtY8PB8rOBJpBTri/htk8PBgjQsGPDqf9X4I4weVWtsb4O+OoGUkm+A5OUDuOdWfPGTeBuV381CJMWNC0XZqv0ErbQ9TBRu1dHx5VeQb1mPrgeg+GITKJZsFBXBKcuCvYtColLgA6AMhGc5DvhrHbtp09zd26tgXFfvVLs3trkoAU7MMZFp6SBOBqKbx1lX/iKDnpXU1DS90kVtCtUw/fxhlPekASOZujKtK1KGc5IxoIk7fWER7DwV0EuYHC7Gaq4SyESfXJmZ0+fJEjPGO8qpMDnFu2QASg/jrWqprs4/bOgF5U5b8l5fV3Vn4BVRhXhxTMer3RXpfEtP3zS+Pms+0SvKX2OKCrx5WEWLmtzBea289RrzCk7Z6E8rpn6BNncrVzrF7xSakSYWunjVZFXqy7Ex8zo2zWjAwhwnNFh1nL2CX0sNv7B1iovMXMhVd2N35ivuV7ZYxOU0rKXTX6/xSn8RyTA0hkL3B4vHKoME6ByAGrWb40MuZ2XR4q8dgVpFSNbFncx1FDEkxnTp67mV5b1z+tpKJWlqXqWCJWTao+WAhAioH38SOLTZgjrtExnlJNwf6r8C8Ik+56L6ef4eb1FYEnTlWFMAjb51X2N6a0cgPJ/BrOmEpu3p/vKzXrYqRZzRT9OvQsUSgAdnR4gxoCQFciI6I70o7vgtic41JXB/siWxsuNJG9g+4wQ6yy0gdxuKHqnmWFP9ug/3MppZcZ6kkT4dFub11zlBSpyqFeUnfIvI/K9Td9CzDWjQFsxNE9GhcmqZOAMOuNw3RRjczqV2dBt0KA7FhfJaISjHJfnpqjrffJ7okI+2OtABDEALQxsDl42yB31FiJznnnvWG0W0n11dURD6sNnK0zC8pXVi80382V03Z9cIJDaYOEvWQapP6Cd0j+qV4q0Hg6KYpPvf6wsjlpVE1XMnQOCnM2u7xwQnj0pM4ZJ9sE+tI9nBTprch6pUH1uKUPxLSMlVlvH5R5nRa6He8seir3u5I3cT6pLPuAIcYqJT+1j1JeDs077xnjxNxUAp9SzX4QKAbhorIGc+guyJbY4XT7D2W5NEaVixDJ8jxeVaHS9IfQ9/xsjSVQFbBFA7iDb8zqK8iO7jTBMqbw67DSA9/Kj3rLGWHC2Y4DtuxcscPqW/zjIXifBrgd0Vcb2dpF+ZG+gp8CL9XSE7KHFh4TSt25Gk2bXhL/nLnv8sBWIRvaMb+lweEPhaIO1dJRAlum2CtCzbHV8lwdCKRncHVPBt6a1Kg9iTnXyvAOdnmWLUmHycSDkT6+4sDUcGs4JUKVE3l1lCgIyx761JEM6kzoXbhNvDSy9w8zFq4hbK5uc7aFoOZdc7CaG9fxh8mrSADZTcQnNz8Im0BFJER7Qs5sk6pqUDDhnABBHpJYH5FYIAtVRBxfbfRzbGfzSoGC1SER4qx6SAGNZCZgYVxLjJks+HEcjXwPgkkx5dErq0+o030rJd5Da0TUy8eVw82QxFBJdM2+GxJOXWR0M/59+sLjmSsd0GFLH0dMRxWX70Qjx1j8oMD5nemSIXzpbmQxIfjs6d17XkyAJ6yx5Kk4Dwac5b1YlBTAN7CAUdLc9WfggkAIPUO9JURf03zYg6jfNFWIQvv1Le6mx7idxigChDHgGHsplcnUUaC6Y7MXW/ZW+rqiVqJZUwq2iwlEbIMcen54XY+0tfvKWC0GSv+rza6kScXpjgF8plk325bd3URMEUBIfkga6Xp+sBW1buQPvZ6WIcLz3PANqdH8zny0+JXkQZ/dBJ+/+yxBJKu9Zpmw3FZw/85n3XF/VcD5K7oszXt516WYzcnWfqRK0H7nPN9INTzPY3HghIrsUnJggPTos2Oi/brcy48wXC/9AjGIr1X/Krb/LNVdvgs2x43mWVVXtcIE0yvWoFZD9Y2KL2rCquNtgRXUpLN/Zgj2GC/m+grvG+ZmNbaXp6VmpFiTLYk/PLgTl4xem/Lj09AxbvaWOfrUcWpCS99xXe34bpAK+E1Gf8zklgxiPCFDu71b7D68afY0Bs9zJo9ABM3gwFV3hDdosquCh2A9/Frrio48Fm7V1Qhe40XoVnW42rnnw80oVWjc0JTAD8dCySXHTBJQmANo/bpFcHM8tJ8F23OKDFZsY6gBcWGXPWse92AXXr4qOeSts4rrnnPHMu0MiznvLkYVXeUYUTQRinmRwE3N1doZKw+QnT5cNkgvSEnnjGZiF9srUed9eNP2osvq6qN/MbqrEtYcG5ADXS/N8a1e1ijRJ/QoqG6D2slWiPnEQYp71QmmOvfA/x8B0sB+WcYguMzK8W6bWk/bJTzJDvwXShjvvP2lJjkbNHKf8amdraNQkwnyHfOKl+paSqNKAI98ap8L5DOPDFrmBXzBA5E0VGa8rYG17kl3MHPCylZBexNU5Qk8azw/Apkoq1gE8rzGXNMLiReuG8XYTXsRkgh+5bMuwkbhSyk1ZEAbtyTb0AsRuERiBX4pzTuFwoNchQdo3G/TegDrxCktgVovRrAMb7n7yuJtlCpi4AhNypRKNnMm51K8T+BOQJf/HyjDw1ZBuurbUMhxqDHfrdu8BjXptsJ85U5CVeD12hsFyxtVYatg6PiZqclMT0oE/OZpi3s32c/KnODbDBDXnN98zruQ7SIuypPDJGe3T7pXSZ5xAf3+u7O2tOu1Gf/bpBMzyGNKcEVgGgdnNFoxM803+cD6W2bl8s4IiWyp7D0Ev+cCWK5O
xobsuQ3nCdUwW+TerkNsHRbz8uRaSEV2odNHZOwN5oMOy7L8kaKelcHqCp34WW3yQ73yraT861TXA0W6h7LxodIT5IOS8VvhNFtsXxjBOIi+qwyktoeCre9KTSXpBH9b3nVXDBLOCZk16qhKUnAmqeBAh1ibQuh7xG2NXCWvoPtnBS6wg4ShlSR2QGQqDqdj6ofvKLSA2W4yxRy206Lp2+FTChslAf92e6GMZ+Z+VlNg96L4OZgB9jwXIrAYmwV+v/ngIquJB4tAtSTOx83hZdIbIbMjmjYGiXV/S+QoVqn+SvxNdcj24SB9EySFdFX22YuvwZzZy9KSwuvZm9RBIF7PsyqCJxlNSqZzi+cOOxN/7/8i2zbU1kFmHJwWq5IZwSyEWuYY+WH3/vpP2VmLjxp/x4/oC9N6KhqH3IsKTzDV/EX8icVTMgeITEBoPbAcSf0apKkkCxx1gJEdvMXrpJz9eKglE/EhQVbm5i6aDXb81rx95fhaFyS5Iz63Ma4APZj48DsW8naSWda32on3xC92FBpjbCpjEqJY0Mz3Jd9Smsxstfd+hzzNFWvdxsmVQ/qFxNUqaUtTXIbWcIR5MYT50eme9Y7qIOxkISzx24DWs5FsBP3b3V1U4CRCRJiJxDB01nZc0HKfd2c+KPm7gtlsgyTBNpwm9l+ZkZSwDRnlwa+C97Hae4i4MP2CBoDuN2OUxJbTSdMM0IoXdh5ZGZIJ1xFOR9lzbCO/Jd41D3AbaxHbyAxybSqqA5jiejfyzfyn2zsIy3paAhyOkmlsdYdK054Nj0JEzV/B5p8mCgdx/Owwm3n1OugjaCMoJCe8xEl1rnEu2CgSgvYwG27N+0BB9veafV+fzu6oY3B4Z7kG3tZ7Zs3Y0SN9VH+tjsknnGN6lClw/7QB2tUyb7gvOJvQDG421PurXS70Ub6hcfF+g8ICsdwgTdzE0PQ8n4xs9dUprKdSDKl+jWRQbNVgWUOZJPnZL8P1Vs0yKQdc35qoviIsCjU1m3/eilHp5m8Cs5OkCAz248fqlTdhrlOROo2WZ1NUFQG/P3tSgHO1mIAqzY9gjrQ/YDLTSd0EkgJtCNbFtSOoiLDxxuJYyQGSa5Q00UCp7QWNjDUScJ1D8jLJAoUT/I8q0Qyb5x/XV/EzYC0jf5M6H8wBsUIj77HWumJ8NlgZUAfucW351z+dgkgoiGxkB7znYGWdDwL9jnwOK2jezpROqVOZjFqQTFJEsgOERs7oPpnYyjMZJbrrOEHAlmQOqwz63moxEjlNbt5kuPdf5IG7wzkZhnOJoNu2wAkZAR02pzwORpBCZupPNucxzkJ/3zSZYgEOgRXqxT6A+MVTyb29shK/+jl5A7qUl+s2JvjiLsWB9nwqmmFRJ2ZssFDu4wj4/m/DQTB3sS/STVDW86JtOEB6Ae/7otkJmHLwTyDdamHklJ4e7yBAk/w+f9lZ+ao3acWmB/EvQBwCqt8q1A4hbzPbmjkBm8tA0UaLa+4EPWu6g/duN4hu/ZVChZ4+bjiJrHX225mHj7AvJvp8rqg9gpf1fhVUSPEgsXvxI0Oqo1D2K7BwqFnPAUIaxw36qsFkK5gK04ocwIHP+ALei3VmEQ0G0HKkf8nq7NZEEDYPfMOHeFaKcpU3JKUzlvT1b5UMSZpmApDA3ZF2iJXKUoI1hVUZpRMkoik3hQrc2hUA90gdJkB616iC1PbISRb9pyFwJ/4KcWJ01krBnzVUF/OUs4E17ciZMm4uEHHb+ov8M8bYOMgYGLpQag1u48VdKXrE+qHE1uL2/tCA7asIaE00SLjAgUz8Ibg/MWf1Xes5XpsZO+4GVvOjjq3/AS4ZYoq/nxenazBkD87OwAH2fSwGsN5Inc0LSfvMuk6yFZohClsQ1PSP3ud31lqUk+gmuBjSPAEx/SO0mOvvdUcygFSOtBvqWytvEJciOI5IRAwIp6L/Lmb7Vf14wpPIENZkgmjj8JzdrbdoCCem27VoPW9jlcDzdtVyM9KN2Ob53E5VMW2eqlhXaJAi+UP609FLy4uVU/gqbhBadcwKSIojemHvW9F9KxdhILvsFi21Y6mk3BLlVO9aIjDZfXxMYJfjjhvG7kg7UA1audhiFUu99ymmy8uPYXhh3O1Aj6VxJVmmAojpWTZ13KgFeGBwzZmT8oqxcfLcctHO0rOpmqd8e8saP4Ia7fvC9FgRRtBdpfHk7aN22BqvEjG/9oyUDdRL4Tfr+kg3hfbEse+wipv+zxoJdlPhIdDiTmIjkNNAclt+bKW0aGwhdEJKZyzmeylErk7JoV0VAq3QpX4ddmgw1yrEt851jkF3icRWWovW9ReHrqHMBSyJQJwS6Ewkvm0VLuY4obtfcKAEmbYZF10n+TXMl5+NeBJN25AQykyYroKaLSSPqy0a96AF+SKg86X/Uw4xfxDTCRNOvq7VsizRLRf9qKPAEB7lbW7ybWpb2DkhPdwWWwK5D5iUcBFEcZqj+1fkO25m93imt18/Y7/Lgk+hc2ZUnRiBtM1F+8jTvkN4Q1W2zInKKwAwm9E7/DPYN6lrscAEJTQ1KZk1hnMT14hXF6JifDrzvj7OlsxSHyWCDhKrtkeBVYuQn92ffCfZsYHmqMBZScOUU6CbVYnhYZmaNPSlHY/UIEygYY0UCdYDujDwiNeiRsRpUj81SmhNwfMBM9x+RLY8TiyfgAxEWLCRi8y05b7XItiY08w5Hm3aGD70lDloX1mxEZnYPFQrpcHYkBSK22aiyMY4ayGj2PkZwxwoHclg1q2mvCAdhhbsPDwoxGZAj2j8ARcys31j6ukZ0krWbQnD0JSm0dCarQfoRVkbNfdMbPhtXs2wCi71qC3gyV4eO6HRfL7+t/l/5o24uDgIqIzzPhODi/FbddB9y2r5FpWu7D2oR8432CIKvhEnj6+iPinGWfAksHZH5pLK9GrqcHYYnTzaVjVEzNooF6hSDbQY5neoUb1G6+5iLobusJ49rMUUZin/SPxwuMk+12fNTkJn5MjDhD7slQl78PCuOzxzYX+0Y3Mm8sKgxdpNzUHuisdQL3wH9TB+7iq1MpTAJwzeFdLtzB+tyo/xRHKcZ75MfFvw/M3LJxCyNuYRObVieC41IGbpONmRnC27qtPpXNk6UbYzUGWRPZbcNcUfYUUbYmQFxPCCPwZMeDBMooK7NhmIFb4WmOmCnj6jlb9W40mvSO0mfOpJgjuAIbCSKdbiD/R1v5/CBnX0y0SENNoRN6FHmamxGFQZ8DHI0xza9ztiYhh3Gw/ys4VimJ61Vv5D1ZQbuGD+Mt67qIJFdUSzYK7NCipf78n2JCYZCeG4D4m2QMqUAw1lxbfMAs0FWZqWzpyfoAGbRm7BKO95yI6XGnTsQ9BwpXxXsuX1mUrz3NfLqZVNwq6pbL2XhWTYGWpHL0TqpeyYlPIMMRHUSWreXWwqEBVD+24ZDwJXxQMTh7UsDVpdnSLZyHOscyxemEW1EDMnWbeiLBgJTTvbdxQV05lUy8SPpIEQDM8b93Jqz4aLB7C/2rHyFivSqbkeWaNlVqgrskSOnrER2s6SNjklXKHF/PHTOiwTlIfuMKGH25igegUuqkrNaAzm88s/RlFHGG5og0IocECOQ4bGPqrY752iMWSjOZT30mNusf/momUSS285B/szbv6r1QDv8Zz1Cc6qi5eW1sDX57FFbrfMzWNvn0dOcBg5THMIgi0SQNMQtIlZ+BMulKWFQRExX/uKhGNuL/fxMTwUwJ1bwXluwuuw2y2MMbkFonT1KwONOJlQokyOUh5lQe4YPB1F+5/y05oRt47FCNU6ne5zSvyGw1/LrZTUAotxhdMcUue0SagqG1+xPUZ2JVeogYiioT/Zdu4RUEdhEpA65gideVfCsf+0WZg6njU4VyrkB7F5Fsf10Lk7iodvuZDB5phZRjaMbPag9VvsiwEXj/VyBUdPC4exdvBmESwtUErwUuu0k4uMjUITQsgn8xIoth812RyobB9RPQdvhuyvY0AfrVI4TMH26bShQwLjf0IhQqZBK+JW0mvRUe2OBiOc4d/bfGMIGqng8M1sG6HJkjQ/Ock4gyMJ5/ZWvEatMNREpAD2s40sJXSc
u1LYhKsX/8KQpwQE8KQ9HXudAesAIxqb+1GYiev8WWY5CluLsoqwyNW0KiTDE3tXyB+V2UuU80YwXEWrODkOcczUrZugXAAFQej+9UeLrW9nZH/ROeJ4WV0E07ef6abImhiWqDPqjSPlJ4rHDck2XjJwpEg5TBBwj8rZeS+1P6y7H6g4ENQmyxQNchvzVd9r5Qy8hTw1yjRg9XGStD2FoV6J0hS74wukEU+LSDjC/drFr2+D2tfP5UNH0AmWtRy+ld7rleQZjHH/NaEhtLNmVuhn34wu/YriHR/qiSfTKviQMNZpvrI4kRegsqmN3Ev/GX9yeix/6BflPB1FNHMS5Kh3zGEQtCHyfeMcEjfxY5AEFsfjLO4ZsA+m3XLGFi10zWDcg5OyslNJEo5vqcarjlZeal+TS5ILi7LqTyg5tIrDRTwkoo1I1IWbt8AFXlxeH7vLqDxBkuEMbzRxOG3Xn0bDrfc6Aw/vacRwF3ZaeWDmHPTlLygBA/QwgFExJrRF0RM+V69QvJBnTCmuO/mcQPg0KD6Mr0itIFjGyC+5rQssN9DPXKTZkB5jY+w8XVJBxYBOvjP/10jraeSS1AsNh2Hh0KR6Vg9LZzUKSSygsNUpAsM4ojE06c//6Q905iUcAHV0+lF9JjoEJKyeaTi/OBb4Kex56eo/4qoR2RGfG82KVvMDQzIXsPb1DiM2JBniJxr5uFx/Hp0xcG0gPD7sCKH4CbYgNA3/Mil7oDx2FHvf7a/4yxAHjRu1f8LvVsnbfm54U8TFvo7kSd9uHqD7EF1/SU9AmK4PaHPsuxEIRpAUReql52S499Imx8DldfuTGeTMwE4MarsfbmQ1i3OR4oTpiy3CfHrNBNfwKA2Ki0z6Mv4yFZypou9oVlPWC918GUy4MjBneyj6ErNEwMfmTOcHA4ItkmO4ZyG3cNQY/5I8wEFAjAyfMnRNq3K8RvrxPKoRrgaXPf+5wfrPqo5pfZ+wgogSIepZza8NrcyAw8rJOaebNQeznvezrYEhtVzCrnC4/WzTQi96uwokIQIndDJNcxkizuTh4oZNDTshvQ3Ge4imOIe5v0vVbz8J9Ktuzjy4S+71ulMhNbsmGkUfmrZz3CUSKpQPI52Yf3K6Mzz9ajmhepUzrng/SGtSu2QHXoeKK+UHRUXHrmcbmbTCam0pa6SOB+ltvyWHv16SZcHraLlNzPOORTWinK/07S2PjG+qQa2IdpsnfEvt/nuVSjaeJBfWnrThWj2NFewO7w+wfTVKUwXK50qDQLDVqRGDKqh8OtS/AdMH9EEJuTBN8pf34uHOL6kAp9v9u9/Jr9kgCaZLqN0JbmF0u9dT62FvCKZiNiJCoE/mqjdaNqrYHX/jBcS/1yngsPHKh5E6Q8Ge2hiBYYDgsiiphXdqE8pgvsBS9fHAUsTfdp0hSyuWs0kN2s5M5+F3O/Wvfg68D7aNAUjM1Go4djFvFlMioE3rZavWmwrM4FvlNCmCQBpsLedmyXdHDYaksnC6HiOVFTSfKX6ip+YcKu9M9scyzGtgS6FOEve1M4USmDKktWH6bg9XmrV0Ns+BJDP05hwOKqD3tFbexeK5NVeaRfcB4lZcyAseJLrtMivDmfG5dgrJkMf6zB9U0Z+wHNm1yrn/O5C9iaT4E8GAMYiS7/A/XTxTqdQ31kBi4TLhVYQR3AF7ZSUsSB3OuMqnh3FzZe3vdRgY6WoFZfsav03eR5IN+fzRSld1jKzf7Q+pQXa78lfbSttry4y/YDyYREbJlRNZMG1UB9pu50wkzx7bUrwmB94xZV0O6VKi9AI/vXY4n8P8fSOzKtWZbHFF3zLQwUK7MIKxp8TOhCQcx4bjAn/q0CIkquDgPMkec9X58Pi71NpPs9Q2MUZb/XqiVamjs0S50ET114QfLrMV7L4BPokbwrFFOIyTLib1RfvDHY1VWCCJiex20558dQnRwIrKJhz3V0U8bdxzAooGZLWjsM43VEkKfJzb29itGNFDqDF1NozIjApyRu0fao6ErRNgehFbnMHsn0uBQ/ecii3E2TW0FH4JociMNhhO1olaZtsBN5GJxMVQVJ0QmAwIMXR7bkXuHnS5DVsyzqaD4HDdHDXXmFxe0n4jLR9GpLUI0u2sq1PGT4/tyte1vRoQbIRlss1oicF8uj9Rb6vCb7Kh4QLVbmTQYjj9fMzPdC+Jo0JDc9l5CSmI3xgora6MTrEa1u0rrdj+ZFPL4wREfWgQTRO3fPMGyjDqeTOSutNyuSeZDqqMtN8jiDh1mXr8XkZ6g1HM35GRYtaPc7iDYD6EF4BqKnst+aOuu1bh3U0aL+2paXKSuy+y+0x/MkKrSkZBU2o2Cb8Od32IduVWTVKej3GHik4ZJ8P94f6t4/Y/FTu3Xyhtr1bR1BKlyFCcpk6WJGDiBOtoXr99Zs6U8BDgSTHpExITYhZE4oNS+88iDZzWl53TZllpsOvibhKy55nDFpyRXW6QTen8E3pftupzsS7Kwbf2DO2VUFgpRke9pULbqRryfPge1+GwXg6Ly+d/JY5oJ7UGhAZenIjyc3s3wV423CXyQ1gLaYcHk+LIo4iDxYsqcQAuhed94ZQhM1jQrgzPtfp0jyudPZ/hnU9yMdg4FfGE+a3vZqwX7KCNMiT8uLbF3ZET4HIi29YXPYWzZIPbx0nzmmLdbW5IKsCvBUhSJTUYntUAGAhws0kIH2X7SDlElVkmN9fYF+4l3uWYxgAjv8HofyJ0BWpiBwngIJ862FzyVduCDRUx8VEW4hLnWU3qH36ttOBEuA21MVihKz53uNS4IsGWEa9c/9kWco90xZ6ydMfW1sPG0JrTGrYhtiaUOVA/xnq0RnE2Nlzh/KWD+y1HmVXv8HxTfPWGKvjtsg/85A4bl0bZFuj5ypZGanDakmzNo6cycJX4uxIjU1VVy4u5Uk8B34a+vllaJoIH1jUPUL8LG3/QT6N6amnOTAkHs799/Kaok9IJMu5MYPp4D0fZSghBoNh/qFyDYTSGEfn2F4PWYt+TYOZNJmM4aYYeDIjCH5STLYvBXFDah3YzlSe0mt0swLawK2GvX8KXkT2sdPUVeZYqle03B5ez4nKEtmamzuo2uDUPv0PV+SKQqbgDtajDartnKybJyttoOBs3JgF9CI8An48SXN9za5lNAcwJitDJaNthzUOUHYJtzLk894mUgH5t+v/25n4aa+SV1skgJ6LkARA3BDk4wh/508JPyhRAwI0262jWgqPoJcJ0EmyO2Lrw61rMnqz0eMM76ySJWa1uBFP+41vehTHU5h4czOlMDSFuE+pj4F/9yIK6k7LToJU5iw6E9prm1UZ+XQAa9/hu+3coY5FxxW3/rv+73fxbxjFRJUJocwJjmwtWa5pjfwGJelhuZpotskfw1ufQbOKNuFR529vFR4I2dIpQu5Hq+pteSHqremHQAYwXLfot00c0JnovKiLET8bS7uUAnU/SWFE7l4tYnIaMOXVJyBtlQ+i2aN0MPsQGy5UCXyH8vwHNoT0I1ElEmTljaxcOsh8UTYn+JNmcpkaOYix2X4eBVIO12cXPadpfuBlLT0Xwd4f2xP0Q/UtJzNksqkC5fdPNHFlmUvhg5n4Epn6HQmfDCgcDyfzkxJUo1hqk3sEwqTJ8v20zC6G3tczxQSBxMpzg9dkqDeXU7uLv4FtMlea+hw5GfXScG5OBA9WhIsutiwB1nw+/HUyUfiAgAltAWppyqdoAqS+luLhSoF8oJdDNWxViZVMdEMxSxsSiGoCzNFAPN6yj2JZYHxjOpcLgD4vMcnq+f6SiJ6M6wvSAYYwSc3qysDVm7cBSYinkCrpOQWfBFBCOBjDmi2I/DwN/xMfsFbVGkbTvfa/wTY7JE2Ld7133ZwdRnZFR4eEuv8H87uhLfIVI6R5dqZgb2kQvS+xjFXr/OTN0pshSCzR+9OhQFsun/xwlzPeidOLRv2m3FgYMs4fG1pl8444einbco/F5gMqDmGdJKCKRz1lwGfbMrOogsG8G0E0TpDnyaREbUn4lHv77+XkQLvFWb5sHf3FpNOKGsxj1msGDs0g+P/UkL0TD679/m1UjcSegJ/g/KnPqPE+q8d/03uNz
R5EAFVQnBS87R97x4YFRneUnze1dFJmGPT2HVOztRauET2Wvje0ubXxGaXwmfyJaGcIDDC06zCxVUuDak0mTjilCCk+Wto3EpWmrxY0XNlL/k5jg/ztcmrdejAuA3eASekrYerId7Ti1b1CFDKffukzcW8S1hUOJA3oFZOA3Z9EglDMRtrlJXWWtoB4lx+H1bJJNJ9Bt19etyVLQccAugK1gZxpEEi6oFXHfyZpPpxWXuROAZku5d7Z8tFM5xV7LjO59MoO2Ay0K0h5xwXCUpeNCIi7ZpjJa7/9Yn27F8vVyoBBGpnLcUF9NsqfKRnMS8WfZlQ/0OdAv4qDl3j/E7Ydkd1N2PFlB8Dr0hz2l5LdCogM1CxzNs3a48qFnUEVueIR1eIolAmX2SbtsFr/ijyQSY8o8193lYrVtbn8zauy4YUakNRe51oIWj0jizXnijV8uAmGsDypJOr4wcG4q945sxKeom3Fzf6nPZsc4r5JrWC2AWfZiCZ5ahqE6xMdcI+y/BslOQW4uQ1gJV9wSA1U5d3sXVwukIiqe/6tZ8nXSsM3U6bu5a1pMdOeqy+kWI+t11AqLC2c19gtUz5xPhKvChH+pUi2cTdWfD9P6WWxhdCfgRZGkZ27jQ7ma0yzgIDLOxrOJRsJP9wob6bQ9vPbMJwYJo8ZcgFlkqSJgEoCn51A9gLUS0t/58DdrS2feEcuf2F+Um7HfNJPr9pfWRfiKwp4enKFZ5xyI9Iv4Sw6fVuTysVMI1bv3xEwq5YmDWSKxE/y1ASS4VWBAQuMunMJc6kAcs3mqD012cbENfyAXM0R6v//+As7tv8vlE2FBzKzjIdy0fHKORTbH9PkBcr/tvP/1KxEd4cVeu7CHOCQyfY8XLEGvbGvQFj3lYmTQef82f7AJi2wFzQR/HwxGBbUMd3j+5M0G5f8f8fKWULjbkPapN3baQERhUo/2M8nt+QFF+SBqFuxwyTkCs4UuNMlNqo3FmfqpoBxkkNCQDOgdUbAty1xn+pHVFl6IZlkwOuGKWxaxD8s7ay0i8GuKYtOAsA78ypIUns3AipZI1SvRb/LHm24RgN7+V5/ofHKNPyrnXL+SV69bbUup5vPz2dLOEIyIX4W5PjMit3AbNrDv39TJ+rJaAzX56IX/SxOR9VSpvlNCn94CXgguaUWGDwLhACzEFeNaMZKtEcOyipRgr5X6Xm+nXfxiBzZFRArN0QFSQQGWFSDSYzIdb0wyt0+CVAvspoFq1xU8BCj5DzGqYN/2TB+alHqpBLqcZ6PBQonAZvRQ9SUiUwYdrWU+shzCv9n2UCLQnjCKFglDmBK+zSL8upEei4Olh+E1ZFD83iqow+tMQb7BlTqO4/QEIwzP1iMatoZKu7eS2GelJ1zaScd5nUhdZ7+zBMlIl/JrbCzqj57OvIKCf1xJhAXdBb3ZJ7DyWEhSKQMHGLodTUD4NFtYqGDbJtgidQpFfIxVtN+40q8mlOlGcguw4KDzFdVZheRVCkjxNwU1KpYVCrDV8lKY2KqjsNEiLa+Wa4iPMvfs0xb+2rtFdpxBCAUKJ2PQzMn4iMNG3TmqnFFnDVZLbJTYtqlt33rpjOr19hhC0W2JiewNopk7lQ0aC72hckzGNIl+H2g5D4yJ1WhXQzb3/5AWb6vYoKYr6GoWktnd8WNrOkpOkf6uxHyIVBe3eTNWX3pImIQMdlYMhtD3SrEIEACzNvMldkB4vBYoaWqfscbsqNx1wblq8l0DVHqL/ybdORQRAQu2lPL8jWM1d4s0NAq8cS0DzLSjgxiSYV7ToDeLAyZGzVjtZv9OCJVMFTyOc08biGWgDsDWasIwYprkliCVauLXk/j6FTd6j5W2Fw0KiO0SZmOUw5wa20htm1/4+/CAXapdeBgAwUcynydS0SsqSwfYnmZMSiVZWZuGdwH6HS50KrkZWmeXFjPAGHvccCVoshcS/e8oKsLLaJMifCq0f64mwB31lpolaUfWm7Nt2T/BTBWMvcJg70ZMW0sPG3LPrNv1cjmyBmC0csQKBZ3qimBktLU/SeeyS7AUdVjMGw5IeV3X/7bu2zQaUAyK5t2UKRtIzN3StFdOD64d09swBYMMBJTSUBHH5/mNQrwHOsC2SG9K9oJNnn6wqJE59FjqBuDHU/mLGrlTnRrYIOlRICDd9zls7oaQh3wBSAFDYnjuYMWeqXUWKDBI8JW6dZutY50VwVl1nB78vTOkLynE7ZatVDLmxyln0dzcB2+bAddnB/1IFukGLKUQ+XQ9KRdt7+8J56LhSRLwveJUrov1eXmOAsRasFMwTpEJsbMUSCwmaOySg+T7d+7DgEHcBXEX9qZzXOUCLxhe6HGj99tKDrx8RM0g69VmuM8t7M38Hl6A8pLVoTP2ZkVnJdFZateHkQ2FZK70z0U3RL9GvyggAmfSgF62fQjzDDj+ELp3X7xxZVdK+Ase4jmpMPfLkpRR8r1o9GwiCJnEz/bjGdcoLzd/Y89sC4akZQPMXx3dUuOXHUXgxFyMzrogVtF1p02I0oX4dqcOcgzfryn+J/rTh3IxhvxgHDOXvnYSDsl5/5dULhwJ1yV3upFZqpMuxUGCa2u2hObsDIbqFAM36YbfXCqJN3Gsh1MifQY3CZJ+JCIedx1nZt5Yhiu3C5wtlDpz+oJldhz//9X1cxnDSgpULD7VxZiRnyztge7SYUxHc9Y5L1yoDqWdUjfnEHNRm8rqIkT9Jo9Mho/jbB40HSrO/BLz64OeRL+o+WGuU9fBno8m6rS99Cz2eEIiKFH8Yb9348ia5xPpu/wgTfaf8T1f7iFmMlhEOXMcihtRrr4rIGyLyWVd5BVV6vKyrDzV97JqgXIaRVi+hZnkMYSX1FRRG5f7BonK/EatIAprzPYdRL/cpLpMvbt+bkbJKMXegvS4bMUdDj18NHbmVWDCzpLR567ItufwUE0/xuOlgWcyZDsKE0b3qT4n6pbynbK2c7dNI9hhVgOAraHAiglUGLNi5WlIAFRV2BaAYtf9XWvWaLBZPt3mZqqtWyARysVmp9YFzztKewmUJ2jIQh8A13BcXouNWKLdF8V4OlKrV0OO3+SNpOytOkazQBUEC0QPpUbFEhE5HQOBVX3HoHDM4myBDfAqm/j+uednNDMeJ4MZqX49mqiFYJzy61EW4F2HWo9PI+XUrun7oRTJtRGbd7aVTEZC+bBKt542ZqqjmpshJDzFq97w7OiT08C/3kcmhZO7fkysPg0ppvqwteazw0rGOxAchEo1nFg/WODp8vhcrc8R2ghfbOVc6JOe013zko0HOEgyhOIW+gy7KxDw0b6vRMFnssMZgmoFC1w+v6V5vdic1xy0AZVZAV07Y/A0JnLqMDHFJB8+lxBM9SYl+1HQYSwXnh0ynrAboTurwhKswoLc22Hzp2MQCJvsuyLWsgppkFmcZd2XOBTeLftYJAFMk4e+yDHCniPqNuUYKFIXPOYnEfAJ75/IaFdmujJoykePGi/+Mv64QPbmR1mOlrb1sy6MAJpgbWT0538+7iZlcNPOIoltvyyRTfbA8IouZzCr8DTZDAOv73vfEpco6+3/gbfbgCX99AEgEwZU9+TKn+bcfo0ltKERMQMK+g/TTHKZShej7o/nIiJU2IBrkyimpSS0OyyicWvYqlrDfsjg54y27JaINh066+E68PbZn+SOVqGzdKIpYIh7/+Az2wk1o6BNb3/Q7wKH62bc1AHOgEPdFs2ehlQRfZGkwtdakIcGz/y7dCtjWiaGUvttNhSjB0RA71KxAZ+W2coX0Ip7wcx9ts+04ALgjkgWFfrQ2QQLUAkix3KIC7G6iZv536L40SbRX1+v2O/8XB/5xPGOaWFTmB+X8rjty+SCvnFki8ImXgq5+f1MuzjGzBUWFabH5nVXRBGwIpPPv4hYxIY8VbBCTUSDtna94LQBw9yedwjOvJ5TsTvcuactN1FcJFYAaIaJ1EvSxNeugQI7qjUt0CjKnrq7jk2HX0Rbyj6W1vWe9damQnM4VZRT+mwxAB6XWUA8RvoXfopLFhkaETuM4E/duP/kG5oE6W+61HdqGUUoOV9YgZudqG94pv02nPcniO9zj3xGU34DXknA
lgnL4qkWmXCgmm6ts6IS/vddpPkJSEe5wXXU2UMJ/eSrbcfYFricg/9HSyeCGzK7aHd8oqD29hWh6WYEg7Xuz1bQfiHRp4iOIFNAJZd6dvBFzTuczCceEnz2ViYmU9T+mmrezY3WG5GdyQ6oMcIHgmQ4E5Xiu2IDvvbSSTIcNi7fC5kg/V0CKDz8gKODWeY9RiAPcgdZLKos3TofbM2orkxe/L5LU5uxga+Gq4FMeL4MI6GPM7M/dyMSRQWAk6VLj+0XEr3dWo67S9ltUByfmLttHMEt+R/whf6NIOER35NnFQO2J6GgJHCea2ChvxmVGMd0bARS5v2C+zbyX1gp0BZYwTy7/WgYQAoAzS9e5pxN50vqZldcopU5p8Z/ZfTqCjviAtN56Ynil0nxYtph9ymXV3r/+88OpzjYppUCTJbzZPDpQvlhUCI39wm+O+gkXLEaYIvJPbXucO3wF6+ULWO4RBh2GCipL4pLZ5jO6Aw/SWxFOEAMUj5G84GAnSSYp1BoNObd/HB2L5ImBlWn1u8l7Tc6GNXUFdXytmiJtu/Eo2CCRDXqrwBhwuSYzKB8smSmI1VUQZnBM5darOPCqxFxSx60vMapUQgDUWIeX4azG9Jes9Zq5n70MY3wmxeCnYZ8dPdREDgaZqnvm3s87V2fQBYiRlCXwOv0q+Kl+IXQ4r1LJXZVbW2AZs7KM9Ye2tF/Hobe/KOPIKr0/3brRlBAnGfB1dcZtAjqKQr43fAvFaYukp3NIe03nolNK6aOyoc7x/+5OfgW7mlESS8E9iZurtk9J/YyDK/AEWGYbnz64zV0Iczit3XXBOQrM23KWDBfqXr9kfi8GY0IN8IvkdFT2z/eVG0sZNcoFXmgKfBh3MirujlNVK3YtNtk8w/mZt52VHzuozql19asJQQYm50qC8wyoJWom5RSrx7g9VVkjdgTQ4Is4pwBusG1zuy4WP+Lg8hG2BtBObfdt13GOZKhr3i+OHceO4JY5P9JHVXxiGJkwiusMvq+J1QEpnnRzNGPK6SMYkO74/sRzw29PAjX6wI9RieEIluvKsL723uqpA0tcMwYl6AL7OOT139mY6RoEsIi8KuasOkiOVuYj3FZ4G7A9WjSPhyV5U4ixdw9xEk709HzDs8c1Ef/BmSYdBDZdbtj7WMhVhc744XPtfgWl/kwd2D46LGa+DiyWiKMIpmUMVN5+QI6fsuH4IjG1v41HAdCU8pmBz/k1FU0jFuIbXFFqwH7x+2ibg3EM0FHHcTB0EMHIOE0zgYm4HRLjG1jge8km2NrC7+gN6/mHf7I1m/v+oVqVvkoEXBfe4ylRq91FPQ71UKXcBgSguCoWP+aWNsG+qt7H82fC2vkVJ1ydcoJkDHGwDnnRrp+SQI52NiX0lntPBpTh40+YYzNJk2EgzB2Ji6L8J08BX3YcUWFx6ES/BI3JO7STVpzJQvh9RjYmZ2WpFSfLXkwjHixQHmvvlOvjgh/ZdVoiDmn+UsLRCPp7AoPM+G7PPG1i/IVmzh+N8tIWbpUp+CQVMT3r7Tz5ejKlphNMkqyjbbD994KvDZMSjgqFUsQuqLJGV20SLddurLsVYs7SHS0fpMCZ1wQ81J2tKvyX0z2eT8bTZWPAsGb+2QWprZDnOk6Me18SZN2NIkMC1JErci0COPe/hitLXuif/d7+zLmfyNYx3D0EJkuwk6FoVbhlbtUNmQOLXvSZoOLnAc2nOq4QEPG5Rt2IVmsq1lu2gj1A/h2YmAQKPFJnSySWB7JIchzOsCQMOLsPDseHNdJa/lrEGmZb61OzYYwLrozPZioREteHNVi2Gsl/r9RNYcJLtK9yVqMIR+7vaAQdsdTjcyPrqAr5os+adLjAHpTTjOXAvnMYYp1VsOSmCWJ/p0uCjBZS+AiNl/XGZg1k03IrEQmAfrxvy/kx/Kn7AzU6msVBc2R45/WUEK7IqdnvPYWu4KOQaGMZyeU+qjP/kZP+7tV9Z7ZpdbCUjNhaYp/0+i1YRq+0TNoiX0eQIGCb4gM0NEUJSW6CfYp3tqVo2FZqS/FXBfW7/9SEe6MEioo/JnCH2Gqwsv4HY1irG2tGvs7yo0v3pJOu20nITUAEqfP0szP50C+B3AnTshOytHWjQ0/1qs3mbYx12DZhDGxBxtClRmrpL4tus1RYNzzYzbilNqykBOAtpBoPGFjSXuwz893Fz3rdWxBCfdLw2paUCAQfQciDkJ+XOXjFbwUo018np+ltRIoEM9460f43dA41Kn4DUZ+TvknFNJOwgMGVzjmACeNagtHcPe2fI83yM7oHJ0eswfdmhnK3ZpbcAGljuSZj8+fvWv+lyQ5rdwS6k5ZgfqdLF2QW2/YMMrvQ1JxX3iEjwQqnh1gYb+eRChVQaYLsOiXVv2Mn3m2r6S/NyIkEwRCQncgPgb/PhcMowVPJSmI1LHKYIaUjzi6SGxV1/kxKZYs0UN3OVXwqBe0yzYOcs7G/vjwA3xRx+u++7rA8SiEqyKTdn29/wGmzLwW5WbiXMAeKqzJhA68j23IE7ar609x4kfRzbMylnDlfsgeMaD8NbW4murLco1K+fG2lZDMVmV1DrxA1GsIQ/bO/BiJ7Gobd0gksTE48ZTIFA63mi2PN/Q3CoMM/TL9bT3Vi4f96COj7d6h1QpNQiIY+3ROlBWNe+aqeEm5+2tMzvAy9PLGYTvN4ouGUeCcibbBRZwCG+mGe5W8a1Mfb8FwO1Jy634HjQ1KOOzVqydhzQHzX9ms2+lcwnc/MhTRg/+/Jc7FN9HDcXUNXsh9htcJ8FYZ3Xr/4Wj3tV/DSTdCHGdCAXu2rTTy+xM1orMjPBaDijhpdKadYUhJDxI+OnpHyOecZPLIsxkHo3P12FFOP7hoi2Aby+vTvSROBeCSBukgI2cCOD77l7Ut831rTqhxkhDP2pMozlACVcRWAKM4SjpvtWIefysFAr4gio706aTKQQJoZVKhyxK7Y2w9Di2mQGGavc7INojTilgb/GDXYoCVuwyWJLq5Snl7u8K1O42dpOlKGqageLVT0cgvEBb5xUw1gYthjxjRWERmEQfuF3eXKXwIQOYOWzOOBeh9VxwKwNejUJR1tCl7QdzVCiXuNeCgzpse1HWKp+kTeBu/fhKcexGrIdhVzn846FsbeenXY2iWhUL417qkKK+Hh1OIJPkZOIc0TkJmowEDYc2t60957gVN6M+lpgR6RW6ykts7YPrtZWvMBDx1lFJZ4twcsAOyr8WIKcJNqYiYs3RneJjYxfZsRW0CUsEfuU7TaJuO+UPQ2XqbpaWEdcYPkkeHY4B6NXyI3kkKKx7YaG3D2VEC14FJg0rL4QJp5uJ9w2rqzwbSOkPqm1HSAef4WbFOET7AeNckWgFkxdsVlyLlA3qjaxESj221wUc1ZoluVJrJUtYxDrDLzdkBOoU3ksaYFxzXAAd+g4YZZXVQ9kvMBi/EhW3r6znZ4HBUZZycNjy7xumIzaBlhPdDpAoqfLFyG21vrf5jQQXkKnQdqh7TEtaam56iYU+hWg6PxB/cqm4+RKPCklzjKXcFnXUE0V0mlRPB7UvdWp0ERLquWgMkE+ty4wr22+FYOCC5WXVzalq7Z0qqPL07K+476uEEa8qPrLLD4tGEETNP/DCCNIqxi6+4S4sf9poW1dAIzxHGklbZKnl45d2IR9jjH2cTiF4Ex5KK2x7TzIAighOts0C80lKdkfCq/FP+5VfztMfliiDCEs48JrOEV5mLNrB4RtqCQIeoeT+DhRG+McUcqJ+f7pZEgy3iFftQiGB1dx+J3cTkI4xQ4DOKDSpdd1ia5DIxg78SJ/2kmSLmYXSxx4otJ0JhqPNk2D/KHD4V+KwJ/EjFOPP3bvGP7MPWEauUF5fDQbX3VEsl/VdDjUFq+g4d3e97GK8+4Ak6tF2ji3SnN2+Annt6r127kAKggKZ+25eODD8jWF+R7Z6qKYSugHeTpKubDkVv2Y7csWR/cPN38M9YPYVe+7WU6yuTiMHY5lvsnupe05IWCnlZZeVG3xKTtMQUgnPtYZHTscKAJTpQRmKtGMTenDxQK9he/SR+FIvr1WTdzqaMiY62Gy7NNjhEiynV7dxb0JCy
TjpQVIV+XVhb/mQPWSOu2qZeVEA2xIQoxuP2YY6R+mICpDjwbPlK9p520tyMLdX99KLsqE40QWKwNfWg9rS8XO6kwWSHEzulagPR4LXJMwMmyuGfs49Vsl0Vxl41qz4d5rJAyfh5hRd45grob2if1t8LPEGSyORk5I1Oz9PDaqAamdLXLkE6dd/MT7lHYu07LqhYffDK1fqcvwHEU0T6vVS4+XUjYcRKy6qGC1Yp+5pp/YOpC64i0DcEhvhZYT4ntEZpmzJ5IrdL57YuXiJ2sWGr5FK0sPzA5vzvOyCd3mcyH+WEe6tgdTeAK8jPl4m8eHfS/F/2UXg7MjJlozh0QABTaHCncbAD6arC7jSgIalpecYQbRxl1atEOErAGS0f4EIrneWAz4tVOWWFZcVg7sosSGwRfPgykUGpB/j5vzp7XP2Yn2007E1+PTunmrV5z3j5Veeq0Oei/+xLgGf+edot/CMYh9eBUG0m09DFYulUtne73lCags+UrkNbzcA1a28V+VEkNLYTC86Lwf+2PGHJtpYjxEAk7z8M3Osy1Nl9DkqAYOB1osrD0udqsgZ7berCaVmVuYmEtu9viVilRpkDsEcq+d9QESynF/bR+lLqTDSS6ejZWKUpKWZcCdnc87myR38JsHbgkNthbJUbQqx3al8nC2pa5/cCD9m4tuQfzbX4mGNb/iir7TF88iXw8OXRNqOSqOBZ4ByhxjQELtYiiJhAAFyJp5f6huzA5ioZtZiR7E81L5VZMmbanyuLW4CdpRbwgcuixQ4HEKsmSETnwaNFgeVzHQbszS/GH8rJA2yyqu+4ZWCNpKd1YzMkHLKoVwkqpplPNw4sBvg0rFJgn9ZzKk35bojFlOnF5FwAhEwVj3hN6CdOjqkc/DwFVLu12VE6xsJ8+cHVJfOvut12pUqjEj2Ofljy9ASVXIVJa1nE+rW3N+w8Mag1pkkQzgy+mTuQ4fGqxgCc81mdT5R4rBZfjop3YdugjIXzINxXsu51/Rg6jfTZqzhYv9J2egrYBaDAnefBW3fbtSjgRZ9jzPrsaD052gGHgm1mAsloQLzx4o+xjO4awtvvrAo+xLFxjx5kEA7sTnkoQvV/6j5kF9IYuUjVGy7ZYEh1aQcy42ooH0T3bhdoEz3D6tdCCVVgXLAd1xyYjs47OWd3Rx6XarWpZfW88uPnAc1cXUDtvN+Ly7eCOuG1fag3Hv3AF9o8VDVzGH9QlKC6IxkJpuN2a9ojC6akzsXJRE2ljQSA1v3+9rOdyvWW2sjuyevMVPNbIyiB90hgXem7vGDl1S/rrHm0liHd/voyl7aiWr/VT3u6uO2VQj5k7zWmqKYaVPNUjE7ghfwDhDOntpLtSm3iEbRhCQym6kcA4iR2VPyfebmyHLStbFKpbKjVoxWRhNpzVueDJHdK/vPQ0CuICvwoNjqYcP1x5Zkg38fq/+0N5wR7gTz1CztqvqFF/9XT5mfYVRZv+/tQBBhcjci2GpC1ZAE9k2IY3C3HryyOy4/ledwJSzFe4LYAEFtR1v5o6AJXU0Gwz+eUyc40hC3ZT7NCsscMwEd6nDGyqTFz1M02aLH8LvzdHs/vOYPOtuHEl2dDJJ2+Pg9hrMnzttU3ZOJM4rGo6S81D086WX+yES8UAkKqKdyl6dA2SJG06kMDtiyNAru/VBJy6hFG98SlZFK+b8GsOTw8ONvtIc58gkNSMH+/DIlDqI5CCo/X3LeJEsTs5mE8ok0+WWg+Apq8lHm+aQ7dPNQrSQwo0NovkcY6jzIb2QdyTxFFt9LcwXkQesUkGVBIdUZNgV9dh5DvQZewNdpOB9Xe4DxRQb+0xlNGV0FbguezZW0VsE7VIYPbzlHVYcuOBFd4/cg8CZFGiNBws0s7JIYGnNJ8OYS8+FAcr4piNtgtIeZbzK7+uZ0TnR/cYtfrU02buPjlNw2WJXVzca7brYiX3uO98NR69Mn6ImuFdbgU9p01r3KE72rW+K1P4QcsiEaj+pHfRSqPogBipxYCBy6Ok4OgbkX6vnETsmpYDLYq5S8nHml7NklNL3OEScJaydWOlewpQEnWVl7lOK8KvWp/GAu7VrUYyxTZM3BPH3kF8WeeUzjqqYBSGjTBbTRGjpkustTd/U6nw/Rb2k2HO7YJrnBgRgEG9GJAUHM+PayMvM6mSXMgr8xetNnF5HiVZ5s1NCC8351wcV2Qh0asfICbVvZ9T0iDLrP/66iIPZW38SPT9L2mO67ZbJZX8Ix1aC/8/SxI/AE5iyDraqs5Pl26QEYofmxlFptMyzP9MQ2i12hTRR0xtTEtJMSffmMSWSZi05lXbh64Pd/vp+mrrVgk/KfeBiU9MqRfKjf5YLcwcSyJuRExrq6B8TxJHpp9N9cHjEQzPVOw6gCCCX0qY1SNzD57MYAmnxMH9If9qtygF/znNrYYWplIt6e0Zsx47KuggQ47aY7/5ipfNPWwXVhWoV63J66iZA+2rpEmfFzZzxxn/vrorZYc2DJR5l/8Yl/PxukkHnz4bZ5SnBItFEYXqsvd1Bz8OeDgpC+bqx35Q+YysL1CEXKyy+bDqUGK7D/4zNBOqSeA4rJ5RbkEH5+NLndYGx8dzwnUoNJ5IcwMlCDU49NNIr5VSCZdIqc8UsarXQ1cI4nM9Svtv3oSzOaTI/bgdptQT9McBQc0u1MurYSBGFH7fWjxrrq5ioVNI9J331QbW4DeZ1Kok0fFUScwejQZxkY5TJhb5zbBewyS3Yu8dV5WjfLkn5P9XaTjQZroJJonlvFaGXll3R0vIa1TEX1vHN9KhiO1hggAmaPZ7vRGo10mYuunX90/VcpDfh2jsm67aTlZTTxUgtymvsFqb775dxedPvss65a+Sqv4TqfcSJowZGifUBQxznL75ljBmZun/XEbViDG9LDY3dLkazye+3U4gKlsCZhZSQnIRWY/W5fyiPg+M9YG3j5fI0mIpRIjBlXNaB5mbfzPM34FQCqhUI3ASMMcVclFpL+P4VR9rRBbCh8nS3FJDZyVzndc8LiYA7S3dcLw54tVzNmkpfqgYC1d9rC9hQ/27w9rbbfGKd01F+YT2rxgPzMYF/vfuqH1Ip87b2cXHd0S7d/TqtMVrgOQdETf+TglJXitsDSO4XgD++TTgqHEK4K6Kfl/SV3chHSM0JrbbktcuHQd+ic4/ogViH6BLISEgu+gKB94KhwjtCjz9NsbGR7Am+tmizOe0TjpuDZz9QFRiTTFA+7tRqycIf8nMXkdsIx0t7QHPXnk5FIpvQ4ZV5NoeoxmIskbW4oB3HOeDWTMzgV4fwN3dYsQkR6hqd5CVVjiIpJle3Y5Vk55U3UdKg56aT4Jme+GdOu+Ptna1vjFhCAz6nhjuLalWM5Q/IB1ZPvDYd/T3eNDSvT3JfFj+ejY+CdfYn3TSEZRXMDqXEki/8AhH0xwmzF0a6HrUZr5BF6vQtKIsa3bltu7Keog6ckRyMQ5e8KeTZf12xC84vkCo5jtPuW3zetFHpq5rN4HnLujkW5U/9ILlu3rYkit+VBp72up+DQ8H7tKhiqimoIwTWEWU7XwEJqy9Be+o91NvupwJ+9tU2/PfQRT9fOaoWdLn5HnxtFXVsMYLvnFSp7uA11lKKHrAgutFCT2kwCSo0OmflCYWDcVAWVCWmRccNwvmlCCu+o0rsEUXCU2Cmn02oh8IymWpVZrZPmVJIR6OTKFkf21sEMLiFUYd71c36UgwV7T0MBDolS7j2m7IBYLNVgN6MGHHXpR427jfYPu1Ouse1Dwp2QJXyBvlPwRuO87DqyDCYsqzhZr6rbwEhoncgeGTJFS/M3ui4fRlPB/4gWCfUTjgBbXQARBiRUFA3MnBHysQKjacxhlzOij0wKGRb6y3dbjN4W+26ZknIKj0tWrQRr12jhfTNXkOQGmTWA3Sl9REZ/tvrbcMWD2uCHCK3bqKfthqtPCrdwoXax7IYaCMwEpvryww6QhPALj4lf8E5d0BclaA96aIflrgF+QUI4iyJhw0mFPTh8UY+HwUoFaBpTJ66RHPAIQnhwGVvJdO/FYdAngcLjpyQ/v7rFG4yBeryfTJFct38/fcjkOINhZ4gBXvllKk/wn
EceCQZy2tDOwKlRvk2PoghvfPvAWOUvbekvR49S7SxZ5Pxre48CFH5Ju0OXwxzEfXcJDYwr+gL4xeumZ94T96mko8zh/0lG6FDJZ504LUgD143xUWN3ef4jnzvAMhaiRgSeVDCWuDbXwYS88Tv0Uv62HQT06OZK3atfciF8FOsAexkCv0WwFqt2MpHUGmc3QF0XiAUokhG1fW5IRRCDBoccsBIXFQE+PCsNI3J/1n5ZhDEgpv65BjLEHs0b78In9M0XesnrYhvemFAGZGc0uz8jfFJchLJT8kSOQga4AsCoFdG4hHSO0NxmJN9KxTTKSmBGpjapfd16gRr89ncwDAQRHXVR7jm/4Lt19VgezxM14METVjVxovXFui+HNyMNipCB7DHw+v+GQ6MrDaPGDgtpoVBhRXPhyPzZWr/A5fI1DpgFa8i8baMoqmvb0GNluTeAF/BsY3JgWHOH+0tpIpxqpfwDnMATDkVhxmvvrze49wyhEIN7iGFZCOmXjIw2P3hTxuk4spUUq59/ay9KAtBASt3qadGPeXZclDGu2A7+dpLnjNeEyHbgbEMd372AniXqHADXjP21bKzEcZrz5heNE4NQ3xsYLJ2Tvv8JlUhDALbzubjRMpaq0a0idZVlCHbNwKWfUWAyF1rvnFf4od6qJ0XCb5b1YUislo/ooNPF0A47WcwwakSVDjoXP2ZD2vqSz09BP5Ry2QIGjDFgKbwtVy5qIOmvPXWcCV+l4od57wR1e+JYEpohERdZcgLyHcCIgSSvzf2xq1SQ4LiqXtzKziBcEb8pS6TKgFYC449kSmShhNNLP2Il+uhBTosr8jBdynMu+UYPjktiM5GreFyl7ahHWUvnlOg0SBfS2drNHUPQtPxpF5KowRwYzHzW8gZcZUgqYIBkiPnIav7QglNnqBeYY5X5R+gzCrjyISFxkiCKx+YcgANE3nZ+KaqC/gOgE/qOh63y/u54KfbstkdJIk3Y/cSYkPrgDBpyRmsU6WpFsDZKaQB9KR00HI/eQUIqP4jOkkqUx44/4ndnZ08WbH/8CN8cpxdu6QubuU6iLXnuMToO+Hfyi9V1js4etpglI9DnBURyBkLjxV90JOCosrLrXSIc1mUVHQtc5HttmU3U2ZcMSa68dpSPJ9zpslOppBlCxeg9buhPsJ1H39h/mvFkW55H9rj/Ot2pkwbXK0pOUvAu8ERxmOcMPIlz/CBteAKN3GLHXBVYqd9cOGGiKStwqbVrOHxIhntHtOnrxbdrbAv4cP0tZH6mFohwRWpsaLmzTccS6Nz9UuRQcyVGVq+FM+pQj+YJ20P0xtpBKrkjyc+3oIqlVbvkPdcZ2NTKyPd8lbRYo3g4nfs9kxxhG/0jtRe4z7NgEAP6WZi46JbQ/kr6Eu4Er5UOUyST/KuNPbKCHvpkFfohDojxRts7CaTAb3dPdC4z00BYRbb/cvmAjD2D5Lilsm9aNRa+tvtHlMV1rKNx3dCudrlsWGbN2erGXva0ocNK/B6wKZrrD0ByTTvohN6YORYBelqOF7iD9gFsOLKSMNMN1KNG5lFaz1zBeACwqbsF7OzUhgkABo47obk6uaMPE+fioe+j4lwbByjrL8dCJD7ljLcOqsqYleCiYbdXPipKYFykJgLeV8h7ZQC8wcsl+p+RJUf8IfipXyIM00/Wg45we0Bz61gwKHBtHIi+wP4GLkXZJZ9MOtQYyaTtKOD4lnfM7VS7RJzqpQipPhpkrjQgpOncYrJr1JklCR6o0KUoofoFDQ8nBkGh9xtovDsVnhtt3oBHINInUzBB/jg6EGM5E9IIJVu7fV9CuxXEGSnUD5TT7sp+QLqJlmfybqJk2aMsU1IgA2ro2bBMOm7wcwh9Ud7soUIwCPMD7THJwgbHxJ6yuuqHr8DPtbYetMOQXS4Eis8GcVkgDgOakvAYxmPPD8CaVBf7KjVFvq3to016fYugPeBsFtQpRSuUZjqLz9QISJZfyBkvJM0OOKD971Y/MWPc5qBFSapyXlNUXmuPEDNlmum/s+Fg6d+nO0Utc8PfzcVlfdToN2qA+bP3NXt9jVTqaQclFV/mu7IzuWUmRGOX6w+dhEw0qRvP60nhkgLhnRraaz7SNLy0CIudLxUsfU3/UaKbRnn6j6hqGKozjkVya7iaHaTkQ7KQ8sKI5LpxNKodQ1ZXbYk5VxcJ/EoCAUnxHdYispN1JBuHE2TcRGU3hv1t+FVilzyUeiJKTKiVXj4fwwelgOLaWHlNtdVUBEEk8THeXYKRbqJPe9ZATVvzsHRgb5JoyYBs2sAp5yNeuG+kg2ITq0fUPjjx1g+Z+uE6ZltlS4kHcVIczLzL4OrAJxWARtykB6QoYKVN2uzGHTWf9IPnGAiYL6MPgOEFvtcHDuy33l7e3E69S1/2SQ8ufT1vrogTa2+sr0wuXU37v+moSmHx/F2TxlYQRhEn3qcAjNMC6DUX4k9sMvpqJT3Fq7qKDPYx1ViRZxJAnUKPVMoAASBnA7DxFwJq97m/XEjcB+TJ146DsPtV/Uoa7OtujQNDSXNZFjTZxyx1vNINzUJDQ002s44lhR/BkltOa5Y/+Olb7xEz4ijXGOVL6j/CkCjCuIMorD+YRJi2Eo9/USuLyqViSN4zMSFAex0f3V94oo1XmAe6kXOz+IliIUiB4V9nK3VBxVq3WSU3426bm74NtOn//Rc37am79qoP7ngYgxWYn2r9Mt5TAmLfi/RKK6ebXsG9PrrCe6S04qW/rZmty7mtvMYmD4nAH2sffMslzBrkh+4azGVHPbuG5t4w0mxT/D5eciCyO28EfCGc30m5pCfbZyEMtK2+IYJsQ73Ev8Fw1WK0YTIBlW7H4jTBesMdhXaG28HF0QB1Yqoq+xUzuVm3SRT1RevdaCOGnvJt5gaaBbsbstwLAdI2tRyOMJ68j/2coqTVYUePN4qZRVphdK5ZZWKb2i49o3k3voLJkGQzYu+3xZYeb4bMzZXOVEm9+OHQ+tadcKjgP+x6wpiq/ZSzfF/EgKQmu/U7/hDGnsrCUDdOlPHZgr2eV6l2qMnYfg9nAD0LPYBEhXprxOCPCOuNLxD4Fcssca+XMnEAI9XNALZaquXJMCbbIT95KSNl0QeiUzxm2e1rsp+FhsKA2upsMij6EPveTeWLv7EoOAoj4xfAzhTpXUHT8S6xWVgu73shpQj2tobWxTv689rzc1NsfKI6CteCzAlj8jsvM+gCgD4rjO34KkjxPEocqEvxyTFeUaz3vPE2Y2aO90EXqGKQG6c+2HBLn0a49ElJSxKCtsE0m4+2P8q7u/CBKsxl1xPjcaijtkxDPKYpzTnDWABxJv1ItzkOTdGZ2ngcataOfTa16Plqs0iI97ieug44tQW5AGvEcIzAimFxHd/nRpETvZrhwuZ//Tuxu3RF6hAKiBZHDgLUETkkIMf2qrlw4ypPmb5E6BDOB6zO6sl0w8E+d6vH6UrCBlESbsYwETa2TB7rSltGFSzukKd8a7byPUgFTIZiuHhtKQU2sOZFfx2qxiLvKAB/AeGtGTTlwRAUj6Z7HRl5otZXOZu7WDPrhEkxQyLpD6cWhJxhF8OrNGo1lRViKJSzEJHtpluiDNny0/5ZgzOepoZqqgWtRup/1V0WObExYaBZKMwjSFCCDxCf6pZYpcBCtJfVolCP0iB3CT9euYDWx5Uudu2LlI+dofHDcKEMzUqM4httOEDsHVwsA0yX+m4KfsMYedkxb6y7sHBlhhjCe0zgxm34VVDtJ2S1W9dAmO1nsl5zcx1SEw4+tm9hlhTpvpt+Nfxk2eQryBwwYDN8CA5T75J6W13TSqLhL92E0Ce9r1urogb4Bmr8OLFBYifXu9HoAIazvjBbBJtCOWA2GptTvY06jTK5+Nj/ppQh4XlMaY/guew84ffO8Bsib8b5EWNsAFO1nTGEq5MlSKC6gkCfzO5U8IzHYhcW2F+4yF3XiRaepWiw0I8eLjgenXobEXFPsI7oaV6yziIU6iPp3iGgGFcuWSkCBNDyNFCkZxtUskEuT+cWEgK3sjyqunCJxpxZDDlz6RhLkHv/XG2n1i3YBubcKgO31lkkWIRJlPSRLDYznnwO9
xuoH8cEVGFir3UJpm2hcjT7ooV1NcPjirgWPhhdESQzbmVdLquN0vXXKLc3+e0xmrRU6R4upPj1Iq67aMhXC0tcN6+oOxfCD5K3Qu0BGe/Rmc6qF6REFnXHihrteChnzsuHIcGe28JGp+0OsWeuNYidL0/iE0N1oojRPxAMl36/LKMeh6KvJNF7j+RIF8UxBQSNimX/p7rV5ms2w9aI47kLLEaAkpzkKpv/v42+xr6Wml7pknw9SPWGStmd4VzHuksg3K4ySPLs6VlNxKzQY7RkEUD4yvIIa6Vg3a6UuJAQEEK5c7DCGNuUkXlRpZY4uM6lUfj6v2PXtFeKyLRjtYblulzfXOH3mPFY786J/DB7YMJ1DcIsAG37EBPvHShnTDaqu6SzL9SR8pSzAPNQH/BddOnismitJIFatN0fmq7hm444CATLHR/Wvy79rIBsHnGeVHYWZ0b7YZHMF4r6kCdqReBBKQufoUXULxNyatfflJbnI7oCgFXgxwPPS4w+OIImm0te5pYWAexJM+eFREDirzftzK99rdSlXgvR4RDX5ZmHIUA00p9Ik3fIyS8VkksQBw3w3fketcufs/mPak8Rlx13qCaHWw/zUxJShztXKbEfYmLRiRQfMeNf6ntisC/Lz7CWvKW79RV7UQT/ACkBBcBaRxmyaQ/aPWpAT2SpiasqVLLF7XGLQkhtLRYmrZGH/p0A461RE0RVh06lzLau8LMUTEYiJrBDKGA/db4rWK2X37YMQVLQM2uogO/PbtWtCbTAOthNRJEsLY42zXU9OBtqug/IEVQPrg2WBx7a7kqMTSrjKzHGbOJHbW99v5BS0gGztQqVdeY3017a13DeK8VBY6WQ246zq2S7zsHKFlZcXDW4c532aac7ZIxItQJMFllvrCUOK0tpVL8ufv2Ocatq4JajB8t4oB1PFr0yGqdw7u/JPsp27mgjDmEw+1hhzxmzCIihjSpNqDcipymbK7ze9o9E6XLdIHrjmMO54qJUEm4SU7Oht7z6TCMMdjVG2IGoQs566DIsCgFHZFikCQJZOV2bx8cNHFWEHCWW/WzAwYkVT75SpQ38kwLgXQeDWvKhrV7234n/2yQalB4UfvlWjYZnazt1R7S17CJ7skbbycLTiFOOWX6kmB+RjrncknZJO3qCfJ/uBdrZaPOmUVZ5saurybwAa4leXEkpqRHNoTBVNMtG9iRA1cI97v7122dUtsKxcEV+xZNje3GbpDsP/92gnwu1kzP4kAi1zaGAUXt+GOnLAFCzk/imOSzyTQP/1LxVoeZ6C/XWfaTHyaG8oMX7d1DkmYYq8QulKf3wqreQoqjFhOnl7V02j0KG8BVGsZCSAEbSHh5nQntUrzp979g0If3BpEteFcAQLxnTQGhBJYhYleuL+V1MAk/SxR8AUb02ZnzLT9xnS7YcHGmXZZCRuKZPWtKdcKvXqo5crIOoTo3uiKXihOQZ5hMuH6XLzDFgS7DfZI2yq/ueh/INXBvWnEdS8BVnqqa7SzW3Es/hdKH9TWUJfTzmtLP6LHFTlxFa2nsT5yiiCdVr80tOeD8nHC5qXMlh/96sCbW3KNyfwjwIkQEACtxQABA30wRCMNFSE0aJAdXxzgJA9NUORPxFxe8OVwLho0VbOqC9ISIipOK7XMfqifpmQ05TpMAkm5zpSTgxGHtrGmTd4zrz5LDKFW4ETJ31wMlGvUPZdXTSNUHZUdEOkHtsokV/rAu6k3nXRx4BQoDSJ2VoBQFZpOkn/4b7ich/BgfAkrR3xD2DJmspWY2cCdqSOv6UykI+p5cQ7bOfM79abCvvZD4VNR81SXaI4owx9+F1b0N22eplitGEzHf9iJMj07UV2KXEAMu/7uAMO8Udcp7ChuJIHEe1V9iArO5UJGxxFAY6detmyhvlzibO2s4Jeo1BgRZVGczyr9oCoe6TyIWvz6oplvfBV1IPS08tuRqWzk5aIVn5CP9/y99zQW0MWHLOGLQKJ9IAqUGUADA/Xoaf8ek20bAfoYMDhCmpiN5zA4t1U2mZtz9m+kDn01dfSIOuWqAIbAwh1o17BnnJ4LW1hqMCH+zuUl7DROa53nEuNlgHtYY7yBI1ErPA0qYc9nVJ7t8PQwiAxVzPrWvvzmOsDzpcmfPqkqeWuyt2ksbe1Nfr5+GkTINyNcbvs0mbvoRtlSzUwGhKe/pcigQje3wP4S/RvkSBIKEhm63wLUMyLuyj/AK427hClW34Fp4H2sxDkpoliA/B7R7OvHmM9oqjtUGtF03lqOAoUr0nchqqCk+HCRLK4FCDPqE/AYkcy1AcgKJDgMocqh23wFObo+JGBRAkpmRPwcnKr29ViJFd8TMB3JBr74PNBL8O9b5dfU+eFxFuAhzE77niQTxJVltK110/P6Epgxo7OhAw/bdU41iED9NdfZLKnA7r1T5UhlRoiIBo74rXYpM57DSk3m+b5bWKvjzg/3NF0kS2e9+QG++nghTQTuRwr2nt95ncinOVfwRWUoGivPYGyfAnl11SvzKU7VpXJHdJ8cDLpVRGATdyRSTcg7E/MGTVtx+1wsD6BeW+GXb98ubxJYCsnehCkim70r7109qhyNOyOUtInEDwQR2EmTtrpbhvQ9k+e92myHO3w5q1aZsJh+d5/Kv37zLI5R7OqejtOTNGPJEFCYPwQZGMNkSKwDETAuvMmRxD5e6DPmrioXYr0s3L19boDq7kL7rddcXECJ5irV4/gMVyRGbUKV5B4tM6UCC+sMix0Q/7taVIgP/WfVYeizqBdmqW0EByhTZ4CCpUk4o/XPU2QMWpCuig35iCVFAktPdP4gA8VqWf31sY01y4o4Rr8l06I7e84YObF3uU1+IFuk4YxUZVuWgFtqTH6kcfnvXp68Z1iu0tJRjKEVazJKLfOokX2XzlVVbJZyVmtyiYLQoC1xEN+l0oyxOzGpoqUgybM4zQSoj/TUk4x1a2+VlG1Dn2JfkIPPyRUIeGtBhQhQbQAA+m4KVy/SW+mllcNekOhlmB5ii7M+X6iD0zm5BCkYZjrvzcgFFgpozee/vPOAsq1Qa/wxFEDbSnUPRzcEYzP7/o23nrbEy6fxvbtIeXXccWhF6uUbMA4N2KQkF/jpGdUIL8a0XuL4pkJtX0jtgSBSHvNbumffD2Dni1Rzw+KhTLqwoSrxKytaW4x1jKDn0PoD0/kZaoE3eZEiXygVwCJVdHf4eE6tKVIh+bZykZlZnDWSKfy8O6Q67xLdJ6Pz4mcvy8udUCpdR4pNgqZs6te3fJXSw7cWRY0ZQJn5xsB9rH/Qw6yNtOGy6FZvHmR7mgxER4Prn8gwOWHJxUEWfyvSR1KeWmC2N3ZjKoOsZxC4BVlXZDBRcXNnDRnj5ZE4xiSLqctwFLC9Nfv8xhdZMPXwiYCdyyOSsI2dCWbrBgC5FXkYq3HO6e3Jj+kd0uSu9bAMQ0Gm6gU6B5b/dmi4E376fvBK8tdxoqEnZEnHpzabH6WNAwzKuOIBkQbIoAUJokLzU046KNYCmrjMXvC+U1n3KnAjyByNtVMO4qKTdsM7wKIunZG0jADG3E0LG534wa9PavUEdvnhWQuhhl93YIrcczZV7VWmgYHcBvwFF/b7istve7zj97QZMVuJYlmZ7/0maFzPfL/tSULtz3jbL0epsmlIZziP4SkfuthvNk6LJIu+ARYe8fjCQP8y+IZmkD44pUJC7zp5DVPhQZY/WBZTEMWolTVLb/x68J2JJsTi1iMLmA8xM/VG1Foaej1XSBgYMOSqM1h/asoZJNkKMvnC+tdotcQH5OrzjrCJq+MD2vkOP+4bM4+6WzgNFpG8ahayWbNftNyN3zZkc3xoOHx8+9l3p+/pLRyizSxrfggkLN+i3HklPWrD/g010rI7gCTJPr+5ALA7amlNtfmk1uhMv9migy8hhOvnAxNLqG0LrIRCpgyOtl9XTu9YCi5/9N+UdqQAM2+hk2MNhuVdTFOzFrggJZD/iUXhPiOm1iojgQ5JuBMiEAUnis5fHjV7mnyPOK68Y+n/xcQnVtssxXmEhqy2N57B+Tp7jAkkNvUvcdEQffvqSO74RliglqcE3HnDLn7ZjqHrZ8oDhpS
VHNXbw7K2WQtwMX3D4hjyiy444e6FXmD/XN6lwfNE5aa+giUpijZgHtAksHk72lAknbq25dwmqaacg+vOJsytJdPw/WI4j5NjySb+E7KCUM93DZTdTmGwlS99C2XbMHsJ3xu08NGzE5PRizxOeR7Yj7onokTN6WDDF9ZwcS8g7pXrCRXCI9w48XudPwVICfszXDaNf5WSS6TLvaS6tX7fEf/DHIi4WVwwbPaVb7lFWDrEwpKuOOuNDtnYj1qJm8iueA10VjUWfEnfNjTFQJLbrp0excMM5GgUX+BaU5s6HG3AEdf4m/0FtmDMCxTcg0Jocb/qtN2ZHXJO2UHCpQvDm1QrFr7UiXBUI10wyCJ5dKAVwE3MEV26aAdY6ymFuSuRZQE5dhXRQDtu2BHRxQEXWJtwtMNPdp6PM8RZbA6aEZyLEp/jjFmIiSc/xgw1koi9BlNZY7OMSVBI0xBzj4sjYv9TZDCpFGLaJr0QNN20cd5d7Y6YcoaOhg1G1w6pTwtj6S2W6Xn0Ba+19dLhMi01DKXHPNKcdQGk8hw1HpavBZBISIW90k0sdMDtqxvEQzsurb1GCHBg6/QZBtxP4PfiqdGs3Ewxiv/Gq1s83PIdp4R+6CnfJBcUpC8AwOp0AsHtGKQMbIeHzhQNX0s2dYqeY374p7w7BhQ738ET/iJN6xhReU6svzfdsbEhUQ+H4cMwxQnDz1qdOgSBLmGycD1r+d+aCm99F5lX9Rtq8dvD91jA3JELwkBRb+3g0Yy8uMYMi1GUczDoPR6S3lnhcvFPVUal2d58Khpie3eIyvdRwINrQGJgtqBhtx9hdy5DUskIVZIq2+Xu5O4Fq5UYFTVPug7aNL8TbUkxKeE1Zs+kNH5zSgfj+nc9SorG6XKcAdovNiFugqK8XyMOlr5k0QIPqiUn0hCh9qF/KXj2VlS4MlX4i2nCBzcyi6T7N1tqLoP8m6ZNGv8OlqB5J/YRBPT4pMqOPrBywf+kE3lDBpK0K8vtr87mHC4lkzs3fUGikHdMXsZ9JhYRt6KvLrv5vQidOm6yVaKuVToOQbE8CiW1NfKNJJJr0G+5ymW03xjth0SsLfNDVWXhR9Wk10JfzJJkEuhVep2S2zB1JoVLjd8IdcDkW7khS314fMfVtkDXqToAPIjOrcmRS+tZ1m0oTBgOnetspB+lAhgRLUfK/9+ffBJ3AwGsZ3dOl2Pk76KVv9xuSUrTU1tA/yNGmGjjizA2yPT4gYTfE5Elz9q+y9L2Ey7GgZQv3mXhG56oc4cM5atzdQs4sEjVjZsPP6n2wk7uvbLpoYHU6Sp40I0J3c+28f7Y3N0e1EznELz97CEeFyn0TgX4k4/enFHqjV/b0Gl60Hj51PEZ2e7fyYEl0moCBSCjL+2UpEq5LTjuaTYspMLIWXZ+j0jOicuVz2Lmd2jpiiJJAILjoenUTBSJlubgf7Z/hJC7W7BN05pj/FmMLYuSYgg68D2N/h5f2mPMlW6VoY6NOQxy+78m6bSErVsOb6EAZ5bl40miq5u3OsPzaxa9KYt2YmV12/ynbt9IgP42LYnCQT3OXvkS4MEAW2I+h2LQ/ZIAznzZ3rDeWz3UEHNmQDVj4zmVmwfJE9ohWJr5BxQNbVTNz3k/2X+KzY8FFMdG+FIBw4oHj7iWt7dYi/lxqC/j3LsAhnGvB4/Ih9VdGNxOmdVo4c/JzYmv8gxGwMnxMErq00INdPqQoBwdHmQ///s+7aMCoGKns87b3ECGvsLnrWu+YyAwxo+WacOZRdg5pqrRRjdWsq+9bcR4+ixFoA3gg+yBMITWs0aUknjjCZPqvUdUgNWJQxHJJoN4y5taWDgAgUbYCoGRq7KA49f24qxlmlTAa/zodP2KZVHs4VU5QVFq/l9jAjsrIHI2HF4yGoyqAlUVzK1u8nKRTQNPWf5wxjBF5QGmOhy4wJ60b7vftmjJk34JkV0l39cGjcHt5Rne5CDhh6m9IJrf7UD2y4jJ9HRUW2eDpqhlSu7bTPNNSUx9ixLQ/sXwYbnRI8hzLVwbi44qOHSBMu99LafLGtESy8jqcyOojMPeoZ0al4ZWjOHVlC55Cr9XFjI5UnfxFzEOAdscSGeDAQgB5jxZYO4sg3jVdCEz9lCuYBhxFV1PoB7OfbLxBb01JKIBr1n877HTphvgvbsjUu5Zz7fePn7+q1eQw6jttmr+Wl+l/HrMkZ+BodC10kghtGLMLEpIUH/Lt9WPbWJ5XpNZD/mAu51qHx4+f0oTO6QGEezCDR1wGqBeIUwoBEG0+K/+kdA4ATWUgqloM57zuY6ZmIkp9/UFJ7L6fKRxeJXI9DuOaceryXHZSdkCfU4BUqm4cs29aj7k41hrTDmRwJmPc+VjLXbK+d313oCvk61M73PyRNS4mVIOz0Z4qW5yVIav80pRMm4Q8JJcW1ymrCwBLQMwqQGzP+VE49+K14IVxhwkOjlzwNy7dl+QiNKEE/mOHfBHhjMe9R1/q4XS2OJUEKHYkbdFQzMSlFAx1rAOR2ky7bnyMOUeC78MRt7sQ65DGwPaOIjoiv0Gh880YMeJ+309i4q/yNUP/Sh/cfIPyzvqIktV6zqN4cnsxX51bxTjsIfPInc5ilrV07vs+Ii2gBt5fIxXmD3Kmqmx1UgtyheAkwV9VPH7AELwRCWB83/vHrwL6xef8ql4mfcPM8bmDFOclBmzS/VG1Ac8Fc4X4eA7iS77nAmnpbgDCXd3JPWL+Lm02SGdOa5oLEU/ze+BOxsDYoXzEnHGBBAdPSYrn0mYfseaIxTrUcETrdP3CXSAABcBxtSR/ZHhWfE8wfTLb3WPRUdj4cUew5KiR60UZ9MhOCPCqPID+mg7HgJEGH85eJiuvRmYfFEfhsmztWADi6oh4o3pHxilTz3yeyK+1DuAeK9FrNVTabY6yWLi7o826irO2rnvYTFFZm+lO/kQnkVSF7TSliJMo1acGcg4Z4I1H+R4ajyszjjzGZoXmD2mK2pdJYdnA5CRBS1aE7d/uHr+7mfvKYRtMydpKuD81pqH8rIgoK8orRN6J012lgewzbQifyCiS8Rd29yNOfrtG7MM5NtoXQCDx8+C5JbUZdCFjzfPlN0LvI4Ja5DmX73kaNyMK22sug/hjhw+niJn3cO7s1k29+W7HnD4SAKqAky8JxtB8AyZdNryyjIZbPBmZvOZIlM6VDKdV4mDurtZnVELASRMtu/VxElE9wqJPJNe/UVzctqQhT0Yl2TWqiUpmHCE0DnrAWsCwvlWN6i8XeBrvtY/H0kRHS3dcKaMw8Hx4B2SYC6LLl7K5oaIquU6HOs7nSHuKdbtcZUO9uzve3MvlXvju+NEQa8N6GKCpNb5NWiw8Vm+ZbqdG4M5s6dKE/xzH0vlW7pB0tHxwzydrtgWH6dYwjCuCMOT8azRvBkVKbqH2fwUX6ftuGWWlMc8f31QYhUXghcWCkvxuOV73CcmoRFbqZC+bfBWPI6aAuy7n/oRFPyc+NgmYj6KXSffmd6Z0Efiskx+K1Tkg7G85rT/OgW9N0tHpgM1nellxbkkX4GSloTY8pcZp3IhQQXtFff2njIgG8XZuknrnuEIO/jZSoEWz/TzxCsbHPY8iKYgBgMUvzK5S9fR+i9l39I44cZbd6+gsM6cgchpsxmhx+z4QvphBIpxlFLSGNezWPAnPt1IMwiGIgpfYrdafif1uQgx7dy1fPruqh0DzCCl2VMd9atKZiOUS3/toCoMpR1BGTcpIz0lPSDHM4ZDqX9cGcaLfdvswUkIEkzsXPbacpEPs37++pO6PI9PQ5PJleJiEwyoSHFAHG+Rgcq466TkeESi140drgNulsa7O/x36abY3s3eSpYJr+C+tqzsEvuxyrpiuUgkyWUeKIWnQMjCAj4wOcpDwPmukEQORPZCo6vNaTN3QYUclvM8Pa5Ebc0b1zZ+BTNHhasbC1fI5TlAa1NilBcRdrJ6ix02maRb916K2GKLtq8rX34Dghg70V+R2s7Huq8todliIiYFZ3KpeFbVu6QLUIppdDT6OXeO2q4C2x94Qc3hKICk1HHAiLjna9mgdQE9i2FS/5p3E9Gtxwl/7yDO5V5KhNnHB/G/KwT
px6EdyTp9yA6tMORgC3IiLWT8omZTjQmyQdjzMRc0/X6Hlt5W2+m9F2XjCnLvXjmn264YjaSKdXCEPyBe1GqBy1/cxmMFmIJj8DhEwwnc8IOaOaJl4K/EMpeP473U17V9hae+y/9GWjmqbd6j2ne8SA/k1Nv4DDctvsAbihRNDkINDQ+ehdYOqMvt9YzmQS7aoL7W2l7E2iwoIfZS9IAfqWBME+itDoqKBPeQvhMjJRE8YxFsYzkTUZx2ddEKmCWG6mozBNGF16SVdiGcJn5TewQenSVwiJP+cvIilZoOee1+vDjoMg9On84Xvc1sTFcZ1r6Wa4t62iFg+ZUZlfGJedatr0V3+nSoUs8ry8l4PakcplCm0RDDppfz6ftY1A9yXEdybMRLT5UggqJoPiPTdS6PXRRKQwYKvFlgxinYkrA9RzsvsgN6IRbQ5gG9Ngk+WSOVwIGSe80nDVdeWjG3Ra1sjMpV3LqS9Iu807R8pK4qTHZ/z1by5vY1iwz3DDrxgnclvsmejzhKeut5xqRzZkkRF+/xadVz00tcsqNkKB9iF0/tjlraPBiolqT2t4ExxxdNLVWjPusoNr+gQzWv4C76pfldC7pSn1RXLWbuV20UHMuax2dH2J4qtky7ClsmHiE+J//vK0hoAj7FNRBlFLSv/X89Ttu0tpY469sJPuM/jQl3xXC1M/8d7xM2i4Kcz44iFuv+L/Knpnkudc8+cggVYqc8NGHNIYExfPtZoVgwr6KucPdYMRWPqaVGlmRYB9r9iVVfBNf2AuXbQolMQDCnFl6yz7FSdN3JVu6nkrbFn9o5L7QzX2Flkbu4DzCaWx1Qj4ydeipdMi7m5cjqO4IalLqueYgVtbHRs4eJte6YX8gkm4GYLAO1YaF5cVTGttUs+i5JgCrnhBZM5m5gkweqDzqjn93O0AVavhm579tuBaCC3ilLZGz/zFA0NyQ3hjtXg0TFzINRC8HLXWG4UcoUwidfB6M94fDbjBKDYf2iJjWvUX65z7tFXGW9CLexjtu7MIeRmyZhh4CAHJAh48Ln2RbeJk0pFCy/Du1SMQ6kGlV4BrQVcDuglXloSxBhmHPVpUWIpmCGrfYeu6XMoqXdr6iFGw5qoIcs6MdHzA4QKdIXxqjLXxwGalepDiFBwUF80QgpcXIyq3uZh7inq5YbWNFu9+Fi7zNDBIogDr4Rhgdny7eDSLLByOhms/ISs15KS55Jmy3uaAQTBFQZG6zKRQ84ZsLZmj7CNtfiTcG/mIBDsp08wfHypdBvgsf+C/FukiAQW5Z5uSzTP5ejT0gpQlsAtccnLEHbzLrGGHsOE/vZ1NLOOuJSMfrcIstgDqhOWKBOsEHoHMNop5Y4TCI3oE0JdwpGJP9E7Myc55oGGxz3TuGN7urIje+Wcti8S2IXwBoaBedvvXC0CbjVqyp1xvuxfbXa8vvGYpa1WB9iKPDSzFRLia0SAd18avvijNSqgA2zRglN1At0B7TDbAOWUl6R96970amNOvsUku6bd+BQ/eFxukec/z5xdz9sQ2fb3ER7JfkbYuz+JAs9NJtJLAz6+RIQyvgMJj4P0EiiWrBfedSOTRmD0DnHxBrslgXPFs66BynJTYM3KbJUSTdUUK94yBRod5wPmDlOnItLjwuzSknE9YlFiUh6IGhEHh8Bwsw6u4kU0p/+oped3R1Cou44MCGApkgCfj8VNBi7VmsbgxlRhVeO+zQNCICGlFaLQDv7fmF0/pOcKh+MJF6d125PZMVYeeHyHoX4tkNkPbWp+2gcWBKdIsSQ6ZcknD/gAFnaRovn8N+EHk+70izG6/DZSdsizZrTdM0siLNLvr3ooTfOE/EZFzDiU9PHzhPUD0mQBHC2nzx2LF4GmFqt4lhqgd+TAMvwNAulZWFTtyniY+DLm2h9KQmtKjYZZf0rbh9SOqGBfH+5zlWGUjC+IDRtCxCMfANBIsg6ycFLWJmzBCkmMMfNOnrS7MiHnTeY7G28hgBuVRRQviNQuyjxkoTElB0F4FTwdi64ARGW++Q5ELUssYwz83S8vEr34gJXzxDKOpy/rSHNjM1ldWXYQl4+MBqVBxpRzSuzJJ07dBm0XOJQUWds4nTQBSR3qT/t9XUwKaqoTaf1dePY/rpuKPMcDgF+792IREAQPPC2IXq+q1JM9uBmE5v1P3Jg3tfeDs+rr/ZQfUVWOLZ7uvDE2I+Ktg+e/ona0iIwT4DHzByBOPro/Gza6ISJsfNwRYKJzTwmryrD4WG2CfOI1eO8/1Vvt+YxpGeDq0FMt4/PmDtsX5xqiq7Ddu8CmmfqT354To2myAAZYBzO0k6KFxcVhDtqEKREPg6pN9483GNzkAqRL2ZzhJxT039Mk3vvHZM30vm1Dmy75xJwSvRcFAE6FV/MxfScWjIdexqBOmd7WXwlFcTWtG4mWdRvU3sr3HHj4sDq2Jp9cRTJeeLNZxtD0GFxxFwj8HTuBGOwIjxOSAaoJW7YbpA82dKfv4u+uGB8s7SD0N+cJSfZ38wFyxSB0fRoiY6WmrcBgBv8v5vkux5jOO0S7bIjKGpJpDfgw1Cw7u7p/UovJZi4fG1JQm5r00YZKcnQyXyVYDTBgAlDkeYKwbKHg5WmvNsKOspD7bxM1j4uDE5RIIDRQGaVeRSD4WYku82mpicZX2kkuHrITa3Das93/SQ72lNecv4Jc4ZcYIr7Q3L/iPAESvFlTyLJ1r4I51VQxkamWjA94Kk+e4GsewFzhMRpyNd9gcpOJHP24uYjnDGHaxLr98G1LSR3eQXrXuqzOL+4QNYci0Z1w3C1a+eOsSxHepHK9gnsTfppvbvb4bNAgFm2f8DTB1oVSR8xmHECwD44hYeDAhrUq9/bu9DbMOvl5AORPH5+DS+f33T7IgL472bIwgTrFaJgmlwwWz8vSPOG+9M2tj9PrQYboAknAGfiZH3CsBLK3GS1Ih8i2JQXSDzBYegyRj/cATxlyRScs9rA1AlF9lhQD0QZrUQdKZJPz21lhjUDUb+t5R4+Bi83ggpVV8xuI9pFGTdgdYfcHcXEpNf4K5emWOmAS1ib+MxsBVUInWI4NmZ8p98BKPJpUj8uKANnY+DKTUsDki5+E++SqNPR1FN8hvFnqpNb8hxaSqDCjZTMDx5WE+ZRXlUUramjDUibUlNpwwjqEcFkPwBzbz1lQluX3AEyJoHIJ3B3I5lTYUWeA3G84FzSFlnYvkN1rhyj5rayfsToMUb0Op9pZKtx7xql0uiBFVylS6BjtyY+S3awQXJl6hX7MzGj0f8Asvz7/HjHL2BP/nMNhi45HzgxO7uxMvCz0VJJemJFpHoqwu1xsGLKtPHGf67ckm+zAUCKdoVEUI0MteMmfYfl1bBvQGL6+8yuMHNyQCFNUfBZp5qcaH3eUr4yqr6z5YyRD63/Ygo+aBUM4m3zszHbxtpSgK1bE93vEVuqRFvJ5Nd2GyD86hx294XZTO9W62HfdXmi7BZnjO/MxecN75iyOw4whxXpXBpvDJGLZTbBmrNV8S4DaJapkAyoEjKu+2QzfIqbKyo4PFfw1Ixu9P1/utAsa0o78v57gxt/1znaQLD9h2i98qiJ+eTJ1WlX0YcD3XAqSw04/D/vLz0fOE7Yj6JZv1fyN7+Q2iebn3yjUaStNYeMe88IDVETD6VNDB37Ule3/2TVGg+RlCV0oSSIQ1kISHrxWqeMrkE8H+Oqe434zuJvHUgnZXF4kP9vG0tAOC+GP5w+x0/45dhILecrt5f37RkXHTDWcXuqAD31+6v+/y6CSss88gPQvbssmZbgIhloKrZ/oLTIHjfoT538vPcGOYnNH50Dr5CEU8ntiDW55xrqDqkCGeKTxufmZ2ardZqMosyUS4RqofEtbkd0DuMgeTPIFLUsNkCgWMED7PaUVMF9GLU05bpsiR3hq0DhxZWtPIwSSCayNEqHJJN6O/k7y4eiRn+ojJ2t2YmdALk/Cf3/EHd9R3sDgIyljcnawR33awgYSGwCiTB5KZcgTvdUAj3luLu1bL27uYcdzZMFYDNA2LgS1WYMe3iUOcl4tnMFnV33kA4rIruh5TAuhM5/KFlXhLV5Gg+bNrjyGZ+0t+a
R92Cm+sl5Xq5ZL4nsrc6QhREX2iOad/iQS61qyZBrlm9lqTvPoxadyDd4dmlJuPPGyp/RienYaUUCl/ED3rFtjdXlB9Okxponf2SgAEC8Fc8JRXSjY0cqvC4fB7jk3waLNSSGkRHYn/OcKWmM2UbWczo5yc1cOOFGe+HZP7Dtrou7JxVutdWgt4pgMZfD1Er8A4MdDTjMuA2/JokKwPV+0l7un0hCdoM8K6wj4XRbdnVauy9a6ihVwn2ZhQwugGKwivhccGIGnyXCRenmwtRyBrRomtRnK0IScE10CydmCB4KDElO1r3MUtvE47aQywDL2zF6NIvDTig4mUevUZ7X2dhkD2Bxtl4uAkqRvkoxyGJE+yBWNvhw3toF+NNrT4Hzmc1z5I6KaXVMqcKETnBNkOubK075XUVA/PfQQMqFyif28hgUD0B5xEPS+6zj7367VvEywqksHml5eaMQ/nO1PCm+MkR00BSDGl8y9Ki3RsEK8DvsDd2SZpIk0VI+vkzO5HLswK4UUmX+Hxhx94lA4/ElC0JNs55/QNAJZP0XYMniTDvuhloYQ0ObTWkAioFMKfRsmVSvChcu33ZUTmOa656hMvDBCCKP92eSAbFTRvFsSix/1Wm0+CeY2+qd0TRyVawSohy1k1geP3/w6w3Sk7RNDI7XqJwT2nd9FdeLOT/ZKTY6P04NTfr3u/BLfr6jPF5IJ3gP3fIzqwT6QPkXql3cmd9CYmwkLHVQhz3tFk1Rl0Fx205Fx/V6O+XSqtFw7py4tG5rX14XEgnDVN6T7GimD7705zPlTLbG4Bd8VNxw9BAiB3etlLXlUcUbyaHccUfubAIEtstO4awGDOSzJPJmXYguQQ6OAHUuUh8D+purPF9gXgc9XfWB4D/eT0WRvqEnWSzadIhxYAzjKzYbhHZYE4XmTCO2oFPaA0VNvBsmGozwJHz87xdsFIpo4T7g8kbo5nCS7T+liTozBMHFGQIdkKMNVZHcAm3l4/HPjThuJ9fNMOEV4U985tVT+1pKr3fJTLAkKswwjqezOraliUeKN0u3LFniYazx4ZzgLZ82JiETjZDyzC97mAammiaIqlA7cATL5SfV9LayzBCslvgv+SUhJ77qFZvOVILbX+a4OnwRRhxYDgsXIkefBsgFGTLavb3gLKVjPp6XjWmLDEWkUFdNpT7+2mCKp2xIuLLVZE7y+SWkWtIhA1tyoNapt/E8/ZYIX8v2O/jEXP6gr9+lCvWPwcvZnS7phaNSancg+OFxld2AUO6Z7FtoDkkriaH4mJB+JmEnhkDVcwR0fOOQIPIYQZCWNY4yhZrHK86gASiEuWN4MFz+EOSx6uI+o7+9c9b8WQ7rHx0eB4JvKyo8CPIOl/+bgGKRS/hqmHsV5lQTuJ7Pt4oTPjWZECp1GHYyv7nX7Vhl07Rf5QVITE7tjFjd3ajWLnTkCyRL2ngx+ue3Is//B+Xw/cJchnJI1l2jqVrd2dVpZZ+eQNWiz9tU8kilRcDWneKkqgU7SsaZeDUOYndPD/1h6TzgMc1Ml1M/TOuVF4tMvEaXVZfWhExqmR3naFTZE6Hj+SHHS3D8yIWFoWUwikVP0W8jLr0IurynKsiyFFGtICCYuSBV+qWQNDEjEOAnpy4DewQcBJe5cr/RFSLGI13B29udv7JgROGK04mO4vXCpoNy9Owz12+iCWGTEYOBI0IiyVpMUAqtYkuEv+OBChVdHF91RvnYcODajD3Gqb1X9Ay+zzGXLRm0s7hVqenjzdxmP29KdW13UJDtyb1cRxvwGig7R/4mNnfogTEtSrC4wTt8VhVtETEdgLTOqxjWbiYO+GmjdOXxVLO7M25l3u2gj8VmpVh/xrW2xLRDsFJewHVBIxEmxemt5UgYtc76uEaXg7iqcVtCWwSmzjaw8tTMouRN5j6CqNjpfrZUB8/hHD6DvTszMdAp29jYcOSx2ZWriHJqBYT+2Fxj75JRIQi6az4ghZC7e0Gs7f8MYydb9m3uO/BNsV+arEAhmO1qnkKJsaVQQ0HbYh1yuV3YToa9wyiYmQCnALHdsurwwMHaI4jqeO6cadHNfrkQWH6uq/Jeq0CGXPBAeYL9/E65kxnpRb9exDVnbWtfwCv7Hh03ykBMOARWH++rMbzdeGl7Wj9NQL1CDOBhXLWxc4kOFyrZfoXJf8kfJhjobvhe2pioK2WjhUgj/2GXL+tBWB24iczJTlgOxO6B2VLtAlMF0nkoifFJgdjs2JYnD9RGdi+DO3LLtXFoZbFaJ0tcki8umguMiBT+BiAQN3PlgR4UpZScs0qejfnfph5//Uinyw/TMDzc0+Mzf9nkrn4ZIq1JnvHGoaqIqBBi+nRPKo0EKelv3928NMhO0GNZ9Vul3jtGRn4/5vYdmnTko8bql+9iaFTP3nYmV5tZ17xYCahXQ1+Jfk95BNigRWIam94UCiGS2anusFqAVTzuDNCwIadHPTyq120ALHmRVtGjXaZiPciMevmCTO9Uqmw8JS/gdnL/uRBhoULAqM9Y0WL+iEz6LKhLSpQwDCZJsSibi2i/G0SMG5TtdOiLN8NX636SLZ34DVMntAqV4QBWW8AfKifiRaQtqIrIGQvkl330sUuE96+oglWw3Qk5YaM4NOkDRaO9FTG4KZdzY87ma8Vf12nwL2741WfWhjsWzf1yjnvuijsqgAYbjJwDorhGyfHVXw/MFRp3KjJ0VctPBYRMpaCxfN6fDwLyZBNzOGdMYsRvYoKP3WM76Qbx8hOtPJhF/jJNrt61VodtWOHW31+Q+V2XatC0YY1nk99FJ/vrTVnwEOeh3YJgnD/50h2rWf/YVX5/e0eiDRE69c9clzEv++a+cGy0T2THpM379PMj/8keM4e9DO1xbuVHMNQT30GOc08RVNe/c1ujoUvRJrLtWX7O5AstG4LNZ9uF4POW013leTYn+FseoSuNmPxpxQZZs5Vptlwttv01nY64upT3GUUAygQIIZJvN816Hut9+KYuJZJe048Bg+kaRxKrnfaZCdTmzBL/XPQS5tExLf3bWGal/2MT5+urHrRb2fQ22I7NM8QTV6PdW7h6dpuVLRfoeMiyskSQvSCLXJy6PPqokGd2ryg325DKbTajub8pNQlCIEv0VnOJ5PWvGIpVRAyYP3fK/jM0vkQB/CjRNE90FYcWiNJ35vG8Ag5ufpBSaxALO3i8XNVz8+n0652al8s0yGvesgfZKz16+OAKEIkUjL7Q89zKQ27MFZ70zzzl+FA3GjzbbdStXx3auMG33vKNilnu4Sx0BO2cFG5J4a7P2yfdwW2eNIMDf+WhcLUIS2HqP2TvloMk/T1eztpHMItzhkMJH/2yPvVOdaDZaeBZD0JrhV5Wdg8JGjuoI9i/SYQvumhxmvFLBN2Zii0+JQ+fwGwEI58vae60oRr622nmTFCJvE+xTK1HZyv/4NNBXFuvorPQWX1R2qfT29rVcj7U7epG5D1maDJcUxovQj94V+MhHDIIeMQRqMw/4fQ7HxpdhaxKiEpI8co13f2uNXZbMGQmC7Pkbr+qbbJ3g6ls74Q1KdIjd+UD9KHf18esBEumy33KFwOT8pJ70fRI1nInpCRYlktUaB3qUENi8MbaZzzieKtjJsvsMpmM7QdwSePgyIYmAIajknSGYsvn+lnnasKbkubFjQloa62eyZ5sZ2nQdXOZuw/Y/ZCrD+1QW3ZE83aQ4wc2gqNLweTiX4j6nCpX5wWB2iY0NroNNOIzrd29fN6SdCBqUNf2zcHZ2vVG1gK08I2u1T1THZof1JE+ohPnmljZjK5OSKatj8epfG3oWtQ1o5MFd+U22JNgf6F81pR1sHxWtkGgzt+bvyaVdUXWZJWimc0CFnEOn2a3p3tLgT0db8l/1RzdPGAvE8wioBxE0pAUOxat6eFw13G/pt4z/0yKAtZZ4yMBbqpGioOffoRyJcx7YojH7j2pU8Se4Fd84RoOqwHkaHXop0MpWyTueMvjuvPiVywakt594KyfEO8mt1U6943aWatpD3t9dKVSNtc05CFZtwotCrVEik1+WfjKeuP8rg3E9aVhIHhi3tANxYNcUMSFcFjQU6zkmw+/jh7PACO
ZWacOOnsvaAP9CE33czrK935BFGKs6YabaPiHT6v1GsTdWNmNdbazPOCStV8OqAhcXKZeM7baNPahhJDDN+zHdkhpHnNOd5yte1NmJUKF0xX8HpIfORbLIhqkBtDsYD6ZLCLqMXGbGeToHKECpLIuYRCrR7MJneSVJH3C1X/OiXwdnzrHXJ4D8l1FqH9n67WfDAL3NCVQFVhDV5Dqh54VjHgpZKsJsbERAo9CYFhAzTxjKpRa4iiQhh1pY+AmCPVSfNwM2axJIeY85pBIOB/4YOVNmWDGkb0XD/gHguLh1oUUfb4kN9cNoflU5LCYibkFbX593TxcKTFzp1qJ1E7uv0YxdflSvAr38+YUcyB8Rlmj0mJoM+UQleNgbYe0Qq06+/wWgIchtmeS16clZIe2MOdg04ApluOJ/DWpVP1UNaVMYd4PkvowXfe+ieqybPtQgm3/eRKSOpby3NF+Yh5gYYqcp5vGjFxksBR/Ue7+C9Jl/jtDcvuVqBUOZwqdoU0r1jkD//EJzDt3cdR4ri+Oiash9zVXnHKk2igRMM50D1E99A/t2Gof9tefJ0PgoD/bNTiVvhzxnCu1AeQuhXNe1txh7soatrBleirEi9JXZaYQWizufjS/VDQT45tcYojRAIU7cZbUXoy4d5XqBEvVKS4uWIcSrWzlgUcvmR9xJbh6vaEo2XzAo+WJoIDafOfMsJUToxN1/LvWkMqYmBUN929ItAfk5P8ChIAeDYczn+m1meQ1xxpMX5OLaB8Y2UXWQV7HwaVVm8jQr5QkfN8oL4M5w7kuMpULx8VaBIT4F1a49njvYSChUW716cgk6l1gtOjkF0fvPBS/eC2KxaWzThYyPRbhoeU95GRAImnRDhXjJXlRyQiZbDVaEXXNE9wGT8GcE7LAavNGzOEtOqWza/FoKYgVYpHMX12vkeMjHwXhLQpBkPlXcJDZ5Ttp5cze+eAlOlZgSdHU8LTQeBO7aG1QJ6F9x4GCcIfryfuOfSk0+koefrYL0w3wPAU4A2sTQypQ4BBM2WLHgY1JbJETDszDaR+F1mNWuIOpLEqHv1JQ2I2eEiGZE2xVobpKjqoz7skOlNFmWpMMx/cUaM9No3Q9A1vq6s4L9MbsMCXHwL+K3mWVVngzn2jBduCzMOA/dBQD+TMcSRCmVZFh6y17vyc1JDTx/TYHHlMf9lHoqMevnjuiKwUHIH6xhr5AoNfJjT8NleUZZ4DE0bMqox0eQz8O9pG9XGjazcQBb8fIpzAuKR9wj8lgVF0T5UqsKs/lTtOmBVa4aiTrq5Q6S+v5KbSw5iiq6jmZQtiKUAcpHWOf2XR8jlDUN0itrARXbR19GurYnrJThyzZWhTYhRNWwmRBoH3zKMHWCUHDS1cgSV/Bp/woLhx9q1t1OrzwNsjw3KfRwISg3AuPjQJtDdEJzFB0U/jiQMzssUJ/aZ3107q8jPyPDHg9l/dpzMSsnGyvLUFoZDxfvs+ft+0+rvBo2kaoyF4TG4T/JKA+hQDfOSZkK6Hy9meZnUugXUH4RjWqPYgya4MTocczMCfxAP0L1JTjpPrrKJXxr15xT4KimX5lFfyXUaCmhLgtKjx3DWEoa3k5B3EXhI8xz/DOX27iq8+A0NbAia1wjljd1lV76kZqmW1Vzg3ef4VRwk6cGP1iir952DLDN141iJ2x1P9HPJF3ji0ph+TmVJ/bixivaYlUzkh4mPCnoLN1haz+gg3MY6IYPMl89FK6lsNdjMNVkJp5/idnn3s4/NapRbwlsK/svkUt6E3R4bU0R0+oK5QcA86ASQspx0YnZHY+zQqn7tj64GVrFLb4Ov/Rg/7XRU4dzUpW0mMWWI96+Z1RNKxIr5P/vjzmyFcLbuuQmYvtnWnXyBNkZt6OX5crX7w3j3L2sl3T4xEng+SRso2+ZFvTjAUYdoOldMAGwQeaxdxx1NUCJklsBmarh4C5VNM8sw2d+mFP+Fs4e5Fxi0Tk+7yyo86Lcja+HNtsadtLqkODado7l6dPLe3ycnDlt0qI/ctHC52UKu7ZXXwtAxel5B4n5y24ar6EZ4Xe2DAMT4tZxVQYfBc78q7vLWccczQO2UVPHl3oatLDHKeZ2Acr5jkRuMXzAEyFzJ+hzqW34bBLjnt8dhVmmS4k2LM/8RVwz+bdkFU1dh0Br8ejo92yUJXQFnbZxRLcAjXyDIL4ft2utvyiMrlmUg+pfb2/S2viChGnzc1aF9bcCsjDryiP87xa+wZsj0ypiadKb0Tz1O0ah3404y70cqbBBrVg9XkrCV23R++eXF3O0CipOf5vKVHK1ioRkDSskshIXyzaxXmmnT5MlBM5fuTZbwDfBGGyM7QoewdXOrkDoiq6oHVwb4ga5Mk7Vg7Nw/OspZZJyi4XkNy/hKOsLFLdx17WCGMwe5rIBHHnisPtEy0eiul8+P8coinvkpTI2ZwWtXh8e0U1VwM/oFa+aeiM666lgG4vJMlUo4G2CwOeRM6R+OwHTD6uVxBDi5iP6XUwIIZb0kUo7eOOaan1ewQFanvLeOqTyilwgfNL13N46JWqhigXL9/7SZgN9WZJX5lmKsA3Tb7YWAGxpshZ0VAVuKfSly+g2hErmOWn7RCyw+3p8GYp7KAyoMVySeDL4z8okt2TfG2y5f/9u/6NoCNi4fIa1LrTMGn4+U8o5im23M5AQoiJdemAaXZHACJ6+nMLipqhUEusiRvzJ5/5ZZEDmVOdo9ZEyrb8OL9+ctAs5z8Rd3Jot7JXJApo+GpMh+DvN5pKrCbNfLZvjCrS/r8wlvsd/VfnpbhwWh1SZJfA8Bi2UQDFFh20AqYDG0jN8iWcs27ZyZiP3cRX88jH/ZkK/8iEMfybKE31+cNJD0+AL8e2BqiiV2j9c4bvCR1IyLqYC23fg8ZP8JuJdI7O+avcvIsQC+oq06WhasiMo9DvgMBtOLlaHG2tAvcZAtpJpWqbSTWxNTPSiwXBt0yzUDid05M4WSF6cQZuUMtNg7drAp2yn/QRH+Q+Z5cItJMrPyx4m5/2LYS51FaXja7EQyPurx9MRygl40KD3NMc+2HfbeVorcAVbYxov+eBLF1SyYiNNY9/2Q5U+xi73AWlWSY4JL+Nq2O2iN442bvaXKE7NQXAtEDDgvgQn74oa42TOB5YWSzBzdNpwQoaicSWUJppl/yIrvfZVKtKmm2KYDMMChr4tCXtDKSAOwoAn78cvuVvz9SSBb8kygIAnFApturamq5K7jGUpBKhvwlor/LCqMqaJ5re/EvCzN99B5awsupeVAdypZgcMykGyFhQEtOIo9Lvvw1d/bRnT7Dmd/TgZ3AAbKZ3TVqcVsszkwu550tadb4itY9Lmw/zfC25RpVnLtS/rP0m7ELhTKITPN3BoXiZFpaE8Muw3mG2gw53rTfqudpvRoSObQirL/X0yzjHK/Cq+vuKxFIEa7QlWpr5LhzmIRLId3icgLfqWl1TxeHCnkNh3YGIBSEDU52g7SnDrqZ1SFEn6E4CHLUUsNW3SMuCyyXyaUmvVaPh6CX6XOwVdH/yzT5kjuLqig8QmxZIWhd9xivRmB+aQ9/HcaK+eeB5qdv05oCH3n9r07vQ1IHtz/yhdO8ap6gMMPupbgxCo6ZpB6K9+dosz/1Zib+ziF2+DxQg1x/h7vSTzlV8h+L/5rwzW6RgcZI42GJz9DJtKD3tMXMHBxeApHOBJu06oLHVtW7Mp+fwCp4w/FRCbJHEtPxqyMkuxrFbAZS9V6Yh3Kth9MHnehDikFEyW23w9xuUxclzIJ6Fdi2KpNIMrhdh19ST9FVqUh74a9JZJPMz6l9O5mN8J7LiDApzFqlRUDmF+QnqG8SCgEV1IUOr1EcBuxpB+gNjgZMZTJ+OA9mRkDvL+lU7tVngwDJDNt6DO7VzbaKm09isXNg1gfZgZASYChhyDt11atyQFWzB23i1RqI15SSrbiyqP3Bbc6KdiZwAs+2o/sz1QAprIXhiSv04ajz25/sWhhIa4twKTRg9AiDQMPmuU+yPkY2uZXVCMS0kbkpdZLMcAur/HYx2dE+QPeQP8GeaVqkPiutqmaRnfY0oqDIdMXsCCkFj8EV6nYnNEiJ9wOe
1JFAHPt9LE8EDn3yj7AgSfQoi2OrD0wlHPp0c5b97czrvmDvxgxaTXIT8QSYu9rX1Y95TQrr1J2mt8/Xq35wuGvQM0xiHQN25aKNtUkInjQV6aCh4b3+A2V+PMv1pqmD8Xjm3Z7Z5C7uxruVhYEPauatpKWCyqE6GeuH6AN/d0eSw60xTvWs61SOWIM0oJSED+VMaCXYjauU2lzCWTiS+88xfAvZT+L8GhbSbqYRCo6kvFGjNMwLI+Z161Le3toRCXO+JO/iX7cRGGtq2NBh9qBrvfZAgf9V838Am2kOwyL4M+mLYAYWFEr8fILFudbWsVKoAHsiwsVJBUvOPHvNS7Nt2i99ik0fK8jlpWSYkBCHiRI5uETmPdh8BtgBeHoHj3776TyVD9f7e0tBkfZmEgyF/Hd+fOKjUDz/XqS7ZKkKw35sG/9sba5Gu6SpR6ZyV4DA9xHL87koyYZzi8U2EsXj22NLa5j4b2h/OGKQf16b24UXPSLcmzbVGXVqfNnnltdEQVpBEq1desmUOtU3O9P4sGx8D8segbDzMCHdHeSs6Uc8xf+0LxxwCJxqd/0VIl6h+AfrZ8rFtSJcknx8T6qweOcB+mAJ4LHTgp3OJ23obcQFFkTCXaRWogLyVOt8U9GZ5v+GIpL70QoXXdmH6dOf8MqxmrFcoqlPU8ptUso17wdqbraOS11WKB9/PlBbjyJF/xlxci615WtquyVZozq5bH1pHwVGmZPXRFKWD6ubdhJC4FkO/x5Lfc6YA/j4nTmTzkoo/oYA9ezy5RzkBAZv41w4HVMogMFUUSYG1aZVaLTbGL3r504PsLnOTs7ANA+4y46OCaqB/5yST0An7KWbB7xqt2OEuJt+1jWQpKd+l/vN/IXAeBCOh1qcwAfP9Kxe8iDHG0ITKse3QYSHIjPq2hC+ClRypmhWs2fnPiZB38FprvUsdE75LALTYM4MOKjOJWEIaB9yQS1eZXxL/VKTACeFFi5+Ab6d5kndz86dgpAxwzDl5CXhCaQaBncbTTNpXyLE2tGvNmmxBHnd8JZ9ChHCqpH7v+JJ0R14dROzyiTazUDI48K97Y15vMMyHxEZendLwEQnQT1BSQwIdYMgy/spOJ9tmxa7Mwc04ftGenifjdoxWPL5D3MT/g7MfZPBPR5GjXIyXd23c40PeybTFKo19Jo4u7tuPPobJnNSl0vl+27iA9Kg7jTZmMmeWIpeckPRcVqTSsm6/QGJpyjR4nzdJ4gR7VHTz4koLgQDXo86DM3S8hL2qngoE6u5TfsWKyF6SbF+Dq7o3xzbZezTTf1/Aa2iR/seMieYbQzbdf0ncEN0TT9gPhgq02zyjNWHGhL+URrAej898lxYWLeuVVzUsz6mNdmVd0omFTJ8l/+3I7xS7mCkZ5QwlSCZ6XpsTKesJ1Id99JT81GbnfnFz+ioLjvvm7j88kDBbKzYVbXIhsT59uZOVvEogI826QIog4nHl7QQj14uQuGM2vBvkJe5UuefFGsmJJ8O0gkg+Ws8eDc/9EKud8dQiJxTJjSUAjfshD9vMrsk5jM/vAP7eNMqxy+57eVuHj2tBn84XCC4zM17Wkn7IL58+UUDMoU4rf15XqE2zoKKkQwakP9P50MQJpzktS842rs4kEcqry0WyehSIa+uVXzIQ9c5JzQwlwtBl5Sba99HwLliQ/d/eriARB3AcgvGVHrBxEaYUVDQykOZPFRIyYb+2i/ffLi5etsgk7fqqBqzoUc+WTBPi+RjtEWIRHtbldf427hv9dGje/kHoKY8oXjJK0sb+itAIRb9aSulx5zQnbOA33XMxZhvVG1l7tJjGrztjYKkm6fdG7yv8Q8Q3l58GJOXUrjq5f3J53J7aF5AaHJILV8qCRw5sc0vzQf4EzY0m8utFesY1olNBE0y9V5DhmOP/BIQ7Kz2j9zZJJK8kT67l1cLFZChjosL8yoI+UEbrExtJHh4nv+MqEiqtcfwHSv1f+RP0AElPu4B1kscBf9mV1+xAijU1D61DfIdoBljFs0o8T9xtF05VeiuWjsZMxa0/Uqkjag8SPA+uYnrFznT4gEjMN0NhTtWV4x2992h7K6vRIOreswiI+9rBC3suUaOhN0iWua2OqK4IYr4eiXxC8nUKefHyBjRgsdYBMhBWYg+fEjfb13vACkdq3/G1OdvlubghBBhf763suQnycR9Kml4vcqh1vHVFATw1WRFFd+NzgYb7SC8uYg0LXB+TmM4RtXIm90S4UbVD6aaWRNR3+Y+h1W2YTcSYuOoiP9O730S0VjUTvpzHkpIbhkPHSJ6pM1q6YrTTbTFmd+L7xej4InKAWaasWkObl5U2+zEsEgawdljn+FnAgJP4+zHCvxqQE6GNHBADsjYFARzugaBALPAr17vdziS0qTFOfE03JOQwA/ANySzNy4iEmfB83PET4A0ndWsVPOldeGIN051dxhULggtmfqb8wGiBE/+4lZQ29H6nzB9c1l7ntv+IPwy0uDdiFAs2Wi7iOJRkLTgkfySIbNsBmH1eSYhbUE7cO/pjrFI3jsbc4xmAR3VP8FsI4JjICPFfw6IgYo5hKU4pOSZ6gTjT+F5xxc6VfLF8TlTAg2jdjoTpauhmasYUaf0m0RWaNRDPYgQ5dv9fEiPgBp2ejAO/5gWRF6Ex41FC9QVj/iIQJW5GpCDDMTOv9BZ1tIkx5f7l5JECLOje2x9PEmwmcgiJBEYIgqOCDD0ngWzJJdDM2tLeYcOQcKgvTrcsAiDO/9GnkfmXISIZP7XA9u703MJyy236yapdUvzAmfQoOfgWZarWOjN3A5cEZAZHhsgUNjSGRMeiBDcMycbv0OfcVjupM0AIJVol8tf/O+E19nctY4sT6LOY32IJhTQTU1stLTzGlAknfkzMF4wNEv7hGYMWkWHujdCSF8N9zUHDLMFHOELk6UpNqo7Hz8lQubw9bpZm70GrI5nUb8bgOZ9CKJmEXBNosgYw3KVrFkDSaIMdY/vAdpzWNmQP2dvUK+IzN0k3Aq3qsm8WaLKvxwVfXsIG5jMLTBEWgHDVUF8tveEkx7Mzkpwpqmfh5/TxLhzWX13o2CRzcxuP2Ky2v3R3r/WDDxk4xDoZWLrMgtS3RAwmXS/nHyJaHCeeRZY+GhFvB88fWpZtBTQrRZvR9EvVxMlFinz19L3qzFGngJ+Ge+E2fNpe2K1DRPGeseDGKoFljDXtFUr0vy4iFfgye1qkyHLR5kH91P8RYHQUOX/cLi8B2IoErsz8+lh+uJeutKahWCG/PNS3AzF1x3OHVzTH2gkoqN5vjRfH48qfBRUhipm2MMj32s7hS2nqXxU6/Ko1miC6/YkX1UFLkcFj6ttj9iS4PEIqO6VDuVGHr+KmmXyQRJ/ph+R+rUMoOCinEvW37XtJ+e1cTkwjaLtbhwt7SdSNU1Fyw5eYMtWVoupU14Ei6xE6QTvOaK6NTPQwbG1bwVb5tKAMfyzntI5oIuUnjs3kmvVMr4sdVZeWP7Ns3kenOCm2K8mS9tlj38y9FiGij1wpUNY50gbroxeEqNnmpFtD60+g0+FP16dhA7YRVUAqqc7utMaGInWKKHrJIe4WFhBngscpaJK8c+JfwlhU1HUfhwxqioy0qvFonD0xbxgIMDGKeaVJGlJUTxOzaninIjUxizcV6x3Hwb6Kp5Bp4W3YWlRBLTldeLfugxwoaY9gR86A5QyZ5f6dWCOuKSYxaH+e/V/SBO4ruZ5STJgpltUf/M7+NXhD5jZtCMEsD8P39VJUb+Q11T9X0ZNFOLToyRJ7k3XdXCR12DJnj2ohZ2PIu59Sj/d5dmzjaaFFeOaShwjZTD7JYoZIgoTLcQw/zgTjZsrW6Aejt80ip4rkB7lBari6FVwotuZtcDYkHvA+y4XO5o8ZF7yhubeZFdN6c0HvEp6zD2fhd0YrYTBVtSZZUX9GM6AZnSzQ7f8RNkBWZcUWU+nnHp7w1BnlFT058l5oMgzVWCGEsOvy82dKvpxJh+wwdggl6T1r2GuUky5+1HRC9NIC1iwwT31A3tuLIiWa/EvACsdM3em4h+YPnqGodWrnkT/VJZFqv/z/px9cLHNcgHGndVHxYWo
wDuyum41F3+Yr+VAr8mdCOCFDfGZLVxe24C0Mot4ZmOvpXo4gBjxY6RxjYNULl0hsgfAl82BWVi4HQVi2PIV7QXY4rHBnzOSS3Sigb3b6F/+KbzMSxNgrhrF3/MKVOFBv8NsAR6oYDDgQGPCeibc/ry7f7Cc6yMuaKZsQ++CreRFejvNxRI9F/PXb6Qoy7SZU/d749FkCD3QA9wPo75Q7L76bkz2Zdpg1iaIKZJh8zfrowY2Qa9hGhPwFx2jUHRSXZhdn3RkKNjR16lHEpz0chkubyMibWxp8dBUNJQseY/Cojr+HKGaFbCmr2w26jphBW9KwUTJe5AF2RCWB7unDyiKSukFf/9TFfMODJmz9Q6Ft1jVujHixpkK2i4O5TRWLTGtu5xi4Nq51njl12d8RWJtYZDEcw6y/uTPAIhkC8bkxNwgyjTxoff1mnS7CSAnkZpojt4EuifsxWOxcz+QTUmKfN3/TkLaAos4vKOE0lTFqUJoVBX/YZJsS0MRY6cGIR+7PlAve3Q4M81FKXoz53eEc74ZMzpnikYA2L/o13Tk96ZZQmi2hVkcKXYdXQvM4z+m102p/gG1kJoxZJLsM1iznBYI0KtpXoMyBcvqdfKdEp0NQNOXOj13lDPi3d/E6t8ZkXVNkda9ExtNaFvBEje890VhIKEt6w5lJBepv5bo6XpXuvYdnUJ0SZg0y5Km3B0x92uwj0rY+Mq9ASusQxn1TZcm/ZS3JKcIRZt/Jaydq3btMfBwWO8CNXJzxn8qP6nkysh0LeY+nQlgu1jWCSmkWRaK8AHbWwjD8lWFFWXOkPqOBUsd5wW1zPi1sJfVyfu7+a1sygwN6g2Pg0a21cej1iKIEKrVXXLXo1U75XORzVuBrnJ7naYBCeD7gCJZVAYWB2OyNkeOc05904MXxZ+qPZjoTcoqb3aGspOO/t7F8CGsaRs2MFBJMQ0GE2h5I01zLdhfSxablqhHFuHA84uyzKe0KgzVl6jqSsdaynRvl+zYIWuWf1zRnCCpTDnGF8/JHZXBD+r9Ug3SXCMkTH34afPBfUBUMGO9+AeGBvEaXyYkXVvK9STZZD7jE0FB170ijRBVucRMyKGZaqrnFmOp+w0WIicWAT+zJ8/EYCQrIHv+8YhLcq5LmnrtjOQvJFze0kjpesoTTvXZQOOHsasxX9cshbuLFtJuQw2r+N1UyNgyDkTyZoQXO9Bd7SgyVW4/uhkXcDMmdboJ4Ntx//rJfPSUxvCV+J6O8tfEBab4E7qdB8JWYjgIJoYujQlkPny8nvrbcRK/OwJ3p84sp7X9BOGKhTfUUI5J8TZ7Qqagi9zHBI51r+xRmlunqGER1HSzOlp1lIxTJW/w2hxgSr/fA8DvP9sjb9insQ1Ytg1vEkIzcXl9DfrIsxtU5AMuuV8Ao5XUKcMn/EOqipGd6phi0TqBMvn3me+ybDdAa9xPaSLoncGUBrhkvUydiuWPj5eLdVuC2MXRIcm7BWcLNExHoUSvDnNvGdWxjH5xHvLWmR/coiAiz69BOE877OlBGWjCrCjrV1Os40vaoxFUkMa6DeaK6ULLaf2J7yWRGyFdEbRgg6+1oBmt6gMG0HsIGyQxnL8OpWAs+3kUFD6PgLbxrlSHYHIGud7mUHsM69heRGi428G18xn29bJAcA4QP/uWNHHnPaGPxu1AUhcOU6EpYDh8WJ88oFujX0VChELEWdxc4Z2sP0uTS6Z8Ikx0i1kDH6qW0P4tLCl/CrWr+yJSoh5e2AtdcI/OFuopNVEk6zK0G003W8DmAgG6Q0W8Sr9hRPuR1enG5T2JvpIm99KSFCvl4NXOPBQrv8wiB6A8iF1ssu0Ffc6ywz6JrsWHGxIeEoD+AP8Pv5nK6tSkNANy1MMxQSnt1XOI8PQNSKWyVKVLLFeufkiJsTgFNdRAXXKUZIqjgBsASg2VPfK0vsjAHUqIO9W/jSs/AhZJ1lnem+/J0ww2ENd6fiJ8mjCqFo49Jh8+iHNUVKPJwJcdtQA7I1EvCwp/lsJ5WhyzO9uj4patcWoT5RPJs8qYXxWCSM6JVMviIyPOjUyv/DoJYJafB6E9FvyAeJ95AabwxnIHj4o5zIHP1OoY/Ky6JzgQtb4IN0s7o0/0AQiSD9H/RvbDbWFj+3Yl9fsyi0bkDLDkU+wA/GalXw4NjAckkm9mAQ8croMZBK1B3aHifwE8ILkrJPpDoHasMx7SV+TtgznaVPS8w7fTdCELEunnLtXqGmONAU7SMY+e6ICOKUFZfouW6SHMTKBuqKuJI2YyUBGMoHvao3Thsynbry6hCITwrTRy3pSNgQWj4dW/k79nR+wUt+JqkkbF50I/MBOHrMgmOxrXFOOLdF1RLcdHfNCaIl4LD+t8Isxjs0NKpVQNMvUnH5VsLux5UM5kW1x23rtl/+r2Tl+Fv+eo4rre+5ou/Jd8IsqD64DuJE8RmDIH0i4mjKw5UCCKs/StnfAy/nymfHdhXiZHs6OyXKVP4luSoo4WpWn/O/Fq9maWI0m3UKaWJ3Tw7NGd64iljMOYadhcjxQpp8mLRCUuV2G6BNHDER4UzUp+7sv7KK986MequQZ3iN8zPLZDGYS+7Eh6U9chTPpM0KsI/cSKNf1zH3IrFVEHJxAz6AMAqWQdcoMbTr2c0Z5PYHXOH7r+Ol3x0ZQ91O7t/xEsoI0vAPsHTLIBgAAS0V2szgxeUUdYYCF0I/6f/D1l4GVMQ7WulLIrKY/BsYs4iuv0HZJNXn7kIdpAp4kD7THsNFh0smaxf/HPO864G1cgrck0/w5kB57UUwDZzx/s40YwRtz7QxQ4AdRo/vTD3kdeqFOA1/s3nOczB+/PuiO4DMKchy8ujQjDkS9kNZvEKY/u58n/iI/Sg/z2SYu+yq/+HMOdFuOW9Tk0ozU9Vk7LnzO7RzFlboJLCh8dcSjoC+sX3TRw/AqNN3ewd1YzFObUSaYeN9X8uBLewFOuHn3q06OtsPnLt7A2bN9l78lr4++oA3igQtp20WfDAooJbNHK+HVEytZQOn1r6p2U30ttAybhweK5LVq13lTunEzA+PUOvo9+RKGSaZDjsY/q5os2n42RlZHokYO8ZAl+k6MdOjtm8tI3ouy23Z8PVF9crZMp03sWFYN1qHpg19hWAVxZM8E+eOE8zrPnHl8W91iUwzeq8jvs2f53iOMyeZbL4epmWOsKe2gylzBkDV0O+bkwe3LiRVZ/tAt1rIv4IAQ86WiMfwP2YO4ObTjglC/EgZBjYwJS5MsNCKmQvh2wMui56kppFZsSAHGQFPzQbqTGRgrckNqEEaSBrlOIVhll/oagvZhYmYbj8O6KnycuH8bGdAuaVEvtePxeEZRgl0scnSqJohHTP20Ruk94fyfFFmIO0L3DrQfon0v11iKInTyUGSH4rOvaaxiqUkUE+1GoTMWIAqrJpEt4zHv+L55tMJicNFnK7jZG7HFP2aLqS6xHU/7mNxvlBejEZLIWlkcb+ZYZUJByV077p4X8y1CCK7FQS1EcV7w3+KlVTLj05sV79p4bTowDloAj2EwVAwRb/67hHPbXHE2+I7fboBHpVzbaiHTsuz51FViJUQakVYv29VXVWinXrSQOCFtRePLpBFcf8WgDMfxxMg5T0GKZuGn2hZTiCJadHMsY7QcQ1+XcCrYupPgzLs7ur+YX6wnFuQGdzwPDvGQVzHwITMsIUoWCDWldTsWRImK3HOsGWg8FqY0EnPVjV/5Zn84W5Q08IVbOkQ85AcmTkFsMECbHKzeY4RcsGSs5ZreHMqAy0a+QNWZDPMa9JZ6bfR4hIQAzK0uW+UcdgrSZXB+pWlzwxc1nOOY26AX3gquNst1WqtKSSBtiEHSRMWJJwCcuM/9rKVDwzwQzALppk9VJdn9elKTdxXS3pVkxxPKSFicvyWPSv5waWhk1pW+jd0yqCND12uSR3Tba9Ig0p34Yg4E5G+znBP5s27viQ9elvqWR0ukDTcLKJoSaRIPCD/7VUXgpS7H/SvME89zsFuQ+gvW6sXUZm4pilupRHInI2tRJ9935cDnkFN/KEek0RuycoB8jYPALKarPHkcCJbgdjfdnC4xAApzwYfPI8jfu
y6LjmaMf4sFAr0uyVM8iInF2DPa3HnC1JDZNP2mWZL+uE0QW7FVuQjwRwWMv2geSANHTmAaB9u3AGX4PBZn+cxTPsQtH1zOwpae4an5InAaWYJ7s98iWt6kYjQWQJMLslAVNAWfBt9aYGKDWwfQn9hLZRoRzsTl7kvX/GFuf4OEs4/jmVI9cQ4fETLTW3UKaNMl0xKB5SmY4grf0REOEhfsYcZkwSVGen7baN1uLOe9uy2czVB24pu9obTy8WCPhCHActzsqFgl/VQCL4uQVMVsS9AMQrGRm6B0UjRzR7vfog55N/mdLpR9+Ks1J3T5Gw/VkWlrYbfXTCMIj76IfZHTHMglUStxie/4gFjb7akIw1iT6yHpPZo/Be1tyU3BEFd/TacjXO9Gjcc0uya8UzQxtyVDM+JwWJUPQYkttF7ntvRQeaOjyEqvPeF1jBqlYZ9izaSbUE9/4+OJjoM3Ac90qvdxwSmRm8WDOsGBIFIoKKeVVAtE/8vU4kmjJ2EZsaVQRt6/PqqjgAV8pCTep8agi50HNyfHyUcvmvyEKX7yHFGxr9RcvboYEFpZVWr0Hkv6Ja35NXbQIaFOskKax9BNySmUEShXJD7H7sESSq/+3kK4BJBptSgh1v/N0zonqg/amKcJhtaemE3gGYzNiiwIVIuIhkKkYZroHaAmcWhXEypKMzRG6n+47b4hUpU0c/XId//tWTX72ORjIzdL3e6VJPGLfkC2gh+jcGysSXsXtdykShNFdZq+bvN5WMlx+J+MR3ZiSaDcfW+DO6fhhujLXm3jQqyPS0hUyTRjP9C5RoNAV064rGyBIgoSZja4JjoVR/ktOVnJlYz0xSVmwDjPrttRQHvFL3CR6aIuMjrP5Eoq8jQsU+rPNONJYt7FMY9vFdiiUcZMDTBqUB2DGutqwaNhwFsaF1qocSrfCz4dg/DIadqy0rXYt2LVJyOzoPJ8fUJAUbNsHRDhnzRIQ7FD/1bvzvYW67udbBqDJEWraBzW3UazcaUgWhxXllpaKqc+RSBqC0NhnhMKfOvLvvZfKDtjjl+qUF9swyBeT0sva8Mv9xVKonZW4r7hxbVgXdGTSMHuQq8vWVRsuRKdLFVjcMi1Ay8b64fTDWiXze1YQEBBpewqanoCDt5iPJcn3DnoLnFivC2XqC4pAhld2RKWRs+mE0daUhq7q3P4oTk+QdGlEYGIjsyOoTpfO1U1wug0bbxtBVAj7P+VfEH3txqiDr1YLsN8kRGp4nNWwkEc47VAU6+7iTB4jbMnZS29GQZwghFSkDe9xryCHjf7K7SLpQ7ywYFpW0K2qHefkOD54z3K/snY0abYi28N+Db+kLzesZihPPFDEYu+2hjYXs/TEyVV9IqiSKmTMB5gfmfvWReTbvB5lV8lCksnXv3OE/4IgUr7L8WLDztOD2c5vXbuGUm7bdi08NySnPu4FupkSuPgk79xj8Kt0J5uQWO8iq+lbaPzm1/Y6MNVsE1Z1frptHemXVIV2STZm4L8aJlG9ALezFbvYb7c7qKjJq9BXZD9/Txb5de/5f+nt+A9faV6VJeXXGLP3qQF8Esdi+6gYZpH/RKI6HgNOAbaHlITkOhohUsea117CPOVgW7gKt8UZk+lfsZU6e2TvZOZ5bwFGXn2e10zjQIFfXDyXCU4Vc1iGPeHLlFJrViSf4EVy40oT9xueHIK0sViu53Ry+pEc1zje5rsHF2ydzKS7apC/lH63Tb+f1ZkUvn0nrjW3t4GSkFTFHGIfEPjFePI8CTNBsiNsKUbwxyfQf5i84ow/p3ksKgvLfeTmx9GTreWUtufNkJHDXeox10zxjG0Eg9NNTLfA5FhLiIB4jt2dFtI0Jy/Vm+FWNPFfl0AEPYPX0QgKNPqiDzcKZX6Tu/qEg/V8Ckd/qm/1WJqBNh1CbDrPj4mJPha99SUSsqM9ACOi8pRTaWB8CablTlOQFv24o0kQWnKK4Wf6liljWgjZ3l/76xxLqjgXv7AJT/7t4TNGgA1NXgwxrayMx1Pv6HAO/bALwDeuVOnmnIRf94oxZrgcVyQ7Iq9qtvpcsXDJ5DUc9JQXb0TPLJqcmD/4Waa4NSwMtKEFSC0Bqz5lwt0zktIM7Ob8DlQ9wCUz+GSvlO+uXNYxJC6RJRF2orBK0zWnF7jHb8DaujGHtZT8suCD4eO4tziLblMoVqVLS6jRU2nO4xvb85ZdePsci5PwPl6mSlgTfOFRoDKAYRv9fwu2paAxsMKFyuEsYkerZW9fifApCQb1v6viox4CLfDRzxvcsN1EqRAZ+jVO2O0jEui1g7id9X1Jw1Dghd5j852bH2ySaKAz3aizRHq3MYPn39fV5kRDeeWlaVtWDtpPVr1Ckeleuv/xasd4n5FsZ9k44fWpGsXIC/XvsdaqkEb1AcKSRZVctmrrDa/Ag1oqzFjPicGXKRYpNDPxsUzGi+jqfSIvmEkkCPzAEtB0UsZmw1tKOzn2BqznS1Cqa5sDXR9/PkrKcq5R+x0sNrzkpfMe+saN3V7e0a0V/+XV9Na7OxZnn/3R+GqljX+bQiWskiF0P1x8Hh6VMQniqz4s5KakLm4gKu3D4j9mrLkEUMISLNenkw3yK5nPSEn3KTFu/FvT1p90lnaumS8JnN+x92+KqffdICLvybsEYS+I8H5X2kKHdOwMPiIBvrLd2qo46rIRQjvsa3EK1bWRwugqCQ3qroloQYLI9VUT11tukrVi3uQVGmscb3tWsN4iIRtMqhzw4AGc/ozSZMOdukf3l8J7meTHtb0Ud3YbeBxQ9VSKBmcIG0sYEoc+fujZlZu77xaQSXmu4pMkX7IA8dMtExzDyPNID6cp1J6mS5qNC08ztCdQ4cQxEJEetMljw7z85ZMm2WaFRtaRo9u2E2eT8cgof/0X6Z8s7gH4X8fHRjTj0Q1A93lP/nU/u/Ldc0FXmugKynkVHAc2mzGAr40GP5u6WR+XkYwYlcSQDvTqMfQTv9vqL3cUnkuo4pQ996AdNyZGVSbwneL4O/dsAB2icGkamUgWYyrb54XElRL9qAn7vg0m/4lXIxx+FqbuvQIbms3DfMvHIVFSYWaJ2jMFMUIoyW0NWgWzgwZ8Oj6tbi6qxMY3RF7qeCAUPOxsZ3BGZvn85KRAMu6X6AHRUxZoY3Y6Nt1BcYBb78Ldzz0iqW+D+TXqUNXT09Wm7oZ3UASde0LIW8bFVR3WSxRRAybmHWKjGgD92ZgeMa3LrF3RcI+2uoJ+LgZ31pI5oB0KgT5o1YPryF7/FC5aAx8K0ev4mW/NTN+tAPinJW38AJFJI6oVkkRUX9lWnLVSIM3tsmZIobNB/O+mBY0Dj6KoUPT6Ob9UwEksBTv6mUjbw1bzrM4KGSpTRDRIUvtHkvyJqAUH+MhKUzDjfB6QDrNJ/tVrdfwDPKCZLyKTz+HrvsJY4MJGYF81yS/KA/jVySRkeUz25Om3eVKHlXvqjLdGVvwCtdVtmLi5JbDsPXKzrh302z49nxrpyNDJxgSIaHHLecm4pyPouyBmba+8WmpFN0o+AVD7/A+YtKvN70sfzDd3ZZuDQR2+W2J3ejZWNNivRLQ2tGrZh41KfrWQr/w5DIr264sobwwcAxMd5BfwtWAfr7Vcdx0khRMwFlkl/l0mofDhf8fQAb3E6R8cm0PR03kDUq+ezb4hAVRXX8LY/jNcex6Mliw8V3gbhl7ovcUKAxAUf56qJrGFHuRCftqVBMIve0jISlIxFkfzWv/YCH3KuOZo9hEDMBzJQfw9L6VCG5MHx9usA5rGrvbcioiWuYMQVm3uImjb15+KKnYYKlmz9GqazaW5r8Gsk7h22mCFjIX/vyVd6j1oZvObO1r7mgWI0ZfQENYa1X76jguveIjJJJXTM0ZRxYxmPTA7vtlVYOpqamt/aHn/PkNEkVyBn6i1G76AsQgpDE0VMY89F2Ji8us3ZVVtr26ZUQijKrAvwauaYcScNq4aKzvsfePYq0eWb9aVrwoESKq2wVP5atqFhOmIU+tCvBtbVoj8kgN7mueG58Rz0Yp9E1BqoDLIzJ641LVJ8HxN0QhBbQ5KCeYJykRmnlZ9SCbgJBXip/NNdcsc5KWCrjCz
Y9h8uOkqp4BgbeuZN2PAUEAs5eO0m38QsxiY+O/oGx8XkUtuc3Zb8Fw7wqMxChnyhGk/shF2tqIa/lFJfP67suJj6Gl7RlvDgZGASwNt7UIAMi6GhD2DeXPCXKz+UM4+BTGAtnNpF//+UEggtisajtc/JHGkkox0l9rXA7SA4gw3Rb3mn+T7tsSLC3wl8stLv9zgBr+MFYv0fm+x3ofMPuP+q0OMIqDOPdfPn1IeW0a3FQX7OuV87q70tfXXYqv2M2epvYrPV37oY1xQzo8yqBylFGlM42BqE5pmNXeF0TdY+6DETzOJLXQaRLh4NismAUgisi1jVmaD7IvujY2MvDhECA3Wb8WhSB5izG3pXGv0Z+fHuJuWESyrdx8MF5wd6deFWrICgQt2IMb1+34b3FkZO8x96cz5a1AqUG3P/8e3ytClOOw8SFn9NBnUhpYqAChNf2ZYN9Rx4+Pl63FE7jwQoSzTI/a0MxIgOkVsyQuqe4HTvVahn6CNw/UePCmZOR9vxkVwsFXsWy0iBJ2hv1y2v8FeRyL3Qa0k3QDapiB+0zSExPsMjCAP/SD+lVbuQ4O5hi+RDsaMvLjy78Oy8C/hKRp3PWtt9QiWFdFc45ZLNhAIeMeHHty6gfYCBbRvSx7A8OCGmXNTKXS4XfG9F4KNDmBpV4he6F9gpXaiGF2Nd5KTZAtSifa7NoNGURzyS+WAbRglouE4y8e+blizBlS8pPtU1PgHw0rUYxGzjDxPc0npnd3ybmBmec7rStJ+4m7bkEINToTsYJMaLvb37iR7CIfq/veYmKmPUUMArniTwq/sQ9ZnYk2b91wvWBwb66Gco9LYqyMN6sKW1CyMG12KtM8ObnNyyayGS/DjEpi53ed15CI7GtI6qPRnweMRnZCJPr0cFRQYwzw2TXxUSwtEW/jUNj2hkIdgwi1v6fz4qBSARTB20zBQ7oGskCwYnF95vQ2toPZ+J/DCHxHY56GcomGCNfPUzCdIGe4+fqTrnkxoZy07C9qfelJMCe/fJHsX9836Z02ZZv6LbwcW+YNQIYcQNZ0geNs36ltUMfSGN4bpUbCruGo/TUoTYREA/b4BASb3H8Hr88Q7X3k84fDk80ECt1UaHBP+AuKtXyXmQmnp/azNGsQrZoma4dehGeor/4047Mxd0OsuGtbuE3yBrKQQmReK9xpfchQ1RGm/SPVUuQdZlD6LNzklp5R2aC/SN2gmUbwoMDVQPcLoUxdW+rI4G7QBOdHQFBC/O3eF1wGyUdZQdMbCDHc/AouEjykiQ6gEgFNxExoOrVdrBd/aCZqV48GgQV9BJEBjVGyGVMkhauYp4lV09VKmyuG370u1hSl/qelF3j7egv4w3Y+TfBJiOFKZ78N+ujMmXHByZwqhIBdBMkRXQUTE1DIFn2az82jQRgfqEovFH2LBkWfSlP40pOKAIYterd3LSEaiNFsZZV7pnJaWImnZAWX8zmQakvr4bdw2r4mlcmK/Errr2C5pATdhUf5exhEN9jjViYmjJeyh8g8qa6VtjcYVCbl5z9eUaG5qOACy4auGisld/5enlv4+Wm8P1DeLpAUCD1H57cMDV0FMD7GBg3goUCiKICXY2thCa9//6B3Di0U04CCtmQPHgV+QmaK3Lir/AFDRUPLh2NSPf+CKTmaF+iBUI+wV4oJPpR5ts3NY/bhGA6Fv0UwWLCNwAs1XOHNxI01UEDh0mTmM1Uw7QOhR4fAFjJfmIWQYH63GdH8rz6D2uBVnrzklOIQgKnPW0FHqkFZTT/x4AAT6DEnGlkmE9Ea/mbiC2ieHhiWiLmFoCR6foCdisuZxLj+p1ahwTVnoLEQ1wpv8wJRp6SfiOSWT1Rm3hCB3cvVjWJNjc/yVloLI3Hd1pFp+R9Hy2rS+VWmlt+GMVYVWCCjTrzAGw1yZA7Mp55LVbnjlL7ecy3sqHA9w2/+JKYWUWcA/osrjTNvmC+LHAdCOicT0x8VSns86lXhQOBSjAB3am2mSqkCx26tgj54odZzUwpAJ6xws1f+J8Op1flV/9uZN7CjsvVhikbahcEHXHz4dTJknnngPWxZ+wx468zilkqkLQcnoykagM7XDpshJRim0LuDGdR9RwC0B85JXGDQlLohruLFs+YntVADZahdjdYiOI8L6TtrRr6zVXX5wlBHrxXLm4UbbFjzdI9UVFLIzLA7ZjM9ZDDP5IgDHhUXy4iqcjERrq/VL1p457lDkvVWIRgTgCmvOmvA0FuwtLxBAU7zcuxzYvzyK8JOpvfGvxQI2vJYXJTgTscPbAbxdWAYBWHYwr9KDLPbw5F1AQYQk60kEV5ifItVAlU9sS5jn74O34yF7Mwkllf+sMqM88RAwJIjlp1n6RFdfnzrXpAf6QD4hY9qEPXy8/XQL9CtzavbwWVH7di46PolFbBcVWrkU19+fXgk2hSbBCIK01NrNNOJICHcx5a7TzHbd1G4zh1+OKEA5ZIBMz2P1uCgmerejO9AvQRDNUoBr1K6J4pyJGOHzc5elyrCB419gIIsA0+eleKKLEwjhgXudUC+k7Q5n4F8Bam721trRni17k+9qQxKZVuNpQXWRjjsEpzMKEi9+c/VMvgIintg/3q0w+MjGWGEEDjN1i3h9c/2t2YzLOVPn6oYxWQIOWyZgcexy8XCcIKj22Upef+jMGknFAneVM3o8tq8/Eb/4Ovy4928qPBrfdqxAz8/HY0Z/HSEvp5/T+SKnhmzAu54Lfn9++2TyUAFnhESOFPlbBrGMFkrPJr8Z4hY34x6FxZZt4SfeIVFl1jcdmx227mp2cye/n4jXgBgIRN/NgfX11F3AtG2ToG4kXwFF+WPDo1jGqHnsu8JrPvcp/Ybg/UcAv/aGdSTjmmLAhdwgJExFDqCxaoTeZcEK6s4jRSJXvb53K6aoUB7ZxOA55UdFIH82z5sZWQnePn1zjWj4d29JBY0FEd9bxgincIi41T2pSg1Z83+0FEfH9ePh9PDyUVrDRWTKqZ2myBhJDzFKUeKc1upPCAI1hmZRqc3ZGEhVs4NtqStNjuOzI91lo9od9xSfqk+RGHyQVw9TcOYd45UVNMOo3kOaucWhtcduQfPP5DI7Pc/pTgN71vXFdGflskD3wsJeJhQxPqA0V8L/KVc2bDCXjirm0yyxS1y2Q1zsC8Cqd/RnF0wYMmJotkA2Jh4dkUozGdzgnQxqjKAzgKX3JcHDFLy0eCJ/7eMLT95ciWxp5j87oYkhUXRHC1i/nTVTeBfMtUA2T055sh5vXw9mVrKSrdZCSG8aJr1kiKKNZPeyY+7zzj2g8YCtBNOB0D7/MeSmf2P3Jx8TUqyNU0nH9FAgD4pJdEsQXEXvsAwbB5drAJiEqR1zXEF1nWWFagqliagMvmv8yOO/kpGliJSJ76RHgg/aoL3X0bqNmXJHP0bpSyR+35phyKejrqPah2HXku7mkShzlEbrdyEZLkcf0rxObYFezOCaSzjn8fCDb0usUyIb06t2yghvlFgKAL7jlHpgUq6O//+I2RvbA3nu4Wpuz9jbd+of1glQDfJFCcrBNgmATez2b86bPUAjj8k4obS0Vv9/r35Rk8XzAwlgjkByw71niH+7pp30V9v0t9jczWzd4/SjMBnMIZtheyGLF6ICkIiZYbH+JniLZGYOX77hpV5scuGmEhrDJRQ0MGyUtiIFfh9aetz67/xIIVeD74gZiJhBAkSV2XlUgHbO239M99/CoPN0//ncqslbBzFfu4qlicPAP6FBpJP9E+iJ/3X5kr++Y0f8MfMDHWZOdsnM0Bj4+qBwlKbxoUQEL4Aj16D0ELpIKmILWtIgLqpxfzhCVRjzJbqR2XK1L7G7VfgeiCnO8wTyj14XG/4vtENWBCoqr3tIbpIAo0m6sVOhYVVeIuD+Fg7PwcN9kMz/otnKcb78HmYs4gZNNBoXOFOgR4pyUQm0HbevSUkR2n2r5FU5fKLe6JVM2InIgZ4Z3Ue7+1dc514/pr/7G4tkER+0BHMr8w2lGpbT7PTVtXkdpPa/9cwBVHOcZU9I/fDNyiVohbttjhPrJO6VDjP7JPxLdsjhEdrjY3hkUYpqVBXcOvFCqrArRpxgfTjj
3Ck8JX/htkuhIcmKTq/aoRfAuNMUfB+Ra2F4snJ9lrCrRse1OdZUtJ7U5rxER8cZmgB5Mw+7eOjSOwQ/9l4/hXZAHaSikMPc8zGZXbL9yRGMg2XylSIZG5hXEAOX+BlGS3/nYsF1ehPoTxJLVBLLx+xqhUfcdKuWKnz9w0nMeT1ueE2GDDNQUYn37Lm0NTYVbyyhTJb4/98zST7Ek2a7px/OrAFuroFHGckBAIx6sP+XVO3ftwj9fbDvBMglK03x0zNE0teMF/TQa2F7PlsB/IZV9lliBB99vh4gnB3nuQYGRlxQo2wlbZ3Ids6aXxwPQt6KmyZHQ0VLUcTT7zVBfxUkcHm4mnNqlnM4CgvH59T15VXGHEnUaaNB8zrlN9PIihSOKXeHR7GUiufaY/K1xeUsKh2Z9sScP/UeEb7uacU1KiwOFpnM1KBUH0g52untAzuo+Ijr+qkALvjTZEfcS7VM/J4PxFeEapsMWQRDtJKBPF0PUIQJOfrsL5KLPi/3JagxV9f0UAaQaAeZRvGZUk3iIH1HS9u5QL0hBZgoqAWeBcNCC1Qg9nmnCtc8CGCSVpC7lT8Nwt3BtVgTNLStTvYsezAD7bUmfYISRHQ1ZGy9IVkfHGzbM2QQxR7WB6Al9OW6KeWkZqHGYTqlIxyl+UiqC4AKAdl5Iy3xtAT8SyF5aisV/3CV10V5ABE4wzlB/IOCvHDQwkSh1RdIXc+HaxBgDbChQfvqpTAaFZuNKJT2Jms4ClwSQmZ8/gFYAvGgOa19NogZWLgOZIFcNCN/IHwtNybl27a8y8sg17neTiFreCgFMSXpXOoOGPXka/+Ctqxm1dTRW1eOor/gdzCFqcPy46jdeuIdlliDLZvIVvOdi3qu/I3584b+U8CqaflSBjCq/L/2yoPoAeG0iR0wLp8V+Fqq1XZGfdHSYKNzauirgLsgD2FARbeYwTg8qS2wNlSoPrE0EaddUhFK3Uul0UMDD790THRtLOnympy+uZ9D4ZoLEKn/2tzipEVMOd0jCNIk2QVRGh7VgwlxRpUtqc7hPr1Th64l/tJ6ABuluwN4FZNF6C0vBNA5w4XGzaYgRR3d+09irQYxLi3JGmhr5I/mH4v5japyqWbhioV5UIJmGEbMTZFpU8olnPVfvOvolhVoKtrnfVrArI2cYhSgMMCg7+7PcsgRKfOZDnQm6CFPmPx9ASyEfJe+/o0sBjSfHtvm9jlMt/wT8arQ0awY+ceqB2WUNY4Cv1RAoo6KxW2fcz73rghreQL7lgGFMt27c2uEVwr/nTWE3lXac/zbxF1j7NDBXxU2YFA1KMEDRzyS8XuFyitaNFMZJR6FQfv9PRcZrc7St68xe96xu9M7i+FooT8Ahv3fh+pYxjuyAIZi5YLoSteXEvBYQC+LxJ33THhffgUny6BO4mF65+1Rpj25LsqECrRp/t1fV2TPEl/BT/rUtrdDy7rSuKWYstItv8f7/I1K6SXWqbtNQp5gCh7cFTS4BK02ir1iHXZ9r7tEeLfpp7xq3Utm9rF0aWSYsoIp54CpFKOKuSHJp+gFKdA7oWaUr8+beG27w3OzPqcbyXin//cDMQQWs/oLiJN8KKjxvQD8GY/Xr8dDI2/8wa4wnFOKhB/V9bIRt0pW2LDrFM3DU7CXjyIVozm8StXl02wUQC+bIltjOTVILVYY73tcJtRpB9n2pZq0tmfRhaGQffstmxHYRXTnjaVcd5U0Gcqto32ys2yqGCj3AbpZbcolKP2LlYis48oxsvjz8ddaKWl4BgSjY44c93ZrpFJdLpH9x6QaHWjZvD2O9GRh94tiaReRGcI62BqaA4qsEemNaW5GVb5CdbBpgy4bR6XkIXbX6JGsGnD+tUesL5Pchc6mgR3b/gxI7/GL7NTOKGRyGvvPzGcEb0htwxaT+b54BmVxVKH+0Fasxc9eIhINFwmwaDjL72MfDI65NPvh0lRGSVV4JC47zLX/qzxbFSmqr5adQYaBTAcvVhkjDbQrNQJb2/Z4bthQhPVsCoauxSCe7hn3Pj+4lfG7pBzy28EG0+Kq60dO2mXiF/UqI3D2+MaaY5PGqCQnxEtAd1D5LQdnkqm1p2jtNS/87wHW7CP+2tCGdFwOJXhzFkVUWccuNv3c2VAcc0qk54F3nvfMwRjhxMVSYLD9Rij7M8TkQ+IP9VWhAjahKyocHrlXjVw860PP5lIZV/1GtTI4YnKCrG6gPTmKw8MqT5QcJOQ2B3QF9Vwip6jt2UupZfHsknoV/dLnZHKEc1WCHhyuueq6iVNMIq/UBF4fKJdUc/De02i81CTt1FG2CmSHXMq/jaN005VcMOqXfMRjz+eucg/w/qhke2ZKDWAsNcpung14mRjSn2fD/u43ynpJSg5i95WkMOn6xLfRmNkC9a47sYiIdLshN+JdVLtvgumoEe5z9ZMpqIs9Y33u5IRzONnHsNuuXxCgZ/+9BpD66aOAjoPlA/YFwZ/V/+1T2olw5+nKKIgLZNJ5YJLif3oNp4U1/AzEDK6TxRHu6/N0Lt8GooYWZKBwlv+MhwMWG13qoe7EW5JEHY0ZLh9IG0Vbd2X50lmUR8pqC4tbZy1+I7cZ73F3z4Vv/uBM3Bg3WbdnfySPNRW5+278mNi5cSoN1rsNhR/W9OsD9yBb+tCtvOyB73JnNaJKAH/aXRCP/xMzRSX7HZcrGUu2OeQ997ADmGoG9dJMNKU+rMpFzQEY5X2Ib5uwaC3YEvH8cMO1Y6EoYcp12d27Qhctd/SO2kbKSPp/9lWK1+frmzlb6BO2rOStIVNG68OwfgoKyQLDJIOThGgivxftQ7iAlVbFxdjT9gszQ8IHDnxpa8hljutqk2ELk1z0m+wu/hGk2vHMIb9bwAd3tTy9RkcHal5vKJHzqx6O9dAa/BHmSEnjoMu/D3Cc/vNMLUnkc4dJKJgCBWb+QRYswUzTKWO9NhBMysP5K6LqV3KuoKLwRaudrCeJ1QHBiKKv3VPsODaJ4lcYxj7w53Pptijpwudnk0U32somIFUIEBp9piJUjqvl943hib0tURhLb204bcKoV/9CSME7Kux5vpcDIfQZyibugG2k1vgbLeRFb8uVNkIzQINXRHMjdyVMmxUCMlsfrbMFukz7jgrbDB/3A8mZbn6V69tQjFuhbhk3BIGBdmVtFiW4cKchXTJdB41O/kXDyiqp8nQ+rV47Z23SnBdN0nFomVEgE+hLob8tf1gvhhmnEcaOoOD8I4GUbL8xwvloUq+qF1QQGYARsxMp5mLj3T9O6ZGOLF4QFD5hg4TPGYZpCUfa90GMPOrwJ4QUxLB/IOp2AV8c5ZhA09W6BVgMJVZZvmSWoLXId/lZijLk+usM8gyUo8+jMaEzfWXJCAwB84mblBhTVGtIVxnCncGvz9PnvUludJZxTvJ0Or9bojBCb4bc1QmCfAnQRPeMySN7l+9PwlMHUMClAwG6CoYD8jPPpO5pooapr6tGi8DpPwRS8J/CJUtgtwsKw7bMoL85CngwFQuRE4HtpnvOq3MVsi0MHGRDu5Wg/03CnbKP/XUyf9cWxXDfcrT3KamzstL/38iY7FZDe3rxa29vGwoXdn22OQtqKYSk4FSwi6/bSKk7ngyvjn8vYSPxk8fA7zAbGaPcEglFtPh/6YOZWqnc+1/qyI9Vz5eLvAEUiGCiCd249OeXDG7EEdHLtDT9HVwEWGTJ+Wb4kJE+R90NXlMI+7JqzWTlfrKhT1gVA1Kny34VPHvvMffZvRKaUxDCBBQFuH37j2jh8hH3FNjlF0S2QWUWBNaopDQ/Znl/RMSClEFz/dFxf16LKpuwDjYBQt7NXfylykJ61QZUGQfjQETtXma7J5Q0PI9Es3frn2cpfI2WtSq885zF0mIdSAR5NoYjBBLpC82QaECyjcHozbm2qG1Ukz47JHgrles7bqkuu6aSFfiqaJOdd7yZkxfXLFSxLDrgeBVOx91SBDKNDbmEquA9nCJhH4ba5/ROU+KRXMr2+YUggY26P4MUG5SYvxrLNGyZxWJzBtUyTpcY9Fjqs0s08jZbcdFUqpE77QigqDGUfk+RkFcqSD3whAUj5HW8eKfxGV6TMxojLuI9
W3wIJLCcfflD734TOehr7GEFBtfKlYA6gy33jdaYE76jEL5rr/3PLMjJ6bKl0VhMZoEekQ4uoi1E2UloTs/+dBQ15qe7/N5bDjD1trtnGbWshPmgAftqUwLAT+MPq1HTHrc4iI92hD4ynvZfyoJwKVLAAfPCyrSmmJtWf+BuA//YRy/+oVdsEVCPEDniAUw1Y9Fb9n2o3mdk9gLN79uhTXzkGAr4rPS7yOhLHAisZ+cVNv8CMBiIrtv9e1dez4bSPtTAWKoGNYNOCCmiNdlafrtI6a/7NvGKyUmEgHp2pJkzGe1BELE7yZv+Ov6jpDhDsenTcIo8mSeVNVpcDhANDKNmBqI4afB2ByJMOdzfqOYMFs7hOkCE2B+bWUimITmIe6ly2E6ohfPuSriJTWvz4MWunOVicV07hrFpbOO5esoGnRgLFFBMHLoHsRSKZFK02iOOs+dhKUVwWXEDdjGwgU61Y773oa+bVwA5ewqBioW1gRBcnpVpfpItfuyRg/4jMoWagIwTzaECbAarGDPsNZwAlcG1zyGTO4/zzM8Qv5mjqgyn/0kztQfsDJYW7eDKAbNBmJBQGERX6tW2llbKCOph7DR5hncnQgs+EhGySAdgP3ZBXit6ZdCYjL8ECyFlUWJjE9P0AGKvflp240K2fdcHQPmrbptNqUIpE15FvKy0drz4yPx/lJrs0EBfZBbTB7KoS6Ou8iPzABhwYKPhZ9Lj5wTZjdjzGesTsAVic+vqtMQXwnXdJfPClRsWXrfcHaPjOK7sebkyoCpbmYEMTnqUuAkE/Rx61OlIL+tYXs/fhiw3BY3rdEDbHGrUAMpYpugmjFjiG5XkWeEHSQ7DLDqFU4eZgX5bo+6hcZOAkTDDg5wvxcWLdqJat7ZPaMkUXWL97XmxSR6M9j9kg413ML2qfCZ3F9fuzxnDMvSGJxRshtaO4x8ZmSLLU0NaVngopheZCT2dt6S4JuyX8IsIcB68vUJ/nXrlLjEwpQubDEtj/20qhhvR3MRvadboSA2+5Wy88AYRdux3p6DB7DdRJN2DW4lOpOJHUcKTgK9y+qr/KbVn7IsUIyHjILsGd3pKXVDCaqgWx5SApLDrVfbiSOeOW6Mg7Vg1TUODv9/ykwPAQ7V5/oA3XcC2I0PtNrQP2zjaozBrrS1JUbR6nchK3y+DZaMUKn1BLtCizyZscPpR4CUsvyJWVcMnecQRcpIDm4pWWtSo5v69xAx7GRPki7bUhMyb629HxbHRURZenkclS7iSCYQF0t95vr94JIl3ml7viTEAw6uDy0OUQg8WmSL+Xnwul1gLCSnthErjSF0Pu24gUB1i9mDP80lE78dFu2r0cl/qfxwHQ6Pbblj77IwDmEMelkkkUYEcvgSErrYT4nAx8hwepQJOKa5ML7V+NTy1jpyVE9vLq0Mx+5CSS+0Ih4bGhuH/+o8DHxZkv2gmht95W88mv4fKXFo5GrOg+WVMukKSEYo0tWMdAM2KIC2mW2/P+ersat0Lr/qODnPTPeVimn8sk2k0+I9gLerUbt57sFbj9sBQaYMfviRn8JSctl0VkG4vMSHmZH2hVfwhSnO6Kbi7RGF7yZN4SRkeZjmdYn/Bh+5++djJTn9gqZnBlSDEUXZpCIKn7dZhThJeLiuHqFhCB00+a2YHFSAeHKarKhs1kBTCzJ2XMI4eqKjMbysQpv/rxREiyBLcfeww3cZcUKN/5Rq/OdxCNKuN++1Ahf00y5YBGsWJlVPASORpq0zvajiDIv0vVGwrcgTemvWK+1ljb9bUL6GFujh3on3rUcjTvqhzpcQJ2obh+n6nQNUcxLYqt5bZ+Vfo+44yUoh8gmZw+t8Vzfcx0HVO3I3a3522VCa33iw1K/Qg8pLW1/1PySuGcI3Z5oWvIzoMEOjhELB7kK7lrrUxB+93tlz+hKGRKeDw5xxPzo7A++uDA0l3dhKV01Z95meQfRuuVJZkkPOz0JezkSQvjX+Tda4L731aUGrFqiV0q/hAV5JC1B1orphixtbmEAQjq39P2A9uig46T0jlYPSWk58FZsmYnpzuGqezGYjnujhxOT57mjSpD1Onjui2fF2EEirOkkx/iyw+Xp1APjEQvIBZC0wRHqf5wCxkpb0ppKg68JPv/egpiSv8LXTBXy8WQzPHlcmP3ZJKVXqEWAXg9Y61FRU40ai4j79NMBWz+UyoLaHZFnF3k3QEbo1XMn0QxSN7Cuo9kQ0rv51HNDXdBACAVuWwFz5LLpD+gBtuRe/6EemuvT1GZn41JmBOA0/5M91QHrEIfwsGcPcv9DAjVhkP3BHsFNL/4cHBzsIhFDhxRKi3DH7/cM7kzrJ33MNqaXq4bfi1WkoqHL4FrELVfI5p9vJHhGPLem6rgvo+x9MlAdDDnIrn06+zxQHunZt8/P5cqM4JMGtUvyOZC1BfQvRoSXo5pR/Hceyhs1sTsYNiMVfwH039QpGG8GpLOqOsPEtLnlmrm65rAxpTl50D/dffHje9zu8aH0amaUDrfW9kfw38yN1VKOeWADJk7TsShr/rd+r8vEzPgpGrS09LYcR+2EsTtmO330k2j70XBTsuv3Y2wZ6BVUc+RLH/IV1lQoG6XX4X5vik9H3Bp476BvTVMlN1R+wjo7u4IK7pef2P0bIJwnmM8zQIvVfCrr+W8fYKVf2goizxLNQ5PT+XVqmHppphVDKBoefV8ayA6b1CTGBciIxm5bofRLisB2gYda0duZe3qudmF0gwnpxkfF3zttmlVFF7om1GVWFrzdS8yU0KYs3TlASA3ehDAURAj5mpRxgG4K6ks4BG4W65D6QRXNp3OyuXplzrNg8PS4Pkb9crTVUeheR05iy+3LhkBzLj9vvGARJTv/FRSc+6tSObNSu3ZNPWzjyAl7dEQr7RejmKxdLl+Y38dfPEnmrRwNbstnEHCtirlt+KuhidciFbdng9M2M+Di/QWd94/Otwv4EdT0F4gkxmv1MHgpvLr6pDXk2j3laQyX3wSjbzO8M7jw0goIP39zdGzfvLAwhVRSkR4Jyy/BxoPYKn4EZAYB571QulCk9iuI27bTM7wXXGMwINh/ACdpY3nN0P1oO5jxRdwFNvM5WwjjzI1tV0fjaNXJMSc0BYAtM+x8Q4uB3J+w7mGbHNINZcXSRYxdGtyemgJLSCTK0knE5aNrHtee0op3woZLyUg/YZ05NdX5+g+H5F/pIbCZXCshdaX+Y05ipXoQI/lHhj/GcE+D1ICbXx3GiNCF56nF0uKBpzqbQAjE0ZxvKNzaxrLKIdgBBMA3dipyVFDD9MxJ74D+c/AKYuIPQDEnKZysPvWtwe3KwzDyorT9w3FCCoVrVkvPmrdHfTBPV/Sa8vJvXBVn94cYtt6hizjjY+uutl4+3YPWGxfZtiQJewUWaLK51XTs183QOVYt1oaEa9w+6xDPe5LoNHaBzrAQaGvm5Taq/da7beR2brZ47qhj3puU8uxLuMpMK93r9TIJwNRXeR5I1+Ls5YJNYJX2+K71wv8hrHP/XLrfA3ZxJexm4vYxRTORXo8bcAGumO5vvbxb1ldj3XrezAVI86oAkXevlYbrmjHeCaOhsbyFUoGiBhuV+fgv4hWzzzkTy3+rbaQk9e7TCpLIz6lttLLuq5fXcGU1MwBafYjQ133jlP92G6ItG6tvEdeAVxvHAs2xgIW+cpu7yU87Ccf/hX6A4qy3MgE3PS5SgW6tqdJCL/YGN7DCNOq4g3/3GVhqDPeKFN1yJYN+ySOcCAw4bLG9q28wkmMLbAYH2dDxCRhniYhs3m3gn3HnissU2mVUUpT6a7U9YZGqHd4g6fPCFf5ymU4IiScRo4FIK0cfnreFendK9heXgpBYBcKPaj2NUeudT6nqIp+9ulK2AunJyaYz2hvcezEIqbABMMcwBSHJp5VlX3oRZyvdejotrHcJnxxu7m7pMMVOtVu3UI1j+WW4AVvF5FfzEZ5OqBLOifmgAYeRrJRG+lQCc8L5JrWJSRoMZriqCS2AZLBDXduKli8eDF2FTRQMwySMzLTvmntNTd3cCJM8gLLM26K9Hlvyv8dTx6cVJ4ZbyZ3P8gK9fJOYejoS2W3L3fpgjX
EbrgVfw/qIcAcMTKHAeqriYtZoTqs9E5BH1VL6eFDP68sCRI6h8LlLcvORezIXd0UiMjq9M49IWWJ2fvT8dZmrThbHDyc6LEc1NTw5QEDYMWxjevNWktqcxoS0Fgb4FuXN40YLMjZsekxHtDrQqI2xta8NNXLqcpzsFJW1eJz4ZDF9Vih+ifYZDe/hi58gCv5cQndZfrEoWss5N1/OaupemunR1bdE1wMvFsPN/kiL8UtZmWZ7gTNWG97BmKjpaoAXtep6Wc5bf8LNH1WgSqhuAudFPrj8W8eYV4Qx/KpumDnIfdsB+mCFt2aOmQNoQ5kvFOj7uIeDNgg+1NU8khEafR5IzYM1uIi8bsOMhS5ini6VrFbHmiUPsfH4CEjLoBWIcvZigaxqYXwGaPzaJO7hjztOobKmLrkVmSlxCzoSnKulXGFFSM3B6Pyc6WiVyit0Q4Cd9gFDb0lReHbbBkqObrqclIQw4b/HBDpH31Szqskv0Rzdivcw/tHEJXLwXqY3XxPhMobvHgOQyrL4elQy3t4Sm2D3MSDc25oy3bWFbzWzfaAB32+WX+32IzB7yR2pDzYPwBAK5fCT/7uGvggxk1NhiDZbvb96CHx+B7UExZ1u915s+qcSnsfMnS1PkZvvT4FFEi3GaFr/cirnr/PGSoUEDtNv8XebgIApvwvSv1DuGMz9tOQuCmvk1WfmGQy9z9LUMqYXmNyHkhEqoGb2TvbKfg/+wfseK/mlpdngPAyOV/tp8WmeYjWu/rX2HFZDK3nzlu36ZCNxjGtrDjUokvvIA5kN2C10Y16BXNsItmh1mkjITOMi0RuE2vOBEcGF5a1XWYdWTVxwtMCtmUtu4lDDUHgHlKBAE8Ph3IwMeERfbEEAKroD84KUfXefIYJqiB1OQX7ZtA56FSLCLdrrQ3wM8aXbMXNhOgoFZXsWP2h1MKCHuhPivTFJlk/I3Nn55/PQyPQOH/dvQkx7V0RRnOUe56MH78snkMdmpyBuN6bR8TXNkVyW4B+9E1J79zQ1iQOv+P3iFZ9FCRKEWU7yKXJxsECzozjHyDNX7hoPNf/QMC0x9PtIMDuFFTnNtoxWMnrNRPSON3jo6jzw+e34ybhozeQnxxQ9J+u0msqbRCGWFuR+XPD0C8nbbdjpf+ZozJqFMhJ9NgOxFQnEOgAVUSVZ4ZwSBblBP+VWOvH0nqVk5lO+t7Z7m2F7H4bhT3dcPs/cE8uguYOpTwVDUfJMIW/5DFmaxg3dMAXbTxNEeU0zAc6qh5IkCy4urrpjjsUvX4UhFLH97x2GMIxy666DRAerNcS0eeU5NPZlXoPoe9t+OnprkiMm2W/cajXTWtaMb4zuts90qo9nCQ3v+tyxjsnsOqUv+uLFHAldNueHG8QiRnfnZa6Ka8E0jseoYRASZFGCvdifHVAGCFXsmOUnEGKzCgc7YT2voGx8tpHEXbB+VqGj5lpucuV9UyTjXkbUXsPrSRNrnguESEIeaXk294TcYyNOki2gVgfMq7Motljxdxd4uTDJ7SNhJRae9noqGN0PK/BaXXgyU9GGVN7K2JGC3y8WDAlL5GiGUVjd/nNJ5F5aLWqXu8oYerHF0jucvJbI9t0yxDsvEKFQsrNW0l/lLi7ivucIQcvAJ2xI6XZ/dFvPStPyIzbwgcQJdfZNx9AvxRx6NyImsA16N5ZFM3g9gymnzeYqZ0LIZB6LTNg9nAQ2Iqv2bDbZd0+KQsnwvoT0DUjvJBddPeuRdh5lohu6Rib07Hrt2HndH/ILekXCmwpQeRbVY2Dyt0ETMyZieIaVEohU9dEkcSsER4MJOyN5vVaKE7GNMPHGwW8WCvYsrOgODVHOOeqe2UIrtclGcbN72fATi05xx2Ex9jZzynyyedoau3AGfnM+vbib1QSctzalx6I5MHoL6wW8imydTO637x+3LRg5SXR8D1VqVuLjP/Z8KH2kjrYIR4lQ+MDy+4u3q6FtMeLT/9CipMe61UobpohkmLbtWHT9WhfAiFh+HWg/D8GJMD11G/pYL4F1g4yl2cGMLsbFzn8LI3d0spUlMoO4zYZj3CAxg0Q9LhfExysaokjshIMzZmSAI6E6X8szNCFQCCo2DOBpw/GCTjwPZ+4E/40e6u0eqmuX/yISTCRpnHIarj70TLSFugr/Qfjw5t4fWT6DQ3hRXTVVroxHS/erqMQwOzbZhlpp3muP48OpkyDLtUTtmDmqCS06GM/xXUpJBh1Kw7jJSJD2FZaDcLhfKAf7EIpn2sWJLvnpOpGl9/y5ZEEyR618ixLeXtfQ/ijP93yXh/wnl37hILIa1O9Vzkhx9xziOJK6cfK2lMfXj0EGza1I0z/nNbYts/U6X7lVnbajnL/SI/U/NmEH7oiQJUHsbhY6XR3yYVP0xqAX5mqkxxpuCu7MIVSWM+9fW2IJfcgDfy3c8Cp6GbxNbvGzJDkZlJ9zWj/sSoTyaWIxE9tjVtTgcL9oVz6kPq1yxH7GbIPaMJBgEaMcI7z/UQAxDOEbj86tzieSsv3S1PPsDz2Zltg0ZVxh6zdUwQWelqyV1BUFWMcskGcyxVO8JYQ8qzWRkMW7HWyHvwgJ8FsMc8dZyTP9AfaqPhzhdAHOF0eCwwhJwJSNQzY3uPHXugtGSq2K3hilqUSTxMpqjQof/+LTrjd1foZCLNncVZIPfhdyozYQTyQq6u5YDjQ8sT1Z6kOUwYxBIcjTjhD1evwKpEMN+BZJ1qjOdVbp2RhdBZG3CfYLRe3Vb/h1ZG5gPKOLFtOMXfS7bookoZy+SRN+rgqy0bnwJ3cffgFbMN4KL9afyUNaf3vha89XDh2Wm1pxdoCnmioF8DKc109lcTtoesF7OAFTvN/vqRpoXzOP2cjmQ9zNyem/OPaEnWd5N+U9i0CkhLPyPYTGUiaiKffDN3oktCADJBYJVKVF+kur325g6q9Muo89yX5UlEV/wU/aSXWfMSWYywucaUj0PW6ooBSCz0K4lb5bCEI9jDaCkQ34NiWAS4PgnDlZtV7RVJ/kdBgoWn2ZwSVI2GUbxT8sksBU7Sb4v5v7HbmuXtCxUGjhgWH6qgHSzQX2avRrAmcsPpFWTjo2xBCWw3qD8gePjqZflswR6FG/euNTOaANq7XuK04flf9DCdPpn4hbXbk4Xk2KZ/KKjmFQuoRHi+RFmn8zXcDVrL2eeN5iX+rjnAcw09MSYky0r/3I/SC/xDKNpqHhfEK2qVGp1SgGvVSZk9yfEuQZQUXXhVXBL3r0NTSmuafrPIsuygE5AGXXFNlJH/zaeuZQcw3uzdO++bvH9sXcFIlMW+LZaTYbeHskwdL3ubWw2820jfMpxHw38izdo4ofOEp5SxG+nl44SSjXNoWwQT/EJqN+qvYtSVZ6snPDXepNa0WjReR/HbWI1MeulAk5Xn/Hg53AQRkbJ7ibMiVJyjTZl8zGxzQVFBgRSzRi7VbCWZFDq3Mlf8lkv8oqCAiwKTaKI8YdJ5UjQcmuvSfqz/bHA+a377HZGL32IDuBvTuIH5m+lsaksUZt0UjEgTXhh25TA7GWyJbszE2JrY+4N/+4QSga3mp4V40v2NUcULExULL4SsTMCBNrRctEuelfN81QFKYUvEwSmFPev9oM3t2smqktyKMwAsKq9e8DOm7zoLLIJj0SAEZqGuUxpPrLyAqWZKf7Lk3GtgSftrDC7XNyepaP7cbeHhjHp1fNQBEqk38mTfbYqnG7lHW7F1ckvokaTeR2fddgNaw5eGH1RpswiZRqi1w1QJnZegGjJACCsMcLJ8EhWbn/9CKVLAcwn6rV4ylrwQIZ9FemByOa4lPFjVQaoDKIW4+dkvn0TW83jb3hONp57rtfBkvIIjXkbUuPv7up5GpSNVMZTckGo4dn/6/SJsga2fqZjjKAaJA3caH9HCxDaGZfgHfZnOZbR/B+IJmrX5Hgdlb44V+B77xqGbo6mwBR3iN/8Wj/ZEo+n8k1cux3x/asvsfGm+7WX8UsqyEA/eCNZiQiFtp2oUtWxSqx8PIhLD2QpzVfCI//t0MsPpy5FwwEYXZp6KkDhhohXLHxM3SSZMEM0mC4oK4oc6J7mpu3t7mr6wVcGL1xKT0odf
N0d8nkQAezl/mFPr5+nBhyATJ/ElJaHOaJJWYF1TdIRjWfviOShFJPWXUFtEkuEwEynqf7cCfYmDFua2Yc8GhQyln9dgsY1iOqAGNvRPJ6Rflu9afvHf9JAEfufFNTznawbbT7Rw4tbQZ6uUxrM0LgralfQJwXb1Qy96gauDTpmmYEDcI6LYefgAio3IuIx7Ef8IlYWgw4j2qJg9ADNh1mSVKXmXrlM6J0kme7PBMH80RLOHzbt7NI33rh8BcfMXM2XfUkftqw5UR9CoNg2dQTgmxmKCmk1lbaAj1GjlyD4c/X8TivOgXNTkrsjcS3p3CnyVagtC0fPT+MSgbNP9smBqMeIZm+hfPOkQa1q57IKhyE2hf8rTHG6rXjTL3ZvAtR3hrVcZ29Q/WNjBeeoDgt3hdFhBf/O/t/6Xf8DK5rPdk2n39A3WvwzFEVmYqGQUCizyRuWiCFpAZXVNzlvlbnKFM7OE2j4J1y8v08x8yzyMZrTRxFiJ0WoGkCxxgnHeFEnnGVjyKSV7VwTL49wSPBOe5fowN0IUf84D3RGcgl3IQoVdoDC3weSUk1o/U1JD+Ge7qd+gLU3XX6dMAcvyaT5MHbgK+El7UDDOE5TB4MctGomdHtvhwP7LH1USoeq7bRf6P7ROYNviTlX8nYf7F7kLuVeTc3Xy1hi4DQrHuvbLewB3Z1sPOBiSjsLenuwdMyMA0MtQck4E3f/+PDVGRwqaJEs8boaWEIjlvN6iw9TDVI8fi3CF1xjrlRLccrcx874B54szu3gZJuoFev6xCS9p5asR2GipHyPBh9ULMwUH9jh+xQJv9ACVhnwNSzyCCCpryT+oirUbfAKjYIu0w7/iV92JyRN1/H8UlOw+ib1Y68zp4U7DpylAybwMIyYYUzO6jgkMgD6GzB5i5bTvk7MYWVQrqVzphvbB/EnZUotOaMMa6SkFofPy+t4+m5dIYnVguTkdMRx5cnxLZo1iEQVSMqhLdJbFFVl7jHggrPSOF0+q5Ki7vKCtkrK+Qocac7CnLNNA229Hg3+lY6mfi+/m14OJLY47qNB6NfyI/iGshTg4mAVGfGrCy2O5WzZhOgYwuy/yzw6yG4C9kEk93LZ60HF69UuhfDxeDmyHy7RC3LwC9h7mtF7h4OuE3JwWLb7dbVyIsEbqjbz7Yt7scHw4+PyhwVKMB6wgKa3hKoEDPhy/eLuswK0kjJNJByg8hH6Nh2b+13V0lQKiPEETUvW8O5+6ES7r+2kJ2nzrgFjAuW/P9Qr+ui34vsgCH1Y/hX93qYraTQqQBRHwJnfchj8cwZ/eQBTvRJYyFHgVkhL0RTPDFw8+JuwftIK8kwi25ClkOSVftKQunGdqGJnKkfbP0tmKUAKiHJkFdYdq4CEq/l0uviw8tUyhKllR3Kp6SV6Id/YrKnf5TaaEdeHvwXoH+rckA67dvUsLn7Ger/1odBbc77eLFbr80/BWb5F49AF4LPH7dgO8pLrM9KDvTglihry6enR2kIjxWaCL7wrsKhZBBK06gqFaCfB6D+HaAU4pwrwE7JUy8Vs5ISR4NdiUEisNocrHKEj5ukgvw/NDtT7PHpjaOnj/EhD5C7jv0CCeFp/LF+Txw7/8PxBOUOC9LjdK9LTC5WFTeBbqn9oaLgjGIzusGysiJF8td/8+MTk92Pf3twTWu9cW8W03kttRaazER65jmNBMqZiSs2sHWmSIFWNBOpjx/jBUpuEcuk0+o9TPgb1o+ziAWV15pqaPVnpKbVRefQ8fFWD4xVU0t1KI48c7ItUlF7BNyC2vzMEu5sbnTwCFeYylqHEkJ04UQwOFe3vluki/PyQedcFFAzRaCVlu4ANININKb+SyBeaSOxwQDdrSqDujvQ/dJNY9/tR2g78fkDcAX7nSNtNPKcsah936q7zRt0QF1B34ajmmxPnkMotu6pjRwf3f4j8eFTD8UN0oAkXVOtda4fyFhPEs0zcGmHsUHvnZ5D1j+mI0cxllxx2yk+3zBg2L5lUsxBs28yBAKe0MvF/PCeAI91qIYoi37txQKYOIN6NIIAaSLZNjEziyGTsLZM0NEkXPdEqHoEoDvmoUgM/5Q5eD4gpj4GVaXbC054tj9GGSGy/cEq/wFP2Skrwo7Kna8T0ndTSWsIfJhH3jUExZNlejybBFVZfhe3jB2bb3+92UrHXnJX23cET3wZ9D4QvuvIx5X8t89T73KtrBTkbwwe9GKM89l47pAc3Yd0opKOdXzYGMTfxXdmccDLFk+I2ym2Fh/55VDVIvYCnGB3MxKVJ5Tq0Uul9Uxvpd5wgyk2jEkXupoWOZWxMHuP4pe2yyEOlqZs7OGpCbAYvYRQNZhq12yioKOYBSKrwkpan1hgpaTAzvqIvo8G7sW77kQ30oK2TCxayMIWP6EknEAJr5PRXO2hHVvUHE5ABn6poR2Tcvud1AYbUisvpfGiyMPN3SzW9GAPw715A09ozTu7NhmK4Q/ybN19n9Du4ln01ONzcRwspOdm6NHIS9ZWoHwmaLBfMApAVwtHazi4J33ZqoAhCM1uywnwg8Xlp3Ctj9CI4HAxBPWXZ/mxheJizOnssmtpDHIzRZLBBftAUJ0HPNKeHxB4k1SpX/NAAuAYMmj2ZLmx2Cr6GQcwo3Sq9KAIP+ErxQ7dsdU+2hqGLQ399R5fVc+T5nDkj9JOZd4iXR9w0cjgM5doFW7l3u+NHy96HqJL7UuRuDFCxkH9JRtx2DGEhCYk0/DbaQAEsX/AcemO7DomiqK0c+SjciLrq4wmQgb3Mqu0vOyYdMhMefio0Dd0/dGwVJjIKcMYCcjADOC8Bt6z/N/WYWna6z2EJezOc5Bh9/5yPN31edO+Lm739u+0sji7aPgs6R71W0MbL47m80reN3xVpbdi6gmcGWbK2qAoDEfFwkxpUQZ7EM0DPnb/pA6x4W5/z+4qcBmLGyjHVOysPzL+rqV2mj4kYFskjUasWvgLLVoz4wdfcSMYXQz/1iVO2VjJQuEMRpzzFTWRVoD0yQdzPfsvF9KmQrlVutWk+0ui0EIuT6+D9tX8pSqW1eE/mI609fU8oA1iUmw8GLBeybRUyk9Dlu1aSeNBKTbYMQRMJFDaskpOpLBv0Lhgntg/8AOzPfDbc13Xo/5miAhRIuaHK7CwJO6n3gWbFheHy9oZRZ+DdHD8mlkjevT0Sm6sclhjQ+Ky1q1ae+/dJNCymeyYLcogWQ0mE8vG0U3yjh/ejVi+RPdzj5ERMKiwa4RnrD8GHjaBmJqo7kK5IPqZutA0OOAJwFSKIdhkipjauxOtou5B8mXITSrUhihKS5HaUq6HMyzuG6Dj4N62nNnyIgV9E0PF8A9qC8UQrGYn2Sm/2IAsmfTTQp15Ivi8bILFROVZ92WoJK51WT0o5T1D1hjmOnrx4tND/fHnjinzjCLZfTgL16GRdyX0CYS776syK4mFq6kgfIAB0BbIeReerVvc9/NcF6Jqu5YjTtLRW5pX679eXyKdNMpVNFeEMMfxlkl87zs2O8RrG3BieFrg48la7qOHClLzJDlsBvrc/9H+qNDgtypPc4fWOWP7UyjQcA8dkYP9AiTv7QYIafl7f+wbdMufJUY+won4HCCRSSWM8nNjxxcrnZvf9dTelWvXkA9hxqfIClkgKhhgKMyKQBfesCmLqY2TqhC6KFZyvqmR3mROasuPbByrzsS4ncyyhpdDeyxt+3ok5yaIkHIDpClnY/b2dQtBxp3QisR83UtjOqmV6iJCZAQXPYt/PqM0G9X/ON+OcQ37L/bEfqQy/WVhixmi0f2SClVLUUs83DKHE6eZ6Dra9TK63b9Zu11PRVmqpM6zIESb0d+HSFUfv5awec8MepsLVtIzf4cT+Uhln5G09OrnqluEMf8fZuS4DGx+QzEpPI04ikIESC9jUfATaoU8lqY81rR/zQAWbqNE4nCtYxXv2oBD1F3oyeYFNCIbo2D3q/55BtzjxugB5KbqPKqQ2Xc27xM6UG8GYjX5nePfCZwoCJHKkSbZ9A3E1J4FQtJLM0Cvr5EYeKhlnpBvuIpYpquP04g65ez0EVF2bgegS06yfUPmjQ2QkazhRKMNgQMH0hJZZtD2tH
VLS38oO98hg/kPBv3JPoLyr7clJ3PEBHa2R/6Fu5JJLqql/r5qqs49EaSR3gvpS3AF/oOC7tXQxVrMUaqN4pG3jLKFo5W7rzpCAFo1asnvLij85taDbjnpwqpkBNElXlzliahioWbnFGW5wkIvGoZiRBL1ul/kf87bOZFqgGRrIhVoVJe2EoeujF5fRxGXuf60tIiw8NTRyi++qK9qFsQKh49B+thkwF6eDK2nvn3iJ61Y45sorrKIwodWn0lpz1y0w+CmpPCs5coFsQLTuih3L+5J/VgtUp5OCfUsGoM6jwh754GP2Ka56uUR0NvXNsxbJATalVJP+/2tSlwHWV+mqnS0UkIRt7mPd2UeKp6fkBvTrGShXIkZ+5heMTrDhaRXpaipzRiLv1hzAPM70GMBZGUpfIfgaWBMZ2F/EFvCSyA+7hK8BIwfWRLOxeCSVorq/asb2npmNwm6Chz9oBSCjq+w9O8sWFcmvuiDkCx4v3db8NOVAz9eC+oLMSrkMMMVgAkd76nzgCG6Gful83XV9MZZ0PG0i2vnyMbKuVQ9qNaQOcTx1sdbW1ZUyFOQMJWl8DoEPN/LrUBWwhcE/vkA5FTgMxmxxHl5OL2Edn8/XKhXAX+B4TRxMYarUsWBepFzxMBD1oeLxRwR/67oQ2RO5nGMbAmn547GNlN/tTu7QakA0DmFhxrMLwTaOI4/TZId5nAfUj8IZvADLt7x6yXMTdvldo1cbQbqhHL/XUaznbrmJg4zU2+LUo7ioeol8TdBbUgA769/86AIdx0QrtX8YdRlQgzzA1jQpyaSff37A3JbJ2VkWCdxKHIr+szv5LDLqcxR0qvonBrqD/hpRNewHw0S5/IQyo0wZ+r7/I3UCtzpZysa6i2IFgsM1KlU/ilp9E5YvW1ru+QUSMklUlXtstiia8AhZ7qwBiTxKBhRfl4QTZPoSWDd5Zh2ifh/EhYErd8PYpzKMQkYHc7Ye5RzQ4iM+pOeiXpIHI1jld2K2dzIbCZw0cP5jKlKDJu3keshQ6iOfGv9xsYLeT7tf/A47ONc96uyx6Keps6cxuW9hijSZ64qpZwOR0Kgjufe6/yWKBXIqM8k0TRVqeZcGelmUNS7J+9ZWIFvikkf+iVGTI5GZztYUDunO7GbN6oTLE6bgabbnTAyZFtb358OBqm6gfHaGEEo1qTZkCX65mIH8gAWisX/PC/LwobAX+zfWw9Qj6WbIGQcg3aXpR62t8TaGD2Bb4ZbPWhZWJ4otCQ1r6TjAKCGo3kwlGOyoTY4XhLGkhA9ykFtX9tiZPDyXQjSkRDQViv+iOvqW/U7k5w93HOG2bHbpml01Bl5OYi5426FQBw31TqNDvH7ATt/tZ9I/t1aBHoAUZoKpqRPwYIaQ4OxTufoTkYNfb15H7k4xm2v9sLLJweFmtqvi4eEOLZzdsPZ1EJAaf17MJqp3oB/OKfd+ggNRDlcp6nwzscM/U4qNfYKig8uk7mdGBp6/3QoZhbhDJhtCfszUT8DnpiUD7i3AXg7qI/0m1vJgotiuo37FJDDFsOtutyjOPQllE4VPL1X3hP6mivn1o2JWXalkW281vnexA8f1bEuD3aYdX33ektSarFiCbYozsWobJ+ZmGq8WuesXTQMIUJpAW0jCvMNq3rRNS5+DtEkfT9wco6+coMRk0STy0ucTg1Aakem+Gijmv9b5aQkf/trbz9LcAADNpiUbj6ny++VLbIUhDSA58cGTScgn07Hlsv+5AmD2IuCOhPAA2zrM72wjqbbTQgx6lla25G66jRVxE4qT0Zv89HhxeG0SIAeNLRbj9BTXISGM9nYY28aTDrFKgFSSW7UhYhzRNGIDS0wjcJqVS5be/jh5f8/EUALfzo6YAVoEFaqhq9ajQqE0HCTq8K1gA56i1xFXaB5mj9MOnMuUtBtVhNB67GSwNTX3/orTPenASwQUoOWuba2N1gJHNycRh228GZtyBC4ZuUO0ZUV9JbSngr38bDjPA/2Pyl6r/+ksXELNP8yOPNB/+nChP8UZKZFlTKsDxN3nb1GBQL7CyeozTGjjJmUIBdDaKDds4NQnchjiU4VoLYYTRD4ezbNc1lpkZNX66eTPRV4AMqz/vcGwJWPsekNR30QTWPt9UQewOoxBiIj3PPlx2Ijuva4dPzr0ouuUOv4lhUn7WWuBKdIQ7QoW7FsGLY9FDHorNU0epCKKL2MRGc3icYBg0saxwZdkqm1YGfUz9j5FgqUy6cZNPgtQcLQB8190Ciy7/kxUcjWX0gSvzK2nZtJWwcpKXtXOqbYjjS8d02J3ual8d6+18NAnu7o/1uPa/KP7dNyPnWKWcI5LQqoPFiZQ6N+I5HV/S5IYE9nWYBpdiVc2GmbHKWgJTbLMF8iCyMf4i5aAyWYBx9bNs4BTJdsSHI4/zf3ScPbNXv3ZVWx8mHjYVC3vqornxXyuPlv8TAcZ+FPKIvDKp08D547hzRbqUUz04bn13pa7DMLs8ayk4PJwQJEeu3bgRItgwkKDSgMCM/eNIGq3eiF6f8GFm5ZKVd0V6uGP4KVt+rD9lWEsN5BWE0y5jn/U1/2yrwDui3Tt3mfEto1VKtIM3NNYFpT+7mM3ikYGxoJeN4Q7HsN8h70wQUki7ghEpz8qYj9Nfdcm1wMJJbR/4TXBnhIREqnGFdvyin5V+uurk016uIKypEDN75cFiKx5Uyp72vLbwpAt7JwQSasNr6bhXZH9Ob6BtuEK/+WJ4TmFiDipRi/f8PDyIk/eCPq4zE4PAQpvIopwO7eDi9ESf/v0LtHGj4p6DuOKGOtZ5wOG6zn+e/GrA1qe/zaho0GDUtyNv2wM5iwOcxpnkF0vc1IlbPBicvXY5wSH2JZXtWjx/0HRbRA/jSR8rSdMXXydi9W+k8XD2qvHSq1wAO6nLQOH7uY5ISx2XNaqHKnTkT4tgUpFaigmwdVSdKZf+LwrcPhPJk0t7s9RNyYbXJesccYrxiQIC7HW0N49vkM6cbdDoXbkNUuNjXQfbVrGZaXCgaeJS2nYCTWIPg4LmPJ5TCog9cn9DWkF488IHhlJfam3AMlv0cXMWeAXzmdQUeqEITQxjHxcQy4y4rNJusl33id5tFuuHeIDHWfug0X3YVBW7DIXEazRamFcijVfGYzaLuZuUSn7C/sAULBLMV4WtFCHGjCMCqK1Wsjy/YGVseLKQUHg9K4cXp4x4NqF3AIcYHAlTvh+PNx4l1dHAmxrpIKxQ6vNBfvjJT8GGLNRBtzDL/pO/CGNeCIBX5kay1qzsEJ8P6aEe/xbMPA+/9d17sJFxRYuVERPdDat1RZsJy+Ch/3Uy4PLAZc5SuGJW2/m6/4IRXi1c9aMC601bakoN/lf8Shs9D78FFelm2DedS/yYl4TGe7V0VjpGdikkd3Yj/oCH2qasyzrFHIE8jZrtNaRSmBPWzFsMdNooJHja9Gc9BtsTbRQBL1x1bZvX9Izi6dbrJHzc0Tzvyww7B1kW97hXRzh+or3la7cnR+lAjzG7Z5OHlTw01fx6N4TlyiiWVki7insjBHXUCx6gPDHEFdx5rLjzi5fNjpA6zuI3p7hYnPq64/DRAIUGTazsnV2yzAHe4YOhyo1MOIqdG2ZctDjOyuC4lR3D5V9twdhbx7R//h432rzJlP1Rrn6kC/B/u5W2DN//+1fGTFiaX/YKE5lmaxS3595Hc5GXI0VVKdqGOFs9M9FqoODJZc8vxJyYJD5EQXKK/dYe4QFTpBTS9K817MiQLEsWqT3SnJU+kaCpUX8R+qejkMn8BCvkaZc3n9BKdcHKE4lM7MDLxSezSANPhYLnd8PQV1is6qoWNKEpLNKMT7Ai7pjJNigJNw6aQ9TxV+wqGdERR3AnD1zM7Kg4mrUfuoz1M1dJf6NoMqkhWoVLDkdFz+SbHoo+aZhJ/Gp19kdAjXnbHzGBNOW+b4UiRgw4NJlYphx+5DiP1/Vo4/Nua2jKHWOF7ugc2Urbl3u0xwF0UKhd3nNFkwKhv5U6RDp+SCgCdDWBPMy/TyRmhvLX0MprIx+Y6fkNz4tl4yHFzonXjD0ZQKNdMOkD71i5MsHRaBn3RcsE3wP5lfq8sC0mebFwIyVI
Als5WYPMLjjRpaOI8MjOYr1D/d3EJ+RC8YPlWDgad/p1MXWapJ31h4qYl0I7WlajC/POl1r48XpGhb7IUgiGouD9B2USvLiCqxVcGqcyN2gs35snoL8CHA0Y0r/fxzwKL2nGH5ru0fUSLLr4+UpDMgNnOJzu+/gpMqUjC1ehQhy3uIxeY+W/EN+vILJpelG09jJ1XnluwlXoEUJ/MCFyzYu8SY2Dp+Tz4HCkCOg/tiRKggMNxiBmMZzimtiHoRyFYsdlHf3PfI561V63O7i04otTCEFFGZ2jlrXPac09go493mvhmuvqLV1L698dxCHWeS+JEFGua6L1/8JzN96BJAERahcPMUzMkd+XTrYCFwqotW3DnaQQbTev7+kRAzEJV7ValsU+3Rp1nGUGT4TXyXHzWnEFTkyuNi6VNwS54cLysdY5p89LN1rA1IW67wNxHz7iFtH8vb2N2IBOeuvTf3S/d1Qg2ggLLVTHzNZMsGAzMK+yYSPs7/Rk+B3kN79RcMwp65hWaRgsClHt8tv0I+scAMA58YcheI4T7kGmetTyIXbH+x74459x1w7UbFdWu41nB7RRWBr2wRmSFRk2bcg5uzeGNePLXFH+TTGCRxo4buwOLYKwUm4tDTm3Pa+8CoQepFCl2GHNmtuBtmydr7CgfP/iGdPHTsmaD4lTt5bPU6hYNlKquaDsouCqrqopu665BmiUtauelkz5dYLRT6io6sqlH8kY4mlXEQ4DU0n/9z8DUaeeMSMv4/rVqRTB/mSA7kLNi8qH3HsLRk20is4TH0wfWtF/vRBtP4BEJG73cSN54pTJSi5UQUzbkixvL98pYbG+QpR479IJB98B0xu/YpFbolW8OPMCdRUE53H7Pg+/wQeIFMFvOwWpFxX4okv3vBP0fqyEEzpa8GhIekP+wiG80FacijJdwqUL/IhS4nfRix/QbdzTXkssrqiQoLeOEfYSebzP/0L3D3KUPYoCIioTCcnb8EDABydHOccGO1mb/P47htqHNSRXT7r1zRCd5guu5xGQwiEfYVTN2Mo3XuPNaQ/I3H+NrwCrrZ1AnHsO+PErOOwqVJ/Tg+frEquOR0GDf1nv5ZbcoenYGdQL8MGncFHt/Oibh13jMHfrdtoefy25JoZ4bvweaYiEHZs0mphcb5fNetbTCe7wPuIYn/Ty7+xYbfqklJnTWVCW4lmbAHkHuMQW8lIDog6bbHBtyzFIpGvCUJkNvbmXiqlRGG92dRMbN6yUflY2XeXbIE1WUuourMsvO0yRZK/y9Zmho/AC+8UV4ylUsVEJs7rlrwVmA4ktq8/xQ9+JE53PCQ1SykwsPDqi7BjVufXNI7w3rVqAsRkXsw8rtFEQe6Z/c1Re2XSaxyKbCUNr76TIj/plj3YL/LrtrUH3ssYuKs7+ChcyJtzQMu3QXQL2E0y5Vki7eJRaotYm+ru/y3kAhCEknhDZKZntw6usrNmb/4w+9DDS5PRHu812M87u6rknUMTdp83OEEYOmw5Bq5OKXeEuwUv+FBTtH8xAPx4kFGueosDpbhczctNkCcC8L3ytEujd6w2BU22dLGq573icWjjVDsNYTWHJpkyoD6yJ1SnOOoMTnYDvGB/E0zuD+LSEfDgBNXZstRlIzzfpFo/8c9BztiDumca4zbo4mepqBVqXlvB8FqrgCKytcDduRyXjRpVP/usWBgzNaITV2WDe5ibI2JR7ItxrYivzK9hDNqjzaVLiJs0p6hdsFml2lYKx5Gxd9mKiLcuOTgQmhh71A5sHuJj3MQgpmOx3Zb1HvA6z7YefiwLdiyAzM6y2xWv2yZ4DEGrWndzdOYq65cuBR2Q5j3Ej8A9yI+4r4zT/uqfh0iigmZDKFMRemzz23bH/2ePtSO4rghFSRZGwHK8aUhY80Luf0uYh3+RLdxOc/H4dlfonbM8ToMQqr6mWu4mNwbuew7JzTTvklYmh2jm7+/lCizRuXHV4OLUa3gaNPZHOl0yeQ/VBZ+rkcvVKvkbWjttfzvZYj0F+Zrknb/QpRAIelIz7yo9qYELTJMqqqZ8afkWZavq1Tn+o9wa0SyqpmvZ/K3VDEtVm88Bz23xWRZXrelWfVDDaFo2ZNHkBh35e6arWFFc0mqR0VI0WwpMMrfzzbuy8hXluvxPF4HXxZB2SWT1CvsesXsz9/R0DWlv8z+BdJFD7RdtwMJDgSsALaiH2VdxslAjv1FMRygg9znD9c4G8W/tjZVNGSl64Exmz6Adwxba1+RUc07hbYYxtJWStumrbsdxCBJ1eNAa2+rx/ILtCtVZPRiws5NhU3uANtlZLjIoys1iIOY1w/qwULfxbxnZ/+ifBD5K78fGKCTovQuJfZFlBFeL1VgZKbPGPi11X+phOXLQbjEXlHuZzUfRNr12vZpCjiwL6H/fcq2dYlPMOSi9UM2B2EgNgdcL1hbncr16qjd36EXnYpmweoqC/lpBVlXkBAmfRX4FmMWgH2CVa6cnbqrRY/p9/pcC73SyZXX0/qB3d29ITLaf7/sJ6YzMMaOiYRkpFj70kj5GGtMAdxJtc3FagkQuxP20SpLjtOsBhNBn9FzVrYStjdhD4NZ1EV9B3S33wjPfWJiww2r5HoJZPemNZn4eVByzhV1cp86VpCORWWdniLE544EkadGUmNAXP3Ut30no/D48XCt05z2Dbd+jxIk0NKFkPxp0ZFcLI8BwFg/XOoxk4LXu1U2IluoaICMztxX4pjZaykL7ZI+EK/PDTw+pcxYfA1CLKxU0flBDZDl1o3kQ3SxVFuxughWk11jbjevODQWW0AXPUgjE2AGXgX/1N6L021pPB3in6sVhqOBSHoUpRmf7Cr5A9ZHnPKv3/B8aKa7d1qK1jn+goX8nw0KvV3In1KWJ8lArmsM+ptkMK3HWeLim5D+ShoHn7VPi4QppEeunqM1YQGtuX7u7IZW0k/8r2FuUb3QzPFgOVJsgnQTENVwSvsA6qyvqECs4M3lLlUGDyJ1tx3JWYXEK4ns7pa+ptORgama+2pcQuwnl7cMDKIZ5lJz8ZDOWbviJyTYLZ3kIndg0RwCdFWSF8CoJFtNmPdpy651Xqbnn1+tqkZQR6xH++J1YwCCdRhPfywJ6ml+x/J3pOZemA5m9YAvL18/tBq8Mv3rPeMJkELGzT9FG2SOdhls8leCxuzLdw6woZ3CdJL6bc8C7cj3Lkk6ZizRK6lrfdKLlh+tQAa1MQj24Wj7zbIo8TTb7lVoiVrdxs1tTfRTqgu65yehFegx4eXo8bOg0cdgLbdXniwXa8WubmOUgC0Jd/728gjoX1+Yb7wbovrjsFodhLcmiM6OQqOqDsHk9WIF6rpMJv+u4XSv/xPGoyDc5i2xLKlTtwVmpfKpoXfyho7m/6ZeAonYmbkx7HS+j4GJHchF7Zu2Gt6eoocq4dyBF4kKFd7XV1SJSdtI0HJ+v5nTiXQ5zaF04R4H/4xQy5eGsnfKt+KdCJZN59zK417/yb/ypTvSu+26CApBkTNwUy8hZikuGDkWNXbb0uFWdLDmskJnUOUrKkcmFXA8CeV+gd8ECNLVuKIW/R4yEByBT3jdz5Z9Gl3uPuK7F2/v+kUzo3sdwA2CVkmyqoVPabz/RdLQJmw2OAulIQShS2DE96r1ydE/wrQAORs9IM0m/I/bIskFNsW8AW/BjL7IuWnnvJJnxyxTAVDthi9VGToHwNyuZFJ9eQrY1Mlsr2IFhh/FWALi07Gm2+3Qx/c9Kq6n3K5n6zS7/RntYXkNG+WQ27HFbH9eL/HvPmZPwIYlgqUSOSbcL287eyzcUKZCuP+IKAO7X6sWYy7OFRavpay/ffMM01mIga/5ya6sgNVXUPtvIJkZriUNFAv7B0MB7slzPPfuPFm1XHdxGLv8jDUC8tTZ4YQ1TgZEXeEsPguJhZDvREIaSJ5OklHHlNuZbyHw5IaB2RvTZnRxhsf5mKORY37Abe7S2+Jydd2iMTn1ritQi/gQpeN0fn6mmCigpV50v83hGjndbVhRDQWh/pUO8Kr5P6vLukTfYO7a2kUx3hqwLMGqdJSaG65g3qdtJFBI7sKOkUIzb5qdrLfzMzd05+ZDLGMcsJf9T2
kjfRcXG0TTpgzQcNt+U2jvCIFHkOjNKz4CE8EgfKYJks91tZ878utceQtgE1LvOyKRDH72mpyI9CB/TbwRGWMvgWhLjspnXdJ8sOzg6WRjDhCZVT2rxxFXiat7rYLN5iwk+YTgca72COzDkBziDrJkvzr0pRbmMbYbxooRxkgjUDX5lgsPASd+MLnzAx+UUeCWRQc+hJvNnt+NZvKius4SPGUMHHB2zxt6S84leK5cEn/6qMMK0J/UjuWslnjdO9w9FZLe1GsOcH06HfFhRfh/AnamRM8/KhCC2OVKMFLTRj6K9OcE5gVEztNRMIOi9OXZfdTPvhkG9C4Tv0mFqRW19RFZ/MbyxjtGHgN3ELBo+0Ig/XayjBwAQLT3/5DLcRI6RlnvL6E1VkoNUJU87U4qeeAgTObV+YqmyYqNEyoBEvNILMrdlAdQL+OkJ8Rhx4kI486rIJ8D9WrfyaeE+qrtsVaxU3zVHxemBJ82w9B1qarG7LwhPmbth/3RfeeQW7pbnDy66V6yBU8eauGiABNpDffaD0jg7ca3lMCGzGLuFfY2oapdU9AmB6yhPvannTQksAWn3aHoVksLyp2OzF/39GniRMBpIz4Z68xAgXhw+kpLLvqpKv+nM02AQkiC1nWlzUeam1cwFfEAqwqyw8eYjbElcCmgS1v/LC3ZT2jo3vnkgFT7hd8uEp0Sa/x267qvJ9TiiYMBxP+utXBlCbgnvekx/Bf7bGE7xlD4Vie6PwgX6+E9ORv4V0rvoKhDFChidmf9q7mo2W/6rrnmE97ioPWW8+zi6E+BQsGOVX2ROLZHX7ZxwQDQMxQizQycbsRwVovfD8A8dtRmO2S2f6orPEa8FfusExG57Vrd55LuzTVK5xu4mMOL4BsNqHa752K3GcPucOD+umIv/04rBeNqKj/6a0eauLNqQKSXRUHCgM+0Ar65PXXLQNiMeomvHOzcb7prjZcUgdYhImiCnmTuchXetv5FpS1LeZ9wY3t83CxW6XmN941uxRgoDZlLMtsWJPfSe+7YC6RZzRrB23qZGrk7EkXX2guVyBBnFpNHAHy2ItUmQVn6Jg99xXk8oBR57zBmNnu/B8Lwly/8ly0HQXjBCGGJyWHo++ya16jjwd9u8lM2EJ+HioqWGbfv/r6yPJ9ts4KeN3nMV1plNexwaPvibepNIBeUyIdo8Ug68E3LazwEanAHSKUOpFWlMKMMGqxwNkNGAG5+oi7tV8vlood0Cg57j6Q1BQ6qSyKz38DI6BDfDux6ALMzm8pWdvm53bkClkXvGzWtnabV6LOfc7q56mXdbq0lcxQXRKk/VaHuWRbLGgu2SvI4rhkbrHQfELTKBNnCve4w1J/cJeF5xF43qZggIdL4o5NZ/L3ANwZU/3WAPjwLPlIvhwcBbDEYAAd4wCCnCrOKMNeAtPLPQ4ZiQftmiHd/mtDG+MLpFtNTKg3ZLlB7y+dtAx6PF95PPAFVE1CHkZj1nwAMcgiZKlCD4aae+n5jQ82atNPurx8giTFmt/s/xDs3u3F2KJPkrUenvo46VCRuJcvwTFEJZTvjGx5IlabrC10rXy+DWLCiIstiEvwwN88wiSRhRGaiq3xAf7XqssUB7aGITLCKIMI5TMI2qE2kZ9D3a8QZRq0YJQ+mkDbM8AiOmuULf9BSJOq0oYqIp5O0g4O+1ZG/z9cKBXCm04gqTIHlDjmNhXLdPB8CuZMCwv3nVd9itVqPuF07Gjbk12gIEJAtDSS5IC1hcy2S9GzTp7jE3e5eSu3qaNklRrg670bxw6y2FLDv7tOxmBhExaMu0JUhBJYqPy8DWl1Z4nG6vTNFYHU7J5FQi+X0hI6zu0aKWft0MbcdMeOkynASsIzk7iESryuQRvGKUxkgbUOeZ2OKBMbv/BjTaW9qQmfXthcQdNEkFFyf0+rVc6suLo0foyfDLHOUwxwRzKenfugm/BAAFV2fQe5O6bs31j9UatSZCfTuCIDKhytl8misLjC08UxCpE8gB8GHxJVSmGZq279hlL/lFQCfyqLW68uuDync6lRK9UH2GZlnfIoM9CCB/OpiL7xqPX3AB8WaE0RPrNGMJUzfvFh4io0qM440jHKnX7YStAsgMFUUA45ThtTIefaxTxlZCaeK1oTjQ68GZ/DaghMchZMobadjIEVeP7C/qBAv4qht02Spx281Z0qgYCsdNDSyXtdd8xDNzwNo6Qowe2WGBFRhCI3kvXfPo6GwDv990CgaCnV/xFgvQwxnUj57J+xFlpPj+S7bb0tsTkbHHda34vaLFzRQyavCDpfzqIXQznS91PdG/MKMB2M9yLO8q/2cFJUXh8t4TlD8zaclwKl+PbzipkNLQSYp8NZPOSwOmx6SOcnFMg+zGotvQE5k71AvgRlnGks189zgol1AjGWfi7kFfYACA+N3Wkrr62+c3SwY6nNGBCK8Pjry3X5BTIHmrqImUQUR7WEBspC40t4fdtGgcNhqkL2voZyGmjXR5nBNhe7n2wcDa4RRHKvpWKs2k7nxjW7zrzBLJag3cr8//rjex0Uu9Fl/tv0ujH1iy+WnzEE8tp8POlZSdI7CeDkcQEBgv4bhbLG9lKqtAMWIEuEvbgisIQBNjaOANX8jk+BJpqdZBHjc3EEV1OtPXxHBGtZUCAZZ8AWP/8h664xcRJwomKrRekl786Vsefze3XXaLATXoNU2D16UFrBDYY5odM1mDpNSl54DrM7X3Vc7Tqw7r/kZKQVBBqUiNAgJUEVnPGdJl30aelVn0/6QTyBMCGN8MBTbj52ARyxyX8XLscOPITBXcMvhx5x7ZKqF9uRlw0dQErPb172WkuxENjNKiDwGyW4jdXgMrnpsF6PCS42XOKGwDrJ+ePLd0YFFe2sxW6WsbaOWo3jVnMd+8+ySln1QenG7L/lUdSPHG5EqakimtXO1DyWVMq3TVta1mXGahvH2Hywo/m1501mORocmKZiJawfUSWOo5d6++5Q+svr/sWGCy6WyiT9PHqsg+sYv/HvSXn6HjNseBl8rnCANkATzahsPsxaEEoFX2QWGGBSPTBojZNm/m1Wv+gC0YxRpJDt4CK5yrMSkpZDrerc/0VmRrCzAsu24hfKASW+5IMZLWGc4KavMKKZKVpQPfSu4GqqiD7MBW85Qh0+obZckA1pZ5gbyG+zGC6cK9hyGQFRqjKXEGup4ZBGnrMTCzJQZUsoKuSXlojO2wD2j+epGMI0/fS3oMah91DT8g15EUsIirXFSPgZ9vJofSklwu93bi05uKNfkrqo9SGwmTyTn1XENfE3yMX11lIP9YpyP+dYALm+wR9xeOddNh0Vx/3qSvu4sv6iMaSux3B3PM16R2ZqflhqYyMpMlK9HunOIN2Ubz8J4JCVvb76uRraXwplyI+3HuRO9j0TEhsVonuTEUoD91GLUZbMMG+acbWssLonzCNU92f3JHdVhvUlfVIZ0DdPkQExMC5wSZbKQmzjE0sKOWl/LSjsnxGe+UMUB2SqY4uEnahZrTcX7VvMNCKgZF05lxO2gd2C+ZqY+cvuFBtcK63rEGlpOXqpiLJvx/ByWQtOprBD/f4FOJyX1u0s+Px29hJ7CpA24smOgMH9h+tjB1kvfBhlWoC6kyf5JWPqh8+EydLLZYH929+tNUeVfImnSaOg3U9eCVyCRciEriGi0RSQRBvjoZW0NWC1eEIg5aLJcUJV79NduCYdvtx6BfJJNp+EcLn0pw2pLM4VvC49/oWRU5GBaj/XWuFrJ40iVD5J0XExrWoYpm5MBMv5xBJV3Cvdzfacn/4diLvGP9JQRtWQmCSj/n8TGNu7imTdD2fQ06lcum0zB95ga/4VyEVcOj47KYXJz/GvgV370pVE9DnIPPNLxFImzH04V/X+ik6Fj76vuXl+S2sRWIA9QmbkJn+5KJd8fxyWBT3Gh+apxgVRZijMVK0kjHt/Dx9BBnXP3aB9NNbpk7Etq6yEcJ7QsW9ei56Zg+gZt9SacZhy98LUJRzyCPJkuXK3Q+n43FkzEeXsXcs0NgUnrat7MN0dCL+m/QFln7sf2VVTMMDdUgw4wV+flyRIsvO01P3naMZgH9LMpuPcWZax+Uu
Wln44oBNrs+JCDpRyVUSXTPVE4gDWs94v+BB+1VNFf+TObvHRz0LC97ctPnBBmXcNDXcdlijIRqKAx0bEQ1OpeQ8Psi6IF1F078Relt6MCq23aK/mtnLf39ywBnm8qcksY6rpOv0t0yNEC3vx2MeLx/2V7bOmO2K4KILK7o6gpHkSRQmblvHZ5UPi0RllDiTlkCsWOTy3ZoCkL9AYMBlyNrdBULmvGMe85OvbHB3VsPNJ0veNILDb23k7lsm6F291/6F2tUe8/xz4qJ9tZq3bu8ndFMRZo7awl792d2sridiKpx3Uv0WntbksxciUYwBRbMU01sHr4plfwOWeGe8MFmQfL9bg1IBWtiAnNYgKa1yllFNPvm4pP5MsBCKDQDq6D7S0Yvl9o2Bv/x/VKtnM7DwnEeF75ABw5SJsRMBFYxkEE2hrguHXpuTtAVOzAcq3tIk4SRWMXtSsYYysZ/kTEQ1mfLeUAAnw++TiHuVcKzwwxrhwAkDC/VEgi9zRuvSU2+YxH/0s/xTOVi1TxCUvDfj7rulA30dJYFU/yc1a8LSFB7X+WyIoWxrmx9o1ysZcT4WWmFXStSv+lnTD+iL9C3YKzbAz0JO8OzphPl6MffObzD0OZsK2z2aVDFbQBppWvpCoKyN8v6EaKXwEBCcerw8/ee4kMG3X4eFW/hIVgxW0tjLk+WbFBCCJsfHLhCZ2G93pmf1/byduKizN+NFN8GL6sGpQzt9fuguWYuze1qyZ8ZuNNJtDp9vGaSLqzhJvb8ijJQs1tiuizXFXPiNHshYWBlIrziqf6FBmL/zGx6q8kaYm0WUnrqrMPzIiDN24i+uXfDHDVSUoEhmiObUb+ff/Pk1dGBjZYvmZ79PPrvjLsyeICIMa+jU9bnKpK2QXBgYxYDU3XLc4gmBkP1WOl90Bo0pHbvlimV1EtroBP29aZGX1hRxNTtqbSIdH0vxD37syqokEi0uRWH8IEAyucCWikz/vaYB9zFZI9Kib1IB3f/r90j9ClZ9bRyPEtq4B2JYickoPoTN2nk4bdV443WQ5IqlpWdsycVJahI1kacx8yqNZoRkWASiss+7UGX9Yk8KIQQlsMIIW3gcVPKCMz4Gx8J9Q8LWo+SP0mmj87KE+oQF994yxl2SEEpUwjyDhMc4DJmD7eBaga+UWc4KmTuMcJ/OszgpXMXPtolF+G81u/GMWFO6frBJER0cQTH63etRyQdZN1nZ0kCiHjfpFG0k/JydJWzV1C9j/guz6GVhB/E2iv6IMNwBxNBRksk9gFt+L43mSYWALRQK3rxWaqqAq5GJeEXRNXsqhzfttzpRBbDHuqM7EPpNrhbZbV4Q+6zHLCE9+OIOK+F7GirIZU5VXRi+9aaq7FZwd79LSqEeReJDycC/3p2uuYYm+n1nzySpv3pF2PgG+sT2RfCwWvHVTAoUfqV9z/KPBRAPgTREgAHT0VHWMXFbdT+87kiNaPKa/YcXiB5sQdSleXheXMITGZl633EHT4bNdCvy/Q6hb2uIPlwLaDrrkH71I58+Fx4N9O0JYHnYsVArKI0YTXtwRzXBoov/rpqEx9YnYjk5y3f/9JyMikD6+woSw5jiRbEPy3LDghaYrDM+jfECjk1p23T/UrMlgthBM8NW6j+w8UnuXJGoYTaZaWPomP/9/NLqU+xYcN2mS1QmQNZ4OXDiTBeZkP87kdlpzvL3FF5D8GBzpQ6Hd8HVuTWkEwOJntzce30GuA0Ax3eo3ZIvREmCspGSTciRK/8Q+3tlIkjNbFw/zv8d4JcqdUr0pUFRTu0h+6Ltyp7panMoyC1VEzmzy+2ET3dUxLhmw4uDk4J/2ff526D3TJcD9O3UgyI+Dg/JGYXkfex+e2AVhHWz8EvASu4IE6vWlL7LKuD44MeUOIm/CPmLtnPk6xQOjvyt7TaoxsPHKHQPyKWeFNzR482lsj6HjaaAFQKobgK1eECtYyPxXL0Qvo+aKw99Gl+HJSJIGS5V2Q4vLOuNM2hReuGqjiuO00tF3dS4sxnHYilWjaI5T7s9t0gNMi9lrzaHBHbbo1tKvYJuQcfOb7TbHSOWcICY2LymOKA4sv1kPmsgKj1EPLE+5QGJnlUF5NRY1znGNnKIj/rKWOXdyrTuSDkHcBlVUzdrUsKAEeM1tYLiaB6YPE8QtHlqKssCVU0S8P3sNcMm3+GI3Wqhk+T3xstoP7YoXBAh/XDKDfagLakMh9UIaV9l/p1Bfe7VnLk/zX7rflHhnH7LQY5dQP1x2FwD7rylZl8TWJuowqNGF4+ZeU3IHonmkLtW7it2HO0mReVA7F+2UjlgrddQUF1MDQa+QrCMuIakPFlVA6qAAi2hGYXAGdeCSeVVotqWOIEvoTzDqDqMHM0gn/zEVZI98R7/mxN0NNOgt4byl+/FfQWVwfj20r8EntVW6Hxukj3qUgkokKRrjBeUhfW+0EF+1nn+pfgujKqLRtOJDCZ3BJKcAR+XBWv+DABtsk0+TGsz5gvEzsVBe5vc6yrQ8BPdx39DaYnuhRwMd6VIEGf562iM8zP7NqVNrwyiw7bGqUCBBcwc61ZwuejpvMLYO0N8igmH/d1SgZ+qRgTOV4OPhS3hBc1ff/j21VXiRhJ6XFs5CDrqV49hxh1yVrQ5VTjzJs+wh+NYf0pJD4tAT/OZCDZBgtnexoBEERjpDbuFAV8ZL1iuJ4kOK3HT5TFARy8ZYKIMPPfN22CIx6CTUaa5crb6rPV2gggH5H2voDLfYOUd2kLVoIaYkrqu7YD+rn/NJafUYBySLsbNd3g/YGLbGllklo2ut/hTcNWKLUVv51kdc+p9ZwmmVkQInuoHzk54jfDRndPsFNN0soc0pAfMRmE8vMfGqRd3r7QMQUNl2pYG+gM/eYPTmTPWQLm+b3/RGxWnsYUCABOboBJCVvb4OlfJZQLUB4GVoieswrvTQ7oinwlI5BxQ9PgovZPuQD/6LZe/n51Gy/XzSAP1N3XXD7rRcW8xXo0Z4lepDBypyPlsZaD2M7/FgWl00QZEgJ+lccKnvwOGa0J+4PvqGYsnx6WkGx7wtigoFue8cNPGABy9td8rEOy1rEYf51ArfRm284L4M8+ledhEf8E/7rYvmRFXxCqSA3vqFPz/lkNLqQK364Pe1i7hmgM+iFrTe2W/vv4UY/hmgHny03kE2AV1CW2s23rgYTbnY03Nk9bUd3XAHdtOgRBQbN1TStqia/cZuQNloXa6QTXMs292MCZDr3eHDd5V1E70F2NaaiMGrL/LL2hKv577GeacXZ6iP+EI6i75WENFtmT1+fh77BOenKB7hTfY3rp+eHkm4+hEwMe22aHm1xVyKVlCmCZ2k7dK2Bqph2tzv5kLaiRxlb0h74YmOgIbXTM4ss4dHPIWB6A2KkJKIn2UaZhAMLx0kflxhOzwFnLA92Be9+lZ04GXvtU/c1IWqP2K38GI+FfAcdoEJwyDkQDAMB2IYS17rX9BFF+3oyuvdFC5N7Ewllbn+aLknPYh1c7cmAVR4JZTzui1vhqzMabWNnIL+Er6HYbmklEYKwebF6dFUxaoEc2bzfsS+yCtLlqRaSH4b/SHfzoaKWoTa2UY/khhh3AdG6MMshsMx9MMLLiBt3FKToO0bDMxLvYk5ZOkPPJxjBEDO7rKo+c/hw/P07UbbcGSTMDHaoPZGZVc2ru0seEoBXb70ZjhicNwMw4jI2Jjpdc/g+QFGtm4HndC21PAvwlH+RdZeJkf8dxBbkubZl3tX7SZTKlCyAJrWMBaaZeqaEJ5OmwrhbH6tt+WQtSBf8R34zE9NtnRpNeXjbQtj/vG16LX9r4DCtM4ROS3vDixFo1IYSOQBuBjIN7w2nmWDhHtQBjiKcZJFCPH0V2kRZ7jsjiWp/1JfVeBkmd88u2NW5ZW62XZNHMu7NKM97XD+kO8h6pCHcZshzS5dNaLzMmJhWgohdgCAEhNtcHmtupKM93xuNMechYiCCn9VFmtakfQ4HaJhrfz0/8bDDaj+JcYabYLwZsFTlEMLwchR0ZJF1snMQT8zkmKXR4hteLN/ejHK0LLWaVOXty2QBo0YLjVulYd2xyr6OhNaZzU4oxRfLc/4o4o
LvkNGLsGe22TVhp2Ma5vsdvzM/4owNef7SWigb7Y86/rQLSo8AjCCcCYjBoWP1ecYWz8y9PKPlXxOl7xZM1hv8F+HjkYp+3gNe4WUrkz40NLeKcvAenK/UcVj9nAgClkYU+Nqq4SwnInOr26v+X0Avxdl9BrIJILXSMoVq8fgkSuN0JrGoLxx4HnXXF9QlP97WU8GKl2w60WKtqxP8oLtRTz0+CJrN2IROEt2zEgfEWRKZ4Sgil5sWNS2OyyH+cGRomwkcVswbt5tKS9r0TXhWwg/cyo8ZFYii3xVXwpor9rphEHCBDOQvdJM0Qg3on8Cu2nydMXM/sOwsQoF61KS4UO3X4XLwgkuc/ycLjKXYdflheD64CeidH3LvTnawZhSDGuZGNccxkUmVtITvzV+Qk/Y6S8wg8EwXXYED+HqBQa84HanbUL/1J6aYHJzyW1n21TWSpuvWs1Dux8N9nS1H8m/mN3i7NyoL8cXLKgGcCjGYwOQu5l/Yujx40cpTLbev77HdELz5exWP6VAucpqhkfrkyLTXGDWVL9eypIUw+cgEgsZsS/aZJCWY32u2MZHd4PYjVHCtBJu6BRpL9chTq1GKnhjWW4mOf2r5xPePjna0LE0wg/7xT7HyF1nE/NtUAhnC50DxBha6SOQ9QY3JRC2T6V8IaV3nJd6DbbDr3WHLNgrW2dnzIZKYLxf2Whv2S1AG+W0AhcwmwhpHrjYfmB+dU1860FU3MV4D90VWMT/qJI1h2u4qZfT8Z1xN7sj1IB9ndbjbOaHfInWBa+DbBBJhSHcT3rdagFtlk+ASvXzqUVz/3kD1Ovqjkt96n2AqHO5WLrYQfL3HY1ej86aj2NnEKCNUxERyWRHEV7+Mwz+CAWzwb9GX9So71i9wa8ExQAFCBLrH1LJPwQZ5icxr4dwj0Ng7I3u8cTEhWW/+JRFHFnZpo0abUQARb+/yp65NgBja5/LjxlfaLq90o8DM55RHozhSeJ6NQLXrn4GQNvFRbYkwmHFsN+pMjd6cAXnknorxoqRMYFX/Ebpr+Heh9WxtGySbXKx7fFa6H4djFm23E98deE1Obc8j0VdOhuT4G7UlvN77U6TLeVBuvgUazu5LqDxjvwD7sXMeXJn1V9wlbQqOJr1akabxSZiVcmbVkZShtxN6IEo3Qeujdtz8qh2ttwXoRzn65LAN1ar0xGHC/0nTFhypEgDdqYMvfFcoDPkRj6zYzmcFuoXWUexskLg5pleNpL7fGsCLAL9ua4dPUjs4GYQF/nm4jNVb7zCLiGdUgCDyUEUDHBBNS6JwAzvWMzkotVFbfUgvrGfVZBHc/wG3y9Uk05ArvwTt08ntNJ1KcAxGTIYDpKwq+BjQu9iPR0pB38wj5w70C2pvUxVsbKxPbngXv0utHei0VznbqJiV1kWRLQkqAfrfKLx4Qvky3PL9iEiIOp4uK18yOyR/HZnsKVq0mwddR+wk1uc8GHw3Q1b/rQAynxFuYcF5niIMFklPhxG6d71/fiCbeWDDf53b/6wzT8Y9nxc1ychlFwnVX0ukpcWgYXcHnWoWN9ttQPdXHklVcQbMV0xS8JRd/bb4llLAMdF8CqJ0h3mePUTQ6oGpqL1iKOr5pSoh44VO0nPW1esR+q2RLn75hho8B7TAR0K0Byni2Aj2kafHgkV/czmAVNkusve0pD0GTULy0JLGf8FDfqkxpFyWGwPgHU87gGlH3CbtYzq5wMpzWiakxKixNng3BKf5b3TNvs5vEy+Ckvb6uHFQyyb6cxSlheMG72RgrzqlpAwf0srZCc6xiHVDzJozrXhk9SOaatHJFfe8RjCI03RkxKsIA83Te8OVJdc4Hjdf625zDEErWsQ6Q5SYcC4grXXSnF+7lUM+oMHB7xsN2LSlIoIMIa/M+qoZtPlW3+EkPl++vPYXY40VQtM8q3xTL+1Z1HgeVI6+E51kdSW0Y1oI1wfJUJ7rx3rHevPMh+aSMFLsbOo+zss3L2uPOmHjicykXEX6Gu2tQjM6G+0CWiacDAoPG60ExB4UL1LLo1MEyNVKJq8iy7+UcdMPqOtxOc3k3PMW6erx4Y39I9zCvSdijE/MOI78fDz5nVjGUd4cZfQFv1ZwZVjZJUUI+W3SSB/gJBgnNHSRmI/wZlIZujHo8PlS19GZBR1NOhFrMMY7ksnClrBRTsRCUr3MhvUvMIJ1uayxTR5IpTPmfxY51X3Ur8CQyaP9d/m6Sd6htslsUcNXw66VMfwRr8XS1c0rjvFi1vdffSivEcgJjzXCxcr3nmPNSKSEeQWwTe+2bAMyzpCVgiVnLnY2uVSAQJA9wPFLvnqq+Y/SiHatk+cGQp5hdh8zLybHqTqDXVpZIEQymyosqjyXEsvKSk1a0+eb/z3OxHTyqT6GP8UIIiAKyAEPnrV0oLDjKLNUi1dmKTnUG6Z6GmVe/Q/vLj+bgLQy3eSj3pFSGwM4aaJmp2EMoqiXE+jzbw+/40cIb8tVfNbNeR2CsdMtfWDxSwjBK2MJ7ma7YIA6rZK5sMnVsjukDipbnvDP/EX8ZS8EoTZg5L6I7QlFkDaWAqmp5Jv1rkU2FfXYL56bFqkg3e262KnWbAD4a8SArJgIn/3QBOFAHnTGiV1bkEj73TjjjPZ0vaG8/NR6N5tZZe+mhikEGTmN9/dJ9xZsWeSE57GsWe6DR44gYZdJAovgNUBK6Y4q3ZZ8bsPM3j2ZUTrWpALPboQGSJ9mX76uIkLcHWZc9VGrbi9dMkjo4D0LPgZB4QuSAnze2tPRV6WYJCsccVfDQ3JGZS+BU9LKYVDkYqy7UmPlrWrwB61HVCX0TTcQ8GTFv9afbZCaVelWHqWBPLdY0zzI0plwaEXWcsPQ2jqHjjOO44Cfp6pPZUt3nNSuts4CAx9WeI5XDMVIJ1xPl2ZrBQaqJmGdS778xBnnBYUeMCu1dzSEapzDji7olbayRWW7qbUwkh90NJTghNvuc893xceCp+Exj0UPfFjqXRsQj0gZuAzVvzsfvwzRSdTOWGo29i1lOJ0+DW0ALvGXbhx2C3OIZ0xtEw4PAKJ4mfmUUYUmHZEuXAGeyQqblye6e/mN19B83Hj6aECVUhoBGIrDBNz0D/W6acSZ29vljlygW5DhQHVXlizBI3EoBnthxPUXYnfNZbpHZQYoGAfOzyHTpasl0mE6Sz2T1KD+TnaPJT80zpzYyR1UENBmE6J8tI5xPxCMFooaKG0Wg5vNVzk1dj7ZhaDqSqIh54swlA7RsNzNyk4EPrYTz/cTveOdrqGHis/LUgUK+KZQf78BD31Ort3n2ojLp/Vh4ek3wVUBhomvF3CbtRQAEY1E7wFf21pGE0ga3dLu541D3mWREyuPxGtR9eJstDntOrYFYdA2eJcpAqPZuYB+2MeMbtv1YnBWyX+Tl29DD8d2laTYKfa7FkjTXMpp/a72S2LjpxgJeM/uGJSXIEJKBwovOaHmDiSHUcD0g/dgt8RUPOREUowEzOiXSyXVwvQqIQy0uOrsVh8FeqGh7IqSe4YCFj+tfodkKQZkdLS7Ao/hJX2gO/YOCt+aIipF3h4d5ZbqAYSfcHhLSmLUCN4bmBNY30h70DkS0DPTSbPAvX4L/MlAs9z83Iqba+BpzK9ECvSSk8aTyS76VSIAurrV5BfcDDX3eF4ZaRYjA9e82RAYpizWBGIjlIPgCKHWdgwMJ0B4q3EDzIBZmJI4BG9qNjBekNQRpqF0buTYRgG0F5Zl8Ai+zEmA3E6/RQ0Lhv9Ny60x8hcBs0VQdNfwLtSVQQRVUh+bgRtF554MR4B9VdJCY8ywLtbvzLNxGi6lXNaAsPWhpb0MWtTSKLFhrH9XU/mnDQs8PcHa42JIn0mqeu9lYXdPiwOmUCl15c7G7c8hXbixgQ6MLYuWlNYVGIMoDmk1XaZWf878317b2gnKRgviAudQP1jvuW+L6R8GCqXNgXPsqWwFdFnrKWkjM6U1+5hbT4clMvWiPlb2zfiefsjIjYEs8RDIeOckn9Qp9PE6FaNdK76fL34AEZ0u+0c5tmD3tf+KP0lrimxUbRgf165Ebejr/xHLs3+LIGM22DgtGvsH0DAHINUoouQTcNLkmu
n00UoEUclsU4C44L+tAj6IUoxAz7D+Gm0IdbCoKhQDvSTtQXS2+EeVx9XiVSzl/RrRjT2J4qisMOcxGB2g7JEg9YQzETE1l4AIu0kRsr0CavBUh1HROrWETyB1ayI8DZDPvxfuocK3N6XDB6mlIJfPySls3FQ7jOX3LSNBfZo86Phldefw3al7R7brg/le+Fj7diBEM8EHHTXT7zU++uky71YNfH+flT8wjD2+ucvrTMF4D0zEBgUJZJUzE2PvR3rwztANtGgaoeMn9a9I9/URW2O5BNIbyd+FgmVXl9+FJ5Nt0J/m6aB4h0KCv8XO+hayq4kIm6kAS37O9ZUNQpiCYWBVAQNdNN7yuU5XnqxQl+M7ySbyHMfQk1udObzX5eNTYeh+gd3sgA+7eAYepamGkBtsv/pXOsFDBE5s916noV49fXK+nI0OrAH/UXpTMGyJPDRGdQ9ZpJWmJhEgrxrrLo8wMZBBEMck3zYlMkuJoiZ9kUwhUaev6hAtILrEe84RjuKO5CC/+wC+8kyO+dWm3drA64Nz4DPJJgzZZ1gHBR44Pl4OxQ78KgVuBP+T0fXNkBmxVAiAtiakj3ErBkqdjAi5eltnk4g2t77oL+ihLWhhzHHGER/sqiszBFKdBtltMRn7PrbUfc5axUesgGt+uJayehy1EMO3OyfPXi3PKmKfxTPm3l7ruPYWM+qY3ejpF58Uyot6Y8Ej6PP0yG0RsjkuuTImlifQ1v+Rzlvew3zdzhQWAwbnOWch0gmCGyftHNGldBEoxc2fke6rheUK0b5LVwGGdSUDGnzar+SStnQcOZx3vGJxI6Og5EfbVa4XXlAm6PnIBMnb1Yw9TXVEhMu0pcwi/b7qK2z/QfH+sEL0WSRO2LyurccTzMySYO4D1KDWtkCKEt944am+HGLr0DYBuD4IVsjVZnPBfKoRnV7ZrIH71PbitHEQ9hbn/U6Ar5O9PXZDIsqb9BqzeIdB0r1gBqgLJDXgboi8pZl7r0LxyzRWJQpwcUnlAYZ8WcGSjIWqrMW/+WPKYxkNIXvkI1qyIXKgDGY3LFAkcM/slO/46SsfHIlCN5dRKfrkljDgDbQ4oQAIXsjEYaWkL6Ks0c15U9aLQESx5BG8XtKhnVglPzC2y6cnXSL7Y7GaEqIozVJefKI8QJLoNvQBpMtO9y/FRiCnetH49Wnz5/sPKTEadKI0Wobwv9nlfLmX6bjJm59lvb3ZYUr8y0X+ttY+Z3asNzdAqcZeEmXMOeyZbLg2WuAjGH6inykpGGAT6QPpghCLFWqhuamrD+4YCNocpef9Leyh238sA7mQpVuqCP5Q664zx9dFvkWyzqN2QTLpAIYpzWwDK+U63/EDz8kdlPBq8QDhTPrh91JnyYpQyb2xQKIkpqlHyrsq4aSQgiVXcP7rv3XFYxo56Hni2OjG+1PBPO2VmhCA6dvglf54SsSHGsVd3njPaPQq9OpuN+SrqJcZwWI2t5rAbQ7JQpozsDGzQkyZQsUB6GCh9WGpeC52TJNSvyL9RdO7brMbeWyxrV8ZXUX4kz2jfK4mQF4PqssPNoQO+rNR5lwQCzictqb8WH8LlV+GsZ6IodCVFEf9KergBAXC89Jyc7oNGZCdZWXyfSwC7yh7z6aemovUBAhSNr3mAqiMQ4faj0z7Gc8fGF8VnzeM/cauu+Z1+6O0Zs3wbW7j/WJKlRVxHo8IGihRQ5PEN+4qQkRaJgCmIQlnlnFPYDaVzNgS+6vA1Xbc8El7M3AL3+Xytva/vvG74lhsFKDcMY7IaQ8QkoQuqt8wMiQ7kiPZbma2robqHc4ZCo/ATNlzkGRjnw54Gq+XrWkCE1hyr+/9PDMwpBLSIMQgoXhw5M1agxLvtG+x9zliL3ARVHMhsHzg8wXTXT7ZP6wfsLZq06tpPW46H30ASkbztJYIB3XrpCXALGOJutWs8Z/QkKt/1rFLJvf2zhDLGWhUWids7JsPEiSiLj2UmHNK3rbZj/oLhz7TTaaznRd1h4uvcB0ciZL6luZGUc9u/LB4pRYVIdR6bq06vaiQKuSK9VIWLWkqgY+dEAZtU1FDSFacExeMz4rCVsFQAu0bbnvWJZpZAdoRlNGvz1pfvvLfPAc+KWu9BY1hRnz8l577S/MRa4sr+ZEQb5jRtW3sEp9Wq9s+w2jl5rLXtMqsC9GY1EiTkKi3Qs8D6BPpALilELyP87WxdIhWp3FagrX2/zhOVPlfDGt1bhCtIf1kvcWKqBaEM404ZSJ3g/AgA2CuOY1FMPyDFQJ8MAPW9rkyIn8lf7YhxSFZaeVDm2bSOJWz5GptbvN59fxjxuwFKNwksikyFGRkaUf86NTKH/jf0UA+IejHECnRhWSDM5eADJyaeG6+DsyZqnHLF3s70FUgBgR8h0NKgIBHMjqliNlGyrIOd0AY8C7qzwQyXG/73NYXLA8XvB80KQ74izoXlwcSK52HVH/14KGJitsiveq1NWd/Bj0WnnBNglyCrSNMrynNZ7FpFDiSut42V6k40sW3j0BbFLyWw/Z6UhhnnoUVMURNIknnjt/1MCM9vK+DQkD5AsBQGR19MyUDrDypAkt0xAl7I5thYYOoLjPQbE099b5Q9UJHSPqsjSLWvWwoh1gHHNyE9lAjhk36U22odHVE5Io67jzS3UKKzmBvcJ2jXkB8h5VnRcLAHkvSQCRdo3/XInpHJ3C68sAsZoeRDA3/5nLWQZgQ9wyCVwYA9QxVMdsa1WqoSSQxxSQM3WMQXB0QzhTPnMN/NenhVbh22B8+anmCD7QjaXvrm3MfWQsF94becJMHUdd0QiDhLYi1zANXwiPwyLVpXGpEwXKJN96Bt4dKyfquVsS1VYc5DCdFDHwo6sKcijEcGpHG7ppW+AIAAe5Vptd45VD6/mmyVCsn2HIVbbzlJMD4Of6I7d+uoO7jo+NjL836WUZ/U66kRC1nHmJ1BmCQ/Zt9GNEZJP+OdBmRZokw2zGkDgGYugdj+2Q2FP7CUWVIO7haGBx2y1szCUdAnlkrh4YPQ3vXxC+82maNRA1d6XxHU9b21mwLAt150ZunwBxcV0mb+2BvR6BYTvxsiGFxQCwaPLGbQ4WAyQYSBb0jTsN5FeJrbFzKbEMHIOpdxpWa8MwFHIIgFEGaJ7PsoW1ZJ42wNEsqY2qa97JVRp2+iDuVGEA4NfTx6D84PR8G+Igal82CLBvKsVdEjDF1DHGLaGeR+Q6q3Oa6I2T3zgCiR9NfU0WXhaC/sQtEwXaHaqRokRFrNFZ6GwrH8iyqngwxxrSB9PQALEObJkVnbQxC1oZvQWS0RqiEusAhBj6qgTgPMp1GLAKDDniuH50thlK5sP5o+DGkwNOWf+29GxyKtGkM/JXFHhJ/9X9fxfu3at0zRXQt504EFYCkhfD7hmY37MfSdf5LgA9MOCj3Ndkvc+lfRt1KyAp/p7HEUKwKwyHf/5Bu96wX5oyAFd9zzrDPRFrYmWF80kiZNYkXadcqflTypq86o379jUW5zg3TrxYdHlygeZGmme8rWmPmgbRJyDd98BalVdkSu0CVOLTPZBmSUUJG8Yx/iaM50GuLUcpORymYsm/+Q5fiBFcSow9pHIpn5EpjcwuMpLrIdkR8HJsAJbrTF7/h4vYb8WU4plWRkAwq4VFDkMbmbeQ9tuKNgybUP8FvPt0I369F0ziZ/I44//W/GKZoH/hz9HEWbCrQ89pd015/l0gIKXzdrpdRD4WnnVq0L5CC4+rXiaEDfDaZ1RGOyBMLBnEoEbjQ4AmjHUlqZrHOX3L6faMedOslb/C5PGWBDdThxqsy+WFNoWKA3oOODqncD/cXki3dIyqZ9d8TMM9OOS2ldfmlFFb05ISEfUAAvYhcUXA851aKFhH4FJvhgbYZcmKqLvebHzHMTeA/A+E4NnQwcbdSHSiHJAINukCkqKY7l6UBtxAJNJv7Srm8FNAXXN/ySUVb5koVsyc7RvCLHN6ghIkN+fJLM8DXifF23niyGcbopfVG5x/KGZYrElGHWuVy39YPW4dXTW5dXBIhRu6I6l8qB5HOh2jzMyQcFl0yGe0PvQ1vSBXvLvN1wW+jUg/MW+AcIb1Kz8uuGTL8g9
FbXk2NAefQ6u0OqRigwBO/OZ//CIrnm0VHkqh2am9/DsXJrbPziQhyUccHJButTaojIowuy0m7bmn/EBA8VqDEnIHd4siyw/rDLDLnGpIrLATTHxODJP9OKyj3m8GspIJlu1Kw/SWU4C/N8vmWJwpAsc9jmcGjFKZzBRrHh4enxAtaKxMDNT+94iD7I70YodjW9AplAfdC5/NA0Ut2NRA+Y/6gCfm+3joHGGwKZhCXHgNzBXAgNS8FtO3E2y0F24kyyHDmI87WMKiZSpB5zq/ihk4GxkyGr8BDyGRHFOr1Qm7znKKzbq/W4x6uDivQuyJbJ6gqLHjbeuDcMH5meBvWp8EeZHYIfMt0o1iDxCWncxAuNbS2s8duaUxkQk/OVA6ik/dvSQ5/La6fVLDLhB6gHU0PWgOua1WoJu8vl/02lC28KrNPo0Zdej1fysmbDdBuhO6ZuTR7C42V5/5t5TI7uU1MOLs+wd1gYB9b0Tlo32WZC34JK9hVC0B9g7MJRn7kkvEp5uWuWxMEHZ/uXIfyq8QVEJdYsVnFCoXN1uV3HRsm8AbqlSjugiT8RD02TXPVTjsSW68MqlVG5QUTi44dAdisopO+2Lc6mAWr3x2Cb2ugrra/aNcVoqbLc3GBO2rChHkwvwythO/HcjPs1YSlzgXDGkpwH8BqBi7og2DbVuRFbszQ1qc8jnBStEtXS5gv2Fsj/GuC1eQO5ZJ2y2VV9+3cr3raRLvofKHuCa5fq9FJC3HLf4Fpt4+WG5L2JWfgP9gVBxJN36w1z9takA/064erWtIi3IMDRzD8/7lfvEb0zWtHX8LEKLwhRhfF6h+OMbKkHu0T2/JF/aAbDxqj/J7CQc0YcopjJ853LtrvX8YKtbhD18m5t7w1N/14OFtwQ0LS0wKyKaKXf+Oq06D6/SXS2YB/YRs/ePqW5mjfsYa0emRMd+f9wt/uIUKjM6LLJJ4kkvQ3GOplfK8jZbTEc8EqXeHnKWFmsVic4V0wKW1SLnuHrX9/A3z1rDj3XILFWbksuadfGotl0YpZA9/oM3nEqSCU2jy+8W8iWbQ239lgnEtmcjZ0kG3RCrJBzWswTU6pe8xGusQyyJM8CJ+88pKgRsS04SZpr2zPz7wpBgRU/xf+2R6iOMEi9JnHY94tNsu3BkuVLPJcgV/juYYKm71LRCjDU0sB//+F5+5r/AWyyXr3JxlRqgAXuwfb5ujS3n6jJKPq4uVbXLuLyL4zucKh6aBR55rTTFADDwTWOPoSmocgf+6jhkHPTEL+PqDTm3zmuguZijc+C1zrho0bCkkFoM6D7/gkcMFZta9Sm8e214GivutVlOMsAB85R0ek5NkFkPqO7pIYRifhYY2/4zqML8npHyddGs/ywSuqs4nsaf/eeviwp+awoBwXuME5krxHdex9sQPPo9u4novpzDNYSErr/5y46dJ4+E9cuV2Qg1bUWdoRTrAqCzqx1pXwSqzmVEBs68op6SZYzMWXPmdx1NTprULWeYD1wkbEcPn/2u8FL4EsabJw4xo3xoabE+JpLanIs9zx5Ijm2AzfVRVVgSjNHq0z/2brgYFVUSSrS6VOMiawc2z+aSGkEcwMSmPH1G3uRA3X0FP9KHp9aFzQvalx+xT7C1yr3B0hGv0A5tKZZywSpY7ymKB+dlPewLvuYOxNkPpKD5dWAu579Ccv5rXYLgC08FPTtqKccjRQg817L4RAuw3sUWTkHQUJJkDBpXavGfZvVVPnOzSfQ1uV7OlHb0C57mO+9ebXEkkrYaig8bUeCmbH57rwqROE0HgfDs1yh67IoK1tu5Io0I6Goc/i5fpXOR+GUcmOXZ+t6ScF3ih2Cp9cr2O37PKol/ZgQxxKJfrw3yA00KjDjtQROfYcPfrDJ2UU6EuKh8DKJeqiqprR9YaayRhJvGGE6mfYA/EIGDqsB8ZbtvNxdB+9bJBcLLbGbYbOMOSnbZ5K94TQ8s7N/8fjQ4bWJSvRWaAUoEyH3hkRW2019wEwBWhUnADY4NLVDU2Y+K5N8kyFFiEm6xARbzvqDrdpYTE/pzuKf9RIDaDnYt7rgFmSkHZVzngOrJv9Jxb2hxfuHx3DZU/FdekKaRxLKKbdSwZIf0bLtWaBotKPriC5ahoJUwwOCzr0udmSJuMOQ2YE2jgrVH9lrmwPHwGI9aOLleoqKi8aEX9In7N2gfJF57UA2fAGPoGs/bAukD/VPQjYaXprd22NniZ7zwVLf3gwme7/jqzA5nem5iAZyqD5dm21Mg/o88IIn5Til0NbIUVqyNFyU44QYYsZl3vBiQL21OoYrazHvuV/ZiGUJTCy+3kdWOvS+6dbaN3Pg4OfyM7IazM4gOdOkAggg8Xd5ydNh6clYn5KToBYAfWhwpXBH608d6PXma8YW+o1KF3FHS94pmSa7N0x7q5gUuxULvUxfNZtaEC6scGD6XYu62doJaAlYj66FgwxCU87/SH+sKENOI2tm7q91Stwbt9JTilWGv/HU+l7IyyIMG+tcDLJfKq3RqvcXdp1rJEF+07KFBczC4yahQfgp4NOfjU4/WEh7Rf0dPAxOckB9U+Q2ID3VpsIKURGbc52omUn3n7S5m6i6+4tQy0SvLAxz2RnyrZsBKwT2pmDooPYgWxn5z40Erzp0IAlcJM6GGRwbz3SDSQ95coj/XTj1RVQPHkVL97WT2EacALiLNHLxgSsXGpwmOuh24Wt9ILGn6FHS1fGXfkMyCLbefF55nwHFkTrKxZlfJQUFtckeKsOAL1JpycUmVOVzuEBLIN7sPeRS+MTOopjQhkQcRUhQB3ZRwiCG3uyw0awatp6l4USC1u1KUvurlF5rVcm7/bPcFut+TZ4qhDg7btjTY3k1r+fykAmjjruISPQ1MJ9R3ejxgscOCn8LoFKyb323wUWbS7cD9OZPXSu0Gt7QAiXNO7pzf97L9Dw4NwQlbkjfta3ZDsP/z8CCGtKwIpF3MJ43RrDk7bbFaL2vONLyXrAScuGstT4CmDNUy6eIwM1CsvpsFeK1os7FoEFZxYsueVAQicTjAEnW8MmgrBXj7e7V8FKfeWk/ReXUKVtnAXH1BVWyFBMO88+r/whDZlbD3a5qG1wK2QBXzL3IegUOwLBaEkoxQKVM7RmgTqWiYwvznoZ4wJO4hZ4FDtoDonYScORUn1n7J0DKUVcWlBsuKQHDlWm/sYZcVaAIMOmLA/iGLJ52BRDGr9Zk7aWt0BjAdG0Ke+pLYb2ub0szQirbZrXdOlxFHcmmHnZExF8TWE49d+e3XlDlbWhAdFMrm/U0qSfQXgmbVrCowz8qJBKl4ZFwc3I+Dn1ASjG8Lv+sGfDsUECRMImmcHw/lQoxq7vbUCZb5cLjRqhHskIZ+ppb+1r7/Ck03FShxLzR/G0u+spqF/E863/RupE5ndxDkVcMkf7caBhFFIoN+V8OIuKgEVDAkqpkn+iSmZokqxR/0hnec2nl3glaZz99x57AtDUt9iETIeZOSa+IzcXcI174suI5MXOVT0ahZXfsEVgqbF1O7e9dhupUwjFCw1WxP0mrshBARrn/i3QYDsKAiviiZ8Og7oQjDDcZcS7wxEI3+vzgc57yxTizZnbv+g2O4p5We1e9P8rEZFiy+oxDpSu6UTg/OLBBOgZ/INaiEz2lpwWWlW7kvpeuU9Al3I7UReYFuVMH5uUWN0I3GwET2tUvkRt304f2Om10yPzMQUGH8k/9jUi2d+k6j48hP2sYQd4qG2TlSj4uwkPvm+zCwuNdjtHLLSDspNn1d3DuvvHWlUwUBiWdUFX2B4L6n7Q+RakYwirH3MiTYs8f4G7uGI7QM3jo4X4uokL3Rrj3yvTbdVnEamS9LRL1TAQAsJTk0vFOHPz3+cI/r1FY1o9pw0gUPonuvaEcj9juDLqLXs6vZKS6+Hkm75EVWssghaTxgKdWdY++Q44pzdIMWI68Qci3zQd06q4Ma0Mdu6qIAZtPld5V/XTn0BiK3W4qYrXFqogF4NB5HxnAkul5vKXZ09Nn27KJWg4KWZY4n4FV5pmXeXtiCdecLm5fysR92FEN/QImnU6J5LLoxNENDUeq3E6sWLOOIsgIAaI25hdgw
GG5z5Rkys9Wq+YzBv9b8k426rJ4kWbLI79C7oEh+w/7ZGwhIyW24Yl0KsRqjA5MO8DV2j9GJw5ik2cZLU+PkGRmNYCxTmyyZR9st+Hka7cMQ2voixn6eikQpU4NhHPst8JcJ8PRDXpgBdWdhf5IUV6sisijWJVIhBjlfrG67MsBoVgOZB2jj7/7nIPT5g+on7r0IMg1UdoE5w6uSeTBFZcX9onKRjVz9LFaHz9cW5d6goua5FPtN2MoUv+cvwY+KusgvtteescM8if9hasXtWUX6gvKxNVWJHFT5ko6ZOH5plXBAuxcQ9tiU8xP3voGjiFl2saWWBUewykqF7blfQGSBCj+8cx4QD5Md6YHNphbWZSRsUdjgUSL1XqOjT++Mt+5r7EtFaqIdrb2CSeK392agI4qZi9zs4srj5Cj9zejvHH1a84qHXyXyxD+lfkQ9o7KH6REIqo0VsqR4QY81LMf8gOo14Vak52f+hlnslDg5VFtwyGzVXQilIvyCsSi4mk2H0ryEgy7c18mZT+e5XBuLqGl+JSSuuwoeIYSrrFlayf3Qk2N3Fo/CMth7OrifASPiiFt5JOD15qqPDQ0bnIjPPu2557gorhKo3/57WdqbAt3BTYSMkiUHy0C2C2uEdQwuFjcJ5pCCu2+YKn9/7sRCc9U9AXIPZN5TcRwd1e/rG9E8ofC1BLHTKEuHerqzVby3Xje2G8oAJyPjdwEbcauaM142eIZVtVkhsedxyXEqO2LU9D/aRk46F/NeJBckCFoq5LZ4Ohv1XF78Jra9MO6faMiB6GZMC+M1+RlEEv3d/khXXzQmpgau4fgksIfcEZ79zy+wIgwKE6BnUBbiMDi0RY0alU5ZbERnV6oMfT/t+WS5k4AX2HLUMC5IWwgQ1tPYeu5LEcDDfN31UTaOGK7L4j+ig/Qf/OInxd0XASer2LPogL70Z/0Y8UfcU90DnGgVfWgtgFQON3zG62hySIOA0McXLkzwWSl29oYx+9mGufo9e506kfi4MO7SDrWxJYp21LvYfFCoRTJ9UBhH97gD6QtK4bqxwqxlWtD0qMtdEjZMEWf5a0tyDMZhmUYczkqOiLT3RsSEa5j2YaaDngK2q50ymIF/xHbHV9Ij59aNliOY14fIQ7tt5kL/WJDJbHVgju9Ha9HD18fKmDuZMxJC+cRWK3wYZw2Wg0Au90nGcqxnEtqpxIdscJs5ClQ1dBJb7TwXoLXTR7xJ11VwMYO234C5s7tBlS2o0abpiDmm/TcXkhrUwqx22gpCX5veCr6mw5EQh08ixivZNR3z19Alurhp6tlUEsIveV2yZhGrEdvdWdbX9WS7QqJDlBef0HR8hIeXUpkVi9ADRs5KEJiOQWvSsCVwFh72LN8pdtVGVRN6mySB5rWgx+WhzYnE/N14EXfIX3GX7ddeCyPLmVmAQB4KJ8c4YntWxxIVhpYPWj2vQSUTK/hvz0BFn3AVUS/ALjwDz3hLx8GwQklmJc+s3hdTA6bdWj54ZNAiSj8RMoDeF7vxN87KIrStlz8M+YD9t1IH7cSdcQf++E0vK6JnXLGllbxCwC2c5uWA1p7MISZFhYhTmqMmaQt5Wpxivpct0ejLEyGDKZj9Mwg4jjmYF/5o5SFXA66ZaiQfNwR30MiHKsq+zTDBp93H6dAh1Ga2JY2J2mae6kZUwC1GP5OI8afnDHooGyJy2CdjQzz3u+PHntQFi9B33LF+dru0CHt14xxKbAieX6J0Eb365riiUPgGZ654TSaWrasK5NrenQLdLtwKUeoV1XGhcesjPOWUT6HyRA+bAlMj+qQtEkPqgl4DocXruDXZHGe9aefRplVrCr36gnIvVSx2/gEDyWEEXhXPfl3PlHYpx2Aoy7ZFvngbfbfOu4alhoNf4k3ZF9eX3mGCLJcn5j4iuAj2LcOgkMyizt6m3Gxyjvp46GkYrnqhEb6KMu1Ashs50PRnwSYogb2NzBAvMawXdASob7gBP8GtI+sjFHurWBy7oQaWLXDc+pj4Z8O0I+65OsbkD4WmWdeLmrRpeiTnFYRa/A8mMn64LA0Unm5/aPYCQ/DEzL1G2RPFJ6pnhl0txqendMZ/pu2mBL6z7pEpcKSePTUAaVCNm2FFzeainNuzxONNvT36C/T2pCMFbJn24RztOOIVEl4r1xca60m8hajMJFisnIowQnpsF5WL3OPwipgdO3YOyjo/fArupBxJgzAPlvf9sTH7ziTvU+akzUAVQpkkZGcqDSKNe9WtjS+Ud/tkfyHrnmERMow1A+LdfFrWcoXPyX5R/41P8vnJOvaY+1zbMBJ/1PhudRQqcPJT24LTXYGd5ylMbzMqZfM1d17MDLUDFzW6GcFCZd2D7EcRJQTPlFUsMdf9GdIfv/qqPfLeZuAx0kkREmHoLRnLK17CqlF7pfdE+vq4RbHxKtmhMd0x96OtuRVixmlriU56ev0Xg+ztPeFLuGUkQsdWetQ04L/ZScbxxGXqwgm2CbrDnovxLCzudN9nNHg1trLajutVzHkcgWW3ogCdYwKb5zYvlMZc39mm+3UYmAHDQIj0DFjzwg0R/oeZd7hbyD5t2VWsrI6ZcYC2OgK587HS9b93S31UqRy2vZ9rTZ1E6jd/UgqXLMcTReG7EwwJu1GgFk8zzObsGnpGMZIkz5pWmz0A+uOwC/GksYNmCryZQ5xh28q6v+awovIdh+Mj5XSL9yIvnBIDt1DDdU8Ix8TLGj1PZyx+jSxIuAwpVH3AVvyxx0cUaTmDxdLOSoWfx6rLLyPpMrpK1ptpoz4NONW7stdc8/dmS7E2xSobm3ssOkERINEeG1Zzoy5oeDLgDCsrLP4DePAZpOiwuOIGUNBtEBIF/TZIjcRbmvaz8ZmlncjiRdzjAfMk/elkg9gTthJVcMkSoTpt4kTRvRD75r9V5FiHqNVDMP4yzeYGwzkbIcl6Dn246R/YkNAZWEY84ijIgrsgULxghqP4vJ0RV/qKb2zBd2z9Dn7hCNIzvaC/ospjY4kVS6rvzXELh7RVNZ8leTqIT6NT3rBJ8gBUHNp8x1dhAZWkBcSCIYuJtLlymBQIDeao35W842TGT+FkhcBvbJe5sjZjVnV5BM5TW2ADYjjmNp2taEQApLI5TMF1iT76GCHyPfyXqNIK0coe1Y20gkF/qWKy0I7YgaJvvhpiNYxB6xcMkHFmoxsbpi0vNQB2TenY+/6Te19JGa05GcqKcenHMBHiFnl0gKVvT6+PUqIgdgMC7Ks4PzHtY5RufN8Ay8DllzYQSUrG7YYAWoCasdr7q8DPx3ysS5DNNZy9SGDytDpVKLLqc1pgvHhn1dbFGsMwV3poMP4kvaA5iuKvomNO9aZcsvAnapQeHcOM45N6vs2ZHLAbCMnByGO16NT9mGzQ56kmH7jURRmSFjktp8gW5TJQPmgciNww4/TBQ7T1hrz2aswBZyQSYQSEmVW/jvAFjSdJOhfajBsz0W6C9TxrQbcCyI4nCu5PAXLDVf+OYbVS3oyQybRVohETePDhLmSNCIDYLhQfrH6KK8Hbrn9VheCwBC34dRAhQvsvrwwTcQcUCyuupkmeA5IZqhsQGYYAjzYLeGlqZdvd1i9A0lB96mZY/frQ7+vFW5LrmmSRt2e2VbO7ZFlhQIcZFkrG7o8wi0P2nV0cZ1Sdl5meV5Q3EFmCW+79YTKIoZU1LeRgezBDKXKKtJrZUNmAN00gyIEXG4Fo+Lcg05MFmMkQDgCUqa07d8aLggnQ9lv+RVBsMOKk/XTyNfgeyhJfhgfz3a6mqr0aZnZztExB/WO62wEjJKC/HBlzNLjFM3qK0641/mFa9ZSX3CcbZLr7hHKtAon8kX4VmB9Dv7gLqL3ohX0ZzaKP/DRMeoX85f3+bujj9Lq52kEGSFH5Q9Lt28KldO+pmYrBZGHv929ud4o5fY091rZ8LRE9TAlnsis6SsQqciCYWpj4aGPlHhPTfC1rCkvRdHiFBjQV+xs3/5PIexwtPTC5Saq/2wn9bUA0EZYd396k+AuQogQdTWpJPKZtoQT5PX88gWCa05IFUWqIekH8EF4W5RrNswGqLlXevPXsU4qGruPYjrLsCSR6YJAY
twJjjE/qqmJA8fn6alhUr0B2wMMQYTrKy95p/+nyHFEZxbsT54S1Vl9jyqFfm7stNqKWMafj9u4gTSKS7PFrQbesDolgKfwLGZaHrmsUJFBwNs9SIymHeHUOWTqUDpZ0z7tJMdhELnJ67lkl0IzbpyQXpgZAXcCP+jb21f8rOrv+ztsBT0xVDXmgs8ag7RFLmoUuYF0++tTBC1SpRJyMtHAONHOL/CBq/fcqzCXlsfr1haaU8ExoVUbCy8uEgSe5MaKcIZhDPVLiEw6/EeS7Cw7Jn/t+PbuKywSSsZfbh1ODB5eiGjZz9wIiqD+8OLxMXnil1f4bK3VnGzQiArbP3WgdDSNdtkvR24HefBixdaojAsXAra7stTe4Cpmu1XYKi8yY5oOtNa7DmvB5sB5vUbB2UQb8QMJsYQqDnbmSVQSURfWG9/YGEnJ7si/9KolsMttAZVrt2xKf6R3VoBRUNaKz0XkZYy8/14hfDNX6SskeZOg+prHXh8ggchGNoN6x9Hiscq1ag37C8SCJgRmnpqEEQckvzS4CkCX8kgxHHeqN0M/QeUV3Y09UrhXILeEa10Wk6vH9Bf948hZYr/OoG7ymKVfW5O5wv3n8MDbL5hsYiwWIlTgOH2OgsXhWOtWlKv0cUs6wzv/Vlcnlm7Zz4BOq/M3Q+EY4eS/eVMPrFnmHKsCslcFIRnqqYfTVxefHVslTbc8vR1YIWuIZ+8YJTuQ7tDy5KsOCq8pGL+jG8SCW23ZWK4kW+WM2FYKIOVN7WIMTI4cUe8F6aomRqm13robhR3qT8o6DPypYeDgwmQhOjBOcHX5lRw69qMzfRSpp2OszcDMTWDGDS1DCGEvkGsaIQ61u6La7STPOIQFycRJNhwZ8xJWB3zeT/K0WWvRh7/kxN99JoOwI9lpRuKgj2xsyUpKn5QN3+9UitwfD/8Rrk6Qq6YmBpIII3vO6HiTUvCzUFTRx7YwU21thQY0m4dd5P4p/PcY2EiWAlpH8wg3PiM5YvqYfjqhVGz3IZ1cz0D83vTt+M9ndnF7B9ssJcutWuz1+eLNMV0poJfe3tI49m9EXRvwAYP4bcAFCTZJn+ZHKo4DsP2fU9RhKpGThtpiC2HtHnI6ZLUtV+TChXVyyfWFJie7ZJG03/LeT7Gj8ZF6XBb5393EABnKQkxukDN3ZzNxKV9RKmpTBXJqT7c6/ixBtyKM1/WDiSpVHZabVmhpsH/HCDPVslSc3r9HIQMpC3mhJPLhNSS2NHtgLQXB4Cn6NpXIyGpGFE0sFkNjRDw2UuMsBwEIMR3kFSpexbG1lRXg3ZvTeRKWqnMYT81dY6WtDHkozQ5soj+gdevmqG2GOTTw8cpRPYEL1V44VlmgUkClHzkdxmCNWBYIvh3Xmk7SMC2qqxk7olQGiwMJU7i34KrM5QZFgaISRCAn5W3E3VoxaVkdn1N+1Pqy3nyRwh1ZcKY11x0Vvzu8JJQbZnOJlPbgiBWfFlXQdRDm0JfmpykCmV7Vezyp4hCHk9sqrxHoQL8iR+8D1a+GLG0l/EtZsR1+mJkX8mz0kJyvwdL8b/jsrZNiagAOIz/8nluI1POwcZJuLMaLfwBOeaNUCLWPsPcgKdcJSaYM3OD/dc5MKNdPTuVXFy9yOxlfHn2Bq3sdtHeSH8gIy89wUE2IRoWVMuTtjRtf9R2Z7SrkXBNsit459d/A+izqok/51FYhcI7gYmW4FqpX8SjFvPCB8Wr3Wyp3SprYTrt/DCj9+atlx/BpgQf7Izz/EbkvXY7Rd62dnGzG0Wur9Yd9UhAZ+eqxWjaSIa6OWecAjgM07PkrywRMTDsSsWy4cMiRwGpI3qGMKguESmFD+ELHzn9A5dIOa8ElPRxDn6J0s4H8+1TuelOOb1H1mUYLRXTsnZX79qwJxw0Ysltw/tKEYMxvw+Apn8YgAdeNw0RraV9VNXCvZyJewlimOmGDP1cEf/Tl7Q/2rag/GS9t7VeqeaT7x2eOdfrp0PrEMlvYmGO1hlMPV71Osl4ijlwivY5IK4URaYuwd/RWkvboo1XCeP+NANY5n2PFUyWqk+uRunnZCxOe4fekqsL+IQhFIMZ55ZT5FuEicQ3D7sNOzIV3nomrK3HdV42Q2iY/D+qNdZnoZPF2+t7DjuxeYjblSx2MdYiUc6z176/cA7qBwELTUYpYllV8C9R7hwh/SyMp15K/6wGySLMHB29SUUSuGD+JV+ntvwX2Ago51Lr7Kr/7VAKvTAeVSvD7MlOevbdOHNGtvsHXimuAXN4z+HjHK6tpupssht5454ims7qBQPjoqFDgBST+jc7JLSXyILnUCbP3x5+1qqQDgZesWN4vtBEK135gPreoejG/jj94noifa7zIwT+XqkQ5yh3udHb2jNeBneL8cZJ+1F20O4Fo9dbRZwT7WFpGwJ4zjH6lpevAaW/5lld40pANDCSLYQU20bTtiC2k6FV8viOJNl8rzwsQTrjJtEGEe7xtbHZddC6KNafkZQkaPKx+lpahPHQoz7BFeYqW4RS+KcspETrCfRYReNKbl0nvLjZQX+cWacEUmdcHE7n538GTrBPPrwx4N7ld918kKPXzTuUuJzvpnfqFz0GoWhRpu/lTpDFJRz3RwyidYEXwuQZfGW085lkCyYAOOSZdYiZhn6ev6b33car1MG26gU4aFTY3bDGPLFoAO81DEE+rueq67gRUvXd2FKXGzX+KqxR60h60zzZVfSC8LoHsE0o6kkOVb7EYJKT173vLQFOFpN7+lsqhH/ll5bSCLoVKEUOD4vqIBx2NLvxkfoRZGO7FVXOk7HbetXVwkE4JJWVqKUMEXHXhVujUHAydG7QFZUcELswFeDjxjSnE/v3drUXc1/g2JwFu0NzAshttDY3u0szL2MpsAsSEAYTy6PCoWaFlKWUrCaoWuDZ1VtkuAEvXzugAMm90wRr29DNWRfxRWFgMtJSxFxmN/HG8UIvqoYAGwcCZb7st8DoXr+MiuOij+0tWRzk9jCoZRSisdQQ933JPvHEUihxIjLMzE3L4OlM5ZvHXdqUhp9bjw9E1OjnfETPDajs3VPzE0Ff3qq0noVaspMLjv4sqHRETaOHiFNGl7hTS6Fm9Gbt/6bK1/AZKOR9QOOAidXT8czsamIwDMJtGGLT0x1BDZKwAOOyuKBkp+apUKRnqyS6f3c3fjy1LgFAKuwDcRHEjlWK+iFPLQbxgP6KQ6CXoWF5Fx4FvlfELvHlOhzjCH5nhHkzm0gzraiTOo6lqmNF3yHURf3YUh52gHyje5sEkuvnX0QfhNZmWwgZykiQ0gmWtBzVocCT7qMSbtlzeHmbj00uOqU8Rb3ke9zI5TzYQmQRXhOI4AX6/yUzXirAciydnLYqJiekj11VOUkV4lQvVmaTPRh4SRwVi6/+bvQrjsw4++P6RWA5POJtbIA4sR0bimsVDCoONj9h6FVmsprMykWV/EOPwYy6I8jJzha/JQ0jz8e1DO/Rsls3dxCVFKZA2t0GxaB+EnloENtG0rUdlo2YnCGxYp5PVBmiVQIlFiK0W54nEH21lz6MQEdTJ7RtG0avRWLXnfp/1OaqFwr/gaq7qElEQlyXswhzf5CDC/+ElbhlUE6LSqWuJG4Nz1tnHSC1/E7ChGDNKwM5+Td0d1ezhoNfnpaUYNr3o/wR37WpP0vWDeUE4cB9CWZNnNxm+5iHuAl/5bhlbzCKhH1unLhEUeLLGgBlHRZGO+RhpJFpf7MDiYHRwFMzeacJwztP4DrJ9SCEAOo+/rqSi2Y0nurm56RL709hqlp8WqqMiAjMYTy23D0IDV+lSBrJQiW9JQUqudi3hZkqerccGsLUtpTMvAJl+op1IzsgVPMpCOpblBqUJFUSs+ce3A2iFaZYhJk7cK8XfX0AKXSoDJw/W65rKIEUH0VdFIotGjvlBuaVysk0E2+SFJen0QRiRCRteisupHaVNMTNzyE89ObEYv4w64wThws6Qn5LZ0d9UGburAiNJrYndlMM6QFBEuAx5PcUTg+rUK9MkL5SWGWShDxGqjClQ8RvYquncKfY6OzFr9z3dY6IWjYhIgPeXaweieeQoycx+MqnUWKtU7+kU0fnAk
NFmr6aOVDTXeW4iuQa0Ty0cpszQsn000LEHY2SD0LBmt20B/emzWEfnBdA9jHdsIJws7fcGCRd2xu7FANCKC0TvM5l1uq0gcfdjO4y3hUJl3nbhwzkP+Xf5PbhPoli1dVU+IRCtjfZhKVDE6WR1GrFq3BFRTTIIoI3FMoST4VW4E3odHgMbRMkgnatQ3vEygRJ3PTP48FdbUSPOvCDXj7H6K+yo/iQQhac8zG+bZp7LbDYhHkJV6INiWzsXmDTwFEJaz/Nh5TrNiHvcrvfNx4hFGofdZwRWOkVmAfqtozxMH3Xse83beGnOwgH06k/QOG8opDYNeNKBKZSCjLju+x2RY1yufGsxYeGcvJG6K+6SMiqmc8UH/nUKrL92QPtHp/C3fDO13lk3cQoIfsjsvYickpYQQ1M/99p+PJAZQTr7uu+WI7nYD5A16c1Hbd61mHC45//tMMsezVBFGvFL271mJgzB+WIhlosibvrxiE+SkavhJ/kFNNIbQOv8avXXbSUJORmNyoP+HdgRotq7E15MzmT8nnKA/oFk6hmMTaRTjV9mZkemXni9d21d60bPir8sVnkVPT7RwwEYw/hSfEmtvwHhLh95/jZ4bHg3FaYOdp+hAtJ8NBDEu6nqROegH1cNnHdikpUxSt/bq/fdxVuey1ppxnMld9oy79ayBq3fHcDkMH3KyNgWhj+Gzp3WK0yuCc0U7fl7GEXYdJfq3+rn0TsfQ0qdIxg8Z3ba+iSgEKpF57bLUlgu2eakZUaTYiPO6JOFd37hDBkjW9OMKNUqXgJ8wjTtxqxGlhGy43QbPLQU8MafZJDZwABzS2xL92ohKay/sKGzRwbcjOetfPrRrBq2GUWt1+5pqzl7GaI8qP6Xi0o4yC0hSg6XgfXAcuI8viDJjZjE+KKvwpl14h+7asZp7SLq3esxTXVTuZzdyT56930gujbBprLHFIObpH2AFWY4WfeeNolQ3kJ6UknhovwE7Y1o9u2KNuaQnWGckwsyXNVFmbcxaTQGRyqTf8L5sPbaC0Ud+eAuMyhennaiq2dBFKi8XfJ+RvKRFXZfeNgu5/xn2g3Ij+QSzJsdpGYgGvJ0rVaqUDqOH5PB2WT0i7+os9lTT4r2yML0V5ad51I7+wrCA8AMEdXp62wVWLwrCteq3/5MOKyLYy8qQ/VB/3O99g2gGS04DDxCULhGgNp8qI31nzojGwBsnTJ1lBT0mGFAoKUwtruQOuiBg1EXNAUDa7IeM0lrejOEQVD40E2iiUJzAG2fz3XQOgJODt1uQXrmXfm6H7K44Qt2BzErfRFVIG6eEsKpfc70XCLxnYvpxsxKgPGJfvqHpREDFlT3OqjZ2/SLeCOC0zIhWhxEdFLjcitwpakM7gBx9+GjHUcM9IfPfb5Gz9YZUvQ/3qf9VaUUdYY3RBkWzEANRbCPqic5iPzt/L6n1UBdumnsTxhW9t65YYTBYHDubGLL0/GHOQW1wbUJZOFWzYaBBEtEU7ms/yUUjQ08p6YPpUEqI/Ej5eTZGTHSqMecWiJHhyBYCCB7Dh94z4eBsiH7nTw6fTacKDkArvkjfPi89JU6XMl/rYcL9JMTdh7NbQLzN94eH4LD0EBhIj45lnCphEIhPPeb3du6iwypJJyUZ6MDE4DQEqlKe7N2xj9xYEgs+JKIQziz0Tb933elefqj10jLsI/fhMNEwVWFKyI52yPKMgb44MLZO7vL2oNdt6FWboVEaVOBRj7fYanLWxFHWQ9noq3kK9Hhl9QwXSCwCH2j4L2MA0SCQR9BsKQ2aopJJiamFRuhdTYGX9Hd/EzKaTtVnMqO87qXDL/KnapyB3s19Jb63AYDP05jqpO5lZC6WDBHnWTv7kgOk5THybsh2NM+Z3WKJrFQE0BdpWbm4/Os4NaHK3NmY77QbF2LCxcH6sFFyFzJ5FRpD/FvkhfUwqmRjEd/VI2KFv606xX/GodPq+KlrQxDk0m4KuYk7vzU0ZKvQv0lwobgiGAu7dMTfz9YROD0KQT5xWKbnC40eyzErPicJHK33TMQ/LgubN7+E4SH3zwPNI5SngxwybjLnzbrMtrK/x1QMXL0+VK/cGVOZQNo7+VH2f3BKDKAIsoCJRalpwJpRaquUl4uuD7XOjNovrNkGFLxgRtqcqmKfxfxWbhXuDbScdm+3UE31yL//NaO/wKFLSIyMxnWI4yk25+tVYDBqhhSQawjyG6mo3eRS46T/TvgGXbEKyFmVtse2PeJ5Ej8beckyF5qsHlPUnYli3Qd4FV5g37KqNOYhoPFvfgVmaT5KDjzjv64Tv1nrqUBywuQqTYlFWn+rg60ORE2iWT+LycLVlRn8lkyv8fVX1xgEeE+b3XrZT9Mrz9XJWHP+Z0Nk2c+QTDYh/ItBlEVbbYD2WsrgGHBf4gbHYzz1w7NCjHppqcdYdaY8wRpDomE1NrUSRikpxAGckftHJlMVrlldOfoVDZtCBEzEEgxouB0JakjPkJljGFJcRy3mYfZdbotTCeI04yEYkUiy/MrQt6ooWFnJUN31Z0PAv9rfA3gJFmVBBqha/41XkdJBP4SqZu0uLniOCg1TuJBMwBpdnKZIP2bh8GhJQIehCVsoqHHZatNB66RI+CplWguwzmavLyq4utZoTy9APcfbowDFcdn0IqhJPZE/jxf5gR2xK+yeU2bCs3tsU46V9+ghWEYTPct41asTx3b5Zf3kThQf95O0yjBORdiE8KkBW5NRCcIw8xfpEc7zqPj6cufpgRpkqY0+DNcPK3wMvnCUr13y/+8xCvf0YCr42wGWa9t+DoFhCOdBeYTmrYMKtBN4HgxaAanrfR6lquIgzVj3O5ASk30oN8yhvIa69TeAHwZWsSlmTtB0FPpbMXFU9s0Bmt05qtDkT8fadu9Ay1ndcvSYoIOC73hZp4UJtVr2CL34p2mzFXW7ZTBHkSP04/b3H7Iiy+Tx5irBZ6JAoLqEZOODo1QyIHH9pehd7tEV3oqG7ExaWXDsJfPbK1UT1Jaq5g0LXN3LZBy/s9gxl3Ey4VDiWjvd/gyvADHh5u5j9RpXNB/nyTi6AtSU5K12J/v27jI/Sn5Vyi9Q5xPZoZDTjkFx6GTP3RVjBi/lDQZ61nibmpuS1Dr0IqoAoMBJMhnSifMowjmPWEoVYQ3qxo2ImRfVhpdzHM1i4pMb1Dtc2lvIySGmQHsbVYK3nPiT1QwzfwpBxQbiVzGmFVgphq6P4eN7KtSBxc4vFI4ew/XVcGwoSIBCBvn7KL74pcUAGg2IQxahY23tbIlhRy2234nmNosUN4Dlgy1s6I9IL52Tdd6yCOrQouHbuK3AO8VcouK8Xd+QVm54//3+jOqJALwAnMFKFqwS6xjDl6ZWiBF07zMfq+RWTSrMM6XzR+Ck0rpSdAWTZGJquLbijWV+gXMMuWDGp/YrebtJZndX/tepVZdBTdUY2QXaE5s/X2dPjXeLNb7xt6FDF16Z+xdyWAAvVC7zRs5WeJ2lmz5dJ7oDNsxkv63dR7/P2Vrk+tl8J7gTqgEPScwoBImyckkicFFmOh0PZLDTqc7BM809UitpFY9gXQj/+pkykBtdRi/YBAS5DSBZnLRWC/5Gxo43hNghF+oU0poUkClkeK8UXcPrC15yKCwOUxzU52Wjc08dlyS4CI5HAHRAZOXJGUQeKRHjfkiecOsBZPWuYnbvNAxnGMauRil6I6mR2T22JpUC3eBYc5DxlnySh6tao0SGgUM1Kc0PuNeBk7rAJOcYdTmlv8DsPNhDws6lFdunzDrtVBhX9A2IpeSKA6CTaKwCyZzj+oqM72y7Fi4WC20u85IWa6wZWITsPWlwwz9A+OwhaTOEVuw6yrSF/ycmn/aXNge6oOpL9kNnWUt8+BJNfuhgqsWnWbs1V6yqkTk4O0rKNPYO20BbfsuU/1sEzfM/unDpfTlT8VoJ6XsSsOezpsa0hMSXtl5zPHeK/qyVpzaL4AqGBZ8m11GroLvm7uSKqZxpKkcvXTzTZake82+RalztJvD4Pb/qqJmNJx4EEMtIrE20bkCuQC8jYpeE69BqEOlARKs5Wbt+tYNIj8pRQpqm+G5zb3xgpR04aulpX2AymmbX
oUi47DPOJKfxBBMtfTaP4+ajT1/vySbcqBvT6vx8gzQK9h6+fXHFhJXVg6dc8ab9DY96wMYho1/7HP4Jl1dRFVErHn69BS0tn9yj3OZV6a1m+DJdHxHF5mXRuqHlooK4YGBg3lUDyFUe3XqvYN2wXfAnoYRbg2vM0iyFGbY9sPyXxEpOMiHH8nxptsWMSoFg41xDeONmgrCrA5kEo0cbsTHTw/jS7GaFR+314iu5SzH/QdC6/RE0NEfqBAZLezjborm4f1FjP4M8HcDLPFi3f8QUD0wcaNfNxUffSTg8DCTkyastCoUgpgpClgtbsJdtBuZ3lQ+8hfurQOQK5c3kHEoEINtA5w0kyUzv2+ZXIADmkL2h4dUz0arJLMC/AlRRO2gwbxYpr5Ttp9vhZdl6P7llb453ab/bsCB8KDRStfvqjZ3VgVxy/IxgOTWibIY9mcIi2lLFOzwOa131CWAmeq5kgOI2C/4YKcVzYSohd0igiyT7/w8NjApkOF+P888ZGQA8jk2iNaFUHAxW7GYHrM8VhMFgzjCaHMH/2nTrA/BFsd2r5j7HeOIysqhc+CUirj4T0v6WLzOQmEpginb+eRNRShX65i2c7b47d9r4o9YC0GSzyQi5aK47dHNFsiiDVv2p6J7vHFyu1I4bsIKnKnzAQMmg9n4df0GtCw6MU3/FfcZXv4MUreO1w7FI98ASauKKKxWFpUpZj0KYiBwWqY2U2K71DBeKd5kwFHla87k90FfHnOw6n/azTKaYs6jX97mLi+TxRvPmlWGAHx8dXW6QY7nOll6anJW1slb1l9+UGT+4IsVY2IL4oF2za5/7KGbEBFJblj+QJC36znfpd7wQyXA0gfOZw+VbswQYHM23qWPchGwS6tNJGNmnjc/MPO/iXdiWxbRyyCkyACrFj/c2OKy/lsjNb9kiOL4XveHEArBW8cVM2hlJVX+fCTOAoll+pFZ91QpKHoE1P/s4ymoSoxjfE3T5RdYoFFX5JSWaFjxmU1Ak87ZjumACi4ChgUy6V9UrJO0Tp7vdtBevYrFxc01NI8flNvs/H51eyG1EYo0vi2YMRi19XoV8ucW+C628eQf7o4+uXHJGZFjOl3PIp52UcViJ0l4DeGH8SGT9hKqYkqJWd6HPK0q4bXD8xdWMJO/PJ7Rii2QjW+CdAFFAyKS5d4mCLNppt0WbEnsf46oRhL92CkmEhbiWngcta8J+UMOteNqWXtwTQMjQ8CjLq2RJcwp+pM42xRg3gtvHMK9P9Cx4Zm3yPO70KZgcC/+RzE9KJlQ4B6PjjO+OupXR9nZCi9/24+qQYIXH/9aABX8O+vyQ/KD+zJhFEgEe/jQgfz6MlulWBREnb+JKV3b4C3HCMjd1mm5mII4eQLYMEtEVDQUXZSFoDDqBKnQiggfnTcUk4SpA7an6+L/4QV2wkSFaOx3UTbnIIBOHcZmlEJ2FsLDjkSzkPXafezjcsKA/34Zb108ZVqB5Rkm9llgJhVylgk/DSmfQthdM8Rpcg9EjdPkkTX43Kr11pn0GL3+c+JrKDjBjnsgaNineD9ka3ZsD6mpyrN5Y3RdzIUDo9ZcDVER0Rv14qCFz0NCKA9f3fqjJ93J/qdCon9u084gAbUnMpL74DmmAUohKSkcLD4fQxCh0bLNxnK1fJ+O8aPE6o/9AaVThPcTyBJTrZ7YjmLgzRvkVmXVJdIlAffaTicCUSQ1NC6XFSDbUAWE6OTw9nyo+kOfsyD+0B3HrlGWQFg78lFCvKgqTWkoDI8sY5BzQn0vxN35Xv2wVp34K5r5f3N1h8MIf+1CuTsGMismhTOXmBR7NgXb2oyLhugv5UejX3VusR6DWDEiZ5exUC0Rk/YqnmZ0ZP3G18hWDntUyjU+bSSZW7DjxPZTyKAn3LPf5Z0tFBeQ4f3py7IKDd76+FRKarsTJ0F2eWDIOB7btf0RNDe/WTnBvlc2h28zZz/cu/wvUoNJNwtIRVccYTSUTaRRrtClGmfDsBWwbm31Mdt2qo8tlcGfHH12A3v2Byk6NdZZdk2vPIn3W3ra6epRl136nyaFuDwBZaH8SGTh/uQ7mQsFsSVZk3T+4hJCKVs5WDyckAupLbIgmC5vvWRIhk5EJw/lS+1t18nho8ICakNgMjnr7duF8SxoyweE/dqWiyqaKmqIxUrpd7lNEc5VXImUDuXDFIUUNi6a1GiH4lHGmT5yyRwG0UeiddSJilJkqWx/BigJtVj1cVNWZ4Zq1vQQwmlaTnnYVFD+CaDVg/xm1tqBrEG+uMfZ6HbciQvWx+fiZfqj9nIXpDy3G22vVNByCqrOsV8mWvnAldhHT0TB39caUqOZxd9NrbAD0yiBXefe0XgqojYgLRqjT4sjM1pXZJp+mOSCjIFRvC/ErYpMe0z+T86F2EQIqvy1EUSaNEqgRZD28pCNFanQRDOWjfPQBaZUMadCJjrzpt5Rfq6hoWvV6fjbtZk6PHdqHiShJHMpxBYtUX0QBQou6gw9ByDIga/yLk7SXkdKd31FBKLoAPY3Smj2WFsubmoxcmRJGefBO8VHTCxapzq0ENj6x4oIcamZf8PDkjToBeT9In+/Q1fobvJGCeMBW7yL+igvO3/RxwGr0WWDKiggOHh7Q2AVnO2HEXXWD6ENDlzo6knUxqAkE/SeXxK2KQtsjxjz92pdsnXTrCTxTwbljjh9iGtAks1jBZAzX/GGtMZeCzQIQPkTQlBcs2tvLVM+q2PWbhm9Aczec7uNl2ks3dQ8DNpr06W7kUY8QsKYg60+aERqlcd9d0K5GvtAX1WEOb2aa5BBsQZxbuo8xYMh/95DOsVCI/9e3Y1vUclln2wyKBvKxpH/BTg2tvhTgI0dVfBIYNrhLTmwnaSxAIwqq/mdf+F/F/dJphkE4Yr2IVj1oHtXq8WsfAehLN2zpKZ9t62q6os73NwU2IhqpdZnidh69uijjKuGSn95NDfC1G5D3e2dq8aXzn4c5Fabn73Isd+bt3WFpgHYZK+YvcudMYl72y5Q2lu7WGmorwULV9h70J4sAKl1NEwi7ILgxVyel3W3CkVFj5JnIpVH2ulG31obUzpxtvzuzCjvu0QIUJFzS8CjISZVXqMgEzyrSS5EopS4EA9ZrMODYdTjIRait3uOS67Z5duOgNHuW6klnU/ick9taw0n2xdsvNeUa6CzpRG89rJfOba4/pDDIXro9QTGI6ujJf9rTyCD671kSBlv0+xpPl7i7f/WIoqvDcKN4f5OOVlpqwDwU8rF7/lvn8UUQwXCcI4cEA9n1c2LwEtRzq2mJr28S7u3PrwQEhtY33mwtInYHFtIOajCJddNMP2bukVvRF65jiiDl9fmMflleBSGaYcMzAVvD6nikO0ein4zicGL8YXvAfkfEOZcOS5C5qjbiMAsGJHnKoQN8oDH/DpvFjJYODe3wkv4M3MwcX11xGqeE9XLxYSm4rtCjsrnOOBmC8r2U1GMCYtakuWqpHvPXPC9H7moCsiejub/twNe7egKZjxioIeuEu/XO9vKjS6VHJUYzSIsq4+st4Xys93WKXJ6Fn7Cx3bOa1yTjJOf7gyAldZ8RPip6nw42BbVok9knNkod/JnNAQggPh0wCc5P4MXZzBc7uAQIAXs3AG2z2G2RyauVeJXsFUULnlZiVMQUXe0daiQTVNwsw8sFkWr1KY6hFFUxJ2AwzEPfpK0sU6ATQWcSGl9ep+tVxh4tsExHd9du9yZch87LyjzqmG/+IzoMIjIe32LsQ+QaLzdRYxS5OtY1dJSB1gCsv21nr98sjAOgu1HsljODYwyrsfe4ltrwRRfW0tCjaAG4QeS6h8u/qGZOZiJlO5cJj7quEhcEy7LPDCgk1tAG4ry1Q90DoPNkVjMRb1JuTXs8cXggFYQjfPvXHZvwHhcqiYKhPxUAlBbk+6IYULCxhWx7XpOcVxC6DgopsxaNXICP86hOT4nT68FxfdkolNcQItq9Q65k0rKHdp2tO8KuSh2LICpY5ZenYcW2CB3xC8dISO7DLOYeTtTSO+CWQvnQggADc+lQpgcVstWOleMlvy9d/9fbKRhQPekBBu/EdfINKlRhRPNNEfgPVhzU77V0
aCCBy5iZuYIJyS7v5haB3okLpOvSf8OO7vf17BJ7QjsstVTnAYVCoju/DR88ur8Sc6y5nKcYY9crbTiZ6HtRgtokIzUMj5QFjdvu/m3F4prH1g+A+5SYaMDa14O+eyzM34ubS7o2OWmG6T/AAYK7LN4vz7NT1dXQ4LNrLRHBrmKf9/66I3D2GYKkUdEgRz3rzdy7exMVb0NlBJc8IYPM/5yPNGJoVI3wwRiVIf781eNEfEVmPLY9v6Wv6qBdT7pGNyk3rPK7UxHPQKh1i82Tuw2+T/ELN+LNaHqi8hz1ISvCHSVjTpPgnPB6QT1UrgGMfbDhsfcecqD+xXMvOKUOYexKRPWxsYh6AQ2Rgu6HmnpUDL38o4/PDh88x6IrpdcqgjOSBQDvoxZbmQikmoq8lsM98exKbicTi1dQ/j5yAfwMf50ACyjHiE3pxhh19Kyojg9sT3Jn3QAvM9OZZEM1SV/jrErZli9p9znOjwKZikkoKBErmW1XPVn/GRMZI33fLXeFkJYhetb0sxzdY1sxOrZQ1j1uHM3evkqrHnDNSiygxuXl3JPd7ydqvYzBnxM1mRJVRGBrVyrGrjxENbbLokUqANt/l9N29WAexi2NIMPj2+5pGc6mrpev9P5iLLv9AcP1yRmSx5Um8sOc3aI8U2erhFoXRycQtmshMCgt46v8667tqbS22U7yApXkOZHnMxvoqKH8lNfMXCLObmF3ejhjHGfoF8VJK4vKqhJq83nOVjTbBELcFJA2uaY9oa1yEaT0bYzfRocK/NPODYpU9CjiTOamKLNOEjLKC0JS0Mh2yDXjAGn3Uu6XVFV6PU1upp5dEoMZrpHfc8UkH4LJ7FzrRqJiQPlWrN5jQ1pJ6wqgC4xRVfH8Z003XELwmPn3VH1m8P0DNTsdD0m3SqB2PYb+EvvcdHXsfFHGlAhVmAi/FmxeARDV+7LbxXoKVopCnFaXAWgkux/eK+2z26oKRFRTkSKzWss5KGYncbnyMUx79erTMbXkCCbHmRBdZ2tJUHBvxKvmqYQxOMauCoJ1kXw9Txjh1nGF9dAJxPbquV857AnaA10qsV7kwq2tU/z6wISAcXqitWgt5pKK7fmcvocBg7jEWuJczS9Ix0Yzhj69i7DvrzRVZ39etPZXmjiV0KMgH9bJ8cQsNr+OXWXfz/Qj7LDxYRQF0flcKwaPBjOp6Yxc+W2ObEvEJK5ni9b2zhvX42LPlz2+rEZ7YzSEkb8CiRq3guBJq35lYEu22pqYMiGuCKlgZpUHz0FiZ2vKynuIs101fajPSI2FZHQ+Zd69c4jOMm4G7KXeI4+HqWaqRcAKVo1RGS9WPqI5RbkG4iqHpC094duAwIVlwkbZkD38Frr/ArG1rwVPeXCR2Hviom079PQTR27ICGNGZ9HjtldOtrNMDaZ7vWz9wgfJSmXXE6AlTwkGObveMYZ2ORj4kXkkJGc/npSiY2n5HHgyZUpYCbcsxs//M2LL43O3+ZnhvMRBZqITtM2rS7KML/BueZb2ZN3iermGu479RxMnMLIRSTJPQx/nWdyqeN33kztyFWPw0ZyrRo5hv50z9yriJfjDF9xavz/XoAEMDmJXd70yg1z/c5Fxx5m4ystoTTPfHLynVhtlQCJxXc7i4Pdw4D395WLQ/kviswwhRoIXKId0YPGFYtWIo9Y3W7q/WlvWYqL9QROyWuF3tjCaiBMqEJdBkpHN/ofMidjcIq5oIWpCK4Sr/vYr65y8JgvCbIXWlBAnmuLbOgWFUK5tLvfqF6Cj9x7Gkv+Cn3qsF7tV892465BsZNXxGAznZ33O1gSZ/RhYmwDtrjPRtuyZ10EU7Y0zeFcHfh3J5lCQRL2RWezoms5qpjBh5R9rhuTQ4D8joMLVIp+si8orUByd1m+6hvVSIwrdep/h5Efkvb1wzdIi+lkJEZGvF8lh93KJHBUNtgPKYPWeUCA676FATNaXI23weLDpOsvACCXr0kLRer6FYmqsPWfZCXa0VUl57f8yg7qso22plMiw4NjWcAy077T0olEvYx9Np5QOpL7uDxG7N5VjQT3LsaoSP0LqCHdgn9fClHsmJaPR20J6dUW8/hM8xjVMUZ5GVtgkng0QPNGFSLLKog7qJJl7U8p8qQ6AYITwLNEVwQ9NzpFKiipgjapHfndrZVIfpIP6KvQ4gR5wpXtgPNba+tr5jIo/deCLq59fdnlJseMoBmtTfHekIhfFG+7aAm2LaBDrOdyGORZZG0DfmNiQUwbULKiHsvDkcxZ91RajQkzfEPkq9U5+CnfzNxHMP387wV8bCl3ZGqKk6eN75nxBURrEYed3LmkuprYdEvdT50cRdpA9xNw/I9RDZjLhntkTo50gsj640bT0hGzFLyj0MS+d10vOSABmi+lMYFeMk3Hf9uC/ohNGs7DH+7JDFzwMAAYSSiq0/pQPuTwK/MZUlSyUFGMTw3xsEl+cZpivw08ck8Bgs1EfRCQOmVysYVnP4k4aO5R1c9uzRgrqXytsdRlh7Us7Ez3cg+8GUZw59MjtKGUJD2cEyyhISaOnU3qzHQqvKpDhFPCIxNQp2HQCxgN/7c+8mh237rDbKMcfr9eambmIckJOj9kW7KeGwaL7H8M7PgB/+mMPy7zoEieycP/RFIKDQDaWYfXHWQUGHMH2uObTmWbVnDn0o6mLWNZa6CScmWd7f1LEdlb2FwxcIiJhCzDCnnWww2KsQ2JVskGh2wvmDW3snRuk4dhue+wug0MqZFVB/Z1W2DZJ3rsXOld9rHDiQYP4lB5kXrWpfiVdKhbsa+gNvnfSG1ypt4wl7Lx+1MKa+w/dsfS+aC2O+smFhHKy7i/JqbIef6zlZdz/C4c31ATzchztSxFxSX+PklvUAY7oKPavVEWm0hyja2KdmmgY3lXU1Xnt9oTNdg4CaZVwkyYNQToW7OGo2fbz5+3iz9ZBSRblsb8WuuAfw5qaxA/LEgiLpg6zEW9tVFq/eKK26MnGFrbLDkHdTWB82wS0mnS9z0y2xX5ck6EYnO6B+QafRi8NwCdveogJ7CvCeO2HxHHGMwTa6U7ge3sMPno7h2UmZH2A9bPR16kBpP/Q4JLXasgP/wLvDEk1ddce5J0G7XCyOqC/rdddgEwO3eSVKlCKzOMDX1IDkUK8RESKXzQRj75BVtcIuTxHUYyyZ19uwbAGxMyXIVRwWcQxNLM7TVWETCRmYjNVy4qchawGDqyCF/q+yJRBU6Io9E8XcOIQc2CjON0lGqA+GOVuwW85ZMI+ftX9HPw0OYsIeZOB6R7Uh2GgCHMSN5aFXkUMfvd50PKJow5M6M5jXrYJxieVeXzYGCzArptSUjdEScYEy3VzBSoh9WzfR1b531+JFJ1yCkaSKYl9DPp0NEKipV/V/OFJwYJ9VO36LCvhXASoA2cBRYTIrld/S9ny7GA11nMyoEqn07o+v1Wt1og6O6voa5w4u+X+BVZuxaL7BaEOqhPUvRnEnXtAhgGRfqbtPPakfCdU3wHIs02KzT3HASlJwSMAgynFg9Av2F8nysDAXIrgbTS7x4fbmYeZfFEPOkYnKswYz3fNEuS/JIceN/wyNIoxepCrH3fKmoLPvETpPxppNpnedKyUJMbByEv1Mw1yWXrCKMCA5QIAodevwbIJqKub9ePUPIa2YWRPuuFNAs2/vtZoq2RtEt+0XpCWr6nJ0kCFNmA+Gkvc7lMwOzZ5yFBNNzuV3JyVxwicT9pMGeeRw1hdooRZcueiVobzQhh82xMeFSXHsjnKEp6hh4CGn3x5Ns/bxv52/AIO9qXTkKFGVQP8qMZ5mIbTRU05xFwMRyn3tazdbRRZjQQlnqbt3PetSNLztOtj3x71HctoJKEkVKSaEpnJ96iAhBmiX0rTNkbpw64/hFXPYdfCaf8zalA7ErEa5rbRGMclJBpR87xV2owal3ewfOTc1DOWvUcEa3cCloEh+WV+drRDfW1QYRp618G3f1xd86k7tn8e9fdTxINUJDbYvcdvNbM/ODJEOdWnKZC9NJ7HcBSD5v3Oybqf+rFV9/TMmcek424WtUV+C8WGZzWwxsocva0ZCjXdVmaG6dsItTxKhm+y3ZnsRvK7
LwnNp0xkJPfS6Koi6nXEwDrojLUPl7N/A9bgptsx3RwvQKv4glP8NtDjf22ECNsJkSJv/Y9FFzbuNm20i0nHYwq+gS9LMk+j5C7oYoVznDqa/PCWG5JF7oK2HZSBj1ZuvoeftkHcSB3dqe4nDLXJnWKokTCmVuCotom4gOUzXI56ILbI/ScChGzOu5I2MSZXp28/mLxC0eRRsSSLMgQIfdrmqwP6uyAQrCgvgQ87afkzTwiHZhKlk0C+p0eR1M3S+P7qM97mRHwkTduEzhhWiB8u88l7Igk0XKVc9mI8IBUYlhAU6gWgthBJ4zDveRNtVVL6LF/tMmwj7VSI4GB6T0AC84gVsx/ZWOVuT1uo3rznzTV8TfH1H7uFcEQFuc/OkXH3OVSQLuTrgKoENHZycJMKPs8WDXL100hI5jVur/249aCLMAbfvXsQE7j2NKVrwrlmqAf+IDFTQjFecbGRyGU4hTUpYClxHaMYxdav/hL2PFGgVdWKH296nV7Lye+VqfybLD+EfSx51VrMUdYuMSU1+Ioq2WA77o4S8zSF9QhXjtNbp8Ud/jFk/IQDC2ctDWKbvSRFbFHYW2SztWPgPR5Qhv68LjQVLKxuAW0B8yEUBv6HuWdhF9r1FF6g45AA5miGQ0Lq+AgJbfo8sqgse79nptQQJb8SkrnAdXlweFmFiMHgoAsV7UM7inKRHA5wJ6bwqcDee6hCNI4eMtOOrbyCe0xlMy4ngyBH7MKBLxudbRHfXoGrhOh9NonLIIIa7pH6ME6LBi0EVrxD2xN9y9U1wbwleObGqEv8BNF2/NgmXFfqAuOArByeYlsMwEWeu+eFhnUcaJEgm+85P4jdMps4ce92lZL2WeDU/9NUFJyfK24bSI58sWR09ZPe+X2d8cUdk98grdQoXz5y9rNqp362Fe+5kysRX57D3xJ6gX7vK9grm70hRzFNdsQEGROQNN0QgcZCINks2+cTqgGCzMOuAN4VCBc9FydC05mUQFUEF48QQM4ZUI86MAcjQY7QOU3/7LSDyOQZhyIlzDTBuwoCfjPZy1vSoD3jPo3w16n8+vRLGOm+z6MYETwVtpBPRp/U+GxMqBgTPWVKlrPJtNVzh7EdLZzZRSrr9xi1xt+REABX0/nKr/aEox94/VSKzcuzHxd07AUIzjsBklVhHQeNU+lJEVEsOE5wFjJqBcOr1ZwTAx0Fg35aXjHd6XExOVT5SC1Ktw+JS2ClyBtUl/AuF74c8oj4IromMh1kmKZYoFLLy76Isypoprq1wGLOFB4a/7rB/dQ9y6iTnxe6lw+FoYY3EBkmHjleOue9EkoTT3eTYeYe60HdZDMHK6YCRbSkO1MzPDyMVVSRGob7Kqe0gXh87dkeBwZHCj9kFHc/Nl+dc/yxdDZjjttdh/VHrm49N7OedrwBK/JNrhs+yybERzqEbiYvOp7H8SYYlyM0huv96YR4G60W0epP5cb94AZdJG378JSziTkbajdzOFq1wqTMemnCdldVYcovCX2TJ0Ai8/joB3KuL4pJkGY18vKjM1CBlvsE7PWlvsKtJmfszh0647m+o7BZOpHMz8WxItThO+SDSUzjRy5bOJ0+Ga/RMi2K86qBFLb8e8sOmvvMFwpnhQMbCMdhlpIdb2TR7NgkLmjDHAQ0+CIKNMwtPDXIc1mdV/jEITkkIyycNWKpD/2yLP4/uqw2WejyIELfKT5QkxYCzvUy/qaxvGBx4JuauormCSdmTJ/YimPFH2PzjMf4MlrOWRP0QoHbF3JGiwPmrOCfEGSr5EprccT9c+/QDi6IJygibD/ENYpPX9/mrw0BB4o79d7eQCQ43kTJbNINOmS7k/7ycTmUGmgbZNhIcPq1k5w+d0VQZYGKWUoch9bVfPpeBDklbdiqznDpiOXRCm/4sLPbkQ71j/kwJNqo0zXfXTLBhjbQpeKcFcdVeQlYxgQuQHhK3nLPuASnMahhgXX9HNqpxjGNPWfgiIoVqT/2Q5CZTvsRttfPMitCWtjPlrw/LqijTM2sh/09E1h/KfVWeXVYyYd4vu8lmDWIHX9HGStGFa5/2O9KMfPOFJzZTGqLspR/wRUmdW6RsvgNAJoA7+xWVq1Cq4gkCeufhUXEtLkcceEQcXtUltnJ2hCiLbN0U0Tz7ti30PKgfusFju64aD6UauD3h9bofyyyV87QHMHl2wM/JCXZTRNekDmGMYbsnl6l+/5MZRq3C3wBSDUXR5Drd0a++UboJKjxzmbiO1w1QK1MRKi7SOssHCCAGQNbv0d9h+zMEArQwngK7EJwyBUF4+tk7ont5NAr7grOzuO+e17EgVEESFvQGkd6Y/k2DVWXIuGkXHhMCYoCVETt84fZPsQh2dMafkyftJbf9ch8IHHaL/3tPU5CvSwKlVaW9w4hRnXjK5X2Tau37Qb/5PNQApdC4nq1ZVEjyJ/XbFEoWHgyGEhy6CctrddJ/sK39OhfouvQDNxzKZcbI91i8iuJJp95DhMAdoSEtKpbmHA/FjSKL5B73xOnPOxA/bzwcvY3U8hbfixVaqK0bweoCYE5BRPWpFsj2O7u7t2h53TECLxPQccCxn4kv9ROhSBgb4vIWPM/Qorqzs2Ix87lUSYuUlCCKXmMsf1EoqFwiDo4RLzMEkzZLVx27YBf7luQYa7Ox1TkafrBYQtQMUsHDFX74bC3xjsDoVKnNzZabRQsB3ziYxmCqt6yEltDY/H/QZzcbYAt9Zv3vFrunU4d5qjGT6B3LdlhvlCtnLE6sxGDlaqG0dEpNfzndbA1W7r9txzqcVo0PpWJuOgkoMF+amXnn85ZVBQo0CNLe4OzMGJvYISkHRl42zxmYsEXUNvwZ6KxYvaed+tARWDolx5GQfu4b4O8zDXxa7oSG8fa7Q0IQSN+A0dPKRj22/tAFZrKUdZX0w1+wUhYz3dg5Q/gQPX6urAtFsZs4yFxrRUV3ktRoSN+ZynYwaGkGsdIy9xsZQPLoaUtueZVzl3oXUQwDnqkwtzDi5ISNxfzh+1Y4QiQ5RtQPDoFiDZ8Mzh6NiOKffBRE3EkJ3D8X69fMxPlxMAzuR6y0EBS/C+c5ho7l5BntVLpXygEm+PERAuUMH9cAxd4NSE9uDn2VDM8VOD/7lgq3WObosWqLa81YpZ7cEXeuh7Ff5nO6DDmHiPqvC7MlHn7pmQGOYlhk3YPN6hDcNxJwAqPLnzo9Qb/7YkCees0WHHtLCc5rOv/pZA3Gtl+usVnnL+g7K8P9vXofXxNyEDhQV+4ITkIEcDkvZSfO+KKeFz1nr4rXaKGuhmx1otnwi9EuPG67kzBWzK8A++x3iwfgs4W2D1dxEQlF1wxIhwnn0UDGmza1V7BzFAfnJb4IA4E6KgON71J2B5WXrNgmONf+NmCN5VJoSWi/+Ykvwbe0shZ5qzwIjSXQcgTrhIVTrc71/cQ9Y/A96SYTEVzDw4jgRQgkvqL/sFbBA05oYOs8/klm02iD9776Zi3vGF/p+yc/MlfFff8ZHF6K8tN3wnh9km7iQfIYwMxR9qHxZ8KKFdwzTdSp2AFQzPRgG2X8eyBuFd5Fqp0gnGTdqZRH+AeDSJDfXs2aCoAEKTM83Drv+eJrjEFKNUMQ8RCxKA+Kq42H7PsVFaZwQi6RkBiVeVozmyTIvFydIjZADhN4kwEhuy5gojf0aeSy5CAKdxJXKKTAFHxnzEp08RhyCBFaQ87MyMpldLr3yjP695VGq+GKnHX2SWyeo56uI+RCfIdMJj9C/Va+wnEu0L9aayCc/hohRVJK98O2+rlZt/4OnmOaH6E0Y8OOCe9PC5LxStpB1OGZdyir8n93V7VNbzb8X41eKDWInb6XcaaIsW3xC3LnBKWNVJCfinAKB046TsXlj2BP38bJoZWlFX3gQiGnOPDifnODpQtrIhN02jVUfdbh/1zbg+tqCMdPLhhQyt22OsRE/OlmQYqIDD8waP+Zo0Aa/P7YyIvxvVDXR6GK7PBHbUh5ntrvfDhU6G4szAhpbPlAhEC6N1+SenOz7CXyXKdiXbidXSmKt7IxWgHdkiAAdhTbmXenf/GporQAqQZMdKpv9qfkl2Bjiz8YgA5dJcTy14KRysa
nNfcssAWPtXZNvm08iVrwcX1lZy8BFub5ZR5ofUNV9CQDkSPGClPMfogbuHAmpQMmxVW4OQiw1vD0jLNjvvIdodyaB6L/YhtewrTNvS8/4E5SEcogVsCvS+dRPE2XwhMziVSa6ySyGmTeTsxHCx1U3Na1iPvpP7uqhB8+1fGXNukVIgd+TF6oV5JH2GosS7SZKronArdMbEWn5JkkgaWSInliQWK/xv7Kihqj4VmYZiOqq1Q1ZHqJBEWchBIOJuQ0GzWqpiuFXiL/rLtn5J7foIk5kVGPShxUWKJGbSXjARPyEY0o3WRWideV4wE5HjP70S5c/YBdClgUzYeM4gf3vAeapntYQWy7LEt21SOfCQydr85YRr/KDsn/Fb5XCz4D2JPpn9e8AhQejP+GolN6GiYGGhif20UTJEs+WFfsHDhc7sSwBePUsR8a98psnPFeLrzCB34SnAtuFuYD8EhWz0nl+R8g65J6tSD66hA3aSG9nWMPy8nV7iwxpRdf+924DoVzs+RO4Hw1Nvka6g3dfaM0FTAKM8wS1HPFQvkRcSPpbBaqBcCUu06ZbjfX2GvNgHLEz6Q5K7bifLtJAeXUdQ1JXNxUvg5/4WpyzBz2G7ZAVbfDYEEET17zyFOou2UIiaIJ9kwCHTSntqe9hXS/EKguTLSZCGh728IMziPI/PXHVnD8bmzyXRdZNoNg3sww1YcMbAXSJ+ZmY299xUGLX7HNsHZBAcFkf0Wq0E73ICPvWoOhYbeC4YXzC4WmgBJQYmc8MTppxzJ+ZJNic7RVeU9rYPgzJj8yG3VbeDJAJmaex9DkzuTrco+CXS8JblXHasDyKq9B/tqmUIMkf5lVHzbjOUypHU7jxeI0tbTOvq5Z0xqVZK1FLXdAoaIN79VIA2msOwKjrqDefsfB1Q6gYo2DZvaE2JtVQYOOFP2fBQ/YFfWZPNF6lkuhk2BjKMMLCbVaTbliyd4idUU+r/r96Qbeth1MoTiE/B3KzhjlLWkc53+v9/X91ix+q6eT4FCsMqDcizvFvWcZ0VSoZPFeMAXti/GrGzUueKudTIAlsyykYIQ3/YHhoZ5vQbxwRUXD0+wBzFVMRdRE+S4X1vEYubEqwgG5DQTsGAVwY2OPIQPOByiAO1/EJ5Xcm0haPI7GUu4UIMy/+G3FYV77DJ3gDr4xxqwf7b0eoEXddrUDOBJvGm11odv2p5OqlwWLBrltYJUNC5AX/3DDnXsOgjy6jmoFF1/Jowt0cm9FAH4sd6yxTAYEHo7YGqxi3k/kdrL/tc6HNKkuV3cewklj5WMTAlbR7jCd27jG9LNR42jlhlbUzWdschT0jIOkVcKEVa7bHMkGaBnaKLPIf+ihYvU4+9AfkLMavtpSIyHkF3PvY8mV4kFzGRaLfIAHYaXUTQKRmlM8AVeuYC5RGmWsedhZ0gzS8pFrTuxYFWsmGtEPxskIiSDmAEpZ0sE5mMMJ4PWFXUKY+F2Qmi129/HMf4s3gek6rHduhOIvwInufizG/kdCgZ+N2a8UFDBdSqO5CBVuojb4j0xkm1FPoJMB8bvVE3ooELLslNeVEL6sTJRHQrSQ9ZqEo0En103E9otUs02P+seKgsmu+JSwQ4WVKviq9r3pDR6/K8l8zB4DSSNbhHLIevvaw1jJOXNCti26MU57tmjJrJU6O/RY+3ksPak0ZI+3saWxAwDSINjhqDpH65eba0+LAEmUFPYK9qe/EvSjCAVWqUy4Xe0bjbp5V1LIleRMbBLebsvd2qWK61FuV7m618lD2g9iYvQ2q2n5kaTczVZUvDsiSfspYmpoRGYCvkv80C1hoTxM1ErP0COg0dmbRtr3X0cK1NWsmznt5pCCK/SZ/pZyV+p7FFVT7ZuYJm8QWVjAQCRItIFE4lz60MU9ddHCAg7pKdWySyZuL7toh40dk86x5ppu6KlGFDjTazipAc0orGS64MYMSFgXLDQyKA7Qil2gOUnN5cUKpLNccrYlPDZuDEIrakZ5X+U48fkS8yvsB26PUWICEuH4UWX8RbhDobkxat306QCUfLipH3vaeABPXsz5niLz0c2P5N53Ya3AFu2UQUS965pulnxEE/Z2i8HpfFCPB30YPLoOSyrFq8nXpoJiBjW3q4Ej6NFuUwsT1U61DsevjL3R1srLxH01vq/M5AI0Jx+wVDuL9P7Mck5BFiyTH6sZxWGmzvB6ubCGSH7joiRJG5hqp6n1rzkMXFpecRF2arTDgd5PILaR/9TJ+IqT5rY4onpSbQDfwZyz45lpMiMx9TAaEdr8TtlAHP10YlYkvHtrSxYc6rqhBTtvf2XmgkWZy1hPTF/7kI//09Zc+rrWNzg0lCPXx+cUAr25SoO59wqtYqrmZamFSlGWrsj/edQN0/4r4NLFlj9jkks4Rzg7lsfeH7UYjZGWE4/42SRfC0g6kUzO1LUho9rnuTHpneEPPxC5v1bIK878n1qFnzrcZHJazcMQZ0cEH+oXWiqrGrMzGivmsI3H9PlXfGZQJoXqm2ri1ZmoLY+IrQ8g4Dr22kSLflouIg//lxUkyWL0NXHOjrbjui7HJ7ppX9qfiXdSdUgkjYYITigWbF9YSSWz4j4IDI2gU5YIFWHEpCDqSX2r/NfzLaQl8knFYIL4Fc7H5Ft/lZ+5Nc/0aJm1MU2zyhqX5NAYtkYHbVPGWvetr8+8YNTJPASF9HsIz/SvX+qch8smtuNrzNVagmoJQI+SHfTNGvwa5Zy8i+96hgL5HAWyB+lBOv7pN5OlF7IR4KdXD377px5gcId27g6I44IqUTL+q6zVpRQM2MSheq1icfT0U4HpOmlxZVeLVE0fBUtpUSLc0/AfJFeOpGrFTqFCS1vLKSfTJOl/RhBo8Iium9raAS7QAp2PEdxKMHC5PB3qH/oKewfJZk0oViLQEJc8Uqg++zxttn6akW7MSySamgYLpNOQyqjGMZzEOemuVtgPRmUAidXCmiqyql+84Q/DW8MuS5i90OCMdrM+lyeHkPyZWbZUYa3MywpT3foc/fa6R14bhx+lMEaMjq0v3sQ2CjeAQgdITgKRsL6IJkNJqRvnEGWXOjsTqJyEfKvqDyql/74sK2K375B9r6NFZKRzx3tIN8aQhiKrtuqvtmT1inbEqaovU3oX+MLlKqANjAOm0YKGvIsoS3Pts4va5pyJAvmR8pJJyK3gdMNekUVbmEefeDo20UMZB6aZue8cSHdHr5rKZH5HHzRbv6ACjFSQ8JF8JBhHTw4QnD/DQOBb8Lr9/xqyJckr0TfWAObObw2GHDM8IAgdglCZiDGWSqbgX4WLfMb/rYvVqw/2X28UiUEm18voJ3qrguWywHQfop3laST7QNWH+sHO6/WhNpcyVRkm9ErmJCAlQkLh6/EehpFgnEl7Gr+Fqo8OLb/Zq6ThcapMXM6aXRkfiqzXoFFQU6hy5wnx1xcn6bXj53JR2oD6K/lBWQA7oCPQT9TBAaRs23u2B0Gg8QKN5sxL2uwogxk3JZ6Kg2UfgGNMLmvUV2I42E+itNfv9mlamJQ1bLYKcKKpwuu/MeaODV4JxqPBGB+BHz/6XAJZVtFZ8/3rxDcd8WrQtnGmogQdeQOVxF3rX7QFh96kP3+UKuar+hRNBa97gyfbi9LAXji2yHsyms6f+ZuL2XA3neEvi6dIp+iESALeOAWnPER28GbGQSFhAVyFjvBnpyOX08hY9qinE9oeKdqlWchQzAs9tO4gyPlbYFFqwbzNRMxmpSe9X1Zsafwzk0rItCWFGOjpRckxH4s4K9uBn+V4Y3SAcFTMZIg7G0iEEXkroyNRIlXLxFhDSFaC3AoILDVJ2PvzClxmCOHHstDIT7IqfQwhjNvLoRAprFG1AhR/zy38sdSvhuxZJGLLIkLj7lwqN/H2HjAEfGsmqbOZkMr78xFZzxJW0VXRJehpBoKkrI/SMn2nASlz+EXLPeFZjc8naO3vnwUk5Ohdz6LTd0S3QNJEshVPBBRVO7g3kh89N9ka/hlUmL+RR/bXj0/pTj+xCMfEINZnqMz45gVlql1StRCaWpSvxxgzV5cQ2ZdYtlzF3aswfPfl52Exdj7P82U3U56nk+HEeyaZ+ii
VPtrjdxfuPOsWI4lh9iEvmbq/BF7C/BGWtvym/0Qfza8HLTywEXvkZufAszO46ZZ6TqDF5q6EzxTHa2d8OGmcQ9PAfbG7SRLYz2NoQ7bGc2ukTp2ANazXlucdbR94bu7/Gxr5cCwXKF6FNQ46VmQlEzJqKQVKiQ97t1ObBrnMV7bXWmT9udNI6BCkbYxy4t379TSlyUfEJw3COiN7oFsKlBwmTmv0SsMEf1W497ycw7DGk3aBXiWHhMYR+BCGqdqilkeeUBZNoMflItU3r7HkLp1XoA98mGfRqE3e5Z6pyffTkwRVWxoJLjUwgZzoyfj+5sdLUAUldp8dlNorFRnuF7RBcFCSHDHR7yqVSn3fCT1xA21JmB0dTG9iIqsoCJCnt6iCqEcMczhhLawI3AlUVYydafT3/31FnmIycxAnkTaLhKKQcIgsVPLxibSIFysM0ZcCycPR6qQZyWVBVpec6FNvu/M3dJyr7We//7u3MT8b9FS27GIb1cYaVFLL2zXfbrZjoJRGdYbkeATjGl9AHfspJOvqi25f2iYcncFtZTa0A74xXoikqobhpm4B5uRKeRp6yKGDT7g97gNuqlA69AVeOSsTFHHze1ALatRTuj1WlDzpAJ7i4b8s5helW6RW8G+Jtn2kpNGnHlInyEpbFQaMa/YQ75UHqmgZptUKtFhh9ETFv661IV1yfOYqlEbVCpwPHqMB3r2L9QXw1t8DTqtXAD+L4JX1qQAVYNHRUHjZUwXIbnqKKPv3W7AEpErPG0P29Q47WY4osAe/alOVlVIAij5g2zjT8BvrHQtrzJ7ue68S834RsLh3c63qnVYWCZfBK9Z0kBruuKSd/++buSbFN7juP19rvYhmnra8Uz17EpvLD2WN8GQQrGvGG4YHIr0b7ta/g3E5bP4lERAe9OoZlr6bvJ3cVbSrlAwgYynsp07VDcEbNz7N1OX6Yh5b4qAKJcFhKAfFFIL5sO1T4rEklkI7p9d8ygXbvhT2+4ywb1dJrgJeAZ8EQ24vsRvnGIHDRGYQF4RbZ38EB5JJ0e+ytlqDdQGCzVOR16Ygzyy6evTiWFlsgfmy6zb5Tcn2rY8fAEwVi/itPZld6p8EEx6D8wysiB/BQJrRu1dM2A+6FpGHDBRpPWg+nFqF1XYGkOVlKyjJdav+cCBP24YynCSpfC1mbnVczg/F5UMTcVqmg3ks9w+DAmFjCD7bu4bCN8098bHBaO5eRkuMoBScV5XZP3TBF37mlGVv9ZIxaHU8Ca7Hul3smdFJhwGdRHrkosL1A6HF5RlgsWxZOkJA/ArIyDOd2uRZrKyKEZsGzyuHdJeEAMKW/BtvKfRaWzB3A88kWOS8Xpx68G0zYs1W0AT/oNk6xlmnrOW2iARRhavviZi9o0P28hEeUTKvV+CKzOaYMHlVGpfjsoGODniMp2Q4zHH/34H7iuItNm8SGWDqSS8hzFHGLDH0fZb/NvJ08raFsQT5WUpxzCVwBRpTi4mhiM3E3A9lPItlPAPDvfEPPKXC7dac4WiL80zR1bXXkx+C3pt41WvWP0Eyl1lSpOu7DvE7Ye0EvV7ojJ++ZRZncBYbwNZbXDJ9EabPcyUqNyhOKjb7hPAQfYVgykqOvdMAd3u6wjFkqGYO+2K/nsUtWShNeETQBAhjeBNIGTcPZeghRaeo77R/F0Yx67BkLRyRzX79Vd8uwfRi9pK7RaG0lbZPrxLJZNNpe98WPWHbPC5lQBt6s+4SuS2JU5ms0UINcZbQEk7bDH4Apja3FPRejeFunkB06VAS4H6XV5n/JCOtbB0HlZCY26+E4+KPIa4h2uZ2lhsJupRZ9i0UMY3QL7X9Sn7uKmoKX8wRk3R/76gII1X3a5E3If8XRiLYJaSWn3AN90iqmQdpwn23qaCq1fMqvm0U+eYe2Un1mFQwSLq87r437xHSq7YQ27S9tL0bBCsLh0XFIJQmE80D71iQ7wksZEz2PjR6jmE6BPUjHdG0PC/hQVVvYt0n6whrK6vnmBUnPxu2KJy/oSPwEVAz7nqS67p3QXwKbCjvyF7FC4mRYVh7RQ10fMyAvpdsf6QGLispjDwt5aE5KIRAqcBDQ8AsE+Cmfy2gSl4D8WPwLwnzKUF8THnpPon5jXfW9TrrP1UVWouhKlLuGDgrzX+ysch3W0KrIb5PNSftPIS7NvXTeIYakHlgqHvSJ3n45wujImeCqQi8eJOUNtVVr53TDHq85ahFTrpFeAnY+tLE6l2G9eug6E1MfZktedzs3aYY9UIYfHeRhq1udxDeo/G/Dahm2GmxVkdRkw4MqgCg7QKipgtBM5gWB8X7TSl57f2/tOptmAFolXW4EhYWqW6uDpaqD1mVO86HH9OvksF/3rJQgUunlvtsGV8DxRhDFuSL1dixN4eNDR3Pw95w6rNinDVJjHYRCz1AAdG4AB0LiMWJc4TCzpYSOGhPW52fKM1V1vvGQV0JpphuugIYrUDyxr5HvlnzIK9WS00vNM2qkbeseT2pwZ7oS6M1Lcjr/jTGcpVyQzhi6Rku/P4zg6rBAlAPLGdxRGAc6BEckhi8X4cuWl4u0jNEmtVfPxBbpWphU7rKNn7OH9lbobCTQpEi5K/bN6lOPuxF5TStfEoccvCeH8Inm76tHGvHkEaEV1cN9gVY4Q+PpTQ03iT3vSgbOV0+5zh1qvMf3UXwCa3dYYk7gDNnuEDUPnr71KitpXbarZnwcUjD2Q2XV9Cv+G5D27fbs1USGs4DCo4qJ+xwbN9OPp+VLhhL8bdzBSkqmycQbPvbq3aVhIl+lklRhDu1ZD9DM2cn1MEqLRcyyjiARtbdDMV1Sq43Yzo07lk3AcYJGZu8dOcNd0zLr0y10bFdnQgHKA0d7FUSt8BKgC4GATt2PRa1spTVm/084fWz6OC5JTYHD4sbjnCQKRiUnEjyjHOtc0VvNHKG+o5amBpEUUO/oyxtsUVry0tvDcxwFLPs3OLkKkNc6l3uxBNBl2eFuk6723GDRHYYuHcVBJOfx2q0Zmj3tsVdZUWRfE82/+mtJNBeQNnovrBUy0i2q10ojJjgYmAv+DRVCxPOSwpdHZ5CRXSsMeO4DhrrTLmwznVscU7SFNjDwhzBbui2QH5fwiWDSIKJ1hKfkYILlDljfRuVN5ZayOjf+AM61tXa6iQamBNiDGo1x0XesHFucRMf07SjZbbYBKNYa8jMhfjwCTXvsVojdKlk2yWBcOtPxycpbn/gad5ZUWywmtRriyxtKml/YV+LttnCHuNPXmJ+rLABawlMj7SESzt8xyMuxdWEtcp/85XGFqvJ7K/HKV91t95dG36fj7J3+3pmkRfp7ce5Am/7efrr5wYRTBkC3yRDhYapJhjWBgbPINsH6ye98kPOcEuSJna78f4KO1ES/S63Klacv4xXmD8tPnoLlNKkuK9dN1ozl4euXPFMR7sC7mOQ2H4NHHQhXFW4Om0BaVwzNIkLxDJmhTLeXnnLWlfYib05gFKNKem2tteA+nWramFNlBGNLPv5jkPkOqJqejy3AqSpxL+LklyPnVsXecPfXkbblvwufwyRF6nTKm0yfLNwvPPbm5s20kpwlrcOkZZb1FNGhQrMy+gHClvOhQyZMA+imrvaGJa//tSYVw4DF+JP082A/W8ssP5sBRL55FncQNJq9LFwM0JOCL7udSBlNvauVF1pvSpJpRMj10twIN51Ak96/uGXFRYVpDtw7oHXEkE8nVEx+ppwfg+yase2QWSbN2ep4ntM3FpnTN28UIrxPqqnHspHB51jxhMPN3qMa9ZWhypsEkC6nIZVzT3YKRsaJoiZDB/vJ65vhxLHMUF2KUJEqUeqI1X/ErBJ/kvtscGqwfR7QqVhhL4ZTp3qUUdN//zoBojuU7FbWjL3YiORML22H2+B7mw97mowLeu3GxWf+c3lD0CR2ybGjl3oGO72w98VHvsNOiViHp74FeCxWG24JDdZpihRSMtg4PRC6koFbJtAGuda4sHCVfSt955v21+P+FAGaLlp+UNNQYvBc9Gg2Ar3+PXqBZ/6g8fGX0R4494pIG0HoC2Ropcfur4m+Fi5GEExMFoFkxzrN1i/SBDe3tK36KPmGRj
YhQWbPCguZdufEIbi2bjWDNt8H60hJQyvJ7vzRhONJV8qN45Dxn8r5RCtextSBsfxBIn7L5W5uHheLZ9sDGrjsgIhJ01zug+79jG9PBc4K1QVT2EqSowWlk8Cvss6VDDZNn1d3qTONk9daiVW90n7BxAuROB2yO2MT4WXmnGpNwc9SSuZXpwoaJhab9bSRT9aAElozT2aBjSPhA+eOcLh/CCjYm+9XFLFWFAjestv16D3O+XNIbuzWe/YgT+mgDUODZ5lyXfIlSpD3jMY24FmXcVVoimiSxNx2+bOeZ41kO1ZiFeRHGqFJ0L67CK6w3FTlCw/cerLHE+97xX8IFqOig197W6QRckwbaTlX7fXvJHeC7ZZvEJmDFhGYkBgEJ6v6ymKSYGNQESP3NlocUNweTkOv5MnNlzM0L0jZIwKrBcDXkcVFC33txpMC5yb5M+QFO/wIB+Eco3BH/zqDBMUw5qIlhdZI3rRKStZ09/DI45vTIHUUqyhVs/ZRswh21DHsbO+fDKsPce7amHJ1JZslXwh8rtmBeVNTgHNu9mIsI1rmFp97E4trZgqYX9BfY/n4DdJJ1HZNrtza51ALYh1qpQT4/Gw35s6WMJuHZ2G3VjWEHNY3uVw2sTrMn7T0tiNQIivrr+ybct1UptJA7k3Tjk1WzlSXqC2DjEtCOU1wrM+qb6dULHpwxdlVtYcxNhR8N/7t/O9pcXDvX9blrMLCUKiJ6RMz0iNS7gWOWOzbj0wFPSuOQTwqtGlDnhTdyy5aIOlBPSNNCnjiqNeBLfeEOMF5QUKSftB2UCKR2q2p0g6F8noACLd6WWHlKn4VOZjoSYOw/6W4AjVRmwYz5WUtKK9ghSSiBaitZ59hen6oN3+A0QO3jkgxiS1AqrICfNwCcdJoNaFR+VTsUuS4nGu+BXVtLhpr3/TCHr7t9xWfMXurDUr3p4ri213wePS4/9K/W9J86MF7bDFeHqV8oXzzQPDXwKA49o/sRdssZdjHLGnRNaAnU53OMN7/4M7X6WtYNkVT5X65Lf+rdalvAEwWge1SzOkse03Njlfs5knnTa7X+fPxRAoMRkT//9wIpSuOxuSCMUSjPZBoTO6CqdnOXmi0SlXEx5cxSTE11drpXTXUio26z97/vs1QrWWNXvf8ZATPWX7o/SS8JPSGpytuSejGE25rYLKrQrxMi8daCoKo0hhbSyY/LS3WqfgHWRPvRCxHi8gMo9W7c7F7l4d6H063f+vAtxezW1f5k/+klAul2ki4Meg9k9XbP1LmVdibqh5EBf2730xrlSbYJ9lCSBYB0iPftcIZFO/Ru/kh0mmT0b+FNw9S0jEksV7keyXgTl9GqoazeJalP27oBU6IjXFAp1Mt76uxo57PkIKZ6QFgrVHZJs3A8qL2l6uGP6Em7D0J5j+XMHrz+NLPlKMJxqk3HS3Agepv9tGGpplkVQAICR9NSlPbhKkgfLEbRQokaEHlZSZcBL5tpYz/6qYvnbr71vVopzY/ONf4/95YYgJgaqGSbpVtICbszPX0n730fKSj283FIl7Eygu13eEYJBM+X+ARjamOq1TuPLw6IwMUUeodaxD/0/9VXbIy3YeuqPSuyHCnpePseOEh8L5S9WFjYEBqUnK2XCJDi8dr5dm9MCWsUamzx8+d8XWSu0GXM+sogMiaPaJFr+U4ZqUjvSBcd79vGGY6NOQ0wBAXafpU7vrvv4GNsgHLi++TX8HkL77nLZtq05fHmPIw/OONSNxUrzZxh612K6kQcx2KVxoyXRdHbqnzd+jZ5lRv4RN2SmTt/rn3gBJf1YUp1wO4PPkUbMivCnZuD4ZtzL3Gi2Af4tWiv/r0yEo2/11HCydCeWxYXFu0JbyVMsyD6xrtbv6X47HNCsH+VJtJZyDmVz7czwjUBVRT19QK3cvuquXHJJu4HChGfUAFXXOvjPIl9E7ypNvq+pWvcuAnR433ZKz1QRprQ6BXx8wfzH2AglEfRAFwCyzsW7RbsO55hd9dRYeYmmrxlfV0X/ffwQeH6y31l8rZB6rGwxpZLFixhkjuT5fdSqZwjlwZHvkwrn3YhzCjsQRzLL81fz4c8V/TNe+Oiy6RsOxaLj1p6M/suDXBM7kzcgfgZw3w7TENSBYyYCjOdcKxL2F0SFWmPNH7o9hiWgR06poEJJELThRFCZV2S+xdFg70KkHgAcZfwqwc2DL8mZqU4X5kpotluKKoTXNDU+l5VOaFzlVlLIeOx+5+/YyAhfoYB55Kh4W0/+n7UwKcN8GjtwS4FaVsfR9mubLuvk0Ut0qI2qZcd/ArIqo98FtpKwpRNtQxh+McR3N3Lw7RT1qb7AyUCMLIXZrWX2v1wNwvHSLxTcLtFRKQJ2kK57gA1Wa2mQgVC68i3IMyyu66ZyqMKC/tzgLI3dtML2R+ut0D98TuLbyUE16S5NCI+O0Fo5GX4LTOGEHlZs3ol+76vr4t43MYkgqwvEOIJaKk/1sTPX2NmmX5FO+ux8aiPNd7TCC4bAyQCy3MeabYBdoQu88qsKnM5yrmDPyg7YoegULDu0Ck6WAmHaRVWrDoIdR1IFg5bkAXRi16v2achQXI+vB7Ors0OCpfCHhz2DztbN0JVracEXytMV9oEwVMrpcoi4OSDov9XdcrEoEyIcvpqEvVLNOYV7hSQQlUgIyo7vbuWrA+2JBU1m6qkvFOac5+SLBGQhMJGIs74VMuyvh5Pf7A2j8aJhINIHsLfpMsIaSup3lZBWEB/vi4piUVLq4ujxICX/5htkBGVUQFCQmD8dxFfJeE6Kq4u//XwRHu2ltcO+PCQzZMjkc2FvPsgA55D9FYj9wzshrMPpFIsScbX9+v8viUQ9lFCrQvLVvHBsWcTL9PyILwMOQSy+lvfOCOmb5NGxJRETWeA4p5c04/hAQ4SQJSRysmKpBojdbdjM7HrYBqjU6kckSdAOToGSXw+PfoQJoD8azzK7yvri5Af2YkRkvQrsKhiAWby5+ashsLrI8N+Zy9VgcUGMEGCVl5dssGUbfFXFAgbWyPfFV6T6KAfTPaqqO1NwCKFYe/xbiSFYqs9eX+OK3zcu85uLatvF8xJwROIngTomRWwX7WKhPxWJ40XhHnU45A7CI0bZZslli8X+g20rkP+TbBUdTa4pKdlN7LvCZ6vyf1iMMr1Dv25z6YqTzBNM+8oxhsGhmXsXygXhf1rag/z6jtiqIQcjVc/mHvb83r94uOv2O96pg7LAyj0zIJHghJdGHdxTnoSMufiKvsarrOKaAS+CaFxiOFqFFa3xQWj0QR+XH8k2gz5iD6mqL10yNJPpJhecwU0fyCFD/NX1CEyI/+RAkoKGoSq48RGfuRb+NbNKuN4vYspDBUtKmZ3yBR4nTFPltvEoS8nv2vf3ty/8e2fdXGS18ATEeJCWC+pZU7aJrJ1Tj/vOFR91KlvjgvCRVaNKQdDETczeoba6kL9iPkUz4HUHaFPcZNdAnojmyzPgXzWQa6j3c4hKyYL+smd62Ze765XwZaLs5w2/AdTp87MNOf93cpuDY/mBkmpo2nI42c+s5YIvMKzgsrYtZimheAEOkvPIrXlIGj2SPRzAvuLv0Vx+I/8KKs8M4h80c3dIacgB5I/AGFwDzmlewmIdLWG7lVfmvmli5XKElWZdfxSZ6sMu5L41LWIS1HwBmZhFQ2nrJ/NafVJuiogsqxOLwc2LX8HIlT1fsa5u7YgWdXVTsVd1ZCJ0FA869Qo3fLvdoqyrblcDED+BrFj0IHG0gLmJpFOQomovFdcB+gl8sARQZQNe3cwfYbhuAUir6jSRa2Y5t47GXBpADpIG9+rYC1bdOmpNRk5Ei3uUdr2n74DDZ1G9swHwxjXgsPFlXX9DayV9LmGEpicC8FdwGKhNLg2Re6uIcfHhZ8EMQx+alFPW3MTAZx+CIDWhBuU+XRUnhwDumWzSdEganLgPCBog7yd9xKNgmQ3XdVOB+8QzwsqDix0aYvdfF2YF6AZzNTHprhms/2MuZNuwGOHsthYVHBAmIpJOXhSDMquqiYAjubPASIowKz06cEDbRM1sekJrSQMow2yWdxNYJJ9ZyiLcC8nLiCCcjHkF7cfMubg7
P+9M/M0Wh454jV0wa+e8+QCmBh5NaE57IKmcLTlAZIZVfUc9VWpfT71x6O0tXT0YGXxJVb7vbOqZPz6Sb6KZQf/NqvyZ0ADnmuv4M9KVQozTAHzy8+T9IxdUqlK8HEqEwC4wvIK7giizLz5ZRWs2oNIZkj54Zgwyh/geRQu6yyItYuw8YbE3QDIdd+3XTJhFE4uBGyI8IX2k7NTBn5mSvPC8aCc45onY0kS7WBvQfUcFQ7v8jcNyH9vY3sZ7DKw638tyUmhTlwyf62uoLSXjBIkHpFnZdmQbg2gYpVpV6BW53MFKqhpRE8PYrL+m5Ouu8XMNW0F6ZJpAQX/z2Z1tMq9+GyIJCzv0AMoLjyIAXRQ7doMkBneoioutDzeqR9Miq37fyEqiaAOvXPn/M6GODIuhs7FWNnucNx2UvKzNT5PPqROj86nk7x077cXZGgQs4gjHDqTde6XLx6UQVMA+RXmwbSF82gaQfr1ehFwX0LxwDWZhCMv2q36hwWU1gF1iFnS9VfW+XLsJC56gNJUbFiwNd6otKeWQRGfOc8a2oxSGhcmvAD6jK0vFqMc+smLqjEZsW3X03xNhlNQHZbM42hKJxvvjnfkpWYt37dsXJ5H615gfRBw145/LCbeRlKPzuB1KYDgo/itYtJZ8B0XjZ14c+1Ppn9aMweOBDEzQdbRSWjHcIbD6URgI8rmOqsu/hqmaO1HG2spmY0zYZyGnG6r1pKb07YePgLVl7Ap+RBOgB752uHyAWITq0agXU/RFAOC8AfZeOPGXlhRIcRtBEzoOS1czAfv6kFfkpsr/oKR56X5LX232Vp7BBpxNPmXlboLkEpaoBDphUDbxYWMMDm/NSjVRmMeoLjv/YjAFh1AbXNbFGuwurIZpB+GP6te3oid0RxNFBCcq36GOYNPRf8hwVEJFjuu/O6iTkbkgavnSLNeBxLK4ZqtgzXzC8Y2vOT4dIszQLJ1Lyp6ysCv3JyLjarToocPDohjnvQvS8yOBPXD2m7G9UwT0KTThXzQByyxn5t2DfzhDoXW60TDVqanea0zkEshEgdqWOa0/VHMiL+UTAO0Iv9ACi6fOeDITZ+Qi9P+TWEw+P57JM8WueBmHYiWf77+e8OI8KMToBYqfZ0K0pFNvXIYK9U0R/Nz/km6LN27Cqd9x/qjEY1DB31Oc+KSzoR40Scy+AnMVOO7qasSkyd7Z8+GRM9bar2HnfbEqSRiXZ9bWqoEdt+iE9KjuhpqxYQLZg1D+TBbMXspCbly4POIh+bOhw0jXibFhqZZw7DkiGa08V2VZEb91u0T2gG3yfpVKJkBqgFsdiFwDNbJBEbr4lDSA1On4374cEOAYfkb6MrCm1U2OxEREvMdiny7ERxOtV5JrfyuSDPDiprsPYYauKl9MhFguhtvXUVXXoxYCQqtNYMDqNO+GC1FQgcpDWTmPve9CLlFSIoLU7ZylaaAb6nGWKrbVJJXd9N3RxGTDuVamRe19J9fNdS7hlYYOvPDQTCvKuRG80WHHGROaGll0sM05jIWqCbs6l5rO9SgSibzltakv0bnnb6aO57+NkYOXDFBgvXTkO6i5DSDjhoIC6nqiIHnqgwdCyNAPgaWeW+JyMW1sl03JWPMhFBfmNsjwyASldiSZMOAoaunwd1K0Bmje9O5o7VitC/cCE0mWvuvZNg3sMxkmiFvk37TzvXUFYwQG/37febpFdyjoRs0tf+jCcH2tazJ1zm9mfSCF1L3V6j05/vGclKTCD/Ndq2qSkHvs0qBbKdanBT6PSTEazUCIs8jek4iThim839X81XdYgEY2xmSAKd8UoTUXwyqUOVfQZSQ1VjqLd+SUCVQ/RDNh+q2WJAygWouP1Q7Wk3HKxo/RnQW0NvvQE0CZn2Hd/CGBhG7c3A6bHPmXyNWi/9xCC2cOopHymLK7Qm2HRX+tMsuQvaUZ6Wq9bsAxTK6mEv7fQc3gh9O3ykfz1a9pm7TIVr1+fO5CHqTGFDRpJkRPCEBIrfQtz9YB7XZ8t3NPvfsXTvBbNxbjjCGZe9uTm90iHvnpUViCAxRrt6koKO3DZnbFiiaikl5DVGZ5Npkuq7n2FEo+GootEkqL/3G+BOMq2npssewp64WiNfSOLnUjJMvck+9qJaA2wa9SKRYIGZPVE5KdKk+wfgxbBc7VwJlFX+Qex+uLyNCS9gj5rkk/uScqrvKIWfsXrnFLrASyuNnP1wXxgEO8xX8EQnhhh03ZMuKtePuRs6+mOZy8zuidub8mqqMwF+fS8OPm6rkiy2QtGw+Xz+yydC5ZR4J6izR8oG86p3nEAr5EgAtUKIqYpi/geZCvXbQgbSo5n/j9V3Cn5VI3oQMpUDTmRDfFsz4urNqvF/NTGZrozaPEzHYMqVWb2+NpECvQd12MiaRdRcub9ToHOgobJgAGb/HzzVyQIov4Yb0QhYzAXcmftw+SSWKHGwc2mM3U2PnhpHcLolT1QIUI7kcoueAhKoLjXo0LHm4l8H/a65a1SXi+PI3phAZlgWPQai2wAeI6LB39EVTDDWiWhP1GZvJWxErdRtuoAwBFugfe+E0sOMzaZ1SN/A9OHWNfinxjEzna6E7Sqc/PvnbUk5Wt6u84CUpyD7D3vcd+f/w1H5yFoO6YQ8gbSPIDyoFlHwvjvlnosQMItiKwKnNL7JV7dLNE1wNmnHgSBGckj6Ba1Kzqr2ndLapVe9lh4ZRB78BcwAe3dI8Or524nQJMe3OV4aCqpTNjOtY4Vi/nJA4Ac/JIRwQmQ0Xs7U93e4pOCdJgyNAQq7huCuGLX9QjOqce5+gVOsSBg8bcJD6gvOrZgE/jwp2JzpH5RL56E4Tpm6kRMRvpcg8whLzqXfBtvQurKkF/35uKv/OMhoxPXs7vuB4EHJCW3JvmmtC/QXfSJm+4E2SHyL80sjzCq5RBUPZ+aa6vbyJRkq9mheTy1GtNfquuM5ijyTgHGbMFk1ILqUS2sFmitVfpyxHTBuQLPyC6BqFQgJ0kRBFgW/bLPvHmGEf06AjnpQGcD+EHQT00DIzGcR+NOxGm4WHtZEoKFG+e9hOuyCdrBN6xchitk7RrtOQfQ2NImJ6Bs5w6QN110lLwCjUwVMOYpUx5xevg3gOCGQg2tuQQdz/uGW3f6JfSbvIOBvq1f2e8EzwflwuS9VyMuT+9LP3bveuQfJb4qLfM+Ylw0ECqO+5gr1jzlo4Up9IsIRCOj3K+PJKYlyrj3QBMTAf/GzEU2Ck50/P3Y6o6hxnPWeVJiPIwSzMzhczvBJJJ3oIBmOTaQP52hKOFoVQuEKlvJMmMbEi4quvROzzv9/si6llDXXMyfkUK1tzy6vNiRBWcwvMXdoSOm4O0rpMb3BdTr6O7kH6bUwmw+Tz5zmftrOy7789mpjdX7bumAI8M4UkJ+yD6ud11Yj+A3qPaV5IXDp/nlxWYKOSkoLZ4VxN1XYlujTYMHYj46Ai4ERguG3ey2CufaKumwUl54F1KtFsL+vr4rVkkqEbwcQuyKIbSJQg9DnJmeVrJJ/UY0GDpGOJviChaLeE+9vypZSHj2/uaXIPYTYl9/l43crldL4QAcqwVit3vdwhtIqI230MI/NLR1Qm9h6huHn1Lb8gEh2l5RtfDggW/KKVkyChtO9a30VTYi5OVMceB6fJWdijqmuqQw82yai7IKFn5VpbLZNNrj1hKFra9Fy1nLngsjJAglyogxP4kcopGo9STsWmYKuTAgHTI0h0fhu1fYeUjEtyc29LqRzmrkjQsTuiCQwRdNqNofSt2oFFqZOc8A4YAVOIk3Rlovwp28aBws2LYmAUt5BsZaKJ1jffYHI0ElPLWRBZ2FGREJgHHdOXmRL14yHeQoMsIV1QkVE0W7vrSWEHcdfFKZXHfIm17DTbLK+hkuClFGXYQ5RVigNoxnakRF1GDsikHbfMgHMus7R6rIBBMoJY33vakn+6TCw6AiaWb/Tvqsa8r8qifLZrxPIabwlgiqMAwxHMTfGyvAANTa96RBRDXmyokz29WwRBqXOpnFotzvaPTrb1uhO6UWWH+VO/dHCbk1PeoQlNi6/8k4BKULmlLxKBTA90Ln6cWOjWYi81Bvuz9ZNyJmert
PcSmJ1g2a8dCdQNaNsaXEwZpA69fXTAGzncHcilWZCaQHW+r4QVM4jheY5oxz3jrjR/THSw8UEIYb1XhRYZVCGnqFNpAa0SegHnLxMTb9Dj1T+ubmqwH6slS6TjcYBMx63UTfmNhpI6VdIc3QDCVuqRyqD3mgmIJboO9HmfvF0KUn4XAUYwdYt84+hUggWVWaYNNwySXVsxCf8BmZtCbgiOcOSzvW1GpOLjhY/TVSTW1CV8qacLMVnMkeuOjBmLqJvSwkAzPqY/7ok1Y2GHwSm+10wJG1ZzBr4Lcab8e2Uewa+E76u/fw7jMpBf5sjytTPhxSkM8iP3KCb2XbG9THw78jtczLjTxR2kTfyRxIP7A6CN0vSEJfkN5qzzPnsb+dW4gBZdu89f6k9yF1nRByIjzjGOvoPYSTg2fNJndivwM/uKWrYJ3JT5NW13HUQ0cbDJQZ40JPwLA9iXgbyqrPvpDcqZQzjPtuGsPwRObeKy16G53tlRQvUNDuQDyyla77dhuvFMiue1BPYz18859twPKYc4dIv/tn55LSCwnPqvXvyEz0kcmUhUoowMOQNyQp9mcEGeW9TOhXIeD5Rh99mfO5eHn9DLswJMav9Zx35LJeiZ93RqU8l2LAzFyFiidnHlkbC7UfPom9Gf5Q3r7wq7vIIKL9K34rJJaYAGOZv0ucu/86WsYyGlqRDLhLpAvJYH5O0a6Bikbe/97iI2wfkUdVjGr8MN0Vxp76fitoJVCwKWe1Dp8ZJKjfoa43HRrGltVeNq+yUcjVGVxPaDs2H5LhAHG5b8l4w0V7EUwwIbG1LKmWn64uIRlQKwT8PTPDTVms7K/hC0TrbWB5ROqyktS6YiFHGn/3BT/Yxt/wWpoTkiJz85mRjWO5jQlYqbB7dV8lUdyyWUYHIiaucVMWBRxzX9OYMpiRYE01Mt9Y/ZA01jNYoNC6Pv4QBEGcOMwXFrqN1AkByRWyn6OBdZ5TLhzApItq1UwnoXP7AaRjEEPP5LkIhCzNy3PBB77bpXjFMu6M9Zp3+MS+L2YEP/x3ZYVWCVUpkvUQGD76XELFXnWnD1xwYgDoU56i5+1K0sxYdWZlq4bGC3DX/MhoqNmLOgvX+fP+z3AP8/Dc79IxXo34fsz1rMD2IOkx45eHABxw4uux46QziXB/b19wkK2vZP1524APL7dr26uuOl+QfIjxB2mgbFsb+3Wk3aYUD8J3cLVKa7ycdK0UpYrvksTS5KocPUgG9Q3OMWXAbM3CZKq7p5hz+oVnLriSNezjgAJQWbklZNYWUIjmF//SPNlfnvYIA3d7wmL2VDZIewTXKVKaJrPC/yHuHly+kOXILVW1n9CXbyecJH6ovD7/DScCOnIE5lJIBrXWXMaLvuc+iwmwcjkk+OraGdcEql7emkxlp5PtPFg5YR8OW7Rfsh8RlKeRrPIEg2DMElsGyhzg/KoJ0nT/ZFQtwiWpc9Jms4opg8KBWnzaq06OWqVDfAYfT+ozO8jH9Ntw81amuPKBDY+YSCq37qgPJEIZPKzWglnndxSCyB27KcOKWjQ1uPhK6sFERIU9U0HzS+88J73N1+oPpnWU7hKJ7KSdm2tcDupPpcUy/XW4AD8veF3/hx10ZmSPlca4XI37U5lzJbk6LFQo6GhC7LVszbMpm64M09ilsZTf/6ypYOg37E/vVCB6OIwwEaY8qltM33voqEqp9/ZcFBMviCQH1l5PF6Oh/qQJeU5SbLbPm6sM6G52jglhFedIP8N0OlTMx8JPlfvv2s+Z07Xejd0AKF9PWlYZYgG0/C0Eq74PS+VvgZ+9g6emzd2LeFv3278AZbfn0njiGt4g6qIulTRuBS7/fp93/8ezWuJ4Mwf0MJmU7Tcy475u5nBy47/UDCerqGAPcU7yAoMYtWs7fzQaLUFsE2LEFlbbeNQGdNQ8bX4rqmTkUCEuOvgf3+z0sOZqbsVctnr7zjXDWzqGqNWoHPJKQGny53MQgSAsKpY47uEX+KC++USiqZVEsvRFTz1UUs/i1Cf+0M0deG4t9PMHvk/qKlt0NpBFt6YmsuR1rjsZt/dI6dGqxIlWpD6AJtkttGnWO6uFUyt+u8EmmoJ/njt+5oO6QamEzo/alswlkCNEnkpDN4B+U2QnJlulzhqus3GFZf07PQyadUsZUmMU7WAN654MtuKp0Aa1nJcjYiN0w4XQvbqPKOuVodWkbKTJMsiP8QSdIQ86n4B6f91LwR3ShsJUv31tgtgq+LS896xhZq+2Zyy2TgixHfI4Y8PGfAUcrtmkEWy5JXsSaniM1gCBnMAH0Rzplf8sdwmXbtkBm53RoKIsAbS4GQYYPQlVQvingboMIqIt+HpGILJPePIUGLOb7uHmjmJV4IoOFAzCzETiuznhFf5TqAsywdeN6bM6wpOANGVX4ztsX8mRGWD8v9Vr1SzCJsKnp0H4Ro0kSctTSKlCExtB5TmR6Z7n9/wbGIm52mTE5b4i4F2iB6b4mLZGFOxhMiyot7JQfytMMdaKnWDnHp2/ZZ7PI9/Y9eDsoTIN1IKcDsdo1HptXa+GkNHSMQUxQGaAEgTkuuQ8a9bsCg5gkMyxoedr2KwhTR6KUAwpeI9wzQofTbFWCg6K1vFfKbKCdJ55BUI02Uw/o+B4fhchueO0Z7HyD+TnEd8513qJKckwffEjB9iDvXm+zHBYrt2ap9yIrV3+mgeKZfLA3TrpBmWitzYsIFbQeC+JvTV0LQldIcA7UbTEiw+VdI24ABviDi7J16nTlwpSF2qU6LLXFFBGhCviGOD0zRSl/XJ5/Wvh6h41xXCn/GtHqsvK3Z0cjtEP47eieIDZBMZXty9ywmPxsamFABQh22ZUAf3TSy7FG+7yslX9Z/UIoba7gnmB3wpyMtJUyw0+u/hbfOUAq7ePO6PvTarBb9+sHT5WA/6rDEeCyWOLAVFGvYVb221NnuDgr4WhYKtlX0QYhlu669f6rXKeI4WCBaPRCvDaYwRNm8/aQtuCjNRT6zW5U1zYl/w0DzcbxJ74WTm5xLtHN5hNTbl8xpQy78CNJjZy4m4qzTUffiVa9NkDk4BpNTzMrtfsImfIgseXKURniUOxWoeLJSDZyR3koXP8b7pT+9ug+flNZWqxG6s3sI0VerNvBlXEAyVPTRVaYMfKuwr+upTspkUrbrJsRiJ5sZmNqPpXGtV52wP/l+hLanKV/PyRuVB7WmcIOYV+iqYn1nSTfOuhEg46NVfIYfHv4RySgJKdHNqVCYimhWtBdPIB4kXH6Ibl6jChcRzgO/Y6zWaeNNciZkN76xbTpbNRG1A142cb7yQiDaPL5tvH3yHQ5y9GZh2bIHWLavCoFKmgvT8ik7fP9vnHM36oo5B0RtpcWYpE6vh5JhGC+L2AqhaPDaA4e9EMTES2ZlKIyz5LoZb8FtY8cWSjafOSB4QhHYzt//KUxfmbvK89Q7mwGmkSUJ3d6BiepmiQmU3yh5hSx7DEY+6E30FGxx/rCK4GsKwLcI4QGSlWA9P+CtPrS0PoQER0khFxaKvGDQf5ASmQC0CiuU7yoCGxBC5l0CaqnqNd3JEsl5G18P1OVuDTYP4P2xE6UqwcSZjh67TMaGqLrnBCMjkyQz84eXyAGOHZ8yXkZfd9p8c2vNKHmdJedpFe1197RkKwWQv0cludYTANDrkK5KJeIa2vH1iCmsNNnnFMxdqeAT0adJrBk5vOoSet+odtnmyHfHd3Hli3yN+2mDtGCeMW2rOTW0ef/HPopukCVGvOwcEw7xC2tMYTqXAhjBDracUC923KxsFLDM7irdHGJEu8hDnlnAizN8MP8SIDTLB5Cfkoqcyxc0eB7l7TidNv1RcwQPbQCc4QO2jxmZEvZaNIhUZfjNh0qSazt87yRoQpHCD0daFDKFNj/XpXXUXBUbNCPT91SpAJ0YW5MrQLeuRhQbCHiscYThLxAa4JfltqLifwjaWj+DoX8fFO74+eMslED40Umc8wjsGLR9L7khBXPmBKWTeSpQJNJMS6vUe0it5lyNORRakQX1iCoRkitL/u5onLh6pn3T7EGcB4rJF1kYGVDd07fCjk4V+HalYXjMVl3b+q+Fih6VUih1M
ZMNGsoGuBQtfH4+/Q8jUA5Ygp/RaJsVYi5aMBFYw3lShut6ShtLjdvNlv8InRMDWTHZXD9pwAGRTiZbwajzrlZl1gka8EdvRo58E0wCo0uQI5l2IdVQLwNpg3uaEOrmpA6dkJuV1CcFva5H/8ZFhVKyknD6wXpOdzXoLel71ife7+iVV3KxpvM1ZrJHhrnR7gMRlYIcbFYWIQsLbm8krZWqGEXEdc+DARNgnytyIpBL2Es0AnFvOKkREYDXg73PVc9xJy+t4VW5EjZcQ0/HNC/HaX/UFa5HkmZ0EA1h8MmEgPt20PjgmBaaOQSIMkUVSQBfPYiZG9FNCK3je2GjNsS+gFaA6+LAKfehrFeKnxiVdKRo5n7Igi10lSVKRe9sA5mvZpjpzaSEiAA4uP1O+PlEtRMdClSd6gAfqkdD7Xrn2mwAQ8/OEVG3xqoJm4pjw+GPZkR9qVrDNuxoVL2LADY8iRNK1AR6WUTOHcZIK1B7SUY9PBrvJqSSZhM9f7OfPDmnTtZo6BKpuSHu8ch5056rXw7ODSpecyjxegOukrARqRBrxjQdzUkluQawlfUGGFPEi4OZDhKAtanYRsIwD9VAazi3zqG9yHYrXLQHCiGYfx/ezb9xE5TO9YnjW6wbX5JJ+AEu9h48RtUlmmxM+Gj7HPSFWV2Qebdtad18FWvtxhxtGUgYSYVHigdVwMRFx+RmDYnA5jNFxKf9aak0KX9uinVd2Ew0Aoyt7+yY4fSZu4BkQyifHj6hVP/KEey+fvyIRf8hkpO7lhB+ntFvpebgHWKVfcsWojlbLI4iCbMgLNpBLS45fhoqeDeK4EakB6jrD2fvIerPUGtL8nWexfPUAqqCfpdFwutSIpSHExtQAyTU6Ew8Do354BP2YVEg6ayhcIneXa6DYmgBbwucORoO9DJUqRlxMJFijbUzjBbMjB3G/nH/ygxD8FAGtVZstwt0e0BjZME6drE2h5ik4fJ6BPQhj1/tMeYj/QFDVaSYguoqzZCwkAsseD4xc53JzlRxzcQ3KpjbOjcbs6fXhllbZc+UXXLUJt7oBFLTb7FQB9LPy3P6lyGwPago32Z7Kcz62zmJkuz/yVTeNqKBBjRGD+j7dcOClUMpdAl+wCIaP9JYC3zOh1I1UiaxSpjKJ0cBhKTW6WDEcncwT1GupJ2UKcqWg9+f8i5WJvBeLfOiS6KMbH2FoBcgAY7LZ7JBn3eb7MPYUCqLFKb97s9g2kfkhpm8gA5UdUEAj6iw5zTTQjelfTK9jQmjpSCcrDXPQN/PQ3aOeq84lidCcsILUzb6YEI4K1Hq6vcMGvAGuoRoYcDn7vTTcWOlHY+MXIVQF1HyikPWy1kRg8KG+AOdvgOFwPrkCuG39iHm7t0Rg5S3pIi/FIhastfTAObJg3E0jBBMHLG5d5Y7+nQm49N1+ng1cNEH1XNRQ9SLb+j5oM8eMBV/vbUbIQhzY+whcjDyRBoLNaKyRNfnmbwMpjiWsNQjXfANOxndrw6dDsMEkhkRn33iI/E91GoVPIxwALnit184v5nQP81cTGYu+30RNHiAT0lJk4cBthusWaU5bm58E5ripmigP+g7cw/yQo2c1qCuXQJC0Qrn9wJF+eitr3dQt+nAeDZdCEHFlWxsbiylm9YaaiESPO/BpOdBwqmFfL/X/oW5u3KTQlBnw173fJ6Jyme9q1ukWkind8R+oZrryQ7x9Xo2B1q/JgUwMwXWbVN20V8+uOctRZxFYlfXGWtwfqhC0IhbpiblsZzYO18RILOnnsUSdGoIM8mK3oZT69NZx9iNskLXjDG+n1BGbno1qIGbp1GHDOOR9DVWCYQeecUn+RmB3KjqfWFs1vQ0thIn6MpAWqoKysfq8fM97/wzPP1ivgXYrMOZvtn4QngKJMQpAuKD3gZPqzc/mIDnR3tQNsKEQSWNvZeHXah6Bz8bH5cCFlYdNz1AJSjA4OsvyLcY7VBUrLsubVSqJ3RGQT2l5tCjeQ4N2ZXZLEe2aWkeFuvRm8mYkvxPiIEw3egEGKojHwkymH9rGVtlkjy5oTet9sLyu67Hdjxqm/CIWkuy5ymWMBAjcmsl63FowztYpA1Il9Es3YK9mxlIcHKGJqCQoz13+T1VssIgDZ2YZkX9W2YvkWP98sgNJ4JYNiUGzkeY/OoOMaAPKy+w7fjYy6ilwRm6UShkWUxhjOKc2GwYii9PQ24MkIUyAbdnicuMA4LDCYZybbEbsIPJhwjeIyHXE9Q4hL83ZlobL80Bbuvq22fs21yzJpkPxWKauxk/85S6Sh6YlT8jNVHuDhp0uCzoFaoDMKfHfEYDsvCjYvb4MNTsY8yk4rp/0UFnHYp0s3qa9CKvIQtfh8V5juHa70gm/5MviiU3wArEY4lfLNlMeB45LrLFdqizdO28xVl6CibeER73SL8ofGoQXjOanSqMFCE7vIxdYqp051SorKWB4eMKWyIqeila+WHwi01G+wCwCFS7Ly/fro4kLyZVV/zT/MkH8VE9VcDX8SBzKMELmY3/XsvkkQrngvjXKaCfQkRfqzXn92ehjSOZHnj1OVkm0NX6p8LBBNHT1d0nu9jyh8kNFRZW3L8wDchS8/K960HFClmme8qmyza1sNbqEWEzq7Z3kdaqJLIbZn3Gqj+U+h4mHLOjg/pF5Q1f02/JCJoO3BPFwumbBbMFY2LU1UEtngpxTpMq/VtY46csMTnEaAERRSUV111cW6BUmBcrEAXVRbnM7wVrk+NfWVGFyZtsPSmeySAJ6gbEQ4eHi6oZJEKraH6ewln5ILGN2GJIYQHF2+ILXL623/xbHTjI1YqEo4QCDRaSnb4BQ9xn7i1qq04/wShRMP102X6PycnBuO0+Zu055hO8dv+4oeY1BB2QJWpYm9sFYesxL88Fyc+JObuKL9sQvLpmaikd2vX5qa84dLRuvit5R5n8hQIN1VAmqiTTpS4lVMatSd2KZV4XiECjdT0ZSDWG+x2V3KFlE67+8Oc5paPueqr+gijzmFu8VNF4L9cuKh6Kybuuv5Lk+dydEp/237erqGuVvx/rSM2Dqza2uih0SSiRE5Tw7zvajYoGszCpRpXrUsoFGziSaaYk30pocRBEfW96lF2wr5IKCxRlXal/WVMvUTvwZKe/chSeQoYFFhLQsByn/SFatyZ5TNQg9MvcSjEtIXg6nSWdgAH2D8XSkLPT0zPLDdd+LN9im9tZasw7fdxasaPsr8rp8Ytbsl8VJmHCcHFmNYz+8SE09UzQ5PtPLvCXGH6B8H+KguMZ1cFTNarwIVZrqR4RZpGebdxjNWcqTaK2/bxJyxEmoZ8OQz7cYUgt/dPdQvVh8WAnO+Ydu9H+4AwSVkuHBS9oFxl6UX83y9KI0AnUX7/BDVAvedn8Yf7upNcSr2jEXMgSjxruXuWFaKVgQDxGqubQNWJ+XPtkhbxXRHVNO1otSYIYEzBqv8BLwtR4PxnBSWFwUMRM/2fmBygrr5XQKd7hXc6Bq1tnaIIQvVOOHTzIKa2rkHgUex1Ddat+MshKLgeUEdg9zgMifNXqXQFwytIwZc3ynyCwOB8vSvAYhpHH6tDP1V3BsOpSLRtPIZuKvrubv0ue9upIBKebJ9qXY9ByFGwvxj7i5v1nlPCXPeQ1FxppwnVsIplu4zv2IYuu1ST7BeyWTnhITdt/Xjg/W2maHViCrbHaKbEy6Zwc4/Sm5087AXUH0to3bNKYkptm1kLqDQfV5NaPyh534KFjtd5uPK3eElzVyDZYVFXQcprAoAQuIEfv3+zZWYacwCilqrIRKBVm3U86iOIcWlYbL0tkCF7ucYmr9v/bp9Ka7feDB6QyitW6eNldKKs9ZdMwbOpfeZNFv1OA8WTI+Lp9OdX71+E0XxPZYV2l111/DTMfK6i4quCkGFDMUXRRa0lK1SM2ZazDnXdgpj+1JQIIeY86rgIM2lgaz0tFU6jGvGV701Z1l/8Nu5ITKe+FEwry8eStCTiL3qeN2fJRs32w3hGLku7FCHdQDxPf/dJZ1jNWGheFGCzKN9XSGaHPoUrKLxN2tXvyeKt/1b7YwpNR7+yFeHGL2gn+EzlshrIsm72rf2ikVDdodiKLR
i4xCzpUkXewhFBxWtWP6/eA24+bMrjhTrRDEhhQXKA6gb9247g2LCT1Og4mQ8SAZMsNXTjye2t2EQrMZbBtUuOWdEVSpO2YyovWR4GorR8+z0Zvy6ZgVHTdH1lNBFh2QOY/DOrXHBE9WhLupbfn+mp27WNtoA0PEjG7W6barmQb2wbhAjpssyfL1MZlmK1xQDxA+ttU9MEnIchkz7evxt4Rkr0TTELRUyETi2XVhbpVdlTEkcMiT8TiFPS4h1CubB1h5kvTJpsyRhl8lmOoN6pk6EbUVi/emE8Qq/RAlLuUuEIPbJSUch2DyPUk3DZYI68uNV0u/XewmXr0eAzr5Xr4XbKndywlAqZQYkm3MzimH0gvjspHIK1u/c80H1iFznBp/KbkN+IBqgO3nSaSE6T8rguEOYRyDe7XFs2Lat+bY9g5PVXAov3plOl0JMJtIvQbUNix8y/Bdni7xEdx7MalYjpIQls2Oubgh1qqUPbKE8FFmhDe1jHQUF9tRp397Kge+clkDGKxRcwkNw5fjQGqncGzKFlpsD5i7RWF+4mkuVD+h/as8tMQOpx9AVeqLmRkNCuEg+vRjydwYfQYyPdIc2cscvO7o6d82BfAl7CCClFtjhdV7ZoLjLfhfsot8ASI6epMI9Od8QPYDZuUcLGv7HmE9do9UQodhC/lVbErSN8abJkNXl3enZ9tqnRCiRUp2LIuDQonKLHOGo2v0DtGmm5qmFMKE++uXh2L8TObyUUvB9Ms7YPA04jx3J1ycYVvNHNHt1/aT+HNhIobyxkByozUkhsHZfzOnArlTPspvzMZIeIr1omCMpToCZDQwv914cJkd+Q9/fqZsCJyJNh6z1s8ez86wVoHz4pNCT1/3V2Fhor8V1Q4a/oB+cIZIuBF2cBzdhmg0xqONQPaI+eNz3bS3fmCEKAvoJvRYJRJ6FEBc4fPHB9/rXTe/q439gsa9WiT9KaPICcxsj8oUIehv0l3x+CvOHTZ0WyTBfsT0a5xT7jH3DExe3kxMUDpjNd8j/NHsKmHfmI+iw0SbJPh7CtkuwA0m5b2oxKLxZ6qARH4OJ0Y4xwlIEoAtc/WuTyD2SKtKBU4xuBCVhT0Wg4A70Gxqa9/hvsOuCIR3IbzzAzv3v9TjZSYkcb4fBIeOwGIrTdi84Bx6WMxhexsWnmuLZNAYq8jZFz2uuExG/Fsu5hQC6sMkuIqrLEVEC0oqyQhUYvkS1y1P2BOS1biijM5wNggGBkkp+RjbQslSY0PykrHJRT9AuhYm6B9HFnIhDCJFGnJS0hb2HfDDobpktx77EIiBB1tDDbS5nOwVBenhTyZEQCfY3q7VOcYgqTiwMm4K4W2dcJTiTHOxQ3G5rmS45sNS1rYrdkl6XZ6yYaYH/P7WXEl+ancQtqGXYQR6jcBXzj8KOuqwF98PweDq2ORh9Z6Wk3dBmDOpzHM8B7fFNopkPApmIUwhXa8UedPGUkX00wtcc2vFDJbytjwMBc9UCqtNXbdBjPbs1nBkh7xB33JESPXArw9mk04mrgEJPy5y6Vz5kciSJqu/DpPeHtZ7ONhgl/SWGlm7XifErKPpvclC5IVBdRShYe2uf0S/yFgBBGVczbika5HVAjkO8jsA71Jxw0+0W2/YC+zbPulfBxsJ0Oiuu3TTPxXHy/tz+OhXletPqftRsZJOLsDbqCvX62sCEEa85sJgMuBQ2INptQsZgBoFwMQpFJqktx9WHITuW9tvMPUmnbWX6tP6QCG8hp4sQMuRilhdwaXIHn66VWJyW9xCA98zt8o/FvkRadxmvx9PNfKz25QJq8UkVd52mNuPKST/3Pjjs9CLMnPysQ0KI3QzVcBJkG4adYSl9eEY5ZezVcElShElK5IujqTBJD5QSJuUXaoz1WZUK8pQXBMJHiIjDwtFvLUrZHMkRxvPP27HgY0TspFO/fq3zKf2NOtULZ9F7n42S8ybAG5UYYJkM/dTh7MtKr2Jt/AGcwdgGr/p4lIvcQC95jzh5qHnMLNyT7k1hUcHxDPWZXvYXLluhZNzlBFW+k0RL3/VCuxUETEusaBWzhuUbny4Oqq3pkKjPHKijg7AUGf00FScwMz02fLSQ44w6HRxoYVhxdQBI8a9+8ydRyP+Md0pvpEwAXGM8E6TWFAHj974jhulMWEUykYWzDsspG+ANj55c2CpM7oz0fSArvQ5o1G8o87C84Hti3Vk5WSa9GFUNKSrEnOcaRw+Ax1ekh1DOT69nePXMJNH8wLq18s8oQyrS5mMjOYz9477KYuEwUINUu/ObzvfsQcWs5majw1Sr0XO5842I0vkEheajY7SFxlrCtXLe2pDWl4r2YhNn1MhBjRC/yQeldFF0k07DtAcEnan2rCEFBtcFwu+Z3kU2UAI3eLD5MVrFQ3f2lCd8v9rBiOenaxoUPD+XMAuO6pndC0xX8yqT4G1omcOFiUonyhqlWOvIrYukHFMSLyHw3vyQbTv8Q8NDwWL0w06U1hDJtn1D/a1UTPsKWSYuG+ve0tQdSzxdIXfJjFd43XK5EEvOacBTvn3AR5M4FOan/FkgcGK8ivtXw5LTKmi7eDMCElK4vb+iYvbnM+aNr4KDN8KQpZpAjPHxHOhU6W3dd2G9MjkCYYyMXU/qNqr244sXgUomEcW8Lixu45ik6tCmnJbk8f/8H7iGE48fADB4ovjlqZbLlgbRzJsAbYMolR0OBSYpuzPFidtAubc6s9fxj1buOc98+ktT2Y3JHysoM0d79yEiZgT7znrmreL/REEqIDMhnTyyiTKDgbr6barrlZGyHbERNg+PLp5W+QmwB7tZfTQRmtz6+d8jFT690xGb2+0HcH+tOw/27jJYl9Sa1fFhrlcAJVFKFRmrYSqwHFSznJehjBynFwDQdQzQqJBwcmfpdhs6ZkTsZHP5o8+9xelz3Fb05zBmrhIoXoRwJv+tZdHdXG35eMvFD/FBr/HyjB9RCqtVqCrC4s63vEMt0fcYwxaCI4oGdOuCtAysKSazLzab/BTP2sbbCK/JY9i46WVFvHbtlBgI96lHL40m2EG3AWHakSgu/mR9dO7vP82xFQJ7MXaWcW5fw1Ta7Eue0WeZQ1IvUpmufSzC5UtCcXQAi4A6RF4/T3Pratzflw2jWmzqWsCn8VzQPCQgixEbCF35lDMNQ2rTA2JbZQULtw09/gq2CAGWl4pg3t1IZy5gxrlew0/+Q86wPSNluxUh1VP1MhMG8IsTC927VUJLQDqSJRy4OdzWtkLNJePixmA5UHOobkWa9yQ9Ov6mOTwecQgbNFLhWexP8NzLCjNCcjJVl+J3TxMjcBTTj7rLG+o5u0M70bMcCwm7SlDEdKFX9FWaTtMZrhaj8MmBeWRB6DDBRrcaslf55VPu4p3HLlt37xWG2h1h/Y7cEYSdzf+YjHX2DIaXUIrTyWLVFqAjmMDyysA87M1Oebeystx/cZCGdiMXD9EbLZB3lA01Zx+HKyOi19tijKHHrqSLcpvZ3CIB6SfV03o9qkSM+5tWzK4eEsfjYdcKYyKVWDthaiatVtxOZ42wNnVdPVJMdElieAIQUqSBXrJZGdhMv+QWj+dyba6PAm0tfncAzwYRF+NvChnaFekig8G/eOiuhGZfSwVxlb1vL6utXH3ZXLi3LUA3BYBmISN+3uvTSYaxqIhBsfGzwXlKrFCfT4Ga/7CNG2edRDMpeNOkQG+MfCUA2iojFzhYQCd2rCLMDBXbwckp9uPPiEACwATeG7GNUXYQ1RtdZYrKECgFFWqKRWkoQGOGKgguLSdyAwmVkihygPU1gTOCXBFMT+FbrhvR3xRSr1Tp8bPWQ+sWOsr5iE9+9uSnK/QfLnvM5Y+xCxrywlEq+bSBrz50KAYkgzRBkgp8ZfrxTUpXGuulpYKHMHCVL8+7wHKa7DjT1jurNpvV5/vX2WUuvckUyPPv3PYKs5xUCOgvYcIgfpxJ+aKqPfxtFXa5MnHad6v8WlQYpC81pQgiF+Nz9wGyxoEUoAawiDzJ2mcnor3cw1HvbMZlKSuJJFxdgz/QRgf1WflyuCM8L9FbE3aRIEQDS2QEGdA51FXXjv3VcQwWR9J3I0XTqaOb3oAFB8R
fYL9GYxq6TSfl30LCrimH2BbDRw74Z0PdblB8I3hFpx571jCS19nE7E+GqukAyGFygsWM50ymOph2AJcnFmWaGR5xUhU80WOfJI0TsAPS2Nv0RY+p8gyllwnSXfu7LJpds5zRXOgBB2fi4Tu7GCeKbhsvj1U/15GXXpQjTFQ6tX+dpRr2fqIKACBQ1MegCHChV4w8u0twjhk1scNHnySTCuMaiYi4ojsu2owT1TYIdADo2cjjraJUXHG5J3F9MfqNVVMIcip5DVc0yQe6XvDAhfGiQQp+WSCxF+UOQs833Il+ZvZLd3/YMhyPoxZ8oKnByz9o++MEx7UWUlf51rrZHjQFHrOC2KtZR3guWXgL1R/AYU0a70p9PGMd54AVL66+FRk65Iq+pt86GeAmESgP1dWXa/dXt7N/JrQOsylrWxHSJ0jREqTbrdkaqcYnXG4+4Ocitbr1xLL3K0Opfj79qQa9KM9yiQ2b9GaY7Ou2fk5n6BkAbi+1Mc7zGhh5bnxhbZSiBpSmVaPf4p5wbA4MM/zkPFchVX7AIMc7+TgU3V+XvL/U700zHzCXxyUYPqobZyzm28LdTKxReLBXjBheRH4eWbu44/VP0Msmx8B07IeHxUw5L5L7/YisVRQOaidb32Rx9unbBLqEL4MDDR5KCng2ASDcrUfI9iHwIxELPZUbgZBBDW9Ct8eeCFvijbBNOByIEIMrjP+HESb8SmA6v/Wf/8NPJj12OobPXAiWV+l0F4ifm/kOplbOuXMd+aZLWKDwAsmffQ1j2JlrDdoeqpm/J/gbxr2Wjs0b4tG2+HJ95B9OhkjTgI+rIeV1DeVnuoaRbAmhlbpPXNn9aXEiyNZjd9mqcOmq7afzd2b9ubW8HRoxfugllfsX7UX190btEyWSMZYElX4MHFFGIfXkfplY228EkB1qaPbuoHsU+ktvKUWMMcFm1DESovalMTAPjGxfVHPb0humBuq4YYMY0+/y70kVQIQK5rPnUK86r4gylUl/ppP54/wMCP9sealsoDHIXVM+BGTwNnzAkHJHcRfyg1ftqng1bxCAZmIZsli5maqnzKdxuvO45cGgKSxyFy6bBd6YPVccBw9e1kLC54ieeQ9SfhacioCpuPULCfG+Hcwe5QOdV6pIa4y2Cw6VlOGOWzUajX7YK/CgvKvr/MvRwXi5gF4agbTgZ1Qk3Rzgs9BBsVODQtwPiHLib0D6WS7r6BCHKRcMzuKC0rRFWfhzxPFzEUMobiGKmT3BLOAilHwNfr0y6xeptHbERnO/nSbEP5j843ZsVsl3dMF0OkywuJWdxC2184U9lKQ11GtbHE30epzPkBMTf3bNOj/BgI4vFzwqcwGIXh5CQDnVul4iM6xFGhOJtYgX6ektlsTu2zAMr9hi/KmtucTAbrD63nBlYSu6D4AF3cnzgX8VW6qV4qa689OIV4/Ol1c6UyXrIpU16JSrKWCIZM1pkd7+PfAT0wPpwkcPdJjwGjbX9R9Yet16/sjR373/zH9tq4Dt0jZJJWaCZANwOqZFSAw4hFT9nooDYUjIUKAXVXtT6x2Qwi/iBPfRh/NXJO6/UjO8fALkBb7CrvwWmwxHSreBavYfULhxyUpMFTFidZlhB7IP5MebHnOGI5ETEKaNnQfS3N6950vcIMOJykywrxxJzubQa6RH6cGXsKc6Dr0Xe3tqzn1J3S9m0p9nuE1hhfzAFvxT2EqoSXgEV0Vq2ERHhQxJaKEn4xmXUb9ffYKJRWlahXo/n3JLSFc9twKUC9W1ZZ1rnY9WqAAxNHHfNckxKNmd2f6+mm/n5VrYnKtp2hbLhFcCcxnNw4nlsihdQ9TcTijuQlCF12UW25XqVTLs9lTzMM8BzAPqqryZ9ZDPUuHbJdJNjavo2sP/qFlQSO+i0gfLb/mdZHyYfAP3k6thm2qhMv0sopovInw8IaX3Kcbpp8kdsQLEmrmNV2V34xbLQpLY65u5oyq5tg+2FrWiaD3c3V+iFG7DocwQCbqg+ore7KeeUywAh49p5HprMJPAlWqqLK6OifQQtCoIw5D14lR7g6fHOmeV+DP/usB7zDpprVUJv2ixvJT4gpMzm7d9y52kL8NDJPWGSpNbnbH9wb+EG0gcrT1WeMS+wDcfx4o17vsruxxiryC5rXtVsL2W6hQWLVMJ3pkb1AlyYR1yW7W0NKtBfibD88nTKsu7BbM7pRbo+F2BPC22vkzKQpJeC8L8csdxWVR7TFJ9Esjwr6oGJVUPmsSgNxQWS+3eyejn9AV8NzdOYJubf2UPciiCqUFayWI7ZVHwZ373vg0mX7sz4a9h/khY/hEmXjjugtdLR6O70wrMfNIMn/DoYai53N6V40rtM216X0Xv2FquZngN3n+woHvJjUGdnalvZm7VFr1CX0SIIK4/ebNqfiMKjaI0iBFSe6QzMBEsRhH4++c8LvQ8mxsqwaLo2A+4vR6fGdTaU/hSSegdWcjO1PzNknRtw7SzozM8HNYC9pzdtjp/QADGGTRNVOnMhgCEsqQHfLQROADw0cPJnGHBp2R1FLqJuhygo/HJWeixIx8lk1pbd5ZALvkCmJ5txENifGAYyWAqO+LgfSrr8KM1YXYTvrdFic+Aso5zP+f9FWskCgaCqbNzqckcap4HVBGxWrnbMijgNdBPNrw7odJJ2xpAlW6cXAW9LxDXZYROZz9Fv4FJTpOn18OwSXH3bN6Z45SNf2fEOoGCAPtwq7jExm4trRzqO3EVCVrBPzSLc0sE6ysgNW6iqbkUUF41s9KKiOYB3KUAc0wdlYwRojjQNjI6w6Oe4xrRR9eZiZ3YLyLTmToWYiv7iQ60QLiQpizbDkoGCv9vskhP90ewe0BhZ/+dduIZ07aZLtZ0Q/i+HoGARKsSsNyFsaxnlRLJC2kL43uiSlxlzr9K/5DOj1ps6citqdL+8UTqpjvtiBDW1y1h8fxr6alQlinXE/znbMhgDWEjyD6PCTWelCKs4628wz0+wwXZUb+NyfTrcrNw5fuC2J7vJjAHxrHdy7yQS8ucuowkP4A1AilfKVyBRBq7+JGtelsvlcMD7qKKPCZ1U8zzcRAbqzg0heAAxciDi6PYSvsV0iV2U5OPDacRKXP3Mt7Qv9aRFOIVUlnnDFz+/woubRaKzO1+L76npdJsI3ZBoz6Vs/YJ7iRuVXRthW1N2rnSOop+DLcqo8yx+U6bqF8c71OtKkM/FSVJlxloslB42O8YCkUU4ktz9XFvD7yvsfV2p7/o8H15fOCt7ldkLFO8Gkb4D+nhiV68h7iEOY4twNaLe9q3tVWgf/vJXNHt4bjW944lPcwSb2qjRRdkHaBokSYkwtukok7LmwMpLygvkZYa1TM3EpHqJQkxo5uSyEc3yiceg6YgNt7Q46A6ic5ixk1yzjVD9oNtBr6HHIx85ocodZCA2X24Ms6eZdN+Kx1RV2Qe5+BDa9dnyNpHXKUQJlvmVfmFXSEBkskMNXKDLh4usjvsvAjCe2ftTou6TpC/p9XSSYm3uaP7ZqcvkN+yrN/ZApqHQb6s/V1mPcF0O5xXx/3tZf9rrhCVQgM+jAj07fvVjzS/x+9WC6Swnk3My73aNJKE6sWnd8/Y5ixEjaKhkJOJMOmguY+PQ7MOSKju24QgL8YHx5Hnj4l7Ekvxyqu+pfCuUSnOcGMZFWdOoNBMZg6W+gZ9YvGF6VIQbVhx+lYWk4XS7eayXtfewCLDH1Wu+QNGdh6c8+NoNLDGlqJ5HYyV9CxK/mbOFux4K54J71iZGUZw2tZkQ8nNPBOg9u2DRw79A50Vp2SKHGwFgHjeBy6GvypNDwt4WDxIyqXAYNZ77MmsLfnwPWigON9H3X/kdhZYQQZm/dLiEMSc4oVyzhMFh8yb0/vzXBEqPN9C3UHwjSy5eIx1DfztUrNZzXRy65kCnhAU/LWDXlxzAkaZGV5AvtdsgUAU1uTw+Z+dhLzF9WXWunlM2giwrP1SSrORguCKBNK59ZskkfgoiFluaN5eh64rfbiOFwBukLa6SYcj/aQAErj4t9MedxpeQWE+ShZ9YOWIbiWhx2NcWiHdvBr5/XI2HAyZh040x83JperAFep+MHOMnOdD3Pg
gIJNb0g0YwDbbqb6wOUHCtdA6g469FQTXui5KdpvrFGe/TFF4fpa9ZRBEn+KTcC5kJbmh4zbpwyOXevHadwkFB5MiOwHPjxX0Vo5VPmBIkp1rlCMs4ltimbFy1ww07TTSaltTpYTHtVXS45WwRWK6qZBUP4nzgOsIgbROtl98LogVpKxaaokj7sZMSEoNzCcm1ZogoUOgNwgQJGYZvjRFRHslVRANIglf3G5SI1frL96Vmmd+Hy6pH8E1gtygNBhxWcn5a8q6ys68SRDa8008OvrzzVRaNnVEkxSlwgx5/eP6dDwlWwPhu2w07FY4smfOY3eM+GNrCiXJjU0Kgp5hBRiFR9mcgODd5m3mS4TwwDL6tG7aU81952XeLRVafW1Nm89dx6buAXZL/10ZUOQBPS4Ncr3V5kvEOubjXrImN+CKQ8jsgx0RfJ880wtjf3yTlUyPNfSqjJQ5pOmYcsPqaPVWZCUv+TCpIsLdU+oCVQMNfJEXq70NPye+IJm7hOrTOv6fv/417Emyc3XmRWjMZK8c8xtXGzyMDXuNYsO1QnDnMyoWSZ724bMJbZXhcVVnJGP8UNbtomfecPD5Nvsq/hkzrfwe6KuSKVW3Kx/iZCJEpmt29XMO69tVsVqZ/tinMPRQpZlRaflP3646Wb9DGrngpgs/0nuwsmdvImw6PnExzPHFZf0ZIaO64BTbXQIBW3im9F+oC1cBLZ0IU/U72YScOTTI957DryybWVB/40MvZs+4uPimBmbEfpAkstbgLdYvpgFqo7gIyNOXd4ZsQWdL6Qq7HX5ziDamH1HmCYssEySQQQgOxQbJcp5zXTFFjoXQ5sVP3FIwP2HM6j9FbElLXjAV2k1ENZj2Mi6I8kHnQWw0UBByFrp5KvKXEJF9kxsDpgrl5iTMANaNne8DuKKElGGfLgW4EIx/jJiaQwduar1Iv8I1MixQIMr7xwjPaGqdyMzmcx2BflF3NBaKJaqym5A4ExG5Jnr5n4d6/cF6vKoKxPXhqeJFqJI9y/2/9FrO0HunyPk2E4TZ2SAMUX+FVUqlNIA9gDxjFWbVeY45e3EPPOb+qS26hDsmZw1Kfbe0i1ppfg6cGzBaYJgHYWxVNh18Fft6WiP9u0UKpBFI/t5/FbqmZ5fDBP4qrLg5GUdzBkmPeovApM3G91jkyFw06YhQEJxTpIj5D9PGhQT8JxB5e30bpCSzMItdAna1UfVvZNpbK6OoQV0zWYJ3kC4IBu3trJTKgN5bLfq55U8ArX8bVF2VgPWUQEQNOzAlRlmKEnonHIm8YtlqOdE7DPkBgIer47AL2rkVSFhseBP5GYRq8XlsucQpnARYPPxpI/4bE1kWIzoGBpAKjgARFkHP+9cQLcnatF7nZgkwPmJkY8JnTpZE/40Dga0cRwcm68YrEWGN/fzdZGTPFE5uw27QUCiadFqbKxUNtLADDZxPTP1dCaYZYvc/qWBZgGFNftgOPk8WJYVtqB0OmDFXKNSm50JAtL5S9InCRUDrc3NRF5itu+RRqF1pHdHDeg8rvf+1ONvm1TigwsztqUZf45Po9e8pUOILiDNltdpW7qYqw5MsumlCOlPEMVpJklGyrrPMQOH/QJWXRFSWEqHh8xIvvYMI5Z+kVhixUXk56+ooxJvFc2SXg7x7XGlQ+QhsAowA/ox5pRRbuA3S+KxQ7K4lhf1hkYuCYrZDDHJOq79b3ehsEou5KThkpv84uypTFnnCc8ORt+1BkgZyg9EW6h5D6QqNxIzDHoX4uLWJdS17w9x1EYZdkwt5pnYhc3aOy4HJUHHIjcP/hBRgsgFCZBuHoBTwpXqXtNG3LI8B+6mXuEDMAvR2WDvFrsrqZBHXnBMCB+CBOkKHcofGt1Akntk0nTEueBj6EOPuP1k8ViQ5C1Wr5eomTubQ3j4wbWbIEUdraASx7pmkznMbnfdHpxZjHCV5FcbDXYdRmOMJwGaIBkcTy7wk8aKARSUlGjscPgZU4ypWgBifoKkrU3L40QKKFr7RyECF1X72jGkVuHIwWrTKFbelWfTbuZds+7XEhBKmGbFQi+pEb+lApy5+Ogd05ddf5SRzMCbaHNfQb+LVzsbZLcsPaW4vMgc8sI09AA12dmnJ9rq60g90oTIfc0sLbbAv/TS+NzUYQ/B4MU7vtgabndMSAHsJci1lYO+nxELNqflXPSslxPY8gCFQoueaZlJmG6PpCj8xV0gmtoDk8TrpehCgvjNjMGN9i2UsUKWs3UXOooWxxO2NA5owAdNPo6zR+4BhUFxl1iZXYr8PCOfQaA1braPiqxphNRAEUPJ6DXt7uX3Rzem0RH54bElQbr9OQ8FJq1CQRP8kZ2gTo9cNkK44+7R/XnaVK8eCc8Qanz7gISZW62Vh30mh3JZmuT73SJxMgp6fkhZuAbbfAybCcutI06SZAegma85sITegbgigQeGDXinvWoQoTR9VxS/Ag8qlYGBVc9JaqWWvJ6yXHoeeHzt7LK+DhUH72+F1onm29hI+B3shc2C8ONy/MlHTm6Y36RxrrLoFUwECBHz30dv8RFQquY5ANP5vK3T2FyLue+BSh40L9LktPy9jck7FPrxX/S0MlVp+lOoDYiGMrSr7sydn9UbQ+78TC2to+xkKBjsd0krmgqQfeWNI75lMisJbCN4DyJ9+vFI+dYmmC/LvmJtPZZ4ksquRqwmJHPsk2sFkr7YuSsxwu7ZEs6olUTvUBOlyBRACPFj+rs62qPhrRxLq5KiC5jN4sJIDXpW0GEq8BuVbhuOaNWLlQtxCSin7zP7AlqL9k78EufFPMkE2p9CFHXC5yH1CSwKAPMf/UWQ+PSd4bhFjZdUqE8A2vqO2k67mrehuRNgILqg7x9z1JpKjFtTW+9DeylrWnrLh7+kroBmpcyRmd1YVvZ8c6HVSTuY1A11W8O+N11DE0t22xov8XS5YLExmZkkqjAh+DAMKpiebzyuHdFAhQWS9DVlesaoizYi9gQMKP0CDcxuCzQx/ieugvkHnPWDKWiMiM9njPp6pbND8sRVZUxgTGp9HyBoFh8IhBbuZV80qcOif4mTM/phw4MgqbTMcgcPi8Awxt9xyPcrlthoL9JfwgN536/5BfM9W2NvE5YXBxHpGbHR84JZ1GgtDMrFOeQpLxyA8NHJkayFZBSKsZL+9LyguBKHhH9aKZsau/0OQq/cCbEWz3Z1HQ1KDNv8KezNFzIg3ChiFgIaa8hYv4nHaWZJWNmIGHmGrvCZKTEUMSMPIEp3v9IZ6A8NWJNPynj4ThPZMcCs1in+kwu4Qe0FFcYs9I439GDSaTv+2en4a3UUt24iwImYv556jMbxaBbowMBZnademYXA3NWo7ILQWhFQIqBc5YbexkmIyi9e7Nn2zagDHtK8vbBBUQCd8b0yJxS6xkwgzwy0H4c195F4AWcEaak+I3vAFMGhU9Xihx7K30lTSJge52BsnpwQoxXZ2v+tFK7OxOxwh9RqW8tMuL7w110/aM8VgX3rncNZgdRboUzJJ1qFSezTdnbkzndr/kum/RzvEEW4HJV99yhIN4i03mLUuju9TwNhu2AgULxjCunghC96MPl6NO2JpI8tJC4JuIZ1GcTT1ROtwBc3zT4h7RzqDGKkyWiftslj29XoNMzSL+VTRtOqOwgugMA9x7LRSz5FjH1LDc2xcoDD/ozAJ/lFA2KrS98nQ5ryET1Oaf06n6dtL1RKSvL+mOPR9SA+in9YHI3OrCeVLTKGWxj4K0x/1Dj/iRvQ03xQak/W6Cs3SvEN5JvyFZ9H82Vw9GMBvzHHDgdFT2kNTzxf4Ou0LJ/pZt0NEB9czwi67HERYPGbqdYsZlPlOz8BybW2npdxn9Mn6vzPWWa9SQoMHER892t4IfmUfGNcg03F3CGNLILqpAgIbTBd4SQrG26M2XKOmieqfcT/gOckHioGvv7PG7lb5ndIPqn//oBht+MwH5HheKRas85Mg2bggyn7fQ+OAjYaJtD0EVmhrKd81+TVBnjW++o+2VvbqSqID17w8kCU7kkKv4yW42P51eNip6iPGvSGuRmJOVnJOztxjV5L9mhAocGtbFRQxZzzaLrebjHjKXIpntY6
5DnT0qK/+p26Aj06QG1q7Nm9OLawdMKyYfGKzNfattAjStrG93lVyp4Ysm1LiPyZBb26HC9gVGwRAduX/nlmgDNgbx4UwO6eZ67wxh+407SHyOGyDeWJoa9coYf4JN2tTJHospHm6/vl8RcM60OSqg8rIyAqIcF73qbCIe9lchRm/1L4Wvnq2+8bWgfbuMnUPZqHR/zczaRT3UCPBPsuZWUGW0RYSXlIsSZZy9/mKT2AbunpfqMWHnl7ppzYNHfAZBKYmkp7Jm9SvXYExSS5gZQQfjZH9BF+8JXsZUSaJIAUn2FWCWP35tySREgsyZNfu7iv0AW6fsMn0yL1NWhaOko3HYsL2UjwKAcwZmsiwR/EQvio6Re4ZqxMvKePGhPm2A9fkAIPHtxWq/r8p+GyB/pK1al2nx21qOCQg2nxSs+1PXVKF2ToCSg+XRGg0In9jtrTtV4di89wfPdXLssUPSQi8sMxxaO3Nfp3G8zczZRZv7xFU7X3XZQoElGYkaIbVeIKeba7k6yF4UQXXL3nWBUGc6Exu1QcsPRqqmXXHm+bR7GqDCxFWR4t3K2e2Q4HS7Lmg35pdTATCge6uRQJEEith0C5QuXBOSf13lVffDFF/zEghm1EGb/ZGThIDSt9gCFdQm4eb2cvACPj5CXXLRWZ3iMmgewjgS7Y9DViCTN5m7gCbb992h1sGbU0+mJKfJgml5rvGUMhWg2SqMyz7K/J23hm49GJMlRj6v6uPLhpn6XyfX17OeXZsV7r22kC+mY8RNgyDo734wbTkXVTr9pE/APvyn4ArQYscAHZEYwGw1QxIJvHky7P33c086j6LFukCZ/Blk5CUOGhKkTH4IR1x1plwEtPJ6CyoAP3/kpC3k2EWIDX5TxQ3hV8uE6N5vEyzibgytI7b7T12SkQ6oZ4wieCyf5ZnMY05k6Jue5XLdMr11Z9mKW5R9mgWes+8rf451e82Cvx2NAy7IrIiDSDUnRXObEw8nY1UsdXIFEu+XZtuirXhHhL7TbKZKqIXZhIh4nK2scIeGcdHscccN2vY9nY43HZ41Z7XJCZvxb4ZGJY2pSYyw0oLilzCYh9eojGwMEf1IUIkhp5OD3d9fD0/irbn8ktfrri8v6ZS+Z4ftZIHv0/tjQeLuCnT/GOgiOMU2HlMfWASO0ZSwOgrfj9h+JYV8CbrqtwTv+5pYlGgRKt/jUFW8CcQ/E4szv9IWJslG6aK8lUwFQo/hNqJccd+o8d3LG/ynzoSwl/xYvjroF/Sc/hnT8wEouGi4cJtU7WS+Ft4FPh8FvwBFoekLS/xLv6/WVpcvT2hf0aBqgpqItavIfkSzK7+HOXcVhdhj6WOElvel9L22ETuJkrxgsWYuXayAqU4psAjl/6Gs99i4bu6zerF6c5K0yBo0sO42UqExeKOiFsJCYZJNufX6pOzAaDuA4XttLpTff55YpKkJrGNL50oQeLJtFHgcC/DoDYaVx9IJ35X6h2iJeeQhbdbAOlVzelKmdLyBGHwIlD+F7wHAKkYJLl0d72Ji5kk9ZT4Cl3EOy+LnJ9WY2cyrgn3MhUF95LxS227K5zjjT8UNb18llycD6SD2Ep+xVuP1HVbKlMwiTxhibwj6uW+AruOgaMw/v1LCU8QyaKKIrZ0CCDhSQmaZitt/sKWMbLoZwTsrJOh90VX/YM84b+WE2FdKsjF6FZe72NbC3+FN7e96moOELwaBBXQ68h3mghJPEOV6PvMgNrjcd6K9yZsTB+rpiqH5xrstqxAKRdB4O9PqfDF5PCQymt8vp2rWva3UvzBFV+lz5Zlpc21vImMoqTUidWNbno6oAFDHw24GSYndofT27lfDyDYOcLAjrAJb49y07Q7VTRs0QGBdrPtDmz+CAyod+NstSVzlpn7BApekAxR+9Euh7hjmzicU+cdbTFGeyERz030SdM8f8c10pLvPRK2Ulf9aQxNDAcEGM4I98lHz1x1S2YJkHNqRjOEK5WU3AdDkupuXk5h5Oqw/kNTExSBjLuiUFv8UqDHvsauXF0PqMf1LfD6caMJC9oAoYCUUmzDjOx6BX2HQWassQAniK+UHkkw0K8be8T46Gus0wuGpeGsGFdQpo34KM7wm6V55kH212CXx/W7LCZJbFzGZbaqp7g0jUJbyhgMah3VYdhQMnO74BNE3fmbnLbTB8RY3n48bMgfy/Y7ySBKbX3D4SyyD/wQiyEtHDmJc5aMRm0gD87OZNdnfWyiBR1rGMAGPjRoSKLCbFPUrJ6HT4A/3Gj+C5pA88uTl7NILsMkKPBi/jMvpMEHA4bPXvjDlx+srZd7fNtcp2U4aTWmYZt9TyvjuQZt3PlCOnzpG2sp4IMBeH5Y98p4rIpthlzlWVUEMaDGFsBPk8FyZNN8B2gQQ+27JASaFIuvKkeozMkcOBi8zKIwtxRMA6IbsfWYK5zy7qvhXF//NQcasZMEhWTbDdzdbz5bVvi2hqrgWFAYEVBH6Rz9PRyvuU88OqwXpXiu6hPUf+kpkeIRf35ZXbZ0MJSkmyrU9x3NK+Kx33HuFHYjDKp9peFjQnHgzK7VOSGGGy3b+u+EUQjUJReUTgsnzOqSOIsJjjAsH0RC+18QzkJqmYwa3iOVdpAkrCAxW/gimlJKUct2/P/2v94IOr8ah+3IYH5eGskZ8xB1y76KIUGMRJYcBc1fwGXkZ2NTrrdaMyD7GGTolkuox6vhqqSmd+xikeHqEwZb2bHBiM8GTRJGYBD9/tebHcStE1h3yTqBwYA4Xgrd1q1AVF0mK0XSKJcKEKmFDt4MIxoJWzb3X5HRlBg2GutiaIyyRCPv4dzJfuNHvKhU+N6kT+5XZmcAxWXxAmkENuvJkeA8q0ENo9yKQfgjHesOjU9EFjCOD3SyU94pz3yumPkXrp1Cxpgm0Cpn4UqYQ3bnnEFkkuasibhFywWskFj2W+94N9JF3f0gmNeGGD4sjwHqpn3V7lAyzdLaLm6qKSoVovv6EA7gIjGCA1KkBBKTi8tF87goy9y7m0IF+G2hfUzISdddbxyehcVEOIjtCxzINksAjbG8fo0Q8PJv3QeR6XZO6OUZJ0FTup0PuQVwJsUlMkOGQrgXr0KhP9OEiwHu9B6+CyqQko7OlfWAZOwDbEPBZc10LKueRDe48x0nk0+7LP9leu8NnBzG7JERBFohF8uDOxQZ7dPI8OKY/em04tidxPZ4+iuRn/qnSmYEw3dY4R85iCOEssd0jfq3uEBM9lkq/bvbS8eD6R8byT+6f/N8YeEjCuJ9ADBSrK6+yIUseEQI1Mu3k+dfaoUO5sl9Jo4CBbnwRCHT0hUxhq+S+WWx6nc6bUsWHdRr16KDmBcEbztuB3iN0P3gbuOdOJZQUbzRcaSFMhPF/Jz3tbcD9No5oEWCw5uREYJNX5paRlK28dVMG9prOb6AUTDnDFu0X+XvfodTW4f8n38N1h0p1YWfbjrYFrUnHgF5WwToBAt9HDeKJZ1X3H4gkv7LLx/EAAdB9TMJqz/sX6M25Oa/nh+J8gA3lDnubogfxRFFopwVjgFxG5W592xxO6zD4U1Job6bNdMDAhu5Vek4jEZP0vqbYAErXEuDlPiQMurQz13VAD8r6McGmV02TGZRNoa6mpqfh6pHOnesvcZsZqa+FwuVHRmlEW7WwAgvrml66O5knmyNfs6i1pnDcdL/FUSJSv1eVpPHde4GjWBk7DNp9BPaUcmLZ1Z48iV23rMNlKW3lPH4iQI8xvvlIzLNX4Dl6fxASBHnudAh59RYSxFnkb9Sae8vTyZ52GTY84kOorbezVpuZ+UHyrdbO5MIrvQl1Vl0IKE2wEnRrtce9bnOVVdjjKYLZG1nhNteAmzcrZH0HM2TB40/MDn+CTSo9+ISz6sBsA95xnnRdyzsYT6Mr4WgXnKcDxG1d8E7oLZ/f37mKLhN7Tm9amQOqxaewXhoix5nkPUZlQlLtsuSsCVsiEg2dAsf9CFSRQI0idOgSNZbxZI7ORvb3u0m7dsVM5mF3Vn9UAH5rmh4FcQIdIOcWL25mbpq/CGCir4h0mfvmvZ56IIgk56js8J3ueZ9elvClaq9kwIAGz5uw7ItNkHkQqC2Pb9
zYTzpIPPjj1Gpg86w2C3+/3M5kWRa5TTva/ZrhjrOWQ+nvaM7bOb9qnOk/QAbcgZi+8uc3vNIQgGn8jKyNlTFQqrILlDCQud4qi8FETsiAunbvDB070FcODGjnyYn5p8pnz61WEdFD2zFY7WasKBESc9Pyw2Hzp72vQxx2PjyyQWldRQS6mxYrcQ5f3FTZMPzIA0MzN8gchKSuz2EDj4zlbrAFAE/LiaHkRAoP84CleP4rEZK5txquai/nq5al4wIanknopUePt+OuF2+wYpdLO6hywGXOP8BLvY8EyHR1eqswijEPyd183XCG+heX9b/d+oEP4/gnwL5WBCyFaIxIKxIx3u2H8u6i6yGimh7u/j5nADvQ7ErCvFMe/YTP9a/rKcj/0Yu+M0qWiFsHcniYGCI2G3ovZkBEuDNjon49XzcF51LBdxIuj5JIXi+8MI4I+4iDRNswno6pFkGoLrHYNoitVwkE2w7VlXqcY/w3F8cTcANFNY22dotCcpbW4pfG7jdvjmro6mGvOqDtVCu0ZysTXTUoA3YojJXnElkK0ovOg0OodQwSW/BmQumr/XmLmDRB3TEp0KmvfLiyuFeJ84qkBogzr0IfMhszdg/mHRdfbvbc52dvgkRcjUISAPuAm7zVpt3P5dlAu2b+ZDukck6Krd0cgJGmkpS9Yy6YCGJh2yJZurgeqECNCD936hSAja4ZzujCuwxn2Pa3XwhHQlnkuZEToU87VEarc59bL7PeQVC/IFc7YpfF3PhhUgM9AJLwhV2gwrytnDLhBi6VENDHH34pJQ7O3IgQVJm5ojlMGCXqUdJIgfw9IJhOiekuTJ72vQkUyGb2tcCLoqmAzzwTrz+HcsItlck8Ea7yCr2gqjIjNHgRFs+w82FyAVH9hoKLFZOsa1l9g2AK9EQJf/zb20hR6uS069VKM/y7yDhCLHlV6kwoP4fhINbquQcPAEiRtr0T+/mRxKss9KIuc/YS7fp/zqEE1vPsnZ5nY+UD4NuFp9UN34zEAU1pwJBKni+lMX6QdehZMWnXcJhKRXroQJGrH6GznNtj7QIpgA2cUIUaPWty133aVIHtpcv3KZl4F3XjiOnAriOjLbTqfkr5/zGjFICAHZDkjriqnqUCyFGWco3A/FTc75CwxBfvW6l4JU74k5f5zlYI4N8rKS1P/DUKSiG3eG9p7bPdWfJ9X0VhMNAIwwLy41Ipg0u73NUYGtmXZTv+RwGUxnAe9BSZZvqcJ80g8v8/NfQ6wFirQCeBK+P1X+zRjVncm/EoTYuHwMtfAblhmaNoMPb8NGTf/E951a9XYgHUqM4vYWFOiw+Uj4+4ybEX7nuFV7Wq5er1V0cTPEIM9yj5LwYEJyXnOtFNxd7F7C8i3wrbPAV1VaB2ZUDA3ZUQoJAgRdZ208A2Cszi09t07S8VlkqiNGJFBxwTuB7bS7qcSwGh1OnoBNhU77NVMDHkq836N/FLMWN5J6JrwDUw+RYIWVLZDj4nhFu5/tsX5iaYhM69sMvnbQHskO6sF7bOCAremX17QFzq809zV06T9LLTLV9uDl1VVm0NwW9qwvP/v+0ftWyzbk5P8/WW+4HVWqWB9Ze7DmVndh6aQ/IFfQaGDFAz0saUKaG6lvSe82KT7n/7o1oj9HB4NQieraCKhhkvd6qQSGBYd1q2eKOMQPtSQK92AQQZ0YqP39YxoZas4nhzui+v9Sxbfd/Lr4qjQmkflPImsqhmsdNKEF5dvyErFxMPX2lD7qQy5dZPIynnkTSXyCe7Z4EtnPk+5ax4QXIeIudKqI83QKsmyOfrtyXPm0hWSspkRAVVfzxFQ+DjxvBpDU+T2fI/DJJ8CCXEpDusgHh3WuEuaCXRvxD3lym+H0uMEe9MEkAQOHMtZ8sPHB9ATY6f6VpabG8xEGYfNKPCpnEeeqrgqGpnxTO5qbFw20m5LiTAroSK430dW2H4jcVubMngrfqAmTMREddKuknDzs/Nu7+yOIxEwP3LOiCsfjap9aLSoU3+SXcDLp6pFmh8G6vVsN6IH0M96nopV3TH+4x13dwA9jxWe4agqOr1JWnVkimpAW4uwpFnT4zPwVdovCOaUtsGecv8yKvC2MkR3J9Sg/CiZ0wZ0gzjvgwuhzFw/7kxWSueGEvrWP+8bZ7f0JUinRDaIa7fWQGTr5FIkd5j0Pkc2RvGeI6ro2+yav1gxltMeUCwCfbiD/5eKU+XkOnEpkcxvB6mRhnc9I0jhckmd/eTGI9QZR0LZ2r4OK/2J1nk7tw/6gx05zrkeoBRmIga+H720rRpVfwTKQwW/Lb4HzuIzHl0rJBnKL/CxrzpGmAfiPMdBudmsEF368vhbSxKY4JFN02bK74cXrFT+Cwvdzs2DUKn+9/cMsxya/bzs1000ikf2ZCsJBJjLK92HpRxLhfKuNBl8rJQCAngEifknIubo89oKzDg8FZ8GcwoHqMG3zspS421fBsAk3Yg9Jr/nBpY9zgUcCH/NZzJPfV3/8jreA/JoOmc9AqPIgwHpXtbbE0IvlmWr8G8tYAQdE5rXzihN412eQ1blLtDBAjvCJHSyQwEi7zZ1/rlZyuXq50zfcPg1cE5mz8l+oksH8LdAyaDAgjG6wm4/1DqCrB/qYaIW+oG62Sq8F8ZSrCu6ceMGCFMWT42geUPO1VKbLiPRnHiZW4+VxLD5QYljkSKnoLQaFOj590KF0wRJud7LkDnmuipguDxSlef7uv+VolvvS1PJwhDjP5obrFlVeNIawO5MrIG65WhwnSezkvc7dlfyufwkOhCHauiusVY4SU7Q0GSpl8wMWI4Bm3vB0RQ6YrsZ5cbM2zf0kY+hGet6kypVxOnZdNDeUXHUZxhuOORcu9x/LAqmwOJCcqsf0PxXaqkHCQjipTfN3W9Ozc1moeoWBgCEU5uNwEQkhxpb2CWBRJUaTNMEs76z25X8Xc576pkXOpLfodvF1ASa7+sRreMQHBkDfjzafUgGa6nhgYiiUn4DvVV96dNOsuTwl81qb48ypb7YNSjVtwsa1Im/aUTcdULdSGX/TC4Mi99be9ZUazdfENEWZE0dRgSHIjAnlyQJuM1mFbmw5i1tBy5xICStuhmTPlJc7wdzrjlt+C5pr2FctPD8NukSHs69krhyVe/l3IQVsSShTbGg0Jw72AqhpbIeQWNk/Nd/3PGPujDccEHlCY3eF1Kvyb/4I6CT+TO2l72ZZsjWGhoW3gAINpWtZ08PEP3ahISUoppDjuFdfOWdoajuDh5BtUX+w8NA2gE1qEUcbI19bslg65Q+dV/WLm3zwcAVXCwBkTSkzw2AmE4KDAZ0WeL4GH/scgN8BLvuB/qOWpQUvKZahQ9qnOOF0oDClP8zocJyYa/lLgYSY7gMExhnv76kuArhfInB47MkXXZ65vdVLY1lVLl48CHEnFQIGAnRgqOEEmW6lYdyiveSLkahLeNQ2tbfFf/sb7TxOTQ0CGwJD9AQXMvvG6OuPgRrRYRR9ckmjvfRl8WvpO6xuYQ+P12WgNunroyVISjHbIuT7MW8Qb2SahR33/G0lcdIZNRE2UEjcxddX4XtcyluIOAhFF0wj7dtPfxKr3DuiKHF1ea6Pgg+JtRwLraFndyvhiW0JEJnNO51M9pH+F8a2FQ/KGQ3WPPkaAhl4ozvTP0GGqCql5Nm2UBOrAGM758QPJJJe78UMAoOkhsFwZhizJEV5/TRgtsgq6qO9mmr0wguMhbo9TONf7wHYFVRJwDrSgvxN+t3p5yImB57hxjvlN9C4JUbf5gnMVUWYeggMUJB+sHpdTgqKgmmAa0xJxuLb64qDSkffPaKDo+lQWZyKJT2FM8soTW6REBABuO0CsCfi/idr1c7Mqd8/L5iPO1s6R0fXiEMpe53kuS+CGIegL6i93BZd8XPQLgmNnR7nsr9+LvAwTNkttusxBcR6zQ58AHMEyZ8XFhOuN+hiv+T3XQO2riD2/D/bvrRLTKAV1y+3jgLp4e/LJrhydRvcd/VwOTn/p5/O9GVFaYhSn2q2w3oiQtegVOxqpa6G683d5+648GWhg8L3HaKT2qh8K5e2CByAqD+7UKcxMy7Ux8U2Y2vj9lHyjvjr
B1rijP+n3gBnZyFYj3ZkxZfueMcLHycSNjgfSHcjabJg5tdgrmGAcj+9ezpNT6sIMIzJwCza9j5OzC6iu79kQb9k886PzNFgiR+ibV8xq551YPT54UDnCnBlW01tO9ZN3GaBMcXNp1dsy5Bw7ZDz7bzKOUo0fpGGElX0SLc9tZMyB53HUmXSLlZ5CzS5Lz6Njlh1Ve8C5dee0D3lkEk+ikYxkwJVODcztEe8QrX8MdPE2l/9H+INsVmE8CiddASYdZTOmujJLbS+0/YmHrVq5Bv1CPjir1A3BUeodydaqhssD7nPDKzFX3vHoyRV662cQvtJ8v8xPIJjWXUmhooGd+EghEoheOzP4nJtjIT5TxHJ2Tg4rKk2ojFBSFax6Ti5XQDODRbn+zYB+QRsOHUgXrngX8JWdIlbxybe89BqtdOvSixiDIWmuzilMoeztNaf+YSdoKwBiCRPANUycAILdFQmMPdJ1k2njEhXAKRAuWSC+Oq09QFe5Nw0YgbC8pZsbK8n/ZNI53lmU92wEJSpcozr05/9i8LTf33XiRVZQ1EQyTQFd7Y8Pe0eyU3sioUpDKKTFOWvM8StMVOzPfs7pGkKu5E/vfzSH6uOCJAO6iMeBqBFP09YofUb0MraQLj+pUITYl0mpV8gXPRLYJ9zfzg9Cq+kb5YPa8THlR2AyKHPqmVSENKjfgxBGN2peXT1PfVmBYYZf3NIjhP487iMzjD4e1bUhHKqa16o9tXecz95bELydW3O+RHBAaKvaXSVXbq5F6K+aejy168B6ZWtb/BxyW5kP6l2lnpKh/XRq7VKsUQaqIUb664rgC2iLBk0dMTESGWnLsVkYPzV8PfA7vBSHTsDpv1lR15LrkZ6H4o3Zpa7vMPCeXGFEE79Z3VVeV16e12ZW/oY+J9YsEOLrVRIqw0xo2bkBVz9PxwOBWEY0PUN9VRcz+3RydL/syJE978xdzYXAM5bEio7Az764P/0lpxaIenXKO7BGlM03tz2B3DbN61tsotgwcmwVtP2JOpiHDu94DyIMFu0jTg77i2KpROwokG1dz/ytFHVPERr4TqAbI4zVU65jrV4y4HPxcYSq+cZOubEk7TAPPPeeUPqndYN6J9fIbPInfyIDnygary8SHVIMNrJ2tKUIsZdkSWS7yY/br8nl24JdqOJ/KwxW1RdfoqkYPQCyZPQiFJ66x4paNjYreQnQFM+uXMxXw00pTpNPK2cwOAD2hFbIfzXbE8DGJjAmjQRHtrwOT6vIcxL58BQiECLi5O+HUwFqE8G9iU7hZMcT7LvctvSITlR366ubqHev5L85f/qZWwJnc6Rs8octb3XUkJBA/7m70acd23HlVLjF9F+63EezypIXkUIbR1j15fjc+YQn76VF51xJxRedqczz5Tkp/fjf2m5ilutJjtglXnhr68eJE1bmRnDYsOcebfEwmdLcNZPsuZx2y/uoEjz9uw6jBRt6to9oGH7aSB8LM+eyxKElYJ/8Dk1qXrIQcDnxoav9zE5G9UrWVfRF8xT/DuZEq+584XP1cYZ/O4+Rtk0E+/AmTFdhUCzjqo/BTsdtBeY2WqMIsboJPsh/jdeB7POU6dgNXFQCcI4ixVqjhIb/fofIjk12rQdNMOb1YqsjMaHjwhCYJs87qGYWroU+5ijphJCi/vqoWnM9/elG5D/NS+VB1uZVt2cBNzzjmJTHWY+HvrxMqBR3krG2/HnKxC98gJ/Hxo9gC9GJIh5NbVfnkuYQFC1t6Vz95bJ07Q7+MZzryJLEC/OPQ0F1MGTy/EkDDk+UShKFMZAr8c4wAYJAYCoKcmRr9K9S2POX/vRKXpWeTWJQP+/vYbiVI4P3JKcqdhlXwSyX8uXPnMOGr2SnSlrh6g0mmSpiUpA5jplGT9vS7zQlqILtmiNE+UI3uXhgwn9J7hR+WIkfLRmtAE/7X1m7IILVzXoKWZ8UvHbAzM2mryuOEGsxw+Bv/7Prr4AJaJDIAV1xDIhfUdwrRJmWwiFa/zXK6J2p9g3vpB8e1yH61sN79dByahiKNKj3KC0VhxCAnJ53veV0JcJQ/7N5rTt4ZfsT+HiLoKGM4LL0AqwbfM+UfPvJyPsPWL2jUElRZMnjpMj6MNOQdDox2RENh0AMzz2Mcrv3/mVPDQ6qzCvLSw2rkKRdHmR2D7IctBGQLO2gLC6c6MJHPSt+oGr4lumrzh+61EgDlnnlnzZPFS4K1IlOHl+3NpvVGv3Qev0NBJXwwUqo2kBMTrnqU54jrZokWvHsklcDPZfQ8FklOvc3sgoV7n7XW6m8g4J9zUk5Z/2oc1+v1nZBQiFV3ZLoVNOqlWP4H1ib1pUIdzqqzGiZCBmZMKBXQPKh37zlLGA3F4V6cYdBB9WTHVtSjOXX7cdvzL1olRNhV+1oULnf7vdf+8t0Ul4A24CMLBeCrMqqhpCGQ9HxWUTKDloxPRhzfeuiYdkuJo+6CBjmtNRqvuqa4ctEe5kbZWclGNuPnyvw//QNwP7Khi7PR9ekj/cddSddCgkNVTFm4Yp4qgoCjou4aFMbfkCqTKCaEBybHPT5UgKfC2VBCdEUu7XVi/SrOgIZgaEgQrGjjnOvbkq4HDaUH2EXf53ZRFa175+eBWtAhSq/EY1TfuT/ZKfafU533Opedt3G0HzdZUqTz/EwcC4m1yI35dwyE+z40HlgdDQXnbhnJPpwjY7qFwBPLcoOSVh4M1NnRVeehEGnYRJKsnDvLTALd9B0HFZo+Ym7WwKTpSRK+Tnj9Xg1cVEafze/cf3fxEtTPATUA464mSrR3uq5eb3GRBdoHX6dnGIp+L7W8Fr0EamK9Y7lrXaSw+yg7iKKZDhMLatZbVqqbpKC7li/2qlwrNxtjjorfxMIkxFnHRvuraLCsvSIqFugpbEmNqUkfQ1ku88MaYzE5YmNSAaV/qOiMSs5/qTf8S8Q9lYkq/nQd1SJnDGfu7flWWO+CvnwZnmLJyJcrBfIABOgKv9NrVAElSHo31sUWNC0VW97oQ3TAosueAqLZxSk1ADN7AQg0HHE9f+599Css0eGzslkiFcnu7/c/kbUmf7OZzy8eNx1MzJokeeF7qNKKcJl6+uBc32ypn2EU3YqBLBW285dGO5Dqy1KwMUdig84aRaxGijsgFhGSyoaE3OfmVpZWgfQ0iNuqi5/jxEHRXwwKIhNlY4fpmLSstM/1e/Hcohspk8cdk00f2J1UNJkynWGPSGcGZM+z1uDBpbVFXHpDQ8r17GM5uUbkBSuEhbCDOsaPx65J94NqviDFF+8P8aUOtwyM/O3I4imbM6bxXIV+iwDxpekfQ6ykPXfja1vhlPTbDRSD0etD9Z3nZWV9jEvOPibnvDDpYgDA2V2qsGq5JL2MgmOLh1wNxJpoDCiUp/gg8IR7RMv1y5PjP+pOUjtoM6V6mSxxnPka8Zs6nJhsbTXOg4L8h5+/24HXEdA55P0Yt3t5UVrxTufCm1LfrqmjTq4VdD878bcLrw2Y3PwWb9539oH7rhkK03Plk9Zhzhdwp4Xn50sJ9jqsmhGctKzWQrYly2IsZKGCOlqjvvZYrCfHG0uIAiDPy/H34XQPQDikKYjtZ6Ru1+Il/fbfiathHErmoWxEQ4SE9KJeUaQdpoFfrMNzoyzlXYofMl2dy5z6XZJcaaB17/A5sQdW3xDKhxpt3w4+up0iLlqJjNT6L1O2GgKAb8t66SSvsfa1x1tkgz1eorFg24yQB2XHWCl6E12yIs2Lg0EuyHx2mjfDhM92Ynav1oMs1hMGenmfkAp5o7gGM1x36DuZxouNUeVEBjVIwf9Gto435tgtgDTQxV9RPJnIqWApy9HS7cxBF1zreUNGsKvsyqr6/+GI8TfatHYpZPJZE3i6Jcv8NYejryYDvpHt1HcDNPrKd3O+/EcCk7GSibWk3rmevWYOUe22tRv/1H2Ni/BdTv5TUUMltbmoC651RHT8TaxJ4CER+CuWHtVgAaD6jpAk6Pe1/xX0IZiU47WT6j/usZZY2go1tMENDyaUayCG/jWCALu6gJms4J6tDdPD3ag67UGgqirSaINb+ad/m8A0Enn1x+JgKa90RMJg8Zd8+dAtrdXMye1bQM
fhOSdJCRT88pTyBu1dgfeBex6pW9Q7oPholJZPsjVXy5Nj8G0MkiLSBRrlSRjKrf1+Tmkr4BYpkmlJyr0ePYHSbKb55kKmdBlOuDZN7iLZbzTZBhAAaDvk1CCUlD/ULSbR3zlaRxam67X75eSnWeE2Pzz3ZI39pNMvaRUrkMK7smvllnI7EWVm3A6d7PgbbUE+HlAxXh7M1gJXkNKLA6z3TKV8IP1FW/ZzzhSKNfi4iSykJeL3c9aZaf3RHuXhMRdcFYEGmHiRbzlfXv1uo5wBx1mBUNcrviShMHVGhcVNcu8mYVSL3Q2mMBRy3JS2pL3abeI3jmy5J3DfJmOtZ110+upfFled1LO7aYQ8Zrc0rIBzHrBoYzt6HSPkDedrpiEI2gLpMfR7oK/GPPfCHNrtGg5veyc7nLhDhX4r0fLsotf5uVN6wpBtnaCqyVePTMRXUqt96JPBxvR+zbYqJDeqepBnm6fZAHCKTNKGvFEjsXPoN6G5bY781JzPaD3s7pozn4Rq/XSePNlp9yBA46gpfpO81WKXlUuTEAa+M0yYNDyQV5+AQ940Rc3kjcdhrYTFCXMMvbOA1kR9xlB0fHAQHcAhO864mP8RSkCvVC7O50pviPLtfaoUfZDgdmfbeSPeN6Ff/ViObAu0x+W5QU0GaBcjf8pYhrAkYlb2F6tZc2lxdD0TGeBjXGRVWuR+wshUQcB4gps/f7R1xM3VarKWqjrhJlN1tciGqtHLRXKFOGXXX+tXHIA+51KPg1ENNKjf2cdzrHzMfX/bJJV9pAzqt40Ogu5fGj1Do9MFFjevE9f1Lqj/2i604712qmGRiOcqCUW59eaR1JxbNjTLKK4ejJWYnrLYLa60UXF0GtXvGJJqr7/ksKdmEWnQmdSjJ34dlXU02sCOzbzyf6AJ8ANv/EHPiMZhAC+kguqFu+d8xP09rpocL5roK05+zOODsS2Es2YVbq6ykXZvE2Qma8Hv/O+b0RcTaWREg1EucDhxzQRhLypaRTKfdMNnEqpWHQg5osanhyfrohwyZoqvi8ENdLawZErQPfF1YpAYp6s06NmIIOEsBYRIPiunKXPpo7AupPkStk4UygXxXuilG0I68WQpS5BDBMpQ/lgny5S8ac53Y5WBgrGUf4onOqroELJFYc6eM9BQeuSTI4Q92EY3HWvXoLIsYG+WgBgXIkQtsESib/ovi0iyQ/HvRi0ndsUIfhLwE26Ta1gZuv3uncx6UPUDJVlj4rSTjkhizm6IJzUBansV2CPh+J2eec7/96Ba5tt/MhZtf3jW7FYvJ0jLdZKA6XRtDYcqWLjEiHbUfQU4kGkBu5xW6jkr8x4oXn/I2NXjpD20jOqOndYnBGMNV7mbP+aeeDDS6/q9rQ2HZMl+IOXLGCeQfVtGcdOJYhdGul70eOqk/Rz31QwZkACbetsm16WVstnsO6rDrT33lUftJAay4nRI5DFyChXHewHEr5HETxYT5YM+NN3a0O/JM/JqVMuvRmh0vgbethQ7x+zpxa4CsFyl5mlnejMu2fSqK3T2xOqgDy6o/JnlXJaN9Lf7wFlI23vHuGryuV6nnMhPG98ipolR5dQbh8hUJ4l0LsnBh6ZJ7KfsKOUiGwWhydhq6FBq+5F3UfXyn1firfkc74VnqlfHibHDFrDXj4HLLAAhR3kq656obJ00Gdv1I/v5OLPUIyVcM02MPwELFMeS8gzBsCkVAdrWYzn81FPjeOU7zsKapvst5oq+/HnCa2grlo02RsRKZmQkFfb9KO8Zjv2Hce6NjXUxQNmS6OJwtg0ddIU8/X5SrRqQ++CBJJJn4Gj+Ds/6uEC4rpiEmIf2jWwR72kIG+vwdG/5qFDr11uds1+cmQAHdj3BHmnZcmDpCaxCSIjl9YWvjXl5Nc1ZKOiPdlgAU7ubPqkF/++Z4CeO3UPCB6NJVhSGJ2HRGzEGiRluX9p0GkweSm41n6vxyRC9exVNl6k6rRgsu2yOimCP9U0AdN8rfzI2h6SpPBuQ68N7kmTRMlJLWxS4HtKZRFUR7ipsQWiXUSfuG+ZW4kZpOAsZSPz2fNgWsP9TiqevdwRv0F2WmisE3CLWIaEnXthvOsf5q9u4AGONoBekwiVVo5PGYXSkHShlsXNLt7wG0sFrXBY+wqX0xSOlLY7L9h76t653ZYU8IDgLDQmsU9x+7h5y3Ig2Fz2Gw6XdW0whuNkxuubm4yVU4pSFEVhpcSey+s9NyVOMbVcthJhu6cb0HJK2GkDCagEG23jBDJ+UZZWdgx2yFLZrHLIBd25cj4O8DlMukIEZEtEgRakYtt+m+hheCEq8zhQJaa6pJlBK1FG/ny1ErbQ3S3V8NqhB1Svfy8pFIZRBuVOtH1vFJhyqvXh5fIUE936OGinKr3jk3IPXvNj1N74zNWlE1zEPo1h+TL6bWAMs/Ab+vsvPhsDGhUz0sNEWjS2jVkaj7ngai/oUk1qHfAXD68SDpPkLt20smw73/chtnbJI+B27Ftg/WDNcysg7ZDOXYi0tNGi+Jzb143UnszSu8Z9L1bx3OMJoi9BNyf7KA3Z57LHxHZaP6EtbSZgNrmFCBu+TG3wnGaYWolDkBSmqdVByGfhDZDVlOiyzvKMr2D/tkC+gNJEIgiZBP63Od9qS7+ATVQK+TTxSoIGzGQOGl7GnV0q7kZnDMRtIrKLDI8Jhs9iKHx7N7e0VMxjkw/RMi2e9v4de2h91l4IigK4HwqL/j6mdNd8e80ZEYfxSfAgRuAPZ3FdafR1eXIj4VZewSomB1AZ/UFQHLo1c8IDzmHYl5yufVklsYaJ2fREh0hLrZAeJuvAnmEUI1ZveotvC2DhCcEEaHzJ+Ope5X9ChRpQaHMuF8YdgOfSELB3Dyp95zdboP6fhjrFu3/JOA2bQXUJOzKf/qyRAadWUmfoio3Y2GrbjvmkFCagl9OJ3z7brg2f7gNZL0ZUei8CFjKvTpO+RfB0GuKG0Lg5pBr84G9Qo3NBXoJzGReC72CyijQxM5IfJ+nxVlXBe7vlyQu9sduQ3JLHF10YRtzV/SOJLonjCsU5e/eGzon2DZeVH9Qszh4GtjAhk7OmWGRz8U6nekF4o0ELhzUU+O1sSA+3tmnPYEX7u7+ha1X3DrsHdlKMtC9fiY7GxxyAv7stCQwcfV82x/zyDYuJfwJrokjKF9t6uq8s7e1WNCV1stNrQghx8ADfa6uvksgr7eFU1fEVcgEcj5YiX8TaEgQgbyrXhelhnkhOjOFJBlwh+bdpEretf3oeUCmqfXmEcPw+3vnkoTfhVlxOKW6mI1Jh4HHsdNnUQZqHriGJQmGsLqqJQgCWgzMqyhe2R+gQ+5zT3ck4ocU4bHn9hKSSSp0HCvyE83/wTgsSaksEzWM46DlbN8iO0V+QL8BrHbwtYlb6e8HiK9ZoDHiJyyRX1TGm89DLRXetwf1kCZKvgCfWdGlMYg6Mntne/asdg6NT6m/omiHZvcJmMOb6RhGUNO35U63hGaKqrCQ3ceiPoM35WV/fj9/RcuP/qB2J+avfu+4+CXRj1cstBXNaFCpfiNfoFIOZ5yONoawPKKDUPpXjdgNKA2dD5/Yi/3SuO4lfMzcGIb8AqdiXO0oXePl/gOHIFGeqxEMgoxEDtj2cZklwkj64P01F65IxPxJFrA0TKm0iNRZJuL9KXjVFLyoldUZ9vk3YpkS/2lIew60Qe/pwUwcGecMuBuIsRgbcl7jeQFpwwe/xSOhoVjswOtawqlgeMY46fGgX4FvjzAK8I2tRzvJvjJdoXeKPK1gS8tlDKOamGvXiuhJ1FRm+icjIQ8bTe/Nho27tJ2EfeE4iZbkhxjYwVIvUeOoKv1IBYUEEaV9IiZm5xx+YP0XDSAqf9ocPYyx+TZ3Ej0KzobqfK0w82UQLRMa7FKX22u1DnXApoB3JAWMbd3N9KnR2GxIU5t0W1VmnlGIPsCuD1mN1ru1Q8x1rkQ+uZyWp1ksuIt5Bo8/S9u4GWjbaNpVGN4Navom4hOeugtXYBcUoOjuJdYtQ0mwuVg3Fz5Hvr9sSHio8BCUlLkC3tVcfdvRUiEiI0TVosyKVCxr/RxxADXp0HGpHrBSpoWKRhH4
YLgydDIFd94ei4caQxEei6aZ3cUMVJc9y3/YTlys/lmsS6g9ArQlVsG+WaKRs4U0K8b5W4rRM5WMxyCMCeYMQDwx/ELtUCSdX0Qy/9Q41m5nqeaF6Ot2o2fi7Yd2eInC4fMAzwqWU8ms/7ISKKVkr3wKYf7A920exGvxsVWvmguP4fXNG8Ln65YH5KPMsh468tC/WwmthpiFyyaolFlZlhdRX2JPWonML24ipMRNpx+I11opeQj+L8IT3R/XHaEA5SX2aUKrPuL4Ky9tkw3s1bQuhOo8AY9FixgH9HN5x1oW/vI9siMjE9be/TKLIr9ClpJYkIAOPjg0S4IFzKbWI/qntw6PHkP/MpnWuDHxppmEyDa5nKl555G7GLQp/AwQHZTYNiZEluGWmkAZyVHFr2EHB2JJFOl7c5GK0Sf9Sq9wKWzEpoPLwEZM53lA6LIk2Vi4V7IvpJ8yxlRLNUXrRtNVo22klMurP2Ou+EruHYMhcHsvKq+VnRaMZlA4Ppm64eih6t4etAjQvM78kLCPqHn9xUG4BAlLJPiIjoWgFJw42954b5o3mK8PCku1LJW8FbO+gTNSfT0H1Ew3pwZ1SNiTWebTo05nqXTtUNb4r5UCKHqGuRdAu9MPZ8I/A8jLB+t1+qq5u0ZCzMy27hyWma/RS8OHI9EQ0n+JD115OUHH3JshF+hfhA00zPnUpBn/lnmWggSTzzIkuaYvgb/ure4INu9tmhjtftt6c222Gm9bjs7tz9SacUsiYWWsXB2WkJrtAv1ttvy5icROrlSTSkfaMFTiaZASz5SKPFV+33sjZLsDUg3hrbrcjke9iSsultEb5K3TA0ddVRl/Mdcq2/kfT47u9dlWZ74eh3yGPcU3MNBa4bp1xgL294G/UDWQ1ql9g1zlkqpGxucake1oV1k2T4qNGFxfV6bFsWOdml1/+dIl70LsOJZabgDLT4hYuGhYq2QFZ51wqkgjMUHHXy7f33qlWpv1Q9saEWXRnhaA0lYllX/22GE9kRdSb6kl+G5/n56uqn6qVnOiGPbGFPsI1mMjK89IfcgHCNLLtijbYFbamnZ+rgnh3ULZJEHnSNBMNC1jWVnCnGrEAHA6XaXqPJpH5nbJP25naMycV0L7YtFa7/nj/WLqIZD2tk3QjsnXzpYPEWAKgfo4U2SzeoJ6MTFdBooBv2cSg42P7PwSuVx7JLSGN3gai31Nz8GlUmIDbwxy1WSPmmz4rmA8M8gUeKSY3i8qSNfsBqlnHTe5jG/QDddp86IEiFjSq7PQTZwmnt+vOI9KUFADpvf0YUDrRXkRU6OFS5VGaRtzpv1J+7UMegZz8BOHdjO+Fou54t00OFMM4EnTE4nGrVTQTxGTkFg/uYAasf2hw35U22mBRna5G9EXKSlOmtHS1YdigzcjqDdH4rTOR8cpQptLPm3KugRzryO/44CsWukZZ43mjxLCMajRbPDTACBgxbCLKKT0D+IEiFEdVXm7NBwoAEL79PM8GrMaYy2apn8AsMzOR0t8pJ0IdJis+l7NCLKNnqOJSbVJA7SfWgBhDo7tQVr21qN9ewbGS/TYCSLNWY4I0peuvWEgfx/eW/gERRP8S8y5Em3UzsTOBAK44KX/ucfqMaH8sKwmb+AvasOkmx1430JBMjY+kRS6pamAMzrZs9QcAgmW4r44Ti7Pnt+6g5VFZW88ukDPL/6ZvSDQEFzyq1h8Zz0uXBe6m7e33cZdiB1naJEi/khdfiqlRYWDAMoap1WA8sz1JpEpb2qWP7vyFkjurEVMiU64xK1BQttrmfl5cuzZJh1Jjflqz8m5kAEJEoEpPRg8jbTY4uUwvAmmG96lq77EWeHNj+bbkj+NFHc620+1CbMHRki1AGycgZFoqhtzJHIBkY4+NBOtL7Y2suEJcVObYNU+HIWq9z+FBLR0V3xSLc4E4kYp8mCVBjYglWOrjKqgPDM5TMYDBn/RWTKg47F0gsdXaD16fm7keXpW91LJ8s0Wg1Yzyfdmaf52wOoV9QkuH053MRf1BSRod5iA4AF/BufT1aRfHnmaCAX0vbwHL4gjJHBgdlqLHPh/yoAmwGdPRBCGrcVsKnXH7xZnlZlAv4L867fRpgAguDDyMI6g4iqJsvO7Ugi7K/H8LGdkDdcGo4rDSFgTqrRa/MmTE1CUmOuZ4Ci5c4IUW3CPVHm0h4D+LWiV0X8qHOA/x7YCCtEYlWCWOJIFDvRSdOVDDboreumiB7mE8DbvQ19tOWyUiKbz0CBJ2tcjLaqbb4WKoCljFlH7Ph0EdbSo1yuJVdA9tUaHWwYgIUbA88+odCeHxGa55R55Q8IMducFim78kZC+cCaw/q4Aa7Vp9HPRQGx/ADZYmjFxaMUjqemSmC5Zc+VkNewT/zgtcniS9LdrKYgORBwRB1SNEmMeLmuvCZ6D7cAUc4fudGYqUCfqOgy4sWS1wqZ/RsBfMz35pNGHQg/NAwAMi9FuXJzhcNa1NDZ8xbEDexgoaUTqpZQlXt/jUrmLAFFskaeXSPyVBkxHo3Y/Vggw5Hi6X8Q6PYA6d0YOASyxKaWYKAd0Eh+fp4HyXhea0hlzmiXCBYu7Kf6dGAhsZLOI0/Jo7aEaXGWsiexQnqTc+3uvLshnaCiUIAjOp2O1l0P+27qdMwMvdZbz+Vf2BicSIMj1Rjp626pERksH/Ew2R6JhsLNcsC4cIV7T+tR5aLrJb+jODw2+RQlUDtu96j17zXW6vNUNi1Q9C2iZ/IUIqt2Ir/KVrMqWyysBgMSkRinrCVhSqxofa2Tm7G1uHT4tE0tmLGpmTtXgolVaU/LKfHVnKzr0VcPsH5pxINPkAGO1bPePgtH1C06IELZHx2xgfse26GQZH/zXc1E9uWDYyv095P1W4RukXOWoZvTtPnV8jAzSbTQeFyCkQegSxuBmdkRuJLPUyKwWG3oUgJ4/EoEnvjbI8IW1URAX9Oory+tJR5bF+iofsjgDJWhw0avzIIeNuWiR+iySX6Rz/OEhwD2DeHGrLbpOKU7RUUXieCXkrg4/tUMpnZFrk9f3LJQp7fsRBJDPGCHgRCvPag1b4CIhyQmjm/LZ5thxNaQaSukADxCLfKI2b1NZIv0mQ3OWu0LTIe8XxU3smSFinP5pDp/fVadCzzOFFIVFhOKfLPL5CngoAb6Y0wH+e7ODJr7oTy26+p+OUBfgONtxbJcYOmtuwgc3SAVi9QETkosWg70lBDPx/zdU6uhzHOB2J/S5r99AVQD5gAs4DVyOAwslYczSJzuDfw1p99GflzbgworxExq9PSGftMCAbc96wtN2CpENE4yKjq5oKvgoiCBDU6CCQBfRJMQDCE7cRC0KuctlnQh+w9SueWaq8IPn5J8C8YK89aEvtNtXgQgH4kplZ65x+vGeUIhh/0ayZ9EWxFGPiXyD+00wnRcrVeeksGh8kCMAA0V9odCIQlXAZlpc7tlrysx71QLAL6UNw+E4a8LP5/EurEWKbBTIAoHZDXjtQM4N8MyEBnwJSnYccihqidENgt/o1Z3wdYqNFoAR+D/iWFNTFfTJzkhvD2Uzzy9U2NrsW1jjHMsn+avtLiPOu4MH0jTFWmn+v8WM7op6RHpg6vaiFeY9pS/dDMExbQp6ODoN5ewaQjPS9qWHWOpVSn6qoj6A2p1yPKMxsf3nD3veU0CzK39hGIyl8JRcC/R74uppP9ChagHhefskhcJpqLqCZ1dKAp/4IoepUli9odi0YBSmeTi5VU7BsyAt6OzZW5rsdNyK1cwpiB+8eaVsiQz9FinKaUB0JZgvr6e9GGaLK0trn9um75ygohko1MM5ZSFrw3HZf3eaxY0Ixn6rUvyBR7p8bnmqHhb5bz1kPpzr7xBlI7S4YdutZvsVumJy4S+JqydXKPX0vBOqM1XvThVqYphMeFeUIZMnL8QQbBfMWAlTewSFTcse5GWnrH+VAzJLCB9YpJ0v+I5Tfn1QLbQI06iEydBmElX8hy9/9AeqgqnAOFds9GiunsE3T3blOS8Zqof0Uga+dddZEQ0YRC5YthqiPABkvJt6Spk3RCY1Ayj8LZzQWkyuOCUOyKe1I1R+tWAN3p76vT9JMlmYDX97y/Yu
42dcLf3B2TuFr5QthOszDUx0UE1RRT4r9cxS5nHEfzuk22NjQsK3r7LGC/x5kGt9337g6Pmv8von8+LPZabcZmwmFyQGbACjC1bQmghr135wgxFRQ7XbiUrfNK1+mxWrRchx50+AxYMDl8LJiOZY+4YhpHIJFnk8ZBr+CFmS30pjm9WuruFLVCfWnoG2lQQzVqKb58JB4WIIEoU3S3xFKK+NZNxxFb2XpnMhKX1LQq5jALDnv1JloKJv2KtfCdo2zo2Hus1ANkoneJdD4stqr/k+gQk3rxHCAZti9bQAUptC+xLGJROsvUg4j3RyIbYBV1DdJOuNHMDkSCx5mBFXDFtFoLF3YhXT2Ne1wcUBNPq3gh8mGEMu5BohPvc9ZgG5uAeu4y29U44ey2eNgTNTF3hlWeiM5G0eF/PPYOZrRZnjSlQj30GMAkh5EKcK/JUEGqWxEUVn0dn4BBTLZFkpBpim3fodG/HoFBOB3oislLjGHd6bF6NCt6nGmJbebtwYItoeKoqtLINc5JWSXs3AOBEcS1RCEbSKr9OcREdksrQspa39angWhaD+JLJWMplRIHmT3J/9dnwAy3M8Mg3w6ms6JRI8fqvCNQIRw64RS6+Y12z5xT17UHHnL+CBMtwOJ+GtCSmjr4MqZxgM2Zt6GGiIb2AmswyTXFHAvj7P7L+h6QLLysJnMOIYmskDTsLSwlyxcGwuRpKp0KQQFaWv1VflGKnDN8mSRH6P+vLPlcKa+c8PeMBrTcuX6zsOa8KBE/RzZSGUTzFhKUWSdeiCRaA/1HfKXz3b2Q7aLtKpS9h78qLAqBCL4iyekfIJQfdr7tSErZbx7uurUF46g2dLr0q25bF02xk9CO/ha5FYO2YBGOrutApnR2K/7MWGXZ5qVjRPfrPNrW+vnl+6STEcMM0EWoHuLv94cgwBGk1+qiLxZVgPPcF3lymcXJfKG+JWOy5nFROGADrN86n0TqmPkkYmRUQ+/ML+wdLDiGLdLDkKvE0jtL+VrEBoJr8aJCCTdbg+J54JEaypnZB9QMv9/F8hWl0QDR5zbwp5W/1LnNT8SEGX5BpmuML/uABaHIC3gNg42gS3OVETOjVr6/8vwkVKLBrcThjbeOYRitCWPj5martgTuNFvIfXj2zOF0DOnq0MiyMu3iX5g15VZc3rWPXaBnebsUXxGiBvwgAUdxnh7z56VY1fDXakUDZcV17so6U5LTucAw5AjbOeX10egGxWU0mV4A3PPxLSD9svCZ178Qf7S7yQWmAixBw924e+TjojEwSAkPnVAd3zh9RHGiUvyxgeiwSYWpeSxw8wf9hweHY8hTs9EuU8sjY9KQ30lCVFF0Hl9OZxEVPYbzJiZYT7pDrkpN9FNdyerztb9DIScZ5qvpfNB3fiiFXoHMFRTUY+NL81vTbpE9MjVzZV0/nTe/6wm7/Z0S7f3+CVDOk1Zg/wLaCsgi75HOgs8tJrjscDutfYP/FEa5Xw/2fx2zbrE/BIfQli1yH+ENYNjYwn8cePDCJQ4taF1bZx4rNWB1zPFC6iXHk7Aulygz9ZYPQV4pyD0632ZWBtx4pQ4MxtuofaCm44UT/7Y8ey15sSXMN4/uLTXECdJdOBCXnSJv61WoGdCeLhI1W+2QfRgS3J/m3aG69ajcxDUq+9xlWeCWnLZP9LIO8v4lY5A986nDhzYI+RWMkWNH9YK8pFQEB/Qen8ozJqLHJzRQp0wgvkp3jnb/8rlv6KeKsqEDh3Iph9BW8oAZk38X1tK+nTzDy6Jv96cZzPU21JoI5D4ZkwUaTCv/WLiw/Qasm1hkom3FI3K0XTYTnQlWN7j1thilT0hw5VqPfcSZ7/1eu08otHu/AdvHC1MBIfAPCVTlJrx1VulakxpLBT7FzPPh4p4G51NewkRE3i/T0gew7PxacXTboRD88E+9caGhzhgKhvN8EKw3wLolDRgknHbpnzEEeJPQ01dNthuMrwDxakFEuM/p+7A+4USSLHeiCtj9p45hhwgJ5AcCB+QIRZ5DZr8x1st2I6vBMBlOmbTt0tu/LvMt8xN7NcB4u5n62uEtne5ClIV+OJcep4OjftpPS+As1MXzHLAZ4enR6AKDWYRbpIaWIXBmOd2Z8vCO5q/PJUg+AcXHB5tj2u0eAwW3oAvqlx/qIFthgzJzbj5c7RHT3XToQ0UpbDDfsoNexzmUjGDPLt24vKeZSMWXSN2m+2+jqcjJzbQg/q1RzoS5krsw9MSESwQsc1oX0IeYYalMLLGhiX54ZR+yRjwjENTFwWZG6UILC4hYl9uOA9s5pytccEu93bBryszNvxDtvfH64J2BoStcPmPWKRy8UuTnR2/0XkVvJ9R0D3Fp+e8tpXNnne8yz6p3sJAQMy8W82L2HL5mvuvsz86ujH8SRJO8HkY07myLVDqSpgg3KR1J4lNO8OBZCPQq/dEl/Eb1Nx5Q11uMHU40S5H2+5hCD6fZCrI40KZNBYUYCN53at/EsD3IngvPT49Em7wPvTolaAc3BlKJws74v7G05T+E3PzJdd6CKaD2RpjUIWE1bmkVcIZCxVcPOwroBfSjqGC9vRssg90HvPo82k32HG2ALCqi5JF423FP/7ZJ+kvQ23N1h3Ky/IfYAfJujvV0kD1Tbue96W3VtXaI4KO9ROXPC8zMzKHk5E0DZP3c7/c2ITunzvAiz3TSvuijq060GUZawBZIEZVyI4v8qfANiW4FGmo6MVzV4N6mGTn0n1v9/gvEr8BjbNDKxmNd3LQUa/610m7Ugkyp6toVZaKl3bbCPwkTETiNJCk6Aa30HS3TnHw3UqIjT+NeXc4nfuaD2nPST52uxIT6toeyjfmJqBp6UlWZNGJmk+yxoUZa4oBUqCSjBjWuAXIQTN2JlMONnz4AVWrNEfuyKEd4/IP9zRMlBprEbt4RvJoU8zVGJkyC7wX/9AbWiqAzlM1aaxozVd6bZAAd5SderJlpViDhi6B1Rq6pSyz26RlWRMT4ZdCj2GaxNGA6llQp9PtKmGUIvquI8VPA9LoZQVXkNl5Sj5v0RN7GIOIynZ2QqzEWrKOrdLZYqxnWj+YEcZonQFzWhyPeDcH3KyX/TDDeNxXZET1bIY8Rdw+eCSPAboZeYWUPKjFO33ZfnANdAUUbnY23lzVnUBgMb8ESd0ZkUNyzsNh02QUY+UYoxJuVzJiRHa3wswYCNq3SIN+CjyFsK2RoIzjPMW9BeHCpQ4qWdVrmFJV0v3vXtEE6kZtTnQU9UaLgKcxAA9rVw4qYmr1BM3Qq1Tfj2w6B+BvFxCHl7SUV3Ih+SdDmDH6K+QCmJwGzyBCX7miJUbOITi6Ljrc5cowSnmjZk1lkjGSwyzMjzrqimBa+Nlcaa96MLeHFyRF0x0Uu9z15ph+Y1m0bby7Ude6J4HK9t6H2w0hc5CcINiho8R0xT8K/XMSj9awNxf+7xTHi+wlU7/IzEaLQD0hh1rND5935BH+txtfHVz56rLBHE95G272Cbd3DDa1TsI6mCpZYZcMksqF55xDJFgTV1EkHz/zK2gyra6Yl4t/vfh72rUwC/p23S+zqiQr5Z+REgcNZBr6/Vq9e75if06mwj2KitcjuSZTlCWV7GlI6C/vwtNRHXzlTEHWgo2yRwxPCr5GvjlhAHLaBOeAvRd/a6G8zJXLC3RhMCk4DTkOSl/j8VpDLAcBVueFsZPgoIEmN3U1h3Oy77ZG96SGaRrCPIg2eC20gZ36b8ohBaaf2G/dDKsrxamBYvouy6wPi214mvPP9mhxflr/LzsEGFcsQwCIP36Sfmfp76LomiEckmNooyHdpRt+MXXOwOYTa3H0c8trO+hPgQzYpEsr0vrO3mZdFWyE6HLjWnrHx3vvAfJ2ZeupwFAtE0gy/J9xyAmeMyvD2vr5b6YknEN/uxvL0E/YNRb4ag+ttw0kpHStt+YzCLKbuR3hI7Lw5IOtDJJ4i0Q10ZF8lL8tlGUysi2VzSF/a9pdVlTX73A2iLmCnrMLNCWMvVOjQSs26NR0pRkycyiDvc1Tz5gg5h8S11ztSGcNIL4SD2BFE4NhuO6jVhoSo+DXSU7gEG0zKGSU7pbSYW6j247jN1Ut7kF
LoWTeKnfpS0eGzyy0m3xnORHtTSBFgNU7140YedKCGf+6Ah3dOMTmeFMzf+JvxR2e5SJBJctWRl+qAKs4lI58UY04+uWO1m4h7P+jbjK1tIutbCqwFR6a6Nvn9dmLnJsMBZdA2TMWAyYKXcp+S2613KGLb5lMYkIIWXUDAUbQ80uKbDcg1aUCRX5IVYdOilgez1Bkip7K3bLxOVPmHE/A3Yfh6PEc/Yd8qc6SldntfKUfYX/DvTjCYMzIx4pNxlI5btOxIEsWb3DJyT0PsC1soCSxGAG88/PyEWv6rKwpYIVWyxb0WAJTBthxagUMFdi5MzBmxiv6nQ5/UUoO0QHpulVumlXyToYymi8FisjpgrM2/OS27l/oocihxRHLEBVyrDb3S+Ie+H6YuxfZrnG+vEff5lckIH6/UkLSV9pAuA+dYAXMd6lXL+zSeas2pO4w7jOFy542n5JoEylwXEG0bpHTouiS4XVGT3DGb85aTbpS+ug5rh3azHfcMRhXV7/o4f8LOmzbMhFb1bsEp/jlCFzp8iT8E3xLz+pEvgX+4cHPF+VVPjvMQyErvxaFo27KtQxCF2uqFPDv67mLfws4mDKZMwVMnvxqPAvj4C9L/HwhP7A5oPaDPPlV2RQrUpB/+APsyFg4p6R5W2UV60tiA7XLwbSl2Bug+bfZuGFRhMRusqzKp1iMN+WjVbG4zPYZ0IU42g/ek0NEkSyuPAkEaQLn8U2E/L9t9JE+vg863McflUp1eKwVVgvwr3BrFvmHFzSN8UJDZO+TBVGpdA/nrqvM3gwEGYB7SbPCDhEF4Vs/AuFOoEufPi+aRIDWzHtrhTM2lAlzBYI4DAg6AkC9QJhms3JcCFD0ZFHHkIk8pxUIU2v7/ggL8J7hHHZxqfiYeuMftlUPD7uaOEoehw/6uIN1MjXyN99HFB4tYrw3u9MPrT8ZmKj8cOK5od6Gy4ZHfQMfp9H9ciJQptDHpC1mz2oQXRe1kgk1TO5uErS1WhRDMjdxhuxv2afnIVvnSyk7gTliYt9QalX5Jug2DxAkP5j8mexOUxZ2dnEnKZTuQwSpLlVMftnAviAquMzDFbOBaPF51QRc6e96sBACj+uMH8HZfdsA4Ajfd1smBFbG2n9HmG0n+iJ/dvoZxx+QyxTWdZvbr+qlgpXg9bQwA+x7NGYfWzwlCJvVgUTfyVVgI39aDF2SDWQ7SdvnUCJFAtq8IJtaO+ugg4FJyJt+zBTmluwq0F7fUrKGMvf6w5PngpAKh4JSMO8mVFSs5HuAJXDUglXAE5pDFPzdy23APfVKG7fmVrD5VEP8qaMs5a9vVGI+Z4A2AGbwfC3CJHX/IOr5zqgolzgpNYYOc6J4/9AhZLgAR9F44pLtmm6tYpzeBGMpl0KYPnR0ICrpig0A/ncRoLLIkpM/DAXoH5dqof5iCfPKwn2lYA0IY+zgmfHoDEEJcWUM2T02izY1kU46erJMnp5eJ1li5/o0Kn0R47pg6P2LXK07tque1e0UvQ7DgJCISYUWnDqWoVLgCM0xXBycdmD/Vja95gveBotzH5sLLVfMKuPVMJxDv3CGy3zyemxDcZ1joOTbyw36SySz3gfYEnnLik5Gn5GqXJURG5XVfLXFMl60UCzn0YUCcdKS0jk9yFcOI5o4xP0uOfBDuA/ZuWEasXNEsDyOIUF54RZ5lMX3n6MDbVoZHEcFD1fw2ndFkochP5np+STd7+tnmD0UAa1AGro0Sba5sCb9c5R6GUCKlkr1dD8rjZOUkqcp2vRLCYlqtrBJoH7JZU92VtUSkVhSwsHEdXQ5vxOGLDq8geKylUJJNU3eJKosIn/n0CtmLHKkwh+dmRu3GEQaMd+R5AaIHFBk0iLfDVU06c+XeI7mlu5KOnZMRSN7aKA6Qa6Try9TQD6SaM9E7NGy9FJOvmOk+aCRKxKmvP1xBOeQQHR2spQGGNrkvbjk6VZlPfmAPYqo3/+ulWsquf8Of6t8Dn8FUDb9nBiGRyjKznUaNlCXt96SBjvPogBEiHz3Lmv6Elb/tiPmlfucjXkAmfA/IS0SE2HyKWNTL0PBQqXY6wnisrrgcTKFOyu1IvtHFjt7GjFc9zmLw7wmMXAVrWJC2HE9imWGg5qPwy7f4PnLOwLijFGVfN/PLwP3Rqk3AAloBXAV0qfJC/j6S70HvEd9G4RuhBjlSAPJIQ0yXlXoV9J0T8Q5+dPHhfwU/kj/Fudih+61/OaWY7C61TYPOek3vLySCtqkFC340dmaPSMFvTg7/TrL4ZutPY25GIX5V565nlHPuGzfNmB6dAGb8YRdzHaXkVElE0PwS1vRSbSvC8Abb7FBpflyhJ+UpFzzwolRPaUK9YszbyJKDmMEYfMlsEs2+I2894r76FYuIVwuZqmYB+1xJBL5sJnt6RzraUCegXYlwJetCI9LlOihUYsGWBhtx8q+diVP/eT2bf9/eQzW2Dd5F6Y2ndaWrETMCPQVi67zTtKSwEHcQCnO10HDFBIqx2r/nZTFSIC7MnysSVGd50Mxv7SgLZmBkl/x5/sE5vMKaLxI45qYKKoTZoYpDfJF+YaCaMYM9PQnvG3DtZHRiNbTtcPzJhTTGLBT8G+cZQm+Y4DD5xrM676h5XqL10mcXwsc8setefXIxZNFBccyqhA1XlaHCcguLIkU+vVkCb1lTotCUrvaOMhYccBG0O/rpetn3OyfU6jKzutnlByGpQg1MuCHH+9iTBYAhjLma9KvUDDGx6XL/IKNqoAyTwQuzZM/9OlB/Bom6O4a928eXqdWvKr2OiC8XkQ31k7XvmwJMAVhasIG9Gom2iXbMKxrMFDbpp3O5fpSiWX8v3jNV/FxnbqSpm8yCJC/O1GzeApShLNnDoKJCv1ww0f9okOpW7GqTxgxTdQCfZTEEww63xOoEWYcfpulSAmUjeZtOqDIodFp/8I78zV2VuVeZV5faGJ2nlwVfxemprAjG4TkUndPHRRYGpPc78IfuGuTLFTUILRV0wbXntFnvgS9Ndc0YpXJci4GSU/MztDG2SCRw005bWEBG6rUCi3JgXNg4mIfBTHfeyJxEhJnhc0WdO/IkCiAZS+sqpQt2TbSjCeK60MJMkYyKjkFU97388T3+wFPpusjgvHmaROV6nzShxnk+/tXcomoSuiSmX/0DN61rAThSuhB0s2j5mKzDu4t1su74Dohjng8TeyWMSdI51BcPVHM39zsiNIu90r2hNbz7RDTmX5yqv9oyiFPLi8YNrYgt34bnJklEh1I+oYk1ZajD31SS1JA0W2OXcyd3FhlEwSp0JWHgVQSfAr5wbFQq4nS/RvaL6hHG329Ud/WYivTIJW6qApuw00IE5ohOHRyQUustMZk0Dm0R6eT4cVqc9kkewRZi99EMBYGuIURAXw+RozbhBV8jbeZfyF/7srPayp7PlH6KcFAC2z5a57JkjrxHNwL/ZPal3/6gx+YM1bMJ5Bq8z3LZ+qyJMIQBS4urMTVWWpd1H9auoHWBvbuQA9mv863LM+4SpgraNCwBeIdG4Sx7o20ScmUgSuYPUMop9vMDXSThXa5DrTZsRSelgR1ryAxDRM8T/Nyx7J30r8y/RTiXlB58zCpuGCKx6pLyzEnUjfiRS41zYqrqRMGhRg0GM9K5/Y27hFR9letGOX/t+tvet5w3rqS53nn+RgdvgV+Sw8RlE6NTxForGufii/gfOFxAmK/O6XtMIzBgTo6mpWJejEC+M1GVQHOtB5y0KRd6bwZ/Ij+7Bd5hSsQTnC4SxVP0R0plIeC5tMendDyut9hxm0xBfHuRJqlaTpbpYmQ8i8VavjOwNwDklLmknmOZhVMBZtsne0pSe3Da7JpbaHK8fvdnuguasQi7vXMWG+g8HzVloTUKcOl3sGDhjTPdoEaFOPqbAT2+jcyS9YTUI//imabHcoBYR1haHSdQl3kohKNIIjhPyuxIJ/+lFUBBkbGqDzpJvM6GGgvpLY36UM+edLLqGHG1ij+Q1ttL0VyVIwcJONrOr8xh16sOebNdzl2wz7raOyCm7JRvwQnzh6SKs6gPzmUG/ZMzlYBTcNZh7IAatWdh7qkt5SJ4Hc3mZLFwaKzPNRRIl+
Y6vJfjfBz6D/ftKNyevcAQhOGCF6mfVX+xXkgOpUuvvly0iNaiat+Ly2Sg3hPLrcVn6ixRYvN1UHRrOGbLgGon+zcMW4nnuT0rlpp96aMvn0q4x2B1V9TYqk7TIh3L8gI1h/ohmUUajUx1JPCxsXeH1EwmNkdspq1v+uLHBWTz19pYGgIZ+WpuT5P8gOTLz9F54sD5xPK47xkedjFk59QWTTynh8IMaUCZX3fq87KrMUBahCYR4t2lYpp83Ai/W9enLy6GcrgtXZZlZcDg6x1ax/iGbcXeiEUjQ4XdJye3Bwoz0FD8OUCuFzTUCCCRz5MDfW8fGM/lBeQtzQ8jtp7oalzlX5sJFqlJ4wDpDsBnYveLDmGmKoGgbx8AFe85qTriFMdJrEpjnYWIA0txZ1QeYT0F4m/Cyeowc48fjOM/PN5dRpXPwO0vVtI4NCk6OQFmMBmUvcc/gnuiqX76JHMRggKQGsXcAb1ovkj64E2eZzNiuSIwX1oqMkvtEXjcG3DuFN4sCMu2DOeV8Wv+kF8NRtFymezl2o5GbWTZdW1qSyEUc6al/OlV+2P4OpQQE582CimP1/IQ1bOTnPzaq9f/ef7IhyT7dGdRLRmi19mrQd0l1xlrAsvF1XEuz5X+B5r+kAz9vHQCj4Sj60cvYFMo/zC8RW5hiVmvvrmHr7g+NCPwgAEMsB22ABi7TQf+21XEserkJIPtmSe7ExCr2SZjPI4LjHnbn9MwJfXxkcJugYsb2Hpfu7bE+A9p2+7hP/yh3f40cvfpkgvhDbGdkr6q4c/R98VOEH6ksQSFEqleKpUHBd2o/v7nHl2CwlSxek0u0zTPZnpHD42U0Cblda3zoNFcULQEVTKfmQL2qiJMSgXAcCXzpp4JYZoYJK8KCXWWTWnaEecfCam0EF1DMSdulRhG+CgUi+vGrDFTQXYNDb+YkL6mivImngibyjNsseOYoWMeZUOTECv3MyRHFT1rMQd1dKTrnYLSieox2jBTY7m/8KVLqtTPemMUeszg+/Zq9EJdy/3ZLvwd/7UeB7DBG8125wU1f2Shs1tDEVDMm3muoIkQ+I4sDwPu3G49Eo7cXFI4KG5Y/PWFGrhgW27457joaj8K4sbYGr20xkdRuC0O6BT4rnKffA6O71nJBhy6UNXYJ40N1mldCgrnGMPUyISoOXoFCSJJFOGwxAQmP03rTEXec6ayQM46h6QnZbRT0brEn0H0kSN9D8JJ0Q7v0RSRi5NS13wGkxMTsLzqB/EJxUfAsBliIo+sbPgaEBlH89ksOBFrxdXgcD+SmBm5vUCTyV2FOZIF4eU8rqYJJoaJrQ5b/LIMxRY/OJEZOFIXOlpoxX/QCPH8j+xd9U4raXCPejKWZlvj48rBk7LEipPNiX8LaV1zmvKW3x/RHScFyceYUwyrFerO4ne2dHx57vq/Ho6esuA8nFnY0uzgYouieaaGpIN9mwsGggh4KhtyxR6ol55lYQygo9A9ZfOPqrlJNVxY+YzEZ955VuoZcwbgmj/n0pAsJc2jMbwMS/0lpw+n3HLgGqqUlQnVgBdIUieWby7Zmr4XjKcJhKNQVcImae78EbZyMv1ZKGuIPGoZGfegHkoyf2sqv/KdtxhTbtpGkMwHXuUpO/hzRpyRFmmcR5lMaOgHbmgtb+oVdFqmrRQeCey7aq3I1lfQbAFUHbuSZyqqRQnfwMCGZf/VMgUYmNjLFeCXokdpzNBVdulnLiekjm3NmkLwopVse11D25+1EO3KjfC5UF2oxXbfK8ymeYg0sZHLGZPmJfSHUh9iJBB9uQZxvLd6n6S/jLe6icbtDB8413sMeFaVLXXq9UdJh/uVSiFYM6sniCkYxfn9ArI3nkviSLhaKMm1BIUwiwqgs4136gR52T9MnTVmESCs7ot0XbLiuNYsJGUHCyk2ec0x3tAQbphcltaRT2mMRkDYAdyofzvi4gRlttSP3n5kYLWP9YPE9XB5Tydlpmul5W+wIZ5tLDVZ8Qy03r0qdMptBwWWStqovZW+aBJH1aWQIJQzbO9ND6MLChFzP6aYbgsdcSg3fK7GamHA/Hi58I4xA5lFBOTwtMI5YFK0hNmjL6VOFRV5JUuxuzHMi+vCOQdaA8i9hdtjzhbw83tg/ytCpOPCj3KNdFGkWvNCtsuXa6bP+d7fntt1jibDji7DVGd8/NwVaoD5w732ax0HRpnioFt1rORwbdRILwkyEt1gkaXXS8W0W9EKuR9k9Ro8WH+/DQ1AbDQpUrKtyVNbx2YRVuyw7TKoUdGIhtsUubv8kMR3ECwLtsu3ePmaZsaI36Qda4ZubzDAYtEj4+UCa/iNb26GIEnAkmC4AM+ep4/NKSxshOtJ6Ol3E9XPIhMwT28B6W16iOZPeHWsAqjzB1FsV1YnNoyfoUq24jqKRbm3Lhza8caE50fC27EBRq6IAqwTsuRu8ZvuoMl7De8XO2lJT8o81MY10u+ptTshMPO2XRqMjIvsZf2saJJigkJKaRWd0m3hAP7hL43th4FAO2Qt8NsZzQnW4YJu2hE0tEXZFUvOXtrUQbVcNO8mIACplygrrAh7StR8eqLgg3m5daZkwduouRcN0O1/Uv8EIS2lYeeI/6ivDDASisabPf1rxX4dkQz1h6IV3jhR3u4hyQOwnbLNTYIzESeTlpcd8rje9b3lwGJQ7FZBpEoE8W4uJSjG+gzuIAqtUNwamfKS0pG/jePiX8bqjKIE901dl6Mae2koEXFg56W1EyLXw+SAqhPgNXFGPfr/fKMQiXU47ltosFB6WCgk0Rr6hlxE2/Fpbl9J/8dMLHA88FY/3KunG/GX4biI1rytqoxS07mHhbRgP4qHCq0cpwg4CMx4hZVcJuc8KtddVP3zrol8GscnD8gVCQ3gMzXo4TLDqnRnua4GE06zYwmh4PNQAAFyUfXhlqLhwLPCwXcEP5FOnAbHk9FvHW2VKZ6WJnHhAC8WOlQiHG7cD9SHF7KT2eSt4anJ8bCW1MgbRWc2wMxfIof27eAhY5gzpGoeqaMKPDd7kAPE7YTAvgeYAjMo6HkTJQomWFDOU+ed3Loyip8nmPXP+VfAv1LKWH4a+6RjuRaA7sWDti5d1cs+DhQAcwLhR00kLRhN8iY5HsrR2V2x5zTSXKr6QbLw6b+9POd+z/0co0vbazZG0fWUwmQLZvQ46XXMTwwFJLYne4QirglUdfeIm8IGO41icg/8Boi2OVSHCONZ4pEjMyQ/1SJXrrvCVMd4/1JV283fRzgYFWZjZHfsoHVgSXfMwKsQwOa6YiuJ84BcPtaun0NRg2lMO/tdvgxpIRbz7R/qb/wUJqaRXEIU+fB/RLvCdUXurROgofnP5zoB+0yckyOhON0PZcVW+i4B4GYyG6loSouIhm/tqb7Q4Ums2gvRyNuO+VTvFEgfW4mHhfOqNYkGZ0SLYe+3V1jmP/cBtHkj70aEJy+Gyh/ktTvHcupBpqh+vVzYAtDdhmmNZHSQSMwLQafbhwEoEfEiB1IJJNOlZ4+4OxEYxnzo0jCRNzwI0cb6iSGSR9qYTlBawLGpaCWk60I7asc5R/nE7haZApOud1OJNhapJ6/fCQMfcQHkvD8PDSBrzMMOaBnaOgyOjvLFhlT/Qz/GXQdh+3LgvywGh7fTjZ2NO6rAlGLCzgKlWcN6DK9Y73mkqet5vteDU1cNqNf0cmm0iE5zrsreDxb1cdLRfLyhczQWcWNk0U2qrLP3OcDGLL4kyCEMQBYsmcaAQOsXP+/OvrnZasq7ryfAI69+84fuL3Qg5XO1UZ461Tw2EAd8sR6r+/tbCbCsLiP2ek3QWJws0gqbs6DYnHZtGbTFcOOcIiVEYvoI1SanXsz2n4HFYmm5kZOpukZIvMgQ9oiqp/Y9RMkOxuT9TqSUpqlTSAlSRdtvtbFhVa43KPb7dXsxezeURhTcGWRVe7XCoy5L2VMlFBBYFcK126G4LnwuaxWErTMti5iehzvVF9fcDjIWREkVwFYK8vyKkx4JLPQnEqCmEbgfEddTP/ceW0yInMIBfrbFCVdXN34aHcAMB/fM1VNUn7JZy76+HBq7NLqrwROH3TFKU+ureuVjJ33a3Ayc6e
BlIA0ND0GalNactDnCq5fcoQ5S6M7QV4hTBZcic83KB4eYMDguKP9jzIyR85KEjoPhtosv0bA+yABNYih+pwIbCyq4Mp4BDZbZBvtso+R9x+RG2Xl+4VcKwypqgBiDI4+o9cmp0qXmpu0CNkfIuoxghZzWk/kU2JiBdWiDhr7S/Q3UMHttF/JXkgKv+0CdIp6G5Hvd/yf3aiMFtPuMtH5pCl6boN50QK19/lqqu+7QSgkgQbw/5MLenx84U5momvTGuzydXJiefbq5lua2HhEz1U7Qg6cx98cF5KvC0a0OqA3t9JTvunI76YwN6YgPdI4vSPYM3DPv0oYhN6j0Y5Spx+/BXmQaOOqdDHGm0cPVsYkxXCEWi3sT9YoRADHaYDssTerLGy8JDJtEeIrCDBoLYohf5F4L1Zp2nJ9cvc05w9oGwMn6il4DIJDcn8WmwyK9EqJXvCelpKIjj71wUoYWfsoZN/3OQH/xAGcZU9bsQnIBUbrPSqyDwHsEWUWrh5+3UnJCVVuAU1HyfNvdYfzrs5/psVcQ+8tFHAhEeztIR4XV1KeYlMIzTXm/MCxDCfSn82W844nv3fWz7H/rkOcqleraiIj5phV5hQBjuSnzyu/TSl4mwnSKxdu/nylCU2uuSLvPkKGrElcavNmcbgeKVX/Pbq4go9L/9eOAT8lYQooOh4kWan9ntUMHsyQ8CmMHpC3+sNqgbAPLjxgZSoyvQBe4i/I/lGDC1P4/Hx6Az53v8MFlswopl9pqq3p3lIJUCpy68IWTY5JCxT7837uEB4RL9UO8kd60snIAiM7bCFIHHtF1l5s/LXn0ZpHzMPGmyRfGxuJo14YSc6rGjDd2yQ9N2I72EAkD+X8H+PR/d2S+jlp+sYPgMe/iEWeTzfYz/mpHK9U0Hj5I+4moxYeqtILBKob95o2d7Z2PTw00Lx7HDteWpOxpy2s1ccw6rsHDvgWL6CO3cLkeimARLjDPgGFcKGiJQVFnJK1dL7D5FoxnlTwyPFQFc9VQ0EO0dmrs+PD5+3KMtBgp7PSSYTrwP74raCHvZadDlXF0X0B5OVrzEp2NkBjn0+j0drlZTmWBc2x60Rvqn35qe5P7+XGr+el7qpFLapHH0qYY6UyafTwJC63TdPCaw1qeTg9IXrN4P9U2Y1K0am631mvqNJkTeGCpPRKNrcTfQ5fcgbaS1K9QuRVrGATHfSQsxxFUN02yfImN2TZ487czjmxOArOEpE3HMRa3CgD1GLtlhjlc5fvRM+QQSIT/1AXFkbVfuk11q6rIByuWxic9czbSbRMTikcIVxXWdTXe6Xm/GvthOEXsX7FeoBIrTABtWj+jZUPuZFinv4DD23T/dKjimr/wgDFJltF39EQbuAbplA+vsBrOW2kg3lYho1oW56h4BPNfq5xYgWZYYfv6dWt/vRxJYArdrw9oQzwiqGrGWOEsdrsYPV/flNo0LH9XuBGpvjJQq2db5/jti1UGYB8XFZ+jI9dCPPv9m5frqKhWN6HWYEAfmX8WyG7mobUW9Gz553w2cxpdFLxePRa5QF3ycadHcy02v2bGVxhrFl6lg6jZvrvK8y6Y/8wHu6by/oLcYAlauW/YTS5vlqIz1X4i4oGCxcrw2MJMqDKMGPwpdHbh0D1X474KHxz1Otz7c3bLg6bn1qWi87MMkaM735l7GiLAb5b7hvr0vu8lT96Iz4VDrDyyXLVIzQL+3ZeZJQ1lGI+JIHPvfNaFuVUxZ7Ud9HGZpCLeJ+z1TFyNcwnaqD0lg9ZjLmLSl0vPyjh9+eG+HOx29foSdSTwd9w6+IN947XiFl+0pbrhd3UrrTn761kgH8Suobqd1YpF7y1tLbqwUhty6SktyikvWwyxUSUefq7oqU9TwUBAI4wA7Oq/gKJIRnpJx5Y3+kLUWBwcIqE2jxaCa7k4pP3g09yFR+LbE/k8yW7Dp23X9yIiA+mPTyPiY6XSBuCcVX3LpHFn3vE62l0lL/V9abGP2H4GSNGKb4GUTTJWh2MTqJKd6Lav7S547kLlqhm1XUd7ZbxFuWSsZBE6H2fGAwJq8GZKuTKOImEUw6fn3jyfywVJ+GR3DynvGz74dDRUgitszhu5xBuNv98QovqGFkSYJQUl+9/nEembGawvWsdBwSRp+rNaFvnjuxqH6CT6231vrEE5UJ0gOz9bY7dsuxO0fizD3Ip9vJ5AJvPRrf+K3v29o7LB/RlvyrUu3C82mhxDNfmr+1nHFevtDlAFXOBLL2R0pJc3RGU2kWUYCFW6odSyUQJo2ObwCW6TvGJsbjnmjvheHgQ2wi/0Wd0rwGQEe5wmR0MLpRrLo55M+Qe8fz4s461E9NOnwZu9LE/Tfz4k6A82vRPQ7aooflXji7wyHUDxsoYn79U0LhYD68qrnqQuwy3YjanNC5JkjBLIpAyAY9dzL9PI2d2CwGLAStbWXTbZ9Gmyl6NXL1ZpLuh7dN0Ut0IbTmY4HL9O3/P7cMOb2mTqF4pLFwEbA9GdP/ehQZuSKAn01JplJNfySHKh/vxhsGrHxyKq8MDapKnU0FgzjuAjjlNo+DfrRx52Fq576FXxLT2Dxri9e5iGw7zm+HmyUSmrBD6cDsp2OMtkZ1EMrArEgqzD175klQpj+uF+MFWK1MV+PFeIk+8NoIJigP3O4lo/iA1E2z3rWBsGxx/uEb+S9j9FAdkOrhXn1gPN2U8lfFsO6oLoU9oU1ZmbowD02cQ/W5Ymzneo/ZCoCpaU4N+SsQ2I8Ed8wZpVMHJAeH0u6NSHX3wKYlwqL9+2bcLCMbROlG+DL/s7bJ7JFUvtWqy7SD1HEvK9Dkja5pMJNOYrXRJKJh73zRHPUB8R/T2mgXRE+bZjdJwSD3VM97DxR6Ee7C/kTGq4Mo7rFfEny3UzKjWWAinP46JSFPt+PDPAeEQNNvLIyUfa7zKmcFIKhqO3abRLgS4LEoeMcYlCMKy6B9Sv95JwIkDWy4N5dj6/iHA2EFWNubwKxnGu64Og+FfJ2Jmi4PgCWZiSM4n37fu4JrRsIx8EP7Dpn+G/zd2RsDbZdL6Aj6L7HAzYmk8ICZ2xWL0cJOvLuTXw28XKW9nEGPqA4QQPu7bfORDsGRzQpGuQklcJfBMCNuvk9wGnOJ0ohFwSElErXNfQcY1lUZ8b3p9cU6MyG6T//8GKxHYtEn25v+DyCjd8V88iOFsXDf76YQpxVLC4oRF0FT7yk/EREUUpADaxUfWffz/J7X64T3MJekfHhFLB2xVGJzwwkWjtrkcs1ivtEQoOitriHkMxn+1YGH5FF4PANmJTkCZZO5ZRk7QBXp658EmvXL08dxX87x0mDvcbvuWaXgLyVDY5qyWIJZPfoBdB2/ODrN+oUphQJxM72FBGeBzuW6sj9BxhECC+7v4//lz7NIGR3xrzSrjboLYfkGWzR8apA3RQ8bWSC6lBkBQUZpRugzKgOzXcs1QLaFHznf1daZ3MkwiNwKbKyyV5QA65cyGPmlaCqZ6R/UntlxxV724ZI80vT9pnNHMtGOf6bAb0KU6+qx1KrKCzLe9e0uRMLx2d+Grk21i9vI3coNxczSyUxRV6bE8JzgiezJ/h2cyBdmhwPGot/GZ2NkKHpaPjpgp+njZSLbpLiTG9zhBl479fIW70lB4mT6w1cEWk+3SnfAgecLYV9MQICp1xXZm32b+RjvgptayHyuIoz9PBUJSd5CgeOiFM7UI+gJOWCgyW4n5RxqYhDuvyJcCEvlBHs7p4EcTrhZkDPHMgoJzOxBXhvRx7YPJrd+iT31IIVlKlLf300WlzXcR/uqALs6C/JQzztLyQWVPYC8/V/5kKn0BM/BjOWcq5AgaxlSa9ovNjjRIGdIQcbdHw1NEeVYDtVaRSesE9WQq52tboEHIm7rH2r8xQDJnH5LSePTx9SJDOhzn/1CkpvoF9YLdE1RqNO/W765rDpcy3/GtHFwTPECKiS2YAE7xNSsI28ywiTo8ClLPfrxvDyoM04GFHNnk6k4EYWKmXjvzTMXhd1YLrut5fTiLsJGm0Imms+X9UTYk8JDxFUvO/24lhq0FcPEO7oSmHw5v9w40dmm+ezcFLHHzhrQxCcHTahleaHc
pjDmXMa2vz8x41zfpdKiq1mbQn70JS/aA2g54DtI2GJlIQHAJcqS51e5Ca/jadrlspIqqPY/HsLZ9spKrr19E+Oey8mEbGYpEu2pT4I6fFfhabL7WfCQVBkUmxXjrd4VYJTJbsu+KiMkZNr2sq2FsOVm90j/vWG4WrieXVobBiuvO8mRORhtPLSVq9+f8I1eacQooITJ8KJetLRyCXH8YmqKj4hGdzBrpA45ds2LDE4syi31KPuAQQkvPn1YnWnEr2I0pjO+6R9kCfipAOT3w2KsV4rXAa2jHRNfP7zq/FXZayjwP4gjVsle//if4Dbq3DQh9qYqUI3DytN6r/No5NVmfxGocv6PIqartdqIqhwxOT/MtJeaYQyx5OKeRg3AWLM5LGMIZVwACCaPfhuZb7P3HGIVbkJUdwuWQqxjrArpHV+JlzcQs+NHIzAVZvDqSu0AcIlilV3kLAWETiNeyoVKqRIZeDbYxRFxQsadwtjz8YeraUTJ63pIUY43VxayDOnyqWUK+UNPYhn7qcZnAWZWQyJJs4UeiDOxuoE4ghXzW5K59YhIb6sHvv/HIh4ZptPKXTC6sahrWn+TDWC0HwiM9ns0GLaUUef+C49FMw/68nFSv/JNuVYpIU3uJDmD3baX0BD0faySH71PqP2P9IvmbwxRXv5tdSFk/IJRvRgkefKODAO/wRSm2hm6vd7nPjXE+hpbn6xKLNPuvd/EhivJkNn7WTctDlk7M/KE+7v2jd4+2XNfMxSzqAJkaUGYxzFvLTwzloF9DHxd26y3uU5C+Q2KROzX2+p6dDvq6emAHsbyjUF4Y4QlHDRmuy7myQY6tTcjysR4GR+/DRhMIQUorguMMYprLv0YUMiuGByfZWfXvDHBnId0jFygUZiCoAiNSsnuN4xmBI8um+gIgjsN148gIAb96mUeNBc1VZFGukZabZ5zXOWUmHnhLdSD4viZe8nEex9CzhtjB7GVm+qId54VvQtPd/DkZStb9NuwEDpvCBOWOFYj/DpIHyJvXMUS+3qIsfyfdcXf0vWiOgn9MzUniULwUBDMD1/2SZ8d0rI0bOjYxIDcwOuB8XtHxkgd1hXHOBANYAgHYrrx4k/A143SVs56FhyomIXOmBi08S2LyKBsZhcxNP3YiETYwNwoPqv9dpKmlgPkEwo4F6tNrv1NWRcU9qkSOmJYp3NZYkOXQnQymFGEMAsyMMSnOoLKHBm+Ww0i/Wsq/T2j7uuUjm87vnpwPd/lzY9yZDvQO4kNlLt4f+6MmU0OY0p8zhK4Nrbuv4cz0MyMO47BFcE1ggXJRTH/Hd2ctDc40bxZJiF3owBKaCxPh91bNyyiFcjh3zdBzD4pqrQcTG3yEIroDu6cPykKorvp2PIHi6oimXg4r/EH4fyYwWAoFQYzPO9CvXuPZaawnYbB4KoE3THkHmkng5pFYKFXJGiCAZRvW8Dk9zO+oVcN0TouiaW7xsRxgE6xnbmHN/4+Uk8/OYw5JThITf0oYNRAcf4N7eGu9e8a56zJ4DEiguUlhbJ1ffEBt3S6pPgVhC8YYlLwS4+hkwDcIz4Yn76+2fuOy5cA5TIUfAwv99pKJ2MuBkeGEIL7TzJPl1Q65rmaGUT9RUEe3v7gSVy32UXo0UjA8lgEsgr1D06Q82f/1KwHNWwKY4U1EWzjpDLfftL0iAGRdZQ4VUEoA3+nKVMoon5+DE1LC7LoPsnPNI1x/Yaz51yVdh131nQo+SdPW2lwuUTQ7a27dFRF3WUXcFLv5X60PcsjEiRVgCKj+CPeNvSZ4dqi3U55tVvG0zOS9HYwz6X26BXPE8ee4IZkfrmD0pAhWDuh1r7JYDF11Rf0PnueCtsK/ZEYAzXDKkhBgGrNnLO+zZW8npF23JKGW/R1Ebp8/NAJgmAxmOd+QZ3fSS0kKnuZ9XhYf23KEtc+M6yF97nn4YHwS/68cUHw8nVnWATO5EKG/ac6iGKzbhCIhTE+pDh+rnzUDyAcdnZ0bIehhJ9XuZR+u5NgmCGmJdHK5ybJ04fBaleX4vg4dlgKToH/3DbcMZ42a7PQyXUffNmyMM1D9QGBejVmjr1goCZV+FLxfumY6SpCHSx+ma6fSuUPSYRoSCxAi48rENoPhr4GOqiFOLRYyck8rQqmpraKx2M+B9ezRTOpZSoE+O3rr9lfC+zFIcHuDDpue2A5HNSznz+Yckrs3JPoOe4CZQQzVd/MWovrXc6mnQVx0rP63AHmbkg4gerich1Gqogm9wDXwdFmYt9VP6h8AqlxErrZoOOIb29UFYU4UqwHYLZ9yvSfnvVtV4m21L4Q7jt3XCI6DtDylHnSfO0Q1T6huUQNsXI5o/oh9s8T8VuJYO31HAga+M9vbfEhK0R+6/UnR+McEY1ctovoPC8FrajZ3ziDpbNt7C+UxQUYV8v6TIr4N+GFUBVHx3EU2NyIMhZREjEMWCei8BIdEXNVNA8SEhQMuNEll3vPZg9c+njBkGQE1O5xKPg0FPmS7zYe7p+Q5o7HlhJCidmn/dxAnxrw1u+AEbTCBvhCXpFp0D+E9aKWLqSqvSKZ3wkYi876eklV5aBu/pyzsqS1IUE8C/P1oRmcP3emZcagf18JNGXkSOHR9lTBFCpzffB3WvoUGz8ehs+NyPjmrdprNE8eDa9tpWbIhTUI4zWlim7EkMjW2S02UCvCAuVv03h3TxYcuRrhFgCcFJ083ySFKjAxMUy39BSglgT3XGPJrrEcg8zQyoohcDDTLPszZPOU2ZRfQ7Gd3Am6kOsa10UTnYYtDVwcMxC6FZKt9aq+JwU1HNZi/mGUcWoypCpAzTp75d75NyaAREijgOrbjlhlsWbf1GOtX+cmkIR3fR1AZI6l4VlWvJDFr8LzRezjnQ6I4+dyL1H9/mDlIPVKmsemUhW+ZapLNaLrwlu7TWODlayAVjGXL/gLFF0zhZ/UTwn0yAEJJwqyBpz2GCp5PB5qbw5B3CyW3Q1ObShReI4duFM8x2O9LP4ZYMjyY0qrvHQFbPxz6XEfb9mEHCsgoq0nCcCMY1GOjk+5SoI6ciR4v62LfdG20oN8E+7rzIF3LK9ObQtUE8wOfPGgNPMHZ8z7Ztf1MEtzEPDRl/IxH//IGtT82si/IKMO0pkDn1sA5fRRLg5NyqdeIwsj2ZFAJ9wTCZL/LXMNZ76h7laeWI9RqoiN9VG200CS6EDDpg9KoogJIPA16YGTmTHRZIR3x1iDFIgj7nBAwjnmGNQeVAFs5WXSoWKBgbw1ye6WHSr4ekQ5WYeRWfMMD2qEfGk4K4DayjMcxmMZPFPkSTcYA8qWo1XWqDWPkMyFI2PCbnXjNw5C+nv25lknUUOV3yyS23TBYuCR9L18wPSa6yuTBZhcVa5kWIyg1ncZm0DmDGqxPFcHD/O4StZGKigd4kBcR/JEAs7bwAvxG9D3yN6vffFdaZ/WVGzGns/pibalTDMkIzAYFlfwko5i7vXwdJ5wRCJ5h9CIlZlcE4n8b6qWzZYaPmmA4lKU8iWMmGhpxUHxcMRSqCfRBNte9DVTuCA8SbNLM6sFGsvIIwaWAuZodCJ0riFs80Y/OlDXrVzs/9UE+pRcOyo1OlFMn+p10tL9A8nmNseAyydLsmnCjnZMCuVtc3Flh7Jp8B6woT9ECm5AGilC6IjulefIxEbljcqjbM6kp5fZTKzMF29WooKERHdgFc4yETdvTH4ovomr0mG5R0c8cIcdfKMNrNXO9HJdbKWgzfrPFVXlJUATI+b2dgjuRHnCtOC/af1/3MtnGI8OhK8JYfOx/s5WNyvs2/QvChS5kXVSDjarjYieJeL5vzBTewQxlWu/EHTeYPzwDP12bbhSDWCPJns1ZcJe9lPmE2bE6xAzUKJy3ijy3SE1rk0TFrPuEK4JwDbifZoTZOxtbGGqIX32Vv9cP35/w8MJmHIWRL89XNQKbOF9OB6+/OeBhQ2L/gWic0171OALikn0nTjlHCMwMmvZwKxYqlAxTHESuS/450OnI8r5D1G6e6tCMGWGzuuxcJkh3KVppBeUDq/s9PhiFunmfgcuaieiCXvAPRSp1onJdMiwGiZLd22BP9rHik59dK0IapKrLrMx
va/Gbz2EJskoxtRXJCwZkm0Vz3mFTIDNMrqxJOmSCLeLfZu4dk/6FELYV0xAOB7u4djNFx42pdcZmZ+eWlzq7nV/vY3fhqlnwtPUXAaK9l71Sln8yW2YVclsgHGqymjYWwnP8+KT9s9jqAUtIhAzo5rmXVaKN9pL38h3ewoKE0fMEmxk25/4C+yfhFWevBVqcdRrGNTexjWR75dvFWnJo1TS1sDFI5GiPXvJWORPS7nok6feOD5FrlkVYFA/yjZw42OyGVh0G50VDA9XCW8Y4C6hChVnzi+1l9oIs2HS+YuZski5CbIt5gsLIduUddJK2qrvAAYmgJnA408SUYnswRLtPVVe1M5oMbr+5mYb+QwLRiWrz+4p6adW7ILuELWJMDA+wKiLg9TKhi0PXJKtsnOiQYyLIlpttrbPEKynjigkFF9ucVpFbX6/JK7Tz8F8MjoxT+RPmcFPpIh+6q/RdYnJceG9/zX3DeMR4GBc/fFpWGa6N4L/dxmoUj6g4qX2SCAzoaKJMYmCNhmJQRjvYT8AyQg7rY7qdnpCUpr286RdNNCof52euaiFkgaOC+HTfbqza4OnoxyuvASzo9C2vLseM4n2MTIoltTimUigEao3fK/fqRByhr3/wNIHGnAwgvl5Jshtoc8wjKEgOdBTuFD1tjwDZ+EYWQ3AO3EzQFgrwbA27N0ulpRzyhxpoH6GyGgbZD8jinKvG84ix27+qjjwqiFASXA8KkdGNHkqMyXhvdJsmvy3oFLssyDiceqz8ja8PecvNVruh315/YV6IZlrJAxkE+T+Fm+SFOkvo/6xbBIkfMmWe37Ho0ejEgaFSYUu3i2k7kGsbNY/m4V4Jm1YjKsvZPEBcGpb5pOqUgul3cub5UxXlnf7pzP0e68rcA3/HUYPP7EFSFhFuckutBf1spet76A+AO4Z2Ua6RkeLZbINTIyiaGPxpWpjoK7DqRFsHa0znjxWT82x7DDxrjyieLB/k7GSU6k+VVYzGU6s46zu5JAImayjbYGQO1vS6Txx2nXfBwxHkI1AzUFKcd+6yiDEtY9h6H3SUyHY+ZivMNTUNpILevA+33JpTtcq1jwbXbB8yoll5tGMdHWPMaP1Xp/QCP9RhjreRP4f97PM5QKP2due0tHylsbws1xw+KcdbHvyQvewaVL9NVKxGRrvjcgr02cDJ9LsymeNFYLS5N5gRH2Sa649S87VdwiWC/MnFulKjvi6LAf0969uf4mcOsnvv/pzT7ChZbG9DxbqFkZWzn64Ogr+9AcsIxS9K4qWCAIldgGtqgJ3FS/i2ItDlvCaryLoWbpwR/Q0xG7yYGZmPdtdzJTjLrV1/5/qfSGTO8NbhQ1i6Xhq6oSkHwdj/JsXgOE07qI/HVnhOfXD/P7I/gL8gH5Jo6RO4arwrCr1pey3D2CLMqzHU0RN/hZQGhGO3yFOTkPuWM5rjHnRFoBUcN11CXkTJTsWGwojlnonOd2VqS3pw1+4YJIz22WDgcpi0PG+fQQflq74/C9pMGmYdhCCsqQs55qGI88qta7CFkqMkGn9WaLmorr/wpya12lWfzDOvddDBIanICQC8eyslhKg4X/fQFbC2G5BWK8iUDcxXJgFm2I46X7rzmOwkmvl/xaJLrgTKkTd++SPekrTlTh46Qese8wFOt9OG95zmrN8/RqmtLMYCD1KLt/zo5eey/pKYRHicXs04+ayKmxHxDAw8t4SHFfwdHGDAOUqcLUEPW/PKHRmuXEvSE1T545A/gkaKX6r20OieORifmLpyjio+YaPKhprQOcroWezHqsB7XU/FV0/UAn2cI/LwznkMSOWuiR8sQ2i8jPBU7mTFembFZ49U6CVE1asmLYHx3+9VceHx24gmYtWcykGfPhz1Qhh3sIRKrMVQROu+sGUGVI7gka6HSh8tuFnnheo/CTFeZvnFAPX2RWUmTq8RFOAE4pr567A7kP9/ylKtw4QAA7h6ZywjBkOU+6j2bed6JuzdylN8C36z6O95CBOeYGweTOr24+66ENMeYN+R27/InoPBTB5l7c8JscIBCCD+A+pJcHR8Y5wKRraSu8HFuyTlfflkk3RNpJ0U/g+Hp705k8r59UfU/3fKv6ckxJE4rev4Py/E+sKNA8A4NhlnlvAQuHv5U1F+AahK4Mu3DrsM6FSRsXNBHfSLRFSAQpcPBJ2OIajgvTlHmahlrmeVEpS5InxTFUsBBrGFgLospyLIAQe3zHRvtP8xSK4C7H29LMnKuyILwdfic2lvyTsy7v+nZ7SGEpxMSS5xF1tYqSPEiz9PkC/w6yOaS8vdCO9ArKv36DPYZZ6tm6JNike0Qnp48oznDt0jxEx/1XnmAy6OYjYwAxtMEQcFWlnZzpHE3lw9nCkKX4gl3LDE5XXg4ieOecEnsixVi7aliW0Qxfw7RQx1+h63NxCuNYI9lxTjkPjEW4a1D4rHnieEO57NBae6V33ysLt1zpuIw+WpypT7f8aNCNtvQmUOSLGQFcQOFjn2rph2D7jCpoJ6snEWhK0jHbrq8wp/AgwdI9w71OBnWRzhcrqIopfTHfqvhOxEVMDzA8BlapvBueRsSZ+17DhmuNpxxVY19RfkdP8TkMHQuvmD6lGBoKUqy0V79Q8HzoLCwAFXgziIq+HPy+4cBs4WtH4ThqnDnsQo4SA6IWmLNFzfEK98BXZncKGwo8laOZF1MTY4DKSB8T0uqv/pVlhQdJrVtclHrCM52b6B3d9gACD0d6GdgOBYBiSjpke9809+wb93fX016MzAw02D+Q5LvW/W/wqIk3RdPck+dCklrNFOoIiKVlYZFJ7f6s2dn17bHDW+JRlPAg22rUK8g6ngaPlBoeCn2IUPWs4Mh+5g3bRHJXJIPvDIdSUZfX7EAttFjdzBsZyRUwSfG2Itk6oGTfP1uCtEbuDOeZri2nZUwCw3GJOEfMNUcMYPzx9E3Vowqaze3s43e4jx+gPbb8CK8ZcG7vdRJGAzRk/guT8VyIxhkUTlqj3NBnqv7OW9XtB3vvgTz6mZYDznzKTmbS1KOHScr/3fRxR6hx2otrho+kB4MT35r8bhlX0M1LWkC18UFS4z3qn/WoNqScteb/D7464alL8aN0fRXcyP8lutTwmR4olTJ0cCH85nHnkzRWAgkO1f+/4yCtQGUfk3xWTwl/sq6tyxdvf8meuJOJtj3jUUInSshiT3t1fGeepxZ5sonpd3LuHv+AyZJopJRHgLs2Jgx6u/Y/FM5oQcMVEZjE7CTnkWxLfTf0My3Q1+pv0HVmd/sKGP5fMt2v5tkfKr4JMDt8nXgNIl8ZZXhuC6BT1xopfe32NBy3mMh7xuXTkm4yVxz7sHQJYMFt95kDU59Q0J8bCLYdzifZ92i4yMJHrIv35u8WrjJ2d9AyCtbP020zEzCYmPudwk+p+Y3ddoxobv/4XWXaM6ONuV64fT+sBumMujgbz0ued8gFJL3dbSY52jkjCAEzdbHjIwsdFxrWOrOOAr72o7rF+FOCSulJj9y6x0/dc/KvXQgrhzepAN71agIBKkkrID8iCD1Nnz6E7SsVze3K4TVONqm+F65aBF9CXp8xLMGrdwg7Yz6UWEZwFfsEehL1FH/nrIK+Znr3o8zo3EtzPdrYa5Izb5v2anaUs0r8MqbPoL6DRz21GdaQ9hhaX/C+LnomCSRpsUw0e+GO1d3O7bk93I5rFrOQ7qSwnVyzTU3TVCt+7jAMNBnNllpI5k0j6/epbRbjfJN5KtM1CVJCy0mbIGzYzP0uOSr6XyjZ9vqVM8vdmKUkQbISxTuB7dWtRmt8G6R8mKCNquihHUyEReDNAQKDbNvX2lA8qlPpAt1RwUs4/PWecK29l6HBA73RWTif+7IH4HehNQ04jjCtrKtpeTYj8eVaFno3bwXPPcAzK0/gceu+iveGJQu/bKDpCi9qLAnybw2m539vPmi0KJU8TFp+LKfodfXvB8y0rFVZwxZN4bGHECt9V+eLtOVGRlwvEu9elRaghiCgpTnn0ukBWrA4mVrG+6xbpmTveUfKl0uY1gO4iuPgnT8W0NMjxtB2VghTdJSLOiKOOQMO2vgobe3SzdO17XJ/wECn85Rop
h6O81MH9VgfGEiGJw5RYpqVmkRQJ1HbuX/BruuivLfoSlIAuPFXuRGEWqDoF3X1/pxT7q54O2IoScPHaBesJ8yrT0EHa1dNW1wmuvk4yPOQ4yqJnnIOsKPsjWS6hcLQ5dr4eFs8fcKrJjjQN7wF5BKC2t96+SziZ4ja0JGy6pYElOhWoJhSLpX5GVnUsPinG2f7rvhRA6+55LlrIRWnoaOxf8UGMvdw6PDL5ytE7kjhsXVyFJQDEnJytZULw/aRoEyGCMDeO3XHO9meXg2bK4gTgMjC05xhNLdIaqRA1/EEt9/cmbsudTF8VCIW/QKecfFtBR/NDGfCDcWMIVt1hFpt1YRAtx2EhI6JtjzhaT94qeOF+Ue0G/XZ4I0YAcKKt+KWPij8Tsd27/e1YyBl1avBFjkEheN1EGdXEyHF6Dw8QqUgxRmpsdwRDA+0kIBw8ix23yLNDmWO2VmZgk7e9dnPCTl9EeKgZgnZezCT6n1sHI0Qw4HHIkw6u62pHcTXwTELww+5iuwaJujW66yG56yCwnoY4vIDCG9LW0aGE/pPM1bs90vVSg+KBB1IrJpsbaid3Vg4Zz7GEozM+TRG8v+0pqKhxQwPRtykKKbZNDnK9SM3iPDP+995XF7gFLbctYkPFM3OS3kQ3tvNYf4zxt3KCHRqv/cDb6aEOW9qWj3UD36cXwpAaSeBq/ZhGZf3AMy6ZBr28eSQTVNOhAxwZWp3CWzL2nWte4HNYBbBXtS/R2d0X5EG91rTwcVOSuCW6YS/QJIixE5pfltrld1arMOFlBnutIwzKxKZttYGs8MCOtrLcLrTSXpXm6moj0nv9XzmzIeuS+Azwd+NacVYRk3v7d2oSuoFshZGcYvOfOwlEBXepAcoPith9ckPbLNH3ah/91pQH9npfQrOTspjz3zBtpxxxytzvGTfBlE+e/NAgaATxps8bRDHdJOjHcH6lNtZu+8BhxIiwvxoVC5JZFwhdwHiTx/VExVCwOdNaquwKxjt5zRwX/zVs+fYMNz1YoDBcbVu5RYBbWeVU3Yd/xB1GJVWtqqOLMHVFNRTkk96M8r2l8YnWs6GpNrhnG43Np58S3a1RkjXKhYI2nry4WgdUjyNEIrLhO1ZgxYjiwVHhcJQFTKXMlcMc0BgKRQJjJq5/3tzXw2btSoHET7hw9cpb1igKzrNDdITV89UFDHMIT0vXILON+IDyc/BjSrojLinQfhiOj/mvYio4Lu6fVFQGZa1IVzdzddguU9D+P8cR+v/+rxTJGUXuVcAzP3yvBcGYSykGugOwOpr78gby8zMS9pl6V/iNXtvFiAvUq3cH1RjBsBJ23j9v1C+0hC5obrmbY2gUjZGSFdqJJnH2FXpqpVi7s/268OxlnMN8c+LP9pL1r3gLtvD90bq/qh649YxEfBaahy9orK+P1rZKGIz9yCasgidq4JMUn2sBWqV6wP5/Idc/E8yOb4zoiJPpZW1C3qrZDja+h1WY0QbPzyCHU7atRxdiwkLY5rJRVWXBrCoF2WBzJ9xUVnLRQFG2RT9JHt29S9r6y+6sWlb8iYeFajV5OlIuY/xYRJuEMe17TR3PDleWTAg/4Q2FV9k8APsQhngAHdoZeei7L4AUk7LzsDLwLNNIATiQeni3skC1RPYBy2bOicvCfIcgIdThSLM5MEtr/FELJCTkUZV2vb9gWZK7axBvUlfktk+Cn5lDoJ/OHqI01BCo62tTp69mTaQHa1sWZnnapm7p1RXv0GMJ7ULaBqbzCTlhtlsLUn8V93RLB5WUjTGxHd/bWSu2IhViETDQqIRHtBFDy2pqjEhWeIwnS1V+yZGVtd/tyvxzV+m+ZdUMDECiYAxmNFBB3X/W3hQKShB9OVP0Fe9IDx8Si+YI2jsblHgQ17E6ynhg6DECJozOkdRZUwvBfdNoEjijiU3h9nLPzEqfoPhWso9E/S0/Q8Mu3I0ilq0aWlKUBh9A9hcd//Same4PipQKbUgD38+jhZulCYmyZj182CnohFeKP089xa16S15yOMwAP899KAX/SFIEQWjpBnagkXveZxnRR4nUfj/2iPeXGV15YLNRJc1idrEdgz/Wwhwlj+UFYoC77rlMamXbwhhOASZ+yTve6fTqlOmv1DOhrXPBp0shshKgfdMTpErY+EOZy+IOjCrbaNR4z269RoBDEXWbgjaIUBJDAyjLHLQU9lWs5sEQOEbg466F/Qe2EZksRutS/0vpeuxT/4H7I8sponUu9e/8I0dcuVSu/v4FYdm2341zEipYsk04VAJxCaNaTBafhsjfKU2aDnmVuD7bC2BBCxAZfgFVHAJdZHeiELflk6zWKWQ++6f7e3nB1LrXVt8+e4zL2vfseyRfIijqGwohMR57rLkYs1Rs52ySsuCk0gun2ivMj7SzYtQwJ68zZ5rUHxFF46v0Ase8Q/nkWGWtzFdeSCmCYzEEilDsNg9g9LzxrDA3hHZyRLp2hRRUPC7RpZCKoDnPYJkSAXXz4Dge7+za8VqLipCEUA454ejXK8pzBzf7x62yaXFNqektRdd9rDgSHTC8CYtyBRl3TH0ZeBn7okBHrvornDfDbMXPOSrzr5ZLrMeBxrYAhiKUVTUkxtHrenXSCJj2ZRd/LUKTOCEK+NbRIQHypOtVnEfASM7zgXgqcDyvT1nhQhikZPfR6Wmswu3i+kmAco7W0RT7U0nNMHfGnvzQADGhy+HbPC8b1x4GFhvpKB2nXExAYRqb0XDylPARwI1hcd6KFChCNMXARKUpGoAvtg3N0p+LK0GJwpVQ5SeK+bsr+n3neSmwalBsCCGD/zkXkBtLkbgS05sMz4cSDvRKMv4gNUpE+vDQfJuTYD7CyeD0vxijA3lgU0DrYonNqrkaepI9GKWWhhkU1akoVqDu9OcJgPf78crW7aGhGD0AopOdhDIwTKowaPQE2QlQOnRpua2xcwM+1PeT8SUv/R08sqSHq2SraS+x1Z3ZnXuZExvKuR0T31BuB9f38ib7rO+eX+32VLx9pRLosuQI0IWTpsE8AWs1pJAGKsbews8bj22NGv8D9OSp+SkdTUenqZ0wSruc4WoUUx8c0b2iz5y+0qLol8hJtgAW7xm8r1CGRjCqJFdRT+oSdyEeGdq/mkoNTFLKwoUM8xhn9/KdFEMH3hyPGoxdrB8ZPwUsHg2I9pmd4ZNoEsndt6P+YD+ZLKB1LMkxRP762yDtF4ItsOeY++MWyNRAuvCoHNCni1ZP42vX3aaBiviIzQDOmtdbH+Kc8WPYT0/7ZcJA2SCwc2FwkEOXM9fzfBw92dQuqdfJv/t1/8MY0pxKkbyHbJQtGWDaTJecaiOJIp0CXi3ceQKM86Ul65FxWYpBcrpH8MfyIqZMzOm2JQDVatetFLkpa1oPCAexQcSBsluPNoCKrwhRiP0oFx6rM2/aWn1qc9SsHyPDoYbfb3hBwv/WlvOqI+Y9EKgI1uIie5RRD0UqDgSA/Ehr2wqVkUxOcRz0tn0dP9dtQ7moZvwZ/2KW8sovhxmn2uB0HJodxAn1yhMj8GI395HzbgIPiP7tUbdgiYDEVgorCJIKMozgpzrXAmGqEe+D43BYA2XJ90Q2Rmj8lrmG6T13O1E7w39H0aQIMumYfEFzxGlZ6aFGx1Q2nhMa+8w86ZA90Fl7LJaBKjAky3wip5NHUy4mAn9bGGyGwwSpkxNPjMr9MKG1qWL9+9UAzGT6BaPWS0mSxjJkRX5Jr8XQK0OBcfylBc24PyconqoWRTekc6p/RqXyYB0XETvzoxgwlTrRexzgYWBVV8eHeHaoCAgGGfAajb/7AuEFGVz7vC6GESGfcqIrMsfHRecP1959IDnu4+D+IoZpqRhBVa9aambLJv+w5377dy0A0tum3XDO/tijSwvl+e5HI+DvFz4J5secEKk2oVZ9jS5IGxPsXcLBSRP8eQbnWL+e47KtEbwK6hMFt9KEK7O76eJwFhnoDFZcg+o/193ofpO7aq7D3pQb3I9JE2pUrwvkNjEd4wWxO+ej6mxUO+tXVZ3LrN15PFovd7HYAni4wayz6NSGvf48efT/WfV1w4vWzq3Lpxoa6/Emylx8+uUaYTelo4yHAsY0
/bCXi4v+fxJP61s6GsVwthNSdYbN3Q+2b1dlnpTFb1fjcR14y9FwCWwtw80upuoh8Iq6JX8s5q6iZT6WBlxUd1MUTIIfUw1wxyR0pEoldaloC/3nlx3eH0Az/qap/lmjqcl82Rqu5xJBXufU4fgcZjqmG58kUZn77kFTKxBvTxyNHRafVXePzEnDuL/Pzl6hNB84ZRLI9nMuUfpWi/T5xsRxLPdjrgDwTnePdViAypM9csJVnzi+BFxBIg4iMlytRpRWgQ/BTozuNud1N//AyHVTWTUO38I+93Kn5Eq7vwqLHRbuiocIovAnda649hEU3lpuTveX6wVP5tXhrTZ0R1n0zKIzEF66MTN+ahitO8ZqSVpKyA/hj97unBqffh7jiGsj4cWLDZq0kMP5NdwoYhjQTOEprf3KaPhTkNe1TdX4F2KyY3CZ69rbQlp/zN9hcIoERisjgZC8M4auevcQf7B+DdO+EKVqD+0x8rXcn9ZBSl0Ht99fD0CQCQfPn6XU4gCW1tyVxD/DvehhXJxwbs97uXwSks9xXwuHoxFJ12+yuNtUB66Mdj+F6y7LvGC7XV09xCh8YcqCMoOrSAcB860iy0l27GuZiYHePiswjqSENCYajtdjdDjHqtsAK/NftS1GX9RQhQXnod+iXCMDo2u5hBo/EEeGn/a7caS1nL1xpi58wuSHoCnPG4Y//gDw7hJh6UufzEEBp3kLc5634MhhKtQnxweGcjppjpTxFUoxLCui5ygtBW94llnzNZBP5mX2pTdQ2n0Em9IeP/pPtInKCJfeAGWvjEK5vGdqi1xzUi69C9elY5qHPh7Z12P+3h4KuVp6S/odBDGlz2HLvBX5nSkrITy4LO6/5UujZXVstD2smaAJP7HX5zunzsnztI8AjMsBAW8LzVyfFQnOLsx/N6anLAPC2oScI2Z422y0FElGU8wHWnaATWoNWjXlAx0vRz1eapteebc4AIpwkPcd8jFcLkaTuo9aMECD+Qh8ggg6hjfWWHz6alhoQgNDCX/hbY1NZDb8qufK9W7jQtm2fJuUPqdfWSH6AN6a8z7Cn5oQA2C6uu/UWvdBKG2d1Er8VgqkbcoQGCL8p28qYTyYo1RDzcHi+6uJ8g3FctgX0r85Be5cVl9fsU/2uRsmdUJk7IyBUEEdMnz3uw7fvwzMGuSOCvGXa+rSwZEmcXb2odD8WPTN/i5Xpu7KWx/Z85+8iic9YaWRvr/o2ZdHow+2Y508xTtHtjJwx21a8rhLTjpt7kuSyrIJcztg8D8qTDYfGw2Smf32SLhFwyt0az5vzwqjoWT6eg7g2u1mkf0iAuwKD/Sbd7TUpZS8ilc7XoalZXxDNr7aogzLbVpi+mzTYsDHaCpowlBJ1KGYm/6cM0pc0+6/Tl2TBRC+jzaet/E+yXvpALvORA/pCooPdxVq55JYDFAB7sf65igPS4oOrB9fE9WHSqc4Yn9NlvS1iooJ4c9wR3bjyNrR0EkaWMVjFGsQHG/Z2HYg2BZizcFuVXbe9HBcn30zEyAsqinmvY8aqJvPCsdwWdaVzdNRLcdx2nn25Sz6QQFIlfdV8lLdlijex05XEMH5jBo/SQF6RVeSDRx3o2vc0j4wty7S9aLDSK3lhEOW2VgK2WIBk0xYAjSkUQrllc7hwi2T2w6Yl05BbCQi/cNBwCG7O8zLU05gxQa52D+Y4W8HC1jU1mf0M0rNfjoX7s1fmQf7EwZG59GT6udKm6BSekr8+MaU9MKUWtgSqPk4zW+fZri/lsidK2sJoC26eEXYSUt2C/vwf1nJWLXDGXehDSZTgtZTe3RPRsD0LCspVTRgSenGrdoz/siq7kfeVNpJ1I9m2izAZfA6FH64/Q0QLiSiUJKafq6McRnrFiA7l/YORkUJTc0NUVhqO7QeeGLAdqhht5vFgfHrA2qPv7DdvtNGgV7rrY9HaSyHw7EYx7JP4E5zbRolPjDgkqMDVlzPNT8ver8Twr6VfUMVVKcL1HxF58fz1njXu8uxDaN9b/LXsQVyiwbvn3QbuwL6oopsJzMgI06zv8KZ0HOPcS9egrU4dtNTLeSsZUOcR+wBAWq8oIuZnNI3O/RGD1cW904IrGTM5wCh9FygH1vhfqOCqJO9EiVcdmy18u6kQD0fVykUK85fI7ZPnslvWqhUl2BrZQhAkHVcX9t16Ym1fclQmJcSMylyDvdDuvdLaIlImoWOUysGyABDkHsUCOtcSC/1RhU7IQUxXh1cXqKmHP70SFi1ISBbL8Z6R1np5E5Qus7+HeI6/itvw9mrOqk7EEopsWK+HrT6mypC062fahdquJogBGGSBsgYfN/Zw6+UODLN7hsKmG8IdICtkl8T/vuFmInITmIpGbHCvuNJ2vEcYI7rBkvpUDqiT9doaA+XOOCSep+ovXx1WgjRXRzLZk2LWjqlYax67dG92I3E12R/EjOohjlfD+p1qnTKjb3nodyUJOYqgehNilHWnXj4ZuheCiiI1L4odCi7ZwARsA/uzi/y1WAAo3zzOy8RUq8jp07b/3NUzXKI9scfzIcQBAXWqZm4AZc7SR6xVYXSf2f01NhyzocDISldxPAES5rZvmKyQyZ8tBvcpKQ/2G8fjnur+YgkZQJRwP0IpIsfoJIaoeG+DWI6G+QdQ1d2bmzCPg0DT4fXUKmSSLbyJspZ5rxKcsD+wc0n6j+GmCZB9onmcdcrJDNZfyWAquLNXdy/mR5wQaNZ9TNBEAZAyD2RPyUXskHQrI88xb3HQHUTNMmEqaj4DF8WtWK7L96N0N2qXTMBtzM3M89h/ko+D2JgVxHmtGLMjzLAM95DdW02D5tl2DqEudq67pt6TGs7EeNHv/pgwpfBlLmmwgTQzNzVX5K26G5w/jxD93Si7uVPJYZXATRf2bnjmZ7umvViZrlHFCkf89XkoA1Ww2dmwSn+zhDB5ZPDafREFq/Hr0vNgbELis9kieYxKb8tjn6h4Y5uWkEvqE1dubFaikLoi16tL07ja6v6pXafGzZOOf5/a1lo39ypiw9QAs5Tyknjufz29qbTKnFUVIR5Y1Mh6ZrwqXVFu6HrYdWd7g1kX7ZbLGq7t5+XZ96s9PRBjW51LO0Yd03GMiAPF8P8lbWfB2ouOJDhETimmRoGEDaiLgOwXwRlIc6GovXB+UYo2f11sIHeQIAV3A09PrNQyJjzhC6bvxa757fLKxH0pCDQmZJgsVf7tnQ7ODho3sMOUbx4uzuT9kO+yLREyFYPqS3O0oTZClMXHCZXaNJzF4CoKVrdHzpdXf6Ogzk4F0ans8zk6ztt5oypLZFGbpV2qN4sLDuSt30aekEkK6mixdKSi/+7a6PFXuyPLsqDsN5GGJk6jzMCEnuvax/PgGt/6bsQXnD+0OY/nE+kWhaYaAW7lNqZK6WUYAF1xkNLhDywE9aXQMQozFJc/TMisOWFLOrF+woMOKcYE1GEkV0HmyrSSY8PdBDHP18avStT26c//Phw8JxvPLsL1YhJVHnCVMkaWIyZQlfo3sZA/zPPHXUO2NWAnFXvujz6vHHQjcY8vWiL+QTSTxUCnwmw73Miem/QDzeLPmVzrJLqyygJxYD54U3n0KXlsYOuZa/sGPAcXB68LEerBeF/H8UVRpaueqRpUu8FnGYyVRs7nyeH2ZYeIvbyrCwtgcRk5TYs+lnbicl2FO2LfEf6d1WRTtmGhEuIl8K4EQQRhp6wvsohSelPqLCfgAcjjrG6SqzLDSs+wFu3yb4wKDI2XYDsZcpPGKIUjujeM/q//gbnEx1bv12TYvv5dbqx9drLjAGDlKSMYVrPUoymlbtiv5ncfrz9NDpcAXT+eqpVWzIh2XVJnsWnRqwzBeXjlHVYV0TbNCxdeZIh7T86XYK34/J3mwMTj4XvH5GBHkIHbIkMDt90wajxg8DQTXZ+Ed8j5HbaWA/nZ66CGsb1CN1UHf7DJQvt8KnGcXOXlM1si3ETRfRLiAR1vjE8I9+tchaPyRzIXCihscI4/6t2UDp3T8Bms60gI9rNqQqDuHsF+GaLIcOK2ns+vMdjT0dJ3r+bl0vPoxuPexWDQInWQosNYaFAvZnr2tVSpZh8YrUoP4VIUmo7
UgwXtqmjbBubEhWrH6yz3vycLPVnCVJIruVETQvUB0lPtx4D1tq8F0haQLFlSJXy34nukqTltLe8d5x0VBqFQ166Ez3qiRFY6Dh6X/X2ggBMH83vhG6+SLR5YlaXe7m8l5OAJcUmrzj7K6sg3oEh324KxYlN9hXgRUAsZPcy2EKoROnSz+NG1cqFRGxZu1THanDfpajpKDzv3p4rkPIYA94bJo7W5TuXy10rdACtLzRgEryh+3XqxXcu9dDXIdT8IRFCJiGbrTfr8K7Ld9tk1BPtF6jKkhzbaGFy4L/6tosg/rZaaEQ5w6GJLaSh2KF46q9uxA6Luhv3Th2lIr5Vn9ei1KoQqznB1a9bu5kKMSLZWvIdFOy/VFS8Bx060Ty7bNM1ohZ2b4BOq2JalIzM5jNsd9PsnE2AFV/iJ4itlM60VcutYW5MNikremaz5WsTvHeCc/ILv3R3oVLe3cijo3X/9JgNCt0v1t1dsEnapHkbm0Kod1B7E34me0RqhUOuS4LWQtf+42swOT0ZuCPusZsLNFG40LUNyoozW3QEg3iovcwZ5p1lr8lOa8MNQ3ZkbEHjUhaZB4RzlIVHy7DtMk/JOoi+b7Jn4qFtXJhU8UDgIm06AtWxhZ0zIxowJRE8kBzOJhU+8OJP8sboYlgpcoovQ6FPHTKIQ0jrEUy71geWJLvjptDFTOKxRIXRNkHAyPcPrJ1vWIA1Kr+5VJuryE6siu+V/aYaf4pijBGzTlPQnuU30vCyQl2GAFNF1bXUcY4tVswQ1slr2DhH8pZhsxfSUuuIoGTYQufdeGfhNirc5tAXG+55j7rJ4fDopXC7coNBIjGEBIk5cYkm1sGT/qDtqp3cnipcEY6czPp80lcH3AegoTH0CESbOZzwgZm3gSBYicSnZdtvbG71OZuIwN+N9RnMRlPlNnFXSkDGMFtetJx/CelfPc0C5tBB1zJMEC1eypu3whXQJk/2DG0JZJArArNaZ/FSigrVwzxgJN/IidAEYZat4TNNK+71tl/t42tbSSiYVgsah9xndPUmzBoHYALvKWv2nA+Es1C3GInRY/LvEgL3oM8Uc6Ki9susiilGn0IPSiNUb05ysUEtLbkzWORzaCAzbniGPr3BuJ2YjE+zh/jlKW2SopBP4Im2DC8mFYsNgl+AdmH9kXPf8S2fnSOI7toijo20ZmhCfz0bFqy++zp8JBJYiwZgpQ9Kbuzl0sbTUY7Ec0JOsTpCOkiEJdKHG+vDUBo30fk/QWwC+EmP14gkEfKFKb7JF9FBHk5WJBTtV9PlMBoLOeuU6Q7tLEy2UD26KVYWVMRRvXtBvbFL09sttOIjQS8syvfNQmgcD9BR7HTsmoCAmkr4mvgV6F9C0gHi9N2nTLVf8W7DD5Vr3Ju8XezkkR5T/7ezmXKvk1j9fDI8EWgiSYpT9uRon+2/8smLyFFOVrZ41MmihcikmwbGWiFNAxWbaeM1JcP5yw8dK2cUdd0epZDxRZ2entjZwt+Ebz391SUetUVy8L4LZrqWGf9GepXYtzMcl0/cqOKOAdjxBm0jLbnXuG7gEr6Zuu/IOCUrcnLp1z/8EZrJIJBjgxr0dxvksLkp9Endkb2NkaWS2WXVJIzQdp6NQWRm34162KCOAQGTf/BGP12PuZmQYc9RcqjBUyEVZXeU0c1PcrlCZP140q8uw2Fc7jlX68HqfFndIaqQy//bPHL4uRdFUdQewxNg58sNIt5xGvnwgprpPF8wWnPaByupIoZNJht75ogM0bh3jcCDUB5HpZ9oO0nEObKUJaE0TVJl92SMKwYjE3wk2sj250RpzO3f1LbIFnw4MFhpbl3+lAwd3gogYlqo/9VY9il+cdtdioY5ps+nPCkbFnGCclMQD/CigOUIaSGTGGkdsN5vUWmBnfOUt/sAZu7Viw/FpYi7Z8SMxTkW2pyRg2BTLYku76ZQi1OiFNKuldGZ38Bch3aTwTWShWyI8mJ4Eo9WpO0P19DIJKU7TJotOCCYk6zQ3epprCh0NWcj9wDa5EhbxCXlE7k/KNEWOJTuzjf9GbuayvQXd6nrD7UG89e5AXK+bE/wa+H0/BnnEF3COFHECbuZv0Myw0aQvD2QMLYIPKO8ryVsv5eUrNFDvkqgqgfrMaVGqMnSog0L2wqpnvrJnOPHzfqW99CPqS8oqbiyC3UUzG/laA7j9ejCegWuG5IERyVrE8SO5LrPnCDS4yJagUztMkOfUxT1pm2LEuRVJpVIEYnrPtWSnX+eRDmQLHeqoOJ8MGaNY8sm/4QX9giAXIYIb/o5+kdE/qPZWdSjtKrESfeEnfYYvspM5gB9KOfZIBPtHwL12rVB4FvOqDL+Z2B3h8I5J9gBHv+N/ype6/n52E5lWJs1OfETqNJ35IOooiTSv/LJjq/PnkwzonZb1WQc6nnPPeS+14xfkX+C9afdBxFcLGUpA9RRc98819hAWwvFfiuaRuTV5gv4ENoAu6KIwyFQquxLna7yERCrSSgSflbM6Q9zbXOf/wzNDkuzabJkRbTryqG5L1b4Zh/zSelbNTFZbxKWojgY3QfYaGT8IkxlA1b7IzJURGWLYsir4AvpaTARP15+ueUM34HZyEzeXpjKKomRnYbVkDSpq7/8AnczObkGoYO+k8WFGO9xZ1PHsAW5T9QC2oxUCJm7PbLwCVmcZbSNyDSUiCZat8dTJzQrrDmcw2atY97y4et9eZ8UZdDqwZKTO+SLtk9tMqcXu44QqatLgU1z7tSDDKSI9LcMyNQZ0m5cPJnY1AZANtBr1u8yYBtZSKKexxdS+JTXT1Cjtu4QIR0zmprWt61btHAI3rBPhSuVXuN94EPupsEti7yYwIplpZmC+WwoVlvA73fYL/RzY9FHflk+aVDEBPqrNSmJGiB/POGbaPxw8cXFrvwSLtaYlfFit5zndsx1iL5wY+onQUVObYCh5alrEv84KAfl4V420X7MEzENu7yK69bszUXHfXniTVIuPvENccuCWzUbf7kL4P/IUFHvPttZS2wZ6G8J7MxDaA769FO+phhFTOJjhpPvhkcaBp5DbsfeAD7IVMUuEv11xBRpRdFHiLWqDRYnt2AWFfdpS6PY+XQGsNkQrQBCa9ES+BVT1OBs/Lhnd0RuuBgW0/K8AisRMZ/RED/6Zysnq2zxmy0FMIoHMNVUCUouHZSN83EIVw4pdFFNZKwtq4+KcYLefTJwRtIjCBdFfhqq0z4gpNDx/aPhUfmzYSusaqIOPQS4lamybMtp6MxSq6NSsxAulaFqrSMX1JhGiaB8jHjlbzdBknBZsyj1f/7zrV/ItXzP5I/I6z5jRLuTSlEP8FaJ2DMDVnsfDfGkKqmIWYM03V4ZexPS2UTuBkgFUfGpKjl6TzHgO0VORs+mbWee+Zvv12fj7g7xzbGifLKR7mLXidH7E8yecNAAXVAV5ctpdhaw2ktJwIS1xAEqOVgQXK1ct8hNnKQQ0KQ5Qtdn4NmrmvchSx0bu0AOQJTyfPKc8QP6tUrnD+flvYTd5+wEknH/ZV8HJgjF959QLQB5z/tiYC6lzA9ckD4bTf2mPFLmJL2at5/R90/FzLtbVNJTqEQoAyH31JeyOkQtV35gBCC3Dc3puko/nvD9GLsb7nIr+HdnP4fwQP/1P749gO4l8qGgEKqDG/3xpoXDOlmk1IeBApHQ1SWVqqP1V8v8s4FLHQ1apdYs0QNGV4e6pQYfqxzzknatrDj1CvO8R4MtZ0T+o5SpXuRA6MsQt7igxW0gv+99Ed9ywlqgWh+OnXsitk3F5JJHG10rd2x7cchniu4EnkplvLPHbzefPtMTd5rabORf9b6pcqGnYqMRTANWKP8VWGipv8+2ws9ZD3trHviu64p4E4zBhb94emUCm2grCOchUaLn/EUavaTssEGxkhzUCuQ00r1mWfY5US4cZvXvE0/aSNFp1h2KMOQrTFZoT+zvVf6oGvS62oxtMicjm5fo4IvUfBGlJnW/+vupbPWaOl9yj0gVgeo0rPMia4/8ojPwLiCRBQmUQnZqcWPTfBJL9XzkhS+aguodkRKJ5NbgdSZ8vo0JP4aYosFzMiKjuKbtuWI4iZRX/e0HsfWg
ZOjI8o89ar0BmpzvB8ykH+SoxnOqobicmNc270vTk4a4JY9EC4mv2sPH2cEfPk/W0jfyRW7sPVyN+axv/KfGrxk9cunYgWJt/8gRqKXG1YtgZFFXAMj1kQ5E0VTtBQfXHH78LV+kDEAyLWmucrwJSCdNwKHSJp5xykuAUZY5sE0k6lDW5LxQgrhVMTrc3Cv/kjGLjEKy5nCWTpIrRTF8s5RLujtvElpv9lz6no8o3aRtuoJ3GxFNr8tu4r3qxBB3MmvaJVhylrod2qmxdJIu4BhfQopQCBOqSfzpCAALBtjU4OOp9XBBT3QGZyQSqE54XGi2mCXalkg3/Q9GOfh0t5qn2fgaDrrn49/efKdukFztk29e00U2bRjxgKviQkUSu4ZpTb3XEuSoVFjBhaRlqzytvZRzp4QLlC0r1mD+ULB3R11ah4sPc8Y28shEEMPIBMolxEIfyUiMZ2RErLp9ostItW26crNRAuICpi5lBtNj0dhI0D0/j5awMV4dc5ms9SvO1qJmp1hkXhi3a5QnVQaTEMUQkn4WBlQEZUv5tHW1TSns2sqevJbXaJMurg75MsKVdp+TRwEBjLcOryJ926/6N0QrNW8bVjAEyuP5aZpc29oOVnRIRKR/e7EEQyXhJRsEqhwvNQcutu6b2kW2FjQT0VyrK3OjiVj832CWjG6g0TB3noX1ggcLs73eps2AB/cYjUEb3TbaZJWuNoUQMqGPcLBqPaBjYJX6iSZdbGqhjTU55aMSKTnqLMTk/7tQnPwXyYXcQ6n557gBf6OuY9Z6lsfGpKB59oYzlMQZMTOEk6O6fwvzW/3yl6zZ/IJSQLkiuFGxWWVuS93kxxveJyt7FHWMiHAx8Vt0IQBoMwSto+OP8cmgjMb0ObMQvAYDONNvMcNtZp3xy+n7o6wtSzX4fIdfgBA3bRoDzNgzWuHw4KFswUVRlxyP/j30eU6tPlw899S3Spumr3/QYciQpOO7RMDk7JEU3t7jdcJGLSAI9QeW42nzLjZAQd8rC2+8OHPmQ+uJJRea8Dd0IDN4Hvujhlcm4++WAbp1KUs4I74uIWLXQdItqKAgV2Q1CGonNYAHb+jBbPSPy8iC5CwXiL/3DFFxfGtsuzuywO3Gi/08EJtUK2IPVrOylQNz74GQs+DJLHC/ppxTe9Vgk4+P5Ii6WF5U9ftM8VpSHW3a4/whkoka+Mku+iQZ/YxbZJnAkF9UiinYG+cFesSeC0IEPoywSz+2/QqdIOK9HrpchyO10+24BuiufYc4QPtPNOBr974BdFCJKk1j2W73enXc3fNm1T9NsHgZCDtWbHDdEgn33P6wfzXfDeXSl5QZM0VtfSK6i4Ldf/WyZ5ylWX8aAuNZ4o954+hdSj6VT+yhItwml2WW984MrztuE5PmiuXH98jI2e7uP+luKiUBxw/8g7aAicZwyCWq0QYSOyzWFI0q1BYAFsUVE3G+saXusDWae9WXNcEgrNVA6CWi/tHCv5DUWd3oo82urQTBvEM3D5GqAannMnfLijH03+y/oBtOzQLiX7faJKDhl9t+aNcXdMt+p7ZjFiRzt1KMUjkpfyUhDESoCx2GX3bwnN3SjtZzXgX1U06woKI3hEcZ9zqVs6P5uBwy0deXchn2AcTVK2pSC4Yvm6fxXZHkUSaFgmY94x57HnHOxXLyxiDM2QOtV1+G/pgZGQF1OkVsUoZ+OY+8ViJSCdfic2KD6SKelYEWU+VK7Rl7IzOEQhccp7P6jU1OguSEt73xjiFa8BaxbNwgJgQAgwcBhTPvzJfuIey3n6O8jd+kDlc6SnHtzEhE4cPQtez4K8HIe5ddauEkiL5KoK3rzru1BIQqXJDvYw1d27YIei5SkXYKpcn+DXWaV/ZPBfdaFOj8frcjt+admE3pAI0AQBdHP0HMvAbwxtK7Q2wUI3P8Qv8O+xs8ZdjOFk9pHr5o5OgNYZ1CQV9CdT7Ao1GCZQEFtTxl1dDWX6zwKY5kddxA73hQRQrEw5vUjvIUTbAL7Mk+oj4Yvh2MyNAHXuWVog3f7PjAZhH8BLq9m1/JWZ5/P99muQFTN3iO2qpudwIfeqiayh7JTpk7Nz3PYZyFPEAJq3Q88KE+k4NXNtSafEpIhlFuwdfwQRtCu0yxROx4GuEZT6UvdjE7uByGH3RnZxV8U7bK5+FtJJTiyw8cFSmZGWmei5t8z6tGQn2Oh9QxQod3tN+5M0WMc8Po9wsJRdoc83ducHdBZTTRXBG6FlikDIz4rinNdt9xRmBafEUG1pDogd1ZomZKjV1pqEQu0sypufNDgFGYTnMA/otm4Msuy3oWS/xC475OljG3aVe6HM/v/LWXR4eOGZt/4h/k0XWW9u/zB3kAzuE0ZWvDH19v5GwToACWkIze1/9XjIjYgaqhztZSrf1ODaB/ekNeutiFAhjw94qMuvm6ZP0ucwNb2/x81rsZLjTn1ae3/EPOe1cVbnKzlcTR5gR77ehde0jouM8jBkPoHo1StBp4p4JEY2mll0c6fdd2iA5deWVlsW7kxoRjXdtiGrdJHhZtGIliRGFmv27NTycIcrjK+zX8O3ndcu3p1b99azL252GB4Kmi0D+8zZHgAhd4s4dZRA39080EwmKaLd++hqlXEIDnIgbTEvY7VGtjYzX/MuXqJ6leBm3Kl405mJouxxyCVia0yxPcc3Q2X1a3Ad3BwuqFBHPC4sTjMMRaqiMmbphdmnaxqNYsew0UGQwS91tTNmvEhYjagRVhusK9Xf5ghymd8kLqutr43alXVWi6XRg0rf9zBP4i6Efx2qmiYPjk9jhyZAg1Ql2mdtEfYWLhyIx1VX2OGjD9mJpS6tezgJ2VSLrgKBDD2ao6b7M4cuV+zQTOtsZGJ4Yxh1grisj6BZ2CBfeIE18juXMTwCFDfkzM01c2V0tu0ywybscG6TRYandVLWlv4+5XZMRGohQPkpcYtMcEBPA0pgzJvI7fftsnMQVxa4uKF7oqcmUxpKeYdWEb39vKFYnEvDcgFRc/vkDZ+UbM2a4bBjHlakBlw6Uk957GeDimOjsZpujfuQsvel+KH9oQCvZqC9tAEYyd/Rx0QoADeCUtQNHYaXsRPsxEhHeQ0Rx+4EmEoF7OZATDBfiqBDnY+ruOC7dJnh+3pyum3g80HUCKQTVvslWPuQV183E56B0lrxm5/SlIXsTW6dECXoCGGQ3QXj3P5hfatBZGYTmzhsX38iRs3a+cIMubDQZV5vmgmJbE5ElCo9MRGTVk5XKT/IPULghEwNJ3kZld0MIOxd4POQTCSpwTC/a+p3AypNXJTAmiQNJtBB8CtD0Kf00UWY6mZrjMD6KcYYUWV6c5rB93KnUwlTlAcgjHDaDUptRsPCgjgF+iHJzP/zVp0BcO+P2Cr+sOL/2XrGAh74HmFt4V8uMAyu2J/28LNt5EANdpIs6iZwwg9eSutzujJP0cta5v/01bEOwI6zzkjqnmD+VsOkSsvoYkI6UrB6cuZMuuwWYXexVHnxjaT+iJhwqjQm3xWnRspMnMT5AQqBBZJTaZL7wkp0nMTy0QcyOtoL62wcw3IHFUYSDTjesuzaTj8GDqiVeXY7+cQ4q8zpAS2n+Akg7zMlkSnCwm6zs6kg8VQTqNbzknbJxs0zk70uxUMMKLmGeX36LKpTt5Y3rgu6s4rTJ/O1Y262mEnYiAWTkBhmIb673zOyJQqC1N2S88Ny/ZHtSododNs3gbNCOjQsy+Osnrij8GXxQtfpOhFNW4j8i2RoJZGvj+X8bivyLbAXZI5A2Vs4IBtY+7K4xDqAvM9Jbya2GWHdAjpsdDCEMJIGQyHmC+wnzxOsoFX9FD1za/U1A+it9Y/G51h5/Si7SlJ6KsscO4G9R25QB7t1nEKBJ51k3mn43CCcz9HyN2RJiwIlrt4rCI/Y//NbmfKWZ5Kxa3gjJzsJtPErYVWV1mC+wjWbwVZ4WRpjwzwuO/l/Y4ZarU83NAvbIWUHfnupfqCD+tfePT7fdsNc481L9foRhNOKhMsOuJdh7aB10U1QO1qfChIlyQzo4EhKW8muggzfPi+5/q+QI7/1fcoUpJED4h4+uJagyT56PRqc6Ub1xS9c9v
OYuloOnFQ+wfftK0L55Q7JDElzVZsHMmVC0jhARZhjBe9myNVdbSOh7Nsft9++e1s8rhQuZfxj82b/D62o2ImD39y4eflCOqFch3C/J/rsYdAU7kk17rv0sfUn6B9sj+IRjSlFGwbNlqSeXPgcIc2V1qRhwqe8lKG18mlrB5lTjAgivftPGgAuFEy8zE7GHrDtl7owh59OUtNXsAlpwAWnAbYDhjmzPE0LL6mN2LPZ9DUFKXvPn+ZJx57YGX8Du6ZZuQWD5HCHzbn1tFb5XCetPU1zGmtMqXYHIRL31V3OBcEO9awDiz6yYMlj8oinBJHBueJLFcpDKIwq8znq7Er+aSQJCtg5H7NvT9sH3iVTJ9DP1NGadA00B1f4EUrMoOj70t5Fh8hqf3cRp9DJCyGUkp0ovgY7QjOBAOThUn9MMvSxdjigDJvfDmtx0NyucCVt34VoMVoIS61+aKgzTrS+MfzBBzKggWkYL8xkPWezhrGVkre46JANz38Ow5mLM6sNr+O587ObyNYVYU2UI0gWfmLAcAhgyQqyew79eNK9sfLu06Jg4D3NfHOe9P/XenTTfqP+bjlTmhousFy2ciIs3yz6ognIhbe9YfBo9bbf6hJJe/vw3mYsvBBdzq9wP9WFuoqE19+hzAWcWvLH87W1chOQiKABTx6EQ/zCoZPG9Zlk51MzqMwb5Z3C1FSx0OH4iZmG2kQchi0BMtKgUAJ2Ha1cLFaKeonLERmApClV9CjGIJ2D33LfJrfGVxiWNNkAW222uKxDlMCJ2ENtECKKot0XIBa1LLmKBrAhkrNojCRZMBBOedZWoIc7hVCIvKBPgcr2/tgkzOwP+g7AgKkn8KI5+5e2t/g75OR6R3axz15mbuJDJkvLmXQ44ySd17DP0Mv3iXL/tXSHvyaLzaXgzmH7m0DbtN4dRHvh54JlP2v5CXWB1J7lyhtgI2YPW0tRwPE7xPjrbUJrkfkGLtZ/wxMNgrZF02SNdGbRdIESLLmJ42cAE4KztyXzl+owaS57R0u2o6MVtGoI2oMZ2HVh9J5eh+4fh41CvYcaN0skRGMOhnP/0FiDrVEMfIHCeL933apbCxVHNMkiACETquZCXkve/TIpWcWXsrCjYETAJFO7Z3rq6T04jAlLi2hLJj4Q9ylvQgCCEpQIO2r+VumxQLILP0daOLIcKusXl3ekHLZw9UUejE7o5E284b9l9D+xd1dnxwR8iYganTwwcg2qKj9T3pzbJkhx7yi8EcS7HZmANpSjFUWLPTXEpQLlq0Yph+bEEPbfbh3GXCaoUGkX6hmd8NAZQnRV87IQFfk1S4uMLSAnAyjWpxMDrS4MsN6ugNynyWc7f2T6y2PMsAqyrgFpIGtOZ0jX1zfPBR9zGhnvuEt0bEzvxJNOnFDXXcIghmfV/t0ADApMGMxpdRi4iwkA/6cfuoxi314CgOcgKue6KSkk9lA1bLu8lyVJdlSegiF+x5RoU097D5/W3EA4HnjOjvQRpJEw2i89lmdTbYDCo/qSaNr8UHudR03oL0e0GeULgGzQo+w33aAiw727WPfNdUwG/DnuTbwBa2Bya2gKEHfknv6bnLjwJo7T8QeC9VZNdcvhrHmvo926YvDD9oDHHSiH92txtWMgegMisamelGr809A3dujd386Cfcar0o/Y3OKDoc31FXHZBcSVo8ddupMyeXQHasOZnrxqz3Y01yo/hHOIsFZL89SAszeT1iJhi5IywBW3ey2O42zRJ91n1/aol4RwyGBeIFS9QVqE88FERc26xxhNZ/R8pw4k5md7E39qngi/fALrsgcV3MNw8dC28YNJ4PNqLdlNqudn8AKUtH3/RD3tQT6asKpuZ+3Kj5HYvGKCy4GOdQ0fLBwzzo8zIMvyBxHvN0T2PqmOVcijZi/S0UqVi8Ads3uK5volRxkmV2fphxakGAJq9AnGr8Mm7KCh30FqrwK8antF22rRWbr+qG2lPeFm1qZiyUfUX5nro815OXFqde0oxprO83q1/neV/exzIN+DRU7mGO0psyjDKAfoVTUBdmNZIG80hyjtQa8nZzkR2s/Lymw7szYoUVvr79Q5CaPvEPGGshp7fLbN3x3KdsZ4ZHCUj+sE0qVWW90XSl61QJx1lE++CGJRg/JarTcWGBKdlYEbtjDFnR49M+U3gDnzu1TggJTcWO265oFf8Ap6+dY1Yfent4Y28TvO8NUXhrCLie4Kp7HaH0SJvh8XSY9w4znznJLHSa7daWpIJ54Tc9hthUSdd60+3XPZls8Nt0Sq7L4H5D33fj31GL42Ycav2fcwARX75k6r7oCE7Aj2Bx8GPI3CgOiWt1rITDM0mMmbi/TIwP9MFQysoRsf1LXo8YeuJ23LiAFiv7bc6ZSy+4hQB8s5L1JIjpVMTjsXhoL+aLQcLyFcwiq7xvwjFJ3RsXpOsRrIurHMneoCnGtIB6PBAFK+XUsyH5a9hc7oiaiBtaPgroia5WMBx4Q7hiOg6k/RGXQQJhezofBqBsmEHVyGZoOM8JYWPws4RRzPsGBRza5i8f1oE7Sqw+kKzxY4vZ5r7nJ158IvAF6WM37KVNArc5QMKeOUeUwAIqvfu7DNVEkDm+Fb06U9ToqqrwjpwlJdfIbQLQank9v/HcXDIRZvFZS63nYMevBQOSa3PGz5HGy3PKIqmWO5ATTFayGjbGs7mbFpE4t8hi9ZbGKqX/9OX/euq/6KAp+kdUXVKSoAs6eLiAYXIJXGP7mX2TyzNi/T8iXeQFnrP3+8s1oD1Wf9WFQ6ZEO7hW80oFAlQCFWdkO9x0Da9+XRrhq9rqMScurj5c58kNFnK3v9SRGdQRaOUSb93NVK4Z7pXvSpybRyIDK2muma8Kszn7xJO6PGXKy0QsUDgFcOIyvFJhgDIAa1dsYtYOFvLIrxSqQ/o31ugo1L4GEZ19Qjn+mnmK2rt9+fyXeD+jdkK9blG26jB5GCXKsfWR1GwbfPP1VvIBQruJs84KMH7vVSqsboQLrAxCcNXCqEIQDjSugGA0nUhMsj9d+GvrbasFD2kKW9b3zkEmC+ElP90uVXsVRoJpFET8JQ70+KhRnZzPo3ryzj5RjBO+z5VwB+sxJSedN0iqrCd968Rg0e9E5RI0zgTBFHwlKZzDwaQPeUHEGu+iXiCXM9RuHFCOHWsJK4neMV9w1BH1Xh/dmOfZZphGI543xdI34bzUbAliVbfl+1dAuyM7qRqfZQEJ7pWLR3YbPOp6xWPcCcSYLdQ/y953kUjQODcTBcBPbPywVbyqXbu4CqnXB549/J1BbZXZj3J+mQkpIpbL226SIIFMusryWcyOgOUNc8b07GGuzGjSLfyPAn1HQb24QyRKjIx/oODhmNyXZ7Uot9u0PmqAarLEZSVPS+6ruAMjey1G5MOv5hSbptpHa3/59aAjkIb3GUnz76vtOGZPtKuHrx6odN9eF3iIopRmkEYp/sr+fficY0frIB5IYHwrbqvcxMlp2dw4A++Wmt2kQKABmxfQusqiPmxJSfX/xbaYAteQMmUj5Jq60M4psyEPymmNc2Eh/btXGpU930lNvwW4BpPsXygXW8yj3x2wIP2LlbK22OeXkPgQaBgJviUR65G+lRfKNjwkDxiAgqzrei9s/qIgPU9C7ds7LJsrU6gERu6P7FJgpGcheu/fZzwXMXfp8OkAn4kE+FJrMuB2hXm1f2qm8Y+dDon3JjbpaNRArzEc9zW5UtKMK5SqpFVj+TkFTbXd7PTxbmrgekcQwzC9DJeYqyk36HufWe1HlOc/kkU92Im/ZrBq9b4jZg1IWdl8glpSkkof3/NIvgvX9+44fkp+VY2zYYS1v1Nz0yiY+jQwZBkx9AOd1ru/UAkwEnhGVjKC3KR3i6uaHx+PW6Wip+M5P2xKmYKjOgTe5VEFaRQ+Ls7qaC6AssXqdgv5u9X75vpv23PYkysKpkbTdMxLAD3wJOLhmzxOp/8cXFdxpKi7vTD98Shtut3fMXpbJxxvwpfNMQwmY5AKdKVPeYzYO3o8TON8V8dVW9G8h58RtBvGNoJEh3U15RPGs+HycLZmvLIVW8JM3eVyLO0KiMpI/IielINRoVp1fzBI
/25UCiTF/MU3+fts6dv7wIx/02m0A7nUMUoLJMOfiUx1jqOhKe4I1ljggWZCwMgPzlkg7MvT26M5y5O4kP3bDwUOdQsIdSOM2wHnh/vCysAuOZhZgM8kRMgyudEUTJhtbSFMuQQQDgjxw+F18xpHnTIOYVacisXgHvXGolPjmaOcS4Jbu4CwXfHetRvoOYNjQhDWx1yRBngL+gzcGnGqNglJQ+SdPgfqKG/VgNbJgkIzdUwfyIrvjt/gKj1D3VkA1Qug2HLwLI9dxlZCGZhP/FBzpeiso7OebTZ/9BJrrWwHLO8b8ZP+zj1Uoalrxjr5y+p9sN6ALKWWqd91q2/HOWbxFwkFXU1Xp/wYnwVmUiwdpfOpQxFo35zCXAlG3094kfHuMso9F07SeF8F9bQLGBmYyj+pHREHP27XUvYCLE4KKrHyE9u0+xHjA0HGpZl40mP221roK9eGUvmxm5lTMPfAFmzbtU0mY7/3USAr1oXn8p/Qe8p7hwGazQLmyc0tFKN27e38NBUKQ1gJMcgfDq+tridnuDNs5i9krUEmA57aCwNC4Z8br85U6jmQEevdXNizdoIxH9tbmkWyj1uCcMYpMx1GH8M6rabFmAZ9uJn95Tmb328uu0Pacpf5NRP975nHr3an/8cgTkP6gdh35XzN0v8sOKSBgA9VUdgZfQJh/vv7OTmtpkmPa1LZnLSt0lXIa5W+VKu58jTL4ZM5ZapNhjkxaUmOca9dcpjoFv/2SVa+hunSZcSxfqd1blZUIcHLXxRrS7KF0TNee2WXq+oOxBOxaVIbR3u6j2PIKbkUOFtbApwbC45z6nQxqv5eF1BNm9nPtqmyxfHmw9mrq7TKnT7Rv9LKbKPn2Jo4DBSuyRh+Vyj9Xl2GnwhPp5Urv5FrvPcMz+FiFcxBwK1R+0KYzyQ49QenNG9XeS54+PXNdmUQzNVqJRLBElJ11I6B88e/qTi7pSv6OYi0Wy6mqYp6EPFenSPdY6eZiQyxmTpsa2KA3NDBdr8usUGJNXpc7Lqf4tpwfTkYT7yw8ZNckGvidi4kZzDouEKhVgN2O+DIhFg42xD9ax4tLleZ1Bm/lg9saGRt6LxTLRcdsNwCfRdPU66AUHkagHbeuBp2r25bQCCJLqMidLnA+kDf25x+xjAPduZB5PKoH7sLlBiFdw2KXyUFPwwyg55Dot/V9x0yG4wNSFNwQrYY4Pdy40GwoNHv5XMPXalSZxERorG8BjSdCR2HBTDiLTtpZuyt7CrrC3mvlJb4AUToXkVPlXp6Se904DhYF4A0OvmIyOpI5Cgty6Rp4fRRbYgSc0ktkaJZecIoN90nELZu+TdJvuwETHN16IrDQzQaCrDZ7R1dND4bQlHp9/XETUvzBoS2LAKkF12GsqUcSKTtNthzSPtvjwODsUTXS/P+YUM7PM9A0rdFqjpmIJcbG+YP0iYti/dEikHrF603hEDBYo9+5Hzdyxa6vNSMCF4vWMTMb3MT3y7nvXjcIJNj6j+fn9q5E1AGsIihxDc7LvO8MZKWlpOlRN6+pPkwWlmM7c7rIFtisdsa9+m+aQwPVmtqp8gQ2CSBCQE3cs+nNrEQ9x4nbIOsDFR2ufD8O1UI165jx+zNJcqwReed6biqCS7dTROcDAi1vC21z/1aqkW3gHDThxIWocMH7AjAuf5ufWhKRC32wmlQcaivuv9bnyNBxFL/4jSUtuZ96NJNfIvMhMInC/IJxlVlbc7tBEYzVVkAlw2CMngVsO0LWV6VLMg/M9l+AibcFjCE6PSXGaIH8PpDrf1aGEeht+7l8zy9GGPKoFQaJdy/RJ2tLLYX1v2vWnWlygsC1w6/AslIqSdt2tDz7UTvAccrkkhirhH/5wqGEGsFrYSd5A99yoR7OVn+K1cT4WPILK4amBQVmuRfisA4hec0EY1zolGlFNcj9Dp02RTwCyH4suWLo3VQ8g4UHmotgsYDuEDtJsojH0oxLyF5sSjtnUVAnkC6HOgSXjvEZjdQIGocswfzPHo50/S4suLsb7CBCx8XiT/hmt7GZWlYhkpgpCZKD/NrAs2muUbczN5YSyCNutXKumE4+EyRoINpSxDWTX6GpDuRTpoWsfZwAV80vMhV64+qCJsPgQhEbC3MvWd05sPOvCDpBao4IUntSWS8YJzVMJugZKIdtNyMPyb+MyPvAIAarXWqGtFqUj6/BlnFDhQ/iQ6FgMa1e3Qv69tGN2NGYWZVSl5mLzBHVcoIbxvqng2AYTUEDwrFAbDK8x/n4WyUsrhoOC2iGTo1la/FRJiHsoXBBTq7f5HDGLPI8IH31D3p4I6rP58PLYjDQAA/INWcugxG3RP9wpHfcb3XE945aVl0z9APmDLhJnlNAPLWt/guGlu0Y7INjfGnCMzC/49nEdaxMxErdC8jc1acNVb0kEyQiatrcvNU1zrWa6P6lhlVVlbJSJPbZQOh9sbOB/NzNeBLyZFisQjJw7O9ibDIY+4darKjVe9u5nXDOvgago09TvBKQz6FNKGYyPAj5OqloNXOhB6lKz7aHlzbVa9pfSCaEhVZdBTECKMw4KDJaDbnvvg9pYhLERaFXC3+yByZl9C2MNK1qeuS12LCsbefB/OH8uHLXU1VwSlQmpXFnftzPJV22XVIXaVPsyF1fcGsPkSVOhOGn/6jWNn18rTzoaDeyB38ZF67ZxeAJD0b8XNqnI8BdTR+Ksvojcmp2/zSpkzZN432RAiTnKKFo2qJfXVOxZjMzhoy1vVWA/bhAeunXa4H3hFuQqUK8Oj0QVS565ZYZ1wwW1Q/+gAik+dVSmpkje8RVWuM0DCAEV0zKn0zAytR7t17mrVI5hekez0CkLbYou4FCEirCWa4ImPmLG9XxPWExwFRAnYwxX9wUJdHYtVNeUjweXWMVOHKwpoZ7poQJ7Pv/VkbQ7BQf54y7O70v3/cO8FPLunD7Xx92Zsb3TG9Qk72q+Mf5E4jJywVwDJL4euKXSmoNX7mUTf9jOCp2f4c3ruDzM3wP2d5nqeewEGoGj65eu9Bm/Hb+vJrwa9fgYv2gMBfpF8WGH4KyV9xoYWE9s2xt1DQRFOOyM48YLI5E+TQa9s9A13pxJkjrBnhF8ymoa34pBD08s/OMWxcg11Hcry+8jKQ+8r63uEbLWhtE8RNmr0fJuyJobEb4ahERjBQzEBLSd6SvGeyUvy2qBglB1iYmxUvX+i8G3ffrfGE+zbeAmUllOb7T5Ftzvoe8eY+2nVzQDBm0oHmYCn7m5Ytx4wMqBLos+1hXxuuA1+TB2vIWpn+F71uRHmU/xTDIooAaC1EiFqRBtNaCUnDwQDlz9i8aaYe9cZDaEVmJzdpL/M1K07t03Dnpn9/vyA05rv+GHY1wyurj2jYB3KbL+8ibwSeN4JGJiK3Lv+Xsa5kNblu4MzsIXNnAskv0tJkkijGkpNfqKX/ORgGkokFJ0zQPkdYNvlV7JQj/mRAAMy+NgIm/ra5DNSS3SBTvlJqFkpwtTMzEIj/AT5BwcBqbmaU5uotbtwCf/YsXaYkY1oiIsftn8gFPE/nnJ9bT4wzIQkcycTNDqRLDu4pG9/A/O4gOebxm3EnJGt2vb9npKH5Ku1VsuvyMc5wQMhtj/j/YWasUshUB8+R46OboxnX7Yr5xOYODZq0vLMe3NumV+TqalEuPkxlnPbTgSWb+0pFHRLwwVboEQGl7pcV76AJ7FKtNERLFEW+lgbzc4sOAJnODhZah419+qEF/XiNOlQysnYfWsEH0SQZPHAibKAPwY0bQxJtw6W3pFTDjs5Pn3+MuYUUHJPiEUHku6+GgeYX1kLFKgvNwDSFkZ5RT1R0K+JLlhze/R2inb1gHyEpEbMOZDRp1GONe+1i63sT4G8j1KXJYssBSH3OyDnXbx6Jt3vTRSEr4r5upfCBnZ+PvrTP9lmR+dhLj+IkfM9WYFoBbPZ1yz/RefaeufbaVXdbLb+qewKmWK5O6Y2TZAesTEZ+5HHdG0FSMk5Nb2A5iQ9pB97A0KVpHouqLDiVpFwiHpcDhkSf+u8Fr7tSlXdROjqdtjeVPdqB67rDTOfVkzdWA0/maXT7nLkfNRGRvBULMX2y6jzpe0WX
BahPs7m7s7tjrmpaO3ZJBwMbvgrOnj8vAnqEWuA87+MYVxHwLSzujdT+eKCDrLPJB8YHYILkg785yHKaZxHXIYspfE4eRr6R9EeK8g/3GREQJlHwbdZtStnpboondHv+n8HIQzzp8iaOykY55buDZsZaDcRqwCbtNExsg6bzRBQ+Vep29nv9XLFuxBiIRk0TpS881OcKMs2GvGzTBEq0VPHv4zODAXXXmWMiYbkE69SlqyNeCcs91Ky/wqT4lOCpejTXblPibBw3Bz5vCqMygTxBMlBB5cxE7gHEYY4P+d9I/tx8QUZWT4bJu8g/cg8W/DNzkAegjVNiH+1dUp/eK2HkdgMn7I+IvXZLop0ZP3/FoJ9PxXQBCMMLoBzi8Z+TxrDdIZhLliD8zYtIczMByL9ns1l9t1UrgBkb1AaOuxUWjKUDlXxtE3eRUqL+KpQs+9qrcYfxcpov06fF+kJWuJoRaztC0l68T45UYs/+pMc8pp9eia5+1N38NUfD/w/aYGnr2P1Dq8m2jDyv4zsw8oqSiEvj3DsAdv8M/Ga4KiBiBIw3goeikT5C7r/mwwSBpWsm/BbT3NZFYKIcGj4PgP3LDW1wC965B78XjQ5UvQ41M1+I6NqmQiymJSk6Rz3ROJJaULLxcWfItrcShPSJ/IXtykjE3FI6bH6rvkrGzdYasRF61EkxOmrRahRdxREh719GVdzWZqI4Qp/mOcU2R25coKc4py1ldNt81K5uATFcWjhfr3yjbGFun9rHZTyDlKlKTfzdOSTKT/PhrJu/5Kd9cYQkFttnm/7v0cACH47UIAwtovBjEyY2zjD2oHnDo8EbrbyQN7Ti4RE5nlUVezeZlS3TXQ7dZx59dWvqqrWpMwBva/fkWo0O/c05ZSBbp2u7uvW+sjG2FHyJ3+LxwRArnnAmP1VQO5JDvX3hm4x35LEtknTepuxZ/VVl4RdQ5S8Xjk8C9djTjPvXW0cin75vy9r/cunHYPdOVFecr2xTtpk5KHGZec1caIO/wtNMM2OmPZH4PRoYig4oB+f7Qota86f4yXqg2wl7E7WEQFgfoITFDlMhbEYltHUzTSzad+ys6KcQ+eCgLvbtHk7MZxeDFGd6bZr6HZhim7/5l7cj1AyF4b7FcSORcyzWtqIhOmbYK1qPAhe1nugeL76FITf4E2eHNImav0vZK7IprPh886hs0AJByfsZtmds7tFhZuX1eQYl/zxhuJYA6vLRbeku/VrCWNEdvxFF2R8X8e/OLJIpaozSbA6GTGCutbRhF7YeIPxaeNg+Fdg+6wtRuDskK01dDbpOoGOHQC3KCUUz7W1aP5gLMOaEScYLiuYykGQBZ3HV2jk3I5qsh7/bORM4cbETu22r9kbB5ZXmMfJbnFaa87sPJ4wkxgmDUgIeJOBBsLKmkcEI3+F8/zWaKzNkcRJdtkMcbLoslLYgZJwu8iSrEMcSESyZQGQqbvvUx/4A658PlVskrUnt9Vrr5wTkT1qvqxgN0WgcTvKErb2+Vg0L5Q+Vdam/k42N6W4UG59tNujZzNQivgHBrhhONEQEnw60vhJl2UG0mWizsSwLLilT1y7LnBMuT83rEHYsZcCFo28irQT/DdJrjrp3JCMmZ9Cpscm8kpKqQJPVtvpP69fxKb0P0doW51y8o00vGxme9EhU21tBBlNx4AjdDUYkfTJwM8stIotcOgO4X8pOKNv42pyN723pk4fHTPeqOAsSiagoDvVYTvGNPtFcGA3UVspt8hDGzwDVbC6eMrWWIPj6iDXwzd38PkdGQjHxpiIqAaRKdRiGCyhyFYe1Txug4iCSyti0M3Fy90LM+0n5nJtQclbn/VLfkBTxsMpiha1UhEsvEID3KyHAnwCvQTM3Rxhbt57CAoHCIFISpJ1JyB+6t+p5YutEWBsMNYbohFkad4uPOfVP/fTOshnY6tkidUwODl+N/u1PFiwlMDyOvR3YXo4shXBO3HmaCO59FUKrztNrEvqU4iD8IbIoSFYxHv8V/2V5HzG+Vi4TRZOg6NMyXZTTsHaileI/L58X+fwfkTFNd9xULlh8+dn3mDHN9Vjgf806Ezl9YoRpYVat1dZHMWYb6GJeoHosOJNmZDenF2jKRO8vo1pIWwMawMTS51tQUliMsDYjtPpahRga9M8/rZXMdUK6RKA9bNFmN8hoxjcxWLcn5nWEAjsvAjg5G0HLqATyy2GGrTIFNVczHeWkLqDTgGqKnqDo1MYWWlH/SP4nHZjDvpx3rpVn19Tuyfpl2CJpN7HnoBwA+jzBIJwhESLjLxRsKjTzNCDn7eAi1HkuOhZrWXmHAlY+sJaBnfH9tQRztO30VRc7/QzMgOv35jLPou5dMl+MvsmHT54B3blqIOIaYEdom8aDPPt9MylH1KZmvAqNj/ZxYcsB23dWCAHoToUhBI4wg/OXM5Ru91kgFz/Jj+Rf5cWCqRFOTwt2UrWVXfQotlY5Ac1sl3pjNfYXaJhtY8E5bdvnvdj4VIAYwfTsVooGpif7qQzT/GRlrsjGug0/0AV1rnNbpE0Drp8sHGziKroWopEkgIO+ZylkA6CE8zCwy9j+5e9gJiOKJJdw9ZNfLaaU/SzJMirgNCuO9Mhy69wiq4GDpVm04c1q1dnd/K8Hspm2monn/XmlNOZq/Po8bU8xJ7V82dXqSQg0oVem74DNuf5XGKwgmN4e91O/hhk8pHAF6GKd3Lkgy8ff1lQOyLbS87z3sO1pO2Ec+hlTY8zxNSTOvz6xA5LN9Hfz9/5dBUb46lBMm5SMHDewulV5mG12pEzdJ3Aq1n5lckX4NI0dz50c6GvxSJjSEOMMwYCzFUpIIvEgBs3S5tRcwR0dSYaqUc4Of8RPeIwsT9I4Q+LW48pHbk9uDJq/mZuWdQw8e4wYwplIsLlZ8ybEb2oSLmAYySGCT37WkHI9uNggbgNl5V0mIa8DwxACDjRdHkDZ+Tmcmz53zcPSnC84xDkeZZlq0KmC0bVLvbEGWMYDtn+1IcXBiEmPXm1rOcscnV67J0DsDuWS+LKQJXSfgMnxjwweU3S5h29GEjaUwSUEyX8Xt+/VAFvld1nF9Kf+DEIHXMzJ61lY0aY4rvcS3VZkgXWsRcXWcEqkroK5Q41MzmzYg7luSwYdexu8JZvaOITb4WrRJHaTYds1tRTapFWitoXjf/X9rvEvBJIx//Cp0IQKqv3nztyPDXNDaZ1yf3Waa6etiZVCL7Q4D3gQn4ksTlL/gwxhHs5jia2W+IvCKVzpmPIG5tgPMaVgd9MUqKVpCcXMLfC8VxWVmttapopflKU27PpJqMadVHmPbKlytd3Tu3Tv+xYefriOQ1gRlmuTiEagzWw2BDg50H2i+b2UQnGe7XFW3LdL004a+3eUwxYnM57SB9ZRAkTDw+XHAKSCQoe4Mga3jyEibKB/rubS8TBfOXrti15ECP7fFZjzKB8Sy2IFMFdbws7mYeg+CQBVHC5HlPUuO47a4WphFV63nuV9MuQZP6M4DqAGy45o3SlNr7s8Jw6eAn+AwlIMfGhSyTDxdFdsgEv+k68O4PVIeBUCnzFfI0Qg9HkLP0I6K2w0y2QCcSee52iQzFdaOzgSMhGZQa8LVOu13JnSv0LRr5M31JVrJrg1Rv46ysqhA1+hR5hTfs2pyu5yJN6WtnwXBEf9bZI2mGba0W9Y6isunIyum5U6ML3urXblGJX0BoBmP4P9J5Dl/IXywoGDhB9mQCfldYAH8sG2GsvHdMGPqYuyjOGaFd+tSwQReDpTt7LnXVJ12JLi7T/cLBrdn3HYUrPgD+OZHpb+AglRvRyuZ56St2rZPSJK3cTZUYFhvIykZmtDnw6BzAYT9IafD2bbV7NsR/NQlZTorHXppk108hHIkOHlyff0GZCekfMI73OAhR1KFzCjs5xay5UkYZZlgkwK4V/1GtRovQCsKmKrYRINibJadOZaM5mp99/XjU1Kih7fBWAC8UtRvx1yss1XJ7rxHwRw1DtCY79K4WhyxWgD49M/IAPWj8qzqLr4xfHf9TOW7qLdIsvgjv5En+ti39QsWvJTDir+YG4ftoLH8yhuWPrXyzE/Hq/K399nn7xReVzF
eFQ1tCnbscSg8UAVU4ZOzQAzPuIuBKA8hDMRr3pG0OkBm4D5pycDrlWHxNjzf8JvI0escgF9ObyJkeNM5kRO6aM3vp7ovaVMKRSYDCXD/53l6EJPQjnBzFMa4tdrGtbOIFGYN7qLPwbS6t/UtLfKrS1hMXLEalzAg7onYeCrl6cQJy+NU3Sg4RJfzhL3WCG+3+QWHl/MQ19Yhh2b3Qme6IlfhcWm0hBtxe92UyrWdJ2DOVQl6NQqlG/fDyII7id8D9HNK8TjIlmJLJh/8RWllKljJ2nCngiujwmK0uOnd+PSRIXB0BPpTw6/bzmxwxEfG4IE0YK9DZwrzWHxs/3QmjpM3YeCC3Qx3ymNc7K5ccEPgV3I4+qEftpg7CQwDKKL05bf+uSgKEt8h+HnIg2k1QS8DaUPt2VmVsrpHr4kI87d1DUMhXowGfcp01MzqrSJ/pM6CxVm0yH8ciSpYycgH5795QWIEfp8YW1wzsUbqhQfs/IHobi8DXfYmnu+le5jxcBFAAsUfVuZsviweic0h7QXlSUyvZiWKodaWC4315UxHX0JoK5JXLoT1hGG6LeY+1inji7Iae8nv53sKAJ1+eNaFZynOs9Hveo+GRzhk22O+x6b894P59tq9PaamTOgZR+AJvXLAZiu6M0FVRwN1mOFy/02CO+4gv88RvWVeSz7DXvJ/58OBucyajAIL3CDMExnRiI5/f+6TRaVfUEBeUrHXkDp9dkRxEzzeF89i/AgW8c/giglU6T7s5f+nk5hPyT+bxTj7RqHXFLr5wtnxgnud0S/MNo/5XGhjBULPse1n/AhadH93xwzjhMQq76bYhD4zzCzEk2OiV+qJwBb6ukKBQkL1f1Mvq+CYIoE+WEmN3SJMnT4OpENIN1pltJtACVMRXAEuqOf3kyVy4IXKL58O9If7lCYzFZbc5Ph9Z36QT2J4eKYJHxxY7mQuP1HnAqM7SToxif8eHAdapWpGBKoEGKKyQMG2lQIG2hujj8P+tiNBZO5Evel17KLTl/HPlMQ7N6BR+kQXGyzzN0PIifX5elvXsIx5UxmXNCvBwFGvAY9YdiV8c5WV+Vb8EFV+7jo+gyI3MBfbyIBhR1sYr0IR8nkqrFJxZlVAi1xSdegmpt1e6z5Yitc6jTIrDWkEvCXKJKCRVDmhxk2t7ghJAChbmOcFyK/RmcqujHDzVwVmQMoF7Le86LwlwlLMZgLivOu/9sEUBqApvradXMAn9ZXUl7zReimz0knyuJZgYV1lIBpZ/a/ejK2ZI0Aq9p5k9XaHvZFGjveYcKQoHSz8p1QGEYxr/okTE7XlrzJhjzDFohu/fbEdlvZA8S7fSZfmJn+tPnEXUPlzWtx2Skoxie3vj5RrstJitFm7fIwFcNTfyqAlSTN2/lSsYy7UcGLWmT3nHzKP9vVjtI8xYpt7eCBGwMWYiAzpw+93upcPCYkvkrutfCcVMPN1m5YaBgPU/TLLHc63UCeVpaZ9hMFNkdF23z62Uf+989NVc+cSlwz5QnNYcynQr+Ql5zMB+xWT7z23Q7ydJbWXO9mrMAszct1pQUTtdqBsEsT2dSfWpwaPbLhOb8zEOddaSzeNnpI82s+K+S2Fa2O4QQPcn8e2EkUgXojONEmdFnIQKLYzcX8aKLnD+Muc3EhfRw7IUWPJHHpcpDXj+HHr+9ZNyW7LBbWc15fTD3VRnYST8rD9pWBkfdIwvPnHZGSYG4711CFfNMVsxMe4f9yeoEz319nMp96O2qghn6f5du7fgSE5pZonAeimRoSCduoea5ZmCKXmLyY6tNZIW29jyiY2Eh2db03zzEsn6oLZMcaIjtAI9YXnZ8Z7JGiEoNaEVnhTQkT/mskNWQybr9xfpN9hLfuHY0wamygGHadmVonn4wzizHy9U/wuZOQ/pNpyJhMdgRZJ/29IYkvzlqYfWl+UEftypvKHdzIVA5Qt+KX1qNoQ8JT+YjMLmJi/GhxePT3BMy9LSzk1hX4Umz3AZi/DoPyUzBsn5xvVCkehEirQSlOfvACf1lGDa4MjgZI+6W6bVTlS72zt26ujYkba3lSvUGtpyhtbtI5wIL0udxwzKh3tfl+TR0s6H/4jpfH5uLzWcHqQDUWM3o5hSiI8adAQc2rs56+hEz/JNKSzJFgTtsiAd2pBh2Zyfet978UlHXe+NcA8WuJ1gKMrxoFwWE/neKWWcZqjcrKvAOp3Aq1LadfqsfE8yTCa9+vVk48soxQD6iEuhnIlPlaWbIRaGUFQZbORWC0AsCaYwFGe8VlS1gBPF0D3AccOk+y0JvO5fZF+FUb9NXMIcGoh1+AIvhkMsXpIV6S/8Ec8j0lt3IDE0sZD4res+aeByP4AyAjW/pJhDmkb4oB03lQhm9DBniQSXHeJFcrjbxfNZx009ariRT/uN2NYT+Z0Z+r55+77ttM/dJcf29Ap4+iJQnbeEFuXHYJtIcDvXsd6ZZgjElO7PUxHoqjtwx/CFtKzE1XxIwt7RKlQ8DNnzrKReC1+aiOiZzzaoLqG5oeqzTOVz9syGk3BgrY/rKVAutSpxiqJechol+oMN9HoAFJ43H+OGBj7rHNU/iOZXFbA7hJnmpiFbZshg5cU7qtTGlh+GPXk7DWheCz0sGujinNXuS9QZJP5un2cmIlKNWkItwJH2Cst2F7dKjMEPZ4iS37rYm2vxS5gnYy/RlZm6voZ8fKm+VUwh6wk7Px8gj71JJU7e3zODQ7gxICS5HTYxrGIye+3FR0gdmHfvf3LHJoGCtiLBU5xyhpectX7E584UAo1dXc0168PNWNDD4IzhFarixXvxg4HNhlcLuxfKqvseoTigG/Q7WlE47mAZC6kUuhw9H0ktLgG4BvMd3WgvEz5arLyUPQQ3SqSsKIVp3oqdqt3DMcT53oq2YorLAlAFXpgoskCrjI/CaA+sRxrUF9KWHXgH1JO27IYfoCCCF36t1gvK2texyAn5fGCQuyCbVhABREB+0BPvMw+gCAeP7qWyKX243aY0hQfPX2+vRZllCOJJBLAFStaHy4SoGvgkGlx3uIB9Ne+5c3X4Z4ramTAT3hWpCCAq+J/cXHliA1kD0AELM7jxgY3rZUFD9Mtd32fKMRFxKxeIaYdj/m9ytO01fanP+ylEjTXFIa2fHg6/nMyoYCbMouMgPqUe1X7XYFPNX1ilMODA1fWjCswdwOa842Y9xYMHigFR/nRHGO4bBNLGiUG/9gyOuvvbTuStW8ZKnI0gfouamhnVF4e/Fvs2XdYQAvirOWpUHGpUa4IfnYv1aAnbMIaqEZnFcplXLLFfmQPXfK3SYGkqd5j5KET1cP+nLSHV4+3r6CyMeKQJxsnBKwlMIGqEF4pYhM7CZ3kFm3ddi24pjLkMhlwmzIFaFnfOcFlsMxMnfc5gxV4Ncvu89mO2k//VVJRg4LTjT87rYSwOY9FFCY+QxITHub+bBJ0EK5Z4oN2SroJjuNrmV+izr2DYrNpruTaYvw/fOmC6wXzVdFkI2qhYvDTEOt6j6s+5twN1A7ki/0CxCiqdgjS84l+bP/VriGLij84oudQbXR1MmO7wvZYAazjMvSES3Gf1sBBwKkm8spr0l4RyYXJPao9Ckd/s9i798e+S83c7AaB1owZGG1YHyn1Br5Z/M7TuIotvN/0RPJvDZAbnp2BF7Js0jg5fJoKQytHy1hfEqDpfr2/AXmwL7oPyMR92Mb332B6DBHvSq0bXt/PQNezZDTzBAU0IbzsD8CtOEoCsLLP1cZn6wp2LJzrXj0YF/GmKsVS//aSn9jvNOkxxOAbNF3jhXk4ww3QMs+ROhk4X25zuR58Wmr+wBc2iPMS1oWdrTq3DLQKilDXN18d6JprDMaWy6XdzQ+d958c0WbQSLnVo2l8aKsReur50irnK7cbHkUpu4aRi7BXRVrcpPwMmnph7pCRh9d15Heh3FhFC+G+ypmMWlF3TTVoStHtvM+r/+Nzc+nWRzoGYrPMv4Htu4qdobcFol9iX99smlVS01Vf6GGJC1SbAGUNsXqrQBNGdIaScCX4AHT9OWAWZO2u418WhVwKHjEOBZ25wo5Ge6xgInnspIVb9b/Sh4qTtUiwvJE8lUJ
7mJ8hxfNU1/ltfLCv7u5ENdEuXMl1OFoD4xZRXjDmNP4h4ARRHFC3ISc8TEgVQWx/q7onWEcO0vjnRJyZD+yIKe8ghBPFQZx4FJ2SYutEY3raH5x+98fpJjxwzkG2+HtLrA3/3j6Mlvz4dkP/BPjkNG7+HVEUnmKq0gsATrVeCJ5ZoznFIWFRJ/+njX8V4ZT3GYXUedF6xzLFLCtOvkQBexKLdr/AWcnDYX4RHnjFvLH/0v67YVKlk1zsLeMxxMMLoIed+Y0o44thdw3BpOuVGQTzQcZTS2vCVcQoQ2HaK/BXfGWg26e7r+2FwS9UFTkfBqFd9/R9j/fkwk6dOYlHhybvpjKGKjd1Qyum2OHMxH9UnCmQaGuc9s178GXjhsSB55KyEjYLQsFOu+mQWnqPHkmvlY4I/GZWPXxTlXCOy2C1DcFUSmd764FQTLxzwkr5XO5fO+b+w7gxgmbtynkDb816+0Uzgdx0ie8tg/3wsX63mcFRxpp3uBMvj8989UFRh4+KXmFIKBryjg2DZ3rca+lRClU0VslVwZM6JaU2Xrc1vxgMm9Y3Zu+bEre9tfAqI3XC0oYCjKFTJ4B4Tqy1WjZhOXsbMaSKL6/qE8a4LSHSlPMQ1MSeG6sprQoG9jPq+6tjoV2oi+ibeaY7brmAnmlOwEhbqIxqULzBWubawqK5hHEg+wcYaD01uiUUgRTL2hXlO7iKGrTNVoMcQXBbXu3UzklR6gDDzy+4nVOPnbUwVCUFEGauywO6KszW2QLMVxs5ujkXym/VvPNa3vaXrD6O2H+wumHGe9jWsLI85mGq13UJ02aDIoMWDZm0QrKc+csbTVbTwo6m56C/adAlvhKw8y3O5s2saEOw+wgmM3OzDovYPq5yy+HO8EYOF8cfI8U6ScYvaq6+CSaHitEdCGEz1F9Wc5vu4E6IhkG4VPCXbD1/lJysYSa2PgEz2eiyl2Gg8q0cR8QTxoQsoB2bqQqvd2wD7rm4RT4kAAPQtiDQGSkXJkQpFa7WrdIv5J5ALnAH5n2UafiDkbl6Z8sNX6E4dtNqjzOKNJlZusTv2h1qg2ImmScRLdEDXV5BHRxz8T29X3e+lEl+jk4IpgwYCnsMhJSIvP3fWL6k5Oxmt1Z4YU/ONP8LQLf2FtiQvLV8BFPBD/vTcSllL6j25RIFwtSn1OYOCEfFXc3kXU5fZObHM8kJpegecYSUUwcvBVd1e2KZg0xw8DxiZ02jxpndIQHiN6GmICXz0kgKyCnNzJN3U9IR1lvFaZZb1dP0Itrkqlp/hlsN75av33nQ+f71+ZGhLzbgCXhMpUUHpZSLLERkEb83XZYA+SSCcPrRHK8+ICupI32bm/zd3rPp4Kb0WIHtfCU6isF5gsvD3TXi+ZayPclwjA98XWuIpCXybBZDCXXaw2x1yDo/gZN2BKmp11dNqIOkA1oCoHUC7J9tbUNBaCD4JTBf61K2eo+b8Wo14LLs559jZFrNFAom/1KC4UX5nPTjgIkxsVcDYwdcfhteF8WR8mlbO3ashY+Gim50TZiMA9AI+gYkUi1/Gy5edyZ6AiVL4i4dSnwkJLk8h1Ck5YO9cDIt4QTBBrrB5njG/Xhaaage3bQcyO0tkSvTHK2ZwqFK2JPqXiX/V1ic/JeBlmejBtw8Mp1ESfm150XuEvF7nSUQeuqqsEBAw/l4WdlY9jRzq2EL1r8gJcMH3a34lMwb7kogJWrNyZjjRfiFjfVP+E1MQlNLs+GEkmowzoKCiJPXDxHJ+1W4tsOAPZHXQwgemE691575SbgCVxZkJFqrGNvDRVh999OSA15U43cLQaqtIkJCtLSP5fIYNNK+f+od+84rGREhp/4YkTEopcwSdPPqWixnDGYlBe3IL4VzH8NTfhGUO5FUBjYDdH+OF503rU/kFO6ZYqUaJTBdi8KfxJ5ttNkiK0ieqlEQy/KIMcBj1jcyOPvfFdlqjSYCQ/QNBHCoAklosHZpEhqy7UBHUiZnyFGUX255ck6nWmB5wn98WCvr5Y7gsacIPrqzYDQCrJwboo2FNrCdAFdXYwiqmZ1nXEhlxJzmVUlm8sfqE1Pceq7mk4gQX8le7N5pLBN+xdE1F+4gQFt5Xp7DVNeWTiCpnMFPjb64rN5uz253ecWO1PQxlTKxke5oK99mcnB9pnK7S/59knAcKJSWo/5hdL5woDGtuKd7m5yvfr2PnXFIXWM52jE1iFqMnhUue7NIMIIkvqrLyoC+UPoSlxfoZbTno/ufKmQKrfA/rjKOr8z4X1PhEM5v3Gu4FGPnrKGRksmcBXUs8pqLWHQq9EjEyaXdCdSMAI0zMucnjoCCBtxfewa5G+If7Lv6cIeaDGEbOQaovCk9e0XwD+zloU080yPlto++1r/C8Lz+jhR9rVh2vobncTdtqvHb0tyOufCvmZO9dgsOU0d40BOLBaZlx8u3agtThqNjJoGbdfcBXdE21dHcbttJiOIS74CEVwfMY+WmCmn1JQgki2xYdKuu/Veh2qYnKyIG2qd8CtNtT93qODzBdC+Uh7lKcvJFYtw2Yjy078DvmPlCEANQEdqLNyn6AmzGV/IQFF3Ofos/WfJu84W17sbszjSrXKHFhsvxGURjF4SCczw0IEK0Mp/YBZ7Y3J5qxGuXDy1RsRBBgIRTR17JOaMPXONt9EYs4MRfN3W34XARQoMEHXeZftjOYBcuWOipHgkxJd04qyV7IaCFtnAPu1dzOoYruJjkZp78jT1MKDX3ZEPqMjP2Trm7XSX3MmG01PadAc8/rge+LSzv6mU9jxaTmsmwcId8FeA80hKjAID/9EN6E5/kze/6XHbN7jpH3WJKKbm7X1RoxmyNb4JE+YvVMM+tSwTC5k5hH+v8FZMTWENOsX4I7c9Frke5DpZ3PJkun1K44XbPWM4ydAvPcPnGqVA6oyIhNQ1e3Hl/97sYd20mB3ldwYSXueS00lBXz2I1S8fZvZZmOabYKiMVr3Ns+HHzMKbg7zCGslZXfz7RCnve1yKUmRDM2nOnVB1poEapxcqHHdy6wwLBhnwMCwFiYNdOWWvXqfPsu0mas1cIISgbsbMT27SY9VegJjq1YCr5O/RN0lpQCiHTpUwSNnB3NyCQtAYV3p7cYu06wNu8YnEkKRDRhS+6mVG52HCOqmDNUykwmpWZO2Fzc5BhSWDc5gBmMOYgIwTbqKfKGGdAy6BVIwmEb6enbqniIld1q8+0VDerfucQ9XS5k3HZfyXIev5NVmO/PeEKWEFZJeXjC2jZ5Ws7tJmiryQz+yyd8L8wmIqOZUiJP7Fh4xMLVr7p0Z9rFXo8ofwcP2w2e4/zjyI1TQOnf1VcLHQiH6xiNRaep89us3nMrFe/LFQteXHmqb+5mdc3VQ6Nu6t0kUcA1aAqtgG3zbsGoEJgFXm7gqealksXX0CQONTP7//L3wz21GrNRfHxgNY7y69etKQDa+Lr4gvJWoLhOmQ7mVmniz1p+y0a3jUADG1in3ebwkYKoyZ8tUMIHlPY/KcLPcd+NrgUEvYXjccxZ+2iaKO7023Wc7fKerEled5E8+p7RtC9Sb94sGlmq8n3xlBgdePUaO9PftVzpPy9DBGfqy2Xq3ldv/MLEqhdbaCwm5pU7aahTSb+zwERJB/9/MqktUMG568kVagYfz2yh14sPqrCYs57OuFN4yyTtqqLGaoygHsefxxGP+zE9VFSLQ4UKilyMFQriTgksCTlRfDE3PyPBhTw1h9xLsPYlEXeUyn3OsIEHC7UFz4kfa9pkAEvDqfrW59+WZDmi17H0yfGkZNRk4HoXd8uxFlsIw/xtboXqWKyrePn+LPGZeXR/WqFwZaoLZN7tCnOSL3rJU5qq/1jUQccRPkVyZGizV0NyVOr/WNEUmK0NXKFcTEcFgdpJ7orQHWM6L7rQPXfFOdd05dq0FbTZtQs0T1vx0ja29FKgJMXRz4r4YXn5TkzXfC0Pc4TFeQZsAb9oD6hGfiQtcHIWHizraBm/feKlvrpK1a2BIZh8lW4K57x5q0hzleYYRdh9atbKbOtw9yliymYnYpeTPOkBLIwe8yVNw35nkZcFTDh+BHVhQsJQ0FCTYcKUFqR5Hgd1K4
iVHAUlTGn5xKybUywn+9VHUMrsdk6njvvOq1yZmiLWDbf0n2BzjboDK2Vps6MWy6+mLW8ThYpm3/wLD4SQBavmTUtNMJ/qJMiLL65KKpZ+K3YNaKZN3AHt9IwflKJ8MIxejSW5q1j+TJ/3NG4PKFp9sl5nBjzty4vOndDGbefL240iWmn0VPQrAKS//CCip5OxjAGYsgWvvOQmqDXxX3uGaTL8F33JC00orjT3zN6mLh9mC9GszrXfI1Ag0/3yh7kitJMW4F1Qt5Syp+ibx80rYRSnFcYc2K0sTYyO9wphyKFBa80S0HIwZBpChzJ3NsKpYAmsBdwwZBM4b0Znh7j/JN33ACVfRCcLQxsDuVXlM+hLWsuzct011UmsOxkBlQNXQkOvqYMTXD/4+yKaOv14XyQ78IJasPj0bTG3uOYaB16FJbvraAGH49wXVD8ZG6Jli1NlPD4WtEn7uQeh/f+alsRTa5pmLnfIMkhaxfBglnpnxQkI27O+n5EaR8xFeQHMss1kYPxuLOGAw9TMlZgQMCnLCc96cfLMRPd7vqwnlC84JNjngjDgoYRaixQLxt5WT/Hxl29RJ34OPYbrJ+jyFPJ7Tu9hY6Sa6fjW6ahUONhKBO6QrIdHI0fWLT23nlAkwP6izJWvStYnJUAfYnBmQgHxbVqAiVzJe6Ja3tKB9/Mh+f8WroQi/dAop+vWqr/bZdOsKNnCvKmTlp4pQdIdNZ2NmvN1kmRNAChbhdtCCJcNoXqIOAi89npABwgmomyDtYVDBm34kDio/yHtiO+vLGj6+YiSP1BFicnip/VA/l6pnsstsZrUt1FCcNx6wOoMVs2PQbYAMt69EehuNAm3EzL9RlCHBhbdJ92AkBbx2xgTVW/FoMo7N/+4OCRGOKGGXMhOPVVVxo1KnsH8BTLekE4BYZhgk30+j4WxCTfruLLfhdTL5NkjGKK7WIz07GJVIVPVS5yGZk0TG5lDb6t0CLRJ0LvjinHbo2t8dNKrN7vEb18kc62FQ+n9hThRa4etGZdcmfFl/Ztl6435aT0UBejiM5V7XQjIkIPUqEsqwHQAtlO7Hu4t1lnq1o6jSf+62wFzaj70n9rgNRXh85IPgriCJWRTjxk1GZ/ZCSW8fIaGmR0nSqpQ2/KVbHFWI45YAzvhKNjXXV9EGJpD8/+dKtoJ/sgAzJgaKFibBpyiKYYJfhLbwUqcIZsd46mOmoB0aA62vCG5pyauUB4JitklD0Pnvvq9tcM8wDgoZkdRLDZT+6p3UIgxI/bnS6+hTo2WeDZB2fmztDJayNPefT1p3mJ68narHv0ToWFAcePENHj/cyxz8u1IDxUEGHyVzMajmrY9VAzOVlQQHgXEV2cO95zq3nTGWYYcQHKO+ZLnavL8zxrgWQoFQnv4AmJAY9Wl7e32H/7GKq2M36cE0A+fJIo6lF/qCMa7vjOAkz47KC31P0l56m1eBd5/iLFqi8MyBKz7pJJei8cSC/pfhcF+Oqa4TlSu2YxMDnH6QGbfTd+yzhvJvCGE8ohw8paC8ZLBNyTFm4vtFPQpnJXOkXvy3cOnzLTjh70P0FVuiPEU0HeMsMGDHDq902FDhh1e5kZ/5DHOYN/5aGwcfp4FSgYqbi5c3Z5upMfPgw9EdFaVoDGAKIRl/pemQEyyLB+G92ywf0AF2lGxTZIyES3eIhxtoYCQ7r++tJKpEJrwPIWXTC/JqrEg13PVybgvGLVBut3D5dkWSS792a+D/R/8gGuQPDPCSL5k1X97SI8GArdjGRtgIsL7lS5LJAe8eP9U9zhDdxIPxgCa5nb+sMCunxswzY7NtaqX07WnfCyyLlCqo6ikxeiyOrUh4ebkEpRMwqYOKPD45FaPK96E+c6xQ0AOus6OcVQ8XoKbOF7vwj/KZ02GYah9tFCq0+145abLnjbzfHrUtOiA8eB2gq2UqP7qcXIBxjBkpXjnk5Zf80UrB/gYeSWzAx4N4Li+cH7GEfNgrncABy4Jni9C3WXzh3v8N+Ne3YRq97pGEp6tdW9DelFUw0j0KPoanrMJgyxIwSf+cKKisH9m+lMpAwy+Y6TtS1J1xG/XOdv0pAdymubf9ahDLPt9BYDKHqjOYdLfPu0E2GcBk6YuR57qQ/QW246z8bbKgdS2JNGv44xJckgNtKM+qD3PXoed6h9pHKNX9o0/xwSACaH8CbaTH3d3DQvoVPvKaUv0q+0/9Qi0Ky8bsVZHNtjgpt3KHVDRDZkUq2aNVACEXNw1o0hubtwDgmU0eEjMxYVH4A84mhuaJGdXNGEs47ikQUL4EuftaqaRWFyinGgzSifiUe5AqV1lkEX06Lll/lFuRgpgczz3VdtY1QDqDPJ9altCtotzEtWZ2d3UUezYHj9/FQNe1cKqDvyxcOmaxIlZ0mg56MIu5/fe81rDqcZBuhPyUqH1IvEpHxK2DDp/fx1Vg6XhXrzbsICKzIcpRXRlhFWVcW0py/R8z7b3oDTIRpKOB2VWdxqaEagi7bj9LrAt+h/u5InHA62W7lvWiA7aNje+hz6tK6im1sOqQOF56igdlrnVKrXglO/obexfrfHiAXcIyJGz45ZMDWq6ANX2FkLf7zUfNT80vOCdvjswMYWu0iFdbsQ7GRpsQmpCr7spOvU5yHunw5UhH0XGY3zvO6uRVdnkT6XhRz9V4PZDWKdXJ6Mi6AZMyGndIMdvkQFYLvGzHusV09DLruxZJmMLC1KOkt3fDExit5ugnIrNXy6clLEPv95qilfAFrIblcB1bwGnToNS6Ke+TWZcYjjUWIA84QvmqWMFZty9sqKxNVdWFQoLpIeoMJOiyENUdY0S3p/3A6HGwbrWWfChwunnVatEhHvFv+mQ4Bu0JrVcbE8VTZpl2SA7nIGe4kPRck+c1CNbfUKEhl9mfAen5P2KSgAqRCh/2eSeu68JBrrSJenHF7pd2hxR47Ax05bdSWU2dk1yM4Mt9O0QOzjAnHZqXIbB0jyqArVNbuvUly6+602aSIl/E7BrCEmGosnZ5thxBNHAC3/hQqG3oJYD37LTC4/fBzGHYq2iAcnbI6ca/tx6x5kjD4RS1ui6BXhRh22b156jDBQb5ZofQ7q2ggXoAkQ4zfUvns1GvSe6+nifZWmKW1l37YA354wWq7Jxc/m242vGK1P0xEjAgZxtxw4NVC2Braj7nbdkDrWofg8M7uqE06VralOWHVZh+KA8oTRoxRFSkx3cowVsDWGPQq368X1ZybdlZ66FWvipqqzP9Kb7kaL3BqYYbjGJ9OWE3KGFeKPkdke4MkbyhPoT94SB2kZ5/K4jxMxhfDX6IfCl/LtKe29LBYWDIXxohcCm5OLZUwAM30H1dFY1TFBo/pHrWqWFWDPU0gAvDznlvzf2H2TJ8A+3bbdEMkl648KlCG6EqlzEMH780tH+Sxr29z5Ns+D4bVtKMiuL1tE475E6RzejXLj77T/2AEQQP0iD5wFNn1ZoX6vkVcz2Tsn9Sta9ZCheuLg+svi0eNknHzGA5PP5TKWJFl+uzrxoZua0YNPNKqOoaf+ZfX7L7Fz8+LJ6dRRgvisxL2jx+/EvRwaiEV8gj3SrukssSnHF637UDtBKW2PwbZ7A2f4YhhxCVDKQN5lG2RBA1CzMPf1gwzjl7xyOjYNs9zodRMpw1VJUenBC7k/McGwi9Yx+xVtG7zCmsJ2Eh6WywzJ60NaA2dokOoCxFcWWw9yEy8TE4kl4EtSSk/ABAa0Rluy9qZlERmRv88obFip/a7sfAreIKrmYnDwdvNhx0o4nEHL78Ua2oX6QLtDfZRZHFmKzqg9lWdV+0Ue0I/7Mv3jyclrk/wJBWlwfiB/rCMyjJDqc2yJN13sWZ7TcZTUyr/KFF5UAZyAh8NE16aJHS7hCvTyBcwNAbMbrNAW4d2ZyqX2aImNg1F4dqDxkzZjZfqFh0NLEMI9i/rg37ky7LwYXg6SBrh65dKcd9A81zpwn1JhZKyfWDdN5IN3rGij66PU9h4ATMOj9ltMUcroh0H/E8BUGjCotnV0JUQkPL8iW24JgSKDWj6RAVyM6GVWiaHgI/W9Y2epqLqCy5Jqlms+p4Ejlr/safZYB9CA3jD8BYw
+sokIGttPbhHGs2PHFIztO+40mFvLrhjLrpirP4nmIxJdl5WudjecUlUIpUNQD+RUtMiWmzJQise1z1UIlECLQKEKBzlEuicLrPt8lSyI5bQd7JKrOVy4WgE/U2Q9zy5L5ktlnLrxXqopDIlWPQ89LgU5oqVYnNPAR9tf2Eo3x67mdy42cxiVwQoaCizQaK2Bwu79Duz15427RIIGeCuuliwKdyZRF3s/5KlXptx5bGQbKCVkFQRJsOP13Sk5Su9k5smJpu7biYK/fhBH95Rc+5/4zZ8ApYd/ridmuxGGQx0936q/PqO4fCulR55FVa4aFkfIpV9st0mtm+yLxjQB6fgDoumxDK7d6ZCpcOmkAaEQizT4irCapnq2ztvdFPPCLzdoyyoUqnbV4OFMY7P8BXAuEG3k6Y42XtaLJ07tlLKJG3aBJw3PD/Pn/XYlvXaikWYHrGIhqKM3o8c1rC+5GkmnqpSx7QxcCiXAOrywZmpC9QWMfImwN2istO8pquTB0LhMxSqPNu1MEhPXqLJg/smJp5JJwuXQyok4gy+d1uYdlL9XQ6oqrHamXTC9Jw01NyKLZwSHJTmH7S8EbnUVBgHYMw0iLA2mrdYdcpoMj5rgfxgnsqOqIiX1kkEf17aXhAb7HLYU6cG0GX3xgl+l7Z4tFLAvcI2i4TNFfpttCNsfapm0kOSlgPKUopGnHcPpzw7mmqvihIdiVf8oaMRScljaGWeslFUYtZrTRlfIp4gzx4Iar8NsX41Cl8UJIb7JdmqC2FZC152UMUO8nxY12Kjq9EhRyLh0tWFsRdVSBa+C4doW9YiOztZd+GpyBCGHxRL1LOsCWkicoREQJxYmAywOQ8pqBi0w0/B/bIfM9JkhQ6DJMPYon0ObVxg2pjzu1wYTb+AAmDvdGFti1O1fMjZnYkkyGwXLN8uKaQpaNf/0s7C29PNEFlqEA7y+GV/41HYZQ/OY00EXGitNmkFTUllBmwZLNcIsNHXy1tAhMnVaZifkyF75CwJfW+P8YxbgI0nHWS6W/wAfAceGX/t0bgGNz9JUAOV1bKlS2CiTNpnErMqSUqpiZLIr7c+NDA3xHFKsmpCqLNR9giZ+Soizlg0wfHoX/t9A1qPrWE3wLxUkZ5QuzAPq8k/sUfIXo14skf8w2vfNhIJ9z8x7Any1639TzPmz9I2MIbYNl4yBcolEPepkh69hBvHK3ylH0kZbuSgoDDexFwQMUUUrLVj4YcF7Yny5E186+qnyE3ZTMsL93N/P05KW4xmXt5wVs1QXom3KaE4t4WtHoTw6LE75Y3Zx6KIuf2G2+Rou0dX9Akt7sVwlfNq5u6tsHzQekUvSopGwZHpgTGngT8DDSzKRvscZmaQhQSOyS0SPVdUpi7yC7yGneh5MbZ52bh40Ir1+fdfVzvchBCUksF8As9njSR6b0njm21FnwCc1vMFmsbH72lNXT88qLr/bjDw1wGmqW52IeCZ7W0aNIuoOa6XPlCtoSufqEG0p10n8gS1mq8TXT/noDHqnfqGXqmnUE6OS8W82v97wqNj9KWn5dduBvBTBQ2bGzmkIyvO7SpF8ePl9dKXqwfRin0IpGccpXZyoJ0s7mYIzrkaB4dpgsF74iRxSQcWHiRfHfqRYYbnw2SsJ2yHojJlQMDvtX5a6bd0ETmD2cvVAxHat2pQYPSI+SA3ZSVJG4EwDzE7kQUcg0MqmOgt/iXWhQNP7wx97pmWAVdiPLZEj7b1l98BlnkKBldegpP9OnkiB9NsX2TdzEdh9TjziVkywzgMBwo9vLmUA9elrHOWBpxeNTyDDGnyf45UCcDU5ZB74aRLUkF5ELEtnCWQfRN7EPjp5p913HPva+qh0qniTSqG3th9pBlMUD/XBdnjWXUaBSwemMeKwkxTAJqCANNdgOJ8a2F6jGwTRmY/lxMc5IXNKIVtXPimUMVOkREnf0sJqHC0Art+oAw6H4M+sOlc9xzymACUWKVU7GbKct/HtuG8To6iyNf0sbCYbb+NgTqBb1/RlK20jUmZdPbeHGb/BioFXW6DzJU0+gHFrf15X6x4l2wNZlOMqsS/eQalDHMiUE4MuHGK8zBR3Ee1ezN1NXV7MC8u4VwYV4XqjxbUZwlAuUAM6wXZKUgGuQOE8LZchuku/vmn0Z/TBSylq6O8rmJI+lHH4bI7WQ1cawCUkggJERn5rlLB4HVLivewGvAjNMZnnGU9uyWPn7HnZL0DgRRc/gOE5hZDFQZb0xSVRdzsfmCnuwp31AwnvD1lnIeKbQKPlyMRUbsV18/Yn6smjGOJL5Ja8rq7utFJ9XGC1FpORZ+F1fIRKSUiHbtrQEaGSCWVbhisIeqfxPqB6fT3pDlVJY1D8fQmUHJT2t1mYEDvoPGKL/9hKRt3YAgn4SjZ8QUwBgztanld+TijTUblcq1+GbV5OKqomML29Jmg1//ShCX518I39jk+I9v7vMEDARUI3P2spNUSF1jrlXp6fqreihRZFz5LVDR4A8wJcultQPDAaGBLTqEktAkad3Un17lQ/MuxOvEp9bhPYBphPwm6/VNv00ja1nDboPmYn+SCoJQBiTmdyFdqqHMxl3AE5N9z75IVSovIQ7p5OTtNN8tj8vp3d0SBhRNFF7aFWHPplWEEqRj9AJmpTDRZxeC09FJpM67/mdHeEw6PGn5n+CaTZ2a+XlbCD6HurA9eVPHX746On37CFF76eKKJ+cO4pKQ95WWifvIf5Ut2etTzyJ+8OL8snQDvc3c5f26UCeCv9GfH4a1HCWjH2xQcNCGhDN/oVRcz56y/ui+9XXFf7w1pwTiDt7GU5yiepujWOa6qBJ1a1mNb7yBPfrnga9Z/NHHB9KoFee0hBjSZoEVB55ULCl2fhK1JmDks7s97tpGbBW4kjZDlYlQhKDS4CGQ1WKwG4IYo40D0Lozro/nZVOivUyOjHX3OEDTw99ThO8ShM5Sf3xnt69UN5lHcx0gA4wAKnAQ06KVKn69lLRFbePhrDxeCnLi6zi6ue/PpEsGA3gxFcbLj5tjxgXmyMuFFr9KURNYByTfVQlJD9ymruE8G/FNxcscKFeBOG1NH3R4XZBJuz9Gwy9gasKnEpEUOn7kC9p81FIkvqccx3jfFfHkOc/oUW8N0dxisX+Nbl7MmT2mjDljP5Sh5iRv29h6fyy41cw1Cvg4sEu8H/cJvP/fXtRNm6ViMP6zK++KwYB9IRGcp/la9JGEtrD8r6CXAqKK5dOSu6qeJ7jrS3xOpiHaJNViOM27kl79U9+3OFCuJFD4HPoX827qXMyGzuNdwvGUkkrirMJPLGpTp/MgISCjAW2zRK1k8PdlRagbzYTcdCXUQqUFYFOOCbVSiyPFjJcpLBGGSV8tL5K25Mdg/fZvJNq2u18X4mxhIt99QQilbqUn6+taBhS8PS0/g937tbIPuC8FBFeubEFzz7/qZi5K4LecW/gXMinB3jYcmnSMDEeiFhkBxe/67Ql6YlxNGHY+aETYGXmkBfyXlP93hBoXTeKLfssPSPzqm79H32bno4c8krS8eNbxOeryBYsAaRlPeBK3WWrRdK6XdgrOmRKJhOJQhOMUnKnWbFraHUO11dJzDlONNLESgF5rA/NHqdFqAmggnyhAuZUH4K7tPTj1gk6++Vp38u2gzLSYcPI3UOm39rM7OaLVGkHBOQNp+Jbt4VClwRR5GQHouHPxW3L+U1DuYeCs4S5Br0WRC+qM2g1wFVaSSHogBbjNgssYCTCwXGd9vMJiOx4/y9DMdunfNmzyQIMVa5qVuv8S2pgvAwOTdlaqFnGKf2K9DsG37m6Rkk9etAuqP7sn7n5BZDfulEj0/D67+MYTU6/s13gD26NnbZOvA4/XvjzngX4kzfryhM38sk+7HP+DB+1OjNAcWyaYU8VjHLpjxXLrWC70hKuhuWFvMrEmu4Fi9TtOQ3+VstOUZ7hdk9ONGgvhrQ+Zbfs+FFRscj+8OAH2BDMQcHdfVgPfwn/v95tX8CCqRjVpVfm/ZzRlUZrbWjj41xlZW9mvu4WQn6XBJEcg6SW3fezLWMwXmehVA7ml3nzqZhfwL8Eu4/OSGgkNcTolCpgmNXEfzuq6d
g+C+jqxAdR/t0O3y6hEB3AFUbDCMiSm3tUa5cRbJNyL6EqbN+IATDOnZYR0V3RBO3ke30sD9JkOZfYipXSHWEKQVllTg8fcP1QPjRGNpzGFmfn+vP95juLtJGonpyTOIzjWTcuu1zkVaBQKfHKk2jif+wrfiHxVoyvDz6GJF9QWT6YLKe/Vr/MT6FSVMg+/ckEmXSJ31DJuAMMq223olJwx4M1ZP8G8znwsUfVxy6043iMTG29TGyu0aOMrUWTk5L6IohZUHBdc8A5TCFlmJrLmvf1Sz6EVpfyMDPGI4aRm69GhNaoGX75dHeEtaLfhC2kY0d6xsMUtZc8trwNCPvI//m6B2g8UxuJbPUBdRYtWCaQdFMevd5+RqWbCcii4V4odn2n8ode5xhcRBwJRNhPxG0K8VYIZzelV3wU4CcxeMZdk1TQdJPY66pO94r1GXs4KGTd86Kq0upgAJuuEX4xRBIoAJ5zksIYXwZXTtzsD/Wl15wZlzmbK2Qh0/mB/htrJ2xO/mJx3bAs3Yx10o43uOAjpHg5fEsm+CC5AOnK+cEpirnGhZXm/JkjNlCeyIz45kqnf1XuNXgKTvO+hLvfeX8JBlwyiRDv+Y/PSoA113BDlz+tayqFzW1OscnG+iZYZUEUFWmihX7+ptQ4rvHVclMif9gulJrk7H3Jf4Ir9VnAyRhy+8hBtM83JT52wAlB2VAcQ9XEoxheWdl0B3R6VUKvpBgG1Ocv0gZf+EBqupQo2xCokTJuaLhev/ZzcAmthxH2lT636G/RfWLwyNuzh4vfe+RfeSiBzddGJzdGh019eQ+EgKbV94QKThtFp0m09Lf+lzBvphs2PvcF4FoxNdSc5TDqtjCyC8sVs1bc6PrCokPDEo4AG4Mm0EhYMNI3ab3NGhlI9aOz/if8gD642ie7m3srz3iHh8dDknYBzImdJJZ8qTZ6TLzFqB7JzWsIMB3kBqZHaGJ6ibXbhnb4wAA5SzcQQyzuum9nclNA+6SYg5HNH+w8eAeewzSi6QtpiEmUsdRAUvioqdLnoJwj9n0uFL8ktNwsaT7ux9f49J4n4ThTfzLGfj9BCr45ayq9XGMT5in353SfFjQK6h2dIericfDz9+blW0Md72cLBD4A2NO8uM8HyzNRIshRmSRTcYCWvFnp3sMgG1yJdkzdvDbYu5DFfHmAZoTIUHm4dhALFmvq4zBto4BvSUf4BqwApPipLkE/6lHSHL5DSQqOqIXJiQxMJI5ZSvXvUX9emesLVoD+PCY4o5q59ABXoU2wXQ/d7Boeo3JNZbm5Cep+zNuqjgrovRAWCajEVaF3cDci+y/ttcCaKZ7/rDStesNemX1ORHycUuROmOsgK8GYFjvYlINyUKEvhUuLijZzhuNXFJmD/9B6DuvAzpBhOiZ3XAJfWTu8v4OqkypE5Q/H/zU7bYd5l57lJVaC+LAMrZj5fHsHACLkRYIA1xRNAaRRav6pK3xymwDQdSjf6sd/mJdBgcg95C6YBVeGFgBJwYil6ApOXps8+kDlQSUdsp4I6pdRcbaVI94ooE9w5LpyX4TYS3xqb6oSWZfDMh/gOl2Nj0gwLoyNHyGaIEEUNDVpwe6fnr9jqtZmdbjFkSy9I5nX+jjRYl2vRSvFYYw5QQvCdjNE32ubx9s6eAnGM6mdBtspA82h3WEGIlq6jFjyLILwo5VnvHFIF16o81Skkfoksf/+yUR2FklCGxJbamUeStcqaq0QNmh8jTyzjSoeQPFsw8TjMVeHgVc/laPhn5FDfhtVmBl9Ts88dnV9xj+Ukb9SJiPhCemgd75ao8LUi3VGzt9rsjxxY0HHU4i5vDyyYuWu7WY70wYKoTZGR/OPLATrV9aStKyBfZtnOGjxiI3OcBiGPyclWgmYL9SOwxD9p7iEPV4n15WD4gYg7Zaql97dS3bRDX9fL64AcNhrExaQAhy0+eGg9zxW7lDxw2lJvNf3+XOau+1SeXqn0dZHMDu92nJf0CiLwoBd1ZTt41VYV5J/8PnTcm9mCoO8BxzIfPYQgp6+1qCES6Eq3R4vI4VVzfcYShxCPG9So0bPQOPrJ4crzOhIwVTJMVWaUNXRFJmNlV4LmY03u79R88HYCCWwSJnZJLNL9KZK7Yo/uqEvSNeHumoAFKA2ZzXU9mqqc3lYLNMpr8zQUc+AkNA/uwANpp5bblBKjjK70UNJZFI2ul1B9yVDVjeQK4iO3RoEN27Qqc++usYslzbIfW3gYHLqTfVE6VExq0LnJwIagWyfsUh4Mcoqr3EJLQ28Rr4ltvuErvjRlVJBw/HYlc6IYbKv+KPV/34VNGMV0jq3NnfsGj/2PHg+EKolZZFdTlN7YLZ1GDrUxDo6jN1sCapVPEzCWbHN08ZkzFRr9U4udAvd90SgXzfT9gcyGscHolih6YF7BE6lQDzQSNrXAa6aQ3z7gCHLhpQTtFDrAjHW1KXHVL+pgGh5EQIyaEBAJINGl7XbaPJSWGNA1f2XLkyUpIfMdpulSeUUac6ZIAIHYlfF5l4AecHS9HuLW8eyf52tPtPGLAjYp/qazuBtwqbZHqxdsNQbrvbD56IyELksJW2ztgENjjvlTumAFyJmWfM0DefOZdRx8u435wE1xfFbH/Zmgx8vQzRe6WQ1MknD2fG2gq2QoTyN0hkbrXQk0v4wlyMldOorZmzOZSXu0dcKpJH4huDHBxDbr1HEUbdtn8/rirtwxaeYcfHoEtgUQ4j6juLC9tA8Owi0BSzkZNzhOzgO4gi1cq28OVd6ABVfkBIosTrPwy5CWt4JtlCZcZZQBmKIKj+He8GAYTMieF9WAXavQnNFObE2oimdQ/nnppjhacGfEX75ZTrkGwdgqGHZwyJ8mdvBdvHtKKRdkmx/KhKcIk3bYGH8dRpq2hzIk4GbTZHwcIRb+rlXUWHP6A5QXwZ3YK0ctuxJbT6eE1qB/DXBLmixogm0oly3nLPc03i4Qu4zq+YOvxHJkjBBtOzZmGHuKpRqMe0iJTqn+eLi8uNqzfbASO1pIOAGP8P0vSYQn4H9V8BtYo0L/E3atN+XGdx73llO4guMe+B7lDWBBcARr+Ra59Oc9FGMdxxEvY3IKXtj2UdUfcmjFwKMzv/cI3yc/wPuRUARyjTtYDrFauTVktuhGcU3TDL2cXkkPF098qt5UQ4GRBCDJKlm2YCXtiA1g/6dvfYgvk2hIlAm335piwkECobqAoObw1IXxZGxzCYq17d/f/56ANcTinCGkpLwXP9QHxxoV267Ia4NcAhn2wwidztle+IqjcDL2k8I8qO/csTGREM7zgLhYiZNUVjeOVxRF8XemF8YMzU4khSFNofeNSOxnLz99pn5SoKU1zxgBgfgv4VUMR69Obi+buyOcTH+27DhsY+OcEJlfSqlYYbiwQsUQY3meU8WK14Y6rK23+Ok+Cm5yAE+gM6ivy248hC+oILWn5jLSMv0NxwKFiBQEeMIv7ddJJs7hnKCt5/bcvhMbLV5C25saurGVRqssCzMYzW4ItjMxwg0LBEZVux1GP4ZE8aUgUvgvX5pA3s7/NOmOeOM+w8ECp7cH8C0W0ZNFdBEVIudLA1S1nkRkkEDkcg59ONGMZM9AHe4JqATOtf6ztUsg/kNXwpO9RDBRXECf+SR3L/Xk6F+2umYGi/pfpah26ERhMw2ksdWREJc9wWEmoaICvw/5KWoyuatmepQf9vEDunE2xCI2ZgF9vrVBtu3uQ0jZOHFVSWPoKlPbir01vAzpSzKwI26gq1FQ/kDM6KERWUxaHCL4hiaoQW4Gbxfuxb1DzJQOwu4mXpgTaRWSCS+ZkOTlOOczVcuzLQs3WgtCsINKQY1JYRrIBd/pWTV6Bad4bVOn45M2nQh4/w4De/Un+l7goZ1nmlbqo7bA0MQesK0iGsdk0SNY1tuyW5V6oKWBLgTahoN0UtszN0gdzNgYyQ/Vx92qEqopREXA2E7b7dhL/luvYRjl7tvVI3P9ipYGZZM/l7vtL12IGoYSecvG5C9HP2bnFj2x94UgcAUQrXsdi1pQR/8+iYdkE0kQYJnJXvCUcaDBOArmNDERl4JBdpIRiYtJnLxKRsxiFS/+jI+wV
wB2b74FTRp2W5o30G0JzEz7QMw6jtFqHYmQZPMddiq772560lsxu1wqk3ks4rdzOuODjwj896hzrYeCuUb+ue8fTuvm0Fv8EsGVJqCip+zlsowWdt0P1pTXOgrgUsId37KsbbHxLrokpWTYBWK2ZsTnmbkBeNE3APM3rkMnmpnog2018dZdiauotFY3CHkcMfNnlqGmCRYEV+RL57c/YA0aK4Vezg6b0V/2DtBf8QAzHpV5jQKkgEdlCH5r5NuJmys7H6DGlTtS5z55n3qWTFtomY9ArUbmdPEFPW8rqU23mpdmlQtI+rcFdemBtymv1kVPtvMYKqRr6uR2e9bGx4mzTTvucxBTVhrN3jcz9QRS63u872QG6EAavmX0BrE+S3wYlzexjUaDpR3NFriRdPMA3/d6LwNKZCchYyQxnh9bALNOS3kcK11ngXV6RyVcqOdPa9brD0UZweyfkavgG6nI1H/E3Ni1pGNPmiG6VQIOAN9gU9t1oCc7Fgykz/a6ig9Y5QzDcQVVhkpTErvrP2SALTaFLo8mRIbduieBoYCoFqR09dfDVDa/lqA8/Z3W2Y36kMvRHDLiIznitbYKwRnQXNUDKqwCtJME7dN5PwnzkktgABnbRSmFIbcis2ycEuZv/2jnFeq5PeETbzsBNUAn3aoW6dbsk1dRkrrnUI4wTfgY1eJhR3Ks/y9F3P18D43epJXQ57b1GFgXCDk39ryFK8bF1ahERy5XLKyBsyvAQrjaTrpns61ggM4cPtf8wtsT9tLlPJyI7dfgEfaZ62ykD8Y/wguTPNmSJiH0PaPzNHFphAnDrAxRVS/68ajV/jBHoKxwxItIJLB6+2xWluRlfpslmNXig/v9PW73u4CWEiFrK6qp7fKeI/WIPpccJmwkiTx1lE0R/4kitxwYj6jsuRtfL0JQ5kdRL785H310cY47ulo+FMtVIAilm0aJZMnWEQSEBUG7ZsU4y7f07/cBLCWDvP70J1zQ12nVSw/uYPJ5DbZjtJ77s88QPrZogvnFRpXHaJKnRz1ww1K+jm+twbW+NBxS3/uirDs84RDM69W1jjPwvBfrLh8V0QkT+BLI1af/oiGfK6dgYdqC3xnBRgZvtUmTdYQt6DZdwcc+bx60ODlpiIDXXVY4eTb5x4paOB2Vd8zJA8WxjPDg/niDspvHjxU0n1WVp0VlXMI5ddB26TeKCUMIAcEA02/GQqPO3ZXHWO3RcmJeiu6Au0N6jcmAA5Bm+26K+2RsH04xMlW+ShOBMvS3DC+K1d211B7J9cOi0H69+vU3vqqzA/LLdZBEiTsjYwLTs3Sp6vCfZvRM99YnBgCKHc2WpLhWO17spz8iuB8OmBrnMn77B5Fm/5WMOrQgpcxxRs1DMczayZc9q8kdfMR9tnZbzZmVJB5r9MUNlzBJEaKPGT6/mj9a3nc00CMNRCiTkWO5qVGHIMpKEKQAVeLsW2NVe0mtvJBdoomejQ91Stl7Xaw0jJJ+3hgvoYOI+JPk5mLC7sS4wn7t8JzXwbJGwkf/tRgyj/5xc8XEMPAwsZG3iHSLc90dxzwQ0QnKaI8vMhDngzsQkglIv/JoGehmsVCd4H4SQzcI0susm+FtNMIDHNPFCLW7Dr7ZEziadrZ+2aKfb1KzOjq4Tq3EHohqqMfsVoNQXU6vcIes24p1WniIkPfxxAUS0PIlfafbQNsYngEHABAAceB2vomJRoTQL/Hjd5FkV+oEOEyJhN6IyAvEsp/grCx8lVyMiEH8QFGoABVCiJvOJVTUlW2gRJ/8tjos/BzjE366DlHe/kdqhbSnh0Iqg2Msp76M8EVlIh7JrbD9K36AnrvkbeH+LEgLuA599R8StyEyEQCt0B/gzc/1hB44wXGWt51b17yt61lbjlqV4aDy31VKFDIhR7O7beSaDF9LsUeg9182WGrNlc1DYtMpTNkg4+t0Qil5QOdRQqqRnfxlhiVaCIBhYJHOTQ92Z7Ip9+WJQXg+MACUMro4Zmqgcv6I3Nqq3S9Gg1jX4n19+kt6K4Kxn9R4ZkZpln3MssehMZkfah4MLT5a8AEG4ElwMCXyzO9wLMuzJ+eH3A4sbI+PStttIzuY8J+Owromdx3Y0VCRMAO5z4S9UNJ64EDMlLYw+uU+4yRa8UG0FfiSyutCzLJrB//guQtC1RhazuXz9gieE1PMVpz20gOIKXo37H27NtLS8kXOxK3THmciThs0zLoh5Ffmk3FaHBVBuPJ60CmlK+ZKHYFcnero8eDEAVa44PkJCCyjOlCbV1KQm/rINWoRloCq/tPu1/bG1K0UjySY4gpOPrIRtrEg2YpZlR1QE/rWYy5f+XFADAsLe6+xBVDGLCmDze94TdteGtaeKhcxkhYn5hG2+3e29H3NHlbWB/QAiPr+OHyjUvwMRgCnoGGlg30B05wevmL25SZ4iX5RdQFyuttvabyMxK2UwZ8V3ej1B4dF9C5rnPH8GwckESJW6jKpCDqSxvMVYMVurIemaBtie+4BYOq/oW79IGy9hLt/oUnMMfy6jinXUd07v9FcZsW/g+nBCQmqo/w7aOZkJ13/YZhvW29blZNdRjcMwnVx7ng3vMJGXGjImaPEl3LohVQT9PnVJUUUzaT+i66yCJBMiRiSrXIg7Sy7uDzwwXih0/YLCZfsHqQcRf9RC3OVST65hgg4oV+xKJNZmChI2Tt4i3eQz1a2aGPvx6m/46GR1SNN7+AwG3qe1W0biUVDip6DFBZVENRLkH+fcqgdiEl6kzxoZB4dxlWhL5IBNy7ekFCjISGU7pwHMrc2OJ3WbKXhsUZ1Uvn8E4O5zocMCjzdkAxXRYCl0MGsGond5yZuWWFnl6M4Xp/G6F5IEROsv8jML9aB7Gs0laxGysQBHRGLoBHopWgvD0PO7bpxOuxnHk+aZ8rHerFoWr0x5Xc5PU2Doi7EEwP7v4AMbnRb7rlnP7V/i4EWtrs5ofrO81JxAqU0tDFeD76M88XKSjNHPlzwmhSZwagTG0BXt8rvilZTP+asYRi/MLW1AD3TQZz/R3gMLZj8UqXJtA4zj45W+WIZPBsyFI32G8oaf5lrIb9MVsnB/s17GurnMDLBcPPTXenwEVwTqrM+FaI/kFhBtpSv/F7oyDICxHQj9ygzR/d+EpNFbh1MDONR3wMCbrHCSG+miy74N4AmDxSLWYC+Ps7H/Rcxut3//qq62ijxc4mbE57JjeUIT32W8EUXt3T/o1pHCwgFou22cGWni5MrTh6WNOMsZ+j9qjBCp0LPg05VJfVtCsh/KGjdNi7qAVJNqm51em5xNEwt6IAK4Kd17CAkE260lAXvWw0x1VilVcAnHm0Lju7Jm1QEx4A8t+Bz4Dmkje2c+r9Y7BHiqgy8lgE8Hay14fIHRw6WE5OnCebS8ENrcHHDk1eKboLFkG2DNj0MqqQFBCe4g4GjkWcdfO4PBgN8fOdRDy80cuELsHD7kE/bvv9R083sKsPtT9ZvAuD4MAdTbQzwMB/cD46PyTVg7+n77aS4FFdIx/hKJ+KZ50K0gTILp+0kwCgPXVeiXu+py+5OgZESh4pcfahnM4QW19xkOCbKj/tqTZRQOFBTZ7u62HT3jOQU4NEJTksvX4S379E+K6hKiTuS8f3+tFdjSS+TUGph++shmMa/rjqUv8sn9ovwrqJhIC1JBrbY7ebExlgoZ00GbUzVG/QQ2Ho0zII8sZPmMDgvZxg5AMkxCUd9SvC2XOP5uqn7XvBgohz/x+JjbV+PGyqo2oPMICS568anNRr0RkumPnlzuCBcKvmbp1iqxDxpNLKeJzmbxmsceJUroNjrL4xECG/nQ7jM+7G4uGwkPeWZDlsu0q04clqxlNC3s5HivhyY5YP9kSkiaqIRz42KdZfYPkND/mooqkxdqu6jimfCAroj2a661A/fr9rx8HRQ5wjzkqgGdVT7BWcFV1yjC3xnrtuz1lQ8BK3TriZ9jVLuyjJxBD/vz5SJ9UkjntVLLc8ncVb+IfZfMJf9hn54Srtr7jrL9ra0xfqChRG9y9XKiBnV6yKUhD67T0WikDls8i5QjZ35h/Q5RHcHkk4T4z8XNiIj/N8hU/e+HX021pntO
F36K8LPqpnn+yalWLt857Id05Lsn89YKl+E3k7UKVC4sKhLFk0XlPP6C00Sr9iFJU3gtowjJEx/7b9fbJWKeWnK2TefJMRn4sBVTT77OOb8Ho6eatqLmUNFHEI3KxKg/8DTAaooJV+K3uhkjM+7v5PI6EAWxml68JHFF5sZS8YdRu+9NQltIRJDh5+anusV/rjovO+mPbtzzVfuXnfdRFE7QSLPSWl4qff2Y5nk/sqCojETR3VmtiqnintgGv9mZLlWr0RDf9w6i4vXKE6z6rJ39cEdGrhMxhEThsVWjpUcR7bUyQ8Fce8bvkl7HaYE/gstZ6EXw24Ad12j/yOL1/V4MH/sVl63Jb46QkaCEC/r/6euYqh9LdlCwvOYbd6UKxFFLyMbOh7/z4ZopcE+FmKSY0/qDh+dmG2Wo3rksKz/VeSXauNbz56Z9dFq9nDW7NQ/2pHGUtcw/UFsfIq3YZR3Bj6LGouS5fBnyHWOkZDoG6+r21IQ2sjuM2XQ1u9box1mm3r/+u4Bv34A6qDFKOdUcwENGV2NhM5/A9ugsqYN9mvP91YdBEODxtzmi241gencdhq93BTJhr0b8cDYrz3HIBbxyGEdx7RPilm4/jBEflRWxWOXldHgJkdQTEuwpDXJu8/Vz5+2p9jvcVt7BAEeI2pF9/p04BS9KCfCetfa2gjLJ5mYHyA9SmYUSwSb7bTC4RUNAizJ9QPFTAVEQ+3YlDmYbyMjI65pT23m7kCG4lOQqJYMvlgIA7030TBzI/qdDfF/8Ksv8IvatmaX8b4zOp/9x546dEcyb+/esanAS3rBdIRtQV4pGaxc110TZvHGHsGIso7WVhSOg6jcjqCZa6OrJhYFVkmCg1cbEnMpDpaKqBJYDO5T0wMs+kE6Vp2zA6ppmnWcOzWNiBBYBUk70LntsuuTyY42BdeKPPJqVxtmaMWXtv2Dea5QZ7DVYb+Ni8Vl6iDBH0uMQVrQgvyU7gddFHo1D+yEQA4xcmhWr+jP/OSMho1HlzYwjMbye3TFHpAuf9CzWr+NASJ49SMQh/lhFXPyxLJtnyfhLGzY9TgWJ9Was5/XH9haqJkHqfGGzt3BZ4LWHtEKeejbnZZFa4Ci7WQNvlAu+SCfPX5tFQjZTXLfVmp0gHUdMAI2QH8/SRz6Pju7ADWHrQytRvtf4dGYcMeRbtrccgUYSHK9jYgRlmjuG6oe6q9j6OOogO4T0WDbsM2W3z6j7PR8ATmMAM4qRbJxvu+TxTxPWml8byI5TDMhYZ/IzcLUe3L8QEHx/UqR3AQ1HktUBRZ/xPnmgoAZ/jASQVmgoFfILQ53dF4FjZjnQruzVIUwMgF+flC15oH8ULM9+X5ow8408Sp30fxY82d0YrzaXhXDquQAML6PSJNDCT3dJEwPSzvyjdjHKFQjPrFc/uOpTWAHrmqott7+c0jHL2Vo2dAAd7g+uqdWJMzNWGfFoAbgpDo52y8/9dZTfYPYeU1ODbLGa2TEJ1snc/Y8zlu0MDEwfPORC50vpK0epsgmQvi/jQIh4M+ernLi8hg7ulcj3xqBhmRTeYqv1c4KqPT02u7fYOrF2H4Vbujk43kam5X57x9YQ1iWnNruhjNd2+vmNT3bl715pSkqKBHcX9c3E4uM0w9I8FVIoE4Y2ZT2csuymoDTxYjyFcwbihGKw3YPKYH9DBwn01u6LNPM94jK3NUDKsqVOhgwn3LpqGWZaUcHIo51FCKW1lihQOgy7LIqYHiLrgOTsDCWC3vzzCUMFSsNfz3S+K9eO6TKdhMxFKwr8CGuEuJbkdfjTSeVm6mQaQok2TknWM0b9Lsepr024RljgztbetkdiZ+0mUIC6pRs8YduXidBJyrCJFSyJV8m7JPU8vcBKXBivKIRx/nmTzcoQzVfOBswnYyxsndw3C79QITqK3dgIWrJD5Ge6CIZlqPA3IrEtWh2CNYt1hcCLvkoHIgAGn+AK0crQStMlyHotX6JHdD+YGzXvYE5EFvC4IGYnK5P9EAFJDsY4A2yS0YwpAkABzTbByptlUo9rX/2Q/TtP0tRpZeuSPWaRJOGQdC5Sq/b0BG6f6MiBCna/L03GK9XAKqRUUdogkmVGmlpZ2lRIheIad865LdkFrfVKeenS52ibpLjEYg3gfzPKSzZLVkKo0HY4hojdXCZFsTcnariNEGqcC42ZAOWu3lnnzdbzSvuvzKiiJSRnw5SUYKPuZza8Nybc8QpWYMRhbSsiOiwqLspNtB4fqYlRSBs+CUzsOGe0ht9ImNIZGGI2HRYll+0frlJENZZrFRabAMw0LUj7nbS3wgnZ7QcBD2aKOOHL4b0xHiSzNN8f9f5TCdUa5heVoMIFU4YhKVIMtdsrLtRSq/BQmDAC7UF7wmXL+1T9gz/bhnacY7Cj2qHzeAe8a3jUe48HM1B34TZ55cx2e+6HjltRNdeK4zbjRGTtmcOpYEHr7EfErLoE1XwjxJYQzjEEt5xb+Y21RdLpO6suXkErVU/8KXIzCXFWzik0Qpa1lLWduCebvgPkHT29/4fn+kqX/ErQy9QztM+/822K7i0X4iTkZIakzpKeVPEonWsv1NvUPBJMeqhDU421eiJIS9Oe+BFisBX1cXMbQUspizBeF1yww3TaGlUoLbt+ZakLLcJ2du+r0o1DUQDe16S1VSlO1FfUdFosVMMg9WiaL7OuINQ5MQ4+prNHzEUV7+/E9L7q8BQZPNGFf2VaiMz4INhhmxzPghd+MZRrMehOl7/WuA62JR0knlQdDaIIyVjdSyKzlTFjQjcm9cW1oY/UOIJ4lLsm5FltY86JOpIZDQsuENGBfdUbljVG6N+SC3g3k6TUa3DglS/NNp+hR/RGS3k3AnuXtLiMrfUjQB68EjGuiDVAWWvkr84pkW90kA65zdv0uG7HfFHf3jEhn367AL4Qz36IujsQj0tEbYHDCZaAU0lmrrc7nt0m83uEm8h75EKOQ3orL36MgC1yh18wwgpBexV5ev1erjxxz/L+WobxrHoWi6mAO8aiivFB0V0VrLPX2S5t8f2l9qab+D2dOE3UfLaEfc2fp6TzGQtkDBqgbXAOCIL61DdFW6z333ZeMkEYwy/QcoHhAZpiz5G8lczdt7WotI4lhql9PiK6ulzzW8UL6+xagxyUEiC2rZ8kX96W6YedHWBPvr2mNa7QoJE4A4PJJSLsCh9I9kyWFa8pFoaCzWhf8yMr6yIcL6C8F0UD/kBURaOuIGjTejvwcwBcJhb9bUXm5Uireom9HHJpQOeeC3pM8k8Gx6buY/9AKur+O77ikCF3fy4CVI44BMmvrYKA4WriaeH6emKOvrUiz4JR8ZOkd1WXR1Ni1ZCxEceQh0sPn/ffxBLT5d5696U/MHNT9c8vPlCOj5LGG3WqK1ujm6vE4Kre4bEh66bRgx1iwYjw/H2RBs0msBT852rxW47IgRZiwHplnmkSQsQ6WkhH6UnIAfeNYrZ5n/Yy5G3Pqqee5MMujqccgDkZuVxFBtQefvLCfdCB6/4DEillEhv93rCQI78b6ZOGIL9XkN60qVzbEMnY7ejR0+ZR799OmoJpnbsKC5H1nqvxDn60+IYuKkeyyJfFZT61MZCzc2Dz/W3FuxwjP09ViI2mVCKRb0xwYNUE5rR5AJP8tLHBoQqINuRjj2z+1cgEOGd8IQdztz3jytlrexbbDefJrF8/2TY94mSNeC9zVXaWkQd5eJ6hOWudnGhjXahgmdkZgsMbZZ6tZxBYZrGlyLQqNAeMsTKjE+ZQazTFM/kQrtx1XeIIUh2soqspWcQohHlLrjbfZqwT+7XwjnFX/CuM+bRG0FmHtvyAgNpVjCoFiI2UVGaklQAh2Nn/PcQZn0bP38y2BjO+F3G6T8UfvjitwDwpLXDFqOaf+PdoY10WqfewdmkooNY0CiHX7mfGMj6a6H5Xn//DlKka6LVAQedQdz+AnDpOpjsvcFDDj3bicaIE/k4AjGSKU/4OsaC5pVei11KhnfCkRHCudhLvh0sXvGxCEWhomf+2TQnB60fp6Pv9PqQ+bkkQB7k4GR9msd9nVwzicbZ/d6prYN1vXMFP0eZO+CM8xu6OKAswuRsLwx09
+o+oaMusg+FDuWxL+OgeMCHXDs5OKAFaBwS3XEJE8AyYtGShUw2Pd0a769/AUm41iqJfgUkPYeCQl5WAjToUQevLAxbDPVja85sJhGu5u/w7s6xEaCoSK1D1jWIH5mf5eOgmc5m2R+dRIrB4rOHhNWiF1E7bZgogFIcbHzEnd5l0IqK1/oOPRg+8QO2R8PWIASLvc1zmbSgqUPjTHXsSSwp4cDQRQU6BQcOnbBh4Uvs0n1Bb+RTAEcE9CYFKVkIBIWq89Ivd2abiHCXVC1HWQQPu4pluKo9Lpo8OeJsr8GYMXhaWpJ1Od/XRB79MkM+/X/wT+hAkulI76ihFGCZ2zS7HP6SwDLN+8XsLrRJ+ba27EJAdNvwyEDmJyYyaNc0nMvYyo4wADOCmI0J8UwMHU+W5pXibhijlIyZfGfIBl+CT3ZJNX8DB+j7w3YzEzvGrFNKBmgf3muAK/yoEWm/vIIPT1ymmpnO3xyvjQwwPvpoF8B7HfjdUvMEDWa7QdU0IaSIsQ4laeBHD54mVQJ7lmdrAVOu2KQLV/CwUsvE9mJXybXqzHo2UUokwgXPpFhPdw/1LznGI0IJ6i5WWyDQlaBjCIVxzPv+HXEPmNE1DO30+Ooq4OBmBmOirzXTWBJ+yZ0M+uZwrvFT70QUH4lEaQ2r9JVw5PCdJymR3vglniJG8EkjF2vytulTGkzAsiYQx51qU7IrZ4TN/nbPSCDksqPBsYb6mO8xdcF+f3qdeNv5vmjnyra64QtSN+4ZRDQ9Dw5y44++/PDdMh/A7rwDq7/al1cOl2hJGsrlnwUBI+PwsepDQ/tvon5L7GBNTjtfW+hwsK2lhkrLsT0InO4ZqeJG4M+zHsX4miRjdBcBeJrzRslZEnDO3xoQp0xVUxErDGj0OhiUoStBwZ6dYMYSj0rLFQCm/wkn9FjCRz+TvbOqcW63y+QmZe0Ehq6SbYHSsLaRO1+/nECfJ9938GkpqxZeubJq6Lfdm68IhZvKpVzTV1kN7tQZ4d4uZ/AdjdKAO1Zxb6cKJdiXIcPXPltQm/merga8smS6NQTqk9DQsupKMsErgJsWH5pZREpGvRzR70QcgPEoJRBDrxUYBpigLtpCSnFAHVZMuEMgWQCX1RcwgAsPehgn4kYG9Y+9zBLP5jjkl71TZxPFdPWEFRZR6mKA0wedxEhe6z9U+oenOa9S121A8KsKFtatAJ/TePx8QaiXLJGG9I41tMWo0tfIAPuBTIRs4qoWKT3GeMlWU7sm9AO7rhA4WZXiZ4C9LWuET2yfJooGbSAIcKGuaAyeGFEWdTrI1UqpJ/jb/Wi6HSwIpaqbmm8alRvsv3+LtwrYZkyI6WMpLtJquci+poF8Ee/4yEenZsmQx6rB3npfMBhgzsrbahkNQZOlzoVneCN9tMcMWuDni6Kd9ztgZo2jO8SQi/KFZHMcwulZXOcyIjXJIDydBV21NEgXrDjdURshd86rh94ws3jG7VC1pCLlllg5X1819HfFCsudX0RP/ITXPs1iTksBjSl/DxurdNmI7GOZAYr6ECSqAt/fX8zvR8jaTBvhi5gx4ytbPnRyYpnRq+LVDeujCjx5rYOft2pV2P+WuPOgb87oBog/bbPELnD+mUCBvoEjJWM2IOWT2Yq4/CI7PaeiFs5Nqusb8R3RIeJsf1zp9UiKJZiNf4OISFFijhTrnxdJJH6ba3tEg8vyXVnBeueHi6xDW5Gi66HPGFT9NOipk+Ni+S/cntsG5aLE9f6QSjk7qBeI++3eNWCct6qw4B3Ez9li9KFOaQCZF6zHi+DWPzACeYeZSG96g1MVJCpucPFmtTVMGMtzSY2qGiAmK4gEabD/TZwsloHxJC0amxiYHs1CZcW8giGHCxOJjHb5Er0dtKO9Mxgl9NaqOOF8Mz2T1G4nUdkh0N0C2ZO4XvAr7hk8HWdZMEAw+C2VXAbFTY2N3hTgQmsFCsfQGhIZyxrDxPVrvAdWQeBJuR7Nqtaee/kVK+XV7GEAjpmAR1poMlNZr+IOkNjOhw2HuTbrEmxYJrO5pDW978J+sUNyw9dj5Bi5EThNyrVfaSmw4BCVnRb6zlG4b8YWiYiwqctFjlPW0N2nAVLbVm5SMwVF0z87Eue2C0YDJmYzELc8XyG7NO/fgS4hiw7DAmjlpfTGBJDtACrTeq7qBkovkIq8Kwk6sNRqcbWsqY6zo/3szruzoylIBCY4CYmraFqp0K8odIGYO63gMPbo2J0QJrdkOlmq6OP+3o+5/HcD2fMrwp/vPQd1lHfa+oIE3Be6Utq926jwVZgdKXtQLOB4AZ3aOSTJZcOyGtoksii/UahOEdLnlyeKOkgp17cTU4WaQGx3SndHcncCDvuQekTnJ/d34xoQDfO4BivjOExmeVJcrMn2ncjfs2Z+Hf+2v8sN3Kb9qcql+GXNvb364ROP7Dv7UVGq9Lq/+Q7QOZ6LCKMmGVur4gX+WUpb2gx97axs8gPWBaqJyCYUNTrOn1r9khwzrBJyxz5ABg2lVZcwyjizrMhn3WeRsO4xxHJSH4YEG9pFtPiSu0IRlyELEA3S+WluWdX456LPFWkdhqLHnTBwNk0dXjqXpNYXzGIYuK1jDvBxw5Uvnj7gp+kE8dvXBrq/zxhlLgkdsAWJ4P8onSuRye5ws0NmSRnSdXoSdN4oDhBCKEkHZbxQEqlidINcZcHCB46D3xkzXqr8S/hIIhZ39HMUBnKM7A0AW4rdcntFUhHEa7K88OkW4CPlFn3+ageXCBX6w3+B+Wwn78O8RDJj5sNhc1OHOdFnieU7JMU+8j/bXtc5Pb/9Bv+LMLUAKxIRJgJhX8ne5ICsCKU83aHe5vh1JKM9Cn4IKCy1Cedssa30dOjCBWMyabdABBJk8MqLkbzqvXARehwE0y7MlVCOzGqkGM6LvT7DDXHO0Lil14Wz03WtuomjUWMXB7SI0RrPjHhys4bXkxgOnE6MPZL/hnX7XMenE6y5yI0uWSabpsYmjdSrZzDOZ+uFQFT/gHKFqcHIuTqwKRvCZUpRBXmYdwOsH7TxuYdfUSfZ4RkKkWZtFcNMnJ2eUi8WXMKMDqtSOTMICy4XNeN6nVGgO/MY7JxAas7EbgFyDhTtxxlvl7TKkgxdjAoQzW6yHn9ns0DYMQHhIEPFSoaZcOCCaqDxpC+tTau6vX/7zMfL5YG9vDJMqufjiS+fO0v1iyB5Jd63cdGLp0cHGNu28i/LdpdNGbqvuVj+0Bs2B7WWGwnTgRgJ189X0fQzZOhFZabz+wWTwxyIMxx6YI25DvLKmIs+C57OIB9Jw2ehZFtPEmZOnztepcOWddz81YSI9xhX6P2fVODic/G2Wf2Hc/1HL5CS5+HuyUGK+wGNs+M9ZYpV5faWnKmoqaphSGwuEVHP8ku66PQ3dLuCdMLEOn6CobJlgRmYZw0kqq4PCr+KPPI4M0MhEeSSGzsH9D1sX1Uxlgus1dnTBEEo6zzUXa+Ly8WsTJALX/vfoCXVOEEfKO2xQrud5hIhVUCYDEcikwnC/stSnK/Jwz4fFPvLAxSVmRMr9HTF/H4larla7lDKv+4AhKhL6xLl3WPVcx7+FvdGxc+JuFJEEV/4XSNXVyruDi1p3LwDGooVlK+POlqQEM1EttYA+q3W4RsnRBCSHGjPkqcKbqK+OH4X3B/YANr0d/d8TsOnBdf/HATwTjWCkN5koujFZ0mesu5JYVvpHgYTUdKA3IuPRvVHulyHT8/VhFUSSbE+ktTm0tfEicmCwHR0RT/G66oSeY6yL+Ljh8etJ8KA/1OZQgbPVTMyV/q1E2Pb7OTd/fnCdP8voOw00L2Jw3nltBv4cFCxeq9po1wUWtrI9/rzmRHcRt9vvXpLTWeqZMbJ+K69OjqokYBL91oCjvWQ9yKj1My49gDvbrxo6LdKXFZcicQeeG8GuU+55L7uzAPd71owgaHdRU1GjrjlP18tT0rVyCvS8sLF3R8oMtkBPcW6PHkLcINP0F7txnl+hBfoHiVy17BSbydkuIe+Gb18ufxkRI+z/Oze7CKDSHTgzb9e0CQhyuwzsFf0Ti79MgLY33exD1I7m36WMetvCGzeayNHH3pUx+vPlgaiO
A+gjkK53I1nC5PJs8Z8UhHr/USkVLD/OjhuJNH9Ve1VHxQ3vLRKHLboPO9PGKwwkMVWBwegddzOL5lSMt+AY0xefWqWx09xjHbzXDsXt2+CBvC27bKyTyUoDbQ38cGqOwZ3WY8QP9Wn0cLi+Do2sXtGeueePj8rsw64u8tIpF0lRbtau9RHdF4dydOD016YxmkvlvEvu+sSUB95YBt6o+uTjI3arODlBXDSy9+tRPH+ERhaoh3BvSc2BYWRq0N0IDrerwli2iQ7P1aZHIcTp7XdImSh8onzTgOzt/8yo2kVeJeMkx/VII93xuAl/Z9xUSyqvEsjyItKMGEVNZWgeVs8VZf2wyBvZOpjGdoeCRa2f6BJPfNvhW9QCXJZE634eHI25/evQl4Uhcn1Ab7PUl0txqPxlbd+yipNCsPg9HKFu3oE312IgMJ5MFErT6w4Tn920HYipOZ3/lvB9JD6Uw3vMpfv4Qm+n86RUsRyiM0Q8uG7rkMVLaUEh8slcbDJX1aX3gKtg8WQlPnBHoBVx0bSS+pZH/qHbNHkr/Qhgw7PB0YGVRYrXx89uRnejCI4GY11iwR1R1UfgSF6TFgGI0ERZ1y/4rIEMTDkZmiNIOX8y0aSrcBNO0Ssa5WtsY+kee4ZdiD73Bz0C7i1o349auyOdYGwaelWdLgD9Re9EWWdlE+oAXZY6R4wbUKIfU/KVDuD5nDhlnCnfjZdnIw3jSCjLhy6YQc7se4pe0XDVCrPenujnWPyTrymA5rmaJyMCyK/qvqP6NHPiwBOiTgTs7hZ2No8TtOUEed/6in7cYo+gcjqkWGiVX6UT7z7pImSMDKBMwAIA3rfSAu0th/ilW6g3/pmZb1Di8ju4P5pllX9Pf/VEl/TxdPETrnUONhYhZ1cbI/8NvfaiFBhr4SR/SASvtqbCjI3Y5jzuBTi+avzfQQY2Y/Ks2ZPDzHqjTRgjClDefRst6NxGe1172StbeZG1utfSGmQoEwMEjY7m2iRBugRqWCoo5sMyDB9bnuBs70iu9QdIizfroz7/f8M/LtDtiqiOurQJyanUYXIpraNRCBInmHDxQK99/OJ0ikiCNGDWAqQf7Ws50P7Gg6fpxQwSVakVrqTwE7E5b+QyM1qA1GYUNMKFcS9lxq9wguAFnqS7UTp5iJpYQjkaYvl6nuqd1W+QiGU77vlEpLvwgPCUBjvDgcFzipvZ6x21l3AB3FyOKd/RRhCfGQPdG73cYXDfj4K7BDIhDNAwwu82BKdryb/0YHIbqZLCGCBcQBwhQfbeQ/5fo2/NzBrpeiiaVbRjbMbioDgck09UDw69n/WGA9OMHPPRSsPfTjs0JQaXOpYGxQTeMXID1kNzq+m6x1n4LylmzW9CKkVetFA5PAtsKDdGIY/DNTIG/eJGPCGilCpsSj38xmU35l61CycVkYqm3V6jV8Tk+nwsYbS6x6wdPknq9+O8nKns3wCHUyw0FKoEH2yMnHHzaIuz+olEYUh10X4wMjgq6wAchNp/T20j1qaGtOODXXkc6fbVKFn483YB0FomTroH9cT8NuyEpbTJjnvuImCODDRPTyTb9iU75z328bVk5Gqh4MPTjpV+1UqUKggUy1VQmh29Uvec2YX0dSoi1PxTlTahkwyZO+QTdt2JFuUh4f5aCo40KB+hIOQOnvkZA0qMnN/w3Cm+x8TiKx6xAigj+sPl3f0k4vS26K74j9Gf80Nn/IO8Y0QxkRhbyXspQPPvkn6rtKopBgVxxZR4bxtI/jQ3JTxTglXAECKPEwfyFkQD7vL/DXmbWHqIZ+XgaYl2OIc57pEP+8e4Skw+sugXV1avFMr6lPE6j0lEF37CeLM+SzrESioLEM2TpdmSwXqOEx56vJVjfYvxZOCNcI/DGUCZ0rAYL3VhsaYkNsSqdVF7mizn3yGCs7wcIDSV++KScXYjli14M78jBFRCeYn+wbviTUO8NOj8R3uYwhbTwSg6J9BJznPxKZ0wfvrZ9gCLOouZxoS1s7TLHhntnj7BZhKg4+69L+uGq/BeFFI1FqhnGmjY1MC6OTxs27x5SAPU6Rp0kfY3o+Nxd4/3MQButmHss7mFrjQSnJm+3IA+AuU7gsO9IbrEz6+iDzC2edyeQmh40BenVGp4H4sIE+Wg43pP+XGhQ2+tVTKBypSt8OOWs7kwgpelnJhE1FmzWMdS4W5zN6Ic0PyQ4BiBsFkiVoK3K/qrR1Bc4yW3n/U+zx/xtY9j42woIInAtegtaAQcvLtotNsg8fUZjyD1oknolgr9IZXuuu1mF+Z5+Gdp6ruPrRl28/yfhDDTU0b2lBeTcOqQEzaAN2rZl5BFlpuDiIVsX370qZu/eNhS06ZnDKG1QomDSB0cpa53iA1jWRt37vkN7Ok5PnepQjVMITwGxy8XLugWw4eNqA9Tx1mG3ShRazviKRD8BCNqsQLvbgcZYZF3+is8PRG+Y2n7fmNYH+MGm7EI+VI3IOZQVSheq056mAGj5bUbATSt9nPW84K6QNGoEQsSXohFX2Dy+w9ITTRl13t7L6SRP7FhLMblp0oEWJydHzqeIv4ed+MCKhvJps8LDjiF8nwtya9N8GO/pwd5Lg9jQvaoVL7fR/oYgszr6DHLwbCO5nq7U97RndVAozPuRQ4uusztK6YG9O0V0rishRt2e0kZ/22kNggg2KyE8dgQ7cuubSbEg2Qsycc4YFFhxGXnBTGc7Yo+54TU2vByFQGgJBgb7CHd24xqid2KotDglTm4ZlBoLhsrHG7Vmc1mw0yDJ8Xxp2cqCk+2Wtq43Jh2N0UexykQKeNsjAl2i6EIZ8+iVEEkB9UmAjy9Ipw9ym9bt6NIPQF7yipbp7VwaR8o0+PH+b/JvXqY9tgVsqza58mLqaoM38ZPhYQvwVXcx2Vt0mvl3hT7TfhDPRQKd5+xXxVadfTX24L4OmQqZR1blwucFlxYNIYIfZ4/yu7LmG/BtDBtl023FVJTnfc7e/VKQxgLwAdLxVFeeh3TYYqhtCcnhYc6qI1YerBLrkOyuVdYpoN1YUKmQbq4m9YwrZ+hdoIIHgsRRP5yOB4+Jak014m9QDws/PtfpFFR5iu39j+8cCLBfZOM1aFaKGhvqn2VIHfmUnaf5Bp1oXYzVnsCs5Y6u3JDYQS4PIwKPoz95sZLGDI+Jm3esnZc6FN94Y//C1qsM/Mz4lvqK84jEKGHoLUeEN3W3MlfVQY876C8Ex07OHY62PCP5FOOU9kIXzBSbtK4CeYYE0ufZtd+GMoi1CvCDL8pkfGkmMDlF6me7qgDyVTCj2LXvU7yYqRc33tNuOi9p/ESVy2wnV84OJ/DLAvk4JWmd66Ytt4nooBbXL1fgw8+CsHC9OD8QxGf28mC30Nr2ZtvqZS+t0o7/gu9cidetYzz8EpCRtDJCGsDZzUi3Ue8gkATFLYIbV2q18Kei7lLN2dq2O0gUM+2kJzY3HD1F5VbRTCygW7FQ3rY+8cAG0QFQMjFWF4VQyK84yfnmrrvnvCzBX7d0NbJyp+5cW0yDG/zLBKoEUEnYRYzeK5U0/8+qiS9hp5Y8N+f3O8Bz56uqXon+MyKnE7BbXWMTYhE20+B2KLXA3MEX98sVdngdgJSgTNm7CzmrCYEk7yRogSn+mQRmTze5npMi1zaoOstqlzOJQnF76zGDDLi1AgDFb+A7r0dwD1pYIV9ywFKwC3Y4J/16BYDlw1zPoiXAQ0mWxr0Lt7lKL+fPS+db2Ylc7csKqaP9msMXv/3gECdB8DfZwTrU71kiZD6BQUke3AUAMZOpgEQtPO+pETpwcW6CZ7DIYsghpWrxPHnEB68GGXNC579KIkJiqWzh7lo0ideDJ+KunJwXDQfzPecWHW9X/xdruIMc+9HD3SzNsjH8DOoMsJty8uzHBfVav2wlmCo889j03gfjI/X52kT909ofA0mBype9bZOe/SBI6bPm7bslbAitJhnvuTRhjS2BC3Az3nHime1KaU0SB0bzkfrnvQG/R7kEjsG/dWBXDlvtGHRw2jfrBbFh3V9qdAolNsM6HLOhUIu9EkNlqBf3IbVrxsVxKnpxR2lny8mpfN1oxx9vbbz/iXIKGhUQM8NJc3P
IVcpMXTVfwJXfaDi01OIUN4YQmuCunXpAaL9WTCcbI3gZwoEyRDg/CZyS4Ylt+12GR+60qbgYrkZWatrenUCZ40lcleONk48zrO9Lt01W7dcDyqF92u54lhUFVUpCCQWysYILTBiUjovLzV3QtzozeFEkpNOC+ae3BksoRrAFaoBJjG7+XRz2Ac28p5tHJxkiDpkPdxhXkW2ez38614OWHwzxtsP+xfYzYSyHK0FUM44JaQJ5XV5Y96gqzm4D3GfJHnALxjvO59JU7mxnRNCXQQ1q1TZ+41619D9EEbOGSPzdfZIw2X9SdrNmCTJogaeEeV7Nucbw6q+0WLt933yKrrduv3+fBwsezz5h7kEaATDA8EwydvOb02mf6/D8BC+rHGz9QLM7BUL/SI0sm0tyi91QH4T1JZa5jU6CzSKu+DgJuhXYaSknxGFZPXMq7El7xC0GQKY5P1M2Ki4pq3Nl7OADCP2yn/5DCbidfpg/cOlY+SeA2ZHMFcm9gKUX81Vw1X3GVMHv2w3qrIpiw2synIoazU1zUooFsWBCknq3YZbSPbMCOdSN6+Frz0AR0OiCdYFnOpOKOj1tzS3S0ij5zKFjd8MNFi33I+YK7fJ6HZQ0P9GRSuCvxMBO9YfZaXgzPAJybv7shfMCg+qvHbuOI2hgx4zWEA20DGn4B2gDDoiGM6VCjeFoh658UZPGwXwXcun1+EaiMXfgg/iLrskGnI0z67vq3wL3mnCTUuCeGsvizZJsRZCRX+C+F2NDH0cJROhig8XqXGl6RX1jWnwMgID3KpVm2HxdWVe5XtfIWMSoQGRgNbiUtqHlsoSt0E2vb1gKINqm+mXAhK2cFf06w33fkCQTnEjdlw6VquoMjeprtleTQwL5Xr0efJ8/6LeB0unSBLIxrrwjcZCpYIeIXWLseTjfhisnCjRJXCtqpX0XtPfkEUECYtwFVYd9p9mK/vOkLY+KuKn9+jxV+SNhPpfrhz0FvLS1w4HTSkYnDi0rUvULNJEWiOAgtZWyDAYmA5oCje4PD1MJewjgJM+LuqGaD4WUmdaZ2TUygWODR9UzhlXOR4kZnAzkTUL0ioboC/GfDU91U2Eg/ohU6egkkREnS5YbgGN8Z4XPKsF6mF3LlIu/zv6ShwT59iFxWnb/soQqNgyd6JC8zNm84+i0dlHhNu+Ou+FYu5Axej6f55lLrgnRAWTdvQWoeRf/xXkIpkXSM7n+PTBgz2qWt47sOrXMCISQivXaEUi+B+YdY1dZSkEC0OsFt3wIGSn7JzkeZpqwurP2FldqOQSRySe6AWt7S5En8Lxxz07bVIAtBezx4tznx6sYKttfWNPhjv3JjEm0vCBB0CRw1BqB9jh1GlHcZ0zw75jA6HN07VoquomsWCGwCDUA81HtEyPPeLtdcxOvd8doAwwSCP8g4Q6BTDpgdep3byHWPRDSwAh2fa5AOt8t1tA4uGjGnMJ719yUgwMrwWE7AxYhYwqHPgZPt4LnRYsNK6x32TS6dDhzvScTa2ACirF5/cxn/8pYA8GBcj7684FiX6IzSE1lO9FjZnui9IuWghgtYxhb5fcMGQktDZVUSRRecDtw/Kx9jIfL9oQ1FPM3hFNgnGhI52UEwAi5rLAUsMSsGFY1FMotxuwJNylcxN0Nu2R7CxpqsC9/yxqqT7yvksYYhacFB1uOwv0U8uMlX9cUsCflo0AHlon7tH2zGtq8x4y1GuD4Eh9hVAuBsiw/6wn2+AFpwJyHpsMVrE4TsX8fYasrv3NqgRjJq9zcFf27PI/AyYPDHHpt8DdTfHmfCsnCT3INiOjqSHwP9Yvs/ZxiWOp4fxXYnDd3Ecjjr2GXGtko7EqJrH+d4dVWzgnyocfLJpELkXU150w0dKbWgG5FC3pD1+aFdgRR/h4L9DJOmb3M8fC5wmtLC3c3kydJMOI9YBMZc6d4A2S9S45CmSOMNJJsoSWNnp91zvnrgRpdjOxlUCv+Z7diuHE60gNEamaG+L59bW6arv1rcd+wL98tCnH3W+X2z+SjCzC9tS3rVKHtNo3iqPr23tYz6Iuk8N2l+x+Pjrj9ypy9vTs5ZgzRZcfctrgyt/r2MKGk+Lt3bZIFl1hRs7X7ygdTaVMCnAlQxOM4254W6cOrXbgcl7LB7UPMPyrJW4pUZU8XhKvyuF2R0uRrbif9LS8QavVhVZd3niJIlyM4BpF3EiYvuYWkWM1zxdE+LwGI4k3aqX+Ui6oYkWQF4Cq/NCF2SNduaVEU+fB154k7CL9oMuvoKi3AEtYb4IOS7/xcX+HIdEE0eQtRaUNLZGTQXPaHrto7dswLOL9BcnAceaBGU/Kh+c6MsaHC962oTiSWU6x4Vn0Tnz/3vQbJQIsXxIT6x4Kw6JABKkRvsY1wBJ+D9Ar17vB5Go4vOpP3WU1Aatb8vLUKkMsNzLm7dsXwZmRpr3cgdwnp9SWS4chgSfFxlGQ5RFZL6lI2tdiHvBEn117eWY8OwM/Hgny/M6gEeD1kHR7NRMLmtp47grluCD41qTk7YDIiHC14Y9LkqfaRn1vtWt1SVpTbutFrm3Ii8iw3Ntp0Mf90GyLhaYLOwROP0r9rCtID/fDB6IICRQC7Jy9YJkhpDtPnEHFgyX77cSShAziPu98LyPqMr/wYqtCDGAGttL6sC7/vu7MPs15/9RPSsbromAymWzecxEJtaao8kwMzt7iHQnPJUDYV4WIvuPu03LWx6MbzGnFfqCNl/mV7pHkTxpKSOKt9MY9L0OhUP04cKdxp4xBjk97C4bYwdi3EY8xHd+wx6RkTchltHVI9McXHC9t9tM/ClNdKiTHbYPgyz+KqJRk+h7ZKw/mP8Xx39IeqluoYu/KJ1WVk3WQrVhyEMvZQakeUxQMe/KUBhfVWpIPO7DcK2FvbWtS0vfNyejra+yHHHIOTFXaoqIMlfk5wi62XGKaOVZETulHUCJBi83KFg2/NRqoOpzmLVgX4cjd/EEREi5mddI0jDXTEpuUNNNpiXuF9qeaAuQsqMO6fEKS5u4X+p/9vJ4D2XThQeacWG7AyZ1rR4XPvsPHo9gFyw+UUf3QM+VyBBbAZIxGd+Ud1AVA0JaQCTEqHCIZiwF37tQL2Y8FwfoKQmoAFbs1DtFBlislNHBV6+EOTEFJlzsswI6gjKXR/SpBet2+pLpknQ00GJTrkJfxAciLUl+tfQaxBoE66gksdjXLn8TI05UpnZpQIPUNfLUJ8X2OhdpAMuFPIByykk7yz46jjht7AwKCjTuEHqrdY85rFsQ3Kz8DL7et9V5o8fA/C/e1wL0zmXRTyq8N9Ajp5gnKujvrGdTnwF6gk4c1hWu5IzzE1R/9LFtUUz+AZBjq7oUy6hfhjIhaymLPc1A+zzTJXKShczO5VCQw2seycHDPHtJScTWYGTgmqJ71dS4sxdWVr4tdHXeJ74/i4tS/z3DLnAGqXO2bdvvVk0tzTkMFjEYifY5pLiXM5Nc/1anU1zi954wrlSWEFjGp6A8r1jdJxeolAsUX4dtdP2GqiPD3K9Vy/E0M3eON60iTHP7CCwaNR5UoIrb+GLwRWzrvkmJL2lHdXB96lepWH25E7Cb1kVHexfDNDZALGPj9ySrvnkqt2vU5kVQe5gj2zjHcc6y6jTe8m3qMtLKv+a4lFJSh/70nZ8aC/HVp08qyySslIrgpOrilj0xZez7VVl8TFOWAurb0SX271NDMe0UaLxIEDkeCjcYuomEfuj73pKeP3Eb0tk/moAUEDpRcrXa/i52UmrrAhE1HdxllwfjvOyppoctgMs9x2njFGlKaPH+MxYXBD3vcf59fBFhb1+CMgPGTLMdVNq6u7kdCLqHQfZ1WYrw7YAc1RHCac3RRZdcby8mWczMFr9QdYjvTALZRwJe8woAWy58d3sLs/AsR1HZ5meoYkOi8IWIF1z9ijFAn/CRtAdlLLgZNfQUZVfjbvrX2s2kvnmSkhVh1KTqnYUCjcAdA0Fy6UGiPBIkZqNumBESfz/ZzJ1p1hpqTLseJBJnw7IT1FaRtV2Jg233QwaDe1h6n38/zZjJ12u7pOog85D/TDVtLHwMs3KIAhMOxn7fTNkmUXGjn0oXcl8+E
+QByoXJAMCPcxI5O0siHZETgWRo7T+Nn+E1nFp4s5p7nfbXTwMmpipJcPCeqmXZrD4jj+Lrz9jlgbFrEXpmx+UAp70mq14guS0ZqXqbYdR7LzLu35qTOzc/gUK8uy3Rjbv+U2s4n2/Mxa6yHbSs81GKhG1ZasLIybBSijRr86S4/mudguPEanRaOhi4J34W5p+2DBim4Mo26Pr0zNboGmJNFzViE7QPZ3TtLjcLechqHRBE2LnP2LY4tY35oWDH/W6DfIS7JiftNIPucUP4z1ItC4GJkMOzJdPU9qD18N8okxV97Oo9Mohxu+GpqnDDTv275UPkGcQXDANFwekvTSylBRsGpMb24VwLd4EKeHHHJVYkvLmXIDAzJTho4YuD7RNs0uWOL7C82D3J17BvH20jrCSrUqzld3p2GnVEsszIdiIORpTFpyK/ALOQ+Sq+9veCgawimMs/p5nIaawHvp2cRnoQF9qbRTuvYh/8yD4fTgaw1vLy3hdNFEy5sCZYdfWFgrh57sz+GuuEfCkOOLMlWMFcIOk1nUxzvGEuO2Ztc63S1Cx5oqmPtqLfwuL2Uyaozd/sA1egRg90Nv7BeS6LsDa6DAHtxO2uUH0tUOscL/uHyGNoeKbv+LkUfkX6aHp6aZkfE/vLRibzEDJUZSQzCtj9CUdXfCvi2V1W1Nd3pMjvpaDiNHH1PSElr6UKkMB8vZpsfH2980CSy93ABTfSoI+JceoFSKB7eH0nQHTXNTNJEp2IxyA57pXt5Fw0sI86cbosSZUR3t53tJFHzwLnCVHNvQFbWgXchvU+p0+nHPilQvnjMTPYuqYqeAt/u7wc+Me6M92yixTUoZfLiPvgAhiSkSX10FqHCv8nOfX8c25kf1T/TIVYsOcGwAgQmlGg7bVp7w89QWig2s0w3MmVd6oZiiBhjmx+evM1k+FnchEbWzY9DRb0ejbhO3MtgsP+YEqnImSpZ3Wmm6mRXpc2e4KNDSXjK7DoZFY6iczpTZx2dXQWmUUNQq4h+dZv1hwcUjNBbax/yC9SGmGPwHsLtRw9dzOONHc7PF56pBoPMitlhKTtid8gaczYrO3btcG1n/uGGtD8Sbm0CfODyczP+kVq0NwFz/r59BqQgg8uMbdQy3+JUTnrFSqWnBHXhkETiwKn4cS5ikdzVE/hfKanZYLhbCm6+G3GQK9ChMJHbPFAtA04mP2AV8xUd5MSQAjRp6e/FaQmkFwg8TX1XYOyVnpWokSya02X3fY8obNe/xhXOLMC0z8xfN7Y6AL+TMckz5ipPRpgd9oHYRnzjXgfINMN8thqqLT8bgeRj5dc0W5rZyP/nnanXqr3upBdLNAPsm30WRMra3G0yZOVxPUi8/KKjond/2WMBskXv7FHCM2wpF4eRwOsfNq6+5N48Q3YAdr8BPuUu//rePSAMDmxsvTolsIxesU+HYEqVDiLM1+ljLaelT+S6Keq0GXcT2RW9eQr3z564BClyIPNayPEXCTv/nZH3stzdveE5yvX8U/YJjogiIez5hvwAnt6s10usaxApefa/JsM45Oh9QE4x34rmDVHhVyLy/mdQe4yvo5jpnjHpLWh+OdFcBT2BCZjmxWOZCyPKqR+LMOUwAAU9dzZh6U18IuPfOtdR24P8BI34crR6tBY6OfNs2+mG7egJo63GZNh9/3oJZqTHFp4KpNrr3eTe169QWPXIYlN80mxDkomq8eRrWg2QndKcEUEZ1rX4PvtLDMHT24kQzS20odo9awn9hBuxI8K3zNZw7IFhy9rhA2EQiDcJsoIz6BA5NFRBDjrOpwG0F9yWG2u5HJLjlPOCvdWhTcPn2bSw/lDmpw1HP433jIRtM4zXk6sLJ1HrhkSEJ+zDRLcwupXXgKeVkBwxE12AMWoTzvrbnbgJdR6DSA1952rhX0RfVGD4J/m5FfP4iLE+3rBK45XrP5RhlBBQkb35GijRbVnvTz1lCBfzTRejdyUMRfj5O4xAR7tKkay1Cx9ZUnRzZXNRGDxh9S0HCKlrlDPsYAsTsuWvjHgJ3/UnNHgkbQL7GtgH7WundFhrWG/347Ve72lsWP2qD403u8OUveMoLGpT8SaWwbhCq1tFjQflcMYCKVcNTIgZLLxK74uoz6Br6I8HpFZCNRVN9GHQM2+f7SnuzyUV9XAMA6uhundt3fIL5xA9Wm9BClFDZqhDIMUPZg7gmPdmbAeTbm2vmkTIOcHgBI8unp/RxgCIFk28EpPN1wFB18XgrbmzbNvzeJf2PiKUwffEB5BBVrBkhhd+KVKoKi+rsSGGGCTSfbuo0YEg8fgMLr7Dg+inwao6mvzUS8eyUVnmlG+jci63FsGC3TaPariLftM2Ty4jvGdsFMtosBdjgR5E17x6L14m8raC9aVRDuEM0oV0llsseBuoHHBfRXgPN0y8DUnqx5k7jWrXrDsaYrCoSFrSR+sr8c9pLjwwHN54LaSPl6TonKq2WRm872xl+oWO971/TEGicE4pbduodKVQjqY6l0jyap5DGpNyUjeLljMG7M0wPnqLfxnEh4KdaOZ2uJnHMN2kesHcLe4/ac7EAh2dYj2npcsKZDFIfh58FhA9lqWAXY1w2HkTHFRDcx4wU/oZomBaz+O0EP3AdqeOF+dQTbSfLXp2XuezmyzXjp4f8Vl/q/J3JlWmId4JXOP8gVDnv84Ylr6LDJRQ3nFXUOJJhFJdHrOU6kBZmJEU1wL54pMRRW8LX8nB9BxBwiZZYuAJA69uKAw2ANhj+MPpmEv3ezP3H0LDJT+HhwCVq6BKxYKe1RSJR0HfjejPvVjbBOFpW+cD9UEQnMbKQSwdmZt64A/1QLcyymejQk/BzR29peKp2SQVeDxnt8TRgH09CYVDwwCr6FA2/0Sia0q18eMqSXl6pyGlR6G2cAkDtOrCcb1R3jy1wwUaCq/YVd/z/7s1FVjY8PZXU1Enitp+4imO8EJlGv2Q6Vu2RuTSn5hlRQY/6QcVFu5pwH6FEaWvS73JPXebWWP7PkoagSeTMmYnipsu5neuEujciO0T6NHuzBiDnfEubmKjUspe5LcLZZWliJTReF4kHxwZpzHep8eWYqT2r4WhvLhTwWyFVCRJJ+/9EUuyEmmtEDqY1kwwcczhlu1mVh9cSlwU8L4KBB2ZyBHK2mt9+Jb24ReEGJhMTVt1COpDubtkSklqE9UACPGCuYWpUYciJPUJ2ZcNlJAHozoEsrTe6bszt1SsbGAaqo7Vi345aHmhmYy7ebhgnxrC00HpRK3nWU4m3JC6wgSgSvBLxbapzIpLOjrbSmpaX0DqWn7qOwWbvG901YCtiWCxbOJs7Rj9jVznFkAa7KKoFN3wBNurYLijlysbBoQsWvrcuzPEBUmscbbY2Xg7yUxVA/VlL2HooLjPFkwNCRNwbNh4dAP9tGORiSfLP4WMJUD2JxxI3kuQlq6VKnPnZa3KITTOC686QXg+4dBAYVgLDOk5RVfFSLUb8L6/1BdVsynI8vI8oPCQRcMhNrfS2mO24P/2fuvF5GnrQTUluNQYQWs1FA/R/vErZF5i2avKHvY/uYlZuahOuEQJaj1aUVUPimRZPSbq8gEf+Ry6Ld2W58Hz6/TklRmzuxQX6h2iVciHhBjIrEPCEvZDZMm6JSmauQ955FkMng18XL2pCwG7pOTw/hTKKbMsPxnpwrfQW6QtwwyHBlkkc/p9tlvz7xmyGGXvTS6P+w5QR6lbilQ0vsTbGy/Xt4hRpNo4GDp/6BeGLMR9ubxfBjVSikxipDu9Lhzd42CcAhqhI6sLfYy6SxAehlSLLL5SP9zITl49JkZdu5iDKs9NgsktvcReh7Od9V/UIxT9k/eV1JBsbfLl6iCLqKFMIoScp0dVf0JmA4w4Hv2MVcylUnD4EZDBahR4g+DVLwppTfWnnpN0hpttrFagrj/xvS8SVm2x03Cqj2RHQAIuCVLZM8ENcmmDbJmUZdykobrvtnZZzyQU5X4YXwTMa4RC4HeqhCZMeH6ihWXu9QUMKvd2FBXO7QCWuoraGv95h2qGF1lcK6dlmG0EAGXqBtenq8g0T9MMGt//oDaSUnm5HcCn/+wpPSJ5smpmDDAaYG9T
zGM61SDE9tty5enePBpz7cUSEwAwZqd6wSgrtUi+adSpv+GD+6xGDSHbX0rYZ8NOHttEKXakoJLOBJ5sSh9OwmtRy4F0/0jRwazabie/tsCIaDCKiROaMvjlKYd9SvLPmXVIwzlkQk88b29ucR3f2A0Png2Xj8VRg7ZvuovQE+Vn0RGB1WXTW1cJp6IRlhjuuK5C+9KlG3DOQqEJKY8kEhKXc8+hWFHhePEWv++eXoik+52lCqGDFt3ndNj/KodoQfAeeSSpx7vYlP1Dh/6tyehqw5J9krv0M2OydlBk/8H1T6indOMzIfgzc8PU0+FV9Mu+BDLfAEgky9cfn9fQGS5uX63z7ccTbE6Jq56eQSH7sLYyx3tQwcyXbrWTA6HObpdg2hJYXHZYu1IQntXUd64SVVKzMY3Ns2pi1Ceds1/YhPZViweV9c3/AvKLHIVQ3zNYLjKk+G/7UTwbpldr6nTP/QqfaiFEUryLcnilsDI4YlNJlXOydVHhM1cocR2JYruiZNfbwCbetFX1DTcoEpPAYC6F+TXbvUMspQ3ojehT9Jjchg6mQjT9xR7zfqMZZBefRlYhnjFr8dih6V04ID78GEZOQAfn2a4yGs/SxUsY8ZH7lr+f0nPN8byOgNAfo8Xt91aCgDWWlevMMtTz5r9oo6AUcUA9/JPw/gS4+ofCByyly/zDjMNTP+Tp/d7sLDx/cBilqk1GzpzG0UXRZmLbtUauO+n9q+OIFfd2ZHOJen6v4+JGk+LX0RugpQVPPi/GmcsjlimtSx4CC6XwlwVG2JDd75nMDsOfYXaqudipuRHUqoKesqciGiy+4+b+VHQN5IsZlQsowfo0nbyB2dTf/xc7641l7VVOdUtCKvo/kDhjRCQA1ewLjRAlY8qLMNCKt02RndmXW4fPuJ7xTs2KN4Xe0clR36phl0JORjEFCIq5MWB5pgMwb4ocanp8hxtOXWrxx8GO1TCfoFUTsfg+ucgByPGQatPX1JC+PiY1YDj1Zd6XwFDviX/OcMS2X7/EOuXFPoYOUJ/yfSSvweKqxKIDsYOJr0HqCvdDpqKgj3gMGa02PnKYFWYfRmN44mClg+WzecpSRv4tq3SRoM+RxtSNZvtHYuBOVQnbaAazTKj39vKsiOKB+I42aAkijMoFF/KYHPYSIoEPzGhUk4qWguN7/gNqEkFbTuzViPyeiqp168UYDHmjIYq78GSV0OwV6/DyJ1ed8bioRRmaXq+EUhn1/qr/pJzdwAED1vN7xHqUndHcVHrT+03/ABs/NtnahWASSRGTvmtXYNXZ7c0SRmslmUSnS4ckhs6w2JlCidAR6yi2xaKuLj33tcfwjn5FeHxUpZuDhNp2/Xl4CKWcw2U2B4nnW/zjk85AO7xIP6rBaEKRIkFwDsQhGjtW0GMaiMpFaeMoOMBRJ0rulqXkPA/USlkkQYOiiaK/qbeT4rQ1CTdItHX2DmOzAgIc9EVlLmxLrAJXNZik0jeHiGhXSdoBgI5pPAv/MRUJZDiJbpg7YEe2Q01dnYPTOcuRC8rzMRPHX9bdGSyEbUgkcmD2sEsL/GJTSQc1BXXa2sr9W3EzvOQHP/QnkRrf5wLfqUV0yQMlx7arxh/XdymRjTZEYA2W0Vp7vnlrUG5IwrxEh1eV+RR4PluBHqez3vG+WU3rMfdSCc5I0HSDWBFCRZ4sxRTz0xX51HwMvcGj1QxjakBUHu8xEk/pdogiXxFETJBLKMRpRwWwXj67ScTgKSiMHnNcVwfQpda6Ke4P+tCjjk/sZhNdGMImcbFMUttwbsxRcxPp6tkcJy6PrVpNGdX0X/k5/LJ2bFYkmrfjYFAgbImeFVoiz1rEyh5ApiCgOX41mQTXFM+pWJr+3VZdSF65uJZ90TdUCZEHVaR7Uy5KiQQnJCAbqOJcmp3rUO7gWqNChxb7tlex6emkYr3J8Fbf9LcRlg3kMVisfoOtVSy+VQb6NgTBc7BPlGfOuv6WQWQibYHQU9EaZuX4nslCbfclpyjx5tUTaOAuETmFJguuaMuvufv1zcC9P7pScpawC18IVznjIsix9CPLSzmQpqdd+29fkUg8P8YtgH2E0ekpMZSCIgCWy00IgVWoot3IGS79VFsiPhuiQZfLJAF0crI3clpxv8ZEEnBMc8k0Vg+ChywvgLVHif0jAK6bKvlKsD3wd2uRsLYuZEu7+A7OzdBxAacbObxC4XtDCdZr9PtxOli15+PFbd4Hyz/afNUZ2dc7ETEnbCHqYnuSZtON+OF5OGIMvd0S1cc7vBbO4kCw9nYs7RNFCvbYhZtg3NjE0TAQ88Wq27MUqh984M1Ze6VStBDvZTyiGQdLsfm4s2z42bF48ZLqduKhc3pdKdFJc4NUxZEM1ndGkWm/S/NKAPmLXB6pBwkhdY+ev3YIFpXRIBbiKVlt7U0INpPdZ9tUZ0w0dP5fJXetDo2QK6RBdugHCOT3hgbuYyMvTUm+hL8Rz/7jusb61NnTR4oIbXf0FtJ0YFfUrWTJ5ZE+BmoDuRadVkGQQaQoW6z6lwDoZyyzYXLWHxh5Fh0Bz2f1Xmd6vBYdikVIwxWXnDjoi/aBbHeFVW6YCy1RPmfNOn9oNf8Ja89xo2bSEyFbWfnq0YpS4tz9/3WP7oz1y+piTXhhMFfJSwqnh4o1RtSwDtv5xXDQVbLExEWgjBPnM46M5IXk82DdHqLU5Mi1cxPSjWBhmt3Bzo7S6Oub022/irYoQNDtS3ygTIdWoXf6hJcVHJsfpNbuI53NyuURQ44UaIev3SHLUeIcBhU5dxryKbEz8gKryzPZmo8CrD59EvyobZeqyU+XhrC77M94KeC7gES/9Fzar66Lut1VQMruzdmahxtxqLMicCtNAijHb/N4Vn/MyQJPWKRYfdEjUvHkWCdy6EOLyxShJkAk3madV3MdJxIixIe3WWkauEjAeVzk9tZYKL+V2S+143qGtO82ZhR0SdNfOEbOBbWbAYH5QjiduPxM1m04EEcoq9GULxY1u08fjl1dKlotGcfK221etZ1vjCBMwXWdRlU18l/wJM5w2L/BZ+ZGglZWE4Qw1t4zUo0kg1R4uWlPL10aa6lqw2kZKCL/2hudRRR0QHjw81tqJmh0A/id2ByF5W6MAE4dFcrwnFc5xBjRbD1S9TYDicI61XAfnheAa3hdv8VHx6c12zR1TKeOHHwUHqZbgoZOS2hnU9e+4wuK7qUZRnSpPV+jR5H8qcnYW6eAm2OyvplF4bfU44cUAvQF5rc0A3vR63P4/JebTFGLmxxNmhgUgdu/X4iZS8guuk0mKpuR88WQ8MIdypSgRAwt6IEBt6lUtfKJQTZF/S5B8WYxZfuAGkhU9Qi/FJ98imprLsXQpfBccQ7lveSxmgu5fZCjHtkfF2yj+Z5VXYcsWzCmzChKMLy+nyAgRWh16QDP9xqvxbfSkxu9wZUiJPv2zw7fFz+yy2OId1+9VHlKl8QDJy6f7fJJuzlcDobkZU9FUB4YmDkCwD/1Qgi+rBg18hpzsOFvMemacS1LIAtYTV9MkVPAGiegnoVO+auvxA4vHBy591+2qjW704ffzwC+Bgp7znhbMrzv08G4v2lqNjokXwG5rW9SO6hoDgTna8tCYMSo8dvPQv+rws7Ky/5IDW0AUe0U+ujqEqnsIaMnXR7Uis+jeuQkbsPpGooXZ6dONJCSYjPrHVNCqkR8i+pL4rLYIe+YB0UbOYus/A0ubAWGgi/iyLudvIRFauC9AIKe1Uf+SnN3n1EgL45WrtGEwnkDmDHqMgurR736u9rES3J3whluzjmSer9uHMwPprhkwlZ4QEM0ob1lckrrMBaf6wMMlUFkaOL/dMeaXiLwq2b3kKfezg6yxFGAG0GBrB52cwwPKarwaC2FLfPqL/0IHMEMLe/EEYkUcGEyhh75RwbvmfEk3V7M23rwkBlln7ANcQoU5Q/QfSTFuCxDsXdJexO+EcptrVP6TOnlXw9+XjgsqgBK5u+tkjFTfWOcILjCeHWk0fzHKh1AffbP1D/6gYUIZG1aoYwREJ5G9iagrQJif9FaOUZyRE1W6aU6S8FBbJFMFZafhgPiGq/pJAp1JXWnWGAGzM4m
hWLzLCnEuptJern6JAAAws/QB8bI7ZUhv1+8XeEHN58tvTuXrclg84RHzePYQUx+KiorUPt57c3Rl7T7WLfWm8gGhrOtuywZ+tXJG3zjJmyAXvS+TLWRyJ9hnTgFBNxEjLmooiBKZU759Mu5ryZ/ZnJDD4DUxFLiIJDtQNGyEJfuOJ19J03bJrFUi63R7MeXX1GLStIxeccgLLZzxULJPKYnwg7Bjf8UUDrimsp41aVTldwIU8IsGHvKw7/NKU+kEdKaOzR3bFZodnSGz3/rgJbcgs1Z3YZTW9umHMnNzBcdcKnGXJFnS9IhuJlaNSRghkxjyvmTYGfN9dSvCaiPFsWQEmj9d8VhEJ8iiPMSKvZFS3z/2LUuXQ38FH0/0vefOxR4PhfQG0m0qer+UQ5//VvWvp8S4vZRwlh/FuWLAhQDcagfa55yDXrC20uRQsX3ViOrXCbYgXnu5UcEJJryzuI9NxQk2XULLzA2EPxHBCdO7r2xm3+22H+Mc8jiOW6F+weRKm7Mv7QpWXa9Y28u3+G1gxWZ7iIJfOCDs6DIyEAEz1oL3VCGe5dyezS5YUPy7xx4QqvbcLTFuhG0aj0j6gElKDw/4A7/hE5EtZoyujd73okOodIE5IJWuZMVjMTaomexLJY8rKqM/JjOKHGRz7fyOXlcVxyvet7pmv1/RrC2JsF1SFofD6SHYxDa+cKPAe8HUSdntJGehO6DyP4Y56q7Gx/e1NNriMLTMaNIrSBGPZHRUpvu1Qh+Tfm1lr/7u7ykZ19GuAbnUzji3i9RmQEyC2GsILGl3vDYNeKvo9Vey7uY7qsfXMlYDRF7hh6rYn6Jy9yduJ3w6ncNwoG3CSaulruRAKxNvSbdQ6KlaHlLQTpah3vFw/ZGBYYJorwLZvSxq6Kp5EzNk13s2GImUDzAF9+PNjU4QMcsRx0l5g74hgNqF+3YyTeJoVQ0etXFG6dqguess96yLfPIt1srCCTjYDsTWJDYYQt03BjhGH5a4uzlteTblu0pKF0cIx+jeKVDya9k+WScPBapya0GdJndm1D8nzqv+YRgNTxFUX849Vy8HUVO20TMdmPQlmaBTv4/412Sn1Dk0bbAij6abyKpHq/nKcuk2vkoSrYLVEVDB0gX3vcs1VaLP77OlHTdAGKYivRnB1FTF2lqzfXLSHcymGB/e9SNLHidpYzUnRNma5m5G+8ACpIjgYinbBwryiAzE6mpfBCxMU6nA5IwK/O/jIQPUOqw6P2Puy2jmaWmZ8ynz18O8tMJc2hUI9QP7C7LuhymWwgvhpgPg+JM8WiIYbV7I4yrt4LlvDxowy2vm2vhDNoopUW+2GQeRDSSO/+jnSXBhn8092FfszGWeuVvPaVYzsHLRI65oUdthdoWni2A5YbvMH9AQJuk5z7wGXmqy+Y0C60EimAlQjlChbd/VbbrfG3GT9r/MEJe1akIkoG4+RzecPWnWFKae99+ZRV295vEqo3u9mXXxHaqqMYQHaQZ1QSZ+HduAkf4lXLz20nnzTTWmAYfffCG9zWGWOEH5sI8+Cqn8MI8qwQVc/YctkHkRcgZYprLOgNEVy4h/U/sQqenatXjT1f1ewWgGeUVkmBlDnZJl9CRCuVhDCuqOMnwTsvFe6TRwt7GQ5EnUpF/h58KFVV4Qy2Vj3eAeWXHc9FkokF5KKFqYosiiDvjUhJD9yp8uJKQnMf7bSDbyMb4ZT12r556mYEJfOawjzyQxegMkAuUx5UTpOfRSNIzKWcuPwqw77TUgb9oWPawQZqdPS1Zr+f89QEoG34LOQN4DviyVXo5UcNXzehlriWLTaQEjdno33jzc76BNrH+MoQ0Czj1x2OcwR1y688VGDyo0xgsD3ZzxTBOHBsdVZ7WsxbnAjZjTjNY9IDO5H5O/V3G7wypW5moISe+R8csVR13Wc2qiyYyTW2POh/1sUgPlWBTzvkRkCRCiuC1jvesQmpmq8NmhIWkco9EgPU05huxQ/1Aut3gtaucX6Fz2opElQ4kQgmWghBVHWHC09KGpThT3sZahDpPGVfbBtG4skQI9Zwh85+8XD4ob3xUcaZQGtxZk8QDfVFjacuIFHNUOuVImV67gq9iZjfXkH6gzq+It9SXsLyczWN/3NGRod2p1GF52QBY6aVqATlwWOXBAUwL6RTExb87V7tfBquur5o1nTjL4Nlgrjs/xisaPpko8lYS3ipe5HXsFUs9y1MZ793CIC7Bf0Rnrp1T2PHO3C/hEeTlSLTW+5uKZHIhB6UP/nTsfV5sVOXdG/IyGYk8pNvY8rcadFvw79JbST3tdM0XFNKntvhIwM5Jzy8O7sgn4wtpWkGWelaBe6dqykXL4nJekm0PIIoTNZuP0VOW1T8S2zbdYQ6nv+7yb0cTt2iCtmPITpuBN/dYptfw54VZoC+AmCPt9Cxx29eDK+CJkjEJ+zt2BooZZ89WKgEz/pgLH35n0yq17k7Zl/EB2SJsnABD0s//kHvhKJilHHkTFvKuE2f/+ABvet6Teb+wWwBL6k7FvY24fsTFu4wWSoxT0u7iU/3Lv+Vkk4gQ4eOnHzbj9aTxN4gu0AZrby4S67WH7mfatYga2AYia8rR06zkHuNdNwEVuDRq3K0saeWvhdpBzQjebND6gv3j0LKcH2BRerA+PhhcBail4Xps02paRiLTO5NsocWhByxsTLBnojGIHmwK5uVOByrKvTCToUE9gmr7Ob9CqnrwmyV/kFOJXTPfcZCPa8Ju/8RUzjDXKMUUBj09TED+gb8btXn9+iaMGt4C6EEXlPL+wEP4R+sjYMaLfv46xeiV76cS6zrgK0irQhqmBRKTSdR1jircIMPLTxgn6MAy/YyhZYGGhi8hDWjK/LoemFI+CoxGoedLfstSS0gwNPVnlt3ymxc5qCXp2MixzLSsnhsXAmzhB+xsVYALw6UoKLo4FSrFaqJV/NKu/RSyfjl7+osgrfHT7KNylLBTGzbJRhiKeh95aOddDRDFmgKWqndeQlYlGrMf04xSc1Aln/LuerWX06A4iTw8lvVUGQln/WlODKercGFtUC7VzcC7qQKiAiAJiysp8skS2jpAjO9zO2XGe31frwfvaU+JcBRe09a2DCMy7XHOnqQtUM861aeRmx8sF2+K7EZM9v2e7ar8fuEuHU0tghR/EUAAgq/906gniO59+Uj7ZonZEvDro5ZE1b5SXR6iJu+9LHEivOtcl+9tJ9gb8XN1lKOdzg0fZNenR6d2CGIc0EKCCoMpEeADwmipHj8vLno7EAQWpRDR2KTY+necvAy8m9uhzJKj4YE4RGecyN5wemK/DPNdXYClDuR5yzQuoSMRGKkIEVJKDIrBpHGBlvWhM4mJN6YB61kDk5zDQZiZrNzjJyWTYqGRSSfSDO5ZAxhAHg+njlCH9nTo+kc2/HK2oxvvbg60VbZ1btEQQb4lS74BKFkk9OelmkcV7oOY/7bqqqn+KR8yTR2y8WLKtMliE5GmPh0Umrhc4dP4v0BJpCLfbWghF7qlilFolPKxbIUW17Vy2/naoEebQUAiF7jxRn/DKt1VO63HItsaXn+E4ykarLkPJBqtC9zWD2yyQohE3ilrOUR6CEHLklKYDF5Fdv/efP4UfA3EJ8+1yEoWKx/7qIGb7kK+CMf7yWQPFNTcf4H6l8CwBpbjPUcuG9vPOiF6+tfa9gT5bbg0Uh3awwzyT9pd4W8TCWLQjW/yKH7QeDmNqGGXUYnFqrey4YAvhnFNNwhNhKNyYgBwVfiRKJOWfGMh2MdEf6s/BAU/z7LdLHuUPQhqZdtn9eRF6nOmVz9kKQobhZeAsytkpGSXfSaV2ZkyTZyXnGBEcfCR97eljivx6RNDrjjiHzvLdQ1AlAfr71xkE1pHReBLcvwA5QQnQtWw2AsPulfs15Kg7grikDOiPr1ksKT83fNIQDIy0kfkwXCpqnoz/m3jSJ6GsSiQ1hVxiIfx9x/bIW+po9PNDYg2069LYY2f9a28oiGvYA0JbstWz9ayU72fhCSs2Jff97fvG5cYB8cWIg8DY6PiyFqQtXD1CrFx6f63HEeGKJXf1ozB2gvgptuZCyxNBiNFSGmdencAtuq75oJ5
5vOgVapBCUZPRg/uQpjzhLbt33AzhBIn0AaTxNG8DiGkj9B1yDvr0OtrCDN49/+Q1emNuUJkbThPaHwUnzxMw38N6/9oKoUcnqTFliTd7X2BU8UyifzE3CMg7WTOqSJZ0H5GYPVtofpBN36UDFi1t+ECbygTvkSdT3dD6L137UHWy57SqtnpcY+dO1ECGH0ZMErnp63T7fQOJpU6uXJBY2FMzFUflC7MReAzTwKDokw9N9uFxlFHMf5qlJ9UGxGoRYcvTrRJlZ7Sn2OgZ2wITsOVbOPyLzaPD45l46RF++POELR7ifyArv7o/70xIP8yLyC3CxvEOCTt8uZEiqrqc7QZyx3s2EcZd5Bty4DdFHvA9uQgQKyGobysAgB2Iy6hygrLWrasY5kCzV8VDsFAJNmt4s61gb17p4awipdJ2Adv9K+AjU9yPQLZfuD6hA9BkwVaIBHCeaT2d28QkCG1KV4Dzas/O2O2vDrMQ1N61JD4as8hr/ypQwr+avCodMEcsB9uiGbdeBOyZ4aPw4wDT0GtXcTxfbt6mOVSR8jS6Nb7rWGmK80wHO/tVzuw2CFeWpsusnCVIRjxoo5CvvitpQSEmiDQuBEvm0V4VYldr+jSPkO/+aQL+CH7qH+mvojOcxY32NllqG4o/jV8fsNpanRcgnIaqtBPTkA+cvurnhhG/bxw8wz+98Gf/8LUlUlSXE52ALwaLiGO1tIOlmwFbQxFEGkAFX1I+hUVFv7xPRmwixwV769Xc9igLyj5xo4FRII3hdj/7UfFzhrOxb6Tig9XbvTQG0MBGPo9Y7L/Dnz7aT2XLW5LvuznVp8EAS+9Wl+9YY2kFWmuXAWJBNhOCkRj8NFr+22tkIZV7J1yRlfguKFm8dSegPApOfHSRbih+86LYEwCpVgLAQbODrxZGII2daGa/4VvXETbqNYHCzcLaV6qKHCrN56JFty9A07LZigq9S72IM4ZTdEVvi7O5mZo0JTkq8j32lKpU+rF01Z+bTuzjDG2PFLtfqMsazoWslpZns41LgQ7QJlKwKfvBsG42tnC9kw2QHBkjfApWV6E1+4w9n7l3a0OhbInOME/6NyKW8M39qx2Rlf41UTBtzEG1Y3irzBVvl3vs+o/f1Gim+eftcb4GRhbyDsqjEtIHcm9LA8dM1zMmin8iIeKNTZY4T3RbA2N4PaVfNtQoycgn4uBZkSwVTfZl6jnciuRqfDXmm2+TSjfkpS9ZnxI1CI5kT/sF16nbDF9lrtO9T/sqq9rqtrrQoAqONEcjvGZ0WvDdZhv63qxa9lgSPuiE7tuuAECX/KuI86LWRnAi8eddoKxuEuwNTr63z25ZZkyNKVWiWJgIoK29eei03tcWyXgftJGpf21J/S3I1a0iKaTXi/kg2cPtBYliBiEnrYJge0k+Ft8wVtgF0d04BcriCKf+ZVEE2+w2F1/pHH68VHOLJRTgTpzMBInh1rv6ECyDGRRlX49IeQ9Qgl/je0cbfSyuoglRmSig1aaiw/Jz1JsGYvAhSQdF0I5FwK8DMcMXLSDFY/RnlwErczjono+fprGc3wxMocnfi62ii2+3b190Tu2jjWzcM0zKzs5lItIxy07s9m070l8cZ1Rz5IFuKgXRGlNmN95EuAxgUSZ5lBmaaaYtyzatWcyM4bMp1K/AQH5Nf6pYGmmr0wDRJAi+N2NUGNxgbsqMOtgQhT+lt5vO8/CKpKGHWksj/k3YWVL6PQdRwTyH0XPxQkp+u5VBBGGL7xtr1CBWQ06TMUGceIToKfqNr+4tgXSW/pv0g2cJHwMDVNZ3BRtk51hFRjk5HQRq30az6GgtfCCXZAwZamXsq+7OEEFzn+QGbtk7DkrlAw+Lu7j18QuInQR/GNQ6sP+iV76mV3qZ6RTHTewO4UV1G5ygLV51WgxbGq/F2iZ1h+qZ3xq4vTUwhGTTkouWEPP/yAZEWfriXQiiwP5K4mlL+s5r4eqDAxObYXjj9CHurosbuMzm8VUYC5SoUjABCaVXZj8QJt/2nDgVy8EOAzjAM5BuJO1hVK/QgEPcmmRDpsZ/0D8wBE2ZCCkgdNzHhUNRUAbktljBtBHnjIaFDY57gdYk0XSbbG4jTOqlPpuouumtiK7eKDQxNDOqcgz0kjsQhSTXeS7YK+L+UU/AWMmrgZkKgqczGcxFJNZZ6iecV78X6FpUgDZWV4D28uPYH5uomP6EMYEnYWDV2K7DvRHfMYB+vNqXkLrtgS1ZwiP6kh1PUkI5R4eHvNM6Cm6MW73A08cEGz6m6pgkmNHZQSW5E4WrCcl2GraIR9jFw9R526hiS5STCy/TzWX42/FIY0ZzpyGh29vYhLgdAZqHYBamee16WkUhFBdjlzH8UFe0uXnU3NcXL8BTaaw6RFrvQ/zKBsYq2AL6OknlSc/5FIHrsBKWBo3ykGs4YRjuANGi7fo0Vlg+SzUuacazs5tx8pD0t0TFXcq6/wG51uOLmX9OVDTDYZAKH2aygKWb9iU4z65bF+vUJXIOhHrr/bt5hjwdOAdurBWbB/S/mZe9dFcALyfRyHmsU6xjSN8ZBPqZZtx/JFw1aZfVWAuxRY3/H7LnCBmJ/cDEKDC8a6OvWZMVFEMA0E39Z1shTfkmQsO9aht7a/rBaiu0onX8dZtJMSRuTrqnNj27jwMg0xCtsBBAEJ4phXUsUNCVI17oSSg8cjbO1njm+PNnMG3KQfh9kCN+Gr35Gx/DYG300OW82jUFWnSSyoU8uYvWqnC4iU4PJN4ge3EalIVKspAIebo5jd5O2wBkYLVGou8Hj4E75LTnmxiahJqTH2+cy6I9nJbwKja9PcjA/TeDea2Fccym6O/lQnwqlJsDyz1ljigNMgctfc9a7/NR8YAkoRF6/0UoN9pVV9VK+fkA5d33jFAtluXPXY0t6d1gkyqEQqb6EhQWFsWma5ZxjGDSxgTrLWRRAzds80R1rfYEjEpOYbBkGoz8+7Bp/mlFxYe2teKFR3csvn9vSI6ySX5zL9QAEBzOTG+rDu8OEkCuXLQycD37s0c0Tkcxojc3ELeFhmLOA/uvTRjTBOikhpW2wAckKTP44kpH5a2HmCoREUudWzsGcaf++OkA/CjK3BV98ioGT2ndLbh0jPjCBj0cppRIzmNCRcBrs7fb/dx7vJWn6TJHYmWjlM2bF5cnXiL5NZwVttwLS9OV635C65C6SKNzrsviDBkYfWd04We7rbdFBCjzvK7RWZOBsjp47O0kYpS7qTpH8nSAIAq58j+dGAycRXQ7KpVZxdzz7ZaFLgMGfvkSAHVJgvBLGQwS78FSn+ZpZDpJBd0aqLDmXLMcg4qwdwSD345d8+Qta6pxp9i4F/I2JI8KNfCiHVKPlp0Fh+jH8FPJXvRBR7eEm/BxdlBMw4bqIxUE85p9v3tbjGtJ00yY2ciQ4bgrV8Rkqs5hTng2YnlVCz+0gdSGIIs+hGpuHaOeSNlE64pvFx7XYhA3ChMwAJd5SoqMrWCOEmQs1on93UAMi0a4zGNCWOcX8PM4JK5d3wvu+xP3OUacJ8Elyk5hOXAzLClIzJIgA40zXlnKzB+gNpgcn284UEURWFa+Q9+eak8b9LlbrzoJ0kPtXbHEZYgNNeakeF7GavIuWbPwUErpzToWx9uCk4RRloBw6yHAf3jmY9BkU4pDJIswIOvdwWEMBsOi/jPmx2ZR8jjJheRrCP2q4RmMVo+KN7bC4dgiaKosxdk9cPkEcOnY9k5xdaYPGm9JkPG0Tp42/99gX8+WnGeqUF6W8NOsG7fY5Bi99CUhrA3bJsrq/d869QNooMmIL3hob2lELUZHUEjL+TIWED4XGYtHE7Hi4hSUi81AOToQn8xiPbTdd/3n0XuGKtbfh53qehB3xEm2y48LSHggXL9eOmLLBPParIbOXiJPJvD4EcmZD3IdIvM9SIiuYOTEnj3WRtdIANvcFrTNLJzV1EkzlBssEAscUpjhwMeKgxdgCNDS/p2fMxaRAb+XagDnlLzMG7R0AGoWndRAmrbhiX/1eMdlGbkJG2yKYcpy0huTv6lUrEIEp8tc27JWRwVYZ7SXOp+hswXKvv74wGKjjgP7tvzxlyBYhCLm5WT
83MF/zUHm90Bsre+Y0m2xS0WSjyw8Q2++MjETndH7vvzjWI5o0yz2hy0IUiUocA1cxLQJHZTKfRpBdl49pEO0pkzSvbAlRZxiyiIWDswxl+irwaPeQ/f0rV7AKluYVXiENzfbzUQ4Xw/DahRvPNfAKQCPXP4iL4Jl2n6Dq2A2faF2GFcCDJaR/koIbCBDVkvDeitq3WF2VxtTNHuUSoZjQGzOZJ+GrTht7xNzZO9OwT36gSWEPQqV9zmixneOWJ7rr+xsfG0IJnth8SSp3g3U3HZFSaOJFs5cHsBW8x+vsybDMhHqJlRpl8By3yerzkARpZt2ile+lcLBpVuvMOGyRxjuUXOpGnc+p9FBsHajjJf8QcNwT9Z6ao7KSpc5JW61C0IvOVtsmxL5ulPnbn5JZZBA3h9FHbvQGWrjaPO4MD5aHhd8ky30c4FBOsh64faBePKXTSYMnyuLVsVdCds5kP3ZGmY3sESqz29irZEcro73tGKxPw2XH71hkF3z4zYl31xIRRv5kiOgQDw2P3LaOk416tVxI5r1RiLd0XsZH7CxxdnD7M5UzSHwvNL/cwmJV0nvuEzCVHtVxaIW2KOUzQULLsZqdzkfN7MjeV+20vS41pzkSNhVhWcy07NCDER5blGMXkijGE7EIiuWn4BA25LosZd7l0uMEW+adoAMw0UasV34tyYmUabXN9atq7gRc7B/8yRjY7oLerPlO9z+aKJb0Js31DO11cCn6Tcmiy8bdMcfQ9w1EbB87ju/KyvCmKB/Jl5K31fRFhab4XbwhqYnxVdHD2XGoHNfUDHJjtt7yUlUDjYhssj3eFIe2f1ADzTa6aP6YOjHoLLQS/b+6sknF067gT5ZQtfDOoAiDsdOxJObb+nRsn82r19lZPBPYIf/2QecDrgH++49vyun6C1EjFG8eroGHE1RMI9IsTXN3RDPXdRKtUykyahgfg21PPxJSPj+bXTQG9ne5tyoxMAVsESRL/aA5eM7+JKcyTh9+hrHiPDHB7GJ9ix12vCWIdfluXgNyVcTWC1mcrPK2SH9X9ZH0fE0HL7eu6bhTrAuLYTa+2wpIyIv+2beuAwaVNmczFKHurkWAkh1bqh1Xw4YYHihvyQNjfi/2IhU5LPQXnIgJaMxsfAsxUuSdweQ12Swfds3vuGpEaz764DeYMWXKoA5Hyhv1+GLmdkTUTXr+zuHCQ6hzodJZPGiJ11dfaeh6ey89JE4JTM24J8yPZYrUKzO2NFuyEM8jn7ZZdouHGs5l5osQ++/O5M1lXHh4iRFcaKB8ujd1AyeGzDlS64kZIytTKDV2AZWknSh6A+UYijtv1yb6EuW8PAOG2Sm4iIXdAM2fn//ro/idFZqbzZ6mWRLXCZkBLlZV1Bzi2HuLVIvvMFcvsj/0wV2SGEdeGoYvtajfrwD3Nheg7cMK+mrX5f7EmdipT7iEoHwHMKELzFHczQFj/Eu552BzXSV+C5xjK4qzDfS2DLg2o+bymHvZaeHISrD70N0Q9dAz7J3gX325kMGXbT4jj7BtKY9VsTbp5HCmuSAY2wBgrcGt1REHyZbSLT8suy5Nika9gW3XqXlvxmlXs+otYqXoNCpNRxmhdNxyQkoSr3/UI8yLPzpwltoCfohyG45Nv22DFqCY+gCJMyyONy/Uv4vfEIxBq2FWH6QK7ycNsCht1SwVbHvrIhEYQBSDtT739mdA2/Ax5ykn04hH8CFkX+r7YwgXlWBlkxHyArUvX4YZpSzYi5e0rjBAVLV+GcZO0EYA163B80zyzrJkgvvz3jgELN2Y13xj1tmKzFZydedSxHbMiTNkMdEAFmOf5aiy83aarMyRB8UMRlSbN+1BN0m/Lgh32f5kkynZmr4oEIxsGPEsV3LneuYF+YaNbcntNSekXQLTr5kGXozhTrJjU795Kqci0Pv7jHr4mbZ98uy/kaT3ZVjzpKSM6k8iYdDmdbmb6swKjdJCEvc0AXLW9oK86BKWL9XGrSW8uRAn98CXSyJc1cP0oW16diLbM9cdZsrdGw21Lr/dZzt0/JNapDRTIj3SUjL4QT03CDW8W1gVpRsJhr3W7E7/50t651Q3ZlTT8gBRqPzl3ME5I+LsBjbdWJrE+2i9Pox1aDYeuKWXLPWeGGLPa+YKT7yPmWCtSjX0ozCy8gxHdLdp80m/mNWcAw1D1QC33jK5oQkdQLtXyx0dfh++yaoBLz55T4F+KILJrE6OvJWhTBHhxa1jGiFeNROUEM6fTXJt0JfFqayPDZOVu24gK3wkkqD4TcGc9bJkVJZ7csqEAECOrzCvyJKMHFr/yahvuK9IWL/NVhQ46uM36/G8fcXVw6E7fZ7n8Ghl5mgw6TLq6sJW4yWow2UxfmJ0j5r8H4n7d1rMOLEE75ZKZq3Sb6NdgTQ1vm6dM212GGrqrF4uFULrzaJ8EUzeotPiljUFaaa70nlY3/uu6NRpcKToai+pW1R6d+Sibb+68jX8XI9JmYS64O0zxcctUbZj5dzXXrbDbKnrsxpbf67gYTPHHEq3XxY/WTOv9RoZfuSB1zrEAKYbseVkNYf0dHIyDY8vYrtan1YbpisSYf2h7Gi4wj+hR/U324ELoZUVaL73kG3Q7GAtKJBFLcpNvLILrK/wzhQZx+h4GKSoiI0Ln/JvshUW9irUcm21Z6MyHZulUGiHHKvSoEy2Rw+PhKDv3K7KJefV5pSYx/7nVzGdaiKRcLiLMGkSo5GBJAnns4G44aaQxeu9R2jayWSts9bb0RzE+jVdkDdCPZzCCznToPNZNo5W5OPOu0Xu81UCAW8mKvFs+2blDwHOFPs6nsW1LIswgwBitlGIOGuVjB0p+B3L7euQIvBcJ8SA8sC9+mnI9I8DmOBYOC/FiNuR5DZfoS5Ut02y8OUrYwCO86sfbgwoOdGopQwDPqrQNBOAsFQDfvDyzQHd8N5iwDcgj65+TnldZxefSY1AAgUlzeurRVwuAp6K/g5dcvUs6tWdWBR+1l8A/jLTf4CXW9ECFR3ryUfcOoMsrKZEd7KjtP92LzDnSYcRULdh4jdOwCxGxbvH9w95ekE1pbDUG95esDBRzLv0qahOdPQLqlRTBJdIGZzOtft/ennlWI/+e9kmRBPGEJGVknN1Jrlkq0i+zIfaR6nAt1JQOOHnmYf/w+iTq63dFwqhn8xGIDHZyDLIcfFo0/QXNKwjcSCCoo+721KKNV8F09dI+hXtHpZBpI/tnDTnGtUhZtMY0cqG55P9QtJOGDlockhkSDGQAyRecr4+imWsw5IJmdf53CYO6Q/5RFWGW+4QM6wt4Z3R7y0Vnfw4KrUDNMyq2nO8e738Uy6xsUVqC0vf1++OEjqw44v9oDTW3u/AaA7dxgR8enkuNDod/h4xjXYo9DDFaTYpI3praZrwxucGSlmWTQ3YmZSFMCvUzt7F2pQvzymteZkZyysUouQKijCBFu7lXk6iSYoedulws2Qs1z+hBbbApZtK9bO/d4qhigrIMiKMvUJmHlyLf5yV5D0IF8kfvKCGuyryFcLWOEoniumvaihXExogUUrcVOLiBdJktPb+TG4WMoD7aDCL47MWicsUCtm2+9VnOgIgDGbZ3+JUCDVXhgNzzG0/i6XUJWeLUxbdlGUMF0E0fYEG/DIBDDRHTnzt7GZTr79BjtT9Mgz1zXnjtlY0MG4TbRZU7tr+8ifm5gEFka+kiJoVUD0SbAwwvBha/2UOShzuWwt7ECkWBrC5gL6X6d1NbxGOkrbe9NG3bm/0uV2fyX4kThSZpXL23w4azCNxdKL0Ztx7DEXaDW1HypzhMY6s606OfqOvIN0zJvqQLLJPSebsv4HBi0Ls/fTq5/gv5yzUuySHyUKAj112D1wfYF7OXSw6ZQ+asR7ANjWff8G6ckVAo5Vx0ZU2pGHUBoauXTSrwTo6Nug05fUJd12OW0wOEvzTlAynR88UVF+9j3/wO5USOYx51s3gl0ZiKX3i/mLU6c+GuovI8lUvVn/8r5fQmV9JPUxthYRfo+V33TT0xzn7ugdp6x6cN4ziFvEUHK3qhKy6SenA1gaPv3hUDsOVpfIbtB92rakucA+FkAB0GV9i5hxwnmpKeci695
NFs7rnolU4LvyeUD7iiSzZ3YElE8wFv66tYesZ2b/jkN3obA+jQBTAaYLGnzuy9Xmflsj+8g616iprkJnfyovqsC4ZdiKg3RxfHuHvEFM3RS2vO33hi09AnET3lHklP7S5kJtij8pnDn4NpexbRv+mjq9jRG3TvRkICrIl0Ysl4beixf0gIqHqrk4KWJ2a8K7fVB3AJ/jxkImTJ+aPYEcu3dh9KXGElHMRD8zRdnbws9wfA98gOQ7sqPp68ndJLyLXKeVh8TrNW6TXurdsozwGLzkkmDru6MWnkrgl78/ktm9blXb0J+qnbKmuOZugBE3+PanUs4+dWxq2u2g2WRhgbUlZRIK1JGAkx7aqXmhA28w9PfV6lLCJ2GY3jG1sQErt5XIumugpp8ri9jBQra0uiZbHK1hwhGIQ9N/Rbgi/hkaCFLglIv/K7fiedyKFhOQSNXE/8cbjKhWyHB7ipFseziTAxywrTJJIgg7a9XEvd10YZfJDSLPtLerWuWEFWDn1Et8OcUzQj5XHPRWgA8F2Bx5SiZug6JUQ1Ut+1nP7OYzsWlMLW5sOrIrG4LV5/0qfWN0tNp9ZXc4Gli5guFOphh3zPCzxKFMyPqu9lacfp43mrxkYZRMc04jqaRRibGkHjPmKUtZmBwiR6Sydg4P45Mks/wbbFHlOa0pWrsDQ6Br6flxZLo1nzKgQ6pibLnR4uXjz78iBwNSmdEGmJDnIxMlPlLuBDWF5zXvXVYeXuEVYzDpW/jG1joAKlrfX3tj7TGsdKfgCCXkFSAlXdXCF5MbT6RrqTHcDVc6H6IvtP1B05nctS10FT5y+hgkcwofgx9fQLNOn6NtfgHmCtKbr2LcCz53bkJ6jIsNHwYMHRR6nJqfgfNfeueRpDXlN1dMXvepEGkEZuSAMrGKnbD6b/k1xYWyk8wKFJ8nfjfClxtQ54ySjoqSUkkVY/y5ksErnDd6kkrVN7WUz2w/2U8aziyhv772B16/XkeTgcld/4Y45iQ1TfMyG7Qrv/8k6E/uVPRvdThbhCgDEGXujh4t+93jEGb4CjGjm9YHrJwJ0qpCCA+3YO8RUtyKGeWpbujFKN0Ov4D7LJImlmsEPEGnwiq4EsYfoTWIv5MGVgvFPyh34CCJbCIfcXR+FJUgP3AjtEvo5MExrg9eNoJIrMyUGI2ZyHD6yqYxtUUuoBrm4xFkr0Iq5bIUSmlmhTTmDF//UpO6+Mp8OrtIB5lrP6gtUkopVWhuAAgjQJO2MVbPQ948BHO+rJmyXsPvSTnadf17HaHyhma9+sOCCLqTyNTV1DA/JACeYNKCAV8hYgiMnjaAcOIvzzjZzITndehnFUYKI3CxzBkBzdow/9eAKuuC0K2weB0ATg6Nt65G6bcxbYnLxXZE41GiG09VTwMTltqwJ3ILEofMEbIyU62zV0NMjGEK/yVbBuZ2B7gCOdGES80SABmJwVEVbNEEYn6ImKGtKTRRGRc4Ok7HdIq23qqhhqEW0txLBlPSzKWLp8lsqDFzPlZf6VtYMdJPxT6RlGVuo88FliOw8Nr9JVQGwOnqP0fRoUI9Xf45my+awQzKGb1via9py5Pp5weNx8Yjc77s8fC4JKTxt0pipeoz4IwewzUe5Q6jD12iMaCxl8QiUoBixwk+YrL5NRPPfIRHrpjeHuJs1ck4VG91cjRw6W5kMR1HRRduAQF9AcXGWLUtmnXCrvmWkCjUQrPpTVgG/OFcFd0AfHkVN792RFISWGZTmOMz1YQUg5e0tLz1oW51CQulXqObWUEIyMj1FI+QIyKFT0pgGJDXvXgf30+cDMVYe7K9Dxcl5N7gSlD8p+7ZinTiFn3ZWp6iiwRCDkIOypjVMvWwEmfdr6JgcACdMTuTA0xACXROFb6ANtJ0ngtG5RNsBlykUDVbBTnUmPVbBSnIeSLaJWCcQvXgOt2B66ECt/Q9z+Xuqs6jQwElD1uK9AzlycjHLDng92jLbRe//wutotltpIWTX6A3uuQyV0HQGnSgv19M2WuZvejUmCwc8S6iGEuvHjTR8Hsw/2cgGox26wjQRz7mke/mip3y9o5Sdypjw8jelauXYmX/Ao14JmU8B6EXfZwhHHil2Nmq5khazywQomfom7cO8BA60yjIAQWSS0R9CvM6u0ZU4mTuL8Tf0Z4ku0X/oZ6gwDGqEf/W6K3gSoON5gtqGizIaAERSl3AgMnHa65edU4dBjLlOVGOn8uFPBho13JLKhXftCDo+PXfimtLo120KVbHGlqcHuE9Sr6BRgCK73izGkty3Qg15mM2JyMY7PXHrusFg7N8JNmMeyiKg+SE01MkdumL65AHaVBAvdbwRqnElsshohCmrGGn24v/8vhX5dQhxIGhqLcEZ0TrX/BHbj4K3edc+HQIuqz81aiysUga9DW63W8DGz47TyAgnO0eD6WPQQogwpqDIHokXGmEsORE9V6WJeuDJvygUeVFBevqhF9tfjBqc0a06JbfkWWIkZdisr3HM1RDo2rMchrhi6ECvzlQZvSSFx1RjhLXGrGuHBFmxUMpIJ8GYvP1XdNAPXoaroNbzFgdSQzeZPM8NHNA0oDDxJZMWasG/WS5U+t6X437nrg8k9TpBtgyuwIc6KgZqyXE/2GPalrXndcXljTHoF+EDi8dcZl7BbN2Yg5puDUvdb4QzHyGP6GELxlJGqDfGPUtFxlvZu6KrSrt7mubRNZFGfy09sixS4pvEsLgyZORvOp+R5eMCwIaKf3xI+KVxVZ4D+b9qYlG4fvd3ZoTKz3xIzcPRejQNk68iGIrOZTEpE+ru9tS7kdhFyZwJhW2JpMnOAn+54WZt6rzvxcugLborX2viYKldkPsfkKD0LthPctVFFSXp7F3IN3XmufTH73f05Zb2cRuZKTuNg8Sd/k5fWAv+CXU+M6KLtkUx1yqJs4nyLZ8uPFg5McCXE8TpEEXo6ek9Q6qMLiG0LHY9nMLIzia8htc2CrdGlNZKRdG0wZ4j6u7gBbjuyIx2Rua4PcYVSTpB2yX3isc35+y8OKMmFoksK8SoddLWzj6y3WyPzltMSQA8bK7PWxTpv5OSXiLbvmroqWftbUMXK7bTCRm0syh81n3UKHFjsPyVey9rhHib+JShWoffud43Pl5m3AC2HOA4gC6pkWm+wtT71t8V2PNuiT3pqanej/vmlMxOoDQ3+raCcRyNgvWSuQgMw5aBa03D6HNIznts6TciHzBe+kzCr0tlmWToUfOwd3nywDUQciGHW6/es1vJ40rW6897b0+R+2XZxU0O6B6OLYAHExmLMQyr/vRlbnMf3QVp5PkiQorSEh1cqIAv6Rq+YZFvDt4Kgl0fBNXy3bbHrogIFxkZXtYIExKkkBa1a4hYeUYfrX9508EFApBPwVtUz+XpdSSctNl0RAAb3vYqKcSefOaRulryMue+6vVVajRfzn2pFCjwq9IfGE7kUzt1uRDdt/PJVKPQpOo2SPUenkgTNRBFY6+bHu1HMqJ8cbNuYfTNm7PhGni7cJmwU8Bgq38FXZCxQPvkrSH9STVufzqrthddeDaIf6W18ICyFq/eJ2/85NGGY2aHwWASwbqk9n3ukLmIaqleX/81GG64Dllq+Nb3i3cojeDffKKdXM/Fwufhw614DFOO5udAgBq87L1e8PRuqeieE80rvU6Z4PLU6bO/1B4cZOXee2YFWSB6ooy1+TXU8FCYQHrjrqfDGzuyMNMD0b7ZGwQdiOTiBQOYl7PwG8wx0b4eeqvhZI4lcTm1K5H+fur3jPb73SQ+MnuvC65tHbRZUNhBWl/cyL/DkaI2Igow8iPKZgsoVdFiTnCT62wlH1dORqQye5/cywlQSXk+1sMZwFnhbY1/PeZV4Ugw1P9UX7zeKsgpSfJL159onWbGE6BuRp18xchndltcgXFek3ZBcw8Epsx8OikexddYXYN9cEmVGFJuquKIZHMekRnZG+RfZHcuvBs8E4yGZHONTKZsOh9k4hud5Ppqlbuj/ZtxxeiXNqF44q2HzTE6brIj3590cYqGfe5NX376Un9SU235uzQFsqpsMeuiE2nw5z9nBL0DWTJnMwj2Pe1gZlytwKlLyz4kLaAmCj
PvhyEe7AQaYhkhmgjmzTCQMBrorodYmFDpvLxZXmYzqskN5hIECPBU/DneZQqELo2UAzNPTn/CRt4VtWHj3tQFThn0l3MVbuJh8pynSX6kugp4clE16UnmuwnBJOyE9h7AjEuZvJMH4hdCLiaTyYSEvPCg8GnsChvEJqBZmc7GO6tCyw9jQ31mwA1XiWGWGdU5xwfctTexJpJNalnn+kX+kCP5jl95JW3oGTYE+kacQz68DTDsV74oOZFVuW9cxpeqMjbPid56JhLnl7KgJIyACJdXxS4VrGrpJDv/xMZ9KJMuamfESkThUAQqDHNtOTh24X1t7zrpgJb6skrA2APZah/NfZvHqlmUt9y1ydymXvXaK9SY8BKcoCjUks05UF7Z/7CtFNl+E7nS04FtFl8zLrKT6mdru66Y2HEQSEanIoGIz5p4qe8p2jtSZZRfl1CbzyU/5B1hgMRNUda/hDTybBq+pKg+lZNEzjc1d0z1AwinRdhJituE3YIOCfjAubOm3JgdEjs8VVuonCMvEl4a+ipf9nV+1D/xwOOmyCi/E5bH8Vth/jgIpX9ozDnfyLsq4RhGMwrkLxls1uyFef+Zjv8oZOKI9gb8DARf66x3AUjFEe7MWxxabFISbynRtAsqWc6qMWT8rgs+6ssf/mRsIn2WylluPFZ1mN5b4+p6T1jq/j0UiNy1sV0d6b+3Eg+AlOQaSAUqeAi3O+gS5I+uGu4/Ttv7s2gx/ikVezXz3yWkeT8HXTKK5i2b5zHIIO9rg4a7DviLlD391e5wg7yIAO+q5aka//lcrICIaDG7vYpcS94ysgO3kKwyZ9rbtQuq+MuqBq5X6DFB9ajHWtTqKGF6torR295GxDYdwIUfxt9V8rL3/VUYY09dKOfvFef9t5M2LxqrHvPbscsDwCSX1CJ4KwZfOzcQPo6nY9P+spJK755PyOGf2Wu2WgLPHjOf0aMYS3mdSfZ3Lo1tBaYuHGo6a+Z/7TmwxHLx5Y8BMSe0HXyo+fzPqpwCyMdC8K5uJFTlBishTvmMlYS0BdghLlqar047JK2Z0hi4lvD8UIU6jnt6Uang5cMmD1xOWxOcH9EZTp+5yCaG7l3Ack603ZQqltdKWUqwSxFTpiCs4dhH/IWQfZb4dTBBA+1EabIVQOG7UbbzYvNeCR5/vyDiqJ5imD5DposcwsqsX2SEWbgXiPt4l1FFX8h6vQq2S6Eo6bL6vqmjwstNTr/xPAc5weUixU8MrxKDFp+K1BXz1J6iuOPpomRn+ESJ0W/l5/wVp+x8VT8VJcC7cMXo+glMl5G2dLKPypKSN8cdcrMBJ43qYHhcIXE0nqNE0NCZfPH/hF5zaetFm6wgjq05CPiEewnU48Iio132Uo3A8MBEMcMPnxFzc8qSKLicUsUgq2gjaldTxrGbAzoNseWX+2z+IBOinhn7TFMLoY5cH+gAaLjaO9ZzDIo+4D+wiORtaoaWqL43ln1kLziZFr/yWPWsxCfP4j5X4eWxo/RDOM0UlMrGNNk8CLJiScY6scFvoAw945VUi0qYgsX/vknFU5V+/nnLBKVU+QKGYuXi9EAS0gaCAwNVSDVM31r5D5BYMrinho4f9qaYCoDZZaUw5rcJUUiPWKOjw14RH7XRqfpcfUhbnw00UVSIrFbKp8o4Gn5KhYR/lT+4OcHpD9ZrbiUhy++Bul5o+CTk6RgvORwPvWbJK+mY3EFYT2y8xk452wLPLStyY3JX0PDJtAzKLrmmAiSUAlE09ey2V1wfKe646sCWwRC9mOxiNuezb3+k5o7AJO0f9tsWI7rAE8NtqLVfBii6XrIkVjI+VwS+oMnFozgzZw55TXyLsDjzc04c06m9yZ3Og54jvCUaI/P8GRH49zu1CkN+jbz9sN0iN7EIzVb4++moGnyVYP/ro+vyQDMSTZO1B7uKneOstiFdIFXBdQG+5PZdRYdBdKNcbXNgd0zHVNQRnoiktvUN8aU5AZZ2FVHS/d7zyOuwtLj0JXFsx7emF12BqrrxJUfgtptjukiuPL+blWzwKKLVyP8ks4o9Cl4E+D24oazMm/4+5V2y8j4vCqnntiTFJZcV6hbwWDk3AF6Wg+ZkfRMpV66yuiTtvlkoliXX+/Y823zcuJjnezBri+mDSZJzc4qE8H6J176Yw+MqmSDqUvr0WcUOAQd3DABcwuDLnZJ10G2QaMs18n7gBkGz+f2kA9IqDZjwZDiLU8BiOsGOVpfEx+qiLJFDuAiMHbWArBFemWwrBOKLupZwxB50MYklEvXu9m0lpNAskXe5eIHVYnhAwHeLk9Lw6CfOTLQJE1qXIc44HKZHLzft+gKQrXoORqO4WZnnLOguaYdq21mMS7Qr0OvYvyUBghloOiiI0LQ8qX5CEV8uTTFEZGZa08+sq5NO5zf5+VXNvnZexHHe094zZximJF92pGHKwOsgJM040F7QODo1u+uKtZ2XvCC9L4wugvgsqhouNBQkOpKJYx/UU1ooyGGa2RlPxUFatcLCfidCySXJVEto+FokJP5Tnsk/zRfJbwI0nvmadyE+4AuhHc4iWOxZdgCL9l7LMEsevBCNkNbupARTaYoam9IFPRThB+tXAtFxWXpVoq6ILC+7faYvf1N53HyVkrtPtUfAwRl+tMnI4zaYTYTGlLexs+NRwumfTjLfG+DGLxzaz8JMfWhxt/s01bbsyPnppDI/1Dem5W2oz5j+w3NqTlS+wW9TRvAKKNuKj1OCkBi5li7YHMCSb9fCO2H4t47/jm7YeoheMTkSEstjPHjXcK+EEolWXHAqmLpOh56U/0RBvoJKh/Hugn9kqg6IwJl31SZ+OPEUCfucnb0iucnOLhQaBSaqs+C8xIqjeDkfwoHK7MZapyz5llkHVxGhKHUAWEDXLFMA88k/XIznvP+Wb2XjWlTSmh/aUZG9p4cZ6kWO6Bt7TVbqU2V7/I7RIGtn9fBKwSWmgR/E9Wwadi9D2VWrEcPJ5cXmcu5uIeSQa3LpeE+bq65gefQldxKalt81wu4/+P2ftzlgi811MZ7qbP9amJU1sHKHHXKI+Ych+ffiOcPD8Aq4mDo256QCzpLWB6FIdqKymuBh4nAQikap5IpbtILTpWwsw9gxjqyWm/EuwC/yUGBNvSG8ATg+RczIiMPvl4BLVqFu4hR3O4k/ZFjPlqlitGHY2iPd2LemXXSnaAi2bCErbpGUW/dow/AwJznoKP2zgEhQD4B+pljNeNgU8xpFpDoUPMHvjihT5wa97aG900fRzMv4qDMojMjJG0g+UZvejms4KD6R7qsukfThIvpQEYnW++14P62T0K+fzNZwwm0ze3nfbA6Z8yTcT99cEh3LBId2LxMokBAUe1g/yH3xlWU0aBzH+nkcko6ydkXk3mEXVfESHlJFFN/W9vYtyZEyjQohlGxOuyEw1S0vRiZdhFTviL/QvHbwo9QQYz14bgXql1DdWBn3p4JnqHkM7p4QGAwRstlGRQ6r7YeavOFMW5DcKeZ3QyWnyp2W/oU7mSmDrG+Ri+sIC3jKbVvbLExG2kXFt10dGRb5GTtyQhlwBZnLhbC77xqjN7qHEDmTMgIdXFK3CRHBu1Qqz5nkZn8Jfnmqn96+YTYwGMYkgtTlLai3EoP8EPBCMN0xiaQq/LrScrmewUdRBkZKuTW/WPmQxS+K+5TiW9Xey7bfgh99pbdVQ5F734D7TfW6Rf9a+IpOJ7QH/WWw9HRbkFehppwUL7ktGqSAyrRpEpiyNqAY7mzoT0DyBQqJ7AG0C/tLd8DTgtBCmJ95LGr06P1JiAHV+0/hZ/6syb133dGTDtPksyDuL2tR2i+bu8Ky2lnrY8dEF6vQ8kuf2fx7e+m5nCPcYGxjAWTIk8YOwdN6tROQM/vPUWtU+CFGm3yjiR6tYY4jlNC9CQrM6xiPoA4dVbluEhryC2UUa1g+fUmBbEX82q4g3IpXvDDO5gKWC2LB37hBOhJh+4E3uysR24lmDfdnU67/0lvdo/toIl6P1QQHlxm7PeyP9ks04yB3SpApHASjvnR99BgbvbU7GgO28mUkL8Km5pztctUPJeryHt5PaWxY4Eo9aKLfQLV01B2Tn3kXm0
xPmHuWkmkT7CJuPODBMEHZ1BHVc2WgeE3futsPoUB52u8PoCnM3Ig5fglbj7RfcPWIzeLYseuJI9SzO8Z2MXDBppI+BWlqEHBgsmlGUHzmxygGq06ZitATX5d9BJKWuh9HEM0hpBv+iyQZkwsVaFj0hgcUsSE0GyT+8pxOWEJPf1Mk0t91zRwLODzXXUEsDP5hLW3wB/IRF2zSepeUhfVY3og73tMIivzXT0fzDt1QD29PklgQO2p9gDPaECxLqZ5flbBRdMDX7pHZNKvOW8QKJswQOQZVivGT87BTQmSJI1C0yqy6Z2a/NcwvECA3iN72+V2EHB15weAuab2vEZH3RohKUczRhysNBZr3Fj2FZalRlNK5Fp7w+Nvhv5v9Dc8sEnGB/5ywhaBBwPooHygxFxGb2nFb7ruQgtZmGXWdNALwap5ub9qf3cF+GSPxvwuX1r9ckigOdVQGa1ZPC4N6uzSPbL7Eyr7w773307v2lZSPz1+3oFiRu5pSp2O45+W64si8FG9E6B0x4TWAuixzp9YgHU7M0EzrWAqMXgV6OTqQTrFGpLAzxWzx4jgo8eJ+Q8g3MFMTUxuHpMY+/V/8j57CRiyOsODzEQ9zxr6/mxRZatnbDcXXn5L1pFRXvozTQYtnF9Wx6Y1vMvo+wssLQAOTrbfPyZK/l2tfTzTfTarLdwrZa6V0nH5ta3kHJ8tLHIwHVQBCn0hhj6D8bI98019iH+b4xZR9+0RIAFNvwjOlywtOMV9uR1C0N6wskoxub7/b7vptra2qLHcNYersK6jL05ZSN6OY9S7yLZd6C/cs8EH7BecqZAVaiaRqoFMuxNg9Ual115MHr2I+pNlBDip3dhQxkzXJNzaRn8lTDZS1owm8FXRw97QbXZHC8whBy09GYJPW/UAKlTA4OSjFgKAoGOdRh07Ib4cEgE0cHtq/vq6co7lbHPz/Wog7xg8szX7GYIzsBI0W41FeaarqWZlq7SK/46KUgHnmie+f8Kls68fgr4YBXJ5T2BgYOeSwgAR+lvjXlz4I50BFSFjYAypt7IdFtmSUzJ/X/HSgYrz7w5n7D3tLuLqYHhxFBqECND6/gVhTZH6g+sTGa69+vhEq+gW+cHp80gRhgkKehrg5BOJqOIM3mo1cauhzUpV0G99mKhA1w8juv5qb4o+h1rSSxRQt2iC/gSzfIcRkxRqZQFwl2e5oBSjGlP9GUDUIO1QkXF5FRH8DdE+KZHCV5my7Ml4lvRtkFnCunhYfwfq34az638MoH7pKMh6qrKhw4NE3XQwKaFvoRgGRy/6mv1we0AO+g0B8PdTewmEI/dT2Gwi4Q8UJvfCbL9UIftAanUjIbx37ssJSY6vA4DiyPDKbLZVz713Ur2GAxRlois7r88lUhbjBqSizxAC/gkH0yN6cJzq3BGqmtEq/+QDwDWQtWuvewsMj1MrNh/8kx8HmFx0AAZiE+qvHePTAJTP2TYxBtUB4e2mjaBhgpTDcCz2eqri+/Io2beFKqIA4tPdWuCO+kTRCPGqIQBQdvm+HQj0JvR9vtYUyiR9O1mqXLNOpZNi3G5f3Lx4QWGyHvLJSH/ZRDPVrpFmWipTuSORnfhjM3DNXZpttSf22b8/Kn7y1IM6H0nWppSyhWjTJClGlF/P0klU35uYHm+Zw+ZEAT04Hh8nHsg3uEq6HOdjLtEutv6rEzblFYd6yHcAVxBJEKjNax34DxE6XvOAGy2t0UWQT/yM/PQ+eDt603z6PnBMxRZwWBAjMq8MJFP2W3FFn7bU1Mpwmaihca4tu2tU6+iHlFLawWUhIPksd0Bts/mTF15F8tLNRFqddrnFcDjbLUpfNZJ/OSeQ3kK4Ub0NuMAHKpLU0DMjRmcGOLIeM3vqOiIfjNodNPZcZzN5WlpWrHuEMw+BaQK16fj/OWWccoUJrSdxb9HRxdrhQpPc5WRmETBXcWHREESXRsgJtpXOjUkwiHxJIWz2besis6yntO+2O8mJTozz1Je0i/T/4B8ZCcHPG8GupboCUAB/811/i9BFQ3/Hma/RHzkWPqfThH/RIO621T6N3b6oVn+iQy6dqSkiNk0OluaUuXXGiC3oQTXK9x143KBMW/m/VYcOHGLHNTlZxKUTSkNDFndAdx3K2Rr57lANjuTtU1EoLMq5/oTXgTwJ1V3X4UAAuojSIvG3p0Gp94JMRTqNaVJliGppRT3yL4qLWBelq5xEtOwM+22SEIda23aWt3Ofyw0X7JgEjUQoQdSX1f8peGccdfkd691pS4jnQoOqII84SoLFThyjEifNKJdoyCQ+G+MBluw+HqW63wfdO0UbdMGgWirpkqDqlJh7M9mncp1/BcsfsC7pD/mMh749epknBz62GeLqVSi5U+PTmNMYMrstahu+9c+IKRq1Myu9rWvodtzriDsG9AjmhLrGO2ldnVM/bse4NBs6LODQo6WHESwJ1GQAlRXpP81EV4b/8gGWeVGxTZxw9hB6uHz9DzvpR8JsM6IgJaBpuazAolvdx1nZfRR/dDPDie7sPJSlAfEyYWlLPrcNsabx8lzkmy7cLSm4ArSeuJ1V/HBGe9f941TpX7w+O7F2yoMI6+F3OL0mMX4lzKphH3NLy58Qoyu3SvZ7V2YpqEJ0l/SD6oH6+nrp3GKCaI6WXUuTyt0+7zjUkBTfTcBma1uqpS8yis3gRE4Lz1O+hpXyp0HPjQZ20U8hgeG8+7MbmRx05lF7Wg5VGgpvM2IdgFbXAyjFsGaBZy58sC2CJveK21OBe2UPcQzOeo5CJB6CM/aZPj4L8kL1Y4ggI0hxQw9MimwK+cQaOljn+UKFJUbqGNudc1zAc/wgCIhGllPnGgVTmIC9Tp2SUMNI9C6FXElwb40KKWNPOMJCNIn25+6pIxuV8LalabrZU4dCnXMDlENVppZKLZO3tSDHbGlJ5WNRji+ohnNpRWVyh2h1thupqVP6Qd+0QdOD8049aff05ofLvWqDxkC41bcVnmj3VmzToOMqZKUPkZTMK+jDb0GCcqYfiEuAys7c1VpGRcKf4U8GOZDTBbqS+ptPB7wxBbqvGPeAA4FuiAQT9VKmjISQzMWgaQ8JbvFqfryn85c1gCqtD80l0N7sPB3fnLGLtO5su73RfYOOGplBx8KTM1HY6LNa1ax7wxCmAU7Z0ZxEQ3AjtvfNPPMMHr/r6PMNbe2RLzjHyLiFQnDgqMlUxgrQbNN8mpIRS/ygUzg3/kY/F+xofUUDSuvOSYjIVBFUYlPAgOpj0i0paRN9J4C4JLYezuiCB01yz2deK8fOzUlCt+t9MCwg09/f6Fx7SlFDjizGTLxeE3HSUlO5e2U1F/3et8Mqr1v+kO9qkb+QLPGIu4BnAa/z+sYu2QY5hQYmyri27SxE0cYRsy8HLy28Sibw9XlvzBDPKS8ZOAPf56HVanrFq6NVPvYy7SIicb/+Bdm1Pg8E4xfF2FrP9ykxTsWH0Pk7bbTkJbAllqYiTxqeLAYS2u45r4IgbFUdotBkHT3tkufHUzcMrEzeEoGBZFPOsD30HLU5q0W1HshO67xrXEW7PgH0R9dIR1hRcVNkV9/gvTP0uon1aNxSfFOxMUAmNWVjuGAeQRE7N6prRq2f8sgVejZ1cLxz+iSkesvv+jmthURlihApjpRJViMCpYuG9udNUr2fj0117Bu6ClIEFgZx0F0ycyQla/0ltwsn/gv3XGAGDpwr/As/TukiwwfNkTluAJ7V1vZQdlkf/xizWZuYzEnCbSbFX3po+LhD46EwVN7fBH9wQax8nYfaMzQHp9B23rqMD24qggjQloiAyogkPABC/m7Tw6d//pQUFdnsMpMoPgjfmOqwUvJrnueVB1z10Sj2CViXF7vlnbezgQGVuEBDHbZHiX/rmYuu3nAGlu6VtxuJHjsCKVt+YSaUgVGrFc+OHa52mya9JN/gvoDAV6h41ENWT+SnkCepc/bQzY2TE0+3Q4OEMGI3CtM2wxdt5u/DSTeZ89RnY7qXHK4GgWfopn7xs5SjLD1JvKQFWjMEYH90bdptACVbmupaXMGczGx8rOxMjWi2B3apV7ojIXTVSvUbR1sfxMRYb9qQosY8tKC5nMO
tybQrA24aEPxdni0rkZkQt0eBRRbxkRTWc8rXwxtmXWpFV+Yb85uP81uhvoa4Q/E6Ov98gfghf6rXLef7UEgM+fC87wPaNIU4umCNHY0PQzUMQoZQ0LGdnitiJAstZmxDxfNpavd0TmJFd9mmwhTMdIqjJXLJvuy4Qe1EZve/fB2fKuZ9JpSxjhtIjlL1FRAvW/pmdzcK/t1L/JhYbcWhV4ajMU5JsbdbQhBGcEifWbutHjP7bP/TrcvoaMwS42hlejtSIZoUFRxHa3jBYdiiSh7xYWc3DeM+J60c+CDF7c50zqfeYQUsTNOzN/SP0MxzGyCNQo4PAajaMBmM2N08nJgcXsjrVkQUKvnP3TTO0LAQDGKlYmUNi8Dt1wf6Zy+x/Ay06uhPCX7Ii2kFXOYlAi4JB0bQIE3MM7+cHiofy9OxK8AxBvl4S1AfBUp5NE1OtO8F8hr579/Q8XFLWZuWEDUSmpTcb5bONqMoANPPHvghB8vu8PhxnXnfJGBDDoKwbyFkOYRZ7nRsYq+Pb4bfWiEf9cMLa2IrMOazkARk8GHzAfGIext46uoktKptdp+KQROHeW+0sknjJhdBgIgkbnu26MxaP9R395JkZV+h5zHyYZLnlWFjph2vpi+tMd6MJmRHxPpx753gA1XfixUwFWs/kG7Rr2lSQodwmn4K2FkIgDDrb5qJYNjYuteThq0f56nb5o2BsjrrOLyZyyrbEaMQMY7qhIE0SmGdOUntXT0mcoSzuDdyJ/xU4hcy0KjV4Q0f2/OKyIQC8HEiOmoTYEzfCidhYeYoXlpz140gdGWdGOu37OKtgqhoF7z5I8ulLjehQEB1+hliFHDqiZojNc5evvrQRqn1ZDbLnzijQ5HgutSUlKCg8KWhlahF4tQ34D9MkHCz2KMzKONFToUrsA/p0UVHmSNOf6sCfm89AlzDdCEYbWd8ojM+rLcihgLpYerMFeeXsJ1rHYuGhdKVG7SW3Pqj3qSunl/oy2XH24ZvB3LwYjJJYtVSvm0dbCB8wJFSTCja2laYHeXiEe0MZU5TCyCX7SCUJZn/K0Hnc28I8RSyhnO4m14S5p1+P3TqusFVqVnsEMaErO11WomIOyMgnFJbBMe49jqIBvvKuxj0iGOhPLh0MLjh2UkqwB6gPXoqrA4X/s3AEUEjngtFYbSe4MK4hGvEtF6McUEKGFeWZYn9mc7f9ONaUoI36zAqT4ARiu9ZaJkn18YYsqKZHIaj0bNltj/l4qj1XtJ0EDGJDBOFJAzzgDllyC4L9XX4E4qA+SBITgqBqOWyMMYc7NQ8bbL0oGKtRy+SJmeX3sKzMkjOb68dfwTL36chtiif4I5TAmxNdKDKFPBfMyaSnc/ORxCIwuYdB17du7p21HjFzvQ4Ro/jAFBkdddY9QC4M8VEfs4zejpcHu/VMNUjXLnSR4XGfUk2+7fLCmeMDWXs1Auzd7QFKsn+8cRECTmAB0tHiUuR3eOTU79mQOwS4Xv8OTdjGLM2DnE0ju1lAxMKqb6f9AkJZ5PdiXNbgKkPs6Tv5hv752i07R/rG6GA4uDYSbr6DVrsxlozj7+XzKD33Ch50UHmKMC4mt9Tsj2OW9/WBGGnwSj7ZOiFU11hmzciljGbzrO/s5+69hy6QyCGNCJEny5bn15pVefix+y/OxZek2MrVo7YwF+GcPJHqtohT+A3zMD0kw/jxDIsrMG65lke0SHRca13ICnBpXLeT0KEecu7S5sJ+42YTU+H/tUb5aFn+wC3AlDbUE7PD628evRrVXrvaKzNUDrUWXdXJwFLwhSbotSMAqGnRlJ1HGkHeLoV8U2OT3eUWAdUsb82iABk6zjUj6Mo5HU1RaKCBdN3YqHgXA0bqWwyTrPSXliTIk0qhyBMU0Uq3OVLaXEQcEt0m9qvylQAhQ36E2nZ+1YU1b56r21vJWzDRJ5lm7J+h0We7o3FZxTobrsLYeefd4NVs01bwhnetQTsVUOU48JfJqb2OxBO44Ccd5TTLjeJX7oi31r3fVUBJE3usZBxr6yknQgXDj5BtsSqBjJiE038OCGGIlxunc9QRRv5Mm/IUARt38j/xpbYifap6sqSwBexUtk59RGRt7Lbn5u+BA1NABqaYHSTDRRVYcmtZTgkop37G9d/qCQW61HwhzfAhGspmSipubGSBGvXU0xMogELgX2tUyOTAjQQ2Cy0FBin3xZMb0lUlQdhIFQ6HZvRSQtKaZ1CbT3v64B4p9/UBq/MzbU2zrGOh2u04PGI9Q8k9YlSQ3XWbwuqLQJJLVQt41vpqXRq8KaGrKK6bWp+HLYnmE+90OnO5OmF+WMAn5BaKNa6WOeom2Uzf6suD1KQGOzFZkI1AEzSg3VROc2gaghIQvMB5JmE2FL4jZE10geaMhbRXXQPRGlFv0+YdHTBQ6J3weJQCzAHAWYvZVxMzM9lG/DJY0SAySIvRgowlPuGvim+CKhFfgy0H9UTNOIXdJ8mRM9qNn9nLCsBd80YGtb2nPxl7vNIFMPp1QHp7FDevtnmflbIF8VEVrF4w3FHgKIsr0lgorc3ub35Be7Dlyvx8An/eeIFMWgzl5bmJfI32vmuGn45ytZ+/m1sAgMvElKlIVCWHCmL39O8YdTsQqMid4keRkUllVgiSitbvh4Y7qc3ArPQx8mFk3wbcNOim7thH5gkeozox6y6jMVnV+rd1W/eDOfarMGwbVl7BRaSsRP/10h9XdlIOK0EM+LJ3zt6/u2EXk9o08ruwJVXq2Bwl5IMr6u0mPIUiX8T9AxP92taN2XvOCkgtsUW/67oAF73u9wtZVdVg+ea8iFdAZoZugByBshAKkD5T9RuT3p1/jSK48fm+r9X1bdsN/GNtXBARoxippJ3qpSB0DRXcJhCffZznbsNNP0CgFOC5oVsGfUvsyf5OrLXfhFRQ3E2tH5ACR9LmtZhz4s0iyArTTqpOaOE0eitOabiuJdZ88PDCpI2uK96TSGOXIfvGpOZoul5fpqBjG3OVrVftYgpIjEdFsPnLq5MGgkB8XLp2J6I3ct7g6js5tuz1Qmlm2caTU9zUY+DCm+B/HoQ8yekeL3Trv+fIOTNQDZM3hJowXRsbvoZmRdCKPgzHVjYDhwTPikjeraWIU6fbeJMLdeMSXtaY1yJ01V+50HtX8UKY3ctPiexRWptLQu+BoqqIP9ew3mBDxnG9zIj1aRcQljUjZtgvc27rgsokncePXfDZuoqT9iM9hI5OslnuLny13hTe3xwKzg39UUfVcsQtrbgiPLwamVIkfg8Hlx5+5nwrFc1LffIw98ErM296w8klRJpCpaP4luayiDQYBfOqKOvLp6VViQBW6fedgQPJxDFEUAuBgSeqmjKoDs4fJ+Jicqh5E4iHcqucW9CFODWDlR+sBhu6YqFK8im0qdQEW1Wv0EDHrxRnSfYX2FBC0OuS8iKSNXA611crrggaGVA0Jvs4N5j8cd1F8yHN1shSBSJwKAAmO4rD0x2IqF4YjrYB/EFpjdC3CwZ3aXAiMKg6VsEegeB1pNnTHeWUnnEvqpMGcV3qbUR0pHEy9bG1Sc5lFLrZ1KxiaWk+vwAdY+WmpJTRNzHZGrAtdzYi7SvIiKNsgoxCJ08MEaEn0VIuoN2rnejBFAlYAh5gtcGAVX3p90z+GsMVPeau16FNV+mFJVQhYWWNgLb2FWaCBHhM7YSJ/FRAuLqJGb+CiaaOoXAy6FwsJRaOjjXZgL9EiF1rchHfQ1YnrrLzwaBJcq87uqerlMP9mBT8LBqGKncPE81nZguvUGfUch4CASs37nNghVLAR4BVW5zZkwCABD8yTfvJ7GtelFHiXbhvITYa+nEJmc3GjX3eIH02UHJAGLxNYHu6zDLZpTUdPyEknH+vfWS2Gp08SmtKkckGmC9KEBopDPlz6XjeF44OfTxzOrpOVsn29RcoaLPRMtTlqC8M/bIYxMW11SbkGLaxyFXXJ2zG4DctWGFCrLVGXKrNOOyfV4jGn+SkFQss5YEtjyWdQPjc05Ya1EITAEyY6NIrzngDg6QSbuHJ5SROQ7R0JDe5ApwNcbCXyCA2M4J6TDDOfm41Od4580bRDP5UOVwS0zTajJ
pMaWJSAAZ+1nTDL6CA0UIIxLq4qJM82h2I2LLl98GkxKwLhOv18lN75Luf/IcJRhoChrCpgc8d4qVJumqOGdzirUKzREblo2kwTkTPUERRx64g+fXc+3XmMSn6coWjieLlrld2hrI5caH7RgVSfhFSaUMQW0im4QVCWwoafepxAbHNvJdG3ZLUecXGrv270buDDpUn7kT3d5fv42BkL4wbbRnQ0/7sd5wMJcBu9F/BFwqCPSMPyyXc02NLYc/1xYRr0MAIp3+r5AQMynzRkQ/mc+Y5v6Zx8FtpwK9vIuDIro/qk+p7y/pxBB4mB5K31pNWMrW8RxKztZBMZuO7fbPsRQ+SJ32FxyOMUi+taOYNPA/bhPPccLdbEKL5F6IszWqM1DbrMOBCxkmuBPfoFrrjeTnDobrOVybKM7RJ9C/iDg1KjYVWUszvcvRmKuUjIefhvg/vnAT8V/SciXeklobn7Slhrmpja1EFw8O3xHweahg/YU7P5NPfYvpxbgSpVQUtpB/q2IxlYXE2zmmFCF3ptST+mV+rBQIjufwqX9cshpeBSx5eIvQgL5LphUQ5JpGmS8iI+3hiistT7qu/bPrddSfX/PVnfCPqCP9jPFrAR9SYTSA4UjTxUTGNS8MfqVThiUbNly/44JOqQGmLCMsOTsDVH8Mx6LKPKiAw0yr6PFjY9fc+ZlgSlOY+1TTRTxNjTwUuaIZlsncZht3kbgRgggPzv9XraReG+85PiKDZ5ufsDzv5GiNzZmrMb9qhsY0idMOzuOufMQkZnt0/V7dQsfpyygVbCogLGGjPaoJ8uyqntPJhtDFTv5AcXDG+zSu5id0TbstJgq4Mebf3s5DT+MMglYNV4nYhKn/T16CXFLYBR/fT25lDnN/DdZAJSZLeWbvTZs9TLITQHA2cN7Z7tOP5XFDSfjtQpZSiHuUey1CYJ711cW8pu+mbQDQMt1ELTm2dLUDQZB0rE6jJ4NJS8yD6bXVIeIqTHeK4YqU3rM0zpVTODvX8W6g8Vb94JYbZW+wGIDRXxTBFD6K5o2j49ZqVqXycxApwHn5jCmRmqXAn/8A1RhZDBoYRzrPUPR1K+alGMKosaiiq8XY/t/RHqOHQ6Wy3At3sEzepFxGOH4s+7/nD/OMnrchF9bLKkr1o4rl7nyyHwjpia12onfKG8qI+aTchgUBcS5BSk4phBUX5RJ6hSNSJ+7HxI0SWk4NWca4s+mpIMpvHRAXdParJrD2l4boDYFCE09fIHw15oPgK9i43SvHjK1blhkEO40b5jRLMl+iUI7ycm42/7/L2ctDjyo39K2fkhG60qJSjrcx9tXwHJ3g2Qr77eq21d5UIJlC/8+Cw47gMgOVDsXWHif4I/MKeJaW7DybEtCHOyIFWZrQKDgbg3E5Q/t9qrzBl7KNmhSYb1+LnWURLaV9g4RlITan8u1KwxisFjDieiq7WDlgUVZTV23el2mmxOGypyi1ZGYFXbOb2glYM9omgRmQv1dtRcdCNRDcNIhlaTiD6+8icu8BlVkeOAE2M8FuV8nxMOGORNx5mGPXLxPn842w6pfb3b/0s+8NYoF03ePwz+k0FF7QLBtUtbOIM5nA+0cXJ2R9k/SzSK9ynyd91lEjWey48GA1axp6DUoPGZmyzVKPzdYVLezDQlsMx9y8R2jXyFWZkVkW6hAUGolqTRN8x4gwBNlNVDed91K7sG09YioznQmbXs/pLlIBobPZPhoVZtOpHXDSj7QYYkRwg+drzuQw+bOGcSEJKf0HXMOK8XNs2J2mWmm46akA9mdoM/FjKm5VBVpLjocgww/JwuQgJVeMYfYAsxRvmDFqkq1M3Us6d0FKvwNAzA968YOY50Dx2JVe67yi+EPh8guE+qkcf1OuTs4b6u9kDnQjrle5UmfdMKYWLFbPr5bzEn0aMtx/vnCpkIo9nccIQHwNEkPBTw52aT/aSxd3mAunq0to+rBMUDJHlGNm4+F3gvMMnX7KTTuR0XWumEIkBbdnQL/zMyxcJBOYRQnA43QhCi7TSe1mVR9Y5/NhOiiev+vCTLEWfeeS8MHa2dv0GHgk/ja4hiUiEL+uPZ07QtF+0TSGwjYzeRKimngnv9y6KniEk6DeVIcelbtv1U7TkU03mr0p0BnpVHZk4/SFPHSU0iSFGew83y3u9LmKE9CbSfJ1wXqUM5DMueMWIUMG+z2WIVgArt19IYCi8f9XnIkkjPJTWXrMD9HL4iQI0zQDrRAbxXVoGpZZabB5zxqTjELsHBmRU8YhdW3SjcVd+rTcsMJ6C1KrznfdzwZS+DhcztONQFIcYUvKvo/jyq4NsMI3UdgnI801L3N6RJ1lO/HHt8qnpN1hKK0RXljxLe9DGbWGY++eey4Znf4y9g/0eLRj5MvR8qD0Y0xSTYINs8I1NHOhuMoeOw/FM03Ru8YRJ2R7CqjV8nA3U3u9BHUq9tfEgxHGieudiEXh/1Xrvv+89ER34BYwh3f86g+t7/aB2KGSJKAFsIY9kzvQyZC13eo8L754LUqedAh8RjdBKZqIiaAdRjDBXRy9VqCH7FX3iLKoLuZFgkCKLVNsu9XSB7RLjvQLE9xk1MQo1pwL1JeOxAh72jlOGHywgnroQ6APJkKS2Mxpg7hTc3ytNnqKwtO4Al9lfvF+HJvE3A+SZPThXEJXAIKwXewmHCipjIfCclAf0btEHTGpQhROCx3CXYwukol5IVFxdatMpf+sEdOuKsMCFcX/KY4/A/v6rVW67N0z0G2cXPDg4vg3/0ltk2RrtfhxGjHjD7ladHP50GjHsr6gAbO/indfEHXgZNyebUghnzsquM6XRkECHx6gnCSHEMDFJmzL5aafanvq+2DhJq1F1R9D86jGBioLM134aUJk5yw8b9d2ZNii8fMZCrpfuGIBM6kfFGvfiRS2eHFZh56YyFgq+PT5QsAjT46tH1NVfX4BOZ+sDuOdWCWAyMsMWI+BrwuNW6pJ9S0tDpRihJq9G9emq0RDcK/pGzq2zNdNftKQK4s8M/gfOtIrhdOeaxs7kcdwHYeNYP40Fw6VFmjVLzK4NvUrCP7vVceQK/cWAYG/mhRwpfOCMqFDhV2SsAHCeT1/1fH2A7wRFdMq0wCEc7JoM5MnsdFBYd8ZqJXTQn4Pv0LDdbDqBP37MIKvUSUUoeojemPjmWUhRLgqNa2ZuNeLIKIfRkqC0vSV2y8ckugYAs5jtxjKRf/PFwctdwJnyPhCFjLUdJ32LVPsM5BTdHSf573gIjScPFe/FPKWpnj7JprvQHnHSL0UW2QhEG3Y++BCNVbuULUMuXSlXvGCPFvecJxM9h2UJ0iXVbOLRD9DNdJM4iy6h4ug0NQjXisNB1BX7vKgJCVrevL926JpCp+pgmSzZPPg0JkC5MewUMiKBwQpPCsEWX/Ewy/X7kgI1QJSDJOfwnDZFH5cgkz1aGFdm3gLvicClrSGXNRfInudK76Gx5p2pomTCh0N0j4JZ2Tjch32pHepfuAOypQiyS2J1ZpO7SPn4wdBFSRt5T/3NEQkn9Z025BZBYi6q8YFp6lZEfez23ldV5kT+faEv6MaB2HvDDW2Xlx/JiHOwuSQDz6TWTn37r23wnBc0KA+TI3YhcTy0zuXx2jiArsUk4gYtjAfOjITD8dUBI85ZSWhliEHnIEMF68hHy/SVWkdiYOLRFi1pnrYLhPF508GN1PG0nFC435JAO6GgTonZtx3jKWVIiwoI55Fej76BHKjeJefcy0whvD4JmyizhfNaOGh225NKCk6+us5RHyLz9CBCa8sum173uT4bwxZH6mVLeilD5lQfGUAYmCU98JtrIUAgWh0lU+tHjFDtJMukQY7IkYHq4XZZ3XASNLJ2xuaBuv5ijrUDM2nvJ8IBf+MzvPFwCdBZFXWamhbKsvmk7gm6QYexjD7MVx9mVUm02sZ7CVOtw9qV/cWHkOW1wxhyxpSmlcU9MqJX5tWtoGsPlOBxtLuiEU1e5dz9g+Z9diEAnYKuRW1Dt3Y1eLt/bHjuDI1Vbe+pjHrRWR7vDFhSJnIwT8upSB4RftXtcwD2LPBCFkOmJp4KOV8+J/W44VoWPYJzM/Wl31hZdcbcrA
cAtsGrQ84IzrxH9BWpc0jdqQQJBt3NpZZGV/Sx9lNUke/RRZTZ0/IgnTqy2WNl3Rlht463VIJxoaWUUG91ZJK9LpOF3JU4WLu85m/O0wpMuL3YGDZmjwZkhzR4POH/DKS9IteqFo07qs6gThyYA+S2o2FgvQ2mZfpLlNG9sWRBu9FtTho4GYW8eD9FAa6AkGQlppePwW0ulTTfMDn9MzYbn5mopMDuW/pKz6jyg+MMfc1+b/zGWQBlKtkjiSNAUWQaklbrTaHmL0yB+/zk5QqNxW7h5QInXmpW/u7iXxo5ls59dajfET19TyJmBKM+DmIOtKz28pKA46EShtyJkKWeaQL8wIKdgPg5z5tDxIXCam+COH0ZEDUqFtD3cMzlJOLN22YQ+oA3lraR8CfB7m/XyLCHwZb6exYcH76LAQnkXsIILU0g1J0MurI9zgEHcAytjgFvD/8ZAZUf2WRwVFNQ3ZyO/3PQgc1UaS5guCoRrkyyxL1BZfmp0ZvJedhs+qdGj1eISB2ugDfkHz97YU6VVQCCw50VtrBUZ1IqFOel661DL33roDA6aivRrWpZ8dgeG65PneQG0mnDJ59Wf4FtCZfRBmrr54xWou4RSJ8LSy48ff+VQn1gaCtZ9RQpEja8i7IyQJ8ypHXccl2tDh+HxjBxqnt/qnoDbM2H7XYDrS5gxetTOvnfPzjMQb5WMj9BEW6fuR0+Su9pGyqAUczU6NfFr2KjwIY6S3PLzBHOsfpcZ+quRZWh4jwWPnmZwPlaBkQLtrZ43GDdAmdGIG8JEG3C/I6C4NrcZDED9SYkCQT0yc4+EPbOiavSucLGicSDEteJuDAJ8MJjJ6o4ghch1Z7+pJYN4QqhEM0gIL4Xl9km/jQlJTPuGSLCWtRq/msNjIYatMxEGj+UOwqALfvHZzsmBnn9Wjv8D/L50vqeImJu0AphzqhB+qn4QgwC2AICUg45oKMFyZ46CyX7XR+npMUkTGeMYECulHVj/AV0MmBMGsqovh/wvLO2exccRX9TtodssRpz49DSkTC7F6dlmBTKjq5SLX8HNYaEy6DG2O1H4DoclGL8ppIxBphq7S7T21GGfU8aMy7fB35BeGlqQ08IVbbSDyeCFNhUdVuWsUgrAiOtpEufW6yz1Ks8W1fdyXTNBhFzwLs2lzbRCahm4CINZ8LWAWN3SBcihH2o25xiVNgkojeH1AN6MiVsOf0cayy7oCw8jQQV5fxX3Ig7cFsDatIkTW8DYNX7PCHoJu9BNnbPXabbCxVlyRwzUDRA92SFF3hm7NlmgwSHdjxQc432vxH15i79KiqfKhw+r1NyURWLelcW432qSdVVVPyX4LrLaHoXK5gyPqg06oP9dUSRbUxXCOvdYh3R6AJK/cMQCIECWAvu016zCDbYXZgGlJlyJUYIAUtFqNLpZ5Ji0aX5k/zwKiSFmsdAhpM+KSS2kJbWEywHmNgIcWUftoLMfvaG+kcmFwg3Lhi06IODjZjtaqHXyz0xJbNOerCvCtRdwJR2dMRA7h5cOq24AH8XqiWAgFKmJnUpp1md37iUA83PbopbOH+JAYXBVM1idU1+/4ZZV9VSsAxyQcDRfEYSHs0odQ23RMwvyb4Quovb6metk8tLVjUCjczblx3fYgH9AMtzBGZZiKxZNJYO0vnvJFC8LXc7KO5PaN2wuDYlr66xS+uFzs8ZqKtMzJLrfUr2WHGOAD5E/U+g3fKCs+g1sT9SYMocWRkSNnJ5g+ge1/aTYb1lx4DlqnCX0tJerNF/BkKRemkLejPeJFHYo5S806KAxZ9cDljQq9UFbRjlOt4rdJ2PgJ2SHJxoXYhs9MfFxbaFvSrtjiv26PT3CnSFgqAOFJqLejJ/UKhYMebvDz1AdzF2J8hGcM5I9YMKy2at49+i3FyrbhJNveXQXmJ84vAEXsv2XWw1/or4oIdhgXO2HIxxMOvFvPzra5wWKFtEdedwTs7q6nQ7ZajkCj9gc0yTRh95VvHUvGTAj3NlvtBw6+zQjXO8FWkOkYRzuWu/+RJqS5neDlp93jwxS2ZZC2JH/eFLzfi/V0LC0MH6Yb3oVjXfyFnXuMzY5Zegou1Pu+RcFHD+nh2r8R7t5SfAKvBEdi/GaYGSGf5H/YVf+wubMRZcdzuy2InCGruxqw2F9LMRFlMYAOMhl6E3IoSRJQx0WZ95IPHNPRnBzlyyxewKI6I04F1egmoxSjWkZVXdGK2fwcJey9gTsuH9LlkBPL9IEq9ShVmRXVumZcrlhWGIKIFpTie8KGZNUf5K5crNMv5xV4R4YpK9YSodmfjhrHDAL1sLQ4fmKy/Ixig8Alsa+eBczbkWgxYAeYS0JDcbLQxk2Ljfzm5rwH/AreRK1jABatyV2J3N4eVMZPX81Fhwf2pj7JQwxibrqx2AJui7l2tviJBF+7YxGngKnhXmwWr8sitO+Obhs4ARDPE7r9E2BwgmCNm0wcViW5jVdrC7U9j7Y0MPyUDzymbbwqkYsWjXbV0nJvWjot3bX7W5Fn5Uctf/bJ8Eq7tcUQRt+YGkdF5F0+jHb7zmlM+WoFoMCTkUKe7HdptH6OWFnw4uSlrq5+6py0a6BAcnAtip1kfn/XjXzubpfWE6q6BQMq4t26qIzX9dVvqDL6ydM/P5wEFibVeN9Doc7s2gQFL+hSCgCHY/IYaUEhqQpYqu3bCuaJzCd7g6+N2Yz28nQJLUuxgc5+7a/fXbZYrn6LGSMXcqCxs1i/h/KaVPKtj19Ak73Cym0crDwZFYCQe3BNhUiQzNGyaqdQ04BxK04mSEu820VTNqgFykhPSGlzT//m4A7KZXGwVk9tbpA0FhyD7ov7repOyi2q+B/P8f63e7CfT1txqrFa3B2ZaVrlTdmaVRTqksjFcxAjJiLGkzqFKsLKI224nQhYsKlW8wGGUgJd9P5vgLAozi25F5RXOLXKwjBFtEtJxEz77fT6sdtxJuEOANZr0f4PN974djqIey+UW0cSCc80o/ELTh1uVhNz+DjQ8xef5BvZcdpak24mpaNewdxwZ6TA1JCFHlJIJNtTZb9hB7LNhW6UPReLqFg0bphFvIZHBZxNFJhYtqNG4ft8h/Rvttq7j4r6QxdmdqDP9512mtDmkMS7kOKjRKmG8K8lkLQMhw3hXatSL9QqtmjccTQn7Tt4pgCmixlCJygW/SAfMbVTLDCLl+fKGUlDlqbk8zINKihHyCgfWsNgLBt0Si/oMschLqhvh/+eGUWDLvbSou2Zwdc5XMdH8ZEfn3KXYNw72GM9432bnmJsm88OmD5/r5RfLJYtrfvGo2m8D3fHXvTr1n3UzRYNVUVxe9OhLq/+8DNQqO03J6HnbGWAV6sByav/bqfQLXRjPS7/ZyOhe7sXayP1aqw+jtjacywNKNpfLm7teRxJFWzun4MGwKbrpOAkU6FS3cfWxrRDXJ+DTTjugkAnEs9rrrPdDmHmft9QFKydJq2X4EaW4UD8X27IYMN3BtvTrsFMt4F2cfmzRe2Enj4A1Klv8MrF0hJ8Xj2sVfuv0OE4rCFFX2e6LzgkssMxfqVAshZlB4CsdIkbf06bZjLmBSPyMqULxm99Hdiw0XDBwG5cfrSn7XXKOQbCtG9YLKp+yP8Es9mYxPD4rLbvKFL72sPTQk4Y1fFMrXx6dSuSoYto7YpthDO484D3QrCAw7K/tCaXOxOSZc0pjHRDxTHSvLnrgxvP8Qeieus+byPxHvZdYz//FJRaQIpXunWJIhmNj4VyPbMzl9p/c5w2PaANCffjy42AgZKJmh4A9upkKU7Jo09Uj1TkvRRPStXjxxrOA8ZXrjTrp6U+MZY1KgryXWWo3DUVAoNscfcX7gXcKtpg4HElzVcw0VSWc7xeJXtqPIfnHgJT5nyj+yGzzmYSt0C9n1CVE8JwijoKgkWdtI5DolUg7F/VjsrFdTw+qvC4xP0CCF9D9aXFIZ57ZHfAZNH0medaAZtuCxJ7H/k3uxTgKk9zBMHDkrKSnn30LQfLqVHjz24An4x/db2BBWjEHZ8U41qgyuNRUjTBY+vp65dvxMZQ25MnZ1WFmYaPZZfInuq0Vits9eovX8+hlxUPA9xH+nIz
TzklwtC/u8Hj3Yv/D9uFFJAzAIrb5AqSPkWAW7uLtHdKZkK+7uodjMLxLKMRsFYbas5Ckacmw0r/fBsD9DDkjNART3O3CQET7AtN8YZQ62uI9LyxMNXejqPiJrgSGUoXrwYdV6VvtGaou7aW9GcHzXWCMoumDtbVUJ59s27avymGyjs2iM7BKpOAIDRbPwO9oU/tLLNNDojcYG34g2AVNcZlxwrkHfZBVkkXDSddG9mvzBIs0+NyZBSwEHFQEg3esRC2lOTuSVUvlIDWf8cf65KvQ/mj3ZsoyMHFU6h/b7NozcQwm9c+EFcsYzrTvsK1ertjHyPco2epheuo032vii5hdTkCmfj8TA3m7v6Iurcbp1ZNmiRN9HIdIFG4SwZdyGXisdf+akT+20xVeUUHR+1cfA0sna9K/LNr19zd4pgT7cOToVM2cHg/sdYmpqE99UXlWLptNSWZYyFItxm/OJl3u51NSy0pG+pcPuCGdlpmA/IotauszCRQ4EfYlyttmoXBOO2ehKbLfwBpwhpGxi+AAhgKexJLa0lyrSHR68nlSxYYm/zv2CCs7aBAh5wql0w8CH4R9WlRcrhhnBCTr7z7Mqbp1VA8G+dqc7u5I3ZiNUdohh+pmagowcCazPBB90S9hg3xkozjdhMmvlnvzTC76p+/mYD9+WocmuxUTfNsJEKycfRqa69aQyuohBc/7ScZZ3KojU+fZeGuiOHmWy/+2bRdCJix7BslmsaRrAq4Zv7izi6XT+505PI0Atn/ew1e+GKyTbWUEeOL3aDL876P4ZkaqwEjkDWLiYEh3Lt0sTO0IegVxjRUMi0xPqrB+XUVZrISyQuOjdZWJZRs55GFd1x70F7fWckGEWFHlUzrVzPEoKdfZEFGEYxZ+9gt3ArUt/ywrlJC4dwyjrXWwxorGlxwqZRQmYYeMd3+KEPdc2zqUz41+wZ3Q1P/W2TXQd3DTUm6RPEZ67/FV2wGRdXy/t5nWPV6F+m8n9dtChKJi65JDPJV55rB1wBQB7EOIlNP4WHI7E57psJXkWi0kK++2KgBFaOf0uHAYPPcsQf7utocGBxukTSgJMcGrKRK/oeOk73jTPNCa3WPDBoW2Oo1eF+5W7kFao4OOVLza/NY9KvpNM2+zH3IFsdOD/4MCCSFKZW25te6YRifVALuSleEUPkdi/Kr67sz+7oWZ/DGMFegwJapuFNQ7crIoNw2MRUdIxosQR6xrAufwK/Ak+6GbYALaQIkJ89oy/L5bn/aXFyG2yKC+dEdBfDLjSW/U3H00THOBvYzlHhpcgkK0hAMG1C5K4kUHTk9niBQYO0E51pjcphnqc1xpXbDiJRQdNqYD/52zNM2X/4D2SC7ZI0Unh9y73ovWHDLHUmJ0+k3P5MzB2tZJOOEBzj13HyI9GesqBmvSCidENakE5IyUQlPF5PGnYZbuVlfXdWcuhPtMo8o2pmiv2O9KZrrDEkf2JE1R7u33Om8qxvKZvpd9JFyWy1hxsayj8szSQ+ZmT/8OxgL2EYu4v7I/uGGJMhoIY46WyKxlkJiOxJxJeVjfSaAYb8YGV6cClLCkIIiyShLFj1UTaw5SZ2jllPZZoSjjyMMMmyueQuu4ETCbGHI637w5qkbu2nw6tIrOaSBfaTS3qcbiPmm5QZqsivFPN70M+Lur/TMAgOcTrg/nwd+Hz4IwYi7o2A8GRB9/LrzlPHIt8lhH60mvtEr6SKtgk/uQlcqcxk0fN8ZErhm4op6eAn2C+g7Amc+E0GFDpT1MKIrAopfYhplBUJ7Vpynq9HbJ31KmRjusU3CtonnciC/5G0gYp/0i6Or/30uF2ApnJ+ESH7dlvqH0f5WGoidN6hykyjKo97PU5QawR7PmnTa3QQs2eQ4177jABCvrkC7jMH0sHa9J1PfrHa7MrMN1dytVwbgxpzbTo98/lXlm0UbLBfFkVTooGzvZfqeYj5ZBs3MwQ86257GwsezbSLwGx3+38sn359yf0Yv4a1SUM3QJAMzam3eWiBEYes1Iv6NaRPolELptVG7gcbOILJDFP/T0JIhXFZREf84psHkK0vibGvLPSTKXH3IixxKq52XhOWmBL7YXv1Hpe4Ee+ylJ4yd1sY6HB0iLoUNIcwsREHEXD1WIuE/hxHBfQ7gcmQqA47svoGh+UZUDlk2WepCHnRV+4dW/n1nKZVRufrraHUQgv/JdiX7L1BR88FqcH2EbHv+gOrkstmSqCs/1FwZS58HWEYt14ZK7dD1lmRYlJXryMRFyQ5pKNsGLdqYHHn/tw3IOWYUOzCUr7/GnBvoBsX202ZZR0g7dqUesStXJ5PTNNtCUX26Ijl96plAQ01T0uS74N7UgfCYMW4sYXIgqpbbF3k0AXX/OmLdFG6WGvE+DkRtldKvc/BHpApBzrYgFEhZX+4l/8pfiJJPRQS0N76eZa470U4Fh9yiiLWnkCNef/BAQC4cFiCRTOvjkx44isAOMZhJbYnsRoTT22VxdgYkEo/y30MihWhpR7lFPRop+bywL29CsykrMQfNAl/gcPXRPRz8qntnTiwHY9WUA7CNABgOeBdG+GKves0uv0nlq1WUErMfLVT5nTDwCWrc7iE/EwkyRId6CbD0c32GzVkVUcLRm+Dwuo62XvxL2xujEF+/jyHmjIimBblfZBedYFeJ75iK2tn6VakGEua1IxegmyPO3R0fKPfTwhd6BY+QMhwciWPDHtYWwsD80t17OcsZmUoTVYfzXo1g1O+UfBNtK1V6OGlky+2q9n8IsxRmIvfWtcL5zc125mEIxZV4MaKg8gB2SQxiDT2IOiutPKbhx6YiOH8HkdwZIfK6kM3507G/vNWCgukT1DhW58i6OtqztBwMAwcTka+UJHzkyCpderAcl63FfPfaVU+Z3+t2/+UveIgKRbPKqaaA3RJT0t876Z5NX6eru56MIahexTQganRSVL84zXyUCFua7U+B26cZGnYAbtD4GTQw2qJOGr6IM5y228/XRkthWZDTbkhgj5ze7JwXmH1AF5fSWEKbbvHnfD8WHCyki3VHB7kud85S+qg16upP8m1oHJb5pR+PBp1d+WxFTLUeSJslBbeiCoMBHaOuzUKtmDVygICDpY+LddmgYtnmFBA0iw/Oxi5ZGFADAicsCyTO7iGCpnlWeN1p+Dk7ShCeblbjcNg/dN5mgOKv/ZDMRI4OunvQtMMMkMpehrQluON785cx8WU+8fIr090/ZWpDwWep4Xpvvw+QyCwRSxEhNfj95uG5VL+lo8qpEvcbQzvOcmq+JDK+bFIdlzOCV/0d4kKwtg7XY7Ebxb2lycACLVQnMnNvZ1Kd5wEQne7muDbFZLgYV5gMsyVHVaz2hm24DSlguuwJ+O3Mlet3ryAVy2mIAVo/0vIn2khF/qKzIHxnE/X9MVMZV/PSiyMnPDiiDOdmOHdC0SQ61Lr/mA5oE7p8+QNLv3ibjcEtueGG5EWRupIo0/hnthsPFfswI50cASTyThEes5UtYfqhY/XWzIg4pqwuvGwZpnh3O7y3sBjmy8glcw2XzK1elFpvp1pwW2yjL0LkcYOGK4kEQwzqUtJwjJcY8NIlzGH/GCArEvALtK9927W5sfW+HjwL8DYzsEA7nFly048XCZ2x/Bk6WShyamZpeiHWZhdqxzUWj2My3615DaKsv2y/CFpb0PNJ8cYBVOHeS5mE8QGxyFhwxu8O7VuMxoF5AQzLwyoP9XGVrAjhRXwcrT1VvmnJgm2b2JCiYOYyy6Y+Y3X8u5R/vsbb9Lv6a9wECCInLIHNN0140VTGbhocYYFQ63gvLL6JCh7j+eNp4JufHl2EyVmoSjIgckA7SEqTgUN3ukaIW5426dCJZrEQw2bTPliHPkorhio9SHseNXEQJ0QN4ZIC1DbIw3w/9aJdnlxR7QkH6WOl6Qrhznb46OGju3skQYdfmleun9yp7Ox6O7ppvu9e/jn+Lx8LA1sj2a/CTNP5NcFKTcPEK37KLOy+mEL4QiUvpQmTxPIg9VFJ3KYWEGsQHpRUbmxAjLYPK/8abTY6zuBAko4Z+Ci5MuO6OMl09cbDhpKLopGWMOQexVSzwIrRWmjmv9Vrv1/p
iLT0NlIrfMDdnpiskeFL6Gr3sZGZFc0dbZK0laqJ7+ccaOpDceqq6o3jn8G4ZCTnVkoH/jFRSCoHZHu0nm7Z/2aGXGIV4zCGpk8gIXH35ykJgqAjxE/mgcdFxZGReIyu8bBeUteW39f0ZRlDUbZHMIGFgK3g/ZvkT1GBfbe/NwRBbuUEGXicaTvIxrff8eTnOArRMC4DxEyYGMYY4vzfWOT8IDRpY+G5FZBWCtiyZrknA5L3z2aQAypo2JwWv1ykW56ZvlMp2p6USjBwO4vNe4zhz3iiwlzfhI7KPMiHnxGo55i6lddYxAQMxJXS+AJOFzuzVrrOV+12UeJRh0loDXAR6SAo0lLKGouFkOJX+keQ4wWH6k8G/cB8LpU+0egDb57LyhlXLMbGMta5gAZo4lMGlLjBW2+7yBz3jBfgOoYhoMi/tvTqB4e5bAegyGJ5q3AvPYNT0XaPCApCFnDusznuzgiWoTjc9BR5damsnFQpEK+gnqnOU2kxBNPPec+BfDwyB2amxe6yIla3cQYf+fEQteJ9zb0wVGCQ1hSIb6agB/sLfWsTAROtszOtjzxU/MwkL2mXBJFlt3BR9ZjIvjOe6XlUBipK4D0OLQOJoummNyeNxQjv+FLFP++fLzZhXhMw3HMfpcju3lfQ0tc4sgyNQ7l3hOohdAOiFLbZJ+TQqdN9RcpirmMS6TjJv5UkZN2DMMxMD+gpcdUKwuQUIF7dcmHE5dnNsXWkiJSbekFMRZbV0UjJaoo6srMofeAnRt2degtDXpfNlI8Z35V5HO2is9bN91p39I99eXQLZWDJDeh3fUrIW2tTlNPLWzPFz7R+Ppfc40yITZkpOEfWlMNswKltjjyBw0LhA9HoLTOHwNBwwkno0R81M5IixpKbIRdANvSdiVGBOLCnyCHf30Uj4gDPphUl+cSPT572tW2DYy0mnUIrLeXkXT9xRJfSgjaYMqZsqxhPozH6FRUwLix5F3sVVRM15Yf48och6piuHn70kP3OsMBhzGlImEX8qQUHXGmgpZNkNb9iNlistD0tvb4oCngKbzECH64cM+UHN4+H6m1dOpQKLlnMwKYDRxiWma4oM/pnZMbwUpaQCVQ+rxT+GH4W/hIWJcd8mtEVs/86ZidkHngRZDQY+ieJAN/0WWLUkkJZ1xIwOUNLaTg13mHzZi4VdKF1EIdTlTm00MaOmmb097bC8EyR3Mkoy6NcmHOsy00xE5Agnay3MJgRGd7GZ38aSqbAHEIvyKys4lz1usXnHX4DQTFpqMCX/uKNsU+oI4KndG6ou3/SfpkgVcmZEz6lMU7oqBGwo1j8STpizbhWnubEjUmRNZktr/bZyWUd2q6/Z7u9al7eYaS+HVeswuuIiv8Fosk3VsUsANbRvYTP80hKZPG7uNF2PUiSsuPM2A+keVaqx9SaT8kRkuxZfpDL67FE6Ot49E2y1dIncwk4lWxI9XtQS0CiXlODbnOY3TMDmnyk4vG6/psE+JUmGpe4ELjy73JY1ilh6oTW9KPKdRc1JTzAnbsVSCfGw2IK2vMHNcYDMCCYNxYr7TjHLWa7FTZ9xsTqvVCRx0Iq1e7KARlnvsi5SuMVQL0o7oDKSLmvW59DDvi1fOwReUkp+9n08s8esjdE0xRF22rYdQHd/1C88wWriNHQ0Cvz/RGLJxqDYUPRlC7o7TO6JdoFRDNfHx4cdS4j8Igr8Jr79uIPzJZWdUv/lZ/VEuI4yvKZge6Ak5f5t7C5UFxO8HszOt++DbVkvwuskUgCmcDal4ugurMB7NkuBhgfSONhIuMRmoYHUfIheGV5Deqx91zeEwlunwujK+F1wpfgYp3/Yj+mvl3iSAlRNdECe0zi1BLoJVtvz++eADd/K9jtXR9yKEnT9TEZKQjTFHE015OOhMEunB0qka1P2D1kto4yCRuMEHr5wABcWY6I+9h20ILNJ3Jl7cg4Jr5A6rCqpZw2Vb/cpdBXThwfqx4rxOr0Wi9y3J/wCevfhWoIa7L0uPWAsmazJUn8l4ymKe/5T9tpVlnwtc7uojvqct2zP60DFZY+5cKeT56aE33UVqlbmX2LzcA/KF701aUiZ2lI1xAUXn7p6G8PY6Dd+tg/nQxTX2qiw7EWDKtbQZY0befSHMQWLallsk8FyijUJg2wiNBfSz2Ro1Q4Yfmypf+pwFOhJfxbRoNj3biLsZBPFYFvKh9T2T6XVPgbhP/mlwSsIfmIYIoRkHyb/YGpwykNZ3Ykrn9NvKsGULQHvmkMb3Jx9NqJH22p0fcudDSsPeR7+b0guVznEe5gc8u1vwhKs6OPY/eFnGtFa7H81Mp0Kt78h9TbeXK+h+oUjdNliBfYe4bpx1HQgyxaC/C0nmm47Ol6p8VyLdkHjXV4hzSws9N23a88hFQdv0OwjYNJZ7ZkSh5QTJ8c67CzS+Tro2tRfdjNBn7duxycGN+qLkewV1RLLkpwiaYe2IcVVeQFrKm5jhjqz5zcZoatZuZU95ETyIyvo14BuQ1b3cBg01TsmoIepMzEjgM+BoPtL1PU2rIKdCxFhLZH3daVof6Om7HHUB6S1M+FrpLWzjaXT/OCl0hTZT4Vp02BwQpPc1QvQhC/aHjSNg/b5D1xoM2+qxuf7wxrbV6nuUIRqnDbfbzaJdd/js881jWK+CTD9VpRwCLkdmOHIK1Blkkz33qvfvl8+b+Hm9X2+r/4eZANpOUcvbWvKkiqusvBV8IRZHkdFzvfEc7C/iQcBh8itd+JJbd2rj34G9smoq4btwfg1TK00TNBxxw6NgtP92r/GZ+A4z4PxEBhGlNjkNA+VxbtZ+AnK7YplTmELWrPDUhHP7KIn1E3CMus6zqw1E2B3+Uew5MGe94ZPt0lF9qQdltONoy4jMn5ibHaCKnCkaVik3x5Glgf2agQUtjo1h86nsZaHuvKekWsG1uMiDpvvBZl3+tbyrdv3ul55BA9FglPxGm5C0/hnI11I5AoxCdkM+yHfFJ0SOnxlLsiEk9EWMEsE2v4z8bYxOQcl0e/VWg2OMKrFY7RtvqRGbKK+8owwvQOjSEcsJGp1fq/u5uHaFjnr27JonkagF2akuux6tULMBJg12F69/mBu13cO8k3LZA4BQVzs/HubyArMGISWHIWIVr/GtIBHK9SCxYVfN+RMBDxDzCMpI2HLvVRQpmUlaAz2KhyaNG61S1TR4vv/zVvDLLtZn6u9cAoDcxqW4I/tdv6y3txt+IwBVngH64frL6maUKBuwUPbMa3AyA5AUvs/cnAcFpLyONdhtbHF0gm6wWdNntdwDT9PT6MTjRu3WwxYy7DXKoMNgtn476b8Vfy7U/Oq/XBtUXTpB9RR3KWyzpW/HjT8qOeOpTCUFHO34b/LuQwu+USV3roi4OWKcF+r75WP74eXIOZd2/KsRNr12xJ4uYrtRoJSj8SHeQ6EKLg0GbA2ATxToiNCFsf6qYmg90SJBlQPqC3ySvOFan7QcxF/JKp9JzFH34+e2KzhBk4OswesISif3otzly2gj93m55ek8lmVa5OKDTHPSVYadXO7IvZMyn51mB6T0mI6FUChbnsRmbunvzxH+R9F01Ej7PflKb1Us/fNcLL/oyTaxJLXvnttVyasTYaHzHVHQCQ5eW6XuAPMRIB5qYB9KECzb0ElfgdVyIg61suheiPe2tHfqUC9ZfDNDKr3z9LI8Dik55GpXEnyv3bnFbo7pC5vl3v7iO5q88CXV2GhA8UX5On9grfQZHQQvBFcNY1DzvlKJRcdQeQ+5bzWe94x8y9V2TOH7AewMlb0/Muuymph33q2hmdEgVtb+rBtRU4gEbvX7Vl94za04MAZ2O7z1C80we58a4etPUnBISC+ZTVWRyA+IrFDRSEDIz2dB8pHVCoNKWDL/Aqmbgqe7YN83vNW8brQuYxvGry1Nfrwtrb2tV/T44Ph5LZSyIDq+KaCZG6biwCil7WpMpPNQQqXBmStj1cqMehtnebJYGx3Mj/woa+7bLj68vgldhSqePXAHCO6lP5jvLSChUOEdCCCBxBeQX0cusZ97G0YP9SivS9Loy7TG+/GV7UAnelHArZl2EZpuatUTvPwFuIhguxc7VmXFvO
Qg3Wmnq6V4kc4LQEkgaHRR0luTZLDXC0DcVKg7rB43x8ztNSg/T8rwbfngGVnO3UOZpmvTpF7IzBWeHiX2r/YuYb+EmR9QsOYvJoBFotbZNCRGhM2gz5F496hDLSggG00ipE0pbI5k09YZ2JyVl1P/sBKQ+5doAHErey/99Ljo4Q3nytt4Czm3w/9LFT+keM9gLxCL5Xjr2bP0rngEtdDv4ndNZFaEQmqveV8MNu5Z25J1w18NhSE162yyu4dtaE7wsP6pBMR14rVOwlzgPAjYWoshtvne0Vy+Kr56rduoqpYgHXdntf2LOvNhQf2OD6T0QpNk0xv3715H6PEyipU8iaPZ/JDhX4uxcahZI9vqCdGTMmGKo0VVN4j7r5Q5USx+toIFOwpkmbCtuaki799NjE6v42ZfvAJp0rvE1YCJp95IM1cfX/CpdtxWW9WTYCsC5Bggw2TtGM2zIc0Dv/t9CbO+3wZyW+RWAMUQmmbhin0KbIjFLe+n0b8op2cvzVCG6Wy3EQaqIqzRgBrXT5FcpodHnt4/Qw6G63EzQvf6ePLdk4mM6mHufWAd44FRMyJlxw95T8DHwuZ+MHAdVQspK4nrKWmDCLIA6p0MBbGw8nxbBoEDH8fMLMbBfMv1+4ogMuoA3oi7ywICkfI5XG42UHmtH0h7dU+HadD5dJJPSi2hEwe8YW9ju93gfwxAALieYDqH/2mjq59kWc5qPR7itbZnomoYtp6IhDsK6uHXDEeG9pKR2vf3Viwfcfbp1ckS0F5cl17Iek5E55bn97B6d3Wbh31R72buWlAonxFck4JwCUKraTzl9R8QcguinAznSnldXvS9UNNcOuZcodgopWezyXl6MfFQEuLPSN7yDaYqADtEMVRe3dhioi/yh3GBV/Re2zvhzZvtQoEVwEdyzUItmIhqfm5qZXgPImMX87GsA36ktcSMZ+nMvwEt1Dk9GS7/iWWx4WbQ/R5+6H2ox88KMsI55WxJ/b/CN0fA3182/PrF7eW19Vstj9V3Zt300knnpp8vgIGyuaW2vWKIgvWf6SJ8X5zKY/z2ds86BARp9HkQsBFs1UndlZTc/q4rpknOcgv6bA1OHFrFyfDqwtAh+v9ZahKhA+iSs0Ywr/u4jUMHmWnoPOM0+oen++lthrLcDpiML038h0THINjPaPO0wSdKBlp2VcdmTVw0USUFWfW7CT84cNU7hrzc4Xyk4t16VkO19BMVgq0oaxtUgx347ufJRcHXneQk+6OfclAsWtmpMkknGkiFin/8mjgoj/0DveHSm5Ij+d+CAYegncAJqThrQnxUUXb1I3yeXfCJHV3hy1U2oUWf+Cd7WsZHah0wjJcVc+GrF682HiFohz1TeK8MOG8sUPnR4Rfuj3AsRZLs5Lkw+5Amdi1s2taJAa0YKcSQHwEjN6xBmGGHPtC9ESH+ENRJiXxfjTMrICZgcjWw+owXJ4euD+fC1KweIJVZAjJY6zct8QL0DRpD8m5w6U0u/hL/pSmeDKc/X1SjuanXisipzI6X1DAIIRd1YHkrW5nCn3EeVJhJU5PWFqqjMd60kGKtpgFXOMQSKUg7KZis9LJ0MFwK5fDVxyWebxTDLXMDMPrP1y+fVKvvXtvGu2HiJBKGjbfkrXHTFpEsm9JirPw83sfrfDU2Zx5bEgFvhP7tUt/SmezHU3mLam6ay0tQM6Ofu5VvCoEeSCLcmLqm7dyUtCEFLfeYS85K5MH/CFxC/N/mMIRrO6H3dHXVhPhums/XkolzCTLE5Og5PNU2S610VPzho5/kVsTI5uz5uHQxCj54O4GnXHnxHMx2EEV+F71aCq1AWSz1bEJfRjkjr5blRtAZFkNpCvJQig9rk6K83T8r+gw7n+q03ZQYTS1YX/b7UmeAQpX0keV6y1VKA0KonzOpJAog62IvVczXfLzpI3asruNmryWjq2PwPxndtmUpENSME6S8oj/EpBnMrwZ6iM2j/CBmIDucK9PYhzVi8tbqrhWPn6+tF9Q+XBL6tLKxnLoieIMQJ85QZgjCvEN2q/9pnBCnlCG/SJLvkbR+nhnn+drdClopNQjRLJPpNCvljglM9ZGV0Ljk0W4LcN2qDzmHZoqSW+U7hnWgq0yEtnL3ExWNcizwqRbFbVude2Hi2pcXYSXHr1BBodUrbpe3+CJoEcq6b6nwoh6260qQ1dLBScSNpVICjNjAeJY3MEAROPtW1lOLsU5VbYWKLGvUrOeYdDGHMhugOgYODhvKEN6RuFEEQlKBKh0dTnEET5jyrFZDf9UOEA3aHDP4ebo0ZSPFmgsLLXrLmjgjrg1UGw8QG/Rn+zyJSu4UAWcqfNoLZXedf/7DPHMEHWqWO9HEzr+xHmQqiN3VYFwan/kPTMMuak+mu29oxARGjspxl0PVvO/BMyxMEARKydY4yVMJOgPhfzi44CRQRPmfRPLcpSSBxXl6BJch5/e83wbdVe6C5kZTu2COqK5n0orTuSsKm73bpvI48QCcwpYqUIr3W5pp50xLyxrO+L+A5vovywNWPyAuwwSJbDyN6FNvN513sFANOPgzA3IkuEmnTulGlWPCPg5H3qhgIJ37mRLpGCxmcC69mJDbsFshZjShL2++HifovVoDsHTcLKty1saUfegWCC9tagL6iVnDyeRgRyJlxAt7Ihp8h8jFyxFpVjS7l03YVTgSdorD8+LGvSnjAz0TQeSqI2FRfqpe0wFqHMcS+fbxfpatfJlJKvQ5kcafyaxKikipL9i2c2IgDJkH2TUvbr3YvoTtATpvesp2lStY7JsdECftLGvJtngztg6WNOijIqM6XbQ7MFkMqpNfURDs3K4bBexl8jY155XmuysQusz9o88rORtKAEqPu4wb67HlHLVQzs1S0PXwas887x870IV2um+p1X0YUnW64huWJlxF57Q3tkgaxpeCK2Iv6alNWo9QO0M2F5wdBGLeYW8Z2PMtKfAaOEX/WX3GuqDH4zUSB4QM75LZe3IFCt38ulbYNvHjy8YyDjy4IpUA0ZqDaMVhpzqbYv9WipdNvcE80Lo2gWcMKPCMj0FEiaai3gqDQsHixLa2XN/e4Rw381rvuoNtPv0CuiY7j64xGUVASrDcVLK0+xlT4mrLMbJmr2SfOpEwxLD10vZlXsFTHKc9PE9ASp33mefutf26LWkMwhX6F8PgZaCuxpH+1mHTOLux7ocBEdEA1unGUs+UYp0Oz1j1mfGxqAJ++FEFCwFO2QuLoZB9NH2lmrqxNVCsTh58YpW1os648z/m64RXNu0dvTu431SsB/rUyx6Jy+pv0nbncamDQWbrbf5GrL5s2Bo9km8HQjOoHZ86KBaFPex0ZDUFBPLc2mvly+kfMiBH4s+LAC/h7C9jmS2RvGPnW+NnD03MSzdqVoODWGqCs7WHkaQrxRZ06QJAnKG4J9ypu1TvhMjTHv2eAZi43WxGeQwgI+B9H9LIGoRPBRjecXRP56/EoKQ1MmK+KOJsiteZrmxcozk6TX2w71bNnvcaQkNJppQ8sS9mcCio1xLETeUAGxA+1yrsk0qsaZh90+LNHbb2xpYCt3vAifaeeBGXROB4Npt8eO+qP7mn2YTU/fOVeGjfCEQG6/mxOH4MIA2maxU/IcRFtHWPIbsSBlW5E1c/VGWyokocIgfcB6ZH4vTE45JnwMj93l+oJsx3kEKprsqJHvJryXkC0dSjYhP+gO3G+15DUfKpyselic4BDiVnAlSX40UkchYR8OiAvCgz/OiD/njYc5lqw8y9NCkvH352RoML6E7yWfp6zkVi6Fr8n0VFQkaiuTmyhmiL4NGmud/urWVHrDjeRtnjlOvLnbNXlfT1zL8DuoD+7aghoingWm4tG4C3baDvUzEISdwrqtDJ05MnnXKnKlpD0Vkk2Fp8Yh2OeR/Bb81Iw+a9SeXq5S96dv8ViRp56LZqBOhWJrCZITSOvdjivR88Q7scVYHmFycJxAMqPjMjir99ryPmunV6BNuguub7ordzEkP1DBEYf5XurhcNS0531CZSDxlMkAoVTUS15BNhyhAdiIDl0EiGdaa9xRVffu5ieruWRTsiETqskPH6kx1FjTNdR7O3f5jZ5D
zjD0GLxMnSFsgUgrw3qP6LxNUXxMQApa5+p+RrN93/r2Ti1SL0AFh8MRmpYk1ZMhhoTDtDJSjo6ZqAOveCrJ5JBRWvOeFLN/FiVOQNXtrknaJ2ABeDM42r1aE3MzbMRqKAgfIsx/dxvzk0bqHLIcbX7o204Y+auur0Jf8hg1/zkIUJwLqxAXD8Cd2K5z7pH3HtwnLgg0vlWolfw8O8F84YwEvscW1yh0h7hapmtI7rZUqPqk5zMis6abEpw6/zNfvOr6FO4MXub/WpGFhOzaTRSSJ35jGpbH6V4m/5pI5rrALfY53a70eoaCF7FNwrxLcq/9Ihpqz2YewFpDHDCUN2t4VkIXjLmhIXXJ6dTlxzHnAx8QKNnVM3M+JYb/Z0IzXn+p4uVsLD7PmhzCz90GjtOcn0d/HvC6fTOyvgPoO7+An7thfPM50JBOLJxUbcCGYa16Z/Z1KJ/grU/3n71YSFggEhGuHPz+ml7iTuOdNHBSzNXGjrbZfQuHXdnya9GTKd0bkEIK9QFG90WKcHIFqfyrsxRQCwtdguz7mK1dTGwKB+BHVp2Iywgshfx7qY6gNUwqR+HB+zl3VUEJAffa+BMqeqlcJT/2qTHvuP6OPXyTAC1xFsQ4h606gH/jfKMZHmgEPs9dWIpznarsDxyBtUqpi9DNgls3sbtP8Q8U93ngroC1ANOB5ZovNtkff7hLcmDs08FIocEERkm4zfA2MreYT/EwQ+QIlYzYj72PYtBXXJe24xXEipKo9jUdSbSLDGPaDdaWHrJ5iMyBO2iJcaFIWnVjejJBum4Qylkqqid/pR5OpABDZz/KdxprUpNdGFYpwQRngu+tnV8GAuuknd7k8NBCjfFj8PokyPW0U9RwY+1xUGXqyEas76vvA30j1VpYr3UYP7UyIw5OeBji3EhNH1+lOxhdBHEG3ErU3ggSzxEkN7Gbns+pf7ChRgWIaOQATsExlMLHYn568MTzx6U20o3SindBspFVUk0vLN7fu2DmIFbVrXddilkfau7X5mgQh7oskFF22Eca0JGWwXmfq0maZfHcdM6bR5spreSVQgMUrjAW1yak1fPvT3i/K+3MaYO0mfKJECGYcBLtVYcFEWp/O3bpff69kBkYgfEVHU079IyUffEMcpjhHeUsmKYAF/Ar2cBwbbfcdfZdKfId9A5Lc2EaivwN0FXSequ0TRM8j9I5rz1gwJ4li5O0NX/lm1ezfPsV+FCGv1ilEuXi4W5CPgchOLy/PqZHpnrrN5YOrFg8mwdOEhN0KcFZ/NGLlUUpIDSui3YCVO7cpbnc+6l9mv0GPb3Lgd9xh7t1yEcxRinGqSauxMcsm0FkP2joItjkFzgW2dt41n9ua+T7TPIrRxMHEfNpOQ4e71mjHBB32z/xJNOAbk9nXW5eAJM8vjcIQet7l/sQy1lA31UCOucrY7xuKh+xQvXwcfyGuq7k+SJuhwxnpkKhdYMT2uSfPX5qRGdqu2n0gFSX3oxFVcXZ9ylNn7utcJcKQEOB+R5VyTZcgbSmJOYYpSyDW1m3vnQiASVEtlzFGVSsxmoFA1EzpvwsnK/7cQaMTh/hDxfmOxCH3rI0rrKXePtzcbN9/13o2jor0vTHZXnZ6WEBlyCBvm9tbFYFTd+94Gp4EYhunRkRndD1EmBJKfPn0QjLbxk5gy/T4ZMT2pASXh+DADdXlSi01yqv0oSdUv05n8uKRLJy9NvoT4k1X12l8kmEA4MmeP2M0QXmYvvCIMlbRx+1v01O8UgdI306NhfMtpm1jYNFYiX0A5k/SMyvXl1IGsDiIOswpf1QFGFUM9Z5ITcyuTwR1HIVy1WeqgTFt6Z/z+nfXgpZCLxUrWuChFD6eXeUcWgK0j5ZumNJPd+Y9og7zUEBj/E32wRwpH+8SRBmcwFvJq1quOeJJyfwgIAFhGHIB3XcC2tMZpHLHEVlRmtn6bix0HEw7KS8wRZvqU8VDDUDmQuj38D5EU3PgyI/WKTStP6lZ3O78uqLRBChjsL8bgUSJKJDrtiftcBFI2lafrONRzOoIgBaBNWvlqGQkIAFthUbP+9OZydEnraFpJUdTo8EHuE3F/eLt5xQ2kwnPZs0iK9QFk1h4IaTxeYOyK7sRMolKOqHaqGhmjZGfHhLyZcvPPcT9d0xmmbJH2OAjzMWKP566KwyhY9lrZpVbB6MD3SuwRFgFXy6DCDe8PjSY0qwEllBWBNrd3/b/7/7HFRrGgo3hawGuzKvqW9Ric3KqRUKSchNN6+tTawuP6gqz3szCB0VkrdjbyQV4yN5Dt50jXfoN8/IDXpg7vb27XESbuQk2tOh4ii49zm1pH7uy8cu0PayUz1qhUpaVfCztMc8HrZUhHLmz+RacTesSgoENJPauab6YS3FfzcqhX8jXur8L6k7Z9NHE/DJCWuPmqH/uYJZ5qA+cZKaHHhfgGrzee+jqWfXGdUVJIHWt0x8nRKOaXeRpigv8BBm6HZVillabzWAkK1MSVqjOy00DZVWcgT1q2LmSpHK4qyWT0LL9utXv23KeCNGD1P3GkFzDlF8IgjDkH73cUXdZKFDR4nUQaLg2oMNGot03+y++mWqyhqnzOpMpbADGyuQ2V+q6FUIUjFim6REnAGKGXonKNghhvDrtg63+05cqB6ZTQVfl7r6Qo3F+LrbJjikKHTrSHSxCe6NyWl66QNQBein1YESxaeJO3mkytlAD65gp1yzFXfO1zl0ul15jXIiJbiu5CYAtdnsHve0mXhC3ADkr0/bdRBMEt4rJPAUeF3KK80FubnXRfLSnT6dAC5puIcXG/PxPa7DB7An8SMCYx4Wof+Fnxhu0cThRxRUju+ZEQfGxCj4AxAa7E89VIkA+g3RyYjiA9VJ5NgxUZ7YgWV07twYeN2naEUIRQyEYLJUlK3Y+qTC8nxYjBFxZ49Vdru9GhTWJqEYNYtwtTcGe/nbWtm124m7xx6DFFer+1Qq+NZIVKvu2tytuQEINnE7oKWfzbMu+/Pj1HXtcsZo7hlIC8wMY6/O0kAQUdZvfQQhvBjQUzurO+FD0uV7OTdM2zjjeM1RhIhu7Fznue0n2g7SRTgnNXLIovCvVw3//VAmJ32taBqA5wK/J+2O2H1Qxz4h3itJhC8rT1bM137fn58m+FqEU+iYhV4vgzQqPq5OOyXXHFQWDoU0fV4FDZeY08Ry0q1xaRe8/2MNBpLr8RLIDcejJ5toCQDRQCOThZeScTRr4Z7RodO9w9wPNHy2uhzTnJ6kdi9RiAUZ+fDHV/vBl6RMtFeBKvzG8ajiuM9t/tmWQUxJRGt83pZceeRWIRqjDA8NfxvbhoBYsaYUQEBi4f41HM6BhYqThW1uHbnRD1934AOv/7rid/w1UJJ5WKGUsJ5Jw+LkjamZjKYDifuJI2XTPuesrOzO304GyxsvIGn9gseGnZEeqou2G8drBmtRlG0pzNA2ICKmVNfcp7ByOoEkh21hUyUDuyXAWvs5lXAWxWXiY1jWYSOdH8larSkz1F6JFYVFrz7k4HWa9JEMU9anj3NYl+e4mAXLxs8ukcX76M+YULjFPNDW0BFDs4py+u9zppQ88XJZ4C4F8Kt0Um054LB2Tu0RhCwFgsWu6snEPWHrLq/wbaUjyu1DxjZds7TFYFIXpPm5y6Hv/w2nwgq1NQ9e3AYHkME4dqbxR7w6Oi2XO2IgmRA7ZB4yreBmTc/a517ilC2H26euMUI1ahnm5QuUYMwMzdXBRqnMGFiAM4MPJsXTZgW2Qk+DRFlL6Gl3DmCr5XN5uPOL02Or5HRew1pqhLzQJ0bYpFxHgRvpph8SLmysnu75qtkHsGPOnCrOHblqd/24tCby+qjrSfM3qmrSTe0r8x+nF6LaMCSgD7fvXnLxYO+Y9hOjlo2n9DVlevWgigAhvFnmEU0zd+X5oBEAViX1x2pv1JPsI8L2hY2zq6UvAauw46Hqu0zScaSJ9/lseYinVdkdsJW/AAkABjto+2lJ6rNhYImTWNdwnGYW8ou7WAAMl0X6BGoOM0qDSLLym+TI7ZWJG1ebg7xxoJaMZuBl6HN2bF6jpWF//ZTHzVPC0ENsQZsN7a0sflFYHdirxGnhZn2C
SGjmZU1UxY7/bJBtbsT++y/CH++WmY481Y0FwBTnja1VU7cPKMpRzcjToqc5K1YqkO0Uzv8arL8W02ZuS7MtU6aLWutjeRFoQo3M9cBvIwXpqFHKoTq4/wQweImrMI+B8g/2/z8sZGxqIIBqPTaWXv+YnQhLfFP0gmqETBQV/EIVgzo3oblUGB3A0av1PQBq8IbDb5tdsCI7GdXxLDAhIkYHUPb1WIRdsApgKuYjhmokfcJ3aVZdE2Y9YMzu220RCLhg4HkbS0NuVtBNmVxuX8bjVQqRIb5s2NG5hnDh8UYggszKYvM8+AHGCC/vGrqWwr/rwiubowOwo7cM9g0xIKLFyCinIchBODfOt+tp09A46Vvh3EFdryf4WBRfJYktEVOEfk2peBYOAvDOxiNgEtR+EnJTF1axqAQh1Zry528LSd2toWvQyo9EnuNtXatANfxCY2/fF74G8jKwh3zFw21ke9O7bvfb2HPyFXWK5o4q8WOeD0bq48CSlKuN/qLQaj3mXlEro85oYZXFh+0Y/fpEQgTzwPxmXBo8hygXqFirlYEEtK3g7Vs6XxSJgK2hIJIh6GsQeupLtYJWnwRLY72lHSW7YQOLh9y+fWsnDV8T2DqpVOUtQyunCnvQawaC0By3LTysRqJ6mVmaFH7MVlFlE2FfgfWJ1xfKMKL+mlnkqDivK0EVRJMGMwZdXOzO2BfKL/8tyeVcLaIKkzg4c9C0v0nKma9yQ4Vdnh3cDIQ2ZP/MD+LKSYCKOh0USv9QQXA1uNv/2S0q/RfKhjMG2D+qMW75e8Mx9lnkeBIbrXdSh54MszeGOB5OKWIXcOhNgRPM24npARdJ5s3OCKQjEkLosoeyWQw3UqbM2l0UmqBW21KNY9IuLsF7pRkR3vVIqiPp0NUoePl6onOaxgHTGD51a1ud0kVvkQ5IDlGm0G2b3uCORR62vS1wPVrdhWTFbcTfqB28sX20V+8st6Ivqm3lvSfObNthR+i38uMJFhva1L1dO7weBcqTpbLwFI78CqDI7Z3Jr/+s2glQ+Xz1HTIWLjWjlCvNfnTKQv3nBRT+E5SsfnSfvNkuPxbH7xt3A7KZeCGcJLCDPo8oucbngmRDNxDNSiDoSNeB8U4STWdh6KOGDWC4P/sueD7185n0XSVxxIOCuNGVr/8R0QXSSIuV/fOHN1YlygfXVBo+l+ZFXcPyJTyayRcpWOUSHA7W5bJLYmRILXzze/BDCSYAXqYVV71pGiyraDs0g7fu9GZtIOADnsI/t2StHrSLYB/9+7g6BDkrU+phJIhvZxTpGDG1j5SFPfSS48zANeXi4UD2gozsbZtGX7ghHufRciU5l7Y9ekaJw9V5bdcaGd05XYlxoa6dwCDGeit+B1vKmNd6vxDmdJvEPwdw1ViwZhzLznyIP5UJp2QDMU/DZOm5IyKQiY6cOsgOtCzQa2DKbCIiQzjuISOs+YahsImWXMYmRuBNLtiIDw+1y3ZD7FobTlNNenBWXHecOQvV2v59CCswy+nhyDyEQr5AM/uZNHc3QbNQJ0TwC0I4jCnT198p1rT8QxiHXwSYWmUTBK7fPr8Bsy7WMhvaTdPXVp6v6nDuIWyTiCq9D4CoIpvAo/I/BeJDrBeuak3xD53Y6rr3GJEeP/pUHeoC65HurC0I9Yt+6NqoiaPoMSc1BDsDJjc0/y/Vrxxx6HBeKw7aWv5EWhmKKVFTASVJlJm+2cOiHw4yPfXZBUC/ZVuiHe7gr8S4gkQahtmEP9hDPgU6Iplb9c3AXqt8pyBv88zRdQp8+JvziMZShWNgUjlixVhwa/sLDymTUDEzXkOmDNnDeHXshjvrv7laooje/f3spBuThDw+OYymadcB3wXdZOsIrtoEEf7vwSE4QvfNocI3tmi1gjbrvRW3x7fBBJshS2OgiI8XigxAV5MYsdCckC2p6OWh18iMGSO9geTySsITAESl8wn3kbNtbEBvUMCPjc0awpwK9jgxkCHVsPNGpWBSHC+G6aNq+JmGi3NszX4WwH36qzZ9cu0ekYqq/dvM4WQvpr9W8Pdb+s93xXHTs6NbKOuDBGBPFv8bnziWyOiUmoGDexhF0juTvCfNdnchkZL3nu3utBLL4Dj4whx1F1/Q6tTFwOxEC/eGAOsQ9mxy37O4wqruMxH9ReG78KjNqmYBj5RF1yRE5wct2KNSoZ9seNjSmk04fHtrIFEZ26CB2lHN2d0Zs47pyPWnGDDBqR8m47eKIsdSZep1dm/UXOS20PEdYovo+Fq7mwv3RJm+P83fM5kZYfR6K7PCowumr9o2gXkIXc1urNBZqa8j9jGnjfomv3GJpwamEyz8wDHJG3tNZcCoekHrFDvbW5Lpa2FBRrffMif/3K0TfW/wI6R99WDbpsFCJoAcxCdBYRBWa2PIi2nGltPsqIxn1ivJwOoA5wzwMDNTiEFWsOh4SDNcbWgAdj3tjxyAWQBL61DUw5c1XcEfIEaY0/vceG5NdoDxFz1XjvfN9pzX0Y7fy0JhByp5jh92Z5LXenbCMt0KxlirDb5PZsgPKd/KjJE06atBFkqJfTXTE9EoRkk+HYwJSr44tkvfnMN6wmJqawcVn76Nhe+Fy2cJ3uMwCmGy+BvANTOiqssDESypblVBHZ+ZW7zoYIGUjITwHGY2mIdoWgbowW5PMA4TSsa1FfLR0ZO0rgwzifT4VQSXdxZmoK5+TlT3/69pS3c7R6gqfmuw/hh4NStDvD5TmJ8tTu31ytKJ4vNNhQtIfdhcIeogE3RGMO2Vg/wyjnvryjcMm/TSYc35dkq11mwQfiwMWav1qkNl2l8zGTZIgUn9m5kzf4QLNORhQ6M0EOly9F26n52l5LWP5DtAgIR413Yu1KNAdC8dT45vT8WR8Y6b2BQs1GFLY4Pv8yEOG9Us+aN5Js/Ks2XQpWGnU7in43H0NrL9JRtaZEYavYCQ3QA5fPq5wqW85Q6va+OvI1nj+uC3pXwjgOi2LbeE2Mc+1fMFtnSVZWCTqEiWI+C4Ja8O+eKS+2g3ZqklDMn/L6Z1ilSVQY1sqNerkdPFziLLDGJXnmUq77L1MlfUa2wnS7M7w9PdnRjneErBV7JnyJudoAPbXLZvyML1o2eiROGqsKi3zRpFN31bYIFnU+6DAllB2a6uT18WBss3xT47HRExp8CRxHf1Y417kaHUAl8J9qi4V9kSvifqOiSMKmlsYIRcZ3xGED4ElaQvH/oVKp2FoY0ACta3EvXt043Zikh9vj9+neLHdGGTqhRYmdqa00tL1WguLmgWfgHzhDvlj2BmNrUEv3/BznkqY/wkSNMwP8ArQubt/KeNPvupNaU9c8WL9lxCI3SsRkQeSZ9sH9ka8zcjoNBZWoiWL6VYgmdOJwE1ZS0v0czYGj19XQaiYox0ceqGToGS5+rVDTUzep2y3wpz/bpQPcQgjGuMbG0eV9QZU5uV3+3mj3T/AwiHXr1RS+svwt5ocaE3jLC0ScOzZYJPZnoBVruZbWNzaNKH/cL4STBIgzffhXHXPPkUdmU3aWz5rSarhxK1TlvNeLjpF5u2GLwxuDbF9pA5Zbx8yUUyugshXwPlKPtzdEbWuz6DUmsR9F8Rp7vpha4ZhwTfYvtvK1s4jIOOX+n2sLGXOytSlJIpr43T3eiO+2xXWgeoJ/63wc8A5cb1KU3ZPw2ruXMFSjX2Cg52fLrj81Qg9Km9b7sVaslciR00rnf55fvRQQJ/AuUGICYw3/TwiKXQpj3HNz7rV7uCGFdZpg1qEC3OWq2v9lyHyLyW8tbwLvBEStO7gJPzHfkvw7NtiWURXewrc5Xz11+s7GOZPttRrmi0a3axPi7JSaes0Ttpwn858Q5IO8JHoTUj4E2JYTJ+9DUqfnKiGaxhyDRiVda2qGYpeitNbmpI6i4VcbOGTk0TrXA9FwjG6PYiyGPZ6UP6PUx4kg4EeCdpgS7CRmWyHYNtB7O+yLTznMWf0dkXzjfgL5FzbYCTaTqz76Qysq74STsbtVCrbYQ6cJkJe9p2a8DKvcmEcPTFrVDuOc3CwKPuhCix2a9QVEqUT7RuMqpdGdcFPBsDHum2na0omnLF2d8PzxybBLIls4bj
mIh7MyZSvhlTDMwJgoX60YeNQXJ0MN92h0I+upAMqIuhTYSWTZOXvPJrOsV0oSTnkb2ewX3nFXzbd0NHpxszQObOay6NKLN0LvMlR9AkJI8gMWBiRj7Rd+4M2PObOslKcHD+jFsehBf5LNR9RQ9SfB03Q+kKGaj6pxASF8Am/ve09AE24T8p6SVh5CznE0+1h6FL6lBNJtBY/eTWsvnqC1UeEBPFpFprmJMo+JCPAhhM1sP4tyiS3oI/OtffnBw6xhoPRyMlbUM0G/h64tjjQeVCMQDZskwveDUzL02Ovp3MPmVLHsbQdyrls+NHHOG946uLz7JoSs4yJPxKrdmDgK099X5RvKAzEaKlH2KQCjLd8czL3yLwRruTQrqp30zwiTiZGpm1RsU+aM+lKSocmQIuFlYhv0SfBRYhfABp3DoNh9A0gtdMhr6w/xTqAxJCE8TUehWiH70rtuNx6UUQDHpSasBErLne6TiZoRvt+YZFf/MA1FIDryiLblX9g+D0VHQeXnIhlC/BcMdvl+Biwb/SKwsdVHdjsWpjdNpw+yDFH/iOgJHxIAjEMlTiFLAeFFMvWcLIGScefP+k+MgXOLga4uk70tD0GyfKfgKYlxm2faNA8u0FDmafruN1O+0qskLiAzcQrxhSmHEQbw0oiHTP0dM/LXqMAs+nZUC93bL8AXTPCwD+iWvV5L132m8ImZnycloz10Yj6W5ZjlFykhxc3RVVdihsBvIOAeTjRuaiK6H720dR/Nw9Io8FASJ+ab2nLnfl4oDSqADi9iHOI71Gnxp6NpiFcjU34yJMJfJ7VNOSEHtzj1hC2RagZ4qVi1TdHH5+QVYoHiT8MVF6gDKJbOYaQ22EjXzY5py1Wl2LYw0eSUBAWLuufs/rBlKSnKrcCHjrJaE/PGUqDSZPpo8x9Zd39AnocbDeIWR1YbKxhVg9nlyg8L9M4ipp6QCQte8VDXjunw+sbjRHC2whwhBmklxWxkR7ysvVYsetHluYV9dCF4PFbZdk3oB3M2PySEhriLqKAzFSgJpPwR6ivqtM84kdQKtLg/UyDZ/HvGuYAh83n0cXpQ/APW8tXXqVHbzfCQmtXwPLVn21lxNmx5nRV2p6LFF37+eBzu+BCofrKQUgK0YksnAmOY/eZkHBHHhJYGz6U9/oZOTTLW8kq5ywK8PO6wrAJngV8VIP4uqtJkMEmPMQRgGCOBNqx3S7aNUkGqSf5tf2vwAJOSSb7JvWvxcwO0v4mIIa51ZeDAYuSs2xIV16G83HUBTRutTxxj+93UT+GBMSGb2i9CtXhnww6VEriHIq62nrHmkuR/7H26YpTT4p3kc98VHcOQ/2RnbuoSK8b0Ij9dFpejSDYZx9Rrx98cZAMU5hhxjmkAeQ/YmWsqTdLAme0I4FbdFETwapADd0OOpEc658zz+zrkrrJ2BKUCFFzwmPAMKKq6ab6CyuLmpRDtjEjC8/qs76s0b1gzN6xxG88IR5JeMbwZNNOZUjaibWknrRcjfktc2CRUhxxztKf00JakmqYlL0tT5LTuouaJhozJt8xWvjjumsoJZ96u6gFVSVQWWdbYgaCrz3cZCp8e+7omdEJmRUT1zHvmL4K6ggi18KxZ73rroklnu52ioXyCVJUmYGBiUTCykAqOdFfREttXafmucPW6ZF8ZbHySG7dhRE924oVmlU1dK6QR6MUcbzoIWDbkKVGLiRtP370VF1agmdP/u7gCZvRDw4Vc70dPgLufp5FKuIOTdRV0c67uybqZg4B0OIzmTBuF0ZmkJiiIgv4nzOibQK/zORtqaufEE/mP8STGxgOZ/sq50IPR04mEGPO/cPdHxCK1gsU3Jw6ukUMfcIrI7B4yf2bpfX3sOv6AdV3zCemYn2YBYwBDP/CDh099DYuSOj/4DEz7FMwJ9ZJ105NiieFTyV2xteyj0oN/fAjMwkN64+HoY3Yg+McZLZb3D5Zl8mR1hcj4YUPewNq83ukbIxzOepHQ1/jYgdpi0P0it07fzRW+I0z6dW9ll6TtvAs2lqaz7dXtShG4Xb7SfCq9EOgN2ZBFOST1xjbQW7g+M5nAvQoxAokL13yyafASr13NvSr0xZfTUiEhZB1XowEExzpo9H6smNBlKSG+bZYyzwWGQ/T0Q9oJ/btWmyVF77Wxh9lwTNSuPOFR4wlXzyZyV8+AmVR02u7ySr0CYTBJ/WidcKlVftqkxADzEA/DhynDQVqTA4Tp4wa3+Bb8jK4WMvh1D5ng1TKBPllvGDCbbmAsOXvOAzX4zBZr7OAvuCDrqFLRDm2Q595+QoARAG8Oe5o+rCrki/yeRFzOkP4nDicapamN4X6RSvrabarN2a4WFY/5hWvC2PM77duKiq3Ddn6N1Tqe+sA6E7cdQOe8ZXrLD3YKrjrCgxqebNkb+DSjR7gF3ol5QIEbalthzapJQjNa995kdpG2Ehqcr23tDLg9m3r3AoJiGu/9QtB+gWUD20q/3Q7rZfPrTvhxsdcxICz/Xe/w3esS4x9JcX4pR1FF7dKlIvv1hstQMA3PEwEz/N+be2RDzc2+JdX97oDMoiZSechtFxulxZ8SZQdJzooaipcUwJLgFXWaBRH4qeZMeF1n1MnP1Q7HcFivOjt7K37taKTi+4JTGS4/k+QEdRdGbB2BSCcEW0Kvcr4W6/i9aBmPbCJ3SXBirTr5oWMyjJRLNDPFQcCJQPf82iGmCBVYkWZJ5DhkfkMGreZtDlUDETtoDAD9WXB8Mt2ZsmMKk+L4JCrJ3SNo1+LaX5Bhxw9ipQwVrWwk0hoVJ58Pv6StdazdN9x4BiewWlL9L3gFhPrpcJIUfV2NujJRrJOWgyzuQp8KdA1MWUS5D0m4LPa+MLh0o/uUX5kQKcmg1AjcS5Jc4x7tosKFxIgFNGdiAsJxM87cRzqVrY5KcwmVh0Ay4MiRPzZSkY+Uw5MlJiv9OYVTtq0twIm8mk1IqqSoLh/E+sDw8ynC81Eih4CnDfKlXEf/sRhuc1pznSA39pXeaHZYhfEVXjC3MGYgrx4273TfvIIKFJaAB4ZVJdO5YR3pvfvSheQTi958vz4730GDVJlis3NffkUtgtbAEa2cq5c7MtPQ8SFKd918MgC0KQotFAh0Mfr3jjpl2x5ZjHbnFA0MygHNu1vXu8Jmzz/TlEOflOyZ8Jkntbyzaetys4/j/kOt+R8CTPkDO9t2W6Oal/37QMYKYzsWZDlk3KyCOyeGCqN8liF+DC6kTOL7TuxXfT5+krd3gIAK8UicjVztqDJOeyfto80ttJtpYIh9GCGLAiHNImn7ZX8CrJlaAxi9Wj12ZfZx9oQExEQjHSvS7V0sFEfRA9WPDeVucCQoZ3e5xfKfcIKh670l38qpiXJ8TekMbufClCV7NmZmyYv2e/l3vr6wq1YxgKZlecWzOsUJis/7p7TalgDdoPmG+8NDjYkjqhicXVTrpYEaaYQv9/mVAd3CjQ7m1FmDRBf8ZAfBcW1sSTgQPQy2f/+Wvz6xL7V7QLPBxIY7rfbW7DpQhLcP36Yu44NS9D1EXTWX/5h+mO/4Wgvn4mrJgDP+jHCbhxaoGVbM3FmBbTKwOdAJsnuYJtGkF9g0S1o0WEYt9EFgf8ClDkOa3vgCcwTyDciu7MFb7rE3y4gYM09Kc9eeDqa2t9Dvp8SvDyu8PPIiunNlJhyNeL7j7xZgO9LAp4phb0Yzi/ga9M0OUpPFoSxlYBGlZp4Csx8Z702k7vmDqgjbr82wKTl4glnA3u2wqMv/zWnWMv2moP6TAw+VF47rZb9MBhbutXnjHzA+qEENHUMIZf5nHXcM0iDaXKIOpAo3JmUGVfHKFctH6ilp0a5IQr8Y5y1mB1QijgkRgXCfDMjaDqnoGWlOKbPtADrf/tDJlu4bR7rKnV5FxCvxVhrx50ioaOc6PfhH/wMZb1r4idNdfivUq17qngATmISqo7ctPgJero/ntn2Wu4imODijnJtqo0UVYygdcnCirj6939gmfZch5oNCbPrVO32tty45Rl2BYBcvRtt32gLnTXtCRYjSsw1ceS2bdnXADW5IFFhdf+bZM6BQxe199NUlMCbJPwId/6vP9//LTzL+8h
LbHH0Vl070XYAOZ4yaP+2acuewWDDmPaNgxZKLUitTXspr3n7/51rXp3QgrndXMO9mealEceGMjOSeTh4BsQi4r5c4Je8Sux1n1Z4tjlrlKB2vUGuKAugym+CkRMgc5BgPCkSyMR+NAuzTh6+m2PBEGJQUOkWJtjqV4/dBJemF2UqciVk/caHvo2XpciWgpBkbx4eFw2FVqhDsanpmoOOV3c1y/bbHIbtVzvj9MN+fyPcU/FC5B/EPajHM5Eoisb75y5+lri+uqxndVCjNsJ43PjWqLag7BrvZkDyyRPjLYDrNva0s8NGzrfFR7sd3Z5t3zIwxiWyXs/iXobI+TXHbuObxlC7xRUDhx0bA18j13MItImA+STF97uy1SjSdIQgbZcIOvQsS+moRo8rcj8Ij3czDDR8czz2TEnEiXrWw9QaIakb3RInTXkN+JmrDhUFlYAEXyankFr3VfyaZ0GcjqzzgOHmjm0qRMioxXKrvra3CG+eNaTdivqVpUwZ6d/Lxz0s6kKa1FrMtAHbKZENNAUJilw9yGvocfzsNHO2syPpu/9/wfehdKbdZyG0LYAmB9eZUrh2GzpbrO890zqnqIYxYZ9Hng0WjjKQeiaBw3wmWYYIQoVvnB6dAQpoplCemwzUR1qdmPk3FBsp1Jz2aWnFpnpXQtZbhn5UmCrRCtnAjOe3SMLQDkhRW2ddQUbSPSkvqPUGIcFUJGyW8+XDwenoPdJtrw+dSuPVmprq64QQXjkOOQS5HqYnW11k1+IhhG8PaVDnaFV3WQBBWPWobfTc+MUp8cjnsYlqXP5pV+imglSnUS564iYnFHfIjyNhn0ktPMWEA9GY2v+JypKwaw5enTb8qu8Y9IZ233OjhxPZf6pTZBm5a3UmsW8m050HwLHZ87w49rlnDB/Z3+V4+ts++sOZ2jIKNk2dRZy3FNyGciK+l2eTbPPuXSD7Ohg3BIYv2fQh5+QP8ZFqw65ZcHKG3/zG83FG+zXsqQr2jHG9WCIKCRHBR8Cb3xZt55hqw0r9e9DgUdWOYScLU52/SLKVDsuWseFnDRppSQ5xOi0hwYIkKSVZ6SOwDm826JbDOCLWrAaXo7VWB08H/ileM0Cznn1GdS+Aj1khV9Y/P3WYWrxKsDXNVQ8zBiq1TQnh3lGvXhZeV1AamU6B7qS3nFbxc9FM5R/y5DHF9qU4gfl3eucV88ueGkAfvpGzP3/0VWOixPibhWw0tdiVO5Qw5jeODLpUw1Ly2A6Bxhf4aA68qcYbMzcNEwPpMU+lRtN7X1O8OdsmXU0O34tt8Sawrg+yxMznIyzINjxqrEtUwrDGbiafQbuj8yiVEHYwbVJS3/ly/wkkotcOvpalfH6CueqXUxtdmtYSsXagdS9DBHHdDpWdTxjEDS0uf8UxSp0801FtsRYt+nOruzdf2UoM+xXDL1CuAkKZiuEOrHxyO1qyABxXn/1W8/XMLihImcTlZG/T9NfO8NYWJILNdC0TLmmKYhV6UgQ8J+xHINFzj9lQLF3QBJDjRGGXdeDSMbDAqCp0DYeJ3V5b/8FT2edWfbSmbr8lFqk6bQO9OfZJHMplxH+n+HZyRSS1xXWbAtEhhI6okiKsaOEYKTOYp9nxsuL3L3YT54T9MavEbJlrrAjbLmVoPBdLwHGIkCuo+c3+GN/KsTUBZxIxXP9TJQpBMXT3gKhvRxv6/EEAFV6FIIm7KADthpcWLizGyIYbrtYa023AqaHfdpureoAA/JpFR4dYipn+vBSw7W20aE14pAoctwfyeOlOe0IuBQoJuNuCpO7auWrC2qFGrWBro5Az6u4m5Ex34Z+RSVdQzoWeZ1E7o676Ivretxm3CP+qEDPiPczmnfcKgUhWKylGrZ/JpIh/7YuUEb7itKrhtz+8oHEENcS9O/pgMNpKJSQI0UUlS3GetZrKr/adIYSUk0pVcfBqUlgYR1KIxqh85CZTPyuFw8pybBAMuQStwO9O6Z5tGwtQA0zz1OZFLZt4HzeFI7pz3hAMAbQv/p3ditBfIsIEqg+bax5DgGqajS2E4IsVVYSZX12X9JoN778sygfvLKrUbDgWSfgxjrrNuNBGNARFUA0Pn0cP/PIIf8fygdK0h1noOf0kMuynNgOs382is7C/uWsJk/sv00epmXsbUSMfhUzQLi/EbiWmF+sdnew7EQaO1TePzbGp86C6hussNLXZgA5sMvSnVEku/pSE3p5lp74J3e+PoCybgw1fQYuH/gD+F/l+dzFvAb6LjJo033kfxaoiXfCvpwi8icyYlRzkYrg8HPCmei9j9zyCgpHylhASmOXhaaFqB/mCAnzOhb/7khmb+z2D5EetEVa247Pz3a+MjTFDgcJVAiVObE5I7CYWyCuXOByzbQ2aSSZ1nxBkcJROWhwRWcCyzUrG6LGbKVGi1FM9UPhBed5+h7exFaCnYXSXFzVa3ogj2YjZ0Lna9X4VjF+uDEeFpoFapGoJr5ufJM26Ryh9w6H+RWQqdWmFmREwIxocvn1kr66w8WJDXyiX9mFMS7VFZ+NMc2KuJPvbV9QoF9IlK5FXT8vkZJqLuxa5TJ9X7l43wfCdyAOjTDpTWaA+IZXtiYtLRB88Wmtb4GVmUyibS+y4Lfabn5EDI48CaFwxBu4Ka74QZULTiigM7CdlirpH+tcF4c5QoIfZAjLCDWqChWPxFfrtS1Ay+QVmU0BkgNryGTnrXPq2fLGOoPxa4+bq7KC9LRTQvFo7UsCkgaWbsGnyRu4fIAi8BcrG+K9hMBCf/RrYHVaM/h2SMu2YfoOIAVS3+3MfmRiH6Jid+923olKnv8Yi9mJrJfIOTJsVIjUGAG14yfcaJDdxgqt9RhZ6YV+RPrY7hw3PXEDEzFv5HIZY59ydZ2zqITtlWZuVxa95oV1wsQ0VWgoyvqqlUlihexl7djlKdisoupBj/UruDc1BIiJUn/MJxlK0E1KdWwJhyybwmyrz7OuwJ33tqqyS1hzhMi8BWN666qsjNHZrSnHSn4goP3RVWnoWRlCOBAtuzQYuGneK0wEuyioeVlwn3OTljX7jDceOSAE/77NYCgG1kV5ateGFfYcXjAk9Cs6ClwOjcom7nfO6gWY3GUqkYIvmP3/FXB3w8VpfaFGtAJ8cvUdr/tHBsK3eP24rZaeajAiQoR+0U52me2mBO+DePhk3dwKeX8T6JWjz8PIf0e5ETLmjL4UrdCw++gR/dqJjkV7Krf+dZoveFlRoW3+aCexGRhkPiNlBLucwYQBSRLgziMfsnan5m/IfJvh4EVU4xiJGBTnc7Kv/tHNy5rLT5CZj1fj2pCuP7nBXznfSHt6OFz5fabSrrkKUG0B1OcEnSGZZeg+AKGTEA2CH4BFnx3E9FWYrNuHTXei9tHWUbegTW/MOo7P4fxWOS+2X/BR0keIkFzn+OYcxW/L3XA4DkQzQ1mnnCiyePhIenaPTfS+W3mmP4DlmzhMNLyQdocoaJ/WdDtXg9+JTYy/IJzNYPPqOqBqzkuPOJEO6CmMdd0zqrMdDluBjX9vvhv/0fucF3/S1PZoUHl9SG6i+5GAOsaOdXhWzrii00uib4DbuHdJsEIE/j9gh7jPq9fR7JwnW+8Wu+yDDnuEysz3AWSjvnxHxDK1YnMs9xvpPr7K2/sAygFVCsou9cykWBjyEXdw7ILL/APZsqQ8wWIjufBbabZUI0v5G28iDuxPL7aV+dw5FdYM96rHY33kphFXTAEZ2eYR7WG8IuyWBdya4cSNFKPZGAMMKRuCtCPBBRZ3Y1IoZWjpxiLQg0rgrg7oe1uySSQ/H8ETSNyshOr0CoTQNZ0S5njpiivAcbx2be9+Wuaj8hgroDYgjzeVeFDA/DF8MhED2Qf8Xdrmor8IYxFvB1u/Yjt91m43fZkOcZWFIhD7Zp+KwSpTkue4hPcpsWgAn48mvaEDt9Gb4PEWcztOdx2LfCznegvBmxhO0rUow8+7m3Y4Z4pg3NYDjX6VRF18ZB3QNHuWybZDMiFuICTC8svje0OqGW4rvAc5PQZyrmypZvqhxv+owDAAW6RHIEwMFF8bYHkmYa2nF0GrCMFcIWJprK5Oi4PBqytTerQi82KfVZdE
fvlXqoWz7YctN8xbRbVKqHXoHBchkUd8el1uacARZTcFRCQMbTmzoFr9piDaCEDKgXDyj1bwQk606S1fwu/KKQsiaecopJIJ56dhtZ98M2Q0GgHN7W939rGADBv1p7U98eilKrp3/NNWaUSOLHj4jlaEc4AF/EWcSr/EWwbWZdnepboX4CgrLiEANkUsHESZ0aN62mjxAQjzQIKvWA+fyt1rZs2dzP8qg4mgeDNsCWTS/eyUJHWrPSO3QLL3X0LoaWUwV8Y75BKacN53jDEUOKrmoa+37cFHBUxhHKJjxMnswLyjh+J1ekq1bBDuMksQQUyuNFPv7LlGddhTg7k8sxDpMSvkWEO9wubJHvWX5wATpYHt8fAf1DG8M89BRRX11wGtCIiveVabPOrdWQ+MbRTQwCKJicukumWlAaOeQuZgg3wcHduV0HOrB3hL/QG3qTpDIn5Q2VCOm5Cb0LZWaKXtUF3D6ec1KjXSfjahYPrSKpMOdr6nkmihslb38sui5NBU8Kz43a5SJ6rcCvgi4wAFPWLlBwiM+QWTgA4+3eA1RvYsqgM35tuHojxjUZbSIRsIzyD2XAlGggpWzQWzwz9sJrg1s9U7vxfcS9ZPyILXh6KzrFMKRuoinQSoX4donjgjpdboF3FxLA+CDL4lxjrqUGzrdt7DqZQatb4aLMX7HaX0geEGzg1/xVY1+o6pkQVKICdMY5ZhtLszALx/fq8aVj7qmuJ48M7MeqrZqLfOPoeQkIBw8LQneTyDgxRk7dfG1PMtKfYIk5F0MvO8+g+GbYAlgwWt1K9mL+dGbcsCWfglcDShocIk+RgQzlxrTiRn/EeCUloWKAP56ybdvTZllV/y5DAKOLUpQa60TEHj7mWJe6fBJvLFvU/lFCfxfJ7ItBBgAISu7A/vbRDSFFk+Q/yIXbZkNwyfOO920LOxn2BkOSICPVDU8QWjmqdpcwmAORyzINpAayx+iWyL1duZFn/qZcxfB74yBLjifpKyud+PN5BVbdGyNPDcJ79v7lp5NpLWG20iXEu0SwKNEPitT2eAxpIv1+pN7MUWTZpMYoM3/C+VkaGsdcbXnXXVpPM+PUF92fVDwL+qtGpGNMrewEI0GtVXvMU7PY5MC2NsNlDWYlZqOP6uhbB3UJE9yf7jxK7eel+h/BYkRWOo9I3/H7Y8mpfBlI8A/kKlONeqBRtJyiAbNz6sEKm4gh3rpmhuj7sOn4SYcs9l/mU3AWCYG9ecI9yrF71g7YqdCYRw02wIobitHnyBp2VXiHUF5sgTwBw6Xmc3d5RcZM7k9nq2GfYUPEDjz3jYz95hBtPOKUA5L2WB6PuNv69VvKG8j2bhPY5sMwQPzLBHSEEBJGfsuqWYiSUJZZL85QoaffGE4fbqTPV4aQrgi6vbBbILqZf8gepiFjvuuZv8CXrCJbVUiNN8fo6i3K/SGueVA2xOIh6TUFCWA2nmuvIwAg81udWYi+FZZE9/m3iTAcjs9RxWMKQR4l/H7FfaEGJY0Cipp56q8ilmsuMhwnz35f8rm8Oaj4lhEIsaeu85NM63qwCUKo5+EDYx9guKZfw8poKwWo6/O9i/YqABKKl2A1RR/mdg3cMYB8Qsb7c9LCI65xNlh6VivW6CvRYwNJA28bEjRHjJY3KeNFMHm/0uEEUmHdSIQd9rXu27oCXfy49+T0gRqidQ/PI/YExrDBEI15BRkRIOtsxU8wcFy5ht66sMLu+ugYgy1fJdXvntAuuKLmWDiLagYJ2bP817fUUjWVzweKnwe2elSaVZB5cOzFcEyrMJWhvug0fUNJcU6E9qAaUWEyQO7GdoFotxnX4D7h+mGJz+aJPdr7fSpeKRRggdkUaKz5i0V0o9iHpxTJKpZkETgtL4VVOPW69qRHSlJUfIOsaKrxLLExDi4vmNaG3Gk0pOOUJBrz3gIIrEbiIZtjp6M6JRw71df4ipol2jfMgwuQyVeOS4CV5Lbl/EG/0sJ9Kxf8ja42wxeOARTTPyjzsvEAIY82mTVydvGbTRw5TEu5HuUvWjk1CCAO1qb9MXidQFohTjJEvGAMPETKSuQRm4PlpjkdOYidvM0x2tLS1o0qsBVRHyYTkQlKL2nytLsr4b+gWp76BGcJtZn77FG2XRZU7NG8zZDVHiyNiaejFxq+K+wNrL3oEEYncEcwpCSxH8WXhVyHh/s/z0fG+grJPwWSCa4FzCE8bW+wPEBmY27E5G8A9/rz5Aw2ykECokE5ej5skMLrn/QgwGYm6iJKggt1TWg9VPFx2k9LC2s2I6CqmYxO0b3HWotEqgEEWMs++Ezg9vutqhc/j3+yy11vETZ0w29ukj6phsQMNFZuxfTRH2uqFm+RgeI1OUR7dDDOD5VACGTIwu+PKoVR8eyLfmnqZw2qiUv2mOGEW+gdV3mNibkX9S1LUdI/St7foAOSafS/U3CvMe2F+ifPY2t0BA7+PIGBPT8/i9lPIKyTLCvO8BK+Ef1tHtc5EHoN1LhJJnrjFPi55F7naB3RON49Dxxqk/KDLYKN90vksBfRntaz1nUNE1QO6vbneysEiCm50E0qE3wzKU0D0WgqAShHr49eJziLB6mZiCiSAblJsE1Q8BITudrh2xajUPx/d3cCMbq5jxQo5mz2BHbwlS89licfp6WA+hopGk46jDEmdBBbJ40e5Md3RyIpKvKbddKCP9XX08myFKo1D1l2fdZkpP60XzxaMRo3bJ3bNkuZfmPN9ZX6ndX6EHBb8W3r2dxux7KO208NczqVxBvRzbpFw7gm6W0JgaWOjsa99vRskN7jO0Hv7p8C797ceGSMhX6+IAzZbL0sF3RtBgZHBZfvX0gFN5vF10UTg70jZcYkyIEEzsu0IbkEhvCSfgPyzGFJhrkdeuMFGQv0NsrZKgmkMDvxPJkmjtW0qX6ofprZ6izU2elSNtc0YXS07OIND0Y3TwyD8uZ7wegSQQRy0mFG9VCHB3pCz7x7EWm8rfAbGePAyI+xqgEkeP6He3mGH2mKEMW2GbICZHfUjtVgampoDryQ0egpOv4e5sWuJPvod+GFyiwHhidNK2FQoMCiKhb1zS+K+UAR+E/b2A2NvBbl0O0I/Opeuzb450l8YaJz4CepcMrC7szJJxqaenlI1yUSYoh5rlDOacZdSPj7IKcRCjJgCZcX4lVdbec0Og+7gvThmNM2/Ib/VsyI2iYcTCoi+GYV1BiqSYaiCOXnzDJsfDu9XesJGbYQO+2iU5TNQn3I71HTyVAYKesVRhoFtsa62S5RUJHAZIDekaYLBNYFvH+l9r8CJw0Es39BMrsZkiq8Gr6iZ0/pzEgOKwHjjS/LjllR5K5Zt8160ep/y89ffe2lWpUR1ar8ye1huWg4GVFAWiuPRNFD0YyNtI6IvemI22QY4QLRz9ybrgG1P38urfHvu6DWWAO/xzni3PqJIPhoB5FKD9DAJgt2sX3Ygl6pYx2cE6INQTD+XzBKcXSaUUf9rhMDEq0aIL/ztXVzsQNG4yFnKKGJa0qwpI9LjOlKrNNZ9XdBfxm26TH6iUwr/Hp6QWMM4xxvq+bSiSuvdE1CyJJOEFE3+TdbPYlnzz2vk3Q8p3c52hnZWld1ec/M7gEHjbRROP+p7HzypRZ7ZmHLfyqeLYKE59jD2brRKOGeWfQWWvC6AJ6rbApbCp/9V86TCk1TUubr1k+AB1cRY3MWYFTQVFkCTCzhOftgledGZ1RTUSvuK4qdO6D1FdbzuDHO4j26y96gOeGo5C9N05ubUC1xi9SxG1O01duCAr7fhF2rJSRxWl9NeMM6vAjMEqmIO2KO/6nbpONtRrmLsbgUTKGNCP/+2v0DF1OZhVUpoB1Mw0cMxoPRb6+plA3PDGpMarehh1BBLQ0gl0wszsLmSwUm3UX2Tr3MLHvFUqrd1CYX1axrHQ3p7VIK0hKQwhSFc/y+rhAwsW6u3vvJXdHN6p8qSOMvgB6M1Q7Vl6K7Aagidcva7N5dkp/W7Wg5zHBWIy9QRT99L6+2JKb2J5yn3acvTzuL+7mGAdC4wep2Y+beP/leIO1Q27k/fEKtZscczDac5ANkRZQztjO2PXQu7TIgjRSFfWfKBowPP8
OGG5BB1lGsZ6583rGJs/LUGgsF/Ryc3/W+2YpCKqQub/6vfwXsy7mQ80U8TF5vau2MGc62A43c+u19Yp3bxHln4SWxNEvQCH986qEI+/qU5R89wx2qkC3tULLJOiz86gzmXBGlZ15DvWCLjduzboeQhx+jZWo2ikz/4gb+OyWorSa8VwetrxjfpTdRSLzX0fmlak3JhZGFjosqhtosalhjvldPkVRFs2/4bRwKZsxPh7ETx5Phgjvf3T4vGMyXGN6b6VUw4ybTaDzDTmOh2IRLLMhzhxTMSuwhTmDQ9/lJrY4z1PiAgLPpuP+Lu5o98nB87stZnk4BByAiUWgKCZKalMk0XJ9CaMnq9G14Gq2octSs7CYcGP9ForVmgShXV+FnY3GsJ9sx2vLM1323ofauloiJtZLceFYpcgRFe3q3VThDmcpsOqYwkevXOpQfXabworzg2pBhhrd0Dlfgnq7fTXi56oK1j4ZeBMOPsUXiXlpunnqcFGvIVdXYeFSre2VvPoJTgAHmNvq+Um7va3Qls4P2wB5muS1iUBjLTEte/ZtXCwId3e+5aglZN2V1vgip+0i2Ch2JRpyfGfCdDa4XFWiZ67n9bVu2i6JJdKXrPMF79DTs+SrXcybw8xRxl7hIPucgKYqJ/23dEzUf1j/9jTWWG7B+c+y5j93Nf/C+tlr8f3trWkk9kcmoOIniDqd9uRBimXGxazGG5i1+OH/uCYzAt36Wkh8nCmU/ZxwMpbbb5PIQf+LmwgqoPNVFHYVHiQAeKiUgWc9MZ/YwjvAUWwX3B9O/TCZe0SAPa0mhYKSf5H7PFQy/NTqbS5bMi8ErPj/t4T2fDeV9tcKwSwits/64bMpKN/nTvlLDuEvLmEH+RzIOKSjEErfqCN+W2eOK/BQ9KX4s4U9P3vmcmu2tq8Ogzvu+4VvXUzI57S3ywptbWrXFcTKTTJo3+rxbEP6xS9cYPGRfhSTG4LsuPsPBDKK3q7pCO7e+hn+rOZaS8wA46jcfeJ6NJhHkRqbT5OGLvR035HFU9uXwzXnUaoDlS2AG2pljSA3jMd2X/nX/mnQG9y9LEbMEW0Y+qnHd5LYc0cXlBrAQZPWqD9axPHEeeWHpZxikNafEcELzo8MSMXhn1Opwhv/h3VtOiZ9WTt1ZmlEaJgiMcj+EblhQuQnBxDIuK9kpNk3fW5SQkbNXIo9tix2EuaaczEu2tVAauJJrCpb7Ou1SswTg3zn+c5GUh4FU2JDlJjn+DOTh9QKCQrQDvgVKTV9jKr7wyCqpxIkbuN0/WXXSd9Od2te9Gmc6uSLouEQv/ma6C4BReMWdpZt3CK2qVj5Zs0r2vUP16YAYi4V9Egg1iCWY/lwljKAC3FLw+luf0G98YtsRLlYKcIoHDTbuuhRiOoCUYKEt6I7vEt9VxyPZ/BRupVBErszMlBhgahgMSr1CpY3OibVmKivNSJhObMSZZyOCmHIkiQ/siwe+C8OcZvv/aJ26jxRphZ7oIGimzcK9sTICJwqlExpKAeCGJVUXBR2s1IKXOcPNy3lkRW0MHDYjGiHuP2uJaS2rbLFimKVwCv8zOXbvzMrdE/vGx5DHaFfFhmHAwyWlk/zGbjX5q2Bqe3C8+cLF8XaZsaqv1MoKiE413eZ0huu6ybD/5Hp2f4XqAISUVJDP7c0yOVa8YMUyGtjLtVEqk/vGH2FOyLSHAtGW11/H5CtMPfAGNQf5Whv98Fe6uC4KPYwIU5lGCv7PqFht2EegVEkhFul0tho/N8om7Sm0PGS0vnLAyLWX7nLIbh37pJvllYdSoaZdNb4svBhmj3bAx/ME09JuYje31Kc+cI6ui1vurG8vIuUBx8amOzB6i5ibr6OYQ3LEtw7L4Uq8bHqtJmySuNktUQBdjlc4nNZhCiTvak8VOmV4fardvx+bzgVxl9eaX56ahjzNZS9BzI8DNvdgP0mgHfOAGRQZrkG+dx1vUcwCuYdNMm8c6lrKMYQDkOnE6CvdfRO4NHgIYxUXDTwZVVlfnhnnGc2CsOfpFJZ98gc2rVnYci+07Gw6VMPqRM/k17McFsetkEINZazoe9LApCXrlLpgiB6WFK6ToAcxj3d9uH//FS7XTlFUl9ET6jyg/568QemPb9GMCOUSjWVHptvt3TUiwz1uu7n+DswhuJONW/gqcwGLHhQlyG1ob58JvQKWe+OuOKbSxsRbRHOLJ/sdpV9Tp757iZRIP2BFgf57vSk/9zn5IA9hiuAEfBBibSLb7WrZayUuuUD5VBN+GWZnSiHHNWaBBdPHav9N27HpejuaNfLJwlA2l5kaoAtLhO+LxJJE4zYYk2XqhfV1pb4HpdJaeDvZfclfgaxn1vE+s90MrrFYZrJV0yT+25MjklI3rUAe6B44kyqhrhpOqfT/acBvJs8S2vChyFbn2dKXr5yRo2liqDjFqkvfDgTKRymXHEjoRQO75YrRXrMKqmBAGovX9e/JKBIi+MsvX+mkgdfRAbQdnHY+347NuD/ZsE3o902a2t2BNVKxpfaxh2N5wBexJtWkM2C8S1it4nVRV4d2uq03Zmt8YH6io15A6VuK5/OhEJ5oljrF9V3ESzK1sO/TlOoXU3x3fi1J+c+shFckEOHwFU828+2Qu0QH4bVlGw5a0SRkrp+jIdNuQLzKwczrPQlYGni8PtGubcVmArJhj3+SSGwt86z+DSrzFzgUcSNrLxBLSAUDNs4vtHzL/4Q8fqUvLUMsV2P1tgOhZiumE0OvcGcZWgO8V0UoqPlWmBWzBm0gbpFXQ9xK+L4zknjxV81WJFkKa7n0kH+BlGXCZU003+P8yRpqkW0ehU0xZKlsDp7PDLbswwaXKkfWLZ7PLYTvDc+M8cA95ieu9ktiA9TXSe5tjzXDm+QXuadaXHhHnHZOG2T2CZIkkK7JSYuDw3DB4Ufoqq9c00kP/U4OFEYu2CuhYyegbHZFU+N2HCnYJN9xQLa2p6/cS/atYWLJF+STEEVk91CZ2WFJPvlg6VpzQe2ER8kajO0VZOZp+lL+7r+vWKsYrAX6WSdfRf+kr787elTJ1NO9V3mg23VWP5ZFCVj8V4BAi/RQOJ6EWYDa11fvXirkLx/BxntQXDNZu4JJG9mpaziPZbl0YPgX4KtCOoyRU+MQY5qPw25Q4uc+yph+dyEyvy66CO1+gPqb7gBrxftgpsp98goWJGAkLTWOu7Geb/uA+rvKEdUvGhxtr0HwKzS18kB/8U0ZXo78w8T6Tt4QtiIEAo+p7AB0Y5qYJESFKcFvscT+7MYBYY728QONA9J3wGa3ik799cdDNGyGaT32qwdP853ac+AiWu/5jNfEx+dQm1QzIzqN+m6ifJPo0E/ZsczWa3Yhh+TgPwJ/cNtx4icOHU73PV3qWbxflumTs6yPOitQHSt/rhqVGRUIpP496KbsiABZbQXEcvcrekOnOXPu18wBWT4qtUGnkRucWEuvUSWjAXy3V2tF4UlSpemT5t4fY6DHdECKcg2gR8LU+pa0yp4/b7LQnAE0cwYYwbn0tHIF1Xyrwo96JAMDVWjzQ9btTR/RP9KClIswlaGCbNvELOACH8DJgDoGPX5aNbRI8frZJ0JYsFVaB01Psz/ROpgx6UWpI1vNTMkLkqs+V4UgHruPw1pxZITwEoDpix7yuuLtYP2CBEJ1wQ6NtusUYlJ61OuPIUQrJTOYkl1J4GF8Q2UHHmThAAFCF1ULmca4Vw0MUhQIdDWHTkUtKghJrRXuQSi2dMWZpZsUCXSx4lB85ooXaYfJTF8wrU2FxxSa0RURk6BWlDkUYskALq2kESP3D+6crilzoP4lGJgS/IhEdhVkAmUMlHQI++3R+UgkUgXXBCCkJTpJUlrKktD+wi5okB/myNKps9PmfPhU6r46bF2vcE2Ef3blJCUG585FbjXPRqDMVEXi9xd18FEGfRutCYGhLamrjju9mu9sg8eCsT0nurtsb158XDXzx0KMKrowKSVrAM6d6D3HmRxMq1rOuKBPrhS9zvnUqrZi79ObJILtMPCgnjEckXoiOl8+G/AFhudOfdc4ijIne5NGP7FdOatOrgXk5sUMG1J3Pdwky+hu/R8SsJoQ6BkvPN
HHgtqUpIrVABJAiiF0PmWrM46uE5YWzmWsRwpuKhAVNKX7Ngg8hnSdkBl1Tek2IIM18CAy2JhehEa3T9TNvG6LhpPLT9oeI9bWpgdKinQPukzM67AglNLeyIi3gp55m+5VZ7aCd3mrMo5lP+M7iPS3TtLaD9IMw6A9JX71VoNncC9X2wv8Wj3ocYtY+Ca9j9DjmvsAhRPZ9jX65JZf1YbL2+mjgJskDOaNVoJAITUh3OOyad1lOHMD2356mCODJZsgBqe/RHgSTvHExgS6DeNek426wJf9JbVt60FoRXUmtnZU5HK+QAYwOh/yCsB5KuNSRMCrv38tewft/eaeUEK9IR0r+1RCvZE/LhOUV2Kfrzpg9BzsEtRRABymHdqoI6bai+j6rhxpxqkEFROvXRx0H+qpXhQ4hZJ765Kr0ZmHRY6JZsRrn5K9FkzL+r3pNXMV3NNW3fJuS7o/e45nsd0QCw+PAgeV7ZW5YgcXVp8CmQ2QulO/HBEvx7Wota3bovUJnktAY81idtp0ygk/wUQvnth7pXW8+V8ODRv7R1/3uCLS7CgFeqOQx4NrwQy2PImKsu/ZITqn1HFUe7R+/HA910trBNks2Yukzn3xQgdKg+QOUlJvkbHieZ67oDy325faQ76BLwU8WylQZKaQE4uebH0jdjvcch3+fPQP1+0CgPFjB8ihIcIWZR5sW0GrorvKzCUXjK4+we/lWG47ruhQ5IixVa09q7SEi6SmGbD0hyde9Wknyem1a+kIYgBT0k67j/p1wh8dD4yzinLuFylXWrUuA47aGUnfL3/WC0Y8sUTXh63HhOhu7+wiXmAZqyoSlsoRXMVBZEv8mIEdlIDV2/KEampNDn7fG9t53Y3CX30twbhaj43spS8i4J4aEUIWc4cpewcV04TOLKWMsteNX9+CPs9keMJtNvtYs79gD5DEIMqX1vQr7m/VoBEHhMUiHJa9k5h/CqkOzpBsOV1lSoaodigvDfDcfRyPwPpGsYOPeBk/5qxkwZf3fbq5lOKCXqR8DCJ79AA0U+Kk7uVvBPwDPVLReuWMnHwWP/T3pGgMSb4IysTc3Tbn5U4ISv3kuQKqsKUlC2IPLrTDCiL2WU8wCTVWmVdcmc54Q6DiCXQgY+G/eA1JcDOWlZkd9Sg8Uic332TidqkISY346mTK6z9CKnEBF9sa5TtbZIyLS98XFkbi3XLCTHxWexBU2B8RwLslSkvdPeyk7iLOdHSvPcNBUkMICMUzkcFGbB1aHUUOeZ/7n4fP1/4uvye2Oh6bsyfkJSPVm8bpKT303JLlibhilFV9zW9Ffp2Ocl52WFrHr9NawsPEvmo4Uo4EGd3ThTuA5CWn+pwFo8pV2poEmlYUC86RFWadLsk7PdqJvI71JAe9rdqfC7N9x5JjrrwLOuIt6MGcPe9+JOhXpR+uXIuLE/u2USjyvzDDQqvfkcZKmNK1jgu44gHGQcGiHa2rCkQ5pSohBhZbMj8HBroD0HEEJfbU3l7uFWxred2oJqBrrcSSgwDzOV7s2GYndqZzmrznJutywtUfWfkQtLqlHVnsfqHt+G2frskaAqxUnM3AJzXWc6vEIpUEiZKae9KiT3KOztKYz29E5t5vSKn6CnA/fdq1p015iL+N0kPgPQg+ab5xNHjednVSkC9+8bGb7aMQ3S0VoWBbiuVeBv8DeC+godR03vSlo7ixO7YK/TGWGJsEC2u5F6O+tAJbJqs9uqfUCFpgf7n+rydZc2/cbtcDH60uMa7EoiCwRLchACOtGDlxBXZrHKO7eWg9iLEqzKsehvBLC3dbCz+PYtUvzitns5Mwh7bkKYeyop8odm5SVWQ45jzfQu5aJOzvphQIl4RDU4zUGU0yPrhHIPdg81COrdbeyVQtbGG0Ws2U36BpqUouTm5IzgzJuDAAHQ0XeiZIQccfNdRr1WiHHAtjD3GP1h3P4zxJ/u4J3iavSxF6iHRf58VbxN7hcoe2ejdESwS6FiIEadIp1UBsZePNUPrqBbUUiUMnld4pRQ5tIqMDL4IMvOtIDNmJCrUNm6wwV+fv3Y0SbaDyAQQ6kImTCG8HEa6reJEE2pdtc1HxPOmyDwfiAg49r3LiUanRX7lnk+YJt+hfe0Srj38CAw5BLxHpqSB5M0t2MIq47dfumsvZevtm+wrqvFIt9OeMcT5LlGnzA57KZz2caV8WjG3cp6fFtG0zHWbZSRBv+wNo1AHblrku3hM5x3/gdk+LTzHRiKJmytBo8F5xF2tImMtzcC7R/uXYTKsYJtgGgYSspXzisb//7pmeR/ONkwvuJ798HrMjDrRe0CXtcRzeAkZ0diJ52hCf/BTeRvoJhrHMcmbem7lHMaME1SUNCUTlDHvN9JigYge2raK5AUFiB32+9gasvsnrHOi+LaGYvYS/sAJXrEgpXnQHpc1s1Gnl+cvVoiiRZOaFxZLO9i7zrs1677O6uqOQQUFCPmVE4UJatvXbJWk6NQ3DA4kZkRVC6WM5LE4psgc4ruYpdwZiOC909dHglSavF6a9zdIZNXORv5H7LRb3RwvjUHUvVUYUUd0vvqQptxzO1NJ3HokEW2doEpKKMWfVpw7cOsmlQoYHRt66MWrOg8TdwnrlQW6+E4+4FzLoXpnGOzAVEr4PzyOr20ssR48+gQlz5xBG5uhAvIrf/apCWC/OHT3PgePhMx4BsK+YSIZeFnODf8fF7BlfKwE/cLWIxGQ9gEIzUinTaqy+dCsGCea4XBcUJUcRPy+ysRIZhaanuYzLYpGGrsLvZvVPAGWPKDFh/GlF6K45R1aSx63J+HTWci8SRfMDM0asVWsb40f+sbBRMqA82r4YHrr2Vl1XicszXUNJv9j+73Di2mWuGEkNjJavUdoJfsrw7kMbE8Y93xtiFhz0ro7qL1ERWzWjgrfnOGLxMg1Pd4fnHAyadpuHZS/l7kIUl0MDf26JGpJo76MewH/Ld8vl8cB+5083583wrhWVPhBVWuWUg/Lzv+gPaS6BTUDAnKY/wzAF36CjQOyT+25aAxQgDPSS5gLgj7nnjQyk1gmTvXlUKKZOXRdS9VAC6LdHnphQ4cyqZMRXqUIKY0DaVCek/KtepqbSNQBmo9iqyGh1Ke+HLAz9k86rrCh/CTSyiDx+M+SBaC6CAi4J/4fNDOOTa9OvsM+DYH2t8PKubHCENZsAVZIlKEenGU4Du/RpqYJLoyhzdWW7SqQn+7j687hKWnYE4nY9gfje7TzjYbcGtw0q7NAzQxURu6FIrzfyBE8xL4kTS45jWbOOgpZnYdZMkC7rZrjFzxFGXw/zg8rAtQ6rVgpt3UtUsM+7TqsJWOvPla2wdVAOR85mZoP4ElM55t3Qem7TdvRHa3iMTfl/D40ajMF4OXEy43ex8NrpkMaVJScU7XaEZCT4DmzQfCPwiR3Ds+p9CqfiGKB/4Gtrbkhc6DHm5nks7n7ZURvXWIqGDtDEwKDnEPcKRDY+TrMS2WLuKUrMQmUlniD0xLf10ijjUYTzDKWHBuIoQLM4Eemjt+ecB8+RWu/uzVbILD0Ehld+8RvMzARqVop9Eff2pK7K/goKKBqfr0NdZr/bs6H+E50KfmeXJPbkGQJFYCRffa9NtonQWoz6s9zy0wczZSWS1Enbup78k/+0Fje0LvSOQso+TGBCiM4lQolBbU/zBoObSE4nhtgWeYfgUdQNtLOhFDslQtkHj8DIilgEpPAFM7poQRtR7G9MhKgBDxZOmBQZEipRD8sdv7Od/RHx8kDSeeaOgawsvg/o4gPiO7LHu6mqS/JHeJqvY47RR94BktDo8KZLUlBgCbVSaNCmNwYPS4ew+rpQ2H1er2+YctizsodowW+zAod/cWdyXi40py5pfrUcwHTrQlerrAJ69vu5JfqihaOgXMX80XZ20fqyUPxcCbAMLpTxMNgn1pu1qFyLJtn34px4NAtEM63RT692aZx5jbI3s83gkQ/zwMJpfGMILXC1nejE614a9jI8yHoKvqN7dts9D2sRvV+dTtWEonHDSJxMnVDUHua+HBJf38HcZiTy1Qqfdy3SvaXznrf+BPlFTwLKeifqlrBzG3QJaE2ePFwZw6WOT+mmb3
ESGkBKGRKxfQYrqzcWRAWeJjiku2UcmnjduULdrGLNlCWrKj1UG83XNFd5UQ9eFcOCQziuEZ+xGM8RNUmZyNdxb9oRxHLw9O39F/PnRQozMmqWoLhQ6c9jtjzXui5mEPY2ySdWajJVKDbfWkF64f8ld9YCOnICu5U6R8HW6ShfaEQoGh+XW1imKY9PnImdDuraexT6hWtoZ1fUvOldwZGzVuRG6j6eNXfI8/LpxpI6ZxVRBnpAAmHQCyzJKpUyT8rOlAh9y1bXcvvntXs8WQuoYthMqu3tjQYZh+wnGuWznZFz47ktd9CgALafpBUSAqPchvWDLWA8a9pxB9qF0XGjNXgwlQsI/aH4ANvn+iCmJIY8BBnAOtrO4qz3xyVdo87qAlvdg86Iz1cMAjWDQK9GAXmtq2lhJxF7dQetKGJydxqpeYXC4xeXnUUEaawOETWAXJgrO4ZxPOARw03mu8iDfPXckfKYN7OBKv2xFn7h6PmfgZ+bYfrrLm3fOUrwEIcwI8OeY8um37CjJcAQVbO5mNGTX7iOnqsvxetB9erHWVxR/QItVAumPNyPVQ2RCDI5SjqYRuF0YGXsD2w4xfAtf1F2f9UXVD9YFOpKsSh0P8QXtGLrLa3mFrj8LaDyo29jJEkmFo/njoMx6Si30KAuH3TYeCHIY7a1msrQj1B8+JB3f4e91pyYMm+ClDPCksVVFkHaEQvYnhKbE9+DQA3kHyS1TOLmZXOaDHVGf6cl8tERwhQY6dP38xjjd3eF8oul0Cgh5eWY2AEBWRqj6V0UTV0byfOCD7OJ2tjY+GgZ+uVxTW6PNLKG/ubUTrrS70vrHlvkzhls0A1/cZXMCQ8MmqMDV6MYynuY4btpelEbrlLPiP1ZAMncLAi0vyNnhR+sQiSleZ0LcOYhakLNQp0S3mLueACihxhEWZnRTyTd6ggoyvFZl4KM6LVX9DnPKEzI9JzmpYQCY0CsiuYaeaFcxrEEuboqw5dE2a2bReLfBuuZQG7Ppm8ew4++zzrSAhgtxbPrSDgccc8ear0lwLKUsJ6zHxetJhUZ5LfDuRz+KuESDV38V06ssKLWmVHtd9YqmwX5UCJ3wzpDPZAHamXR33cI5zR9mO5q5NspM5C4DCFaDruSToP/XOHEwRMNwWr0EyUEtqlkxGXyWDJpi4BrNU4VxAaosMyUWIfgoC7c2uNid+z6CvEi4DyTwSi4pZ8E9c/0FhGe1W25pbw6hu0u3XzQRZ5Gw8IkHrAw9h65WufTxiHcilBPIvZ/H8xrpJE2r5G+DFPN9oR8owrlSEkj2Ehyp4eyoGBT3izuTcbpsqKW5RklpzREogcQVY0uwq6YCCPwsym2yqvCSkj5swVuvLIcd24wIvzkdwlHeA9Vipbh4OwLxGYpY3zibiLb4fiAHWnB6PFK9b5u2SUsqxDRkRwEgdMp+RFGm1jUn+Q7YJeEr8Crff3G1Do1B3jP9DBPPezbyW3EiNoDoGsZ8f92VBrxqyItqe4SmmIb6XYfKU92U9vl8/OvYd8zFon9EObZ++mMrFdBpEC5SAw/qC0u0K7Fv2uLaNtppmQUoOayHpwkpRgxbPwK7ZaVQQQNm4piwaNMM0aeR0FtgdwACOxwfj267YxKNCiH1SQifRzXR7tUJTB4o8duWKPk5Cq981/FKQLW+q8NKHX4H6joS2qvt/JKUGVN7kd7/tZPR9sjPrdx44Us1m3PQDgT9jqIt1alkoOZhRuFzIBT3AW2UCQksZrsKFfL+tA9I0v/oPyASrwclDYzw/F/UJv3llAvasP6Jn421hkLmsbVLc7am1HZgFIFCPwP9Tqon68TgdFkS3hrZospw4zD2Rhj3XfRE0XG/2SZZgfF4Jp93tOqndIWc8CwknDQIeEhDwsFC2tGRGTtBnlq9vsnGAGiEhF3nIbPzqp2zhwRUxZVpeKECpQQ6ILoWLe4rmCDzA1rY2KuaC1LrOovhV8dcVJIGtqwXPW0zLe4TjWf87kbsdYZpc+LjeWPnvSIlBQCboj6BeXZ73at68koCtFfwTigYypdWUyk4GbOfKAPOBVTox8LZetwPPLDbmrK3Isqj8AtcE6uBzLbqkdynZDhF8XJXgT4QquobJDWsb5JgPqv+NKM+1QZmluSsQmj4vC/I69PAQMzICl9XR3GXJqBGzYLlSiEYMWWlttbImIaKoGoXsYNcEe2Rf76UiXlNUXBvn9OA6aMeJ8srO6zBh6J6sAkcwiyaGaUYdCI2xAcsZ5VSCaLyxQK3pTARxzY6ZIWOqzhztIuh1PjQqx/1thm3fQ7Lba5j4H9v7dQ4tYo64lFcAzbOVr/Zu3gJnHxuoGtx+Dvc439HWrrS9LtBF4uYv0t8V9lr7MGafF4gkwBZeyXuvoyl3VUjMKeISR0LipZwVp0VsKkOUSx++hMCfedGJEtrIGllfsEy4GbEdS86dLy4oJhx2Rc/gq2vibOxhI2kMoqZxb2GnO6NkzdfBK4ZZWaaevaCwzPJEitHPAG3ewSJeRu5dvk7z2r5vNB2Vx9YR5t5Y8RCPfqyx2bVeZ3EIlnCIkZBXAbkHGOqSLe5+J2He6nVIpvBn4LdaHWkj0oSuJTvU4DcFVHUReRekccAljVtMEBECmxfvxz1Hw6pnEFglKURfutFlehbwA1hUpdNXko6wKac3xZJsM6ARH4pb9t9cP/0aZlxgISe8GBrPUEK4BLouXAY8eNR5YVByotLjq7g+1WqZ97ogsQEGhPuMrX9D2t2NQGYaeGvYXyVYkcRjrVv/GvRldOVrut1K5dJMEt+19DvHL7ZTdhj/hkY33kNUUI6Bfglw+1WuomNgG4AfrRrM1nH0Rcr2UXLUv7jBlxfFyS7TbDgyHMrOoOQGHnrhh5cOxawoqfnoNk6vuynIsn1MQ/v1Q5CW5FRr71NSgKCuYYNAVc/2ibSH1rUo4/bJI3xt6u95Ah41Oe4Zdy3BGyUsYt7u7R0CPSk04F8+FIkbMDms91/TUIWvlUOR3oLkf/75TWvJQoPLmosCTrXrjsvzR6HchtBCtrIHXb1Ai4MAOSQ9ULv+jljcpbH7z7btJEBlcSCzigfEKOccWO27CrWjU+yhg9STr+SKUK3kW2+llnn10LHLA0kcw58R8O3c867d150KmN50DIeLg2aAgpTGH8EXj24xzmAbjRFxNiLom5KaAycM+qprF2tvQ90zkSQ/qlnOLmatx6hI2ptfbVVi0lHGNNMs8doEhMispJ72NDzc+9s/5IHEjkvPAchLXoOL3n9pFN8OaXzZzgKMhSYgaNm7LmUWOYyRnT5/cF9kEKG4nj935qTyhp2briCS4vzJqHF/0DCa58zFiuA3Y4f231hV2fUMKob0P5eBskkZirOIzXDmYQ5N+oCLlN9IxYstuzLY35VVMJbfj6AFXFxm/z1DxHCdzNSWeDCfFsj0pQENYDAw/seO2DeFoXeLTveSP197cExxT0XglFugMGft6AwcL2JUMzE8Zmes94UsigU3wRo1TDXyVjzaSnKRyx/Uq+ZHHbwzeB9XZVDlzkcBCNWJrirvLAiBiZUwxno13VLc1iaz8UhexMIq6rbwnKMGNAeTkHBTXXanp+OdXc4LjSJTrcbjkG3JkNomBgg9+w8/sGn0hLyz4MW+keeYUfqiNQqiB2XJ9II6DO+z+jHWTP2j/zuasTrE4+zJignoduSa1voygN+0WueSctrWvHSGK/UQKgCjNgs1I7uk0o8vVCqUnAa8p6lSikOKHI4j0IZnm6RXZXcIlgLsyeZodbLLQ2+r1i8vNsoAsJYEJhbX0YvhiprwANfEIo7f6WYwM/+Vpc8L4T9bLSkean6PLpvk4ab/gpK4K4Lpq3HqNI9/YpQjd/mab48zhhmKSUwCtmif6QsA6+Tp3FTh1oWZcxYF6mu9iqFznFsyansHvUTBPRDmvNbKxX4ZnDvbWcT8TD0UNU+SgwoH7uz3lPuYV+70Agh3FpEsk1xr+5mO7svGFFCyQR03J52aPqLp0CgLCb3TD3dvxGQKuV5jSt9cAM/pv2CW7fLJwobnevxYSob/Mq+f4u+EUlKcEmdekyov/nCxFPkyZq7yCFN8Bku6ApYY
P8F3HihpI/BNixJfxCld6d69pr7ViUQKtPVYJgcksrIXk/nl5iJRie14uJBiqVMZk5wHF6oKOPDLUo0i7FXp9nT7DgeyDstIz5Sz1uMbfWUZRCmyYbHv0Y4/tQr7JPqB6HjJF7B8Fgs/ur5TnSyhecIR8h8KDnL6lEM4EDazREWy3stl8xV5qplpdLhY1To396nqJpEAXjwtf1ajgmBx/a0ZWEIUz99mr6kSQSFC3kkarAmX6kZC4PAoEEBVlsM3pFLWVKM3h2Nxrsy7PubNI411un4AUuL+q5L/Huq8w6pncV5bh9ZnypdJzaNG3trScGjGhMk/L7EZGHAw8ngi6iWros0UXIdl+sxhThFFHLS1Ep7Xd2GTdn8okl8/vZkK00p39Xq9+z99EtB+8VsTO6mtfiUvAWYw6llRgV3Typ5wdBFBKHwHeGEctVykf4EAm4iT+xTmCNLbq+2rFWQpaDYr6sNjvYmVfykrAE3+Fe0wKCog+vHPyV5nRzL5ZxlKdJ2MH9oxJaFEy1bnaGXaFcPy18U1wdrnvuY4qOCBYNM6dg6J/r8SSUnAtk/mkhvCH6zEMKLZ/CtL/HKR2JO3ELTQqRoVQbG0xlKcJx5rWYeTIwR61TXYkRVDEFphWcqJfiNsf5RYA2Cy63S+lAagU/erKv6dxDdkoRBbYvvQ8KcvGiK9Qyi1Yyhfd1A6r9PHj4SrGryZ/6NnydatoAwnu7an0dV2SzUfkLCaHVVOcvaS/qN1SexAajVa/jOSLUpqXSIv2rKmKmnKtTcQLPInh0kA4/y6wMgH/u+kfU8lIAY93x6YQTHKN1iE6YUFf5uQGFbyysKoZzLtKZDa+YFc2ZIUs+izlUMZBp2HrZZXCN76RhIHxWXeRoOfxWqpBb2CgbsiOLZbjG4g7WMAVn15gx8smizkTEaxtx/QX/6i++c2sW1L4Qu8QncZ9rWgkDupLSI1RtRpD7tYw5JVVTOM+pQID4oPOPsJMWOWpSQgX6C8XCVj6lzMnbmPWzPgeCvE5827BsFU4vkN7pOXXSGH8N2faSTaAaa5yy0PcRoeqRBnOm8YzU17m9aNonEzxTkIbqpq+5L79PQIUndHwN9I9OI7cJVJ3uK8JNk9Ij58zQ5vJmkWcymCYIJtiIG1HG0+Rg4lKw4RQt0K7f0m+TQjfx0gDJTDfZn3xwGHWwEAb3rj91u0K8eHV67Tdb/59YQQ/60J+F6hl97se/aJN73Z12pID3FmLn7j5Oq5mpxmhKTBkyBs8mvjtJ03TMWEvdyvY9lvlFYCqU3GTzpOUysFghTOZaVZZrHmzAuq/vJHnJ31hqD3tCHXKM7rOywElBObYF7Zot8d7j7N4qQkq3nt/3DwEWUo7fIqGUW4+u78MybKDuytYwvfyAAtAoWZQAjAcLq5pqPaMHuKALVCDzOijuSslYFMiRCdc/EshJmvxVN9TFN+tmSIAZSWDLUXXd1iwvP18LJnlP2tJ9mxE9Jdrh5FA90V98qIrdkl0+kHYIo6WLO+agFg56dz9Aiy7NB5HrqmBMdTkDIK22a+EWDGme9lb/yOAkxcXav62Szdq38vOQzjJ2oZWURlbYtrs5fMtm/oOO31ZxiwHiXjsT6RgPyB3PkO83NwUbkicPm480tttvK79wirCeeTtIiFdT/O2b3aUMBVkoyvPfPjqQitN7O6QlPdKdDK3ZejbEji74DCLElf3Q6bhMDoKTq8UjSFpWn/2rK98p7lGy4D+8MnKxjG1MWNDt+xVaysqZfnvaPCo/dV55XIfc6cU18pp+EQN4OY6hUhxLLTawgkgJCdqqT50cctwX4BEDizbFbfM/zfscmAy2Ry7k+jcuSDjNtwNEYsR0zdpIUrFhk3L3UCAzt5J856T/OYYOazEEAs99/goXQIPL2Ik/jtIuVL+kYNlWuXdDOIt8my+w3obhYDBMZOuvdTT8j/ma1czB2BWfjCleDyqet0EnEtH3DQf3+vUB5qC9cA7mBjz0NTXIqQxcE7IQM0UtShefHGgFqpAZPQvjUUXdUYRVn7pmCvNKDXAidLGKrsyTLQnPXCnn///+2WqSx9RS3dDLCd6sd5JOCeMtf/Hl5GgAz08DWVljRuGMdh+S/RD7mFiN06kO8fRsaedOQee/Nfej6NG8eE9mQtwZIJuTWDeUM0nLKAMCyVX580hy71TWeIzELuGKb+3OWVNiEY+e0m5ir9+wbLVYs4PAbpVQ0X6jpylPIcpEx2k6+58lT1/lWrOa544HyQzZgYTIy2fR3smvKLdru6wo8++2QQe7ZFyek49OjIFsCgoJvOGcmxJMBa28SyESuMMus0utlmXIUaGZtTSXbnFQ0Xunsoxx0Qm1VuH2qpyaYaagV6TORCRHF1QaAfXH1x+hVgax7njGsqwM28jg/c5nGJV9QG4KqyfBTJ63bt+T1hLhZEaIRNL7KoP2rlff1+ak0zcZopo4/telTYS+fT13cE3dqzCMdaG8IsCE/4ogWkX6Kbke1mYvCCZTQlY6CFCVfrWfnGXgTWU5lwLuYIedQy4pUzeX8Ev8V+GSNqusBFF41UWUdEDSrhzq9OzvZEA7Bpln770vpOAMe1ry0CeqL9OXS+xB/N6BBLt0A0ysGUm1oOMZo/w404K201ZT5IEnFI+//K+vdL0SsvPmXV3Z9Fso1o/hD3KacptXyqIdDDu1dvcxYHoHBNi4cp/23sjqTY6nfi7fDenuaVJLLH9Rna7ygNOP7H7zS1B6r8j7PLoK/iJYUjQSnauuhxGDUMmN6xymF3z++GWBX1Z083oHexpSzq2xPnlBKKETWlVK14A2YUazo5lymghjddP7BfFgnxQxFUDmr9Y/j0AwkGBjE1Vs6HN7hSZANi2RxVeFoIlJ9eBDIeFp2zFwOEiu//aDfbwRr2eXz2MAIyiYrH7EASdgU5FXp01QpzzFgodJ/u28XZanxLrsFCiucBzPQGIwDL12x9bZ27Kicnxw33LHvaFgloIcvQnkHXQDWtrbctGymmDpuqgE/OoLkHe+cUH1Y0EUCRnvUxe0f+XlVM7hYFT8wa6+JTMviPT+B+PazFqOxHpAqlqd/DIJI7l1+ya2lCndjgRf8qMUeW6p01wnn6Rr8PZVUh1+C0GUNdjqZU/wiRsPguGlQ3T8K6iaUiL8H/uc8YFoRj3qlDDOoiw1vLHhhYNJbwG1TcGpKZtRGr6QMvq8fMpBumHzeIbdIX6Kvm9CJnnUURa9lGHl3G9GzHf2V9U1am6if4C+M4SFM9I1EzZUl+a/MpHU1z9XGgKGBCF6joPkTFhyLthL1X0d48NVRcf4Hh+do9B7VHuBzvx6IAjlmY2xh5/Mu29RFGYWdnqKze3eGgUaqLWP8iGHjYV5yVjjSbONOtkR0QuXNl2SPOTOuHAsonP6KCfcOq3qtmso6eR15krTkib0fXbZEoi3avztBMsllGeRKfM72aYRU4ADVTdOO7JvIlJBpGaoTWmlRA53E/oPOlFFOkh0vvl7Sh761rP/lRE4k7LrFZw+W+b+TvRqma1aZacDMVxes5toxEdjpNx59Zuio4XUqAIPGarE7REKvZdcMSXqlQW2Blfd7Nzi8DTNIt10kau5UTVLQlsD+tNXAtTJ9ttyICBAuSO3KAWDq65f9QIWd/uzHPL+b/A0U2W9OldFR5RRecCvCInJgV2rciR3yAFO4LYLH3yxiaB6b0KiJDeq6vQP29gbPXixzJo/C0ZF9LWJ3gPjZWGanBYVXK/BAC+qHPHfJ7r7RR2SNMW3cA+VQjyJc0lV7G2ostSE/LH5t2pSSJw0Hl5015hWTgtBcm4CjJ1q0SXWgGEU6y592QDymWY3U/rafOQGwjPi/Rnp0ppoygGd+BtCyQLoZekB4HLBkLb7xYRL4v+sSLORNEAePrYb/oFg9HqeQl/glDfxn2DGuObJRRl1nj5Pa5oV+dIpyq3e6uQGmAvm3bxm3mqce4+VXhWW+XNz3NmVPs7bK7JA/0F0FUWOx4zFRiR2uBJCU/skE4gBxom33eKk+9y36YKBl2roIe3TLBLSEAutvV4/WhQWCjUMl06jxuXFtdsB6dd9TDe+vdxlm9z5A9IQ83
j9PajPJWTSkdCQTiV6N6V4m7/0iPShQP390qDu53THO3iKDdhNLuuqUmo+lNQE4HULfBFmYvzY6Fx90KzGBqQGNrglWuwhbaTozgGV2oUj9NZqIDGJGV5QU4ZNBXALzZIeyTWRMLhcnhLQ7bZThZxgoFodA+7+eTao9+Jqx/MsMSFs4hgWqeZY5WmnDJz+m9bXMi8vljtz2kPa0hok3138smE6gnzDaQl2iu9UVxsP8o9lYwtu0TYBJehXtkJo6l2xkNw0qPGVTZfwegbltl+U7+w7QuDyBHz2nlFcZV5aQ7Ze65msqHyoYwRpSph8aZn1c2n9YO4ZZjCqhr/6GwMLfVBFB5fAcISIQ9VHwCfIF5p9a7Uiwxq8xWZoTKVT7uw5oFSNdwlIUkvlFxOJsE69Bto4moJRp6LNdAONaFXqr3BX+JN2KXMZDlar6OvJrxeS06tml6qGjLj6536p0dv0lz05N42On+E4xcB/zIA9T4RhNeYwfP9mThgnvv/4ozn35EAe0k4SDd9VHeV3x1Od/RmR9CHw2Lfn9joo8AToeQP/8yjKjSyE63pToOk9l7yxLtjsjQy+Uz9fWSbgcmzulm1jdb3LJMVOutyx8oURd7ryg4isEzhGh3Q3xLNbwENWTYThHaDoZ6WdrhnVIXr5rSCuX+pVBohsipkpQVa6xnmmHnZuv6EfnU0FuKlb3VD9QI7+/+GjzB1UuFVANR9VEIeIEC/4RuLE14rgPBzsMh5R8XlHwbJ27mKv1fjmushiH6j8mJFjn0HTL/nVn+lpf/NvkAwPJr1Kfg3g3AFONpqKWw3y/geeAOIseFXwU/RCUI2zxNPJHOTBXat5IEoQr0rMzJcHjobICN7Kh0jYMdEOhZTzXvVGuqPtPbb+7LfRkEIGqe8fDZ7PszRPtiaZKups6rm0MAcXg+mS6ffBd+bDlV8Hmvsnbeo48T67Pc7RAoR8k3xQyo/+lluTvxMYJvB2pa+9HCMKEEP81vmhjOLMhItc3uMBUmhZGaTiSmLj5fXbt0S0XJIZOcS/ut8mLvX1DCP7PE/wL6JI4Ppm0font+XZqO9lS2XfwrLr8Hs/MDHXtGij8K/rKh7AQn9bIKoffO26R7bo2xdkMKjI16AkIapq/c3ej1pFjA4bZBT3lVcGakZoFSyCoTBkPdWFHY878EtVw2Xa+Z5I5A6eUGPxiFh/eFjUbihRfji0taS6IBQVrrt6bfqFdRcchQhHH5MpYwg9rAPQHJGhrJ2Ds+KR5kVU8LbCOPn6pa+mr5phWm6giWqGxSC6K1GnDPPFA8UmFThHGkpJJOIP8g+fmLCziZLDymKy5i2zJiLzMqvkzBWv4v1kD0WWG6dkQCrxdRA7bAe/OC9pHkeVJ0rsJPDsdvEH1YVdHHOGdRyOROvuTtXSqOCYDSNkPBV52aSIpIWSNyv86yMuNr4N5heLYHn7MOPuxtuqSrYtlkUXQgyNmU4Ek4RY5TOmy0er7XkX8ouQ6zS5wVjqsJKWMjkxd3vt48Dz0I9LlBOZHi0SYue59NwXXCS1XCcHw3MCfgp4VTRMhQ8c4xlBJGgDx7rgn31eUNokeEzgi5TXmoQ1DSrkcAzf7++gmqpmbRC/fgOR9HhlhZZvAEHFLFDfFyotJCg5DzCn5+LqM2gmtEoG5OTJrYW4SZr5FJ0wXmS2qfmpu9TPEDbAWh5JH0lP0OxKO7x//aLq5DzBh3kTn/d+ofXIZZ2036+HMZMYtBKO9iFPQfVssA7D9QLkC7N1/o3jYwyzwtMF3lelQ23KQABdZ+ZAcoOnd0m5ebwGXaPSwBCiNKxFJ+dBb8KXogivJ4Z1wD5ZngpHjjTBg0grL2HRCM1/+BFGsPuwzEpC8430/BjkGnhgZ31AK5CvOji/e7MD+sGtmVpvlc5K/wzztcDHaxnFqizy8tvRXaovCfXb69ia4iD0JuBQoB1mpdWqICZBpD10Xt4kmIQ+ieDAsXsxW2kaXQLeZ25UmIpTeXd6Rx/0YTZ9ww0dnOZ5QX0oPu3vt3oagYbgG0lNFgo0MSjfW9Bkr8o3sTqzSf9avfCI6wqJb7yCQSobga4KowJvYyA7yh2ghd1FEXsfn9ql2alhAbz/nuQB2R/1xIvzV59oivgHFT8hc9i3fQkrWYROJdtNuoh5/Bh8/CjjntHv6hgsbykxbCgZvXM9xHeccShjVpRWm4GgRHKhcj2UYI3g2OrvUrtCKKNzy6+4JDnKGDnAaw78Lv/8Q7MlPkQ7HmmVTgZ66u61mUnPT/vie3sbqPWCUgPAzGA/0idVVqdxckvlQCOyaqcWys0Ug86/mcjg6EKxWjBcexGufjZXLRga7u8IafD7u3uEVy0mBXs89NP5d/Lnq/gV0MsRtmgs9D5cvV6Wfi747xD2BhSBnywkJFmlARodKh5q2Tr7rwAfCNkbaCWwGqyxOGLaPpQPVt+fnq/3GMxt+MnNx+LDPAwlpWEE1MULvqU3EyFJCBP58SalkqIDrLZGLekNFO8dsFEaa6YmeGb9Lhyhj+OGVPVx6bsDzNi/Q+um/Vw4YK9BH3or2ZUOeNvIRixSIRD3KtS4uPzNUkZsKvJUZdfoD9ei6M+eSPm7SQnWD6vR+qLw80qpynZQAGRz1wSzEalVwsCmwstf09/89miwik2vXMDlZl08Sbu3wwS2o3Et/9AYWMqRvXsApMQarhkFyWO8F4M8zW3W71MQjZ6WKWXWYEU4inn/GwqueR+o9q54YEVFEYGE9pEB9lkfhbJ3qvF7ABSwAcYdh+8oRNYG/SY4/AFv3kSa9ivDYHJ+5swGajkh02pB5DUrSqzEKwMemi3HO93wcy0eWQBxZMljntaIdj9vo44XElJ3eUI/yEdqmSAcK8vP9Oquwp1zc3mgTy0y1t6ErMsQKd6s9VbZExOsTrGUuou8iiDAzrlpMFEv7oTT9FnHT1uGNKQL9I+5hSgeAcQzjNXDx9zCTI9iCP2kdJhyHFF4YknoyggroDT4vb0ykb/sOQ+6oyfyJ8hPr0Fw0sagPnVfuGJ49IfdDUMkFXlpvbzIXsf8OfQ6UVrfpaTmLMsLdPO4r2At41JX2+y98bQPyhseecZKkSfLzgxrZHvkuv1mO0UpCq6ZACvstlRdIDqh0RQ67GsFZ13NaZBVn1fvEEN0DiVrxB4pkho9evYv3gwqitpyalIwR0IdglfFW10o7DKGRmIaQnZwl5tzbX06/mGUzbpyiRAtdTeXz6Pb7ylmAfKXvr3O70xuRm63OenQFP/bA17ZKW6Mr0YLpVH0JssYyAGioSJ6UEKga5HPvzLNTQf93Or/SPpxXrJgiCRT9VhxOJndzGe8x2OtJsuXvpI16dIcloH2mcbyP4vOqwvRJNxKCvv9p58Wvl9CjrtQGdgPNJQDVurAs/YiQ5keOSyq67hgrcoKBPgjsddYoGblJCBBGPFC0sTX73N3WH+wjlUV/EIuqdt00i4R9W4g9O0wgRxMmhXCJWWErzEBwkwG9T0f4SPAQe8npWKD3iMzoml22XN/9spjL3O7j3lbC/wr6EIkm5oon7Po5YmdnqT2y5PASdg47SfBZOqt16PvvrVGC0P5cKPlsi+6rjYVUKGwf6x4TWS2lgmyM49EJzX8LbnGhgIvsYfVCyvJeINQ+J8N6eip5eF0EkvbFactmM+mPwURHEstppSO5SRg2QnsVqiIrKpKVkNFeXo+Xkf4M0E/S86baHvgXbDrFJk4E1Z/EgXvXvs6IgHioJEaLQ2njXMfkaqQD8kCYbfRhGw1vpZ0MA8yd+jxxZxJ9elGFD5esVwVgp9J0KuMflolreyx4JBi9Aax6m59FrMGwAwijO6tKNKiAc3xBGkAhApwqT9iULKK6tFtTLJ0zZ8bjKOgu7Q1oF1NaULrz06ILDj7++unI7voDqCbU30aDbDU09HOXymaQ8VlvqwiHPHCuAdQgBanoZqbcbp+DjvdGuRTKsCoEWWRV/H2wmuX+4DNj3QIzzYm3z19Z0qhbSBYqQ6jVd299yXlKwBBnNFATFJGLZ0UrDyinibyoCUIrjJnYVqJw/xX4YMgV8hFNWHCGU6ZbqVAavWX3zFFXhCWc4MWaI
SXXqT+1LfkfiXoaAPSrmCxwl8zKwlZMkBuy2uqnidxFLnOSPH0m9+EsV7DI1snGs9tT2HxXJ1E821Zi6dl7UwrddHQDAMQuVcUZY2mYSOlW3fpH3cR+Vp0Ck8K9wuvbTn71M9MDDAqRyQ0KqNOW02dhxFJNayNltX8xhypk0Za+UTCm13deEORRvsZRYJqJz8pGKUHd2V0wxIYZn327KmgnWrTJzFPibTqGlB8QppyoldjavMcKFjtepKOk/IrPgv11L5Wa7oXoMAzGAADmjX3PWRgRUgJtmF1R6Jffc2BG04QjqPU6WJm7lVQqMKN6H++znGs4eGgFbFc5uqZjtrN7n7rVnysOgumKES2E0/DXfVkQqRnEuQw3o1w9V22GIVXh68P9V7MTOPQBvsH6T3Kn9dkD5iQXfxV7opN3VXk8WAyRb4KggTU2ku4EZJJ570xcwLO1xgfkGLjhHotvVoTEQzs0aqnNu58tLK2fhCFlC1qV3RFApugOMYwtS5hiWQzDWDTMa4i/Wg/caHflex1TCS8GwkVyZCEbc8itVkrqMEEK4wu8mePjSQvVWd62Sq0Fc08nvfnOo/JnolkgdCDJ/MYnN0hTfzgPG3MqQXW+OUF6r1aLyt7j4b76zo10KiIv9AJI+ncBjarbROb6xOGWUDGElYCUlkU6u32z77VBcB+omGyqetZwDFf0XmDuPalgQjpZaeLww89KJUUx7M4qdsNxHLVfIGMO7V4eNVQ3D//2HLGNC6IHSQ/0s+OjDhnc+uB6lKsMItcXJXsGoWcRdc8hd8fA/XqejVXYkRM3oWqWMmZY6O13+U5kNx0MZqeHVMBvZ3RLwmb/8AOEagVM7Q8tlmc3sgWre3+YX78Y+dMRl0hdjt4/ZdLM7ohd0ARIuaDq8CRTC1HNedh72CcJhZ8WqmZf1Ex3FjDmsp9VjCZUYwrkJPF38+S5ACx+68L3bIyBb7J1Yi60j+Fo/u4EUP+Q7CcaNLGbezHc3yPefUkqTIL7W6sp29tEgiz+Sigo/SajPjvCptt1rsV3s/sQa1sl9Ch+g1VQ9tuQ8pLqQTNfS4kJZk9Wey/v9WvwBAhwNZGiq31V+0Q4aIqR8d99SLDzlr+n7nKz2vDkBeH3HJ4ETbp0uQkyXHaf24EFXckoMFFvrkuk8h32hDyVsdGcQfCH8QmOgCuBffURtObLjCpirillz1njn6hWIaIWGSI4oiRaxvh+qGbweowvjMg0C7KYu7COcnnNds80dciSIOAR2ld4dQiKi8wfj3vlRDVGylelX63N4CCr89MpN7jN1040m8Nyw6iCJJAlqtMHMyNjS/TifyHLt8Npu7whiUNFVKJpl9xFOO9MI97OBQzM6mEhLRmrJE9Cwu/nJiLZBodfGdOs9+eVd4yVgSP25BqteD1ymols1bn0Tm/PrUT5sO6rwWVpEm4vh7gREVjKOFFhY5kySFVz0oOMxcRKbdrcWGen8oVq3TKXfbFCHG+SO2YQ2LTyrAglcKBHJfcq18h29UQj1GEKH4Akv2eXZ60eoR4IHy+wDr3nvIf48G5YlI9y+H7xr0WzSUPu1jF9vJbQ9fj6pFq+Ew0UkZkeh6P11Nr0FEwZyAWbjkTfAmtYLpPnlnfxCW2/NfwWb5NRd8SyjCXBV9cQ6NHGZflrxYjl/kFTHqtAHPTkBFZZR8nhcjAWPqEJCq4Wtg9U6eBc638C7QA7mh6p7HapG7tUixh3jNlfLYGsUfb3DG4pz7alviQBFhspooue2nSb3jcWQzfaPX2dTYZHHxr9eqJbXwi2b+Qm26VJFsltR8xMzz3nkYuiMDNiMVBV6vVlRXv8W1oRLP7FvXtz7YYP1XNZzODIAh3ODWoCKo9RgMt/wKpoCUwFG+FlmFED5aPrLRsVNY2izJnlJlEji/MUeDm+tD9iKz2ERHiMJKlnEP9Z38n2Z0krtFhfoMsaOaYi5175epUkpphp+oXJ7o8N9JHQDIwv2bHbpqaTI+QdbTxns9VGGMv9nRtcdwK+EYxCiwL6/ur3K3OE4/QeYWZmgSGR6rVo5kMWrg4carKI/oWH9RPxOsUkgmACWulvgxSqqRuWnhvHwfdvkh35H0DwPhegz5eGytxIcNOxI5V5KFgXl9Kmvc0O3V1D4lyinwsx22LQXFieEf6AHY1C0cSLehAMbdyl+CDmkhgULLmyKJEKlzPXuPmU+ygDwtfSIumPuAJZYcgBSWoEHgzDuaNxqzmR6Oswv8p/oPl2hUXuQ2NmIZIlNrj+gQHDKxdpLFSDWt8EbDVyu9rEcbey9GAbawygd7+CIHLOCFDAlmsZGaUxqFYfF4x7ucs0uXtkiIXkphHPWMb8nT6Jk+BKa9+5nt4p1np55AMNNg+urhGY1KaOnN7UTHLuwaEVl2ECgwA0gEyXlb4l7Z/aMRAUOcIMswSKJ7H7IPb2OIxclm/8v4x3ElIFRC1GwtMmltjvGVO/+patZVeiX7LNjN35VLxvaEWZzhqxtDDG5QuuxuPVdZbP1D8XQW92KY9Ye3JgXypBj9DU6mJAEzh4gGdt0lYsvHxleLVQ2AMR/t1RzUOK2BtvKPr3/RbfYmyjECSAynsXMpat+9WywRD7raIVc3VCScYfR33Xa3m8rm2osMd5xqOKdCpD0V2zUP7/NArtPdhp47o8vVceh84hdGxMG7Iyrgtoc79mp6FXk/qiib3AsOGkQYgW+2As7PCjcVXPvCkJXZEedfbeUE5HggjkMVYwCzmr1rxr7HoQaSWFAX2SBch6dcsm6ezJzQKC1HhmkGB+Y+rYKsEbpEOruakwQI20CkbndWLPA4gPGYCgHqSnN6wXFRQ04+YymeeXbugiWA5PROrQAt9lFHCE+OEy5IoxoAyPkCIjLebztsQjkigX3vovvKv3pm8Cp1/uHmrcR/RDZvyNmYoqB3Wd5lAImf+yEZp4U2oNhg2fovKXqqZ5XsCM4eIoLiMJ5j8mVAk5ZNrb6hztcNWtTCt8OfgVmrDyqgu/K+y4EtTlRhJq35krSgK/gwqMJkQpTGf5hB2hhPQOMmEQR852WE3qfAM7yOk6v9OxwwbTY+iXeUTvFld6WOLdqINHYTPpPIjj6BaCFad0qxxbRRKtP8LdzA28CKmet4CTWYAfqD1Zcfxcghqw/w72X2ckGlAVVDjYRlZ+TEBPSsAp0N7QxlU4kU78fHMr1YZ7kpK0Q9i4Jid6hsTnYEpxVZKaA1AqjV1bQWpxJ4Ul3O6sHozq3GU0j9zVm65Nt5Oj5zRSsWhOgb6TYqmePRDKSNCQlE1em6gdwTUMDrD6ZOZikz9wJgqSSuVtQ25fcp/sr9ZFUmG6znVAYQR8/N3F7m4dGlreQLrkmnNkqzz0LL5He98kDrUTA05kU+q/2yf0Rn4EetM8VTUn5UkrbAEmfH0B1UBrwuhqMDlIU2O8ueFh4YvMhNQGB3eu/SNG27sY37Q2GvZlb0olt3+UzxFyOfGgVrZ2qvkFm87SP+lD9c1SRoYhM8PetdyONP/piVWznzB/Xy+HA9Tf+5fKhcY9dF9wwoujXDoewv87HG3ZQvzuKVlIaxnhyOfHaCZeBbBvdlRUq3em+aK1OOQ1cFwsY+gclih1jS9VKC15CBzDTNlC++p/R8POvQXg89GbweMTMO7TAsmIQHEexhZn5IKnZ3YQOybQAYcEfdc7WwIitAbv5EDK7rh36TJ24iMmLgEhjUdvGv7wPw8KYfqBeWlo3nmU8vIetFV0Db294DXro0E7p2PigulaeLd4IzFCcKYeVHJUBJwvrL1s6GxWi+1RlrjRjEJrcfiqrQoAKglSmJGMzMfp5pgeqOkYXbI8CoPrTqoarkvxGJeNgnHOiXD5h3Pfp7KXPLfkpUNqcXQDezJJE58xLdSn6KqXvZaS+qIlWwux6kQux3G/ng3XGDl60CXwgeeoXc9SX+HYLtgV2gr5Gr7jBb7u6RhCJ9PTtwcoScIpHqI6UxXZIZ/7kG5rudTB7+q8NmcUldB5ohXRt3JCahyqCSGxh/QWSyQN7aumlxEyY4VOwMoNE9gGQOswqDSnFmg0Jl7eRdBabZ0OpmUHV2uFzRWAxzOEFgbqJj4PW
CV/7R/o+hZKwkdA8cXHWt1ucu+gIh6BmjSftJ8tnZTnW0m90lPcZS6nb7631SnPl5KHZ1+WogCLYImQe/R6XqKxeFtRWbd1d94ggycZLMPdk/9n7JLAtQf/NzaKidDZuEsxgwfMejAS3Gy7hEkbwxrZIZo0q9vR2qBUy7EJKLGJs6x/0vSh+CFdo1LI+ORbUTsYr8k3jr64KsjZ1ZnnaeCGTmMYCvFHjEsUZgeC5p8/tyldgx0XkOf/2RNYlFXuzcMHdLin4XVMppgw2VrVALCqRIq9ECxj3YUgPQ9DC7EZHy27S480ez0Y72l5yyKeWhi9YHGEsXw5CxpeR/q3mCZvZM9oGq68eTIHS47vdQU6CR6zATmMN3nbzAVDn1IscYPEkkWegBfDIgxI33R0nlqVNULY8pkwwdSVBve+3bJ1b9TzyvREU+3+2kQZbsx02hO6ThCi5ULMkpFtOPxmDUC3oYGXR32BVaaRJ69ykldpqWj59BtR1xgQ6tz0P2H57GXP8/w9cLmLrfl+SG2hsHmxLlC4/RB9ew1WtboGH2A3DVpqVTcoiqqxn0ZGbSIjW3XrdmKqKuiGLcwz7CcEuLL7T5ke8NuNAFipasNvwfAdd4RLtKKiH6gGnM2DxXDOPTqS9877YGY7W9guD30yfn2cUNHqPhmopRAu9/sYSGrgZYRjSDdjgxB93hmAXjO3kkgSkyI8niqVOG+dUqvD2EzgYwmtH6xIovzhkMw6cAwWW+wMM61LzFAEQ6fmKjthTN84VZ7v0piVc4mIqUE4cPj/FDrQHyOSrygdluf5FykYVFZLi5U5zYtdo4BrWqyWGdqN9f+4EHhQ4aIwFLeux9N80eow+O3Nlec0T8HM+nF9KsKM81IvMrt6uiVhq3mEpcLLwzU9iQCMgTJeKR0XW/Eh1blUF5DsfeK6d1CfOVi3CwR4zQeh9mmjay2oOhFERtCc52g+rRwzD1GQBU0l/Lg7aCJrhM9zJ6/vKwTFtF6jU0xJw7sq3BBciZZswGqG6SvQlEgNHGIbAYhyN5Btb2rC91DB++fgKOhbE5YdND5Pi4qwGUnPs++Slindu1qbV/KWUMgyBOMhF959P8kvbepKplo4LY9sus1bBlQGhYPN1ZUvIC09SDWoNFK8fpEExhJE+lt3m37m45HAtCikLAGMwPXLVLMk2/d16/OLvunRRcKy37qllR3wndAJKB871WKRcDecly8W3fvijC4J0tglP/Xdr4oqGLjze9XyeWegHYBLBYei5w4VYJaomQLvdhnXUE2PF8zHnomIdin2nzk8WTftbDYJyryYxRoLIGkxlhzS2sZ6aTSgW1LSLpfEJnztIttDZUDWn6Wpm9sRjiwBbAnzv885LDhsSuy38vfs9PbT0RDT0N7FZO9uYaZVZhPjdbvCF8ocSnbbRPYj0tcKlO79YK+g6pxgWgFL0WZhwMfDZrob6ZzHI1ylbAM5yHIaR5ArcbPL8oa2CQ6t2OBiyfbDRHOqRunQ8Y21nRwGEyBQFmq41EIPnhfEDPZRj7tmkMlUtIMkQsupv37k3gjk6clgfzsjaj3f02TZzV8IWIUdEMjWSg2Ji9JW5OZkKsEj7D3Pu103oKxQ/eI8zyebFXDchOw5joRCgrdaDWXobVwNQaR6qMve2tZyxt9vEV+AwMpLTAUmu8EpgyTJB64jJy/Z69RgGhbyXYI9+YoKdzencjhQnRr9ZZDoI9gNnLVS6T7Zvn6qCUYC84kN2wj2Kgg4MJc5kBQ11ymdYUHI+H+zm0fK92ZFLSw1EMTmUOJwGD+EJZfpaEczt4D5jtJ97KElmAD6TU6+6qHLPH3aJtEVLCzfc//V24wNm9hs1NzMvG9S8taJ3SPp75dOVfFRf/f1M4QApmbfIh9OsjKK17SMOsNfO5oEIzq9r2S2ukqo/BKcvFzp+Zy8zDSM6jKonOQ3txAVP+R2oLmAZBBDbEuoeF+BAQtI3skhffn6HvT0GE+f3bMczsJSCpUextsf066O0paJs78npu/rPVPLkC7QXOspf/07t1Ug9OykvI8sJNs38kR2rkpw7Yb/niO+oDjPVYGJS2OI2w6Cav3EeD7WpAzN8+UU4xfWDR+EikHXm0OiW77hzRynSuXAcaxVrys/E9dhRFZnGTF0ANQtZBwYh5+Rtx4MIbBaILK6uwKYiYHJZ0pMZdviWYppOxLDZKJjm4Fu5dJo+07ntPUk+H7ZzKuRN5Fws5GRrrViwc7ZMw627swIQBdyOyNhyq8gWw0AzRVd+bIdR6aPsoOE/HXVGI+22FTO07vEMNcSkMesu7mwh9KSpj22RvbgETcjTE5HbMGmBmu7n3L43bPVZ6uqloRJipxGU0YroWw/QqVdqbfcn5tHZyoIdns81mhQgscLBVWG9WU2kWhDNKCl+joXZ1lQLgx/MeqCUMm5WNIsreIt6VIIFAMAK1x5805+XNRgnDBQxyG5QZj2jzsQpiJzfOoZqPXVa8Ikai3gLs6T7Rs0ojmVqL3jWOm+V+ElO/aELToDyHLZAGF8ETGNwCCQLrhygELxybuNmma+KgHo7cb5SGCJeUfGNT7CeFb6iX1egSnUkTnbJzcUkIXma7eyeLyG64OXoN74ZuXYZhjdmABqZcRNoQWF7PWQSSIrJf3eb2Io6n/BwC4Au/zjAS3q3KUNKCgG3IEcWtKE8SlFlX2K42DRvs8/lwqWR0iBvDQyd/w49ipFF+ll7uSIzbAng/x/OZy9i+W52DYNnI15xIIgjyKtErTAzUNwtg8tknLpgBDsX41xl3rwywkTM9STwbtuEGZ74Pw2fB+fhd+te3jFvEj1PePOEToFy+INvgh4pFAdKava3ZjOp8FSNXNAN1i/YCYKiMkksbg2NYvmh5Jou3VO0t2oDpy+6bsEzTUWVbuj0/TmEEtQXPZ79/N5iAKQVNFUuR8vJ/g8lAjmoyPFVQm/4a9+lxeR5FVIhyQFiy1Bk2xTZlCtfVA0SgEi5NZeyYMm+uWH4HzyoJmIC2KSXqAwZ4u3wPCC+ZVW5ZZ32GBrIGQ7ev+ddxNY09oVkK5ktSU1G8iRzGq+Szt7ZfemnkarkzWZtPgNYBuLGlIeG/NigU68oh7TU//KF+AFB7PtRtpl1DXERCHJ+XYPCj/86Dh4Zxp82KVqf56Soty7APaEbhaA+hlpRLaRYgaKPs0z4gxoPjFk22q1DUq3DRZUeVhzEjwy0nhErrmKPTt8C9bDtZDELxkRtk5Chg12TooQxM4A4I7FaUqdIwUJ3EgwTR7cyqPedHKV/pqDZvjoSMXm207fHzOw98iVoKl1mGE7xy1E0OFpWDdHBHaXgwPWHJBsz4pf814Lj0Ij8oCmCuPiyNpvAExs2Un4VNvSWYvIiFqv75pW5EWSYfCA/G3NkOT0fUvlBXzAdJCpv28cyBojN0olg3Ge8TwD1GQN8beKkHuZY83jjNpqJJ+H47iw8xN1bOusxECliatxLkB6C/t0aqgbJjETIjV8XMNqyBOzsZI5NJea1GtIp7vLeA5gepKd9iEFYw/eH3vG7U6BhMCKw67U7er/gsCNj5hc1UZ0W6R9tbStbTrj11zBnAnCujWe+wPmJQfdYKo7ecwkusITB56Da4LLSWKXW5K2WdseJXMl0D9ByWVaXF+cnoXKZIjBZIRu5bEzbmFB5JkEj4l/M41HTp9Zw17coKhG8mxI7UM45bsb8ij0o+T39AWZHR2Tdfp4uPH0A/duZSYIQR4NOmzDGfSg8QoSVoX59V8IAD9yt+UuPDSY8kVnK7bu00EL2m6yecCpfXiA6rqyiYotJNyJ3P0ruyuGGQq4hLiY9jW1yhWuwOAY9CcCaRyulOdNgx6UiwWNm7NiktQCbeSRQy1Yw/kYWV9dUZUCj0SsncP/Bx/u+cZY4VQEfz8uhq1CF/42ntrnTLlBS6o8JY78/u3J+Jq18N4VuTbGMLnI/Nlp/CyHd5/y2NOn7t8/7HwFMAJu/+lWlxinKAPgm2V0SpvvxSxTJtLrVlO/LU1HcsejIHtTmx/z5AvnQX6bi99x/f1YILC3yudPAOOfXRm7MhfdRlGL/8jWqhJJGiTmxmR9qYbf2pNv0
8A/xngbuwmsVoTy920WpYXuV68VyU30JkQBiWOBBRpERugmp2WsOnnBgv729LrbPxvGSFcSGR8WrB7dEoVbbwA9W3zRUvdcAnGu6uW0Nf7MU7fPZXN40jfyK/oIN5d4O+6yAb45+/PIEGc4qrseDQSbfy/HOlOJ/GRFU03HfOWeJGyP+YRl49JKbufg4/VEWmeX7Eo2k37YkHkAz9qUmiKv2q1xMGB34WwUa8QbgOnqi00GeDmnfGlqNdrMfXOh28V/myk7nT1hve3o26di39aeY9gGNSTD1F4pevhF3BsrGu3zjGwPCvjTCq89qsgz5Ye3KKHtOVxUDj0vn6Kc2c23xsR6fVAGy89TboM7TaA5yaxEtKqc7rNG3XI1LiGd+wcvgtdlQWNSv+vsEn5+f0NwT2zekRURCcq8LRmln95Fs3RA1wFLNphAGxHeO6PBUyo3V6WnxBSHBrLTf1bkk8rCBFpX9z0mUSV1Y6xEJk3LDKzaalp3G+7n8u0cBAbcNePeLGH5E2u/q2gcxWy8nP3m8vTyEhFl5uDspt7mwX7QCAwooAgsBhX+4AUMvNJYlWogpglzlt/0kVGUiTYGZS0ey9I73L04IeyjYumiYuE5nc0Yl17veIxUgeDKMJXqYqFJKrMmwHdA1pSJIkPIq4z2lxNtRpsTtQJCTVdoz87mA/+wNReAq2/geCqMCjvboVnGVfL6QOoCkOtSW4gun6tHCLwgRykirA/k0/tVr8bupFH+kpueOk9dQm3NWu/7m8a7TeP1BY4V/KZa4SXzDhfIjnnxqf53+8e/pGu4mntfYHHXVCdrPhWpUcT/cc0rAKVBB1u2G0ReM69cuD7cAnXJlB5OqXkBBuH7TWUerVbqVupPFKLox7WwALfOcvUBxLBZArRz5Jn8QT/UK4IHjBcxUMCOVEtgXrAABt0CMgZqD4YT+sLw+o+5XTGdqiegqbO5H4kTS5ckxGnDDCl+Pu/O310OTabxspxYvRk1W01agPmacK1BJv3byWnOjHiOnE5xq+9h9yRsHSykTnNyp65Q7qPcTiyGjYgHQEgvz1UFxwpnG+v10+17pLHFS5+xEVTIHuPsp9C/Wnlo8KoTuSxinGaycfGbb44kT1GqEP+d0dNBmoNqkod2KgngIQbZhSGptvCja8qRZTQOSoUUQyVmXeVPgq1FsNAwz2Ci4Gxk4mRmrjvsd+wbAPOPzH6vvYA9rzZ6hg4LmMORTthR/LRgRB91y6M9RiBc5dgIYAhlOxMWB1FvHDFp/ohjHELLEPG46eKw5g3Q4xgcrR9ksEATfx8/P5RUwEPXFG8DHgSJkuqLwU1w5fVMMCiVMROFIWEaZZAjU9bFyI3XIHBJEPcUfp1BphR6eLhbA5K0pjY3a6eDHE59lcgZci2AlHOCTZREaWj/9EmmkNY/AkJpHbk0IEF16QD+sWdrq+UsfIou7gNPgAobydL27op8htKclcBcyY0xBbpxN2RkE/fPf/RmrRb4JTOdj6qn3b26cCoT5R325K3vHm559tMoJe/FPUukS5e/ZDhv4U3WIgR7mwDDOFvfhXdrbiI/fSiGRRRMmOriA6mq+VZQcyyFgtXE2ziEZPJ3cJebjguLqGxnVmiA1ZBO5L2GCtUnGCmxS12KPEgtlH0RyOqw/kGEfdznkVuDtlpU4EqG1+Py0X9oU60cfHjGThxdwm3dZ8a+iCAiccoVx7bqv+eS+cMkFBMykhJ6uLMU1qXZCfehDd3wecFCawtErgamIbOs9Jsq/4resRrKVsUJwY7YwuDb2UBgi0QIMksSYIy+bJMJiVtqMysr5fbHThxXV8BXoN9fLF8S0hai4KMvdflZejwaLfk3FCIVmN0B9Q4lLlGazyRzu7O6ogs7YG1WXCILA2Od2HfNSqwsD9J1VhiET3uRQtZMYb8/NQCxg6m0Xmuc4S99lioqEZ2FETpuXczvF1gRlfShixMhq/LYO7ZD1pc2vQs1c0qswW9kcFFUYdPYqYf6YcDIZbHY94z6+fYJ2RJ1NzrgFkjgP0WHgH0EOP1ggTnrZoIqDWoaZ3fcj2MB7TmDdQExcTTgFV0fqdc0KDNobQxf2RFuA2usIobtE8AOl2Bdfs706R6MMemTnRfnWtxu0NVzVtLTXQAD2i2xHUdpCRrsB+PDs6d5LAmrXVek+ZmK2hUVdQt/8sJPVWrpVnlXSqYbdd+Nw35kyAsl62LV9GJQtcKfeKKg6S4FUy5IFSFkBNvFArSeCEE8GXGcwWjD2V1cZ1y5pWvLIAxyzYO+p6RGoRQuZBy81mEz2MiGh529AFK6COmyEuGQ5OFWVSEbEDlDY+l297oR0h6i9cwzqpvW9Hg8UgyaQgOe469GMfEaEHD/F+02suvciLTscylRYT6KtwvqwA4qcm17cSqPuHYhAYVhjdUcbeD8WJY6t1aUUbMrN4rnLFYAz1fECsAn+gPfhVYQnPRBZkzBx8j7kB23bkUmQpHYCT9Hj3MeN2HroguqzAG0eHAmewaGxCuxDw0tu03VL6/L5GvZl5dZkDqrigQI9zE1sqeHUH3P0w+7pYmE+I9Yye7ZqnJ2a8CMDeUj9iqalngacYq5B4O3Nu71SLR4D8SBdZ9ZZton3hOvguQg5MSOEBPwQadQIHWNtDcgicUo7wXHuhLSgWEjCX2oWeCnq/+Tw+wcxCC32dGNTBQMYonevXkGb4I112EOn3ytY3LKQ4vqd73p6P4sJUAXT1RLk6jZqKei9/OW6hGqiuip7lYMf2E7C0XoW7K8U9zL4jMfLFqzdxPo3FX9cB7m4y4C4jdLJcS6sC/QUa7zimypTaHFjiQbkkPb4Up0kZgNNsT0P0cmMaNl1OqvU06kuLqoWOvImvUNs27J24flW+N4S0CU1WCAgEJSTAkKg0xOR0s2/XeLGJCZ2lJgbWvuZ9S6zXoT8uiLllsPWvDwACFJ7XSrebPr/2KMvkWSjfDCJwgut1GjuM8TCmeaQCMqlWD1SKH0SpO5nTjyWlOUnfOAwJYILaUxKlSGM0kGqph/VIEk0BwuA1Mgc8ebbQH8MQKCOl1ws9qo5RvOkWU/ufZqRqK8+grZPAO1OanQ/dJjM3iX9hXZBLrskFjFyopnWklIpn7t8pG9Es+k6XH3mfVeB7iT8uQO2WkgZ0w5TkiGrhqsncreWvMZxApQNrpZwuMuKZZrcgbZQlgRlJqnbft4+fmQ1YJptNE6hYD4vAv2LrkbvLrNzBgt5hDghQlVg1NTlfUmi8cF1oMzpSVANihIY7eTsPaVubKBqXbyhNngbBweeCGRwCP/HjsIACc3pQpIcotef2603Wny0SqqIH9xLZxtCnN4TmtOuQbG39HI9FvIIUbaWpixX0Gkn5L7i7rzvIcnwAxH8JBIUAmtdzqIOl0TpGJYc32LWYmumh2TG3G4bjv/qUhZdxyXOuBJbfb7+YsVl0KuK/PQbbNJJk+uemRi3DO/uJ/+uNkr/Hrrzjk+mkNpFKgXBnS/P+l/fj+I+bxknB/sEfIdGWMu03i2OwHn1/OblzcMLefnBtEjlIQme+fmuJ9DEiTZeHhO9csOb3eC0VlH4Pq5V1YpIlT+oWHfcWGCB00jTmJ9PejngbjvTyo32E2c6n9V2sCioY4At6tnSb6JmmIk4Wvns9vLUMdk62IVN77Sv6t2NqDuHnexScKdoo1lkYInbrNJp7Gv3UjmrXX7xkMlrT7W7hvQmNwh3RAz6uWoxur3KZiHQ/Qv/HCsRvxgy67j46G/vXg4PpHuhFCNnEfpJ1ZRv23zCDvu14gy+D18jK2tbvy5EgVvYuSy4mPU/xVNRNv1OHw2X5d/LT1ai+qq+DbGxb+z8HPlDYhjYHCzMeEQ2tZq1UR35m7A3fR21T+/HBR7EQZTaqjRwb0ntne3el24Qd99W4aOReO0pIQHzxg1IGpWXe5lOWhPgbN6NBvxzONRrcOr1VYAZ9OppFtQPKQ0JKyNWPQIb0gyK2RqKoGvtAiUDETb4Gr1lJyTHqiQ46nWbrInXbmc1hymzsqfbk8q9jjxki0y11poq5Lb7EpQYIcoH0xkb/NxsfgvNP8IMopc9aDCnllvr7BJ/bm5DkOz8
I+6hwmjZvOnvNS8ZfYtoPWj8horKZSZ1Yv9L0shTOli2AAH/JsVmVXiE9DM4HyTw3y0scM8NIO5BTV6aND39pr+u/m1BLLRQfgDgkFCDTRXp4CAD1KaEElefQJtgwmABpw3mAUfng3vwo0kUYCajN+CwxYlNgMqIcHI9tEr43MODY270FiUYobeJMZoCq3BE0VP/wOj5QYaCL9AUJtrmkPZ7puk6jYtaaOqAEtMTiCZFMUxW/SDm/Fl0K5vyel5iMKXwyzaJqJzSogXfJOuCGnt3W56cU2+XI6eSYY9ghjCy2TEa3QXWzTln3hqx8h1yZEa8Ko/L1bJOM12xxj4OSHCL53CxtFkG6Y3v48+tvwawO7sdgR6oOxOPy9ZTTzY5Etg6NlAnk/EWzivpku5sVmgeaQsU4HY0vHwJpbProk42z+DIjDIsF/UUH1OLZkmmonYyQ0KQQp7vYazFFsmsy9xgObEWs67bOuhqxLPz0JuGbN7AHV5pxYa4KEMFG9CIor4yCQucZdebI7BTRY/PeNJX0DMTtcdkdnwgtUWqKEG+T3Ml4hDk3XAGEwnJ0lOuQgOwGdYenEGcTrGrtpdEZQpNYSmqFhIsy6HO+UWLJrHy8V9VY9AczwvcM8PObPglkAaedOh5wPPizdNUx5rLelJNkCBsIsBKV6ag8KXpwVvHKIvrZoxux69aZvBthaIKr72slbpkVrWLYSROIvy4gUmRnhrFWxpWHxSwZSMTdNq19tUD2McxTBDdLEO/wgNcrLQ7xOFpsTAJz2WaWxaMgSe9gv9nOAW58v2FG3v1rZiiZ8L067oLZrS5X9dTB6n5oDZ6wCO4nar1HFwQuljGOUuDAXxmjUP6gvnJXWDd6/VRnSop3zgoi03R+62cbx1g7RIbPCzSYZGlAdrVAaZa+qy7UAufiuxTEIajx8Oo7IPSrnqeDsKgMjUJsfBne6jl23EVob1QcU6LmyySPhECyjdXQS0Honh75NzWSh8b/+eLKXuamGqsuPQdq51U3VZ29L1fcGhYkRBNNHbIHPDR+l20e2hHCSX1ORTV52Bao3c9YF5NtWvBvHmk7QYcFyOFRhIPmZ5p3XPby8jStjFrinCh2gfANCtkiBynyJVCwQPYpl3vhZeKmMizN/9yH12ZGjAwoNPL+GFtZ4J7PUj9mMDeAZWFcXMV4rErVKXtEqh8/dFehRZEAZSXa/2RWBDTWSbv520v2EdvxdviFtq6uLWQGug3mOiaJuxQrH8ePo/iaPe/j5TiqAcXJcXQ4AHqUncq9x8l1/ASTyHrqWZ0+tWRG5Avlf/NKMXhRPK/VXIR0gfSJdTtjYAX2UUlg146U2i3O0U120CKWZy2sD2kZwDPfGjt/CK2eisAMhMs90vV/9eC4hsFcvLWoEh3j0CYP5xnN7dSatYiUPKWW01W3bLA9PcJPMB0G4XYMakyjJdnzclbE2JiW6ilva6HRyZRj6FswFGCOeKjSANV9nyuMAOeKIAthwHCuP2PvI+yMLd4iPLJUx9pmIMBiV1a78DfVp/YWew0mBFffnI2J3JwKBjufpUyLNy8aK8Rb876yumSf7q835bZ+Gv2K01WiBI8HgtT/id+IAR0eBTddoctUdx78u5v/TNcVEVV4F2vCjdd5A63tC+nNv6lES4QdCzeF+RMeMo+Ln3HGRxrTRXBQn0DT0EDNFUsQFdNmGxSgeQmYU/Gt0FJuZumYKQIMwOID63mkM2SwBo3Mw7UZtzw03o0qs6NJxKoHR2t+4M4w2sl5IvbyxLkkiFcJ9PlqNSGzQrGqb0GLegm+PGpcnheQz8P+fj3OjDcqYMaINavG1FK2bbSY2zlXODq1SXyhx/0tKhFzUqriJZ+Jc6pBnEsTaHWh+hSqVvqoBA2fSvzcWxHf9y0cC7ZNEyxBSag9ObDR8EASaSaMB5VGmWnqvehBWu1+3yvH+JT/77cTqR7XtQtbjGAfjqjX5HaIj6yLvBb3MkqQJJd3soQbd2dCNzNRxhIEJQBW6YL2JBykMAbxu1n08wmrS9NCz+0YE9mZ6mclvJxhfMl2riTCx9pwqQ++vMJDz/ZhLP6FWPnrzTmoTr0rYWjP1gJHe+gWZk+8kPPjbSC6FtfS7mF+iDcsHHaJbpUaXR5b853MOUA7/xH4CDN+k24O4iYRPHI4g6NVCfcf41/38uao1nJPlc+DqL12gdqQweJu4KySGy+DfRiamAWBU0RgWotLCU5fHu8hBuiVAW8qGfjfxx9sw426LUw77Y+O4I16y7u+ehoLxx/RRDdEHb/0LegpD0t/LSb/eFqTF6c/Te0Adda/CwViFrd88PIPlO3D85UIMyJlNhpzysMNQsuReVp9r1r5PeOdSKJBl7AA8z0SpQJAZy4/pt48pK9q5s5OKjiiRautnbKGQMIaWmxr7c8ZQtW0V4L0PB/E2a92EreRNYUgEe/bI1Cfclu8v3KVUrKuHgFNA+42kxN7x0ubBXJFhsHJTdwdrmDDhHZybnlpV65aMsGzzMh6J6/qpdQsyghgKSd8PeA14wPWoAODjtq5q3UPNyE6kgoaHRvD0z9E7JMuAsjc1i/x9grAMVrr4MAD7aT+NUn2jYHAlMij7e03/uzwAvDPgzOLlSuU5V5pA7ZHnwscw8vuHXdm3ixzKPjDPgb8xKzk/sa4cQBALuZjkTbCDahxFjMLL5LQj1Pgk7MhT/y9kWXEXknr3FxCo7ZRzcV3vm3g+qE39bejmLKpbzSI4MgsmpRPogFRlvP81lNolmuw2JrhA2ueHkmWLfuPYHE0dpgcwtFYPiCIHh5VqFpsH8xMQzrZ4Um8AX1yRgQEhlyH1XG5ZRGjmEv2w4ru5A8GXwbbKim383K2wI/RenG9Lu2PDTa2mdjNmEtIz0JpVFgkBIronfR107RvwnHBVar3mF6iiQV5+RxNbt8/rnZiOoYGxLSr/tsorbEKowJG8NgW51iMPdIPOCEi6MRpfqZ/obVGf1glrxpppx/ccKCGQE4YdMSgKbgBjI8evi88tSfRi39TLhai3iYPbWX8Ivf2D/H4Ey2FDdOYS4n4ggmKOmxaWx5+QHg0VnMI+e6ahoJueulkhlYpdmVwi1HmVlvij73Bp4QqoQSKW9p0FRpo/O9PAZf55pSw4+S5HPcfcYm/2XhSsVVuhmcdURVqEgdNlIN93KR5NkOtQgXzbETsmlVJ0wNR8Kmfi2raQrNdSf0V6isYju+EuZGkP91UIMy+s5BiOhTbkbtvzJ2V3EQmBziTEmC6CHbHt962mhUCHPhTgrWUBCSuR6QUXIFu55Ooq+Lg2x/eTKg+kk4YK53av99vaKhWRyOM7Iua5Z7GQB5kvlMoVhOlKFBATQfc1WdWI3y+yfLkI8rdlhIiA5833uBjZGfvQ3utM1uQBgRobPjgv+8Xs0AI9sqrnNw/WbY9exmWnxEDG1l7PEoVZdA/URTzlWOJ7avEXMIL6LBriWFqqhU7avmmZb4SA52JKi8bhloAauXWvSYcaYiubGEDi0cQWG6FKPg3lNnJwJ1BYRIa1WjW94MfsJEd49NAf9nbyacEXYZPjUNAHFla6jNoCJSE7lT9hDxL5lGlTfYB/GediyvsTF9Du4SCEf4Iy+LSv2R4H880W+h4lTFx2cWuYo/lDADLqXlz10/knpblUcqEFzfjsmJxTwzggKIs+3TDj1L+0mmPUHG6T0nD216BczvP/TvlPJJ3M//u1FeaqNaE/SUkdwMtY5OZLT6WH0fLw93klb8sdkXa/+EMvTH0f5OPgt+lYhwqw7hno+l5ZZWd72ZkwE1tLxfnvv0sGj8jBnn5iMq/wqFfOi7R13N7TMUkGEjsaW363QBzyvfaGEovhZLTiflHSn2wIRFOaq1gP695BzAvuKPRJi/o3oEF07UNXpjBxJRy/yU4WY+Ou5+shUekEOVVldcDz/VLDFv/BCEd3rk/b8TeLiINzK3LsHgCaeKpbJgoWhT96JzLVQOaH0mvPgHS/NKF2eMikdkqvTtWwPK5K8otsTeJyEnAGEJ0yFUB+c6MeMwGLUvIjwfSpS8l1UYJIViJFTQK+0XAT9XEMU+BJtrZMzLIh/mEwbzQOlt
ikpu3c8pC5aAW3TUd6ciPrEpH2TVqv6EZeOHUjoV8xKR92yj6DJENySVi+t2yMNXZF18hs91QK+WINoGRViVCFOi9AcX2YBC5YzZqRyWW1E09Fd52OcUpPlhx9iqk+RmKrKteYWt6B9i2vRQk3xb/62JThvgEItRKknw+osGgeS5AX9Dvy5F2sCQFqSEvmJbo9tifETNwt4YQBCPOyvxfB41tLkagL7pJ1Ax1a9alDuaZiiaDpF/aSemdJzXdNX4d3naK38fWCXQ9suSRuBArT9WEInybjvHFdEnOm9q4q2uI/EUgRB4ncEIoaqTMgJ9gp4GQxanL3jMmqZRdyl4if8CALe1EVCporbaj1zI+Pc8WKtLQV3xOjfb32TmhIhaohknodb+JOinQjEEtjBYOs2wd0FBVIDZVNnhfNw6BoyhLZ1GG8m+U2B8jXrb4OrOsGZ8ajyeseYilphspXJ6CrNFjC4UXiY55vCXqY+p556zPDXMhB+ELQCaCpRvjsifsduOYWFvY4vwhk/o8iiu7zH9NmFVqtTRsHyjp0hyCTkpvG//525fxY20ob72BPzPUf2qRR8SQKIQ2ubQQv0gpNF9TcmrvUryfm1HzDIJ+wb/wtY3kf2ZzgryRs7UYx4JDKvF6+9ioNMsHaj4WDjsorfTX08+nje0aQ1RJWO6uRxIlBUzJmnp6QgdQ0Qh0UWdpFE6LZUsloed7qyj1mhSawg+2iPm0+d3i8fKAAZn2fpXTR2VO8ouZ3YUGihkAP4OmYrD0K1Gy1flNmkfj+T6Miy3Oop6siJAS/zmbnLDFaSqF1hwDIOTDa2ADFBiBpizrtCpm+tbyyvKZy38MxtRlquEnsaUn8sw/T32NyKDGUUxlTdUvx00jDAgazBjlEYMZ2tZUwPEqfZLbqj3kj8RtqAni5aRLjXtkLr8enn6Q4ZAqKwqn7mVKjmfs/bwri77isuzocx4NnLS2DOMiD1lHiusL9+5DFS/KFVvkC6cNHC7LsVHkD04UsADQq5Dx+q56XKwbVGo/wfIFXgsP3AckEADdp1gkVXAizU84eXRwyPWRiXgRPKpTKCQBDLHuEQdJ4oRIEanseMsFbZtp1K8Y1QbTRdUmgzA7l9Rd8t0zguXJZRpgJhG7ef2GO6zzTLQE8wa6eRGsA4+fGrQVQArd6+/zFzIdI1Dv8H4YTCQSfFBR7nK7lycxrEEREqG+/nDBp6TCX4Uf3fSGW9hGIgEgMb766e5RUYdJo2VxAxjL8UU4TZ7lMFR8+A6uf+P4bsSa8OOZEkAh3i3tEZ0eQ8GBx7f5lAxY4YF6R14EmEI232InGqL4N1k034lUqjcbMBP81Vwj3HbcEQe4yUqP6nizv5FQKUlmWHMVUTuNlf4uv72H3EUn4uErB0nI0Rladm/RBYOgbnJcWvjY8SGMqLrLIQ0E57XicNwXmKS2ukUSYZ1jTLUyY3S45jdh9ABjggCLQZvTepr9Krzr4+YT3bKqOdtC/8vWokKFR1ZrJV+8NOn5rQxDtImSIinrTZkCNWm7eclJEUtPuE6cgol0K4qieDX171jZAlOkikUkYE5HuajRQQTMIqrzKo2sKwEoVL8TIWFrlvorMKaZ3pDWJB33437pGyPxlZ4wKdotN+S5uqK6PYCRsmnmzeBTm1n2MWOg93HYVRPDLYXhrh8Ru23IjnL7G2+zy8+miSk53SXW+stE+ljVYTaWCJUHDw7wl8jJIyLEaXqTy/btwuDzLByr97YBI8ZS2OCB3oDdKnMcs7XC5bCURhPvAAAD8bWORNM/EQnLkHz++OoMEloip296SB764bsxMGGv+3pDVDkAao2OFynzMoLZsKkWkCyuOyqLBAFPwfvdXpKvJUQYrIR1mGyDds3bhdsyfMKi/0+veBCRpEn/fXx0pjJdKVB4pGNGgYIhIXC2Rg3ijSd69rjsofvLpbi1w/8XLxraiqxD4J4QUobDNqvh8xH2ZXF7Zcdcb1bWpLGDLIfB3mKl9d8/qw9eBBwMhOk45QxgnrYvzE/eKwhoHeO5hFWKvn0CoNNjHmPZv2GR/Fpr0MYaoXTXpaVbRIbnoxZKKg1j0sNQgnNdEpdRM7MXRlJZD/06Nm87JbMNvpSt6bn8DjqDKBaFyJ0HHE8tp7mTmfIjRYp2w003wjq2u5qrf2+/Uc5GydpfKEcCVXcT9XQOyVsIJKaAndid7ynBziAWPBvTlMrKQMS9ZlO/z9P+dt4igDkm0dUmS3APuP7hYTqm+u5ZZ0quDZkb/H7rKjOk8SRuxYhGAx+5kKl94zwUGOINLpgS7cWxH76fI8z0P8MP3mFJxlveo8BIXt08APjjycAtV8gmE9p8E4LRAdue+a7Oj6GzxVhtUKN/wweXyqK5fy78W3v4Rn2k1EvFP6i5H+em2/cle2IlvuR/3r5GeEUmBdjTXBhAMI79c4/z6LPjUjWD/YFRYK39NY1mtO2nuPbyVtEk71D2X0wW0Jl6HjHSFbUHZA9FNI9YJUdxGtT5JyZPT8S7exPfiHReb01WtdFKOUsqbk7GBBL1SKlHzBvonbsCrOJ0b6ShoLy11oNC3CMYjv3Mt3i0PtckEZjoRnAEYtkTpNcjQuGZK/5KWKAUKzUzCGDqDnMXTiXQK3EVlnO8QmLYd7YkQsyDfgU0IBU1ksP9xY9iHOumwTqDrTHlquG187thFEuSASF/mlML1G9O8UOF+vJ5rmhKny6+WQGysUhhVtyzWuNoYxsnm98spBbe+z09d1wohiC+Bp9kSB2jcMQskQUq3ZahVDhzxqGx0h7ZPy+oYJiusa0TzVHEZN/7zq506ORghbsQw4IkQOgRdDh3tl5euPpm9ECcvcY2bjomCSvIGtA69PZvsQBBXyH9OdLLTNqF4ttR/ozKIL1G5ZJkWWPp2wja5VHp4SZTIJVH6kWWxfUHuq15vyDd/+nMvH9/pYePfX2MT6/1YOnPepk1H6GfpmMeeB8AHIKowQZB3mpWt60DaZUKAUnd9WT+S0bW3C0W8LYCbDlcvdSaSaOCEZ6mahkD+Ej9mWs79S/wP3Dm2OZmoG8z5eqOf4GkqXbAFHoSbCQKXuKmrmsH9oIzDWZhRaxNbbliHJOc3J1XNfFA6XurQkKdJwxK48PsXr6olGsa4FwNBZCR1XqmIKwW+e7i+s29Hjqg0rtepsDyiC7SkmaELgF4xhkl0NhqNcWQUng30QxVmnWuNkMib2q+W7HaSkN/QHQjiTK8X8PRQb2C6eJqi5h/j11ePjQlOk0MsHecmzuQFWQzNMZCgLGgqFM0bz4YVPlshdMPsTJO3WgB7IqwQRwTX1M5+aJ5EOO/7cBXIrcLDihixT7sq0Bs8teN1W+68fgGnQLEyhSSYXul2w6+B9pq8G9EJ4SNAlV8ZgFlQJRuKkeGzE9iaxoqYnTYopByPFmLq5MVID93zsT5pEvpDZsZmnjl5QD/mfOEpebmNBMqxEfx/nKPePxI661igxAbc+L1aIlMXzlcBnAiXZls4UM+78KVpSruiF6CBylG3ubMrCQyw+SNSxycHKPYpGb6QULq6VW1gDd2oK8amfTqM19EqtQEs2I2UXdwKrnG2fN2MPMKSal14PAQSiyja0LpS8pcoR8SvpbzJ1HyUrbrIF391+iwCciaJ/DBTf6WCVHTokZkHq5DBCKFkiqPZkbr/xHn34zBWkgZ/eBpDBpwu2mMU8m4OsBBGS+GgpvNUxE5EYnzcjSGu1ZrRAcEJP8W554HDciLJgKEE4EVqX+b1jjQ3P7UZPdgDdK76/aslkYdFh+15V5DFtTImi+Gg3/hkit3igEhDaXLSeOm2BmuX+TmSsWWNte+DHsMMatMlKm3JhtbWAgMSxP4T7DxV7kbkS09gLz2wRtyzXpwkTkDCTTvcBluKsPR3/Gn+7m0oHH2J2CrlKPkBCxXGVUzsqxWeYr2FU0KnfaDFHyQUL0IHrgwf5UFVMyZek98C+9YqN5GJqQNFY8f1owx4Q5c5GFTTKAeVhgmcZMS3P7RMDf7S2NqW1q689s6RcXRhXAgrF57dwEFE5ZDAII0nFB1AW7RcFmeDDjOVy5R+Gp8h2k+aHLlVCgVAlvzkdM
xbioud0iKxcGxDxEYlYvgnQi0ifqiCanrrtPTwdedx0hQXjfF8k8aLxHbiHdaJVGqgWEMlyVNOcdzFXZZQxanIkf4IEjyefdbvPw3I0BvoYewfRYkzfJIJcD4PH+byvyaPNbHfL1zVcNRFWnzbzhb9qnpowRqX6FP8K/HBduHMeAUqdEbjbdpRH55A/DumSkuSbWhK7Lh78p7USloh4al0aVCsOlmVfAtFpn5ebS5dA74GoY0MCb1US6+mGpCmRt78thIgfPgPY5rix9HYs9ZzF5HqPFAoPE1dEaEFw4VkS5KWOo+zObrlmHPx8dxPkmU3tNO2+buvjsYH4ZFDOF4JjQSl4rOxMx51DF1bC/t1sGjk91eAPSqNdgQPka03GTXQD+7mHzo9F/Hy0WekDSdVjIVeS7M8kIsluqQ2io14jJhIozS3wL5sVgtAO1oltcbiLgu2IEv3YGwQAK+Toj+t5Z+Pm3yV7Y3bhVFNZBCuFgK2oLAUt6qBH/4VeD35+ZlSPZ0G64cVZXvguyRYh2Zw6MFXXKvrl2Mkv1LfYYC+Djf0CXHWcI7yoFxbO6lQ2fa2049dfHSKXdySiFXE182IoJVKadmD+NHvQKDExard+3cvp5gwtBoLdrAKBt00dE07NaIjCBXAi5/GI9uKRFy22SXTzZmspAMBWYM1fuInMtCeEmUaMfye6vm5HP2n37txks9tf78230tg6rP3k5VrOjAaT4oTRrlIeiDtLMWThT5ZLKudaUNvd/J2kLF7DdtJMtzpw16FGQdH43/0vkmOJ1VMMIamxZylMnN9mSGX4LHvUSA487vN+tQYEha1PPIMhRL79HhFvQ5Vwnmwh1HQNKhstl9eEvlMIuki6BQiVMoYAqxElxkEtqI8AAtud7hOd+7MCXmF2HStgov5BV5JOwfKYXQ5qFGSWt4dGd15MFjUcOpaKVt2Q+ebBZUN/Awq52v3ILQ3ECymKlQ2v/i+lFNmqau9lAjQpbmCydSyE6YtyCocxUFwzYTF/3p5gL9MhNRz16FhHbQWdasXcgT2w6X+zbmJ7MhCkxUFiAgZYuKWDs7E0Se27cDeGZ2AEhiVL0opwacwkkYub90l0mv02RQuRKaX6lHDzbiEGzOvSxmvhXP9WQjXLBeSNNKLnubUqOnE9SirE4anoE1tCxHEb4QiR4WP02e9Oxu1+YxZPIFV/WhVVDXEkZD2HCbFJJZ+LsXSSiTrJj+/fJkEhiZha7Eulc6tEYIMPGAcLE4NLAh0rPzSGMk+GrZpSacymCK4Rv+Ajz3o58NSoVxDrpfwaFNlvHymJx7Mlaz5L+uUsFPJ0Ft0Lz3LSDL+Uu2/s9UAGPvKClzlsuJMqlfEk1LDJ7yh5K+PrigGBEA3lnicQCiyu8205Xmj63piKAFCciKr/gGtaAf+pIGvewELa0Q9MSdT6aZoNdLPoTOaAdKIwCmkKV2f9rvyf2p4dNjPNiAX0572c4mw048dvzgRXkqTad9cXhwvEelfXT5EaPB2NP2NXGw9adUxM2i6g2KbiPWTXWlWyytIAtxgVxy6bYgML4vYbs3zRoJxHZVhF4Ve+X4suvvrQ0vDvkn3XWjiubGOTteXANyOtDB7xtGaR/MnTl5EJGyo08OSCS4Lu4ndVAl3W/p+iVYq4jhPOtonxSaXa6+v8XpIJpdRrrrUjos6LiYhipPcdM+R3URSSl+eGO9SbKmZaAvUSYLYxNuV3aMZY8LbneSBz/4lqDjfpDIK5QDz5jY5GqGTpjhtVfKfAY9X7CyqzoILSRR89wGPSWtobCj70fs4ioikMBlO9u2+i8nes7fW3kdw5wh7P20lIRVZqS0TXaFtL+pMRVQYcC00AZjguwBLNdPrg532kOxmv3aFhoRgIqSQ/QDcEdB8H5a38aIrZPvXE8iZi1XrcLDPz68Oi96r14ahQkxuMXnIyrpzFBLrKyGR7B1QtHBobaV6klgSKT5TuFiGFR+UIujJKo6MuX+h30KbFfSvrvvVhKbd/801DYxjJjYGblTtx2VntkHnd3mfRMxnFRYLRyxJg6tdrIHHAnQE4YpbKcO2GlMRs739qdhsfXMYXOIzX1Ftf2LZMYM4y30VYj4HMlsTejCLl9eJ5QjP66W4GW9nUZNfWJMZx/dEerGfUbzDTuf3VZRmTM0n8rFq4wyguNaNRmuHmJJrvqPK7h6k/hThDVGwFqQ5x4rqExBAoiUWDKZbYTvM0pfBmpBDGu0j07+apkvsh/wvmRfjypscajR+v8LxXvE6xqR7kvRypplwn/wV5C+pK0juYqS28x9EsDcSNDF0R8dYvF9q1jNOR83y4FMm0vMIhxPd8VBrhpKC8gx+QwDLD0mUn0ULs6Ov/tUKtoPNjZiF3+lmHeMjU0SqYDXj80Q6aQVMk23uG44ulLr/5swp2MmYZ+TwkfoXeLsQdKweVyrjVZBAMZUi/RjB29FrgEDOnOsIUzy3S+iesVFVChBr3/4cPYGu/1bQAH4RqwBd7eOsnRLmFbmLXkAzPci0eSnfgY+5UuImRnU5B6T0YxsOrAt1Bswgl7FjwIEw4tRZfvecOAoeV+IdBanrDQ7ujuPCIOnUFo7twt/y8c2LK+/f5/sC6ZRvvCpXIF6Z3ZPBNLhvKNynmKdgM49hbW7AbXpASO0E3lRlk4rgt4v5gaa55wDARqM4tuOFVrtl0ndY7tdPPEl55g4A1R2QV5jCOl6gEs/TJGq3FBKst+6HOe4UTzN9RECJm423ZO/jlDERDVgHag7GyHz/meeDWvhOhY+rAm6VBw+N9jpwlGK+1g/ORp5E6fL85ytS0m1WMceGYCS/wg/8BqTI1VH/2hmLFHKO4m+srTclwmGdX3C0SvFSTpBZvrm8j9P6x7oTq7D+WFNQV4tePnG08AsnaiMATN5WFZW67UGZo8nd7RsFoXz5hfbXgPf8Ie6OLlzm4dhXBp7dYFt6Qw/lH6cd0gDDvCdPxccMgah4FjaXN/wO8pCKsy8z+MCjBGaZL4TUO6X63LNhVHJi7/ifVoyQFlxRL0alMTam8pbUsp/v3sTsQAI2+NiLIMhOhTJzMtLqyb7/WcBFyetfcvRx0qb89Iw1tFmyMMfUjkLu6V2n6WZ8CJiYZEEGvKC85qzUNGl8xYUABsCJLmM0FWIvQFvIJmBAFXJNcykczlVcpeOWywYfjicCR63ACKEChVgUkqgXrgbytBaX10DbiXWIKsv/XLD0B/HiTzL5XQmNBmaTwU10ewDAjKQKx4lcX8fAItwIaHTWXrpq36BUs1SwKWIQqujuGNRLbMZkb+h7VxnbPL3gQ1K1KFIEjHxpdsmdnwfud32JSqN2guPslUXpsyUFj3zwjV1NmqsmWoPxwDg52aOxen8y5yTMvsVnhZFJZcpiNiUbaMYQkTU13Ms9gPDHi7eXKI2+8hdMXuF53nLE9DNr1AjxrvVGNvapKMEJ7FOZbl48lrwn6BR7PAsuHZlmiNLFypew4ktBTXJU7CrCvOhucUFtlw0mwp2Z/+ROcosE7D9zYM48bRE2pjqvtMgbzisxNh6qYYYNnIO6TfziiCMcmbwhTyTrttcVAwWtMfUsg1xAYczKlW32klclFxeAIGSxwB2kI0xFTwZ/hScLDIOlF/4ueTvowUt6vtmZuPTQdISOqlFMwHYSjZQKYXlxtvB/H4TqKU6bdwKiVNPaV7BA9jnm+H6isSxQEbF1h7Qo05QKbi0i0PDtenuoQvwoXuQ5kMCDBltjBif3ewDm4myGWYZJ1Zzs1csMIQHysHzFxys3iqvPklm1b464nmPiAYtJw50mcEH/xhK1ps7kNZyO6O1UcY73I09X3oqOts9+NhCQLBX5O/69RYBy38g4Jpmz2LhRWJbujnnfyanFSEdeq2gMg+VlC2lwH2odpHtUooQ/op6/4ewROauEsNq3K+Ct11Q1d5jNwi8uY26cl0BFEeHdia3uCDrSpmFSN8jFxeBDuiK5mJ82ZkMazZzUz7xxzI3oCrtxvoWoI5MPNkVAxHHYixvEWr+qWkNbo+OX3kX24qqnzEmEpkAdUL03HHX85hGXYVfkNFG3lK1cpDtxqNGxlLM2JNNNPn6VHR
NfXUfoyewVNAtSUhNFty4OvXdquXawA24rrugcBxH/AUWZzbT3cHJz3bJ5y9aFoueR+QtL8HcxhoGAnxMwvZo5Wsw6LSoybZ4F1nTafhnHtFYPVNejXKvD8d04kyIMfcT5YJI0bx5jWNdzoHgXkp1gRA5nHWpljwhjOAj58u2pf9WrTGZ8EAH4fUAQ5nkb2D4tRyd1FTunjYSncOEHJQqOl5VQbEYqBmZP2oMvwZc9IJ27UfHWnO4UNL215XoIOi4UT8Wu7JdH6oyLBBvV301GSuLIJz3fzYZigk8bEtZVTSRiE8S5UNP2XxLaRdfUGGK8eNjHTWwNYq8v26Ga+C41FxyHTaNGvhCUycJEGxL38UaeQdhZEX+NOkGMZNnPpW53ubR3flg4xvQxbIcdHkbX4wUXp99+RhxfF3/5u4pY8hCOq5I2INEy/xJrdC7UNzx6wDYPZru1rJ0+ICLe9QYg36HfUn7lYFuScyHlRnCi939EhJFKBzpI78odFik3q3qedPbPgof5qYlj3ELzHiINOXNRDLrB8YpcofGGClHAgWOii6HRK758j/HbEutN35IcvsaPim7sucMwynUyfvNKb4n8e5FG9NZ9VMLgXC/3aCtwj1xMyZQxghsenwdqPxCU849H+WJhxeAp+SU7tpiWv0Sw63gZjri2uON/XIoOJHlUB5DpZef/Jk5auzE/kJzhSAMB2/SYcH/H+AA1zAavNK39AZrfr/zfMIP9+TWf0ojF8nSbcZTqXJ+4QFnvrHpVb3bx1SmBK5D186cRf4+guSjLqOkNu7Taj/kE6D69egyRuoVTNkchtaYJu88u8ebyzFapxMfJFFwLjYKICBNnvNbUFMBmmBUGCOramjqU08WE83wRWRJX3xClAnFEx4fzdiRiD+cPfrYvfSJcI/v1/GPlPn2qc5skpGgEmAz96FvXEmrQhQg4zNYp+Kwtjju/VmmaIX45qyKHC/aJCf4Zmtu//pTXRLk8L1prFso6g3sYkSZpGx8Kdz08Ty2rD1H2qZ63JMfZCLbJBq/3mcT8wEpGWEFeYyZui8uPejVxjLJrcz1ILn1Ea5MdtrXO/wjotKzShGBDySXWJUFZeZxrbBFhKCoJKrz4ganDu5Yc+PmikqgDdv/EULwLOza8gd4wC1SfMUiitrFGBydSd183AeyJsw2SFnCStUXG/33X0d8Cv3UKRyGuK0wGJD6zT2MakbIAvmXDUVW1wUO4YHBnvBulfs14Jjx8DpvNMEZRjgQ8dEItG2zE9BZ09vUHDJMw5zgBYdAXCBxYOmWaC6e1khEUoOWYlyYZ2RLSS9R2xLhbvsyfutP83O4sIl11Jluvb1g8bruhyLTsYrMSbBO4a7DFCO+R7kq4+bcDyLeEMwf1FfYilTgfDXmWPLV3SIOx/2TQtGCApXDJzTTJ0E4AqT2Unyw6E/xSw0PMibtNnMZUaRwwVAMMZU57HOIzKqesm37H+AdVrrTvJXSXz7IqVX0rdbgtlexfj0HQV/1obfgWBQYomefcHX19q+YGdn6Gr7nAZuBiiJg0Xwi0UmJnsv9AWuPQEFiJ3X01A/exgQOTM3lUcBPjmtSL+6wzxDOiN09eY0u9cVjyezou1Kx8Tv+FqxBPF6siUMbnwekfpFOWLlfCE1NGteCd8J+5QWdaqdDkUZdTh7NY4XTbU515+Tft/gvROyShiLYqOJPep5da/OY01B8/az9Cp22DZBICJ+zv0jEdfO65hJFYP2Fe60tbwE46cKdjP0QleBtw17fFpTP02Vek3InOt3pam/W49FYlh5ncNDpzht1G7s8TrD5ljkpoOWFyJuzTKov1blPwDC+y7n4qGmjU+r7BH0Hzb2NdVQ0ASjMRTzqj5AcPSauvTOhiRIEF3CTbtCg70ff/TE+FVBeHgOnSW/rxUYAyU+XljwqfJ1Csv5aopRVjxgXwwwrjcBI4qOhsZ+JEskERmc67aCjDrLnO075t67L4KixsptXZk6ck9Gls1d3MdbmWjPdXpL1VYsXESkL7edyM64fyxKTyFhT/TeI3FZGLnGCcl7PGzsvdfZa9p/HPHAuV5Mt3FrhzYMzyta2k/8pt1tHrvgOIUwgVqg0rShF7IYFcOr+L3QL6x/DQljzl17u1aFAUrfHdAjtJPrbwRo+aQ3U2gzYiTlRP5UXZL0McQIcLxiJuv3Uzis1mz7scupYiiPmdPZh8y2oAljuHMCt9m20sy6AIsxanjlPZMOqLEa7iJY7ysaK2ymgzwNw10KZID5aeHjPG7b7HySyOkYHD+Smz/Lx6Fq1r4D+O+PEBqWfPEjeKruPlHLPmFitMZZbyadfYZSc/RAarjr/a7Ij6Lbg+HvwlL6qrM0r8ymCcVjiXM1aU1nefFVn9qPeqWlBjQuweNqWP4lJCJdSdDlN4qubnvw6VBouYXCP15nRO3yOsyWXh8+po4BbkMQsjY+jgnViMqTpez1pxgGTZ8N1bHhVokBU4jMUNQP3m0S/NhUScIudPDc5eLhaCUy5VIDxonrLLJZVT+8UyvOr8AaolZFReBgYXhr5hdKpGKrPxCZNboJRwlIbsZgcQmuaRIoBFAGZ4AfCokKWr++ONigD66j0y5pQw64Cdc5X5cmDobfBc1L9XhU45yEyT+7BgQPkbRN2VvCgj/kJjZ49Aq4h1yRNoWf2dL1BsFh6d6y2Q+WFBEXpxkTk4+ZhfzncnNw7JpJ1LvSz4Xxg6A+mJL4SeJ8hQf34V2215fiX29k1kHr2Q2ulZVDtqpBRk0nfGqa8nQIwcRN6+TcTqmU2v+kQmwMSdUh0EQvkg+s4UzR0MPnpo9FzywmIN/p6DJbmBHcHiej9yDJ/QWq3wrecGZ+qI7/gZCsDMesH6atK++KXtqmpr47AX+3GUgOrg3igov33L8U6YshLM42cKldo2BVrcMNI25R/QeBlG2s7vcNbaQrMRQTw1OrLZTbe8LYf4NjLb1YSThaqnGWzvfYCki+Zzi8SKxAG/tETM5AEIKWjxjavaNep90TfhR2dYdtZz+IvbYSi6cdRW2JhwezoZzKIEir0O0ennGglaOicsPsF1wv/g7qyfHIaVmQarwQ3pG0UkrXOFxTPufmA2IXhYHZvT+/wzR+kMaX1pslp0asTp7d1iiMbZbjJdcWKUyZvZxXPaljCR01sTZ4Etzp/JuT+pSJdzDNM0WmML1C4dpP+wb321UeKwws7nIZpghXIBTX9EMKnpcYVcXh9qw8M10wOW7VUrUgLJIwT7kWo9gYpELCt6c3BddPMG3aSf/gR4n5GIGNUVymcxkSloEUvf6v0RlkJ96WmDj8nIKjss36B9sIORjbf6sBf9CljKqc7iHq6FFPNMJ6Ihp5r4NJXum3BnqV0/kOWZ2tgEy0z+aJcao/xKTIOqqi9xCAgabKugwznwG9YYJMmLWQKry64KxrJaekbrk5UCA11ACHOqMcLWNO3VxulCaWnuVJt1TdkCjvQi98GlLXjbqur8rc+pUcdoMj4IBLI1mdSwLiIojMxXBdQwMGSM65W24ouYiuLjF7IaY1M+Wb6f+TfNckcP1QHN4K0df4XdQEvUhaIIqHPf/en9v33yQHDO3XVGI6mPqPRc9VjxgNOxuQGlRhvaaQ4iH0U7vyr0srKiL74UHF9dIjivXcJvHdzB3HEKUy7iYBeQi46c4FwAZZe6ySyR23aQz0exYISSXZ0nU+MDFkuycnIzHJSpdZBW5d+xQ4ZNW2U9a2nflQc7mm3VuJ4uCNroG4BroKgbRYBnFVGmg60ao2rh9jLCai2A7VMDefaJt7AxCvK2viHnzckxpeGBDc6l5+Tl2Rc/Kxf1/Z6GptvCi7BB+1aHIAwyL829dpQ37U04/sqKm8QQvthhnNwBKOaL3pkfk3ETARvWsVjvwomNCo6NJsWDeKm9NfUc1EuVFBsIN1zQ+LmdA6b+51IpJxPJmDLgXplLU9wXrNtLAh9Kk/lq/oYGYYBFOhbX/omcdBNfGh2uk2Xydt7SEc4un8l5RM0/W98on5fgpM03RuNoNn9gG1G4ER30lKCVsslxCEzrWak8LmI5kFvPq8Te9AlpiR+jPgqJGUXB2X1YwF
QoyTGUZe9IcacKcLjQA0E/pz3702uCuUdhaeeVRqNxs73+4OVWGZ80lMEynD55FojbZQjEBa1v6pDMVSUfvAFQZmlxAcT/a9DchLldmzC+6HE20LGCkCp/N8qZWfXT+IMGD4kWvCkkVaacIwt9wKaHA5nx5XgZQCbl1x4ymPxmQ3cGY4XUq6UctAT/cEmdNjiV1R5Tnxo0zjXn5FetKVYGCv8YJFFpx88mUVC+dqU7oJjKyiQwAdG9vUibULARE3RWWhF/A6yW97gG4PMdFZb3yIlx7Co1Vhcb1k8miCVyqGd9Xe6yEEjUvcGov6EeSBv4H0Kw0PeAjhb+98AxCMf6LSkHlcACAK+l1Xso9BSEqvOp5yDdbhp0p7x50AfRQ6TSckKXiwK3Z6qT1dqmQPdNWEkjPGAzOKnPOIMKpog7f7rWLnRjEz1UFnClvCCwdBdReummsa5WKKrtvJ4qaY3pcsbajE6r24MbNfua0ipkYE+Q284EXuLROmfEsMl4vmLl7AfkFWe/NCyIxcjImhtffBL1vVfzG0BOy4MNIVy4MTPrTwPbrw+gPiGgD0jMB/MM+gRUsaP92f/GTzy+qC4xTa8Xrbi5Vz/zVeUOmoGqqJtXO74Gl0I2yPdZQd5u7fXrnn0Z/I/zfBwjSLxRUtYZcRkH2irTcJrsjxUUwe8fw7ynNQwi1j69H+M/biDcgSrdArE/+6xBbFPhsqdI0ffB8UrYGX3DHCCY5XXZPgpb5cL2UouyCebk1Q8/hYbQqz6WBPaEcXF7HLAjbAoxzYqVoO/LVKjDvkpISpLFEtsVzRtX0A3li+j5Ii9GHi3YiYF60sWIX19jG/RzZ+JthYz4VcOtAwDHbvE4wqvXsP8PnBc43d6MZLv5DOc2bsS7793+t8vY0ulx1zgSFuf7StmMUBtVyp4CDDN3PybrqLmlX8PbUhdqMWdV84ixLhqIje86lDocIjjiM2/nK1M5Tml6fvctYg/an4a26pIM8VJkeU/3W2hahs5oMr/M081fDsEpE1Vwvpdw2dxKskB1Nj8IWHctownBmDYLqdhG6tFeOqsDHa4E4NjwBmgoJWh6o+nyB7B80s73ePIzl25H8buTrGXlSzbc6rxK1vk2/qdtF6K1k4Ib8niegODvj0/bNCjsqRxs5OQUWzyfCxxWdPG03cZk3aMqwwCAsrVaBkhNPA75soUgHE8Qe6kL2j4j2oisEbPcPt2J/FIuwPB6IBS4H1YZQAGZ6vR3xr0bNs45+IvZBWBKjRGGcsNm2IoSGrO9CK+U+ZXgAU/u5sjLsIwYlb4bzgwr2m5XJd9dIVRue+1zk6/VXYVtEJIRPjkSMofIUgOsOiimKQ4UV18xTmY/MhH0ZKsHHB8Iov3ToCyg22bue3s2BYblA2S7I9MIJF4M+FDljhcXfdGeUB6mQ1vI9a1mi6p4LO/Gu8jNhhuc96VpuVp3opmyahyns4zaJ0n7doO3Hsjy0+R5EfM9x39xfMVAUuRuAMsbarpks46IazfRg9NV05Kc/yAkP5k2tk9wb+xz29ImNyol2zGLTZe9GU8LKPQVK+gipqOGw+bZGGrCbPfJxAA8W+I9i0IhZF1bk+ZwjelcoweYnu39ZMLJKYMoPvYweoRjfDYfCndSZCEWcD8oPcqZfg41fKpwyol5Ut+quTCmgp6VdpYjcfrSMD0WOSxGdWV+YbzjlveN2udbPnWUMdb8X3HledMvgb2uydM/1Aa6iEolO/okCJwkzoHU1vJevSieC4FD+XOjdqrGXpxn74duGwTYUJ/x2NbvR0eoDqoCwDLbJZwRiLMmd74uJC3hMdoBqz+FlNjJ8mDZKVxOiPp6OIw0Sr8TiJnnxBqqyqvGU/7gkO/yFjXx7C5gKt+kQWl58DqckJOGP9GYa+KkQrkL7/8GRAQN2Xu417eO2A1NtZf1ZP3EbPKPL7BV3fTqZzV/x9HX6AaUouvLjexJ27sc9B8zXCui3Z/RYSDBVb3V/dr3d0x0dW8U4n4nht5XWPyzjeoVbAV+ams8hqeFeY2DqhP9YKAfuls2PSbHfX3VdwRyBtDvRsD49pbABQ+9qEvjZYIgzYojFeVcb2v9+ENlJEIUPl0Bcp6AyBvquUwno3PuN5P3Y6Bot+9NMbVK+ur7nPy+/Onri+7vEdZ0rPXE5EYyYKvJR+3sXVGQXW/yv5zAfxYuh4eSK1bHh7co8p8vwTfvPL8n9WWhE3OgOgOZ9HwIFn4YG6Lg4/Pct+9RaEbLJT2PyUp+TJ7Bs04KqqTvVy2j0JEHsiNQAKVOs+rTSQBGx8agt0A4UgK9T3vkjRpnhhpzLxTcrMSpY0up95uAI61KSlq2wYPbqR0ZwEHGzPlUcTiJhIWIm6U/pifb8MK7FboS85ZSXRMzXfhQH4/n/argIHnHwwgnfgxR5nW16ARcJakzXGJRXeQbW+6AAZrUBUcbCNkMRO7eehKGD94gKIH51J73ekmMAyjJbHuCSQDySpeoXcUbhGK0Tn3UReup602x1CZFyAn/zXetZbO3yzB/QCl+mwriBRwI26itLIrs/G46brDnzd92kGNTbf1YqEoFIMUsNaDO6mRS+EObsppvLpYux2g2XfzK3WzsU07GZAoK0KJ4GWLcChxETr2dJzixKMXoo9ics11TRoRhKfF7qhvNwlfHyDEbFilznt38c9vrUTifFic4+rp0TsgWVcBa/n5TYiXzHrCOqr/e7B0UMKhSjuu+3yVP+EaKuv3mNtOVdb8uXMAoCI9DKOZC4NO0kiLz3UY8LgHkgF6MEL+qfHTJWanVl787iuk49VeD+1o9kJAVaz8ZXDSEiSBjXZ2NkPmhdj5h5ogjkf+KrOU5pTllCQpfb437MMTQG5sxPJgfszfLtvekZQQmZapQpyTkF8qZ3uRVotc6JsrVNQyOE2U/tYksFYOnanfSGdENCUoP/tdyFXzKKKBJBB8u+Ln58uZ4aMzQDmaWJKT3zedL+ZEObKApyWRm8wzyfWF0jaAeG1vLzzOdLl5ldPaNOGbjdtqO88NkTMg4uMWTsVZvmxddNtbbzthrfxvz8Gohpym3I9AQL6B4QsC4wR3Ihm4iZ/1jzy3NvISRe3hL92KbFl22dL1xAkIXTMFrvmYTAx4kEJXpT6IDyCQYx+Mi3ktGSH6YfuDd2BU9X6Y7inRiGXpmWL5xDHb0DmikuHlghuBAoFz5+cGuc8K1vTBgAyRRHHDJtjuQPIM5bawLpfbL/qmpFdzZ0rhA6kMAHkLACsxFXvE+W+Y+r7BucTEN97dHo72FEr3GGafbFOSvXPTdNGCkCGozkGJubrfRIIWumlv6K3TJPF17wQ9hiidDJ6REF+jwsxWzDfz4XYGXG+9G60LaTaD7T0wk5eGIB0ryJPlBy8gtfCLPi9z4Zvj4TCFwiBvpoTFTFAr1BipyxuK8iAf38PlHcKEhZr02rgQkwYLoyNnAat8wYuhbZV8kowXsEKdcHKwpkhIuVKTWQHoO1zY/clCnWAXT6nnw/S01q/qqNOT5s1k/nQKnwUcH//khDn68aRLSH0bV/++0sTOQVXPeT7y+drBly0ODvYTxTXShfgUDwErUKN5EOXfAIXcirHUTOjJN2dXFR19Cdo1cRBYLIe9K/eAZe4HOqbdxqoLUJtlVXPD55JLaHdbc2ZmCH3ig5idRMP7FrbfCMPLDXDdL1frFVDbhZYB/UB3qCrZoTlomkY1OD3+2CKnjzGrvKw1UjRbx5cT8xaVKP4OfPNhnOtsNreBncxyxWEtXRRWDe8+bb18RIrcNEuX6S4vSCUxa9w4BnK1fZr+Xgj8jrkmkWV/8BAtFUTimSXzwPBhDZ84GWqTlsmVCKe6AhiyaDRph3g64vLnSWdyjnVaG8EqLf2vqmgiblOSegc1AUlk/hWUfmwIgw2Wtf7hfaPmx6ZR7wGFWhrQO9gkYONsxENiJVN+m7jz7e8TR8GfTHca8syPBVjXxpK4CNjPXKZ38OsUMBw1EZ297scwrG6SHhFoj4axjl23x+EiFHqnqhAecvcK7NqFNHieapnmCI3JS+SwBVZYJDnXxn+c88Sj+Sq676AnQ04aeWPoK+dObvmNHlu
l4u82pxYnL4Y58g3cglHskLjucvKNC+1/5GyN2myG3b1vd3JG29Zy/nFlZvydcBkhKbFYzE80O4Zrrjxcaws7zB/5yXiuM9fYGYIhOnN1rdYXacXzoOmNuukJh67yrViHlMMKD6oh/4aQbkypDr9w7ewggSwN0uKTW4CUohhER1sp7bWXDGXzI+HR+wBlitPWRyhaYzPbMmrKqE72BIVIHNk7Y3UPT3+OIaYf3bzTMAUaSnDH6G+FXQzsfsBtsmspUdLEeY3qciolhd2OTwvra2hqJ1cLtZm6sL3r2pjDBUhO5z4G6sIX40oRNgW5nIhsWjjhvG22XVUSD2fCjN2Gmqdi8wIyFn89WZagNuV+DsJ8AF/UeGmFdLZjWLZ/4LKlV2ePizR1ItCYtgeW6CN81teKHxWJ3SSpiQ/bqF3F7NKXYeixU3kTTCbisPUarJ5ypZ7svcJXCT7N/L39+oNTdcexo8zrSm3xuo/A0iDtH3hmFLVx5a1gTZzad2wEPJj6qfU+QTWxbSMfCSBnXyNDGiz2Xjxj5x7c1MB12unI9Yq/sV3IMqi/kBwWZ2nwi+ATOJzTuurlabKDRo9bc2/U4zLNFsYrQO4mNgvv3lITpa0kHWJeanQsmOSGL2lTrkIUABT70Sks5BG7wkw/Wu3BOzj3ZuTYdY7UGaT6asuwYJZ4PVLZ0eFsYJ1CFZHtHNbdtwy/iG36HD4ddcEjdWKplwoZOGodMDZr9cb29VynT7BKceCMq8861HJFWq7jrNcNPKimwes8OLHeRScKRFtGggHUMAWIYW6gP9YWO3Dq90DKouTTEJbZ9K3i4rCjRazUUDan5jrv8hhcoiE3BftanVVy7uc+IMh58kiMA9DFlGHOw6AM1sMuSORxJLA0DJuunPAQ9yVMV8Z3IIOLsVHyifkPyc+lQAm4rTlU7xHyQXZaq2lVi04VrFKU3CwKFlFmPDj6AmZ8rThDvwsDHm1eIAJPGDMoelcWrpxpGTiYxw/F1KszmSKOJNMhQe9zTuiACXZ8Wufum8C5oM3DTyxGztkxjDIAFVYf1zSZKGcJpHFUzE6XNxZsnSF2lAp8iDeY0sT8VZXC/6REkHOqcYwrDVkeX2z4BU2mU4DmzDLIdR06UI/8qWTn7Gy8uq1Ks0Lh3OXeueTBZaQrnMXrEJUCoRv+HsTVflYA5E0RAZ52uLQCM2JYtn7/GPYlnkHBhetSgpaVJ86A2XcrPwg13mQxfvb7UKwYeiPsZVBGB7B3FrmEdYW6fUsPKN5PUxAIAqz+hfyWYBJxDuhni1zgHKM54JO3Gu/Z9L3z7pzXaK+kgKHFac8QPtwSb2hX0WH7yeOftaK7oOnaMu+pQENbVSmHCAmv50m/S3qh2vr1vPlUtR8P7noGdPYTf5qUfoKgobSpyiT6UNRUuMItPX8FmL8n6qXz3m0OxHMTNV0IZZRICNaKwwpiXFDDqtS+DnNud58cKYctwhFMElXwxNiHvRKP9EWDa8wZA1nHHwvfkCGb66Fcp2/bKX17I5CWAVzljBqlGXdZRCBjTwcT3qRvX+lRP4Xm4ZG29ULJhXyK+nRcimd0EGCc2JYTS/gTMsFZjiACxdTQWxk/xrP2MPcNT2N9bc43LVcYTOV1ZOhXrOQpRrYDIcse1GeYWDJcPE6mTcAcnr93yaMpt5+4tduucIA/Rr5CaNZ3MWp1JSDJ+NCHsfvJnQem5ml8z49TcedKOQ1gKsZ5y+Hfy+AwSjAq+O5LvvQ7/AEhbXp6DE4E/WzPkm1OL6p9Jm/1MszkugRPjvoupB+lwnagnnSHmcaRtjKFsM2QFHtaGjAhEMPFNHxH+LMBa+B9HcW921AtO2w5iohnQBx5yTNKyB+p9+JJkc26uIb2z32t++c4l+FTa4wfeobhQia8tAMtaPIDH9os95UNtvS1iC3OQuz6UA84oanYvy1M/9YLX4fkdgiYnGDB7SMScjPvwSGdhA5pkeoCYwe7X2NVUiQKTfol3bjJ0VFAMFuQHArK/htkivV9iavndgH3628kvlLxkDbv77SxOyiOo6nbhqZFLx87X+kcNDFnhplQkCX1RkYo1Cs46teGfpt9TGquX+RTIKXDOmuaxhE0D/0ycoytVhPwTZ52WVwnQJtp0zIy5ecDtiOTYVCQze/hgK+o9o0+M7RONGbOYA6KGbg/H9yKjh7DT2w6NmYcJp6iohZK3X4H6H3THndsKl97bcbXWo1hLEZ/XeF8gqJnOmO8u3Uq6cyONhPrb7d4ylZRvM7rDy+sih6aLFRohPaUslnLEKK0DPjeLKZT1Ecdg4kq2mQ3OIHArpr7WYvFmuFedNMILTAlOaH49nPbl7YuqhxEM/1XlPpREraysXf+5DsbeoTMo44e/MGCPVG5bJPUElmH5jH8OO4dYwjz3Dkq/e7ocnwTNIgo8SgppUN1M4pF90oVqR1LffUEYNTv5cNVEVeu4YzmLjlXAT2qQlY7Oh3gm3WHP6WS6p3JXgYxOUGLwojp/VPWb/Ydj6z5m6jV253Nw/6AA6jYPtQvEHf/jsc3bCgIuRTDqZi+vqdIIY6MKuDcdRqtH50gWHJ8huI8hqxumWXQ1OTQqS3kifaI5dMiRO+bHXXE0RZCYms0sYAv9K8iWsA1bdcpNX5cpDpNTOfFQEwVkE76WfXQp1IQSYs12eZ8PTbEePCHq3l+djAdGCSwKxe3VfOfFR74dSr5nkXxENpfSAicPnFfNWVn+iEb8joKD5SGUBaiJN2S6OF8dd5P8X9+j+P+JCZ2K8rS3GYyYFMNibIaa0Jd7mAj9I5mVLheAR6bkkEDYgJiQ0ANMP4HcJF+fDtbs6209kyClyOaZyM/+xE/DyZ62qZvWjwCzwsA4uLOOj0G7lq0154A9ZNSi765BtsPEwLU1BU/xa2LuJDVg2/FgqlsqjOtUOZrxWoI3hD5U4SsdvdAz8lsmqXt+nayGzY/OeZ5UyOwHTw4pdRib27oqTSr4FYXpcVEjP2ZzdxRE+e52I1oLBNZL+LDDfL+s4MSP/5h0ODBsdMiHgbRSabq/SNTRtQKg/m+iFL6wqbt6rs+u38Kh7+qequr0w7A9upMgXV7h8OBbDcOwrzd+I9Fg1OsKlger10z88zH276imyJ+cnz8tQpS+N2V1IrWQYcki9LStPQeImszbaUca9RBbL4XkS5sz7luobFaoGpQq9vET9qVlDqMbYotKN4Cojsd+0IXQoFABJ/L6oF0Twbt6U4+qXBh7DLE4vSN/LCVRF9TBU0ByfAPq5BGXzjuxOh1C65tStjeCAunzYkQzcbJArc2aYbkm0Dw02qevs4lgPWzmWQ+732iFCqh8zxiUwe+nh8atVXABflUI5sOciDfJUQ5uBwSMmjQM96Ga1IOpjX4oQ3rEsZWDXzIrdRny7av8ROKFCMYZJYUQyaUiuNEUti0tyw4Xu1ZuUTswuCp80L/Dal5tKyjjW16FwwxECy6+u2l8AFdHsy1JXU9h9nyeEcFIbBAgPLN9L2uF1FzzfJt+KRdcLPCi5zWZoTvKPc5xrPI3qFGKz94paxYoa49mWGakYEy7kx9zLV4jGH0HVvlQM1hNPHio3WQR7bWh7TnthvNXA1wWp/NWlyE27pyskhReb/8o9TWh0u/ybc7EyP73fgjHwocuKxzB04bs8NG8AyGgQZ9D4intN/L0aSSrBIsL8zZtVAdm0PAex7xaqpojwjCnlm3FaDFAhF5ZCTArN6u74JzAMOx3cG1d2zr9oADcCB9EPhArQ/mb9MKhwarY7klbdnxV0TDzvaugrXFFtX/5J5C6WWDDXNHP1NjgfMVhpLErmJYd4hR4LPrmDQ4vs2s2IqdU1+UygJIGj5g/sQCra4T9QxKmtQiBz64o4Bpd9VSSMwB/6LJlGjFwvWJe/4VPFN+lE4MkAkVs6k/aZwEq7m0EWIWkT+R5z/ISaI7C3O5A8s2VotSL70e7IDPBRxo5x1xBBzxnrInjsSjo0SSLWCpLD5SEWR3jOGtH3lTV0ZzgOYpG76MHLACKURGdtgu8aYUCNyCte4DDXhM+KnmzLML82hL/7IRQIvAWwX+Xdu63hnTu7yGVBRwj/axb5F
GMzG2rZddAY4QTSAVHt914USXexND7s3I7WRuSrITC2BFLWzouu7zr/Mle5tsTwOnq3kkbVNznpaOPIVf79Pf0hqdfvdndD6Pvh0Hy7XOTl8kvurZFNndXYhIfBcIYkWRARdQ0bt9hbAcRK4BMVyKSYi/Q9TGxlJ2Amob8BLfjkVHjGt2+FLvBoPRrjGLnm4SW0N7HC69qOGtQPk7zwL1wWf45uJsMYAKVm+BhpLkG5clfG/m5vvJSlnLzaf1KHUnS/f4rANzr0nTkSKr5Gg7yobXq+Jxfgj1leeZ+jHrcRIYpufmFjXNOr5nIcFrD1lpf37ojvJdJq3espQBAnuOsxR6WBmaXuygfaVDkWcjPUOddd3B0gD64c+UwPJ19cZFm7N1svGuy51noo7Y1c3nhKVwucGburc4tc0JmJ46HJyshanDwI7mLvWZ8gfXGpkbxVP5QrKj/uOY8m4B/d+9Kk7/ui/UvxUwqiWmSELNHSjykSJPh7h9THi+GczU//S/A5t+nk7Y17LUlMIuj4SQjGLid1aTVWQAD3nSYlkmdQWQmeUySzxK5FamR+cKybP7HgEZSdcj4Ev0ynea7VnHHsCeFpO/C0IugTrw3n1iiYMMUAhqQqKCKh3Hd2o1MGGQGjlE/zeWyW8g9b1qFSq68zX891xpG/zkPGKWnGtvV1jLKTJNlOa01fPmxBqiBoio0sPC4L+AlqDQsgfSp1Lw975U6/xlC9dMRGs/eiPSjlYI4O/ze6B7jlqujIknCepSX+yV60Awc6TAVetKHPe3gWf/8JfdmMFq1VTIRGk8j1z6/mW5xqa/oIUyh+q+6x7NUcKeW+9/yhRmWQmdOBLhPfn2esXpQCYkx1yarh/mYeQPqdnPS49FPNfDw60b/pUC/7enfu/EPBGV5ILaQCGBYqf8pg3Flv9ZioQrdbLlu4+VponwhKmGp7xZJJiJTurLosGVMGa1DWQ6bH5bhO09gS0CjNEP855f+ypdlUpX++OWH3xR7o7/NDJrxiahFJt5oJgu+wpaJ3DWL9eyUPWIhRvhBqWcl3zN4b8y1uyg6ZvV950DII5HGj+gpiSVTfSOcB8BH5FtkWdqOQ8AIzKtvTYp3r4X/a/fodCmkTG5FDYSKt1JYG2BYIZ8hom3da8OBLMlGNv2nzJdOM2hCQHjfKBM/NN2HLDwIKYFBL4M5jkR6SyX3Gz2lQb5ttN4O6F2mEv47jhwBIhpVDwMtBZs764TzJYRRC6oZ3wSDqMt9A8fyGH14yDMS8xfvvctBxLm2MruDaPZaDvDGBV584zoqZwXa7C7h0rtXfHO5KbGzoHF2Sbeq04kgvOS+pbElJ5Xew5vS0qXuBFJr0edv8PCkVbuu8rsPeurW7uIZWmjdJG16wibovghRkNEyocyTpdM2BsCy4xVq/XKQCbJ96DvG4Z/JViQH68BMiMr1RDUYBxDny1uRXhmoGfmLrIWN9/yO4uuHgCixekp9u0wB6TNV7kdNhl0l8ol4S2ebtyYMvWHmhQb9S/uVvnFoxVVnBu62Xt3jscLHvA/HjB8B8YCw0DKMKCXvtovg7wRBCgiN4VbbEulT59Uo3Xw0OrSD7lU5yLPR7JlDliVCp6LiTOj+dtFKcrPC+sM3hoMhOoLIOi61bRAUV5sjO5a1bi0Ye/xqCL3t6WpjD+XcB95o60roW6l8Th6uF4adzS/OBf/160M3vh3nU9lZdC3XOZoBBQzR91OKxW5/SFkb4TYCp7RER6j09+opkllGXSj/OuBOeWlrdAwg1XA7hLZwS0NAP5KjqUNEA+Kcl+/ix/lkSgJniIjHawJYgd9s+m69halvg6yS0IPl7pfhyczI8JRN8v2vOsldg2I8pXLidor7RHXRKTfJ3ZotQgSlaQXtF2bWj4tn5FAV1pmZhSwfmAC5yaGWgOWZ59h0SGxoxMjnVku9CAcz/ZRl+LoS8srbIVrAnQR5KB1DZPzS+0fPN8k9czCNv2fj5gC5lgWtvaNQBou9DtkaBM3/eZTASiVh5jr6EhZa9nGLEzn6ObMRu3NUWOfr28JfO97zXmjrAsn40oiiwja12rhd3f3AVq2y1tf9IGkl5Cuag8BG1ysg1c+dcT54bQknqWf53QMML9Cli/MXDpDW9LxwSDtgzJULTDsvjt/0AjZ81jXzqS5+evUKb5dyY6r/MKBDkk7tRvFNjPqL4l+C/BYSArq1GrjKgJz7JGTJJkJLRq3Ri89GpymaTwDoo9JHKH6Hs32uSBNg2fjafdzkronTG986gg9cPvESK166xQOOii3dE88FT5RckJHTG6G3P1fX3wSUG4zLLbGYTr2esy8kpUNUnaSqzL9dn2D3TSeSfGxYfXSNlCxqKrgNeK4fTj8FZ9TTRhzPGx56uMRrGqG9YMOxtANzAIZqnMULTg9MQxkuqnzBvqKPVXIoDDWKHGk2RxcFdPoPXjnvZ80+LPPyKXpqw+JwrNTRWTr5sqhJXYY28JfiZHoeC+oIOkJ40taZowMwl8amDGGqGzbZoTCIx4mhY6eWjBOz4ceSog/0LAndfJJWw2Zef5Rh2jvUvzkoBc8POsVASSpfFwoNBCFRg6T4pLK0nLo6MCUi2EkhEes6fZXE8edRyC9gB8w5xCVyJcaYlIFG9gFiQ0yeg5tfgVY1nG0soVwuURR7AkHY0HFaSf7gnxoIej8UnuBOv3+McqGdg4r7lNiTR/SPVOPJACBBJhO2sur2KOR3Ildpk2aoPkt3SFBQNvwmNByt8Fkl0BMBhZeu30DyEwmKGDTQrs2m5sfiB6V0pCADDNMNO046dX52BGL/6N+6ZLBCJAkkL1/CuiD9QkilrglgYxgf2Sz20JF/VIAfesQXmzgtTx5NZ0ZHXX08USCAPI7CRiE3VmOUFT9kBXi6r9mtVhimv0YtjTrvZSw1T/qO9RgPn1Tz5keSRcOQMa4IioZV6XvaDGHRhwRvoHZ7XPJmFggePWfruBQVpC3m/4hVOWJvSwE37QD1JDxgsIUXe+W+TcwwqkHsbcHKxdN6U4zOImbuO0X6p/PKMF09ESm5JwqCRYYknpsfWiTFOrtqF5G7I/2UWrh877WUoJpwSvNxNSR1kE9v/xz3bOzt1BUoENFYfFMC94f0vih9qXR2++9muyQfdrZGiqw6iquWaU1I3oZi49uob8f97GWTZgGOi5ZkMhpDja31rqwEEBiWsUb7tQUqxK8O7fL0XWju5sEFlzoYcRl4AswcGGfl+L2u1ZXokfVo1x64yRAYBMijxTIKqEQUhluBxGBFAFlKKwy9bVcbaRKd6pgwXRtiiB+Cq6OrV0xYCV1FgsAcQJek1aHL3mZKzODy5nBrFoSlB8dGRo7CdSlSgl2CijkI7Naj+FzOjpIQycW8g2SVJsb8NFHOW+9jRKdYIVL0lTcZ2g5k1kFvXYgS+W4gJkyHdv4MG/vZN5I0NfK/VLc7UA057kyQN9LRBgy0kvMV3xnn/qBpAQuDy2+1OBRyG8tsSftlQux52rNfS6VeIkJlsHVDu7RPljXo1FVkFrIBWXJVn3mT1eb0H1js/xrt5lcNLJqTQJS2qixv3ha0xVB7cB/DlsQa6VBSxItQfD2dgIFcqgkHGNjrzUtdT8Z5s5lYHkaEQKtEkLRE4WfjphodGo05mw5IkWo+qfL6t3hosmX8NpEMX3d4XISC+aHHX890dfHCHVGUxpQzq44naTBIx9eHubRAA3teihZGbqrmKaXk4d+OMLiBoIyqVfiEurLrSMn2GUhh6uRKRlMyziEtmge8YzrBBip5JvfKipOsf7dp1JqrOXMae6EigWlAsa+/9VU6LOkJyaDG9paMtvTBAPrK/0zi42AxtYG5yIN4rlQamL/C9qQoiUzo2VFvnHELsENJXfLIVBuvlOjo7iXheichxoOCfsPBPUtdsOMuSPhSEUNHRvx3hd9my4ji8JlU4/QxsgbAEzPmPdHFqx20PfsFfDYJMgig8MXaIsdFJvqmtUXLXzAK6gmHC3v8WZM+GQFlnK4YD3KBtX49vbV/X9r8h8xQmD04tCqXkJob6JPiaQ6F7xTIuoeC/puWH2EH82tCp5jTZFKgczaa1PP60a
lNavmpaHWgm4mt8dCQq5djgqGnvY0O4Z0M4al4soCa/MSQNoy/sngg3aLlcSkS2uEkJGhfbsdL0hUCxTjVcMuDVUJrje8Ux0fz9LZuzp05ryiLgMzRTMdWAg3Lq+bpsZMkNQvOPWoBvTiOhRZJOtHFw4+vWysqFdN9xfdXZZVAjktlz7kCBV/FOlvR28uZd7JzIN0Ti3R1J/KK7imSAetZPS77VwMAf+Ydj0URwTWkup/HhqPfeWDvBoU6zhnMBBn8oLzWqGpd6biKcemnrYHGnLQCvSyKNrjfEpabJZclhQDttO2udueJk6UHuhYfFaRf9ehj+5i/csoto8MSvtZudduUkJlch9LdCt0xN2o/s2LCdcsp6TS4gOtNLnXJjq1sCW4vFPqLr6iRZPo3SHIAxdy1Kc3NXtuw1LYCzjWFmeUG4TkVqT1j/Jn2raqxOJuxdqz5ch5Rv8vU2kkqj/9Ae8heCWulbszEfa9IBh9ljE0EJHwqgKVvdhIJP0OyUm28x+htoH3tb3fKh6NDUB3UBe46IEltoE5ztDZc/EpMJe8Ujk2k62MDO00oR8Inx5vU0sANfpZ+cU8pZuk+YnJl2BASwu56BpLoSJyVBXwNhpGZk4Q8+Y4VQJnk2L48L/w+Y7VHzZ3Xf8Vdt0OoKBBTI9JbDdmCfmb69YuzM8EZYOybIin8lIt66TpkbkGZOU3j+rkyIxZYHts5FPZMkm1X3iyevALHm/uPHzYtTPnFYLQ5ZSFFYimIrpKbLL9v24RaUABAsd0CHtVZyTQxoZEIac2MK8IK90/swOGiZOEn0Z/NrBYPvab26egGzvbY1RLBc5ds11HlAxbIkOm4UWnENUjp20XSw+grEmrmxRfR4+dbMuPVijfgkOHNnWDFC1heM/6XTa5N3rDXy6d2lb2fpBV08YfKBXeC1Xf/SZxIaKJZ9UNsLXlIEk+fSFatpxMDEytVufHmxCeEMgGBy+5DfM7UrVGDgXolo9UP0Y9wnL+vxPqQJYJX2FYxXrHJVVqwGjsydhrQsXlWPMQ9wE858CasJZwgyuPBvzQU8YDEq3UCPX29B1rDzXNnaKnSl3B43YS3xU2OaIpPfkWhXL5rZZTxAxbxS/zfzrUEKC1MywIy3UJ2/nZ+ajZ39zVfuN6v1zm6vzbg1eNdIlcmkVp1zYLXIkIXYTbfbXqE09R6Y6tEB4euWSvTWN2jYNgZfHLLgKYz7rmk/xxtEtwjav3wBx/vHFPOlGmJODbDY9kKmnEIS4YPDCotsaWm8qnZPDl2yETd4rQjxYpLPyApokMo5oY9it6BQiPf2/AJsHCDGg3JCYnzR/W8qitTsOyGOgdZzcz2RXkaBcnjzSnZLqdijjt6HPTJHRppJmNpwqBDsiqzTpUHH/ls4Ck+wnlBkwm8hrVr7xiT8FLfSGq3y36m1N6r0oDmPuuTAphNe+6A7HI3V3v6VJM8UEgU5sAXTiAfWaJ9n5+pt5uBlgqCID3UGXkOL2nUvUKAonIJ1T076E53Pq08lIed0NWQ7q18RpR/AEs55c6WCjOIG1xAXXfocHrS0gc0t3E06tT3e4FlCVGhN3wzk9ynBLk2fPWQAOZQvGaE/Id/e56rkSY/KiF6cxQPLln4AgzwrkSLa4gNqDHKuitP4oap/tqz8PcWLsHpDyOpF66TxtYIina2TNJHmu3Osmd0MdC2ddKEqmpdspsprh+4fF4KThpkWaKWLOQtHYxF1rrFX3SM5zA/Gq7P3mF/ZjeReROx+STttUcRNTzgifnDBKxpjmH7PDX74B8S0wST/X0Gcw/vayXdF/78/Bz5A+mOTs1EWkJvf2adD4uW6CjA0aAIZ+0BjGqY/GINyBTFOppr1XFNisai5HramnaHjXHTte2D3NRrV+egvX1wGD613Z/9ikQe+QZMRvnh1J5tCS4Jzp+y/1O/OGRlevfGddt6nYHsbqzHQ3n9At0hP730G5yxZ11sC1ZvNSDbh7288BTxdf+TAozEOB+oLzcVR2lt44Qw4rw2XgtFScLevVy7k3wHG/8SRy27lDbzsYP63BNW49ZdavrRcc/ZNGJblXH9Uh+vm9qp8lVciRwLci+7MtbWq6pyzSYoFuo1IBEShLQji2pKTSYfvoYUCgzZDdMiiVsRpKYUz7V96kH0nLSOvIVU5evH3QhoGKyTEqAfbvHuXrHd6Gyz66POJvtIdZoQy1nQwSfmS/j45sXkHwHXXs++GdmXt4O7zHcuTHQtpSUMhzI0Re1lpwNjfGis1rC5kOu7OIryp3b2T4GrZvxNRT8EICMefJUGgTsNpoki972uIom5BZSOBzHk/pmpbveaRho/Rl7/yYIHiSvDskrvHN3c+XepMVMxh140f7feVv7iBO7FelOLL8U3nbkvJuFvQFlffHNcm+ExkkM7Qv66QJgyMWhJh/JZnbJ69/sUZ9PTlBB4mFOYJAfv0wPR0mzweOOPMtN2jH5/Cbde4WhJmNi1rWS64Ys65+Jh/ejBJlxxWFKF08rfxw1ekZ5RtTS9jX8VGdOGvTa9yEJbikOZ5Rvxmho6/SL1w3S5/VlL9XnaYenlFCjr21TGXrOAg3FisX0zhrPZm993QcHT78LKfkZnMmtZu8LO7xtgaF7xu2NIMcKRHS7cYbYJhiIo2yA/NrdgtHxOqSRNt+CKxoh1UDidWa0VTOUFKfjoV51eFxr2+VJjJOihGfLan1b9lnWdWwHtxTUJGKqmFHAVEagXoxrJG3M51hWN3PlLbcjiUeAFk/l8WOHeNe5VegFwLN2hyYkBhdK9iGlbms+HCeyKfRovl0HutF05D2zUydHa+GTxBSPRjhZtVVj6mrG9J43rnEcIDhSPCqQ9qzmVl0zaoB9uOr5fSwm4tq5xoUfOKqgANYJmY1TNHufnQArlPqP+yERsxhCEa2VSHAoHf1O6LNxKYH0p+//Z7Lw6gUBKQsPdHgE8ljy46aflpr/wNzgpCvYlAi9OtDpcm9uQkYQGqnKpL2wd8bOqhnvmQrxrGzW5chS2C3VKiIGRYLWv3KcTiUsP25TNd2dSYZ4SJwytYRIjgDauR9abpoi8j2upNAKFz1wXbOlf6XqP60kYJ9Hd5OnAY172jDdZHI6rdXUeSXdrnyG55esZYGitmX6kgD0erJPknpi4A0XdlCIKFptn8bLrEtYh429tQP5UIo4EJzfByuPSv7Jr/Yrxcp8aGccJvBe0Tjq/pXNNe4BGoLyHOvR4zAl5wxaX8UwCyBSUaMR5hBoEXW9x0t3lfZkszOUlZtqfCXnHOQ8VKP8jdqaihYHyd5oteE9hbpwCmLmKbE6bpdOUJMQWjQB0sjuRqOUSkLe4XquN+mqR/SQlfdcE1qJ73rYN6eg7qOF6vYSHTM9FJnJ7TZC+K92tY9BOuv0NX/Byifzz82/4ecbXJTaYswAFiFEKBR5McxHJA0EEda1S+kcmjqlcpaA7Z2bMO8HeaJlgZVPm1BJah5ttwiV9yNvNtlS78bhom7L1LxewvYIVF+lw77MCgS0o2WCELjSfBeFlb0qxa4koOA4vY7SdIlZFVuwrtvdWBgPiezkO3JfI5S2yQmLJtpcKzszsqlgvxk2DpGt5/OvUGf5jjt0BwGF3ZzDcBvub56sqKamoN2CfDNDj4+eZy7zYfRkuWg9Fy+dFGra0/e3fjo7eTFCBuGBjYF0DjFV5FCrpMOQV4d1Mb+gpQ0IM3yhWyq900a29bfYOyL/C5lpvcxsh392PG36hdxU+xqgrog6hA4I24y7v2F+n98T+mjEz5mYH7Y/feAVAyeB/WcQ6FaB+Jn8DJtcP8ik8fi5oDPRvH6KaD1V36f/yjh71zdlnPbU0Wdb6HcQJxftcJbe96mkdnQQl+42qTZGYKRS+IV7U/xuqWectApmig2NMpPCK6wNmrX+vOHUcuSwix1R6s8C+5OsRCSHojjESHUVjlFEcnH1Ax4pHwTlB5hVZqra6rLUGngsHYLWLCvZ8zBNltbLPcOYMRepFamzWjAUDJ0dRQxn3qeRBvNfJXRTQYYQc3UkZSjsPQoSJScY/M+NwXQi4wg4C5JiYZejfG/Tw7WAKsfmFGeaRS5uicDY6hS
fhEFJYQJGgtRr1DL1I7z4cGrQG7jMWQ1tZbXS6/eHNJSowvWHAqY5bEyu1KAoM2bSA/M7+WB8ytAZEhzFkjp91GDckOFE6BlNtpfGrUMPfrPWM+slYdmrwn5+MkwWa/ZmMroE7HfxjWDCE75gCPXu3XSjXQ7Wtug5nmjq9WrDI/ZisDxbXQXtdkgvRXaLwW2IUluUXuZaaixHufbsUdXAGQC9pOTIR0jPYV1gXEutXIl9bUxwdLaFlRsGwqONiDw4RjLPBYfd1FbSYYLDKtMIT5iFxEtqsUho5Qzug8J259YEfkyH/QL/Yf/Ab2VDbCmhpW4InJvvnR9e9iBcoVWHn+r4ZlLOgFqMP4AmeJd+YotVZUREGyF8U0xJZXCNqPajG+gzt04r5b3mJsJ6TcViSIsJgTEg+m+793WLqcdbdP187TAKeMmqyrevCmNQKltzlW7iskk76cljHs4s7nq4PZLjaJSkbEgqS1pgo9JzxdO6cpOKVgN2LB729mXgWAeNLrBNMyJXw2LK1beUqyT6BP9m+xaf9j4X8aNss+vWa1aSCVHauNijNHiWSHA8cnOQ8aIIfVQ5Dlis7HCvClI6CPVsFwIc0fyQhIhnVYSuKMSVAenvA2xmHUvDS8Wr4QWArGfZjRRuPFhbKt6n+izNoGZQXiZLGJIJwIymQGisDcgDlGbrpPs97nJnZgIywzpsOHZ3E2ZbBfdVgxXyTzMBJsyx+nx60xaoX8OYmhI/TyUcx2jdn0XhkCFQHLl35JYiSFX5xejty/PL/kbuOBwIAugRoOKyu2hyr85DFaUmfKa9gN2+9JRZu24j/GrU/ELtS0ex6PPPugSuxDWJ9oYn9MEvRzKyelHt3NOP1Sexq1r5WRZOlJymQOOPD8PdnPRZ4iNbgbK2uQuBdLRrDVzoHMOBeaLwZIOXsKUh6lmWGWXLufbJCEqUHUJOKKs0y+KdumwdI6T5f745r29cvfw7MXG+QkV7ksq6s2XZ35UY3X23FIFs1+H29fxLlWmiCPTzyorsfH8PugLlomNTVIRZME5gQjHdodcm2Jy2D5AZ92eqZQ+YexOWLfjGPkU0ddzOhLuBAb7nkwbiHl+se+nuvEZsK+SGPTQUXGUpF0Zh5HXg/Yx8uGsYuGvgXpKXTIdBIGJYzjkPBdlJxoKdLN7OphCu/Pqp47FQcaT7LcGb2rmxX0ijBHmEjvrybN8Y+xdvn9cgcWjWMBhW17owZram5s8A4HvN4tTrJarUtyKxX3NGiU4svLTQbFUOeUUcZerxiUVIyE/ZxqveDngjMzBu4wuvUbzqGIIfDpoAN2bMSYqZ8DsbyF0DJMFhx9O+mz8Z0VqnUC7QlrTxCk7PKZHGXTuJTa+65/OokIbG8c9mvvJanIaxjNVB21SZglNw02ilEXDHDjkUVe1BxObRJcT+Ssr+fffWw55Q/B0htoIvT8AfYqyz4zy4iSpJDRlqGsc1WlgxsagZZqt+Fb/G9yUebyMlV2ScuBvc0iCY9B/6NVAWHMeFCQ7am2oNTpb8JCUWWPvNhMRhKaCY7sUwzmZGkhWfRCbZRC9vxNs+uv9ybUn1B9diVjm0GukSsL7By3j7OZT50Jb6OYpeGz/Ty5vsJ/3DKv8v1jRdSNI/nCVggzyWebZqd6NRw94eSbv239TXSl6OOJiyedtQzsF4mkxOIMKmpFlx210b2nagWEZM1oVHZRw5+O0p9FQ1Um8116PGwj2Zgs6PVvNDOaIOzKHeTaYxCTUny2PI2Hx/5GHxAxxNp2tpLFgZDYw7iUHKCcotoLFJMPLltubLaOfyQN/LgwTbllMpmTk6gRUsl5sQljAhPYMAhW4VN/l+t3z5wdaau0WzR2sA+bhhDP15PhSN5lfrqMkBZzflXS1XBm/9ud8Sa81WY3B0tLykT5Q/rlF0S68K9A1EAL/QRovw8vOqkzsp2rtwWFXjQasj1oxYKLZ8dkdMvdBzogMHjyxa1c/TmW+MdpBsj4EWAFBZksZPYU0i8fmYrBN96qbA3YGz81QWsIjPjk9uS4jY1wuGAGiYu8Sq9lRc5Ek0EbXFpPZbIzMBYBlNdiJO+eEgcIwMxBEOLdKVRDYbbM3BEF5Z7YtPWrkLg8PD7Vfy5MlcwfTL5RUpM2Y7KfrT42ckrUqXVmgdtu43Gz2nkQBZ8pn/vsiOW0ynwzASlGddpmjGtBOYd+9iN7PwhBNtCQm3+S1a6jJMdTPQ5WohOwQ/bTraj3L+RTXN6SleqEyFDLrtNnJEoxg0fI8V37GQv6QHl6hD4i60/hYitBbawHpp3WCx4xfvC5jzk8Kpo9d3UoezvCrHQOa6jiJ5JpLZoMoNOLsSXGbO6BpmMK4ZuYfrbR+AKje7AIOHNa5Q8Wo8oUWGCh7RA7VZNhPKI8dDE9jdBYJAWL7FtBTH0NrWmQk40EcejSCaTX3c6oOoc/xoGgcomnFcbRlPRAzJ2KGQ/PRxR+V0W959zi5zhU4AwBX0eVd0t7AepiP+nbadpAoKdL9vFRYZtVSDZYyFr0kNtDx6AC0lBAuRvdsPzMstGlYKxfLC/poLSScrFEjyFzW2ZgQqqhtYsUbsEOU7zK4/7kR4koIx+aqFo6yGu+7QvRRo4eopRKHIUzHMbT/+9IZljFOe4kMZHAC35TvsEwV2qf+vv3HsOtt+OQmLs/0bZiBURD9n95EBnfk3oqkcijelr3F4e1VbgTFpO/rVFE8foKqEK1HNXMcV/I4cTH4Uz2cx4dlUtNswbDWfEdgEzOnr/bFSumU2dREWpqY3cnqebO06o1lDN3DVsWhBEnGR9EtHn0i+F9iGu3vsgNWOPmaXThN8JHvNUjaViTgrCsXW0R5jn4cVW21/VT3RxbujJjFQlChxatraiwHQZhzOGoNzjjA7G1OV2ndnSp3TvcC6mfUjXUfie1H5Txuh3JzVCGnFuHKy7nvCflREKCrVdquht0YYFIungFHSszx4KhCi1KaOD52HppRdhk7bSSvgD/HLi6gFVl5dy99OA5hLLcKPtFxEqxQbHkJ8WWUtTLO1btH2yWXKGJ5OO+vNUyz58bgFzVA25Wob4Lw1yQuqKhAvxuuLBWOtCYdsz1zDMOLJV4aLhxM5oUXjlLRTz9Is+eFmm3GBcFmFYhIPSQXi15MXT5kROTh985thJpRciInd0ecEz4khAI+Zlc5MDaJIzFtxQ1m0Ttk2wVEJmi/MVIMPSkSGTVPp0kOhzMR9B83GI1atYx1GRhHW1KDa/R8188KbJbhRQQftFrz+hmB6+n7aHQY6wWKGoxH3GwPDJq6HHKBN/s12sI2R0clWWsaKQwr8ekcDE7kDa8QRrVSTPFDHCKvDqPsnH1QRF62v6o9Su54SvWgKG+6LM9TwuKEdCwJRlNh3ydvh/j7GYI79/qZMafDXpD/B8++hwBWw+JMppsjhdMmIHTTy/oFBkPwD6vAWIM213NZjWhgEGn5sN+5BBT3roJXe3HcFuZX1WYP3DChdv6kZRtbr3t2goTjoJabdNoqruDB3NCLxZgprMzkLxVXESzEJvyEzeP6oGgVAG3aetznFV+cMQOAKrUy4qn0lpSGnbIRVCiAxdMHxkJcpXgF9iimWVDCmnxoqH5Pm/zXou6EC3Lg3d3XqJZkc3LCOK9p2GtfGbik5BvNJrkarntWwQJ26CC1kH/qMVhlLYwbA0y3vZn+IAb6tOjrgxJ4HZdhTLjscB/lzxex+J3WQkGFikZqiC6+our3XjOBHPgfs2m65wgRtv1RR+LnZvAGvTWCNS/IPp6mUTpBge/+YNFkKUgWZ24knsldfoR/ynVmzYAnWpb2gn/6BBSyw4VF9b0d08w53gmOjlHHnYcn+N8sFeAFLYzqc/DrzF/NqhSgoZSxy1V4YUpCViM6qcNinpjJc50wHwTnheSJ3LzxCterBLu0EeYFeHJkcG17WoyQAoZ46x71SA492MyMd0WPKRCVPzr3rvDxO483lR3KhM9hlnzrOAuAixp8uxgqQqhu4V4DV2DKiyzbooUxbSFzkrRDovlrQZpfmnFnTwq1/8oYID3QX63w6rjMUHkXNnqD2y+l1kJp697XWTqvqr++/F1/nhE6
eyxvi4iN4DfIJuGhp0YMZCnrtSnflXLELzpiFVL/cz4OF57XFuhnD4kFDbX+YSA55bdtyNhPStNf0d3y3ApPhW9a9wM2XS5cu5Rv3jgmMwy8UwcQWRbjaKXzxvpaa5DRjgSgYaGA3bFsfHlIW6UYcG9LXZytP/wRf/t4L7+ZJSmyiSMag73/KbKE4lseI3hvdl7Hgen4TY3zKFvJpI8y6tTpuxM/yxBktBmRNzxtTG/a0I8HbLQ/BunN+NcYBwA9of06WJKFaPZOIHffiOcY+sJ05lWjkSgh9xRt9wAy0QiooiL81TeexWAnT0PvlnGyx7WTltg4joQtvzZDgJUa+fMJFx54oXQwPUQkeeOfP9MYna4m5K/8maIP+f2ERHEKNQ8YyK/Y2PBlYnwGAD4Njp7j+AfVW5SajjLzLFbcUYJWgfJ3kHiC+2plwnl16SpHT7y3bw5eeWX4GnT9w0WfNLTDpsW9kfdnt3CYUoYP94HktmIod6qrmqYy1cbLETsE+k2EeD4SFXcKdwU6CjNEfRzlTvHj3yrcZBwf/Ay7D+y8OoeKGbfRtu62ED8SDF8ozPvr3+V2FcHb2ynhuTJ4Vdrm5i/YHjaUrpHL6l7aPZFaW7HgslBTWEOlRx8Kes4C+yKDx6EiuzKks5/bHA+kTulIhOSH5E90LWnJsiV1xV5zfIqWMq+e+Wac/z2soStoaDfKn9+L3Ju9fSPfQafIwRhrSwqiwLupBbzOYP6aHwOkZhay/hFLnNZ2EhQMehIGicFNrejXsLWFObQfFiIsYtoHVnzN78dKatKeJw9JvQqf4zcfs2RaKk3NgCIQ2curqWnmtO2+zFB8DCuqy5TtU4/oOGy4NHH3outZK2BzQaFiLJigy36kycusfTR7MQTmER24T/a5w7Dmloj+sWCWi+IlntO9kUkvd/Kk0U+eAfKoQiHYvVNUNgyjAAWOV5AuVhmPWm+VO2MsueKkIC9emR4Z+yxHIj7nsjhj6OYBQXqyQX14oHM4lRuA3Ar1hxVtx6vtmNmxvP6+Y2wiIaxAzLW89Xo7NWWHh2EZrqK1YspE8rx4Et5MWS05iPi0qhZ+yme9Emhyjt9e8mffwCws27/n017i6JuMtvgiT/fqbLIh8MkYjc8vFiSblpfUxyeHp5cnvFPEp846w6yjZIWDiltBbYyxyUUdDhdfajev8deM3PC8Wxzoi+5nnm0QOXBrlV27GZ6/cwakTO7KJqwOZ7+i/v9HcAzpe/Op6Hs+ciImCTL8WrTNXDVTPMj6NF7y6nd0BpMVGdfQJT3ZANgGU73xx3Nksh7BJIfiQR/8rfP/ifHhAgwfcyd1AeKascI4Qt0h+zEe4NxAvg15sPuCllntWbyEsYLuN6KwToAAEdgpb6LbqXeuH7IgI+Q2eJtB9/YkO8zrOqNU+pupf+uYfN1FjdTnneul+mnChb3cjEqCO7bSeMqN+bixEN1l3XTOAkIFIqyCtDdUonCCMBe8vvcuzncfIzVDP5X+ashewL3cWnyK5L9CuJET1x3wzqVMrFH/xr2CqsbUlZUNh01MMeKm/qbsfGgvFnrzuofbG27eCeb4iu/918EKIkyuoOVkTX2+f4JEhufE9ik6CfRbWpUwvf8FIBOXzUB1TNzcfmO4sYpRCBd5zS4Ba0kJpFLlYfqoLYEWt96PvriuS0T+faVhz5gevhLVKdqeOkrcjfUJnmPGvnHh8y2hYBHX2LdUp2pQvEJ6seIgNudbD4pGvjE4gzesfjmgnBKf6HZ4KnZVxtApAturYTi236t0yrJAPDMldaVOS5Ask1gUdobTlZhwZzSnyEDL57Ta7YPnFNQQN2JYvOoR0z3Nf1zMr+Cl/Ys/vyTOwb+cZHbFm/DKnYpntjIdhlvMmrPS0l+tcqqKPeBsZgSzm/nKAULLBFmqGYyZuvxuEiYMPYWR5rOzXRTzhiHFCH4z3t5EQzqIejPjX+eXgvw86AmDnKVXlO2+xPTTuHmKdDdLLc2lRDcdaV2M/yFY112kWDA8kr0KeBC/ENuit+n9nJTHFJAxPjoGQjuHwECottf7rF/D7wtLRJG9dpUNjTsEW0mL4Nl5UocGO408biDyasyd2HxZ0AdRpjDRzhFtc69dqmIPXiU8C1qrQ2nxaJXGZ13soHVwR3YqcFdCWMZYUtpbzQ/UpQdGSph15KCcm14PwMroGviC4SwlgVdbtEaXWTnpx5enA0rUDay4WxegZy+Xtl5YHWkkki6b41XqZjZiun5mZ3mvw6hxsIRhjlJfeMNbLiWx6sdQV2vEKMBRbAOl2l9APXEGkjJCDRr4sGqIjN1eHnJE+NdOQVs51an8Xj1zmNAwq2ITCp4rBGNqtn+JK12EgM+u/LC/KdYVE4mEk0erZ0pXVl1pBsVb1xX5PF4dzaOdMEMUMpIDALXQK3Sfo36k6iIu0zGRvzY1C18+Wlbks1OAvDHyoNMfgKhvIjZmoCXXPtwyvrHeqYf/4/VDvoH/iSZPwcBTUC4RkyXJifuyWG+4MMSuRB29iF7qrwEwKPKC+g7q3Jhb8P7p2hnS3DX5ECCuq5afgt8twdGFVgDIwBlz9/GqOR7iPmUWTaua0223TnZKovwc7QdR8hGrOK0E3ovPc0RshRJa72bkS739+zP3kb5f6F37FHE0+H5/PQ97kyBAXxVcrPCMJuzuHz2BfZhyZl/K/VsTGmanZXk4yZohJrX6I94Bwwrm5Zk7ib2o1o1FXkPdvCwe88KljN2Jzy9iLKgpF7e2oyJsa8Mr9KfZnLnSzPQr2XspSpC48gh4d+BU0OhHz3+BaTPCsJxCW6w1goeM6r39Tgy4Is4OVGjpIgEvSdzaCQ7SMzjln7M88z2KN9E2twF0POtUjZMdAB+MzfRDdVTbWS3Xbpsh0R3Hh54JkAs/j+IVzOW5ZdxrutsUKV5NKw7t+a8lHJ5TJXqTSEzrmNWqNOKZEahYolQJdJN2sgPFKttgWsB5SQYnnYYmUgszrKSnSqpIWrbfM3T8mjT377EW3j4onM6hbeECsjRPs0PGRRSr7kIrVAQIoDjaNt33ZaDiyK45QP1Lm+y3NP+BZBbhmmoD1i7c44rSnZWEliL/WBnyEuZ5DClutbrWGUZDD48LoKZnmO8grBskVDrSQyeOYPJNh3jqxkcyWr/b1IOSuwm359OnEBszX5aGF+2H8itkJBT148Ofw3aabZy4MkSYwdtmwaF3reLSq6nbTKKqyGRNM4k4yXgpd9CJrtdHSJh41pJ7Ulz7UVpRyA1DQyZEkBAxhwUL+ixwvLa1OGVD0SmOK1fuSkROpBqUkM6Ol3wAncXiCLrEZGKT31R43OFuQrQA4Ce/lQPdSXNDwNqXxdlgKBZXUCRrtRm2gctf9GRWShe5vGi5GMHsofbE9VK3y2xTb0OyMWkaKvjWYwICRNuisKmH7it9wpMurv0fAoxsE9yPp1O0AVCgyX+CMWLWZLBmTRPPo1o3/e3SLDbTN+xR5xuEkla/WT36qj9jSZjJs2O5Eew/xJsu77ilztpFfbYKWcWWlOIHwHHXmFkzXZa7RAbxUCMgQ/mH57IqcGYR6TCcEOzrfuyfjtgXLzbHnwoSJ4UyhhhgxI26Xfjj945tVvVQjH46gt6h8HxrDD6NjfFg9QSBlQKSrO9+JL9QKVrfcFo507mBtGvTV+G/4KKaWd5hrEcnLzWZk5od5n6WdTTt4EWl/cO9VVV6y+d0+fl3acVNmOl6wKHR2jEF4zRl7FbLluyQQ3XRtEO98I7xZID/aFFY2g531UVjThsiZbxGaYUd3b1QbBn4jVzTLgkS/GzELpym2lxydI3/cK4+BMX8KQ1BZD0UmxGi4KTLn4VoidAEjpzTR1r+s4W3Dcugs2tL5LR2UHpeCESQ44ztSVBvqpLqWAVcgAZO2JTLzQ6/MaMGJVyvxLkR8UlWDgscbfNiJegLnbomevcQx/Elj7ry6t8YTdBA783sD6A/IOayWlYkPPN1c09ME0LoF6Leu3F1dimHizAohNuCeMbB0hSpPKKkcZMVtgh22LYnBcQm2NhfTaHM0A4+90BP+GThReW7dj7h8b+yWVEdyXtSrYDZjvrLknm7
pvKe2sHMgZyxgjc8a3W9XXcaT7Ala65GkYrrhnPVvZPEAZiuQRcZJbN1qDVjeg7ecsBD5dGOA31VFLY/ZT5Kx4TqU2tLou0rAzrK1d9+aG7OOle/E92UWrqqssQRDvfFGMTwxLBmFuXcRiYHzDVMbAPbifq6wJlkxWbGJPSqeSXdmtIeVuglaYEzvBexEh5QB7YilY4DXdvAHkYECjl5mNEbJYLDg+5kvUUSoHzFhsP/e3sMOZbtz9rz4xm9I1E2yj4LQtQgdHT0nErrylLSP9slgZcXCHUAH8K8WUIYI8zP0Rgvr30Nr0gBkjVAUhlYFCmVR9VztWN25Stn5XvBXlgVq6A1/V+/4b9PqE1QlmlC5TxMfu4CBEyAGxk3T7OX7xc9F5yGuL5ajd/clfe6sn93iXNMNfDCDmuCUcoAybZD9G7A9JuJJRSDBYnokKcUYwbmKxtD3xfEmANHt7DWB74AuakFp0QhXLuHq45IlOOJ4wcHISAd+yRvDa1roWxKTT2+jc8RmvWpFlPoJY8UQXXT/24k+98W1sj2TmnukMbTtkK4pvEDiakj6A0kOP42usGZGaQkDyvbmDL3ZWNhC12fMpsjqHs/LN/gc+HYk85Dmrd9UaMb4JTshpYUblX11g+wp6dTrN4+QeOWmC9y1BrVlqvbny3kLMPDN84aEmw2uR6MenkEDXZyU9Crm7nyQU0GT8DbG1o4nr46Ql6Wxaeht5lXo+Z296BDEhwYHlyRNngL9Njvh4m1BVpmawN0hBCSqxDsEmMyiP4k6lIKpOZwiITl2geBPt9lkNjf4pDWMTQFPBtN6KW4L4XVAIz8shqsHGBuCTtrOkWD2dWKFgVHwnhGzSRNqUS+hy7zyJRhtFCWBzKwKqUi4RktzqxfPkOtkZxwWM8lZ3iJK7nVZaGwzGNY8yEKK/FF23uzA5t/DcxUHo13V9+3MgQ00rScNdPMekMS/DsofIGtpNw98EP+AmEfVzCsNvXzURxG4vN+qv8nW+0MPpO8EnB8yrhKRW8fEWXQoz+LCX3uHIRz9NL/Ht5CESy0kmcaD+NC3ELVCl3l7QzaCMWHwhg4rZ5kXQGOabtYFM04DVI2z1EJ9UKckIPG1wFuq492l9qpwMAKZJKLAuVd7DKX06+8LxDOc7rPgVW7e20y4B1VHyhwaUDBt9PWpjtqRpKCKQbtqQ1E+BWRGSR0NXEX2Nx8MzxCZkaLbDv3kJ/SVzBYTfJpjv/d9WRqvVs74TxbH2uJnSlY0QJsvN6h3xjZo1O/If2szag/9HJARyU3sMTY6mT+52EiffT9AJOxr/tr9SnlIB3Vi+qpMpLy33JAjADovndkTmHS3r30fqdHGZrx7Rh5mZo0mcwE4y6TSCl0Ri26X/KqB1n9vSs+qUZ7EIcMiB+Tl3C6yHGM4P2DuBiuRXibJVnLaXoMa6hTJqdF2Ns8P/SIAiSyXcPpXk/SgAPmndrliBBqmSeRiSBjZplgMC/4ksgVDMjMNDDs1Cmab0VGJcoPl8Rf1E4/uekBYjs0rIsibtb6fwOJAuI5tBxT8tblwh/0xrQi0bgiEGKUGv63CGhW/3nDdFYBoAJ/H7Xqn3MsbxN/S7Fn5It2GlicPuzr0GVJZf5cy+TGMPm0x5cJOvzMGGnhof8y5zFXkNnJDNk2Q0x2iGK/pJ/gUEsthoPUJJ8Xm7e9EwFH0hSisIvG4OVKfeONq8s0YGPS+ZlFl6qRG7aZItHf5zNCTF+xaS67so/UjCNl+7ILmDxTZAdHHUGwwPsE1m6EmS7WY5sTaHV+ebw0xWup192A6f2UyQ77mxZ1IeZOdf+niorXWdMAdLmz+fvBNCPRQ7bG+b3umW8+6Ot9t8D6qHjOkHUdDOeb1eZhOnqPvMuuxsZ1cIPdWgIyv693b3TnUOeZFs/JopAQAPdUTCIePeZma8HUqP+ikdoQBTvvYtSfsCAXVNsti3t1/uCyg2rVsP64cNF4mGjYaDwS/YWYdpigng6V4VQjO0TvTAWXYGfrq6yad5syuALzNudk3bWTTvV/NjgtqlKjrwfuSHAJQRNts38nca3PTVdtx1wSx2FJFcW0bcGEsIkicdBSzqzMZqBQF7DPC60FIItxBLZiPwowwOn34sfxSeRWAn5zx2ME48JiWSHN+8V+V2ChxAB6CBX9M/5bEFYi8azQrH8uwZ9zAIih7GAlJEb8R+MLX4LZYUzmRS7nOVZGCr1Wjc0zk1Kb72if/hw/1vMmZI84Jbzqtl5P+6YbSemybay8fjjOa0HXH0jksFs3WZDRpO7/EuKNx540AQoouRr+uO2/Ts09H5YLhnZuNTTLDlJBrm0Z8cgDTusJVsEnrJ2UQiW1OxaDY9WKH7bJDEutm9VOYplfnO3ti6qSS49/atTzDmFcn/VIPtyufjBynIFZc1gzwXp3/6aMfw7DkrXg/uQWqmdDag4y7DjFwLScNfZUDJ6Qwq5MQIRtfVPS+Igzxj+jsmY2c9y8UzSYRkJo7EJ6tNkq+A73YnvY57ev0S5i0beU/4B/GzjYrqX3meYRl3/bYOZXBq/IWB2wWkA8O8XoV6Ola+Qsut9pgCxA2ABLrIbBoEQ/sqrNZr6PbTVJvaizwKf93ETu0l7FWQZyeAHISpC5Dj7Z2HFlmsdTakpWQ4B8H3afGgnN+KqDxIYIftIcQh1MxBNGIkcEKo4dMVhT6U6FiNm996drrKG7HMQIJUrwRRrqiE0weCW68Jt4kiKMvZftpPL2edfexhWPXZ5QjNKAHeBI2jM+riuFmXYpmpVhD/4aQovlxAvgHxT+/jGApab+Jl5MLIZLUaDHSyBA1yTV8M6RQwjLHVg66XlrmXs+DU6SD+hH3+O9t8dXkbceHHZ6dG2tcF4h8gNPC5t7dl+H/lHYMJwG+zcz7Jcat6xzHy+zS/vTJROEoab08PcfMksqPe1TpBWOvmzLr0T5tTaI2yhS0lgCFJuzrKYeswpiFNab/ZafBnp7F3WkKOe1f6ZBwiyR5Tc6ky/Gu0s1GM6vXM1MbIyvRmx6sm4RYmZ188e4KwdvJGs4MhKuz/TYJJjgY+RfaaXyOpCmbNuWmiwVTNvk0VTKXdBR8DD69Q4gbBGy24JzYELfLaC3SRFBcNTLKt7LwzmAFv0xNwvdw9NV6OkKVy6kCDEO6LgFSnIa68P8uV3ThgQV8LKayFCX4X3fJGRZ5OnEcBqteuV7kX9kc4BrIdS5wtFT0yrl69ct1pqD/ezGp4kJvTB/oMeq7aWO4cdJamrPgeEMkCR+piqBzijlotlqNPZKdUoQKsCM9FwL3wK3aAGEEW9eSVwHCCRvczzF8Kc/dgSX6x9PxcoVsvwPU3bLrKVPLB6MGfhiDNMa3GKCsxMMG+Zf8vWCrjHfxOYQbUAiRc3z9MK6eUicbzR2YawJcntv41cXHs0NOjIzT9YMHiqNv2eAmU/T6Wu2hTBkTcoeae4R3Qzkk1Q59MqbUcsf0VEcr4RHT6GI2ASLztZVppEkXpPySvrkTurskkMboNJwGors0ob5XcHX3WRuKfgoll+YEU0BwsPr5/YGV1pyCbV5AdBUEEpA1oCWoILXook0/VN82EmeJJ5qKtHhyA3ql6Wfz2hyYT2J0kQuonzWK05iV6oE82+Yj6cvPJFrtCe4wMRjaK2GXE+n1iwbQob8JPn2WXUVOhrkHJAii0Z3pUf6QmK3cPR/r2hXVJN0Pvns4kbvVZ2T01V36inD1EUUG3Iuohi4zFFwJIYsDWlo2+AZNgHAYYX3UC3YTMXjwOTn3qSezF4sF11Xryc2xErY59egpo8i1tJFJwFAx43+qiHiF2zeteOWV/yFxQCbWSpEvjSPcyQ1QJ92dJ1PA90DLC1430S71ciJUvwcJCMMR850A2wwfgxpelaKl2lcLO53KpQJmsjY/eGOYWWdsekDL1O0sMkT2Aat4AiWuHsmjxXMo1ywjx/MbNeK4D7xuG6t6aMQnFSsjLzbRJiG4epDC2as8uFibpZ/Jb6Qfbv6n6Xi69kd3rqQgUqBlMoCl8MVqDn5yCGWAZKm3M31ofA1jEto5pumA23dfbgXpQL3AIldEM32ND059fvwX0Q2rtJ0
YXuTKvQjhSKmTk9Peu7pr8YJd4mzZAJDQJOltT7yF1KHlvy0nC63jLa9DAGndPtSyYBW+QUuQrBARnZQDkuHr+QND4Dc7pg5qCnCrPBR4sKeOHwyHWNrBRObpaY6E09VDB8MI0G3ttSoW9+JMYW3zEt26rm9Cx7H2w+4h2lMTacPb6nIvPgDjCsfEDu2/YJ/9rDc7ZQ8FG06NISHh58/5pW3x0b+3CUe9uFNpEb0TqWQhOBEgFBYxZKbZSYqgjbTovbv8Ts+BcjWcn0K9MYkSPY9kUAOhN13CVUTNTL+tgQWz9oiIRvYvAKF3LZg3QhzH3wJ617VbPEn4cqd21zlGZq//jvhUjuoJScLNCZEp7ODI7g6PJ69GjeidRXmiszUznatVAFqpgkU8jPErIuG3Ny4ieA4NuE5EvodRtMVNSmlEjF83QOip9Nkw9RPN+Bk5uz6haAVgY1ElJ8juzyYw6NE+KUXnV2pP3WmjTkIWvIi9zideFdsn7/jOokLq6fE3Dyba29aSdNbVXT0riwhiEan4qvXCLR/Dsf9ftq3RT8nVLh3xR/tdhkvk1FSyuo3trgYpIDyzJrOoaKWXXoVvs8VIBbbixdBdLpBR8R0xdD3xEDaEBwAdq0UyRz86ndymJ9o4Qv6rqcNIYHyk/4LSU+yv0KESeEhz4O8FmN2wjd238k6WaiXWUJvf1koco6eB6Lndxb52TyJSBcGciy5DAi4FHrSSZp9u2hbgXsLFO8roRNXRPXUpcZqCxA+Ml8rmnu68P35sZnOVS/sDKudnPWAnd8Cq05b3CZplAFwts3iyRb+Cczzk1sU+X/sh8FK5Mn7zYfRn1zGewuaoe7rArRmKnryA/iBq+2soO8KtBZmeChOHTHjKfE5K4eNkSLZT6y7h/u+Mj4Ch2GpfFBGrSB2lpejk8bCCStcVcc2Gw78xgbm2J3qCLhVoCLym2eDsDU1e+niuPM3V/+Tszl+C0NW/6WEFHLKEA/zywY4cMrEKnayTQHS1fO9iD4DRuJdPcu3wR0BQVhR/phHsumF7pHY+jStsm/KY2YcqizRkm72BGGzHpLo33G+W4QNinHhU1Sxhacw2oZC79PJERPM/EzP32xwSHGvpNJjOwRSWhTbjhu8lcCvxHJxA3/VlKA7GV1yO3OnmOLE8zp54IxU8MZq2nmbsvuP2ZsmyFPA58IB9Nv9lDqnsdIzYp8+XxN8faHqv2CsCJToxhD9XxA5J4v4QPw6mdsLfZVjLSDzunJD0X7MnfHwLc6vNt9418NXLhpm7Pk6rChso+vm6iCFFvfyUm4v27mCoMmaNln0xlylRC3dIJ05+lMW4k0lDECDwYa9joIT2MIVzgfCk/YaS2wwJBiTO83+2erTDJqdijIHpwBQBC8nhW9q9nt01GLjTbr0zUOjAAA+OBPmmzPit+mvVg8eNVvNusSy9XBzV4yqMtSCqL8PI++eSqG1GIwT0iaMGISXo5E9vTfzCHa8JuYkUJjfrQccEhhsCnL6IeDgW54pUIxpDDz1ONSarO375VanHxr4uLTyqBLJmelxl0DDk39gi72nY8lGU3z7NNF7eSj/oNLRbJJ9Fhw91MD8JKh29avhIAKxbdFZwJx0hIOI1Qh9pGd2+CiIwEnK/Pcw9/kg1dYnOqjnODE/wXYbpxfuphh6blynCfG7n0EXsiMEC6Z9lx56Iv6X58o6ay0vJmLteWzjF3A6AXDTc1jkzYGdvR/OsvBgHXfTYE8iKsjPNDzJIRYvTcHCanWgtydu53ICzePs6unsLuqPRhMwE0MPFYoM6ZGlWF/gpVK9lfncfQlGFzhiVWN1NHGzkulGXozI5LWu41os7Ss+5Q0pAxkEYg48GT7GMjVFZUYWs2+IpgoObmp8yaXpdZAubX1PdXkYff6yyU7IlsndzsBo2mi7OhViz4TEUPivs73uyJXrz06uI2MpbQ9ThmBKsYvBU30n1rDjxzs0otSAO6NvXhx2BGrBUbZuf8VCPym3WYn36gXRpjh0hHTN63OF7P+P3MROP+jhVc8ByDYA321BEzPRm9LEJF63N/y3HAB5uVou2EemzHkFK8LI8S+6EEmGUMM6pgCuIgy6rykSOMmVzAxPCYU0jSS7ZRnKnYaE6ZVE8Zc2QO02ESbET7R9edJdvy6OqxWxgbkrLe5+4JtvMrSGl8/iOg4cUZJtteMrHhUnu9FaPtaqToY4n/xyV0o65oR/HM4FN9FxzUXOMHrUY5pj6qCAmP2AVvg0rKc+16N4vPi/45dyR7XP000bYyaJBae0dNgNJvXr3bXRHeOxtY3jHh3J8D2Ym25/R1H8ljmAsMKJqjucH2RyLxCNDnF84FWUWE/skDcCvT5tZdw5fbxiFzGesDH16U0O45zIJQgG4ukSDntAu7FFTn20naJK0PLEPO4xwF5KfRW2tC+tO9T0iuNTJrc0qv5AaJUlQmS9UEOChcLJT7dDBRED626VE3Otm/Ai71Biv1i1yVjByHjfg9dyWQ6iqYKHTvwe9inBsyhufnaJXxqBeZB3E1NjIFgWVMKnCn3IXY/K89WUXZmFLKpRuujjBshfW2OI6o+azELNfEkt5RoRnJF6BxyXC+QWBv3nvhjpv906qp8Bm0rjgpWRlfHbD7Qi+PiVW+vcd3/Nfy+iiuiplBD8ABs6IBqGBvA34y07MXraES/tUyK1vAiN/w0RSUTG5tl3YcbLJ30iHOiEwClNng9hvaMCnlf7BTDiuHrrt/YZxLuq7Mf9lnfi1Huljk2eyaASqBFfjWf5thdIbUxeR4bqHVb86zybqXrUqRTBgv8iURvHlD+icMKGFfIY+rYVw2bqPcYwI5BUGMIDbECgcIY4OI0kSbeY2BuUyzaFJIH3xlxDgjPREcRuz4reeaoUNYOVXG6A4qrq1Iuds/ujgoZmcG9vK2jsm7Dp9yNxQ1a7PCTA/8OGZw42g7DXqHw9OUJJw2mvcfz8goroxEpSgZ9EMRTqgWO4PPmzHLcg/JrqfRSyEy8p5UQ+J4lDWqgj+T1IwCH9yMD/YePaiHyZVu0KSq724Cy7B6I4GUDbW7EGRI7kceVsm9xos1rhwjDg+L9CBvf6lGEaWEbKtYYBhenqPuOZJK65aD9xxc/3+JxJyb18t+OAvw7HFe+GXYxpGZoWJeKxGFiEpALyu3qrh7J9YW8govPF0kLW8/vrIWTaHJ3jSVuI/t3jB9DQQuONEYPo5mcxV3iTLfYxbtUEXyI6pmckNkHalyBpP0aVlAfpIHndoMOIaEMjSSkZowuOKpD2AI9MQ7aVFq9SYMJDgZs9iTtcXX0b//v1Vx9xsCkYzjFdVqmZsCDYhx+ULJaiWeQaEdg9dVH999wtAWzgOa7xIzqZ41x1v2dYXN5ohnmPyJ+a56Qo+th1RCTlqhfstsJ86Y1qDyRrK/R+eUFwrCN/KbP2a1g3/Z/DlUmqoc3T9904u7C0m+1I42LhckZ3I4dJGvkK3BQN9c1Hdc5aCqB5PoshAxwvFJH+HCa+WGDkbO9xptzvrgZN7RLnLBoOqn+4n0Y0MoD0Gnaq4VzJGeLsyYsUEDWqig2dAjaRJNZj8WUoYx9OTvfraKMwQFT/P7TkPJzQPYTXFiTWAUk4gvxHcjcb/AtNrvXsHjz6F7aOq8uuNWTFlpgm6IbEOTIRwxyqhlbZTBkPYUGwZTz1URnO680sC0V47jZ+QfqiWYdRMOzBltTtJXU5Y0g5knvfPYTyThzW9pPJxQBT8I86Qnf1rJLHZW/PHsu0wTomxCRocI7tIvnCOKdj+MhAPGUjp760NWf9Ah/7HUEsMHSI0CZqxfNnoyMJADCgXaqEec7jcE0UMYBxSjXFyfpueAo+WGTsn088suN5/AhKBeLZJXS9q6NpOjnAlhLjNqId3vPRzcuGj1R++5Z719XY/FxIUoy+pxh/tpl2VSOHXyWBJAFk4okGiC5MJr1O6kUWHilkY0JXXqD8Q09CSWXHHB4/JGWAtPHdDDlW3Tx/8rDtV4cw9fkyup4AASTVMZS37GPvvHricsT1ReQHiy601R+Ac+8xSVtYUgM8Ss/nywB0i2tv/ojXcX7k06HCeYhjIQXqS8HG
xuTuuJBk/LgzQL5pAPtilHjkoUgVKZZPPnJUM41aENmHvhD9Ssl3jAGWKVyFSOJMZB7IXxunFeUVnf+NJOg90qb/mbo0Vy7ePbkDatvSQZiCjhq6ZIrFvwP/h9rQmEC+0PF86b3CDixxBzEz4I4umJCXrQpdrqqvg2ILjfWhf1wNQbLJdIwuAi11FSKMSAoqc4maSc288greSW1z8tPqgjos+NHOcmsgH36Jbrx5A4zJPlexVibKaKQ/svJ/X+Matz6lSRT0c67XIdUQjZxog/HB0gmczyVk4hjDsaiRSyrucx70THWRr9wgUcZfvKwH4UjWvcRZ4U4AvLoK/kMvHjRbQx5qCJG1wVIcAzuOzPCAteptJevmNk9/elbFVwXKEptIEmRbW2ChN51fcBPlClrCXzQgIzC/G/qjoIvdDcS1NEpVBdM1V5G0opIhWZdI1M60L41xWoqdvroF8UcjGqKOH7npNT/oJXPurFMAF9ALofi1pK5loUu6RB+RjYpe4ZzOZLtriWNbWPUchAso3AREm0v7xDS1utThFov1E1mRpzjXUMHYlXhoQD2ikc9TV8iDpbvXc0AmhykYqu064UCgFl0ZQhOPUYVHRLNLVzw3EzOHMNhVCKZ2JNcOTcPRIu70O9or3OcnhDeTWxroPvrjNKSIFgVZvaST+adwA4uYnlL5GkQlVWbff1TGj+NjCACkDuxekMmoB/U6PjCiH/Jw8Lu8+gNcR4uIg+Y5pLEJiLNMugDXE2p1/HxEX8EGLWeD+9JF6QryGn/PfSevz/gWhMFdyya3rUMCpjzHcpkmupAa2isW6kuVxdDbj8Z26UCF0zvX3OQOeLmVYW4GqP0vw3l3dkYxBpRv9CSqSuLjg7k8C2Xy+i2WycRjZ14xMvoz6q1wfOmywdxLy5I/uJaZrbSLTay+oxEkcEE0Wh9C8gRJ8a/whmBc+jNApp3WfGNs+ulmBcIPxkZohprR8wOllbUv3GA98du2QZu2Uxt9L3ePLm71v/lkhWkk72lAAfD/EiKqI7S7u3dljoeKUb5gCuhryUUQCyeoiWQtMq16VdKYC4CcpMQ09cmB+Iuf4ntYbzjWMaZ8UYWzWlfpeVqC5pT4wM3jOMeV2lKiV0mPe6fbqNYbQHgHmk14Hao1GXZZ7CGvDwDk0GfINp2vMItlfR9JP/I/0Gu1ZuFbgo6Oj9/P2a1/WJRNmP6EJrgV88s2qwHoJf9tOE60S1AVxycSnUe+XvDOBCcNZ8ndTNHBqbufqvmd0jMTA4BKnQLTI7dQYNoaTi8hlG1Bmp13FGPUyC7LgMMJIwEZoCU8D7SVBOXmc6d0qlYJ58HRr4/+zHylfcRCSzDnIAZl82yxFZeFQIEViDkVnm+MQHq++J8qkvTqCV4O6tgL4GaF3DC+8zU+wVzLeUH5dDEuf9T6A7tGcutA3IT5r1grue+2FLAMk/2dSHeHFujBFd73V4+MuwyUCCjnDwp/XPWuhjmWHXNqBwwHRDFqsRAWSqBZc6v60FV5rZCBkrdvktFkuHY8gE+cKmfGiiJ6CyvsMCN4z2Vqd81NoUEKISwtGtuWltcggJ2yIw0V0XI9lsMLvtQHAYni8EhzPHvCl9p1kG5le0LdYYcNzzylMV6/PscbAGu1eukka+VTUNOItFRkEyfRZYnbfxV8d/oXHYOM/z/s+pVYlqfXcmDofotKgyavOq+IV05JFh6ADJFBXli+Xy/Sdc6zL7HPmInhFXdcipTLC+sSzMp4LFG2BiP0xHU4vGGZnX4TCkDWA4EaDgYkOk8HjXDSAZoqxUprMIFu9tlUQBpQ+R20Ty7wwgxqaJUPnlrtAn4ig1opTJim+XDHcTXD4gM5FOZAvJtHL9r8YwFH5yXbHLusD4PDeGS8R+OwJS+xy8HdOi74kUOg7u+oyif/rJlNo0follHLFqxuOQPF/bDl8szk2VjJqUm+pvGZo/Q9WPBa8WZ+zXmnF/6jQ4oja06/LRGoPfd1xWzrPV4yqlUdD8SNDpGIvss6zevnu1DK0IMcDwWYB12OEFSmpwdd54eJ+5tj76rZHGpOI0sl9/OFa51G5gIUjrTLg01sLeh9kP/9DvJ3qD4EVhScgp/fURujRtgueOdIWSEdHsVGlilQkLN9JRpjj6ZTKdFQ4pEfMde09mOOV/bM2q75iNUjWeEhCOJg5ER8AqA9kB8o+6h23+C9hH66LDuCXKHhTHW/VJQIWyNNC2dnlt0kLUtcXGq5ZZONSGIrYb89C7Uk/rs2RuCmXtWOiiniCVHvwTQ7+evsVV5JKTBR2gtPInEWxIY274G2R0AqflZZimTVBxC3QozVm6ieTyR8EAq/Kn98/e7oSxIcM9Npd4Q8ZHjT2cJDHVoP7lj588+J/zr02tJ39lIchkibkgo5lVr8sqTwV+mv9pt8vrC/4vFkc7/C6mITzKBeo5zMSEoNvol02aBzTfrpMVLB2DTBCHOkz29ryVlba6FFjr2ndT6UGKOWRtm7LnrmaeXmLAxDXSy/2MTYjXlgV5Sr1wXWmLbR5mS9vHpvT1w0+zLx687qg1cdgbRdeoPs9t9ubIzXQAqeXB2FugEJgiva88MWwie/zuKOGaIrUjRrIA+lmsiKnAhWV9MdE348DQe1gyv/bwE3I+e0abB5obWfNOtTNQV/ti1BP2Hjb4GgeHZfUmGuTFm0bf2nkBTdM3hWZrMQx9fuNIdTxKR6qbAz+bXDua8Iin0O3vE1wUr+66OtnroAqPCrI9OQnpNxozBNh+ObcsQ7IEstU340aeb1v1XNPiLZbdPW0HaUIp9k1XBC8P63iExtPmpsHJ0o8wSpYXlS0JKW1SF6uzhjttxB++hJIBANTPV2xpv4A28dESXIJEdhgPdqM2aB4wf/nZ4YIPVPfsdjSOumsgOb8wunmS0tmorjpg2Ot3bbLt05ItcFL1zAkIXqbW6yEmeoXsM2RywxtSqVibperR/zCGIocYcuEb+IcHrcEXWu+R+FXw62ncm79dFsbA5URdBqgGd9iOhSQtfU+qq4pZawBeC7fFLE6RQQJm49dHOFmIUf1XctXokyKQqkcufZmLlmtybMWtk6yj4jp5He6aXuDshMNQ+FKiNRW/r4/+agRnHL02nVI2+z18YBbSJmJeA+8PPA9HiGeX3uKcPZb3rzgqishDss7LYG+bEWDsP4PHFwGI52cfpVrCIsh5+B0ytaPsGoXMW/Jkz4veJ0HhMer0l30QpVmLF/4JJmD5zVl3QFVdDCszuKenbV40/MvooJVzDawzWrIA3z7hZeFkZVtcPzrlXgXHaLCtI9FilfiyTkqWsOs8nV27yQXX6ut203AG80S5kzvBXHVV9vCey04trQ4DyZx/W8CcQeZj6tQOKZDz3XODk0m5HRJ4fse8mIdRDjBS5SUYzMju1vGYpLNO4nDj7Bot/wpRhYOyNEtjakkwwO0tvwi51MfHANLY/EnbdBB1CCJgS2VU1jdgDK6tChCYhnAky1bpMfbvNRVVtUy0K6yYK51D1PDKE7qRvTKgKHhP2EBMnqdi53WW1ai18mFZTHSrDk7se3SjrFKzHvA5T38qf0TJZXXjX3eKzBuLjQMMGzaOx/YQSb/GTv2KE5Q6r8eDeYOUEFZpNx39vY22Z+nzIiTeznA2bcemy5x9ZXFD841ZG0HKPf7TjGkNAwp78GYu8fQAU1SX/aCshYHp0eadYEltDpFrnqUdCi3rlFD9zJtqWT8npz1Fh/omk8fXbjBFiiv7gWRpZbbFWN93ZYGppD+RnKPEAtRAC4rjNb864ABhjTGNiSkiUpqF3Uy8fA6tS10QSr4F5bbbgVrQisNITVcCLsoaGPSkhoE8u/oiSKFI0uswU7NSp8S2M9atJStv3M1qQuD8ZWd2ALyOc9ZtmVkBnJ539AN7KxBc1DeBebFp46Pxx4ZruIg1Lt8YQsrReb8UdCHKgeuxE3G0jjyGCoVoCHTyG0woVJXlltQ1LgyoOTbKpWn9iG7YRhRtPitbTaF6uiCEJweJm62yG5saOTxTonr8Cw8pLTXwaHx/v1o9jMBWro91Mjj+AroZGsN1tOAQ6jaS5xWkNW6/2yg9zYQIIZ
Ql4t6xoXVNCqbhSQv14CW8vNQV9LFIBYsZ4O6SIzg6+teR6zFgUKioTtYixQtW9uO1M0GSLvj+KnbxjSdsITzhSJPN0N/2KlzejC0tpmyqnukPqUJ40tDM7E6C7+unqnpXw9lDMVoOGtJ1vP7tmMjcma+/pAslseAco3iL0bS/vXfYSUH/LPzq9newVdzvtIP3yJ2Jblwgs+bKNupMMUmlKMw1nIPOI1gvN0Et+E45PI1GJi/tQRCKG5sv1ITBTqNkPQFwWGBqW/W43D0wTSfJ0vhuSXCBxtVHRaMYLQWSjaBP8EYac8KsNlThiKuQYPsyqWSd2+PdLNc+AX0viCgyMFCnSNmvpSoqQv7uWAY0zS1/rHzSz0egpcWx65c6f79l7qIYB7h6syL2cK7G5MdPlAoR5XjIChjrOR+oGbNAY64ngap8MwInj6oab94qW7yG7Hs56KhXNDcEya8b52ENcjJc5v9k9YTIKF15lfjwLwuk3snR4LLkl6tSGFB86f2TrDZyQvC/zFsSlBbb89sjsCOfGHukaf7qKrCmjFgx2s9BfKYfaoHLWGw8am+xQYPsA8HZiWIi/+9zpaGgNjBhQKOK9G6AWlHEyewMl65JpSGAlPkUqktCLhdvXls0hfJ2nOJLCrgvn1g3ED/gOzYT7sugvAhnzXfedlxIAkg/Piyas3wrokDc7ZRyoBXE/wLyneLYiGhTvNei7IF4MxbMy1gc4v0t/8ZhOrUiHWCft1h9BtJr74BF8zcPpmTDtq94fhabxWAzWbFnqrGAvwjYquTUAFCYrD3WSFqOW5aza8myC1DuEF4PoMxvju+HY30L+moeZttTSNZ/+CHrQmKcb3IE87PC478CZDRsA7BDO2JVuEfuoWrtekS0F/Zq4/y1DgKxaK2hIj7MiIp9mjvuU1wYNNSCqyM+AMibrNtGrGpkBtzb2e8aXfvgW7wSvtFZaMPHoWwZlWnVkP/mJYFVZhOM7zh1j+JQwimaR5MflO3hYTQB/e1l4fi5in64zJ5V7CbBVEZPzymgv342PQmsiexmq9dcLK2LpJ0Jo5ySVB+ce0LlobJwRvRVCYYlpRg8fcJSEZ5jkrrzR1elTW5aWcy7LIZ1mwv+Hf+a6yyftOVwC6gYzNcQzSJViq7GoXuys59kPPoUR1zDndl06LdjiIpze+Zthv8bfW+fyIz+SzzADm/HP0rPa4tLdXvcu5ZeAdDIiAWBphkW/2XxK/WqloieCf8hcq4drMhHR9kq4gcEC+sSvfkeYSUVCIzodhcmqSh75O/CSt/6mYaNC12xMqcBD/xmaVv86wslpcINvl74qsqQbHwDn16DY9E4XHmnoTDnou/8QBYqR1WmccoZqFqqzetMr+AwftlPdUTjEOXN1IHyIdP6CTc2TRdiAUqfpyfx5Iooo1TQzDzf64Sl1TUA2yzaXkaFDppnAyqamJ2wQ4YOSZVM7je+XZEQxfwXj5Dr/ug8vDQeYUzboQPw3mpYmuHkyrBuDGnSW776Rx28dNAS1WWoi38jAwSrglpd2qefSNDoyEcKLdDvGMdwjD1xHHcVHbm/XjEy5fqpcqPUj7iG3S5122tdG9GMRPlKGipfyPy/q+BEaDnAsXSrSEPJdN2WkfAlJ4zKj0eLLfCYyNtvPGodMXLg9JgVTVlXqTthxVlbr44l3sI/IFz84XD+xRnVMqraXBUvLGn8D6pIMiTGHEplErwBP2M5k0i5S21VKlhpUVqWvYj0gLo2PBzd+tqGeGEzwGkqVqMmbp2Qh+YQZMCFuxJryicljAqRsXXq16DCKJx/okqqmkEx+c9FcpxqdsT8Tg7X4t1E1jzvq9d07TPc6bnPZFnh/DfIZaSp1B748UBSIB1pGlee4H5bAWqmkZcXvIHxcBycporIpLgjd8r/fgBMISnNYjKwTXCPnSXZoGtutmdRZYBN5IBx95rV7xEYpXO5sPTGsTME9cS+wALXMXIQgbNbsP7w6ZaNmcvCK1/a3lxXK1WVlHF8h5VQBPDp4rLuzVPZVhmi5xBeY4rwOQXwKDNIjXhGSfujokuSn3In5Xtu+0p6hOCsPyBkAXlyJ7Abq5UTiprV3sNtiOsEGejOVEBIpXYkq7oRK62YQfruSUFKcYgkcTWb0Zh0Y2gXJ3CocAHpff4m07GUPolBtHu1YboWeZDVfrM1Y0FTnlW5LJ1zKZpjff8GN3rEavoHEAEyi8HKR7AEb8qjvhLyhji3eCcZUAGTQV1vsvIVKOAb/ajoPcAH64p67tG4KWhXlngZRTQb8xG5sveBLqHLYuhXsL0c9ghe2TJBXrYmxLofsock4cYbdX8DvOHwVtkgukBZG4XG0VD8reXl8lzy8Z0eMkAliLlh/CW5xmIs522Cu041HI+upytqGnsX7smk6xv3hnoGf3Evx1+ILKhLGTvKlHvLma0fsFTXUaco7W2qw/ztU7TaMamqcjxD0c7UJ53hFnvaCvXhZEEtxT14eqDJPgv9AlQxj4CZncyiNKe9W4K3UzYs/0eoyNCkk/qGHBw3Sgc+ioQaXRP7VmfeqjkwIoMYInZhEVsYQI6P7hvdUxALb6ZynfHOnrxDSXdss47XJfGCkEudGTNSCm0xeYWI5SGO4ICFCogE3fCjSBhfXpXw9PCZczsl2AqPkCeqvzv3Y9+AlnDwXpe5tB3aJ3Oq2Uz6HHuUKlpi12M1yYp5zAkxc2AfVLxsFDqCSl1cV3q4wAJ3tRF5/DRdkDQj1VvwM+8JUUCyJs1RkbFpEbj4sN0rRHnElDUQ097ZEggG7Q47Ys9rCS0bFOhM2RdrDWYr/irvMDgZlVfs1cVF0rhVIzpue+2fWeHOLVVPhMxqnE9X70Z52U6tj/wRllCzuyc+tSbLF3dCpRFglIq/RwUBdq1lmz4I/SY+ZIJOuUia7LpbRRB8BEeOyfZUizQ/U+SqZFz+UdtH59KsHFOkzW4eSNy7PYrkZgb0VzJwjamkrdVzqglfEdmZBjiAEarelhYPwOhXmRFpgK15Pt9HIXqE9kN04emK/SHoF9LMdPZtF/I1sOp8/75AkMxDXb6AoNpr6gfDg85cQXdhoRILX2OuTrmfrVIK5gXBFbq1K9tysjYXlTePnJeEPIcK70W1WIcaMNFA0Hs9Qhtbaj9nIiE6INP+Xv06PwuN14nw0dJA7rYRHsxtpD0Yh3EkzBKD5If8v18otqKBNVOniQsOu76zMSpVCGEcIjA9sGFcGXSHIxzNlvvntp+9Q73Rouay6RPugdhWXcvEIdN92ODbr8XhpjE255EPGAWZCuA6C8M9ESq9Vk4H0ybOiYGOUQJi83QBeetXMZZiPy7xltNvhPERB9c+IyH+RALv7uYgc+UNCFE9h7R+Am/TNnKcZPzrTVSNSXahd658PE1Jk9CsI696sX8ItfzqzcRkRs5UStoFoRoYYWrRmsWJZ4Ws6V3tWJ7wBudTqGq22JctW5g0sdI0NFpxgmL22ClwtleAqemD8rq/o+GV5gPOi8Ugd8CebcDX4S9fNhbg9bVtmw/4lRB4epSaXBg/QtR8pKF1R5ryKmJ2a5DiD1zjCi28Tuay0O1x5wrkywDy0jV+YF/S7nTNFeFq17KU3iijkOM/lJZtSeL/AHAR5y5niMgvKW5GWR8iw97o/NkFGtskl/CURcBosQF6jQrBvyhuyJlzcLYz46dsO3v+YbjHN2IZEjH3Ocz1Nw02u9bkPyOGPRMNQasPLqjoKDnR2JdP+qsGz4jzaxbhmkmw2wM74JmcgjHwzZbHyI7c4FbiZDrSMmjX9iidaaBMuM8tvH6fcoHRazr5T2EmqBpjQkWtMSk/USuHh3qoiS1hI/GyaaNbK97gmuk1NHQr97xwSOG5itKqexaGAJ36S4Z/6wyFRmR8m2pzocsrnu8OdBIwJBMFYhNiNg5BIzt+ONfhd68ZzgT8h9ZZ2ZYasMdbHlmTa+nISF3tiHD5sxYHdzLK1N4TO1cAmGslCRu0i+NFPKDrZ12B4OlQHUx1cJGSdv0q/r6QBv+ilCAgi32KQuugU30Sd8Iy+BmuLGTuq8wjOqg4ucI0J+YjFQhG5RxRBVYDkfYedCzxDZXxWyRJvv
EF714HLRqgsB8BTXU/QlssQ0bzKpzoNUF1kZpkk5feSDc+JJfMZAxRHBFgb31eZxS9xV1glQwN1noR/OMRNmrBhmF51+GYm7ctbtbxlD9IF1q9mBUpenwBIXXeoQ7cT2oyLTqdEgkE0FJ39zMBcybV8K2TpA47rvcOjopWiUmH9U8yo74+NxpV1avQDA4Z5SLv2jcOi/t9h0JVTG/um+h4lNpTMmC07+OLAe+aZnSgZ1DiVdKBvVqKreLG3SFCIJQNlNpnGMgtPQ1cLWPBLRywkgXgoZ4kcnpUj1idTiMTNj1k9NLXUh6AV8k9Kf1rYHMBr6Kd7tB/tqywyrpZ35/q9T+dKiOfK1WnL+jEn5BCeym6wLK0pwOTjM/zGYVxVUEnYsUVCDE9V+K4OVjnt7zUbgNl2/U/6ltU73xUQyBkxQqRpIo0r2xL5DyH+YZc4mjlOM8GEe8nrcdd+p7ND51yaKdshFwxqZRNys+xzPTYkSr5AoAEL6kADM6Pi4Pym6HIpji05QONgFyL4LBQLo5v98SgkAAcwVZHodKZW1HEcYdILRSrhROipg5jIODGAGiNlSq03S7ZEfk1XhpfVzqsiaAiiYz4syQsjSpDUmZ2B17Wr/UniNKTDImvKPIZla06/Q4hkwflB5wyPXUY4g44dMtnMGiBbKVWvXA8/3miXZ4GKAi0zIRefx9UdrCRqu80GGA4qLnxLZnMBpLNKGYEz9R86Qu7jk850G44UqxMLuOUhE6CQrx07onHjOwdhYR4PmhxSvYUNKUxnMjXsTEgztIiazfjm0gV+QdpzwI7VYnXCDhIiaXp8o5XonVPfjLK29+Am3bYnpiOJJE7NdMrHf7+TsmnC8NZZZWzuuSx2/wkW6Hoex1PKdOdy7rMVDGtBKSfU4yV51nuXORDkSbQcb1D9HpTGHKQGjbMZvaRRQOFWHkxz7iLzQSu++sfKSpeUYm/sJVl7dPtuFAzt+Hz95oYnUVX2pP9ia2WyUEbw/rVPpT/mVFvaFwCn8IpUK9k2kBjRRZase2but6e2WpsekK4i/fT1pz8OKCp1pnltvIsLm8U5sTSqn4zeU2iTj+Q103CzUlUJ3UM/KMdLYLm9uRElFvR82bWNcsJAugn/U2NQysgBzv92cVU/2nYD2UPm9+1dHrEg3kko22ZEaaJOeKh4go6A7RlMi/S4F01I0o/LFsp+uB5rc32M56LH0KRbJkoKfDlt9sUICZaLyeezZRZ7SQCUng3bAg1DrcJ3Cady/xMxAdZIHVI8ioFmeMTJnCLd0FnuPSm8hqdv0apCnzLHrELeevfO7rB4MA3EN09Zt4HROCZf/uPr2ev4HXry4iANTkGHAEbhoS3mMxL61GS6pmFR+HN/CL9WxQ4ZSgg3UzZfkOD+owgxcETPg1eIc8oyw7pNucODekcrCbW0QYe5VYRB+a+RLNhh/YO+WZCER/406EB8BkTN3T+30rt3w+YKWt8VhbiYbJw2s00Z84SkNjMk64DmUYs2nYDkhbXyddkhtAW7P2W4sOOx1OTdi+CXS4IqS0prFozsbUJhzqU6Fpy90v7zXBYBC3TrkQU8mzmSzK0DB10L8cmeY9vBbbJ9Y3cnm13x0hANB2F7U9hq2vhi5dO7am5SaYMvHAG3qXgmd/aWcPAtk0eKg95m5CP9WVR79dV8mzcmfv1Xq2Jb09aR4j5HC4zpn8n3QS7ka3DJ7qe7RrCC7p7IPapSddZIdx9lnnq9AH5oB17ydrwCMQisL8KNMyZqzNY5z0IZRWL/lefAuy2Z3Nc1IxeL92eV94Ah8j1d0p9ubQJMRiLx1gmIV4fDYjyG6m2Smr7qJcobniS28zG9/qxBpeRLVZTPFffgtfX6s2vKEh0LGQkrU5WTDxTij+4GfRf9pG7FW3BHejFs3aCxF+l9GTZin25z3SbZKMXD1yog3quLyA/oBLWNzpFndmpDWyZ3/2+xzKyjwfRJrTNIQSrgCyqSUV8rKlAxF3CC/we0W9wp8Baom6KV+/8hHmYXfDyqsgWb5vYtvGnpRCfH2NAA7hoB4XdugTnYToslI3n7iKzj3gpZ3yDS2/nL1DqHTDTtpa6lfX6+qqeANEeB26QFEKutEZ2fq5eAVe2ZLAqlKiBV1pdj8AHI5K0sYXnRicXSYsl0avbgIkDJOXj09JBz4LcZGGkvcG0iTqSpnf3QXvaZfG8PkLY+9vJh17TiiyFQtkj4s1SZJWOUsG4kdQohLgCyAowTrtPB19RUUbJluwVNbXrMpJfFhbK5h+MUZNc7d0b+JUT1VCXRz7QjsYARoNm0Tl/eHZTIallOgq3bEzcMGXoph9908uBKhuuxM4bGJ9SqNPsQp/dtGFGQAv/zLquneIPDhQiuhWUA5LYFPZX+rK6zpXpyPV4q3BD4WHjD4EfN5lXq+kfU9eAPiFjmD3NkfHeJpWwnEI3o2mNgl5S5IAnicgl8xNC450T9G2auiZr864tIRLwYtKjUzmONnCgUgvTWuRiIov6Q2kdgbRqfYZRb82RErmGkvLV+u37XLj+MZyd66XduOeYu1P6RbPTlY/4SyeJ3jVNo5vZA4YewuORzQYM9icY13h95OnDhstEKlQ9udH28tDYzo5xBqPUhm/V+eQWPr6uf++gA0eF7U/pfy2fr0GvN5dr0s8bK1maa12x6TAs9r39W5au2/pMafkkKrEBgze7AewepJbolM1naqbTm2LBmgYQl7mz33BQpIVXG1iOv7Crieo55Y2EjO1oM+vB7FU/YB164xjYxk3pDgHjXBbYfn6JBBjN6vESP/L2YWX1WgQdrmXd14ON2av0w/f8kOAQG4s1PWVPLwi7y0I8yy90N+BTkDRpMXLqFlyyzTynxj3lSZhwSJnn9TFwRNeU+TIrj/BY60ksBxFX5/ePXkLMpsgfWLr4c0XKeBW9maQ+xMl2KKkKcEGb0xl/JWygb5i8ntYHLgauakPPS+kEUkzlxkq5HttmtxOCeB8CJ2tqdZRYVgXwmUfPTucCGGfLY9E7dYG9fMdImmYD+XFrR7QIM6c3daj+q3QcZ8RUKV2eD3dhboqUtFE61cw/kUbOBNTVwETteP7DEbXhC++CLI+VCxE6J6s3gc0ZpWbiN6bPDR29wN6A62rABTn665dCCBFLWbJikAJsx/sEl8d/zYpJjQmhbQ8J5sWYFWjugwMPEw1vr/Dvjanr7ZyOazYtSj29ApOpnHHgPlCFl/ywFe8w/ITsOLCsqILmZcqKeqJp9YILP0+cSZuZjqzG5huwoNadUNUc2zREsb8GjhmtD1t57UDLOpetRqbQns6fQKHoZesgk3NNCxvYCc1TKymkJom47BWnVhwSgSCmiM/AIN93wyCmncAT0Vhf+tWBnrfbslOC0oK0OjZWG9iAl44JwMQWqxRRXPovw7PtLiNZzZ6S07yiOCxfJf/akM2qixzo1Ry5Q2nRpLLiDV5sjZ/wOhRkN7FfDndWZTIp6GnOSIRjtsl1EWFOAJk50y/xTJJe7Y9IUwH8FvqDZL6qnJEp5v8g31skgAyVQLwdNuTR6Xdz7X2Xxe+y634BoT4zkqSFb08lM8BJytQ5mxSEAlOO5nIgbz4NefKySA6s3rPeb/OL6QSkJNn/3iGuzEKzSPXh/M4xJNZ+H9445QaFRbhz0ZHATC7iBJRqo9CdeeK+gYmkgbud3PwdRGnQv/NC/fLVPBPvIN4+p7fcVrvFHgJ4bY+vtiqjmS7oUXgZ7ABHbaFEjkt9ynmwznpxRkfMRxIhwzlpL2in/O5M3w8IG1XCKpZYxu5Xol4cHaHjIyP4I5DHWUTSeCysTOP9m0YtzmnCgx+PfPZg5ysStdxPTtSpVCYUznjZmgYiht3hKAC0eNxbasY4mfK3B32Eor9/SEnJtmt8f/qkaXpmsV6JuGfRAFvjQjFWCbsiUWXtNFgIk51htyLAANrtdeOgJaZ717FTEnR7gyPndli4O/ssgCw8feFBIndqyOQeSp5bEepc3fFZewMyIChRgKWihbKtjlzTJKeJE2Mad29X1hfTc+8R6GA3wQbrfXmR/A6iDuTjKIQxdLVKH50v1eEsk64XucEZq6xt1cDxlF
jGcMVvbHZBN7OBPU+lTNbdXAb2/FL8vQxKkyEyDTxOb0HUdrumWLsSthzcI6mloIZ/gyhIQz6NrS9un1xMt1QVKfVXZixWJsTwBa5+lixupt6aO+Ikfh0ZydVI4MzeaXAxFp7BI/bu7oqIYbZdp2byww8jYqttbxy66V3SbQtaxOz3otOHKYuVRrve/jTb11NZdUmpABypYMYyuLFTCdPqrV/v5Ne6KLLNvkTMQ4rXZYhuQkNxzW3CK9xQlM5HnyXjs0YX00vA3L0E9Ni0i3RspgIAlTKHO/uxIjdEXEQgTERSJB19aUU1N82EPnpwEEuMIV+hXFIFXe7oi8mAHO8D7PeTir5HVaCn4OC/Tce4YymAxBQ377MY6t+YRWLR2toVcz+RT0F7EAm0JVThMzBaR/NGGeu5MHqs8bMUZ8pGQ5F/jYhjr2Oiv7BL/9kGZ0i8y84Z+n9eDcjyxtaAi6qOUa7avzdmjHJi9OSYH7eJ60BO3HaP4OczDwUzh2GtAhdbt5D6tZDiqpubTfxCmzzrspXmgKFHhRl0n+LBFCC+sirMHHS7X6pA4kDxjMmvwx/hREvC+F7lPsDmaxqgrRTRqZVfN8b3OQ6e6Kx7GH+GqPbeCYEe9thy5ij0qBZjSR9RWn0c4ZExXnSo1RgT7xIumYUN9Jp4Gwul4GPUoPcQ2b5T0w64aHWAjB74zuiufuRl47Rwtf6o2gJ7VwJkjeUgws8wBSfdOvT9OxSJ2lhaFPE8Vn9/poGvMN7gFwuFrNxdO+/NTUPg04Hb2muk1iHVC/fCn0GZ75BIt+yKHcXMGMtWcyFyQwNbTUPW9RR4SqHHXeMX/dmDjkiTOQIWbcy5mItsKB4dMCXbVohrvhVHsSr6LX3gKuNJVAa2r2oYBgeStkUI0MKiojSx8R9iChuLm7lRCk7koMrxydPAXvr3aB+7eB6Z0O5D7hS3NZwj3zhevZBXcJ4kKC35PDrZHvP6KLbyYrINIJTGTGALbEkz/bTV/bWx66uJ5z1vWlU7xLRaDTNerEJbb4XmrnqFtdbC52rp9VhIxJZnSjWfYN/5smdEvPyUBNCV7JwVxhrNbWCERZEwEdlLDBK39+xOqWtFMI/yJLW+Ph70TFDo7AJcTj63tVRaNWbvPngLhEmc9b+QX8DOs+NAmtPD/s0FmC+NolJWtvejDZpDuquUL6sCUhWe9MtuTvh3fsKUgC/KiEybdg86Rvcuen/QKTHSUKugATwZM3a6/crjDsAxpnTSJP654gdOOuJ7ko/VW9bj6+lhwvtguPxdCclD5G5pdRzga80RCy6yS/Wt5iDkJZsp77IAwlItByNAE3a4rw+QcJgn4h7tLE6X1BM6woXWQfanJj8YSBWUx8XhqZTXLUp+qUiumqbgpZvo+h5x40xNKCY+shsbFdicS2rtW6M0jq+YvKVIIFq98bzuKMIcLXpcuM1qxHnlOovgo/APsBao4tv0OV3sVLT7RZmbDuCi4AZRLLbzp/7Qi2upQwS/3TBUmE72EFD060FPMEeRwhUnZxWSgeDrLUfd7ksz1059vkeBK5nfyT4tBWKAXWO8sGETLG85ARYSOSm9wta4sw8sq8zRi91MGn7GeskErm7avFnt6k87nNY6aGpdfHmscvZaK4Hh325gyd/tdsD/25C1yfXs5x049JhcG9q9QjsAar5BcT7QCkIOWEU/dYq743qMfoEETrQeJ6sB0Su3KSIhGElC4fxMAUlOctoCosj/VedyYbxC2ZrejNPVQPfNNAF0RNmPF/uyvpEOHsjOsxQnOty2Mj3+0nrSyoq6h3RKX0QdTCRWySRkIdMU42Wx8j5gWlymrAeBEQ43A4zps2WeT2cN7aEljxh97ZYzh7Si2FtANJ9mblzkWACyahl+2Dj+hjpN39/CvoCKuK30AI3/JYYdyctImVgZgA/91t0Pq/7CMypF8Ls43IReoE7+YIgh+u/y0CYsBVVo2RhF+cBFYFM5D9SZK7CYLf8W0jVyVc+BHHzc1UBfSPOnjUS296GPmYWp01EVOP0ElrF1Tn/6ZnTTY2370T7W2WmZTWJgLLd844V4qHqdLmola+vnGq/IVg+8QERqctVILmjKOw0vgjXnB4tsYlkDjNcr7AlEURvxdSib9i2WFmFtp/R89px9VrWySiqkhcONsczR7AQ/RmE4r4WKlGrEpXze6UAW8hr5Vnr55PoGiBGwB62IG+dtbJm+h9w3BrmuByk1M5dfEufZ1ZfNc4hbOMG18BwWlr27NIhD8oLaPK2Q2uoemq1KdzruSpw/p8fVM8GrZa5yad6OXI7vmq2ng/Lq7KctC6FnflgC2+CUR1hpJVkEEAb+mjAHYlRRjspJv8uu3kBhd797YXMZAMNDuHNSqHzYVGkt6hQuBo/Mqyv8ipEBT0JkpQEV7Cb53KeSyQi7WgksrpT8GGtekyN9FcSNd9i6BfCq7Uv0ER42/ZtToih/KXH5Wx8FcCTF8sX1lfwQiYcHlfVwJf9EIhch+A1KZI+LCprwdbj+FKHoz/7DIKxzWJdoM3NXaDB1y4pRSSX1PammEIVS8gxCIrO6xLoIsCCnwqWIecroJYN4dz9SsHDnWoDWgJ6mQaIVyvBD5VBuBL9D5NZ61hRFui48e6r0ElD9JNYXyQLEEylvNQNj63gyxrgJm3P76tA/Ro1H0AkGn+zuiZa0JSjvD3esHvK1dO5/fvGK6rW/CGexq9Bcgp6kTfxHFBBxcwMI+9B1moCEeUoYrJcd1e6bZsa0FU3f+b3lHCDmG1guQRooi862mxlhgjudbkyLLU9Bn6H8sM3u9oQybDIxgOTdErVHCVbK/PX6Jm2jyXexyxS8qQnVsZc5sIKEoBU8VOQTd0s6MYcLkjUdWq8j6Txm6CORhiRNZGeyNBj75n1AnYufGvU/41eNHCEPwO4lyW3DDsFwOw1zo6W8H0mOfUfTc8o2f/UXHGKIxy3p0AR72O9I6lqttiCeQE1WFN6rpzB2hStqsSclA/X7xtVjfhP1+nK/iCt+NYSW+dGyUYwaDlZvhdzyxw6m2qQbKcYYh4Zt6LyZsrCunMPyWZk48RiTRvpzYFUx6eRy39dnc8GemvVoyDDLFjUir3JxMXBOyDTWIu3yuyXOn+TWnQf3LdjNX3r4A1JASBxSdLPPku+iAZcqwjRsVPpmEa5f5LpRzlW5ZnmiNuUUTuyumSFxpCDog4ljRy6M9kFF+9F9hOgSd3klyk0PS4xTvpK5dqW/Cc8DbRW8og3lNohCAcMYDnu+TkxM82NDrZcmnQ9Zf+5ZL3ce3hHlTJVvX42apopx03fZsxCcm/yChPfHqOJLjFDO4D6aWuyMYS5MT1RMvdOqm0BzC/Ky0J27FfBPzRbPOe11THnQHFlKEiBR6K8IzO7gqPMm9LPIlmryQ43L/UOgOHkW6y6oT9uLB9pJ7FMBvXGNM8ylxOJM3gCNucICZSoNgxuZhOibFLjF+W6PKddn0Grm8ShDaqyUxovU+dHK3X8Q566e0s/JM60dLFMR2m/OFEbcMSD4i+QytqVT/xeU9s5p2ck0d5KHnLza8mMZGWzRageRv26cV9WJ5KQQ9pWQbUheF+m+Ze8hqZ2IppcGrDEUuGRewfH0zAxuPoPWLt/jCF2emNu0jAnG2DhJNGJ6pLFqpFwIaGUggU5re+ZFbh/jJPjSu9mfG5piuwOXbm/WL6dkWeHAIqk1Ui3wAs7jHPnB2f3jj6GQZbOdzDgqjMVzGOlg+BSAS+C1TA0rzKv/lxs3k1sy28+4HiKxIU8ZGfcZ3YVnTOZROjkPSIhFAW1KhoNp5Ulb/ADfrifRZwiB0aGAiqU4eI6mi/jsw7dCDWL4FXdBKYAOF9TKMC7wve36NLyGEon8P7rGLMeUowFx3NQlFXguEi1/N8mNhW/ZZHTIxOr8P2CA4Aie04skWutYsLE19SkbBCO2SSx2I6sIcYqGo8zklrmMDmnc7m1+01LE0IvmoqNa7OF2SlxgcpKfLy32pUDW+goRyvCDIgPgu4YeSG2YoKaR2+eaDFCvsj264fts6ed7TQ+EQfwweYLl4VCjGsi6ODflKA4zE4sp2DwPUVbx7mI2z9
j2BNAxXvOEPvZN8pXY0C9sj1uOgwuVd0mP4E27oGq1OCrkgd3jeuBiAUxawysEHi70gUETzODll1OdhS47WlSslTjWFw+gx8+rr1vL+anXQsCWkk4fEjytYI30Lxo8em36pzkYiwxVlin2ydXsUErNJWP9uOgJAV7I68K+1llztmU8WTv+FHQtRFmrPWy3SJihrqBnItT6iUJ7ikhh/naAQDZ1tuTrtBeGy3mvrE0F1cfAa7F08+xuW22Wp9uTmKSIOQq879M0UmiEAQ+4WYFlgoJOSKIt2bWjwgXaYcuN+Qy2aE9q/5CQwJbNuBYeHmHzuaiOCaUEY9QIIZ+oG3LSQEnGLrChBDVBzfNAEqrcPUlHLDP0Tjz8Y2cX5kXt0FbPBIYlvkSUJov8N5w5lM1g8QV3+ocV0f0POIDS3X7J2qGQU6a7hsjbmdsLIbnreeEjwsCA2G72HJUxGMeujtdqOTbzKObO08VsdwaTP+DSfKaMOao4IhnxVUrPHTccPKpGDteRrlyTn4DEIb0/8Lgr6iUBeoNcjOYWz8OLsuJ37w3YUion2b3dqHxgcUM7xAzQtQ0YGdg2CTiCOsUGycur6uX4AXpkb/ydTHUw3yH5pwiJzY8d1UJYJy4c0IPtKLs792KYvxav7Y+ylo87M1JZKtgzIMrJcNB7KhPKeJy6p3nhCRpzq9bLjgm8IBMLTAg++RaLCeSd3uX0GGoo2/GbzbJ9afnubrbNl+kS3GPsSvpkX8zBHljEQ1JZss7eL0Rx00Nghdj4TKrk/e1csYeha6MQTiwZMAv8asuYa3A0UT/5GrtPx+LPDNvo2sSaJ+jQDqtJ8tdmvoDEkTKVTfT2nTzav2Qt3ps8DHDFFvqtzO3j9exd3a0yF/VDwhBABh1Z/FtXzQO4kO8w176H2HgUA0756V24BI5x+y2327agZqTaId1tAYjAjitvbcT/fBVnaLtnvFV6QMMGWcN7xQQFyUeWN74PqTTu5BYprtkdwtgLosm5NgefPYt/noaIu/a6VokIMKggxtjsPmT/y09ih6JsHh5mo8wU+wbzsePQwY2+n40Obnj8JzKT22TIm/gcNpvLGMdNBhyqovHeBo8achp1HqR6lhv196OQpPAcs6ZSRxMNRQ6XVtOQf/vz7jfWw5slglSuFYC9RGghD/PAEkRMDTVBdyRWdu6ajGWdnMsu3aTYItdb9FNVzXRBQm0nr+LxuEEm4qTPqWJiY+WrEWmCYo1kdU4nRWfA7dW/zS+JQ01b4me/SteXaL+pKfMlSezuQy8MdNkvyBtCWNk2HzIgkrMSM2lPdOq5XvAfKlPxdCOEh7eYnR9rg1NphMM4giN7evDM0m7scHvOghufq+cl2sZbDWbNh+VC3pHn1Asq/Pp5lTeciDLb6rGlDge6QpWJtYXYK/ji0TFFT0+haUu5mnkVmT5mhmHR7248XsPqSTL6yWuRD0Cb6A6pPjm8VdnjBNPmHnvKubzNHcRe85YPikcz9OGTAr194mNO7lEibIomV33xZE/i4mPAQItTRrv4OSFtdhCIBlC2z3WFsyueevYXtcaPqKS8Tl3bNttKeZpd9GoHiebk8FVc3TfL1R8i3LQNI5svQy+Ku30VeJVTBRNHb+Rw6hF8f4UnYUv9TVvOzy2IdKc6Q+mjvCSQdSOUTcbnniiadWh9jMnPfCZ5cAz0rezsn/jer9HqAylv0aWgkO1i9rvXUQ9i5T+1Ny7oghtBKwUZCY4jJP9G2B+OFrsy2O6r8DpDSWqvOGZlb756QBXKQGShIOOeKh/29Y3cHSbwpYLOJYe6FiZf4m3Ttita750hUwYEGPfNSLlp6hqtjDws7kuDBgJjhDMFk7HRgEFN0i7khS41DOMrM06hb7B5qpNPiucTV8XYMYrMu447tFbs7B7vj4da8XDuHk6alT2dPxgjdXB52pjIgxm4Fd/ZLxdpoSkv6JcqL7nCSz5/o6o84Uc+hcdy81c+tILUMt3kotfFfcZALs+EFZr0Vs1IhX6WYV1rPcMjrWPHPmD7pN2m/Pc20Np1pj4qQowwGrm6JGxkDNWy+WiC8pjciop86VU3Xvs7nlox5qivT8GBXTefaQX8YbcfBwWC6XKA8+mcaXRgbl/Yj6BRNIzbRS/D1gD5BrVYAWUY1BEz20UNhez007Mc6/tiSKOZebLaVPZVCIQ4KLMkIcPSu5Zkmst6lejkCKpHDXVe418a+yj91Va8qnB30YffUkTGkKE+kpy2HApXKHabQ+a2tfWodg2B/CowcPQ2vulK73gcbKz8CL61gyCqYStR+QvZ5G3HXA9RJIj7dd2RSEJAiikS8a5hYNgeJe9brOk1s8mOyjhlF+hwqyVIya7PPsA2V25uAYyIMMxWL08FOGEheT39+k0BsYxfCfg1rRgKLd8nex8zbxj93YiosqJrFfqLSmbv3WzTPTztGpnLL1jEC2gq/O0Sp9HXfxEe9vuY6vtvcBnuSTrNpJ4CtByUBZdpo3fWyo1Tgf21zajYTA3eWQ1eyXSl8kQu8KgD33l1ipQy7vdMG3ZHbuGFX8pfMmPwbAc7++0yRSFCL4vGY+6KnPhHnwT/BACf4oRY5KUPbSZG4pDJnfdHTK73t5hqx0C1Ublnx4sQnjVRHyzF8dRYJQGTD9gPKEobrpV6QqL3B9NkxQZDlSMNV4S9AG+9AmWjZXqvx6NSDML64cJh0xXi1LJjCBXEW5dwykNgsp70qwsi/URIVisavv6xyMI52gWnsqEkiK/ieI/s/oYBG2ATXIpLDVr7eCZFP5c146nlZsrErDaBGBzAuZMOgJ+JU/xrHz95+4lxcG99E9SyJjLBBK2RuHe6mozd3emDvCUUdyoPRHlS3WZW7iccI/X7UsciyFbZwgQ1DH3/l1CuS1elVr4kHu1EvzToK3pAqy56ugTsFeQPmjpM8b6nn+bT7t5wEDl27hbltzhkkJPh9hfsaPQhfh7wcx4OnFEHueGXOQuJOPq6yXYmIv0HEeLsWkjyDIR96Iuvhvzp28I/0oFKbI2Sou1hVhx31mWBxOBSeoMPCemUDY5cqLGQHEV5AQSt2HPF5x2tKKbQGZFM8chsszmQJUXqjwY77yJM3u8XHCQx02Ftgp69bJRf4IFPDU5Hvx/nrLwksA4BBosZ5VN1siZVzWzwfRXXDR3oQbABt9haZ02Ocd8nV7rp3zzwWWC18NGTsyaYo5APxD07IPJsLz0nzXgeI3AKIxi/nKVclyxsoJQ32iNuUMNlMfecqupTGkpmDDznv53abmU58SZMCg5/fc4ucwAXs7G14CGXT06YC4udqKsPLRCWJwrFwx444o9Y+WdW6m3rFZxO8UvaRKKwPj6wpr5nmXYLE98M7okvPiDdOvNMz+9+ux37Ce+ima9QkWiWyaGY1CVl+3S3YnqC5ZwEvQd296KD/RFfJ//YI8PPnUo8ysh01crZEmCEzFi4H3Vhh7cq54/FmwZV3pFyx18d6ytdT96512Njd1FsB15dlh0dcAXSmJBnviIacaB02RK9ZS7USpOl2Pk1JSEoMYYFCFs/NKCkboAbJCm7T8Vp55/apJVnFDKc5hOgONe28lVubTrmrRFXASEQBrUMbHpTJRwO8rgbttDzMqru2qnsdvrnQekn+HiKmR46qqEGy9bptmvAJyY5WGBB/b45DrJuJyqjFiD6eFEnRb4cH+Y2ie6EG7fmoLP6xnuiTiE1GMTG2tiazBUqevBP5KFElmnTPkECr92AnRwZp90cYiz9tHtMQwtyihPKHvR0l/rk8sezMPu3ut2girVNQO4gdJ1l1CUlrFjMXedgCmEUx7rFq6LrrrltkruIFXYciL2JiTyc3jaOG9GmA379L5TwUWR1DGFWsjuX0oK7511ME2ESoXl7vLL/xDhYXcw72URcYU7UNzIqml2EKXWOUlZE6YR5voUBRHYEEC5+V6pULa0Y4URdpPyT1yu9TygzPv61h/gltppw5x05TVOgMTIiqvp/1bbGUp/LpUXdFOF4SzdP/yxG3M3gGcnIbqYeRycUdQwzWzrEgldeK/KuDuFU94ZLKmxOhQEKutAC/I0if2vKJOuYPXgUMEC9hs
PGfXiKOYRy20OU1sf696VxND8r27Pt3Tl60pYf2WGPTZ800SDRmw+uTdWB3vKdK8w5xonAMAC8k5vdnJ9B+qI8yXXLHiYbxuv/venSKcdEzxVi/5clJBVYQYuwlbx7LTQZjS8GTFLrEL8Efx+TGYKn59SnxiZqlnhnTO/9ulY3TctQfCmqmbiLywoJMmSO4Hx+IABpokg00Xcnt/3chzZbqxjkE8ZENcNfNl7pluiCvzE5YGs1HJ5VKMOBN0C9PwXYbKipXDCgOEiEmPmXJ6JH30N3CjHywWqCzET9ksLxmfsv0isqfuJJGiQ8PteohhpRug1SvBG/XMHsmp5P0w4rQPQUBsuBz4RVy6aFfR69nPZNyQ4XW6yBo/Dojx0mwQG8i6ni+jSta1JN+tnfGYG5AdFAs2W03mqgGULvU5OUylMBEsDqfIJGrxrcYQ1OJ1Sv6tfMKkJMJPatxHnZ+ej6CMNGawLkhTVaZWZfXiLIJlRsm6ED7MVGnerT8NQHL7fJC0a/Qb99oF+Qe0BDne0lbrxqKaA66PR5jfwo2xcznRdZcMGt2ROgop33YJCwiP7Eby/7RJugfcgm/mONWx8DogX9+LoGQR6RWR2bxgJ48NEZ5qsovrt+WE0Ly19KYBE6AfvNTivxVja6ZKFuG1mZ++vB/oNDZ9s+EhI8Enh5GZitnCWnORJtg+7miqHLpC2FoeqO4btM3i9q8uNecuSWF/3zsYuNqH1l8fLTfTYNn/1ZGX2LgtK2EnF90JStqWyIqFOs+gC4wJkdd7PSxaWNqkRuiqh80JC5zJItcKpUi+/dbWWUUVZj1BvQGeUsJz2yvpckk/0Fn7Ax+XL/TMZUaZG9BFVrv90YAs5Vna/Uk8bfIQLWK9KtgVUZUP36b/udBfRLHXEbfRVJ92wbEEoGcbeTsxA15yPGj2b1UhViBhwwJ1FVQyRxfNJzF45YbdmvEuLTmidj314SBKu+7q0/7bAWUv0PG9vINpFWMMf4YnIUB3ew1hcG6FtMqUaC+Nh3/2yzRpE760oUG+g0STxLmnz1XmklggjjLvmKSxosw6Nzlwnq6Wn+VKnpNEqv/qwK3V0nhYvEsGqYkzkqVfdvk13RPIai+teGzuMe/c+/N5bhAqiQlAkjDoYlEuugsH/GoesKLD7jrb/aqzwMivHPrKFIyEMv6/DfBgGPWb4cjcg2s5FzzL2KrLguLPSllitFAEwjqSJQxaLfEjWAthTlBDlPzVeitN9JiLuCysY+meOf8ZUCbJ73VNlNj7cjoGAob+npTPpKVCX+gV27qiJrQ3WgErzIEqsTy4v9WXyJr4M21gefzP/Ea18XgWLB0mQ5qn7fSnhfnUoyylMul8evcTEZhUFF8wTDX/OLBm0HBsHDodRleT/ECJIjUfv2zi+VGjv/XJCFwbzlW2k0g7uV8DiWaQacc+gUEiZcm15W91viV8knstLJZJByT3xzhlfM8uh9zA5+YhSk+mz/xA3g9Y1jyB3Nt/st03bnPm7gvMU4w8b4wT4cpyrROrXzaSJE3jDLGyUhq0j1q+acm8N9RhtvSR5n2eLccUQOQUNnLsGUsc1A4+OVtpPeuFn+Lje6EEe1A94fjvewuNyM5hczZI9qRihG0dPXjYXNrcmx42ASsrzT/8+U+NpZmHs2+GTJAZI05+9pG0qv4ZWnlYNL+N6mwff9g2tcAlGrwsJHc/H0MP3SXhvQTF1jh18Ya1k+3tMEKHBPxOzBr2v+MCix4BsoSBDJG+dlS4L8RzKdc2a6Q7s5XJr858GTqgfk3Cc1SZzvKPbx2rsU9bEU8cNd5lnqf4V/aQVB8rpY4dQw/g5ymHKbRMQo2myeC20dgPjp8AUodr3e91c7Cy/W3SjMd6ll/kgos8OHvXzRMj9qNqOMk96CxWhKTL8pKNKzNAqTLaGFm8lg4atJEWY+rrz0FzQqs2ZBlFdiiPym/2s/w6Qh2B9kcnvhpd9+IyDA+JHz1f6aRVGhIuyXNyG+54lumS3sOlTLX+wpXX3DK7iVp5Oq7S7P45y7yo5CWHNHSAWqko6GtNAnsUKvQMDo92AIcynvjg+nD5/H+7H3YgI56KnT3ZwYB26fcmuX7MTT9TtYmzKgNwr5m99QMG5y5RPPnMyblk2kpCExbCJnbigvX1IGV5EPEpv1Dt0T7IgoMdIEIo2BUJby6ICZDyzSnvB842cah7v2/IZF6Y2x7oPYL19PNb7p3Ut5nVb+JixThNrE+l+SCIpCOoDDTHN+2RFvgGEFZNW2IOazXdvR+DV1Pb0ERVn7HBOA+6pl0JTqfHKxmtnGGrvvuBchS7RLYueynGNx17xFnbuFdRlJD3nvOw7Atq4kxkksxO7mjr/XIGVJQqcyP0CH23a2FyFh/dMCUCxad0yi0ZPisV8fQPMC0PGKXUiRq1bpklvD3mf8VPjD1JOgfMfKTMnvuO1nIYj/TGECP8w9fjbTcUc7pb56z63YNhGLdpKMHfB/iX6yQ21yKvIvRkbr4EUuWtQs4iZ2jLm3WRfTjUOOlHtKXOEPVzKTPcc8SOPn/0s9EClkASYDbl2rglRZTjOzT7eE5oF4P/wneu+bvxDeRFKJzGt5qOA6vS3AAdnNn5kQaAMwqVk3fcIP3crfbUAwnfpunIJaNI7JeUq/UXKmRAbPs2JVXgsiy1aY9svKiqvZHp4k/oC94I+EcsmEomo7rpDqa5McGAHe/DzQk36jHbSvI4m4jDkKyT4+MamFYspIu7i+P+QZwnX2KYFs3CVTjcJanC0XveEMUalh8zaWFBtXpPcjxXsQ6jafsdbLVrgh21KVOT1N1R7VAAiFsJYDX3FfHMlJv00KiBjKzhDjoXc9XC26GdeT2VIMPUylz5J0OE4O51SYiIdbLhu6LGkgVSw9IjwimmyAJ1ADeWIw36B8zg+SM0LruuYssuUI55YVLxWbEE4UkPZpga6w819Yv4/Jy/YCJBU6v9xUvsJHo0ShhpfYznJEGUCQsmedwR3IqF4zRhS+0Bs2qOkVW0S184EsHpebqePkrcTm7bYDggGeNYAjnhqebR8gY/gse20LtCopHV2AZni9uQfsuuGDdOkXkOFh+pMVHb2zE7S3h8iJj20bWF/sQQB8w2sEYqzUSuLcLLaTx+ovdA6NGgqB4s4nEJowduAl3B2MtAoeh/er+RmHEaFHrndd6QoQM2OrLPSYp+VPcTU7lSpAlfqy5kjUbmAC+NHWNN8hv567CM/4DMdxaUhB9VCpW1YejWMR0DX9FnFB1BAkk8tmMUphK9Mp4iiotuNGAWBwQxWFLTQfZr3j3u+ofCfDJSCjn8r+/AfiZhFWrQ0iUE7ERMOsoDTfRjVAEqE/5uzu081eFWW2FfG3S/kSHuzepwtbjcjhesYlyXKWNBomfHbrBGvJyXiv+GkCeYWbsYXdoLRFymywroSXXs4BbNJJpXqsFYWL2EPFcLs09extT06/RFGjNqzz2C5N7iUZ4AIoui0W8SJ3XpYi3IlurSH10+0Kqc2x0mKk2k3qbgnBETyWYbuLmXE1pJNbiJcHRfimYdJWFhFC712DB9I91RCJ4vHMBpQ7omsixElD6v1HxGJnt8fb56UXGw0J8h8ceYHWKaxkqrpqTorLv9YKWRz3nsbrge0Nzal8f3Ix8F7wf0GUi3TDlb3gr6paWiLKRJ5wHOKy5OLF/oM5tIdWHJIP1HtidNrSPQ6mGfQIESJUL1v7T38MUgbPD+XpSI6ugLDhxHQOaiJT6GsKsynIhjmjbtyxq6V9rzJFCQkKSKpxLINg6Xj4o2F4OvdFMdFrVQEUIqAS5sGfrfuSyz929KS/xeXriGHozZGkzCXthrRJGpTH0FbI0+vE3C30t6YSHfl3aBvsn6W/adc9/uZzyvMu268UlkVEO44mVwHde9VT5iLQBmsaUtJct28sl4VSeEIz0E5pNOcCnfMw8zOMO0rvosE0/UyOoGhOfbrCzmn70Bsik/gxsAbNzaTa2q8h78uhA9EBjc0RDfCLVRiNrRtMqpqHFT2chtqwM8xtZm6v1j/QIHC79IR7Ppraw7cUAUR0ExnGcLp9xz5daWyVti16SCynDhUpt33ZUD
4kd3aWGfuLCDhmGY9MNIK7EL8ABXgJlo8C3mv9AnbPf9ZOCe7haFHkRHEY+LreqW2lbHCgfv8QGuYxShWG5xtzsrazQuu2PA81+yBrVHDpNo4TM4eB9vM/GjlxCblfjxmMvza2K/iQoUXxJiLp7ydOIa84HaIoKP8WBb872nbiy8vbRtuEd0V4jPboeweTr66I8Dnt/NYTwsHwk3sEStUHtO0+M2W3m/RLsyZXeg8x+iv9wTsBO6FdhgvoimJ2oA3BiQfZIA56UHV/uCZxuBzUssMVaKr0jCAXusuYbjTqXo+vIQwGaK74o+Xz47FtHzftNfgHoQ27E8z1hQLqHQcxFyLnDyPP8BuwZEupUhJWHi6SOZKkKeJ3N+ESNv63CuUraKmdrAbuv31d0mheMfS1oAvsrnx24jSbNX4n9no4qE1YTfx+gl5mWiiRYeLTZ4njeXNmMxRiTMaxs79UpCrgd6XS50neWSqK3EaPSwue6TLZD0rCO8jRAiEoQ/AAhFJBsd3IQH9cgn2QefvniiCpNrrCKcD/JvJztCeEj0q/HLDoCTqUa5DkZjdD/+3ZPtqq643IwOuLt5lCGXyOcfezr8P6BseeJkNXvZ0ufJME9O8C4b1T0iWZ+jWkvLvuByzglepGi6IUV74fL/3nMO7HVv1poGCmVlUYhauOSqgNge2SuNb6+ir4eVBxnGqR3BW24D7jlnBT398O8V2fVhPybjKMzhTk/pPvrChiltm9DfW2IhTeMnZRpaSyZsJV9ulqo2U+zK7iwDTcus8QGao/gTWbLjAP2/sSCqgAeh3TZUObCyHT4VoHvweTELCms+fRrbpyJlM0Z5V+4Bp7J5c3MpdjpHXWvt0f/xsZ+S3bH+VutqxVewWXoSZpv3SAvfrFuucf+vEhqsKKoqVtNGOIR0PiZKfLe0PWiHRh69tFUUmkF91JlHHL6lQwZxBItXfc1l+ixj2Fh64JM+0RHYi2QoizMb2AkMb46p2/PPr/83hvadUw6dlT6HyczvGiXrvulXTrOy/c1CNz+3eoFrfRgWpnYzlQ6CF0IK17QlAIodiNsE5TjM2iJYPnKaMc2tnNbZ24hmOZNqJsGzLd/A9eBapxFjWnaqF55PeWEc6DTCCOJirKS+M3T54sesleuyrcrC4R2cF0QWrTaWrvwyO0AJ/+eIWJrJiyCnoRR/i7H7P1bPhVgCENagjpTRT+Yh5VYWornO/vC0SOiCQfvf81Yq7eo0YVBnn4LgF6uJxlJI3d4bedTX9CqeVl54xcZXHCWyNNqrX1+HDjQzWE9Q4bs7Bj5OJ4vKnW16gUeNXObuv4qMODOkmzPEh24vIMrIilRIOimZAwHZ+YqW/eAwogcBTxIJg7fg5Pu3a/mQ1jNUwvq6R/W1ieYbXDPctjDV9xcUXts5Kscuu958mICKAUr8/HQb71Y+bfXFcl7ALNYXUe14pciarDexsZ3dUm/zXHDJY4/sIPIsvCoGXuxl6PG/ZYOf0ok4yh55Th/g4+3T9Xj8og0UMaAyTs21p8RGMsnTL02zahzg2RwEXkdX/bXXPB7GvJH3cGTLLl2Y1k6ZAUYZrflsqjedZfhCiKXNzct42sm3JI0+btuHnNboGF2tjAiarZGKQNQ1yCYIr5x7sjxOtrmy0y+WzDRa6as35vUzPqgecWnX8eU9x/fEXYTx6iZqZgcTjafsV0fWXMJgAMKWAU+SGjF+mfi4PxJh9YFyAJbSM03E8i6CDgibgzL5xPH0icZTM9fpCoeSRyXujKZLuv1ITDNlP8PStsADIFLDZqxjv6ifxfvx1BZibCOH6Fe6myrvXQUbiX6GPXDzCAFUOCQDxSsTtHOkn5rzrcke9grgd4/i77yaFsbGizgtIFo1Zpjnz/xiuMY8kaRofswllExkIy3xIL3Ou/ceJztPFKDneA2skVsmsaeJcQ99UlhHF8PhVw6liPZRfnQm7zsJdLDfz9kxoedYDFazDO6QrFZdx485aQqTRUkw2PeteZVb8ohMVPhEnTCHX/PH6z1BlamSkv2SGpje2wmZ4w40oeCfxbZnfVlBuz14FYCoFRkOKGmeI0fBwvBwQDFXYGpkiTSPMU1p1bv5qp9bl51uiSSRPy0Hzf4+7OuZNczIT4FnoeYPK/VYC3atK86JtNvHUQo2NJBOBFpap/nPuyiMn9Rs6IGKWFE683i/vIiFOVt610MXyQd3pv0jSH71jurcF1QVmf/G+2W45iVRyxQTbtIcUAXUt8ZTxchZDM5G4FmPd0Zut/X7DrlHjRgwIRaNaBWiDt/XbgAIrL/Duw6yARhaHVvYvFGwxKEBl5Gp5DqlDOdHo8ZWooDByhDSToGSk4QKJ9tYD+XqmvBm3gGuwGE+nf5DLHchL6esUOdwzYxKrauAXyGNQ1o5MCuhNhtkSaB/Bb120FO2mQ9CTedYaCTn8xz756olExttyUWbd7F+ZWKxbmi8UBXsXV+P7MrCzXwfiYH1NHGYRACJj892WGx0ihTZzq1vz2hcpkbh+AixbQdEqXbodwJggEZB/dPEz2A2WtKgVLPb/7drbJtuAffUo/G5WerMkYDtCdmnfWPez69iwqEKoTf9tP3QawfbfI78WDG08jiBLMRVItrrp+Y00ecx2n1Fc10lu9vWJfZKSRdhlnjjwRiI2w182Kqq5qMuZOByaYaPGHX9ZYSQVai6pbNsbBVJ7+/3QM87KtwvmZDq/qnRHf0qGObWbP8sTu6q4xFkDcLCdd9vKNbd0TA1E60KkDAM2vmPB9vzYO30jU65DYlTI+/fMrIcX4Hlih1xlaQdwlbov2pzWWfdG+qStU/V3/S0ACjOxit7PzjrM8uu07GixfJA77HMyFqrOkc0AEzeLBrG6CtfPBJbdr2owRaon0sxO/8O/BJ8Z4EKbwN7GQapqwmslKupLc/TF+Jb6hS05O2vZEGfPHvAxw1SDmm2MFclRxPWX6qDKzmxye5YAhsD0rjpS5TM3H9Nny5XvQSgXO3GLCEuPo40kLrMUC8enu/7whIQ9/T7BBhaj3sUap6YokZUggn9zNTJEMNvHWJI2uxAJbilsgT+pkaueK33iJAKYK1YRG70LjxB/+uHvrjL0BhIyWD2iEx6iEqqHJ95ryzw//8xT5Mr86gJ5/HCW0eF7qSY5ElsIAT2/iG36KYfoOs/TURxYnspExt+a4jTmo68/2kk9t8oAMtedgZ/3BLs1Ol+yktARJW/7/1q+/skI+jEE5UDyNu8GqVDE5EIHeEFPtDWeX8qfGypDtYUVPEXQGdjCBYeXJCw6w68J7jX0ozAP8Pk2r/nID0cPElkFzNtHObgIx3dWN4dJwjxOgMgzYVrZvuXZMFOaAEt46B5VdN8nLiGVZMYMIaiWprBRv7AeExPaP7W1pJMxmFhSVfTY1p9Va1AEdTVeZOGs1v7lwASH9Pn2Ikk4Ps6OjULKVjRD2z9HRNyh/RNdRXWV8EA710oplciKxd8cs/m7n9qSuh7hJq/Jm0rW1Mx3NJrCWYVWfMZ8/+SNoG2U0SaAdeHgxwkVWtO9lojWAPhKSEwSB5Qaoa6T/zeca4swip+xHzXg7ScaLPOzPI8yPiMPGq52CnCpf8mM3a+KlnM9ok3GPLNsMKpcgb7Qekpv+6tV/gOAtLXwX3G0fhfrTXXdUnthR50Xtptea4l92flxF2AXdpBJTWciCS6BwRXWUeVpgZIbR4MHO34yP3CyKP3QlDjV3iqNPUXG6QfhMJWIxuCX5J1H/iw7CajRPsMplb/p7/bh3LTKwyFCWnNzvcA0exzv8X60WpiGkg8TmGPxacQT8pf6UGg6CWAUiVzO47v0os+/VtykI3iZLsmtqHgrkv9xug0rop9S6L+3ER0s99ykA2F8G+IoB58CYnr32nadxRUmwhlkgJTvwRcr2Xhipsb+1E8v8V6wXUu38S7qPgstvhBVuJgAIhe910q2PZsKe00tUjuqi3DRMePxyHEYhC0Xzl61lFApvmPtqWjolI3vzZUwXr+71bQJEHo6ebJ7LpfRl11o2aOfPEdwxeCfxuvUosu50UlU6K45I6LNOhyyreUa63jsIl8Ar2s0gv6QaenRx/D
f0AuveJpfd2kKOZ/nZ9N0sS6qwgJsMldy6tN0MU7JlayYLMug0V+RW7B/H2CFTN65gmF3hi7hoqDC27RZIlE++49bPcTBDP/XF15YUX9BFSZ/bWmig0Y/cluEpYBI2KmNkgWTG+JvMYi5FG61imjNVMVdmeWfJ2OeochXo3typoIfkZLrZciAZcKDYqNq5RecxkkTVYqSx0498inHcHWrD4A6goyMDtn9OiAq+n8oy0iA/bsA89QCq/j5weiTH+Xa1dQanqYFMoO4Wkdxn/cWg8Jl/y8KigGIUzTs/IUr4sYRPy87ByE6ZcnAqqtOLYAzOmQ+DmrCHa/kYb6P2KPYbGrwMrC7BL6EdDIQZhdYgtnRALKyOIsBkccVSO/GPg8XmiHsfDzAtBovRyVc9PsdroVnY6tcdOC1pAUZP6H8A/AhWB8LYqlX+i+QIH8gkHpKYDesh3P36xH7VjN/1O69PZ4fNejk1Iw9yMj7bcee+qBwuyWCfDmmXZzWp6jahqUC+9Me3sVWlyF4isprC8ywdUAOfVrp9IsLi9/C1ITSm+tV82EiqnKXv2EYoaR7SxUDJlwtcBE1xnjX0AZuUVOOcJ/J226bAAP18iBVBYjVAT7neW0B2wjfkUqbODPd2eAJcfFfWG0XeZZCWoV8EP5mmmJYGKlF24oFhyt7OKcHZSkEPfsfSwf0Q7Jr1F5UnRgigPOrgpNBWD5J5qv/Fq9beG9xyP2t9fHzisOShkzAT3sEH5Cb1YJsoBstG320y5TkeptoSnCOB99TDAfFaFT1Q0qe7LrqqKz/s2Z8Qj86rGmZ4695aj+dDdCo+/6im3EbUUZlup/wo84+dR4C1OA0K35JzoFlUy6I1VRzoodIKfRf/VxrizMLHVxXXr8NTxmSSv3pWt0+Zju2sjDpKPLBg8FDH1MCmwUDKxyZywN5ul7t3t7cV/B2/1Uv80pG/MvpeTFgvgh1/heNZRMZbfZ7MAKNmAkcDNMBJYDx9d3Ue5H+t1hBjVr8SNKQQVzwVnm/Y3i2ywvNN0OyIvuV+trodTVF1RJF7dxNB3wNbzBjnIAQwgbaFvc055AKpRrH2KwZuS6n/8J+H31olf/6YDTT/YY8lRoS8XeSwe7MNQKeLdgkwl5hn9Mih8/v3C6R68HKkBQgkvpMU5h/JKrrf8kOZIfoNGOwO/PvSP61U8sCIUdMwo2uPmSTYSTIEDz2W+oCGoxx3zjPP7A+aCoU/ZNI1Crhqsk9SWTyVVtXJqHTs16MKNu0oPHRKzMoO8mC73WJGZXgI7WOOT33+R2mGI3Xbnsx179OOGCiub5BTedBewKuyoHlti3Kf5G5/gvDx8xTqc6kxP9IhICyHk3W5kXGp9dSlaXAMYyPD5gUlYtGKP2A05D3QHmGYEgFiw5F3IBDfFOl+eP6J8F7TCKMpblHvHB4tSKZ5ICqDOn2buUS+dqTqL5s2p6Fm59JWmWbxJ4h+KOtQ/7b4+NSZ745GmkXcf1MAL1rM2f7Wx4IBv8aE878QYO1e4vZNLO0dExVrCv3O3ovGIqa9HKSXXzj1beFFt9/VtndO/nHA0k2zt5u18hEbpXL9VUGN3xUhPLBpyBVfAuWZvFvmRekbHz9KnwoRdRLqckrg1yUI+6L70wexL/jCmCdNArBq0K6/N0Pa2mBpWnz9mq2rmobe3LKJSS+5A7Bd+sW/6QuQTXsD53wRiwA/m4SCoI8lIAlMa9qsJMJdxuzNs9fwWSeWOQ6+jHi7T5wV+Y4+8NVGQqKbKn9/gaU8NwfeiwhUlHd3hEaG3/DU3OGRslh0f6nC4TFQeL+lcMQo//jtieWbsVSOTXrzTPKy5x9rUzB8v0Oks0kCaWOUkNqZqSeBtyAupoyB/Ga324hKRo6Ls5C6hHZfrKceT0Q5uJgcm/n1e+sbHOn8/RnP1aOdGffzzc6DSJhhtwBRT+a9jMzIqig0sSoLjoqHVbpOkXU7qMK8YQYIG7+4h9c3HKbcFOLMhXVP7X1bRb6QLXAlGdyKuhPL0pO+KxwPLfB93RYQs12CjhJpCOdv2zgaUjnPwJZxfRC5Tjm22Ol75Iv7DHXgMFT77v06YiV0vvAE+IGY8zQyEI0EQnF0N3ox4MX2wEMO08r4ywEl4POwOTNguuBBku/WAIk5DUVHgNtagEtGUY3wx3jlG7Ssq0njXiYMX3mn0hj0Ogfnx22dw9E7UB/7fNUiBZpG3FxBlKQHeU+XRQkdX9LtrNPG2X6X7edRezFWtb+da+k92LYQdFBY2P5DTJnZf4YTBpWOqH3yf6+vpeFyT4mQMQobVsX2iAHfXCoHABHN7dstEpTNYJDgOL0lF7vqyj3KZebL7U44c26hzS5qq9RziYpC1XDQ/1ZWf7d2kkNHlmkjorKWeRXJYaGmEXlvsXzsc5nE8uMzH5L4nnyz7UiEoTv1g7hgu9vU3bDn1ND2nRMc1oDh2hI4pKlET+zPw6e+/C6fDGs6GwNgwIxPUXBWVNYujcG3XtGh9CAoe0koZqT88q7QVlirUi1J4/rjEb6fHja/kzjs2TJ7Elo8RgC1VvNXWpG2Lj6AxId568Hpw/GDPIu3A2nUnQFsuuKQj+JB1D1PtOZmMwBwi2T64QVrWWkA9S03ras0K5vVDIYyeJSwNeCib5MbVKqmmPIJBDF0gxoK+cdkygYON1dxgX1wlQO1HRMQ06eiWEITIcg7j5ubJTvJ92XeX+06chDVlfrilt6tQ9VT1Vcwj8rQBQGPlm7c7RwePA1mpdM5wv+2BOzh7lODr42GJTWBnSnEAqTY14ccVqpfPrfeOEbFDlR7Q+M+YtX0B7saj0f0Dm261R75mmXLO8AGYqwFMUGbOZbKClxnqPlC5Vai9ueuQRk4uZ2QkmuH36YOaD+seiI+yO2FLwSrxoQj4OQip5S+k94oMb15yQL50hz4pyEHpch6szdByYRcnoEPmkVCRYj67moFRX2cMHvBJG3eJIIIIKMSWBGll83mscdM1lLQI6+ydevoWHYWvQE9hY+sKUYXcxxsSRozdl93CqwcLjXn6KqIhb3z+XCK8vJPEWy+OpTbrvdDaHtNX3dWePyjRSH6Cgl/qNiMJQSG086wQWBKIfvihXYep1phz0Zt5SNpCnjVJYPP1Bqr6OSvo0y7vnk0ebvUlzdkEG1WaF0cpEThW+yjn0LbbPcJdny1IwhhgvjVeYWKLaN31zOx5n44ctpLZWMQznQaEYGp9njNnbASG8QMn3GhDEMFBn11KupK1lhpDfsyib0+m//y3vzCKXYrHJnUxQA21mJRxDH0Z2HYqDuTz+jVge6xMp9GAlnj5I35JuleCRbigfrRigFCiQJm6soHL/W2LUm1yyi8EPAO3MjtD5yYCEQ/nRbsjB2xtizeYQVqrHJ4nESh4/WUUETbAQglXscfmqvo/qJMv0yCAh6hUKAU+QOLcyZCrJHEs+B2KdDahbS94WogOkMHCOnin8Mg6NnEYbw/B7YeRlk2h+34SCzKGCUb5UZ8WPlcKANa2BmOzw04SDUXZgkfQCG/hx8DGz0f/C73D0Fu3Tni8crYDrdBCQL7WiyHas6Vo0ebngQBKcIzEPF+t5dY4ySQOn0uUCqXtv0RSkNu3Luw0j34J6E8r3tv/tR4be7a5aPhtQzMPQRDVZ6JOT9rlwVnq2gplrrVqwZgmlUbj9jaDkgdyAogqzRyt2XEKUrVDS8Ezinvym+pZvI4ksFzAJQ3nF6yLAuVMVenNRdAZAR8K+NlwbnVKqMdsuyXv/hybbBoQ2dC6hAsdF/Al6R2kQ9kJAgYu9w7bcSJ0AOxWVHQC0qpBGAvhQ5LbuPsdzwT2QlN4jfZU+PqlTU0m6saqwEtqmpjhnRudFBy4wfinjgHzPeUyyH2+Bv5NtzLONyinrakVlnvxtmU6bwpRjjZ6B76mmMHob9P8gMm90IOdhEVvyTynll1vtZBsRso71MgFGzOxr6CcKyH0gJ81w6W/rf7aQ5Z7KFSNfrur1kVqANSpqSKZYMkJ54nHnE43gtiF/oSpEa7Hw7BLQMXQ121Xb4JSoXcB/0FTRARHzbyx4KDSY/E+69LCHrroD4IC01LKINyHx4r5k
PceBke2M+bcrN3fMKhwki6hl1EIhfNEl41DbfXlMVw3m5KtfQUXdrtoZAWWBiik+zdogMNbrZJaXe88eONJ/ffJ8qCFB+owMYB6UVzOxwflWp6vHvk/3cKvrPCyBnd6DbLRNl/ijP9n3R6WoTDWQGVv0CU3Hvli/sBK/4yxyVga7YMHGV1yQvDdESyPGDQdg/ScWJlHxQi4aRZvNpxHNUErEWFIGS1BqwmIOt8cSLitJJXJQQ83hzBqmTzLdBYzrSjLwRNIToYOoAKyyScxZneGfgU4+briwMVuiQEpA5f7eQ46D6jrFse3bPyNCsA0ROw1Jm1wo7auXN/9+XKev2QgxOsuvrV3r0ir5T4igzJqG+RxSMCpm7G9Gi3BEaUKtEm8paQBZQFsrYn3FYbydyGxUs4ObU87CdHLzZAnPkWnnWUgVtfY7PAzw9LCzb2n/c86IrgOvgE7D+WGXql67sPEAnO6Y6w+sXjuSC1mPuW5k/cAfKuIVmo/U0288rlaEsMa5lO+bOMyvAFJvfinCfr/P+8sLh/wx1IDFDLOrSCXWsv+Ed66+iJjaoCsP2haUYI5AL0bzD55wtncwdIRUsOkm3D8ZIeaHh2WTq51IJLTBzdhplcaP3t2SE6JcALt2VRd4tNi4iBqu5+yjB0/MF4gZTX5hBVGUqV9dlYUKIjO0L/EQhQ7sogJU0u2mDjTE2F7u25yvWqiiVXP4TK/vkBas416Q3Ndoi1xpU8+ZB+XBOjkPxQRDt8iVerqtq2Rz8aAJCN0k156VrOexdJTmgY+4MpRoN3oK0jjtXAk8eRNMXf9kbz2/ly3Ym4LJrctZtcp1KTo3PomclDUCCs5c33OU19Yqk0Lnh90nGtf6lf8Q/cgpDr3Z/6K4GoxKpwQkFll6SEIQ6+6u5JzfVV/IycaM1AVQYMuTc5eHLDGKwahm0qPGuhVV/ThITe0AsqFHW4X2T4QMfSEK48mL2SUljyfY2buFC+4n/gTcmpCY7JCK5L/Br+FtaKGo+Xs++hpoU8uknENh85C1rAPfoCfmk7xnOyKIjyozZ5sfm6NrxwPcK/kMeL2wJLoDLotl3gR2UjrLXJhzNabRZK1xHHTq9JNHsXh+1tiRspF5ulhzbScvIhoEaiYdySuUMJ5prML+P1QLOBU4EjO+h+S69UNN75zJ0QfayOAaSqN6WGVqw9FqhSGfXmEG0L0l3fR36ezZIj7XDIqzWM7V0/GjWSh4RQflb6zDe22prQD2G6/HgQnFjCU8nQSRJVZywrcutNbc0frHRJaxh/et/9qORLsGzuknxclYBtu7r5XHEvgMF3QcMlHiCrhlnMl/W2X5P0eUmox8pDeqMtSJKKcS4WGuG/4E2XTaSGh9hb+67gLIxlR2OL3B0UqtvfV26b0AdbI/mL2SYKevzwCdPpatwYiJegYq7B+b5h6+etm+7EbqXN1DHEGNtcdoFc2PxJ2NuxSgHaOM3kUbV442s7SohjyiNL6itEBI2ZV0uc3NVixnH9Yuy03xn5kdukVQQZ9QWct9k/+gRwDPs1e2sO5iWuFQfMv5It/mPWM5NE6Li8UGVDJ17kts4UUUCXSPOLMgX9Bwwi/RiOM+7/ukWLU9RNfI5JshgTvOjs3XDIWT+TT+677NlQ42Z/156HJ6gB1Dc9dKT1jP/TbjvvEEuulip+oMp8xoYR4D/S0QkKjrje05W/6bdSxQO5+6Hxz/zQi3Mkzqn/jN4W5seECXax0X075yWYxuf1PeKEHuuaCAuIaAsBzfts+yTfFdDTsoxAKM2uJWCaLnO0RizKZVVvqHx+7NPulqGzu8k68q0Gx1RTmhnDvuM3gCTYjrsQyfqpPMvqcVq0VWbVft7E1sdEc/L8ThKRs5FYxYJ+81PLXzcIFTMQZcvkG2Cium0aUgUFzweNU++HU3tIv/epH3ETFmrvZ4nQSUnTTTFlUvJcrcnPYJYti2hokgCAQdTs9wQZp2Hk7BTUZJvXpuBY7AmHvVZ1lXXj0w0B1JCiZMwejcgoqal751UBqR17xVETaKkLbfmw3iRD0CmjkLyeeCw5TxqURWs++MJCOzUlf5mFt58r72C+0esTFNCOIOjm/EIYDYix0sEuBc3kgnUu5iPb0nb2SmoCw/6ab7eXkmEjyCFLQUZH9bkrTf0M5hudRBzk9Hqme6vZ5IwAb6KqqbaGdq6RmBjfU48jQ4sW8tYyR7hVn0XEmJ61UM/pcc6IzLf7mRy72ZG6686xwX3NAPJ+//9/KZx8l7AmYfOMRudCdg6rqZp2t1httq0o/GK6z5G9ZSNb8OCrxzpSbwniNOZUGyjnAM1TITLfOS2F+8gThoUOCt2oCnjvG0WJOZbeCytT/lV0s9D+6mN6rqRAQ6fbkjLg5opiYsajsQdu5eAYujMyrskN6F9UGUs1ghtxjZu1X+KqSLNDLlgRaI20Y8az83c+gAkZrGRy5n2Q0TgQsM55UViqKyN6iYvWMAZCRkr3ixv7HT5oO9+H54aQM/v5TTSzgxrc72LaF0mnFcvFwb3ANVaOuu9RbWFM4c7Vt/fjlpvZyILeGt40cpCvEgT+48Z1MNrULjgDL5EKhqzqeYtGWCQwIiw6ikkP08SmITGC6HZ17VQinMU0qG2mMw9hMOo7wWzZW3QuT7m3RIVLYXVJHqz4GOEExi/lcFWg9zQciT/V1MVK99dsMvpC7Rent1kktYAD0VBzHWBvuZUX4GTXy8uLskTifmn6N7rSeZwQYc954ygmLjvIgLdvqfggtgjygHxE1APx0dC/Sdf3JvyqNUTSCF6QQzdtqvPs6fvpfQSRSP5swGVGlcM66NIEfUxLBOxgWMC56Q7BX/VA7YDKX5eaj2ART0VrhSvU29ptRZjBWbtqccCCq2vbsIWYHpU/mlRDf2wr1+8Qu1sRh4CvebR8Zfy2434xvFny8iZ/1ujnFBZJfuioqFjQi0Es2KiXB6vFc3CX2rkdnfmvoMNA1KBD5P6GxrX2DLFVjCctRTHwEuR+yoVg1zhIRcZ/L796jIJpomqxUmikYzegWAtb80hlmJo1Uj2bjvi6/ajx9g+omOusjOEI4iQ6v0TqX0ea3AT4RHjm+WQd8or6TfGNRmEHe28oX496AA5JyZefBhlhr72zjUaYEevPchLDtJNVKt0wFpCkx80mIok7cUqQndwVj+AZeQOaw4juKqC/J3MjK0F/GpCTWP+W7ZSqmg5y8d6s1ACapfJefLG30gLGuI6CPbjbI3S4zGSi6hrfzteU2R/y/Pi2r+R48HlcSwFwNpzubL/V+0FlQCgo4+xlMqxXYyTrRQ8BiD+8vubK/+JLBtCJ3SnexCGtQTILO/4odDlOXWjfvvsWOXpCnDYw0KrxhgRXQNFI8v4KWlut01LJn72x69z7EOzgO8Zzff9SNG1XGr6++uB+nOJa+7Lsg2cnVQT4CsJ+vo+a7i4bbzND3iGKuASFjJKEEfHPVTav4ScrJE3MC/u+LduKQ3yICzh+Wspfs+OCSQCwV2TpksFabKxH6PRQxd3E3XZXgz8rRRQwcu7byDF0x/z07d28cRyoxkNctIYWHxXjN5T1iFXaQyW2V+n77oCAQP3bkGA0OfD4YBtWOqj7Kbptc8I8KjgMtxDZUJ+Fbxc9Zmw9b1S3q6+aUGIRm9+6N3ommfKLhCsgGGo3ug/ES4Qjgxd8nZR2kBIE8jep/+yU9nD8nUqMZ7Jj1g2R/NBtqOXE1YmeyM9EXFhqFxiIRtmHTjz1zEUYqZuLxM7RMCh+OjgZHdOe9p8daiELW8yeuDMJR9HEBdubuDpMxjh99P9LZwtL1LisnqQ9pQc65h4VPaRZU0o1pzekNaCoQz3K3/81aMMIJnA+B8hdV+e/wKWj58jieBywbrqRjk28x9Ya270Ds8EIK8hkAoXUwgqCyD+Sdofx89CJ9Zb0bzw/ISInv34BMaZZQi4XGNOLV0vRo2sHcmaS8qVewnclYcG5P68qilBiU75nvp0nYps52MkgyRwz8WJ4BQOwq7ohx1RElCAMn7nVpMjawBrmLx74OiUTfXtMFQ1PJvXVu6LwWkTdxQEJdxbrQdDAF+6RGxEcEJM3C0uZMr
OVfwyc+x/05wBHXec+klBvW8h6jLE++d4FbwCkhnX44EvQFl1+0mJ+wels7hB0wCHCL9jsL87v7OJ9NmY6BNwLAuEIuaEfYT3OcS8pS2BPqvT6FmbO472LQsDAxcoVf1jQKH1JkrqRH4b3F/62iccG0dZ2vUzdxrQxnCJpSn8MDP+NP/zVrwOg7vlzHbmPbWbgg5zLY0oISxJ2Q0BBC+QG+8hKQEw4pnMghifpgPMmCvX6cb9dDHlpAYNg2zC7Nw/jG0gaXcI8F3hPJ5fK9MP7g94VaOhaZ4onfrLoobE+I9ialn7SOjw2yH12bmaJ73xDzHdolffy7MNPB+O2gWNmzOP15wBXjFHmTz0DbgKPPOKTuxzeRGZsSzqf5hQZ8L47pLMOA+AcJ0Nk6bTZBkUgSu09DHZYQg12yWPC7Dij/xo9p7ovwCWL8fTESZChR2Sq4TE160aNF9wRPl+HsYkvIRiNtnVFFpMhabdVB0bscq/WGgld7sc8ejPvO5u3QSpimRzq/9ytVKR8xDAX4WlDDCphHl2qWMOuGT3uQhdZOFv0Y3Swra6gFPuL2xADcKGQqqZROD/9eZeBBNzrRSgINhISktrwo1dR/7FXMmFK6hmDo+PhJDfXjf6I7yazgLfIwX8h//Kb2g1rAUktuWREyeCDuDb9smu6Tab5j1oT+9m2v0ltpFwgG/imL8VUH3gfIeYs8gDEZMPMBTYWIVR2/I9yepwsfyybS8QDcJ6Kmn9afsEabRmbHn9ds8j/VIUBHnJm34vhyaVHwVF3LecHoWkxtptIKg/pPcxgny2WQ5l2ROof3Q/YOL6W6yRbGduHvqcFaEVa0OUV+em1IH825EKo12RsqMB+AOnNPpwiykO5Zgpv033Y9YDHKgMU2zoI8n3mObjDVbkc7ETXLnrIYiUjssza+Rboz3qXMxtJ7oqCNhyv069OYbl6QKpfDHMoHvwn9Y+Rc1Lh4ulJA4ekSU01XSfOksuqG79NfYdHC/JRcflllfCH4OmgCttIrJs5RKRCMP8sS7Cmu2WlhZq28rP0nkDh71WPO4CMq9JqtxMOxwMLE1d+9vStqJWslSuQbVsGLeYTGRAh0C3dEAxQGXchVQ2NQJ0Wuun5k1KV7I9Rw5fr6LF4P7ZhSTzs4dPZtpTkdLPgQyHJNhzCgrevO7nOJvzr6zs42Vj7BwbJyaltmrD1EGlhBsHa7LaDz3vy32Fcns1Rzg4oF8VUy4iP6ADV1jncWEDJKUb/31JBE21pEPSmLkO6PZXYCDKMMlBg8ojk5B8WqQ242C9IvWTVabax68rAQv2HAhLIIP3RM/sWd/cQGrG4REKlxO3ZBl7/+1RPSJbv1gXcQWp133ZYtoFe78Ek8GBMRgix2GZ0KFLuSyo8Yc+ZaUalql23fkHXTAf+kP0nwDZ+9Yrw/dzn32aJFOibEfOieZxvLDowMmmeoSE+YSgDaRjwYaen5mm5qlyLclB+oQXbk8ZaSiD1FnOB0QiDnKyBUUjSGXVNo3NEaHyQ0lAPlAm+mU9Pg1+Ssow2h46eeS7HeuOG9HSp5fyglVgPPkTBTfBu8KzkYWM+1WClaKoakLwpW01Jy7sSAkZl2XkTpLjDCwc1u0jmBSIeGOASWz2niwvVPQEytlc8sSy6hDi6Yef63uesFSAe5l2+/rbDwBcAZFRek/IWjhkE1PrmYbLjVlWhH6CC5EoPVXh3SwTR6putJBfbUqcwXKuXBxX7aWA1VS5KJjjiBy6CldOjCsUYlk+EqBF92u3FtAgkz0KKVj9+zJc6tvu8kdmjws+HOljSCejdXheq4S7qwRRD3GDS+DVpvsmT4OXoJ60bYJP2nJbBLUjE5qORU0WRCpV6pE4WA8vYkpX9bujnrldKya5zXTvDXpWaOtqgXcS9QvSiuIZ4U2/DcrhL0r1mbHU7CB9Hs/LYRCIS2s6vOhmlnXm8ZZ42K96XQCyUIp6tBF3/6ruOaoH62TbpV0Z6F2yYWWLkOEpcMSxLZuNFZpH6InhnF4yO99aLyHO3M55yG0bsGy+Ui7uiilf5BOB3zkmNh07NXyZNVBLaCQuRAoGeeX6SIaAATmPAHAGeQRI7riTdgVRmp2a7jVoQRrxFSQutow7Mp7ANirv2YkrrlC1GdgmbzD+T1WbhOpFHZB9KcG9kYLDMwcP+JVXcE3wx99eZTUf82ebO+rD2Gy7sQZmt3W1yB3PHe9MyqNab7q5xemHo4zas0ydRSptubuqVdF0YrOKDYGiczstRiQYIrO2CDeHUP+h/1sX6aLb3lGeC+/62q0dt6Z//1/4doblsB3/tDrFZixUujpYFTu7Y7gnHk0diatcC0HOysGjync6nXznd9WTFERDJGfwPRnzQwyBl+vySes6c1haivU01o3PiqB5j3TPwd56U5kyzmANfHvgCXh645nk9u3j0DOrBlIIrWkEc9SLRM40KwaHhRjN2jByfyzdT61SsbYp6Edt2spD5nkIiNqMGcx79EV/5pKZyMwkuGWt5Z8MfyK5T1FqdvW97IYIg4BzYtVkyn/h/mtLlDg2oCcmVn55Y7Cy5p15y85s7TRklkSfAoGhkVezxca552nEDuY8pd5uzH3SMppu5Hws66CojU/Sp7QI3c/qtlvNk03na7IuSnibt4U/Y0hCJNsHlDd9vNm4dCsarxYswsYUzvrkKXpMfpYFQnWs/j/YVcJ+YHDnN7rBoSQo6JcgH0zpHZaHx1fM7He77Jk8+Qwq0ymML52lEoUhv8S2gXn7yswHK03aihbsjgNX1sVR2M6TxkfDdG8mm9Rx7bqGWJ8tHKuSFILbf9ai3ES+FpUwRJGVcaV4U68eM7DyXgBg6GZ+qNoni6ner0IPDpbngcwohcKJ87R7g/yxKIkm9/04hzXTDX+kDFqWbgEgVEp81c6U2legYfaDwMwY9Ov5sQRoe+ZSQG0E2osCXiZGAy7Yok7p8QP1vr1K9oq9OSx8Kcyp17O9XUF7TomAxS6vuAtU8oOYwiIyuDOE+l0FQPruSkhcQrtk0xXgNOhO23kHWeY8KYGEX1JGIrAFtmCcEl+5D7yW2ArSQFYbS8xybLpEbpE0D3BzvRYTaDgjjOrJWdYLM06zhLntA+jpn1zLd5uFpEVa1RgHrh9dc7sJaqtpZCzqbFY3P6AfsfDoD1aHntFqeNEYfhIF6J8FFBpiEAM/8yjxCXFnwRgKpA55vJPyCmQYoO5Fi6gNVsSuYtgy59hB9jcGsoyW3r9x2ODydRnicH8gQqYk7fzN7nHZb0exi2GVwFJojusQWYaDqHw8ZD/6TXg5akutkX8Hkq4dpRUs+esLWncQxjV0rrE7rE2h72h1ayMXObkgb5agU0/XG3O8VFPfPTlaMcYQuGh+/LATUZP6A1rqItLHiV2lHeMC3z5BhGNiIAlE0b64YSUtjLQ3w93ntuuRnqaritQYNfRBMcrBE5oVj/yiP6q0oVM9GRhlJtiBc+PsoMqRmuCWZBlqjs2b8mxijs4TP7PghI9yJOLalccp3XqVrEKoiEn/nfNs9s6PI7tnAeFUX5e3KekxG4qUDZClMTIgf0quZimJ0rj/MROf+giYM5ibNtr08IjGb4VGDHT4EIsSt4qAgfjNhVcrY6Ia3hJ3rnYq50CojMaWYN3kcdqwmEbFbcJPyCFf8cbyo3jko3o6SlgQ/2VUrX/7SVzsIBd6SqRBkPXzKJNb3JRxoY3VEeWwBHpRWqSED3AumU1rHmW7TdI69zBhXTuzA3vY83niixBViLtpZfMINtXT6/erEsSnqU5Eu7BTUnIqqDHMQVArJ3TAvRFtaQnGuiRyUBq2LUp1CihZcwDfcbbwC8jzKqOEYnLtFJy28bmJYkjP7iPb++yjaIhuWt56F+MjwnkY4P7VLxWMZ+tV7NQX9OXoN/twpJzTtJIfqn/Qah+KXIRXMrgUCVuET03eOog7GBJBU8LxmX8EfQtCjVhaFRFEw55xUEhgnokyL+hS9+Z3TJohwIazzIP9LGYghJ3CKoj09WjnJuVS3IIue2p6Pfm/BOwvSJovRWzpfNbFnH4xr5NtBWv9uXswrl1qkJlioAPKjA1IvYBqlLOBa2Y
xSc5dpAcs2oulcpyRiVVszQUoJN4YneXxPiQxed65zcKgWyUAudjTwUAsOBO9ne97urU44npxCYiKr397ZBhIPDrktq8+h8TpbWyCwmg1xh4oKxS3EuhKrcqGasn7YMMQvcq3HevELAR7gan7VjcTLow8UCWWYJmOCiUTOaPu935q8r7Z06tCyEeL+x713j8ax4xrvN9pcgSmAkAldUjP5oY7uEq96bBSOMTAHETq4Pp3O2aSZHgtYQaCmaX+LGVoGNQdygz/KRibOQUUbEePjY+OM1rr3VvguK3gI4/q8ksMKzMV8yXf03Fpj1hpPjaEO4iKhx54U6hHY3NnaMuNRjDCzS/Cinrbio7QXFusRRFODJlNKD8sAXhL76buaBUxuZdRTVJY5rwM2yfp3H/hzOfy5jpS6c/r/bFlsCcS1Ki5kXJisyNSlKMkBydRIsuSOjVSOBm1uyVBeZdYCuwR1+b2kKFfYvNXjaL5E0t3F3xwb3Tyu6PUp7SI1GLB4+x52fHvXD9HH1n1+yohDEIJRl2HFDz6HRaeP8HEgSsymVKHqLIHe1fJMs1f7h3ngb/42KWUO3uf6elj++BWM0TdBqUTh35dLctR6DWm+707HW3zZYSfHEl9ABx6O5uPY7aaVtF25/CVCZ1btGZd8dOUjd0FOG47F/rFbfEI+Ae/n5syVeVAeVWY5HNPTLx+bWnnylj0T0fPzqZ8gj0cyre7zayMw0NTkKSNPwrKT5lvx18QOwdhU7XPKtxgEScUMyduQfoLSuHbnHTiMeo7FFxyr0numHq5FV2ZXY5Jh+aNARcWDTqh1xBwvHNLpLkgM9914ayzNePMzVDpAijrkqwf2o6sTOc46hgMHU5vuc392gAh2lEOJfG1j2wRrqtJfP2NGY15pderMGrbvFZsy4yWHoV91PzWOPz2hSl3hsp4JUv5c5xjdUqtno/qW7x/54QvM9KKRCymswlTor6HpMV9LPl9jqwHSU8+9rnRV3pk7WyNMwqcDcqH9OI68ZHzYzrdma770gmHZ/NVXRlWQoxtDckObhUuORLK4vVOJStIRuAMsXSBbHDJwdj4uJzHPsC47ouPCr/VaH8KGGl8br+beIUlLiWtL1YQRZt57PR/lX27q1ZLwQcQp8nXTALiKBsxRy2WCSoKdBqz4A2rdFT3MpAKVG186XD99ev33ZFycoBD0VUjY4wHkdzO4h4Wowe3VK7H8TWU3a9k+iOOUt5/SuHAkX3aw/NDqB6jMN6GXg5mmqfRDhQV71wd86kYZl8/unaflCGofQTR7GO8EEyrUkbwMny8kyUTDVWP595yukBdE4lZyRZm1U9lW+OLAEcIcwiQjxrCOmp3X1n6tDqtJiQU2wguTKGe0++ckS7O6VFEIxZ8nEXsZHKTVhTOVuSs9+9hsWr2tk07RsqnpNv3ytkBt6X6LltNcf8YNTgCSJMfTDI9N+GWX+c63uqHNRP74gvVe+c8a0v78Ivy+fEsAklg3sFoack3MAB+DyYFVqnCxvisx+xNLXU725qpH/s5NyYlzcO+uvCjUwlkdjcLTXWg0cIwJ+uT+U3KSKYuU4CCE3JtfY4WLCYlfpB3pKr8S7OmuA314DbHrRa3VpisCsm9IY1lOHEsEVnBBBsPvuGI8VZfeQjAbXFNXsmUR/2/knRbykRau9wnxfXTLJWsjKmuL9on6n6WkyWRvsJMuLTI2ZSghUtV9f+0PD4QjmHlnfKoWR8+qsoMOciFKsBAdd0K4TaXZXZYuTNgNwhXFf2KDCSyqoqIoK0Xif8944lUHPv3B35rt/uS/yWVSC8Wkp4WID3wo2BGJ7qqA4tee1z00BMQre6YuUoOpTJgjOOFU47h61AF6URhfWiWTGJOqvTUrAD0QBlig2kc805/NS1JnRNbg9IpyJ4atzYgxpxauyqmeW6nuAeCqfZv7u4TkLBM36uk+rtYE4Hvla1WCgQ3Fcy26YFgdslZMmXkv3FviRcAoEplCiPKVchXewYSOUvgAU3XmfVbmk8NbE2tFUxiMxe8HGGAD9LzxyFOqtUuh1keMnjwurnCibAJfUxhQm8nS4fDAhHFp32a3eTGimS7SS+iqUElPh+2YHsHj31Z71z1Pq4MOf46gLp5CJ869ttS4No7HBiV5hgX4gRU7sjt08jXVkJ6JdxorOyOR5ympT/Ymz6XUSZw08XP8AjrG06jYqeaFWqXPsKscvs11HJOdcKNEFHNGycsFKo/J+FQN85hSn4vbrKzfoWonQCODOqjGWBDF64E+s1ngXVS4Ua0NlxtA3nTHfpUJaXpS0na2+xVfBGYAIw8jh5W2baz4LGD6UEYRDziEDCJoTtOIPQ04Gs6h7l+pnkJk4Z+FKj0KLHXsRW7g1P/ctIQHyIV/OL00LYORgBj8CiQnnMdbIHGtUHUze5XojgOuMl2vnmsju6u5aqGRBl+5y/12nqr4wUMpNdYXlK39kDKmwIYLCGC1gm+hjBJy77RrSNH+2i5yivLkGvg2/XQrCLTuxVWkcJYLpyjuNGzw61qtHnd74xvD4XMQraPleK0gt2TwRauLdV/lUSRl94rx5h1w6hL4oVUtZtfBPorA4Xk1d1k1xYURVmsnOLA1x6+VO9YzF/pp40eqMWwJfWgmvZYPpppsgT+weUYacCy9OoLIYv0mYy3PEDZQTIDad9rS7A39gFhARDhO95WMextmxOW7l/6DeIZ0RpM3GRMVqd7bd3UHqEwij9P04D8CrgphrV213aGA+aUZ0JCDR8n2Nth3JvS+13ksS5XdhZhoWCi7cyLcak7X90zoKA2jwNCipNl0PpTvDCzFnHn1I8JnEBfjwu/VJCFX8mM4ZbAziywWOJdI7wt89evK8NXED+8MnCQzs1pSfbWB5pjNx8yfyuvEiI9ecHL0wdS52CFEF6JmyKKenW6N+HCVn8RK5i/etm9uQOFzjCfFbACJwOVyc4oSEdY5tMhRMStxX4txLRs7bfgTBH4XHjpazY0QZzeTm+Dcgxte5pamdG23AHQhiYNEVUEmExVJsC5NcjJnmIOborxgMRUJLRb7xG0FZDicMDmypJJ+bg/wEmqvV6q72U+dmteVJKOvKtpFbt9+IADbHRvvFZ6l2Cbf6hZJY1RkOtCR5+lxT9ZFErtyIcwBiVyyMHChwd3JuV3PlSWzR3NiodzSO+10Jg9yfsSn1Gbw/uE1Az8vCv/UyDuu35I2yrP473nn5qaDbZkGafsCHYMpkAV4vAFKutuXeTAXe4Joy41+INnkrGGrEPdCaRzaE8unh49SxmSl3xJSItfyy35bGXYA8QhDo0eFcPHY8Jd1Fj23Ca53qD08Mgmc9kpIJAKLv7nLGisxjRmbgyIj4FsBsyxyzvapII+akmy6DwnxEuD4P0OZmOJToyFCxhteGH8Ptqn27gHi4ZAoV/TLi6CxG9exufsDTgP8IWyVFcFqZtp1dwh+7dD4gFvayYETdjuOLmFEtO9XLDqMeSpXPRhCLTd4WGIBu/5DosyDHqUbKPT5Gf+2Q6Q5h/LMgPc0HcZ79o6rtmZ77qGdhs/Nwq40NDZZodexcs+Sq2C/vcSICdoJUXxEE957BNl9vqaygUme/5Op6nb+y+EAwWfZrt9dTH73dCuNSytGIIwLFMRfm85qp2Yr4vrAj+wWsh/qFIvxCKALvNlFarMq+zm9ebd41DljssfO1dryJr2SsdsSxhx2+BKTUPjGy/H8hL5XlY89E2AXONWjo2kWB2hbg3BdeRF9ftBNxncnxLc4yRKrJ9fsZNEyAxkOdWqgFPU4SLvMn/sdPH1rDAxYEbip3dOMakRxNgb/x9BBXlh9Z2ZpArPwyCBba1spo/Dhg564l/TNYLqCZs3wcE21Ar0y+p8DfSSxWGSktEussel9nA0+tkUW0tuLN5zcboa6JzEqZ1PErCtVJARHVM9DQCOYpU+RacmJN/Zyykq6rNUVZ+uHY9Kw9fDUguPoPHJu4K15dWjzhS0C8TR/XZ8cK3LLPPZAnOsn1dVcmDbMwfe8YC6WFJkdw7EpEHMXHZ8ZtUVJBS9hgCzJJ6C2mikI40GIrMsEAacybda2hdYVa5D6TjVFNd/4Om
2LDJo4iQEl23A0en6uLKfcOuVX6gJX902TBzdJzNQ2l+lCD2P+ZHA19jtnVy8xz6WMVBTr8Qc3BEypqzRB/HYjydDMJzVRcN2sJ4ms9VCXPMZGpYzSXrSvXZYwc49nV1z75yFiTTj0iwlkVukYzcXKvYQCUVvRW9EWdSpfsv++C2sMxT3Sv9yVLnQkwM/o02597ADnG1KZhzLaYWNIZCUrIOUoZtDLbhCo6UhOzZLFYFHYKbjWs7CHyt8pzwuNS6EFCoCcpBAIqcaLA3F05pbzQtTOOREZcN2ZoHv1gQFzMpK/BbLVqiifHa7uU30OhsE37fyoikodGzhM+9O21b/CVjz0XqVYCZ/bGE8wRky75trVy/gpb10cHuu82SyTH+4ggEuNTGacFRE89sVQ83tYS6PU3q0+9e95BOsWuvfoFYtF0AkBNTX0nSwpW3HnGowZ3eoT/NNzOAgAbsDl3HjDMNKRIn7z0oRrJwMNEsS4RKcOQvtVrjzbTcyDmXr3PJjBDd/mZh2NK9QeF17m6IkmRf31D2l31U+itEF0iwyRk303D3d+j0rkvoOkNUuYlsVAEWDslKKRmHD0drvg51pnICzuhHWBat2eJ8u1+/hNmgwekSBQ2q/Pkg8gtMNik9vznaKhYd9mMQCz4SqToTU5FQ0Of8OONfIz5CInezNzPlhcMrebzVTUG03KGYi1gLA26BiCiLN3IZpaE4Nfx98t8BU0uGLdNTvWigsEuYLzab/aK5c9kH+BcZEwnNscIVpRfEuU1uZ6C9U+KfIVOUrHnOhdxpyoNc84tNR8YapXmIW4gogjJkpe0v5opFG0fVVWmbMHKPsK2qL9CcoA1kieOZmWkjohReoXJo1LCFt0l4OLqhy6D5OEtHOzGv0ocHR2Gd9QTIoDxmxL3Q5dnrf7LvUG0RFEVv0y6YecojfrKtdk2j4nVucbPWRZ2JvIne7LC/GckmMqp+Vtn6aYV6EwsT4kI6DEz73KBDMLpQEbQD+VFwjMIVSRXjlYQBLPEaf5Sa1a3LFbwTjwT8TO0Tm2eTYfeGbowpCHjEOQ5WUcm7391Q58YDtW0zIWkydZYz9VvF/Lbz7xvVEzgEWEzQFaqTzUzNM+NB7Q/hy2vgYtGnfh8ja0Vq477Gys9GgjF0WV+3gSeqEoEdACrstGYDZ/DHzD8xFjT8ZF/wivMvbyiPWsbqW8qB4zLxwdvEEUCcsTJ+3KEA+vHrnUcxj4EgwbG1yaLurR/VmLHftfivf5RLlWm1g95lUPxun7nVDzipYpGFQ2WjC/wKzqEDdVWymZk0yAl9l0Nz63f53EiSEwl099fFlRZSIX46bIHYMtB3GkMshefVbyVuW7MpTqE3MAtZaF1d17yDn2hCgW8bGAXBDAonOaFbsxlC9iNsB+qDazJIeu5r4zMc0R0EewUbh9yePYZGWR7xGfXedolf2TJj03I77ZGvhCMoE0/rzux5YSBII4HVDskFQ1iNR9NSmfucilDWXYv67yhWjRwdkzwKzMFHVpCvnLt1RjATMDdCmSDOhJbtX00Vm5bQ6Ds1C4JoXVQHGIDViFzF4nCCXsWF43o6J68Urm5lqtPHhEu2yvkIyPgfD/TxiLJz1Am0KIFsxQisogSKtfZPTCxcLy81wADK0kUqiXV3LqVRC+2R68CIjAENObqVTIW8jKn4PFIArGUL/JQjY+ReCktgLAvfGxdENEAiHROVy6d4CLdjJ3NzRfL9Xu39+DNgTWwMfw+zuc/9hdC/3GP6jDRCvQL3bAoyHTq4Q4utvf/XtETgTGzoI3sRkhX5cebhmerZevwDbqj3/ujbHNS0EpulOl6pKyjMXKVnXlp6HS026qkclvuKwuBfl+/N6o5I13r1h0ZrXNNeBVAT70OHofhOBZQdcsM1vFhyOi4HS3rqG/+LD/LPf4QLlIgf4fHG4CcEoDaE8Bc+IacFouRo+DJTknYCN2JaD4rzmNH2E5HI/0tE2P6g3FM2H2rkuoo9IIkUuNBQsl3eVt9iGcx2uDdlRnuEvrGYGMJiiPQrzaVdhrb0hJM6o4ypxSfgPyzi1szPeWOYodB6nSJuMeg2/Sm18FEf4NTAskV2do/xIHmeeg7yH5Z3W97fHXOCOg/sUS1kJWRtwISHHDTu8MAkioITEfDzywIoSaUCyYi2pzcHt8nuhUIdX2kukSWtImTlwROfdj4YavbPB9UUDu+wBDp5aht/oYjRJuy8XWDkWGssVQyF7WzJ1yu5lmQDRqzskRBt4dC/R9v3GUHbSaMO91R7suypIVkYfDs/H/HqrgvLtAlFxMGlmqbTSM6djbqeE2yYYhADCn+VTDRZJLWdEvlegwrC6rOeD5cvE882bm+70hYs4HmA5Pho7fkgOd5VUAEiwuBphK5lORlGL6Ib4NmYpYQroCAGoaJIpZRhE8kcmmxb8E56X+mGamr+YaHtPawt7aS3EZxKopl47Jp/Jl5ycqcse4/4eelW+fBZb52uwWtdqn0z5uWkw+oTKu+NENsaB0C+59ATCnSm1Guvs0j1taHRjUaN/Cm5bVsvn0nJiL2UoLpPW7cwt7RcVgJL/YYiFN+zQuydFOzvxOJm4BVq3jgI063uIvvNLujRx7Zpwo4qMaIhb7OvKGR0jTcXMut6RE+6FxR9NK3EXRPVFdeSVRU3W1X8SR10/GOKa04i7ChNHAHQdezqfG88FzbZSR8bkNIrRFaB0AZL7iX/cW/jaooXqHYXpLgNkfF1qXDYn0Ps2H2KAPab0/h/npEOYNKKz/E69o3XR2TY2eaoL54MomY+FnnFnZym5ZKiGyHt7smpE7OkPNuVNILU5Zir/egFOVu8ZkXJGBs7HHxuMlXjgbEoSkZAvuX2cHLTeXKigS5trK7njyenQK3kM7u/3hKdIOLw+Bs6wSq+zCdgQv7Zbz7EJVm0SavAKYR8lLmqPVnszvbnpyJQPuBokyFqPVAVmthIGgMDrJZu/Fr6xm3FuW0MZ6zkd5SxSp0EWF4FyhwcsCH1ErYpJo+VcwkuMDM9FYUuQUe6c/2/To6Q46L160DJPBht9uWmhnaWXV+l9mjT7QkWQKcE7MGpbZEfBbzHy6vPqsI66/eSHUmJKw7xcb17jjZ/LcTVjdNQYjfwc977gcEMKOR5eOEl9LBWOUr5YVdfHGLBwcUZXJGNIKq+ueBvxmzmPnWQKxcMy23n0CqNjMSaW9UM780qhIVxXtTAzJgektVupTA4gzFsFYRinDRWuM1rXQhRJBkKZR6KoBEQduUdMvBuchwmC5oa4J8OzepxIUuhGf50GwCrS8bbj+TxC/NPpo9X4+zTlffjbeDWs05lG1ZO46buTub/fnf40r44F5fK50NoOBvD7G0/Ft15tADYz44VHJUtqk4cG/kTQIKh15eAyTESAoKdy9ZsMfSl3gzgm2Rax26OS9A1OwFX6/buOjS6A4GfGEat2x9mBzLNqmJd3Dl8dh/sf33urg7oQNR7wV567Imb1LhjuMi/hiEbZMv76CirqVKGlafK7z+IMNgvhCFYOlR9qHtGPsIRV2AEZLKxJTkz/5EFOJus6Au6JA6HppMUY87Yya69DVv0TonQvBnABDo4YUqvZUcjfDJkLHiua731hks6m2oJpIUuRfJ6RoFLksdtMy4+Bt4gF+Osa/QYQFLjfp7H9/Kg6Cnqv+60b8qAQ5Tr5/ZFU6RfACW0xViFUWFPTdbUbhfl+9wF0LYxlaQujt+YXf6dYuSnEtj6IK01WQli+ZG54ZIYQyl6zrxb7FKwHF1+QwRIIsTde8xVCPQ+TIWTQzUFFVB//94dAvc8nEGKlhzMbAFo15pUlALKjUWSgGCYq9sJlV+vu4OzMF9gauvFovkh+u+WkmAMac8YGkS/PnXxk4esJ+GVys0jo5PmMvpTjbZ52jO5Hf3iao5junC7pRJ3WwryugXbI6yIgVlyhWIWLSsqBruEO6yI8DRNlv74LAp3hVDHNNnZAQaSyLDiVwY0aIhj6O0QCT07IxgWOtU09BWt2JlBGcaiCL18hiSWRl7HUx6hArF5uBRKmhyeqjXYP+/I33TFqnAo3EHdcPhDvtjILjVQgyAOWw+b8AOS
jG5OzQfhOt3P9H0ygQ24TBDnj8laDLHdLj7Ss86v583sJ0+LSqYlehpgSMirhHqGhqxZTSjP5nU/HKH4QDuTgmReJ32VGQSedLo6jHZci3KItN4vSx3pjtqKhyCWuyvpMFgetIEaSmIEzL+hdt4EATWz88Y0woznNGNobnTNK4axEGKHcvQkIS5t4xvOk/zMZkEHdixHcwFn4scRFeSHiRCxZYUNutFjwTSspUZMAvtTwH5C6LHlYGOCqOv8CMK8n7N74upIs1xDTCe2DEE43oWJohrFIzwzJLf4b6EaD4cTYjqHaBI8KJTqP675JHSsdsB5UgVum7R+uJ+p8jTosa0X2j8a9kodK8TF/DXDIfOCni/y62jFkxS1LLBTXq4WHOkemcJH3lGaKmvLY8grihN2pM0Mz6rnh4iv8tciy6EMeP0zPUWsY4XOa49zureOTvu8HhJ+5thMQZCWlmKg4p/dZFBN8Fu6qs9Dtile1cZ1KJUwu0EoapGfZvWvpGYA/X/sus1W3PKB+oAQDQsd29DHA98HLuvsXmR2jgY8eL2PQHodUPh71/99NVIb7TGHKsalBdVBX0uGSFjQnx0pfvOai1KvurPomuKxUe2wzZBi/SxT3HWw85cpwczUoSoJ5oaulStXyCfD52m3s3iGZHJ2lSbc9NG+ChvvvVFZE5WH3GhnN2ivL6nHZG6ner3PDqJ7uh51H4jnEmmOzan4gy0/D/yzVfFuogrAri7U2B57KBDQVkJd/NHDsxxHvtBNKbTw79IZ871eYxZXQczPhG6mPeE+zN0xkPeryR6KBd4zpLxHcSIbyjMgcevsuUipNLTp1CMASr6TnE3mEXi/3lVmOy3UJvujEEKjxZSq9ZmHeG4xLLl4IoEmYG5jAUnnWmP4l+7FG1uv/d8d5E97g+kpjVOa86wnQmNuSoBVRHQLWvcs4Q8gJHBP0JzgSAF8Fu9ep5oKTs0i1RfSXN2NuUHEISQ5Jz/EKCysc7nMNjADXiM4GuVMKHjMehXWGE4Xpd/xFm/x1lNUJcxF6CHHBjyRR0BuNoFtxs4Espd+DQTxWQVhDtyXZGK4EFdfoCsZor6QS6Lmf7IqwJWeJinKZ8ImPfbuD6TRsgmSTNW8M2QY7Wq77maDYPe7qKyapuHmOVhhDAiOeCYHmzwciZdCgIoIOyrKp0mbPCUpcSGHkGFZBx3kQ5w26gISxb25ZUHu5h2Xrtc/xenOkYi0Di7EpzqtwGi80bBrDhxLP0KruR4MRqJDsuFxOzivb/zgqCOiKaruK2NrDtwKShJuK60bX7JRHQ0tgNeyF1GO3SvzzbLJ8/1opBet/mRb28xF/nsz2l1wAbX59XAsmmhe7FC2rCGBnNYsy73VdYU+jeyXNR+PzWeqCiofzfe4Q3RlgkwdZWlCcGPyZ3T9tJHyrFaJGyH5WBjlGpGU4whVeAZXt2UK2hfioMsfBuTRfnUi5lpl26T9ySTwFYDt1SfpRe2cio23Q5z8My7cL6xOTTCFroZPu8j5ppW0/O5xgeP0bLyxT8TJoL7FA3G9waGTAS8SGyrMxtcoUsGTnwftck6AjiqjkD9GAwv578h/Wb70gOpIT3agFA2U7CkoF0NvUONU/SWYMukciZ9rUtldYA02k2Kz3FG9ZXQIod+xgUNz3NQq/XTRdJNCrtxCFKKS/Z8GKcbACXx7YsLyxmUp9y5wfbaTbOdj2JVELXM5lOhT+22CHocqOF8EONemc/lMMH19E9ymp36IHcS/ftRDj/QGBaf/7y5TDLYSjpzSAIbg0Zw5UJ+J4fFWYss+qJsfQRNHfaeGU6ALnwz+sDsRALYQk6uqizg17cP5YwYbTlonp3+zbQwkxr2oa7+ltevObPPe0KQLudLfOa18HjEi0qQal9AxYMSFY6/K/eGTPKi6p4KN1gVnJfHOwN5ucKvRC9/uJBJnZjkTlhwgULotbWAYukO72sw3IzSNdBACG66++w6ojL8IgVBSXAS4ShbOhe6d8FwKb22PlTfwHj8sLBxjh5r7rWFWJ2eROlv2gOLDg+Iu7U8K8t23fE/NCpwIOOuwJV3wMZY4AEp4Lu+JSFRTkn0HtTZyLTfzw4X8l5xd9FY1EfVMSi6uVzJZQG/ahVrb7Efu7cBEScLzFG0dqhACcsNEW1oJHpP+YXzzV0UfJ5ffi94HfwCMsLTHJAtv0++2dzG0VAnD6YP5mdXvYSU4K6oTw+EKSZbiNMKe3Zwb2Ch0aWHAe0rqQcs+mjAEDp0U6WIOFZl9XCvvZA4G6BPDD7KTM6+tBV2Irpb544wU7B7MZ+8b338asLE3zkwZvZOK8Q2TRrLZ8paou9ZP70bopfTiRdXEuk0mUa+b1i8z3wCOMKvMW6pN/v63TXVCOGb7dx87ENY+8f0MmDBmGOnq2f9JJ6r41kCbWWiJe/sJL9Ka1fl8nrKgyvhOb6pH3Na915zwY7u40ZpMO3K8S2gPw/Y4NBQeXCG8qrHld6en6VzFxNvXVDrsUrvvs5lLAuK89Ta65As8ELV093PZQ2SFK95CkB2Czu648xa2uSMm6AvHbx3zTdAC8guAKarlN9hgG98nJTPSolWl5UHleo+QZnL3NIB7J307EMsYx2oJ64NqrEVDmnifj2LlMUnEuyRe3dfp0x3s3j06B2fm/+9OywMrwAciUIRJbAogfilVGO1RoLM69GAE+kqKoYlJ0HTP0qd1+4b6DAinnMj556nAZYHKYm/hG8TTKtlR2leliDa7mS46MiFLDVaogREEqLuMnE7pkq9izgOGIbbVQsjVyrL2jhc2nxUuNOLEPdBdTf5U+OSu+co8Dt9VF8m6voaKP7T2uT/OZV6CqmSptJI+S8J1LjIpf51aEXMqqJj+JPZXSSURrwUVVb5FftyrkMecksros432NoxJAEfFUHnKZdKKqgQtDXBVtu1Gozv0ovEg0NFzm/FzTSjBbVthwR9tMZEmbx/qEKqxTHEUUXEG51LMm1vZJEoM33l4Wvd7LA9DKeRhmw/7zb4DRm+g7lc7eZW7NDmyv1sWmNecEsW0viHXD0TJCiN2UP903hxtBYb3mBekUyRtMLi9UcNDEIIS5LfPmJM+Tptt3Y2poD1Gt++8Ow4CfE8B0hHLkqpnqQz9DceVOx8YJMANu/5BD9aJ/i0B/sQdM52ms5kwO5r/7Y1CYE3O6XEPe/ff6uldmcdX+KfVE0ZOGAPOBuPGH7/dN8G6nYXZ6/op/3SCGP85aT3eNToyzPRMTynAwkdIiMbiMnxoSJsolJaUWDbI2r4POPicwSnTTHGN9kYZZOuYUhiesg8TDqyd7tiALC4CCvrDIgLWEgaqiAZSru3UcDM30mNete+2vrFCkImi932lSz19mKGA6BJhtF8ozd9A8M3upTAFpyAB/QnJcCmdmABJYDV43Nyo0cdUzufeXbc8AiaRETAMknrs2k23PFNwO7WZKDRxsvt/1gh287BxMjfJ9v8Jr/HZRGtEmXKKBrhZrr1eu4hUGfPmOM0Rhf35bOWutIgw2AnFX3QrXSOO03P1kqcQonMXN0DLFyo3n7188mTJ+ugQsPpwJgAzncTqATMIIrEPuaLPofvZMZwawpkh2KQzsQFiPMSMUKSyFLLvW7bbeC+epyaep2LLuz3PcepkZRl3gfPROZkyhkuBsPDhtY6lF78JjlLrQVJR8BdvDhvbgro5YP3r+jBolB7rQc5I5H1OtZVbeSjsNock7yrpbWzIDzhkWvbzxHkQnx8Zw2viA4VXIpft9oa5t/Ysb6uoMo952jK2753wnTg5LxUfqfELToWx+QkSzmzU/N+k21ld9fTqwN4bzB2XKV4Hs/JQIjoGVot+0jxPRG4kn2a+u5LwxcnI3aqE5ZXXuoWsP7sjr/ZMLQMRY3nplU6stXXrH6ufuTLgt6nEaLhE78BNDSYXm81QJN/ZEmtIC68hWjIkHMP42pjhDO0QUiYkeelxzBuQxitEE4RcLemlK2k13x9uluokj0SM/jAdBOG725oWbzatIXFkL6k3/WPuakyIlcvctLyW6FuYpe6eclcrpapY93a0k9y3OR+NUFaMW+TKPYi2y8bNKDxNhIf0DZc0
dTnMr30zApdOw0Sfr5Iun3LiGvcwdnye1eCXP+PIUcHzg0725k5HqK02ABgbQR7uTn7Lna3RSxITgnRt9U/zU7kBqVYZUhqwysxu3/A+dDSzNI80bFtZ08sQeJILkY5e++IZybgt9mkK2thKKrGbAbxjiB38ztzetL+WOkxWW9RkN+t5nr8sh9DhqoEAdYn3arX6EFEgTF+WnxiT3HpI6My1etaSn/QKgRmHHMWBSef+3KX6/RHrZwckwXTgVQQxrYmwTauCqN0hWmW+1LgZMo21FH/5j5A71CffbMaLYaRvk34wy/n7Ku1BAGY0IPXfgTVBXpxvty2Nyk6dUosc93dauuuMJdBn/97HtjzX6NQXSDiy1PHexV0AOcUcXfkOp6MgwhmSsArL8s5SjhWH3TSaWZ4l7DhegCjzT0d37g9b3ao52t7NwCMVs/pqiH/hbsvIfAE555/uoha4YOH4LNgHijmOJCqVymSYpCy6PimGTGTw/SYeC+x4n6JoFlAvLFFOd4dpZiY3x0dMJwbUzyHzY1JYO9lUlQfQS5gJkreS+0rwy8h+piuliGPGny4MjN05Cmu3RhuUZjF/dRH5dLSZtIGyTOKl5EGVRHBbcAQ0XZFnM3alPLLzBCdzEQv6wP7FGoeH6NeD0UO3+Bh48QiU3gsSZm1pcQ52550Ndvp2qWSWEyKdbx8TGcSprjvmrHPhJc3DGWu7Gn5KSbWse/S9J2mxFoByIDzJKcn0sfypCJrCF4QQwbH/M9Xr8nAxig+ERVQg6EQDvgoNAjpspZk7g7qhmJLNr96NTzhrLZ2LXhuXDkrMHGp209adfCtiLnhIcE6dTuNHZwse6LYOA8AueEExW0jRf93tYQo8PPKlep65PHzriHW+6OC7T9VSLX50rtJ7RgbesSTESl01kzyjBOaOFDMh1Vw8lwoVic3JHXHMnc+zXToDKiKBPff43HtN8oq1ECbphpbGs72IHr4bzGuo375urL7KolFBSdALfxC4wzCuh4gKui7GYw+eLBux5Un4AioPcFQvPFoiIhf0sKTf4w5+gPaxt4HHtaZp5KDZvd1VFlRiRlQcCkw8iOZbPlpsnjVNmuZmCzfPpbH0y5S+R+xEOmYi7Y45FMiwbui7/n+exQsi0JpI5dYrABUtER8MD8kciiH/iPteBIu5y79a2PhBsg3EjXqJbzfOQeZc7N0Fn635m43Goqbjo52lhkcVX8W91sEheGDMiO/C+R+yL/8iNkqNVyHCkU99Gq7GY7Efw+WZf6R1dw2oAl6MSMlKDLxftBpVqRCb39a2ZU8tm1+DBD+c7ERmMZieyz1kJzQ6ERAQoFAsJ4IJmFRYzTlFgHScGec3PnSsZlji12WWoLK5dhkNygVLWWVQK2mZ7eFYRiS2TPMBIxzwwo74eEUYG5FFV49FgZ3GF6G83RZAtFFy15OsZsggG956IDQkwZ4vcQXe7x5UoJO8QHfdnnSGfX4vvthWof8cfyaWdyOWnb96WCIxIyVLFaQcqfG8q17GQPfhCF4FWBiQ0nvEDSpOO5iNZf3t/n/HCtuEnl0BK/u7qdaTcx07syEcJQfT9S+KysgBg1g64HfZG2GszpIFUr7TZQ/q7T3botetD1VDUdSsBDhqRWwMPTeKwSoJ347BJcbUEdnZAgSPT3MI4Xe9+/XFeppdwsigrR85AOvWW/MoZmlkEubmdqFl+dA9Ix1SmccSK2DcNXWR3P0dIKSK5LL/ij84gPB1o/F7AP9qshTIYkLFjEb6PkqlQRaivmLHXKLV/b/TQhv/dTkSV40uUwFK/RYtebtP1ArqLQdEzOMRDAD3C6tL9NvVex4viFNFvw8rjMNj/9Ih2F0IomqvYjuUpySglCj9qiIQhRJ72dWbK+DbqWKmhj3SxbgcGKfeI7CJJJ1CSZQIoialr8ouH78FGWNQWOo+581FjTKkvQ2ZyNfOvkKSobv7twtFqGdyK9CQPIXBtNnHmpxSPQ90+i4n1G9BXcTyfkoaRCn5w/7pbEkAEOVw1MtuVfOJ/Z3UX6FJzz1m0B/KtqKI/0YnFMTOB4XqtYSyPjNfNmn/nhmHvo9SWtNU6UIhkk9hUHTsbSBp3Z9sBBpbGHu9c6rkmN2cGsWE4aH+33Uag7w6ykHYNQ8G3M82fea0ENIQAC9RCvzrn9LuGFrs/IVZsoGobpcb53r9E3Mz1tmIgI2KojOftW/Y5k7wpPjzINqEIs8RHDgC4cPh+8BOWe3HOppRe5QrprGlHDHMCUOMtne1mCqQCZ93Hw5GZPnqZ99iNStGtu0q7bjeEus7wrZLqdd842J+q6bFO0/w01hCb6ljsjghu8evRrOsTZ6uxVuLLzQsBcqqOTjVNQmJ4/n/tfw4GHRdxQgu8Dcfr2zeqH1h7nOA2MuGHadVQ+rwQF/5VWTDE2P60LgjWKleJPS5CM89a2nme7wrS++6LB47fLWuHwgPspZ8QpUHagakKUtTs5ps8igK9xlAq4HydFc8BK0AXE3SHXwwJzFR23bkZqrdD8P/sFCoNZ7r17EmsTO1yvSb8BRPEg7acI9RTaPvMfOudh62JfnLcRCJhHKGrcG8009e1nxb8hao0W8wt4wN5CUZpbibpjH7TwlnuAzZjZnspSHeDEph41COkq7YvMWqKDK3UVwODKmbYHSJKvIm6MD3P9lom0mnj2b8bJnhiwuAaCkD10jnX1GMYCkLhWKHuUVrvMi5+i9S6YGeD/WpDLWX17zW1sBYOvCL2nnwk9XngNxJyBQjQ3UNW+M7REte6M6L/uftGCrwOsRmWWCfBVDIdna5gh1JOW/4GV4S2PqohusZ/7Yu1O1EM80QhjVKzVaccO8Vi9esX4qLDLdc2BXv8eGm5vDnXp61uHO1WsDSo442o2RnD8bIBqvQWgnSxECMH4C+QDzD7uCvrqkdsizQIgZH+diukJNtNGH+yRwmWHzFaWaxp2GCmWQWgWLtJKF7zSlbLw0RN7OOH66rxItwl96nnQhfwBRsVBripmD8A5B4MFQUZZEnTSLbdyeTi9LOYV3Z3gCrcM1AXlzUYx5N7ez6DYUyl5nrdZBiBtYZSGj752Z7wcXMmDJAgPX3MzI6w4mOSez03AJGN5x+VWg7idHrmh21MeoizEkG5VsBwIrEg0DhdFRVN8gjtFJfAf1e6Y79GLejTNDfnu0E7bOvBSMrN2ThC++RzdqwzSdR92tp3Emo2zxmxjbQIobgedMJLgh37xGQaL4+I38zxcRT62Rng/TNRRATWVFloXb28UVcUT/TTGRVp8/hAe/hCSyfH+QBovU1vF9Ej5u0c5T2rVSYU2HDZqp6cUxiq66VgoX3x5Og3WhrAjvA2fBMRYYmfiyFR1EARREGwnZQBB3JV9tbO95fWtCequKQxbUtTnF36GTaGnQCqrDst9uqVdl26Hc7GN2fbYbRxBbFf0qUGI4W0hOgVwHhPlWNL5PBont8kihn37/GUXJLOy8R2kDrsDTld4RMjbJIzEaLE/374vPKG8tFZaTM0d0Ads1u2uvSl3akUX0dSXjUE31CcjLBKS85x0xDVmoV7FLEz41hnQq5vEbCr+rAeV1kuaC2D5shd1FtjQv1GDspdA6ihT2OydUVWERt1lsOmEeaTCbb6tnhkv4BYHLe95F6pRla0QCnU1Kn7yxWwhhKjlZFeAL6TZEGFCFUQrOXmta29RYH5lSMQI9lAzNJAvx3xdf0B5JqmhMbnBK2V5D528zLIhOxetIjxgGiiJyK4o/4ulDstU7B4FnVaA6LKkmp7i54tHi9DHEuDPoywuWP6fm/cHBEmAi6zE/CSCZkD1Xh8o/vPRG64sWwpMjnBJvFMyN72It10rQJMdl8lXx9vzUUBp6HTRaP0BoJwoMh/npMo6pdsbBAhMAgDMplGQHPBU5ScbPWrK+VY+I52yp2YIrmOHVcqoPeWd1FBYIcEIjnj/N91QX2nd8HUEs/8Yz5rhIVyUiWuUmVXuO1+LKwO/0gl9RPQtHG2hQ+7Y1+NISxMZ9ZHMzNcTXkQCS215dhuvR2w7Zu1dLjKWJ33xHlKGrWWXX69lFy8s++leMuArTO1s75V4RKCdKYR4rJ
FfF5w9Mni5HfWs2ExVAJDc4E5JTiYFjR4vxyySR8VrkqLeHL6IVij53O+JLOwr+vfvWStl4rO/764DCD7JbFraZHF2m8XoI8Ft0vQ3Rjc/8KfpR2szNT/Vk81Yu+b3VuJjCadSj8Rf41pKMEG7Q60DuiCqUMYGmSO+AuseQRosmkBwEdoUgj13ysh300inps/GY72YdZJK+d0OCzUPiqeGGFIYl7EemDW+MC9V+EYdIbokgk0VPI0qu7LdS9gKX7s2bxck/MqdtDHodE+5vrOCs8PapvCrFuqVCWxGqdNL8O7PIxUuWV2QHdDFS6BaaWqu1QeTHyNNEWjA1Sny5NihZJ4WYBJH9AF0TNI53SvS8FwTWihZGPXBvI9QF3TF4xqL5fbWBfJ8hndHEM5FocUFUCxeCsMS//RumCuyi47vCeqU4h3lrlHu/4g3FnW9m753yVmWC90YnNYh3mkEHu/csKLGei0nLNnq9Pjv73qaZP1nSjNxQ40AX/ultkN81kcBm9eZrJ7vNUVem0rSzlgqPGVQo1o+uCZLfn6kGMzvy/jkHhanl/cI2kt+V3s93+OmLVrBYQ+0eJMYUU5Ck51CP9PMqIgZrcsnv0WoMe2ookydUQ37Ab86T7oGQAwm2LP8iUhbIvuXKGR6WzS+0cr+f1UjuMnwcOHAQtWakrBe+NNLUbd4yBi4ANtotEUzLPQR8OE8rMOnzYyCOt4QYfLnyLHTojyJUSbgqLI6qLBRVym3Hv3J3FhkzbNwT49XzF6vCwr7ZWGNePOR1hCZmUnIAxKoA4ZKKruIucGCWes2jVlkESdEV5guskgziJheDq99K9cwWchvXTp5G02Xiaa8t9qjLxb8KKgTUdCqOIIx0Nl/T8J8ixu7bDPCIhOwxKv6GWCTZUd/oZbRBFQIE9tjvdrfh00BRTJ8zdJ91jTVtYR3k3NZzijO7ownQvaUxkTiieJ9jR1kLqhSyK+M/sky1Fiy/J3fZfGEw9uWyo/7Wf4swpzSvCNlWDEggnKNrpttQQBYayZQgJbJBbbrvYABzvAXy1mwjjt6f0I95dR9cK1xy4KICddRdxZT1/iWkdAbFwR5AQoykVBxf+E2gE9LYYoi+vFa8GeYEUrTXxUekgnIHW9wnw+VD8fm8u5XV9vHJAMumDdOl7wapNpUPo70fF+qa1sKkZTrTxRuk3pGJxgptGqs1Jvye+Ktq8L1qebJ+Q8a7dkezwPXX2fRZSX9waBcVKrKP8BEus/FBOIPqaxllZyGqXFy6o7YazZcf75NCdtUA7+460CqZzOBvGGYsfB0jhNRDJo+boIYn3+VuykYeJnMLyeSqLjh89oSYW8Uhc3ks7HkTSIEdDGz33VhDeSeDPSCrpJB36m8TINwXlZajrmmVNu3tD4qEL8JV7EHFl0rn4ZR8IIeOwkjeMaGPh+cNU4mnUYqXrVKWE+A6b2LBy62xtJSCpJrm6oCWipOdbBLrqMdSXhDHuwSJWB7K9CV5cEFyoDoT9NnY4ID6DZ0px8qI3t+7GwCYnY8aDuc+eZS9j8/2Eoe6lCHJczrnnABk4Sq/xM5Akr6I7NQmxxQzFN5W/PG6Gh2V7TmsHLDhK8hHpX7D46bZGy2R88s3kADT8V1DJj9/FniTMbs+yc/aoZEelL9kBMayiLcZrC5BYLVKPVlDct5mWuLWpTGt0RNKgrQNk2GLyapQmrVVWTY/CuLzXzop6xbjK+Tn8lJFRTpWyD8Al/HYiOt8ldd47va6nyYl174tly33z+CSYM8ffn8DH5b59DS3oGOjAs7fcMC30pet6QETDYgG14bl2uWANQV41EInl+PR0UOvvOx9t+NnDpA7RVcxcz0D1KR81ChnCGZO7nNrSKNcRKaQR8f5pc8fOqtB5wx9e3Z2/S0fYvXgMgrNlAEJ+fg3YvURcrbOwgE23BlMFmY+xal3xDR2LfhIqtj9dfjxYQZQ0/INMjBzcx6ZVyaBIJ3mhzdxmPWqPlU0RAAdV7fKJyMdPR7bx7lcGeh/zmQn0uY2Y+ZuxQXVtsh78VbYQtFdvLUgp1iwEWfSPcPvDGBQIntwcBA1nsd33ivkEut9N0LjcR8bUQ50CPyGsLNzvrBgr8uHana3QYD9Psv4OFGLe95koJMsoobJ8HdbAsduFi4xu0zYdpaF18AxlXY11OxifCNjf+x5hyFmPvI09Jhmc2LwsZ6krxbiLnhsyrTs3jMMoReT0YjE8bf73+o1crqREZIjIo2+q1SZq3RLeJ8+qqPNIC4ulPiOLMq7wYJ6uDYh0+xPphT+2nKyK/TKHto8r4zvx9hSzJy7rmLQlZWk3q/mGX+2ECcW7wuCfisNvmGg4z7nAIvd2y4jSDcL/p2cp1AopdISUQvhec3jY+WJm1OHyRn7pGSmJ8PgxJK9pFJSsWaV5KPW7Jt7tN1HuoIaOlKwRpnWUgmIEr23duJSmlTxAgjPGdtxIi38TzaJw+QaZiA4ACXzeFjmJOgfDcn/O1h8lsCcRCmu3W9/H9HHdTdI0aRcEzbairpJrtYM0tiGI/VcBIjTinzdxsEBhF7aBBefmpROI7G3cWw+ncSvEHsb40u+S/MaheilIcKwLS90vLK0mxdURpHajuJNJkLbR7d9Ie7NJId5Vt1UGZohEqqfqJj8jHTeleBOKdBYv1+nHDp3mqVU/F3lISV5uZXo9h7vh6Mg7rhUF4eJnucXVDm9yZ6jljkCI38I5W2vC5yC+suI/St/INHgDZ6t+tmNz3X1X2MiAlbMAo7SCy9mO4MXmL2wuMRAajvHRVohEgQtFHcUpacotFAFATKnqaDzizCCyBTkNLJjAts7dDpzM3wgowCMuDQhX6YfsKB7McV6eF8TWUJ5AXNYCZzYRzp57fx24IvxBQWY0jC+RmnIm6Uvr/686UQmb1Q0h+D6aqupQ+S1aS+oRj8HXlP6FlXMTykv5NIJPufOmYqXfCW3CdF0BWzIp6LcVlyThWsQdpKGJ2Hm09phbl4CXdb2zJufA7qqK2Z4nCpbF2zNuFsOipSjCS9EijnkRjw+TYcGUBodrPQelzc4Po0P/K+srdRe7Tjz0NFryCWKQxpwToL4IL2oeREUHB9kRhoD+JxXDJNaISYSyiu6ppOsyDcdMbQtepVPwqKT3YUCjQU1jido+BmqIR5TZkTVy+U3nDRRDFZLh7xwrOFfS7vW3EI/8WO8PrrX3AghdqJV6a5yoUnvkE4LtWp9X4ED8svh7S6xX7bKFPWYLxJzBIcc2lkC8aangTIHqTGfHJrs9qJYHSstuXGFjUQKyxz/P1BoCLBhSgKz/cfA38GsEfzejzXivJ9ypVCaEI/1OSqqLhk++XMraXVRoqOrXUqP0Q/+Ty2oWpTasZx9gzi6rkVwZsf6zCFRP9IAlmb6dZygqkUnXzA7XTMZQAc8Zy2G0Wc/9uZDjArwlYbDYQ10OzQ8BCTedCTnViaUn8MsjF1vnCcwv7JAGBJlcxLc9yCwCtq9yukM0ptSMkzSIcpoFUFKO6R7SiJWPNGLYIJ2KSQg4+q3h4alIfAiTXyRVHTuk5qxASy4A6jTRsMU3fO14hA0Lq14KFBGkth0UOJSJlHH/U4qBa9o8Hjhm7HAZ6lp1OFHw/hmLU8cihBdkjzLlImI98PooEyUxNKAjgmie6//I2hQb58dV9XXGqrGieZQBoIPZDb91WYycdXQNB5CQS3PF0Dns8BKJSAc2TQff3jSctPC+SPDMZlAgxLITx0MbKhxJz6gT8VTPVDKu8cqdz/cWsvqeaslB98vF5B+6OPFSn9vezTqPOq3mKXL0S7qbE7DpkTr4iYPQ9jwvSUBSpPxtYlJV+3ZACysFtwWF1wpZKtQBkcPCGtEGOyuNgL49WlJwUcDJJjHqbdjERiME/84w78iGjl/t4aFo5KGzT8I03F5VARBSBy8fPxZUc1xmRBPVLeHWX6tZ2Uu/ALKCd1nc89COHRc1RJrIemNQ1S0krqy8n9baz+l617hHwv9rCiFky8JIJGBTgLmtdYSEigov3Ff/k8QOjtFGERuvJ3Ljd33PrE2xHfGlgCI3EtUm0NmdaJllQylJYHJwChPNRqwZyy+WCmbc
bAJFGIeHLiSc1/0OerDjF6ODOPa/wPxzB6tFM5CzZ0eBcvOtcqLn9sl8gKRPl+m4u3iBDWHqjg04yjtHpXiUBM+J7bIWOK40QeD0o7B+zmYg1+3kJkwUrfWOlMS1SpH+QS3z/HB/mSt5ndpCJV7JtOJr8r8pYY/m2gF1gkhVYnD5J4y1J1GEzjFRpHjC1FgMhRe3631Z8kwL5IvrSG2bKqeXp3ORamhZJkJ+Pfdl7KXCKaGXDM/mVTF2T0KlFunc9g5NbpH7d7DY4w2+Go4QKJobxnoJf2E0UhWrb0kSLVWds1R7mJD0VQruG/5/oZpr3Otszl7cE/V0lO+TmnBLtQ0DeUc6fLalTOa7eGI/nS5lPmwOc0FLIaQLbrGa0EY1E51zKkd2V6Dn/6tYDXtXk98jPHSlJWoRnPKvOT7prsXlGh9bBk8pothaqeaPK/sDBOOUyTUFy4aVnkpiJWwe4QXXc0QcxvXdXvUwYH27jTiAym6YqiYL/HG+EDN18AbnZ7YYbax8jqwAzO6ZHh87epPQNCOXC7M34CjqMRGSqFAaE41rxJ//H0X3p8yv8qmbreMDbJxxz1XYNAinJ//L+/vM3I61Ss52kusMH+Q6QIoAz/fI1biOaZVAK2VgyQ4wgxJgpdThghe4PJVllkb4xrZBki+TMXGbd3JgYQhjryt/6rFFfEu3D/vKk/8+SS8P1dSrUuuH1acVmtzYCh/7VCNPyTa0WtH3il4vYmrYod/JSQ/BfH6PThoEWU+Ba33at3pjrQGEs5CMGqocUWqK7ZPPRzIduQziG5xZOzram8xfVGQC7cqTvb3YTYlzacJTfM5Hor5Kf4q5iqgGPm9QC9B0lYw3OTGWE4Uyok5BpunhMVlaFgS1SLSji90E2b3g08zbIDVGMLtduaKQfSTJIEDW2H9wIZVyo+o7B5b8CwNpXyPrmn5gqbQJgcTj1FK2T0WPgTtzL9LX3pvMZ4zRJeDvG6pwCp7AhsN/L9vcqCLaJXHzBSRf+DOX6vz92wSef4oVL22/FTVu3Be8GlUVNIu8PyQhP209+SxVXNDtjwRnwA6IjLvOlf4DAJXIytyck4QQxKV9G5/ACxIaqYDYOhfZXUKmL6tCnVQIZrdqDAEt3vTOoq6vXhMkBB09L5SasRpMFYFgs255HzolYthGXojj+qhTSvCSMbwzLckeuwMcXEIl3P2oTaMt5rxH5p1Z5AJ/88nd8V1fQL5DcPkVluVVK9KBsSSGzl/qqLlmQR4O3rX4kurGaCqVGTncF6K9g7C43OqNuJFk5NOjqKFPuqNqT2gIZB/2zT2CrBBSX8S5KFgTiedonFKyzkgunD0KEAxNHm2U9UP1r+9EQt7HdhZPTG8PW6iAqWZdeZGuS4pFbmihs2VvXoNQcTVF15HdmKmKgwxoOtem+uF/7FPnX5OVozkaN6NkUJo4Xfbvu5hgKX6wwgHucd5SrP0AA1FrgBvDblBMZkpGlXgwpBq97VLplTPPAAk1TV/QRId7dBj5Lr9zhCG18Z/3U1APyA62g2C8V0o59DXqxxL8pBQ3q6CIImZ4kYCiuPWgcosYgojbAed86uNHsPuYP7/ctKkTlmuS7t18Whcom7mu/n+okfhlzYKXvHVttuPa7i+UtGQ0gLmtSju3McKddsOIYyBKFPvfB+nJLNrrVBHDccWF/fcqULBuDgb4Ayp75wCnb9AaBLnq7HV6o2gzeeq2r8TIfWKfGA5gV6xFuKYMmButJENa1q4yKW3eTJpMYURtgmIFb+LWLAlyAL8v9o63LK9uJqibsE2VjxxYwrh4a/cI08vRpP9y07KGyt8x+kNqO4B82gQYFyFKQkcdO9YrKlb4WRlKrV8OLMbmwC+2R4AuY/xr/QZFD0yTKXjIExs3X27mkGtuFdaz1cUzaq/HFab2JwFoWX/ONrEC3PayMB7gUQICSl1ZXFNQ/KWpc4tCzm14Gg9xt8cmhG2EW0NAlfUmF5pzBxhr3IqxE5VbwGHRVcpKv9WJ2chV1qfRPtffgyoXLdx5RsrSgM/tC2N9GtaEj/UMz0HmVbieogim0v7MPNlY+xhc1AlPCqO0jbB6EFjs4Sr/d3XMXhU2qbBMhxjG9s/6BT5aJCHVNExOaJk9J964NTme+ZVFT2Q3OgeyK1F2eB386AJJs5GxOhGSMSyulj7hhjihH6Uqm8YszNjM9VYTGz5RE8/scwrs3vJ1TIr6Tbb9v+sGH7/+UfJH6GNjOpN9em3W+KtdFSLlCuMtprcSEARIaozJCEJ6tsa6DjTp/2T6Q43fRU+8KuHc4qhkTPkUq6fedEZ1yXrtQSpJRlO0eYRsoaM9k6iBXOdYOBCDwrl3eEANs5jbzgWOXNxB/d0lXkzZDoRakdNA8nQ5dWSYT0Hc+buzH/isgP097Lr85lEMYUDE1UoWAVU6IF9vh+ljlerOZp16OEyFDLNlzsCaPh8LGSjCz9wHdaquFX4ugje55meRgPG1y1UVXjql8rmD36uao/GSngKbaCjOBSF5ptsfBcomNH/vpGk2Wq0ySI/jX/QtXXaLlfdcYpoLmqGCTnR7X2QDwxZd9Viqza3yJlDQkJcrKhkwy0qYfbQ1VYE6MQ2Ayu5xtUPd7vpjrDYGzNLirL5cAkF2i+zmTdZbpPLtVK4M8O9CgAB8hkyDYP8uGIpqAObV1CxRSbcB+iOr47ShAfLQb3PoKYNeJrz0mNXc8OZeulEsfoTy7eQh34wfNHmTPZ7lUcIA2cfP/vi9pZNbtRqGXPzIoo4lhgavkoiogkYYP9uP3PU/NeIuON0MVRFUAwDiFqUCXwOi2DifUBVUtGN3tNom0+l9sVV9N1i5MmETxh6Wmc/ccegLfPjvFvi9DTT6z13MZ6mtdGld7u4Qj5aJ2Kq07sdSbnh+WWISuwx/nQS6zHGWI/2BUK6HFGYXvFb/5+TgUxDni/PnMtJTaN/D9kdUmBAs2kc0A48SXqMfHzMa+H/dSPnxKC54S4QsI0ovE9fXapc7oJaSa4R5Jj4JyUDWzGBGVodQgf/Ej9d1gKo29coA6kosCJVOX8KEijedl9yrR9pKS+lBvUgoJePo4ljGGNF12etf4kg9uIgiatq/qBWKzCCmutv58CKJEuMrzYi9/z4NKoGZKq6wzMEsedjLLkBArW62kMdl5LA3a5E51IferFTb/KWJSIGnu3DVr6wfYIaSxucT8DQC7NO3gMi4v8DT8Y9zeCl8OdLkLN+dUUrac8xATYoN/XUYsszDOQaGTEELPdJDGN2kk/6P/Oyi3Iaz+Fb0xjVnmKqo6g9o5mEX/XGSpDA/8Pm9+5W+eRdNjZhF6DzgV4h/FMTmyMXMu/J62T/hxqj5XNElm5b7oirqc151f5pagHXBKVQkv8FEVip5c5VCOW7vzFZ1lA8Msi5e5el+p7FSP+gIAHAwqw4bHj9PWZEZIpiJrIuUkq/5wTgJ0HPTIwpXEeg1zZXFfj/I9Ic56D0z8mENb3srfI5PxQvDkfPq6TkeiCq0+Ho0jxgFH0FmuCJUO1262+yJlNeNj0wNBw11iYBCigfnxSohWHc799WRvtti1BDRXXvjhHhf2B9S0i9Su7I/3rTU8F8RkWTJjb4DJnHVP5+mV4GiWLObf3LR2LqcLlgyHRfoZTkrfubCqQ9WnCnCX4OZXDKuL3a1e2PS6g9lFpoMd9rc+B5VdaLyKQKLx1A8QA/yAEhNEJ+iE2RqFxHXfI0UVgNQ6dfRlKHUaiyFO0Ve80yLfQ+vR/xnEEnJpGhgKX30BDmLtPVOO29qQV9eWkYolKF9EecajIi+ne48AcevigTOtk+RBMNQERHk6wpu6Fu8XjC3oKqZ88SMr1zCGD7YM9kI2W2i3VtnOCP1+4XV+zvissvwudrxI7d+GJoW6XPoBcj+187RcH5ZJrjd29q15Y4ko0kAUpgck3DSlwdT3ivpV9Dic0ZLUgeQn1/72zLGC1ZBnImXtftmRL0IvTzCfnc/cGxSStm36nCZccxzb1Mgr9R+5dNPDpbmP+rFVQR2hZhHhE7yy0xDRY23OQnsqfX1UYF+SE7nUam6w2WaThl+N0QwLSR7jcwZqItHFoeeS1kH
BK3Wl7WG6pVTikRENSVC7Qv0A88oXn9D9YfzM3Q3pRv0uaXEKEvTaxl3jYT5gvzU6Zm4g5cwvVpFVS7gv/RrWCnRQMrpxBlKVaCFEUA3pr7L9ke11U7v0MmOvdCkF5LTidD9RJlFCG3K7nHU0h9NCCosAT/J4IDb0aegnbOrBu6Q+9ktnm4f9A99f1BqS37xyejBf3K22eVnyGJzYM2L6XbD9SFKYD/UltZYefysKdSpAZr2n9ZIByO9yaE9D69Rd9VIhPngY0cLQLw/W5e+PXaWO22AtXXggYTaSW1oZ2KbrazNK0Cv+GSyB7eTR3UsmahRgyeMsbWl6CkLwY/PVAoOktVy5uo8gyiU6mFkcW5uxDgA+sHQ6D5AzZwd3p+6RI3kHxTekqGSEoTuXvBGSGBCyY90k2kDwH4sGUtVBAjlX8i/vajn3Wckl4FOBVpwhz2CqMtuPRppF8o/BCvy06ghYqvsSSKLp5LyufMncrrTBM2JFuHSS+feRFXQSm9AC03D8N5GVgiD2/+ciXuz8d0PyC/L8DF5T/U67nZaqtXSnSvLUUjBB3NeltnmlvopGS2KcnxHSk2wqfaujmS4oZfgmniCvco+V5KmfW+C0etDu+ttt0i7PKblVcbRa9zN38OpiZ70xz775l1sSYTdoErvF4ovX0ohzfS/p1LHuSiyDRx3DtUi2qMM8H9l5uhM3bHzT0UMUPXwukYegqj7pP2rHFFXpP9etQT1qc/FkHbKtzQWx099Sbe/6aNW01EoXdtsT525uqfx295W1QGhe4bOCm4cOfw32dM/DY2B9WgXB0DxKBFfoPYo/AAfOIjiFl2ynIxb8H5NSKHr31Lr9ulNES1gAqHdQEAY7ZkzMsTKmiFWTkwl4AxKRRGqlyTqm5t72glwVr5FwyROr0LLIKT9J+OuYdougC68KUhWLmlwCo02vBFEb3nSeIBH/RVwrt4e8jRmoTkikI1rw5N3d8IngNSpbXAJ2S8W9bub+n8EKLpu3Iba5MuXNxiCZOgwgPgWp4JOWtfMQ8DmaCXLyUkVNRokaVxgjar7p6irylXkJjzw8Wz4UZeUrN4Bp5Dc77uUxNm9FDxZje0tteRDR7o3DO0Qo679p2ff3lKoV8tddHyNhE5XHRNYaY0YacgHqirOGTJa0j65QAKkx9n17X/m6QQb7ut5/VkcYatVTw4/+tuG2VTqD3fbc5kbEmgxtO7rnx9pa/5FkH/A4EVB3ECPqGUe4S2Z8tMdZUdfYtnJUy/EsKaEjH4MInbI/DJLPGE6UbJxf288r0iPQAFGhRLlfvJJNXy3gMuA2Al/io7Bjgx+KKYonGdWisjtEOepybQ13IQWgb4pGBuE0YrUdUi2QJP+mdVAQIcsRwoT1vNP7h6fSe6+jK0zFS/CEO/9MsJlYHRspFrQS+tiP7goXBcUpqo32AgsphNmcQHhXwoVKK1bQJyTVLRE+J2eO+ztlA5G1crKOG3L0UmOvNmtD3G3U7AQxeHXG1m9JsF1VnhKPitxkANb61NdmwWbmuo/S/g1Oi5lCIDQrklyaS+jpTcypJrx1AEwZ40Y5AA8DG+2w8OQeqd3SpHhm+wlr7vPecBwNwJi1qj2ZEs01rlmLBxt6pG97OdgMo/wp00isgS2/H8m1jvofWsejOKcihgGCAOZcy/jk7BcEtb+G2+VJnIOH+x8eo52Zj9YD5fvoSlUVybRFmIWJe8Z2wVwACAo1l91bSSiBxTcfiQdhpt8Cj0Udt8cH4Tfspyq6cyCA+voV7zO6cmeY9+f+1Ns9OChPghBUi9sG6OELsIKVkrUElDDUhjgc9suuvOSu55AslO4jO1TNAIgYMYx30rxxLHJgsYaYvkxBj0ICDgGFlrt914G/GNsn3vy+NQKPwzhe+N5sBf6fbvnVQ+bt+9P45taOM+P9jQ4/KlbG3PWemxhqa8JT1o/wnS+EFWZ2igPBGW1yuPzaJgXq7ASnnZj8Jsv8z7HhhIqZ9isy3k4E/jTxn2fobg6vCmFZI8VVRXAlBnX8/9Iz6RdP/0zRIWn/R3Gxl3ms68cRTg1777NSo1sIJ1cFMv8zl7qD/ZFCOsttls6G5CZjlVLbCfqTnOChOdXngS/ReYhtENF8lmcE+YRFUusr3DY6k2W79o9/sHjryMGLexaRyXe/Q0UzFTE+oj1lCEfSh8gdd/ycqhcxZFS91UBEG6ZWKVffQeRMPHJ6/GP9+CP9lh2dRSdwHHJJZf3/3NYkJjR7wXp0idVJKblHHeNq5O5BDcIh1IlfOgqZDYgtZTxL429I/Cj54iVO/r1wHhYYVnDwuvHXgB7bBWId7GYGFhal1TIxAfOeGinElX/IkNtdDgReYfRO95GsFnb8dSB6WfK/gwBisxRZDwXrgCrcbNJmnXQD52v1FCYV3Z+BrU3mrV3/bC0nfTJAZ+dGrTCHM6PAZe322/nchaBcdGFGBysbNXonMBoE2RoTGL6gRmHCIpfJUPMoPHlv+mtYBgOxIigKykEeKtLRiYU6vvWgrp7Ncvau6he+MSEjbntoc4aMM9qrk3og90B5+v1dmVGmABVAKctqS0tvDTu5h2e72quaz4mJd6vhsw0N3P7ZWR6B17FW9xgoDSVkwPQXKbLLcw/sHHFQWqos8vD0lNiCg9fAYGQMfbVwBQjg8Me55YzucXfu8L+5Y/mhU0oIfiRBhk9qSvCwl3x8Gl1IGARkOBVjP34Y4yj6NTOhdKLBDRV1FxWun+S3WMOPP1oCVNXdnowjv9VTocyRRkAz6JmA/filMOyv6drhtJIg0EYzAoEodArhD14YZKx+wobPdca/SkQB+80f/xhZPOBNb3xTHYIDZCi/6qSU9iZUJMNgalLwaQ/uqLgXM9y5tdfcH8kFT6nlwofvL07/Re1B0G7E2+6ZakcpbVIRP7Ph/0fa9yZfneLS11ntpYu8Kb500eKTwu8VkxA8/MXoSLohodBUIjqyxiEdxzbKhZJXciYlvYqy/wCJOAo14zhDqMGZup0rHXLEDvMCqIHx8qk51XxPS2Z6rh5yu71JzlJVU4CpVG1VkqWQcNeuYjIs45KYWM1W1KgSf2pwxXp7d+/guolf52AsY3bYtTRCVhHut+sGB8ipge3SLvtGeTpZwzpAPKcvft0pvhLR5FM6h9F15qRTCNvcPXFOQHIMhLRVTsT8dXhbMwl7eQyIM4etho0KaRf49pANiKuflWr5PTzev972kMMzbita1Qmqbn1BGdErRff3mNbLhiJ+X+GZJHZKIxOgfG3dO8uUmbB90AE1UgTC2bCVSPwEyt+YM8ChSf2oLoZNzFatsYYEHHRdpCp3+foodk1qHU5cM/zm+cd7KPDxh5UgOyQqEUN/c2nnHaqc3DJ51HcbmRnp7icuwJLwNi9I4s426IgS9ESUhLU8JMfZhA9vIF+gVS5HLY2mStfCjVmU5YRXFfpOnq32WD1PB+g7jLDrzpFxUPIH2FaoQUgQHS2sGFm5+ODGnwSNMYwWB0s/tCBKGD0rzkyzikJ1jt/Oxo15L5d/owxQj2qGcpToJRdBP3Xrl7sbj98oPzG6o4exK1XyLWuaq3yLn4rgrw/J7pqLw7TYyVoJj1izInZTNCC4YgepW6sjQbMy2RANpQDGCWBCY3qLCnBT5yZNtXI95b5D4MtEbQiDuQ4bkf9uOSV5WIe3kZUSpkIont5reEnVLeoTdFe+YCHD8iaef8WTRr/2kxYX8n+Uo26RsFI0uG3R0ZRMHhVzzJqrqpnXXjePgJlGKQGNaFl8XwhJODgSAlhtkQSiBJlm7BzWQUhpv/QxNplxjWrn99bfA1qF8gxpUOqSONVhikraZOpj/3sxHvP0VDn42MbKGobypH0dCcs7bhqhxRXPH30EpL0x6UBhoGg88NFahIVrKY7tZpd7zRmfvAgL8FtG0AssShOoxxxmV0DiAN7Vh+NlE55oxUJIYOkSxZ8GwCkntiaM+IMMaNtQ+zidYk0TXS3+/tGp6g8PcsJkfDkxCOlZu65UQd6qwoDHNHkXWu947mNIsMFSWSrS+1QNF368yyqdJY6DrY+g3s8ZuzsaRgbDOACSyvBoDM26nxuA/NISVvi
61wh33/iSMsirIrQVgbv0Dh6C3px45l7TnaAQrqXbju0DBzYh05/LR7cdo4XKUwExTQTWgNfisDmc6ss/XtYoBKEnN0dAG+ouYwp0cGFOa7EkkTt+6dX4K26vStIu33MBwz8FKsieg6y9nD8Sde5yUOiTUsajhQJaZ5BXoEJBdhxbU+xV+MJvqQANuWQ1qdn8eq0TBLqcFYL77K98+TUgHQLs9Gk1CfQvOqPBcm8Y/YLy/Qsgs/Do04dfpU2LttxjKpXB/0q0lQgaihI541PBzcHzIMv5AYJPjtkNArV+fpQgZ9f8V1CkB3UrwpJseP4LvvYsT5563f4gLK+OC9QpaBhHQ1bfh7Io+WOoOpgo4zgGpDToeb+XitorikdwW7QixpPAxm75bCoXsSyrZg76gFBMrjVOy+Vlesif6QL4QK3qJyEtFgbo1gixGPaAEbaRPuOmFah4jSgwuVW0sSbwIQ69rOz0k7Q1EQDTF1VZovqKbZ3LlztBcukFoosxv1+k/w1hiUwDTK9c/tRz9ZdKQWrwX+Ay9nFQGXOMPg7+aKKevzKt8D+zvVFMmekpv+Rv6DjDnXIrXINIE+nDPDfQrtX9Vjbiqjf/C5c5JtuPajbMgiqxg0MBeBzdRE7RpoYAdZNPv/g8+I75i7MSg6EdTpwEt3iPp1zzN/t7S8af3XPb6dMi71PlTXaYe7NLy0xXnnbD47BXxTkWoHEmse3+bUQK8acu47gyNM+Ej4GKFHLIyYTq8q5/ojJKGswYLK9VRvIBRYa5PyS6RaE7HOpqIZo8PvqyNK7ugmfpcYR/CZZFGgOnu22i/a4/6RJfikEaxy2ddCUfKXLcZHmh33pbcuOstjNs2mme8eWpCHP8ngERPcFHfQ2EL60hwHkJqKxDhcItb8I0LdtDXktyDTcAHwFD3FPPfOh96oz0lNHDpAjgsyNakqRerqVjap9vOFpL9/Jc2/xmXdbSaCgilR16uJQtXmfTVYQbvehu3DfoXCE/57vgF2H7aQNanTgZTLN2lftuuqLnr63GbztogURGbUOXAzfBlvdqVT/7xvmGUhU9R/qR1gXLZUbfrd3ZIhhTajO2i2cfaYDGyOJelzrDNnhfsdmCA4OWhOMX9zOHH8dczgIcGcy8uS3b+5leaB68MMKJQZkRqqD6rLO1UKk2+YN9Nnufdz7Cnq7PaE3EuHrmz55uJAlNp2BN+B6Oma+I+nNjUFAEXdQdU89WdC3bxBdKIm692fznHxIQG/V96eTa8eR/h+2GNb0dwIe/O+qWRvjPNCVMaxJvcSUbW8/B/hEybdNtR9elvExQFHBbjHCOaFP4eZNaNUqnmAfNpSbzeomMb62AV+pll7FG9AOC+Eh/j+o7NiqEdyT+TL5JsoYLptRjo4Zr0WPbPRnaDr92nWumMIm52tik1z2iLrX1evGHKjOFbSYjBzvB0hg6anDlmTVyzSAj0yPeebBbEM54QptORTjCL3nP+cKGl+tBjWr1wD1u+EfYFtT3oI/RK5d0YOXvbiMUygu3req94+hHnFK4CY/oEsPiwHy7KAWgucTRkuo/nwGG88o9CHmWq/EEBJZx0R9SldJOdJ1v8I5jWD7Mfb1DdoGF8oQxdiT5M+j1tc0xaiRox2VDvr167gujHG96huXCQb1IQx/OvY9gPTS5heJllVc0ARd1pDWR3dHsTtMAKQBMD612wCXk7C8oGZyYkxECdeM4vK5uaztRFDJpeXwpj9YYbUxvIaQ81cROze1O8TD1LK66GcX9svAvdNIwB0oZE7o27kzoMmmkM6dsF1PVnb2nfkGHLZ9W1gorYCU+Oj9/BtcQ/Aa1q7c4fUMv+K9OZVm0h2bl52gmlR5f1dwWtcKsYtLVkrzajiUK8pxwyWUI+CIcHzvfIU1gmLu4DY5guM+F05cd0+g3XOn80vbCgk1kkyTBLnAdso+U8c402/YyNoRzCoYOoMlxlD6tNT22dTftgGYf14tXkk7NVBnu7UnevPoXAsoUZ/UkHa1O1AadT+8uqVJhF7lXh1kch+/bMTNlYz3rylwC906dYrRa8MUYd8vW7zkJSddl9ZmrQqkixGuK3yjeW5WqB74iBw8pbf17ktxuw6BAdRBiFW0Q/N2C1hh4FAOgSq0Gsxb653UrfL3jOConfx+Ce8ScGnbfwto2JQnfKGsrXlcxwsbfUqeqkJM56iPIfSKAUvlSXOgPDKn7jkJYaK70bfMnKJkvVPqlQQZzGTzMHgrNniC1PAaPTKm7+j93McbnPCdKL0LsUrW4oBW41O2IpWhHy9z12YOAIl+wJtVQ0/bLecc55EsiZGPee63Umq8gfyXxfDf3SvjYWaO+lqnUyZX9bc5vAbno008TmyGSlFTCQVDxUl025pLIr0QQRMEx/hnToshL+KJ2raiyLPM6ZqHO8fozKuREKJEHIrLMGdsd2ZNUI0VV4Ste7Sag031wSMtLkZCO6vdg7PH1w643b0GpZrhKVp0PjA6c3VCovZKKu4ixtRCsf04BKg4UKH7CoRXcK7LTP94a4oM5lClRR0sd0B2XIFf4IlY/RGriIKTyc9xnKfyj6tdu3ecIRz4rkFEiSQz4d1tyRec+a23ddYc+p/VqYfDKV0CkKWbxtwmuEoH2yzVy9P+Bey0eEBmYd5ZxdOdwWMj8I9yw5lPMY22UMkhAv81GVEYCwKYW031LaBWh4Z/qG0Q7OX2DSmHZKjEYaOY/s5bcD4w4mroC9QEXZY1HqCR9P9vqCIQmQp2rPskmypYBtYdrL0EDSw12q29k8vdoUnjtAPiTP5Pl2SCqog9fdKhD6R5GeiZnfXEG1Yb3OMS9ZjnNgb9QwgRhXbU8oQf+XnFw1GVHZmTlgzjM3ZaygYqJKR4fuAlaaF5PRxH6M3xbpuWMzIAhtwLrE1PsznBiDfq5G6q3CDayMnW8pbMc4wOfYzoBgt7+sJi7AOB+faSzdzRCz99UWrHfxwsTZqKmnvY8PZawPtRfU40ICp9R9RKyFAu6U82HRdnyu3mmSIaNVkq5gCq9Xry5dnpdXN1bSB92j52DVAGAZ8h/gURj3JSxPyuoR+SNgvCI8OLAP7xgOnolBPBaojGxHyc2JjP5MVy5/ZLIYyeLQhyxHaVbWQAOHn//39kmtDTbWB0rGkERM4GTGy8JPvi/3xwKuKE8RwU1Az1TNNnpEipPZaSBH4W4um+uAWAnyMSzCll7d+YQ3o/o8CLbjrzrHBBj7BAnK9D7MIctxyEnkN3lzBZbdQQav8X+o0ymYGVoRujhQ1Q4pkVam4v6CT+JeH1lfZF9TdsHkMDkQ0bbPcnR3nx78c+nYEneIGpgWH+3Ra08OGq7l3ChYh73YYMmCpQenBRChf2JSy7mzOR1FyK05aw5So8KJvwRdbts+X6ZHjjyZarBqoYTcC/sOItvmKxlVFpN2pvJEeGzMTsVNQLHS1094efyOG/j0UPdmPMZ0i7YfRrS69oJUrA5eYpXBdXJPMKYHSW9q1mnKR971JVgjQiA8baphNHhCYCgfWdgiluKFhQ68PiqXqSKtTc3so+m5/XEUYdSZM339KHygK5+RI2JgIVmKNu+V5ARGUnSi/bP0IKQ1GtlgVUmFq06Iphq6bOGT2HcJ9RBT6eeEwXBrl1+xlnoE2r28Rmwsj3oyfkZnPRfVIFdrvO34P33+yk9L8d3yYPy5pf+7/iPI9X+YB6cKbK7ioU623i1mrT9GhjVSh//j+xXPT783oi2SzkjeRlBoTwWEmoAIIungiIjahnprPwVK8CK+Cp2XybOM5hL2du5CHzPePrqMsudmC5vAqKUBKq2MVsypPu5RRNEH5LldLvelpljkGx1bDzQEhR2aeEUBVQ22/uVa3+LUPpVUf/bkbUPoI1RhHr7NVCsFFZunA8fntNILuX4UZ29rWMRZvNi2sbvkchtvAF5wal3bJ/rPVgjflIGG0kefMvGWHio78FDxLZql1JEgVXbG+RH3TG3j88dUrQfwpzj0QIW6Ci1m+lRzyGx2HiimVer5bT4c9fLQsOoya4hCqXYHadzoVgeFQjthdal63NF9bRB4Ji54h+sjZ3l3qZoMoZc57GID8kPy90ixFf
1TsRVu4aLvOpda1uLjd4dceb161inJ2mEm8IY80Bx2B9GD0MHkW1KC0IVtDUNy+/A25Be1M40PCEC40z7ChKPmAWgqlalZMgLupJO7JIRZ0o/4HW/OTOqiG76dy3kbv51F/5xwF9z2qC5rYiRayuOarH7TXCBshN5ItBoD/6SINAUhfDNFAz57FtNt9LiwqeUD1PtzserGMyX+GAbscifBL4i7HMKEeh/L14O0PrSS+WxfrhkE80EQGfS+KMkTrfU6UgCoQm37of/kdvr31xLBx4jvsp1340uzKnbN3ghYb7LI+EoTg43tRfJXEEhgNMl4QmPh4NNJa+La8HAWcCnNpT5o/LyCj26aNbPAm9pWC5l0N1pRaHj8YKWta6CZV5d6dhepN7etjjpsVrg8gDMbaVjHn3rDmwgp8PRKJTRHjc2qrx1FC6sNVn22R+KziCXFeZB6E1aMPXefFMA+eNaBiZ8yBAHAXiFcmaVFyQQqfZsXt8wrNFm/PdCmn0xEXA0Vc4ucWittYn6GEzOejFo2olHERjjcrm1aDpBSMelrbFj7arC7CaO8HkZDcPkChHG99PpVnFXwzIhKYOVzIsgjgFAR5fKKU1Y4Ac+C7qDdh03oQF7mwSkTY8i/zQIcc3a5VSnFoodr9WOtO7Naui/gQTlM3SSjfOfSKzOkZtfUt2/+TtWz+SQ78mcidYVuyxLFt23xzU51Me8Oc3aIkSlDkb8ezts59tXCbHYjhETbJZ8oHY+z1Rq+ry6YjWl7nh2txd5+xuRJ4/lrJr15el/c0xEb5wiF0UQA1gR4Ux/aCQsTugWEXIBq0HAUul1cya+MnLVZ+RBUCiRhHRD02sO7Jr9+7omzWHQHwQZawPb7VPeHUYyTr7KDY3NjNwMRfzutJFU3YvzctlaAf2Cl75ncSE0Dtv3NssLTNpePJGRk2BwLw+jvz6Fbtkt8SZtmeAsTXJybU55nY/8EVY1hAOBOB7r/+NrbMY1vwPB/eVjynvHywIUBZzdtNzb344PzW1RtTRidSGPXOHX6eJodRt6Wu48CeSIcY2fsdS7U00DpKvaKYJPI9OuUOXfUEeosP7gh1sO/+v7pB2bkXKbsL/yeJYexDSfiVsc1cuz4uev5+1lyDSsAyXj0PNeMbT10dKsOFCnsiOJh99FcJtLzz+9aObXNALvqajDLCuStz/x3WoG4oJjSZijuzvmPiNcr7FOZnVWGTopVWbyvcrx7H1RxhN0FTKpoCIqc4xgC4Vfc3BbNf/qpwdPTiFXytSnRYV3B8muLJw/m441MlbfTz5x8tMTf51ZVOIIcUzPxREn+7LBpoAWps5uSB7WMS3iTfxUIYlMc36LvTcgtPWa987O5MM+l3hxl2wdhXTv5pJ/cELuQjZJxGfx5yi4c5rfypOBv3xGybV28Y8ugZYuq7mbMGv3WODV+e5Wktio26vpkAk72sRM9CsKZLjJ2P9wD/0uRIQOPruRxQZEznNFmhB1J3t9AR+M2+IzltACrx3S43u2tDh5SKAdfGKZBysT6dNcyKMG13GOnIa/zbxelIujWPodn+NHf9+Z34HuzDr/vBKA0gE9Se+3JXMymcyUPf4DnZoecM4pZhRNJTcLag/qrLU9enyZd+e7ZFWLuZclUpuC57hejc+WQX6f870jZsKf2a9dfPyaM+hbmjqVO+O1rx7p8mEYIWk13blepbEvcZvbU4konoHR7klUQfvK3EkY5EonZlxB5/Rk8VChUyLOB0TWH1Z6ZffzjH/pipc7hgR4A31Gi1x5JETh1Gycoa9Swb26ao+O8ZbFZcQFQc7U/TSJvLGOhFFk4YJcODCtm+4BsLfzu9sEmlFIiB7mhENzNa55Ea2pb0VQLEhz2dkxEgoDI/qXD/q15B8Bas+OrpAZDdiBOD3RDphpvCvo22KSwWF8z5UV8Lxkb6FpP3LR5VQX/nCNTJz5oebzuZlSDavM15/ZKudpnpV11tCMN0iVJM6SICBoT+1twqWcUCp0BqF5IKHmS8YSFd2yVFIyEZ4kCsad1kGPIoizmpUXBWEjsh2T9FEV5CF9VhB+v3OhNUKYfJhbMVDyCNJvr6jRMu54ciNjCXtTYJMdAFc0CCYJqhp7fcHEtOKrj/QWzlYmSlHbsp+Gbvhmp8UIHoKf1lDgNhgAGZLZvNpSHi6fo276l0XeoqbKLFxKu+8XFhPOAUO+OLVwX62t8SQmLUvqEZmuAkZ+KtLVu0PNkvwoKUL8nxGndOK0OzNSHQcLArIsM5H+CkajtNSJvUCFfxtUp87uZWCIWIKkAt0i1gG1a3OXatOvvilmkFEm6eHSmYnyztaUZt0swBA4iKvxqZRY8zl3iHDGX5PYiDUZ+nhn3DtI0S8io3ij8s8axw/B3iPr/0AMCM3lZFxa1CCGnhkCBRVZMe3+sDv8WS4PrF2O6GEmOoRPbfgGgMN3Ched/Na2hdH7PRQTuQU/rPz7+QKPVoFs0qjByk73X5L354QKSG67/KoyybUJyWHc3SCQpwejL22qeE4dkgopmfNJ3p3gCG0C0MWKRU5vvDYM/bSQo8GuICFC4e1Rcx+88shTgoSaG9xHxsSqLiD8mD9MVOqjJGm/gQ79rrbs9fnuEspHXKtPq0Ayius0XqkvfLaXrxCgzkSIl3aEjF1IO8vvsFjY7CWewNDbOE1NVIPU5krbuUarJQHt/tM1GME83l43endmLRdGM/cQ5Fb9kQA+G8cI5OA/Kqr+rqusVXNop2/1j7TM8wuCxeww1s1GintvuCGWt41cOtl7jhMxlJmQAOrv39tcr0Cei4UPTndPlt51i03iwI13LnZUc9zxhrs4nIjdOUH6FVgea5sLoOwQlcobvHofdtg/RXWGhAbPXe2pEQlneNX+CkICYOK4e5FBQA0S46Xsg9mr1rRnaG5vqj+aK8v2zspCvk/ygnvjfq8Y8Z4/hPe9c+5qRZowMV5LxFnYgbJr9yJI3EKNm/RN7XALPxxFgiH6K7I4x8CeJk851shJVefQvCMVagq4UXr4E4l975XRedlP1f6Riz4fkq0FkV5mfA3G5PngKMNEIC+cE6PizF11muYwdxUP1NjmNgXyL4YyHDOmWxbEOZO7nnvZU6j3kzhTu5uf+DOCp2M71Y7X2vakdmpQ4eE98G4gU/dpmVfjgz0UMeaOjS/cMQvvJzVQvdJ6GRcvU3yMH81kg64DKiapnojJjO3t/S76witLpPwZdit5qv+K6TxV4vINEv4zlcMW/DPr0rfKf8yb7xIFPNgSWTb2nSoIUag2iXRaSZjs9rf07Dah3UfjGy1VlaJkyP/Mbeb/3aP5CApVtIh/UvLBvTHeQJIopHI6gDoIA9OnZgpEQBWRNcrMrjp2+BLWCLx3DQYM1nZrFq/3fDB8vvIo2IRbhBH8lyHpuPi0GY6X+DWKu8XQFwA8B1okqveUi/pwZttZbS7VLJtO+sa9UbbUdzbpjWVMcZUOS2rogDCm0OUGLGBrWJoP728zk0szDdNU7uLg0vHHSVjElcLGSk0HvnzAAjnOoTDlAbFf4ty0NRUuVK+BZddGIvxB6zYW+WlRff/ZZKuNmEcgmWW3DH6UFEAmiMaQ97jt79WN9aO6MH1rAB/QXvBHmIJOkL5gGHz/Ow9q7UKm7anhCLuU4LGCYAceiEXh0X445Ig9ibJxNBL2bfKx67AhgvPKLfGFuSwTOq2xqjev5cEU7sw1E5/adu2svItN4EcA5mjmD0SSFuyCqNx2qIRw22nJwe9MD0HFa2HxqzwCKOk5Wi9kObaqHhp+vlXiBPfNlVlDT1mkToHpWsM9M44KkaiIqBS/lnQ6sc6Th7CB3/BZQPzIIkaTZffkJloOtjKU7O5kYEMkNRXwuRzFBfmqPG6QJNTFoaVqnwBnvlut+MNpcLcbsTjUqF2Zy2SyJoaJBgiymuTFKrVJxG2eRTKg3TRCs2uKfu7J+5RSKozJQlyWOf0PVo+5Ih6Zj4k4oMBrg9yaJvCN3LUlBCCBstNCq1OredrSPfe+DdutSuoP9fxcRjbd+cy67RWkDuM8kci0f3puDwjt6nQ08BIZyiZU8n/LIpDLneJvpNwxwEVpVWl/vO0
coa66I7YRFj1vrdMJJDhtUha29riJACBGoC0jTS8RYPOR+4NGDFww06eQMkebFoxSmY72vgxYk2V3JjQ5JXWgNlW3Zonc4Hmla8gzCGyrgCetpv17wEq8cPkUbenWhC8UkI912prtttWGltPQ9FWigLzR+5ZUgPKyIptQnkyRxYuEdVgpPTSrkIbD43HvXokdlJR2+DBRenz3ytSiiLjRgbEL5dGwE48mZqNN5RJH7SAnByj9L6E+vOGZIeijZhB94uO6vhGcjpDZ++kuNm6nS8E+DkOE9553WVWARYCSFPQzYhyf7r8tOnqPFzqGSA1ihQA7YrhT6WIgi9bHmUFjDKPT3YFgXSKJkTXOFpwjbiNdeYXwn8hQJgOguZ1oi1JGmgYVRncwc5kR7ZrC/sFrGq4Fx1Tv8Z7ExLhIX7ulyMMnMDHKd8Lm7mKf4loROrzDfd5Sm2jrtqYcQ6i9kyLYSsxujLriwsKpxFi8Fd22s+ciiB614ZzzB+oMWZsoCScDNDZBOWxQ81TM0S4kzRqgWBjaB5DLrkviZkVpKDI3Vt0EpnctoNivVaCyaFKuOwpAUFRHykfCYLcZH8iNVVcoFvKTnVPwMjeWS73ChzhtMXDZrhgeb3fDbmDiIJf389QPkjOSEgNDNNJX28LPVQEXE5vfvnmTpV15jFDGYWU+F04Znx8BjkmL4PYm6TTClhdfJPastSMsWPsoIpopBZzg/3dzAwmpRBJOhVgEBLHjVKT7lXLN30z4IAzac6e1O3by7kOLUtQVc05rW02cgLgqNhNAXmZ2Vbcy8jnXwxq0NEJg9kwzBRTRDFsrE+nsjyHCFKQBDqOWHJeFoS9ldS0sOC1r+xuPL2t/TLy5M4lER/N6r6D0ukERuIXcFUcGGS33IE8nqed6/XVDSEmC0wEHLiqY8hHvC9rbLikj6+/ReDsqdyIRWq8idATe1Gk+L5g770nI3e76+eDfpG3DGJl5MAoL62Z8t8BRveigXC8cV0+arLAx8usiJmpNFhxjCfMennL2ZYjv89Nl7uI1+yMOFcx3AkqHyBw5UAPwMvrM5/HuSyKOjXyPwBkN1xU0tzMzDpoWHpl4veTMEs+yvj9haAKsSZBzonzitVEsHZv3GAO83+UXdWMB50SYiG7nz4sTJEi1PPlpX/M1iuMW1doeicH8MoOZqFwc+flEVHceLawbXTe9OB9LvGDK7pDWzGiDxwSmHs0KStWZMf6tDN6NOxnYIxwcaXl8MljzW7qiujOTfWd6RyGxsoleK6DxgaZ9kxUnppdfQTuSsJ21zGt0qha0YKWqyZI2sFdbViL08tiqmcO5H+kUX3MyNCZKjQ9wkbRALPdsAaOR1hrkxZthJhkMM+IqxBz9wCwMV6b90IHgy0WksPGnGNowOt3pwmUs2wpmlQfYD6/R9PVP6xPEWt6AGaED6oGrYnDRVS9ImJCWP7xsJ0sVvlbfGcAZdbpFVq9coDPFsqLnKctyPkZdv2GTbkniqdituUMwyhJZ9BCAa8W7VyzsxNJQ0rdYBdKFg8bRrysmesbMKTPmS7MMNsYcSRE9IgiZd5n0mKHH6sd7wgfXtWzUrJqr/bfnO8MvqxnfeIxEFvyLE5pDv/fQMvwzr5g6B8/4xtYxhMmSgG7VUQB3pgQvTVxRWhieHqEdAyI5VY1sqFnctvW4+tamZgmgsB6wZ0ec4jbtNlnILzXk6VQkedAy1O7ACio7LWQ97IDrOoRM3HjucOkU3TZrWNY+M8j6asptu50+Jjt6B8RVjcalqgaJMUsC/Z7BZ2CXa44Ni7LGUQcsTiGiT1+d53vbi16Xr8SOo8mBB8DMThxkWPVh8zCYNRkZ/W9nhA0hbV17wBzHHT6bKJqGPaNBZbJ2qJ5/OCh2LCHb9PPg9lsl6H4wdOoBJ7h+hoKenfowmzPwu03hAWW1aCwVEUHWtZ3PlOJbZqu47inW77QWGKzKGthhmt9Eei76UAEsb45S+sTxj2yLSfHd8vkTGH++Ve+WYnrdl5BGlc6gMWdRyciw+WCkL4ULdrOktXnCYGDoevt6ZJClPAr5ADIPZoVrflaMsZn43jYQzYGMQqhPYDJQRYeexICVvWJVzrqRBj5AyV+jhNCSH/1K+ldc83cFk23+OiZgmvg8nfTwQrBCGvMnn5n8cZf/frm3iAQQ5sgk8AX+d4rae6pGiouWkPnG6cZmahir2J7K6K4JGyI6xbS4c1NQnvlAWIrsCtAX474cdzS3zYxyq4svs13K5uqkZtyDSBD5bOZX7+CAa4ebsVgZerSAIgIEAQZZCP42GIVZ/AkkKtu102VAgv+jq9nTdv2yOHLUDrJH1SKeeOVv3D17nmMW6UrIqM8Jp3aSb1C5sBRrkUhU26m+ec7g/JitZKj6U6h+AmWjU9LneWVyZLBudzWD7ejUGZYtx7fnnpMbcjgJ50/AeWj2yUlhwrP7HCoNtx6/u2fCFvrgww3W3rnrL5Ud0a2YovkkZ6ACGimrnCsmQNF/vOmy24W6TtN82W7EXVoKbDtmLuvKaDfkeRdc4yKAuWL6LfDoo2fOdVSxOeI1rdsjY84TVejFVoLoybhlCdVnai9dWcfX3bqOX1V9CMNS7vXiCXdMuvaxWxhItB1BxBT7hhZqOuvdwb3ZAou0dbCGYO5yHOZW4XeXzOBX+GpaQVco/u/4qo0xPyu6uwTyRmYq46Yqk28fStXi9wL+7R+5WULPLHWkbnxAlc9fhsxxSrszJh8uexv1+vP90R5UzMtOVIOlkwlGIFtVDfDBgWR9/bMsnB+QSYtngvJ1oYOuOdCyHAwKsb42jbr/LSfCV3LaOr/+EZ6QX5wwXME9EerYxGBwpe1CLrPfD+/Q4ZIPmvLlC4otwy7vWxljsgB9Ub7H/td6PeRourgXtUTVxX+qnoSaX9mViuDZxNni/EwtHnt55soHTQO4M8p3NP7+q5Q7gye23JJ/XNTYg/L+hWqnOI2rw/AAhlx2rhcLiW5LS2rssKZsMjU23CTGpCnjRGg9L3cMLXGIornykM57yTz1hRTw6YBGlikOKNru7POs2dXrTixZ82PjfGzIjFH9+yHxwS58VIa0EEhlfeTrHzXA9f1FE8Fi397dSOS3ip7eZej5VUovDV9VkeAcDqNenxgimouEgdbBJ2ZPvI4Xbh8vcjg/DI49Mlcj/IaVExLTbWaFpysQ64K9wodIWAuvH88gJoPYMvkEGC+1wDIdYNOKjlfOIidJFaSW/kV0LfmklPaSBkwjDTsl55r4yZq4u6tMYct1/sE4mj1NVjf0N2JBr/QTaoMH/ejTeRCjAlFOUHWnQ7zrsZqJJLfqP5CSVY2X6sZog/BJt5L9VcOaNyUO979u0VZiHtwHBbY4e/054RVRa9fqxmzxNiBtvAHRxPMYhOVSZir07Dxn8kxWtys6PaxPY0nKqgwMJ2kHQYqkzpCy57o0hVf47lv2Y2Igtm9mZIQtnuWVipnP2KLS+fwjT9sbReZ5iE7alOvaOsYPhauhWh81KXEDEBF9JldlfHbdQzWUWVlSnBpeqdAra1MVB1HElAdkGbx6wG0HlC7joG7L0f5MaM3O1Qi3qauwyOP4cwMmFkwIhyZ9DCaDk9oIQNtHC5dd7WT/q/6XB5wILyabGkTfH5Uu8DCV4U9bqyHLM6GV/g2sXaMec8nk4i4a7Pi0wgMwhrHKBaqd+mhWN0ITjWoS2kvtMJKf5S6ImLbkR5GKRUxghxn/sXKTghoybFIcb6XSJWpJWO/aQ3Z6K5aZMrGOpxtOGzIGasbXOI+kbJuIzByueh+jwIAV8nmzV/G93ZQ8+JcurkmWlla9JDrEDAuR/L/+bnQCeYq5GkJd57o6nE0DFs1EbP9wj1D8AsJLvud0fO0Wv+Olc1xx1Yca8ingElBzXswFCVXBT98X6v9EfBsGopRJnYRhFhAF2OiTxrf3vnkXmg+u1GxkixrZuOKXrC0FhJ/jYPSpIBhYWXpgOI2eHpNSuz4NhrgGLyAl8LnFStzclKzgnymtGL8XHiLpopxXdyp/RqjXILDUIte9qaJuGwxvGKTPxu/OD9xYgXUqwXjklJ5Cyikhx7Ii7a9jYimJTlq
a6W57Rxs2y+ksr3V1zycNam8TZ45WdXxunsOtOiZz3RE3FH9NnswcY31j7zALpa98ZTIBQIeP0IxJPAQHHmzDIXBEKYrQx0UrscY/vtI7jAS9xzJOkKIVoztOb/OYi4YcMSWBJ3L3MeRqWUTT9y3LwsgniSl6Jvs5yZXyr4Gpc7K8+KB+TePt/TsGt3eJTrMri8MNksW04W/aTb7DDcc/2MgH+dS4OYIJ9roHgrPfNByFH4FGpuQsV6wHgi6YjNZHXaZDmtQJklI03RPDTb3kNngNGYTzNu+VOYW/6x8713rDdBEvkbdgpr8UTZzDVaF3e96/0mFbizi82Ohv1OdsR0za331irYQKJxSxSQkI37UhascerGWxEL5dMVMyAutvSljf+5+xsETvpGIcE1snEwU5DoqMtNhGldfq/rvCL4XVbrbkd7QrTIa0OAuCLYoOG10Yj5Rz88Vqc2x+EwIrp/rJ5FEJfi5Yv4AK5OrgZAK4mjJveZGJonq3e0cgElJ/znVD72KHVjALq81H+NDEo16d6f8cr2Up9JzHbKKAzYxyhsfwqSdiSsI6zfRNiflq0UUR6pQV3NfIwL6Ilxynu1qoNjtIprcea3J3vA4uV5DLWaX1E7Pp5KG3yLClJ20WjPEJdnWYWbQXQFYEpoXc4pW2BgsJSNfGV07zw0pVAbG20RrTwsg1rkBSUnp5XX5yhoS795pg7j/PPo/M+nC3XKXYOvfjaPzs5GUxwk3kCotpSN11FSvYWbBhqunQ3f/w4J124tAeluC18LQ6rDjfJxXQYHiHKe762rmArl3QDKPioWk+WDPGeyVOZP/AOs+ILTF+r1SMgrcWA+LepL+CpFk4LiR5KIDZlbdt/hLlk+qWlbb+CPIkv7hjFcbFhjYqqjvtfXZsnlNDeAXumU/5liItCqsUJc1qprW6yRMGjEKtD2hDhJURfjVkVWg2AtnR8rPIcveWtnsccUKMDaxmpAb5c5khVSSsjXfMKwFvPuu9UpfYMjUsTaZyeCnTke/la42afQud9JcecBOMO4A0eLMi0qQPyJW5g5eV61vih4EW3gmID5eyHyrzG2cMrbP+fWzUDLV9YIhPWfQb4aFDHJeUgRcnQLaKOXAvVtx5ZxIOSep6hd7Pv/fKgtEgTpXLLEnr+9VFAUuh0iUaYu3V3DpvN6hXT9SZ0u7AjNmOx0QURQWrV+Ck3CQvb7Y+HSQljG9q8b7GrMc5GMME6cP0LLhopMRDx5ns7R10wiE/QFJQn3L5VG6lZ68eiBxbU7NvgQfbO5t+b8Cza0jWZsRtGAMSofl13+Fz7CA7TjM2Z3Z3U9hPQF3FMbNMd3N2plbEEuD6Abogq+BolAM8mkDEiNJP1uXeS2peNcaYhkuBhoV4RQ9OtnddaTbLz22NkY1I8ynlZXDXtuZMGou131gV1q9hwYwA0UXf9c3cKARsT02IIerIVX+3PFhphCbyT4atcnj9fwKBGgN0epZHN2x8o4o9m7xGV0rRvsXFvJZRQ8oT9fi3qE+fAAtfct0AAGatVFZnw/s14fW63+0JVELT4MqEmcgNB7WALgHDs6ROVCO+BZUa+RS88wf25jqq6txjAjTwMY1ACF+vOdE9N9AdvVBl5OmKU7hMOM6Sdcda0Z2BFdv5oOuB3GA/0AI4rx09ggxkS5+QbO7/cUxLSs6JSs2T9uFCCVF5iw7QArYC2jt3JW9VeEDkwktEvxyiIsRRXb0/nyC84UUf76lgBza9p4VnJXqZd1ayGUDH8GNPdr1j2xwh+Tzs/MOGEGZB1tO6VkYSxjU7+8O1eMRtCLXv8ObjO5QlzZo/yUk0wgWrc3+QeICmDY7RgnfipZYASKRjl2ddCvf2/23bjDaXQIg+D4dWhYMx+/cKo/23uUMngNT7Ygfgrowb2mIU1YwacekOe48kI5bIolIaRdnYj53wuCWe0ta0ldVTDLq5cQuetzLPN2lkInPUXHRrIX9x+HxRdLiaWgd6C8fF1RE5FxtcHKSLVQ3zaxqUOx4IaBkG8t5U+QqvQphnZEyGg+WNzmDq0She6NLW18CvaFDCF00VsRWcT3y/pOTd7xqo+MMwtJtp4voAFeDk7uhJRU+o1Fr/jAmdQdRv02GlZVdjRACbagCRszS1E/klBWEdH6Mof+z7k1bg6dzn42nBXJfsJTBRaY5mMk36hfW9HebneVnJdFXNbUPNFzweqAryf0M3J8wY9UxON6/L9e0N1MmKtpsJZbZ0G5c4vD32XcYjAnzgtkTgCqHvCv6NU22/QSkRyChqeKUggrF64VtqxQHvW574Sqn6AZFhEEIHjEe+NH0z3wseFz+igeacL9Oo+LqvMEdmVAQ0MQeDai0wYlpYG46nhk5ygsBDgtr/KJN0JjvADJiP1zyLiXrr1aFL7G97cuMD6uJcF2iyl3yqvYyqgN4NQHQCLGUGw6KZxMoEMd/NmgRpmyoYVXREbI45TPB6C4RhBigHF1IzppTHmdDhRM8ABXJHhdpGwJ8dVZ3RPZ8vjZggyR5FdzHsXswN/j1Xyss6X8qfB5rsYon6iafpBGcjVq1+97N/xnNFNoETiWmzOeOIDGMVOoxsCDkhOlNqhhozQ5LbFUsly31H2a266MkxF2MZgtbZP+R5bBHAmBOegbMtPaQZDcoleMbLLYAL3S3zZD4a7SDmhWI6hYOl6NI5e4jyvxwbeA23+Rfu530XdARF5DjCGPQpg/tnxN2uQtK92YOkUoJWTUDkUbNAm08omTH7WbW7joLmu4b9Dc70tmakb8K/Ej+nH9TfYeVIY+kg8cYWmCFsEtL57QOuoucZAjb48Telsp1s1ioGFMT+QwCnM+mF/IoQ14XOZU0LngyrkM4ulhTrmxZ46OELlRlMIdvWYzdZ7tRsQp1q8pgj+WzF26K6bTCSezzpAIhAhuT0dXVL4BTBtNJBvi5jhztknzHXeEIRvpyRWz7PhNXBfrB3tOE45db046euKcg/TJ3+JtM15gMx0iVFzI6QmvZyu3GJYF8WOXKdBtAiFpvU7kL8+RqBsKAIbLPWeSNdyU40IBV+c7wIxsOJGu7rKHXSqNdHDL9NYdOBGTpvMNUPKhtA2ahLxeBO5bexvxvltpnRj6bN7rmjNae5ovCEGJzO1aM1dAWbpTELv7hQUGKUkuUS/lA7LfP0mdRX8aQRd90bAzqdi5cB4wPayVjSLz3GvkL/4GdmiBn7VeSON1U7tOTTeMM//3Hzi4RcA7Kjaz/9qnq5/uRk+dzhQw4OEKgpBHMdSGF6Az6evD/xTuTzfen3UtUYKnsMxZdI5rjnsyr3uROK13tl3FBW6xORT/alF2utzvU2C+pdvi2EQkoKOb1cmaXiwFoKbmhzpmfJl/f6f2n+o4uCOp2Yo2eKAs5kM7rynhR/JMUPRGWX0ydsAB4hA6C3QQRPsTk1VVUMS/28GOTB91eLKN59pwBZ4vdRdobHhnr5oOrL5edjvn7N05bgwcZyFTH+N+tzVijQfwS5J/71w4ObnGerXE9NYPxIv8uMlxabljaHozflesnM1zRzkFSMl2vWBQcckFCmPQWeN+5rBUv4FGycTOD2KHvca5c+9mmG5+ChUG6P3uDfKVT1r51Rl2JZmaLyYH8AoT83C/O93dIU0xZ1r6sN5WGkfoMpDeE4kNufbfzGMdBqEACrPS9LT2uaDJR8R/DQPF2798H/4DK7nbyswsE8orBEHwEfqK6AVZQ8viPGBloVSb6tCHFmhZMIGz5bEHKAPzXzl8H0Jkpm+R5Uc9GTXopfADXHzRpvrGAwseuelEtN6718UQru12LL4JsHYtHTq4DzbK8Wi++zhlSN1xa3lKqKTete2oPWCrCxDGlimtWQRauzfhIjj1uGUnxs3PoPj0yDL+MnNodmudPMrIwBuxdgRTJpCLmyzaAdvk+QH8HhuRLET7pQk041QUKIncMY2YFhLb3R6eBIUFi7DlJGbyGxi/KqFd0wRvZIsA5ckwmlL7GMwa1qE711/VKttXgMqHM6USFMARvkB3adVjO0JocpP9jn+c1UHiRchZCtXrYL5gqBy0V4As8T7tUdsUnL0wu07k3YkG+xFobdJtZr4om
BbHQ/Z0TGiD8++FzzLzjfXfV+qn42/3KhPu0Nx/AKqSBk/zvDHO4LOtjhtDE9fCrl/DY9mctEFCXENzhGwsY8Z1T6nd5pWo2BZAt0uj8PKd3Zzj4sC85l8P674sgkVO8mNnnGqhctvONjD8KWLIL1pJGmib1RMJN53IjiMGByLP7LNfXtKBf2CBw5W0L5ieeuqA0Bo5dHdLa8v0fiOmQUIZdkpSxQh43rP2YkuyjuTPqOfexs4mspJQzBi8C2PCSWJZ+o0dN6OejvGTSNYkzWYi4ACYQcnXa6G3d+jnqKl0Yc0MrXNT0nc9/eb4YaRGdjYoZeIk2bJoe7nqwBnjaQyZ1mcysmXExHbdfg9F0ys0Ix8cPt6pXXW32sFymKH69VcURfhVUm25CFEVzRaAwRYuY3/inuv99MEAbR4R1TnB+4TfO2pQMnBAON2MyxkS712vVPKGR35Z2lTas4YQpnas2bqWnVVkPddj0ToLlMG9plSJSkgeZ4MDXGYlVBNEUzHZFof4cWZG4uXoro3MOn//CqIdAdXs8QW1sqZLMy+GJ80MqH26gj7SPRXQ/OMtzZ6juV2n8J43RLlB3UDMRYem8g2Fkk7HSNeOPt2AueVTawerShfxz/mFVM+mS3iJekCUpdevJBjELvQp45gwrIRrFSmmL64jDxEoVEyKFgn8PBccxiVP86n11Y/uhUU2yUmKNcKPpId3J4eS/bTg3zfM11bFep1hgVLBkD6/kidjcHtwjkM2Va/1RhC1ib9ZWyS76Na8sCkcvl8Rf88GOfZuEHoRiwby3XfggLmEC51ELgXFFJDCdd2XhqG12uPB3olrknFPYZssfp95Z2sCYoj4v1PP563B2fN/FwPs7veGEdveU57L3PNPXZtRWpFzpBfSnWT4o/hyhKv1PHmWU7HJ6n0qDzjQDEnDTsoP/5o0OoXKJXNheV1GLcctierKQSt0VqDuVUfFynOSx3PTkYhgymcsilolfaf5ee2KoCaj8v/ghVwEov/WOLdEUUljHj05+Yof4i4PYBHrrqHcn10G5R5R1eN0r2sLRUYeMj81F5aY0Z3cYTJEpHC9jFVkuharvV9d746vTPJv3ODirWW8dohZuLdpOb52jpaibWYHo0g1dWLgDBbbZcewlSrkJYYKaju2721QdbF8Wc8sjy0skpBKlPk1FiFdvPPKJ+rdzshtB5s8KkyD2My8MciaMRN6UF2sqBQPBBxkWOCBlwAQcS8aWW6TR8jmEZ6WUO5wOLQsdDyCwS09An3d+BNV6yaQhyh2u2/rPJcgUrjKvb6I47tGb6POynvZx2RMq5Ys5f0QjOm1iZ7tHrbmXRsRBjmX0XR6wGwQwXwgdMEO9fLq15pqMz9QhQ1XsOeCq7n56Hp3cP0VEgF9A2hTDhboSje93twN8WsYbQXnW82yDa3z7jtEBIz5MoX+qqVdRA1941lByx2E+CaVYydr+QtJBYKL1V1AJUYSOVr+bHX2bvoFzAlNOISpkX7Ke6pORGoVG93/NQUmVAytUIhzGdY6p3hhbSy8uaaWWPNcU/4WDdq9Q7jNLmqEAg+++Mp/y2ryoTwX568nykeRHamZlqIRkfwv32aondPPRm4Ggx1tw/C4bScLHPLR36RkK7ngLbf8319Ogn7EiTnEWEG2NT9oZ3ZcXDz7IY5APWyKJ3OEhMPLIH5EUgL9e7qDaBjCWKH+w7RuqXwCekTnPVOtdvApb3eH5Q+SVrHCsUxHpHZ10WsF1E2ClxIYeVZJPgDLVvfq/uYx+UZNvCM5mgPMIpAshMNkB0m3OioXr/JaVQaojMKhCcZvU0YJLJyULP7tFi1Gfx7z28u9jVieSmIPQ0f7XjiLmVAzdIzrmckO9vAlghHVfN2nX6BCRSW8RWMV+V76LsitS7f4ajZYTLzrt3Mo+MKLwhYX/rnOIxH5s/Vbc3ChD46wne6orSjEr8XyZDC/NX/Yk85Htv1/zmk3BCZeeVjSga1xw9EuinKJXJaJH9bzvVore8Z7I59jLWLqxuHD87HGIV0XJ8x7G4ljU+177/fFsVEWRNgE4mtVimwryPJmHuVqLtgTlm96L2znOhglKd5tW1RaVy7uzaeZRzbMsnzTAWhwSxeHbJ2DTDaQfzzJMghpE/2+AArBPonP2zcJ+Gh1KXXIJ+QQurfpIBrsmlV14hW9rOwy5SBR+IefZHvXG1+MRHk1feOiFP+Hkjjq2a5ltFBXD+Ax4Cfn/huBumXMccoJdVr9w/yK1J2iJg3VLiWXdL+z/OOrH6DN3ePTi2IC3KQ1zpTnV/TjM+Zl86fX1/8Sod7hM2Ux4ellcZdef+bClJgewwj3Dk7JYXMF1i5Bm9RcLheBXnyoGgyUgVbSg4MKkIX2Fd0CiAt6K4e31F8qpHjo3yRdaqYyAcD+PZ8jU2ycJMQFaeHCWxGgY+DvQ1nsHopL7OX7PP2Aur1Rq4VOVFeXbkTDEQpBVrl1w8xtWCXMdydHhYbClQm4ssPlYrxGrGb1RYWvAhEw09n8zvIpuxP/MVGsMfyERV/vwpmO48kAg6ZHj/wDt4QTjDPWSmn6hPyJiNFged64UnUREqpQMoGlq8spEh4KoOVWmtAoWCo5pUCVs07RfgphrftOjEv3ylHTB/HTUl9FkTMOyHTxZ9IuK9iD84pWNDJBHEk+8xyZ5peqB0jjMC4ISUUy1zVDggonW4TxpWJHLLiDYkJy8BJ5d/1y212EFva9Dwk8VAfBklj6/3eGOyRAIJc8QM04H25BKjwbxXvtlizk9Imp311IvrsKKnExW7GZ/vi5ldX8kR1fCv7RrRRT655OUf0gJ/tQz2FR0vLkvoK20Kj/JvJEnje6hDmj6fY0vsFHMT4dKM492gZuH9wHG/UcjmEU5hnbY8gh6QXtLJGEte8bR7u5l5ZMnaKx4XjyHI9fRUXoEf42YKbgjWiTXnOpUJ7PRcPPxYaf4tSQSGN+IsS4sZMnToWesyTE+tObwBBmvnjvOG9ylfeLYafwnvDg7CNlmGUbuE1wK1TNr2LALYblCUAXoWhlVERGGj7lEK4UY5BRn4cJL6OSHX5ijqvRKteoIbYTc2aoiWfOOtX7e6s9CIy//2C1dzELCRvqOWSHlSlIKJghhuDQrelx8wRgjmJn4GlEztewKuchpTWzfPL2l1t4pmBVja1Otr/V60o62TY4kQtXbo/pquvlxsz/05JBI0vofxssYGPCnx2lz7FF/4vY1SSSfB8xMl1jTAJMsUWHBk/tTZxqwYPR9+jzYXxMgkLzusywRI3YXnQsnE9T/iLLfIdaBp3TMrSDtTSjgN4xyazC0hcCmNEP9TI8pBrpJ7U9UHBPv+BpscxoDBnDlPk4RwYSQU3CNdyZ5DiW+5sKEac+F2tQp7XJ5A06JBW+mTdydwk71ARkWTuS08WBwang9KpS+IC6hPgDwgVeXBcL3io7ae/AdH24sqB5w485ajP/i+/y1lAfWTdQKoMGPexTK+yv2J/6TxfRiMi4EHQtOEXmTp3KVDVtBjd7weUMkqPUGqNf8y4Wyprry08rajW0wpM7+sgie7Vuc+iReOgtvrBKHMSjX4fPwuIfy8nyq3IZ9wgCLDRu7BurjgzxgX+pr/fZXt/jjS10+KbOpY9tCte9WyYdCPne77xR4cdYsmev20cxAUULiqguSuk9tOtw+tyuYdgQArYvPDptLNgV9cpet+Kft2/9tS8PtXAqQbh6h16NSB7JEekJyZQ9gQYHKztQ9dMiTUqJb1ntH+8yrtLHh7IdPuzM9luCRhvMzT3O9ZYOmQs+bXKxDR7v6vSVdWR7eyH1dhG8xn/lV5Z1nKVV9q71TDUaKtMugep4k4vHcZlBkcdo4G0Z0HOqA5BzOCAQN1FTjZmlPRAWNntOhVTJ7Lp0+sTV5xbNpNXsH/XKeLyuKKF5KMlNQgUmCZnsEpCeDSFnICQoJ0zgqxmlgnRxmj7HprfA0sYMXJGO942wC2LdAcuT7a5hl1+29fIcd+g1PHpCVPYNph4HMLZnl9Ifw7S1TwzcSI+7ltmMR1eviTbVfoFg5jPJOYX4lUS/K9Bo6DWV0sfIwkUjHHEcpVNA5Cp4hSkTc
6o9EcA95pcFKTl2+KHiHbWyKJV6EDjdmO9IDiaLePwPhI2ZgGbHvwxZX+VIdOHat9bCfKWh7yiC1SuDRxQwWRGDZq3zCav/lUspboaGELunz5dqfrpnzp0xjPC4yHj5S6T0KQl4ukUANmoPcWgpX0QDe/EerrgQch1W1E/nHiq+gHhD1ku3vrWcQgFWbmuuPJ5jaXbeYSDv2xL8qZQScO+lSjD4fDFrRDte5ZUa/cptyO4yUq8fMd5SIJXqkDgJX1eauj8Fz8swSAqV3tNEAV8ATJxeiYwHvt5XimYLOgVlIYs2HaXLQ5xOJU4jmu5464rYCXF8brKCOvCVPje4MsknEuzTck2ll1NdjkXx4ihXUJXsl0m5kAWW4k8hj9tFNbF8GrqFW8XaaWQnxWLFqQqrKlURvG+/TRbxUJpmxJ+/MP+zSrQyTrhv5ziwa61XNrTLmk0gIYwOuwxXWiag5ftrgGooRmq+8IeGvzxd0uuMquaVe1F5yyATvje/3IFk7CPMMDgwk1NebkTirV3/+mY4VTTxsKeofmAf8TCS8RTztODHVOhfETEOUyxR287Xe6Rfb6XggtzfUNWLC+6bcsa4MAAQsBxU48uekrb+7bor4fsUOewK97ic9PJqRryEgS2CEXyljH8XLTuBUIDNAnp3lPGo6LuTZqrPpg9cXyS/PHo6Z8tOCaM0v4MNNl9ZMFUZIeGfEmQjf/W/oLrKQS+xXFpLCLtGjVXKpKB00l09Fx1j+IX9sReXIXaEZjbv1nKcJOX0UM60QBr9IkhqXeYeCYGzaz2NcuW4yJky4aDVHhixUWKcRg2UVmhtzejSmjvEc26Jd36BxUYz+FZGGoHYW2INcIX1NmBPRpLx91ZtSKSVftj+RD1SlN8aGiufXu2f4kCyaVPMqTKX6V1iCOIorH7h/IrCdbXhsFNZA5DTfo/jT1tgBEorQlRZYRJW5vWTsi+1Jxgh3X2CM3W+KQRlp/8nNtK6nvnAjA5j0JkiYM4s88zMFxdXgEmn4iZb6TxtnQRp7xhvWnl663d4HQqLC6qoxWEpQMvQbaung9h1GntYzKqRN6J+gwieEmHbdxSJ6hkrgLOs1MnwtujgwettU4u45mUKYTJ4AaYDkm/9n+tvRMEGxKZsB4NO1EjbSZAVCFnnaSicS5vFdv7KCPRfUAtDFmOqxEM1vDq0A0elxIM1smsG2rbF2yYddlZJa/oefAByW0x0vt0QRRySjxNnB9WgYExAyC14UQkfwFKLzDbTKD+9KEfMtTEO4+JFLas0j9CwB3knzsq6DAjZxjSU6y+CerUEcQIgbc1AGoVHWQBv6U8jqGE26yS+xNoD968oQ/9nZBuX0c2/5FGrlgqRDxmTOBht6Iau5/PB0SOEsGRQkT8qDPFnloei+RdI+fJWIQgjcaBbEXj92hvffcL5ddbJuv2w2mDp8aciIZYHrNOyOa/9degJAeHAoo9njccLJYLBbtvCd+0GabjIcDsm1s8tifzxs0X4lcYWROOvM0M6YMKqtlZ1OIvlSrizkHIWuDo+px5+Soc7JgFTn5fVfM9zFPKiy0YrjUj1C1AFHPj+QFpz93VcU1Il234HIGVc+hGVWqJHQnpkwQtUJdW+FAGlHdbyoOCHfqMb4azSDy7UVGDaTdOH8adtR6g3mQ5Say3lsibP16gvgPFIbIeKrOtAt6tOmrmUOnmWUpJ0HnxmHC9+rY3HnFIuqA6dGIFy+4AVBcshyEKp3ca7lvur9gIkzqiPYXOACGvrd/q0I6tb3bBED3yIHpWjhGeuDymN7XFz2gz5/zWmLDn7ZhqVHeO13SWP5HHEZZIXz4SbJEjoii2nCPp1MyTAx1oFMt8SYOBBykQ4kio+1gSAdwgmfiMDcw28U9T+E4gRkYryPhZk5ocx3EVNt5Vu2VdaO394beqtwByti9gRst5dFXD604H6bE9S12XgBRODPjLC0WkJ21sj0YTKatqSleEQmvCNBAHziP+qKwQf66rMhiO439IGK9/4pGnO8hzojZ1jY9sJOO1VjpYs0wy62vrVYXpQ9TCOTpGst6pcblzps9IDDfLK0iAqa+uMvsBQex5S5j5DfqPbxa08rNHGubRUcsDbTJH0LT3jmi88x5IPZOrPHkV26eovtB8kD2sKDvDgh0woDxV6nYqUgH8F0EGeoZlLtSk3GzEb1EMvwQj9VXJAftMGEJsT6Zd2YdpMQtumW2eARAQ46GlPXkWSlcaBYM/7mQjD31f+QwWPCFw8PDDZYn1qCaM5cfVqnyIVcv32doepYqMqVp/mGbW0yQFIgwc6h6v0XMY7qG6Go1qpz3/bcqCo7RvG8fgEsfdkOxai58cAtZ04JkQQYftmqBP7NECj+fMLk/+JbaGW6Exja2dm08mC8nNpmiaXkmFpUbf4Zh1et161Vk1Jls+g0j8d87xLlcb7H9DTLCbxUqunqV4QNKE3K6/ynsowOr7WQvch+cHffOu9TILxVolguEM0JMnPZ0d9k23gyqdK2Q2cgp7ylR6dSd8hG9JEciNWXqs3HYtLueD24mfinG3IokKlfewfueB++tHM/6OM4KkBaAe0TkLAMVYP2MwYP7EXUJTmZaK3jQi7HOjP7s0PxilpTRsLgWBBnEwGLhWL+bTGZt0XmM8TCbzyQa2+GlrlAEtRdJu/+XxynIxPLDZhj73l8G5h6K7jiLv6PcI4L1Yx8Cqa7HE0RGRDzgMqYJMib3V0JuUzjJqF70d0VPLDrx39waI2NENHmqEX7JFoD2srdxSuxw86W0WBfKy315sJCo2H9g6kQCCSbszWKBYXiyCSdiDgTIkiiWiCmuicLtfCeZsMjH/DIohvrMYG9kix+F8DXV2idn3LMOeu/T3BzqJrpSjXrsqNBTyruspfW3LvW/bwy6moytJBc8vbO9cyAzyStT2URy+5nNtRGMKRyMOoRI8CxxO+cTdTrPhrdxrnF73lL0AN4f+7RXXwT3ixafrNJW60HZpeLqZ9TR7lyEa58UrUrsEQnf64nq1bAlzResjLN7+HIE0d5VxQIRdFtWC82Qe0afDbnS7xXS1ZMhh5x1TwjVmlo5CWX/+Iive8IdbObsLOvIDClzb63R6IJhTQ5LuLPl6tgx7ZpIZjFrmjMh5AoOsDc4equ2TlCTCK892iROLoV157yDdwbS6O8W+RC5eTwETTeB1dqMq02NCrIOL+tC3Rzady2RD1rky5fdf6v6jn78E3fxq/2KgQ5dJGJkPEAAHcDwY7Xp8jUdAJ3z1205mttD0lLGmg1AuK4XBUxe5qcC4giY5RlSg8D00fHc+AyL31qyWc7N0t35wu1x/XF3jjUwu6Df80royRtPgxMKfhY0mx5kj+aLTJMpz2ZeqDoVqKTIFQiCyqwkNFE8H7jSK0cc3Ncc5tZh4zRXaYn+Ox2n9biHqzNh8Xy4jVpXPUiEFW/xfA7RzMt1lWi6J50syH1rK/FR4bcYjYK5yHRtlpaPa66BaoQi7R7eRxM2opUbIUocfUL6byiUTUqvmJ6LZ1zEW52IXQVzT3leTgQbINJJbcfb0WL6T03QZb2YWjo8vT20DJXXaiUSlwtX5uzoUtqtaJKb4j+scDyKyyZi+nQiKDzCX1WXO3nzzCTrse4qZeK8jZXU85W8Dztdm1Jbr7JlFHPqSK8gFifkIBa//ned2+/PxGhhOEtE23lQrLhTwpwOm8FtLojxanc2RvKbNSI7ilsageC3RW1csnFNydSr8tKIXgG2hiXrNa6Rlaqs5NtqfotfI5H/ToXlch46PEUFiLzHamdb9/6BcEeVPaPJqA6g6xnUmylOpScGiNt54AYzk3o3jRhtPoaRsbLm/Q+R89HiYbTzsOFnk7ynjplror4yCd3rY4UHdg5EYUMcgApQ4yp1qBX7gDy0nXr6K/XFLQV+SuFo+9FiJuKamNh/8/ZZfBhq9opVb/gN9zTkpn7jd/yqMZECEGVUvXiszRRSMe7wdLNwxrX+k3/JDl45CIoUJYocYl3yLr4ls/ZymH6HP+8IMDWOZXhtwF2UotcMG+DtXaRsBDIMqQiV4F3ZF6A0E+ZcXHwzwnM0x4Sbm4RG5CJMk7xFVRu
Ler6bbAmaz+yt/KvTfvw+bmGCMYoM8vsbPTt4EbWEXYj0zX7AJM0WvO+mW5/asOdtuS23EicOdI+D3iQrclwWAuHMY0AmJLM7pRJldlRiMmcAh2n7rtMd0aPzjE5+/z5577K6VSrmFjDBr2N9lzwWvL4cP0+m47Gnnm9S1XQpcDHgWeWTvCfy750cNkfpwz3Pb/eqWNSsgMe214cjsVCIrWB6CDVsFUaAyZ3zOu8UIXqwLObzIis0715r/ea+l1typ7pICSEthqdlXvjmLXefxkT2LryYOt9Qw6glo5LU2a9vTfsHEZjqhjj7P/WTiaIjfTYASWoqW+RzTX88DgAeWsI04FAbyWpA/ZcNrFiKOla9hi9sw1TgzUL4LQOIn6LryzLPmXuFWkm+BBf5qHZTQA50qE8XCXg67lciyUWCsCFPQ9vz1VP2vLxHdU3zJWBbLdg8hPtnijvX+iHDryXhFR6D0ijqIxI3H80yO1faMWBAibvyEmZyrthtNu/otMYHRAiAUz1uQAByslhoY9hGYeC0SDCHeabl6RwY6pAmlcH7RpAiz+VOs7OSrBODeAtl7PqzQoaBipXgRWBB3nrhGrVoRB4p7X5VcplZ2CiJnIkY/erpURq9Cz4uI5eyH37r+gXRMimLKuI2E/uc1rUiznlOgFvhAgaa1kHxyn0FTHZecvGSd96iHsXnQRHEmZ6pH8lJC8wdhx+HJTugGCI0VqN8G2JRoM/x8VPHdCq+lZIHtbgzYYu4a5dW9rmMwL9omFsXZ0LYznBHm8isQTKbZen+kfShAMsR1CA639mqjGHtqyHpkCPClrsXvRQZDI2aVkqSCWTQvPz8Dyypx3Ul2cIBsP39lX5+LQM1ofwnNDQ9A1DdMrmTbOQR8hEX/xLRxwJzzduld72GVbwLjSobykbpejCD+WB7ap/CLtkD+kPSYUHs/JNHVWwhsjRD9hgpKRpG+e4pQ1xJnaEeTsqZLU7p5iQrzoSndD05zz7HozSyp0F+ArYG3rYg3Ewg1KtKDhaHOdAc874gyMYdV9u4xXJ7nJEtKYLKHDPQrpdYNIgVRUe5dBMwT+mnnhVyHe1Xly1SSMSuC3UujRCrqTtabjZmcwoXoIZVdlL+NbXQCYlIFaRx32KrqyLz1xi2t2mv1cdUcA7zJ6RrQs635S2ZQ7rOLvYPl5i6YZg1P0wVt6A4ALWypOFFnJZP8JW2Nz/nQhxyickg21KDNgOivbRYzxYEvZ7bqULnCqvFooQ5WJMt7v8sMNfkR2Cv1EAhA3x3FE5xvquZxOlt7PFM07BKMwmIrZfUDR25XTiYvZ2svRzilkVGLLFdRygkhgsLj+uf2JyK4+GdMvSVpnDF7DKvcXqZ5QettihzivF9cCG+3p+YIocjFhsjCnfxEK+CCjAbhtpJdvf9kpbSd0tAxu5WgmWvZ92u3C0+AYLnNvriG8LuE3z56q57a2RHlXf7TluYD95kJ9B7AH41YQKrY6ZCBxmqlLUHOZV0OzzTxMs9yjr7SNQYlIVGTkE650zJCot8iVnWa24qYgXlzW1FO9ehQJhPu1GzjYmZvdP4oSUX/T/LAr5pifKxubMbAjLXdw9C/slykVU1ntRo+4DY89SD2t8+hWKr4WGCbRXJZTdLf6OtAOPtZof3LHFoPJfiYXh+UiwIQRMgYObNwfKukQE4EN5oBGzylw/zsfiiQYyrtjhx/6C59djXKPUy/3qSBUsrnJ4Ynx5LSBr7WbA/Vp6ppklAnNZ6pTQKITJNkbIZ6Xl0YKQLslC8ySuRVPwFEzRuJgJe5JDTlgXzyCIeL+4OrTv9GTaEiUDPEK2nfj4F8rpurai3oMu0Spiy9lnWF7it9uW+Lm+WY7xLoPI+4YftjO6668R9CM7ZipQAt9ov1Yc8Xb2JndKo4SkxlHpbQWIDbLnMWKXsTpi1C/VQRQR3moAlw2CkZYHPCrsCix2TRzX6zZLyHGCIJta/Wz9OQS06EsEM3xulr93FOvQjIG23H0M6CkBEykNX/oAgxiw3f1vR1mry9w4DVQXjQeEwRpAXRI4qTyG1KhC7Vg8djSD3dHOnChTQrxANUuoAi7yVIfWsqIXjw/XvASm+s+mhzRPQ/4obHTsQPfzMyxIfpROgr1W64pBa8N4CZ+6U7rB/s4ZPvSPnqPybFsxbsW5GvBOPMG8X1ViEf23vwHIGLvfyrcn17fqOvhGg73LG7JjLSlw1zcJSZVNG67ODmok0RckC5pT7GDNGYC/KVaKNCbhquwGZVUmsujIF+vs9bA6FgKEnkvRPTpTA+1uX9MR3MWMa3Kb+jv8O5aBpcf0wwqsyFPg8XoKjt/VQxAeNOZVi4J8T+HhIkRC76Wvr8+G1wnRzLO8t34XkByiFHzLegreFrbItHsl2oLofqP/uoL53OYz81gWOkP/8cvvFigRbp9/5feevDUtOTUn9MxjVZvZkulbQiaFWImOKIjduvML9akKXZVvGT35fUs/2YsXpkk9vo2Yzde9+6w2QTulrd0gE/f2EA8CrylCrjOYt8SjHi/P+CftKIfTpuVusJrFaDZRlL65baqitxNo68ZvE7k24VGkPAXqmQx6/tvMxwB/OJIhCvlKVkQWVSsAkBYZuA2m95SPYFls/JZnwQykO63yL2o+z6t4qlG/+7dlrAzmqWDRduUls0bIlbBll18Mrz89OAPbZ9aGCusw5t82u7HfykwzI9m5+U04pqyJaMo9sgtKic5T9WVwcJD6IRKOgmz+2ZHBGLwL7q5z7IbC2MRDhk0aTAdtzEoUzfl1scKvmX62ztoOfxVGcclytvyIXm6t9DgeZCcX7IHceZXoMDx4aq3t02X14MUFXyd3ojUHYygnDTjkzAPOWc6W9EUUgdHX2KWf02IWDmkWNPTqTKOJViTgxSuSSHNEDmN9dOQOOvR4GmV5M/+6fDSQfD2W89e+lCI3Aw7SHSoeQAvOLVpTIPQlJUNHdENIsHIlWVa4HgieSvVEtaXN6+L79Rg01ZiRpvpcq9nLxM4bcxqFD4VKXo4kzOV04PiD9rXyOy5hfvXLqObsji9G03jHi7uPVdCWbllnwOuTkUn+Pzg3MVpoUCAIB5PCKBK54tsVAP9SJ5rAvAQlghVRflqaB/ZIhZwC582pmKPM7Sk0lE3uSw66n7ZJ5nrwW83g8hXcyCSWjJUltWvbXaswmbA+0C9XRKl6ENrYd8EVaDD3gx0F8QRmmMVgZ/rPC/LsnDGxQT9q4xtiPc5cFGi2Qm5OtOXBXLpKJKdeK95iH2zf4PQ3goX3H/hbb+K2bAJmj31koU5in+jXcKvNGCEmQSUFwbu6fcz0LmkewFwy1C8eYF3f/0YkQgFWL8aj/1yFPjVC/lCVxfKzAFhFIgUIIdj54ufsnDV0AcvvDJqmbFvHkdpo2srQjDEeWRxiodsFcjMG+XokahVYytrWcS5bBQo3m+XhEXHSFHQPWAEqRvpLFVIRnzFTvY1tb6B5sz2wVyFngzTxPO00gAURJ6UYYsT/t6dnGEDJTq56an/M0RDTt7xjEgMub6bKuelbBVzM1ZSeWt9HOeMI2Yu3UHUj6PNTpH0YHeGULSUlzchQgf1C2LTLXFNeJKgC4OrRHtCna7lDe9vEc47Idshjtj+dJbyFNB8q4+mXnHJVjyf2iboQXUGbMbF2iAlSkEGa+dbt3DU00TSRZ9k1LuP4CVDvlgcbLiH09urFXyJcQ9BaTrFfEF6EUy/vf/52RxHmK6KN0JWcuhg/Q/pqSHBFd4cWAGW8+sSHTd4Z2nSd/5IILJSZQMgtwHhB04iAIamrv1wci2+5pAP9ce3iEr1lkB2pz6FqomRy4L9ZatVTsL5okFgNcBw6FVWjQNwXVkbZacbKdOSmlUgDK0TDBvYIL6/pEODO2TI7QrPHsec530vP1H3oD3rk2643SMCrwFg0+m1grvrKqZXJD1vQef1FfqujmV+2isKNO+poWeLHsrEqMY/amXZNtBHSkxamoxx3L8ee4HyfjIhdHAOS983Heg6OgH9VHzl0WyHup4Oy5OCPqpu7OCmNnEkEvDH/A1HVW2s4N6TIfLMg7qcxTqbrq6DZiyZOax2g5CF7
iysU8rGuD8V5n/sC9IUOgU6PQKT8Gj+ZaP/opRgGBwm3hbAq7brW7qmcQ49iIx3KS8V5cxoJUyJj+4/q/NrKqd1IDoXLqm/cq5nljRn6hYY6svyBXcn+D6a+fjkovKj6geQ2EsbxFuOQMd8vTYcrEYm5x/gnZRaRJoH34gKdHzBFBdYc5uqxKZui3rOn8/RyE262llIafCg3gJOvP/vb/YLjZasckT4OUs2n/zf/E3lmiTwcyOhhmdFPlb1u07kcXe5wjETMjqxZhnzBBWnPTz40ikgT3pAzw6a/96HOSQ7iPEYe05KG5ZYikxVaUM2bQLI5XgHlgLpb563a0Keu99Gc9Ve3hKiS4oOs/SdJxGNNn8g4iC+p2AIgkQK9NfN3q8Tdo0hzrILNy4JmzSlu2tsR/zJfMdr5FRc4sArucftkhiMr8RXL6zQBbvYcMStG8rIznlqsXJwmRylV3eg1EqDlWqsFC28YEPn2KFGcplsOyr5ynj2YrzC/HLfMVbz10iV6pzr9OdHtaS+7gMuosxUmX/Lba3lsfJuKuk7VaROw6eZMsJbySKsIEkjTiYFff6iBrzXa2cmlqZArb27O68e8QkdEKaBMF8oRePJ01QHvkeMRN41CtjZYtXff8hYtom72EYZ0C1ogjATTNYbG9LzNE351TlfRUm5VDAarrh/6ZlPihCYlItmJcQ0vUblL/v4x+v8nOWoOp/CNwSl/GANu8KbMTWPf+NEdcQ8AIgNrkQSQPPs6DiqyTkjMeX/kGfI8EQbGuIwE8Ij70g0S/ItYkKiPD4a572fzkBMyeriUelp0Z40jMgztedEkkYnCzfhxgJchLzdJM7GW9iLwV+GXMbbpXzX41cUYXbHEdhGftcHFQekymkGS9zHYdxhnt6t/IoAknXnHwa0eJLSr6HI3VWjWQpTOiTpq28DvCJBZbtEvN7FaCUvT68v9AwzdGwsLx5S9PmKjQ0I+2aLzpi3HRS3tgbPckY9h1lE6ydVgdaerRD+pJ14XAra1v1Vc1LABtEqsvu87MiYHm72rZspdtw+aOcoQJkN181LNDrgH16iDtg5ibi8JUlSJAtzSVcsCwj478g0zzwX8Al/kL8GHGSe3J0z0zFTXlMXkp4JTObW/Rd85wAmIcCQiD8loS8DPHppxyaE1eHLNo0QIaY5w6lShFGfVku65knSFq5Z/hwDrL172aN3VgI5arBrUSmJyfgamqOnqnApk9RRKY/48pbTMjmte88LsOwS0iTyv+vgmIyU45KVnXDcey9BkriZAKJJQ2uvzTaZO4MQyoAfb1Y0AeYvMiBimTCBzQXO6n5j4G7cbFPa9qYtsraj1uZ0YGul3XCa1k9iidX5CeDEalnROfLutDgWtKuH741iSx7JXbphPJoJLDLMKsF2F9pnjUI14p+pWRAr+QMPlfEuaUsVT1Xwh8Fh7dX48nKW7qReTp6TXYG2HUm6yLwP2W3dzsBxv1VueODZvDSByp1TGISxZepw42uD9UUlWMr9LMTYEIznPkhZJisEPJ0101YHkZavZTA1UzROvISiUEkP9FPCjcdN25J40u4L4tFJQr2cNAKvHaG2xBbQ+PAF8qQyua1CVv8kW49TE/AZOAKsXQc7VmPdAKSIudA9/tz6yTbS9UnOZDAzDRw/uBQFVu/Keq2c2JicCg94RH54tqMpOJcoEnWitnEKPq2F8l+qYhkhida2IzyQqL32uexmqTn7pCoYWJz2l31eqXSU1RglNWpbrayMK9PTS/2FSa7NEFqHYvFd8OB2PldFarbG1sX6Rbp21iSXWHvVzTWGmKaiHYPRmk8u1ybPusatglrw2jL3D1GanYVFaPZesIVZdDK7Ddm5pYtqPSax1V4KQNWs6+QeP73Fvy+AK+qusbXn4tn7kVeO/SOnWTYb/jTmyqdK2jvHDNfrHtyM8izMzkmMr60tn+VaV5EupbGNGp6fMmAn2ONmUCfm+AJnIe2h5xQurWyjTMTYnlHs4BCVwFieh4lBCcpvDR2lVwl/H0GDqyLsqhE+laJoPcpFIUCfbme2u1AvtbSe2ULjDJHd5srwRFQP0welnok3FRB4wbf8xZ5QiFqB5rWtp5dZPaUp3VOmWvRO3haF/ZAa1cdd2DDT/cnwxFzipa/MRx36Jlwmk/QwLH9ZMxNzsb/0KOeK2cbxfvLA1oLJ2i4AlHtejLzdCmm3IC4B7z/MAeDs5MCoPLLQlpcYkBAThEPBksx1V9PF+E/E8Q6rgyX/ujLVM0rqJyt+EbsyE6VkOF3pYkN/NoV7DlDcehZbgACafyGzD7zx/iMVksqyEUZSX9YZQ6SCkLTdX2CMn+WbYh4POSh/ECqmjkXFk4gUFHot/NrKzQ8SR2t/BsK+nfKri0Zzsayj9b+3e3Jj1NlPpJ6NU/vyDyRxjIKsqg5MkTmmwYILc/pOI69MRzGfPTd+7w+unH7jumB+uw70Qpr1PWB1hxffb3yHOD2YLtox0oayn7ePGBNuvdiD5wKRF81cPsLy9b7hdVNXdVQKrAHenICyENNOLU04n2A0Jm62lvsLFNRt4a5JNW89ONC3wLiCvkfjZTuPXvgxiEa+zO7ccYR0qlFJvMQgJX8TeBpwvcLsY1ZyPutjdu0lfh+9K9qEwqRbvHimyEIC7I8/a2r05ywBNC2eqsnOq4fwX0o5WpHHANNVLZdfrLBpdGJI00pMH+zL2u6aY0oTOoSQXG6uP1xxi8atxfdAkB27ePkMO2ZCyXFQM4uON8Evp94VjC1svVQXzSm8/+Qk3f0gt8QOnqXk3r0mE4fetxONfzZewpUinb8r4a4ywZShZt2I6eGNRabqRnC7FKmhz6GlLuTUNUnxhFpdzux9jDMqbW6zdOgIFeaL/cDymuREpDV/RQdvlwL6Y8XZFOYkt8i5uJiiUPQgNJ7SLn/X+gE0GNIqKIxGsqLz1wXodqyzb5ksTE2z3QEN1a4mN0hOpPqbgl/OR+sdBqsjmXCrm1YhbtVZk2reWmEEld1cZ4+HZgbQkZ561jSf5f6gk4gnndqtpyOA0fj7dY1L+7MHgvZ3vJcodycRptYrOYgJmHu5cCiwBKTKTfJhbQ5RUe2HO6XPgLt9wDhJ5DJy/IfHdd5m6MNyJttWMd2GWhB2ihds9Vm3w9/D+qql9XHQSuyvY4vp8ouxLhTpf9RC+r2ft4TbL1TzqBHTTJQ/33MwyHNVGKaLR6Ojp0L6Ti1hGofrNWETO9vxFpDfliHF/URe9gWl/PTmViB3Pw/W7FNYV9hLE9RwQialOnt6Drr9CWaHFXeUgOtGZNvJwI0uGh9Og5c3/sThSZmXf7ymi7w4kkWTjPL1ExhAsxHGZVjQADxTlXdrG2VLqsxjNbp3S98djuPrseJBomS7CJ/ncFGgCMqH9lbEmM2swNdQskLiJ/bNhypEHW+2ygYHt+6Wb97J3LTVIb7oHnksp/6W8v6iEAQrDygMpl5+nVdpSj7m9QG7UdPrISUkc5lvy9kV/JzaugiaYv7o4GDhaCPauDZLLBql0oUImfyzozk1ILhXAXzoxxoJdDRUAQABjr8miQKquvPzo8bzm6A/WCJs8wN9H0oUEIJh6PL6bX4eNkHP2sJiro/JRAXBvjsBZxrrsvCknsEmtDpyeoiCrRlcM7xrNmQXA8RyiEG7Svm2l3fS3pJil4drxNrnUY9nYz4DHX8N8RsddVfK1eYw4ls2UN0w1TTPfy+O6hMRa7EMYHXJhfoOWgMO7aBzGDOBG8y3vUsodhzUnb6pgwx5gQpiRWYtmcb98gBkm1RufCmGns+1iX6gtk2yDrBbHONLANm1aZOG2lGb1n42fAsoGTMw3dOeVm3xAlyT5ujROD79Wh5ZFxy9LCUf0GzFPOn9FVxP4/sRV0MgWoVxOML+x5ztaqmgTLxjWXczB8qHH4zo+MzzEBYKa5ZfLBhKm+Dz0W6Yh/nhqrLcCbVeCPOsTQh8ctI1Yr98JufnlWW5FPhRy0zayXvdhymIJf9y92pCHiuYACE73PnYJiTxRLKvOVMk18m7DdvSj2G6SqIAwWiM9cy8o+2HH7BYt5XKTJ2tpQAG4Tn1I9S913BBnncJrof+L
bVoDna9ftI7TnCgMUuaCt6w8FwVzN9jEQ6SX6fnLDBVxdAthqJyPMSmSSTMBBi/YGecTsAx35vA4CZwKyGUis075Enil3wJ1xrCejq9puPs8XvEMYTUsBl280Bq3xicJ4UnEiXKKMgWSKkh9z/t+H1EKtE9LkHL6YS9nCKDm8KZ7H/i9zf1TOAJkyoh1bm6S5cJLRQbGtt/bU1Nbo+yvMAOb+2PaJ2JN4CeRyzMJ6Mee8MN295gh/AcpLDuigyURH25eKr2g6Ryl6Hwm9wN+8c/561U5eeXBFXrdYOWOomBUHEIMR3vOoGCCenBYjHsmLV2ro1vn6WkZxamftvcIcyL/1f8QFPRgx5LlSWuU1CKOypu7ee8xiFl+vqZUPaPMeFap/TpX5hoGHQbj1ENcPy78Qg/kRaRenwAnThN3I8/EtkDDqHi8HXf0W1X6Jg5bBRvje/pbetJ0vn6Vew0UH6F+/YvaIiiS6KzA+wBgWggEIxSULdJuDQKoBYqOBgzoBCEdH4LSqb09Uv0KUpaYbgTfYFh8p8GlB5HhLAcyG6rATh+qlaF6OGxghyUEuMOnt+Sbre9jzFqJ6VXQiyOnWmPfBbz+Y4OOWS8pN+/7tdN5OeTyJYN6Yizrsjpcy5/urYfwatiE6AU203sQzRhkw1hkmXepS2y60kCRk+fJQOvCFfJm1jwBUBzJnb11xnYDd592AHlhDVwqHHXL6pU/8YLs/22AxsNw8VVFkBR6+LD8RSwyOZk1bkA2qk+zoBJ/7dbh56Jj0EqY/Lqz0ijIz2AKAsF3jAS4PWWMBTHanwLaI0xlr4wa2FWf87Z7nzI/65C2ct2mmV+vr//5tLSerujx1YyL5mu439k44FfDZ7LyYyLC0ig6HL9pfEcu7m64nLti2pmCxRHF6WcpspRYB0HgiqJOQtYgg7B2/vxE4+hKpud/6b2Z5090fCRJrbpqxbApQ7A8r73NpajTSQIEB5TOtNnDM4zXWlw2ckyATaO69jC9oezcoaDmfAu14u0D/GeoZc2+jT+S1e6lTM1OMmbtgq/zgq/vpMCzs6BQOs1sKaR49G87M7MwNL4eb5STYUhgzY8A7EBAl1ZfPYQvtkh47fbgbOD1BE8S23I7MlRa34s8pvqMX2OSLjU3ymk1Tvx92Y+3yklbT6ar22pbYObo6OPS821Kg2F8jebN4sDw1FZFQm+Esy+Zt6f+0q7U40MzyrjnR9Ylz9mWqDY3k4jmFIEqaXicVYdG3eIZu3eif3oKHU63ZlyLr2pcD4Q/S9nYUM2slWXGHKws6Wt6iB98bMpWgrpfGwxviv308aLtyR6Xvts6MJYTMiN6jSrOJeyzfCROq9P+7fXV+N4DSHQLCj4rWI94pzdmHVmDLYD6uSfEQF2AsZAqdyqfRUC32oN93HVjDUA+BpsMEAkV8nLJkDRiURS24UWScaz7oCIoWI0x46fIC6Wx3IHooX8wtvSi7EcTjRTnUyhVEH61niqh8HBZ6bWtD+6LFeIXxbNx0OPr1NQpgDoP54Fll44QSRgc5upOKZ86GAeHPMKfW6m8aID1WNOCd4ZIp+2xxzxaXtl8V5eFBigy81Rh0RqxDpftnYLXWULLYdCBU1m6hVH9L53WYId60JwZ2ME5CiXk0ohpfAfNUnUaRI0hWcfQAdk2+qBkY0YoNKJ7wP6On9rkDeqcJ1mypfUALvfiksKKXBLyVfGPDHHlg7ynAAOC7xz9+sBVn67a/fRmkfT8VZ0DY1UUNzt9Zzfu8uzr8dnGllrPP5Lb2Drs9ygINPGv+8i8DWMrj/yE6s+hrdnh4epX5zP8zSn4pj/WjHUsNavPPaEprGLuSODZOXznt0F+GOYCjKDWgQyWFWxyiZoLOWIvkUz56UC6wWRpvQOf/BIGrah13lZvwAvp8li88SXN/Hm2Xa3slDUHYcwcS99eTQoXg3t1a80Nf5PTTFJOmD6X3EvlTMrxzNwYPJh8PLw4+lQgGX+eF2Pl3JpFo22sKSH/OgnEGCGlV422gvNPEe2zVJ9tqDhyKhm8vjtSJcS9Otttb2rPf1FkjFZq9OWDeZpfIEeM/ts4lGH56ifxFq5rZWOUt7ydiEtUywpFMG6qa9MMpf1J+/Vh45aCuKC0FsA0/oFPJNodYOArihsRDi0LqR2GequIdHnzcUbmI1cTmnmPY/UqPzYONUHoqGloO+FnVh8iVleidt1SB6cHeaJeouyIAWSXosJ6g+OKPOKKZeMaYjALLRYD4hI/FuFBXZBU9jcKHDy7Msd/3O951ABYq7Q2r/yAk614VxQ338iU+BcY5PUhY0eoPmGUkzq//zfSLvzovCkrGcQuJMoCBnGtrF3oDndavCPxYZgqqmTtmTIJMpr0po8OWIu8rNL6eVOEs5BvY4Rb0Zk/2c9G6luSYUHShIBCLDmGhTC/vz4T+G+mJNjwpBrTv0+jf5j+rLA9hCbvG/VvgoBMH++n3LNEnMLb6cl3Agta/yu/2NNpHzAXDrqBMI/WzwclvnWjBYWfABDO2IFJEUQygfoToJ4y4vG8wXlnnt9G1KCVQRASrd5eiVs9eSM2BzaQ1vca5RANFmoqpyWa5f7jwA8qhAeppCX+PZlKcUlyg2Niy3htBwmHTLjwglPtqF1lTjytVro+FI2t0NIvxfBCGkpz4FDCoI+zO9GpVYk0xyQB3gah/EkXOdNXmUcY24WSEPfdxfJVEhcVZttBKjX5JfmCRIlfrs9GCi2x1q8HVaDZxwDA3hJ3UQUUD4FPrs3x/texB6/ibpwauq2v9vSTsqgqFEFFBmN3dHFySMaFDh8CD17gvtY7n8VCRNV+Hg3H4WxIT3Pa+SoFxDd3MOyRc2AnUY2gEgq5brzEZPk4ZujlTECJekm8kvZhdtXnV8XcJyl6ueH1uZL8aw0YcOmhdo/0HKnzubibM34TGOOoUu2FUU3nSwFTqTeTVGm6HVJ757XnB/gfgkE7NZEMzJ7zKa40MjzbPdY3xDpQ8j4XIK37GFP0jwF9hXZxQulJg1J3W67aYVm2CAcPzZQLA725P/L1yhOS9N61CmDPybIVju0noQ3h/s4OHVZQMNPrJ2llUBDFIRYrpzml+tN8cQMFW4wOuH1qpGEtyHslG0vQjTW+by2wYLjX2pDE5CV/vOyRr+FagtVAd8AsMlWsnS50e+UIYOyEBCuTHM8fxQ976A2tpNt71Ow3026sTrcqX+dUtO0riHog3JtJbIN2CVL/wG2NGOw0fw0ypngYx5KmQMbm4jh6A5Gt3PRtb+Xx3ltLVRQ82+xY4YHplGksCdswRbAoj+T7OafOfKKBfrSXUt8vI6I10kFotys2xVO1o29mnc8xBdAqEJ0RktSZq3FfxG+6Hkhv553fwihqwEA70EeYSk2MPRuW5nhLn95xRjpwZHIctD07krCSJgfIDzhObWUgP7gz2x+FrZpTDzypVCGv9CacWsEQciWDUjUj+HmOu3i5tqi3srxxiklB4RnHzoZdJYwrVvl+5CpoecDknLKr0iJDD0sz/34n+J/Jat+hf6mpCY7hc5z9OIFbgdMZST4FTzRRhtY/yMLxK3FJCPwb4/mF84nUDCZXjbYH13WXnIagnHZQB/dt48drhoQSq9PDJwaS58uW6vH5rP9yWmUkJWrhVCKn5Kn+j1NxYyGpz1zoPDyirJ5ONeKe/VzbS0khEr7Qyr+g93RMW0xHixCw/xYOm3vwsYtnsypfMJZhuIHnT/XkPlanQ2VFPalb/RRSp9FHBLAE3XIzFlsPy2+EkzQ6Pzj74jPvNJQ4+u7chd+3v8OiKCmWLZ8vq0xZQci6Hdofe55Hr+ENbyT6kbPIWgxxJoep1FqIs26Kt9i8AwIu1hm3VkeBvSEDd7PvlvZ1ud/8meJVjxOtDRVSKJgwvZ2NvsNAem6eAks+ya/lEeH15+6mouV5UaXnuP0KZVOAfmTisBugnXlZ/NwKScQDK+SI0UkSmqjwhyzmW+3cC+Z8UIOk4qsb04jezjn/Cy72AytmbrUE5Aoh9gCEoo9RdEWPVcz95sdKCT/k7p9RV97H5F/frGudqgYPt3YJOm6KRXsm1JJMvJ+gp42LTvEemD1M
W++9eYSkBSLfvrKwzcq8PShYeEpZvdtqn74psx/cFepD4ag9BwLoGrewTfEeoQ0MErJV5mG182ndCVqFtNtS0a5dpNM9azgi6On2g2CklHEbu8u7e0LZ8M3LPC5wTzTuarWO1DbpzdQEZy0kBAV1BUXqR2bcxO1Qbngwm/Cg9/+iWYjzn80U0TJI73VDeEOwCr0Cz3gQwePT4xyL8mwLQq87HLLPMCQXOIhpR9KFdtglF1GNMmco2nxPU1fO9wVDOVXc39dXO8NThwqUG/730KEJY/ZJ0xKjNqGudrtjuzJXIsWcoXI/FdYGQB3Z5AImZ19vAjzaoL+hklEIM/ma6AiRn7okwPxNkgbKg96rmckmN8FjV2uqadW5iVseda5wQCUSLhKGH6oC7d0qPajT1aWLv5yd/PEzsRhYwPzG3AmaHT5BikJaTx/Ly8C0IKyaKTZxqA9de0jOIqW2cE5ufAt6X4H39XYMFgEjcGFyBeGtE1Fl2kco79Km4MkQ280fhR+Pp+WbMvs/VhBEeELtonx4Gm1viYnhxcCPDUoxQh3wyUWjfBImnMvDNRSIxgAsTTfXaVEwqMavFk5BSSiHPrQ+DtPOVDeCf95vVdtJtzRPOvgoeE5cfYHAOWgz6ZMWBWwswRwK0la/aBS4IPe5c/98+Rem7aqJdStaJfNMfFlJv7conXgVGavCaawMTTQmuRjRcZjvjIR82wwLyGEINJiBPrtO53pdvqK3fyuUyjhq73zdHoXPS2VZ0XBXzIWKtR5Iglqjx+z5ButQKlqV/eGJQ7aAOhj+cyqLXtFSPpi8lTac46BmyyJEkvosBI3IgyJhQHJkIoVNKPT9MtKgKY5P/NBGDqLwHdFQpVb/VIG0c/llD+8qGLpxyvmhJEldsvwcikkQh/Ry/gwQpzl+S/EV8aD9kCJNkRpotr60aPFJ+GSGqTKcyCec4QWHKuzOhzyuztpIGlBHLZ4j9MCLMQUmCp6uz0gKUYAVlO2p2sMLr/SUSxNB03hYvkQqOdp4TZ3k5ucUqdYXBbNcOIn9juhiX8/S09dO0Jbov8s4JAeiU4lcPJ0yrzZrAzsepHcQ/J42iHxLiVd1EfoUHHJC+y3yh8zhXfAVgL5nkj1aNf33l634HVdxBQwAkGw3uNKG8Lwo+Cr3Gr1YfBKVWl8oTb6ivXgGygcKuaP5YfNRWtBFHNf7yukpM5Zu1W/PoRk+tbNJ8tVrVQzfX2av5decTDe14fJqQTheqtphoriFwKfwGX5FgJ6B/p8NiAV7gdXcv8NNx08/ae5pvj3hTIfTBOhTrUKrKQshBQfRVtEUqTU+bWEt31kbh5wJgAVJ5rOLIdUPtPuMrZJwoiuwFPbI6Ao9pV/7WcesPqtYGgB9Jz7FrgR7EZYECt170J0a/X4+1+aCkAtixJ2CaacE3CwtufJ2fvtm3bRkvUxlWa8H0C/YaDUcofpO8uelurt3MK9cOnRVBz3OB3DBA9uON+GqXy9HbMIniCi7bA86cbKCc1iT2lVj7HJcioA447MdgWAdlOnH8Rt9UTkEitG78TD1MjbfaP33oQunIrTumXFRdcPg9YpYwNTOr3qR/Njh2WlhrluQa3BrXG1DdKAcZKpBlRa0tKn5c96IK6ySnz6VMCQInhUW11VtaYcEPYWp45FooX/ZqIYSr0ZLzgyEp1/lcByxIvR0fUIGWIEjuHLDLczWVOn263ERsZEaye1D2zk/vW2+KSVn5GoUGiPHkQ95VShhuGBI6yHbq8p0WVKPD1VeKQjwK+3ZNZ/ZaIEr9IhAUcJf0MxnvIofmI/bXW0cdvQAxXx187IjKM0qUNY7xxKsBmDJsso2Ir7AePQvB2dzXBV1DI7DAPaBdfwGvuSIUeQfhTbRAWaruiiNF8iwM1vcLEKj5x3iEpa3vHK3TBATPT6ziu/qF9l3mPcDa9G+GUbHQRxdk6ZXqvhmAzqkb3WebHON6fEJMhtc1ZX581IfVmq5U6zBeHiukJkI0S/+WdAJLsRRXCs7yzI6/KxWoBd6Qq50DfmwUGMnrpQ6VoOF+WnTjl1srePi4iRGLTSXJBi6hx74oMO1fDyJHCmqMbZ7ytLlp62vU2W0uEHxifjJpSEmCi2PN7HqN6aGkMzdtSDvbeHYKXEGDz1nL4+JgykFKsA+a/RM0qYEdGagm2i/TpaZV8dH7dpvR1hfCy/Nk2BRuZlGp4ZXHjIMUOlLA7YU1xaLlzVbskqMVx3aC6UEviWPSEs8deaSzuWUII24Aq2ZcTwjXqVzrNKh3qJtg3+89fioi/hpaG67E+60Bu9MOm3G9AIyyG0SSu+lKTIpWc6L73FofsqTq+n1wW6ThCgMFv6AK1/L1u7ub7ifaaCEwZRFg6P6Gxe/xZPYWpTa5jKQXI7KJsVuq1RWXJeCby3+Xn4g0372YQaj4TIqdKVq+gfKSzHU4zZNisXuJ7mPh4RCf3BLNIIRQHNwVw72posivh4zsvkHLii1xHUPLoqOShdNW2db6FG0qAjKx/ORmyKi4TtoLUtoHgQnSprYp8CXf3bslvd0iNyaxhLSD+cOm0VlRX++GzY73kptvayCtUIoCrdpq+F0VQ6ykT3cq1w2CeIWt0whf9PxcUDUfGfaZjh5/DgejyR0gieZD/G6uZrfL55zH32HnOCMfBhPxt4Nj7YrR7R3c1e4sfk0hclQZK4mhiYYiJ/nZAQ04SMOj0o/Dj6PmmiNPIAy8q7biUMxhxssstDonhYml/3OxNbU1wMQMoU7rlRi+qrGE5dGD3sNNg+RlTHXGSC2SPUdN6L/nej6lO+rx2oRamXWVNa3fSMR5wHwehr89Xe5z23U1F9wycoYfGsbjekz26vdhfOsEgkL6s9w2u/HHsIO4Rg2dz2DkQNNj/3S4kk9mJm2pADHy3i2Xnkv8gGLJqhKJQwCFTSHP4B4uHVaRoubzJdzSY5VsXQgkczc4JSSstin6wSIJek+/Ye+kMBGjXVhfyEEk4/SNn5SBhkNPGqgk9t9aEghOzKr6qgWv86fkwaRIUDdgmJVc0bDHFOJOvjEERfXKqKi+W/K7qGeyZ4OpHFbmXTwdqVKfwcGWkBD311QUCk0hpPyfe7uMkf3rmwDpZX376V7p607pVLP4rDN1Ly5+emg2GLZjpLbproRwL3YmU4uYyGEbpiBC3TBbChwRUg8sBqINCVsvrROFhcM43oNpirje26Wc57n8CSRkW2JtHlbr/40vVFBjtM5Dc0RDXlvQu1pJgXZoFaB0DPNyGTOnss3JUU6qUZyO65OBgqEnRk25BlJXFJDXzJmk1y3ezumvJyKE/paJ0Uz6aenYrTG9uqg+M3SLA7qomraSCXIxUbFqFoRDQQspIaKjQ7S7a3YPLJQl/7iaU0wY4LDAu3rmzRs30SGUpG8Tl3b/9ZhZFZn1HL/ykovDZxZ78T/zCdMh3LlEGd/uaWk4kzYdExD7dSEtnKEib1DF6JYZ9xj0JlJ55ir3b4dSNQ2H4BLyEP6fSq6afdG3rnfa5xLGwZgfDLaVS9VA1tnB6ZIpjLq7obACVfO9lcX/pnfe+Nv0dEHJ6nysnd0wAn6x/iSA4mZ3wy6biV5oGSvVQPWDklKIvam3gHF5O81eutWzRDPy2BfmPPbkjjS4sre6M0RL4sEKRSdOFZ2rr1XAhYMpLTgue+htAyIv5nB1aNsM8P1fvTWCUv7cSwtGzbqfb+7r+bw6HGPKgkDrNi1+AmjCN5k0+lwhLNq7vPHjD819384/k+DY53DR0bAUu1Jn5rSMXaRlD+3OOcTsL89osEKE1pcLqFb5fG5kAWsaywWSWF/eAfgsGfMJzkn9GprtQQdIG63VZ+efit0xDqBTpSPzMKMsZ9sFpMWl9x+xbALLiQ3JXO0pDfEYnYQF08JM3mW3COLhUywq4sL4noj5OKmRN+3lMa+hdoZWgs2rFv+++AA/QpsPS6toJvL15Ic0MO79st1h3JdR8u954SP/PssFV+Bu9RTlkp9TgDF55NFCn4/9NpzGXzVHKz+50zpw5D8LQkSnVUi7W26KJYZb2GvyqYg4Bjj9vciIE+YhVkf28/kLSNphh7BGrojbUG997VlQrdY
3K8OJ62dnht7JzL+EMGmuTs7ffXB6V/kvUrqukFfpalgpVLOwBKTo8zhLwWocea0aw6Xr29RUsNXI2a/lntA/aI9EFkzODh6Z5BeMdYxJx8Y/+bNMT0Gk2zBhID2o6LyDsElWwMqoIFkWaCyk8iyMOFAAUgAFAi9HcybJwrbjUfJu+eRnaLwZGAnB/P/WXxhXf0H4skonSel7kDJp6M7+u/finEOZcwrOrMG8c2d35pZ1Kqsm9drfW7E5Dy3MZ6RzO8oGx7EbyrJe3An5AkXGd9CoDc0XSmyA+/Oke10+l5+aQBQZptaSnITVCRZKdToqRLbqqZB4BunckOL1CZpInAXyWsZ5wiARZk50FNkz+OxSoB6XdnKspzQrV5Qla7arTJw2t9kqENzgB/Sa1xfLENt1j+pcrUx+8aRh7kljpW9qEyLH5fYP2Ww88n69DccdC2jZRWW6/g6jG8kuZ6BeLCnSdpARm2iJ1Mdg1/Ex2MH491PoYC6exoQn+uxitd9ese9Tg1ooVZWc/A4KvTP0c/jTG/+UnNYJ8amw+X6xMd59Zp++4VpueKYUyHG/RCqe5Xpcp/vQmNrOQ1PsUuLb9wWOzswCum6kYNS5WKvBjroBXRN2HBSjiQAkoTh04SI39NUdIf4h/HDlOjVOVUpA6/EAvNENvLWxkZenck8ev5okE+2xtNHOO5sUi+bIWmEojVhvNoi5Ci74kLC8luE1KVfACLpB2zYPA+D7IOB4Ntp7BeoEozshUH8Wi4KUHp/QbljdZwg438jOYKW9eUHue+Q+qvBXD6KdYx+xpAh/KteMQPB0mEfHD7xFgGpz4uyNBT7SF60AmLIXWVM5/KXXx41LUroLC3HRjGzqQrWwAO4G1/pUag6ux/5HmHA0x4PfbKguMh+bIcMkpTP2Su5Uff2WBbGvejXPuvcGWopeJzi5O8fjXatrubD2nKjbMOD+eH62xUzVuLUyDm5nTP9mW/Qjq5uYI2JFlGppxFalCnGzu4hfXf7Hxw0g5wSb0fr5yitFQ8ITuMBo9vF8yEcMfD/jo/WIIvpomDDx9iQPjFHCbxGwXA8hL7W3OsBGiSv4FipGhRFFfqjaljb40gF0+U2SdWZsBv/h4H0D9WjPnNMgVs4Ak2ZA1M7yxZ3vNwyFrT/7ZEbHl6yw5/gxLNwwla42RLqgE3bAiXUjf8CivJxnc3W5tIhns1ac6RTxsFzV9iiWqE1uQpiggiLBpECQu3ssRSxseBAOYD4SZteWkEMHkakSkE45dxdlYw+P87sLFcuKhN9Ur+94zgZ8EpQxT+T7CUjMBbyO6YLlq173pPQbR5s5vpqrLw9RhNeUrTt0ZTIZcEeTr9bu1CvL1+tf328WO7h249E2Xp1nhX7rAfI6uJ01a8ZM3q2cgeJLPerbPv/G/noaNA982hzBpzUj9ArFi1Uw+xiHhbvZi/lzzGYvhpCoUwSEfYSMVigOC0uc1AnCuD22laOeq2jpPZDmZ7we751eemCeHOS8XM32j5iNvKOcQ217SS33W/77FChEP6kfbkN4Jva5EQ/5Nl3NukfPJp7bhRq7E4XIE7CpccIMn67N2Dh+LRNBS0e7tx63EIJtNIrs5tzhEVpjvKXQrkFJITJpwGDMyg2lqyVMs62Kz/1uBR14FAnYcLjP58Z1PTkP/g8Zs0PHaIkizbx2xXJG8EBfFOfS6n5/ZpHDRzsDEGyKGIolvA/2PjEg2qU5hFMEYlK6iAsvzaULQ6EYPtIKHCC1w1aST6Gz+ZGprOQwSZfiUBRVQ8QjAsE4BRn/ckUEi8x6wP15VlHQ9+l4gxckvwfjWPMGEMtVueSm2dTfNtwdqxUkJuhjKs98wHr9e4oEVcfsWm42NOqtPawf5OBr1pyh54cgd+EbtKPrjBbLlhdnBq7u2V1wKD636ofNjxnqGbel1kLCdPYugK3wM+bWVE1k3hp7i+IEHDeV6rytTWezp5mVb3ARSM9CEMS/S+SeXxlqZ76wtXp4aTFI7LcGA22HpHHsAfypaBXs8t1OzO6J2lr7UtfVD3OkL2PnCOUp5d+nS61A6/2Pyrp52t2qP5A1au9ERMyDqw6f0pkCHsJupagTk8+lLio1btJ/+eh6uJrs16DIybT5cqjR9/1pjGtrCdtsZncwR0DVnrBzHXlOYEssa1jF+esY+laq0JHqZ6hmtaEu0G50sMuAMmMrIUV0sSsARSt9b4+Q14tYOFXOJfGh+Sp3z957/5oLIXqyeXNjjR3yE2pfUKbiOaGDlDjPcPguwzqIapMQZw/jYWtZnzXuQmdTOHwBgNBfCPCdD150agQuEgOUjUYiODjl30MwvIZZReWdYIYruFZFK4+Ea9A5xlrBCgSeoKjnHLqjov6+b8tQGnrXcPTGpK/ACqNKGf7RF8thJ2yWQiSsrtgyrVcgbW55kdv2svVe5YBlxl7GcM6WM2f7oXQvp4OLK1PjYk3NSVP1X1AJ6OR9M7KkpmADZtLoHrhreeuVSQCS8mNRPwGn5hIofcs5PDYEK5I7oMImFNAcuR3J1xWkYi7q2Ln8KtLhF0eCKV0xqHcVZHDJ5ZGDmDfvUNAA6oUPbSrmFUyl7AcxKBxrF/IkNNZwRCmhB4AMJCP6m53vf0UaNCAAgQbApf4x5EOzZkdXWU+zrmn5hRkqQlpBZrH0Khd1JAVZUaUZAdC5ked1WTjmu+DKJ7DYKdFMevLjHhqWGY9cUeOJNc9rZrHof/BY1BPAvjCgmMGweIyy9ewXqzUTCqqUm9c+++bwOMCTkmskYxV9iIlYCUCMhWaidL+Dctj/qTkxRIxIgIGvHot6ZAxO8rA0UinWdeeFPI8PinaGokJifNIDEq6CHj0jBkxYYXkarieUrob5O5KuJ/FKKM1JOuHNCQ5fjcnzhwmoIkzRQXjdWvau4kR7qnT3GGPu3wpNissiAmhZH0XbCZK3Tw4cyM0LbbLTonPPo6WAQaGI074NEvQ+IfyQFb/D7KXaXwc0sIfko79VkMvEzLgOk9NYps7Xv9p1wnYPmVYPEyHMpsUXd+ZOb3saHRU21YuI+rUjSGpmvGr+nqT0aYUnykv/CVxz5Aj6cTGVuY+Ta/9R1ZVNoKHlX5ZxDV/t/oanAlekSrb2yaDCYosi1WK/qhFhJLO8VLeN/du66B6JVHfO23fVLzQrvOxnAYEnFVm3Y5uyZNLGdnkmqQAODITo60YHSTgUPZcez7nIxednqMvkEk+spDRbLG67ed6flyNhr6mLrPuFEg09ZB+Vpa0hxntlAgQXXh+UsYn3VmaudERFoMkVxAE+67W6Q+o7hMQ3zdOlqiPF9m+nDAw10Bm/EJwPRUhZ5umHNjXf/WAbdKQASp2IOVuExaCyDOPdQ0lsNkwe0PRoKdZLG+MyvhszmQVocNtr9LyKKvIEbm23N7ji9dt2Wf4uDHN3rvDkjCAAcY2lL41BjUDZgeGatwsW6XD2VVpxCU/smRLYUME88Bksd9CUVYLTh3rTt0/CSmmCCB9scqHsqMo5g8YoWVXBAawZguYOHHdoi4Ue6SNnWPUWHOfWeMizrXJZAaScx98GvpeO77r4K9aFh35tRJXhsu+zk5DsBnjfolwDLK2wBcQmvCshNNNeMNb0UFJyBnK2KEu97u29r+ncZDDnw/XByC46BpqFvs+NvwLzwDVdr9l82WGWzcUSf0iPtOsXdZ3IKHe2u3r8O8pLoaQwT9m7SiTRKdHl667pWjuY/Ia/mQ2J9/I3UDC0MAdUTizezydehCCC7OOaugDcNAdksyB1MB0RbLV8nwqhfmX811H4OGBd5gn/QFiJivzqyTAhjg5JYXPOWKhZHTuMdyOLS8kdin6AJyywXgYVZMV00DwBTspO+EGN5SpokQdBYxoKkLCTV4khWCKhGuFQXB1h8hpeb0/Y5htHRoOuuJobZ6T2nmqY7mBH0Aa8BZsVHfIMEoSa7OOQeOu6veUr00fA0HK5rZaYF2w0uREtTsZOTKZXLUnxlPghiFgwcvIysh09hmRhDkYUQg+bdE02krcNsE1MSEC7RYyrlHF4BgrfIqzVrhgFpd/eJ0TX6cONDtR3pZc1ownO1Z4BydIkRG6fILb
KnB8t6CWflpJm4/vTRvoJ/bsLCzw/w3WFV9C7WxEzPg2iIFJurzPyvAMHuUi87jYx8ORG/UAwnYuGAIdBataVI65EwZSgHoRmpqG89iQvMSTI3j84S9BYJjMdNujDhC4ooAgMt5X8fqBvONbh6YIbCG1DokJtF9fooPtxRR+R3YwwPsMXRgnQjWw6Z2GX2KTa4VIyrKBycAMe7/uKPYvEEVuizD+7SDt14M7NSOeAeCfwKrsbXk6sncjpN7v9mCjZnybGhOzbREUAUkR1WUwt/2YA0rGheFMUnyH44tYTzYpfdiMTZm/H2neYUmHLb2fPHVOsNJQJqY6fSs1syyrY+zGWDWX6xV0b/x02Zx5aVtKCr9LQo4UMdN4BcO/tt0OVDgLPrrfFWO3V2ryr+7anO40pY4q6YXJ1gXhLgvGtoPr44zj5osz6OTCZHKIikb5BTzhE2ln+l/wiN6Srhy1lwj7xZOvVNbLxAQTzhSj0//0OOIbcMRkAtZMO4VzBcUt0FFjCMbB1V/HO3f6Shx8j5hk2Vd8ENE/YywXoOnoDznp4y6vCZBKtfOQ6kZSFRjISqDDS5PwbIy2TzOt8JtbxzqZSYjjSFKWt32CWaIYCBkvXvF1RW4rJmCruFuoIvVs0ixzAv3FOvsVaeCtJ9SWWDL61sWyGcLsdpg8Glf6LqKRnLE00PaWY6+Z0Z7ud26yEfVEqQ/cUspSVs8mhaCy84fZlYRdpf7J58W3agGIZbzM61zB+HlBBR9EvjkLQqNcQrRcQZUzPf2vD3iNaK1Q9hndp5BtidUQl/WSqhGvkjKkZc47WyO/niDJ4tJ94N69pVt86BSwgn9gRJHd5vLsKob6bC82XeIlVc3uzrGP8aMHHg/1Wr85JPvVDTw/S/YVZp8jgwGZX5L7T9risPRQxw6nqEEMguDFLirYA0xy+OBf/ou0Pm5vkshi6x6RMsUB/FyrgL7CEnGGue/Ww7M7B6uq2ZsEn+wtVaEW7M82K6TtANraQy8ovIqM0Wpg4Eom7gosdNP5zDdbldALns6VIubiFqsYMoZQ4Hv2oAl17LfwZJ69I4jHmt91aVQzRkvtmsYnAjYU8SBnDoiKvW9leXB7n9FD4QGpOqXXZ41TymhSaRt14BlEkkJx+TA2zNnErSlWpqvc+ZMG9ii61wm6XxNVOeE/UxqgCntkvFzQyjoUCPD5SCj7srqSAuRqvTV1ZypAJ6lmf40QM6+wGQGefzXVaUbl+adMRhW1ERyo1Trk6RwsTU9MOQ6CofogxoZ+lhbGN64VSlZGH+KpDuHCMT3xa2HjaonRycs5H2WmwSbFnj7lX7Dyy3fLOs4mocEcKqrtSLclBS+qZCsGgHAY5cEAWbQ4HZyfMBG+WI/3hK1wAlFAO/vN5qCndZ8wY97mCK44LUUMhV+BOnqzvMjZfyfqeLDisRWNXtDXpBeD7Ryh0g0XGCAfnJFROqs+qIwTg3d1XqLLLWeaxzuVAsAIhnJ+Eb+2u2qMIIzuqMp/2f6B/nMIvSy4SWdp7JPWPF8tyFXUbx2UJoZVzHgGHZzuZXcDenlyg6qmdO2BDOa5udJRLGz7DiUglhSLPGDJ9seSOP1JUDWPS1/MrhrtnkO5tkz3N0srKwGSAt1K5GDlGToUuB/RqzicU3a5cz2rxlJkbbTGPzJGKpD/8O46NlfCarhmS3Vhr4sviYRT8w8yZvO/IDDtW05gDcQcLWpMYS/F+cKbw/BupITnqgpVMYmnp5EX3pAh/JiffXuw/42FK4nGtFnetc8FC2xzfjD/H3VLrFrFv95pWgNvCmq+x+XgHwcEOwPBaTsEfxAMNK4RDtoVaVjLxMySGx22znSiVCSGj7TnSVlKuipPom5UoKmOHdYHs90wTD0Y5ok1oNpTc7mI4YLT5Xjn0C8damM9C70CSJWB6zZz51DLYQ0oKbOKPu20k4D5K1fShcyIg91VzYV9ua7Q+PzdrmUnczJ1jjFSgdQnN5DDIEQt86cwCuYWtfErvkri/BfBb2LjpiHy9OI7A4daQ2WR8+HgCm3NtWZwgDPL4f+Y9O3IlbeexopHi8U9awNMAoW+jieeb96UnhRKd8PDpDvX6msK8OxMQUoh/57dkKAQHRocBv3Y9Bm+PiuDeDVyManNYKIxFCuRnppbZpOwqiZoL0KRV5VUAkFbmiTRm9bbZdA1TPOdYLnwv8YKTUSmAtznbHWrnJEAR8AGOvaIeuyVM+J0rI9dkExIJok9U9mcVmARxcj8d4mYcIZFSPU+iT1OMdh/UWr8Q/yeox7q0BH288R5x14DxX09V+qE4SX7nNNYzwBdgcxVk7CFXCBh8zALw85RlGFCN9ZvoibsB//r9DuuoD6sieD0bI3qO1TzP3V7jJb7eEA2k1N4d1qy3on2g67U8z8N/CpqGC4UzM1irNDDEwg8y5GcRDAS7r7Ujy7SFjm2H9/jcmi4LaYNn4ug5v3ii96vczifZlYrruEbfIr2Q7C55rSwp0a71kkS9XmTjkSXbOSC5hSqgh5I22+8N3w8JVo/FijDH2ylfsC2C+rVKFzAxeFJskrtqo4d/rvvbwF7MwGq2UdpXutw1K16LWenoBhvFkTBiryqefNndia28EBEXjvc8j+KPK9UpiKyGg543YSHt5Ihes4trvsR42Xof0ak0pwWniSxdPEVqxatni+JvbKPWmPq2OmO0nZmDCxbgNO1VzQ8NVIMjJi/iqRVha5ntE3+xkRidulWqW/iVtqd6R33Hoqg0RU2KVf2hHM9laOzzn9PeQVn20ohq+PDJMQhkpMOSo2QRyO5i/FTbia/jxhpmROKXo9hLtwRa3KyOJZAy5EGGK+H+XI5iyXLTG6vu2Yap9mjV+oO1NpmCAFVdwXg7xZOB+9bPzQqCqWQ6TyqDjn1ohipmCpe5y12YfTTgUnTxwxq9FOczucHbgCJcTFnAltp8I/YigbN6umZtRLC8sDwdZNLKj2ouT3Auj5iiJpeHebblFL5+as+eb0N20cIz9ieaQc1lWNpF+3nSTU/WsGuSWqSQDIimO/pEICFa3PRkSyxDB/IY4R+QZbWGf6yse6v3OhRji86H4ckIqpeomL7xfgzgiyt3IRast+An4sjqy7MyKZrBUS6HfGBNQ+ZSNtKDsWlC7+R7wr16wC6rRr/0N6nPsYtEytVMm63+9kR8xqn7EdgiX+MG5Nxg5s5hl9fRqeA9QuFw9s8m8ck6o3HV4NOfTWxYnRqzlVpQ6Y/Bhn/A6VysaEITS6uBv3t8DRUMc9UIqQLCesn/W2D41afS+706SAMYaYzE7f0BQa64pDG9ND3NI9Gs5M8rAqA+YUcbT/WrF0zmLAec2WVpjXNxeaDrtPgl2JZ7zu8Qn81weOuQUi6vBvDDDeEk4zwFNBwIOVBR3gtWcVAyA0SCid3sWTFHaE0VDvy8+4gzqbCGwg3kO5hVi1rZOzgGOy5FR7pXVDFv4Xgm8m/20gqfVPjVKVRAhP79RC2LiRhiuSbtOcTVxWZgA3hcKTeGyMmaYuC5g+1OJ7c537t79ATEJ7Ebxss46ehYmmf5cs3j5lJMqKon5o2kwACgMEdeVVAuX3lKH8atJT1xBL40KGdbuCUjH3cfu6qX2S41MshhzcEfGzzbiXXBkkMurTP41aOSQWg7rzenCUeOvy+VZnRajTu9sQ8YJ3I6m3/EaHxXekcEeRTQe24RwT72A+Z25JtkDg4hBgPO4Nq1QGCgPqeUUkweH4l4GLNRsbHPAnBbEkNbUs7kHusYiDrsVeGoJXSBDlMPJxawSqQsegfhhbpxb/OIBNJD4jWbcqHgF2ipDyiwVtzIsa3mxAnDhvbXu+xpcNO5m6rWWrMDUG6fCamPgtqB44ZElJLKmHdk6bL0yZweoMc3vB5Z3Js8N4nTTkaW0LQdd1sFVlVnwejYb5gY9zdPc1X/UOZFw+C/JYDgYQbnIT5lHi+b5jFVrQxIrfh03HTKWmBevofXpO+NubO957SzI7ImW2EH5t/qGmOuOh/jCkfG88PwuzOshPD0QU8+TzMGE0fHvWlCyucikRLwBuni7BcJ7JkdPXFTaEJUpiHuYYBMtIqGxrRexAgRvpr
VhKX5z8Ffw4xKxTeweCiVaMubCJsnmgRtRe4pXvQqYrsA93YxXyEGxp4LGWM89Wizkm1RCEtU4vbDrnAjCVL8e8o5F9b1BwKSRRIiIdzbZyzPALpkGhQiBtqdDnFgoLHPN4IOsxZFnfSd0KCK/LO2tipGIYvdfodoCWo4SEjYr1Pp64P7PT4GXlkJ69SMb1ZddjIgTusHtoEccST+HCs40MmTtXxAChGmhOkvdlOcP51Akx1YFeS2FOe8hRvK0QICffxq4e0HvJlHuhwMMP74IZGjnC6e/V9f/i/mTIwSaBqkvQgio12RQ8Ix4AGP2tnwSffckbgBq6MI3VW6jQQlWxjQ2Hjf9KL14juwmFHoMN6BiH/djrPutRWsROEj2mJLdE2RWVod6+ztnRB4coXmHB/CwDB28wmuLqUsV+QUAtXHK5OKEKY2pCQFTYVGs2pdKawinw3lmDCeJmJdeXSgCeKhFlAxV/lu/o/weE66cFme8Kq61wjeYEdFBYumlORpKg7a4yZD+RvEceDYoxWGh/yYwK8bJrpfUFHDa+McKByNtaJ9CkhLm5Eg5bOryRjYMYdJODpAYaqP7AU8cK81WkuaHqurGbhTiPSlZO4cP7LCVDrfWxtgwjJnDt3XRCElz6QIRdqJA9Z9OBmZdCHOO0ItUoAJlF2H5s2DA3cGnAB9wt0hf9GxZSFy64yM118MlxIOJRX5HHz7FpsLLDBlT2362/d2k09Q6eum9V5oxSnIeqkMWHAy8JKPi8jVXDwtNlFw2SMSpmLUWzD/yBsLpgSF15MqeqtnNcmqsvSGy0QW+/GWHkIGZT8KHuAV/VCrD3GXt5mp83kfRSt91ACeiLw/vY+bciJpliRgjuCuDjyl5PkQ6A4SRx3TFj98qK3JJU1pcTue5yPFOpulJoDYO+yPgVtJw7/kgyOZbfZIj1DlaAOH13EUjJ1x+ZBMwVax69UGbUrkSVywUOzvK7w2AMVIWHJmRZly32/eX88zV5lLLuelm9Yard3os4Ley3Ltu7fX+WmGvzU3MV+U/cyG7XYZ2SHwY5A9RMf0+om8kWhZ+IN8sPzqxzzNuoAxI9SRjKYc0/mFSXnK6GqLz78aLxuexERpPpMUZHmZuP+nl04rmOy1abpBeE6qrX1MUR99wNvXbGRNCkHtpq53bHUodYT91NYSFA1D7PIY1OL4JBSDmbQqyxIX3ErbL28FKvLlrddo2QH55mdZI7unJWGI9kfAGli9LzO+NZhLwPR9l+F7LKWtfzGkIG9iT1bq7TVyH8eGSlCSCnz4CfeUCK76l+wJ2AAjui2kjY8I35rlPiyy1q1j/O6XkHzQCz9ICaJkoddnAnxHNpQty62PhJcA2SoNZqXOZrnsH/bAthMqHzz34CTZO9F6HZs48nEL3198hBy7aJBDkYhboCL/W/p5F0BsLXWiMEiAeP6J62lGAQ9SirzT2DznzTaNsaFy5RZuofzYj5qB/TK3yDhiLa1DZQs2GZOPSVDfEzuMaucFDMXqGlKqxeR/f+fckm0It3dWQawwtuuRgpWhHb1XBFseX8Kr2fmhh3Y20y2LZbQ20XSDO72Ioy/uaGHthoL7dzDgHGg5pRisM3x8YnVZAvrIGU1h3E3sFHMJB9KDcuNwmk1JVJ3CPHhQopruiJd15KhLFtV1A7KRNBw4TuRgbkVJ36OBGhoeB/acgxR7Jzqk4Zr9o9aAU4NhbHpu5AYBEBAKkTvSHJDfTolgF+rwPD9yJLmHkjvubKsHhp5TF3LTH2925d5nN1+Q6gd/8TwsEkYKKv671f15IVb/HQRozCkKHwMLemMMcjXbt2wfBw6yW0a3/Kp/oiWCmR1DyuD5jd+tY8+rCK2Vd0u8dld36f3LU1kIbjE6fc1KOLkI/xamKz52zmfGHHhR5nLFgniKTYf90rYVjQuSW0ZgbrjBHKSo+cph8WWv1GNZg5tKAPjCI8R2DraVPcePhAKkQLYwBmV5iNG6BeVsMRTzIGcovo1i1jKm2OOx+ovI2iOozj0WqC9KcWlO9pwDwIP7HDjZdPPLZSwGn5DzDsIzmgu11cDkexaxWov+fAeusmpMZSuudMnhMnACsWQFDSJLyQ21TnqBfoar4TYY1iqy8P7XlS2IiVDkGCxxwIZHFq9HGe19jfpslZjw/fWi5s6b1YTh+9BJB+rC7wj9E84mP31vNRnMxi2yg1/rEsnrYE3s3+/9CYGqtfYZZrd+/iPC605cHe2jwgo4JH4ijvTJ9MbtlVgk7PNroMAm89ZYZUJVo4xZhT+HBlc2KN75vmLwvYQBx1VMXxunfh5stClbw2blTOOPAqwB0mmoMFFffOQ3wS2qmgUFEPyVC/Ri1KbXJAQUtv6ffInlt28F7yv4sdvsI83mmB/s1w7REpykcUgFJzXvIT4uEL6hGBHRrh52CjUqManYl6fanpwHUeNCILhXVxebTnz6Cc+YpgWZ/EzSEQDPnaTlg8z2gKq4EGYxUcjx1ru7mJltbYzV+Si6KNFGpSEDuXSw3B9uQYjEpdzXARWivW2GMc+yWMuLufSaRJqFtEhGagS+Z5ggkqTJrd7DjhNfBodoszQQOhGSegmqAgwYlNuRoaTRr4CshSIHyFQqj7aLzOpOyeV24XhltLeRgeIpwJtDUA2PSTZtwiVS5ZywFz0hUXOa1uUw20O8un8dMik/m/KceJKbLrm/vSIkGyXWG0iXYA6yRVxFMci/Q9BrF4BjYCFrqLPfIg85EIugaArBS8dhza418HVoIv5N10YPNIa3JCC+XXdlA5cT8X0QnysBLxCQNaBe1sNfoakf4FZzRPpSzpkFOF3hZrihpftQg58o+jlqStu4X1sJ8oapnnzM9bOgr+uP/v0+Nb2dMVI4rVVSdohnSYPuX1b3BZdx6s2ftP8w52e5qdRvEu9DeefaD7gWpGLiuRwz5P4kPN6lBzfILv/TVdSL+E2U8VG8zCJfhLU+ik145w/i6kCkSf/cVe3vQUOhMeJUbFYwR/1fMvp28MjscyycOLNooQr/qx5hxJkZsxsTVK5uwm7bo5sZQjwL03Vpu69x48+5kO5SW+7hOetR6AAz8fBMWkdCorXIA1OIXBwjUST4MymrqqG48DdC+Myrsj6oQgl3ElvbQKeBr+f+uSBkVsdC7GvC4GPnOc20UnP5Amz1hPDq4mgAZ1JImNLN7mlsij3kfr0DTrRIhZTJVgletYYELpx87NunyggCOM5fKZ6jQPpo3X9E/OQOfEnrZPlhnBSqlopntyYa+3Rss6hO5fJdhvCaGL0NbfGM0ahmsOAgcJbJPdJNqZH9GgdjBZwnHJWjXwcoqo86nKmwXUWtH+IqbcGY/KLjgIOQ7090cvQlK245wSLvIZAtjrHHraKAsfczQXyTuLxNcYBnzH5edcnpwWv2qYeUTXgE61Zyamedv/4XDCgpQ/oxdL3tHGxbp6WmIIIJHB7MW2qDApGuyPBljaJjpzS3vVKpXopPkakwmI3N1EfyZf8sGSnMxHXFk+wfeGXJTxa4TaaOtf1bfDXsn4ePWsAVx+H9QK8fm6TfmBFCfHYfuik4eAVybn7+Iyes0pGlDYejw90Y60QzGZ1O3bJYRJ7Sap9k0XgePNW5gd6YGD00+KHXv99bA/NqEmK7Y4TXojpL3/riiZvBRkdNw7FsPwdQ3eOioLPz5HIhfklmCwD5H8VaY300yA7Z7+7H+aMl7hDbaivV8MhFJtY9FmqV+YDoTXtWt81R+2Z9T7vwyrEQKHPUKxnJggBxkQKVOsXWJrJI1aEw51kFhfRgUMzof3xQpeeG4TLAvWVmi8X6c/FwylKD8c7qvsJ87QBkR5NO8KPp50LR2CX5TNPoX4G8FgSmPJkFbzoygwjaEfcXn21kEoMouhG3CUXDFRqABFBcpYhBElzQOWEvOH7ClDciMiohP6fXZxaahmJD4PNncdtb4IITBB6S80JGnZ0TmWIDwqah7o0e2qQDI6XE162tfxn8qYrieZLxwkBsh+PrTZSU05HybO95vdzx9BKUT00OcS/itf0GmH50kM6gKWPCSC4izL0b5JHbNSHI9xkrwxN18Bb1Om23SM9jNelZvG+
vG0wuN0bm31AKSD50fhlpLatlNczayOZwnycjOSCtX+MHAvpfIHTPp8tuXLyLZa0UEn6dTxZNVKNplAaAIzX4vH/h7Y24K/rRfCTel/btY3QSyGnA2Ah3p59sGn42z7jS1jZswnKCBop1wLcreKm/VT5yWSL6t093N42qdxOjiXGY9H8DSHoEBCwHatv4gih2ncvBSbuV9tvB0StYLaBhhsNRZHGf5xxTUbFQTCY0HOqV/RC0buwd6EA/NdHFcW2IDYAAAQx02WNfc7ewJajQhslxtjs/46BRKPiGDmY7vANcbc3AZTmH4U4PaTtk+HUNnnoVZgRfdEhjPSwNV83OQYnZG5eUGnG8wcUjSw4ZLpJJWcEm2rq138btjzJnvzIu802nIuHSEv8GoxUaD/M7d8R4VnFQciBWgFQJ7jwnUncquAD39SIp5fedNfX3LkPpdLM1dG4LazwsovUOONAPs/ZjDWO3zRtQgijmPeisyLjkEjkkb/y7v4A6d9N0gGISvJRlglDrUmI+HrnQR0i+2lx9gv5nfJUOIfL2hvkOoH8nbrWfIdXqGo4vqlzshwI8RpwUAVG/Xclqb1MND5eUNNEGuBTN1Zm5iQghd7PMtwyUGSATB0isrMLohWKhwzpSE63zUbHwuNpoofQDccvTDipijRvtGjt3UksuIuA8yC9zIRjbP6US6813h0SfQdK/Wl3HtzBXFzHNiJsdCYGvowbIBS1RGQQVJr7COF6BON3HAnBzcoXc9YtaXo1xyGa5nwQG9qa2A5DJHSmui5UlYg/m/WgfO7zeXWIGwppXJXLXSWotikgSYmPsAqeKBxXJzcs7fRIK387RE7nY+bGFgt3f+mnhejn5hYyJ4lqRg/bQuyr8BTqMRpU5whBT0LlO5XuDLotxKnxQZvqjUkCwGSXT6Wm8YfG/VS/zXPxWtHaXnd7GddnLKz/NFPlngu2rXmboELKVFsHeeOAOCjudS3xRc7ZVeYEtGHEIoh55fOM8LxZSMOYDb3AZnWuTCOODUEZCQ+HH4YVk1+xPHVL2qhseOST7tYHfMTus5Av760UpI6mPkUPnFVpPR0tU/BjGu5S0xbiujSNyIymeMHpdpFLpoCecrn4vnE2qTT+qncyErKbXtKLKhnP2KO3fetAKJYypWSdEfXK8ZZNFaR1QQjrIqz4ylsZ+pf/pngJAv/CTFpXtIj+SeMBL0kTRo7NpsEzlq2h4san6n+d0Wx8gkxBY3mbQVE/h4QKZaLgL9OYDtw4aAgjKVc17I3g9fPS7wL9Ybggt3ql8Zz0550PaGaGlA4kL8dXSP1jflc144GEf/2VI3m+IlP1Yy490wMKXWnQOwpkZl5nidN0Ux4/7vSwkmmj0Rg1VLa9c/eutfQGpEyhp5Q4/gZ8HVqgh/AHgpodIjeqd/HDT5J7PQjsab6MlUNS/e3gRNb9wSVQlhMjBtzry9mPTXOQ+rTL+ZUiEAj/J3Kjy8oLQScev+T6VbfghV5rA4t1shcAbjcvXbViMv6I4mm0Gmf4GDrIQgJfsKsDfI7+EiuqVzC2wRA62NlZe+1nDpmzXEBRLiLI/qSKWY9apvOElMPB8eq3+T12Z5ofSBB0QkyLIXknuDrgHfrIaik6UMZlxYaJU0mjPdgeZkxjiQWjtKe5N+AHRWNaDe8+lNCEjsOL9TJRBOqieJ91KXoYpjL68fawnuJ1+f1oS6rnb31k1Vn2e6rdGTz5wY4HLAOvSSX+vuw/wBVk6cSh5Ct3bAFNvpimQbgv47GmODet/P6qaPUi4uc1HXkTlNXkgGC1M1/cAci/CI3q6yGwbrLO0l4YowMCemy67IuyXKd5m5jF4mV/8ILDfgN9PRLqDI2xIBxlSTolMoMqSm9DOCXk8QygYsDTvQAQwz9/8K1WFPEAnF2qdQ5OW7yIs8QqCXClJnHbDsvLnR6eQ/nx9Uw5rPjzBek2gzE+xUxDEM0BNI/lPeSjKDlOjNAfcATaTSGUPg/V5YGH1r3HeRnpTvkQsJZx60uJ8fs0dJIQa9nTDyJbsmOtPGtkgL6YQRYcEHxGjbpeuTpHb+o5gFJ5XuwYbT7flvL7zUr2hJwSFCcWqwNZbOEDDdGkhEyx+Nce+Rvy52H6iG0vEvitsnSGvOd38IJxgsiTnOJwt9KY5EugnRQcz3sGzC2zZA/Egikm7fPiBCcq101SSU48y08CVImOJjIi68JZsl+mCg3zrfFeS/9d+r3npL6DNhA9Fd5AbGXPbpfnrCY/Q3modPnQT9ERB2NJYIffLUh7zTzLzNVL9TK+d/VyP7R5mbnitENZSPBN8hOlhCuQ6Cc0/BHgxy/dYJRrAXWWvn1QI4i7vDfgU2g4xhoz/z05e3BrAQxjLQYZgwB1pnSdpE5SbS7rUCX9O1W1koyrL5qfIRVQEZbXf5b2OxlbVFnOZZmIBvfmHgsLm23N5Kcn3uPShtUoOLNmx9uxrWLU4oe7wb0vdYIJ1My7z6yPhCaWSXQWmp/GbiWa5ef8gCZDkceUvrDnRKr/vT2/PcAT/nCQ2Lv+klVArjGOuqMnPs0hJ+GcVmaCNLYhCRfSpqP216E1/7q2NMaulYjtmEP+aqAiIUquum+ik7ddKwRKY12x76o9RKzhsC/7TClXty68ktEtNAA4/f+vrxJEHSw9VuzWAaVM/QdA5NlwnW6zNvWDjlCcUsZeCR/N177h1TiqqdngqnIe3y8vjfT0G5SwBDURrvILeL2XRlPp+461g0DEkyTzWoCf54rEqvxEYwk570fNb6KMbPDU9tSedJou5kX8NOaGbcL3MkHYt0F0CdmTrIdBEq7ddFQH98R9iiRHma1POkl2Q4KtMtJrSD86IC71JG9Do+m6xcbkiX3OpGIiD8r9UcHWGQgSbjPMTC0ppU4uKobu4vqmd+Ax2Ma2xMXbOM0psTbOG8+C2dYUADbdIS6loKwZramHe2sDK0vCSc2ZM0c0GwDhRYYqenr+yAwy2v9kZ2Usw1Ry9/JnnGY2/OQpmCD9R6CbpkyS4s9ydKIeeB05I1+kmEnCONDKeNjNiWy0qXSNu4OwqvkTWOZe3IRdK2bunTj3HSnDjJLzVHK7dI1Yg1Gv2VoSB3DlTDy4eVAZm+l5LVtYgx2oebTuDz0UxdwObySDz9zfV4rqfLeF5uFRWZxK0zadMMM4iNveWZVGoUKdBVKWxsJ1VXJrnKCLkaDVHE3aNNXM/1hwW/ojjx4QQG8sYs+sD5HRZFfnPqER03Z6DvcugkNbwL6SI+tmMx1mj3OBmsEouTob1LsMrqK2in62qvluMBCEZan6xjA9kPloTQWj6Q6pM3aF+dc/phhsS5rEtsHwt/i10NqCUI9QB3fyZbAC2/fn7Deen5YbWtdxrfYNsH1RMrIYyTB5pSLWmQU1E48vV8WX3vvfFcr9wmQjZ9yiaR+MizvjaqksrsJsDhqsNctgVjV5H/C4Pnh/l+wqyPrxHdhlmdgTqgSnCBorZ0iscK6CPV6n73ac1ShCRaKdcwie75/9BmxwAtVvdHXnVOki8QCzw4RbN7lG0JnqILlqGC/0kESCRWMPZX0NqVxlrW+SOJJZxu2VkHrdIkboXEIvRIQ5D7zSF4HsNNf/oDFzeuxyC1ENbUv4dct00VNZ9PbPPMQIno3CsWc74wBHyKBIwOvMwnESuIMrAPmvBZl0LG5w5tO/wNpUpVRMfuqrvt+oIbOegGcYGiRjrImdCut6g/nPr1lbj9urLio9m6n7Du9L7Rk0DGEvWUKpDWkPaZrHBkpUwTA2A4y+nDAevQbUw6hJB8OtXHNZffp/dmHfYz/Ka36JIa9hEJORPVN3JDaNbCdLSz0ZiiOe8+DEBaWodLbhTtD9pLbaAX9x/pZkM5lAHJna/IoQDdaSIt2uIct9sd/U9dNml9Vf8AR48lFD3SZ7r/Chyl/NVfzI5juSbkaJx8C0dhd0XT/CSTpWUgORU9G8UNPEilN1+37MYPy8lu8lL62x8EJzeeknHx7ih8gE9QEzY2eDyrcevBp8vLz2/LDoK8skm6NX2h9m+wHfVWfQeGw95CeAksWysCV2nApRDqnA21+wPtdkp7ziVGlsZQSSg7tm
ryB9yq4TGVZgaHK6v0SXz6VdkvvXN9M7eUx16bvCMb5uSceLIaQ5D6XUW+X1SiuT3jRSlNbzB1FKMGBs6f5+cwjMeNTLfKB8lskBQfK5iwZ13awCY/nUjkHTft39gqnsaqsxWmhq8vkzuE/UjpwiUyZ/vc82EZwfLkikSP4/5bRUXEjcQ8NuQcFs+zOgGLxfTSfmVJVz9YcQ352hk6JLxOgxRHMNy2T12c8CX8slSimit9PNDdAFAPiqUJvBS6KA0xfyvQMYq0s0/5IEnOLUIFTtTr2ak48KH1GW5l5eLbCEH66WQz6qJ53S0F1rxbK1vYaFqEWD8zwdQe1N/6xOtfrjhD8s6ax/aN2FUJFWuEPua4l5AbDNAItwVwZxzMUZmH8tDgfIA4KyP322g1PMo7YHUG23vcgFadhXOXrmd8836FEz8v+ex6hMMTqSFKHKa0odKmhcUHjkCXjq7g11JUgn6tJvnb2gglRKt13jJN0BEWvNz4IpeMalyW7Dd3XW5eTN6+ozBM4GbHsdAXPU7bniu2hAwirwUiyoiCwEGMs0xPnDPcR3U+GeF5x9JR9PEz5L+xQfO8+Vmt9W1OCMTkx+R2oVPubwTwvtzkFSFH1MKkFJ8T7FVL1FGf0YJSE8J3/9WI+XTF/EWcAxzQWKk7/E5hCeipo+LTX7QsIEE2COWb2zTXnZtkFOrKZyaYzfC3mZNmh48F5JzFt3MP2aI/ZrN5kIo901Oa7cAxcQ6iBxVQTON42qbkBVJj6ar1HYeDy0r8unRBwy8+tu3jCWKiXpWvvMjxcWmJYsAE01dle2jl/VqiAAErXeaPIA8U+ACYrrlNY0oYR8eR8i80aZWAXTmpqdfdglBH9itftDoJ8qSkXnrJOWqOpFkNm4UMv/caAp/jZlJkHyb3RCZ5jFbD5Ky4u7sXocOvryND9DQ+f+kOjJkCXws1U3tyn10xBT2PgANQnF5ED5Zpja2FH63cH/9vb3+L2fvFmKzhXyRSysHVqYlXf316skT00vvcPiMvr2IGgA5tKslp1zRkW3Q1gHp4F5IYvD6nqR1cneNUlFeDwLbPjGbAGtpF1ZXD88HRXRakRd7UjgKLTxdvBIYuvk+MB9UhSo85kHFhwExy0eS34Ys7ScM9cQC264uIdjXp0dQkHZfGXytlKlzCiA+z3YDvqrH692Bd4NWLPFp0+t5JfqwGJOkm9/YHDeRjvINFbaJycA+e7+Z1PUjuM36yPVb7Dmha1KmkcstopPc2UiXZz2yIwGCdABmzwRq+6ye/K7plsrB5wHjJtB5HGL41+k8ekbvzWfX29oWEMXT50mptPzzauIstbep4WQk1pZPkmlkmcjGUOYAwuOQ9CjXWsM7dS5x/WsQ5wDq+8dKboeqjLyCMD3UbyMdi+h3bLsnDAh/WPsrWlfaYh70NX3i8J8OtcwxY8bGGlSu/SwfZMJpw0bxQsIXhPg87UK9YipBSFYM9TFSAstH0MM+UWT6jxvibkOQiFTNDXpfFzfitp1MAzpe8d43q5TePb40RN62urgCFpzKG1O/gbdYuf3H2fITxZu2BTBJ0M72Mvb7hsB1jHtSLDceAuQacNAZIIfCEKsvykuofTtvP2zJh0KdMZj5FzflKfEfesB3DyCz0WRpcCc1c68Y8FhdU+/Ppm4tp8PO27/MS8+ck9Y8Av5G7sXE67STIIvp+I+9d+tulN4zO49o4o5ShRfU8BwN0zjtou16Ei7z2u7xluGkVk2kxq9CwY2S0uIMcPFdTx5QCeXc2Ei80HKRa/LC7qNIF6IAvoPhC+grdBSE0+K+3fXohZa4f6aey61VsDikkLccZHzjk2SfK/dtkXnPeNkYmq+lhaO9UsgAOQnZdezGE2mg89lzh2OIxAlFYZjkQim74JA0bfXgzVenBi0QAisgr2srsoshXUxhAzyd42Rqy/niQuesQfhe8vdlPrRyxb1s+ujtpAjW2Mru3ezkp0KjVXNK0XnB9kMwX+Rxh+OCfczjzH76Djh1nw4t8bIFx92mUYjKfBJRwJ2fjcnTWLrVif71KsoGBkiSLUO4Q7p6j/kBvqMFRvH97o5TQACp/l4DAPpIU0tJdWa2AH5iAxf7ufadWX/r7shwoSAQPiaXRmGHV5equ4DZ77nzIvDCyCSS15GfP+ARaPr7+rhUY4RAWKB26QEos/+rxBwZtgLD7F+6r8v0xar3Ot9J8R7T02jf77XrjB11fQIkB7aVk326zGdpo1VsWlN+nsrj0cQfZ5E5Tnn05cKXPfafk4Zv0pAHME9CADmCVShdTVv9iTw/8ov8uxyB4Rhb9svz/oQMlc7fC00/CsKgjNU7dAu1hCQwaeixKWYd0z/lAIh+MCSls0prrq92rBfc0EyTTIrLTaETIjQvp6asmSXOLWkcAyEn4eomWnpVqapSSdfQkMQnhMNXjRVUDCKgA1otv9psLf4iOZ0BXJAwSCLcK6r4J5s7R2I9Jtl02aru80Mh3uzi5VF4LKrZfHFqukTaUF18IFIbYIWZfK0c+hdm1CMT1vCA/I/cwn0zVbKaAi3+2z1XJf+nctc52quYs4Oh3w2iLXP8/dqjy7FiOsmVcwtmxr8DQ674TAfu5yjJXVm/eLdLrzT9MM67AreUoXyGKbYmQtN6gB5D/IXtWF8mHxgaZvFmLJvTZ2x68l1EKZPI9IWs9r7Oz8lF4723tJatNQa0bhxcsVBvCAaIBLctLmKP3nuin4ibr1al/zAd9YgqiBDt+EKQnXCqgwGPnb5uYFzEYSD1Pf6UNIuj9Zlc+3/fMlJCE5n/j19IA5HwGqjF1mHWUIR2H94mS/kxOsAbYajYqueqpLEsBh9sa5KBYsXS6exW/VT1oUIIRtdpPzEC75ycnrBCkhEay1/nkCFwz1bm8k6XTtlKgftYxGT/iNo07iNPuai70Dv/2NO/zw26dXnZzqWt41Tv4Y0AYQjcmgyCaJ9WybPuLrpQ5AiNbwwzturUJKhFVi3GZvVmAcoSPRloNn5f6InYFIley0jDEICTcCQsC7EadPx6LE2TWTaxFgotdcS//TH6ylLBvMoKM6ZIrKWGEgVP/0FoLImVRw3Hm7Is5L0mK/CflH8aGiIXkINyecVB9Jk6jo+ayTEu//OtgflJdK1z9T66UqrsGSsd0usij8XAFpy1+ls6gko7mdN0OBH+MadQYNGzdzrwto4s+c88uyhH3EHfLHe8ePt21iTmTbckV6qD9mPxhRh34I2NCziFQ8OpyOU/UsdX8NyL5xZg7FhCbJG8pzjCNSqJSOBrd+d5t8ZiGC4+GC+U8nUpGlweJziRV+owNjw5kLTW92GaESsmCaeqTcTeMr47kcMKDQ3ylwcCJOQB5GUOto+oJp+ejUsUcoWJ9N3D209gS7Kh8YqxAKe9KktKhIj4nECa0hvXtewo/16ULMkeHLmsHmwBigsw8VT0H62S2QBF9AFwTVDDKRbMndpM4UU5t2V35oF+qPFWLkar9I1JfUo71YOvh/FLkE2dZoiTNZxKjmmINNfzmrqYF6GWusUqoS12fgICEW4kRz+b0pp9KA1P8N3j9ML3fq1br5G2u+7pGHZFj9sVLZAqhh7DqX2WkErNO0BtxrX+vofIMVchnokJFcSxAhJ6O7IGywZFgNTPcaOIqAlzy9+YOTvuHUJM8gy+WEczl6IIQ1n8KE7SkYnBL5nbz0fBbn3/8k6GGVJvAscnYHP+YC9PapbTOW8NwRDWxflcq53Wh1EeGpFNWOftXWdXRZFOXdb89it7sM7VgRDlG1XtwiJg/YyoLaRis3D3XIjj/xz4gSVSXUadNAWkST55rSLsWz+143QsBIjnjDuTwmWatFuJEdDDf3vQpHu7TJYQaKGmxRL4pwLHa6oiKMSTjiNFes6DTmQ9fWnXm4Jd9lSwVD2MMstbp76o2/BZaWQ8gmBn1jc6dwDFXG9dRZrwg/9QeEOj00f9LeepdSMBSjM1mUiWhNZcGW47GIJHbns/2sfQR0ucvrWgr45aAXXa8Z793CHxlZitt4Edy9uYK2kTFxu6j8dCSbKPJSEo7v+S5Gb+UoPu9VGHWjTbGLoQ9Gvz6Ff2ET599n2XOc0
lfEXQmagUwCpSG27a4dQ3cZaAZ5SpEHyK9q7byuOd4UGwDgsa0LdAjobSTziK0SG0XcLegtiI9i8K2NbbxFDAC/FrDHBQihCzMVO0TwHw3kslY/FM8iPZNBTxPraLkSEfJ/hX1weCApOqdheQwhUo+rZ/MFMrNx34FiflOeAL8xtmgmbL+DR/tVqgsalHe8BbKbjLqukXhMrT3x0ZYpBSnc2/YTKphtt6ebFiFC+r5i+HZxmWMak+Y7/JWmGS0Q01b2zS3d9XB4oV8MXop/tMidqIrB2JsaXE4Rudw5M+EY5387Ada6GoxHLnvqDVk2kBB8gfgdrDLfIIVIghNp0hFApMonTzO0ZtH4wMufosyAeLOUOhD+T8We35I3jTLM+0XcnNVHdZa8TtnBYLgdDSLZZupg9WHCNrS8az7GwhLZD2MTotTZa5gd6kuonN+K71gJSBotEWgWqzOLet6fzWwpup2WsKBG0ZsQKxz0XgxMhOu1X8Yck08w5lfVtZhcKrvI4+7Ia4jktHpE352Q3zsmCEYh34pyaAz/Zo0EeLsiDLQU/K4+2ee3nVfNHamsc86KuBcxIZOK3kqgamHgzSGjlvGqC+PMehMfIQJEeh2qoDPKDPbHgu/kT+kE4bZ4kmIZnF4/faO3TicpRxyF+9NqJX1gIB61mD28q0pGs6qk0Jy+E8Q76NmAyz89iDHeV/mLAFaqHbN/YAVbDlfBzHVZDyQoY7/GXasq/WrCnDrRIQIRkqQP2utO6dkmQ6BqfeEx5H8mriG7U0Fq2gK3juO+PDaRo8l5Mze9sD5vpKrmuv7TmXyhOsM5IuszGp4M+Hc8kj7uoaIqTdGNU7616ix7Aw3DBEtAFFUzQWUHAEIm1NAhClRsozbkmixnkyTGuvWhpwDeE5hG/YJofY4T0oIP5DoLiJku0izwyg5oy3ilUlcnCkhBNievdxw5OZj1OzcwV+myoKJqy3mAcgPhDHhb7omP52Rk8g3/tUwx+5QedobAQT8iwrttE8cEFOfoLSzmf8ubfd1IuaO3UMu5UJTXrdXDyWGNtHz5OfWXNPyW/AjazjfAZab2hzlmhXKT126caRLx6mKvph3M+D85bJuERszchYVcosWMg53qSseACEyDyh/Mw3u3T0M55g0rD9fFiNck/ypLpFLAryX1/msf1BtKmHZDjaWlW/VuXxiWPWQMaYLB9zasN8+eyg3G2ZkQ3q10o1r8TTsOApvdVY24TeSUSrpYwLx9YudRf2NH6l2e/Zlz2doxw2ZhmHiKPUGbENOMEbkhhOeK8vxOICnqAgnQhmFZ22wWEA7ltvr0vWMKNBn3g0i6/kfz6hsZLBuK1/gVBy3ywrSOkE8aDc4i5ykcfZxPr7mr/O5z+nOTDbm4k2gqxJtgSj8HAvyH8uXXkX8Fs/qYLyxfTg6TIO17GhbNIrZkRyZS3Jyos8zEv00NFVnHQAyf7wuVHQuhRVwd7O7Dh50e5Tb13KCVC0Z6+8KVe+wuZ7w4CgTuR8Gj9+XMijNecke7gWV0mKz8mxeHF/KKYIxxVPCdUhoJE5eSPDKug/GStfeWchQQKjhJcFypZZSCIZGEQ9i8ntv2Il+UsgimEVqbe/mtm6zmekolNQnsVaxPTTosyy2qg3jBFDu92UJJNWcZOe3brHDAYzMdkfFdchqeWySuLIrFmlrM11UO16KWyynssO+pUZMcCk3jDVF3iGc6haCfaTxN72/72qgGkQEEFuHqfSiQjTc2qiro1++rCWucFM9pVXAyXUjAclCXMJrfWNUjjZa5lnCRSJiwomtSITDR5RrN/zTKnqpgEIJUFssAlDRiyTtwpoeFczp/GeZrKV/eAPCzlB3vS9YXGAJk8L7mRljgmXetz8u5iEnLGnVSlCV2h2hXI/OFQIUf8xjP873Vb/3YGt2g0THJY1baxDrF5Nr8CvUKPI3rbmmX8VhUQ7xqlYDazD60aIsR5VOvcswV0+4vXItBk0jamDvpfvkOwQECz9zQMiPdGJsrF8AD1atlBiaj0D/zaRasd3sz/bg8kwkboWYF1/g2bL56itTAIc2LcCcKvXEaJARZ1Y0YxhK5UwOvyLSDurB3gRsd+NUNqelDeWjQsmKw5i+JgBfFlOGpLZMAykGz+fdV4lljJsKoY87K/7iBu+uJRSHxhYt/e9ObgRXS786VRjVLN7mtJcMLYpwP/FR0N+9IZHKVTRy05F4uiMs8J+YPVExaaajtcmfJqIsrFMq8gqamjmSWfDKZPOYB7RqLdEdfMuNFKzhoVmann9CuuCwWGviudwV/i0B2HOQ4r7EVH1F8GZEiISHd1RPxeIqWq5M4GwCW6c7JFKrrINNta9aEDkf9Ezsnkk/R11lCsAr7Ljo1Uxc+H1sCJGpXkCSduqY2b2Zjawfsi8IBvXbeq/Ma+RhDQyNjCXMYObEfcJQKuJ1Q87AxNv8pS32Cb8ekAWlDH1ZCRCUtzXQbDD8QQdpgx+9QeSYix7Lbr7kYxGa15gxuGfyl4qM82ewzynO3UMMQ7UWL1GZX+jbd8crEzOTOCTKBt5ph+RDPy54baq3ycuew23E6F2dFmI7CECkQT6FBDghq6PH1Jw/1S3p82nDpHnGnfw1Mn0aMu58ytwGYr+Uh9ItHDVJuGIUZjNwCXkyPGjXf/irylcNbtyH/rxO1aSTlp7MNGEgH7u30XYTiQaYCBfK9N9SYueIo4mOT6/3mN16veFkoiSW874qn3a2jquC5PcPN9Tr6000q9S/GP0zO2Vk6e6GER2dQvH/JHcX9jzWuTmCEMvKfyp30jm0eLE61zoAMy/3bW84+gatieloUmmITT0TJo1zL6Mi4Avi/SH7cQ+TFM8HV5kANkqVas1pzmtdREW/5Yvwuk6H6LrERQXz6B/zOizffFUkd5UWH8oQcMHcO+0ydajkVyVigLsqpx9e9RuOLS5nA/u5uTGKyB0Jd2I4o7u73YR+GfW0H4Hs6v9vYr3H3ky/VyPKQacd06XlqKKhE9zVu0Pkn5jy3VE+IIQyk7SmroUShTiVroIlPvcb83mLWAvg15cmEXylJJFZKpVMt4M9N5lAPzPVvDLQqzuAqAeDOvSU/1CHJHtxSLkYXhRTFJ9987a+udl6mnc/B6yVnfiTRvIMWDh/eIi7/jEkoFy6G25iuoF3VVX8iZaN1FNo89MPjJJsBIhuJJ3/QngFciktTCmwMq0C8XoFJdTeERL0iA1YGNctite3n4/KvXc/IvrTFR4vrqRWhJtqhAuTcJ91k2GMRDQ3SG9+enbigYGTHftGR7w5PzMU9xT2VyQ3WafZ4hY30K/IPPtkAgE7Ai3shcFGmn2I+d2T1XDhQLwZb1uJk8AWDUCklX8otRG4ydQPPn/OVjAegr2DN6tRY77JOyOHCkzRO2Ggfqtz1AICeziZSZhIc0EbNipCnPCujPpUdaJBEB0Sc6Pb6RFy/T0jYk0goyvP+6n0PGffZ+19kSqOvlrr8fv1CBvFiRuCKueEV9UvlTFsLbdiQBxjIZzZiskAB9VD/CSHte/FWgZVoD15kgOh04WYLq06Ea40Ri7yBOS67eyhmnUItEFR+tVrBvD9wg4j/Aglb6XYaWcitH2YISn1e45Q62Gbrb7M6mSwvfSJLECZFaZOrvcbqX2YLIzerOkpDA2PXje/er1VKbs5zC2RsL+Opnq/dZvYdobr+36cEoXwen66P3y6iaUlrL9Re5a5zxeQ3odGK057/8C+AyynDu0gDkvW9+sZY1lwX+Upd5+w0zwkW1aWXREP1VDBn8A4CkrzmC+idgiFtpobkouNyDsZ3RiO5qzKbGC6zcNeXR0aWkQi/Lbmh8PAkZK8ZxyNFZDcTeBjs2jstq0HQzVKlWlrhSFRp6ty9ePhvn9zgVBv3Zh2iO1ztklT/HezO/zvM1JQ4ItLTYlhI/KbFXQqfODdocZlApfhbAdSlfTQ5bm77iJ/dKKtWW5R0SzY9GLzjG1Bwndv/89jodsq4BTmXS9sLt3PlwQ8I49gCtAWWPiaNfQrfE3VgMQ1mlhwdEt8rs/ijw1xW5vB0V4dn+ocaV6kCHykdYIQDNH4DI5rpJhHL2j9QxP0Fu
a4fa0fMGROhBaeI+F3GyXTIard3VCtONDW3Omqe8RxrHrt9b+NB2Iv0Soyrc0Ww2TmABMEp4IJhFKIBuGj+R8I6fM4mHhmDTqClSDoBa7BZ+4LYEjtxvl0ODs2uNxOmBW1yR0iTxFh8eq2xerEdSuuLGIApiKPiKyJgQXHEFJcPLl2urilpHHvw+aoB0+N0FxW9QmYScTqSBTwUA8dZceHH6nZs5GhU9BQ1xh9BBum3oXgLD420fN1IAxI0klPO/PR4SiItxl9cGGtjIhcXblcfOwIJg3REdTo5tDZXyWmWTh7eCOKGvbbrzaMh26iqI8PijbNZhpinmZ44mEwSkY+SzMRi4YQXFrOEWfzRVx3bSeGsQFOjFh2FSQ97ls0HdPHC9cs3zNueZWGlvTDNtK8SLZTB/+B9ZuCaIZwr93kiRf7oLJbXhBoZzKNMKL2lelkPDzKRXI8U5KiAjKvp8YK/zg/nO9eemhZE+5g9RPwqvlm2pe8kkiDrI7gRwPL0EuxYR47x3+fMf0d5M4Vl+VJVLPIh+epvsA53wvBPzX+4qJt9DKUG3nJXwkJMhTdyrQrCTgEASwjN80i8fOgCtBRQnXZP/J3zzwPbgOJDZQErWudppzE1qYxVQiFJr7aR2ly3QoVXkneQLI2pZHi5btbXco3YajVobI3FKBDtI+V7oL+M8fzU53KuV2aXV3Zq51LGjz0yJ/UqDn4yPpb61jKx7nfvjhyhfBLY9rJmmPkOHa3cXE6p+pWMTq3WwmUYpFEyYgQl41GaDoU6iLRmgy+oVbUiW5qUICO1o1qmZaZr5XhQPBfcCOkGfxuOOXsOtTrfWOWc4MZnLoYNhWhVaMm72eMmRaAMTIEdUD+kS728/67w06M5Rap1szOsFaC1W5zXrWAzT4MTQxTfUObDc3Ftt9nj/OBslkD7/xoPwIRYTVqd4nm9KqI9l5WOFy8Sj0cDEpOgQEHVQXnTaHE7LknVX8phy9aFRcGLQoF8JwKJi/iMbnnkrwSdRVFT/1+eJjeys28f7ZjViocg9m8/oPWWOfPD058zyjb1Ux8rdaGoeYrEJa4JSF4lF+lnazep41N9hi154i4+mfqo3GQJ74XJBWHAZGqab4P0GV9TZLco0REluyLJ2gt93H7SOb9X7+2sIZOJty+Q4u35gH0GynQ3GoSZ+yu23U7Oz8xltB4LQ1617+wn5SLmzO5+Y0Gb3WnJZPk8l50rtsKqthVRCXF61RcT04ivq2esZdY1WJt6IMVKMR/5WcGXhLeq+5SZtUogiRRqD/DX8XMusm25UzFCGV7Zi4RradXYcEbTSXk2ca8+SxYDyvZfH0h1BoScG86zzL6OHV+wHuWXYBwx2dn3DvTGeE4DtxFq1om20oXhQyTABPWGALGsG+Lki2Sc60MRZbJocAFIelLIVCs1wkUn92UZaXB+4AxWEqIi1ZTGRpON1kFF76i7TN/PndBUwt6574jhJfkMMCdp7Zlx9IegSGIerTxLXq770wOHbqHSL+2/bFkKydYqL9iRvuh5eEYntgLJ0ju7TfrphalgmFPA70fbre/fY0cd6dhc4eKEsuF4E3A6N4l+VUgOPkjzaDNjaYcaIhQztM4UTd6uEMdU1JZWFyz93n8vOFP1/xQVwCzqLAhiuY6xvT+MnaYoUacTMxLmuCVrJTxAIHT548Eiu+6LhU+VZSxAd7+Mcg+E3ID8AvdtGjpLWmm3WO3wqfcZTkG5w7NSEbOS6MraPdUmCvzoLQj2d86argBx1Y1aCAR4Aj8w+GqzWhhd2fYW4e4xAJnQHkOHnyRRThINHNbKnuC69evlROmv9hgjBJGx50VgNHoI3u43eroF0JCgaZMPcUppSaVzojxZG9LicUY67d7YyRVqF0Scr5YyhmfxlYOKbpH9QpVMqGMcF+cro5d+cV6Ulzslapx4atBqzkADn4+W7KSLaw5iT1gcbl417BNyQ78nics4lAcjetzFnxe5IjbXDdGOxb6GBScuKE+yXOqPpla2uXotaMEuZcNRgqh3c42IT1djilgy997cF0iXdw8cAPS8f4tcYD4oxZ1ao8lE3KWzTBFORofYr2YUn7N3MY34HOFvtrRS5PcJ2GEjadf4UiE+jmyqKARlHo2FPdDiqIIRSIvJUa+uwci9RnubqppMo7iOGeAjErbeyd3HWv1qQIaWMFeR34X2he2lgzLj/tqQhkXoJPNdTyWbtbqWzvmS+k30azrxB3tYrNFjOSG4j0/Bbo+QL7dYO/l9pOgtxiB1NyGExCKHA2rtEHr7ZfbYAxCSbiv+qx1rjDwWVDLZb6OZKiNY+2oj0vcIrnhgz25cDANwsVWnmQ9Wvoxwg5OB3tiBqUGvJcmQdCGBPlhFn0IzW0JWc/452X+e2Dd8rBY1KznTsjK8dc8vn65lKP7kn70WdOZ9bgRJW5IZ1shb4WDMENYnL2xm+xcB93eaqj9OkK0d0HqMyaDGaiAiL120cASaRiNZPOk+H3VCNkIICRtGNhqsLWGCiJvXlyVa2UHtd5qMk2njRSGcIIa6FQBP0ITV/6nYbYQZogLXWZkOS5KHJtAYhbpHZ0pobDTWiuuZJFofE3HQjgL1c/+8kzc3zzlCt/IdSQkejP7NOY9ozR5HpRzDuXvsKaiBTkA/AlAXqDRO+kegsWOzjNZlLwL9c5WMTu6Do3I8rXy5Dfu5jvNQBH41TgU0oDgkzh72LeIeDljqfs8FkWLU5AyFszcQpCP3S+k2FToipcup82r1yI65CvmOher3ozveRbT2jC8IDIZlwGvb7jKx3/kBxfIf1yKKa+paMqY+vZl7piWjfgQehISib0z+zbIfS4vdVEUgDsF3icyl0ciyxAYRHPQuOrsS/eyrk/xWhh7zxUWK4xaSPytwkPPVKX8MZbN/FNkqHpoaZM0yTtIByuDzwNan1sjEqJeZlMnrMfMvxb94hr5UV20l78jG4376zDnxoooG3oRjg2bp6NPRIgSMEjC3yhcYqbN8VfLWwHsBtSaprODR9OFiBVOM2l+Ujhyj5aI9z/es/E9pm2lY5egKitbCyojf7J2JK/ei2Z5lNRd2AjyymLns2oAPzKfiTej8fnDYqs4oX7jvOwvFYg/laJ5uUSfqN70zGoeTRe08BVTv0OqefIKe6Bks4mZN0CBfEC9ex7QiXP9PcZghSLdw4+LX68DCl0sUp/IX9TFa0e4ct60nS+Klk/CiOIR0Sj22X5TIAk7krf1e34PJPbcypj6/37jC6k2FRwtPdqIyeshnQoFh0grvfJqiHBI5AzW5ByzX5xH3cXXVVIQ9lAfZxP/unWih79uKyz1Kk9FimiaDIRMQZ8rjrIJpj2cYsWcgh6nR8jMdKy5OdiAwofFQDWTMQtWd9Bp143y54gH14Bwh1VsLxbYEg7yuvy2ZeCSNVEI+EZXz/ep1hGDO1RZOHU4JgMEYGGtWHnbJVspCnA5QiLfV7FIxTGKGCPBShHtbAPzf0oYxgkKmsOZALuWMvcOkhsJAsbtXsCYV02WpEHvHZ9x5M78fq/NjsTomIEV7i0KUvMh0NgDpXTeMGOesqS10nA6Ebcd9e5wzkorcm2c4lykgzcfeWkdNMamg2Q5XtzwZNatgQ59InDFZDfRh+/LPsc7m2U1DBMxOowYXc9/RN1jc9V8UgmAg7QEARWDZk7g+6iSStaaR7aSXec4CVnVUFZjoomnFCj4lEskKHN4jfyCTbXdW3tuFwFPvxQL7O+t/Q6Ie8cPy2zqs1R2ZC3auiXo0I+dQuI4miFtLYzQXwJkfS3rTLEMBu0ZEETSf/ja3dMTQdE/vS/C3PqcVGvi2yU0PU6t1USVZyJdk+N4PB2b39Y73IyHDnWtWeycZ3s6SZcLhMl34MeqwstIKRCwpeuDRVvIMo0Ji37EU12HdFGB04A7Gdk9MXVxRAlQLSkm9b6y988EfyPo6huB5qiSWzHoziXRMNZDSjxNm214PlCpcFolh6CT84DEJ63zTV3nLH2dErFI4f3gSBVe/DU0/9WLCzIChwuV5SSZEuAb60mAZhJMpYZ5wdGNX3jG+TrhFYVMErARgCbxFpbBAtBBjJ04rFPj2cUQpZ
G4NEO3aDFl4X/CY5DSq7qZgm/dorKYa4ioxHClqW8cKh4gsTzQ1QQuviZV9+xYDwwinzkzINTrQGaoBEtuwxu58f5j50gy/gdc78zepLq+4XkCqgjJJFuqz4e245RHqjlT/PJ37Vs+CT2B6vAHZwlMSTG3KdA4ifT92BgT2sifGCHIuOUIaCu7gq9YRQ5GWX1QhrKOyIsPoTVGkOOF1gglnRYSY+EPRGUJQAUlxRT0R7sH4gz774HrKVWIasXytabzpYU3cZEyAQfzJ7lF/v2OedkON6Io6rlj5Wlf1nlIbf4f5Oe3itEVXZgy/xOm/Dye+AG2ZOGH5TMjwjd5QiyTzdcOh4h9FPJgqPDHUHsWpfnIQeniYCpGWyionKmoAveLcuZxtOxymRs0Dgxz2LCVY4gVXcPlOeZqCu3840hZK6AaB/AIb/CrHcMLhM3a5FWr86uNfS3l8/delHfnsJHZltAYU0Z0XGy8kEasb/EPd/W3ykGoKReaPAGaGYDIDWlOpDcCSQYfDy4NPtiOMYRWBV/L/8SExkwkBoyROnIAhY1lQZdLKePIPZXZfFyz0Xg0mpthxF3U6sFrn2Fj2RzD/A75QFsSZfijTgddslTSEZE//2HTUVIuger9YOUk6BP6Ey0bqwa4l8vZcAwgQ40d484anj+tf1/tKkcZwElCF7ybF/1/RfqjHoOT1NBg6EZ3nM4XsGkZNLNIuN90IclCZVsRwcmlktIBx57Ss7y1r20IGND5BszdpqxTZqYgalo1U7M66KoFWfaogxhNR1NRD1hH/EWpSgwUg8gQ61AASPv6S0xxFJjeFlipdyXSw82kjRKHvij/ynb2DReg9spz/lOgnOCWHrBkNSMa4G76JkX/jIW1x06p4PeClwav4V5dEXVfZSTnjLiT7YsSGw12nlI8XhYxR0lCERVPIEGn4MjEOYPZYf5rlnyji/6Y+ayN2CZx95wYtSWkbhXUKJQuGSl0+EeyoytV42sVSjBM0ZNCA2zXhQe3Qae0d3zKLZ3W1u8d9Kfqac3YfOEOp5RdwpEdZweUhhc34ENmCZbOEtYA7o7kZXgDFLvYjsj1II1VwrwCnbWIv6VVksmwwtbhdisxVtk3BiHN+l5XBrAX3IgPLaHFOPGRkMqHqJuCo8Zq6TZWKVRTkbkC1TFRJA5+iTHmdoKJ2PyAlMHdISHLSzD8gXgL1dj9D+yJetjfEFNIMEjf0ULncLiRnAGqpylbQQkc3DZXWkdGneJtskEjkSUCrwYe3ysXYe8f5Fsq3z1qI4EqoQrihipZq9i3oSFpUhyHanb92hWKr7QFIrXiKhDHXISHKFZfTffRLz/HQHJ8ghc30w6QU0k0fp2AT4Sfq/jmEAJUhvYFwp4HPOsNOgxMxufugFfFcnf/ADDaI63mMjO2yMkqGqfED+TA8tH2HkyqIS1TlLrSQ20EJV+kvGjbcKe+Njm+N7rHf702zk9DWBXyCP9gmH3kwaC3Fi09D54QuE5edk+mGGrZ4ORx+1KuclEDADzEHLYq0Pj9sm4C75BkIsg13Wm1IC+DIQI2VNg8yaTTVYZQwGh+Mh19Bj66CcZYu6piL/RetjnOWrSlHDJevFfmqX8nMGoG/kAr/IzmcR80PrWdnTYGv81kVTnwUbPPbn+FykU0Ck/te5xyMX4guoP90O+LR8IWNO5aUclrFL+fsPAJWcw+CtYju7JmRwILQ6P8m6uU0FAuFECoJ4hLwEUoAJA7SaGzGweEjro/XqOt8YJ7M1VYe+9/dUBQq1RrDiDII+yRgHMAVec53ftVRm2tXYYb3M0eVvX7DpfgglIOkM4GtaNwbV1gAZXnaXfchdx/xsAUpNSQlRm/4qos/gMxYLwoEHWXukh6LZPoRwJU2D4ltsxAWlkrRv7l4fDlPZy7A4Ko6QhH1a0WjvrmX8zpsz0mVJTxQEDEdPNHJVtFHxJBlqqj/hqr1x7nza7yl+H21w7575g+XbZ7C7c5ursb/pwYUhwUNZpyucPUWVsNKodjWXSwHCRZq0xoQtNBzNcwS9lSDrxDF3J5I0zT/G35nji/P6RiTjqVD18ZUpp44/8mwrQJtBHwC7Dh6vPbKKL4TYRQxSo9NudMvspSk2wqJ2FiRQyZ1/grq1x4JzpEM9cFwlo3HFnk0+N2I4tDOpHgZ0OLhfUEz2sf+XH2L0IFOUGbF4rxF2Dh+cS9cHLTUoJD6WHEFq3vVkCfngqS0cNhctD3gjELDsO4yGExndKMkHD8CuSJRj9fDy37MzRdL/lkGPcRkWFfPeFeV4+rgXLuI/GlPOal2TPwN//o/ItL9mXVPYSM+CXq5FA0I4DXT8uHETL65Fnq0kAKXxHhWNgilB+M++Y0JNjKP8HyUPqQL8xY9C9OtTUGJS7S7pS79U4jkq9KoJiFoJ/48YlENVmA82mj9oLkMfLvwajkY6wIiMzKqxMY4M7F7L075WZj5K9dOxedY2bJ+8AD11bQXiqOVG0tcTsGg1hQGhjkR03V+VcvEqeitc9Yfr5AmeIuBSZ/6OVpovFw2i9kG50kG4m07fzqhfwFw/C/UKS0BzTRgcbxI0FT6m6bYdNaZJw5b9VzuZhhQ4Uop/jzBADmiEatFTBxWldyS8hNNwwdJzH1xnabgUwz7hJlliN0Bt8IoD0s2bfeyStLU5t6+CyRfzwaR1wzQ1hrVjz1GoBFkIy1lX32A2Ti912cvma9bE3shWJzgnKtYAakYd+p39hQ7cvt2tRgD79I1IXJQSG1Uck4518yUGUH5VJ60mVBFGuqa7Qi3IAGjdKIbZpO59oMiWgVyen9MhyRCZ7EUnE3L57Hf8NaIT+hjA4RASsLxznjl9nI0Kz83UGh4L4ypZyycB0HjyFT/n37sRYbb2pd+zBysBmJ/j9kstxbkOqniU15FyGAW/VAOZMgCGVIj/Y9RY2WJo92L6ukLjIP/5pmylL3TKLn9Td8qmAFSwycZAtRVr9boLqNavkcWGYiOVGjpKj1JEFXJnvBRHXrmQyNfV1TKs9Cv+lcGqK23qFdPtLJZDlpidPlzATqAwnN0ip8Az+tcBiW+QNgQ71ztbcvlR55Hr2nIQdluXosPu15wHxRcvPDk5zGH+0gYUYAgAjP+fHM3ieRdb71El3cbQUuyXJCfATa5AMKnF2hBm4cLJ35xTCDn2EJn1mbr5URm0l/nE7+PH/ytOk9roah5RWrJd22wrukn3yB2DqiykOzkaK8cDzyKD8rOfBP5aR8MEErwN6weidlRsZqN9ZfOaEAxz5HaN5B/BMKdBlO+UTj7x7RZ+rwb7y590DStwzqWWdGOXjIw9IZ/OUY3g+QlGzXgIxyHLZec1vY4W9jh3RIsb3pCX60B0sDyTpam1ftJrDxtyEAsIAI851wdLtzKw0eKd7vbbr2+L7RXbn6BYffr3b9W1nSz892Llz3GDTPwOb0JYS5dxZxXMSVUkr0eK72IN8VlnAYqmL/25mTledyGR38hGtQ+3PtFjl5koX6jsgt8Ivrb69+OkByF5lzUpN5B9zY4o9RKWqTCkEleTY7rOYkHQa3KOJiZvYK8R7Cc7Gm1B8Lq5Qk40yKsNEGCEDY5/UH4BUXR+PvA2k6EgQH+aArYDsx0gJobxqDl4+4/NdzC2dznHJvZRuGHW71c8KhU3L3ZKQkywavTGKT37qO2pnqN0sMiEiu0ibLnuxFiJcudXlV06t4VlWpAQKZES6LERRiEUDsr+l/++HOn7EXLLYwtKOvvxIXA8gZTfkULuElAMMiN3KXrkewqYR+Z1zn80CECHgEGjpFOSVXHU+Afp8X4mb8eAotl9Z7Meq75Y/S4QTP0r0umRipxNpATdkto+M8sUdvE8C+DB3APkYaZOu9TsYHrFg4qMvefKX+VwJ7MEcHIO7sJjA/kJdNGd3n8uXrq0mN7vKssHHuGONtGC5Gr235K8srBsVAvQul19Rftvc+GiPiC6C5rTqxelfRz2kLMD33E41/qBb983vYDT+0Rt9AYuolWlvC9uqAVWCvtrvfB7wTst4y0m5wT+DilO047S9oQyW2ITFzt9rC/y51pLVSqLb13mYIrAdWNB6AM/Bru3cq91Sqpy
K9nNngB2CyPupRqeZTLxI2TC2bJrOus57jQubhZz5KCxmeGgsFCb/drl1Fk/jTmF961lqeW8sgitwgCTWofom8uPd1tGQGJKvnKsxwX2I7hBXyF8jRN163khbZW8JAn7J0xZ/MzYHS6cqu/FVxC81bO009eAdasIAPEwqe7RoihD4Q1jS6DQ1bxglIs+8qZ5e++CxCMBORfakOzGGVj3N/RPICYAJV9X/lc6NvCsmq5FJRCtNZRvnaHSUBkC5HWjGDULUsDtCBtNp5TOfH5HWuQPy6X4xyxF7MD4EQWIVsm4+N4TDuhBWNszwXek1ar8KK/C8WjdpkyaaMxZU1zHLWtlC9sRi7IIv3EYDTzzoFP5006Y6mub/xyg6FFiYUwTr1nhqhvpKyWOwk8pbOmtE7jykMBqmhTTpKfcyPInTmWvwmO4PxdHiMngaYWSYWt8UOj3yTV1qZyMSQB0S8VoqRakdixtM4dcoNmnSg4ithp/x3Q+n6wuunhkwJrIp2c2hK2t2EoiwVtEba4vnlslHGLBA9TiPQis0r209KpPASwkf5gTK12R2PPT+cK+jS16cCmX0McAVuS8l1kt1ASVPkI+BKAf+EQxI3DC5bHlPl23PSzLXKMTWU64mJMUDw5QQeCCD35OnUbV5UmmQoV0SxmB0YgbO0DPzB5aBKwxgjubu1EuwemEKbZzh3x7a3VKDyrSQlBYuwa07l5uvievxTCb0lg4oKoReBZXAqWo3J+jPH2mSEuy0py1oK+Yz2z7ZipPP30jBDabhl6EWeRtXEqvwFRp/LxrsZOmlpqm06j3pxXmZaEM8aVOxWctsfeU733oWsWOe+Iw4dEbGK2N2hY33IySprR8PKTaSD7NU066UN2D25TWnNp6PYCQPNgouSFm/+VFOiuxa85Lyth+3gTX2I8zavkOcJZD/eiCc2f0PkJrB5MHLOnaQ5o/A+DdB45TrdbQStagXX9MZaoEkK+XDO95v91pskholPEsM+cmVUVBURrclGP6wg8glSwp5IGMnEDKdwmsR3T8UVGKrjZu3ce6NHjLlVLub+n1QXIupCA+OG8y9mixgdkFXYjnzqR4lZsjCx6ZriXAObG8zBuFKzTNyey7okPpsCCWNHCTRLLfTxcq6tjYLO8GwSx5iLkpi3ldYsErO7cDAaAHYLFhXfXUErVUCL6Y8wZwO9flRhDVBYtbEo9+D68q7UKWz7q6f6h0bL2C8dQwdDkbYlUuRYXj1f8HB1AWVKJW8fUSaSDc6RTt/hI06h+VKcKLYbKGYoNsH7IBgZfbNpmxxutPWpJTOLLDjF+DFYInpNlJ3Pzcok71kO9js4rPdE0VeYJVeOO124wOCP4gVOc9I3KAwZnUcl5Vh+ISE3JnFb5QSf7k0OmjIgJtRBFDSDklzmeguyC+ZJYNW9Vq+FlAC6INgHZT2FjRYNzWMV+xYc+9OLacXEwK1R5SVF372juPn8WUjXBBlCJTr8BFawH7K7+3vJUdvq7Fcq3TeOhF7GFEPZuOYTeyU9cK//MS2hXmClQbqYlQkfMmwD+T05BSW0YWPMA7IIfH4ejjte37nbcUejkN0rK+eEmC3nyVUQL01YFfWOYwLHhdNgRWZM/aecyGHFxx+e2jt6ZaLYPpYa7f40pZ16DGhqOp98g5ewl5sQyiFSEZZLShan1DNa/G1nI2fN9Ta1CGdjWrQZFQM34JW0HiqWDW99IUfy2YaSJbjeSnVpN1lpxjKTuKTnFwSc3k1StKtQzwiBBh53zhZuSzz2lOLuRCIfU1bUmVB9r34UClPkOYgW7D8wdbNJu9Kcl4PgOQO5wFFsE8VoJv+DSjJo0bKboUW/ivIxKEQ9l2sIRFMJ9HS7P/HQisJ3E3hnUVmBGdfBv/eSHvKhLbcqleGuhFMf41ms2gaApYofCP+6J57s/DJgO0L+Z24AKldGJ5DAhnmqnWP7gnpiAk9YzpMeo+vtl9T7buZjRbxjI9z4Ah8W2bNtKDiDAfpAIZZeEIPzQ53tD5XApE+7P+PFgwIp/LIBCP2fj1UGYLVo4QxFfQWM0q/gHMCNXV7nZppsCA3tvkripPQcXV3XpIgXq+GjvelTGB6BJ2SFFWrKPL2D7Q57ZIRgZxj1Ylm2jvNgTHvn48JPx0+XPnkJjiuwfUJR6otzEXdKSTeZWv6Z3ScvD1Nlla9k8bnOTn16oAdtFSls/L0NY2ZefCyuI4lpS0ID32TsoEEi0FE3HSDnKUA2YVazkkACLPLCD/Sc5Ba59BOVTRZ3W8j+tvLoS+OErB2k0p6OmoQcVNeWToFHPVJNDR1odSzcVfOD5bQjKIIii3zQ6FcEhm4pk8BmNGXHpCVuYnp3fohjDM1CdSg9jMG5e/DMK34k0ZXEIPxhSbu6Pn+XMHnMSd3/6vJ4VCedzgh13hYgIt7wNZ68xeSvbjZnxhfvQaY1mcdaiJQE9Eh2PHOqddw2ptvN0sI2sQZsj+QHOtWwAbCSWaQix3/iX3ztT4X1mofAOAMbcmRo79FvgXhhiFUsiKH/6Sc0JNmvyX9TD63tfdL+hAjr/AOULcn6NgydGaoxnqXvAe0zD0NwN0J4S8neda0Z2MgcLeliEUZOIHvFUq+I6Qjw/IpTv1UfgSeu3FeOMvcRM2U1OKbSizMzEyaArL2FsAjbKs5QhhhWBtC6frHlWjygC8z2Opmsp/chOZacBbB989pWLsBm3eLVdNcxOe+CUNAFMLD6FsV2ymuX+eLeJIkanqSNOI2x0t/r6WfkuoJo/5Ro+zriGPTNtgWb+1EWIAjImlvl4aMu9t3snqk8cQ8xRPbuanWvWay7vki7AfKmTge3YBBDSLXRfYMNP62wm/xkZv9vVYPvvnLdpK1wKa8BaNrV784ELsYc6IfC48sPONG5URUdHgWN/5kashmFK/mSOhQJgmIfKKhgw8EiDOcx8pDImmllk9ZOQZicXcJsazuUhXwkf3nOxaBzvzrZjA4GATm3YYk5U5WB+JqRw/n6oAxd2fqk63Hfu1NSDu9mHEo6vnmUm3fkk4WhLY7LDkzzdrGsEe7oeSWx36/L07Zng9A1GZfwYDBBdhRFHFIqpvB8LUMSy2zev/LLIA5yjua/X+14iThJAdliOextTJk+GVT0VuwRtAQvpL3Xxw7a/tReGfXndK3DhEAJmNOCqBRn0JV72ce63goNwuEgmgziOx1XWHb1ozxr2mo+zJSsyVEuWiEE0Tb+SuFpxft2BxsF1PA9QiSbmstOJoMpu9bEpDN2Clb3RZfwFDzUSMZOFwdj9xaUGi8rv3EfsapCd2Gqm8bZ/YAWdB2yjT1VFBn76L9v0l2vs8QpMKjMgFhrUlZd6MAuVtfWg9p8re58bJpN3/td7JTDXnZopuNGOXIow3rsmvW2gFtXZO860tTZBlP7AYa6zmeZGOVXxYYwQ9973tgTe185zV/1ToA7BxgsEm0NtCvDc0QLXdAGMxUR592oQ/fwPx23b4gTPyNGd7iofizbbBKTwPt10KmLTt3xiop2PIbdKl9ioGrd4fqr7nAmINwEVoUuucXe1Q9AtzgGEnmC4hrC9M/0PwKIOZNdLTDtLJTYyKGG9/snR4T44VYAkqMnG+v7HD6F1BZRvVr+/n2VpsdgW0hjBE94E49bojHbZiMX+cOygSGWEEDnWWsUw/1ic8cE9mwkz3Yv2x8HOe98vC5UDWyJH/Z0NSCoJ/F0WVJ0spwqxMIyqn+G17tmqJiLMQiO6IxIy05+BiMEp5a97rt2MAVz+t0bj464vdeORbtUxT9e9nb+TqQl7HzjOUSC1E/8gsrtWspOmdzb55UZU5j7Qr91Dx5l44Sw1mmknmDtNE4QDabZ+oLpu/nL84cGS8LqXtE4b54mx3FtD1z24R+QXDLZYeNE3CcmWemtOoaDfjaTLVSJBQIRPFynVthoPdzhj88ZM51+KnkzgEKWAI9AxBGPkz2zYhywjqh1d9VnEEWxNLPVdLa4WtNCRD94V/PLWLMMFVY0NFHndZcdI2/wGXBS1zXjibQihCXk3dsXtvrDKdCWRr17ZKznc5onT4LYo/qH9PwlfAhybKN5RqjqYakqtX/PeEfPz6Y0Xv
0gpVistZI4FQw/X5KT8z/cVT7VQJl80gj/1ueFxnkVTjDVHPZpW6HWkJrjscjk5f2T0yPwS9XeOODRHKLD72pLccGWEOf4+Bu0d5BId4SiPNYGC5jJRMS5nsuzKRWhPo+8Vs35quJ/CMbJJDMLxLZBaLlm1JV43do3qocNwDLTGJ1A+lmtCZ90aoOhlgi0+dVTnxT6pgCmESl6V70F5HEdfXi0CnGsBAAM8yuqSBfFdiCiIV7+kmp0vO8X86UboBgyQtfM9YDlZaef2ZeLN00NKPm5GnSBM0d3VRa+tJjWwzGeMFkAw4mX7U09saymlF0AmhD2nMuDLOhFDhOqJR71m0PtIk9B4tPtopys458pCB6RNY15GC1j9RIGuDk+bpCIsp5YuLSGa2FYXgwSuDKY3YZ1maEnxkFF9bj4zM5+lpg4mucqEIlDfPH+eME6uZ8XbqKy3jFt1BJuKGa4pbTLiNUUZ9WgBx7HNefTOAhip+s2aK9dYnAsXpra1SKvQ3tEDUJT/7s/BsvFn6asv69GOzy416dWONnJqi6kSUCmT+9oNKnYk8M6idVE+o/ME3T6f1ccOkosKmEDKXYSa+eRq3Cu7Ue/80hKw//4STIRm7I8yJGRJWSptQO1p8wCKjLARU66wnZgCfo7fOF4qKTCeS2l16cYfPTIT/eISkdEwR8jdGDm5yGr65anZA5YFaxW4nun7XDrANlszvZSSpwyYXF2rHwU6BZfCU5UqhaFzpsUBIXWB0KiFh6kSY4BbeyxdIY3AoxOmWTFONLHINcSESb58Vrxoh++cAQXAyyBOo4TsZG/f7/mDCaLEceCZ/46Ooe1h+tIckaluZvBjU9uc7ryci4U/Mzdxj6OKHtbhtixfZp/E6ayR5pyF1Q+tGe8MbNEwkk0+CyGgEMFLY6GpeWjFmL/8GuzkRUU048oRING4F5jmJfGqhRoQm1FPTFiEVdpE6NIET2WCiiVW/c58RoeL/K5f8uI8CLooVM/OG47q2pAoackIC++bBHV3wypMchQTDRmjlsBtoffe5CfOIoh2vaXWJtoREXjZRXYikZ8dKjiSvynvdp+EaMG4kLh60TFnLTMgmmIWCzqdjl8zmsdiyqPOiejqYVlrXZaI47QrS1HQ+Y7gv+l7IvfGKxZ0pUw9U5qxXRvSdCamwJAvvWx4UGufeslTaVnMQl9QIQ1pMDtI25VKAP6sHhjIlvK8jVrwZtuv4ummUgNJckhfzSAKTifjaVNPI7WtZ+u0SnB/I/ZKzu3SC0CAwLJlz1NZs+FO00AezoKsGTkyOuQ8PCIPbYs/cd3CGbdJjzxKuEar0Xcqv+cTqdvIkRbxynssWZ3UXejBfSPrkmBykW1UFlAuwz+LzjJx0eP/AL0SwYQCgdGsGazEgl5km58pE/7MMigNrVnQwD4yQpxEvnW84csuSzx+mAikLgo+zo2kOBAfquqQU0/CyZBsmBnTFgEY5DD4Rjcu4MZ0ynT6XiLFcxvV9PGv9ShNFkZ0qkllGPjbt1lEhz97FC+ms93Zl61b4jAYK30B6ATiwQ+qEUB6TGKxwnruKlKHK7SHiq7JoqzFCJEjSWOOFbocVmDxKhTHr5+sLCa2MNgBrcDKU9SuaxTJWhvb29iC2Y5mYw3vJMVA3bSGbVLlmoOy8W8Me4GccrAyBAp+ioOkFQyWdK37aY7VkWvg39pmGYeVtILI8laTNMiiPFViVHD6DD44Jn0YddxX/1/AfScv+azcOe+3YsUlZAK5iQfv/xlnHSpy+v5mbBeaY9dcry1tu4Ys7lzxAG5gcQWgnu8V+bdkt7dJmv5H9wo10yQ2ZXTBfpdz/8ye5zahaecZqYZsZn6Yw9Z3qn5IC9A/RHlonvVOZpz0IH96m2orZ5SESDkkMECuRNX7ffMpM6KjhI0ohk0YoQBBUNRQTo2rQdZG5J0jo5UvquCEy8jux7e4zLFhFoTH69RamM0mlRWyAAICPTb/I2GSxhRZmzPJ24zMs3GyAOpysb1ucEcKWAe6BtPkGiAuM1GUn8HJkmwjsbLj7/9lEJVH2FNiZf+eF3PPIC1r+80dc2KO8vyUMoea7/Rsk+iKt/lBLxHra5pNPWW+ukIX97s7WhaEVicCmsZcdmF4dgE3Rybr5ZhKkhiahcWbPm9hg0YdGSuirKXgJql4aEheD62PWZcXH9YdTEsSBmtlYTMgvvX9xj7Az1otMkdcJGYfQWN3XG1CwScF++SooztDj602az+ozUyGK3DDIW2lUi+sRwx3nwadT27Nyz9hMnJ99anpCwsCzmLfIzZGGMPgKYg0W1Q2OigThopUvIijNqLPbltcXZtlYpXgu2PgU8Mz7EsKGK/IBCYl+rvK4/FwWQcY9Y8JbkX9GjzH/vDhEi19UtNH8p7dra45mO9Kv1rh/+yfn1NlS+gey7qMIhPsH44Hl8e8XKR4sC0HBiLIELdBpfTYSnkJGyUuBp8jKncI/uR7rSePJRncuumRu/A+QkMmT/uFwR1gdwPAw7VLDckoftalTn1uAvqbYo1gJhl6dLVtFvo3nPwgV4hOsT2A87ge78hWraNxUagSaw6yJqeiDqRL02i8IFCYZ5oLzpEpzSFwRaUjTYSm+NpSpJDPav8qVz9W1+uhZiU0zqSF4ufHuYl7Fft2Jl27gzVWU1YvvhiCPRuJC5UQXcWSClVSfxSwHICQLrJbS2anshatWjyT/wMts7TsAKaa2q0eGDoqzp/p9kBgJKm2NkhVGeZIEn6Cr6QTlfeLNHsp9zKOqjaUQe+fYhUwxpvzkER/SRfkCOa4eaFujgnLAJELPE1fwu0PBDKK8NRJ61HmBTFw+FSN8UaCJs3Vgo1jzG8qzbUyw8GMsBD1H6TcZVUR/o4o8WraymhR3RFdh19oa6m4NS3NmrMrwH3Wx2QSd2STGnaaOXCg0ME0fmq1exQRDtY4v1+LICBW7yCZ2mRLpgY86+6Y3NfXDjr2HbcU1yVSZnHcD8/lbFqf0+SZ8lOwgLn0ReYQG1bsLOLpVGn1KH9YY2Jw8ReFNIBVfjuVlSTxWKvSvTpOmZ8xsSK1VvEoAN1nLUkqXFDZg7X4tyFpVkDBveI16DTI4a926qGL5wusL0qlt9Vp/DylZGQqZ2bF1LCg4SWJHshXJMRszLkkwowtBRz5vOZcpw8/L8qDgVP8bU+JtlU8eNY+acIUL1QF+kJMyDA4pQqTXLMS9C5X3IkpKYkkWyClqSgEj/HkkhimAbyaKW5QmUpB5mpyUSV2BZMa+j38AQt8PCJfiL3OTilGxGIs7LhFxaSsZjPKYdD/ryyK/OPisXQHRXe6gqLa8UOZgHOVV6z9dHezM6zC4TfBY8lXcoImUQOvT19W8J2AwIEYlU23Djnpt3KhUoz9gInvhEu2q23iouyeOV7uWLx6jp1IwfXFh2frAcKt+DdTWmrxt5rv0YRbynVy8Z9CZz/CidQOc67wkclEhjNjNx+TmuDxU98zIOxhrXwRL+XplMB8bfFhk7mxAGdGHTDIhIBCPDPcH5/v2aw0OuTQSGXJJ8e33d3qUhcyeR5Ve/eFiKfuRD7HXzV7xcW4QDvfEdxcDeDhVbIn4evXwegalB0raXPgwRMnYnjJw8QBA5H6QKzghkhqt5LBYEhyq6qCGGikEAq9PuUKX35EICuWTnRHLq77WxhrmoixgHQDfHDM+z6bZQR5tYDZZj0q6U0kcI9qr+TIkv3TZWOTShU5uESMrRVIwD0xmf23jSR+Qtgvzl8N30FBoJhE8gH/Ok6YLNLrz+TLVQlEUaArxptHncu7aMGojXkt2yUSJPyd9QYcGzu7cGdmlj6jGxKqSKVvql6DKPJTEyczwODUWXJEDX7FIm/EYI9343ljMJK3azDl8AXVHnS68v8HuxS+dWQmo7M36/TKGCJR59pNiCbcQWPwJ0R2/QINTSPaYrCzskeGXWHG2oeC7tM8bUc1q2dG9GPjLL8y7/PPCuyeG6Osn7ffxQewdw3C5Sjrk9dYo4ZvNX1CImne/x7WvCVp1c7pWNn2XljAJgaGW5g3hub6zJ7BlR9uFIy8FSBCMW5+FMrhwKzbRKNWAeJ6USkD7Sy4XcFTX
Qg/5ZAR7VKuX19UoanKaurzATlZDhP5W9pYHbOPj6AVIdcokv10r1m+501PMjvjUirBVxxs87fyWObNekCublGdxche8V2B8sWJ3UPTTyHeZGclLWEmLtlQpliXUzpRZljBdbpKhWVyoKCozHjEofuO/YntPTbM032xmyAILDEF92JamvBYfr/4o9sPHn8U8OzemPVeFtDgAbJulLrE8q164c7SxqIir1fPvWCft+KXAo7xrczwq13dzrxDbP5cv55NSXZfWwDrjVPDhDVUvxXxSwZh325VJn1G2boCTc6WDUkI7ew0jb0+9o6bxomjdEuQuVxLOO/AMzdnkp1apdZhDxSSObSR8eHPq1I+9U/1P7xTwDVgDB7yCVLd/eQq6BaQmJCNE9mGsNLqiMI7uRz7Q/ly2fjIv613je4XUMr/Dyf9pQ+m0mvo4oYi4LqBkquWejRMFTpsoBPMAs59PG4COTY0TVlDpXZ/An6Tm8JfPJs7ENX0F0GCWT5HwU9YgKcDIoChwdgU7x8K7siwXRufd2pIMvOyuItjtIMUATmYzjgVaUqjqI5/GYO0O4yT9oLWvIwAPvo5EA2COStwUYqcIPsapeKEsFPcXitbWdIA40l0jNG4mjzWOYGcPLjx9cCopV8FdBqcWOV8d+jlIApMziAP3Ihklu6TESUrxrNggbL+SwapdpmMVsPt/LlicoWl+fC0C/VtaEeHL+9tISDt0KIA2KahsH2QLF8BwnMNM41OsEw92l+u42BoWAOouQj4+gJI15xLWfXRD7jeDcunYtOcz3DaFd3dwOpf9eRIGBP/XZJ+8E9Md+1pc2+SEYGJgm+AcOklqXMDonVTWWh/Fw0ekFO2SikcudyQR8arRyhs/r3LfqMxQPnhMfrdN3oGswimKTJRlhwD5co3krfjsE+nz1yFDOYk+fh86zueGTWiR5GOCx3xIBOxoeM29e721zIUmLgh/L3FRfRkJZQzlOlYO6YdTowQAHbTaU1tJ2u/qRS12Y2ztHQrmRjjbcHK5Nv5jq1j54QpiDaPSoVoRD3QhPiBAKcoQJe2B/WvAn6mdKozEMlb7TgyThd5tFUMRMQDZOl07lg0jPsSsyGxn+jIB45fyaRRP4n4r7ayXCcqXD1T7lwZ6yVf5OKp5447RZ73eAf8WH5YZuDq1GYZuJAsfMENyW1m9EYHlqAbvyI+W+68dvTkIPEhZKufRUF9T277XMTT/tY6MDLgrgBrAAInhqAAUckSU3Nczo+o+bj3cFrlG7pgKmsemOlg1uyBE2pwQ6cNO9Fg0SiePQv8TTUa2m0QuGxiTf0BBKKJg59/fyqjhs/x4N2TYdY3O1MurQftG+9kNDOstIugbv75uIInD8q6DSdTWk1GGTnszV4HIic/vSw2QTxor51T9tWx63VEd1qxv6nR24XOKct6VUUkuHCuL1uOKv5mLWkx+bwPh+y0GryBDLM07nhoZBb7NGFmbwAEn7nF3UmVhfRiiHEWSbdqAcMvz5JBIWWHH91sq4jIGopZtfxWDczaWs+bV4VeqncIpf8D3R/T0zaevEKaqK405PYmZNNHeYOzlNX1x6ufZWwK0Cne7tqVewmLqZUgexgZs0YBIjgjzDjY0zt7SdtolbYTXToB79e1821ZMu0hYQrFUOVKfKqQEjg4AqXlt4HbEU1U/9Xqo9SW9u19JQr4GaOOaPcijm7g2ujW1kFCREmt/Pp7omoxArd+SwB5FzYt1hgw3Cqt+MqW7CA82ubRMJwt/tCHMTHFqGHm1O5iZpGMnLpOpyR/auiA05Wqhh56vu7wWg8vpYmLxK5lR1tZabhhRnZHibCA3vpbT+CUbG1EOuOIbXRXqpE3utK0zR+qMjr1C+x9FXgDG1SDAc82Rm0wgngOsOP7/dnodhdE07BC4iUlApRYT8dYbxxG1qa9z2Whdqa2vp6vz/6TzVZm8b8L4ACREN/Zo9pXACWz/w5LuBDj47KR1bx9ppIZoevYkPHEAcGLNj37l4KwSyx0cOVbbGRbaW8SmQumu8GX+tlonrAHRNRlEH0K08PEbURMLJl+74USGaPryuK+UyNqg89GtsINIiwHGNXQ8ViuzwAwAE6dKIqIirojYDG9RDiAio9Ve5cY4tUh2R2/Yb9A0orVu0ManndY9erkGIF/M+te3HCYZV6vDSDjc3d7EGApXpTVTQap7bQ489Q0JVAxxZPoDH7zyxzfanrKIctXo0IilKJPCJwqL5MitKAbnLtaf77Ud5VvGtBFcZs1Oh7M9xrqkFbatzSg4UgBlH4kYYwLJyThxcZ4p80IH9sGGP60aGPOJYw0UlFnwGNWsyXowPOkw3HruXdVPzX8nMbrKIkRZFeqgxFhr82W4ULkZhQHaf8ty1NkANJHDW1YSB5ys15mGoSbyooxPsHzRreTzm1X8LzehpKIP5T/rAxcScgqS/SuaPaUtwPBeyX/ubFLMUmrl+cbVof2L8Z2A26XyP2Ch0ZLU01qUftXuWKb6zIlrBb0mtBenzaOYIbUFW+Y7m/quv4knlvkr/sYiKXj5h4x2rDhO/dNIwzdr6qgwKKF/5Bej48VnEXoApEH3WVKHwSOG0+lCmcudhLhFGSAWgZBX4N2abEjHtqaDV0Iql+YcC2ruvGMMgKjRfElchCE+aDww625ELregwDHKT+Wcw+d4PSCbN/Mau0txyeudGRoPy+q+R4Qsuo3vF58YSg3Hv0Gqg1YFJ65OYYOrqJJMk1rd/yHY38jj/AI5cOwctAx7jHcNWQmhTPofEZP+MXCJU0enBIAqsnjk69R4J8xSX0fBwHNyWZYcawZTc3ZXfOdnQ76o/SvLV5Vk98JlDC/YX8Sk6a9eEMGyJOiT2mWnKMkgNcUIcrNPK5OsACpHX1CcsuEnNHJWhwn0axrr0YuvMhefmWRiNI6u+vCnombEXuCC8e60cG9MYNqBeftarFNgVrqtMGLj7EVC7M7zEdu48+tUw+QlmA7HTrR+lAB3cBJG523m48eYqnAIVrVy9ZhTwru/4703htcjc52fPcav7xpWJ3OsaTSi4Rrp7eQXSfs5QAJYb9f+zV/eNODKu/CBjYVBoEt61PbrqkEWTjzqz8URf6FDYeDgXOzNTcx9lI7mjhxWL+VH5Teic4ib3ogMTqmONsT2GcUdKPO83VYASHUhi5Xh40vMWXUs9eNzsE1LsnmCaTTaHSnftFogA0HtI5VoU+UECamvNBhWC+qCboRGhW4BKbasiOJgDFLFAyKQYFIeRr69NCxsXyzNMGwWbioZKVsbyEq2o3L7QIdc3DsT7OlglLW7yX6nd4VtFBqSjm1crdISIVHP8ZSEXVTjUqZsjFapMkg1G+GdEjtYCzwMPEPWH75Cfs7GQmTp43TU1kgO9rbQHtP41cvs+lU42G1/HmTDZrkVn94BSCgt8urSsnJXwa7LjMTnXxZ+uotPtHj8llRoQdovUsnDxEJMj+WTjPC1KxgOSIv3e14Y9wnf7g1W2A0Zq0YEPIIkNFzzUM+z3CE2/mt4NKyFPFKYXUAdGhHYBLmNKr27zsBlv3Qd3PPC09Hneq/w+WWw81A7YvSbW6wjig13zd6u1PdalvpH9kWb7cswXYLo1FvGZTPDixZ8WL72JT17VU3O6cGZNb6XMSAmb+TM7Yh8+ThUckK8LPHtGWr4Cfko8wVldxqeN1ggJLObiccD5T7ykjUHOa5c/mPKSj0hiPMACqi4EgwRpcVUtGi3gCsbCvdAMY4r0neBGlkqWN1zW38vZYi7ybAtIKBQ1qhWe+6xBl5ChsrakqA86wek4ndtkHIQl/SxN1Nk+u+BcYtZolhXNCqY97hEz0EX5PnwcKXvc3z5RqEzE0WBs6Oa0NdAM+8lvksZf1GqkhXY+PTw8tG9UotOsnhRgeYZKkge2MAkxNdkcs/xNWD539OSJtjC48y4KoLC8KJQTRNgrY0qzBwvFWZjTRpTNVNpRXgtQFnRjnifvDmYpSwGyEy75S7/VUlNotvMV8FHhVg4qPOBCD/VfCrd14YVfqOGR1EF0xLbxElhmhIKebnInRawgvXfVg8Cw/Yz8QLblpjf4bHcXud4DgGQhQJrkcc7
EZqEqHY3lrDxL+uZ2YVutB3szSFrDkHYJ9klGSPr/34gOdmBUGfsQoLJpu5mzyIriCbXyTHdGk8PnxUg0tMdyZkG6PrQFBZbBOoEmT23IqNmLrdkU7uGLWNfvz7S9ufG/btJ4qmm4biQow40roY8UtB5UuSCghP4PZ0rrKAVDQofROdJXosDmtKzcdX6pWT5hph/YTuGP2g9bV3POKgXJxJMEOM9Vg38pvfRXECRL+f1kYSbNANUfWj18nWs4v+yf0BdBSjR1cQdzCVqYNDw32lRLJ3rlOCOQ3Xag4yYAnt8dogo1GUlEAbEmmy5hR5gy+v+KaxCEi4NE/lxWwVwTV5t27tKBJICPBS8OaLBaN0fqYus+NymX72zIU/jXa1SiXgBlKEfsn0w/DG/z6O1ZOh+kbLKeUvBGy4N+t16yefeSuP7fHCqp19q4oka7Czarqs1dimIoWvvwzAL688mqy1TI8j+qi8RuAb/siPfYw4zAsy1OjZY2H/PS599JmYh/tu2LsGZdOm7MtH5ds6ydQb90Q5q1njHzbhvCo/SNgrmiF+sbXvXF3AVBEJYqLidoQ8eZb8j9o3z4n+JfZ2Yyo4M2+2G51ee3aYEUX0iBInICGMgopbEFKw5frbhXYwNxlPq3N3G3Jzt/RoqvYMBRTTtnfLRvnXHH9PjAPCDYWTTIKy+auxgn6dfunwcKrJGwpbs4wg10QMu+bJxbpxX8Hzd+hYz1Kv64CNf5VWAOU+ebeEBcvHNok93k5Rp50LkIRIBK87QoWXsTS+IHHXP/rXvb9rHjjPeBN3cWhesaRnb9qfmU7evs6FSQMy/mj+X7JfIpfUn7f4F8V7G7aydzKOJ54QF+239vBP9Ua3hZZLK8LuMSrE2w/OVFkw2EGUMySDap7UOkVd+XmPZTqWdk2on6H9GaqYNFd5gqXAKeR7mDVPmbLirp0dsmmnSDJcmuS2J6J7OJzflEcePSKQVqfgLbH7gbir3lftWGVAzXRI2bmd7NiQnE4xgdhGIHYa4vLEHa2uq/2NJB4hpr2Os1VNJc0QgREubJ+G+yfJn+pwbsXpT3kKXBvQEG7K6LP+MRhQwsfOnMzDtISSfVDVydDnjFXIqoAPEtBv5KG22duwYrM+lEuy48rqXgDwRMUPrEtBp0aq6lx+cBvZy2n2h5pCoja26FpFuJkRU9P87xGX3W/V27Inu+88aZcT3QWThi62/i2AIu+6PU+DaboinykTVnNT3KCGBScrZrvnP+kTIWmhw38jcvVSk4eJAC2UnXbULUTITKYsgQg+i2rf65DVnpxUslRroRZBnGOwkXM6CNBC6kgt7Q3NjqarQTxT5fZiro1sj3DSb/6/NU57us+2A1hrGjv2jC54++cAz7VUt5w8vq17Q2rIejPIO2Ws6eAJro2l7gIfK583/hoMxmRYxfzKggt5DPQywNNMt0MKOYki4TKE4Otwrg9u+FiK+f7r+KTYz2xGrOA5BGzSnKthFc4qgMvkSzXFe0nnNfExmqFsWC4m1F8HHWl93MF2iOtCqUPFR5lKf8SP8WpXZpc5nmbMsrFgkJXZUSSq3Kfi0so5t0eGF0fNDKqVb2DSQyI1PB+MBdztZJ6FtB3pJWEQwsc98tAsGPqEtwigmxxOPOaet9Mb9I/4q4fM+hx2aSiXDcTRN4f01dPQ3qmCOxfO3GlXjzzELTis0jgZrm+Qk5RKBX9+sGdrYSKhKivh0Wg/ABpFx3rnhug6qtIV5APSbuvpPYur39r0cBdIBr2x9V0lGyo8g1nhwXNk/vtnhXk3jOSrigdw6LNcHBcjDxpxxuJN/IxldPA0YVUDUvcb8rd5cQOt/WIY5XLJmZeB3VQmg9k80ojlDU63qcWKmMtru98DbDJAh/AL6kRY6e3Z6hGU9mLkUOcHnujfg0C+lyFEDLzuiP1ExuXmIS2mykgTrbjKmDonvGB7GE7i2Efh+jPOGis+fbbU3CwIQ/ROZDOM5dL5Ot2TGGa5mC79LyvAK4mZkOMF1QZQFjZINZsr7D4k6xZ6/eNaP/Nhir1ztLm0aX/28DTgkijN3MXCmgOMJJr8TpY5BVhNLD72HtAmolRHt/UKCUdqOy2lAvqvj6EVzj0C1dcuHCQAkFahVMBk6sESFauX1aj0xSZQ5k2Lm0LdzryWx87BNVB0pskMAlv8Ic1D7NYxzuXWyQeMrb4TgHeuhLESDEASvdyOArZ0dk9STAkW9u2AQ6pP0d+u065XNgksZ+mNRZ8BiOhjfbneaCepl8fEQiaNHINNqD1j5YmdlInq7UItV+mgmJGsTdk5W5uKU+95ubinlCfhQUgbmXA3hmkoIgGOII8PoeX+U1OFb/QrktQNxL9BCwq3ceM2TQTJ8UwcJcDuXIWygKIMVApox9IqBJ62vOJkNeVNQ8V4E0/hVGTv0PrnIuh9uB6cPH6HDfHUJu5+XVHQKdiXEOSNs7Du2Rb+RK01A82CrUdnOXzsfEv0uXgbQqqQhMS90fzrNSUsrZTqjxSzqAPOnmNoqW0vM/SuY5FWhyTprkGqmaO1nLLWvGF7XT322gvCX/K2wbIXivbgg1GKqaIfTcFbPDTfV/h/vAx6RyLHvA1h3ng8OJKSGcKDj3NVrxIkapigfp3dQoPk6D5DhWEN/wazdlfsRlONFKebmI5DwEsDySLPUbXP7+EuAuU302kGVDLWA90m/YKy93awxaZnsFvG+SL9ng7D8+7FBn2LaJEAbK+WLhhcRW8LIYipJiLzkjdpaDgWNCDjJlA2iumIgvzWwONzsNzh6soWKtv1SMOoL3apq2VTcXD4T87stwElohK3qFmBqce1WixuMghPxlhHHIY/7jSa6BmhvqZnHioFl+eFHgwA54gC5swP7mFDwENcl8hV/2yIJmvilwbPL+w+H5orJPTBMUzJKFShOvdUEAhbvozDZ//ITe5oJ0b3DqdbDdnUZioorIbIML9LCoD3FqVbxrxx6VzUENtI3Mr2cY+d2OsIPhgvXRU3snIzs1EWZ7xvf2F1ONPOBLwC7d8PA/GtdBffHJgLTLKemgG6ff16Pkhkn77SUJ37RV0B4b6Do55n2bbjB8BT2f6rt3Z5Q3cNWZAITGcd08EU8sVePnCUJgT4OoSpKgz3ARi52ZpUHmZBKG2Qt2v4/MqkeM70X5QXdX0AD0Zphwg29+gj0Ho5dkcfh8w8jvPw52Mwl1/0ML3Swbjty8VhSJ0CFLrKwo4YSHstH3kN+l0svKlSQcCi9xBdFlcRYKDx4jqztE+fdcTgysLg1uj9BsTj8Hh7anMcNPQctDNDrAO6e18HttZoMdHX3q2XhKnw4u+/QyDtCJkJ+BKmXzp4KfuSeduWm1xASSYIIij0nJn0lyOma1w/Na/R0AcuohK1iuReAn8+DqY9qTllz7ZnDw4ogVjLrlCxcP4XtTC+DL8CqxZ0LNP7SS7FaMTzqP9iDe/loXOS1kzh87oKBmqW3Hc4LFnspsHXekiDUMX3VnSmcFmczlr09sKNEQAsXgmv4ouKApfO6BkGsCjEA/bt9dIG1Fa1v/dpfw9v7i5Vt0x8E/qAkfXhhI6hVyHK9ui/81FjB1909NVxujxpjaeC7uk2dsJT0S0I21dER1I+RYu7UrKDTXCS5y/6NjpTjlLWmlPLM+03UkIP1bUO4CbtFYeAhsP0V6+m/+wFDmin6Z4Nc9ocoXjjzwR9QDpj10mJNe9BQt6GIhf3fn4STMGEbcW5SDGTOsU/I8hV15FRWAmFR3YQonnSbj+QOqKSBC1IVoGRqn/+SxQg53GJmmnGy3juUodv7oi1s2f3P8GnNnNJyBCrJMdd/Xb1ImG+F8i8zQCZ/NY1Yx09mLo6Ox0pzS67GsE6WlcxNlEQvdTPzs6QxLt2/pv3uFEfady6hvdX6GCa36ET9mAHBu9u0gskkKIQGL1U/2sM+fbaapVNnc5XJIHabaT02PDItN1dcmLC3m96UK+RmvvNIxdiJ0mcM3wNrBUi+6lngSXF7OLvwRy7rg6MvyRzGGa4sxmzroZe3LqC9jWMBl7VkAAJFNClViqqvrMcn67Od29B1OScY8nQyK+niBr2D2hBwxEqh0cZ3
+db2dUqSTuLBntadPJKdDcdUhBR80aJekunH5Uk3c+Tox6w34zr2CWzu/8IE10gJnszMFWTleA296j7+g8LjqCNipBQ2JPO3DZ3ys2xo7zFCLmBBcrVSs1fBAtCtsIlGIB8u7rYOY/mIVga5HcssPCqk5vmuczOgn4pLlJTYjXp+nf2wLEAOyfd/A65lCPC0yN0DNTeNThKe1fWF90VC+nwfDbzwkixQIl02ywQcMGBTotrAF6WOZ1cRSjZqwEUH5tHL169e0xs8LJSjj3mI+O8VRpeGTyCqMP+tV1hrnZpldaVY62KU1Q19+cUnXgbHXkHzKEhhCgzJnTlUs5GSugNk4u0pDaz1AF1ng4IMM+GoKis17pkAiCDRhZlGMLfaKCQB3wg93sevqeCYEZcqvG1ybPQ26pgYfI6Ui2QVu9NwddkySUwBGaHWS42ZjM/SgS6FBZ0M4jrAQstr2Q6iHiIqo1V+DO5wmXt5NtaF1ZsQz/8aigxZRMIZ9OqKvfFH63Acvl91vKrLi10E2QH6pxYtjy40MXCnDxgByIbP8C4hUf3XdqlhlL280KZepHsbiwWr7e4GshpKpEi0u8jnBOSxDAu0FMwjx0DhOulB06DpWgq/fEgczkfOgFvByNQHqSxWzXZ4NKTu0DwqgyB3ez8wszojKEA9yZLd8sNjhOA8XKbO1iAd4P5LD2Mpp8cKfmeDL+wRyHK6NKygmffwDAPeA7+gtr+7QbhsmVPbLvoq6uswM9eHGyA0dqpE5D+8/2APQyrwgI9+Sc1z+KuYKv2mm/mtoVikig7J+4bHm7nnqzZsB4TpiEMuhjDiXEc7plvTnZiPxxviNxS1r0GzPnJHtgLq5Xqks2RCNckGE1PULItYocO9kMa1ii4XQv0oJXyPeVDhw6PtVYtTfRa9xVphsG58bWCiRbBJy02DVoR2R3BQvlgWTsz/wLDXhUuXnChsKxA8DeC3AWoTndsKbB27TJGIBOx1KsiG/9B014ShBc8JaRzjx7d39aAwzlfzcViIZ7xz/Uv084eiFsSYer9LheAS7nWB7BIJYgCmhGQqhyW4s986d3uuE5yjSPCQySGQCYenlrF25p4lPYkIYvrzoFA0bqorTYTuqNjqleiZ784NLk1+RRlK3lFEvcy6HEMUgXV5O56LKphQnMmEdUMOY90Ozi9lOBwYzjEiYFxFhgBRHOlfZMHPtw6TWu6OWP+SrkvDDM40wy0QIGaBcs/1R6NtbbzlabOxTx+H+YRUvyMA/QUySU56ElV49oCajoAH//cgE4Mhu64YCQaj1g0x2qC7vDRvxzyrMHVmqtg/8j94B5ldrKCvCfKQYvs17XpP7qfcYg4QP5GXVGgXEB24WHYdqK3TtpXRxM/vod4+dNUhEGCYHOOxQYTbpaWaKOMxz9nMPsncr33kwm0DDs7xT094bEy+bmWtTt7JK57KBYXJytreINi35AK0fkDo3ATxASxZTaAb2vi9g5FndSVKx/iLtZoTjONyIcHUdUiJQjLX/YWJl9ltxfh8wafLB1YQEJe3yoxuMoF5OCPwTdj00xnkS6pugOTlp+sODGq8MfH4Pf9S/Xv5LZd9FYhWUyyZXJjVZVoN5DyxF/BFi7WbgNn7/xMBYgUc7Tn34AYiU1bAz/TMdmY8tI52akcTNrm9iv02gCRUqkzpj3MLEEYsTjIEL/FhfvmiOkKlQoGrbJ2JDdaAmk+WyeC0eqzWpdZZNNbCP5VbShVWd43DJ9S4BMnbbIKmHDVuzmU3Z0P8zdqwPiZhSO4qvaSmw8xnGogx+np2tU2yZV3tjXQo5mWfP36FW6pnCbSLJ+i/LGJ005uWVcosKSEfevEJoxO2FxZMRQsLFLR5jH6onso1cxLmUvUcG/Hz05LRvoNzhV34NLmcx0cxqrqt/kQLfyhajsuwY6a2MxJdWowe2HoOleWLvHcNEKTmn/zkjgI9UUzOxH/oyi4BSesACaE5/LYFm21Ny6K8ApDIBgV8AFCLo4g1her52GKcoIVPSU1woYlCdLqyuHdxlMMgrCzSMxkW5d5Q2lAvHvU1/LvrAx98ejGEzCQzY6ewpsnitCRtr0ikodHjR+2I8maqawIvmhcEZzZjNGm8W79ngkNbsqNnmmpe8tPzWeLrBE7yFnOurLs7j/83ZQ7Nx/4blGhV1TFcEECAjTUtUjsHMUgvUMEuhXnFKF5BFkaNH47mcDX1FMpDnLTLgX57CO3EncCRXtxqE3m5DKO6febG7theyPmmuXHg75WJD3xFkBbdBz8aGfYKoBTgSn+qkplpdTAo9KYACy34pA0CMYzWzr2AlK4OHrBZamT9IdZJRIw3cSMOn9I2Vm8FxkqrZGArRK+bXzXs4it/7nT1IhFTc09ZLe+joTAnJzFsUrHPCeqIMND9ioEb3VtQ4RN25IttnESgQFs8dzS8gQRhC/+UguJeNMqRwGBi2xRDjpHv8yI5hpd/pMaMgXrtMFSBxjrT5YRpN5jJsbRudkvQ05fBraICdYTWXQc6XyBjmXOEuQLrTEBxHDL7nXUfty+9g4ToOCxrk+qx7jRrx7/FpoX1Z9EsoapsMXXqUTHO4wAJKghVTNsNA4xkKigsu/o+skyGb71wx5GSvym9wF1s2xmTyEc3U0ZbQUunQv2+K++SkCLfYRQHuywrqM6freVWaxv4PMacvapXjbjsZRE46ImEzu0y94livbfgVJuvESReRclWlkJJQk52RPyzkQI150hNYwELgxSf91sEcPa/o3feNpZt4OpDmxBDgUwHVON6W/7JMhtVhDJPZKQIS58ZpBvi5+LyRlMm58k9VnCKOOl1znL6jjNYis/3Ovo4RrOeaXBjW24uy4brteQD+IdvnI8z3jtrvspsWqPyycs2SsdamvZvEXotiyksDerh6buqQmkiTxvb/sqCTuT+ZR/gwoA9rNlBLyx3oTjHsntvELdVONM5Xk27dEk0d1woI/Bzys2A2/MNustLVOO3fAVjyJ9oLRF+jMpUr08WXkHQMrcp9Tr9VTrYb3aQdUqle8VhTjunRvUqPPl5nfE994Q9vBJ/nfTM35Tb4aT+GwWIe9DIlQw1llV8IifWcPO8XVbYMxs0QEt9/bg4fR2+1NRE+RigFzElYjBVQ6QWg3X4+87j4kx28XmEOmgQM6ebngEXF0ytSlgvpjdS7yTnfzYz6D3br/iMHVCwAyuzzWT/J/IXaUfaAWwbTHIj1aP2dsUcZxfsYLJ+Rl9DUxJm2CUmrXVfBkUa/3bsI2MFMm5Jhpnpd1Jw1hISpnQ8FSRHe9PHoSagFscY+K8VnHhCulE7FwrrujOj812X29J8sAou6w7Ett8sO1USRDoxMgv0xQukXtu9lgdtzICRzeq25JdI0QQa7cvbwCKaA0wAMnVmodf0RCu6EulzMxUZvxX6QAhoZsCqJL/T/k9W2WgC/SxDJA8XRJhO2xyrqcQ1zjWfAP2Zc3rXWFVs9K+LQkwDik2VsI+0jeyZqZWDeQeMvNDbFFo6YbPTnKGC/1eSS3kDsI0u/x/edSBTP+WVE5mXnpNJmX2EEvjZ8IBd3S/dcXYWDKo9rUuBAXeuETibOBhFRDu7ghcuGCCm6XoVqgz17O1dnzITRWKrmO2d9l/68kuZ/yzwwV6ThcfE68k70vIxiMPfCKbULWEMPwSNsFnWxGja62uKoRumMpxK25MgbawrCgXK/eC4wOIFcvGF/XihIgqerEmm01sLP2H6Yhzla0MFMbSj7/9kovMV3HyHeYgqq8JFinhlO7J75xcY4NfWi5srGjgUgeZOx6AnXMT+ygVAuclkkcSfuGyJC2bKMcE+8JsbbWSY5W0pILTeBQfq+KRz8RGBozSTKDur4IgaP58s2AqB5hnpeVedQSxo8/smwIbJzmRS2acFDOytuGy6xWthIT7A0DbJBln5DTG2II3ZGy9hs1i+xRqk5J+0rPL5U7cWlK6Iq0hTvqaLMtok9JxL0DGYswciK3g4OMgjkHaJ0r0JyXoyzZ6KH0Vq+bdGnhUMhrIYng2Bg0yhzVIy5nIm2x3oq98iQDGabt4F/vk2awN9OzDVB9lIcZ0a2B87buC8jpjqiPtE
PKFO2rPbuFSsx3FcLQdZTKPY2HLba6CB2DBRF0Q0FJNlRz6mGLNs+icjH+dUAhdGJRftPl98KfZHo6zAL8gtbqTA3uErRsxjAUWYTZQg7nY8MNwv/CeGfTB0ZsLDcXTlHeBVgk3Ynle80aPxBndvkdX74N++r/YZFXgNq9qRlSKiMlquDF9NIGQ1oK6sqiQ1roc9Dbuvh2CajaJWCHHxWH+2gv3s6wttvUDRaR1ynvkwKZED4F9B24kN1K8rnX6QX8bKYyTHS3P17FLXnFkh5WtLNBDFrZHZgWT8hP+yOWDhVvJf6ZlObIQJdiljevER9bk+INB5sLKH6h8h8jMg8cy017+v9kSNcdkrX3thSs4JunnMaSl2mrDYhMYEyIj+Kd4SgaEqqe3qXmqn15yIoaxarX/MfRI+STQyTs5J6KsuFmVZtuV4fcbvm8ZlxRRYauUJE7xQKWw33NTdUoKYoL1A3LA5KSuQkTpuU9CYTJuCSndt4+JvxHy8E3Z/KJzeWb34c7NrcwY+qvApdk2qEZV6iNwrtTDL4M6AeHi85jqZo1m+E1uR5eOX7v7zVR6olJ3D0SGBJkS0RHGMSk1JaMD0sMToKP85FAfKiMlGTCE3UT5FZ3OGhG7JV7snFXRyWGbK4PXyJ+VJ0dWf4pqk0JRdcEyaVvTiWL8Y00htoaasjZKVVT6OQZltZM+FLLys1+c0HGs01I5Q6OVISDuS+hOuXaunU3pAyUDY538c84B5Z7TM/3x+lnfWAxwT4YMGPYu/WaAiBHP63Xyixc+ufV+uSB5lLnDo3jK17Y8Ym4Yb8fqp7KMlbZ91IyZTGkExm11NRmq9QQTiakKNnvvY3BLSNA5jz/ao7Rcf6nZ+tHfuHKlIeMN5awHbmctKBArufWBFHdgOxGDgps6DsXbpyS0OPyR/ub7nr/HCdZ7BGiNkS9qs4cYCJy81xECTER5SJig4qYg9u5Wr+9QrlFyiGr3ONc/Jqy5KfEbLYkeqRAfowOPhlGNq5zX/8T+aZCXMmyX6zmEpIxxofD8xsQO8T/dohe4pKLUqgbX5B6K10xGzEl1ra/vqcPwBg23gD5ZeQNAyRMYPK9WKncn9BkEvHHpHezq+QPo1eHT/Dtv73WbnF5ELwHta7YYV1F2rz8arU/4+KcbM9dhMAU7YYbB1GhDv8m8+DH7mAvbLFo5KGkVpJl8hamYmjnNSNhZwPUXgm0zOrcAEVENzIrnO5C8k7ANydln+iXyP0z1rufZNkvWfPyOG1+ZHUGPfVh5GBL1cJPEoFhioFJbW3aYB9eGBtDgA7ju/TB3nx+N+JNZqxcHe4d14FvM66dgYjh44h4JaQgr4Uv2Fr/GhySJjUCX8vC/F4bnNlDHl6rT1/8rZs6sYKEh9IIcni1x8F20iR6avbwqEK/nO0OghUDhGPWUEWwUbZK4ydV3xkCdOaFFvcTYTyWRlykTKAY9jGwm8Wud1HqaumiZc+mGJd9HCDNF4g03rrFvP7Lh2QvWVuM6hSRT7TpKUMDBue1oCqUdVrJM6eRMEG4xsdkhHMEtwy+FDJTend2fmht1YsE5tuIdyr341LmmD/BPfyLftunvWQaK5LXc2uwtJRl5FCib3wWbZKEs2eMQdSpNgD6jfiDIgRm02hVeb0K+fIIE5zQpu1kWIoT4M65RZnAQsa4dh/DwdqOipt08bV6uQSLHlLMAkOwmTmQUOAcA5wbD3zVglzrQpbBS8KPp4YWbrD3FIFG4gITjqn4sUZvAWlyQkylx9CIO+OdwMC5oy1x2BJL48flSbT1BphWxn3sU+fjzwEXQDjDfbg8hd4/ekzX+ROG/7qvDZJxAqs0rLWx/BCBCyR6UmY2qA/PNXN8ZSBcEfM1SAY3PH8SdWrLQRegA4xRw+M5vJk5Uj/EBXgWTmldGBiTSIWuhf2jF9V8utHYwZL//tZ0Z1D5vLeond3nOrcVjF/qyANr9Ja35FE317Mh9zNKe7NcwfigtHJIUQWOcCgEv2p8w5qmdGoIhkeAOru/tcCIBNzXRmeGzGDCI0oVoH9RoCEhHZgOhRld7YCds4sj1vYsk6g0SDxoP29oTsynDRMR1fiWg27HaURrZUuQOTBhvQkhbFkrNLxpcILovuRuamHCTwpz/G1YLpXErLGuOTLWwZkefY8VUHB+05TPJ0KHHMVrLyXq17Ju+mpt5o11gkFFwXUvb8pd3IXJDLZXuAdXUaA46N5rW+7JncHImRAsbMojMQnGfl0S4pNOkc5LqCgMVAb2BrUbvwJxeCQYd0g/pqSyGYtcONNo/oCGgyHr8nPwrtCfv6US8sYFNgrhc276FIpz25+AT9viL/JIJcGPXjb05tM6g2oEkKRCJwH4K095cw8v/0nqsJm14XY5N+NPIskIDRJnlWwE8iOMAY2iHC4nKTtx6am1NEMSuzQwwYI+0KguRgBKE8Kd87+IQOranLYl7RdNTdATcBqsZBeoWvY6vzvyIIK0Z0nSsaVH629ogyZDvwpHYpevztQhLsvs+kE28Hzo3dqS7E7T7LNr6k/4L17JBGnofg3MG2GYwdP1QwdGgDlo6CnFwFQ2X0FXgTPPo1U8D//VZuX1pAaWoDefBoEevV2uhGY82i+RzinHgtptM1dALmLaE+xvtN0UWoDXdbBIdv/XNU8aXB9J1IkNSoJ0vxc2qCmObl/q+WymdUBANQswibaIErTSQgvNNA6hbs0t3PJbsAyXJID13wEEdHLzaHGrMrmJV89XJz+bf5y4FQwEB40CNwJz/nkyiBti20LPOc7oe6zbHFxMr+SyUew2dw9ufW1opkWCqgDKCIgnT+WLTaIJOKQtkNTfmolq6TuRDvlcMK1kGGkNC7BI2x/1uT2P/GzGGe50Udi8n6IzaehKwgeitIeQvnj6A5duPcGfpOZLBTfSgOTr2Jsww6/JktX5gzvOw1RLIvNng8lP22nxmhohNXIgCBqT0PXZGmwpZk64AcCPkpEQRD6th5CbCGyg7JvREsFab1LXp/+KsQm1UV3Y2Q/HrhcfN50PN7OMytBmSsRX9f5WRsHSpFWphvd/cKuHv1OSG6Y4PEh6a26Wag0RPn+BOCLJ7ZII9qDxyqMY3LSQNi1IrF5bHRmZydqHO96Mw449e97nagl0rI+umpphodfNVbEhCJEYi16SoYp/efFQ2oHLfro3ItdTpVxHgvGtyHH+jf04AFPpJfqMWlwBoKcukx+TOp/739R/fTZ8C6pXyzdjPyXxS6sAD37xzD1MFEqc2iWb587d4aw3qQXk8HT0ih/M/F5999E7UVpv/hcQMXctI9H5s3se6w577+oRF3ugSX3C48tYAnKd7a40CJY7CcS2xSoflQFyLG0hCo8Io8xeoBpHRCqZ5R/Y0YC50ruNpma+ZJ/2yGVBE1cTcb43U5n/bqcBkPXJmIqNAacjW1xlaWaDCpaTqC8CqnWElRhBiZ4L+xugPfYPQ7A5LvgNSfZbHoP8xsR9peaLz/rbJi4amHXhn9sHhnJlNd0nLMNBxB9QQBkCJg+mWnr360QxUA9e+h/BEawo+M3rAM7qL6Qy6rQNRIQKAsEeJ8QVoQfM13e7DmrFVXiqzaHWB9YjHdYOFNi3UOtpHeTtJVE9xMXmDL1MFZl1yV99bytnKpjgjYRaF0Rrk92q+35AaX5nsKWgo1spalP9wv+vYa2u+hiwzyNSwzT6D6YBgAAEXjD606UP9udF539l3R/4JQoF/FKcJp9RRWO5R8Yatpiw6FVrQ6G6WhpAPReYApH3HJu0KlOkwZ4u1DH4SE30j5cvjfkkUOIvCT8js7joy6q/fcUvBNhmw7bILDfnudiKKOQVhrJIn39nRPjTKrelRX7Qf1YyQnPhRXyQvDFmXFAY2hXv5D2/fz5vfj5uztxdECtX4bjEoQML0C2ybDpXwRiRPT8VdCvN31ERu43tbmTagGC+BX8IEINo2cGc1SzCkuXRX6rYGDNKXbYBfRVFr0piCs+AoG9RdzIeSuul/pNvLXz29NIqNkj63SSo7xvGT/9bMKyThEGABH4Ok6u6+A0ufwFlD+Hbf53vLbzmIFGPz7gNNzZSAkhRvY570tOZX3/3NX
WXkxWXlQuRQQBg86vcOCtIV7ETxcSIn8HQtFwSkR2L4ZCErAyNKusMvXzmcuktn5OEHLVc5VF9ppZGiur4hSMxHAM5kpP6ppMewYqmAjYdWsfi31ATcItv5Jm8Gc1fM53+uD7EP2WHqTZjbPWL/7fAzjt8v3jS352ReV88tnM+SH2YD3e7aXZ6YmbzpmGvVDxeS8uH/Hq7uOevjY/+reB2dqXQcfUDNefrcjSg0IrXkHbdXk2XROHxq9jd0RT4IKuWXOsNYQzNOSNbk8DT4cSQQIlTcvDZRCfAM30pLPsnrCTQdeDkUvrzGVToR4+o8tcc+13U6D8ML3yjQMCmm904YYWoiTqB/vVQJFnRFX+JcsgnHtsFqNxHO9Axw84QrhnJ7mjQ/nb87Hxxjeh7UwQYWR15ATNG8MR4q1XxsPaAoOpuHDbgXmOYlO3G6n4K05TLCEqOhZuw+JxSzUGNHs0LCQN23lS7spCDW/Lwamb7L+2+nv9DqKP/86eNeWmUAgGKReJ61/3KYYHYONLfScYdVFRbHYNjaQMDkcmhero/4vfBstJEb+s1bi0IdC9k0V1jghHauoYZXShv+T/LrjRH+ma5Rh1RmFwDD+2wpxO7uTBKolk5EZsXby07KadwVl05L00otP+q/zOX14HnxRTKqBJld1S7pwMxaNwxiAI9uQI1BGfSF5pOWQkHv1vjbDCIyUfsN9dJlRsm3LgYm4OXmSaW+wdeIG3fumHhb/QL3+UZdt8dVJVK/J4Uh60TGqqy0gU3yYqzqXyWDbclS2hcA7MJAB7zibdX6QNWPRALVX0t8azUD/+QXnIys/PSW2LiC3dolK6eeU7PWxEo0x9bV08krYQrPpL2C10xIURUTFN/Syr6RwA4jjDz2tSA+VmCLIBtD2XXoZo3GNDaPRez3h977JfKcy9/iFDpNrd0EBen6bINmzL425nxgnCuzm4hVnIWrblrSm6OS651sXNubebNf7HlCGjqpviLQ3vcuYxUyvLipNtFJjFPf5Be0O6fZVAFwsIMWzaLGs/8SrrBbZ0tA6YZcj0yb1wvs/iQJnxI8QByk8NdVaRc3KLOQ00v72314n5leNjA2crqKCCgUjmgc6oAjygGJ0gswG9iRdr16bEHFk/buP4wIc07MpAkO0KC3CETaqkmNpda+CjYT1q9Y6i0JBuXz5y4hDKcf5RxIO/0+a3s36JBVmHzUqrSCxQK6lJdxHCq6iRJoVDaIINGT1avs9YjKK8FqwywBB0RtFuBDnKRPED1SvyC6jJ6iNqmKLeT1qKwBxPEmmh+qYIlPvUwqH51joSTkKeooocoOA3NgdJWmwkTiehyYRJWpaav/QwBg5K67+kZI4vmuOXGuKQ6kjvguF/F/FXO8y5ZXdC9iWJ0ooLcF5tK4g9fO6cmMoMcnniQK+oMiKPPUtjMWUfLbO/k/jgWjeVcmjZmeFSrGEa4HnWtOvC7fo5DMs2R/oXshMhtidJ5rB671u/+sM+4miElQnS+zqFvdmqOJfPRaols72MheYe7e562U4RQIvN4shZmNvxZEQ31wIkTU/oSurypQ5D0t0MJyPToE4uPnmiApfO9fhDj3Flu4nnHOOGvpCioYF4J8KRFMrmPT7qPk+7xTyDwFdUGsQUC4IGq99NrwAKDqZYqEKeldJH4lP/mYs69vLRAlxBtkr3shOoSj0ZH5EAuvn/4CXz/xZg7m97ClxQQx4VuobgfwL3YcxmUEm1pYyCPDjTzE3qxjxZLVxtAQk8/8EzpOAOHqbChYeDSkdZn8BIQdMwF++iYU3UCc9R1SZs1ltobqpwOsqaid2MrnkeAftrc/2Ofw2RaGnzvVZBChGX8xDHvaImyPTnjX58dwzW0XvAt2SMgjN8NKchCxH3eyV4cyME5Hnaaj+37rftKx9b3YK1YEpJODVSy6tPBxqI1/Idq83dTOlTbIOtisAMbIs4EsNN+wEtxPjqeodUdBjp2Nz/bmu4y2Ojt+1EB+/7RCeZeVqaqVrda3Wuz/mb6ZGC9MRQiSioXJ5gDwGAgycgvoQQidsbdxt/h1EKltc0eiwzsRh4MDPTf1G1ddrp457KmxcXQ7kFFYVR8bGyySzTPaPNmNLjbObRIdrSPtxFxHNbPLskcxvIllekk5m126OzGwnIkZmGxqPnv/Y3rL85vy8OAL01qkUyi+OTUDS+dg/awLw01ez6mUO/RQWw7BNroSp8pTKV0oGIQlkNf4Hcu/8j4XzTJYSp3d4xRspxaWIPBu8AP8byMHaTEMHlLBi1EmqB/DYtnjjeadgcV4TEdbgLhCpIF8iPK2F6cSw2qirezbhfX5N6mg2p4pqBC6nlf+hsBUzZGqpCQu0dddcBkyyLcUGL1fubn2dk6cyuOSmdh1lHlJmztEFsIC9DmemUFr5XtBmETLSiHKzj8OtpK/5pnM+2xijQfaKbSpp9zw4M+ozvxMNGuOUFGTlW9k3UUrz556hZRsIjmqT+K5RGSJqJAZGtvnPMI1WsrGwppUW9wbvlKQnReX0AF3tKqEqnMYKLrDAEQTTzNNjNekx+ESxeHcyJpoMHjekSURgnsf0phq0tO/0/pIB46brTrUMXhktZFiTfZWCrQU8Sort1Vvp8ZfeDdzpFYdkhSGxQDtoEt5f+n4KI5LXSHuEaPq6bfGEFuDtfVdne4wMyKCJCMnWCyvqw8Q/nX4lB3hm30NNDEutrIk8TEBdoF+AoxAOhDPcVTmc2oOkwWetl88fyMKqW1VtdjPIYNTwEvIN37BisHFzFsxmW3WiejDBWkVrAsNW4KXoYfVSlMiYI9YxaBV5K9QybJezSJp04/cA8vUWxjBqJ0GIqlqn4N3kgeSp8aDMdSR/RdjluswOMQ5Dbcao1kne2bDm4eb8e2diqs+uHtEybUBKq5Nm1H99XvY0tNZubRDIwDSG3O4H3Je5ALlZo2inRwiOljvGLonOFRmTCMMQ7AWTj3vRT/Ay4kIdz1geSw6QUEop8vSyGoJCFhZrCxaNAwPfpHRoeF7fvGNmy61hhTMHjXAPxvLa0y1D/iAOel2pN/1vkSqssw91Lbcz/fk3srtYQLJzIbD+18kcLbUpfeg4+bmO4vpvKd5j7CfMtpgNClpSSt4ikIlZI2PrNLjAO1KYBAlbIKtPAsJ/7ye6T29gDC5J/SZgJcn5SaN75PjVkhAEKhHfQk0KtziJmZRECb6kpw8NEjOaM/AnY/VSKV9BUTJIqzsOD4xdUQyKSsKcwEoA1YITBz23wratIsfaY65toNW2dA37c6CqrurcsQnbCTHUTgsmsQash+XvbmVgPuxz6Z6BMBEJ1hoAQGe0061fkrBbIK+Tn4B8f+YGrd24395fg5RjHBgKuq+1WBX8ITdRrhGEhiExjLVii8SZffhReGSsXv2bLYgxF8DmPJqeGREg+gqQF6cTqiUwrV2MhHr+TEe5Haj8XigEbW1qCI4N6s49bEoD0nV4785VIah6McHsnULViFRaTSMMry5or+6UpLcahEM2HgTFHQQHkhtZgwNywpku82rUfZAPaBjheIEHESuYzQ+UZPv22rePeDfgYFCjmLF+tE5A3b6Ua6X2Mgva5j6R7zPk4H0hcpOZICJF2yOx8fH3qrWuLBbuR6py5eO8h8RwzJb7o0QijHlwPDDekd90gJLduW97gZwgywnI6sS35uOoPS18lo+ntfWG3eIjE8164bhXnAZcUXFB0q8rAJpIhrGDK8BG3zVJivhQmI3Erhp9TqfzNhMBeKi3zcibD+8L+xVDQ97R0LKUvNhQX6az7f2K4PyPFppK5tlwezDTl4Tf2tq0Qnkr5HqS4vCNkd9MbRF2L0nyrNav/eMttKa/4wZlUEYfBFxYH/fjFHuahyEyHfCi7XnjookIhcD8spep554YX5hVrqAyBAa93qhFIp03kkw8beQ2R/D/tBV8WD7O94lwrfLQY7UM4rI74eb4hpxpyHO73E8TgyzbMjoU31mNJByeJ+YhreDuhlyn25+PyONwVL2CH/ZxkeMPVZgkQAmjj27PZzfEtjoPPhz33xdDL+imbhjjaHgQCnogDiNpBJHqQlZ1yQlelvchcRkhBpyh
ZEKkgMGUOqnVzqRaaIRENkbXKAjJJc9PMms/Hii4Wr0/297MsySJBL0xwbagmn4iH65eY6l4v8sybMfMjCAbUzkktoY3/IXersrgqFi3DtMKxrmqbuGykAxlKft4W2M3BoOm4t4CINc36ntywJcA9nwuofxTlGpgSiEVVZso3s2rbvj/t+ltA4NjBTn6Uw3ldpkdHBbyau8PlFZrvX/wAEFjNQ4fl0+XumXAMKEhuWSItxdj4b1zB9wBFB8OJQFy6tLIsnwnXRlDKXAzwBKCDMBzDK5sNbSK7yAy1VJLwTsBiMw4G9dRwVejEMwqvKK2YaiOG59Q6DXlKwy9Kk57//KC7TpOXbOEY+KzEwL+9h9jZalstD6nDQOTudifPegNq9mUX4FMIqpJUA1T5uD2tWN+IFE2+APzM1MdxJp9JeH5zgrw9eBSpGVK+bL7Ma7/M14m1aWwp6gZPvsozqcu3w9eoiXZNXZDthOAuMi6KvRCETqiBfgoAAQXWZo+NxpFU2kfP8TgLsyHO467opLTW80KDb1ZNf3oAuFi1S0GJg12UfcHDVneAgOrQm6vVgOUw4n9Shalw2MDZx20mMEbGu4t8Cz0zdV6cbFQ/X4yG9tn+TqVAgiDbz+M5m62OOnHzssquyLhLnWJ8Y1j43um1VaURrr86YyqDDHKbC1gie11nueqWxZReBeUEWYbGT/CiPxHBwJuKzhztiSGW2IEjFTUhWSyHP8CSn7fH6276yHsMov45p/FmFL+H2O5OVnqFLnDnxD/wkWisDKQvZuSZd2/Fldmpd31+ohnC8Ewwkq3iswXqPm9T7dd7x1KqoSpfyKQzlfg1Zg5B8tX8kOlXrgs85b3rck/aCfcURtqlPMdIrqNQgYhCB+9geX10wKqoPNvpkQLLoAqfnwXGPESPD0Bpp275PXV4hksvimv+xLR32ITnFBf7M2onyp2om9Z5c7alJNMtC1h9nZ5w5scCLZfWS/oL706BCjkg/aA0qrUerIicVqCtjNoOfMDPGAdO4rCCKwMetFeeo2gK7CHSQgCexaToM9SqJwBknE9kQ/aKVAYSW8VoFsVEi9QNohYjHlKcXcFeIiC9q9j43pPgN9gTksKtPwikCa6mARwXc/0+Bq8vg9kF0fSvzIqqyAiJxlo2fUMCc+rGy2MtqyYFsSq+Mx444MD+hlPThUkviZOto86esTS+fTeOOMtPj4symbKAdtDjkGZSWQ5F6tNJLdKsn3dGFitbaMeiDJ7G5j5YMraeCiSXQXD1Y+Ship4nWbziwGoJbKH5idOvvKkIbE/yQ1sDWjnwS70PVJx3Tk9i8PTsbyLsm1vBZrDTD+M+KUr4cDAjdGLh+fniPr/ZKm8dgh46+gpvIoTCcvPv4EIjjW+8TtU+vA/0m3cgjAwSSrXUh/jh9oS+W046jKUuW8oFyvKu3oSuHllja8+90VT23/n70DUXP5Gu7HaOJAo2QY0Yngw6fbYxQQhti0rd6tTeDpvQqBCa7CP6hd4IUBPn8b6UW76oF4KwFSQhKjGYvpyf4H0KFPUPk5JfHMn2m1Vt9RSyMGpCQt4+tWh0g7gwNJlsJeAmwfI8O2x5m0gLp2vRhs6RACAUMHGx3rwiRFDeXQ8Oh3huavXtVcTLVdYaPcoLEGlTsP7agluTlYJ3ELr7PwSNZUHWooxmKgyJQ0zkFiD86BlLhlQS2zKPkbFvfSYM9KQcyrrF/vp9BlTnhAdjxsDgmiRAZHK1spT1zh+0pYIIBEXK4EK7f5TVkvsr3DTACLb/PrzLIFpPLserXBiEpeJMwpGboZyucdmB9z1nQ75IVBXOi9zd2jLeDFp/ouz3yR8CcKA6HP0JsXOzkm6E0e5QMd3RTVqNDILaay5gZNKlDHRhgUhXVOdvBnNBwLs1M7MEDWjg9/Xw9uZ4CXamOmD0foQTZthYsa5lK8asfHb+g2vlF2XlWUvleJafwJuB198A5eyYz9+Ag1kYNgXfT4UV6Iu0/1zRuozFOXmkiPTF/vcrYJ0Bs+/TvczmANaAEoI+sgVSXlbaXlNTUfRE1flbpVq1iAQCwxdc0F//3EhnQMBgYMG63dx4BWSwEMhT6B5SWiPkQLjn2tc0UUIm4sSy3Ln25VShBHwNOrI4aI7oikKqJ6CP0rrdBQ0vgTopNFf+IpfL+y+9x13kJ69cA0pgUwI8Cn0Ib7tMlqyaOdnaM7neRh9as4fINwucaFZJepU/Wi8dNp+mGsg77xDSEDuhhyMDCiFViuHQCofX1OnXDJFQDiLvo5+riLBetmCFSqJuf6YbzPmxCriNyTCcwAoaP4J288iC2NOYHSVt0pmefYHb5FK3rZVFx/CKZ5NUKH34fyPKT8bP/dXvl0y9tszZ+TCsu5vJYayWgSqUTqZaE3pH6YDJ7hsUizkannO12ucRDx8oJwbl0hL5rTDXlq9TPEDgqwfqqVJScAcFeIufsD4OWIZqMc5blUbC/CcTTrmt2YsDlaGEkpA1qCQBTScddsryXrS5XKZqtsTaAzrBroXz/+DGpHGMXqyPI9AFjDsVxs94fuEZ1ihKasURx/7TmKfHKFofZdsqfZ/lMehvJNHCcYZyz685FrlmMC51Jg9JYzzaTyQg6SEgq5IruDk2bO1qhZ4pjBj+/wCegBJ2Xl6oRZWP8xprcfX4py4iTR8Jg2iRlLUHhf7ZzKoLRPm3r2buO6mujmXR2PpWKdl+M+pfwnAZ6yv853bDprI3H2sDqY9hhGnuWmcAq9pH6mZaOtCwe8ccYc5F/QyzEjOY/+n8BI5uxOCPUgm45SgEJBKakCMUSIHEMxZGOT6J6V5Eh4MSJqlM/YkoLMOujDSabNUahwyUixTI4uB65HQ6alwG2I8W9zoaTSqUtsjWOVczcqoZBQmQ564OL+yhj46JmzrTfPnGHmC8ra8seZawgX6gzYuJxuxe6auzn4ddY65SSre3/MIpMAE4aWvhS6XL4HKySZN6Gv+k5vxo+AJW8msfXdn3g404MUuugT0xV6nocuoyUt2O2Ifku+8s/o9NGPSew+Cu0KL5TnW8wX7rl9CXAiIOdaqsXSocxoqtfkRDYNVdhoz5nBxs6hBQSPhamqfF50BYkIsYLlNTMNKbYoleI15TPtGJfetQ2hpNfqONDaOTxNsSKyxsa5DTIVpnKs381F8trtaxVWDNwduBRa0lpQ9Jeerh6mx0QsoS9n7UUnZKjCYSXxwwah20wm+EAyEOLYWp3zcQliLd7A6Qz40/tIBby74RdTZQtMJTszMAE3wlRoCjqCd2DnNJgwPfKi1yubT7oBNip1IwMFlfAIfBCLpLFHKcaBk9+0aSHDPM5UEkOWsgpSdXtpzN5L+/m690mymth2uaUCRMAcjFEbm2VKYbWrHXX4rHz7InxwSBnMRca+4k/Etws7P+3Yvn7PDeapp6OdZbDnwK4BmsgdBFZNJgKtgz8KsvR/mblyVL0HZpZBvQz4iDqZ4PlZ1O5+M6tvhohNIMFIYnQ0xQaROnlsVUZinl+rgEOyBo2aMZFAwgxY91jHcdxyt1QacpOLfy7cAOI4EGhO43ErFW45Jz+MfBtdfh9N0lO/4i7VeRXVIwraZZDI2gcekxV1jW01ZcZjxc/YiaOu8zjWahaqGUi45Jy8Qd1Uv+p5Vm7sOJ77nE/tzDmZBZy0Lw8sCOdwHKEo461uaTDS7UTeWXYmfeWvtGN984E6zfrJfVHJ9EO4FD91Ok7TwY5BDKHn78VmQ8hfn8lKHBIxWGs9JvDp5aATH0iHGvVICnqKZjgFCVldGtX3TD8Pf9o4elCDvTyViwHxFZElL3BddbE6wxD5vrFzA2fgw3P2NsqMqDhFLrsODPqEMBiAkrBxl0ZbjFyZ4WVhBxe4YkdkwYQW2pHCBj7N7p0pSxR37ggIlVzTc/1didfYTweDuq9/G/abDzSQlPErNQwaSDdKzJ4K8+lB9b5fZIXbF3p0BUkhYM+t/R8A6bU9sNu+JWxIMgqate62AD4gUMwaYJNO8HLq1lJ44FRrGDU8pRAZAIrGKyyrFcqS6EbHDZkKqdC7TpEEE8i8Cfa00zigQBIa9+PtIgZtW7K5lpVfP1SO+
3EwDynDNww8BYhtI27leZtHqT4SBY+vJy7GYyrvvxi/2oM370tCQhgeIBZ2MswG+FIvRMz3vnz0IZQBJjD+pqinfIkTuPlscw1wQhKzLZzDnLvEhHpNMrZLmynzcuqGLwTISXfkDtCKn6RgmvDlKBWDKo8Hp9qxZm/yvnPe6Hd7ClfeWxJ6w1nhuAFK9Zqoow8ixVUHNIiSHEKwA+8K9iotUN9q30UZDBy9h43nUlUs9mFRbhzea/o2MvEuGZaHY7zPwxl2eo28iPp683iUjmKn8DN4MWT1qKiu0G5c2M4y2bRcM04ajp/pwZaX/FPJt3dNpIjRcmEQFa717LTtHp8xDnHCbXFF/rywgEMZJNkWSUaeoG7M8TkkeujCfMGLaPbfkCLIbdH5ABEpCJCeuzfXs3xgxebht8Vf57oydUcLFzstzskakAQ+u6mYIACpqXRk5x2e6fPNBWnOIFDAMX0CsQtj9zVby4MLt91iG6sIgFwBvyLO9w6qZAd8jHtJJWnuoNSleDOjC++EHma7SpHxJMAyxPjliOz2+5tsR+QN0Xcn4MxEj8zvrk91teJGt6YA4TbL5ikLM/axx83SwRrT7jN3F6wacT3mS9zpYZZEv3UVltP+UMw+Gm2FEuHOOEzpLQglHUZDdTMrBxqq0IRtuG8K3l4FJ0loX86RL805LhDqXDcQ7LYNbF3Ned5iPG54afJQq77SXLxZlMuwhDDyCEuRzmdgqLDhmAzNq+Np5hJwNY9bGzx5Hrqh6lEkgw8yZsKNhvpB7GhHGHEBIR3eGdvSgRkySPwiQek/sNngSmRXKPRhBtqEBuZ94/iCFRosN5GsgBeenCSOwHPMu/fOBthj04lbgyYs/lUnYb7vZ3vK6MmkPO4xiMJebpLhSXfB6vWfS1JOXK0X+hfnJqGGPi+/4EUicm2gMI6CHRVDRrE39UjTuSJp7+IurU+q76ur6TBvopRMLdI82mG/vymXwpLsDQxk1Iqkb/aqlnaq8v6awnfMq7aJ2I8ET/vR386QIu+GvWeNfWXYf11j/keY1I35fgtd1g/23meM+fjWP1cE1zw96+0X1WGoNAIWWjP2j6GtHYVGLTrZeY4M9fdUMlf7bFG95EoaxO+4TTpdBPGRtBqeyo+HHhIsV49aZVdwV0f+mIUSRgoR4f3DfmuX4TL1/6Mkk60CvScCbazYjz/zrDvz22VPmMNWDnltU8GRyLMnysawG5QJlV+BPzmO8JumVubIYMBjDG6jXAHMFykGN4/J+hi+Fau8pF34eahpa67pxJXYpgdq2oUkDP6G+wChycTfYiNmx5zGYScEk8owhRvZT4bJNmtsmNP3qPnAGVrqqArBH0sxyeMFXOOHDdyrim/u/3Dbk1dVcY00Uy/1cNE7dtYX+xFiVErLypxJwM170YqDfhMqFO8Gd7FGA+UIwITjA5BLBByVPc2OnX5vQkzESRvwJ18gZ164PJJyZ5NNvQzce25MttPeAZwZFwPoLv86UCkLVj4VRtSK/T9IED+eIE2dDjr3RZk0nVdhDHe+blf8Qjbz7NR1tJXL9MgroW3X6NYcmnZmUJjMJzNhcmYqRY5yAjmfCi6Yv2Iha4ACmQbQ47W7MlqMxtMeTotuKEPFxMuQF4FvmZIhxPqm5L0xMpiu7I200JAE9/1pKnIcHQ5C+xTwwSGRM8RjPBqSxoaDLAWbEez+/n2zsfJV/pa/Dqh/ZUUEfVpy+oD7FSqntguzUq6fZ9brxWvSAqfb8mYznSDF0QwZ/t2UfEIQlynLA9ibTmsmihT2iEBzZBwLxJy1FzgSlxXFCUH0Un686S0Rp4D01G58lsfnhf+qiwiZrK2LotThvAzEPjU5pgfKtOsPyl3RgQsro4+TJUsWUvqmDUPKQconCCQvTFkXDNUhBOqPPrcuFNh9THAjWh2ESHsFCL7wlqv0+z2of3/ROKKHxD/ePFKZrDoibnVzz80xqkZLYId/pMuwCV0UXSW3y6JfggPM+JX6jSADlOl/737snr7wLerHW9rBkN50zAm5ZH3+9W5dGkmUIhqqW8BohdDNiO1wCIdapZWfiPEjPoroxwsaLqvzr3kYbKCrLdRDOgORX6fH1f9Tfslmoi9DNpAymJKTzU2HrmPfE8br0u9nd87bPDAQi8aQbxad6WAczDx1U4Go2WsuYZIzpwdELq37dkFk8Q5lNBMJPphtKr0HkrrrqMNQmGeBc7MkszkvUkpI/UMyjYrIEBXlDJ2YSBe1TS6GnAYWQkbG1SBHEUu+QysUaCjxBgknVKI5xwLaVAVXx9j2Liz4vau2b1YL/2EXe8VJqKAnf1wgMbbKpEzsUkyGDqUNaylI3E8ikt/QSxxUu+R48jiwcimC8MmKXC13LEnJi3xCIgIABi8UtvvBw/KRUlQsLB2zp8OlE90xNB3P88pAsbZ0VDA3KyX9KN69w9XH2/H32WAeSX/xoL2r5kEB1tno918D0mhMW7QVyVhs+oqGEaNVlCKiWogBUC2h81UH28IJ71s/xKAnibdRhvH23fo4Oj/8hh/U313O2lwilvWbOGrCanWlnDRbFnWZMIoKN7MF47zPwc3Y6PH16uq6n1JLa6u8Jss/dBbFMp3V8Arj+shCxMBhF0aT01ZxC82YskF2QVomnLR/Ec5Z5oz2EpefZh0HTDWCr7vY1j7bAvkz0Kx7fhrF/zXzGgmLlNnssXv7TgwIHKavEfKRaFm6g66wXd2iMD3ExEHLYpY8XTNuvMCIB6BIuPcKVLe/g68iOoLGRcmenEGGZ+hnd3i9iL3dP2AnRh9F7OulR+MIzv5AilopcFjK4nLngbFY0c7TnWVDx7pJDhli0UUFDjJOP0vOcKmjUvnWF1wz2n2p9YMYvLj8QmeQTYiDofoyCcCEcO6PLkMKem3Pd4XiAQxLkxqxS07i75CQNvKHQaGgG+06I1Ii5y5pV66NK+1oNuwdxeiqZt6yne+FBjvN38ILmDTbGcx2Vd1SctUsp3pqx9msfiuD20vZCTaLcBe0splxO0grGyjBEyYujtQt4SD54gROo6QjqaQTPZvjDVqKUMPWSxIsvfo2YtFlPrqol4x/aoFYCY1OM5V2FDH0tGTIIGeuEdxebi0+QCh/zdvfw73ZPngUcyqUzStsSBlQ+GgnL+yil3Z0HsdbvHoAC9jNTPPuQyGwgL8wY6tqjj3Gog5aElD8lInud05krmETGNAm6K9f6gULnCPtMizcsFHJdf1Ku0Bpr+VHgeUIvp8JyW7SkafgurA5wF8pi/jwIquoHiJ7enJVQ/eiotfWvNMtp8TTOsSsGFSCVeXXHCf3yrKscOQsmB+Tv+x7wk2UnJfwPqKOEBaU77OIuDeUGKHTgo3wUZ4usvKF+5gkIYvYWU1ncxgxYRyY7NxxOLEQVSbe7BQZAtffBcne0SW+IgFHwVEJS98ANTjQqzPFI6SxIajh7bsx8vai5V2jQKTvxNWk4vxDo7RT4Agx+XFGWg2tDNXBv87p6To28B9iwgTWsnTZjeVblCPh+apn0lyiRVTAocuJyBJqKqNuS+ag1JFnwdEEo9UNYD23WVitX1jWChOzB6BKftz2OnPHe1tJO/gfZX/zqnum9Xs9wzBp9IM9TnAOKo1dYVlAmae6yKLNme+lGM2P4ixUAxR7jkEKTin2vcIgKmQet2tCoMkEZUKUN5+yjG6MKCEIfyVa2jhOYFC9WRBB1F7p50Q+BbpT3e4GrND4kYHGc8yC7UoXP32Ui0fk5g9FkkwEuP4PdM8qpfFExyzYfi24N+US5oyLfNEIKiuUsyVFEZOI36kyW+kcNUac7tigok/SiYCbaQGZtwM39W7WKDq9QnmkoHSGz9U5P+D6dmCY0MmFXBG2kUSGyabQWQzw6qC1un/ibflABxUOvSjSdLrhYbdyuJVJ/JdcGIPNGzvso6O1/rVqvcIXxBtVqkCYPAaG6vbkcYaxf9onmO12GnCNNeANAsMzS9oJwFOLxr8X/YkW+Rq1OAiW0cabIokPbSEXzOTumqIV+vcLurmaLfkp9sD28fdWRX0PFn1THphwNWAcPO6CkMwv31OHzdS2SnNiGnYDsWEl8NFzXaw/x
8xr0EvP5PqEIEtWpg9Z7tpjx7VVNYP1HURyCgjHnq0zT8Z4/CR2x0yTy8MslYtea8T0DGQ4ZcGmx83F9/wCufn2DnHS4lryvPL1J3s2vHQHErWkyKPrHecnngmTCmULA03Zb0IpzCFmYe21tbB7ot2ZJ/REPvJfof97HLfQFMNDpb3ApU6zQt0U4mZD+D+42uDAF4XR5d+RsrBfebmhpIzq1C5BktOPkD2JE5AxhPFdO4tsKBDuVWhEO8Hz0ahjVfRMBgT/Sg04/7dz2p9cQqg57L5MdbGvBXtVBvEKRBuPx71deUsOmAcatmgykG71mqHWwOpxzP6o1h6GAriazcQAvEvOv+m8sJmyLBK1tfjMvqu9Y5k+VBWEPC3u3LHs9diRV7nS8UstRq3DCieM6fjH6DXrHi2pdy0uhF9K+kpenelURT7HDl7HV1BbDnaMjrakUf291CbXY8qq9DYmFY4HNVW14ZUQIU2KGriom9dF6Ry5tkf9nK1VMELQaEqE2cKOZs3MdwAaBIYhWQQqpyDQQ1PSqKvv1xXjSmwFniNG5AfSS8PMbW3B5R6iqPSsfXzBXWGNvvds+GvvA9wcEVBC0K3VPzIDK1go+F3lNIf4ste8GW/B1Mi9ZGUfSff83Ef1S6+ht6yZmMXLsOTB/JKbqIQrizb9b21jYQf9TlU8sek0CNpeQ7cN0aHBEiEbR9VIrKL4GAmfZUKLkhGG9nC0UMgNAWhjK7A3i1WzwFiCkN5nF8bVpYteLCggq956MkZ1dzQ+foDozyQlhFttACwjoOtKV2+ZWKX6yuY1JyEJJzPRkIvHBXw4cRTk7Hi0NfapE5ikAJZrSLDDBEbeRobeB5xBOII34V2R+5p9kYORbQxIyRD0kiGFf5upXhxiU2TWeME5gBQFD/AGQBHuy5NFHPS5i5XBH3yNftnanwmwvZ6iEffIkXWDkoM1PjBiYNZXx+pMzl2W1g2qtH8Vx88Gazb00lVZFYU/UcEPFZMBn2jLDk7pTHGOv6E6avQAtEnJNvjJzRqnkTZiHYuQluPPFKjA7cHSBDFkdveCilT6HqYE5rzgAD9PSOSPcftKOERrj9EjbSSL3HVLMEgS1mCnCuG4rAdWqCIwoA5hcDa70DSNw8mAADIQl0tCwGcptj11LAdHajFpD3cuzwFI+AjPuKHcak0Xmk5fntfvreuQ+H7cMwC43pzVzXQkGg+GwxStBJS32EAQGVp0Jqf7pAnH/zSV0CEX5UcqxQHvIIXRWtTA4Dao5IURAYsEpcOm1ykztj+PXIaqzfjrxfrKrA1ebTm+aYS9xBIogziIvnj50tFP0puHmOMlU6VCRL7ClnEABSEAqvZbJSwH6vGKM6w9zO97Lz8GISZYi+kV2TYS9QUfqrRwOo5lax85srdXoMTkuzBFeb/S1IpjPXAyET9WL9x7ZoBGyg7Y24NqC/j2X5wbVdO/VjYB3VY6GP+IwcP8z/HbxeKoQc7KVFx8sqtZIGeUIMtGAFIxh66vZYrRt5WunTV5kJjY74zu3M/J6aK9ML2p/s0kJxXK3LAHUIpW/InAeDUlg5Ml1qY804SfL2EuY0zyfjhS4sY0Nxp6C1leeuydJIrTV0GpYT42+9Cjlm4rfMCDlDyHCkZCYVX1MhF+ghiRgw01/hwDbwXt6rrxpNS/cNmNfaEyox085AFjjb5ENIxPIGp5tI4u03XRACL5MXrb9hQwsbfGpyqIJHDxS4x4AVdv+p/BFn0dSbHECxdFl4bJsa7szHijpcm/nws0/p5Qa+uvZcUG7fsxe726Doc58yXSKL2DiMOOaenQOHJpD5A76sar7t/HbVUpSkC4n9rp0o+mQsBE4DJYq9IM/S3dFViwaIyrbLKeQARF/p4jMWqiUEK/EPASZpapcNU57vn3Fp6KgBokzsTe2UWT3elFPmC3aZni9CgoI3jEUMK+YzAeLJoGn5WfljFzMFKfIJ5Y+RbM9ZfT4FcBGJf3TYHcrUQhcS7Zbq9Mcpy4j9Uyj5mpQuDp+Kd3utuqiXGy9q6+W/Iop7zeESuQxNejd18/6wSejxRM/AAm4YveXpt3FK5ajv9kXJWgEn7HdUMn/zA1lwT/UvqbphakTyFsp54Paxttwg6MFHxVY097Z6AmwEnOVb+nEys8r1u9Ut+G+Zuvf+b0jMowPopUyqv9OMYOP5wsNnIzdQ7314uiQbG8GMDxUDbGlxJwpOKNdNaYbOzzh16jcsxdthb5egtlcCbRXq0BSGlXbRte7wQo69cTV+gKxkLZxeDUhS/X0l5C19g/gZlSL2T5UyrouqeR1/UPa3X/CQBFUdTgi46SU1edV0G1iolfzXohrKRkCUOYP6HproWHa8Aq0qisYBJ1L9Ekqlf4bNvUft0QmkXl015b4FDFUAzdm62UvZpYy2UM0mP+oLIkMuwlLm+3wQKaf0qGulK4Sl0vt5DUp9wL3+OJ+F3W7kfI7BoOekZf0XqhOyzr8/+nEQQOId694w77C8F7ltj70jMEMg08LBBkpgxvKA6tfOKMzT1qLzf3ZXtOkB2N545A1VkM3tAWH8wcXjf7yPgT0NQiKj9/vfNYCGPZ0AR9xaQ4nOUdWyByxvdQqIS0nzyWYkIQ8MmHxgw9xq2VhK3uTbggT1VgkLaDkBYO3W0o2S6V3sHprV156iICM8IqEMi4kQDgaSDWBES6xmqiANe7aEXiMc5z7/ErDC52DsLjG5x/CzJjzSvjd7J6HMJM72D3B1d5HTb4M8YrWjndqkktLor+eVX8ZUjSYdufKKqW0TQc32xSjMPbg9EUUOjeRyOfNbJwy51mZ/v7jIN+m0se6+X/gtuCifKwSeX+Qo+LHeYsAvh7JqOesseeRNCmesRoQJjI1RVeUA8WDmRCpSDwUHS8InYBB5ULa5spWxZDJK80ChfM/9MxS5VpKn5Sj859DGmXQtL3qL9jlSrY9XYyOhMkJO9EAz3c9Q/qi7RB6qg5hYSjjzvbfq1GlA1OxOPHHNz5kRnMippdgNOtyrGDww1pfu3n0uAWOjEXuXdBYN93/j1E9PWmvywoiyZEWpfkUl+46+g2Hhf9Plt9WGmPqdi0eUee4CcxKV2iW7glO9ev7tcmfQqix8wa9kH5io4vK+Z4tfjMMzqiosha9idEIy0WFkq9pvwF+Z9iCvRyDwGxlSxHWuiq+n3Drfuzj/lBCsETboQeNJ+BXPAWRLLpSVlDcsEIIZ/Kkzxul0jjktACJmj98GcDbOyhnjkgg9frXkgSkh4gEQUFDH5fhJ3wx8H+y+LHMbrXG2eyQf+zNeOtC9NPEWepgRc+AvKAstsObvy87wjsUg/ihN6apVP/Fg/AjbFsgKZPx+lqeFseP2X2RszN8yOQT2zORTNL1x21TBEwnIKvzy1xHJVcpc5xdJV3RBVLdfo5dXmOC3Qf2IbHZ/sHaDJ52TRa+dLXes454hFXI1NNlU4lqlzKjAQMTTltipShuER1Vme0vopNXpCEEuWH5hRzJ6Hl6hGmquvLgmT84yL7zEJbpmA/p+zqsLSiv6OaEa+ZFd0iSy+8o6bx5a57/+DgdysX1F/3Wr5cBHNjf0P47Oyh1WxFtEBIQLC6oy0BGuUqtlJ3+iUW1pCbdWM5dlK5jB9CMLYYFJWjcu18jdwABN1Ge4NzOsABimJrhZrWOac+u3WRCxH7PshBPuDJxHkUD9nfqn5EH9O2QHyqVb6ejJ3L00GOYG5K54gHiewfSCRCCwFscuh5DHccmPoQ63zGENBuwDfuJCC8jCyv1xDfu+gAIeyYmhm7wQkhRndFk1ShKQw3O5BdMYdLpbmQaU4tYcBXTPLUkmPOVQbaENVRfbJKATvVzzi5o18c5rl1NVTzH0IRIbeYwyv9mxR8Fp1z6ExmPoO8oYcaZBDkUN8jl110i+GmJuiDI0Z3bawLZoKC00ZhDuq6g8gmWejM/jxeOhdnmzt1ZFB7vBaEF2EjL9uhenKYkP+S+AZphwvP+AcjY4mQ5iceQEJ9LLjwPAGcUNaC9mVC9Vlajzbsh8SfrQJUFOybNjF06J4uPPs6muAj/EFBuX9ZkxUFKUXsEpTmxqTiapiZTqxA8YxtGUHty
X4xwF6GIhzsue2YJAa4AtMzzVViYcmDC6zrpe+zYve8IRpqxFlTVbS0CfHItKL5A4SVjSmIzV1hNhJWUUWNfxu+px3gRUKULmfOZ0WjFCGaAC/Qb/NNu90IpRXa+dPLwOyoRoPNx9+60MXmLan4Uid8eQpOuUrHecXuai4g4JoUQM90y8oeM1xjlpho1ZV/9atldbgD/Y6Ff20ZJeDjmY/X3bszvuHLgj7etlqi0NanSmR6BSrF4i9D+mBHKgvcd80Q1tJr9M8MAzSLi1/I3rigVxkDrZTvysXk1ng/VRyy2Mz/iJF6kkG3RqfuYRteFeiL/5V9EEWSXRCjnFC0r+4s9+JyNxKDiUAicjTt3LT1UK2osgWv06cDqWQFJzd6WViQGBgW+UZ9RRvOgQruF4qN+plXuZqa4/MXFoighVcgs0/I7XXfvdPPccmDiELyMBiQoloh7jLXNK504Cl6rrRX/c2pEG/rl3vbLt/Bqf8XH79Wz+bDrosZB8YiFDfXyWLRTRn2C4F9XOXZ/LPL3D6fdNYopgY8arILXOc2+4+qj6zMxtbnrsc/V6MCePtaOxOYsitKcY/n7HpkLM2QMkPcbMfmfgVft3ud8PltvYWhuizZwOiJS84qlsZuXd90sNGBWzUB56uL6DPx1OXaGz1fjfLXX/5Do8V8pfx90YOdooDsfxwJLdK6ar8wttpywIo3A/9N8bGbkb33AKP7lwpr6h9/6khugWOMY9B49TIv6FLSbD7TsB1JsvTrbOaCZtzpGaLyOR6r6Yd0Aygpg21Keg299dd861HMmtHagG6UlO5WsHMoEE8csmBUhv9dIZbNsTb4Ay8AhcJ1cN3O0HNCymU+dZSLXT3QYCo09pAHlt7WK/h5vEi1EfMrSXgkPXDLZb/aBdP/kzSlw9/XtNl2Yxb5Z+Wz7cJYMM7VnLkA1FZ2XSYWwVhDWgnHsRoz95IFdFaA6FqVsx0FfWebLcF0Mxq1h/JuhuITfVbTB2e0sG6O8RHXiXBZpd8K6rl1sTNtSkoWDZ8nOZ8Lp3DsDuqlVoAlu5tn9GyWqBREJfzhFP5D4t88rpRX7WIJ79m11dWXF1GUyoFv1pOkMdy2qvhIqCXvF4x7KrgUqGkDvUVluXoztl3S8nhyvSbZkuNrScEXq2KO1ZCk0/jfCS6eGxg8w23h+aw3VyajJ7FRtwGJ77LC+L0xZrMbFcX5kPlZSQIuoFeQw/EXFCBsOYn0q8aHdomSWPgfxbrzP2L9N1S0Z0Qw710u/koXHOht9xwiqzQaFE4tA4WTCr/xHhlVyL7sF1hvFRHfaALCPtUnu6iYxGiAX72BnnZqT6C4KtRgdS127GAs7aULCro+lV9+G38P7k4lqzLr4WcVSUj2r3XYftSD4mOibJ3OJWHpe0C69M8ZwDf0F/kD6kS5arKEqNU8RmQuxryliaBdBmeJYFOXGn9pzu+rGUBfPoitJhcLayrsIeprFwoupDPidYvCFqKRkLO+b97rJYWekF+mSezm5Sgu1SpOSnByHmubVa47Sl7raQxXXjJw2FbPCVRKG+9glmYD62tXfNHOQnoPLyoJ1wWPGF1I860N8KvGxACIvpcwrOJpBgAaQlSRhz/71GdLedZbuLAy5x2iHKF4TiE6e4CCZySHIK1eldwQVq253t7w4tU4hEmp+6dfqlYLNZ2H82rJJmJyWWwtRTieVMFph12MdowQMBP3C19mEbE+aa8EAC95RVxg9xyWrqSEtTv1Zi6hISQgIGl4fvvUhh8g2BMaJQ6R44ojmWdT5jrQBbXUTkWKRDmwaEz1wVFotWCUCgEpL0CK2F8aeWZdQxNBeFElgWV+OWE2Njd8judOWP8Iz1XOUuQJQVwxlygKuY+AdEx1QPGw7q9X2E1qcKULDmqjLDEUiMTWHuauL6caPV7+K+egmYgdxXJi2cC2U+mRnrF3LcQN3IA4ZhzjJYeMHMRGak5Z9GHaPmNNL+u3QwSpItkuzPB4ddPgvgCSaq+CqlMf1R8ReCIvMszRaFo1joBb/EWwQt/lq+MGFb0rlmK6x2/1BFlC+rDwDu5vZZ++VKp/iubrYeiggCdgY3ol4HTuCfX4P7RZcH2z0zgrXnkzoXG/iNRuwSlcTMCdYLxwuFPU3MO9xs/SeNBdd+xA7I1G8nGKNyJLNunafLZP8NpwWqUlZvB3m1Hhp1z7XugikRmsJRiqQaOtzFEywZZ8rxENKGmsgYZbYYnY1RoArOLbNednUop7lekpLNxWgKpFKTyAunDfzmoXaCh01KNpuJTkGdb0Rq1ANyLmwQ9MmD9HYAmwqs2Lc5sq+ZjJXd1M0khX563ha9ZsNW/rv5x80loRgQ8lKwe7m+mwugI4vThSk7yicUEzogoKDVDSWW67YUFDFLvfXF7yZHyZq878lsnC8fznP9sRR6d+YmyYGHdFILAUO7ozUHURjRnpIosjleBvvJhk+bj5qnmhu2ZkPzMUpQKCeGM8WXtaLJibQGqq/6kjvzi5n34MvyxFrqdnbCEJUuidxxc4WQKBeZMH2tafqAmnVENz5JxwnqbTUdzF8OLzJ/WouFhTuKRoJS43WgY1bYgzd0so4SDNdOHaqUmS8aooKHdUncPY2lPFGLKCinAAulp/QcAR/y8j0ygVKuUjl2UdWMmG2tcSVwX00WDAb/vYAVV2TOk95e7xR7l04DIHrXKeicAlfSRYudpS8z/1pJ6pLaMJBls0dqP2PZ/vkdDd4v8utbx76flbgI9/7zQQgoU3M0/3MEYU32DOv9pUFbzqZJoSpUn8etWVHHLtqwnEO+wx1oeLC1aErYS8kYiL0hN4CDoMghrMV7MMPiDTLvxQe60GMwVJL/zfzOA/XORwacE9oHI7StLUIyDghFWfS/Jg/WkFcrffNXZyD+QgwYTp07LVr3kn7I75frE0iH8joVTWRV5mlmy2SwA1+3/ZaXjXzzQpLMnV3puTf8pmo9912sbub8wFQ8N11SC/d2s/9DZKLfBwMrImSD4JfeXmTOYMrwbzKzdrftMVgRBoMFuc27FovWqa/ExiBwCEtNyccID2Y/zl0ERholKv3PB5nmAGT5031iRC2Q7H7ts2i3oGzhrMM0Wcmk9/5+/RSW2uvjsh0OCawvOBi94r1vDDRDGdiX+CiJGHJ2Wo+sbAiVOSTQyc4X8qWe23baEDT8jZuytc37LugenSb5OgLZRTOhcgZgFOkhqP09CYgijk8S6SINzs/sNZp3HSlB+WkPRhfFSIRt5dy5vCKOFPwjbXgtNh/JVsxberRM23kvrHg62CSxVyJ+sHnS03l0VUSu8Sn4ELq/NNNw9FR+GBWrkMERyWp7jxNgxPZVghmSGGDpNFBy7S+qLgJVrhjUlfcbJ5H5ln71iV4DElosPoC9qrhGclA8Eq6JTtdAvmEmpqhKbBYJabpkov+NhFMnw+v+LcKksPPTzmZhosFlWns3229tBx6J+YHMvaEK5aP/4Ew16+T1cklh59z4/hT77rg/RYk2sGtndzXhcnxdsckH5iGhPGNp1cOkcIA0tZfvUxljgbMh10nWAAOP2G1EnxJCLtyriUK08LtFAHzu0Rfg16wkao788ZsQY+yAEZX0aqdXiOA+mcixrRxeOwpcVCQ6/Ks5xtkDo5HbExC1pxUD47jwFkBCBSI4qSeXrtsaezVxnZMQc4AtlEEtYElU/bWYKLMFDhM5jHfB50sKajxlWvB5XRFxQNGM725/hejGOBdEHR8hefq0mFt4gi6Ft2G1BRR8vb7wYvFlhx8vSjaoV4qNAG/d2Nrl6v4RMJhunyJF34pePdsPHJLXr1uTYFtvwRlMd7JIKfhb2cQt5Hnq+3DP0eYLG0m9iSMRbT0G5cmlVuSKntLCrd4xZhwMO6ygrGHwSIC1Pz7K0YOlAwmxNSeXsc7pDz27vYnQsvo0hAatXT3RN+HJUP9pnU37UVFqe55wToRCCa3tLfEWwDQ08GxpWyv4TU1NUqdoVOsbkZY25ey5b2lDVoX2mlauYvh65JQQu4XqphD7eOyy2Oc+E/OoqIPcPyLXMU8Go8/qsEP2cSgENA61eTYP4au2rApCZyel4f7HTzlgDqD
w878g8OTnD9EWZxzZGP41NYzwGkGR5sSJIElZoDTbc5KbFCH+wKaASs0ehF4BGWT0fLSzBuDu/MJZvVazzqggDymlqpN+th+Y26ymC28rcbO7JnBQvhtj4D5QZ/0e1GsINTtS4/FRweYHRo4YdtohvT2ezqKcLarsKNA1I3HQHCro4Jo0QWForznz4dbW2wTPLYZ1fsRllgZBzZfF4vGKBftYvzkdmcm8I5+JvH/DJSJ4+RHnRFpx8I+QDOVOrneqMlnE1yfP3w4TsqZzlwU+YMDyrNaclPRmgcC+WjOMZpQ3ZV3G/F90dUAaHV4utZ5++Ia5VDAFpb4KwHYfTPa5esPCSs0VuUhmai7t5nkBAHBRQCpqK+mcNOhkA02Z6kHuQyz+txezAouJ7302WFGKO1K4aoqUfczUmg+zPiqWgeE4fcfRkDSVvTb9S7x0zbMVnDdj2i7ZgAZAzoFMcdW3IVLECExjEgQCcegTN8BgJnRq86w99FCsUy09vu6gnNANH759ybIcgdGj+UvbIJ1qpH5L73PUgOK6CMewT4a6KfjdNBrVJFrntKMOWEogdzFbQdjCGfcQlrqgWcWwKkpysP5PzBBLSwhZlORqurNKc3nTdE8UKy6jYT2Xx1TmLS+2g8LHBoeFxY300pgA1Ug+WCFRNm2k8T7//u74F7Zks1BIT/9IBKw7vsDLW7aTeh5ED4vXFUasfQKE522hXy0i7Ej1sO98HdR4MqPh6LZr9m+bfUwyv5h4qZXucVlyi236hSe4ajy+7miJbadXODzbOnkka6scWbx0d0WEBRObLzhantQnIj5Nhfwzw3x/bdDqY+7j+mvESTmlPm/ycflGY+h7D+S+Ut/whISruYjgTVcOA5FttY/gk2OeWPxaFVSHn70Zqaq9vQ1HamQYWqKlCQMy8kO5R0Mgot3dWV3yLT7EFqO5oPpVDqa7kW1Ng+ORvWJFT7ysTYyrlmiL1pGl1gyZgNmmcokfbuFegeLBiGL8/YjGjPtdOqQUbM9k1CnCFTmAQjJve/+9FTYzszalM1G+IaGFEdshMFkap3P2QLZ/30riMyXsqU3HMj4+dHHxxkNo4pucRoND8z7IV/odCTLAR7E3lynZr1Nm5MQ2dy8AbyOsPNN1smFR8/DqkO+uHsp3ESKCquzRqhUTtPO326TzcJYHdtyyV3Yp+2t+q20rliHqzoBGOWrak3dQkDJyo2xjLVT6nVEMsiqwn6/FXSGr3VNT5LjEFp8d2ifCpQ4XZs+WAVlMnMREz6DMO6bM1okGw7U1ywspKZr5d1hf62WUFSMIL6dD2/FrQ0LoIVxfakDqs+mDQRibHGTN6Je29g0VP/s9f8QDEPfn3ORHFTbjImvU6nOZhRnGz8XMQG9CdAf7nLygL8QfoOX2g/rYG3WmHnAnv7DYjy3DxcFlSniHWyjcxUVFYw7TJr/M1oJzPw8qaSm6MY/48SQNi6rkUofz+suj6y8r/q1KajVtfVwi5fdBVAdYI+kauRoQ7e/89EK4PIxtImaSQbL5hNS3cN4xaL2F/F1YFaADJb6j+XwPYX8ES3/cuFOwzqXZpeOBG3MyunEJX+LeDAdJD5JExw1AH/BhCGzffnyEYY4g3UDSQjlYpN1FCARRZLWrJuwKnit44GE7E6f+BrSrMmgE8XXrImtGhNo+l0I4EIDN64VrOk3WckkMROtWXOe4bu+pLfd6us6LDJkkhoHtvrAfBkhzHr62KCuPQtCRkhqCAp8lOruawYDk+ELC7g1UCSaSpbSYSb+VDyNdAEGWUwzQ/hl8bmEOHB/pvGqgaJ4ekW3ilwUrz1//Em1+muKLQfbuAa9LibWdi/GN71SqpSAmDYuJIh2j7Q/9ghkdU8D+ce8OGcZaprn+7d3rYqrDWEtyH1wrMhtvfvB4rvn6eG4BXet0tZX/lYJ4ML3ftnmsAwJKkMPvpPqoBuufSHkoAb8DuTaxtG3ckScdg+Q/683UeOhcxWyceQvahB7wxt0Xby6dWzwF6kqgK2ah/DMBx1czcXX5kwPCv8ZgJKWtTIftEyhM6S+KFKFKT3XqTyysaAA2z8KsiDFqXtlR4Y9wSh+1IW+uC7RZB09XjdVRhMgwZRvJFvNhhUDwGU4jOFLj9JaH0uspOC8AfH+Cv4F1sUOtsrWJmuZ84UOt2BltJYy6dqb0kLx/abaarRljQ/MdIHcxfOFqneyQY6xelYlqiGV1jNT7pd5YBm1sZfhPm74jMiPqNMvC0R3uS5xXz7Qr8S+N69tW0jpY25MFSbiTBAaAxJ69vLqH5Xr/5hlSPyEjqueTpAdo9eX9iHkhIIAUKyacaWxsiKCgQnaPQWjvWRZRVcvM0CfWqd78F3KJXbIV2Tr3IrSnDyEBvlt+OAyujmQqw3+4u+DcNH+lY8jC1LrX3YRR8CJhXJNXuBRonIM+SQ1TOonAifzhMTX7GhV/4kjy/KFDAIlTts/UBwqQR8KDeTRnSKBVI+w98Dynq1lGh5FOGYIDKAw4Suyyd9IALUNR7mkj5tGRdl847Y5UGcK1HKcDYiOdEXGa/3FlbAUBi3kow/TDQseSg/jX8bFy/MTVVTHPUNkelPwCPd65VL9CnU4rWH8syUdr7slCsNnuICY9UtmDFU5pxIN1CHYobOvsilxcRUpi++7i9rJhfOHzQXhwTassojo62rv2nV3yV4ZoaaPZ24lzUbQDzql/fGunquJsqQTWJX2RJMA1owhu0UYTUDF40shw8rX7mB8ZvN2ixuW6fG39axk4pVDTTxaoCZzbd7bfMHZ32fJZ3dOBpuARXd0yfY5VPorBpKiAgBQiHvMoOCRe2SzIR/ssTuqyutsGhc3qhVrEjuqVx7HkV9xJ1wkalnNGbK2jmsvvwO8wMNJNVutTtjrcmnLVHbiopz7pXiLl0m5sDn+uAYUQSMCLZqLEGi92ZgOzPszeVuPUEh6Tkt6YmygvaVD9SniRSJi+bJ0pDCcE2H6tzF5NjKYptCl2xK9mtNeDj+TRcLvUyWgLPqO6HO9Ccl/FMkXn+HL1xq2C14JutgQ2wInz7Sob9QXLugkeS/ktPgsDaCV7zHU3olIo3N1dP/bfBPA/LOQdrTUWTrcrl8KNr/zTDdSVJX+bLM4NCrLu2uAG8R/yCgaogse4E/3uAR8cby56RhO3lZUjlANK1j5JHxDRNFZEDxcmWOowMKVYdguqmMl38d2ssjeFgA4IkGwW1vfggiLchd0obU5h2HzQx/xJYY2xcr3A3aoK540DCPr4kRJlPK+zMI+9y3uxQ84x7jPos+Vxipq8kGZIU8fUea/2xbtppWABFwNsnY5490/swx33UzTmIwK4TbyHUpCkOGpZtldTYQBiq/rEf5eJSGICZA8aHQadnDGoJnRb//58AK/KPgaPp8nKdeeNuGIrzx08uMLait8BS67glZEOsBzlYBwpvL5AoBLQCkoSLxlqRsRti1Dc+FOcwVfs6VP/fntKA7mAceWmKk688ktZ8Krv18X7Vb3LMbqT4ydid7NpC8yE7AmLUhKlXVM/fczfDwhtPgnuNZErDrJQJ0xozzztm8FK1DRDh7JMAiTZiLeQDTveWIv5xhatLabiHhM20D6Rn4+6tFFzHAY1OTsw2v0ZDGiAq3UPhyot57xqY7M/jQ2DpoYt2KzhNoLZDiCfHuU2Sf8N6HLnSIOY/I00mofyLFtWTLN+sJPWEQH33owhhJWb7EAI3SOe9HXvm5b6A0UIlsBNE0GQ0W/J5Df2jVii+IJgRDsGzY50Yfslh1WVsLY4sCIyRB4NYTyrHyYsnvW4dvgVSfmaES1fEfXSpiw5Wabg2mSYDb2Lx2/4DuZ3WNsq1hL7yJ0BSz6l5T87UbhXVepv0a33y3l1Z6n0R06ZFqneaaQec/EWQWOvHW+Hcsfk4G/5B8Q7SbKd0JKyNd+XHb+QSPnuY/z6afgIyqs7So+Qkse25vEAoSbhFJ85/RWHh36TktsRVXizxSz3Q+9uizi72MnDMHhrAggOBzRwJ20n471tlWWlolI7l7BWyWS4j2j2jvTXaHNgskzbpyw/1oPUKaK4xZgfYcnMl/wjFoCWbXzO2JjDiUp7Jug
lFulATBFnWopH7lze2Dr2ZIsUBVxzaHN5aLkZdCSQk7E5fgmB/k31sbIykPeUkJQUy4Kwkg7TJg8rDole0uy5Ek+WqkFsIO1LHqybfTIOyYXmVo5H6M9tnSHve9m1nlzqYGZhpviSFegEoww/Vw92vzcP+xq2wnKBD52Qi1h7APdTqwnxqWpu0+lE/v0+zIP1lxrOrFXLakhDz2OZHB36CDcwE5+8GZtaQFfA9A/o2SFPfdDSJndcDDw7+BCzyJtcUROb5fZHBLzYMdKOryyRGJ1hcxNLxzu26RhB7uwB19Ky93uZS7r8y3v7eL1gz+YWGbhw0BAlI7UBnKSLBvNGp55gF7vE6369skHIB5RY94GxLI376T2Vahy1CYCM8X9Yo2R6PaWtU6SbDHhinkSJFcXPkhmHgTM4Qua0RMU5EoWEabNcogi2SP14ccaBPvLeR2e2wYmiX412qMg7qUcBNPhQVeKLaVG9OY2co2VTXLb/Tdttfwt/ArAh/ZSUgW1Gro8URpc/0dnU+R3u3b+7p0yDvqolUd9U4r4xwM6P1Q2h0X8WhA78T5w2W8tFOMLM/KZKEbmIbjdhn9DmBL0QQuxY3fDSKLPuqAJ0EXxHJiNnmnPmcfLdHgnRabnVaFlnF2GsQap1iGU/Zhc2PXIQmHevUUO8DowaOoFUtWR1QhcWkG0nPXl2Vw4StcEObT5YBxmLcT35l6G5LTTXdGwwEi7v5YMizWKtSQV1fqWXf20iK6ucqXoEyL+fu44sROPxceP0wz8mhH5WUt0KtWS44prT/Mm/NVeRCNjML2f1w5rSTIU2Mhp1apHzE33pyQXIAKz4XaqTMhdYrp645+hdDlCLomDJKLLd0mszruENaeYvETYb9RdtnMGgXrfs6Dla0K4oQu8zEOsJDkorqQplGGnr/rmAkBPknnjXacfsia17UtQGwNkjI12rWAvWfFRs0TvdMFLE/6IGhlEOjEfRN7rHRhqsJIjQo6y+SdCnwcxhKG17zyQe7D563Khxe/mOrzBS7mgoXUlrx0gqnEK2H1Nc5/Dv7vWQxyKTJp4rwKm+HPHbHbCHKBthAnsugYXTwKkd1yzyAeUdiH0geXq8iNS5Vg0eLM5WZPv4POhXv+5Afqa9AzxmXo+liYnMQRhpiTS7d2t3+Vsebn2CpdD2oZV5hdK/SkgHY2GMze7BhuYv5bOMLOwzqVzoSaAnxrfeRGy4ft6iO5bIsDxlVlrrBwjdCgrl8C5v9xCIGxNddUM8x9ma76xcTHBW5MYxKi5m/DmHAR6X67v+PBxynBr6aJTUU4EfZf2wWkJ65L1dkXP7P69UBBASl1SVHJ4EitOpauv7kljUTJuAjnfRAoE/iRdFZEcQl+PhYhOSx2mJ11/V/56oTjkSlBeGDR36ZvpF5BjDEOu/l5EoQkxCv+dnvh5bet6B5XPimmQEoJF2JDfZDKUo1MD33uxdMu2e9AzIrLe+hRWoLwlz0tmnmYSfrx/ygzADEK0uV2RtcTZHqTp95v0wmWJ2Qe6c3x1tv0nVbtvtyew2KmipjKFJQCxjlyss1DDMaftRdEx4nH54LEVrSo6MU6SO3rAGMydpbzkK1SojBZduPCrtLUzEWWibKdlSY/8i5RzNoFkV1ztfjVCT8aJ7k5VQ1OJ2+2Tl7optSMdJyRqWBd6MYBf44d/7zLZKGPWJS9ydgQlx1i/fTdnIJFA/is7BOEQUmGOUeaHcK3tZlI6BfW+/skaoIJ2wB8LP2+MU8C3XwDZLN3qEeZ7lr4V1DOdb3n4fdFoXEHXhDYZrW3iFg2Qd8xNFAI+Y2BDSu+027h14BcFv/urXRNg3f/4EYg6o+du7kWLoQvB+58JX/cRBQYYFBtzrdUb4ghu/Nf9SlV4e1xvBKYUrekW7lC0M53aqKpbH6JRV1Y1zpFXTyHW8eVx7uLqA4fREyKarttG6j96ANMQTfSgAgVjSQMG3Y4fqwDuomHe3eQzfFDU2RVxjgY6jseoEDBdO1vUQ0RpFOWyufRCrgDKkVJj8WydEJRqXkfT1u4sXwrRrluP8+RVXRDKPg377ZjUdED4YkRocgBuxlYyfSGkOJN655HX/Jf1eq2BXKnj7OUhlGrmFAF100O37hC1sJyOiQMfsLCPyG5Mv3uQU6f92mk1k6nsULOsdhvIGXW7gIsSiV+d6+Yp8ZhuIAh9MXCHJhoagaC8xhJ6FPeq9u1zR81x+8CsHUfW1waAqMoi08ntoKEHCUel3rqnd08zeLIGME8GWWaV7pclBMvDhcztm7hEPs0qmfXwJdLG5cObgKQAA6+ixqyOV+XYiPPDcgTMhyNwvCZbtsrACih0/MZ2F09Z0umnE95AX8BbxO2uAi88Y0rwVRYl8VDrE6KjwBsharA1CpFHp/2iK8CZ8Oe8RyjjqFljzjtFofeqB+DlACOc7zX154EpNUFuF8EESCXkd8pWoCrYQvRsZSEqRuOhw//uwFFpzrF80eWiku4XQg5jUt1M+rZjQOG/sPC+Hmi9AwPidb/spX9/v2wo7DMLwsI4q0fJbjsmlQV9SK4eY8yzgy+0XQyXto9KRvCN0UHD5GgbH/IOU6SZhxZrnZFGLWn8XqvErxUzR6U8b6NQfAaMD0pQwCtiZl8eystV60QulzScFm30qNDTcoZMiY08kyksus9Y6bvGjPdF2yMmbG9mNCiXAoSMueazdBKqUCcXDZF5JKC+2O5u7wEaOw1ErfO9f5h3vX4AL0sJiap3BHszU762zywXVwZp3yZ+GsqwlgOaGOxfsaDGsWXRyypu/YIptua5hjvsC3+VeTbu2qeN63ausnxAPdkZYf+xmBHq9Sz/Tfl/STkX0brXVXxQrB5yRkOFcaQY9uYOWdIJSsQqgeSaWqIowNa74+aawOvyIGC92wMbZTtpxkRk7wwLaBf7TU/Hp4yJSmncN+mcJMKS9RJ4TdPsYqVP2/S6RzjAzYx5dONuVqMXS6/AlcmfON+uIhNMcznMgmbXAdo8IkoZqx33dd6LCLRDOoWvY87wtYMJfSs7gIpFYi+wiDkMA6kIEzmVQ+eW4kWv4AmQ9pU7dsz2N9I59eiT7r63fEFB/GvjCecLMXbCDqWQWdRWWR4i75oaUCGuvZOAaDBkAfcuo0e3kE3EytEbGBDk9s8V4Hq8+sy/tQ1mOd7V7xCFzH/VHFhe0c1P/5t8D4PObxFyp6cHz2Xri16RG7v+CgyCoETBd5+RfalY43QRRAbLbfPz5aGL8nVBRawnXoYVePlvFzhiYH6875WLjjlVFUIC2hsBwCWDKugq5i2LjF5g79GeXGESyOa2VtU6myT45eQqKT6k1Qs/lE9SARzSy5CPMyv3itueiQf9e2PsoUQOkL5XyUBR7eBoDy43kKC+vUj4J4ZIPzv68nMHYjfTMUtdNuvcCYWKMFAYlfW6p+Fgcq8O59JFroQ3bH3DIAHJ/ETNd61iX4HSEjEY4+y2nmHVkRRp6r59fw41DyqQjZdB4v4CMBXSU9r0feZ8h3m5tjlza7574bx6WSj8CFxuO5stKS5kt5hP9xtyDP4AIKJVofPp++1I+GbZ/3e3rdDL4S9vE7+Nc/vNVGc/Swz/EetqLhxzVqUw//WfvR+8PM7aAnqQPcQP0h/vZnNRQnxFI1RFHmvj3lsWEXSu0JF8r4a+6DoJX+oqCmB47n6u9W+xsdfN4UAHpYaxD6xTMcFIsRPTCoyvaBXO3BC+4O8TX/JR0tJrTkOvWU+5ZJqOw38N5PdrMk6FihnWFdRl7UCVBeRdWOs3qgLocrg8f+xmNGjuWeDPHwkQAOpLjLOsGdaZh5+uiaEek6IbEK1IH6yYahcBswBL3YRaZRLWl66ZbJz+MCPcq3V5wzXoejaUo6ekmM6flvWYfN50YQfOo9kC0ZFcj+unnjQ7uDtH3t+HKMSKuUgE6iu61l2yDaeoesQR0YV8AFXDfTSv29cA5BvfERGQO5VgsIpgOD7OJk//KdF19ZAfLfwVFd3t95rczSqfK2dp/gKY/mlV2UUL9VsGg8zXJ0VR5y/EBu88pU865X+9OoHxT6/BMoitkijEQ+xTpqjRLnz9EHeRLiKwa4HPXguo
Zj141nLPVkF9rrBQMeGTEurJnOv2x2AJAg9qwFwC1j9DX0mXfMatU0Eybc69KtFAp0mMTESRpgamrY6S4TzehtnVQKhpuxMi1pNStiDu277pj++epX6vt2dzJq5DBc1Oc/p4Pryg2yQ98z/tuLEqz2O+D8WHurUiEIiKdlmIrFZvT2KJpLEpr3rJagDUCVRdN+ik5XxuTkfZlx+oe1wNuRinXt5h/D+VH3dbJeeERDQw4jMj9bGhqmqULdro1VoBDKVAnzdOTYWfNP5w5k1PDXLyIm0SAyN4W20v0YQ26Y1CNhH7R5qB6VAQbmjd0ZfyUJjhyczO8GIha/2awshnohr3IaQu3wFP9AOVPzIWhbEraWvapLRCkgwp6nBNSKMgA5/SmGGjGSmZbdTpIKyiXz3cScDDTJHUS9Fqaym4V4YJ1EPbQTMYjj4+dFrdCwMjETAdDsg/DgFfX+dYgZtffL3lrIb0WwlErcIW0K0DIsrAoFel0/5Xb9oDf4wnX0RQde/tn/wzjwC83yWT8J65hMWcTiwf+O9FLQyKt6JsAfCLYx/GsA6LqeE7lJMjX1J+MNdemrWPmabr7GghZ7/uC9sI72agpw1Z+ZduASym9wgq4dFQ6FXt6iLprpmFpDR4iSetk7nVsJKZpUyjP2dJm3YJyTQMWKqUd508+QGZ+JEgriHElmhIUCH/jD4ImcH18xlJVUSliR9AZBea46dZPOEPkyFWUvVsLXZUC+wY6afdq1Wp5zijrcWp1IzghfO9Apma/zl0rlNMga1xtCJkO4Dy1RI4MuKP+FFlElgRrPTpoJZQAl2a0Tn+ab7KOyBtur3DmZWFoK0CFd7Wag876F40N0oyF4Hess27WZB16BlFsivWptXpfseyAWntRH3EbkLAs28XA151RLvkBM5JrGMjjnU2mEej73vbYPbfQPbtFRoApR4Mn21EbC0xJtMt/3bpykNBwfWQ77PCUUqD90w1xQGXJ7KMgi7JVjk98RgXqR4f6h7GfYCx3sPuwu6Ld/wzjydnVl1LBQoyEmLe9SbEayWDjAPIObH3VJpa3HcKVMWpav7PMjLGnsvA9sv6nzGen0Hr0d1hfgZh4YzcOWlG0AaqQNa+uV5zdhnd+05VeOpg+tmOT6gSGV+81EARM/x+wb+bqXpnkds6gal67fHYc87fWuadoI8ga89JTZhlfJ4gttNrjXPbyqazdffI6dn4u886/a1Zccb10Xk4ewhGd8dZQIgG2k/U/M1vCWzu322oobwbaHa3rpsRg2ARZs8ijFjTgxpOXl4JFPy1cogQaCAyLtMH7DKc0dKOjpS3bg1e7jyJBnz8XRhAbHrqoukiIgCo3BJ3rJUTgkle/Hw5tAe2w7RAHP2S44XtHnVxjk34RiRTY2Ev/6Sz4NqLua6khHgTU++H5VRpKjDAwdUfG7n1197k2HyMZA/qQEc/kIcsdBUhWoO6R5A4Zwo4SQH0SuGK8ThqUU7ARqcqMjWeVw5UXVGXTR/UdOH5+QvLegrlejfXNxNMCsPkt0R0emJIosgx4q1dtWkXPPRLeBkgw5HI+u28mp8ino9DLGaa4UxY6HzhWtszvfqjrSrQkYTDq6jd/JpDeb+5FANFAWh4LNQ1VZfP16WCeZfD/lmhAByxPMBV+jl8DketgvqvAAWTzrpEjs1hMuyEs3hDYjEpmwkQUjKELG9cPlYlbSYVwftW76p2pSmcsOLD99zIPMYqrdgKqUyIXvAwWhHqiyuH7UayPjrVIoH+btDczsLP0VWr2Esk5EoB+3xdNVkdEX39BeE2cuWkalf5JwsY+1gmzqmpHh4lpcqeZdH1UZ0PQfpDP4JH6bQbulsD4p4bRku+fyAGlGfBqdpWde7pOVBjm6s/vX/zOLuHtrhy5GqmT3pJ+dz48gYUHawjKp0qGhG5d6+7Ql0xGGhNnSaOmBh32UT+xf0u5dfO9aaKL5+WKXJAHgeVD4wVQX++xcN/lof6i6JFtZ1R4MOeHEolh1eHhzcrASfr/Ci7Rj3Y+C8BfhQh9639GEVnFPcGsZ1dTmMO8aokjwHriXavbgYl28II2Fz5yTQLomGnEwO7ZC+/udbH0iiL3D2AOqquKyTTevFj2aEeqqshdfbR8z73H8dw6u/g/gpfp3dD/Gcj1WHtoh7iMfRpCSssxmYhCh6Y1EX0fi8SOy8I3hXTNyns2OwZbhxJUZn/QyOO8iyZ+lWDX0L7We+BLmzh/1Sxq3k6Mhn7DwyBe1qqHVz3AVKMfcaHkvZ1Hh2ElxS2nMt5mu7X/lwwLB2vYAGfLY+zB1gUihB34PYmWkmBMsWMLCHB7v4fBnBf9AJ2FlBJmEyeS/aClBk2oKmfdoGdqv0zoTEM3RG0DSdxAILQ7fWwlQi/Nv1+ss9UjqIVHMKFNuqNybmK7U9WjjSibndmYFBTbRELhMe1BHV4mY/ul8z8pjQamI/NG6wVR4cwoPW1FEHm1OD/Z6/OXS4M+T93AhXm+oGDiNdCGwLs4f0rd0FfENx3QrOSxK+4wFWzJyda7gc1XphQDpogT1Yqvdm8sjl653KWFX4eBTpuolZKneaOVZj0YFAzsx3jmVfQQIOznNkeDWYTjp3ohGyaXX7UxB7y2FMxIBu9hcpycFOwRz3buzFpAlm+yeS+fOcU90jNjGvJCIr6PnBPFAfls/nz/K6jf29APQmjE2MwuYBgXG4LwSl4L1qgzRypvZT0wFEzNwLI+zuMmbrJcGRFcmXTmkaxJS/Wz0q0UKgWX7+tRN9DPIhJBz4nZXbUxC4yabptXEIOmFSVjKtLWVZcZYFNmdN/HsPtIWLomsSK/VynmUH5iA22jQSwRWOMSgHD6GUmBNwmXJbFzkaNc6gUCcRiqoscOH0koHmqjjOfUF5B5cEC9TtKVXtoipVrlz1hCUtzRZzEvkAigpxB2u8PkJ0TnBZc8et3eLuDS8QAQS/Ud79z+p5CmtSLF/VkuEeTLFlCVAz1m9eZseZoEnU+fdLCvmhV4ARC6Qk0PHBp+ypo1gLgf67W5TQATaMH6CXuUkWxs5aQPrQxP09CHYU/x8rRDrjEZG/tjbSh8H7Rxj4FYydILnIRMLhibpVNwczNE8rN4xgFYXQVcjX0dqxDYTrOiSIz1GHZouMsbpKK4EAlb7QQUq6DEo7rT3FMyIZuJvCvvMiPq7X3SOIArNmLJKOcr3wP5y2wmQPALryMJEhxdu2d6H3E7sedWGbvMYqIGCKuKGeoiyrqTmZqkZmytIH+2eaNlfc8eJ15oFxBYrwsnijKweSn7koNiV92I/+ySg2+3A4xnfPv7gn73yBtlecaT/iBHRcphOQ7i+oy28DEgtHkdHcviH/S7v0Vjl98EVtNvUSn6HPsrIm7IF1GwRuJDB3+OodKY8FQEHC8/8o8cdZTjoH+pC4e0IulDuRoO7DR19QNUl0lPgeGxwulCBZmTVpL99yH32bx1GjbUuATsbSKFyoc9d0AQmR+rAZEa8HjICr1zT7ORujzMpj2m1bbuE8HAaP5LAv5fMEtMcEv0U7pEJR3do7Yj9XTqwDi+8vcGWfE1VHX+3IyN5D60okOM1JfcnVyTzstSvDsaUA0fAJmF1AU6G32aRLCnDnktTXI+6ffOue5Pwx/dZ8S0hsDWq81KcakI8o0toWOffu0LRLKbV5jPG66Kmej9A92Rd0k+6ZEnbAgKG8aAcgvl0460lvAWnToPPH37rU9+qf4GkPetzI09rGeF/+HusKKu+XCEzNcwb2d3Cv17Zff5/FE0v7nYn6Q3JOIYjSty/GcMOnMNMX9M0ds95HXRv6g6k0boe+PxUPKVnJrxuAhZRTGJSc+3aNgHZwLDPvc7aWGlYxV+PeDyNBa/zTEIMMBaGjIBcMrBfl8hP81lxD6MYRbhjcYOJYu3nWMYfBdgFoM/IltJPhdrcbdPASANuaKZhYICErcTR3EBfdsS6D3/3AIe5vgru3dYMJJHTKjmYxfvqkEqaKq+qClXSALw0RsfVdez+xJUyJDxAAgdlpqCredtOSH2dwv+kfJlT3/WO+Zre9c8tMNvj9MSS3s6bWGPOFP7BHeDJcMiZ8vVOk0dED4Vv0RPcJU
dIUbvlYZ4Z4b9SRn/6VZ/2LetU3oGW4TS77/L0Muv5YBaxbMDPyBcx5Uk2QXgh6DwpjJpIxtUcQhKLwKG/BpmsQD10qL3Z4g4eafqVY23Q3hWDPsp3NbsQ5MNltHk+AeRxg5m1yfXmmKIH3PGBVluddQOuDUwCJDCMNxG4vpcCtHmC3LqVURK/NXbo4qoaatgosWcmWLTB67FzGTJWUFyzDW7ybdcd4L9Urg0Rnxk5+TxuZFW0OxKV5LYK4TWDzt2b6qh21LGxHUZayZ2jj0uq6fAAoV6wBqm/KvJB/hQa3Vg1TN0oo9qvY7oKHhZDuOTM60F/qQ2V6zDcIly3Ku7LC8RmT83ujjJbol61yCSV1Q2Ckh8y7yLOYMr23m+q+fsP624kdz+djGnITWIVAPTHlSOtVS1vVN63cXuMPBXRDfr+EWdUEzV15bRpOw9vo9Z3/nTTx1q/+zrrK9iu5Xa5EFYGnuY+bkDfPwnekfjcflWD6ITeIFvZ97GNn/6QPI0EYhsUzT/LA+6bL3J5kBaSeDSHewOGi7noZYY8Idyv/Qz6EL5qU46IHctzxWS2T2n3IJvAny224Znq384t6ngwMLR9sbg/njjmxsWJ57sH+uB54JzjzbvzssDrBoAltagOJRoEt+/NGNdMOXiCdAOkZzJqX85V/k7RboJrhaRgm8mSDkGwgUl2qEVVJWm6LaDpB5IN3C8/7rlVQLF1fV9m3G6IyWlbW2mUkpngPuEVn4rHANA7iQUjEDYNDgO5uKm6OtOmBTigz7uS+mCES/lLdmBq2ahBhrC3CWfvtUpCSsVxg40wNRgCaoXPhM2PfOolvw/n5oyyHlURnmVc8OtwqUf+FsLzZznKNoRCvVF80OARD/mWwi5+NHP/VrsEZcsMWOHwO9ft1iq70sF99qgAu9SMwMlm81HMXiI8bjGPt0YWETQPJ7vZ0o4H8eihFBM2yjEv4N2pa87quK1geuKcRWkI/r9wMI2NbJ9/IZExna/uj7ahQ26In2k69rLuPiSaB3+yLMZ+PFYQ3La7dYIuY1634cAKAkVsvY+dFaO3aT1YUPIDorAb2PLywyvP0haWKR7d1i0enZkrCEJjzF006xljhnsuJhV+yT7o9QlArDWZmu6QYyJsKlFfIy+lrQofsDsW0Zm6KSBUQTbnjIpZ1VvBoug6RrqsEIl6r65WIyCN1/2+iVJUO9xrR4xDMN740sK9ZAIR4h7fyCZ2XWdGI+t/UOqzeWiEaKNo1JKk6pwxnsQ4TGX7yAY9+ZKqoNdWM5Og4cw/GXY1j3R7nxMQj3m6dJqzrfKRPBOS9HhjlkxfMOstW4NCK5PjDIyb/q1Kxl9cObfJaRTAdGGHl75RP3MUyVQgwdqRbNDt31piKg6C6bYgpT4pF5DBw80RBanl6g/Qh83uHpPE7nQvt6eQDo/rf2sCDM6SOMAvTQrfAWa+OmXesz1ZGsm2JTSNWWFqUrqEn81q8cl9g97AQqtF1cT12HIhAYkH759IE1MtKCkisLi+PpU602bYwPTDzVMk8eDYEJieJzrZN8zuoqbXqwA/B+RFp6bSWveXJqUK7iEbHp2+e7MNJSJEWjp350g1tzwnBfsNIm3Sev4ft8H2ZhPepvVigOfKFg3OuAOA61fSlEqUTJGMbNcdJdZUNdB3fnCgRg/qXli69e8Uhiwk7W+MBGhNvB4pahpL5laMLrCBbLVzB4wKPVhMJU/uKvdQZ0LRhV9nZPGdQKrlgncQoQBYuD0pAbRoqDn9m+46rYNU7fXsbrKAmLUiCiTdUhjwaMh0n44Yzb3xyUHZ9NPFREn24ValCdlust6VyvgGtrjCoULLic3Ms9UWqZuGlXPl8q8MZIB8ImFWIwj2VSqbW6BYN9XiYlO2CVG5wcbaaYgjEXKXj6BTJ2nXaXvg5CPGbneuK8Gcpjh/My/bNXVqFNuFePVetUSWSdBveuBskH88UmiA2bfEJRFIma3TBB1mWyNn1CGrukQuJxhO2JntEoloDecGw90I3SrFPBEP8PUArvit67onoe6nrkN9nfG1Xuih1ny1PiZYPpbCeEe9NHEKNhV0AjKkV+PyOio6WUe6xi2/ho97LHyd3khxOnE+qQYn5/6d14CQnke4PjiTQVtuRcNzorBJYA54DNqOy+FVkFTeCl/m/2ijgPXRi6/S3fEn0LxXJe7iN6QahS9neNQryRY35jc1JGrDb8/GdayzKOJ0KtRbHG0VwtAQapx3OvrvJmrMfSoOynkaGwZp/Dz8oS/uRkPWVRFCTdE7I8wVKb/WP0gcpYH0c/T0zvMQVWVuCJEfvsprF3WCLa4DpW2nUF2fJqUy3IfsBFIUEB+VUFSYQgcm7KUgitBXF7+RiLW9seRY7kvFbztu68KyLPDsY8cezXnZr0bHwXQuZ4Epp9uq8/JJdJDZSMDGlNRMYl4c/DwqkSNPP9Jwde9cn25ihIDwEkCxbcnXZxpbCfaLOYiJruokdyBAose6LGgaPSZ+79NJqZihhIU6Y+GgqrvK7AZAkpZYDGjKsbh7zHDaX1ppVgZz85+Ffr7HBKsgBuz9AFy9SZCPzB1AzPdLZr5bMla6swYVGcZx7e0nDLHjp1ZRSzjiwNcpcIwz526dI23L6gtDiqQQg7jfXpUnldqoNbagmPWow5s+hs1uDlwUBfCFh8KmUXtB2zM5XUB7CH0+8UgtOunh7o9vtyAYsRCq643RZ3EsdrG6ClSd9MnIUYffKgvXVu5xRdDJLb7TawdGNZXiyq+LAwaa7jide7/bGcNiQtXDW4JIHbpAuCyIrl8Z0IlfmQVjpnlvUamBYHX7piPGDp8i1/afpp8uBjZD8orRBF4fRDZ5UIpsL8xMGgwGuIWfYrI2QfKCjkGbo6aY93lDWIK+K12OqqJX4tJVPJIDVkdMXnYaRp2uNqkZqYBffW4tgqqUIIKhms6TwXoHqSJkYbXm3qmLyBRnMMFMLTR79aug99HogwEcaZoTtSUbdnqahmFIKLkaP0PqO1HkYM/bn84qjQYuBMuqYaqOqhJCyTB3R1HYk3+28D9ZAj7zFhXlvpynOGgu6SfZrjbKF1Mv6TxGPbBgM9DrPa7dFfdA974aw4mJ08haaJZWoFLtNh96pkTlJJEggesJKe0ofhZp1n6jli2DiqyBaFdhBn7cF3jheZcG1INSAXwY4jeYo1wCxuF5IDdcz3+wCmZFdDarcJYq9ES0pdFI1rVEeEIN6ATzdrwkiczAIbOXkFertGvA0UYyBj1JQbTGZpQ1QIXewK6yLXyH/cSfWZoSzByG6RiLFq+ayhPltOFUigAMYxqkEF+Q3DslT4uUdTJyhD3DsFv8b+gTAmBsoVI+cArDPIeJNMLo6qZxapyMWBbNbfDbRewPwDdOeu4+cledHT2HBFIGZfpy+4voy4j6xhOlj9/4puSN+KzCm9ZlMQaBqm7B7C7qB4bFdVzXqt5lJYA11PXED+68p6n+gCs8dCjvxIBFjKkn56hJ1bvVXVnUyEvSw4qKiYChr5ZRXCmHiW61StnUUTbOsauVQCLXFY59SYELgKncuGbKfVP8hDzkE0KNbAXylb9yODynuGhKfIO2DWzb6+DA1E+AgFhPNz/ONWDQB6cMerU1nI3v9Qnwza0RCWYLTixwlIQzWh9s2QqyFw7SU5kZ6qlHsEVjHtSh8At/U5fmAShJRD30tuPlJv1WmJvG/7LvBPkbWYkS4r7/FxIKM30FRqhkKTniuo2rEoay9WBHxzlmydYBm59NB1aHC0OJAXtqCFnszKgFVI+UOjdsCD0seA4W87KofzVPW6KATSis+cOlYnF8imb3cnuQC31SshhhFAvi55rfcdrSgx+N/pcfHyeWcxREtzKq+1Mlk5e8+FdQ/TOYP+XbxEF6zy5gMycrNdDcfPsM1PpQSw/SezOYAFBZFM9UnNEqTkqdRFwCn61WB+ks1RwCxzjGTTxIcqwiCO6clmlDySh/4TrVPfIhyAjFEqibAbQeL9AMZKwuYL34M2F4mOYYIPze9qtWydN/WPy6EtMl9oTfQ5/Jzg91z9JehfOb/wrAfX4FV2j7TNFr/gDfEJTSGxyLvVexHsJZ/h
3qtQy7qMlh1oJVTpWojskCU13AqMBUJV8lhkwTmXNVx8JliB+nVht0goY7hweG5mHA5PYEWAxyT2mFRCVKkVPkCF1K5xozMnzOxRi+FwG6gKoS0DKf3IMZKD1AGoa6t0HrzfMhfeDqLr/Xe1huUqxchF1WzqB+T6lMTYGn3rc1MhyRaOa7ErcidLpoZAgWRGtlm5zK9beiKhdB168O2SpA/DRCOyZtxtOwBKbabJhyqZDUAHMgKDW10mXmwJIhzQBrePBv5AKiXpoWhQHh+mSkYNbsJ+Z7EfYSlnoGPE+FXD0J8ZTc3eN0W3ff4sAxKEkTG9AmjI5BXO5XAlwGxn5NaokgZ4bDn6umNK2NSEO10CZnXqGYJ0lJNFRsyaA9T0OH2tjbcnKnYe/+e1pg9oKQFq/+85l0xY0fKSnh40KMjPCK5GcCvu6LmDyjZSkl5yRhkhG8JvZYP5cymZO8811I/EL8mf928pZxwtlTe9iLfH0ybgp9kvOzTGHQqaECW4K3SMj2/UI31gLkCD3mBdrP62CubTRZkch5g4t6JUbE7zi/8/bA/JaCpYggQX0gJFxKGFlgrmuGx5HD8qFqa5CVv/OyRyQ0jPdQNLo/CXrxOmGs/u8fSCJGkDx2+UlvGCHIIby1uagyUDNbsh0ZirMccugFAID//pp8CBJtcoB5d9vEULLR5tqhM770KZsoP5Ij2ih0SBJ8i+GE+QWEh1YvRmf6QAtbjgIjQua7KDZV+eENNdNfKZICcI6OOw0yZTI9lH79Qh44Rn7Xq1y+5Ll6v7JLbzPQJlddWoFVkFPB6dPb/lpGtAsAJCZ8L1E+e4XJUuvM1Cx+vpj2+pVG26iFDKP15F5qboE8H0W7kK9rlBNSHJonCF/qjE1kSuFeEpWicj/0byCLOYQI1nDX1ol808jNoTcKRdD6tcUwEvNUVQhrRDa0cQkCGvAtj2SPKMlzjNO4N1iARuO9kJGdeLgAprIirR426FED1vSYFAhEqdnhGXRtyOXO4DtTPw+36AtfWhAhIRMk81zvYNRcUXQlabT3B4qwUklWh0FMw9DCjos4ahPOftiDDuSd8TgbIN8x+/XPEFVZ3a6D2Za7fBV+JUxjvYLIqtJSYl0ylwwpUVIgijWTnQDiq5oStdvkRspjNjewqPiKjhz6j5PwxfjlSxj72R6VKLh5L/SSy2k10p3AvtVwFjZdrR6Y0Pe4TJWJd4l6gSg/R1RR367hhifRtdyH8CFGJER3wxLtrTf3A1nIP0mCOBa7qjO51SgHwWznV8XUJjKIUL8NQH8WRl7ntGh4+L5jyR+ucLZi6DbWOb2UkJA+MZDiq/kj1Q4F4ob/OEFwGUIYh1S+V64Pm1J+z2o1WJ8Sq7E+KQtTf+nmJv0SC7GaYiZthhMVIwG6XduKp2buCzQXqGwR2dqlfAB1dPSqZpFM7Pi3VmszMjTXePXF62FjfOqtXEQY9tnwHrS3+phlC+6mUUEJCMvRtetOG6Bbkj++wu26agwdBZD7cnP2xLrt6uzau+F02DumTgMvgsYoQCJ7oIrDWQnufAk0OrHJqHdXw7J3WLNvnk2Cn26LbEA4PjhP4M1seDjtEp6njL04MRsW3+ZCdOqVdSc3hqxfKgV++SAVvJWXMpEIFiIsGpFhrfKLQc5A/hbLecx1CnkbiEf783I7HU/9kNb4gHqggq8RC7ovVNwN1fh6SiZ8ZqXTh9mj6TJukycydWaM7O+3WAmutZGNUMA2/oXPQLhys7z7KvNzC+1XodImQyP1tx8TyJ+VuVV8kL5JAWq9V27lyuedEN0W2lQ21IxgDFf0s8fZjAiaHItuZOFUXsqJXymKLYjFM0+VmrkeTOfEqhKOt1qNXzatpZSr1hrNGNIAEv41G8QzpI1xnzCoztffOpFxfT8bGWsf8VGcp9e+9ADHujyUqMvG1AdSKVfoU7r3yj25nLz2eMAsgDA8t/TUwaRQW/rGL7V49II0RjlyM4zkbJ9ZHjhUu3SmKr+hLqe37H98d/w+Ip8DLd2oP3b6HFxIzMflpl95/DVcrcU68mSGz+LsqAhAzSy0MR21pTYuMv2Ko/ADWnWY62LGD9OJn7thSL1ILiEBPS96EMWJk3+QXu0jd2x2+B4i1QujY9rUaumHU5suGYwj0VpdWksuvmgEz6CTD2D1uxxUUb481kiYtkHw4FrVeXnh6R1jVomd2NfOqWG25RvpzwP0VrbU03PA8Hbk5JofgcP3p/oN7O4wdp7/HAc0eHX+FOAz7vp4S2Lg7txyRNhtcsSxuBOsW3yeze+oU3UkS1sQLdkgpGibI8ifzmSXMTAhSnHMQFc7aPSCkvSQP9rtjkGhzC8G+BbjagjAG8HoamaL6EzH19YhmWOMlNrPrmyNbSP/HdJU2g7WXGigUyW9Ftq9EgXW/WXtpa3nklQoOgv0g2Rpy76OJfSnYjoA255IkdxSBIzmu0oj7ep9nKX23JUc/+bA0S0yqCF3aXmB7yIbkmILlK3txuLwOzMGRcr+pP9qvQk4qhNFtQqxRRVyiqvMWBTOQtOPL1/NC/oVmCqWFGNo4LwMer28VqjWHtd8xj60Fk9+FrgOsxDKk1s4MvnG9kCrKLEGTkKz2HSj3VaEAVLJ64S34Tq9o+LNBF7rjqys6Pw61QHeS1YFMpLUmsbQpImm6Oizcbk4xWVhwNWxfkC8+vSTl7WOKgP9M3Yyq8nDSHPYZ8eVmchDOod6rmWqGOUHGyarQ+9t9E3xRqTmoeDfojQTNa3AM8mzilocsCpdN6B2Kv7a5HExEP8u9J6UItZ389XJwM4LWtJGY928MVmkFCyerPfY/o/OVpXoIiEXAXjWce9H606PIiL1m8KDhIiCauodj1k00CO+QdNWFo8w15idwGSJ2SyVI7j0tCoXQC6bddPBDhjLpR2Jr7aNMUzxucogeRU63Ga0iqQBnQJDzUNfppJk5JVFEdXzr96WsvpT0L3fMLJfwNlQS47sUKro9pcYbrN9NKaXqjpfskVfknLDaRrWeUPAZrdhdIHGUtd1pQFM5PjH0LFfHbey43c2WUJjldQPZldB3X1wz3IslUM4KdkPq5qd9Zq2yQA1zXPp0t99HE3bnp/w9CYsMFHwakgMwd9O2CV/rH7ZbB92Fz82RKIBh0PEa7jFkfsaOGh8whxLMbCj6eHJ+4qcGo8KXb7ev/wn+CnqSaJSvPsWcwyQIV6p9y1+/boHTJ5irUUE8J4f+Q88md36jFnhRbSHWX6ZlwRNHuQhfmNurtVn3f2MOxBsxsmqv1ZrPopeaB/LIMhTAqqvhTm36TBFZNFDxmIco+nzPTWCu+7iclhTAyrPT4J76U+gVxfJePbG+Ih5AWrD0Dmks4oftBHsiQkiISTXT1mj00WaRyJJzqqmAH5sMZMoPvAYEyyfO5A7lkLkBxrV6vCYslroKtTiY8mZoNB6rtcToSnt5N+xoEvtYNfvJcDwnYFDaGLjEy5n9aTtDkshKGsAD9rd54hD18ct9KnjPNuOzoASNlLqvpqfN+MoczALMTLTUfR6a+dIRGUKimjQwsHE15GFADYpInRhv/t3S5xMQtvHTQI9D0CueVdDrU5KmYRZfWZiuk+W6CPEJOqeSTxKmouCz25Yh1qz2U5eQYBJlZqxX7MBBA0pZBVhoTAUFmHeUYhaZAGWJLvpYJhvf0LgVroXXSpUEB3lV1vIQUW9Hs5Z5mMyKIysfLS1xweB4Yxt388WwOWvEZ3w1oEhw8vm55D0LpvY70c4NQ+cU80cLlAr+JgVL03k0uVPAiYuQLJwsnGMvlCXkZoxwpSV7XtkayaPvGVfuJmkr/PWUuxD8pX93DZJXxKSze4IE4SnZGAdMFYPApOoAo1rrEsYuY0r/AhtgCX4aex10vcQYmieBkvmDdwihl0FDP26ABT6nZHUwtTltyuOXBnn14dt22kncZ0jjsAK1EP0TraAOzq77upduwu4NrI1pn7c6m/uYfktdoyni1Y1yNUIpduZ6K91sNhSPokYl3hIc7xIkgGK1UgQJqH9V898b9jb7TJUSUD1DXB+HJuvLa7+ZPi7/fKdiB3OvGfBbpXUrzGCo1QrMw3jjA9rRh
7AiFNo58keSbnDmytMchUDFBWji2EhRAjqVYtNTD4DziFMVEooSg4mg47B5v+4t5zt3F++UgixVo+3Hc2dm0lG6CQg2uw13BLXS4ORS0bffsvDXUFCz91AGPdxOC7HuykGvGiLlZBE8HXjMOgdBLqfFT9WVKu+W90fJHo8zjLlZYtHZIUG3mg/58jPivWBJ5Ll/eVfwobE3vGjljXRAmV3am9Z/x0By+Vng4sWuFUZ/54a/2+15XSSSrBDI8j58hanX2b1K7eCQIuknZnfQb7AOZNfhqYtnlupIX2KL4zJPiK1kMd6wKo2CCUAMYaEXpxMl3/ibZlHiTVxjwsXLPuFPPNm46Oz41dljIPp5QRK0l3XpMQcfa8C9ylSb8x7Jco7gQlscMISAX9o/xgMa2zM8oyPzqxIVmJuY9bENylG/v7oLCjMLSLlEzzvgt95wi+hBCwYtjrfdoAYnZf4OhD2Z2m3naHc4KHRM4rSKmFnXwcXIivS7yZroL/59MyOdYaNd/koqoxbKM/uSxKvPPvWVFRGVB/U765FWuX9fnI151Y0O2hJXO5C+TI6Yk/PrbJ4L3ks7Gnf5cWENVMqb2D5H8r375jHsKVo7vNfItmr/l5RDivEwbFsqWAgY6spB6mBSlt0Bv/OtxWJxv1Asug1s2PYOHsZEE4B8CXOhRoyry+K8mBIwZJ2FtogY1PpiO0c/dIvTNlOXG/s9rVtYYTZWdBBUQ8PtaHJcw9yh1Ya0q3BFqrnBl0xIVvFAltUYMPhzFOxp1GFf6T+HO1EV3CAl1m5qwYTqsE7UCbMWg6NIb7MUkHMTemMhXeokrVdK7n7a2xCFJ4QJf7XscIBxuwd5SmLdPg2dRp71jkJyt8+HVdweHnk2YraMcmv18UGTER/4UN7gah9sfEfoGvmQsiLHGmzOVyml65MYtblmPEOmABehE3op71oQc4IPevBVcseNA6viXIBlitLYDs781rzqtyFng2l5tf2irGx8HplvapIaw6CIaBmTqe1I/7My+Ha4cysqMqFZfbEhaKmgCdWF6/Tm76PAWvetQ7lksL/qDoK9cbl/29uW3JCCAY5T6WRDe3lPaj7XCM/zsSn1XKFIKJRwTgdNqqrf5St2RHC0kWul6uUxmx0NdJ7bJuWiJmKeEZydZHZ0LEXgOOmH060t1U64trrkKlOeOiMDH0PBxjQe8oceVaLiMRi2csrs9yPWh1EEOa5FUjTTxy4fpbaem5fbxzItVD14fuh7bViYwxXXphX3eUKSzm6Kit7E0kjfGM45gHKy8ClNT3snQfZKIk76g2YAm5UZuFYlQkjKwAD1aSBKQMhAU3frvrat4BXbL6xwpxP/MHPjAQNlsfl2gk/JXHwI1PBWA07kB1dFGf7x2deI8pcylnrtDN9BgFTVhMIQTbou2OEkpECpCY6CgytC6d8ba6l9gmvg3LKmMhNQ3iv5xsWOC++chaxt7QLtFSrYJPLzqx+QCsA4KFME/tyURLpvdCWtKEEOkImCALFITh3LrdWagR6U0y0vWqnHhrpk9q1c2IsMMrIWUCDrvlw72IoIVv88j4ZBA4XBojjdX6ASF95Oi8pQRMgXBJXyR75nvUs1XoRvs7ohYLQnQJtcQNQ36F4KxXUoakF+gvPPO2hhCw+RVBrHm2+S2a6OrWm8+eMOkYO3/Cd5kVfAeuXJ42OQgEtp0o4/yft/3wPl7geNzUvdiB8O8ryPjsKWsk0cNOpFvRhS07fxHsq9/hltPM6QCPyuVH+2ObwN6BxhSt3Jk0Z5jXcGNrrn8oRAe2eJ0BCZrV4+XK0BN5/5m/M0hCk+JxCbcRVcmW86BA3xpp1upnL568LLQ66kYMurTDpU5RsEr2t+OVaITpdo6zWU5jS9jWumzKhcn66DVPX2fYldDd261b4iRlc/j0mGzNL3qQRaXral50kJZbMfUZ562ERqgBfAzuLVuG6s7qsYR28U7guS7K+HyMV+388/W/IxD0zUV71qsnf96aDoQgJGwXo4i9YUfS1VNXhoGsj3ha4BW4NXVH9moDlYSlqkUbYByc1qf3y/IlRHalGfafyxSJUYpYMdWtY4NOUWPRl9xvHrxJX0m39hn1uoQm57dGDY6Wd5tBMDj5SNUTdZ8uIL3jNhmuWYyb8ROrxVk8N19n3+R+wQkJydFaMP499vCUN7th91LhB25olbohZpxw1+S8goTaR9z+SZAbxKMJinJjmXmrdDOGBLiJGMlW3+wLyRetEXpTOcGo6wuk8B5vGLx1XgEJHROGZ7Bn53vQPzz0GHG1n8tju3eRPm4B3A3iN7fIND1aVNqjtbT10yDhm5VhVkJoSAnf560KoMg/J+7FlEtEiMfh9e2XyqPS6fqE8hENzHdqtWuhu/ToR1fTbT8WF210jyZB5T7/QVIYo9SLB4Fku8DAjdK2fSMNxKK8/jBBGf/nzGNsU4uXErfoEdVZ2UK12JH6xITVMVOSCaDg7IM34h88es+gLWRy0mikCwQeMYcZ6dMHH2ih4ZyQ/LZGMdIcoas9QQsywiV1HbLeAF/yJ7W26Unt6cUwSqREq9OXohh4fsMUzNJ9mAdZ4iINPnpSpis/Hn6yxTV25wIGBPPpEMNHZynDF0pvjxah7QKS+HSPhws9iUIgjBSxzkhwu+6gJi8ftsTbYXTSq/7IoYCj+E9TmmCJ3NTYJL8GTPgvX8geGtkB0M+E0QCt/awzAYbb8dizJr/mxXSy42UX7wOoSlWf+G4uY0K90zoyO8qmsTbORKH9et/c923/VmP50xNI7DQWTppT3cZK8jCNunAWvtXwj2SUhjN5wUycGNGwdnnqPm/B1hP0DDACRDLg1N1nulWed4vJzwQ/8rxRC9Geo7mFnlITGKJe3WnlXMZKj3O5qV0ikrv2gJ8ziG1A0P9wfHUfXgabjTv/JQsGNGLdq4NTP242OqJ2Bm9JNbRDWy01xZD8flQ6r/ddd4VSq1ty9DEkp4wJLJxajgyGaBVYPUpVCks9bugaJ+dkk7SO7d+CEUWLTJ18P5D9ZLvfmwo+yGpe6jpKB8CPezCG/ziJ0wylm9K5qTxQvnwz1NuLp/X3FH8Zyy/Nu0gqrrCN1F2lvXXG0QYA6y6o3cLPoA4gp6Hdlsnt6jhkaKcvXTCtUl3XXcQiXZuQ4bNpKH0ahnRTw1yyyXd52cvheV6UUnoc5XH+a+XYIoKZa4wzMd7qQEsQUitaKvpsaGH/1VyETd/2CRoMFyNORkQ5pYTlKR591i05eL7d4OawofeG/ffwTAKkccePEu8XaN7hSEEdGHxeYEcEn/1DwXKGrR12ONpAv/5Px6pJPENpRu+Kid3tSK45XaRvytHLV8UFmnS03/jRlq8sWleGKM/jT663v+ZuH2U7h3EetwT+CKTf5y5asK7wK70NWq+zYZG1yW4UykqNIc8jZTUyc8wqD6M75wM0ScdeDD+wX/nFEWp1FXnbUWw/+KCS88LLJKqlV4f7IHw4IsSdRbNeIqV4DYJss/tdrjnrM8W5WQLBpiX3Z82GJej6/sTPx2s7TcWNufbaAxZ0S/sR14vi92BFi6nyMVXp8lEEKBcaL84Zg9oXSlxjctw/KArHl6szMoxHDdMlSoP08XuzMmQ6bdtNj3smx9Odrflq1oketoubRgmkRrrtDAhVIKx60MeqJIxThRmVMVUEYMHyPSP3tQjfQfmlEm/f1fy7UBR8AYFvtb5BVzxDmVN3WHr4vKFMa3ipDEtgqgQotVk6teCWpK8H3fnhjpGORxWgL8SVMWnCn6aBrO4clNRSTXpqaQwLicDOng0yGzAbBQHqTmRQeeernlyVruQ0TuBYd8yZwtKlzGPaU1M1vDfbhNpJ+fc3M4ZzfDHxnIlUzEvunXI0g4Qt0MF9huwIgoQ7pM9MoGr6JfqP/jtK5AopPFIvSPle4u6IW1gKbXmJX9+u0h3PklrxHqkPAAzcYQuATf/1l5F+iBLa+dHDqbCcoprFR/DAZT5XwUrFxOxxhqFHmiTzULMXyzYnadmy5wmPqiiWNffxwEFlShCR89mgaSCduWHz49QPfsHmEsc4TAJcVj4cseuGnY538qz9IsLKttsIRfU
BaWEVXEcmYI/vq6ZtyQsdgQnmWBNxQZ0s2Gnkl4VftqJ7O+eUfAwK9opdsRvrelV29XRJk363ucoObTdpCl+M/gVD4/2qOLaiUHdvv1d7xQ4URx4ux2ukyYHmeTe5UB8VHJGAMGeyaC6bPspyBsdIwVyZEKU6e1/5qCWKFwJgoUbdF4LHoNagN6u7442TEHhO3nmP3JM33j8ULeRdHKh//NalrvcTy+KSTu9R6nQthjCAscgQ2+jZxiKupMwjK22oEofhzJtKAiGBnQbnglT3/8nPN6O4LrlqphMr5RwK/UBfjrzAXHHClTBc1dvklpWiPcL74H8EA2XkIXmcflKheQhfeboxOCniPZjttKQ4XLYaJfxp8gHvIFA52wcmgdN3pQj7foAKE5YnpxJMPpeginSjADIrZu9/Plb6gZYFXyo/rHPfijFQNgcmZw2vLnORE6ps+N0KoIczzf2tJ801/yI0MqrsP1xO879WQUKx0OrlEqyiB12G3woJ3fSiUfHSx5UyHVsU4Yc897jJLE6IHYUbPp/ldndaHvfFfT4TB7Gtl6EfJj+Ay///AYunVVVjYMIrwbQpZOYYrH9aSySES+ewXp6T4HRaM6D2Wg8w2hJuy99V0eDBzt2WTSz1Zn3kwE0lAVOAclEQvlcEaOFwkixkmMhigfKN7vS/q4IbS4VPx0xe0m4R8osuE5/vllCFVeOjx0yVfRVVcXDaWODB4+akNh0Lvbf3MDRbIFiYKxvVQAyudYxI3S4ZApCE1DLLfFrUFelPlqJrV4dgEFULYLMKHLQnsPI8oVWc/fZvvhSEKoPbswtBk+ObxQGPIiBI96xFkiYEubHMSmIvCGHa5ElDqgNb+23dsh0gbxPUutfTpmHpTZ53xvPpNDKTXk3UTowtI+upZap17Uo6xjyrAUKF7DNOuKyLFWk21f1S3qEYWYoFT3l62VaHnAjaCpRKO8Yll1l0wkP5/bUA13rWJOeNL9p4ujqgw67U8mTWCkiHoxNKoG1iWGPHn1g/T7hqElpUaHz6xKzfDzZWXPg8nOfraf5RK+9cfF/I5tpf8OQN4id21d+6QKsQ079cePO8JQHbOICNdLHLUL80FqF/npuuum3ygEuYnwvKp3LtnHHEDn00CvlSpTqMiQshgLTak9N8jARYwgWM+/9GZW6IHKGXYVlxbFbOg5S9lKUc1wheIQrGK9CJ6+A5uYuyi2+6WGjVgSh0efGJjUcMTmLgN85vUcExMYUafbx4QkTKnsdzku9VWunPT/Vx6ptOuz5pFoWZE/Q1jtlejvUF3G6FJ1cC5KYx2+3qjLVc+QlrbTFPCXX98iNsj84Mg6axMFq+haaPT2Nr61ChR4Kb10hWfNsXBkaFRMFbtd2dYlkZtvgm8O6vSN6AcwUeZa7MQN89WVzLCg06oLOwLXpW55KamRraR9LiYLOj5QIntbvdTAW//hUBlk9PsLjT0xT1DV+t6wYzSIHnRtg+ICrV5h0W8b3znXDgqqxhQlrGvb2fN96ClU2Vq/AVpHXeH2flKzt64FavwHyHzmGuJTdwJe2Lf2sKi5MAJme/uoYsMEAQBemte+krrfTfPWVWeF1lVKEsZ7dh5YA1qKlAJvfeBTXfoHkYSZmTJOPj/d/x9oj/Xkyyx9TyjDYqMw6LnUiyBzyNOld6YoQuNXGKzwsnPV+VBthyXEtbLrMAGJAGIhrA/TVUaGxfCzxqhVnBflTQtFDgCKSIjVAQDPhYFj61yYczqCgWkSJC3h+CkcsN31LWU6jmp9JtljfELXbOjr5Gb3OCHPtfYu1NDrKXoCr4xHmrBiWRiZKVCJwwoC2gaWtGtfI/Ope8cHJsJ2xE2QEObUUPzfTYbtd1TLSgtRCN8+/vCez4rwgBrqizS+ECLLSwnI1XV7+bjUTJmTNhA2DCdwObOihxZguja3632hAyedaghBtfrG3OIS1Jr5JN+qmt2u2GLARIuhUTIiffls8V/4zlVetrB9AyOhGNmncTNyviSl5vRTJ4+7aUba576sMgUa3BX2NjoWTPJ9xQu0bIJDmFSOAss9nC5u5KGekVhPXkOtAnT6eTYHGdlQpsvqutRuHr7iiJElAHJtdDI4qHaQY8RTQIkIolwdgGU70ZK8cCWhbF5Ph+VlrOvUGSgb5X+/ItEQUTvlHOxwrT21+GxgUPxKUWXNJ+xZyqz8Ua/DW9gYTw20PHY5T9jucc61QtfdRD7WbpOSZQNjhtMm2XYjWcImoNOn/xk80RMR8i+hvLyIRoFgSlUz2yyo4IaGM0IBh3Gnz0bE5Gme9lIhhnZvtUn6JMwgd65mOTOK1KfK0TDtO7/+b70S8xFcLqP+xIRXaO6KRmZ3juTpdsq/8hG4OJRza0jSW/B26UvstvcAnzDli7vmSsT3nDgS/l+6YFf9uKqcp5kOmrkYZzzZFz1MXHDPvREobm1xQbn2RnnXOHLVxlJiZQkEQh12Sqgl5WCcpBaXx8Bwuho98g6LHa9Wn7vgaU757bZxZMnYKirE+Y9Pn4bgqDDQQoKuQoSy1uJSe6vEcMsdI+UGh7aASR3Bikx1W7tzAS/rJ4ohcc5IdNWmZl4BRmTZRgs8+hpnnrlniMpJ94fAGVG2ianG410exywzDujZoeZRtFEExbO6UWm2ccMj7x9a7D3Lwq/9D1ITkcpne8tyvksjOhSP2jWXxCmDXOVVxw9Zam8ThC7W3MmCLKImXrndVnCaumhUeeOlcMlk5ljk6ghfFNvLjoFTdYwHItEr/sw/cw53A2b34Hs3ow6xzYs/akwx9CGQF9VwmF2vPcT9hWaB8gF2+Y9lPGg800cqVoOtAgt1NDS2JdfxbutIt+5WRgBPly/WoceKxLp0zw30ASw2MBC0kxpkJQo1DViG58feL4n6eAjmVXp33yuFHsq3ZxMQl3OdHnaYS/DlMfuxHYgxkc8hhklBpjxy1guy+br8IVR1cNiv6hzKPNZ0F86/eMHXyke1bhodxJSCqMHmfcnzZMRg7P5HsmV9W41zcP9nLkoOVGY1jecmOn2bgQMxaARr6OYmRYhd5uEa6J71XkhZR/RZrnjYNFVF3pa+wNls259VSuUmzpzUsIK/hO4Aebo9N1UgQtIyf1eYBo/3c3O+TBJWfseKBwR07ygqyJbOl934Vygl4bHDRqe7G+dq+SXmjCASLXcoVZXRcBBX/30MWqnKSdJOEyA7byEtI9Ic1hZUZ/+UVeVwcDmV/kshD3y46o8PIaydBURtOOn73lgxwU9z9oO6MYrLa5giR2bSOtGdeiowHcGpgQnu5WOW9NAf/F0V382J/RVEEHnO3Ni4oy0y1artEJh+O2bxWAuKWkWuFF7sfvdxo2TlSLdsuQzPYtkuFEDWCa4354hm4cUfPRaRHGxvsJZKNoaqFM/tgGeGq2omp4PUnGPp6zJT8GKjYKncMYUAvpg1FPnUuXp2GvGtyNPtCI0O7XGGTv8xefC1EaYtLsA8X5syTlRvGsBc3VtdvEaSllv0Ed61rGrF5Lx30QZUgeF7+s0VnDigvWh2M83QawAqnhMXue2dK8az3E6tgvKITSm152BD20KAjVVV59c/3chofOX5ZTMjPPwOEnWcjKC6RK22pAyzsGgjVuFU/N5ZAyKVnJdJ8AmuFtMRCOZwlR6YPKopm+c5b6eNsyHoL+51G2yvHjKDloFlPqd0pBFFfsWzw/Cwhahe8yiEGuFNWaOZzcLMFXG+VLtkIuDnaWvBmS+LMNRNMLfGqXHE0++PHAaaTBw+OPXw0IOnOztaecXqxJEol7d/alRGp6aGG/GkLEbv99i/gcYRKPUyT7NfAbrc/NdXIO2hc8pfL8LsU2AXKyl0kn9PfrHONfbxyjIURtTvQNO549Ui1GOMvG5/uf8FxBOnkqSSOm4d14XTMyK5pAbjOVsIqkFio6VjYHVIsEVDfD6rd49F2c6J5aBeTIB4rehjOiHvkOzBpx4gZysYwzae6P21kUSxbx2h5bxn4Bzu8OgPJKW48YJZOECh/Qlg7RAWk0c1TEgTVvnaaJKpaesOwhjTRAGIx1V77JaHegoUEawv9x5HSzwxI610KZzAr7kbx17s9aqJBroR5
VuvsPVempoB6KFH+1FMWq7lZ43ZYHWNFO5lUbfznxU2A4+IfGEC0r+ZQnwi4dlkejUmWiLg59xqQNQqAuCODdOmSV5q5nQV/2/UXm6qBj5UsLJnwtTH1yDxW68SuY0ACxodoyThS/DFNsVXm/xX7MXqinIXou+4MQtHA5+8kp6qshLTf5DwhUB2J9h7Pw+O09oBB2YMi3AZBx8oXfuKqhywB1jSmo815v6joRrBTg3dKjvCWcbY/jDdvhMdlQENC5jSnMOxTTpKiwDEB8t+YyiEsXd0HSOyCQqz2tx3SwjHiE7djGDAuVJLjAuUcSHnR/d1F0+ToKHl7J74P7vy+Aopet+SNe0O4NRvujgUpr8ga3mD+wIbscI3X43J/DAdFSFDilRYDPn3vPdWJH1GGs8fDBf6OaNPbJWv6ALFr5c0uD9RovtRoFhvA6fE1rUB8Q2R6AelxRgxec9F2XkAjM4jpYGGcNlNpY++qadzvmnhfZAePDEAX7+/HLwR07kFE2z60uW7W6Rwh5FWJKDRMPJA3sJFSbhFj6UIqn8JC7PtVxSrrc6Cg7RMdtFc1eO3uVqAM5NwrAQ1ZrfUBF9tx7cS6VxFSmm8WKQulYQdc6TuUorhEKShyNOyxLepcMN4hHkTAB1R0LHr86VFW9HIu8+Gc3HCXVr+jIa1ciFbR6xOzZJMrw/c4Pz6T4T1+vQQW2ibcXBFpYdL1xF7Y2VYJmoD2UfHfhVUe8VfdKTuKZMdxhPscS0ZgFDWVJ+dmsUpBMw3v0alHOfmHKLZYnUC2rYn4uLql+MEA/flL42NOlaNviBDceB8ctDUrttVmGJ3B3FS1Itvi+zHVBqUbhFa6KtVuK33dWVQANuGYURRd/SO/jd7UrbJnyNA7dk8G0d+eItsO2+E0SGaD/SbP/3t97AE6uwzHIUzDLYVypKWrMNwreFd/J0tmgbqdh8Bsdw3VZ3caek73yVIrsITddQRNlcev5f/jIWgH2aAt5K8g7CkkOQ5dyrAFaRw+lPIQISNLEBTQyyh+vz/ymFBuBBaJet7xQoMxk3/ys6O6VmOUZSseWgTqVp1enHHgCx5g1hEvNCq+r31PzED8S2oe/6jtz8qt2j+O+w+qZT9zDwTBXqOUYbbG6vVf7464orKofAT+JsGVQGzpQ9iuIACxNXX5bR4sGjY0pJw+QbhnQgROdhFrmQrg7D4/bsy/2LzOFEZ5AFzu5kMwbKsJXcuWKpKT6My9p5qD6V4I8nBf7rD57p45bZhpfoULPPg7U2f8JjUaEW9CXMywVVc+E0bSMEtFPpCCk/HQbs9vDdTA3HXmsbmcbB04v7979o4Npq/PzqaUZqzmTimNVzGLqcQVjXQdKQtVMEpUYsY0HbZ5fpOukTJvFzJ1hsFZ9fGmvjsEzjyIC0AHlY1u5E73kfIS/0DrgIj84Xs7/W9ByQN+8k/0NCG9QCy1lVxmCZC7jQcBW0dk1G0ZQ6EcHJOe5PBMTv+eX3R1gSviIQ59BRewYWwusGCAly12kdufGPHFqpEOr4vE7+7zIquEavUBHsNtquCBLK1RHVuTU5Yx3efplBuKSqOhoxH1ke7arsfoRvdzmJbiCjyPSyhBnki8HuBPpARvSCBMHDDttAfvXy1WWqhIDGgktZYYLtNeeujoYs0JuKROKeNnfwMfycX6t2lapL2pdGqOnH6WfYqCY1YMM9pRIjpYuIRX+PWjOk4vo6eyxTPMeJhF6EWTz6dS87tXubp2kIBG8CUNIZfpTKww8szkfwkVLMbd5rWHPoeDgK7NG2DIt70mHafEBk9nhkTd04fGM1m3pql+VyyR0vzOV8wpr2eU51H8jueLymxvEvtZ4M04WbXQtTU/10Vo5uO11bDWJkWNJkN1fboh3iQRiZ7rVrBhct4JYhZyrJAyNa3t2ppB6+jxygIo0cMJRq36fqeaA6OsJnbRAFGDsFI2d417xWF2DiAlsWbxIRT6M+PpFBNRi/oYXa4qTFk2AFAHvQ0ruw7ERpWk2VeUPz7cyu9ictKMBTFHarbmU19nvZQ7iBsOIVmz5R5WvO+8tHsBn204OgepvKPPOzYlb2jLJjhU01v/6z7edfJ4Qw0dZyk5hcTTKiOA0wrtB3rV5f5MICTjMFz4jhcFUXL5k/G87FN9YwzsfZDVp8ywsawN4u5lAFVCiaQOJ0h3vttXSbkx+vzrNbkHm5WgjO8LrfJuiQqyfm3Nhx8AuZWVCJpSmX6q/NP3HO0S5mtZT8ddVEmjcOmHDMa+ubyl9mJp+U5Q4/HoxDewufNjsnwHia7CevwSgN4vEAVch2+q6TbJztIgSNBYyyyiJELYKb58qfqRRp45qSxZO5ZqdIvNw5K681LkvhcvDl3S+XEfQ/4wLc4ZUVz7oTsUXgK+2/1HEEkMrGb89bi1qdgP/7V3qDw8zl4MTwqnX16l9o1Og0pG2NywB/Som9VjEKXJd1THIbfrdgGcM4G+KvlzPq+HwXxHIMGmMUamutuhUrrgPFtwPSeQcA3lFUED0JljlCa3w/770cDLUe0q1CLHsf6M2xgNeeR2DG5wQMqMy4FcGFiPWIXPDw566A5IY7zZv87BQiCGy4E4fVEarkb12MRtrg0SFMkUhKrGMpGXq7iWTktl2WvfLbK0CckbPIFhhWxEBU3ueemBv0Tn8qBgsXs34l1Z7+EFhTg9Ok2p/o1Hlk1RlwSbbO2Nky3D/HdbWCkFLN1aDjANanrp3iNOGW74ZZD3ZNLG06usIMVLwr6vy7r1qSKpoQeRJxGje36zP1wYENsuU5luLbsj1bgJwAWyrEXwSdylZNm18/QRdIebJA8qkrlnXhQqDmR8uTwbqKQqxTWyxw/vSJzOpNUu2zL5hNuD+CRrpN8RKNPhw1rh3KMVET2QfnDG7NgcaQX2wSRCH3SqzL7bvh8tRslob3tjfFvLTchuoJ2WQTimvGbRObEnlIb8ZHCD5uyRpiFJTTOr+fb3uv0U2T3ljHSsKgzKkWrc7IyiVrht1HW2EgfQvxj7wHvFGIk81FA5Am3t7MiDW8bzjs5veOTN5UlaDUyc0fclXeNONARk0c2IxGizZHsXiCCarr1TB2fm8o5ClIpISvs87LVg5Q76huFv61dL/QacCJndDwLTb+5rjFvrpCLfgO2nRYUu16a5E0nbR4hPdk4eC8qJitmOElB+HSmS+LJ5RUVxomuv2LiTHq9l98fEfiXELnOLizTX0gpRrrzC1A5COE/QpQj3uQSv5zQlTxU/o0wW0L23N++jTnY1drEPOOtUtDM+C9hLFOhRYexNQdfRU4csEFHWCvgrgS/mj1zpIvbgt0kAjLh547LSC5vP1YzHXEljEvmBlivY6qad38jxcsDl9M+wC5Y7Q34zf0RroAx7iLv6pE7ItjaBU5u2XeWG5OEuLC2q9l+4/3oPRRt90MlwKNYng9pMHZUhBDliOXRKs3HpmlC45JpmGZtKH18xFIOgy5Mnfx09LSxN/HOaofEvY+s4BzUJJZ3ski/vLcv9zRrRwKu8inLmqtsg6BQ9aZxvAncbGqsyvlQTYXrDJU0VsZb0/Y511mBuEkZZiWbEZzvuRGlzTe6gHabkKLOVc7lKf0iTbEqpmQDXfwb1z+ab8kHeSaKWOhNpbJNJM9efAd8aSQgq1lsvN7uO5kIgddY4OyXW3Df4QHUf8v1tB0ahPrsc2AdM2ZeQz3hAbTvTJqyaBgzlOG3cvWJ/KrBRHKpRWOa5TQbMBq2KFpwlcIBA+p27SCgZzvClVsnsLIq5rRYBfkQDBqDTu5C4YsqbPBrzR8D8iAzTLcUXg+QO0pMIQRSiKqbKhBpazdut041NIhKtMOFfZOS40c/ncR9OfSNCgR1qeeeLRCowonaqa/3l1F0iuTPA8eUpp0d4fJPzv1RXyQDplImrdUOi+E2t20MIdA0noNL2cZgOeHkCgD0HFWM125xpnnVMLfeuT+0a8xgczySWrnRehQDcEGNuScU3brdDz2foaWjKVGotgPvS2pU00kIn9gMJCvZxEqQ3wNlM7gVbna1SOPgHCI44545cYAM7UqOl9DIFokLh4dHEFS/n+N9XGR0TZK0LqCVilFjD
NevYSdjD4lxP03V08XD73h4iKBhiDMxbLeWmUxYSFf439aELMoivxJ3v3CtIK2aXeRvmndPntq8qH3nrjxOeh5wV+k2ZpgXb234c8qmbfVEiSE+9CnBVRIYXYFuUVcLbp+cO3uYI69YG+DkbuznQK/DvLgoFICm5wVSRZvygvR0R8Zc2rl/f+j2x8jYj27WAaOeQ2cnpGGM9ebqIme1HUplIJvAF7mSQ4jrEQhbFAf+j6ZTUnS0hlp4d2NnZxFT100uEPmembWkJIzIOfIJUN8dxsr1PsAMUWtEsVkaSB1LAubNlsrO0ecAgb0EBHyZTTfWnSIdzLTqv05+YiRi757YY1l/0BcPgMlVo0QvmbsxNpbvXgn2DJYAhEHb+eG4J5vIVMQFzs7Nef+yP9cWYgFI2CRqQE4K98Uy4uSX71f7lgCkSd36mJpWUR2nJNXRKCBlM852XLCWJYW0BkaQ4UX9sPORPikiMsrVXhgB43NIhCIimZmIVQg8pbWjtvlYYgVwCYIhQz9Y8ZO+4mO56lqt5YXfbQCTKcKR3SvjDLB0RuP77Ah8C6F5ZTw+5SMxHEAuCeJ/8UEadjAQ6S2mhF3ZvYtShjXmzBXKXeVq/VhjaWohdJIw28b3mNFCzTVnPtAQJb1AODGv6Q/fFj2C94bRty0UUTLhC8Jad6Vx6aqM0REkO5J3jNXoFMB+84EsMbZN+Zca4/ZrxarpT+VVW99OAilNmjTPmEZxwzQWAgFf+R8uXwg8ESIGd1kHeEl6z9MCIjc57H+FDrtjQosbjFGLR4Uw3b3cCZb5y+gOB0OCpY0MTWyvEwn3WWJtUUUjiOUAq+G9QaEqmHrnN7MMtYHu1jqGuQzfFx3C3ytiJZyeEXj00tHYRarsHuNWh46Eu4W0pkjTEFX0RXdmkWYnNmXfOCRGv78cCV2JIZsrpZQUpSBW8nMW8CvfMujOOLvyZZtNSnOl2kzjSil/MYcNVFdxCHup7m9Yj2sTK3bVkVwra06u28K1fWOjHb++KIuvT29r5tku9bTZ+W+fXJo+s5EclIEz/vM2LTagp0C+N/K7hCFpf+7i1323JgWNrpDNTAJMgppmGdvn8TY1fuMVacQXVXyXVMMzf/jA4Z8zTFHGmxnKW/ykSK5HOpjVqbQoCBUhPft0X32JS0+Qc9BtFaJDwp95jTMook5M6srVd2STjGuc1H6OTk3b3E2lj5IEg76vvNEzTcnozsb+yCyOFkdFnkhH/gevCy3xF0fb3P/g0E0N0V28o0SagSNaECUTPCDJl3LuZNo12LwphWpkTrzhP4eqq+/eqkBq3609Wp5Wg+JopFdT4sZtVV7tQlaRSrYYwzUrmN0WuBhM4OtI5QtUjgleaXfYsVK0EEGDq6dsWUBbMfm4i1rEwuljz92AbjIzyDfEwlFqo0eErIaNK4RZ0waeb+4FsDJEj9ZVCDkOV1bMmza3AnoBhcIZN1LYCgL+R2FHzJCVU1TDSC4qffkpZMUDEfM/Ir1D9kYulR5R7dTyiWF/ZLCntVGcUDdus1WpUWv3Rah7OGFLizDywEk55/L0JcvoDhSd4oCNySqj4Zzoc7tRh3m6qXI+k1O+RHpmXQgi/k6HVRS9SvIu/t9JTtIZ8fNRB/qZuVhWit00bLM7HCyw+8jXxYrQfgs8NMLC/pn5y3Vu87fc8FSHbh6UF1c1txItiuC+gUzT7DD4kOuRwVosJSSRpZTnoH+oTIthaBsPLOHUjUuP0xB0Bk+faUCOjRVqjw3y0H7ab7TA3WgGtI5XcWWKnDVaUCNX6NPmIuNllptvvJF07tFVe7JWynE6zhfVJJENi8kwKJDLJMobWz9b87fDgJrHG+BbouZUXJLLvP/80RwFOMqMUoJ4Sk+Qhp+6WLIvrJ0k+faBi+/f+xTkWMpy732ARVtH/4kT7Q0TjSTbOLA1a3gi65MgF9hIoWnix2utNM4HBTfzsREG5Ego5o5dF6OnTNrRqdi8rNeBHPkDE//E/rbZC22a6lEQNlbD8KyFvS9Pm8PezaC7WJ04+XxnOJ8EgZDZ+pHCvyoQHwlh9sP4eB3GM+1mYb561BhOl0bZ4/PKu7gArWIHMofS5Cs3c0Ic9pxrST7btgf5PhzDteEEYh/Lx66JtM34a0XLQ2WnCR5tqRN3tlRgn+YyCqaCCAOFxYS1LQFA/ZQ7sk2PkCILWJwcKZKLUBTnTccS+/53v5TQxBr+OtP+eFYCMHxFDN6C/GH8tcdemwDcZgvUtHGugctwUevHPIqhsAKP/LUJw2sVeD3tGfa8SBcvvj4f+ihiS6V2FVLQ3+1z9LOIGj5YSRMxZilUlxcRuuCuQlLgdJ7wGF40FEnrOMb+ituWoOa933EbeVVrnkbNmjWcV+zKzdDo6BlqnfqJa78EBbzSeUHKBTMa3p27bcf8jKoJju2i1V2UgnCO/jUq5IvnsqSZkq03Iu9RtFG6bfXkU2HbTaLjJ7mjIFzdNhxGASRpuYLf2PQemTO0LH//FOeFU8He07ctzhnPrFnVg8QvsO16aiUQkCMI6mHKqexMDSHnKLqF3mjnCFy/PIcNE9+Cqn9PPT8fRDIW4tBc1I7arDDv2GqQAb+vQDhSyULM0XPYW+2EbEM5yoLy4sSojmR5qQuoW9/zALD2v/2Cd0RZMBaDCdw9CCdZupov7871ySYk8Iaff8mnOeAM2yoKciKx3pkqdufvfRasv2r33qUT7wa+1CaQqjspvj0eO8Xcgd0jLnDjZ4D5Iv8wMdgGVrSjIz8vKy9CQliQUHs5wtxCsMDuvEDM92RFg4Hx3LbOrGFPlUbpgyetAu8NEaPRnZQfaqoLKZSaTw3M0ja3IyKqLNs7h1U7WxSdWxyKvev/uAWgi6g9GNVqWq+SxjFVv+X2NodwAdjc849O3o9PGq4WpTctCJJNEVJWZIYPTQRxYGFGMeoCD10yaW7+FgJQV6xxFz63SuvVXwvjSLsoCo20bXjYaO7mB34fjXU59QTqe7UeROtAP4wtFqM/qIN42ASSSAc/WSw6Gp1WS84dJAn1hF3DZzr+owawuBbgh7LkpO1rFi04/mofKbAva5S9Lmi+oaP1GrhKABg6fhHcq8VQ7BI4pAL4cI10nnXoR/LjIRoVKSlFwIGPqoE06NYhqHI6f5sWJELvgRXMQtf2JHngdxVP2HsHdeK4C4lyNCujb2nSn/eieQvHEI5pZYWLtZSa0ZDJscsl/J9CiyCIJBBI0JSiwkccaouhBIn2zisbwmokUPCD/ezD3jDwY53rOBgQHCqj9vaYaUWiktJqvqJ+/uiQeqjlxvmAyeLPV3el0ONA69BDNpVlK848disaO3JlzLzbDiV7TWDvxc/p2wiNThKXffW96E3+h8ClLwC8EyI96G0R3/F8b23qR0oPafWFvR5HZYZepgKoybEpuv8d4drHmtDJceAaQclfvQKCg3hHF0olkC39OCEJt+0NmZFwCh5fBaHvS/h6hqMnccAmdhLASWQayY87cH7GfowKVdjqOoa80tvfk1mmc4s2OaSOdB/pKourj/nhcl41pLivwTepnJJgwJAYIohZwdGQLNvC6IcPTHx8S2+vQCa9T3In7rCjzdZ/zwJHye3g9BYLRXv1g28LJ2gg7HqosKeiuNGmowoOHYU3rZLkoe4D6qJ3WnGukXRHLIc530jKUeFMXQbOCdUTyJUAlW7dfq8lPGMKDW0C/hVUihJaQLyiO3e7sazBM+JhzKrR/5URXqLtXQ6JZF4ZQtzaeFxINRARGL0tVgHM17QNxufSfEvPSZZNLnEKyEqc+e6pdzqAAa659msXwx/KmaOOjHGwu6tlEhAuTpDpZYtOB69DDORNddV45NUDbtsO/isQbruBkHj9mGNpcID2KcP3cXg24rmtmi3rEcY67kNpuyso4JzxUfHQonLRJd+8/zK2vaq21e8cG2Rb8v4mLRvdiGW1uSlEfaFERAPzsSfrnlZBLmJSf00+gdnJOd1N9IVYJw9oeXIyRthDm5acBO4Jh5DUqSl2HTBReZJeapGQ3ArFHChb93ys4qloqSX70HYl0EoUJKqPTjMnfU+yrmloDesdotsxqwx6LEe9icnLl
31l6jReyRdBo+/auVJ+GtBuoBBqgx6pfdkh/EUztFGqJC4HtKD1TQBbAgzcojOG1mybK0wvFEVgpzW8bQXZ7oowsXywuplI1jZbcMHH+70JQB1F0l64GUaJ1BrbwM3qU2fkWBtbcVK4jNk1nMsRNgHRxZzLfSz2r8zjTtyn2GY1E3TpN1RSN0eodB0W/auPiRKWZ7fLH+aLAwt+sP4rgV2ORxxaAoqJ40YdaPZDo+KYRFzF6nuaLcFDuRYjOBXiX/NY3Xmkc/9mUsXJCKPzJ7Cmk4UL+hbZXVvSZcBfuWWxI9ppufVJ3aVptPfGwF8EILY6zV10bVZhurBpGuL7c3BXkwCVZojoxuvNg5nVYpH4AXFwUb6a6P/2KSWhQj7U6d/23UHSITBT4V4hd84FvC7GfW7CobtGoaegkkRV31aSnxQSCNPmWtYFvm0Q72dyDMWGHMbshvYyc8jBtppNBWjw7ZLLnh08GQ14rZaNtM8xI+plUcv/bPmLaiEdlaTtTZebJZiQe+hoXIg3uP5sNr7nDba9XJcvdY1MWculOzTyNWSFLwdbC2RBEkzDLrOpcNQWTpw71uLeH26Wh2yWtsNLFEAx4qIXYVqUOhIAYnceDGurkM0VTJn0hl3uUn8bTKomvoBhvqfJ+i/GXwyXbB1M7j3GRV2nxMZkd4DrBDk19dQdwPA2vXs84iLEGthl6mUamiClSR6Ri63SFUk0L4iV4ncI83V53rY5kOqGPNM4ikvvFyUdj7dBIQBbH99Jx2DuDjon1aApNNpSpycKDeGqw+P3N7pzU++SvUiFm1F6/ih8cYtLOis1/kprKB02qq4CbqxcWXuo2514DYNASZdTJFOlcYXp8CVau7DrCSD7cVsyQAQ35lD/9GSmIQjtleoVeeCWKwvx55SSdjNW5wn06qoL+uNnh6GdFAMK0s2ZQAIOqdBtW+VX3meykrVjz51DRvgCex9NLqkefmIuD2T1y8W3c2UVhLqjUtO6u7FkOgQG3tP3HrC1/q2RzUwEK36d/ZTl8nCuyS/ZF0MuQi3+0jQZ7uo5VZaYhn3Bv9BHpTegjXAMuQOqdXguniM5zyY+56VjbGJ2V2XiDXco27AJqDQIAoBkVCWJBWv4HkFRJ13T/v5Mq2Aou/SMoaioa2P+lWSo++eDK8nMhmiAyyVliDCsuL+gTCrGHs4GW30sKJVXoC1Nf1UO2sunB0Ju+5uwk6hg2GHhCI/uXeDE+KZCG3/Diup1FcD6x4lf/xbDeu/9euQOfXjdxGYyVfvTpfjYo1SZbiyQ2LFl8xo43yGA13PeoHDbABwVcTmkvocwtUwnUY0O5fkc+G/yXPN+uC6BTk6bM3/WU5JhpWpEMpWIf6X5ndtAnkAWR5aBk/39860xu3qAGKLJbI6EXMBY1QvFARIlI5BKLhGtqSQ9lZqqCPvHev6MnA/DSTGBdYKjjhUdW6EWKcoanPBR+Bf3zbAFv+i9FfTx/NZN+tneOOrMgS+pgWkw73p8iF2dc7WvVpQ1gdDCbzNY29bw4ixwSDAZgiOpCZJ8tzGhUG9LGfydRhHZGRcbeNvKsdoNMjIg0LCKUY956xmN3IpNsSibkxT9ZG9WGUlg1Lr5O1R2kgxyDEkKR2SNViY1TKpZjrwODwXZC5OJnh6thW6q5vjzQsUgCZBax8uLuUdxqGsuRpH1GXnKRcoQHY2331/ez9miNIgHe/9ERQgEFIPh6luePWK/7/9mH4pi8S0NSmnlEL13hdQlJuHCT+zQkOfLFcdIi1ooNn6OOENDSG+0Q1wGqxfk9qkQ52qWstdYrFf3RGR77sicIXdAKbFeCfW1GFbZFmYIIxYu3KYh3cncDMnW3bAR+2PdzJkg7sH1mIFoV8cMCyVp334BJ2rEdoU+JKXLFcV7bhYgVYlz6+ECZW1o2LQxFlibon1LEKKtLKLBWzuF8zU7rANqDTWw4IObD4t7Q94S8x+3lhATKzlmWNI5qK9VV/pMTIkFYvjhWzs4pWruZbOAMBqBiRiivpLFdOr6tiK7JUChRNWrGjPcxOsEIGCWEN8xjVIol5hVsa7ccc7NLp2GJ/8zs1wKd2Hjb6T/azWyBrfwqo3Jw18yKgFJx94rash3nK8fD5mnVSlWNrA+rl0rQZQtuRdymw8yN28tsZIVCsY/OOeFc9yZcWGQyt26P8DD97nmQFfqt3M+Rfq/xO01fFtZBHLZH+2FWujUqpUr9U6G6DkUm3FWVmLe5Ug07O5Onn3n0JAWy4q5QCjJZjWE0+n/vkvXcM7TZLLAlQWThVY+PyUQfaq13SkFD+m2+C+LGfJTWqzXa7Dgpl5bUOlt3jGYj+PPn2tmrdgUJKdUZ1ETVi9Ps/Q4jT2OxHBHsN8ZVZ66y/pxZEATMfxa4poHh7+zMCt1TGeWFKyTN4b/wXeaRPN5Mzd52KaR7VU/NFAdDdsqB/ThJrYPhyx3H8XQAgnfoBSX8yI3XGbMs3x8PF3fUYb+s+D+z1D7N1xYu6MP30uee9zhFdPwedcqoXf9wO4Oqx8WdaFhDBlHqs46EQsQRZ4RngtK7m+bjjmYH4Xjaw9DT6H+rfSs4KlXEj73wXKauywAAew7c2lG9T+qyN0NN4BlNy1KYxFkGwVEuxuSyrbFttssdkA+PdJlRoRL0t2FEXx3kcd7FMykbcbw/7gjAP0E3YiPNT32IeyVMgeD+OtSZgNmfZjGVeRm0Kxhzcc3xwbcOEUytbEN2kQQtj5nnlkjG4nFJ5+yy+FFsv8oecYAN6q3LvUiAWqFB+511UxHlqv2Y3Y34Oexswuk+sTnC0oNOXnEnYyK4ewiB9n7GBEBX1BkdTj+pNYA1OlXc4AZFW+rikoXfdr6COcUjSuWwjecO0NNjjH2z1oeXC2A9CvXq5LRATqk8UDUj5ptZk/9QGsh1BTatIm+TrySNTVfTadIZljrGiMY4abkr3CMDB4TMSldSRymRqiQJ0l9FhFf2oL0vQzEjVrypc2UhSOvFsElJKf+Euj+oyaZkiM1p6R1sktnX3/zJOZ3PyKjT2YMZPCPTyiqsGbODTAfU4bFKg/ZCGQOndaJ6vWOfOWho/3ger4fFuAtgtduCJBqiuIsQ69s7CTNJ2yJz50tMOZZSqfNQeV2l31zW4v1Lc5s5C3XTFFCtKiDzYsrAmav0en1FR4+hYazCrz9+cUAg8fXAhVzA4NVvX3BFGLQ/qrQZY1cnIp8NMq7mB3GA9cUDLt52a/uNIz76/Pro0KY4Ne8CGg6FH+wxIyXp409qC3pS/v7cXXBhK9pQuXGMSRNI16Kb7HpI/vCHB+1dw+b4JblTsJBZ5VSBi64iWCC3HuwbtTKcJZvkbiP/+iN3AEzv1jN4teQbJwVjTXvHBOHXIUL2womsKRhRSr1pVhZlEQFwXSt2OZLTeVcAJ3c4hj4fmVAMvDNO9jh49IokvOYDafl08vn0G6NcYhyeGT3qfzx6vK2XUASBULvNDVrQXrEDsRa7r13EOxL0My68SvEvUmw8k7v/ieNS72T2EC9uq6OoFGdmCKn+2ItevbeBsScbrnwmI/v1NXfMoPR/il0mf5xndx75+y2hYdDOWGyW6mQQIikIub3S5/dSI8Pe3llxNSYvHrJ7Yorf1Gcyg39P//GtF2yaMJdVS91sUvZyEnuQ+uno0bkbFhsuBpvmwJSZ9uOSr8YkEs8XBXfrJa09gJWP8M+plWqMAEm9p5HDojfwD/RnPtol7mpJSbPdE0wts71OgOsJhDsrYPW+D9loVIjIknKTAV+r6LNjoz09E0wb4Q0kZ8lgZXC9vIWqrSvqkNanDP1z/ZRRtZ2ZPZjsHDDQv8J/Irt59jn8k+tZvi/PQ5e2OXQc6On5PFySuD66/r59M3igCRB8xtOe7cKyHiWxGs1cuCLFsTU5Js8P7ah8RO0OBWkgAuSoBEPoPgh5/l0fALyKDQhmVJS6QA+wmZZUgaLspXeRJB9qXi1P7Ublq1PumJrlXkqZE2XsW1AkoTlflo5P7iBm0r7AVmKcvDb5efbV5O8FIQaZS6q+mq/w3KWc5b4c85sMoSfAFWLf6OADY9gsr3f7nlRhFTXTvss94hwsS5IrrzD4
JYEaGivR6JK3L02XurPWY5etnMRWuGMV5a+0lgL69ABNF3KJh5mrSSTfmlHWDqnApX5DHcU5hONK+OTDheXp83baAWCQkCoskfg1LV3iDiH/BssrHYnrvIxIIHr4Mt3p4pm7RcSOozgv3MFxPu/MwYOl4j0AaXxigUA1tPuVQeBqLBY0Qi0agdcwJwpQdjPJSFNrgPgkk9Nrg6bE9h/naFrLk+jsvzYIc8qr3xpbnOMfspivxB5UAvp3hIMmgzz87Vhb42vOCdTkTLJY8XxqJN2TZBM9QQLABbxyu3BL0A5eOR2ss4n5oB/92VEu08GUZpWYDTc7dE1Ciq7qM+u/h0K6kMURWWI4NJ8W8GrALl6lq5FTdX71W+nBJh95XwX7law8HT9T2lpT4fJWdN+vx1Ix1VBYhlxfVwX9Aiq9k3nZWJBVYX1u1jqdWKZbo1vBW/eDm9jZazS9ELIuRjEgF3zx15dmrEgIdio0FK0KM4M5ljdxRZ+hDra8LFI6ur0J8TqzAHCTKYvM2YhDCipxh+o9fo16esV7aVIpkkBl3+cRPikdM7EF0RkUq1ZJdYcjE6C6LI4cMpG1UYPwbPr/cboiFCGT98Z0nr54wqTm/hzKFR3t8ndNHst6V7R9Ky0rBlltx1SR/3WwesrAw+jTEIm7oy4NJduL7vTnK58VgPvheL55GAzupSEs1st8jlcisiUFxphL0rn6giezlspgeaOlsA5p35r2gHgDP6jAE7/lFYKQBljmTsxpxfFHu5mEg7wDqb6yjMV4LjKBVWL6GrHSFDqImMM/OC/Z/62Zfb75EnyYLeM+Q5scJ35GLqvtOygLrdGfgw+rcWGVW4DO2m/u3ymGBaxtqL0QFvm/MoPot5aZqOllmfQcAt0TJn6oVWg1CjOOGAIL3CoSv2bDxdUAd9Bbtjb2QsIlGyA8Lo40bOjoUqnoUvIRPYjj/4KsuXBrqYJfn9dCwU7auGw7t7H5ZYRRPJ6XN7tacJzERxhuUAYVo4Bt5B7tWssGgmqfTR7DDbfwQUYgmK/YVmZfSjyAXjYnhWYD3kAwXH8YzCpaJyEQMWrXCQVnO9vOt4JhBY/Ly3xGddvvMtDNka4DEtcyc4x+2ELmzYr5jtdb7hKF7LF7bz6JvVV+mIcJZzSp7p3IQ2cRVkAuJ9abQXxRcN6eB8tn2YCT4Yb6viooe4AzhKRg88IhpyZE2N/S9iVBcfesZ7vg+rwrxL9QapVKVQfKKA87RVSQ8GiYsn1rSFBdTGhhsuOqfb9HXbQQbUuulC9arWrqDR4j7M6SxldxXLpAzuSRh73j6aZdGvoZNtcYxVyYkPHTduOfavDkfEHT4m3BjGlkZnm9XcTawvaKDx5D+WD9zlkr9246FVoiLIfsmrweKKqaMOi4xL//BgBoQ/Od39/36b5xENXVNt/tCxo/acZMWk97Ms7JcraUOXTbHnsIM85MU76Q9wtCx39WjR1Zy0jLp2dxpau1tWlvsAvHPkzr1KUWHZ4VTfwJvZ6FVHZqffy7O2GMRxXpmSUz99ZoX9g+G2EozMOKREGA9PVimBK7J13TekJkiocq7jac6e77AMKkC7W2CBk4Mole0DZKtsT1BPfD0rO8wzqsk3PN3FYZ9dm1Onp6mXR3i4oKkgRH9om7anSBXbXOl5yMgyWnzClgOef01dmMuGCCDapmCitQONGvQ+WEibj+u3p1uwq/WhfGSRqhUshzS1DsioHf3VCL3ujNgGVQoHULi0hZHyfK8sWshMhFfeIfCXRVapz+D90O+KdNX7AE6KnYpcmxda5ySealO5miNzfXF34CpN2RdEVzLS/oWqPcOxc0jREA0X1cOLIqiDnv29X3f8QjC6jadU/nDRabvJ/GZDaup9mMDm6jfbGkibTHHGzYCHvqpTuTOFHK7rNpXSG3/r9CHLV6OwRXzsPEwi1r+e9uSi2fSPURX71tNKEqY72PcrmrCiVg/GaDd1drrPrpkMl7S6fGM7QlRhgTjLCaUA9H1DkAWtj9192gH+3HNMefPqiAhmaLddKa2rv+2L1VaOpVlItgsbVI3s6MKnL7A/0rnMR5By0N2ydgcv4D4OUgTucMAgBMTRA9HYxXL/cBtdLtEEP0aq0AQHLwyIUUooILgxOD0Qz/pwyTGfkGabFZZ6W/zZ6aciM/kg8fPE4+gJvwQkYwZonFIpOSGwO7mwoN4nU6UweDVqnqyCByeDsdMORzkUiLvNsgPNPB6P+C26aYieIxVxNGCgDsT3Cco1/XVDxMIpis08Z6gEWPAyV27akiiFhzxxhszHim2t/XPrbmFgLDAZOMPvgWGpvuzi0+/oWhJa60MFx8nwgtNgFitSjU6m757gOpCDW7f7PMgGzjHsSCSvkIyNuX75DNruXLcH3MY6kpnXLt3RsnLiTdMJ4U58ghtE3y+WMAWHABVuusG708DCjwoOk7RFoRyEzz0GrE/9Pp+ZG9qc+2KsOl1Skh1ZxMJ4ThgaxLrg/HmQlai4r539DS+4kVpwWib4Jz8SUmbbdu5+BUBVTk3LyhTYJfzlUiactl5put6GI2VpaGKODn2FWloAyOgEOftkBANGZdSvTgxyjPaTgNkjZxzDyv/AFBqBQOdCm3XZdDoBCQIOTBw2ssSqac2ZtytN5RS25U5CmQMWrOqhoQ1AUeg9VoomsslLMw2C2lZ4hqX5Ft2r7MMKCIDXdmq7RGr/a9McKLB/XwXP9SGGlPB6vVBbN75MR8N46N6rpqYUvHgWZqWVCXn7fN4GeGQRar5yjRYPKOpYjjeBUHM6tl3arf5GzgrnQApjIpObh/3XskaiewhpcFaoY81xkVIbPthDhoiRYbc24ZiSnIQ/zJbV9EvvkKW1xCfn/nhMdTedVMP2hsccmPPp3l7nUHI6XKW3YhKk7MNuI1rm7pkfGsLLnuG7QTQ8G0gKTACogLu+I9WWcrJpBadqhCOzHVtjEN8bvWj1CqYuTGryI2riCGLR2ssKvcJdFDaxI0oXhvna2fpVU/yH25YbsopILTpmnUeYG68f1NYoGZou2gyAgRpYxqNDyxp9IJybszCmej104xzwlOTTJd8vI9DpGAt738fdhKFRgQKYZzbhiGv4vSWY5qPQ4tjZ4p78k/V78thyMqelWyS6U5mEWx3kgcsTVu1F+I4q9Tm8Av1t20osgFWOhgJ3lcCSEj9U5sGeZrS73pIYt2K2JDBkjNztX67E1HY6k9HiITDixAkzPp8xUwrqFGwJ65ysq67TRrsqfJ0vO1K9qk38gy2XXYwURNEyWqfBwkPJF6d0GdbeepddkX7gKPJ9wofCKlzzJo0BTGftzRUquRPXOCKZ39Bic0FMqN0c237KLoJtJHackGGd1n5qlJ1cLOC5h/fx8L1wEVAHNBqgP+Qivw7ei2b8Pwcz8rdZl2ovWr1sGORKbiLsiGBfyusITdueu1RvtXsdKSi4+JbSYNVWO4nyu11IUNtIBtXGU+XTdY+70YDXQv+wRePjmm9zRjXVaQ+Q/4URlpxdLLGuWy++zsZqJkFDeIElkY7N5zYRv4xEnDMBZWdUZ98yXt9KUoUuFkBM/5giRyYinTgvAqtKDBMq6pf3jmnKH0/cVFk++oW/744RdA6zybm8xqpDja6eurEkCohIMMLcGuS9PdhSz2f3KiPFecz2XOZxHnAm22XDR7+A0sO2nJcM/G1ORbxGDepqAB8ivSBcml0k0G1V76jPrpMka/1pPEObNZZkSDKw+SyCKMMDJ7DfaQdz8Z6kgrMh/vyIWg6odlKcKX42yVbpTLFfLSbLew+yQhIa0Qefh6pYfTYsSSV3WsDMQBa0PhIhwD9DnU5e78JDs9Tf8MEGZg8cKf1dDDacjS1WfU6W1j07A4csdfxM3ZSQhvQFIlFvsGkgle6UgYzsTaa+5hFYN7+B7+ZdIECLEOm7TJ/BTNoOSUS1SQDniY6DZZPzji2RUrZOO9C5Ofb/EkwuYDVRa/7bTErYIcHVnPsGt8inDFpPogz5cM7fMEhEP5vku+G17TnSpSdQQcmTqRRQLyYodyOM8EAOns/R/cC5hiXBaWQmnDK7Z83iqr9doOZ/2U7R5J1bTbKVRX
EHevAWdP7/MXedaRDnj0SNwFMrRHVR5+Ombnk8fKGxKf4fO1vz62gM7lv/LrDUhLXYLl6WHJjNQmOmvv+oKOW40okXYrn1IfO0eoyVqBwRiP3VcDJtlXrV1ZVXLSDKVyqcaeLerpXVkpERHDKVP87y3xcUmth79T97gS973TDtGWGRvRCopvPo4+u6x65RZEVg3yXS/ES2R2uXiGVz73RLT19wFqoQLJvr6qaorzJrNWRJBCrITiEA6m+nZiWteAL/FYcIYt3BgZ82MVnC+WPKAhpHAnhPxHbipP6u4PJNRhyzruaqFLJRd9MMDctQhsE26HISKTcJWFqWFahFqC2uj7fp6Lbl9S3vs4Ep6rkgIiR4/tm4yl1qJ/g+elGuEXjU55Pw1DRjzONxaUept651LhjNU7doO27Rf/GKamVdAKzSvm3m6NM3jEECeYANxt/00BGm1g3Qe0EDWWiyk2uabZHGIEeV8xtO21JzZCf3BJPuPUxVA3lZOmLWStRyR7MW1greQD5GneQ3q3UZJptIf/LtPPCVUme8V5kXhsLqxGClBD1j8KIRVXK1V56kUM18V2pmx5JmUMOSNHZtxFcwgfU9t3TqUJP7GrBZlVkYdWwigpdH/zkj8jU5PZTasABdW2yZnKcj0cmmk2W+kFH0QF1hjtFS0GjPqHjnMvBUf2xd+evGMzwuaV7f3aRuN2ZNdqFfYZiLzgDGwbDc2+1ISFuvFgwjzdgrdbcp04dzLkIuy9+KXl/cklTbRH1+6a14FIV5+uu7aIW/Ar4eqgRmxqDyiDUjj3Lvo59GLXbYFVm5xgiagjoF6fktLM+r8fsLqzHegIiB3i+AmWn+QzueeJ+SLuzeO37bh3aedvIfS8V0q7wH1RKgR2RUNV6fyEecS4fobQ06Hpqa4ixe2CflgrIhTR7OBTr/TkOQRtnYjjzGGFdnr1XrjvxJJnEBQr7LjNNaNLX5ks/mjTOuO+MySZnRYZ3z4xzRp/SMAkNCFyjNxUkIpgmp0cgara+CzxkBiAnuGIrbjnhikCdi+ayHw25ihyKTXAlVWaJU5+0MSXmkrDCA2zny7tWZf2I0XmU7wjXzaFJ/00U6PXmw83PbCAf6WQ4Ay1KJkwbgFnekUlzkZVg4VzY9mMwP8iat4WDSh4/Qkh9KN2pli4lcoYBv+GKMWrXBdHqTo1p90/Aa8kl9o81PqKk6SHjQYtHekpAUuZHMBhLYM+XWacghQMh6rXZ5+3rvOTsv34rBmRsX2QW8v7RyN0HUA36U1q7tu97Fjhfh8aYQlMPUBEvg93fz/sK1d0IehJCwhNFCbWYTp5LkLOrNOYTFV5vakPZJnkSafcMPnl2vPCkY21Sx/qs3YgM/8W0JBfIaOOg+uZG8GUi//2xKf2V5pPLPUbGjwLA++U0paadj/A4Nf/CzfPxd6sGFPmqhxsr5rAAHXZs2Mslw/speWGOyeg3HAcWKZvrSh2F8GCqmY8bcEJ0U3CMCiBolfHUrKajLHYU5369VQhfKNoTm5tpI5wzq5ONhRFJstaHt2JJZlTuJQ4n7hezlN4u5ZErUGlyDLHPO4O3p8glHE8Hlc9brvguZJx63R6qaaCgazUv06LXubcydBug3E8oNNHwWthkGm2Kozw7llMYqJNJgG7ZZbtH+YPrVobF4xdoW2H1t0u2Z0HGz5qwBpXluNxJ53D5XgtY5aQddi3VTMg6vHmNTw13Z2G1Od1g56gU7yBwuct3e+g0T3sbxeBaCeEJwhLPz4caxR9Agm1i0MCx4GFYLfdgRRlKgFJSKDPIO/xEDg/ZWIqlya7jYEfRnl7+KvsmouJ0GAMdbF2I6BoLSb4JmdxiiAmcv0Oe8PEsWWOS5q3jyXAuQUKwUp8XIltf2c8jjZCFGb37jVTCKiUR9sASQY8b159K1PlzP5633KZz9Yd2+skt49L8sc6eDXaXswHOLQk3nLHAKqZQ+MldtySKYWfI7RnP9M65y5VUC/n+00bCR5aq/GabqzSMOl6PLnwcTdgYEULr1VHb+6mONzH6AuoSGp0I9ybQbXpSBdK3T04/BkaMJANgQeKnHehMF6oN32IYhpscbS7N2v1+QpHfUtlXG3HgH3JPa3YwGRmGITETO61HA4HyOgpv08PI7bhuhT6ZNzsEeBFJONM9p3BngyOK5RBp4hlXZ9NK5VQ6FQCKHqSk/P2WB7kkHpTloLvSBO5yWf0y0FCqiFQR/G5uJtBkhUhXt5iNSOGIF0XYjE7xZakF8uFE4OiyyUIcvuZ+pjz+9BBd9I6vMpvBX/A3/q+MAtfqv6RqGSrqUmejF0mpQK5dE8pyJy1VobfzZEkCSIbVy634odww6toPCPPOtfdDj/ny6BTvse8E4JBfP1AvnZ/MWjOk2dy098GRN4qp0CUFG6ghmHBmBnq9J5QxnRSxBIR4zuLsXqhMuK3FOZHAytL2eAtBpdJmm9e4ChmYd22Fag9tZObNUgMTr2inmJs6tgR4dyvTP4/m3PLsncVCB6SZLSHBdpmZ+7oqglein9hTPFK6XmKqf5DAC7swhkMmq3Pg6iG+GMVie4EIetdGritRL92271DRRtAhoybge4ThW5WmxAcsuIAM01FerjMFbmZ+DWzxuO0Zf69rdeUjEUhtkGzUYiP6DyGeqOE+bLlZgGGXz6bSS4rVuInBwsIqwmxSjyiM9kQwtSAH9ylLQvNSES0qvVPjFomnwUe3tXjITaFGIPYXITr42kE71QPZbqF7XYKLDGg0HnaBgHmIx3uzSgvWqeILjakJhWWu9GNT6Dwa4g0N1DNQF3/eGNTkbSS0ZAlouxR6VHwFVpLAj24TEF8KdKVLxZq16OkLIkElgp33QzcdJcajRb5U2TsQT7f5aktCu1dcN99y3GUG8YmjoVyA0tCbDMsZszXyhP2p7V6OmnGbEWwbnP0o7O9kW9q4fsle/+KI8viw5K3wfSY97Iy3UIuTRw6O7QDzQe/BBf/rSMj/yMaEgtvWghKXLQ7/eNYq7ADrB7cYVPF8jmUx/7Hwj7ucsJFz4xiyu896xBuGLQLUgTY/6O8Q0SE6ge2Wky6bkArGCbFboWQbcmQggBPZddJVu4YdNQeBrVEwl3GMvVHmA91BDmWYfzW9RBxGAsNiQ9IK6yMzJOqNPcpzVjjTExgWwVuyn/HzJPGunQri3Vvw+asCW58LpVdRRewbGjO33Hp+50pSXBXm9ZrMUGQFfbD1VWD1PVbuqu5/kKU9tivH6/Vk3NDT+k+9sHpCkJ7lv2xWDejg1SYNV29vDA+jhysP27JPdvWd/g43QVsmnu49ARyVfViM5W/0w3lI5UWtjKQHCGiQON8dHCI7T17Fq6ooUGiXqBWcN3qg90cpE5eiPtemraItoUwSAHkspOEzWruJRHAig9/JRpUAv5A3S5FJBSx1WlKCxlT0ydjXx/SwDiHqXsurHULc1aJxv2UQ8oMcMbOaDw1iFMDnrrA5uNPA59x0/nTZpntKFteq6VZovN4FPvUaJa7s3JIWOeffPEB/vh9PYi7QMlQN0Bs5JalquMXodbT28px78qKmcb6SCDuogzOFZqTQ+ktEN7nRRQsCEO1vOx4E5zGYYf1gofoT5kzON4feVWlEul5WC56ilOoKB/KylHZDj6fJcIIRYBneJMKcYH3V+bYpu3/2hGSTUsPZNUDm/rXmvB8hJhdMHfNKbOWQWa6U+8HR5TsDkGwue5HIecuTGXpdDK+Cn/ma+HgINTlIjh1HdTfOcDU3tGkgNKC4wW/FGzEiUG0cXKI9mIbUNmkfUO1F2e6k3IsxUvr7gXngEbzGWcT9i0dos8/RG7w3H8zO2MDAtqnu2D+frtOLn8se10ytqYgop+jihmfnaUM3t2GhRt2lUU/zewoaOk4jOxcWnLnyxrGGkMSMlXFmh8xOmiTc17lBCn70Fi8pC3thoH/wIkafJ7W0gmqKaxsSWus6Jj002tRTpU5e4zW8Y/FY/A7BBjVfflxPPLt76K82tNCvf/qnMh+6+hIHdEwO8NGBj/sJSpIyPYDdzCdg19DxtcHU8xf8VecTW6+V9yTZzCXDVFN7ioErSf9tg7K2cXfC7rKCA/l
mniPLArv1QhyhhP1EcsijqSE0WKMAkyI03ZXitGxvG8W61wscxAS6aW6AEPSEpAuTSNU41BoKnScmUchCZEGJ1TyWkOVJ28DzClmtXx5AVnpLkr7qvZ5SH/CXi2d5MtXZ0W5zDb/DqFdxsEhHd4p6RGEVGTRswcepiOzYYxSPrZuwHBy4Zk5coBwA5HqhLG2Ov4RME5+t3MNspliWYY757k9nYsHobsN6gFAgB3qlvSho+Om1bQt4/0T05j4OCQaU+PNJyKmVT0TZRTQei8pb1hr1rTROwAwZH3lB6o2ENwVFl3FQCITSsf4bznyPfTUdzYLJ/1w/VPa7pTsQnVFgRDninBGjicAppJ4yclJoKBF7YrkEoe0EtGTqUnwWIrIEEQJBIDjCNWDNaOBqZXv/Kky0YZqTm5qgKElbLIEMfhaxFLhHxd0dZ7ixjmmJyEeckZu7z+oXh9GXPv6CYAvneGDbqITjDquNxvgY2BO2nyWeRt+cluq+UPta4cuUmJ2Rk4U+fVNkLYjJ2bijr80xreH4g+sD6Z8gXqdQ3O5hmWmN5RcaecGJFrjOPGh5hY4AtyJ6ML7aG+tFzL/LDqaBHhnf0tVnsQoTBFSPmz9w61+U9Hc7sqbc9zWjTvKW3PRAi5rhvr8UfyWVdqDI21DtnoTNcAxolxVnwL34oKVf0BuNkKZLtD2bqCA/R89vrqn8Ov1bcRZzTEm0ATKlMpKPgzdSrk3AZpIOUT/aI++yoErkd7JO9U/nknC1bX7tG5CTb6Hvg6ee0/eoV98JYu/VD3HaRLXc+oX8V70e6M1u/RU4IuBSq0NqRTmdYHcZ4ZVMwrrU7OAsWW2Ic2ulTwu2HWSEWy4ePVyEjF7tBME28u8IlFNuGn12Iz4wox4U6Szpy9v40AAEZ8Lq4RZ7Ffs5FfNSttpzV3yIHXUZ70VcP9IwGiUFWN6G//ePIzF78C3yeMDxQun1AvenzaARcnRqp6FI/f3I1qcXRhuTFrTJ/okLqIhGl1ayxmIvHg4gRVKg+5fsQPa2smIZ4oZOJA2pB7aLuU1w0SHLuPFTOqElSFUR13rxpko2ul1Yf9e0O7IIBlbwnPnBRfIaYhKkIoU7zGyFUtnFfqwz9I+llVWKvQagy9SrLJLwYzbrLKtfTET3JfnlWFDUEezxWGRxvM1U6hi9Y672fTDBwHGGFmkVlrjQfz7kDdxtwTRuNDVsyw+H0w0YzGWl1v6qL6pkZyw5gu2GCNV2g0sEb2EbEATY/2iJd37ulc1MCVn5JlqVfF807Cb/dhWeetNV9d+ilJxaItJn0d7/1jDN1dvQqw3/kT2POF/rAyPHDALCojMm6nTDU43LjJsDp5t0oabxjrWw7LrGLwqLaw7iRKe7uCfjVSgl+eEMGJwhH2Av/w7ctX+zWfpjQxwUG/X+WWMFG2Ha7oHcaXwjZgGAkoG2du/oeYD+S9WQ4X7P7pndLuMwyPpBIy8/jJLEWaoZdVdT8ruKwanPXrRbg6PZjzJn5LnXHfu/DthIWrKD5mKHYGXGuo0cF4+jdhmLsvQLqpCu76/OXCsY/b77mJhhAFEDCzFUcYReE6mjFtwMo58zCjdiXMHbq55vmHmOLNVm1Z6hlOovORK8XuAUKbkRilNbOb36/dRzhnm9B8XpW7kkwviMAsvPfn3sv6bTq5o5xcBPcLt0UiPr/dishRvHDBuLOKsVnWgfp16wZUmMWXOcVdEIYKOFPPe5DOsefzZmhIpqrVzYC2Ffj0BMP988o8FNwDf0TWDJCJwMQEOVm8OrP4qhtpBFVJfzJk3g6dJvh81g4KR0aEs749PNB5Z/2JxCOxITD+l//bTN+z+caoRaHqk7JQaXeXs9u8uvFWHSRqCW1+6YJNLkeuWtIXDNoR5folZ6Q6Jvrz+V7ltPEW2TaSE4dgjU3EuMKGk928fvtMAZWygCIH3BWjeoIplCR0oXdRhv+tdDm6HEIyVRvGeLfPrKFAU4ySGnDALTOG++70BK27L2nfYgQwdKgq1x2HLn0RrrG8e08swBN3tr2YarROK1aFSCz3yiFkyatokbfliygfR0/WNY/2Wa4G7QWclYRz9PJXMFZOPqqeltKgFkZ88MWu1caZQGdYftx9ocmqj0Qbiw5EG6RZYmtzPkdXqF6SSAQ9TpQvfjwklb7ZFV1i9syA3h8pg8FB1psDBf6y9QA6EnRfAuvtkmwwf58MmZ9VVLwU7vFnhOKSRgR36drQvTtrlp7BK/sIjHgiaO3F3m1rvCi7+uUFaxIM4f1cg/NRyhcS6LeuxV/qK4ydkv7/ZQ5PlhH5dmPJ157Vu6YFug1bISVrZUtyheHZ/KmYODC5ZJAZtUxDFc9lspCz8KdaYRkcakpS0Hvcw3I7AbiS1z407T2nQFzXlPZmHEAzcmAZ7BZfk8vFASJ/oYeEfOMFpy0Efkvo5ri3RJ6U3iawdAbk8wYKmfEsVSEuuKHZHR/rIuVCGHBl7Ppep2HWiaFUwHDNlvz8xJEAtUgypISbO1rhs5coHgSfofJWQ9Sk5DS5IrWze2G/2/GXsch3bmgEPCOvwyN0BOOeOA47mGPlAnkuFmY1jBRlczGmmspDqqUnvcp22snZso7hy2CvYRlo34PzN1biHeZJ+TBnX5F/n0bFPtZ/3AB9rT6abZL0LT/gKBufQOKlBwogBWyGqpWilqG+Bun/g+jjfZVPeowwEBnwAP81cckl/lMpbPkgKtLNFw6OGapgEUVSabVA64PGCNj942j5cbAI+ZXywFD6z3NaYmJSrrapaVnT4o2eDeOftGwXV9pxaCf9hpO2TtbmTilzLCGUXBHlXaMNQyy81mPwfcqw14uqTQzScTMAa8GF05nazVqBvqyHaFpC6MLRxRsfMn5T0/+r7+huUO86bLby+j5q+JS2iFjjYzsufqW1NCofYB0Nnz0vYMcP54Ty+3MUNjhLp5C3xmAa64sCegbNQScLr0OLCT3sm57r6+AKCJbb7FCXsHsID3SJMUdGSyewvtTyl4+EkCopHScGbPpb5jZVdKDAG+rM7IZgl2Vrc2Scnch+XQbGVLvBejA7OC6xzhYAkaJYeUflRinOUylLKxzEFkwkEGslYEAbEXmQGz4B6gNBjBTCwK4n3xEyR4YMz5aIQSF9Rps9VFFHuDZSj/WY29ms7byEWmJY+zrTzRPQ054G30n8KTPGoA6OGO8at1fDPYda+3VMhErmOb8CWg5pPKrtkcSWtY6F09fo1VF9jgkulrx+uNhy6e0f9wFtF8GcrIhhYKxyHXPtixPWimb42idij3fyeoQJQ+ZHKIlWgvkaNicFIzHXOY1msncAuHu4A7p8e0Y/SPQkEpIh1Xm/yAy9YfJJ5yER9/+WCtkuaT6r/Lu7HZSg1bPDZqcvYAavLJHFERmSKGSx8KxqEOoRKitf78DM4rA2coxpFvTmQF/TsGpZB3mNPoPKKqKvDSl+7iX9pCMgVEjFcIFHb+2iWV+yEl/GZ0ATqurhM5915722WIzkcSMXFiFZvuKzDFF1bB2hFBqe5ncxu1Z2vM+cKHMeVTdAVo5u8nZWPZ0oRDDe1lFsLceMr1K6RMhFMqQ7g9egwOKtbuDAAhpwr/EU7id4eyzB1ZYW8fJ3H9yr2EeXGcY/r1g0ruKNfyVFbIL3lx+w9Twoodz8hC0pp28wZJnbKTvfkc4/HA2yLv253bbX2kF2hYgsyte5blMP9LfaDFnZGoGo3fVCIogUi7i9MsPcwneFYl4DWso9C/mdWEy8nw8zwWjnEOv0BRye/mOeo1vhyLS97YFQNlbJZrXFWTvnVl4Rgu6MbiSzn1id68rGCMpoDOylNnAZPb5w7wIKWU8tuEBhAQ+wfc/N4HNxGjl5kmqa3jCiYLUFk9nVYkZch869123G1A+KZiLUNW5zf6b61p1ZFjor8fpT2cd3I8ib8N3E6/gHxPrXLbGBmlcEWalsEBCR5sFX73wcrB/XR9NKc48Yu0vYR9CUzgin+u6/NktpN6XdgM1WyPEAxM3ZIZpd46fS2ksfA+ZMoA0enADCLJq5DczxQC1fw2iAI4NSzvCIGeJnhjuQnNv27pPM2CZHK14JCFyz+daFp
Q334IbHynf6MjhTH6gCd4qILwZyJmLCtDUnNJZezk3g3unl3dtum+2o4NlzILz2MEng2E2MGZUqp55cnjQhqV/WpfJxdSWYfAhvwqbuUeDhGXRTJ7xNmomYul477eqAowCEg/5IBrLqCB8JnwfDkeVxTsi5foHFWGeOKXoXbbLHtDt+50YLbGuKxRHYgBckb7xy8hPG46zI6sL+zr837zO2+nQxt4Kkwov9qj7q7Mg9qULkRfF+EXuYb4aYqLenu1KNanwkJWwPh3iV5fQ//5TENiuh6SR+3NcseUneSdix9rBUIeJg0blt5MWao39Q5g/UpOG4kto+qGqWJgO9/kYYd7t7mn4mWqjUcNiHUvHdJ+q0Pdbk163jjUfwO1WUqbXqa4ErdHUXze99ipkNuPHFKITBhYPVUr7nu16DWmXPk4BQhfNkriMcklW7lLxp66aId0ZaslmW9m/Phi5T1QummmRXkTM5RsU6D92VBaVc57JEbMYc+kuDhFtDUU9M8S0eNicLrAxWapUA1VT5XiepNduVttE8ad8mG6alrd9x/RFKr8AWxcBQF57PGjL7QyjBFUIUZTsE1IPmif2imt9l7Xpc1/KNdXwr9LiS7n1wS8YZYU0PaIRqoeE1sOoTLa4u925tPykO5H7/+eRhQNA0YOZFzeikLzJlCRxEPg9lQ0qtRYgZWmIq8J/o42uJb3GGuRfNxfRUhlh0qiIQUiOiAag6dfqK5Cf4z/xKYdOUqzYrClKy9WT+IaEh23Nw2nPZoT5Spz2IaBEB0bOnfJdBWZeZZZ/XrQYgw940V85JfvJ6Na+UXViBG8af1CPGwTjQLj+UBZlo/93Uv9QGW/PknarHH7/X/VIFBos+Zj7eNV/yb6z//o8hpgmZLUIE6RtJq42ejrJOpM3aIajnIJTjM1XH9wfrIqwexfaI8IIgIPYTc/7x8KNEOYjQdtJHSJkDtwtHQ/uFlmCaoJueekOggx7cyZpRi1cv8VA/sFB9IVOLxczGB6XYm8Ert+UqlKciwQOf9ldYcXo3+dcEz1Ke0FZYuuuuNVFc/K5Eg1cpFeZbfWI2LH1DQ8tiCvdTTWf3fD6TPGQsG9HSOawZdmVYdoWUeUjTSm/XWhdkNErp2UEN1X73uuMXw8lkOuGyeeaHbBtqtQyvMmPEEBRsLLL5dzZpzA4YvW2tQXOWCE4z/CUbJmdWdWydHM5oenOIxA0UbCZcOtfmL6HLIhZIwG8IP2ahBGSJj0Zc7Yk9mOT2Ns6gjeHux6EOCvDCy8Kw+MwKUy/K+6elOe5vAPw+1kLvKyESNRMoUXM3xjOPe2jspJkT/20TWdgoQcre21Z/obJ2ZgfaJ1FxL4Lb9r7pPBL9nTjIjDrLsZiHQ4c6VfbKbYPTHQcVd4ujA2rJwVRnLe5KNXICbRRpcqkaBRHY6itkXLXxqbTIiuegxXbXPIAKwJ6Ag/HIDUZG74cSaoa1udpJfqz4RFMOTWjpHW3f/DX0hpAdmdYVVTgBaQxA08OxKA5kvFs1yz09l3UgdJSc0gv5dlAwuKiBPsrDu4G3IdjmyNYW+qRIs7Bhn+gDkonxcOFvSlEcxnfMmDiVmNlcJi5v0xjztfYd7JtSwz1yORvjovfqHVK4JyecWRO+wun8sSeYlnN+X+18iYJNMGZbM8ZQKbwOEnFmZ9lkTf7LpC59D022eAaFhOJyyyVlFiXrCwxGm/KeXgIRWW83zQ7iqHOlSUdj7lqKLQLbFW3gM0r0darlRXchsH6LjIvMrmPLJtVdjQiZ+p0NzRKvMkJQ6DBs0e2nOvCfXEHbyruM5xDSPTaT726uL6p0GziRz+LV32aRs8xOPNih2r/UVzs1Tc/uv5zQNZop82bpy7QJYvBLvtriX/Yf4HCTlbsOtTr0KKtUeYXzOq0tfNYOas8uN45C1XIWnS4q2xiEz0AVts2qpfviMaZ40vNgUw/89RBVTTo/4bnGU0Z/+YQPvWxtzN/i4nSq+b5upXZ1aj2oz8VvmlUWst7KdQsjgFqbuCSN0TBd1EyPZ9zTSy3dC8Vtf/4OwBqy/Q5OUb9RKb3fT93yBexRwRMuAKlAZ6D+vBxLphEZVMealzgHMZ5+VwX27/ljtmChrKv9KBQc1BTY+ZfgxWtGSfmMlCRJY3EwAA6hM7g0MHRljCcaEyMOwcIej5UmeReH/YXPp0BefLhxReNgiQKZVQ/Th0hcEuo1jycX48JzNQk0/dGKP8s6niZ4OBBvc5GxzaBPi3jjNJbalpKzhA0mu6bdf2aUILjvQ4L5DuwrUPdjkHGSEUIht5bGbndurCf7BgNEjTUlTvDH+w02CiMTxi8UnCABGn/HBEbu/A20LtK/I6aiAK8FrwZWuChNP0EoKVSkGCT2MgzkCXh6LKSXSlOLLDXSZ+xfUeFek2Kh8jtlwq5Wz4J8jKZqA2mmUD8wCRUWE41JMjSsnGnGiY7VKOMGOIz59uPFHobKuTtrOzMJJrkjTiTpewiguVQcuvsAuDu3Ajhyfr9QiDEjmIpSt0AlHQGB89TbY0Y031LHgOlxEFGRVOLAsICm4p8Tb1WNUs3zBofN1pu3+NallUEOL5iv2oiTe5Vk64KWjaCzLS8Wi1O6IRFXEzg2hwjSlXGSoP0k4RZB3cHdojRD7gXhzVoOCEN+H4b3EwlqTFDSBxXektJxr0rckM12vfbzG98xkpZlA7X2Ch2h8n46CNAvrrtEHIycn9XkLMZC3lqZv4bRc7MT/d5ZNiYZ28qRAMEm421mS1MrFM6Bt6IMQtAnly5GbDAUqLp2kdJ+dSFW80pBpNZ3yDMtP1EHjXh/h/UU5DYNwfSGuOU+vnBxb1C5OT7xsmQWKRA82lmx9u3pwRBaGsKqI8SoRv8XCdB8B/591es0JHMqqW5krm3QRb8NDxt7HVt+InyE+PlE4IEZ3ZL1U0HhxFux5xiBzr7i+ELwFxSLbV8D+mxsbjSEUkb2spRorppVL4ZD5Ct+NWEfadimuN243ChpXVi6k4CuUiGCUb0O0t+RLKiP7nufNeIV59YA/SWgxxX1d0csAinbKQbIhqRPIrKJ7TkdlcVeB62D4f8qoBSRDaUO/1MSZZe82JYgA/ln1krjjv97hwd6SB/OMCrs2Z1dKFCG1bfFjJNd1qNFH0NZYBctZReXYaOhjScuCkQ+xYLv7PKa2G7C7OjA+zLRUpNWwNgBpDf3m1g+um4QFZzE7+q/dB13IdxcvMLTe63r+ypZoy+f9sXfcECEwiEne7SasV6don16IgBiBncHhbU7BtL35NTnaxS/8CYIsyNxmgX5KuuLAmhNS12U0ddbpBy3Cj7tVDhHpHT7Sa1L/9m06RMbao+LRJO/b+sVUj8pmIQHjWPLw1oMMd1qEKFfM5lMaOtn1NyPBPTgbPjopHjAF7DphaZ9EPt0+92N02Rt31I0IS9/viUv+bNVpFTLaknG9hs3WGkkPp84m6clOg74wPWcC8bfFb0IU6Rvh9EwTPUTZv3VFjX3oqueq1vLl4wsL9NGbV+Kc4Ejvi4Th+qdredXr1DTnKnN4VzZcaUekrLAYR25cC1iWPRGl60FaEYt8yNRsOaY7F8EfU+nQ07M8wKUG2guyARxrW6X/kXfC6nfEbW8puIoqzX3r5o+i0OHyH6A9VAYXusxhQ2MT3DibWDNkKhEemMZoqI+COde48tDbWPGmv0EP2e5Yv2ophgNxnZErMiUp0MvM7fU82ZKk/3hLaRB744Xb9bKgYxRsliG979ddB5IODXyvlDNQS4yOkzG7tr3x727WXx9xEZhkYyGncOHuGzE7WKgoaP7MdSZ+QG6uxb1uEZr0TDfJOI44h1gpzI4RFk0SjbYZWmBwf2Zd6zr43RCYdifv8gIwBqxLWsPJLQ2qWPnowJwn0RpguRkAOlR5hho1x6s/YEZYMuH0TFQpGUvDtVUfhTid2zKS+bg585DWoPvT8xwYOAs95RpUr3dg7vnCoNswrSqwsEDRSs2I/0cma6zy9SbIErBenFK1BAI98Ku96kC5YKuJelKXJ64o1+Z4xu4Nj/lYymXj30vxmG7qcO63Bx1XC5oza+p4UwCNEUflqxW19ZX/9NWg
Q334IbHynf6MjhTH6gCd4qILwZyJmLCtDUnNJZezk3g3unl3dtum+2o4NlzILz2MEng2E2MGZUqp55cnjQhqV/WpfJxdSWYfAhvwqbuUeDhGXRTJ7xNmomYul477eqAowCEg/5IBrLqCB8JnwfDkeVxTsi5foHFWGeOKXoXbbLHtDt+50YLbGuKxRHYgBckb7xy8hPG46zI6sL+zr837zO2+nQxt4Kkwov9qj7q7Mg9qULkRfF+EXuYb4aYqLenu1KNanwkJWwPh3iV5fQ//5TENiuh6SR+3NcseUneSdix9rBUIeJg0blt5MWao39Q5g/UpOG4kto+qGqWJgO9/kYYd7t7mn4mWqjUcNiHUvHdJ+q0Pdbk163jjUfwO1WUqbXqa4ErdHUXze99ipkNuPHFKITBhYPVUr7nu16DWmXPk4BQhfNkriMcklW7lLxp66aId0ZaslmW9m/Phi5T1QummmRXkTM5RsU6D92VBaVc57JEbMYc+kuDhFtDUU9M8S0eNicLrAxWapUA1VT5XiepNduVttE8ad8mG6alrd9x/RFKr8AWxcBQF57PGjL7QyjBFUIUZTsE1IPmif2imt9l7Xpc1/KNdXwr9LiS7n1wS8YZYU0PaIRqoeE1sOoTLa4u925tPykO5H7/+eRhQNA0YOZFzeikLzJlCRxEPg9lQ0qtRYgZWmIq8J/o42uJb3GGuRfNxfRUhlh0qiIQUiOiAag6dfqK5Cf4z/xKYdOUqzYrClKy9WT+IaEh23Nw2nPZoT5Spz2IaBEB0bOnfJdBWZeZZZ/XrQYgw940V85JfvJ6Na+UXViBG8af1CPGwTjQLj+UBZlo/93Uv9QGW/PknarHH7/X/VIFBos+Zj7eNV/yb6z//o8hpgmZLUIE6RtJq42ejrJOpM3aIajnIJTjM1XH9wfrIqwexfaI8IIgIPYTc/7x8KNEOYjQdtJHSJkDtwtHQ/uFlmCaoJueekOggx7cyZpRi1cv8VA/sFB9IVOLxczGB6XYm8Ert+UqlKciwQOf9ldYcXo3+dcEz1Ke0FZYuuuuNVFc/K5Eg1cpFeZbfWI2LH1DQ8tiCvdTTWf3fD6TPGQsG9HSOawZdmVYdoWUeUjTSm/XWhdkNErp2UEN1X73uuMXw8lkOuGyeeaHbBtqtQyvMmPEEBRsLLL5dzZpzA4YvW2tQXOWCE4z/CUbJmdWdWydHM5oenOIxA0UbCZcOtfmL6HLIhZIwG8IP2ahBGSJj0Zc7Yk9mOT2Ns6gjeHux6EOCvDCy8Kw+MwKUy/K+6elOe5vAPw+1kLvKyESNRMoUXM3xjOPe2jspJkT/20TWdgoQcre21Z/obJ2ZgfaJ1FxL4Lb9r7pPBL9nTjIjDrLsZiHQ4c6VfbKbYPTHQcVd4ujA2rJwVRnLe5KNXICbRRpcqkaBRHY6itkXLXxqbTIiuegxXbXPIAKwJ6Ag/HIDUZG74cSaoa1udpJfqz4RFMOTWjpHW3f/DX0hpAdmdYVVTgBaQxA08OxKA5kvFs1yz09l3UgdJSc0gv5dlAwuKiBPsrDu4G3IdjmyNYW+qRIs7Bhn+gDkonxcOFvSlEcxnfMmDiVmNlcJi5v0xjztfYd7JtSwz1yORvjovfqHVK4JyecWRO+wun8sSeYlnN+X+18iYJNMGZbM8ZQKbwOEnFmZ9lkTf7LpC59D022eAaFhOJyyyVlFiXrCwxGm/KeXgIRWW83zQ7iqHOlSUdj7lqKLQLbFW3gM0r0darlRXchsH6LjIvMrmPLJtVdjQiZ+p0NzRKvMkJQ6DBs0e2nOvCfXEHbyruM5xDSPTaT726uL6p0GziRz+LV32aRs8xOPNih2r/UVzs1Tc/uv5zQNZop82bpy7QJYvBLvtriX/Yf4HCTlbsOtTr0KKtUeYXzOq0tfNYOas8uN45C1XIWnS4q2xiEz0AVts2qpfviMaZ40vNgUw/89RBVTTo/4bnGU0Z/+YQPvWxtzN/i4nSq+b5upXZ1aj2oz8VvmlUWst7KdQsjgFqbuCSN0TBd1EyPZ9zTSy3dC8Vtf/4OwBqy/Q5OUb9RKb3fT93yBexRwRMuAKlAZ6D+vBxLphEZVMealzgHMZ5+VwX27/ljtmChrKv9KBQc1BTY+ZfgxWtGSfmMlCRJY3EwAA6hM7g0MHRljCcaEyMOwcIej5UmeReH/YXPp0BefLhxReNgiQKZVQ/Th0hcEuo1jycX48JzNQk0/dGKP8s6niZ4OBBvc5GxzaBPi3jjNJbalpKzhA0mu6bdf2aUILjvQ4L5DuwrUPdjkHGSEUIht5bGbndurCf7BgNEjTUlTvDH+w02CiMTxi8UnCABGn/HBEbu/A20LtK/I6aiAK8FrwZWuChNP0EoKVSkGCT2MgzkCXh6LKSXSlOLLDXSZ+xfUeFek2Kh8jtlwq5Wz4J8jKZqA2mmUD8wCRUWE41JMjSsnGnGiY7VKOMGOIz59uPFHobKuTtrOzMJJrkjTiTpewiguVQcuvsAuDu3Ajhyfr9QiDEjmIpSt0AlHQGB89TbY0Y031LHgOlxEFGRVOLAsICm4p8Tb1WNUs3zBofN1pu3+NallUEOL5iv2oiTe5Vk64KWjaCzLS8Wi1O6IRFXEzg2hwjSlXGSoP0k4RZB3cHdojRD7gXhzVoOCEN+H4b3EwlqTFDSBxXektJxr0rckM12vfbzG98xkpZlA7X2Ch2h8n46CNAvrrtEHIycn9XkLMZC3lqZv4bRc7MT/d5ZNiYZ28qRAMEm421mS1MrFM6Bt6IMQtAnly5GbDAUqLp2kdJ+dSFW80pBpNZ3yDMtP1EHjXh/h/UU5DYNwfSGuOU+vnBxb1C5OT7xsmQWKRA82lmx9u3pwRBaGsKqI8SoRv8XCdB8B/591es0JHMqqW5krm3QRb8NDxt7HVt+InyE+PlE4IEZ3ZL1U0HhxFux5xiBzr7i+ELwFxSLbV8D+mxsbjSEUkb2spRorppVL4ZD5Ct+NWEfadimuN243ChpXVi6k4CuUiGCUb0O0t+RLKiP7nufNeIV59YA/SWgxxX1d0csAinbKQbIhqRPIrKJ7TkdlcVeB62D4f8qoBSRDaUO/1MSZZe82JYgA/ln1krjjv97hwd6SB/OMCrs2Z1dKFCG1bfFjJNd1qNFH0NZYBctZReXYaOhjScuCkQ+xYLv7PKa2G7C7OjA+zLRUpNWwNgBpDf3m1g+um4QFZzE7+q/dB13IdxcvMLTe63r+ypZoy+f9sXfcECEwiEne7SasV6don16IgBiBncHhbU7BtL35NTnaxS/8CYIsyNxmgX5KuuLAmhNS12U0ddbpBy3Cj7tVDhHpHT7Sa1L/9m06RMbao+LRJO/b+sVUj8pmIQHjWPLw1oMMd1qEKFfM5lMaOtn1NyPBPTgbPjopHjAF7DphaZ9EPt0+92N02Rt31I0IS9/viUv+bNVpFTLaknG9hs3WGkkPp84m6clOg74wPWcC8bfFb0IU6Rvh9EwTPUTZv3VFjX3oqueq1vLl4wsL9NGbV+Kc4Ejvi4Th+qdredXr1DTnKnN4VzZcaUekrLAYR25cC1iWPRGl60FaEYt8yNRsOaY7F8EfU+nQ07M8wKUG2guyARxrW6X/kXfC6nfEbW8puIoqzX3r5o+i0OHyH6A9VAYXusxhQ2MT3DibWDNkKhEemMZoqI+COde48tDbWPGmv0EP2e5Yv2ophgNxnZErMiUp0MvM7fU82ZKk/3hLaRB744Xb9bKgYxRsliG979ddB5IODXyvlDNQS4yOkzG7tr3x727WXx9xEZhkYyGncOHuGzE7WKgoaP7MdSZ+QG6uxb1uEZr0TDfJOI44h1gpzI4RFk0SjbYZWmBwf2Zd6zr43RCYdifv8gIwBqxLWsPJLQ2qWPnowJwn0RpguRkAOlR5hho1x6s/YEZYMuH0TFQpGUvDtVUfhTid2zKS+bg585DWoPvT8xwYOAs95RpUr3dg7vnCoNswrSqwsEDRSs2I/0cma6zy9SbIErBenFK1BAI98Ku96kC5YKuJelKXJ64o1+Z4xu4Nj/lYymXj30vxmG7qcO63Bx1XC5oza+p4UwCNEUflqxW19ZX/9NWg
NDxZuvRKFe3BTV2EM1DB5N5MDA+M9zm/d/1amQFrRDwxSRCz4WTAGTxpwSyQiUx/oxYAPs/G0LS1dNi6ro5OH2LZlw0qAO7QWSC1u1FkGnmTI7csmD6068Kf2OYSm8/QqEF2W/aJzr9n2UVJYr6on/uCfacO77DiLxoJTIr+SZ2uixLMcGUXaRLLETDoKateVdCTRvQx5upgd2Bw85ijVRbYBoKQpJj4BxxoDvkQVm3BgaIZtReJt1p//tqQtiiPRnJ/lXPavhx2Acr67mO9DuRQPl5NoG4rmFd1b5gmwPZqcZp2gVAYwxuZtog9iyNXw98zNys848fMgZNrgEmtubcXlb0xs2MnPCX94fHcVpS/yTKZsFDc1IWn+QQBVP/LkGLN5/WSBS4sDw5N219AskLSfUJGWmKK1fUoaNKSmhPuIWcCRRckrJMuDK870Kg+QlfLYF5wb8WyB8dAo1qYqEH3hjrREHAoSqwKFUA2b1JjYnbofH9yI9bkC0F/isPGKAxzk+y2c4N2nq9tgM7qcLH3LfPvK1ayAP7r84n6OrKys80Rrg4glIbKToCsXm1oe2EZB+s7jdKM9JLTdObY3yx1ETGcp96IM0+/Uc9PubddxnL49Duy+kKeBqHE0/mVxc4nxCltS3M0MKrwT11WDL/FB2w//nxvHWoyHyZSRRbZjgmd21sC4IHdqpOuUQ2W+SKiiHYb1GLE67J8CzV8ap1KoHV1GhR2bGo8ibaZq/s8FmkGWSfz1zlJV7iVmRpmRVD3dLMIkIr8PhN1lfloWjjpUDo0vCNVXafYXOnvRGp5UoRxuYhZdthwB0903kbXBClq15nPVlykEJ3ai6dzWscWctvZ7iybC7i8mGuJqtrVVlN6uC+Hg+gN3hJaUJAPFACkm1PMg624zoe9yS9yTdjn8y3bBHQJVR47PWrer4/1j/ZlGViH8x+xoGGtekE1+jEeN2hhA+uep3cs10IH3lOfdjR/br1qTDfnhMS5VtMjQqHzrOyZLSztceAngEfWksf/ldkee/B3yzOPR7kkKPMBC/WIBIBAq2GGR9fUmfqe0YfZ7jhjRg8KvPaUGHQ2PDF1D9iJLPx5CKSxWtoYER8UdhJpQNHcJXq7y5FPRo6qWwz1I3O7XBIR+4H5mG7wFnVLscSeLcCAuiW9wKKjElIjL70Q4gcx4icjCKxzncYiiTT4tH5a47MYNnZQFnd9LzC/QYlQlZzsArqebCiPXC4/zxFF5m672zTCtyWRQFqSqCmxzN4ZaJ0KeX1rUEZ9SqObmDyjjeBBe82rn/NuY/7o9vbnpJ+m+4BdxtiklvAl6XjFbgsvQ1g/ueI13pfXK4Yfavh6dGb1goGPG2PMWmcvxTg69GBv4qrh94RcNJxbU+pP4FZOfqc7tWIxde7nWjT71/6m6OIPrbGD6LtT7cJBallTEDuR65KowjcinvpsybTnHkuhpR6jvIS4+ck9F2ADlAqTj0sQnIQOg0u5obKK3LdI/YS3DkY8hVF1qUTVtjui5LQUbboS7Zj1nfr6WidrDbf1aIxSmVicxxYt6ECqkcTfWRaZWOnyPraZQQJ/NnBpad/eJgg/swD19jBWZvMi/j3yPEQlRqM/7Tmko0t+E6+ANxFh9CDO7+05T5YLf8VV+9HFtKB6bkGa/7eWronS8YXNjXXZRs4RsmvCaeOelSfrJ8xXxhkN6nEGAS0j12Yq/sytZ0O2PmxKfSTQoalpolPkyZgYfgfp0xqFL2l8/QO/OBz/0qo/6YrEeha6p06xCpH/dCGskOXuSxD2zNnIejLC7rYDGPz/ZI6qIbe4/DBONkYepZfTc0tKJLwQwoQxJaACmuRSCiq48SiAixfaxT1H/RRO7qxD0LmVbHy+xBPQVyM3Tbbuq+CTxOdbPD+WNyC5jHYaItvWI/dpGkA4cNDxy9/GhBL9/DHmETRPyu8CSgh1gjEzlvXL/+BHximRPRlkVPzrUzamY7CDbCWnZ2f5ssmVtDgJhViTm8YcJqOSYfgl/QlACAqHTEd+Kap7/24K0C5yh/GRi9WUeRrdqzkXS7gPP2ai/I9/Zqio5b+nmmkx+M72rKQhwwr87ov82I4knvakxtO44SRw2xzZ0HsYDUm0P0hT0eMZg4vUSM+29GwfViDvD4IR8Um4MnUAnjrS2WE2x2iX4rJ/rHluyH1aGKSwR3GQaIcVPnhbLH+iwaGeu4diIj4mAo+H69Kj1Z+X+UEmoUPr/O5nC+LqhC3O5fbpJhsWa0EDTmAm2SllyZ3YSq4gRbVcNPObj++nMrrb68rQcoC/0o0zV7TkQcI3CQqyj6on6P6j0O5ROoiHOyR7BEG7KiDToBmo3uX/wY+PQqYAYkDbHBmY0kEGLVIbzkhS8XVxJc6ya71EorCeUZzh/oqFDNst7uuFvFeUAllQi29tWLSpfn9GXyFlltBQocymiIY6+IbM9RFtB5qE8M98uYJgLWOBt+sVEnFXBwC0lchhQ7Mor4AFXmu5rhXxgZXoU/CBzKUU3J4SsUH4rCeVyHOS2AHEEYsdqCMPMDo52yuzxis8rNaPObnAFFAPBS7IhBIkEWxuXWCD3c/cNnDxON6NUH4e6TYKFDXG9hZ4WG62cMTANgwfKbuNEL1ZWaT280QSugZDdMLXZRK3Q5Wy+RGytyhtCfVTwvCw05O1AsFLbx5dAvkS6T+J9sxW1+ycbrymP4/iVFAD3Q0Y2cyreCENqgLJnvxwIGOhwV6DeMTMZgXyH3jIjXaiGuxJKpa42M+oDuQiX9o89nnLaRgs6eZ5LJIRu2wb+VZzIoZOTZlSHS5d8ImpC7ofhBoqUaNxC7oGzItKPgKlFE/tOV6+Wr1ioMd+l52BXy2KGn7o91ssERrFUy8sz5oJ5Kmt1vDRKD4+6ngp48M5QVcGkQTvF9g43GTcIL7I2PoLDL66qRfzs87u/3ws1Tdqxptp1DnsuhMJeYIZjEMa2snV8Wa2atTl5Th0wx2sW0MS4IWZMvO6UbMQlAblz2WWoaRxQHYJ0xWGgSc7lI38zbrTXVRHhiL2q/2LPbI91NiVeOneqzxK+ExKhZPapVrqyRfdAvlBzloImOuhXKexvuFrJm4fi5ltAzKQknrUuOC7RPpJVs1a36TzrnXglLoKx5Y3cujCCKmqs571TC+mmc/pCrPfKd/Nter4E2RcLT2bjibDGogMbgExMRZMKH5QLcSgX2kFwChBneaH+X91vQUbCaq3PvFPTHMkKJJlLv7xB+fm9UKosWYhk09y+R/PdBrPCfFmJTrA6uM+XeFn6fHNeuOrUs035f0vBAoTOVVZ/nFoOjUyUFEZTmJBsmIVlPDwTIZibAuCWyvngdByM2yKRnQLi5wCHUcBbk6ORp8CU3rDexMaprLbqYU0NWX8hy8o8h60g0vhYMMzGzZAKXVr6IvS9av0C8k4aPTXYHvqxTOGbp20YvHuJ/K8PJab/JLgI46zSca3GbVld/keuAzgTkDuQGCmhI/iTGD7EnVnk2thzJ4ffFSUhdXhFcEzqDE085oy6XdHg4uDp+AMjWS5CXDr24aGQ9FW41TnVjs8Ief13QD2ALYrBoKV3IlnzKyjJyljaxG6MUtoV4v0MoFq2D7bHPMJij7MoRZTwDLmLyBQN+4bKJmU95Rz/xsVzvuXN/2qDu5faNKmudgWnsdvCUBhzngcy8NFbHuR5tLrxKuY5ntZD7ofdvf40wr+79D7D0ZyUkFkgnFTu2ZKvgJk+Uv6/CXVHSCMX//YzXXDVXhEri/hxwSj+t7c4SMb5aBI8R8Lj3tX/7+WImpdPect9YAKw0Yl++riY6/ZDPSfcX8ulZt9TS4gvEXaQ2Dq43HJa8P+ibdkdFagc2c3Iy7ItyIFyBYVKJWbhd+b9kHdn/IKQ3ojHhJo/ptHy2DePGtSyImO/dRK4+6oyQWE0fXa/oHPmooqZTpEGLWJHOyz4K+FW/bZNs65nRmC0FvIWQAnBl+eV82/OBuHgDw13m/P/s3HWhyO9X6/pj57zril2jfMQkks98UUd5h2+VaCWHM9AJgEPti9SraAZ/H01dAVNymnFRXtg2f/OQw80OWUQaoh/hTxLH/pGWLC
FzfMmilNa+rmTV73+CgiKTncX0xEFJ/GTcXOOdr5BIykCWV19xGNDLiE/UFnr4m3brALA/pQmq9NaReyTmArOcl2BODGjzf3jCZyFPnacEmMqSCh9RZH/PtjcXhXpz/bPsu1Jy35IWzQ9YBsu6C167GsCMXgEXcd8dIkHUQFyIiFDQMR4wiPahewLYV35MPjPeVY3o76OM0OAuVqRCELUFTZwQNxycv9zSthzWbq7lTon9PIjgrU4bncRwrttzF0RMBA+J6omNqKV/9R0d9EhrV1IFgGJ4QSgeYCXpte93VOjR6vV0p8NfJkHjzGpP3HeprLOJ3fPPKXqALeNaf/0fd0bzvqCMh/6YVUpR60kXjh1HpTP77SIkwS+HnmNGj1D2M4YCImLyGFMgbKUzEGmQuTOPaGkqw24DKyxWUfS7X2n7wpR/w6OpEJIuNzrGA+vYYmUKAYpYK8M7X8K8qEYA+TisTQHHBAX0Qjrf1TZa9HlzpmGrUf+TUXDMozWCi55tHGcB9CptkEQ1PBFquShxUe7laJrKrXXUt59w5Y5FJxMfTHFwMlBbZhB1o5+XXWPFNFkkM5vM3K86+yHppQ5PhNl614yr4bb1fvCsjaBRnL1MJelAm4Pcz/ZsdLxzt7owhGz+ELy/mYqtyT981St1qC/PSvovq9kIQtZjte/IaXQVaF4/bTATMRD+DsgGIGi5acTEtw9PK0nePEn6QhAMsU3CiAG7HkIrsWrr8VAAUPUiM56HJNogw0gjuwwCmmuASOtZujc1tjYlwQSol4hZjmFFe3YjrqBRxc+GXGmPKfnStdSNR7/7vYSsb2yXP4bZRP+JX3gp6YVGsJYCJPA1X4IKq7XzabT7ERlyzGoDKCza3XFrFA4URauBmZHJFJ2FdhD3YOjqMq+M346zu7/u85ET+09I84ojPtGRjxeepe7b/WRsuHcwdC45f4Jl8TCWKaEISoYT1H+3FaOZzar8m1DuU+zyrhgtiR3o2opTgytv1DAlq5POM4C06a8U6dhZIGHupAGUuvpXhPdkXHwMoBjPjSQyGYhhABdC2XyLpJ36H6HhA6SfojbSt1aEkHHDd/lJFTWRr682ESHi7EdnR31gZVZzFLTfqciaJmaJLTP+gpEKnak7i+SDKs0qUfs8lqwA/wbW5WLVlyqFvoIY3LUYCI1fqqvGtCmC+r5RIy/r9hJL2frVuuQFNSQ+0Th+xEW/PM4FRQaH6eYOsmdGvE62+Q/UZ3XvBsFpctIPAoAkTsgVy8rmq5ymrYveFiSfydmO6klEeEn0Fp3yo0KQ2PksO8byZ3fMepi/M5s510474PoR16zCYJ9SClw1GR0N7aePdWfqGKG4QqrZi1BiH1rwgOngV2RP0Ar3jWIYMi178yarrYPQ2RYLziQC0+GXk2cBiB4qs1YNHx1hCC8cJLMSVrLCanIEu0za15SH6K2g78yIMdZMnpU75tW33VpONl2oCee2qQ0IIc+dQdOfgyBsK1A1N/SLjgjVNj0Vva7u+NKKc1P6GgSPf/Md7y5Ka6Q+crlj+Jo48r2zmoFxqcK180TSXlcxaBjgEaBIqJfzEBfAuVB7O/fw7xEMjX0vpNZ1DQ6/R7B9uykmwgjoJraxRh1cnRu6Q+PBc7z4/hgViVaEbSmf2xVDFjzd/ljizIwkOX4gfge7TdA7qjEbVw3R6zkflSgMUrnyNJptOALl335oBA5RUQvTquhOUl+ULUTHIuuODwqC/tBVNCunB1Y2Z85+q2zLDQpzHvIRi6rWkA+0k1HUM/K5aZcVl+yPzhOTCg8iyO2fn4XB5bHfr8oF9RIJgcF9SZsSpc0djgx3qaFFRsKYvoHvxw8+X+l12p8Yh2IsZ0eeoz+maIS+FJ+uf84TIjOoZw8VauWpm5fSOxL11K30ltTYnDTpzOdMf3giusM/cYiGP9T6cQXELpkdMciz/ZucbZWUNBgXSv4ckHSrsojnRWO6yZ3GKVm66X9V8EHQZHT7J9pdLpVVkHewVDEo4GjKziD7nCbcVaVTQLdRgnWHUPfRfzDi9YPD07sSGAK20EZMPAINWuSsCmt8bMt8CPazBFQZdDtyyyKmIxl7DxkIFoDv686MNwy+m9lSM+z9jRD0H34yd7N4SZgLw9cEWl7gJVX0Vdbp3WU92gjU/p592dZcwt03lzAQYfeyicWtXy4tYXXvWRL9oBluf1ITtjxG6+tJUllMWm4fdPwQNNWuE+hT0YEWh0XHQtRIvRmQZDXumgXoBevZ5NGj8yMF75ebQGaZlZbANexGdn3vHJgm8EverAldOX7kHLKXfs9yKhRaUp2+L0WcaPaPlBIYa7o7E/uzDAOy86g5EVwDU7i7K+YxUh0BTEcTpsJq944fODFQwz5LNRmsFrpw8brSEJlpwXx42Iv0rZhHQiwzaCxRKU/qX8r/ARnJATtmhMuZrfVI67ubnOCF+0fkOhbqLvMWnoT57w3nwP5dnGur6XyxeS2g3qAar4Bdt95INrsWEDlVX3jSKklalQcFt0MRAKfFw/4oNFJtsULMJsghCZ6NCfwK+Qh6EzMTt6hFqyGC18ZrO3J5W0C89dOVyfTFA0lbG/QphMf7Ug9YYug9laPMTHWocn3WlPIh744v7lO5Ia7aOxmmFnR6WHfCbYCDP+COmu1mDolxv0Ez8iGFVEMx0mQphpEeq1c8FMrdpWgGWwUW83ZJQHYdakYPzDbu+QINPWG13xBLg2DYTowRPSPC1G9r0ixMJ4oOyQKZNppQIMAOzxZpcLrzbtW/16Yx5wbL1yGuEtmTuJi3cfjb3Vgex2AN4tHFiwzFSJ5zRMDqHsj5iq1n+9R5GQucFBFj/7uqKfX/u2VCfAqHkE6wUe/31UdR2TSgnBLk1BO61kzl0GrFpMxDtML46aDXosbz0FKtcHMKHivd6GAA4H/NALBIbSlalydf1IkOQFuHVvrgPtO3bfEeAU0ziiouJ/zyqLC2WR3wRriXensDUV1DN1n2gSOwz9VuifLTj6MC1XdGSpxWq1fLwQdH00HQUFN3oFJOnqTbAMhumvoOGiCe3umB/GaJ/OJrDrpzOe0rdc7k3ISk6iv1PqgjhYCFmRh+O3+2OndXDBdUtO47cKIMz5cq2BmkaKdMKtrQ0AtzgPuuxBCiy0f1WYX3gN0dhAT4tJkHJVhwHM9VMP1kkK/osnG4hR51XFicWWWACtmLqXU8PIqFx3gSCBBmMYdCWso9apIhzcAAy8bcJ7uaTiH4649Lzk+0SeI805Bum24SKAeSJTFUvpkpe1ncSimouvkmuLiQ9FMr1bW0a7AJuWdaTyAv0zfMRCEZ1zug511IRSn9ickrGYrP1nduTDByY/s8NhO+1/cwNrS2q2dMIOEWGmeNkxPwCMv8x19qUE0F4rUSOLxRlP3CFicM4aCghhE4/EEhDsFc325RYqAJC3OnRZSdIEP7SqIA8kyPqpSQqWacFjm9mYuBEqgVpF3cFZNUfXfx75aavvk+FQNC2+7ow1pML9qVs1OYJQGI2UpSUtrT/fyGt3YmTQyXTHs4mxlpPulbiTeZZyTrRG18O9dRfOwG006qtYoHRWjTCW58eOVNbwzitfvLPOALkQ5BDocDAsrQo8t1qr5uU/Mux4UhxBBwxs6lohWogSskzTDP4OPivNZWMQsFfWWwj3wG6Lp+syBEpbN2DYS39e5QQMhZZsWT+HdHMApM+nqYIzooMAfsAKc3m20XNcaCXmM20qukrMfybrteN6L/HeUZZZ1FRCESmcQV7O5b6Q/Xdeicn7Q5vqaqjxpVl2TwvDvL7+ChA8WN0JfwHP2ME/SniRafQFfyifgdeKfRXGxDhw+PGHEm3Ur55BX7DVUYjtYY+2zAhM4d4E/gir61Gt2hJfM8i/yxqwc58z6z4lAhxNIMg6catpXAZNajyZmeDX1G6X19fjRlQb2FqJ5IYS786uQAlBYz2MX6Sk4kXdQxHLpdt/ZmRdRgsBfIH8S/zeRtg6WbHBY4Whpvlch3XY+6fTW/1+KQXLz99DM5VivYG8K3KYvoKVgCrKZcHN1F/Mye+UAdlgr7jPayL5gJHs/7X/7tn9zUpJWi4iThsr
tamtX2VBBIznPV3ERTdoHiZX+jv6RAn/NBFfMKCL6gzJMz34/3WO5lV08/8Oh5vISLmZjDfDu0yV3BzylI6KftakGFeua7zdIiE0YLXzzmxhwleyrkhGlxXyivtswGfVcpF0T8ewwJDGfYRcgrhxuVDeR/m3Cx4/DVgeucTcluRw6NEJ+tGEW1FI23EW2DZsrWSEhf43CKUGWdGskmB4J5ijLqST0pBn/ottfLs1rnv2CJh42n2jgPuLXIJNE7iJFhZ9db9AVnFTVcfHsTcpGQI9/PbmELt8TtkN3BrcPGk72ROdj74BUc2qUmkkinLH3S9cv8C/07kttYpzFNGRjONEq93mPA4xBfoLgeyZhHjgZVwO0mg5mhZvS1PFg6T7dVC3pq/6P4sDI0lAIDNL2lAvqG3ZdkbbkGPkwsOjBZoTDlEnU4hdYPuTXpY56YtexelS+k68ffhPOvcGcPbZugHZ8nZ2FpSxOkSO+85qmKhGDTV90MQORoqRcvWIpXl3zl9DgDDDbcM5aE3whuWHW+kIOqgdwXkbstF/Apo7gvAamihT2jlcBHtan4MYIPTbJxFRUjUMNfFT3kXkCbMcXiEbtQMShCWX0Dc5IoDodpzTHKqGjJ0N5MBVNJnkWbFtf4ZFNE78kjA4rM2yOtXQ3+rkhl1dlH7vGOcu9+peTYAuTu1K2XETM2FcfYsLIVtRu3Kt6m7KutfpPzhFgX6vYD0tHOX62EirpAQriKz7RWg8MeloinHyDQ4Qak6dA7R1U5X/AMVjZPmw4euOkto8FTNNjI4romFvFKvPpja8FnjhMbC0N3xTqo1cn6fu/Ckrxso0S3Qw68LdZ70Eyue6YXdopoAAMmhv6u6+rVNUoQjLVbcgGffZfgcEaNkGrhIVENg1k5XeEY7ugD9pgXbPHHq/xUuKomY3chD4ZU2wYDax2JR+lbzcIIUrdCQJaP+y16ytr2XNpAwsr2VH97GSAhYqOlbeimsOrSjJp8ktxGKrQNCUneq4gmNyRp6VtbCKKMUSvL8xhqo0MRjVJCWwA54mXCfXwTvr6wAFRv+DAED84h6nTzLCJqGj6SRTp/mHCR4C7YU4zzZHpoaAW76bvF4h0G6PCQR136/mMc4VV3oNDereLAVcHCUlFC+cmicODfmJuCcMjYU2RFqWmTlHT8YbLbhS42BFPZmpjTCn27Gm0t479eBDPBnV68Q3g8oox9TMjqGI4s7n9ichWzQRspdK44tXpjrdZfBxPQLeqfkgZLuQ9oeERbcckiwmY28pWw12c8ihAutcSoL2QW7Y7gNAOFf+mpWM4vy6koH2DHKzPoR7Lx8j2X/pY05gZrPpbST3vmVfsSIs8+NJZHLXRJ+yldhGHMqdNv394robZbBduabrEW/z0j6St5fn7XP4OpPsWuMLOIqzZYkgenC3bbCqDSxhgtRt1u70mOycnPVbKb5Cx6B+55LTNtmd9kRHgpOQ6hnFOcwl7VfT7rVstCpsxvXaSUXVhji3mCepICZ2zNWyh28GAmCYs6UoaeTb3HVd5OuDJpReYsz4S6oKdo4jalBLL9O5eyAUsex7AHy8Oqttd6fRe2uKrmii8UYayCB+zirSlonqM5oLi6blItH/pwll1XvaGZ9VrjGn9TqaciznVpqV0sRNbMaIxO94M/qJ9NA3wBSpuP8g5Bg4LuBGHDwK/My2S4AJvN0+kwdN0//mrG7LU28wR18n4oJutZRf5pWiGSlyJGq5aqBAWF+qqnYRz7nI3ymlZanPi+KcJOK7Qsq4MwwEy8DAnKRTFbLK/JDUdrxi7rkqUliSNHZXCjSYvh+fomJU50WNFJtcFwLF/IwpphEmT4sXBSJ+OiV4kNtmXiCJwKH5Bn0xoGZQi//iy+DdhNs/T34IlROiXU0nZIAUkHMGv0FYuyTIlkzWOtOW1iwpISPU6V3aRfbd/smPwflkfgqnj/hYsCptCqAMgrCY+VIcG0jD2FykZDFt4Vyns8ZKYtl0+WPXVCe464mZVFronPrmdr3JW68J5e3eAJms3WEN+AQuTURPp7qXDBZJgyMTNd6MpgJii+aTN3qbaPa7mMLB9uT1FkhYYIGPlTGIIr0Ujx1zLkFPAl6qPnBgFPmiS2GTkvKREu/Az6md5vVX1OVjOEGOwqlhuer6mLk1rlHNTH3ATzLjL/GkAvRkV9xhgYFgHC+HbtNq/PnDyMnOUVw0/+b900juEzQnWgUEUh4wMq26Hpx6vzjz/15J+d0WG3TUuSpreIVHmXhzOKBfT2k3OWffQKKAd4iva87spYb8B/Tr6/igbGjUnyavTfSozCwdF+E1GDtpL/ZlFG6Tv2b6lYcRSbdW7LHKMCxfd1cPi7ZUJL9Ny71IashuQa6aox+vHPhf7OC/LmTGR181AE0+ScWxyC5HpkBEh/wVuJmHs0hzCRGGISt+a3tb1CJyL/LzFbs5k8bW94RcfPC0VMSibaBWkP1XmNno8qCXUnpPGBPU0PlcLyZKxJBjqlJfRC2VSAHuLLbqReQAWTBCa86rE/ioppv5bb+9cMnEE6AX1OLjd6cxlMKVvL1OWn3lG+dbs2NIRE7urlov9JWX3O7Ts+ZraqX5TOyZ5vwOLWI42N9PybTO1b42x3KUjVMv6pM+03SZafsWWXKhQUSAe61HWLzt2FBpDpwPBwEpGTfN9R9CkFGccj2aWj5hBAemf9odbfFZQxzZaarafRbsTMM7OBpsc/Jy9PrsM2gyajLo75ojv+lF/HaaTBjJCfRVj+ZgDj2bjXiyOXfDpw7KijT2q4k1bXxvuIT6VnQl0Yj4Ae2RwpKDwHdlYHEG1dj7fuQma0zBw6IrgCBc3nXo9yFRM3hVD/vKB+NHoHOgXL51xEMFNIaqe48FbiB3FLxvY9jdPUhlvInF4irREu/M2uyUUkf+gI+FU0TWjEsta7cTt9AhGK1I3H3SQ/gnVXgc1xO06k23iby9Muipe7MSAzvZDESmyv3EedLPr2a2Gen6z7fM2xdsqbwKFOHCxVIFwp8Lswt7VcxXK1o5zp0Lh1zmWjI5009oNsYim8NuKBRBpS0U2FFqtNJhFRfagAqihAEqIONP8YCvT9G1DZ0idar9wWdRvbIkWxrTP713pY4Ae/E0oIiIM/sSOcZttLvZs6UwegZPWID1Tm2mu6a4cNXidxqm/RHJI7RWzYNCaSHe7nwsWyBsO7lGQz8RuL30iKmnJi8xjBvPTcpa+L22dTmlHq2/+SbhtfiO4xr2gaNPfJ3xRT+MLaZYJpeKBVdnku7qWlE7JQ0XlP59WgByBvdf7yyOfsvFtEUR4N0lPje1rubfh7qQsU/D+0QQvjaju1hXlFdfJxkRGebTuxx5ZUP+va90PgrbXzX/axAainHvHY3/Aq1LUSa3uJBr5w7ZO3xqBSlmCbTn0ZnZSMMfLoXRG7RgHaNS7Ebxn4xxvowbjvBJQfWRNy8njvvJrcYCls1gl4dcgt/lVzcBnPfadJ80NskiMOlQabsMCUmlXp+a9zj/N/nQ7yHXy7nug6+myhjw+JvqDYxr6FAvLIDNz6htoMeEkIGwx/LxNAEntgwS6sxPHyYKL927ZzKSSxoTVfuuunDx19TZkRlCD5jawktBpJ3JwQqKJi2zOUGHldzXRLPABrFw19db29PrU4EX/VnzhuhqnqV7n09BcNGAiqqStOVviDZv6M+26J7WpiX2YBnJOPKZIAJiLBMPVweWWb7dABBC+EEPif99IrC7NBMj4LKmOd24hj09z7ie4mcu9v1LivhV3JivfNF+WqhnVSAqoyrygQL9UYyu4ojGnejS4x/24Wyv8B/kTM4/OfH4PBkSTw4RhK8+gx6C4TOACtEnkkpyF7zydyTnsKF8PwkBH1BeTF0dPA/I7tQ5qgQv8BvvNIhp5Tz5dB0PZXnc4wr/zC13JPZvOuwevMs8Q2MLtG2LPrVN1Tr3evx5Mvtzp8BwxawYUgUwgXgjdvEaNK0BxCKRQu8z96v1tzvfTYWe6wOTdoPDl94Q/1E5l3qvXsqInUZoYP6TwHlwZg52mkQXEgZNSYbq5OkovCiewDpjYPXpnE5d0Jj+K7RUfH9NsqSlD5OS
Vh6IJKUTChNRpm2QXmnNt+dVUd9HqcPzKo2RE/PXTMBS0EoTkAhe4LOSmcoi9LzWIrsIEGWNgjV87qpVhxiq6NDFyjw+JWwhEbAFx/SANkqzkHhE44EIH86Tb0dzpXTJfp7ge5ssfy03EK2+jwvAmg1YgndziKihQIucsmxE/kObMVwtAi77PYBFNyFd9EpvVTtbVmJ41b6cFCDmq2JZeDDDMt9TUYPjJTb3oXP6xdJzD9p777OgeP+lvQXWrMpKKjz9l7u47QbSqepHq+hmTm3+BziWqG3L2nHut51Puimk3e9x1ddakxYMNMm+JZucURCRAFLkM9MRj1RegVLt9qGh2mlhgFCf547m2J2YibxebS0trzOLIHpMM5Ha6oqsCaWItjOVeQk8TTaOyHC09mpZV5thN53Ja7ecIsT/KITy87wdTdhJutVkiDg3+V7NM+yw69MtUSSUBWQf4dHwu3BzU3TIUxtK9bXzuIX5fBIsUWbRrgiGwXMmRFliUm/O5lIp+N9PhFeneG059oz7GAd2au9Yp5DLYU8f0NTXSdHFRc5tRAmoJQZREUc8Y95WJhEoCohdZMGiIxUnKx5GDKxAB/lNf4AEcRQCazoAQJTMSMmBANijHTKQ0NsrIy+QGbyApjP5wQVN7oWRR9etpxWQROaXn6TR+VOMXrhNFqo4P5nISva44luoY4h7TowoncgudLWGtghorIYf+szjW/qxYNiEpvGv8mqWQGjEqufql4ABCDP0HQMd1NCsZvj1YEVtEw5vIOgR41gjiX4leQv4GhiNoisG99xYaLRlaIPZx7jwhkmAzunEToXG0OSLNzA/+PL/E0t2Yhlnj+1WAvULIf7U0FOosg5jKfEWQg46GNIqS4D4JMFFnsSjZEnhMMsfy7wU7sNCJePBLfoXG6EJV5rFAjY+qy+683yfrgaBAOg1Sv0sM5DRQ0aOZ/iSSQBM0tFPyiQpvVhTVwTnzbga+XzEaBvq85zRRqtTJLY8jbOHSPocGDqbl4dyaKuRDwr7fJuIN5VkZNJn8zhgCGkAuUGnl+kdfklICCsC3bxbPqQNN9MC0NrLbqiCiHIIvRJvsLjjHgDjancLz8mSuAF7t3mAyPBhd4AjwIHMgAywxUJxmt33t6Onr6OS77l2kFJuJ/cWTYWCpA5CXNt/JcsSo75G5wIGnCe1a1g7hJayP/zVDq+tE36R+JMO0Rmjcx4e9J7Ja7Em87B6WgA8WatnV42AXn8Vgtiy4VRGa7+i+B2ocx9JRwPJ0YchPjy5/m7/ZtBUvyjWr8+HdxHHhmVoklDdwa1BA1C6Hd681qRNiwTT1e+rcdhnf2LJZeLpgasujXeyT/ZNqtud01hEz+mcdJQKhaIKnSy+5HkfD8yqHPdtU2X+puBGlPNrvWGSx5A1mfrCXcAsqWH6B0UwAGiL8L8GT0g44UAsyZVm76jQsMZ1uswAO2WL1UceIG8IfWA8DuorHcZ+pJxW7VPUpPtYSobJHNZ43pABbP9542t/0BcwoUhRbzJrwGpKV8jdPuvawUVBM2S6TUAbJEKM9JuaKwIJRR/uRRFxhCkcn6VRhoWF8oQuHDYAwMxrSi3TcKxcI4Oxgh4PzFEhCcAafpm/jjewGKMfmRQUchsYmV2fjScLW01U0i0fXy8mXqQaJ8zMFDKsQQ23jtdw3L7zsoAN6vYBNC+mEvJiCqo9hdF7WeN+flw9BgOV/a4ujP3G4+SOEK5Wk6Lswbe9snx9mFT7VGeClj9GjtfkTaq/USnpMVwgEyGTuU8112h1YH7D3bXPuAeLXuZk+S95FZe59S9Dcl60OH9pTwerM/75JpdrwsN/tAg90mGxKDDjspTCDMIwOCEHJ9rxn7zacXRC1+N43tukqNn1B6Q0Ln18qM8tATR7LsxV21b1MrTzH1mxx1UQOZQ5cotBT0dQNSVHap7U9qk9KzTgRCl2xLX0x+DA9Xw2NoYMxVthaj3ejgUnTmddJIjW80MPtoA2zWHmovApABCn2Hkts36KdxkU5aqDArgpp48oOY32w3KX6+0zgv6TKyPwopQAAfOwGlOrI+hjTsuahXktHNQy6jz73umTdoc7Ryztt5hRdXwt61QNbkn0igZEhkeAoW4yKQL0j9Y52DOd7zYL/7XEzxjsftpVpz0HvM1LNm/G+aGq0fJNJ1lJ1Jp9tm6QFtyJvbAiBeeCiHvkfICvUQAJw1qOZOgo/nsGtaXcXJhqpb3HqtQeESHeAJJ2PX4NqZMHgNW6YFWJsLStElt9TuivAnFcRW0sVIrpRp1Z5daRPhRwEEjwg5rdYvFdKty4DcNs4z6bvfb1uTdPNr1wK6Hh3YGDkyQFX4dl+4qp4dKUzjaCphaieq2pZbo4aIlMOrffNZqrirDQlWoyMl62Wj0IqoGBavbWS8m+1GFFpn9XlQZvBU6az+y9cuLZff4/f4EIJm3qsHyPklNpP5OrJuUhyFex8hhwbngOoq+Ipdn1TwCbIkN8LrjFnq2R7sldF/EtLyhqmUqmXso6a6EzMeCTZQvFDTS9am0sx0hgY+uvc9QRYsBOo3tOKgw4xuCtTRK3XTWDHpHVqGQ5a5CFrNbyN0BJvVdjWSQgD1POZ3YHUcFpKhZaz2TDS3uLuwMML8Par6rvYQGARDmG5vZrLQfXpXkbLbQwC4XR2AYEc0cl6580ACAT3xrZaz5OZNdNybRftT7MaHbdRohtV1MohmSZrQFJ4YMy1nV0F1h8HMTR7pj5kzaBxYbd33u/OuYWu238yZn2xXSbAXrNs8sXim/I+RLUKzI5K+Yi7FuUFZv2CeKiO7BZgdYOJMl/cpX9EP7JQuA22tcZChpTOFdHrTUY+zw9jwMrUKnwpCMxrzN7yZWmC1xXOjnbJJq+siC1lPs3IhkZAYR5y+IPNnHPRmJt8LX2xGYAClnUokU7JHWoR7OQX11KaUVM/wiXhZzOeIhYBbXaRkfuvN97+i/24pxBVocAPgKykb3PBnz97d40tuGZGXG7v36n4qIyYM0QxFuRigA0wdqCuwGouDtZUECK3+EeSBJOWla8VYzuSOC57SAwvdqbwVwA74ryIzsLbVW1kMV4sFj+w674mWRAfDsVt7PFV+PUoKV5N38kvlmazXV8ZV7jm9fVAB+2MLjfVZLaH0Eop1W16b4tGIO9QIjrJK4mZp0fWHHf9hlNPfXo/yG8E9psFdAPKh6trxB5qgDQOArUW5YcRAkoiaGEjtHkaksUhVao2ybNyqiaoKbcmjMJRFPs+DOnngQ4PXtp7qTPQoM9eJJ3iUMKGkz+M+Zhxv2r2Te7ZR9szINHVI8r1wSzIoUqE3rZ1P10SpUI3Uj0k3kjLM9yI9aqC5FhSUqnhPGNZZ3cCgb8H0FouAP+9raBEtCP9KXLGrh7Bg61Nj4Ae4SyA2/MC4UBQxugy877l3EQrNSIetQzikHkyXdt2VWHVz/GQYBrZaCTuOAEnDrjryt1lOsZpzHm4NQnydBqyNck8nS6SfLv+5sUQH5kpPx5n7VMhLrt4q7xyqYlbEBQsl9hrOn/Gn0cmuU6Sk1qcp4v06f2NS7tIskhNrlATESWZIgtxsrsrsFEVjYVlu+gdQ0Pu7H6bCA7zZt6SDuu2BN+COk+/AW0FFFfWQ+W6g9BVxhR4VJZ44cDY3vg3QfYNeqgZ+H7lAhzzJUtSQn3PsJMZBtxvlxrlNwrb3NjhjzJ1gUdC/ge5+vbv2FvtUH6Tcp1c7pdo9QuQoYtTn3kXNJS+SoqJQKZ0SsaM2Rg1nZUV+fQFpOCbKg4LcEQtTGvY3jJLmlkWJLb84oeNrOaIpsaD/w/4ggfJHv7jwtiQw4WgCj1e3bE5dm/9ApL0iYG/WRprH7xaIwrwZi4gL3CIgy5+tZK9vltm6VGEoakFrCsWCzKGEUsYKR8jnJ3IG8JZJwCcwBlcEldWWcCOf318hde3Shs1alNL5zJLYoth6rBO6Su/sUH5Io74DK37KIMmOKdBYbB1XDi7yign3OhgRmPgFRMvpkRjnSd2NkJBfLbQH75NqITQbCPM0yUrO9SmWaSQA84KV3hmtmEzk9HtusLtZArtCt3U4NDRwnOxa2GlGJb
2vhaPTYJ39H/DZYmc/73rUeFRKuIAHIAdsJupUXw3Cnb8hTxh3xR+k7OpYcMlBRUcFQcpOQ+D6qrLbu7mHerU5aVrhD1uidN6qOauLWUww5cA4n0cEkRiUqj6VIdPwGAgJeNtjwFNcsDuttFpBZWhVbUIBBlF3vi7YHLFijP+/9Xp18ts12jQkUk2t2SCcvuv8rcbveb5rc0LiYbsoaK+fcjSpIx1BJjkQIc3bZOT2t6AEYXTHR7zEg7/qBbt8iqRlYjXigU64EBvYwRWpn6CzEJMc/638GlSPeX36yIsmBebZJcnjD+2EC/q3KTcY2K2wy7bw0cyuAyQt+vWq/GXy98u4+0E1SMg+7uir8MU3JPz0c10O/htGj43BOw5R8J0gFtQyTLlpsbS+N3ohTgfd7igD2qowoAw0YQ8/zCHVT6QSNjoobwQplSTc8B7LELAvvlkJ/rqWYErqBQqmjy7BGaE/rZvEGYO1ORt4qpjnMjoL6d95bXSOFPq41jcEAcr5bukgbtdR2knlmOax0WE625DIzpID7/1ju7wx1aV9obHJXToNbDv1AlMJBfIMGJw6eZRGA9dSfYGOBktd3uaRr5PDf4i8eSEpdL7EAgcT6VT4Yt0lR9QPviQsi83KJwASnXB5URZJvtX/Y6RWj1acE/7DHhAU4w1GjTPGowJsykdyfUjBb8VAQKHq3U/gKZEUlHl0tZVZKZ9lbYNOXTznKP8KKGxugeDlF3FRHdyEx5fAZBfRkjt2Y9P4N+gGbMPietdavARLImk/slz5A2MFbXwmXMmWMYljBNmcHcq4A5DQS3JZoRYQV7Vm2J2B+dVdCD7FNJskNj8Zj5yA9YRQChuDkGNdU268S0DIKypv3eqpu1VcoiE4EqaCjSjxfqfJA/5cL6pmhziMei90HtZLv5RSUipq8zY1t0DdDTG7Skid/Ya0VSsjFFn4CdHzRNSLIJ4v8kPHS0J703NBLke/cvF+kF7mw0zhpmxlJ2gfTcR+R8eiZUr1SM2WFw9A5fraxNw/cFVWvO/tkwxGjFnvaxM6+UoKE5PlGFVXb7Yl/Yk/GV62DONcZycO/km3JJoZm27xQLU3zge9Oo2mTqjEJNCvgtM0L46EcmqWvqKt4Tc37naH5NOEUPhYf+3h9sTsdz1kBik6zLfMLWQd0NOmVqm4W4M64DF++VoyglqGc6EbS63QRrqjs839A1aOCRMtHyFb9Cm3kOEEaYR8VTKYfZDmkogEt8mazriGoJl16OsPjms6443TecR5UnwxmUWhyQ+9irMdTaUJhAA18UGtC1Ior8Wdme9+pu/HFDUswjnPdC/zWrbr+5DsyD7PlDseZ1eo7D0Y/ZvtK+Z+9kd0IAeg7NmUElMJn0lUbm6LBlLq5NwTkxyLnaWfzuKhUnLB5szRtBIZ4j4Y068n50FkAwl6Q9xTzf+kHIfIS3fpxkd951u8iJZZNiqLrsZUJMIy40vp5kRy10bpS52KKd592yDi0ONVn8F07W9aoC+0eVkADUZzVvg586XCjwXMJX4GcCbHsNJZmfvPcJhuPyEpdX6AcyGRSZpBGVBWFEZo4HP3l/G5xnarIkCnxc/a7nmWeUJqZQ+3GpUr6z1lb3RYJK9qMaIaS+oPIbqc6LJBt8FmPax0ky/UIc+0/kSLC8gRc9wPRHClJukOCiEeEtwr3i7x0uVI5B3jXG+f+CAuyrvVXxxurVa0fAaSSOFNPvUKRIjhjpsF2+1cssSIXgdL/sJuLw/20kzwYTlNTElcYcmkzaHJWlbZkANDYZBDbLSFCjjvaFl+aKkQKlccvcNe+bsZL0HHobGB2ySDJtDT41oskZKXFWcHqiz7WRXbyeuamzA/xnQZLY+4G+ZmMzxiaiX7zGkX+6evaHT3FTLDY2dWNPW2MduWD6WHypXQzETM5YgpOn9A9AeOmBNcZvxnmkCdCVhD+bb2mmm0QuP6/MUoHRi4RqlK2AGOXGXhiKOo76Epah1tkJWWi0VGPUVKgcwBqkT+fHNQZYfCvHCvv2qA/cyLLLkwVOtdSAdng1B/JeYV2kgS2Cp57en+YVz+ZO48+jQch9ZjgRHrSfSYRnrWF06J2Qgm6leYdLBBLuC9E+HKO8qBj4mYuXLzFrwJLiCj7u4xpSUgN2AgYoI0vbUskwSMuKNTw2e8/Kr/IcsnqlaVe0O/7dYCSDiuD1O1YjehvXcLGVTY30YP9XzDzE91xD+4jY81Fcxp1QHj99yK6wbKkydI60v6/ZDRAviBwyg74DXnCh3vymelDtQGvqzGduzbvh1iZOvyIW6B0DiTnP9I9e/CB+jJ7NekXmFbkD2DuL6t+f8DB9wlnn18APTevf0ZXgQDSlQjYTap63wKD6yL4DsjtPPXuR8WTCfgOvc6iZQYluevY8/MNMLT6BlMhFc0eFf1AEzyBXb8JSfqc37b2DcrPlR7c4W8GNXB6sRU+pcXvsVw6GLYb2GB2G7SmBlsxF4+6G7GdPmJKYPTLPhjJ66Zy/0DAe5/BwYdRHTYFMnVmY1NnVwyRd8yjFSBKpKg51seWHWsKoIGRgutpQYcFrQMubwjwz4BeFC5P17NW+dOLFiLFuI5orFo0MsC67jLxxVs1uhoX8Zqyh0uh1CrbvGLxyzHf/kPIxm1MNrG53GRwcJyT9ZO7/SBhOwSl+d7bKF1bJuToia1Yja4a5TlBYpZNDVnApwccRwITnPm4GJWBCLM50DilBIrh+gB39Ymxfyh6SgKQPM818IwhTWqLm7aGuUP373pdGPvEj0hU/4OS2HKmaoYm2IugfKGaXHmNkiLV9UUeG8wguGla6qAyhkJ2BVFMCxFiG7aS0893X1PXCw5qDPATA7MDxkbGmUIzeaAjJz7vQSB63Kngrj/tur3gKW5qdry+hzqGhU1S7vr7UpqHJ/rOUe0kxep9jWDeT3Oh1yLAJuq+iWuoQDvcWv3crMG30TqdC1qeTweVAy1BZKcPdG2DvtCzrM+iSaxMQflqQDW+wyHhkGxbMpkCAG4WOQxqfBo+XBz7qm7ChRPDEt9jdBHVIy1tD9tTT/2SI6NeG+YIhDFASARlbSFT86/ufFCBZGUTSj6zwabtOFexB+qMDe5IcCyQmfYpTX+x2G/yCybX3pW5gTQH2W4em7Ma999snps+t2dVqbip5W4LoOEwA38vnHDBB2xauvNIubVNPlUbt/B0kCjOyhRw9uuLxMN2MEmE4LRkEp5HBeZGv6gMW33BmmBrAljJ2F5nO0IkXx4FBofMv3gPq13JI0RJbCDQCcNmxV5xQqQdkAnFsQ9qGOo0rXGXUSK5JWaEGXddduR3g6bF0ytiBMUprzm+/7yL6Tof2juWdvZkICZ44YIcJqGZ/zdhZw27aSctZrPRFqV+9RZp9m8si5UX4XmqO3AZOa2dx9N5RU3XrCQN3iaQlaeB7GdN53rfGrbeDzqkjd5MJ7Dqt5i+4bgj4i7lER+EJCwkWHI0K/uMFnbw/mWp2Cc7HSk15yjdsJqR216KVp9TXZOxV+hLoP/GNXELhWZgF7OPKb0OuPJVq+BILrSUn9ZQ5WaUXhCcdFFudi076xz0q+3YM0cfRaZ5Yif/pFdpR1wCzif+OfzRjvHRlX4Hj0mIY2z1ozhhmQ8uHZ55ZqpMWpFbXbfC21DHmthV1bmU0fPD4usg1U5Gv0eDFAZ0rqBMXlzvscxwwYc8jA9tOC9IljlUBOJFhol48cvBPgofuNK2ujfXwJU7vzSIIjblmSiFOPkgSWNnW1btG+8NoKckFIK7rLcKed8eubWFXDafRS2O4YyZxX1qO6+rNL11axvgEGznxKErOs0/XjRvyIGhui7FOpinAXRX8jkaCZLs/Z2Q4iHhj0DhHKKkK9avOHw6fO/QDa7V+RoqExdP6FLpdWyN0AELoYAp+22bb433zJAHNX7vF4XKzqy2HhDv8JeLPi/qoMB9jj1RADks6ovNB3lEmwEbeRuwkszEImf+8+WbOODJOMeh80ocFwlw7+w4kQ27ehFaU+EVNF/UoeNDMyBEZQIQkr3rWtAS5kdpVmD/cXknquznBWB4JVPGcnfTsvcY6Nu186QowUSnpC2hyC3Po
SjWMqSFP8NYVaISpvTkaBSnD/ozTVvbTLrVBcEy6k3oOUlElO5l3/lUToA80gUf3rg+j0oM81EluJPVSUGdfRnHo1gSm63w42wBDPfPHqreFrYYX4X21BwfAPqOJKplIiU7wfk2belRkE/RIz1kr0cfVAeSku3xJxJEsvKHhITchHKnnXCrFidkBh5eKxQdFktXn74gy9MHyNjFuV4ZWy5m2eQDBVIO5fUQZAw46bDVB6dGWN7enKe+rbI2yaufp/utgpz29++Fce0DeqMRrDDnxfeIhKcFABCDOsilvknt5cFsEY2/qTBNDc/Acud0+2SBmHgHWXMDx7Mvx9Xnei0ZIePQf/BL3Jodm5o+ZaKr4aKdeHuUqZRQsqpbu4RqkMmaw2ZdSesm6DEDGuNI5c3WsMyj0QNeospRRM0cezKiADVaiuDUH8jBwmL5sEZQU4UJQjCc+DC1nwbkoM8Rlkf7vam/W92tdSc1ee7bJCceVz2CBmv2oji0/SMfDnBkOQntlg6ucJITcKCqHGtxvYLmd6Z0ttObLX6A5IpVhMU9+pb1T5WKchxYwqhn1CRdoD/xOsSSqIZwS55bTBICtvUe6SWUkiwkAtDNS1kKlPphGDNBNgtEjaP1iLqK/RJ1Mq3OfuW0ymH5VnFK6Xa2/pwoi3zU/x6MYWLXhCI6jOwQn7cBM+2iquNmqC+S4YWpmWfHeH90vRN4J6C/i4gRiEWtnEdBHnW0vhFrznDVe1o0ndoLAG0GRwQT4lf4BshTIY8cj6f//yrlSB9NVxZl1GY6WuQlz2ZLUkkGyPiCBTMw8+hCIT6XgeQDRfdvYRdMKLnW3EoXYjp+WOIzUKQs7HlYGs7wMRgK/9SWA6YFiGhavsn9s2Y9HhD9L9R26hSaRoBIABsWNLsrfsiU1uVjtIx/8ZGOWfFSHfbVqCf2v69Vqbkm/4QP7sbKs+Df3bYsNawo42L2ZQOZTE7frTHPqRgUg9DLVCfi5zzbKzTcW/nIgxd2nINUNtHmwcQanFmjUCxNk0zkXAqozBcwNDvvZ9kIQuztlNl5l6NXPDrob8JayGSO6LTqRPGNuYIclZJSUpiwbq/bZy+R77ZWsrpPUG2s7fv8uWsP5xH8Gon+YA3GynluHscdVDELfKffHfHewGVFMonR1U2AmtA3MnbRn4Qi9KRFVr1hk0wFH0RD1gjQIH8Pqgq5stOT94ZinCN/CP8XxJsNMPe00tbtyyAiPc7OYe2tzQn0kMDh6+oaE73vnERT2pTKBBPtzCwaOBTHMN476VOk+AEoENasQKLws8xeusQYejzqtmAMJ9zvo0Ve+Jz0nEYkTBBFEApykQ2IsKL8mJhEcWnuCKegV0Ivqnn/aNqn+EBLF3JK8ZmkI8xVTrUiN6RCFLfvjL3SxCB0Zeil8SYsDWj/GdFSnhp9kXeznvGCpFbUBFU5IPOVPV8VleuvlF+AnEhm9tpVJS9D2qQjPzXFsnH8MK87EVKtopekvnbyyfMTJm7LuMxDNYt/eVlmIBrvzvdIBPTvsCkcVeyF8EE5bCySNM1iYlattgvhZrRTcmoYK/sObLTuo4osCAJv1FczXEhR6r5akC6YQLJkMvalPEO+eMChAxtjpbWWT1AnHOih+n/n2aSBsEeHUWAKixs7PDx+G6DKT6vOcJmvi9IJtTZZQxbtLIFo6yyqMLgZi6otpCqTX9r8maBZlo2Ea3Cqr1+WGi29xehGO5lS6/v4+sBgpjivyCQk+Z4l8vszQaEaYRdXvQx+ADm2EwXIXIXMPE1RrqHNVsh8cWmfJwM7nvItgd2W63vqE3yqczdkUSyAWBq/pMUclwyJg5EXqupyrwz3+++VS0t8zNoQ27SS3ytTpPueyu4/XJ6zVkWEtLMzn+CgUV6RdC6mX1myc19vHA+1beZ6i5kKAKWXl/Ay05Lv6CqT0DXKypeChu4RMPAZdxjtoPAYQ0yjRBA1JSOHkmKeFhJFDD2PUH19L1neIvyaqZlMk+bU3z+mOINefBIH8R/QjV4qIpRVohhbNjrcWVb1/pvuXt3qDPP5OToYIwKT+PuB4AsxKrFO+AzH5UFuqFA/i76EJM0RBFZQLAlznT4dlMQob739xVGSXsLMucoqPCd4iXM5Euda5sQ7lETvxYaoH6Yen5V84RD/45G68kWLrzr4xGRu2hEsbgFkZmCQUlQS6DR/qod527lnhSACSvUmBAqZsTmWwp45NohfnG1HHleQrnspJvGriFzif+09tEnLOCPgql73iLmEUiaUu892DsNFH9HVzzTOPlOLvnjX3oMm1/qEW/9If7lxe9wzYrxtjdDEvuwWzrC0P2RNZD3Roelzzsr/G9me/jESImBMxIdWJwzdDUN0WgskydXl33cfxKJ/Hyg42Tp6hL4/wgWfmBXrF2KPY4vI+6niKRK2s6GodcOoufWCaxZOxi9K9I2S3sjzn2WlQ5Fy+VAs8Q/yWLVn5l6ntur+l7AK/Nl72EFbUDmmOnTcCrqe272QVtUwPsfneCnNZuumrE8h3t9oI0j0PJIAJyb/c3NZzawYc/q/tLGGrBa5UJGpq2XgXBMaPBzXMdruYQDJkovlMN5xRkZ2IDDa50C07eoP0Q8E2YMvDQPmuYREcL/pVqJwXa0IKh4LtOmO9dnzU1WwRGvc3hcET/V8HiY5IYnccThdgPfg85re7E2ZDIOq1bBOijP15Imp0hKa4nCYFqLBZY+4xIFnLVAcIs0nCkYa6soXuo/BTyPxsOcx8C8xs84svt3I2F9pOTp/ooDVbYePcONK8/TO6o6+MoMxkS+XO8hHAUwgaLVm7xhWNes2W8NHLcK52PeatHIf4SadUOXXVDTtxe9qIuf28CszuNLAXQAxJwobqJ5mIe15J508s+5QdDSGfStF2382RFgXnyIiXNw6aqSTOXP1bJualBe9RIKM+H7jcFXk1StH9YbJt3F0lzdZTf3PhwdnsFSNjK24LhPzk0KvQ3aAa5t2UoiLhGF6ywMoAr3Fu0QOHTkrmErbXXu4FrmB90QpUYqcZXmdA719SH3maWoROIOJGJkbU2M5KM3jAgiTlBC+97BODGqBFbACD2Y8PqTlGiaHrzKjEFK5d1RoEI4qH44zvB/Qtey2R7kSOQdKhkQPkWyQX9S2rgcs/fyox5wn+sa66T2xJeO+8vJFTScLt/s3nN+mQr5gAIZifcIyIzjVxRQ3UvtJDxKy7IyfkYSW3GhYawK2jX+VApmRoDEjSscNeZwEvx4tSBaFxJh1N5+/mPmn9FK51grCgmmGVdVlOGsf+s8hPeclc7Rl9Zgy6HbvJZGPpX3PBcA29hrS4X3LeV9Pk495w8ZRatoNmo3oxPKBv8lrx5iOpY7sgklS7HQjFq1SEdHsp6G3oIafP/tBSM7fiGH6E2NIOAHVJFQkubB896Tl/9YAwAVFV4l68DMkw1SMGAW6xX07AbjvbpBgTKW5jMxKnVsEee/RwywSSHWPAjKD3WcW2XQTKXmniLEsa0cT5So8hY24zmFXsGVMndS7D1I/qmyx+tcbEN185CmOiJMbn4fbnKJjPvp6aiA9H4OFhjqcki9kbrD9PVSFiH8Jpaval8+/ewqguYYUHujDZgZwHwmtRbexc2EP5R0Sf1ojWnQy/83lQk/3OSjcjBkpd++4fFpWHbalxHFWmfaOdG5gCysKD0SbOWCXGAHHc/kfSCY6QPYULZCAj2CmjNAV5xVOacjLMdvNE4symqtm/rvkqkty3RlhgtNZQPSCtyss06VEHKdflQVyYNkNj7yXsgafMnkvU/ga3fHsHepwaUWHoNj7YVx9qW/+QM8oElCYV8Apg+tajN+Scy1uNy00tajG+bQ8uvmmqW1ywF6co98ElWY0QWycwcq6mauXsgiKa2fjbmXyceglWQ+nwaoM1DL+7RGwy+t2PFLbdm7OaLAcKMTsRia6+Jp678bgwVDltO+VtFDeKDXMLhNwX5ner4/aqBMLoeaB056WbGKQgfrANeNWzHIiRqCBDV8lLLYNB7G1QVmeXx22a1LiXWTsrdCB3QxkUjxUo3/FdXRtfOmpi9MotIXIgIKjT6rM2JbSdn/CJzDPgtNaR
J5+klTCV6/WMWJcauRbERlg8oxQdKEQQBZ3hTnPSMm9ooBCEWkfa35hNem0POm6Kwi9fXxvX0y7+hbmnurLX98Iz3WrWrZw3gfJn5CACTvSZ0QIZcpFlXY2SFgbsayvWNzSEM3qZ+Jvr9GrJVWQDWChcwj3a7slwMnORVZZQTBoomJotlRToS8CVVetwty+1WiCAwdJvNe6y0gxp12aYPK1rK1yC5gxgsy9prxYfrE0XKCh42LBMFBOIk9uGyyE1ivzSJtYSnKf9iFbYaXv+ELf8jOT/ssVoC3E3D7X2lljA7wMdHc9jg8NS6Jbzo6j7RPfzM7hD1hLsKlZ5ghh9CLHOH7SgnfJhkdf5m26VI8rZ5KMrHIulMBS5AVFNGCtBBSNGtCglOZAnSa5w7HVBHgIXE9l4Dmplb2/FrnTuzt3RXOXOc9/Er0FnrNBoZbcIMx0XKOAPFNpVkHJ7I4dmXM8a9w5c4XTqM+CIiQ19LqJHUQvSOqed4AzKC0K3W4nMSKeSRTztZH3R5mpU5yLLuvcNvm9RzpgSGmCdV9WYWHWIpH/rl0rGzAyt4dezuTB4Dw/kNw9rir3iAAa2rpTIbTLh52F+EKTkEvI1O/Gme1+S1LblBuRdMPaLvu3p6+8FhATxxV+B6c2g0CQIq7GEw7UR8Ru7VipPrp9yRKnLOsqcSnxOzWXDuKCL/ax0AMQ9XeT/u5eYhhjmLYTPwm8mNKMd9fH/yqTOxMO74HJ69MColQdhutbANiiZBhAiHN8oESLiFXYK8anekT/M+MdvMkHTdmv10IXvwslND+MSxEUsPhUQOcpH5moxvANi7nLKw/oYMJCFPfrBSqH+bRUKG6aXMJyxlyEq+ak8bz1MaE4ILBxn/isx2sQ6NxLQFRz0mhjHoEODaSd3PO6V/XwinGXv7BPJmAhRDvDsFtfFm/f12eh7+7AFuVa3fQB7zGTBvkEr6ian2ZH5484mqkwehM2qCGydRfRSi7MCgWIm+EXvBs2FdR5s1bQlJ3fV8TOdiHmW5fX8t9Ai9M3dFyB0eT2+htS68lt3JTuHDhwoXT4VketqFWd0B8qsI2wlNIh+06aiYBNsvb3UBn/QlTPAvlAQwj6VqROsHFJMCcPMH6q1+u78WrLo0zfyP5ckimeOUwTvjA2tIs5rpfPQ8/0/7JimhgCuVsH+4NGaed0Meql4OY5xJqKhlRUxW6pdZ0DuTUAckzLNUILrFgYpUeifWWz7JoKa0Q2hYtPp9b3+eS4lAhbK/2o5MMdXoS9nbs4Z2lkAp6AGFy1uAmHH3ENXAbleubTwxG6PXs7FRkmeOKpW/VBbUZ2Zdz2VK5fqAwO6SlrErqCo8fzjedC9ksJD0c6Z3iJoSzy0d5z9oAgEFzFpx8f3kr/tyKxHqyzMzubt1SlrEdLP2k9575r662sR9xUQEUmRTeS6EC1Pt+iHQqgmWCpPKtyHdWTxDwz63SzCXkQhNqu1ozSxN9MrzrYxhLDQkPCZ1Cp2THEDDSWBxtKfcuqV4pgX2un7jhPlbutfzMb3AvSsjisuXe8ubQF1XjBTjh8m1ns8fV1tuSYouz31UB84gMQQm3yd3Dl3AMJ+24j2kcAHt1b7AjoezET/kIMesMUVBdxt68Q6P6NEc6hnpj07z8iNl5qkxBvf9Yqm7MEqIBFHdtVsbdwOdKquy6Fpl5gBOiyAlvA1XQfxIjhSApDoV3TiDBouh+TD4vR2XM71nuj5aRI+6aQotdPTmIf/kac3UMHEP1GP8nikLcqORbvQ9My+k3Oqg9LRWXO95niR3jaSdOtpEYE0affYc/rmSz75VQOElXTltzLkjw7cxoLQdQvR0BiyI3+yAHqCTqbODqcBXjvOlQCb3NbCnfiVJyzInPUVKs7otDAlsXWzfrxj9QgZ5fKqwFxzdOiQ7a3rrUH2mQEloQn++da2cox2sO3Thq4Xa9LF4D8PDh9gtJDUzVH6FJCCrpg9auR/q+cP+ijzx4QE6JVU8BPyA91FtU6bwaf/inj5zeAXVd0MkkUDeyjE7eaXkMBC/TZQ54M7od9mOsB9v/xMkN3Mke7nAY4G5l3Ex7RJ7nYny0XkkWI04jDNm4/XfujprjzE/Oa06W7AUMNhHkr0qNL5pJySx753WoxG/2Aiopsjt7Izw5J4+JCTaI5BL+mHyMZ476Xvwg9uJtYAa58g7TVHIp17p1A1OxSFPnmVpc9y7EIDGelBdh+F+UFxT8TGHTveqM0shZlPJ2dN4i5fFPzX0PYZQoN7bEptADsSQm0SU+5WWKoK+ANNGDxWS3C8TAmDdOvOwVDKMveJyDiwINKosKQCHDvHSmpVyyGD5ZQjDDqxPI+hS3EwElPoqi62RA9F/yybw542xLwcsMqgyArVIR4zj5gqj9Qh4aFi2AZPRYBDq4XtnTbAHgs2pvoOIIrrf/Chudy2djPhBHClehN7Ijv4BHhOaTJsv4QTlkkun6roHEcr9Mz9+wPEL+kVdsZEy10M4AD8OcK56Uzef1ogafISzMPHteYQVDIc1ZMAGDGRlJY36ymI9QGDYg7NeofnmBTtEH4pNePTUrvDciNBb29T0FDcCAG6Xc28XtGCmXjuM1Aex15nqK58hh5ME+8r8JN6vFRAPjzjDJyXvq/Epb1leb/kv03x+Hyce5tOv2GOgzV5BLNqxf53WckR33GVLzkDrEwTg1pYHToaLDgjvDuvApoQCvaGnjoMAja5S2xhMLMnp02tqz7JggybTjg0RkxR4H5ERrpQxjIPCJBsiIUaXAYtTNiLgxxCSe8oOhNHDaT7qcdtTL87o3UrTgMPw3j8zLUWTGaqKMp8xC2FjkEFkIxFsoVSw9c6NZ5xK+Lr/o5tsmWMUSFv52RGcsUydu6kWumxn43NCvAYmY+uNoMAZKya88Ocracs2CwuLqNna9x3cXktAWrI2kQKhjfkfflBecKmeZ9oJblzKjgZe8fpBR1lZKtlUfgXAaLZI0sTrjGbIevheSAQhi0IzRaxDxZ0UUkzxx0jP9pPqWyS+QP5qaCgCy05zHMCN1VPV1tIB6qkoLf1U3fMihooG4JgFJMLrmgnFcxineor9O51Png/GI7q/6Ol5GUltHdVSeIyXKAa/0kCNf20SbSZ4BW3T02Ucrw83dVD9NAoU8EB6Ix1DJOSOrOQgHWrfNbgoyJztEetJxYE+FwHNzHMzqcdOqUkk1E6n0kT84SoPeM6hJjz9mpQc5gW5McSLG7oquWioN5/wJ4VZmRH9TwOm2nmSSf+p09DkWHA32GKED3pASDq5P4v9vNXtOdH1zjcg2Zxkjv4CO26JGz0lYo++c7jTylorSFFV4h7YZuAdRuXTuZxghFr59DNnxax+spYUXODbpv/LMJQROuyIItftA+OcJVzomxHWGH7bktcqcT8xGHgnvq2Z+d0yyoW7Yn7zHLzjIVNuLxiv2wvE6vSUaRiE6dyiNAkm9HtH2Ny2TXBCZck1uOTrXUdBmr5ctsrn9SEMle9KV4L8LX0BXlwDlGi5R5bsWeMFhg2+c6HcnuCdWonfK/h2vQKWSteI5iiWYkJORnlHS13PBwCY2elXqxLRfGbRNDB5KwWhW52WQb/JuJqAH8Rk5m82CYnP/d+clq3KzouydqrIUiSrSJPqZ7RZTjq912e6DrKcjG/iV6FD8qojU1fCHB5BefYAmBRKv/dGQL+6MK69Hq3ajC/EMN+Rj+b9QePG8ZHmDkhLJtZv8c7VIC4hxtw+JZ44zU7Sc/bkUSd7h3P/RWwIIEbzd6n1A3t6/WZC0aN0CAlWwz4ODaeSPMpl7klGSBl+tSiy8q2soZ0UYJLykik4VAz1weWptovfdJNiAybHUk7pCqJtoH6B+HHkX71UbBUqfSf0iq2IIdS3eKBw92FihiJcv1whY8Ml1eFMI69vk6HzGTV2FNl1SXL/OHYtnBormmPXrKFL9ioGuAZsVL7tTQftCSiTpqijWMP3zUKqhQdKibvtBB2D23xH7/nz7fxBCn+qv43TKKj9m5lH4uti5IDmkg/Q27TOjaTE082Wdx6P4tXDm13NreiBPMeAWkjaUQetIRAqJxyZfGqwv0fT9YxZBDf
vHF0ZKyMfNEOuOMAM+/DOLMOIus0NvYbBsU1igm4TV70IqyH0fzUk5RtEqFMmOxZ72czkqTiFZQZjSWpUQO5UdcIp46vpbbPYebf7b8X9zXZWPKSWlfE/GJ87tNKrAGL/H+JfzWv70aQH2XxUMadvZkoq8oMvPC2oBcsP7hFzGyZ1LXN2UYCg0aKvFsgm6sw+m3a+XJJC7TzYrvgfpEalYOXPDC+dbJNDHk4p7nzpoTHbpL9pe/LXTfu7Y4LCNL6EZG6YBxKhWXOK/ZGrFNKHG8wvak9bpLktz9m0Rk9fL+A/KZJ3lr5lbGS526ORt4YqEIkZvJZP2LzfOeh3ogHrB1Cbr6CnS1rLSaZNugDBFO8CUMxGxRMGNDNmwJe+wwdX8mjgEYMMhG3Dc/URyzxHjcK/FEES5gB3JCzHx2YXNJOLorI3yA5+qTgc1Mp33LOeoa2hQ90g2D17ecbG+wnfhD7GB41tcSw8l2J7DWE7AkosPguyE38l/PDG2xBzvdQNbrghAGvn83x3UPYVozZ9zI5taP2jAzuPYo6fh8EdS0Mq/Rhizekpjp7BdBTqTNdaZGEuD/WF9ZOqisyfmGATjgaLmHX+MRNpf3gtB4Hpbf+eY+ttCtz412iwSAM3bO2tj3YoD8+TY5vWt4aYr7JiDNZVtmlMkc0biKZXjrGTERN9S9VMEbXTe6CxbATiFyMwx78jnAWTsT/wqX4gHhTP8Wf3vIPDuh9MhQVgHc9H1mph06ANZ9574Qy9daISG6CGMmwhyYYodffALc81tEDI1idjWQm32FjRTHSQbavbjW3aORHakhC6rFhQI4sjEawQZGsTJmxkXTKcFq8HYClPUe0Tnqf9uGEq06CSkrIqN4PL4VpDY6oq++tWPP5eWlbZkp/bs3CkAkQtUS2ccAv5U6t0MRlCEM7UaeBRHC1BEAQqR0ho3I15rBak84oJ8bEJmyVqNSRHltAtcVzYxQvY78d5Q3O+SUKmxIxjR7JuwMbgPgDgqjuRezGQQAmdqq9ycuoyzfxwZJ4xTBtLHlT8wGM8e/bWl12UdK3QwxiKaOfQA6Vw10AuGi2bjRFn5a+pZsZop1WFWDULkL8zTUDPCcG8dBQPnhKDqyfqMA/fSnVRWkPsIxcAjCBGKBRx0ylcZbHr88hwS1+gwlz9Ct2wcfhMN7zVAnvLWjtbgZMK8SkeH0RV/GDnPGmaaJ+lawwBYEXNr9/03cQF8i7XWuQvjVYrE7BQSJamhAe2YVXzIiskT0xWicbcsfYQ3d+85eTYOW3q7Xnr5AmntpUqmrvztENS0z/QezLPUpltm6YQl09+7ndD5trUkq1rud2OnZ9stV7CArcnkt17u9T+nPrdOIU4nNQ8KUm9h/6NuG24fRDJ/wu6i/G+yZBj1yx1cW+/I0pFYBVBhh0mMYYMnJ5cbyBOVzkw/JXCk6YiDlt10CP0fkEjiEBh24IlU9tTI02jdxoMx+cx6683pA42J5X0WhwSd7d+mCPHtXqNiUXkv//GqEkdhYbAi5imPgG/WlF31YSz2/YrrtPSzUXlMQpRRUv4j5/tOZ5EzSL6LrW5bCd+dQmXcp5NCyWevvewt0KJoMfSsoE14MOT0eshsCaEkAxV6j5dTc7IpeaZYbLc/0C4FJOQERlOhvO4/+fcnHwesaxpmKyRS7KyxJJE24KIBcgCS5jvMXcanPCyWew95e7aUGIC8ZWfyX5bIoUz65ZW8awh2BJJb7qDn9Bt8Vu9jMXiHpEinqvkzOpfSHbNdggrEiYoXZ85JNWCf1PBKRxrnPLDfnsSKU4XnEK7aH2Y7+L+doH6YV+GgtzG7faqB7DHX7XWcPkh472TT7k2lrzDj+jhEMdbD4UyRgLU5HpgGv4w7pLpOJs+0c8uaZOkj6QGpJLwIHgpwb+ZHzhppSWAszoM/podVptwTGNBk4nSicvlG8I0fXzNJW3oU4WWxime9orEcBvAEKTkrdwX46XI9hTqKRg1nYMImavBCZGmig1hsq+WtE6TlRmPNfWxJ1myLu/h5kT8u39vOZn/vcfQRrFH2X/V9pEqmai4Wf1bG0d3Xct4Qw+tmVGWSTC10seLfgwbDovD4UO3qCvm1OaImp7mWdYsGY7lmaCpVzlqGKtYTlEFreKQVoEwZ/sqclRUsF+RiAH0A96wBWHW2co8GIovi0lZfyGrFEY8rptaj70g7ZJnEmI76cOFW/q31WbFaMmTe6lqwoIu0UVp0Y8b8fF+A9ECDLtirWrY/SnUwI7z1blkVrcgWhxkJ8RaGDLXR9O3lxwpard2MTP832VQo9tmeToaRJi/nfARo5wLDtbdMNaCLsLq7+8mhGEoKtf8yhHImppeim+kadPRgCceEPvf9FpxjCT/4bApKqvdcj/ZJ8+/6G9X7PhH1E9x1pD0/QPhhbqnX34WSVSfa/r5Pubp0w/Yre4Inu6Iq8M2fQp4Vp8at9rJrYOvCOYOTMvz+1y06BQ1wlMxmYkFCdAXxQZTztguS4RnwSLYpCJdGSOx6d+xSMhElookE92vYsEbQ6pJ4Qsh3+XV33p8NYNIVw8SyICEwEpqTK8ysObjKsedvGfiWyY0MSND7bYUxO7j+kW25RPHERYex7bMJ0IucKO6WeYRSc3aAl1iFgvTGxyDbbLTS8qqQc4ipkeMDhi1qTdImiUp3io7rURQ9b0ezm7I78/qiQznhdVByNdCjUAFnBX6B7jEIksSBFHd6YnaUOFqgfdmO1wuQqOarZP4GnLH27wFCuph8fl27zlWUJJFFv9AMqR+xZJcGF3yyMP3bX8gWMIzvwRsk5ZqWcpxVU7mYCnl5xooMpATbbkFL1/Vznd9jmgFCAHQ8jBSsgktH98HkW7OIfpVkIe+WyU+RuK70rHhEOF0v/ZuP2mgaEUi/5g17+o0RCBZ3wPfdW3c7uikYMaKvS2nMVGfLFtfFi8mBt3Ph+g4+P2ifodF6fmFPMiTZ6WnPP/W1ZPc67rt27X42oer5dQnawUz+tNGrgn6mySm3x8q4sr4dlI62qKhVG8QzslregATI4ddSfsW11kAqcWwGCLFMIzYD0HsVIsOK6iCOwMlBtykrAwiK5Qr1PWGtY87JGoWbMKnb7iX6hcHyNHFEyprZ25gfz1pwleF/9e5EY8nLYDFv9XWJ1k5BSQx0EnHfWDw0yNEOovDrtjT0zZZFYsHyIuGXN2G5vy6Vb+dtvqLUfnJZjuzp/oYSxgs2BZV2p90FzVu3Z2U/0VLv9J3tW0acFzK0QiCzT70e90SpI47oPHSPEaSBkm8nLYpH9MS4u/vDUAQ0gjHPqqrGmz5ndAjKr3Om0AHFGsvuYdXOmtnFUyiUjQvFQfFIvvSl5vhS1zuz2Vue1PWwC+ale+oxgB0bOfI9mcyoTNFp7k8o4dn5obW2tha8zRpBMdZrR4+Q3M4jpDWXDtiUnmGhfqwoLanF64b6ZouJTz9alA+81yefZpExOEGndX5UN4oULa3F1T2esiNmxVkH6fTm7jUg+WdFU4GGzZ4MI/vZDQLohGsyZkzYGQuYqyxKH0X3iEPSIGe1FkzeIOkd+qkU7DK6U+XHhWYufjy0q2zbKoKMprty+FMaUR2mJgvISJ1kGsY0OgWKRKe8doljzsYwZ5OnvLJ6mALdDdznBL06gyzr/hcTP/KD8UN+S10xD4MW+d2wOYLuLWVu2rYavvzAz5J8DApsLlr8VRpKXXyPrDgkgCbE0w3XcJ+DMdJcxbPsjnxda/jUplFoIfp9HRSrmHXzop3c6BeDL3PxYKMviguEiFtFJoy/Lsttxc69kNgNjQTEweupHneoaRN3pGbcml+c4OnMuOT0w5uynl4paVptMvZ39Hs7LcjYVnf6XOAN+/JcxX2a5MvuNFfKWOqNRF5KRp3uKqIK3wPwqf/QE+OdoF4JfzYIqqxftm1rHWzqj2Nuqpx666uDRk/WuUgre9NBD0tGV+HaAi+IIuaM8Ncs525R41OfQe1Gg+q0Ybos2hwigBk5uxh7Hoi4A8KVh9/AJiEbeLUVMwTCuEhMcINTjQ91ZWYN9QIFfNCoI6IG3EaUSWNel0+zMwCm1kQfwTWqTtrcvcUpZH
AJ98hgWew69Bn2v4OoVgmXMd6bLIoVFtqWiUaF9pasXvwsAx3Ip2RWjB8wVHOIfZnwV4qPylN4N4WVdZqIb00fi6SkcMdN/CIh52wwNnTTFjVvPAZ3H5RB33LVyuNuLxWmWe++x+1mBECGxzA92/htVGu+xneNF1tfZmd2hzAu0wd8putZcpTHlHgzMkuud75tCH1h4NFUeJOHvjhPAcK7/m655wc9azIpjQDJjQDEs7qFA9MEjUGFqJvwKOx5J74DvtP++pFbcTwg/KBI9gTHRwApwj03ysKyHFox2rh7qLZgsvPBTaer5m01OHtc3LRYCssKsnkx1sTrGgjtMStGD9ObC6k5LPBIxqZOSFJ0K+nzSPP674sbBDOPeBQD/U/GAoF15RptScNDpeyKnd65mQR+mD5W+avaSoiJx4IOOfc9VggBJs/X/8pUg+6/RKU2u10LvLgH27yQJ8zKe6bY15e41HQuq3bvjAyTPlDldJoBxe98RNWUQiB4+BzGP8ifvYsV8GcmPUKRB9EALsao2rQkmZ6pe9KvnK6VB5M2Ezxzdr0qxq5+53R/4keCcUtp5ZX3u+k4bTs2xyP6rd7S6wBhcahTYGTozNZEynzLr8rlNmb1V9IawxEqL/4Dk9YtdE8vaZ1WogwF2sVIJ2f5nlRDyj2xjuZnPRkGYKXXKop4w3dQSozeYZinj5M+SnQOwnDZgvfjLRUzJaEO/tj9l9LGBOeuoQFvTuuzwpGt5j6Gb0EgOBNl/nsfUMcz0fHGQ7HHQByn5d+LKBY+yKEePOLy1QOQkTB8iR/9UQ6WOd8JkZTkJXi9/26zQmAWi3Cf9vndLo4CqZaL2Y5zduZE6MJh8rxW6x+7K01NcEuX2JfMS4chYz9GlJELxmYBDa/fP2v6KC8tBZop5BTl0+U+Dp3c3l1j1+8DN5ZVKK/wK5sSCIYv8dksPtrTHsoEfapBH3M6iLPTiJm3eDlmsU7mKqvVky1L2v+/lesZ91cIXcb2EPOHXjgK8BRtCIbrJA/WqevJOpAHv3Jvuq/zqsJD1/0qa8RU3NhpcTii4SSRsTSstMV6DTTZlIQ47PwGfthGFwBnZPrpMZGiuUpYxlkOe24dYPQw+5+dpM6cgbZgsHU+1PQfRvmtzfM0aRShZvc3kzAHC2Y3FXAJJUJt/8Frckjrrr7nFvSh/2H7jibc0w0CEnYE+hb3VhD1eK1rEjSlbQvRwTJgk2EVcrVXyN/YCsrjgSZSnsMQ64ty5Hk/oirzly/CqnaO5l2pcj7cab2mPCvRghfzCZ4rPso59Z/KY7v5l02wFcCvxgbt/2abpngjZNH6xq2tWzvtmrvjH1Vfr4HAPzHUNZw2eqUrZAt3viwGjqJv3vWy0tHgYbdvcpLmwFBOMgeXvob5gKDPNxnBu0JPfsEJQd7OF5T3zggPLikIg2Ek5bxUVUoW5cYIFeGFXKCKQ4IwEflX76wMnufJxqUonksg2Cgvrsj8zve/za/SBVamBTI+9sjRY5nL45NXbZyP/FQiYEsPBkLHjiRDllSYSbA2huQZbjVWhHpkR2yElubSsagUIqSKXd/xfuw9K8NIhOu8ZaRfYPsW3pEFH614TIx+YtREKc3Jwkt87OhmcAh2xpiu72MOkFDuiOL66WMV/IkiwZ8tknrAduvmQhVeiPx2/jnKnpp62VlKwGn63+2eT8lararSRqe9lxzQVa3Zu8X8G7sQQeXMLowdjHyZ7d3OyM0WRAYFO4EKPAKJOJ0EpajPVEIrhrCc63kyOg+5gzrAG9ZcEruFkHdXW5TUTnYX/Pm4nLO5qPgn7dAKMPiM2hYF8P8j9WLdm/b0E9yAPkb/Cn0cYtRZKIcQP8gDYn/RKDPjky48IQCu8TzDdiYFeqlg/Xnv+08v0uxmnZ3oTYTkc62BxddnsxKXywDgamBLNEYn9g0Ty4vRc5638F8el66ObZ1/Oi3uJCZTN3JVKchwxrmYQ1XBBaCYDMvp6/nBLosR+f2ksuU7ozbUWPUge72m8Jo5k7aXDcINganpmilLW0hhESMLcJbGILjz/uCEud2tYY2YBuz1P5P8gKxeCXX79V7kZWyM04FIE3YzOX7ZgMFgnzJ2M5HibJgEuDwmMP2erJzoxnWCwlptEXL6cDg6oiPw+GWOaCs8RA0dRa1uVK0Pm6CM1EijSUDNaZfDCkAo/1CVswfRbu/wf7A8xT0BtxpgJvfIAG6+bkS5dX5jRv4pkxALGbb68AASjmhL5I4sSW+YzRxaiCVldutIV7OTqG+NQmTBB/0E2PMCAE2B1RYLveBx7yKDIUvrS+Ne2kk0SbG+nJ+KgP+JD/6zHznzS+fQSVenoqJLI3qAEcgOfMa95WsnmJPXIyfIQuMUd4MjnXfhVScRdTXfhJDrX/1PINGcqp9uchxSqjtwv7iceI3RrcOGqgFX8Fog3rKK2wqmMkz4mGsNEub19PK/GOJx4FBAkCOdV67sg/+pIQ9OTri2Yn0z0ToPrwoqsm3TAi2xoeRKjqWuiqb1pEbd4XhZELC4hStuBPMXrRAXjTzANWzfzV2N9P05M28vjn01X0ciGjgZza2M+cW0ZY/jf0Ie7RggXp3LpYKbug4kEJ4TMYhsCqe9m+Te3bo9K8EuVbiB/jZq5UlqDpMMLoDrMD+IvuOA9U1l84YjSn+4tmPl91oLuafcWBScUnff/Pk7coKvfNYAKzVQsVvvWyQgvPlWjfJ1ugqcwZVZDRgvLepWPZRs8OZa5DT3Mtzp8xEN9qgDijspBDrvT0RNcEQ4UScZhOdcFC+Zi7NffXuWDnsQoJ7du8QInpChgKe+sKxMMIFbYfQ+YHWwxPQ7owIOk91Z4vW6UlfFgmElm9ofy7VGqn1TXWlJpZl6vDfXh0w7KhLMLVpKQYNWVk7C55skhn3V+tBSnKLwVi5qtgHhtqe5x4j8BdSMmifQwYWzN5OBD7jMRKnd4kesGkZy3LMNQ0pn8qtOAe18jwWNMdjmwLhE+gI9KcyQoBJoIoIQWaEwhB4XZnwTZVf1+tya58Jqi3p/ayHtFF1vYB4+pUAU+s4a7L1mzrhCE9CHHAPN88PUo7vEMMReVMzdYTzNPp7rlWGRP2stujVtCtSEV+i9gvMVbttE9+RivXOGi7LxwnLKCeZhGeXcoXh4I6ktxx5UhispgafxgaJc/h4Ix/zDjZpYa2YRLcM3fWJnUUbwfcJj7qszQAppBMknjZTHJ3lTPg1ZM2Znn8Sj+uC/QVuRymwTJhpRiXBjvgqovcAG+q4FeFK7tyWQyH3m0CsbTar2cYMsFeehpe913MlhDsIq5WaZIhTvBnM1GuYMgXUVe4DmqKz1sURtnWGghv0vnDOvTGvGHAQy5l077P37TWrVUboA2mEMNg+0SzPMBPX+wEbcDF4B2kax2q5wW+nGs8K3SMlXfcNMkTVywx8eSuBOD6QdPHRp+ZNgk/oFO+3PKp/hs01gFS75af48QqrCwg9c++ladw2wRt6bqNH6Uk/NEgaulJgkFQKt7xOwTLPnIkN86sWnOvPPJpHR83jAiGtljvPL6QUGEqJRNHq+Ay+AwffFpMb3sned0w7us8yIfoNEoYsSq36se4XgC9t50gI66IscnQBoReFGV6gtm+JDq3k0lZVv7EdbogKvhayv+0FgF9tUU8pcV06wEOaptgfmAcQFdYaBehUNqqaOAw39XtKjpSNC1zGziebTUDvsLzENBnlB0F0aAnldRgO2/0BYCCAASStKRIetgOvZQThrLPIKvcLnJ54JCpA9Bsij95u7ZYuJ9aLByKxBqa5ufOPG6ZFYKVKyF9lH/9W6yjHthUqDP9mqlRgcXNtRS/hqkMHj357RdpY8HOYBl0rwWskSBv7GQyiRD96W2k/zFsHdglK5+X5zn9WaLElDMGeD89W118IhxnpHSNwkahEx2OVkanS4oPEp4CZmbFLhLqywVZW3/z6fczupy6g/oEDVFl6mDS9VHfpIoqhlxj04lR/bROGkNIBtOt+gXFSAiEi6is3SpbQynRKq4JCZ70U2jCedF25GxLFUwmFHCdIz5ka0sIIdyDcDL8gZnTWPu1UyaiFaYxtOneEdk7
NO8/JicCcvta5Bho9Djyqdz95Gg/MJ9sQQFTmD7kzLgl3OEVQzZDjChQ0pdaPmbPwVbmna1MquIKH7skbbzpBN35lCB9hDOmTG0wazga+o41w7U6NdxKTiHUCcFm6FOwP8o9frIXf8eHxHjvxSMtOuMCQharAg8z6YPV2n8rHChiueQmn67PHNqy/0FMiDKi1mAzZmMK5tdKJvnj8bGIS9ReqmoWQ27FqiAiqQeO2mMgijUrxD+YyZ1xOymMHCtf/HHCIR2JNge3BVUDTyyuHEArKi3Sjbg/NwPBwOkJDK8wi82QL93vmmX2HxFp+LHWUVsqnOy5DJ658loTNXfH7u1596xU5R92vdf7pqCKmWtxpAjT/yC7e/5qXp+YCt8uSYyaLngYfAWJNVlOywQxH8BO7KnHUG5GUcuqHZtlzMD/NYWvQNPRhFgAKC0XlGkCyYMSfb/nScEvyTHBaYZXssAI4/dSY2+Li9dA/kiUqPnyMZzE24Wr9CEyta8K/Y/Uu7SmIWSln/ypLDgh/5nEvsbOl9Dzy9VCHS0QqPXPaCRTZY98eVEDmYyHpgO7KiISUH+AKbhSyllE1s+FflDUwM8Uf0ZBTXa2FrLA0vBDjAC5PtKNhlQSCYdBh/Kck21eegR9WQeklVxa+gZCEgc1Lj7JCYr9B6VYWVgFpbfsxP/3oMXxNdiEIWYKKey+p9I61AUcTBsioqde9isX3a6luGblH5M/6OtgGqg0C/lxL1x5TTZlNhBlEMUVXmlKvop2yFgYLfkp2/pw/F3W9eqH3GR73EfF/kdKmiZhj+j+GrcRt+WYGjaxNQlZQ4idzhevqqTR4C4RRlIGFtsD5YINoAIS+vDUleHBti9JtzDfd1qXSBFLIJXzGxaYbC8tY00eW/0b3pqjyrcQc2MZQbnVaQVzMXORWtdAOU3o+MlG0m4TBtOTorBtO1IV37ANJN/+zoWzzAvISNo4i7eDlSdtdfwnjvgY86dfvxjuSI0qU8LNNl+0diMcl/TqMIk4M24ylE9iViYkSJWERh6fCAThO/xzoe8ZmVvzKTfchaIkEigDSRQ/EIojfeZF43VJxead1WX8WXu/LkZksIDFMM1QZszNRpszmnBfSDbng7v2z4Oqnd02zH6aWW64IJT5mdzdL2Zo0Z2aMkBy6XV2/O7I94M7imVvXdIrEH+Xk2qsoxGmanXEgc3H/Prd0HUV5lj8XtoAXxmRVqZv1y5XvApL+qFKYFknCaM2d0uLOZWE7f+q+acQO4NIH6WgkguuPabAN/oSrVlOh/gYgGMNVOiIB9KIsLkXLxOxpx+3pWaC+L+Rn1sT0zA3XMkjrtuwmQ34HaXL1epaIZs4ELXPH+3n3dxbGyKfOfrvXVP6mpD0zksbK/9cLVoKLDsai0zH//aIp99SWtzTE1fi+ilmzt2tR0obH3oNR8hFE1O2h4l1d9vhgj4+ScyXMWUoxn3CMXprELreINzivkV+xaNxPXw5t44XfNn5DAe4DTQXPCJAoaBewOhS7BIpVAOVfgYtPxeyGx7id2t/hC9w0cL/J2sinU0yWrXlp2T7s51cheHN4wtRUFgwhv6gJI4V20M1sC7Sg/jyHB80mMa5FOVF96mBUqICWWLHqK4ms0K7v3Cbi53rCsxuMhbyW3SLWK1j/+qaqS0YcJbp6+6AY6+ZZkIOEX1+bcJil300U7PsF+FfAlT1uxwajFO/5HxbRruS1XCDDgyALB/d+0C6llsesZ4Kwzv9PHNeNxMApaURVyiRTF2A7KWge+Sz2C4jjR/9i9BRBV1nTLxuUKyIT2qTga9qVRr3T4zjogv8XNS/rjwKwulFeHx+I63BA1zLloXxWr7Ol33BXnO382q7g3oRhl165B8UZ5mUMCqBc+03zxKXz9EyfdHt08eDCgcgbwTminAkf411g+ZjHajmqzFmY83rR6d2EgWCHrDnCzjgZgHdm8W0WCVatELujPvtL969gfGE/E3KD50cz7h2NkM7VvAdhW1qa6DzvHYhYIVXx7sZMpPGTxBtn2x2ezSzPRYMOSWq64bC1M1DVM2slRpBocyQoJy0vSy5NyAt+UO0tyc2jFHgcbFae9qUOqC1MsQzAL+ajnBRDN3RS+pPqCWUieBmfQf0ZnAnJAFV1S/rZWZv7uj2dBTiyWaSN71AqQyeWfcmLdC+fIP0+uBZ+jdfBKlkiM6pPWkguXxUOb7ROB81u0gbj0WYdXFzgXqGhqIvbU4zWI6nWN48KBvCLxP2DQ8KSLA1lbwdB1Y9eZipx9GgHOHYYLpD3JJ4htZk0c15boGoVOgMfVBQLLZ5as0BrLDBCz5Csu6FWMJqUo97QZZmgeqxoX145ZEFrtk89Oz6frJ2XBBHnKpYqD3V5PZIWJfgsN2Q175je0asd/C7deAckz6h0Xu2aGeLPcGG6X5LZVgEPBs2eQTaRXdBPqvKT1xmlAeuI3O1lmqL73hr0q4N3Fn5AJqq/l9OLN9xl0HYegBgA0PiGQa8RNJ78aJiUy87b51n25wrrleNVyyPnxNEnVH3aCDw+0Y2+2Xgr0JDjayl3xTqfETnXKgLCKyhBLv3+7HNKTSicXWLJmn6Lli6+hyOcCynscVfRGurw7S0CZ1hCCTaawrlJ1yqHIAjeWonp3s3qKJaksW80X2j6i5rBVVo+BFER/j8wYgMV/YQcHuAWtex6ESvItN9hb2Hxi1OZfXceKh/IXhS7PzZVcBOWV2bS7dclXlkKFMdESxDbDddz/538p4XVgKRD3cPGdIdISb9t56Fodt0WctTcblBOxOVtbm+AFYMlADPuQPsOwHW8Wirtce8ppaP5qd1q7AS9yzDYAbL0nge+UHkiwMB8/N3Gs6QAuQLHnYprZfndCLr5fWlH8sRD6pDrgzTY9pKlcQJLINn4x/8WuwPEK9gDsPF5zMcvNTZ2G1BnYuQhWzTUlkuj+fPOZROnj5ba94S+8wOAkMOcACSTg7dRNqH5w++VA5oezMfHGDnfFTqXqOAmQ1NKMFHfhCpSa5xPDSZOYT7ubb7rYeXbWEUW/C0H71VEYH52ZPKeeGeM6FIT5tCTHKuI0Vs1PVNO4A2zKi7FVyLDsRgSmhM87oD8NwCxhEY3dx59TB+Y3plab8SSriWD5lYeNJa0n09EkqN9GEnO/bTs1YOfR1zVHBryOIZ5Ds2V4X7ZqEM+IND6v0hX4A0B5gJcUfJXZ1m2XXkgTMNokDSa7sj5H6HQ5EQpL3RC1qwN8wedRMgQCv6JwPB4bMioFPH90idoN4BdonI7dlzLfwZT0TiBXhY1cvo9pUF2d8P5kq9saKPCiYSat9Wno6bGFk222+Ranq8ECa989dQWjn5U7vVLfkdX6c+qakHjySARV4j+5IdmbAJWiGS59s1w3kbAIQTCDXtXu0AUURqdNYUlAftHrb+1BeVVpe+wc2Zup9y8CSsmV+jnEhgH5zlHWUCG4bzcHKVm5gKS5jcaQKAT/YkIBuTNmBoG+x5cX0K7Vw9b0wDATaZrwmkISuRDrX7TeXJva8YcDq1ccGKJZ0MYIxeqtyF0wh0Zuj5wwgvSDblEUVPU9szJrpYR/tgaxc36OO+AFhHmpQKPap1R/RV0mjEFGNGxcTs9SzesBpBRxCFIWhd8baeg1DmKll/UzMa/O3ujBeMAiyiwgqD2GlmXvt5YOMcGGb4D2KuHM7MeJotdWzlVXmFo2EQbLoezPlToLc1bIy3fxcvTdk7w7fdaipFcf2gCPjLbhkpxfD8snk8ZcTKfaoa4YgfdU/9CM7gqgtTnIYqceDnILy2V47Tj/vDeCI9qQOBla7Kl+py/+mJ81RHNdH0m1wmsKRRraD6vsl4AesG7ARgi9GnaxDKWhcFo3G9YVsFFqxAhAHd+j3KnrxpMNB7HX82bKvliE5DwwKbvHmZhsws/V4H7x6H6TIQS9nwXDYKBvqhb5VilrDQ66tNCxI9au8TRKl7ibfNpqLWofw8h4vicpXeS5z5KCZHgUc/uLzjtNHXnJgJ+2J/FT7kZ7p8PyQuGHKYSFDEG5WE5vW70VnzOjibTj/DJEr8lFKgD5nBacNGJOiwZmTPQPZrgTwHhcrwu3vC
49I3rDGxd+8QwdYQmSXN+3/r5Oyn1S6vN/2MW9MUl00V8X/Uh+5YR8w19x8+lTJ+7/UB2mvH6aY0WMDL/whZ57rnzAeiTiA5BvYf2j3CXqrnlYExxmiPkyT4CpmtmIVqDH6dR9YFFvrlq/7BtDukFqMrb1cwDtmwv3OuKNFu+U+Op8JCJnEnDMnwOdH0ypK37A28HdoXJsD6L34YrWGHPLfDguou535ZFJA+NxMw8tM+5JyDIZg7UoLlLr0NMImEDZoELBclIv+onAkEw4PzFHOA9qnlrfzBUFnJpGr5SSVmxQY7wwRGK8ARpu8H6MZ+86lYLwiyIpEwum16VSySRm4/iDVsd7DKq1nlzjWrYTi+q83UW4rpNTvD3aBL6+2Lv8D4pjdHx1Xu6pGbpL/mlAQ3fSL56CnzXTfYoLblPSckXgSpJP6oISFTenHNJt9W1+vqkjssUem8KePMur07F6IOShRGw6dUnqNH4SRXarrR6VkMlsJ+zH72NZnlRUEEDvLRnzXfq78nqnluyiq+XPmuUD3BT0G74d1ucoVzny7gSzBpvPoRlgXAAnu9J++IOyEUfzkJd+WGCem3jLdW8vOlEqwqVh7yVrZrOP99DucXMkGIgBmsoFfEC0G9TNEXVtf/osERIDReO0+rWAGiuAAcMO6EjY7rgzXPLPDi7v59PVWMPi43ppuc6PjhCS8ggPde3sdbNTLFtxWyJFuC43sby1ehcxWsj4ZZwjTaj/GJXL7D+IF2cuk2jOzroHFb0xWaDuye1igHcTjwtcnwnl21q9VhYkq2o0VHGzfq6lpoEF6MdX25AClF5i6MJadg3P5/WENPqyodTZ+Oiy9reQ+OS1PcKz1kS9aCVDsyzwifvyjmMfw7jyTP7Xq7MP7YGGSqFHKIyNncM0vmZkciXhJsAGM9TmijWzhdRF+LXhDgC92UI0HUecFtmKkP76saNRUUwXe5fsmlmTEDUJjsvcTFLvtMRBuITNaFqupzLolJqASkK7ePbJ6vnudAE+JUWk+IfXrFNJiJWEMzlrhyfSJevIBJp+voSrdGqNRr7LHHrhKur3OBXWlPrTd/4pTOamhYRO+eZRuzKCdvExKJ0Qk8yInNcUqcf3loVZbotMvFYNVXVGN5gUy7E26wm3pG/t44WBvxD0GsnhtB704WeeQ8KTAj1GSVEldjeRCchJPxeZz70TW89l4iipWLF5tw043GsTf/XaS2W4AkLaQiOWa21iiLv6+/Zv79WyD1gVvqbuCh75khypksPWj1dz+DLufEkUTf8x+C+mE7t8c/DhUiYu1mkqUJIAIzQgRCgjDy2DeVhED0qUywROeva81WJ40SVX9N+cCPMXtDxWZJ2HOoClTvuAvo3GZWOFY3rtRS0hyJgk763nz8Aj0Dhszck6EFacIFn4uYHroDG4rnICxiRJEXoZarx12C8CV6mNbiEtfdgyYq71v1HReVdOvBqKAnYmZ4xxQBIf37LSVe6mJLsQ6vkwKMiTaAWcefiPnzHotBvOWz9T4agKA3zNeCvlEnKCKxWUbd+5rE2Gz65FpMcKEbPh1Uf14QwGMewdQpvSlzl0KlCJYv4KTR4OXVrK6RWLcD+4WNuwwONKX1QKUX3dIBPZ08e5S1cOLllCyucwW0wWkJE21fFsMyJm3odl8V0l9qJR46tkNE+YFLizozrsSv8RSp15AFpdQgFPHOuEqEriO5t6xrfkRC6ZY9z++YleaAv9JNFEM6W6QEbToYTuAvlhpRJk//r97QPC/OJVlRAQaVIas7pS3EUR5zdMAKKFfyAaLt2fNJH3KK4aq7duqgesOE6OnK5REMOaGBuVGMQpZBrab+UkwaH1rKp/rVaI9Slr97h9YH8d2uy+UE39YfTx7hY21k5f6OCP0lIUoNhN6WSGLU3cPW2YP7ZcUkahtxMn1os2qsDu0Nl9Nsa0nvXq6FUA8SdQlvCzmYFDfA7JC5Ade2RfbEiaJxWc/ETDKLGJhgTvocxpX1P6zixT9g3x12X4h5tRzBXEmDT45zwRW+V9jLvbrgIutb1hrC1OaLah6BvVjSFu+PJeWVJemNnEwbIveTyOgl5xfXafy+ThvACNMApYE+CzVd348+v1TckV2GJdjLRMczrVI22JF5rZrKn6FUwDmIZTb88cIBRD7BtP51c7CTHOU8qUu6y6yf32HAdSi5QHJsehFDNbajfCr+fYpctXuYVGcqMjT67CD8x7Uf64fq3x80HhC1+SH9lXRURsJ4HvR5BDw0sTADHgB/daHqJ2/SWLXDS97Jn/P9VAJKcrp225WGp6NUtMUpx4ZB6s1vZLc2zYqEUcMgDK9YtO0CH3DfyEFR3KYZ6ahpuNK4bbCnXvEkpBzCkrBCrvd+PtuAnH/aPauCvSgl3xEkEPM2UHAbas6HjCdc69aCpmL7ikZfkNdTvmTtVdBNMt4aFjvqhDCLlQgbnRjkXbHmqyZ9baGSwW0i/nx52naF6+XtYOLhIgmQGoUFubbW0p9E9Uy604YW3/13p92p2LeZ6vnWq7lB/12uqq86VDDv5b6appD5eBxh4c4WkuXSV0qdEnQCvryQUFeoHgYGKo5IlAqFgaGRPFvCz09OZcDCdO2NfG/mxF/5n+G8QgUABmYw+o50xAmnalxyQpNlxlFwus2QgeZmZybgY/l6PdPkpTWbau1BnGnnjaNWO7c20P86bJAkVmWpulR8igyXW5JEnB8J+lMVmuIhN8FfXa1To9FNuHFnyqbwMUPCvl71752U/LW07IkpQSREMtC44W0U5iUGUZzRaDsIaAqmACk8kn8RjNBiAAqGU3KONDUB2GraGVufA3ZlXMQObwKFJR1DUBEjQR4hTRbdeix08rBtCUSh6ZKNFVZH4y4nocu2YqxF7+WOyxoXy/slMUFEoE8VUnWeS7s7ibx7uEqelzCGxN1w04zZ6W5eiZR2nsX7zJReY3zCxath9+MW0F9J9sA6SA7jZItl5HDkNVqwznU+uxYjZF8vRQbpfFZH0au7Gv72/Gp77hURfZp6apdA5y7BCDe+S+qffoGaIcp3bhfI0+swqNk49t78eiCSejb6pjyMojeXqR2quedxPY5O8mMSXbmxAcgKAJmDqpIBk1abAskEUeUZoqLR5vqZ01ZJE+7qX1Y9ApZX9yvvXIZazgwqALk48K7XZdkZ1/0lmKvriJjMPq63alWSkVI4spKSR5uN4yiD9lyXmVzq2zrSIrDhJO9uA/g2ggQzkrk9EXWQg8rsJgkZC/MRaDV1d2tPVKA7t+0n+cdq61DQoQ58YMYYW+qCJZRFIHKKAR6BkX+sVMN9coySvYZVzv9Mp7OmRyqKc1zgsysUPSz9ReB87+aJsCymPKq3M9DLdCXBxAuA5paUdMnqLqWyKTG2h6En+QfPN54/WVLLWXrjycCS7ENTD2Z0RL9+8+sntKkHPv4QUx9I8baQ93gKCWXs4Ks3G84vTJdDgx3BJSfrKRCXapYRFN5rdmjhtj+ChTGZBqzlbN1j5cO2JmVvW2OTxN+Ti5ZaNTwTcfQLavXCADaEk4ChqNJ2D4H+0QWQNU9gzD5UnaqT1ZP/DfK+2mTe1tugTV9DlCIVJQv2t31uH2+duJ8w2i9p7V/SRHoFF9G6qdC8M3oJAk+h34noMo01y5PmdQr71LycVOq965Rj8OhYPE3yO7AFcmQboortuKcx/xMEPJt/AkjivoJnN5LXXwqQbWxT5BjUnAyDzL8sIcINL+dUNwMI3COfnoFHEU8VaYmVcx788uGfiABDQ0T6ux60QljahD+/3ENGyySQrLDJJm+1UzpB9UzvGNiPL76x4/BZThdykFUZgoZgz86ZnwqfErZOa7BSQ8i+0SwWj4dWo9uUkxSOzzRlAHq/ni4IW4U5GW2l8RfXxiVzdS1juLuyimGuB/GQPKLx0PnEYn3UdTaqKgVosZMxLlIKJQb8YdJAvxLspzT3Dcqvbex64l3oXBChMrAWFMWlIVZ/lky8XA/UEIVY1p6apXKKhP+a8QvLnbTVbUbx9K9u9lctOMeDssTarE0JK+q+EvaqNEk7NmPOfvt29rIAsGpbTiXVPIQYmChXJ6LqxlUg
WPl2K4qpktjGuN/g/OrKW1QNZ0gKTnN7wB4G3ytHzYu76AqyqkDooWK1CHU2w39l/aDMe05bXRipFcFiIIoyPDdp2UaBXB49P53hWIUNznzmuAomYu2Fc/xRZi9WbkHaiDm+5KiD1WrGoVCQtfpHs6Ji7S2BbTcD4of4pfnV51j71+dvHu204gnL0bccCe8X+7l/4zGzmS7kPfIqnKLDPQby016MJcSfzQ/bNn5l0s6ybNfC2f1vryIoOQnfmEJ/6uKHtzbrEv1/fmWT7BtK8ybtF/syRenkc1jQyKJD89CbXl38d0qOX6443wVN19xBfVhUFlS5TFa2C/Mm90lLbEHCUQdy09aklkbbWVKkUX9l93H3uG71f09aTVFb8GdkAsg7Vg1MUDHOwYQkkizBKhNq7IyRxAWCLMeYb7M4/ZHryZ5FdAzXJpgsz6PhalRItpDnHUx9B+MGwa6VDmvCZSw4u6sOpR25rpOhhU+0q7pBTQYlc3NcBl6ArKYvu5MQYsr+RyVOa5zEnXqZ4JdTc1l1eWzUj6bXBIM+x4BKXUzSIovTowO2HP+n2RKYM0CmGiwMHBVOIuOZTdSCFg6b3OYNdee/WiZkoriQEtRxuT9A+ruBq7e5556k9Xp3Pnf5FzhDnEm28FHIQHpRiLfc04edL8ke+oET7YADR7V/hYUIDcfAGSOWvdkYqfXEIOl5Jc/Fn03pmTstO3AfYPP6E3/ubcnHn1l+hLkRawZ+lt5vjXxusRRsnKwNazmj99EKC13s/KvurvQ1gnRZhyRfiboRNfuXzm8NaEYwPC72Gs5E9f2oVueNcNvrFU+Jep3B6dkvJNqHoamJf5f9xzxyEAmgdfKdMhNXLQ8Jj0Hz0Eoe1uA8WwR2Nriy3um/vLan5E2LHe6QxnEvBZtIUjjVK9nKwEh5O1+CK7YjPUTqieJA3zwr40v7p9gu9zuHsEgIcY56UJAw5XPtgHyuY9OZp1aRW0tEhoXhqY97F7zVHPoUFikvWYDOF7A01KSKIOgtpLid1eMwZ1pV8ovDBC0ipalUJmxQVvQKHyrLN5V0TgCfseQk6w8KSIvLTmlLw/449i0GeSN07faLYao3EcWwCkdOgKZTGryoW0huPjbhTbbHyjtnXorHzMR1dXgACNRoXIZzUtDK2L02FM934eWyCn805ZeAuqiLciMyLkFT2sSMrGehmocv9vp5Zvw1T41TPK83ERQF6cP78i6U8iOuHRIBDiW/aALY/02mgb/pcUVhMs9M2lLZ2pyTnMLVVLih0Ij2V3UHMb/qGw413NjtKzqBCx2GmUChgUt+xMUipKYe07JidgKGtXY/D4wU5VOxg/vRG7JuJjujMR/lkZtGbeWhbo1IpB3KDYC/OYnUa1wcl0SUF9gLI1Rh1KLRYvGiASlwifNUPjpcwpLUemexE5TWB2zvyGNHmRK7VBPMsxqnokBtb0jx4A2+xZVz8obVv+m1vRKI46VaHB3aD91IUIPwwk/V3PhbD09b0zAQI8Wb4dOO51ypQnLXXOTE/x0rD5Fwab6tphpuoLLk+k+QZfpWBC+pzv8chjZ3OJM5uvOGyXRp12Z6m8vsdfzMVOOpZfu50nj0dK6+1vcG5iWUxsLC/VfMrXSYuRfrGJfNWqes43N9Keiq1btObzSvmirRaugkuzYCzU1s54KsOXYUG2lXpl/gSZC55URIkaZwHWLcUXLk5t3pe86OJYzDTkM0byK9QcQNf+eUCyvAFKCGe9KOvLcKsFAOiZm2hvt+PrYp8FoO9vx3qaLMLdKOM65a5Y3zkla+0dYwSTx29CYhWQVZs4INJoy6WPXIuAMOyq2vUOWJ27FPuB9VbuGqa0NhEMuQEp/M/pKT7kQ2anmyThQpTvJxcCxrP+QGDlEPZuMG/23MDxRiGEbJZHRiNI3bXj0TpN+72dDO9agz3LFnX0J2mbuZ6hlieZXk9VpCc5VKJrgLaN3XC3z3QNYvfTW4eGV00tTEbxK0p9hSdY5guT295cHj3pY1lw4g6Zcu/B65J4DLDsnQT+oakZUZQos8nDt1fXkPjtY1DSv/hc++yWqzgvWf4NrVAe5Aq85SKUlxI0tlbsnaIQFQHFinjD9Aa8cZD0X2QeqMKglrFDEgRb+0dZf2ZuzrfnaSbnABNLqi/O9TQeP55/lMHAniCSWQa8NQ4zQF427/IKVY2QU/9E7hhfhEx1J4dngjwf945MzGy/tXbA+XnJR7FezU8U/X3rYnhxEzSQe9zReKD0+PucaiKZEzbEhlBS6KNTE4wOEmQZ+ZwqAjK47YqpmxQ2jkC/sY6oXDAUHI59n4kFIxZnrMYfTJ7UV5SV+4MA/vabeQIvVCnzkb5y40kx3Uq+NGJTQLkGs0XkAq6cjhfnA40FE9TZEd9iCWM7vHZ7Mk6hNLzsO+S7Ss7nqN5Q3HXO0ajRo4FlbcxkcXV4vmrnuxw6HaVsRXZFt1hkNXR8o5lykcgwIKQxS8YzMxc/ueUsYu443OybGp3H1Qc7N143XqzIKZRN4GaNIYN7iu6TVKHA+ijMeKNqOJT7ttEGjImLEab2BTbFlnmqRZzHtcPWayCFi1LLdOcnwgsCLYGx4F88n0qxZLcDG7iBJwe6PXnnK6ph5M19ZE/1cAR4XQr10EGtygl0r3DLDOU0Xz28UYzS7yKLZqYAXvy/Q+/fL0q+LEqoH6BwM4MdGXVqM2V+IOj8enGSOguoDlS5eBVnKhnS1L2T4sLIeMU1K2PNakJVuiWa6KdR/jHT03Wb4c+PJz1Ze0HzL1mOtsG2lbGBH/UhEYDzOKZCYUQefd3V3V0WZ5R1qEjpZK2E1WilSPWTWhl7ry/ZiTHNy1gv6QUV2+UCv2IKtceR3975/sfCyoosbDycmPE9hNE8hvz2en9nz6SHcI/NjG4wkz28gDI3j6lecfnJylI7gw1ecfM4v1Jr9GgadOQbtfcQkWzsroSfSFOZ2CcSIKAtE1vrXInKJTdClUuROZchkmknSAj2clpwaba4aNrzis/LJVYDOJal1cSezfJ5zcPjVlASBjZea1/qv9JDjUV1obMEh9ci9GY+/AWtw/zi0Az2lNfjxgBB1Mp7u8CBFwfDBvy1JfMJCzef+EdFDrCbyJmFwbeGccQ2khMzG62F3550HuSh7RfSxROoM5jEvc5XHMCdCR2yYGMlEoGpkc5OLJeF3BTcC9OggVR8VFCpWJX8kU/+2MSgtrBbw5aWA0L6rytKW26dWsiMWiqOC52vcqBBVJ8esTU6IS425zaT8js7voYj3pib9WBx489I8xyD4OVIg5P7EqNArLgopJxo78HoZZduvv+7QvxKT2o5HWX1xL37hbSrrH/Y09w3oPlRzKhakETsnWolUA+76ejPKxmgptdQzilptohB1kt5/V19WuZoqA9Tb5Ho2ZvWGaCaJLmh1m8VP8Z9WbH1TMd2R0TPGmSGtuYFzB9omrK4CgKZRpUxf4F24xaSpgVEhGRwhg4xOlR64vj3/o/ThdQticZ0nicVP5XjnkCPcCO9IjX1IrIoGCH6tgZpfairJb+pinKIROoQp/4g6ccbzBTZIxTklnU2GYWH0IAu9cmAd4O5wixfzwMR9spl/K6yOCi08VmTg9RktItBQoup5SX9N3HglcjqzUYPEAXWyhtGMwRaC+PdGi8FLG1+EDNbtHyQL5sZSCLbouCHmZGxX3ei04nSb8lJ9efFRhwQvoYI3flBeI92WNdt5OIpBPCYdUMQEH25CRWcjI22QSBi8v/dOfQOgGMbHy0Ha8b6NbIPUgEqf7F3ncuV9R+cdCPOXSKlCLO9eeN8gKW16mgoDI+GOL8TgL6bNyL7YETjZayCGxeVxSAYuHJg3Pq1X+pKam41K+lcvlRI//TQ/haY8/B+LIUiuADtWf0Xe9nOci7RmRh7fJkC54HiwEhENgrpmZJmdRUbwz4Pc1wX5BtxXlFsdkVX/JdUoESoS7jFO7kjFygz+VOJpbSW9g/9RoNcslMGodL9JDidgll0Qc7z69xMKNbRusbcv+VkLRs9ASc6UU36t2dYXP6JfB2BKVXN6twLiYJamdMWDdV9tyknOM5DXj4l1paBh+nUL/
ZQFuv3AmEBsKjo2W5K/dAQWzxpJ4l0Qid1l1atcUS4NOZ9QQHBCxtZD/B/uRe3oSbEF2JjJRA/gsYsyf0lnOHc9WZargemWJ8LlkOAxji+jJdC31StBKvjnRBIr2I3C8QwjPdKAqj9suokfnikaWQ82NZ5f+YpRBBr/74o3KQXWtqXnE90gxqHQIQJE1IDzD+lkqJ9RoOwhh0FVt7Qwi81S+xptr+SU/Vl/Tg7aKw60UMsXK1ouiyFrAXIRV+n5DilvjaGufEaLNk+eNJkTRbWOtXn7D0/0yEarX71cgrvJUY9IwY54/EycKPA+6rcSY2ZbGwhtasQsjPLqlk2IYz9FQN8T4kEIid4Ok0wIONmHQK74fr/GEAzRs9qVRrCIm7aJZpXp1GUeqTwIfJg1UA/c+Bc3X2McnSnOMQ4a41K87Eu3KaQ25yUSarCMTmYPGxFSUcL/1h4frBhIIENGDQmiwoqOJntDIStdKx/FbygZDgoTTeAhSEW9gKW9CyYhYqPzx07XDz2D4Z7zhvFx2oBo9eqPi5RE/FIddtAAfhYCW8Ji61pZ4EvEBYAkazOSHVnwwYAdaJimUhbMI4bnul39d/SGv/o/Px8eBIzpNrHeGZhUuaRYZSYOgxbnd+HbJVqAEgHyFy637N16QzSkn3+OxowRg+FhUSEuLBWqLH0WacN79bJiAHDjGtiF0q268x/L4JeNKbz9kfljROCuSmHz52EaLM1fNXoJQY7Rl5E9FVaXk3hZFkPAQ7Eu7gvOrRedyIkWgBskysuK1HQJAtnq3J35e18an9KJtNeoMjFFXZrn/Zz0ifdzVuHtNjLuNQdQLA0vwleh8l3UGtTasOOSbk4fSONTzT+/smPOjHeEfVQCkdKKlWdcS6W+4jy60b84PqPcfj05j8MzJCRcu6FtQhGvIiUjYiUlJFmJ3OdOxNj6ltMDx37jaJ8lt8KjBi48IYNI4GANKcIPoA4H3DaFtyqKBLFiufWQXbyaamWSCpcXhRMEsIwwW7HJUVfoq77GawLjOBiUdURC2TWfI3CKOxhnc5leJwHV/2ehpzacshO1L1sXbNX0LcSS+PNewlpY/LYdrsrxDgHLD2q6WoIKhFstV+B6YWxBpIIC2bNyWKOoCltKS75Y8BOPjUQYB8hxElRJSsnr4mOxMgFIxkjgXRVvfY1vss4W16IW+ZDSOzDCgvCrBefqFu3LynopjUZBXSCLdmMRyBCykT3ssp+CYBTZaUzTE3AxZK+2tX5V3s+2iRWUfnC5Rcqzj4NY8gAmXSqdvYJv2nHlW1Z4qWrCUaTN2auVbHYDotFAfmSRFkNuk4z3WJwQ3kPOZTgtg3DdSbN0CnbAfgghZLw8pV7rFAjfljg9VEBg1k4Pf0bz1JL3H9QNPRohdcDnFtvF0QprUNDbVb/K1MzqeaNXhrbYbo4fxmZFOL57SzTC9ASpWgZ9C/QnF1dHgXLscoc6HWduHxYDQZqGG/VYiIKDyLOypeuM8/dYlLxZ2U2ua1Mbv6/6Qpq3EjfnvX8fg6P/xD48u3bP5MUBzGhLl0hSZUNARZ93N2eoVBJf+/V1OCgDwpQ2q+lwlCo6BS9IydPd368iyo4y5+P2BjFGK29LrILTezuzSTip8DI6/vEcwq2IpT5HW0Bu9+04QJ/R96PY+ECurpkCZMmyoK9UDAixAtoFUBSFEpE6SEYtBF1i+W6LRBIWywbQscNyqOSb7HekQ1ei6GmjbvuTpmDKpRLMdK2bQCjDHWCyeL/7R3lvhrd6Y7Rq8zDOJ+rqoU+T5YcmHzNxVYGXpMVQkB/ycm1bnkzIE3Crn0OfMJjjk0UvLGPrtaYRkGhCx85a6+GPsVUYy50Zv/QAEYa8/rdGrbXzSF7X6Z9/8lXhnlKhj+5lStxjcekOA/mEd+O8iiNpoWo+LAqTm/Wb1pCJiWJ7DmVJPBuvZzEaZParGlHcVERa//xt3DSQbrko1Gp+UsokspNMgNgvf31kZpwR8QP1aU5y7qFmg+qqWzoS+rKX8ixafDZX+3Medd+TgrcfuW2XBE1jk4es2hFhKbUB0EL0XcN2IF+5oEANWlw/mQPdhgxaNRie8zJvYzpCu9OvGsi92PuYXokw/BljNAmf1lr5cBkR+iI6s8QycTtu7TkQ/9uWellO70lGr0h5WZqk+6XEl5Rj4bR8hm3M4Vdc848wXVSpC8UGBcF5O9Ll/c1aighLlxWPUieRi34B/p5/4oNhw7ReNzUJa3edRGxYOQT6uadd9KSywC/cWLKQGkfJs6p1Jo0qFivqjfEhvKZimga7aySKzny5uWzpybqbZUeWEodxjeA9GfNxJWYTracQA71zFFeACIk29kGf9XAYiI7NPAzINoiY0afF81cmU1VT/yJUkhzgXsHRVQtvyMhs2WetYAUo10UuLVvnQp9QXIH3AXZfTs7uzSC2f9DK6Bn2k8aePkfhMxg+hOLHi6dPfVz1XNzp4g19asNDpM35aGDpcEhxHG79RjACQR5y1n92mPQCW92DypwRQkWUE/8Q0UMQ2PTNsjlACqSYNVZ9mjz1acjmL13Ni3EpX9OYsdzzDMD57DcPhQLvJwaaIzPkTmoEf8onh2SI5/T0kZCivpQqXWIV1x/YYExmfkEFnjSOtoZxz8OhczGWk+l2XsjloQNc86XH/5vwHGayPWIqV9yx9nVwmxwy/8szx5gF76gjWX4UYMXZM9xNwAkqAjMKVAnl5FQQooNHCYji3wXvKRwHWmY82Qo+k8usMBzb4w8KgnF8LC51+N5GGXtu81nSAZMOHXpQJ8ZxzRH3W+QH3bl6JiDAm2UOiso78JCFwZoHYWFFhnXgb1IsG0GHcgMFb7PfDOaGLskww7Zm9V2gaJ+qqQfz9/wdqvyAwjUacLHkML6zQaz+lQTWal7msUJsAAZVWGp+7jr+ZmUmhB+DfAg5JBita5urLVpd27ARet5M0DlHWu++Te9OmLdOVNM6CM8+1dDpP/8wnfyAWivjfWAMqmoSLP1vv+/M0tKXICIJFmj00XSkCeOwh7OUBRuNp6aW1KH++/YNA0vmWBXSPb5FRRt3EapyeQeZcz8crRDm1kUN2d9WqCNaKLOZ+0qbUbj7+5H0SmbK6B2G4eADdt0EZU01DSmM//wI7r/vzbsmyz0VqmU5T+T0+yBtokPluqKT3X3ewOdWrAH+/btOsqju/JMuer7mt2eM5y32dZ/LQUa+gWQv2gZ0ybr9Ek8rpJ4fjU+CihuekIioheYUepnR/SxsXkQ/r3TKt4dwcqP9Ml1dThbt8MQmKeKFXccBTRgZKbvPhhtoF4dxURaNbr1RjOii8WPh7ITQ45Z2vfEmyIKQchsCZ/aYIVOfHbBUKaKTxN5HgM2AgzdeO0/Ymz6BGUu6nA9vdlhbAvyZ5J4C4UNGTLswhD6prr7IyytOFZVtnTv3TZFvME0Q+fl6Lsn/0v07ZueAMyqq4/8vZnQivEX+yOkWR47Zi6zJbKm+PSBEJT3QtjqxUplAtjh7c2/VJ+vtBx5Wn/AUoX+okmSo/bcQGAwqM8QKB4I5p79w+4UI6ECEfx+mIdQYQx/mW6uXWkcDoUJyqSC0jEy/Jgk5pOVp0pJP/p9LdrggwbyoNMWAO0cib0L0Ta9wXeLBAiN63cwcGNY8jut6vxU5E+s1wZZfkti7D4lJU8gPfKcd4/K8rXuCXoRRFhDSLISnXrER5NskZPyBo65RgzfLImXkRO7AEexP9hLyZ8pIwEhwNmva2hTe/qyFGhZnDd0izzvLGimRjXrKsml8CwV9QwKVm1FnJGaJmuLlxonVnMSZYmv6VTVEFu6DF2KRQWRgUhUOp5/Q1WGwBrmMXYAM4upHnZmc5r83hL8awp/cKXUTW0t8ma+o8HQfUJKsADg2sAyg52JzJiQPPMDr1X/97/7c7WlhdMYKPR9Uo9dh7kALvvtCQsrqmHnRNjagEeufVJLbIZiO02BX3UROwtRnpTMI3X7gzzsneXfjMSE2MLateUMXbd8dAfkyb+MerKdrrndY+YICBCpmPY4s/ft46VaAhHJYhd77Lt9MbVrRIxBqdjWrqzQaAupuURkZRewk8p17Mm4Cm
rJmzRYvSTLOlAQwt69j2RbHekOAY3fyX9MAlYTS+TtjHGz1OvGz2T2/nGu/bDLsMn1Tl5M1+R6zV2TUCyd2MAu5415Nl/az0xu77IETsF1oizzWvHijCigS+q6gT5vz24T8iejMksLA8CyRWRyEA/LpWn6tXWq1MHNahX88RkaAg04fPUTfU6ZtBKXk4xrXskecIGbo60u2XOUPeFyKlDqwW7L1sP1o09TJIXoiHu0gyoDNv/g8CxaUTep9gRZWZfY3UxbWXnMGdBQmt57qMZ/oLpz/cQdCm+rOlRpJ8tIrowW1FbWCq/FHuY78kjtJ5zFCRbXaUjTvwhqd17MMLfF/9VCugBUglVOOWrLgjoc2WwDwnko8c4KKMID3RIXPExkjdRvDTaczBKYSan56PYJtl9ngdBOV2N4JWVKmbLp71m317rFGS6Dvv0F6FONz2SHjnLL68QFp7w+VTiECGIR3Gdofz7zlPHJpGDDTOt7j6VWpSFwOyEgtxaaVYYv7R97c7G830bpy2yGTjU1O8hls296UR69mrpj4DPOW3+7qcbvNou8rcUPa2f127jwWi1L/Bl5D9NDCoWr4tTgZk4JU4ll40BRrgHfy2uoW1dt0Irso4BEBmbL5fiVSBphTWQMiIKjhuNwwVeO/8nfULSIJoSSlIQagm+JTJ9nguP+XfQMwQbZpoHU4bTmMVOJw60edCfbyLYb+CK8h0cHyQbfOg6p8UgBc1maVvmHK70IAZW6ihcmlDzkAWUdWxHIpE/JebJ23+J/nEQPJZSAhjw8rn5jR0FihoiiLKM0aFxwDamXRH0qWvMu9neeCTzmQmxX6u4Cz8/vbNuPOz0cbRriaFYfd5K21fJI74/hrneUHukZCsRPzjqU0fYaaOtucbdirv3mpaNMSaBY+bOhzjRM8vab8wcme/dVMMbNoTVr5T51CfCHoHdY4yDZNsRCQjKynbAWEN1Ryfq3I3pPLFBa3MTaGXc72U8MggqQR9GAHBa5lW2bwEbGsqSb2QfZ+gWc6/Q3ojdIfPliDHPNSdJjz36bYsLejAGhbqWrSHa2M4h3witiAbEi4RburyKwdUfc92UsCILlo1He+IO2UW3SoJA5mRb1cAjkN+d6IR/RxUw+7htL78XApDcEABqNtTCY4IOCF4uE94fL2mBE7Y4fystDIvb5wqM6+IauI82Ojb6chsDqnmrQ9U+/IuRYpjd7cFG98NvbFhJQ0TIxzKy1rRbv7hhT8EEsgLvUX2PU+Z9zV1MqZqPpZWwAUBN3RiJndpB3/39wKwuoB2UTqTAri2wiV+p0JCUA0u9jfUboSWEP4KgdEHcvlmnKtw0Io5sexk/M8EctpxcTx4/R8Xlr+C51zHWs5Sz9D5kC65Mns2iy7dj4TYm4IEecKuI9bW89Fnss8yA/oGhMwBi1KnllH2Ah85sRZTBq6pIru61jJjjPie59W7kIlTwUQK2SKMh6buyyOY9FvrgEAkMPqA+Q5eQExDxsxPkzNspHLdrZIGe1DL12sQKKCqeZ7nWHwM/rKl3fBdjf2MppZ0saixz6nVW85EciiwA63M9xSUwqtMtaEnZUO8kfqpP9OYVSy1/cDXKu74etT9BFFvxNX4/EQG0LtC4KH5/EBj90HU+ROeXErD/+SSiYMYdJNivVwAwMNww+gRAAZJzBya8WINCg27FzwFVw/i8ZtkOYry6rpGnsyzdGW5XC7jj0eew4mFG7RZuXYl5oKe5debFLphouv57+R2ewDzr72pWxT9Cr/ASvYxJA2bkzOWGnPRn0QdYyFPGXLitSwE1QTb8YwnGksdSdARKadmmtEGb06yrh5AoB+TAM225ZnpF5ZIIrdeky7fC3MfCAxe9Ek919MxH9tIevjvXG2Ob+fC5pLGOF1gp5b8m5T2XWwpG7evdPxArq8PM7obxndvxDwkWd6ymK71v1wt1ZB5KqZRuMMEV6Px4DgBo4OXAbtgGFLBnSSM7bIP7FYI3gg4WOcSwK2kU+KhqmV3PPVzAimRBh8aUwtzs/wJEicYBZBBN2OU1aTgRm+XUEP0NmScI5ngdNgoGDl7z6AFAZdIPBTxo8gJNUyebAmIRL/5Hb6pPSkwaiHGLtB7zrrVovnjdkZ7jVCQKMiA4b6jvKyalYkqm7tiBaqr8N7wwoRZzmK8nXlKd6xNfYfDXz8zWVzjZv9sMVuSwP3U3OgOgr3zwQq7lNGuKiep8a0O3evfRPajb8g+UGZSzV3kAZYJ2IAtkReTSyn/jz1LTxWpQmD19vJ1/l4IMbVGdRTM/EyyZ0zu/w/kvStZYH/1JMYk2IdDJzcIzlYfZ9ybGUVWX/pQzXjxE3xgrikHqBD+SLJQSQZmZ3f4apJBM59/Rq6ZQtS/Qo6kjFCD/yEeMLZYRjkazsdVRjS0RnHtG3FibKtaS6QcDWJssGYjFO/8qAItV808nsVOMUq6cWzJNgvHUXY240vq1ODK+Trfj7sxAAF0P+J9RlfQY6y2XucL0Q04WYLp+eSaqSoyi79h6NPo8IKd9dxvkiDMrKSXxSTzFCQCdAQ8tndg22XxqXc4XZkVj5JQVUV/PqpcwCp/Pmkryt0IdYfxt72jiI5i2LLgrpCTmvNspaDT/UlYQsm+0WCmO3zQSzEW4LruF48JZvqbHGq+S6jed5XIskw+Kh0kudijJrUXEEY1uolBuN+a8wVsFP0FTFkmy+scy6DmGlXnsCMdPJTWG6IWu7vo1VBgD+VbG1BTTg8vuQha6f5o14LDc7wQJlWM9ucOTjLIh5NkAs9UP0xGITONB8rKic49Wdx0uxDcST2owh2dw6xjPwERuZZ8riOrrsd9c2+diw0d0rlEYx9LHHsKSf6UcEzhSToBNChj9/DbaQgjKq8I8sTlaStpvlwVZ/HDJRDfua4k+y9HV/XyMKgqC92qmPcQbDXTEi2n6QnwTjpJ8MbQ3uZf8s7EG3CfyNCrWtQ9VGebyQmTPETSl/yzUj518Jbxrk8LzMF60I7pxcDVbDrRDnP305+hLLOhu4PHpfJGpQzQGcYhsGJFRmVgGeIYYH3UbaUCjMpd8B9tAtimPQNfmeGMYhjE4Xod2flA0scH3R/tRv4ev7NXHEPTtD3uaiDcw2DJkozMCG72ayhOXn8XBxhJSQ0FXfrjfvcQu2DNfX1Xvnn3rmQqQEeSA6rotWFTl+km3BOPRb8N0fHGm6/xX1EZy2UMDaEGszI5Irj1kKZYlx3CKOcb6tl7RzIpTkGFbNoVr9Ue1v48ZQSYMLX7Q6OG8DYFoiTcCTHVBCEWdta+ZARhPhFrkzEpbcSZmFk8+rL+mmhYY65sx3Cp4Zf9qcJnAzEcatFl206Y27t4MyTsQGDMYjgib0bVQ61mEVopJliVggnL4gt/FeAxCFtIel2yZ5Po4XbkdU9pBjNAxemNFYdtpGrqWxjv3YJ4wulf5uKw/Q9RTgtr8cHa7tW+H1OtjhbRxGbZlbTGS7Uu2h5mgQ5w+EyG1kNotiVKl4WCq6SGnsWi5PT9ANah3gG+ozh9848UdMiKQCc7VNycjdeZw/RQ6m7ASYPThrqsZ+r85mSq7u59TrlNKCdvPEu38pXe85zARVMQLNjqU6i62j8wKhaQSUx0fAAgicdOf8+AdCN+1BrLxvhaXJjssWi2RpWN6p7SOQDbwHahV4SwIpU5IebhKZWLI336HrISpJwHbgjaRYQk/+hqyYxrksZ3grWn/lU/oJV3RGGrS9y8Hr4hWLNd52I8w2Tz3GI5AUg0PFKz1d0QCwdKy0EID8UWjxHCkSRhdz4h30JBcow9EfknGWLdzETjiV+1x5Cqxd3iaatSImVsLodofJphuaa0uoOaVu5stXirxZI4JAWFbH2YCsystCFWHsiAu86O/i0HYr5DbSVTjm2dsHY+bezbzhYNeve2kKgnzUSpwQxglcmef27b7HLgW7/l2wuo3noncFpfmPXxg2t+RX/K48b/5XLy3P7DQxQPm5LKObUlJnPEHwC2LlecsqWUHEvc3Cl1hZLEXngCkdEHey1DGPwF49v5JkEVkj+lT4Vk/T75BOKUnLGlroYrJQGvSmOBMx0BAtbrGsmnR1mVR3nC
rwOHXwFZVtGC0Djl5ZlXifqGfeo2DUhPSizIOK7RVv1dUt1dEcsdYXDCeyBNuogwi0+mXLKaLTBCuhuzj9wBU2pzItK1QUnAV6eqoL54Y5AeL8Dh4nPGZdJj6VrvuNx9nyyFjxJV9VpvQfU50fJchOPG4VKlDlXOeCNZOgDDXOY3BMixqxwTGLy0bWs4wBqECDjcLP+E/V7bxU0FgKc84tanM2S3UCAN9DfO/EAk3arEEmySTMqONbSYAqI3RLio7Wwi+b3EVL6vGI7MpRgJ0XCboS5sRNsUZJX5BV8/f/P1/j7rQmn+HNqRq5YqdGiE/opmA6ue7y2+8AYOujtZ3UQQmFiH4/OUQ+Pkdn34BNRX/mxR9jEXq0XvB845ah4or7BjGsbOVk9fmkeGltdiI8pReWlOpINTOnU8pQacbTb1xzHXM1K0J/kbqk9WIPbsVSYlZiDsUPZ4ZRvw1kKubQ3/XG2Ug5WUCQVQdIp2tXwYemMtQCjlZRt0kxdDWNpCI2u6CQ7LqDWdvLD6/YO+ogpRHNybDZyw3XlpzLcuC/FIQh/XMT++N1iUgv5ZF2okkJYVxwY/7qC2sGBO5yblw/FRhc+jySdoDkjmbILX36U484u93T7PIoGtR6OTqZ84JfDtJECKyjcPN809zYBQU5Vp+xtXM07egYIrPH2BrbiAvDBixCWhoRmMZROIeROtIYCi8gZrotb0vidFFRNvt7zB9gTPDRbSFPPOvMnHD0pGXwdPDnfAvUTZUWUSb0L7d+D4xSX6QTDelw2zMXeFhRSZGFYMEEallVt3ROstng91KGhVoNCeMoa9LM+d02js9sgar324NZJQwreeiOmhFH6rJcXwsh7TuBGddz3tr4hY8xwYF1olgRcZknsUOBoOjiUdf5iFmBvdB+2aayH2cKeIYlWv5zmd3yfwrTwXyX7qzLMnbdxBKkZ0WNnst4leHHY13V8IddlUGrvulKzeNSufFGBj3d3nGaPxQp/IuvUIj20phIMKJielm1VXDtb7dy+RJKA1I+UFC7ehesy0sM7CKdHxmlhVWoEhbBKebdr+l3Wp24r6wCWqiXsh0Y8Nk4UgZUQ805J1nB5i0Zk0uPNGuT2GBGJwlXJfZzsog1Ka1Nq1EsnOtWI2S2whU+uHKVbMwa7t9QRGXYqKvbP068Z44qNntQyHgzRT3FSYrya0dQY/axCNkUu1df0a4m5g97N46kMPnoDfmG5gSePrLTTGUkEj0Vb2y2a4N1z2RksrtehaO4Zd5+w9MWFys3yP+aSDtI4Z9zx3Pl3dHAQVUEvDh64fkDfiOj2TJ4DZ/puiIkZvvnPkSMRWbHkoYvNSfBYKvfKrR35ceMtL5S2NHZj+s8pXLgcBFWV/yhu14RsPoNEN5uUucwwaTgD5K4wDmAlIFoza/gAhqqkKVjuKZCbqzwzwmnM0TrhWl53jOtTsplMOK6SW7TZ/hlV715Q+OnkRqdWZOvUOc6gLmLvxasbcAIk2JSyTkfhM5a6heaSdAYe0PeqXkenH59wCSqDi+4cPSENs4n0m9i8xCqCmCCkoFkBuxCK9jPjpKYcgWE/gFdTIryr2F4rmgBys7XCWBFOnkm16VlFP4GoqlHs4uJ//KToiwl88BDRAczm7jlkaPYyvNIVLcz2rGiNUCdFdi+8QuAXF2etHx43Qn2oPIDtPSmceJf/vzijAxExc1cAGACvAVPwgt7KL0pYEKPPzr1Kuny2ygE51ZI1zocUn+ZcTBho6A+zaI3yYLbXgYTCoXABekNcHR6Rmy6HGOKUchKvJJxw2qMMjR6ECO2qYO06r+g1MWORCpqTSGPbJ4ylGQIL9MUvMQqk9eqoagEL9qHhqxvDq23k0H6UYPe1FaYrafQdTg0ie2Chh2MUdL64ozOWOjZ06USCw8H7MSC2QCQ6ldR0/D5AOF6WnXVqUtBxSWMmLKLMlOCYivmKbzclqkVpKdzWYUpH8fV0uZhZyTxXbaYPMoBjd+dj6ThXnNaqL8Hm9POYCuqFvxmll1joZGL8uLUPWQDXCZtVfHpm8ZG6fEPdj2qrgQWk5eqk9SzyUNWHzpda2opX3pNt6q1P8C+5sEh2fr5+lPPFShgMvgctF4C6WG/hK+359IUKoomFO2t12r+OfyPhIssrd5788iQcPIw8Bqpil7M0D9mZL2Z4XrlM60VSLTu7I1OrR8b/GzVDzvEIw5th0Pv/hcUcH2koI2Kh7pC0P4tNasfJfPH9wByno8J1WCa0o8VS9ui0r9q/W2qnHBMfKmk7M5y8LXSjbUjUgqehmQ1woHd/Z87qDCnJwjkNkyu5FMq8MJ+Z8W+2QdwFegWtU41fa3fz8XRQavBZiCHnJBFmvC8MSQi/r68NEPnsA+ARh5sSEsrgQrAn50gXJBksdu4KS5MMrCmI/5V226KIq02aTa0lMMSdmZjneqOvhiGm19x19tglTNunjCXveWrmuin9QqBwJKCmdbQPwAkU4FRV1LP3XLKMqqvFMgevB9lz+GHt1aOUzsTiP6pdPTWARvEVWGwC4vIgIhHlCoNChSdJSlyPefGIOCdYpvTB4VYxWxTEDiZvR4hGeSwUZpnbgdUhoiTut9lvcdNWLrK4mJOCzJJULvK1Vstr5IO+SQlbjiLRkZ6zDqjCk4bTkcRY7nrHzRlyIEdz5eokOsB40k0iw0sxD2LZsi/p17puwvCdEYrEK5+mlUNBHDVSqWfWQHKqhkjOJvI6Kh1pbQFWULNrTsgicI9BGMFWs8pHCaFd/+AvWbKEPIRzEBTX9Eel6QPwNKJCdIb64QH84ds4Zi2hpU2QSm9b4Lj9Y7iUBZXeOrWszIuzNoPk1tseYLmDKPe0JY379DtFK7lht6YZt/cCaKiT+pz6KP4jwWrWfPldeHpMcrFntR6ES7J67MGuEkoxqzNKXUjtA/aA6dc1Mftq8VWBIrCT+n8HC4P/OjMznizGZe2neBEO31ReeP9M7umO9IRdjM+N/jNaIib165WOtRfkyP/HPToDg4vYjTSLAvZhC+XFNhfDzc0FmoTQN85GfO4zmd2xHvh0jdxGpGIHI9++VbLgbItqUmYXUubThAYzcQRwmT7yuvarMVYy0+4VVAPUjK20rIyp1Q+GcohXUaNeUYVfrPqTQnCz1LoM8atwxxq6wzdTZ4zMqQTZ0MjLk2L5RrZmong3kM5r0afE3/c5yFiG6r5zEx1jNn88dFrSMywjFmF2y5iRx/lAq1vsumFT5Rx2rMMD2MM/v7FECD964X+M6DJKlDyNu61D4xt2mI/PmDFTCp+JTKxfAsS7E/desAX96wcJi8MRjt3ebDKbE0c8GnX+biKu2GHjmro6/4BTiKRMYbjkOsznWCAzbDFIQI1BMZiWEfsyJNetSaqWVcu5cfwla3Z7LgDTOpCol3dHor4reecoCaX/y7vfy3gQpl8+yhDUoev5LwkD0r+GfYQpmoZmRjnl2Xt60qzHN/XuVR+c39soaACmQCjJ8VOP/oumO6JRd+kO4+i1V3fhJnEOyKee+lNOFKEylZHgoB3NqYXpqpidT8nCbEKKcAH4aeT5tD6dKQt6U70WCFyNt1yGXw7CsqEXriajxtD5Fw6C+BPZaRF6CG5/zTtXs+wiK6nldWyhGoUu/M4OprlFECXYIOQcAZi4fzL287g27SjFh4n+DeL4RCHgK0JuRMDI84pjCY7hSjUq4IyYjKegavWMTTZH76RbU0cFZMRI7sA8kyG2zQL387ZuL4FKja9RW5tEETzvKzjV3tMKunkszUlRUKwFxmwKNREGO5Zhwj8yB7ZJ+qsXSJmuo3OD4gSt3R+ZPr8SOll6khKUUTzorzs0rT5K08JofWqmZejpbtuy7daqVEmsbPsHAhh4gN8GW8Lq3z1/mnYi8ezNqFm1D2pjBUjrg7tzdN5vSXOc65InTFzHIt0coxAnH3efjHFEvUD8uX6aV+5cOO5hqsjJtCt6zH7fbzU+Rj7Qyl5lho89M9pHX8IoKVTZVVmbW0FUeaH0XSyyeItL5I6pyS5W4+EfkzyJmGJGwft0dFNZ0Y4+bpcnJJpcFCmoaOEF1nk11+XFP/5MfPnDF2uBFMWms
xcmls2wuvaHB2bJQSF4VAjCJ2n6LjuDmiko4UqtX++2JgLTi1uDR1BKEIJmh2v+d/mGG9ba35Ox3uiTM0Ek9a/QtiPs69i8s5E0JMHBLCVvqMftzQStFbWiskekKKwcNTrOUPUkJXi+641np9eGajZE+oWFQ+Xl0V4lsakCMVXSZC25XPf7FgOKAJwlQU0nbwRsP3VngOoIq4aMj8LhIRYZCg308n4npTBd5f/INkFGoasu96HW0AAWQNgxfMRPD9ISQDFTtiBVSgwWVvcFBVgoJF6C0oQ0LwoIrQT7LbHaPWgdJBIweTlAvwOq23YrvNMODnkcSlp9Qm6UWEc/Xj9VhHHpFUKbZLSOZ85vz+0yT3EoF7q5MtjQbDob0sxpme28Ezcfg6rsS1SWuPWxd5vTguLXIAEMfDrVb/tuxOUnKO7SQdigIEJLxSvxNGT2PPRRcNpu39A5u0w1wRERXr0iN5WWQ7Iw3gVJH8Zo5AZMar7aJSI87/qqBKUk2PX2SArvwt62kviRxLjKBMj9chjKLXn1QqpKLDyx6a8Mw2uSQ8HolAz/FsETZZl5WqWQCIQdsKSx4i98cqJgODNKpcW6KnDbYK5bOyIxMvB3fyxRkcvqLICczC5ORLd5RL+fG0NqQjQTWdqL1a8+CYPFTwjWwV0sW4kkBxQQdvxP+CyvG99u1MNmJNbu+jTrimlV2oV414/6IqP/bXOxO80IBun7kg0vFwN4NxSYATErn3blzGnzqC56ZfiYyfUViOcXXjwvRVO+gKEY4Dxsgu562VzNNKgNTdAk6pOwJzWApiFcH2Mvqjt9eWDZwhivH6tkkWOGMZ1OEV5QStdULZus2nqz3yu6SU/5ZfufpyTM+bZHkrC0j7HhO1Vy4sr0aNJRvtFVP4apWPbvnkAINGe2+eQxBtL07pCVa8etbFzsjZMjKc4XWdc0dxln0QiFZGGzXSSv2RsycwLXhbHMkWgvr3Mx/KALR/TnFS2XdvipUJTvG2+lWJ+5g33vAUZaWDaE4AZUjgS5+4RkP0vM09qy2PfI9z5iZVKMHEHJxlpIjL1KSHQqHudPBTEdKoTaJ6caQBn7oJo313arKVyhWFN8IyKcqM3L6GcfFY7gvNgq/gDu9MJoVRWu6b8S5gwA6g/7+HXFHtm6d0gcmVngxIdTXudXhhzRNeN9g+oqd+ieEp26BDHYSigV1VVImwSSjwM/+UwlyAhC6vTL3T3LNxVwRzzr0nYVahMcTmUrSpZLnkhQi+RYeteXPufTPZ+v7fKkmyIQ45u3oEj9rXv3gKrhZDWrwGfiVukB55hi+WevHkfZZzGcevRDkXrOfHRe/5sydC+nW0dLedaFx2CLbM7ojPdN+hW640jpLMDD7NIvlV70Rwf7G9zZ86bN/TH3YFHpEL+uaVWK9eYhQ02hbFEQXwf4YyXHk8JuKpjL+pmVKIk+8kXc1z9w+syG/GzonZVdTqzy+kwEaDnMG32CilJLIJlVfLZk1GwoV+xoKARWkQsw0yKBwkfUw2vZJBFtkSvOwFYsjxQSfVDeFuSxHqRA5QWdb5A2thWuDmoYnE/n7DO4bc/s+4/0M1YQC210sq06L3OAuFW+PFxjp7b9mObaDYU9F3i/RLLS4TFarfcz4+Y/ZaCtJDvPAL0IUe6irFjGgPPm6lCJSXA4txBzMA/aJG7V+CgOayn9hBnST5kcs2KmzPt9nfgphCiT03c6nqqPaDBjr/gNrorn9SyaHzPyW4zZpUiYRCfSANQhlte7koaeeEbBL9A54K8NzaATtb3O+4TnMYye3Dp1ZT6yH+LGxuLZtTxenDqfiPwssA8LBlOuJVrRW0gRFhLU7VVMEcjEdHWJjSEI7YMy4Ho2oTECGKoFt0X0W2EFBFLuYl/DGXxgkbBtDfNJqVpt+Oev7ueCCZFra5lan0SVQ4OEfh/G3ORnccnFFbEJ31RmmD3xlmUZePCpqMQz4ZoNjwEIouTq5emXW8i1H+970Qo9c8AIpanJX/lwuW1qKW80dADBptCMukXINnyh/EfFW0tnKO65JXKzbbt3TkJKOR78PNsbkR9jdS+WivhAsTNggemgpIfZyFKCiysBhy1X8wrgKH5K0x0czmpIGQUCbq7LRorGEqzfzuM8iPn1Ow92zEQaM7xfwcgIms6kEqo17M3bUdtV+nUYPtCZJNhfZaPGMzHJ0yYheyd58yqH1YrbZo8ZR3SA0JpupqIXed2ntndo89nWmSbgIvSoC5EWBXmYJXP5zfdizn5WhKJ95NSWIQH51Umv60c6VPxadSBaB/ndgsdU8aCw3F1ei/xTD0dT/r7qO35PjX+tUQBPROIxTqXd9CJZ6RGHYgJz8Ldp82ufOGllZ1OjP3A235SZ7fg4Qi1Qe08E0uAQ9XpzdNuKChD3oHPcLm0JWbGkoGhl4D310mBRtIK4kbna9HKCmMmppEyUnCyCx9f9EGRDVE38+HR43FZ1411b5C+P7hgFfc4JCJYTw9n4aRHWWQnzLq27O91Avfu7ZQLfO6i8udGJ+FL0BICHqVnjuu8sahWAX7BO0XRgNCIFBQ+KGP1lv75Z0j1pG0sR7ZBGVAYGHV8gXgM8RgUR1N6qq+zKRAW0uOH6lKXz/z8EFPi4v4hE3O7INSTU+EMyfZ7OTLVxGzVG0skZ/DkV4lN/jy44SMadCXXurBuYcoWAuWqmtlLJAxVpOTc0emekOgc9xxvJWIl8RHaOe8Blsjh8rCJNtutXxAew4n+UjMKLEw9IfSq9LpzGBj72LFdoQEZ6D2j8vr5iXdYkiiybyXl/9+6znaUK107s1WZFIx5bkayifZgSDfwHqfhjNQ/U/Qv8YFzJ994NTy5X94DaDuWXH8+Al2aazbP7hx4lo83eqUP5SPUvrz1dIgFCTuLk2QBCc9eLQs6L5S56LG+GUyX47BArsP8tI6aGtpScYi7jtzMXhdavWmcKrJtBuKYkTQshME+QVeNowmWP8LSug8ur5l1+77HToxQhDAqNxM1x0XloB7XHqrgrPLLgIjjb4+i9T48Eucv6hbWg02kVMOLBqK3ABS/HHf+YmObOMn7xQ1jqnK9ixM0L+9SxMnm6Di4blTsNkUei8D1pjtgaNDgWtKcpEfAq+y0RCnhvCAhj+uYEpr3nSlN/vLqDey8vWRdr95pzJWl6czHvFTXK9BWz/EMdN7bznQQ0Fh+tZqUxoSAu/MWE3I659yiCFKmkuld4jbqICZvD1SDpvyBbgL/tn/mCLw3rlRn0SQwxX3tQGgQdFMQzCADAAZDFx/zA12xZgjZ6MBE4xJCaNXsLRfYLabxJ/b92UQNpBsidTcIXiN0apYYXCafICZQMZ7+GQJAoPzx15FDdIDsj2aLRoH5m6KFMydYQY9+1GNlj9KOY/wRnmeJg3kP8aX1r8Z/sY17pzZ+Xsp5Vb1Ha3uUkkkAE0L2zxrcN8iMCjDXoY5dc5OZVPG8N1B0lCioHkIE1W/Z4SPqs8CRSZX9KoVdW5Kt39EGA8ppoWpp1HgDs/eqDJ2avMo5STDuLzRKF8XvELZeDHFXDqaFF2zEcoyn6uW3LOdrFYPwkr2zDnG7X4wrLos3gG9sIQDcJbUxSSOz5y9fgEIj0QkeF7TUocEt+wgtHNmoqcxnnO83FRm75Zv+H5qhstvwzd2ASxR/YJONRhCQEi4x6v3rdBF0mPflz293xav9jLGcYRO8h0Nbf2lw2GyhYohP0vJO7DEx6yprx6jnM3xH5uDumiuAuksKiqi0LYxrmC5B33psZtJu4Ve+VyGU5bURdlQ1ixla9mBro+sMSMqrZeLlq/R4XLXZkZEQAQC6GZ3XkxqC6Iaoatzp3gInaQ88L9LDzO6nFC1hFrTh1rzS7Do/SlGj3rVjhSn86dao5WilLLsCZbE1hBHUoebt9P2d78yHqADI6qlK6lGe65UATScMIi/+1IFMoofPgf9KjuCDKdDkUx0/DyV52Q99lHvGXhdLrIbnP/VudxMV/QgD8kNafmsvy2KBs8yj37oW/3P6VY4e6Rx9u5e1UAvl7Mpivc/M7HtBuIhP+2MPQEtopUUBcRecZIsrFtHApZ7MZKuI4UxTHReuCu
3goQuD9SFpidmsI3G3pyFk1hykjk+Y2WJ4v6HfeT8ru2iox97S2cYpxXEoeJz5Jo2Ms9iHM9ecVwgh51OYzNDFyTYD1DmEfUv/tcX3ymfQLF+bgymwTbsm/W7nZp+VUoLi5iW4TvCg7aps9voqkHAOlkEXzYA1BhxtRrG55l24D3oS77n8QYCZp6i7Yon52cd+WewnqiuVyA85pxwbNTV6tnvOsQgc1Q4Y9pxZswWTD0F8EOMBP/JQAKWxLIiHNzZD1yY79RlExy7mYG+pRMhvIFpf/XLTsxh6mjTwdqtRIoD+NIDMmPjYWtVIDd5n7dkbDYArXmXpVlavWkYe/XQI/czUdg74JRo/zNa4tSo0aZ4cOG2bEbj7wMPu4jqlEiY8BmiTN8ZeGDBpR7vjGwxiu/wK2trGEM4zTV85WzRgquCug2GxByIuNtcuOtDSRFruYAm7WYX5V3l0b/ILIQ1Fvtk/zs4b7upl24PhDeADtt+k7UL+RDSUKEWvacG3nwpkg0Z+PpEP8Bnd6Qy/N8wN86S6AeDEaZZj6qjeHQPdNzPVzXs6IjxpdeRUXsSbpvMb0DNG260lzXXmvjfh4c12MVESjZNIAClqtGNHcNFHvo4b0U3XrttRqpCRuTm4stSdEoHoehqcAVAbb2mkDtXODaKWNcWTgqtdiw0khpZ9sZs9DW8Vz9sKfpHLUvVeDkHyGOrs4y/YlwELcBF41vfX49zXfCBmRVuVQ3S4pda79OCYobDeuxDfw+GxyMgrvuPCVmtPMMZM0pEZGWGGUzwHkwHszzhVaIG+5P6HQUIxxvysLoMUJqbLvkUD7Hs8kM7OrVl0ckKlhxtvNOiDVPkI4sqdhxcqBA2thLtTIw+C82Wkrqg8Jld0TQd/tHJHKufPy50H8YlAZVGXyoNnoU0EJucQB2BjowyDq03CoUYQeyLLnQEB/0kyokbG061je+GJzzRaTZxc4qHpoAm/YK2DgDrtUffIhp6yoZ92iSrNC28XCO10icpGBgNKbdfH9d++x+/zQJeDITpF9UpuE1WAtunni8pLIwOv9XhygnrBb812VXHh0itCuolqlbkeM5fX87BPRxARJ31TmX/NN7cuvzqGP7V+Q/o1lPD2eZry+qCAdhbJBa62cFXbeKSPfZzBpevWt3xHz/yR1/x/65qQYtjOVFu/errCZ0yl0bHcD22KZp1BKI2GWA3u+vI5Hwq91Omq1YMcRO975X9/w97/adhQmwV266VKXVzXMBnZqFb6UeH9z1raJqngBe//B/q17adBucGt0BfpbeLFJN+6WvaLXZppvaMn0hmSECCvrNM22BFCZu3JgA/Mnf5jCJ6IDqr2Bcp+D+7NNbsWEcAmF8CH43BMHAakgvSb4P+UE+4Vn+5IIoWBwc3XWm+ZJ2PGc3LWceUK5y4IaUIuJc20/i//JKIaf5e9okKAkaPAgm0P+2cV9Ksx0/WcKcb7Tkq4TH/tXdUNUtMWQMTi4ezulyqY60JJU5ATzhnwc4+r48PMxyn65SGX0AVeL1TeNUGvD8fgmbWwt65uo3CIyrwo83w+y5PBeHH9phGbWiW6EsKhI2vYanWZy454wqrdniuSYgr+nqQ8HyB3GTWr9YuD70ZGIAaqtW3XC5uJqrR9YRwz4zCns5n+W7C7jNVxkwkkHVUwBIRZosFqnBUVBVfTQbs6TDZWcNkKPHtslbmFGzljSBh3q2pSc4/7vc4Vs3JpFhvRMadEDdFuXqmC6l8IzFMa17eCyE8Q22Uwvg1E37knUgFtdnyXvo2+Yi7AHOr2emRgyVOynyXceXtxgfKa9VzcfOwtZpGD+lZO+KyoDR+gnIED8+4LIrARdf+9DiUy6ourKMpWlT25ADfww1LxsdhZiQb17nhveN2e3hbpTfxHIr6WnpCH+hQ6WWtcYE6sMdzD6i/dEdK1veDHxCx+QE4jWrBWqLcs4r2kx7fvs6fNNvweekqiYp0z1Ol1WpSjp9cYTLK/hb7vHdbjQxMJ+MVJhck1vNrFCJJ9JfIjRKo2lhLzpE67QoddquKJXE5lZllVo8BDSDyXf8nUS9gf3KsDciRfg3H/133/bqkiyZvuPoj4UF11tCs2OUB/SLhAyORaxOuJazkFnWmlUXN32ZCADzvDatnSyA0UiSdQ/csPG/fFHUclUZowDpuy31Q6lJx8LO8v1TKPDdA55cYMpxHtqd1L9JTJyWwke6y1NjLzwJQpGzm84om6ZaX2nGcnRMF9N6zVVk7LOhlLGJCl7fKPGhB5tJ2gVLLPogg1Z6mKNAxVuo7/11qpNFhpnhkVbuFzd3E9QQNgAc4IPrIWVz9ieUIlGQ+/f1DaGjnw7b30t1dN0jPRni8mURkapuL9eh5v5H71+hfAs9l4JVYWqAVSX154uvOY0VPAF/27BcpPRmInFZEUqNyJOcazO8XPMhw2BLr5ugI1+iI1ZJ5S9+S4xBwMZH34wt5sCJy1TACkeEzAo9069V/RicxiaYbHPwrz0R7w8gbTuY5QYbV4WwvHso2smI76auPDN2MwHjsZ4fXW4FrQljwju+uOLezc4W3EFio2YTQACUVcYlDKbWrlUEJ6WEKNELNWWDX2UgZknStmhC/UbQ4ooWbXYZYPsFqj0uxnDqdw+razCs8bbMdQqHvwvZxe5urO4UyNsrTHFochjhMjqdxVTPcokfG05nX125YUq/mxgfw18ZhX44RcaErc5IXjtV5qA6bPTfSV5WTwxP1ytq7vp++sDhNpW6IfvOXilBjKFDBUFhIgdKTE+4iCSDoDPBkm3XlL6uak8v3n3egUN9IzlKR6NAQ3mRTq00wTZaA7pqbU7IUZZ68oQ+zTqKZD2JIRMTtP/1fp0cmofov07N/OAhthf8Hdo5iejZcUZpU0XTohXWv0JqXnmP9vH+LMzIQnQJJVUGHm/iPB8+QhjWTPn0bnrEETToQlU+0rbkDCn38Bv8ArmajCPvHOIzj7+GAnd5GZhOU3HmwinAwZsShwD90Zq/YUgHWv7Yf6+ZW9PQIsDszSt22hNHpO9jAJMfR/8X2Zsu19H527S0QT5SQy72PTm1rlXjY6C7kTUpr0b6oUb/D2is1AxnZ13qsKYyTvKkSsica3/nfy3LazUmVkem84WWtV41XTmSIr/oLY/MOQsoHWCcAHZ9QoinmHggzg8v7vMa6SmBxEpUiy9xA9KE6vL3W+v7ZZqXK/ZFxp9lC8IzhL6TLBlf3QRmJ2B5JpFCZ0+vA4XyFH5SSlZf4V2hYpGMBqjiP7ZzwABcRBMpCelQSUtJgC+u1weXx5fFFkKVClnlCmmsfxI3a7gzZJXVgnswiGJlTUIHGKExgLAfu3hQ5ml7N9S85H9YBUVRSuh3HLI/x8/wogBYuhDKkO2X1fjDiob6Eidd5HdQM6DzC5THSYclg/biS+9k/JJXxc8IFRshWOFrNnwqvWLn2+GdLkdMdKxzrWL5WxQKF9BavmtMqDQTDIQdDRLVIlkeUEyHusYCkzWPs2CYoX9ksIlf/A55ITNnpVHh/nPEf8icxjkYG7Pb8cZeeL4MnWhs5X3cAYZm0egM5Nf8f+twz/82qdyBFg9GAjl4okrr/yu5R+gfVmq8shxmXsWrEUPxy9oqkrpfkwmFn1a0fe4o3jw28pDkw/uJ/MTF1Ljpqc+ck9EVVJ8axtUS9/jGWHKM3Yu+KuiFk/o2nf4b7PtAckH0f/smY91i5hYyyNZg2GnGP4OsB002cXD8uOMZIsOGvuDeOrTao4txU5lcCXidxoQmYybMcXE5NzYmLmVdGaYqdLANaJ8sVDeXJfd1uoK6KDL6ZTdgsskfzvIm2O2tUqK+HLCFsqEgDF1QOsnyO2XQfDZgfFtOkBLTyRmqDi9bMKSeJ+Ni1FItNN4BOwFDru0Beb6FXW+qfPvFVakbMT5GVjiGlKXyeg9zTfnT4tPPyttsWQuyMr/2PgTPZhPDWONY1dnGbPWTpogGLxQpPbKY6MJL0ANzIoI1FKos28pQvxuE+tz9K/4QYq5iP0BYMGJTNmqG7iNkTvyMUGXLOkVC6XCt91V7GCt7tiP3liOd1/XK4IAW7ls5XG+rYjv5qV2+bACh
ZDjxecJ/3HwHdsWSAqs8fCUi43tvrjeXELoNtXHoRBxXmjC8BwONRuFrLhMFZw18+AhRCxsAFsT3KoxoyuAi0TyIcGiv4mmi8oNZZJAY+kG9R8vJTvTkOihIxuwBoPmHts+k//NRgI7mklX6D1dd6JJtrfqCTrbZZpDC/kxB5I/YUxA+CjqF56TIBcdAAaKowbkLiLLKB7d31JGMIJ3yXcb4jD4NagVelzDUILcyvtKahtyjiphROaYIJDZVA2vPsMf/phqvCkNDLooJbiCggtKpbgvb07O8cnq49RDwcbG6fPWWJR3kdLL6pnlL6AIbE/Ngl7+mpgKuWrUQ4EJY6jNfWffQcd8r2gPtTTzO7wIOr/KZxhYQsEezAvEdk1quxnsIDkI16mIT+WulBy2Macn2Oe28q4eKVdXOxF8v7tuQotDRinAYUfGtLTh9j5bjT3RH9TpjEt504436hVj+yJq3uz6Q2Q8svGAlMkFpKdu8Z8lGkC2VvSOndLFWT/Wxtbj/vAJRbAlmpYFCc3FLX0/4Ig943dW9ORdYovXzmRX47nOdii2Sc/EzSyDWIUEGeVaAzc4lwkrQsruwYCfhNUodFiUuHV1HbkZFb+DoaNzijPTrd8h5C9jnaaxY2N6pd00QPftksP2f2mQsHP+PLLMJK3bdQoDlhcdTCkymg2TBrB+T4FLgLv8Ef4lQ5o8pYTGvGLzojeIEloDubl+qYnhsLPnaqnO5sCzd0zH7FW3AZIlHVCP8rZDNOILN78sX+uYEKSSFA3roHys1ystG8pW9lsyP2kwBhGmcOwBCGdFqXt18WJs26CcCMNk2VecBBK8BGUbLxxjidwULgz4yg297us/4DNb9xoXYae3F8ncSH1WB7NaBQHGbJ5fpj8rrtatR6rOODAciZrQyBx2MSFY6Epm6whFKI/QjaLJ1MGSKVd/ZpmSmtNXWgDdo3ovrj8qp6n2gIC0i0bBPFwFQJDdfgDHgfUMUj1cV+4llGftkBK+pxdpaiZ+/rQUFS426Vhc6IDq6+ji1zE9oVUZsMtR9wesnl0tyruUrE/y9QEBwP9Jisgy0CdBfpezGvbcPX03TTLvekwmYcdWrRlBC7cDKT5htI7ob854yMWUlFA6JRNL0l4xGbjD74/MLXMWG/Ji4vWr60dFG5UB1h0KTq3sDV1pX1+AlW68UQIGBbIhJO9OudomyGBUAdbuY0NeSfzDYSZoju9NO6hS45W0znmVxfoHPAdMl3NUU6van6JXRps+4kCPbQIqtyn4s3ObeBN6vmsIEX4LOnCJGVqj12ur3p4A7V6hmZRxx67E7B2EYc214tMvf3sqZGURSn2BA5boWqvElhxBUqkJ0cqRuR0kqqQosl7mCe/gXYyKD2dJH0lrN989Fou8LTpcP/nOVm/TkzWe0dVuI9wyUYmO5Eu7KVIOAXxaO1LCKubZljAkjHZnCg7g7pllN0e70HB1WE0zHJs5CFb+NRGwS4FOhCpM2IggsXmNOhqf7qKp5NZ2ofd7Z7/cLniBHOqPGA2QaEDAwgQ1jY76lGErwwsPPomCqMshyXQJIuzWKXl538Ac2KI+FY2GY/XoG77r2uT9A7+SA+9DLtFnN/JUr3vKl6r9Pw8sAPS05Wq6nkY9459d8kRrSHQdtrlTI5gKtFjPvA2dl0cddmXpTCjTuQ+zGVCmGsiXbotEn3XOL3qI1MXDLoNJf2nxXx4jsEs5BJcncqUB9jfii4z1GFQmK4hk2IbR885F5VUJyYA4J3xrrh9Slxah32XFtPOgii8yJdYllMQnDGYyO8IKqndDt3VC6OXpkpQftuDG69RX0YZmwfFPxbtbOL8FKLWCJjSSLH8toZBbsObH3e/36p+YhP9pIJQhus+14r5OC9DIP4s470V+8Q1R2d07SzC7ThknM3oQQ9xR+cRLAGV2yS4rN05MJlfmfytqBOdA0pkXgpggFezp1IvUDVSQKsNl5Uo3PD3BI/XUFE+h1Ogo2iGaras4ZN6q++f0xyo1bNin+ftYWM+ZukMog6SrUQMZBx56iWS8UNe8ARrOCzBqXDau/dInm25AFUVO+mGwYU/1vkG8RQWR9Ay1TxtJq10WVeHHBdUTiup3Ij9PgQl+Ohid+PQTyyXgSCAoEZc1RHRtOXojXgrTi8cNfJ+BBXWXOXZQAFgiu/MobWbPKXeTceAO8omjJQYizmCkHyZUuzzlAV9Wm9bBV3itTYUS/TOj7U8cfh0An3SXw58jIH1AN1d4N6p+ExGhArMYR32oCzszPjfDelTnmWmNhJRs4+eJbQhRjGmTSEuJHE/T6yRPxgIrOB1bqTm/qH7dQFL/xiozhxgn9O9KENOuqryEW3wq++/6Ih1e/Ap+wkgOsEOrWUg9kIMemzjJ6v43fIk7bytb/WOPITr5XMDpqTCcGEbQDn5/ywSWgyvBc3NBAI6bvj4PbJit6AMs4PUnAjqqyk0hOb10rjkosYJUlXiY4iFsXAovCaTAq1uRYN0tz0eeaaYdYILpMI0AUx5LRPK6ZelHLPCcjQRBSQ6CaaGFEVSg1oIV1hC0oa0Zs6z+a0osFFh4kaAn/AwNHOuYgOlla78Ywu//mNknk/DDx+wPr/vFyLlknjlTuS2jLkvhesOKO72PmFJTxTeSphgjPk3QQbkVzwzbU+Vqj7HS+deDIwNjAFp/h4hR8Q2HnnCh+yS1b1kiVE38bL+yaJhwfjqc3GMKULjOB+86bFwX/PKGF/kZUxmBbkDRiRO2aNwKKwGUXDGCTYz7Nku+Bxp94YxJXr1nTTOu3fA5ERgfE6ejo2J2MVJ4STbZYBATyT8320t34sM7H0JiJcyLQdy8KokStNJmP1jUAKVlaSlGR1YCcBSxP+ZxcQriUkTOxwDy9fN/gJvgRlA73nEhrtGpmmsmIPn96ltCCoCQnJuJTU/B9E2GxqqYn1lZL8fRw3ZoqoXNvD8jJB9/njT13JxlTIujoC/jDZiFj02TFPwDPcBB54KNT91l3SC3047YxIcIKFasUuonowNmQKr83pW7P2Zky8S9he8wSvANK+2oVQiKPOoUhNQCUF2wejWxfztC477se70jEPZ8UQse7ABbdaxUqQAZT83Y/cqaImDo+6SyPBAqhc+LxUCsXEflstECqMmBlsn3ICCB2V7dR04IcUWrb4Iz42xVdH58HUsvhPzqLIw6L96sGG3e0GGuRX/6RD7PaanB22rjChbpmatEepAyhlni/MFZ/wKXrtnhZaapF7qbl2YelgcOpzfARQtdeZ3mrfjqZT3bBKEjj8TclPtZLsWeHAjkcD+8lYQHbkOcZYX39mWM6Pks94b8szRtg8DcGw9mBsVIGcByQ1cxcUWaj2G5xlZl1RvQwl+gb+8UwVggXtxicuxsgoL+T4D9CntYAfgIQ89ws26x4cFnZx2mBsXV5BE3cXc6vTxPPlE1MHxcqWookUxr/exG9gQZxg1zv00/hxY9qqQ2aQ+ErlENxrI6euzswX5rRzkwreZ5aiZJJZKCmRgyeMLXD+6J5ZBtYfvuopxzhN3L2Mdi+aILZ9mmNjnyDX3xcfmoL8EUFR8lzR63ALNAXP6b6eNIbZCCg8X6nFm00JiBHbuVJ4Rc0cDa//by53BVGEBOV5+7naXq+an5gp6zt5wjJEwN+hI7om48314cyGEdnmeVK1RbG9l0ZcioGL83xRsFnAHSkZYS55IXkL0f8YcNGGZZX0BD7a5mZLqbknNZqtN6MwDZ5lnaAO6CLZInZiUHqKts/pGM3xiVfzGG/Do6NhlfIRTUm26UpTWztKZBH2kAkPwT8v2LimUjOSW/dISWWXh+MT6QhzvgQ83ly1IvoYiJ9uosPAL+RJrsBvKdwm5GxXQsDudH9G1GwF4Ki8CEa+QTZ+ByxYfZmu1PF+TEat6iRZLVrWp6ov9EosETVGCRNEobSufy29LzLrvGX6vXN24ntUTEgJmsJi77/WgvPqG0U/fIlyBwAX6VhIzfT7htwHDE71llQwp7Pxy6gGB3/zGi2o6MYD8KDiVtaTcGAMtqj4+Do2itbQddO6VwhTQRWCSRrJterpuODatMoku9ZaCidP4U9PZH1eUcI
4FmgclixpO6h/Nv9K0CJCfb1s3CLOX2GGKcGD6YRvi4XVKcMwtL347sGd2tJeVD35b352OH2kyzeYx0FGqLz+lXk7quLdDzjiCJ7Rj7ql7MY5RyDRbGFOTEvuSH0flQSaMQ7I+eQmhkBNDHn119lOX/MdN7/nal95gNsLZCJnAkcEBjYZK9J0pBtIdkBSMF3AHbTXxeb3OEMHmxHX503mhLsbaJlUm3Qz2eN0TxfZPzSJC+CBvq1lVf9qtLtfhBzE0bFFi6mDGt9fStNG8HXF32DIJdLWgZwcEdvw6MCu3omFJN/vzoHDCOEnz0c58a0CD+bWh8YjhXOF4dFcmoGbiTlTuz8T0T3GHzPZ/BU5oMs8RIi9vdGhHYo3YOubAnbW50YfDAJ2kuHmWGC+UzCOw8ZINly/lQLXRmZgSDq2fWbTkXp0fOQ4Nw+yF9Z/0LD0IP4UT4kwj/b8GP9fRcljBZgvl4YAmHMeAeORISQ47lNL6nJ9XNi7guR8doOuIleIvvXDUuq/CV4coQfkeS3q5qcIdq9J1n/gF01YRU4FhbSk0Vtj9dcryVvxSBAKxKTPYJ26FbV+Tiy/4dnrcqeI/pkzxlK/pu4Bb9rVLvealVKDs3s5ZSpitADkQG3PUdxuapYh+2V9D6P03/zFcNJMA841jxp/7oc/F0p4C8VUXcoLaprtweIxWgXsepbAazKxDMV2YAncpP5m5KlA23yp6LhNKF+UbiW10+eOiGOB0axPL7wD3WHGSxzZRJHByLKciHb9OyxZ+CZsv2338TV++KxPy0Lg3ttnb4k7KzlMe9pfm3BjVnhi3o+FiTH/s41fPDs8qWtyh550WdFuJbGKQ6dmK/EA/Ab13atedBlSA9evxhA/N7Ptx1402/m/ETOtjBFDXp/d5Hwtp3/WXu2mdOcasa8vLBVzSviwlDsb08y8sTHQtM9/PlqNAaLS58lCCfaFo0kDQkwTsAuAkX0VkGeEBrscaaoZSWHqenOzzFBeXjUS5TnDIChZXrUbHGM3DIDb+9HeFPVNShSNT+y7RqqkBuOsb41cMxD7KLM35oXxfg7H46uf+OckLmQYrPesA2yx96iq1IxCV9h43C6H7H/qaOsRKKStcAG4ic2nsrVnwoAb/Harw5KyRt6FaP+FyiDFuPOHlUoQy4zhaCK/glT5ughBW4W9SCGLcwRL+1yUnAWcaSyxwhFY4BRQ9IrOKXrj4VAHINDG02enwJJTi1bJ4wuCcR3gDRxlVowfj6ZwTt2us8KhZ1xsq2a8FZZs6oxZJNeK979fgDU/ZsjN8/Zp1x23D/BYOLr+i1btTpBMvWrC3XN6yJjaGQpxvNvaw3WaPpSDrnWYYiqVt/w/qdEi/OQiYJFdtn1wXegoaarW3Jof9MPzWns7vW9KAKiUUSkPuibF8ORudoHGPhML+TZ/V/YXviYWJGrsqoAAjoYtsmKQJ8Lmcd1tpVbgEeKC9bws5TuHzKnuwGSboUQofArt2L9iI/bzbrn6WRLRVLM5oD0ALRg+IQHHaOkpLC9HtF5gus6+lGRulo5AjDhbv015vMB5i7D5umLEpwA5Helbr4Jb4AHUFbSzOFQi56lweTjkm9vnRPF4IaI95ErKeomiRHgOix3kb7NXs2aQjRuvLMJq99Cu+9sQbTYDy5a3UPYlBk0uHaANM2KCdQo1K3OjP7AAPAqASBy1TCqqHq32BSlB98TGyxmH7FBYOrGtioMQc3j2/hPGfPnC9R5ibYnLYLbSgPOxRRL7EXz1eE6c4l/e7K8AjhCkgCpb2HLN0FPjiaFIYqjHyoFiOpjB8v3fb6cYMvtGcbqBKJN34IsDkg39YRhyYw//BwJFIyRk1IBb74GI/ThXcmBvxHXRU5sTEJKJJXSPgZAIvFk1MxwHxgAVGOCFYegRPPOdDeoL/cn4g1Kdd09BROIe5cm005L8W3uxiGDNGZx/7NaxWZN8PyQlRgUoMmiK+lIpdGBzp/Ll+ByErfCkU3Eq4S/yZuDZI/ommgubcGQWHWyMydcQxkHHaBiKoThkz/IITh8uIG40MZj9Um6vx5UWf8Ei3mQA7feuoapNiWwkWGnRtmestTMmftfBTNaoYbJQ2Nj3FTNoGnORHDQYT5SLZj7UE3Cukt7S1PwR18HidnInaO/ddaPh5cxm/V8N1/vJZOiw+BclscLV+A9BTjhx5FecRdxMI2Gt2IMzm8+sAv4il/fi1YBWHmEGPtwnJsrY+8gpbJjDtHaZ6p1P8kVBpVl9F0/OFy3u5IIDyyjxvfaDUN0MUvkZiSTJAynxHGJ5pY6CudEQVA7+736kCdKtP1Plo4/vB9JQof0vrsKejVjyJdwQce1hB04Ov+sWEOSaAEI8cNFswZkXSMqsGY/VEfb1z8K7/ykCj5dEwSdagDJAItkiNbY7i9QtPqNrdDQq1JcCTnVSdArsveCDe0ov3tBA/mInm2IWf8AC5/zyuXigPgSSRNGdV1bqFFZbYtZ++MhZegBUois3HPmnV6+w3+NUHE/5rMXpURBhQ9FJ9XB7NAwDnJnJNZwWJ1kKN5m9iBM65NMF0GaNgEB0YBY4fkl5qzOlvkxmCv+m55qf/fOI53RT3gGLfdPAzhCj6cp+OjnXHopJryuICG2xefJ+w1MiUcpokwPddmOphKLOjupVSqyNVQ6C1PD55G2UOO4nSmlJOSW0MO7jo3EamC/M/zMMukEL5sCuttmzZB9qVD3wcEQolXOFYowFxmaZ2dxAGScqBMCdUWnuGmdsql6wty4dG0wbQyCglDXBEtnLKqiPuQOcGbl5qsbTmAOOoMxYioTJJINF+JvGZVWkosRX0VKu7mTdhdgytVFEgx1eOMYJMCi3e+KkTsDz2LrYQ7eup4kH3ieuP4fiVWdhDgoMcWn86Ey88Czb4HE/v5ECHSi0kGntsgak/ayuOY1KPAC7N6o9yHkwyolEMrdFOMWuWA9Fby/T9zlqcpGJ5thp68BKweM+9ibvs0lfOsMM93lg6J22xiWuuV3pwyTKYaXNsCDSUn+f8ujZLXeFnNI9DKkCwEKz0ByNlP08D5Tv+zYyJjWltuBi4WO+PCyiKxHhS8WgsrLfXr5NlzFgHIhkYvvktSr1UFKpCpWKcmG6RPrQqufRMIFCSSlyA9k+sfxbWyBhHvlArZy4CoQXtGjCF3a1au/YUhzuWWoJSoxpTENCGDVjD7VPdtgQtW+0hspgle5A5g0jxlcZ3bY4m9/ZdE0R77Ww9Cs4tYlQmVUxw0Xin1ITxNtAMru22xJOmL5L/WMNW+v/5tbQJCoZWyNKoJ5jeTOVTMXn4kDHL+fzsQEGNBUFG/hMKzY5CBEKS1TQdAP67DQ1KqmAgC2YmaTIq1DRPlp3HBd4ZyXsLp64yOoQlYeNryCetPZY5tqR96d227PTRS4vTd+CzCD1yfZlq1u7wHfm6QWb0yDb4vLFSMIiSwmLjQ2URLS/05Dt2ofTa1oSKZEcR+gynJfT5esTHyT3cKZGlKSfy1jw9RRmrF6IBhvzJqXRoGIHSftVRy2cOG5U1wmvNSfTUbbWXqNrw7KqTLrC6NMtKtHmAIvZsDhdptjtKUr4S8cP7w9iaNiod+07g4kIt8+DEvYce3foHjlF/Jgdtng1dIaOkiCFm2CQr0ERGuPKXttt/OgUvrA4H9TCo3sRhSzOJKY4NwB4yKQQU1WNAbBPl9GFyFUhqoSmRNwfWu9m2aDcwRMQ5E/1xWayPUX9BMlmhtXrxtgV+TK58QinOBhvK6SFyH3CdBV3LFwWTMzF9Q49Wejhj6qquHycBr2gmfbyZiwRKX/pqXlnfE0JAnJ1ufVp9ZG9IFx/Zu7nQPdxsSNH1VPNOZFpI8cflvMyWMPPj1Tfr5JqJRziWZiR1BnLNNbn0/78ppr1FnCJ6ptUPL7iy7mJQ7nm8iaKMuf3TCZq9iOZVwmA22TO70dJjVsCYmbs9um6xW2IJpSffwg4B+Tq/8IXYxN7eviWDgIgA/a4tztB3xD/bYOfx7OkAX09a7ymyMHSOM5BtiM1zxp+ANMUNzJ2S1tJeRpCc6EIyDxF5ePsNz3AthcLexMmjTg/Xjan5iSu59r5hp7
36LkpYYjdAtOwvQv9a3v2NtT9sgUt7BDN2hQQwiCFeq5U+uNI0WjxO4bSM2D3S1UlP9SCMW1qmQ96L+wCV8fCb662k3tsXKeKktjgXUVyEI5ohBiblS1zyuN9eQpor4Kg1MBNoVnajIimu4Wscp03ObZOTM1GCf7wXQSMiS6OtpZFKm5G4XWCQjT/oDev347E35iTHw+ZnTbz+TWNxtxGtyQUPyT2Uncn8zkfQa2m750l+aZ32ub4Xpovwrcibe5/KSKbvJsDGOE3rS8RlUo8im8KBuVCS+sNveiWhKXpNA6t443aNMdGlcMhyAiqCmeWvQ7Sijh0WNyVXQZ4Rz1Tn2rr66M+1a6B17nifFiYa2CbpvGF2QKeY62Q9MDZ4nEAEzZ2Rx2oH/iDTkd/NpEMGoMOvja0HElbilyYuWkfH2Nu+B0eAQbxobxzSIBPiL18RdzvDpkE6F8/qQgAXOEnAPikvPKgG7gcq5uQKCDbiBbVcZmTVV3MCkQz3RBaB2VV+DXY4/ZcCtMF3YnbSN67HmRWVTuQ9rmJLpmhOUOOUPYvDTOSe5e+NB3JABH9n8AgBkuSVrkTgutCkJNu6jnhdM8BUaPQzwed2e+vLQb6M/sGAYRB6itGGOiPgFxeZBBf0dyWDJUB7QWeysBBikiOlRheTfTTO/8rHQ0z+qNRxZuZCxn6oZv6lVL7zC0wUkUOpllKebDuKQ8dNpidlD18wJSngQE+UwCgcNRdHB+H7t4ebpJM/yaIcslDI9ddZFOtj1tAf+d/nXyB6IRora2Bv+5slkwzvJr6jQDv8PaplHqXvurRDn6W1gSdlhtei+KCutPScjAvgGC5gOXhga9A3mxs3BHaVUueMOSX3F4wV0p0+g2Aob5JwHd/yhKwiOTwnTSlfKmgyGSa8/wMYPWHaZ57xYeZo0OpHkORlmtyIFRiqKyN3tumMdmHLjzMkGKLlbOOm8sXzoktO1xl0HednZkr0/ATekbN4vTDzEaoXb7f4f8fPQAyD2/mwFi1ze1bRn56m8uyIgqipO5O0XEJrObJIh1RjV2Z+648WpMGiifXkWPuQxyptnmQMp7t6bpL4CVeeTbJD3ufEgwNWlQ+B2k3EEQAgdhmYd29Sr1lYtSl7cGOE+QTXANoo+4KoWW9DUC+nN/35kkb8a41F5Y93JmLZCeGDl64LgWjCA7Rwx20FH56wM5bqRnFFqAaIRweFBkB+38EttgIRonn2XEoJsrlTA3WoL/1X3iz5XRkXPB3m3llv832iQF0d38MO3pbAi4gbtRQBstHBrBTn3Pqc6H5gqfxceoEc3t5KKTnCmyg9FNw62wy+SBJXp74c5Qo0ksT3Mo0ZZElO0NBBSYED0styD7ZO1XWcH7aJaMNXgyFSW4FfM0cc0nviNIaONTa/TINI0l6SgJv1mmzQ6T2z5Xe8hl8afHaW3AHla9W5Wtbzv/NSbuv0Z8kl3nfNu1xPjwKiqkvz9tFB4K4U3ahldEF5TXJNBNMqe3x0DY9tQL/z653QirQekoqZudpRuINk+Yu9Znb++N9FFI4YEwoKx8mfX3Fj85DudtuskdL7LQsJylc28oNG2C6S5oy9adyzJ4Rnn09+M/xY1SguSAhsCCYcZfRst83HsFhtkriTj4MPZw+TTtcEzu0qZPTfrNdBOvCCuaq/rMmrRbklpUNaTVEyEJ/rvs0aIP977SaNkcJ9wX3IxDF3REbx97B7F3uLnsCPTtolpkgxb7TMupT17tWE+jOJ1W37zQWUZGa/qVa3mO8N0h4yyztSEsz6zu/fKal64iFZRm4FvRNGbReLyNT2nvm6GLcpFFCW9Q9Xv0Q53zgBUoOGua+KaR6n0sR+eikFBJVf6p9YW8nd1KOZJ93m5/3SQqYG7daeiPmt5F9tCPLdR1cG5F29uDELhofXVCSiS5I53QR4gglApuSeyAdOxsrCja+/aZwzrELJ2FAxEqDWaVaY/vJvYTJd2YvwIWkb1lMBCgxqAcu6+YEls2c5ILNZUfBJ/BQewLLK0/+3x5U94gfwC56FBZ6agxvdKF/IgIzYV+HrJKcHpykMyzQBKrF2u1E40YlPIpv4L4fKPQOmjd6jeu2ateBgoFbiZ6PZ6SFEbA5UM6xsmiARPBWhvzmcaevr5G9aZ1HXg6Ggfo6cOhTT1k+730pHCCcIMPQipswgiPhez9Narj/0AMzzzOwzzeyczPX66Cbhvbvzc9Nje//qAqviJpYwtmfhLUIw4h1PZg55UjNg/vgbxoCtnaNc1Cf57uWRn7hJGa8/azxLzW16TOxDveZwdS5uxFbJBSswdDunrWQqqmVuUM1MJpo8+IT91o+FUnkN8Xdrx/7lp1vPeKCi12uACKZBS4g2/hnOvcKS4HSIzPiT4SVmTM+0tsVpGS9UarhFmgBy3HVwJzpE0Or6QbZB2T/tU+gk9M75YZq3LO6ZnAduIBg6BFwoTjFVVIxMakyK/Rzagoe++wu/1Y6AMgyHt+pxIMdn/v8S6AOBLAqTriuATvprl7LaBuQXHiymfUt+VuZqTxuWHQaRPTidiu2Mih/6IlH4G+OuoxPyuE11bmIE1H/wZMROJGLs/u51jGv/yPBTKZ20bI5aRBT7Plj+zuhSQt8pqmblUdv2o4NhBCPC0KThd4lgqYfh2AWlaHGDIEXe7yzEG+oucfDyIISevnugYW+XtVA4Vqh5Ap33WZOD/tbFOYHo7tPQ8Zz4Ddyc5d0OZxukaU+ji4y028Ug8d+8XTT2zaIarWaiqvVSXsCFZFRWQzBU2W31qZ0yfWvSICXqpvcIKsd9qxTTSMAxRVmxMuqBU0U5tC3Pxtgpn2ra6cg2AU1yAuobBOUH2l3IT258QbPmRsI8qU9hfYOqyuoHTzOLdUoMPbxEc0WBBVc2CnApRmckjr0qhvjlAcbMCQaGouU7kOrJPISDss0t6MmNNoJrazY1KOHb46fd6UV2v6nRQB6O9bjE8C92f9+CTeecv1L8ClFfu32MtKAPhwDr54epPRIaW2OsXLJ9L8Bk3muhSsrr9Q0SfmVM8AQO2qMvwfagMLCIXmAzNpKRKxu7zkLzVuCya1nXnpzBz0LQx7cdorcldevS7k7cLtgEay0xTLnq55buY9kpM1gY/hcAGyoweHqCd1Y0SJ9dOT79bWjvvB8RFdDeAMsoE5vfJo98uAYwJ2lM2X65Mb1ZgH7N6naeUGoam7PE14XX/o1XjXMnf9lfVpH7ZF7B+ulK0z5TdyLakTtDtcSGFInd5jfCHAH5wvby6Y79PS95Wj4My8U2P1xAO8i6m0+lhIlhuXURsyNJC3MB3qneP++1Phrd4/Alw9w9O2fvPdUuyvmyKFgJxPTyXiI9GBsNehdvNXT/ok3NhGFfX8djncmihna+WQPW7xGSR2/z7M3DcLGZaoSMqvtIjtll9/8bPeaFrQfvLFSZKeQnFTb4lBnqjLm3vkTSeMpRSmGerQmnmMXjOl4SMrj0n7huFMbANHS8e8T90oOl73XbBfw+ZIEzfoXAo5TV61XvEuoCbIYNWIvAbes4akXi8B9UuBM9gPV/7fATsuA8Bst34TiE3Z4pQm6vw2mhZ6uTmqMPlCc0ObrS4+gfB+iNpCjnscQyF2bbyeeAEGtXad3cedBughYoWK2cKiAsTht5QyKG6iZK9+sP5Vfbn+pJAbDFQTumrOaLNhi3IowHRn/jDjump/Ikv3di0rKWEW+dvX5dvraHTQNUodLCCFdi/JdfoW46U62YGTcRZ0Y4pFAuWyIYLAF5AcmDAAAJO5/P3cfL1uiCL8570g69TNFnymiFISMxfHGGTWKY77r5c3cawAyN5IQMlgRwEigFU9vPlnoDARGBT1a+CgmC+5joGhSsZC8LMKm6kdEvQ+bL1/JiLm3ayISyVm70zRscmWOaXxJ7mluC/AhFgbudpJs21yVo0ZV8iL1oWsJBPb5JWvayxVOyproXPRG75vJfyqsOtTGj7XvpDErBAIz/ji02545OKf0EevsTl+j0raOpa0O6Cxm/Yr5aP/CNh6xkpEuxh/2PORUBWNwsQKqMMmh+a295D1diyXxF4lhWHSjux6WicMNajT1s2D
GYxbLSCoXe+zNzyCB+nUASnfbijIweYUkj7yGE5zYkesORJ3Gia7fNm++GQnMl8qV+zuMQtlnfvr4v2Iy3CE/QGOBs7BxEV4pRqqkf4XeyBbbQvXQqENuYo+xQE/auRF6JSX8rI1NYVGOgYwR26oTaUqvR9sCOxB7GdPwXcmvjibZIvvZ9ShgqLVZRUjD17hS5NvTWIBGNJvFSoSS2CLZ9D1G46C+MIhCi6KLPB2TxtQc62tobIZRwbLrC7oJ0zIfJIDgW3Z3qtBD4tDmJ+jKElyj5z5a67ci+qRpbfY3NfDycPh3n1qgmcXuJ7JdJrb9B08QVyFc60O9+X0e3S8Z7l0MOS1QvWLtAOAJwzCxlpq/3hN7fF/xwRZeolhGYZiQuc2BHuU6eobGhU4o3+F1TXBlSNvkDiUeR1ih7nZmoYjnic4DN+YKnUFa/Un3MwCZBrrXAvLhxscV10cgVCvjvMbY/ObwHGNVTr/mbuFgqlKjoAwX2qRHCv2NGsJcRU+ES/HPz8nqsLSEMrQBLLyrtle/n1SNhDNF8Kw7OnK1jmjuc+Ebj8RmVN/EJf4O62qSG04vIgsiQV7Cl9WrfV7mlczoWa4tVtteC5DSQKTH3FRpOSfRs/vKXUWpLQPULw/iJg6AjmHaCKrMvQdf9K4qAzOdqJAkGxDP7ulLI5iumxpjbm4a5i0hFGzzjjO9Y1+YiKnQn1SZHfZMndEQPQPIodcqf3VfNAC9qUHhLTfplsk1zcPqTxPql6a139riirDM5aFir4p614Xk9OFQLa7qbqLrIv8D3Dp8zdXTCf9Qry5FpeuhfwVaJ+Amx8iyQC3EXy2qAd11ZNDEDvK5Nk29qJ4sqISWw1Nqp2Tba29Tuoe9nN+dwev+rNjNXU3sRekaOiN9G0f+ijAkanj4dKupcyZ9dGpJ2VLbbCIrT3PVXT8UIknkPedjs8+QeHOeaSf6Awb0k+Iw48GIFGZv/+wW/aWOkxGDjx4JWxIvIPU5gXZSOczZa6hO7o+sbDPGAWLvAxPZEH/HmUmrxnFublfMJJLnAqz1I1GNICHfs+gGCNd/9jDvTm0KAe2yUuIXHq7O91uQPAi7imNnDyYQ6iuAWi+t2GQW7+kH+QesIbVTXWEDFzQuT5Vc5uVceIwzCAOH3l9D0rx3ymWHE+JapzYJWuOdV2GV/BpRdZdagE0r2gZqHwzLQG0VPv6a3/CM5PMFGowJ4hKjFfEkaqNDjTDvZ1El+15CBt/LB8orSTtA4ndmJp3FVEAlk0islFi+E2Uzj8mbuakI5r7w+a1nUF4lnUgJ1qVnuuuhcheCz6QcSfQoJ3bWf7cQbXqR5KI46WWaUnCsadMyQ75SB7e2o0vgE546cZqpyMl/MjRHjvsdCwN+veQx4uWGtZO8TWPsh0a0+UZLDoW8HUB222oKQqHhsTD4MlKaayjnIuafh1i2E1R6tLaN3U5ErWF0bsq8elr+4tWf9OShtaCsWr15Ok8OUW2EdTHr2sw5ghCpAQ2QRLq86FC1Ojlk5I4L9OwMv+4VjZpQIXACZ9yXGAwn+xDNJ7RflW57dbvPg18HOLg0x9fY83lN0fzRD116vksYvzB22rM+eVb+bV8XHBqCVOWHXLbCXoJzEP/aYglw4qJJyYwb7uZCcIfyNCPZIXk6/kgCBNgbP9MYjGKz0924JKSlSHaturwYXZ+xor94DN2z7vesp9RF/WUPksrtUjF6/iD4fcMYDr+rY2ga37GlXAGvX7OZZOHjIePmS+RxCA+0v9tde2L9XxJJA1ihxlRcf5OqXhrtkxJBuCyWKwxlIeqwN+wufExEdD7y1Xx/YFL8y/Ukk8NGIeBAG3E+jvx/MGgN5/09Xa/YP234ox3s1XiAPql0tQi8bhTsWIxqleGsdaGbivSM1UpPbn3bO0v0w59jcL9jNe2y0uZ1xk+1HPI0zAyjKYkgqipVImjGZ2DaW9PC6hNXjLCWqbX9Xq9XUfYk8zeghIuzGjMiXgnWnHhyuVkfB+UYGsUuozDw3+RN2DfEILw6+B7gvtoekyv60yZGUX+ih0AU7F1kcAzGilGJBHpYrmmVsvbNu4QocInFMb7K95iU844PX7JfOw6uDDMRV4Mjk3LQ1UQZI5ZgrkVxzWIV0h13jjnDdAnmNOFFaxUTmWwkdQgSuSrF+Lut9Xf0gg+A43Gc0VOpOxqu0G53iog2KuXrPF+CqSW1WN7TLxgvqgPts/YK6exqkaJaz4/hFZuSS5zAawZh8xTguyq4XMDLEE7LZ8IEz3aQm8NowrB7iKlf/CmKM5xklD0Jcrqa+HoQ5AbKrosHFVZiKWSzwJY5y7g80JeBUL3/xcJ6bLHWiC2tIyco5vH/dKfRqfinip9vVB6yhakTWTjB5mKtexqanCyxmBw5sNk95TkzJPfi3AmgKeGGRb6ZPFqDQALc1Sx7zakt9cwrpQL1+Eck0iuoLEADGtJ91aLrjccdo/0AGvac+IcUKKP4erTttjdkhcjpAAXIaGGrD+CRshR2/jygxaQyIxObr/7FQosLYxZZ6ljKUtMHQTB4TPP8eu1a2arYW5t64HA+tjGF8FVynWRyPWPB6Jd14nz8FKoC+x0j69NvbqElaEFNhpCtCWc4S01sOfY6tX9UaaUwzDNDCs2RlItVPC53retnEo39kFpxUUk/r9cjwzG+gRxjw0AXdYsm5ODuFH0skxIz9nHPf/VzwfGZso2DEuvICXQFJ0GOw702J/vRNdN9H2r6YVjoWbY5oNQrZT0KwdFysmHe48+5Vxq9X00+YaMk7O2lp+zo29ohFJnYYz0ocQc0QF4/tmiquVOeVQTtFDicG1IZyCwWl0lAl/YqE+RTQwUs1TFERJm9NYlAzHSlRSK3N9KuzTcwNUDAVMphTyOgEXShipw0OpUzYp/LaTl1WAHBSs0lSrL7qhkuT2KPIxREA7cfuX3Y/aecvkqQsya074t1QuzY1exZXqHaC5WOOUtyRiMti6iPpaMqGou3DbD8hCGaJ8YrQDTHE+bey5OMP3wDFyVQIlFZVFUdp6DviTskylZvxBrspTncTMNKKH3KgJ+q957G6WHrPXbWoOM2vynjqjjrOVb+cIVoQPLtoKc8Z8BY0fNPl8/T+43eFGDGOf9Todtzvy8u9k4P0GUstU/m3SG2MkZy8Zw76es/LNTs/Fs6EVPVtqw3w4OfZwTXaVJfQGglo8YcT7QhnyXaLU57gldP9uf4zETEREmaIqoSMbxU6lDQwXKmqX4oTBvVwsuvZgL0Eq/buka0lS3CJzc6oPDYkraM1T/x53ITj08ovEXaA59lgmI0jW7m9wwOBsRtPYwnTg7ew8MdXWyylgxLYyuym14qM6hcxV3XRpKCYuZ5AHPny274+Wa4qAGf1pWq4vW72XmlLcNMp/piTeBNPlc7lPBnd+QVfQxNl72DDSO7LLzowM0QIzmY/W7x2dgjrM93tTgjT5pCT+eDqQWWrnD2nyo0IiS/CHMdMdOtpwlQUQyguOboApEVFv1Ipwku+MccssvyGjht7eS8x5c3twLbDruScjgUHawkTEu66BrVQAx3JpQOcyo8chawMHdKrP9dRoGz99WXtwwWJEhsaU6GP4g3BixAZGDv5W9JkihVF6Hwnte9Hp0WIuRhkhsF314IlqIxbUECPMd9TmlbFQwIv3JSJaTn7xmXSIG0hiqOD5ossQ5/OINn3sEZeeK0GXErLnEM7/Minvj0UshlPv2O2O1vNW3DaVd+0aojtBe6siW08Os84MSpYOdiyJXVQZMtG5PhjXV2MIMEZXWy+yNrTyKohaF0s/Fp9qlj1iZZ5j+FwwTzjF7/TiUAI/LZx1hwbrydE7TS+yVOw4oIH0IPfCHD+AeT9SElFTBPQfpyoSgfyaRak0Qvn9q38Q+vBdxqBXK0j0BfCF6u8lsD6/OIQg4X1/IDGwrk0e5IeUync/4Ci2GxBAshIHBDxj39JxwkPKlJUfbGlG3bwJlq0GY/IWcWPPZKcVpkb9D/5+DriMOE8f47j1blVczml4iWljxkm8ug58X5+4KCHGaNW8zQdiGwG2sM/FcYTXV+GzEBmt2iK+3CmQZN4+mOg/U
5/ZoKdKHOPQIns1wVlAuQp0edaB5ELeY/8BYJO3Re3408FwA9kcs+ezzSyNpogiPIz51FZaWOSVizee1SqA+0nPfpr3n45HnUlLCZiD7/Al28cpVYj16Va1GmIB76eHSweFt/myi2kI/0tFiVU69Mfq91Sgl4mWPE458RZiFFUAL959KjpKB8qQ50060pjDM3LRQmOleXAMCIIx219i5ev7JrDS+ETigXV5dKdfJmUd/Hld2ayMjmmM2cI+yWd0RwBYCqxGjh9U/5qYjXphvLuy/pLUxG5ADaulT6lXdrGrZl8kbaAIsg14vkl37XqGKPilfDibYDQK6dxoSFD7rAHKqsNPUuYRJnhGrFDXsg4UHEGhCG00k6jub/giWZtM/dryvz6XZrp1FmgJ4fjOLKtu0JYmdYwmRnAFoWnu1nqgXdHODdcy63q8flfaq1IKEu1MMrlzeb7qNpuxx9RN7qXaLJqtwF8alRQvvmf6i62ZlSuJ80APmcZOoPOzBdjv+Tvqb0aEr+3fSMc6CqjZLQBibJQuM4b8j3wfphozcOUwH8HS52/KqTiwo0A50Goqe+KpW7aWlBDp3UcvIDl7Ut9ytetNCzqrs/VgO9dPrWA5NqrNlUL9WUECRVkk8eq4j4Kmllzxzx5feq+JHNenFpku22mkvgAiZkIy9NdUpwhvOj8z6p7UCROCR0h3pXAHqrBJUDRhS9V2EXeqmW8CZLWZ3W0gAGg5aw9LOAW6FydiyM4e7yQALPTMld5f/8N9pOeCu1MPxv8IWlSkK9GztoW40WLsUUO4gZWroOYVlbl3PQZTWyop4yOvJ+djJj8AggOJp0tn+pM+kVCdNXCdu+nZzGj1HS+EeVsDoHfFPh8rWqG5gnB9DEA0git+CSfwHhXxNzAekehBbAzwLSsfmyMLKpre8ybucWJCmwAGW6nL6wvJAn7m+FHR3KOswa+5WwlKora9Ic4C6347BnwkOoG8++7Hu72DYjFcLEW5AZLImyAlvMLyCbaIrMgvfcvdV6ITO38EZgp5Ox2tyvO1G4dGNdLkwaGLk9hDNmuI/+fkWN1I0qRcNI3fP2FOEA6W0+tPs31yyyOnwNToH2OpvbPZ6IoD1pKxOtFyNtPire2h1eFtF0aljhWr+WQ3rbz5S+8ih2iG+loS7iIJp3TSAgyMmuttj7VkU4X3KwRQV/YpQfOUeD/OwTVNxaaQwSEJnG4HZs/QWimjP67BDnANCtorrjqL5FHpU6XpdEGZfNKI3iyqCb3BweOLH4LWpCEPGSIuN/w6oS6XFYLXis8UJIuXvaPBNwcEKm6xSs+GMnd/TzL21l4YZopsdVo4E7xNSYmcXwkL7IrCuKLlj6rdZFlD+1wRuSMErY0J8MSPA1Y7cmYl0Wss3WGrD50HeyJSQ2JdRrNQ1juQfBRwhsP6hKZzixrFVgURpMt85tgTObtKLy9m+Sdq4ilVoOxKWBIX/4r7AlBl5oyjJ4fVUjSXDpiOTO9Xx8Q/ushoDi+MVxaG7HJJttGq//WXsU5IYhijN/mLwYL3w+CApjk8XH/6RZgTTZWBJ4bcH6Z+ln5NicBoGP0tWRQizni6kruQsJhM1lXVIVjKNPJ/nLarUx6XUs6Lzf8nVwrzu0EV8nFEoloDzpu6Oyapt7TqymAw3sP0zEFN4w/7cne/7H2MxDNtjipNNKHYZA7aZbo1zD6VoXid7g91zhgYCpAa88NZ1muxJOiS3ONslwSu22tjhBBHX5XQe9kNGDp0y85DGPr5Uw0L18hco0LkBnkerqa25oc1OxC89LDC6AriPDKokKTgAj+rdZMjsrSAV0NVtRFWN7m06cbwrKVg4cAlEvzMsu2QrTOD0QrRvcDa75EUstXKLloyCZXKnlKaxEhy5l4hM03bssPe5wpeARY3ekPNW9qhz1iir/M0+SKPfpbL2jYZXT2MZU49GA/Wl4HHc2LMAawrwh+P7XZCa/RZ0YhkLcV2/WOiMDBa/N2xTJnVQ1BBoZc7zjUhChPrUeGBR7CzXvfmhLVOnl/WmtylQWR615GhfltWrgMb3JEaue/xenjWrjkj2hJpCXnc2KRtrGlZQN93hLxNRXeQfOCfvalaMT+17cL8UUHaO44kIXV5Jlq/o3az9sc1tqIPDrFFB4KzfRaCa31DohfLWOJu92Og6WYWqKf84otP3etUQHcPilUKsduzS2qkglK0pLvf7EBIvyoIPVUte1S2UGyMi0i+ehK0SAQ+Zs6JakAru6+fHNxCphuV/5xtQVAOVW8BsuE8Bn/Y8GGYk5cUKB4KlNWkDOBx1nuGgnZZ+sYwuBWYlQSa+47kMlg1k5r507QPwU4asnp83E42OM33B3+1bhjLiH2X0B9Keiqxd96h12YcUzOXifUPqydocf2OsuoEBk9Ly+jTG8dpOtPTuw4DlGoIesAyVNTDoGLviCfyLlkF5QZZNuc43IO2AJrMMHDZB9iEnWLrn2XHtMdB0pz56GWil3yj/aZnWOdFEdcASA4U7YkKRo4VeaUU52PUFwn+qHcXJVa/CmFbXEfUq7KacuhXBShsmuXHOUJNJ1p0lJNvIBHtBmpKYCWsDJ2Xo97wV126+c70c7rDJJCY0pU3y9WzNgEIuCceT5BfUK4yuTSYtggdB5Ja2A2JcUN3WmTTum4iJ+ox25SMWr7BGSs0Txzrpol6rRcNpMfHzzC3l3g5XFDmlvNaEpZopWmKlo0sXY7wbstjcM5QkLDuyTQuZ2b5eb74uxVrYjpE8ic6xYSN65ZEuDcmorAbJZ9qYQhivcHtgt4WUSgj1Z+AKqdWlc8hSkqdzCYrxmk+tyDsuZUQTKVTSEsQe6PvL+iryxymoSGCfbqh9pa6SHYXf//Bccao0F/rfDM8IkKtT3esSr6x86govFwNB8b//kBf2i34IFSBmsXLjP0HVrUqFtJY1C4nnh78fYVGtl46daMr1d4+8Qk6BKoBV1kFDsYBYYrkFTE+Wrj6HtX5YnQeN31HMBUIpJ8EkRyF21zbeqfnLVy9h3GmQCgdvTReQuWG2rAIFXoJltdSNQsp7duhmOQHsmfImtoVQ50LeAghoby9C5cOnsnG+eaxBYOryd5kRI7vteur8y/5+5QtB5ox2kaedraNea0iR+tP+Kicz5fP56aOnhpRBoIc8KV7Ts9HjGeYWP/tsqrPYIkSO7Fx1l+aYD/fakiYydp7q+GoAOsCh4SDYvoQha25B2AMjRyYAJkQp0zTkx9PJEuOi50SsuhZLEgg+sq7lsWxXjcZrRbPOUUrq3T2uoEUKzKClFnLq1vr2sb9R+ClffwJa8K9G1pDO60n3Ii23W6jpLemN37GfyMGxWwsETG3G7WDyMXdHA5YxDFyVPv8/CPyecDInPoPBNGeQByXdpsRPrqCUsnEt+ygmU2uxK9Zg123YMkrcpv0aSrpwSm5CqyJp81jjhWn8kB65ylW7Af75U3uEkXL7w5/PYO4gvfwbDn40nEe1iWfzbxjjJyhBM5Lt/CM+3FmA0OgVpPcs99BEqftBwokcUbhMvv0mJfjosZZbRB8eGdhqm6J0MTvzvtdjRMXMNYiMUgPiHQFgRAprzoDS2aGSIybFQ/OqUwTuA29R9t5Wj0SYebEQCItNPro6Hu+cBlmcOix/DgHB3j+ilnMGTIdDAy36/i4Kl2k+7uNb+YXmaLUfdF5nOzM2jis51MRFcq35coVyOragJD4y57IVbjY3ZQKt5wsNzgSsrQ9UJffde/x8tNb57AabaJsHxqv8IF8eDwJ9kMt0Ccg0REFRsVMzyIks4GEt1e84ywjSLT57CNmZHMZ4uj8OkEhcrW3aKqyEX3Yk1V7iEMzg4A3lW5u3IcKmrHzeqADj+V4QzVS+lDJdsAj0oO7Z8V0gjl7bZWGloHZzdiiqvJnJ1B6mH0/TYeRyXu7EkBELBinKM1PQudtYV4392RJ/+UC3o3OLyRXCUI426I8JfgcsNCW9TH8HupY7AXGS/VnZKKFGw6XofD32289T/Y60sP3K2JQU7q6L3pimj9SIdmMHDMUVUtR67IJQ89RgJzO+WU6uvOIreCGP5UzpaaRulbGw9FtHovMroM4aZ/2D
67gmxrQ5WAdnP7QGFgtyiLIi3sacUDrhun2YLvwlKEympxHwy20O+qftrNcqTrJxSspRhWxw4Xt+J4H5cNHyRSapjwedd3LrAAOIeX8Mv8G1slksFS1fcpfUXU7SOSVzjqKebrab5kBcvuyu0sRk1vVbs6Wiumh2bnIJlBWxnLRKkM5ZsRp+qcP0IL+6KILQip6M5rfUILcpPlJN7zB2qXquTGLvtffcZeHx0DPiP6AM1UiKQCBLBU1QgtZbE8sjvCrRj5nLLdBLiXfmqA30SNpYdag9hgWr+P++jV10BKn12p/rJROrOUKxoGShT5eQbcnUA0eJK3lw5DiTbp2Q4RpWrXLTmlXFPOzlWPeXsxMiFjuiEXXDngSz+lnzMecPLwkWyb0FW/K4L3eRJHow+CRWh4+Y/hYpx1XR29jgZkfO9WJ+Za9jRC70pMfK9QFACLRo830JV0FFcKnjfSkT4XTxKnkxIJNaX2qGtZMya2Xhb8ZeNK/JusshI3H52uB44hv9L2ewzFehNC6MQKZTzsmchQNBCoQzU6AM05rBdKBSfk9y+K3ATLXcEOhza+If/S6vY2De0Z9N0oz9CZd1L6EnKrQhluq36f1gxGshABdyMr/HHAFV/0m87lOuTg51vfix3zrjIvsHNGRGF9kmj6LHgtOKmlA86pb8XrupRCY8IYCVSgiWAORmwOsC7pFpBEBgRTdL/aMJnh5HySxQ8oPksKCgKVmnmmjuvMdTsqzVTgEXVbZ9nl8ap3n51a/kDnNa0BjtwytfB+UvUJ0Dyup0e4UiOzhVM6wv3mwE/dOu3LxchZcphRQPi4ESY2Wt28tpR1KeLgt1UQO0/ofH8wzvWPLNcn2kjZw4TnHMxJuwKTdEMnECigJolHglq2ibYHpYpVnjCC5trFOgVd6wVkzXrBvoY0skSkX/NXkb46s6XNIsYji17fCmV3tzAv3/BZQTWFYKwlqvEOLuhNcmZ2hZJ07b4oF2F8356BzFCdeP/WqTmDIQzdclY1D98OXy7Ul80vQrmMDa7PwXT0u2lo1y/jkgrArkfxxuMlDadvBZEHIV/Zfnzdkn8Kkz5iPbS/ZXr2G9NFqsvZ+zIhING2atZ34ihgYo7ssGgkZ4DO43YQbUwoSszcIuZDPDa4/0fUuRUiuRShJ4RZMkL750DgEFKqtouan6aHmV3ZBJk94drxyJlpJxEZG2brg9V6ulHPhJpqk8daJQlVOB4pvuLEP6HJ+LS+XEngizciniReAZbliRM82bY0780IUGHcFXsAnRpMGkh4J6UzCaY1ztPEf/KGvZ4tL7Ko7f1abKiJ6/p2ryGRqUOi26sr6ewkGsteqqQ9elXNFz/0p829i5BjpnHT0lUfDmHfzBp0tvajzJ092IvBA4WrX+q17bVenQp5SDMhHyHbJOJFPLO7BxuFyZHQQ34jt9ERUcvvtbpLtUlUKu6jLym1Ob3RhfK3RTwET4w7DGE055sz/xDwy/AUex2uXRWX0PaqiYILnz/yjvHPk8+vDtOLqqh1q6h8GFyQrpgdNQ0CWTBF7GCTeIkn1LcSq1rv2Le1NbNdHSRWWUeV3BczDJ4uZ0Zdxpxfh5T+qZ+hClT1d3WRZJhK4pA1R0lVG+AwyEYTOCfLw26D6b79G1edV0KXsvl8AY1IozN34t2t5j3SZNBA3OMFJq5x4HWCkP5RVnvAM6nO/q+ikCpyHs1C3zkz6txwMZz/HKebv46hqfAN3xjIVVIB8vTRfjP3k97C2e4UNr95hu8Cixk7kzX21Mz7d0zwZiKIogcw98j+bB/ilUGFukUQ6656YccSn2eq6mW+pGo4GcL4BXoqgGwGhjkEqoAngLuJKc4drbC0E1MBwDM90jajmQA8uMaPlg8uuIGZNEuim1VtrPhqutuD+zjztqizJeSxqoNl3cYuIAhW92U9+a3sRv07pp9w+ZLjv7FHFnw2H2xdWPQK7sSED9yyakf+3iQoxdmuREHNDdoZMrx8dLLiC8p9YFbBM4JPSM+L8fklM12TAYg8s+UXCZCiEQ3CxGYgndrqJqehwbl0t3e+cnh+Yode2zNN0/mkj8lwnJJtsZWS9bu2TXRPcdP3rDGLYrJ3wyp98RtGBmESF8phY4yxxbrvbM/tsBsZcLwb1CpGfFdRIV4vMnFTMevxVFFOevEopeF9SpCpcOuG3OscYrIeuS+NYhLf5Fzm0s0XB1S3jjtfokwtB50Y+Mq5v7xhefvR+t5COGWbeCBVGVlqD+T2m7GTM2Gnjm+eWvkq+t8g7rv84gm9KDKqEAONjOMbZjUuw/CRn8DRQNi0bYnrTaJZZQgsbQedZoHxqUMANZu+JeZsl25YEynw+Bxad6ml+gcsJHcXKyUfClQE3bM3lWwdSp4NlqKm8C2rexMEqw78FSPZuajUHIM07B1Fp/FKw3q2FRTzBPhRpOWfGxCGRZeSDgi9DE7Mq81QY5pccIBsb+6ibmiqoHx5+XBT1DW8cmi25P+Has1dJrGDO2SGvN48YInSWTtzeBTYOlgzIlphTVshRS1mVoavwa/wnTtb06yZjUm/sukLh6HTIl3KmnnHgLxSwn4Wxs6820ImerbffPC8GyKvPYL9uctsG1uPwG5KRP01pd/tyOydNZUrgkJu+E8S2nA8U8CgckoXV9/WNptitJPZhOmSsZ40a+ptdG0m042kJSCZngfvEMibvF5TJBgXctU41sdrmamKDKiP1Dk6lx5sw1Sr8bJ6ir0aaTjMU/uqfZJsDNbquCElUce1exqAn2Gzbo3aXiR69smZcPA0lCPs8IFbB8biLjpUyQHaDNNyomQcRWRQuNLI3VNxORe35LeHxb8Rw9XHlyWxMUHSDKABENiXCyGBuLadD1f3pzZeEvuJVwv5y+pauSVwyAVcUO8AaMnkZz/sDpzaB10iZpT70iGh4LMNi+kvEUr/l281NhEGAJ4uSiw1ClbAhXg5GislMklgdGtOFE/7o8F27oM75f6RHiiWoa1mD8aSQoEucBC0c9AD1QPUetihEQCrF/l+LfT4yMHy4YS159prV51B7yVpDJnU74rCSulhwk/nV/YwUerRV9FAIeeEyWIr+k8ind/UO1Bii6o3gBTRTQWjlQzcobGGFyt/Nt/KKtXH2pEM/Q3H0ksd2g34rXm3bucI4xy2g8bQq/SsLUq2ahNfN572Kcuog0ZggWrAyxJOtqoEXjh7rC4ozyl1OErTEVNlt0UYAhrkFwFIYdyGwDtvhoydILTnnPuIVOG5Bq/da4El5yzcCtVymneBeUs70JcM/1a3+woA6RL46fhztgXeySZYteH3DH88v3sqYlSpaQpnPD+qwr3EDnBei+5iwj7qAya3t7fDHb6XbL01fJ8FbzqRernhujXq4gMuA0GUg4d1Ohlzl8ysL5T+sK/dJ66GTxYGIXkX9tgjKglnzhZ5/VbWoXPCa9xvIBitrlaMO3vvZzm8zgOup4+r+oG3pdZBmxJU44bMDP6m57+n5o6N6258a0jpyvC9bJerBbuhXZgh7niA4HHH3uKOcqP8R0AtHmW97K2URy7t2jWW50XB2X+t1Xgbfw2/OXJV0nExjJKnFJ8P6wbrUm4elONDeAnry5C7UAp32y16y2xDBLFBpqS9qcPkt0SXJyMzq23RZ9DKQ5vWBMa35jbP77GjBcOP/GqwzEyXHtwfn7kkCYGeqrbIFTUT4ssOwbbezrTHTikkoEJOHIvhUsVlN2uyeBXtDOZ0LIsjRlmdQ31Ere8WQzQZK605IWWeMZvEQgTdiueNVcGdbX9fFEg2V4OD7VWuCl5vtLv7U9jeOZbLCN04VcAZkTrAwymT8AmGrMipr19/S4XOuq7LR7XJ2eWcpKnLwU0YxZKXsqIXGxTKL0XcLWgsPjo0joMCNPfiLbHuAUj2LTGnjyeFEoBiPQlrwLFlGSPABWfrJ74Ck/Q72jQVb4DKTY4qo+TZS+gNeKGrQhCRCiebPRN1UQrStgEAiQsM2/cl2IkFsSFQUpdeBfWJvoUg2M2ZgUQjn6K8NqHz6ikkOfI0rx8ZwJsHdmKTDX5Rns9Z7MUJi9cD/4KEf/fOkwYpaoeYwLpJvqTpZ3
+FYKJZB2BUUPJ9NIYUczpLMW+lF9Mb0Zn6YHEAxKn4BjqbSdAjGSk/6ikRy0ijX9aQthCw32Rek5h8jWguSmva5GojawPOYnud/O6RCgt37xWWEhpSJ1hXXiCC0dNtm/KZa47rvQ3qYvJeIX8/abjvx72fnp4SK1eVhNuAiRxoY0gbB5hdgVqH+XOZDsEj/o4kSzbGx6eMeYOJwLbfw8UF+tFRL+XTfgSQz8HIY1HdpSheE3N4glAjV8w2kvTYTYMhGTxz/mr+2LA4v16ARkvKAW9bF6BQvY+FnBb0kcG2DtfWkwLQ8WHKelYYboylL3wI+WTKOz2dr/FA1TWCuN0d+79AuddHMeTbftDUXKz+v1iXD51TbLpIQP97d/GaaJgGgJ2MsCgr5OEYJdDjBQ/DCIUJ50od+VfPUKMwFVw9dxWQljtmtsHHFObN6GEjEbSFvGDd7u6deH2TqiSkVnUXhYuYeACcBWKSpNHSoXy+Nw8zsykVe9rzaz5ePIjrFosOTxXFGF9fGw1xnH7f8hMVIrvwnMJRV0G58Vhd7lBVqOFJE7t+v7+IQQf9qshBIve/7w19Pp09vv+r802oTKryPAbV5C35+dXRQG795izL1B0MKxsx2R3+zQ1emQWbnBRqeYqtxQlVsT4SVsqGFv8wnnmSIlZFh6/QcIAYY8zSBU5mc96FudDp2V05Jx7d5mt/cgEah6gfefLpkTvJPaN8/jjGJbraRNjDs3zf2cshE2LTFOfCbB2pMIFXRLxY4R4dUIXTJoPe1Y2F2eAQ6HiaJ3E2y0anrvCkfPqhX9pSYbIX7tIYoMk1Rtpi9AJ3eaUNAA91fAlBGGSVDVF4UHrExENnowmrQ5myr0Jzd2cld/zr8sW+SoxiRJr0+5RQE3SgcfoJtl3dIgiGzHGOswVsl+Lg29RjggKH18a93vPR3insPrPv30+b+v9O/nrPywbviK4mI2bLqvliCHFk9YvcGGAGFwkyeB8RpX1nkTiXJJuzDZlKhfCV32J+DYtx7KVZJtqa74wJZxx9iLo0YBB6x/lskchZAXKWdVlmZQcN7V+7qnZqRlcvOkd9hQDe1y2aC5ZJheV5f6HncMB2YmiA5602mg8aFcJYW1hx/iQR53K9OZDsa3cnMnv7tn8kLHfz41dm0HbNYqz/vKgGqF0hk/t4Z8c2csklLPZXkDIjmdheLKBBKjpMJLg7ABT2+xeUqepkWPUbZmbL5Tc20XjggeyM9LPy/1CtDKgen9JdXCDehiHmVxPFleQRtcWk32Dcj84dMuRsQU8SfP9gD5yhxFB5EfTmRvEpPdY/Cdh+z5eVGf7lK5Um6HgdfgVL2EbXbtCbC49+UnSLIOvfTFIt8MG+/frC8c/dfTot++GxKL2Qgfd/XV5O3fiyZLntOXWcej2IXKqIkMxHijT2U4ZXZNzAEweI1azYy/pCMiB8zNtjbI79j9x2QyP5W4MXvlr1pJROs5Blncc2mkTRk6LDxDeA8sdGnuXmGCut1BhleZwCk0cqDQ+NgAOMpS3GfdRxQvqb4aUjjhnJBuNmoe8qnn64+Qok/Ima8guQFmb5Yn7oVQZXukA2lxH2fnCzXh8zQxHk/K69eaZssZ1W87IJsmNMb6EdldEqbE3PP9DE+zMA+ziJRYMs1eO1Ffl1TZ7DGChaa+AVQ0io/5Mw9/zvzSTsUR6/773nBpl7xlejB6MBEAwojildki4U2VsLDoCwDsASgI3NlLY8KTRydsalTrlvJ/BgIbomfWaDBuzHhbgeUvsPTbO9USK4eYdpNLWrJQpyzHPbb3jchnydNeZ2JU3XBdSeGK5c6XtX2Fw4jZZ7YbXuTBk31C1hQLet1P0bD8uxUZd/G3LwwHwDS3J4xnQnOjvT2U0UIkpwi1m+Y8rhn+rcd8XHBWaeLnxRmidLXo377mKLWnHSwnUZdQUdGuvZ3brKIC1yBZRvBoW/qs6IBTRQIoiKRMTHNqokK0BS4e5oxJmLrJGaNaVTORhfYsSo1WVkriKuZyjFjMgDXKCs/2ish8rNwywM7Mb92QYVTcBS7GOVlA5WKOFvpIeMi1sUGwkuRq++4aOtdvpPlYMaNVaNMfbSzcjrETVPFwnHGNjT+Mfnw66wo64dMLtt/kbUB9vmBZMPoIsqQCZ5djhc++Ka7+bI5wpEWdtkZ9Q3d3VT1qFblDCai7Z7IcvrlR4smSVLBCLh8tFldAaEnf9NNfG61p29K/aS5/XxoqL3U1s2db4Ma7CN+X060cKRsiHC55vukXRUhP43HU/KLZSgaiulwFbzj46DmgBzGXNJAa1CbUhz5F7t4IhL1G8NVacm7+FeN4NqLbjZq/Ot/FiVCBRmmcY/pUQpOwWrYiQaDcBTZhax/vTyNI2/tofVkv+WXAZyauCCjSIqXCnUVSCJgnPd5OCNxGv+OKflssaCtvoiYfEInzAnPDBinqgyawaJXu8Z3d8kTTz9FVYNq7rNaiWe717j1E1EOKTFq/ByID+yb7DDhhIqEkzQjHB86yp4YGLxwx4cSrMJ09bPlwtoddL7k66ez4dpdiyTiUOBhz/t5JetxECEd9asVwE6egnABhVXWrTteAs7tiq02H54WRMlYEr4YloL8j1m3U230ogRm3miJQUYTXVnANTFwuO+dpMMGzn3P3T15uwy/1q6kc9kpuk4spE795ZEwQ4zVKMvGAuNdqQARJ89WrQL4V8IblDmqdBNS2qx0/fgVSrMOlShhTByob80hhX+kojaBm7oLz+0CiXxxpBzFahKM20vANJH8z3TTJULxPrQ0foizeK5AbFCtIgS58rXDCBe4vbuQYPph6wKmUiCrWfX5i3I6PmfiU6ZFI4YTGkqFKOvSMLOF6dyjdV5P4U4hYfGbzPkWlMVj2/L7RGfM0xj+VnvLndeFze+vC1Cficc+vzDD8wvVys65lYjhZQfYaAG83Wle1iwJabMta79mLRKhXPP2MULNliI6OxWqVQqJi8TlGkZrC1m8gm9F+RhGJMw5qzflZ4GFQ/y6fZ34jDL86iQW0BHT6PiRldtIs5w4rbdtSOeP7G4JGVtW2f7x2okChSJTn3cFm8faT0LlaLsF3VrflqT8N2BUwVNRb7ihNG9PG7o/vdqv41tJmoYf2r6X/h2aAnjKlI9aZwnrj/zx7eArwaJ84DgHwXH1ywbk+6QNBmAYQZ5PK36KMOTyWwkAzoL3gQx5ZG9hB+uXLHo7x0gQBcr2iit3iW3b4xBFXOiVxcN9sRnSv6RVnKcjgMq/KyvLFc4sq5Ki6x++awiiGWs1RlmO87tXHE4QvhpP7KMRL5IjLpHaM7ceS4hpOp/CQi/EYpVOdiUouP11IrrJDy0MBgyzBPaTXwKhBCYKOqAV+i5fwl63tCj+VYJVJfRtcjNee/G8bykYTi8WAWNPnKzcrpwej4nKvGF3DzpYLgwsjrhIGbu5GFEES3PpO0K5o7M1Q0ScI7rWvxdm4IUkjEPWzJy+XQyqwZykVrCyVxOIF92xelyqxvSJ15qVoJJKqSmBGdaGNXNd1mQlHIYwFIonfOQRkQAOWz9RmH89GYmP6jip5HOCACkKxhWsMUR/Eg822PNR5FKFLEVdrKxkCW2eiZlMe1016B+5esB7v9pE3dMTY4uzdjs9GbweT9p+hYs/LDc8lUwG0FTri2OqnX9WyIgYcSZLziudwPQNi51WTnlk7qI5NG46RhkmwGBcYDLsJMT+XKuJ6vHqY1eVJcDIsf/tucmgF7Z+DpkfESmRiwQw55+hDtI32DXJa3kxNjrmTmj6tgtsFEIuODzRgEcM+wGfGGdlnXjNk6Xng8KBs1BdzX/1ix66oT/9QZhcKJO1gQunxZn1C15NWILi3s3pCuNorPpFuXKrBgG5PJsZmljhl4h/1DEJiF3gV2LplIJLbeWlLq3UDzlGEw4otquDxX98jG6N2kqAEiagXWVLRduZODVBCMh4riyyojOGc+pJYXNEMI2rV7wOwmqdakNGcsyUWwE7cCVNj5wVYK2gKr4Bs5r3s6dAwiZBJ7/bP3nSTqvIBOP/+SJFFKqafeVlWnY7BAHTscR7RriLieBmDIgmfG8ce8kvDBWkU
AS2vREvoSRZ5VSEwjvy48J04Me8OgqE0ZqWTY6Br3h0LfE3yYFBIgEuVLaxIvZNso6oSBsY7l+8btB9CkihOpYOk99ke5eNxk0P8DaOxzHvisT3MeJaj4tGgAN3DNatXBkAxzE457JZmVOOLojARjHhtMXJv9gYiC3pJuZK9xRntdxRhM8RAV3HF9Hse9nTooOEn4vXxy8Mqeai6zIRuRLe7zNsYBCgMKwPBH9LP3yPEEHiFoGIau+q94r87dTsJ53FT1+i/HvZ+E22HHz5IDnurDiPuOyGG/eyGTiwk0rgouUyNxMKm1hhNTChvhKKCRYlREkENtYOQApbTrzIwNn9v2BEmK+w9iSeutLuTb1kHkWnYuGXZZ7Qgnmh0MBFjHp/0baLy1C9MdN+VcPYjFEMD17wR4PuiKLZP23BJfUMGC8dX4gxapKu6yqrm+I9Aa/jkIQdztM0p74bOoqq7dnXeqRgUUp1CQpQSFpFm92wvRBUlSCCCiFfn8oknuy3pPWW+LCGxQttTNrBZWfO/5DpveXGyjPm+lwmWGzLd1i7ejFw9K6UOGm6x/wprQUw60+HWM8DzILoqaUFKIe4/F5hLBXfjIy3JSw955v+gLi1LWCS6tMziYyhFAcGhAU6lDSmDgxnBGUbp2ixEdhS6qOhjy4dUOHUhz5B4wgC6GR6UFZEpl0vcCZPpWLqxgJ6kKAgw90vabeNeAJ+0q+YtyTBju4thdUym++InHmPL7ePgF7uxCPFv3Y3BUep3wDnRU8W+NV19qkzMaVMNt+hI9eh6v180K+dExjGsCp28QoSEnsHK7MkdmpCJ513ojg/06SociHiOSWrWHcR01c4An2zj8oTPjH6YfPowYJAOWymARXxgVqDTHz8GC4yQH12e+ikhG0GrpsxsdiwiP5JEh+ipmpvfzA2dVa9VQnyWKkcU7FNff3C4qSTBhtzeJ+9YvG52X2sBLW8s8TbZjcVJqoJUMsNu07X+rpgPJxd7NuMku7UCYfRIDNp3E6+OX/X0dKk7+mSW5X2OdFD99GzOqp3GIN67XzqV2Y6oq9n9Ei7HBj8lDeE7DYRc5Zf3eTyw9O+9ChWkws4oCZnyYWCTLp200SMN+iDdXY5GY2oI8wer0+GP2CjGX1a7fHPxS9p0kF9UaXhiNBTnCZnE9bO7hetrq4xxM7amXNSpulvTsDZ1AuFA83dxQlkXgJDSghlRQCnH24mVQsy6yrcb4TV+tzBT0Qd3p81V++Dued8s22tqGPoqoGmc8ihsm7d2S6TN/Vem2/imWe2DrENkcefafRpb1buzyBiOaBdVczXpR/+w4N7Btd7WzXxqTnhIHxRLZFIkDceYGV9+Kxf6Kfk/fhXOFcZiTk8jjRRmf7EnfufxNaPkT7B13A3shHt0VUX511+2BsammwUb26RALhO5yZz9/KztOMXun2MlI7gvJQCvVzwkFIUq0Jgh1tbFw7gfVIjCb01S8Guli7OSWaQh1fcUPAXI3gXCVF1CmhMAi46JElXKGbIYm12IX/8YPT40KOa/RFjiKKimza4WUUprEXfGrsA+xci8YiotaaGE2gf9kHQszE66lKmj2wtuhpwPsyfEBkoVFovLa4+HIUNsTM9p8ItiyjQNDea8XdjTsXoGZa6vOXXcDWNui20hSxQjZxdhSam64Tc+WZhls2u1mvEqiUk6fZz8ngLuAP1Ef4AZHJGjAeUVmD7KatLF6npFa8hAKtrziErP4M2lCEIE0qP3JF7aTFl+ntYjzLGcTrlapDECmYzoeekLyBRfUpVcFKZa2ZMcxYbtcTVhuv80nU/SG7OyvkCHg/ILOU+BsAKJv9U5s05RFt3KCrGG8/bvzMImZ0rL2ohhkIOjt+1I6wLAcqJ1VYql9NlR5vzRKCtaZWX+nKmsFv0Ro6tLmMMUmIrs84vz/9HxQFyU/hzUZ4B8S46SfTOa+uFvljWhMNRAdkyBHrTE0iVyJcNR2oILaUipU+y7E9ncFTa0ml8fUzjUfMqiTvjEu3d1VmE1/UhIdlwq43y1+7RN4o/nynZmtvS0Lf9FUN8tS/12dgcPU36IRzY4stUnopifzh5xQvLG8hs+2UfhChHObD2/ozxnVFErQn9MC6DDpi6NCTkJRmFSLWd6jwnJw267fu41mVsW153jGDYTR+UGshTF4aLqPq9mCtORgMLPTyW5nPtxyjc79tOVko/nfssiNDGvmyiwTR1aDTjmuDu4t8MDRYSpl6qBPX+GulaNKDIpoCSqCl5MMcEmXNPy+hH5oXM9Ww/U2VnAD4eg6PwQK6q1VZvxf+9izvbl0g1xx7QUTj3djxwGpkk26aCxg8KOPCAxhYIE0HXxBRFROUoNplL5WN8DrUn3kDXBnn999ZZboaJtFuaoDH56CJHCGAKwRQ7VN56dpHnQXYTJZiEw25+bbpT1l+EbNKW5NQuPUIx3fmXnCWIIIXRCJoR55pQnLGowDJ2rR6oYVF0ng7jiJRTnFFJxrnlKsSLJ+I+TSckw+5kLBXKUdofHnYVBp622L1gGafmYi3GZhaxqv7flFW/DASY+VjpHzsdLe9nn/GzcajxBUWrSl4KqujAXOMvAlW7HeZwFeA0tUUh92RQSA/C3bds4+91YN86TdKAKkcbpPFXiMcZyEUGIUmcD/BRyeZ+9Akx+P1QoV/fg3a4q+qLuy4HG2D2UgW4HpLJ0wZLlEcd6e7KxFnd6PqdUwfEZDEVyPsMxFgvOzwYqO2znj19K1MDe126118OYXE1dBdMFUmVlI76ZYeuRiiyMx1mPieaHMyf5SVDzDfhp8KmIf9QGWuZUlZsuvbydfbx+i6v7G0/ymYCiJUmBgUhSMDojoatX7U3PY+e95FdICV1luF9WxEGt0nc4KFEyg6aUoS1vfWQ6cXW87YO9HmTz/1VY17ydXUf2ZL89vzy+XhP/PRoAVctOxrSGUT179eMjS7lURiNm+UJtwapC4BfgHcqulTwZB25DqZalLnYEOlX8ez30MrLWNsQkqF2HH0+w/ZjSWlGH4sC7JoIsaMSeBCQSAwN4FQvHCMKeeTlaZBtAUj0bywvImDgWiQH4dLEa+pJq9fxw2bjYUrirMGq2PWqJ/NXgkBneDTGVxYXEh+pcf4lVDQ+oOl66ZHcZ2D69+AJ+MKvXY9iU02V7itIXCLYB+ZkYRn4T60oDUbUX5YASjbM7V55s4AbzsJJZfBs4onmZEr0SsBXFJwJvnaPfTxJPKfSN6ZSENB+Kfk5uEOdm9lp+YYYdRXS7Z9NES5TyjJmiD5YVeMerWD8P55dldbfxtmnsF50X5R/goCDTsJb50cjSp7YxK59PBKy3lvLbROw1eHfHOOhzM/WHgkxa0d1E3LRqS/xTtwSKAIkjxMcXT2+kl1WekwkDf2bzc8AhAHE48VGxgnNK6cSdLk4LcyhNNX+LHto/j4PkPtbu58smqj69KL5ayAlMI8v1u/MAVbV0+s//4s7WxZrrWFiJPvaV264n6iQqD09yn+UhVZZHKZD7Nw9qyXdnu2FPiOB/sAJ7O2Q6loqEqeGx8SiMSHAVnilD4fesGrujQ4FurftP679ZaydywY0aZ6nsxQ0sBwD6zbel5nvQ4sF7966sMmd0COt0ZsrAiRv0sNUHCFtBjaJJCmWjdw0Z936USMJEMj5XPtWELZ1jf655kBfs1imimvRILMscVBOJr65RTJQ16jhMKiUIM5Bd+5erZG1xshLyJXl0BhDB5awX/vLir65Su5WEodnkieNUATS76hnhhz5oDERQEoVS2WxdCYnR6bFFURpENesFoSSVkfy4dWMizgBahYSsEz1obrt3hH6AMpp59QshTwhwQBVAFsXfVON6WZdbOF+n/TE2UYpRuCiiVQySDBhTGh0v4Uzj6WONpaG9dqhADo7QeopZ2gzo82YRztl+LtTC1fJW2Ab8PAi9cCsL8T941YzeIgIfIPSL/dgdQfLEU7EN8uaN7YU6qxlHgGS3ioseOUlV4UxutGpjbn44xIGaJAqP5ZkFdcAyiNVIlXM2PK+U2Kz5o1ULccFTWv6hGeJODzbmkx2GaCuKnp/7KyGEsy3Gdt1yBX/oWJ2Vn3Yp
ulGZz9KWaGr5Gbbg8h1nkvl+VE9NsEZ6tFStBu5uYdx2FgdTAXWVNkOEZ0pGuuMiWeg33QPkLFbEhJu7c3dTXiSmKZAv0FH5trh47RL2NczwvAvlP8AYrdZ/hgyuub2TVNGLheURRgnG688+sE8Ve3+OT1igpF6ovfhhtUbraAcsh8UNZwb9DGJGXN/kb9zEDJ5viCSFYNY/yUzv13oR/qgWPcHb0Ero8R6VOEIv7Comtt0vbRLXb6BjbPqmSTrhCn+EnpfseCMkW0PXP6Bk9QAfoV82+44Qklbqz5FXM/Yx+oMKIopf0avzyXRekGAhfrWBkfG+ejzKe6b3UFn7H8fDDEhHO08WrtyNH2ubOun/vwFqV6NUKA2FUo/s3T2pRhzXNXm33PEcDtAyJE51vWH/x8s8igUbRRN1iRH9ZOQpCafDc2rKFRzYqZk5GH6MZZZNsXCaHNi8mekCzu8qhX0ZLUpCLwTD5V9H6UiA9w8dIVQzyBFpOyn5YdcpTyNXndzmRx0UEiVpdieB40ObaQyLI+v5/7H024fRfIgQuOAYfh2nrLQoHqMBk7PtJ/x0x+FPTrKfe9FAgGhXlaktq/9v07k6WyaZastKHdt2Ll2z7j10KFBDC//HeoUzmSLAzpSsRebfN2PcTJQPtG6Mqn1m9sIEwK0ZwL4sWy3Zn65KnEzGj5FaIeyBXYmUZmiUcz0H2IkdsWMv8J6BLiugCOUnHh1EY5jciatxx9NCnLOud8PfDJ8Tk3ct68jCAz5S3OLjtR2YEHrwZutq0sRvnh4vhrHhBuj9jriKgW2hBPGqCSy0HCRC237Xnzwg3L7eKQ+zCMJ3g4ZTr6rmmv2tnDbkW2/vbp7o9n0LIJBcZnO2jEzVBpnTKZSQZUmnMuDDXdieKP+qHKx2toIc5wzc14YJB6IDNHcJMXTCelv0XeHI3kfN71yD+9j6rq/EiWCHVqJRJJaHqIWf9s1mGgIuKXCX2pKiJNzy/Xfvu47lk+OGsS9PX21DZdNRO8X91pwmzHZzUfOkPOb7vWRhL4DoDejBccaJjedoiakJObX9htiAQ+HLhF9+hLWRvrGMWk78U0FXYFuxqHpP/V9vk6J4mcdN9Bt3WZjsiWcaSplfFqD6Wh075uGrU72OZTUvuhDuUnAOyJTmzQrdP2ftDADBR2K13VW5XP03ipQlgcqtDW0GHZNzfZscIuUnISSz/THjAvz39VFXqbRv1xbry+HrEgW9hias4+f52FcCE1TTWzaa0hG0rQYk7Y6bo13T5myo9xlGUpx7je4NdHT5k5uXYAb21TpP/xHLdeAzIRfjk57r7dpw+4DCCVIS1DulKt4jPxP4PJ9ehPMDq3nLJz7e4u0RoFf0CWloS37oRHk9903DjC8xA9ZT+Old8Bf4Cp4Rd7i3iP36yTdqB6RtI/aWaoa+tffRUczDHq6Mjn2YeR8vpyz4Srm/cLv5UsDvNn4QEIUiN33iPcGOcdy8sfzYEPgUGr+1gSGtb0TRANxBPFD5rjQS1lN8zvNPxIIs+Yzlz7++Z3AsJHp0pM16rhuCDjuC1ct9QW5iFdmOoT7/EEBpMWMIbCU9ep9En8jT6uRXEUPHuB0pAhjS6uc15tGc13DlwcOE3y9G2byUc0v2s6C9YYylJM2X3B5DgOmxDiFd2c28KaIWqROoT5qmYFRqYgHU5z3J7P2dakUkaxd8I/1tsHK+bZa1MifEwlBf2NQpaoND6rGnyl5S1V91Fn+eDHSm4Ai5ikqEzN3XnSK/VD6pf6gbWDWDtLdhSsDM2u1PVRpYK4579nQP6Z+bJx+qsWW/pO/Xci+mk8HVmEsBm3dBJhfd9JBjklYzA8v/VQl7Z/ZUzEyu5EnWKxm6Uofs6FPzgoWQtLQnWmPPQ+P3gHeCztOmmGgSRil/sPuLRekDFrgNXq9yNhRKG9E9NGVKwwD0Vq0v3IlGqZb8b/Q6h/p4U1CWgPlA78UvUBFSaxyy/eYjnxkMNj9QN2ga8yOoZQjGwhG+5eeUiTgQbZnPo3+GkcPP/Dxa1tKcPmsagaSngr0SAw1C9XFOWSDpP0WQZ/VHDoS/vYnocLZkKGIIgWAnONeDNEUq07G6H1Lmdmgxg4f1ScqdI50aYtIu0l1/DDWuT2jkBjpuKZhoLh8chQDToakzMnlrjEINAOckYgNmSgqogoY7EagW8mcM4BaAlzLILv3j3rqBtQeXfPHkvHDYVH9vtrHvQKmfhmrXH7aL1ZoET8h3nWhOs28OMYIzsJs5zCewG2Q90Bru409WehZ9lTwwlhgM93mFT1i3LLx3afOCzHnXttGRnAiNk0L0PqnHxOBbD+VrmW1Onv5MbroTuvk73M93o3GgVLLDHj30IxXI7zbaR6tGxGsJspbqk7BvqijIAUFb5eGISKEhjtoqfIhflVqUI5Fb0Zvw2tYc7PY0n/NgkhXVYo1y9R1wn0r8kXwjKKTfcsVDE/oeuzyxmF2NxsSR4VkRvjFV+5U6aZ0ip6G4zDpm5xYV8qV7thgrVWWNTA3Z5yLEj/roJDvBoy800DcCc5MGyZfKnnoji8ayR6FwYlF8NP4SKtTtVOdRqBsJVYtbsqI52ZlZJw8F6rY9+qUEky8Z4J5Gv5B+tP2Bg6wsIy914EHsau/S/XYbv3c9iXw004GwBaykXe8mpsCDas2t71ugRk7eRcXGMMmBZC0JYz31C9Q/qAHVjV5qj2JpStCBCU/dW2mR4vIRPCH90BCKV6yZ5mWB81UGZ9msx0e7oQ0nHfBreMCWSU2AvrcESXdKausvUw1+pkfwv6Qyse5i08sBVNO2Zgjfwrep0uST+0fhJPl1J20uRUT/FhazLb183U6FIXpsHqKS2AnPrJISdgbTgL7kRt1QlgkXPoNvC0dY+lY3VTloWQ4ozAlfE+HDNKGhEE8eZKnO8rGMiSftbFhaV3NiwWtHvCi7+c+BCUsBi0m8XeJpWIUqCs+R9Hq+4Nz99HB5n6/893MH05Z9WEjfTCZkjxaZAP7wmYh5avqnQ8AkpuLYojCtSvSwbv24pabCi7iHAS+hu/Yve2bp9KR/W3FbuRm7XMeCEb4Lty02BxTT83OdlZ0qBCW1nDWfHCtwFG1LmFS4cswPz/FlLD2mqFAmRF+OWh9r21Qnz/cPMTfgt70eID7n/lRQbWAvkBz92sQdGMWx8ORp6ZCLWni0llRtXr0WLVSzr2WRNq1LWk1vrk4Bv/jKSP6aO2YUUjTYWU6u99U96jgxH4zkGNGuHJFrWvhoNgdT8QN9641hnlmhYKPXILTt7dI2bB4k9LvHUJTD0RiN9XMoLT+vttOZ3DWS1HvfaDaecRY5aRtw5VQIto+6N23vP0wQiRN8pxrTZ77u6sczve1nW6mfSpFvWO4B73UTpHtPdq9dupo05IaaVD7LiGxTs5fWdEz5I8WEpd8xRqw8fWh5LTTPOwdFh8plYh3rCozo5XkXfykk20DCoQDAp5PiIp8+rmHGVMytEvSq1P1og/r0Fhadyd91LIAlkmetIXpVjHcsE5QWfZXadfUBLzAI/fZJitjE/FkglD7u2aG97SKXZlfv2T+4ipjI17O73RqKSnbW93zT4uonKfGKcXmc+Bp1IavWSMpFP4E7B62Om/hAVdDwhhYM90+GTMDXCc2E32rEzZz53fiLK66ZrXVxqYeB5lrrNzCbeB6+Cv8FJ6GTPffsxLjdWFFI8ACft6I5Qu0YRavQi2QkTcpVGtzdDlNq9VcoE06rtCSFLSpD5wjDMItD11Wd+oarcpNFSaK5+gWbBgcfTQVS3fDqzf2DRRz5EhqvPoAnkYXt3kiMe9L7mz4U2/qnnfKWT/KrsMF7rP76KQIggZIG4SQtZ9i0V0URLxlFhhKUDCOdma3r8hyxiN3GP/jLUCpW1UDXrFm8PFpSE8W+hT8eqlvkKNPhiPu2voyUGSs2+cZWwKNLltdJOgjzIwoWqSgkAwKmPz4WW9goWSK3f54reN7V3zRWKfekKWbK6VLgBrBwjnWjZNWsUHwwdUK25Ka28UXT0xhlD9F6cLqya54AFSXIsW+I4iwLy43wYsRhRqv4kdSfWexZtv3guP5GPul6C1k+
9OGjhryIyTkuPY0haa0BTuuzh8Dx82txgo49DFDbPVl3BPamVXR0ArRFQNrCAYoK+LMLjzvCMXbY/O9dbkx+eNChWPxMq5h66m9z36SfNoj0rISXPoO3xFF1uS2kwqNCL1wP5YuCXNhlC0nokRJV0iXxreq0fVZf1BAAFesBJvnRwjI5OvDfirWTT67JS0ZCSlzDRSPU5FjtfZKpLrE3/+m4xtDkxc/PkWu+w1unXfiUSbe9EMY+xWExzOVj6Q/9HhMhCpbESzpuRTJ09HPFGWTQmAfdaea9o1RvKIP+6XpBsZt/z8eQATqn/H+kahNq2d/F0piIV9VepgRE8otCUSpGdMjOX2hAWbTFVJ4bekwB2qDj0QVYOYkXQ7LveN/7/EclYs5VAV74gZphs2xkNBR89NlDgT9urADdMuwJYjZEuTZ/2WOk2yIQCbJGYijUSeYQnDwP+lNml7lNwRGy8xMSYNEc6GsnM63+DcGiLX8KDqYAGIx3NpXUQNd46ACWYza8ruk2wDFt//RCIjaEDQIh1lMFVNcyuMUizKIIqhRUgg5yfHxfGuzFw+NzeRKPW9b8CbQ/X5jK2KSC5pUFRLzXfYLcgKDL184OIZMfngeeSgFsgIGr7BMz8mOsn9dPfTqSKW778slRa8p07fS1Cj5yGbi9quphIbzIbIjffUnoC41JGeQfRbmyYPzsRTSUU1F+jCctRv/Tryv6N2q+gKgH90toodWZh/+y2MO5cypxt0tG5sqr4VyeNX+ljeynJ+IA34TTogE2mLDrF1+bdNs3q2hI9zeBejynirIw9iiyOrROUFV5p/cDfaKCZp548HCa+wZ/AB5zJBpZ73ajGONCu2+I1zMOpTXI5kJaqlOk2sFscLpQtJJ1P5t/lTvdxL0iwYyM1WNkPDzL0GknjbgXFyW3cqXWCfK4FG7Pao5lv175Bqmty21jvw3LMkxxUMgnd0smRL8eainaSC96EryYoETctXBouxyoTNjzjMXCwE606MpRjgHAgUr0pLZ/7p5RgjdCBUiExRwPJ0sUYGb/C+P4n6fgWoupGfN2tVOkk5s2j1DFBa6tuesSFXprefnotUz0Bp9xehSbRsRADAgsPoPs70mxrOt8wCM1hZx15oxeBpryqpX0HHESpDDm2DzA/E5pFtNgWULJpHyrAJt7MGnl/1auEHGUfSAfEwE6+1Hl0Xp+12nrD+fUveaPfRUrBQJOUdgS3qv3o0OR+mB5Zq+zvP9VMTjdKVCKeJrUPweNeDqcFsF72G5ovH1Zdp2jKStTjizzUsSXsW4Qm4mYln9l8eY6maWmAen7YHzQU4hToz+o1JtH0W/ot7rNKR9EptkKsDDaCOva+GqwUEdIuslKG4gz+5fHdCUssMsZTpQ6AhknMagV28gw7gQtWa+F8+lInL0AIUlJ6O9YKIpXD1CZdw+K8esT8iSdaRbD4eB0giB4ub18oAfzOdRDQ3wuJxE4Jj33VcZdbstj5iewcBz+ORv/pYdPvdQALcIRQUl2T4Us6Bo88QBXeJPtxin+w8ilql0dnXiQ87csCp0MSAVZMj/nxutqZgeGQYVitPJYlkCeBm9ejUeNyrFTbiY6pSVt4nD1roaocQ3AEvM0zd40HUwxi+t8pk0p+uBI8hitHjGyD7X+U7WBr39UNG0fWVoWWsZW8svXKaa391Ray0DIMAz27M0QX4S8NYKrQXNmQxrmxhDgIb7JmysCE6NV47G62MD+46h3qMdP8p5VIqu5tMnjUywkkVJgN/9Y9xTn366hSN0G6BHbkpX0JPCWAqL455isFKWbcB8Y1OWFrmZ/elVRkSrd6baGHVGbaGmAEQCuusCeYR67prYG4SG7s11IzQ58wqJCPMMoO3K0yoNBqoUdogfvMCJ0thrLaa589RC33yt22lH5gqgUVgBSYULDwcgeiOPtwhJ9apTcU3nTuSKyA9mmlq0Oe2Ztt8bifozqpvjoNfSUFgZOBikTS4kamNzzbt3YFDJuaXW1kB+xjqaRwCzPXyeYZNM//YHfyeozcKWb4JsrcPZGrjOr4D+1MQOvwwQTVzSxhnL/1ErLq45OosHb7ImDO/SR9/TmI7R9O3QihpSwGNDTtYSuIZjvHtn2pqhTkIxt2xbR/QBOluunmY4ozHXiJ37W8H8BergRnR6mSshjAlQOW7+uDcal9B9mATyp5YcbnqQ50MhGQiHtPRODyETE7M9wLFifG2kol/b4o7bGepgxRoo94b0I4gNqKegYsS6GpcbdtUtcOR4nuencHex47itsho6T59VebzwGDK5KzFpIwhAMQs6By0TK+fGvJ4J4udG0rXyzcn7uQ3bdU9akmumdH6CCP5u2lcTU35Skhy86naxXBgc5mGu+Gg3h4wTaIH9cDCtx2tJtXU6b+Froahej9yZOBqJWe2BCMzXZs4h+qBSlUbixgJxfD6W34ODDm3qk8n60HKVZyE1RPCb7A0Qm522Sx3Sl1YBag8N1jMkNCtca1xpmxgR+TRw8ER1I7DlEH4VoGAGESjiGid5T32ql1BDDSsb7L3s6DijAFgSXfO9MZSfE0cSTBUcCAsQ8SyhQqSfzlT49RGZbue+OmtR0qIcXCfXHMEysdjuuEZcc5EZUxuuSO3CIFFVExvXKbBjUR4Bh/nOeRoc5VISdxd1gjEm+VbSX365VcSTD7ccfYPRxEPstZFnc8h+TPQkiE5g28ih+Jvbd/NIn6x2WMzqfB8wdlMOdVL9eSi1FztvHpV6pb7kC0GM09Ou1HFMiq/px6d/BdxEerIkvzga/4y/pugqlUCWbpetf+OsiomLf6I0VhRP4uTVBcis9Fugo1qfE9Czt1xVdQm6jkFpcdtW0SF9iglDyo2SQ6tK1ig2BTqKtsu2vSQk/udgSqNBifLOtdtqwzhazbFfbICMGoWL1qErJZ42n66zZghFMUmkbrOdwVN/cJp3msV+ImAFAgZxcFVOpSAz9Z1Fq0FkUNtX03Ygey+pXHYm4snS6olbOD/isF108FeO8J1OD//r/8SNOTlhWNlvair6NWeQRtbmfrnZXV7j3U9LX07zezfRIDZ2fv8bafWYHnvkYshpg7o5aoqj+0gBkbi4lEtj/HufpT/Grb//vCAB2lQ38aOj7KondaPt1+wcAGbdL3uwfmpa3cf8cPBaFBOAHN7VTm/scbp9JlWq+LNu1i93xN3cA8yAsdo8qJEzaPlfTjEExUECbNWunc8j2jQejrl5/OhVAjEDW0pSD0HKDmyLbOn3XBGvUq040C/NbeMK/NOKCVODhyMV51Uk5NOwC/KurR7B4RGVg960oPv2QzkjMeVH8fqqp0PofxARx1UoOiEld9eYMYX/64a9RLSYS10LsG8FoZGKKVvsWzeREWRc3eR/Zb2eKFC+xvwx8zkMuhjwcEymhcB8z3YGXoudsiXMwpQAsNdEHQyENYMZGS9NmatgnVKNcyy7WaAsu5RxgC8xie+PORxQCC/G2is86nqGXV72ksDUHR3AguYKys8aGVc+rGoHyfkuavAWyyKt2J1Isdhur25xsK5B5Y3rdu+7Ho3IKWH63c6McExaWtmZZrFlJwMlgUPxZEf3q7C001impSzS0A+IXl8teRDPPHQaVffx8di//7HIH7qsmRzxzgopdrCkgTTI3dXtWNRzTatyIOGII0ob90kCVqHZsM2luvwmUdk4cWwgHuj3fUqPBQUyrj3DJSGG3sQ7GhVpF0W3tFufpEPE7PQ6ua4qJtDcwmszu6P5Ch7fw4muosv68roIEfKMwU6PkG+lqS6+27VlFIMoJxMeiSXskmhhZaHdb1UPGffQaILNnhnzBvR79P2VSp8c9exHU69m/pXfJyBpxhgtlvhadnQIWPh14SCLGFvthHtqlf4OgVfvZAGJu1rxd5kfinjYV4m5P8qkTTImWf3PGXxWkn5erluRWWeLYjL/Xu7nO7PQmsMSYqwxu8r/E/NbJu49cj33ZXSsO6NQerL67nlQVqjfGygmeVgc6taTyU2/epHJCZSfwWuLYrDwAL7PPAAwSXNoZDPBGRoWIYSSkDPBvSUETKws+L9RQZQBcWOeo3pm7GPxzQJbv/yrG
VcOFhVIJ8g4erkigVEU5wb2syR/u0pSQiVfSqVuLraf1rLx7PFXryZqfkYxVkDymM39HobEMFB9JhrsDyd3k2OJ2RDZ3v7koSIMJ/4Ku2A9QB7LgG/liwtRVTd/fw1p9Bby2hQOmD6HAWov7VmgFPtG8fppj5eJdV5UtyktqwbEvJ8qInf4UirkZVq60J4S1dP5mgp7TmOCMfh6yDCqRK1Ts8wnYJg8Xzm50bx3YIqI08p/AQMYuBXsn4KgmHvt3KsN7K2EOULVHkTqG0KP/ufCca8YKuvgjXvlyNK+rzQRyZCZQKpIG86djGBfkw9GJr9j8FEs/yqgtPB0LVggT24f8289cO2+CF+w6yusztPADfu/EZjB5vfruEJ82+Gyjdk2iCLy5Dl4g+27JeHafOVRs3zI9ZmrSsQEtRHIpWS5iGBYvW+TflZm40K29Og8pcpK4txh8XO3NYkUWllPeUxZ+hbdiZFFw6BuGPKVYVZtP0uEk9XVn/S4tlklAiRbJH5XI7mO5w4eOIHD8kTzCt6bd9H7SWdi5u0I+4jtLWOWzTaWZaXVixdUBY158yox/TYJG3NFZ8dWvqw7N0Bs0+nfcJrCBATpdqsd6zMCi1iUTPz9laCMrdCN7I+it0Q8vFpxNBxXn4XzmkuyMsB0zfgN0Wlyvy+RwdVPUhcpVon5HZKh83V605SuvN9NQ1r7OoXHSfjC76g4crD24/LNIc8MYBAWspkuatvmNz7UBHP3fo+g783sG0Rq+P314xxYVafRaIbd66+6NeDD/0UDZp7gEtvXQnqn1X21wQ+R0A3pWHfMcmSu+df8l0tXJNG/vbSxzIjX8IFswwPuhyMnW/EuXPjRGr7OOtDpX+IsqDES9d1kxsgsk5V16vKtZ27h+xP+TjgHdmNcyWnU7Pz1h/nJPk0QI/8Hqn4QazDRZ0+DbZFooK5yowNAPok1LijFSm9KR/C71Y1p4rQyNNSrbzO2PcNvS1QfiSAtonLND0H4G0eY5Qi5SgpZ3YtjjlVQZoC21pWozvdYQ61u4EVflBTUdVmMW1FMnD3WN9Y/U/9qGv1K4wQrl4vxljaSuWcgUC78ZitoX7gnVpHY6Os0qoTZBSRIplcXmu+zHfLNKkF6nerGEO9gVjCkEFZdunJzxYbliQYLcWZPB58FwqKmyPoTwouDoU1kukLKdTrKV19YgY5fdFGdUqBNReINudZewVMU40UfVtKwzlEJD7U8iTEbnbuhbayW32SshxAaI1EOYm5Rck/+t1lxVTcY+pIinwBRRbMEuGKpc5WU+rRPAbFaKyrgfPZRgMEU1YVbS6RSrCndeaUo7WGhY6rMhU4BA9+zRXoMuA6g5i1geQDj3AghA9jymlXlGnhA9iqCjHMAdvzVGJbJJ244ceP630bRfnpfTcPNPLUO61TI3pAhI4oakrxbdm42/7sWe4NCF+oaqr+cP1xUZZBesCcZc1vg9JQHFT3InHEZJ+uNvG9oSEitOU/nBynFfljnV4mzApCf04LR+silI4hDIFW6okDSp428EE4WBSsXPV1uBGZm5hOV32vQ/Xz5Gr0+b7RYhP92d9BRuvAXbTjUAeu3/G33xwmREULUWp3YjiZTj/7R0jt/HC7TICsvwYeOmGgaSXCwhtQ9cVJnNcxt5PSU6QIofFHwWGV0V5joBhYEEfXDxDEpGc+HGgHcKqpmbhrfFaZ42vHzD1oltc0r2iczGp8bL6ye63rYKe6+tELvZFMljHIoO/rp4iuDCxBbGAQyWpJxnwfjItHp3bZgRnj+0LEX264eo+YV280IYJ7jmbmD0RBhZTx0x/UxTBMWIg9cf1uYWXW834gvYBBV80jMZKw3+AP0iaxyLsv9axYH59pwXa1Z5GY/FnfSNWzFanvHb4V1bJHiVZhGjX7AuG9tKG0P/wsvTYsUNtTYhxe7mwAD/MTSCHac8Rk02TiXENbQz8Q7jfDDf06W+e0lKNwR44fODIGYtG2wcKLe4bk/yXSYu2De+PYHhD3Z/S+glOUHD/B+lmfXxYLSEA6U0wkwv6WWa6S2aoixZ47XaJ9r5i0S3OqqMzzEGwNlqKSnbFkFVG/JKvjQjesSkCbVOL1y2ubrJfBAgvN6lopRXd7UiDdwunG7aE1N7GmisOrlyUkPXCVzbF+THZPXLDrauXVhIFthbbvCmaDURcmkMaBHI0q06W2xEXaNlfdaKNXB+tAPjBTwahZesh3HDYGMcT9dkgAjDJHi/wAJ9COCDn/DNYpF++/CpxUrzI9Q1F/LF6hqF6Rbgrp6td2oR1LTO3djze++IdrN5d4FvivIj9kjckYR4DUMLtlSj6fLe1Jkj7ovkHg59euU0UQxI7INKCpQ/rd6qPxKb9Hzb5Zei2yHK7Qt+Gfcv72L+JXK0ZsZ9mB6+a/VwEDPZeEXn4SoDJSiT4jPAzHbmpBLlos6tthTDbXt3eCukg0OB/ctn8tC2McEOX0Q+gPkLtz6h9tY4bjmW8Y9XYzRaKdd36SZmPGf6g/59b7dtvpmPlOG7zVwJObYA+u3C5g0xwRCawrB8PDwejPYLuEyaTYk2SaDcE6aZs7u2vH2lnbss3u/HSmRE8PFvLnUJjPWieUdQG2sWZ06JF4kFaBvdCmrvP5Lhdm7BDfHWMWKMpZDk1Edo9xzL1qYWvD9GAHumBUc0HFMFotz/1UgSDZTy1FmZjEXlnMrujV7QsZbJPPpJFEVfR2gwJMb9ztBsoPdrrxOaxcEQm1prx3JejQVA0gthD2+23uQyZSwtHcze4JaiK6v4JWJ+qSSFspVhBD8GluxQLWqe3NcTQw0QQkeeFB4MxP9pefuQP6x+UZoXflvsvQT7rlY1SIbZPkAsCa7zdMMJuse8+Q4mOUyBZWpyFnzzv49qVoX7iewoT8hpGnyiGqBU7N4AzYW4Qj9ujl3DxD2ecXXaCQAjx2XcsQd0nrE8iArCmkt6xlikbwOz93F85OM91iH7h7r6RYdJ2eX8yNsN382jh5UJq54bQeQJJK77HIwHJdozKqoZvNbmtvc46VU/VZwHqoTaOzMeEedJvXnUIB8KtUoSzECeNXXkIOi/90lL0hURZTIEfYvBjeMZfusG2DuC9in2p1cZyviGTSO6e/xt+Rnezfx2enrKrqXWoEhZRbOlSBe10kmDbKP9Ses030ehs8sHUA2pwKM3G7mQUVZ2vIXbyJexB3Zt4Ca4jZN3FpQpo4aZt1iJi0XnBfc1TDlNa4ND9X9qF8jMY2cfP7WZjgozfKlJJdUJv7ajABAHMVoMpTsTs2xRZsR2lm5rUzKHNJ75nCAbOgp1K/EuIcLaLc2kFsrAdQ6zmW0l6RamuJS4+czR1MErZUEZc888OSA3IVd+atplG3n2+YbuJ32vFf8TeVR2FUCzpNqQDa7qEPVaptUB1Utp5ua6IYhwaNyuQmcI9EUM2eVe+ToNEqaywGnR5Pv/IjYRmH8QXcGMD/LM/JJjnaZcmZbfIMumDG5KeDRtXDP2zzwt0wxuF/VbvcNzAClt7SSBleMixvKbwX4s8eCEr5gnhxB82O+4ZnvRkMZPq8xEold3JZCnLwTdOYn46mtsvm80vDobFaRJyOjMiM4Uw6NSUbiVFhoEPooR/kpEsBqVzmCMetZL/enityUHf5F8GzF7RWJYkx4/r5ieBPTsUGBuwvqN48Zs2v9Ujl2l5sjr31FJjjwUwbi983D0jqFqI5XhxKkpHc4VN3n1qSBSBJ997U4Hmj7OgnA+Mmkq09BDGwCxuvsySvYJPlIsnMW98vN9gdcGmlxyLyaqGlYiNU0mSu2cE1fFP0rrPv3asjBEoiXOayqWlOPoLCreULscD3n8AG8NKuL6CwdwZswjCyRgeoGHgvDYCS38mg51KZ1H92fUeD3mBzIt8fP9GzmmcUJk7SWDkoRL6q0hVLRAGXDNckbyMZf38RV/Cgk4J8r5D1jj4G3wmvFkdO1SqwbUMgru6XEf8LiHkvZiMQqyP+4bfvlrUDEs3uVLt1Ux6DQf5KS5bCrfSPuCGyW1u9iIvSvjrhU4aSLlD/7h3RuIKTrJ0oRsKOa0bbofsCQeOVSdDerzJOqs868lKrjboyvz
GIFopMyIY+tfuiEuO15CWGHyoFklCQgBJqj0hrh1VwHOdKFZRBDsSOg7BKCebHx+8N+skQBmphMzRvM6CBXdvCs46219ZFCltaG78viPrYtbcPvsn/AsdkEOoGS8n3zyx2HzREMCoKE5/iNsdwQ1QN8HFLXVZsbnR7YmSjtJmp14G7BtyA3FncOIJvUdtC9JmJE+vf57Q3tEqJw+aKGpZX3/ePqmrCzyPm2G+0rhIaRWw4VMzu3pstCmjp6Ezv62IbLeVdm4IFEi5he3EqvUy+OZHSg0g4orEpguIfH1ZieFqzbUJfNchrRu8BdDMdfeH7pP1VGZST5n0JsmHveglTVrcdiZichm83dOt+LwZSNCfKt8E4Z2MRho1yVJbat77nRstJcVSDix+qeuppmpukdKXYuGotjLAYDM04IScVY2JI5liR27JN2KIrbW04od4swgdV7W01+dMXpYfLNQovd5peLQbIJJJKobuglnFraNxlgTfYuw/ntTR3lFWh4lnvEU7sVFKbeVeduK689ouycd29Qtdo8maWZqYGsdiPZ740UWQDzuUFQdUZsXHOIBCO33x4FIrEDPxGv+/tYV3QX6p/OdPZ9pePgZuuyHqyy+aa+HyWtPyycvxezWqZH3YQUN9pp/PGHtuVi50M17P2fKEAvnZD3CKpFjByQP3ce7CxMJBlTbxRQI78KrN4yfq8VrlHOVTUzY8aL9YvGSE/sG8g0j5/rJVh6yOUAHcBXkrm9gM2l88Yfg3lqUcB3c33cjFsBqPj3c2HkzKhF79fbEbBNrzNkMy0PyjCND/r4tTrnnItvYU4e03R6rbqFJQ8LuIELaq+t8FPu8361h4gVLF1wVBGvnDmx8NMqunpOv+P3BlZSUxtqZRtkbm8g0Vntr7ecOkjs0QFCwWURpf89NMeu2pvlXkkdthr9TQMVjUR29CTlMIFxcrTvRldtyUK7cc164ge+cNnMQow1/ZfLYpBv5Y2d47Ir6NBRranhv9ZAfCUIogCnuIRTEcfk9WzOU759IxwPWukVMj6At899C6PLKXJSDQKiICMhmCq8vP2/lPVh3enzwsfgd0j/yWxqpprkGXPJXuUfHeg/686y/sLD9AaCXyKhUNsZoyjrxQ+eP9UnS3PtlVKTS0agl8AW7csI4wMyLdtkNusbNtxQr8fgaKoMwqK4oD32kdaRfRDj0o3FsG3WkHCGyuadVR3+Q0Ldc8Bbm/c8XkxIKJIq2NO13VcJcUjz8I53U4VPWS9P6XYDSSO+6hNOvFHzEuJHv17ZY6+wmGlDqpN4DpwhT7laPXa/Ic+YR0eB8QgLvlhB8cIAmUf44T1RDvHMfPxMHjP0l0AlbGvSBK4pCZO0s7jfd0FPG66UXK2GbcsI7OUYF1M56Sj33agkcR0nfr7cvGUzz4AbY7JIbajEzk7uSZ3ZlkZP6dkQZB1NboI29lz7dsJmxt0XNG2ihm4xN1OAKQiTlFHoYyQ7SOobJoJ9zr4IvPVlMjkJBC3h7ufK35Xkdl9rfqO+Cx8qpAd7CHdSBc/4Joydb4Ixu2d2YiEfJGdaNqUZ515eazFbhGmBkliYJJv/TCgciTxiKGbdndH+TG7J5OZJbVw66y8/wGbZZXcw+UOQapIFVL9/YxifEsTXxxGqVVxVaxqAt4ZN+snExZZJg7ea24eH+NK6iIY1rnDUMen1ANRT02a+T/NbRThjzdLVuepuTUjk3+paJBqiEXiMXsFfFASuBQWhSd7VG397zEVCFmUdVP+wxq7uC87C1gsmxqldAC8m5ihLEwSOGHxtiia8JyPF4AoeaNpexMO3eWwD6YQ9oVt3VIGkfKbd5z1z54SRxziUFqTidzLg1jt94GmLeZON1UstLvXUEu27Od4tdcQ5hA/MdiC1Wxg+Vw1XNiO6F1lrJun6U/TnXqwIo76SI6l9l0p980jJ6qUYyUzWryHpYO7tj6S1SeP3sla9f261oLAkP4uhLf9Du9YIex0w1q3fXBrWxumlb4f1u0ObdVCf3tb370hJt7x3406mIkOiT6GTnI0YDIrxF0gpQYZywbzJ/FMF3QW1qyLJfGgBVPl6jGZYgZBmxKSmnps6iMjh/BOi8UP452JkJAVZohEI/RhFpDhcZTPO2kIjmMGbaZjoRP7eVKVSZdYqBGo6lH+VtVtOZbCNMFDixX4NcmXW64HW7R3+yt3SATvSd+YtJVySO7yMnAxIeFpk0OsftONkJl4oWlEd0ymP7BRuiCb5zi8JzLb20B4JRGAV9GZlZl7mkuvtL+LzMUXyCV2k0bHc4piaXuh4mRI9KwHsFcaaR2HACJqOXF8NX8BDBO7fST2yaaHWDW9fHJ1KOeHaZguczIRn/uqdcnAu+D6PRozN42MKS+KeGPpdKqTA8zOkfDk45GfSzELzaeX9FMBy2pbH8xBLaPNdcYvfZAXr/g2v92+uQ7Wmk2AYWkDV/nYM9Hh+ocXmOhAh8yYuHa7Q2hEML9HYVMPLd+qOfVwYFw+Ubz3Y8uMeRmGqfUda3rnS9NLuR5+vZw8Sf7BVgu+U+E1m3KxnH1irZTURwbj2GZWvPOFJRhO0By6BaLx+waN+p8RPdjbRujhRRecM0cxf+BQt9C5y1WeudT8LDyMQHHf3j+giRH4UEARFWq/NHGP32GnH9T4G20yVQoH6VQy7IJV0Kzf5/ssx80Ydt861ZKV1lcbQGv24X7pNISdappyuWeWAYwIQcHXtzyrJFp2Ckk6jHyKBQzgPHXUPeUEC8OZOaSgUKu66WvKLJJrBhqae9qmNWgfTMutPbttKBaJRLU7Zcp4vv7ktIBYjMBzbUOlt/4HPGGWPyYnHi/W1GWePp2fDwNe1Ioo2lHk+MBJRdyWneoLI/Z1B2PHfkbNo5otfUVc4Cv+xvjCvs75USk44i0EC8DWn7aB1inK9mgyOioa/ILLrMxhsl3qRnYLUXjTjPuLYHjuEuFXKnU9stAUOy9xZIo2bIeLXdGOnP8D3Nc8anK/ekgdbVQMaiu2yZQ/xvcGrlUAoNzupGkOCLUN6B2gamHOR8ZSvmeK14k1EBS5AJGDpX5GYfYcxEzVVj2o+ti4uKc8f493qrhZsc/wnDQGA5nzwKY1rXGi5LchK7CBZs4AleNNOisCWtkeA3xZVQ2ZweZxHwC4Xcr7mNRRNfT3fPT2JsvzR3j7LpszRHrQ+4NcIOIMDOP+fBS3lGHxuv+B/VWpnJjuIchPBiG2ALJmfmW+gWYgjpvKKiXNjc+lIRnXjsI71UqDOH1UTkFSAvEdEIBrhGnFhDbJeoWE54hkP0of5blrZ9xpen8uOh8EThKRBP7zZ2VMc2uDYl2KJ5DnIpPszxhO14FSpKHiQ0M36f9TJtRIT7kh4OJCu/AIBnXAcWx1XbqpZkj7OFzbtjGaO1cNWBnTtl2TuyY7MRa/6oCAyr5lB3ZF7AIj5ETMYoKXZqr5pXLhcCGGeBup1x4OHV+ndZWtgcMgLuB6gD0YoOg5cCJGPOst9aldEtl92bFumzsQzcb7S3LTsoFxpq/Rnc8esDlIzoVs0UCdaS/PQIhGr6/HHJdomDHbY+OEYFnbXqoNtoNfmzL+cqFWmhfPUtlzNsN95Vg70Xv4jryatcTKehBQF2J5K4n/xBEl5Y+dpy2TOmLdr1R2aMKz0r9zT4ZmtakOlh6ffb8ADStSwqbUi/p9+DOTyWXZlbvKOPx7PRpqYT1TdwOWYM6OYppvgKTRGr4oZVegnjWplg/i98+GqtIoHu8Bg9VcsREulxdvWtQvNcZ2Qv2+ttKIayCsiAhjnqBN6mCkoJG2Qi64sSx4Dl//wGTsylCNYTSne5G7KSQL2QLciNdIlIfV2OLt/oOm9TDViFXyXFAVfY0RF2MJy4s5iTpjIY0CRJiVXbOhB3rFP9Mt7QqVFcMawX72RZn/ubkAW2i4N31UhH4HUzp19mdeMAlOMvJhr2e2nEkkeh8fYXDn5xsgGJus+hsc3/pQdToP7FHqFsDZKKbh27IIEACBJlCnSDtcYtqsZHvmw11juxh1n+gANoTQFWNoG8Ty0YJRGupYz5IBBTLBAs5GrOKfGyqdLKDRyr4aljU21lqWWM
JVoP+f7to3jdHAuasOeeEBNBFa36iC2rzlDz+Clo3fvVKOl98e/XgD9kLzAG0ESZ3lQe5fMOmnf+aw1Ex5ehZEH14yB1vMj+WxFJJ1Ln/gR1YISKkKpeFhNFYjCmFTYfM3vPfRsjDmZO6hSBhsdaRoiP3c+Xf1OJX1qXhtBs9wu9J+g8wBy0f/4dd2UFwihiq/BIpVK01W8EGeiN0tmxpDGKQVCMFiY180U7JuiUIfu6VXdkeVL5+tbKvh1NJm/nJDLmS9IFxM/kx+1BR+74h+7ijaQaquAK6vxcMWKM1FUWpXLgFRRksqQri1ZODFad15MFDSTfyL8jClXQYemwAouHVeSZQqvneboXbGTkTJzsXrt6b+ZDQxajhIybS9V7CSYyA+SpgYLgCAGPtCKgD5OCB+mUw8iBaQZhb8Kt/+Xh5NSvcnWX9hM+F/KGEnqrS9g6fLt/MKl1fO5PfWiTjnj/GUoWScH22H5tab55lQKZHGEHnwvIBLtMD5/j2qyjaTuvMxGvXA5hR9DCfs0BB99v1mtKJPQ7Y+AwJ10hERK0/69JTkv6AWMwZWu3tLKJe9EoQXks+KeufqIcjdGXhW1xwACEgSp6AmJ/mK+BS6uqW6NKE3ap9S1O+HAfRBW9G0HlEW5MIOAPsTFV9sYeVQmOlwdhlIzdcY2WmM51vRcBl6OEXrlvXHHKSFPWCwPuUUT1zr4wFfanJFefpINtOsCmdcWHaI5fI8//7Glr905Kf8ULWVizDLi6UGf8waR2pAqzc0llJ5CueVWclfNDW8LP/qttCSYwJj5lzAdrFR/K9efUs9y/NTaQ63QN4M7sMzTrByBu7d0jSTy4xJDtHZzkcwX6uyMIWiYCl53I3+fGM9SUbpaf8okOh+07LfbIV1mIYl4AfgorL1hAnKUv12hbqO61L/sLdJwAFz47KR2JH8oUntsIZ0PgcSoPkLllukXFWoQwoSPm/P5/sOmp9EHE2rPoPfOsR1SCK/6b7CNbcAXPGTM6bGrdyVFv1OvMqxGp1lF7hCIDUoJp6xphTTiA7LvYnk1VFg9+WFx2Gm2R97mlT39hcsGyjHj7VesXe17Yk1XVwhTk/Xz+v6JgWUX5wjJPXuzopvldlOITkR8pJO+yfE5jwvPllFQN3+hfT3IYSfTiH8NsajGbtzDA6N21YNZoDfeG+7Ys98sRIsPmt1eDHTrtsEpAoWU/Or4YesAaKjvqyj2ttFEr9BsRXOronAQP8Yh4NUKvmWDDCWwTNUH9gDw0E73nOVXyJHSQr/Q4L3ZU7O6i416MYIl+7DhBunn48QkE+nq18nQ3QjtaRQugCs3kjD3pzS2QGWAIgZ98qcYkn7gx3WLoS/KXJ+U5hQNOKyQ1VjokMjuMMObXrh6OwOzGge6qshuOWNNVoZDE9S4oP8LBBMGitijUY0RWoTxobaqorU6Co3mqoyWhEVuwYyA5nLu6xw6NGIIUxVrkyy41qvqnvYBPAMWfcYau9nKxrnqETQnPvfsc/+8b4qH2W1i9rXKVem/1LUrWDG4uoertOsKwqi/dMwk/bUvDuyB5En1i75MEbMywgJf5kvTTxpBHvYJNXofMFdUHOuk4I+hq33nhH2iLlDZx+cGbdI7nh0O5AyTHMHmyQkMpYwUVx758SvKh0t+lZrLiGkkD3K03awt5Ls/tgsgdbR4l5ka8bDmXQwpHywiePvG51oDMjKUxKAfaLZlhAM/kpiRqM2yBqsBFL9KJdQGBMVouMhDz43RiIrTBfro/20WVzzS5wDVhXgzwnnx3GvgEIQt/l07ku+9rGSJ5dArCsZ7yhIkTvhAKLuyXa/TvsSdenkW+jq3vmzUz5YRVVbuTtOpNOW6KqLUA4oEFRod2dLJlnBX/S9xn1B5o34XNxdtLr9VLTryJBnobYAfVbHCQi/3fazSe9QS9Fi3juZMtEEMPiARqXgSVhV8ZBiNA5jjtTRCjAhI1QtoR1q4bwzspPWneW+gQXtxT5NBOxbWQUg6OzU3y5W4TdrTHYj0mEpm8Jp2rWQSBUPpm9SnTd8BzMv1Dz3i5wOqv+bQrk2HKw26IxYOqzmuPoTJxob363HLd+FxMf/V/mbDb3nJIPGDmn0pU56pTCQnedzAnWqXsxQF7xct0P7VUHGwcVkvkePaAMzIGhNQWQqGNkW8c44NAVUBz0cfx01+3oO4tg0IJIxhamxBhiu11bV3Bt+MrOJ9dnSTQY3uXygtGWawT8xCWgFqM5ZNLbKuJtnpr3yg/Ijo4kMGPhDddyccB6jc8PavWjTrfi3e950ngi1R7ZMhEvyw9YXEpChHWp2I1oCPNeGd0U0bH0MyqTJffAHM2bimZpexb0cMWrOoaxZsLRm0SDftCmOzhvJpKlrYFMLgwFlxd16PxwNJOEnvRunJmalMhSsmH+2Szmpjm1I6XDQT4RUQvChNV1lom97d2f4G5a2Rt18xEV14gb2HNeOUnBU1O/Ng84UkrUdTP1AQz04kIotVCAF8Qgm7izNXjhR4/nlWLmkhQRQvomCES5Z8T6MbaH4LRos4Yki/D9csgKFefBYA8kAf5csC6oT1i68CP94Cp4ghFYrr3xVEX/O8r3Fq6wN4GNYlEeOg6W6zuc0fnfeOp5mmuLBfsLlqbX+6CZ01Dz93F1KA8z4AxJ3B9WAeeSGQ2PuXNmMFssgIHh6M/ugZa6GzADEv6lC14xHeAxIc0jxg7+SLD45A1g2r6eJ63aJAuq2ISjuwrJUPqVdNeGKRY8Z9R7UdpfQZxjXRl4xXI7d3AJ+GsjPS3VdtwyhnZ+k6wgHUlc6Jd7nvqB3ROU3lt06fAxMZHFM5H7I/oEVFOiosh7CHVa8idniaePnghBOT1ueemi0K0gaxTm3QKb+foH1cVeYUsbe5198HNaMVstPBDW+ETOWTQAZiVcxEKJ0GuK56jFLpx+IFMfcSfaxncBuUgWnPxMpEBXoxpriloc7g9IWtfVzf3vunsmq2ZfrWIfudo9JkEegfxORCeD4qbqwa2uOoxee/krzaXvLlECdavegn0sTMvL5MDbJrdhNuRiuc0mJmsrTQ8uS1bzcRgea6x9NmC/C8y/z3PVGESVU+Dm0olyUUFdj7qYGckY10tjfu/MxYi/wUz1rFnUTuLWuqLPkmaeOiAfY6+cxHlO/paQbiW/ixNDnTDc5ols9FBN0VGHR+H+XLctwNm7U1ce1LwC+oVe5Mz5dxpAxJUNNDUksyEibAbpMkmnMMKsynizBq+FOzLHgkMTAfSWb8PdCuhleE4xv76e8NvwhUR9bmct1IioVb9SEYkDrjFTICzqh2JsCzHWh+lRjwQW4eyiNWdA4fmMlYAeJcCUOF2enPO62wjUaYbB7TRy0VK17B0Ic3jlCOD/Dv7ZIAvVrXRmj7IRIlxmwwi16IXYiivwiUYK0uwpG7GIwcc6z5uHbFhAqwm/KjBwULEQy/Y5tTpO//IhvQFNrrpn3SFL4D3pDPT/vCFz++Cr7pHTSO5fm7DkIySd8l11C0SYpsDV20bfmXOk2XdWxrauLCyYGJ21Mrms+sJA8i8QX97MxGyTBRlXfSHaZbJcy++J8i6gdZbJflYYTSMAL0OqAokw/RCWYBl5Ivjdp4ezctV4khoPCrV1iNkU11VqcwHanTYISbDXHN1oOwvmbKUTqqea2oyhyiQMnTfRB9ACZB7B9i7Wy6Q12vF2KsYja43nk6A95ezG4a116Y1tkNBee2vu6QEvi1VIfFuHtG/pCP773D1zbagqnKfamfMBfCD/gQEWWTFSM9INQmmbVz7NXxDWqUbo+1k7U5PTwQeM63mO0hObp4okZzTR0bW8FrNxLLIsKazuYIED02P0K6No9uzdL5GC8/qHSz7sZR0xcNZ5A69oZhub4Kzt7GPhNc/9wszXgNKq18JUP4VuhKTPYg7dKxR9nRbBw35ifTpDtSCWk+ZnYhjareA0NBi+GRtALSlg9iXqmQYRaZ9L+J/Cxj6EWVyW4ZdrYLnOojgCBN3tI8mD7vO5f1cu6OM0t02SvtVcnDw5oMgi7hRKJ3k45NJloabAsc7YrVWbwnx8OkYoaaxmP5F9KhJwpopWBvQSa0W
3Kk0Dl0khnewncDOYlW82Vx2V0TYIK1amZn8ih6OsQaXqEmskoz8Dl7ruSJ0vupvACWc/tQJWcJkcki998SlyHj/cmBPjGcV/XYUYYPj1+4pGltP2G4vZCp4iTS4if6agcNeCpoDrcp8DzOKlqkVLWQuWEK5SqrPRSrTsgm1V4GuRCgr5hw35CYPg+ocoJfl2D5zy9MJD/bf9HfrmVe0oLfRAzxqkaRFncsPZGsGcwyGI5YEDTs7kCXTiWpIjtmjp9rPrSPcLNS+IF+U/f6cLG0FabZiBkPzq7PdV/0VXuASYIMG17y4vjJzfCkNdhMAKZgBJYuo+E2KtjQI6G0wL/FAftQ0WPGdkRjJEcJYeFgfc+lnHcbn1KKE7YJ99sJb8NENHVcXt2erIu9HXMSQ8/+uZ7CFdhhbTp+xjhnoTs/rc9Y5w2b81uIh4uyqaCRGXerZoEoPIkWgoVG7z70RST/Ndk1fDg2xBtEIvcR2N7UxTZ7/mTvBbBA9aZoBJosKFogQP63GoF1i67kt7DR+BfyESVWjc+vBYuftALyJPh8DjUQ8oqrqc0Wo2KtnpRNI+y9uiVd2qPXZRhUwF1xIlXbplYaGBMiOAfiYdgwHQwBzkXGhTRwAWKs8RX3jkq2oVuSDjrwClUIud0Bu+A6399JlyQ0mvMSqChRVxb7pO+d2m21b1QopF19nGX/+FKuibWk24wo11fIPO0MAPOnspJX3J6+dFaw/xHimcF4AmYNbqtF77AU97PMl+KOP9dQin7q4k/mNTdOjoZpVhRC7A9lqGXyN+90jajH5lFaKt6g//bXaeoPXJnjsTrF+qYuZWZSNvYk0I9yijnfrWga8ayFfkGd+b3XWz0cg1MAyZlElRN2D8rf5i6p3vxoXmkv2HR1GkndPx75STtC7yQvkYuU/pGn61HP3GXquGUZnR6BW5l4F1n5/tv5AiGCoWcFzkMnGdSrfqtgc46fcmZqiaA6/hDANGzNCh95sTpy83FcC+E7wdIlE9F5x42MElu7m68a8CmKBwGlqWeweWhM61agNiLY452R8ExQN/ZUhZ/oxIE+CZ86OjHKr9T8BSVTjr36GLFckjev0VE7SQVEg9X31mDLdjdOUaE0ccmNsLAQMTKSf4GfBpPDLkEvLBW2W12xpvmkA4T8PXj3KcStI4t2jbFobGSNkxkgW90Z/NbuKUBwauEi/s43261Dod/5/aMcjIzo+GU6BcRdK/Eab5rZH+vrOALmcePK2pbrXgOTL6AsX6yv0TyldhILUccDEzUEv30Bmmp3ZdPoMWikFEwB8FZKuNrPG9xP9WV7BrtVRV5vpWCOam0xAt2GZylvrlaNz+Zys4FJq9V+iwrOXI4nsSU5Ldox/kNRnt/ceATUQrLLN22hsEI4rbPDx4Tt5bka4bMguUVqgSL5l+i5G38YYmKeWZF0LzGdDUIJC+dnBWD2LZ+XqLfnULD3cc/zLOs5gdR6e/uTFMaLg9engFZgzferzjjm9rZw8PJMoHfqS6uTfhiZ2UBTGkeB305POVebo+NWHsHx/oGr6kxSAQisWtk/Q2oA9bouv5hvo190t82IxTfMEGJBKsWHd6e15DHOBbjoKufTSGw0D7Lwm1/vCpUNur2DVlwdzGDGLu6OUkv8D9VkMB8apnTTe3xo7Dw373ZqD2uGo5Y2Q5FP+CVE/KHDomEgjBrd0I0UYjW2ZI0JhLVAJcq/pm7Raw48A43VLJx4UMpFLw+q/AiJrS2lULfWAUBBRrmdgkN6Rt9uR7DQqkwUR0I2kpC7RmP6UEYKbSg/vAfhyh4bk67pbLWqV7BIBWcWwXEg7zBp+pLDPpoVpBCTEPKEaIDpNt1BDAbvhezi7iqbIT+tB9i/EWuJZETcRD8PIgpXBMe5MA0xoDGLJc1rTecr1Bo6zdoYtqu1T/EHWjUt5Qf+0qbKEs9yYlYdL+afe5NQ161AUpuIxdoBcfZ6KVmQjGQgPquoJWw3JojlE1yIO5oci/5B9LQwWXdXUIQNUDeGft0MDZKvnA6ntRBH/COFhgJpFi2LU3oKa0MoQF5gO1Pq6W181EdT5sh6MJwxyX8kkMpngeh6CURXaz+IRHx7Rcja8DPGARev0I59uU6rbGMI5zYhddvab8f9RFp0a7+1zz8d/ep2M+nulqKNTZSizjlpcBpGjqWN4VFmbWYUPdCTThYyfsT5SmCiE9jRk2eXMeJoX+WUx7bHmGTiQimFTRgXMPDS+k4cBR99mC5UR7U4MuyORbZqLKP/BWgdQmPm/X16/oKiYsrFB+c4D8lIUio+LQMHwSSVcLqv7llG6JGyAD5vr/5ZV9NLc7wjnMNQVHZBjLc5WbIofQDatutf6My/FnpUTam1mZZe/Wjl/7Qs9t3bqXudl5usbflSBDYKOQLn+po988/qc7OZgGl9Hp39xFWCLfWkq/m2hLse/MbpL35G4bFbXsKk2AFzwuA6xwGLqM2e2OC9Z3Vy3lmE9/cyJ6hz/V8vGqm7VBXs6Q+Hj7JYXDKZL5tnTs60PyMlwP8IhIDCeJfJRPIprUfDThPhXDEIr0uGmGw2I74nLMW8ZSg69nMj5zneQwO3zYwrsMGinzTywkLc0PVYafHiic2vGzDQFPpjj4v39N9u9JgE2M3pQwnwOIkUX4srOaEFy7n1Z+z0Iq0Y8Z/PIa3hovHuiz+4iJs71HA176OrKyZYkj6evm87R7j6Ia+hDyif+YtPK6lKF6r0biBPSnRK/HffkzRoczHmUgvgTsJNKMWOQimJGC4FmY2yON9RD7mnUWUqXR17g5xbLEIWbKeWftlRtJcV+0yJ+zQAV/19ZchWZaCsEfqzUQpGyVBWxM+eITSFX/3LDuiWrnTUUJ7zFE0WGihjoJUiHhcMLbJrsv2cH5Wd0xuDd2gLyMQBugoIrssxVAb9iUNlVuDsl7jEejJ4H0Ais2IcmiCTj/YAivpQOSEHRXAJcs++4dQ6tti44gSJUN+IfbQUkAw0rJ+VOkGnE+FgW9Ze9WzjnEGYV0qIgFTKaVyOoEfV6Lkl6n+zfL+bYs8wDrcMcpn10VlKiZ49fi0fxp8o8eQ2kc8TTXg3VdOIgTVlIFaCRwHwkwL+7XUWHvKgXtACi7webGa8P8y8Z345Pt7IAVpRYg6mbIWbwwPK4Ydbd+RjD9sePmuZdspBdZNoNdyhHEOnRZcOuxPM7kxpKH03zr/WYMDXtEEw4H3N7pxFau/mTyelfvsz6q6J9MJ8LEFmlrzbca3YJ+yJb+x5Vfg2tjsROz6GsYVKppiHudx8GaijdodoAayobVAr5RrWucYmTMTUKpgyEWIhHGaPvzWgIGfP+ocauYu1hmLZOpPYAzeFszUntNJ3K2XHNSDgYC/LnawLh6hc3+kQms5m4raGa3ex4m+40h8JhQeaxziYpHYv5AaossD23+cIT4/+pNAH76KkBExfraPI1gmD/QCFeYllGsWhfgLJ5RDG9GdoI/AqfwBwQzdq2xnfiBt6cXmPR4yjUeNZG6PrFeisZSIsxCDyvs7YXZxwCugoMQ9ryyixghMJ1fzF+oLqo5TyM1zod7eOtV6RMsMaFD8C0OWkKoNG17VGKrGI2EYTXM5eJoUszwOXKZKq+0ES4WH0Q0IVTjzn136x6De00velkiKVgc9bBR1/sekDfS3EABcXGPHaF5YQyGCzNcwxXirEdwC8i5sWUupJJe2N2prAPa+zFGpU5mVX3mxhoyplfF63TtPO0bYNorvENoyv5Az3CTVFp7DHPI9fexsnj1acyc2xoV4CQzclgLBHIhxxJRe6uLOfA/VZLuk2qvNCi5XoehPLb6udiLgjrl+x+r3FMMNpinkCKqKKQl4mMAopd6Pkx9JfyhZShWHLhe4BhhE7Z2XgYZoKBaFqivI0ZvhTVQLRHbjXPCyd47HICOywPV9fZDDVoiwAvCvXb9391UJ5FnTIaR5V3mP3B1/F2AIXnEeRt95CqmODJf7coxqb3Txu2jpM7M0UKbbFjc1t7mc5tUCYsVJVOToW6m/nEftzM4gix3Co/o7UffCzObt+AbeGfLdba0nmPso64U7wY94HiP1+NES6c0vVVI4f4RQ+f
i8NaSaiapZuh57zkvlSiaY9XLGrqCtbv2iStm1Mw5ocNug50udHi4sfazGkH/0BDo4Tif91RuLsJzHVCRMYMfuuN3UtcGcQXiDcI1bL0Gz/QQIE8PUpRRyiXF6gtuvheN5l7WzZcS4j3D+x5D87W5H3XayDvYqPcQ4YdGY72x3d13E5KvXOobHWmgx6NM72VNbPz/CZpWRlYajzSstIY2vi+uQuFPvMYoxkVMjRIJNbll+NwW6dwzRSt4RNy2f1oYO5giZbUyNkXbA15T1OR4GqJDLDIcv9R9I5LJmJo+L8EP/Odhp887BDi8CZ/NaVLhdfhJh0Ie3gX9i0vnlIIsbUWn0bcYp80X4v8j+3FLr51K3DwyE7jTBApEoN3CDTvrVS63zSqNb/e02t6U4cQQaOpCs1mqsN4EkIvU/rtN43v0fPv/TK7fA/udBhJb4b4HaM/O5KC6PTq0LyK419kynF0H+Z5Dg65w9tlIxx7KFfU0mGehDfwa9lZhYuZ7VCG7iVuakp4aU34saeij9gPVz99P8w3xTZbRoEWGkvzyv5JiGpJrsp/npV3dhTI8pYDulln7sF3us9nUu1eheiWhL9Dvr/2GWbboBLbOlAjXrJVo9p8U3mLTac00BXmhMOYL6daJIOB/NqLxQhbqQ9oZXZbNXRcDEZmJaWA7FnS2yYaZ4IFai2UVl7A4YrVZCy6RB7UTlyYM+0KwpIbr/0/wrz5KMiYmsAGPnqCozb6I2wRQNmSewCrpo2rDC8M06v/c9afVmXgX6LsSe1HDX+7KE6T0ciBw4T1K5L9h2WTfforqC5VTe7rceScUGzxUaH52vduTd2WdtDqqsKDoCFTDDTAI6yygyhn2NG/kJ+k+BU0144Jc7pHGxsZucprdG8ifhS3NUjzfcTROhMK+K2/5IRMo2nrNqmP/+jTq54Z3i2bBpQqzKhVeUdcSEqZ8ScTTSwHlIt/fRM091GREgy/E7gWfPfyCbygFQumCDzABozYCQxcKXBYGiQEiuphJYqdYZbi89zix/xo/7KdI9jfah1HfpVuuJrHWe9/1+nGKqSKskxsY0fatg5f68ELEuL2pKDGHkz8/G+SrpddX69vA2RQ9JY7mR2RgwHfX3e2Vb3gyQHkeJiXF6HqESSOEg+NtiB8InMsUBnp0TlltKhg7y6DCPQoP9OTyL0r4vbOkKXuEH6HTsV7G8yQ9zMwqDVRSpUzdhjKm4C54F54fljzx7CMGiUU1ApWUuO9UEk1DKfyZX6R0c207IVURGuj5675LRpqvz8gASOviwq8MBXFNw+t1E2UU9NPsBT9ZPMkKncZVRxh4/j7sIv01gBmUnosKMaRsCs6stJk5ByMXnVszXc1MhYsE3ffQJtVX022PEaxGeOv9Afievxfjr7FCPGXEegUbXdauEFfhyU4Y/uACtJBqDw8nMDKD1Xh/IiQWtSiPoEScmmgszXjZOf1wDnZar55QLBb+0UvmMSDr8GlapiTQI7+NFg7LvnLOm5v0qTfcf2rl7u3X5/Uv4074AShfsdFFXOLN+B7gU8u4MsmVXfLkovruDZan2G0oW4CgNEuI1LQCUHnHjbFBEdzi2pVoD/l3QzvMqFxc/eWF8cIb99rnyFQmL5Yj5fyoYRZW4cTODU4nJlgK5uFVYzBRVLBFWtcnitT0c7bS8ph+0+aazWtoQ5BsH2BkyYjTOS2E1Txyxv/PvzU6O1VQOIeAfaLxQfx7WKekUHroaDE7Pygc0OzlebJQfuOFiKocMU9Y5Uds6/1tpK/0fsRUNPVx/rrs8mDXK2Eg0r7yge+ovaSTIeVmEo5WLnzg4R0zrWLeHsRFKeOBed9Dk/jizwlp7+vt8Fjw3WQ8kxPMWm/o0dm1WyftJibLpd9ZKy+oc2KHr9A3OP+E/BAMT/lwOHyP/irWtjqb6L1/kZ8JLVgjnrwmDrhE4bTB2Woz4Ts1FdE0+zSCaJk8DzU4ZkaR+JdqeQDxj2jdnLWj2nW07erNWTU/NoyJQBDLlwG1XBtwSclRi/gnScnduvFRa+ZV9Zm1rqu6GuBoTLrqdHHiiioa7TqcWJAdrxGDYomF2AfcoUM2NBCG0JJcS1cDb5Uhk42UTmjbGRdBGOjvvibM3z2yQb1ClHHD4eRDktguMA5sr9jtBsNn9/5oilT1ocBa1THJojB1VAqHH3cdIck9tjsB9r3kTi47ayUxk/LFmp2oVSqlrh9nePOvW6EOV8e/e45KdbbvhwOlwYnivJ0ppJQaU/uhtReqFGV+LUDPnUSaAicLccNKhsTii+4vPl2AkJbEL76qf90qdpFuN2yWF4lsKnV9l9XNQFMCUhBZ5GcOrVt0ghY/kDRx4D3J4ur2OQMYQ8gBhvdSR2XlSnEA4zdR/Gj+yyNmvdEYpjDmyN69suT4Y519AazTBzSTNb3WRT27MfqzFnfbXW7vrsLTIs68u0C5gzCB9Ns6o7FjYX1uTJa9O6vlp2AVLWYpycNwqRXBp9AnOpZ9ojiOJy2wioDtfdbq3t75hZjQ8kO8BvDgJElRTVXzJu4svYagMqWsGvLwwiDOT/KMNxOpn1VrawDEI9zX8um1eLKQCDwi8fyaX0YqK2tVGkqJTZYcTGB8NzPPHbQ5Fj8oKQXy541QR38J1blHnA6NyEW8nq9QMrFkOBrpTuB/Spf/UpT9z+mO2cbBX7BdGi+JZ5ScYLsMBF16mGHoOvZ+/EnaXCvVgdKkckjg/UHc7eg2Nm/OolpIRtvy6IEoevF7GQ5qQpUVkPFRENkpqRgw2Qd/ZKhYZhwSczlZnQrhyTyQS3GVacDQFe/c7pJB/rwfz7kRZqKnt+0meEY1DYCHtLKL5SxHlnNsH0B7+QcXSCMzTGb4abxQJ6IR4W3gBp0mbd9SCRQT6CG2XY1c2rFlR7w6uN4cl8oMNaLLm5FkpJNYdpVCDRJ7r4D45paM4mWfgLLSxaAVep5arlNJuvGC9hgN17tDsh+QIPj1Gwx6+7MYhirpIdMYIj+o54ETEyxSG4YL6RyrQALQej2aTRADzmhuSOMu5Xek0oFNq2+mqcRM2ew3QgYZtgct3bdu6a3O2Xtb/Gl5Y6NDrqRDN2FOJq6CATd7VrcNVwVojTFltxwHM69DUfVudMSrC0eRNzFvMzClJQyQvp0nIh4tw6W2yycg+dWp4WwR6uZvKbMtNSF6rSRkjeiewIy1V2QT5WJOKDPCS3WV/CHeBM2oAljJLXaLLGbjEreMt3xZeZi9rH1g2jMn2Rj6bNRk6+H9JcwW4f9pW6PCWmuRFNH2PH1T+oH3mzx+g38TXkXoJ8akivOVIfJBNHjjeMMbKoKRnglqk/LAlLFqJ7llYpDntNLP0SNuumuuONbAuaRUBHIMDgYs1Hrdi8Ma0JYpfZGg3UEe/oWU7PdTWrNVNEBmY+UP8AWQiX5M8oACCY52J0Xi+4eJrSUb0xhmSA1Qhh0bfCLVVTVWlgXA5wU+++lsayoWaWkxU/tWMQOF5nng6bgQygpvkqbQ6chAFCpOa8d1QdsTLXX8q6R4dy3+EskerckF7u/fn0fOgIcRsax+IZO88jarWZTZhf174MSIKjBaZ48yYbwJpbKENuTGbLsimO/atRSxVBd8N7IkQzkT4aELDKcVZpP8+QTWOO6V2SmM5PBgdwwvFey2f0vmk0wV/KhujhBn/XNay12Uef7KTW6Tyz9wa2Xf++MbiL7adh4jIOLsC1wm7airpZrNT5cDMYXXSCNs9A0tXLTbaSW6/ZavnqNuN+Mn2w95hwEN24dh3wbfDFf3l/rZLWZ/dPgNbIy5I4CEdToMHl4s1uslgu9qWcz1KXBp37iCi4zaUTsmqSzpjB42fbLJGDRbu0QWipa7C6DzODUtJ5zZmV13k0lyIM7m2rjatyiwwjZJvGVRokATDgDS+1xsF5zwTGb62HO1PtqWfZlMjzH/5XKGEJVFlBTaOvs+T9UdoVji6fcjO78JZuzndkaisd7H7yGGOG55ycrE6AdbqZJzQ1qmjhWnkQowUUV+E82k0eCcTTo5UWxKxO0keachoI6RevX16DKHEqsfWwOG+De5nuIg13QjPq47eWMgni1tUrTJzMJ
c7KlDNRDYd65oxKcX+cioXDeUjNGnG6SXIIWWdH33iruynCp72lVHekHAxHuKC9iOFbq99nSt9l/rORX1GkIS2R2zV4vkGsPUmOICaXoBA6qEByH/9CKvtLAzWsD4R9LFmboixybukPVMZX8MCnEDgV0LLUsvBqfgp9093Yxk9QtSYRABdyQgaUGRrbO3BWWFgCXcGHEkiaK3cVuCDGa0oQUMlDvGM0H/jSv2AsZASDWdKcRynGqihtiHuPvg3cUm5LeTP4PtpAgZXDIPqg9iZHFgctlDy612YOv+lR21eLp/woxOk+ioDru9bsVVHybve/QV6Qa++JLnvcqEfKvuRZAusTMaFg9GOVVPe6ZJVL04HoePKiTV+yN1M3AiAB/zJh7eMhkiKbG5/EGkGPMoX6xE48nmWLbXRVAusx3mDLUqyuD7C3NGIr+BdS0qVCXUA0ETRq3zdoBKvyh2vGYt+b+JSHNqxUGmluZtSRDdcNtBRXKngT2Hv6CVb3rLlzCo9A3yz1RwWX1zLZ1HQTQuMgrecp/NmtzqZe2Rtu4Wwtmowe1lpjBbkO1by15sEFDoSltNUnuZDjmICaipQaAmTzpgjae2lL50PaWHvf9hcglWzzVzUDm8Nvr0pj16cIaTT41jhw9JPvzHQauVQtq0Fmi46azSpDPYe3QQu/a0gUNqFUjqyazaxSEyNfHC92zcVbDHC2JFrGz+5lhnEE2XDal4nSJqPCigJd4WhN/YFcc+s46wB0REdhEHP0X9HkxY6tsrEhlPc3A0DCG8lTyTrlvs0Asp9gV5mW7vgnw7a7LqkxhMuOAvIUJD5ud0Aol8MCrunjlgzCUXDOmG3gbT2weeGopfwOy8vb24HSfUc6KMlxwolr5kZdWyKER7Hpl27OmgftiTgIKmKbfPNt3rQ1oRnYKbkflUafm9SgyF+5YkX/YF+E+6VGdWBP+P2yEknGU5eDQGloloBraKsBIhIEcwQO1FG5kAgEOooF4pIPr4ANUM0FfxSXVr5io4ZC3DURJdos68XMMaruZdCBK4OmWl3Pqkcn0EEASGSxCLbYWIdqvlhApmSzmvjNHAoHFn6KoKR1Wiia3OacfEKEjL6FyHTb4vNs7uVXN9bY/zBaQ2XtAtAOCqzwWiWVgko5ErHrJ4bxSTQSE5FfUH4RwgkpKsTSx2LepO+uEQbq56++9KiskOC7IHXqrU7fHloyOr2KY8eb+x4KFU7J9iVQrKrtcl5+gvkisw9bIy/GP1MC2YzLFCFqUehzYAX2bPG6hVchIM6QNt23z23HvCxgGTVHuwPSnx0NJ8CuJjelgADZE4hzzhdkFeuVD6iUi4HYeuBhpn5s8FD1sQ0iRG7VJzk04JorS0qfoPb16hcTOcwk/8b33jyEqQy2Mw7Fc7vTpK3AdKShWYAbqNw2+kei8FyF13sy51OGOPvNXRIM3t5zelOveSyKOMAinWzJWQKYz1Nu6tNKCdH9sWmb2CTxfzSrcOPeYpbOXrG4NtMf6G1VzV8JcXlduh/2e2mYDuVN4cv6WHAA98J6iGNbvW6m+uG8IAG/R9hdYp46WlrdtaHJnNczZ0uhA+NHl29zDgstBq5GRP9Fr8d16jKkitfNOUWuGwh7iDqhXD503WRArDsprQXNyIGA2VQxIZFgkpHfyA9SGd+cn7PmnIYYMaLjfrQRl6Eji/wL6nLCvStRfwUYZyhvB7ngOCMpdRQ1BA409eihmK57wgBGgB0SDQg7BQSzPzv5cKNhmgkRwyQDp/YaeqJSh2Tytc2JOYRZen+Yuq2OmOlAhq3iiSAbtFPxQ3U9FRc4+8eyGFs+eZy7SdWdotAYnYihQbLkD8iBwFZkDklFaygr6MSJaLfod/7w/j/rQ9044kWt82PgtiugL2z1R0lo2pZKeRl6ZqESkUq/kI8oyeJD03QGIo84xL7YrgdJO3weLsBOnjS72xBNfH8RK6QU0e06U4Mbu4AJ8tvZMz/RfuUi+cXqDYaHuCm0IAkE0q6OEmlL+mE3qvBHVBE79Bg9iwGqJFfX0nb/lxBansMXrCL+qfKa4FFNeNfMZJBXlNERTUubVk157CmLxEuWQtSeDZnrVOAOY2CmkBTtD7H8znpnFry8GrEuZazZY0S+M3RQTyPx3I6xWDkmwGLl4mw21aGqtnb4s677fcYpv5xqHvxZrfokXreo6PQhAbw8uE6lNR4MUajr9UDM2ZJU9+giitUVeWZlPuoug/jhDAwPG/rU3oVGA7s0knUnOFmQl1wr7c2ScW7hVaJ85mHQCgVgHI6HtloZJAsc1LLxRdJYG9hVuYu3fhjP97eYtfUOEBjUBYR0SYb/WrMWMR792WSYwhjLfSwK3Nnz1C5rx8L/o/UoAFwhq5sv2yXRl0PH5PlfiLrFYokKCQ59cmhwPKKFTorK6aZg7B4M9DfmvuL9X6xg8wENzSFAK/HEGkG2/4HQYQUF9vt/MrDKeNC5VVGhHmhWApj8CkC0FhtLGdSF2hmm87f5l9q0ccPZJUoznIAHXhOi2uC74GBAmyrup+m/VXSeMqi9/dPYtmHzQPQGkuV9ssQCMPtYW7Sg7cIVTTMizz0go22WmHxJWUEwD8KOUkiClXcJDD+E8IrLZ5QLD5742OFn1CausU6yChZxt5ibK2HTWqXWBVws7ZC22zbl3bDIQCK3wxXa7rjg4mGr9iITtInPKFLMjnXO377aSwBbZqAdP3ypGXquALPtsa7R0B564Rp1FTzD0RkgZWug6cqboJ4J1gO6XsKcwL9w1nSY8i0aCsqISDZ0v1lje/zMjdbxCQ3J+wS9EuGduj+Urz6B8i2qOd2Ikr8xd/WxP6TOadwcUSK40ebL2oH8pkaVpGiOS8ZVV8gvvfkh/JyPLPvBf6YXN+DNwiFdFDCccrTGUA3BuZSo2yg7KNJUuSCnHC1bhbLhpy0w3rvhNjCGGwlbkaO/HOZVtNN68B4cgaLTy7oY5UF+hd5o77j/XWstNAiDlx/IwP1dWomgqI+/s1wJuzWdL8HVKWjw8iNEUtCzZYk22C5l/LUS5k5Pt6UcYpgS3FWxJI0NHhWAYAVsEEcSoR5uuA28JXIkEYKr0E7dkGZaT+ZllALynlzX11RadK8U6pzvbV/pijYaX8fwZF5nlNl8yCCQj21Hie/6Egiz2Qg5ZfyULFGBtY0nnW990Ek3ZVImGrvH7Q+O+19uu8cjX/bnEFa11x5lUZQfHVYvIJQddsx9NV/finIqQrqntxcDk7OHJmh9pcf6r3OoRHkNQkNzkl6qC/csG3HbYypYm8OEhoioB5+W5DoQc2rhD3/kWqJVVTnyvNTEJbFLTZW+21ztA38kapVhZ3Q6gZgz+B39iTpt0kqYQ2ylU0tLfzb60y2jRz5bigAOQtZUd3K7pLkzGR0a3b/aE3hmQPywonAQWJNDnnzcxFivQkZVKqnq5UVFiQqexHpp31h2pM4XZvsr35U+L+UzjKPGU48WbJsTO/7bGIsn8HFtzTzYg64zF/Msz83tIF2PmBeaR17lBoESf8ouZJOjN34R0qCQpKUpsuKkl2AxlwGeCbAMZCu+mMnE9Bi+VH5bb5No5J1fy1uVl4bPS2aWBY81bxQnAr4Qv192STBYE8wkjwKqg+jSW9QyTgJeVt4rv73gQi6EP/Z0Mu9Mcgmft8DxRYp+M/d8T+hUQj2vPRX8eMz9buPhLOTRUUsyJwf5Ax1W2Y+cCLRDYuE8xYyhMGsPPtRWA3/sxwK/gTpzo05FRJp58duAnLkMZ0s0FDS+gjr/XLGK+OAun3VE6tf82z4PcAMldTjbtE6Kbo1lRntt4oGAEvEzTXbnC1FsVknBCzGwQs+2A1KkMCbEqK8YnyRyIxAzL8kQKRlc5yz5YgXdotdiPZsQfqgnmCqnYQfzajuffTctZLfWYB/6UgUhB56tt3lW6gq/pNN0h7Gp4Yf22H7V+w5arQcL4fwSMsPJy3Gn6dAxQ1LetdNpjzCqPH2gVEW/qEUH6tvAsNWhuzwgfNyyyXCnk7kFSJxRaciUXzCCRlo8UcfhB3kvz0ngmGcFykRI5d02jC0k/MTYOUr4wDYqfFAD3TtXR3M4Tknht
MxtHFHA5UPYN1mbx2M3SRGQs3QJ9NVtKkb0rwFapBQCHF13fvWxThDNUxBHEyJOwrp3qrCHiz+If6fs3x7qf/04coqVPFFz96KApgeati+nSdAZjeBNN/4f1hDxwlD/uIwaJxYX2fTrnVaBkc1ezfB0p5ZDBvF3py4U417b2CRZAACc4Z/VJ3c8GClqlXvKl78gAT7T2iIDqmtacM2o9DdHuqDkcFeLKHyd6IZa5k2VU/g5SPKxfcv2Ja2sOLCshORvGe5d7cR9Y7EOaEkEXQcvWmhO4AHjUVtxaL/3zkRLh/kuwYUhMctNuOPMZTQn/SfNTP0ydprArlmM+eAB1JlXibF7kN47Bs0oC/DOns3qzrR6BmWUChMhOCkjRRivyPhjkVb5zspg6b1uflMC5txVdstpywCJeaG1mUk/NukY2nPgT4rhvMrWpfecDcIDBqDn0ywKGmI5E235axotYTvCrvtLCv7uiOKGXf6Jk8HdGxfGHfG5rsLafIa23dbEwmDu8qNgFGX6Ob4ZkodF+6SGmbdADcUoizeDDYp7SkIyLzVnLQUvJBql5Zz5Bq26Bsc99w1UfQCHoAfB+7wKHg+XNejiE36xdzfq/7ND0hLWIaS9Qp7Fzgeblc+eyo2EGQz71a4DUwpCOymy8InO6FFkQEDQzDcrbM81wbAoh+AcbfAG98YKXpJKSHZ+qICGUlQkmsjKz84efMm51eKcqudg07GvbdWPsO1tgT+1YYQq7bcnNfwMdzDoccjXy3FRcHKH9M3waGqZdc7sM5Nluf+Ldgzb5/rDqys4fOOIquP8AYMEQF0Z5D8WMfvMUQjguHT0iPvA7XdUXvZxCZKhCN7ggyTonevop2dN0ikXEV8O7iFwQGgiOi4Azn8Oi18zkuYaF+Be91sooHlY5SU5t3Y7cZeK8jxOtkaQE17uCt9hjQfNFco1uuDV2WfeZSN0ydu+Gf1DJhIXKYGmqOYaoVGMh/3ibSkU0uQJyM7qHIXpOzjPDO2mGfQo3E0ta8yVb8yTk2s9KIJIRWJxev0fUDLfOw8ZEg4vacibVpHUpcKDFb7kqYXSEd7cfHyd5CEK5QpSboxq67qoD9ysed4DtFhhHd3gSCtKhh1FEz+06gIIBmjSycP4Dm9c1d63XRr97WxepPYl/GJj+14witn0nhyRxIG4FzipjT0fchlXK+Wqu4rO+akk/bSUbUVhjP8VMLB6LqZ3ckTGuQsW9u8fQroE6bANn/nLjScZua2QkTT19KBIwI8ISGUj3jTi80H6sjd70b/PXWvz4iL3FdLecnBPYPFmTaGrp7FKRnj8gFJ41vNNjKrg7aO0lwJOQwae8JqriPwnxd/+1HubSxfCwDZG0osR1IyOM2txqdZntNZ2FqXwYeUMf2592Vr3589fU+yzyKS4iRsG+Ut6oQIcotu59TuAI7p0A0aWza2e1uh6TAn/iJoCDG0oWD9MVA4Turp6Fy316jrjPbrvmuNb8+yBg0+DV7fsrZJPh6GWAuP2QNxUUCNd6v85Say5Wr3Yi+RjxIyVGE1+fH9sSBP0slInHRV5STKfX8DjsiTcB4yCPK7diJ7J6S+doxrjjsgEHPG/dvYT1RDhie8QXbHSCQOrZ9LqI2JrQP/bjvW09tXzE7MbXmsVaxeQyks7cl+EtL5nJn0N++twP/X7bf9P7Qqxl+4nTsZ3epQY1QsbYXNQTvLbYL1NbHoeIGA/aaKksGLD0GH8JEex0sA3yPGLLosZ8fg8u9ovqpQMXLmDDK5014tf+N5NyA96EN7HQ6IsiUwkUbjs1Q1idhCVKtPNIY5CHV5iO5pwByKA+JHj32Fpn0i2/bPAKm7ECIJ/UOvxTnCW22C2bnLN1IcFF+o6nNgM+UGnGhgYJTWEA5C07sfnbVU0fHTLuuDtvSO8nwQsnwGzHb69Qhp850crXvTZ7ryzDMzsbRDDOBaA8rdd8PRy4CVkJfQKFxDo1Mf6R7+V08STKPPM7aEuLRd0VP2dPIKmifz/yXLwyNqKNISHFp+oQ/96FPcZJ0/WiIjUys4H1P9qchCkdspQDPcgkQWSPvf3d/zzPkF0B5x9zikLKxPEiDgbfHN0kgVbTgp0Th4y6q3lK/9aucgENGXJs7XcCnQp291EbOAdw6+kmjeI1R3m4ydFUa5Sa47AnrkLRJSGRpSYn4FpjrDQ5vJZnXNZAY8F3Uwh15XHVV7Gy0cKxBJiBt19ebkitj2y0cIa1jtcEnof1aiT+OrJ0SHywjD/NTI8EDLbVkWQsCXydV7p4VGssSIbq7Gk6SQ5Yz/KzlWfMEBYk743lXFvt3VJ3F76oBn8mL483UxLIvNRxaGgoewOaUG450MDhu+Ao48uoj9R0/DYef43vL/5o4v7c16A5d3kaXQg+A7+C86SIdAJ3BmfIX0dPfI9Vj8n79oP0TmsAvbybegIUz2C3LB2KlkLs13g4Mtb1dmEW3+G/cdhHe8vxg7qcQ0MuI4p4NQjarVjPWTIhtAKDdPAL02hF+NG0M0tYYip0mWgRgdi4vRd+UFKjr45fPzyPNrvWh3897EdwNlndl9s9QFepXts1P3ZUI1WS2P7QddHaTlJZbjxsroVNMzr0nns3tDtxB0UEY6SBVIG9Gh4n56Zt3Ozlg5+J6KehHNM25PLpMlptTfqR9NzSljVQmOMJm4EC06Vhvo28xhwKhEvXGdmyQOduhcWDZVeBfAQ3pTVUHcbaymMy2itPpLPgUqFNEfyn/YMZPVAUm/SQ5+Tl4+Pk/euI+1PjglYXrh6ZRUS+Q6bSBsy0rjueLZNRv24n5wFD4X36nlwUtUHOnmfGi3sw2LLOAElnZUQDnerUcNeZL9j2U0VilTem+kOSbO+BmG1oIXT/+iS69ust/t+3N28kK8n1SGIhkei8mn7MfRp38PWnKdmvaEHfCXDtPCZZJNavJBshSXKQypb1yj7qwmylhN18GwNzzMiTE/BcO4OBIpsrAvG1hA/JK+DxFNMlL0tKEowAGF0io/mHInGZOI/ctbFaZhsrnI60qkfIqU1t0ts2dM8ltUeL9o6msLcMzti1Hr4Nvt2Wgs/iS0PJUMOky/UOvlwqs1GNcHGs1KdeLv1ETO4Vsj5nvFDQLOA0Tn/Hm83Nmer81sgUt8H4X0k9D8bVqgMVVLNb1pgKkSIHyMpznryKd9H9mUzKvccotEBFlJNh9Z+nVTGBMJrll37SiR87A5P0Nj8ahw1DxFZRA2CFi1reri1JjX4S0u8GNTmjpjXscGhXMGq/k+PARNA/QfqeWBKD+YaPWzGmNnh38ZH1XF8T/GOggeqJyIBt1zk3aTrrvp1HBiL1xtMvyLdbBqGW7FxJI74berk86wva1drXaASnZ7VKG+6ryF06yL6+XbQdXKcL4tMNsMT6juecgt1aJ615Igg9hZy1rSiNGkALswoMoSLofJaKWMXKWw+R9aiw2vGeOF283WlrLaDpXgarcpnsmeGh+svk/htYAzUuscpzfpwYjQvAcBAmFZVTp4QrHAmWr5a5tv0BLDMTC9ZZL1v+I9wi35nzSH8NpH1/YzCny8zXTMwR+Eejhv4bxArZD2xvTrV0G1p1yazo5glm7XqfD0OiOGMobL/ZlrMZwGHJO+ZA85NQrWQWaX8xJUuLLScnSkg9qeGqUle6AQqG0KJ0PYjxSuWFAedrAnSGb7te1J83PQICzHOK9xK4oVdEJRfLUT43UPCMGYY4Mv1ziynLd4Ch0/SK2uoraujpzX7Hs/I9rPGIHEdn7PsJg7hakbwTw+xOqV3Zop9Xaax50NXJ4O798op6UCF4Q4QdlcElOiXP9lG+x6FLJJ9bpxmecF0fu4wSC233oSYpMvpBpjLV0BmLxS7wPb4iUHcLvgRWueqvp9D8okK3AXergc55ohDdzhpE5qhEzYR51zK8+M05MlQbjOPawA1xS9dEZ+InpEyAY3a1aVBnmAv/3ggMF6etkA6KMVABPd5nq0nGbIih0zglHhiaUNrfrphOR88gekSajHppEyeQWdZWY10EAWMksLgrVh/g9nxFTdfxzwW5CtxO2rXei+CkppSy5hL66sdkb0zC3KAVcuqMfrWxoSo/
u4Hup0smmfrONrwlG/PoSjCHtNH1nErFOjkiMaFmft/LvlKy6Bf0r9IPN6rQ61AqXBz+LRmnOJUV7Hd6ZSD7Ovux592wh/sS0OfAVxpolx0M8GNRHtxXMbeaIMv95/I5TaDoHkKI8lzNGIcbZ/vOx8zDi1vtNHaFJlIuvOY0WcUetHzZySXYWHBQfCdZiZs54QH5m1JZwx06EepIQIgfTSd+HNtXSu9/2CobjRSCBPTNwl7+EruCx7WXuksASm3A8ICmaWXIDUCDQLvDUsFd+Rd/Jk4WHrdRmIOlgjNEHpU4s2Mi/sACg5uao1cJ8nruLFD+4aStKr0i7fET0CoU+0c9msKooDYxAUsBuDhhfSf6Ps8k7cJinuQnLRjNnp5PA22WT7FEITmJ6n1CZF8sqUGqjC70A+FYJ4fHDDJePZ608FgKSHrTeok9RjFJdoiOVy5NabyPxo9NB9oE25KpAkbFvRX5X58KkdP6jXOHkK/0azhCqGT4vw3I+yTRoIlNPmEPUyyxjb/6idpxJecygYJf7gUfhrW+Y82hG7hLxhm/Yh064ikWbvs3Te6bpwZj8hkRn4XAfthtpUoPLXQb2g2FyD3BJMCDCcwY0CjYI8ToNek9YmKwPym65LIM5aXnrrEf7TLY1p/GCAb6qdtc+t87+9hOAmQ6SA0uT6gCjLZJhH4s71yp2ItVc1LCwM/zSXQ0TzAnmI58RZZ7c67yYoByMZ7uVRtR69tNbik6UbL55TE9B7E77jcoaNUZCrHoAcQOanRd2MthZdd92uwz5YN2wlvdKBjwvkG/fjfqBlPWIiFzPkLzuKozBKGvzm25w4jz2G0G7/D3Etw3QPVbmjslKzHmv4FVwu+O6JgqXwtsMBR68m3lmGusXUA8WjOoA5x2ZUbHn8c+CxynFqtkkozj1oZuts4LCINPJLUZ7az2oJMvfXaFrtl132rEGOMLlZvsJbCUh/SQJjwEHYOEnFo57Ugz8wm6PMs1kF5cC4ExVJx0Na+DIxAb+a3OG72sUVlJQ5fUhRpyCVcr1mIv1f4TJh/B2wiTKaftsBww90i2q66DojvgD2VDg7DvGrzeDacT+h6+fDEQOYBsLHXQXUtTV16sYqC2MpsuVkN4emOjWtF7yFiVeqAk7gHFNcuzth/fVmjp56g9gQrnaN9mdJh8hjAuMUOT9nxaa3GDtpUqRc3GUJqEFy0WfMnbhF6MdlgQ+JGzcyciSm9yvbT193/2l3ChMwnYcqcmAF1u3Rt6HIBcaXvLjhMnUTXWm9nyAsRqYCUTWT47uTc9zM7kvFYyRhmC2ot9QB/DMc5tnzqTtBJGxuaX/BDMzJdkndb8L33i8AalFmwyRvFPH9mR6xxJKDBEDk6dgANHj6e6uh/Ody5sBwEERawikD5Wbfy6gRcmHLRU0TruasMupnkEs/8FDp5Syz9EfdXzAfnLisXvzgguSwowcGGWHm/3vKXQaBNR2t4+ppPL0qHOoV/zJvlBaonVzuId1eWJqYd7zWP0wrEML+3z/uSWvKH6nCFonLXfMHIa/Pc6u0MehG1bm/FfcHmlEMdmwUW04RK8LZznvn/2mViDPFslbwTKnSnt3z4XaNC07sGkTQmHsC5plZDCtpmLFaljQSijhOclRmqOtxej7+yf1xzuUzHTPh/CUx9HtD5KgRUv4W5obSSHXDX9SgTzAPnlOYF4lurqDxJqEKTYJLCvRnpuBRMkL6Fp5dnyLy9apT6gpOWaFUGuMlAOmShOkR5/IMf/vCEYhQ1xUWpBCZzLSbleWRojobj5MAuzkHPiudfqwV5cp4ZnQHRFJ7ILLT72vWQfaAjfWHDiP31vD6U04e6P3DP9OLLGln7PtQAgjr6V9XYW86cebBt29E6cSU69Re57HkyTl2RoOPRSRO+b7zCCVPY7r0f1hArpPWKuY+DegeiwyGTwFpHWOSm7Z309Ph5CI/+azkfKXqZOeCY7Oen37+h3rbY2m+XAZue3lGiK5OoveNZHWN9x737TLG2vtLNYKzDbFPIw62qFKuPRcmuAuA+E4G4QgXXQOGFDbOnVWOe6+jep4n5chZZeoCxMs97cP6xl9XxEBgATxVUl2rGrGwJXlR4gjMWaxCJPj6DRm6gaNSbqfQqpF2xIYq0jVEQ1psfBD/S21maWBaGuKVITIjpQkl0Lg/XOtaMFnpwLMi/BhQYcTMQoQmT4oc968+SZlo+Bl4AUPo+GFoxsXiCrgGSuDLtb7TPvCy8xYuB0sTAr2IrxmkphP5S7tFTaKA11r+QuHO12R8LFokr2km0rfdZGw6I5xthS3aOXDQmVXxiiubuULyZsdOIBVPxnY4tLNyHg5QWiKGEpayvsKUzrEdbhod8lo0UskiTUWs36Vsm9+/cwY+6fox0npqgnGxQuhyOtDxxnG0aoW1JrmZUaN8WTQuARhCu29xr2rM4NnIu0QfyuHscuOnD/51JBRFa4mYP1Guue5D2jXzItJWKd3Db29xDafMoT/UuAQNWlg+Qo6VbSPjwx2CDa4EsCUtW69X65Y/aMHCPHn/ZXD0BaWEeuspmv4kJKRhdjNXCGmfjr2/68RrsfOsGWx3Bm/66Grv3dG34ev2m+O9AFXzwbpV1vLeGwpM0KhxHOJkQdMkJ4bk2D2cNCo7zXSHp6n8uG/xRxy8kjfS3HF5ghm1aX+ZZMwjx1og3xMBg7f4lZoory3KEoEty688YPXMmIOgAPagr7RkSJJMMthea0QRP8tpGSoi0FHjEJdWtBUCk+wxmAqDNnigq4mpYHw8igm98K1IiKFh34+uTgHVfObeUQ8yxqCvSh+x8KbSTREzNbsMeR26AjlDArlHH1+RCJUXTwY1WSy2d+sNdil6hrpJE+5ucaMVaN/0+2Fhf0IvXjB6IxdxjDCAmNdhxcyUVNPRX87jQEPA3q/UWEubuoQgXfyVbK+oMbpSv4LPdRJGVZWhOxpkXD8a/XUxX826v2wjLxbE+wVm5oLmyCkKBbjqNSoyi4yo9+2C7CD7fD304c3AOwQSamMhzQwhd/qWzINDVAFHQQWzfXDLgk2ZxpyWQOPCExXM6K4LWZNCSvsWT5QMAWd5LPQ+oMyuqTT0fxzn4gcL+yRenNL3yE0c1L1W+gzy7I+huhfCrxgcVdYw/6RNijH3JPH6PUkxksb0dLWBMWx0tosKPL6Cemqr9OGf6hq+7+1wtFK1rgxK7Ep6+po0gGMd/li/+ws/sfhdOUs8KLkg0nFe1pC3YJCMULUiZHAroUDfJpcryciPtQxC7cx/LkftW0MLOjSznYV99PFR0RliGg/210W0u8ymS0etFsvA72B2XrrvDRZmzdSafuKYsEfuTWBH7i102vHpQCpBoXiEaVzArUuKuXg71q2q3SnZBo+KPNptjiT+mtNvMFXnSnx+L0TthEEpb1m6DyaV/xqOBMLmlIZH7kt7EcuphJTYJ4aM+NZA0YeZ5wREUfm8Q2FL0xeO/fY4J1mgdTsS4Zmx6j+JoOmDqoSbFR1UEbjR6aWZSDfqntSRLHw7N0/lz3euCO6q78JC7Np4l7BpZkc3g3HGK2XCeo+US6rZfcep26jQLPEzONiVgRSmz6ahWVGvUWSL3k+Cep1DITWounspNmeOMJrw07zdrsX7qVYiLvx/PynYEBgHZWv3KtmEv7jI1sJpTl8EqukVx7eq62wJfzmoP4AFyyOhL6Hg2mID8e0z8h8406nmAtasWY6SCm+33aKbu3+ekcOzZe3VIUT/g10k/10KRcjl4kYazDokq6mtp/XmBwmkXq5NxBH4z/65u+4922DxT17Nej1XmfFYe9vvm2Dw/lb3SL0Wv52k3BDu4RjPs6C82FSDHmxJ1z60Ta+B9s35ccabry68PH97dftnUE/rObf3LEa2dkEayonPjfv7xwkcw+iCKoQEK6lChXLUgloRCBifObu5Gsv6LLFWZPQh8bzV9wP2kYsDYwkj8d3VdkeTkijDbxQGwQWgvaYMzpL6YpVIsISFUnE2hTuR25fXytiIY4uC1c3T/4bcYGAtwjsDKSA71U/nW2I8yY2jTvDGGOXn/ie/Ypk1OFPKTB9IUf3d596v0ev8wJAL4M
yQ6pJaxonAQidhxKIvUAOJKsr/mA0HQp9bSFuJg/96vXNQ7MIMoOU3yopQTMSGf9jhgWhjpAN5qDGNa9JYc9DqeAD+uKhnP6xJpJFDCwRXqmj1FQOjzN2XdA59IvV7D06ug4FHKWNlg1irguQXNNqwg4kMB1F3Rts7uWuugFbbHIT7fiEfGAxL0uH6DriISWpE8RSR/zjLKyya8846bsGi76j6HA7qzeX1hNNlyg4oDrfgWEGfWe03ABon+wdMYlc3qMIQAlV4Rnb4ODl6A/zHThQ39+MVH3Jk/JTBKbmC6xpHHbFZh2QUZ8Mw6ZYEHpfbRe+uukDBo/nFapyR6FzZ0xGneOx0IQNwZEnzmoycOzWVV1VMZM7jVK2SxbYbG5d0yxJwnk0r5nIoeDx0jfb7Ma0MTF6XAE/9+mVV11tNkToSXTTNmuw1eWqWHqDQzywjTk8ROOZNfFpoeDxhi0q+X4MJnYR4rUFIyXvBMY/MIhleI435DM/h6N9MU/G3RYbROmFRgslOHEYwOeiShETwi4WGPRr64TCPwDE1KXqMNTkL0/5OyAGHHzemdQO6lmVxSretzUeFEg8DtH88mNRy2oM2NyNz5PMHvAJO5eeYejEgAe7m+Up05L7/iyD5nEzaWQxf7vgm+QnIKEiUMq1ebodZuybbGoiKHy65uNSj/suOBjvyci0GGMiX6RaBppsBU7X8WgcGuhF1QMEyrWwlyTRFhwCufIm8Zp49E/FrfNXmf+Y9pG19jy+ppEVEHG5v5yrOwbsAQOMHl2SMrQMvlS+d5EEK1cHrRebbcMZz/sfFzIrKHcasiN5VFswOU1451sBfyYroznyri4RdRHJsnpNOol9CYo/76ngLo5Ct+sAzlDfhGJsU8T8dNhMqtFPRVyWBjmi5sydG6Zst5jyJoVj7weirohKkOVGqZA1zbJ4jMRHX3rd6tLAEi3Vz2qfeAgkkA6J3wCcELUYD624NnSoXJSTf/P9xnUpQsNEn0+1KbXY5KtoR29pyQndinhRFtB6oO1G3nrEF1Ih/i/cfpOkHkaqSyn5l4WAK6m7Fmm/V0oRD/kwsnXlAzzwjbT4oWoIJetYxvlq3DzF+AnCG15LO0ciyi7sFGiTeh6qpXJgwGP4mSHShsbBFK5snjZLZ0AXf0chKKe//uxl4TnvU3bN0lYTMauoNjJbFrcq+b4MBJcDG5+8X2lGYd2K4e/aOVa9OODlenqbHCW7ZFBbZK+/+CAEwkLTICtq9o71XZ5cVBZgZGmL/KRDZq2mz6yawgMCSTELEZHUyOBh+gg475NCO8ZSgsonWvjiOsz01c3Q+ybz5BwXVrq6bTRXXGnIXCXbU74Gu3TqcOTRj8ouc4jkcCkZUmzUzrk+fwdJQo03WK780u1rxiysMdRivCWar4O6rAYtAajiRYulTDeVjOBuV5ogYErpvwyt1aKlG5/jwS6CDoIiirwo3eyXaUN4u+L/5ZXUwbO3+b4fIvqyJkJrLhs9G8ZmFI6Ini/BYM27eJ9BB8MKA506/gBKCFXhuQYR02PRahroOiX9jnpBTU7/tVPQrdt+1U4kQeu3QIipBsa5TEPsbaVnfQ9hgGhpe3AM37rELMEA8+yeT8ktow3gC7KTFhtu3Y5ieldbma44na/jzMfA2Mx7X+z5xLhpgccymJz3DR41mhu6mYfDH1c+Q1JrDyYwjHSCU8Ahu3oj4+WWrOm8zjEabzwILzL8ltO06hPJxIBa3CsI9nqzSDF13f+E2+WWWQad+WSb/7GWeQsUC6jItDSfdsllzhns7pjq0LgHUAM/xSb9AD1/c5fqjZISEJ+WLIuAg5lV+6BcHkpv4XvNZvhOk0RGIw7Y/2rQrWyjxDnLb+UhVSkTHC2ucMZ6eJradsAZ3AB5+QP1B7S5u9e6+yzmtT/PwcIJ2B3IQGGek+Rv/AiYyt8JCeFdaIFKwKssmUxaaeY25fC8gZQFuDbyR9OG/P3cfucWM3CskTneNLezr5hPDJRa2KzQiBYrk/KulwwzPTxyfRIG8p/h8LPghb/7/am4wb1KfHZk4p/S4GMCTxeF7D9T1gncRFCAHQzwHfRAGuhkaocYoDeYrmAPkaWHsnI+UJIe2Dzdux/c3ZRIoT5UD+rT81YxRJkFFtaciB8Xh5OW+hYzXHyN+D4PWxlyIcIQ8vg6RFyHwNUfsokJtag3S0laFCpeBz4g9ec0qO67Dg0TxjDh4HrAArbuUy5096EyLIP9+GaPY64J/0Gu1tZISrT42NAxAIs0WEuFSyiPZAGU1D3qtYZ759uT703q8tZtJj2jRSsHu80E3ujHaqMm0E9msmk3cfWhwanI6C0DoHLYwrXywb/1LQNMpYjQ6ULr8uLAr/gRKpGuzAZWl7uLCqV0uTLi29dj8vISgBNFBJSs/SyYEPjllrZO0WHh04IrwpMZyBJW7oI4oBtcynSJo0qnVQwPdzp9+m72/ZJVErotZ7CSksJRKRW5GelcVpu4dVCBpIkmClpmQL9v7V7M4aSGuQk/Qli5uQkvi83Baz2ZRJ+clCzQ6qvOoqTMoeH0fGbUGn0hkN2JV0GK+WbiGMbdu+5rqdP3zj1JmCgrX8FI34wpSL8lodDMiDm2uKpr1U3Gh5QNf1DlEcHqA9BhxwmZUeD4OE5DNE2afsipyJ6po1bP74yjxnxPhIOUbCagWE76QVlaoVxU0MItGKm7DBvWns/1UvLUEnHHWlptepX4zk2Dco6x9zmNdcsIR2yQqT1AZHTy5h9ph0gjfdrXz0ZTbM5lmFnOb05MoZkGf440i0364STEVJ92yftt2TCeFeR79iqdc35rzuL2l8ukDk9ArAJLaKHOsnZsZqgKUi55F5yThoPrmh5nFpynZd5jtV4/I4fImyHJuSdr0R3Njt+GXqcys2C5sBk6pZRcnppNZPqmnl+0NUQ43yhXvcTCChn+xgOgp2eATFpLMmrPZYCv9ZPrSjPVm+0LBtgBtCdRd2RJtKej+jp5qFzNAEsbAlqEWaOKh9O66dTlHYzDprNSzgPn8UNVvqntwKb+PvEBf8IYVSL3T1PgbJLWfSI+TkfyMbP2q6jY5JazPo7b3WxiW5yJRSnlFb+R1KCnfeHYHkqeSfl6UnmizTqUISaWe3kPUsDnPmoOGH5ZbwCMmzS+DI3Vaku5gw8ig0TZH6ojlj36kVHOupETV81p/ydYOjUlmwWnCzowvvEcZGOY1YE3n+ubIVRVWZ6d5qZC+Raf3TJiqDnb2mHB890i2Ci4trLuLZQdcRclREMv8xJmET52yGyyaHQ8ZfboT5ZEl6J3ZEN7/jH21h0Doh6fxbIZulBVeEr6+REl4p9EYdx7M9x6dmDXTiDwVEytiZZRw3DdpyNmmFDa5TFwOqE1hDyAfSV29yGYivRmtr5Rdh0jQ6FoRXFINDr8+DYbUyPWbntebWLyZWb4GgMt0pJiBn3Zkn5IDtHVguzEcbY+JRYUgNFrcHwwMGL/SI5JgdY++rKWc5xS8CnpPQXOFiZ2j17GVxgWYyTf5+TPk8o0cLFh73jvxK7R30P2IOfLhX2Dg+IFqamPY+wduw3QUe3IzhGQoIzfBJgHRDC1Qu9peQcUNwK+HgQG+7VGlaVWIAG1IYOvxLWhccyntnGBqCd4AIBHfFAPiyoHu4w2wcA0cC4fJAzSdnSgAs9euQDuDFfknle5Y1/A42aMzZH6G1H+86d/Xti5WWWhv7jO/+nPNyknV/qAKXZYrbFt9Hnf1JDoc9CulZjpv8Py75DhaFgLT4a75ONorVOBmLHYa5hiu87u3wefbVBM/8OtC6rTTjGKyNszjJKdBYKjj5NaItvAmXjZRQcqFyqxW8CyGDxApBS0ZRFe7abbODEa1J7fjZJ3/PwQ0+27HKbtAtCeTHT37z5G/lEAZsOkBnfna2iuIYsbSRLDSyUqKgFPyqCuWhuK7/Y/O7uhQ2NuWf9fbmVfoYVCR+Gl7WX3GFXMqIQk6/FVkARW7tljh/vCBjqvJPTkpc8MXIQg+mdTuGqaj0vPHtv4qIklmUGFJEk3vrkq/67Bo/1Hgv93n7l/5n9c84m/LgAdqWZO4y34Q8gCSBn3AUEDK4R
C4gq7bVEczb6bBEUFvHHlooKFeg2ecjH/oCV6nO4Y32lrFdQ78pzVV173WoWy8OB6B16smSE4srewcukKHMENFpMUAMNZuh5pCBwnzpU9fz/34sYL6xa6uefU/W9uN0dALhfcw2Qu8fdZ0zYAyqBVd75W1RdtKRYabG/xA2gv+2iqyER1DdaJjXB2y4W1hBgDwcYunK5Z3Tsmmf/NEELj+sqfqqQLFHVe/fz1bEe/SEyBiBXWhQIpJxlAKY96GcB5pYvNhqYufxdxwts0m9JbhYN17/u0lUD/y1W4HCI4AgHANyZ7ewypJ0oM+fKgPAQTj1iL1R0VJ8V+s3ALALCus+1PfZPesvhnF/RkmipE9XeT+e3IAwYHZbowm/B9WX83i9/oV9frDEOPeSqNvYGoN3lhvHgC0lFZhThjVX/+b0H8FGyayTTpLAtq1yJSa5TmUdm0BNyDuek4/OfriRcINahOxUSGvXXv4iGDuAVA/K0sFQGjxZ00Y4y8/KUzLeW+uTrbEcSFCjYh09y5yNMGdRAazOw0b98ZfwT3LBaxeYZi6m0ElAmpvjclY0Wo1xKmmhxwyzIawt+Px4ItjIArsF5X9zLF9j8B6xm2q8V6XhfHMO49yPV799aHJH03+pqjr7MsG/jFv8pbvW3Wx3nry3t+utRKGVR+v229yfiY0R1y7pUs/Qexw7EWAG4JsHI1Igzo7llRGappBx52qWc/2sSMkQDLMzoVhsOWOgyjhIMw8Z6rtkr73YBkUGce8gBQJ6JqtD2jKQLUUd8aOTuoCt7MGSyzmkQSl123/9HxG2nlT/hNffZdNwXornyZYJBnuxSKR/Io47OOJXfKqHeObmeWYXg1B9lUvPKhdDo787mg/lizZL664evHJMKKB6YaLQmGY754L7r0eS+E6C4jozJXFmeU3w2FGGyf4oX7nFiJcM8TfCDEhDvsDKJriwWiOUqk4sUo+Uic0Bw9dpZST4OFQSHNP71WG+JKDai9kODnlKFzEPAi4HhJ9b9BiHDNNJi0JPLr6K1VMftPcAmWI/XW2+XmKujTzhXh8Y4aC8hVOypc6qCXAT8jVFVSG6K9h/7wGcB0y6dGwpLkvcTWPoGDFxg+itSiXGPyc184LUFWGKH0CUcQYAMqDhmn+3szI6ghRYvlZVItRjyfKvwBy/fGZglaJdxNldPrKPLpk5caCA+8edbx0dwOn+agyzvrfITJnVsgXqruhxNX+CjfTSj6gfMoTmVuzwQ+P8zEfoymciuGqLpKJi5ksxVF+0S/FCfwWOLe577oJSCuHt18HgCkd2DpkkYYBcMlE1TKm666M7M6fyR2+/uHsKFr1LlVScto9ZQLYQtgpX1ui8eDdGeLMwobJwZhTCwYAbRU/AA04geY0xtmnqOTMITU/ZJn7ecoA08D1F4WzqqYJAhw6Ou4UcOWCJvZ7qeFI59jCeqONbJipWEdkyBx3bYqhtZ+j6f+HcaVbRtz+DIpaOf7heILekGFm9vDCrjs4MjmzfH/u5iEZZ5/J+N3/8TCD0X+hTIkaxTfMHXp7T3kf06AYcSopWjfQQb9emyp72bLgIngr/IZ8GfD73XhSFHf4YF1BGfA+dxWuRF1XhQcPfUCfZRrMb8+8iK0eJkTIRccXWo1abketbq2G1J7Tlq2j5vG9fvbe2hpgA+/Rp6sR8LDELDtvDSXVc8d2sa72f8TVtNMdmdi2quY8igLZA4nEQ7cxiRC2CIUBM8mZb7T2PYFhUtJXKVeLHYTMkcV1JhY7Fk/8aAXROrP/pUjtjqBTSv4wKaFaf0vBLMYyo1EAAAJbefPU3Lse32IMVNeaEf1gMU4DlsTFUEAKWP5WucNE4KIVNtqmTkfwHPxvOnMdPPF99oqOR8/1qWVbjGG7IpsyVpRBinat4NnAsKTenriqBOl6Cz3z2nTlUSPEGbcM6KMhWvN8ZJwqDhNPP/jBnrkY+GZqrcbo0VGF+pCFcN5lqJkG4XI18YB8FeN+6gRN2H/b7E3ZRETKLuWMuEI/jACyMPfsz1dFyJYauQQM86o/n+airpZWAZv/+pjobqtPzLdXgGWPVQeoFKU6/Cbaezpje8UTj98eiBIeoBm26b8hwv4RC4dbVsDPgLrvKykr0Hs0zpj/RKvpw5Ft+eEQM34y0pFef6k4l5re7nBK/CosgBvxN0veP+O5UUYkXHskmQmUbvvPM5QHnIaqPGEnXIlVA5Lk78dGXCKXZvaYV7fpfEoc00snGAh39SGa1PWPujad9o7q8CRucyf4mlVNjP7Y0wTlMRXUG2qQbtps2zvJSWi8Hle62Gjz/fcll12VGVdfvxJuiX6nupImlKCAcUL/Lzopayi7ZUWxFtwIPHdU/TtyTqeAdcLg+bh3Lo2Irhadw5ywgmb8a9oeYqFeCmiaahK22Kax6uO/BaPj/3qp958iNlq2CWRJlb/TZWoBwT3vaVadVShTtggB7cw8WJugKARErPmV9gE/wT7jxqW+ToIxOJTgv87Auk2fougcQQOM+ln0OsatNn6/3tU3Xd+bvv6Xv3yZOXJTMOcTR+wlyrQhYCGP9LO2HBxefYjipR1WQvXVOTbiscC1evrWDm1/rcg1IswPruhCblfWhQ3r81cKg1yRdjn8S8UBISsI5SBk0msEGOpEzgaQBIBcisONpOwbm+NYUfU+yPSBn5jF8IfHD6jJQuSUKtgAnSl8U3ozTejNamOnl+PyGc7kHXgnEZHjqs6FtCRm/bO7nJipSLSD3Tpe04at8OVltHhAVEeIQav4SGnxx2Rn0eK6q11el5htGwjd7nxEYSjajilx4vMIY+frrWXd+dUcUQnYSeAjibKHBdkF/C4724TNb8iECLe2euhDNixmkZh2sZh9c2g9HWHTDJOyOe5KwqvK2Ac+CE/6NJYmGixYYlyU8u1F72Z9bI0g12PTStTppV2Em1zQKmDFoIsqWRdE9LM3K2ohAirU7PyiQyLqbPRak1GVsip1XUPe02mCHCzIijnKaF+pWNUFG6M+1Y85Bq5FberW+sGzCVstgdD1VtQ8LBOoUjSX0pqPiRPYmISXgzWRWq+KWUZsxyr1hvu1Fpse65qg1cV3W3AiOxbjlmiL/wlCSnJLR5jXhRLqvqaxWrwvWMjqwOmbETi0pak4Lv6Q8XOMb1DwwGT/pfrhlsKvEZ2tS6nkD2W1KaRBM4RYPCzEAnjhuY64ilJoCYAuJe5v0JXJF/+UHvkbfTgrb470FE9OQBEcXw/nx14F2yL3A1S71NRJVEgJFj9JUtWTAH7N0p8z+6OsSD737n+0PxdFHW8Misrbf3A0CTwMZ0e8XijxYhuCvXnsDpZZpHO7o71x9Ql0oHsyE9GgQiRtAT5iYULVMarRW+iL/6mlHncY17TxKhNfczFeo7c/F2WLR+fXNV8h8rwSVj3PKBdKwQ+fkmPjLs5u3EgPVc7D8lG/sfstVW6Ta3O0NgmqGC4uroae5PbOG1DsNUx4vpNx8Uo2I2oJIjsjRUS72EWJbx7AJ8tKnqpmBhc6N/WVitvsoxp8TTlqNYJbxc2DjivfBvnkBNl0OHQx4JnRHRVv0yfRISXXj6g3AU1DA/K8+oEzcLjf4MpZyyZ3OoLsZAK2KhLrYRueDt1zo25+N6s96LtAkYDgJ8a1uorZSfBPDKsU6FC4SYUP/m8EFl+pqziUuj6L1oaCafl1GXw0eX6DvtYAK7T7ddPeDI/WDfIro9acNT6Wv2sZPA39yWuu5VxJ562haRZSrtUQpdgdmJ5mszwR5i7wW81n9OSP7aK59um216XqlV2jmlogq0GpT8+Qxz84h28yu2JwHjuYYDjWA2sFEOtfUWpksLKbbb/23vjZDw16/DiG3sBrO+RgkJ07SZDRl4qDrB/c9mmwrxyWJrrln0pboRGDOXB4NpX1l8J+6arcgnJuASn1ru/xgNPeacF9/s70FhtEc3ukYnypSPropj6Nqpd1f3N2YqusvpOYwuFOaQahaecXfEqcPGrAB/vZqygY367YR8ro2WLKq8MLSf9B3a2Ea82nDcAKB67CBUZO9dD2fYSYBVfaSHzQ9u9OTLoyliuqO8/YVDco6ZFGt1L8Lm
riuarUXT+wcr7Bz61lW72roX5a5YpD6sVqD3trqRgy7VkY/eptgMClBVYDjGQj6jLYyz+QOcma5sjWD9kEIdJ7NARLH3sjoVbnWDyZY3YFbalsJAJPB2sP8SuBMtNf8/hyQ/FkJcWPNkrDd2DhKV80ZToalJIWqyGluNAoJU3/3vx3YLvPWEAILi2jrsRYi7kTCVHswEHQVLRdBSZVRZ0WOLmhWHeSFr5XLITTvp1mUMgOEuagmt27sP/4a6LgcjK0xFH2DLZzObOY/91bw10M1lDE3k1x15JR6RNsQdt/8lhdVhTShXpxL3DmJ4cTTgXLOb3pVd3vlL/9fqfes56d1RirWK2yJ5oFpMo4QF6PPY2ciaewVoz4HCwxaXdVYAUjh1qAPl6xe2udpBVzm85UZMaTEkM2Kpt8s4OSkWbIxQAiC9MofeVxCnW9ETOKZ57WjniyGyjh8DGxur2/v97xyeiewFF6ciLGcm1iwEHCdy7ySPpPet+KoLT9X5TpYQWbF+w6XLHZF67ND0SYJbtweQ56oCz+djCsBmFXH5pDK2RCSJ25INHBF8f5YnaP97nIgCUXUhFIhPjq7c0CE8CXTJFuRVVPdOd+hf5tETGkgSQnRMhEoWkjnulqamqTDEFVFe53fgcI3AS9pT4Rzn1Bg1b5+gTxPh0PElW3ceA0bs271cAdPQEnG8KdOXOgmqgstfrr8LixPNDCw/046cID5ThW9UvW835oHyw3dKzicxbgJDpM6etvOx5SccmbLvAlyKsASGDWq8NiTqNKcix+is4fSrnzTD5YcnE/uMl91YdRRwZx5vHnZ1CD4bm0z4V/gLMLvwJrzHDl/b75VSU8QJPzbm+V+mDPJsQ60VD3mPvDHSRr4O+as/TtMZeLMMPw1N1HKiJQMxSZH84dhoomUEskzk3dNWn7Ew2yFv4YLp0f/TcUODYQTW+OyPaiquwjVEIPcAMQwr/mA22XwFv97cL3cx2vctdCXhYzk8zslYW+YRd/4LIg3xLpaITjQDob8rY384shs52NC28gdvjF5jBY7xQ3oUcx9G+jwy+ZVGRW3UFekN01jFZtayfefdEmTh/BYNmSVnaZOefdddCwUcDqJmUpw7zDbChKBaTa1b+Ra//NPMLGCe8kzp50ZFTL3tniUaQGTFrsgAvucbFoRDQMNMT+hzChL/mdvad74hRf0y3ZDzQwKP1anCQOT+NH5i4kkoEeypOr9i+is9ODHJwn2aSs9eqK/xmEnbcfJBmJ+yho+Ab0QRPROe8S6qBYqDQie33IG0kGkTP/OnvhagZJ0E9Iha36zqBriXn1E32rcCwHJ7Y42aNkjGHEWe7/wMjTV8jxE6a+A8YQnytV7aCCsX6OldadgalXh29gRzEsZh6guTeHIO0PkCcISWk9ao5aklEhRM916evIcQuQ6Mzb7Rxc9T/FsocnPUjZcslGcI7UYmF0SQLzGMgxeP/b++u1QYzHRpnoXsHPgM5X2TWHODiy64L0S58WnQq5s6r7K4rxYm/xO7Igh/IUwXy2bjpY8UURrJ4U2TBXyoZz7EsqNNvw4y8Md1v8WWJM8nQzSnLSEMVyNE20LXHQVN2t8AZLgQcBbgdiWJp2K6SgLvrKL/6567wzvKWrsuuvLoBQgruzpPKKMCJTD50M/h8uzrnIvlrGqgnL4PSfAfTjbkyeOsVWSFi3oeJbMXyjww5HugfuVw0Y/8pUETXkTUFatMEjp8+f/ja3eNU6WSruzuueIDPrXz7uVTtZI/1+Po1dG5SNQ5yv/j3MYFqPMV9sshKzPUwEUkLIriS8Q0tvngAR7Qd14c/bQ/mtB2LHsw9CpyFiZQ3C42C8QnIQQGmzpXBU2TT4Y0s+QmxW5n6DHPc7Xdsb0kBx70+qoZX3dG4bEQk+oA3R2O7fA/MTHzVDdbydndJ2AoqtDVvwXZdsyMxvVynHZ1e7wauz+/bptZt37XrH46tf0TNgCPapuzrxSphRiDlO5WRxOUiFFQAj6R0EVrkEEEBhKqFNn5Uq+EZLQnQ159f2Bh9hJeidpYnXOTjbsDeC5uhwBPlYE1tH+FDF1SyxLdOshuym79RCIRJ6924vOW4nN9mxUf9rM7BpcFbXldxSpqAE0S+AZyZJIiur4/WJLnP1ZqrMp1jw6XjbzILiG/zoNybwW69Do5I6KrRA07oOwuwCI9I5fmSGfGpzYqi18m0gKjukesgvLP6lGzUAnr3JpRy93+Iaw9H3xfmsOla/UfuQivhv9iqfGwDdtA3khVWfeJukr6wO5OI+73plXsgR2sGBNFcTNqxGRn9uV/CsKmLCNMCozSOXYqY0kimDwPIUdiiCkhZ+dqZQmtTI+3dr0VreCtDLiO/0RxqVJ4ZjddBlc8E6gJZlZV96VtDg06c0tLQEsfEC20+MVRVCR7gtOgPc7pKswXmfWp2t0B5IgmvJAXu6LJSKbaYMY1uJA4GJqvVNAj3JJaihvEteuN8drQi3y5nK3xv1suynakzaHsOKAuCqFIPq17BB3rtD/SFNdzyprShJq4c2jXx50cjNPXGl1sgSfBWk2wQqef1iTBoIVvMhTqwOJf5ZzM9RqF9EWxOcNSbH3c7MIGFoA/03Bx+oyuMsRPjynJ937ox3vqFChli43QO+kRn3zf+bXbtTVj7rEkAISx2VOi8T9JNIgPeslirS82btUah5lNCWyXk7MrVaYlFjj2/Yuf5izbdbUH+7X6p/dl1fI3ZDyNPXLfrVetLmxoIfZXECRTNGqh5KnpQL3c47cfENtRuzjtZxU2fW/1jNwhvJBvtChkEcSPEWJI037Z6YdLYCJrJKK3mRMkssRHigNrV43fUxbBag+EY/SP3XQW1hJxebODdupmmG90kbkMC9FnJfAvcwwqBoJ0FRZtC4cREEMO8e4bx24jV/CZjevffDGtKhdWqry6EBb0CWNsH/4JVlla3zZcCWfUcPfXxhq41nkSIx4vFIYY/fKBZq25524Gosh9N5zafofeyYX/g1FDuIPg++1PT9QDGk25/CFsixSqhdyfkJYtC/OgHaRFHbn9OcKWDDBTDsfDehXhlM+VP4U/sGhRhSPSQguwmdeC4fAeKox5yPcjglztV3T3Phliy8BzzvY3qz+i/sEQTkDajsyioT7YkerdVC38c0g/xifSqg9yB3Q0aVUOAC7yfsA1dPJT0gHpnWn2X13CEpKRDgS4ewDgp4+FTGUNPOjVKjgSSoap5G8dqBm67ZroVd8NS9gSOoADY7CJCWQicYo+0/KqzXEtuN8lfnxKVjAxYxI3d07iqEIMnUwCpuuqm1k/GUsIZ703jUvPUuV5Ysja+YXA/X0YSl+RqpkDTFx9hdmQgsn+nlXfeez3RzwreyRY02jAgWkWLCn7vtArSQQpSQD/AK4MhhApeU9Je8EHCVCq9ibgY2LoOXGYmh5Chj3nPs0ZaYiNAYQJC2dfIqjRUvp0bXujd0tUOFC7LUTXvYS77pDbwy638dYTX1H7YEO92GN7p8xgSyxh53ulXpwns2TIG9wNfSbHBGNOdd+y/Xu4mqPoXK9McdxCqSNuibr2aW6dbKetLxdjnaSkKRysKOSNkyq7PXQKZO+1BmllAvGrjMa++T9XqS1jGeYjjVEK5hwiQZoNwCxzMv9Uw/u9Ovugs7Aj//fQieXjDXnB+dh+6DohJEX479xTpIrtarEEMFmA8X0cbpyFwNo9DykLA4vPe4S8xXRNBJeACcLz5/D629euI0eTlw6/bXvwfIQ7tno9gimrPMYGlGt4PRRmFTVWZSD+utKLabIlDs0QG92ZSJQAAOGDM2V0YH56MUV0XpfdRUciezuzUyc+ZOjRuQmkL+mtCYDznzR9krcDmGD8psJXa78Vs3FW7l6wJoTSuOQu8RSD9E2DD2EPXL5V8T+eVnaHf8RpC1CUW9kaCtnTbt9caUnDkaG4YUYfM7LTnho+JdECECgnfmRe27HMGbkI0xYClFBeoxp0xLU9L6bW4aHnP4XddzA8c8ikAimLr7VTl6+PPuzIrY20LzF5ZyLDP0CH2Z6fMF/tLQUTGSda2eowKUw/3quhheCPBQTZYPU22OHDQEA4Sx75
gNynaRpmzmL46Ze1qwmhxcLBg7ovKsuk2uJ4j/kbLSzy+xpYBYpLAjhx6wC9yJr0QTKfUKFunm64kXi8hR60OzGZLbkjkXt6MOte0labMTh99yJzrCNXMMhAAdFe5i6PFvns3wLgxh0AXcgEs0SkbF07zIrgpkKY4HTX/uBhcLfKPit3bdo3gduPuuaymV2f0MjsVvxaFmKXCDUW4nw3nECt2hxLVGaK5L/c0HOD7ZyDhQOh7c5m/dRGb2UmaZvABwJA/UZ+aQ6T19ZMfng1vABZ2vT4S5MeWES6qLlIrRp/zRljnTCP15KWdt2b3iH6Rn8+tf0ciWHQzM9TlAmCizOo8/wCTTuZEFxrNiKMM5fSKkE8FXOtMmBB/OpUgUCRZzOrMHp9ohiW1mZ+BGMAiLa2uAlBpDMwAUGCSNz7UB6U+i8MVy3T1JJXSowAHxdIOeNTX6itr8jRehkBVaSLboEh+G4C3MpFkI9oQTs+pxCuJ/Bb9zs8CaEzFq4opFitdI73qrDcIg2EPniKBnUE/PK7lsdIFU13sWHsqvQmAu0X2vuVkymXCwPKs15Eap6XIZLHljFctHFrCyfGsJ/xLCWKLoa0blUfTGuWcyhJpfRmxY7QNSH/PnLXaXK4Bay9SKl2qJPluHOIqJQ1Dfd1pzSQxADGML0L6hs3kR2kSn1dAznaRU4PyRWORJgM5+B6tgw8a0oJyOB3XGt5WRjN6w6UueFPPUwEHvHEc4ibkQnC9OxfaIl8wZ2CRonDq6Le0GZtPjPvhrem8qeuf4JSBiDNpzb2gLtKZ3eovIo129YAa4ONOMBCDsZAS7droIeoPQw0gvQaU7RiINGzB3HPRGcCCQ6pAGfSA+OVhwxrVvIfNcjLQKDPacKwTbYVTT78Fc0llrJqZVuHpRKVdW2vwmVuuecM/J1phTpxtJXMnXVXnQfinDvcUaSfChUj1RagoVvHyE0kBrKBAMOkRXRLk+9EeeSnexKQIAZoHe6/L+zLZmaQGb+3zw3umfn4b4xGKQ8T0SV2Q0NzED6pyGpy0YcbzdzhX1VkcZgjNUq8yMRRjn4kwpoYtD6nMP+HI3J46lY9qaCLM4ch8XaA8y5ehXfsVJhPojUsEpU/7eF5EQWD+1waDv+ZRQXXPU7ylI/8xiirZ4kg8Tz0npy1wVW1jnXSSmcMR3aRK8ILpxQRnOoWYIWeAVBLxaDFmUL1AQuDsfbh6SBlpIsdqx3mJh8LihStONhLD6d537RnowEchLQ6bSbzgUYdLRZ/DofIOhMhrBaOi/KzLR8I6GqnU8+xWE30XSWeT/nF8JhlQAjD4sT6ghEJ7b8NKE7PDe2Lo+59Quz3uGn2D4IP4CQJRyY0AZ0QB8ht32P8bvd08hCKH5W8WKs2sCvsfR7ki5CwM20jiebiIq0D5eId62IV2valsS3bAoNHuiaRafy+Fa5awZym3KEdRLw3ZDp0AtUJ2z/BICl9ybqoV31caTROCIbdjsWy3Jcvd+VNtb8Ff5GHDiYkiLMHECzopXYc2ccsj+h/YsgdwGU0SX4RfxStVU+tQTKkTAnAMRY3NizDtYBp06hJPnLWxn0jEo+cYZnq7hq7GhSSr0sDKBqsvyXfPDsb8C8PnSDV840m94mxExRe9qFRbxFo0prPQJrd4L4ve3f0Rzh1DTmbU/QJREARsvRaGNtNQsx6c5VH4pB7XIpkhsktp2M++sSI4yAF+MyKSDqkJQJHc/mOl8gqCGMUXpWOnqTHYWbUhbCJ3IUM93u4OoGmbDSiRR+fbaaSInfR+s5RgZVlkphw8KeQ6Kqa7GtsV0NZMX7inRSvfSK0eDPcqejiA2LLYlNukVgfKq0pk7D6+Eg6GkezA5iUIJTyVRaLrp0tAkDwod0G0BBSphjh5lvswGDePZRnh6F3fnIiJKkF/oJvge5LSaD7ylUVapNO5xpTSH8dzQtecIDdJsqa/nkcwT/W0M19ODA4h0g5OU8Htypz7DAPdTWABMBHx6e+eYr86QHzUT0m1D4EmH1pbcHCxgm0Z8Ae9fgoLM3b8+6U08A73WChlO7XjyML+50rV8cswxP77hS2NTh+cFvphlNWjMkkCJPYzCOCJaphHqbjWINTe82kXDJ+snkDuf7COchfOVIsEhBBrQvud5qD3m+UWOVrccKfpKS1cSeV/z3aTmdf2yrAuQ3GZN0/pQyEd89jLYvpRqOon2vF+5uudzb/NBFj9SJhq/YalJkNXp91zsCsqRl/JUSjU5E4DvniMZkWDEBAe42VgK3R3YnAAGnUNWni35LE8YQphmzptef+/xhqnT8jF5GiHXDeD2Pn4+Esres6BWXHINov+Pftjw3985FfrFTEFsRBkWtkLuY8d2ygHW1qQ8FOwcbN4n+BiHHVkEocpEOoVhOvpKOYQ+SX4G1wwabMRXGYF2WshSeBCLWXKHPbHbGyVJY3s1hNGH+ETvzoNJryE0JzcpbT2Gr9+8LVJsiUy/cmw71VL+ZBYxjzbWTIreL6a3phVtfG5yt1k3+iHhGNSlwoU4Fo0n1lbNY13BIs9xi6DnTtM1SUrHMuJV961zIPo7qEwm9tKdR5WKv1W0dwCnxOA99GKhLo2WyP2v5iiVTk2qv75i/T6+7c5Rx3ah2MLCrnVwWhL9JJZ0gMszVNcIy3UaW2l41XlRaMwTy8v0PtyCPiOzkQ+zToIv4i36kKI6/vGUZdUA6fAOXVBlumhym3BgPKe/IR/wS6Pusr29VpqE8iOFKbrJfd6r2ScSfS7zE4qGTV9gSqm9ukT2eXV8AI65TlSzL7lSICjuAJYEDo2qDcKytR/uBmLJx2qTWuD9GdYlHirb6b5i/qpBdqY45ctw0HQJwnUZZPpvOhQBZiC8YXn3hy2KRFcGwJEbttZTdLGoEgeNCbZht7ZRsXR3hMbPuJ6F7L9FnELVj6eBsBW7eOOWHXLRUT6euhg0mYsYpFEehjYCQrefoljGMKt6OVO057dFal3dFpPgHszowEc++Bn1mLbOgdnkDtkySrlUr//BdWo+nvjmIDMtzh93NFzlHYgoQLyOLZgNPzWxUttl4q0fdep41X5ElN8e4P5onzWBie++rNohn908pYUEynBH9qWnxbZi18/zJDQVl0s9i06YKIvMhPpDXc9gUVVb/9TJNSjPFCGn+YtfRYavkcCKF/XU4dHpPiVQ8wLJvu45ub3CZS4thrPfoXC8q6Pm9ZPBPyv5+nbl8Hs5BLfCl0rOtII5l9Vd8nW+axdJ4d5zdluSnr9KtrfrEmOmOYFQl9wM4eu4GRMZ9/QG+Sa+4IPoByNHuQA60zXhJ/7ni2H8UvQW0cVvkGnkZaTc1t23FCfeU4xnhMv/iTu89hhoDlOOMRcpzWxUDqsuqtZ8Qn7ke48AWtNKbHQZCJ8P6wUiNnMOII03l64xb3SMDI97WWxFTvaGPbWFn13m6LvyAgxHdNkTgewmxJZC8Esr+ft9YnttBQhoVqguSnkva3gAWYSjsgvzd8ELnwtMEDrQriiKe2eKijtzEgoqRtArX9gEnZQOZBZSHGxqycjTdnweRwZUXlkaOiqjPFzKEc+UTkFbPOnM88eKIU6DiVXsIZiVmzmL3T/+yLnLVaW8AiJ4IdDUXpTGRd/TWiYouVpbAGAiw68g/SgPt49lSrGrpT8zSfOpj1yOgRQt4pDrtQFY3a/1mZk9bhS/4UH6sDsGDjo2UOG6ITDWb3a/4pGbr/xrHLzD6meSbkXSDJA4blCbC6vlec9dke4J7igUA2v/uTQIG6M2c/WAN1cwMzYNrywBbhHbexzVssZrsatyEyhn/iE5ssJ3I4/HBdNss49iO+JikZ+y+ksH8yo/xYxT7ezEXVKOcYE3ZvTyr5ZMwZUMH/iQHym3POc/QTcgKoSkQT0NeBk/efFXVSexj4qfmZQA/4R8IGa1NNW47HgwtbsE+dLsH0d267xtOCl5VeqGcu5DyvvfxfQ5eua9U6r4RlHwYqKJfTApBzwtTpGXBritKUUl+lpXva5AXnRNhf1u3ZHK1VOnMNRNHm4EAxpbnd0kyOAghJlXfUJPhrI879ZLUePwAM6l3NFxadCVd3mpr7viuUPRpb
bM/NKbHSREduNBwslp2vqllW6ZQD+6Yhxnpp2s9qD1DaCVV34CYttjlJtCLGGGawas+T3uWmzX1drazcVh1FDP3j7aMIu30y+KWbXQRofmpm5FGflgFxlfdPUnz2WqGFOTLlVwlHZ5pD+Oe/ZCwjow+HUrUrFGKyUiiSnuyRImoCRhYX6y1AJlu85IlQUk6ym27RmxFlRWf7wpXD1y51FAU1nDUJjxZadEsuybwWXcElKnXPcFgTr25XRR4XvCKS17VSsgHprWBqNlA1vfdi4Jg3LpydqQwQqmDADuSeymFnMN0qFIoYT8ptz3eSS6bPH5A54H5nRsV8VRuGOgwVuoGZ+FkLdiCIi29Dv5k1iQSncFvbJ7JC7yaQmeo1EEURxqzOEVoPTP/1iXTpW0b7sR+NYoSAONrnsorCrV1P8F0nUEFR4FNEYA6y+eTzQXcg8BUHFqxjYZLaNUiWvyNsy90zKuEnwqX6VCFejx1xcbFVwySoLKjpknK6efmjMYMD/bCrlW5gx32p+/yKOwBG9CdC28S4eJhiTflz4z+vpPsX7gswaUMmE5UYs7nFmTme300xlnd0pOIIXRRaYd0EA5e1IDRoENLWRJG366AFL9bSzuQcjF6/AD88pBU1JeXguTDVn1tUS7DJgTuxpHNEvhu7zKi/7s6TGMjAl/Js1XeiDguoJ6H9N8wP8rbCWo4vNhPMbq0O1Rpar4i9quXn0Ol/J7c4ZM2uijKI1hNyZdZlw2bd453+4RvTOMQli4uaSGk1wYH+9nwz7Npty4PTEXkJ+TLwownlNHydc+yrS5c8GX9CejebQkTpzrKN7hKzQnW726P5QtYfIz+DniWJwoN1uhRPf6/C5dFR3GH1nsz3NtfYlbOW/XR8kt8IsnWLxus5fyON6mbwSBsK9xJDkuib6X43EMIV2pE4OCNRYjf9NiICqiKAmpvuJ+DqEpRvUzH9t9/A4uW7gMf8v6FnTQBJqUB3YK1l/6adUyuAQb/ktg7qc6wbcjh2/7PFe8hdcD9vK7UQzW0grMAvqSG0+nMTYAx4z1Vasb39DJoxwBa1oqx5bE+ZiObPwAhafVO/jNcMb6Bfu6ieOpNVfxfohV05vR9Lap/BKldYsMENUUREtYY5PU/NvbdT3Z89haHVfJaGP5VMIOhbEllC/Geh4kFyrvPlL0+kdbbqDGlRksvHQGTByLlWmSbOKIABvDDGCRA7Urp+713JfsZwcOSoMBr28LwBcKBMK6WLryojZyKNeddsALooIoskyoVNDZJ8YsBEG47dNhu7keUd+giiP3tR4S/t+2jTKp0JaxsjKj0tvxpyIN2ysVR+zZB4i4GjyN+G/E4K7LHHODToEi2ZSXluTxOhwSHvgdzYre9IN3kuXVxVeJ8sqGinnVo0KwXgS2Nzwen80BAVw96o28KMJJ8YQ2zKs9XwfBllarKKpsRHvWqF/UrHzvyXvxni5yxV5B1HNubWUSRoZ4zT3121NLPiJ8qHf6QufmIkfDfgCDcG0KGfiuWWezY8jAysIrybrVj2+5g60JqSe7y16xONuIVqYIFZP7W/bqc4dQmIHnm12kDUNDpUsrI6bnE4MAq/hVBG6fJQ2wjUwtaL4phcrqbVjyoPTtPmdKxC0wRSTyf387Z2Zs3pW2Uphj0mBHCcIMxTvrqRkhyMhcOh2ri4SmmyDnvH9jgHauNb6zSxGrPL79r6Yetc5T0jF4Nlda9wCNAnjfUjC2UcruWZ3VaiZwQUGb6YSI6YZm6DxSTvUyQVizIyNcdPe2NHPsOND2HckGsA6c0DapneOtR/DTL1tWrRXWHL/7fhrI4YTSfEVaZPN2DZ6w6+8iwat5X2Wri5bB1tQecgEjkC9+wsR42MoCPYglVnLVyCUMa4U87tCO49TlK6uoMdxVK6+l0Aj+Q3G41fpHjTaBH4adwYGpHkP300V9Yqw9kzEfDQQqpF++8QDBgEW5W196MtNK9YCzbKZA4wfpwyfv/JjCelyfNz8xxIiT7+wwYL6Pxg7qyaqP6Cdt8LSpPMYwY1TeCcLaPTQCyI5+YoC4oIu7LNRuQ1msNS4lWR/g22n0wCKH2Yb+4v+eOYbNtLcdN0q39G77yts693AD9bjK0sOdDZbQs3WQDppPVYvpNTyMGnDqyUU0woHwVdMh8tQ+Dl9Bvp5WHgy7Z5wUqTObgM8tZDzB7U4uapCxW5VnI8zC+22FdtdY6nIy2lFkJAjKRIHTzcByLlukGbyZu0cUi/My8deF8jxu50mb4IFAud9QMmxVyJdwDUGmWrNpiWkKV5AJIOoql3kXbWn87PqidBZ2yXia+7a51IH8iL7LdZ5txbhLvmzgZzBx6cYTwMFIZCBlUiKcSw8SJVBGXDGeALniqlH1XCO9FscuwWTT3fdTiwjxnF6S1lIgFbdLyR/dt8CFVucA0U7WfpFs/Lwy9v58/HAPPaf9K5472rug2ue3pFgDgYf+4y4J+DlZWnvg3sCpYDK9oiuP8tQc/skfvohs4MnNdFHcxnyzxKf579XI33PNDZwGmpXW42NxIdK0BAvWr8zoM56EyrmHPA/GBR2x3qFIVIGn4yHW7sVRdRvUpFM/X2v59juXR/O8ywpd2ERl9Mpyi+VFucb0a58j6Pa1ZhC0/TEsIkK8yMD4wbceXw0GXUQ8xdc2YRCDFW2QRyVWX9Sm4yLB4bphyD4ZGxpD4wyWsiJkbWJBAqKzjuRYyfnKIASqClxDwjz4AV7iqWPL0bN6CD8bh93h7cUV9Ylkgx2dMN5Z0hk1AUjmB4efQrVhU5ywZEvcea89AHuA3iGXbgNHsRU40+k+2ZX5wyV9hgScbi6pdwoDhVCMfLahaaf2tCha7n55mAasryjf8X8PuTSHaBvYXQERhXCNRDe/+5frNLle/WfkHyADoFWfbByJFeYN8yJo+Mq7c5ufKRxydZt+ioXT6Lcz5aHSGM0p6YgAyQ0s+C3zZzWFGzD+E0+/VTa8373jhyVgsD/VLEQZVyM30gatpV9k98DyNu8/Vwihuw9lh9rGmgdxLE7JBPHELAPzxKhY+03mXYMVqS+fxINOchS7a+vK0WTBXyDzIiXadov/rwqj3r86y7btdQkRQYHo69rj14VgG8Xr5m7wwJV/UNV9tbZOrdrXzkNvK3dT2xM4dKTDnrdhXeJ0rmNyK/wYQ0LvnjCvLGAMBQZJFy9+8kEQhlMb7o8Py2LMw9TxxsQuP39eAYr0tiSkCCNzplI35iUIHMdsJvsJOjsErzbIFNVH+GPE5Pj8cfkgoXhlI5tRq2pXTA45oorskoxYwmkPKcJtx73IBSj/TtLeTQF0NtTxZjplGn67pcTmqqs/MB3LDdWiohmaFJYiJhkjTnM0b9Z5LzZUU4URkCXt1MNUZ7+8sNq63GBDoRV4mB6Hgach7QmmzRfjcSm4A+uwLyyP6M6pIqi9iYIume5o1O4H/N/gAipdL2UDqn4ITCpUSmLCC1pxetj+qJbmeA76SZILRJ/8oCXNrLoFOkEDVnCEn//fH0TiyzW5YtFq34T6KjefXbRoDVvo0SxnXwuXCNmtHIxOBMR8rZ0aCT/L3QABHYiuHCaW/IXqGd4tr3jAEGz0COHx/2i1nB7hNFY1VK2uNh0Prqps8J8yEeucFVOL/wahsoZO9qUpi6uCSsG5zMGb2mimuZDO8QRcHvXo4t8+RnWFsYh9yENGb63trkmuAITd1urwuj90L0Sk0mXcXGyCWnBlW1aRCYSf82bkNUIriVR9iVZBw/UWIoYLbugNpFUtsxZPn0sgZdBRiUkxUnWZbCA8fbapFD7NP6kszDkHjyIERtC04ey+sssmNMpsWayNK7MTTSnCHwXKMiQyvQSqWYeMOPAOB3gpLtVjT0uhOLpUwp/AaH1qsF50VC0NOt5alvKBFL3TLdjje/8pShBzTipS+gn/u9jSqCn0ZBp8DWsq9gyaUgnAyVmbCIZBxSaJxTMpAhj57MFVoAtUQIah4Cpzn7OIEva8EGq7GytYuYNDNFX9Mh8MgSqMcsKjF4y8KYjXOTihe7NENNngmJbuyZ9/omHp6KyVxRj6egqmZzgRNFoAk7sdGO6HIyg1pM
XslKUZFJD9HVw7gd/DzyYCLQWHdq5u/8uiXldCBpWquAP1DekkkRxwPT4XP/PkQAxMRVbMBFbY9uQRDEvfqH1CLGoyTa2wrhqQ47HYW8L34EbXySbGYW3YSuETffp2V/tUfVZCj8v13VU1wZIksT4zpI+9LVFxxloJQbZ6sa2qg3EMV/YqmaVDLpCGHRMNLG5uc/jFWeLmCnTi4BnLFJ0MuLcVwcVwLwrtRY6rW0hyHJrbE6VJs4RjOlwCeiBT8atOChJ2/QCUyOBPqwCt1fCR4nwoMt2/p0FCAsnOWV/QHj7+kMOD6Cv8jGvkB1nwsix+MHwYhLWBwoGIld2srQS+5OJRQWH9jAnJFiDLgA1m+vXy2RqYTowjhFpaVSVih05Xb9RK3HBdIU/mWL7oTQzUGp4E92wKYZy3nFVrzq4FnYq4scgX0drt/xvMsoDgvFOZWoRjHxtPXQLhDGshski7yC3B5yPMXKbefrykbxQJ7VxYb6Q9f8N06UGqpMUTh7AKbVLjqiXYkx8fF39VpD9eVcq0e7aZMJc8wrM4VQD7SvsSJ/cn+xzJ6+OvcWwdxuZyckbW9e0TwkmohVoqD3WaJ20GMm9vdZHqwK6vA0c1ExSny3PSu0L90pxpgLkYiSILSsRhK53TcF1sqaNd4F2el4LkbEKkcdRqUKLjUL51r3jz21cOeJxtRfjs7uE5E3vPWro9yU1GrDGl+EfqMGiOO4NhYqMreXQCG6CKCm1xAPqGSLCIUHZiiStuN8znpmbqB1xXuG/oDbcfkg7yRXUZu9pGSNYHG05A/PmWvb2yxUsoG3Au4r+Lffokc6HAwJdskGRurKUCU8gC01ZUiZiyrcHudGOQO5aaF8ah29WFRtDHy1XvnVhrB24RVL0Q1Cu/g7AP8yD7xL77UbaNzFwFHUqezjeaFs/BXC17h1IncArRBAdKb8HstksLfunxQMe4JnNgDRvFGXZtOqLT0/08Cd8NMPoo9fZGwUqNjkpSJV1D42jzp9auOcCbumx8ZYuOd28cSJsa92K1eNo9511GCZd1KlCAmjMmKDtl4gb5KX+80G04TRh3s5aQbyFUTOQdU3plU+ydYqCsPs/lYe/jcck0sOtzzFgZj8jLnN7RXUc6MOs94xs4/m3EeOe7LRg+Vee7Fib9nrU1PzoFzCO2C1H7aT4uegakBQcBElf6Mcm/tKTNNHLB+cGBh5+aW8DKlFE9VNGstDoX9GpVPRwKxE/LRZQuA562tRemmoit5+gSf/2jXxnNGMkSAbDnIGLPMNoOeCnwCFSoNJm6qgJrT5HEYcCvUB8hbKRIcKZfg9g/GVv+Qrm63VE/GEVkYhsCoc0WUyqHpKLbOuGjn8I1oqzV9vQ7V1/dQOhG/DiqkDIu+wjoKRXl7KU4YX+1/Px8wPtgAlMvlkKhFMORxqDJjLKkKfPjZoMRbJ/VW7JvLmAQwU/wQkNEG3A3VVGaXUXa8GWoNohTfSErt3+MDz1dlqzKKA4WtNff1R9VQY9nf0W4Rxu+VxX+3xcPdNeAjEqVr+P+8KurqCMRaiN6USvwzFnLzTGvePTKT7BIvV9kx0J/fWWDuAlbeMeHC4WXMHwqUpXpJnpjO+NtO5B+HTS2G6pS/JNrJ1cD/ONGV4yGX3mqLpsWvuuJAMuGj20Vff8r9uS/FXgMXvZWdCnNGveXFVTrtppd/ZJXm8TL/amlBqceiC84emB3NQvp6msLECqVLe/WhGJRK9gDavVuTWe4KpFohn6dHa/swFeqdQYx5JEusLrrGjXiErx1j/JZgs1pZnZa6mTHy5DwRsZK6jPwS4rAYQp1wlfHi8gXuzbBHMSOHvO3NM+FoAvcqf16T96a7soZ6gXPlKhDsRIiZLeg9P1nYRlywZiErCox94I9NNtUeuStyog0JIzAqr+VDeCVW9ldxhPgmTVoZgluPm3q4Ef3LmSBBpkmzd8QehJg1eHcarYw33FBGDOqguGRKCvRrG9TdNSGH3LbugdnW0H+tj4Hx8nmVYmufFavbfALaNuauebF7nzwTH4DoQtrrTHVbQA6SVZJXRieUS7KnCmGscLSvvknOiDgpH2rDer9xY4FJeVupk7sJWNsLJoJ92CiQjF19FtuRLRyKcaNesnEBbzYiHkfzKlE8gTa2X4R/jpsFTEtpQLkNwWwREXtEjXDX2k0RsDFLCZtPbkMLEOZrzCK1Qtey3MNq6fZpIUgLtQeO2kQumwhxdehkGW9ND71R8vN6IuTpObla8I3Dz6PE0sOefPEgR7937gpAeaPjIo87ZlkryjD0coE+I87oLdKb1MaLO+UAn0Eb9C2ZRdMW8ItcO4Ceonuqi0DAngJ3UF8M/NIV6UJp3ofFNKUIWFwd2FJU18+opDY086Npv9udCFqB0M8tupZ3ptrCvX/te2AgasFYY8ieV2Rm5F7MdqZi6d/s+XcEknJkXloNE5LU/uCV0p71bxF4j4HV4SLNIZDbX9ILQEJmBFD58rur2xdHy8NK1+uH0CByUlKvcYrW4KO7nUPCWVQpHs9Ne7Ocy8K5iRQ8EVVNLq3USFC16Y/Kv2sRvPy9loPbzH59HtJsC9SV08iGHTNRS6uKiJGA5mg94AYwHG0UqorPm1Lqg6DE50fwYi9iitGnG+48EhVh7PATb+OMZqoFnwwJXe5UMWuFmzBHzJ3h34R3Y8+NIUl8E8RJa9hXFaC0PnhEEuUsjuhZLyfy+eFnMBjT+4DHuXEqLuw+e4Q8NFac0MBjicj9+5wRw9D78DuhHkM+K6r0wSo1885DNNbuO4dn2y/03Tb3F+hz59aYlMr1ZgXsocTU43H8Swcg9/rozTvBz8tmLrFHUCBubzXR9ILdpJHGX4uOD/IjxhYeGaR3G4J1rVBd6jRaS41cAJFFru/0xzxyMRgHBEyY4M245swzQgmzO9/lxxC9g6OtE/+uDTpqHRho9BI8RmyHauV0w9nt9WGnx3pOqp/PPKfgpGc+aLkvS8nWGC3gwsxP4My+Hk02PXqtT6ZG1QYw1f6AsUBsKs1NPNp+AIlSWbbAiwxfOc4pGTOWAMFQiPa9QVNIn87VJHHQooXhP4sMTweoQ8wQt2rWqNHds1RhLx3hzlkVsb+sC27cLujMXaztm4s5jTso54+N6Ygp9NJV6Feql1vnJQoCmA/RyRH0d5/frlxfg3rRk/S3N0lgEeWL4Q9JQHjYfW+IXdl/EIazWqAdKzou3agwhv3oOchbcczmzmVyHgUKUh586Pg9gNfyxHyJOh7Wqko4n3U4l+ravU/6SbxgbMt6T4kv+kYw3u6Pz13t1A3pp3AgSq0b3l0w9cFpUjSrvwTYqonWBfbqoC/UBXUtkADB3L2sDosSIBu5mP+ffHHI+GFurm4jDlKhzTuiD9r5ur2fkodbLco5pS/swYfnGiDdgNG+giqHnoMsI8iGsjMIwLsxM680Cg1QF+NHU3JEmBTAuZCCEGlDR62Z277DLh0pY8gkuEqPffKj5QR5e5isCALucaA5aV+JZI4k0h/PBA0ieggxlFhjE20igQqJNzX0MunQ3nDYmz7Q5o2+Mi5N8JitkVd7sKj76mby2MEtMU5x/2kfswoPqPkMgQUHiUDjehe9mz3Wqet4sy6PqXbmJvQK77n2xPisaDW58RMhIuvD4FR+JkDSj/XXnp2GK/WzqkW7+misZMVj9FFF7oZWdtbOCw/GkVurPRBVoCGhpZm1qsyvQL7d+199unYTtnizNuPoY/kBBq5/BK96dK9wSopqY4ewxtmcotoR0sKkSH1SC6FOampMy0vZv7U3jgo8asIRp++VsiMsfnuHU54KFHeksWRPowrNDnjt3ZwgoXuG2mI7b6Wgy/WXfPFulb0k4S8qdeJcOqnIC3wcdJ127+azseEBqQlIMv+yQo5gkQvil+4Id4VDRR0afSBSkVeaWvPjxNZ1w6I8NxU2AaGA4fvEbkJO6WUpQ9Ir1CHtRJkH6BkghZb8Q+k9mepRyRSDnkd14laRnDJlFpf3avnK26KXl7PSwPnWYJv9oTpFy7ZbckQ0uSwEkTklEeyBmjQy0Np7iRGzhsw86AlKzo03cMYQEmuH0xrUIFaEZSeWM
12skKUQ4OLEI8XubWf151PMEzYLauWx8wMgnFWJxitnnckxGToXCnXzM4q6GOsoGH80kFkqtKXc0THm4MezgHCfx/clfifXSIxxexupqOw1/npyBf6sA96kBXfXoNJZlg9DOlzHB6gn39yqRHiDYna/rzIMIg5fi4KgtRlmnx66IXGLJwARUsuEnMcdJYj8saiH7SQV6riFqDWHimzE7K+cwjKJb3EcPBDU95O+M+f1NswDK9QmpVn3hU6brEkteGJw7AmuGKuNddyIOFns88sHC9dVr0s0102DgLfhOeb4Y5g19HBOqX/qIbCM/wLZHhSl/7OXLTloDJ3kxMnIDu7inP38eO6tGjI+AmzfCp66jPn03Lv5VlcprCFnIpXICbA3/Qshkt1bXFIZY91XLw0ciSzL9iavQSCGZracPfl3A9bDnotG3vzLKf1ihGBaqfqA1IL/z6wuUahMNADxehKApEc7Z/kQDIjzbLjMpz9S9EnpSC1jjocT5hzkXxFyMM+MyfkmWzauBhlfl3IRsREvE/35t76NYZqHrJUQu08s2/+APZ76U3YkFAk2zTHepG5SN0vpkSDKBoXefYW/JTgsdewrP9TxRsnw35VnLGr7T6RP+KkqpDe6WTPslRtaMU5BVWqnIPgqnxCIjYYfxiEBwuU1w0kIIEL7gp7c2MhLajxNR41vvBQ7iXSZfMDpwaGZHBPttN8waFyrx0HvG9DiaAUsrECT74dc6HFqvOaajlbATKe2ih7qj36lse6nIPKAQ4mTM3osYKEon1gel2IGiwrIQLMctdEX7doKTijOmvGVFJ3yi4xATzqC2estsvFrE5XnvehhtleHLIIE9QGg246OLX4E31zs9m9Bw/YmpUlyCDsz0debpxmwBSSxOvn34E4it7qAknlxWXDpt3i5VavYT9CK2UpcHmYZsSmBghR4uvyLvsbI4mm83ZcktsBKQa/8RKN0J504QPsxUvNi/NKuUJQg7TgDuWrVCjMNDfaAKDXMcbWDN5yfj2+Qg5H0Yf5Ioz+BD90h4KAKFFFNgZ6HBTZelpEe8j5IMbrlBkIFgm/JswtU5t1G4CfmuzpbWEDl7zpAe2rI4H4rBIK09c3MdgutxNjtJHnnurvFj8xd3PsCn71kHTakawrG0v2disMJwW0E6pJhoXndGoRV6GQPdgEUWMxSfpU2ozaAPjkbYF5CxvhL4AMozFRxwpa/R99LE2OVFfvoqygGXGtNgSuU8pcUHmk1M4pdKdNOzSbmnsv3Cb3HhCeNOC32g5mRM4H2NtbvUVJetRtMDntaiLl5RiqNqJOjFxI2dOJPIxRP5eHQgD5fI5qzZZ8OPdsuE2vmSfb6YJb7DvskFU1VU2Q7bccrhQhVOZM1BcTiMu9plNGIL1KVqSJlK9JbQuPu/v3OFyA0yHmKHTsOoZzSTidYMhXPNYVHUb9LIrf0FAyEUgJ19atOYLQS8e2Bri/RtWA/oI2etzcgAb6cPktWJ32qUKxQ3b78M2Nwczyl2VX7//NmNqB6Ex9pdWxMSuoawcK4z/88TJDhQVAjItxOzXdd/SPl6SzixheP6nspW74Bt6bpnmPU5k/43fMS/fngVr/45dQnm44ArZl84mbuJ1l6VXHH5I2nhjGYb81fC7cdVd+6qiuU1VLhWzw3CIv6F38Q0bwVlmkIlQGdPlAV/bo4A3oXB4aREdg3iAnKsfJ9cF5vLEotT/33ixQWCnKIiOSJCsH9Rr3y2pIRQV9bjUB8Ajp2TOjDxi7SRbMPe9gBqxI/5rPxmKeKvdF4yJOnaYpjUf/4KvJuhQS1hAAXy23IV3+RgO+fX6QsVsNHiSmw4l1LqLFT+bxwU7PfI2Emack0eCfSaJ9IQMEbTRx/rOymJPNwQU5WXcT5+UiFKpSrHA0mkeaU2dW5TSMpzNMK9ogCGnnLzEFJmIKjshgYqqLxMqQUDsqTfQO2suO70ASK8Zn+yoXk3SaRZOfmqCn8DnpqvdZ2w0wwciwc1n34HiW4LJnk6w0whbSxoZ4ZQhrf7CKSTQQ2qCyGWIqTuyb0xm7TVyrV9FlDEpOF1N0pYn8KWIph0T/OVcqOgWR29yrJXvPMwhxPgJEYHqPBMY/+H65ory7Ltc854XK0/1Ru6xXMURQM7dLw7V7fvrjReDQe45bw8gO1COv19hXVO+MfrX+jmJ9AhLoMJDARfnDYVubyOVfrfbICyajkfotKkCEGER8fs9IC0t/nMBPYWULi9fxaVxIvnKxjeqIkUfvVCOt+DzLFsIV5QdOCcvmj/ovA7kpK6PdHCEayMhxAFZUfhbyXysD3H0XQafAO1EZucMiC4LaR64St9hN+oeEGC159GYrLQ74oCY91fIx1dBe9dKMUZCY0lqjVgjxPIFBGLOEk4sYTQNgtiYRbBShNX8/2NuiIBh4VU+S0rHvgEp6Lj/gqyxstKaGWs/sDPguGU6JgBlOxg5hTJuqAITehTqhRIS0qUTl7StLQJuiD+hHfqBOG7lfaHHWqeFLVbGoy0lkBpksRu0FpF/PZ8/YbiHHqvwZCVMVhIJ84ufWUlFVDq9lBTRTwRh3chIcF7fvjMspW1c54gqvt00lisbL+VEMK6wk90esnvrEQhiCQZpF0iv2l7d84xM0rJfoWb4WNpzfXKpBdb7CqvPsaLn/vPX2AuaexSOu0OduYynkhkuRQpnK2HCjqp6q+zaBzkQ4IpfBKs8IUy9c5lBm/rh1Ij6GZMPUgTLSN6HJR52tnswHw2HSL2zUTbgqXedhqACdrVcUqbSvXxjpWTvuBfE5+xZI1I/K0F5LmuHUL+ATPj7fYQS1B7nGhXDcM+nS1CVy7oGEjqwpPUaAb7cANXdagh57LFpiWV4i5HthqPU039D1siF5PN+DjG+V2zoSSbVga12hW2xoR4vP6RseleUcBDpPKssZmth9Ax1SvkfIFmMJn/CjB9chupLZ0FJBJW9vEz3h92gVGdRGbw8uREEjk8ICdf4MNldMyncrN4MxInNoj+Iz0dJWy64r5TuMpsmDg41Km4IbyIkcgLjrh9e+pVfFqm184nSHPHOsQPBOtwf/l/tUE2YW38wWR9V+B0T8S7nfMNwIkVSNjrMYKYyLJU/g+Pm1fps3TKfIacwk2giD0Va0BdBG84oCRWLsWDoweNAJqla3TrD9VxtTToZNv4ihYvlExI6zfWSsK9cif2uG6X6e698Yh//99gCLzjkW+2rH5E6+1D51sLnzfXmXS7/02o9GZetZYZ5ypYfM9ZPwsrOiC47nEz/emBgns2H7POaT07mFykJIsTeinb1dvfX4+cm5cBB4/7RsGLoIeUW7CuiJ5K6JthK9SJYoqKo9sBGCJqCCdIEZ0b7ESFjJWe3zMvFQDwaxkrU+G8Aw8hdLaOH+8MlEuGX7OVFRKkwoSsZiYFNTc4CAkJZo0szqjfCIgiX72LlV6Dm6VAkWImG3QpzotTWln0V0ypRuH32hkD5JDXP08l63/bxh+b9NHz1hg2XLP+DJfqO4B6K5ES4j4S1BnbYHJRA04jO2ub28FxQ4nd6YcvFJsLGBNzwI+14zlviSkSJSk/+9qqKNUzSkqVsRL4n3euUKpi0lSZujx0GVbxBPhLQi9cEMI/iDZ01lI+gT8Dj5PU4adPW+hB3eq+3vEz1H+OXBlOHSG20jyoVkV9460geQuj3M5aqF2l0jyT/YZlhx9CRP5pC1THrmNFI5iRJoSMOcZWuFFEGyZizhAGuxUxKxl2aLtTQ7CPV7ugxmlyBszN0eqTXSol2tIbhk8UdB4/ff1r4hi++ygB+oyqlLbPwZz6EWiKlZ+uJkuJp+7BWoxfuKidvYOLnMTIhjEnQKyC9670RU40udFQQ6RLxfIuJfpjw2hLzFOv6MM9EejD26nM+qiZFpXFHVrnKoaXtoadCl8plnAU4kvbCzBggQiKjtgT1rkVdmp9sbIM8P3rCK4tPDxKTVqCwAAbd6QqIW3W1Hi44xfWRGwKFCFMfqqb9KpKQW1cuPKkldPMoYMJOHEgF/ZN2p3uLomM9PoHJnSIrahST0l74hB9xBG5uvP1NROAqgtHP0yCF68WTKlK6WNszjE+gMLG
n1iIOEjmXtXNsbE1R5zcEXfXRktRz2POcwSqWWNsgoiPbT69KxAsXGy/vvGskInxXyAdQw3rTDDFLAeqr66a+ktNBf0SCd79a/3ASCbyXeve/B/3hI9nd3rC5c8AO9vQxRZeVdDICSsUNPjaPcWGiPslf6KDdrasyeXMgHNBtyLJF08JdP+pn7VPI8YHAKyQxffNJn/yAfmQzE5I4TcI3KLj7+gxVZ8SH+h3CsHiTr27+NhQ4/lZIq0aTZkgUsYk/+4eyH5YJRlFs//GJ6cFHhqVdkZTmRmUt3HL7ndKEKIb8gZ1sY8ns/0zUsjm0GuIiOw5SecMDxP9/JN70973nvz3t93T+BJLmWk979CcbnLm00AY0v1/hmne5d+ojr+mRzsvfJRU/Miq8PciegFpZU2wZjMjCZsxNCncIKmEBHsMspBi2HKZL/hNpb+3nwvxSttQSI26J5fhqQqcbe4XlwT/E/anca++GZIUI00ByEUYLL70Q/Z6lG1ky7J9l4U1jHs85G6dP4la2o/9wNsB76jHfm26V9saAM7DQavB0LmVrHbsYl4JIE714xmt7+vY+15KEJU3P2kLxOpxCkZCXhFd7PWpRAB9AzSVkOTA7eDqhfhuGzY5GgA+TWGkwEPZLFLKQKnVL0/SGGposLgJN20CyOELCpoDyxSNheJB96mC8V7Z31kty3sqKTCdsXzjBTS2RaLWU+AuZkplCF8LarOA6o8RY0t2pebnkY06ZWXGp5xRNV/s/nl8YCFnSyC/WSPLvZ7p0HvybVAkmJ+Tv9TGpp3Kb+PNh7Ly6x6NZD9JdKUXCdCI6I4RU7hRQ8SW+CT11QlHVh4TuxwLDCB59bWjIpABSjcfi4gBxlflwMd491C61vAMH1wN41RajgETsHEEISxhJmNbc6vXda5cPlg2r4oPth9QLSATMNN3zzYfeXUvEE5XYjA268PP8YnLhSIa1Nh8R4SA6f/vlV3JpXXMbVKd39OqaMNsykdyw55+ao8TxHTFCvZyOHKk7WAwAn2T4KWTVkY/qd/pnV3GUtlBTLotPDMFyGcOnsa10xxwdKZdhdMZPKSzK5tEILbAVU8zUIX2/JLmxKehZE2+WTBSkrxQEt3bGzLVuUxSQYAo6zEC7QrIQTXh3ouC8Q4JAnzZUzkQbs47P7xPfRiIK8+mBzRPL7DUHOU6WjQ66BQa+5H6CtWzHKoNaVPRUA21fK8q4mOmyrCAP8qO1V6ad1Sex8rpbyrRXqHqdgwvFJil54WRuEKpU42jZaaLc5Kc9E2B2cyjsgdHuUSNjSxEWBQUp2Afe6P251ZtUK3baOKuYU9UsyBGwcBmnYrZS2hF5wKSV2v32PB+LltuwviaEoK3ifd8vNVoHnoIQndIpZNwYOuqWHQ5SwrOJwNR/+idaXksZOE/AnBHoerjo1mUXdih6/8QS0Dczi6bzKrQ2yKUVBW5JTrGjWA2JxIyX0vhHkXKcHF1JLGNNam24tV5IbgmrgafhTqMukIovgZZ+8fs7NjWoeafyHZ1uRvITQp38nq1VOe1DRJgEdJIWOkpuPNn0HmTkXbL2Uz65L498Gq7k/6MSfKn4e0MaC4V49tGzhzBvtvsNzMGnPb6XRKh23FQ7qJ4jvIi+Fsh+h3IZcIfkP5TpzuDPqUHxDcKyUPN1h1ox/x9CMi2piodY3Nf6Fku+etgoZZGnb+TKEb+YDInciPhrxv9SJAnUE91QhQbRXA2Osl3TgxofqqdD1kKDAb9Jy7f9s9AmMTLs8/PrmLa0Iz9chR6e37EifXVJsqAV7aqiruR5IUi60XED8wDDsYKWh9J2949TUBrc7SRjcqICAcQm6DkVytVk0+K19LLq02NMQvPrdJxdlQAuP/8fEK1fmawgvDj2Uk4EgWxdpmUl5a+dPaf9XU7I26asEKyzb45mIR39fvYiVbvfBq04XH+ftxlgyy6BU79VvgD8/nOwCvY4GPuQs0gK3RiT+MtGJpAjxE4P+abDgpzrpB1fhJ6N3MukM+/s8er0bnAVzo7z4X9o6nOLgEFNgmbl/cnnUbxR951qqUGSRd0JLr0wFCTpdv2PQZJseIPKBAQBZJoCCZc2CoCUCQBX+UyJF6SafH+ifveEPsR4Z5s9cfMorzgXP4ps2ARJg+G+GbNo36n/6TrNQDST3/NGEMie+n5BwITe+wRgSCPuzfUG9Vb9CWNBxzfZk74pUf/B35seMCfCt8HFlX7aDEeWF6eWKEyx99yNcGSx4lXDhPQOCVDM7D0qNEho5UZC/aUhPNJ2u3ZdXSGAFrZoSIUsmyu4r+uIWmZBmcDwjhb18gxgD4GcMVUgua1fD4gtXqJCPjTe1mSALwe5abyptHWbpwXNbuh7Bm3/nZ0vEZEB/QwToiGyQeKyfEdrzukRmGO0tY/dNjC+3C+M4FoAOWRDPgEGPm7n1v9VIzCOiNHODSsvN2uIVewfYRhNkQdpd/ggKEpdDtiW4uifediVCh+SbVHkOBq0rva4C81Hf+NdAz+uVeeRy7DGIojGuxUVMLDwe1i4cK7EsLMt+DZz5B0xyJDKPprVeKUCzEXt7GPcYPO/eWHmyEDjgfjSR/hay9ONBHBtNjywDvYvXWMh6uuVJ4mJfuyxV1IiGWwK4eGrPWZ8TOn8JhKA4wEeOLCC+83WL6Kj2EuqpgWYjUyA564sXrLp3/cUC+esTzPMxHNTbmacHMpz1bG4XFASRqi9Pkto2qwRuNg98RoEgIY5AGmGx+4LSGStH1eCF86IesnMLckFLqmEOP7MZra59jNKn8gaJ4DrIlDD1aClxNiOjP1OrRkQfVMvYfRZKAECFEGt7D/56oWGjhNid43qe7jn/LHymhAyUBtGq49UXyrNPFU+sa9aGsa45xXqrZCyU2Bhratygpj/YbjjLA2mfUGN/kC7NlzNbtBKRfEaGobX73Ws+w3FLs8ZnKhDPXbbuPhgNsPePhpbH7KO5nQpqJXle5Sja1SQaogljwyqdN0Ujq5cU9Yb6Lra4syjHAw5tNl4ezApPc6bsYc06kXya4DwmK7T5te3sBosGyQIrNH9Ys2MAqk9xX+KQtHnRRC0eSm7GnVpxkr8Z914YzzLnHVsRYGQEQzgWkhVBYraTADkVXEaa00+AvoPXvRkjsIufOXM6R57INMZRbJruaHNW6tAtYCAGrogoZyCQpRUtl46LTYCydbVoIn3iSfd64t3SWyhfOviULkRPwOdg7pBakK67bTtlGa5NQMOd6MUC8HL7YpqiA7NmYq+cepTFdd+ZLJoaaNnhQZUS+C9pBINFodbIJ2rIQvGJcgB9brISCkgGiUXlE0qZlDRdUC2mYj86RItu+euSaha48Sh4BCMpPX59ZZYnpfX0XK+3dqcMJNE6oVOfdJ2V/a6DbTscKf13wtPxhuE4pSAsGpwfssTOAWs2SFxbBxweX8C2O5Kgqexla5lN/K75+975yGPQg5x/gz9ghG6Jn37/JMIgqnSAWfJDxeQtK8eSKFalgRR/XF8QovPI8QqsNPBwzOQeUap270lykljUIpyB9kcVJliE50apo9nEBQED1/3qPYWQtruBwpmzJR+wlBlmx+vQPjpVrOBgiOf5tdwdnD05gbx0bGIE8dP/N3Ht2RZhGFwVrsitwg5+XGdFRz+gqQzKst4F//PKWWms7ly0zI0cB57c2yuEs1AN/UzUi5vtbznmfE5o7dGXgVVzhTJOWyUwBLBTAOfJ3PJ96cK28f0yj4d5VwPnrEVtmaFZlEVf7VqEuAkczH7pgFEnkAnjPOkQHfYhkDJqVlRL8j+uD3B8HaoeO5ZfcUOdi56yB6HZ1fQ3ILo8xvaahiZVrT4M8QerJP2y+uYZal6Xg42tiT7lT6rwYR2iM/ul5s8PkZARBk9SLT7559gVegrKItHmkPX5FNHN+Ady59Jqgm+VeArElEq87mozDwFSK4yReKMCQrY0yswfDSklsT7eX8JEDEf3pssYthCp1Jxf0WICrI67waQQH3Yw1hJrmym0s8G+TYdqm6Q7JsyuSxne1rQMvV1F0vPSsjwgmb0lX6mDXpVH5QtLAn589LnNFH7t63h5sofWHoSssPD320kGw4
TLsfqWAjChgnhpSC7rMmOnu0MKfSBDaV8h/RVE8XzvTFLzD6gdBd1qgLprdmcK8fm8vrX/pfqNOSFqk3yJyQ4icJjePFnAbZC5f3lrv//DHfC2/C0GPDc9RXTPjX/Ucg/Z6LuGLuyOFGKoafqbgYWDXOwZwhgeU7ISmxyitMb3OFmRXBGtKm+OcwNoJG0ADblIhkA3LrWrZTk8LRpUkb77FWu3Zl3lC3HtuUf9NB1PLkoCzG0adOHpBVYbGIHMKB97E2Daf9aPtOR4GuimsIuKeEt72nZH8wspv7qQTtpWTxqXjm/4aHlkiVuJsLcM9vJZfSWzNNy+TUGwaPWhi7CPd3j6y46pSS7Uu6d9TPqRVZxfIgCZzTPBarJr7zeD3+8GIY2u57BfxuKkcWOhqYmgUND59Rx03ILn9L0hVzEHVAgAKbpIYHMsf28P6F1xET+H2uHc9a2yyeCqE/Avc7QIVWBtpCxakabsh8BRNSOXVqC353JDNKACzQiiV0SNo4b1bz2HOJUTmMapPBFiBMH92+sruVIO9L/GhStfY9B9qnviPZxMPj/tw/mLMdkajP9Pa6EQ+41vmE4CdULVV5usK3I+5WF/bpNgQBpUx/aIZqWL9qfGtz8imjw7N9N2+Sd+Y25O4QIx9YDtBUd4mu2rEDKnK7mmHyFg2Dn6UJ5/kokSQ25GsV1EalvNHAkwkBa7x6djnxWkhCzGETEjRntpqAoCW5Fu8b9ViArw0g4Y5qIjIy8oXBkbCCVfXH8rrUcB4vFKIjXX+KgZauganO9Yg41iNIgp/+GrAVmSSIrR3otnXGh/tyesG6ml8JrFbvB8oe5rXj44hQTl6ArYri7PrTJcsZl9sRquUi5d7Ys2kJz2J1Hcz8+s8hk3ql68m2q5EIBi4HsX5Y4odnqRD31IeTnNn0qGQ0mj6bjYW8cdxRxW1ssUJYuNegHePCaNi4F0AAeKb+OqAZGWDzhz/8nlHc60/60O2pUlr7kwOT7xvNMIqm9+lLITM3dWAjeuQgPj3MGSi5MxiFUPiVsscTUbTgXvj/SujpmJIJwMc3oeq5K2/C3UD0/NzOMUQj3PRWtvmNxBuyWtqBk4ryycuhfC7Ikvq/sCMEkR3vbUdg0ZvAXTbFI0krEKTuK8ktDW8+eQRQ3Yq53BsycsGWepPvKebUF+nOk80ht/IOUbvKlZAXpZwnkShXlEkBVaf2jy0l24z54SlBOoFYeCmfjOkb3alyiaxTEl2OZR5gKQex5fYvLQZgUN69HtET5wXhZnMowiYQpzRiO5DmRpJxeLc/T0UWAwMkVBYA0NzXSqiHtdo1INNa3MYoySIVO6wZ7T43GEsRuQIiWYJZVkVCyT48YH4mJEKToSFLPYO7+XFL89+xMeAVh8rbAzcPKooyvSEvLrVWStNP4lS4RcD/EO/EU6/H+ohczLVk8BnuEhPA/xo54E5JYt1xUq9Bm/5OHcuUWcRwOJa7MerVpJlDsc7Cv69t7MXjVQLMRxzAdASuPcRTXRCJAzyI8eoLYcfAIszYfshFnuP+ABCE44FfS7LXAueen4v/J0jMsGt5Rd+2C7w3k+twFrqn4uB/IP+ziEYktjO98nyEuRF/6PNYZqSXMVPifFwGE8vlPQAD78/pk1q2dPoRxX+7kmb+XoGNlnWjwjW/uVqbcUa07SDW1tAuFU9eSJcHNbFPWnZTG4ZgEFc0bgOPiPiPqz4s9dAg33u4xtcC+F7FmkvWMuFLmAfb0profTXdGXmpudysIufCsR38t/nYA4HuXl62FBRMtafBzD49E2Hbzb16L11z/wt+0rddnLU+X8rqCg0+CEJvJMU4jxPKZyBWSKWpLybehq6fhTbAlVYMexTo/Ddqh8LbtFUeulSiie2PNJ8kCIsrnliJ2wj5Zg1bCpBpF9rIqncMtW+q05ZfJs4qjJYlUygvyYPnst11hwGkN9MDfEW4fNNmn6SGATcmMVrJVZS41JCTuCqCDbntLlAE7zeZYZ4bHau0mCGrAhK5SuRBYBEMBDfkEM6xx39BFoLw3G8rNGFy9Q/SL02medwW56QWybchMRM6cQhB1PyhUVvMnmmerHDqlHChKPuF6cnMjEFF4SmUu/w7B0fPVLsPJDJTBEeYJwlZ7ZI6Xta62PseHD3Js6+Kgt4x4EHp1CIobDdmdepqNL+TCRC3uYm5w5+QgjDJoPQvU2MOmDPNC78FOK9TpLpho2ap5iUwezJZ9QiCa7JRfduKD6g25qz/XKfAEdw/oUGTlZLSvES+g43kA7XNdypXSW9zzRUO8YTAnyXbQpsqN+b9o2LVJTFEdPGYinv8TqOudXwpOwsIULlizf5sgl6XvY6bimhA1bL5RWjp42WKQcgiInl+K95TEhM5lr3TEzi9b2Di3BCGDLdIXUIDPkdz/njq2+pQCrG39fGPoYQziO9M1qY69cN1BC3iDJ45Yiw90r9RzchDzkNoATD/HNmAXNSXvYEKjfVl3/mxqHaHkJm+nvGUcHBh0VwrAIR3MYLQa9dT9L76y9rndt+eOtO00kxrDBcSxvWibM9dlEh3hMLPu/9c3fOqTLX8uDPVQZVe1ETw584HRWvWe2b9VOscdtXQqOgtMedTyMUsrha8SyIHxqJxGNRD8bRD8mnLmNfGKBwTaZo0TsOy3fthQR80bDR8/SH7N5TtFvOTRp++y6zuFzrkyJGxUwqK4e5khOteC8TobmFJTQcTXkq/2vMsQEK8Dr9f0yASwjn0rB+qXV/VthEjIK1CqIUiGOWO/E/Os9hHSM4ap0vQxxnhaWFc8QLncl+++iiHn5/UZMkzgMqq4+PSGbQGCef4PW1UxY1Zwb0rrNFy543Wt6sdZu8LjITA9oS2YokP912j5WkIojAZPdFQOfLN9ICN9nhvfaPTH+2STMwL3JZ4r3vJOh+CYr8PK/dVtsOb9DJTj/hWur4lJUO55VIhANvkoiWCuMQrPGjgs7xfXAQAaCL3/bikwMZeosQWTbmQ+9FLV6/pvdq/FnPpA71FzE59PXWHSsfBdf1jXO2GhVCXVlKxbofQTqfobzVi/Di7VEPf6Gfflk01DyA6z3yR1cZGopGwQ037Uk0yFkWOVxTS/D6Dk+MdzikdLt2QGoy/Mp7v2TaYo20rz/aBtTdYNLxc1NoQXbEwbVBELxLH6VRgmN6SacLIZRqKGf9hOYyQp59yXwpMBJdpGih8ROMSYUq9gGD1ZVptEbcKy08ctZ/8a5M8OxaCyXzTZgP66+U8oL452kT6zp1wxzD7PERXFcqmCrTAWfMmkscXbQd7KQUpQi6RZbcLwrdjeupevH8UVfsI6PxmazGoPSJIs8zOh9FX/kq2hAIYZ1J6343+xFrSAM0fAvQZ3QMSxIWvJCMoCOZyH2FxF6txd9XqX0OhprOMfsnFJ1nnOz7VYiXNMGEsr9K92Sk9MoonlyjuAvkgCZqJRmECFMQ/ZgUxTMhQ5LruLnxq56Zvmdp4JoR3qgVfEqVRyzQgVGjlgUJ6zmHJcY7OW0MSxLbWUSvBIMerlTDFHB3233FA6wqX99o+k5r5DSyS9fllseSiSf+MXMM9kKhLAc6ym8aKRSMqykKoEC4UI9gfFkXQe9IM3jJgqII4OL9GjcNR3GNekkEL1VHs2szqlaDVvSI9Imektl0ZmY43SJH3HDU+rUgfgYZQM2axW0nGWA1jXPIlm3B5T+Pjbkw491jWX81R0CiA/LBbAlrmmLVvuLGjDyDqybAwV359aO4REYCpH507XteIczs/fRHbfOS8aibUGMWtdPo/KaMzT1zTYXBBO2o93oIbZwOX/JjNn1p9S174wvYPnOv/WGrBqgIou0QivSINUYlq0zCAvgD5V2C4wMNZnQVpsjBIFHATIXFnBZqIMNJQJ9MMXffWFrPIEB6X6rdlRzS1ixbYQo0FPUQiSylmHj+8n1447TjrqhDlYWgiGfGJjDKS59do7Ft9/uJCXzd3AHizhsftHp3WqnxrydIi0aYKDus8ajDErPXaurxsrYjEklGZg9pPCnc1cuhLAEyI4y4zxwlyOWy+sKrIuPLuDkqBk58uxf/tx5NKVxs788M41OXDv8F++cbk
fIrdKSw6BMYbun5YdMCncYducOu8SuU4UYGzLYB3Bh1xbl0hOe7OuXaQHoTV/kbmi/uFbB3ImRdKHFYNrxiOQGiWxGDVOCuFkT7KzLziyoDislFprzS+i2zkcn/5q4lwmd/atVPS2OfGUhbVngj3zCUOVYI+Dv1LX2EjSX+YeS4XypRb+8OMrQLRbyp1FWtqvgaTgyeBhWNHQ+vxOreAFIud1ng2Z5XDmTQRQ1jEXLambUOvv6pKKH3zMTsRGjChsrcolG0RvaSh5tAcgv2z0NwPG1sGluF1dpuoR/WduMlZW02/ksmJhMstTNefFq/i8R74d7dXbRVldthqVj6jFZXP0C8cBj/b3pKMiOCHAf5IUia8MnOEw2DAdOan67TdYg0BbL/Q5Wy7hCDkWjGAFKD2WbjxpX47IYHXz6ToWpSvWsRBl/4C9xr0h83ngNMGmdl3KYTkOu4QETRfYtgiBO2Dw97Os1TTodsZFV3VMhsYn3Czpk4ENSCA6kTKYdUytOAu33QvI1e/Wz68vvqRJtWtb1ZWiQaEKpPm3SCxHd23CamtqWtTWCLff+6B/RkQ24LWERcfrbD3Lspn3yxKtmnnCgBqV+Vd0fY0SS+yUuSbMJ/0iwysB8isD8/AHQuQFL7SowT7WVCDjwpL5rjRw4sXqQimZzf6iT8uW+b78wtL2ZC+R36yJoRfx9ra7hxcdk61RBrlE3rYTT+tnBj0pKVUx75glkwiPWiiKUoAkQHbeC+a3/J8tSeCBjF9J/3uo7MKSjGPKjjp46q4zB2qWds4H0MGZzn75JQQWQS4D+HCtp6oP1WZLQQbHv2MR/qUEKprTnYs6XZkIIsvDbgmSikmcDd8oDXQ/cCe8LlkuH1hl3B5Qq+IpZzKB4do6sXXdmzBjg8xhYTty1c2pCCcIB0YaVpOhtW5n0B8BH7vdiJn+e2ToODZG+Td8RZxqD9MLU25T7f51uZYFyApCKTKvnNjPMFanhMG7mLCnunNIn39m8mmRxPV+CnisrrNCZ5oNKRO2RWPZzHiYuCZStFt94FROfG0pnGxP5ajzw/OTcjFfzaEHA5WHX7bS6AQIlmcQZ1LQqPFO9Ombc0HOo22k7HwvmBE2mNuLEvrv2tc9cA6oFTlGhONZhKchdseSsWfH+HUp0f9tIIl2xtgv+hN8a92V82HPY3NMKm/rdcNijStXWFSVO7QLB6pSYhMw004VAZ0cAmgDAzRO4dZVathr44vRePAiv1Xl89B82T7aZ7jvwbjA1YL5jyrGNDWwlxT6WkmWjutmy0jCjQqoCC2VKfCF7rj513SRDOM72FlGKhZr45fGWvA6r97XipcbjUrzDimz6c2s88jhhh2/5XbqZniJ5QSDYneV3v5L/IhPmt1rXiMMokkO9khoMQNfdMUWu2aRvYdezmXGMWFJqR3kOrMu2Ryz+LcEWlGfwn7luqhckAdHRKHcvQf+30YGhwhcWZdYwyCDWIA5yLDTXk5vkTS+CJSWTTIjq7lWq2JQfLv0M/+7dLytbbCRQWwUplFTnTpeBW93QaRU+Yg2x/HgVXtixFCqXyPIkEfC3tBeNL0Hq8Se4HLllenp6TZmMIlMj1nx9X0sfR3IxeULKiGqJwtGqctAjW8LDYJMP9jLxz/teZ7N0EqCadExy05Ikrce6GuNRtQiLxm37FyJX/nN5ShbDU4Nhz81Dfe2EnPCYn2TUnK5KzcP0ttBY6IqZ/dko+jWPXXb9dA3XsP+TUR+LZovrfx29HmxHIjbaxVEpDyZnt6PL8AOLPWDF1VkhCA2asrd5g9rNoZB1m+t16LVNdtERbyUaZt+VKsaRhIykwTFo4OuGPNWWUKZci4uEDZoI2+eLAhF5b4NNQ6fhFa2/RwsHOmAIa8ipVJs0sIFZWjlBoWFQmViW0BSa3NBe30Il00jlvwkr0Pis1mZwyM30lujRU7JdewqFJAjufWZXhDZLC8eRBp0B7vuHgVFBqIrmMGPos2VbMMA/A4NOrIgWtWfIlKCJbM+e92HV/CBuwYWIjGaQ0mmx9defZkshAYvasv0e5rUTGqZ4OJ+QAYB1Q+brn91FkbLJmfGNOtgX7iBp1NAEVo2+6q5dWcH30fEEj1WMDNfMgCJTiKoF0Ddp3lJNbZHfpbxKYvfXK4u0gPpjz+lquoaO9gdPujp02G32Qnme2dZY4ClO0fgCWO8OABXlvh1FExp3kjTwhVPTEOS652XKJSNs6vudE29KllAcw3evP1aVvJAHHQpNKmPmOiVqXd1l/KCW6Ea2IUuzfr2a8EgYZ0tZ8Uuvx6SwMqdIMqZbzxVF/qA1rZtRocY6nOkVs6VzXwlAk9exHlPeCw11uDGQUgWM2ZjbVjACNAD3OV/QHKv1gy/0ADUyPpCbtxEJzuAYM4iNMJRdV/JIofjxcLY8PIZ/8tX22A32e3khq8BEyvpEEQvKQtXbtoeNAfOxDQPbzKny3A3RLZzHWA4Xag1YeJt0JtlVIs/553KvOihmOmHNAuhLKDGK7EUZYMK/0fUSdEB0lW8Age4T14X6hpoq0aa/NA7pRI1r3mp5eQHfwAz6+O7DnG0vuVtBIK1X4ZfiYLdgONqubWw6MdgllgX8PUytg4vuF/bZmYOKULGm9dVWBGQjVt+uLi44/Sd5KeU1Kq+mCFLLeeEHCqrksWFiwnBHWyKM6Lo00Qrdk8lYkCkb2iXMmBX9P3XdIj6HGonQMR35rb1OsI4MB8Ijr0IqtbBA/MkoYZhtwSZUQ/eRNeIDR43UYNWZ13F27kGVmKumDDXhwr7lol1qypyt9MEKqsjte+4CxpIYwJrIjVnu3r0gh3n0NiLVT2qh3EWorw65fk5aKmQ74RgPFCR36yAsq4yG4RUulgaBrgodX2QOvfRT4CT7kvTR1fV0hb8/3J7FIWQB0wFVUY6QfaqyIUwXWFnbRzlMnRm8kwdlP8Hhgv4JCbv7zYbzJqsUICrMz9FpU7HkEmr6v1vdh86/vlCKEQ5MFFbf+VrM3LgsrXK1es9bGIBr6Mj/E6V9/+vuBXvTzZWHeABVL+igJVTYjYUCXMzqcnxHO9Xr8O0Hdu5HndgLFuH6nYMXpaXPNyuLA7tTtZpxlo1KBlqDuTYcNF7Pr2P4gFnTwTlTOxoJ5SojfCJKq2PLAH/Vg/8C7Np/v8+rN4w4Ab9Nb9QyWlm3ADc2/NriC5ieIWh8B2OWKm93R7nIyzmjymaMq1vlShVRBHmK+3MplnGiVxzMpPTqIBSc+sMH5k38MAW8tHUp/GUr30pbZhlkwXCSiHLhArRAXP+DE4AesBSSsxklxr0fvJZy+3j0M7ayIBYQL+6Vv3W5Mq7H2sfTxrP02fA5Vgqc6JY78ybgdayTUEXd7Jm0QhI8PFZu0YG8EjGNR98+rUzqht05LTgHl50qcL0ElBVOuaZ9clDvQdFxkZEr9HmtsXsIulP8CrtE9+fEYt0QnQL+PHADlzIIFlIpgQEBHyRgbXq03sSz6cjHErpuw6t5jrwO0StXmv5ubgopWa68FfJu24jiRp+zvOcmF5ptoJX+dkiORhVjPO9jc6Wiav3agVV9hqnq9EYVnUupqPA1h17zuyItad4icHfeQiG46cdttq9aWmCwJUPjSA9fk0zn23cJL0uowLgUKx8XlQvIZ6eDk/DkgSs8H7brKdCPPvZglCm7aHSscRnlnfu24M3ffkI2CAYIYTRE7DUdvvsL+qQXJF/9qTGkTkAAae/XNgqLDRjmADm8ZgzN7pWFTVxr/2dkTKatxr4a+8XgFKdDNfLppjs7Xew5tIuoYTEZOqZP5da2ifhJ/qytJJj0LinYKhTOgAXfuBh9xmJnynmpR0nvjWzS7IY/ko+JxCcPc3+Bym9KD/3PO+MbEP+QEC1IPLytn6xcT0f8etHkQS4WR7GwlcXhF+ywKgs5MYUcUPwN+JpksVRMzuLbFgytnk+Y/j5dMUQFI5joctdpdRbA4ZILO7G7xjFK8vmobPIzORg/zlhdHkIEhZOhkeAUBTemiwAnHDdRxO7+TkdnAqehgdu+aPgIUjdZQHm8/QMhd83EtzT6dQdWc2C8ieFeia8ve1H+KV++f3G/6Ee3cL
gHqJlM56HGrLlBMpXRmCv+lX1qH0IXbZlY6fBO3rW2hiJ/Hpj8iYQ0cjZf8PtoZGJH5p26hc1qcbUqVwwN+FqBt+sxKun/srXHTBVz1MuwlwfdYKUDTg2bpw7KC0Oe2fThgc5XXuqTveU3g5Wi3QQvUT/UiHsl5W+cVvlVp2o/EDcf9uvhMP+vWAbYsVQDedP/wnXRKgln9gWgpsP1yTUNjKnMXTecPOFd4wSiy+1RqqKur8VkJb7dun0ixHVq0bI2ftrRhMroZ27agw6MGdXkeOUPAonkE8RQcAnKsXwwPOneRF0qPMUWBMRyzF1EfWE8wSpaav+wHhLqzGyZomufWLuvqi3jL5Qb/lo5vMbZqnjcH7PbN8hI88ucraSzY/3PcbXA+id7etw562oA1LZioXbARBTa63VFFzXtok9JTVlkxG4/Ew9DeYtBUPpRx//9eGSu2GmVnhzOC/pohuTxlWpvINpTRBJeWr+D57O4Jpn7+6fLKUaikx1fe0vtu+SAgziBQLXkZGlbdfQ7Rs6LzIkAB5F3azAbb7IEAHQfXVLnNg3CHfGZxVHWRlt77BcpKRa1gWL58CqHtzx4XFb8HGSW0M5zukPOLn1Qg52mfurY1TSe3XpqwNbGU+8rViBdwfBO1hqaXhaidgV+IYausygorc3zed2rL2gxJTHZgFKEK7n989JWLblQhsJAIqCB0Tc8FoL+gVrlkl5rGO2LQsKB4dUg9j3oOttYsy1G8jOQG5LV+2QGwMqdBSmUBS3FaP4rZILhkA3FE4FOeg4c7pBs2SGl5ZmA9Qf1C7HqBdcJ5Hj20y2fbOhVOgw2dlrGEnkyy4/f36GODz3a6Ev7W3MooK71zdB4iZAeg2rMlpys739nodk/B2BjtAbKvwIkxYdte/Sox5TBB0Z3WPKpWblYVmFPyh5MKKtseU7h7OvUxTiEgkgMcs4yvZ5BAfmc+jMpUxrTKzenmj2QIS+SjK0TQlpd1uhF5i69u2VDmi+0VN2fEl1OjUkPfmMcdsZ+pyl3h/fByQy7UnKlcOTvIIPwYMZxy1CXR9eVTc3zIAgkq0kSwUGu4+2PfUzwD9dPM5UjUZaGOLsOzY8Eoyj4o9GVkG3sI8gXukokTzHz0krDLnC9Yr1a7ZRh8VjWoNmmDjZz/HiF95Pj+/Uza12BW3ADeo/R1ymP/r3D4paD85dwhLnOYgtVaUeYH9HpnQq4AEYD/o3AkQnbGS5C+E8iLk1EHg1Pz5ujKspuDvfaKyVZvrXF+koP9gK7PFVq6Tocz7vnry8Z7OtAkqptot08YP8kZcdwHXR7vAfBFxbRSCL0nIFBvlPZ/WOsltcJDCT1/Fl3yPVjVwAOxDvmsf8cV7l9CtefAeyaZ4JMCRPn4YNeNTX3E98m+KUQUW2pdJE/6b7+a3ilU2YdmhWk2pve4U2pMDOXgNtRuX1W+2VSUjpjDtW5v5Rrn88NDRqYBLrOnno+wVKMGJvOZSS+hFs6ZSNnuuWfMmjyAyQJOygDmst1zcrmrRx8OyvvEsXRT6rimGAhMHxCaSiB174g0DC6M4p+Kr4U7o7iYsn5GIAq9n6Z3dS18vXQyQ3R+gNvMplVyg6LrP1D30aOkaMkOkBn30NYCByfv0cg/AjAWWlZ34CuwKMNYAjeBBFPwJKJQd5hBGHFfMcnch0+HvhNyXrMLIYPyXaqVIGhbRD0BfBwRZQX9QUT9iljSROzthZTNXgdQIAq42hRih1X/QUvH0DNIrllpa/b2lyPqWnaZBHJGtoZ2ccYm57TXhm4j2r9Za4prlOdVOw7ZNfF4yy31Qvh9mbZyWAw5s+Vjo96UwiAOwyrodOlarMKyJGdbxlVnfLBttAy6K62ju2fPqgAGHKw9vwjvxYNJXpCyOJ5/sSEEWw10HZcDrBgo8Avs7aFx4VvLnfbz9DZcphbKAV9SlzH2RvHxJ5f8ov5tyXzghHEZluKO6R4nlucNIJIM5ev5B3YYaVLBZLTAgVdlQopnwmaxl2iofhsg/9mkxthtTlIkaT+Jlv1Ro0WBNyMgB7XyXNLopSaEYA7AnFDvQrozlnlBd+JICQ+F4aTP+M4UJByB90Hvd1w2e9HdlvNHE4a19YeYEE/937WIgViV8VyrwGwLSUw3rr7ey8ZZL7kGCrRj/bQvnd6amgdVu1w27MgQ1g7kby4l4k84gVhS2oEaWNloCWHNaqIggyHA5743K4OO6wvYCwg+65PjjkgpbA2YXzovNx7R12yuB4XGadPGyTPHuPO+XP5lZHPODYH+nrk/jCtfSPgUm7LDdH71F+FAO2D4Y+sYPydGxysvD5Ol6N7i5106RUIBgBRMgIJSwc9eU/jY0Dnu3iqBR2OOK7V5WO1aKmTa1tfaNWgJXYBonnU+nAa6ofEtTnzixFviExgl5NuM2akiI8sCgwzfTl58r0RUXhMiXx79PYjW1x8774xBDo66W8CLcpg8yqxXH5CVpfa38Mr2YmpOeu+D09v8PNq025bhVltHimAiQuqsnAwT+QUmyQqb1l/1+9KjN3GJSo/0o7t5P9Fv6TP+Crcg3p2y0X/MTksEIvlhL+PiEdf1o3+4CfGxuE4RRjPd4fEgL+PH1iB8Iyqv8JInQdDrZoSTXDugyU9vSAzGGhTejj7bV8V6KcTpdu++Q+gqQnIV1q8F7AgOiGsuC1WwmzcTrMJox3Pz56oLcod56Po/i/N6xZlTqDNT+6r6eaiAVdmcjppYPEYcwNZiRyahQgaj9MnaVqauFN/8Yonr8vmN9e0331GzVDO1Nvi2MQ9zoQQJen37cOaqeO7N8OkPqehURRPu6iiFU76RzavnlpJoAzk5OzZL44ueuB0nYgN/14v+b4POBERD94bYi46JiBtBI7iDMjso0KgRjhmyO+KG1foGsnZdzrQpVUBicFsDs+aQm/CDh30axN6DLEqlLP0SCAFRNUvBEHA8ygfilTXfFLsKtjGRAFoAIUuM9d/ity2GPadkK9MpMpY76Rwn2amw8br5+mCUH6EB5cMApFH3exGN2mUFyZ9lp8pNOvQkPwdFnCTMEVX3s1WwR4wKLHilR5RhGyzZuRsSLS6ncKklk57N0ZXZrZxxKYhfq+XR6yHRGuyKgq9ts7ha7wsiloRpJwumoAJLVrJ2zbg3AWcEZhMzjfuOwjcZnl/7gUsHD4z9Ht8e9EaHvMbnFpk8q9xPN7PZ0J12rXIqXd4b0vIr68qwE4mjLtJKYSqkcnKUnktbglQA0Ij4PGuqxNbrOUdrgVEOKvx4wuzv1wTOXXG9z0x4GQy92NTWWmIHbz6pftdf4iascNr77xl8YZivE+GjA6z0vQ+ycFXqF/7BFj3U7IYUhZJ4CzvFgNyEQKY8iZeny4LfLIfeJjBkrxIvWU1gocNROkbc0qaCo1KZjApqNmseiKyMmviSiXDxPvyeQS/9NMD8iEao40Az8I6GwnajJDB3sa+N39QBKBJGe/UC2KLJHVvmOWXKaT81HPdWV1jZLmbr4pBYxlXrhCa2VkKhpbBbPizeOdDgK9m1zERcetksuXPjyF/Jmu5bOx9WMfZaaukIoglX6Xyrc1lUAmJ30O5zix3hWXoesyYvGNyVYGPb8Q9rvczUYXg7GtadCKzL/FqRgNpwWnpdnXYfb9YX2DNISoAaffVhV9r/Z60HjpM2PydkpUcc/TjumpwvPBHKrFCdTqtz9fl1E+k9i+MO3+/zV5pc4b7IubdabbGFIJ4gFR5Ky6Zer0qIMXwloitXcXu6efyxrr+wJuxyWpx7trJFEMxjK+9zmoSh4SG3EYzhSlVdSGVAbtmpNVBPuti3e27ssRBQ+1/m0Ur8hsfeOyzmggxcHRhfKQs02J5TG5d/slm4AnN2mVVNs1+rQz60bu2PzoKKaF6XlqxcGXIh/PNGwLAnwLloRRKOILA2yfymtaztg0Lu8YqGXmFriMHj6y/1TFlWLekzFNwg212LVM6zL+GZHS0BhT6mCxKuRgv+SjpNEWz5fb0vA0JUkj/KfddycEkvYH75JBj7lKXfxefZT0lEj93Nfhjo3Hy4gtp2VXZFJlqF9e8hQ04KUeCo+turLnvw69BEAPQZNluPK
v/KYoJjs7PknKG6Uhtx9JAXqrh8SSawpPJo0fTwdfyUHyJwtwS/8QRZUbeOVbmYQvTj2zvGUSv4wljdDtzZpG58RrE5UOHzt0pwXuWPwsb/XW0IDgt9+aEARbtGydZf+6Iq+OwUxFo4q/Qk9K0IMglUfjJYwtVBJiZEeRUlsXYXwDBpiZtAAw1g0H4xO/YxCt2nqKRozGNcjJh47IEn8vaBHm5xcSwwyuVQPOuw2potULvGzHx0bIoKabuUQyLlcTUCHOwwinmL8B59ga9NNW3y1lYDhArRAe3O46uvPMTykdQIrbVTBBafkc72NwP7/TZ6K4j5jJ0z3CvMEdYm9qdbxPpk77JlXmmjK0A3RLgnRIKRtZHLfGg1k//A8s9ec5nKil0k4VylXMVGzYeFdh7PDF7BvZOD3hQG6Ln/LZPpWpqIE7xvsWRK7Wage0HfuEuaspqxdfQV6ayZlWLmz/fIF/c+O3VOli9GEcql8uCBQjtwXvpiuD+2oC1Zgw5wZerg7wrCBvhVKfbhG0/2KokJZ1Xbe5jE9u+k1EhtFDtCxM+rMJzfcyHr904WEeReHxBjOws07hNdnP4rmFk4Q4fNqEl025urKZhvLj4sMXO94/9+RTs2BQk+lYUvcvMmsTzbVA3l5jdcjWVHvUZIriKzyVuPzCUVCbT4pltAOpjlMmc0Yv73wWKtwLEb+b55mFyJ1FCbMzE23EcOFD5OxtZrhBYhod8ZIpzNGkMS7s1PpG/p23HalthXDiod/jksEaHar7xo698QQsa2uXuUFLG/PWPjiQn9JQL+aJSOUILcKxoeEg++0Pk03ZSHoitfX0lXUZuiKqcTFhXIU35Clo5WmNv6jRNcJo1sJWihZNOV9gQgiKE5bSauImvQbPgPAlXh3yQlzj3ZJ/urIt6H7shnDlr67LNVqzK0TwovvAbTiumqQsalX3pYJDsLAyFKnRXHJFyZeVimL3QNur6SthmIPx9XcNcjMqFP4LbsFtrnmiddx/TYGSzYoqnx7SevYBUJvWWLSmTo374OIMngQ2jqct3asi3cLPLpIlDCkDHyZSWISoVBV04r4rW1QL3KCA87Au+m8Dg4pP3lAbwSW/NfyOaSCdO852bshqlw7zHNIx7a4LeBg6z9DEgzsmdM5Q1Yovt2mfKRHnuz7tGopmtYALq+SQneuEQMGp1GWu3uxFg/XiJEVnGeFo5C3vlwoQtGOuQ6dgNrgIv8+QpPJ5pnf9aqTtMwQd8kaA3+0jrG1f0CLrz9tW/NbYlpKCy9bMCFu3rZZwfsgOCCWTlVUweIKaPLZVgZLePNVg8BJIpy+Wa3DVX6k4+YmqVXujtobLMGcAYjnv1NwnZ5KTAmW4JxYCmXQYXxgdGuvCHanCkTJin7ovIQ/LrFjHRYIfWNw4X9YUQKYRlJbH82w7IS9WtoxzF6kE+XM1tQlKjr5ExwtKiOURSSAYfecjrRbc2QTWjwV/6GgvULljWb+ypJDfexiGlaeLyqqGu/YGvii+7ohbDuSNOUU8Op9p3ABo30/rfH1kM4xeqDv8BHtnz9CyVucvPIyIlA+ms2gaUAlOwegCYT0tP7BISRY1IoqGOdeereldDWd56A59+1AF6S/NxrY+2WGfuz6cTkiSepJdrjRj9OmscF+OiGxQDCU4zrw70B+0jPLWp68t+pZGwqzQMuANrR4MJcwJFDTehYYY+tpJAOBPOyfzTBMhQD6sBd0H5c1gRmIVB4Ivyq7E19iltBRDTGFu2cQrtATqHxul9yf+9RQ5UQifG3hY7kgg+CHu8BZzOQTt9gIIWCV9bQQKoKd/FrXsHwU1qcXHlms4QYUQuS23gs9nw8zkplXYb1lGyvFh9EfWhKwpFV496rYh8gdKp3PgksnXKf7IC6xdWoAMjm4T5J4QFxI0/hSPycTRVAFTRAits7mJ8eBbTOmTbw7MtcbuPw/1Cwenvsa5dnuUFTDVKn0BCQw1RVYRbtryGjOZQAT6EBqmxE+f1uLzCwzHnu2fP63LT4JpClOqmi3XPNIqCYf6iiyWAwCHkjU2QT14Xzdzt7nRD3aymSvpOMDOiov/LG+nLVCnug/agJuvhxnQ5Te3GlSIKB5F49PgzH4ozLoiYSfAzJgR9YPV0pVAH5oWy2pWZ7O4YjTKMnLtp4LuWCEKE/Skmylqt3Wx7V1pEPFP29Y/K+jTx1M2Zx4WttjxgSGKHWHYhz7HE77UptuiuRz1xaUv2ThQTy/h8MUqlaAVhoqeHgkRHxjJkD1X2EAwN9Tg9I1b1Gv9muC1ZbL29w90cEQ9pwf9JTpssPsCTeALDdveBYW+bIcGMKhTiCROOUKwM+moR0iMSmdY1xPY6DnUioXx7OCnosInPDc2DP62uQuLbb0nQSfTR13MunbZOBB6ILVXhHFpyS6iN5fzzz6Fxoihs8WGloxynKn60MwsDWP8WvH526h7zGdv5ZNCaOLkr2GRIqtDZMFZWE4MU0Dfg9pOK81TM/9XaJKY2krbJnl4SgzAvyAyotKuMJmI3m5G6vMyFcj3p0COwuTtsHTa11L7SFrFREi0B8PJhxthkD3cVDwhnPzbuSZ/qa+dVnfSQDSoKwY4UFTdGWPWek20k2hsNGZNtNABDZIKvOyGjhhBgcTvLLTkgJSMFI2C+bSnmWlBiuWfieXZNud/UIpn5v8UIAAFZifkweNTfSd0JRVT3mjpY17PxIXBgXzdE3/cezYvtwa5GN5XP/3T/3tB5uI5xCb12ksTYcaJtxUaWvsPAGLKymE7DpCIEzss5XFVlSA7Ht8a9X6rXt0UwaiYkH+No/vODqsgZ+bPOoOU/PpwxTB1CPcYvAvjk7/3nDdv3GlV6W7kn0DUvhonyCLCtvSeVX25tw7zcMjdf4jxMZj9XWPZqe4G1eCVijkqHMkKThxqt61L14feF9Q9bzGGL+Uuf1Ur/mTbIdpOQb33ny+gSFUOGohCaYYlEItUEAdtVyIO2+OBEMmmoGdTr6+/A/mLEQspK2zEphKIflV9ISH40F89apOak09TtQE2DtAtjPujmZJew+kJ4fEDf12CR0QjLic27H0i1NA0GW+PU9Q3Rtjk4CQz0sRKs24wIdjcenI1Bd/rpXiRM/fOqhnSzQxxuZh4GBAm1iZUzr+0eVhBASKEqO9uVcLISbplMHhOHqriA7DoW9o398GN7IJwCv+MBIQJiKjV5d4v/EWWlU50nWg1GiDTkTD1YJl9hl6Rk6As3awVICXBWDSyOc+bYhgF1PzBnPOyIDWJh3UzqXePOJDTK4/GLayzT5iAD3S50EAbqKtZNNGZKKoclCKgUq8uYkieaBKLEhObYb0irN2NsVlaGu/ReEMyulm/brVmUzVZgHJpYFOmIs2E+yHuzPDNO1PlEBO7BtLIscHF4wq8ANFM88gnNmzia31J3+KQvoRnm44Da7kUJm287vysLcboisB+LOnGSnweXZEjZAMXsjlc8iSChw/Su3hb3xHzE2i29jJ1y1CyiHpVrQwHV9D7sJD7VLRXU2CXsTGk1bvCT2M64BsgobmUyl1p+Cul1V1r7s51DtecNPfHUYlWhTe8n1JqslQKPhh0KlZB4ZYSwNp5mLExETf3SxLmXWHJA3A7IYvBpAFWKUUAYpB1cp0FIXJna8WU55W1tJwblQKZR4NT1TkrBuSst/NVsxkZ22KuoQFlwnd3anVtqu4iJS8yDwlfZVkmvZaQyuJabqR/lN8cMbNfkfraH/9XtFL4JiF8hKjMsYai+svz+i/yaMUFUOwsl5b7K8nQeRzXWkYzh23PHAvqiQLkD2seYjaarxwXriUyVZfvLkO9YtuJ/bPy05D1J7rN/rKHfadxsm3I6twkris5NbGqDPiQMa8iSWjo/Ypwi1LrrI58WsC3IZn71UicPhIdcfQkUEEQG7OCEZqdVt2/LDuq3cyERCDRyHHJ12O8iF2zRuzuwOTWxtJZtLBNT5HSwSsS/OdDT65YIOjUkm4D4rFBOAW4Eg+uYpl/wKOLS/rq142aqmSA76CViAhf+HpxpLiYe1794MqMLVz/Xg99YXUGc7pL49BK5QAau2+d4QC1KDHZCXMNdRhIhNwiD9p
ib+gORVkTKkPma+v91InSgkFkzJ/aJMhhEkCrYvAVNLrWuW2LLJ/nrMFbZz3h7n3QbT5YT5qBFPb7Sra2KIThZUktcMuXtf9NfBPebpUW0d+u12vTxeCCyGxbYJzcJK+ONWY9O3LQP8hhZODjS6Q6LIc2O6Hc5BJ4Ge9t0ILjGT5PFrxf1o+FlsHoP6hGY/nBVCxfITKQQpc0aKZkHbnu8KmQpBNdU7GAyIoMx0IdaYoV74UDDIgfWsHzXjgJzDMPiyXlfCiDJXkQsvFRyqc9r2TQQvoRM82SV0ImizcrpGCdYatWyxTlg1uL7LaaWVls6g961mykowEmQJhl2zOoskMMOfwNi95GLT2aFz8ZFOg+BSOJBKhCsFXBkyqoBrVZg1U2olsjuNUDPwVLYXlnQ9j6frJ4eZZeN346GD4Umbp8AXfwLV0KFnA4kIQrC9ipq3gkoFGxGJea4PsX5zd50OoDuyRu8UR1kyPAxZwqN440WXxRIYjJGCMx5992QDZKU0AAS+jFzuoTdwExpdHdAw9RiGeUpM9zMbLnlrLl/2eqfPze6nyAO/fI9huyKPIUa41MrrvXX2zBXZPUqh87qsiiCiq40yHWAj6rJ6vtQQJlWhqCDKTHzD06iMMo4e7qzvKg6bUTwg+45I8Qrv7yWtQRkJqyToyM27r40icmy4Qe+EGxLYZdewbaRPAT+wgOp1lBWoK+G/ANNleBOuVvXUbVAGTN5NLrsfs4DO+oHbqXcGdWAkKHjhDRpfGlvGr83AP2TOqylyVO+xlXOqohTwiMX7SlhOf45477XLNaI79PDL4y77UaNLsWEoZPwXVbOXUTfu8XJ9TKzpS+W+vFJPUC4iMGavtqCEmIL2QEwO1QlB/8KO58q3kmUVnwl7Tb0vu5Wmoo6usyk3H7LlfLAvLifxYGxSwYaLyaHxBGhvkk7lxY7wF3Q5CzmIfCLSZ5pWAaKEn4fARUb/SoJAgjn9KLPq3QvKwao5ALLqd9+pAkrBls4ElMkImsb9VJcqDhmxPGgdrxhwIi2qsbkyciFSeLMBz+tdajBcMs7Cm/ZfEMu4KfhqznzUqZDQ4J8oP29mmVzJb/SuZEjfrxYFKfNBRDPdFBZnsaJzTE3njs6Teob7I+4GGKnjPt7uRHDg7bmcGEJ4MH0p7WGnddRqB6vdIMkCUplqjcfayPonj/nxLQVZ3E6TRq9EvHCTqaK2tOsrZ5nWnNPZ2OLkplvBAbFl4h1wPrBXQwjXEBUW+kp8VHf5/8B7YEcfjyJbfX61hVe1SIlwd2OR0YHvTEnlylMKYJoefFMU2YCT9a2AHfojXWUVVUMnHCXyKrtiW8Pg/XXh14TMkVd8OrxpJelr1WJvUcRu/zCndgYbqHXVZ+2yPWE66VBSuR7S90W4Qi6zpDHJ/dCuWXRAkeNTNsMwWulssf1yxiyhgBz+2+HZNgNYOxeoccSIT6MRMsovPAD0s+jjV3AmysoTvzujb7dOvcnC9bg9d5v4z1v3NgOHW0oEdSKjEbqJ866UoJUx8GzLkpCLtJO/f7H9Riqi5trc71uoHN6W0vHZP3IZYyQYLRZXHHYJhzqdugCRJyIINtRbL83ySntdC6hOd5HpghvNDiNuP2p2q2UYTZ1JF7j6H6GSudiAog8c1ljk5Evu3FR3ZL+FQqATtrYkKj17tp16e/gfGYWCeTBl+ffqD4Ot24iUwE+rYS+5ESt+df31pZJYGeVyhMHoVsitnMPgqOtel70K13dVksnn1sTo9WsF162JAcvAjku/YveCgdWmpweKvbe/FWSzHVk0ccv/OYgAwLgF/+Yt0cThS3x6q6ftfinpvN2pm8bD5D6BL4XuDoIs/r0RkU4mszLt5LXwBo5n6BwNVjSSecs14Ot1OdaW4uvwkxcUsHUYAamTuq6BObj/qp1gLPettEY3z9a+XBuXtDhXk0DXWW2XE/p7f1Gm6JhbnAff9Cu9bqpsxDCXoWbsnSAk8cV5ZZeVmU2xhd1wSoXgOHea/lNpmbsgg0sniPwYrNBT/jhP8HkBebdWdM3TxIRn5p9zA1KScdzmUsqBww7BmCsEnKu5wIZoRfTY5nXyEeIhRNwH69ypn4kfB8nTtmi35JHR6PKKElwk8aqxFQ+gIeVY7tlUV5VVpQsKu+bWX+W4+sQliol6E+3WaUoOuHsKMHO3fah9VwX2OAWdpMkup3W4R3B9z7g3ddsogbYkckUSmrxIw4pAvOCN0yKJ/r3GonTGCQN0tjW60gRDnbOI97rl/xCU79DRB2hapm7FViHZU60obFpyU60LnjDY8/7iGbiSC6pcqPuvs6S0LTVtpWa+SrhmQFBA/Q722hixRh/14uPBnfBQYDbZqDlVVtBu9zzOBvw4YP6nfcyrd1yp89hocKtl2sDBmg9SlM6Dv8BLSeQ/vpb4vbYn86TPAbS2SfNEl2aYIZB88msT8PXrBbF7vB8fdHG9UU9WAu804hsCqMo0Wt1D1zJJiYwhusJ37Mp9Wp0KQWdZf1kkV8LBdQJjup6KZTm7yeNfUQ0V7vVsncuONsLBP2E7RXkTtrH8ZjDDc8SJMmnekTUISxQ+5I0wEzWlLuc+3XGwIbBT41q8ap2KfV1I9MdwZxW9A9qRnX6TADZoBE+gfrY2BLbZGRgLfoIaHOyP3bG4Dl5TIL8xhpalnIvOmesHeGKyF5ZlRuBGLUDjVuvtw76uE3VUlmue7ZHpaYpIaoOgLIkaaas4uAiVoGovNN1mUzdZVBzxmOyn/DjLVudFKWXOe/vF5ycu5Th/KUQilrPWt1S7Hf8vzei+EOYefRP8+IQ8DSKqST0CQeWWBx9fF8L7f2nEda1+Jdv3a7OpdKyRV6NwsIfGkiwVmeNn+c2bET1/i8UDQjv3cNlv2jGo7P5XCzumnleRYwpKSEAKFeCiesBF6/Ws7VrTukA8Dvf33SDTftG8BNuXmM8YQt2Jm3h7zaugs9PMsh7nzA3WUkXuCUn/oKuvrbrow/Sf60pp8B2quYRpCAtsgoqdYEAaq4TK+OFgvXWXakjJHnZRFOg4EWnmO1WECR77aeuGr7U4S6OBlusRiIvwXdjHIO5rR53DwDwSJyt621SVdWMEmLSvmD23RfA0ySwXs1eIolHSyaBXijkpCdRhsNBonTmFN0ZvIDSwovz9Iz71Ssr3Bm7Mb22roQ/oM3u61MrJgbwwubVGhHn4AXNpyq8dVOUCY11wVPsDmH59ZSGz2iKD4qKtZAngikZM+2XMzE4gn0tBiOes12smiyeXrQQnpe4fApg30LMaUjLwHGprqrZ9NNUUTe81DXFgpNiA/jFM2MvJTafjJol1emfQBu4VYPSwc0Erf0SDn4X1xIWkaxYUTndvSSGaihMBC/nhhQaHB2vP0dQdAB/HGvhhLpLFGXiFltN6436LupvLL9luAEV6sQ6AXNR5c6O1KSYSN7Yjfi96LGYybBsSmZo781Lb8FIn0Hnw0ErPzDHO3jzCVfgmbI8Nx50qlgqDG23f2Z7wwNXrM99PDxqcH/vcnAKgUdto01rfzX78lVlgJmRegfwNPbtVr6FpCro20muTIIJBdwnjd3dX8FhXTIv1mimdRzpsbh0l6BPqaSV186OlZat+fubvvO0A/ScedbRfljKdW3lEc38B+tovPAhq5CYv8+m8HVKfMAoFrZxa4BstT4f4WJxtQmL8qKvIG2c1qUtL2nAP0+CRScJvrw6kk7TccY7Qa3TeFH89co9AIbYKs9IZd3Vn2ClE2vcGYdF2Bxq9s5TVGRzo9hXjGMdzhMstv5Djcaa6UhxQMDMuHNHAIJPMKQRdvtjcniH3aF3G0wQXS7aZ3AF7PCFycc2DvUtWb2vm/Cim+676d8asH1ge6xTHbwCxlwTmtQ2Sd/jA3XdHg8TeDil6xS4HOGdfGXIKb+4LRM+/hVr/yb/y09SZrMKGkaX/b4my4hiypAIl2GA5DCAY0OQ1xtzvd+X9oyS97eHpL6i3sMBkTSPldUTmewZ4FL61jjynx7op3Ya9nvLCkzQNYK6lTVMQnWpR5JGU47yE3FmCMMMwszo3fBeOvrduNVxignYD8AiGPhfOO0WW4f4Yc0ABy
cNwSemtXkL6eYg2LQ3u+8ct9WcMdUMogMwr2PimeEvW50h3W+ZDSGUG6MbCODm0xZ9787IrdW15vCnhKtt8VRsUTAyiblXDgJS2EqSxas1UC8uuivHIjiP7pCxdz0/Jj0oQ5RNmH8QZO9WPLC3VKSLGCudHrCi6alwM2VArVVhLdRwaMO/xcMefvuHGCHDcwCpzzNGfBjfN1u6gK5cjj95DtNwU3tDlKWL8JNydpVvV9OWS/nMMUGkwHqLpY5bBWrFtVyULuOZ9Sbl653i5b7AviBSksEl6k2Xg+LqWEf6EUX3aHPXDxXSLxqfLgC5/E9nhGIRRbFk7ZIenvPXBovzHNEH+y2vpa2uVSpsJRE6p2lznLyHeXJnYRKKsKtaAFzgBAGykmEEXgL1gQ9Qkt++T0N5Vk5YDmN6eDHCHKPJ0tH5QuLQx449uFGhATolTMlWm76+c8kEINT7lIp+QOrTDv9bbpenwVK+sz+pjT67DMnAGnoMyusOls1j700GMigqDN1RTIzhty1A+25hPBRB03TCwiRY1fj6LuKlP6qbJEDWRPk/JqTRUoOOotmow6djGiNK+aeikMmoxcdNAodZLZVRBrltCovIKulviBAMw1FrlX776Q5+Ic71+GrXLdxnsHlHvWs8vhCcxe3e5E+dDedw+dzXYuuZhvwDMMJXc3ta2nu+8B45MUZpsCMjcDhUolubE4UnPdbxkboUeUQQGaAI5kTcevOWpM7VaPVn6M+5eBqwPVJP9U/yxZOuz4r7y3pQS98OM/nronV1f7C2vGrOpnpnVovzI8NfRDhT5UQ8Zhr5xqYxr0XcRk7NgzNvma5UcyUjbgWQeRvoCTpP80bWfQTrZyIZykfFPONBpM3zSzu0dYn5ohDCql/awxEgIfq3mbHi2y/6lqKznDCBhPw21qRtTpv5wJeoWq/QJGLTzmPOgBzBpsIUd2L2F0J7bNWkkQd+msIyNM3c+he4gIz58v1N8BpmUCvnVhWGsdcp5HylakaALmNwfj5d19b/LcvC9BRkhZTemYor50EOe6My0+7rJi9n5VVvcJ2uUELFWju5Re+wCdMaK1zMpI7ZWNDNEJoUVd9ev8/BLl9W6zpleIUvXv9trKno2q0l+5m267KZFLAePgSI11W/kQBgfisFX/bkO05UTw6SQDWaDYklBxDCzGSwtCGUucM0m+dLz5+FlBkqHAV6P8H0YDUVwpa4xaLrqD11YsBHYxBfbkfBsqxEGsrkbouSzE9Xxka80NbQ7Skwk4Ph7LFVrTDNMqlpnuQYZYcLFvbtp8tHyrfdjmJfnBMPuL3mMc8PSkRaCllHa45W2pWIUSpoRYjuvaZmvbZv0S9sMBUdhMuOp/V8KFMXyIcuFARUTvva5eeVduxr6Bgf0p1s9by4oWt86/bX+PNixt1OYdTR26cAYbSr9kkSnZH2O4VkuKsnrDScBWncjasvXnr99jqh46+OgMFr4I+sx46hV6ROepqK/HzAflb/uD6LDCmI0oe/dVXpEU3xo6J82k6uwyaxEism9JIm2tjck6ldeCZ10ZBo5pZpNidhsuEjrQ0UOALxa+fiJ3Tc8FTy7zgui6xJ0mYSho6XICwtHj4XvRh9d+OPhowJZx/QoHJbCD/F6PdMgK6uYv0SbOwg27ssmv6uIQAyGRJk7R3nQsHcevFkBomfKk5Kef7NWpxCYONQ6p6phckXdEscbQD8bxgNo3+cozi0Di9d4UoFe6xBr54XiFGKmLF779jeP4y9HqXmyQpYn6s1cfm4/+KwAJM+QJqKkTGxeRjsY7HpsHy3UMnsLdTXV9LmSOuYgUNjepYoQz9F5E97awmqxiCGRuPlUKk53MfStQ2OrlaxtvPu8gkJFgn5OtNe2DTjo585dupP2wbOA/QrAhqR3IPlI+7C+mh+AtzlLAq/ZPRv0iOUcTxrXQTd1J6xmieNz6fv3qAnTK4u4N49wGDBNtxn4g2fRTDm/xpOE3JZlr5DfH0mk4kB4urpfr0QjW0MgDkXt7Ozy9dEX4IpMCTMMo+u0nJXblpxu/gxk8JwSVSI1FyT3LFk9InDdfHKp+Dzurm1D2N4339n5/GoB9rQ2J+BkIiT6atf7/0lNBgQrKBQgZRw6uSozKoEx6H4IeRjDkAvHIECevnABF7usmO7jO22cPdgyC+dMxYCXqTT99BIhey49v3XciHoKYGIGjfzFRDC1WC6EdlLuIganJxhYisMCji+VDnrLSs3uUiEcgf10c95OVsLE8vg9GyzU/ieNEi3izxvz17AK2RJpbPmO/tWHDE8Ug6nUgz9JQPz4CO+PkR+FrkgRUysE+lHyATKk8zRBJqOefazCGNnmGfoZCzjHmeYrvXllbmqjcicXfrDG6dCzVkjjE8y7KrDox6jCiwOkGkR8yH79JEMIs/FLvHr9Sr82ggFNL663W3VSLMSCafqIOKh4hgGVfq9gn2nlI24WeD6CdA0HA+C/iNjwDHfhGTBeBL0hatSriPqyuxsRw4yECtNnyOny2bdWP+ZEnfEX0LV++qIBAqkYxhYKOK05VkzlwaztF0DuQEr7ug2tLE+OL4+yttn4KMP81BXxLbmq+PDsc8Yy8oGpTEl5j2sy/PC6DZdb6UQHFU89xLFbykgptaa/qnz8dokdB6M5lS53RgRE1tsUd8y5j07eiIS7hwN/u6eUF129g1i+Mxnh+egboWaLnrPVKuQDaH2lCrLWhpoRvhpQ2LP9SpoNQZSoBoeDLrSNuDauaDDwpszD9HzFnOTCLDHRAWu87bQ9DvHtIndxG/xwmkwJIrJ/tVtWOJmeEy/MpdGA5Q3FALN/QtgFSlStEanclB308ORubcfK3Mhk63SS7Akb32dKcG7ps1sxDmsDt844WJ7QKNfBsjoPqeydbErntDLYd6q83N+Y4Fx6pYYVI5KFn8xBbxD5O3nrjsudcJ68oNFrFuo4n3nzFF9aCRDkpDuHwxtIeqmt58OmQ3FlsxO5kQGx/VpkutRN7ga7ZBIM1yg2TYAN76thMux2GxzwPrgvHh+lXj7FFqzw61Ag2+35vOIF7j+Zetw3NjpnchaAdTFKhO5euJjCXEFOuI1JQKueWctVfYDezp+3PKzv3773pTTcLKmehcvNRIcUZ0CvrYT9RT0CM8fSmFFJkhapsoOoJgIMzYnZymUHLm+gl1gHtpqkdYw3S7LinECX1ENcUoHmiM/X+1Jrlfb0f08A/wr6AjbhOAT4k/BS7QbNmSbMpM4cTELkqxyPvuls0yUywYLVRlhIep9OqnCZgUWp8ab1GxvgUD1DZhKj331xQN8AyqluISYlsZgDC8f40qoooOFObbjWRmlFNEszwnlgWVavCP6T0djD9qk8Pzf6Rz7J2wEWQrqnKkULOvHB+jOj83sJb1F9T6fVLGJaoeYVIqjt9qhK6qdzmZXc4PBS0P/7vj3Pil7Jb3qrFVZYsI4jrtjONbnetJzYTy/2ZTJJn7TLhVZJfSo6f7nY7xMgeyG9odkt9JCyhhqvscGeTYU1ah+OcAg3CdVydUNBXo9B5PDcoB/XrGQqJCz/Y+gZgThaR57r96/ALvXr1kURMTc81WDQzbcaer9EMS7AowZqeXGxdUCKhn8ZZhtznRTJMEPR8n0tVRBzJDRxjvUf/2XftutBy2XmYjQhXciwOf/ai52d26Tj8riaEjh0QWE5GsYvwK5tv7zqjflePHSvAibhU5np7S143g7nbfvuuq/Ieq24QqyYG09OR4WbXx3hEOi9bThokQ68+VZi5ejBBoVAeAypMjJjhbcCG2oWbm/HJtM6uQPUuad4Pvymu0wV2DgvsiQaokvzeDYHNcf4cU4+f4GcpWTZF10b0aMVpZQsj4pATpW7gcUKhSduCrxKrwcRP7ncZvna9J7a/95860i5bsIUFT+LJP78ypwifzaoqY8zDsoEXLpEjXm7Gzv14KVESyxPmt/LWTVdsVogTyJP90Y4NLtRcQ+J9lBRmxyNyxh33awTF3IaLX+tzKj9554YQ6TCl1tAwon0im12WDnvWipjjB7ZDilDzlMplObyAj23QgK+YFms2Fm3Cy4rzbddabMaM5nP1K32MDO47
EbRBNUzngRiBAusiEZICFBa73FvJJGxli0mP+FXg1GO1VyNcbhBpVQvGxsJ5LNK7HzdugusrvdeVh5jqGFufxpotTXgnXa9mI6zMscsc5pDsUooUjU93+zgw6Y56KaK4g8m35u/BreAZbyzlecAdnPDZ6mtFj5vT6wXqpZWnp7VkjBfLGF4nO0Malps8u0wGerAQXUPJvGd7tTE6cFMxdKfPd41Hw8UjGjIizA7QBV90TdkVjD8gkStUi5IxSGgzQpSEY1f6ltOLuvgiYupWb8nzEQ2QqHfrxBp6rPIBAGfpvOO44kMQDuKkcdqmcgijNKgMEQKreHtcKqNXC2JrGS6k8R2iQrusm0ZwjI3NRpSDkm4uFDiYNLOiImkUX0HeOiw6QDU8PNtTXLkWFVjCfl+eFq+l54WF9h8NuPfaSq+aysFniBLvEgGurtO4lkLEddARfY12QSDEbeQVq4cX2Cb6sHu+Jo4swK4esHWndPZUuYhJZ/Dm9HHwFy665vlEJlcByVF9yGx4tHZbPFX6+GwOj4pgasxVL6VGIOE5xmPj8wMBzW5ZquS+RGNH1pw+AyU/71zBllsaYp2NUSbkhyfwjW+ZLY4f9zxPpZELKwc8pRovwdcMbb2T1MS9oh0qPoLwNybLZF1AUhthKEyaM+8G1dBiHmjNK0fglHrovfogtrWDqo31zSyjsQ2B/n4/Y00eWRqIJY2sO0ZAP6WRTmqyZEccpN4o0vd659tUqWiiXCKTSHIxnfr/cmjzWHLDNwvTGllzMuqThVCQkWc5nBiAaev0RMz9uPcd33YpOV1XZEVNm9yJVGH9LWeNQ40eD/umzf0kLOYNZaxCoyd7ZSG+qVBeNnBdSaR/aWApAg2/OeLWYgDIkhNMT3hjOX9GMwFVdZqrIKmqtCnHxZPvpatKpmp0ohbndFWhKBolcgHnG8/JKMQBLDQsUKy+lqU2LNJ0J9MT9M4XGLf2nAiaZND3QeWKzSOs5/+t+jV93iZEQy5VFSKv3LFIlFKfKsD6MMkla64vtEhVggnuyARRpmfRfscGseZBN/a5vmLQ7OhcMcSmNmzYvZE0kM0kr5Wy9m6rFd1LxJeGSTBT3ZvTiUpLtf0v6u5Aq4x+k9i9TmMyfV5jtrTatgfzHmulTvHlCUYMYp1HDMKt7pQpFYa/vLRvkknPQTBgIG+OHIzunEi7RRsmOvMndTOwFtiG5AUEWhVKP2VJr2OAEEM+wuy14GSyJEiNi/wg7Io3RbGYSubkjNlvXVNBfg6b1mf1Hbq9kzho98ccpY+YisIRqCKavsz2Thlzak5rzTYm1Gb868bX+S9Wa7iGbRpymQYGQ9NjE+cdYcPML3vCdRczxkQ8FoOB7C5lSfcFQ3okwPZ9R6bLFadI1o427w23u8E/fD5TVhsPOLsLx5RhJcZQwlXhTqZZvE/gbr1k/SAOkaADALUEdLAxyLKR9wDe9y1mFhYpjm8y1zQwbRcCLLeJ02W0c+Bifl4k86/qruxomltOgshHnGPqbb0io4FrpVqH7V7OGZFwmlmfTA+UvzDGWXy84KCzbFb0EqQJWAhWZxrbxC/Vbe+OmkCUP2fpvR7n+qE36bWdBLvarDMyIERFezPirzKVnBc8aLe4LL3tsqMGSgT8eSQp9Zjwl1KlDlPvWgayznGPExPBTxdz2w0hRAi6JhsYKWdMPAFG2djjzTXIM6Neo63AIe4UibgQ2Y67YMzYHKI+jCzrBt8/oFgOuDyX8JoWlB+K6ATLj0lQL0QJKJhGPXJ4LpBs6ZVIr9ntkw/wqlCkK76QAHGsxepoBaJup21P6mZGx6IjDV0o9/wVGPdVrAh7BjIA4f74KNN1GlnMES89uo/tZOFNlytDy11i3uVIwM+ZZygxsh+px8R1ONEkVWOY2ytzo0LcLFLs6MXTd4+9HwFtSJD9sDk/hMEJgofzZ4Rz3XSGNoQP0HuPWncrLx71081aXJ/YvF5RDQsJHC+Iq7/a2gD+s+7ogg0rQhwi6DHjkcaIIjL48tl4ZOl3h2L0eUdD8Og5K/GhhExee2EfeVtYx8Kq53+5PhvYGk52djXCpLxFNXJcCErn7qBDwDfVkavgOFJF4WycZKa4V+tOPlhafBItiGoJ+g06a22L0++AC/hR30rAFGOTPNgADwd7G5uHGwr3PCpq1Sz3iF/zcNzJIM8FbHdVGOYUMFht3mmN7Kfj0KhGSYYN/9jTti6LIR0ttVmYz7/lVEzZD3F0VUgi9TxUU4jm022+AcAMQG1yJmjLN6Ft0uD/ZnlKS3yywzPiX6z9rDX5/QXq2luvB9Hzk+3IX+gMekjqD78Yb9JMD3tG0h3/K/ZvkpfwCigerR+RQbN0Niu4W+6wFTX4Kgnjae85xUHYKFTmnbeQ/BDvnoL+KSvnTEQ4Cf4oHnrZMFPZ+WakOKYuZN8Ia3K0CxFHkxdJfnNukZsk+bZB2g/XKBdFN3GTLaKCmzg0QciX63hqb301kSR8GWiQrlCZ2s1naP04GTeY9kFvis9ibf/uz3jsKtFeWog6g8m9mtacYsm6J1srs7S4KALUmVssybXFmJSvZqIpSA8g5Q81sWRi79v5Y26NOM6WQIRqynWtFiWWzDRjTRP2OhRUk2Qyu9prz0GkrBGu17SVrnyLuio526LWq2FfCP7s1rzWNzfYMm+rhwjLjYy4mn/Y/zmloCX7DUPEC5K+usFw4uIXEfFM2HXv4gT8frMhIP8V+e2FyRWrAtIFIRffpl9bBPrpW2iXQP0mwXq0cPTEnsG6Id7QP4kxC89A541Z67kpq8ic5g6O8G3DzHgGiDhcIo4CnPjgq4MdVbWa3S2zPXkKNVSA1TdK10/2mT5Nh7o6xBwB23yLWJAgMCNe+2HRmUKWMPnAZHa2aYQDs9Q8VLYBYJqZSgTBFOMGSu+6YG3bgFzsNqB7Hj/AX+ROacaFzif83mDWJjDzNxlB0watA2a/iR4MhQ1s/l0GgbeaBIBCB0NEezK1TRv5JQ93rT+jxFhZMFvFPiE6vVODszOnxcP9wAEI1e8NdkTpyq9tm952d3CS/40OsWy+LQvzQG6A35Ym0SMymVDtYFtS3gRyFyNSXnmAofQpiimHI8IAx7DSU8Oi5GwVtAhC0aCTxqkJMqAJH1dYDT6xvvJj/Y2HvXzcc9y1uq2I9EKWM+/p7NfDDhwi+OMstxlVzmkGqcn+O4x+V5npFK3VnpyXyKd7vbyjEtINUo2rKo7GOFjl9l1P/tr22hmzasg5OJLVyl+/xRSsIbR0jdwYoLB2Xcp257B5s7w3dNb0tXPV6pU3fCm9o/4XwiGeKXmpBR3HmjJfFnLeuKAdozyF77YsBwJUpEqs7Yq11mDSRzk75muKgSeJSAPTKKC3mh1S1CwN+j/lTGCVqE6FDLkP68OWqZz2A/7/dyHN37w2mLz/6C+v0MZAMCmol0l1LRj0RXAJgnAl6Na93EBdsMEmfM/lMbyqMoPc+SmXMhn6QghImuhdQIZJ+DVMD862RuGRoaKKuGT+gAP2AizMIWGKxuHDEgtIEw0rYj5Gu76MNM+SHJ/t4zEVvq8DHfPc4kpJx0mU7orMbvzozVe+HhoA3zgOJNs1Bn53Si5wYsJPQ68b0Vn1AUvx4hI3VoXdbysDC3wKMSW0PmKyPicMkRJOL6rHqfRx/f7WtUclVHH6RbloaBPe5BbKms4sTAQyHQfHN54+HizKE8JoV1HA7bR1tI0FlRPOL5YwJxwnOJ0N7sW5zX94F5pjhOqKadMnof2r8RFX8AZrFVaLTSbbNFappyZwsaIAGEzmRg0kjbMuGexDa6UhjWxX3v3f8sbshjUf2Qe7loPbwvMvHcxq+t9pcHjZcDppSE3QtqsI93lFnPAsISW2rMGXAiD7K9Xqu2wJh7nrIYc1Ct7SKT24nU7lGsjJx0JvcjbMBqNijiQKF8NXnchfg44B5OJz7ciGI4+3CEMUiJDu5+A3FTJePnjJrci9d7J/0oKu5RRWoF2XjSZ/5FMnS6gnw9lFga+zZUZXKgYownLG0uyrTE9OnSmqbSt/P/T2d9dD1pbVi3gmmNUjD+9LKHdf6qkn5Fj/rJLFAXEH3xTl
bbsXzDpX/50JtuAOa8SUq6KhlgmqyLzj/58PvIqFU0gitCsvidZkGUKRAMfMcYbI8juaHh1udOBn5sgK7+IPdlsbldO5geOOkQXshjovxpIYDJqOdE80uOKZaXUZGwr8ONpINNvTpLhefMtQpr3TvfarRJi7v3JgSnrL8OwgoZHGyi945MdPzU+pNNJ8MKD2mZGrVnJWqBjrNVXweTzf415QicGjbiUVGtPMonY4lvKE0IvK9I72ZWmk4TXBtbcl0gKqVYCZ5AbRSIHsoVY3raekObyf7aTNO5ymy/VThwlxNQGinFM03Gq9GuWBVE2BWTlPqFxUNzAQ7Si0vH3bkvPtZP1FSC4uCnqsu7ij35VfVH9v5cD2k7A4KeWwcj6dn+z8DF080bP81otfZFvuvGGIwqYpJOT8orJYoT0HZmD8BQObXHoB29S9/1/liekE+/dqP5Rd7zOQeNRyxnCM1Q4DAgH5a31GzaLqEjdRgjvzKYC/TGoP3dIx+vpDml9ZhC1NI2TXCmxtlQ+7vk9fzSLopih+5InSvdxuOED/F7O9MIJZka9CGBuenfZrpJ/a19ofz4Q8t4c7YLG6RkyTySbZRZW7GnOwk5djFgQMv9p1Qh+TH8axp8pGNk8YPBpJ5ir9o2Q9HleM5RtLcpC7RLDh/3CLI45hWamuv2cYn4eMD8mV+KnK1czZ5HGzDAREyiFsx7XAVoiyBLXE7s4oJduXh3fvaZxMAe+o8Woc366wo4Rrxpd0lCIwepZ0IAZVg5oVwOkWlp+ZQRXcO0HjTx+q3NOQB5ql8YwZPhHw5xao6TJ0OJmKOmdOsCpnmWiLVFukjL6tBeGIw6J65/qfKUBTWApIa2KfkvdgHEnUv3KB1Xcqy3unOnCzwsHMsgM/zkgZ96dsel9tR5OPG8DlYLGNwb5wwxDwRvGn0mNmQ3etvOshXW4MMe74xIb9Re62G2lei7sX5HqCejoTrIFaIin/X3QaVavFAESzrGd2rnYclw9Rr2FlgT3pQryy/xZFs/CXxfScvUetKvJrrLpnocCIuLTozJdoi00uYERK6rzXmP6teQ9PYy0XXmDNxllBH1fv8SiBHzYGxEPEHl2ayHqP9wNu0rUbo/It3dtyYwVgyoKy2pWEnmkea6tm9CRyRrdb+ZSaXj5HdSfmhvdBxfmk57X86shCr+dND7NbkR4TJuJiNFAiYlNDLZ2Pa0AghC2PC4q14e593YQ6gN7RJkRvvJ7m2KtbGwn76UW1d4AYBxF7DEhBy3mhX3Q3q9fsujjLCofoOk2v/jOXQRk4n7e73eHNoTColJs1QMkI7GFuWhxM4+Hk2aZ6/TofA4lNBZl3eldf/B1kSi7BaDi7vc3QiuE84ozLP/q3cyu95ubOXxYBiazXXFBKUwJUZ47G3rvQjna4ydfm13Q5M9n4bLj5RvnmlWgsU58uJDBD3GQ7GV+PzIEwHT2ytAKsNMd4mJiSixlERao8GZO5KJMGp8cn16NLbUrK81ZxEQtQMdeELtc8JMFQLU6ULgY1kvH96MkVCHVvHNal53w8Q24FFGTfaATkawwLKAwis9ugA44aj1wOnGjNsS+LejksqpStFidbp+8O1bywCwVdd4B0/asGaLEoleZFOxWMQN/LPhApXUSAfmV+jrIdsOtSW2xISAj4RT0SkEdFYmI6NN2+yTTRA3E9QUd/cq7zehyz3IQflCnXlfLBbnKM+NEsA1KZVkADgmcSqY852mpdqRi6NLJpymTgMoMqNHNU4UXZ4IhQUPh7CT3x6D7tEVojeN0GTPDrAQnVqTHvwId/N7vWtF4b3VUoOh1o+yjodZwGnveT7fdkAggzKIlC7IInofUgtttfeLeM7hSiA94hPOQtk4RCcaTLXZcHbjpxDqQeUakuVNMnOWLu210xpYoDHhq/KD2KUCFbV1ExW5FeToZfxKCojadbLwfM2mf8OkFzawZvmJ1nUp1OWmbMLc2GkRc5U4g7iDT0ksSUZz3PprBb3wf/F0WSdq/G2pSLUpvPmIdK38DY9GE1WFjNBWciDLrnZRZnsNIdhIplofCRSbjIHPrFoSa/pjNfK2wY7J3MyzhaV7tybsZKUw/J3/VPXu5ilgddE9keVFjiwrCzftj+bBMLqgiZ4IZsoaj7huqOZbrWVo4DbG1Ek1SOsrRtrCUcO5uHDblgi3mwLg9w40AVWysi0sQBrw0Vc10fjONfWRS/kdlbN/bq4gLrDUHzeWnq6uBZWs5DPwzQ3Leba9fV7U8FN2mDg5fv9qKbgphmxw34PXjFM/Mfpxz8lRTrePmEB++x9DwUpudOgyZge+06yYTCciOeltyfzNpGncTUP/WBk+lZBUreWMORkiM8GLX6J2xyvD81K7wcH7BXn2gabMzmZqY2vClv2Wn0X0ftLj/GhE2GwUn2BBPw1UizgMUpiyG5VChpvtPCEcyMuGIE3S2jXneuCIHT/VspmDf3XrqAB1eT0etc4C6UtIySRipFDkUYNTxC7D0XUwknetz63Sl9CiZk8+YRacTx3hRY1vUdotiP+j0re61z/B/OaIvvknQOhs9F7PyM3w5a843Tfv/yLsKruc+C5h0e2BtaxpIh+ITly8Ohk0zOdvvniamPVqR7Ia0j5akryVYpcTtP0dpDB98fDEl0NPfEUf5tL1GIlL0MFiJReJGAZ7R6ecJ/e8UjrXv35gEipfArx6YXfl3StJ07F5aLSWBI29JVQigThI15xyV+ltd/I+aj1aRxZUCt5ibJfkobVxEaZBaHpaJGhv3cMAVkWowsj3SG9KSuFhMg+XX52d0AKxYUTmhVUbFBaavYBS9NTZw7ME35+5he30e1XIEaa8jqxVhp+Xef8M4gfBwn9+8HYXjxb2y4XGPTo7EvZTLt4M34BUFQJvz3GO3J3N3FeFIlYH3ZMbIdMKBHRFQyDL0LlUsHhZ403MZkiAqX8XSOC6TMf/nHmwTb0tXrW02FOCvR1tfKGvPo9R7Z5P2zsVGlngJGlNZRZTP1EJo9rGbc07+dDqdMsCCcn9BoB39P6ie4dsfyRsXuVJ3gFMEmhwn+rovA5mennOBF4JRUAI9WSSJkJ8Zf+LGbqORikO8Jh8VlIovKuQy7lNkQwzVExX0t0dBpSFtKMp0Q186St5f1oFjheqwS4fnhhjjJ5uLKHJD8Wk6m0gmet7TtMZ+QTGZFWhrys7/x2srs06El+2xdc3ksD0T72/gwCkmaDh9gFddYoh02w3xfeX84kr56Lkk5gxB/6trzVouxv45t+xnLmDX+pxKmjH6rS93XPe68jOpqrA3uLRo2+O0qtj1LHwUlvf2AUsw/E+MeBVMBdV0NwuGXXNaBypFZGLqe3O/Nsmhm0dAoBg4cdoe7uLBX7kBnFZoSAppnc176K2pSng8P/RW3eqrrg9dcWr6oI9hP1ifs7UpPukRUNf7mhc+dT4nLhJZJ1LqcWkpb87YDGixJ3iGlALFF8BAdaYydlMn0otOyEi1c9o5S35JPXuHqDY9YwpKGJz79MMPEC4t63dfXmprwes3bjRKiW9Nh2UCfBMoLU1DuvSMiDklzCH1bYPOsyDyFJdH1bCu3+0umDTaOWD/haWRT9VFtcOa9cUXI/IZ87r64+pVYAvB2kR9hjb0WcgCgWf2MTpHT1vb2YEIib04WFcX3dZAko0nHpBJ0AgeH0E3ut5DYJU9sEhrAcrxHnoxEilpmNOQ1mmGcSnudAqpPh6yCsL1tOeeuYclVQUlHMkDh0d7pI22eLOE076yoHJGTuiKzLOUcbqqcFLqCvPmZSJZWb8yYc+Ilr8NHPR4DsuZ1PqsSlly7Rb0avctkumMes7CLGqYvrPgG+v2vAJYobt65aQ+hlU3L2mEsT9ZzbNs/IiNKP1z0lScutqumwkQdFkYNjXcUWrdVVlZNdPuZ0vf/0oOlaUwINdoRqKIzhIY5aIGi3umKFqaRd3rvKQ3Yh6eCxLo47hVS8rCpSm68ayT1evLWa1pHhgSOWLt2Q/z7+GEoY8oAkdx36oUJbK+eIhTDKOlqGO4GJSAgbKvBE1WNADNWL9uc7p1fMzpOcaCcB1L/IWciui7m6lbwIBYae2PT
ejSRUIOO2K4WJK0x0Ceb5r00Q3hllLFBGWYXL1dDZDXOnttrChH8AgVvmP1IosRz/8iSUZ1qgbqvTnNJ8Tk/AvZ+xFw5Tt3DZSCZK5YP2M5genieMb7gxCfoz6F49NsiW+jZYtSyAGdh8hLuXVN87YPrDrJE5yDRiufw2fARJnYpI1TvdTiS3b3mkF/zrcnJBogn7+KF6OKFCA1F+r0tkXYTreLFR0G8810vMvcQvwF9KHysgf42dby5PVYF8zVLOoMpxnSOAks4Rbrs6gDALgYiOySmVVrFB89kYiRfQdLSLXVxYMzgcpPmctsU2HHWWAZo3Geyx5SsMdy0sArXTFMIe0Ao0wD52db30YmVbYR6hRCG9n7V3BTGaNZmpWC090pIOfwv/cO/Yl5hvZSL4oZ5E/9epiGpkiye2dwmR7NCHQp7vmEYsDFMLhsebz80fQTiVqIS0VI5Sgt9D2ujOLMmdhNeKwZYXHvXxlWAqrGII7+dDJG380ZgBvmHkmpEljFOi5b7oAR2vS7QQlFDJR43nqRzj/ThH4wHSH6ugMdFiJUwjXThe2cifW6/fbmbOnIxAWAwldVki9H5TqQNlvIc9/KSux65rN1smOXyF8tuU+tSPrFX7MlAOyjdHRwJkVTzwzncfM5kApUyW3rp0CUiCaubdXJX1zBPsz0s1RUkUStsfFAWAUf5Gae4te5NcJ3iEHAXdgP3ys2iETcdn/zd5+rbdUZtZTRWrNQ0E1cUiDk4iJj0nrUFi05VgzvrX8nc/MQfpMIq4CZWZhGYq908Avyj/efFzG42Swry4MGIThIHdRaNXNSCeVA7hz2JMJy/8SdDChGBeKyaX4zlBrByTdBk10aV93eAGegaGJctqMWPD+QCkzOLGSAuIF2Eg+NsMJH6FBfja5ZgvRxiupo4hvo6RgoYb84B5nI2NA7TpPT3angGPWe7WR7nrcRj5HaV5khM9mmdWYPUjmfqb20lWxrXrBq61rPKsoRVpaQPV1HtMVoh7r91NO1mDHQHjphhBhehAlJ3c0V2SXjqUW4inhOQ+7g8WOhRxzOXZnva7Y3dnXGvhyTgZKhZA9kiCEDOqkWH9nVZd5HJAqdvx5kLqP2k3XCI4+186DFT+iuWZ248SS1t/gcAPgNhLTOwYafyAhVGMAJKZYHvWDMk8LA13TgDLzrasqx98SMSyYw2iylQY3xK4otPKxbyMpPRl7OAJYBNd3fLhm+mNThWkXDltnRDLlHuxQo874vCcPhvcAXjnE5B/w4/Gd25PACcwnW3DiadfOutota0pRb256RfNba6twEzcvA/wcqn9p88T9+ZyMdBE8aDDUx7QzT5TmaXTBXlClLRIPRmzwXpTFBf8IyRAgV8qYhnEFe+A/mIx3HPC74Q3fMoqT9IHTWHJpNmeKz6os3wHBzXmOKV2Jf0pUDW9u0d0u6hfeD8sNQwxxXr9xXI4L9U12Td6u21xJj2T5ONu+lD/iAExalyd+KA8vypv0810Jaf7AdC5E3Ngnm2ThhPLfxdQj0RPAadR+V46R63pEdeTHdzjeJWh4aZwiWcQF6CcfuZUBSNLhSEZp5xl6hJaEFmOyHkN+HV2N29GhFb1oq8L8/2+mQ1UZOKd98V8x917wNuIFQL9NP2W/rN0UOi1pq3qqMnOJqSDS9fm7b3MvpFO8JEDc6L1ZmaPhhi+0ysjlLQ345I9P0hOyZ8RePs6aLeEze44JkGgfuP1ARJTyJ6cARpsoK+ZuPdv/Lq87nnK7ZKu7VMJs/IXewy67AFfq+6UB0nPDF7MkW/6UPYO6fYkt16sfotdwTZ9smj8pqRDGWzwv4P4tnnslvsv9mqUJs6rzd/EYGGKOT1qAhnHEl7VK4ImjSa3244uXapuzB+ZjxzxNWUZzea/KVljiSc3SYtOb2WAcmwOYZlQ4lNuMGFAg+Qpcfot7j89SYzJ9+32oNqwkyCqLyNZD/vLpu4UyJBQEqh3ZoU+d908eQ4mtsa5h1q8XvPGNlsSETP9+G3BfJWmQbL2tqET7yDwIHC0qwCR+M1hkPCGYp5YBsWvzq2/dvPhw39xUWK4HyANHW46M5uJ1CsDvDJvIwY/NCR461ksRAhwMj3y3SJnPSE2guqtSlg+9MEeyRCot0e8AkfIoPWfkrcwuR8hdAdQr0rvSf7KiFjx1AEriAT9l+HEBCLfbJX4hsIe+5ye/R/tEVXJNxhq1Xb74Bfk1iq/8aKfZgpJ0wX/xoKKvZy66HvjMYg67qPbTp2ENCAPLF0dg31Z7RNyDCdnNg7j+qKZwZEADbLaIeylyw8b7BkqPqpxMEGrW9xUU7nV1oFCfnV9THDa51eeqsN2PwjYGphT7qwEh2YXJu/q7OpKYO8j1hgvH0jVQX7VGLEyb5wffnMNAszY43z1Gp46Qr6r2YtYhK/IksRt/zys5bzx+91amvk88AZhDyBLXR5GUR7KLgeu3pe+GCH5i2NiMaFy+AHLH4g6CGHp7b6fbDUzbGspWGuRfP1AnwoOO+/BtvoXeI2wFY6VzSoN3aEmY0O/gWl8Qmw26C47MWfzwNIgbqo6FtcbrvLDDQfFqGcg2zfAdEh/OY+ut5oe/b8+LT9DkTtQ+Q5mtrWvpEXu6Gxe+7Ff+5W3dPfgri3Rln6yqQErIBvxb5y9LmU5npt0JzZhs9b6V+u9BHsRnfAeZZXFkPai2uwEdfdF1pY6jdwOvCHIqbUSC4ppDzFHe2hbAPGUjM58XdJDaXvwkc74eNXJvB9f//O5tAcJJrzl4xDSdR41pUTKkZBeIRKen4zFCx0bbDNnc1Mw8mgSFYOSlEwAbnvJsi5H3Ql/+f+WmtCNUGh9vLeul+dBbwq6A+PNkngIZLDb+VaEzFVGk5EA/wc1QaPgwGt0KQEIxEiiBcXnV45CQaQy1PcgziwONAMM6nEYHmhEgQI8Agenk1comNr9l2r2hcjsS0aQf89ZLsSKqn1UFVE0z5xmEpl7hA54eUJVqHLwyf4Zmk9o3B/XqSjPd9pAcdBSQ8VLHzNLxqjNFjBIJzwIH2zaRkiyEUMx6V2WKQ0GGLdfv02laOULv0aS5PTeGSs4JvWahJJU/II+yBcJsMAuF5aRGzPTgCXPZezbypH012DMb0PVtZ5fOKqTtIKEGmUWzP60pS3I/VP+CM6CcoOcQNwdSlVdxO0FHyuynImTyDv7REvvVKmTAY9ScHZacGCEY2jiKmZUhg1xe2nTk8RfIQRXT0kBGo1IUCSiLoS5NwOZ75CdVQmmqc1YFUn8Cgo7ggD4wMSx1xx/xWnuWxGKZV2SJqk6RhU+DSXhDGZPCmIoMIxdD1MxUBD/RJOhzUawoD4Zj2xQhvyqpY9pBcfYV7SLWilnEvsZ54iXayBzFPfLn9M6jm7N+Nock46gtpX6/LtQ0IeepEdznzy8BI7FzmJrYhjVtA60AeMKlUzxzmtDH/pVkHvObHvV3KdDSV0kx+k0adYrQUkR7pQdtUUUWWVOxFXZHxO8d25RNtFx/IKRecnJdtZiM9yG8E2hDwPhy8w508TJK/0DRPuqL4nYjI0CTmBm+BV/ia0lZ/b/Wki2s3wcExa8lxcaDgEUmcu2uBAfCkrSgmHjPfQPPZHUjDKdv8zLDfen7sZEBYVqHC9fMO3kl8JNJ4H7Ur7JezBTZvqdwqQcHpIklV1QYHS+0pqo+xdfBlLmbOnlcOhyN/forinObT44+joTS6LsfCiIpHNyRrzOAtwP5Hc5NgdCJH6rtm2/Or1CgwSy9PQwHLiVDiR3MEaD4n6mlct0Hg9Fow6kS7NhuK073ISw+/KlxjEL+DOgIkrqY/xUs5f9pGVYDpOUyXRtKl8+68HfW5h2a11mbNhQeAItO97FljA70qfRsUMzr1YJZJJa9e0357sBOMu8ZIWG5/Ax0Lt9Yw6wc3Pj4+JA1f1oaoLtWtf1f5jvQsV9ts0/J/aap94LqShrIDU3Og/WLzRW15qZwhacGLSkfCb4eaQB+bnbb/o6O3SOZxTpS2HaPkr2KhtUvO8W2Wv02TYwmb1QHw2Te2p1+LZ1GwFwSNw9BF9QLkd5d4v5jxAllDp+Q/nbYzmbwSSCGWrU/f2rJ18
ZJegKQQXCFzxBu1u/m7ZzBw99LWYvQ02e//abDtkTpk3kyAOEjjiv9t6HzIOtA/OjjSvEavb00DtJsOzHixV+Edz2VgOYHr4eD571mckQY05UYri8k8py5c8IVCBOtA9evBc5XW87Kow//jSy54OSKODqh1dZmJO1O6paMqiTma/vkAnj5sdLQf9C/CKJM0lZoAMlGJ7IvqHFWtwB0iemOztlSgxxJ2euWmtLGGqOWDDCpQJu1w0PusCke5YqH8ZiIE4sHzlWUicDTZbD99kQulFbllcrqfR5+TBn1/W0fqLzfNNylW9SHgVGELP9DUuGe1ZGiWILHA3PaffVjDITslLCXno6WgHwhvaPt1lKJnh65Q4fxc6PCueMalwEWe1/bkqq2d3XxCC8URxARfMPc4+APUefDXCQNiSj0Pq2/xJaoPiDCW6+Dfc6I1qJlwBZUboAPfg3Frnzv86DbFPTxkfp06oAaM1S7/8p9DajMNCoNF6AK49dyQAkcnOn/iRW5QUbvUluVGrHlvYomfsE3OTI9+DD4l6ubbUTQ9qItsd1iNhdKdrI5KwdT+NfP9YVH9SmTmKiTkiOy5eybIU2JGwI6W34wuRLBSwTGm8Wd6MhxXGyXbDjrrkxfC/DASTdgrQG+SGkVxt/cr2De491KM779QnpjDKjL4mryARde7VQFZFdJ6pm5wjYJphd375ut+CLOyTPyqsTuEpAgtSrcB8KcPMo3C5lgqV448rproHjReFHDUnpX0eiN+6RMyqclPp0kjQTnj6Y/M3U8w8XqYvyWP1LUvzBxqE7BACuO4y+mlEOiSD3tUf/ijY3+go7LZbEKr38RB2TdNsZfR8SovtTPZPbHJRkFQQSwCEQOyJHDpBrQAhi9HMI/k9C3y0VcNzSXppylVB5bSRBHAQWFN2QAZPhRpdH9slrno3boRUyMatEHs1eYiy9CudOyuwUUHhLQ5rEtdgAgddqyI4zzL8BIbrmriTw3yJJtYXO7uYvn11v/LnKy2sntR9WHrJd7u0y2pu6XH7+Hys6ledAe/iAkcHUxgHv7mW9iBlPSS2vJC91R0fU8wiGSRCTtO3u+V3MNTuo3sV92k+bsKLLlS9mkGfKWThDEa0SuLBFULPocwvA09+zAJ4eimJipuTKEwE+UravH4SfJdsydom7+WS/vvJofWVHt1cPiFFd+s5WINmaAG4/rFxtXOcbb9Zagu31DDCLxnABvJ+5NRGiUlbRFlAELsqDVII3LXVrc0vsourdennkxH54LUVoW4mJTtOto6Pj38X9qPifiIbdrgFHeIBRReybxFXDCCd0425YI4OcXxo9jrNbBNm1IwiF/LY0LRv3fGfj+dwCKIj4xnZcMcrXnkKkGoNf6lvZpZzrEvCLyGnHbnxJeHJVP0613m0niQyFo8eEXzDsd0mLDIj4pr95d8ExBgbGGOI9TeYMT+/6YpfZCSVqSsTRPrXDE8PR4WUUReYGv8pcDJyET2s+eceMYs7qig75NaOkzb/FS/gZwkAKhqjQJjA+WI5hadobulIin+ZRFHxum9UcIXFWRpnkj5LtqpFstc2jDa+J81PS7YmqYQQHDA9U8ZKu+1CsqTBaDIUj/jyJe3Lo50ezSdKjubQpclrDSGiwa2TROLSPvZ5EodcIR6aqKOJqdAx1X8GkjU7jyZGPRbG5ISbdrOYfr79GoYQvMUq0k9AAzZjKeTTOvLGGbKXo1QUUWkkpJY1cERhkRqoamNxnuAPNf7hvUCbNqu2okpLtiVQXYnEg21KzRZdtP0+9t4U0tA2EXBGlKmTA3sYKu44XHDNVFa0tIjLEdNtblMlS30GVEevGLsiAhhabRz7Qwi1wir5MulS/IxcT8cHlYj4ontyotVnxN2l6EKfYNym9L9pCVO/CH7UQ0sCe9fhtBGN/tjQtPtvz6lQ4sqy25fofKdmKGffxp1Tu0hHzv+firx6mh+becchE4E8KPD6oKPN4vK7W/paDUShiWbNA3U7Wxfcr83s6p+qq41zlMx8i/1Ju5+9o9W5sulSJiP7jrb7KOz6Hfr6b+RPpGs7h9TNfeEy6pf0UepOB3vW3qhK1wKalhYAGi+sTfYXeQ80qWfzUoZtBMAnui4G8jhmrebbB/tn9bYRPsUWYag+15uO/VejUbq8OMvICZ2RRRrPfIhn4A+Ub4zTTidvFVdQ6LNXNtIHO8a3jouLdlJOPf+chp57mcqYLP3HPzdQyY0FUWebk8giI5W16EpLA6KcsCXuvXXS/o8lJud4CXstkjlaf3zUbRWUcmztaqSmuSLQs2xIkNw0Jjh5lCSBzEzoM15ZbX8rXgpsL05q/ZdS2GLVx1JNrtQ+CCcWsqbK4VG0JyHRVvk3TIws5aAadfG6RpsnwgoKIpWUlJbelJjoNWtuU75Ek2vfNBQJ0k++C78X9Tc55+/KzK9SeFvXkZikW05LXEeHgkh710L97H44MvwMzHY+OsQ4hwHYL4Ab19vYshZ8lt7WLtGY/x2ad7QZjDq6Td+ePK+glcoXSEwtwu5KKuRzSpA0dD+MjOHvIVdUYn4l+vQGdnuc7wnGucSPYwk8s1p8ccMu75lycAH8xsjvj5vavTPYhdeU6bRouEn7lPxDKyUC9MZnnNbfb+OoyFyiPiQ+c1LdQ53ZBKzYKPqyR+0d+s0+fw/c5Ng71Fb1Jw8ylhE5xIg4L48nN3DR9MTW7b9ZxAbRoIfAVQhJJzf9L48MZX2+IhYn0/dTzqNEkOKuMCkep+pRDZrhinFhMYLhQWBYNIQ7KPK2l263/O1wMhgo7fNDjwkWS49EuUF5XbBbP5PfKcV7NdXK5pD1Cz/nSMqU5IQcJfU3LFSUWzxUKfHkN+FLhBlSeC6wghjsSP8IWEJBBYVep1H46+ysLF8q2uAeb9imsC9Tp7c8SvISSJ7RGP9MVG21O4ACxFcx9qBByGFK14n/LU+X0tdTXoY1QPK7nD22+LLV2KSXkP5V5i1bI8/3aivlL7eWxUH98PugvmDCP8mPx+rpi5uZq97J5mt6bQQEcOpJaGp/1iyngwKoBI9JXuZVPekQEE2EWIosZfgHlaU9AS8K40uzZr1GTiRuK8uCxgMa1E/iWd6tiR3YtOSIiGU7BqDn2j3E3JfOBMgzpIzjwZGNFZ7nyYgkBudBYsKeoQXMKBYFFobwpM3UGkAlYMILcmMYQ0EEgFvCBdDkRcKb8ddV3tWmxtvkvS2TMFzGwaWwIFYAgH+p/SNz4TKduokDBi6Ek9Nk8nxYqyjGXEjAtj7ebEvTx2ttZ9z/eLkqrz4pCwWpUF1NfL9esxeeHmElE6XgQg8Qnin8WNPPKKEaTbBvAqrrDlXuWPdjlSwPPimPzVVkmPObhzuSGFgfHnrUqObknpSEg3u7PJcvO+W6rhTcPkKktIaQ7cLolVfvDr8O4odbG8GydR7u13EAxJMG3zSo89qGTsEIi2yfkkDic/gRAjoFOOC8T/p405Asd7VGTjUikpou+GFBq9QnagqZj4b0kBcVEe5LXrh9QixYzNbrcqKQfnz3q4e+EIkLtJC3N8d4E/Oh++Akmwqeuz8LyJ5ms8hAQC6KZ32rDbiDrBIJaCuPX4XHMHI4E4GGPtItaZH2tU+7VERxs7rWALC567du/SCcIhlOzco5yJudJmhN0LaegejS56V+9rxuM5v2ptwLfL5KuOATR/mkHbk1s7QAKu9OcQJZTps0b0NoMO4/Z1TjCVKMlJEmGUAAWd1wR7gSlUAVLOsPvWvw3/8uZyMWKqZwADj09z5bWZ5wKIpCXtHQM5Rfbo99PiFARv9eK7/KsG+dBPNhk00ptrX+ORU52vMhv2eFFFNRSo2sYq4xdpiZyNc8Q5X0JFhQ5iFsZ7sORCARDDPUlk7+Ik/myU0BVuAlp3wHK2wgtmqE3ZksmLO3PiVhwGgK65GLXXLq/J7DdPjyGWo+sb04Ax63dbyq7xyxwRqTuTE3NtAQ8Y2tDl8B+r0owHoN2xd81GyExz88GuFWi0gEuAvJcr7eA9Rj/xxWxSVl+go0zPiP3PNHCiLrIe4kyEzNkRy5XXzt8oX6+DEPbUF3pVGHUKv/FKKZTsMeEMGv
oO3Ldw2eqBXz17OBKM+gvdHA3Z2nIzqUCmUs+yhJaD1BziZpITQJpW8VM2jQYn4NhL2LGFqpP8J72BrM+nqiIVVeucQ39reAz9ebcztkhXGiyBQCd0JNsI0IvbNGxSBeiG8RjFM101FmdOSTM17SrLCSYIJcfg6633x2XsW7fPzig5WV/E3PRtA9A7q1N3Z3v1wkYAn9dGoJNR9KlC9nbAZygEauwkCOeBoT7AZRK02gzVUlgUdmwjPBZeVKGE7/+GVrjDi7LMXMRMpvAFnQoNN0gGYF66o9aTnkWKOKyDuuRZ8Iv/2/rxfuQlVd7ocoEF+nzcsP6gs2+kYlUAYmpE+hoNPQp2o6B1RDBUpg3NH0OzJ9pAuBGb1+nC3QrhHNeKkzcWex7T6XYqInkexSRbernAB/gMlyRwy2g81xtIUdLtdOBMqHEHs+rqCrS3LanxYIPBJr50hbPEbSqyngWNgtPMKN+UGsBjp6LsR1Y4TnVvMsni8hhtla1sN//EtZz4uA2WGff8n76PVyb7phocim6mpkyUCrE7+AigpvtcMtZ29voUBKUadJcFd81Aimu/FyIcyXuNP2b87NcRQ3lyIiJj+Wr6n+sLh0y+CfC76KV0/YcyoFBadZf2ywoe7qy2cv4eZqHxrb+W68vQh1qr16sFFRwY30rQK40s+mNu5iQTkcExIaxBED7MnxLBcN8fmB3mevbM6eqD3zHXSl4Ad387WoZPmZ2+I8q8QChbLKFtZ9A/XbvEZWv+eQBTQ/Z9VTHNZu/PU00t5P2nRmSqCubNEaq9wAFtfyxqTLLoK9paNWZnnpp+/xsTEUjN2dsroYRjjwVGXPH51ilK0mvuZUIkshHgy0oej11GkPdLlkr4hVowGEaHqHDHKM9vXAcuWp3FZa63wOd7vFc9tferMavauuxMwxFVycelh3TdX+xJ3R2vaQSLPau+zwa32RNo6ul4kexyvJpNLatU8YHQR63UsJlOEFAKyf4kJXCN76vzifBREMCmWLTkG7qmhIyNj40kN3tQe0W36jcYEnwe11plkGCEzcEt81pprgFjYWTjbLuJw/KJQ4//9Fo+q31Xlpq6gNKil4BvamOHCV5163Gdf/jzwMjXOD9HfGVuxDTFxtOW8AUgusKnoTpQSZAMXDlrhwwCfOTTWj9dExME/JMOr25iaxkaWHPHpZv6SKiD4cVERQt2Un//1AjQRoDUh7MYuERUDlax2x/mxmlKTUAu90qLCWz0kvuScz5MCuMe01RGf2Orf05xGd3J6y9pxFq7jt+oxhmr6FGs5b8kp+i3NKZaPa9hapV0wlT6ijDRDgvh7mWlgwSgSyNQ3W8nsvxCS3aoHtEpUNF+xi/BJ22AY6V7BD8YjXBlePG6eGuKRFdKA/WqeyryLy6wTH2tAAozLJvjfzgbixu5DU0SUN8CO4AB/9hxwu54AjLGjH0VZdGkYx2VBrbq3Oe10hOZo4fHvfAQcCbKPj1aTdmJxoijcttI8PGQvHIWWI2l3HeSiHH94U1CrAnPwFEuz4YeJz3ozwr/HE4du8cqMClE44KeDTIfCmrLoPRTj5rjUBr7TXY/uDGcCvQuuiL56i4lRIBvof3EQPFfAgVjoUZ4Id9qAvz3jMBYBNcGD4fMhbopeRLMPjzXHZHOsW06DSWwbUn/ZSO8SADrlosh1TQq5t7/yn0RXC+ie24bQYicYJir5sZzfv20jRvmFA4lxbkEhRMa6K8ggDx0sQDcncjIxKWx9R14WiK9Sv+5+j8i2s7LoIX933hTzkGzOl11mJzypCsRqFJ2Ry3Je353rrtaaTjJ042/T3Xo79MuO7BvHWeKeLzeW0y+n1TZnVwJEFLR2XuBadC4+9tXFGjGxuNwmwQp2fyh3vSzCq7/mt0lZK4UM/0VTIPwZz8sGlTHbNoMR96IFF8waSyWx9m6+765wl0P8SQGypRL0DUCjN0IMiurfvvLKhGckt8mqUEo+sykYdXN59QfC+VIJ+E/ryxresyr8sah2fo0DwBoVY58IQmp86yN69XTOO8+6gsbg2wGLaKSt72W6NC2nFaD6hidd2ELmr4QVVExP25eT7vkUAukTZ+CRNAu7b+WM4YPqbfCMjD+iLGMKg3Ogdmd+ymw1d2Z1CeW/lIhOkr13yRy3VBLY4hjK8tW4wwR9QQHla3FtvPPhIEfhjSHX9nmiB30mP+giSUgBAceE8yfmzMYPOT24MRBDp2+3NzyYAfrOJZNfJfFCVZLYzFZ4wgaOACPHzFYznRqPH2VqDQ8y1BVO2Zc8XntwkYJ60ub1wvk8jr8YlYg6I6Yn/s4BzaRORmOqOJUcR4iqMO9K/Mj8L6Vzv8XipjPeAN2+HOx3lAvu+DdQQ5wkrtPO4AjJj1QgoeGGqEJ0IuzubVC30TkuU8TBu7/FaZ2ClOG722G2W4xKAWlAIfSPmi9VAIZFBqR8f53gvJLp/eljv4pGelgZCVoT7X+2jQgb5HZPu3aUjWv2Dm3BrAvenoXG8TOv+4G+C7l2IjIUNOW7EyEOJoy9s7HpR4YtD2UdswOjciAd6SYWSXxQ3Sw5MFS6LqSS9eSHqgugOzyp/t0HngAC1T+XwUk/VZzvSVYQ9wI8R8qo/ZJF+3xTGUqrVTBzJoco48g/UWDx4mZUVk+j7DqObpyCJ2WKBeJ9/zN8GupbfLPB1OTfzPpl9Yq1DVOl9bqrdcQKifjRscsQZ58SMFxgmakQl3jOWZ8gvERW7nHZ1AP7N8z5IX2kmNV6/ENwq2337d2RyqnhzRHSE359tMOPXb4p2pQmToWKr17lfppCeyYlgr8LKMwAJIxmv9XC+twoQ6eM7Wd08abBlbclohEbCl5/gs8yfzRvbpyS8+7x/YpwDHoNzPzRSZ+qVdVb5xAPtAh+EqAjdS4sLFBhCz2rMAzpKPCoewJLWbSlxdmI0qEeS3LQ1wnKiJ0LZXwSST7BaAxAylPF5Sfi1KeHUrb/Ns4QOLRfbwrdYlP6e69hyQjbvSuY0EQNJDfD9rM4WLpQBPPG7kfChUKgRH86E6ghFunaSIYQL5FQU/OjnSwBLmVjjDYjpnHHagm1hN7/ixPCoYn1JftJ/+E8wWTSR7nYcK+5lcX2ZnBE3Lvw2ouRQrNRouCk322fVAOogKzQQeY6Rqg0f62ZnAEO7p0EC6dL9/i0CUfG690MCev3ukmj9+Bx9upNQDCQkIK51sogy52xKbiuUvvpdEgd7jzOt/7s8sMYh4ceph3MmNRmOtVuAD/MKFZ3hxA4b94N2CwNryJ+b40DsP7iRPpKLRGeqphS1pWrYEIOR5Ye445KXSwz/Hxe7Ds+bTSVLOQ3NbOxecjMEHgO7fBA9HuxtQz5Oa6nugKpJPcbERangn4RnBvVtv7mt+8p96d5fGxy78Z9icLH5NNzM/kjRS5juG6dQAcfSHXu8fpMZiyVsewCFvfUIABYtBMozXhHax6qpXjMUO3Ev/FplOoNS9ET5CCgEMd8ACRRMrBGJSIUf1MeG8ORp4cuR6iVVHCFc7xjqGB5OGlvCb963kvJKw7GNaxb8eLFG8VVtUf2t4oCMbwwj3CAnmKLO65+RYDD/ckLkAIjXMzNE26cRwymkuox1I34KFBxiG54sEYrHsD5U96u+lO2DDaeeQSh46Uvl0HCGyNwWoZLJP+tSYCa1zWbvxepOGgcsDTe3GsOlS7pAcJ9IiA5CvQrP7PVcC3w3UyH7edpupO7h1pAm7BAzMBnqgcZ4QpZpPdebg42i0bERssQuzwap87zHzDM66mVlX2ty98Sytz31Alz6j+nAEZ1oshor/iBLDdC75+41hgwUGODF4Vn3xtSQFRsUDCLAfFsBozKi2mVh7++IZVVWamrWeXhhMaeLCi8zHlhXd1eZjOHAaEywWOhlg43lVyva3fx5all0T/6/ERYIQoZun2EVlI90epijHjMLYKn66qoD5FQFjvgEJWMsq3312mPm6m1gC/QKvx1bSzY/vRkfJeVPlM1Yzp/2qRFGENgLUsMC/IVXAn8gBGvG1tfFRZGB38adUmwZHJokOVDQuoou80JwOgZkV/K51EkDF3tRx4FsBQHtsy9zSO2AKwMG
Yq6IgHtSue2kVBTK/0NFfRSUMjVL8nc8vDnHWJpD6QPmmjXXP1CU43TUBnXIduhZKc9vKMdJETwMI4+OC9FYJcQiCNRk3lSrtGV0F+MX9uKE1Xvp7/sGUsbbh+c6LGKhZnOa3xlFbO4z4wP6UcQnLQ152Q+3iheHmKsCaCq/c2UtXUBvZqQIFgdMDQaIL4jsBKWaaBkDbEHTOWUsX6NXz0rDDvjx/AG86imrTa3rZ552VRYnNbscbhNrtjwFddW0SUBoMwBzdbez/txiOt+dEIy7wJzUbgB1QixOtlc3bvUc2eZqLOT00utuht+PjYKiNECL0RogNaaux93jwhZjyY7QMtoNDk/leREr6zzsngg/GJB9nts4+XVU4MYSrZ/FRq6SxSs4EQ9Ca5A/DpNdsInC0SYuS6soEGb0LhWgvYuxQprPhKngQYHrB0LmTRPQtdHlrA5ZW6QKCICzpklFEsSy3E1UvTCPEcKWK4Iy7rf9U1AnfVV5rsTKLcSOOqAlxousDezOBC0dLcR/q5pCEt4zwsVqRjq1NV9OIaaJs4tAhJoNdv2PszQNdE31xy6kTyd7fa446UBIkCgvmfataM/mCiiyoHFEeVTalEotpBgLWUNTA6lTSxbgf5H2RlUGuYWGM0JTdIYAkdkA1rn066/fMUAjIJha7+95DLWgOOgjT/Ng8mtpLLqBGccYjeX14MZP0veZCKjccOoTbk+dVcVwu5hxa6OoXVVoNuOjQzpKyHAY4pFZs7QDdjK99UHfKY+mDQsi9R4mvenDwBC3w6yR8xxQkEBuVTNk/zxxVLOcwavbUcmk0ga8001oG/HNFtoz9bYkTrnJPdbdSbZMZUmgxQJqTzq1LbGkjmNWX0iyRbOZpC+Cw7aSFoTjYysAY4MtjTyGld7lHlxmKxxRDT0ZZTBjOIEq7KyUE/WI+0rBqxH9zOdE/JOhYEMSqr8hgeHT9V+S8tCgNqITvWQmi5+3ZlO5il3M6CkPbx+oYLcGwZmteZvm+Q72s2DfRoyxSIcivdQZ121mdGWeM8Hat6+70FZWUprWnXEDiNy06MxRwRf7qGqc7uVE1CpmYaSiu5HWooJKTzP+LpSMM7s2w6S43lJFrGrG9v3CxRYPGHf5KmEHkdp+V6lcg8Em/zFoTTLYNXQs1vwHOtCGsqvhPd/2cQ/0+/uDMDUjFkKr4Bd+yp1ymUdL4EaTzVLfUvzkiVvscV6KLojrQ6hd/9KYWoNzkB4C304kycBE/g5WH4MY+krOEFDNGoH4vTTY5mYQ/PNq7KXCPAizD/2X8UdtGsyslXRDh7EcHAmyHxA1voxSWVt+76G6rNCWAKNO0At6jDH93Hn8A7k7gnXWHSk1vEndWrsoZNAZaoV7vtO2buNFF+rGzSw8CVWdZ3EcwayYmpNcsDRuw4Q/b4q77iMp+ozoM8AUG9xsmwoRuaA9yqHTEdmaOxbeJE02kzIwnm66ZfOTrF06HBA459wtbihdXQYsut90+O4dNFcM+Uj+TQKxzZnSFqZ7FQ+Xh5PLu5SmtkuXytXEX61n50AnR5YtInbJu0xYXWs4G6rnnPdoojCPKtrq4C9pmTZGqJbHLS2dBPTTww1sXUtU8sThbdVe8X6OWtdfdTImgIApDwz6yOqPhUbHwHW5wpbU7OLthIC7JD5ox+u8R7ukI112RIxxk2dVJGO8JR0ZD5kbX2I45Q68/W/9lXTVYLiPcUy3q+vwIrQ817m0fCv1jlUB5I1dJzPrhwVN5gkpxzIj/Pku2BjzFrdDv+Zk0M0iCyGmmA3NJKK3kmYs8DcZ2uXaMClVEepanm0nj0i2IbW323CTP+u/TTqdoyrPIr/EaOA9VA4OxVf2dOJRGnU3+InrjZ10sPSc+iaAQeWU9xCXcePGbCnobLVWkfbS5icQBw/RLE1O4hqGAWlFGPax+enB3cBkXJJY0048JITUkTGGXMi8ea9JNE1qY+UWdv13hsUVrOcLbHgW2eCMYYkWhAU8cDgjd/BZThCF2qsr/pqbZeCaqcnuk0NIQ+DcDYJHUClwIWjNCav5XRVcDWIVgKnT56fIdbiNTk8zkLs+CVE3UVxCVvqRTnICJyTW/kGaMOOH4IKAVfqK9yH2FugAN3Z/zthykuQQoNK9XeWHvzs4BIqRyJ0ID9xONyY32s4HyNHAKVQiw3s4gnI/k8cSXcODPqUR/TLDfYm3Y4fvchLe+DvB2HfrgIkLkHKkgRo0YU3Hf16A4v0rFZvj7/r/TPos7eUy95YWjrwc2RH+hH4Tces/ar55goRWSh/xEz0xLwnm9IgH0yuUfw14UxCS5g12uzlkyBnJ0nj2os168/0ASgV7yHZdj7U1M7D2TfX+0rTJO9I4wf/04AnCxiAahwt3xyGm2uesQOl6PK4HQ3lrVlrFw+J0+fEnyXO3ggshY5Q6QMdlttKT/UVsycthepGyrY7Emhb8RffVvt6wLql6Q4GBaoyAASz8H337rfmtSJbOsC7TWz3OSu3IVf9FTqsxuOyAVaTqdALwHJnjsKewMLQa6cp2Sl8E7Cd2xiqrl0Jaj6Me0zcSpkV9Tf32nwnugaweCkvjONvXxUCKpFqMAs2kkG9Cye+AU4NSiBpaE/fZ7wwsDDzVUuUYXp5nEuo1RIKUl3SgZ6pMF5zRA9hFVamUhMkQkb6g0BnUJCeHpT9QFMVp41N9835wglqq/jFjWUg6MAXUysDGZlrl03R5+VNjwwnvQE9GZocpI/iJAr9xtpGCpp0hmh1yG0YOwbNbzfwOQEUOtgdvwkxxRB1IFTxG7bs6aJBuIHtaxOoLEksaQnvIanNXgDjUp+BURkOa72uOOUW1EX05o/pyCwcZ0MDwRY/YhnXJB0XM6a6nYUDDiY2vPHr9JFHYH60K+JjcSHT36T9mjDDIIx6xHtIS2E7AzH3OXPC0xaE9hVxAGt4nPKGPyJ7PEzwvSthsgM66+2ddMhr8he1XziUu1Nt56AGoleKM2Q+kA6R/+Svd9scDEaYQXcPs/XFzcaDaBnkYSfuWd8/53rXXLd9t2LPRzpgHlGOZoumSdYctp+3mXW8xp7jYQEhMIto1rWSP9SgyoL/+UM3VNxO2aJrTNAGDm5VIdNEsVOYfSyfSoQhuUHziUUy8AsoW3r+XKXl18DJXuWfB5s7U5yNaQvx6b62W8ECcwp1hciSXrLiiDgcnOkwvJHZCauGnr1bEybEY55P0/HniKqwc/e4WqlXyw57FVRxPbq2sEE8synrWXL6EETQJduwtdk51xkYCuReaGzI2fmIMdYDkVnYVMoSGxniaKNcmtB/1VIl3F70ze+6nNj2t2O4XkISNQ/+kFrKTyQf0XBBg0FfxFtAVxMolLQ7+6fUZ+DLJIZmKTvY/q/agTEq6VlX45t3n9rmYQztot3SKgIjIHUQmTkKTz68gTWvzCZXF1yKlerWmWsIXTb28yowo8IdC8exTpSeEVhTE8aWnSENMGrAonK/bZTxJanWAeHGI9ZJKTPtjEIUmqUl+ldrx1v88CoRqq/OvKkwtRRP9PBQkEz+DNjdwdgNkP1kVYYuIRZ67Uff6aCYPltfSA75NK+IJUyJLJKJ7gV6JE0u2oy8SmkiHwoB25b7B/1AAnNlsSD0MaZLoAa4rSKCNLS+sd49BsBgpsaWo16BoHWS8A0rEN5dWNFkcAy3/dmrCr1XeS2n42ubsQtR1UfFBwqPdjfPS2OEhL/xALzyZLLT6bHPQlcw0I4/DF54Vbh7aw/9hgEh+jQ1bmhy51RuuLMPnSWOx44+7eGQ5HwxgDN6nDRk4nLSOmoGROy20Wc3eOBNXlSadJDdid8qboWIw1Hp7Kvm3eZ3C+2Jp+1Q9vKkfTc2ybPwtB6HIto8tJ/uzNEErl8QkNGDbvE1e82k2Ep4KCfie2BG9uerKuInhrXfi7IpXz9zQmqVtLQq/s/jGN3x9ETIwuaL8rrKIcukaln6JTNkxBWs2nQc8CIMRuyTK7Ih6B5W01e7/yvJtxV8iwk9d9MhV9QALBh4EfHxcf5VhD+JJOJzDJMwFRph5U1tlnjtahzl5if7H1H6PAETW+SlKu7ldoJePf56VQbgl1PJ8XD/k
wIjjkJct9VZcwJ/N3IEODdL9RzVM/YqVl3GYiXGVIfCM+u/kuibrh/7RqeYDgIRZgm8ktc6CA88PdYJMivCJgCONJSVJlI0tz6K4Z7qVqVBnofZ3g3nLlqRGs/9+dmYXv7bE4C1NfSKxInKzyJDL9DWPYy7sRvnllkFU1bOyXOCotkU2eHiKVP6AceDsvfCosyGAmAuns9FOFl0fGTWlPqo+U7g2DIGQTmtwULwoKyEi9R7pKP39L/JNQB+KcyozsLCxcHB/yADFxA8XqCL4Htnzcr0OhXuSUhSdw3ApFElEVK26tkok3FXSYAgrmx+ZLjwjk9wshpnd1NkiHBW5WNyaAo/v4t7Ntze1dHLVXDmsIgEdnS/w+GtX88wGkbgagdx+/NLKVwKs5Dsmku2wConyfFNsTDZv+JizuhAFiwG5lxhrNFvhTPy6T0BMs/lqIXV4lcG5T6kkWnjMUjdydonliaURuOQI355+p5bfMd7p7ZPpQ+Zj1q1CTHECSl2KwIMD+pSoBbCrUnzzvYQ4NLKvJu68wCflv7Bfzbp7jYeRTfyadkLZN8nzND+cIey5nYkA0GKvu644LWYIb5X+3mWyL3sGTY1pw6YobrboamUZnRFiU1CxKTbdN2HbaLaziWQ9h2w1dDuQdMPvFFNv0uLqmHWsEsDPjSmiCKcNYnQpchPr3iGNv10UT4QfrNooYKVSNS5XWr7d1Vev30Qd2348EaauTa8dT4lqOU/SWnfCD5b2mhuT1JnTIfjIrM2mad3q3lag67I9kjlk+ABUVQ5LHIP9z3eddbpT4Z1htiFYNEboRN2kva5v/Q7CChHcr67gQ+bNNQcy4tV6SNGkidRpY/dLtSZSa87udKauUQXFD7xiTh45oJElVaBMqHX0aGCgsgENJNxzmzmPC5AnokSHFHzRp8BUp6B32ZKiVAN5PzVYJS2XPoJ8hA9blWBEql3+zwgkaxe1nlEFfB8z1Y7wKhTSkhUFCxIsCTFZZcKxLQxN3/iuDntpK4vY7eKpjtvG4T+kzYgxAg8sO57R4U5MUHlb9tW6KBqAd521j6hnvQHpRn8GOnWTxbX1JDLC/smqOL9ehZNPsqO5sDeVbomxrbg77Jotp8M6WYne6DlKt1WrQuLeCMGvbscUKpIAxfpugEP9Tbackn4K4xS8OVfy8HbE0gOXvDWWqK6uF2QFE9SZjX8FiJk7uLPMWIV6i6Ufx2AiYuMM7FEIFdTvNQQz/cMRYtnIsc6RJfIK/Wf97STX40HmnsulTyzRzys2yVZPJ+hXIeUtZvAt+dGTpphh4zwbvIDPV851/1ygSj98oy3pdxGFGC8dtvkTPeejF2E8+AY3a6chOrlP/Oi80Fp5Jqg18HIzTS5mUDAszOML+3b3NarlVcXPtjp0m7uS6SNTD2/02b+dQzYOLNeu2wT3M3RkJMXsw9YQuzBplJTXkBYl+HzSN+d1N5M5vOVnM6Sl4qsF1v7ORajdLGcKD8ft5o7gsQEH4yYdAIMyULF1OvqJls8LIU8drlICB25e6ZSdgdWM9Dnve5DcF9J+mcureEF7lU7eRxsYWQj3kIxGdrmfWxz8zstnIa08y7bJy5n3EANzCzsuIr+575p3NEE/4JgGkIY6iRsWEx6Dvs7mI0ZXbFkqsMaUIVrx+i+hcIVKz7UPW8S9FXood/Wg1HDMXnO58lOwzkdslml6VV1aNsJqDKgQ9EhRT+017Ol8CYVBXJPH9Kj0czJ72ttG8KaBsjWECK57ZmWlttOGQMjVOmhNgtOA4qac/XEes+9DCnnmwMEjP1uUIqsRUxVFZpXyDTjr7PiwcUoecODXIN0N9uzEcX9HKzL1G0LMh8ICtxnZLy1pW4xq8jKzZRf660zYQSzUtKoCIFazNFT5vh9/ecYmt0sgbOM6wd2kU2vwWfSmt89UijRwVdA87ffeWlVrdvbdiPnEqD+ULA+kbEaWc1dAx0PRbYeufCAkifK9GwilHTLFChF+T3JxUn8lQEw0XgjZ1VqgVpOSVQ/qGwn1tJUBwby4ZLJ5jBdj9eHMc54E6IabuCNgOWVNLASPSxbZEQSIA/vU0CkNACxlNfvIJ0DZ6Mou+KBwzZVd9M0WKyHbxuhAoXZ23qW2sbmNrgUCVd45pJCxo77hOAo59Bp5Jg6TlTIJqzCiWg9JrCHpYXfnGllcoYAkA4jUGkbz2c3zpgRDAsW3MyJWSFlPqkaqJ+u7xp3Wzcv5PFVJoNBW+Ss8rvLCCYwhPSTyDrwg73IuHcUz18HKbCvH6E9YGFN0R1fZlBgF9XB4C3PF99a5dFB+nFiHGWdbGwm8OfuZg7WOLMX6cqjIslh0rQFT6URsLS6haupcakKWsaNqYqKzJYsOgPUWBegzCDiIBOwGpGuwIFzNF97DVWYgEz950Ahicv0C9dAAb9hjZtulfs8oA7QHgTQ9RRiW4lIjbaYENtngE+ZhmBQGkmM3DN/WyMMbPzQUpzwmFn23EEGIIUuAvKRoDy7AVjTKD30S8OPuUrAoEygBccJVZNLgQhXbx5pWAPcBBUQiT5RQDvwYlm2RGSCMBQlTTPwqIi9ZND5ZOfKXtEVLh4/Zt/p1CzncnDvhmy8KAwqdaoMuT//6DADKpiO9mgSU54WHYAl9L34rNBovOib8Vldzn7B+rgliOZNPxlRboPpICKwG3yrmOXnYTtkQvptbRiTDT589ar1Vn5/qdMsaDGB92dfRbZlRRnXqYZbaPZo618NM7c3g+AWbKH/ZeVYDIpeJpMat7d6ldYVyN2Me1qp6suJs4oCgaLXZpnR0uWvGv5nVpzT6bC7ho5XOPg/nh8a9wqT3D6UeuBNxJ1ltoVFOOjC5P3P0iYdZrrtvrwDzzux758NBEeTGHs73LDvLqDY9wE1IID88ZVeYRRSkOE+In3Qs/jcxhR99oRX2Qx/nYpyG+4sJnEONvbQPIj0mmzJQUndMqppRClnFtYmc+0YR1kgZXu8yHhUnvBuT3Lt+IHcUPnvVPKs4px/05lhAdGAxWbs7tDwcvZrq7hGphfpS2r8B111TTSdXIVxZjH+hQWVRlZGuiQBm9H9aNbvEqdXhUwBbzFRQUyW1fpVJeM+VJMxRMKFbcXRtBLUtlUxL0aXvtxRwurXgAMTq5CtxsQAKXFvyWvhyh/XHv/Wr2/r6rKFbfEjO7YGgCU7Jompl1lAzgyDTqVIUDSY7Rva81+ny8utLiOmxyUH19dvG6aG5OCNgNX2CtmH7t3q4bqnY6udeyK265dV+bF1y+812JiHYJ7PD4+MBYCngxzMP36bdIj5vrqygWTfMuHO+5WEUxAO+g1QITwzzE4kFux0CBb0jf9MFhmvNxMW+jGU7ksRZwVmYQpkWLF4VzaWyUyJwDW1BXBdkyYLKSWhzQv5jPQrxkD0EIo5W/42eMdS+zOCXZaFPAkRgKxCfGOHd+NEzqD5doyUMhm+ZT++beG0uHNfZ09s0OVKLCX5i93MVrfio6xTHiaIWEUEE87xkL6bWolJHRuY1pJsN+2jVaMmffxfzCGs7XPCK/FVP7XHvJmO9uesw+VZUKhGvETS3iS0vWlcEZhjYnVDvWQE4WWjs7IuhjAJpsuJz4RWYem5yPw1uKX05dtivxTkPF5eS4Xsgyzx92tjeRfH8RqaH73NytqI+Mhhd4JFa6fMk+faTp+adFumtGTllfERk9C7BGagBzInvAQ8aohgEXcIVPMzUDruxV31P5ofHmRd00LNVNO/d+OD65hxew7iuizUDGklszRw3hskrjkCCZIxBkqZOTJm4GEM6+er7hQpMpqhjtczYNVBJUczeOyA38WCa/mDuO5lMOSR95IMYh+Y/qJNNlec5CVBJgYJE6FGxUOOhY3UvPzLILfw8c6RjO5bbb81Th6mSOlDIlaMLx94LGv3BT7ahu4EFeHXo4nktTocFiXSX2JV84KX2rqw6vyUOsjBN/rKalS7Xx3VIVXOPKTS34c2knjwk+ajSKi+NX8fK5hbrxMk9erV0mb94Hp/1EYF0r1xJQ66WRq1HAPl4Hmm7Xrupn+J/DTIx9yq4az8zR9riyHUjGQXq7Kh/UcdmpS+PkgHohbwEj2yf
YtfEAcLwIhUvvyeZkGUvFR7hfxgS7HnT3GTSLMrf+XSOBJcfeitLiVk10JQYTuMnmmHRiKo4Mj0ZXybAPEuQV8doUZRHT50JUrrtumkIH3Q8p8BCbYoqvul7/S06jHMaTakZmgMp4xXMG6TFv5G99as6T72tIK2tMb7AegDFw+OH7pNVRi9/ff6C8n8Iq4ZoIIaW+Rs9t5vWDc8io98VatxdfMkGlJsmG9Q3Bh4VTjpJNOBdFpd91v8h7csOGbyitxa4JfaIyB+fIU3W77SrfPCxr+4HCwjzY8JZkUQrg1T77Yt2GK6Hn2HlU6rh24l6PEnGI+t8KgkbI15huFFNdjc4YP7OsrXyDEVXyXIdd/U7qGkCwa+4VQbHmuHh2DQlAZ5e2CSL4ddHN7rRI5ldyhkIe0SAKqb8Rf+NyetUB7H4HdvTPUnAUUNgkIazSWVBLr9UKb9DiuUY1gwWBAk/8X8IxjkCRq2gAMmYJBuUyQ22EDZ5HxC1O4C8F6mRCWFq4g+P88XOWxj+jyJrtoe+Lioy44r+vR1T/2g5COfjKym0aEUUX48tVZCTfOKIt5ByvGJvfoj1nchbr3l1wlnBMficfZ7QGnZkgPWP4RjvccOabt0TpC+dNsPS8A3IiWoAsXX89KxLZdq3JvfFxwg7+nbG4FXKTXO8q8mmASq4wNwaz7CA9OL9RCaoRH7Hqk+7r5onuRzZs58X/8qeKrv7IJdv4sztHXmSjX5fGPquF+LxbW927l3OXIW151NtGG+v7I3AHyZxSwM67kPd8d4XBMPb/b1XJSrsIDNNAsyjksPCnT7lyOqBoI0IfS9Hn2IP91vp13VcYzPK98BQt45G7nqTnfZoY+2a+iiz6qFDe1nBSlLvLVVJaQA/OC3pWG78FXIQgb6TGZRDJ0kJwFU5A2FntFSAb7aa2cya+yqWTrUKwILuNm8GOccsmZDmubYytIyzBzEFmU0fnv3HaQt0KL/JDzfHDew/Yn/M4BKoXtqk14etMuXg2S0Dzvqz5gXHicd0nvo7S5YVFPFOBgSxMZ8BJeNh3LCN5rHDqEJlfGAR85wPZEIs2Ye6L0cj+gl5Jw5Zn1XqTQ+lettMWCkF0pJwVI79tn1+Z8qhx4+WpuOBGBO9bk0Qxa5O1AJ7pMi7KRjlLnf/sJpQFxrHLzwMIt73ILWXvARPh9avnUbaTE3YrNB40RXzRqB9sE4Vgjs0Ek2CPPtoR5a15giCaS71i5dYI1hCP0ekcIu1znFzeNW2OcqQt4jm784J/s1b7NgYxCrez25G3ZRik9996jkQE/TGwsZlmIWMggKzjn4E5MVhkfgClnPO4CWFmx/cbR9LICOJP1ysQckmV68UFHRhgMvNv1FJor5hBARSgrHB8c95mzjeqzlaaJ3zvswwwNCA4yujL6fqx3tnXXQp4kC9YI1KtpEVYho5B3so0nVtL+pt5uQdzImhz39hM0FvZ3wsdxaQw/hniB4qX4tnChHa3m1DiRA1m6w3L2DT9leaP5jiuvg8fBOCFLNwGx0Zdxz/DVYLvTJZvbsSgNNB/L8Gx2GYsW/oyS+YGdD9+O7KAiZBvRXERnYKeI0ZcSoJzqxqmUXzXJElfbSXBaZ5Gi5axaSthBkJs3ziIcGMImlq919yC6ounQbnMSby5VsUKvPxv7pimSI4stZFW4d1fBxSHYdtEVBOM2ONXLbr8yF2RtYkqKo5TOMDKUvfejqtYs8Wv4maaKIpR+vLjUCDBfEfTUV5hKvSmvUhMryj0nm0F6gPwjX3svYDmEQdMb02JQ19Wq/xveNHudDpM+7hj1YxDnnPzEuXTL9rQz0MQUoBN6ZvXUssmYNp/QFYTw2jAu72FWQZxEdZfFJkaqr9ufK6rAZLyu/6dHJ9WVSp10jfkAtyFodlS2t0g4WE33afTpagOr3XZzenc7317vpk++1hVX54ZMsjL4xVDYymsENKQnm26pWSOXd5RM7xb2FHUQdxGbhlc5SoiI5xb84Q1XP1ouhrEjz2YN3nnU4NOJqrO/9wE0ZBbStlAK/QAcGhMjQ7vnIMcQXTZ4Y26GoAgp91D47PwvNi4GY4tZm4dKe58ELug5WlfsqaK/UCtjXtIe0nCm3WGUUhZILi1KCxGfxVxmmAgaim+12HHX2DxnhsCAj1cdYdpaYbZDVr8QvsNfG0KofD/AOlcwgThhU8d62QRQe95ZyvXP3sq+driavrJqx8OlzFryEdVmmG2e7z8ItnnY5/nnsZAGkvLbsfvK9UkHXQOGTmMEcOLDXoltOnTS1r3sw76SCvTfmO9CoRWOxdLAc9AkDLNoF/SKjFwpDbXZvMhXGQxywYuJvXUvgaxt/xjJqO8UK1Xc763G8Xzo021vrL9fUz91NyKPngnLns7cTFiT4I7wH1/2Eh0fyNh7eGKQ0pRcacoZ3xGn+HN3U/R1h2OqVvobZAttMVc9AgfSJk+VsBKkzsUnCc+jUHEcV0JMTT9ZKF68k7rGUkBmRswZg3hOSvlbyu/+DKxy6bMQ86pAc5l9O544e2haA8q27ZFewRFsffFXzt0WiHbCoJSaVh7aBo6CqElV5f/YBboHgdDS9hzSJ3E/hCpE2/o+EIOE4oMT5wvykXDrvJAZsYSWvyKEMFYnfHh1qtX68uZMqGUPW3n2OgDo5OugkMI8zTKSCG3bc8OvAWh8p3W6JAGQv8X9GuI3VQjsZgM/1zu/x/+oKX4M9JyRpJE5qPgFGY8IFPmKGu7oEPBEdLzHxP1I0oQZjYOIlqiRN3kXPxIresW4shr0wzpgDfRCJQzf+WjEuxJcGaMiFRKD//5ImRo5EIpvAyXKE2xL95aMFEHFR3Qt2/hKGPil9QiPryuXK8Ez0ZaK9oa3+P9xdwnO+yp1H+NOxtFrQeDJVSuwSL757+lGrzuP0qSB2Gorc3jokVkSGTzgXjNXEPRo+Cfo8p3M28mOCRFBSiTIwh8wg7GGyFedbayVijoaKXBrm8xRhydtKs+pLwrd9z6wCX5rLtaadkntWFV78H4H+oMM8qqmSWZpR5AQVfc/ZaZ9KSreSjKZKIl7UFcuzfDS9yko6173DSt37Cuvr/sgV6npRYxjNFrHHMj0MihCIi4TeOovyR94Ah1BVgZ1583QgNFDtOSOYU6vaoD/z50Mh/ctJUmoVTkcoinPU/NJoxnogDfaHQ1nkCyvSY9+oAgfKI58NscMYicZVmiZrYKuZhyo/IHKIFu32laNWTRwg3aHcWuhygWbuC2lmMo9xQl8diI6HMFO9LF5uB/RZmCaMHYTqtcwlrUSkKrkodLjnnJz8UJACUskOxWpDymLnWNQK5SxSpEtcbddMc0HjYFoOWL4xM0M1ZEHMmBdSUJXtDpLmrLwCIfix13FhMIZZ0b7ggFa9X8pwddbnR/ho3H3dTcbTPXJ9/x9d2il/iOyWki2foG6hrX+XTxXzfhyp6bZTskNTmsb/ylojP2cdg1unvMFPqyk5hJZT/5PGjclJeQpDbDrbg7Vonoob70lvk7OTqiF3XFl4unBGOaAbc5QofNATWg8fo6jKfMTzxCCowQIihwZFhsem/hPMBetMCCY/vBoVQ9phb9V/qmn3PUoab9rKicO8ml19xknRAq6QLa+x6JTnRS+KN5ZnVqNtgTB30mzAl14WBSmIM1BjcrRIqouDCHwkmqPyOsvBDtTW3dlhpm3hkSOgBn2XtIJrKa+y3/yFvS9UxTgmH0M6aL6Iwkz96ahlVL41MiIoYJAT0xOJPwl2pc2GsQDmWYIPN7Wr50ORkfAP603S7GcdiRtCbw/e9rD9C+mw9bgiUGoJPgtJXFP88esWqGG3B0oOW4pRh2Qq64i48gW9o83pUySkqoJTVraHjlSiIBoSdrhqqF06IAd5FRHyrEIoyc/z1OK4+SapNbzuBy10ZC/NfUuF+5K+IrGZ+b/t9wv1GagJB90HzK6wDHXG/uABc2IJaEV1wPOT8TPgtn154nP8fyqS3uNgti5mxbw3RjWI6+xQ5vL9E+M657QT5jYFh0+n45yXaMtQk1e/OBCnHnHxn0v7MbUSmwri3wz43u7Ybdc438kjyWo2BBYy3HThwuZ6NzWLZ9bya
1n4dxspmWjz3o3NLEh0xHqABykvaIPfoZ9ImL5huDrbUuHixYf82WvVcj8OdyQrGrGTHR25IfpChDKmqzpevSlrj7SFzPh+qaPoCEvVKV9C31xq7HTWb5ERUZMGVyD/DTe6qoOtHRlvWfNK3CXYsWBuDIScMq19bTfe9Rc2V7ix9RXbkH+RN3MBX6GwKdKlUK3lOw6ZP1TQCbYaaJukfKkxa5YL/1wHdms7FN4XVifCRk2r7CvyyJifIvBuZIHIGh3pcGTcZOBSoW3G8LSxdoXGlIag0CchlttHa+rfzF9zNeUPVUS0XHPFaJOI831kdP1BC1yCu8rDFZmBMBt0fy3Cs/b0W2+j8qC8xKRT6/MMUTEQV81fW2C1m2goteORlvduiYV+ju9bOmMIKE/ZkM5xY9gv+0Za7Ye1zQ6VzgHVdvdVsg523Gb4V244oZiMI8R/JtSRlohrB/y/Mi6XW8hwNJMqrsBJiuMJHOPflaJH0745zpQrjc2eG9dkrLo+ua1dt4w5RFfH385DdIk85H2xENBPdKqt+SZnbJqFF3atuqg66emE3fhcoUa9Urg4N2IBKc2RzknbJPq/Tu1VQUCsWWGM3Llf+zqOHkx1royGLMs+78iEYa9S0TLO/3cknFOzyNldmanFHCaqpsa//OK4Sv2ligfbnK81iRO9nwe0sEYmlXS+IFX3MlTk6pyyO2gISU2+rNHdxj+JGK/ZU7kD91j/g8l7AKSINCu6uP7wOgdHnylSHwzFuQEu9ROGmZYFXfxJRumPopRppgTFZDev5pIqguk0/74FYDIEdVTE+TyNqLUcD5HOicopdGtCG19QJYtZmo2aIvvpb5/Nnet6QKQK3/9amrrjwyAW10HPzmQBIp1vXJKbMKpw7jwfn0BPCSkoIfwDv6zxscTr4XEtHZbhrZtQRXf+44RAd9JPojgiZznOgXMR3hPWZczQNqM7jPl7Ydigtfhm40Y4wdB0mNZnfDN6aYDdrFJv7bD9fb8eYZN3ZSlo26/WIA4w/RIB+Ztdw6qbFN7pZCeNcbdvwhetFQpFQSiRDg+S2DRxSGrH/ogKnyzsijhUzij0zMDuCiYfGtL1W2Pd3uLgIJgd1o2hPc4rjru2cwGF3OzRIXrsH/A9doIX/8ayvOTe0Iu3HQkfWz7zmgapUUzUC5rrN6vcmN3TqKpCWk9S7SInj653vErbSPV9zIE1ILv9Ugzh8EPPG1PrxxdmP3IL3JQaL3wzBHALmImWnhK1sSKSUGYxpF+0I/Nq2nOe5bon2okd8vN1Rh8xHcqMiuaCA1kcTULLaNpClPaRVVEVx2+LJz2fA2hSlT3tj4D6iaOkp5e79t7Awz0MWWMIN5PcccjnO8oATnDnJCMKc3nao8I2Oq/4YijBQcdQVR/utQEh1D5rK73xXAvhMctxpTrmQ/xlHhqhLgH1v1CpDIn2QDyI7l93lZblnXAN7ic8bajd7hS/bnrAZy5JB7RQBlEJzdWA+xUeFkAP9Tmv5ypxcD7cMGFYwr7cZeHsO0/6FHayt/g5wavia586F3tfZ0ch3SKzesRcq4F5glb6TfsP77oVevP8dfQnKPK6G46IN+TinUK9cMKDKto71UB0ge7P6ImTgGZ91xz5PhojRYxMbc3kzo9QnNVsrQ2ZKLMA4234rB7MaF6CaAeV9zzhFO81KeHzk5T9nCSevoKDSEt3dJBgNsUbthIroMvdM5Iv8iKwFTk1QlFey64szsC8WeEBYIkHxk3XGXVrbrfJugcEvoMatSqCp3OCao0DI1fMYunkY9Iqg4qqCSHABY7HlvpI0Ue5fa0MZroCWacathtD57fqlTSJ9xyCj/A78fybTWxvV2Y9KRKsUeZuLy0/mrO5A140KY5j+pqLo7VoQyrUxnXwAqJ+S2KEzfEqTqNK933xm/3gifIoBuesyFk5gnhViKU0MiYhS5FN6G76V6DwRul7/engA+k8ES98KJD73g2n2QoItZDkMrFbxRVGDs8dbmlEsSDOM0HZFtuCT7XMlg6VTAtEe63PbK0QPubBJoMnB/0y1WwJznkzpkqX6ReGOR7TxR446MFg6QLtfiB36fnMQ5CXToMg+bypRq/c1Ssztvvdz55TfW9H1r1L5GzvpWq4poH+MWmHFtRoCUK9ESvUSvkwmReZznrYMc5ms2cs4FFN57Q9vpHQmrUQVax+LWj/WfElsl/jLwCFE7u1F/n6Aiz04v+AkCurqL0FrrTtNBOOZKRJLvSA0zrehOKJ+TOFX8SRzL8qqsKIFq4PGUxBLExLJIB97R7CbpMo2KtenfcvKzpLSmzMA8YchLqWO/eOetXjuqkCTZbP7ylWpW/k+VJWqQ8AIxN0cjKKwMKRQKOeXxYV6Qtrc9RVRsqQyw7m2QnxYusnuH0r0Q5zW3VWMsY8gyb0cYA3qlRh1i3Evhjq4JQ75WrXl2CTbtFzDrrEN7fQcVkbW+yvaHp0Df29TIeD6jxjn+ALPwo/40nmaeSYyFmJ2UhU0h1pqRuwj5Tx/PuUHSH0f9x4Qt26d9HqJJeWGiz8U80JZ2Yxm+6z6Yt/isyyYkudYC4xLXVzHV9rg/aW8JLVioxO2NaH/jPZr/ycRbQME6Z5Jz71Mi1kA3mizM38nhTokZvsqgtQ+eQ2MaVira+Ahi2XjGYwu6BjWJ6kcG5dKHDnU9auxMlRtZVRfkhjHwkeTX4tQVrxJjaMDznf3nXJY3COI6PsHIHnS+O+nady3e8S+3ll3SZMNuAkXPZectQdnZcLBzn0LSOxqZtbwIQcB9ulddAzO7Mts4Gl2o09JZOdcxqbuUDy2NTnffX41XYSm8SIxVqmZWUv/jXIRE4Gls2dkFgH7Wi1HveEu4J1CGRAKwDo2nNRGXkjo2YWtt+5EaxFsYYld3A5ncuoJlLRaxj+ylLiRUQab/eaiM+GFk6kzyhscNJn3f7hW/kgjpftfg3wRmQJCK4CJZgomYmuFiiKGkYQKR5nZCO2Yc8iDhycMYCMvmD965BMll3fak4Cd8SlV72xTih5qWKzl9FvEIY+byTo7v1+2lHYyO7t4ULy+xAAFonZ8vIZMToGvyiQtVIfhl9MCayuKaJ0SbOuxAshrqhlnKpfqbkPIn/GfpyyAP2LEQ2O5KRciem5X7TBHmlcFxWXA0x8bfkxftSp7vKPvu7RScfXNQrHfVaMvG9mlzovscr53+1xsRflJDpd9y3m6eRt4wv1lb0eiZ7PnQu2a5OznGaZtu281dAHBfZarOJLdRhWYV34fxYBmcgOcWNW1rz3j+bJ1cZT8Gmtg+xh2hqrk4SadwBo41f5RBIxX7mmPRrReg9CbvDUkN8pSAiSonRm60iRG06gx2YNiVSjY9m8mxQvDI9iKM3J1Ll6XnNssV9td8uwQq/at52hAFWzyXqUhj3ecZNnlDfMikGihm0RWMNVQ3gfUGGGZzLAJ0p4Wks+9mj8i7jemu+qMixG8r86ehadLnyLrehtTTPTb7ULfNBnq6aszjxnQsGOqD/eEB97Bdb/o3H5R6DE4QDLRNUq/kpBkvaUkf7JJaoD5d3INQnkIvXj1sZN9Q7TYuKBBDfw3OE7+x+caYIeeUIuYauRk6M+8++Z9IoGrdSSxHOwhbRbBHMO+12cNORY5SFsLmSAKIAHWgvseGe0HCxxCWX3HQcvYUEw62PWGDp1IFzUXtosUnObcGVRMPkmk8VdXvZqg8rCykTzjVCQQSSTG4hX2GDctvoup66wu4BnAoJNKtvP/68D3HEHbtwncoUmVrojYaOIofMV9o3lgzbJ1E+NbzBu/PmyvooO+Z54qHvC8Qth8sHDHgealGoJxEwHvD24HhALvzJxXORPM6rydt8BxW5DeaI89Z8aJRV7YidjnJo2aVNwmKgdS4rJl4Dni3aGzq32U9lPAwvq9OBGz/sFDCnUOaB6OGdhuxW4++bi4g8w3SwwehyVmQCmPZQ+uP8Xa+KKOTgX7IeEhEjTMzSdTacGatLCRkmekxRZ7rif0XM40Cbn9DO+/MbujxARbF/FgvFKlO02CqHymMxBebCZbdpFXxZPXsceNPYob1QLu5v3am52xISMrjnUKXpnh0Cy1
jEoBBHIkP1eWoY9mRy3UxtCGGIpebWgk0msU9szFfKomTw5vM30N1CCxLns0wyx2gwn5l2nAF38IYLrWJV3KG6cPHSux5jkGBn6KCSFuS5CZScSdOLdSikNR22Rb91LvNsN4x3+cVrNr00KTFmoLWsLrBWbWG1Wbo5ZPH9zLrTSrxRwo22tocUTZ3Y1Adx2KHX+0sqbOeBVu2Ilea0nmsDhD6UdRM92u0ItmRA1tRPFvZPQIcRabs0SxMH57h7kqQ0W30nU7zVlmXMXEw4WP/+QZkwK69P29WjqNtbY3vz6DJ8vLrhBqdjs27mTmruAdTvNbhTGmY391O03xojAHxrQqK/Cg2B7/kqWbGeT5ZRCXx7eNa2tQ7MYRkBKZLpaEaEiST6OXvSFamg+Or/nsulhlaVzQYTryRJaNhPkbwKtb6YJwP1JBTOmzBUtJYYlc8nMrY3SWFN4ahb/o5f2lURQcpoGjvz3jCYoMha1mLpPPrSiVLu3Ec4VMElQmhjnZTUEXI/lYO5bi9llTyu2SxKveMRS87rQgGls/nx9xYsjn2Dvatt7msQoNwtl+P0CsfWdb9IqmeIW/FBbRWMWhvt6qwozAIhU5OlQG7uIMTnhOI68GwvoAK79iQPi79fJJUh0PgbvLS/arXHGOr9gZA+Nr7F5hh8RpjBgFS+2VwzBgZY+n2i9lb2S7XO52um+N+2o18aFbfHrqlF96VynwIcKmumG7iaVO/eTYra2ux+ZgNqgQ9r2c5AIvvzuUXdcggvNc1pToQy3ILmFAs1umIfhiCEi0SnTmV+u6MGSmqcL1QqlATApr1xzwvw7HHONGNChbKMQ4v1g+ZrNDXCLlniN2LosazGWWjWLbrHHR1Y7hWGBN967W0zmaZoRLDYZxLVrkqjMnvbNnQl3lZ0TuydPigkrxAFMHbUrqNQAQBcXCpFyKeAkZDUaUxlNU6Qh06DbNyfoAraRmKqeMtU4DjOAB4PmkNSqs38l+m/FyE6s8C9+T8ZyykFctMkvvdmJk4sA+pzSBigPhNYXMNBS5LALiP+Ric8IgMsuS+m12XRA2vOfHqUA45dFzVTCEIv0F2dwF8YFkFG7X2SgHuvInN5OcHafRaIvFOrbFnCa5InkpmTXcTL20ymQcUo+O29rZdZfMrYj1XdhQJsWjnW5Xf+lUwYuMiv+Nx4uIMEs8xh/cZALRD3+JuWX8c+XTd2PE+GISxBNxnaaUYTQ/1oCqHUcnSh9X9+ujJ/5+EWz3RmGkHUc2LUflvU/DkLntp7hTqsrN0HHOsZxPp4CFpyRjbIkhno7bVFOPGPVC5YjB06D/+Pj5KqDSWu7vQw8lgKLqDoW7ZkL6uZEeHlnxARdVOmm7VSm8kpHtg+xZrwLjRRVC/v1cPGCVA7y3ZLmMGkzmfPbCtzDxBRSoTbAeEcXJi2YX33sEaH/oTn+V3WBVKoTdplGr2Vz2cOUlPZsVpd+ha7kfaZ4qEwYedn3RiIv+Xosf9cc3OYkoC9o0M5SYcExAyKsxB2EzP3Xc+THZPbQcNDzqAhgfyB5ZesrUc+h+kOe8uQ0GRefS5YqXM/oSZJrChYmJs9c6fkUeuyT1sXG7bbEkrLrvcV8xsflhLOT43iYXJBAJzSjf8zyKCHU5AdGQZqXoqQndbyo2Z4CFn0BxZjf5syVin4HeIZ95Xv9eP32wDJQgPDfcaSwHHRvY1Rl/i/nSLYvqw/0/eculd0KmusR14844mCgp5aPmDJWTI2AsZpt62SrkQ5W52w4H9wd1Ql0XIBqPNY4FoKSf09aUeUVwPlPMDVhapo6V5Jrj0cjWBrso8vWqRoT/pkWrMNAWYFNTNLoSV4XLdyniZCn2I/U9AnRDq5vDdvx+Mx7+4dpxG4bJz08gzX4FwhULlfFu4gOl6SKS/pOLabzw7OebLAGSRiR6wm3ornNzlnBfXS0JdIqXZfJSczEVQUKhSr0xk7KEhtR8OAaKXZcyWZ21kQAJ7fCQ3QAIN5cXpU5trN8psQr3GfI4O0fsgehcytMz5E7s0DN9KI7a1+eE9zPe9/jzR2clYpRXLpi8gOQ8UE8QXZtzvrKNONNc5o8YUFIswWFBppjH80BNb/Fl+ole19CLG8qlkywiVD1sAEMqeGt5htUXqjvJYnDjIrQkI6mq0YMP920ZvNsdZ8hEZjTxUBwlKug+pSzCIq8ufFPqGwTGZa1RwVa2a3m5azirf5/2Fg38JtYoJ4jQ19s0p8DM7IIymPY9JY67zKdS1h2t0cR6l/1KtiAfkiiuABthrycJ5F1FqLquX41sFjE0vM0cdrhym0kzPx0GN+NbczqYhzK9mKC73v+xv49g5UdBzDlbSmhxWmOEWUqQWhWBM+2Q+cLEINS1E2BDqhsTpdebAk/arSMhTTzXeDCsOK4mbjB53pPRlMMjYH5hCrVM8SvmBiFyIPHmhLsQkyFc/7aSEiDHBGbqXSS3P62MfCAZ1fUEfiPf74sT8d0QUvv2GNoccvhMEhxF1Q5HpFbLw1dcx75nqUN4Fjz7Mbc8HJ/uun47yN7xw9OyIhLziY4PwbgoVB0BCgBAakTNSE/+F1chXB0ffuOU/bfMBNgDt/ZK5u1ljJbPTgcXwu4UFKLiPAmcy/O6GKabH+QakV26Aq9INhxxBFy9PTAGID5FVANr2CnTh2RiyNoYwe5ji1z4zgs6oqq0MeGxTbVkdfFkwIVeG3pgk2MWBeUtgsT3Ts5qXyeQJXoE+ANon6ZJknPeX/aCfBe+sXBMcdZE2rEcujzrfIg3KO6qEPLr2/XVKq1pSmcJuqQfk9ScwRpi2uBwqBikqVaMfEm/9DT4tMHsESHlmDvy28ZW/kOZr4HHAiVgQYRX/8jCvGmOqWGRms6+qnZwzLM/imEzO2GrTjtV3bRQ6gduHC2JhInadq6W+jH9h9Dai/FpOm+bIwgzuC9D6SIh3p8xuw/gQFzDad/LrQtKbu2bx58BxCraCX8IMwwVzzD0UwX4m7qBx2CPNQR9G1FJakuvxzDxNGNHHB04iTAffId8x1lslYAOV0Qy3NkaOw3kjfaEDx80B93/kb7gY9YxnKac8Y9Tb7dgcVGYlvTniNhNNCUJc0+QHtpeZSl8kkbFD/yA5XKaXr0w40kRXVi7XhbiRllSWLu5IUkXR1WvtSt6Ihr63WSoVYqD9wbVW/BBtMfB9fEnryMqYnOrTeqqOsjOD5e0DjUWVctvc4Zhb5D/UHrDk2MD6dcOiI+6VHK9HsjbKACsymxwps6+S7Qa3eQ94HpymBq0Iy8VuwT928AgNLiF6G2wMRRY9pwIgBDf3Qdt1uN38zMe34HmvoWlxDOr1cBESOAFZKETdXj0YKQ7NdPtApYTDR+AsctLRBlWgmi+Qrkjuc53JxoS6eitF9vUwsJBpM7g1fzNvUpuJIJV12uzU7PHwTUoId56TqIjktNrprT9u7oIBpLAle65hsVZlKsJvzWgkx9CguX4Ix1FAFjovPWcZvhZiMj7vBOoI5NHEGsPc+SBUF8Nadw+D/aK2OUmPPm76s6RCM+brB5G9XaocHTFMhLReSFJaAr5roBNLJsNU8Gbr/UOPV9GN11bSeRuRHuB7OuS6bFVxyCAci4/jcOCBMg4TWrbieWypUe74hah2y2NQwFyKp/jejbZMAmRN3f7xExDpk2vf/seUL+lKN67DRdW2o0cANVeQq8JjEgKumNA3RnL97/2s8TWBVMI0+TWR28KgDVVIQveMu4XwZ60Rg3zRO3uGrtcEHxe5gp5eYtkAcT1mEr/JqtDAw1YHNEd2wBdFYreMJVw+VvcR2UnHYy30xpFzbXFThaVF7Oe62x0By+Qb7wWysUxdx/AM0C1cDTZaghKM17A6sWQL4fd5/iRexcEfvxzlAMdOGocEBfpH0zyIPVWM/pRDFg4s5UIrHZIBwzu17MpMGuCaZravaN54chWZgH+tY6KvfP1i9dNNmtYAPIKRR3vZg/9ry66KT2w3TwsAekt+Uws094lUWrUJ3yRkEqu+N8dXrraWX9Xaw+qhhfb9UG1Nu4ZSrGzITPz8s+aYShvvKSxB900cNxEhVFvcQWza56EmyCkMVWyDke536ki
qd2gs1I/UlI7cbBkIeE5CHQIb7vvgaKInjCUb9t5eJ786uOuP2F6esUN9eew+FC7sW9ohGPtkss2Mk0bvudZH/cEI8NDsLMnPKapqn758l1AYb5qTZ2hNhvdO6c8HMF0sfY/1dVkUvbRy+yB13NONv4nrUjmP1NZ6cgvTXkxyOW7UiNK6Bk5CLIr7Dnw4qqMTBFhxyUwUs2nJagfZhquP2mOkZYOqQ/zY6MtNXkhtoLECeiEnR7xpnt1CJIAmKh28ThmTDiIzY3baVfRxgjlXPRuVFwOJV487P/wJyZp8vsKqEHBce27OQzWXhgNrGyWM5Xt021Fdrke5ND7fo7EObjmGqlfLlAwhbT1kbGfSMGxQ+Kz6C7Fb3TyJCqZyMNuwefZF9079tXN2Ct1zIqamxVhdqLb+Cc72a0p//ZVSZuQ+roaSEBSWMiJRcjvRdYNVmSfxnlEQZJNCK1V+4PB1v3Mtit0OQFGvaz19Tgy70Q+owmnPDZ2PphQebVTl66dQdJzhWM3g2iLEAAZnSZdUIq+Uj2hln2UUEc4nhc2mUXL4gDdUbPJdfViluod0LtZ6esDnWVNFQ3h/cBl4EMFBvNdrF6CtH/+PQ99nPPFBd3RmWqGVptdsnJlYICBMe/NBFDUJ8m4tmbf9uObNHgdHzzDqvlIcyrgBN4QhtiVzp+FY2Y2gAw2oQ5CiaY2YkV9Y281aoP6RCwbWymqRZwaXe1iwBy2XSl9n6jPgyiHRmv3Lp803YCkjZdWSAucAaXjeKbG5CSPWAKHQ9f9HyWCK4ztMjYHKDtrDDnszjcLwvOo8jNHsgF/XMXvAW5wjOOu+Rpd+rlUimcmfbOwExafJpEpBNFsyjl1L1pOFcyPfU8QZpwptwzugjqs3ckIloslnHhVf5WF6pyHwVMpD4O86BP+ZBgHL2kNtNG4nVDT91lFd32b4WqtpkEdeeAoYX6MyZn/EsgZS/rVcrgXmfydHwa6ezG5OvBTga9r+VagzoYGxNBmrDGPeKup1zubxd+6EnNiUOiYVaztVKViXKX8Ll49WyHNkVlrcUt8C/+2RQ5NUFqhJY+dnHp2VrDDrKiVKlMcNMZ3PyKld1YjQQ23jDNfi0/Ic5OHRVJxFXsnXR0coAhd0vBxj+frDjvsiNrhJb7cvOCGeVH+mvVNEH1F95iH7tecEfEGXdWXKcR+RbZ0U5jvAIRr8JWBwdDYDS5NTLlqbCQbWSp2hWfikkVs6G4yL7FGcvn7lat8ZKG23oYdGkhf/MoVHO4AJTncOd+wZ9nYK1DOWxs46gmaCYIKiFO8Be8Kr/VV+4hZ/EyCPphulpk4yCaiRh30v530ueAzx25qlf50sVXYqNpDkzwVOT0G3T8GpP5so+i14mbOKfU6rtxB0tfbHVzgaIxAFlTSsM15qKjJ0YkuFwcAS24ZLUyzI4UyLm5RQpo07oIdKhSP1AlTb5E8Epvz4qqYFJe2QB47ZGBnlgvUfA4xh8SBYJT6YY/lg058kI7fNBfPAoCHugmY4lJ6Hfog9bQ/Pn+aIcK8P7XYeB39CskUAr6kJUdpiOVwqiiR1lA0xSfe5EF/vByqlDuN29CJ/971W0ObxzJF6tVv/Nz1iyanPUXv0EpWRoKA1xas0Sii/rXsS1z+8TxLjHtPu4lEPo9yj/PkH7Sj3CEEdYVPieVd1r98meQV+2VkWdP0bpq+Pq5Pvn34RIsxmqBJQ/U9uQqBk6uss2kziv9bk8n6gBEL0p8x8JJYh/qgFlKcnBH5wDNpXZQxzEKaByw6dV5vq4z+vUMWbHl94fIWlljq3kRwUC7xuG0RKe1uDk4+oq/D5C3qLIG97+raLujL6Z7xVxh1S/LRWv0cADgj8JUI25UIW7NEYq8U6FPu37wsO+RdrVLbXsjWr01uMoQS9ViN2uIhVJIw6FtnwSHirhmiByvTGIOv4PeI33IDWfbmiP8GHuZbFHzSO7+Q5Lwi1O43G5wmAAEbdgzX2sTd06SAHq0hKtEVG7UB0E7udP54pCe9zFTgt8i512Ub/1neVSAK/9iWzR43GgdK0I5RSLZrADb20YZbVxz2I8UwjPkJOl5KZ0jTSaF5tMGLZ1B2oYVgM9UPkKvZEOAiRXgJmiGfq63tUBjvjUdMT+F6dUBErJQ5YCH8HRkcSqdopGmcmcBrsk/FoEHHcLpAgtpM53+qlZKi/FWogX2NhSjrlVjkNqqIGXl57nP+0jjdoVCZkxsuBUrTJwufuePLNn6J+R+MEpqgrF3vpBWBShjBGEB+qJlZmrKCOCIE9My1ccxDgCQ152p/mA3U4AqlpZAZsze1GFN3R75eJfyYtTpmgtOvApri/upbyrA0QEi6/coOZKHrOfKID2YXDlAYx9Z0w/J/G+h2GgvQhy4EEutBllfcdg/w8iwn/grlenrxA3plAmdfh0wTtfaJy977n1rJEqxC6sw3bM3h+v9e8pS+0LJkyDTAQfYppW5fY+nGpiiVoaLhDv4XSRH5AC8LnmveO4ZZOATk4mJT/bnhvPDdPERaRGT5GNdRRj2Qb0oQYJOhYQurZ5gHDQMOn7REfjYgID4vJUokghZSRAcWasZ6PitySQhnPyUHXqtkTCJ3ZVMP/Fdl73bhSUwFpLBvsabUGlNpftnGkg920gKR7kkNxuPVbkJmRLs3o5LFBsvW8X43D9ykRqYPLdyJE8yMS2gYkjYNtyWfdhMFufqVMFoTXSMOgaJ4N93XpXNC9J4LtPQGKp8Ethk6iKnd88YOlrQ7hcPiQqxyJG6qu+KXSDJLMG3G9onWA9SFVVBNGuWVieInP/16vmHao6UoXH/28R2tea3mFgCWYIOcxLOHprnWbOf4QWBNQsxqVBAVzyhBTv4W2FFGne1TtjGzPsjZ3gjfpMyivKBUszTodd4t5ThuffgQCcGgJ8CFFNS/Y9l/FhbtoTCN6haXju8ZW1JsBgK9fk/Ftu3YVE/Ad7kZcrwC00LbkAkwuLwMILvxptIMMJPlr7PVnlqcWRo1c5ZAPXEDOnu05humUodTYOF6PadG8HHYRcwRKg/4D69mrg31IBDwsl9TVdAlmGRqrEBEyLQMOUCiiAo+ww1fqWnM/e1uKfKQmRr98ULhXKNJd7wNmMOFt/4jEr08d77RzZdbmi160K24WMUN6qznRzgeZ3uznNswpTjfCpI9ctU7ql6HrPqJsUCtOsdndJely9LKRTFd/m9R+TmteC25yenQCZa3bQnbHaVN91AMWksR4UhaEET4G0vA+OloCFLTHcN1iHsQeiEPsYsCfpTBRfsRDY8yEs/lewg7sCWl4fpZrMn964MSX5xQ5Thn6CDrBVurTuaRaXDHSfOvG6tNRWMHzp8FEFPYIrXdNDUbZdpFayZyazNsqXkT8Vkmu8ChWqZPbWPpQ7RP3iZsOgaor9COm8CY7+098c46TJR+vor4jJo9trqkVa1nEcVG6/6HSFm6H3uu3X1SwHh1RBtBdVdXvck4vdMcvFWt1EQK5SUwzQjhGMpLfXIa0EUb7l74DOhU6GzmwbnfQLiVNTiVr2NlVg5j9cJ4vAuC8VupJXzi4CtsYuOoX7VBrGUN0mlF2tk+3hKTDDbrJIY2/20fp0cWnjpRo7nZqq42sTBhBj/P8GYwEGwOz5J2XCJQHkiMx/jcBhjDCy7pPtJSiBfsxpKSpxyuGtQTtinWA2+/kYmRuz8tOsfUEltGh3Y7oHy+/LpvvJ+BZNB8o1f/f0FFrF87Qhgm9x5PZOFkWyDw093zxUGTb5z+h0byJXS3hjJWoEAdKlAdn8kxkrVT36TYRZHRiuzS2zVvC7KdW/AurEMsfVWsle4KOIpi1J1S1aHx8v6RhxRw3pL4DHbGce8EhtO8vRlbOc0yUWznvM6xzDFi/j8iBikWEGTrMYJEct8097H3/ggaG2JiZ48w4x5PvfEdRtn+e7x7A7vLXRsQRMu/eisUBR2J9VeGd2dfY0iv4M7OKQHA5EFhjggMFjAqz6YwihQZuxJiXqjMHGauA+uKuBulSbKWnU9HCUh3OzAWpiV52JG9yJS3b8uXVDoZDc2MOEtN/zc9Zm57WDk4U/rWNVxxt+PFTaGLdwgTeYBC
NGsUpjiNPT5vXgAJermMFwIfxslk5YS/6uQUsjXcyxpBNLc2bDnBMqRM4dK/tnOaSAph1iycfrT4F7bTH0KoM6yHiSVEFOQAI3J9C91Kx7NmxNLJc6Y1IRGjcMJFalJL0QcKrAIqXp4Q5oszuW5xtRFiBdpDXm2vyCqS7EZSlzl0Eplvdg20a+Kx9JfSwbrHRUEJXuoHwnpVZuiqQpJTN3BsavpJtu0ORIGpR9i7IV6QNabIIzsoxoORW7xHcCHsbTcd4sWx3q2yBqcGm0EHDTwd2U4xmeQB1UQ03MzVw24q8o4aibQ2ynevCG2+ikifitHGw5HwGAXFisstRCHpa7KU+o84lYibOjDr+2lt4idS806k0p17kHJ+tigOJ06TGx1JGBPCE7EmureFTW62wnzck6ulIp0pXXb5onPOWBYWJXa871iHobQLK/tNYT+NmAZu/zfbPwgEqYUAEdkLfAtESOA55n/9vboVA8xnN8FcZL2y39z0Yua/Yaz2JYlUQFHKI3qFNWMIdL7fYH/eDScgzlTm9XFk2imID80nYBNUorfXk/W+GRgtGzrWWDgX2CBjs5SUhFYkv25NSw+hgET2Jlf9B8nZf7QWZpQVtJ85DlJgGUS+l+NXgaiBsi34eIm3rDhrx9MaNg955B3PLiatcRZSi5L04WlCQ9EDMZa5IqMIbOaKHvnWoTraaiOoGbBA1y+mLGFwj9D0Uvey0IJREqRwe6XQiigu3u6JQaVXFFak8HdFtjFlp6pYYTqqs+8NoysyX4UjaJi6AhhmVAhjkPwEzN9ooIPXnPpzhGyFBiiWkzY2Mx6dVOK4zIJQx4OEqMDt9QwILnNbqTIaY9f28c3houBwB6XKpsd9I39R/xlm18NnTJsqpig0uLoFFBSYFPiLZRiOsX7ftAwHfKus3QFa9mFyRQqrfdTGlRDrlxf8g+nAQorqxZZOnNhUzcRJMybRy5pUlxWa0K74HY4BF/EkKTIzmpSyvuaITzvtav3PRoY9FCjI5ZurQqL8258qDjq0KX73xOGFMOhRn29Bc3V1h9eThH3xjAZh2iGRi+JmA0vVPi4zNO26L6wCirBxHgutyrlmN4MasfiJiqIk2T753y3LSXjcJcja6ekCQpRAFp/zz/ijEKVFGVosq22vcqzdKUefru1dQvkSxnL8sa7IufTOeFZofc4SLEDS2ECy8ZMRENamg3+/nk8mzZqQlw4mVNM9m2MddwAxB4tkIE6gVKkb2DjIoBSaes+JgevAZ8Sd3t/GF9Ji7Mv0/JKWHiRBFWeqnPPZaxpMRho+15jEMykw96zwBBGrFDgZpxslm5AI8C239/w+DJUE9PDpDiQ3z/1JSZwD6UUPKJpUPBWNkZ+QXruREy0XV39yV49v5A839HejWeZbTRvSdzjJh8OzOoxEv6BTCB3QssztACcReQ2vaGCL8cYjPUf1h6Y9451BoMp3gkp6sXN+2WuxhKIQB6B/JREjGP15ihbcwMAP4/HvvMpabWlk3hNYxZy6yK0h2bqYOGhabPnkvAP75/gWBBFuiMFNobZNKoa+2XhmYbJpLGWwj5YICCk/yraH/gLDholSd9lvNfAkzeyphzD0TMal+1OMkj4xYN0KZrIMweIT5LtBf3aUXp3L9gVw0NZyhgiP4RhyyRWch0alny9+Izi70udXBgIYqSer4INg/9lPWHr9t7gPX03NXaOlFL8EdUhl6WI+H0iZ0iPmCDcHdpuasTwOwK5IwYrLiBD6Yo+qQ71rFSDk0ODM5obX12mxJ7ALh/0PM2fceyZLPw7aKIpcv7HY+MaDbH6TK3D8h68/E6U/cVT0pFCwmCZ/rdYMIynhq3rdaQMACrDALuSACQYM/ISNXHFPmbgtaKUovh0WqgYdANQ5rw7htvLLPVBcvkJ0j11fxVDnqTPG1tDZ5KB4F26vigwYVEIqGSrgF/NcVQTaHS8abC/7AVNI09lqoczfe24pPzZrPdLbtdOuPQzvKWuB2lcuKX/VnS2R/zsybuG2oXy51Fr/msj/6nRyTwV7zYVZ/pK+R4Zx8BTz8V2AuUUI4LxRQDMGqDH10/1GUD4rYZaInRSPD9dltUte/meqgSHNJyK8awP/d+hxp2//HI53RXghdhN/79welsSDVkFKY8Mnpx0Gu6AH9XR+ylCxEoCHMrI3pvtKIrd44bg3yXCHujKMdU0avpVwZL9GqPoH4KqvL5aG+2COkzkJOI8rtn9OfkGCyLiVEz6vhGZl9Xsch8TbSLd84OWaEeQ/CZpNvQ1TCWNw+hb3bqxwdMAY7RuofekEXtHTJ0P8Z/892nkAuKovA/iD84t5bzdEJX+uWR3fgfQo6wJn09z9G4ORX5JVTN/uPLytR7PFTOTjRgKSE3pw96S7WwCvJ5CLmwhI8NSFXQcLo6uAQfRGx2a7f4AJX52nKpZHNEY/i8xwqYVseEa8QuGbM0gDn1RpcgAR2SGnnazZjaPoQTWHFlC0qLGiWJiqGwyqx02CjktChaFJxv3mdq/y6WsT/Hz0RX+4LeOcTepkJ6VcAAkIEPh3ekIAeTWdNVWM8BMT9+vzBvPMKKRzVXa5aLi5LmEd9jk+3suqZwT1EdTuPdFzlA2kUg1q3c6fhGUvDY3BEOPwF7KlL4q9YvfZkqs583Xh17dIFJFs3tBdCS7dic1YNSNS22fGqVJwYayIaZ7AgBCYIbltoecKVuHKqvKgFv13n49BxpxxKNE0rO40TSwVL6n3JAJGIFdSWd9vB8ro8SmAyNErMIYptu+AGyXgqiu121rQjiDn4yF/n6/XzkYyupMobqdu5wXZo5sHtoNNMuiU1DUdlJRxPMsxKz0rYav/Nu8FzJhY3PXq5o74zwHDF76FhOhX6yTmHTtAjspYafREASO6bQcTEBKz4QLh6j1chny527DaGkBCGPw0HJj6f7Hc44FXRikMvFrrO7rGFquVQWmCll+rcexrC1RBTeOx0bgc2pI0UYK0rmqIE6plNsqbimrQ4TXIU5IQzjJ3ZxZ7DOjLcH21B2SLr3fP3zwo1PjtQNg24VboSRuae/E1dcwyCBUAvxJoxyMZmsP9tSl3Yu1m9P+YgHiXpRTQ28SwSPGrJvis3Iwh71jz6D84nXzaxbXLYvupc47eL5Hob8QZLQnNaD4kiQUjhhghDX1aWaYu6VLKzfmIrDt8hXRV90ITCIouaT6Oleyg9/DNVXCQ9OqEWcqtZQdzS61g3vEtZ51owpaEr2tQEqC7E86ych67/CVNgHV0pbJv8PnEjdvYqor0vuB9fSyYEds1MeBg3KSlPtbkrx6PgABLKVOw1QQ+qs44gM9CLWQ4819WRsYUkHqBCJiSJasUxMoOE7LvTyz9FnTVN0fbOqCNbLFF99xX7Swspg4oYxOmREPYJM0FO4+WU6RfuDTbCS/jdgXu4qFYEJnzRpBefKJB4Wy8bPGp2ED4WBfG8HVtfCtJd4e8vAV8cQh3xcJ0PFBBaSKZO2aUgMmHEGqLKCNgXuEzk7IWdUA5eAplayN+QDgNlwVqzIVTr5gPiIGB4GMWYJ0HuBzP5HkVtZfw8eiHNGWrPn0kdcZCMRrmxGVH5Uer0PRR3EOEbpUp4bXQ3y/vaBlD/LdytVa9N7ySl29ZOKl+xqmqd5aQ6PX8kENCUUQG+NsMciX8DL0xjt4IMKKOwG7X6dItpibB8PoDRDAKN7zArRkXlQmtF4aF84BpXw/V+PfQJ1cwSoBG90ZRndFfLzGhPCfKI1rOnJ55wOjCgecFDXuZK2wxt/3ihl2Q+MUijBe22sribihoSyAruc1Y4EpPcdSVIcvNoL1LvTg3xttO6PJpEsktOoA3aT1tCAiMIu2jg9FPSmLrt/a2ttn7RvZT3qYqauyM6R4MI4jMvHLAUeXyJV56Y7oH7CjZXb1gNB2ha+YN6lf2dYzQBiF/SRSgBUa7ABMif/XZSWt4lsf1oCq7hhFCaKoWuP4bZ66PgOFBthfIl8tGTAuEoTrAn4vSv2fuxMZq4WQ8fACln72VPtEbH3lOO3UNwZH6WqQzGluli3MhaCzUt1hB9Xdb9ACdIjCeg7To49//uSQ/lyR63YmWuUf7508K
BVnIX0yBLNSi0cX2U2JnUEMiKqczDFf24svvqBMGnflRbwScZHbEknIGUWTOOngeQ9v1A3sTsAwnhg/h+fXgHkHlFCCRLoZG+krz5U0sRgPWPPpwnjlF4wOnH0nK6VYdAPL0hEJ9w9waAIU9xIrAIl+m8M+KoPcZbXSXdzT1CO7Zt2ZwLlKiQjN1U4+jr2Y/JbWMHIrZDJpMShIi2oVzW2b7m3xTuZchsqlaO9GQxwgQQznZvUryCgBgOymkm7RejKXLgqKuAOAAPDTSewDog9wHc/+NqRab7DxDXCz12Tc/ViuqV34ckQlxafjIdWmO278EA7OcGyf30VPURiF2YqNBVgOmVp6jRZtZt7Dfl3feY6zTiiElN1xScaxmcEiWqi0iCRjTVr4HU3jrtZFKV8ES4zM1NWUhQJxqkEjcfsYPNzLhpfQgjOcuyEc5OdDTeRjekYllIgD4R5noY9gajX8qe6KlCwZkI4p17FWVoqlE+kWIt7XsXosTwXbPa6F+X8mxfR9zkmWDJYCuzswmJkl8QNmRuWzgC3snFBT+LG2cRuBGlfD8AyMGKUgbzp8eSW9dzu/b1k/Wc67TLkHsbBh7Xfemp9o0QSL2Hyz6fpWk8sZ5wGkTcZWB1qqYFEXQ4GWq4PV1J+C5bd1kU6ZiHbwqKJzBFG9O0FmDcBN4lKcDFrov2wiVdmpoNsdCBY6JslDLzMsDkeDDwu7acKz6+UHBcUuMJvZqWNVIfbJBT63jrMA4YdzBqePR2PwDPVvgxISg/NpoVEoVfTGryDfkN88PH0RTBb6t2oYnhl+bEkmYkxfHOQMl9ut93W5T4mC6PWT9dbUZ9tcOLt5rDIa7ewIexfke/hhPoRGT9FTI/IjqYxsZ/B64OVvXqnM9uML6ePSKaHuRsqebEZVWUwH0+ZgTwxl5wjESzcKWu30vw1UA0Oy+IfUQRKIaxbYfMQ/wxhigPTZsAdziRniFQP+ISpfkuv3OB9i76rybt4s3vV++W11Amf6RjSApnli+kDfnQrZt9S84zsmdrVx0rAHpNksZtvi8fE6A+Mo+vj9gJNmtQUNPCi6FL6u+PnLVhTja77HD1QffKYYp9L95h0zWVpjf5gxSFFzbYfmFI84Y4IHEsuAvF+nA1k0SjW24Dv9GkDXqASLJC/7jbfNCE2liexmmr27LniIJhAa3xQ1lt0W6+5S70LHEQNCUf7qxj2FUBOwnGVlN4AyQ8APFuFfHOTXrEC7aYjJqKhbfCi7I3gJZ+9M7ENOMpceW/t+8XUeDlTjSyAw5nMO5UQ4KjszjOQpfPPorKc2I4UD2iiDmrdq7AyhXuG3rqg6su038jJs+m2SSe01nohzoiObb9VlCr7mx7znuQDpLYfezO58ficTpg+mlKDFe5cLWUZ/B48xKTdFwd6/gZT0jB2fT2wFaCd8Nulaiv6UiWZZv05T6fnVvSFyBHL22EyX5grxjf4TUpDDA9v7Gg8w9XKf7yvBmgip/iWb75tTJ8Bo9sNKhHbP9s2BmZAprO3f1pJRkoTYgQTOlzTzONrDtxUCBrF4tzxEj5gFiL7oYxqBXn6/SoWErcmN50qWDAZaBJm9ko3RcIo7UUzeKNlFIp1YDpG+EhX80SgKDMICWVFEe5rnS0W+qfnzIo7CXNQALmDcC2HA0idAtrE395MmfOQieGwq/2YZ7TS5ih6gUuaLf6EJp/kPwe3rsfiJbADNLUOjfdgaKvKRjfzIxTQO+YYpXkLnai3/zIdQ+h3r5gvJev7V4VN8ewhPxf6ozh0zcd3f9LCClDFtJUbMOqsfpZc3LlYoQC0SOVWB+hiOn1BMR4CpVrgIf4U2seqFnrnypn0hLBe03Nv7quV2t+RYO/CLgLZ/wQXIWkIGwhcIfmB1c9sHucd9om8Ehk3NqMyfUHIqe7ZKrcjbv+ZzmIGHYDi1fLAh9XTrjJtWwIKD3uKIovi4Wq7SvpCr3pH66QId2hTXqurhOJKgjWOCsw7uS7M0X7apTz1NOT++B5H9ZSFMs3Sy8VynOvTNI6STKta1M9K+szOKfKZYZg+qvOCICibZImI4qYM8CQUO1lHoEiTNYGT3+FLrE+IwA/D7qxO/fxJq+emA8jJE1sBZplHoISUIkfsyUf9shWSTpf95NPjeV6BAqWWWJXeCzztjMOeHSsMSM1l3sFEzupayrqJJkczQXiHRRH6gc/140O5vtL/Mlb2yfZXzGVDoFNxXQCj74E5oshzX3oTbZIhr07mrlMJaV5mNOTLVoV9RbTde6k/CpStWnFsuwWvB4bxodgv9+8M3encooxww0+vAy3AqmPUQC6jiQC5SXJi2EMx0CiS9BhAC1hYEh6Ynu0VMkzBOj5EP77RsB20SgjgkmWiEAgJ9r7okCHzJ9YHLVnSDGcWryabCEUrwFqO3B1RTmahIi4gjEM59NnGnq66KOeVGjbP/rP21VqPDq+aO5ak1lwxalPylsN7gOduvQ3p3iEmZtVjyyx3LYty/aqsEJgm9AuWcYo+yCH//PEm5muxr5gZ8crwU07QlMhSM1q5lVD/vJEvrVx5nu88EkwdI7WuivVO9Yi3D90GLetPNBKc966q4M6QmdKIXmKGQUxt8Wb+FVepi2JxYsq4d5FM5t3rw5TXzvewv/odIDy6BZCJqnWQ9iBkO1d99C5vrOM/PJDhT3KMmNYyu/GMV7DVgLUDt+tYO3SeYuxutNRAWUs/FSsqFOHGnrVuKuQuKP4VBWnCt7g4aXcvKx6m/VGqKOOYmJ12HVLP4LCvD/+8Sp2tRHiUKBvjWJsYox8ieUAIcmsIr0DeSre9azlh76Ly+hFqySiI7kIp1Op7u0SwYwGA6GBals4bZCj8ilIqp5Zc0DM3Is4t916GGFFIVnqY6m2uP2EB2cZWsbODEXvQnOMK56n4bc9TLLML8ieUNQQ/XCUhXvlKaSZx1Pp8ZxyYDv9oMHjZyJ0auAilw+6n1GGg+7IAb/1b4Q2i6aPYf6gzm45A1wzjlzZUKkNkFlqDraH/wxRDvd3cCmc7rxsYMm88j59S1hJ3dYlRbaXXESNC2zm0WzjJD0ONyP2P54HKA0HojK3VhTbJ7oXEyXDNcMgebgb+oI8lM3w7Uyskm/drcwOVZvrfl4u0a9Ysv30WDng3EIbXzEy92WadEefSaHD93uCxAZk16SdafVhozZxjz8Plo+n4ZXnZql4FpV0PUHI5BiPcCL9AjkfIWpe6m50/4qzTdOHL/R/P71kBX552iWE4xpqJVg/aTYubeC66n9YZa0yxYhymY3BX6lvtiQqEPbnveAseVzK0klPgKp/bfYT8j6W5q06V4TVX2u9KcZERJaYnlZTjjiz6m3cGHbAgHUTnAshkhMVmKyd3woAHbroz3TLxZZwS3G7EXIdyXVIu6RHZOeZCPdx0S+00zVYGKDMQeQJVsg7RPy23+1lQLjjNK1aH4Sf/ouOrDd86GuySJbQhudzXV2BWqemMo4NV3ei9kNgr7NOBKuYIzjctYsm+1gh8GCBhyQAqBxJXO0fR+AUDxQqP7VuZCSplHVMDZl+29N+3Dbr20/30Zii5oyTFD1Lm/QG5/rXato6EYbz/IiuVaCmOQxHPj4dTgI15h4rVZ57ztlvMhRbgLr+kRJOl/MDokBJj25xTTsNajh0YcrB1GJJtoLnYjLNXb49bZFeilpVaOJeLLKKiaQyXPha5iGY2cm6zDgf2FfIMB/bYX/Cr04MjoNPJ09hBwt3hEl7UWGa67av2vti+UPTLkwWgmHmAcYErnPXH3cjs6KeFdbshoulWYcUrabecC1dfK+96USckDFgDDQf9iA+e1gc+OKm7mPWiQZTNMABB4EuwQZruhbeWIPmGzCfVH5qnQxyh865rdilGwktwvO2Omgp8FtCsySvDKzV3a7iirAgPE8ulHRwTmPy+xLMUs6q2YldHonxR4Uk1kvsfLyCFSh4KhGCEjs8W2TMflYKWd3BeDs/8iDx2wTkoxqksdxkMIpeAYlSaaaUAj5sZL3Gr8tSoNtT+0OBi5R3tMglEIw9tXw+u4GKJuvvURmf/BsAJgNgqBogMmuI/q0z/SL+3wgxklbL8pQNySR
gPvObtS2QHBwrgIz1cvcjfjQBJ7AXLTZltWWjm5MOaJLmEUV7HjQ0mRLAPRas8/Ljy5fjdoA+Y5AF0x9FXHWecKgW0ZUwemrm3xl0nHugTo20BJy228M2BeycAnqR+nMgBDlHGnYuIFDKHLP7giyiFEf/3eCE7Ym2B/KAyTW6u7BeIMZ2ci+TeyV92ispugwW9FYcYSTmTWq874iNxCay1sDbDaQmwRjB4k1WfNEbuYfsj3BGo5ZWgP1AtWXrbLvmcje1FUy/cOzyUIoBsAG1A79EPZmrSBz3ZsbzBZLHGjaVj5dkbTWcMUqGJir1JUgs983vBQM1O4qIJ/fkiDX/224box0YjrxjvgESRe6oSkYT7xvcORM9ZCxn/5OYzXcKlTtc3AJ33zYeKDDmuerEttsELNt+3NQaTZbFPPOOGIF1hLSRil5z03QMvvUbV/Y1YULYQG2NSe3VWNiUIX/FG96+2Og3SdMYTmr0b3WSDgYvYKU8hEH+MiQiCAXULlE6hKNJoETA/Kh3doM3WjFSYs9tWpVzSjlsO3WyfP2E2+qdKLawgDHnGjpxjoypErRuN21lD5qMcLacVMAsUel/uMVwujFMCjSEdZe2EEc2XODlFK3iWezdpqaLJjSJvRV2asTwu8yK75NGJKKcRfBU0e3MT0Rrz+pk2xGmaWt/4SRIrhDv69g6p+z0AAl49vzgwJIy0VCf/cl+9IpUYcM4cO6gJwOcYeVNAdJXu/Pay0IxHiOjxmCXrUf4AmOrBIa7ojAdwVQkB3E/ILakCu/6hiyeFbJaS+9WXDpsBmBjpsiI5qDYWdsdHb/apQdT/tpRZ5Kbtd2BcKEGChNbf08VCCfMettyUFHKhrWP4RmXU9MSgeMhO77kleAkIbHBVNpGEnnTUojyV+mYuu4OFXs+0IeDP66+B17jGmHQj43Oho4KmD26x1xYFMqoC1IG7Ei9kngwE0N1mmPBluDAPK6groTkhY7e2DM4rk8vY+ZcOQw74Z0+QVJn+zSNo9SV3+YEQc5UMD/2MJGmGBhLRxIRBVJlLrZ5F2wJSvlqjLJafMt8Wkszh2ZWu0BQyIsgzvyC7CzrMvdwuydgcjz1PNDqWgCCbUdZ0fawMlovQpGbAIHIIBGHW7Vt2Z1FsA3YPpUP4xZc6sBjOnG7qR82C38J3S1FwNMcN5nCyF4yzXw6r5tjQ4zGnunv4IJuJ869ZEb0NospzbEC+W6/IZp4s7K+XE3ZLoRzJ9GoZ3An1GVi0pOae87cusodErxhz1RSpYVtCkT5rGg7rVUCRMOBHvL2jrSKHB7Vk5JPlMPnBVRMfBHl1PzGQSh9seicqsga0/dL8QE2umn9MnwbYAwetJicLWHmAqkBsnfpJIX+ycah5KI2wGEmtCjOoYtOw5m8f6oZA3xBKdBn8wU+kG63+sZV2zOCOopmqKKrQCfjy0/sJ9LaK416FEX8Tvrbx6fxTJAsD3n/YnUsmsHzmD8xo+5tDO4x39FrDjenJZQL3GJK1n9yNO1oSh2RczUsLnMXpqM1KG/GJj0mII8qTG2+r9bDvh+uQFKpflAoah4tf6HzOM3ou75IesooIsV4PA5zILG3wsqpXbiTrdpp25Mfc/EgS7wxpiYwylEZGN2g7u0hR4/Xm5bXxJMtpbvjFkY3MUpEkEKPR7eWYQr85uj+/p/a+pBXjTakwxaloKGWiv1BgWbYS9XG+imkPxVxEDcbOCUsYBN7lDyj/rTnxsb70cogpss4zjT0r3bpPW8SL6SAY5/vh+aoh+W6lHY+e76FMqaQkr55XWuLOdwjjHZ9hQ9vgAer1BwylwZGpFmFLEMl3EZ/xMqEFFVRiGjp9esqBt2EkyJKtDc70zDEh0o7gjgnYJM4rXoWDhy+RmjC3/4i8Ul71Jk/BG3EWmXEkZe7WOsBJvhSHjP1lVsZDbqL8eGrrORi6Vd7VPcYoeNzpu7LA4IObS6jC9c5Ur25Fn5zmIGYqkqUAyLxkeliLAQhsjZyp6sqcYOSsROdxysU4IO8r9wVnmA+3Ts6e03xBDeM89WA1BrSkGClQtQb2PcgA06LW6uAqtaRg/Wu1aAb8+lqXBVdv+8D3FsJc3UkkyPgxOAynvCD3eIBPlc/dldzWu9ZcW4xfrqwYfAnYBuilTrvtvufDIUoR1eJZYCzUVaJpltQhCYt7OBTzCqa8uNsgOdg7SZ1g3K++XWHOGfnVSgNbUT1McjqrlgZbpgMoVxKDofcAquzCXjZKMT3eh210VDKriBDW6gv5wwzzJedz84ad/JGLT9HmVlC/FWj1al/I80jXtKA2NugfCpObif07dRe55wDfjFaeeG/F4AGykx9I8pnPBMzW8433hOdZOVNKtMSYRA3piSU86W59P3/vEerKCvTjnBevGbPdWO2lBM5Qfy2KphdEVetglLZwpZQGUi2R8Zs4VlNrxKGjoJF4L6GewbaIYVYJJKk/MqCO1BFM25YZ2gqSMIkJEblVGrC03tNABiia6mEG5BF2Al1WOia9k6eMPyuj2thDL4hyLptOHAAeZYuaksHvbFh/SUMQiXw1dWX25R772iKEgsbyWo+pXbU8ZztcXhuamF274duArAg526BQ4/4nGOhB5OVecJFQthMVDrfhpGFwqKCApek8sOnAEjaZlNAK2wJT6vOWMKvpWuffAZq0pRJnVeMnBZaYEhHHNJt+Kr/D73COS03zy2kq8KTUSWbxwKdASBBBCLWzKCRi8nHARNtrXnaMhn3Kuvr/jwhL38rNNnN4/KiOjlSLPrd/v/50B4oIsp2ouNy5Brvc7e3MrbBMGv+LwpryBDQ7geXZPCXE9QFz17Rk0kxmP9iUCRSYxGcAvSbsW/WE/5g9NyQDP4zmoJCvF7LjAIzy/j9Ka/dYCpIRim8RVb8Rjf/5JPxwNyH98dHVBmNKXpEB5B0vDFaWRQmzY6N82PtW8yzUIadeyOuLGugn0aLzNicof5l5Dfpmm7QLpMlCtJS1RSbo69hAsRoMWBOnqm5BNtxc7BdyhWTeQyr/fPeRXxfVXGHJqraOaYZyW+HwPn1MBE5tkLb3UNLnAumwaLCXtejm+ghoEyuVe0i8RYorNfCV8XKwCl14/zSTETJh+gJPkwM8/BQ0Q7kL73965VQCZz3BAJ4KWpjKXWQlFIc/GfHwvQ5rZK/7pj5a5xXQKL9eV0kTqE/gu0L362IpDQ3UXOy14reouG5JI3n/Ub2GeWgaEelyHNf9f3/9T2qfTgZEuO9vB/SDJ4xOp40VEGVMzcQ+tewAz/uFEMKPYVN0lZmPoj6FH0AajTuO2ightQ0dlWq7MpAmBAI3w7JmOT6S2PviH8rsAElw/qKi8+fNEGs72AfmFKE9nqahP84VU+ERJsQ4lJT/bI89LRMixEJRRUEgu0/d7bxcg5q4em/+j3lsabqp/jm38WC4OQk2cXgrJF/COqZueRXEgunnsHXwcQ3zpLlXTWMxVP3pafwbytAR18lU0F1XagJnM2rsyBSfhJ+608HokcIp1u0i4xi1DKqONHJ/22HVFMRTZASLSGgDTlAsI7vEJGvtHtxtZ0/uuPRmkM7ntKvlwxW6PbScQkT1Cspz2Lt9yJewP3L0qca9VnxmSajfzFYfh+hdfwYq9zqg/lsN+1EBviKgYMRr2YumACZqW92pyQ8AYq2YXdvPVeKVWWdz76qlS8DA3YrqXTX8HagvsqWx5FXw5yCm38dCrAE5bxzd5erLp2q3riMH4+e6/bfpNpPf7qkuRzF4fiTJcT2OkABElWT5Y/Nb9659zzeUTf2hjgvxY3J5u/b11j8e17voaLVaV83fHIGtjjKTXCoCGRI9nfw8I+jSbwnLvp+57h09Gl4r08FDylYn+l1wpb2aRWppgVap4So7VeTOe8Z+qNXUTQX14RlKJQjS1Mi9imVRG1JLOqf1YiKWqe9GM7KpXQUENjNnN+qyzOxpjdamJSVq+D9AIjByXW8zy+DYpmMTfKu1U7dVRtoGh5WxApEH4B4Tk9TqPr+wqwLD83umw9YneSvUUQwJUCXlqvPByCJE7E166mbLyeOBI59JwxwHLq85EYRcTsC7IlwiK8GJCs19GG
vkAGzzKkhZU3Gm7uoZC+ELrOE9ebHAHDbUm7F/qJc4z51RjrTNmLGDDCBRVIlyEU3N9LNKDmMcjXLodoA6LMqBlh5wr7r4a/NJvxZPn6E8C5jGtvod15wZ7+ri43bK8ja+Pv7t7z6addql1bR3i2m16L6Y7p1y4qPmn45/0rKKWsZQnOTi5/xSZb5M2jwJGLz1arLQ+kFDa/K/sKSZrKvKNDoBCD/9G/h3yOqhyymdn16t+mj/yySjTdQgeZW7eZjxpXwTcn1g1XP6SoX4KSdWKtxLpcNL6QOLGcSeYEXOfmf6p853w21udnjv2gjHlgK4wfUgSMaqBY070gl0q5VX1v12FG9fApTs03b2X5a6SqT3LtLR1j9kQOWJADU/jiQ7NsWRCI/cudVLrfZQv2A/p7iEoFIB+mkJCTxPOwKedOrEIaMl9qXwVviaqOc+olp9zQoDdTg6OcmOehjJXvAmlfwbcVChlLSrrNE/NXD9JZy5SYQr8O7sur1hU9gwOg1+r7KGvwSIIxwO5EAoEI0N/u+H5U+Vv62DlH+NiMr1lGBSstOC1QA6Rcq7j+VHE+aMFRBweWzHzNRqeak100KyRHUnWcNYd9SyB9k5GAzJlMZXdV3qLnnMd7H+E3n35LIb87FfAZs2RESBVpiqxo1zDIu8X+jcd6pMuqN0n5nN+/o+dLbQX8vYBvLfSCrT1bKLa4T8Nac0FF9aAgZqdwcul0q3s2Mnu6QJuGt7V4ezlG2S0K7ZEr5jinLWJl5hn1q6dJluOmf2XmvsOijJi5VGbTUgKAFuas7j/zXfaqx76vaneWPuy9EC5ykTI168uPtbCkulGsLIvl9JVSrloma3BxQG3SVY/8S6X6LAo9HAlZfhuRRsmpcMzCUPgCxLX1r5Ok/QwO+RgWVt54paMQaXab908ALWbjUWFUAiHStaMEhRLegIODI4WFzqR8JXIfFihVtTuzOJzSuxYu/X9Buy9F6oUOl70wf/U5wu/GT/QAn2TJaaq9Ub486gplMJk6MoxR+WjQ6lMMzjPdTr7qOC3pLAtnUS7R9seuXwa03jDKndNmrmqeGS9rBydDegX7ophsLz91gz2rVWGt8msqWi7Dh3KHIqgYlU9N/XcE8/ZD9jUftQgvNKaR03hkkR09auyJwTYehQDlxaxiIwTQ+RzgRAiJk4klvg+o765wsEcA5Sb35fD2WTyNN2LVZ02mRRsKfqgbSfSC0+1kocd+80ot4Y4EOtD3ImZWRUM/ZsYTlSy2RxL9DXHQB8NePhKQzFVofCv/qK4JjLlABUtNU0yE9of6kgI8mSIvJVqJ7yzV07yhmt/YStnfRs1c/Uv9FgFK/XZFUDhCgkomRyDnXZkJqPqnRRrmzcgH1159YL28UOv3YVjkAKlPEMqYIDR3hse5A8421VTIl+BYUvpuZkpY3mj1tx80ddL/a8ZNwC/nOs8GbrBF12qgq8Z7hkSFdsLMuoHKmD/sJrAchvTZH0mGB1UEqyOIAfh80LGfTZV1dO3/+6dj4nU9nVQJ34KWpD6g9ToE1aPcwcd+l7ZWRNCSNt9wq6hEQdGv2RwwUdHvgQNlxh0ggZIrpb/nQfi1EWz9Qywj+buXf1sl2GpSEkmJ7MdhsoFJDPwaR6Em9oIaRI3P7EYGvihYgI4gGxQEPURnDZMrVdAwABvAWym2dgh4frQdYhIiOXK7hl9WpOCJiVR7fuSt4LTttqTRJOooitx7bwDQxjMSdflDLNoVKjcs7rd0WcRt6VCnSQlbGyw9cMpX2BRXH1aBL3ev7iomQxoKsrm6IowZFO9SPTP37H6aNT4j6N3bFJcX4qUOd5pPzb5WMKIBn1J2uoU+ZPUvWNP7TYt3QY7eP4GMsBw1c0eKKT0lc8VFDjuKsrsfBxEeRM7rvtImvZmlz3BVXyFTvyi4R4TxYax0iM0vSwyY4VaG8INXEiq1finEpFkrNbBBRleABpu5vNaZM3aJR+ySp9wlJpslHJSdItrhdJBTr5o6O6UXBQ7wt4RnJSivDnNt6xRO8B3b0U7rU5tji+8o90b+4KhaM8wPsaPnH6qDvgSEzD7s6vRFS12/tVlCSW1q05DpfnBcoZpgxJvOzvxiBRwG8bigsawqERTiKakMRPfHHiCHRmPG21NakMiUsRhjGrM5oLypEcUMr5SGd4VlW/Mu3lIbY+omke5KHHF59D7iDYSSGNoNatImjLWr9QVIUNPQZxZfTmTOY0guC02O/A3Z+JiZbfVddOAuz6+B3EaefT18YOvn7agL3Uq/YCRvuZm+9tKrl+msxnpNsQazIXSVgCpCwEKdWsl7cz6uLq6sM1HbplSLHLhey031kqItP7+eAdXSKvMvrqitpHXU6Nw9ZaTKLe+i72Gm5AU9pdXkbz8Vi6Tv63ahcRDxVBQHmJs/nwS5BJtrO2kB4MX1oW/edeSbyJEd3A2uWUSo2zywxsJqyiDjWFWM8HbZ4j2qDlTVgziQD2/15rkUYnyCxTVrfHnLPaC/uOVxfrOU/eO/avdoCzdl4Yr6//ZF6TTsZNOgLQk/qtOf41rV1kTSCSQy9fXtqKZn3Z7QWlvkrDNlwITq5h/bubMLxwUAj+gQFq7hHpovqTSZSm1kwTqIhqegafuoIyhphLvNisqZF0pmoiheID2dYTI3zdfe5r2wDHMpxZzLBqGPgKmht2qng1kNJz+SAxOzgNREpbyMCFdwruW0QI8+xVDnAeIiwGXQDMT7MIux+8IamvZHkL3/yyCS98S4rsTx/Mno+jrShGbKBLgeZ7/RmnV0Vt1TB1TU+ius5D0taslSQie80+ZooXA37JEeBmOexxumXKj9opBB6GleZnPI943GDYvgedtKeeOV4Y2aLyjuSI11h3zDdmW8NjtdCkZ6Bj0bqbcK160dk9cDsqoQU7dksNOBn53RPii9a0cDu4QMBhvqB6XekF6q+ieYH1JK+UEAuH2EqqvDyMPLOT+axYLHK60hMG5TRaYMGwCT3w0Ga5p1N/grmaxwMnblqm7/ankRM3R5a1EmYSMvytMyPSEPEEtIOEQdGFnZfbGbBF22rq/Ja4f2qgEE/vTgPOKcUF98CF62w6jhJej60fK+/yGFpArxEhvXAJ2dLWcvZI/y3NZHa9FSKaKyUeTlyRQIhNQxUbN8ol8tqhdqt87vFpoNwLkz5w4wNJhkSFRFwcFMtmXZamCAHxAmiN4tEhBMX1WwPtzeiBzRvOfvgmjqnYr70X1Vj0aGuz4Uyd5MIc+ZfCjwMfSWxuY7Kvu9hnBWZZGMqJxkANCsU4/dkgkPbuJZuq8udHY9BIqUfhy/jBQbkx3CiomaAl2LSYpbdfJcn5BwGe4UsvUp+95UHBcMEvCGjGRVkG2+rc9tZsIdwSP3CDc9cwdaG3Fb1pTBbmDY3hXzJGsW3srib7C3jjZe+jeLxbHGG3pAdok7/edMYTeUWm4YWI3qaqrxwIuBodGxm0aJ6IaA37kjMMg+zL79Lcfa1LBUjxfcOly5mpEHvKULNWhgqZgO7nG3jRJEA333MvRB0riXrEnV0ZBDvNpjsE0egm5o54DyyYIbSb8ehBi++Qw/04vkNwvjbvJH/cE4tQT6p8mzPBvBywIyWCXn0HHL0uKq0I8x5F31gtfWI13gpv3N47NUR2v3ySkAKwxBEKhSiARchMB+/Mlk854x/KAfmFvPeKwyLt9YQeiyhslNMeVYqcfLtYTEJT97zfjGsfxqQhQAe8aKtenk4P35Fjk63itgHZUNHgpxnMRlmoEf0zwW6MojFGWsJ+S9347xFgz5uMzZ6112D+Pj51M7nDJvyXri2aV5Q9YdIE7QJk/LQtzPy5P0PDtVNLTBnEfPgYlPUdzASoam3mxCHjlB3ougjh4vD3dsBeL02EnfMg2hS2pOzD52XJ7Ya73gh7bsViqpq2qsFSaFhQ5ZooCdK0+f4PlbDpdRc+q5zChLqS//lJnmtyKYMoo9WHUWirMgk0LJJckB7+C+vH8IQ+z0518yvnnlhV8xgQ0ICpW+l3AXKE33py48DtnYXj2xx84i13/rbpML37cNGtIHUaQw/znHM57a6UEr8MrFQ6PyNWAonpZVlY5B
Bfd8cmd4rUW6RqntuTrcyzr/ZZ9q4kh7s5nTGReL9tEj0uFTa0unqqV9UNM+oagjWHYcJum/D1HmbVroDTW6PzRlpKf4SWTBeHd5HWy+Cvq5djr9uoO/V1oTOKTBYCsMrSSlNwcGJyVy/Gd1/RNTP2HSnBeR+qdIvgdBzsUH1f8C5JaCXq/iNJTA8ayxFdxmBgQSYM7I3MRdKRHbGggfaVYuajf9ft6rgP+PjtNgR4jMZIS0zM+NpvnwFdim4y9W+JnsPKYWPyj2Jfg1+dLdeqexXdVn6tmMl4RWCQbFSzRrFBk25jBnJz91MBoNOqUo1cH2DkQQt0++w7/1MtuoZ2uWYAqKT9RPSLnWarPkBy0ZIO7CJ7RmsZBe+a8F65Juw8dEjOZfCcUhAtsnPYXwzF+03FP91np6FUdJiTYRp3R63uN3SNWV/8BMcaPcOqUYnpqcIgfQiILaeSmErdWkSTqIFsWG8hSGfbuubcLynkuew7syRFUrm6DMhhEKvMh8t2hd9cW0M4tHWvNy2TcIipmPdI9KzhYvyzf/fDxPEaJ4xg9xSj2Np7blMDH24iYhqAXQsv6wnS9GTwG3y/Lg9DUnwyMBicBGbYOEQMpBrc8U7qK9JIjxSpvGIWhKq/SLjzQZFudx0CrzYoHviXTD5Vh3LXlNfQ6KRTkI0gA6CtHvkgFSXW4R6aNz8j7QN0dIvGkVHDixzOLSBudTqxqw46QYbfaDy5WN2zWw3/6UPaHPDWvsTTSVgy8euttBlrFcHKvBc8f+1ImMDPRDKpUP1yetKnsVXj3wwEyrvgAR2cr/jw5LDAzODuaAnLWBhr286nzZwDRCwMGpdNPiXMnZ7vRpBrtJT2A3vFGKntsOqL1dBs2Plas9moIuITpLR6J3CQsVSVwF2/MzVizORtak1mrh0P0Gzs2pTavEVGQm+nZe/NZT+lQhVxqKDTU+bemYc2SAHcYAUjR24cZDElusFl2EuvnH4B+YrjuWWcJR832uIxgeEoUZsV6grfcaei/+2dWTx12ZQElF5JUmxAaQOc8+JuZCTSVtDUqpaK807+PZSfsSP6TcTLf5bv1sg06lYZxgIS4I5ziyq/1cWQjwthkILW0LrKBgarVfbIYrIE8sMzzCdJ7PxHStMUWSwJBok8Y4gsF4qzL6KUX7JpSKHra8oOcYx2zPMIo7ty0O79dZnYolQUbwZxE8EKyAq+6pM06S6n8zG2oRuNAuY8g3HWcgEqJiYg49ac4XEHfR52kFu7RUTfRZSNVsIOBun2JSyXrYWZET1PUlWVkS/CNVAccZi8jQSTc3EnOJ0t1zI26UE6w5TMxY0vL/rylmN2fbth7EOMtg4pTBkqHA4cN0qKTTtVjK6E1q2Yk0zOmGybkvjp5zfOjCkeusLs7wfEJYepHlS5/c8H1FEp0JRNFOwqYLnK5XPSgJpAlUZM0AG0h71cFJCh1HWQS4GQ7xg12TAr4kiZEvzKFcShvi0jU57DwF1fNb9MFfHgxLTllK5LxMgZ8SUGcts5MkdKNYX7H8edtn985MgGDk84cIqLNBBPL3WsujjDm5ch7vu+ONicPAGaavhAT9d3fLQTAcEMewsAf/00Y6BTramwJjSob9s0MJzd3WdCvjMQUVJbzvVDY2IPKMuXij+8wca8YwdCHhaDcENRQVlJI0zFB38Yiw1lVPOErK2FWPV4gMYXR4uwi1XY9aRoPZYn7Pw+vFG1uDyDjRsLeMpkXzyzFa83yJ2Vy6xPpgMjdwni8HmXFVQj/ZVGnuAlNTKgoO4eqNbOTGM1JJnInrzMzn3Qy0rrMKNUOGf1DGc71HkekIyAR2h8GLfsKvlpWzV/b5xrRGU7vBK6EcOwPnV2Q00K+h8kIxxDIgc7TuHsks5aOdpuyH2UCPoZUH9nevmAOJX6jxrZyAGOfyqqJ0X3wt0JsQ/uB3A5KCCdDuSJCiIZif+TdwLNUI//Z7dps99VtqPfhoj7pxRXQgObhR8jVsVuMr4/BIptoefGDZOMp3xttl6QvmEo3TS6viIHMgkdFBxQt464KvCR+8zlUBA47gbZh2SEoqqxut7oosUXizJAE9yMSzn2x0p7M6fEfPo6M1d4fVfIcHu6E+c3iAR19t3l2GJ0NeNuOU5qiIpWfOJCFdbXPWwjJHxPGBxtMKYDeUSKXmsGvjyD9JDmmoyV8FOGkbR/Oj91dxBo66VBbm0KWGJYkq+tKYjlktflH7or+0yLWeUeRDNRNPeXFaC/kemaiwCyjCUlB/d4WnL31xsgHxPCyu/QhlCChR8IGgPsAidiB0/lNtN0aoWXUBXjc8oWBmZFthSZ/JTdN5LbYhYfRfjjQiMCr/3+pVYCxjnRTjW7TZqglxzSXOFw8rNHhyn/9kYdPY96lGY93dG9lic4vf7VdWRORSP4NLti6kPmIb4qtFECMLTIw/8msMDKWTsa8jYdTWt8CzUQGBOnvea9GN8+saiemN+/JeyqsMNje3QAC3etRFgFZxpDzTdyl/QTMeLQ1YdC6oOUKbLlYYRbHb6BM8qxLMCzZsu4Rp3OmEVmtUIOBELl+UKqo0oJPBrgY5VUz0aM4ygy76QzKvw70e7nbNhl/HeHdq/ZhLtZjVQ2kgvkdnb1U7LxiCa8G/2yevBkQF3R37pqxFbEq0okDF3Z2tnNPXE8jyLXVfNsd2M9uEgUBTiMN8Zei9qpIRPDnTc7fOCVDT+owcrgCD5X+GVfJkL/oIuCFrcov6LjyfyTpnGONG6Iz3Hn/Eh6EB60OkWpHI1LTf56WY0Sg9lfnJt/5F38zBSpGxGHEzoIbgsdpY1UN6psqCPiYpzdvCMn9DzsFX4uNBf+M8JVPt7mSzC0oI6bP/7ZOVZ5fQQi/WZxHwfdQy7ssVzzAy/sqMVesG3/7KvtIdRv/jJv5RqfHa9XFdysKuWW2U7a6MoRIDOyDXXMRq53mPf9AbcaaklDJkDMZv+kkgWXf4rQ4+ChK8d7T90APldvhs8e0FWupbWd4J96ctzhK4uv4/4/c48Dp2lnCiTDfUJUzuhNKt/fceBxdeVCimoSNKHWtZhl1awQ7nwSVQicSyvhR2IH1a8PNamMFuREqJK7IRmiTmgNRrLlsp6lrR12g6vsTW9kmmR5SWB9ExiD8AUvNii3MhGPleUrQvHfOJOfWzgerrjHV7W14hTQSomy/TZZ6AW7YN2MKUfCmI7UjZzHJ3cDC+XG+z6HqbhZ/k0Z6x6azC8cffShTGa7+VVLY2tG54DU+m9FE0ApPKfOP1V0TIc94JLkjODm3cZPUGWfgM4YEQG8CNOohd1KBGE7YjdcwIF3mm3XocsMln6rfAP8jyKmrHrKHEHGLcT4DkIVnyWLRGwW9qpuIPpq1r+2Wqt/qhxBjpfeZ0BP0D77WAfohyEGzhzA+zu83C0HmMe4tX6ExUP+k0vhSLsaPQMm3tr5ZQf9j0YO39dcV/SjmFhp+PW+prdq9si3bfxPlGK6IoHt7rDWVMBcoQmMSIlTCGQHebdtVcY96MtDdl50hQcb626Jgf5gVqjy18KaBlqjwO2bpoFxC2zHVkF2i28Qd5TM3hbIVTxMDoV07sMzE78FRKUVUzOE9CqeLrbIqK1fOWftHOiZQSz2werGy1kheR5jIVmsb15YcdgAJ0dXkRWE3Gibb8N+6Q6ef7G75/bNY3tnIqM/b9N0RQMruEHtMWQ+fPco6/S+HFMHNGmMyxAsnB5GUREWQcu5eKA/ibNUfG+v9/5HwEnWV0/Todd2JO3GX+wKnROUGezi9FvF+UACR7OMosJXvh6VhJdscGfWKzOrATPbBj7+I7BGyv8yeNV6T3R0nFw1UlMgUIR3xRz3vYRPGMdQ1E592sTCJoE53sEtwm6bJI6AG4Zch9RNWsBJjrVe3tfFaD7+GsS3yHhEzT9bLupvyheoj4MVHlyy4o8R/iZBd1veqHb1rq9xtZawHd7cCVzp23EtlzOvc/FNKAS+LIl1t4swyC4ME1yFaunBwyzRROGVmhrZrSe3jcpkVcOM/U2rBkwB/Uekrsa+HFfuB2+T9VbHaPs8/zcYwS9DyrHSS5/7IcGiCOaDk0X3EzsAy+9xW2/IzX
Zwd/U9XtkPO+XKJAurrt8hoschrBk68klRLLArO80m1z6a0f+hXU4xlGI0MQ1g8KVMnW86MPmA+a/+BT7fNc5UaE15rKXvgEC8umJlav74S3V32w9WozRbNbMGdKdvaUafHa14KRsIMEROq4J8WIWbdlFx13cEVvQfZYhm1+a3d7a0p42I349ersJp9RPoMXRsEBl9WUuZ5I2yBli5Cu8lNGlFVIuCQQw6v5oh7EgXpo3uvug/Kv5l6st/oLLsv6KSKAgIqNJ6b+Uq88574wbQMm9Ag0QLEk4zgfd084LZUJ9dyZP+uDlyk8rpdYnlZaWeqPXKl6bt5XzBfvOpP8w6pSJXFMJigE3fl2H+vCAXI1wto2Ajv2uVIDQNUP2OvQ6sR9nzoSzYKXDuCl1jnA3G6qs9Ec94rFgM9/g2JXxeniBx217IGOPStHRtVLIiMRFx7VYrFQULyQwCFQcgZLg6gqPrTk0Yym0tlYqKpk17P2PaCqMl0jsvo52oN+2eGIemghmd2J3sTAOZxL+UjmpGzEN4IT8Im8eO8/cWNwlnwHhw8vjVylpc2PWKtpkRWkxElg4J5omKNq68fbzTkfuF3jcukfNpNaUp25XIO7cRzIelCGPlaBEQsz44yUN8PSwJnqVO/aKz2or8n9jOGwBesS4FWoZ3449f4zlVrCj8V7JGATy7NEsweuu3fLiAtnjxbBQEv1j8WxaAMtETIhtrf/6tI6/qXhqvGoshTNM+jNup1IT9aJwGq2weAuDQqRSg9RegUcQir25CJHLPntofV6bmmfJsnN6fdP5suKj23lhp4R40POI6JEWM6BfuYMb4YSMrWqWxC8Z/TAVtLEA00QJUYz2rHjfj1OYIvNq7MW9kzjngDPhBi9qxdwcXLvHPtZqbV0uT/leq9CtRbKXnwt63AnKO+zWLVETFXYGKyJObcD+1U4N098e9JHUe+u8mUq8UQoXUIqED9bOexQnpftaMkiWNypkaYwh4zaKByb4NFMdZmRzXE6C0sfAHHHQxV7VBl1PCXAoCqpqMwpAIrVlAqlyLFC1YSyebpdmKGjc+mrV+Or3w6prABKaOFd96qx9EmK+JdTYlLgSX4jkZHuOmOehYJm782xEDuvcNsVUH/hdXmwg0KDVGKAAbfeAtYl9QrksDVB2m5P6/Ruo78zuoHT/NkEhirYQv6eoPzuZyvFZeYdwGOVQAZf8nYflB0Tb8uCGGL3CyQwnjdzU5ohVHO/LDvkHHffeJ1ArHBweHX+dL3nLbqdBGas0+8GkGvng0ORwXytOSW30vRGXJUIJNQI4X4Iy8CNt7Cnr30aEFOdiK975tikIBj1JQJ4dWBWqC2cbVLEyDdQKwCgqEo87GiaSRRT9xA+Vv58NDUNG4j5cwieqdp46QFBsBcqTDdPSUUByTuyOsp/N7URsA5gV7SD/hNSpXUYdSmwUgAEfgv3qlDUyX9VtUDpsZ7YuuuXFqK4G5+ko8qS4VKJ1o+165jXiYuKKwZnxd33ZsCY7Msh6p4DAF20XZCKoVfml1B4P/bOO9RETk7Gz6V0ctM4O9sxy1tMtUmWw0TNCqxEnQUrKOS5B/9Vth00yK3NktkgIHFknTESYEPjkOSx0dPWrXHhy/3crVCg6m9Ryct17mXUErtHktfUA8eKfNKNfODX2VBgHdE4StWImBuLv8b+C7kxNZuekcDRjXEWY73IGWxLINNuWVWFr2vPtKSZWddcj3Y5OWR4jyUfOo6CihWmhDlD3OWt7Xh010OG82Vgx2RknCZfxyJHlLkRmczAsb1ZFWcYCAzWp2v+lJtkIjuHEQ3EXwDYslALsMMQI56yDjrA17sbSzZYPJ8Sy79kYJzEEFx81H9or4oC9mE1TXwCM5dwK2ocio1pDfGYDu8mmXQVxwf0G0VF+gAnuFAw+V4Njyre5XXNlVMsWLWd5DNa2v3vaFqY8cUvnQhdyV10I1cc5LMFRLGm8hR5VKb0/ST5Ejk2TYFWlHHdcU2Ek3nOVQhwUiScKxi//NDh00qBPt6ubeSnRakUysC9IT1UYzi75tXtLRtD3uVmuKzf1KiyYFCHGTay3JjQdmLycqbRPqZqc+W+jIeV7RYwT6WlP/bW9cm9xaK/aJfrZGRI6YmcTs7MoYjx6AZ48RZ1WUWvt1Pdar8tmjSS6ZszXKPICd9ucNVxktG0fx/rwrxywOuMgcuXs0DSYTwNDwdY+cIdbjCcL837cml/GBslhQQwtPczBC7MRbKwzmnBBfY/HImxqLsJye9SoPQUV5rLtTBz4objXoXjjXuEHxvoLs8UtFRQNu1EBKrhr1abdG0FN8RL9Ga0ft4XbVGUOa3qFGPdY2ocVRnbYc4kyCS8GR+igiw6XjKlEZMCoIMmtJdBwxVHzToFD/dyEeoP5VHkc5Y8zEZZ1KX+cRGrigmSaBD3au1klS2N76oJFnHMxZbyGTXo2HcNE0ArAvFLNlhNBjjMhK1yp82ODGh/LQbz699gwom6r998IzKMP/C708W6Ibdn2fMkMw4PxWLLvNXvu7HDpwPjx2xhaUGmDBsKQ6oec9FO0zNz8lnprC5ZXa1Ex+tLW7kCfreQbzkbZnlcdKyEh7Hp2mox7ksAJrxklMDfW6Icy5EQKA23thtjRQQItkA42ryOEIyT49dEW2Kn70dh0hp2oz+cjs8tqr46xYHpx28gJR99s816XWVe4gqr6xBztXjdbpEszQoMd4RZZW0jORXrs8WGXmgp0o6pt4CWI6opke5sRc0XyK9vQBAVO40BQHKzLrEWuC7fegqMZaeYBhCW4N78P2HFK774na4ieTA5HaFLNIYPJsqNdeIrGzGOKgQi5o0rQnTCJ0w/5T6ndvo2XvQZ432pGrCEldB16cCVyU76LY9b+kgIMjfmBl+gfjiRt4HOV83xGEbFquqbPpZMyrK0RFWTReJYK08glhu5kpIqq1iSKg/5Gu6P3XjWI/+XuRD/2Y/jup3HzgMaC+CS74AuQTmpQZ8DaBWqvHLQ5aZslWay9LWWVOp9POlSChwOe0lszQZXYhpyY14Th9TDcsEIhuD/Hr9SRc8ZJIQbOzKKRHZPQXI2J4Z3PPDxAQ9HUo0Coc3O9j4qNBG6DjEPDxTGGQE0bWJQ42WYbKK5FLZPKknH16JfTTHmYzIjD4ME7GH0YoxVN8r40/Dk3vUtLStu06ZxCC3qiNASF/yOwu2V5vOMjpc/upbzQcsZ1ve9FLb2LOgSRQL+JIr3ms4Mfe2NEHSqZGgHTH36ZVabl3sMByUCb/QcMBocwPzfnTD9GYLgtcWFfj2YpIY2TAhm7/nY5Mo3XyFAoabvBILKWx7SHAWHBe205AjZ2fkFy/HdlaUS7QP55wXu9nveRBnCxyrVRoVvc4ZjMxIh6rnEOg2ak1xW/DMybcd9408Caouqijgnq7+00SNJFPubCqynwyietrsDiApc20qSDeFUaI0whFgX/F92nrL+P68nvvgUjNufHuu0yNpl3iUFwrkHWhOHrKCitv3zohcdIADnBBCE94JMeofDz69kIZjPF/6pkzVNy4clzamVWYZJ/NQrE4LFNsc6O3zUcAs9lESWbsI6NdrMvvTfHs0rSOinLtBY2TrC6vIB/r0JDbjbgRhvQkI5JK+NS4kefsZ9k+hV0/vMdDKl4T4KwXa/zsQzj9LrwWLDQyVNJ2oOe+MJWMx1X6FkzM4rIfhn1IH8sY5T5LFbATCqjP7jTDplveslXrQWaGiyigLfoYqkbRrSBpghaEmN7PvvH4ruGBNQcy0msNohjsI2dvNP90R3ooLb7f8X0t1LzxkHTz0nCMpG2bmKS4xTI5cpCQ2KbwRRRUEgnmf87Wk7mZdfypaKnYjiizwY+Dhn+O7hegR5EkgBkKqLGMEeWe7h9utwLGDAEpATngHyK1zRPBbQwAgVuD4YDfvZS7jh3YJon2mdTgHVBCPqg0WekvLqzkHnY3QfnIWRVIQVjxDuhhtRt0sVFy38yGwJXi+0f0FDxl1VvuNKRX8Dzvx8q8jzRS127B9l7BVPjWB1SB6nmGQD4DQ1PgaB1xVKLRtDPPCnOH2DZvE9XI5c4Ra28wmJmrLLcsGN
28bzLRO/Trpx66IX4fK0gcBJXapx0VZo8ZWtkGdMGRoBugcDeYcAl65VX9O0DB6dU6CXp547xDPHxtde216KRTkIUTj17CJCVXb48Ga3ukncix77+HO7awCw0zyem092KrCx9nPFg3TEPSzE/waZnia2QugrR0LNv+ld9Ngoph2RHAkEGrpzGhvUjvjfxPrHWv6tTxewbraryQEXUqaqd5tKc0Z+32wHv00q4TfjVEZAvjGyVOzUzYKW2/D9hOFyAOhptmVRYVjPUcwec1NDvMEKF9Dr3xJGg9phTSMUUzDnhKZiNhtJzmvZGX+MnNBwpEzejbGyLgJPP5jj1jQZMWbY+GW63UAvvvIQLg5U+KPNJ6rX/NmuQmWzmsEVA1jhZ4XelPyl0ZVjdn0ZbSO8wGy/cGJLXkhyVBI6qFUX5hXCKF2tE82vx8UyJ40kiry48z4lBVM37J5Jb8H3nVQTbMoReJ9glmeT7Srzhr5tL9N2b77PognFnZB5fd3T0VF9EitW4xBFaw3yaFkORMHURW1yJgNQatKhn3YIZKFZwWLMDVJv7QkQLpBhPqMS6eVo8Zbc5B5Qc57rTJxAbZQFkGjf5xvF7IZQX9IYQ8ouy9SUWxaiRo5YyOH3/UV1ePFmCLIQ+Gv8T1C/OznxsLld1ClGj8LVJa4gSkdNW3rppS7HNIYvWHa0jPeEKj5BGuuCSWqXQeqyTPKwRkbdJ9zdGaxEc1NqFBKIWe9XOv8FeVOgKLb+9BneObrq1El4uUTxmt0e/2+EJZYjDobJWKE+zyYlRWgoAT6YMjBcNT1t6GoRAt5c7NV7Xl77rkRb/c9DdXvMEs/tJnlngJmfOXrRw4aw+9afwqq/CJbQZzMUWOZpoFhnyeG8wmEGqtGOtXljEpz6O274vC/4nuNHVGJ3UI0sFuGj45blVjzuuPHOmRxbV6owSjPbVcXd3PH8pHlJPbxT3c/59r56ZyQVwvKd5xn+WrerwKPKuDfPDaR4Pf3h8Ono55wlavoUzHz5KsfhkOJHY7tU4mc+yctSXfmCWjy94ORTJGUk2k/f+1CT/3918aJY6LeT+7nO4kB0jI4l97Z/8AKHV7DI7KnsQmUeMpAUiW5OksCP2CJChq/gJiQV8EspE1atb9Zz4bTqaeeAyqaUsaZoBbSU7P6FTPAdoY6DhQvhDnT8abC9fQHFv5H/XvFzduwRZseYWnX7Q2HR/kdIzScA4m+iuIX/DID1d2e6OJrNrltAKxglA82aWVonkKT4Ni3xeDD3YjnT0n5d1sWvGpgSUc5AbAiLF3kyVpExumR/BqPX5OGjOrUgEXYBCxTdmW3iRf1tAGj4FADlwX3JOTUJv8O4vV2/aXK5exSlje4g7ytISNXiECR4saxPTtQkXV52BH9AqmoABAV/6+75zUOgupxJSgK0QKa91Cvt5Z4wby07+7+MmnOqqKjDrK7RM/7YV+U7be0t6X6jVgPrapEceXbM/KXvi29WqkrECWB3dlqyP6+YrBkQcun/0LFSGLpORrbIbbPvnKCKoFpe/EKycjftsIAgnzDEbhzhgWj445DtgKsXLCGLRzcykW40Rx32bfzAzoKLsxz5vqYpnSE2WPNQIcQwnMI9FV9GL4mqpXmAhGLpKlMLR4PPw0FGKrjqeHaF8DFpEnFlfhmjQpAMHHJl6WcOVXxCP0Q9gm/Ij0tCX+eORTkuyM7ILtvUjJhGju2C4IUcG/aHmnaWhUj1xjLrlSd3NvV7prrQWGFkNHXgQAo0mR0DSves3Fe+EvoWPEx4lUOtcKY4HX+18qo5SRI2qnYg6L4Su19HicKK62/rwNbiRc3D9CsENIMY/wxfYKoUpuMn71KugQrjk96FuAiNP/nckK2OlxeGKILBMZvpzJtexVcmodPhmGIOeVbv6XYCBV7luN+RctrpErg4eRP6Hz1egzSJY7srv/lNyr5N6vSt4f6WV8ZgECYrtvS6mVzBcahd8Q8ixu9J522zEdheGB4pMWFBUwklPfrRSUpXlNfaPWQYnEl/WFI0jSkXt97xPbmu310rE0Cv4jnzDGX/NX1z6PMyiig0BuGEpuwD0Ti/ZwN33oaQq2fOfJHvBE8wwgs8uS2xeotX5Igpu+GWPxH3nC8H3T4j+oebZY/Q9YTBH2a4Ovdolus+5CoklNv2x2BlvLDINeLntKX805baqCkDVEJgnkotzHek/kZNMxgkEOBHtvpg218JT/QKsj726HtOof/ikLExK0CZNWd33nVR19aQzCpbAF5A72C9DFeE45a46j8tgYaBaAtS4vNzrUGxbJ5/4mFDOWozi72QR4JwkdOf1lZEAdK/Uj/4aKQCyB7P2ohafSLlxpdaPbEvUehByZCdMSIQqkP2wOgovKbUftiDARRVME/IjMuEH2BoeLWuW3mLyZMr4XvU5+bcl2k1B2KBlpUJnVsO+RYIabyw/SvTh3wNdF7tvSeX1A67mZaNFMKy026hsArlIRzPZyejZHQNrze/eWqc9mGH8/OGjMUeyWRHhEAO5Mo61xhadr2JKF9UfoqM5Jo4kMncFQZ1zgWy7hIp+TRO4YMbq/5lFOCDnk1y6fga/kZReW5GZB4z9E9iNlixoWUAeYyMoiU+dDZuRbeM/KyLhlPZTTovryHCuxhI48YJ2w5KV45lXbq7vXbZeKfFNQRm/5Sf7JehjuhRh/n1HfEQ2586jayKgXyX61Xs7Si9v1tExKZlJOVsYjNkdL2xWyN3C48wYO842NI8WSrSr7hNjnrrPZF8QbOtfDaQEKT02tW7Bm3RQUCfiuXluruNVwubcHN+QPCknb0ktv4cIBPaIIAW70+3MccCBiV34UjCyC8mEnpKeX802vxNJCOq08pw3gIDg6mo//UW+WXSbTxqgK8ZdH+bc+QMQSZ/esA2900vCyDDlD9jQHkGJZBHbEIo6qZ7z/xnS9c9vIpMwnIGOQlMy/pKVhQQ8BkY7U5lRFCud3q5gx9HIBO2WAGXg3u+iLAoqwemxH+I+bMOJJv44svKgfw+he4e6csx7nwM/0EhmW1E8B5I4hd8cjxIrJ8Jwl7X8Y8PH1M7479mf43qDh9zrz2MxBfl+rDo+kJ6f5nxGscDfy74AHVVM4DygRjdqXLbNo7CHRZ4BUpGxBGu70fjcjVUGNmfC/ETa9f/Vrxjqgn+gWsBlD+tnA9+xVS2YO+HoIqQtR9HRtXz2pnKRr8AfWJD3J98Kmoz5LhpuiFyVVgCWABxnoOL0HYtU/U+Xa0kMcDEMtuwUM66mQ965DLK6z5vb4iKf424KmkNIS815ZaD2QFscLJSWkdbA9KqwzSd4fJnHH/ey3IOJErmQvg9ZYkfF6Oeo6TRTKqTcPY8x2UHS6bRLGSdthuhn6+aBTjSlzEW4JwKtGptxaEPxjcubFVlye/RrWH9b26mt+sHBPiB85aAU5fUtp+HJI731W6nNGZeOUK04NeI/qIWLgtwHyOd7HS0E7Vu69nDmSJ2ltYnC2ZqQ6jpphZmBpQ8Ui1Tv9sguiHMfho2Upjg3dJqvxM9axnyJuC8Gxp/7wrglyzXGsZ2Q6Wxlgh5j2Oi2E3a14LKn9ITmvcF8Hu3V3tEOrNSlDQ7q8pBT3dTYM6efng+eLenVa569NEVN59ITG0N2yL//8AJj4b5fz5k1cpp0F1kAmDu4++4MgwcLW8QaLUkQU1WxlhcmSdCVcudbTPOt61yRmzl5t5J7kO5rfrrc3qmmYhbEzinSPnlLH8mYzMbU1ka1GFwsMYVV9dTRgSKSjb3G79ad7SmmWe4q5ZlUJQU+Vk7NLyc/S/nb7JgN8GkorCLqvH2TPMjGT686UYCxscBAC84oNAUyJqQR6frMEEpWvn3W4OVukGU9AWaJ2lBDLKHumvbHLieTbK2oIviaf7L3lJQBkWtgazjVtT7OkNM94Dw69EYB/l3+aP9mzbuvgEnC40sl1os3K0gyeJqhbeY1iSmwiN6rq8HAqfyHl1Frm1fTQKclU3/kPeYfW80ak7Em6CnqWqzaMHt8oSLWPUbEhoggC+dcxmV9P1FjKzbeNx1kL7J7jZDdfrr5PmA4cXb7Huc98d9d0nOkgwBdkgRowOV
tsH4Mts4dKyHKk1SHqP8vjilMGVRIgSTgyDXCDTnRkLUTap1eWSu9CHnq+cMyhWW/EekHFugsw7MV70BhF0neIe6DtzbcH5SyvLlSYV/m4+WJoT5Zwc159EOZExNpIU2+FfSGVvK4W+aauMmx/2RMx7rlNiIbxtmSI4vfjXsQnqylRbyhvZPijEurKpMu7KBKkjhYes9r9Xy9FmQxjG7fntkYNVLUgSoqSrKdI08cC2QEhnBXP4hsxavc+8IfLHYaClVj/IiKW9W1EEqESOHcoXDUeMt50ytTfLqNEDvQtb4OYdpXZp6Jul8Vx039VrD/e6Cd108WEIxnB2Lb8G1O6p9Ot7GtyeRhAKt3utkpTgKLNnLig3mD1ujfaxaokWLOYCsrtp4YWx8GfnYYGG5ii5nxFgtRHK4uvmK2vjfd/z83ON1XcQH6YHI469G/evU7OSUFPE0dtNWfNl2brvWdHI5oa5Rk0CScmRStKVkjYZJG+sCRSAdhmQ2Mstb2m4j/P3YfmpGBpM9EeIVK45qxxVptTILJp1sKezAKmSxvCOWHf7bt8kPCzRH7UE4V4KQZ0bNL+wtAh2/gqaroOjT9P7Pr/gwnPB7PZAdkMMEvnaHfU2a6fEkJeVUH0JF7eGJ+561Wu3O73W9NPWt6qel83lP4zYrI99lbUZzTUFnHi1xTDuOC4jknmO+LPqIjqI3rE+gJVoShWBNl99rebsLWHwbcqqMSs9X6gXIUpKUhDxK8U8Km+v5grWcDeQciCXQirx4o5o+CNWAyDUwMVh0wuvlgCkRt8UTlkRshCCnO2YqJSiaxK3gMHFAK3U6r2ZwnGItBZ9FmcALTNpz3/P0aO8TmXltru+D8eB9iRa0/ehg52zV9rMQ19GDr1YnjE4seltARenIcCCAT4k7v8pTgnyDHV/xvV2DYQsUrNjXafn53xYTOZXhnn4o/u8mTl93IYhLz8JZp7QJhnqwZ55HUfX6VNFrNmV24QGfJ6b24vGBl+4WIgABgRMVPMFifnWMICA+VLPm4NQJ90SNh5c8jx8p7XYT3P/s+LQgt7CazYyxXh2d70I3znEovw/6g0Z7i0+PezHgQyghYGXz+yQVWZ9+G/7xkblDMn15LR5++1jtaW4OaZw2KC9CxM/ZCx2ZLL9LfYRUG0qDb7D6SnFBugJFLeA9ne8c4H5CkK+9PQrfg3M4PY73p4o9ATdfGpxtlIz9AfGePP7zb6F0qWOvnBo8K6B3AVEsdQkREAzBLVI8SGDZ/SI+YLlvx+KeRwGInNkht7X3KQ5NmGypAMIIqCigJmvtlRkip/XCPVbChmZc/nlvKxk3nHQKrBkyhF3rfKrLTwyH0lVtDAnBujMivnkwA5eaZC3f0LzmaqcGFrmMXFmg4aL24SX2ylRUuYaqbXDH71H1fgKwh+zvG7jWLEHUtDxOEdOMfesGkcTRBY2CVOUsJelC9fEio4lVFY7/NbQvMms638dpyqKYckVg1AmUFMsz8jrgexyKrtLL7bo0RCpoKVLz29L/lPPrfA2qFIF49+S/PavYJiD5ZYCo3nIUbdsyp3C1nMywL5tAU+F/JzDy1o5aChQL3GAMx8M8YVoRZ0WxT7JqNPK/1aNEEHoLO6w/chPVKXtkloeIAW5510ujXkbeOyyn0OVOSLw9o+sHAVcW8uMsKT6PPvb9b/Z7dRXSlE9v5eL33TPiTixujlIP/QfqNSnEx7p8vqCWm/96UmAsVCfTl6DCGr5NUxdG5HZR/Ar3h5h2sEyeH6IQi7sLTxRHUQpOtIzNoT2mWl3j9xc0NYU6FUyRgIfYQj4COiHF9WEJlZwN2VIwZfwTcWIX3hd9ZgMZgFC5YkIG5nMb3k3LsntA5qTBKw50d2ii6UVXRmiVYXN/yFmRKlFhAolsay0jsxPxna/+ezm8dYg5jwKpGmhpbqwUwDw3e9AV1YKj5p96rhZ806ervAvtV9d2nZBgKe5K0tZ2j4CtvG3gIKSHl6Mr8KnQxikJ83g8HucoaAvvj3lFXWwa4ORIlJO3wrZuQDc6TBCLS1G66vPkJT09vRqkhjXBdw0gmi58D4D++ZuFQOH4k569FzqAazLpM58mPNC4M5/MdPGAQDoUn5Iu88a3yBtUl5UOHcDZnL7m2fa8BvCUBUPKfpIw/eKnrtzMS/UlkZ1i5fKt+ioU95wghnhiP2RlyjJ2uRG/ZwLjCzNjlHqzS9QOzEr9xUfYtV9l5vf2DheYhE4KGRAscTaowz/Fcka+mfUoa3e7iyEdFShN0ij6RPmrburwYR/tIrvgL220X9eD4Bu/tg6noqNJTz7u5PKU9qiCn3GJ1j4sn7fpMtsHiPhc9d/VTInGa8gNHGYqvJTbe+ayWN5kWeweFUnLS+6NtzQdLb7Xs7PohZz1RezdLZlMg9rtS3Nw3xkkXIuzBf0KlhLBV7lOql8HaTvrzE5IE0BAWEsnYNqpW9dVRa8mm1efMkV8CTOr//LjtokeaddVXSsd5M5Iju3+sgUw9ZZXk6V92doB6QyGybM/2k5tz2oqKPqEOI3gvpfjcrpHav3ClNxzsDV4goCPyyzFhkqrLgJylQBreVO5082Mc0lifJKtJd+RJihjukinW+p/7fewpgFPYPEM2whsXLEyQCF8cmcTzCOJzkt796TwjGgMHky1GuBWYNUCbcYJq8RPu2dEoVWJ6k4FkCby7sHO9MAvSUrQEHZK++bNMjfVPrivcicEYWFPnbJE+0PFDnRNK7/KFPcTmBd4GLVNFkuPKVuMbMU1Sz6uq29P2jVEsktXwRD0PqzjtcPscxiJmVXpJ46UZwCCatdAwfIMIbu6enV0XbF9QXQLx8DJiAtJrp819mH4LAn3xQyCOswvRBhaFxkQp04gIis407UwpVBi3hS4ZTKEiOiHoudJNSGVJEocZqK1QTA2fcg5fOVmaStVbgBiKuOCmXLJa8KpNNJ6eAET7BySfEpqY04TsZpE/r7dtRl4E9TvMxanJoUckfwUj4sRMmftoXN76NcCySj8RuO3swU9LNxhvPUpxX0sEBZNZlHJhqTN5evDiEouaYanXv8sFQLk4KKK2py+Vh+jJ/AZRsQxuLEcSkiwkrjVJNALl0iFe9WHF3wM7yETZ1gjy5Jp9W4F6v+ZP7xKJlxkLLO/ba7UYJH4cXrnTKxXVCLl3z2NC5+t5QOOf96v7YiNMZ1yc5tvvWzINopwU9xyrCWUFBy2g+3gJUN85hls0JW6b0uachfX1mFUpzcjoKjQz6AZOeFVAvl+mGCT+hg+S8VfR7v8DNzoueqFWvvGt0te3Y6OaoSUY4bi/VflZXVG+EdX26cbmHEslBpd6DG4wBdmR+jhT6rdFwP1PB+eFPDHD2byHDeQvW7RGqFaKo5XdcZVA4tOahkkf56DcoN3PFEcO6FnBJ+uULItrvczdKOpjZRAbRErDnOOuSWUCZUozzWhRKla+TgnL7Us9Xjere5J+HoJBvEN96iHmhKwwiuabO01cd3OJgZkpIiHK2zWlavbanv483RC1QAmLxQAfpBzKyc9/F/EgLWdaN4pZq0XLXGIDCOgdqUyOogtmN18nmFvsqUVl0vsrNlnWicG/PqbjL2KxYBJD4CdY2w/QRQaNxPpT7kBKglkAnP588cfKCped3iuAyEy05GSntDorHyE6EiEou3GKuAlaNUBvCtTssjN/a+mA7jA+N5HSS8lHJbNhxqoUjg8GtSWGSOwxuRap8XvV4xlj/+qDt+Auyfg135JXPORQVDk2y2gXNQB+pHNZfS7CAPpnwPCnbgxVbO6MhndD5Dapkx/606P/hXuVFzC2qL7fnnh6NQPdUypvV/kgy0lIoR6wQsA8pTGeg5QW8oz478dp4MxYOQS9lS8yAlPx2xoNoE4WQpxIbVYgkO1gjI729b9O7nxuQHU9v8EgKlFcKS9Q3G+G7+bS9a6a6C6ok2DqdiTq1w88nruE1hgD46M/b7YJMO9JGUKyystGYDjU2rimqNYbP2TU7PwHkrhPs/yloRL+BLkHy9h1mVzARwo1b+llZXbRl8J74LQ/MbCy9BG1G//u0nr0ZmmIInZsxUfP98cDpLk6+BBDKh7a5El
epUahv+tXmQxcM6VkxXni40tbTNmul5YxYufePYv1c6jM3FHtNsWBO2dvSfIPz50QJ7WhYf5CtcC6VKMGx+Mv8M/IccFwnotWMWv8oHrIJQCYucuEh+6WP55JToemHjucu87gZZvxeGUcrPIkU/Yl35Kk5kl2PT534UZtKJOaiPP+QmKgdAb+iF68od703NVPC7ql068mRwxpe9eVMruntrPwd+EHdj4SDHmNJiNLHr5LFrNejtyj32OtPVl1AtvrT0TNVGXNNf7cYBFN1865jFXbceuJ2g94KbzXOMOSkrexBqdRc6gE5XxCytDvfWKUeAbOUPgOqltb7PIDDaQ2OmNUkYmg+GsgHps7jRs/mUF4ul7o4p19JbYu+OkY54Azxh2X9Ixi5dlyc7tei3KxBW1Cw7NQ7MJfTzujFTuwYHwkppic0gsXKhXQNJvqXb8l7McKU5fXhL6ed4qHym2QP94n5PHAqlUQ1psftkQY93qMkcX+SR0XogX+LdqO84UBFmIf1/DplK/tq5+q8e6rYmA2rDirrKPfc6Iznmf8tWTKxiWG/5wlakaowy0bxCFAswkdCpDFvIDqjmgQBVJLj1gpm/76jNZ/+rVegCPpgBwk2oW67okHraKkarWyXpGeDv+aDjYkbtzQx4/cxLfL5f8UeOJL36WLcEB497wSaP2URpMXY1/QeDKkJPuEjMUc2NlkJYG3lszMtQVsJnNxASz8HqbPj9WxIleEV0noWn3QMmfwbR1up+3CjxqV+USynMV8htlRmGCsiY+yFMTDtuKd6ey/wbvQoBwrOlDoP/dlItz7x3D5C2Cx54poVDKlN0haydwyQ8G3kqrBOgbDvEWm/Mjl/5X104Kr/j42xbjdKa4VJZ6eOZ0AwkdIQM//XsVXT4MkrL/+QQibFkXOd28j/3yQzgkxdZbyyw8WZNbtWKfwT8uH+Xh+mhBifag3jW+cvt7Zb8JHMJS87km1zXfMlClvTY8P76XgRqYIN2MkkawzvrGmB3jQH1nVtb9jvLa1SMQheV+tmDe8iVbChuxDPMRFiF1b59OVaR1I+SwXZRJW74kX7h7BzWF9YhgEZdWfLkgwxW3LV69nmdUDyQzPv1msVODgZecQTC+kRGaxDaYleE5PzYIyiXG5Gp37z9ZxNPTo7/pRaLW3CKtI7RjKEiVVdfO0Ne8gVAlLZUCHu/qksAoZggxAITyjNgDleVjdiw+445DWEkG/I89ZPSX4uRD8NXornZ3ksK6HSBdphA1DjloskyAsiNKj5V67kZg6dVmwHGe5SOTg3n6Sles8lLKSkccjT2/tL+x28spMklYApw2BgVaZvonG4Djr005kADL3gpKPbKvfYXLpUUXCop5T8q/svA5JAj9TYRaYV6LkTEIN0VVVe5jFyZ2GcH8Ub+x44Ds8Zl+TwKjQ0EYbT8CCwGA3gRmajB/6huw8b9c8Sc+zLaGAS0kJQ5LDleCfGXaJSFWIqVUN9OFDfVlTAVHPTUJSkCutl93IMvmNZj72F0exK/hK/cxEdoQ3A3WN4tBEyoKGDYs+LkJe8W5e3wHpVn1daSQz/vjYb2Y17SpJdUA0vK9sR/xWeeBFakeLIpzREUz0DJLVrmrWw0ZQ84PvAcyUWOBTr0wnQJG89USnaoFCYrVaVFWK7agk5DbkUSjsulLxN3s6wI/AItQqWIFKDp8jf5Vr+DW6I3JqaG2YG+NByIM4YIhU16I6LkHW9QxJuAjKwLO4ftvSliECI1Ayr0VutfPwA1hFFXDM5bMKRTctkLwslF72hHPDGdzMoDAL76qMwWmp2B2GU5zpwqG44bGudAMtepTUmsINpE12XpP9gBkZaYJFrDj9LJmNKSziYXc/yYqkcjk6fkPbm84kwi4N1LdVKe90bSDL7+82PxNJjQXfM5EWfZrQORhCz5WnTSYwqSfGjxvdyI4hNaRSgt++9DB3W89LpmNjzDZex6YeV5E8myJSaE0q849l66o2sKXsR7deEHk2IHPZIeYQFJICFyz9h19Tz5FxkYnWyCe8kBLZq6cdIG1gHu1D6ezDvBc87zWAOfD0tqp6ujuvYAwD2nECTMvdggMLuiv88wRJodXEnFs3aMAPspAWDyxJyCotEKFiooJRW3478WwtUB/exuDz7RWDjjnjpDmPk9LRbS7uKX1yvQoU3n4h/2jT7NOhfIIPOlRPyF5fJ9I8SN7OC0oUTDmI+5ZerdgRgJV/MuA9F2+loscxt6sobH32Qjw7mrQEizmZfna6oYXeUS3GwJDx254lt92mrlcS7dYufW4BYIcR1YyZ3unKkRN3K3mVxpKIYdqC+U5W1PNTelrVdWTNUMoeOJVKh9gAZcRZYYLG/KYJ3Em/sjAAm2Zd+kiw/2UtgozmDCm5r0Q+YdSSw4rz/OHHu5avAzLqowI4fYwsT3I6dawWJiKA8nrIcKCVF2Mk3s5tvUPcyi2EPP6ncuoUgEqO63DgGrH2b4XkHqxy1C+pvUvPO+h6ug+u+Dwj2KVJqwnhbAUgtWVE1dZiDWwIaLMReOW6u4r2GgWgxBJkh6VTKwF1MNzlIRlsV6LbjyGm6qbAyhqUakF1zTW13ZGY43c/9gq2PS0hRrC3O/aN+BtOmMGRSILDo4onBvzgKpWWC5SFvcZ9C2kTNqtTNGgevmNXaL3+hVse2jzcyxXoXtYU5soiE+a4E0QD70s+CpqOMhdccS0ZU8dRn2xPWHSJey3pIA0aVXZtVaikveZoOn/z3kW7MbTgpWm9yRhAQajRx7LdoPn/qvG6BYqETIZbY5T5DTTMh0cp7ntMxKbMdSOzR8tSZX5AEE2K+A8Poog2mctAMX/Jfs3YXflCqKa1j09csar982P/NDJ9dz+ceiCgWFY0f4Ut2MzEmDYI07idYKIXFyi6Fb5T0sYkj9ZCHRfwu0yfJkFqQNiQ+qpL4oi5jwEV7hGW6cbYAFB8tn91QG7uEgA2h8ldTbpRWepisELoJkX6EfzOBXnlea4t4Gi1qW00Hh/RwfNpJU+ZcXL6Y/6tj0syC5x/YxR7oboCnfpSL0O52Dym6K+h14//WSCs1Cwxqdw+MSz8sTRNr5C/SdDGjp/rcVjwj/cb5aMObjfu5IFqZaQZwbaIv2TlB6YK9Rf/O0q4R8hchMh//T02Mxv0YrpDxbbsSC/36XK/1xr3UZVdDFyoj0CTtSe2Q0wUzXsMD4OXBUxl363jfLMmEG2d0NdWsakQXlo9cNTH90+R4bwKwyzUh5iUy/v6d/zd1/XKe2T7A8Kg8ZCHqHmxBLDp6pc7ipR3+MQuHC7VIzWBKMJW+pF1MI4jjbJTNn8KnWDpHAFQkoi28CuLHwQ4zzfVs+d2OeE/zw9fwhONwNPB7rbQP5PDTBM/EE/e5jxda1vMVnT/EALCxJNMnliyK0UL+amQVSYsBgxY9PgzCbMZsrzScx7K81D5wZ9N2F5/IwIaXR80SLNZXS4VSMKK9ixzyvK8/egplpxgH1bOHIU6cDen/CsBTW7rP1CRtCWQGV28qqxLFEKm1m58L58llyQ8Yp4TsFnOUTUS/ejMDqvrAGfMNQNzMi2tVurN+mzDmTAzVSiVwqixL2db4lSes/hx/GeGA9ORrS0DdH89NOQ6mwOgAgPESE2IQNNxKXckc9x4AVubXM4CvH5ab8Wx+UOY8oWdU7ylr9g0E6km5IdGA48h16fSJf96dW83SjxSjb66QfUzdZhKz+GzRqHtAPEbywOUWauHsl/any1p9Q9FFD/UMFOdZMcgkwBl6Wmtnf7X8susThGqUOoqzbNJ/cEzvuEL2B/EXZKjEzKqNvagqiN5aQ2UFj4hSf33Jai3vKhaEQWc+nqtxAONe0q4U6BCi4fSnLouKEqm7H5jzy7vSEVrVBHLGo6IJQ01bqHftkQ/QSl5HIjHkAglu6ZC7waKPa5+DZLwJlP3vkh4Spdi8HCC+uO4bC22AJdFjzMernNjhWusoWw1ys0lfdk+c/EpXKsU+SlXSMHUqm1rLTFAonQqjmFdjuyBHGmO2O8eLzpW36TyozIlAVVKkg+4tOALADNlgFNxE+hmwCYMp176bNbEnn9DJ5atY2JZONBzDK3
rXcztKvsnMgAK5Ne9IySHPf3jgANgEnOablHHrbKjzUBiC5g9VD0eSFdNJqAq9FJEsRAO+a+5S/F38iOAhBsU2n4J12kkqDpiBLr8b32OavvSDrC8kxr3pOtN4t+3AoV6i22bhOyH0/AjUqzdjGxJmJjzUJhKTfbVM/n/jyzPEjG8RSgw9sCmW74QYipgBy+TG5nCO/kF3rk+Af/UOMzfNlsOLkuZ+s/I8EkYOMxZyKhbAjR+QAqAr/wySE6dD3+dWVrXrGKYZAQwAhwKfQ00jNaOf4ygmG2qTHKLBRwlOcUv8qgArHt/z4EWepD7/HnePm2sPOHyYKwVSJN1xjjCppCvWZIIsK3K3l+H6MIl4Hzlsai1CQT2gaJo84Dc3Ln4MyDzpLngrWRuBA1yUj8pKREBAVWDhWxx/5OXojqtf8cGA7otLHCLxsWdsS+MXsnSa1ofOTGb3HFMYgYm2rgmr6GH+dkA9sSgwO8YqN37xNcYolBcZv0kgDnhAneI+ig1DXmf63VnPGofXFW1710yERJWWBngodcwhuZ2G2cRCICZ1U0yjTBpPvVST5EMlqPqgiiJdaXerEBEzBcYnXRxids+vp0HtdDkEF0RweZp5UqRn7zKSiXRNn+11TdladV6TRDeX5Yz4kqNIvUEpdpxvRI+gK97edRQMoXwKzmzo17+AKf0O2Ouw7TV7eXX/aKl2jC/A28CIR2pt8UGw55xDSU3id6oCwPNKPM/5Uhd4rqAdwFRadTzO9KzV8akY2xlC27xLckBT2I6GkH9yJcc8ocvZe39cpGGmg9UMdu7WZr0VguylIELsautgJXMzeP3kiMbeBpgfbrAVuTQ1J0mNfIQeLZ+zfiLGx+jF+tZdeXUf2cveQyco8IdQgEllz0ZsXZIMP9ttodJYW2qHmmzanK/B9FYqSZwyQZlxYiJGwXW668Sj+DV0LmJpeXvxJE8zoSfJVzvxEd4hZI5SPy6vio3wTnv3t/tu4yio5ElwTKeC73VyUNB3yipHV7Rua5NMK1xDFbAIa1CnWrhgWz+hwZuvD1uWtrHjVMvdi22tAMgHNrd4pl2wnnQ3rWwqwkgXH6I535iInj14OUKo5pULWSMYAjKLvHxpO36d0Nxr8olriihCpeTCxSqq8L+0/rJTqjalmrE5DA3dJzweKjVhyUNROsRg29yYrOjWq2upzKmNbgHtlvSrIdh7h6EMOP8fZ9sXc6p24qGRXF/pnMSgT/c7fsEPygkY4u2n+GQA3KOACeKht4wO+JMmZee5kJcnKxnuwKiGB1YDcSOzwwYlVTvArkCphu30zz+Qu1QVLWcLfpN/U8Ki9sIl0BiJMtNU5uDYN60IebTNEcSkymaThA25z1wPXcrups5Dtz/URcoEcrG1zR918j+myYQt4bLEdhlwDrfowP/8DggwwGkWMGMEScuDSaTAm3cghxZlzlwH071v/C/UmTRcjnb8b0dc/wN7T+GIX/Pg6r8JSkbBTYOgV0uICwKXiR5V0POYz7sh9mHUC6kUKozTINhPGrCiNX2LvdIgu2/bWYJauIDBGt3CVCQyWnNWD9N4+dCQwvp/MFL97/cLxNa+rTGdTobmx/lIAqu+kkRQRbdFP7U6gz4MXx8CryKUZ9/t+/6mZmCbUaUON5uqDMNOktbvW5piSHKvpVWx5gdgk6MQY9or2WGx8pRbD5iTApPR4HyTWsc9RDyQBqD5yVGtW7uXgT99lbJcBqTC25P4hI3YcP3ezM1c9RL96KXAs0UoRPCFqi69wnmwrCX9JZzZQ+9dC4NugEUYxl6CRJgKrDNduD5NlK80rjOWdHZY3goSiSiBZDEKE5pXmGRzAnSPq6EC7vCnUOAqFpJjoU45LxAtm4AaUbfy/GENE02W6bsW5a0ETUexBlzQtQAhz9ME4qKWDRk0Pdl3Vi9GqacOfPpAWnrbeeEuHGNURByFQEFXWBb/Xg4pdDpS66fHlc0J7LTDftYG/k79/fwnp/zQO+mq/Ix5d1Yf0jCAkoC9NcaI0pMv3QEeYBLcVHlwDLYzm9DuaNrdMm+TEBxZ3kUFpLZUFAEBSLIWFMq+5c/Wgp53+rVcRIkIn9pvNPppm3c1RFBhUVCk1o9pDiE1SAwczaC7Fdm4RCMsxnGHW6GKPWum3/TyeiX38mjWxj71fy25c1eP9qhIMpTb1XBAOceDCyk/ojDf/K1ozcbP2j8u8EI6NtCO2H3lMrL1f5Z5c6WPQAiagXRHRZcCP96KdMfp9S+7JtyRJqXZv/jpHaXWfABTiWMUyqEVwD6gXlaehRK6rejOX1RhUHPp+FEvtAfBqrUL7+0C+KABs0NTocgwQZsskJ3yDtCbsMr7H2YSwm67jZlwTFjR5kW35W1R/3jbHXgBcHsPCWLdGp5eJRKwTwIJMOfqwmpFkvoAi67mEZOwkf2G7WHjpQMo6VaUVMnEWZmH4iDrNyiGNLEumWskTaWPHBdw3bb3ynVySCtSKDEFaAGNEK+0ey9vl5cpavh+Sr43utvulpLzA/OHeeFiMN0EgbzGTD/wT4CNMu5nPquuVYGvj6i8uu4j/yi+GKvnQGKUtHajil2CORiC2IqDGvdkE5d+rr4gTEttWAkd6vDkzKQCYTwrVA8OwLYvuSzhm5EZoONhX5oty8R0SqXovT2ilRQH0zouVMQ7aKZ6ikUs28w2qgpcLyzJMTo6ARg+7rTQ1YgHwfogYAhAVzGvl4mGtETtwOWVExYKmGJIedSsevOsyUbztRaCuYtiRy0UNFmsWeVUYy/XavQHxBzbpNPF6MK/8jfk58pZNnuJMmJY57Z7cB3xZLF492pF43w94lJZleOu6OCzgB/hxeSLKa7Tmx6+E9nIGrmT5KVT1chyi7VGh2kODGNZM49Uguro05qUb/I0Fo+y6bKsUcUazReBNKNPQGXsvYvDPBrfO2fRrohrfsLfF1pHICsHw9yVCDjCFIr/+ethMXDbLXlxFf4FSkW1BKjKmfwv1ekbWD1ApiJO8oF+Qfa1Wyn9k7FYU2TPNCx7ydytcXSUsXuFcjNMHU4xS7g3GgTobOAf7Gf5Hom6xmN1R7oxMw3XNJHjrKDPSPnd+umfB0wFQWU7bfKx3AJGuONlj4+ZApPTh01XqhAwfRiih31KjP0dSyalCZYR8x38eHmsu5nXPuCzhOXNXi231EqPG78XHJ4XmfuC8PnalZd3ieetfWYi/9VIMWwFhlDfaU1dz4Oa/u31i/8CzNkFFT+LNPPpha6md+H+nKUegQ9/J/SUJBNtBcE8LUGfA/iNs+wsPAaKNEjyTM3bnCPrvjb6WcpnAqKd0IzRbnGujJUqk7qI3UzK/8I+AOSvDFFEYVL9JsPjI33v/d2D9YUtthThuGgMMheTeINUF1DBOYbKIfpBEJV60tm8uRkfk5kIRBgEJHMDyPj5LkNNogu1nD/0cTo75C1duN22kWIZ31aV0HgAKP1JQT3xRQpMOmGKO/mzfvuc7V4eYEwO8sHDxHqM4ZCRJcbSMGW9Zcvot3VUcVbJONasaWRVNPfsNlQR3iBHOryWpzx69u8CgyfG/TajG3pl0+SvwtI6QULf7Q468VeZEdXlYaajNQJMI8IGl/4bcljJOk4p3F2SGYPWfrMpvEdX0rA+dO15s9lcCamXcyqb1/1av5By0Im2STfd6xqY0IZOaNX19t1SDiIwnylwsu0HWvH/uuTtDR/Jk+Sr45NNuGPIVu8Kei0Jc0WPo8t2339EtwGkXNrMmHR1Ex1c7qaQd6Wm/ZKr2YsBDzfJVZu5KIO4o9UzN03djbnNTDBuw4ssL1lEbWM3FOVFlSJyOejUC7RPiKBKV5SRGh5MpfAZ+61Zh1MTCV/nzbkdUcE9CeEFzTLYFwnHRcVEzivMHxAm4fO7MVAU1zlosmgBN29H84wF3ql7sA+KZd3uubuBwKNHgustNP2MR7HiwjLlPAiMy4DuNh/lZ8h4eEwWmNgLXSMF0l249z6rv9r8bNF30AtUMS0j48BAti5ciV5RRoVD0ZPY0B6iw0gi+BkRBqaGi82r4fe7blsuuI25JyfZmgF+fTyY9YUhmArSugJoiTbJIjH3hEs9wRj1Ub
NmWiKRFYZdjvlsbb/nm+Ib4ym57tm5/dsbB6UU5KHCbKy1XihtWr/+3oZs3+y0JwxcSRzRB4wzYsgQRgAWWFBImSXePGsF6hjK8d2lN3IHwjtQCJWdpp3IryhoRj4Nq1NXjJpNznugHoJ9zaeKmxg1YovikXz7DT1IxE1tUFE1VNlcNV4stmITb2ZQfOt3vEIjdnvEK9E0sL1HAAs90s5AhUdW2Wgg8dleZS3EUKpbuEDcG9/EFABMpHsqWXa+fi7eWXInvf6evNX+9AsnnB4oEFUQVIzavnXzwILKuXpmBrKLeghE67+Hh0eRZcoNOvn0bl85eaZpDhv02FLVeFSVe5I5oE9UH0jpmPSG1S9Pw1yTL/BrMUngb6OB1iqx2Ok9XDDIgc/Xc/aM+//OUxFb5SXGZ4DiK6ZurOjc+sJSBnWjA2iKI4MdLj+KSiAuxfzyHivTgTLZf9Lm/Zo9c7RaOOfUd2HE/YU6hAS2XauGsojGrsWQKQaksfY4kjpSeeMz+dsB7YdAgpM0POMCbwuLfaPNxIiwvdp5raCWOiuYE6qiopbhMiXfjU9n0OSsJ27f7f4b5XT3JpS6eNq89nPkatWYhAZuci7zrJe7YA0Otzc20J2x1vYba0Rz2MyRf+vLMrWLKuRTrrK7xvean0HZbeJZV9RpC0Mw2ixQQZSsQI+UFSJx62ISBIOkFdPxE8i1DOb4lZb+cyga+DcXowIVK9cZR+Se4aggHvpdFXDWKeZ93h5oTjvBXRXH0MtOnTP+MBkJUUNLBIpN/qXJFoqlde1N6oV/zLRE0Bjq6oYp7ANsfW/CJAqEZQmtxozJnQhQvYq/731a2fLdM1NaZh6Eav3Z2WqvVjg2cN8SnlQDDDH5QZLzcCpIBirb/huZDW5w27iSz5N7e8q8Q/OffpSx8tvvCnSxhG1+uoVbz+rnFhbJPaXQFaWAMExgBSSyBq8NNRBa6yWG0xuh8c4GzwT5JD49sT2PDeYDZNJ5qB6AifVemZwk0H2iOtSjE90Zpf03kzzZPonhJ7MGW68mJkxsDH/ZDcKU2aHeJ8TYV0kjscbRQDxLS1s6iG6/IJcEs+biumdwuH/ZEwRKjO+5LokSZca7qNBwS6P6XfFWGLBTGJ4fZRUDsVdKWCsfJm/X52bZSybvevAVRh3xmP2BrAymKIMfufrcn3u3y2Q7xiKE8TPOQNeD5Y8WcQ98nAcv69nU+3yXNPLaw/IDU8AKpdRkti41rTLkcROdeQEHg7vItydD7wkllBfhOHgdoQ+Mwdgi7XwP+f7F9+3RVTeqAjmHnACnReIN8tKkfVRZusb8BZd4lXwuixYFQmqsk6vE56MssMBFU3NvYLHT3RIPssdb5+5v3/Nn56/j1pEnkaTcb9htxGk4kApfIgz0z7rh/km6iJ4jjV2qc8YoyJrFhn5kFWp6dlnGUIyHK1aSMEoekJsn37RzulLwF7N0jwGrhBNo38rn6vuk2GcjH/fES6WWrnzQZ66IT1ULQ8lP60g8nAsQm464/R9/lJShxERz2DbQunXUGicT9Ny3Qt9yaBtnqeEw2KiJQsWh9GRvxdyJNJdk+7640Cahka4nG43Z/hbUWmcMEiZO7EcNr1nb4D6P0fJsW/9sBd3iFJ6bZWhO4wGF1WcgwAEPTDOEFiHGAJetSEmuSvA3eL57hCwQ8cdIi9yL3ewM49hSysxtfekQ299tiEMBotvnN9d0zBQ1H3bqZUOCTX8CcAX7zw+Nl8vZ8CgerPJ+nHkBQOHgb/1zpZRvLwejLrJKaU1y24kz6T/tJR7U3eI6NwQlFgylKL8fo5scbloc2E92QSH+RqbHscJalFpGTIH9rRPaHNxcX+zLnbdvYw0Y378RaIrxvjJVYc3d/aldYStTBPUXqZRBZ3dKpA7vcyNQjW+50VHN+ROp5R0eip3hLpPlIlUWmj79DaWP0pifoGZ29RdFyNpgL9Wa/i1CFmELFjtCCJikCmqHfcOBDQ+wQnPdbGIOvQIcw/f/QRV99HZY0+g489vJDi91IImbzXOGRKX+BsAopzMF67tlDwI6n4g2d0PCb27/ZNuFsa5KEPrq5pZW3JDqIgL4AKsGe93QRNdYhRJbha9t9fa5y1INJ8e4ApoPKn5dAiiFnnBP/T+8Y84QfspfVp6oNKRcaf83U7l29/3Kvzent44kKejSoo7cIGQgL/XRGeeBv2lYM8ad+zS8ZZmKoOoZlNofvjJfKCMhNpN5bi+ThtXMnev1rg8DtcPluvipUICHDNLdgcoNlVcrE8/aHI+ntSfCuWpbySheSenSHaPQGy2yyswUWWPI404NOo/ccSQQ3HTXFobg5XP4CICVE+2Mpeu4f1/Tgq6qxQ9AITpLn7pomvML+mE+NL20Elh6onSgLAOdZMqZrNYyySM8Pu/JR0xH2BbGaOdYJ8Zs1geKXJd66xdw67HI4rYJAFLCXyzglZSsmqz9gQFj+VoTE9glfS0S6By0TKjq415/c3OHphsa6qfK1qoRGoKWu6cZn3o6jhPFbjry5ttAHi/bvQ6A06x5aqHtg++OWwyBFfWBdv+Lf2bJVDrUtrturB9DlyPEQvqle5ZUV/sI9PJSX737HRUCMutQzz1DU07tItv0b3MEGZ48s+ytNc+CFNQKdyDlrpXuJZ5f9Tl7lhZIxjSZIT/4IiXiaoUNSxixd1yVGc11g6rjLiFfK7d7pyt5oYx+Twvy/m2QpiGUlpGzBDCFOkWP3HSPeVZwHO3LYWrhROCDXOj0eaOvpSWiMSLSNrzGwlp/wGgIWtXaE/WNbcAbf7KVxZrucUAxBkF/uTDM0x4JQB5P4X1imx2Nx6+8KxcstUQnNnZ7LGZAiFe5D2t47PUCQp+eOcxjIjX3Lz8IUIiaDndi6JevtZ/vvGsuXnmJWXZ2siqMTPeH32b+hi5ysOoqtZGAa/sPXum3x2RGBUFwisSaVsVb/O3iP7i6AGpWFY0yRxa77IKw+dN29VjpasysWCIEfQyGg6KgKCwAN8qrpBLxnEThtq1hya0TWqkmG7Fwtc9TfA9R34WAbmMApCbEBJMca4aGLwm8K3MwY77Z4mPuM2IOScEpcztWxo8LXYoKwat4PWDhcd33fF1RtmbHQHdnZjRCXCNyYLh8rivdzYmZgq9V66j7amzWHUN0KOJDuVOdQW2kBk9cN/p10GvbVFZkHPU9C8J1Cnfjm7L2XcLgYeAyoF+VSE1axR81B6J9o/ecqunSP+SkzYpwLwSLknNKKOpCzSUU2yo8Gi+lS4/Y1f9uZJGv/52pPY1HG1LWVSIrgXwKZhUmYCbhugZ+cL71xdioVw64KJHpO76QYGnTa+tm8iwDYaXfLa+/KCt3tGWxHtBIT27OLkvPkpHXfid2zfPplCNLQxOzWWQwM7g2jizEqW1DXKEQUbbixRCgE6zD5enkHp869ko5Nx1EG+ycS4RIJZ98fH/sEQu5oEWj5GOI2k0+Ut03aDBsB40WraER79wnqcVfc+IX/8yNwibVTmf9kGnPMoe2Plc81YHjW17LIJwbh5TY142XYWepBP6zcCjLaLh1ZFDSS9s9r3Y1D1hodXBhk23Kn57hPfCVFcVGi5D49KHwWDCM5w1b2pggNyAiSfyZQWjDKczOaqo4W7bJ6GFQBHPsPVGy+g4VljKM5EMlW5cQ3PzuXmztbY63qd9F10IBb7nKbCnwbGjK3VbKS7hGVCrGeh7A2v0IVanIN+pKuaAwVuGmol+dBhnyue21bdebbFXB2jj07iyTzPzIbVKwRo0YKc/7yGxrsEVXnEWsxCoEGUX4Bn7M+TU2+HSux5Gto1KKiGsoJc9KW+YpmwBB7EnLKlTIfPtBVrNJdUJWPdpNV3F+js9KddyV/w/MfSg96TLlIAI88LxozQjrIgY3F4/zuhIgVBN6x+P2mTdjsqskRcxRWKiKyVwaxsnT//DiKAEK9PqdMml3ndwFxy6odHnEptxR0TAwZEoIUAXVrMEIQLOf891RTbBrpKBKK3cIhIObemaffqTQsqDEKXelXZCOP0/M3SKb/Gu0BnLDUGKPulRbMD+fpicNVlGU93CNpvJqPN5M2jtTnT/Mat4sLC
aXdd98dRvZiA6RNUKzgHPn6PO9ZgMMd88Bav1sBN15VLYxvAt+dhjasUqAFMADgDvZWK3Sf+u37CjDBwqHtk+JmouZ+aagMrs6DKPTpjkuEzscqLxcFO7SX4Oj53cSiSpJRfKaeDkY4ndboIUDyZa+7P+GI4Xfi69fIJyuwj9IKsm2C8VMUDtKrkhXqbfvlmO1+Ut1mxK12BweVV7sdhjUD1Xs/dmL5PyFk/zUSrEisr2C/K4PWOn4KPYPDmlIrn1M/HZ/haOrqBcgbZFyxkWeMieP+fWRxxIWdAZG5LGWunM4VpS20gyGFlU1QPxTx52FdHe52ULa2Q9dzmHMBlFdWur1AuoyISNhzNA7eFKCxrRd1PFicGTJzp8jGkxrncuO9TIqvO6cZzgNEQmpDDIu0kj12c/6ZvygHgVdDVCdKd/mpShrwC73HTpu6Ud9JE9P2tWUfwrpo30YAT6aZYNnVHvLWTJskTTKIa98hq+O/ocJmn6M7+3hkxKWkfVxnTPyilzjQdsUAE6T6YMa0VnxB7e34bd0DBAqkcYlsP7SQsxRlVVSPGeFbCcMk9abZxwAYe/c7xMYMlw52k8Eswx4RYrCd+mX8d/C+7ZwngXu5PHfwDox86GOxaZOrktYnD9KbvEXsuSl/9iXMXRtXeH37bs3JpR8Lm4gwJ1IDWrHyvcQRjjOdI0DliixBbZU8xFuBNyP5fkDj6mvT3IQhAQfd48NLsjw1R890ufFPgbhkgyTyTiNP9/29sQit/D4lmYSAldY6OA22ZzlnTHQPUl6VU5WdQvQphCcBKPXOOuhvEpfSl0Ifv2Zw/ZuSM/hJVqXTxA8CAnauKjeW1ODZZkng7KsxcDCuabLNFVRjXs7qXyMPELz6bKsmwNb/WpmGnou5EKflcHTgBdOMXRg1ISk5CoCHDRuIkLQhqkDLycuT+2uGNLlv14pxHI9cskGNUy52SriCqDqdBMTxJZTh8vL2eOulPkxi7jJiLEHU6isHR5Fdztfoq/0Iw6dIfIVBIWCnAB63gzrzRvE1eV7KM5cu2aPRWIRXtdmRNO0aSS2kbGFhB0h1hizSc5wVQWdtW7N8+dI3bDqrn6NL+Hu3L/6QvqnIW1ZqRwI2sjomDCuGT/ZDRLBUSqv2E+19EWlzp5Nfxs+oOChVqzqa7u+anKdXBjpV+JOUOddSTXYfxg6zCD019nIn5XC1uAVTHTa3RrAjfV7neK0smY+5zIRJnWyA7OzNL+fEFFo0Ve1xGIz8ct8W7MZnzdxo7DWZVSGGBfyn4jap/aGdrB0msr1qwQiJlA8/7WRLNUbJYFw+W77BIJn0nTAF3pxXGZ1qRDgTrYTALepxgYX0af31/yiQZnYhokMRjrKiJwyHNjSqzyKomhXClVtQGZQR7elSq9UJNh15WM1n2f+i9dKdWhxtyFq5e7ssYWQ5CJs7hGNjvkd0zRJmwHLhEZwaFSwUk9N16ngBRxLIzgHWWBSBasGer3PzQcGj/nonrsGtEPEM59DrubYb9YLHYhnVElik/dLfefFZkRNQPmFzqKG+iFAx/kv2X4ueHLjqOjkVyZSsGd4ePJCAdiQ57Wg2Lhe0+WpCStjQPQ2XbnEi2B9GL48xMNuMXectfeB8ZTipl58PfQXY6j92z4Ejun4WBjEW2LU+RpncXB+ozq2ULMiNcspo5HykYWggJ6tKdxPqKot8cKxdNdttwm6DyBTCLjezzoxP8+VCE7RvF5V91pnkJr7CUwUJZBErYKNiF02s8V6OsG7peA6UgeV3l0ZsP7Z1z4hLAWVwKRyTZC19xlDAUCx7CTeGD027y4nW8VB2p2rtJUhMsAmlDBURrAZwqDPGlhPxk3cME9hZT4R1EE5qV9RPuLMWpBBOde+Tyfs0ovcEle4QIPb48qnos8wIKVB7BsoTQY55wN5qCUgPZNGarhiScIELwgpTqtV7WRGDa1WeXfAz7OuIAhGvNS1isrxNrM2lwVMvSlulUG1+SHkQDP6QkyEOYkxK2Ofa8Wr3sBebugC9bcMezXqrPy8dUauWfEHVz26C72x+UQkzSnuAF/rwsBEactINLBLnPUpO0IHHDptT8i/457RIJtXDVI5i3+vUFyfrdZ11iWrkIrmAIW5B6Xu2u2qfl0RtwPmv7aIrOqjcPePxZUNV/NnRe0sgpGMKC1D2Bj7G+963FOFkx4SdW87EZPPWe4uq89TnTjtJehpvtUI3gmGJYOdHDsANsDo1PUpsU0Q2Uvo8CEMS6Ky2duxmkVLDZfcYdeWgCqOz4AOEu5JC6/F+UVhm+ao8rKa71Z1WMgsMJjYCX32emP4ggwNOhpurgrbtHl1rYikPDq2jJAwuH+NgAHRe6YceQB/pUMyt9tA07m3dtr2CvnU9pbqVePQwerfnKB2hbEO7Rzw/tO6PcKO+RNrMBgxDet7dJt4s4aFM3gyVQU4cCOj4Em29n8v8N3L4om2kfCFO51l9AyMIBOJDeXp+9PftZXcPOxyPEFssQOPge/36X2PKh+II8vzKK6kcUiO74BF54ZXvL2SuVDaUoMmfRDgIHyQ+6FChZvYZ3XKAG5VGx0EfmZHvd786sIlyQTnZelNesuCFyiobmPBj33z5Vn1ZUb5tOiZH8xTQTDL4oEtaDMmMs+7JCIQGShAT7wnqGRFFMpxDsOukEa3AY1ejHXGqWbibf4ioNOeLeOlaNaof/dwJUveAbq5kXgknB78E7HbGVQCNkglNVGjzUWGxeyCiH1+97oRW+PxtKq6ODJDBOEJwlATTgEGcbG3PfyFYZrF0alnK2CH5Xmnj4hJilynIMjs+/s7SqUqtS+wWUhH5B+2DOZ8YrGzjszaHd+6sVgo8GcLZN/h3gNkzUVI5pI/FGDZN6crO3Ix1YoXvpzKv0Ma66PKcz74zTtH9/4BCyMQpODY/hbRgj8YB4wzO+8tVrkZkwNDlqofX4JobveVWB8tDSfvqGz8OefhYihd2EBSqs5aLFgje88OoipYFI028JHSolDQ+Dk6wCilRmoYFeYIOP9GYHsKcLniEjNi0to5SqK5PCyjTQAW9aUXHNoRK4FyXt8fLdSZYHk6KEU7TdsiHpDfooOganoWGZW8531XMQNi2jwNmfaz7LmOwtWefhsCkDyiLA2k+H9xF9xez4TuiCCU2T+EjHcC9hhmySo/zAFeopMJQcZrvZH1Ga/b3trS8fnC51ECUHgYmyTUOpxeqlKrvKWP2JXbOdaF09AYHoG7t0qKdRG0eQkLsEaOrdHsr2KCyB33V8pZ34PqtCy8cWTSoF/7Q2b4pnTqEatXrdLlLsGMBa1YuynKtR7AoPcY012F+R8HwZa7GDf6RSOYbPJ3cg0pxJiDm8/7EeDiQaRYSphVw+Io+m1yjHn8eSKhxSCwRZiF7G+H7eMBGzYdrFc/XCkJ1mlzI2vdavekzylH6DZeUZEI7N3bDewHKzrErHEMqeAnJJUMcQxm9A0if9tO0ruDVwjDwhjEhRrKov/lmtBpLYVs/iJqfwdH8uKFcefeE7gtMnX47BKJvIhnpZo1gwAdI5rvVWQ73ezy8dEqLMjPP16WEsHkV2Wncv/Ge1QHBbMA7qLlO/EwyCvLLNlzNfe2mC8Lu0lPALu44HeH3OxQ+jvHRYmfviwFm0pylDfr0pSTcfmopgqpGYI+Y2FSATmL4p1lvDWTDN/SDYaUJe+ozGc0mIFTgPlrG24bLhenI8UlGCrkNlM3glbup1QpcDmLR6n2ST1gFlHg0WBgsT/44Jk21lzaXtqtww55URMkGpa7m8ohgjai4RKJzJlhT6wrP3EAd47oOZu4fgIesS9KF5Z4tLFW0EUjC68JsgV5XzZv4Exrpk8BgwhpDEEhugHfH7Ysvpb0e+FvnwmmsNsOYMi5lEPAj9HuDiJgp4Ye3CSrViu7aGGoOHsHEUHygMk3Lq9QLtG1bpzGaatE1HC74Z5oRsCeEPaE4uNzWnrJl0Cp00iDiVdxsWQonLRc0vhKh1ffj/Cw82vUBgWueOgY9grvBsM6rTJ2Ndal5i5SQ/tCMBs6yXdNYN0ts26jLuPmV/VB/DHrtCCYGlcWiA9bSdDgZo8jMbStIL/cLn
qogvqxUPHRBMqRB8R6ina138KmV/ab/HPBMBStDMYlSscEhVjcbrHaYJWd9uITClV4PiW/IhasTYvZsnUKAFt9Jr5j7gzuXX0BgnJe3oiEYsiP+wQRpFI3EetYdh2wXoqbRhILT/iHsb5s4r3xFprgl0VyYFkJSF8nn3qVnR8xVB6MGdz25nxw8MKP297xW/gw8KnMY190JUxzZL0kLBEhjqHdqtXJ/76A4MJvJ1GXNGLs9zyfVidiEhhefGuHI8CxXCqXHOiRGjjc4MFLz1LOPS1jhWtJrxfuNEMaXq4XIKbuczhM4cJ5wAuiwKH0BFG3ihTnxZDDehQIyn/S33kiSouf6yoa/dt9kEoRB6jQkBSLu23lvMla8vuZ5l6idnJps+Dg+MBPROr7FpwE5sgqibyrP0vaimIZfFtEVvsZuf60Ojz25KmJEGGxVYyR9TwWxzw+r+gxh8/f8KZVbsKT2oMMFHabuWGchHVE+LAf5Xp+EhZAPF+Tf1W2EFHFMhKVVz1VSw6BTFXxQ2hAj74RwJq74Y1gLSfn2YZSgZNN57Qog5gZQwuzpCsEC1p/wHqVXp4UVpDmS+GY9tv6Ci+3acdPBF30vCwrGtGhQ2qd/SQC36TRupoPpdFfwKEwBrU1EhJUSjnZbf896caTspTzrvB7UQ7ZFaSQLi2d9OrKK0LuYzIcsCTTEq9i91ywm9IeP0QufDJZf48WSKvE4WU6xftReE5v+PedpWft5DBq504UoGtR42OHRlo5rzR47Y6omF2q9gamO+1bqx4W+gk2Az9ZfofLnJlDtsCPFPUBmS08QsHs+yv4Cmfx5+12Bmp55wqq+NHOvI+SyKCqy8JtoobiV1BmJF6jCfWDxdkNQG0S78sXouka+GFGxMmlmO1/50Uf9sd0TAR4cMq20omNsSLIPn8eGoLTRLYod7G7vooMoBkCkLrKzvqeRp0/DeNZvdssXCw9IzGQ3ksAEozYnEVER4u9z94b4kJCCAL1Neq7qNWUkUvY64YHaqgefULqYoDPFAhv2ux3QmpvFgFGVlPT7cUUSG+Q30hbxY4RLnA7yIw6EuxRUFmvJz5HCCjyAr7ciIW8ce2gignyvtFlPsP2izZSh05KHd/O8F6LLc5XtsmgO8QioXLVLRNmgYZ18DrtDOLB7G7a83031Y3lz+jTv7j+29hgv5jldYFGGRfiGLS+BUVi2axxGe308wMkxZ/cLrKphtKWPfaPjWbdii/dvNxx125W3jvxuvTNFfel1tMC2aH0yeUyq5MsR8qUCOmHDmrvYS1JB1GouOewAxLbg/WaJPU9WCyQZumKiStsCRRg3RpYujhDE96iTMu7CpX6Qq4tLFESpKZSXYVqPF0tDDkLTR+wzkZhpsuZ3EMMQPqvHoIJkRvqFl7EJqWKNUl6gzhIzmxMsRatjrpcwqNYtpz8AVlvHV+lmQD3dYHEjTZUgsqO73wF6Z/5dYWZJDUgWTG1MueMVIhtCk2eiRw+9GbiE029HictE+X3I6NvIA7kyVve/NSYzwS9UQe5HszIv1xWoV+58um/thMZaTIPUh923mcgVMPHkaWmBsSlsk7eRoqhkb8FnIE3z2qqu25SrPzkoZBGBJ3BUzvXcqgi+mH8U3r7InPKkYKrizoKnr6YryFfHy7E0lMOJ0PIloEYRiQib4cCb3tpqFFIcXiu2YsdQANjeRoH+1hgmA9svHEsfKRNabeicOflvcejEGwAJmwLYaZ1ZiPUlpgMRygaf894/dXuZv2ZwoJcMwJyZFDJ3tE7xw0Acy9l0ZgmctKxemWy344cV3L9O/F7Ysi4LT/VC7zhjG5zEH+WufYo93E4FeS47mRvqQVACQTzm16oXlQf3lTHbSDGqmo4We9Z4fHhJqQ1IjtPz2EVdBIW9nA9fKzDDM3nBCF6PVfHrjXcH27TEB1lfsixKXFxqrSzsVGRfzZnO7Lbhu4+I5pcnCU9+wDDbvMs7KCyAInn0aWrMEGQv7d5q5Qf/DCah9NJOdTotL9i1RMSo1S3ZLhb+kabN4sZa6hmkAOXWRdNR5rdmggJXM37D7rFYEpERPPT52lH5kme7F7zPwyKm/mY23FqBf5m4kEOsa9riBydW94kUqxcUWoRKHiNpSperK6eZVEP/wLlvXMgat0FrmXEeSpJjAzP5V5DovaVsyGqZuY6kOzV+Y67OP6oYuh6AdaHSjtauXctJ6xgmvGCHI6U1WnWuG+W5vFd1JOKXSymoxTKzQPcFwjBK+U3DoBt+h1BxAFV36VOMxO1t+aXd/tz5bzoo8gT+nv/3PNmtdzFvO3lJBC8C6I+HYxAmQtTucwZBZ6/EPVkshcY4ywtBHp8pHMeLrVQQwZkSqPiQVD/zlJ5g3iI3moQleo/sy2hyCMItRFrthPm45wMxGyUM9gnZ8DwGMMTtWrATwlBZXmPf9LQ2imHsni39lFZlxlDY4jQsUUM26x7WnshYCvdN8Dnu6dlCZE1RQ6SVKCR+IbEEdKmaXlfNLY+H9vrB7PQs3KGAJDb35UklPbBw/HH+7IGCBOFL0/C/D74OXIg7sA0Z+F1pNmA/xEOO+E298qozPxVbqhUCWmrdjh9r/YavAxs6TP/AnGcibO4AMTj+Yt87kOb3T9fyzNaJP9KFyVFuacMy5xXYqYFblPtm+62lXazIQ49sG0F1wY7SlvKnvryX9BwLKLJD7L8xUFbvKDNWGzunC1teuJolarg02kg6lyQuBqgRl85OvljvVsWzcipPPxU3lhYzGEQGOjBrUAZ4fbXD4Wmc/+xcuqBAaVIQP+IfFNFEyutvpjBVC4PygJ6BD4dClyb5haCGXD2W1hd3MDXyrIJEAgVCrPZnHAqVzz1WJ7GRdqYx4xn09/ifUpUINkJVFarG0uEVr2AKRUilI/6VZ4Aa0s7AgeV5C6D2AizHQOww+xDR6NOeQ1MlFcNvMOynZ4TSosA8MTNn6cMSIFnWs81KdNFHWY9ZVNxiJNo71TlD4uWctfzKptb5qfjbMNlMNJ7sLDyZQxliBfb0eKXL33jZbSPDhcifn625WqyiPJglYW+9Tm0xm6dRh4UdSHHAigqw9Z9DMldDh581B0zlGEbwpgWMN0xWA7npcaIh3jXEVr9jia+7LgN1mWzka4wXWIfq2cuneTbgvKyT/99u5AGqMvEm3vG8S6Cr9bhw5IPUsBBilhEhN9kHaoU9Ov/iyW4RbpehXumU8k7uk5KIb657B5nqyHpDASuHf3gzwoDFScq7c8VGXNEOjMLYY1KHC1HaUBhzCSWev76wUWO7wKFFL8A8yHMbHkdc5BqANnp/zefidONYSeZRf2Gt9R+JJMmgOENzFRODMKZr5QNN0IH1J1nhtDBPrih0bwTwj+sA+1U964kOOBCbMJ1590hBpswY5isUvaK/c5EEyRubjGsdMwwuheRIAtXg8ihqZel1VJW14WApQatHipIYBAYO2Rqblpa06VY2bPwOfQT9t8bdntjx6TIHPJ5x0mf6uJmVpTi6Qf1OENXEOBKpXy4nc7Xj2+oQC6eZZS5IEEv8cGNrfT+M4vfxGHJ0j0y0FNswMweyNASpYz3L9rT8ChLmuhR5joblw9HX4U1xgv/Serzuo6LsEC79nX6hzEHD/ASUc75UAUKGVvwMb7ARqG8sSkCG3pJHpXnQHMG2ZXnE42ZIs8B+ZiSudGwFUnwdEWQw6WNUFY6dueLbQqW0KzIduy8zhsKvdyRLWRhb7AKHVB3HT3H2s/aN6y0kMKlQmYTjBkpcqa+xjOJ4hBRa8h6slmbbJootnctgdUvgJOjUXdtbv9QZb7Z3oHe+hLGBDikFPLMPdQU8IzJ4eeOeAqMqGdnbjvPfvnszdXTqpgErQK79zn1gqIVtAodw1DLEYmDJnYWfsDrOktoo469atY/JvwL1Xkh77mgnCkgOrl9wtUtJyfw22+3STAPeZHll5Ja8sxSlal5eh9Vu9ts5TGiRQUpDv220+F/mlJNYROYfmQh+VnfzEF0S3gl4MzMIOWrHr2uY56LkhPqqu0heR8RahHkXZhoS4zGccQwZAtvrjWrWyVX6IAZEd1stv7aCoCAfC1tWYA0UqhIy7
F/ySCVtufUPDWWEGrLxbgqQk3hd124ypZ6JVNdU5rezggF8XYxM2Kqi/ew74IDQcnhcI70CubheGfyADhdlOO9JzqmALiOZJTjFfq0JEmxAB074ZwJdMXZty6nIkQFG7aDF4bGW6vJH0MN18SsSQPUYMXFe7qDChrRX28Id9E/87h5iclmTy35mWysxFqh0J7GEksFK7xMEzAdzSHxSxXs2mU9SZHqq2S4UkHLKvD4KJzku7Nmjwp/kyWl4C3tFPTm3LkuUHwvGK2Y31xM8E6GsZsUhaGO59Q+82Nlg9Tf27ny/zVxRVMsoJWkQAi84rqAKN4WOoHUun+UaJPtl+IH7Np417bQCd7qCxBPfiAnsWtdfHfylLSzlimnxE8n/LIS+tLHXliohszlvrxd1Z8ae05QTi1Wn75pR8UK6ujpByxcW16zb5MVpBHtvI/CUdG6KMMqy5euoyswjBoVMfriyZmVQ0AWAC4lVBKQ8rfq185O/+HL240Bbeqp19cyIhu6F3o683CcyVFzjaMskMqFv9Lr5XeUPXjzsGfgQtePFoDnqby5sxTAAwg6WSB96l91XNT1th6K6mvE+/jg/rg2Nan4JMjeY1sUANAkuZXASiSRfgy03KUaBpKON+SqgXy0JG8YjbwKilf2KXvwjUmtHyxe3KpHx+jxtqpucqY29mYQQ9FqAojJiXYuF1meh5FkHGunx7V6rfO0g4EiXfi9QqU3++3eC/PdgDb1Rw+Ruwx36WR2j14B06guHaFPyPPcnWyMWi5GVQHZDOoJ8XxO0bkGr7XIBPmHHHuMJgEH1+T0uA2pKYPwyGbI4gkLfqdF1I2Gu9I/i7ViWw9eipd3BmCDGlPyYuK78p5uMGzCj3lI7EedlWT0fPCXTRJ5wlwezvAczWUgM3aReyjgVJWv9sccWCw2s7hY9OWBSqyAlPZjl0VAgqDurRBAC85Bjk121c0KGpnUZ15gW1I6EAAYHp3W8I4kN+E5ZlpdK11vggc6Gg5XdaAvAn2Y7lkFuB6EB2g7h+pAd97I4EWGgXvQsxmD50rGPmeo4Yqb09au7+rsIaY2kgKYsU8eA2iZFzQKLLN+QvpjP2WJXI9s3TdWkrxGUvAhVdjhWUsIIYinSObYHFZy14YeVf0v3wDEUdJAUm8FDbCRWgGQ5FxtEPPdWMQQDu4PagGz/Exc8gNDUeoGcPivRTzGNK//PBqd+z5koUvndLTxRmc8TRPssa4QxjU2puki3p9g+aIRrw3YRi7lu5z3x5/CcSYXe8bKiK3sCWkJ2lPiaby0Zo6N+DWg7EKBqGwRPdFHGnOoko5m2Gad29nXrCxX8okE+tBRou9n75Ct77HnY6GwDgMUPYdXby+8aNRJEI/0spTTP0Rcd3LwFfyYZMx2HyAj19DXWAg9fVYYT8WbHzKyEHWbyjR/qPVVAdO3gEoBzVlGdqo0nC0A61x3TNGVG014k8U294D+gaJf2NuqX5Uv4psr80L1dtpNr4sKOTP3xIpkp6lbGxpK2ry2acxTVlZZjZaQi3vdrnPH39+BVPkbAR9ShwlGvYRI/9xbIUAl33U4DqhC0mInoXWj4eqHuRwoAH7fZN3C9922a98i0eXMHuLlAPf5Uqz3MggcruzP/7MHEIDNNye0VxjRmhY+1bkSvyi9GMM3nrcyMLStoz0o9l1Hyc5vDzJMznBiQsOjmlYcrzIKOE2d92lSxXqDfMjDVAT4Lu6zMr3XtUzMXjTjZ0PDNcCCIP1B5nG2+1xPQL6X8h3i7MU28PMIRcxN2Chomz7cVfBiE+XiMAsRVcxld43OtD6ioY6IUozTvag2SXQFpixwK9qGGLez/ZH7dTTWiw4xdTaqyIFJwfLWHBy7hzivUOzBVlq05RyMjhoIKHDRDqadKBUr0KZGxAt0+wlPcwCpChxtFaufCaw1jsq23ruzlC3udMZJu7+SLh5Dfcgr2ctTrPDXgFZrb2A91Enbi6BzIIjjIEVWkyiL45ZoJ1ve7O2wnM2HMrZq5gIoLV5uuoO7emx8myPCRMW14f04Wv0mFo7E+/VvS8WCnjwK0LAwLE2q9EE3wB6yDX0Kwpvnahiu/UvrqNCMbLXZxbMyYBW9AtG+16BvwsWdOjgc+TtZlNdjn12HWLdhUzqrJzkYj9rl5/aWG9+dHdID6AfnAtZUVM1Yf6U2kDfsx+WrnUe9y6DGQxN3XYSj0lP2j6kL6tcGktgpigLo4/i1/asxC3mmWveyOfPMeSKyeMvaXYkFsUXYNOq1fFmOurTKOnzSuGE+0y/meHfYueZZ5kMvqd25a256wFurrhCxkfLECos63+Y7nDbu99r/3Yr+4HzyPgs57R3lv6EEWmQFEKj6LIVPfUIfjlTf+OpFRcXPl2Wd9ucUmWcqHYYBqfyOqT+3xLACF7NLCK7B48JwyT9LW4vmeX8sJx9Z03rJsB9dbIG2ccnXE9i1dgLsIJEDFNceJQk6E3fQyKvVllrwHCy0kNwwMtTJXWw3yDyihD+rosoOUt0OqpwctfFrABN3j/J+HA7G+6yRe1Uaz64qDc8SbcmCYliMCIrISYgWMdw7AModZxNf0+69ucRohTP8Ma9swfFHOUp/glG6ro2uxXU7bWtrDgOeZB+FaKBhmNdC/7eJz9hBI/nV0qsUhB0oEyVA9VB8ZWCsASWi5AKw9BXeT610QQ92mBEvLpHDllK+R/EMP2bLG6vK30cm7kChEM5Ah0SZygr+9kdmMlhk/BZ37/6xjJ/4/f/I/VQ2aK9eYdt0c3/xzTWetaN3rE/xpskR/Jbj9uwYgEmzQoKykHLWUZ5vjvQbJKsyXyQvrHSiar2ei2fpSwGq/CZbwn2tsa95V6WmHZfOwSodV4Kgr15Si1LdvjuCNzCiy4w6RDUSKmnYCdl2ZWt1P92pOi3BVaiortBk5nukdjXse9f4M7ZGpFLzbTmRtE2nZ3r3OeoYTR5NZQHmq6eAgnssAySoQ2dbbpQJmaMv5iogYagET5USEm3dzioQaXEl5uXHtbyoQezRCndFw7VPG+pKTO0bHSacLfQ0Z9XgcINTecTOqL6XssDxJjRV8ohI/Mld2/f7bKfKcNm2oErA+X6b9OdVjZZ4g3yQ/8CDGO1cBqerV5QvdLLsACCb0pfxi9pB0S4v3ExwviFaDMjfwyQOn4GWHQqlRAevHNPDfT+v+5uCxqTwV2ACvcjJkDdi468I4rFn2rW0o8mbicVt8a51EBCZA67wP6ulChjDZEDCuCYY1QgmiDlwMr1+qrBSOkp9bE1BJXDhgWqNPqJ97+gR/vtk9D8TkjXKzJh5RrDdRZG6ZZNOuQENC838oSEwiGNrfZOSXqz9a8G/OfKy1wmF9qNa3/JlFnDVPtjwlSi8e/ZIOOkSrUTRHjCGi1rjnprS9NP6Gak/4W3LV1veU2r0igAJX8/vOnlvTevX3jN3uUOiHbBBqFDJpUkxQJYDj2BMsu1MISjiT/lAFhPFIaA7dXKVJxphnUJZh3Jn3HwsJB3TM4HXfHeBAY2qQuFmldkw7nGpVuDcF/mpKkjg0aVSOvEP3Rd79vFZ2aTuWL5riyaiPBMs4UyZy+s3m5f+YSet/OGde5xqfmVPlM7Zz9OhLt4xN0sBapAoMjp/pEzLYK/vzuFJmMS9gz/1u6+kTB1aXroCnG2C1jRqRxymd4AK2hbhI7LusO4BAbw5WJGJf1Dga4P++KjmIQxWtv/pqYK/m54XIYLX+oBk4MVOf/qrGpO3rDrZ5akVxkbBImlIXMX47beHtRoQGhWU8mcl+6NWaQKRy3Y8pj3MPuGD3XXnc96o65FzKKgYmxdTNkzsQFVKmM3M20T74dFIWHon/oEFZUCGEqHS9z8obMGI9meqRE8zM/uD+zZG/qOBPZa1JPZU1mN/8R6FBT+VHAMeoabE1ucJjp2rYEzz4fGJp0v2nI5Z+4Jq602CumRxqBQ3CDg9ia1hMNCfX36bX4DQcRnHKrzLVZInKV4EKwd7kxDUBnE1San4VHZj+csddVumYti3sOYy4qnmdPCXrD5OD5J5zQe9tihsl18PuIcmQVxIf6Z04/a7pd1GpjrPBx1MI7El9ZtN+Nmcu1
buZaEKk7W3yfrOkmvw0xHntl+IWknayg+3O31vmQiXUskYW7nLosMozsZ8WfCy3FC5W6s3lQGOIZiYuHufkcluhZ/GOZLKYOBBKq7hKzFD+lvu8Wo578pjKWAj6OndxptDeLE5nZfmwPXl/dwcjamBoUGgiMvO4Tn/cbBL1RRktkeOcSAnJrAvNJTHw3KQ2uHXHSt4fcPPXYnuCwlxPQDu2A/Bag3tF+o5bct2rjB2cTlVZNDHP2FyMIhRIcCDete5fvvxxgcWbpo9PQEInhm61f20cF67EycX4MNkS9GrSQIjHo2uiCrN/ExIPLWb2smkT0NvLfOeAclASU2GwPTXRI7oBk8HMl6Ke+9usSoUM+hmUIiJcbHZjnf+LgjORpLwVF0/TprEWEBIgru/vyUOs/ZJI2IvW4Lz2lRmy4Ble7lX+VynYiJeHfSI24x7dtScbTp9vRBqn71jku7xQTpmKNjtyopa1yOCJepiG+uLICZJDq+BrC/Do9IVAbUBcvSJEysunM1nkVNBwd2fl8r+ghwNYUVeViqVNGNHOO3ncna0P7RhHOseEX66TW3sEZgeE4p4D3tuG/Nr6LVfY8nlxdQivgwQiHWSGfJ4dK4ovuJiEL02K+URjLN1Cs3ybTwH2l3AQ1UsqB4vjrqwMkYRodICOCjwz7QmhJaPYJvTKWY6oTkUDwm4Bdx3nig1CWXvqk2kBsMDmRNE79KGvvG0Q2jP5Z6bwIpaGTxhMB/qkhPLqaJcwEEncjSTZjWgOPI7w4+spnSptWfr/4Zno4c2Z0f0Db4o3lUCfFsBM5p89THDcVCs7omDegiAmaHqF0LNp+u7nTtj6g+u6a9YKj28+QHmr3HhAE4kT9ekq7gFv25xHb9/7bMrDUfVn+C0bvlJiYye+lozATeH3zEelY06cxKC6LQ8CZmHuxK1M9O0dBXCGMGL7y/MWST6hdjpsdwk/imCrdNEcx9Qhq3M15V7cosBvjwtym9o0M3+tMSpQpyIsfITHWlZyBnVAKswlrEoazBE0N4bZ/5xjjLHJPl33MVDpRPB88i+ZVRYwwhIiLPyCRlxMxs0YGyWT3hE9slCPaHZrug39IxtWKUvxS051YnZ8gfU2g26h0p1s825O6KCpIRpJxOk332SJqcOZFK/XFJVBAnxcT+7VHWnnD0J8AOA4xe/fR4hNHndEhdsa+IY/EtEZZ9m2kwTVJt5YaG+zDO0l3QmrxuU/H7qWNaswOwniSLzADIKxMMj3hE0BL5gXyrWRiMXYPDndnH/i5ZJPd+YjMrQ6AtBQox2sw8C93uAn+IXsPVFMjBzq+gDyiI9s6h+sZeqE35P7OhgEWaw5gPQl4eazv7v66f4qjk0DdSg1TvA3OXTvpLvdLt9la9hdIsys4AkmRqqfM6QJLF2spT5bNcV6X3d1B1Exko55tzWrLSpJAOc4hPNMSi5IjkgYkS2wMoD2W+jroyX6RrfK5ljDVIdhs2AC1xbcR+nO884oVSFL6XHNgB7XeNIJKtzn0g9ZHvKVUX95VrbzYbBQJhuNHTzRLAdlmb7LX5ss+IDVga+lJca22a1DYjMsRK9texLlJP5Rl0E6pkiOi3BCez/82sPNbcNWDa3N4Mo3BusHDrTFAyYfccVb3wcKrNnwGMJXKO7BNPVX+L9+I/8urdkcw8C1VcxbfPSFZBby+R5QyT1uPCsW2nvPuSnspVaA5BITtuwGmlCmtxaDmc+xCsfpjb0J7D/mGgEn4JDvk2+Vja0QD1cqqNtbkIyeT265qxqFkwnZT78u2CBSHQ/ui5EjGuPavRUv7ZECkSV7tYJT2rrPq1MmdbN8bnXvFQOPAOKcHTqcP/HveqWdMoe0lITH66IF88bTjAq8nkwbyuSKnSE0pPyOCMOUT6hR1ZGlPajKld2ZVEyxzPdu4s115qIvSPuRY2XkHGBr8jZj4UEI3F2chd/2V+9nQ27CM3z8vPI56nMBospFKU5I4Oggb9QP/iWtcBS5cRTzgBPsGvtHMUHYxII1vuOjRlAltlWTsas2SGTVG7yv79Jn2/hqqW2vq915A/mBppsAPc0dQbTBii2uIRR7SKQEmD/yrLb6LI+b7bHEgwRiHUmSl6KIQMdVQl9mgRDArb5cWUrLvmDB85pfV7S8tO3TJop8iydL3o1ZlhmRry1tWm16xilja3+QRQP8VWAVAjU+fuxjZOIoN8T6hEETt3Qm/k3pc/wvOzG3HmXHXJbCFAMLj8pl4Iv2fiM95RolA6/uXdSwQnFcuiVjGBLOiX3ngeE3SE3qDwsF/jsx+AwLKMXOtgX2hxGFtuuUwXBVhMLzfPctbJNRbJg0oWDU6QhCB6BH+vsvDa2UhQC8ClGE5eAf+kqTGjpbliV3XCX1VYdMh/do0Ku6oIHXDfiAKnylChDEgbuCIT7Dl/WNFtnycMF6mH80CZgjq33WwknLKqIXXq7S9ULOyy6CJtmyFSfJIBbi5vTkfyeOCHX1k71x35jCWs9a075otL0XDmq53/B3Ig8ts/enbj/a/4OuQShhwTKQxS0eq0f0u53Ym9hUCWVjkA5/RU1/Q/5ikuyu8wsPVhLK6hG7zOA1Q8Erl66ekGMHkMbECK44WLztM7EXgfdbXWf55NcprsFi902h8Eg4X1bjGoGXlzPiQJQDOl+IjXJwft7OAbJzBup/qFrFs9XsDr4f3imBE2JnqBVID09imsGX59R9odRg+6uBShn7A35ssjL51Or47qB+CvJ0YDn5HK/ITmVQubSzCo6yi0Cqfobq3Yq6tdWxLxKB5wfAAlH630VpEBTJKjBithy/gUHzP5D4fXhhRWVj2a9HuTxifqgVqxcf0fYCb6ERAKngHLPd/8bw5k3MvwLD16TOY8wisoBR9++Qj90wFGgZ+LMR2KcS4+5ZhxnWfgKHCOwE7znDRnfVxeJOmJVScBRrAKzwEjfgdewRqgECbS3ZKkQWZgm0c7ZcjpWYr2dfvXlKDlAZ3bCs94Wc/jL+8vbI2S3RGvfgJxU+riaCqYKgmMOJGUfBITbf+bDmA5fPFM0m8pUEnL83x/uO/aPztL5GODNTH/YfSIyyID5D+K32gbCLggv8t7PI/9wvHijSkfzhCe8lSqxxYCgRhzKsFoCgtpToIJBkzv3etR7otqwFNA+aeoQofyc28+HWxmqdEFUEEb+0jDF4jcGKgp0nVxP5DgDyd4kCFCKwoG8fSIK9obYdOIcxHAWRjtQIPB8/snKMwdUPz5jDZQs0Ws8YwgiwW+y7FSj7Yi+sDQQtrkIpbRcfBK8OB2xuKpGBF6DtLzoAT+WvGIHTxI8W0NCJasOz+jfhIjFI4QhoC1UiwA41S44PVv7MtsLKTYlEOfRsPquH6c3eecntXJc0UNwphMSvFzg2HSTZkIVDGPJy+RawZSob9ly065/THVzJ1Fe8OQCWcUmoyRWzfiRVCErLG1yWd7wEk8Lre1k21cKfgntzNFmN77m+4nOZ563dFvhY0eCcGPqEKVUot1PEASRRACWR9TK5MZzFhgGB80jwDrZQf6vqC9IHYlwq/S8VoMMYOlHvz4OIaSyx6yNr0Wok/qKltDLv8THtV7PF3XE0ItyyLRv+DcpSaDM6JsBT7CMmjNHLve3nY1luDt6HdzZDTFTxWdTq8y4lWLgluhQZKGh2uX2A67IM3ov2pT85Yy6lH/42Eq2tgwBFrYaPdIfEyR7nmELpJLCSy9ZlrByjc76LoVOCP1IOdVoXAJKrRm+YMSFAsP1Ww+QkWedcWBFJts4zrG9j9nCQbIRQkAy/U1Xg1br9HhboTYXT9zF8wsPXzi6wdc0Rui+0Ls/JqQxjfohHSI/1LK1bpIaP9VOIkA44VlpfaY9/0GuZ7Lhzmr/rql1S56mBHQHC4cgmUUGyzDm7l+BRsyZZNggArdeWtgIjfNtd342862ZPqqhIGyvt21QWP1qNqQwuQeBlFAD+w0Xw4W09yND6PhJiL8OgKm/0zqpRcLnIRhRZzvOlIDTB/d8zCJpNj33l+ZpTD1kEWnt/WDTiB8aTycC9+jkRKo+IE/iHzc+CUDwgzvTqI3WU/WE7a3maAdgsXatZGEROrARjyVPtZ
oVbYEpQ5vU5iILt/Vhqly3NvIPqICHRdkmRMmHMcTAu5/Nhl/AWes4lhxMRojLZIMqZOIUpbR2QaoldaULB+F6889LuZ9BUy/pzrQN/vTTIWmMl9/hD8FSoJCHxDO7QbTAZJyXHYEtSIwGCxsVGdCOta7YHDiU1fh1HAomDb5CGlf127eb7+4qoW4pdMOCT45ThB7ZLI5/sSUrEUcQG4r8QgeJPmA8ekm4ANF1L8de5mLJcqTLR2nFVulucYYxBUqul32Ehpzo549O48SEWznhFsY796urdi38mcGasF6+957nbzj1ch47np1bPT8Kmb59jRvRG5F8N5WQOd7kDYDI+wn1ezbrgM6MEEFAwxYG1Y8f2kLWNC8UE+KLlcHnGSCBP0Fu01xWFXLL+R9IZ4CVjXojbHN6HlTI97N8RZKglUGK0OJTnqy31K7Bs14ATrsrsf47NNCikwVvqAQVB8hu0cJ2c2MQAqLODUpQt+W9NveHM/Kuj3+6TN/x3NgQgUZgzMUAW9z47jBXQILYxt+0LYlr53Kq+7t+tNDqQUIiQYdqPMbnH8FxVCHfbP9wcY8QJ+dVK2NnI1jfD7EwmmTiogz5KUnLTT8l18jj5bVn/rooiKUPzn+tzXqQ6wcWNK0BLyi98hTk8ovhqZPwrAHnAZ99Wkg5km+gUezfpBkqNG9BfedFTb2d1vFZ7Yf/X12Ff0evEbo2y/ecJewcuJm7pxHYtQQFDMB3NbwM0LTx4vPpDVTGHGv4BR2M6Ns8eFW5deJPDypwpSpyyZeENFMSkDStCaL42oyeaWz/ZAYfixE5HiV3Nwmovn1tiDycMYKYVL0OcBnwRN7UroD9jNnTYPOVM+vatDXZfwpnYa03prZNBICZ5lXWCZPLuT5umdybkjCLGjzWZNhEAzM5QB/ETYYkmlbEBIsyLeClJIm1V8mrF5NXKqG/PfH+6JxQjqFWfuvWSn3XGqpCexl8x+8puBBQ+SuEkg5lSa73prXMJuz/6UiISyW5hUFF9GhQ4pjPqVJlIG+/7/DOQQzb7kaKj3PdexOsc4BZW0kktldWznanbzp2tXSO+ZNdhnwahkpAMVoxS/KcolXtvofNtpJ2YmYguJj4f2shj6oETd/wTP72hMEXRT73iQwmN+hhzrzQudzzb4LXUukYEi/W2G3zRQZPJNSsZnR2zhQYTXbEn9Zx8es80clAALhHTx5cY1duaohQhkJ9njMhI6GV+zTC5zM8jdgIRmLURVqoCj9Va58QDN/qoIN+mLi//JQSLWfP/i0wFxZi1Na59u9AUm0O6j03QItz2drrR5NS2nmPHxTZpXA4rioDfuH2yWQRIIo/5B5H5G/auC87jTQvdhZcZbnX1ULxaO+RP4FQDYl3dTFLu+a9FZs2TZw8m6yaOlIysC3H8FbYhA/8iHo6Zgq3jeLNKVmu79MCzilXL1xvcoe94CduD+1MvnKFKxWL08kyTITUMfU6zCBoDarcLpZidIrawQNfSTNsD7Bmlff/ahzeP80hZfMkxKkeEanOnzUKx4bC9MC4KGUjX6zE0DCyy1WSaf3kPvtxUpTXNeYlPy9wZvbBYuXvOSmKLucRnDJgpp6qJ3zS97/hLEzEAdco5q2ffvjqDueYXipuTf6wz+cNUlcbFkbFCrpdijJRcShvxFf8tC6EuIQ20ZiEbaSc4XLjCxugX+aPUUodySIaZ9COIabCvItD4rTk1Ob+2hS7PCKUEV7MsJvv4jVwSTFPwioaoN/wz3RUT1EkMc/P/IzZpNDpIjVSDQd9M0rrW+IPfn27ZMH6WOI9VOQKPcOZmi0LVMpyQZmMtbxhiqrdmrK2acugIfMxzrMNwJkZYBnk9fQ2VquTwnxoqF1MNsmum52M8FRtYiZv0GyeHXoDr6gF+x4deIpeNWOLEoWcHzuLzP1gH+YvcylTYmbXlex3uG6mJxBIqo+C9BPtkkF3v+LgRW0gjfVbg6/i5AKHDK2eZ+65EJTa+/4d1PWWM6KweeBnUaYvAIUKM5Euzv8eSyYve1aY9MBFmcyw2LqI0qq9dD4Ofv4LKld+15/FFLj8A4PghbD7EHmXESplhB4e+aSd20kR8YCBrdU3fWH3cNWIAmlvbM+YSPtwLJhyh46vnrPYTzwrgsyvYJBLNJKB8bimu1IrmcoTdUFaHZP/fWrE5Mty1Td7OzEW005fooRp7MFJh3LIh8LzdBIA6QPvH0LQIv9l9UQ+2oHHwGGBIOH87I15CjH3TH/6RiZMG9pnktkDJxn7Q8BjhbRrNLV94zCLX32jnntSCiKXqOF5ydoMi75mgRSD06sH2k9a5nDDbvjaP6EjZGel9AxlFH/UMF1cYGG+FszOr5uFz20yyqaFRIK26smK5EaXvj+eCbkzUeO/TdRA5EmRO0lFtLDike1pLh1aM39c9b5uKzXJarLdFHlkIDbZjsBJs9oUhqqoY78tA3Gx7b67YbpPYfBSFXbV7yI/RTwZccsK8Qfg8qFESuA3gEWl7IsaI3XmPJKP0PyXmVRDj8u5X+M6mSFmwn8SL5sGhOeRFGKcZ3iWUQR9sC9KnSSZHLNsypmTxESQ7fwv90jA0W1elJC1+6f5plYRe5Ujs1L1hzidCj2Mpeie/zgXTkAVwqqd2niuut/v+GozeUbZKpCJ/T8TOZ9qUwvysz4JvAdpIDQzBEGlNneMQMPaNaGmMEiJhhVM9JFse1+3sCIMaIuAwOfoz9ZxJDMVInDpQpf+dXrdbA+KBwzUFnBaOGhuUqv9ZrEXtmGKbj2g66U0Ce73clAlrnBCBezX6wxbNPm/9kljYy0CKDupvGbXHNv1b4V4ziAqQo+6jJYGwdyIXKOoIREWJS/HQ2y1eV2IYotbVqSz+qLC7/0Ud1pYy5KyxxE4WwRrLDUB5fMhgL90VStVxZXESHT9pZPS8WZmuQzfJXYvaQ8I1ti+RWlZ/1XqqECW4iFPVZ9cL1jA8k5s4CLtTpB+gfkhkoUDxhzV/I5vVr6SW+KlzPgHDQEUL5j8k8eqqLMt5bAAirjcCO4YpJUU44CTltyXmjythD7LiP/jbLiejpmBAeXWCtu3j6X5tFboWB3BD4Ug+ZQ5M+GQ6IHnEyjm2b0mIuJWDRwkovaXk60jpVX+Bdp+oWzkRarP1t9CIGE/IFX+DGg+uXOHUW77AibC6lEeY7XcBAEFtE4lf0yfL+uBs/150wgpMmPSFNXar/sxbz+6D1F+z3QoNzoP0ykLEuEVrw+YMiAtf6AY0vPxKXNZEHXaaoUHTTAUuvhlpJDcpSTiJoU6KH0KZPFYrV0FeACA9NbB9bbAtMCPQ00Rxux+Q3qaswF2XNSr222zpbT8b4TcyY/X+Iy/u+VsL6WKR8W1hUruHa7JaXPiy+Y9nCPUJv8VQ6UJIOtdHmlYRh8WiXg/SnCuShvD64YHq1g4/6B+Zv9eI1GxfGYtn9G2wlsFa5XK+/627jc4fkaL6IWSwP2acSvRL13A+4XGOYHWmxeeoPfeZ4pWSjgYEumU38yYpdQEdjhOdB/sGNAgkoPtAI66099ubxKxAnBJVbCkCf+ELdvfXqZKPXoOopipT4mLYddtUCwKvYFHMKxuUqvWoesn1XkmVAYNMYLPg3KU6floMY/gHHUyDB7hYX1QlaKeISp1p6qDYbx11PRByzLwCV0qh9k7EoG3G6KBJljzXRc8LS7cNeYh4OQOguANrgV3iaUnoZEaAR3I6u2fTgY9s07pzbnYshBP5tzlTSNN8v7B7LQQtF9l44cpMeK8DCF9hBhJ9o1Z5q6I/F75cctfVGIG3mSuUCTZQeXTvoEg1IqOwllZhSkIWqt1xgUHAKUmN2UVGnEuxCZLnQQ8IusqX8BmJzEeE0f8r3oS84wBdv8YDhm/mAEYog0yms+H+XJCsCL06BHQMx3qu9zCuM2b7ERXMSVLocrywUaNCnu7Xc7NOmQ9+PW0s9wjRu0pPBv/fX30iGtYvspFmWxwTjofd85ly/i1T6oz4EMDthCTtJ4vOJ1KEKiImk8r4G2Y50NVmhVuCWCq1afrkp5887OMBI/arRvgjWpngBv6KrvnvXNW3Bzn4/J46fyEtItkUoyVDL
FRaGzKhRMINCGttQNVrXBJqbgdSgyeqmgyeQ/pRw+nA8Fxapy/w4QrvFQ5V9PtvjXvBMhK78SGlf14jCGH+BdQPlW9DQRwJ+AMSVKpfucd9g1FQL8d0cOMEqjUdNCj6TJLIzYzuOLdK6G+q416yS9OQD2AljQjXrzmkT8NlsFTjrA6YyF25Jj+6wQnuayIL5mNwL4wNgrhidD4kVFZntGGTdFptn0CIs3rdDOOTScRSISjniW6BfZZD558GEcyd2S+bJHHkANbRFh8JuAYmsM8VRHbKll0+OC/7pAe3yO7XeCo5ihu+un7r74dncWCqkG5XoYDjo+UeLC39AMHjDA7KWsuuZgurIMnJrhfP7/uulEISa6m3hwCq+HadmMa9dGJehPlZtYxNSFR/wf9EfJDlM5VK8vJmewWC+9uib0sX1NXZtT6fvM4QnMh7nJzeSPSWDa++ZchAPXDRGaJEm9VBj1Df2irKuXqdbhpPy44tXWeT+gUIpOG8VYlVcU/u1AXQHM+MeGPnhQFtztYMwdENkSw4lI6E5A4zjsVpeONmFmBScesR9OflF/oHSWUzv86fFZ1ebm5/EmGTCNDRFLQ7WRUaUl2R3OojFRd1zU7XbJ6Mka7d2uesio0sM8KiDMs54sYYIPE9hBA/HTXbG5WlLFkLpv3sm7xjLt44jTpNTtRXf4jwDPNnEQEzoKpNi8gnRH4VXRb3SG84HkEd5WjbFRBGRfPbeqdaMpYZUBrM/qYKPyhQXqkBvE5sXmvrmnu+uP8zVx1nZxd6Cz6KCY/RSWTZu6PO7XLd26wwY094xlAL+wBnkoLdDq2vyfv4rQvdZ/n9eYTpXTWyb8p5MlsOcsJ8/+He4NDVV3+Y77uUjCz0uGvgRx0tqj3fzCv4hz7bRNhYiW0n4O62/12DV0+RJ4+dVPv97ZnaIXtLWvxX69/XPqHKVHJxHd1DX14jbDRLtCDMVuoJ19q/b9NWfxJbabHx8tBTrFxY9mMM17IEsrMgzd/x89j5hlNreXn3OOHjORqfPnlN/w96yLu8H6G/G6RrHLjhuYEplbtPLybyNBILepBlJJVNkSZ3t3eS6b0r4dPgtkMYz40XuFGYMAg9YwhCsXkjGBZEslB8UggblA4O2B6VQ79fI4TnzBiue4qzl6GAd1h4Fi/UWieIlaxZWWao486SePNUS3c4GC/FfsAjw6nJEUDj3vWP/JvrAEiYsIyafov+cKrKeLwOVD5iOXTxs//e5smYkSIXt9yz9vKIOSMBfz3hi/Az6Whcb+Nt5kD1TCvkOB4+3t5z+SXhDAwSBH1xXI46mswpc8JySGg3egJRR2rd+8fnTsdMi9PAJSH3KDrtzIssHP/VopyXmaexMMy9TJpjaOy1TM284J753KXAWR7BX5YtCJA99ZJxPC32hfTcZ5e/22uvq+uA8v4fHzgu9xsf2ivQhPunHx/1MFQRRsVizinEJLZJ1bEPOinZf2m4Vy9EhGiQJS4+GWWmjVxvekprDVQDTeETnlRUhoAL7XwAIICiKQbG0YidWIuOPkxMqs7v4UEFvTXGIuVdj5j0QJd86CI0+d2mB1u9YJJYnSkqjr6i8Vmu9ZB05wTLBD32BjVj+7hgjGVuI6MkuNIHVWXebchAmbxuyZqC2J/cqekBBsYvbR4kHTFXRDt8nshSTirr/T+h2cw8B6Fk6lYBW3MP5v9ecX7QsfXTT9K37jPUF3hr3yDOPgtQwk39vK2/GvnB6cABX8DwB002mgpjHfPE5nbExe1u597TGR9WzFcPB1rx0ADMpWJmDKI/WouSIi56YS5o6oLHCw7a4VuySPH5aag5zC0S4taArT62h4KioE4ey9vpOeS+7nIjXl1zaXEx/cVMEgDIN/ZMtgEmtSUR1fYEBhtzhHOZzDYN+sB/65MXl2tgTcH/XDSXFsQEc/KqJuNY7UmcstEqd8hMYp21E4Rx7ROL4Sc+oqthx6ZqQgX6s/c799NvNMfdUXeL+3mvhjb6b13xeYMEJ1EiLJyrp8Gfq+xblL487/MKqtP64NMi0jQ03tu66iFZXVhLFOOW7r/lBQhRm/KCjv3VsicfJJFMPrVcerpga1QwSCB0PwvuDZZZcw42gAxAnLfQtlY5QmFtXvLlTXtvYqAQ8VFiBBm/Dvs7pTlAVbth5pMgla+ipHVSZZ9D29J/RTejU8nttaoQffS4coLoS2W2PAdAtF7+euNpZHJCyTpg7hzhfdHX8yxCjqW2qs7PgsKCRvceBNZ7p8DJYylrxW4qso2Xme4LYWlCuS1QcvpfqvIABcTUupCY5HIC80brK6fkss7jxmmoVIe8boiWG/8yirXoJMZYmvMF/lH8qatbyO6SHDlpc0RuXj0iFRyLMBt64Zm8sjOOEUwmK67Ybbwq2F1Xs1O7JHNOrjaemaskfkpUsKmNel8MefVQj6XVxoZ/UmM7jhfsmdVeskoOQfYPJliBTwjmdc5OW2DlNT5RNgFvs+ojBHONOhIvaed4E5Li+MzGAVLNT2ot6uXQcGXqYUUatNTet8yDmPShLEgdPrijp+3XU+bWouAUKGpjkicExpthbTUR42o32G3UrCAiveTLHpsaj7pESQaYNjWE/YyZmLy+fuMpcTT3kjy4Y1xR7d+E3IFA08SVWx8z4zB381QV00XE+7h+Z6joN8AzgyRfRlHPpYC/wqZelOMlsXQktQiRjaf7tpg6CZNT6m1eKwAk6zKBgcsUKTY5ZHWznd2PVJzsQ+rRK/XIOYPJkSlH1YNAF0M/uZQ6LK21Kf4yTkQblyl//ek74OdtQfbyt2i+esgtSvJHdyJWf4UAQKAzB6gvoXdE77pKl5fZ46kWes6TSjdY/79BxUEintZjJm6Pvh78f74/5Tu9hZ3yuQAWMzvsQCl7Kf2hnierEXGBWsvb16XkVm75iPbS8g3gUldbvIGHLOLGpq4PKrXgTs0jeRZ0gDYBxHZPAiKcR7+SrTBMduWWOgZjV26GWJoxSmHC9zEygL11Ul/XgDVzRwlodRng3VeVg2QOI5T3aIDeEh477PNkIksSOzdfwXwzInGpOlRAC7/soaoWkUPGAqwQ9ZYTnMRiuVUCwRvh7Q4rgJ6krHQpr3j51AB2PCdGTIsF2YsXShjJW7WElXH1P+dSeoJUj5wEHRvc6t3pB6T1IgxeNfg6atUG6cu6pqaO8d+WXxHYu/1d6VkQrFGtNqLZCZziGIeSetlALePRiHt+Rl8Hu8wzFGQ16/h9dxVmcBjq8sncrLQVRrf6K3MUtLTzVmh5uBcI5bl8aa61rJRkwfjMHHiensSP26sDfbR6krfkIKKNXPVSGyNjUEF0caaIury6LagzPlVvAtHUqrF5+ihM5ixmWkTb8BKgT6e4zI8K0OqKzZy9M928rSOb87bzlZC8yomcuctwaq4h7wQYgDSUTHaDN+xFaL2EMfsRYMSc9bAx5gWpgyfk9x+bge/Lzo2gVLVV4N7kjesQiwVjXTLIjrInSb++j99BcoijrxO6HbOPyZ2WmFnA24IUTIEvq+HC6DUIHlKCYyJsPvqlcYQ3seWLelW3ZaA51gSXMtfzqYJf9E/Ma7cR/opVyWghzg/ZMaNdrt7oLmh6aSwVSfmvcLFHQucK6qKE8YK8MsBSkJm7V3UDtJQN6n9zFieRcCgCaXR9s4ZSaPnizXzE7j2wYn6k8RGMdAg8RRYBYCCWsS5kycdy719Y6XFRPHwBMgNJDekSOfgS1jEBGRgyht4V0Irfl3fCRkL0nQHsaGQIrMK8We69XVRSVG2o6Rcq1lOus7G4IeDiH97oYnfbDnlwlD5hx1jYCMLa1sFd+ecqeE8UCzTQMSWHLOMcAl0TuulBYCC0BGUMHlSPUHcqn9P8iabj8t3eDuMJL35hRyrBuuMp0m0R1qn5BcVz/FAJtqDUsieMzZN2H/sAXsFbolpr6SGj6s1qhMbQdeyFGJTuEc+lR3c1UvI6egNzhR4EpXSm+d+V1R3hznK4wQejETR6NZYfGgamzRhalxgEk38b1FlZGHnF9nOwJ+TwRtQ5jI0dCFBRKhKBz9eh7w6fjZ06xpUL8DqmwCsiaa8fxhUEXfUYIKlBs
tQavKBjaeStuie/FkVFsBfRLJv7lcG3TFgTteBkPqM6boZoLk63DRB+JGYrQ9Dc2YwrqKM/j7GoPmmNr7kt4t+5Zl53YBLyf+vL3bruAJo71ovte/JZSp6ZCo7oiXRH7eahk39CMrqLbWq3ijq4LcrAEkJdvBK9F6SbE/y+cKrcwUHxjDvrb5XmjU4dwi38ep2NqsS57YTfud20wDfSPpPiKlx4BbIl2lIdFmAYFGucvCe12yDDwOEY1uH6qFb7URDcqUAM5QR41xn6iK0JbW7ljeu40i/i4ng9eB6cLspUBn32mTnzllwsGpNyRRLuejuFj+3Q4DUvhcoT9vOxzSvKXwNL8rAXu9j/ZU0/XZaOibU9HepcFpLX0Qi99DLEnpVdg3APWOhISFUEgfZ0aYj9sEFBLRXHG/WJ2WNyGuJghACnTW8WpywE6p6a9yHx/Xyi9bfDtROcJpdbCAsGCjskEYHU1GjlIrT1hszGn6/WayUwvnFnSPxz+kuRwSA1g144nBgGQjGKdx4OV3GbJq+C8WCOL/vNaws5w9w2tiJ7qHtOvvr/jWpShDvIYtybu+F2e50PztlC6aMjWUX2+Qb9B6Qy2vahFOWBCa6nc917/83ZkiJBcpYTN88vOLnCXm8swTnVTWJ9dGF2O0MMH7+UoXENFXSgAK1c2/64Lum3xrA5oUCUW9vGV/NvNzdBdpPwnPTLzPpM7L1UG1HGLq6cVS9HmxTvl90WicWTWYbnmCXN9XHKOyKx9Ja+08k4hxOCPqhQrq5xFJqrkjTK7SQTQ7TS0xXcMPL7XX3SbYx8RFCkoxvkfYhKTmcJlcqIjyvE5wWMn7xsvIGNbil2eFJNnL+OvfvKHhtBj+JO4iLzpEbBJOpZrDE11pPDijVy8uhEiuc5DyrdU1eQ5nzwFcbR8uc816rk+JCBbmqxi2l6R+FqqTW5jnRHPXiee+qZghe7F5aOxcfV6eYWph5r7Sk5FHsKB2J2ib/bmLgNOy4vNh/TqGLmjwLBKAkf+bgjWkPBGz8oYxenzRoUctmyuK85pud5udRsEEJGWg1M7D0nu6iC/vEdV5D7ca5DODYAcaJveeoyjNFuii8hvTDh+i3kyE61fo07sZYNCr7d387AFheRP2tVs7nFaH6OjDWr3LSFaWx2LHHl/neseTAxt0ivVUulDmjYWcAq/iM9otrqLeq9jYF51xyT/ZENblROzvNsxvhpr/Y5RgTF1vYhQXGfSJKo78kkcr0VFlkzvVQZshXmYJuUY1Z4sFI7N535m9Fek/cFt9stUc8L1CbDXkeAO7j46UEu9HCAFLqc/bF/BMwW6W3sYtrGrt7qi14d9mnr5e+qVg+3xcLpOSA4bQ5hqM0NWny3Z6Xidm0l5O/WJRz61xYlZaZYOV6rEU1cYN+2llpHc3CkDgZAd29euuPamkPJnLlKLSPODsxV9tBhr3dBpqquKm9Vi2n+PW35YYfdqiiyNxh5vdptyeSHrlDXshoWc3bVQL/4eXXoW6XN9tLNlLw+aAvAlWmZV9RO1xK4H+E2k9s1UQVdwMi2qQ5IJ1p+67YEz3btPSulRykV7iLn4PBO7EBxCVARZtKi8MrA6T9VkBEXl/AKB4Tt9I9rL09r20aNki/crEIK4Xbk5RWM0IbJyA/WY5vLxFcpVxfPUAlQ4t1q5AF2+AcBAEa6tF2JztiEBwiLANH5aPxcIo+hmtdcSiM3+3zgQCdvj8z8CGZCHccrPsa6lJkdYTECyLcmXo12g5t2nYSG8+/lBPNdHSNst1CVqt0XoftNPnmHsYBLCqIrkjhMlN/y/Z7/NQS2Pwnh44lxtyR5AA8RT8RX1aN2pvlKs/T74knbyL32THrYmTWL2KJgwXgCKpDcfdlMlgwsBBxJBGZ5rnbaTM4zh2XPHuIqG9iyHn1XDtCYSuVhUE1bQFecfl7VxG4/LLBZmjDH2DbtNjzyRIbonbxgNEESfND3FNBe2RZgKooTmHDJYQFHpfcOc+congD4R2s8NNkhmBG35uvvxWPdS916y1mHcdklsqDa0P1KomUvQIIzWjV0G5zf7B27ys+KMguUbyGFT0/8pIHbRvvW4CPyOcytv9YCK9ThvAvlT/+tN6qwxlpL7W8YfNhtSGcIGmUyZn/5d4iT1wjLKjh4ue0ivFZ+g5pXXmUkbtzL9o9R7ELFq7ynYI/AJ2qCnm/8ca/aJ6klH6VVAUKBlpN/6gpt4UGSTlIaQvtSsFIUAQ43ba2CtxwpOrZaWI+pA/kqvPvclxrDL9XkCo4jXsdqcNt14LlsgWa0Dp6r7YS6k89BCtIQLJ3nF1FFUL3+aoyiDxsMLa2+Kjy5Wb44o8VCcPv3ShhNvWJNfgzCbUszLuru4emiihFwU3C84O7F39NcxSxGazxm7p27F4gBV7w9mbY5VX3iEBso4AqGPlWWtKYjIktbcrMobkvGQdAPhX+Y/Nhj39wc7J4CaX/noo2PqhDhhlD0m9312R7B3DvQDZVxoy/aMD5F3oQMDpj2yAgrIfY2OhSn7/tb5UvEDfkuVT6bzFTY2a2K5i7MenyQSEUkdvOKw7tg8bNBsld2W4kIKvKkS/bC/PWgWz1LbA78gqGds0zO3jHpoci+JI6BZpZFXI6FiJc2D/4wbtz/eeKR881yhppkhyRDoNY0UysonoL3iaMtv3kF6cp6x0IteS29egjLqkq5d2ZvksT3C8AJJQd4O8Vl/A+PtJhe6LIe7IgTn3TMZ3k5hXsWzNBlil9Gp6uuq4qsmqcOB4iuOaT/n86hUhPOEc/cXPvaTSInUkap/JF+6XZr4U/Kpq1VVZrH1xqus3PElFOwdKb4fxkER6M7DfcCMXknbOJb1By8KLA4sOpW1Ty9wH2lwVZNtvaDxpM/jpzDxNaeDiFwO0XY+IjHEv1l9+Awn6auXm9a9DaRq8fSjkAIveqPI8UqR34hlKaMoav75e1MJFYAga52MnGTj3rdwXGHxJH1sgK01do+DpTAnynMd/qVhQRbYSaeQiU8dwD/hGKaRc3Yduse2O1+zfSvvvYWq/5gyPkMKZorkqKDnDNjs+S4mE/N9J6RxqKC+XsWv9l230GlehPSt1lcgO/d0+qGL1PQScRg4VBeDH6YxMQoo5fO17IadrsgRW+4Lc1Ka5GDiFbscfcjEJl7pun2aGXK5eZuMJuVxFELv7yRhwznvUG6Sp1bFo9xeu/5Tm0Uwo930vtvHyrnYC8E+fwAKqmhgUK7/qoeZkMm7EnXcd7dV2ny8oW5apmhHxtwTX9n6nZjIDJpnpajR/yy0kyl7dSy/FulaRRGcAQaITtanHlOVFWD7OHjngR+3d0+tecdmOFe66vPliu67GQTcIs64zseduJRZUTSfrXge9sSOEXfFblKpRgSk2wXtvgnPYwDzW4+j0cpmgR2/3M9THoLeom5lu5mkDdfNNJ4kpQwc3Si90b4/WpKiiEPnPlx6vM1T5/0CKFXCUPI5SpHROSyUm/DQK+s6tv4xdeSpmY9UC2LPbpQtHipMNkeyGTsT4N67JL3asNaemU6vclMNWp0XbEqmBZN5KJR1AordHQUP35yLD9N4XzYS9KErxXBPkPJJsH6LYlgPL4PuWPOFK550Mj+cnn+GTsl9YC/Ua3UEAK1blk4WfsCboeKPM+w+GvfjDMSk/VvEbokxRibCatc3rayNnZtR8RRowpoaxG8St2xDGcvBTx+A/exr91x0oPxKgBWa5xnvMQJdlkYc/c2zZf0+xwPK/mlwQp5hF/EP2Y+fq1Z8WnTx9ATq/7FZpKm5CwMov0kWIT3O5oDcrdeSgFJw0KzW0SmTv252ojONUCy9h9imnEgm4xNsdw2yZoSAgx/4aX+6+bPiIAO8fE5DkXDo7gwM7HVBjrlmG2lhbYdrcDqpvP2+B4J0Efs37mpLqkI2zN4BCfG6zuL+GMTsjN4Po6YifqGfLQ5qRyxu+x6wtYaA/Gxxf1ruzntwjiAWic5ECxol+pIzP27D7EDS8zmCZoVgcdZB4xKPoJvJeYkLU6ssN3G1hcf34AngufffB6e5R5xKjU+uUqgcxANtBpJCvLoCG0X98Q+oodsC8aQfFyglrAEx
7rs2j2nca/SOfVydll0qsUKoqyi5l+A1Mbg1C8DBKoK8fJQ+2a7pqmJ1Y4K79ObE+JvX/IGE8qeNrvnsywRPWK/sotZN5ch5rAawBPfbAvWO72KZuaj222zaLIIT9Ek2oq/8bp8wSVZQFVTpm78Z56JhCdUYgQnZud1tAjySIQvBuDtK8l0x5iJ7t57VWOz5ggCLQ1VB/q87tga3fbpH8wuPBWhFN68fAia2FXegpkRWS+XUKJanb+VN9scd9FHw1C2WWNVIA8vDbKLRj1e1Sgms3Uz5OwbkcEuQT+HIHWCYEFEuFkrdmbMA/n7r3xhrMQHIy2Ivh9USp9ICE01cTYH7g4iSQ1OO2pMrOV1sZxip/MLMYlGje4UVH839Iuv1SVozdyY7RUdNIqwTwiBIk5VaNVBIs9QEntyRmxnZHQn70w3dQHK+l+sEMZuRJM/9mpM4+4jiSd/GC+SE2BN8L0sMOPNVulajUP3aPQJqUOBjROjncpChe3jVhoxQVouRsJxg8kkMZZBz8XHMO6JgYbfEG6eIgaBZyc8bvGdEUOMTZDh2jcI67M8FuiE+XEWoRrNO4f6jyhzWZnwqi1UCwwYtWy5g63Cm1bqBQjYQ4PECR4HwzV4Xq1ggC01TYkAfkoQw+ROFXHITfJJMsO2RP/Q1WiuCSMcBvYDphDHu6qqGuuY3guBTe6FQCKT7ynn7LkRqLoVBNKGD7efLDYEb99LECNQuidfF/HbW1St0xbMQk4W6wnJ+7M4ejjdDKqZ2PYEzo82aBi68dpfRQZdRrSlGl3V80xnTqEQ0vbJPOY6NYQDt4JHMxL/QkJXoP37sFraO+PGO8H7lCJa0URT7AAwl9rsSejbhZW32VkLBbebcfkH/F6IxxBX8uj1tCzqGPXfDKh7GqBBDmD+6WeEgLly6QSW9Xy/flEMFYIA7gXSf4KNlasBMuszgTDUhDC/Z1zNm9lusR2PrsVQGatxM+y+n7ov2g9wwU4fa3uzMckK5PmhOvvFsnL9tQCRlG4x2H8T+rrKLKkZkegk60dnb6Eq2mxIT5zVbnnSgrgLyqKFUPW6JfeJPSHymiPZyUL75etaJioTQMGx9bzcEI9aGBystqBK/x74Ai8mFBHaMl0HCpyWG9VCxwqamMxBX/8efmKKS4idEDjOXCbfPtqdDQIg6+eSzDWxvoY3GekR2T0CnDSZy6/7JnYWr9p+qam6gtcw5A9HvkBjJgfHdh51eB0LJOX6qbvUoNS582HDAciwOn/PYoKyBuAIkfGZn9lO3imxzvA5kqf1ynldfGWy1UYy20iGPZaEFYTdkWw35mqMt5IGcpu6GokFOwH3NVMdVGWu8Rjk9zSi7OnL9ClP89eTrdhTKUKvJjUxbNzLRyID673vgsolTTiuuDoflorjHWeUPPyBOnMj7ZtCYjanEdsaqHYuM3XxYsP75TbiDHRiNQ8DZgk9HXKcHTSHG1c0jUNjMqpEjQVeoNPAsf2qpbj3BOxWp70H5KL/WJ5UfVsRpD/EbSIARxH2flWhisYhfWajaP9KFBxFIKPD4sMA2mX9z9zSwgysZUKZ1vqx9y4ukIDWzkanyYIAyoTzpaZaCte4uMEMVJ2bckasqTKqJY3pnhlwYxdQSe66afBj9+6YQ3rtMfWnPzzq8bAHv7wBcJtYPQUom0M5zYDYQYiTW9N4/C4cJruyuYaLILjIJLB78aKcTSxhlXmdnHgXHgJ1FYsBi7/nHsPm/8AajvKu0vyLnXXtoQFZPfLgc4lnlCpBrc8/LTfXd40/QcuPGHo+WJ17TM3VOH1L5sEREPZwYMSnXRZ6G5vlsGG1PVfqpfNamAzW4rdFYkCoi+UePcqdLBg866fPUwlz5QICrsInkSw9xstJx6BMMzFJXmq9ennITtbRWQp9dSLJf3Us9Uy004nZjaFbvXYkFrZ0OxKFYv442neEPZw46RsdOZUsAR/twRFy6j1SwygUVaxliWDXm0sTDtpNfWufjNlxegtMpN8Pnavoto5LeC5UbO05ESeeWPBqSHifKJODt1RxFYkux7XuSrcNlO0ByFfRDr/HFK2wCZyfVOaDg9G/YbWuVWxiwpZxSsTW5xuyemM13FHb2LBUgoyn+S3/5Uqid7QNJ+nXKKQdjRBvL8zFt2KlxRQIHOF8wN14ErdfYOju2e8fuqQ0VvO+4gQwrXDNWH0L6h1e0yENgtnLo7pgYMrCjomwIjxHjlKld22RV3rD7bcGJYARwMHfs/Adl/y6eRJBNdu8NlcqkUyNLyeiobWlyYb0cBMimh2ev+FoUPsSYpnvC1UEGdIP1NrI0IAqx3n0/CxxJy7o5Nyr+3LZ+bX4EwzvIa6unVf+qqd7rOiO7wzYYsHQ2nHj3SkNvzHcX8sI73pfU21ZR8C1COM2tlAjIht5/Kyt1o5CbUmNlCY0s934blSm78cvJ9AKpnV4wOgdiAGkfbs10bh41oRxJlkMF+lo+wQxkKuqzv9q19eWDv9hb/nydx6xFOIf4kscnvo30naR2zLzrPdzBErGKW4FxBSyIMjd2z2SiBMgLmpBWwQVjm1UwJe3/N72X+rmyhZfteIDzLWHC2czG0Gi7RYXsXxZ4vQlzSiHKLH8HSM6i0mUEe9Dn6TlNdMWuqVbj+5NeVPMyGDstfwoEuiwYxrFbdvZI2+EXkzrvTYY73VtddtXoXo5HC+wQOyHqh8y3nHACZOXnbQUO5af4b/ANtXt4rhfsRp1cJIeu5g2cKuP3WKB+8QI/TXYOK37hfY410ksQfwpjyJ5yvaRhwNuLt9IZQZVdwLcLe51VVi08scFE9IThUOgBEb7ZGyMm4NL2tSc33CboDwo9QyvmjpkXhobXeRKp1AgT0mttp+PfeZNBm53kIXtuTD2hzh8XaEdIOvEt4rRt7425jcewntRn+dP7uINBu83ZVPECWeLcAIiNwUZlrOAeedoBIM3unYzxrcJQCJ9/HgiL7AKrJlkNyqHMOcN3P/wWJIgcXdlDvqyxIdfd9VaSCgOz82+CLAOqkl1AsgYEgnLWHBaQqoQqMABAJVhba6FTSAmAgssPfhJu7CzsFvA/lXqklO9xeF0+t+Cz3ce9HLIevsicydvBwa/phUp4KbGKsyA6/lGcxcrfwpDa8oU3vh7YzEc0kejm3O+wvIZ7tnqHubZnKOVKYpw1TFGOBMwgR6G6gE2720XZxol4bv3zc8mZcqT/6wpEzgyw1K6g1Nlcl7dv1M5b76I8Y3n8Q939OcM89q1SGbN7gTQ1tgClQcTclqu8D0uK4FWyVneRO2UYOyG19Y7XhIxlvo04p+/aDMNZVQ1pD58gXR+2EYXHtLi5/Oxt+kqe5WWeTvzoVdPEf7s9Ob9GwHQyLTqj8YW//DfPRFCipKaWr02xUnJPckp8AC/KtWZDdMYvTYqQ85jiuS4tr6srMEJC0lu2fTq9w8ZyBvwC2QaH0/H32r/lL41cqeT7AHgif+BVuja6in/iHV2tGt58LOEJyzQVmScm5lQXXXtFggiYAWQqrLM4Khxb7xSDKSsmSpT7fBxXGEdHpqhA8HsUTnJsshEoPijChGD9Nd1X91JpAe/KitvmWq+MTu9AyowdeUfJ3un8nzTgjXQJbtQVXDS/vdw9uEtv3wknf3IHhLr7TqtJW/seB+OHmWS1PpOznrRttNJU+S9xLKpcfOZYYZCVPgbuZY9sX3mI/iQJw9dx8h/+rrfgmMbBK2EA3Mes92HsfDWL33uR/c4jiEAs6tqqNudAc9XTlPDRyiydqnKyygEDqvbkBdYiCpm2kgF7ipWw2hSzfTvVqzlt9lXA5uCHyM74CTm3Li/fwW/I8l1SBtaSHZ9QuJcAfuixeU4+KFr7ManPPjjJwdUz0MgliEWD1bZSymcVKycmUBLJ7fyBv2o4lv5yHhjOeKfVPNzEBtJ8tPKSvZq5d7TTuKA55cqiV9VfjG8d75AB8FJIO6ZfR3vaye9+2Vg4WuqCO26MQqiPeuHN+FIISCwqCWlwMH+qsgiIuJgv7Fk6A6ZpSjhSdLjdOwtScoyWErk68r4uv7pWZMdjtnq4Il7afC21ew0OEV5EWUGjuRCDgaifjD7u0Hl6
mt0lJwu4bAabPUVYxKtRv0CU0NNNl/wNaOlZLrri6L2BvUV5IckS9XjkoGCbGn3dDoi/l94zLu/OzXhdTbLei8M/3qHYW/wteK3w3nLYyI5ggvhuaQww7XxhW8l/MG17G2z5gRk6Rhv9eTe/1sIr6MFOVI3EgxjH7KS7hPBPCbqxxPQKuDYYFANej3xloAQL+HFhif0cOdfxi+OFJ7IlKwJXfkwjsQhanK/UjG2QTzmB6xRdP4jbQKaq47CAgqyNf8dJ10lvvmv7H9RZl7In7Ylu7xzcNIGEqeCMDCobzxEfqYWVxCKbQyDpPHL7qnv3P5AsUTzO4qSiC5gxdfeKxUIlL6zIp9wFFW6JYL815wtSHz6Tz1RAVdIcEGkvqfQeqKIIDhflFfYj5Pyb4JDJbvZ5BUxERwmVdbdJnB8DpiJYyG8k7t9yTDyG9OChzVMvXENQWAvVRaJhjC6E8d5VQw7qPtnTIaQy7BFjB9vd8QaKxmC49LKY08RhCHwEUxugzRr0PmeOoJOqpWeEsRJzQZa/HQrI5mqzavwfSGGLvs4rzGNBYqEAz55xiX6hDRCSZPXwLh4yU3XpXVSt9+ua8cJLyQmwzvPUGdtwHtGL2QKy+ULwjk/SKG4R1QUe3M4Z22V6OigGOOyOLN8oG06d27fD9bFTo6oD2a6olwrcthuKBfkPfxMwYf3kRYBg4IfoRBAONs1jHmzCT6O6ZvoXqVHuW3zdPgyFp7Q7yneCnwGDdUC3+0DrQcL0CaGcDau62Hi/8q00PzfA9X7IuXmHbuZ8iqNMQWiOgIB/dG31UCPmFfsgM5BNlJUCF4VgC0e40gK+w4oyX0vf2BJ3ZRw+lJZzQ5C3YNckbI3OoXjm7XN1B40HUUJ64H06Zxa/kdZDDp2VgXz08MhrJGEeNzSQ10uoHGSSHdExO9C2ob9Nht8Dk8ne7Rq0lrgV3dDp5Ae0/hUkdGgZD4j7J79j2ic4nSu0a4txVlBxFVQT0FuoG791jnrHsoDw/iyfYhlTbX9YYObhALtrATFa0NRKuEG5srWHT5QQu33R4ynFOHYTcEmE9QyetpMmrIC4DjeFieGNNnVIYtEKNEI/uCTsRtznMRpZy6uHu/dNWsbj7PLTUegV/LxoSgvpf+uN1h082UJVBsiJzBFDVhp4SVHQHvALoQJ3dJA0/Y5M+J1ayFj7d1WoPv8Zd49EhP44DgGKkeshyPZxzxtWkqcoCa3nTYonAPAFmuWm0eahWVzJD0QjbTgVmyGFwDNI6UsX8D/jjY69jHDP1hISFDof2PRSyl5KG6IJtQL0WPjAyalXG4kYAfDqmR5tmYM5Bm/5ClDuCm6fM2JVBIgWLMAaNfSzUqg/hXaJCxQyvg3JuGFOUnM7PBOEkZ6wQP6GMTp1KKOkHpvVSnvm1n0pt/f+s16B4PyLkOrdxaqTvliVvZnNKlZoOtHOWBb1aagTzMLl2U9Z3dQ3R9YHPDMiJQSieOeBsjdz2tnMqnEhGm18od8UQRnyP1iP5MIzN8w9VePRJ1HRojt0+wJLhT7fSGvaOtTWp4a3AOmsRP21Qe541YPby4OKokr132Gr39TGI/Yo1G0M07FaOcsU0lZTF847lkFZVJJQTBRkmKOEAFGmYJdugSUWijpNG3PuWdS/PrGqXxgiU+gI8zNJqwPUmGQh2CCQcc9WqZAAsUbVC2r63riaEaIGpdTs5VThlKv8XSguZUdXSmBCjLbjnloS2sbkQZfw6ODs0MujCqmU2MRBKoys9FsKaC+lQeRa9Hrp9PYtdORl7i4/HL87Nm9LV2PVoIq0APwxfACfs98COkciSxacTuk60cXkTz0D8s8VtIaHPoGPGdzX3C9mF5ZO7XSL7IBwdXPDeHwCIX4sfGIb65ceYxhkfbUbiFwWvp541XCVpc3EuqYZDpXJw8bjMRZoqPSk9ebf5pjfe8nBgeLEnJS5avZWdzfsGvkjB6yqxnD3gvlb7naMGO/hQw+/ZLwPA8rKWP1UB2UsV7bD73r/Ys0iF0+3Dtj5qCZ4XQGNdxN2xM889/bruCwWeBmyQK1noBeutDzvKMsL30H3JNEbNivlw/pCUWLIFoH7T6SQGIaJ+E5UoRfZdo/lUoSGgJrXNTJg7KUe2wPZSoeD0A+yfFQmUVlf0YHGTLm76k8lK9QXBrIQyFZcx4fzlggpAT2XkzNn1N6H3q8BnfJI7xyChy1IwK19DT08NQAv0LygVv5U2EOlRrtam/vekNhgfFZSWnVUprcjRMyqktPmh4sFvweaJLvrrD32zuC+dgv4xxbf0GQ8uoby/sRqZ9+noyuXSO23Jq+WWP4b+Pqgk65XVuhqFXvJSzvpaIhMzwVAAJYctIHgHAqlAAJf/89lzyqKu413hh+Ikoy7scoi+86XQW5pUQekOXEWVtf7iiIKfoX6Q6nBC1O6clpcFYoqyRT74B/SScO6XFNlKOoGYpiERNnHFU97M9dd6P8t63xt8do8bEyAW+eJ0XcVBlqR4F6R1vV4HN+dErzUMS3vihIfAg8tz9cZz8B9rOJ7r5DfUTr/haWbsjiutgEEqtEXG0W8oGGtFjXWsbiT2FgITyVHfOhhiWHtGbPVPItHO9rqz2ppbSH2BgCQ+UVO633yIwgdeLKHOG5DAJj5E9cpp3B0tgWbgpiR3uTdn7WuDarqFrNQUKZlR+X+7h72x8cwkAcMwzkXs6L6QZ2wCfbrdNGoR8jJuzRFUljNyUigB/AIkVOtPoLAH7A3G1zM3jCtsWs0PU8Xwd+mgyIB8qfBuGtGLX9Da8Nkv5QIGASe8KmaZy/NRYLZBaqkaI6d7HbrYhjLgaSGF6LdqqHaDm7q/klsSjZS7CK8+n3iSQFZFq7ngvn2EnmqElj5kXX0EtmQdAqB3PGNOixiFTvpbHb19ZdMCDBCkcYNeXyznEXTPC86nSELXmT6eLN86gLVStDrESCN1xQ0Xc2kvaQdPifqVfgB9cOXGrmLiLx3xUUNLI9UHidIbgGDV3CESr/5o4VUkYtOuEoOjbAKthViwC/k7g+L7kCR5G6ecV/ZBmznDZWXYOJ2nt3B5fnDhyeOv5BwKyeA7toFjUdcPlA+g2Xt3r+Qji1QbXM6gIcww6u6VnwrKlmeSdyZJMsgPUtwophFvqKYxexPfqsqJ3Oz6hKGA1Tueffcxd3+IxiHEi9yUBCV297S1sqITa2pBl0noyL/oUyAE3drmShCZe3qHRmBijL9LGxn8sEj1tvCtmKC/AuE2lmKdtsF5ome7qKtaL5czdI9gXlX3wE1iJMkR4QB+QyBWPHH2Cv1Ye9o9g9ZqWokvUgfTxz8mk9IGFqqSteQkkB8OGfPpxZSp4ADjfeGkAj/W/yDn+lWK832VKUo0VjIb0TPX2EslSlzLV+11DOM4TpEV8Ij0NMu7FyAcqw1QjPg49R9O6wa/F/ckdklCtwlJAbtKkipHU5xOF8SWlUK+EmxqE8HfnjxpnNimOjI13jq6y281Y0oPp5seGRjQuH/ky5ipTp70XkmdJfQLqM0d2v7TPBc4HqdJ67s2tPqu1Yz/N4E7Q3NyGs92xw6xDpOTbTov6hVlvNZv7If74xOdbVT+72PiUABkpegbiEdwk7aJL+XMtLWXXNRjCRtvG5iL9vCzj4qBj18A1N2CmcfVDLe5m0xF1WfhGrn+oV9lrv1+wSe2BURa/dwJ0wfQim8bMv2Myu2M/iipldcKSGGtRbIvER2CEE8FIbL4oP+3+YFVixCn/0ez8x93s8WXZDC8G2mTRqb5Ja8BnhBhQDnz2+mQZdk3wMBdc8uOXlqnCYN/OX68PbSUzhSejtNYWZbSrRvZmdpzHafRzI4YlM7sCQBqXmF3csuCJchL1bjbYiCbvBHR2at+ecVLb1QSNWjanNsYA3XWt4TAgpnS+HzU1B3MkBEFVnNtm8G4yrcEOzmuKUr3/lbvaDPEhJxBNTEtBtIXAr477ziDCONl+1KxvzqLBU6Ebv6iLYxc5a0JGDF0lm5RCRLDGm8Xs0PjO1nMTueVeKWvzaKeMl0thdSUvpV2KtJwF2Axibnd93ou40KK0oO1FyHRxQBrtxdwoaqWXdvHMAG8Ro1
n8K6ibBirVcFkdP1FX0CVWeOZV51cvFkhGii+UbuI3KSXyIbQc7clONWWknrBJhGoC5A6TM8m8BOuaH5L1t9qjZcLdFTto5utGWQtWcmiCL9XO7yIyuEVoWVPtEBb5RLD6ouVTw661pjnQmOmbSf37SWFPYAdFq8mKZuM9HY26gWC7QccB3Duc9Axbyd1xBf88b+PRmlhXkQL9qKjb5hCsLfUZ7bkKPRnkQqW70CoQSU7VN5kqKuY8+AHQh0tLIQg0eISSa5WLJu4r82iig3el3tYK0JVFl8FflQBRP0Ty/S9EvuV9T050wcqVFZr44qoT8cigq7c0OjVSMTPbGWuZ5a5NpLIpAgCmsvsqbYkwLLEidYH27hardaPii2M5nOs5D4ZCTiIJamIoRnb2AT00+3BpYjNhXk2f3PL8axRB+h8QnSxfXlVNdhDNXdZdwoTP1d0iEdN8LlsVVBmlls4IliUL9t8URXxOCPh4UUmE3Nc7d0TKbi2Rurt88Ol5EiT5yz0EeTcV2RN0fdaGENuilLlZUh2wOuYV8VFjN9+2K2q4tiObWEJSwBKqFkjA8x6HBdnjfs89Bfm/4rdgTS+VI+cubdUBBb5qKWEXRXpQzsyiyWsTZHWYqOjHQjtCDGzMd2ifbWeiZjybyo8SEFyEWd+EIMVDjJVp4UWMIRa+c4L4souf8iUznCMpPQpHkDGCg7Lvxt1PaKhp5e/AYdZ836XHU1xjFqDvonyWfs2m+5G0DGsy5oovInd6UE0eCi3TzcYiuXVyn9scq028RjtlR/3HiTW2poCXlWVnhdbifblTb46aYOBm2zP17z124sOeHgKw4VYK/92IbWvwJUGdXULfbzoUC6jW9TWYqQlCubr2YFS3ywVJQub3QZ95glCDIfBbeTa833FfVQCRrauHt5j4n7eQ31jJqmuSmeDmstUkJfItsSyucZinMsTnuINvoYcVHkt1zIWfVIEC7K1WV9Y5pj+NhX4LbWJTTM1myf58pgiAnUz/ZKJJZdrjA0+aHXXx7vhq8Jpemdtx47r+YOkiTcYtp6+5LJWQjykiyL9dMDDtDKAZVTfmjGpTKCY8lsCVbvvc9AiRr8xclUijuiV2Q7Q8rhQDOoXzYrdVmSJX1481LQm08v5EXYI4oTsSYXFodsoIFH+x8kQHCBX4lVwyjwVEU6I9M0DYQud6NEKK7qwyzuq7/UxsLnrW4X5ODEzENvAsGCO+uBDosyp8WUep76u+3KLMaQesCg7VDQpaN9Ue8JCO93NlR6IHhYCJa70HoWJ5iMj3GNs7e4zKH6Dj4rZ0dTIgK1ArTinC6PWA1hVOZlTh0nj1dBnSvm4DGaC6C1+H6xhM1Fhn1TFDhzuhOSfa+X1lAyK20JSUCPfGpvx4gm4HkA3m9Vsrr0OABg5fj/A2YSqFhXj6qBzQhVVHeOVmLea3seXvfRo/F7kEU5cp2TJ9DzBirJqaQqjC1I4nwH0kgEyAwHz+HefW5OA4dsKdao+1GYPb7nnccujnph8RRZtoVIPbyrm6dM6EhAEVbleXQjRSssX6kXHZn2oz3p2V9xmKsbvAkNCWGkx29B4obPtl6Yv102y24fWT+8WU7o8+4tSFokq0U/cUm4j6Ms/L3LgB640YLjOQ0YKMC0zLBv4c/nPXph9ZMeTDwzhe3jvn8RM/QJPSoBd/i0nhIDlMyoDvWPzhXNK4N1aUdxj1+drgMsgdAU1HELbBRk79gLYzXWl2FjrCkE1oWBAevtXnZTiIPf+8JN4Q8jNVXHxfmb+n2exjp6NQvcip1eKPqzivogNuwS9flt8zc5D2vrci1kaCnZvAeY8Woicze0x41vc0BC03WBrc2h1hhaMumL30F3wOiZWoSxrv7kWm4RjZIjTFwEvcYOH6jzhQrYfntOikns2pa0GjeEo1ks1SXd0ityZPCxOwohuFVVwoPBd+A71zkPF9FZ84rPXunuKupzh8kforfcUFKhM68KBqQEWttoPVvgDgGwLuB7nK5T7FcXE966ghOBk51cpnoZhhQHqctC0CrTiRpEOKjZ5SsPMCLta8d9aXJ3pKfi5eHqCKdxQDNaYQcqEZsKzi8GfxfO4DWtApufa94TgpALcFw/jdpbzFPY1a/T2m5hMSg3ZrfTZD3bppCoCPiayJ/0p65xS5YfxCPRII1TUmMWAy2x+DEZ7nFP5vB4I/j22J0mq1OVxxHmkaztf+y2NlRpa/b2Kda/3OEbYg3Lj6WWOagKxaWsoPDZ4r03EJgZ5JQim7O+i2RFSe/PNw/I7P33owibuHvVNgSOlxQhU0WAz8OY9Vx84W5PGqCXVf71mbQFL0S+solJ15Aj8CNwQIcnfXo8Q/3Gh96wtjARhrSSJubycZEPEGP+wiHZEMqT5l1BuoopoRGhlmrm82B8BV1T5+OKK3Iuwar1aVYTM+mstwHshwLlIGncmmJ7nW6h+8zS+qcPKebe3brsTYBg4BdFSpg5YrLQ0vXVvlNuxbCZbfz7R4XSI64Y9fGSqFHFZVIv4X7tgnN0X+w5a5CYvAdzJ48q0jc+7Lk0C1FA2hNyZ2xSgPIhlWGDSI6TrFE30s6qMqnq4GQJ/cZ8f1T0CmLz1sI8ME+vu4tSlmDY4dFL2LBVwbZStcLIMPVhMAah7JN/QRwdcbhDo3BvDajO7msyyEN0Qydw/zaFYBV12R7jY0vq+mVEMqgbHrBm/GApb9ySf+xAI4XxNCmd0i6YceNRd8FbN7JSs1j1rzJRuDb3JW9OytCKgVz6BlSCHCeKzh+vxBjT3K9PTCsbY9Sp3YxdJIFIu8JOU6Day642uT1janxHoyyb/6/bS7hJ7OcPLkisPIQrF1zl+AHAyd143TdmCvAhIZBlldgoMP6WhpE1R0gzcYfDpSbS/gY5wc6lq2vZiR+5se1MMCMMeN0oQ6hqHwjEHSx/EVkYrwHnakQFWFzLvuC+bAuEdnX/EhJ2CvzY/LGdg6HYlR0k1B1mEj/HjRgWoAfccwqPGnQBfB0t4EbY1lhYgruy/cq1GR1linAWM+mKJoug8Moaf9R8nbrX9oBIjzil/lT9MOA6lNroDsiTzXgWJ0P6TiHUVCFVtCGYu8Qa3WNC6yya6I4rDIT1edSSYX/6cq7LTZqCLmCY+n2gGTJECL/BKZPnQm8gVsS/NfU1Gnulb5ysRQIIY4U/2894XdIQOVC1Zn+mFXtjYFx61NLci38UC7uQHEOIDOCoaIyiY69TpXCuGrcpU+K2whgjAjm+OMQsmhj4/kSZOyVBglLbyuruxMGh1DE79L61d5dOShYTos+1F4gDBaVe3QBmtCum8+cgERGuYme5FJ7fTvTEgW6AmGNRBFj0uqe3ptIrxURpKUOhrtGk44FJgXv3DdLx6m20Sd1wIzCnwt+fjEi6cLfEusNk2V7XUnWhqihkw0+GLrV6UtZlyRLlA71oRFVDWgwpl62QDRKoP7VWk2QNEFzdGWmLAnPHwsgao+T9lav4A8/38DydYAZIfbiU1UXF8OvnCefPOnzfnl3+lHXy7Vibeu06RR1F/BDNSRoYkYvgzkKrODBvv4v+aPVjUxPGjDDngsRcp8HymxYqG8NhhVqWJmfhx3dTvTzBbj4YJyAY0eFZHTOzZeO+TfAcF2u1Deb75GP1BGAVo6x8Zbt6M1zJLevi120RFG6hXXwGvzXSaNJSq16uq6I8bmDni1Xj0xbOlwdsh60+PcyFnmaWk0IAbFMq/bZfzUhiJPdfB2QTmFFBXQ7qb7X735jjUL6FVKaqtB4Hggt9GQCJ8wrciHXwLzPwI3dA9O1c0E3HfPo4Ru7xgDRNYDe2ra02R0Np2pu/fbxhluW+Cvo6V9byitv7WgqkboOUpAOkHO20od7iWNxGW+KoddLOodV7RH8AHOKAA6WqPL4Zqjv+6gF/DkwImRZ5Tk4louXSDfSCBVRN/8gRXajxYATtb5k4ScjBYN/WsQKix4LSLlydZS33xgtkbqjxNBrTWRePw3dR/rB+nPD1YH9HoQsIy4ooUixJpfyS5BUZl5GDvorjDCEvEvEz0MvSMNViXIE4Kawps9TLwIjX21Zwr29FQd038LijVopcvyFB
abbvh8JMXJjvj1tLZ7Yu0tX2yKZwzZXNeBQQFtWCjZ/5Pd1pIr8J5sZ15G7uOE537IAzvwQUKZ6WDjhklEAHqQVEsbzRpRZkXIYs+XIN1Vn8lGb2x7DB19vkxfICc12wixCgDhAbyEPbhcWVoE3+hr1er1u3HW/pupg7v8aeDRjWkPnlYRx6Vgb1R7YpqWe6GnbXXPOydksLF7fEfbAwqARDU3bpYIa72KQcaB9d8DWtHMVkUSZKM+vv03QlnG+ts4ZCQG3hrvNBMCWQ9XAwz+BhCy4zDX6PoGiODgJYmF6N8813sQOBYQFRvOO0z1dSTfcJmH+Ey/7pYR3oEp4k80yJK5M0z/wmzUlnR4rDmDfQEtNHi7/fR1DThSHQ0htqco0Yx7QQRA35L/A2cXyMWoiKyPGEi3nf6Ex/2J3cdE+KCnLsjRVrCPun9FeIYp3VBWDlm7VBzvnwdcPoJdzfaoaRjPkvUqbHEU1MUHan5eAMTpSRF4/GKtfTVqN9L9ArlciC2CBSALsJfSGMUiji4b/mWqL1eCguZ2cOdy+ZlahiLtvraLcCDCLpf3L7nJ1TkuBbKBU5XzcwSL9mXIDeySpUK83ZWrC8NnqXNjzk9H2qVZ2PIG0AKQWSqvs69xu+uJSFQmeandv/sfIoCszLB+F/lpCJbsXDkBbQ/tCA6my5OC1TtkhURG4lkcrOtD/m0JfDCpWLB7ByQDyjIgcN+T7rHCM+nKcf/z6FJ2xleHBv0doeEkn/Y/sjYZ+sES4RkH2lKnT6T2lxF4pfnScMc9BmV+pkB4QGE/b15ejHPuToFsWGAms57WSzJYGwtLFz3L1Pwko9a+bRKAESftwUQ7vE1ct2iyBAu8yeq21GOCnazd4KKG6zAwpoJ9dN5gfxQ2ArikraeFJHLJKVHxDlBjnWXLw8xyAOZrIF7ikQGdV4BIQgcgDK9E4SLPS13zt4KP4uPTQ2IdXbUj9wiusuuRBLLqnDr72BNamG072Dv6znunac9dqy1tTZrBJeaZg/44YJQOPhBqss52QCcoYJPrBwHFYDDQ5d3MSXtY7Qhn/MuhdFf5VYTvx03TeTy1uq63hfJJwrBXlT3C84F9mlHs1YadKI+uwbQmenI9khYCUrErQKs1IbmJfYKtq2g42Qp9xclas38Uox3BgvE1JXX9whQa6DeG1QC6DHqU6FjuABgtgELAlI8NVfdv6AnrSC1cBmh8gHU6YmZbhzwNXIthllQk16Q6u10m8CuPDCEM1wIt8ECesSyb85C1mPldsB9kqayghOhXyD02hSukgm4yKLUTRQUkPwGBTfv1NBMsyfxwuFGkPntJ6EXFl1usEnX7ge3x9W+t4I9nUtzaJb0Ej0A1wyZN2eru1piDDPi9OaXZ0YP6cWwHQaa7SMdAKeIsKvdGGwR3CSk/cixO9xvHjfm6tLpa7LX5yrRXr53j8k274nPN8Qu116c8UfFMGKWfcovf7cvk9Ubl05qw3wEl5MbUrx/qWkYPpZxnQOE0MWkOPEEn1q/0t4lyWmJle74iipUFEjuYh4zY3GC0gT8GW7YYGe/0lmnnMc57+IgLu6rFKe22lUMuWfZSyDmNrEt4POF4RcerHFJGTOPmKVORnudSz/8PYw40Yx0mc5LyVWNc7cADcU+MAfbVLqGlwkNZthP64GbGo0miCC2HVuIirZohsVpDiQ63XcaojhdTtZOM5OClWM01jx0fBG3Atwac+5oF79dxF5IL8cV7n2OQS5Af2Xr7/V8pJDk0Uuiy5d5O0o7Pb66tLFfNO0cpVz+bIE7lPTJg5L0KG5kJSMT/7h9ZvNdbdj/fw+iNOET+lzA6DbO8H02bkbGwx0KdXcBZYvtBfjRTpXQpAFimRj48ZgrrwElgTzwXMyepABMsG5Fsc+kqqlV0RzgxeQyHkNAXw4qiV+jONEqVfJn+H99CVtadb9zySL/Gt77RzzjhG74JYFfwEwfEUDAnBF4WAqjoxk0cXVgwSQbjEMJpNBi4dMTozhboeX/LtySvECob/No3/WJTzqaOHtTgr6V+SAPZW4hMUwIxpCUs+o27QIKCnE91ovQXkFmsBT48MCNwMTZRI4fKCO1IAsreuwfvywzeTfWEtKryr+GFmhvGZkZqFEpc6AsSy5jw8qHr0jvL/FWLTOzj4UtZg7O+givYjAn1gESV96qRWrdwNBRCM+Gy67pVC7iIwF4KH/8kZgOlx3ftf60sfOtKYFrrOM+d8wfv9UoJSOUjOisRyNHbMwxbewm2uNllbI8i5lAZafQKMeFf7X0zH6+qYk7EMs4W4SqSKNjOUi0xficj95qmpeWVDlP/B9q9xuoXsuUPAEKnDGQ4pRDXL8seApkX81FHI9SIi3ZEgrtvHeEwhHv6JA72vezer9PGKSPS5tfjIfUQjPvVi4/O8foWgWf3AjygZ2+DBFS+Hr7NI4Kd3cxuXXogm0nEet6c2qsUBAt98AZn0Pa6EOoGz6nLrI8np3YypvTF3ZWHZx1MOlEVU0scYSVTlNwqKg+9tWHrP+5RZ2sF1mbvrNrsxi0PxW9Hnhmb7rU+kPE5nvXrfshvf153ESxo0FAA+R7MDbO0Tr77v/PAS0I3nUiv7qeGQsJyLveQeAZpNnkbNbXEo7ao+nir/gynxs6q/FDobzMRlN3hPoWM83DfIZmrqhktnX6jLUZxSsJtXWakMlncrIMYOeahh765Y68icUruPnn72wcN8DHz3mY0UR7+gzgSb1+RvBdqp9v/2QBdBeuGZl7QZwAwnkjBwGreOeoczgZlu5H60TJCu87Yn5ObXJ9mWSaSkSRzua0LUqzcUlyB2iYW1uVt4IIPakhjCQKRBgK4e1B0D3Rcf+SMau9JTvoqQj+95h6atK3w6Di34H7tSyikVYUklIP0EQJKB3cxmHxfGgHgt2FqSbtCBmR8NGyE6a5sw19VfViLl2/eUqU/9qgQg1MTm+XJsqfKz9QOczkPVDI3EKbjXDmjqK5VPBy5u8auG0IA9r5s7aNbP4v6DyU59y2NKUx40C8jIUcNWujNUpDTwH4bjZaYfH/iuL3WqmWOWWyxwdv8FN6SHyHz15LzJpuPSPQlF+p/u4TAs1NkfLUvxTTvEaIXD6x965G/UHl4zuetgEFYqfP5FbWRWGIhSso+lM7hauRYG9BCNSWADexraD04JogOB/Aaqa3ji3MQAQUHoR9LCIWIbkQmYiwNlYhJYGop+XTzXA2i8tzfY/6N4HOl+iaPZTGrjCXAlyG2lzUbgQ7O1PvSSb18OGhl5IF+b1AeHOHuLFTZetK/i0pdhJy+IAxmxbDPeo2H9NYLsBe5TaG5BODLX6pwZ5NZD7n+HsblTfK2jyS3GwHuCScKWUk80R0t8NZ/qZEF4VBQLMpS1LsD8O2pXLQ+ApCu+MpqaMvuU4ipYdZuSkKcR4oHkzYO3aHg5zquXbDXSayumhMsuufv1AFEWuo8HQXgYDLHuzQpFGsOhHfl0rVOi8a6mey1NzaHkf702eunOii6CzO1ZphIQG1iveiy6PfUFdnTrfBS/Z8iaI8HFYrB2xl6fyLSlSn1HU3m/N9fe4HFMq1XBJWliWjaK+AzOqwAWVT8SlqHHy+tzpmdopzsntfd2pBz6TdlMS9DGUpOPynsYH8lpoPPdOxteqqbeIdp+GrPTLvI2KFRxgwMBKjALm3GaVoYhBcpWMlgwnOa5Iy4RfRo0qWr4xIndjBDlwJxueyavaApavIc1RgZ+6rmQxnOuAZBNvKw0ByRHYmCv6I0n7wdoBZOTdk+m8qi9a/4jEyRViYDABdfWfziQEElpGb9v82GZJD4TBMnSCqaEYrayCca+tAlwN5ifK1TaSN9AIDkoKs8Jwe0zs7A+YEMKIXUcTFw0uDO+mmRZV8NRfJOA2SJtdBPF8ngaEkxXvTM/RAxdIvVKIk4kgpLuP/9OkiRR+6GmNjAMDr6JZiG1nuTf+YGg6U1G1RYcIc8errcSpHEcUHOV9LzN7RwfTogMLSh/W/iNca782z7vAJTQ4BcmQTvx5/Tlefc9FPtLhE+bah4Uckokw9ZcPiJ3Scj6sDUjB5/Bbj7XM+qOr36YqQQ+Nkg6j
Gfz93vexPPOOexzQGcS5VyaEUf4rQ574c4LG3P1m8RPOOBdzsFNiiLMNy8Ao53jjHEOqw5IXlZ0R5vwyoQ0rhPyysPjhbMyJ6A5cegDXhWn0sPEaCKn5LuRXyD4eZvN468Cg9lfNUDHi42Dx52TEuIpzCUKhwNcr7rQUbg8D9/rNAqptN4Asbs3wX4vzBUWRBH5X5kZbXmEW0Ac18v7cL8BwHefdNoC1pjXA0JlereRWuXA+wyXdj5SzPc1+BU2ds3cJtUZE6LGhsh3EWpr8ydmB+DJv8+DWt47m6aypJe0i058GYfzJh5x1FKEksvtsh6fLtXSrYJekmtndEIDpWmp6Y22FqUnki+CVcBbkd3McGJIUvOiAZKdEgKfZd8uFsuNN8eZCDuON1PxXZmIlfw9MwP6gFD4lJznymgGHQaq8nRQodvoiuyZVz+7K4JHlhAbaEL16PWfDEbMH/vdKBVGHKs7dnwYq0n2Pv/bZ5M5KmZRPk3WEzbJ7ZQXlwzqT28VCfWG3yzIgcR765zyVlXwBX1C9TM7HoHIDmKLu8yF1M7hqi2kWTYugvkgWTphm6P3l25b690HGqEDJrWkqjMMqKg5cBG5FHOD/ZyFVp98IblCUg6ClYwvixWqVWE2IHXDq8xMDyPPSjPAEzzr8q2kZp+SRz2BGAuaFDL6xz1DTyEGNDyh2jdKKJGk7yN1Xd1l+wTOPSAfM+Pm5tFKISeQQEFKP3zX2AeNldsloWIpYBcsk6uK/2FUXTCTxxXL1s+hjx+WfOajyHug/MnrZ1j+Jf0oyVWu+FjagkHs6Pc9BW2ll/aaWXmjYimdyP6OUBt0iT22+ux1vnCph+WKoikcvvNM+O5llxY5/jS9/08UUfWu49IHAxx1hAFULDnNVog65+nHX/1fm6vdPEbvdQ38TSqGbGVJRpsQALKbDQGtskcoDxmRXAFD7H2av1J1k7AdOQb6GuJa52NtzR4YMHK7OSpguKsVzHzbP/o8R9jmmyViLP8w70x2hOVyE9l2H2sDogGn2D/oZKOD+q4rsqk06lFczV3khCMZ3/7wJPVLy0C/EkKV0iDJnmXQIpSVyWFE/ZPexb1rTO3l+/4m2rSulX0Q7XnVxCYCDIedoPBgmFiKw6Wxog6dqj9FxKb2MUmSYAaTNVuS1TgKJbSAVDHyFWQe93ncEp0n9SVyxRMSu6qFn2bbosxCnWljTIu+pRGCLGAaX43TKQjyeEh/VbgHBYkZJiRKj6z1bY4TZTIT934wO3KGKjzAyjrwz5+W3DF+kC8V9Jir6ppZr785g2EOzhDEQT123UNB6FdSBjFtEU/oIbblr7GcxZT4+F+qTgGUWuzZcJrO8UW+XctCzvduGJtQ0+ViN8dUhW4dOZcc8Mu/AKiI7+YHVmrvO1yKZTF18hK5eqxsXETiY38ZqAzUwrbqLO8w2rNepLPGEW5qNLzsslauBl/cEumOu32PcMs2v46GHMakPerg+mER4WLr3ajSvinHSFSEUDyDznj0i29KorhRVG3fntlMzoXqn5V9JO04l2Clxei9x/dSrk9im/bUc3/FXK9oAjp+nV9Z9CHDd4M45aiaHDTvinTLJ/PH0oZtRGejrRLntGO03KJRdHt5xusrlWNqhGeHWfV/wUvhcSymLur0VBRmX9vf2XcUUiHG+7hklJgEv9NmQsUQV3WRDZwOSFqEW3FaFxaffnQjB/zZPytyvRcuprpHEhbG2obSAUkQC2/6SqtaKcod/TsIAibUlfqBeDqN66Le9RIrl+V4aT/iZnWVQvn55t6qqOEGvZB6Gqhs3TOk+eUaminGQnJVX9ssox+opZwTCgVGNGu8cIkUlkLSc2mN0setIrWYQJ4arVET8oWD4qHPfiYEfP3mi2WTz+//KMJsg6mAtPlRtMUkDAWe9cekx+Fm4Wq4HGCF95HSkYwpHv3YY6ss7F9A+vW/Bn8dwCaDiodDcTFbH+mTnE10PxKYZtSEdwNpajrudbkre8X0QtJX7uFhGmwwR1T1lp6umvVfPqmlUM+HH43qbD4bHl7Fyjs097XQgvugcLIJ+OkEEFG7sF6/4aNxoQtP+17bSzixoo2Z1pJ0a+YdSe3xn/qookjeSY6RVk/rdPcKHNZY06a4R9d6w3XJpETCa8iU9pm9czMQp7z3XaP0brV61LKgShATabyO+y68ajVl5D47BFXoQhP6Deew0UURXNj39FiYdEhn5Vdqtl/e6OO+dEO7QlQNL+LX3OqXCiXJbE9sVQcEPiA9AeTy2l4GD3pGc4Qiq/RfDD4RTWFhguDb9pSLkWPgJZ3ckX0FHXy0x9vYycXvqY/xx73tJSfiV0TeTqE/QDG6w86SFzGohtjL4KDWuh0mHxidkj82nhL5FulrPXfJ98z2cJuhj3qUWHjrOuEyz4qd73u9b7iikg5aZ+V4jny0fWYS1h26iLj9T6H/Lwe/PIqRQNMq7/qUSiXDl1PI2OiNOH6nA19IXvIAh+JYFOnfcnrlXZ5NbcDYYtVEzTtEm5CDVkI0TfJTCob746nt+iEwIvrAPVbBYQW6dO4px9an+pbuOl67nEmrUSDCrCQwe9PqLo1Pd5Kx68tn3ZfrDYuUmcn7OymX2Itqu7iznl/ljAloMefxV/2QQsbwpiLqioL9laG6Wvuf+34mMGKKMkFMComk+HKGfFBsv8TjkRqYP5tnxonV/Fy48hXcSIvK1LMBQ4tafIRIg95BqBAq3ILSJD+yZQ6Y68ewq8Qi+wmPREtOkaOIf8C1rn9TmZzYAX+hDygt3cZHjD/3vOX1DRAgjxk4RedQfn9D/XYDbRX2kMC0IOnkzt+foST07EQv7CFLZ8iViGNa7FtR3LBgERkqwjWNHL5deQb3bqYPjdn0YPoWT14NuGtgDzKZCrT/o+cEr7L/3C2zpl/fzOU0bb/8p+0MSJ0N8S7g8d8DD5AitER4ihdhMBE4B+n36tNeptbFz8MV87oHa2MRcPbNpckGNLwA5s27W0sj9hoMR1ZDeBmHEJBrU6M5xEWWmyMZMCgKkLZB7ixDDQFylQlINT5e/tk8WcpmGbLrzovqy2X8Uy+o1/tk9zr6XSKkBkZYLKYvUS6cnuJZp3AwY33MyDAbSf5GLcEK2rtXvS35AQ15xf64t7hiE7h6V1Fd0xImJJfIKelO8zkf7x3GlWA+BLjuKRJ9+uT9yOdV2u2//cZs168aUIaB/cSccPhxhw1o+Jy90ooy09C1j7RVObIiRguKZfSQjHhOhTSx0Its7ZYhMAbF3u7Ol8sdX8ejnejJ6ZhkQUfDMVTLSKxy0kneRyNg3CgwX/hUaIYUWU+lq6dyUtQqyGSvCreIUKoSdZk4UBaIggy/3hiLiOAtQkSYM+Q7xEXCWZqKJm7hl1BiDP5q1P9b6LUsZop5/IYh4+sqqCjJ04A7g0sGJDaK1zlIwTgK4Ooj9v67E9MmxDpgSo+t9mQJxm4swLObp91ShIzhP7gkW7TyymbsApdp1Ov7evF4MJ/Kuf2CG71/q3u7Ygyl2VDu7Inr4HLO2QqV2wuxPtZWjbyoCPR5SwFM26UTAsUOxcwqatErHKWJoR0vcB1agqbr0jusddwhbCF7XzAStLi/hRxlqliGlmFBvrwOQkFbRG4gSWaovmwX0GKM4K5SE4hhLWMdFZWL+e010gtHfaPKnXXV7bB0zoGZoZpYMudiT4OFhG8QjN+B9LhkC3QBpxeUn4wSvr42PQ0cfsT7yTcZL6WxQN//wihvLxkA59M20SyzV0GgoMpuCMKAk/3cHhtLUGp9TMoLbUbnjQmDw7M3DLWE4mPI5652yE7/6LfaFydsa0eNxjzm5SHLskRqmzaqw546sML2j0dWxnkJVrDrI/pWsVCrDcz0k00hxZLy2vG96AzBscbaJJu3oCy73OiDXoCT3bpPRgzOkcfWd7IR6lx129dqNc+sa7wV7LlfE8znxc4zEiWZCbP1dpi162uI0NEuPS8uGqh7JhngSbqN/lqIOR/f1TrRsHZtY8S3M8w/dkwzIxavzbcHMnZogXwoO0mXSJhjpRA9Py4i9r0kp21R6oallShr8s/D788dai/W6JcR8ohkCWHZZ
2v5yxtSuZEjsnQ441NVlPM7EcqBiZ2T8zPUpe6LqDOVc0Dey9RCFA+qyUNsHt2p73CqYZpvY1hyuHL7EL3/ZrD+VyNVqlZJ4GzGtvYF/67t0eYkqp0aADDK4DYSmJ3+5vWSCBxfeRUm5OS6TvH7xcEyccJygH4NmXwe5i6be1uyz9ItBu5VuWo9zLpUo0aopUEgyD1wfLmd7uTiumnMSMD5odIO+m3FH6vTR6z5QHPIpJeSGXnth5GlujFZAXOi16xFpXO4hf+HHXnP+Jpj3dd6uQtMp6JT9yGCd3Iy3dsANnyRMvwHLPq0KIV/IacMmqF5ke55lX0sVXp2P9efVQkBxZ6wVDOo0NCWkxnwbaM2oj2HLpZcrA02WHJa5bZAkwwrCAzTiqwE+mbgsoQhdH6YArQW8SWtVrrbpQ65OT0ALHAoPXsKQkyWmn8zsCuF8yz8E7lPgD/jYeLCWQMRwW/wE5eDQ0qAGyWjYB4U2Fn+uTbbcPONjxzcmihlW8Nvt/UxV3zsW0+/IX8QQBVpzfh/gnQgQDQKiUud/ZP/YyspolcPspd1YvSi+n2F/LRjnPCu85aarAzrI75qCk4GMcU8pPRBO0p02yIYDcPEvrqbL+nBbuRsXqAftFXKtSznWkptpp2DwXU4qBU8EvBmxMwKc21kDR9vhBc7Rx8ZFpjBqg+0uTDhnF1Sru7fK74J8EJwQZZtwqwsFslaUQTC7DQ6fypyp9smS9hCU/FcqDXbJqdXgScbdnGnH78SUfUteli8Z+n7HF0uEK3NTY56DKyYyH1S95EV/g7p2gaZUwef7hdUkBIyCI90QWf+owvPi/Cd9iz3ewn8uVulIEBAMXZPVf2G5L2/NjwkJ25JgZXuBLm6gYh6MyEbHG3F3uydVGgnEMW4MNCJMLKWyxcxTN+4i9QF1H3rZf6NfgBWEOl9kAAm9CVhl5FuEGbe1i/NIUV1XkIn2lSXrlwWhro36+9WbT8hzA27vvoM2c0EFqqv3FGDYjEvioMrz3jDyIv+4S3hlInXxJZkXtvdJfnO4hdmoIsvijDIj/dr5XcW1hcA8AG8n4J/Nak6+LPWnGAQzEq9jnvwUoF7esR7y3zt7RXvKMKvmVyOEQ2Ldjlnlvaa1yvCF/wxk1xOPq0cXYPVuRp1v99Oazr2SdiBDh3YdrW6xxhrkZ7seUzEH/vo0PG+VE5dUnhDS7zgx8zgb216PM57bRPbjgzygKW/3hUnSZ4Ti14lRW8qzki40qyesKRAyb5Qu6ICSzMAHE/0fduvmiuCZJIa8HNN5MIKXczrVo/NDJ+H1my3IilvxMYdwyLvkTs5Pi2TqIKUQsyjkL7gPuKqTFEcLWxfV+wQ5S86Yy/7mCrVjfj7P/LS0sU0dDi+Q1dCTC036eSjjlrEE98bCo8mOQTY4Wn5B8My34IP1YTzBxEzX4IDDaYTVvahN4MUaFaoFppMwwTKeDUgeMaZMqra4tZJqs0u1awgOKZVhxWLVhYKKUnBA53++dJoN9iAmKn4QPO24iKedGKDAPlJHlKcqgwq79mv+nDPlbRTt7zxfDbZ0JfxTGzlW8lkamobWEgJSEEf50wZduIBK/mKqu4Ve1XNSisxkZT5aBYdDjVgYTE3jZvgkOMG2qTjQ2Uxrl2icJ4MJ7bqiuvIZcFyfm5OuASeNGthMLsvuJ+72Q5J0+MYQPCoicnS0F9qy3Y6dJDn5iA25xJ7Pp/ANiUASb5aKRX6txepP8eQZdqk3ndLP34NZxk5FlEmW7Jeu78td41VlfT+eBHkD3SopGANI2jNDO4ryWEU/ici6wQrwQZIxQnwJ307bi2xjBVA+Z1LALMQcW+rjlOH6vqmHPqP9s73NxQf98pGFnsBe9xSN9xZCdZI5TARAQ4mce4lf36AkFgqw0ADDC8zb05tVOv9J/GEz/Z2eVd7riQAAtsgpK8zbajV/S85UbsR8PjVXm5gND4N8gtD889w9RfxfhYU2iFi5qRiRezigaxZRXgfygQPkDrVDXWWHW111VaTQksgtGm8QOzk47cb0Sh5mz6rlrjieis3Ttmj3iKsjxyB3HE6Cpe4vTz2AP9NK4h1l/sD26UlqZ2XVi++jEAU4z16U2ZGpcQc17+lHSoCQrFNkGKRihNIC1+/mweZnMbvUfMhvrqc3KluiWrIe4imokViehRdsr1ntdICd/7ruu6pI0BG6ddA3VBp9PRw+mUE6bhMxw8u9vWJE8m3rDDBeUFHgB1qrtCKNcCfFan6wqYsat/UnjhDo6plW+56Uy65chdXRpcFwdHebJI5Uk4E1H4rHLgUkiuyIGroXeiwETSO+1DDH8OxyulIuEhdp7OQ8WADFjgptJS1TuUplLKhhAO0QfVdQrPOsPJ06i7zh9u/2tt1BzlQlX8/ENp4kVTtliJnVo/TOaByxziO6oXEAjFpQ7IaCderioPwER6uGYw8B+JBmuO6Oet7/4cDUp7pUKz6YWrPSD2fsiIl1bAdl1CtQhHKvznqUqK+0o16q4AUHIK6vTXQv1DtgAteKQCFYc0HW2qzXTxgozMMKWaaRKld2xpl0l0x0o2L4KmGxV4PCz6kmLbYD6ek5mGqhoq3pWG655lKjyjrlQRko9xvLie3Gp/DUa1fZxvXOsG2AZfeMDxtnceQE3loT5BSL9dpO6l9DTWKXi/WVUMCmBDxP78aTd8VFNkD1zirgnvyiSYEABvGdxMTocuVfkyTcSxNr6E7uH1kiT7cSJpGLiVGTSOZh0dz43AJ1L0ZYh+cUVRN3hE2jXWA+WHIzXF1YflX0LAqJh6cEeJr8olUvm4rj27kb7+n8Gxj2ag5R+Mi1NoGr9Ixf6u98x6ST0HLjujVFtkrkfHP1o2B0X33z/fnaCSo163d4ECpjPDog8MCNJvdZZqhYhMiS55SW5N/ofKX4NgRElAaeGsMQ9KMNd1nxnq2mpSagWSvtTQz10VieBZdMOyIHYbfncyh15p9sP+IjzabQiA8gaAFUadG2kSZ5kzqA/aW8WhlKlMjydj+oTEJYQcJbQ2KYfFKe/j3L2MdVXLFCDvo5oCxqgpBQCad2VfZedmk0LnvFl6kJ9knq5SfygJD/jNRjDyAtVP2AJ1GpFsWvHnYrbbdS1jfehz8f9Qg/64lQy3IbD4/fSXZwysIH6ambtUJ0x9kPT65L+sCZwMw4yawWMu4+CgaENQRTZeYP4410sTjzgmBLZQ5p3mBYTOhZ0Xr1/UrLjDuSB22kcXPIBmlcYYC76lpYuCAFvRQm4Bb+zXcbh+sozIN+LpYt+jH7nZm5enV2gr98uShgCMW/DdDuQNDjB64s64H1d3ugVD8610aDpt4m2TrY/2N7lwa0sHntDIeoayjakm0q/EDgdZA1Y/uv9GUVm8YYBicIGkGpeCqY52o4Dxi3Z8Byk2pzqUzcvhOlLcdBE5I2usyLsf29uX4kAnJZvqHPJAPD+NrE0m9AE5Rz3aA/JqTGZATyVepodQHzL+FOPRQgNhKkfjef0gif7mGdi7Zgz/CHo/YjBO4lc/PpbR/VBX8UkPMQrsQpOCzOwgF29ymIzquab1RspHZicWKSz6XoGp5B63M8scmoSsw+7PutVdgWh31JlyK0xrcq3gBRB+ijiSCkiiEzzCUVAgBjjhqkRdHYM9RBI2+N1bedwFFOX5bLz2V8647Ytann8nljE39jMwmvfdOBTzxO2r5X4RT49hL4z43eAE1NKEUifOqBIfO1ON8X8BMM4ls+TOi4zxZ2sVrkcEioLWx7OYJ790UNBSDitpIX4hzGtNgK+z1FvnYzbQOpbfXvuTwQvLUpPA2MEUEZOwe/R4HSAZKKeLaKtqkGC98Ip4v3E4evROv+R+M6VC95W+HS3D46xFw6nGvyBFJPsrr6Qqh1T4ogp3k3cLUrIMI9ZEPreft0h8eByLU4cr3DTpmCzl6TInViCYn5Rwxueo89R5rZyMtFtQ5Tzyw6ToVygdvvdKSqxV3VK0kRQN5nn/HG1lwfdEvFWguwIjnD9yVkhUW8fid/yBZc54/2tUzbqkr0OR8IdqDkTF2OEF4Dcndsw8JX0Oj/3yeKMZ2dVfyq2raHHLisQIUDKrjk
VRz4GqmlWeVTdKw/qViKy6CMryrUhyHn38PHhyBB+FIM4hKGglw7GwSdwRzuswXfoTFWbho+hNta69wH1rsrbYM7YDSaI1zxLj6ebW0Rhmm8mVNaiah/65bv0ccSjPPEkAG2q/qJPWKvBewnsnAuSDXL/itbk5n9o/NVXv6/2fBMZXZd7awIH5wS5XqKOSvIoGTJJdp72iNtHhR6NFRzw2Tn1EgWgf4JITOdJKK41biRJJ2IoTD5gstk4oyFzsjyxC87TrbD/Na1QuG4xQasWHHVNbpb98WPBrBZoGpI9bBnorxBMSCSjkHQPr2aDUx10Lthdx5KnDExobs3iNYxJgkslG/AWMxWdvdwGnNO/2E5FBKTAXMZHQIKRJAN+2Kqb5pQp8H4sfFkxQ/VGo2PnYsJs+PAabRt7e9suKmCmRzzopmlGrrJq313dE++zjQZw8WIhYyZUO/2Wrx2R1bhvami73MTLK5ycyX8m8FvVqOU3TsyMjYJr48iuFTQllpYkoJDyzwVDXqHK5JlF+CPwlB/mQkCR/QBBqTkMFo2pZrWjppoJehmZGDCJOtX1OrvXFLx9gcFiUIMfl5fikxjmi0vdQ/vQFtTaUMWQMHNsJSYTi5cyMWpnsv6zdecvWm9P1yucbkaUluIJaIoMvpk/s0/xy3iWjXax5hHv+3CA4wVW9JKvCesccI7O+tke61wqHbPabpTG/BEb1RPmg6z9lZMqqTaqacG1o2WAt4ushwLfSDUcgol1x+siCA41r5CAL+0jlblO/7QL24GFw8BJpty8TXwJ86HrfDlQjHf3d7lDO92Kibl3k9nvkgC7t/Eu6XYYGHT8GKXtVlt9HKa8yAuCH8p4p84jf0/otPFhlHjfbHrVmYVKlS29oslTnThLw3rPj4SiBxIwZdFHD09x/FJPEePL7XNKRM2XqQNJpQpAFHNKollW7tVZsrl7WhgYTQ2afrsbV83o3GsPV7IEFPPqshiqBE/k9HHa71vRadi6EIazI67+Zm4Jzs3zSlZIAYMefyL3013gz6UTNK3kKKd3+x6IjcCEbgKhsvsCaY3VhDtK5MgerNAt4q4n6ReX+9uUj9ocwnQczZoDiINhytbcd0S/A41JToRtmKL2wWrICq49g4/PvBbd6FscVXvYgPly4Ytgr2L+ZbK1VQpNCM0guc+SVVNoWchbEywNPS850HGbTA/k9JU1H8J6/E2kKRKbv2stzSD3nSJYtCIUh/uox88A0mvossjWHLD30pzECfGf+BwpBvv7raoAoomv6EHZkBLIG5jQUVuA3VcrNJKsIdk/tknmppmxwE07vGXRLS0UM3F3CZS/t2KJDLEP4pnL7Xt5dmwbzJVFM0HE/Ymzd9bwydf1BLmO7krctfRAF2c9krTMdjAGLjo/jBR28drXRAwYskpD65O4DiJf/JsRCULQrpEtWH04wfZnMlitbVp4tDUsfouMd36X313WBj5PiHG8Btqeo/4OY8Mbon4Ru8VIdVyjhom5WJJbRBjie85AYShblPs4GQ2/lX4bB9ByZVE6/DZqeGwPXoKjUI1B4FF5L52UwBYMgmIFD2z7//OFsuB2D+f4hi+cnXWaq5tzMV93jA8t8RNPcY0kRvn4tVfhGT8ZBwUdZILO5q4Oc3Nw76KHeqYdrL2auTaC1wXJNCKnjCr+giD8okSX/H22xZfxH9MpQkbzZ3M0Mjg4tYbxZAwvgIZzIOF4/gST7Xt8bd8imZB0UjgJ9MZLbQkqVBMfbHjLTJlLwQTMaI29SxYuSJ5DL6Jkhq/iHrSTpAYkp/rhVm6+04Nm4u4+r0yUfrkNcd+zflRxfeFCVtULoD1WiG/pws70dZLAIOqCO9HcD7PdDgOxTYlAXQhDL4auK76I8e4v3Sq58CSehcP5zgQl7GKyvcAnoJ3/MsPNQiIazlbTdIwk07N6d/xMBNRJs4IQZxHSetUy5Xd3UzQigm5w4iG29q2G4I1Y1qVXGFK6g7t/N/0PAdLld95fR82JyeGb5QH1Ilrf84Tw7BnA0y3fF32r3E4yS9DQIkLNpxd3EzhweTXToOoDJ64R9k4bzqJa1tPmCwc0KL4IxMCSY/QPFJh2fjwcn0lgdShTkWbY0oMXaTKeRHuSuQ5u9r95oAPjJbbQNIcAoaVVXKrwzDNyCIArVud/1lVX/Z4qalNMGpGktTHXMFSZuSQRbyOYTy+Sg/LwA5b8iVbaKh4fUXFSQQzL7Eut/J98iAb9OkUDkVY0eZX5GK77giqMq4geUBxoEMzzgQ2OE5coebA23TDc0FgVFQorqJroLV1p3V07TmCtxXfyEsHRMA+JBhoZyJswEY/qHI3Yzn5N35/rogjv0sU41WCh7GbPlcdNaR2pqHAXazuyGJE6bmPL2TVdwfMRYDNBMUgUbdpKFp0I4UZNItOARi0TxXEt971HhKobRgbYq3g77zDJgV0RSo6cdS39/k4L3VaOXLTVF5Mvt8kWWsOPDwiUmG/C9G4syULFiK7uKH+96/zHmT0mSrX8N+ynRPdEjJCPtVg3Tz0mM30qK1UGDkudJL/LrcZtKKOmG3VtSGyRqmrlgvDlDKdiXr8so0rz2qcMKEwgDjt30WUheDL6jtCLcHBW9EBlSEvPgQE690nA6AtVU7wzgiNQEcP5OJA5M9YIvbJ0z17yceUdRtVwA+oYwj133fV4Il9XEl3IjUGEeEGO1w3JkdAHfEcxnEEJrPS2fDSMNwnTEXXOMZTzOb/tIeGv1WRUs1R9U7fcsj8cbS9Li4GUKHsZFwb+URfqOjZOksyNNZ0nCpshVBwx4zyfHZivxZMQ9JEyJXNQ95oZrwDBVWalYwUW4Gonuws8JtbCWook0/1weGjSNXz6Dyd/tIJy8dNp3bx1vcPCpcaR2OFiJ5/Kkb5Qz2uAjDyvFSVmfjUkSJl27lHFMrQbtVUeYHXoUsiH78dXGYFTpenUEs3F7lzGUqb7O5wFmA5I7mBWhTDfIgO/AdVhRDAquA1kz8QY+DnqHgT9juQffFbhFolzk2KvqivyUyELmnJ+N08Yf9FfIFneno70OKk0ILqTcAgjt0STEks9LUZSOOZom13CYE+yjHJgUsrDaMWynny3cxeL70HOobRyQjEtGcoheX+K/ICn/05zfYX8s5Q3MPFYxuKTvRQz4lM10lnyIOgqrf+1xTmhV7CquPV5UrzCPfWJz7CUSOaYjHCswx5XGXNhtd3d2kwbk22LQTpSEL62fsGbuWBWCg9qtEXCbbcYqbw0qZV5cMy5Bp9kQu9JCGhMORfXy/5kYgBG7BlEMc/RcnnJ7ZvwyVr/T/0L1bCUId8QS+9Mi24SwBwRlOmSfQv7aID5j7oXnEG0rotxm8aAyJPvacIRs6C/F6Tvf6JsRyMkMi4TRe9WF2R7MLOLgxZAhVgcdUMbJ8+HYLEigPp7mEommhrkvRL8CuiiDsd916S93A2xdGy6Bbp61TA1E4voJoeWKCuYR+Fs4X6zCgwDpZFojgmd11aSNpOQb3LHTy5GIFwvVMBtiI7fWefLeB84khprtrfsTeI/1N/Ry2BFrHylglghiDLqqWQII7b1vdBmCIEOU9gk+Axe5NBetT4bcI6lICBfveZPLU8Qi6JKk0ZpSVEwegziwnZ8VN4aFSPtBc7jgTpRST4klyvymBG+DdKT3aG7wzLQEasZ2IVIwlB9R6FeFTOYmVOENpkKWsLW8p+Bbx1HsMiYNHa7n2qwfO8r8S/kodSfXB/TeTELjNS78hrnXI3NChW5GdzHvjZ1C4v3dmiW/F7jvvFdmcJTLAM8X0ARkkHUhYnWQf1mOFzNYvl04b5X+NyCVvDELZJNCesJxE+xXbHLI1fQBTaFg0UbLmWGAqS5ckBn8IzmdU6I/ZTi0JVnqO++N8KDegSUUVWs9buWRSP4FFMYeM2GusDMhAp8+fYngBsMyROL74r/wJGhbwq4FCMgT5cyv7+3/gpMH+w9fj44q/PPjLy2f7EWxpxSHJbZ4xd6P1Rb9qwrtLt3ods3ssZDh7gbrFfZ91QbD8RrzLFcO1+utuHWTovg3LD9Y2z9n0MJxtmNYXymTtwPuGRQIeBq6YDJ2hPqMtp
7pnoA3o+oQMAdIBnZLR8ngEimLFLd0qhEo82eRHTknrkPe3zZq0imjK7R5MKdq6dCl4ApdIb0PHLuPeERN5CBAJpAnCSdH5+QsJ/BT0KhXkl27cqTswHlfqPog05S4J26+fzHqx34agMtpbuyNw9gf96+rN/sX91J3321ednUa5ijjUFpDt4jXuYayj25REEg6/IoWit1wvfPvgfcYQD3b+A4TW+xgyd1IvM00VFzXdhFJWQfKwa161J4fzvQlCVkaRghRcrrkwffOL1rsXd4MagRY6x/tztv2AOdo1wH23MppeQW0nuGItktt1/XYrmP3baTjVAOwFCbxmvHrvTGIDizcGOAWmFHuiJ3S1VTY0zIWjAncrqEVSGRsGtVOZzfRe6eZk0GnZAUM9D78hZBlDif9OjfQLXwfccR4+2XzksAUC9YbOFyuThw3r0x4L+vIHv8Sx1ZrwhHp5fh6WzL+qJaXyGueoSN/pkyTrU0D3Ld0NsokEfT/z/kMJEmgDDzL3TEbTtLBhRJxg1dXWtX/XkXqCEz0VVZiiyrMN3XQCstXRwwPBParOtF3Tm+xObZ6nDTnkVghTu7KYAX8NB9p6fa5yQFZhWApUklRfTdRyKGCiwkPAeS9TIozO68RrHnLiaTshUwLT5sgVIockpWid982m3rhe4rDUTdqytvoaVnvBIZGifnBrsRqZtoPWd1p5Mr8Fw61KguOeneSzR407UVYFQqIM10QtuG22Nq0xd1gNtp5K+TVZn08D9b8gCEKtDDxJXYffWu6Iv2zrg8b4nJfDkB/A4/sIBv0QL1p3zZ+1F92beW3Ts0mVuXID08A/HU5WesF/yTgnsfHfJJ9QgPro5GyXEUfyhqQymoiXfzQbC3D2rG/X3osbpkucOYp6jkKSbWQyK4/BHYbKdrqN2kWdTCBWs6RFJxdNKoc9uSL3aan5CwIRfL9OCB40crsBFRi7B7X0iRlCzg/p+3s4XLu49iojuXYN6RwlPTA3tlzCfAbJM5Ako8lOAVctu0HLcbUiG7RmIMee77pgqZBnGkSbH018eGvg2sGk8dhFwpedFY8lLVdIxelwYIBLZUx0fmz4buLCRf6KQGbbnqivPyJCYqZaRfer/MD9R3oC+MkUA9qVB2O0Dx0oIhhRz83ap6Ww5PgmoiX5q4NGkmN2tuuD5TxQNpYwR/k0y4gTMrfthyxXQdZWxKZzaxuc1z8KwPbkfAteDbpY8JxsxyMlY5vcBt3z/w+EYvZBJqgC5h53uuFEmqZrtVsFdePb3pnO7m+Mr1WGSiHC3Ktbn+NOHZLJMldx3nHj5jhuwou0s4g8GT6GYxXCul/mN3RtHPXdYcHQUMUVo0iQ3sdDbx1rehy7BbwErsct5lCUeMIzt4VFC/YrD3IOYtJ02uIvipRFj6HIlJmQ4e2J732q1uh+5YnzXBo10c2sXyyhj1fu0MJ2rbb/UBtdlybZouC50RZie+JgiSG7itdktzgDzS5DIlY0fsJ87QY9+XWVgBnQm7fxL9OTbxGfBkMcB9HiH1Lk8el+pBHiAkrKol2vNgwVn/AzxJ6Q5fJpYp9lrhVYxuChk4mkY7S67rvLPwegw++Hz2r2GHq+VpHuA0o5J6XLn5VWQpacWuyKZ4etTLY8xV/C0if0tn7VB1tdsH71j/6uaegP3EUxFbahHq+L/l4XcnLiIZRGfU6cH05WxE2EAjnV1L9nfHJNQ2U4fanu+2aW/POUZPfbkdyo3U7WLspN88CV03W+GNBLle9WG1FbYhDpRvCFa7dCIwpBm9/UfhiqG6kBJpCmWv6BC/yb1NAYYaXkmTwP58tgiqB4G+9S7jTYdADpEmdOQx0Olo7JHCbaEfidcH7mlmlymYB8Bkz/wqz7p9gFsdDr7cwH1Xlr2R2mCvtKkEPT9KF9gtY5D/Aa2/JRv/l/hxBvfRmtcaSXMnENXBORWi3c57GYo/mix7x2e5VSOOEi5IDmslh8OianZCxXws6iV5F6NJaxR892cRvKlIYjYr9+9S1fVWjzQ4/j8sr6ZQgCGjenOjP43Ss04lkDZ4psMD2lVJKMPEXKr2am7uJtp/KdG+vN6N73ONXJri6nPIcH1YQRb20s+/klEOTRXWDuQU3UMe244Rpfs0YFtRrn6VEcFmlGKV7BUeKKQGmvzYB0FcWnKVneSglUD9GYqfpjBypAvSyXlocGgEcql8bYPvQ2c6HXz9UfaJtni13epYv0p4++cyqgLpUvidWNjX42tc/26RC1jLrzT1eUtoBG7Nf+oH050WlKU733dfYNIqdpBD2gjZftGLa0Dunjc1sQciZc96TuDii5cP9GAnEyX3WqvcxDOgI2OuN1C3aj3P1f8+71SVu8bVQY1HD6imFTftkkGRswtIeYATqJKWZgkc40NCjtWuMEFAGy7lDSBud6xa6T79AefpQzSffSVEtzxWtWxXreJZRxWqg0usu9J/YoZaHOuHnxiT6/wd32qfy3Q7BDIW+KV8YvUdibv39/tI0R1wSALaRlgQcqzc+LQjwuelb3XJLxdlbXfiLYUMeyUeeDpHhjsnV3+n9L0OTPZBayb8qoWTXEpKlSiGKLWsIcKuhn7bCnFtmtCAEiH8uV8j1YsKstaahzRsvjKvpXZnhVtIJ+KoERQ5nVcv7DUEKmehNKQKOxcjDBUZUB+BpHo+Re4hf5GxZ1wglifdFvowmT5j8EGYCSBp8gZleHkDoJ0lkJcPnNflWtAnzuxk0hvWdr6k52H+DYM1EAtX92/aW1uJGkU7mzk4FgpU2a/xryzm4CyqpAKGPa1VUaLbxmHp6APjdmu2p77EeQzWZy5XWFvoN6QQmeAWuspPsF3wtW2L6cDBX802p7G3cX7Z/bSDOJc4aLNFwtvW/HepAl8o2HuXTQhw5lcmy4ONdbUFUY9IxXZwpRcijQ0fOWKhbPyx2Sn4vr0yPndOdR+NwsiDCKb3OUEDxJQOK9mgmXuFTMT4o2C9JVr91w9TZJkMef+lifbKkKTB4ip9ZjH6rcwWmjF9a2pY6IuAAhI8ssrSrbSmf6Ivyk1GL1LHMZcXEkwDQeCnBG4b7oxNi8uACLrAoIXfYjAYUojASHCTtDK0FXO3GbbjVCmJuNhwt2chnEaINRh/u6oGRyL1kCQ7WR3ciq/PzIkKOKTdlTQn2DaH5VthEqIdC4viiZRkW1vBMcTy314XzOidQqx2MUCsYy/V+rfSLYEFVYmanfTxUzAfLZysrYIbG+CuwATI/Ei4VuboDMJAqIV1AsCt/HFjZg0bPkCRpPoKXkAfCKNkHUk8s0M6KiwfQDNm1QhuSFkEv9GgG1afy4i/fMc+oCcB7h4Z61YlRcG958U2h5t2ym3mNf9wbCu+lxG7fxvmE87bz45DwnJ7AZ+D7bs3g/xuGDbblq4sBVqtj9l+MRoqwun2Av9qnyW+YuSxhwt/TiQMFTdfbtKAwkrXRDAFltkCwOkpaw/e7335k+np2qexlUbrL70kZN+1KAj+cmYgX+DtcQULLDLpO7zIxCaFra18/SoCNz673Drg8JPzMOnjwCX5gqxN696RIZyDPePEPdbf48WoMLBxCapw9u/ds8SjsByHAvmbpmTqR1jbCwNDUsenTvVAKxSk9Vp3RLoHkfbupRS2imhaZw7RlKkXeT92GarO7LpFqSUUVRmXHb23+h6o7SplDYdRyP85SuJr0oyPNW/Z8xAcGtt+716xbZzgUrjH6q3TCEl+3AJbf7HIcfpp9IeUoRPcnSHfMgdarmLNV8WVPBJj6maTptp4gOOrT53u9koJGX/VapO0mWsTMvzXWtLqewafxipAvS8oSibOa2TgPdIUGZnBXa+gfUt6WQV2WiVcXVwQSI98K1ruQ1Hfv9RDqBOQ2WoPWdMScEBgCkKoNxHdDVHUx691aa59Lfxodu0KH9Xy9IddEi+IcSKhrkIPPaqF8DEvPZXusgYcv0CNJzJ2502Eropxl7g5O7V8AZC1VLj9hzG29MGCLxLTf+vBddfBHighixkbRVtNIaI56rtqqV8339jmrrFGzm5yftUkKbhegsDd9NkCLNzQm4luMYyZ5+mkni/3fhVM0vPQJ+OkvZD
eABA0SQdwsSGUQwfjcpJcZLDtNsnt5I8a2nKpW3bnyNsKBjCRsSCYj7Lf4qjc2dVceYJrI1YIZg5QV1QtC5n/IWcpfA5VU4UUBLQYFSTYH11BCmzDf6g1fIYH/bVPgu3NWkGjF3tnftb/AnUVgdSL6hbeUBB9QqgYa7JbRhH5ygMPqHp+wEwEv5jKRryQUbuOoJ1bzs0vC1Y+d5IBWfhJY7OsiZ7A/eXSfSJ5LPmnpYmdnOSnrTZY2XWNwAbRrqPQdc7NFCxT4WIAprcc4sPlOzJQI4YPdqR6OQ4HAqxDON5+RjR31T5qEQbvJbVWPc9P0qBX3v/tqp7gkcMCzjijRwj7frvryrvSiBC6qlfoecFk2yxXWvVtAQn9PfHPkaOUhB0u12Gafl6TjwNwA99UkKkUNKYrcwHhsH87/tDyqh78Rs94HS/6N7O9QIPy+szDMn7fhTEZUbnMay65lw3X3qbZn+QrON/FXZZsnskOH3+4uUXf33F42kO538ttSb+jFKvDvX872rkZU7Un8USeCDJUK5SLJtOOwFSwAYrvpyqw2I4TFKzErSba96MAaoN+BrZbxRP7pXY/Q0+RG0XTx1g3RAGB/Wm4ALA9oAgd7IX68m1soxbKmDTgxz9xoGX5jX4unVNp2t3tOqkOtjeVAAAQg7BCE+aCs52NaP42l1Vh+lDLY+KjsjYZqR7ExckMtDBsfTabxxsZ3H5CA1Pwn4uMyWXWdywW+V2/ZqG2dMD0DRrsn48kuZ2TPhYWvzQcH961G9P3Kl/hd3bqfFFlGfQXF6gvkeCRLADdJreGRWJYkygKyYoDHP1aMkF06+VRAkFWCygKCxAA2lkZOte5IhQrIUlwZuVXDVhou8K63Zm8RpM0hO57A4foDDCENAERlEhxIxb8gdm4JJZ4VfgBxpCn28OCtW/YeivmFyG0GtDTk859Hc7vTl3r/Nckl8QG0ABEG8IfOKF0vWlsFtDUFCE8gO59D49ghX0UNKBrEiMH8+wtQ2ecIV4Vl9HVsiBnzweVxNEAq53YzDhhJoZjXJuaArpY/KLzoWNibrixivZI0uL5GCuJkyeXF1l3RGCOf07LwXZUbnRj+S4QwJRvYMBMNfjf3jJ+mgkikBpOtWnAAWK6ePuT7ZeUZm7wHiI/jTxkFEtEk/n1OXPvQAQCSIJfQEr9zCBRmqIYyFS97uZiDKr+Z9TxJgVfOb1ckcbJC2/LO+iDFeBzPU54vBBNNnjI+hRM8xyHdpBwCFHq5XN2oUPibHPDA2KXQMjVvjq6EbJFZodIV8z+SB6Rn8zMNP9o+Qp0DkgmsUl63O3AF8kmCgi41ARaBvNAeieA7w8McK7jp2j11+HOy7UqcRrKxHpwy5pUYOWFDIl55C9rpcuL2KWq5pUj8H/QLXdj7svQ1qGdgi/lqaaEsb7UOptBEdYcwcTC9wt7ObQdBo7RflGTQ59PMBAIY1fvXkfxDO36h7FAu7iHbv1ocjVUpC7bidU0A7eahqd8oeE7LSmdSLC0nXkQy35kN3A8mD68aPYEyd/wo62j5G0fP5fg2Jf2fG9o6USFqBDen6IIir3pWab4eEKHFEx161oijXD6j2jQVOd5MPR+pkEdgVWRGiXS0pzk5VjoBXXINhmqdeeow/xoVtdSzpgED4yC/q+2hAqSW7vZYqRuE1Z47zrlqpYI3KOSAP2fliVATCP+e5X9R38OgmOVSh7VKGD3SZ9fEEekM/A7cgPWZRmgplxdkHQsGUXm8o+cva7Q1SqFlni/Fvcpy1hA2QitCVSAL6Zwl1wlEQmVaAK3P9XpN/Mqq2cD6EXeAhWzawkpKGMmx9jSBc1Wet5LJKD/Ggx5xjkqEA40cZCRw0ZU6Hf0QjrMf1ngDV6jaY+f/kZqdffuW1yfxdaK6d5abtRx0QWomYEYJ37Mxr7Bm+f5cHgbcgfFdLyhxZuRDPiR/yNXCS2sGQ++E9kQouEF8pTqzzxGHh0m0lrrYnpScDFiNa7vkeqye7W5G88mfXQM9v4LK2Di4hderSNJziSnuLcEEU9VNtbo+VYfCkuD/uGVurP6eCuJH378vu1qbvyc4jGyb0JWHPCUbhzPLFbP7PIcSuIqpJnKxDXHYhH/qyRsPWcR9Pw8Y4IToReqMHELF5t6tHqg4wY2jpyokrvOkCvBmm8gaJX0qv2OFKJgDO3XXWZ/s38YUVxVkPQ9r6QAAqtaIhknCto7wo7ui37Li6Hn0iyuiWkYZ+us+0iVTjQF+3x6d+4g9Ab1WVfw2FoM8PCQyx0xBEdgGp3meTMG5vS9XdRCydMXppxoksCz8QokSorAYVg3ezLzLW/wdi+DpR0rShJm929OE4Lf99XeguBLBQMPkscz2Q0MRlmSH6D1CEqonxGopuKGUueCssn3Hk2J5Hbls+qC3RDgkW/kbe8ndBlhYDJgDq9Ps+cHrpK4yhe11bZbYfNOelWrrWo10DvocKbAh1DfU1rMXWz9XnyrohcX2bS/aa1FV/k2cLRdg7g3rshWhABhsXZ4F6397FCQbM2WdO2c644Bz/4xBmO7jcTL3m7j8SWDIbcNb8mnm7IgrQDMB5HhfmJvl/pLJV4xThL9bb8TVKt1EOxXk51JGRCct7ZsUOseGUCC1GRpsZ0eC2nt+UvN3g7gJXRlmsAs9IgD8F8t2+QF3zmVs37k+maQCJPu0D4FAEvWmoNF4Pcnds4wooWCpSSbqEJWNGB7ITOSS0fJsA6bUoOBXR23umoWdDRdQ6KuJvr4+sSzAVPcigym/o1AmcrFlJBagBmJWobH2AfO/0OMFIlhYYsEg3JSi3ly+1cqJsSLP1CHFi0cwly28pB+6X7bYQOrmY1rvinninrTDVk0KZs9n0/66EKyyPsJCQ5RGEcmrRo6R3V+3xwVzktCKQ8IODfixwhcxgYHRHsnfzmNrL+bsb3brjbiRlyC71q+LHG23sffH5R6Jdu25m8GDY/MW6AlyliEEmWUqpSte7+8tXXIKKhlmjxtSmCpdqLDHAkArRVwpoESc5Ph5m0Lkg0WgMMhU93lO4NOxKlYN+WnFbAt5suDN3EMHpO2RWlSxhT/gQgPLi8jYws1vzs5w+swvMYT7GswiRR7BsJXmY01FGZOCr/Y9hVvbZaun9lTqxjkuCVOWK4yE2yyBaXy+7ym6IOY7VovOUYANZlMYRXXgdIbCRcnFrrFcYOUnpTzS70cxRQF6/1GfWQWGn+JtIwSZIWf8pYMguwjjD3LsFrrUGOkNEH7hjSEMQFvEgSAeNxDIyBwzLVA8qGZXRMYE5I/sj094ayxPYN8bId+9rQDnTLHPjvejifSJthc8HGGuc9aLT+wrkFNMfETDyEr9cKv8W9VGYfTRmiEwR+B7+Mg/SXe3s1dw6uutQ9v5v4dDlq7mqqXJqXIYBX96s7E39itDrbrgPfULIl0sndGiUeYCob/Z3ZQngDXyiARQOTa+/iI8g/Stf/nC7MVqpg0kLlXYkfLxWOpJ4wimxDdu9BFci5N98fupUjlYjr5u9/nmWZ5oMuk+BxDBVd0hQOgTkYCyb/Erg68fbIzOM3zjV9TKPlIHQo42M5bdAuQthdcFeMTKspu9xXVB2fUThEVsNTSzSgyOKrtrEglihe0b0ZvodRAQfdI04gEAxlgUMHGhMSK55XrlyrpSV8oTE1lc9YQStVVHqVma4nEM6e9/uoJmc+wLcjFoWmk0YENFTZS/K+mrO/6wPh12dp28eR3PMRXQ0ff/e7P5HajO87hGtAZ6ML15Uht84cvfIOj5z01zk82Bw8fVt0vrducHEBx8eXw5rtuEGaD+uGaqKuEwzQ4Vw3duYZ2Qa30GdyhP8cFI62gDw9qNwrGBixR/zGebVP562nwh3at2cNTGiHFtSlEIHj+j3euqODQfnIDqdefEaVVgwxUxB4TP4u/TVfib+nJuF0T6Ink0H2grsQtpqUVZmcumr0E5EE5WtApBnaFppeVGMg/yIaMGO+sXchcVsbB0a2Mpq8A8ON3/6Llhas+ErXmpqz1v7YiTRc6VVQI+e1LpLZq1YCBtREYqzwaYWGfzt3MrL8ZqHQ48BbHDH/HFdxXiXBk9+2o0GiR1T5
7c0vNF3FiatiHrQ4qU7XeB1XU1fmQvf966tuJHg1JK2Vqah00IbT6X3iHwdm0gn7bCl/NBUGJ8yVKGI7MPt5KWYce+dO/Kdt5fGQlKuDHNjULg/fh0YnU9V0D0XxtVGNAz2/5rpMs/s9As13J73ehjlJ6lni3jvAdfn9ESdRkwltlXmyKBNq/YCwLwruuCyG/fxI0dEMd4xy8Z20Q1efiWrhNk65URvHBlUld8hBWAwJ/f8RznOu4Z9weZppfOEYLDPFYpv1qlGdd63NjJqeKjITRpZgNH4oVQLtQ1shMDeUvOXRToiMQ2AXSjv59x867aJwzB6naMi19+C6/OiDORyiNLHMcGVg8CKJEkMMjrJuV23kU/0N8nX5hoIhQ4M2x3rTxPUaBud71FGTKE/8QY3qBgd5qiSR3h3eCuo+D/PtdYlPNS4AAHMMmqwhWjxzE8qk9JRrcYt0Np2jZ7t/3sQIjBUUrwKQxB7pS0lQx0WumX3E3fSyOYmBWKRQVvAQEsPGVRtiZ8TTzcwRu7CEidtsbZcvfzvXcBdFOzMQIKJd+F955uyi4rOfKwzRdNntrI7EeI11IiOQwa7WY3y+G56eeOUfLdPLcMI60lhtThba2Bs0JKEqIDAKJmmGyWAqCswjSWhi6EH2/heeuuR2y5k516mYme3K+8X6HtGud71jRBdXD7v2WCsOsi/0BM/qPXE9EOvPr0Y4/4nwDt9w3c2+hWZb79+BkUnZATU9x9pr5gQo3gYf/S8NougIb2bSBKQJ6MaQCn6CPUzwxa3imX4jsT5xj9vlV1jxmXCu0OHPKCMBG+T3CGLGFzkzpyDlBlQ+7ibv0qZnuzRF/WUD8LDPP+ADf6Eekvyu6uwQpGNFqQGFq13Natri7CZyMbnVK9UMm3SMAvR751g6amlXIJms4FNZK8qQeH6v8bgh0iZ/iNkHsIKVcYU8MGd+5ddwRde5EmFmpHiOh8+4bDX0YETEaSnzryk4bZpTE/LvEDoIq/pNY30f6tTNFJ5lgQzQdHoJJiErOboQibfolnOji2DzrzCV7l6nLnUvKVD8ynVnnrqO9ulQMzb9AYuVxRJAXhfbdMm+jHuyAQI195SY4Kx7eB5xv+G/tINBioFJ7qVvdssyZrawgivw9wAvxOKM6J7j4U3ubyAr/mdPAel0UnIyZo116rXtWeEoIgjOfLcX1MiRgA9UFNOYyFDLF43Y/o8iL5YoHL++MW8+7m930QBtBaD1npPJ7xgPs3NRnsEU3EGOlm1n1WIkasmh5uef/p+WPOzhzkPPVIpR0ekJgRdbd8Tx7ki/QsswuPw5OHG7U9yfqAlEnkBVWcqhc5aiAiKQNBqfnPNZSd8ZT7xE7OfBfKoQusxqUy2J9woHDiNZq8P+6l756ZYtrXvn16MCD/40rE+EDmSbcp8edLZBdpD7WE+A+YKkCTNT5B0687cIlc9Rnb7C3jHftgP2MSQPCoBJmXIO4LCcTigLEtH4cxrkhA9BXc++q7oV29vIIu/EpOfUVTFEE+reoxdHGmAquqvuZLjPDEpaeBS95C1PB4Qy9kSbVCph780Ophy5qq456BUYAePKEt8pj5oIXPVmJ5dMr0LYm+FK9CiPuGYHvVX4zxglSt+RK6gvewq0GXFUko0GH8yLNS3yAXsZ1a73AIM3U0QbniipFPU7mN3mPv22Q78AT+2FezQwBwh/6mJaZOLX4d+HIZsqD7zVWkM4x7rzvxywpkuWPh/j93zhVqFUp9CmEQst7bQOmJL5Yx4MaCl3hQ4+BRjtqMdrUyGHZia5SqGKQXcxmZPs/me9S/dX8QyRXNRjzHe5tqoXzr2l48Tpj87vUIiMehvVjt6Ar79ZKhaT+NeLBRqGoWl1JL2QczERxDFnsF8aHBzKX2fRGD705mlP6zGMJna0iSJu35n6KNyTiA2zmdgwEkBfaFc7+FOH4s/YQJMlRbBfuTNPQ3zemVNr//u5w73kD2blhmf4znGGhBixZZQZK1BIR8UiTckcliLIHYT3rNN4CDz3l2vMsJN8duIKqfhykwJdOsDYteJx0ZDmGHx0Q32d115hlIvL/lAcVyA9lP2v09sPFroVP7Ns3a8/LKLjoR0bXNIdYc0IMTYcAfnrIdcDGZNyzw//TcCwWXBx6zq36jvRV20efCWzhwminbxa3GS3Cw6LB8RlqRCpcTF+Pf2a5vv/AncJeHr6ArWGvYAJByqAeNKH+9RuIbUjfu9X46Vtjs8VIgx9GiGv+IB5TNQEMAr5p0VwnyJAxS7FOc0RHlbQ+Ls9qEGBcYs06+mrBfHZXRnZq31qQVxWOmU/qZV0w0Ph1vAL3Du/zQNllHNkKRwgm+5q7Wrd7Mc36Qhlgc9vuP7gU66qHtFOQMsRSH5PTCiqhyKx6VqoPIbq53KR/xJlclXFP0naaIufW6OPBNIJjPFQtRof5zKoPD5uocc7B9obk6vn8EvfRPJ4SmIaKEHz4GLFxD+QEBxalcMfRCC36gx86+EZ92lacMRtVNgkQ8uhE2lvokn9HDKzGvx7zs3HY9957XByoN3gH+aJ7kJqXknuHsygbTjVIspjwl9k2K4nKf86kWZCvgwHpgi/SU3BAvJbwUevr5QauNT8RhQZs5ygH60gp8g4kPYxcUsvoFJYI06qbAAP0nXlyzcHAMXf99gLkUFlmre0wx5g1I7+7seYe8Tpfo4UVBKxYg6n8nnnrkbBEeMM0P/7ymEFtf9PrBZPt7iZOeouLwocNmN5rjjPeiuSLVudYtjddkpS06ZJoJT2iRPxrliFaHcPw7Ff/JplqxwfflynngJJCcKAzFM7crHeOlJxz68doq8fDIJ7d163/NP6GCpME1Gr7lM0R3XpDrIny3wLQxX4oYCqHiiO+XvoZalKIQKkT1eiCMKsuL0geW9XpYGjsOWc/7iGPSVHV3eeIWZi1KgcNa+4PQa8io5UmDNzCXNTc0kRUT3p5AYKwHcbvRB/zki4x9RBi/L2XP5XFTi15oQaBVeHaTFPWcH6MqFJAS13pWvFMoo5shUpqZSn+0CEekQFH+fZGcWy4zQfQWApxIJ2BM8w3stakW4c93pdj4Z8i5uqxo9GRLhgDpQzqrIMfDXK/E6K1R+3VV6lb7d0SPhMrGlfCQ2pA43exXACvKGY9lgR2OheUR/DLGf5IuiOym7UEuINskb5Z+iflmR3176G6cDhJ7R4XRyFkMN11f/E7RnOxE12DHaAJyx7oROCUB97gHPDHFwO37o+OAOFczaCCkpA+p439OyRdI7N4jT/musCreFnF52I3+hoZ4WV1LhiiOljBYoRH/Ko77dtDUeBNfFl7Pb/UZUF7mzyejZxHCm1X5r0U3/wo7fFxod4mWo8+AzyotFyhj2d6QKfGiT6ilrUmbo1MQbB6YNww7ETM36PByYzrM3F6oymemasZ5IVpzTv8MtL201YcX3jYCUmHGenmrAFGbgwAiwe/NKP32qvaA8KX8l/NiYmTja/JmtJ185ov9JMRf91yK8TBzPVq5PAsUux1xbhZlaIV7vhBrNZUcx4Oo+QVQYXE/siB7n0iYhFZdDSmyzcb7xQFItQ+pQ3/QGsc18DzLRUw30j0bWjNK9Z+mAeWeVzTbyWwqHoTsnhwkCBIM3h/WVluHCfFTvTq8Ns7+fVLE268vlDQ0mdehd/Jrw+H45p7VYWAnzx2XSJtCdxo7KxbCDYvy2614vu3ZsDjGKhokvVkUTH424B6zj03FSaxPNB+cG+XRS2che+IABrBU7MGgL898KNBz80K9qO7e3xy7mlrNKvHv7yAxjxVgc2qSZ4P1jXxPja8gXX3edXUnSj4HXtnMgrD1836ygkOj72UJcLr8xr4aRx7qFK8+cmtA4bNsVUzV2jCv1i+UMbEZk9pcCL/D14j/cFMOjx8ZmR+yMSAINYQlIWdUjw5a+j2f48NbLgAbnCghnA7jr8ePtdkDMB2tSib0bvXGAA1Ku7j3woE+sqS0tsYdvuM++B1cd0YXlvdAy2cOWqEW2oo6Yww88cS1ILUwYVISV/FEcbhsvMGi7RLXztDGorlCSwr+vJO3UrX+6YpIfvRxbtzltW0MSMm4HEEkDe
n0VdD8ZYcrMliNXaZLEh1r17GytlkSH9D+zLU1ywnaNXHlM4DahKevi+zXhR3KKhAfHkB4bx0pCFm0vd8PduZ6JsxT/G/DXbLeikqKynrPwjZdxGP8aI/MzBtEq23Xs64Si4N3ozo420rK6DaTHIeo83Ooqt5yDHqu87hn7zsRehwEnucZCebwLeSCfoPESydBeEKykmnbl5MyI998GEpQvWl5AMVY4KtCE6BkvP955SYSyUlvk9lF1gQc9jQBEypA0NZpqMKUe6gV/EsZbmX6KPkyxja7UAgpGF6S4n7hQuz24ZpZ5T4v0bHN2fyjo6Hw9XaxwwdLGtiSwQTJ5XqOuAa/7oOMg909kyCNmcCVAB0SjUF8mioYFV3cDC3IIh0pzZYpX/TkygJ4bmTSOTFXfbf1GVbYUe7qzBjXKsQVVXg3oYIBMTCqtFHm4/3SnThz1bvNBUwHvy4TbDXdy6eTJHDaQULhps5NRwbEmEclmdGTBle59+9LT1/9rinhO0MchIG1hzVBbYiH/rE9K6zN1ka6eLCvSTApdUkCGD3qKqZUNHehpdiRaJwwY0GxIzy7c9AguXOSaT7DHt4J3zzmEVNt+DApRrzHwf5PqVRjEYagFmHwjUotwRuvNMm2m1Yz67zMhW2pk5fXc7GuBKTRzZ1k/AZG0175t425s8PV9St5nwLQYKS13ctESx0NRgwE5BYKQwjLmgGiqG2Pgqff2oVY3iAgFrN9ydP7cqTYH8j6onOw5p279W2jz1whEYE71Rppyr7SLsI8tKfTZMgVM0GvNn+P6mCNFtlI3dilh1BmxOMHflNjEpcZGtTLU9LbpxlC7f1u+LeQ5tyXHwImZGHJuinVwPafL/qTk0g6Ec8JCRYeYDIURqgj4Pm9rO/SiUTtvhkhWgz138scIn0J9MFDIef6/8g/2yIQREsG/V4SIRhRGYopZ+mWEHZ/c7/9fCagxSRXzdaMJ70+NBJcbXsumeoKQfN4WwzWJnKnsknRAat7R9VmUQFhcN1MUGssncFBDcozuLPB/hVshEgAUkKNUHIVIUaIrFo7xuAf/6vLO3MPvqpxXUtwABJTcnRE+bdCwQTfe/Q90gLpSo0RZdc/QjTnoQFn16JFx7iHFKcCukrjBa8xoBO6vzf/uSPc5vBq22UGIGZVTleT0dnJ6w7xUTo/D24hK96LlOO8f8rhQ5iCsYaSAUm0g7UDKQLvRRe8OH3Pe4DwYYfNiMFZxcdrmKOWIDCVlKXrHtOizAYoYbZkNVR3Fk523PtxeOI4OXhYHwoDsBCLlj/mK1Eqqjp+o3I42lOzyKBu46zLgpV1IWj4APb2u3hg8cEkM08AtoxsMln6o61996dIACdJrrhMnJz2JnFPaZMuWBMGj8VLf24OvxJRx5xMuCrc64bwQj9cxISjMVrNEPT6rj/RGNB76D13T/7ps+Pka/4dMArZDxrXA0dZuaJyJFju3aUTbOZ7mOG1oBfAGMv2v3eLW8OrDargsgaCKlJ1lzBIZCuktxxRI+acgR/Ginbuwi6GJCzQzDdeUiSyzrWnOzcrk3+p3/E0lY34BGQA+XNIttp5NMH300fkRJPhwJ6624/7jBHGfWz0T4dCq+dQSsgF/Y8cbV9xeTeUrgiBRwMCoCj/gpHtSkSRXLuOX7b2JurvA0nY3gnaXeDQeqvyRyymp1gchSy15FKX1ZMJZTYv61dLEjK4FmW0FS7a8qZFZxaYbBwYqpWUmJWxe99D74Lo11/xQwpGaXrJVODka+8d0WBxtvpBGvV8wXbMlWFQLFDGWZ8jaTJlQSZ9GvB6p67IzGGpZxiTtcPzIcsuiSrDgjkkwmbsOk2/EqgwEmHnqshWcNXjLTIUi2QprAoDHvMUx3UcatC2vJO0sJeLKTfDs0hXz6z4mLRQENUVpVzH4sdXisIC+EugJRIgoKYGmOxbUNUetaAas37QoMgrcdgOZAwwY+uE4Qozq1PsJga9mJ/TUfwF8RddU9DP7WZ+/8NBAdbEBsgD71NpGgz2JxjR+7I38SfIDeYqjqfbzd2bZ3gUhWjHr0MErKVMFm5YbdbaFLJce6UE9g/570Ys9XX0K2Ie7FGunrey6qgUoxHn2ODhD6y44Lb67alBAlPHvAf5p/aa0vxLVbQOi0ItiTLldHd/OHoF3J36+qTP/FnFG3IRcGxC3viO8x3DHHbufZRbAL+p1wdWzvjrC9qpoH9/qeouKkLU9jq9upB8JIXsGpL24QwaiuAEim+0W0otD2ANyXUhOWnMvuDkfAx3pTl2u7v4Gd32mdtLGJuysT6nygP8yLZpAdl7+pEIYbz7wY5hdQx01WDVTK/OnVzMOIiyHTfog7VMXktyQQs1O/7aGqLaAelIeLC7J/S0zGDRUP8XqmFOKzcsncVfSmI3t5lRWn8TVnzrYDgRH7wWoekTOrGx41JV0I/zPE1F5UBAuw3hWkS1mepE0RZe1AJSKCp8nlhJFF45CQ+gSFV5SbPBV1TwzgfMpWsri3Hmg9OUsAPLKwK6lTn/GSo3fbhXUxBsybyMKtOJLjNiYlDJH3ChbjflPie9zMDa3XLW926hzL9AIVw/ui/bzMtoEVxA9qv3JlUnErwmZhfpZ8x9I8AKHCF19uaILsxpVfeeZaaoOhgXkcFxF/IhaYxt5tlYibYpXPYkxOeHOIcgz0GIAKCM26qbC8WTua93fLuNxmWZlNm0wTg/z0i1j0L+J84H8KXs+ViIQldl5SaCwn6dEx0Skx0DcOi9BL+ZQWX9fxgpZ1uBi0utPHtFFXkmdAbhP0Cve7Y4YklfMdJJBq1ea20lOo1IKbXj1/3gFtQm7ZYAtqZp4lqg8ARVGmRKWgRNtApDdD0Brc1AqB4Tk8SgekRvsfYg4zlKN1xOSicIHhoptwFQAWcR/Bsx0wXGFcVbQw3YDup7pILTovUS9EW4pmXHwrsnoSn0QKQk0SUI9rDx/zwNWK5ljyQrDmCa6Bo5DlKZIaTJ9qVYi1p3yGJHJy97CLF0FfIHhrtSxx3LxBx0Z81eCZC22dlp1fwnwJaIrrIHhIGrE9p1ja9hiR/dDjx9ExlUXEcE4n6loBSqSkWe6wynDRGY/+Zh9zIDaKZx0dho10JWvltbG4cXwgYXfxwuz9k/SLWiTqZya3kyQal1kuqOLUaVoNa/Pzxj7GnrwYOQtI2UPDw0+FMcrqs8/TfGEH+wd5wPSRriHGaFyxdM8XiPdtqP1EvnoVJbx5ktl3LC3vC7Ep9pN25n5oXDv46Ml09ppqxLdSuMXAXgGsRzPXyr3OfnTxO+sjqI4McKK+Q839mBXdtUej7k3FyjCX0thEE/FhqdqBsDkd0O5t/y+QGgEDXNW07Sk+BDvaxDxkKCtfjAQ1n/CnJX9HpcewpFO2niT/ZdmwH8WGeF3jF0/hqlLICn0eRMPPIIzA8Xl8BvbaiMbftJW3WqVhocY4cCLh/l+nlQPUd7OIxSKApepLuda56SxwcRx6yNm6U+7bOlZ87BcOaueB+zxLOn1kEqOtgh7hzRCAIgW3+I2xC5hJHFCQQZ3ed+6xCLUqcJXt2MxRXWlOQXPSQjHWn5lsEUqyslVNzNa9yuAP8YRiszsf1NORpvFApOvExrnBq1kLH0C9uxxLWsHnuSvb3BCaBQqv1s1xxVGP2bCGx+vvH+YuG3bqREM8eIT58VHng2lYrRq+wnUQ5j5R6ymwcKWk3gfJSqibfITwMCiH1pVa/ZHiSWEaKHdrMvgNmJovdN9tpTz1JdsGgglAq3oXuMbk1hSV4coUJ4C13Sxbzvq/EIJgM0xE9YXym2l+zw6X4jrWc+1VrY3ST3ShS1I/KC+JQVQhtLqn1w1TRoLRGGDAOjMoZrPYy4j/Ovx5WzErHd7vTS4dWjMBk6BLKR0DxumFvVSy2rqTtdBt75ZOmFrmto4/H7os6/DLzaN88R+DtrwjEwwFsuf0ZAwezQM/TAWFD3YOZOXpbCvuslB/gYVZcg4q7j3yhVfvJIICUL/FOp4qCSSNJrbSgNLLkeAH63mmo7fbfJrwI/76eL1EEJ4O7FeDIHaNIa0KkVHkYQHeyoh0PP8B3OjvXJcaxIKlvOsSLKSm
YWzGAOuOwJStjHD2AvCpf13s5hlAkp6TiQSr/tenOw6Cbszr/K76uUVdAKJKwY1F+/SnEW5dQfMNCviJQccYcW4NMUwILlMmCaxaRinCnMH6hC8zL4Fl0pJ9Oz5yffqyVPtPU4ls9YxAHD7/kCwNcfN/pEU8E+DkBrpy/SRopuLjBELNk7CgWVVbKQ4RnvpHA+EwM9AiCY6jmB8isie1k7JM6mbW5ptwh+AaP5FFxNOeDP+c7URSjLi2L6txwGboha2Wg584beCpObQy3Lqjr9NKejllhqFm0VvnoYCylUrScy+dwJ1UxYgRVJIPZa6xg+LXYC24C7ROso5vz51Fiv+SNI+G6n4kSQmNaV50HSzXq3spp9mS0yn0536oaiUk6jCRn52atoEVag4yJHbgJn8Q4/3NUQ9HEjbPNi1kId8hsuZze5DEtsGxhWMhmc6D+uoBPvVz9vRdXnqPe5Lm5++rq0P8SLGO2LolL9vdWNUvbubiUVodwfvX5XggnpVFH1JzXEL0P2HR8iUZtIUAwt5BHXuZCM2asrzeLbwM9Yu6U+gVNmKr+d5zsg8lGBspAt8Mg7wf1kY8ofxBCu62uqvIu3aulHMRDeZauTqvvArh/hmIVDy3KgzC1uNAeThVqXJ0axXMQZAepdXvjoxNeOLAsrc5UvGjwEsE2x49MAn0/y9SrmCYpAVdRqahENWz03BBRJ/Zeaf04uOOL/dLm5ZjK+ny6z9SGkbMXrm5yl4U+XghO8X4Bbh6esGaMqh+x6QK5exqVcdaxM5c63adWa4+CJZdBLH8MH7U7e+B1+MDMQyd+/bwKBnXCZ2cSRmkrkMV+15Amj7PlAAg4tD3yrYjyU34J/TPugh3ZfmtnZ8SJ/ZrcWBW2EGL1RXUjXBpZ5/S8xI7W1s3lrSWoBXlukKDiXXFVu93XE1hnPTFqt/1apsAIUvJRuHHUSNAps0grAnvRjIlYX25h5IqNtF01iGMqnp/VWikIZZpy53TarRiqOFH7tHJgnfiwoLxoIoSS4RfDt0I54NuIlYEADcFAQPKyu9+t5IJwG0gbmeb2fgkNgbZjlLQDWXt2DD2HrdhTjwiDORwWPgkFmU9GwKXYSMuZXFMz+P3ljjnlIoJ/ESz3/ParY/lYjS9eMF9SAcRk5TGnnOBO1mZFDe362GuN4mF6hWs9yl3/DkH9loDyikTIzwlmAUMWl7y+2Gbz5QDjGGr6Rm8f4gx53SkYQzcOs840/74sGS8KlT9EJZTJCx+4/T2HptgJ89+fylAqHDbh8GOmdU8RKXLEHswUWzXhVxNShjWkENwKIeK+Y3cqG67tq+kZIf6QJFJ9kw82xVGsT7CZL0krdF0tKMiKkdC1RUMbfPSrdJpJybaVw6JywYYlU8fj/VPWchwRlbK6gbOr2USllJJpctUe7LqKNztBb5XAPbTXZhMpP8HKAn0AQ6lgGbsChrEv4CCPltqJk0Qj5nz2EqMIRT+aBH2p4usl89k2HjTSJmaKv5qto3ZMk73m1A57hOXt03WVU8AAa6+4ZP/aMIJW09Bva8JW+dxThShgtVsOYysVBNNApd2YM9xhDHvHFABBAADDlqOuCUq0lF90dcjbEx0twmHzfW+PUKhCP4wS3BvMLdq4pqCd68vqXnt89g3MhHtoLGfe0xs3yEW4eeTZ0uCj1gMJCli+qnRLKD1LqvqG6Wq6REvBBrSep69inB1oue8XiZIYe6HhNXXRpFqk1uuiKc3w+bqBeFngRmCbIq662VBCt/fBH+iIGMDYKP6FlMZk6EM7EGAvs4ng6AxfHm/FAUreT49QtxPBKoQ/bNMYHiJNN2mmOMUWTk8O56zKGehMsAUxQJQcIoWqHCXMqygjxxLPu7PSVhG80YUzZK0ppiqBgkw8EhqfpDjh08yk9aGGhsdKZ2ONagKQrNR5C+q+U1FNd4BUYeYATR3uNkTSwO7xCswSp/kGBVpfPc21mOpnMPSoMDywoxfLDjLt+ll/24qjuRFZth+ucQxe0OjhjnlLoH5t3uvPO/HdA6093CH///gAG03kdi85zi5VZyBPq88wedCxuTDDmLlfRTpHUoqdnvfKLTxXX1wV/3igXONpcGFByvB+pGUvmDG2VzV6zTtxrb3s2ua/m+qCq1L507PGly0iBhQYxUOBIDze0CDAQrW22sbJzD84mKIOCQ/l3/OhcGbSRyphca05uXU63/HMmgYmlucv9/oMPByohArVslndsunLm3rAYtDbarWBDTbHtb+Zcytc6bCdfVeYIoXWo7ZSmg8NJIPNsS2SInVZMYABqiS9DRo6poPEiWQc//ajMHz1f2rACPbZr5rDMnZNA8CjYoZiN6Py1SxeHQfkX+CR60pu89E3fy3jbLvubdis+yXDilCiH6tmOXU7p0IOuRXtSuDIedat9Fv7xkiANrdxOHoLjPEYDT1HWjcr+WQLJwf0jUEm6x7B4IqfwEZjtgb2Rlgk41tEh3fqOtZQroq/1Mine5q6P21eHIeWdZj5emPIXWwM9iohicvfZ/QsvKgQgq0U8cnol8+WCsIbNb4iZ03/eJ+6gvkpojOnGRK/7uKWnE5p48vcl+TVSDv99UjsdWbkEeCdxnFRiYAY9ZU/2mdXeSmLH924h5z7jGl5U/FIw+pToNkJYQ4qMK32bjIJUWQCIDdir744LYxZef0ViZG7ZsHEe+G5zIFiOLhebxbD0zsaUJbEqLtvS+nnMQetwvgEU4X1cPIcICNOHzVy62c7ycn06G/lYwjybkrodY3DWzwAbEhYglHy59UXGpEgn7hAvCBOsIPlE5XUVfY0wNOH0lBSYv2jATjerRyK4DMJPgVaMA4ZXur+L/QHZqM8bqeKe1InDF1wQZpJSM1aSG9mp44kAgmSAe/b6L6pl7LBHu2eendGb9NTen/eNAzCGpQvWrH9YVtelTPQo/4E4hfwpat9nGpy5oOFWNhaZRn/ru4Bm561ozuTWbKpK2dAlOy/8DBGhOXwVcSkGikC8g8Hh8iHMm1RdWkZ6INJr+e/bGSEL8/F4o0htm4yUxgGlsA0qPYPo9FAXyB9ieei0T57AamDD0vJw6BsbMl1ndltZen8YQxZMVQnEBWcyLxpPdEKLn4QEBcCj8Eee+nU+iPyMxQ0+9+15MUXlGfBHcnshM8W8e9VT3vfa308LhnSXUf1vK+Z6aG0e4XTRj/EfJrGhKow2cp+l9ucj0n6UJhM6tpdqMt0v4Lllzse7niVXAt16H/Rutemb3mD/ceA/bGqjmP+5bpQTqkua6QuM7T6Iqh9xORhpieWPkEau87wwldDtFdERgJ8c3UQgIXCc1WUXB4mVdTQ2kXCZaKpmlL4Es20Uo128pLxGxo45aHcyZozOro7GeIReU25Bic9odgjxtzA3AGPBqFfGX7qE0/F1iCxA+C8J0uFDbuvRYzFrgNkygFOZoGNjz8WnZS+6K+0DWhGD6Jdo6uf4c8qd81GvaOQL3sXtVEzjtbRWgo5c5aL+v0mNSraYnz734PLqwViN/+EW1M0UYSW3LKGCGWlqrvRpwB7O8Wf5E6N4Qfr/uEp9ytCZHoPHh2qF7TWounElA7VlF0nBrjOBuyoRdQp8Ny/m0AVKWm9t6XUvDcRDBGk21eU/IU++GIgJ5MVg/p8Vts0srH0b1vjiOiMuP02M036KG3Whshf1maVAS/i3t+vkwVBVSbWj1J1DxFrza7jqv5i416jPHrxCIE9/l/T7/jKgtXWjQnHA8djC5sWpWA4EusTartsaoMvUXRJKOJL8OkpZUvdYb7IwSQBy1FN0RPOzOToW49axUR5w4DJKwmIAdoMrW+UcBbAOjM0vbx4v6E1P0IKkD26HIVeAy12/+SIJGq//n+Hl9Q/tv4MZsjyOnysHlCserDPRQs/RKaiu4CZ8XseLiD+nt97A/kra5R25bB2V7tGE3tyhG5NbfsjTv6uTSZgas93vDBV3SWVqg6Gp4n9nsQNM24OLupS6aaj88rZrt5ddvrGduq/COGdk/An4a9FZiV/NAKKURsuUSaFu3iOSYSx2C2dV+piNI0fkmc/GWDVrNnOHT6Aepqb2gWFggjsBqhYAcZJMGB
ishrQrh+rO35tFF7ZEmPJbueFXgEJlfrQdR/i+TZClLMaR/AHh7mDbEeMiPEYHL0PmOvXdkj3t713C5hy+va4aKvM00afSrVx9wkz3D6KEUl9XwcB9o+nPqF6zjg5DHS9rUALsKWu0Gxp3zdMUlvCj9+Cer5mZfT0nqnOxV3RBZ6kXFNaOC6lzMEo68uo0E0/2wvDGQfFL/372PakvukruoTIf3s9e0ikhv3jKAC5fg5MNRiC5gvyEic9KmAVWRNpAo05+sIqBXRXkJR/GXagnntaqAJs9VZMB8j+c2WrczsZ/t5TXFl6FERRRSDffzO42TJVRek8OlvVN3MhLJhLtOAyjL8oUFxueSzMEY/BYtS3wt7GR3X/ZJlTbt70XbkzvCLlcuE1QfGXsu/kO3h7LRexiivdxzmz5IJqnN+m4aGfE5Bws3Lz3dTF7st3uiKsZsgPQPHFGjIQ7wNOYGsX1Vf8KvuNg/Yyw/Xah0ZApxwpgZf3qUWCmuFJE3Y7XPIkHqddtoQU0WVOnLkYAHwxytzzXZb8BmJgm3iDFKFkYSh6zSfSLQuE9AjbR0pyBQvzj1/Ny8TfEWaeNWFMpa6cuFkDQWtOZw2M50pGDZm4EE9a8BQtjqfmhaiejnUzKWLzPblmcM2zPB+a+lLJZlzXuegQJLpDbK4lnRj8UmLP/2D73yzO0/SYaT+Za5BFLvAUXdFGw/bqzvE0JswJAelsjG2K4hN0k4QvecyESVJ4Kpd9cJ3nvNTxu3cGCOAorr6dKwPypj6A27u6aAqQ+UzrrA9DxlIXUhh59t6TWebwrEVESgUDf9YBKqxCP7hFsyekZaTIAexXhKN8KZAKpvP5HX9UzOyjA0Avcr8XFtCahB4iN+9VubCrA5kZ+uf349D4uNR+gWKr/kr217ufhmslL0mAhWOuIRtB0hHseH1ZpjyBeuLliS5GRmFtrQKmox9EQpWYxcvXSFjwZ8HZCNueu9Py80kF7K6U9nopLxX30dR+3NVj0ebHHR5OQVY5MWjn4YcE7NAvJQSiaxb2D0u+fjA4pUTDOtY0o1WWlzjDQSDdEwXvndJz2JCLlE5JB77SNDAqibl5wVUb9LQoqkHbv+0UhZZEBqabzwgXaTZGjWqqUaNrrVMfwiDCJX1KfY4a4Y2Awg66pCapzEDWP0pdQtPtSim4taStn6LqCXakgMI1pK36ZdcpzJwv1GGTBIj3Ub+AYfNYTb4fRzCXrU2snP2Ij9qYYMVykPoE/mx1xjmx6YA2tFRw8YwK6k7ukZhZ8Q9VDitpFrZDXctC5GyJ2eB9NCUsHpV5MMDPB79mlMtm+jpRCOGhnEfc1wjAA0n5ewniqVjUHeDh6Wmg3nXgwiFN4Pku340RkYOz9ZV0yyOVV4MIpyHOCrt0BwNIi7Td8YAxYBauGOXW1LktEcJjzVn7z9FIRtGFGf2IfhL/Fd/DyiwlBg9N/L7lm/EoqbAB/VqOTSFeuM1cNBTheYQAYwPlkim/Ee3YhGQJGvTqz0qiR9QJw9GpFjs7KwVpOuVh36HRz1v7ec9Ml+tA2SkAZPNDgkKW7VWxTdu/hiioSrOqS6lJL+62vFXfxI0siYwcUhViXW7W7I6ewxQPHhc9jUlvVJMHPBCOwGPLb+ZVxamAp5TWF/xSe+wCnYE5I9Fgykb3tJ+2naMee8OW6pLb7cnPXm1w9dcMbPLUDEwuW/32YaslUkLV4wkxVtOxm34aFGSc7r2sX5AiZiQPy5brgNsGv7OuTQ3LDKY6OSen8njq3SQA9HgUIHUGfr60va/VhTxRPGECNCUiHmdgsQKuIXRn84nHU3ZdpCKc/kPci68EnjpdiZVfNn1bxOy/Jzw0iZXcJ0HSzFC7tV1guGIXARzTBOY+pUhWY9anXhsv+JdmfrmnOUA7xtCx4H9PHZrlJwRK7oTZvKjSSNP9C1gVBucN02qMlmv62msr5Ig2JCnrU4zcFCHiNxUpDG05FxjpKJopL35C7SR2UuZB2uHvSHQVSEiWNqWUvZxz5vKEAOSMAbSedkrVnyKxKp99GaXK2Fh/NglOZTVKusFx0nIR8+KJsH7zUSW3NVP9aKDVHczV86RSMCgc4yhOXxlq7UeK3kjX1HfCQMDTHMYyef4E/kaIJqig8YO7gbIH5FsiQe33ZzRcFZZpjqLw8X6Sc7xcWvzCRUxUGS2uIEn5Lm8vLdWovEj15HBSOJbaMgx6MLTbyYKSxXqMkUM33YftONBO1OfljER644elBGbc9fMvCp+I8yTjeYGIFyO0KZWN/9t3jo/PTm3XEwqovs0XAQJP4/om7Q+5kqOYDMBJmB0hc9mS5RwHHwi9+bxxLwgMhAUIfbSZBsXlNlsgXBp6dXtYp+hfXxPZgp+o4n1sfYmoTKd32mbmlj+6xQ51h2Dq7aTXohL9aWXyW/9CK8fDqzDsndjWQUGDNW70nvLOS/kjNHy0vIJ4isiJabdbaX7x5lK/z1bSu52GGF4PvJqwNXYE9ZXtA4RFb5wpYfHo1BEv972lyc5xayjdmJj2KOZs8NZSXV5Fffn9zVsO59/i6kfVT/yVG46j+dNUYLe9lddijDp9MoBPJEfyXqFn8HPkyxqPfcsF5KVDoawxCidyA/tR0ybtanOKwdXyqGXuDAM2QRzwGjjCcX+ttA2vN5LVXjYASDAN/oPshLhXha/Om6sNorKvsFpHGjt8WQV5y16HL2fVtyDyb4UXBMOq5+ZS1Lt/AKWoWBzqAIEtoJcL4248ZnyPfjWoDgH7IYREoyfPpfsz8dCGaLd8OBEDxfbXlgXBQjgR5C2kJGLMe6Fkb226JobJicgMxI1AOdpuAnkyo8+5ep9CfFVbAxLGHKq9GvATkR1Dc4E7LrTq29B5GS2O7j0F/be+FFT0YSbsYSEJGqr6Ca8/P+bo/0a9tx5rlcrF+t92hmre9IJZALn3wbVxn8+ax1lpAeoYJFTlEylAZNnAeEbUAk4+aTEfSIGCjeeuFuF+cvcEBKUO4DCWIbfHTpicREXyX5VKAjiAiCUWdloX2ktPva9V/Yb9CjLIa3gsutabBNRFV3hw3V/67wDguJV4csChWhKHsUGHb8ZyXN3aATEDZg6WVbIEjcmyRTtgA8PHRl3Agnq1mFlzLAP0WAr3BdZQjIOx1cyPLm1vvG/8cQsLeE5koNRIqSE+Ls7KTd16YMGU7DdDbO0UH0Se6m2A/9lKba8kROP5jz4dGbZgZskfBL+CssAyVeobV7JxPDgPdkvOBtFeyuN7t6kIgvcy0zPo/3VQHAsjpXFOhC1cO9bdNHxtVZDlM7h3UjWWJ9foxYZtQ/+8/yOUjV9rinjHm9/uSnJZ3kPUtPDq5V7bsuhJt6P8IOeXJXaDIBUV3g1QoaI/9cS0X5XUVErpqmviIwEvcjn26lcWS/yPZHh1Ylft1HBYTRYH+Wt402a6apaKSjhWQ/azflfX8NqWpz+T68FffkC++MsMhwD71nW3mQe9DzlK1WgZYmwtKtggX2zsxNmgm5jNSIqnWibGl9N35utsCv5dZeXbXB//oRUV3CAauLQ3ekWzry9/3XeJvgPvBT966oX1QF3/JLajltU69G9NGgEMw4m30/sL0FCaVyFHKIVHHXO7rqdz3HvMAkjB19EfmJojE0FvKxhpx2eCkFNpKOlU0+7BVZtn3igtSfQNstdMC7of8e4+8OESISlCE+6Gwxe5z3X3ffy9IXI498lO7BPp9IngS6/XS33OV/225YX0LAGJprk8Aa2BaBf5x2oNn9dYtWczSMGfrOjWhgR0AiDgBSwITWnavULuYx8HsaMiJwi9LW1yFuaEyv7bdw1+8W7soaDhnJra/YwRQkGEN9PPA8zGnmPBCPFgRyMvVBbAIxTKI5WJBbfkZUHqy1gy00ITjQlL95GK9ZATao+gSYdvJF5A9mtC4JF6y4xEh/hRlUva7jyyZVufpZbcb9eR7/jHwwg/oHj46mM7DXKqHDjY85wefWzVI5gBQnykrAIiMP4TDnvwkJMziiSxZnSNUBnPWKpktYWUAPWy7H2XHb/V7ZdSSi4Iokrskqi8RUdYgl+lR9iQws/RY+rC3TdIvhMww/FnPtC
CnX1Gmm3PcJ01uYeySHkepjyDTbqQKgsJrFCmEmGo31HW24w101z6j6x4IvMfSLKeVQ4FLTwOPZHB+4fIT6CTuyRgBm2liVSt6L6gWlIFNZROBYyUFMf/KhRRfwnpC+VM7OYs3+SqecsIolqnTc2uX+nzobActB3qbaZ/iUHSlrWM4LksFRUC5YpeDMb5iUbGhRBc3KxpmeLCCTEwszl2BeTRk9VTPVtfWnLlXLMsohEYWIrkoIRT/6X+eSeL5mciKNyLF/PC1OfHbNY9T9Tmy3r+JmcJeVbeMKZHehydvP9P0NVEUb/crov3Tlx3B3BqLlnbW26MnCDXzP94r5A1eJMy28QDrNWnyvzBnoSeZXp6jqbimfGWloGxbaC8d4oX/LTjTQqoOC0xul1Yrc5oojZL9hysU3jAs2Uf+ho/IzS9bXyi6FkKy76KREC5dLFnxVJDRnpIY78fEIIVBwDJzV2Jxg0DWkY7GEMPuUPM1w25CQ9kyV8osbdD5peJuA6aWq60eltfj9mJYpKh3RZcfuWCBmj1ogRHYieQeMV4SXABjyYVAwWoAcTOTqn8po198K2p/E+jRT8KhqTnQviLj4E8MiZxmWhXicPEwtYEnCOYxCCe4HubSWDFMDU7qZhzHujbBjoUww1RnlHyAYxz4ajyLVjNm4t32gudFhyRwP8WcKJ2wZbjsl61BXIFXkY6tENHeEnO9vCDcdwDikmZgAJoeN0TVO5/j2aAKg0uqw59luZnyO2Luw3fwsWHJg5LedrXC3CmN40w6woynVob7rFvKwlfiHv7CI6aK7PQfxWPyVVyhaH+Bxt1RRxbL0F5b3oBxVGFk6LLj8VrkbeZQWmdaAgr0mzTR8Mt09MaOo65pPg3oRtSroi+dU8pPuUTByWLCNAnBxQhau0+mlhGF10L3oOeIqrqR8hgGb6ffsiajbO2O0k95K3FC3HXgPIePb3jlnr6snZIyBIRuITSo9cdA+d+qsQkdI7dravE7giinpnssimG+nKjCHgdtuXefKI6GEjoQ8DyR6AGtOdztf5YRG0BK0cvITGxmRY3AhDcGoQq3FU9XJN6NGJ4Voiwu8cIIoyxBC22APGInzRFXHk/EtblLpqWl9qwd4C5hRlNR7lHgDzvUNlLQi6sqWuMJGUgIJIS1AysZdlS18b9UK5ULCFb5VMIG6tciKhQHLoDxbenRNuPgfDq1/QAdpOOXWg8eUV6DPJ5efwV5Mx8IugnT8J4r33YSJ6T9ZyMP7k3oNc0Y6Sh4djW9RB1FbngFWcx23naa64Kj1nh5ebGN20EOrlWhbj9ud0ZnvdZ5SUxLkV1SCdS3OVQ3/AWpaJKC59a7RBngLDO2WjoyEUqSzzDiRYnUmX+4jKWCNuNLZUpLtFtzIpPTimHs0wzaH5MC+sLlnBBxuaIXkh+K9ibu7G+Ze3SnO4LHbXE1pr/NGQvdRpeME0c2guY4VxWa6x8amsbhVsXR9hX3eFHMOcSFuiZA85ZzUz7pFgGfhvPnNL6RAKm7Jb8h+Hw9AK2dTShd9NWlhqyTB1PjIQzNLzuQ0/eYoSedx9wU+jPVNWA1T+qrKKmQI7XIZ0TFHUYS/i9MZfaONfwOpro7GPv918XRbMJTlyGsLuJmAuDfINi8I8/5imPolP+qevvRa6q6W2xEGFKOmn6q4SdtYiHUjA5vckNh07qdXM91rq4/ex3Ajz+3NCURKijvnIpymsRh8YLfe/Mh7Ak3LZxAwnRbHmnM3/2IPgfLPFr+xcLSgge4MI783YB8NWpeWAIGntFQ9LhLL087esikf+m9nLbvaZlORcGFkHEtksQUdT1S/td2CsnsnjpyH7rR31f63raAprt20qu2/bU59IFRurwRM+Vq41tvqVoeKtE8+mk4CVFcKcZuDmPoY8UTg0wEUNFkRDt/MhVbG3n3qKlTNUpEG6ijlJzF4Xazv61KEMTfysH5z0N8GgQ+Y0SNhV5JLniTHJUQH0Uqd4AkvIJwz4eSaFo8LQQ2o/JbB0My8/PsRrngtoLRfDgZ2tkuvMs7BN20/v9djZUOybSGgjcoPjFZO8RI7R7+egvqId1AYl7qThq5lNfGR/IYDFM7s/ddAJMagEjGO4s6r7MxPGp6wyrm8tZ0eZphuS+47rT2MtGnqsLGYyVWZrKUfZXHiJLhNRXCcgCCQNq+ALynVQRSNgw+FvvZU0K6skx4q7CyJtDISyvOxP1oqsIPnt7SE2Xac7CeYQVQu8XPTMLmsuDmBxYQPaxGFzfPqZSI+03PAGzf8bCXxgSmqa9nsXJHoMwSVzM4YCtsFoNDXCxWq4ARgmJ+zHxNIOogMNJVEgpWZO4iMPpsj1L2IPwfmL56UkDBcmuQ3J2m2B5Wyh4FgiiHWBwnIzYzCx9ui5LnAvMF4oIEUuH8XYMkreYfK90N4/tn0KBJAl2BquOP1DcPch4jsnd7RXb+9K97ahmU5Lu+KzIUHuHo0tNxbx1FKSGXt76bgkyeaPVTkP8ogdL37TICGzlcf+Ci4D/2F3SzvXu937/DnZCbvTnSsw/8EGvVf8RIQxVw41IiZlt/i/N9ITqy4aQH2AoJ0G1UB7Fm1xeo0H3qRwru4lLmT9a6MNR+miNHkyUeF4ZUlEWfkGLwCbkfc8FrNEVAI5CYWLXu3Gn6nGghsZ9bw/D3aEkI0gTdyyTdikrTrfcMGvjk0og2RcpPyDCm+6zCjMB6KNgZB/ADHGkGP2MtJEpbZfz/PLS5W7JZMqrKJN+ajjA8ZaAZ+5eC4PT/SKFzS3suj0S7C5ypBOkfKjCopJtKh5z1TCzbSdf6cBxB44JJXgaML0mokPcBY+88zfX0T8gWP8Ts/tatKs9xQth0AsMO1d+ck6Uqu0MWWNbkUauHAqE71DPtjSXfmo8OPXpmXdy2eFJRKErJNob9gYWIceeIGiMEqGzr8CQTjNxwME9yik29S4ywBntEct4PgbSypv22KD9q2H+baUY8AaDSxM89rgOtmrSnSeD5iiTjgH2Y323WkR2sARAqPIaQNTxwVag2nN5K0VmQdDRD8aMZ917uTV6jyXtZQapCPHVVz6C3u8+WVX8juTr3sLoVKxd622v5xSuqNxlVoYo5ujqrsM1h/PLPcM0lJU2HG89eDjKeo3vW23qHO7GvwZNkGvN22eGb4uVmmWAy5POUpzzNb5gFOOSFAlaoDJ9om1zMMRM4Schc+VUX7j32XJnF2xnr/p9ZGro5wEAXQPFcdKvSCzgTXi6KniUL6OBardIwzuctNgrP8MvRQRHzvZqcgRidRg4GNb4NPHPRhu+CfqdBOctHdQzBD13Gn8+By8By5SOOlTWaQgnkg5VtoqJFZtxlczacg+k3anPKohWDtnbbuuEsy8gXpnXsfTGixGP45puG7t3cEvaUnwxYtdFHdWqDT2S2YZeJBeaRnSsNRAmEg7M4E6opFxNWbxt0kC3Bvb5wPmtUuYekSWMi9tsWPD+ur1KAiOMmkk9nWktswvFCGfsAznNxxUUKLO+6Vgg1x+Q3eDpjB9O2bWy9QKuTQh8V316xPuaVF8XJS2twEBmk/LJZAES3Z34MIXhyO27li++sNVz4m+h3mFDqkA/1t8mo1/OVJClt3kqYxMn/ii9d38wdk5y18ywL6PBMHbszvE8dn51LcNNldKKaMdcND35897D92+fQDVKN1iDUy76gIA8KxBFoGPr92G2o2YLYTtVZLNCXRRYgXspy7S0FRq3pC7cNn0yYPzn+NWIuJ3IFOAsdpYpQrPOKkIk5hP2HCSEMCvaucsOU7mHbjO0RIzkUFVZsihEDCZdGfdOhBk5x0s1GvwNBEflJnks4WOxkYYTW9zid8p9tflbOv8/rxo1psrGOxRcs1A3BCnnXRVTDAelOneGNbMRXiWsJc6dO+6/nIWjD0jvKs/NHTUd6W7EJCK0LqBMV+s6tzalR3UlDJKSWa0xOUQWM8+MhtqeAzpUI3erLou/b4tTCDn/VKG0g+tTZ5TjlZTXI28jyRVqvtXoqg6Q4jB6wa4VAbN4phBxWEIxfz8wY/vpue9WNO7vhrq16lRnL0/O9oSXgaGPUVPClZcVcJKUWz2O0/dpEWa
IzG59l7fwBS21sXk9Sv909cxR8rhXMB2Mwn+MD5SVLDBJI53ILRmn0Y44ce339zfvUYxFy8ox0caqDTEeuYBceWWOLHt6mcGzwswU/pg2/eQUY/tsk3nd+bEz3MzFNTVUejYcDhXEHBN7XxOSFGA8S/iIpUpb2u4XrG0lpC0RcraAI7jGaAu33bj5keZXrIdRigkU5AvfWSbE4IgbLaK8pLsmnR9OH/P1RtebH/7tGUs3PWT/UBrapvFxeIxof680ZMMRqqxn2GoQJjMezTZpvoaUrSdggwZ7I+ZGRN+y++0Qv4bHi4YFWrKfCgSsW7dv11Ww1BH70B/le6bkUgdRDA3ON5YhhTI6xBMnaZho9kLfkiu6JBdA6RnEfGF4S33rYr59HKdrHSALar2P0RdR7Ng8SW7I+lo9prcUXx/M8s4+lsQx/HwMGLbqKeY2/LRpgsnDIukapZv671lgzlWtkq38Jc3KmRPf0SAjq9mJG0Ofak6K1OFBWT/9+j1ILE7u/b28z9CygKq9Giwjn3oXS4I2rueHtVMysHodOliisYR4qd5p5NBmemmyDz33WyBSB3GExevpYddGgvjpwd9uLjs85yBred5g0eDlmsRk07HMvt4L+D7gsQUjrp+HhTp8LYF3WwYolPfJjuVTpvR4LYJ5bGI13SiYcuE+ux1WWAiBubDl8+MFXxsJ62F7+RJoYul8FZr0pSaTXrenJfZ6O10IqURu5iIsi009LCmphIXH7eJnSYTl2in5g4EHwlistc5YTUtEd1McEqsE1aLfgdKxm+uLUpUVisYbl9O8GIjiWrXP1aUby1Fs+3oUQcRloM3PPafbqTwUi/uV45mlVRYFOXcdIahjE6h6lvYdGDmrrUGkUog9xN6z75j42NeotMZe73q2iX9eolGu0TR0w7tq4efab3V5vjhQA7hw7giwNJziGnGvok6buKm08PsnEMhM/jnSozF/A5sGlbN739jKNzVqb26CXwwQuUIWmaCGgnhRjm0sf8Gr3rdBhMwHKLaEjiPTib96u6spSUOTsferKqXAKqmVY4VaaOpDwfbazwIWw1kGndqpEiRcFDz++uCWl9jzb4oLnIb0m/PllZBMq03EkM//zRPgx9WF9sFEitn7tukhaR6NZ+/qSNAd5OvMxmbTtx+ww30NzFwatjyO9g7D+hBxjzSC8gQETou0+4WCVH8x3o5sdouzpjqvXUE97EbE7Q1UXDbf8S+8hlX9KmDjpdLchdFrhMchtALv4dQM4mymhVHKaxiRnpTEmFXghH/eUxESnFJkRSzJjSIw1Uv/ccNfxGPIHPcgLBVSRnOoMbIFLHO2XZT3jIVcoZWPXdGkifZOcpuOme/tWYovToB9QlyoxLPl3tZ3EkmwJFQa6PB5B6W7Rjrm4CCUG2n8psxFBrt4OnfzIOUcJuhTM/NahDqLgg9TTdMDbXhYPVtV7FYb2AnotbqMnQHbyNCo5wcQHcPZh2QWjxR1lDfkKwTduenysSKiMkX5CrC+Vja2IZqiXprFkdx/keJhYWW91JDEs+rAbHmE6WOwemLELEAMXyRdR5nvZbI4ab4chsaezY+ZZkvKOUHOPe7hDzm3bELVVWlEikzqYey8KcIKSQ1hvHCkJqxOE+5o4qPGm0MssMs0VvGioXcemz4ck3pbni8gGh4/zeuitLV37k6Lbl2dlknuxOX3pzdINSwp06sDtpP7Me5WRjPQjIUIQ2415N8XqOJx/ssm13suDeh3XwXgYp2F2lv/SJBi7W51ns4hw366efE4tcU7UiIBClwdTXheaUOhgWFsat6pjUtvhe+1LFIx3TxjghOQ+ffPZFRC2DikAVVD+cJlvCiIYS8CyRXIlfDHNzAnS/EXuQv+AMt0Qm0FOnaYa5lgmaVyGRUAonzcI+8IVM4dC+tiW4TesJjynHD+Jy05x4C+2zdmaO3i467zV673NfsLh/Q0rOuwPI93Uw4bQgnTpY06JLxdT/TLA7kMDh//KQojD3EV6R8bS84G1hTYSyQKo4hETlPGBcMgNVjbPBdy5+liPzpzntqpWUZXAHbyHDs/Ot6SmvjCPf/ED+61txVzSADjVOnB6SbBxDcpuXScMZjc1RPTLd5DpfQLl+hGQ1FhlC6kNTj3jEy4yUmm3vh6I5682lF3C4OICwlextbXo5E2cXZYjQI9UtTnMaoc0YrqTSznXJsD2hfAc9q95kENVPBN0qn22IXFimor9ctqtwMOA17+yQoWQC9ytzSd882zFV4QMQGtkr0mECBmtY/ih6RB4M8JfIM5tQDw1iaMcrt/l2mcl5fIYRUI5p3qTgpMF/rwcPqys/SjnwOblH9UOaSc+vDOd3RwmxXEn0nv7oB677+WINq+W1DZwu84MbWwtbWnhxds82bXA7dZaW/ULstfyFlltYky2NFyP6TIFen7vhIooESvWwaFiDsBRGi56YqAtHZqENnPynwEROwl6+aSYvwB8z0IWfxuUQtQ0MHS3ii0u0jskfnJAe92WPG8IgUm8vf0q8ZWG56cLLF7+Fb715fbzFwSsFx14dr5h+wZXnVbpNUeprec8uuRzk8ordtOrII+kZMlhEAUZiAEkWvHXfhWDD7zL/oxVATLOgLyCBBI5IZ1uj7tA/hDoPjiYJzvDpkItjBj1xzkvmVRPVlqS7gb2JUtvNZfv1CdUiJ+Vnnh9VRJe/aFQQRKHAjPHsmkdBteA6JaAZ6bdYfEfzagFlMcVWJAorl5wwQcABVTibcU9FOhLQgILu6P0MEvVa9wY7NlkqJTEhZP+g67jozIN0pXlWIRLR3BFqgAQmYDIOussoQcAn/Rv8EYNkF7jlcoYhBfVYrNxsZUrdO6DtUAdFOediQRrDYCjYmv7tQbc7ZNtDp7FRWGmhlB7r4I44uOiD+u1MaCrA7xdcp/Sly0WYzBOX8LQ6qErInI9qRvJNXCBsCRqQij3LRUR23CFn499WjSqpsEb41TzFaZiD8eUASuFTHZI37cYkYFOQSpADLBpNotHY7yFmipnl1lYUXNTL0ha0unO1mMd4qV/GWFtY7qphrmYzvp935f1wJiAGT0JRT0CF0rky30qwM8T1sPFERm3a9GtR/T0WurPoq4wG9L5qmdTf4ubR1zwhVM82INU/+yYIEXWTdzoma07xOh1ABJ3hz6KD6LZi6CBNb208PFF6li5QczVbuYETmkw0UVByntKhvgI/XW8F9Q5TVxlfiU1/1TYVKlD87NenKxKry5+cd2PEmz2Mno4vS7PRbUNqBYMGvNmFtr6fY9mcOCrYbT5jrrO+dXNO1sFPyKeZiAxhmXRuQoxA2kzQzxULeXeLsQftJbChXPFFKUHb0Mh4dPRGt+DocPcw2wwVQD5CYbtiq18QogVQciing+ojqqwLTO3/pc6Npuu32+ec7U5riqNqxQk282Y67vbyX3raOAFJjApNEq0BVHfe3UndaMZat48P7hvEmYP43xwWm3bPsjVL5dmjqqakVDzyNVadWqh+P0ceQ/WMG40G7MJVFpHEtqFHdRkko4olk1wqCgDDMAXdOltxD8SyIXtrQ2Vzjp+R2f0u9SGh65IDGhtegBhdrMjnMcjmTJXVN4IpPSsbx3nMeKG13ttjKA4zfKCDStrMe4MhdeKb7XlAwKuoP4U1dw/21SeKkSfN0ceFdRd7HI+UmeE42i62Cf34cGLRx0CDz8aT3p4oWpmnTZoqgmNPURK+VEyXZkXJfozZqo1SBGh4RbisfRp4lZQQJLKA3OIg8FiztiNvhqu+Upi7es4Zdgya2KbvVFgK5jC0mnZjFt3QETrNCqFPm/t4RWDDPNw67853v+m7rqrUmanI6ioePe9PKa+VUY6NptRKK5PYnICQGZZFKB8WYLfx+3H3OdFCtIIQo4/Omz2pKuZCToHU+26LXWdhx5fUB8lLtQWunMI/uqaXj1QIs7bLoM0xAo/B8OVLqcyg5paGHiZ58gku4QTV36DmkKAOOO++dPvxIckJhkgcMPh1s7nMFmL1W8Tl4RisXiceU/gIKkQyq8AM004WeV4MS+jymSDOD+KRfVzLTHXYUel1UXIsUBYPd5gRhGtzi8QwnyTM/
wGpn2ltGN16gYSmDsBBoY/NbexaTyPlsU0N/kRdG66hYXZb/3OToVOuiqUx+aaxWnqb+8YtPs3D2QmmFS3sYXGfG3/Vl5SPImowHMK+wZ7qlf5CCvSMFyytYLqHFjlf3fWGuw7j7i9A7QgLArHW7TZzbeyJKWWvkxbohZy4kaLNQeTwEdqusPOAvPyvBIHi5fC9I/SP7NtgCls6O6lmq1kaWzwbgK2m1gTsdLAzJbX7ndAPm2yG+f9Z1c9OiaDtXd42AMNpgVH/AI7C2tvt3sqPE4CX8nNnQJWtCaYeK6sbpMl0oaQl6PqwrKa/BEBLRmQPQTeKLhuwodHlvSjqtAqZVscXeROK9ll0+yz1DMjG0D4x2Jdf9DGaXW86cz9LcxyfoDvdi5EUIbekM+XsfFjAP86iiAEVRUq6oRk4q0c4ooPCLIBYvEyqKVAHIktoejyelJJMlSu7RAgxEgu1tmmEamKgXScP5CS5jXE00bF7Jzs+CJX2Jpk7smzh0gS9/jfNT4ZxwbcNYkaOcuT8U2stTi2byn/PhSMl1YRPDO+J6K3IuxKWoTNGVRfx/kJLu/5/qu3535p4djTTQ69EbBESZ5b22K0URYUWlYqVI4C9i0WK4VP9uGH0lvPA5RPTO1gX1Ldb3rfYqu++zeclR3lodpUGjBB9/NHTxk8zKz8mk0/G8iCq/RFiCLMyIOS+9GzoFsO1cDtZLwm4w5Fmgq0thow72GSh0d6vMvOx/H9oEeymJLyusPU2lDRyBIlSe6aKsiqbFks1DGLmkB/GBAUuFz7xZOsQQrGLbh9xcwGZ7k3y7/l8ELgkchiwbtnq59T3+WhKexyrlMsb7J3dzKq7jVOxtszV8cOM3Y4jT0tKiqjw7pEm1kANzu6X+2uwTgpv6ikQCVfSF6e3r4qHOSMk1UBnHotFRvML3ORaUfMWBAsVOjwla/L1UAJQRavUVXCfaWznVpeNaNxIpUg55W+UIiePxKU9b8e7nUZMW8FlUJlpuicyBY1/1unJaOnyg68QYU19xmp9nEGhcAMgk7wYPiXLZyo5YV3APKCq3h+5EKftfp1x9JyncNCWpGJ8aXZBzTHXUSdBE327RfWI409vIex4ET0oXiCErnOFvN+GGsg2sUolWQhyNvqBd1NIFWePiWJzWmz4RqQ5tMULHBttDAotmnTnYRDXvqEhr8EPCLFXcups2WPNtL/ReU5Tzdibv2hQqYqnOSVSmMV0d08r1q6j9tndOVrH7aHyASOBK4T4xb5bJ0MUGSBA6aPKeOYpBa8PQ/o9uZMxwmuJN3JL1sLzL6flMB5EXpSo1XszK+Hw/BznAi/iBq9SyRzhOglJ4LxmL1kNtgCnQPuYKmCWNMLZnKq3SRI86wJu0DYKxYFpFqbV+HDbhWMerzDZNrrd4VrMkCVyEtPPrpyNyRWHUEfSj2harAbGmUVxlVaEFGI7ySMkXy2Mxgm6ioLoOXV2bn/f0SbYxYz6vHW+WBNvLBS5CU4BJ7LojLwAzvyKGzHaSVXE4+wZyYsHYCrSfS9wr+CQW2RyymE3c+jATPEpTCjj6255aDx+lNRnCd6yOvxYuh9fsLYd7PLHxu0Au56gXVSLRL7FVsG2ZoZUNqhx3wgTFapa0ZckULqE6nMtEgD26/Qmf3aCEtNeDAipuCc7dsCtgiY9CB11hrxfqV/vjyfii4cus+zogS9e/1wJxPRUu5d/uDayLZ0pZG7hnKnEUxNdutHWCg/8fPN6ZGuIGmXCiZ5SoIQpjNZfNsMTGz9Te8R1wy3potCgEjkKa2qeIILVk5QPVM1+INYQlMwc/BSNTk+mK42M6tggqfjZT5gDJw1+WUGc3u6vOKDQKqq77IKoqX/4h4DRpHBVlTTfwSXPD+LjPusWaypyXS7+7C/A6+x6kzBwncmtf52vhU0sK5aR6zUXWcP2UpAnupFDmMBSDNxoeunxh1ADwBz6a2jP9ulPxxQm7V3zpnk+TFIfg+EM6LXpXIacgq6azYXYidKp6GXJtREJ3RR28/H8UyVDZj5nqZq/nq4dYDmetL901kZu+djbUzZMsBmH1gVaqkD9Tf6BOHva4ugDiJ3R+kU/jDelc5jLDl62IVnzMFUAvZmEmqoZoEGlguxPrLMc/tf3C2t0hqhX9pqO9OvEehm0M/dARA1LYp7YNbwS6lHLpBS46CzVvpEHjjnwoB+IJBofmhf9Rvey3fAcPIUveeipvMdiMDWEWbf0uYuHcFUP3W9HwHnxvJzLdbZb8zGvrBGZ7QybVDv2ryR8q6IAgvoCEwr/vtIrFMb/suhbeT9XvIBxjCD7+sCIoZnc8BkTiodeCd5kRdqB+Pt7WosoWC8ms9Zn1Ma9Lrt6Nag1sdmtq2LstQX8x4HzUDOvxYmcp+0LbtaxJBPOmt78JOJttWlsaWlv7mfK9V5mwsxhl2LW1h5eY0tE3BmFpEuJC5kETOePYZQlL7eCFA4OvL7gnu4bSiebWtEYWRxcWi6fQQzUbBfT7iXxd74EBODz8/ncnDhd1AF9spTUEkzx1AEs8DFOS1vlB6fxEZHPwA69zco1VVLLIIquDfkipXbvcYQBGGtbO6y1S9x8oqr8vRZIauD+naGSFiNwjJ62JpjAovzTzn56XK8Ye+u5bbeZIxoZs2lK4gG+w+zj4JS5YqUpnIXEeQq4kBAlT/STgdn6FDh/SIMR0eAIOKEKEGJvN/PK4tlkrJoLDHVCWkXyHKAvf1i3FaI3tNMGLa3FuWKMQBRNzyR2HrHRKCkz+1u6UhVOqV7q+M9isf0r+83vqPl6z9a+Utk61QokzS3N4labUZyyq/19skQGtCoIwYEXhTlRZqMN4fV1Xg3ZAFbQwaRQ/lrBUdzpOaM7WLDCb2CPH2k13b49Mpwoyg6EeB7aqTvl4luWZfU1IHXsFk3ze1BIuMxT2fLw1L2y4QzyzzzWRcXdRtPIYS3FiKcJ0LI4+/CFpwcfzIZZSQj+N5B9P8tJzya1fGtIR50xDIaFv65xu2V1UTUEdno+/rd9mfKTNKPSqwX9m4+UFtdGCQOtEyANsV4WzgpPwv8kd7oSHIaX1Mqw4uVR9MsqGgH5UskxTayugW4u+OA8WGHrIFt24msOEgZv8PQugnBtwNd167xH91UJ4O/GfitM5E/1X5XINC2js1w6spvbysHPEbbMkEchLnEGPhHH+74DLJcW1UxU+Ib75HdXkgFJq9gCgsQ7IoXM9q8ubfjm5Z9JdiYTd6Q9Obur72b4j425jqvlY4N/2mjkMLiDGPPDZ0mC9pgil6V9sD2AV9062Qezbghftjm52F3QsjDFWEdwPL5JgMqfUFjbudjKOO1Ct9iip25e8dBB6ja1VNVfkoy0stoyunFKGHEM7Tta8nfxL3blNwMh+zOYUbvYV+MMiaNwRHJs9SigssOaaVd+yPnJLK6BoO98Qg4nxp6qExcVEbjBUqbuHTSFagGLUNA6PzMQlT1zoYu6xz/KQC0Y6XelBmggEMNAizoJH7mYn1WwHl8psNwZAlL8CRh5H9NG5A3fA1sDZVj0P/Rn5o/drgISUHqGZURlLTZFoeST+ZOzcs+WlqSHS3wGc2Oj6X1A78rvBBRSilzk7d/+A6b+/ND7f084TrJSRgFcQGPvAU23Jg8dIqD3pqZIV03J2lKFGo1KBuwUXoLOvtkJxg+F6pMdTWGidFtSGlV9v3/kkzKzXhUriv1uQKmBk1Svlq8tC83xBOmSTblxEwh6dj4P3nd6aSJD1Mp2k4u3mCEymWARTnM/Z3g6R6uikePbqulS66RMbKRyuXt0NRChrcZaE3vP1Oz9OVL1E6/HLOdW0VrBQUp/zKwCB5tdbISXGQ3qJwVqe9kRL5bh7n8Q2QCwEtDlf7d0cMilvoWrlGLiiAbyKVKA6rOU3Xqz7kjEF7me23g4nrjZZst3YkXKeCZK62gqAfXGUv25HUmpBYkTI1DJK2EJZJrQOxmrHJGsjQkDFFu/ou4RLxJygTHqJcX+qxDdGBJHii252JgJBlvANmZloPjgiOrwFOKyfCLvpl59d+y6mdVHIQ0tYoxam4kiJO+82JP8IRKzldGzbagDQ/1o8jn9wqE8W
WUmgK+HoG9IecO879zZvdoE3OUZszGGUFsKBedh2jJeaIQz7BaHGACr4FhpkZh/Po/SH9YSVz2rys5xn+pM1Q4oK+l5aPxQbUPhnhj6ddqYLjQQBfSq072wD3psz8loGkdKcGV37ze+VbF0unayRHTK5VLSTqpfrnKt/oErSjYZE4T+2KhRdPdEVm09bKOwL5g0qyKbM3ZQaqLBi8KvK8JAAgQ7fOu5qdpwUICNn7OzW/v4zVJmmbjL+vrJSI6AmNYTX3CDXchI38KbAGURxKjtyAGrkOIbh4Z/06XQb9ftXKOb33wUUMoA7DS1nIMuGdNLt3cLxpHELqUC3cGRe4QysUwaHiJ2swzk02daF8vJlR2Zwb7naXAwrppEgAnCkZu46v37jvs+w+wp6Z+wIR58CLZDvR+/ylbqko0l1cJlV0n3VF8HbV/4/u+SfqzEjjQVWesdw7hfVB9YThawkPp1SvsgahTrinTvX72PJUGHMGfzgMhZhUkHf6r/YyXs5wacynBzOILqp7DtpHAW32x3Mnq6uQRm2oHQn2ow/DpJHpkoQZ5wntQ1t9sjGW5ipSMTg+9fOiOu84Y3ceKlkenoypnALfSZRG2kNEvfQKwcr7iY0ltaztYdo4YhdfVd80XbG56K1iFD6T/EaF1UB8zWGDhPqjDKfsAxTWTrBbQhN/wJlKmogKQvUD0sL7le5AINAVefXjgJtmEm/HoXky8Dv5ieGDGR9mB3oLf0qnmS2BvEEB4SdgF8g+lb9dLK/pG5xPfM4gC4eDxLlP9g/yYwjBYDzwR1QdsHkHNhKkqSgkMPcQNlNgW40+Cq4uvPDPTvmQXdFGL2BGrkhf89oqV6w00PTJy0jQztKcHXAh0hPmTBduMCAFxaOihnygiRR8YQI1Pdx/7jTj1GvvKD1S5oICvLt+rC9ETtlsLULupqB6NDceAssWeN7MY5tT0Fg9EXiPnYHOFk5h7tjtN6exluapo2X2GISLdpeoLTV6ygBxxnbWNQXfGaf9QGwbqKfhZyqRL+MjzL1ejvlWYnYNIn3GuNUnAUvpBTerg68kRBW6ITQyqZJrUgur711w0Px5mx8QF6wWNliv5S96fc0SpaSIwIuK4CahS50ZXI92aVlB6Wj34QXSawo0tb5Qb3coXURFTIP0tLx/suBi6rOawYEAAfVCFdJaOQjh4j0sIA3eLwXhKqrBTCyz8aX68fKBLaIu0rOUKeeEXvVrznadVJ5IzBi9y8anMqgLZFqQw4rh9jhUcEteAWiitVG8LIe1TGWSS+BhZEOkwvYxGu60bk3col0sMgptvcyI3Yz+AFmEr3hBBsK9FdHWezCBvmZ58WdI7iOvdNhXIogbqADtogbA4gkhdOfQJE6SM8FRu9KWQ7o5klO79fUo/ma/25Q8uK/mu7EftKzQSAW3XPB/O2/6B7rkqJkKqUetuf7anZwlbc10v4S4Zf3H20QKBXAx64r6yLmxPQNXjUZj7IAePl4+nrHI98UYus/ItJtZlQbawOLPa0D9yp7tgVoM/j3x9FS7iCmKB5etJqDHpE2lKynX/PeeFgAr/o4VsV+NkioTrdW1ZtScgvB3PTIjPvAzWYmkSg+tLsmSBL4QWG7F7YSh+GZpG/BvPmeeLKkLpGhCIdRw6dJsy9YqTiAJzisD2WFVkAxQ4I8dL4GTqOXUOEVSR69eOtB5DRd4jQoCSWzUQRreA67zpLEFSzUWPhdAajJyCmG5lZkS0ByOA3OIHSkM8+M5IS+KrOrHM7WCye6OYMM3/SJWTF9c8f6+7YphvrXU9/ALF0jydANyCeE3Xgpitz90Qc0iTYp4EBX7jhOef0o1lRlEEzY6fXSWCUPAlUhL+V05fu996u0J69afDLN/tmiOzHUuAyVn6dwyH8et9+3e9jqStYE9SzbrLbDr2WMUBF7yoy4yxk40NH3ESJ2N74IN50quCzCVvDvdVaNPRK2k0/VjSjEn+wVOs4ojQhAPjN/bAOkhsBQ/wCisdJ+wWME7cfs8ZCwvZxXQCGDOuWjAYnK6v7wlerj/iXXjwePgukQzKKRXWSOWww5ADeoIcv9Ubu3DxqiJVyB7dxaXMtIACny0aSTQNkbd18MWP5I3OPfvDgnbnSC4ihHxe4Vcjf5kRAn+XhJR5DLSyMiDGoXaFsrnKNNUqNFbuM/yztuaXvbi+olK0QNGBZhg+KxGEWrS41xWxXLTT9+gOkC5y9u5fJFt3duZVGrqUVba9EdfeG0c0duvFOcZW0ch2DjglltfyP/Kaf3wAy4afyvPScRzv6ln4FLRKlv60lRDmtjgjXTGlFpOdWlrmt3T62I7292boOU+JTz4UuLhj8caDm5y5lEsWC/qttMbHWFUNHyjBcE17FRsEHhDPaD803jEc7gVcZf//72eHDLTQoB0qW6f5k7r8L0gsy/CoUcJpBkD0B+C7Un56IKzvToWCH8MadpmJP+BvVdizemm7u1Qhu5b0opAmWxrcNVwhUIWhE2WSYLWlLrXcTN+jFYFXtdpdGSwluBDdev7OUtq5TokoNmfrNarpjKMVnjYj28j9nbZ/0KP8XVGq9mTokgBw4Fj9kGSyZvtuWgPVn3Ef29kQpaKEfhcbdwbTefVHoIqeMGGzJHv4ldnst+wbToVri8w2hXUb8ntUDr92xIfdbFXxYzepmRKfGO8pGwPUpSTdNl6dLNBD3mw5etGORRfwMCxLL15olcgb/wMy2Yac1bnDsL8BdiFebqarb4CSD+MLXCZuJNigs7Npwk5yQRY9c2eGhsUuS7u2qVFAiINenmF+gQT8+8iss5a88Joa708ohOXAXF9/szwEPIhSNTXZ6TUs8QFvfB4iwP/RBajFuOxMtsyfeTCm9jzx4tgOfpifIKukCsfFcE96uwBwDe9eGsAVbGKWRROt/1vVUK1MbExS2VAe6VBeFoUUZLZWGZBfkWZLPLKITYhJdokXO04uBywBdmnP5aorg1rhedGw9iVGNFJJ/W51rapiCw9VnAVrB6+7iT+9zu7U0wRDTVNY2O7m62q72K/8/+O4DAIKZ0sQ70bneMSH/kLJdpflwOznU+9dUZBm/Q1vh52bL/ycPni7a7nZVu1G+RzgWCg3iYirV0PWm4aIZ/0uQvlRlNvC/od/YoCaSqpLS9uBZnAxbixONfQ4cWxVj/7N1sxkgBryHJYHqYkjsE+viLCVLhvFwyRKEqwKvhoy/c8/KiVLJHFNKyNrWXXCHDWsyz7y15Hb3w84N3kP/x61XubBbVeT4wNSHm1sdjT6VlH/S+QcCZFUb5IGZkDglBCLy5uAIgxf3elca2iVrgwg5G1F8x9myt6pQ3OglrY51aC+qZHpQ66SZey8JRIn2+7/usB1YJIQEJN4AUYNgGFd9igNHNtpLK71EGQ+D5MlKV/ppRZ/0OtNRFwxcWnz0XWIczAztAZZjQh71VrlyFgCQ4gfeZRwU8QBsekz/KJTsnY7NEH/N9l+IH3U8K7Qt0n290q8lawie88xHtI0A907qXSKNZDjre+RlhA9lAFmtO7XE6Z/E9Jv9BvF9qAJlgL7Q5tdEclHe9dCbAo4DvvjgGZVutFHGZjsMfVJs7gUvqW2alEV5JfPX8aUB15mdxiBzzIpL/dVXktsITwlmcB8NuFK9slyPYcZfuhoD5TWd/IwzOi3e4JZxsGRKJf/nY9fkvRbUDpGYacXfLlsgmvLbN0Y2UaqJek3ofj44S07iAYjOquU6LKzeuCvNQCi8CUwnG6oGP8hV1i62uxo6YGxV48tI4TFYtNx0qH+Qh9BWj/zgQVnrpzloyil7xYJFYOIRfZiHSa0KzHQnnyITTAIaLHskZaqBbMAyK9UlkzP3SwfV0wAgGA8p5FC6eFDyEgolgWsV2u/TGMYr7atbsw8cymXcU6y2CVP6XQep7cDf8DcOfElTb1o24reCh0/xktWXSCVAHcP92jN4sbVIltjaLjsPxIx1bNHziDIvd0rk6nQvGnSQMzRM/6B7VCnazNQVNk9T5HNXZN2kUZ5dt1GtGNOCFs64G85LF5Jo+5DnMsNdf6Y9WWrxpdZtMw1xRSfwqb+AUfpfau5OPUTBXffUaN0Nz
T3g0HNFuFeucN+QV4ROwU8oGVyWDLYD7il6tSPLA6gdh9a+Fc0SliYh0DBKhuB6qnqNCHon6HC+7RDTQNgENZg9oaGANGudsSd6fDT8+I1XfWjg4hFuwjYq+Frz4mda6E5Va7jmactRG8msjniLPDWaCzFjw2ZXrHFkLNQ7UFF3qCryd5Fu5k+oT2svdMfj2AMY0wDdhEKn1b9oMnp2vHYGBtMi+N3QsYZIXj14NotPZ32zYktDxB+fHJ1A+8pZCBIMhV8cBO/AqSvvRqaTvm2gLn8+qxr1hf+lAKdCrZZGoQ/2zz9LNwLpsIiRDSeNEzKrSCWozi68fYs5eIvJAvbJZhliD+501uB2irt1jU3wnDiHNvlGsjnn3JZtuOa5VSKE6Q3JMgVaUBwj9f4pzjr/+WNoDzmoVRsVg2bkih0qN/33T6TLM5Qcz/jWp1l9UVVobw+LUx6zV6920S+YQ+P41Autwk0IMP3M8evnywOKLZzayfRj58BWMm+vd15flVI7nWbc8Bz7ZrtlN+XoL1a6k3bUZgEfRGnT6moy2p/WDnSWm8xX8xYj7isCncnkVMFhC7XO20BI4VdUotOV+uQ8+cWlBxxX0KZWQjuRvPlLK2dCzSh7zajNbMHwas2qUmWmzWKg2CWaSIbVnxP7t0jL/oN8pRwDkXI/oj62IjmWtbpjXcd/KN0Hi1Fy1ykKvfE/dxKRBbBBmDg68+fPMkwPlmKhUOcFNFLxFX8NaFdyXM7JdE+kagXdW7RgV9iu1sOqFtYwdCohUJ5Iq0ZhWwEQtY5BPcUSqNWA4Nu+vLEHiBX/j/4UGfVt9MueDP+Z8wTNYLRiZmTZ0vKTxYLpICmRYiKTYQxYninWyrwp+3Z6mOmwLH6O1TwAR7pY19FUP2C9Lt4SKmZKtjyn5846dwtwl2muMDi2Pfz59Is+aScDSEAe7lz1ssRUuvX5d6zCAyidP6wEYSQdMbSlEaLSeaKf4yBShBdRsOooHZr5B2dq/tAvDRzD8IIUiFepL5Ih5W8tYD2h/k39tTWAAPapVnS8mqm16M4sH3VlCAq3atvM6K9eRT/rPHosYGNrb+8hhukM1JSwDk2pbF5R6MVqG76kPEHPO9nIv/yMK0BjFVHQTigxy/uyqyECWiPlBQrnBisAah29Qv14TsRt9qJi/ZL1+r0bmoj5wGmHGHTn87wtG+mlm9cJtcnQU9maozwlNyApvISd0W0GY+gzvMQCGnu9vJwcq0XzoXB0k5N38oppbYwY+2qfhRgTABi2AodKdB7G2TiKKDoNLcdPEZHdQAkQztOoTfEW1azycHgSw/jw0l7+cRw0Qmzx0ykh4h25zepM7QDN9o/7HWdCwH07grHbNILkZkEe/KNm9zWGsd1TXkDS/w7PD8LDDIqMjMm7OJukca2rNWSCOOT8fmnuC6GS1i3lQKxrSvawKAGxoqRwnueWiAEsK0o55/+avbcG4tW7qkR8rH9zUTMFp8DvYxUiaPTyRQNyAg+8S2jtySTLECPdEonhnInvsljCQk58qM8s7zcne5IBMlH4z0B+kyWf8A318mDOBxq9TEcSzpM6K0asfTMpPJccOqdHB7kl8TSYb4Vkcrrm8C1l5y4dAMcLKzYCuzCXjuMCYLdJL7ViPiEM/7+f0Qm3NilnDmmXburNwzjd+Ftq15M/kVkCo5uO67DqLQnrY5ejIlL7Ew56Ea/UxYUCwuAYYfjNCX4yLDw5f1Nai7YNFJEj1gJi9kO3WD6LE022/2OvzpukNyOYBvmj4vxfhLPOVJbE8C7MfGPvZSE+tZLivehPnsCLFmQfRIS3+SDkcq8UiTgwb+3ou/b3QSNoG6KYgCo5LcHVDA1FIWP+xvNQSWGo9JARTAMfmVP3VJZEBkrXVzTQdXW1Jpcz/a5F1qnzsQNpFLjMR1ye4/f9I3e5X8VrwXI2Y5kWX32K8wv8nQzDL6z8xDgEUxN/mZjqF9Bf3Ns7XPmVizzgPnlncEPiGh2Z3iyjYHjWiBCU5Y1NiAmYaI8/qucifG4fjuyOVrM6EaCHyIGI0jh+3rplJHijbGiaBd7VkkWo+qkvcj0czCmSERbnxGrNqJ5na8ABB/YeLZ7jhU453vFj4Q0fO/0jchuCJUMzTgCqIsNPtpKZKQtdo8CbDc8otWIlqyC/ZTPQwgJT+OdCpc2g8R9MdMrNxNC0UmyTss1+6+0XF9XQIdXQ6lZI8SYLa5jG5oRf2gXwwxFTgXKSxJiqIIzI3KIiVUxbfCVNNyDfvM+959gfFNlsfDlwcSkFDCo+PPutelhUXNcwr+xM1AbkMfPrzxvvbw5kF2j9EsqYcSQMhJ/Y+4btvkFgb91C+lg9Jm6nnizXJQVD4l+K5M3gtDteHjqOYTnWTcDYCOuC/k8/dRlga4KUy9x4ycpqco7bWii0ZiUNf8WqzUaAltiwNtPpD6YhALn2tSqMF1FjHTLJFgWOFYAPiOj3yjeOUwWgsGskk1Br9LnjiKyki0HOz3o+yTenluhx1MS8w3PvRVzv+DomxFK+BbfmH1XgmPQpv53dxN81A10cYod5+qmZHFf8NvVkKWboTQnHEANgqRM+d/MMzjLytU3UniznTu75sJ6185agsrlKi7t7spq7P4qTjeIC6/xYjUwe8/YbjTSW2WEPbVbxipLYjXlphDLgmsLO5sb3XO4HYd9ZQlmoyWoD2qmwq7oD//kSACy5Sdq8rRao1uu9IDHMHFlvHAYdlYeYfh1AMeiKdvG6lkAu8LAtf3zv4Ac/bR1GD5topOgybGx0S/p/Iqrgs2pT7VxK2NrXQzyOgRjhKf3/Vtx1iLdbX9uxHA4DXcH7qntfUh4h0g8yjQ9UmptZbS2S8MY98oSds00p42tSBaDQNWeQiswjjj6KBVpEeoTtsSCVhMGCEmNaf37gXjOaj4PK1SZcmhNO9ZOdnTTd4gDkkYHVbdZYdriDoGUXkveT8z126uc0nEDKJk6tXTQ4OPAAscXPakkAn08MfyG2d/5GCY8U/EPQfWcMrIv3YRfxml4K+AqO7td4PrTkpLx5c3QJGVMHYJCaZdQQwBHhNup91CCm7zyx1sJlE/b90Ep79uISMok+nHjbAd0Np4OE0nACTpi8N/+onodRLWGuotFis3djNkaqk6GEs5DxRupla/fGEBZql231KlJh0jza15+Up/wFJfYlHMuNCnPXsAxKXu2YOGFPY3aTgKUR0WEqsh100KdX8Krsk70ucocew3/iCJJ31Jg2M2oYhrHKZuJjjSOnBkTsyixlw/7cWoNgM8j0vtpdXVU04tFzpCpzHWJFc5lsTJUPFTdS02F2+aj9dQwAFfLA5i1ZoF87MZEVHbvpaCijS1OYQtRChogb4GhyWrmcbzfKql7TYrhJTB65veXMk7DH47lGljI39uHboKaYXfpOr7b4eIeQ5IywY47Z0d1cp7jpu6Q8YIc6LHebvqqfverbYNXPhOxOwBTujm8XYCrRO1ZFs6KYxAhxLT2oUHYj6Wy140KkEvTYJMTONu42UC54kxEaaCdmexO8itCUKPNREmexYvuKBc37yOOGqm2xFdn+YhoS/7nkDyy/XVwV9JnglmPLYDCJ2ym3UYaDplHDAu44vzWJganhHjL1LU3LXcAsq6L58PPAWfVMJUK59vzbxYpe0+KD1NMPgp5OOWfgTks1rHofb44UINECB38PPITm9sx8xx2TY2e9omohxvmX73im121otWB9C1amRU/71oQn38KpTcGEGFGMw8GmaNch5bD2Pv556iLBSHpmc290nNQpHjlN47LodUSrxNN8fh6nf3Lvdcl2ruX0EIsql8xv6EFfSw0BxvrCMBjnCrzMZMQEQ6rE3tsdEjKQWAmvPK8IsGpa7hRPN0lVwNqFuvIeEm8+Wyvc8iED7TFZFG6ZE6GZyjyywXXD0IuTkZ2dxgRgYOfpuIy6z4d7oXa/Ck7Zpo+qK/LMdRb2C8JHvXQFM3WzAbb+kZ7M2otE6IbkV2JJXJtI5fdhY6JIAZ6bpW1tjpuXR8wElwf4gKEgtEIGF3autMXPzVTUD7USxBKdA/qq3PXUsOHGrJBd6hgDSKQ1nCQZA7qz4sg41
1GZIQEUzTJ95MPP0S/9+e5kOtAiS4GQqTPmSSIK9P/sh/kjbBO1ELVSZP32mMR/J12QEs0/TlAZP2SHFvflcAALjpZ5A3SYuF3eSfMpVmkKM/ZGCfebEutUJ588AUGkUOI0mTqDbMyJPMP10a5bha3m2sKrFZwMS4wK7vY9VnTp6KuQHNkXvTxgPfCRNCWTNaHzKx0fBUNZ6Yv7lIgEekcPmP1WPVnfNUJBhrzGf/HYh7fOVad1nAeiEtWOmqK/LTG8kWNfs3IDthGBor2+ZXs848dDC4Iyw55ph0TXkqHQirrovJGXEVhVjOMOcMQ8ktf7kVU6X5zrnULbWMlWE08y+gcXN2ZAP1Rhml4zO3KN4dEPkNQ0EJMu9AjzVNr3/MkDnHgclj3vuHViwy8gZKgbL/3s1Vdi1cH8NnlbpI8iBmOZhAp5ck8VEzNY68q7giWl7FBzUBRbzUzSKoP7wvsd4z9Y1B8ASi6KxxukPirBvobjcojfL8j2mVhC3lMO8wo8U3wyjleGCPnoMH8bTJnLQ3ribL6djm+X5iFyNH2Ff6MasCuVaL/ESwk1h5eUujvRnmHl7OhBVQB+Ma9X1GP+fL0lep6Bx6hhbjePNRCDzxW+d75pGozI849Rdq2hxXiKZS+ii73rfx7YSKXl5XNEe+SuOnRMQmrJ24uYZmvoNNX19/+l3sQYgWYzM86nfLoqkUXlQ9q8E2+BDDqcTL4Q5SYyiUmaLqSNJO3YBSSKHpx+UAngZJE3FBpFyRZIbSyf5b0jJH5PTa09JsZWrNvxcOsPrwSgGGlV9HyIhdd51a+wYFezsclojI+Bz/7mANEkBxKMz4m3WIbeRpVgrkptOn3n/uuBy5pgaa660Rc6H2HukSs9t0xWVMgrTMxXMgDg1NpRT13lUGIur+FnEJSnv/NVv/PWcynmEG0XvX3mrJPLVCk3FKcsh/jiAGn55LF1RzO6g89mv5oel+N4vA91ChqFxZT76bkwQ5IUyThNFHtpm5+VA5zoMoaYOubCjDyxPpUERT5OKtQhQ1DnfiiMFl8TOtusRLwCwXewvxZTeD9hYFGWE4MS9xe45vCCfcZuSNJL880gJbp3rr5U90JxAoVinV08GVMFFpkkd2mm2TaYTTkbtdn+TB16W9J4l1uxssYp9sC/8A639mboj+sCtY1RfslrOLRZAfqwmKunR8AqnaiXAwtH0vIZiMM0bImG0LiR0wP1UX7FKzZwhBoL02/4f1meuTUIHBRqSuYCetJCLBzuHNYRFTEQNVmjd2eQL6qQF55RbfYuBe6JnqdrRxyDz+u/mMpoE8y1rBPOkO/N6ZTn60h13eQFpv9Szxd9q1vaqN0zivPFTYP90K4j+a6iEP1paXxnZku1h0FC5TiXkBsIYP3Cxz0n3iINhlOLvOBuqbNWBWl+yaXMJKADJ2bbfuf9peGA4B2v2J2UpWiGp/wUSD37IpYsDJHwymOd1sk5Yzst7/68RzXX2RxN0kW6ZR2fnYE0WF0d4yWsgSsW4ScAMRGECKTOpz/cBvO1f8NHOqjYgs2TctEM0LxvN4j6SqLQePDhhivSBFagVT/0rWo9M95RX3owDyzIPlEnldwFiz+72olJM/YDtGMoCa9AvCEgrZP8sqoQV/90UH1WxSbGkBFLxKDjvGh0GBkAMipUeMEWfmDHLKVMTiXPTa06VpKo09jwlPI7phn9PFLs+RaYfvOIbE1v3J6UJQoTmXzGLDpEa017woqFPL5njhsbQiYwu0qRHySKp3hkjqUw7W28UvV8Oipv6YxAQO3l6X526M7zjKsi4xEVuI8uhZyYFDno2QHDFw9PBUQ//MgOc7QeeoqmaR+zcUbJExQp8mNP5ya34WzXA8w9HgYVJFX4TvOJeRaFnZg4wYa14/0r4Yo5r2IhqvNzbrCv4a1yuGx2Wc2O2gJpryCNkl/lEw78x4kcn4HVKTHRwsr/PWbViEIv1EIpAUEdvehXL91eLCcWWU2h9zhORddL+BGk1WOv8JNIqmrEa0B7sTtgYlk2xD9hUE92yfB1uUuaUfZ2tcr5dmTRkzz9wjt1zUsVDwHnf26C4oWbV1zlWOz4UtD1Jf7xm4WrXgMkaMac1QNEoKLKxRogToPGIl/8tpeh2UGby9vqFEY48KxE/LmYZPeiZ4tHAC4wNeDYQoj1rbSKZ7LPQhpfiFEh2sEHXoiipC0AUsMm9bO1bQorbLlLRRQq68hfhw1+5/S6hvfVKEhRaUpBhc9d3TxgTJ96QkmEeWFUbMtjnFVZvwkPbDWOw43eVTsMF5SNZiCjLPJjyhJ+tTVNE/xw2L1Z9Lfl1IyEqUvA60zPcBtC19Umq6Gr1KeIRtZ550AJG/eCoFsR6w3NsCCsyYUY32aBRjYlkmQ6q7H7ud5tqFkDBXV6HCGkjaKdZzTPZJgYW/TJNFP6ShC6ivjQqebQQl3wQMc6zP/tf0SWDUn91NAm+v2ctBmC1QPn78PQi86rEFKVcVOO8vLxoFpPO+wh4HFSrS/QYhw/HJgvEDWnXR4ethKlato7SwpHlmx9z8A5MJkxAAhWcFl1FsELHY38DzNngEAqs2cPjsaXI/otimJfCrG1Kkpn7bzECkfn8mz0UpSLN1S+txb7gV+muE/E4zek7nQl4C1fq+VaSeCzVJa5zKvRTONECwyt5+nsD5ybd3M8lpyKXNSDccvoK1uBSzQ/Axi5G7fCY4ZYmpYHe+C0I5bhxozJa218wdQfJOrvTxsLnP4td2Ez1C4M+9ONel3sYNW7/JqC9kBd+ozw+JAo40kH9vUsYByQeOtGfp09pq6rB5phBY95N1lS+odlOGHGHNGLi/dRp9KV1nOZZdnadWpAq4eVyv7/1NCIYKFqH1adHaHTMWB9PYi+XETMa87TNzFp3HrMzNusHnhjDEc949M2aVMYw09xCO/OJiNJFoD7uAxy838ZTzaSgGjwSOpPnwfbjndXnZaHtT82D8HCvru+YfTKDF8WsDva/Te//sHfvj9bUzgpR0cSul9+Z7BdgGJ86DQRq7mLL0sGZC/thw8nmh3gncxw8PCX53wnJPduhfIWwoWFEbtR/kKG46yzTlNpDKfAslJJfJDnaPdDu/fqsBwO1U6Mpleh/1aIInZvRxZaBJxiso8ekBiW/qDFzY+BcRfLH+GkNg/hoMeSLcNtNWNn4bqr+2pSW6N0zzyoDLwvf/8HavTHDzlCpY28r2gEjdZFI0WvXzM2bBbxEaMIed3rDRRFXd1QeKknLrfiQu8o47Rw7+gjLZ8sfhmqh/2kr6rAqILJJ291KqCXEUbE1WBOgjc9CMmxu1s3guawjimOqBimcyII93YGwStjGv1ZtLqMW7Q7r1YJ4w5d/aTGL3fg2dtPB1jBujIggpF3+Rty1cHXD/x5N8pcRvWxJtartlqpR9+ls0M2nb1tGDiKw+lJ+CksQoKcA9GtRcysB3NzToJxobGpI2D4kBrU168wBViUkmcGuXQvPknDVUCqTCNm9O259Q+eINjS5Lxe6OzwklMBMmL2DoNKiIKVRl8oWZnIrKKuNe2pECtBjXPIiXWpf/8/iO7u0CvKhGDEvvv0j2Ik7bfWuz0BDnOqaLQH5xRWtfVv8+/2wMX5bALLTc6NnNAulhW12CtoyvnWI6bt/ASbZZ91syXjFpDUDJOBFBe+IEY9ans3wPGyTb4gUiXxVCtAtEk3Mb1NIfmaOExdyLgxl0YkOpQ5/n5WZrd64Qsi+eHenaun7GP09m/HWGOV7PjG4nKsNgOD5WUgFGCWUdhBZwflWCIQXn3QGGzRsqU2bv0fwQz7xuvU9JJmZUGKQ4l5EYuwefk8/+yyhHdStP1JNdZEbFqIMPtGCVszYQNV7qBJiiN3oezmf5ad/lfS600dx9xwh/Ik9sMyMTCBnS4A33afmH1wATSWl1Aqi/sfhBVVdoFVygwhYi4/uNFrnG5cn9VoTpk5V75UzzrEbu9lFv4WlRGj+SUDykzRKmNCLGXnS/tgqE+w7vt/nkBY8wIqvBAsfuV9PuyGoIw2i9jei7AuYGSo2au8w0B38ZT/uR7t4+nZeU9FmK/qCujXd4PUATVP+5OrtAQlJqHRU
jt7VCIq0m/ELR86JepKlV4fsW7eV3efqgODDKs2yfS70ICAn9EEIxyrq9zEisO/IWtAhW4YaNFlhpnH/BdFoa5i2Tpbe04OQXNEJgKmz6b1BhIOdbAYcMSXUihTX3qPsuyg9InZ+MZdi5Eb5ykzsM1Nu3oEeXxN9fe1Bm3fplypR4wFOW4/iqnag7EkVR1TiUKtaqc5eI4hm+wCUdM0BRsM4fSazd6xIzPCD0GMkJoeR29aqvBJKMSaKNSHuLcPorc0Q+r8PxtpR9ucBHSRpHt0qRg3DFRHBjw6lXYp69LG8LYPXwnufPnzEdY9ugR7W9Jzud+p6sdJOoRQFMslwyMuPIVQWavRGoGNGTqIDiToKIxcWanCIwh37KwzQy9oCROjZmE+P3/idiRzNJiQT/0j1B763mTKXseO8wu+ZHyMbOFWmOka7+7BG8pbJApRR7KB8gkV+TjrqSyX8VibYT48URV4PuIETXaeZkqY8lUQ5UfBOcAa9RfLzDyJUjVS+zNwT1bPR+32SiCvrjRdIxXxBCZsRb0GDOygzJ9SnJJTRqpXC3z93g0R0otC0IzWLcoNpYUvwe6gGdH8RTTjbBGwHXne6BOtKgI/clAR+iKEeR0mzzUFlUsYPJN7qi2HyWH0XCtBD958f7K7DdFICfwn7Jlz4oCvx//8UEzs/F8YdD1PDjswwsDqFKADrrGr2OULhCv5aWHLtw0Rqc5ujuJb5gP8uxagdiJozCTp/Pth/8H9J4/TovBmps2X9aDIFPV3iYWgP+afmJK/x+9ewNkstrV9DoZnkGnQhanPvlUWXx2kIjhXp9SUjZ6gvlSe5ruUEe6PLTE2Px6Q8j/cvnsFqdIqSOs/4PlSTWRqDgK8f8q4ypfFPdwICIh0Z0BN9EQu3SUtiGFgnnJr5F4q6nHo+BQqb5xZpY2HLPi/SvNFRpXq1UBUvPfl1zRHUt5iiiFKoa22CUilXYJ2dNLicMAX7glfFGB7APVVgYtxJxEB5dnr3lW60rUMdYl1/D8eAMZo9krVWh0sQdp7evbeKUl2syFNaakgm85yHLT+dJ37P7IqwIlWlt7M6cC1R9RwuMsC7UqzKZTlNhrUfkovn5Z+M8nmCemvPeu/TxqmZuRR2LN5XEkZnCSJYHbsyD8qCzhP+lmG6TEVBlQ1ddGLuGIBQT4BbCzlaolxCUhXNuR16soCLLjFZgEbuh0MKyCcrBB0eTwFD/+zrmHbejHEIwdqL/Tq1F2jnucFoAZcyvtfDeu7XmLQ3IH8EazSw3JMVVQ8TmOcL9IVQEzN7/CyFuFClFAxZezS0tiQ24ALAXsCmAS4tSDt+kkurwLpZYzqOzrbPG1CnREKbDvviMJD1nVEjRYODlCeb7uXn9aZa02LIz6SvpIsu6jJ2A1hHZs8T+B6VH2iGP5oBmQP/FhfXd4GS/Jr4WWHej1qqKVHDrY6UbTYUEal8n/USlUHkbz8O0a0DRVANmKQIX7kqoVz4NyMw3lQmpN2Edjr9nvt3wc3L2Kol0qi9WisHvvvpTugstIPOlixTPV1qAqrU5b7rljMqzfbYiiQP6nqsy0BC3LHsGnB2lL205zdUTyCmgJfRpHfPBJiIGGJT7vhDhO7xeVMVgiSruF7+ZpuzaEM8/lyExeO62SxM75IIGJiycr8ckX/Ris9OYdaMMjehKKv38X3dvAMLmrk7unJRxCZXBWmcqu6gdVbOyjUD4751oTUO9bH45gUPdr/IdlFA9Q/ane5ulP6aP18/eKw0Aa9M5gvJD08KQv/FjmpFUfQJY80+5tWZwDG41DVp7swfA/whtv6Fn9UUW9TJSbp6Qga/tZ1IYMElBon5uWgFrWrdfJXWBO7d8ljRzyOx0uyM6XNV+2jI/LojkFEqyyOekD8Sq0f5UvEPR239mRUWdTp+/fWFEaRZQCZ75gn8ogxqmFC9eUPC025yy6TpOTBtJ7V0xuRxDNtM0BoqdXFTgqIP/FfbUMNUOWmzMd+aKVwRM3g5FIQ0jGAfgXMn7Mf9Cpe/r5Cw8wzrvBNXcsKqQd++FmOkxhPl5w6AdILtZwZTEWE6x7WgS8RGniazwODN38KQZK4X0M7Pn2nWaPN7gfT4FCI2aBsoeRn691Wys5bDCQwTltAakNnQErebHM5LF8OZ0ivk/wEOKO1mPEbOGfytkwQwisYrOQSeNVKIGxTz76js0UxENLA3iJZQnajv6HoK/M3qpfJlDHQBAibnMBsVTN/JU0ZW4hPkHM7DXr+Ftgdgvec4REhzeaE/8vmZExsQuGrckLWps/lIgYn0AIREtZ+jQZ/Y5KdHFGU8bJkxliqZBQACOQ2cxIGNJqmTTmzg9gjovrWvtqIxVZz7w4OuhXs1Ka3WHF18kQ3ku9/B8Rc5TSdBuyeTs/eFhidifBihsZnkQE2Pp9/w+GkZd8KHLkVe/CqBvZfN04GTlbX3uZ4PtMLNzLnI2uO6b0NDlttSIpiQI5amN1d66A8h74UrlAOvFuSfFELpeOUrdLA8lfSa5h+XA1PrUumbEMFiiejy4GERev1cHgl2QJX47xnpwEadJHfcAmg9nyVfO2JsLR3Wv1CWVf7P+IihU0VFTeVfQfUTU3F7DlplOOPQW2pjs7QBrQL68USkJzIzKhf8dOzN/hNMkhi3FvAmX7qgsIfEixtIlFTcIWz7j2xGSBFIGPgFublLM7l4gV5pxAiAR+Z8xVkuoAkyuyUP6l03kKMIXV7FgzLmvUWhVDHYL9qB/F6la2CKSWfCaslwawBkWpOiPvc/jZafFYx4rPi6rcPXrIohBwsRjixkNz+Zg3/BruhRBulZmRXB9uk/wGjI3Ud4E5mTpX1GH91MS4Ew0PtbCzGMHc6ub86xY8ExkEZZCCfxo0KJi4OBXpPbZ4D3HvAR1iuAmFlRByMZcN4ryGGqzb4sT7W9pEEJ6o6vrL2VbNAxUDdsnI0hvJGKRD9jevtRDgXjZhXz4h0Ka27Xxu09LCcQx9cirAhMr5boNqRwHNTOJKLn03+uBVi90jp5mkyBa/4iKCbkfagD4MHpYqO7K6V5eDUs9q4zjenuLTIsWdxAllPt1GzdjqCxtydBxFFecP8mw1GqRoHXIdVK3Y+LxLsbI5Eg/7npb0fwFeOuDm2YH/Orh1FhJe+SnLhK9TKBdzZ91S8aWQs5ixpCUmZkehc05BW+iHZKl2cKHQqdRAJyq/mWaXSFJTSDtttok6IsBB9RJKD56Dg3WWDsuLuGPWzr27228lNoODAFEf0Ad/dYt7B8hWezRfjqsiKOHRSjUSCGcwZxb+nUzs0yHUS427vMJecw2j4FCyw9Tb8TQtI6fiUmYr6hULMYUNm6x55wnLcFXTn+lfeElSVj9PVSNmLQAqtv1pYjUOLXCbwwEbOlgXwzI5O8uwmEABSPjJfupOEE+hAVF32I1DrXrjuzoDYkOPNe2/bvWU/7SfFP5cigxjgeMoXeT34nFLfxbm1Wr5vRyv+4UxUImI+NXSAqHqSFfqX1HL7mD2jqpZiaWIAb3i1n2E95ngLeYNZXtb18R0GOWDoWONRRTcjlOKGSgVpKHnBh+DuxPDBffe9vo8uDxlOJ8CXlyPQl1cPfES2WZ5BqJUARQE3j+pAq7cFUUysUtXlEgITv/HYJDL8UT5zwxH8TrDO/q0WM5iC16E1dGwKaN0made5/k9S1sWfCNDRlVyCM+TztvTNx+21CiJLlT5PTf7/nNuO22gveBv9PWM2Ep2Gj4d7LDgzVLMg7Z2dYgqFd8N+Xq03rCjDdar2nmO9PWHDve58y0wYFG0w81viHx67Fru/5z+OMUQ4PwoDW5J08tGyKaS0LbBk2Yo+4lyZC1ztdSsn51jOwIguDHL8/7EjRji1jc7UgQ7GfKP8KpO3UrHoZjt5gEYsgPAJg63NANgGf4FmvJmeXMzF8mvP/KZOS8FrA3hf8oNr2OBt1Ep0ahfMxCenNEj69+CuNxG2G0xgDQOfgZ+G4iM92H0KoaiHyYU2C/wU+3xteL/mLmkSXWjvGR3NW0C2ZnWNZ+tYK2+PJkIrI5Yo2TieT7to+MPbRRn2Lkk1L88zMCSXcJ1w8HfTWW49Xx8ST4rAG
gUk485eJj71xof5Ap1hThvP4W4FNYJM5Q2Q4OaONXJXQh5qflniPk4GfiX5TDFrRq/tC4hDI8BYpGahdMgQpRdu9rddBapFa4wB8uB1hhyfcr1x09o7Ee681kvDHFS4HNMYFParvwu2sx64hUP3fychK+JUV7Q+WgC7Pnj8EJiArGxM4UtnUvMl1KrJvE8jRH+fafW5pM9OxvL9v5GYoviieOoDoMzmDQmln1hMLOjTbsP8EvL0UwBZH6XODaG4eM0yCY13JkDrumseERqgZKzxgEuAB8gsmx7mJh1pqAybYQL6mr7F3NJNYP1GkGF5GvlCOkJy6Ie1y8Xr318EFCTgorpZ4IIQZ2u4Uku8cfjf+4+0WhCZOoBA0XdQAxgxUauMkZbmTYLBqdrPIpbk/rm/L6CL09dOPeRkIXBz9nTuAmmIGENXDrIzCOUl8BK6W9gszhGaChomYAAPuBAr/CtYrtJBj71jEZa91rYVd27Wg5EG6ky0fFoK+4mq/7InT9BTU7Gs7lvzv1Mb2VHFiIayn87p+lzfA7QpeFRehw3Im1rIMmuglUIqLhtcQSPJ7Gf+lQnIgE6ZZX89sE8q/jKlbMyV+5Bp16KkenCKJdNR4pBqzVZdklao6UF7q53Ar2ZASNWpZ5z5FPDxcZIPxL7bR9MWji0PM0QN81kfIUPVRMl3fzNQab4faq6+dzjPDCiecZWyqSDDIniNpqW85py+3nAJG1mOxMNhVN7PI8aYSBCksF9SRWSTZN+DY7PRgd/RpRLW34dQv9ULKWgzLs966ibUR0Uet/Cg3j7xMj5yEx99cmv2tFg8u/odSa5A1uacc5vjfIj9WTsrL3WpYBohzwxz76KopS8z+pnZ4JsAhQS9F4Fct+LNb8AeO3FzQep1kh4uccqjCxn2nhYK4It3eBucsOQoRgzbTAI1bASnh4C2t/JympAkpjsyYmKM8/KXxg2ioM6DiMCsbNkxqpo+QRPl4I3QGlbc8ElX3O180Z+x90ZSrCsPckLT/y/EBaQZqSgLAcSu6Djpdh2gWfhCAVOlqQKuKdhO0yHu0KQ/wkJe8WnRJgg2oPUeu0y5muhjsl/+w1RA6KMHzrJH3TA9VhBNIWHj7AwLWVmGTn4rFRuQBH6qEoeD+TmK4Pw9hvFJ9vbvH9tjrFq65hBrBFUbrnfkEQr2OwzbdjTwspjYXOgVtK0uCcNZYHiu3ngmKAY6ySC/PcteIq/UDk/ehcDg8AcYIj9+TidAo5IJPSJfHKz7Q//m9h+G4UHqR88AvecucRgKcfWx9oTnYe2GrnNspLb0GvrbKKHOfTPIsmBS8VvBUq3/f6pvrBiN7KUjCv+vCXItlm1To5/2zEApbjuDT7f1OYef/RqwLAboTAmUBmSVftR9GwZcohbyNCEuTkC6XQoY+Yf7lWeSScU8zNivjRA7CDWvgQaic9OAQr80h8CBJvglPxYRieJEU+U7SQbvAXgyHFxOupmYtllYWF93RiWVBGPWGss7Q+Ib4t0mR2BEQu79mDfvfpe0cECDdDOLd3LHJpL4NH6nyiSVGS2T9m1+ZZnCkXz+GxqfYzgmSHtwrKHtIdTHgn2l8Ze/tdrYUtbNhqbyJXQ2UcaRcVT6ifcsxPFv1EqB/fVmooemYdORZNikvBrbgH5RvcrukET7Fsxl9/Np9/lpXZmBEsXqDu2zjxrPsuhKNeHPJjNPqqojUyliRP2J3UZS8HFqZreVCvip3kh/HB0XftAqtDPLZLALnHd84/n9aOdJBS5xkb8u7ZIcnQcEAXU3+f4DHto23nVRoRyLL85rjRovj/m3DkcxSfFO+XburaDdUHalHm7xjmHPn1bju19FgWVGsqwP1JlzF2i9EhQ4uOMNo7YbyXD4eeLU57rQZ0vcUH9Zcp0UqttBYR7lu2+ot+GZT4nc1fI5iY3yvQR9BckVXcI/CwIuAjlSYtR6nygNHFD4LVpNMeW9x1sDmZKyEBk9FSK0QupqGR8ElVDvcn29RYXQYmrl4e5psw3FMHEKo56vIa7H5zB+dVAT4HHmosG7l2PIHUwmJXZuyIGaluxJW2nhI/dpGKdVS0pievPletgWHY3aOk81/zSLzQnRwCjCSWHSa7jFEXbajjUBNvZyzItGmFLKGu9Fo3YoX0LBE/ZyW1SEr1TV4Q4YTbys/L398V7ZgFKPejiFR9xmkdHSVPsFe5Bp8b822EGby7xm8G53qJhno/ZJe22tj5Ut/FeZGi44fi8D/8ZzmwTG4lVZSuin26CuR0/fErbVUL0YKLsfhKK1BH0iuGUao8fs6wOyOLxixhOCaw/tnKx5fZKHDklOMUJROeJnzp4eEJIGe4kV11aRMXtsREgXIuYNKOtVHHarG0h5NYk4CFKN4buZpwe0kuGvCflkLAxsvLdPY7qCRT+Z+5ss6NNFlBjphLR5QJraqOierVDrakC8iBOmxLTlFW4nr2v19SypMcEvT2tH+JyLCeroyp/S5gWl/96wN6y5P7T5nG7LnU5E2IGOLQwI7vvkp5fnsGKkVctO6TreaVn7xxht9u6JYSZvGTRhJsOz9NiJNwgT5n9BAUmSQa5nRPusv+X7u1PP47kRB8x2bKTeoUAT5uoRnKFG7tdfyp0+Y5qwUyqO2H5F+OvKkolnMlYz+FFl+drD9mDGnkIuX4YBNK567TsGMRBqGInjrrtf8gpq0S2C4WMd8Y+ycowXCtgiVJZLKwDKoaGHKK/AMsARiTnvBU+rTsS/6w0RSharqhjiFvk2M5FNg71nhXg+B7hrCMHuYE4m5wl6oDyHM18HEyV6CzgmHsiQ0i0xmTzjU5P1MMkMn0XIxtSUFWogUJIfVwxYpaMZzAHy89Wn9SI+ETfVihqIdt24EzzSnbV0PcXEeJZYgzUtC+AFytNdh45F+1TFoLaq1z74lroTbiIZ98Ro3VBc9OituRSYlQz7cPqYzfGbiHowtja5Lq4fA85rmUQ6+YxcKWt2GnMA+NPlr217G6KWVzMV7abDVt56WZaE0Oq21wYCWDgdWbN7iTEW885bsIeb6MWyFE29+HgllOQQLAn7N4xKvzvGmThbptjcEc90hjJW4r4cTz7R9YXP7hN+NJaxmcHCYdUsqxEZrh3TpWN48KbG2JUkwolamxxwsMUARBefHupB5VSTdIGbPk4BXfBAFhSGrPXMWewyHXeN7fo0RqnanKW0oUDgoLVB3ON7pWoadx7D0+xHXcmqwizoJddNATpJ/T+CFTLHfLstaNL7JGqp4FgVAO5t4iKtEElDl+ykr2e0qi/8C/CIsPiPw950MnTfusy1NYnwPkrUSNMXbXkYLhqgiDSGwK5OP0QVks90gk7stfmsKc/I9+Q/azHKHzUqlR492woOYj+FRHQ/V7gf5mvSWuIHdt+HjDuHSTxt+sknOo27SJbMtASZQK91fHi8FayuBBJIEKJxt+EVVaWbgYhkO7o59bzz5ZpIZIZtmPk3AFnL+yzieTGTxbR4KQeOdt3wm0DqdkJ2RzRsvR/GV/kTctquc7+0g7cQeXoA73ji9MuB6lqDEbis17ZeuAiZ6aQHr7rh1Mi6LS5kUwbybSskATpCC8BV/zSCGTNEggc6378AcQQ4KOo9+zRUF+EPzUwaAhov5Zf1SGcuqqfDsNn3a0LeKwFVxSTo3elCiMbuE8igvYwOXMLV0aDbd3UWMgkipD2lTaBDWfD5kMigzY1IJaBB7E+Nn5Iv7NPW3PwAeppKBx6pw5Oyo6C8eMQcHoric8XgtNk3oFOU54EUAgS1/5xHkD1J2vRfDvI0VfrhkOLyx9lDVtucjdXvSB7+Iu06rjkY7kEUQo2ZmrTVW9W0veVMlMsjLWe2iR1O4Z82wO0IQ028t07PcxZhbWvDouYSHVky/0KFEFwQIxCv+pdDFPO2Q9Dl8TeA974jtRGdNTyVh+AZcjh3aoQEsop8MtrvVboZmTrvPZs/cnS2813HTmJaoJ4eXsNEPjDlTgnfjQv1jDykCEYSHGhmDatV0AOd9C+IYIUhhHErAtXVIppxTHbe9eV4QCnnR8nIjtpY8pBh4pGYnjDGtbi0/YpYjGs16ySYXWaIMRedUuCAAB0yw
WqiK06p1W4uxCgS1qJYQJbFz2M9BkbZYyr4YT/SpnDgwswkY/yOMqjbgaLxmANDgkub11yJJoAzE4sqQmZmhkY7ZQc/rXS7nCTkrL7xVfVEcuZ86HVZIqxLMwrMuqky86M2M+EOn/hKkVnjwT0nQNU4nMym3dRFNYTpo8tsPMAvL6tU/zHaEROxm393XzouEyRXngxYnNOVT1zUDM1p157YyptpJ+DZGjn+WMvdOfu8MjRh5hxt9pjxKWlrT1+GcM17WVJJTnMvVSopgtLLriuJJp7OTMRer+uwORx35pzT0vgEwPQF7ODwNorWVVobCmFCud9d7YTdAMogeC0i4+QpzybkZ/UyZBl7bg7xHGuAFWCb/NEjeGoCTjMFfPjzTFzza3orKpVgKwzekz1j9WehTojq9ghbrNSsOwSka9DQcweFsDfSW5q2yOA/Wm0+jsUh2KzZ6pf4nDSU9V2MtAwGObl8SLCwIUs4l/WK32gvpySkpSFKcMawkeuCZY9KHkWYmeerK5MikQZMc7aH4bPvtaW7AMf7I840W1osjHVsO4iqd5IInJgBcxdx4GguzsTQ+jtQ4Rs5hHRoJQx2AABPM8O/v7AdWhlPi3yGA+2SbKN9b6hVwJGpxyflIWvSUVigE38xRSiayJRXV9+senB4ZEUP41YC4Hp4uu652VIe39M627ZVih9Eh0blbKZ0/pEq4nnRln9Dz7ojGo3EezRs5TpN2bl1y8yimL7+EQ8zQ2GY0IXcePcCaecqqJ17GoyjGmI6NXAfILuy/r8I9Y3v/pZ5SetNyvtcQsR6Wa7KcA1LCEbTOKPFZrSUqcUtvZzzR/8oujKNIlCsSXz2LmIUY7PNrb/y+9NddH2AFrnlYivdh8SEZXhWlV81eIMCVfh8FbRwNlyiZPMfVh6fHQo8BDARkYDuflhnxzGY006zF8YA/IakCkxcupqnD/a3+qjL1pWXMN1hjfCEAvotwvXm4Vj6+YpSjUnHeT3xwhSJZo6tiaRA8HiyY7uwiBEyyU+JqBmIlyp6cl0LvUziRDYBxh5LZMf/1phJxaolADiQckuRPv/0YffQwOdRbOj0blvFZkv1UXdDyN2xZI7iGwVRMliXbBMM5j0qY/Zdwi8UWeur2sYaa8w9OKakmRLW4i9qFvYkShDBezpjQKlkmkLbMqO5xxqDSI1aTPrR6FlIB6KWK9/jNwugIfPO2vmWs2xruG49aZsvNOYYmM6adpZNil1JBGQdRvTNU0Lkb9oURPbqJZOrDV8KFxl1//Cm5WhxrxoC3uHtbOAEAXQolJnuhbkhsn896GFMBCNHSH9FqbykPM9JQHoDm6ioSx/NlduY9f1RcWcCe4gRMOw+qygL8FtKhA3MAyhoFLemNjjHxqUv7eB6asub5TjT8d7zuDhOy0SkyUvhJ8VdUXpQVOZz1DC1O7xh2ODQbzKPedYg8JZPpv2EGr9JhTPoHAnwTSIdca8w93IdW3kKE9bSlNIyvqdNuD7mNGvvnSAaabmB5/pc6rD7XeRTfsE6mNhSboNYW0N8mz5tbLdA0PGGrrEHinyYKKfHuAhrTyJc4NaUdTnSssHzTLds90HEBuddW5mebttMZzOzRCZ2kMz7i21gkYuD0C6d8m5PNsIzIWccNrqq/KjWJDp5skn7/Nz1CvpR4G/t2Ry0Tb/4hBL/PvVLPS0UbGfjjJTbsk7xBQBwpLCD5HnwUjvFDSGj0xWrgjkaA0lXTFaOPizAz+0g+oNPLo+l1DCTfH6nb8pcEMcrmBYsCRoVZuhJDvim8aFdQEp0qocpxwCba22k4xnZeB7/GdtZI74CQB89J8bVY7MB8M6yOwvLabhd9jfyLKU2jzRQ4zxY7YfVgaK/yMEUzxamlGDO+ogjOgsMwSUKncBVUuUfgLrgTbjE/eWnxV1ZVIC4uFg5qOuMHJ8qD6CIodLvJBaekRNst/0/BiFlS3LGTL5Kmkc4SrzZ/DVLTFijtS1PFbqeC9dKvdaBTWBDqEcT5shrHUpspu5FBSIdYvc186DJqcuJ8eUy67ueRozY/y9l3cbuDpPDUUHusnQOSxyK8hcZpCri4Gli6IF3A7NrPJPDl/+tJjcXsZDi+mqVvHA23rKCvtVJSWyDK/9ZmfQM9jH6PfhDF8d+3hWNkeSLTTJAumiC7HrIXEdo+UI+8pW2djx+bp6YGkCMUK593yVeAKg607Sr8b7o7x/ZMTpQbqOYmPoP9F0OWV0MteZSY3goI6L2eNrRGiMZiczyXaLo/Qxi1gJokZqpsXlaMOOMJFUjAQcChf848g8HHHqXGF2A2Bp+/5Mm8z3+2WL/jmeFV33aeiWkNVduTSa4bzl0ccobj53gX4r5I0NoTf92d8UAMSWtjVUxU1gRQgbM3B55IJ0yTMCJ++NFk3yw4BEtIrex0zbVCzskDiY6+/0UuiJXPva/OvzwlH2u9BTxD4cq7uRxPL8XcqWZXR6+zX6jSRP2ZUrV74Sl/4g29wImqjVy97QuG9Op+Pfbk7DESjwy6IAT5aSF4dAdioKrTaHJ4eHvI1CSgOnl/W65Iy5DvepYDF/3drbMutlKDzzGcA3Q2Pr/WzaxTR+uuHrFN1bwXIlskaZRPoakSxDdebRhxY68ZPBO62PlTCCTEAUACgCznoQqZqx4RZi1yKleGoWHdHqfBOpKjuv/JVpPq0L3YKDsJatszPD2wQdWfuX7oe5zmQp1sP05ytEfe3zmn0PuBlySDtqcFHHCuGcltxCVAdpV9gJWQuOTXgdjA12Nkd+jwTPXgf26F1nRbky+BCprZDn/CqRozRQd2JPQobgnb21yDDdXPqHEIbyNDZmJ2juwBKPyvTy4hyoSo2hVUZrsn0IqWxPQlUTI3gjhJlE7uTbPEpOsYvXjBxmq7aIda4w6i4ceLqLj9FAJxZgB1xDzedRTePMQIvszzNYemvZl/DpUtA4Sk0yM1/4YoZIjkJhBr1Z1vqNPZu1zJt2ipJS0DxI6kXWvrfp+a/Z45dDEP0XiqajXFr0R20Dzx4ubvz/8ZiUK/DFMz03gh3TmaM4hvUaNV6xcZN6Pp1L9OoL5ZMGjziSOdUNW+3+ulBPcvkHQEUWXcyd3jhm/HEgajHZjnGjiO3aseqwdkfSIBeruiEsD6I5h8eMx/taUwJvWb2hN3WsnjQLGV/wwo6kA/Tn5Ra8dnN9BFxl9/Toux6Y9DBo6WQY33REHPCvixYUSxAhsJVaihsihXeF/ojqTZ5dioCL8OGbxNg22zrBXfzACTIO2ryehKZbFvqkeyp1WvYJzVY4HWYnfWESYPFbcL5yQdjp7O73yd2iiQKOT1E+TN4YK1tZDLDYqMsw4g0LvjFS0tCPfe1CCaaXGYLOcs1f56pQ3M84bDD/hU45XL40j+GXEMLFTTU7kn4ZXNqBgLZ+05ygNoU/Cm9F03lNMjMA1k6wgtsbnqtU2eBZg6agxBWVOeXSeED0uXbgiyvzYKikRDbJv5rkit3ip4poaHTjkPzsaHggNkhzrT6HVfyzWciHL6h+srZJxIuXZys/LSxefGsb6vFA38OY60Y9Z7q/xxyOH1G/yQYVs4rfGt5SrhaAwLwa9RJ5gQBwbMF3C12gvhRowUQrgp1Kw40N5FD1YzwVy0vQBW5SaOLc5Qak0tQpQeETGN9unOdUHKLiIFQtuH+O9K/MgJ3hqosQ6PMJCj4McABff9eaCt1fhoo91y9OYOsJsHw/umvl0SLwI6OvphDfUazE76xnrgfOMdZw6rVvchk/6TrFQyM0XBp68RZhm3Lh19/LI8OUttWQhwwcfGW46STu4+Y6S4xS5XdAHZK1UgklsPo/bzCN4t1PJ32wJyRU16uovn1P8QT+qfRNuHkXWaBvVtvJRm656ImpfclCcHUI9+6o+XaRQEF+SHFjbG+cirj6laxabTse6I0OF7thIEEp2hL24z1islUne34/1b8jyrV6Z4AMjqRcSfNmRLRwJeD9tB4g/K644gePDM+lG1sFHY04fVcwR6It6g8JnKCAZd10RV/z2g+DeiF3XkRlyPJ2viCKbAkDJDdFl2n4fkVALsAx4EKokcUHw6o0xlC4GSTay5cWJ8yku8
63f2a+/gQoBbLpJ5CFoRTzt3jRK57LdsQZX5lNMGpsMBd/os9gtMYYKMiWwxrwUagBFCnRqYhQ09ZhhZSDUnKEJw0tctImSqGzk/R5L8B7dK+lNsw30MuqihnInnA7RgGyleOH3QEx5SFuVP9Ul8pOXXNy8pJzRLNwAEXZ1GAY2zIRdoKb14LAfAi6VD9CMu93llPWcUG6AG3OMVgwbm4fyYip15FA6L5CNiQhujs7cIrBJNmdJDFogdINUas88v0XDt11ARTx/xinKRXdnekHWIkdX4etsub6UR2nHLmzF9ljWQdJIxxfpqwrhYuYvo39c1Zr+WnM+VcY1S2rwfMy34ElyrqGPvzG2PBbyyaVufO567K/0sYtaG7ookiR2+0aKo3yseKi++UGpXKiy4PmWwDsUOH/zasTfJaX3KS5CF4mjx/4fVPeC4qU0dwbYwUIbPjTPEjsP1iVZHQQrfvoUxu4XLNj3X8PTBpZ72msXTqS3GGToM4sFL92azYtNKDcvcVSLHmWzFS+OXvfZOvRUNQgbWYDscExEm+IZAIkP+bXh/rFEo5dQ9ESD4T0kKWIz4w6xHeRPOlkRnEBQaZtCcq0sp5M2RabybiYmMJeG48jVaAGsquGlupSuwggH1CgCVDQBVymYFI4cecyklbnr5qgbNNpkQDITJyrtXyY2dAJKmgkf1ZwsxdGOQyHgCLmWtfIGgONvXdQXZmSJA3OFyKfBp0qKYrQj/TNU+pB6SgMTeEsx30kXqg6PaofXDBAenfMetbbZqfHKR639lx65t9lZyzyaJdl+4ZRHATeFo9Z9+VRiNSM4WpQFCEKFXCUi4qxAUvZnTbvBbI/C9bYJV3kQxVTHlx2V0wBT2/2KDMGqItzBbIvOp/AuQj3md5ZnKNRdXMkp1py9sV44UOoLl7pWtnBadxz9Q/Y/bh48QDgqfV8YL/MKfigg3euh0aY7ONxeswA57HjmiKHOvlrUuCqMb2F37Qyk/ufcuw1ntrhWz/lOcKfVCcajgHf4V2onOQpShCLhUSfgLnlhxIq31Zw+4+OAVbgRe3zZN0h0TWQkVWti9yPCvT3FEXV4wi9Np/w8uTeZ6I4V5ZP/rsQApq+kDpNd+G2ztUbN2EmPdmN6BkgGT3pLzPAjWrAlxPGCAQoiTNRSBXLSteO5LbUxE9mx/ES1BjTNEZUW6RzsAiNGMa0Q/FFrf9/Wnbp6ZCcrMC2LVNAddMwOHNEvB4EUeLlDecUEMQxuE8mjM3B9vT12pAWwQGSTYbhlbdzjUhUKSd3DG3GmNETaKINVCn3yhQRA6nDsYqso76xAabohe2MutXA+8ZKUh19BDEOGGVymM7fmVB709iLXUN2usCbCBtkwPfKdd2EMEgXRma96OXyXj5Q824V2rBlThHo1eK4k24qs2U9/2Z6nictaoTcl646NalXPEro9OUG2802KG0crgBEXQmNu+Nz6WDz1GXL51wJrD3NSIEF8/xDnZyddIj40O0lVsseVnFV8ae35oj7pi4F6+H0adXfEmtABHFzm8sNEghD/md0sK3FqDSw/iLQDURRxXzHGamf8ymQg2/a81KeIzadG7n85gID/PRb2uUGE75hRDC6h4maj5Az+/uWNPerKzMoCRjIlwepajD4hAaDNvc8Ak7N8A7dJN7bCCjJ70evosZbE4WvSIiVgmtDd2nyPoydnh8m+EaFAEAwdrnjsMkQLgxyaRVPDiE2KlKV9aXp5c2tfKmw/di4vP6hlNT/oGL+xarX5N7hJVaUs4AZb6ps/h08xZU4gxXmIq62d9RYUqTYsPBpEdc2L9BFRNKSMNzjK2stDTpZ5KyiZrEmG+R2aXvS/R/nW6+Q9csWwaM06lq0RmJE5TebZLvZ0MaAjaKImn6azuVQH5nHMW+wvDaqDEaQVZmY1Plrxhy79rotDpKdWEdpPj2xdB8Am8Gr016SGLC8QVvTeQu3rbcjDgR2fl8xs1bg91I91B9QxJKshzAjaz3HMUC66KyEblFLLipJ+wJV4LAqVAFD05V2bFIhn0L9iuHOauk4veLQzDSi3unrO9iUNnBEdZL9dJqdhYo+E1ggyShMxm92PX/YbO6U9MbAZOlqaoeo9phDxkuYJ+Inv11xNaI8yJXT2CVIFMxdNvFFrmDEPFb9znUmlAcx9UVXHScZ2K5ln52lGhATheBq9YVDmPttQrNhwqK3JuPPIPi9AiXYHYY+GjlBU+pCUqTdtdfPG7aMmC9qlhuhjkoota7jq26xlcp8IrnZdxLiD9ylm02knqobx1PyOR4uXhGdvVpMpHGo5BQdqZZATjlZdsZ6eQ/dT7/ttprejIa8X18+qh8poWPhKwWghaYNQ1F/K0pW11JpB1+0O4E+esnAZOyVFEd6jgI7kFJRpqBb2qoLu+uKL9NGbAjIIG15/9xexJSOMWhIIVCnoyg65EBOo8WRsfnD57GaI7upuBDmWDtSyEAJZaLaSNZd4FgBSrFhEX3Gbw4WOlab54yvC1z8+CBoWtpJj2r5Kd4kyJkGadyASYc3CjW8As6KNG+zJ0zb6WhjnEo66Ma1IwkUCm3TS0D/dvkUu19eBXofP5SMZb1pQ8UqSekJ8MeyCvCFFbU5GO0dovQCWvMbbLoSosyVMd0gAt1aR2/g89Hc5d8OfhwdI9E2X44eUUbKuNfRbZJEkNCxyGI5UQBt00GWy7jK+M218e09nIWXiKFUsj4oY1dZeiNG+aPDV+ZvsdrXyo2PPlEGtz+tE7CPdE8hmRSD/5fruAtPXaAPnTp+N0raHmgw2ukiov5LQ3nEsaBNA0V8DiGW5GdnrOMEK36logGUbmpLuhFLs8+PmK9a2XY0YWIxZIyz3ppey0HXWEw3la33sV1Iz+n+EEexWlvP7FjnopMu8kDiyDZylxvfjj3H6E+pF8gmLbPZmMpZydLhtNwN52E4zsYbCA9HfVSRtpGaCAkaTHgi7U3BNqjVFYaStgZUTgpDbMn0tUSv3HD/KCLpYLMdygFGcVzhc8I46vFJD3QpKFwdpNG6+NIOsTUidbHFHU+59moRCCTXlTqTFf72u2Kyz1tkpvSL3t+wtVg86ucnVodb5KATPvKV5q70VeA5qjHuyI3IWCo+On6TZIkSNifmORa8aVvZuJns13CxWwjfk4YTQmw4SVl82sWFndfX93GUs0sCIxG+e2JrI7d+YkThSWcLtS1pR6uz778U3ce0ECcO9/FHoyCE7ZKvSMinOtGfLNVNihm5yDJfUGGJT6QpS7hLfOnKGIis1Hgx8w+NP4US0Sm+eZxwD8Y11IvD3Kk6+QjvTeRVaPxL3i8eesl07Cx75xRwTinfUiUpfNKnLVo4tq/uTIayLR5uqzpY9jEnO1gaB/7xKxz0LaZdPmVz6k96cPpudcRJOzZTKDtIpYKYOTA+PSqjLHWgftYis4JrbUvvfP2ZUzmUchFAPXv5puSK0dzY4fOZKSgxrrIAzDYmVGXVhKjTbA44/3SrCG9TrPa90j6WcOIAp6U4SOq4AZZlphH9ig5w/4VmctrACEznvnL7LVugl8XDqXTeHImQI/osG+GuaU2SeL6KlQ1m8x0i+OUe5Q5otGgjPtvgmEl1tqOLEX3zKX2ClbN/szdEukuYxsCdTDXPPptcla3vhdgDro9TGE7ehu6WK/kYNGJ1XnBXnO2+30LhS5WOxUuyWfc/aXAHpJYmLjbb/SarEYN/s93p4XOfS4DRpmuzhy6IUCTvxsYfdhRQJZ27FMpKvuKi2W///+rCH/ZlneBZnH+dc9SnxRbNzJJ51EwMAd26uK5H9QK9PAp+bVSnvGITzEWHvjW82NPoFCTJ29jKUBi9rumg6xcn8XTkplQOl4PZ6+droq52GMul/rVa1KPf70yRzzPjj0PQG92v+EGX+RFlZn8nPRsKrhPFXNz2ryBbTAe6GGS/G/RDHASP+H+YX7HsAYHpKkcGqv52s5gCuMP2rThh33SO5xs2XHETSsEd6r0dWvZUG6J+5uC0oWBnT6DjiF8JMMPF8kzatSlFBv/WC2/K+lx1i/sIiRFKWTkgzz8tEOjCOndcF03T4drRhDTTu6EJLXFlN8yrYIJAXO
nmJWuRJwatJqJbb2/v8gtsPlFtE+O9r+63hVbRZ+Yj2u8Y/cCaVaJhY5oaKerCirMNcgL6zbqBrIKJndfrr0SaF6WDIRVd5IvECz3YOfz0SBNn4alpE2LBFD6QMADRo+LCTlLgEowZ0YqgyNxOMnGrD6W/zWQP4U17ouVJP+VJgK7pN0mnN9Lra0xRm560UrdQAFor2mHDy1EbhkWzhQvs8jqiU0zHg0GWNFhvShzxOZvKtVprnGPGz++PI1D6+uucTVOhWwjuoSeczyKcQqPv3txow1kXKn4d4CrdagaAx/95e8jy8YFtHGoWC5m7SB5RhysOjsou+7bJQo1Wt0ZkBIFPLzUwFD2QcYSwwj8Y13L/z6ee0AWB+GqYQBtJqCkp9w82cA2PwvagcTKVVb+PgvKuxr+WVZ6tnV4RkZKT++3yv4/dOjQOTQL9DUI6cRZLEfiNcwJC305CaE9qTdvkejSvUmm061JFWAsbneTPboQj/ldHc8d/9Ln8Rf5i6aWwYW1R5DrgD6S9DPVmZvS5BKdhm1pQeUTQBUfPUYdw/e2o9+h0zR8za613FTfoNWaba3SRwfOoEwfg0Kr1qHCJ5qHVQajQTLPQnZ72MV7+4sXoXBhFrsEQNhuhCeWvvpRPaQL/Pvo9kWkJShExkV4DzcLqe+wXEjPEVbLl+ZjPl12jwGFPTRIJtfvazP/KM+hBbc5MsYIujpLrE3diq9D+hTtnM7l10XRQkEV1oi3Nvmuc1QulWfgPDQVxciVTa6mIIrdZfQDUc919hG13yXJXaus8OPfYZPiEqxT2/O4PkY8qTHwvoVo7Jsh+FfoXUcYci2ZUIQ3wYBbsRKy/N1k2TQk8j5WIy+HSrO1rpMONgssdjudsAO7NkGTsXWvka+BULQeZJpkd1TFgGJPDdQDqrIPH4Zl979PAjtzwCkFgAdnUwsEleJZT6s8LE5lbRzbWWBJRAlB1eCIGBbaWuzdODm1W1jQe3FCyJSDl6YW+KGx2TKDwn5dOCh0/aJJ24+LkkVI+nKdr5jVf+dmhw2RlRImuRjJmkAsMvgmydAcQqZYhSXvxtFwH4zF8e8osyGubKoOFTJCkGNaTisNBIBHi9WNT2Xb1i7IUd+uCNRm4oRASICFCsqsDtOS9EJsxXCH7g8yN/+YSsrl2p3s9KSp2Mf5PaiTA/Mr5Y/gP1H3Mj8zIc0Yv6ebM+NRomG3K+toAbYmi6cgVXMTgn4ec3+gfQdPRpZBu8n7Y2i2iz40tmpYlc9QzuouP9JyW3Tnr9aG4Bp/uZAMeiN6ijrl549bFop193oH6ARXFTYSWTiAFvW5pd6DblWTX9gDtctAsw6gjw+ribHccAem+48tk7i6J8zyPlmOUZkzdVr6tRzwUw3ltUE/Efl11ojuSfZF9vU1ELRXSnSUvH3VjYq4EQVSOX0qpl72AsEbW9YYDYk/i7jUHe1crEajqQQXAsqHvT9Q9BqcsRP0MKZRExTxQ0JlUTTQdySL9ZjzhcdEXJnPqok/vo0/sK3Jm7xQoYbJQIsbO/b28xvyh+EA7nnXBA9Vkj2drrvQOU7gBya7WiCGTx9MgMZmFU53CS45NS66WDPtfvZB4SP6a9OiLBHZiHiw1c2NPcffChb0S3MSG6RoD9UXIVCZsPi/bry+K9KMpI6Zs2ee4SLaNCMfuFc25odmXBYBi96Qj8KtNVPtMKQJcjzWayqVf0hHdd1dT0+C1lYkBcqLlGJ27vAr6KeRok1iFuDrElDV9u4dYBbFJQp9sq/VVeFan4NADyzJhs2r/WwJA2HlPHGKDyNjwFjAoV7aTimGol1dnMml07sI+cc0Lki1XEl8qIEF0OH+3dk4fLveqfMrrpnPcl1MIU9esLDuXQAupbIUmG+U3h9jUtfXGyDqNxszDB5vFIMmqEv2rL1cvAHSkyIoNrAefYtdB6kYCdK/fnyMnshjqOEf+89y5ROGyvwaY29PQcLLS6zTO9hEwta5+y/yP4kCnlqfQs5t5rBKTpw4pwHBqzEO9TaLa3smzS9Wxa/M3QjFSivY0YtMI722h24gfUJZuCF+oNNgo1Wr+RvzVMmtoyjD3LG6WDgMleziM9SbcYM3uxXTEJCbIlHXdS9ZSUNGSqi75yodiVr/V6xZKte3aEloFT0U3945MAuIDgXOcSYHKScsJuy5cLlXkYpJG2CKwTMjef6iAooPKun9AMZ4ylZxtUB16kOQppOQa03e4Dmcc+A4IEG1mjEjNcC2ZhgSSfp7WV/6dGBKuD0z7JdgkULfSAUigSvTMaavx0UeDVqzi7FvM1YvTK3F8LOZv44uD3VI9WR2Sp/ZnoEX0xWIIdEvGW2n4nKFhIZVLlmrhJ+pWmMQdzsJb82W2QcYzGTfqEBBb/nM55OCHp6L6vWknLSfOoqw4eLyowR7Z2DXvP6OHTy+t7V6a90MG9jTPhmeHUbvqiT53l7nLQGqThtaODwdv3yTUvRlD9Ne5qrwEus5TEFRGIWZ+ztXpNDszQQGm20kep2L+cENsU1jPL7aMugaVaqeB3GMFIX7n5+fISXJ6OprxHWjPt6lES6/bP2Z4dxfxpUTTif+E6cC+a74NA0bAmHTg1xCc2nEL5KhimMFuPw+iVYjZoJLsGDyAma9XwdmxLKgZqGDwOc/Aqmn3pCQZc9Ba4jean0dDYn7Tg1/g8L8+NqcFOwxkb5G7LtU07iJCm9uOfqPr3mV9vn++M9GR3Tu8vtFSVYgdPlVSwh3wGTYf4EY7qeVhdufqtlr/sTjMUON7wwqFmSnxT/GMjPrACWSlW6IlxuqEV9NTlm01iuPrDnmsk9Mqg9lDog2IKVXYf0AANtlLVFxNXeTPxDKMvjiTn0zH2GPN7d44YDK9cbdMfD4Hl7RWqw30Mdy7BP6gYG471nSaUnMq2ZDi+y4Ht3NHYKRr98XvxNDoDWx0sy2Yu6gM6gDCXCqZE2gjEvjy2SfYvpzYVNfNu2vzZUfRRLj4BQQeNF5rtukqB9Da9s3ElpQjJXOYUBjp3hjgs4hg79bCiG9QpHajGFlfN6BYdqws/x8eEf2KwvAL79IoIRsp9ae4kYAXa4ZFhDZRFkkJPGhe2RexX6ObXxvXwbrBwGVMibVAoB/GNZJynO8ggduAHj9+VtbQ0bvMBS7QccLzECIys+20oBagdcQpSP4+bk4qP8QwX3bDvccxtAcjdBKBVM0pZHd7qgZE6+WT4HwEPi11tvgwXBuUHWsJkxWS+dXDoUR1PyMh+if54TxW2gUnIRoODYBVI9N6FBlhuAU9MDixjjzwNlLwn7ObCggguk5qGo07Y17csjzt5vPJlsPjuW0aedaqCg3r1W6EVoDyjBq3GZJGdLRot5XEjNq+OUrVZ3euGucHgW5t1XN9vdSemuUu3Rog47nYvuHITJGLHCih19Sktc3nGOYgto+xeI1qgGPy0aH/XJA+8a8hoNE5h9FK/IKPIJJwNitv9+/+31qQrMOEe2HqaZ3+EtCdmqA7cOD1Z5F7ppw7fb/v7Cd2rm5P6Od440KlXOhUskqltKeD+FeVo+rEFj6G7sbsNysP3n5S7Ca2T0GmwSlWdoFFfFERdYsh8wSkGNh9CduLm+DMxP80dXHwggiNXvcoIWC7Ru1a80cjwvoW+NDdaxfQ7DCgpgMxkRjfw+bIYpExuTv+xbiBuizHZ4cMWcOsr9GhTp98ceoOKVt+kEW/QIvF+2depnOnPtl7sf4e+LoPnQQ/kQLcyY/J1aUgEnL/zgBiI9geBp3IKkvuJW23hGORQuZHppSx4zLsgQvxJ/ZX3tfprcmslZgh+XbdP1EToEjTeRIl4JEMcyb+XU0U0JiRtjXBd82/Tf7mZHrlr+7UWOxVxqekcDSHK1FUa/b0+4puIIAyKsRcDyuQJuxUeUgxLBw0shTN4sjtOBWYhONnXm3YmEkrMsxzRG9L9XmfnCoQkWhufV4ObmdZvDW8lGrc54j0R4dh7XFKDYLDl4z7r8dWqK2o+C82ymIpzx6BDvruF4p+17TsUzOIz3YftH/fi7W7JkoAmG5UceMD4kheV2OztL5VKpO6wxSz7uJjzASCBzWJI0Ofwjp1PZdarIxiCn
vgRcHvp58KJeXO68eib5N+CPRrYcWLH8rbf1ZnP1kZ/2M4dVTRuCKFgHFz+CWjaGD8IyCUK6zrpr4/V3e9IbRtkW/R+ov11QfT3tHtB+tN1kYsd5Isec6duv8JXEGaHrDpLiNVsxKQMwYx1KR3+wxqffISWgRkVrNmFmNh+bT3eMkMikWSArb4KeIaaUgKSc+lY4MRQG4+7M93YXxb41DFq9tobAy6ufI+2RzSR5TIfs+xIakI/5Ft53C2oBF6innmnMzsTQridBIW/NmTHNCwHn9E1nKMTZOL+nNoatzltCjRhKnv/LgIEgo7YZRZu8M2+F3bMJEIO2GfUnqr0F+fcQ+qrizZPB7IQjzKAievbKbbdE36HM2Fi930mrLOjGgc55KeWavXFfvIxji0dYOAvjtk47sTIEL/BEux+KGawp69NKyQDSy28IaRnZ3nEJg7g6ARKJWKRfKCilzLkYABeAi708Man89nNbW82FPFOzYtxTbUVse51S09Ng+gFxtGNqpIVi25BCiPvYgDcZjaVZ0y0j5uNSsjT0uu4CAAaUgFirx7Sv3vSIzrKSdiWtCJaPuCy1GObLvw9lnfep6xLPgsaHHmTCKL0mXh81/vDc5Gsm2s8GfU5UWIc0QdPa+VqhDkjOwlMSqTu5Tu6tqrpQ5seBOt9hddBwiHaqVqARwNUZVf5FF6FBgHK2z1RjfeFwQmC0OslUq6wrUfyNKV3HN3mDHIn8O0BxVL8oubgp7SU1CEHqQa6q3Ix45xwb/58QpvJJfl9v5bMcc46H9ReX8LkD2FZvgx9W4zcPW79TBO9B34dEey09/hketLSWzPaKAiPg/VQ7rH+Jom5pfY4f8jUdsnxOwDgBV9S14v4o5skQurt8owiAp8Gq05fUk7YPPpPr0BbBMY2yYEEkosOq5qSiU/lxNxRbNKA/Q3ZszC9yjwCqdhqpg6lwg1SCUGVuJVDmB/BPY3v44GXTvf87RFJIG1GC11s9Qs9WSYqIp+6Goi5cyY3KVDfXJ6SIGhlofcYIDinHhgBVzplcUorPC2BZUGLWRjynfqGUZlQHO+SszSDZ0JFXX/sPUAWV3XHP3zIhaZRNwWi3MjL9p+WdbrMNkDYK27Fr/1ESsGirP9y184PX7MwyHmIMuc2g+dkxWI4fP8iX9nzKzILqi+Vz/I3dQ/xdHYoJdLC+wE8iSmkMcEhAGAt+9fNZDbVOq60IUBhCuBrWCz2GKaHD7xyYoYp99HdlQYFrXkC73pxdzAelT83b0GDjhNPLbci4yR5UeBjlIEpkceZb3Sq+VK0NUvL5oijtunPGehEB3Owo3j6t6TjxQ4F1IojxGpsqzTJE8x80b+DO4G6KUL86bvP43tV0TteXDxSHd13wd1pw92FOQhj5s4BJUEweGDflv0Xz3hjkvdWJ9llnUCltlZdpFii2y7ny/Tow82fnP0mWCZDG1HQcafixUhDXDAbtRIgURpaA/GYbW7/9rdckGN8W8R/UHrCV/7+eI7EsKUs9oWaE+JNHMbH9GlWINkbRgmqxr871fYBYWGmZUbdS1ch01ewK7nohgW/d4LTpL3XjCMl4DC786DQpS/q8wAwkMd+lvfn3Zkmv9lVeF/ABxy2188HyKlXxztyKtx2/TSb6/2sLqhDefEjVaJaIYIVtff7/xt0QUNaJLTkFqQvWgstxfDBRACUI1e/4CRTqN+19n2+I5swqxgIABoLjQAVd4XcCWY2KE2cAg+VBmVqxbkyl9iKSKC/CTlzkU3bYlGr0Vw5nO0wJqd7h32DUbawzW75yoUssddag0Y2XtFANf7VnutLirbHb/mRTqI/QCqTCBZNrCFnEA5DRuYJe5bANVlSAJOubHFAXUqMAj5NKzKXet13DDXl9zQZbNjiXV4pG3aFY4ag4akKqaBPUUMpjyrVT4z4tmWLGRmfbyR9tRPtBrdljxEu2uygotnHHrt2D6bHpyLWzQqF8dC3RB1RK6eDXzt1SqhCV8Kk/NTxBCaT9no4QYuFFWpg+lcc8Ngi0Zxri4n9DpmC/YDwes3gNmdoGbYZWdgyr71kvYZba3Zugstfsjn0EbZYffIZoT25DSxuZ4HxxDDeduhTxyBpJf9GzJ1nm+Qhl7vuYkUOGBIbACdJmMoJBhvBiv6OnABBUouXW/VmF3CT2Y0ivgGhcYv0XxmQOn4wSOHVg08MzwW9PpMRVzd9WXC7fbQPlYcCHP4T3lwi5KH/6TL+la4ZGwN/ARAu+F0+2csVCGtCVav73rPviBxq4cWybCC+0tZrhN4vjKo8E83dvShmjLDrn4fHZYFanN0CFldpdCdzIHMMm+sKAe8HojeZHxvJgmPPBol96bZ7GKzqDD75CaPfNBar9er4WphQS0M6chhoL/IgLlT/7zqm+I5pqOFMialgihZh9MBhPx1G2tVxWqEaHMFhj/7IIjmDDFr3qo6iyymuqnGnSyi/8S/6coSHsab0lf/1zLjheUe6aIQ8FZqAMi8t7fprDhun2N12wSr77KkGg3tihcrjw1f1NeswWtvr5Odmkzd7dKm+Ety/lLHOy+qt8ecHQjmBVPYApDSDta96KINeWbeBO9IzlA2QZt1HTuKPl8ps27rEcbW0KEn2E1F3g1AqZbriVU7AuXZZXKuKOyWzwFSiUx4ISB/eDaNoeGk1082PDq39V+QDqcOcjh9rq5lZMgEaVM4QTafCYU+r9RdM6hKKSObR1Q/I4e1nHXH2CjZn6qpoZIAj6odkURcJ5y0yfNmAaLy2IS6mxEqunpe/67ktLDfxZrXwyw8lcKPJ9bPwRX+Roaji66OW9GMLEUU4UMFbZhF9CaSsn43yinFhOuCL2ceudB1x6OjEV+i0V7+ZkYpq/41S4iVvZFo0eil5vGQNi0gIxP4mVNsGDSa6428a7akR4t5dB9hrHtELFiGsgxD9/IiKIuzGowDL86PCJ5sX20MBKq0B2gOpgeLbVvLoLIdsdMdPMe6qs+eUB5DHdhmN8nflbJUy2Xpcj27+reHcESGnK20cVhV+FiPNfq9j4SKgzNpysMECTxdlk8lXe1/iWkRCrVslEiuvbTms304AGHN7ib0XV0yG9DcK4w9ZKtl6qK/pg44AKEjLlpCetZzwGxXUWGUTSjNb8FNpdZ677x5PreXGD0VI5Gdoh+sWIAd7meBq0i5LuuOl+R87KvYST+pDMA1dD2bpfU+Tw3RTuwGkJqgvRg1jjGKQCt8CxUFSvFOg7uX/vwgwLQZGMBYnsbDMatY/FhPT/mMwB787BdtCBfG0ULPogIO9lnR4QttHpoHKkMpFHJ3Dw86Ko/G4pX+qy6T6sUQgk3Z9ro+Y8ZkShVqSUsM9jmgB9pc0z3SOsZ/TJuAeE6fJgFQ8Z8BXF9vpFpU0CeFw7PoKBcHIxrpGcwmnCLRzftjtmpMIH7C8o3fI4prFXM+zQbhzrSEWVjn14uJZPWY0h8qHZs0/ZlYqKevMQPFjmaOmhtZj26v4+5s43AhUhBZyw+VtfdXCTILG2Iov//+vrRgeoyTzjV+HdT9/H1JhYaSEh6IAd0t/qHWSg7UnJO/87KtpnPm3N/d8yPBAPHrQSUnWFuvrecE1m13vcPx/yj/MXto7taplxfq4i5Ure84FWbi/izxjC+UxluIWz21gvZOmW3NwqoljuDYYocFNmZC/oUbEGVl2NJYjkvNoks1yyevjbJToiWWe6a+F1Uh/hJGjYYb/UqCDf8uDpTpE3oCS8GPyehTKaXgyliQBGcIvO0/OJOTzFCeMZdDDjStxn4p/KoPgs7u9+kHeU9mhngi77BHxJ6Gm5rfSfgksLK224wtoI5cAeOYdBpChLbNNxUqgN2L6kVPy1A0PqOP2A7FWqkNaDsrjjzIwreFPsIikwe6eMZnPe/LWItBiGS9Zhz4suLUKRdUp77K+ytl8wpxd0i8++IaO+QSYITkwiR+K+gru7BSFH7bp9YqgvzA60wnnLdarWmbP4T0j1rowlM7N0PwfeqAHWoiSjBTZn20kLUZAoKVl3a/NGC1NSf5HmNXc//z2I9oQotEpqw0L4EmIyqoo3d5wP0x3O8QtMccPWen2Bg9CTGQbWZ/cz
wcSLpY8nFU4KqblJJhBgnBgsEp0dg2PyBAzjY4amS8LwrTQ9AgHxTb3gxZmuf805S9YfRI2RS6Ga7804GhWwUylxISlUXSOZ9lRl1TJL+Yx5i0T9UpcgBJHz1X/teVqOg0jWO8zltzldW7YhNoGs4T/pO1UmwqSCDBeyv8+svPfYKdH0wsADP8LY93mNGbrXPSQ5JvqS8z63V2/GF6HJOpxJrP/7cimx3GtpAzSqForNAsLY5bsVgJ8hN7Db4E45zV5o5ho5Twqsm/EbzWxhzbWFD8i88NuilE8BJ87H/ZH+57cUmDES26oD4RyJi+DKlXKIAODPZPXfpWW/eBNrURuvyMUXRXRUfp7hg8iOzaN27/iaGkiPH0AEnYuM7NBdfBz8ga3eEtdk/l9kR4bHkHyyAdIOwSd9alzWRU7hNpF/7HH0cq6Ae1E/dtCyqKaSiiFXNkKavTG2R9fY04MPh9LPorjwYwJh1N6zGneG6pI25QaAFpQMDFzbAn81lRFjCCt3ZjPjmNwJoGoJ476K8iZ9y145MnYTGcfJIRquh2DbSku0LMkiek1nDQBaZECodduXPLyD3Vo1ZW8vh4hiKwywbdjLIBmtV6xmy2jF+sQm63DLclbg6EtYtr15iTH3lM3NUVGBKgbdX5hkVrRxOnOMCjCWtGunGmIG3UG3aGdm16LsiJP5iXZKyNUDbgigOEvzfHWd58wP+rk+apwklJfGlXHdAdlPOkUmq4H+h9hqsdBRIiQGzAp9UdMrEXQsU6XU/ASKikccIR6SE3I2Z2pAqsnhjxbfXl61hfLAL/T5fBsEAraWmSeLPCFTiOWVvu8DTGGLWBg7YkmW+xfei/KhoUdqHmLaDG7EsvPjUwca9tQIGak41eXkCyvcbTVMfNzcnzwCCZMUZSoK3+QWizRG+0dlXmJXH/6r8ah+me1bc3W6+lqwRhPYCSlmKmk2a8+rjHDFm7IjF6zylhSJGnQm3Xm/J5f8J82PNOlLbhggrwuTQZnH5c0e72kPaD5kXBSTh3q7ejKgzjXa2VDv63dO57QAz5UUueIKVSdra5Io6SexdixgH/PNutaE+3Y7gnavn9UW8C3fyXgG/OGQEqeVU3POHwFzVmz6UEgzdOyb4mF48yfPWrEIru72+6tztWVK1TsNdeqns/6fdC5usYRIDjbqhkshlsDUmlQuUXptsC1JzaiIgnl5PIPtrWFWBb4asqGFRCjIabsbZ1h2y0otnKiGL7VE5HHp2taIO4Cp0UgffmAUg19wkzlVPDjGcZPW/K5eQfLK3qvGzUlBA8JhkMds0GrWLNO26qdmLUuql8nZ3tBojl3AXOHn3UimpzUe3bTbrkR35GsVyBuwm5ZuhzHz/6CcfzIVnsHgFVEcJDF0+hG78Yu4bSRYtxSd2hUaF3zdbxKaSiOflnJhkmpFMfS5XVPjsqN8xm3djDRR0w8E+w7DcD///he/aaLvhC7zYsGh8jNsUUJPPJa6jz/AuUfzvOLmOFL9y7Q5wlyFSfFJlfvzh2tfj5wS+3xJsPPwal3vyM4t751D7/wRrD/jHDoYCDsWZXCwb5b23LNC3lsPuaYFKP5TZjBjO3jL1DiWKdqA0GsaYa1T40Kg/rPO7dLPqUpcrxjXXVaPD5Ovk1cLGjdJ5x0UIow/Ufm1GYdLQeAwd/TRANA4O9V79GwYrYcwKXbEaa1btqITnREHiaba0jctTZNEweXvubHwu7WukGamAipkJbVvV88/xnUkwHKr2J68fr6WkVO3djbaIZswOF/TGSM7s0B8GeUCMsKDb6hyiVkAuuZOrmJuxZWUwPfYTochnZEHIUeBp+uF4cXhqYZd9n40WSePusqlQ4hRVfRx9BNYooYauPj6rXFFWYax5OuLqp575QsOSL3tRFQ7R/Sdjos8VqrW3FhnqKuY61yrYVudjh/OkZtOdrHdrDiD7JUCz4yfMrLi/LO04XXlqi0oC+Jet0BY/ysv0d8Oj19HtrynlGDc1RFgZw9Dg/ompU7iaR/uVqNMml3sfNbHrJI72PYED6FpT/aIqQN664Eee9OFutdV3IT0OYH4/1LTXQhuPhfEdoP+ISpFRj9eXCXwvaxJeGepufyKDjtzfAMRTt+e5MdUoHwNRwwrrMPKSVLPBpDmttlR5KjyyNgXxVhsiquBlkQgM+Z+HJmXSJxxRnahqZ2A7Y65/aelB5J0peDFoFjCRacr9ZH03SgFQwsoWzD2Fq1XrX3nCmETDDn5pEsiM7huspUXvqNSep4K3hkmOwYHpdCpueSFCNNMOu3jYHlG3D9CNJ8TzU7MfKYSqwnVUQNqk73oWkmFrIYdtJBQWyXpTkWFLck6gmIp0iF4yQmZS96GhjkRM2Ac0JobCKGzeLIQuzLNEpw/+0MPJ3UfLtG/85cKtJawMdVBg+tVuMOAIKhHbqyiMv7UWjFAwnOMFkznqu9pegECse0vkyzj4hVya8zioFukG/pvC0b+P1iLqafm4V8DF6fx/bntV6DhjAhYJyPPUM9EBSt+GsZSC4L1C+Vh31Om+cFQCDPrL6rPpdkMY9OFm/dqCXW8DyGgyKsKMlrzMlAZBSuugIJubYieEggrwDKlY8PjuKeuVpD+QcYlocf71eBHEr1nWk06pxxiLLI7V/je9ZS6UUnrZ06jGu+VPNO8Z+QxuRLmlVdlsKcwJOeVdg+TGMiY+48xL4jj3e9vQaE7GKb3W+boBveENsaObfVaP4GIPCOaEXrwMGQByX5NQqZ5eDCdR5b2g3xr9pk+79jHytAXlNgCWumXO1eijt1KBnTOpeL+bzxkgRzgHkBCFf6cQng5O/m7jBMvAM/ki0w+g5G1PV+mPVWi6AEEvPeLQ/tenP4QdJuVZEv7nJmfdRNrR+6Ac70Tcv1+9AoxPhMPqsPHDPAy6oiIZ3AKI5rSl6m3JYMGPJ05EHeubebreMmMq5OcBtYmDrrd0ow2H+IEnZqRXY5lZPwonMiyEf9vsJl5+kaGhwkqNrKSbGnB+J+vZ5o1oJKCshebltlSwvoHfIXTwAAOis6IWDCaFcSifbY3H+voegT/kNWz9WG1DjR2MHSrmyLRd2QQ4M8A/r1Psmb00LhICEwe+erk80JpmuAgx9+8Y2gQhNFs5fbtCc5WoUPwkb4y41E1ZZHiRNxpzHOl9XPHGMdX3mdnk2+mb6a5N8C+mvA8rupN9agh3OiCykEsd1WvPjwtrpCPgks/DDtvMaDg8TkJuoHOzEW/KiEXa+y8a4zZi9dL4M0R3qlBkGyc9b8X9yHNtp9cDqR+rk6SnFOADtYZbEffOGEvajtlAh6EU/gLiuqckm8j1XaqvUa41xozFfE96ix//LmGBXQexKUGv8BUbCblEufVM6SLXj+a3cKD/Tu7nLKy5rzAYoIibvkUVWvr/BHyL+w9Cfd1dpM/SZejt337pAbG+udavvHE0hO3RyfUONqL/Npc0cuY9weIBRKHdgrfjX/az+4txq63QVmEIlKYxP+9O5pOin/Jd+qowC/zPHejFngYG7IiCTi8LWkNcCn0Ma/tE7M66e/Gg32Xxuc36S3w53zOUzyuBJaQkNMsVmP9Cn50WEELDhmgD2LhNy5+OeQ4dnIh8Z0Ond18kYblu5JaYdsvTgq2rqznBgI0K3+jJYq4Z7HQDc36c3btvt0W/WIt3zwQhaPaQUBlUeTAcv7oFdMtRXjqAgB9B3f7hEYzjAo2F+CBW9qQ3c7IkjNi0PEoXfNttGF1+uzbq2nQcG1GHpPgaiUgig+RKcXegUl7odLeBARd7XLLbuydQra7ziVbZ94pjl+mL5WoW9LtMdFpIiUbjkbBJWw9PGswLFlspRk65/PMFLtilkTAfa5Ap0VvX6lBxg8ippSyw+zE5PoDTMusFvTR1oK1R6xhaarFehVDjZ2GJsU/HtY74/vniuACbmGjGsz1Bx0WnnMc0BP47/HQFcB56sKXx5LF0iTl3iH0E7wP/Ffv6WS3mP483euKe45QFmZ/PicM2GLWxvQ/F+bsG4ScErKXBcjTp/qvbL+QhfYJKCwTMzxNFMBG+ljVdvOMIrKgme6nicqBmWn0A8VEVsD1d5NtSD5Q0oAZ
jHnMn+DJ0YtsiyZrAqk5M5q9pXgsi5xETy3dZbdrQVjfYcL2/LXP1lgwDXn5gKM/nzOKgxa0JAgp1v1vt5EXVTiwjcx19rcqlif12KHAOlwf5L85BeuopLR2sl8GJ4x0kJ8xffW3dQckRBFNXKN4tvVpamzy6OA1x6H9PJUVq6LskemPlJ6tuQL1kOf3xcs/ZE+sJLUCWL1Qmk2RPi8SqlwVPm3WoRwNgGTuRbs/1aWajNRkjG8Ik39jdmxOA5RK389olwLlfOD2vE8t47sk8XLhquyahQSVMNAcrRK2/f6kccNB55/JQiWeJNfhR0IYzZjkoDt+HtMM5mqaGIVHmED2/xn8RGtxHvelyJAR97kN6lvWU4n9VySCvXtqDQRnIWkUJULS0ueESBHp4NWYoTxLsgEk/K3GweP7XgkAw2GO1EVTRi1CQjUfoMkfpfKkCGYrYq+Wo+s5CpC+GazNvzJNhRRiTZvFLJFJhfPaAkrSOZO9mGUl6I42wqJVSEarbHKm06lY+TbbFt3wKBMVAt9f2KmNPvBlUeUsFPUMnsP6XidxTOEaO37lE+gNoJ8HRbmReZJrPv5f3qQGpZZVGmCL9i3+J+bYKVnFH3XfetJayJas8KAAYHu7TfBzYoWrTQc4PnERxZ3ammpcyPDwhiNj4oBiahlBImY3avkcZP7GUdaCVjqiu5F13bHFk/EDvdQeu1+8II77b8YmIF+s1NgTghliUOnJknueeTxd5YIddlO7SwvUU9O2grxw+/T5c/t/j18uP3wbp3CE0dez2FsyHZfpV/jn4iVUEytifpLkeKkEU8H39hY1J5aORXbW+9EIwz/AFOadWSdPCMqfRNbPdIlUI/XFs2H/w4iFrjjwjVaZGVFXopYm5R6Ikt8DJ19URueYHmSQLuRYaGGTEZexYpcf1122RnexyYxR5q989S9DLcZ7NCU9VCezc9cJ2adq525406bjQC3ER5H/ZMP6xG9DKNGWrpDaASUITxZE+SvoRksvj/Au1lT6wq2roSnIETNn509p24b1DVGXOx0JfUncslnXtnPfIc9JoQw3iSbsIyP/wXiHtHZfltlq4iyGtURPnfZtamTt6dmukV2W9GNbwLs3SdLk/7wFOz2gnCLDXKP9JDUse4hK0u0zUKJMjHX+zDht/pjbjNH7BXOhF40+VGrdmBIeIuDVgPJ11f4IWZv9OKBppen7/mrN/UeBbBkSE4B+O4Dx/yscoyKqRwomvu1K1IiR2lOHeT5yJCCAn6Q5LwdsajOC9tC7agnl7o7htTgPeNQmyAnHp9DxVZY0F4Lk9cMNKLOKwApb3FQxDDgpvEW0QAwb7vQZDhU8haxIKcGW5ZZY+GbEhfKWv8e2j3dsC9UypBoPrPwbgVum2JaluGzSAqWk1j9OkeUiMCUIBK8PrbuG41CoTjJ6V+g0guzo6pMOU9MLtaSlu8uURLgr7OK8xjn8IktgQTO74zvXQ1PFF1+Q32VPh8t5OjX5kjrZpUovX1aw4yuMOtGQJadWF46bC9LXlPqLaq8ckqmjw4l3kvUUFIAzfM7G6OEa6KjaFb9ekmDaOs38NRSBFdbjbv7gNUtjQxMqsKS3Ly5s4ic4/qd2uMHEKf1oAhI8XG8St9W/vRsup0cUnOjjQWauXsKY5ks4vEjP2OS5LlkjPBZcxP2zs2s4yZbodqZt3mUCgmsonh+E3g4j/1AiBevYIorGxJKvh2sd+BfCHHjmtHx3ESRZc2WUPMib/xTh4s4k9PLRIGq1Jc0FWEgNkC8gtOid+XVHKVRf77bzb1Wyd1YF6hGaubN/cZQhSrvU+HtO3PIrk3NQ9KKEtFgb8Xj/2PD1jcHoeUS9sUySeZ36HNrsNmaoMkGGVKegDjQLgTibiudMsh7vEN+HfaLgBDpSvJyxIf00Z+5ViG+d8zRvbfqRsqxwaZQAddJA7TDC3ZnAdFTHJFBwzTUVnwoyOV2nHeZ+zbzJVuzJjYU6PI8pjOoZjjrrEVft5Zbf4vADVki+4D3wqUythaYJzLZy3MXbp0HT/Tj2T63lyuSepU0coPKogsSrZzig1HKXRgC1c98sZyTOK1g+FEkJ2CqHt6xdT5lXTaAo5EEldn4N43FQzoo0elpF4vu6tkWSZ2cSC9F5qyNXxib7sBC6O37DqWMU3b3i3e9yWIeXNnwWOHwraxoJMqF+81PMqv+2XBoz3nQ/ZrTGjfmybSS7d/ijPR9CPHMQgt3CzDG5bjsFJTKzCxn8QKe3tFgaK1re3EzSeKagOG8soqMt9iE9alivlib02hEj6dQRxSyo1Q2NUepmRBlGhKTMmVK3aRnX5BKBfincEYCsw6IPQtF8XWBqLCqYDDqf4LpPZRe25ZcM8xkrh4C4MrzpsdixaTlWlJwSnJ482lDarFKSX7tSO3vhc1zoGrbKBNmgCUiPjS1SeUNMMv6A5H2Oo7Y7ktXHf+E4h6JJFykdLj7zBnJTyTs7q22Z2Wn/e7OX32gIq3isb/CwKBvjq5waSi6L+8jvmexXNP23tSufp5FqeYgctj1bU9Q1rXRUM/jj2LbteL8mN8YsiGK1ouPQXptXI6IZgDnXu6KaYx0yap9ByL/WSvwbtUw5pn595VU1yznlHKFwfDA4LtuIVuhn91F4hgX8CFz0JN7rPkuxryhWSO4+N05fWmthzKHTE9YGgYPWqbALDDErZLaLXhSCjM7/hOv54wfFwH+pUJj9XJzzRRICTuv41kRNNbBQg6mlA0d3JpFKsfoZTX2gWi6JdKSeCX1A1RPECteibdVUs08v6TJOl7KV3U1hGuEpDG++dQjdRnUdsVM9I3EJJabdrW2cI71KLL8qNQ2MZlmYKHhXSkhUMEQoVfQ9CqxivaekhVhVlgLvbMQPEZt6Uq5CDDSwvkjqKD+GtuWXoCjGmpwfYMZqrnCSsty0RplF967ik9AJe/YqBnR5OGjSOjpnzbWHJIWolKnwDovSEVC06vchO8f73hTe2ktyBLK4i2+JN4G3XWpS68772ufWh6+TNU0vR8L4JXcQycVZcd5h9zzVTZxGmirJDaYyBbew9KUFprgvalBstzFMEObKRexGFis0lx+eIkKmR/sbi/r/jo+APS7VSKMDyHcKlOtLqcntoscrA/zlrObkXTtr4sNv7CDCefN6mLpPP3acM2yGlHgioG4oYAXjPestvPr1kxAdzpr8KQ83VeBw+AgzjzRcRmd8CvLOqysvN7Y4bKVrI/1ZiT+WJP1gds6QUnoVM57JIczEbF+5ox7McSX8tJZ1eSuAldTg/cy6J8vzfx1UDk5S/Bjit+YsZhMh7Tu/CPA7B8eh3tXLLl7F7W4b9kN/vD7Qy74TmwlVRrhCG1BqVqbWfcjPZzQ9qHIbIpWwxK2i/mBjxtma8T8BPB2Sxt+Kb4HuYYa2bnv7oAHloLK+0XJJ0Q6FqeorOFpTOXy8mw/MiJco1hwk3xGh28c2rQTs53hr5WXWTKnGaIZzPQnGn4pesHlynZBLOQ88HDMfYX6PMYudwX85ORuSNvaTEZitdQUTEYywi3TWSarons6T2yKcJnsweqbgvpkTc7/A/aDhMdDouvz7l1V+FGzaNkfxdFh7SQm984oFtXZSpScWTks5LisnXK6IOYW1C5BmHNZb786aQf6itoxbq4Z2hPjeCjOXA8BS58XnqETAWodbj1Dasnn5Nk81EzONAIJLms6Sqi1fiGA7w6UCVbYh5OgXYZtqwgYz/8QM3WVd6g1dyFdm7IQveqXvutt6pseemGKk/81CldOKlEQu34zlbSlIEGD5eKckonKwWp5bBO7kt7nVwv9rcBV0N4/9XRngwaqdblLTmbj8OQI/eZ6a1nQ3t/zBlvljyKuhkyT6Oa0T/t2nBZ2p2f1CYX3re9bbmmn0pzFASVyENfNJ5sg6ZU1RKU/E1BF7bZkhF26K9Zm3znnDVNVNEg3HzI5IRo5Zl4NWOcDxA4hSgN7GMx+7hw8duW2JftoEV5LlpHn+s0AsFQwOp9IM99lysXLZsgONucxA/T9T3i4Ts+L42YpkfuJq29I4VSTaQvldb3gbnyQhJWDRKYA6uOmuvJThhv7XDY5qJ0Ht
cJDP2oVHjIc7aN/rGlyvnFgfjUQhJW/6sM/XrmeSiP8tgvgzyi1Al6PzOjfEOmtD1XPYkhCZYIxG1RD42WnFpXjVAexbbcTeY4hnp9gAq9sP3OtlMMWNW+fbwsSVcvEfw7RSscvmFcGlKnaPsFdZsJp4+XOlj7oN2+uAdYmHCR6ORNiyzigm5s5CkY44YM2HO8DI4eWb9F5i82+3gaOa3VyzKfgAhLxYPQLRoHg7HcmusR8L8ZkYuO+GLqllgRq4JFUkJ7WWxJBmhZzgaN1lXCQ2VbP8NhOj9EfN3PIgIwZuXM4t6j722LG5ymG/y61OWfKT9DE4akTpGSy94hRM4498nlUD5TloHkiFtJNM2u47vyDNBTU+vT8qFYQJQIjwRstd3sdAqaq+oUcQC+tZy9I3+H0GO5SCl0VuqUjt8wpmnCaRhwqs2KzT+FRInnjAHnKM8ZR0mFk4O1vBgq3o8U3pXff3XNxKyQ6ryps2qsR0cuG8PMiCqEPRbyJFnZrBtNyNtSNhZ1un6BTh8TbIopC8FKyzL5fsizhW2P/HOwtUXZ2eJ4X0C89VYqykf3EgYiS2af19lQ8n+KO/E8+PEvXl5QBSH39kNoeUR+85OGcuAuR71xyUJDlzp8Xptwffx8EPsuGdMCeaeelymk+6/P/Fpwje9NTG0qfvfOxo3N2HqJKtxiAm+066BoO5YmIesOYFv7ffWR46utc+2eV9feepo1W71hjdUkSVBK9lYudA3ilMwT5yzHJOFUFKiOz8ooVM2SH+GkX0zZXtDYznwenEF3/kmRh14ImOtvnqG5wUemeC/snLhu9uerMmXBF0+4UkTbukBJaaWtCKYsZEMGIsoOHwnBQcByLPX/5VekBBLfUhDRFkDDPBvfCD/BdePhSiqBwAfTW1QbnzQpOfocE05cp+o/HeVpHmihBJacM7a4nhTC9O7UHTaGzvCJfDAC1oJwTOVLA6znI/+h6EGiu4kBXhjchEzsqLbfXyMSLFmA+accc3L8yKbU4hZA7fZGy5nzf5TDmU2GLWD1NuK5Ym5Nwc9ANh1qMZ9SD6ioRRXwKYI2MveHzBd0Bu8I/Lz3qDkevEvgl3C9zr7qwUOXNCvp/NYH1G1sZH/f7hIho2dewnS5TMCNZDcejMknpG6TTzP0NWrqem5Bxm97m1i6HuuycQ6zhZkIgeAc4hftbxcurVi90NgD6NQQ+/NYIQNT7A9XUtTEcfcmq/DFaA3/ByCF92y/qTQ7BxtO8T5yhUji6/EID72bNBL2F3IT2Sq5Js/JP1GTGRwWaqv3ujY3ffSt5NA4488uwoTIBtmrlDcsi42KVO1sc09PkXGfV4hRHOHYpX+c4l/BWzdbgJklDUAx0jeNQ5ymuoas2lvtCUhpFcUsskbaQWuL8SpgTh3C7tQjj74pFIDcUZYYZGgcSdcJkmjaZRfZ7CiMmTFWOxPg1ju8z8OZRyIXBjjifZ9YZUsOg34Xrnp3kE+pVDWo7tL1K/dgtkRdNcxohSvfs7OiMqzgwv888Am0LWLxC/odmB4m8aX/Qw37o+BMQsKc46MkdgaC3Us9suQWtccrc3nxR5V3NZE9ygaMhtRNqalMxNcMgnWHBSRcHQdoHabiU+qsYV0L0uO5/2Zy0YI/3tcGnggvd00WuOPJAoyQANc51rU5SNUAl0Q36kOwN8l9juC2d7WWyxCyUGpJSUQrfIsE9FLXnodksjZepeldIF6+iEQIiP5KVLUC7aiNCOcwPcmIZSWCKWy51rQfN9FObfGPFJyyD6pBIclaclabcJPCF64tSQ5R4PMJjo1w0MSMGsqyX0hi/G2vxMZmR/pr8VBfFiQDQvx1VSFQ7ft4iK9E35pSHKuCPhgDphnZPMAeCIlqidZh0rNfGN3FZKUcwhhAb0xCSjxYOaSfaZ8pgRXPAY4cQROFetRG2fAG9HgYeU8v80Q1Frc2JX/+RmSQrzEvt/RcrbCq2FwQKDOsp3qDvy/Sf8w5vsnrtLVArhur4zdmIcfH1vlLZ8hFClSsUmoK7QZ93B3oxNM2yC2/ges6DWAYslQDhosDnpTesmmOQC99dr5WIlf4/w+n+0xnfYTYHcHXfKw4yoW00uZsVEPSV6CHsHsjQcNGRhglbSjZY+q0fjElEx0RYGamk7Rju3oeqmGRTfjCoSWAA7DFv1clikNILnjzFhzQEFV46Uzi7cxfOgGiIlt4L2cNlYxNNMzioGpnUCAQd2KpHtxIictyNvWOCwj8vjIgER4INSxS3vAA6J4W8DewdajksYwFho7PcL8yXQQdlsmNDeFBJcD7xQbdgnUJmYRmsYNkGBIO99j4tgSrW9E8PHFerTWR7x1CRpRX8zOvNHIW3DdeHDOdDR1rCueIeZEJFbh40lZ0mE4prKOaz310F3+P9S1m8cfxZvvD538Z9wDlfx9Ll8NIVtK3Y6XJV4Or1HyXnkod3jPjTvw1EouJlJd99V8GSuIedQXCFTftIBEUk4RYde7U9CIp+JkUaHuu4YZR8aCt07LO1Ic1qiDDoldwtV1ZSLf6QYmYF8cM1hzUMja5VKUvwP+BMtAVTYElpft781xiH7aNK7E6THPIDfka2PXnTWGXcCCeVRKlH5nlPs3gQrK2LAOBwsxkrioh2L6K8/uzS4KQiL+r/BF7Ap174LBO0ZKtrlHocoY3eqorsbhLRYzEuK4fvZ3cTZB5CeUHY66cetQO4lCv1sF5mlGlZrACyC2SPG3nKAuSjhtq3ypXpkkLbU5VUqKCWpw2gF8ob6d54xGbUN7ROGKdqE5yLoCVYCse/9bsRmhks6LiJ+Xz7mrG5tGC+HZzIpK3kDungAyxwh2n7s1Z81r6D4MtqxOLSjpFxMSRUpeZedLiXRk+IDBVHSveUO528/V1F/tzJXfgP2DviLpr+/draFgLz0nGHL3uOAait3R7jRUZktzjRV0vz7xv3Ch+QCb6A5o7bYLJPjTrd+z60HrhwmH/PlVxcfy5tl2mQsYQXuTre64etL7fgSFmt7L/yMxQQjkXAXWxLG0QwBJaX3g4FwFZEOX2cbnHkbFze5ocfWvqzPafx/QmHEUlsYdb5261SUcI+lziSvN68CHcwVNZlSv0FrQLUGm2e11FrDD5Osber8J0UyckXzeNHPtraEfvdK5yiw4M+YFsNF8nzm9KsZHjnC4z4t5VEvIRKPxcGvuXiwdOr41s9kD4f33HNqaTA6VVIa+Jn8kaIlIKqlEcMwpo/tdMTaL7TkotW/O4pRodyDQX6wfRP83XqbZTQ34qBVccDaDzF0Jo8T4V1PVOCAIMM5PJz3aLPNSWCG0XlnCM6LNThMT0DmW5k24tZwPjbi1HYeod9fpK2FDlV65rwfa8ahF+hgpwv5a71oDP8Jj1d4WI3sJ82dXeVacbGhu0qyphS6u/o0hPrpmQTnAd/4eftk3CHdInAFCCFs6+oijqwzIqElG0pUvu1DPLajIbWSzSM0iTwUqHU2r6v1aoXbxoZpeb3DIzobH3+y2YrGIYaTx6fDiXjDWBfamblFlJH2QqarlsakosLG9ZEfcRqNB2k7Ree1qRK30taAoWIYhggg/H6KCtE2cR7/WApNu79DPt1OJkWEzC7qC50ksLlDCWBAIxukCmpGVMuP3dDS72Yy//DageCQVat3eBQ3/AmTOIUxEbOPrDgCCJmJOVZkw2WHgZtPgit6a5+mE4rIydirDrsEY4gILaPtmxtszZel1cQBvYOX2o2uQ7NKyMJ0e9IERMmyaNJwUhcEh9HvTB5xy/vWve0bK4Gb3UveViwaTu1C4TkLJL6t8kANHdzWWiD8akmI8P71lmJmrltIWtIJx/xPdcXaN5KCB1iRP5dAoahHzkGAW4zAKxmLJFNIAz3bWDVNV68imOHtDTtTjkcZlhSfrhlblCAsVgIW7StrSVs/UlIeYya0TBDOUK/LCHPuHw6M+Q4a2/lMHx0Un92omgB0bZo/g94Nj5hSUhn2AqbVjDCRKlhd492dBRZ4FJc1SWAhN6BzBwHYRZ9eHb3j5oU54g3MRByXt7bJbVOsLaiQH2k5ZPS8Slu701WBX+MZjVoZZrOFr6cbudJc93AkzAKr
mmo/aQ2XPZhoe8179ejduLygER1jmU+rma6XqNl1J2LuL8ORwLHmgBUUWmBs3LXWEIZSqN1A2hfclaXw/lNM0Pzb6+QZsNfmE9GJrgCNkhTJDw2JQTq+WaSIj/woPDNqaRB0L/tXVD0qz1wCzojstENz54loEC8MyCyB9n183mYVergzQCdUpRiu9MaESbdG8zgakjzQ2rDgQm6sKJHTUOcl/ySYiqAaGgSBSwE60Au+pmaAWLN//osabYQZSnNsh3aQ20iJtWnbRGtvyELuu8A0TGky1mhX0B1oICTKWMZSxBdc4cVJKG7lSUHzQUod2DHfAQ8bfkd2HpJscDRw0Hzp8eqGiqBYzK6ss6f3Ak0X8nFlTikX+RTQ06TlC51HY0o4qZ7Jg7FVf9xEG+Dly4pULDK2opBgbt4lLhGzFKFMHuW7d+KMaqMD2At1lQhYV28SyKyYPaREquzJUAh1woM6d8rHZC6QIkFthtFfdskkyDQ+aiR2aSInYz3Np3dIqw6nXzWv1jP5ovMavC2owLtRGaClBYYMmq8g89SdTw1srEAGUY5h/5MsvNvDTY0oeYnQCxx9L5rV2KWMxBtdyopqF45SzFeYgN5LR6dbyKldTnPt0k9yHKy8lS91JU9UxNA0DwB6Vg+zFWwzv4JP45oAhXBajErKoEPvPDMFDLdSPpLx40MdZziiYtrVhjSEU1ihShg3umWwPDuNB4KAwDmKz1ColaJsA6H3On16gZQoeM0+81FtglyhCMhxqx+mdSRtQbBVSzBi1ddILMqZOr11rZ08jIghfxNUmMRDeMPVttj3AqWgdMk9aB5fVh0x/BO6bLtn/F/sd6wgk1lHtA5M55AdqFZwdrc1jj1w7Ac4NVdtD6JbSpz79MXCNCwh5BBxP7L08q8MYrisRqigMKzzsC44jNC2q9YKPvqmR8ChTaCP7wYMDcCui1LVmaOl7Id6X/OnDz4A5CoQz34Ru0zntSNBENwmnGayhnPEOMZvFe3v6rBeNXuejqgKSXnQ26niM/NVW+9lgT+p1VZVOQHC2w7frbS2FURl/8onTYbDy9My6T33mXVWRaNSS64p3jRjq5W5kJNg2cDt1VXwYOAnD9o/0FrinOryzFTV47PgNzo45xliFkvAtjUihCp+0bT73y1LCdiNjOdSqMoNityeT/D8/KkthKf/Z0QBSdvlLHgcYIdU0VW+Q+TD9190dZt7dQBfk3r0YF2CavorVrPicGARkkEWluvrmr3FWy4AubP0PfqsPuYFcxxAXXtoI8UfUw02HMq2jzv6sZ/3kiJRukRfIdlKwQevxXE7CHaVjDnllOeG6UMEjhjI08o/Rcyn6FLxO/h8GOeGMScg6pAXKPqAPNIJophoOsspI5FW4tlTeb9WKAhNrl9KGaPFIH++dfkUtiTWwtac+eMvXReWM2a3nI7nn3gpvYZH0APkIs99L4mBr4CIqGSMe4fdVjrhI1EUVVcjiPVjPnWcFTTQmtQvwUkMtLEGL3V+nVlIhhGuv1ldJCzUOoyM6SeBpuzyptOVuB3lgfKKo+gl3XmocC/npBajidLpHbPPWjOzR7uE9y0zuJ9XSfF4cq+aqIIcJ2h+DbeHgcMZGjToOa8wGcBXKTX+bkHq7oxEvcKaQtYp7ElR4OuoRemD3BOLtJZyrBXf76rUNlGn5LZBiWBiBKqzH8mb5r6nPTZd4jDD7VVWr9pSccClMC99tRtvcBgReVH20VdypFVwNSDgo8ZEMugWF8unmjmton+81QkPN9wbsCCounikCCfgItQ/drseFQo+NEGodgP8bImeu6Q2Hv0udRjGWV9GCAohRN5AC5kUT9VC95EqQSK8+VvPWMUSSH/BQpqwsZdggGnqTd2ptEnG6suY444xEisXBT0Rk2dbOE+r4BGUN3i0cr7dCyo2ikaDCfL3qTWVq2b+dYWlW7K8HE8SzbkPrjC3TmDWxE+RmYjo0SjE5V6KkeY8YtwbvaSQ1TkbHxNU5NiZw/cH7yc8TYyMsSz0/T7AUkWeonv28TfWWk9/LaUpRsycoHN6yl7saEi0Fc18P9D3uzMmyTyDw5uRPSUenqaQb7kVlCaIKiD2VmNn/KhuiEe6LaLDPQijNi+97oHj/NOlq59movAK5aBrzgHv2x98fznaezma6xadrT7kAL8ZL7rcuQ5q5OGff0/ZMEuzYeKVFj7jMY2OSXldU8lKFf0tAdSZQopVR5M8FkSQIPKx/juDstEIXKVAIYX/tMsySwt3LX/v5QlZSc1A+bsVlYKcX7mQ8aGUuEEFLI0J1wu7wP7OmaMEg+FFWSvoDcTk1BJjlKrrj7H9p917y3/Shr1I11QMqAg9lh0FEXsfsiwrbIcY0wy5OTYugVNWhusxY0fmdlgWKmkOog1NmZhkIwxmEytwL/iMAXUHmtacz9O/gVplNXbx2ncb9TxGGuHVVGV0F8ldpElR8XQO6tFuhIqXYQmT3T+jiTW9pEDb+GB9ConbEJR5fJvZ/R4ucqXTEGGA5TgzjEo2/rA+Tmh+4auLO7RmRYwaVvOWJSAEe/DLXsvstBy/J428kisIB5TA9yuPO6DxSY902ppuuS1wVZxdBsfCuFffD5T4xHeZygUE8CXv4SmSIG2y/TuQJqKvF90yAxqB6RuQO/s/+r22p4p1sG8CRBh2JpdjvcyNwFzpTVEDgHU0WKxVrjeK0PyhTJqg1cDZ6xPS/OXzk9dy8f6bS7uXDh8ZADdN6AUGYB8fojmNFN7DGhxW7px42/PJYptDvh8K37uPg6AjtwAgJCQhuiCnctcv80KX9BUSnrUVc6ewPngpBsinfDbkFOG3Lmfdt/Z6UK9kn71KY9KPiJJxUIiEq2Yf+MaCgT6lR9h+PEelYRcN7/vhjZ5Vsw7Oo+bee7n8APwHm8Rfi8ateNqN3NMvjkgz/xmAvfgt47IrfxrQjyuDnMmbRXLG+rhLou22qTdf6Bz+KUSDpf+4duIhgS6NskV/rIRY8rcXrYq3PLEq2waxVDKGVFBc0mxAV6jpjIG8Xc9W/1ux2Bka5KzEWi8ZkYSaDFuM0yuoQKfB4uBEXoPGqr3Jq4tA8LSHer6DidYuiI2Ea1u/l/u58uY+oz9gBfZ2mKH+b8X9l4/hm8507OSzpo/fpV3I7L7GQu4ZVuYU+ynxMjdwi0O0JXshZ1pFVOcM5nYnzKsMPAsh+Qd1xHtUomcbtO992HZxMVbJ4muRLI9nWgkQU2zVkBqT4Z17Ecr8b93+HRAiwpwvG02eJJO+EcFq6kj87v+rI9LKzvQmVz8khWhYBWJZ4fhX6eeg1vY5icyvJhWAEZcjrcpn2HCwgXyxukizPEOjKNbmQ9Xik+lGx5I06n0mtcbmb0CpsYyN7bZevYSqcUtYxzWyU4la4/HklJtEQ+6iGE22+/+9urDZbtflZQ2PtfTAxdys0SnfjX2jZJLQzuW6dXF0oUT6fyCkJjaQTuF9wTBm5igDEyVpwuOexChVfw1a4xQJCAJF1g4iuBQHPrRv55relYighxsnsX+prURbsSJzg2qLG4uqLVByfVPk71PKfshRi0IIpDvxjswvp81wWCAW763hcdK91/Aw14icrvnVwMuQ0B2lEc6DdoV7dfYzV+scfFL90EtpktG1er1rCdS0FBSnx+Pi8POOyuGY8vtNLDC4V/BJiEtJhAeZpCnOGfLw0hgnt0chW5czXVCmXEKvLUrm4ZZEHXdfMjuFUQV4KBv4x81kUem73dGR2zeX7F5SuV6vuLhB+GKsMXO6+Y6f2Tqj+Kdsw2rLxuI/QjzHs5BKnnAjzR4RNjKNA27J0qPC/mPfproMFAyNW2ucZuA18+xNLcUleAXe64S2E46enJ+YfW4K8DWm9xKtSn7Zv6OiV1leCp35PUUiAP7LljKrx4XapxR64q1VQfKnTH7UXPumWIfI37/WkWiSglwhm9p+lg9zNx2cXas9LDcAkRzPkk8b5bWYfHF+Qsa4nNDVdGIpX/R2jmM4f1mv/njq9Nxzsoll8YhjifzXNJxLcjpZBiWSrT+D4bf24xM2TGowMtaO36E8SnAJ75phIRWa9x9Opqa+LirbHtMDMelWudBx
4SN+O7o38QigLPcT1JCmGvrIvOZWLgG/c+a59vLYY7cQw371UH3vkP7SKl6cMi0fDk22/Ykc0zL492tiV7GJe81nivz8pKPgCWXL3P+0dOZBm8wwgGSkIptS2ctcOpF8CNWdC00KDhdbIl02K7IB4N6IHwRs5g9EGAxnmRulFLsgdXFoM5Piqdn3pLX+tizHvNJxIYgMd0hC+WDEFM8OK7EBJIIGG2krpPHJeaz8jRMJS5tCm8fnrXmIPFBJj+B1TaNU6Ng2zKoRE8UVCxWbck17kWU8BvQtJiMELf24ILN13PCVg4GDXru7SuDFdivM22/fw6vumr3VZuRgP32CnkwFXl6rcl2YcJQvUBNxHI1Cvg7juyYadcTs+x1pxzoc/ilX61X3zi/P5janWgLMCYLUuAld9GQH/FZ1bmdvdNErSaKS6XT3WbAyVlBramwqtQVTH+LaFbnr2JckEZ8U23aWUlCeXQ2dsz4OuZje4wOiem8WX+v/mBWVoemP2wNfnmUIB+pzHHwFqUKUrL0hAExTY4sfxIosL2e9zJEg/qthtPXdl3LElryry9/JMTkFfkjgbtd6VYM4EgD8Z99Hjujg4oeHp1TiQbIh7KYYj0JaeQSmilyPJpnhd0XyrmdJADvHhEfB3ryAMI6l7AvdVqqz5Si97OuRnwYEdUDapwJ0Fyttahn4rDuVBh9fIaBU4NALVaiIkoI2j0gU9GyWRY4vezelbaV/Rb10IuH7qvfPCGWwq3lcNF4DtivTScQhwS61gwd/P7jTFoUSAhY5I2v+yx0VbacRRNreAE4WQsJW7+Cfwr6AxbjeEmTX1f5f+3YkB97JyiP//5EAoOdE0xZXFRCsWiaNAwhH7TNSYuv+jOhaCRgmXt8odZ3587CJFtB4bSWCxoyL2nBrWGU0lL9BUW08NCtxAOjgLCN4CSlKbQacQ/Ljx0K+IOasboFrUfV7dsaHW8JOGsaE58G1Otu4dm6AEkiuC5QYTQ0Vz2Zpct+sMhBlDsovFeROerjH41h4Ci2pDrYcX/tbTfUJ5cYWSs9DxhFxtSIbPhDU+EnRb4KhBPIqU3Sy2DLLdne4uI/U4U6ZsFguDktUwZZh8nDtuKjjApqUzI6T7GFAc2Ecux5tiMfeiskf2OCGUQ50TJGGvW7gfaF8kH+0NpdWrIflqNdWuLH2g99f7P7X+AIb4CRnp1V2vmgY1M3taqISHCdI45rt3LidrWYp7K8ywrfo2s7cER8+bmr++jRTGkvTHclUfiasydbNidmAEcYvV5FeYu6Fz6S0BEYSe9nEdcrmrU9PninX6RPJ5nqBvzK2SDsA0kKTiRCH3YJWQKxC1xIKCXNog+ZmS+dcCpsTofNUtPCHtuN7AamNrqs1R8Y3wVWOcYtPI6Igex8sMS9Il6pDu4kYVN4ZBBTDLCnt8T4RZ5hg64zdjf/k90h+3I4JLTrMXPkDZC7l+A0kfKw3Pl8Qtknd83guP49kpVNNI+yNGDJVcM4Mxh/8zCqZot/ixnGozhF06eVwu33nB4T6/7lzCTKqQS1QcHSspveQ5fGMmb+zHYyarW1D6oNK4kH8/kpWsEGaFHYOFka1N0fuyu+chE1Aes51K6vb6LI6IwluCt7ggz4snBd2pMZoWurt0M3kz8iSiA424XwaYnBcMJH9i1n3gFyy2gppTVBxkhxfbP3AYa0WP+Dtq02IJbxXYsEIxl4465GL7mmlZwpmqoNhcrJ9w/juzgOgVZwMpIv2zn5BqLQ6O55s0P3VqpW+Wtd7TLz/0nztswD1SKCjXutZkwzGEVCPrBB25ifl5YIgVF9f+TvSUM18+4HCuqXopsmmm1cjZQzYWp8ViT04jsPFnxc6mTgzkp7R9EpEAdFWiuu1HNS4zgiDcl9ba3CI0IZUq3L4TtGylLGq27TPtjHdZb/7K/+3J4eyc2LNNKPhfcyouZRbfrxjw83S/6melc+aqwf0J6PEsBXXrsE0+8OFycrvR0zscne1FMMoN06HcVDhlomWcbJkVbZCqlpp8whoWf5SFGKhuIjZn9bE5wPlUfuWiy5QU0nUcMmbF4AYJgRwu+45/qL6LPWkQSPSdjSsGU0f2YLIBjp6H49jps4Lw/i9ZvADuWc7Mmnfa5aL8pX5LKMfgxA1BPLKq0uCQO/nexuHjvpTGckeNEjM/qdPNl3B8Fswjv9vAqf+8WlcCbKcBs1T2G7XYOl5UEVLxEImkuao1pUduj/8DZJ7d/Sm3G3wlUYWhMhsQsmuyOzWwgrT+A/XKitu74heBxsiiFiFl6RTgKOJwIktbK3qEC3OExagHc0xMGBhGYRcOIiFj5eBTEIAaM6u0tDRwDbyzj6Uz5VbwBiXjVPhsvKrVSLd45b9Bs2UT4kgtbFR7TtbwBWwZI9m1u6tlBih4BcV8cDDudTZ7mnAPbfoqhfgfLuOhc7yaijs96LcltZncdpTDj2KPIAg1SZDruI3WhdGnofT+SOHocsQ8N4iUSH3GALvhLtNK+7g2XcfP+jk5OCdCy1QluRhZp+V0Bq5WQdKvbw/GfKvFzeO2IK4rzikpJKL8uX9hmipw7yyEGlf36CizjxVy6Tzr2nkERFn+h5+BeTYZdTtDRlyKLSn6iN4kNxtPUI0dvDVXpHcDTPE4QtHqc/LauKlWH+bf6ZDVaDfa/SQXwCoaJjfJlxfpeAtlEwam+M0yYv6mElW6PzIp+MJwWv4TE/jVCI4tyxKycaaSzx5QWAYv7Fkx53GARAp0fgqFuoZU6NBXm1JIKdVsYAuVcD8RPVPMkyatBVhMsvwwtAoCoIhj2vbilL/hsDxJ1JYnW+DX4nyoEqZrwdYQ6t3h/3VE3FmgF9Dcs+TwnOGsd5gKbdtF3aLJt6GC/fIrySSYNfVD2je4r6DTJJN2J/DI/8amHRG/xPmdC/3h/sUurZTV+QFbfSNnZl9tuEtbXCjLQHjggdggBIDggVvmLrRZGyC+HmY1+IR05z2l4ZAe7AeNPnwGYOuQw7UbX6GbGitLXmIIVEQ8HBFvAHORqptNiLqXP/xJQnItxIDHiBz1RsAwW+yUTl5JUqfqVZ1mcYjHUaTpoyuiQrg+xGYgXNxhPlf6Msurr1aA4v8p+F7z4K83forEQBHTmSJS9+XJG0JHk3Hm2OyafoEE/yA0JzxPcQJuccS1U6hps6C0wOLwrH21iIo4wFxQwI9JTV3JPO8t5Yfwq8fMZB2G7C7iKfSgSBAOcRXJce7VgsC4pD+VZzd6O5n+qupm/w4hoq6FQDHgEeb96ZiDxdcCcb2BbTn3z9VU7IgtLtkw5pYEwhIvnCHyempPTPJlFB3dSS9RMV6cWwv7qlgG/swwDGGFTHe0BNgLLHOVEtVWS36igGy6RDdod6QmNvwdKLOeYh1pukZvPnUeoQURD9Ks9Z2lhgCPCPDo3Sja6bFkw7KfPJggsJooXtZ0A47XPWjyUdwFa6fBUqM6Fee3P5PLIug6rgSjDs0D5HM/4a2v7mKASQXIFHU5P92r/Iy0rYCAbS7d6W3MbyOPNgI7fCkO3UZw0FTIyfjehCJvGgwpUihm4YpXobTbWc6PaqppedU2Y6R+wGuFDTZ/DgxnWe1GhQz6fqvDaYmp+hru+SuS4tlPsoPsp4C0X6vLQO38KD/IG2siBLlkYScWKFrMtDtJ90dITHu8Risu6TU681kR2sSBB5eJUcGp12rGtyXAbQnDk+ZpfD59MYUkgSPtdl6PItGwkTEKreX70T/LN/TssemtxKwZ1PWXK6CsG6qaDRmBUvuNPQ9FLFzc8EVf+DQqjLDP8u5IHBmSgYZEgEh8fyT0XG8+qncM9WPaX3+YNmZjGX+8IMvkNXtDtRlOucO1WnS0/h1cEtAxXfvMK+GP0B3tHnYsTAAx/EnJWpe2B8bMf7QUakvSv9tygQE0Eatx0xvnp3lEE2NCV9otcDVOedrylwmrmOi84zdTLuWMvWT6F7ntpLcBSTFPVaCZ1e6kFxvM4bYiOQu0jge0DZwxL0AkJYMyJPspcsnAkqdQT7wx+KGmRAlFLyZjmgA0/1j9m7/XpaE+Wo9kHvf11IsDjGb1wYCrZ5/SaZXNlaOSu3VrWOC
NPReV2wkf8I5kPrNTrfqU4hfsBdh6W5ivSvV2xkHGuVvNHpVIPqx7WGayyeHMzMgdUoqH3DLLyaC+IA/OgadZRkjOu7unXAlrgQElgP2LALFG3cV6K/gIu1f6AlGQHGGAkN4u4hXO74WJSowCSXdtb48vVtAHFWZ847ufo7oO2HxCQ9nfUOKgjc9d0MmWi28yKCmOsUKADjCVX7EUNn9/TjKwLMqjQteRBP1aLluJIiC/AgaYXbUNe63weavtpMlq6RwqJHf+JZSfHyBh9ehs5aD0NaMcforUkCrG9EQjtfDwr/etteptwXzGngf/KAVDXSHHGmBpdYyx4ptGsryKvN1eRZ1srHNf3EBBvIdgMH9njXRCrhIHOneuvUEFwrgUlKZNgISNbrXKkR3Ha1tsSVUVPvwIUJ26N8XN+SULMPsUtcca/Ny/dT2JYsxshp1588UZvbyAbRSPhIT7JDkCG0wFnLtdmAAUEg3BMAlIUsXDFjeWnKmorFHMAh248KL8KD3uN63NMFkCoPQQCUODRlUdg604ucnQX+OcdWrGM/n17DLeW/CEOR1oFDtEQ2GS1/2J2xeiUsU4g9EuTHEVh1IwgbbDPbMwn6I5OsDJGhO5AKWdKhmGliRSuwmFyHMiYRNHIRF0YV3CU5O03yE0GOK1E/2I4qeehVT5jRPsTVXTBcdYBkpeJKKNrRF3ghco0vvefIgYl+a/FBlURHgVMELHbbk++TwNDtW5MxEOqyMUCNA4YCtLx+vTl/iy8zDh8AwZDGPMqqhzaBA4fKNZGiUQGLJ0LmthtCjNHKdB8sJKg65DQ0E9uY9+k4egJnYKlOQ3Dw9VfUz6R9q3ta4GoYXN1WN9u8nUsKDGuOtYog9XMp2faxMoaRYH2d7V9u1e0xhPwog1nqrKBDicz0EAobEFzaHNus7ttwWg0fnjd7tEfUWP2+HqzTTH83lsGLZ2jPGlIsLqMBFSa1o4N8CwhMh5p7ZrttnQISOv/IVkx4DVT2ya+FbZVdyvtSE9pCWY/+5x5hEUFpJuFck8n9mYOsFdoMSA7qOVrTLE/MxIS2BXAJ960GpfC4NME77jJW+wYjnd2LUhFFWnJHXWuz26PbaTulZSW00cmyxlRG09sdp/vIPuChX/hj4p4QOpIa14XYInlFhljhjQ0FhHaCV1icdKI/HmLPSy1s+dZnqOw6hO5QLSlrrflRwbi9v4dS9hACjOcY/lJdbpfArRcBD0Exsbf3cI2+bMGgF5tuJ6Sh3pVW3JEPHdAPd4+4miVUbzNMkONuDk5CEWyomZVzmUZWQ9gE6DaDgWZbDdm4nMXzItI+QiOhVR4GMIsWwvmSxdRPoLlvdmtSOFhcWTkmxJOkWWN6IYIcI4nVsJeBPkZWqZgRCaHm+dXAY0wmZi5Az9CvSQ4Qw1oBkvdj8O1ex2dMGGy+Dp9KgZcfv+mrcInd7W5MHp13X2z9YDkbci1DBq2+xuuOg9IzW4uLyRDBrcnXDmXq23kbOZlmn9/HPxqtn/ZvcWg1z/g0ndO80C2hPal3xck64NGxyqyX4LlO9Yism7YGZW0lUxp6zpBJlu0hQMVw2FsaYrT7Q4ZcHOx8Rxwe7oqyQiExWpohzDwxumZJmGBiU5ftxlry/pqhvEn//iOQLC165UFnYuOQCfu86RB/HTTm1TxOk+RdVcBX+o5w3Y2rW4M+J+5Pq1vz+FfJ3LhQco/RhAtxLXebi+u0KBZJMJNm43hDa8G45FE5UvXxHniOA2q9F2iM6k+0XMUy6z4+CRliLTxlvEloMHbELGAyIFqKlnLdn/eI8kpjMniaqUem/gh3cz0yj/nHTwKnQisiF2/kzpne/lqhqFXQjg+ihlSZhkBKYXBrDtPAdvALHTmIPk88VEq18ARO7n1I2jwLE8CDop2aiZ3zPCPsurzmsAkTxbTC/CV7ln2ZtVuUo0ugCYoNFErsrtG2cgfbjYheLTqJT1Kbri5kNvEOdoqHGNWnoOVonRV04mRoQHifaP1uh5VKe+Ded70eh+ohXFDKi+YCwhtsse9j18+Y8XLlgEnrzZp7N8Eo97cxpB7VecylTrnaaiLyP5c/hlZt8KlcISgvSWFE5AMr8Ku8ev/pwon8BB1JrennmptrtK9inhHoopOCvflyhjVwHPhiN1z5gUkmjcCalttGT4j+loletGQ3T97cPfT2kHpnRcnNQxljKGYytSCUnDAOSvW5Nwun+xtjCy1otuHUQdZc0RxsPLc4mvUNhpguEFnpiFOHgrwulS3YAsAZWyBp/3JMc0EcihLmDTSc58owyZ72h8Io3VuwNz3atoQAH7dMUwiTCfZis4gnuABEvXpl6JejiXIi1sT+bDTCsjs8b3LQMlFeRiOEGwYUDd0GdEMed7DC5EatQunH2W7cGz960Ybdq0RO63VFlbmx4baivO3kH+Z02P6wQVh5JjAHj4LVutM8SN5/GsP18G27qVx8cdyQ+NE74N+f9d3pJYhu1FiPyE2w7OdocK1bKq7dLCo9Kwi9EQdl/DyYkfJ6PgCC4g65BNJVHP5NB8ExiEmIpcFjSVn7BGp79STlkTlJXOdI5KiU0gz+nL4D4KxYG+wisbD9qJFR27qDtH2RSe931ZkKHo4dPmycgjoKTJpV+JoRVAaccs+AXfTGxFRwFHRFGD8X9A4EE6RQbgz4qP0D1j+rkcVt7YmhgljNcTb2UFKdtu5ktQskZfQrYiKmcurxwydzpjLjJKGtp4H78W7IDeE+6gtoYD/tq5xiztCMS0vB+b5rDE93CFOUGrmQuYjyTRPvtIGNgS3CzyYehuWS0oxoAX5U7X6R2VEOMUcPo7g5keZst2accXlp6SQxbpaPWw8OC8CdXEGntqmD5uLwuASb7hPesqL5Zlh9ta2p1fAUkiuCyyeh0RASwdp/zPHS4Rbsunsg2KD56QDKvHH9KKpWMLJITE+xx8iPj9vwmReLZitH0+uUIL7W7LhL+SfF86UZ8kZsFACgvjlvL7i1FhNY9RtEKzSw5M7RkwFwO42x+3S6zSrpIrQSIcffECd+qiZyDewnL+GPKifkxd2MeMRxKTBcmet1eU9Bn/yQwYQK/O09npVybV2tKnqtX2mWoeRzI+Vjun1pFqtXdIJG5TTAwHvkgqITsY5EmDe93t+MlKRIxerkvGC56wkCw38SNoiejs/3X8OOk62frmStDM44Z+sJvDXox6zbDqNDo1JTIc+AKPQQL9yqnPKiLjvGSNsBoIGl1tKZ44bJzaJwjjtIwd+dB8+YFtz/V1nBQ4qeErIxo471pvNW2fSBqmwfNNlFKwPlbtknq6GhwWX5FEVtjwXywTn0rX5ySiAY+J66gBL+clwgjulRbdjovM7WyqOn+C4xCJF4VLC69kWBoC23/IMckX5UNRKnVxK06OYw0mEdouR1B/DXQI7ONSqErT4U8xTXyc8ZdUIbMe8LYDZC4NJ1Mt7ontUAlSIlvaaFms1JEVkM73sS/LYwTtkZt1NgAzCUqENtPSMNNbc8atKB1fbt5TRnRMuytdSASjzsJ6MillLp2NOk40NNcM4gctxjtREUEDTiQZmpe808wwPX5V18+7Ft6b6SoBRY8O/MDPoylBkLJjd4cxQ8hI71qb9ZAxEBAyFx1oZ6SskpCpCHbWKiUHmZQYqH0V4XdqA8l7SwpnYyLkHh19urqOLkRbJEnL00mB/hEzp/bQVfhSCjripxoOwpIKmKnLZkyhK0F7TKly9wv5vhr/8ZnClu6HIwGyyfMdwtquQS+U20rGc8TlY2ZTufaEpjyM9uPxaDum1o+rdqQcaAUWC6TIe98lRlwLv+pvlWfe10euPjlEyvwatd/ry6AR35n690RcgKMknPjIcpAGYgYNxKaJnUFJBiFvdFTUfNzCbyJmm8x3fg/T2njnmoorZ8qu8dDdcnJj7uSI9IJz0iaBCK1pF7bUISLA0RgC3gIyx80NMLWUxwH0yOBD+smBfpw3XJt0D061szPgW9N5waOD104IFf/v3k6zgRDljwlceEii0OSZ26230RWFkUOAgHS9xNCEW3e0lZFUFeW9ZfyLDvWZVQjGnhLgjyjK02vNuVwCTzejIKn
aB1vgc8T+dv/5weozW2cv3X9eGoAZLvlI29XgutZOAPC/2fTpupSFZ8ijjHY/NDeudQNW8nhw0sSX1N5i9jWtUg+tOhV6uuM4Pga5/sYwREiuPK7qUEhE8dWuvmZ6By1e8XkNyht5mWR1PLn3y0azh+t35XKhWON4uQAfMfP15/ybX1qOUbiL1hKApBhY0Jdwl7APSVuTuChqrcIYrJ0onv0J5EGgHsBoezTJGpHVoJ8MkbV2F02cYUOpIsn6iXDu7+h+1CJFq+nFJom3CN9ZO7O1QJA5+MT22h5+/xxFdiPnu4NwpHzMNJ8HKLyo7mFaOji5R18OqcOOlOcZnWQnwaq+HM0Z7ycs1P6Zi2UEdhCwTrhaEXi5+s/jyhB9Ps95PlVCd5891wLDTorbnH8kKtjo+GqXlbNOUbFhf/QrcF8OpXR1yLTwFB33t4tKN9beoGRmG8NQLtHZMhgO+8uAB7T1LefYegnWqm08sFJXzEANYreeI1ea45dRVOduqzLHgEBnCfG5kSk9V8AlAKalfFw/mtR8wl+CQlVYKdx47/W9qzSHideL6vdrz/OLgqdParDYkjxKalkrGhSHPfn0BuB8o27uLTROKJAs38SSWy/m1A+UxrkidhIPKLZLUR7RLcOIuq9afrM0NjwG6QlIY+AeJM3JpHxfFhn7nGoN8Y2eEj3NVuqvdr9uZo2CVVGEL/h/AlxjfhkbFp1A8/D/39ivm8S6LGqtkepprl1jjoe/Rwh7PfWEoCrTh3oko5SMw/FQZ5iNA7uUCyhWdojToLomRMg13NxHh42bUbdOshlLkOfiCmTiyIxXkBYyQSMV4Dy+aujP+/jPSLMn4LwEDj21QCLrkZAV077kakjKkcLJdlY3bnpgHZOrxjplXF/eujy15UBjNq3NjvhN9G1Wr1xGQibsKLkFwmycqUWqHqdPnnUXpi88SBQeHd7bWMQk2tEb43UIUTxpl06kcsifh7QbPGeMzdnPt7RGzFWvUqGjf+ZXdOQUCPfolLLL7VPXfGDNYPMy4GRfo6i1mujWjrXTVCpjj3bunGGqX9FweypyIvPe8hUJE02T3jW6DPV74+kyjhWfHirggj/DQY9cCs2Dul84p5rEVXml0Ej9zYRSlP1txzPX6omX8H/0JXiY+kpNdz4pT0ACTw736wNikcHMGVzvgO41Fsocl3yNWRDlrfhaFTcVx5FibltYjlvM7/u0C48zeZpiZa4MLP7OrXnv+Jv4jaSh1sFg2NQ51jzeb/Nyv+LanD4poiD0KMnqTlXVdxH50CwgmhQ/PypydPbG0ggd0ceG66EPozyhIEzOi5W6HuxaqgSg+/LuGsvWBamJMJHKzsya55nGLC9Q9rWiYN6f2dM25kNliDKvTSkE4awn7K5Btii3bFwBx2lwlq6lwzmO0Cv8mh9cV2yVu4WPACbjkMm0dI579GzzXXAT5w1iexkiLRjMoEz8b78lYdKdKJey/blNj2QWxAa61Vlwjh7+sq+qx4d+g/b4Lmw7TIjdeLD5XMtmdsFjHQJWxTml4L2gPre/THHKoU8y18/uNO312wjXwYYwAuRUzmGYbiXweuDYFTwapf4eUN5UOi3Uz4Ll6bwu6qrA6w8w1x9BX560pczspd+9Gf6GdbDIjFn3qyvjQ4pzv32sk+8yGniOAJpaL1T0h3hAe4Bts/ehaRZVCFFbFLI6IUpzItmBQ92GOI2DkyTT1z/huq8TXfmCKBfou0n083hO025nlN4d0es7Ya/jmjRpf0Ck9xgm2poDEwmbcA3LaFsHH4oAz0wU41mPufgwdASwlqxKhLR9JgoQxjBXP50zbJSbwY5eJ+o9ZW2FeidGOTwOGKrUipeVylBWJudYkmaLwVlgMStoRICQ8ebHogESHztAFE63gPup6PZX/9Oncu5pWrBNKufbd1yXNjkOf0z0VLuIU5iYN5K6u8FJyqTiTm3zPdITwtyZtvzngExG+K/9UwPcaKVYnvtChPLP2MkbbfcDcdPaR3fOI4Wmq3+AluIkseEnC0QNTXT71k89O+jEbPdT4mhOcGylNETT9T4soe30ZDMTE90gH93lh0eu3X4U+Dyl0QL63Cr3Li5vALAJOuPfDzwuEG99T+dRsYBe8Iitgy6UdJ6NxY/VGyg19T5bMMqoVj62HZrklXodu2US/J6YwhXYN4djhXj4I/4EAhp0aKYzfhhV9unrgqKPGFufsJ2xKBkgfIf/0Gu5x259R1YbVoa7OFyj4CgTxLiMIHpDPn2rSGehEczqAp15dxQ553y1bvFL9v8WEbsxtmqY8PKnzOV1ZAn2+VS4R3V856Di6w8uh9/2zzt6DlGXyS1l1ip/t4aK4WbDnsu5GoO6LBjdb1pKxNVx/XnekyuDvLk4gkX5WmYzO8MeZ5D+y+DJq8z8r+MDCpELxk34ssFqPBVdHxjYyx1DBR+px45l+PfFs49h/iaEJZ6V/vAUotc3u7XMts+uWkjZNh8gERsis44oAzJnH59eD5TWh3735fsG0nf6bSpgYSe4+jGQuK6HQ/BqsHuq74RPdE4btJq7xOv6mczqlY6N7StNKP9OQoofEWtFaUpyN3z2nZU+w9JOHo5kcruIIEbUmXVLrx5NyqSr1mYwlaBf6CWU4HhmhMWBzC3uCh0fHO3Tyk9h2uB9MxXYEtvn/OuVI5OFbzIW9QTnWplQPmY+MsWKkqYLH1Yz/uUAlWVk/3C3F+KKV1TnHH3zYZOGiPVz9PwiagLrhds3e9OLFD2feyeakpFWNlIBoopP2mMRHICk5bkaj27jdMFFkhsp6kJNptejrtsJgYWxLwWNsdWgwXjLy/HrVe6aaCHuR0lFJrKmauaTFprQBGqRaT8g2CRz7jMjpSX7m6E1EjXkBBij9M4gdgD3JHZFuikeJGL2GRM9k3dLGjVa71MnDQstqloIog48ebt4RdOcVCRam6FSdBFFeVUHNV67433efkDDZi14bGmRMTd/AYC9gCEJO23SaJ6bs8mSDaDT2AkLPaFYSxMcdOInZdw+UsHkWcBT+9zWZHFQLu3tnju+lRiazzi3SRFpjCFRb+D0vDuT7bFqi/BCpPmOMb349pAyymvXHX5cF2Cax2sGMRtwl0Cx0yxEvz6HeQpeaK5yxwRkT4jmzybY2dP2QLUKvDqB2P6Y7kbtWNNrRtbp1lmLqP7CaZMpdPzjD2exHuHPbqY5yxmQiS6PueeISeTf0HsAtEOj4U+7xNU6OrMlJQdl2zlJIWDmGnF0tIEhgel9MJDw/oVFhVBEE6K2U2miNbUBEMXJCcisHfMdPLxyZkycPyUzdn0msJkuX2QId0kt8TkNFmi4g4t79NiELBKBEXeu/tIvZW1MiO6VCWw5y18b+fhe4XGNp8g99dIixMxf/Sf5c3pbGIYaWaoFwPvxd7pjPZNqBpzaNoDGufGafLtNjsEBKtPmndP/waRrTtwwC9ja0UbraGby08dYz1+x7rw6atAaxnK4H4uyxv6dmoL+EbsppFEvneSDKcSbpnyIs8x9+DOMpgrZ1mi2Xs3DZvQoIqPCFx04oclSS4uDAkUFovmghl6TDtn0zWp07lwnyzOB0yyQNsKWzf5eSAi0N3dJILuY6R/b3Dr6tm2//1H57GBurJ4kUqr7cZ5kEB5T45nr/HTWJQOPM4o6DNkePv9prDBsfaHgZTY7OeqqlIDd4SpFb57S7V9kzTKnBe1G7C3PpcShbIJTppjO7PF6Lo+Ap0f6hNv8zQUeaoWqrVlCrLdUt8Xz5LJ/b19hGj76nTwLI6SCK97S6DDm2qoG50fi3e5/5yvAXR5Txujlc6zs9wNPnfo8yujzi0lcpZcrcu9vlrbmoIwNfg6NUokS6pqfEEEE5OkRE1HHX6EvkhTi8llmmXJNn0n68yjkRYr8YwoTRGabd8W1EWfHjTQV6qo9JJVMMKvM6Cd62hz/arubzlcH8MMnEVbmYTdAs/a6JDHnszWF9gXIPKJFHx3QZt4GFLOPsDIyNo7E5usJdRO64qEuQOBwIWnzpYYVe2JncTgc1oynzvjAAOhmue1NGP06b+dVNQ+YvwOWqfN9LqeRYGzwn7jrov2rKQsKFjD
BmcJbVc15gRGcjNWcvn4lY7zBhapwhU0WdSFUIbXYx3h/5E9OdcCpowYVz1MHhtom5zn827MOUcVELGoajStyIxDd/QX1VFCJOXUOmJnio/iV41wDtdJfzJy+ELBerK51wzSv+2k7mnknq02+MZZQIXRUhiO4gh8glVMudJf4U4RvVlYc+JesarbPafpcJZIMU/qL5qnkAnjdaRDJqvsVQ44ICj3W4JuoL+DfxNah5gsKh/d5/kNg6vtH3LndljsQzh0+b9fKTsVG0ULaMjHI1kvta+WjYDq3OpGjQ2KCtBEvefHmFDUuLEfuyduC7R8u7A54qbCZs+qv+WUs46ZBSn1kb0nAdVaRLD2+jeWGWAY7PrM2H5kvZKdYSwtWH/gFP6uM0cbY/RcQncmtXolOSfn8vYXNNKC1RGQORJwCWz6q9L0Nru5IusZp4GCeufRV83bTKMoLFXP8PGjBYu6ikRMWYl6SCuYiTcG6Yudeap86APm9spBxbZscCYbxIFHBjMTz3FkZgZIulvGlvecX8yXvL0cIQlFx7I2G8bwjmHLMPJ6Je4TdecAF+SATiQREx0+SWwpVbt2wUQyGYoOQSpk2FX8Wm0xP5oOm8p3Eg9l5TH37rnB2wvmXoiycptlpV93GHkI444VrYyIxBNAwsBpMyppV0cHuN0Q9ZihPRjnqR+mIRKqsFxwgLwvnvk30ehUyP35nNYDzBt4zTZZ82MIHgvta4Piuqjc5zs6sK2tKcEXzsj+k2ULVr8i47xohOnmT5ZdnE7kUs5oSe+Mkf7RG/wnqhE57CDGU2EWIUhnHOH3GiFPVIfgmFF5w9Hu2ZcHXRTDy98V2wZA2f9BtGyvZp6PCr3dijoGAWNO9YrOKQYro8DA6x3/oKfLdPwAn+5gfJwzDfpjPuL2YljWIAPhowqM01J50zqWuI2XcgCmU9yaxwk51VwT9ZBDp0ACrxPQX/AV7dR5pKFEWKLCcx37gHAcwec8kloQceekzxEtCGhzWGLYMhLN0zufjhqOEr9CfDP+E8PsvlkkYx2BsKJPcYwl4AZrVsbtx7vwmh+6n59Fp702E8EImKK7Pp+KigyjPOeVV6HKMQRI3hQnNbHhkvaq9uB0ZryQEJGs/Cr2tbsvrnLiVJFrB9H99PY4k2B2rMgUa9b/LuenejBF1cGnnsIn+LTegNm6lvKKVUTXBSHSjWtKapV3E6x4ryXJ1voEiCfT4BtYNcyDEDhVW68z+OxrHywAzz7jnu6okMFbKoT5sHYw9Q20kopCJRzG0kAXn4vQ4MAA72h/A886/mKWw7u9ZdAfVHvG+mNUqCI/w6OpmLDPKpvbB65oBSAJSa7TCW1o8OQHK8Pg1ld5kJziT5DpBxTKoHLI92Lp2y08cqnK4APIAZtJAzqwQSpTyVU9bnyXaggIDk7ltLWjiH0VUMxhYUFJsROdXCtHWw577lhpv951TJiybzso5QbB+3s1R/VOKWfjLZAQOwXVz1YPiw0rmK5Hn+AyAcRDXoimSePCx4L6dJuewef6YOC5/R16OTMZ7lribscEY5RM4S87NaQKWAWbuaoS8cyxTx0o0fDY7Kav8R4sw/AbQEhbBnR3yWubtCMqephEAVurvzNt/89l3tOwnY3KguC/lnjqe3rHg5FDe3PVDai8k2+BpHRMFm72U51E5teCoGt/YgCmevdnKr5p22/MlzJtdG0bcaZAKpnHUP4kw60LSpCHJdVoUxJVlGoZQ+Zv4LRFDdGqoW0Los0sounFc3bUKQ/JqLesK9gxuXi/B0rZ0a4fi1dPWG9CEUs8VCiC9p0FyaXW6zmrucLR3vUnkM60rtYaCDT4I6Bz5olvBowiB4x/QnOFyVTK6WMqFRSPY8UKYYYfFURfWHEafpDaRp4UNEj5mdvpJQN8EwdQFL4z3HOhnKcWoZVapEwmrgWz2fCc1ujsNOIrhONzOJ9dnRKc0PJXKha+JSXH9meaKu5WMn4kfxsdDpXg8r2KISQqfrSQIX+kS8UVAKgS64SaNEQLNH/QUKsgYd1nPRrb1mWdwQN2fE5tuSFBQFlJaDuHQg7yvSEHk8eXzHLCaTFbzJiRp6KMJT2+4Rq6TcnskFT7c9s4xHATeiAGznZ5bDjrXeqafu0T0oS3anITJrU0//t0lTDt4hN2D22f+H/tHxlp+GFAXj4xqpEY23lCIShnN/sjPScK6ru1OXBm2x7A5cBYEQXv7PBQZ3wiF97la/mBw/U7ZUKuljUXdZCBT3ZaG3pHfA++IJmhIB3Bd/iS+84sT5CDft42NFPkg3gwC+/47CHqLN64DNJiEN14IqwYokGyCJr6fui07V7uzfRMsNmGMFmp1IVLB+a0ihT8zs/+qZJCXYwK1QpUXfvQLP6drSQBF55Q9kTuw6D9NYD+c+WvybmqSP5APY+LK1g2j/xm73CrWdm0kHzMj5V3k/gWIHnlfNu6YMcsn6HAJXa3MD9iJN24liMzG+fkGZDNFOKTdxNpaqc5Gamk++p4acy/R1ZWpSHFcaxYlYDCYPD/TTra8u0Ha+MZ1TVGGtZhdyNow5Mwv/FkQSDMPSsdSwJ4rSjY9cugy3yFwX8+mnMV5v4dPVG6ECj15fLwq3HjrBRjbU34avMfiuAsCso+kbrQczywM/76QxNdaVZ67aFhALLTONuCYTh3qSrFqDN0k/Swk7BeoJ51ElrMLLX+lJujv8agXr/Qfl5WdY4kMnHt5M6Y82J4uJk3ifxNyKGmlHv/2fgUhb4RTFAjDdlFmN9mnFmpRzVqDBKObVVnWjBa/UDToHUPFeCtGowA4Vzm8yzIix9mWh87+BuFcoISlOldjLQN1ihjjM4Dgkqrh0P6Tegl2T18e0SpmW7tc60C+nOyeVrLg+w1/ySrnlmWFCU/87rkZts5B7OJhg83reeLcnjW+jL+s/jmbLV9RYB7hJ/x35Gq5IbP3Jk8xcGx2iNvWydc1F2axZ1cWfaN3e9RUsFwMjxbzHhTWQ8BcUxTGsJMAi1kv9GWOfrPbGYckblJMErskFLz0Nbj6PLq84bjUxbalV11kBPYzph4EFq0J0YkSRAVnQJYiuxdESoaJ0/1FU/sXeTiXXjRxQZWJqs136UxOc7aVcVI04SHtAwsU0OtxyQyHUnHwfU48TbW6KCyUK2AtvGsoyLrRRQdpf3OfUfXrhuYWOsYF5qzbR/tkoeDr3iBIdzM1+CFku6AE4+cRu8WEJQXvW/H/umjlAEueoLk+WETNXmrEa3hkhFwDTx+rrnpexEZ0Cv7Cst9+EOSoSpvOYVVBpxbJV5+quPNA0kQkDpCeA1TnZNLWhSuVRWExFtjMxfW1IVLH3m8omjZGcftZPUIjNYFHESnb1FllEjszVppAspCMfeK9l92fveb0wWR66fJPbmz6/XM2TAmDW6f/eWt7+SI66wd3aYEBtuTHTrr5ur4YHygRHyt4IQd2JGG2M161JEosnbV3j4P1EWYiXMYESS1SDncQSzvYKpXiQuuQWDY2ym1ueo+1aYbOIH3DIf8YIGH74bmayO2wSK8+FX8sKJw7GFnsbRd09ARYLC0y1I1PBqNlEwVsm4PB7lFE9126lIJs0d0ceFeC2pNNh7l799/+iZ4qrkgyxaqjWW5JI3fz6g/xA2qR4UJNNwonquXkUMsKHolScrOzfMHuS4soNHZPVX7yll8MepqBy9++CprpRYcOeUbhl6O4B5dXQoxy04d6k3cWIbVIPlTLiQFq59+NBZ4jM3lQ0F8M3CteOE0Lv4JwdZjF+YoYRrK9E8Sv7VGAE7BcgVrxAmGkznbvnlzAQx08Y5DbdSTn4rPTeIIf02aDO8SXMvFb6VnT/tMwwGPa6wHRWqAq1yjMN1lgibgx3vcKClL8c4pUojnw6N/5pphsF7FKxjHhAE8OVZ8CboMJ2Nbgz5m4tO1BEiG0mV1KdBI8InHviWe8+LAULam8CgAJ3cM5km7gmd1FtSD5Y3scUoNegE5dWlgzA+Upu0oTMm42wwa3dwWBPmYeUY1UaVt1Ih/xy3Xsl3GcWfzALM3RGZO6zI3yfZe+ez85jsbt6LpKMb9SxJCjy4jlcyUfSTT0wwmDX8PqcPh
SkFj7TP3KFejTFNVT/YrgLkjnkqM8K/UwhyFnIT77AU/+OtbtM2FaM0x2omXgsHYThZSVLFlllttC6Tms8rLLXIl8UTj9ccZtMx3zMg2cUYQ9QcEFnJEQ6NGm1Sr3yTXJ92rFhjoc95oF7L5EWY1kbSrs7q2DssyYvR9HDRR+XMI0Tr0njc2n5v16u9gw5+BIHmIVW6T41Z1ZmWtGDmCbni07q80s3aKHafnGt0E7a+YZ9MbbARytozDpAhe9RijljrRKySnTwtQK85mqHThZUj5SFfMZwnO7Tc+jMvncnENfWpkxeG/aQNL6XMacE8JcvfXHwITcNNtB4JJx7YhZlLwAkCq4/RsNKrGI2ckEgHHub1xekrOzhruhS2AanJ7NcMmxslKowshooo2NB2x+2ZMtyTn60y76X5w37mN+mQqHgpg4CxcQbV3tp41X84SqD+etH0QYSeExB6Q5E4J8oFmkFNiRgZ4zU4ej6EAw52vePDQKiw7r6Hv0IudtNC1ujIY6Mln5uvVG/aX9rBrYdEyYLKmNwkDEFsc/xqjxBD6unAgjQ55LiysXMb10cCUlKIU6TU9jq+QY3J/sQ1GCUJLC/rxdTtKiCyas5+jLdssGwPTLe+m9BPmB9hHwM28lUzaRq9md/nvT9PwiMM3K+oHPXN2l8GNRTBmKVc6buRtEoiFVyaCm2mcD+0nCSpKuQevTGIAnyPrY4ss7xw3s6I5TSHxRnmzSyNS7tcnR+w6k/ooTa5zZwsqmrDLJN6gLITpz8HF1FsOA+J/EUoqWW2wgj96x8XDbBMsIo+bowGSrC1ZL6FYZRvnnignfcS+vHVySuHW6ejoKF7hlV3Q4JSbQScGx0QamJFS+lX5rhgSFBbu3RyUq8fLZ0MW69hG1365AYEfS+3GaCNBNOzYcObHOrv/YHfIc952JJ48rMtAVsoCC7kh1qLtlTk2EIpIjSxI6FhNLCHLrl5lrmbLTtMYJhQxrU7nu1otcdXimo7JocfyXu0hFOOtPgAnGrRIuxku1EeT1MT4UlpNpVW6jyZFyLzdXHMz4Y+NpdUawk1DVFCOjYWapqao7vila4J/WJ2LztqNdcs80mC1ySRKDRDGanlzL3AUSDiMIvrRUDMbqB+5p9XgPmOQQbvtnuXSDI27pHPPmgFzb9NMJjmMWREE4VhJdNnmhYBjIUb9j9IyvM9JXD+SSSH3mragSDAo00ENx57F2axqzUtvq3uV6WQ6l40kv0fXcu4BWx+NG8rwOrGT63IE+DmeZzmH3vApE3+L/DYUcHzDbop7eAg9LVCB3RpY47GgRniCruubUWrPUx6xO3P77s92+7gofaxSbzXyzz93F2Is2DPZbdYER4waOMoRMLMQFu0IChjgMTHp2GOE9I/ATclazPoNyY605uNhvV4g0d4jg+xp4znTItfSbRiDqSSxR+5DUr0t3ciW3mSINjRGwwdQ/Fj5FjcMsqBx7AnElZeWldPEogdhZGlmi3CKZSFLwEp3X3U693B86ch9GTBRaovFPfMaFhosmHY6kHAKfvBIfvowKKx83OH3kwFqxcIY6cbd1uSc5sS+sMbyAoyGpe++M20PTFbubLInYCSVL8TEQEPN7fBPxDn/d9WLfQTOqS5DUBuJ/Qw7sRAEm8X3oo5zJXfqZc4SZFnKngmedCWsF6U61R3WE2/cuqnkw/9XxkzQ5iGWGmqr6wVyjPd4LGArLxKo8DiOmbi/26td1xmDpsNsAK2A9DKe3K15uM9Xqy1u5eXAK4sZvRrD1IMDOZqKOxGS10amQdHksBwhJaqh7BNmWqorhPNLcGKq3R3uqr1gKopMJoM459d1HJd2F9TySG6qf7yM7Ok/3kzXDGgGY/MKi2hDjsmNAj+btKeWcVS/DLOqFs0DSoHDeNEcj4/WcfOKPzj9zLhuaE5MaO+KX0dDSdlmja9WluwgbXhVO3maeTcqHHqjGZC6f0eB6DpwkkdS1W05RRjaEXbNyR959luw1bu+LQrIDj65gm3FbsbF/rJsr4UcOw3yzXBkgZzBQdEmKB4cu7pcp1os8jWKWRlYemykhUbTK9KpxSKbtHEjbhJRa46hu634drKxf4NaG8LOS3Y9OUHc4IYnge7HBQDeCuORpNXOM0QOqaa1TfavtsWPUnzAb8sITNZJwZadf0fu41/uKlPCnKs+hwTVUADC3SkjUH4yJiT6WA4RuyfSgt0Wt3FAcCI6SIKSinYkFYYWbXLLOxprgOwKmTiBY2R3h14ccS8FgkKGvLOqLno4h1hddP5aSR26TFoejnvbUbAIfmNUmGYE6k/cguWmfVvYCAWpOeHpBOYCNUEL+Wnx3QctK0H0lLNx5Xg/uZVpX6SNdyd2kj0WU5e00O4Acl7PMeF/rhxACyoKHRoHg5Ch9lHn4xHDeZRSpro4oj4AwfhRFuUgMtn0LVXhj8b/RA0jYsgNlTUgSeuUeAJdxQHOJrqvYYxNK3WiNx4JnChcdpht3FCkU9vD11uGyy3/HpsMrLEfoQOjI/6Db51nM/+XHBx1g4CQZm0mkHtriDvj5R+5h8uKh2pwcIG/IilEEKrRn4Ep10vR6tCZffWUgtJh8o51EOHIgBj4zUEdnEv/ldSgLjZkn5Cc3RnqU5ld6v+WoLjWcm4VIVoqhph1cAJw2iImqHy8xlUPdlUfipVeJ5nA/UKPK3LwRD0tZvu9zOfrx7hMsq4It6sAZmowc9L2Ws/XCkI60rIiiNkadJUDIT6csg03MP8ZtZW9kLS8VdW7p3QRLsrbIUuhJ3nPmi/rvXjugww5Ndlk1L4zq/uz/JRXbvOP0yKVH6KwV2wpkChb0HVHlsR+UR1lJnur7q72anxjBzjQ0MyP8nJ0HO9TCx/7idA9J3L+2brYKne/yezukvkT39TcvuQJDscc9nVDgSftjwpEnKMkEkoBri1ALYMPUaMvNxFHG1yE6uGkgU2P/jgPjSHf1VRnqytLa3dLV9DWtfubJorNOtin9SCE91wP3v4HQgVbB8pbo6VB0QTdwgFxoyL4O9z5cnutbc0yw7/Pvih4kCLZrEicbYbLWCvKap0V+buylDMZNJ63rKtHwlpjrOlQyTW53riaH/WSmfYuPwhPspS5SW+F10XLMFuCWe7KumaGEm7al3Cw35/RoNXZW1Qwf1c4j5O6Lvc/c6DEMrkkYFLYEODSmijdIHFtk1AtsbRbROmLwVv7V+NSw/WkBSe0ccRuEMzlPmOISse+78wQvxt2HGgUxEa7NMlxuUPLNpVBn5ruh7p2GpgcljbtcwtVlybGfr3RFPJyAc2feV+QHYGKQvh4pLKXtkqAFFoGUicRhW3S4wSGi5dOqcgn3YiV6Nb/s9O5MAH3Vgc2MSBRnDFPa5ZomqJYi3Hd73rNDq9N/8fWx9ZpunGmUczfNyF9FAKRrVDaYRcXrFQxDbtealC7ziDq7v6qjjo2U/mO5yVXKs/UoKcerRc7XnqBOFmer4Tij6DVaP5uL6OaYHubgXdXmJ8ELkeZLhy/XxfHaLL165G/C0577hzT7GFGrVXThEVOK3ao9AphQGc0g7UVma6iiWFHayKrAq7hr7kHh6NAuXMT2Pq9nKRVp6eHl5gTpgdU3FP7jPWlm4s9oG5K5T3HXy513grRBmV6MtGU+1EFEFHTVusaljyqlHymzJix/w4nNkctAS6ZIJaV80mkJK2rnzQjCCK6N5T1GHuq1AbXcYunjlsj2g6sevN8/WBehspP163Sxrkv/J53wwusTM+epyW8Hw6eT+azob2FU/zg2HMMJrgO4ThYMPXCQSWFa3F9TRyE4o1sZsEbSs2mVrq6Icc5ZTGAlbxK9eTAmVHdUXh1vjTPhaTbC7vcNfJmykGnQwE8qBnIuAucUof/2SmxVwIs4edg7ajDJWCi9xx7CFDBDYyAxW9zDPg3zAE9A4dNU6INjBwpegA/kz+B77A7gEsrXPfY/C/vi9VQbeQX6CL2uWL0qP97I1+F0dUyc/yKvXpGTxJS5qVBtxivGPEqOm3jdoro8J5sbWAF0aUYnx/oerXw3YeOn9TS3A9mu6qOSYgiXyjRr3LIln6SPqoMcKU017whTt5Uc+P2
Vt7X4UrYqyrEnfoU/70wRpSIJAaQCeIvE9TBYvx2414bCyyomDbpfGBtZpqWyF6vndDntJRNnXvxLZR3082P3xCitrzZZzeBLL3PYgv3DFpNdsNflfca3wp9Q8NvwznVeHAu0VSnyePluJIp97/EmmGoFuCO1PI1r8VraUHRZop4Yrp635R3zSSatE1IlHTNTpALbNeq+2LOqVm5DOmaCGfa2Jznm7pAau3Z3mELD6JK5SI6fIIKZDso6U3WAVY2jbNDahqCARMI5CVcjKtu28Z7t8ibPPnLmtVa+fcbg6EBsXZHPKFcTieLD+H6ebPJttzhNSjCiSSVwtxNVOI9GSQ5KGRPcBnSKCO+Etva2RDMaF5bnnqjTdzTG4bnsucRO7PSOsmGV/y6IUDjdm624DAt5yWJqIu/uv9v5hkj6wQR4j9StRMUDK3sTWcM87yXRaYqe7P7kGP7F9VeFViFa5+Oni83XcjVxfiCSVsjFmBDOSwPm6DdnZZx3152z8XR8dqVT/uRfULBQ3KvQVtEL2Bz+dpNRczBKd+KdyXGqaD5l9r7qtDsXfDuTmOCLhTZwpnGZdohJbuEQM5Ul56n/igdb+MhatK/6bePGe5Z6yF6vv4saU0BUA8hMAbPQSQJPHyjU/laHLLPTUWwPG/+C/sb1LLjYP8k0rQrkFFK4tmzqjWSKYy3a7N3v0CfeCbj+AHuvGANS6pDObbMM1QRs6cyTZIHG0rtznxXGSh5d+MqKLX/aWCVKp0uxMNdrhqo+kW6hRx8//WjmVRWKRkcJ1oHoweXsq4NizjoHcj0v8eOkj1tzYjjBdSsuHPpN3lSsd1pHQtmEaMKSGnX192exULHTKxbFjbrcSQ5r2Mu2OnKrr5cztRHvjt0GEI8JyNaLHqeIv8HzeaT7VOL0vTva/0wW1YFghqOUeQwijXXTyDfuTuO/dnjCW+5f5KcQAZuKrWZXgxTcMngOPlytr1HHxBlV0DnTtszJ4fV0cxnw+IaGP8k9Y9UKzroPB8sJOpjQt1DSKqgEcfBuKtUynCz5owLRS18Llt8XHBy26gUUf1ted3f4furTamAqgu/As4irxEVhgUcaD2M1t9vaASjnL9QzfsvhI40LmCKaEXpxYGHzMj1bf9u0khw//NeIh0vu7tP4h7yMNXKZQe7KSo+Uv9A67yNbhch1pVSRJKOm1/ANZH8k3vc++bRFqLiHAJSoWyhUTi769zDrunKN+FSxuZaApjaMAfEBrbnNEZ7Q/106qR9KUM7uGLbGKRs/n3Oi7bGLw1DdlKqFB6vPtnBUiiWUK2bympxM76KdcVR/h8A08IUc1s5SbRx3HWF2wTO9x4YHpBgGaBGapioEdLpt6MPmXBmA+qqLI5Tbtu3A0Rh34m8Vyi4ZpG2rnlr8ByLpJdwP8sK8b69VIf5OqBS2vE9DEl+RUv8u6SeJQqD1wdZzeEKYvEqMRl5oEmbWiZDodWlSfiFS/ib8UcwTGDHTTN52CRVyy086RGyXX3RRxmpGXlRGV1PeeYpvbP4dvcd2uhnBP8gnR5+oPL6SnZTsDVViEMQvzHL7YAAPOV4W4z+UUyIOdoGB3ZNA3wR6HgQev3UGuJ+cIzHGSfPP0FcCJtpblHnziK+EZYLYN9LDVWHwse05ZCyJCjx7je0/1GLHGgzE9uYxIW1kRHeb7OYSGxdG9zlbEpXqiPPodhKmZcf/I8Um1Joq4CEaz8M/pQg3mHT4I6eVZF0fdNjuEH5sb97FJgbvzGfXLso7RMsoymUFTU5t6l4fpyt7lAGse8DShA4AbsoHUnKKBUowqqSO+qkcY4cMWti7eAz5fQ7yqLz21TANFUe2pQwtg6KwQ0t+M1bBFBxfjDFFsIXIdcqsr7d3OuiDBpQBZ0fuCzpF7t39MLBR3oylueKRQA/1a4rkFGUqdUOMqx/dQ8ioqqz8EuUtRvXjazeP9nhxyJoIizU2i5bztKwKIQsWO42OPGok+aiq142jwceOn5ORL9yIOfSnHRj1wmPv/R9dJc3w7CbptWaKi+dV5gnwcODTArVQ0E7P/rrsjhLPzbjVgGjHLySw9tYzD5xPiddmxCvmAncFJCNUsdKAtqkbfmfCoj1MVwVrpwW/KCobW47TsFzIs2m7BhySrJNZOJhVOLy7CqhuCqEYrvEubLOV6twoSGLI5oRsS78xPEnsG9waptuBUlV4FtTUAwo8VGg2ue98BdVQTC7uGlK51CqSgjZ5tkm/gLh1mbT4YmwdjN8wYfQL2EhpUJIB0zM8p3DGhmRKwA3spDu/DTPQDiYY6lxhboDDgypW1OMZt9V/jhRQXlslfUhvzaOlvuxVp3zmHNAd2VkoHxKBKA/nQbI9kwpiCSpKRgDofMq4dWhQr9/2C98HN7d2DpWKNNOg96wlPLCQE8AGDZyTNo9wBKs+yQWb6ChTH/F4ot8xR8W3TJ10bEn2fNGf4WeUzNJ5LoDm+IjGCWs6alUQKXvMQblhVP6r95U00ikw2y9Gm3F7SqWcbQ/m/yQCzt6K5F61P5SsDwB0rnenzytNZ8bpjpH0xor6ZgcJ7fFuOk2Sb90fUJBPSn7w06Yhj8fpCeiI+dYT7APcC4q9/B6RpFk/jM24E+8RT+AuXPPMiUDnlc2FkEo/srpI+0BwUhkszoMxIubzifazAnCC7AK/dUAvI2ztPkB8/9Nj63UkQ5zUCHmGsY7w6L97XkXG0F1El/PF4C0NStT88L94mh3kPv6hFVId5jYpnfc4WzvvmkrF/O3Kj5c/Mb51NWA1VkiBPzQ6dVXoQEXAJi2w6jBnSkdPdcVop2rt+9rFG3volJj4H+odQ2DzNeJ5BBzB4jFGEf3/STyeIS2ykFKhtWyNgksOpjQjOeyWalosrKKuJDquRWfmJN6rfgmhquyaCAQmsSZNzPKfpv5cf2gjliXvO2ExNZ1Lwn/AezlkYkDNB4Fr91mEYjbFxiQSuW9ttC0+MZQqYzZvylAkrLWuCL3D6csv7i5tq2kl8DIbzzhpNTLrg/w1kKGtPtloAAQAAAAAAAAAAAAAAAAAAAAAAAAAAAAAAAAAAAAAAAAAAAAAAAAAAAAAAAAAAAAAAAAAAAAAAAAAAAAAAAAAAAAAAAAAAAAAAAAAAAAAAAAAAAAAAAAAAAAAAAAAAAAAAAAAAAAAAAAAAAAAAAAAAAAAAAAAAAAAAAAAAAAAAAAAAAAAAAAAAAAAAAAAAAAAAAAAAAAAAAAAAAAAAAAAAAAAAAAAAAAAAAAAAAAAAAAAAAAAAAAAAAAAAAAAAAAAAAAAAAAAAAAAAAAAAAAAAAAAAAAAAAAAAAAAAAAAAAAAAAAAAAAAAAAAAAAAAAAAAAAAAAAAAAAAAAAAAAAAAAAAAAAAAAAAAAAAAAAAAAAAAAAAAAAAAAAAAAAAAAAAAAAAAAAAAAAAAAAAAAAAAAAAAAAAAAAAAAAAAAAAAAAAAAAAAAAAAAAAAAAAAAAAAAAAAAAAAAAAAAAAAAAAAAAAAAAAAAAAAAAAAAAAAAAAAAAAAAAAAAAAAAAAAAAAAAAAAAAAAAAAAAAAAAAAAAAAAAAAAAAAAAAAAAAAAAAAAAAAAAAAAAAAAAAAAAAAAAAAAAAAAAAAAAAAAAAAAAAAAAAAAAAAAAAAAAAAAAAAAAAAAAAAAAAAAAAAAAAAAAAAAAAAAAAAAAAAAAAAAAAAAAAAAAAAAAAAAAAAAAAAAAAAAAAAAAAAAAAAAAAAAAAAAAAAAAAAAAAAAAAAAAAAAAAAAAAAAAAAAAAAAAAAAAAAAAAAAAAAAAAAAAAAAAAAAAAAAAAAAAAAAAAAAAAAAAAAAAAAAAAAAAAAAAAAAAAAAAAAAAAAAAAAAAAAAAAAAAAAAAAAAAAAAAAAAAAAAAAAAAAAAAAAAAAAAAAAAAAAAAAAAAAAAAAAAAAAAAAAAAAAAAAAAAAAAAAAAAAAAAAAAAAAAAAAAAAAAAAAAAAAAAAAAAAAAAAAAAAAAAAAAAAAAAAAAAAAAAAAAAAAAAAAAAAAAAAAAAAAAAAAAAAAAAAAAAAAAAAAAAAAAAAAAAAAAAAAAAAAAAAAAAAAAAAAAAAAAAAAAAAAAAA
AAAAAAAAAAAAAAAAAAAAAAAAAAAAAAAAAAAAAAAAAAAAAAAAAAAAAAAAAAAAAAAAAAAAAAAAAAAAAAAAAAAAAAAAAAAAAAAAAAAAAAAAAAAAAAAAAAAAAAAAAAAAAAAAAAAAAAAAAAAAAAAAAAAAAAAAAAAAAAAAAAAAAAAAAAAAAAAAAAAAAAAAAAAAAAAAAAAAAAAAAAAAAAAAAAAAAAAAAAAAAAAAAAAAAAAAAAAAAAAAAAAAAAAAAAAAAAAAAAAAAAAAAAAAAAAAAAAAAAAAAAAAAAAAAAAAAAAAAAAAAAAAAAAAAAAAAAAAAAAAAAAAAAAAAAAAAAAAAAAAAAAAAAAAAAAAAAAAAAAAAAAAAAAAAAAAAAAAAAAAAAAAAAAAAAAAAAAAAAAAAAAAAAAAAAAAAAAAAAAAAAAAAAAAAAAAAAAAAAAAAAAAAAAAAAAAAAAAAAAAAAAAAAAAAAAAAAAAAAAAAAAAAAAAAAAAAAAAAAAAAAAAAAAAAAAAAAAAAAAAAAAAAAAAAAAAAAAAAAAAAAAAAAAAAAAAAAAAAAAAAAAAAAAAAAAAAAAAAAAAAAAAAAAAAAAAAAAAAAAAAAAAAAAAAAAAAAAAAAAAAAAAAAAAAAAAAAAAAAAAAAAAAAAAAAAAAAAAAAAAAAAAAAAAAAAAAAAAAAAAAAAAAAAAAAAAAAAAAAAAAAAAAAAAAAAAAAAAAAAAAAAAAAAAAAAAAAAAAAAAAAAAAAAAAAAAAAAAAAAAAAAAAAAAAAAAAAAAAAAAAAAAAAAAAAAAAAAAAAAAAAAAAAAAAAAAAAAAAAAAAAAAAAAAAAAAAAAAAAAAAAAAAAAAAAAAAAAAAAAAAAAAAAAAAAAAAAAAAAAAAAAAAAAAAAAAAAAAAAAAAAAAAAAAAAAAAAAAAAAAAAAAAAAAAAAAAAAAAAAAAAAAAAAAAAAAAAAAAAAAAAAAAAAAAAAAAAAAAAAAAAAAAAAAAAAAAAAAAAAAAAAAAAAAAAAAAAAAAAAAAAAAAAAAAAAAAAAAAAAAAAAAAAAAAAAAAAAAAAAAAAAAAAAAAAAAAAAAAAAAAAAAAAAAAAAAAAAAAAAAAAAAAAAAAAAAAAAAAAAAAAAAAAAAAAAAAAAAAAAAAAAAAAAAAAAAAAAAAAAAAAAAAAAAAAAAAAAAAAAAAAAAAAAAAAAAAAAAAAAAAAAAAAAAAAAAAAAAAAAAAAAAAAAAAAAAAAAAAAAAAAAAAAAAAAAAAAAAAAAAAAAAAAAAAAAAAAAAAAAAAAAAAAAAAAAAAAAAAAAAAAAAAAAAAAAAAAAAAAAAAAAAAAAAAAAAAAAAAAAAAAAAAAAAAAAAAAAAAAAAAAAAAAAAAAAAAAAAAAAAAAAAAAAAAAAAAAAAAAAAAAAAAAAAAAAAAAAAAAAAAAAAAAAAAAAAAAAAAAAAAAAAAAAAAAAAAAAAAAAAAAAAAAAAAAAAAAAAAAAAAAAAAAAAAAAAAAAAAAAAAAAAAAAAAAAAAAAAAAAAAAAAAAAAAAAAAAAAAAAAAAAAAAAAAAAAAAAAAAAAAAAAAAAAAAAAAAAAAAAAAAAAAAAAAAAAAAAAAAAAAAAAAAAAAAAAAAAAAAAAAAAAAAAAAAAAAAAAAAAAAAAAAAAAAAAAAAAAAAAAAAAAAAAAAAAAAAAAAAAAAAAAAAAAAAAAAAAAAAAAAAAAAAAAAAAAAAAAAAAAAAAAAAAAAAAAAAAAAAAAAAAAAAAAAAAAAAAAAAAAAAAAAAAAAAAAAAAAAAAAAAAAAAAAAAAAAAAAAAAAAAAAAAAAAAAAAAAAAAAAAAAAAAAAAAAAAAAAAAAAAAAAAAAAAAAAAAAAAAAAAAAAAAAAAAAAAAAAAAAAAAAAAAAAAAAAAAAAAAAAAAAAAAAAAAAAAAAAAAAAAAAAAAAAAAAAAAAAAAAAAAAAAAAAAAAAAAAAAAAAAAAAAAAAAAAAAAAAAAAAAAAAAAAAAAAAAAAAAAAAAAAAAAAAAAAAAAAAAAAAAAAAAAAAAAAAAAAAAAAAAAAAAAAAAAAAAAAAAAAAAAAAAAAAAAAAAAAAAAAAAAAAAAAAAAAAAAAAAAAAAAAAAAAAAAAAAAAAAAAAAAAAAAAAAAAAAAAAAAAAAAAAAAAAAAAAAAAAAAAAAAAAAAAAAAAAAAAAAAAAAAAAAAAAAAAAAAAAAAAAAAAAAAAAAAAAAAAAAAAAAAAAAAAAAAAAAAAAAAAAAAAAAAAAAAAAAAAAAAAAAAAAAAAAAAAAAAAAAAAAAAAAAAAAAAAAAAAAAAAAAAAAAAAAAAAAAAAAAAAAAAAAAAAAAAAAAAAAAAAAAAAAAAAAAAAAAAAAAAAAAAAAAAAAAAAAAAAAAAAAAAAAAAAAAAAAAAAAAAAAAAAAAAAAAAAAAAAAAAAAAAAAAAAAAAAAAAAAAAAAAAAAAAAAAAAAAAAAAAAAAAAAAAAAAAAAAAAAAAAAAAAAAAAAAAAAAAAAAAAAAAAAAAAAAAAAAAAAAAAAAAAAAAAAAAAAAAAAAAAAAAAAAAAAAAAAAAAAAAAAAAAAAAAAAAAAAAAAAAAAAAAAAAAAAAAAAAAAAAAAAAAAAAAAAAAAAAAAAAAAAAAAAAAAAAAAAAAAAAAAAAAAAAAAAAAAAAAAAAAAAAAAAAAAAAAAAAAAAAAAAAAAAAAAAAAAAAAAAAAAAAAAAAAAAAAAAAAAAAAAAAAAAAAAAAAAAAAAAAAAAAAAAAAAAAAAAAAAAAAAAAAAAAAAAAAAAAAAAAAAAAAAAAAAAAAAAAAAAAAAAAAAAAAAAAAAAAAAAAAAAAAAAAAAAAAAAAAAAAAAAAAAAAAAAAAAAAAAAAAAAAAAAAAAAAAAAAAAAAAAAAAAAAAAAAAAAAAAAAAAAAAAAAAAAAAAAAAAAAAAAAAAAAAAAAAAAAAAAAAAAAAAAAAAAAAAAAAAAAAAAAAAAAAAAAAAAAAAAAAAAAAAAAAAAAAAAAAAAAAAAAAAAAAAAAAAAAAAAAAAAAAAAAAAAAAAAAAAAAAAAAAAAAAAAAAAAAAAAAAAAAAAAAAAAAAAAAAAAAAAAAAAAAAAAAAAAAAAAAAAAAAAAAAAAAAAAAAAAAAAAAAAAAAAAAAAAAAAAAAAAAAAAAAAAAAAAAAAAAAAAAAAAAAAAAAAAAAAAAAAAAAAAAAAAAAAAAAAAAAAAAAAAAAAAAAAAAAAAAAAAAAAAAAAAAAAAAAAAAAAAAAAAAAAAAAAAAAAAAAAAAAAAAAAAAAAAAAAAAAAAAAAAAAAAAAAAAAAAAAAAAAAAAAAAAAAAAAAAAAAAAAAAAAAAAAAAAAAAAAAAAAAAAAAAAAAAAAAAAAAAAAAAAAAAAAAAAAAAAAAAAAAAAAAAAAAAAAAAAAAAAAAAAAAAAAAAAAAAAAAAAAAAAAAAAAAAAAAAAAAAAAAAAAAAAAAAAAAAAAAAAAAAAAAAAAAAAAAAAAAAAAAAAAAAAAAAAAAAAAAAAAAAAAAAAAAAAAAAAAAAAAAAAAAAAAAAAAAAAAAAAAAAAAAAAAAAAAAAAAAAAAAAAAAAAAAAAAAAAAAAAAAAAAAAAAAAAAAAAAAAAAAAAAAAAAAAAAAAAAAAAAAAAAAAAAAAAAAAAAAAAAAAAAAAAAAAAAAAAAAAAAAAAAAAAAAAAAAAAAAAAAAAAAAAAAAAAAAAAAAAAAAAAAAAAAAAAAAAAAAAAAAAAAAAAAAAAAAAAAAAAAAAAAAAAAAAAAAAAAAAAAAAAAAAAAAAAAAAAAAAAAAAAAAAAAAAAAAAAAAAAAAAAAAAAAAAAAAAAAAAAAAAAAAAAAAAAAAAAAAAAAAAAAAAAAAAAAAAAAAAAAAAAAAAAAAAAAAAAAAAAAAAAAAAAAAAAAAAAAAAAAAAAAAAAAAAAAAAAAAAAAAAAAAAAAAAAAAAAAAAAAAAAAAAAAAAAAAAAAAAAAAAAAAAAAAAAAAAAAAAAAAAAAAAAAAAAAAAAAAAAAAAAAAAAAAAAAAAAAAAAAAAAAAAAAAAAAAAAAAAAAAAAAAAAAAAAAAAAAAAAAAAAAAAAAAAAAAAAAAAAAAAAAAAAAAAAAA
AAAAAAAAAAAAAAAAAAAAAAAAAAAAAAAAAAAAAAAAAAAAAAAAAAAAAAAAAAAAAAAAAAAAAAAAAAAAAAAAAAAAAAAAAAAAAAAAAAAAAAAAAAAAAAAAAAAAAAAAAAAAAAAAAAAAAAAAAAAAAAAAAAAAAAAAAAAAAAAAAAAAAAAAAAAAAAAAAAAAAAAAAAAAAAAAAAAAAAAAAAAAAAAAAAAAAAAAAAAAAAAAAAAAAAAAAAAAAAAAAAAAAAAAAAAAAAAAAAAAAAAAAAAAAAAAAAAAAAAAAAAAAAAAAAAAAAAAAAAAAAAAAAAAAAAAAAAAAAAAAAAAAAAAAAAAAAAAAAAAAAAAAAAAAAAAAAAAAAAAAAAAAAAAAAAAAAAAAAAAAAAAAAAAAAAAAAAAAAAAAAAAAAAAAAAAAAAAAAAAAAAAAAAAAAAAAAAAAAAAAAAAAAAAAAAAAAAAAAAAAAAAAAAAAAAAAAAAAAAAAAAAAAAAAAAAAAAAAAAAAAAAAAAAAAAAAAAAAAAAAAAAAAAAAAAAAAAAAAAAAAAAAAAAAAAAAAAAAAAAAAAAAAAAAAAAAAAAAAAAAAAAAAAAAAAAAAAAAAAAAAAAAAAAAAAAAAAAAAAAAAAAAAAAAAAAAAAAAAAAAAAAAAAAAAAAAAAAAAAAAAAAAAAAAAAAAAAAAAAAAAAAAAAAAAAAAAAAAAAAAAAAAAAAAAAAAAAAAAAAAAAAAAAAAAAAAAAAAAAAAAAAAAAAAAAAAAAAAAAAAAAAAAAAAAAAAAAAAAAAAAAAAAAAAAAAAAAAAAAAAAAAAAAAAAAAAAAAAAAAAAAAAAAAAAAAAAAAAAAAAAAAAAAAAAAAAAAAAAAAAAAAAAAAAAAAAAAAAAAAAAAAAAAAAAAAAAAAAAAAAAAAAAAAAAAAAAAAAAAAAAAAAAAAAAAAAAAAAAAAAAAAAAAAAAAAAAAAAAAAAAAAAAAAAAAAAAAAAAAAAAAAAAAAAAAAAAAAAAAAAAAAAAAAAAAAAAAAAAAAAAAAAAAAAAAAAAAAAAAAAAAAAAAAAAAAAAAAAAAAAAAAAAAAAAAAAAAAAAAAAAAAAAAAAAAAAAAAAAAAAAAAAAAAAAAAAAAAAAAAAAAAAAAAAAAAAAAAAAAAAAAAAAAAAAAAAAAAAAAAAAAAAAAAAAAAAAAAAAAAAAAAAAAAAAAAAAAAAAAAAAAAAAAAAAAAAAAAAAAAAAAAAAAAAAAAAAAAAAAAAAAAAAAAAAAAAAAAAAAAAAAAAAAAAAAAAAAAAAAAAAAAAAAAAAAAAAAAAAAAAAAAAAAAAAAAAAAAAAAAAAAAAAAAAAAAAAAAAAAAAAAAAAAAAAAAAAAAAAAAAAAAAAAAAAAAAAAAAAAAAAAAAAAAAAAAAAAAAAAAAAAAAAAAAAAAAAAAAAAAAAAAAAAAAAAAAAAAAAAAAAAAAAAAAAAAAAAAAAAAAAAAAAAAAAAAAAAAAAAAAAAAAAAAAAAAAAAAAAAAAAAAAAAAAAAAAAAAAAAAAAAAAAAAAAAAAAAAAAAAAAAAAAAAAAAAAAAAAAAAAAAAAAAAAAAAAAAAAAAAAAAAAAAAAAAAAAAAAAAAAAAAAAAAAAAAAAAAAAAAAAAAAAAAAAAAAAAAAAAAAAAAAAAAAAAAAAAAAAAAAAAAAAAAAAAAAAAAAAAAAAAAAAAAAAAAAAAAAAAAAAAAAAAAAAAAAAAAAAAAAAAAAAAAAAAAAAAAAAAAAAAAAAAAAAAAAAAAAAAAAAAAAAAAAAAAAAAAAAAAAAAAAAAAAAAAAAAAAAAAAAAAAAAAAAAAAAAAAAAAAAAAAAAAAAAAAAAAAAAAAAAAAAAAAAAAAAAAAAAAAAAAAAAAAAAAAAAAAAAAAAAAAAAAAAAAAAAAAAAAAAAAAAAAAAAAAAAAAAAAAAAAAAAAAAAAAAAAAAAAAAAAAAAAAAAAAAAAAAAAAAAAAAAAAAAAAAAAAAAAAAAAAAAAAAAAAAAAAAAAAAAAAAAAAAAAAAAAAAAAAAAAAAAAAAAAAAAAAAAAAAAAAAAAAAAAAAAAAAAAAAAAAAAAAAAAAAAAAAAAAAAAAAAAAAAAAAAAAAAAAAAAAAAAAAAAAAAAAAAAAAAAAAAAAAAAAAAAAAAAAAAAAAAAAAAAAAAAAAAAAAAAAAAAAAAAAAAAAAAAAAAAAAAAAAAAAAAAAAAAAAAAAAAAAAAAAAAAAAAAAAAAAAAAAAAAAAAAAAAAAAAAAAAAAAAAAAAAAAAAAAAAAAAAAAAAAAAAAAAAAAAAAAAAAAAAAAAAAAAAAAAAAAAAAAAAAAAAAAAAAAAAAAAAAAAAAAAAAAAAAAAAAAAAAAAAAAAAAAAAAAAAAAAAAAAAAAAAAAAAAAAAAAAAAAAAAAAAAAAAAAAAAAAAAAAAAAAAAAAAAAAAAAAAAAAAAAAAAAAAAAAAAAAAAAAAAAAAAAAAAAAAAAAAAAAAAAAAAAAAAAAAAAAAAAAAAAAAAAAAAAAAAAAAAAAAAAAAAAAAAAAAAAAAAAAAAAAAAAAAAAAAAAAAAAAAAAAAAAAAAAAAAAAAAAAAAAAAAAAAAAAAAAAAAAAAAAAAAAAAAAAAAAAAAAAAAAAAAAAAAAAAAAAAAAAAAAAAAAAAAAAAAAAAAAAAAAAAAAAAAAAAAAAAAAAAAAAAAAAAAAAAAAAAAAAAAAAAAAAAAAAAAAAAAAAAAAAAAAAAAAAAAAAAAAAAAAAAAAAAAAAAAAAAAAAAAAAAAAAAAAAAAAAAAAAAAAAAAAAAAAAAAAAAAAAAAAAAAAAAAAAAAAAAAAAAAAAAAAAAAAAAAAAAAAAAAAAAAAAAAAAAAAAAAAAAAAAAAAAAAAAAAAAAAAAAAAAAAAAAAAAAAAAAAAAAAAAAAAAAAAAAAAAAAAAAAAAAAAAAAAAAAAAAAAAAAAAAAAAAAAAAAAAAAAAAAAAAAAAAAAAAAAAAAAAAAAAAAAAAAAAAAAAAAAAAAAAAAAAAAAAAAAAAAAAAAAAAAAAAAAAAAAAAAAAAAAAAAAAAAAAAAAAAAAAAAAAAAAAAAAAAAAAAAAAAAAAAAAAAAAAAAAAAAAAAAAAAAAAAAAAAAAAAAAAAAAAAAAAAAAAAAAAAAAAAAAAAAAAAAAAAAAAAAAAAAAAAAAAAAAAAAAAAAAAAAAAAAAAAAAAAAAAAAAAAAAAAAAAAAAAAAAAAAAAAAAAAAAAAAAAAAAAAAAAAAAAAAAAAAAAAAAAAAAAAAAAAAAAAAAAAAAAAAAAAAAAAAAAAAAAAAAAAAAAAAAAAAAAAAAAAAAAAAAAAAAAAAAAAAAAAAAAAAAAAAAAAAAAAAAAAAAAAAAAAAAAAAAAAAAAAAAAAAAAAAAAAAAAAAAAAAAAAAAAAAAAAAAAAAAAAAAAAAAAAAAAAAAAAAAAAAAAAAAAAAAAAAAAAAAAAAAAAAAAAAAAAAAAAAAAAAAAAAAAAAAAAAAAAAAAAAAAAAAAAAAAAAAAAAAAAAAAAAAAAAAAAAAAAAAAAAAAAAAAAAAAAAAAAAAAAAAAAAAAAAAAAAAAAAAAAAAAAAAAAAAAAAAAAAAAAAAAAAAAAAAAAAAAAAAAAAAAAAAAAAAAAAAAAAAAAAAAAAAAAAAAAAAAAAAAAAAAAAAAAAAAAAAAAAAAAAAAAAAAAAAAAAAAAAAAAAAAAAAAAAAAAAAAAAAAAAAAAAAAAAAAAAAAAAAAAAAAAAAAAAAAAAAAAAAAAAAAAAAAAAAAAAAAAAAAAAAAAAAAAAAAAAAAAAAAAAAAAAAAAAAAAAAAAAAAAAAAAAAAAAAAAAAAAAAAAAAAAAAAAAAAAAAAAAAAAAAAAAAAAAAAAAAAAAAAAAAAAAAAAAAAAAAAAAAAAAAAAAAAAAAAAAAAAAAAAAAAAAAAAAAAAAAAAAAAAAAAAAAAAAAAAAAAAAAAAAAAAAAAAAAAAAAAAAAAAAAAAAAAAAAAAAAAAAAAAAAAAAAAAAAAAAAAAAAAAAAAAAAAAAAAAAAAAAAAAAAAAAAAAAAAAAAAAAAAAAAAAAAAAAAAAAAAAAAAAAAAAAAAAAAAAAAAAAAAAAAAAAAAAAAAA
AAAAAAAAAAAAAAAAAAAAAAAAAAAAAAAAAAAAAAAAAAAAAAAAAAAAAAAAAAAAAAAAAAAAAAAAAAAAAAAAAAAAAAAAAAAAAAAAAAAAAAAAAAAAAAAAAAAAAAAAAAAAAAAAAAAAAAAAAAAAAAAAAAAAAAAAAAAAAAAAAAAAAAAAAAAAAAAAAAAAAAAAAAAAAAAAAAAAAAAAAAAAAAAAAAAAAAAAAAAAAAAAAAAAAAAAAAAAAAAAAAAAAAAAAAAAAAAAAAAAAAAAAAAAAAAAAAAAAAAAAAAAAAAAAAAAAAAAAAAAAAAAAAAAAAAAAAAAAAAAAAAAAAAAAAAAAAAAAAAAAAAAAAAAAAAAAAAAAAAAAAAAAAAAAAAAAAAAAAAAAAAAAAAAAAAAAAAAAAAAAAAAAAAAAAAAAAAAAAAAAAAAAAAAAAAAAAAAAAAAAAAAAAAAAAAAAAAAAAAAAAAAAAAAAAAAAAAAAAAAAAAAAAAAAAAAAAAAAAAAAAAAAAAAAAAAAAAAAAAAAAAAAAAAAAAAAAAAAAAAAAAAAAAAAAAAAAAAAAAAAAAAAAAAAAAAAAAAAAAAAAAAAAAAAAAAAAAAAAAAAAAAAAAAAAAAAAAAAAAAAAAAAAAAAAAAAAAAAAAAAAAAAAAAAAAAAAAAAAAAAAAAAAAAAAAAAAAAAAAAAAAAAAAAAAAAAAAAAAAAAAAAAAAAAAAAAAAAAAAAAAAAAAAAAAAAAAAAAAAAAAAAAAAAAAAAAAAAAAAAAAAAAAAAAAAAAAAAAAAAAAAAAAAAAAAAAAAAAAAAAAAAAAAAAAAAAAAAAAAAAAAAAAAAAAAAAAAAAAAAAAAAAAAAAAAAAAAAAAAAAAAAAAAAAAAAAAAAAAAAAAAAAAAAAAAAAAAAAAAAAAAAAAAAAAAAAAAAAAAAAAAAAAAAAAAAAAAAAAAAAAAAAAAAAAAAAAAAAAAAAAAAAAAAAAAAAAAAAAAAAAAAAAAAAAAAAAAAAAAAAAAAAAAAAAAAAAAAAAAAAAAAAAAAAAAAAAAAAAAAAAAAAAAAAAAAAAAAAAAAAAAAAAAAAAAAAAAAAAAAAAAAAAAAAAAAAAAAAAAAAAAAAAAAAAAAAAAAAAAAAAAAAAAAAAAAAAAAAAAAAAAAAAAAAAAAAAAAAAAAAAAAAAAAAAAAAAAAAAAAAAAAAAAAAAAAAAAAAAAAAAAAAAAAAAAAAAAAAAAAAAAAAAAAAAAAAAAAAAAAAAAAAAAAAAAAAAAAAAAAAAAAAAAAAAAAAAAAAAAAAAAAAAAAAAAAAAAAAAAAAAAAAAAAAAAAAAAAAAAAAAAAAAAAAAAAAAAAAAAAAAAAAAAAAAAAAAAAAAAAAAAAAAAAAAAAAAAAAAAAAAAAAAAAAAAAAAAAAAAAAAAAAAAAAAAAAAAAAAAAAAAAAAAAAAAAAAAAAAAAAAAAAAAAAAAAAAAAAAAAAAAAAAAAAAAAAAAAAAAAAAAAAAAAAAAAAAAAAAAAAAAAAAAAAAAAAAAAAAAAAAAAAAAAAAAAAAAAAAAAAAAAAAAAAAAAAAAAAAAAAAAAAAAAAAAAAAAAAAAAAAAAAAAAAAAAAAAAAAAAAAAAAAAAAAAAAAAAAAAAAAAAAAAAAAAAAAAAAAAAAAAAAAAAAAAAAAAAAAAAAAAAAAAAAAAAAAAAAAAAAAAAAAAAAAAAAAAAAAAAAAAAAAAAAAAAAAAAAAAAAAAAAAAAAAAAAAAAAAAAAAAAAAAAAAAAAAAAAAAAAAAAAAAAAAAAAAAAAAAAAAAAAAAAAAAAAAAAAAAAAAAAAAAAAAAAAAAAAAAAAAAAAAAAAAAAAAAAAAAAAAAAAAAAAAAAAAAAAAAAAAAAAAAAAAAAAAAAAAAAAAAAAAAAAAAAAAAAAAAAAAAAAAAAAAAAAAAAAAAAAAAAAAAAAAAAAAAAAAAAAAAAAAAAAAAAAAAAAAAAAAAAAAAAAAAAAAAAAAAAAAAAAAAAAAAAAAAAAAAAAAAAAAAAAAAAAAAAAAAAAAAAAAAAAAAAAAAAAAAAAAAAAAAAAAAAAAAAAAAAAAAAAAAAAAAAAAAAAAAAAAAAAAAAAAAAAAAAAAAAAAAAAAAAAAAAAAAAAAAAAAAAAAAAAAAAAAAAAAAAAAAAAAAAAAAAAAAAAAAAAAAAAAAAAAAAAAAAAAAAAAAAAAAAAAAAAAAAAAAAAAAAAAAAAAAAAAAAAAAAAAAAAAAAAAAAAAAAAAAAAAAAAAAAAAAAAAAAAAAAAAAAAAAAAAAAAAAAAAAAAAAAAAAAAAAAAAAAAAAAAAAAAAAAAAAAAAAAAAAAAAAAAAAAAAAAAAAAAAAAAAAAAAAAAAAAAAAAAAAAAAAAAAAAAAAAAAAAAAAAAAAAAAAAAAAAAAAAAAAAAAAAAAAAAAAAAAAAAAAAAAAAAAAAAAAAAAAAAAAAAAAAAAAAAAAAAAAAAAAAAAAAAAAAAAAAAAAAAAAAAAAAAAAAAAAAAAAAAAAAAAAAAAAAAAAAAAAAAAAAAAAAAAAAAAAAAAAAAAAAAAAAAAAAAAAAAAAAAAAAAAAAAAAAAAAAAAAAAAAAAAAAAAAAAAAAAAAAAAAAAAAAAAAAAAAAAAAAAAAAAAAAAAAAAAAAAAAAAAAAAAAAAAAAAAAAAAAAAAAAAAAAAAAAAAAAAAAAAAAAAAAAAAAAAAAAAAAAAAAAAAAAAAAAAAAAAAAAAAAAAAAAAAAAAAAAAAAAAAAAAAAAAAAAAAAAAAAAAAAAAAAAAAAAAAAAAAAAAAAAAAAAAAAAAAAAAAAAAAAAAAAAAAAAAAAAAAAAAAAAAAAAAAAAAAAAAAAAAAAAAAAAAAAAAAAAAAAAAAAAAAAAAAAAAAAAAAAAAAAAAAAAAAAAAAAAAAAAAAAAAAAAAAAAAAAAAAAAAAAAAAAAAAAAAAAAAAAAAAAAAAAAAAAAAAAAAAAAAAAAAAAAAAAAAAAAAAAAAAAAAAAAAAAAAAAAAAAAAAAAAAAAAAAAAAAAAAAAAAAAAAAAAAAAAAAAAAAAAAAAAAAAAAAAAAAAAAAAAAAAAAAAAAAAAAAAAAAAAAAAAAAAAAAAAAAAAAAAAAAAAAAAAAAAAAAAAAAAAAAAAAAAAAAAAAAAAAAAAAAAAAAAAAAAAAAAAAAAAAAAAAAAAAAAAAAAAAAAAAAAAAAAAAAAAAAAAAAAAAAAAAAAAAAAAAAAAAAAAAAAAAAAAAAAAAAAAAAAAAAAAAAAAAAAAAAAAAAAAAAAAAAAAAAAAAAAAAAAAAAAAAAAAAAAAAAAAAAAAAAAAAAAAAAAAAAAAAAAAAAAAAAAAAAAAAAAAAAAAAAAAAAAAAAAAAAAAAAAAAAAAAAAAAAAAAAAAAAAAAAAAAAAAAAAAAAAAAAAAAAAAAAAAAAAAAAAAAAAAAAAAAAAAAAAAAAAAAAAAAAAAAAAAAAAAAAAAAAAAAAAAAAAAAAAAAAAAAAAAAAAAAAAAAAAAAAAAAAAAAAAAAAAAAAAAAAAAAAAAAAAAAAAAAAAAAAAAAAAAAAAAAAAAAAAAAAAAAAAAAAAAAAAAAAAAAAAAAAAAAAAAAAAAAAAAAAAAAAAAAAAAAAAAAAAAAAAAAAAAAAAAAAAAAAAAAAAAAAAAAAAAAAAAAAAAAAAAAAAAAAAAAAAAAAAAAAAAAAAAAAAAAAAAAAAAAAAAAAAAAAAAAAAAAAAAAAAAAAAAAAAAAAAAAAAAAAAAAAAAAAAAAAAAAAAAAAAAAAAAAAAAAAAAAAAAAAAAAAAAAAAAAAAAAAAAAAAAAAAAAAAAAAAAAAAAAAAAAAAAAAAAAAAAAAAAAAAAAAAAAAAAAAAAAAAAAAAAAAAAAAAAAAAAAAAAAAAAAAAAAAAAAAAAAAAAAAAAAAAAAAAAAAAAAAAAAAAAAAAAAAAAAAAAAAAAAAAAAAAAAAAAAAAAAAAAAAAAAAAAAAAAAAAAAAAAAAAAAAAAAAAAAAAAAAAAAAAAAAAAAAAAAAAAAAAAAAAAAAAAAAAAAAAAAAAAAAAAAAAAAAAAAAAAAAAAAAAAAAAAAAAAAAAAAAAAAAAAAAAAAAAAAAAAAAAAAAAAAAA
AAAAAAAAAAAAAAAAAAAAAAAAAAAAAAAAAAAAAAAAAAAAAAAAAAAAAAAAAAAAAAAAAAAAAAAAAAAAAAAAAAAAAAAAAAAAAAAAAAAAAAAAAAAAAAAAAAAAAAAAAAAAAAAAAAAAAAAAAAAAAAAAAAAAAAAAAAAAAAAAAAAAAAAAAAAAAAAAAAAAAAAAAAAAAAAAAAAAAAAAAAAAAAAAAAAAAAAAAAAAAAAAAAAAAAAAAAAAAAAAAAAAAAAAAAAAAAAAAAAAAAAAAAAAAAAAAAAAAAAAAAAAAAAAAAAAAAAAAAAAAAAAAAAAAAAAAAAAAAAAAAAAAAAAAAAAAAAAAAAAAAAAAAAAAAAAAAAAAAAAAAAAAAAAAAAAAAAAAAAAAAAAAAAAAAAAAAAAAAAAAAAAAAAAAAAAAAAAAAAAAAAAAAAAAAAAAAAAAAAAAAAAAAAAAAAAAAAAAAAAAAAAAAAAAAAAAAAAAAAAAAAAAAAAAAAAAAAAAAAAAAAAAAAAAAAAAAAAAAAAAAAAAAAAAAAAAAAAAAAAAAAAAAAAAAAAAAAAAAAAAAAAAAAAAAAAAAAAAAAAAAAAAAAAAAAAAAAAAAAAAAAAAAAAAAAAAAAAAAAAAAAAAAAAAAAAAAAAAAAAAAAAAAAAAAAAAAAAAAAAAAAAAAAAAAAAAAAAAAAAAAAAAAAAAAAAAAAAAAAAAAAAAAAAAAAAAAAAAAAAAAAAAAAAAAAAAAAAAAAAAAAAAAAAAAAAAAAAAAAAAAAAAAAAAAAAAAAAAAAAAAAAAAAAAAAAAAAAAAAAAAAAAAAAAAAAAAAAAAAAAAAAAAAAAAAAAAAAAAAAAAAAAAAAAAAAAAAAAAAAAAAAAAAAAAAAAAAAAAAAAAAAAAAAAAAAAAAAAAAAAAAAAAAAAAAAAAAAAAAAAAAAAAAAAAAAAAAAAAAAAAAAAAAAAAAAAAAAAAAAAAAAAAAAAAAAAAAAAAAAAAAAAAAAAAAAAAAAAAAAAAAAAAAAAAAAAAAAAAAAAAAAAAAAAAAAAAAAAAAAAAAAAAAAAAAAAAAAAAAAAAAAAAAAAAAAAAAAAAAAAAAAAAAAAAAAAAAAAAAAAAAAAAAAAAAAAAAAAAAAAAAAAAAAAAAAAAAAAAAAAAAAAAAAAAAAAAAAAAAAAAAAAAAAAAAAAAAAAAAAAAAAAAAAAAAAAAAAAAAAAAAAAAAAAAAAAAAAAAAAAAAAAAAAAAAAAAAAAAAAAAAAAAAAAAAAAAAAAAAAAAAAAAAAAAAAAAAAAAAAAAAAAAAAAAAAAAAAAAAAAAAAAAAAAAAAAAAAAAAAAAAAAAAAAAAAAAAAAAAAAAAAAAAAAAAAAAAAAAAAAAAAAAAAAAAAAAAAAAAAAAAAAAAAAAAAAAAAAAAAAAAAAAAAAAAAAAAAAAAAAAAAAAAAAAAAAAAAAAAAAAAAAAAAAAAAAAAAAAAAAAAAAAAAAAAAAAAAAAAAAAAAAAAAAAAAAAAAAAAAAAAAAAAAAAAAAAAAAAAAAAAAAAAAAAAAAAAAAAAAAAAAAAAAAAAAAAAAAAAAAAAAAAAAAAAAAAAAAAAAAAAAAAAAAAAAAAAAAAAAAAAAAAAAAAAAAAAAAAAAAAAAAAAAAAAAAAAAAAAAAAAAAAAAAAAAAAAAAAAAAAAAAAAAAAAAAAAAAAAAAAAAAAAAAAAAAAAAAAAAAAAAAAAAAAAAAAAAAAAAAAAAAAAAAAAAAAAAAAAAAAAAAAAAAAAAAAAAAAAAAAAAAAAAAAAAAAAAAAAAAAAAAAAAAAAAAAAAAAAAAAAAAAAAAAAAAAAAAAAAAAAAAAAAAAAAAAAAAAAAAAAAAAAAAAAAAAAAAAAAAAAAAAAAAAAAAAAAAAAAAAAAAAAAAAAAAAAAAAAAAAAAAAAAAAAAAAAAAAAAAAAAAAAAAAAAAAAAAAAAAAAAAAAAAAAAAAAAAAAAAAAAAAAAAAAAAAAAAAAAAAAAAAAAAAAAAAAAAAAAAAAAAAAAAAAAAAAAAAAAAAAAAAAAAAAAAAAAAAAAAAAAAAAAAAAAAAAAAAAAAAAAAAAAAAAAAAAAAAAAAAAAAAAAAAAAAAAAAAAAAAAAAAAAAAAAAAAAAAAAAAAAAAAAAAAAAAAAAAAAAAAAAAAAAAAAAAAAAAAAAAAAAAAAAAAAAAAAAAAAAAAAAAAAAAAAAAAAAAAAAAAAAAAAAAAAAAAAAAAAAAAAAAAAAAAAAAAAAAAAAAAAAAAAAAAAAAAAAAAAAAAAAAAAAAAAAAAAAAAAAAAAAAAAAAAAAAAAAAAAAAAAAAAAAAAAAAAAAAAAAAAAAAAAAAAAAAAAAAAAAAAAAAAAAAAAAAAAAAAAAAAAAAAAAAAAAAAAAAAAAAAAAAAAAAAAAAAAAAAAAAAAAAAAAAAAAAAAAAAAAAAAAAAAAAAAAAAAAAAAAAAAAAAAAAAAAAAAAAAAAAAAAAAAAAAAAAAAAAAAAAAAAAAAAAAAAAAAAAAAAAAAAAAAAAAAAAAAAAAAAAAAAAAAAAAAAAAAAAAAAAAAAAAAAAAAAAAAAAAAAAAAAAAAAAAAAAAAAAAAAAAAAAAAAAAAAAAAAAAAAAAAAAAAAAAAAAAAAAAAAAAAAAAAAAAAAAAAAAAAAAAAAAAAAAAAAAAAAAAAAAAAAAAAAAAAAAAAAAAAAAAAAAAAAAAAAAAAAAAAAAAAAAAAAAAAAAAAAAAAAAAAAAAAAAAAAAAAAAAAAAAAAAAAAAAAAAAAAAAAAAAAAAAAAAAAAAAAAAAAAAAAAAAAAAAAAAAAAAAAAAAAAAAAAAAAAAAAAAAAAAAAAAAAAAAAAAAAAAAAAAAAAAAAAAAAAAAAAAAAAAAAAAAAAAAAAAAAAAAAAAAAAAAAAAAAAAAAAAAAAAAAAAAAAAAAAAAAAAAAAAAAAAAAAAAAAAAAAAAAAAAAAAAAAAAAAAAAAAAAAAAAAAAAAAAAAAAAAAAAAAAAAAAAAAAAAAAAAAAAAAAAAAAAAAAAAAAAAAAAAAAAAAAAAAAAAAAAAAAAAAAAAAAAAAAAAAAAAAAAAAAAAAAAAAAAAAAAAAAAAAAAAAAAAAAAAAAAAAAAAAAAAAAAAAAAAAAAAAAAAAAAAAAAAAAAAAAAAAAAAAAAAAAAAAAAAAAAAAAAAAAAAAAAAAAAAAAAAAAAAAAAAAAAAAAAAAAAAAAAAAAAAAAAAAAAAAAAAAAAAAAAAAAAAAAAAAAAAAAAAAAAAAAAAAAAAAAAAAAAAAAAAAAAAAAAAAAAAAAAAAAAAAAAAAAAAAAAAAAAAAAAAAAAAAAAAAAAAAAAAAAAAAAAAAAAAAAAAAAAAAAAAAAAAAAAAAAAAAAAAAAAAAAAAAAAAAAAAAAAAAAAAAAAAAAAAAAAAAAAAAAAAAAAAAAAAAAAAAAAAAAAAAAAAAAAAAAAAAAAAAAAAAAAAAAAAAAAAAAAAAAAAAAAAAAAAAAAAAAAAAAAAAAAAAAAAAAAAAAAAAAAAAAAAAAAAAAAAAAAAAAAAAAAAAAAAAAAAAAAAAAAAAAAAAAAAAAAAAAAAAAAAAAAAAAAAAAAAAAAAAAAAAAAAAAAAAAAAAAAAAAAAAAAAAAAAAAAAAAAAAAAAAAAAAAAAAAAAAAAAAAAAAAAAAAAAAAAAAAAAAAAAAAAAAAAAAAAAAAAAAAAAAAAAAAAAAAAAAAAAAAAAAAAAAAAAAAAAAAAAAAAAAAAAAAAAAAAAAAAAAAAAAAAAAAAAAAAAAAAAAAAAAAAAAAAAAAAAAAAAAAAAAAAAAAAAAAAAAAAAAAAAAAAAAAAAAAAAAAAAAAAAAAAAAAAAAAAAAAAAAAAAAAAAAAAAAAAAAAAAAAAAAAAAAAAAAAAAAAAAAAAAAAAAAAAAAAAAAAAAAAAAAAAAAAAAAAAAAAAAAAAAAAAAAAAAAAAAAAAAAAAAAAAAAAAAAAAAAAAAAAAAAAAAAAAAAAAAAAAAAAAAAAAAAAAAAAAAAAAAAAAAAAAAAAAAAAAAAAAAAAAAAAAAAAAAAAAAAAAAAAAAAAAAAAAAAAAAAAAAAAAAAAAAAAAAAAAAAAAAAAAAAAAAAAAAAAA
AAAAAAAAAAAAAAAAAAAAAAAAAAAAAAAAAAAAAAAAAAAAAAAAAAAAAAAAAAAAAAAAAAAAAAAAAAAAAAAAAAAAAAAAAAAAAAAAAAAAAAAAAAAAAAAAAAAAAAAAAAAAAAAAAAAAAAAAAAAAAAAAAAAAAAAAAAAAAAAAAAAAAAAAAAAAAAAAAAAAAAAAAAAAAAAAAAAAAAAAAAAAAAAAAAAAAAAAAAAAAAAAAAAAAAAAAAAAAAAAAAAAAAAAAAAAAAAAAAAAAAAAAAAAAAAAAAAAAAAAAAAAAAAAAAAAAAAAAAAAAAAAAAAAAAAAAAAAAAAAAAAAAAAAAAAAAAAAAAAAAAAAAAAAAAAAAAAAAAAAAAAAAAAAAAAAAAAAAAAAAAAAAAAAAAAAAAAAAAAAAAAAAAAAAAAAAAAAAAAAAAAAAAAAAAAAAAAAAAAAAAAAAAAAAAAAAAAAAAAAAAAAAAAAAAAAAAAAAAAAAAAAAAAAAAAAAAAAAAAAAAAAAAAAAAAAAAAAAAAAAAAAAAAAAAAAAAAAAAAAAAAAAAAAAAAAAAAAAAAAAAAAAAAAAAAAAAAAAAAAAAAAAAAAAAAAAAAAAAAAAAAAAAAAAAAAAAAAAAAAAAAAAAAAAAAAAAAAAAAAAAAAAAAAAAAAAAAAAAAAAAAAAAAAAAAAAAAAAAAAAAAAAAAAAAAAAAAAAAAAAAAAAAAAAAAAAAAAAAAAAAAAAAAAAAAAAAAAAAAAAAAAAAAAAAAAAAAAAAAAAAAAAAAAAAAAAAAAAAAAAAAAAAAAAAAAAAAAAAAAAAAAAAAAAAAAAAAAAAAAAAAAAAAAAAAAAAAAAAAAAAAAAAAAAAAAAAAAAAAAAAAAAAAAAAAAAAAAAAAAAAAAAAAAAAAAAAAAAAAAAAAAAAAAAAAAAAAAAAAAAAAAAAAAAAAAAAAAAAAAAAAAAAAAAAAAAAAAAAAAAAAAAAAAAAAAAAAAAAAAAAAAAAAAAAAAAAAAAAAAAAAAAAAAAAAAAAAAAAAAAAAAAAAAAAAAAAAAAAAAAAAAAAAAAAAAAAAAAAAAAAAAAAAAAAAAAAAAAAAAAAAAAAAAAAAAAAAAAAAAAAAAAAAAAAAAAAAAAAAAAAAAAAAAAAAAAAAAAAAAAAAAAAAAAAAAAAAAAAAAAAAAAAAAAAAAAAAAAAAAAAAAAAAAAAAAAAAAAAAAAAAAAAAAAAAAAAAAAAAAAAAAAAAAAAAAAAAAAAAAAAAAAAAAAAAAAAAAAAAAAAAAAAAAAAAAAAAAAAAAAAAAAAAAAAAAAAAAAAAAAAAAAAAAAAAAAAAAAAAAAAAAAAAAAAAAAAAAAAAAAAAAAAAAAAAAAAAAAAAAAAAAAAAAAAAAAAAAAAAAAAAAAAAAAAAAAAAAAAAAAAAAAAAAAAAAAAAAAAAAAAAAAAAAAAAAAAAAAAAAAAAAAAAAAAAAAAAAAAAAAAAAAAAAAAAAAAAAAAAAAAAAAAAAAAAAAAAAAAAAAAAAAAAAAAAAAAAAAAAAAAAAAAAAAAAAAAAAAAAAAAAAAAAAAAAAAAAAAAAAAAAAAAAAAAAAAAAAAAAAAAAAAAAAAAAAAAAAAAAAAAAAAAAAAAAAAAAAAAAAAAAAAAAAAAAAAAAAAAAAAAAAAAAAAAAAAAAAAAAAAAAAAAAAAAAAAAAAAAAAAAAAAAAAAAAAAAAAAAAAAAAAAAAAAAAAAAAAAAAAAAAAAAAAAAAAAAAAAAAAAAAAAAAAAAAAAAAAAAAAAAAAAAAAAAAAAAAAAAAAAAAAAAAAAAAAAAAAAAAAAAAAAAAAAAAAAAAAAAAAAAAAAAAAAAAAAAAAAAAAAAAAAAAAAAAAAAAAAAAAAAAAAAAAAAAAAAAAAAAAAAAAAAAAAAAAAAAAAAAAAAAAAAAAAAAAAAAAAAAAAAAAAAAAAAAAAAAAAAAAAAAAAAAAAAAAAAAAAAAAAAAAAAAAAAAAAAAAAAAAAAAAAAAAAAAAAAAAAAAAAAAAAAAAAAAAAAAAAAAAAAAAAAAAAAAAAAAAAAAAAAAAAAAAAAAAAAAAAAAAAAAAAAAAAAAAAAAAAAAAAAAAAAAAAAAAAAAAAAAAAAAAAAAAAAAAAAAAAAAAAAAAAAAAAAAAAAAAAAAAAAAAAAAAAAAAAAAAAAAAAAAAAAAAAAAAAAAAAAAAAAAAAAAAAAAAAAAAAAAAAAAAAAAAAAAAAAAAAAAAAAAAAAAAAAAAAAAAAAAAAAAAAAAAAAAAAAAAAAAAAAAAAAAAAAAAAAAAAAAAAAAAAAAAAAAAAAAAAAAAAAAAAAAAAAAAAAAAAAAAAAAAAAAAAAAAAAAAAAAAAAAAAAAAAAAAAAAAAAAAAAAAAAAAAAAAAAAAAAAAAAAAAAAAAAAAAAAAAAAAAAAAAAAAAAAAAAAAAAAAAAAAAAAAAAAAAAAAAAAAAAAAAAAAAAAAAAAAAAAAAAAAAAAAAAAAAAAAAAAAAAAAAAAAAAAAAAAAAAAAAAAAAAAAAAAAAAAAAAAAAAAAAAAAAAAAAAAAAAAAAAAAAAAAAAAAAAAAAAAAAAAAAAAAAAAAAAAAAAAAAAAAAAAAAAAAAAAAAAAAAAAAAAAAAAAAAAAAAAAAAAAAAAAAAAAAAAAAAAAAAAAAAAAAAAAAAAAAAAAAAAAAAAAAAAAAAAAAAAAAAAAAAAAAAAAAAAAAAAAAAAAAAAAAAAAAAAAAAAAAAAAAAAAAAAAAAAAAAAAAAAAAAAAAAAAAAAAAAAAAAAAAAAAAAAAAAAAAAAAAAAAAAAAAAAAAAAAAAAAAAAAAAAAAAAAAAAAAAAAAAAAAAAAAAAAAAAAAAAAAAAAAAAAAAAAAAAAAAAAAAAAAAAAAAAAAAAAAAAAAAAAAAAAAAAAAAAAAAAAAAAAAAAAAAAAAAAAAAAAAAAAAAAAAAAAAAAAAAAAAAAAAAAAAAAAAAAAAAAAAAAAAAAAAAAAAAAAAAAAAAAAAAAAAAAAAAAAAAAAAAAAAAAAAAAAAAAAAAAAAAAAAAAAAAAAAAAAAAAAAAAAAAAAAAAAAAAAAAAAAAAAAAAAAAAAAAAAAAAAAAAAAAAAAAAAAAAAAAAAAAAAAAAAAAAAAAAAAAAAAAAAAAAAAAAAAAAAAAAAAAAAAAAAAAAAAAAAAAAAAAAAAAAAAAAAAAAAAAAAAAAAAAAAAAAAAAAAAAAAAAAAAAAAAAAAAAAAAAAAAAAAAAAAAAAAAAAAAAAAAAAAAAAAAAAAAAAAAAAAAAAAAAAAAAAAAAAAAAAAAAAAAAAAAAAAAAAAAAAAAAAAAAAAAAAAAAAAAAAAAAAAAAAAAAAAAAAAAAAAAAAAAAAAAAAAAAAAAAAAAAAAAAAAAAAAAAAAAAAAAAAAAAAAAAAAAAAAAAAAAAAAAAAAAAAAAAAAAAAAAAAAAAAAAAAAAAAAAAAAAAAAAAAAAAAAAAAAAAAAAAAAAAAAAAAAAAAAAAAAAAAAAAAAAAAAAAAAAAAAAAAAAAAAAAAAAAAAAAAAAAAAAAAAAAAAAAAAAAAAAAAAAAAAAAAAAAAAAAAAAAAAAAAAAAAAAAAAAAAAAAAAAAAAAAAAAAAAAAAAAAAAAAAAAAAAAAAAAAAAAAAAAAAAAAAAAAAAAAAAAAAAAAAAAAAAAAAAAAAAAAAAAAAAAAAAAAAAAAAAAAAAAAAAAAAAAAAAAAAAAAAAAAAAAAAAAAAAAAAAAAAAAAAAAAAAAAAAAAAAAAAAAAAAAAAAAAAAAAAAAAAAAAAAAAAAAAAAAAAAAAAAAAAAAAAAAAAAAAAAAAAAAAAAAAAAAAAAAAAAAAAAAAAAAAAAAAAAAAAAAAAAAAAAAAAAAAAAAAAAAAAAAAAAAAAAAAAAAAAAAAAAAAAAAAAAAAAAAAAAAAAAAAAAAAAAAAAAAAAAAAAAAAAAAAAAAAAAAAAAAAAAAAAAAAAAAAAAAAAAAAAAAAAAAAAAAAAAAAAAAAAAAAAAAAAAAAAAAAAAAAAAAAAAAAAAAAAAAAAAAAAAAAAAAAAAAAAAAAAAAAAAAAAAAAAAAAAAAAAAAAAAAAAAAAAAAAAAAAAAAAAAAAAAAAAAAAAAA
AAAAAAAAAAAAAAAAAAAAAAAAAAAAAAAAAAAAAAAAAAAAAAAAAAAAAAAAAAAAAAAAAAAAAAAAAAAAAAAAAAAAAAAAAAAAAAAAAAAAAAAAAAAAAAAAAAAAAAAAAAAAAAAAAAAAAAAAAAAAAAAAAAAAAAAAAAAAAAAAAAAAAAAAAAAAAAAAAAAAAAAAAAAAAAAAAAAAAAAAAAAAAAAAAAAAAAAAAAAAAAAAAAAAAAAAAAAAAAAAAAAAAAAAAAAAAAAAAAAAAAAAAAAAAAAAAAAAAAAAAAAAAAAAAAAAAAAAAAAAAAAAAAAAAAAAAAAAAAAAAAAAAAAAAAAAAAAAAAAAAAAAAAAAAAAAAAAAAAAAAAAAAAAAAAAAAAAAAAAAAAAAAAAAAAAAAAAAAAAAAAAAAAAAAAAAAAAAAAAAAAAAAAAAAAAAAAAAAAAAAAAAAAAAAAAAAAAAAAAAAAAAAAAAAAAAAAAAAAAAAAAAAAAAAAAAAAAAAAAAAAAAAAAAAAAAAAAAAAAAAAAAAAAAAAAAAAAAAAAAAAAAAAAAAAAAAAAAAAAAAAAAAAAAAAAAAAAAAAAAAAAAAAAAAAAAAAAAAAAAAAAAAAAAAAAAAAAAAAAAAAAAAAAAAAAAAAAAAAAAAAAAAAAAAAAAAAAAAAAAAAAAAAAAAAAAAAAAAAAAAAAAAAAAAAAAAAAAAAAAAAAAAAAAAAAAAAAAAAAAAAAAAAAAAAAAAAAAAAAAAAAAAAAAAAAAAAAAAAAAAAAAAAAAAAAAAAAAAAAAAAAAAAAAAAAAAAAAAAAAAAAAAAAAAAAAAAAAAAAAAAAAAAAAAAAAAAAAAAAAAAAAAAAAAAAAAAAAAAAAAAAAAAAAAAAAAAAAAAAAAAAAAAAAAAAAAAAAAAAAAAAAAAAAAAAAAAAAAAAAAAAAAAAAAAAAAAAAAAAAAAAAAAAAAAAAAAAAAAAAAAAAAAAAAAAAAAAAAAAAAAAAAAAAAAAAAAAAAAAAAAAAAAAAAAAAAAAAAAAAAAAAAAAAAAAAAAAAAAAAAAAAAAAAAAAAAAAAAAAAAAAAAAAAAAAAAAAAAAAAAAAAAAAAAAAAAAAAAAAAAAAAAAAAAAAAAAAAAAAAAAAAAAAAAAAAAAAAAAAAAAAAAAAAAAAAAAAAAAAAAAAAAAAAAAAAAAAAAAAAAAAAAAAAAAAAAAAAAAAAAAAAAAAAAAAAAAAAAAAAAAAAAAAAAAAAAAAAAAAAAAAAAAAAAAAAAAAAAAAAAAAAAAAAAAAAAAAAAAAAAAAAAAAAAAAAAAAAAAAAAAAAAAAAAAAAAAAAAAAAAAAAAAAAAAAAAAAAAAAAAAAAAAAAAAAAAAAAAAAAAAAAAAAAAAAAAAAAAAAAAAAAAAAAAAAAAAAAAAAAAAAAAAAAAAAAAAAAAAAAAAAAAAAAAAAAAAAAAAAAAAAAAAAAAAAAAAAAAAAAAAAAAAAAAAAAAAAAAAAAAAAAAAAAAAAAAAAAAAAAAAAAAAAAAAAAAAAAAAAAAAAAAAAAAAAAAAAAAAAAAAAAAAAAAAAAAAAAAAAAAAAAAAAAAAAAAAAAAAAAAAAAAAAAAAAAAAAAAAAAAAAAAAAAAAAAAAAAAAAAAAAAAAAAAAAAAAAAAAAAAAAAAAAAAAAAAAAAAAAAAAAAAAAAAAAAAAAAAAAAAAAAAAAAAAAAAAAAAAAAAAAAAAAAAAAAAAAAAAAAAAAAAAAAAAAAAAAAAAAAAAAAAAAAAAAAAAAAAAAAAAAAAAAAAAAAAAAAAAAAAAAAAAAAAAAAAAAAAAAAAAAAAAAAAAAAAAAAAAAAAAAAAAAAAAAAAAAAAAAAAAAAAAAAAAAAAAAAAAAAAAAAAAAAAAAAAAAAAAAAAAAAAAAAAAAAAAAAAAAAAAAAAAAAAAAAAAAAAAAAAAAAAAAAAAAAAAAAAAAAAAAAAAAAAAAAAAAAAAAAAAAAAAAAAAAAAAAAAAAAAAAAAAAAAAAAAAAAAAAAAAAAAAAAAAAAAAAAAAAAAAAAAAAAAAAAAAAAAAAAAAAAAAAAAAAAAAAAAAAAAAAAAAAAAAAAAAAAAAAAAAAAAAAAAAAAAAAAAAAAAAAAAAAAAAAAAAAAAAAAAAAAAAAAAAAAAAAAAAAAAAAAAAAAAAAAAAAAAAAAAAAAAAAAAAAAAAAAAAAAAAAAAAAAAAAAAAAAAAAAAAAAAAAAAAAAAAAAAAAAAAAAAAAAAAAAAAAAAAAAAAAAAAAAAAAAAAAAAAAAAAAAAAAAAAAAAAAAAAAAAAAAAAAAAAAAAAAAAAAAAAAAAAAAAAAAAAAAAAAAAAAAAAAAAAAAAAAAAAAAAAAAAAAAAAAAAAAAAAAAAAAAAAAAAAAAAAAAAAAAAAAAAAAAAAAAAAAAAAAAAAAAAAAAAAAAAAAAAAAAAAAAAAAAAAAAAAAAAAAAAAAAAAAAAAAAAAAAAAAAAAAAAAAAAAAAAAAAAAAAAAAAAAAAAAAAAAAAAAAAAAAAAAAAAAAAAAAAAAAAAAAAAAAAAAAAAAAAAAAAAAAAAAAAAAAAAAAAAAAAAAAAAAAAAAAAAAAAAAAAAAAAAAAAAAAAAAAAAAAAAAAAAAAAAAAAAAAAAAAAAAAAAAAAAAAAAAAAAAAAAAAAAAAAAAAAAAAAAAAAAAAAAAAAAAAAAAAAAAAAAAAAAAAAAAAAAAAAAAAAAAAAAAAAAAAAAAAAAAAAAAAAAAAAAAAAAAAAAAAAAAAAAAAAAAAAAAAAAAAAAAAAAAAAAAAAAAAAAAAAAAAAAAAAAAAAAAAAAAAAAAAAAAAAAAAAAAAAAAAAAAAAAAAAAAAAAAAAAAAAAAAAAAAAAAAAAAAAAAAAAAAAAAAAAAAAAAAAAAAAAAAAAAAAAAAAAAAAAAAAAAAAAAAAAAAAAAAAAAAAAAAAAAAAAAAAAAAAAAAAAAAAAAAAAAAAAAAAAAAAAAAAAAAAAAAAAAAAAAAAAAAAAAAAAAAAAAAAAAAAAAAAAAAAAAAAAAAAAAAAAAAAAAAAAAAAAAAAAAAAAAAAAAAAAAAAAAAAAAAAAAAAAAAAAAAAAAAAAAAAAAAAAAAAAAAAAAAAAAAAAAAAAAAAAAAAAAAAAAAAAAAAAAAAAAAAAAAAAAAAAAAAAAAAAAAAAAAAAAAAAAAAAAAAAAAAAAAAAAAAAAAAAAAAAAAAAAAAAAAAAAAAAAAAAAAAAAAAAAAAAAAAAAAAAAAAAAAAAAAAAAAAAAAAAAAAAAAAAAAAAAAAAAAAAAAAAAAAAAAAAAAAAAAAAAAAAAAAAAAAAAAAAAAAAAAAAAAAAAAAAAAAAAAAAAAAAAAAAAAAAAAAAAAAAAAAAAAAAAAAAAAAAAAAAAAAAAAAAAAAAAAAAAAAAAAAAAAAAAAAAAAAAAAAAAAAAAAAAAAAAAAAAAAAAAAAAAAAAAAAAAAAAAAAAAAAAAAAAAAAAAAAAAAAAAAAAAAAAAAAAAAAAAAAAAAAAAAAAAAAAAAAAAAAAAAAAAAAAAAAAAAAAAAAAAAAAAAAAAAAAAAAAAAAAAAAAAAAAAAAAAAAAAAAAAAAAAAAAAAAAAAAAAAAAAAAAAAAAAAAAAAAAAAAAAAAAAAAAAAAAAAAAAAAAAAAAAAAAAAAAAAAAAAAAAAAAAAAAAAAAAAAAAAAAAAAAAAAAAAAAAAAAAAAAAAAAAAAAAAAAAAAAAAAAAAAAAAAAAAAAAAAAAAAAAAAAAAAAAAAAAAAAAAAAAAAAAAAAAAAAAAAAAAAAAAAAAAAAAAAAAAAAAAAAAAAAAAAAAAAAAAAAAAAAAAAAAAAAAAAAAAAAAAAAAAAAAAAAAAAAAAAAAAAAAAAAAAAAAAAAAAAAAAAAAAAAAAAAAAAAAAAAAAAAAAAAAAAAAAAAAAAAAAAAAAAAAAAAAAAAAAAAAAAAAAAAAAAAAAAAAAAAAAAAAAAAAAAAAAAAAAAAAAAAAAAAAAAAAAAAAAAAAAAAAAAAAAAAAAAAAAAAAAAAAAAAAAAAAAAAAAAAAAAAAAAAAAAAAAAAAAAAAAAAAAAAAAAAAAAAAAAAAAAAAAAAAAAAAAAAAAAAAAAAAAAAAAA
AAAAAAAAAAAAAAAAAAAAAAAAAAAAAAAAAAAAAAAAAAAAAAAAAAAAAAAAAAAAAAAAAAAAAAAAAAAAAAAAAAAAAAAAAAAAAAAAAAAAAAAAAAAAAAAAAAAAAAAAAAAAAAAAAAAAAAAAAAAAAAAAAAAAAAAAAAAAAAAAAAAAAAAAAAAAAAAAAAAAAAAAAAAAAAAAAAAAAAAAAAAAAAAAAAAAAAAAAAAAAAAAAAAAAAAAAAAAAAAAAAAAAAAAAAAAAAAAAAAAAAAAAAAAAAAAAAAAAAAAAAAAAAAAAAAAAAAAAAAAAAAAAAAAAAAAAAAAAAAAAAAAAAAAAAAAAAAAAAAAAAAAAAAAAAAAAAAAAAAAAAAAAAAAAAAAAAAAAAAAAAAAAAAAAAAAAAAAAAAAAAAAAAAAAAAAAAAAAAAAAAAAAAAAAAAAAAAAAAAAAAAAAAAAAAAAAAAAAAAAAAAAAAAAAAAAAAAAAAAAAAAAAAAAAAAAAAAAAAAAAAAAAAAAAAAAAAAAAAAAAAAAAAAAAAAAAAAAAAAAAAAAAAAAAAAAAAAAAAAAAAAAAAAAAAAAAAAAAAAAAAAAAAAAAAAAAAAAAAAAAAAAAAAAAAAAAAAAAAAAAAAAAAAAAAAAAAAAAAAAAAAAAAAAAAAAAAAAAAAAAAAAAAAAAAAAAAAAAAAAAAAAAAAAAAAAAAAAAAAAAAAAAAAAAAAAAAAAAAAAAAAAAAAAAAAAAAAAAAAAAAAAAAAAAAAAAAAAAAAAAAAAAAAAAAAAAAAAAAAAAAAAAAAAAAAAAAAAAAAAAAAAAAAAAAAAAAAAAAAAAAAAAAAAAAAAAAAAAAAAAAAAAAAAAAAAAAAAAAAAAAAAAAAAAAAAAAAAAAAAAAAAAAAAAAAAAAAAAAAAAAAAAAAAAAAAAAAAAAAAAAAAAAAAAAAAAAAAAAAAAAAAAAAAAAAAAAAAAAAAAAAAAAAAAAAAAAAAAAAAAAAAAAAAAAAAAAAAAAAAAAAAAAAAAAAAAAAAAAAAAAAAAAAAAAAAAAAAAAAAAAAAAAAAAAAAAAAAAAAAAAAAAAAAAAAAAAAAAAAAAAAAAAAAAAAAAAAAAAAAAAAAAAAAAAAAAAAAAAAAAAAAAAAAAAAAAAAAAAAAAAAAAAAAAAAAAAAAAAAAAAAAAAAAAAAAAAAAAAAAAAAAAAAAAAAAAAAAAAAAAAAAAAAAAAAAAAAAAAAAAAAAAAAAAAAAAAAAAAAAAAAAAAAAAAAAAAAAAAAAAAAAAAAAAAAAAAAAAAAAAAAAAAAAAAAAAAAAAAAAAAAAAAAAAAAAAAAAAAAAAAAAAAAAAAAAAAAAAAAAAAAAAAAAAAAAAAAAAAAAAAAAAAAAAAAAAAAAAAAAAAAAAAAAAAAAAAAAAAAAAAAAAAAAAAAAAAAAAAAAAAAAAAAAAAAAAAAAAAAAAAAAAAAAAAAAAAAAAAAAAAAAAAAAAAAAAAAAAAAAAAAAAAAAAAAAAAAAAAAAAAAAAAAAAAAAAAAAAAAAAAAAAAAAAAAAAAAAAAAAAAAAAAAAAAAAAAAAAAAAAAAAAAAAAAAAAAAAAAAAAAAAAAAAAAAAAAAAAAAAAAAAAAAAAAAAAAAAAAAAAAAAAAAAAAAAAAAAAAAAAAAAAAAAAAAAAAAAAAAAAAAAAAAAAAAAAAAAAAAAAAAAAAAAAAAAAAAAAAAAAAAAAAAAAAAAAAAAAAAAAAAAAAAAAAAAAAAAAAAAAAAAAAAAAAAAAAAAAAAAAAAAAAAAAAAAAAAAAAAAAAAAAAAAAAAAAAAAAAAAAAAAAAAAAAAAAAAAAAAAAAAAAAAAAAAAAAAAAAAAAAAAAAAAAAAAAAAAAAAAAAAAAAAAAAAAAAAAAAAAAAAAAAAAAAAAAAAAAAAAAAAAAAAAAAAAAAAAAAAAAAAAAAAAAAAAAAAAAAAAAAAAAAAAAAAAAAAAAAAAAAAAAAAAAAAAAAAAAAAAAAAAAAAAAAAAAAAAAAAAAAAAAAAAAAAAAAAAAAAAAAAAAAAAAAAAAAAAAAAAAAAAAAAAAAAAAAAAAAAAAAAAAAAAAAAAAAAAAAAAAAAAAAAAAAAAAAAAAAAAAAAAAAAAAAAAAAAAAAAAAAAAAAAAAAAAAAAAAAAAAAAAAAAAAAAAAAAAAAAAAAAAAAAAAAAAAAAAAAAAAAAAAAAAAAAAAAAAAAAAAAAAAAAAAAAAAAAAAAAAAAAAAAAAAAAAAAAAAAAAAAAAAAAAAAAAAAAAAAAAAAAAAAAAAAAAAAAAAAAAAAAAAAAAAAAAAAAAAAAAAAAAAAAAAAAAAAAAAAAAAAAAAAAAAAAAAAAAAAAAAAAAAAAAAAAAAAAAAAAAAAAAAAAAAAAAAAAAAAAAAAAAAAAAAAAAAAAAAAAAAAAAAAAAAAAAAAAAAAAAAAAAAAAAAAAAAAAAAAAAAAAAAAAAAAAAAAAAAAAAAAAAAAAAAAAAAAAAAAAAAAAAAAAAAAAAAAAAAAAAAAAAAAAAAAAAAAAAAAAAAAAAAAAAAAAAAAAAAAAAAAAAAAAAAAAAAAAAAAAAAAAAAAAAAAAAAAAAAAAAAAAAAAAAAAAAAAAAAAAAAAAAAAAAAAAAAAAAAAAAAAAAAAAAAAAAAAAAAAAAAAAAAAAAAAAAAAAAAAAAAAAAAAAAAAAAAAAAAAAAAAAAAAAAAAAAAAAAAAAAAAAAAAAAAAAAAAAAAAAAAAAAAAAAAAAAAAAAAAAAAAAAAAAAAAAAAAAAAAAAAAAAAAAAAAAAAAAAAAAAAAAAAAAAAAAAAAAAAAAAAAAAAAAAAAAAAAAAAAAAAAAAAAAAAAAAAAAAAAAAAAAAAAAAAAAAAAAAAAAAAAAAAAAAAAAAAAAAAAAAAAAAAAAAAAAAAAAAAAAAAAAAAAAAAAAAAAAAAAAAAAAAAAAAAAAAAAAAAAAAAAAAAAAAAAAAAAAAAAAAAAAAAAAAAAAAAAAAAAAAAAAAAAAAAAAAAAAAAAAAAAAAAAAAAAAAAAAAAAAAAAAAAAAAAAAAAAAAAAAAAAAAAAAAAAAAAAAAAAAAAAAAAAAAAAAAAAAAAAAAAAAAAAAAAAAAAAAAAAAAAAAAAAAAAAAAAAAAAAAAAAAAAAAAAAAAAAAAAAAAAAAAAAAAAAAAAAAAAAAAAAAAAAAAAAAAAAAAAAAAAAAAAAAAAAAAAAAAAAAAAAAAAAAAAAAAAAAAAAAAAAAAAAAAAAAAAAAAAAAAAAAAAAAAAAAAAAAAAAAAAAAAAAAAAAAAAAAAAAAAAAAAAAAAAAAAAAAAAAAAAAAAAAAAAAAAAAAAAAAAAAAAAAAAAAAAAAAAAAAAAAAAAAAAAAAAAAAAAAAAAAAAAAAAAAAAAAAAAAAAAAAAAAAAAAAAAAAAAAAAAAAAAAAAAAAAAAAAAAAAAAAAAAAAAAAAAAAAAAAAAAAAAAAAAAAAAAAAAAAAAAAAAAAAAAAAAAAAAAAAAAAAAAAAAAAAAAAAAAAAAAAAAAAAAAAAAAAAAAAAAAAAAAAAAAAAAAAAAAAAAAAAAAAAAAAAAAAAAAAAAAAAAAAAAAAAAAAAAAAAAAAAAAAAAAAAAAAAAAAAAAAAAAAAAAAAAAAAAAAAAAAAAAAAAAAAAAAAAAAAAAAAAAAAAAAAAAAAAAAAAAAAAAAAAAAAAAAAAAAAAAAAAAAAAAAAAAAAAAAAAAAAAAAAAAAAAAAAAAAAAAAAAAAAAAAAAAAAAAAAAAAAAAAAAAAAAAAAAAAAAAAAAAAAAAAAAAAAAAAAAAAAAAAAAAAAAAAAAAAAAAAAAAAAAAAAAAAAAAAAAAAAAAAAAAAAAAAAAAAAAAAAAAAAAAAAAAAAAAAAAAAAAAAAAAAAAAAAAAAAAAAAAAAAAAAAAAAAAAAAAAAAAAAAAAAAAAAAAAAAAAAAAAAAAAAAAAAAAAAAAAAAAAAAAAAAAAAAAAAAAAAAAAAAAAAAAAAAAAAAAAAAAAAAAAAAAAAAAAAAAAAAAAAAAAAAAAAAAAAAAAAAAAAAAAAAAAAAAAAAAAAAAAAAAAAAAAAAAAAAAAAAAAAAAAAAAAAAAAAAAAAAAAAAAAAAAAAA
AAAAAAAAAAAAAAAAAAAAAAAAAAAAAAAAAAAAAAAAAAAAAAAAAAAAAAAAAAAAAAAAAAAAAAAAAAAAAAAAAAAAAAAAAAAAAAAAAAAAAAAAAAAAAAAAAAAAAAAAAAAAAAAAAAAAAAAAAAAAAAAAAAAAAAAAAAAAAAAAAAAAAAAAAAAAAAAAAAAAAAAAAAAAAAAAAAAAAAAAAAAAAAAAAAAAAAAAAAAAAAAAAAAAAAAAAAAAAAAAAAAAAAAAAAAAAAAAAAAAAAAAAAAAAAAAAAAAAAAAAAAAAAAAAAAAAAAAAAAAAAAAAAAAAAAAAAAAAAAAAAAAAAAAAAAAAAAAAAAAAAAAAAAAAAAAAAAAAAAAAAAAAAAAAAAAAAAAAAAAAAAAAAAAAAAAAAAAAAAAAAAAAAAAAAAAAAAAAAAAAAAAAAAAAAAAAAAAAAAAAAAAAAAAAAAAAAAAAAAAAAAAAAAAAAAAAAAAAAAAAAAAAAAAAAAAAAAAAAAAAAAAAAAAAAAAAAAAAAAAAAAAAAAAAAAAAAAAAAAAAAAAAAAAAAAAAAAAAAAAAAAAAAAAAAAAAAAAAAAAAAAAAAAAAAAAAAAAAAAAAAAAAAAAAAAAAAAAAAAAAAAAAAAAAAAAAAAAAAAAAAAAAAAAAAAAAAAAAAAAAAAAAAAAAAAAAAAAAAAAAAAAAAAAAAAAAAAAAAAAAAAAAAAAAAAAAAAAAAAAAAAAAAAAAAAAAAAAAAAAAAAAAAAAAAAAAAAAAAAAAAAAAAAAAAAAAAAAAAAAAAAAAAAAAAAAAAAAAAAAAAAAAAAAAAAAAAAAAAAAAAAAAAAAAAAAAAAAAAAAAAAAAAAAAAAAAAAAAAAAAAAAAAAAAAAAAAAAAAAAAAAAAAAAAAAAAAAAAAAAAAAAAAAAAAAAAAAAAAAAAAAAAAAAAAAAAAAAAAAAAAAAAAAAAAAAAAAAAAAAAAAAAAAAAAAAAAAAAAAAAAAAAAAAAAAAAAAAAAAAAAAAAAAAAAAAAAAAAAAAAAAAAAAAAAAAAAAAAAAAAAAAAAAAAAAAAAAAAAAAAAAAAAAAAAAAAAAAAAAAAAAAAAAAAAAAAAAAAAAAAAAAAAAAAAAAAAAAAAAAAAAAAAAAAAAAAAAAAAAAAAAAAAAAAAAAAAAAAAAAAAAAAAAAAAAAAAAAAAAAAAAAAAAAAAAAAAAAAAAAAAAAAAAAAAAAAAAAAAAAAAAAAAAAAAAAAAAAAAAAAAAAAAAAAAAAAAAAAAAAAAAAAAAAAAAAAAAAAAAAAAAAAAAAAAAAAAAAAAAAAAAAAAAAAAAAAAAAAAAAAAAAAAAAAAAAAAAAAAAAAAAAAAAAAAAAAAAAAAAAAAAAAAAAAAAAAAAAAAAAAAAAAAAAAAAAAAAAAAAAAAAAAAAAAAAAAAAAAAAAAAAAAAAAAAAAAAAAAAAAAAAAAAAAAAAAAAAAAAAAAAAAAAAAAAAAAAAAAAAAAAAAAAAAAAAAAAAAAAAAAAAAAAAAAAAAAAAAAAAAAAAAAAAAAAAAAAAAAAAAAAAAAAAAAAAAAAAAAAAAAAAAAAAAAAAAAAAAAAAAAAAAAAAAAAAAAAAAAAAAAAAAAAAAAAAAAAAAAAAAAAAAAAAAAAAAAAAAAAAAAAAAAAAAAAAAAAAAAAAAAAAAAAAAAAAAAAAAAAAAAAAAAAAAAAAAAAAAAAAAAAAAAAAAAAAAAAAAAAAAAAAAAAAAAAAAAAAAAAAAAAAAAAAAAAAAAAAAAAAAAAAAAAAAAAAAAAAAAAAAAAAAAAAAAAAAAAAAAAAAAAAAAAAAAAAAAAAAAAAAAAAAAAAAAAAAAAAAAAAAAAAAAAAAAAAAAAAAAAAAAAAAAAAAAAAAAAAAAAAAAAAAAAAAAAAAAAAAAAAAAAAAAAAAAAAAAAAAAAAAAAAAAAAAAAAAAAAAAAAAAAAAAAAAAAAAAAAAAAAAAAAAAAAAAAAAAAAAAAAAAAAAAAAAAAAAAAAAAAAAAAAAAAAAAAAAAAAAAAAAAAAAAAAAAAAAAAAAAAAAAAAAAAAAAAAAAAAAAAAAAAAAAAAAAAAAAAAAAAAAAAAAAAAAAAAAAAAAAAAAAAAAAAAAAAAAAAAAAAAAAAAAAAAAAAAAAAAAAAAAAAAAAAAAAAAAAAAAAAAAAAAAAAAAAAAAAAAAAAAAAAAAAAAAAAAAAAAAAAAAAAAAAAAAAAAAAAAAAAAAAAAAAAAAAAAAAAAAAAAAAAAAAAAAAAAAAAAAAAAAAAAAAAAAAAAAAAAAAAAAAAAAAAAAAAAAAAAAAAAAAAAAAAAAAAAAAAAAAAAAAAAAAAAAAAAAAAAAAAAAAAAAAAAAAAAAAAAAAAAAAAAAAAAAAAAAAAAAAAAAAAAAAAAAAAAAAAAAAAAAAAAAAAAAAAAAAAAAAAAAAAAAAAAAAAAAAAAAAAAAAAAAAAAAAAAAAAAAAAAAAAAAAAAAAAAAAAAAAAAAAAAAAAAAAAAAAAAAAAAAAAAAAAAAAAAAAAAAAAAAAAAAAAAAAAAAAAAAAAAAAAAAAAAAAAAAAAAAAAAAAAAAAAAAAAAAAAAAAAAAAAAAAAAAAAAAAAAAAAAAAAAAAAAAAAAAAAAAAAAAAAAAAAAAAAAAAAAAAAAAAAAAAAAAAAAAAAAAAAAAAAAAAAAAAAAAAAAAAAAAAAAAAAAAAAAAAAAAAAAAAAAAAAAAAAAAAAAAAAAAAAAAAAAAAAAAAAAAAAAAAAAAAAAAAAAAAAAAAAAAAAAAAAAAAAAAAAAAAAAAAAAAAAAAAAAAAAAAAAAAAAAAAAAAAAAAAAAAAAAAAAAAAAAAAAAAAAAAAAAAAAAAAAAAAAAAAAAAAAAAAAAAAAAAAAAAAAAAAAAAAAAAAAAAAAAAAAAAAAAAAAAAAAAAAAAAAAAAAAAAAAAAAAAAAAAAAAAAAAAAAAAAAAAAAAAAAAAAAAAAAAAAAAAAAAAAAAAAAAAAAAAAAAAAAAAAAAAAAAAAAAAAAAAAAAAAAAAAAAAAAAAAAAAAAAAAAAAAAAAAAAAAAAAAAAAAAAAAAAAAAAAAAAAAAAAAAAAAAAAAAAAAAAAAAAAAAAAAAAAAAAAAAAAAAAAAAAAAAAAAAAAAAAAAAAAAAAAAAAAAAAAAAAAAAAAAAAAAAAAAAAAAAAAAAAAAAAAAAAAAAAAAAAAAAAAAAAAAAAAAAAAAAAAAAAAAAAAAAAAAAAAAAAAAAAAAAAAAAAAAAAAAAAAAAAAAAAAAAAAAAAAAAAAAAAAAAAAAAAAAAAAAAAAAAAAAAAAAAAAAAAAAAAAAAAAAAAAAAAAAAAAAAAAAAAAAAAAAAAAAAAAAAAAAAAAAAAAAAAAAAAAAAAAAAAAAAAAAAAAAAAAAAAAAAAAAAAAAAAAAAAAAAAAAAAAAAAAAAAAAAAAAAAAAAAAAAAAAAAAAAAAAAAAAAAAAAAAAAAAAAAAAAAAAAAAAAAAAAAAAAAAAAAAAAAAAAAAAAAAAAAAAAAAAAAAAAAAAAAAAAAAAAAAAAAAAAAAAAAAAAAAAAAAAAAAAAAAAAAAAAAAAAAAAAAAAAAAAAAAAAAAAAAAAAAAAAAAAAAAAAAAAAAAAAAAAAAAAAAAAAAAAAAAAAAAAAAAAAAAAAAAAAAAAAAAAAAAAAAAAAAAAAAAAAAAAAAAAAAAAAAAAAAAAAAAAAAAAAAAAAAAAAAAAAAAAAAAAAAAAAAAAAAAAAAAAAAAAAAAAAAAAAAAAAAAAAAAAAAAAAAAAAAAAAAAAAAAAAAAAAAAAAAAAAAAAAAAAAAAAAAAAAAAAAAAAAAAAAAAAAAAAAAAAAAAAAAAAAAAAAAAAAAAAAAAAAAAAAAAAAAAAAAAAAAAAAAAAAAAAAAAAAAAAAAAAAAAAAAAAAAAAAAAAAAAAAAAAAAAAAAAAAAAAAAAAAAAAAAAAAAAAAAAAAAAAAAAAAAAAAAAAAAAAAAAAAAAAAAAAAAAAAAAAAAAAAAAAAAAAAAAAAAAAAAAAAAAAAAAAAAAAAAAAAAAAAAAAAAAAAAAAAAAAAAAAAAAAAAAAAAAAAAAAAAAAAAAAAAAAAAAAAAAAAAAAAAAA
AAAAAAAAAAAAAAAAAAAAAAAAAAAAAAAAAAAAAAAAAAAAAAAAAAAAAAAAAAAAAAAAAAAAAAAAAAAAAAAAAAAAAAAAAAAAAAAAAAAAAAAAAAAAAAAAAAAAAAAAAAAAAAAAAAAAAAAAAAAAAAAAAAAAAAAAAAAAAAAAAAAAAAAAAAAAAAAAAAAAAAAAAAAAAAAAAAAAAAAAAAAAAAAAAAAAAAAAAAAAAAAAAAAAAAAAAAAAAAAAAAAAAAAAAAAAAAAAAAAAAAAAAAAAAAAAAAAAAAAAAAAAAAAAAAAAAAAAAAAAAAAAAAAAAAAAAAAAAAAAAAAAAAAAAAAAAAAAAAAAAAAAAAAAAAAAAAAAAAAAAAAAAAAAAAAAAAAAAAAAAAAAAAAAAAAAAAAAAAAAAAAAAAAAAAAAAAAAAAAAAAAAAAAAAAAAAAAAAAAAAAAAAAAAAAAAAAAAAAAAAAAAAAAAAAAAAAAAAAAAAAAAAAAAAAAAAAAAAAAAAAAAAAAAAAAAAAAAAAAAAAAAAAAAAAAAAAAAAAAAAAAAAAAAAAAAAAAAAAAAAAAAAAAAAAAAAAAAAAAAAAAAAAAAAAAAAAAAAAAAAAAAAAAAAAAAAAAAAAAAAAAAAAAAAAAAAAAAAAAAAAAAAAAAAAAAAAAAAAAAAAAAAAAAAAAAAAAAAAAAAAAAAAAAAAAAAAAAAAAAAAAAAAAAAAAAAAAAAAAAAAAAAAAAAAAAAAAAAAAAAAAAAAAAAAAAAAAAAAAAAAAAAAAAAAAAAAAAAAAAAAAAAAAAAAAAAAAAAAAAAAAAAAAAAAAAAAAAAAAAAAAAAAAAAAAAAAAAAAAAAAAAAAAAAAAAAAAAAAAAAAAAAAAAAAAAAAAAAAAAAAAAAAAAAAAAAAAAAAAAAAAAAAAAAAAAAAAAAAAAAAAAAAAAAAAAAAAAAAAAAAAAAAAAAAAAAAAAAAAAAAAAAAAAAAAAAAAAAAAAAAAAAAAAAAAAAAAAAAAAAAAAAAAAAAAAAAAAAAAAAAAAAAAAAAAAAAAAAAAAAAAAAAAAAAAAAAAAAAAAAAAAAAAAAAAAAAAAAAAAAAAAAAAAAAAAAAAAAAAAAAAAAAAAAAAAAAAAAAAAAAAAAAAAAAAAAAAAAAAAAAAAAAAAAAAAAAAAAAAAAAAAAAAAAAAAAAAAAAAAAAAAAAAAAAAAAAAAAAAAAAAAAAAAAAAAAAAAAAAAAAAAAAAAAAAAAAAAAAAAAAAAAAAAAAAAAAAAAAAAAAAAAAAAAAAAAAAAAAAAAAAAAAAAAAAAAAAAAAAAAAAAAAAAAAAAAAAAAAAAAAAAAAAAAAAAAAAAAAAAAAAAAAAAAAAAAAAAAAAAAAAAAAAAAAAAAAAAAAAAAAAAAAAAAAAAAAAAAAAAAAAAAAAAAAAAAAAAAAAAAAAAAAAAAAAAAAAAAAAAAAAAAAAAAAAAAAAAAAAAAAAAAAAAAAAAAAAAAAAAAAAAAAAAAAAAAAAAAAAAAAAAAAAAAAAAAAAAAAAAAAAAAAAAAAAAAAAAAAAAAAAAAAAAAAAAAAAAAAAAAAAAAAAAAAAAAAAAAAAAAAAAAAAAAAAAAAAAAAAAAAAAAAAAAAAAAAAAAAAAAAAAAAAAAAAAAAAAAAAAAAAAAAAAAAAAAAAAAAAAAAAAAAAAAAAAAAAAAAAAAAAAAAAAAAAAAAAAAAAAAAAAAAAAAAAAAAAAAAAAAAAAAAAAAAAAAAAAAAAAAAAAAAAAAAAAAAAAAAAAAAAAAAAAAAAAAAAAAAAAAAAAAAAAAAAAAAAAAAAAAAAAAAAAAAAAAAAAAAAAAAAAAAAAAAAAAAAAAAAAAAAAAAAAAAAAAAAAAAAAAAAAAAAAAAAAAAAAAAAAAAAAAAAAAAAAAAAAAAAAAAAAAAAAAAAAAAAAAAAAAAAAAAAAAAAAAAAAAAAAAAAAAAAAAAAAAAAAAAAAAAAAAAAAAAAAAAAAAAAAAAAAAAAAAAAAAAAAAAAAAAAAAAAAAAAAAAAAAAAAAAAAAAAAAAAAAAAAAAAAAAAAAAAAAAAAAAAAAAAAAAAAAAAAAAAAAAAAAAAAAAAAAAAAAAAAAAAAAAAAAAAAAAAAAAAAAAAAAAAAAAAAAAAAAAAAAAAAAAAAAAAAAAAAAAAAAAAAAAAAAAAAAAAAAAAAAAAAAAAAAAAAAAAAAAAAAAAAAAAAAAAAAAAAAAAAAAAAAAAAAAAAAAAAAAAAAAAAAAAAAAAAAAAAAAAAAAAAAAAAAAAAAAAAAAAAAAAAAAAAAAAAAAAAAAAAAAAAAAAAAAAAAAAAAAAAAAAAAAAAAAAAAAAAAAAAAAAAAAAAAAAAAAAAAAAAAAAAAAAAAAAAAAAAAAAAAAAAAAAAAAAAAAAAAAAAAAAAAAAAAAAAAAAAAAAAAAAAAAAAAAAAAAAAAAAAAAAAAAAAAAAAAAAAAAAAAAAAAAAAAAAAAAAAAAAAAAAAAAAAAAAAAAAAAAAAAAAAAAAAAAAAAAAAAAAAAAAAAAAAAAAAAAAAAAAAAAAAAAAAAAAAAAAAAAAAAAAAAAAAAAAAAAAAAAAAAAAAAAAAAAAAAAAAAAAAAAAAAAAAAAAAAAAAAAAAAAAAAAAAAAAAAAAAAAAAAAAAAAAAAAAAAAAAAAAAAAAAAAAAAAAAAAAAAAAAAAAAAAAAAAAAAAAAAAAAAAAAAAAAAAAAAAAAAAAAAAAAAAAAAAAAAAAAAAAAAAAAAAAAAAAAAAAAAAAAAAAAAAAAAAAAAAAAAAAAAAAAAAAAAAAAAAAAAAAAAAAAAAAAAAAAAAAAAAAAAAAAAAAAAAAAAAAAAAAAAAAAAAAAAAAAAAAAAAAAAAAAAAAAAAAAAAAAAAAAAAAAAAAAAAAAAAAAAAAAAAAAAAAAAAAAAAAAAAAAAAAAAAAAAAAAAAAAAAAAAAAAAAAAAAAAAAAAAAAAAAAAAAAAAAAAAAAAAAAAAAAAAAAAAAAAAAAAAAAAAAAAAAAAAAAAAAAAAAAAAAAAAAAAAAAAAAAAAAAAAAAAAAAAAAAAAAAAAAAAAAAAAAAAAAAAAAAAAAAAAAAAAAAAAAAAAAAAAAAAAAAAAAAAAAAAAAAAAAAAAAAAAAAAAAAAAAAAAAAAAAAAAAAAAAAAAAAAAAAAAAAAAAAAAAAAAAAAAAAAAAAAAAAAAAAAAAAAAAAAAAAAAAAAAAAAAAAAAAAAAAAAAAAAAAAAAAAAAAAAAAAAAAAAAAAAAAAAAAAAAAAAAAAAAAAAAAAAAAAAAAAAAAAAAAAAAAAAAAAAAAAAAAAAAAAAAAAAAAAAAAAAAAAAAAAAAAAAAAAAAAAAAAAAAAAAAAAAAAAAAAAAAAAAAAAAAAAAAAAAAAAAAAAAAAAAAAAAAAAAAAAAAAAAAAAAAAAAAAAAAAAAAAAAAAAAAAAAAAAAAAAAAAAAAAAAAAAAAAAAAAAAAAAAAAAAAAAAAAAAAAAAAAAAAAAAAAAAAAAAAAAAAAAAAAAAAAAAAAAAAAAAAAAAAAAAAAAAAAAAAAAAAAAAAAAAAAAAAAAAAAAAAAAAAAAAAAAAAAAAAAAAAAAAAAAAAAAAAAAAAAAAAAAAAAAAAAAAAAAAAAAAAAAAAAAAAAAAAAAAAAAAAAAAAAAAAAAAAAAAAAAAAAAAAAAAAAAAAAAAAAAAAAAAAAAAAAAAAAAAAAAAAAAAAAAAAAAAAAAAAAAAAAAAAAAAAAAAAAAAAAAAAAAAAAAAAAAAAAAAAAAAAAAAAAAAAAAAAAAAAAAAAAAAAAAAAAAAAAAAAAAAAAAAAAAAAAAAAAAAAAAAAAAAAAAAAAAAAAAAAAAAAAAAAAAAAAAAAAAAAAAAAAAAAAAAAAAAAAAAAAAAAAAAAAAAAAAAAAAAAAAAAAAAAAAAAAAAAAAAAAAAAAAAAAAAAAAAAAAAAAAAAAAAAAAAAAAAAAAAAAAAAAAAAAAAAAAAAAAAAAAAAAAAAAAAAAAAAAAAAAAAAAAAAAAAAAAAAAAAAAAAAAAAAAAAAAAAAAAAAAAAAAAAAAAAAAAAAAAAAAAAAAAAAAAAAAAAAAAAAAAAAAAAAAAAAAAAAAAAAAAA
AAAAAAAAAAAAAAAAAAAAAAAAAAAAAAAAAAAAAAAAAAAAAAAAAAAAAAAAAAAAAAAAAAAAAAAAAAAAAAAAAAAAAAAAAAAAAAAAAAAAAAAAAAAAAAAAAAAAAAAAAAAAAAAAAAAAAAAAAAAAAAAAAAAAAAAAAAAAAAAAAAAAAAAAAAAAAAAAAAAAAAAAAAAAAAAAAAAAAAAAAAAAAAAAAAAAAAAAAAAAAAAAAAAAAAAAAAAAAAAAAAAAAAAAAAAAAAAAAAAAAAAAAAAAAAAAAAAAAAAAAAAAAAAAAAAAAAAAAAAAAAAAAAAAAAAAAAAAAAAAAAAAAAAAAAAAAAAAAAAAAAAAAAAAAAAAAAAAAAAAAAAAAAAAAAAAAAAAAAAAAAAAAAAAAAAAAAAAAAAAAAAAAAAAAAAAAAAAAAAAAAAAAAAAAAAAAAAAAAAAAAAAAAAAAAAAAAAAAAAAAAAAAAAAAAAAAAAAAAAAAAAAAAAAAAAAAAAAAAAAAAAAAAAAAAAAAAAAAAAAAAAAAAAAAAAAAAAAAAAAAAAAAAAAAAAAAAAAAAAAAAAAAAAAAAAAAAAAAAAAAAAAAAAAAAAAAAAAAAAAAAAAAAAAAAAAAAAAAAAAAAAAAAAAAAAAAAAAAAAAAAAAAAAAAAAAAAAAAAAAAAAAAAAAAAAAAAAAAAAAAAAAAAAAAAAAAAAAAAAAAAAAAAAAAAAAAAAAAAAAAAAAAAAAAAAAAAAAAAAAAAAAAAAAAAAAAAAAAAAAAAAAAAAAAAAAAAAAAAAAAAAAAAAAAAAAAAAAAAAAAAAAAAAAAAAAAAAAAAAAAAAAAAAAAAAAAAAAAAAAAAAAAAAAAAAAAAAAAAAAAAAAAAAAAAAAAAAAAAAAAAAAAAAAAAAAAAAAAAAAAAAAAAAAAAAAAAAAAAAAAAAAAAAAAAAAAAAAAAAAAAAAAAAAAAAAAAAAAAAAAAAAAAAAAAAAAAAAAAAAAAAAAAAAAAAAAAAAAAAAAAAAAAAAAAAAAAAAAAAAAAAAAAAAAAAAAAAAAAAAAAAAAAAAAAAAAAAAAAAAAAAAAAAAAAAAAAAAAAAAAAAAAAAAAAAAAAAAAAAAAAAAAAAAAAAAAAAAAAAAAAAAAAAAAAAAAAAAAAAAAAAAAAAAAAAAAAAAAAAAAAAAAAAAAAAAAAAAAAAAAAAAAAAAAAAAAAAAAAAAAAAAAAAAAAAAAAAAAAAAAAAAAAAAAAAAAAAAAAAAAAAAAAAAAAAAAAAAAAAAAAAAAAAAAAAAAAAAAAAAAAAAAAAAAAAAAAAAAAAAAAAAAAAAAAAAAAAAAAAAAAAAAAAAAAAAAAAAAAAAAAAAAAAAAAAAAAAAAAAAAAAAAAAAAAAAAAAAAAAAAAAAAAAAAAAAAAAAAAAAAAAAAAAAAAAAAAAAAAAAAAAAAAAAAAAAAAAAAAAAAAAAAAAAAAAAAAAAAAAAAAAAAAAAAAAAAAAAAAAAAAAAAAAAAAAAAAAAAAAAAAAAAAAAAAAAAAAAAAAAAAAAAAAAAAAAAAAAAAAAAAAAAAAAAAAAAAAAAAAAAAAAAAAAAAAAAAAAAAAAAAAAAAAAAAAAAAAAAAAAAAAAAAAAAAAAAAAAAAAAAAAAAAAAAAAAAAAAAAAAAAAAAAAAAAAAAAAAAAAAAAAAAAAAAAAAAAAAAAAAAAAAAAAAAAAAAAAAAAAAAAAAAAAAAAAAAAAAAAAAAAAAAAAAAAAAAAAAAAAAAAAAAAAAAAAAAAAAAAAAAAAAAAAAAAAAAAAAAAAAAAAAAAAAAAAAAAAAAAAAAAAAAAAAAAAAAAAAAAAAAAAAAAAAAAAAAAAAAAAAAAAAAAAAAAAAAAAAAAAAAAAAAAAAAAAAAAAAAAAAAAAAAAAAAAAAAAAAAAAAAAAAAAAAAAAAAAAAAAAAAAAAAAAAAAAAAAAAAAAAAAAAAAAAAAAAAAAAAAAAAAAAAAAAAAAAAAAAAAAAAAAAAAAAAAAAAAAAAAAAAAAAAAAAAAAAAAAAAAAAAAAAAAAAAAAAAAAAAAAAAAAAAAAAAAAAAAAAAAAAAAAAAAAAAAAAAAAAAAAAAAAAAAAAAAAAAAAAAAAAAAAAAAAAAAAAAAAAAAAAAAAAAAAAAAAAAAAAAAAAAAAAAAAAAAAAAAAAAAAAAAAAAAAAAAAAAAAAAAAAAAAAAAAAAAAAAAAAAAAAAAAAAAAAAAAAAAAAAAAAAAAAAAAAAAAAAAAAAAAAAAAAAAAAAAAAAAAAAAAAAAAAAAAAAAAAAAAAAAAAAAAAAAAAAAAAAAAAAAAAAAAAAAAAAAAAAAAAAAAAAAAAAAAAAAAAAAAAAAAAAAAAAAAAAAAAAAAAAAAAAAAAAAAAAAAAAAAAAAAAAAAAAAAAAAAAAAAAAAAAAAAAAAAAAAAAAAAAAAAAAAAAAAAAAAAAAAAAAAAAAAAAAAAAAAAAAAAAAAAAAAAAAAAAAAAAAAAAAAAAAAAAAAAAAAAAAAAAAAAAAAAAAAAAAAAAAAAAAAAAAAAAAAAAAAAAAAAAAAAAAAAAAAAAAAAAAAAAAAAAAAAAAAAAAAAAAAAAAAAAAAAAAAAAAAAAAAAAAAAAAAAAAAAAAAAAAAAAAAAAAAAAAAAAAAAAAAAAAAAAAAAAAAAAAAAAAAAAAAAAAAAAAAAAAAAAAAAAAAAAAAAAAAAAAAAAAAAAAAAAAAAAAAAAAAAAAAAAAAAAAAAAAAAAAAAAAAAAAAAAAAAAAAAAAAAAAAAAAAAAAAAAAAAAAAAAAAAAAAAAAAAAAAAAAAAAAAAAAAAAAAAAAAAAAAAAAAAAAAAAAAAAAAAAAAAAAAAAAAAAAAAAAAAAAAAAAAAAAAAAAAAAAAAAAAAAAAAAAAAAAAAAAAAAAAAAAAAAAAAAAAAAAAAAAAAAAAAAAAAAAAAAAAAAAAAAAAAAAAAAAAAAAAAAAAAAAAAAAAAAAAAAAAAAAAAAAAAAAAAAAAAAAAAAAAAAAAAAAAAAAAAAAAAAAAAAAAAAAAAAAAAAAAAAAAAAAAAAAAAAAAAAAAAAAAAAAAAAAAAAAAAAAAAAAAAAAAAAAAAAAAAAAAAAAAAAAAAAAAAAAAAAAAAAAAAAAAAAAAAAAAAAAAAAAAAAAAAAAAAAAAAAAAAAAAAAAAAAAAAAAAAAAAAAAAAAAAAAAAAAAAAAAAAAAAAAAAAAAAAAAAAAAAAAAAAAAAAAAAAAAAAAAAAAAAAAAAAAAAAAAAAAAAAAAAAAAAAAAAAAAAAAAAAAAAAAAAAAAAAAAAAAAAAAAAAAAAAAAAAAAAAAAAAAAAAAAAAAAAAAAAAAAAAAAAAAAAAAAAAAAAAAAAAAAAAAAAAAAAAAAAAAAAAAAAAAAAAAAAAAAAAAAAAAAAAAAAAAAAAAAAAAAAAAAAAAAAAAAAAAAAAAAAAAAAAAAAAAAAAAAAAAAAAAAAAAAAAAAAAAAAAAAAAAAAAAAAAAAAAAAAAAAAAAAAAAAAAAAAAAAAAAAAAAAAAAAAAAAAAAAAAAAAAAAAAAAAAAAAAAAAAAAAAAAAAAAAAAAAAAAAAAAAAAAAAAAAAAAAAAAAAAAAAAAAAAAAAAAAAAAAAAAAAAAAAAAAAAAAAAAAAAAAAAAAAAAAAAAAAAAAAAAAAAAAAAAAAAAAAAAAAAAAAAAAAAAAAAAAAAAAAAAAAAAAAAAAAAAAAAAAAAAAAAAAAAAAAAAAAAAAAAAAAAAAAAAAAAAAAAAAAAAAAAAAAAAAAAAAAAAAAAAAAAAAAAAAAAAAAAAAAAAAAAAAAAAAAAAAAAAAAAAAAAAAAAAAAAAAAAAAAAAAAAAAAAAAAAAAAAAAAAAAAAAAAAAAAAAAAAAAAAAAAAAAAAAAAAAAAAAAAAAAAAAAAAAAAAAAAAAAAAAAAAAAAAAAAAAAAAAAAAAAAAAAAAAAAAAAAAAAAAAAAAAAAAAAAAAAAAAAAAAAAAAAAAAAAAAAAAAAAAAAAAAAAAAAAAAAAAAAAAAAAAAAAAAAAAAAAAAAAAAAAAAAAAAAAAAAAAAAAAAAAAAAAAAAAAAAAAAAAAAAAAAAAAAAAAAAAAAAAAAAAAAAAAAAAA
AAAAAAAAAAAAAAAAAAAAAAAAAAAAAAAAAAAAAAAAAAAAAAAAAAAAAAAAAAAAAAAAAAAAAAAAAAAAAAAAAAAAAAAAAAAAAAAAAAAAAAAAAAAAAAAAAAAAAAAAAAAAAAAAAAAAAAAAAAAAAAAAAAAAAAAAAAAAAAAAAAAAAAAAAAAAAAAAAAAAAAAAAAAAAAAAAAAAAAAAAAAAAAAAAAAAAAAAAAAAAAAAAAAAAAAAAAAAAAAAAAAAAAAAAAAAAAAAAAAAAAAAAAAAAAAAAAAAAAAAAAAAAAAAAAAAAAAAAAAAAAAAAAAAAAAAAAAAAAAAAAAAAAAAAAAAAAAAAAAAAAAAAAAAAAAAAAAAAAAAAAAAAAAAAAAAAAAAAAAAAAAAAAAAAAAAAAAAAAAAAAAAAAAAAAAAAAAAAAAAAAAAAAAAAAAAAAAAAAAAAAAAAAAAAAAAAAAAAAAAAAAAAAAAAAAAAAAAAAAAAAAAAAAAAAAAAAAAAAAAAAAAAAAAAAAAAAAAAAAAAAAAAAAAAAAAAAAAAAAAAAAAAAAAAAAAAAAAAAAAAAAAAAAAAAAAAAAAAAAAAAAAAAAAAAAAAAAAAAAAAAAAAAAAAAAAAAAAAAAAAAAAAAAAAAAAAAAAAAAAAAAAAAAAAAAAAAAAAAAAAAAAAAAAAAAAAAAAAAAAAAAAAAAAAAAAAAAAAAAAAAAAAAAAAAAAAAAAAAAAAAAAAAAAAAAAAAAAAAAAAAAAAAAAAAAAAAAAAAAAAAAAAAAAAAAAAAAAAAAAAAAAAAAAAAAAAAAAAAAAAAAAAAAAAAAAAAAAAAAAAAAAAAAAAAAAAAAAAAAAAAAAAAAAAAAAAAAAAAAAAAAAAAAAAAAAAAAAAAAAAAAAAAAAAAAAAAAAAAAAAAAAAAAAAAAAAAAAAAAAAAAAAAAAAAAAAAAAAAAAAAAAAAAAAAAAAAAAAAAAAAAAAAAAAAAAAAAAAAAAAAAAAAAAAAAAAAAAAAAAAAAAAAAAAAAAAAAAAAAAAAAAAAAAAAAAAAAAAAAAAAAAAAAAAAAAAAAAAAAAAAAAAAAAAAAAAAAAAAAAAAAAAAAAAAAAAAAAAAAAAAAAAAAAAAAAAAAAAAAAAAAAAAAAAAAAAAAAAAAAAAAAAAAAAAAAAAAAAAAAAAAAAAAAAAAAAAAAAAAAAAAAAAAAAAAAAAAAAAAAAAAAAAAAAAAAAAAAAAAAAAAAAAAAAAAAAAAAAAAAAAAAAAAAAAAAAAAAAAAAAAAAAAAAAAAAAAAAAAAAAAAAAAAAAAAAAAAAAAAAAAAAAAAAAAAAAAAAAAAAAAAAAAAAAAAAAAAAAAAAAAAAAAAAAAAAAAAAAAAAAAAAAAAAAAAAAAAAAAAAAAAAAAAAAAAAAAAAAAAAAAAAAAAAAAAAAAAAAAAAAAAAAAAAAAAAAAAAAAAAAAAAAAAAAAAAAAAAAAAAAAAAAAAAAAAAAAAAAAAAAAAAAAAAAAAAAAAAAAAAAAAAAAAAAAAAAAAAAAAAAAAAAAAAAAAAAAAAAAAAAAAAAAAAAAAAAAAAAAAAAAAAAAAAAAAAAAAAAAAAAAAAAAAAAAAAAAAAAAAAAAAAAAAAAAAAAAAAAAAAAAAAAAAAAAAAAAAAAAAAAAAAAAAAAAAAAAAAAAAAAAAAAAAAAAAAAAAAAAAAAAAAAAAAAAAAAAAAAAAAAAAAAAAAAAAAAAAAAAAAAAAAAAAAAAAAAAAAAAAAAAAAAAAAAAAAAAAAAAAAAAAAAAAAAAAAAAAAAAAAAAAAAAAAAAAAAAAAAAAAAAAAAAAAAAAAAAAAAAAAAAAAAAAAAAAAAAAAAAAAAAAAAAAAAAAAAAAAAAAAAAAAAAAAAAAAAAAAAAAAAAAAAAAAAAAAAAAAAAAAAAAAAAAAAAAAAAAAAAAAAAAAAAAAAAAAAAAAAAAAAAAAAAAAAAAAAAAAAAAAAAAAAAAAAAAAAAAAAAAAAAAAAAAAAAAAAAAAAAAAAAAAAAAAAAAAAAAAAAAAAAAAAAAAAAAAAAAAAAAAAAAAAAAAAAAAAAAAAAAAAAAAAAAAAAAAAAAAAAAAAAAAAAAAAAAAAAAAAAAAAAAAAAAAAAAAAAAAAAAAAAAAAAAAAAAAAAAAAAAAAAAAAAAAAAAAAAAAAAAAAAAAAAAAAAAAAAAAAAAAAAAAAAAAAAAAAAAAAAAAAAAAAAAAAAAAAAAAAAAAAAAAAAAAAAAAAAAAAAAAAAAAAAAAAAAAAAAAAAAAAAAAAAAAAAAAAAAAAAAAAAAAAAAAAAAAAAAAAAAAAAAAAAAAAAAAAAAAAAAAAAAAAAAAAAAAAAAAAAAAAAAAAAAAAAAAAAAAAAAAAAAAAAAAAAAAAAAAAAAAAAAAAAAAAAAAAAAAAAAAAAAAAAAAAAAAAAAAAAAAAAAAAAAAAAAAAAAAAAAAAAAAAAAAAAAAAAAAAAAAAAAAAAAAAAAAAAAAAAAAAAAAAAAAAAAAAAAAAAAAAAAAAAAAAAAAAAAAAAAAAAAAAAAAAAAAAAAAAAAAAAAAAAAAAAAAAAAAAAAAAAAAAAAAAAAAAAAAAAAAAAAAAAAAAAAAAAAAAAAAAAAAAAAAAAAAAAAAAAAAAAAAAAAAAAAAAAAAAAAAAAAAAAAAAAAAAAAAAAAAAAAAAAAAAAAAAAAAAAAAAAAAAAAAAAAAAAAAAAAAAAAAAAAAAAAAAAAAAAAAAAAAAAAAAAAAAAAAAAAAAAAAAAAAAAAAAAAAAAAAAAAAAAAAAAAAAAAAAAAAAAAAAAAAAAAAAAAAAAAAAAAAAAAAAAAAAAAAAAAAAAAAAAAAAAAAAAAAAAAAAAAAAAAAAAAAAAAAAAAAAAAAAAAAAAAAAAAAAAAAAAAAAAAAAAAAAAAAAAAAAAAAAAAAAAAAAAAAAAAAAAAAAAAAAAAAAAAAAAAAAAAAAAAAAAAAAAAAAAAAAAAAAAAAAAAAAAAAAAAAAAAAAAAAAAAAAAAAAAAAAAAAAAAAAAAAAAAAAAAAAAAAAAAAAAAAAAAAAAAAAAAAAAAAAAAAAAAAAAAAAAAAAAAAAAAAAAAAAAAAAAAAAAAAAAAAAAAAAAAAAAAAAAAAAAAAAAAAAAAAAAAAAAAAAAAAAAAAAAAAAAAAAAAAAAAAAAAAAAAAAAAAAAAAAAAAAAAAAAAAAAAAAAAAAAAAAAAAAAAAAAAAAAAAAAAAAAAAAAAAAAAAAAAAAAAAAAAAAAAAAAAAAAAAAAAAAAAAAAAAAAAAAAAAAAAAAAAAAAAAAAAAAAAAAAAAAAAAAAAAAAAAAAAAAAAAAAAAAAAAAAAAAAAAAAAAAAAAAAAAAAAAAAAAAAAAAAAAAAAAAAAAAAAAAAAAAAAAAAAAAAAAAAAAAAAAAAAAAAAAAAAAAAAAAAAAAAAAAAAAAAAAAAAAAAAAAAAAAAAAAAAAAAAAAAAAAAAAAAAAAAAAAAAAAAAAAAAAAAAAAAAAAAAAAAAAAAAAAAAAAAAAAAAAAAAAAAAAAAAAAAAAAAAAAAAAAAAAAAAAAAAAAAAAAAAAAAAAAAAAAAAAAAAAAAAAAAAAAAAAAAAAAAAAAAAAAAAAAAAAAAAAAAAAAAAAAAAAAAAAAAAAAAAAAAAAAAAAAAAAAAAAAAAAAAAAAAAAAAAAAAAAAAAAAAAAAAAAAAAAAAAAAAAAAAAAAAAAAAAAAAAAAAAAAAAAAAAAAAAAAAAAAAAAAAAAAAAAAAAAAAAAAAAAAAAAAAAAAAAAAAAAAAAAAAAAAAAAAAAAAAAAAAAAAAAAAAAAAAAAAAAAAAAAAAAAAAAAAAAAAAAAAAAAAAAAAAAAAAAAAAAAAAAAAAAAAAAAAAAAAAAAAAAAAAAAAAAAAAAAAAAAAAAAAAAAAAAAAAAAAAAAAAAAAAAAAAAAAAAAAAAAAAAAAAAAAAAAAAAAAAAAAAAAAAAAAAAAAAAAAAAAAAAAAAAAAAAAAAAAAAAAAAAAAAAAAAAAAAAAAAAAAAAAAAAAAAAAAAAAAAAAAAAAAAAAAAAAAAAAAAAAAAAAAAAAAAAAAAAAAAAAAAAAAAAAAAAAAAAAAAAAAAAAAAAAAAAA
AAAAAAAAAAAAAAAAAAAAAAAAAAAAAAAAAAAAAAAAAAAAAAAAAAAAAAAAAAAAAAAAAAAAAAAAAAAAAAAAAAAAAAAAAAAAAAAAAAAAAAAAAAAAAAAAAAAAAAAAAAAAAAAAAAAAAAAAAAAAAAAAAAAAAAAAAAAAAAAAAAAAAAAAAAAAAAAAAAAAAAAAAAAAAAAAAAAAAAAAAAAAAAAAAAAAAAAAAAAAAAAAAAAAAAAAAAAAAAAAAAAAAAAAAAAAAAAAAAAAAAAAAAAAAAAAAAAAAAAAAAAAAAAAAAAAAAAAAAAAAAAAAAAAAAAAAAAAAAAAAAAAAAAAAAAAAAAAAAAAAAAAAAAAAAAAAAAAAAAAAAAAAAAAAAAAAAAAAAAAAAAAAAAAAAAAAAAAAAAAAAAAAAAAAAAAAAAAAAAAAAAAAAAAAAAAAAAAAAAAAAAAAAAAAAAAAAAAAAAAAAAAAAAAAAAAAAAAAAAAAAAAAAAAAAAAAAAAAAAAAAAAAAAAAAAAAAAAAAAAAAAAAAAAAAAAAAAAAAAAAAAAAAAAAAAAAAAAAAAAAAAAAAAAAAAAAAAAAAAAAAAAAAAAAAAAAAAAAAAAAAAAAAAAAAAAAAAAAAAAAAAAAAAAAAAAAAAAAAAAAAAAAAAAAAAAAAAAAAAAAAAAAAAAAAAAAAAAAAAAAAAAAAAAAAAAAAAAAAAAAAAAAAAAAAAAAAAAAAAAAAAAAAAAAAAAAAAAAAAAAAAAAAAAAAAAAAAAAAAAAAAAAAAAAAAAAAAAAAAAAAAAAAAAAAAAAAAAAAAAAAAAAAAAAAAAAAAAAAAAAAAAAAAAAAAAAAAAAAAAAAAAAAAAAAAAAAAAAAAAAAAAAAAAAAAAAAAAAAAAAAAAAAAAAAAAAAAAAAAAAAAAAAAAAAAAAAAAAAAAAAAAAAAAAAAAAAAAAAAAAAAAAAAAAAAAAAAAAAAAAAAAAAAAAAAAAAAAAAAAAAAAAAAAAAAAAAAAAAAAAAAAAAAAAAAAAAAAAAAAAAAAAAAAAAAAAAAAAAAAAAAAAAAAAAAAAAAAAAAAAAAAAAAAAAAAAAAAAAAAAAAAAAAAAAAAAAAAAAAAAAAAAAAAAAAAAAAAAAAAAAAAAAAAAAAAAAAAAAAAAAAAAAAAAAAAAAAAAAAAAAAAAAAAAAAAAAAAAAAAAAAAAAAAAAAAAAAAAAAAAAAAAAAAAAAAAAAAAAAAAAAAAAAAAAAAAAAAAAAAAAAAAAAAAAAAAAAAAAAAAAAAAAAAAAAAAAAAAAAAAAAAAAAAAAAAAAAAAAAAAAAAAAAAAAAAAAAAAAAAAAAAAAAAAAAAAAAAAAAAAAAAAAAAAAAAAAAAAAAAAAAAAAAAAAAAAAAAAAAAAAAAAAAAAAAAAAAAAAAAAAAAAAAAAAAAAAAAAAAAAAAAAAAAAAAAAAAAAAAAAAAAAAAAAAAAAAAAAAAAAAAAAAAAAAAAAAAAAAAAAAAAAAAAAAAAAAAAAAAAAAAAAAAAAAAAAAAAAAAAAAAAAAAAAAAAAAAAAAAAAAAAAAAAAAAAAAAAAAAAAAAAAAAAAAAAAAAAAAAAAAAAAAAAAAAAAAAAAAAAAAAAAAAAAAAAAAAAAAAAAAAAAAAAAAAAAAAAAAAAAAAAAAAAAAAAAAAAAAAAAAAAAAAAAAAAAAAAAAAAAAAAAAAAAAAAAAAAAAAAAAAAAAAAAAAAAAAAAAAAAAAAAAAAAAAAAAAAAAAAAAAAAAAAAAAAAAAAAAAAAAAAAAAAAAAAAAAAAAAAAAAAAAAAAAAAAAAAAAAAAAAAAAAAAAAAAAAAAAAAAAAAAAAAAAAAAAAAAAAAAAAAAAAAAAAAAAAAAAAAAAAAAAAAAAAAAAAAAAAAAAAAAAAAAAAAAAAAAAAAAAAAAAAAAAAAAAAAAAAAAAAAAAAAAAAAAAAAAAAAAAAAAAAAAAAAAAAAAAAAAAAAAAAAAAAAAAAAAAAAAAAAAAAAAAAAAAAAAAAAAAAAAAAAAAAAAAAAAAAAAAAAAAAAAAAAAAAAAAAAAAAAAAAAAAAAAAAAAAAAAAAAAAAAAAAAAAAAAAAAAAAAAAAAAAAAAAAAAAAAAAAAAAAAAAAAAAAAAAAAAAAAAAAAAAAAAAAAAAAAAAAAAAAAAAAAAAAAAAAAAAAAAAAAAAAAAAAAAAAAAAAAAAAAAAAAAAAAAAAAAAAAAAAAAAAAAAAAAAAAAAAAAAAAAAAAAAAAAAAAAAAAAAAAAAAAAAAAAAAAAAAAAAAAAAAAAAAAAAAAAAAAAAAAAAAAAAAAAAAAAAAAAAAAAAAAAAAAAAAAAAAAAAAAAAAAAAAAAAAAAAAAAAAAAAAAAAAAAAAAAAAAAAAAAAAAAAAAAAAAAAAAAAAAAAAAAAAAAAAAAAAAAAAAAAAAAAAAAAAAAAAAAAAAAAAAAAAAAAAAAAAAAAAAAAAAAAAAAAAAAAAAAAAAAAAAAAAAAAAAAAAAAAAAAAAAAAAAAAAAAAAAAAAAAAAAAAAAAAAAAAAAAAAAAAAAAAAAAAAAAAAAAAAAAAAAAAAAAAAAAAAAAAAAAAAAAAAAAAAAAAAAAAAAAAAAAAAAAAAAAAAAAAAAAAAAAAAAAAAAAAAAAAAAAAAAAAAAAAAAAAAAAAAAAAAAAAAAAAAAAAAAAAAAAAAAAAAAAAAAAAAAAAAAAAAAAAAAAAAAAAAAAAAAAAAAAAAAAAAAAAAAAAAAAAAAAAAAAAAAAAAAAAAAAAAAAAAAAAAAAAAAAAAAAAAAAAAAAAAAAAAAAAAAAAAAAAAAAAAAAAAAAAAAAAAAAAAAAAAAAAAAAAAAAAAAAAAAAAAAAAAAAAAAAAAAAAAAAAAAAAAAAAAAAAAAAAAAAAAAAAAAAAAAAAAAAAAAAAAAAAAAAAAAAAAAAAAAAAAAAAAAAAAAAAAAAAAAAAAAAAAAAAAAAAAAAAAAAAAAAAAAAAAAAAAAAAAAAAAAAAAAAAAAAAAAAAAAAAAAAAAAAAAAAAAAAAAAAAAAAAAAAAAAAAAAAAAAAAAAAAAAAAAAAAAAAAAAAAAAAAAAAAAAAAAAAAAAAAAAAAAAAAAAAAAAAAAAAAAAAAAAAAAAAAAAAAAAAAAAAAAAAAAAAAAAAAAAAAAAAAAAAAAAAAAAAAAAAAAAAAAAAAAAAAAAAAAAAAAAAAAAAAAAAAAAAAAAAAAAAAAAAAAAAAAAAAAAAAAAAAAAAAAAAAAAAAAAAAAAAAAAAAAAAAAAAAAAAAAAAAAAAAAAAAAAAAAAAAAAAAAAAAAAAAAAAAAAAAAAAAAAAAAAAAAAAAAAAAAAAAAAAAAAAAAAAAAAAAAAAAAAAAAAAAAAAAAAAAAAAAAAAAAAAAAAAAAAAAAAAAAAAAAAAAAAAAAAAAAAAAAAAAAAAAAAAAAAAAAAAAAAAAAAAAAAAAAAAAAAAAAAAAAAAAAAAAAAAAAAAAAAAAAAAAAAAAAAAAAAAAAAAAAAAAAAAAAAAAAAAAAAAAAAAAAAAAAAAAAAAAAAAAAAAAAAAAAAAAAAAAAAAAAAAAAAAAAAAAAAAAAAAAAAAAAAAAAAAAAAAAAAAAAAAAAAAAAAAAAAAAAAAAAAAAAAAAAAAAAAAAAAAAAAAAAAAAAAAAAAAAAAAAAAAAAAAAAAAAAAAAAAAAAAAAAAAAAAAAAAAAAAAAAAAAAAAAAAAAAAAAAAAAAAAAAAAAAAAAAAAAAAAAAAAAAAAAAAAAAAAAAAAAAAAAAAAAAAAAAAAAAAAAAAAAAAAAAAAAAAAAAAAAAAAAAAAAAAAAAAAAAAAAAAAAAAAAAAAAAAAAAAAAAAAAAAAAAAAAAAAAAAAAAAAAAAAAAAAAAAAAAAAAAAAAAAAAAAAAAAAAAAAAAAAAAAAAAAAAAAAAAAAAAAAAAAAAAAAAAAAAAAAAAAAAAAAAAAAAAAAAAAAAAAAAAAAAAAAAAAAAAAAAAAAAAAAAAAAAAAAAAAAAAAAAAAAAAAAAAAAAAAAAAAAAAAAAAAAAAAAAAAAAAAAAAAAAAAAAAAAAAAAAAAAAAAAAAAAAAAAAAAAAAAAAAAAAAAAAAAAAAAAAAAAAAAAAAA
AAAAAAAAAAAAAAAAAAAAAAAAAAAAAAAAAAAAAAAAAAAAAAAAAAAAAAAAAAAAAAAAAAAAAAAAAAAAAAAAAAAAAAAAAAAAAAAAAAAAAAAAAAAAAAAAAAAAAAAAAAAAAAAAAAAAAAAAAAAAAAAAAAAAAAAAAAAAAAAAAAAAAAAAAAAAAAAAAAAAAAAAAAAAAAAAAAAAAAAAAAAAAAAAAAAAAAAAAAAAAAAAAAAAAAAAAAAAAAAAAAAAAAAAAAAAAAAAAAAAAAAAAAAAAAAAAAAAAAAAAAAAAAAAAAAAAAAAAAAAAAAAAAAAAAAAAAAAAAAAAAAAAAAAAAAAAAAAAAAAAAAAAAAAAAAAAAAAAAAAAAAAAAAAAAAAAAAAAAAAAAAAAAAAAAAAAAAAAAAAAAAAAAAAAAAAAAAAAAAAAAAAAAAAAAAAAAAAAAAAAAAAAAAAAAAAAAAAAAAAAAAAAAAAAAAAAAAAAAAAAAAAAAAAAAAAAAAAAAAAAAAAAAAAAAAAAAAAAAAAAAAAAAAAAAAAAAAAAAAAAAAAAAAAAAAAAAAAAAAAAAAAAAAAAAAAAAAAAAAAAAAAAAAAAAAAAAAAAAAAAAAAAAAAAAAAAAAAAAAAAAAAAAAAAAAAAAAAAAAAAAAAAAAAAAAAAAAAAAAAAAAAAAAAAAAAAAAAAAAAAAAAAAAAAAAAAAAAAAAAAAAAAAAAAAAAAAAAAAAAAAAAAAAAAAAAAAAAAAAAAAAAAAAAAAAAAAAAAAAAAAAAAAAAAAAAAAAAAAAAAAAAAAAAAAAAAAAAAAAAAAAAAAAAAAAAAAAAAAAAAAAAAAAAAAAAAAAAAAAAAAAAAAAAAAAAAAAAAAAAAAAAAAAAAAAAAAAAAAAAAAAAAAAAAAAAAAAAAAAAAAAAAAAAAAAAAAAAAAAAAAAAAAAAAAAAAAAAAAAAAAAAAAAAAAAAAAAAAAAAAAAAAAAAAAAAAAAAAAAAAAAAAAAAAAAAAAAAAAAAAAAAAAAAAAAAAAAAAAAAAAAAAAAAAAAAAAAAAAAAAAAAAAAAAAAAAAAAAAAAAAAAAAAAAAAAAAAAAAAAAAAAAAAAAAAAAAAAAAAAAAAAAAAAAAAAAAAAAAAAAAAAAAAAAAAAAAAAAAAAAAAAAAAAAAAAAAAAAAAAAAAAAAAAAAAAAAAAAAAAAAAAAAAAAAAAAAAAAAAAAAAAAAAAAAAAAAAAAAAAAAAAAAAAAAAAAAAAAAAAAAAAAAAAAAAAAAAAAAAAAAAAAAAAAAAAAAAAAAAAAAAAAAAAAAAAAAAAAAAAAAAAAAAAAAAAAAAAAAAAAAAAAAAAAAAAAAAAAAAAAAAAAAAAAAAAAAAAAAAAAAAAAAAAAAAAAAAAAAAAAAAAAAAAAAAAAAAAAAAAAAAAAAAAAAAAAAAAAAAAAAAAAAAAAAAAAAAAAAAAAAAAAAAAAAAAAAAAAAAAAAAAAAAAAAAAAAAAAAAAAAAAAAAAAAAAAAAAAAAAAAAAAAAAAAAAAAAAAAAAAAAAAAAAAAAAAAAAAAAAAAAAAAAAAAAAAAAAAAAAAAAAAAAAAAAAAAAAAAAAAAAAAAAAAAAAAAAAAAAAAAAAAAAAAAAAAAAAAAAAAAAAAAAAAAAAAAAAAAAAAAAAAAAAAAAAAAAAAAAAAAAAAAAAAAAAAAAAAAAAAAAAAAAAAAAAAAAAAAAAAAAAAAAAAAAAAAAAAAAAAAAAAAAAAAAAAAAAAAAAAAAAAAAAAAAAAAAAAAAAAAAAAAAAAAAAAAAAAAAAAAAAAAAAAAAAAAAAAAAAAAAAAAAAAAAAAAAAAAAAAAAAAAAAAAAAAAAAAAAAAAAAAAAAAAAAAAAAAAAAAAAAAAAAAAAAAAAAAAAAAAAAAAAAAAAAAAAAAAAAAAAAAAAAAAAAAAAAAAAAAAAAAAAAAAAAAAAAAAAAAAAAAAAAAAAAAAAAAAAAAAAAAAAAAAAAAAAAAAAAAAAAAAAAAAAAAAAAAAAAAAAAAAAAAAAAAAAAAAAAAAAAAAAAAAAAAAAAAAAAAAAAAAAAAAAAAAAAAAAAAAAAAAAAAAAAAAAAAAAAAAAAAAAAAAAAAAAAAAAAAAAAAAAAAAAAAAAAAAAAAAAAAAAAAAAAAAAAAAAAAAAAAAAAAAAAAAAAAAAAAAAAAAAAAAAAAAAAAAAAAAAAAAAAAAAAAAAAAAAAAAAAAAAAAAAAAAAAAAAAAAAAAAAAAAAAAAAAAAAAAAAAAAAAAAAAAAAAAAAAAAAAAAAAAAAAAAAAAAAAAAAAAAAAAAAAAAAAAAAAAAAAAAAAAAAAAAAAAAAAAAAAAAAAAAAAAAAAAAAAAAAAAAAAAAAAAAAAAAAAAAAAAAAAAAAAAAAAAAAAAAAAAAAAAAAAAAAAAAAAAAAAAAAAAAAAAAAAAAAAAAAAAAAAAAAAAAAAAAAAAAAAAAAAAAAAAAAAAAAAAAAAAAAAAAAAAAAAAAAAAAAAAAAAAAAAAAAAAAAAAAAAAAAAAAAAAAAAAAAAAAAAAAAAAAAAAAAAAAAAAAAAAAAAAAAAAAAAAAAAAAAAAAAAAAAAAAAAAAAAAAAAAAAAAAAAAAAAAAAAAAAAAAAAAAAAAAAAAAAAAAAAAAAAAAAAAAAAAAAAAAAAAAAAAAAAAAAAAAAAAAAAAAAAAAAAAAAAAAAAAAAAAAAAAAAAAAAAAAAAAAAAAAAAAAAAAAAAAAAAAAAAAAAAAAAAAAAAAAAAAAAAAAAAAAAAAAAAAAAAAAAAAAAAAAAAAAAAAAAAAAAAAAAAAAAAAAAAAAAAAAAAAAAAAAAAAAAAAAAAAAAAAAAAAAAAAAAAAAAAAAAAAAAAAAAAAAAAAAAAAAAAAAAAAAAAAAAAAAAAAAAAAAAAAAAAAAAAAAAAAAAAAAAAAAAAAAAAAAAAAAAAAAAAAAAAAAAAAAAAAAAAAAAAAAAAAAAAAAAAAAAAAAAAAAAAAAAAAAAAAAAAAAAAAAAAAAAAAAAAAAAAAAAAAAAAAAAAAAAAAAAAAAAAAAAAAAAAAAAAAAAAAAAAAAAAAAAAAAAAAAAAAAAAAAAAAAAAAAAAAAAAAAAAAAAAAAAAAAAAAAAAAAAAAAAAAAAAAAAAAAAAAAAAAAAAAAAAAAAAAAAAAAAAAAAAAAAAAAAAAAAAAAAAAAAAAAAAAAAAAAAAAAAAAAAAAAAAAAAAAAAAAAAAAAAAAAAAAAAAAAAAAAAAAAAAAAAAAAAAAAAAAAAAAAAAAAAAAAAAAAAAAAAAAAAAAAAAAAAAAAAAAAAAAAAAAAAAAAAAAAAAAAAAAAAAAAAAAAAAAAAAAAAAAAAAAAAAAAAAAAAAAAAAAAAAAAAAAAAAAAAAAAAAAAAAAAAAAAAAAAAAAAAAAAAAAAAAAAAAAAAAAAAAAAAAAAAAAAAAAAAAAAAAAAAAAAAAAAAAAAAAAAAAAAAAAAAAAAAAAAAAAAAAAAAAAAAAAAAAAAAAAAAAAAAAAAAAAAAAAAAAAAAAAAAAAAAAAAAAAAAAAAAAAAAAAAAAAAAAAAAAAAAAAAAAAAAAAAAAAAAAAAAAAAAAAAAAAAAAAAAAAAAAAAAAAAAAAAAAAAAAAAAAAAAAAAAAAAAAAAAAAAAAAAAAAAAAAAAAAAAAAAAAAAAAAAAAAAAAAAAAAAAAAAAAAAAAAAAAAAAAAAAAAAAAAAAAAAAAAAAAAAAAAAAAAAAAAAAAAAAAAAAAAAAAAAAAAAAAAAAAAAAAAAAAAAAAAAAAAAAAAAAAAAAAAAAAAAAAAAAAAAAAAAAAAAAAAAAAAAAAAAAAAAAAAAAAAAAAAAAAAAAAAAAAAAAAAAAAAAAAAAAAAAAAAAAAAAAAAAAAAAAAAAAAAAAAAAAAAAAAAAAAAAAAAAAAAAAAAAAAAAAAAAAAAAAAAAAAAAAAAAAAAAAAAAAAAAAAAAAAAAAAAAAAAAAAAAAAAAAAAAAAAAAAAAAAAAAAAAAAAAAAAAAAAAAAAAAAAAAAAAAAAAAAAAAAAAAAAAAAAAAAAAAAAAAAAAAAAAAAAAAAAAAAAAAAAAAAAAAAAAAAAAAAAAAAAAAAAAAAAAAAAAAAAAAA
AAAAAAAAAAAAAAAAAAAAAAAAAAAAAAAAAAAAAAAAAAAAAAAAAAAAAAAAAAAAAAAAAAAAAAAAAAAAAAAAAAAAAAAAAAAAAAAAAAAAAAAAAAAAAAAAAAAAAAAAAAAAAAAAAAAAAAAAAAAAAAAAAAAAAAAAAAAAAAAAAAAAAAAAAAAAAAAAAAAAAAAAAAAAAAAAAAAAAAAAAAAAAAAAAAAAAAAAAAAAAAAAAAAAAAAAAAAAAAAAAAAAAAAAAAAAAAAAAAAAAAAAAAAAAAAAAAAAAAAAAAAAAAAAAAAAAAAAAAAAAAAAAAAAAAAAAAAAAAAAAAAAAAAAAAAAAAAAAAAAAAAAAAAAAAAAAAAAAAAAAAAAAAAAAAAAAAAAAAAAAAAAAAAAAAAAAAAAAAAAAAAAAAAAAAAAAAAAAAAAAAAAAAAAAAAAAAAAAAAAAAAAAAAAAAAAAAAAAAAAAAAAAAAAAAAAAAAAAAAAAAAAAAAAAAAAAAAAAAAAAAAAAAAAAAAAAAAAAAAAAAAAAAAAAAAAAAAAAAAAAAAAAAAAAAAAAAAAAAAAAAAAAAAAAAAAAAAAAAAAAAAAAAAAAAAAAAAAAAAAAAAAAAAAAAAAAAAAAAAAAAAAAAAAAAAAAAAAAAAAAAAAAAAAAAAAAAAAAAAAAAAAAAAAAAAAAAAAAAAAAAAAAAAAAAAAAAAAAAAAAAAAAAAAAAAAAAAAAAAAAAAAAAAAAAAAAAAAAAAAAAAAAAAAAAAAAAAAAAAAAAAAAAAAAAAAAAAAAAAAAAAAAAAAAAAAAAAAAAAAAAAAAAAAAAAAAAAAAAAAAAAAAAAAAAAAAAAAAAAAAAAAAAAAAAAAAAAAAAAAAAAAAAAAAAAAAAAAAAAAAAAAAAAAAAAAAAAAAAAAAAAAAAAAAAAAAAAAAAAAAAAAAAAAAAAAAAAAAAAAAAAAAAAAAAAAAAAAAAAAAAAAAAAAAAAAAAAAAAAAAAAAAAAAAAAAAAAAAAAAAAAAAAAAAAAAAAAAAAAAAAAAAAAAAAAAAAAAAAAAAAAAAAAAAAAAAAAAAAAAAAAAAAAAAAAAAAAAAAAAAAAAAAAAAAAAAAAAAAAAAAAAAAAAAAAAAAAAAAAAAAAAAAAAAAAAAAAAAAAAAAAAAAAAAAAAAAAAAAAAAAAAAAAAAAAAAAAAAAAAAAAAAAAAAAAAAAAAAAAAAAAAAAAAAAAAAAAAAAAAAAAAAAAAAAAAAAAAAAAAAAAAAAAAAAAAAAAAAAAAAAAAAAAAAAAAAAAAAAAAAAAAAAAAAAAAAAAAAAAAAAAAAAAAAAAAAAAAAAAAAAAAAAAAAAAAAAAAAAAAAAAAAAAAAAAAAAAAAAAAAAAAAAAAAAAAAAAAAAAAAAAAAAAAAAAAAAAAAAAAAAAAAAAAAAAAAAAAAAAAAAAAAAAAAAAAAAAAAAAAAAAAAAAAAAAAAAAAAAAAAAAAAAAAAAAAAAAAAAAAAAAAAAAAAAAAAAAAAAAAAAAAAAAAAAAAAAAAAAAAAAAAAAAAAAAAAAAAAAAAAAAAAAAAAAAAAAAAAAAAAAAAAAAAAAAAAAAAAAAAAAAAAAAAAAAAAAAAAAAAAAAAAAAAAAAAAAAAAAAAAAAAAAAAAAAAAAAAAAAAAAAAAAAAAAAAAAAAAAAAAAAAAAAAAAAAAAAAAAAAAAAAAAAAAAAAAAAAAAAAAAAAAAAAAAAAAAAAAAAAAAAAAAAAAAAAAAAAAAAAAAAAAAAAAAAAAAAAAAAAAAAAAAAAAAAAAAAAAAAAAAAAAAAAAAAAAAAAAAAAAAAAAAAAAAAAAAAAAAAAAAAAAAAAAAAAAAAAAAAAAAAAAAAAAAAAAAAAAAAAAAAAAAAAAAAAAAAAAAAAAAAAAAAAAAAAAAAAAAAAAAAAAAAAAAAAAAAAAAAAAAAAAAAAAAAAAAAAAAAAAAAAAAAAAAAAAAAAAAAAAAAAAAAAAAAAAAAAAAAAAAAAAAAAAAAAAAAAAAAAAAAAAAAAAAAAAAAAAAAAAAAAAAAAAAAAAAAAAAAAAAAAAAAAAAAAAAAAAAAAAAAAAAAAAAAAAAAAAAAAAAAAAAAAAAAAAAAAAAAAAAAAAAAAAAAAAAAAAAAAAAAAAAAAAAAAAAAAAAAAAAAAAAAAAAAAAAAAAAAAAAAAAAAAAAAAAAAAAAAAAAAAAAAAAAAAAAAAAAAAAAAAAAAAAAAAAAAAAAAAAAAAAAAAAAAAAAAAAAAAAAAAAAAAAAAAAAAAAAAAAAAAAAAAAAAAAAAAAAAAAAAAAAAAAAAAAAAAAAAAAAAAAAAAAAAAAAAAAAAAAAAAAAAAAAAAAAAAAAAAAAAAAAAAAAAAAAAAAAAAAAAAAAAAAAAAAAAAAAAAAAAAAAAAAAAAAAAAAAAAAAAAAAAAAAAAAAAAAAAAAAAAAAAAAAAAAAAAAAAAAAAAAAAAAAAAAAAAAAAAAAAAAAAAAAAAAAAAAAAAAAAAAAAAAAAAAAAAAAAAAAAAAAAAAAAAAAAAAAAAAAAAAAAAAAAAAAAAAAAAAAAAAAAAAAAAAAAAAAAAAAAAAAAAAAAAAAAAAAAAAAAAAAAAAAAAAAAAAAAAAAAAAAAAAAAAAAAAAAAAAAAAAAAAAAAAAAAAAAAAAAAAAAAAAAAAAAAAAAAAAAAAAAAAAAAAAAAAAAAAAAAAAAAAAAAAAAAAAAAAAAAAAAAAAAAAAAAAAAAAAAAAAAAAAAAAAAAAAAAAAAAAAAAAAAAAAAAAAAAAAAAAAAAAAAAAAAAAAAAAAAAAAAAAAAAAAAAAAAAAAAAAAAAAAAAAAAAAAAAAAAAAAAAAAAAAAAAAAAAAAAAAAAAAAAAAAAAAAAAAAAAAAAAAAAAAAAAAAAAAAAAAAAAAAAAAAAAAAAAAAAAAAAAAAAAAAAAAAAAAAAAAAAAAAAAAAAAAAAAAAAAAAAAAAAAAAAAAAAAAAAAAAAAAAAAAAAAAAAAAAAAAAAAAAAAAAAAAAAAAAAAAAAAAAAAAAAAAAAAAAAAAAAAAAAAAAAAAAAAAAAAAAAAAAAAAAAAAAAAAAAAAAAAAAAAAAAAAAAAAAAAAAAAAAAAAAAAAAAAAAAAAAAAAAAAAAAAAAAAAAAAAAAAAAAAAAAAAAAAAAAAAAAAAAAAAAAAAAAAAAAAAAAAAAAAAAAAAAAAAAAAAAAAAAAAAAAAAAAAAAAAAAAAAAAAAAAAAAAAAAAAAAAAAAAAAAAAAAAAAAAAAAAAAAAAAAAAAAAAAAAAAAAAAAAAAAAAAAAAAAAAAAAAAAAAAAAAAAAAAAAAAAAAAAAAAAAAAAAAAAAAAAAAAAAAAAAAAAAAAAAAAAAAAAAAAAAAAAAAAAAAAAAAAAAAAAAAAAAAAAAAAAAAAAAAAAAAAAAAAAAAAAAAAAAAAAAAAAAAAAAAAAAAAAAAAAAAAAAAAAAAAAAAAAAAAAAAAAAAAAAAAAAAAAAAAAAAAAAAAAAAAAAAAAAAAAAAAAAAAAAAAAAAAAAAAAAAAAAAAAAAAAAAAAAAAAAAAAAAAAAAAAAAAAAAAAAAAAAAAAAAAAAAAAAAAAAAAAAAAAAAAAAAAAAAAAAAAAAAAAAAAAAAAAAAAAAAAAAAAAAAAAAAAAAAAAAAAAAAAAAAAAAAAAAAAAAAAAAAAAAAAAAAAAAAAAAAAAAAAAAAAAAAAAAAAAAAAAAAAAAAAAAAAAAAAAAAAAAAAAAAAAAAAAAAAAAAAAAAAAAAAAAAAAAAAAAAAAAAAAAAAAAAAAAAAAAAAAAAAAAAAAAAAAAAAAAAAAAAAAAAAAAAAAAAAAAAAAAAAAAAAAAAAAAAAAAAAAAAAAAAAAAAAAAAAAAAAAAAAAAAAAAAAAAAAAAAAAAAAAAAAAAAAAAAAAAAAAAAAAAAAAAAAAAAAAAAAAAAAAAAAAAAAAAAAAAAAAAAAAAAAAAAAAAAAAAAAAAAAAAAAAAAAAAAAAAAAAAAAAAAAAAAAAAAAAAAAAAAAAAAAAAAAAAAAAAAAAAAAAAAAAAAAAAAAAAAAAAAAAAAAAAAAAAAAAAAAAAAAAAAAAAAAAAAAAAAAAAAAAAAAAAAAAAAAAAAA
AAAAAAAAAAAAAAAAAAAAAAAAAAAAAAAAAAAAAAAAAAAAAAAAAAAAAAAAAAAAAAAAAAAAAAAAAAAAAAAAAAAAAAAAAAAAAAAAAAAAAAAAAAAAAAAAAAAAAAAAAAAAAAAAAAAAAAAAAAAAAAAAAAAAAAAAAAAAAAAAAAAAAAAAAAAAAAAAAAAAAAAAAAAAAAAAAAAAAAAAAAAAAAAAAAAAAAAAAAAAAAAAAAAAAAAAAAAAAAAAAAAAAAAAAAAAAAAAAAAAAAAAAAAAAAAAAAAAAAAAAAAAAAAAAAAAAAAAAAAAAAAAAAAAAAAAAAAAAAAAAAAAAAAAAAAAAAAAAAAAAAAAAAAAAAAAAAAAAAAAAAAAAAAAAAAAAAAAAAAAAAAAAAAAAAAAAAAAAAAAAAAAAAAAAAAAAAAAAAAAAAAAAAAAAAAAAAAAAAAAAAAAAAAAAAAAAAAAAAAAAAAAAAAAAAAAAAAAAAAAAAAAAAAAAAAAAAAAAAAAAAAAAAAAAAAAAAAAAAAAAAAAAAAAAAAAAAAAAAAAAAAAAAAAAAAAAAAAAAAAAAAAAAAAAAAAAAAAAAAAAAAAAAAAAAAAAAAAAAAAAAAAAAAAAAAAAAAAAAAAAAAAAAAAAAAAAAAAAAAAAAAAAAAAAAAAAAAAAAAAAAAAAAAAAAAAAAAAAAAAAAAAAAAAAAAAAAAAAAAAAAAAAAAAAAAAAAAAAAAAAAAAAAAAAAAAAAAAAAAAAAAAAAAAAAAAAAAAAAAAAAAAAAAAAAAAAAAAAAAAAAAAAAAAAAAAAAAAAAAAAAAAAAAAAAAAAAAAAAAAAAAAAAAAAAAAAAAAAAAAAAAAAAAAAAAAAAAAAAAAAAAAAAAAAAAAAAAAAAAAAAAAAAAAAAAAAAAAAAAAAAAAAAAAAAAAAAAAAAAAAAAAAAAAAAAAAAAAAAAAAAAAAAAAAAAAAAAAAAAAAAAAAAAAAAAAAAAAAAAAAAAAAAAAAAAAAAAAAAAAAAAAAAAAAAAAAAAAAAAAAAAAAAAAAAAAAAAAAAAAAAAAAAAAAAAAAAAAAAAAAAAAAAAAAAAAAAAAAAAAAAAAAAAAAAAAAAAAAAAAAAAAAAAAAAAAAAAAAAAAAAAAAAAAAAAAAAAAAAAAAAAAAAAAAAAAAAAAAAAAAAAAAAAAAAAAAAAAAAAAAAAAAAAAAAAAAAAAAAAAAAAAAAAAAAAAAAAAAAAAAAAAAAAAAAAAAAAAAAAAAAAAAAAAAAAAAAAAAAAAAAAAAAAAAAAAAAAAAAAAAAAAAAAAAAAAAAAAAAAAAAAAAAAAAAAAAAAAAAAAAAAAAAAAAAAAAAAAAAAAAAAAAAAAAAAAAAAAAAAAAAAAAAAAAAAAAAAAAAAAAAAAAAAAAAAAAAAAAAAAAAAAAAAAAAAAAAAAAAAAAAAAAAAAAAAAAAAAAAAAAAAAAAAAAAAAAAAAAAAAAAAAAAAAAAAAAAAAAAAAAAAAAAAAAAAAAAAAAAAAAAAAAAAAAAAAAAAAAAAAAAAAAAAAAAAAAAAAAAAAAAAAAAAAAAAAAAAAAAAAAAAAAAAAAAAAAAAAAAAAAAAAAAAAAAAAAAAAAAAAAAAAAAAAAAAAAAAAAAAAAAAAAAAAAAAAAAAAAAAAAAAAAAAAAAAAAAAAAAAAAAAAAAAAAAAAAAAAAAAAAAAAAAAAAAAAAAAAAAAAAAAAAAAAAAAAAAAAAAAAAAAAAAAAAAAAAAAAAAAAAAAAAAAAAAAAAAAAAAAAAAAAAAAAAAAAAAAAAAAAAAAAAAAAAAAAAAAAAAAAAAAAAAAAAAAAAAAAAAAAAAAAAAAAAAAAAAAAAAAAAAAAAAAAAAAAAAAAAAAAAAAAAAAAAAAAAAAAAAAAAAAAAAAAAAAAAAAAAAAAAAAAAAAAAAAAAAAAAAAAAAAAAAAAAAAAAAAAAAAAAAAAAAAAAAAAAAAAAAAAAAAAAAAAAAAAAAAAAAAAAAAAAAAAAAAAAAAAAAAAAAAAAAAAAAAAAAAAAAAAAAAAAAAAAAAAAAAAAAAAAAAAAAAAAAAAAAAAAAAAAAAAAAAAAAAAAAAAAAAAAAAAAAAAAAAAAAAAAAAAAAAAAAAAAAAAAAAAAAAAAAAAAAAAAAAAAAAAAAAAAAAAAAAAAAAAAAAAAAAAAAAAAAAAAAAAAAAAAAAAAAAAAAAAAAAAAAAAAAAAAAAAAAAAAAAAAAAAAAAAAAAAAAAAAAAAAAAAAAAAAAAAAAAAAAAAAAAAAAAAAAAAAAAAAAAAAAAAAAAAAAAAAAAAAAAAAAAAAAAAAAAAAAAAAAAAAAAAAAAAAAAAAAAAAAAAAAAAAAAAAAAAAAAAAAAAAAAAAAAAAAAAAAAAAAAAAAAAAAAAAAAAAAAAAAAAAAAAAAAAAAAAAAAAAAAAAAAAAAAAAAAAAAAAAAAAAAAAAAAAAAAAAAAAAAAAAAAAAAAAAAAAAAAAAAAAAAAAAAAAAAAAAAAAAAAAAAAAAAAAAAAAAAAAAAAAAAAAAAAAAAAAAAAAAAAAAAAAAAAAAAAAAAAAAAAAAAAAAAAAAAAAAAAAAAAAAAAAAAAAAAAAAAAAAAAAAAAAAAAAAAAAAAAAAAAAAAAAAAAAAAAAAAAAAAAAAAAAAAAAAAAAAAAAAAAAAAAAAAAAAAAAAAAAAAAAAAAAAAAAAAAAAAAAAAAAAAAAAAAAAAAAAAAAAAAAAAAAAAAAAAAAAAAAAAAAAAAAAAAAAAAAAAAAAAAAAAAAAAAAAAAAAAAAAAAAAAAAAAAAAAAAAAAAAAAAAAAAAAAAAAAAAAAAAAAAAAAAAAAAAAAAAAAAAAAAAAAAAAAAAAAAAAAAAAAAAAAAAAAAAAAAAAAAAAAAAAAAAAAAAAAAAAAAAAAAAAAAAAAAAAAAAAAAAAAAAAAAAAAAAAAAAAAAAAAAAAAAAAAAAAAAAAAAAAAAAAAAAAAAAAAAAAAAAAAAAAAAAAAAAAAAAAAAAAAAAAAAAAAAAAAAAAAAAAAAAAAAAAAAAAAAAAAAAAAAAAAAAAAAAAAAAAAAAAAAAAAAAAAAAAAAAAAAAAAAAAAAAAAAAAAAAAAAAAAAAAAAAAAAAAAAAAAAAAAAAAAAAAAAAAAAAAAAAAAAAAAAAAAAAAAAAAAAAAAAAAAAAAAAAAAAAAAAAAAAAAAAAAAAAAAAAAAAAAAAAAAAAAAAAAAAAAAAAAAAAAAAAAAAAAAAAAAAAAAAAAAAAAAAAAAAAAAAAAAAAAAAAAAAAAAAAAAAAAAAAAAAAAAAAAAAAAAAAAAAAAAAAAAAAAAAAAAAAAAAAAAAAAAAAAAAAAAAAAAAAAAAAAAAAAAAAAAAAAAAAAAAAAAAAAAAAAAAAAAAAAAAAAAAAAAAAAAAAAAAAAAAAAAAAAAAAAAAAAAAAAAAAAAAAAAAAAAAAAAAAAAAAAAAAAAAAAAAAAAAAAAAAAAAAAAAAAAAAAAAAAAAAAAAAAAAAAAAAAAAAAAAAAAAAAAAAAAAAAAAAAAAAAAAAAAAAAAAAAAAAAAAAAAAAAAAAAAAAAAAAAAAAAAAAAAAAAAAAAAAAAAAAAAAAAAAAAAAAAAAAAAAAAAAAAAAAAAAAAAAAAAAAAAAAAAAAAAAAAAAAAAAAAAAAAAAAAAAAAAAAAAAAAAAAAAAAAAAAAAAAAAAAAAAAAAAAAAAAAAAAAAAAAAAAAAAAAAAAAAAAAAAAAAAAAAAAAAAAAAAAAAAAAAAAAAAAAAAAAAAAAAAAAAAAAAAAAAAAAAAAAAAAAAAAAAAAAAAAAAAAAAAAAAAAAAAAAAAAAAAAAAAAAAAAAAAAAAAAAAAAAAAAAAAAAAAAAAAAAAAAAAAAAAAAAAAAAAAAAAAAAAAAAAAAAAAAAAAAAAAAAAAAAAAAAAAAAAAAAAAAAAAAAAAAAAAAAAAAAAAAAAAAAAAAAAAAAAAAAAAAAAAAAAAAAAAAAAAAAAAAAAAAAAAAAAAAAAAAAAAAAAAAAAAAAAAAAAAAAAAAAAAAAAAAAAAAAAAAAAAAAAAAAAAAAAAAAAAAAAAAAAAAAAAAAAAAAAAAAAAAAAAAAAAAAAAAAAAAAAAAAAA
AAAAAAAAAAAAAAAAAAAAAAAAAAAAAAAAAAAAAAAAAAAAAAAAAAAAAAAAAAAAAAAAAAAAAAAAAAAAAAAAAAAAAAAAAAAAAAAAAAAAAAAAAAAAAAAAAAAAAAAAAAAAAAAAAAAAAAAAAAAAAAAAAAAAAAAAAAAAAAAAAAAAAAAAAAAAAAAAAAAAAAAAAAAAAAAAAAAAAAAAAAAAAAAAAAAAAAAAAAAAAAAAAAAAAAAAAAAAAAAAAAAAAAAAAAAAAAAAAAAAAAAAAAAAAAAAAAAAAAAAAAAAAAAAAAAAAAAAAAAAAAAAAAAAAAAAAAAAAAAAAAAAAAAAAAAAAAAAAAAAAAAAAAAAAAAAAAAAAAAAAAAAAAAAAAAAAAAAAAAAAAAAAAAAAAAAAAAAAAAAAAAAAAAAAAAAAAAAAAAAAAAAAAAAAAAAAAAAAAAAAAAAAAAAAAAAAAAAAAAAAAAAAAAAAAAAAAAAAAAAAAAAAAAAAAAAAAAAAAAAAAAAAAAAAAAAAAAAAAAAAAAAAAAAAAAAAAAAAAAAAAAAAAAAAAAAAAAAAAAAAAAAAAAAAAAAAAAAAAAAAAAAAAAAAAAAAAAAAAAAAAAAAAAAAAAAAAAAAAAAAAAAAAAAAAAAAAAAAAAAAAAAAAAAAAAAAAAAAAAAAAAAAAAAAAAAAAAAAAAAAAAAAAAAAAAAAAAAAAAAAAAAAAAAAAAAAAAAAAAAAAAAAAAAAAAAAAAAAAAAAAAAAAAAAAAAAAAAAAAAAAAAAAAAAAAAAAAAAAAAAAAAAAAAAAAAAAAAAAAAAAAAAAAAAAAAAAAAAAAAAAAAAAAAAAAAAAAAAAAAAAAAAAAAAAAAAAAAAAAAAAAAAAAAAAAAAAAAAAAAAAAAAAAAAAAAAAAAAAAAAAAAAAAAAAAAAAAAAAAAAAAAAAAAAAAAAAAAAAAAAAAAAAAAAAAAAAAAAAAAAAAAAAAAAAAAAAAAAAAAAAAAAAAAAAAAAAAAAAAAAAAAAAAAAAAAAAAAAAAAAAAAAAAAAAAAAAAAAAAAAAAAAAAAAAAAAAAAAAAAAAAAAAAAAAAAAAAAAAAAAAAAAAAAAAAAAAAAAAAAAAAAAAAAAAAAAAAAAAAAAAAAAAAAAAAAAAAAAAAAAAAAAAAAAAAAAAAAAAAAAAAAAAAAAAAAAAAAAAAAAAAAAAAAAAAAAAAAAAAAAAAAAAAAAAAAAAAAAAAAAAAAAAAAAAAAAAAAAAAAAAAAAAAAAAAAAAAAAAAAAAAAAAAAAAAAAAAAAAAAAAAAAAAAAAAAAAAAAAAAAAAAAAAAAAAAAAAAAAAAAAAAAAAAAAAAAAAAAAAAAAAAAAAAAAAAAAAAAAAAAAAAAAAAAAAAAAAAAAAAAAAAAAAAAAAAAAAAAAAAAAAAAAAAAAAAAAAAAAAAAAAAAAAAAAAAAAAAAAAAAAAAAAAAAAAAAAAAAAAAAAAAAAAAAAAAAAAAAAAAAAAAAAAAAAAAAAAAAAAAAAAAAAAAAAAAAAAAAAAAAAAAAAAAAAAAAAAAAAAAAAAAAAAAAAAAAAAAAAAAAAAAAAAAAAAAAAAAAAAAAAAAAAAAAAAAAAAAAAAAAAAAAAAAAAAAAAAAAAAAAAAAAAAAAAAAAAAAAAAAAAAAAAAAAAAAAAAAAAAAAAAAAAAAAAAAAAAAAAAAAAAAAAAAAAAAAAAAAAAAAAAAAAAAAAAAAAAAAAAAAAAAAAAAAAAAAAAAAAAAAAAAAAAAAAAAAAAAAAAAAAAAAAAAAAAAAAAAAAAAAAAAAAAAAAAAAAAAAAAAAAAAAAAAAAAAAAAAAAAAAAAAAAAAAAAAAAAAAAAAAAAAAAAAAAAAAAAAAAAAAAAAAAAAAAAAAAAAAAAAAAAAAAAAAAAAAAAAAAAAAAAAAAAAAAAAAAAAAAAAAAAAAAAAAAAAAAAAAAAAAAAAAAAAAAAAAAAAAAAAAAAAAAAAAAAAAAAAAAAAAAAAAAAAAAAAAAAAAAAAAAAAAAAAAAAAAAAAAAAAAAAAAAAAAAAAAAAAAAAAAAAAAAAAAAAAAAAAAAAAAAAAAAAAAAAAAAAAAAAAAAAAAAAAAAAAAAAAAAAAAAAAAAAAAAAAAAAAAAAAAAAAAAAAAAAAAAAAAAAAAAAAAAAAAAAAAAAAAAAAAAAAAAAAAAAAAAAAAAAAAAAAAAAAAAAAAAAAAAAAAAAAAAAAAAAAAAAAAAAAAAAAAAAAAAAAAAAAAAAAAAAAAAAAAAAAAAAAAAAAAAAAAAAAAAAAAAAAAAAAAAAAAAAAAAAAAAAAAAAAAAAAAAAAAAAAAAAAAAAAAAAAAAAAAAAAAAAAAAAAAAAAAAAAAAAAAAAAAAAAAAAAAAAAAAAAAAAAAAAAAAAAAAAAAAAAAAAAAAAAAAAAAAAAAAAAAAAAAAAAAAAAAAAAAAAAAAAAAAAAAAAAAAAAAAAAAAAAAAAAAAAAAAAAAAAAAAAAAAAAAAAAAAAAAAAAAAAAAAAAAAAAAAAAAAAAAAAAAAAAAAAAAAAAAAAAAAAAAAAAAAAAAAAAAAAAAAAAAAAAAAAAAAAAAAAAAAAAAAAAAAAAAAAAAAAAAAAAAAAAAAAAAAAAAAAAAAAAAAAAAAAAAAAAAAAAAAAAAAAAAAAAAAAAAAAAAAAAAAAAAAAAAAAAAAAAAAAAAAAAAAAAAAAAAAAAAAAAAAAAAAAAAAAAAAAAAAAAAAAAAAAAAAAAAAAAAAAAAAAAAAAAAAAAAAAAAAAAAAAAAAAAAAAAAAAAAAAAAAAAAAAAAAAAAAAAAAAAAAAAAAAAAAAAAAAAAAAAAAAAAAAAAAAAAAAAAAAAAAAAAAAAAAAAAAAAAAAAAAAAAAAAAAAAAAAAAAAAAAAAAAAAAAAAAAAAAAAAAAAAAAAAAAAAAAAAAAAAAAAAAAAAAAAAAAAAAAAAAAAAAAAAAAAAAAAAAAAAAAAAAAAAAAAAAAAAAAAAAAAAAAAAAAAAAAAAAAAAAAAAAAAAAAAAAAAAAAAAAAAAAAAAAAAAAAAAAAAAAAAAAAAAAAAAAAAAAAAAAAAAAAAAAAAAAAAAAAAAAAAAAAAAAAAAAAAAAAAAAAAAAAAAAAAAAAAAAAAAAAAAAAAAAAAAAAAAAAAAAAAAAAAAAAAAAAAAAAAAAAAAAAAAAAAAAAAAAAAAAAAAAAAAAAAAAAAAAAAAAAAAAAAAAAAAAAAAAAAAAAAAAAAAAAAAAAAAAAAAAAAAAAAAAAAAAAAAAAAAAAAAAAAAAAAAAAAAAAAAAAAAAAAAAAAAAAAAAAAAAAAAAAAAAAAAAAAAAAAAAAAAAAAAAAAAAAAAAAAAAAAAAAAAAAAAAAAAAAAAAAAAAAAAAAAAAAAAAAAAAAAAAAAAAAAAAAAAAAAAAAAAAAAAAAAAAAAAAAAAAAAAAAAAAAAAAAAAAAAAAAAAAAAAAAAAAAAAAAAAAAAAAAAAAAAAAAAAAAAAAAAAAAAAAAAAAAAAAAAAAAAAAAAAAAAAAAAAAAAAAAAAAAAAAAAAAAAAAAAAAAAAAAAAAAAAAAAAAAAAAAAAAAAAAAAAAAAAAAAAAAAAAAAAAAAAAAAAAAAAAAAAAAAAAAAAAAAAAAAAAAAAAAAAAAAAAAAAAAAAAAAAAAAAAAAAAAAAAAAAAAAAAAAAAAAAAAAAAAAAAAAAAAAAAAAAAAAAAAAAAAAAAAAAAAAAAAAAAAAAAAAAAAAAAAAAAAAAAAAAAAAAAAAAAAAAAAAAAAAAAAAAAAAAAAAAAAAAAAAAAAAAAAAAAAAAAAAAAAAAAAAAAAAAAAAAAAAAAAAAAAAAAAAAAAAAAAAAAAAAAAAAAAAAAAAAAAAAAAAAAAAAAAAAAAAAAAAAAAAAAAAAAAAAAAAAAAAAAAAAAAAAAAAAAAAAAAAAAAAAAAAAAAAAAAAAAAAAAAAAAAAAAAAAAAAAAAAAAAAAAAAAAAAAAAAAAAAAAAAAAAAAAAAAAAAAAAAAAAAAAAAAAAAAAAAAAAAAAAAAAAAAAAAAAAAAAAAAAAAAAAAAAAAAAAAAAAAAAAAAAAAAAAAAAAAAAAAAAAAAAAAAAAAAAAAAAAAAAAAA
AAAAAAAAAAAAAAAAAAAAAAAAAAAAAAAAAAAAAAAAAAAAAAAAAAAAAAAAAAAAAAAAAAAAAAAAAAAAAAAAAAAAAAAAAAAAAAAAAAAAAAAAAAAAAAAAAAAAAAAAAAAAAAAAAAAAAAAAAAAAAAAAAAAAAAAAAAAAAAAAAAAAAAAAAAAAAAAAAAAAAAAAAAAAAAAAAAAAAAAAAAAAAAAAAAAAAAAAAAAAAAAAAAAAAAAAAAAAAAAAAAAAAAAAAAAAAAAAAAAAAAAAAAAAAAAAAAAAAAAAAAAAAAAAAAAAAAAAAAAAAAAAAAAAAAAAAAAAAAAAAAAAAAAAAAAAAAAAAAAAAAAAAAAAAAAAAAAAAAAAAAAAAAAAAAAAAAAAAAAAAAAAAAAAAAAAAAAAAAAAAAAAAAAAAAAAAAAAAAAAAAAAAAAAAAAAAAAAAAAAAAAAAAAAAAAAAAAAAAAAAAAAAAAAAAAAAAAAAAAAAAAAAAAAAAAAAAAAAAAAAAAAAAAAAAAAAAAAAAAAAAAAAAAAAAAAAAAAAAAAAAAAAAAAAAAAAAAAAAAAAAAAAAAAAAAAAAAAAAAAAAAAAAAAAAAAAAAAAAAAAAAAAAAAAAAAAAAAAAAAAAAAAAAAAAAAAAAAAAAAAAAAAAAAAAAAAAAAAAAAAAAAAAAAAAAAAAAAAAAAAAAAAAAAAAAAAAAAAAAAAAAAAAAAAAAAAAAAAAAAAAAAAAAAAAAAAAAAAAAAAAAAAAAAAAAAAAAAAAAAAAAAAAAAAAAAAAAAAAAAAAAAAAAAAAAAAAAAAAAAAAAAAAAAAAAAAAAAAAAAAAAAAAAAAAAAAAAAAAAAAAAAAAAAAAAAAAAAAAAAAAAAAAAAAAAAAAAAAAAAAAAAAAAAAAAAAAAAAAAAAAAAAAAAAAAAAAAAAAAAAAAAAAAAAAAAAAAAAAAAAAAAAAAAAAAAAAAAAAAAAAAAAAAAAAAAAAAAAAAAAAAAAAAAAAAAAAAAAAAAAAAAAAAAAAAAAAAAAAAAAAAAAAAAAAAAAAAAAAAAAAAAAAAAAAAAAAAAAAAAAAAAAAAAAAAAAAAAAAAAAAAAAAAAAAAAAAAAAAAAAAAAAAAAAAAAAAAAAAAAAAAAAAAAAAAAAAAAAAAAAAAAAAAAAAAAAAAAAAAAAAAAAAAAAAAAAAAAAAAAAAAAAAAAAAAAAAAAAAAAAAAAAAAAAAAAAAAAAAAAAAAAAAAAAAAAAAAAAAAAAAAAAAAAAAAAAAAAAAAAAAAAAAAAAAAAAAAAAAAAAAAAAAAAAAAAAAAAAAAAAAAAAAAAAAAAAAAAAAAAAAAAAAAAAAAAAAAAAAAAAAAAAAAAAAAAAAAAAAAAAAAAAAAAAAAAAAAAAAAAAAAAAAAAAAAAAAAAAAAAAAAAAAAAAAAAAAAAAAAAAAAAAAAAAAAAAAAAAAAAAAAAAAAAAAAAAAAAAAAAAAAAAAAAAAAAAAAAAAAAAAAAAAAAAAAAAAAAAAAAAAAAAAAAAAAAAAAAAAAAAAAAAAAAAAAAAAAAAAAAAAAAAAAAAAAAAAAAAAAAAAAAAAAAAAAAAAAAAAAAAAAAAAAAAAAAAAAAAAAAAAAAAAAAAAAAAAAAAAAAAAAAAAAAAAAAAAAAAAAAAAAAAAAAAAAAAAAAAAAAAAAAAAAAAAAAAAAAAAAAAAAAAAAAAAAAAAAAAAAAAAAAAAAAAAAAAAAAAAAAAAAAAAAAAAAAAAAAAAAAAAAAAAAAAAAAAAAAAAAAAAAAAAAAAAAAAAAAAAAAAAAAAAAAAAAAAAAAAAAAAAAAAAAAAAAAAAAAAAAAAAAAAAAAAAAAAAAAAAAAAAAAAAAAAAAAAAAAAAAAAAAAAAAAAAAAAAAAAAAAAAAAAAAAAAAAAAAAAAAAAAAAAAAAAAAAAAAAAAAAAAAAAAAAAAAAAAAAAAAAAAAAAAAAAAAAAAAAAAAAAAAAAAAAAAAAAAAAAAAAAAAAAAAAAAAAAAAAAAAAAAAAAAAAAAAAAAAAAAAAAAAAAAAAAAAAAAAAAAAAAAAAAAAAAAAAAAAAAAAAAAAAAAAAAAAAAAAAAAAAAAAAAAAAAAAAAAAAAAAAAAAAAAAAAAAAAAAAAAAAAAAAAAAAAAAAAAAAAAAAAAAAAAAAAAAAAAAAAAAAAAAAAAAAAAAAAAAAAAAAAAAAAAAAAAAAAAAAAAAAAAAAAAAAAAAAAAAAAAAAAAAAAAAAAAAAAAAAAAAAAAAAAAAAAAAAAAAAAAAAAAAAAAAAAAAAAAAAAAAAAAAAAAAAAAAAAAAAAAAAAAAAAAAAAAAAAAAAAAAAAAAAAAAAAAAAAAAAAAAAAAAAAAAAAAAAAAAAAAAAAAAAAAAAAAAAAAAAAAAAAAAAAAAAAAAAAAAAAAAAAAAAAAAAAAAAAAAAAAAAAAAAAAAAAAAAAAAAAAAAAAAAAAAAAAAAAAAAAAAAAAAAAAAAAAAAAAAAAAAAAAAAAAAAAAAAAAAAAAAAAAAAAAAAAAAAAAAAAAAAAAAAAAAAAAAAAAAAAAAAAAAAAAAAAAAAAAAAAAAAAAAAAAAAAAAAAAAAAAAAAAAAAAAAAAAAAAAAAAAAAAAAAAAAAAAAAAAAAAAAAAAAAAAAAAAAAAAAAAAAAAAAAAAAAAAAAAAAAAAAAAAAAAAAAAAAAAAAAAAAAAAAAAAAAAAAAAAAAAAAAAAAAAAAAAAAAAAAAAAAAAAAAAAAAAAAAAAAAAAAAAAAAAAAAAAAAAAAAAAAAAAAAAAAAAAAAAAAAAAAAAAAAAAAAAAAAAAAAAAAAAAAAAAAAAAAAAAAAAAAAAAAAAAAAAAAAAAAAAAAAAAAAAAAAAAAAAAAAAAAAAAAAAAAAAAAAAAAAAAAAAAAAAAAAAAAAAAAAAAAAAAAAAAAAAAAAAAAAAAAAAAAAAAAAAAAAAAAAAAAAAAAAAAAAAAAAAAAAAAAAAAAAAAAAAAAAAAAAAAAAAAAAAAAAAAAAAAAAAAAAAAAAAAAAAAAAAAAAAAAAAAAAAAAAAAAAAAAAAAAAAAAAAAAAAAAAAAAAAAAAAAAAAAAAAAAAAAAAAAAAAAAAAAAAAAAAAAAAAAAAAAAAAAAAAAAAAAAAAAAAAAAAAAAAAAAAAAAAAAAAAAAAAAAAAAAAAAAAAAAAAAAAAAAAAAAAAAAAAAAAAAAAAAAAAAAAAAAAAAAAAAAAAAAAAAAAAAAAAAAAAAAAAAAAAAAAAAAAAAAAAAAAAAAAAAAAAAAAAAAAAAAAAAAAAAAAAAAAAAAAAAAAAAAAAAAAAAAAAAAAAAAAAAAAAAAAAAAAAAAAAAAAAAAAAAAAAAAAAAAAAAAAAAAAAAAAAAAAAAAAAAAAAAAAAAAAAAAAAAAAAAAAAAAAAAAAAAAAAAAAAAAAAAAAAAAAAAAAAAAAAAAAAAAAAAAAAAAAAAAAAAAAAAAAAAAAAAAAAAAAAAAAAAAAAAAAAAAAAAAAAAAAAAAAAAAAAAAAAAAAAAAAAAAAAAAAAAAAAAAAAAAAAAAAAAAAAAAAAAAAAAAAAAAAAAAAAAAAAAAAAAAAAAAAAAAAAAAAAAAAAAAAAAAAAAAAAAAAAAAAAAAAAAAAAAAAAAAAAAAAAAAAAAAAAAAAAAAAAAAAAAAAAAAAAAAAAAAAAAAAAAAAAAAAAAAAAAAAAAAAAAAAAAAAAAAAAAAAAAAAAAAAAAAAAAAAAAAAAAAAAAAAAAAAAAAAAAAAAAAAAAAAAAAAAAAAAAAAAAAAAAAAAAAAAAAAAAAAAAAAAAAAAAAAAAAAAAAAAAAAAAAAAAAAAAAAAAAAAAAAAAAAAAAAAAAAAAAAAAAAAAAAAAAAAAAAAAAAAAAAAAAAAAAAAAAAAAAAAAAAAAAAAAAAAAAAAAAAAAAAAAAAAAAAAAAAAAAAAAAAAAAAAAAAAAAAAAAAAAAAAAAAAAAAAAAAAAAAAAAAAAAAAAAAAAAAAAAAAAAAAAAAAAAAAAAAAAAAAAAAAAAAAAAAAAAAAAAAAAAAAAAAAAAAAAAAAAAAAAAAAAAAAAAAAAAAAAAAAAAAAAAAAAAAAAAAAAAAAAAAAAAAAAAAAAAAAAA
AAAAAAAAAAAAAAAAAAAAAAAAAAAAAAAAAAAAAAAAAAAAAAAAAAAAAAAAAAAAAAAAAAAAAAAAAAAAAAAAAAAAAAAAAAAAAAAAAAAAAAAAAAAAAAAAAAAAAAAAAAAAAAAAAAAAAAAAAAAAAAAAAAAAAAAAAAAAAAAAAAAAAAAAAAAAAAAAAAAAAAAAAAAAAAAAAAAAAAAAAAAAAAAAAAAAAAAAAAAAAAAAAAAAAAAAAAAAAAAAAAAAAAAAAAAAAAAAAAAAAAAAAAAAAAAAAAAAAAAAAAAAAAAAAAAAAAAAAAAAAAAAAAAAAAAAAAAAAAAAAAAAAAAAAAAAAAAAAAAAAAAAAAAAAAAAAAAAAAAAAAAAAAAAAAAAAAAAAAAAAAAAAAAAAAAAAAAAAAAAAAAAAAAAAAAAAAAAAAAAAAAAAAAAAAAAAAAAAAAAAAAAAAAAAAAAAAAAAAAAAAAAAAAAAAAAAAAAAAAAAAAAAAAAAAAAAAAAAAAAAAAAAAAAAAAAAAAAAAAAAAAAAAAAAAAAAAAAAAAAAAAAAAAAAAAAAAAAAAAAAAAAAAAAAAAAAAAAAAAAAAAAAAAAAAAAAAAAAAAAAAAAAAAAAAAAAAAAAAAAAAAAAAAAAAAAAAAAAAAAAAAAAAAAAAAAAAAAAAAAAAAAAAAAAAAAAAAAAAAAAAAAAAAAAAAAAAAAAAAAAAAAAAAAAAAAAAAAAAAAAAAAAAAAAAAAAAAAAAAAAAAAAAAAAAAAAAAAAAAAAAAAAAAAAAAAAAAAAAAAAAAAAAAAAAAAAAAAAAAAAAAAAAAAAAAAAAAAAAAAAAAAAAAAAAAAAAAAAAAAAAAAAAAAAAAAAAAAAAAAAAAAAAAAAAAAAAAAAAAAAAAAAAAAAAAAAAAAAAAAAAAAAAAAAAAAAAAAAAAAAAAAAAAAAAAAAAAAAAAAAAAAAAAAAAAAAAAAAAAAAAAAAAAAAAAAAAAAAAAAAAAAAAAAAAAAAAAAAAAAAAAAAAAAAAAAAAAAAAAAAAAAAAAAAAAAAAAAAAAAAAAAAAAAAAAAAAAAAAAAAAAAAAAAAAAAAAAAAAAAAAAAAAAAAAAAAAAAAAAAAAAAAAAAAAAAAAAAAAAAAAAAAAAAAAAAAAAAAAAAAAAAAAAAAAAAAAAAAAAAAAAAAAAAAAAAAAAAAAAAAAAAAAAAAAAAAAAAAAAAAAAAAAAAAAAAAAAAAAAAAAAAAAAAAAAAAAAAAAAAAAAAAAAAAAAAAAAAAAAAAAAAAAAAAAAAAAAAAAAAAAAAAAAAAAAAAAAAAAAAAAAAAAAAAAAAAAAAAAAAAAAAAAAAAAAAAAAAAAAAAAAAAAAAAAAAAAAAAAAAAAAAAAAAAAAAAAAAAAAAAAAAAAAAAAAAAAAAAAAAAAAAAAAAAAAAAAAAAAAAAAAAAAAAAAAAAAAAAAAAAAAAAAAAAAAAAAAAAAAAAAAAAAAAAAAAAAAAAAAAAAAAAAAAAAAAAAAAAAAAAAAAAAAAAAAAAAAAAAAAAAAAAAAAAAAAAAAAAAAAAAAAAAAAAAAAAAAAAAAAAAAAAAAAAAAAAAAAAAAAAAAAAAAAAAAAAAAAAAAAAAAAAAAAAAAAAAAAAAAAAAAAAAAAAAAAAAAAAAAAAAAAAAAAAAAAAAAAAAAAAAAAAAAAAAAAAAAAAAAAAAAAAAAAAAAAAAAAAAAAAAAAAAAAAAAAAAAAAAAAAAAAAAAAAAAAAAAAAAAAAAAAAAAAAAAAAAAAAAAAAAAAAAAAAAAAAAAAAAAAAAAAAAAAAAAAAAAAAAAAAAAAAAAAAAAAAAAAAAAAAAAAAAAAAAAAAAAAAAAAAAAAAAAAAAAAAAAAAAAAAAAAAAAAAAAAAAAAAAAAAAAAAAAAAAAAAAAAAAAAAAAAAAAAAAAAAAAAAAAAAAAAAAAAAAAAAAAAAAAAAAAAAAAAAAAAAAAAAAAAAAAAAAAAAAAAAAAAAAAAAAAAAAAAAAAAAAAAAAAAAAAAAAAAAAAAAAAAAAAAAAAAAAAAAAAAAAAAAAAAAAAAAAAAAAAAAAAAAAAAAAAAAAAAAAAAAAAAAAAAAAAAAAAAAAAAAAAAAAAAAAAAAAAAAAAAAAAAAAAAAAAAAAAAAAAAAAAAAAAAAAAAAAAAAAAAAAAAAAAAAAAAAAAAAAAAAAAAAAAAAAAAAAAAAAAAAAAAAAAAAAAAAAAAAAAAAAAAAAAAAAAAAAAAAAAAAAAAAAAAAAAAAAAAAAAAAAAAAAAAAAAAAAAAAAAAAAAAAAAAAAAAAAAAAAAAAAAAAAAAAAAAAAAAAAAAAAAAAAAAAAAAAAAAAAAAAAAAAAAAAAAAAAAAAAAAAAAAAAAAAAAAAAAAAAAAAAAAAAAAAAAAAAAAAAAAAAAAAAAAAAAAAAAAAAAAAAAAAAAAAAAAAAAAAAAAAAAAAAAAAAAAAAAAAAAAAAAAAAAAAAAAAAAAAAAAAAAAAAAAAAAAAAAAAAAAAAAAAAAAAAAAAAAAAAAAAAAAAAAAAAAAAAAAAAAAAAAAAAAAAAAAAAAAAAAAAAAAAAAAAAAAAAAAAAAAAAAAAAAAAAAAAAAAAAAAAAAAAAAAAAAAAAAAAAAAAAAAAAAAAAAAAAAAAAAAAAAAAAAAAAAAAAAAAAAAAAAAAAAAAAAAAAAAAAAAAAAAAAAAAAAAAAAAAAAAAAAAAAAAAAAAAAAAAAAAAAAAAAAAAAAAAAAAAAAAAAAAAAAAAAAAAAAAAAAAAAAAAAAAAAAAAAAAAAAAAAAAAAAAAAAAAAAAAAAAAAAAAAAAAAAAAAAAAAAAAAAAAAAAAAAAAAAAAAAAAAAAAAAAAAAAAAAAAAAAAAAAAAAAAAAAAAAAAAAAAAAAAAAAAAAAAAAAAAAAAAAAAAAAAAAAAAAAAAAAAAAAAAAAAAAAAAAAAAAAAAAAAAAAAAAAAAAAAAAAAAAAAAAAAAAAAAAAAAAAAAAAAAAAAAAAAAAAAAAAAAAAAAAAAAAAAAAAAAAAAAAAAAAAAAAAAAAAAAAAAAAAAAAAAAAAAAAAAAAAAAAAAAAAAAAAAAAAAAAAAAAAAAAAAAAAAAAAAAAAAAAAAAAAAAAAAAAAAAAAAAAAAAAAAAAAAAAAAAAAAAAAAAAAAAAAAAAAAAAAAAAAAAAAAAAAAAAAAAAAAAAAAAAAAAAAAAAAAAAAAAAAAAAAAAAAAAAAAAAAAAAAAAAAAAAAAAAAAAAAAAAAAAAAAAAAAAAAAAAAAAAAAAAAAAAAAAAAAAAAAAAAAAAAAAAAAAAAAAAAAAAAAAAAAAAAAAAAAAAAAAAAAAAAAAAAAAAAAAAAAAAAAAAAAAAAAAAAAAAAAAAAAAAAAAAAAAAAAAAAAAAAAAAAAAAAAAAAAAAAAAAAAAAAAAAAAAAAAAAAAAAAAAAAAAAAAAAAAAAAAAAAAAAAAAAAAAAAAAAAAAAAAAAAAAAAAAAAAAAAAAAAAAAAAAAAAAAAAAAAAAAAAAAAAAAAAAAAAAAAAAAAAAAAAAAAAAAAAAAAAAAAAAAAAAAAAAAAAAAAAAAAAAAAAAAAAAAAAAAAAAAAAAAAAAAAAAAAAAAAAAAAAAAAAAAAAAAAAAAAAAAAAAAAAAAAAAAAAAAAAAAAAAAAAAAAAAAAAAAAAAAAAAAAAAAAAAAAAAAAAAAAAAAAAAAAAAAAAAAAAAAAAAAAAAAAAAAAAAAAAAAAAAAAAAAAAAAAAAAAAAAAAAAAAAAAAAAAAAAAAAAAAAAAAAAAAAAAAAAAAAAAAAAAAAAAAAAAAAAAAAAAAAAAAAAAAAAAAAAAAAAAAAAAAAAAAAAAAAAAAAAAAAAAAAAAAAAAAAAAAAAAAAAAAAAAAAAAAAAAAAAAAAAAAAAAAAAAAAAAAAAAAAAAAAAAAAAAAAAAAAAAAAAAAAAAAAAAAAAAAAAAAAAAAAAAAAAAAAAAAAAAAAAAAAAAAAAAAAAAAAAAAAAAAAAAAAAAAAAAAAAAAAAAAAAAAAAAAAAAAAAAAAAAAAAAAAAAAAAAAAAAAAAAAAAAAAAAAAAAAAAAAAAAAAAAAAAAAAAAAAAAAAAAAAAAAAAAAAAAAAAA
AAAAAAAAAAAAAAAAAAAAAAAAAAAAAAAAAAAAAAAAAAAAAAAAAAAAAAAAAAAAAAAAAAAAAAAAAAAAAAAAAAAAAAAAAAAAAAAAAAAAAAAAAAAAAAAAAAAAAAAAAAAAAAAAAAAAAAAAAAAAAAAAAAAAAAAAAAAAAAAAAAAAAAAAAAAAAAAAAAAAAAAAAAAAAAAAAAAAAAAAAAAAAAAAAAAAAAAAAAAAAAAAAAAAAAAAAAAAAAAAAAAAAAAAAAAAAAAAAAAAAAAAAAAAAAAAAAAAAAAAAAAAAAAAAAAAAAAAAAAAAAAAAAAAAAAAAAAAAAAAAAAAAAAAAAAAAAAAAAAAAAAAAAAAAAAAAAAAAAAAAAAAAAAAAAAAAAAAAAAAAAAAAAAAAAAAAAAAAAAAAAAAAAAAAAAAAAAAAAAAAAAAAAAAAAAAAAAAAAAAAAAAAAAAAAAAAAAAAAAAAAAAAAAAAAAAAAAAAAAAAAAAAAAAAAAAAAAAAAAAAAAAAAAAAAAAAAAAAAAAAAAAAAAAAAAAAAAAAAAAAAAAAAAAAAAAAAAAAAAAAAAAAAAAAAAAAAAAAAAAAAAAAAAAAAAAAAAAAAAAAAAAAAAAAAAAAAAAAAAAAAAAAAAAAAAAAAAAAAAAAAAAAAAAAAAAAAAAAAAAAAAAAAAAAAAAAAAAAAAAAAAAAAAAAAAAAAAAAAAAAAAAAAAAAAAAAAAAAAAAAAAAAAAAAAAAAAAAAAAAAAAAAAAAAAAAAAAAAAAAAAAAAAAAAAAAAAAAAAAAAAAAAAAAAAAAAAAAAAAAAAAAAAAAAAAAAAAAAAAAAAAAAAAAAAAAAAAAAAAAAAAAAAAAAAAAAAAAAAAAAAAAAAAAAAAAAAAAAAAAAAAAAAAAAAAAAAAAAAAAAAAAAAAAAAAAAAAAAAAAAAAAAAAAAAAAAAAAAAAAAAAAAAAAAAAAAAAAAAAAAAAAAAAAAAAAAAAAAAAAAAAAAAAAAAAAAAAAAAAAAAAAAAAAAAAAAAAAAAAAAAAAAAAAAAAAAAAAAAAAAAAAAAAAAAAAAAAAAAAAAAAAAAAAAAAAAAAAAAAAAAAAAAAAAAAAAAAAAAAAAAAAAAAAAAAAAAAAAAAAAAAAAAAAAAAAAAAAAAAAAAAAAAAAAAAAAAAAAAAAAAAAAAAAAAAAAAAAAAAAAAAAAAAAAAAAAAAAAAAAAAAAAAAAAAAAAAAAAAAAAAAAAAAAAAAAAAAAAAAAAAAAAAAAAAAAAAAAAAAAAAAAAAAAAAAAAAAAAAAAAAAAAAAAAAAAAAAAAAAAAAAAAAAAAAAAAAAAAAAAAAAAAAAAAAAAAAAAAAAAAAAAAAAAAAAAAAAAAAAAAAAAAAAAAAAAAAAAAAAAAAAAAAAAAAAAAAAAAAAAAAAAAAAAAAAAAAAAAAAAAAAAAAAAAAAAAAAAAAAAAAAAAAAAAAAAAAAAAAAAAAAAAAAAAAAAAAAAAAAAAAAAAAAAAAAAAAAAAAAAAAAAAAAAAAAAAAAAAAAAAAAAAAAAAAAAAAAAAAAAAAAAAAAAAAAAAAAAAAAAAAAAAAAAAAAAAAAAAAAAAAAAAAAAAAAAAAAAAAAAAAAAAAAAAAAAAAAAAAAAAAAAAAAAAAAAAAAAAAAAAAAAAAAAAAAAAAAAAAAAAAAAAAAAAAAAAAAAAAAAAAAAAAAAAAAAAAAAAAAAAAAAAAAAAAAAAAAAAAAAAAAAAAAAAAAAAAAAAAAAAAAAAAAAAAAAAAAAAAAAAAAAAAAAAAAAAAAAAAAAAAAAAAAAAAAAAAAAAAAAAAAAAAAAAAAAAAAAAAAAAAAAAAAAAAAAAAAAAAAAAAAAAAAAAAAAAAAAAAAAAAAAAAAAAAAAAAAAAAAAAAAAAAAAAAAAAAAAAAAAAAAAAAAAAAAAAAAAAAAAAAAAAAAAAAAAAAAAAAAAAAAAAAAAAAAAAAAAAAAAAAAAAAAAAAAAAAAAAAAAAAAAAAAAAAAAAAAAAAAAAAAAAAAAAAAAAAAAAAAAAAAAAAAAAAAAAAAAAAAAAAAAAAAAAAAAAAAAAAAAAAAAAAAAAAAAAAAAAAAAAAAAAAAAAAAAAAAAAAAAAAAAAAAAAAAAAAAAAAAAAAAAAAAAAAAAAAAAAAAAAAAAAAAAAAAAAAAAAAAAAAAAAAAAAAAAAAAAAAAAAAAAAAAAAAAAAAAAAAAAAAAAAAAAAAAAAAAAAAAAAAAAAAAAAAAAAAAAAAAAAAAAAAAAAAAAAAAAAAAAAAAAAAAAAAAAAAAAAAAAAAAAAAAAAAAAAAAAAAAAAAAAAAAAAAAAAAAAAAAAAAAAAAAAAAAAAAAAAAAAAAAAAAAAAAAAAAAAAAAAAAAAAAAAAAAAAAAAAAAAAAAAAAAAAAAAAAAAAAAAAAAAAAAAAAAAAAAAAAAAAAAAAAAAAAAAAAAAAAAAAAAAAAAAAAAAAAAAAAAAAAAAAAAAAAAAAAAAAAAAAAAAAAAAAAAAAAAAAAAAAAAAAAAAAAAAAAAAAAAAAAAAAAAAAAAAAAAAAAAAAAAAAAAAAAAAAAAAAAAAAAAAAAAAAAAAAAAAAAAAAAAAAAAAAAAAAAAAAAAAAAAAAAAAAAAAAAAAAAAAAAAAAAAAAAAAAAAAAAAAAAAAAAAAAAAAAAAAAAAAAAAAAAAAAAAAAAAAAAAAAAAAAAAAAAAAAAAAAAAAAAAAAAAAAAAAAAAAAAAAAAAAAAAAAAAAAAAAAAAAAAAAAAAAAAAAAAAAAAAAAAAAAAAAAAAAAAAAAAAAAAAAAAAAAAAAAAAAAAAAAAAAAAAAAAAAAAAAAAAAAAAAAAAAAAAAAAAAAAAAAAAAAAAAAAAAAAAAAAAAAAAAAAAAAAAAAAAAAAAAAAAAAAAAAAAAAAAAAAAAAAAAAAAAAAAAAAAAAAAAAAAAAAAAAAAAAAAAAAAAAAAAAAAAAAAAAAAAAAAAAAAAAAAAAAAAAAAAAAAAAAAAAAAAAAAAAAAAAAAAAAAAAAAAAAAAAAAAAAAAAAAAAAAAAAAAAAAAAAAAAAAAAAAAAAAAAAAAAAAAAAAAAAAAAAAAAAAAAAAAAAAAAAAAAAAAAAAAAAAAAAAAAAAAAAAAAAAAAAAAAAAAAAAAAAAAAAAAAAAAAAAAAAAAAAAAAAAAAAAAAAAAAAAAAAAAAAAAAAAAAAAAAAAAAAAAAAAAAAAAAAAAAAAAAAAAAAAAAAAAAAAAAAAAAAAAAAAAAAAAAAAAAAAAAAAAAAAAAAAAAAAAAAAAAAAAAAAAAAAAAAAAAAAAAAAAAAAAAAAAAAAAAAAAAAAAAAAAAAAAAAAAAAAAAAAAAAAAAAAAAAAAAAAAAAAAAAAAAAAAAAAAAAAAAAAAAAAAAAAAAAAAAAAAAAAAAAAAAAAAAAAAAAAAAAAAAAAAAAAAAAAAAAAAAAAAAAAAAAAAAAAAAAAAAAAAAAAAAAAAAAAAAAAAAAAAAAAAAAAAAAAAAAAAAAAAAAAAAAAAAAAAAAAAAAAAAAAAAAAAAAAAAAAAAAAAAAAAAAAAAAAAAAAAAAAAAAAAAAAAAAAAAAAAAAAAAAAAAAAAAAAAAAAAAAAAAAAAAAAAAAAAAAAAAAAAAAAAAAAAAAAAAAAAAAAAAAAAAAAAAAAAAAAAAAAAAAAAAAAAAAAAAAAAAAAAAAAAAAAAAAAAAAAAAAAAAAAAAAAAAAAAAAAAAAAAAAAAAAAAAAAAAAAAAAAAAAAAAAAAAAAAAAAAAAAAAAAAAAAAAAAAAAAAAAAAAAAAAAAAAAAAAAAAAAAAAAAAAAAAAAAAAAAAAAAAAAAAAAAAAAAAAAAAAAAAAAAAAAAAAAAAAAAAAAAAAAAAAAAAAAAAAAAAAAAAAAAAAAAAAAAAAAAAAAAAAAAAAAAAAAAAAAAAAAAAAAAAAAAAAAAAAAAAAAAAAAAAAAAAAAAAAAAAAAAAAAAAAAAAAAAAAAAAAAAAAAAAAAAAAAAAAAAAAAAAAAAAAAAAAAAAAAAAAAAAAAAAAAAAAAAAAAAAAAAAAAAAAAAAAAAAAAAAAAAAAAAAAAAAAAAAAAAAAAAAAAAAAAAAAAAAAAAAAAAAAAAA
AAAAAAAAAAAAAAAAAAAAAAAAAAAAAAAAAAAAAAAAAAAAAAAAAAAAAAAAAAAAAAAAAAAAAAAAAAAAAAAAAAAAAAAAAAAAAAAAAAAAAAAAAAAAAAAAAAAAAAAAAAAAAAAAAAAAAAAAAAAAAAAAAAAAAAAAAAAAAAAAAAAAAAAAAAAAAAAAAAAAAAAAAAAAAAAAAAAAAAAAAAAAAAAAAAAAAAAAAAAAAAAAAAAAAAAAAAAAAAAAAAAAAAAAAAAAAAAAAAAAAAAAAAAAAAAAAAAAAAAAAAAAAAAAAAAAAAAAAAAAAAAAAAAAAAAAAAAAAAAAAAAAAAAAAAAAAAAAAAAAAAAAAAAAAAAAAAAAAAAAAAAAAAAAAAAAAAAAAAAAAAAAAAAAAAAAAAAAAAAAAAAAAAAAAAAAAAAAAAAAAAAAAAAAAAAAAAAAAAAAAAAAAAAAAAAAAAAAAAAAAAAAAAAAAAAAAAAAAAAAAAAAAAAAAAAAAAAAAAAAAAAAAAAAAAAAAAAAAAAAAAAAAAAAAAAAAAAAAAAAAAAAAAAAAAAAAAAAAAAAAAAAAAAAAAAAAAAAAAAAAAAAAAAAAAAAAAAAAAAAAAAAAAAAAAAAAAAAAAAAAAAAAAAAAAAAAAAAAAAAAAAAAAAAAAAAAAAAAAAAAAAAAAAAAAAAAAAAAAAAAAAAAAAAAAAAAAAAAAAAAAAAAAAAAAAAAAAAAAAAAAAAAAAAAAAAAAAAAAAAAAAAAAAAAAAAAAAAAAAAAAAAAAAAAAAAAAAAAAAAAAAAAAAAAAAAAAAAAAAAAAAAAAAAAAAAAAAAAAAAAAAAAAAAAAAAAAAAAAAAAAAAAAAAAAAAAAAAAAAAAAAAAAAAAAAAAAAAAAAAAAAAAAAAAAAAAAAAAAAAAAAAAAAAAAAAAAAAAAAAAAAAAAAAAAAAAAAAAAAAAAAAAAAAAAAAAAAAAAAAAAAAAAAAAAAAAAAAAAAAAAAAAAAAAAAAAAAAAAAAAAAAAAAAAAAAAAAAAAAAAAAAAAAAAAAAAAAAAAAAAAAAAAAAAAAAAAAAAAAAAAAAAAAAAAAAAAAAAAAAAAAAAAAAAAAAAAAAAAAAAAAAAAAAAAAAAAAAAAAAAAAAAAAAAAAAAAAAAAAAAAAAAAAAAAAAAAAAAAAAAAAAAAAAAAAAAAAAAAAAAAAAAAAAAAAAAAAAAAAAAAAAAAAAAAAAAAAAAAAAAAAAAAAAAAAAAAAAAAAAAAAAAAAAAAAAAAAAAAAAAAAAAAAAAAAAAAAAAAAAAAAAAAAAAAAAAAAAAAAAAAAAAAAAAAAAAAAAAAAAAAAAAAAAAAAAAAAAAAAAAAAAAAAAAAAAAAAAAAAAAAAAAAAAAAAAAAAAAAAAAAAAAAAAAAAAAAAAAAAAAAAAAAAAAAAAAAAAAAAAAAAAAAAAAAAAAAAAAAAAAAAAAAAAAAAAAAAAAAAAAAAAAAAAAAAAAAAAAAAAAAAAAAAAAAAAAAAAAAAAAAAAAAAAAAAAAAAAAAAAAAAAAAAAAAAAAAAAAAAAAAAAAAAAAAAAAAAAAAAAAAAAAAAAAAAAAAAAAAAAAAAAAAAAAAAAAAAAAAAAAAAAAAAAAAAAAAAAAAAAAAAAAAAAAAAAAAAAAAAAAAAAAAAAAAAAAAAAAAAAAAAAAAAAAAAAAAAAAAAAAAAAAAAAAAAAAAAAAAAAAAAAAAAAAAAAAAAAAAAAAAAAAAAAAAAAAAAAAAAAAAAAAAAAAAAAAAAAAAAAAAAAAAAAAAAAAAAAAAAAAAAAAAAAAAAAAAAAAAAAAAAAAAAAAAAAAAAAAAAAAAAAAAAAAAAAAAAAAAAAAAAAAAAAAAAAAAAAAAAAAAAAAAAAAAAAAAAAAAAAAAAAAAAAAAAAAAAAAAAAAAAAAAAAAAAAAAAAAAAAAAAAAAAAAAAAAAAAAAAAAAAAAAAAAAAAAAAAAAAAAAAAAAAAAAAAAAAAAAAAAAAAAAAAAAAAAAAAAAAAAAAAAAAAAAAAAAAAAAAAAAAAAAAAAAAAAAAAAAAAAAAAAAAAAAAAAAAAAAAAAAAAAAAAAAAAAAAAAAAAAAAAAAAAAAAAAAAAAAAAAAAAAAAAAAAAAAAAAAAAAAAAAAAAAAAAAAAAAAAAAAAAAAAAAAAAAAAAAAAAAAAAAAAAAAAAAAAAAAAAAAAAAAAAAAAAAAAAAAAAAAAAAAAAAAAAAAAAAAAAAAAAAAAAAAAAAAAAAAAAAAAAAAAAAAAAAAAAAAAAAAAAAAAAAAAAAAAAAAAAAAAAAAAAAAAAAAAAAAAAAAAAAAAAAAAAAAAAAAAAAAAAAAAAAAAAAAAAAAAAAAAAAAAAAAAAAAAAAAAAAAAAAAAAAAAAAAAAAAAAAAAAAAAAAAAAAAAAAAAAAAAAAAAAAAAAAAAAAAAAAAAAAAAAAAAAAAAAAAAAAAAAAAAAAAAAAAAAAAAAAAAAAAAAAAAAAAAAAAAAAAAAAAAAAAAAAAAAAAAAAAAAAAAAAAAAAAAAAAAAAAAAAAAAAAAAAAAAAAAAAAAAAAAAAAAAAAAAAAAAAAAAAAAAAAAAAAAAAAAAAAAAAAAAAAAAAAAAAAAAAAAAAAAAAAAAAAAAAAAAAAAAAAAAAAAAAAAAAAAAAAAAAAAAAAAAAAAAAAAAAAAAAAAAAAAAAAAAAAAAAAAAAAAAAAAAAAAAAAAAAAAAAAAAAAAAAAAAAAAAAAAAAAAAAAAAAAAAAAAAAAAAAAAAAAAAAAAAAAAAAAAAAAAAAAAAAAAAAAAAAAAAAAAAAAAAAAAAAAAAAAAAAAAAAAAAAAAAAAAAAAAAAAAAAAAAAAAAAAAAAAAAAAAAAAAAAAAAAAAAAAAAAAAAAAAAAAAAAAAAAAAAAAAAAAAAAAAAAAAAAAAAAAAAAAAAAAAAAAAAAAAAAAAAAAAAAAAAAAAAAAAAAAAAAAAAAAAAAAAAAAAAAAAAAAAAAAAAAAAAAAAAAAAAAAAAAAAAAAAAAAAAAAAAAAAAAAAAAAAAAAAAAAAAAAAAAAAAAAAAAAAAAAAAAAAAAAAAAAAAAAAAAAAAAAAAAAAAAAAAAAAAAAAAAAAAAAAAAAAAAAAAAAAAAAAAAAAAAAAAAAAAAAAAAAAAAAAAAAAAAAAAAAAAAAAAAAAAAAAAAAAAAAAAAAAAAAAAAAAAAAAAAAAAAAAAAAAAAAAAAAAAAAAAAAAAAAAAAAAAAAAAAAAAAAAAAAAAAAAAAAAAAAAAAAAAAAAAAAAAAAAAAAAAAAAAAAAAAAAAAAAAAAAAAAAAAAAAAAAAAAAAAAAAAAAAAAAAAAAAAAAAAAAAAAAAAAAAAAAAAAAAAAAAAAAAAAAAAAAAAAAAAAAAAAAAAAAAAAAAAAAAAAAAAAAAAAAAAAAAAAAAAAAAAAAAAAAAAAAAAAAAAAAAAAAAAAAAAAAAAAAAAAAAAAAAAAAAAAAAAAAAAAAAAAAAAAAAAAAAAAAAAAAAAAAAAAAAAAAAAAAAAAAAAAAAAAAAAAAAAAAAAAAAAAAAAAAAAAAAAAAAAAAAAAAAAAAAAAAAAAAAAAAAAAAAAAAAAAAAAAAAAAAAAAAAAAAAAAAAAAAAAAAAAAAAAAAAAAAAAAAAAAAAAAAAAAAAAAAAAAAAAAAAAAAAAAAAAAAAAAAAAAAAAAAAAAAAAAAAAAAAAAAAAAAAAAAAAAAAAAAAAAAAAAAAAAAAAAAAAAAAAAAAAAAAAAAAAAAAAAAAAAAAAAAAAAAAAAAAAAAAAAAAAAAAAAAAAAAAAAAAAAAAAAAAAAAAAAAAAAAAAAAAAAAAAAAAAAAAAAAAAAAAAAAAAAAAAAAAAAAAAAAAAAAAAAAAAAAAAAAAAAAAAAAAAAAAAAAAAAAAAAAAAAAAAAAAAAAAAAAAAAAAAAAAAAAAAAAAAAAAAAAAAAAAAAAAAAAAAAAAAAAAAAAAAAAAAAAAAAAAAAAAAAAAAAAAAAAAAAAAAAAAAAAAAAAAAAAAAAAAAAAAAAAAAAAAAAAAAAAAAAAAAAAAAAAAAAAAAAAAAAAAAAAAAAAAAAAAAAAAAAAAAAAAAAAAAAAAAAAAAAAAAAAAAAAA
AAAAAAAAAAAAAAAAAAAAAAAAAAAAAAAAAAAAAAAAAAAAAAAAAAAAAAAAAAAAAAAAAAAAAAAAAAAAAAAAAAAAAAAAAAAAAAAAAAAAAAAAAAAAAAAAAAAAAAAAAAAAAAAAAAAAAAAAAAAAAAAAAAAAAAAAAAAAAAAAAAAAAAAAAAAAAAAAAAAAAAAAAAAAAAAAAAAAAAAAAAAAAAAAAAAAAAAAAAAAAAAAAAAAAAAAAAAAAAAAAAAAAAAAAAAAAAAAAAAAAAAAAAAAAAAAAAAAAAAAAAAAAAAAAAAAAAAAAAAAAAAAAAAAAAAAAAAAAAAAAAAAAAAAAAAAAAAAAAAAAAAAAAAAAAAAAAAAAAAAAAAAAAAAAAAAAAAAAAAAAAAAAAAAAAAAAAAAAAAAAAAAAAAAAAAAAAAAAAAAAAAAAAAAAAAAAAAAAAAAAAAAAAAAAAAAAAAAAAAAAAAAAAAAAAAAAAAAAAAAAAAAAAAAAAAAAAAAAAAAAAAAAAAAAAAAAAAAAAAAAAAAAAAAAAAAAAAAAAAAAAAAAAAAAAAAAAAAAAAAAAAAAAAAAAAAAAAAAAAAAAAAAAAAAAAAAAAAAAAAAAAAAAAAAAAAAAAAAAAAAAAAAAAAAAAAAAAAAAAAAAAAAAAAAAAAAAAAAAAAAAAAAAAAAAAAAAAAAAAAAAAAAAAAAAAAAAAAAAAAAAAAAAAAAAAAAAAAAAAAAAAAAAAAAAAAAAAAAAAAAAAAAAAAAAAAAAAAAAAAAAAAAAAAAAAAAAAAAAAAAAAAAAAAAAAAAAAAAAAAAAAAAAAAAAAAAAAAAAAAAAAAAAAAAAAAAAAAAAAAAAAAAAAAAAAAAAAAAAAAAAAAAAAAAAAAAAAAAAAAAAAAAAAAAAAAAAAAAAAAAAAAAAAAAAAAAAAAAAAAAAAAAAAAAAAAAAAAAAAAAAAAAAAAAAAAAAAAAAAAAAAAAAAAAAAAAAAAAAAAAAAAAAAAAAAAAAAAAAAAAAAAAAAAAAAAAAAAAAAAAAAAAAAAAAAAAAAAAAAAAAAAAAAAAAAAAAAAAAAAAAAAAAAAAAAAAAAAAAAAAAAAAAAAAAAAAAAAAAAAAAAAAAAAAAAAAAAAAAAAAAAAAAAAAAAAAAAAAAAAAAAAAAAAAAAAAAAAAAAAAAAAAAAAAAAAAAAAAAAAAAAAAAAAAAAAAAAAAAAAAAAAAAAAAAAAAAAAAAAAAAAAAAAAAAAAAAAAAAAAAAAAAAAAAAAAAAAAAAAAAAAAAAAAAAAAAAAAAAAAAAAAAAAAAAAAAAAAAAAAAAAAAAAAAAAAAAAAAAAAAAAAAAAAAAAAAAAAAAAAAAAAAAAAAAAAAAAAAAAAAAAAAAAAAAAAAAAAAAAAAAAAAAAAAAAAAAAAAAAAAAAAAAAAAAAAAAAAAAAAAAAAAAAAAAAAAAAAAAAAAAAAAAAAAAAAAAAAAAAAAAAAAAAAAAAAAAAAAAAAAAAAAAAAAAAAAAAAAAAAAAAAAAAAAAAAAAAAAAAAAAAAAAAAAAAAAAAAAAAAAAAAAAAAAAAAAAAAAAAAAAAAAAAAAAAAAAAAAAAAAAAAAAAAAAAAAAAAAAAAAAAAAAAAAAAAAAAAAAAAAAAAAAAAAAAAAAAAAAAAAAAAAAAAAAAAAAAAAAAAAAAAAAAAAAAAAAAAAAAAAAAAAAAAAAAAAAAAAAAAAAAAAAAAAAAAAAAAAAAAAAAAAAAAAAAAAAAAAAAAAAAAAAAAAAAAAAAAAAAAAAAAAAAAAAAAAAAAAAAAAAAAAAAAAAAAAAAAAAAAAAAAAAAAAAAAAAAAAAAAAAAAAAAAAAAAAAAAAAAAAAAAAAAAAAAAAAAAAAAAAAAAAAAAAAAAAAAAAAAAAAAAAAAAAAAAAAAAAAAAAAAAAAAAAAAAAAAAAAAAAAAAAAAAAAAAAAAAAAAAAAAAAAAAAAAAAAAAAAAAAAAAAAAAAAAAAAAAAAAAAAAAAAAAAAAAAAAAAAAAAAAAAAAAAAAAAAAAAAAAAAAAAAAAAAAAAAAAAAAAAAAAAAAAAAAAAAAAAAAAAAAAAAAAAAAAAAAAAAAAAAAAAAAAAAAAAAAAAAAAAAAAAAAAAAAAAAAAAAAAAAAAAAAAAAAAAAAAAAAAAAAAAAAAAAAAAAAAAAAAAAAAAAAAAAAAAAAAAAAAAAAAAAAAAAAAAAAAAAAAAAAAAAAAAAAAAAAAAAAAAAAAAAAAAAAAAAAAAAAAAAAAAAAAAAAAAAAAAAAAAAAAAAAAAAAAAAAAAAAAAAAAAAAAAAAAAAAAAAAAAAAAAAAAAAAAAAAAAAAAAAAAAAAAAAAAAAAAAAAAAAAAAAAAAAAAAAAAAAAAAAAAAAAAAAAAAAAAAAAAAAAAAAAAAAAAAAAAAAAAAAAAAAAAAAAAAAAAAAAAAAAAAAAAAAAAAAAAAAAAAAAAAAAAAAAAAAAAAAAAAAAAAAAAAAAAAAAAAAAAAAAAAAAAAAAAAAAAAAAAAAAAAAAAAAAAAAAAAAAAAAAAAAAAAAAAAAAAAAAAAAAAAAAAAAAAAAAAAAAAAAAAAAAAAAAAAAAAAAAAAAAAAAAAAAAAAAAAAAAAAAAAAAAAAAAAAAAAAAAAAAAAAAAAAAAAAAAAAAAAAAAAAAAAAAAAAAAAAAAAAAAAAAAAAAAAAAAAAAAAAAAAAAAAAAAAAAAAAAAAAAAAAAAAAAAAAAAAAAAAAAAAAAAAAAAAAAAAAAAAAAAAAAAAAAAAAAAAAAAAAAAAAAAAAAAAAAAAAAAAAAAAAAAAAAAAAAAAAAAAAAAAAAAAAAAAAAAAAAAAAAAAAAAAAAAAAAAAAAAAAAAAAAAAAAAAAAAAAAAAAAAAAAAAAAAAAAAAAAAAAAAAAAAAAAAAAAAAAAAAAAAAAAAAAAAAAAAAAAAAAAAAAAAAAAAAAAAAAAAAAAAAAAAAAAAAAAAAAAAAAAAAAAAAAAAAAAAAAAAAAAAAAAAAAAAAAAAAAAAAAAAAAAAAAAAAAAAAAAAAAAAAAAAAAAAAAAAAAAAAAAAAAAAAAAAAAAAAAAAAAAAAAAAAAAAAAAAAAAAAAAAAAAAAAAAAAAAAAAAAAAAAAAAAAAAAAAAAAAAAAAAAAAAAAAAAAAAAAAAAAAAAAAAAAAAAAAAAAAAAAAAAAAAAAAAAAAAAAAAAAAAAAAAAAAAAAAAAAAAAAAAAAAAAAAAAAAAAAAAAAAAAAAAAAAAAAAAAAAAAAAAAAAAAAAAAAAAAAAAAAAAAAAAAAAAAAAAAAAAAAAAAAAAAAAAAAAAAAAAAAAAAAAAAAAAAAAAAAAAAAAAAAAAAAAAAAAAAAAAAAAAAAAAAAAAAAAAAAAAAAAAAAAAAAAAAAAAAAAAAAAAAAAAAAAAAAAAAAAAAAAAAAAAAAAAAAAAAAAAAAAAAAAAAAAAAAAAAAAAAAAAAAAAAAAAAAAAAAAAAAAAAAAAAAAAAAAAAAAAAAAAAAAAAAAAAAAAAAAAAAAAAAAAAAAAAAAAAAAAAAAAAAAAAAAAAAAAAAAAAAAAAAAAAAAAAAAAAAAAAAAAAAAAAAAAAAAAAAAAAAAAAAAAAAAAAAAAAAAAAAAAAAAAAAAAAAAAAAAAAAAAAAAAAAAAAAAAAAAAAAAAAAAAAAAAAAAAAAAAAAAAAAAAAAAAAAAAAAAAAAAAAAAAAAAAAAAAAAAAAAAAAAAAAAAAAAAAAAAAAAAAAAAAAAAAAAAAAAAAAAAAAAAAAAAAAAAAAAAAAAAAAAAAAAAAAAAAAAAAAAAAAAAAAAAAAAAAAAAAAAAAAAAAAAAAAAAAAAAAAAAAAAAAAAAAAAAAAAAAAAAAAAAAAAAAAAAAAAAAAAAAAAAAAAAAAAAAAAAAAAAAAAAAAAAAAAAAAAAAAAAAAAAAAAAAAAAAAAAAAAAAAAAAAAAAAAAAAAAAAAAAAAAAAAAAAAAAAAAAAAAAAAAAAAAAAAAAAAAAAAAAAAAAAAAAAAAAAAAAAAAAAAAAAAAAAAAAAAAAAAAAAAAAAAAAAAAAAAAAAAAAAAAAAAAAAAAAAAAAAAAAAAAAAAAAAAAAAAAAAAAAAAAAAAAAAAAAA
AAAAAAAAAAAAAAAAAAAAAAAAAAAAAAAAAAAAAAAAAAAAAAAAAAAAAAAAAAAAAAAAAAAAAAAAAAAAAAAAAAAAAAAAAAAAAAAAAAAAAAAAAAAAAAAAAAAAAAAAAAAAAAAAAAAAAAAAAAAAAAAAAAAAAAAAAAAAAAAAAAAAAAAAAAAAAAAAAAAAAAAAAAAAAAAAAAAAAAAAAAAAAAAAAAAAAAAAAAAAAAAAAAAAAAAAAAAAAAAAAAAAAAAAAAAAAAAAAAAAAAAAAAAAAAAAAAAAAAAAAAAAAAAAAAAAAAAAAAAAAAAAAAAAAAAAAAAAAAAAAAAAAAAAAAAAAAAAAAAAAAAAAAAAAAAAAAAAAAAAAAAAAAAAAAAAAAAAAAAAAAAAAAAAAAAAAAAAAAAAAAAAAAAAAAAAAAAAAAAAAAAAAAAAAAAAAAAAAAAAAAAAAAAAAAAAAAAAAAAAAAAAAAAAAAAAAAAAAAAAAAAAAAAAAAAAAAAAAAAAAAAAAAAAAAAAAAAAAAAAAAAAAAAAAAAAAAAAAAAAAAAAAAAAAAAAAAAAAAAAAAAAAAAAAAAAAAAAAAAAAAAAAAAAAAAAAAAAAAAAAAAAAAAAAAAAAAAAAAAAAAAAAAAAAAAAAAAAAAAAAAAAAAAAAAAAAAAAAAAAAAAAAAAAAAAAAAAAAAAAAAAAAAAAAAAAAAAAAAAAAAAAAAAAAAAAAAAAAAAAAAAAAAAAAAAAAAAAAAAAAAAAAAAAAAAAAAAAAAAAAAAAAAAAAAAAAAAAAAAAAAAAAAAAAAAAAAAAAAAAAAAAAAAAAAAAAAAAAAAAAAAAAAAAAAAAAAAAAAAAAAAAAAAAAAAAAAAAAAAAAAAAAAAAAAAAAAAAAAAAAAAAAAAAAAAAAAAAAAAAAAAAAAAAAAAAAAAAAAAAAAAAAAAAAAAAAAAAAAAAAAAAAAAAAAAAAAAAAAAAAAAAAAAAAAAAAAAAAAAAAAAAAAAAAAAAAAAAAAAAAAAAAAAAAAAAAAAAAAAAAAAAAAAAAAAAAAAAAAAAAAAAAAAAAAAAAAAAAAAAAAAAAAAAAAAAAAAAAAAAAAAAAAAAAAAAAAAAAAAAAAAAAAAAAAAAAAAAAAAAAAAAAAAAAAAAAAAAAAAAAAAAAAAAAAAAAAAAAAAAAAAAAAAAAAAAAAAAAAAAAAAAAAAAAAAAAAAAAAAAAAAAAAAAAAAAAAAAAAAAAAAAAAAAAAAAAAAAAAAAAAAAAAAAAAAAAAAAAAAAAAAAAAAAAAAAAAAAAAAAAAAAAAAAAAAAAAAAAAAAAAAAAAAAAAAAAAAAAAAAAAAAAAAAAAAAAAAAAAAAAAAAAAAAAAAAAAAAAAAAAAAAAAAAAAAAAAAAAAAAAAAAAAAAAAAAAAAAAAAAAAAAAAAAAAAAAAAAAAAAAAAAAAAAAAAAAAAAAAAAAAAAAAAAAAAAAAAAAAAAAAAAAAAAAAAAAAAAAAAAAAAAAAAAAAAAAAAAAAAAAAAAAAAAAAAAAAAAAAAAAAAAAAAAAAAAAAAAAAAAAAAAAAAAAAAAAAAAAAAAAAAAAAAAAAAAAAAAAAAAAAAAAAAAAAAAAAAAAAAAAAAAAAAAAAAAAAAAAAAAAAAAAAAAAAAAAAAAAAAAAAAAAAAAAAAAAAAAAAAAAAAAAAAAAAAAAAAAAAAAAAAAAAAAAAAAAAAAAAAAAAAAAAAAAAAAAAAAAAAAAAAAAAAAAAAAAAAAAAAAAAAAAAAAAAAAAAAAAAAAAAAAAAAAAAAAAAAAAAAAAAAAAAAAAAAAAAAAAAAAAAAAAAAAAAAAAAAAAAAAAAAAAAAAAAAAAAAAAAAAAAAAAAAAAAAAAAAAAAAAAAAAAAAAAAAAAAAAAAAAAAAAAAAAAAAAAAAAAAAAAAAAAAAAAAAAAAAAAAAAAAAAAAAAAAAAAAAAAAAAAAAAAAAAAAAAAAAAAAAAAAAAAAAAAAAAAAAAAAAAAAAAAAAAAAAAAAAAAAAAAAAAAAAAAAAAAAAAAAAAAAAAAAAAAAAAAAAAAAAAAAAAAAAAAAAAAAAAAAAAAAAAAAAAAAAAAAAAAAAAAAAAAAAAAAAAAAAAAAAAAAAAAAAAAAAAAAAAAAAAAAAAAAAAAAAAAAAAAAAAAAAAAAAAAAAAAAAAAAAAAAAAAAAAAAAAAAAAAAAAAAAAAAAAAAAAAAAAAAAAAAAAAAAAAAAAAAAAAAAAAAAAAAAAAAAAAAAAAAAAAAAAAAAAAAAAAAAAAAAAAAAAAAAAAAAAAAAAAAAAAAAAAAAAAAAAAAAAAAAAAAAAAAAAAAAAAAAAAAAAAAAAAAAAAAAAAAAAAAAAAAAAAAAAAAAAAAAAAAAAAAAAAAAAAAAAAAAAAAAAAAAAAAAAAAAAAAAAAAAAAAAAAAAAAAAAAAAAAAAAAAAAAAAAAAAAAAAAAAAAAAAAAAAAAAAAAAAAAAAAAAAAAAAAAAAAAAAAAAAAAAAAAAAAAAAAAAAAAAAAAAAAAAAAAAAAAAAAAAAAAAAAAAAAAAAAAAAAAAAAAAAAAAAAAAAAAAAAAAAAAAAAAAAAAAAAAAAAAAAAAAAAAAAAAAAAAAAAAAAAAAAAAAAAAAAAAAAAAAAAAAAAAAAAAAAAAAAAAAAAAAAAAAAAAAAAAAAAAAAAAAAAAAAAAAAAAAAAAAAAAAAAAAAAAAAAAAAAAAAAAAAAAAAAAAAAAAAAAAAAAAAAAAAAAAAAAAAAAAAAAAAAAAAAAAAAAAAAAAAAAAAAAAAAAAAAAAAAAAAAAAAAAAAAAAAAAAAAAAAAAAAAAAAAAAAAAAAAAAAAAAAAAAAAAAAAAAAAAAAAAAAAAAAAAAAAAAAAAAAAAAAAAAAAAAAAAAAAAAAAAAAAAAAAAAAAAAAAAAAAAAAAAAAAAAAAAAAAAAAAAAAAAAAAAAAAAAAAAAAAAAAAAAAAAAAAAAAAAAAAAAAAAAAAAAAAAAAAAAAAAAAAAAAAAAAAAAAAAAAAAAAAAAAAAAAAAAAAAAAAAAAAAAAAAAAAAAAAAAAAAAAAAAAAAAAAAAAAAAAAAAAAAAAAAAAAAAAAAAAAAAAAAAAAAAAAAAAAAAAAAAAAAAAAAAAAAAAAAAAAAAAAAAAAAAAAAAAAAAAAAAAAAAAAAAAAAAAAAAAAAAAAAAAAAAAAAAAAAAAAAAAAAAAAAAAAAAAAAAAAAAAAAAAAAAAAAAAAAAAAAAAAAAAAAAAAAAAAAAAAAAAAAAAAAAAAAAAAAAAAAAAAAAAAAAAAAAAAAAAAAAAAAAAAAAAAAAAAAAAAAAAAAAAAAAAAAAAAAAAAAAAAAAAAAAAAAAAAAAAAAAAAAAAAAAAAAAAAAAAAAAAAAAAAAAAAAAAAAAAAAAAAAAAAAAAAAAAAAAAAAAAAAAAAAAAAAAAAAAAAAAAAAAAAAAAAAAAAAAAAAAAAAAAAAAAAAAAAAAAAAAAAAAAAAAAAAAAAAAAAAAAAAAAAAAAAAAAAAAAAAAAAAAAAAAAAAAAAAAAAAAAAAAAAAAAAAAAAAAAAAAAAAAAAAAAAAAAAAAAAAAAAAAAAAAAAAAAAAAAAAAAAAAAAAAAAAAAAAAAAAAAAAAAAAAAAAAAAAAAAAAAAAAAAAAAAAAAAAAAAAAAAAAAAAAAAAAAAAAAAAAAAAAAAAAAAAAAAAAAAAAAAAAAAAAAAAAAAAAAAAAAAAAAAAAAAAAAAAAAAAAAAAAAAAAAAAAAAAAAAAAAAAAAAAAAAAAAAAAAAAAAAAAAAAAAAAAAAAAAAAAAAAAAAAAAAAAAAAAAAAAAAAAAAAAAAAAAAAAAAAAAAAAAAAAAAAAAAAAAAAAAAAAAAAAAAAAAAAAAAAAAAAAAAAAAAAAAAAAAAAAAAAAAAAAAAAAAAAAAAAAAAAAAAAAAAAAAAAAAAAAAAAAAAAAAAAAAAAAAAAAAAAAAAAAAAAAAAAAAAAAAAAAAAAAAAAAAAAAAAAAAAAAAAAAAAAAAAAAAAAAAAAAAAAAAAAAAAAAAAAAAAAAAAAAAAAAAAAAAAAAAAAAAAAAAAAAAAAAAAAAAAAAAAAAAAAAAAAAAAAAAAAAAAAAAAAAAA
AAAAAAAAAAAAAAAAAAAAAAAAAAAAAAAAAAAAAAAAAAAAAAAAAAAAAAAAAAAAAAAAAAAAAAAAAAAAAAAAAAAAAAAAAAAAAAAAAAAAAAAAAAAAAAAAAAAAAAAAAAAAAAAAAAAAAAAAAAAAAAAAAAAAAAAAAAAAAAAAAAAAAAAAAAAAAAAAAAAAAAAAAAAAAAAAAAAAAAAAAAAAAAAAAAAAAAAAAAAAAAAAAAAAAAAAAAAAAAAAAAAAAAAAAAAAAAAAAAAAAAAAAAAAAAAAAAAAAAAAAAAAAAAAAAAAAAAAAAAAAAAAAAAAAAAAAAAAAAAAAAAAAAAAAAAAAAAAAAAAAAAAAAAAAAAAAAAAAAAAAAAAAAAAAAAAAAAAAAAAAAAAAAAAAAAAAAAAAAAAAAAAAAAAAAAAAAAAAAAAAAAAAAAAAAAAAAAAAAAAAAAAAAAAAAAAAAAAAAAAAAAAAAAAAAAAAAAAAAAAAAAAAAAAAAAAAAAAAAAAAAAAAAAAAAAAAAAAAAAAAAAAAAAAAAAAAAAAAAAAAAAAAAAAAAAAAAAAAAAAAAAAAAAAAAAAAAAAAAAAAAAAAAAAAAAAAAAAAAAAAAAAAAAAAAAAAAAAAAAAAAAAAAAAAAAAAAAAAAAAAAAAAAAAAAAAAAAAAAAAAAAAAAAAAAAAAAAAAAAAAAAAAAAAAAAAAAAAAAAAAAAAAAAAAAAAAAAAAAAAAAAAAAAAAAAAAAAAAAAAAAAAAAAAAAAAAAAAAAAAAAAAAAAAAAAAAAAAAAAAAAAAAAAAAAAAAAAAAAAAAAAAAAAAAAAAAAAAAAAAAAAAAAAAAAAAAAAAAAAAAAAAAAAAAAAAAAAAAAAAAAAAAAAAAAAAAAAAAAAAAAAAAAAAAAAAAAAAAAAAAAAAAAAAAAAAAAAAAAAAAAAAAAAAAAAAAAAAAAAAAAAAAAAAAAAAAAAAAAAAAAAAAAAAAAAAAAAAAAAAAAAAAAAAAAAAAAAAAAAAAAAAAAAAAAAAAAAAAAAAAAAAAAAAAAAAAAAAAAAAAAAAAAAAAAAAAAAAAAAAAAAAAAAAAAAAAAAAAAAAAAAAAAAAAAAAAAAAAAAAAAAAAAAAAAAAAAAAAAAAAAAAAAAAAAAAAAAAAAAAAAAAAAAAAAAAAAAAAAAAAAAAAAAAAAAAAAAAAAAAAAAAAAAAAAAAAAAAAAAAAAAAAAAAAAAAAAAAAAAAAAAAAAAAAAAAAAAAAAAAAAAAAAAAAAAAAAAAAAAAAAAAAAAAAAAAAAAAAAAAAAAAAAAAAAAAAAAAAAAAAAAAAAAAAAAAAAAAAAAAAAAAAAAAAAAAAAAAAAAAAAAAAAAAAAAAAAAAAAAAAAAAAAAAAAAAAAAAAAAAAAAAAAAAAAAAAAAAAAAAAAAAAAAAAAAAAAAAAAAAAAAAAAAAAAAAAAAAAAAAAAAAAAAAAAAAAAAAAAAAAAAAAAAAAAAAAAAAAAAAAAAAAAAAAAAAAAAAAAAAAAAAAAAAAAAAAAAAAAAAAAAAAAAAAAAAAAAAAAAAAAAAAAAAAAAAAAAAAAAAAAAAAAAAAAAAAAAAAAAAAAAAAAAAAAAAAAAAAAAAAAAAAAAAAAAAAAAAAAAAAAAAAAAAAAAAAAAAAAAAAAAAAAAAAAAAAAAAAAAAAAAAAAAAAAAAAAAAAAAAAAAAAAAAAAAAAAAAAAAAAAAAAAAAAAAAAAAAAAAAAAAAAAAAAAAAAAAAAAAAAAAAAAAAAAAAAAAAAAAAAAAAAAAAAAAAAAAAAAAAAAAAAAAAAAAAAAAAAAAAAAAAAAAAAAAAAAAAAAAAAAAAAAAAAAAAAAAAAAAAAAAAAAAAAAAAAAAAAAAAAAAAAAAAAAAAAAAAAAAAAAAAAAAAAAAAAAAAAAAAAAAAAAAAAAAAAAAAAAAAAAAAAAAAAAAAAAAAAAAAAAAAAAAAAAAAAAAAAAAAAAAAAAAAAAAAAAAAAAAAAAAAAAAAAAAAAAAAAAAAAAAAAAAAAAAAAAAAAAAAAAAAAAAAAAAAAAAAAAAAAAAAAAAAAAAAAAAAAAAAAAAAAAAAAAAAAAAAAAAAAAAAAAAAAAAAAAAAAAAAAAAAAAAAAAAAAAAAAAAAAAAAAAAAAAAAAAAAAAAAAAAAAAAAAAAAAAAAAAAAAAAAAAAAAAAAAAAAAAAAAAAAAAAAAAAAAAAAAAAAAAAAAAAAAAAAAAAAAAAAAAAAAAAAAAAAAAAAAAAAAAAAAAAAAAAAAAAAAAAAAAAAAAAAAAAAAAAAAAAAAAAAAAAAAAAAAAAAAAAAAAAAAAAAAAAAAAAAAAAAAAAAAAAAAAAAAAAAAAAAAAAAAAAAAAAAAAAAAAAAAAAAAAAAAAAAAAAAAAAAAAAAAAAAAAAAAAAAAAAAAAAAAAAAAAAAAAAAAAAAAAAAAAAAAAAAAAAAAAAAAAAAAAAAAAAAAAAAAAAAAAAAAAAAAAAAAAAAAAAAAAAAAAAAAAAAAAAAAAAAAAAAAAAAAAAAAAAAAAAAAAAAAAAAAAAAAAAAAAAAAAAAAAAAAAAAAAAAAAAAAAAAAAAAAAAAAAAAAAAAAAAAAAAAAAAAAAAAAAAAAAAAAAAAAAAAAAAAAAAAAAAAAAAAAAAAAAAAAAAAAAAAAAAAAAAAAAAAAAAAAAAAAAAAAAAAAAAAAAAAAAAAAAAAAAAAAAAAAAAAAAAAAAAAAAAAAAAAAAAAAAAAAAAAAAAAAAAAAAAAAAAAAAAAAAAAAAAAAAAAAAAAAAAAAAAAAAAAAAAAAAAAAAAAAAAAAAAAAAAAAAAAAAAAAAAAAAAAAAAAAAAAAAAAAAAAAAAAAAAAAAAAAAAAAAAAAAAAAAAAAAAAAAAAAAAAAAAAAAAAAAAAAAAAAAAAAAAAAAAAAAAAAAAAAAAAAAAAAAAAAAAAAAAAAAAAAAAAAAAAAAAAAAAAAAAAAAAAAAAAAAAAAAAAAAAAAAAAAAAAAAAAAAAAAAAAAAAAAAAAAAAAAAAAAAAAAAAAAAAAAAAAAAAAAAAAAAAAAAAAAAAAAAAAAAAAAAAAAAAAAAAAAAAAAAAAAAAAAAAAAAAAAAAAAAAAAAAAAAAAAAAAAAAAAAAAAAAAAAAAAAAAAAAAAAAAAAAAAAAAAAAAAAAAAAAAAAAAAAAAAAAAAAAAAAAAAAAAAAAAAAAAAAAAAAAAAAAAAAAAAAAAAAAAAAAAAAAAAAAAAAAAAAAAAAAAAAAAAAAAAAAAAAAAAAAAAAAAAAAAAAAAAAAAAAAAAAAAAAAAAAAAAAAAAAAAAAAAAAAAAAAAAAAAAAAAAAAAAAAAAAAAAAAAAAAAAAAAAAAAAAAAAAAAAAAAAAAAAAAAAAAAAAAAAAAAAAAAAAAAAAAAAAAAAAAAAAAAAAAAAAAAAAAAAAAAAAAAAAAAAAAAAAAAAAAAAAAAAAAAAAAAAAAAAAAAAAAAAAAAAAAAAAAAAAAAAAAAAAAAAAAAAAAAAAAAAAAAAAAAAAAAAAAAAAAAAAAAAAAAAAAAAAAAAAAAAAAAAAAAAAAAAAAAAAAAAAAAAAAAAAAAAAAAAAAAAAAAAAAAAAAAAAAAAAAAAAAAAAAAAAAAAAAAAAAAAAAAAAAAAAAAAAAAAAAAAAAAAAAAAAAAAAAAAAAAAAAAAAAAAAAAAAAAAAAAAAAAAAAAAAAAAAAAAAAAAAAAAAAAAAAAAAAAAAAAAAAAAAAAAAAAAAAAAAAAAAAAAAAAAAAAAAAAAAAAAAAAAAAAAAAAAAAAAAAAAAAAAAAAAAAAAAAAAAAAAAAAAAAAAAAAAAAAAAAAAAAAAAAAAAAAAAAAAAAAAAAAAAAAAAAAAAAAAAAAAAAAAAAAAAAAAAAAAAAAAAAAAAAAAAAAAAAAAAAAAAAAAAAAAAAAAAAAAAAAAAAAAAAAAAAAAAAAAAAAAAAAAAAAAAAAAAAAAAAAAAAAAAAAAAAAAAAAAAAAAAAAAAAAAAAAAAAAAAAAAAAAAAAAAAAAAAAAAAAAAAAAAAAAAAAAAAAAAAAAAAAAAAAAAAAAAAAAAAAAAAAAAAAAAAAAAAAAAAAAAAAAAAAAAAAAAAAAAAAAAAAA
AAAAAAAAAAAAAAAAAAAAAAAAAAAAAAAAAAAAAAAAAAAAAAAAAAAAAAAAAAAAAAAAAAAAAAAAAAAAAAAAAAAAAAAAAAAAAAAAAAAAAAAAAAAAAAAAAAAAAAAAAAAAAAAAAAAAAAAAAAAAAAAAAAAAAAAAAAAAAAAAAAAAAAAAAAAAAAAAAAAAAAAAAAAAAAAAAAAAAAAAAAAAAAAAAAAAAAAAAAAAAAAAAAAAAAAAAAAAAAAAAAAAAAAAAAAAAAAAAAAAAAAAAAAAAAAAAAAAAAAAAAAAAAAAAAAAAAAAAAAAAAAAAAAAAAAAAAAAAAAAAAAAAAAAAAAAAAAAAAAAAAAAAAAAAAAAAAAAAAAAAAAAAAAAAAAAAAAAAAAAAAAAAAAAAAAAAAAAAAAAAAAAAAAAAAAAAAAAAAAAAAAAAAAAAAAAAAAAAAAAAAAAAAAAAAAAAAAAAAAAAAAAAAAAAAAAAAAAAAAAAAAAAAAAAAAAAAAAAAAAAAAAAAAAAAAAAAAAAAAAAAAAAAAAAAAAAAAAAAAAAAAAAAAAAAAAAAAAAAAAAAAAAAAAAAAAAAAAAAAAAAAAAAAAAAAAAAAAAAAAAAAAAAAAAAAAAAAAAAAAAAAAAAAAAAAAAAAAAAAAAAAAAAAAAAAAAAAAAAAAAAAAAAAAAAAAAAAAAAAAAAAAAAAAAAAAAAAAAAAAAAAAAAAAAAAAAAAAAAAAAAAAAAAAAAAAAAAAAAAAAAAAAAAAAAAAAAAAAAAAAAAAAAAAAAAAAAAAAAAAAAAAAAAAAAAAAAAAAAAAAAAAAAAAAAAAAAAAAAAAAAAAAAAAAAAAAAAAAAAAAAAAAAAAAAAAAAAAAAAAAAAAAAAAAAAAAAAAAAAAAAAAAAAAAAAAAAAAAAAAAAAAAAAAAAAAAAAAAAAAAAAAAAAAAAAAAAAAAAAAAAAAAAAAAAAAAAAAAAAAAAAAAAAAAAAAAAAAAAAAAAAAAAAAAAAAAAAAAAAAAAAAAAAAAAAAAAAAAAAAAAAAAAAAAAAAAAAAAAAAAAAAAAAAAAAAAAAAAAAAAAAAAAAAAAAAAAAAAAAAAAAAAAAAAAAAAAAAAAAAAAAAAAAAAAAAAAAAAAAAAAAAAAAAAAAAAAAAAAAAAAAAAAAAAAAAAAAAAAAAAAAAAAAAAAAAAAAAAAAAAAAAAAAAAAAAAAAAAAAAAAAAAAAAAAAAAAAAAAAAAAAAAAAAAAAAAAAAAAAAAAAAAAAAAAAAAAAAAAAAAAAAAAAAAAAAAAAAAAAAAAAAAAAAAAAAAAAAAAAAAAAAAAAAAAAAAAAAAAAAAAAAAAAAAAAAAAAAAAAAAAAAAAAAAAAAAAAAAAAAAAAAAAAAAAAAAAAAAAAAAAAAAAAAAAAAAAAAAAAAAAAAAAAAAAAAAAAAAAAAAAAAAAAAAAAAAAAAAAAAAAAAAAAAAAAAAAAAAAAAAAAAAAAAAAAAAAAAAAAAAAAAAAAAAAAAAAAAAAAAAAAAAAAAAAAAAAAAAAAAAAAAAAAAAAAAAAAAAAAAAAAAAAAAAAAAAAAAAAAAAAAAAAAAAAAAAAAAAAAAAAAAAAAAAAAAAAAAAAAAAAAAAAAAAAAAAAAAAAAAAAAAAAAAAAAAAAAAAAAAAAAAAAAAAAAAAAAAAAAAAAAAAAAAAAAAAAAAAAAAAAAAAAAAAAAAAAAAAAAAAAAAAAAAAAAAAAAAAAAAAAAAAAAAAAAAAAAAAAAAAAAAAAAAAAAAAAAAAAAAAAAAAAAAAAAAAAAAAAAAAAAAAAAAAAAAAAAAAAAAAAAAAAAAAAAAAAAAAAAAAAAAAAAAAAAAAAAAAAAAAAAAAAAAAAAAAAAAAAAAAAAAAAAAAAAAAAAAAAAAAAAAAAAAAAAAAAAAAAAAAAAAAAAAAAAAAAAAAAAAAAAAAAAAAAAAAAAAAAAAAAAAAAAAAAAAAAAAAAAAAAAAAAAAAAAAAAAAAAAAAAAAAAAAAAAAAAAAAAAAAAAAAAAAAAAAAAAAAAAAAAAAAAAAAAAAAAAAAAAAAAAAAAAAAAAAAAAAAAAAAAAAAAAAAAAAAAAAAAAAAAAAAAAAAAAAAAAAAAAAAAAAAAAAAAAAAAAAAAAAAAAAAAAAAAAAAAAAAAAAAAAAAAAAAAAAAAAAAAAAAAAAAAAAAAAAAAAAAAAAAAAAAAAAAAAAAAAAAAAAAAAAAAAAAAAAAAAAAAAAAAAAAAAAAAAAAAAAAAAAAAAAAAAAAAAAAAAAAAAAAAAAAAAAAAAAAAAAAAAAAAAAAAAAAAAAAAAAAAAAAAAAAAAAAAAAAAAAAAAAAAAAAAAAAAAAAAAAAAAAAAAAAAAAAAAAAAAAAAAAAAAAAAAAAAAAAAAAAAAAAAAAAAAAAAAAAAAAAAAAAAAAAAAAAAAAAAAAAAAAAAAAAAAAAAAAAAAAAAAAAAAAAAAAAAAAAAAAAAAAAAAAAAAAAAAAAAAAAAAAAAAAAAAAAAAAAAAAAAAAAAAAAAAAAAAAAAAAAAAAAAAAAAAAAAAAAAAAAAAAAAAAAAAAAAAAAAAAAAAAAAAAAAAAAAAAAAAAAAAAAAAAAAAAAAAAAAAAAAAAAAAAAAAAAAAAAAAAAAAAAAAAAAAAAAAAAAAAAAAAAAAAAAAAAAAAAAAAAAAAAAAAAAAAAAAAAAAAAAAAAAAAAAAAAAAAAAAAAAAAAAAAAAAAAAAAAAAAAAAAAAAAAAAAAAAAAAAAAAAAAAAAAAAAAAAAAAAAAAAAAAAAAAAAAAAAAAAAAAAAAAAAAAAAAAAAAAAAAAAAAAAAAAAAAAAAAAAAAAAAAAAAAAAAAAAAAAAAAAAAAAAAAAAAAAAAAAAAAAAAAAAAAAAAAAAAAAAAAAAAAAAAAAAAAAAAAAAAAAAAAAAAAAAAAAAAAAAAAAAAAAAAAAAAAAAAAAAAAAAAAAAAAAAAAAAAAAAAAAAAAAAAAAAAAAAAAAAAAAAAAAAAAAAAAAAAAAAAAAAAAAAAAAAAAAAAAAAAAAAAAAAAAAAAAAAAAAAAAAAAAAAAAAAAAAAAAAAAAAAAAAAAAAAAAAAAAAAAAAAAAAAAAAAAAAAAAAAAAAAAAAAAAAAAAAAAAAAAAAAAAAAAAAAAAAAAAAAAAAAAAAAAAAAAAAAAAAAAAAAAAAAAAAAAAAAAAAAAAAAAAAAAAAAAAAAAAAAAAAAAAAAAAAAAAAAAAAAAAAAAAAAAAAAAAAAAAAAAAAAAAAAAAAAAAAAAAAAAAAAAAAAAAAAAAAAAAAAAAAAAAAAAAAAAAAAAAAAAAAAAAAAAAAAAAAAAAAAAAAAAAAAAAAAAAAAAAAAAAAAAAAAAAAAAAAAAAAAAAAAAAAAAAAAAAAAAAAAAAAAAAAAAAAAAAAAAAAAAAAAAAAAAAAAAAAAAAAAAAAAAAAAAAAAAAAAAAAAAAAAAAAAAAAAAAAAAAAAAAAAAAAAAAAAAAAAAAAAAAAAAAAAAAAAAAAAAAAAAAAAAAAAAAAAAAAAAAAAAAAAAAAAAAAAAAAAAAAAAAAAAAAAAAAAAAAAAAAAAAAAAAAAAAAAAAAAAAAAAAAAAAAAAAAAAAAAAAAAAAAAAAAAAAAAAAAAAAAAAAAAAAAAAAAAAAAAAAAAAAAAAAAAAAAAAAAAAAAAAAAAAAAAAAAAAAAAAAAAAAAAAAAAAAAAAAAAAAAAAAAAAAAAAAAAAAAAAAAAAAAAAAAAAAAAAAAAAAAAAAAAAAAAAAAAAAAAAAAAAAAAAAAAAAAAAAAAAAAAAAAAAAAAAAAAAAAAAAAAAAAAAAAAAAAAAAAAAAAAAAAAAAAAAAAAAAAAAAAAAAAAAAAAAAAAAAAAAAAAAAAAAAAAAAAAAAAAAAAAAAAAAAAAAAAAAAAAAAAAAAAAAAAAAAAAAAAAAAAAAAAAAAAAAAAAAAAAAAAAAAAAAAAAAAAAAAAAAAAAAAAAAAAAAAAAAAAAAAAAAAAAAAAAAAAAAAAAAAAAAAAAAAAAAAAAAAAAAAAAAAAAAAAAAAAAAAAAAAAAAAAAAAAAAAAAAAAAAAAAAAAAAAAAAAAAAAAAAAAAAAAAAAAAAAAAAAAAAAAAA
AAAAAAAAAAAAAAAAAAAAAAAAAAAAAAAAAAAAAAAAAAAAAAAAAAAAAAAAAAAAAAAAAAAAAAAAAAAAAAAAAAAAAAAAAAAAAAAAAAAAAAAAAAAAAAAAAAAAAAAAAAAAAAAAAAAAAAAAAAAAAAAAAAAAAAAAAAAAAAAAAAAAAAAAAAAAAAAAAAAAAAAAAAAAAAAAAAAAAAAAAAAAAAAAAAAAAAAAAAAAAAAAAAAAAAAAAAAAAAAAAAAAAAAAAAAAAAAAAAAAAAAAAAAAAAAAAAAAAAAAAAAAAAAAAAAAAAAAAAAAAAAAAAAAAAAAAAAAAAAAAAAAAAAAAAAAAAAAAAAAAAAAAAAAAAAAAAAAAAAAAAAAAAAAAAAAAAAAAAAAAAAAAAAAAAAAAAAAAAAAAAAAAAAAAAAAAAAAAAAAAAAAAAAAAAAAAAAAAAAAAAAAAAAAAAAAAAAAAAAAAAAAAAAAAAAAAAAAAAAAAAAAAAAAAAAAAAAAAAAAAAAAAAAAAAAAAAAAAAAAAAAAAAAAAAAAAAAAAAAAAAAAAAAAAAAAAAAAAAAAAAAAAAAAAAAAAAAAAAAAAAAAAAAAAAAAAAAAAAAAAAAAAAAAAAAAAAAAAAAAAAAAAAAAAAAAAAAAAAAAAAAAAAAAAAAAAAAAAAAAAAAAAAAAAAAAAAAAAAAAAAAAAAAAAAAAAAAAAAAAAAAAAAAAAAAAAAAAAAAAAAAAAAAAAAAAAAAAAAAAAAAAAAAAAAAAAAAAAAAAAAAAAAAAAAAAAAAAAAAAAAAAAAAAAAAAAAAAAAAAAAAAAAAAAAAAAAAAAAAAAAAAAAAAAAAAAAAAAAAAAAAAAAAAAAAAAAAAAAAAAAAAAAAAAAAAAAAAAAAAAAAAAAAAAAAAAAAAAAAAAAAAAAAAAAAAAAAAAAAAAAAAAAAAAAAAAAAAAAAAAAAAAAAAAAAAAAAAAAAAAAAAAAAAAAAAAAAAAAAAAAAAAAAAAAAAAAAAAAAAAAAAAAAAAAAAAAAAAAAAAAAAAAAAAAAAAAAAAAAAAAAAAAAAAAAAAAAAAAAAAAAAAAAAAAAAAAAAAAAAAAAAAAAAAAAAAAAAAAAAAAAAAAAAAAAAAAAAAAAAAAAAAAAAAAAAAAAAAAAAAAAAAAAAAAAAAAAAAAAAAAAAAAAAAAAAAAAAAAAAAAAAAAAAAAAAAAAAAAAAAAAAAAAAAAAAAAAAAAAAAAAAAAAAAAAAAAAAAAAAAAAAAAAAAAAAAAAAAAAAAAAAAAAAAAAAAAAAAAAAAAAAAAAAAAAAAAAAAAAAAAAAAAAAAAAAAAAAAAAAAAAAAAAAAAAAAAAAAAAAAAAAAAAAAAAAAAAAAAAAAAAAAAAAAAAAAAAAAAAAAAAAAAAAAAAAAAAAAAAAAAAAAAAAAAAAAAAAAAAAAAAAAAAAAAAAAAAAAAAAAAAAAAAAAAAAAAAAAAAAAAAAAAAAAAAAAAAAAAAAAAAAAAAAAAAAAAAAAAAAAAAAAAAAAAAAAAAAAAAAAAAAAAAAAAAAAAAAAAAAAAAAAAAAAAAAAAAAAAAAAAAAAAAAAAAAAAAAAAAAAAAAAAAAAAAAAAAAAAAAAAAAAAAAAAAAAAAAAAAAAAAAAAAAAAAAAAAAAAAAAAAAAAAAAAAAAAAAAAAAAAAAAAAAAAAAAAAAAAAAAAAAAAAAAAAAAAAAAAAAAAAAAAAAAAAAAAAAAAAAAAAAAAAAAAAAAAAAAAAAAAAAAAAAAAAAAAAAAAAAAAAAAAAAAAAAAAAAAAAAAAAAAAAAAAAAAAAAAAAAAAAAAAAAAAAAAAAAAAAAAAAAAAAAAAAAAAAAAAAAAAAAAAAAAAAAAAAAAAAAAAAAAAAAAAAAAAAAAAAAAAAAAAAAAAAAAAAAAAAAAAAAAAAAAAAAAAAAAAAAAAAAAAAAAAAAAAAAAAAAAAAAAAAAAAAAAAAAAAAAAAAAAAAAAAAAAAAAAAAAAAAAAAAAAAAAAAAAAAAAAAAAAAAAAAAAAAAAAAAAAAAAAAAAAAAAAAAAAAAAAAAAAAAAAAAAAAAAAAAAAAAAAAAAAAAAAAAAAAAAAAAAAAAAAAAAAAAAAAAAAAAAAAAAAAAAAAAAAAAAAAAAAAAAAAAAAAAAAAAAAAAAAAAAAAAAAAAAAAAAAAAAAAAAAAAAAAAAAAAAAAAAAAAAAAAAAAAAAAAAAAAAAAAAAAAAAAAAAAAAAAAAAAAAAAAAAAAAAAAAAAAAAAAAAAAAAAAAAAAAAAAAAAAAAAAAAAAAAAAAAAAAAAAAAAAAAAAAAAAAAAAAAAAAAAAAAAAAAAAAAAAAAAAAAAAAAAAAAAAAAAAAAAAAAAAAAAAAAAAAAAAAAAAAAAAAAAAAAAAAAAAAAAAAAAAAAAAAAAAAAAAAAAAAAAAAAAAAAAAAAAAAAAAAAAAAAAAAAAAAAAAAAAAAAAAAAAAAAAAAAAAAAAAAAAAAAAAAAAAAAAAAAAAAAAAAAAAAAAAAAAAAAAAAAAAAAAAAAAAAAAAAAAAAAAAAAAAAAAAAAAAAAAAAAAAAAAAAAAAAAAAAAAAAAAAAAAAAAAAAAAAAAAAAAAAAAAAAAAAAAAAAAAAAAAAAAAAAAAAAAAAAAAAAAAAAAAAAAAAAAAAAAAAAAAAAAAAAAAAAAAAAAAAAAAAAAAAAAAAAAAAAAAAAAAAAAAAAAAAAAAAAAAAAAAAAAAAAAAAAAAAAAAAAAAAAAAAAAAAAAAAAAAAAAAAAAAAAAAAAAAAAAAAAAAAAAAAAAAAAAAAAAAAAAAAAAAAAAAAAAAAAAAAAAAAAAAAAAAAAAAAAAAAAAAAAAAAAAAAAAAAAAAAAAAAAAAAAAAAAAAAAAAAAAAAAAAAAAAAAAAAAAAAAAAAAAAAAAAAAAAAAAAAAAAAAAAAAAAAAAAAAAAAAAAAAAAAAAAAAAAAAAAAAAAAAAAAAAAAAAAAAAAAAAAAAAAAAAAAAAAAAAAAAAAAAAAAAAAAAAAAAAAAAAAAAAAAAAAAAAAAAAAAAAAAAAAAAAAAAAAAAAAAAAAAAAAAAAAAAAAAAAAAAAAAAAAAAAAAAAAAAAAAAAAAAAAAAAAAAAAAAAAAAAAAAAAAAAAAAAAAAAAAAAAAAAAAAAAAAAAAAAAAAAAAAAAAAAAAAAAAAAAAAAAAAAAAAAAAAAAAAAAAAAAAAAAAAAAAAAAAAAAAAAAAAAAAAAAAAAAAAAAAAAAAAAAAAAAAAAAAAAAAAAAAAAAAAAAAAAAAAAAAAAAAAAAAAAAAAAAAAAAAAAAAAAAAAAAAAAAAAAAAAAAAAAAAAAAAAAAAAAAAAAAAAAAAAAAAAAAAAAAAAAAAAAAAAAAAAAAAAAAAAAAAAAAAAAAAAAAAAAAAAAAAAAAAAAAAAAAAAAAAAAAAAAAAAAAAAAAAAAAAAAAAAAAAAAAAAAAAAAAAAAAAAAAAAAAAAAAAAAAAAAAAAAAAAAAAAAAAAAAAAAAAAAAAAAAAAAAAAAAAAAAAAAAAAAAAAAAAAAAAAAAAAAAAAAAAAAAAAAAAAAAAAAAAAAAAAAAAAAAAAAAAAAAAAAAAAAAAAAAAAAAAAAAAAAAAAAAAAAAAAAAAAAAAAAAAAAAAAAAAAAAAAAAAAAAAAAAAAAAAAAAAAAAAAAAAAAAAAAAAAAAAAAAAAAAAAAAAAAAAAAAAAAAAAAAAAAAAAAAAAAAAAAAAAAAAAAAAAAAAAAAAAAAAAAAAAAAAAAAAAAAAAAAAAAAAAAAAAAAAAAAAAAAAAAAAAAAAAAAAAAAAAAAAAAAAAAAAAAAAAAAAAAAAAAAAAAAAAAAAAAAAAAAAAAAAAAAAAAAAAAAAAAAAAAAAAAAAAAAAAAAAAAAAAAAAAAAAAAAAAAAAAAAAAAAAAAAAAAAAAAAAAAAAAAAAAAAAAAAAAAAAAAAAAAAAAAAAAAAAAAAAAAAAAAAAAAAAAAAAAAAAAAAAAAAAAAAAAAAAAAAAAAAAAAAAAAAAAAAAAAAAAAAAAAAAAAAAAAAAAAAAAAAAAAAAAAAAAAAAAAAAAAAAAAAAAAAAAAAAAAAAAAAAAAAAAAAAAAAAAAAAAAAAA
AAAAAAAAAAAAAAAAAAAAAAAAAAAAAAAAAAAAAAAAAAAAAAAAAAAAAAAAAAAAAAAAAAAAAAAAAAAAAAAAAAAAAAAAAAAAAAAAAAAAAAAAAAAAAAAAAAAAAAAAAAAAAAAAAAAAAAAAAAAAAAAAAAAAAAAAAAAAAAAAAAAAAAAAAAAAAAAAAAAAAAAAAAAAAAAAAAAAAAAAAAAAAAAAAAAAAAAAAAAAAAAAAAAAAAAAAAAAAAAAAAAAAAAAAAAAAAAAAAAAAAAAAAAAAAAAAAAAAAAAAAAAAAAAAAAAAAAAAAAAAAAAAAAAAAAAAAAAAAAAAAAAAAAAAAAAAAAAAAAAAAAAAAAAAAAAAAAAAAAAAAAAAAAAAAAAAAAAAAAAAAAAAAAAAAAAAAAAAAAAAAAAAAAAAAAAAAAAAAAAAAAAAAAAAAAAAAAAAAAAAAAAAAAAAAAAAAAAAAAAAAAAAAAAAAAAAAAAAAAAAAAAAAAAAAAAAAAAAAAAAAAAAAAAAAAAAAAAAAAAAAAAAAAAAAAAAAAAAAAAAAAAAAAAAAAAAAAAAAAAAAAAAAAAAAAAAAAAAAAAAAAAAAAAAAAAAAAAAAAAAAAAAAAAAAAAAAAAAAAAAAAAAAAAAAAAAAAAAAAAAAAAAAAAAAAAAAAAAAAAAAAAAAAAAAAAAAAAAAAAAAAAAAAAAAAAAAAAAAAAAAAAAAAAAAAAAAAAAAAAAAAAAAAAAAAAAAAAAAAAAAAAAAAAAAAAAAAAAAAAAAAAAAAAAAAAAAAAAAAAAAAAAAAAAAAAAAAAAAAAAAAAAAAAAAAAAAAAAAAAAAAAAAAAAAAAAAAAAAAAAAAAAAAAAAAAAAAAAAAAAAAAAAAAAAAAAAAAAAAAAAAAAAAAAAAAAAAAAAAAAAAAAAAAAAAAAAAAAAAAAAAAAAAAAAAAAAAAAAAAAAAAAAAAAAAAAAAAAAAAAAAAAAAAAAAAAAAAAAAAAAAAAAAAAAAAAAAAAAAAAAAAAAAAAAAAAAAAAAAAAAAAAAAAAAAAAAAAAAAAAAAAAAAAAAAAAAAAAAAAAAAAAAAAAAAAAAAAAAAAAAAAAAAAAAAAAAAAAAAAAAAAAAAAAAAAAAAAAAAAAAAAAAAAAAAAAAAAAAAAAAAAAAAAAAAAAAAAAAAAAAAAAAAAAAAAAAAAAAAAAAAAAAAAAAAAAAAAAAAAAAAAAAAAAAAAAAAAAAAAAAAAAAAAAAAAAAAAAAAAAAAAAAAAAAAAAAAAAAAAAAAAAAAAAAAAAAAAAAAAAAAAAAAAAAAAAAAAAAAAAAAAAAAAAAAAAAAAAAAAAAAAAAAAAAAAAAAAAAAAAAAAAAAAAAAAAAAAAAAAAAAAAAAAAAAAAAAAAAAAAAAAAAAAAAAAAAAAAAAAAAAAAAAAAAAAAAAAAAAAAAAAAAAAAAAAAAAAAAAAAAAAAAAAAAAAAAAAAAAAAAAAAAAAAAAAAAAAAAAAAAAAAAAAAAAAAAAAAAAAAAAAAAAAAAAAAAAAAAAAAAAAAAAAAAAAAAAAAAAAAAAAAAAAAAAAAAAAAAAAAAAAAAAAAAAAAAAAAAAAAAAAAAAAAAAAAAAAAAAAAAAAAAAAAAAAAAAAAAAAAAAAAAAAAAAAAAAAAAAAAAAAAAAAAAAAAAAAAAAAAAAAAAAAAAAAAAAAAAAAAAAAAAAAAAAAAAAAAAAAAAAAAAAAAAAAAAAAAAAAAAAAAAAAAAAAAAAAAAAAAAAAAAAAAAAAAAAAAAAAAAAAAAAAAAAAAAAAAAAAAAAAAAAAAAAAAAAAAAAAAAAAAAAAAAAAAAAAAAAAAAAAAAAAAAAAAAAAAAAAAAAAAAAAAAAAAAAAAAAAAAAAAAAAAAAAAAAAAAAAAAAAAAAAAAAAAAAAAAAAAAAAAAAAAAAAAAAAAAAAAAAAAAAAAAAAAAAAAAAAAAAAAAAAAAAAAAAAAAAAAAAAAAAAAAAAAAAAAAAAAAAAAAAAAAAAAAAAAAAAAAAAAAAAAAAAAAAAAAAAAAAAAAAAAAAAAAAAAAAAAAAAAAAAAAAAAAAAAAAAAAAAAAAAAAAAAAAAAAAAAAAAAAAAAAAAAAAAAAAAAAAAAAAAAAAAAAAAAAAAAAAAAAAAAAAAAAAAAAAAAAAAAAAAAAAAAAAAAAAAAAAAAAAAAAAAAAAAAAAAAAAAAAAAAAAAAAAAAAAAAAAAAAAAAAAAAAAAAAAAAAAAAAAAAAAAAAAAAAAAAAAAAAAAAAAAAAAAAAAAAAAAAAAAAAAAAAAAAAAAAAAAAAAAAAAAAAAAAAAAAAAAAAAAAAAAAAAAAAAAAAAAAAAAAAAAAAAAAAAAAAAAAAAAAAAAAAAAAAAAAAAAAAAAAAAAAAAAAAAAAAAAAAAAAAAAAAAAAAAAAAAAAAAAAAAAAAAAAAAAAAAAAAAAAAAAAAAAAAAAAAAAAAAAAAAAAAAAAAAAAAAAAAAAAAAAAAAAAAAAAAAAAAAAAAAAAAAAAAAAAAAAAAAAAAAAAAAAAAAAAAAAAAAAAAAAAAAAAAAAAAAAAAAAAAAAAAAAAAAAAAAAAAAAAAAAAAAAAAAAAAAAAAAAAAAAAAAAAAAAAAAAAAAAAAAAAAAAAAAAAAAAAAAAAAAAAAAAAAAAAAAAAAAAAAAAAAAAAAAAAAAAAAAAAAAAAAAAAAAAAAAAAAAAAAAAAAAAAAAAAAAAAAAAAAAAAAAAAAAAAAAAAAAAAAAAAAAAAAAAAAAAAAAAAAAAAAAAAAAAAAAAAAAAAAAAAAAAAAAAAAAAAAAAAAAAAAAAAAAAAAAAAAAAAAAAAAAAAAAAAAAAAAAAAAAAAAAAAAAAAAAAAAAAAAAAAAAAAAAAAAAAAAAAAAAAAAAAAAAAAAAAAAAAAAAAAAAAAAAAAAAAAAAAAAAAAAAAAAAAAAAAAAAAAAAAAAAAAAAAAAAAAAAAAAAAAAAAAAAAAAAAAAAAAAAAAAAAAAAAAAAAAAAAAAAAAAAAAAAAAAAAAAAAAAAAAAAAAAAAAAAAAAAAAAAAAAAAAAAAAAAAAAAAAAAAAAAAAAAAAAAAAAAAAAAAAAAAAAAAAAAAAAAAAAAAAAAAAAAAAAAAAAAAAAAAAAAAAAAAAAAAAAAAAAAAAAAAAAAAAAAAAAAAAAAAAAAAAAAAAAAAAAAAAAAAAAAAAAAAAAAAAAAAAAAAAAAAAAAAAAAAAAAAAAAAAAAAAAAAAAAAAAAAAAAAAAAAAAAAAAAAAAAAAAAAAAAAAAAAAAAAAAAAAAAAAAAAAAAAAAAAAAAAAAAAAAAAAAAAAAAAAAAAAAAAAAAAAAAAAAAAAAAAAAAAAAAAAAAAAAAAAAAAAAAAAAAAAAAAAAAAAAAAAAAAAAAAAAAAAAAAAAAAAAAAAAAAAAAAAAAAAAAAAAAAAAAAAAAAAAAAAAAAAAAAAAAAAAAAAAAAAAAAAAAAAAAAAAAAAAAAAAAAAAAAAAAAAAAAAAAAAAAAAAAAAAAAAAAAAAAAAAAAAAAAAAAAAAAAAAAAAAAAAAAAAAAAAAAAAAAAAAAAAAAAAAAAAAAAAAAAAAAAAAAAAAAAAAAAAAAAAAAAAAAAAAAAAAAAAAAAAAAAAAAAAAAAAAAAAAAAAAAAAAAAAAAAAAAAAAAAAAAAAAAAAAAAAAAAAAAAAAAAAAAAAAAAAAAAAAAAAAAAAAAAAAAAAAAAAAAAAAAAAAAAAAAAAAAAAAAAAAAAAAAAAAAAAAAAAAAAAAAAAAAAAAAAAAAAAAAAAAAAAAAAAAAAAAAAAAAAAAAAAAAAAAAAAAAAAAAAAAAAAAAAAAAAAAAAAAAAAAAAAAAAAAAAAAAAAAAAAAAAAAAAAAAAAAAAAAAAAAAAAAAAAAAAAAAAAAAAAAAAAAAAAAAAAAAAAAAAAAAAAAAAAAAAAAAAAAAAAAAAAAAAAAAAAAAAAAAAAAAAAAAAAAAAAAAAAAAAAAAAAAAAAAAAAAAAAAAAAAAAAAAAAAAAAAAAAAAAAAAAAAAAAAAAAAAAAAAAAAAAAAAAAAAAAAAAAAAAAAAAAAAAAAAAAAAAAAAAAAAAAAAAAAAAAAAAAAAAAAAAAAAAAAAA
AAAAAAAAAAAAAAAAAAAAAAAAAAAAAAAAAAAAAAAAAAAAAAAAAAAAAAAAAAAAAAAAAAAAAAAAAAAAAAAAAAAAAAAAAAAAAAAAAAAAAAAAAAAAAAAAAAAAAAAAAAAAAAAAAAAAAAAAAAAAAAAAAAAAAAAAAAAAAAAAAAAAAAAAAAAAAAAAAAAAAAAAAAAAAAAAAAAAAAAAAAAAAAAAAAAAAAAAAAAAAAAAAAAAAAAAAAAAAAAAAAAAAAAAAAAAAAAAAAAAAAAAAAAAAAAAAAAAAAAAAAAAAAAAAAAAAAAAAAAAAAAAAAAAAAAAAAAAAAAAAAAAAAAAAAAAAAAAAAAAAAAAAAAAAAAAAAAAAAAAAAAAAAAAAAAAAAAAAAAAAAAAAAAAAAAAAAAAAAAAAAAAAAAAAAAAAAAAAAAAAAAAAAAAAAAAAAAAAAAAAAAAAAAAAAAAAAAAAAAAAAAAAAAAAAAAAAAAAAAAAAAAAAAAAAAAAAAAAAAAAAAAAAAAAAAAAAAAAAAAAAAAAAAAAAAAAAAAAAAAAAAAAAAAAAAAAAAAAAAAAAAAAAAAAAAAAAAAAAAAAAAAAAAAAAAAAAAAAAAAAAAAAAAAAAAAAAAAAAAAAAAAAAAAAAAAAAAAAAAAAAAAAAAAAAAAAAAAAAAAAAAAAAAAAAAAAAAAAAAAAAAAAAAAAAAAAAAAAAAAAAAAAAAAAAAAAAAAAAAAAAAAAAAAAAAAAAAAAAAAAAAAAAAAAAAAAAAAAAAAAAAAAAAAAAAAAAAAAAAAAAAAAAAAAAAAAAAAAAAAAAAAAAAAAAAAAAAAAAAAAAAAAAAAAAAAAAAAAAAAAAAAAAAAAAAAAAAAAAAAAAAAAAAAAAAAAAAAAAAAAAAAAAAAAAAAAAAAAAAAAAAAAAAAAAAAAAAAAAAAAAAAAAAAAAAAAAAAAAAAAAAAAAAAAAAAAAAAAAAAAAAAAAAAAAAAAAAAAAAAAAAAAAAAAAAAAAAAAAAAAAAAAAAAAAAAAAAAAAAAAAAAAAAAAAAAAAAAAAAAAAAAAAAAAAAAAAAAAAAAAAAAAAAAAAAAAAAAAAAAAAAAAAAAAAAAAAAAAAAAAAAAAAAAAAAAAAAAAAAAAAAAAAAAAAAAAAAAAAAAAAAAAAAAAAAAAAAAAAAAAAAAAAAAAAAAAAAAAAAAAAAAAAAAAAAAAAAAAAAAAAAAAAAAAAAAAAAAAAAAAAAAAAAAAAAAAAAAAAAAAAAAAAAAAAAAAAAAAAAAAAAAAAAAAAAAAAAAAAAAAAAAAAAAAAAAAAAAAAAAAAAAAAAAAAAAAAAAAAAAAAAAAAAAAAAAAAAAAAAAAAAAAAAAAAAAAAAAAAAAAAAAAAAAAAAAAAAAAAAAAAAAAAAAAAAAAAAAAAAAAAAAAAAAAAAAAAAAAAAAAAAAAAAAAAAAAAAAAAAAAAAAAAAAAAAAAAAAAAAAAAAAAAAAAAAAAAAAAAAAAAAAAAAAAAAAAAAAAAAAAAAAAAAAAAAAAAAAAAAAAAAAAAAAAAAAAAAAAAAAAAAAAAAAAAAAAAAAAAAAAAAAAAAAAAAAAAAAAAAAAAAAAAAAAAAAAAAAAAAAAAAAAAAAAAAAAAAAAAAAAAAAAAAAAAAAAAAAAAAAAAAAAAAAAAAAAAAAAAAAAAAAAAAAAAAAAAAAAAAAAAAAAAAAAAAAAAAAAAAAAAAAAAAAAAAAAAAAAAAAAAAAAAAAAAAAAAAAAAAAAAAAAAAAAAAAAAAAAAAAAAAAAAAAAAAAAAAAAAAAAAAAAAAAAAAAAAAAAAAAAAAAAAAAAAAAAAAAAAAAAAAAAAAAAAAAAAAAAAAAAAAAAAAAAAAAAAAAAAAAAAAAAAAAAAAAAAAAAAAAAAAAAAAAAAAAAAAAAAAAAAAAAAAAAAAAAAAAAAAAAAAAAAAAAAAAAAAAAAAAAAAAAAAAAAAAAAAAAAAAAAAAAAAAAAAAAAAAAAAAAAAAAAAAAAAAAAAAAAAAAAAAAAAAAAAAAAAAAAAAAAAAAAAAAAAAAAAAAAAAAAAAAAAAAAAAAAAAAAAAAAAAAAAAAAAAAAAAAAAAAAAAAAAAAAAAAAAAAAAAAAAAAAAAAAAAAAAAAAAAAAAAAAAAAAAAAAAAAAAAAAAAAAAAAAAAAAAAAAAAAAAAAAAAAAAAAAAAAAAAAAAAAAAAAAAAAAAAAAAAAAAAAAAAAAAAAAAAAAAAAAAAAAAAAAAAAAAAAAAAAAAAAAAAAAAAAAAAAAAAAAAAAAAAAAAAAAAAAAAAAAAAAAAAAAAAAAAAAAAAAAAAAAAAAAAAAAAAAAAAAAAAAAAAAAAAAAAAAAAAAAAAAAAAAAAAAAAAAAAAAAAAAAAAAAAAAAAAAAAAAAAAAAAAAAAAAAAAAAAAAAAAAAAAAAAAAAAAAAAAAAAAAAAAAAAAAAAAAAAAAAAAAAAAAAAAAAAAAAAAAAAAAAAAAAAAAAAAAAAAAAAAAAAAAAAAAAAAAAAAAAAAAAAAAAAAAAAAAAAAAAAAAAAAAAAAAAAAAAAAAAAAAAAAAAAAAAAAAAAAAAAAAAAAAAAAAAAAAAAAAAAAAAAAAAAAAAAAAAAAAAAAAAAAAAAAAAAAAAAAAAAAAAAAAAAAAAAAAAAAAAAAAAAAAAAAAAAAAAAAAAAAAAAAAAAAAAAAAAAAAAAAAAAAAAAAAAAAAAAAAAAAAAAAAAAAAAAAAAAAAAAAAAAAAAAAAAAAAAAAAAAAAAAAAAAAAAAAAAAAAAAAAAAAAAAAAAAAAAAAAAAAAAAAAAAAAAAAAAAAAAAAAAAAAAAAAAAAAAAAAAAAAAAAAAAAAAAAAAAAAAAAAAAAAAAAAAAAAAAAAAAAAAAAAAAAAAAAAAAAAAAAAAAAAAAAAAAAAAAAAAAAAAAAAAAAAAAAAAAAAAAAAAAAAAAAAAAAAAAAAAAAAAAAAAAAAAAAAAAAAAAAAAAAAAAAAAAAAAAAAAAAAAAAAAAAAAAAAAAAAAAAAAAAAAAAAAAAAAAAAAAAAAAAAAAAAAAAAAAAAAAAAAAAAAAAAAAAAAAAAAAAAAAAAAAAAAAAAAAAAAAAAAAAAAAAAAAAAAAAAAAAAAAAAAAAAAAAAAAAAAAAAAAAAAAAAAAAAAAAAAAAAAAAAAAAAAAAAAAAAAAAAAAAAAAAAAAAAAAAAAAAAAAAAAAAAAAAAAAAAAAAAAAAAAAAAAAAAAAAAAAAAAAAAAAAAAAAAAAAAAAAAAAAAAAAAAAAAAAAAAAAAAAAAAAAAAAAAAAAAAAAAAAAAAAAAAAAAAAAAAAAAAAAAAAAAAAAAAAAAAAAAAAAAAAAAAAAAAAAAAAAAAAAAAAAAAAAAAAAAAAAAAAAAAAAAAAAAAAAAAAAAAAAAAAAAAAAAAAAAAAAAAAAAAAAAAAAAAAAAAAAAAAAAAAAAAAAAAAAAAAAAAAAAAAAAAAAAAAAAAAAAAAAAAAAAAAAAAAAAAAAAAAAAAAAAAAAAAAAAAAAAAAAAAAAAAAAAAAAAAAAAAAAAAAAAAAAAAAAAAAAAAAAAAAAAAAAAAAAAAAAAAAAAAAAAAAAAAAAAAAAAAAAAAAAAAAAAAAAAAAAAAAAAAAAAAAAAAAAAAAAAAAAAAAAAAAAAAAAAAAAAAAAAAAAAAAAAAAAAAAAAAAAAAAAAAAAAAAAAAAAAAAAAAAAAAAAAAAAAAAAAAAAAAAAAAAAAAAAAAAAAAAAAAAAAAAAAAAAAAAAAAAAAAAAAAAAAAAAAAAAAAAAAAAAAAAAAAAAAAAAAAAAAAAAAAAAAAAAAAAAAAAAAAAAAAAAAAAAAAAAAAAAAAAAAAAAAAAAAAAAAAAAAAAAAAAAAAAAAAAAAAAAAAAAAAAAAAAAAAAAAAAAAAAAAAAAAAAAAAAAAAAAAAAAAAAAAAAAAAAAAAAAAAAAAAAAAAAAAAAAAAAAAAAAAAAAAAAAAAAAAAAAAAAAAAAAAAAAAAAAAAAAAAAAAAAAAAAAAAAAAAAAAAAAAAAAAAAAAAAAAAAAAAAAAAAAAAAAAAAAAAAAAAAAAAAAAAAAAAAAAAAAAAAAAAAAAAAAAAAAAAAAAAAAAAAA
AAAAAAAAAAAAAAAAAAAAAAAAAAAAAAAAAAAAAAAAAAAAAAAAAAAAAAAAAAAAAAAAAAAAAAAAAAAAAAAAAAAAAAAAAAAAAAAAAAAAAAAAAAAAAAAAAAAAAAAAAAAAAAAAAAAAAAAAAAAAAAAAAAAAAAAAAAAAAAAAAAAAAAAAAAAAAAAAAAAAAAAAAAAAAAAAAAAAAAAAAAAAAAAAAAAAAAAAAAAAAAAAAAAAAAAAAAAAAAAAAAAAAAAAAAAAAAAAAAAAAAAAAAAAAAAAAAAAAAAAAAAAAAAAAAAAAAAAAAAAAAAAAAAAAAAAAAAAAAAAAAAAAAAAAAAAAAAAAAAAAAAAAAAAAAAAAAAAAAAAAAAAAAAAAAAAAAAAAAAAAAAAAAAAAAAAAAAAAAAAAAAAAAAAAAAAAAAAAAAAAAAAAAAAAAAAAAAAAAAAAAAAAAAAAAAAAAAAAAAAAAAAAAAAAAAAAAAAAAAAAAAAAAAAAAAAAAAAAAAAAAAAAAAAAAAAAAAAAAAAAAAAAAAAAAAAAAAAAAAAAAAAAAAAAAAAAAAAAAAAAAAAAAAAAAAAAAAAAAAAAAAAAAAAAAAAAAAAAAAAAAAAAAAAAAAAAAAAAAAAAAAAAAAAAAAAAAAAAAAAAAAAAAAAAAAAAAAAAAAAAAAAAAAAAAAAAAAAAAAAAAAAAAAAAAAAAAAAAAAAAAAAAAAAAAAAAAAAAAAAAAAAAAAAAAAAAAAAAAAAAAAAAAAAAAAAAAAAAAAAAAAAAAAAAAAAAAAAAAAAAAAAAAAAAAAAAAAAAAAAAAAAAAAAAAAAAAAAAAAAAAAAAAAAAAAAAAAAAAAAAAAAAAAAAAAAAAAAAAAAAAAAAAAAAAAAAAAAAAAAAAAAAAAAAAAAAAAAAAAAAAAAAAAAAAAAAAAAAAAAAAAAAAAAAAAAAAAAAAAAAAAAAAAAAAAAAAAAAAAAAAAAAAAAAAAAAAAAAAAAAAAAAAAAAAAAAAAAAAAAAAAAAAAAAAAAAAAAAAAAAAAAAAAAAAAAAAAAAAAAAAAAAAAAAAAAAAAAAAAAAAAAAAAAAAAAAAAAAAAAAAAAAAAAAAAAAAAAAAAAAAAAAAAAAAAAAAAAAAAAAAAAAAAAAAAAAAAAAAAAAAAAAAAAAAAAAAAAAAAAAAAAAAAAAAAAAAAAAAAAAAAAAAAAAAAAAAAAAAAAAAAAAAAAAAAAAAAAAAAAAAAAAAAAAAAAAAAAAAAAAAAAAAAAAAAAAAAAAAAAAAAAAAAAAAAAAAAAAAAAAAAAAAAAAAAAAAAAAAAAAAAAAAAAAAAAAAAAAAAAAAAAAAAAAAAAAAAAAAAAAAAAAAAAAAAAAAAAAAAAAAAAAAAAAAAAAAAAAAAAAAAAAAAAAAAAAAAAAAAAAAAAAAAAAAAAAAAAAAAAAAAAAAAAAAAAAAAAAAAAAAAAAAAAAAAAAAAAAAAAAAAAAAAAAAAAAAAAAAAAAAAAAAAAAAAAAAAAAAAAAAAAAAAAAAAAAAAAAAAAAAAAAAAAAAAAAAAAAAAAAAAAAAAAAAAAAAAAAAAAAAAAAAAAAAAAAAAAAAAAAAAAAAAAAAAAAAAAAAAAAAAAAAAAAAAAAAAAAAAAAAAAAAAAAAAAAAAAAAAAAAAAAAAAAAAAAAAAAAAAAAAAAAAAAAAAAAAAAAAAAAAAAAAAAAAAAAAAAAAAAAAAAAAAAAAAAAAAAAAAAAAAAAAAAAAAAAAAAAAAAAAAAAAAAAAAAAAAAAAAAAAAAAAAAAAAAAAAAAAAAAAAAAAAAAAAAAAAAAAAAAAAAAAAAAAAAAAAAAAAAAAAAAAAAAAAAAAAAAAAAAAAAAAAAAAAAAAAAAAAAAAAAAAAAAAAAAAAAAAAAAAAAAAAAAAAAAAAAAAAAAAAAAAAAAAAAAAAAAAAAAAAAAAAAAAAAAAAAAAAAAAAAAAAAAAAAAAAAAAAAAAAAAAAAAAAAAAAAAAAAAAAAAAAAAAAAAAAAAAAAAAAAAAAAAAAAAAAAAAAAAAAAAAAAAAAAAAAAAAAAAAAAAAAAAAAAAAAAAAAAAAAAAAAAAAAAAAAAAAAAAAAAAAAAAAAAAAAAAAAAAAAAAAAAAAAAAAAAAAAAAAAAAAAAAAAAAAAAAAAAAAAAAAAAAAAAAAAAAAAAAAAAAAAAAAAAAAAAAAAAAAAAAAAAAAAAAAAAAAAAAAAAAAAAAAAAAAAAAAAAAAAAAAAAAAAAAAAAAAAAAAAAAAAAAAAAAAAAAAAAAAAAAAAAAAAAAAAAAAAAAAAAAAAAAAAAAAAAAAAAAAAAAAAAAAAAAAAAAAAAAAAAAAAAAAAAAAAAAAAAAAAAAAAAAAAAAAAAAAAAAAAAAAAAAAAAAAAAAAAAAAAAAAAAAAAAAAAAAAAAAAAAAAAAAAAAAAAAAAAAAAAAAAAAAAAAAAAAAAAAAAAAAAAAAAAAAAAAAAAAAAAAAAAAAAAAAAAAAAAAAAAAAAAAAAAAAAAAAAAAAAAAAAAAAAAAAAAAAAAAAAAAAAAAAAAAAAAAAAAAAAAAAAAAAAAAAAAAAAAAAAAAAAAAAAAAAAAAAAAAAAAAAAAAAAAAAAAAAAAAAAAAAAAAAAAAAAAAAAAAAAAAAAAAAAAAAAAAAAAAAAAAAAAAAAAAAAAAAAAAAAAAAAAAAAAAAAAAAAAAAAAAAAAAAAAAAAAAAAAAAAAAAAAAAAAAAAAAAAAAAAAAAAAAAAAAAAAAAAAAAAAAAAAAAAAAAAAAAAAAAAAAAAAAAAAAAAAAAAAAAAAAAAAAAAAAAAAAAAAAAAAAAAAAAAAAAAAAAAAAAAAAAAAAAAAAAAAAAAAAAAAAAAAAAAAAAAAAAAAAAAAAAAAAAAAAAAAAAAAAAAAAAAAAAAAAAAAAAAAAAAAAAAAAAAAAAAAAAAAAAAAAAAAAAAAAAAAAAAAAAAAAAAAAAAAAAAAAAAAAAAAAAAAAAAAAAAAAAAAAAAAAAAAAAAAAAAAAAAAAAAAAAAAAAAAAAAAAAAAAAAAAAAAAAAAAAAAAAAAAAAAAAAAAAAAAAAAAAAAAAAAAAAAAAAAAAAAAAAAAAAAAAAAAAAAAAAAAAAAAAAAAAAAAAAAAAAAAAAAAAAAAAAAAAAAAAAAAAAAAAAAAAAAAAAAAAAAAAAAAAAAAAAAAAAAAAAAAAAAAAAAAAAAAAAAAAAAAAAAAAAAAAAAAAAAAAAAAAAAAAAAAAAAAAAAAAAAAAAAAAAAAAAAAAAAAAAAAAAAAAAAAAAAAAAAAAAAAAAAAAAAAAAAAAAAAAAAAAAAAAAAAAAAAAAAAAAAAAAAAAAAAAAAAAAAAAAAAAAAAAAAAAAAAAAAAAAAAAAAAAAAAAAAAAAAAAAAAAAAAAAAAAAAAAAAAAAAAAAAAAAAAAAAAAAAAAAAAAAAAAAAAAAAAAAAAAAAAAAAAAAAAAAAAAAAAAAAAAAAAAAAAAAAAAAAAAAAAAAAAAAAAAAAAAAAAAAAAAAAAAAAAAAAAAAAAAAAAAAAAAAAAAAAAAAAAAAAAAAAAAAAAAAAAAAAAAAAAAAAAAAAAAAAAAAAAAAAAAAAAAAAAAAAAAAAAAAAAAAAAAAAAAAAAAAAAAAAAAAAAAAAAAAAAAAAAAAAAAAAAAAAAAAAAAAAAAAAAAAAAAAAAAAAAAAAAAAAAAAAAAAAAAAAAAAAAAAAAAAAAAAAAAAAAAAAAAAAAAAAAAAAAAAAAAAAAAAAAAAAAAAAAAAAAAAAAAAAAAAAAAAAAAAAAAAAAAAAAAAAAAAAAAAAAAAAAAAAAAAAAAAAAAAAAAAAAAAAAAAAAAAAAAAAAAAAAAAAAAAAAAAAAAAAAAAAAAAAAAAAAAAAAAAAAAAAAAAAAAAAAAAAAAAAAAAAAAAAAAAAAAAAAAAAAAAAAAAAAAAAAAAAAAAAAAAAAAAAAAAAAAAAAAAAAAAAAAAAAAAAAAAAAAAAAAAAAAAAAAAAAAAAAAAAAAAAAAAAAAAAAAAAAAAAAAAAAAAAAAAAAAAAAAAAAAAAAAAAAAAAAAAAAAAAAAAAAAAAAAAAAAAAAAAAAAAAAAAAAAAAAAAAAAAAAAAAAAAA
AAAAAAAAAAAAAAAAAAAAAAAAAAAAAAAAAAAAAAAAAAAAAAAAAAAAAAAAAAAAAAAAAAAAAAAAAAAAAAAAAAAAAAAAAAAAAAAAAAAAAAAAAAAAAAAAAAAAAAAAAAAAAAAAAAAAAAAAAAAAAAAAAAAAAAAAAAAAAAAAAAAAAAAAAAAAAAAAAAAAAAAAAAAAAAAAAAAAAAAAAAAAAAAAAAAAAAAAAAAAAAAAAAAAAAAAAAAAAAAAAAAAAAAAAAAAAAAAAAAAAAAAAAAAAAAAAAAAAAAAAAAAAAAAAAAAAAAAAAAAAAAAAAAAAAAAAAAAAAAAAAAAAAAAAAAAAAAAAAAAAAAAAAAAAAAAAAAAAAAAAAAAAAAAAAAAAAAAAAAAAAAAAAAAAAAAAAAAAAAAAAAAAAAAAAAAAAAAAAAAAAAAAAAAAAAAAAAAAAAAAAAAAAAAAAAAAAAAAAAAAAAAAAAAAAAAAAAAAAAAAAAAAAAAAAAAAAAAAAAAAAAAAAAAAAAAAAAAAAAAAAAAAAAAAAAAAAAAAAAAAAAAAAAAAAAAAAAAAAAAAAAAAAAAAAAAAAAAAAAAAAAAAAAAAAAAAAAAAAAAAAAAAAAAAAAAAAAAAAAAAAAAAAAAAAAAAAAAAAAAAAAAAAAAAAAAAAAAAAAAAAAAAAAAAAAAAAAAAAAAAAAAAAAAAAAAAAAAAAAAAAAAAAAAAAAAAAAAAAAAAAAAAAAAAAAAAAAAAAAAAAAAAAAAAAAAAAAAAAAAAAAAAAAAAAAAAAAAAAAAAAAAAAAAAAAAAAAAAAAAAAAAAAAAAAAAAAAAAAAAAAAAAAAAAAAAAAAAAAAAAAAAAAAAAAAAAAAAAAAAAAAAAAAAAAAAAAAAAAAAAAAAAAAAAAAAAAAAAAAAAAAAAAAAAAAAAAAAAAAAAAAAAAAAAAAAAAAAAAAAAAAAAAAAAAAAAAAAAAAAAAAAAAAAAAAAAAAAAAAAAAAAAAAAAAAAAAAAAAAAAAAAAAAAAAAAAAAAAAAAAAAAAAAAAAAAAAAAAAAAAAAAAAAAAAAAAAAAAAAAAAAAAAAAAAAAAAAAAAAAAAAAAAAAAAAAAAAAAAAAAAAAAAAAAAAAAAAAAAAAAAAAAAAAAAAAAAAAAAAAAAAAAAAAAAAAAAAAAAAAAAAAAAAAAAAAAAAAAAAAAAAAAAAAAAAAAAAAAAAAAAAAAAAAAAAAAAAAAAAAAAAAAAAAAAAAAAAAAAAAAAAAAAAAAAAAAAAAAAAAAAAAAAAAAAAAAAAAAAAAAAAAAAAAAAAAAAAAAAAAAAAAAAAAAAAAAAAAAAAAAAAAAAAAAAAAAAAAAAAAAAAAAAAAAAAAAAAAAAAAAAAAAAAAAAAAAAAAAAAAAAAAAAAAAAAAAAAAAAAAAAAAAAAAAAAAAAAAAAAAAAAAAAAAAAAAAAAAAAAAAAAAAAAAAAAAAAAAAAAAAAAAAAAAAAAAAAAAAAAAAAAAAAAAAAAAAAAAAAAAAAAAAAAAAAAAAAAAAAAAAAAAAAAAAAAAAAAAAAAAAAAAAAAAAAAAAAAAAAAAAAAAAAAAAAAAAAAAAAAAAAAAAAAAAAAAAAAAAAAAAAAAAAAAAAAAAAAAAAAAAAAAAAAAAAAAAAAAAAAAAAAAAAAAAAAAAAAAAAAAAAAAAAAAAAAAAAAAAAAAAAAAAAAAAAAAAAAAAAAAAAAAAAAAAAAAAAAAAAAAAAAAAAAAAAAAAAAAAAAAAAAAAAAAAAAAAAAAAAAAAAAAAAAAAAAAAAAAAAAAAAAAAAAAAAAAAAAAAAAAAAAAAAAAAAAAAAAAAAAAAAAAAAAAAAAAAAAAAAAAAAAAAAAAAAAAAAAAAAAAAAAAAAAAAAAAAAAAAAAAAAAAAAAAAAAAAAAAAAAAAAAAAAAAAAAAAAAAAAAAAAAAAAAAAAAAAAAAAAAAAAAAAAAAAAAAAAAAAAAAAAAAAAAAAAAAAAAAAAAAAAAAAAAAAAAAAAAAAAAAAAAAAAAAAAAAAAAAAAAAAAAAAAAAAAAAAAAAAAAAAAAAAAAAAAAAAAAAAAAAAAAAAAAAAAAAAAAAAAAAAAAAAAAAAAAAAAAAAAAAAAAAAAAAAAAAAAAAAAAAAAAAAAAAAAAAAAAAAAAAAAAAAAAAAAAAAAAAAAAAAAAAAAAAAAAAAAAAAAAAAAAAAAAAAAAAAAAAAAAAAAAAAAAAAAAAAAAAAAAAAAAAAAAAAAAAAAAAAAAAAAAAAAAAAAAAAAAAAAAAAAAAAAAAAAAAAAAAAAAAAAAAAAAAAAAAAAAAAAAAAAAAAAAAAAAAAAAAAAAAAAAAAAAAAAAAAAAAAAAAAAAAAAAAAAAAAAAAAAAAAAAAAAAAAAAAAAAAAAAAAAAAAAAAAAAAAAAAAAAAAAAAAAAAAAAAAAAAAAAAAAAAAAAAAAAAAAAAAAAAAAAAAAAAAAAAAAAAAAAAAAAAAAAAAAAAAAAAAAAAAAAAAAAAAAAAAAAAAAAAAAAAAAAAAAAAAAAAAAAAAAAAAAAAAAAAAAAAAAAAAAAAAAAAAAAAAAAAAAAAAAAAAAAAAAAAAAAAAAAAAAAAAAAAAAAAAAAAAAAAAAAAAAAAAAAAAAAAAAAAAAAAAAAAAAAAAAAAAAAAAAAAAAAAAAAAAAAAAAAAAAAAAAAAAAAAAAAAAAAAAAAAAAAAAAAAAAAAAAAAAAAAAAAAAAAAAAAAAAAAAAAAAAAAAAAAAAAAAAAAAAAAAAAAAAAAAAAAAAAAAAAAAAAAAAAAAAAAAAAAAAAAAAAAAAAAAAAAAAAAAAAAAAAAAAAAAAAAAAAAAAAAAAAAAAAAAAAAAAAAAAAAAAAAAAAAAAAAAAAAAAAAAAAAAAAAAAAAAAAAAAAAAAAAAAAAAAAAAAAAAAAAAAAAAAAAAAAAAAAAAAAAAAAAAAAAAAAAAAAAAAAAAAAAAAAAAAAAAAAAAAAAAAAAAAAAAAAAAAAAAAAAAAAAAAAAAAAAAAAAAAAAAAAAAAAAAAAAAAAAAAAAAAAAAAAAAAAAAAAAAAAAAAAAAAAAAAAAAAAAAAAAAAAAAAAAAAAAAAAAAAAAAAAAAAAAAAAAAAAAAAAAAAAAAAAAAAAAAAAAAAAAAAAAAAAAAAAAAAAAAAAAAAAAAAAAAAAAAAAAAAAAAAAAAAAAAAAAAAAAAAAAAAAAAAAAAAAAAAAAAAAAAAAAAAAAAAAAAAAAAAAAAAAAAAAAAAAAAAAAAAAAAAAAAAAAAAAAAAAAAAAAAAAAAAAAAAAAAAAAAAAAAAAAAAAAAAAAAAAAAAAAAAAAAAAAAAAAAAAAAAAAAAAAAAAAAAAAAAAAAAAAAAAAAAAAAAAAAAAAAAAAAAAAAAAAAAAAAAAAAAAAAAAAAAAAAAAAAAAAAAAAAAAAAAAAAAAAAAAAAAAAAAAAAAAAAAAAAAAAAAAAAAAAAAAAAAAAAAAAAAAAAAAAAAAAAAAAAAAAAAAAAAAAAAAAAAAAAAAAAAAAAAAAAAAAAAAAAAAAAAAAAAAAAAAAAAAAAAAAAAAAAAAAAAAAAAAAAAAAAAAAAAAAAAAAAAAAAAAAAAAAAAAAAAAAAAAAAAAAAAAAAAAAAAAAAAAAAAAAAAAAAAAAAAAAAAAAAAAAAAAAAAAAAAAAAAAAAAAAAAAAAAAAAAAAAAAAAAAAAAAAAAAAAAAAAAAAAAAAAAAAAAAAAAAAAAAAAAAAAAAAAAAAAAAAAAAAAAAAAAAAAAAAAAAAAAAAAAAAAAAAAAAAAAAAAAAAAAAAAAAAAAAAAAAAAAAAAAAAAAAAAAAAAAAAAAAAAAAAAAAAAAAAAAAAAAAAAAAAAAAAAAAAAAAAAAAAAAAAAAAAAAAAAAAAAAAAAAAAAAAAAAAAAAAAAAAAAAAAAAAAAAAAAAAAAAAAAAAAAAAAAAAAAAAAAAAAAAAAAAAAAAAAAAAAAAAAAAAAAAAAAAAAAAAAAAAAAAAAAAAAAAAAAAAAAAAAAAAAAAAAAAAAAAAAAAAAAAAAAAAAAAAAAAAAAAAAAAAAAAAAAAAAAAAAAAAAAAAAAAAAAAAAAAAAAAAAAAAAAAAAAAAAAAAAAAAA
AAAAAAAAAAAAAAAAAAAAAAAAAAAAAAAAAAAAAAAAAAAAAAAAAAAAAAAAAAAAAAAAAAAAAAAAAAAAAAAAAAAAAAAAAAAAAAAAAAAAAAAAAAAAAAAAAAAAAAAAAAAAAAAAAAAAAAAAAAAAAAAAAAAAAAAAAAAAAAAAAAAAAAAAAAAAAAAAAAAAAAAAAAAAAAAAAAAAAAAAAAAAAAAAAAAAAAAAAAAAAAAAAAAAAAAAAAAAAAAAAAAAAAAAAAAAAAAAAAAAAAAAAAAAAAAAAAAAAAAAAAAAAAAAAAAAAAAAAAAAAAAAAAAAAAAAAAAAAAAAAAAAAAAAAAAAAAAAAAAAAAAAAAAAAAAAAAAAAAAAAAAAAAAAAAAAAAAAAAAAAAAAAAAAAAAAAAAAAAAAAAAAAAAAAAAAAAAAAAAAAAAAAAAAAAAAAAAAAAAAAAAAAAAAAAAAAAAAAAAAAAAAAAAAAAAAAAAAAAAAAAAAAAAAAAAAAAAAAAAAAAAAAAAAAAAAAAAAAAAAAAAAAAAAAAAAAAAAAAAAAAAAAAAAAAAAAAAAAAAAAAAAAAAAAAAAAAAAAAAAAAAAAAAAAAAAAAAAAAAAAAAAAAAAAAAAAAAAAAAAAAAAAAAAAAAAAAAAAAAAAAAAAAAAAAAAAAAAAAAAAAAAAAAAAAAAAAAAAAAAAAAAAAAAAAAAAAAAAAAAAAAAAAAAAAAAAAAAAAAAAAAAAAAAAAAAAAAAAAAAAAAAAAAAAAAAAAAAAAAAAAAAAAAAAAAAAAAAAAAAAAAAAAAAAAAAAAAAAAAAAAAAAAAAAAAAAAAAAAAAAAAAAAAAAAAAAAAAAAAAAAAAAAAAAAAAAAAAAAAAAAAAAAAAAAAAAAAAAAAAAAAAAAAAAAAAAAAAAAAAAAAAAAAAAAAAAAAAAAAAAAAAAAAAAAAAAAAAAAAAAAAAAAAAAAAAAAAAAAAAAAAAAAAAAAAAAAAAAAAAAAAAAAAAAAAAAAAAAAAAAAAAAAAAAAAAAAAAAAAAAAAAAAAAAAAAAAAAAAAAAAAAAAAAAAAAAAAAAAAAAAAAAAAAAAAAAAAAAAAAAAAAAAAAAAAAAAAAAAAAAAAAAAAAAAAAAAAAAAAAAAAAAAAAAAAAAAAAAAAAAAAAAAAAAAAAAAAAAAAAAAAAAAAAAAAAAAAAAAAAAAAAAAAAAAAAAAAAAAAAAAAAAAAAAAAAAAAAAAAAAAAAAAAAAAAAAAAAAAAAAAAAAAAAAAAAAAAAAAAAAAAAAAAAAAAAAAAAAAAAAAAAAAAAAAAAAAAAAAAAAAAAAAAAAAAAAAAAAAAAAAAAAAAAAAAAAAAAAAAAAAAAAAAAAAAAAAAAAAAAAAAAAAAAAAAAAAAAAAAAAAAAAAAAAAAAAAAAAAAAAAAAAAAAAAAAAAAAAAAAAAAAAAAAAAAAAAAAAAAAAAAAAAAAAAAAAAAAAAAAAAAAAAAAAAAAAAAAAAAAAAAAAAAAAAAAAAAAAAAAAAAAAAAAAAAAAAAAAAAAAAAAAAAAAAAAAAAAAAAAAAAAAAAAAAAAAAAAAAAAAAAAAAAAAAAAAAAAAAAAAAAAAAAAAAAAAAAAAAAAAAAAAAAAAAAAAAAAAAAAAAAAAAAAAAAAAAAAAAAAAAAAAAAAAAAAAAAAAAAAAAAAAAAAAAAAAAAAAAAAAAAAAAAAAAAAAAAAAAAAAAAAAAAAAAAAAAAAAAAAAAAAAAAAAAAAAAAAAAAAAAAAAAAAAAAAAAAAAAAAAAAAAAAAAAAAAAAAAAAAAAAAAAAAAAAAAAAAAAAAAAAAAAAAAAAAAAAAAAAAAAAAAAAAAAAAAAAAAAAAAAAAAAAAAAAAAAAAAAAAAAAAAAAAAAAAAAAAAAAAAAAAAAAAAAAAAAAAAAAAAAAAAAAAAAAAAAAAAAAAAAAAAAAAAAAAAAAAAAAAAAAAAAAAAAAAAAAAAAAAAAAAAAAAAAAAAAAAAAAAAAAAAAAAAAAAAAAAAAAAAAAAAAAAAAAAAAAAAAAAAAAAAAAAAAAAAAAAAAAAAAAAAAAAAAAAAAAAAAAAAAAAAAAAAAAAAAAAAAAAAAAAAAAAAAAAAAAAAAAAAAAAAAAAAAAAAAAAAAAAAAAAAAAAAAAAAAAAAAAAAAAAAAAAAAAAAAAAAAAAAAAAAAAAAAAAAAAAAAAAAAAAAAAAAAAAAAAAAAAAAAAAAAAAAAAAAAAAAAAAAAAAAAAAAAAAAAAAAAAAAAAAAAAAAAAAAAAAAAAAAAAAAAAAAAAAAAAAAAAAAAAAAAAAAAAAAAAAAAAAAAAAAAAAAAAAAAAAAAAAAAAAAAAAAAAAAAAAAAAAAAAAAAAAAAAAAAAAAAAAAAAAAAAAAAAAAAAAAAAAAAAAAAAAAAAAAAAAAAAAAAAAAAAAAAAAAAAAAAAAAAAAAAAAAAAAAAAAAAAAAAAAAAAAAAAAAAAAAAAAAAAAAAAAAAAAAAAAAAAAAAAAAAAAAAAAAAAAAAAAAAAAAAAAAAAAAAAAAAAAAAAAAAAAAAAAAAAAAAAAAAAAAAAAAAAAAAAAAAAAAAAAAAAAAAAAAAAAAAAAAAAAAAAAAAAAAAAAAAAAAAAAAAAAAAAAAAAAAAAAAAAAAAAAAAAAAAAAAAAAAAAAAAAAAAAAAAAAAAAAAAAAAAAAAAAAAAAAAAAAAAAAAAAAAAAAAAAAAAAAAAAAAAAAAAAAAAAAAAAAAAAAAAAAAAAAAAAAAAAAAAAAAAAAAAAAAAAAAAAAAAAAAAAAAAAAAAAAAAAAAAAAAAAAAAAAAAAAAAAAAAAAAAAAAAAAAAAAAAAAAAAAAAAAAAAAAAAAAAAAAAAAAAAAAAAAAAAAAAAAAAAAAAAAAAAAAAAAAAAAAAAAAAAAAAAAAAAAAAAAAAAAAAAAAAAAAAAAAAAAAAAAAAAAAAAAAAAAAAAAAAAAAAAAAAAAAAAAAAAAAAAAAAAAAAAAAAAAAAAAAAAAAAAAAAAAAAAAAAAAAAAAAAAAAAAAAAAAAAAAAAAAAAAAAAAAAAAAAAAAAAAAAAAAAAAAAAAAAAAAAAAAAAAAAAAAAAAAAAAAAAAAAAAAAAAAAAAAAAAAAAAAAAAAAAAAAAAAAAAAAAAAAAAAAAAAAAAAAAAAAAAAAAAAAAAAAAAAAAAAAAAAAAAAAAAAAAAAAAAAAAAAAAAAAAAAAAAAAAAAAAAAAAAAAAAAAAAAAAAAAAAAAAAAAAAAAAAAAAAAAAAAAAAAAAAAAAAAAAAAAAAAAAAAAAAAAAAAAAAAAAAAAAAAAAAAAAAAAAAAAAAAAAAAAAAAAAAAAAAAAAAAAAAAAAAAAAAAAAAAAAAAAAAAAAAAAAAAAAAAAAAAAAAAAAAAAAAAAAAAAAAAAAAAAAAAAAAAAAAAAAAAAAAAAAAAAAAAAAAAAAAAAAAAAAAAAAAAAAAAAAAAAAAAAAAAAAAAAAAAAAAAAAAAAAAAAAAAAAAAAAAAAAAAAAAAAAAAAAAAAAAAAAAAAAAAAAAAAAAAAAAAAAAAAAAAAAAAAAAAAAAAAAAAAAAAAAAAAAAAAAAAAAAAAAAAAAAAAAAAAAAAAAAAAAAAAAAAAAAAAAAAAAAAAAAAAAAAAAAAAAAAAAAAAAAAAAAAAAAAAAAAAAAAAAAAAAAAAAAAAAAAAAAAAAAAAAAAAAAAAAAAAAAAAAAAAAAAAAAAAAAAAAAAAAAAAAAAAAAAAAAAAAAAAAAAAAAAAAAAAAAAAAAAAAAAAAAAAAAAAAAAAAAAAAAAAAAAAAAAAAAAAAAAAAAAAAAAAAAAAAAAAAAAAAAAAAAAAAAAAAAAAAAAAAAAAAAAAAAAAAAAAAAAAAAAAAAAAAAAAAAAAAAAAAAAAAAAAAAAAAAAAAAAAAAAAAAAAAAAAAAAAAAAAAAAAAAAAAAAAAAAAAAAAAAAAAAAAAAAAAAAAAAAAAAAAAAAAAAAAAAAAAAAAAAAAAAAAAAAAAAAAAAAAAAAAAAAAAAAAAAAAAAAAAAAAAAAAAAAAAAAAAAAAAAAAAAAAAAAAAAAAAAAAAAAAAAAAAAAAAAAAAAAAAAAAAAAAAAAAAAAAAAAAAAAAAAA
AAAAAAAAAAAAAAAAAAAAAAAAAAAAAAAAAAAAAAAAAAAAAAAAAAAAAAAAAAAAAAAAAAAAAAAAAAAAAAAAAAAAAAAAAAAAAAAAAAAAAAAAAAAAAAAAAAAAAAAAAAAAAAAAAAAAAAAAAAAAAAAAAAAAAAAAAAAAAAAAAAAAAAAAAAAAAAAAAAAAAAAAAAAAAAAAAAAAAAAAAAAAAAAAAAAAAAAAAAAAAAAAAAAAAAAAAAAAAAAAAAAAAAAAAAAAAAAAAAAAAAAAAAAAAAAAAAAAAAAAAAAAAAAAAAAAAAAAAAAAAAAAAAAAAAAAAAAAAAAAAAAAAAAAAAAAAAAAAAAAAAAAAAAAAAAAAAAAAAAAAAAAAAAAAAAAAAAAAAAAAAAAAAAAAAAAAAAAAAAAAAAAAAAAAAAAAAAAAAAAAAAAAAAAAAAAAAAAAAAAAAAAAAAAAAAAAAAAAAAAAAAAAAAAAAAAAAAAAAAAAAAAAAAAAAAAAAAAAAAAAAAAAAAAAAAAAAAAAAAAAAAAAAAAAAAAAAAAAAAAAAAAAAAAAAAAAAAAAAAAAAAAAAAAAAAAAAAAAAAAAAAAAAAAAAAAAAAAAAAAAAAAAAAAAAAAAAAAAAAAAAAAAAAAAAAAAAAAAAAAAAAAAAAAAAAAAAAAAAAAAAAAAAAAAAAAAAAAAAAAAAAAAAAAAAAAAAAAAAAAAAAAAAAAAAAAAAAAAAAAAAAAAAAAAAAAAAAAAAAAAAAAAAAAAAAAAAAAAAAAAAAAAAAAAAAAAAAAAAAAAAAAAAAAAAAAAAAAAAAAAAAAAAAAAAAAAAAAAAAAAAAAAAAAAAAAAAAAAAAAAAAAAAAAAAAAAAAAAAAAAAAAAAAAAAAAAAAAAAAAAAAAAAAAAAAAAAAAAAAAAAAAAAAAAAAAAAAAAAAAAAAAAAAAAAAAAAAAAAAAAAAAAAAAAAAAAAAAAAAAAAAAAAAAAAAAAAAAAAAAAAAAAAAAAAAAAAAAAAAAAAAAAAAAAAAAAAAAAAAAAAAAAAAAAAAAAAAAAAAAAAAAAAAAAAAAAAAAAAAAAAAAAAAAAAAAAAAAAAAAAAAAAAAAAAAAAAAAAAAAAAAAAAAAAAAAAAAAAAAAAAAAAAAAAAAAAAAAAAAAAAAAAAAAAAAAAAAAAAAAAAAAAAAAAAAAAAAAAAAAAAAAAAAAAAAAAAAAAAAAAAAAAAAAAAAAAAAAAAAAAAAAAAAAAAAAAAAAAAAAAAAAAAAAAAAAAAAAAAAAAAAAAAAAAAAAAAAAAAAAAAAAAAAAAAAAAAAAAAAAAAAAAAAAAAAAAAAAAAAAAAAAAAAAAAAAAAAAAAAAAAAAAAAAAAAAAAAAAAAAAAAAAAAAAAAAAAAAAAAAAAAAAAAAAAAAAAAAAAAAAAAAAAAAAAAAAAAAAAAAAAAAAAAAAAAAAAAAAAAAAAAAAAAAAAAAAAAAAAAAAAAAAAAAAAAAAAAAAAAAAAAAAAAAAAAAAAAAAAAAAAAAAAAAAAAAAAAAAAAAAAAAAAAAAAAAAAAAAAAAAAAAAAAAAAAAAAAAAAAAAAAAAAAAAAAAAAAAAAAAAAAAAAAAAAAAAAAAAAAAAAAAAAAAAAAAAAAAAAAAAAAAAAAAAAAAAAAAAAAAAAAAAAAAAAAAAAAAAAAAAAAAAAAAAAAAAAAAAAAAAAAAAAAAAAAAAAAAAAAAAAAAAAAAAAAAAAAAAAAAAAAAAAAAAAAAAAAAAAAAAAAAAAAAAAAAAAAAAAAAAAAAAAAAAAAAAAAAAAAAAAAAAAAAAAAAAAAAAAAAAAAAAAAAAAAAAAAAAAAAAAAAAAAAAAAAAAAAAAAAAAAAAAAAAAAAAAAAAAAAAAAAAAAAAAAAAAAAAAAAAAAAAAAAAAAAAAAAAAAAAAAAAAAAAAAAAAAAAAAAAAAAAAAAAAAAAAAAAAAAAAAAAAAAAAAAAAAAAAAAAAAAAAAAAAAAAAAAAAAAAAAAAAAAAAAAAAAAAAAAAAAAAAAAAAAAAAAAAAAAAAAAAAAAAAAAAAAAAAAAAAAAAAAAAAAAAAAAAAAAAAAAAAAAAAAAAAAAAAAAAAAAAAAAAAAAAAAAAAAAAAAAAAAAAAAAAAAAAAAAAAAAAAAAAAAAAAAAAAAAAAAAAAAAAAAAAAAAAAAAAAAAAAAAAAAAAAAAAAAAAAAAAAAAAAAAAAAAAAAAAAAAAAAAAAAAAAAAAAAAAAAAAAAAAAAAAAAAAAAAAAAAAAAAAAAAAAAAAAAAAAAAAAAAAAAAAAAAAAAAAAAAAAAAAAAAAAAAAAAAAAAAAAAAAAAAAAAAAAAAAAAAAAAAAAAAAAAAAAAAAAAAAAAAAAAAAAAAAAAAAAAAAAAAAAAAAAAAAAAAAAAAAAAAAAAAAAAAAAAAAAAAAAAAAAAAAAAAAAAAAAAAAAAAAAAAAAAAAAAAAAAAAAAAAAAAAAAAAAAAAAAAAAAAAAAAAAAAAAAAAAAAAAAAAAAAAAAAAAAAAAAAAAAAAAAAAAAAAAAAAAAAAAAAAAAAAAAAAAAAAAAAAAAAAAAAAAAAAAAAAAAAAAAAAAAAAAAAAAAAAAAAAAAAAAAAAAAAAAAAAAAAAAAAAAAAAAAAAAAAAAAAAAAAAAAAAAAAAAAAAAAAAAAAAAAAAAAAAAAAAAAAAAAAAAAAAAAAAAAAAAAAAAAAAAAAAAAAAAAAAAAAAAAAAAAAAAAAAAAAAAAAAAAAAAAAAAAAAAAAAAAAAAAAAAAAAAAAAAAAAAAAAAAAAAAAAAAAAAAAAAAAAAAAAAAAAAAAAAAAAAAAAAAAAAAAAAAAAAAAAAAAAAAAAAAAAAAAAAAAAAAAAAAAAAAAAAAAAAAAAAAAAAAAAAAAAAAAAAAAAAAAAAAAAAAAAAAAAAAAAAAAAAAAAAAAAAAAAAAAAAAAAAAAAAAAAAAAAAAAAAAAAAAAAAAAAAAAAAAAAAAAAAAAAAAAAAAAAAAAAAAAAAAAAAAAAAAAAAAAAAAAAAAAAAAAAAAAAAAAAAAAAAAAAAAAAAAAAAAAAAAAAAAAAAAAAAAAAAAAAAAAAAAAAAAAAAAAAAAAAAAAAAAAAAAAAAAAAAAAAAAAAAAAAAAAAAAAAAAAAAAAAAAAAAAAAAAAAAAAAAAAAAAAAAAAAAAAAAAAAAAAAAAAAAAAAAAAAAAAAAAAAAAAAAAAAAAAAAAAAAAAAAAAAAAAAAAAAAAAAAAAAAAAAAAAAAAAAAAAAAAAAAAAAAAAAAAAAAAAAAAAAAAAAAAAAAAAAAAAAAAAAAAAAAAAAAAAAAAAAAAAAAAAAAAAAAAAAAAAAAAAAAAAAAAAAAAAAAAAAAAAAAAAAAAAAAAAAAAAAAAAAAAAAAAAAAAAAAAAAAAAAAAAAAAAAAAAAAAAAAAAAAAAAAAAAAAAAAAAAAAAAAAAAAAAAAAAAAAAAAAAAAAAAAAAAAAAAAAAAAAAAAAAAAAAAAAAAAAAAAAAAAAAAAAAAAAAAAAAAAAAAAAAAAAAAAAAAAAAAAAAAAAAAAAAAAAAAAAAAAAAAAAAAAAAAAAAAAAAAAAAAAAAAAAAAAAAAAAAAAAAAAAAAAAAAAAAAAAAAAAAAAAAAAAAAAAAAAAAAAAAAAAAAAAAAAAAAAAAAAAAAAAAAAAAAAAAAAAAAAAAAAAAAAAAAAAAAAAAAAAAAAAAAAAAAAAAAAAAAAAAAAAAAAAAAAAAAAAAAAAAAAAAAAAAAAAAAAAAAAAAAAAAAAAAAAAAAAAAAAAAAAAAAAAAAAAAAAAAAAAAAAAAAAAAAAAAAAAAAAAAAAAAAAAAAAAAAAAAAAAAAAAAAAAAAAAAAAAAAAAAAAAAAAAAAAAAAAAAAAAAAAAAAAAAAAAAAAAAAAAAAAAAAAAAAAAAAAAAAAAAAAAAAAAAAAAAAAAAAAAAAAAAAAAAAAAAAAAAAAAAAAAAAAAAAAAAAAAAAAAAAAAAAAAAAAAAAAAAAAAAAAAAAAAAAAAAAAAAAAAAAAAAAAAAAAAAAAAAAAAAAAAAAAAAAAAAAAAAAAAAAAAAAAAAAAAAAAAAAAAAAAAAAAAAAAAAAAAAAAAAAAAAAAAAAAAA
AAAAAAAAAAAAAAAAAAAAAAAAAAAAAAAAAAAAAAAAAAAAAAAAAAAAAAAAAAAAAAAAAAAAAAAAAAAAAAAAAAAAAAAAAAAAAAAAAAAAAAAAAAAAAAAAAAAAAAAAAAAAAAAAAAAAAAAAAAAAAAAAAAAAAAAAAAAAAAAAAAAAAAAAAAAAAAAAAAAAAAAAAAAAAAAAAAAAAAAAAAAAAAAAAAAAAAAAAAAAAAAAAAAAAAAAAAAAAAAAAAAAAAAAAAAAAAAAAAAAAAAAAAAAAAAAAAAAAAAAAAAAAAAAAAAAAAAAAAAAAAAAAAAAAAAAAAAAAAAAAAAAAAAAAAAAAAAAAAAAAAAAAAAAAAAAAAAAAAAAAAAAAAAAAAAAAAAAAAAAAAAAAAAAAAAAAAAAAAAAAAAAAAAAAAAAAAAAAAAAAAAAAAAAAAAAAAAAAAAAAAAAAAAAAAAAAAAAAAAAAAAAAAAAAAAAAAAAAAAAAAAAAAAAAAAAAAAAAAAAAAAAAAAAAAAAAAAAAAAAAAAAAAAAAAAAAAAAAAAAAAAAAAAAAAAAAAAAAAAAAAAAAAAAAAAAAAAAAAAAAAAAAAAAAAAAAAAAAAAAAAAAAAAAAAAAAAAAAAAAAAAAAAAAAAAAAAAAAAAAAAAAAAAAAAAAAAAAAAAAAAAAAAAAAAAAAAAAAAAAAAAAAAAAAAAAAAAAAAAAAAAAAAAAAAAAAAAAAAAAAAAAAAAAAAAAAAAAAAAAAAAAAAAAAAAAAAAAAAAAAAAAAAAAAAAAAAAAAAAAAAAAAAAAAAAAAAAAAAAAAAAAAAAAAAAAAAAAAAAAAAAAAAAAAAAAAAAAAAAAAAAAAAAAAAAAAAAAAAAAAAAAAAAAAAAAAAAAAAAAAAAAAAAAAAAAAAAAAAAAAAAAAAAAAAAAAAAAAAAAAAAAAAAAAAAAAAAAAAAAAAAAAAAAAAAAAAAAAAAAAAAAAAAAAAAAAAAAAAAAAAAAAAAAAAAAAAAAAAAAAAAAAAAAAAAAAAAAAAAAAAAAAAAAAAAAAAAAAAAAAAAAAAAAAAAAAAAAAAAAAAAAAAAAAAAAAAAAAAAAAAAAAAAAAAAAAAAAAAAAAAAAAAAAAAAAAAAAAAAAAAAAAAAAAAAAAAAAAAAAAAAAAAAAAAAAAAAAAAAAAAAAAAAAAAAAAAAAAAAAAAAAAAAAAAAAAAAAAAAAAAAAAAAAAAAAAAAAAAAAAAAAAAAAAAAAAAAAAAAAAAAAAAAAAAAAAAAAAAAAAAAAAAAAAAAAAAAAAAAAAAAAAAAAAAAAAAAAAAAAAAAAAAAAAAAAAAAAAAAAAAAAAAAAAAAAAAAAAAAAAAAAAAAAAAAAAAAAAAAAAAAAAAAAAAAAAAAAAAAAAAAAAAAAAAAAAAAAAAAAAAAAAAAAAAAAAAAAAAAAAAAAAAAAAAAAAAAAAAAAAAAAAAAAAAAAAAAAAAAAAAAAAAAAAAAAAAAAAAAAAAAAAAAAAAAAAAAAAAAAAAAAAAAAAAAAAAAAAAAAAAAAAAAAAAAAAAAAAAAAAAAAAAAAAAAAAAAAAAAAAAAAAAAAAAAAAAAAAAAAAAAAAAAAAAAAAAAAAAAAAAAAAAAAAAAAAAAAAAAAAAAAAAAAAAAAAAAAAAAAAAAAAAAAAAAAAAAAAAAAAAAAAAAAAAAAAAAAAAAAAAAAAAAAAAAAAAAAAAAAAAAAAAAAAAAAAAAAAAAAAAAAAAAAAAAAAAAAAAAAAAAAAAAAAAAAAAAAAAAAAAAAAAAAAAAAAAAAAAAAAAAAAAAAAAAAAAAAAAAAAAAAAAAAAAAAAAAAAAAAAAAAAAAAAAAAAAAAAAAAAAAAAAAAAAAAAAAAAAAAAAAAAAAAAAAAAAAAAAAAAAAAAAAAAAAAAAAAAAAAAAAAAAAAAAAAAAAAAAAAAAAAAAAAAAAAAAAAAAAAAAAAAAAAAAAAAAAAAAAAAAAAAAAAAAAAAAAAAAAAAAAAAAAAAAAAAAAAAAAAAAAAAAAAAAAAAAAAAAAAAAAAAAAAAAAAAAAAAAAAAAAAAAAAAAAAAAAAAAAAAAAAAAAAAAAAAAAAAAAAAAAAAAAAAAAAAAAAAAAAAAAAAAAAAAAAAAAAAAAAAAAAAAAAAAAAAAAAAAAAAAAAAAAAAAAAAAAAAAAAAAAAAAAAAAAAAAAAAAAAAAAAAAAAAAAAAAAAAAAAAAAAAAAAAAAAAAAAAAAAAAAAAAAAAAAAAAAAAAAAAAAAAAAAAAAAAAAAAAAAAAAAAAAAAAAAAAAAAAAAAAAAAAAAAAAAAAAAAAAAAAAAAAAAAAAAAAAAAAAAAAAAAAAAAAAAAAAAAAAAAAAAAAAAAAAAAAAAAAAAAAAAAAAAAAAAAAAAAAAAAAAAAAAAAAAAAAAAAAAAAAAAAAAAAAAAAAAAAAAAAAAAAAAAAAAAAAAAAAAAAAAAAAAAAAAAAAAAAAAAAAAAAAAAAAAAAAAAAAAAAAAAAAAAAAAAAAAAAAAAAAAAAAAAAAAAAAAAAAAAAAAAAAAAAAAAAAAAAAAAAAAAAAAAAAAAAAAAAAAAAAAAAAAAAAAAAAAAAAAAAAAAAAAAAAAAAAAAAAAAAAAAAAAAAAAAAAAAAAAAAAAAAAAAAAAAAAAAAAAAAAAAAAAAAAAAAAAAAAAAAAAAAAAAAAAAAAAAAAAAAAAAAAAAAAAAAAAAAAAAAAAAAAAAAAAAAAAAAAAAAAAAAAAAAAAAAAAAAAAAAAAAAAAAAAAAAAAAAAAAAAAAAAAAAAAAAAAAAAAAAAAAAAAAAAAAAAAAAAAAAAAAAAAAAAAAAAAAAAAAAAAAAAAAAAAAAAAAAAAAAAAAAAAAAAAAAAAAAAAAAAAAAAAAAAAAAAAAAAAAAAAAAAAAAAAAAAAAAAAAAAAAAAAAAAAAAAAAAAAAAAAAAAAAAAAAAAAAAAAAAAAAAAAAAAAAAAAAAAAAAAAAAAAAAAAAAAAAAAAAAAAAAAAAAAAAAAAAAAAAAAAAAAAAAAAAAAAAAAAAAAAAAAAAAAAAAAAAAAAAAAAAAAAAAAAAAAAAAAAAAAAAAAAAAAAAAAAAAAAAAAAAAAAAAAAAAAAAAAAAAAAAAAAAAAAAAAAAAAAAAAAAAAAAAAAAAAAAAAAAAAAAAAAAAAAAAAAAAAAAAAAAAAAAAAAAAAAAAAAAAAAAAAAAAAAAAAAAAAAAAAAAAAAAAAAAAAAAAAAAAAAAAAAAAAAAAAAAAAAAAAAAAAAAAAAAAAAAAAAAAAAAAAAAAAAAAAAAAAAAAAAAAAAAAAAAAAAAAAAAAAAAAAAAAAAAAAAAAAAAAAAAAAAAAAAAAAAAAAAAAAAAAAAAAAAAAAAAAAAAAAAAAAAAAAAAAAAAAAAAAAAAAAAAAAAAAAAAAAAAAAAAAAAAAAAAAAAAAAAAAAAAAAAAAAAAAAAAAAAAAAAAAAAAAAAAAAAAAAAAAAAAAAAAAAAAAAAAAAAAAAAAAAAAAAAAAAAAAAAAAAAAAAAAAAAAAAAAAAAAAAAAAAAAAAAAAAAAAAAAAAAAAAAAAAAAAAAAAAAAAAAAAAAAAAAAAAAAAAAAAAAAAAAAAAAAAAAAAAAAAAAAAAAAAAAAAAAAAAAAAAAAAAAAAAAAAAAAAAAAAAAAAAAAAAAAAAAAAAAAAAAAAAAAAAAAAAAAAAAAAAAAAAAAAAAAAAAAAAAAAAAAAAAAAAAAAAAAAAAAAAAAAAAAAAAAAAAAAAAAAAAAAAAAAAAAAAAAAAAAAAAAAAAAAAAAAAAAAAAAAAAAAAAAAAAAAAAAAAAAAAAAAAAAAAAAAAAAAAAAAAAAAAAAAAAAAAAAAAAAAAAAAAAAAAAAAAAAAAAAAAAAAAAAAAAAAAAAAAAAAAAAAAAAAAAAAAAAAAAAAAAAAAAAAAAAAAAAAAAAAAAAAAAAAAAAAAAAAAAAAAAAAAAAAAAAAAAAAAAAAAAAAAAAAAAAAAAAAAAAAAAAAAAAAAAAAAAAAAAAAAAAAAAAAAAAAAAAAAAAAAAAAAAAAAAAAAAAAAAAAAAAAAAAAAAAAAAAAAAAAAAAAAAAAAAAAAAAAAAAAAAAAAAAAAAAAAAA
AAAAAAAAAAAAAAAAAAAAAAAAAAAAAAAAAAAAAAAAAAAAAAAAAAAAAAAAAAAAAAAAAAAAAAAAAAAAAAAAAAAAAAAAAAAAAAAAAAAAAAAAAAAAAAAAAAAAAAAAAAAAAAAAAAAAAAAAAAAAAAAAAAAAAAAAAAAAAAAAAAAAAAAAAAAAAAAAAAAAAAAAAAAAAAAAAAAAAAAAAAAAAAAAAAAAAAAAAAAAAAAAAAAAAAAAAAAAAAAAAAAAAAAAAAAAAAAAAAAAAAAAAAAAAAAAAAAAAAAAAAAAAAAAAAAAAAAAAAAAAAAAAAAAAAAAAAAAAAAAAAAAAAAAAAAAAAAAAAAAAAAAAAAAAAAAAAAAAAAAAAAAAAAAAAAAAAAAAAAAAAAAAAAAAAAAAAAAAAAAAAAAAAAAAAAAAAAAAAAAAAAAAAAAAAAAAAAAAAAAAAAAAAAAAAAAAAAAAAAAAAAAAAAAAAAAAAAAAAAAAAAAAAAAAAAAAAAAAAAAAAAAAAAAAAAAAAAAAAAAAAAAAAAAAAAAAAAAAAAAAAAAAAAAAAAAAAAAAAAAAAAAAAAAAAAAAAAAAAAAAAAAAAAAAAAAAAAAAAAAAAAAAAAAAAAAAAAAAAAAAAAAAAAAAAAAAAAAAAAAAAAAAAAAAAAAAAAAAAAAAAAAAAAAAAAAAAAAAAAAAAAAAAAAAAAAAAAAAAAAAAAAAAAAAAAAAAAAAAAAAAAAAAAAAAAAAAAAAAAAAAAAAAAAAAAAAAAAAAAAAAAAAAAAAAAAAAAAAAAAAAAAAAAAAAAAAAAAAAAAAAAAAAAAAAAAAAAAAAAAAAAAAAAAAAAAAAAAAAAAAAAAAAAAAAAAAAAAAAAAAAAAAAAAAAAAAAAAAAAAAAAAAAAAAAAAAAAAAAAAAAAAAAAAAAAAAAAAAAAAAAAAAAAAAAAAAAAAAAAAAAAAAAAAAAAAAAAAAAAAAAAAAAAAAAAAAAAAAAAAAAAAAAAAAAAAAAAAAAAAAAAAAAAAAAAAAAAAAAAAAAAAAAAAAAAAAAAAAAAAAAAAAAAAAAAAAAAAAAAAAAAAAAAAAAAAAAAAAAAAAAAAAAAAAAAAAAAAAAAAAAAAAAAAAAAAAAAAAAAAAAAAAAAAAAAAAAAAAAAAAAAAAAAAAAAAAAAAAAAAAAAAAAAAAAAAAAAAAAAAAAAAAAAAAAAAAAAAAAAAAAAAAAAAAAAAAAAAAAAAAAAAAAAAAAAAAAAAAAAAAAAAAAAAAAAAAAAAAAAAAAAAAAAAAAAAAAAAAAAAAAAAAAAAAAAAAAAAAAAAAAAAAAAAAAAAAAAAAAAAAAAAAAAAAAAAAAAAAAAAAAAAAAAAAAAAAAAAAAAAAAAAAAAAAAAAAAAAAAAAAAAAAAAAAAAAAAAAAAAAAAAAAAAAAAAAAAAAAAAAAAAAAAAAAAAAAAAAAAAAAAAAAAAAAAAAAAAAAAAAAAAAAAAAAAAAAAAAAAAAAAAAAAAAAAAAAAAAAAAAAAAAAAAAAAAAAAAAAAAAAAAAAAAAAAAAAAAAAAAAAAAAAAAAAAAAAAAAAAAAAAAAAAAAAAAAAAAAAAAAAAAAAAAAAAAAAAAAAAAAAAAAAAAAAAAAAAAAAAAAAAAAAAAAAAAAAAAAAAAAAAAAAAAAAAAAAAAAAAAAAAAAAAAAAAAAAAAAAAAAAAAAAAAAAAAAAAAAAAAAAAAAAAAAAAAAAAAAAAAAAAAAAAAAAAAAAAAAAAAAAAAAAAAAAAAAAAAAAAAAAAAAAAAAAAAAAAAAAAAAAAAAAAAAAAAAAAAAAAAAAAAAAAAAAAAAAAAAAAAAAAAAAAAAAAAAAAAAAAAAAAAAAAAAAAAAAAAAAAAAAAAAAAAAAAAAAAAAAAAAAAAAAAAAAAAAAAAAAAAAAAAAAAAAAAAAAAAAAAAAAAAAAAAAAAAAAAAAAAAAAAAAAAAAAAAAAAAAAAAAAAAAAAAAAAAAAAAAAAAAAAAAAAAAAAAAAAAAAAAAAAAAAAAAAAAAAAAAAAAAAAAAAAAAAAAAAAAAAAAAAAAAAAAAAAAAAAAAAAAAAAAAAAAAAAAAAAAAAAAAAAAAAAAAAAAAAAAAAAAAAAAAAAAAAAAAAAAAAAAAAAAAAAAAAAAAAAAAAAAAAAAAAAAAAAAAAAAAAAAAAAAAAAAAAAAAAAAAAAAAAAAAAAAAAAAAAAAAAAAAAAAAAAAAAAAAAAAAAAAAAAAAAAAAAAAAAAAAAAAAAAAAAAAAAAAAAAAAAAAAAAAAAAAAAAAAAAAAAAAAAAAAAAAAAAAAAAAAAAAAAAAAAAAAAAAAAAAAAAAAAAAAAAAAAAAAAAAAAAAAAAAAAAAAAAAAAAAAAAAAAAAAAAAAAAAAAAAAAAAAAAAAAAAAAAAAAAAAAAAAAAAAAAAAAAAAAAAAAAAAAAAAAAAAAAAAAAAAAAAAAAAAAAAAAAAAAAAAAAAAAAAAAAAAAAAAAAAAAAAAAAAAAAAAAAAAAAAAAAAAAAAAAAAAAAAAAAAAAAAAAAAAAAAAAAAAAAAAAAAAAAAAAAAAAAAAAAAAAAAAAAAAAAAAAAAAAAAAAAAAAAAAAAAAAAAAAAAAAAAAAAAAAAAAAAAAAAAAAAAAAAAAAAAAAAAAAAAAAAAAAAAAAAAAAAAAAAAAAAAAAAAAAAAAAAAAAAAAAAAAAAAAAAAAAAAAAAAAAAAAAAAAAAAAAAAAAAAAAAAAAAAAAAAAAAAAAAAAAAAAAAAAAAAAAAAAAAAAAAAAAAAAAAAAAAAAAAAAAAAAAAAAAAAAAAAAAAAAAAAAAAAAAAAAAAAAAAAAAAAAAAAAAAAAAAAAAAAAAAAAAAAAAAAAAAAAAAAAAAAAAAAAAAAAAAAAAAAAAAAAAAAAAAAAAAAAAAAAAAAAAAAAAAAAAAAAAAAAAAAAAAAAAAAAAAAAAAAAAAAAAAAAAAAAAAAAAAAAAAAAAAAAAAAAAAAAAAAAAAAAAAAAAAAAAAAAAAAAAAAAAAAAAAAAAAAAAAAAAAAAAAAAAAAAAAAAAAAAAAAAAAAAAAAAAAAAAAAAAAAAAAAAAAAAAAAAAAAAAAAAAAAAAAAAAAAAAAAAAAAAAAAAAAAAAAAAAAAAAAAAAAAAAAAAAAAAAAAAAAAAAAAAAAAAAAAAAAAAAAAAAAAAAAAAAAAAAAAAAAAAAAAAAAAAAAAAAAAAAAAAAAAAAAAAAAAAAAAAAAAAAAAAAAAAAAAAAAAAAAAAAAAAAAAAAAAAAAAAAAAAAAAAAAAAAAAAAAAAAAAAAAAAAAAAAAAAAAAAAAAAAAAAAAAAAAAAAAAAAAAAAAAAAAAAAAAAAAAAAAAAAAAAAAAAAAAAAAAAAAAAAAAAAAAAAAAAAAAAAAAAAAAAAAAAAAAAAAAAAAAAAAAAAAAAAAAAAAAAAAAAAAAAAAAAAAAAAAAAAAAAAAAAAAAAAAAAAAAAAAAAAAAAAAAAAAAAAAAAAAAAAAAAAAAAAAAAAAAAAAAAAAAAAAAAAAAAAAAAAAAAAAAAAAAAAAAAAAAAAAAAAAAAAAAAAAAAAAAAAAAAAAAAAAAAAAAAAAAAAAAAAAAAAAAAAAAAAAAAAAAAAAAAAAAAAAAAAAAAAAAAAAAAAAAAAAAAAAAAAAAAAAAAAAAAAAAAAAAAAAAAAAAAAAAAAAAAAAAAAAAAAAAAAAAAAAAAAAAAAAAAAAAAAAAAAAAAAAAAAAAAAAAAAAAAAAAAAAAAAAAAAAAAAAAAAAAAAAAAAAAAAAAAAAAAAAAAAAAAAAAAAAAAAAAAAAAAAAAAAAAAAAAAAAAAAAAAAAAAAAAAAAAAAAAAAAAAAAAAAAAAAAAAAAAAAAAAAAAAAAAAAAAAAAAAAAAAAAAAAAAAAAAAAAAAAAAAAAAAAAAAAAAAAAAAAAAAAAAAAAAAAAAAAAAAAAAAAAAAAAAAAAAAAAAAAAAAAAAAAAAAAAAAAAAAAAAAAAAAAAAAAAAAAAAAAAAAAAAAAAAAAAAAAAAAAAAAAAAAAAAAAAAAAAAAAAAAAAAAAAAAAAAAAAAAAAAAAAAAAAAAAAAAAAAAAAAAAAAAAAAAAAAAAAAAAAAAAAAA
AAAAAAAAAAAAAAAAAAAAAAAAAAAAAAAAAAAAAAAAAAAAAAAAAAAAAAAAAAAAAAAAAAAAAAAAAAAAAAAAAAAAAAAAAAAAAAAAAAAAAAAAAAAAAAAAAAAAAAAAAAAAAAAAAAAAAAAAAAAAAAAAAAAAAAAAAAAAAAAAAAAAAAAAAAAAAAAAAAAAAAAAAAAAAAAAAAAAAAAAAAAAAAAAAAAAAAAAAAAAAAAAAAAAAAAAAAAAAAAAAAAAAAAAAAAAAAAAAAAAAAAAAAAAAAAAAAAAAAAAAAAAAAAAAAAAAAAAAAAAAAAAAAAAAAAAAAAAAAAAAAAAAAAAAAAAAAAAAAAAAAAAAAAAAAAAAAAAAAAAAAAAAAAAAAAAAAAAAAAAAAAAAAAAAAAAAAAAAAAAAAAAAAAAAAAAAAAAAAAAAAAAAAAAAAAAAAAAAAAAAAAAAAAAAAAAAAAAAAAAAAAAAAAAAAAAAAAAAAAAAAAAAAAAAAAAAAAAAAAAAAAAAAAAAAAAAAAAAAAAAAAAAAAAAAAAAAAAAAAAAAAAAAAAAAAAAAAAAAAAAAAAAAAAAAAAAAAAAAAAAAAAAAAAAAAAAAAAAAAAAAAAAAAAAAAAAAAAAAAAAAAAAAAAAAAAAAAAAAAAAAAAAAAAAAAAAAAAAAAAAAAAAAAAAAAAAAAAAAAAAAAAAAAAAAAAAAAAAAAAAAAAAAAAAAAAAAAAAAAAAAAAAAAAAAAAAAAAAAAAAAAAAAAAAAAAAAAAAAAAAAAAAAAAAAAAAAAAAAAAAAAAAAAAAAAAAAAAAAAAAAAAAAAAAAAAAAAAAAAAAAAAAAAAAAAAAAAAAAAAAAAAAAAAAAAAAAAAAAAAAAAAAAAAAAAAAAAAAAAAAAAAAAAAAAAAAAAAAAAAAAAAAAAAAAAAAAAAAAAAAAAAAAAAAAAAAAAAAAAAAAAAAAAAAAAAAAAAAAAAAAAAAAAAAAAAAAAAAAAAAAAAAAAAAAAAAAAAAAAAAAAAAAAAAAAAAAAAAAAAAAAAAAAAAAAAAAAAAAAAAAAAAAAAAAAAAAAAAAAAAAAAAAAAAAAAAAAAAAAAAAAAAAAAAAAAAAAAAAAAAAAAAAAAAAAAAAAAAAAAAAAAAAAAAAAAAAAAAAAAAAAAAAAAAAAAAAAAAAAAAAAAAAAAAAAAAAAAAAAAAAAAAAAAAAAAAAAAAAAAAAAAAAAAAAAAAAAAAAAAAAAAAAAAAAAAAAAAAAAAAAAAAAAAAAAAAAAAAAAAAAAAAAAAAAAAAAAAAAAAAAAAAAAAAAAAAAAAAAAAAAAAAAAAAAAAAAAAAAAAAAAAAAAAAAAAAAAAAAAAAAAAAAAAAAAAAAAAAAAAAAAAAAAAAAAAAAAAAAAAAAAAAAAAAAAAAAAAAAAAAAAAAAAAAAAAAAAAAAAAAAAAAAAAAAAAAAAAAAAAAAAAAAAAAAAAAAAAAAAAAAAAAAAAAAAAAAAAAAAAAAAAAAAAAAAAAAAAAAAAAAAAAAAAAAAAAAAAAAAAAAAAAAAAAAAAAAAAAAAAAAAAAAAAAAAAAAAAAAAAAAAAAAAAAAAAAAAAAAAAAAAAAAAAAAAAAAAAAAAAAAAAAAAAAAAAAAAAAAAAAAAAAAAAAAAAAAAAAAAAAAAAAAAAAAAAAAAAAAAAAAAAAAAAAAAAAAAAAAAAAAAAAAAAAAAAAAAAAAAAAAAAAAAAAAAAAAAAAAAAAAAAAAAAAAAAAAAAAAAAAAAAAAAAAAAAAAAAAAAAAAAAAAAAAAAAAAAAAAAAAAAAAAAAAAAAAAAAAAAAAAAAAAAAAAAAAAAAAAAAAAAAAAAAAAAAAAAAAAAAAAAAAAAAAAAAAAAAAAAAAAAAAAAAAAAAAAAAAAAAAAAAAAAAAAAAAAAAAAAAAAAAAAAAAAAAAAAAAAAAAAAAAAAAAAAAAAAAAAAAAAAAAAAAAAAAAAAAAAAAAAAAAAAAAAAAAAAAAAAAAAAAAAAAAAAAAAAAAAAAAAAAAAAAAAAAAAAAAAAAAAAAAAAAAAAAAAAAAAAAAAAAAAAAAAAAAAAAAAAAAAAAAAAAAAAAAAAAAAAAAAAAAAAAAAAAAAAAAAAAAAAAAAAAAAAAAAAAAAAAAAAAAAAAAAAAAAAAAAAAAAAAAAAAAAAAAAAAAAAAAAAAAAAAAAAAAAAAAAAAAAAAAAAAAAAAAAAAAAAAAAAAAAAAAAAAAAAAAAAAAAAAAAAAAAAAAAAAAAAAAAAAAAAAAAAAAAAAAAAAAAAAAAAAAAAAAAAAAAAAAAAAAAAAAAAAAAAAAAAAAAAAAAAAAAAAAAAAAAAAAAAAAAAAAAAAAAAAAAAAAAAAAAAAAAAAAAAAAAAAAAAAAAAAAAAAAAAAAAAAAAAAAAAAAAAAAAAAAAAAAAAAAAAAAAAAAAAAAAAAAAAAAAAAAAAAAAAAAAAAAAAAAAAAAAAAAAAAAAAAAAAAAAAAAAAAAAAAAAAAAAAAAAAAAAAAAAAAAAAAAAAAAAAAAAAAAAAAAAAAAAAAAAAAAAAAAAAAAAAAAAAAAAAAAAAAAAAAAAAAAAAAAAAAAAAAAAAAAAAAAAAAAAAAAAAAAAAAAAAAAAAAAAAAAAAAAAAAAAAAAAAAAAAAAAAAAAAAAAAAAAAAAAAAAAAAAAAAAAAAAAAAAAAAAAAAAAAAAAAAAAAAAAAAAAAAAAAAAAAAAAAAAAAAAAAAAAAAAAAAAAAAAAAAAAAAAAAAAAAAAAAAAAAAAAAAAAAAAAAAAAAAAAAAAAAAAAAAAAAAAAAAAAAAAAAAAAAAAAAAAAAAAAAAAAAAAAAAAAAAAAAAAAAAAAAAAAAAAAAAAAAAAAAAAAAAAAAAAAAAAAAAAAAAAAAAAAAAAAAAAAAAAAAAAAAAAAAAAAAAAAAAAAAAAAAAAAAAAAAAAAAAAAAAAAAAAAAAAAAAAAAAAAAAAAAAAAAAAAAAAAAAAAAAAAAAAAAAAAAAAAAAAAAAAAAAAAAAAAAAAAAAAAAAAAAAAAAAAAAAAAAAAAAAAAAAAAAAAAAAAAAAAAAAAAAAAAAAAAAAAAAAAAAAAAAAAAAAAAAAAAAAAAAAAAAAAAAAAAAAAAAAAAAAAAAAAAAAAAAAAAAAAAAAAAAAAAAAAAAAAAAAAAAAAAAAAAAAAAAAAAAAAAAAAAAAAAAAAAAAAAAAAAAAAAAAAAAAAAAAAAAAAAAAAAAAAAAAAAAAAAAAAAAAAAAAAAAAAAAAAAAAAAAAAAAAAAAAAAAAAAAAAAAAAAAAAAAAAAAAAAAAAAAAAAAAAAAAAAAAAAAAAAAAAAAAAAAAAAAAAAAAAAAAAAAAAAAAAAAAAAAAAAAAAAAAAAAAAAAAAAAAAAAAAAAAAAAAAAAAAAAAAAAAAAAAAAAAAAAAAAAAAAAAAAAAAAAAAAAAAAAAAAAAAAAAAAAAAAAAAAAAAAAAAAAAAAAAAAAAAAAAAAAAAAAAAAAAAAAAAAAAAAAAAAAAAAAAAAAAAAAAAAAAAAAAAAAAAAAAAAAAAAAAAAAAAAAAAAAAAAAAAAAAAAAAAAAAAAAAAAAAAAAAAAAAAAAAAAAAAAAAAAAAAAAAAAAAAAAAAAAAAAAAAAAAAAAAAAAAAAAAAAAAAAAAAAAAAAAAAAAAAAAAAAAAAAAAAAAAAAAAAAAAAAAAAAAAAAAAAAAAAAAAAAAAAAAAAAAAAAAAAAAAAAAAAAAAAAAAAAAAAAAAAAAAAAAAAAAAAAAAAAAAAAAAAAAAAAAAAAAAAAAAAAAAAAAAAAAAAAAAAAAAAAAAAAAAAAAAAAAAAAAAAAAAAAAAAAAAAAAAAAAAAAAAAAAAAAAAAAAAAAAAAAAAAAAAAAAAAAAAAAAAAAAAAAAAAAAAAAAAAAAAAAAAAAAAAAAAAAAAAAAAAAAAAAAAAAAAAAAAAAAAAAAAAAAAAAAAAAAAAAAAAAAAAAAAAAAAAAAAAAAAAAAAAAAAAAAAAAAAAAAAAAAAAAAAAAAAAAAAAAAAAAAAAAAAAAAAAAAAAAAAAAAAAAAAAAAAAAAAAAAAAAAAAAAAAAAAAAAAAAAAAAAAAAAAAAAAAAAAAAAAAAAAAAAA
AAAAAAAAAAAAAAAAAAAAAAAAAAAAAAAAAAAAAAAAAAAAAAAAAAAAAAAAAAAAAAAAAAAAAAAAAAAAAAAAAAAAAAAAAAAAAAAAAAAAAAAAAAAAAAAAAAAAAAAAAAAAAAAAAAAAAAAAAAAAAAAAAAAAAAAAAAAAAAAAAAAAAAAAAAAAAAAAAAAAAAAAAAAAAAAAAAAAAAAAAAAAAAAAAAAAAAAAAAAAAAAAAAAAAAAAAAAAAAAAAAAAAAAAAAAAAAAAAAAAAAAAAAAAAAAAAAAAAAAAAAAAAAAAAAAAAAAAAAAAAAAAAAAAAAAAAAAAAAAAAAAAAAAAAAAAAAAAAAAAAAAAAAAAAAAAAAAAAAAAAAAAAAAAAAAAAAAAAAAAAAAAAAAAAAAAAAAAAAAAAAAAAAAAAAAAAAAAAAAAAAAAAAAAAAAAAAAAAAAAAAAAAAAAAAAAAAAAAAAAAAAAAAAAAAAAAAAAAAAAAAAAAAAAAAAAAAAAAAAAAAAAAAAAAAAAAAAAAAAAAAAAAAAAAAAAAAAAAAAAAAAAAAAAAAAAAAAAAAAAAAAAAAAAAAAAAAAAAAAAAAAAAAAAAAAAAAAAAAAAAAAAAAAAAAAAAAAAAAAAAAAAAAAAAAAAAAAAAAAAAAAAAAAAAAAAAAAAAAAAAAAAAAAAAAAAAAAAAAAAAAAAAAAAAAAAAAAAAAAAAAAAAAAAAAAAAAAAAAAAAAAAAAAAAAAAAAAAAAAAAAAAAAAAAAAAAAAAAAAAAAAAAAAAAAAAAAAAAAAAAAAAAAAAAAAAAAAAAAAAAAAAAAAAAAAAAAAAAAAAAAAAAAAAAAAAAAAAAAAAAAAAAAAAAAAAAAAAAAAAAAAAAAAAAAAAAAAAAAAAAAAAAAAAAAAAAAAAAAAAAAAAAAAAAAAAAAAAAAAAAAAAAAAAAAAAAAAAAAAAAAAAAAAAAAAAAAAAAAAAAAAAAAAAAAAAAAAAAAAAAAAAAAAAAAAAAAAAAAAAAAAAAAAAAAAAAAAAAAAAAAAAAAAAAAAAAAAAAAAAAAAAAAAAAAAAAAAAAAAAAAAAAAAAAAAAAAAAAAAAAAAAAAAAAAAAAAAAAAAAAAAAAAAAAAAAAAAAAAAAAAAAAAAAAAAAAAAAAAAAAAAAAAAAAAAAAAAAAAAAAAAAAAAAAAAAAAAAAAAAAAAAAAAAAAAAAAAAAAAAAAAAAAAAAAAAAAAAAAAAAAAAAAAAAAAAAAAAAAAAAAAAAAAAAAAAAAAAAAAAAAAAAAAAAAAAAAAAAAAAAAAAAAAAAAAAAAAAAAAAAAAAAAAAAAAAAAAAAAAAAAAAAAAAAAAAAAAAAAAAAAAAAAAAAAAAAAAAAAAAAAAAAAAAAAAAAAAAAAAAAAAAAAAAAAAAAAAAAAAAAAAAAAAAAAAAAAAAAAAAAAAAAAAAAAAAAAAAAAAAAAAAAAAAAAAAAAAAAAAAAAAAAAAAAAAAAAAAAAAAAAAAAAAAAAAAAAAAAAAAAAAAAAAAAAAAAAAAAAAAAAAAAAAAAAAAAAAAAAAAAAAAAAAAAAAAAAAAAAAAAAAAAAAAAAAAAAAAAAAAAAAAAAAAAAAAAAAAAAAAAAAAAAAAAAAAAAAAAAAAAAAAAAAAAAAAAAAAAAAAAAAAAAAAAAAAAAAAAAAAAAAAAAAAAAAAAAAAAAAAAAAAAAAAAAAAAAAAAAAAAAAAAAAAAAAAAAAAAAAAAAAAAAAAAAAAAAAAAAAAAAAAAAAAAAAAAAAAAAAAAAAAAAAAAAAAAAAAAAAAAAAAAAAAAAAAAAAAAAAAAAAAAAAAAAAAAAAAAAAAAAAAAAAAAAAAAAAAAAAAAAAAAAAAAAAAAAAAAAAAAAAAAAAAAAAAAAAAAAAAAAAAAAAAAAAAAAAAAAAAAAAAAAAAAAAAAAAAAAAAAAAAAAAAAAAAAAAAAAAAAAAAAAAAAAAAAAAAAAAAAAAAAAAAAAAAAAAAAAAAAAAAAAAAAAAAAAAAAAAAAAAAAAAAAAAAAAAAAAAAAAAAAAAAAAAAAAAAAAAAAAAAAAAAAAAAAAAAAAAAAAAAAAAAAAAAAAAAAAAAAAAAAAAAAAAAAAAAAAAAAAAAAAAAAAAAAAAAAAAAAAAAAAAAAAAAAAAAAAAAAAAAAAAAAAAAAAAAAAAAAAAAAAAAAAAAAAAAAAAAAAAAAAAAAAAAAAAAAAAAAAAAAAAAAAAAAAAAAAAAAAAAAAAAAAAAAAAAAAAAAAAAAAAAAAAAAAAAAAAAAAAAAAAAAAAAAAAAAAAAAAAAAAAAAAAAAAAAAAAAAAAAAAAAAAAAAAAAAAAAAAAAAAAAAAAAAAAAAAAAAAAAAAAAAAAAAAAAAAAAAAAAAAAAAAAAAAAAAAAAAAAAAAAAAAAAAAAAAAAAAAAAAAAAAAAAAAAAAAAAAAAAAAAAAAAAAAAAAAAAAAAAAAAAAAAAAAAAAAAAAAAAAAAAAAAAAAAAAAAAAAAAAAAAAAAAAAAAAAAAAAAAAAAAAAAAAAAAAAAAAAAAAAAAAAAAAAAAAAAAAAAAAAAAAAAAAAAAAAAAAAAAAAAAAAAAAAAAAAAAAAAAAAAAAAAAAAAAAAAAAAAAAAAAAAAAAAAAAAAAAAAAAAAAAAAAAAAAAAAAAAAAAAAAAAAAAAAAAAAAAAAAAAAAAAAAAAAAAAAAAAAAAAAAAAAAAAAAAAAAAAAAAAAAAAAAAAAAAAAAAAAAAAAAAAAAAAAAAAAAAAAAAAAAAAAAAAAAAAAAAAAAAAAAAAAAAAAAAAAAAAAAAAAAAAAAAAAAAAAAAAAAAAAAAAAAAAAAAAAAAAAAAAAAAAAAAAAAAAAAAAAAAAAAAAAAAAAAAAAAAAAAAAAAAAAAAAAAAAAAAAAAAAAAAAAAAAAAAAAAAAAAAAAAAAAAAAAAAAAAAAAAAAAAAAAAAAAAAAAAAAAAAAAAAAAAAAAAAAAAAAAAAAAAAAAAAAAAAAAAAAAAAAAAAAAAAAAAAAAAAAAAAAAAAAAAAAAAAAAAAAAAAAAAAAAAAAAAAAAAAAAAAAAAAAAAAAAAAAAAAAAAAAAAAAAAAAAAAAAAAAAAAAAAAAAAAAAAAAAAAAAAAAAAAAAAAAAAAAAAAAAAAAAAAAAAAAAAAAAAAAAAAAAAAAAAAAAAAAAAAAAAAAAAAAAAAAAAAAAAAAAAAAAAAAAAAAAAAAAAAAAAAAAAAAAAAAAAAAAAAAAAAAAAAAAAAAAAAAAAAAAAAAAAAAAAAAAAAAAAAAAAAAAAAAAAAAAAAAAAAAAAAAAAAAAAAAAAAAAAAAAAAAAAAAAAAAAAAAAAAAAAAAAAAAAAAAAAAAAAAAAAAAAAAAAAAAAAAAAAAAAAAAAAAAAAAAAAAAAAAAAAAAAAAAAAAAAAAAAAAAAAAAAAAAAAAAAAAAAAAAAAAAAAAAAAAAAAAAAAAAAAAAAAAAAAAAAAAAAAAAAAAAAAAAAAAAAAAAAAAAAAAAAAAAAAAAAAAAAAAAAAAAAAAAAAAAAAAAAAAAAAAAAAAAAAAAAAAAAAAAAAAAAAAAAAAAAAAAAAAAAAAAAAAAAAAAAAAAAAAAAAAAAAAAAAAAAAAAAAAAAAAAAAAAAAAAAAAAAAAAAAAAAAAAAAAAAAAAAAAAAAAAAAAAAAAAAAAAAAAAAAAAAAAAAAAAAAAAAAAAAAAAAAAAAAAAAAAAAAAAAAAAAAAAAAAAAAAAAAAAAAAAAAAAAAAAAAAAAAAAAAAAAAAAAAAAAAAAAAAAAAAAAAAAAAAAAAAAAAAAAAAAAAAAAAAAAAAAAAAAAAAAAAAAAAAAAAAAAAAAAAAAAAAAAAAAAAAAAAAAAAAAAAAAAAAAAAAAAAAAAAAAAAAAAAAAAAAAAAAAAAAAAAAAAAAAAAAAAAAAAAAAAAAAAAAAAAAAAAAAAAAAAAAAAAAAAAAAAAAAAAAAAAAAAAAAAAAAAAAAAAAAAAAAAAAAAAAAAAAAAAAAAAAAAAAAAAAAAAAAAAAAAAAAAAAAAAAAAAAAAAAAAAAAAAAAAAAAAAAAAAAAAAAAAAAAAAAAAAAAAAAAAAAAAAAAAAAAAAAAAAAAAAAAAAAAAA
AAAAAAAAAAAAAAAAAAAAAAAAAAAAAAAAAAAAAAAAAAAAAAAAAAAAAAAAAAAAAAAAAAAAAAAAAAAAAAAAAAAAAAAAAAAAAAAAAAAAAAAAAAAAAAAAAAAAAAAAAAAAAAAAAAAAAAAAAAAAAAAAAAAAAAAAAAAAAAAAAAAAAAAAAAAAAAAAAAAAAAAAAAAAAAAAAAAAAAAAAAAAAAAAAAAAAAAAAAAAAAAAAAAAAAAAAAAAAAAAAAAAAAAAAAAAAAAAAAAAAAAAAAAAAAAAAAAAAAAAAAAAAAAAAAAAAAAAAAAAAAAAAAAAAAAAAAAAAAAAAAAAAAAAAAAAAAAAAAAAAAAAAAAAAAAAAAAAAAAAAAAAAAAAAAAAAAAAAAAAAAAAAAAAAAAAAAAAAAAAAAAAAAAAAAAAAAAAAAAAAAAAAAAAAAAAAAAAAAAAAAAAAAAAAAAAAAAAAAAAAAAAAAAAAAAAAAAAAAAAAAAAAAAAAAAAAAAAAAAAAAAAAAAAAAAAAAAAAAAAAAAAAAAAAAAAAAAAAAAAAAAAAAAAAAAAAAAAAAAAAAAAAAAAAAAAAAAAAAAAAAAAAAAAAAAAAAAAAAAAAAAAAAAAAAAAAAAAAAAAAAAAAAAAAAAAAAAAAAAAAAAAAAAAAAAAAAAAAAAAAAAAAAAAAAAAAAAAAAAAAAAAAAAAAAAAAAAAAAAAAAAAAAAAAAAAAAAAAAAAAAAAAAAAAAAAAAAAAAAAAAAAAAAAAAAAAAAAAAAAAAAAAAAAAAAAAAAAAAAAAAAAAAAAAAAAAAAAAAAAAAAAAAAAAAAAAAAAAAAAAAAAAAAAAAAAAAAAAAAAAAAAAAAAAAAAAAAAAAAAAAAAAAAAAAAAAAAAAAAAAAAAAAAAAAAAAAAAAAAAAAAAAAAAAAAAAAAAAAAAAAAAAAAAAAAAAAAAAAAAAAAAAAAAAAAAAAAAAAAAAAAAAAAAAAAAAAAAAAAAAAAAAAAAAAAAAAAAAAAAAAAAAAAAAAAAAAAAAAAAAAAAAAAAAAAAAAAAAAAAAAAAAAAAAAAAAAAAAAAAAAAAAAAAAAAAAAAAAAAAAAAAAAAAAAAAAAAAAAAAAAAAAAAAAAAAAAAAAAAAAAAAAAAAAAAAAAAAAAAAAAAAAAAAAAAAAAAAAAAAAAAAAAAAAAAAAAAAAAAAAAAAAAAAAAAAAAAAAAAAAAAAAAAAAAAAAAAAAAAAAAAAAAAAAAAAAAAAAAAAAAAAAAAAAAAAAAAAAAAAAAAAAAAAAAAAAAAAAAAAAAAAAAAAAAAAAAAAAAAAAAAAAAAAAAAAAAAAAAAAAAAAAAAAAAAAAAAAAAAAAAAAAAAAAAAAAAAAAAAAAAAAAAAAAAAAAAAAAAAAAAAAAAAAAAAAAAAAAAAAAAAAAAAAAAAAAAAAAAAAAAAAAAAAAAAAAAAAAAAAAAAAAAAAAAAAAAAAAAAAAAAAAAAAAAAAAAAAAAAAAAAAAAAAAAAAAAAAAAAAAAAAAAAAAAAAAAAAAAAAAAAAAAAAAAAAAAAAAAAAAAAAAAAAAAAAAAAAAAAAAAAAAAAAAAAAAAAAAAAAAAAAAAAAAAAAAAAAAAAAAAAAAAAAAAAAAAAAAAAAAAAAAAAAAAAAAAAAAAAAAAAAAAAAAAAAAAAAAAAAAAAAAAAAAAAAAAAAAAAAAAAAAAAAAAAAAAAAAAAAAAAAAAAAAAAAAAAAAAAAAAAAAAAAAAAAAAAAAAAAAAAAAAAAAAAAAAAAAAAAAAAAAAAAAAAAAAAAAAAAAAAAAAAAAAAAAAAAAAAAAAAAAAAAAAAAAAAAAAAAAAAAAAAAAAAAAAAAAAAAAAAAAAAAAAAAAAAAAAAAAAAAAAAAAAAAAAAAAAAAAAAAAAAAAAAAAAAAAAAAAAAAAAAAAAAAAAAAAAAAAAAAAAAAAAAAAAAAAAAAAAAAAAAAAAAAAAAAAAAAAAAAAAAAAAAAAAAAAAAAAAAAAAAAAAAAAAAAAAAAAAAAAAAAAAAAAAAAAAAAAAAAAAAAAAAAAAAAAAAAAAAAAAAAAAAAAAAAAAAAAAAAAAAAAAAAAAAAAAAAAAAAAAAAAAAAAAAAAAAAAAAAAAAAAAAAAAAAAAAAAAAAAAAAAAAAAAAAAAAAAAAAAAAAAAAAAAAAAAAAAAAAAAAAAAAAAAAAAAAAAAAAAAAAAAAAAAAAAAAAAAAAAAAAAAAAAAAAAAAAAAAAAAAAAAAAAAAAAAAAAAAAAAAAAAAAAAAAAAAAAAAAAAAAAAAAAAAAAAAAAAAAAAAAAAAAAAAAAAAAAAAAAAAAAAAAAAAAAAAAAAAAAAAAAAAAAAAAAAAAAAAAAAAAAAAAAAAAAAAAAAAAAAAAAAAAAAAAAAAAAAAAAAAAAAAAAAAAAAAAAAAAAAAAAAAAAAAAAAAAAAAAAAAAAAAAAAAAAAAAAAAAAAAAAAAAAAAAAAAAAAAAAAAAAAAAAAAAAAAAAAAAAAAAAAAAAAAAAAAAAAAAAAAAAAAAAAAAAAAAAAAAAAAAAAAAAAAAAAAAAAAAAAAAAAAAAAAAAAAAAAAAAAAAAAAAAAAAAAAAAAAAAAAAAAAAAAAAAAAAAAAAAAAAAAAAAAAAAAAAAAAAAAAAAAAAAAAAAAAAAAAAAAAAAAAAAAAAAAAAAAAAAAAAAAAAAAAAAAAAAAAAAAAAAAAAAAAAAAAAAAAAAAAAAAAAAAAAAAAAAAAAAAAAAAAAAAAAAAAAAAAAAAAAAAAAAAAAAAAAAAAAAAAAAAAAAAAAAAAAAAAAAAAAAAAAAAAAAAAAAAAAAAAAAAAAAAAAAAAAAAAAAAAAAAAAAAAAAAAAAAAAAAAAAAAAAAAAAAAAAAAAAAAAAAAAAAAAAAAAAAAAAAAAAAAAAAAAAAAAAAAAAAAAAAAAAAAAAAAAAAAAAAAAAAAAAAAAAAAAAAAAAAAAAAAAAAAAAAAAAAAAAAAAAAAAAAAAAAAAAAAAAAAAAAAAAAAAAAAAAAAAAAAAAAAAAAAAAAAAAAAAAAAAAAAAAAAAAAAAAAAAAAAAAAAAAAAAAAAAAAAAAAAAAAAAAAAAAAAAAAAAAAAAAAAAAAAAAAAAAAAAAAAAAAAAAAAAAAAAAAAAAAAAAAAAAAAAAAAAAAAAAAAAAAAAAAAAAAAAAAAAAAAAAAAAAAAAAAAAAAAAAAAAAAAAAAAAAAAAAAAAAAAAAAAAAAAAAAAAAAAAAAAAAAAAAAAAAAAAAAAAAAAAAAAAAAAAAAAAAAAAAAAAAAAAAAAAAAAAAAAAAAAAAAAAAAAAAAAAAAAAAAAAAAAAAAAAAAAAAAAAAAAAAAAAAAAAAAAAAAAAAAAAAAAAAAAAAAAAAAAAAAAAAAAAAAAAAAAAAAAAAAAAAAAAAAAAAAAAAAAAAAAAAAAAAAAAAAAAAAAAAAAAAAAAAAAAAAAAAAAAAAAAAAAAAAAAAAAAAAAAAAAAAAAAAAAAAAAAAAAAAAAAAAAAAAAAAAAAAAAAAAAAAAAAAAAAAAAAAAAAAAAAAAAAAAAAAAAAAAAAAAAAAAAAAAAAAAAAAAAAAAAAAAAAAAAAAAAAAAAAAAAAAAAAAAAAAAAAAAAAAAAAAAAAAAAAAAAAAAAAAAAAAAAAAAAAAAAAAAAAAAAAAAAAAAAAAAAAAAAAAAAAAAAAAAAAAAAAAAAAAAAAAAAAAAAAAAAAAAAAAAAAAAAAAAAAAAAAAAAAAAAAAAAAAAAAAAAAAAAAAAAAAAAAAAAAAAAAAAAAAAAAAAAAAAAAAAAAAAAAAAAAAAAAAAAAAAAAAAAAAAAAAAAAAAAAAAAAAAAAAAAAAAAAAAAAAAAAAAAAAAAAAAAAAAAAAAAAAAAAAAAAAAAAAAAAAAAAAAAAAAAAAAAAAAAAAAAAAAAAAAAAAAAAAAAAAAAAAAAAAAAAAAAAAAAAAAAAAAAAAAAAAAAAAAAAAAAAAAAAAAAAAAAAAAAAAAAAAAAAAAAAAAAAAAAAAAAAAAAAAAAAAAAAAAAAAAAAAAAAAAAAAAAAAAAAAAAAAAAAAAAAAAAAAAAAAAAAAAAAAAAAAAAAAAAAAAAAAAAAAAAAAAAAAAAA
AAAAAAAAAAAAAAAAAAAAAAAAAAAAAAAAAAAAAAAAAAAAAAAAAAAAAAAAAAAAAAAAAAAAAAAAAAAAAAAAAAAAAAAAAAAAAAAAAAAAAAAAAAAAAAAAAAAAAAAAAAAAAAAAAAAAAAAAAAAAAAAAAAAAAAAAAAAAAAAAAAAAAAAAAAAAAAAAAAAAAAAAAAAAAAAAAAAAAAAAAAAAAAAAAAAAAAAAAAAAAAAAAAAAAAAAAAAAAAAAAAAAAAAAAAAAAAAAAAAAAAAAAAAAAAAAAAAAAAAAAAAAAAAAAAAAAAAAAAAAAAAAAAAAAAAAAAAAAAAAAAAAAAAAAAAAAAAAAAAAAAAAAAAAAAAAAAAAAAAAAAAAAAAAAAAAAAAAAAAAAAAAAAAAAAAAAAAAAAAAAAAAAAAAAAAAAAAAAAAAAAAAAAAAAAAAAAAAAAAAAAAAAAAAAAAAAAAAAAAAAAAAAAAAAAAAAAAAAAAAAAAAAAAAAAAAAAAAAAAAAAAAAAAAAAAAAAAAAAAAAAAAAAAAAAAAAAAAAAAAAAAAAAAAAAAAAAAAAAAAAAAAAAAAAAAAAAAAAAAAAAAAAAAAAAAAAAAAAAAAAAAAAAAAAAAAAAAAAAAAAAAAAAAAAAAAAAAAAAAAAAAAAAAAAAAAAAAAAAAAAAAAAAAAAAAAAAAAAAAAAAAAAAAAAAAAAAAAAAAAAAAAAAAAAAAAAAAAAAAAAAAAAAAAAAAAAAAAAAAAAAAAAAAAAAAAAAAAAAAAAAAAAAAAAAAAAAAAAAAAAAAAAAAAAAAAAAAAAAAAAAAAAAAAAAAAAAAAAAAAAAAAAAAAAAAAAAAAAAAAAAAAAAAAAAAAAAAAAAAAAAAAAAAAAAAAAAAAAAAAAAAAAAAAAAAAAAAAAAAAAAAAAAAAAAAAAAAAAAAAAAAAAAAAAAAAAAAAAAAAAAAAAAAAAAAAAAAAAAAAAAAAAAAAAAAAAAAAAAAAAAAAAAAAAAAAAAAAAAAAAAAAAAAAAAAAAAAAAAAAAAAAAAAAAAAAAAAAAAAAAAAAAAAAAAAAAAAAAAAAAAAAAAAAAAAAAAAAAAAAAAAAAAAAAAAAAAAAAAAAAAAAAAAAAAAAAAAAAAAAAAAAAAAAAAAAAAAAAAAAAAAAAAAAAAAAAAAAAAAAAAAAAAAAAAAAAAAAAAAAAAAAAAAAAAAAAAAAAAAAAAAAAAAAAAAAAAAAAAAAAAAAAAAAAAAAAAAAAAAAAAAAAAAAAAAAAAAAAAAAAAAAAAAAAAAAAAAAAAAAAAAAAAAAAAAAAAAAAAAAAAAAAAAAAAAAAAAAAAAAAAAAAAAAAAAAAAAAAAAAAAAAAAAAAAAAAAAAAAAAAAAAAAAAAAAAAAAAAAAAAAAAAAAAAAAAAAAAAAAAAAAAAAAAAAAAAAAAAAAAAAAAAAAAAAAAAAAAAAAAAAAAAAAAAAAAAAAAAAAAAAAAAAAAAAAAAAAAAAAAAAAAAAAAAAAAAAAAAAAAAAAAAAAAAAAAAAAAAAAAAAAAAAAAAAAAAAAAAAAAAAAAAAAAAAAAAAAAAAAAAAAAAAAAAAAAAAAAAAAAAAAAAAAAAAAAAAAAAAAAAAAAAAAAAAAAAAAAAAAAAAAAAAAAAAAAAAAAAAAAAAAAAAAAAAAAAAAAAAAAAAAAAAAAAAAAAAAAAAAAAAAAAAAAAAAAAAAAAAAAAAAAAAAAAAAAAAAAAAAAAAAAAAAAAAAAAAAAAAAAAAAAAAAAAAAAAAAAAAAAAAAAAAAAAAAAAAAAAAAAAAAAAAAAAAAAAAAAAAAAAAAAAAAAAAAAAAAAAAAAAAAAAAAAAAAAAAAAAAAAAAAAAAAAAAAAAAAAAAAAAAAAAAAAAAAAAAAAAAAAAAAAAAAAAAAAAAAAAAAAAAAAAAAAAAAAAAAAAAAAAAAAAAAAAAAAAAAAAAAAAAAAAAAAAAAAAAAAAAAAAAAAAAAAAAAAAAAAAAAAAAAAAAAAAAAAAAAAAAAAAAAAAAAAAAAAAAAAAAAAAAAAAAAAAAAAAAAAAAAAAAAAAAAAAAAAAAAAAAAAAAAAAAAAAAAAAAAAAAAAAAAAAAAAAAAAAAAAAAAAAAAAAAAAAAAAAAAAAAAAAAAAAAAAAAAAAAAAAAAAAAAAAAAAAAAAAAAAAAAAAAAAAAAAAAAAAAAAAAAAAAAAAAAAAAAAAAAAAAAAAAAAAAAAAAAAAAAAAAAAAAAAAAAAAAAAAAAAAAAAAAAAAAAAAAAAAAAAAAAAAAAAAAAAAAAAAAAAAAAAAAAAAAAAAAAAAAAAAAAAAAAAAAAAAAAAAAAAAAAAAAAAAAAAAAAAAAAAAAAAAAAAAAAAAAAAAAAAAAAAAAAAAAAAAAAAAAAAAAAAAAAAAAAAAAAAAAAAAAAAAAAAAAAAAAAAAAAAAAAAAAAAAAAAAAAAAAAAAAAAAAAAAAAAAAAAAAAAAAAAAAAAAAAAAAAAAAAAAAAAAAAAAAAAAAAAAAAAAAAAAAAAAAAAAAAAAAAAAAAAAAAAAAAAAAAAAAAAAAAAAAAAAAAAAAAAAAAAAAAAAAAAAAAAAAAAAAAAAAAAAAAAAAAAAAAAAAAAAAAAAAAAAAAAAAAAAAAAAAAAAAAAAAAAAAAAAAAAAAAAAAAAAAAAAAAAAAAAAAAAAAAAAAAAAAAAAAAAAAAAAAAAAAAAAAAAAAAAAAAAAAAAAAAAAAAAAAAAAAAAAAAAAAAAAAAAAAAAAAAAAAAAAAAAAAAAAAAAAAAAAAAAAAAAAAAAAAAAAAAAAAAAAAAAAAAAAAAAAAAAAAAAAAAAAAAAAAAAAAAAAAAAAAAAAAAAAAAAAAAAAAAAAAAAAAAAAAAAAAAAAAAAAAAAAAAAAAAAAAAAAAAAAAAAAAAAAAAAAAAAAAAAAAAAAAAAAAAAAAAAAAAAAAAAAAAAAAAAAAAAAAAAAAAAAAAAAAAAAAAAAAAAAAAAAAAAAAAAAAAAAAAAAAAAAAAAAAAAAAAAAAAAAAAAAAAAAAAAAAAAAAAAAAAAAAAAAAAAAAAAAAAAAAAAAAAAAAAAAAAAAAAAAAAAAAAAAAAAAAAAAAAAAAAAAAAAAAAAAAAAAAAAAAAAAAAAAAAAAAAAAAAAAAAAAAAAAAAAAAAAAAAAAAAAAAAAAAAAAAAAAAAAAAAAAAAAAAAAAAAAAAAAAAAAAAAAAAAAAAAAAAAAAAAAAAAAAAAAAAAAAAAAAAAAAAAAAAAAAAAAAAAAAAAAAAAAAAAAAAAAAAAAAAAAAAAAAAAAAAAAAAAAAAAAAAAAAAAAAAAAAAAAAAAAAAAAAAAAAAAAAAAAAAAAAAAAAAAAAAAAAAAAAAAAAAAAAAAAAAAAAAAAAAAAAAAAAAAAAAAAAAAAAAAAAAAAAAAAAAAAAAAAAAAAAAAAAAAAAAAAAAAAAAAAAAAAAAAAAAAAAAAAAAAAAAAAAAAAAAAAAAAAAAAAAAAAAAAAAAAAAAAAAAAAAAAAAAAAAAAAAAAAAAAAAAAAAAAAAAAAAAAAAAAAAAAAAAAAAAAAAAAAAAAAAAAAAAAAAAAAAAAAAAAAAAAAAAAAAAAAAAAAAAAAAAAAAAAAAAAAAAAAAAAAAAAAAAAAAAAAAAAAAAAAAAAAAAAAAAAAAAAAAAAAAAAAAAAAAAAAAAAAAAAAAAAAAAAAAAAAAAAAAAAAAAAAAAAAAAAAAAAAAAAAAAAAAAAAAAAAAAAAAAAAAAAAAAAAAAAAAAAAAAAAAAAAAAAAAAAAAAAAAAAAAAAAAAAAAAAAAAAAAAAAAAAAAAAAAAAAAAAAAAAAAAAAAAAAAAAAAAAAAAAAAAAAAAAAAAAAAAAAAAAAAAAAAAAAAAAAAAAAAAAAAAAAAAAAAAAAAAAAAAAAAAAAAAAAAAAAAAAAAAAAAAAAAAAAAAAAAAAAAAAAAAAAAAAAAAAAAAAAAAAAAAAAAAAAAAAAAAAAAAAAAAAAAAAAAAAAAAAAAAAAAAAAAAAAAAAAAAAAAAAAAAAAAAAAAAAAAAAAAAAAAAAAAAAAAAAAAAAAAAAAAAAAAAAAAAAAAAAAAAAAAAAAAAAAAAAAAAAAAAAAAAAAAAAA
AAAAAAAAAAAAAAAAAAAAAAAAAAAAAAAAAAAAAAAAAAAAAAAAAAAAAAAAAAAAAAAAAAAAAAAAAAAAAAAAAAAAAAAAAAAAAAAAAAAAAAAAAAAAAAAAAAAAAAAAAAAAAAAAAAAAAAAAAAAAAAAAAAAAAAAAAAAAAAAAAAAAAAAAAAAAAAAAAAAAAAAAAAAAAAAAAAAAAAAAAAAAAAAAAAAAAAAAAAAAAAAAAAAAAAAAAAAAAAAAAAAAAAAAAAAAAAAAAAAAAAAAAAAAAAAAAAAAAAAAAAAAAAAAAAAAAAAAAAAAAAAAAAAAAAAAAAAAAAAAAAAAAAAAAAAAAAAAAAAAAAAAAAAAAAAAAAAAAAAAAAAAAAAAAAAAAAAAAAAAAAAAAAAAAAAAAAAAAAAAAAAAAAAAAAAAAAAAAAAAAAAAAAAAAAAAAAAAAAAAAAAAAAAAAAAAAAAAAAAAAAAAAAAAAAAAAAAAAAAAAAAAAAAAAAAAAAAAAAAAAAAAAAAAAAAAAAAAAAAAAAAAAAAAAAAAAAAAAAAAAAAAAAAAAAAAAAAAAAAAAAAAAAAAAAAAAAAAAAAAAAAAAAAAAAAAAAAAAAAAAAAAAAAAAAAAAAAAAAAAAAAAAAAAAAAAAAAAAAAAAAAAAAAAAAAAAAAAAAAAAAAAAAAAAAAAAAAAAAAAAAAAAAAAAAAAAAAAAAAAAAAAAAAAAAAAAAAAAAAAAAAAAAAAAAAAAAAAAAAAAAAAAAAAAAAAAAAAAAAAAAAAAAAAAAAAAAAAAAAAAAAAAAAAAAAAAAAAAAAAAAAAAAAAAAAAAAAAAAAAAAAAAAAAAAAAAAAAAAAAAAAAAAAAAAAAAAAAAAAAAAAAAAAAAAAAAAAAAAAAAAAAAAAAAAAAAAAAAAAAAAAAAAAAAAAAAAAAAAAAAAAAAAAAAAAAAAAAAAAAAAAAAAAAAAAAAAAAAAAAAAAAAAAAAAAAAAAAAAAAAAAAAAAAAAAAAAAAAAAAAAAAAAAAAAAAAAAAAAAAAAAAAAAAAAAAAAAAAAAAAAAAAAAAAAAAAAAAAAAAAAAAAAAAAAAAAAAAAAAAAAAAAAAAAAAAAAAAAAAAAAAAAAAAAAAAAAAAAAAAAAAAAAAAAAAAAAAAAAAAAAAAAAAAAAAAAAAAAAAAAAAAAAAAAAAAAAAAAAAAAAAAAAAAAAAAAAAAAAAAAAAAAAAAAAAAAAAAAAAAAAAAAAAAAAAAAAAAAAAAAAAAAAAAAAAAAAAAAAAAAAAAAAAAAAAAAAAAAAAAAAAAAAAAAAAAAAAAAAAAAAAAAAAAAAAAAAAAAAAAAAAAAAAAAAAAAAAAAAAAAAAAAAAAAAAAAAAAAAAAAAAAAAAAAAAAAAAAAAAAAAAAAAAAAAAAAAAAAAAAAAAAAAAAAAAAAAAAAAAAAAAAAAAAAAAAAAAAAAAAAAAAAAAAAAAAAAAAAAAAAAAAAAAAAAAAAAAAAAAAAAAAAAAAAAAAAAAAAAAAAAAAAAAAAAAAAAAAAAAAAAAAAAAAAAAAAAAAAAAAAAAAAAAAAAAAAAAAAAAAAAAAAAAAAAAAAAAAAAAAAAAAAAAAAAAAAAAAAAAAAAAAAAAAAAAAAAAAAAAAAAAAAAAAAAAAAAAAAAAAAAAAAAAAAAAAAAAAAAAAAAAAAAAAAAAAAAAAAAAAAAAAAAAAAAAAAAAAAAAAAAAAAAAAAAAAAAAAAAAAAAAAAAAAAAAAAAAAAAAAAAAAAAAAAAAAAAAAAAAAAAAAAAAAAAAAAAAAAAAAAAAAAAAAAAAAAAAAAAAAAAAAAAAAAAAAAAAAAAAAAAAAAAAAAAAAAAAAAAAAAAAAAAAAAAAAAAAAAAAAAAAAAAAAAAAAAAAAAAAAAAAAAAAAAAAAAAAAAAAAAAAAAAAAAAAAAAAAAAAAAAAAAAAAAAAAAAAAAAAAAAAAAAAAAAAAAAAAAAAAAAAAAAAAAAAAAAAAAAAAAAAAAAAAAAAAAAAAAAAAAAAAAAAAAAAAAAAAAAAAAAAAAAAAAAAAAAAAAAAAAAAAAAAAAAAAAAAAAAAAAAAAAAAAAAAAAAAAAAAAAAAAAAAAAAAAAAAAAAAAAAAAAAAAAAAAAAAAAAAAAAAAAAAAAAAAAAAAAAAAAAAAAAAAAAAAAAAAAAAAAAAAAAAAAAAAAAAAAAAAAAAAAAAAAAAAAAAAAAAAAAAAAAAAAAAAAAAAAAAAAAAAAAAAAAAAAAAAAAAAAAAAAAAAAAAAAAAAAAAAAAAAAAAAAAAAAAAAAAAAAAAAAAAAAAAAAAAAAAAAAAAAAAAAAAAAAAAAAAAAAAAAAAAAAAAAAAAAAAAAAAAAAAAAAAAAAAAAAAAAAAAAAAAAAAAAAAAAAAAAAAAAAAAAAAAAAAAAAAAAAAAAAAAAAAAAAAAAAAAAAAAAAAAAAAAAAAAAAAAAAAAAAAAAAAAAAAAAAAAAAAAAAAAAAAAAAAAAAAAAAAAAAAAAAAAAAAAAAAAAAAAAAAAAAAAAAAAAAAAAAAAAAAAAAAAAAAAAAAAAAAAAAAAAAAAAAAAAAAAAAAAAAAAAAAAAAAAAAAAAAAAAAAAAAAAAAAAAAAAAAAAAAAAAAAAAAAAAAAAAAAAAAAAAAAAAAAAAAAAAAAAAAAAAAAAAAAAAAAAAAAAAAAAAAAAAAAAAAAAAAAAAAAAAAAAAAAAAAAAAAAAAAAAAAAAAAAAAAAAAAAAAAAAAAAAAAAAAAAAAAAAAAAAAAAAAAAAAAAAAAAAAAAAAAAAAAAAAAAAAAAAAAAAAAAAAAAAAAAAAAAAAAAAAAAAAAAAAAAAAAAAAAAAAAAAAAAAAAAAAAAAAAAAAAAAAAAAAAAAAAAAAAAAAAAAAAAAAAAAAAAAAAAAAAAAAAAAAAAAAAAAAAAAAAAAAAAAAAAAAAAAAAAAAAAAAAAAAAAAAAAAAAAAAAAAAAAAAAAAAAAAAAAAAAAAAAAAAAAAAAAAAAAAAAAAAAAAAAAAAAAAAAAAAAAAAAAAAAAAAAAAAAAAAAAAAAAAAAAAAAAAAAAAAAAAAAAAAAAAAAAAAAAAAAAAAAAAAAAAAAAAAAAAAAAAAAAAAAAAAAAAAAAAAAAAAAAAAAAAAAAAAAAAAAAAAAAAAAAAAAAAAAAAAAAAAAAAAAAAAAAAAAAAAAAAAAAAAAAAAAAAAAAAAAAAAAAAAAAAAAAAAAAAAAAAAAAAAAAAAAAAAAAAAAAAAAAAAAAAAAAAAAAAAAAAAAAAAAAAAAAAAAAAAAAAAAAAAAAAAAAAAAAAAAAAAAAAAAAAAAAAAAAAAAAAAAAAAAAAAAAAAAAAAAAAAAAAAAAAAAAAAAAAAAAAAAAAAAAAAAAAAAAAAAAAAAAAAAAAAAAAAAAAAAAAAAAAAAAAAAAAAAAAAAAAAAAAAAAAAAAAAAAAAAAAAAAAAAAAAAAAAAAAAAAAAAAAAAAAAAAAAAAAAAAAAAAAAAAAAAAAAAAAAAAAAAAAAAAAAAAAAAAAAAAAAAAAAAAAAAAAAAAAAAAAAAAAAAAAAAAAAAAAAAAAAAAAAAAAAAAAAAAAAAAAAAAAAAAAAAAAAAAAAAAAAAAAAAAAAAAAAAAAAAAAAAAAAAAAAAAAAAAAAAAAAAAAAAAAAAAAAAAAAAAAAAAAAAAAAAAAAAAAAAAAAAAAAAAAAAAAAAAAAAAAAAAAAAAAAAAAAAAAAAAAAAAAAAAAAAAAAAAAAAAAAAAAAAAAAAAAAAAAAAAAAAAAAAAAAAAAAAAAAAAAAAAAAAAAAAAAAAAAAAAAAAAAAAAAAAAAAAAAAAAAAAAAAAAAAAAAAAAAAAAAAAAAAAAAAAAAAAAAAAAAAAAAAAAAAAAAAAAAAAAAAAAAAAAAAAAAAAAAAAAAAAAAAAAAAAAAAAAAAAAAAAAAAAAAAAAAAAAAAAAAAAAAAAAAAAAAAAAAAAAAAAAAAAAAAAAAAAAAAAAAAAAAAAAAAAAAAAAAAAAAAAAAAAAAAAAAAAAAAAAAAAAAAAAAAAAAAAAAAAAAAAAAAAAAAAAAAAAAAAAAAAAAAAAAAAAAAAAAAAAAAAAAAAAAAAAAAAAAAAAAAAAAA
AAAAAAAAAAAAAAAAAAAAAAAAAAAAAAAAAAAAAAAAAAAAAAAAAAAAAAAAAAAAAAAAAAAAAAAAAAAAAAAAAAAAAAAAAAAAAAAAAAAAAAAAAAAAAAAAAAAAAAAAAAAAAAAAAAAAAAAAAAAAAAAAAAAAAAAAAAAAAAAAAAAAAAAAAAAAAAAAAAAAAAAAAAAAAAAAAAAAAAAAAAAAAAAAAAAAAAAAAAAAAAAAAAAAAAAAAAAAAAAAAAAAAAAAAAAAAAAAAAAAAAAAAAAAAAAAAAAAAAAAAAAAAAAAAAAAAAAAAAAAAAAAAAAAAAAAAAAAAAAAAAAAAAAAAAAAAAAAAAAAAAAAAAAAAAAAAAAAAAAAAAAAAAAAAAAAAAAAAAAAAAAAAAAAAAAAAAAAAAAAAAAAAAAAAAAAAAAAAAAAAAAAAAAAAAAAAAAAAAAAAAAAAAAAAAAAAAAAAAAAAAAAAAAAAAAAAAAAAAAAAAAAAAAAAAAAAAAAAAAAAAAAAAAAAAAAAAAAAAAAAAAAAAAAAAAAAAAAAAAAAAAAAAAAAAAAAAAAAAAAAAAAAAAAAAAAAAAAAAAAAAAAAAAAAAAAAAAAAAAAAAAAAAAAAAAAAAAAAAAAAAAAAAAAAAAAAAAAAAAAAAAAAAAAAAAAAAAAAAAAAAAAAAAAAAAAAAAAAAAAAAAAAAAAAAAAAAAAAAAAAAAAAAAAAAAAAAAAAAAAAAAAAAAAAAAAAAAAAAAAAAAAAAAAAAAAAAAAAAAAAAAAAAAAAAAAAAAAAAAAAAAAAAAAAAAAAAAAAAAAAAAAAAAAAAAAAAAAAAAAAAAAAAAAAAAAAAAAAAAAAAAAAAAAAAAAAAAAAAAAAAAAAAAAAAAAAAAAAAAAAAAAAAAAAAAAAAAAAAAAAAAAAAAAAAAAAAAAAAAAAAAAAAAAAAAAAAAAAAAAAAAAAAAAAAAAAAAAAAAAAAAAAAAAAAAAAAAAAAAAAAAAAAAAAAAAAAAAAAAAAAAAAAAAAAAAAAAAAAAAAAAAAAAAAAAAAAAAAAAAAAAAAAAAAAAAAAAAAAAAAAAAAAAAAAAAAAAAAAAAAAAAAAAAAAAAAAAAAAAAAAAAAAAAAAAAAAAAAAAAAAAAAAAAAAAAAAAAAAAAAAAAAAAAAAAAAAAAAAAAAAAAAAAAAAAAAAAAAAAAAAAAAAAAAAAAAAAAAAAAAAAAAAAAAAAAAAAAAAAAAAAAAAAAAAAAAAAAAAAAAAAAAAAAAAAAAAAAAAAAAAAAAAAAAAAAAAAAAAAAAAAAAAAAAAAAAAAAAAAAAAAAAAAAAAAAAAAAAAAAAAAAAAAAAAAAAAAAAAAAAAAAAAAAAAAAAAAAAAAAAAAAAAAAAAAAAAAAAAAAAAAAAAAAAAAAAAAAAAAAAAAAAAAAAAAAAAAAAAAAAAAAAAAAAAAAAAAAAAAAAAAAAAAAAAAAAAAAAAAAAAAAAAAAAAAAAAAAAAAAAAAAAAAAAAAAAAAAAAAAAAAAAAAAAAAAAAAAAAAAAAAAAAAAAAAAAAAAAAAAAAAAAAAAAAAAAAAAAAAAAAAAAAAAAAAAAAAAAAAAAAAAAAAAAAAAAAAAAAAAAAAAAAAAAAAAAAAAAAAAAAAAAAAAAAAAAAAAAAAAAAAAAAAAAAAAAAAAAAAAAAAAAAAAAAAAAAAAAAAAAAAAAAAAAAAAAAAAAAAAAAAAAAAAAAAAAAAAAAAAAAAAAAAAAAAAAAAAAAAAAAAAAAAAAAAAAAAAAAAAAAAAAAAAAAAAAAAAAAAAAAAAAAAAAAAAAAAAAAAAAAAAAAAAAAAAAAAAAAAAAAAAAAAAAAAAAAAAAAAAAAAAAAAAAAAAAAAAAAAAAAAAAAAAAAAAAAAAAAAAAAAAAAAAAAAAAAAAAAAAAAAAAAAAAAAAAAAAAAAAAAAAAAAAAAAAAAAAAAAAAAAAAAAAAAAAAAAAAAAAAAAAAAAAAAAAAAAAAAAAAAAAAAAAAAAAAAAAAAAAAAAAAAAAAAAAAAAAAAAAAAAAAAAAAAAAAAAAAAAAAAAAAAAAAAAAAAAAAAAAAAAAAAAAAAAAAAAAAAAAAAAAAAAAAAAAAAAAAAAAAAAAAAAAAAAAAAAAAAAAAAAAAAAAAAAAAAAAAAAAAAAAAAAAAAAAAAAAAAAAAAAAAAAAAAAAAAAAAAAAAAAAAAAAAAAAAAAAAAAAAAAAAAAAAAAAAAAAAAAAAAAAAAAAAAAAAAAAAAAAAAAAAAAAAAAAAAAAAAAAAAAAAAAAAAAAAAAAAAAAAAAAAAAAAAAAAAAAAAAAAAAAAAAAAAAAAAAAAAAAAAAAAAAAAAAAAAAAAAAAAAAAAAAAAAAAAAAAAAAAAAAAAAAAAAAAAAAAAAAAAAAAAAAAAAAAAAAAAAAAAAAAAAAAAAAAAAAAAAAAAAAAAAAAAAAAAAAAAAAAAAAAAAAAAAAAAAAAAAAAAAAAAAAAAAAAAAAAAAAAAAAAAAAAAAAAAAAAAAAAAAAAAAAAAAAAAAAAAAAAAAAAAAAAAAAAAAAAAAAAAAAAAAAAAAAAAAAAAAAAAAAAAAAAAAAAAAAAAAAAAAAAAAAAAAAAAAAAAAAAAAAAAAAAAAAAAAAAAAAAAAAAAAAAAAAAAAAAAAAAAAAAAAAAAAAAAAAAAAAAAAAAAAAAAAAAAAAAAAAAAAAAAAAAAAAAAAAAAAAAAAAAAAAAAAAAAAAAAAAAAAAAAAAAAAAAAAAAAAAAAAAAAAAAAAAAAAAAAAAAAAAAAAAAAAAAAAAAAAAAAAAAAAAAAAAAAAAAAAAAAAAAAAAAAAAAAAAAAAAAAAAAAAAAAAAAAAAAAAAAAAAAAAAAAAAAAAAAAAAAAAAAAAAAAAAAAAAAAAAAAAAAAAAAAAAAAAAAAAAAAAAAAAAAAAAAAAAAAAAAAAAAAAAAAAAAAAAAAAAAAAAAAAAAAAAAAAAAAAAAAAAAAAAAAAAAAAAAAAAAAAAAAAAAAAAAAAAAAAAAAAAAAAAAAAAAAAAAAAAAAAAAAAAAAAAAAAAAAAAAAAAAAAAAAAAAAAAAAAAAAAAAAAAAAAAAAAAAAAAAAAAAAAAAAAAAAAAAAAAAAAAAAAAAAAAAAAAAAAAAAAAAAAAAAAAAAAAAAAAAAAAAAAAAAAAAAAAAAAAAAAAAAAAAAAAAAAAAAAAAAAAAAAAAAAAAAAAAAAAAAAAAAAAAAAAAAAAAAAAAAAAAAAAAAAAAAAAAAAAAAAAAAAAAAAAAAAAAAAAAAAAAAAAAAAAAAAAAAAAAAAAAAAAAAAAAAAAAAAAAAAAAAAAAAAAAAAAAAAAAAAAAAAAAAAAAAAAAAAAAAAAAAAAAAAAAAAAAAAAAAAAAAAAAAAAAAAAAAAAAAAAAAAAAAAAAAAAAAAAAAAAAAAAAAAAAAAAAAAAAAAAAAAAAAAAAAAAAAAAAAAAAAAAAAAAAAAAAAAAAAAAAAAAAAAAAAAAAAAAAAAAAAAAAAAAAAAAAAAAAAAAAAAAAAAAAAAAAAAAAAAAAAAAAAAAAAAAAAAAAAAAAAAAAAAAAAAAAAAAAAAAAAAAAAAAAAAAAAAAAAAAAAAAAAAAAAAAAAAAAAAAAAAAAAAAAAAAAAAAAAAAAAAAAAAAAAAAAAAAAAAAAAAAAAAAAAAAAAAAAAAAAAAAAAAAAAAAAAAAAAAAAAAAAAAAAAAAAAAAAAAAAAAAAAAAAAAAAAAAAAAAAAAAAAAAAAAAAAAAAAAAAAAAAAAAAAAAAAAAAAAAAAAAAAAAAAAAAAAAAAAAAAAAAAAAAAAAAAAAAAAAAAAAAAAAAAAAAAAAAAAAAAAAAAAAAAAAAAAAAAAAAAAAAAAAAAAAAAAAAAAAAAAAAAAAAAAAAAAAAAAAAAAAAAAAAAAAAAAAAAAAAAAAAAAAAAAAAAAAAAAAAAAAAAAAAAAAAAAAAAAAAAAAAAAAAAAAAAAAAAAAAAAAAAAAAAAAAAAAAAAAAAAAAAAAAAAAAAAAAAAAAAAAAAAAAAAAAAAAAAAAAAAAAAAAAAAAAAAAAAAAAAAAAAAAAAAAAAAAAAAAAAAAAAAAAAAAAAAAAAAAAAAAAAAAAAAAA
AAAAAAAAAAAAAAAAAAAAAAAAAAAAAAAAAAAAAAAAAAAAAAAAAAAAAAAAAAAAAAAAAAAAAAAAAAAAAAAAAAAAAAAAAAAAAAAAAAAAAAAAAAAAAAAAAAAAAAAAAAAAAAAAAAAAAAAAAAAAAAAAAAAAAAAAAAAAAAAAAAAAAAAAAAAAAAAAAAAAAAAAAAAAAAAAAAAAAAAAAAAAAAAAAAAAAAAAAAAAAAAAAAAAAAAAAAAAAAAAAAAAAAAAAAAAAAAAAAAAAAAAAAAAAAAAAAAAAAAAAAAAAAAAAAAAAAAAAAAAAAAAAAAAAAAAAAAAAAAAAAAAAAAAAAAAAAAAAAAAAAAAAAAAAAAAAAAAAAAAAAAAAAAAAAAAAAAAAAAAAAAAAAAAAAAAAAAAAAAAAAAAAAAAAAAAAAAAAAAAAAAAAAAAAAAAAAAAAAAAAAAAAAAAAAAAAAAAAAAAAAAAAAAAAAAAAAAAAAAAAAAAAAAAAAAAAAAAAAAAAAAAAAAAAAAAAAAAAAAAAAAAAAAAAAAAAAAAAAAAAAAAAAAAAAAAAAAAAAAAAAAAAAAAAAAAAAAAAAAAAAAAAAAAAAAAAAAAAAAAAAAAAAAAAAAAAAAAAAAAAAAAAAAAAAAAAAAAAAAAAAAAAAAAAAAAAAAAAAAAAAAAAAAAAAAAAAAAAAAAAAAAAAAAAAAAAAAAAAAAAAAAAAAAAAAAAAAAAAAAAAAAAAAAAAAAAAAAAAAAAAAAAAAAAAAAAAAAAAAAAAAAAAAAAAAAAAAAAAAAAAAAAAAAAAAAAAAAAAAAAAAAAAAAAAAAAAAAAAAAAAAAAAAAAAAAAAAAAAAAAAAAAAAAAAAAAAAAAAAAAAAAAAAAAAAAAAAAAAAAAAAAAAAAAAAAAAAAAAAAAAAAAAAAAAAAAAAAAAAAAAAAAAAAAAAAAAAAAAAAAAAAAAAAAAAAAAAAAAAAAAAAAAAAAAAAAAAAAAAAAAAAAAAAAAAAAAAAAAAAAAAAAAAAAAAAAAAAAAAAAAAAAAAAAAAAAAAAAAAAAAAAAAAAAAAAAAAAAAAAAAAAAAAAAAAAAAAAAAAAAAAAAAAAAAAAAAAAAAAAAAAAAAAAAAAAAAAAAAAAAAAAAAAAAAAAAAAAAAAAAAAAAAAAAAAAAAAAAAAAAAAAAAAAAAAAAAAAAAAAAAAAAAAAAAAAAAAAAAAAAAAAAAAAAAAAAAAAAAAAAAAAAAAAAAAAAAAAAAAAAAAAAAAAAAAAAAAAAAAAAAAAAAAAAAAAAAAAAAAAAAAAAAAAAAAAAAAAAAAAAAAAAAAAAAAAAAAAAAAAAAAAAAAAAAAAAAAAAAAAAAAAAAAAAAAAAAAAAAAAAAAAAAAAAAAAAAAAAAAAAAAAAAAAAAAAAAAAAAAAAAAAAAAAAAAAAAAAAAAAAAAAAAAAAAAAAAAAAAAAAAAAAAAAAAAAAAAAAAAAAAAAAAAAAAAAAAAAAAAAAAAAAAAAAAAAAAAAAAAAAAAAAAAAAAAAAAAAAAAAAAAAAAAAAAAAAAAAAAAAAAAAAAAAAAAAAAAAAAAAAAAAAAAAAAAAAAAAAAAAAAAAAAAAAAAAAAAAAAAAAAAAAAAAAAAAAAAAAAAAAAAAAAAAAAAAAAAAAAAAAAAAAAAAAAAAAAAAAAAAAAAAAAAAAAAAAAAAAAAAAAAAAAAAAAAAAAAAAAAAAAAAAAAAAAAAAAAAAAAAAAAAAAAAAAAAAAAAAAAAAAAAAAAAAAAAAAAAAAAAAAAAAAAAAAAAAAAAAAAAAAAAAAAAAAAAAAAAAAAAAAAAAAAAAAAAAAAAAAAAAAAAAAAAAAAAAAAAAAAAAAAAAAAAAAAAAAAAAAAAAAAAAAAAAAAAAAAAAAAAAAAAAAAAAAAAAAAAAAAAAAAAAAAAAAAAAAAAAAAAAAAAAAAAAAAAAAAAAAAAAAAAAAAAAAAAAAAAAAAAAAAAAAAAAAAAAAAAAAAAAAAAAAAAAAAAAAAAAAAAAAAAAAAAAAAAAAAAAAAAAAAAAAAAAAAAAAAAAAAAAAAAAAAAAAAAAAAAAAAAAAAAAAAAAAAAAAAAAAAAAAAAAAAAAAAAAAAAAAAAAAAAAAAAAAAAAAAAAAAAAAAAAAAAAAAAAAAAAAAAAAAAAAAAAAAAAAAAAAAAAAAAAAAAAAAAAAAAAAAAAAAAAAAAAAAAAAAAAAAAAAAAAAAAAAAAAAAAAAAAAAAAAAAAAAAAAAAAAAAAAAAAAAAAAAAAAAAAAAAAAAAAAAAAAAAAAAAAAAAAAAAAAAAAAAAAAAAAAAAAAAAAAAAAAAAAAAAAAAAAAAAAAAAAAAAAAAAAAAAAAAAAAAAAAAAAAAAAAAAAAAAAAAAAAAAAAAAAAAAAAAAAAAAAAAAAAAAAAAAAAAAAAAAAAAAAAAAAAAAAAAAAAAAAAAAAAAAAAAAAAAAAAAAAAAAAAAAAAAAAAAAAAAAAAAAAAAAAAAAAAAAAAAAAAAAAAAAAAAAAAAAAAAAAAAAAAAAAAAAAAAAAAAAAAAAAAAAAAAAAAAAAAAAAAAAAAAAAAAAAAAAAAAAAAAAAAAAAAAAAAAAAAAAAAAAAAAAAAAAAAAAAAAAAAAAAAAAAAAAAAAAAAAAAAAAAAAAAAAAAAAAAAAAAAAAAAAAAAAAAAAAAAAAAAAAAAAAAAAAAAAAAAAAAAAAAAAAAAAAAAAAAAAAAAAAAAAAAAAAAAAAAAAAAAAAAAAAAAAAAAAAAAAAAAAAAAAAAAAAAAAAAAAAAAAAAAAAAAAAAAAAAAAAAAAAAAAAAAAAAAAAAAAAAAAAAAAAAAAAAAAAAAAAAAAAAAAAAAAAAAAAAAAAAAAAAAAAAAAAAAAAAAAAAAAAAAAAAAAAAAAAAAAAAAAAAAAAAAAAAAAAAAAAAAAAAAAAAAAAAAAAAAAAAAAAAAAAAAAAAAAAAAAAAAAAAAAAAAAAAAAAAAAAAAAAAAAAAAAAAAAAAAAAAAAAAAAAAAAAAAAAAAAAAAAAAAAAAAAAAAAAAAAAAAAAAAAAAAAAAAAAAAAAAAAAAAAAAAAAAAAAAAAAAAAAAAAAAAAAAAAAAAAAAAAAAAAAAAAAAAAAAAAAAAAAAAAAAAAAAAAAAAAAAAAAAAAAAAAAAAAAAAAAAAAAAAAAAAAAAAAAAAAAAAAAAAAAAAAAAAAAAAAAAAAAAAAAAAAAAAAAAAAAAAAAAAAAAAAAAAAAAAAAAAAAAAAAAAAAAAAAAAAAAAAAAAAAAAAAAAAAAAAAAAAAAAAAAAAAAAAAAAAAAAAAAAAAAAAAAAAAAAAAAAAAAAAAAAAAAAAAAAAAAAAAAAAAAAAAAAAAAAAAAAAAAAAAAAAAAAAAAAAAAAAAAAAAAAAAAAAAAAAAAAAAAAAAAAAAAAAAAAAAAAAAAAAAAAAAAAAAAAAAAAAAAAAAAAAAAAAAAAAAAAAAAAAAAAAAAAAAAAAAAAAAAAAAAAAAAAAAAAAAAAAAAAAAAAAAAAAAAAAAAAAAAAAAAAAAAAAAAAAAAAAAAAAAAAAAAAAAAAAAAAAAAAAAAAAAAAAAAAAAAAAAAAAAAAAAAAAAAAAAAAAAAAAAAAAAAAAAAAAAAAAAAAAAAAAAAAAAAAAAAAAAAAAAAAAAAAAAAAAAAAAAAAAAAAAAAAAAAAAAAAAAAAAAAAAAAAAAAAAAAAAAAAAAAAAAAAAAAAAAAAAAAAAAAAAAAAAAAAAAAAAAAAAAAAAAAAAAAAAAAAAAAAAAAAAAAAAAAAAAAAAAAAAAAAAAAAAAAAAAAAAAAAAAAAAAAAAAAAAAAAAAAAAAAAAAAAAAAAAAAAAAAAAAAAAAAAAAAAAAAAAAAAAAAAAAAAAAAAAAAAAAAAAAAAAAAAAAAAAAAAAAAAAAAAAAAAAAAAAAAAAAAAAAAAAAAAAAAAAAAAAAAAAAAAAAAAAAAAAAAAAAAAAAAAAAAAAAAAAAAAAAAAAAAAAAAAAAAAAAAAAAAAAAAAAAAAAAAAAAAAAAAAAAAAAAAAAAAAAAAAAAAAAAAAAAAAAAAAAAAAAAAAAAAAAAAAAAAAAAAAAAAAAAAAAAAAAAAAAAAAAAAAAAA
AAAAAAAAAAAAAAAAAAAAAAAAAAAAAAAAAAAAAAAAAAAAAAAAAAAAAAAAAAAAAAAAAAAAAAAAAAAAAAAAAAAAAAAAAAAAAAAAAAAAAAAAAAAAAAAAAAAAAAAAAAAAAAAAAAAAAAAAAAAAAAAAAAAAAAAAAAAAAAAAAAAAAAAAAAAAAAAAAAAAAAAAAAAAAAAAAAAAAAAAAAAAAAAAAAAAAAAAAAAAAAAAAAAAAAAAAAAAAAAAAAAAAAAAAAAAAAAAAAAAAAAAAAAAAAAAAAAAAAAAAAAAAAAAAAAAAAAAAAAAAAAAAAAAAAAAAAAAAAAAAAAAAAAAAAAAAAAAAAAAAAAAAAAAAAAAAAAAAAAAAAAAAAAAAAAAAAAAAAAAAAAAAAAAAAAAAAAAAAAAAAAAAAAAAAAAAAAAAAAAAAAAAAAAAAAAAAAAAAAAAAAAAAAAAAAAAAAAAAAAAAAAAAAAAAAAAAAAAAAAAAAAAAAAAAAAAAAAAAAAAAAAAAAAAAAAAAAAAAAAAAAAAAAAAAAAAAAAAAAAAAAAAAAAAAAAAAAAAAAAAAAAAAAAAAAAAAAAAAAAAAAAAAAAAAAAAAAAAAAAAAAAAAAAAAAAAAAAAAAAAAAAAAAAAAAAAAAAAAAAAAAAAAAAAAAAAAAAAAAAAAAAAAAAAAAAAAAAAAAAAAAAAAAAAAAAAAAAAAAAAAAAAAAAAAAAAAAAAAAAAAAAAAAAAAAAAAAAAAAAAAAAAAAAAAAAAAAAAAAAAAAAAAAAAAAAAAAAAAAAAAAAAAAAAAAAAAAAAAAAAAAAAAAAAAAAAAAAAAAAAAAAAAAAAAAAAAAAAAAAAAAAAAAAAAAAAAAAAAAAAAAAAAAAAAAAAAAAAAAAAAAAAAAAAAAAAAAAAAAAAAAAAAAAAAAAAAAAAAAAAAAAAAAAAAAAAAAAAAAAAAAAAAAAAAAAAAAAAAAAAAAAAAAAAAAAAAAAAAAAAAAAAAAAAAAAAAAAAAAAAAAAAAAAAAAAAAAAAAAAAAAAAAAAAAAAAAAAAAAAAAAAAAAAAAAAAAAAAAAAAAAAAAAAAAAAAAAAAAAAAAAAAAAAAAAAAAAAAAAAAAAAAAAAAAAAAAAAAAAAAAAAAAAAAAAAAAAAAAAAAAAAAAAAAAAAAAAAAAAAAAAAAAAAAAAAAAAAAAAAAAAAAAAAAAAAAAAAAAAAAAAAAAAAAAAAAAAAAAAAAAAAAAAAAAAAAAAAAAAAAAAAAAAAAAAAAAAAAAAAAAAAAAAAAAAAAAAAAAAAAAAAAAAAAAAAAAAAAAAAAAAAAAAAAAAAAAAAAAAAAAAAAAAAAAAAAAAAAAAAAAAAAAAAAAAAAAAAAAAAAAAAAAAAAAAAAAAAAAAAAAAAAAAAAAAAAAAAAAAAAAAAAAAAAAAAAAAAAAAAAAAAAAAAAAAAAAAAAAAAAAAAAAAAAAAAAAAAAAAAAAAAAAAAAAAAAAAAAAAAAAAAAAAAAAAAAAAAAAAAAAAAAAAAAAAAAAAAAAAAAAAAAAAAAAAAAAAAAAAAAAAAAAAAAAAAAAAAAAAAAAAAAAAAAAAAAAAAAAAAAAAAAAAAAAAAAAAAAAAAAAAAAAAAAAAAAAAAAAAAAAAAAAAAAAAAAAAAAAAAAAAAAAAAAAAAAAAAAAAAAAAAAAAAAAAAAAAAAAAAAAAAAAAAAAAAAAAAAAAAAAAAAAAAAAAAAAAAAAAAAAAAAAAAAAAAAAAAAAAAAAAAAAAAAAAAAAAAAAAAAAAAAAAAAAAAAAAAAAAAAAAAAAAAAAAAAAAAAAAAAAAAAAAAAAAAAAAAAAAAAAAAAAAAAAAAAAAAAAAAAAAAAAAAAAAAAAAAAAAAAAAAAAAAAAAAAAAAAAAAAAAAAAAAAAAAAAAAAAAAAAAAAAAAAAAAAAAAAAAAAAAAAAAAAAAAAAAAAAAAAAAAAAAAAAAAAAAAAAAAAAAAAAAAAAAAAAAAAAAAAAAAAAAAAAAAAAAAAAAAAAAAAAAAAAAAAAAAAAAAAAAAAAAAAAAAAAAAAAAAAAAAAAAAAAAAAAAAAAAAAAAAAAAAAAAAAAAAAAAAAAAAAAAAAAAAAAAAAAAAAAAAAAAAAAAAAAAAAAAAAAAAAAAAAAAAAAAAAAAAAAAAAAAAAAAAAAAAAAAAAAAAAAAAAAAAAAAAAAAAAAAAAAAAAAAAAAAAAAAAAAAAAAAAAAAAAAAAAAAAAAAAAAAAAAAAAAAAAAAAAAAAAAAAAAAAAAAAAAAAAAAAAAAAAAAAAAAAAAAAAAAAAAAAAAAAAAAAAAAAAAAAAAAAAAAAAAAAAAAAAAAAAAAAAAAAAAAAAAAAAAAAAAAAAAAAAAAAAAAAAAAAAAAAAAAAAAAAAAAAAAAAAAAAAAAAAAAAAAAAAAAAAAAAAAAAAAAAAAAAAAAAAAAAAAAAAAAAAAAAAAAAAAAAAAAAAAAAAAAAAAAAAAAAAAAAAAAAAAAAAAAAAAAAAAAAAAAAAAAAAAAAAAAAAAAAAAAAAAAAAAAAAAAAAAAAAAAAAAAAAAAAAAAAAAAAAAAAAAAAAAAAAAAAAAAAAAAAAAAAAAAAAAAAAAAAAAAAAAAAAAAAAAAAAAAAAAAAAAAAAAAAAAAAAAAAAAAAAAAAAAAAAAAAAAAAAAAAAAAAAAAAAAAAAAAAAAAAAAAAAAAAAAAAAAAAAAAAAAAAAAAAAAAAAAAAAAAAAAAAAAAAAAAAAAAAAAAAAAAAAAAAAAAAAAAAAAAAAAAAAAAAAAAAAAAAAAAAAAAAAAAAAAAAAAAAAAAAAAAAAAAAAAAAAAAAAAAAAAAAAAAAAAAAAAAAAAAAAAAAAAAAAAAAAAAAAAAAAAAAAAAAAAAAAAAAAAAAAAAAAAAAAAAAAAAAAAAAAAAAAAAAAAAAAAAAAAAAAAAAAAAAAAAAAAAAAAAAAAAAAAAAAAAAAAAAAAAAAAAAAAAAAAAAAAAAAAAAAAAAAAAAAAAAAAAAAAAAAAAAAAAAAAAAAAAAAAAAAAAAAAAAAAAAAAAAAAAAAAAAAAAAAAAAAAAAAAAAAAAAAAAAAAAAAAAAAAAAAAAAAAAAAAAAAAAAAAAAAAAAAAAAAAAAAAAAAAAAAAAAAAAAAAAAAAAAAAAAAAAAAAAAAAAAAAAAAAAAAAAAAAAAAAAAAAAAAAAAAAAAAAAAAAAAAAAAAAAAAAAAAAAAAAAAAAAAAAAAAAAAAAAAAAAAAAAAAAAAAAAAAAAAAAAAAAAAAAAAAAAAAAAAAAAAAAAAAAAAAAAAAAAAAAAAAAAAAAAAAAAAAAAAAAAAAAAAAAAAAAAAAAAAAAAAAAAAAAAAAAAAAAAAAAAAAAAAAAAAAAAAAAAAAAAAAAAAAAAAAAAAAAAAAAAAAAAAAAAAAAAAAAAAAAAAAAAAAAAAAAAAAAAAAAAAAAAAAAAAAAAAAAAAAAAAAAAAAAAAAAAAAAAAAAAAAAAAAAAAAAAAAAAAAAAAAAAAAAAAAAAAAAAAAAAAAAAAAAAAAAAAAAAAAAAAAAAAAAAAAAAAAAAAAAAAAAAAAAAAAAAAAAAAAAAAAAAAAAAAAAAAAAAAAAAAAAAAAAAAAAAAAAAAAAAAAAAAAAAAAAAAAAAAAAAAAAAAAAAAAAAAAAAAAAAAAAAAAAAAAAAAAAAAAAAAAAAAAAAAAAAAAAAAAAAAAAAAAAAAAAAAAAAAAAAAAAAAAAAAAAAAAAAAAAAAAAAAAAAAAAAAAAAAAAAAAAAAAAAAAAAAAAAAAAAAAAAAAAAAAAAAAAAAAAAAAAAAAAAAAAAAAAAAAAAAAAAAAAAAAAAAAAAAAAAAAAAAAAAAAAAAAAAAAAAAAAAAAAAAAAAAAAAAAAAAAAAAAAAAAAAAAAAAAAAAAAAAAAAAAAAAAAAAAAAAAAAAAAAAAAAAAAAAAAAAAAAAAAAAAAAAAAAAAAAAAAAAAAAAAAAAAAAAAAAAAAAAAAAAAAAAAAAAAAAAAAAAAAAAAAAAAAAAAAAAAAAAAAAAAAAAAAAAAAAAAAAAAAAAAAAAAAAAAAAAAAAAAAAAAAAAAAAAAAAAAAAAAAAAAAAAAAAAAAAAAAAAAAAA
AAAAAAAAAAAAAAAAAAAAAAAAAAAAAAAAAAAAAAAAAAAAAAAAAAAAAAAAAAAAAAAAAAAAAAAAAAAAAAAAAAAAAAAAAAAAAAAAAAAAAAAAAAAAAAAAAAAAAAAAAAAAAAAAAAAAAAAAAAAAAAAAAAAAAAAAAAAAAAAAAAAAAAAAAAAAAAAAAAAAAAAAAAAAAAAAAAAAAAAAAAAAAAAAAAAAAAAAAAAAAAAAAAAAAAAAAAAAAAAAAAAAAAAAAAAAAAAAAAAAAAAAAAAAAAAAAAAAAAAAAAAAAAAAAAAAAAAAAAAAAAAAAAAAAAAAAAAAAAAAAAAAAAAAAAAAAAAAAAAAAAAAAAAAAAAAAAAAAAAAAAAAAAAAAAAAAAAAAAAAAAAAAAAAAAAAAAAAAAAAAAAAAAAAAAAAAAAAAAAAAAAAAAAAAAAAAAAAAAAAAAAAAAAAAAAAAAAAAAAAAAAAAAAAAAAAAAAAAAAAAAAAAAAAAAAAAAAAAAAAAAAAAAAAAAAAAAAAAAAAAAAAAAAAAAAAAAAAAAAAAAAAAAAAAAAAAAAAAAAAAAAAAAAAAAAAAAAAAAAAAAAAAAAAAAAAAAAAAAAAAAAAAAAAAAAAAAAAAAAAAAAAAAAAAAAAAAAAAAAAAAAAAAAAAAAAAAAAAAAAAAAAAAAAAAAAAAAAAAAAAAAAAAAAAAAAAAAAAAAAAAAAAAAAAAAAAAAAAAAAAAAAAAAAAAAAAAAAAAAAAAAAAAAAAAAAAAAAAAAAAAAAAAAAAAAAAAAAAAAAAAAAAAAAAAAAAAAAAAAAAAAAAAAAAAAAAAAAAAAAAAAAAAAAAAAAAAAAAAAAAAAAAAAAAAAAAAAAAAAAAAAAAAAAAAAAAAAAAAAAAAAAAAAAAAAAAAAAAAAAAAAAAAAAAAAAAAAAAAAAAAAAAAAAAAAAAAAAAAAAAAAAAAAAAAAAAAAAAAAAAAAAAAAAAAAAAAAAAAAAAAAAAAAAAAAAAAAAAAAAAAAAAAAAAAAAAAAAAAAAAAAAAAAAAAAAAAAAAAAAAAAAAAAAAAAAAAAAAAAAAAAAAAAAAAAAAAAAAAAAAAAAAAAAAAAAAAAAAAAAAAAAAAAAAAAAAAAAAAAAAAAAAAAAAAAAAAAAAAAAAAAAAAAAAAAAAAAAAAAAAAAAAAAAAAAAAAAAAAAAAAAAAAAAAAAAAAAAAAAAAAAAAAAAAAAAAAAAAAAAAAAAAAAAAAAAAAAAAAAAAAAAAAAAAAAAAAAAAAAAAAAAAAAAAAAAAAAAAAAAAAAAAAAAAAAAAAAAAAAAAAAAAAAAAAAAAAAAAAAAAAAAAAAAAAAAAAAAAAAAAAAAAAAAAAAAAAAAAAAAAAAAAAAAAAAAAAAAAAAAAAAAAAAAAAAAAAAAAAAAAAAAAAAAAAAAAAAAAAAAAAAAAAAAAAAAAAAAAAAAAAAAAAAAAAAAAAAAAAAAAAAAAAAAAAAAAAAAAAAAAAAAAAAAAAAAAAAAAAAAAAAAAAAAAAAAAAAAAAAAAAAAAAAAAAAAAAAAAAAAAAAAAAAAAAAAAAAAAAAAAAAAAAAAAAAAAAAAAAAAAAAAAAAAAAAAAAAAAAAAAAAAAAAAAAAAAAAAAAAAAAAAAAAAAAAAAAAAAAAAAAAAAAAAAAAAAAAAAAAAAAAAAAAAAAAAAAAAAAAAAAAAAAAAAAAAAAAAAAAAAAAAAAAAAAAAAAAAAAAAAAAAAAAAAAAAAAAAAAAAAAAAAAAAAAAAAAAAAAAAAAAAAAAAAAAAAAAAAAAAAAAAAAAAAAAAAAAAAAAAAAAAAAAAAAAAAAAAAAAAAAAAAAAAAAAAAAAAAAAAAAAAAAAAAAAAAAAAAAAAAAAAAAAAAAAAAAAAAAAAAAAAAAAAAAAAAAAAAAAAAAAAAAAAAAAAAAAAAAAAAAAAAAAAAAAAAAAAAAAAAAAAAAAAAAAAAAAAAAAAAAAAAAAAAAAAAAAAAAAAAAAAAAAAAAAAAAAAAAAAAAAAAAAAAAAAAAAAAAAAAAAAAAAAAAAAAAAAAAAAAAAAAAAAAAAAAAAAAAAAAAAAAAAAAAAAAAAAAAAAAAAAAAAAAAAAAAAAAAAAAAAAAAAAAAAAAAAAAAAAAAAAAAAAAAAAAAAAAAAAAAAAAAAAAAAAAAAAAAAAAAAAAAAAAAAAAAAAAAAAAAAAAAAAAAAAAAAAAAAAAAAAAAAAAAAAAAAAAAAAAAAAAAAAAAAAAAAAAAAAAAAAAAAAAAAAAAAAAAAAAAAAAAAAAAAAAAAAAAAAAAAAAAAAAAAAAAAAAAAAAAAAAAAAAAAAAAAAAAAAAAAAAAAAAAAAAAAAAAAAAAAAAAAAAAAAAAAAAAAAAAAAAAAAAAAAAAAAAAAAAAAAAAAAAAAAAAAAAAAAAAAAAAAAAAAAAAAAAAAAAAAAAAAAAAAAAAAAAAAAAAAAAAAAAAAAAAAAAAAAAAAAAAAAAAAAAAAAAAAAAAAAAAAAAAAAAAAAAAAAAAAAAAAAAAAAAAAAAAAAAAAAAAAAAAAAAAAAAAAAAAAAAAAAAAAAAAAAAAAAAAAAAAAAAAAAAAAAAAAAAAAAAAAAAAAAAAAAAAAAAAAAAAAAAAAAAAAAAAAAAAAAAAAAAAAAAAAAAAAAAAAAAAAAAAAAAAAAAAAAAAAAAAAAAAAAAAAAAAAAAAAAAAAAAAAAAAAAAAAAAAAAAAAAAAAAAAAAAAAAAAAAAAAAAAAAAAAAAAAAAAAAAAAAAAAAAAAAAAAAAAAAAAAAAAAAAAAAAAAAAAAAAAAAAAAAAAAAAAAAAAAAAAAAAAAAAAAAAAAAAAAAAAAAAAAAAAAAAAAAAAAAAAAAAAAAAAAAAAAAAAAAAAAAAAAAAAAAAAAAAAAAAAAAAAAAAAAAAAAAAAAAAAAAAAAAAAAAAAAAAAAAAAAAAAAAAAAAAAAAAAAAAAAAAAAAAAAAAAAAAAAAAAAAAAAAAAAAAAAAAAAAAAAAAAAAAAAAAAAAAAAAAAAAAAAAAAAAAAAAAAAAAAAAAAAAAAAAAAAAAAAAAAAAAAAAAAAAAAAAAAAAAAAAAAAAAAAAAAAAAAAAAAAAAAAAAAAAAAAAAAAAAAAAAAAAAAAAAAAAAAAAAAAAAAAAAAAAAAAAAAAAAAAAAAAAAAAAAAAAAAAAAAAAAAAAAAAAAAAAAAAAAAAAAAAAAAAAAAAAAAAAAAAAAAAAAAAAAAAAAAAAAAAAAAAAAAAAAAAAAAAAAAAAAAAAAAAAAAAAAAAAAAAAAAAAAAAAAAAAAAAAAAAAAAAAAAAAAAAAAAAAAAAAAAAAAAAAAAAAAAAAAAAAAAAAAAAAAAAAAAAAAAAAAAAAAAAAAAAAAAAAAAAAAAAAAAAAAAAAAAAAAAAAAAAAAAAAAAAAAAAAAAAAAAAAAAAAAAAAAAAAAAAAAAAAAAAAAAAAAAAAAAAAAAAAAAAAAAAAAAAAAAAAAAAAAAAAAAAAAAAAAAAAAAAAAAAAAAAAAAAAAAAAAAAAAAAAAAAAAAAAAAAAAAAAAAAAAAAAAAAAAAAAAAAAAAAAAAAAAAAAAAAAAAAAAAAAAAAAAAAAAAAAAAAAAAAAAAAAAAAAAAAAAAAAAAAAAAAAAAAAAAAAAAAAAAAAAAAAAAAAAAAAAAAAAAAAAAAAAAAAAAAAAAAAAAAAAAAAAAAAAAAAAAAAAAAAAAAAAAAAAAAAAAAAAAAAAAAAAAAAAAAAAAAAAAAAAAAAAAAAAAAAAAAAAAAAAAAAAAAAAAAAAAAAAAAAAAAAAAAAAAAAAAAAAAAAAAAAAAAAAAAAAAAAAAAAAAAAAAAAAAAAAAAAAAAAAAAAAAAAAAAAAAAAAAAAAAAAAAAAAAAAAAAAAAAAAAAAAAAAAAAAAAAAAAAAAAAAAAAAAAAAAAAAAAAAAAAAAAAAAAAAAAAAAAAAAAAAAAAAAAAAAAAAAAAAAAAAAAAAAAAAAAAAAAAAAAAAAAAAAAAAAAAAAAAAAAAAAAAAAAAAAAAAAAAAAAAAAAAAAAAAAAAAAAAAAAAAAAAAAAAAAAAAAAAAAAAAAAAAAAAAAAAAAAAAAAAAAAAAAAAAAAAAAAAA
AAAAAAAAAAAAAAAAAAAAAAAAAAAAAAAAAAAAAAAAAAAAAAAAAAAAAAAAAAAAAAAAAAAAAAAAAAAAAAAAAAAAAAAAAAAAAAAAAAAAAAAAAAAAAAAAAAAAAAAAAAAAAAAAAAAAAAAAAAAAAAAAAAAAAAAAAAAAAAAAAAAAAAAAAAAAAAAAAAAAAAAAAAAAAAAAAAAAAAAAAAAAAAAAAAAAAAAAAAAAAAAAAAAAAAAAAAAAAAAAAAAAAAAAAAAAAAAAAAAAAAAAAAAAAAAAAAAAAAAAAAAAAAAAAAAAAAAAAAAAAAAAAAAAAAAAAAAAAAAAAAAAAAAAAAAAAAAAAAAAAAAAAAAAAAAAAAAAAAAAAAAAAAAAAAAAAAAAAAAAAAAAAAAAAAAAAAAAAAAAAAAAAAAAAAAAAAAAAAAAAAAAAAAAAAAAAAAAAAAAAAAAAAAAAAAAAAAAAAAAAAAAAAAAAAAAAAAAAAAAAAAAAAAAAAAAAAAAAAAAAAAAAAAAAAAAAAAAAAAAAAAAAAAAAAAAAAAAAAAAAAAAAAAAAAAAAAAAAAAAAAAAAAAAAAAAAAAAAAAAAAAAAAAAAAAAAAAAAAAAAAAAAAAAAAAAAAAAAAAAAAAAAAAAAAAAAAAAAAAAAAAAAAAAAAAAAAAAAAAAAAAAAAAAAAAAAAAAAAAAAAAAAAAAAAAAAAAAAAAAAAAAAAAAAAAAAAAAAAAAAAAAAAAAAAAAAAAAAAAAAAAAAAAAAAAAAAAAAAAAAAAAAAAAAAAAAAAAAAAAAAAAAAAAAAAAAAAAAAAAAAAAAAAAAAAAAAAAAAAAAAAAAAAAAAAAAAAAAAAAAAAAAAAAAAAAAAAAAAAAAAAAAAAAAAAAAAAAAAAAAAAAAAAAAAAAAAAAAAAAAAAAAAAAAAAAAAAAAAAAAAAAAAAAAAAAAAAAAAAAAAAAAAAAAAAAAAAAAAAAAAAAAAAAAAAAAAAAAAAAAAAAAAAAAAAAAAAAAAAAAAAAAAAAAAAAAAAAAAAAAAAAAAAAAAAAAAAAAAAAAAAAAAAAAAAAAAAAAAAAAAAAAAAAAAAAAAAAAAAAAAAAAAAAAAAAAAAAAAAAAAAAAAAAAAAAAAAAAAAAAAAAAAAAAAAAAAAAAAAAAAAAAAAAAAAAAAAAAAAAAAAAAAAAAAAAAAAAAAAAAAAAAAAAAAAAAAAAAAAAAAAAAAAAAAAAAAAAAAAAAAAAAAAAAAAAAAAAAAAAAAAAAAAAAAAAAAAAAAAAAAAAAAAAAAAAAAAAAAAAAAAAAAAAAAAAAAAAAAAAAAAAAAAAAAAAAAAAAAAAAAAAAAAAAAAAAAAAAAAAAAAAAAAAAAAAAAAAAAAAAAAAAAAAAAAAAAAAAAAAAAAAAAAAAAAAAAAAAAAAAAAAAAAAAAAAAAAAAAAAAAAAAAAAAAAAAAAAAAAAAAAAAAAAAAAAAAAAAAAAAAAAAAAAAAAAAAAAAAAAAAAAAAAAAAAAAAAAAAAAAAAAAAAAAAAAAAAAAAAAAAAAAAAAAAAAAAAAAAAAAAAAAAAAAAAAAAAAAAAAAAAAAAAAAAAAAAAAAAAAAAAAAAAAAAAAAAAAAAAAAAAAAAAAAAAAAAAAAAAAAAAAAAAAAAAAAAAAAAAAAAAAAAAAAAAAAAAAAAAAAAAAAAAAAAAAAAAAAAAAAAAAAAAAAAAAAAAAAAAAAAAAAAAAAAAAAAAAAAAAAAAAAAAAAAAAAAAAAAAAAAAAAAAAAAAAAAAAAAAAAAAAAAAAAAAAAAAAAAAAAAAAAAAAAAAAAAAAAAAAAAAAAAAAAAAAAAAAAAAAAAAAAAAAAAAAAAAAAAAAAAAAAAAAAAAAAAAAAAAAAAAAAAAAAAAAAAAAAAAAAAAAAAAAAAAAAAAAAAAAAAAAAAAAAAAAAAAAAAAAAAAAAAAAAAAAAAAAAAAAAAAAAAAAAAAAAAAAAAAAAAAAAAAAAAAAAAAAAAAAAAAAAAAAAAAAAAAAAAAAAAAAAAAAAAAAAAAAAAAAAAAAAAAAAAAAAAAAAAAAAAAAAAAAAAAAAAAAAAAAAAAAAAAAAAAAAAAAAAAAAAAAAAAAAAAAAAAAAAAAAAAAAAAAAAAAAAAAAAAAAAAAAAAAAAAAAAAAAAAAAAAAAAAAAAAAAAAAAAAAAAAAAAAAAAAAAAAAAAAAAAAAAAAAAAAAAAAAAAAAAAAAAAAAAAAAAAAAAAAAAAAAAAAAAAAAAAAAAAAAAAAAAAAAAAAAAAAAAAAAAAAAAAAAAAAAAAAAAAAAAAAAAAAAAAAAAAAAAAAAAAAAAAAAAAAAAAAAAAAAAAAAAAAAAAAAAAAAAAAAAAAAAAAAAAAAAAAAAAAAAAAAAAAAAAAAAAAAAAAAAAAAAAAAAAAAAAAAAAAAAAAAAAAAAAAAAAAAAAAAAAAAAAAAAAAAAAAAAAAAAAAAAAAAAAAAAAAAAAAAAAAAAAAAAAAAAAAAAAAAAAAAAAAAAAAAAAAAAAAAAAAAAAAAAAAAAAAAAAAAAAAAAAAAAAAAAAAAAAAAAAAAAAAAAAAAAAAAAAAAAAAAAAAAAAAAAAAAAAAAAAAAAAAAAAAAAAAAAAAAAAAAAAAAAAAAAAAAAAAAAAAAAAAAAAAAAAAAAAAAAAAAAAAAAAAAAAAAAAAAAAAAAAAAAAAAAAAAAAAAAAAAAAAAAAAAAAAAAAAAAAAAAAAAAAAAAAAAAAAAAAAAAAAAAAAAAAAAAAAAAAAAAAAAAAAAAAAAAAAAAAAAAAAAAAAAAAAAAAAAAAAAAAAAAAAAAAAAAAAAAAAAAAAAAAAAAAAAAAAAAAAAAAAAAAAAAAAAAAAAAAAAAAAAAAAAAAAAAAAAAAAAAAAAAAAAAAAAAAAAAAAAAAAAAAAAAAAAAAAAAAAAAAAAAAAAAAAAAAAAAAAAAAAAAAAAAAAAAAAAAAAAAAAAAAAAAAAAAAAAAAAAAAAAAAAAAAAAAAAAAAAAAAAAAAAAAAAAAAAAAAAAAAAAAAAAAAAAAAAAAAAAAAAAAAAAAAAAAAAAAAAAAAAAAAAAAAAAAAAAAAAAAAAAAAAAAAAAAAAAAAAAAAAAAAAAAAAAAAAAAAAAAAAAAAAAAAAAAAAAAAAAAAAAAAAAAAAAAAAAAAAAAAAAAAAAAAAAAAAAAAAAAAAAAAAAAAAAAAAAAAAAAAAAAAAAAAAAAAAAAAAAAAAAAAAAAAAAAAAAAAAAAAAAAAAAAAAAAAAAAAAAAAAAAAAAAAAAAAAAAAAAAAAAAAAAAAAAAAAAAAAAAAAAAAAAAAAAAAAAAAAAAAAAAAAAAAAAAAAAAAAAAAAAAAAAAAAAAAAAAAAAAAAAAAAAAAAAAAAAAAAAAAAAAAAAAAAAAAAAAAAAAAAAAAAAAAAAAAAAAAAAAAAAAAAAAAAAAAAAAAAAAAAAAAAAAAAAAAAAAAAAAAAAAAAAAAAAAAAAAAAAAAAAAAAAAAAAAAAAAAAAAAAAAAAAAAAAAAAAAAAAAAAAAAAAAAAAAAAAAAAAAAAAAAAAAAAAAAAAAAAAAAAAAAAAAAAAAAAAAAAAAAAAAAAAAAAAAAAAAAAAAAAAAAAAAAAAAAAAAAAAAAAAAAAAAAAAAAAAAAAAAAAAAAAAAAAAAAAAAAAAAAAAAAAAAAAAAAAAAAAAAAAAAAAAAAAAAAAAAAAAAAAAAAAAAAAAAAAAAAAAAAAAAAAAAAAAAAAAAAAAAAAAAAAAAAAAAAAAAAAAAAAAAAAAAAAAAAAAAAAAAAAAAAAAAAAAAAAAAAAAAAAAAAAAAAAAAAAAAAAAAAAAAAAAAAAAAAAAAAAAAAAAAAAAAAAAAAAAAAAAAAAAAAAAAAAAAAAAAAAAAAAAAAAAAAAAAAAAAAAAAAAAAAAAAAAAAAAAAAAAAAAAAAAAAAAAAAAAAAAAAAAAAAAAAAAAAAAAAAAAAAAAAAAAAAAAAAAAAAAAAAAAAAAAAAAAAAAAAAAAAAAAAAAAAAAAAAAAAAAAAAAAAAAAAAAAAAAAAAAAAAAAAAAAAAAAAAAAAAAAAAAAAAAAAAAAAAAAAAAAAAAAAAAAAAAAAAAAAAAAAAAAAAAAAAAA
AAAAAAAAAAAAAAAAAAAAAAAAAAAAAAAAAAAAAAAAAAAAAAAAAAAAAAAAAAAAAAAAAAAAAAAAAAAAAAAAAAAAAAAAAAAAAAAAAAAAAAAAAAAAAAAAAAAAAAAAAAAAAAAAAAAAAAAAAAAAAAAAAAAAAAAAAAAAAAAAAAAAAAAAAAAAAAAAAAAAAAAAAAAAAAAAAAAAAAAAAAAAAAAAAAAAAAAAAAAAAAAAAAAAAAAAAAAAAAAAAAAAAAAAAAAAAAAAAAAAAAAAAAAAAAAAAAAAAAAAAAAAAAAAAAAAAAAAAAAAAAAAAAAAAAAAAAAAAAAAAAAAAAAAAAAAAAAAAAAAAAAAAAAAAAAAAAAAAAAAAAAAAAAAAAAAAAAAAAAAAAAAAAAAAAAAAAAAAAAAAAAAAAAAAAAAAAAAAAAAAAAAAAAAAAAAAAAAAAAAAAAAAAAAAAAAAAAAAAAAAAAAAAAAAAAAAAAAAAAAAAAAAAAAAAAAAAAAAAAAAAAAAAAAAAAAAAAAAAAAAAAAAAAAAAAAAAAAAAAAAAAAAAAAAAAAAAAAAAAAAAAAAAAAAAAAAAAAAAAAAAAAAAAAAAAAAAAAAAAAAAAAAAAAAAAAAAAAAAAAAAAAAAAAAAAAAAAAAAAAAAAAAAAAAAAAAAAAAAAAAAAAAAAAAAAAAAAAAAAAAAAAAAAAAAAAAAAAAAAAAAAAAAAAAAAAAAAAAAAAAAAAAAAAAAAAAAAAAAAAAAAAAAAAAAAAAAAAAAAAAAAAAAAAAAAAAAAAAAAAAAAAAAAAAAAAAAAAAAAAAAAAAAAAAAAAAAAAAAAAAAAAAAAAAAAAAAAAAAAAAAAAAAAAAAAAAAAAAAAAAAAAAAAAAAAAAAAAAAAAAAAAAAAAAAAAAAAAAAAAAAAAAAAAAAAAAAAAAAAAAAAAAAAAAAAAAAAAAAAAAAAAAAAAAAAAAAAAAAAAAAAAAAAAAAAAAAAAAAAAAAAAAAAAAAAAAAAAAAAAAAAAAAAAAAAAAAAAAAAAAAAAAAAAAAAAAAAAAAAAAAAAAAAAAAAAAAAAAAAAAAAAAAAAAAAAAAAAAAAAAAAAAAAAAAAAAAAAAAAAAAAAAAAAAAAAAAAAAAAAAAAAAAAAAAAAAAAAAAAAAAAAAAAAAAAAAAAAAAAAAAAAAAAAAAAAAAAAAAAAAAAAAAAAAAAAAAAAAAAAAAAAAAAAAAAAAAAAAAAAAAAAAAAAAAAAAAAAAAAAAAAAAAAAAAAAAAAAAAAAAAAAAAAAAAAAAAAAAAAAAAAAAAAAAAAAAAAAAAAAAAAAAAAAAAAAAAAAAAAAAAAAAAAAAAAAAAAAAAAAAAAAAAAAAAAAAAAAAAAAAAAAAAAAAAAAAAAAAAAAAAAAAAAAAAAAAAAAAAAAAAAAAAAAAAAAAAAAAAAAAAAAAAAAAAAAAAAAAAAAAAAAAAAAAAAAAAAAAAAAAAAAAAAAAAAAAAAAAAAAAAAAAAAAAAAAAAAAAAAAAAAAAAAAAAAAAAAAAAAAAAAAAAAAAAAAAAAAAAAAAAAAAAAAAAAAAAAAAAAAAAAAAAAAAAAAAAAAAAAAAAAAAAAAAAAAAAAAAAAAAAAAAAAAAAAAAAAAAAAAAAAAAAAAAAAAAAAAAAAAAAAAAAAAAAAAAAAAAAAAAAAAAAAAAAAAAAAAAAAAAAAAAAAAAAAAAAAAAAAAAAAAAAAAAAAAAAAAAAAAAAAAAAAAAAAAAAAAAAAAAAAAAAAAAAAAAAAAAAAAAAAAAAAAAAAAAAAAAAAAAAAAAAAAAAAAAAAAAAAAAAAAAAAAAAAAAAAAAAAAAAAAAAAAAAAAAAAAAAAAAAAAAAAAAAAAAAAAAAAAAAAAAAAAAAAAAAAAAAAAAAAAAAAAAAAAAAAAAAAAAAAAAAAAAAAAAAAAAAAAAAAAAAAAAAAAAAAAAAAAAAAAAAAAAAAAAAAAAAAAAAAAAAAAAAAAAAAAAAAAAAAAAAAAAAAAAAAAAAAAAAAAAAAAAAAAAAAAAAAAAAAAAAAAAAAAAAAAAAAAAAAAAAAAAAAAAAAAAAAAAAAAAAAAAAAAAAAAAAAAAAAAAAAAAAAAAAAAAAAAAAAAAAAAAAAAAAAAAAAAAAAAAAAAAAAAAAAAAAAAAAAAAAAAAAAAAAAAAAAAAAAAAAAAAAAAAAAAAAAAAAAAAAAAAAAAAAAAAAAAAAAAAAAAAAAAAAAAAAAAAAAAAAAAAAAAAAAAAAAAAAAAAAAAAAAAAAAAAAAAAAAAAAAAAAAAAAAAAAAAAAAAAAAAAAAAAAAAAAAAAAAAAAAAAAAAAAAAAAAAAAAAAAAAAAAAAAAAAAAAAAAAAAAAAAAAAAAAAAAAAAAAAAAAAAAAAAAAAAAAAAAAAAAAAAAAAAAAAAAAAAAAAAAAAAAAAAAAAAAAAAAAAAAAAAAAAAAAAAAAAAAAAAAAAAAAAAAAAAAAAAAAAAAAAAAAAAAAAAAAAAAAAAAAAAAAAAAAAAAAAAAAAAAAAAAAAAAAAAAAAAAAAAAAAAAAAAAAAAAAAAAAAAAAAAAAAAAAAAAAAAAAAAAAAAAAAAAAAAAAAAAAAAAAAAAAAAAAAAAAAAAAAAAAAAAAAAAAAAAAAAAAAAAAAAAAAAAAAAAAAAAAAAAAAAAAAAAAAAAAAAAAAAAAAAAAAAAAAAAAAAAAAAAAAAAAAAAAAAAAAAAAAAAAAAAAAAAAAAAAAAAAAAAAAAAAAAAAAAAAAAAAAAAAAAAAAAAAAAAAAAAAAAAAAAAAAAAAAAAAAAAAAAAAAAAAAAAAAAAAAAAAAAAAAAAAAAAAAAAAAAAAAAAAAAAAAAAAAAAAAAAAAAAAAAAAAAAAAAAAAAAAAAAAAAAAAAAAAAAAAAAAAAAAAAAAAAAAAAAAAAAAAAAAAAAAAAAAAAAAAAAAAAAAAAAAAAAAAAAAAAAAAAAAAAAAAAAAAAAAAAAAAAAAAAAAAAAAAAAAAAAAAAAAAAAAAAAAAAAAAAAAAAAAAAAAAAAAAAAAAAAAAAAAAAAAAAAAAAAAAAAAAAAAAAAAAAAAAAAAAAAAAAAAAAAAAAAAAAAAAAAAAAAAAAAAAAAAAAAAAAAAAAAAAAAAAAAAAAAAAAAAAAAAAAAAAAAAAAAAAAAAAAAAAAAAAAAAAAAAAAAAAAAAAAAAAAAAAAAAAAAAAAAAAAAAAAAAAAAAAAAAAAAAAAAAAAAAAAAAAAAAAAAAAAAAAAAAAAAAAAAAAAAAAAAAAAAAAAAAAAAAAAAAAAAAAAAAAAAAAAAAAAAAAAAAAAAAAAAAAAAAAAAAAAAAAAAAAAAAAAAAAAAAAAAAAAAAAAAAAAAAAAAAAAAAAAAAAAAAAAAAAAAAAAAAAAAAAAAAAAAAAAAAAAAAAAAAAAAAAAAAAAAAAAAAAAAAAAAAAAAAAAAAAAAAAAAAAAAAAAAAAAAAAAAAAAAAAAAAAAAAAAAAAAAAAAAAAAAAAAAAAAAAAAAAAAAAAAAAAAAAAAAAAAAAAAAAAAAAAAAAAAAAAAAAAAAAAAAAAAAAAAAAAAAAAAAAAAAAAAAAAAAAAAAAAAAAAAAAAAAAAAAAAAAAAAAAAAAAAAAAAAAAAAAAAAAAAAAAAAAAAAAAAAAAAAAAAAAAAAAAAAAAAAAAAAAAAAAAAAAAAAAAAAAAAAAAAAAAAAAAAAAAAAAAAAAAAAAAAAAAAAAAAAAAAAAAAAAAAAAAAAAAAAAAAAAAAAAAAAAAAAAAAAAAAAAAAAAAAAAAAAAAAAAAAAAAAAAAAAAAAAAAAAAAAAAAAAAAAAAAAAAAAAAAAAAAAAAAAAAAAAAAAAAAAAAAAAAAAAAAAAAAAAAAAAAAAAAAAAAAAAAAAAAAAAAAAAAAAAAAAAAAAAAAAAAAAAAAAAAAAAAAAAAAAAAAAAAAAAAAAAAAAAAAAAAAAAAAAAAAAAAAAAAAAAAAAAAAAAAAAAAAAAAAAAAAAAAAAAAAAAAAAAAAAAAAAAAAAAAAAAAAAAAAAAAAAAAAAAAAAAAAAAAAAAAAAAAAAAAAAAAAAAAAAAAAAAAAAAAAAAAAAAAAAAAAAAAAAAAAAAAAAAAAAAAA
AAAAAAAAAAAAAAAAAAAAAAAAAAAAAAAAAAAAAAAAAAAAAAAAAAAAAAAAAAAAAAAAAAAAAAAAAAAAAAAAAAAAAAAAAAAAAAAAAAAAAAAAAAAAAAAAAAAAAAAAAAAAAAAAAAAAAAAAAAAAAAAAAAAAAAAAAAAAAAAAAAAAAAAAAAAAAAAAAAAAAAAAAAAAAAAAAAAAAAAAAAAAAAAAAAAAAAAAAAAAAAAAAAAAAAAAAAAAAAAAAAAAAAAAAAAAAAAAAAAAAAAAAAAAAAAAAAAAAAAAAAAAAAAAAAAAAAAAAAAAAAAAAAAAAAAAAAAAAAAAAAAAAAAAAAAAAAAAAAAAAAAAAAAAAAAAAAAAAAAAAAAAAAAAAAAAAAAAAAAAAAAAAAAAAAAAAAAAAAAAAAAAAAAAAAAAAAAAAAAAAAAAAAAAAAAAAAAAAAAAAAAAAAAAAAAAAAAAAAAAAAAAAAAAAAAAAAAAAAAAAAAAAAAAAAAAAAAAAAAAAAAAAAAAAAAAAAAAAAAAAAAAAAAAAAAAAAAAAAAAAAAAAAAAAAAAAAAAAAAAAAAAAAAAAAAAAAAAAAAAAAAAAAAAAAAAAAAAAAAAAAAAAAAAAAAAAAAAAAAAAAAAAAAAAAAAAAAAAAAAAAAAAAAAAAAAAAAAAAAAAAAAAAAAAAAAAAAAAAAAAAAAAAAAAAAAAAAAAAAAAAAAAAAAAAAAAAAAAAAAAAAAAAAAAAAAAAAAAAAAAAAAAAAAAAAAAAAAAAAAAAAAAAAAAAAAAAAAAAAAAAAAAAAAAAAAAAAAAAAAAAAAAAAAAAAAAAAAAAAAAAAAAAAAAAAAAAAAAAAAAAAAAAAAAAAAAAAAAAAAAAAAAAAAAAAAAAAAAAAAAAAAAAAAAAAAAAAAAAAAAAAAAAAAAAAAAAAAAAAAAAAAAAAAAAAAAAAAAAAAAAAAAAAAAAAAAAAAAAAAAAAAAAAAAAAAAAAAAAAAAAAAAAAAAAAAAAAAAAAAAAAAAAAAAAAAAAAAAAAAAAAAAAAAAAAAAAAAAAAAAAAAAAAAAAAAAAAAAAAAAAAAAAAAAAAAAAAAAAAAAAAAAAAAAAAAAAAAAAAAAAAAAAAAAAAAAAAAAAAAAAAAAAAAAAAAAAAAAAAAAAAAAAAAAAAAAAAAAAAAAAAAAAAAAAAAAAAAAAAAAAAAAAAAAAAAAAAAAAAAAAAAAAAAAAAAAAAAAAAAAAAAAAAAAAAAAAAAAAAAAAAAAAAAAAAAAAAAAAAAAAAAAAAAAAAAAAAAAAAAAAAAAAAAAAAAAAAAAAAAAAAAAAAAAAAAAAAAAAAAAAAAAAAAAAAAAAAAAAAAAAAAAAAAAAAAAAAAAAAAAAAAAAAAAAAAAAAAAAAAAAAAAAAAAAAAAAAAAAAAAAAAAAAAAAAAAAAAAAAAAAAAAAAAAAAAAAAAAAAAAAAAAAAAAAAAAAAAAAAAAAAAAAAAAAAAAAAAAAAAAAAAAAAAAAAAAAAAAAAAAAAAAAAAAAAAAAAAAAAAAAAAAAAAAAAAAAAAAAAAAAAAAAAAAAAAAAAAAAAAAAAAAAAAAAAAAAAAAAAAAAAAAAAAAAAAAAAAAAAAAAAAAAAAAAAAAAAAAAAAAAAAAAAAAAAAAAAAAAAAAAAAAAAAAAAAAAAAAAAAAAAAAAAAAAAAAAAAAAAAAAAAAAAAAAAAAAAAAAAAAAAAAAAAAAAAAAAAAAAAAAAAAAAAAAAAAAAAAAAAAAAAAAAAAAAAAAAAAAAAAAAAAAAAAAAAAAAAAAAAAAAAAAAAAAAAAAAAAAAAAAAAAAAAAAAAAAAAAAAAAAAAAAAAAAAAAAAAAAAAAAAAAAAAAAAAAAAAAAAAAAAAAAAAAAAAAAAAAAAAAAAAAAAAAAAAAAAAAAAAAAAAAAAAAAAAAAAAAAAAAAAAAAAAAAAAAAAAAAAAAAAAAAAAAAAAAAAAAAAAAAAAAAAAAAAAAAAAAAAAAAAAAAAAAAAAAAAAAAAAAAAAAAAAAAAAAAAAAAAAAAAAAAAAAAAAAAAAAAAAAAAAAAAAAAAAAAAAAAAAAAAAAAAAAAAAAAAAAAAAAAAAAAAAAAAAAAAAAAAAAAAAAAAAAAAAAAAAAAAAAAAAAAAAAAAAAAAAAAAAAAAAAAAAAAAAAAAAAAAAAAAAAAAAAAAAAAAAAAAAAAAAAAAAAAAAAAAAAAAAAAAAAAAAAAAAAAAAAAAAAAAAAAAAAAAAAAAAAAAAAAAAAAAAAAAAAAAAAAAAAAAAAAAAAAAAAAAAAAAAAAAAAAAAAAAAAAAAAAAAAAAAAAAAAAAAAAAAAAAAAAAAAAAAAAAAAAAAAAAAAAAAAAAAAAAAAAAAAAAAAAAAAAAAAAAAAAAAAAAAAAAAAAAAAAAAAAAAAAAAAAAAAAAAAAAAAAAAAAAAAAAAAAAAAAAAAAAAAAAAAAAAAAAAAAAAAAAAAAAAAAAAAAAAAAAAAAAAAAAAAAAAAAAAAAAAAAAAAAAAAAAAAAAAAAAAAAAAAAAAAAAAAAAAAAAAAAAAAAAAAAAAAAAAAAAAAAAAAAAAAAAAAAAAAAAAAAAAAAAAAAAAAAAAAAAAAAAAAAAAAAAAAAAAAAAAAAAAAAAAAAAAAAAAAAAAAAAAAAAAAAAAAAAAAAAAAAAAAAAAAAAAAAAAAAAAAAAAAAAAAAAAAAAAAAAAAAAAAAAAAAAAAAAAAAAAAAAAAAAAAAAAAAAAAAAAAAAAAAAAAAAAAAAAAAAAAAAAAAAAAAAAAAAAAAAAAAAAAAAAAAAAAAAAAAAAAAAAAAAAAAAAAAAAAAAAAAAAAAAAAAAAAAAAAAAAAAAAAAAAAAAAAAAAAAAAAAAAAAAAAAAAAAAAAAAAAAAAAAAAAAAAAAAAAAAAAAAAAAAAAAAAAAAAAAAAAAAAAAAAAAAAAAAAAAAAAAAAAAAAAAAAAAAAAAAAAAAAAAAAAAAAAAAAAAAAAAAAAAAAAAAAAAAAAAAAAAAAAAAAAAAAAAAAAAAAAAAAAAAAAAAAAAAAAAAAAAAAAAAAAAAAAAAAAAAAAAAAAAAAAAAAAAAAAAAAAAAAAAAAAAAAAAAAAAAAAAAAAAAAAAAAAAAAAAAAAAAAAAAAAAAAAAAAAAAAAAAAAAAAAAAAAAAAAAAAAAAAAAAAAAAAAAAAAAAAAAAAAAAAAAAAAAAAAAAAAAAAAAAAAAAAAAAAAAAAAAAAAAAAAAAAAAAAAAAAAAAAAAAAAAAAAAAAAAAAAAAAAAAAAAAAAAAAAAAAAAAAAAAAAAAAAAAAAAAAAAAAAAAAAAAAAAAAAAAAAAAAAAAAAAAAAAAAAAAAAAAAAAAAAAAAAAAAAAAAAAAAAAAAAAAAAAAAAAAAAAAAAAAAAAAAAAAAAAAAAAAAAAAAAAAAAAAAAAAAAAAAAAAAAAAAAAAAAAAAAAAAAAAAAAAAAAAAAAAAAAAAAAAAAAAAAAAAAAAAAAAAAAAAAAAAAAAAAAAAAAAAAAAAAAAAAAAAAAAAAAAAAAAAAAAAAAAAAAAAAAAAAAAAAAAAAAAAAAAAAAAAAAAAAAAAAAAAAAAAAAAAAAAAAAAAAAAAAAAAAAAAAAAAAAAAAAAAAAAAAAAAAAAAAAAAAAAAAAAAAAAAAAAAAAAAAAAAAAAAAAAAAAAAAAAAAAAAAAAAAAAAAAAAAAAAAAAAAAAAAAAAAAAAAAAAAAAAAAAAAAAAAAAAAAAAAAAAAAAAAAAAAAAAAAAAAAAAAAAAAAAAAAAAAAAAAAAAAAAAAAAAAAAAAAAAAAAAAAAAAAAAAAAAAAAAAAAAAAAAAAAAAAAAAAAAAAAAAAAAAAAAAAAAAAAAAAAAAAAAAAAAAAAAAAAAAAAAAAAAAAAAAAAAAAAAAAAAAAAAAAAAAAAAAAAAAAAAAAAAAAAAAAAAAAAAAAAAAAAAAAAAAAAAAAAAAAAAAAAAAAAAAAAAAAAAAAAAAAAAAAAAAAAAAAAAAAAAAAAAAAAAAAAAAAAAAAAAAAAAAAAAAAAAAAAAAAAAAAAAAAAAAAAAAAAAAAAAAAAAAAAAAAAAAAAAAAAAAAAAAAAAAAAAAAAAAAAAAAAAAAAA
AAAAAAAAAAAAAAAAAAAAAAAAAAAAAAAAAAAAAAAAAAAAAAAAAAAAAAAAAAAAAAAAAAAAAAAAAAAAAAAAAAAAAAAAAAAAAAAAAAAAAAAAAAAAAAAAAAAAAAAAAAAAAAAAAAAAAAAAAAAAAAAAAAAAAAAAAAAAAAAAAAAAAAAAAAAAAAAAAAAAAAAAAAAAAAAAAAAAAAAAAAAAAAAAAAAAAAAAAAAAAAAAAAAAAAAAAAAAAAAAAAAAAAAAAAAAAAAAAAAAAAAAAAAAAAAAAAAAAAAAAAAAAAAAAAAAAAAAAAAAAAAAAAAAAAAAAAAAAAAAAAAAAAAAAAAAAAAAAAAAAAAAAAAAAAAAAAAAAAAAAAAAAAAAAAAAAAAAAAAAAAAAAAAAAAAAAAAAAAAAAAAAAAAAAAAAAAAAAAAAAAAAAAAAAAAAAAAAAAAAAAAAAAAAAAAAAAAAAAAAAAAAAAAAAAAAAAAAAAAAAAAAAAAAAAAAAAAAAAAAAAAAAAAAAAAAAAAAAAAAAAAAAAAAAAAAAAAAAAAAAAAAAAAAAAAAAAAAAAAAAAAAAAAAAAAAAAAAAAAAAAAAAAAAAAAAAAAAAAAAAAAAAAAAAAAAAAAAAAAAAAAAAAAAAAAAAAAAAAAAAAAAAAAAAAAAAAAAAAAAAAAAAAAAAAAAAAAAAAAAAAAAAAAAAAAAAAAAAAAAAAAAAAAAAAAAAAAAAAAAAAAAAAAAAAAAAAAAAAAAAAAAAAAAAAAAAAAAAAAAAAAAAAAAAAAAAAAAAAAAAAAAAAAAAAAAAAAAAAAAAAAAAAAAAAAAAAAAAAAAAAAAAAAAAAAAAAAAAAAAAAAAAAAAAAAAAAAAAAAAAAAAAAAAAAAAAAAAAAAAAAAAAAAAAAAAAAAAAAAAAAAAAAAAAAAAAAAAAAAAAAAAAAAAAAAAAAAAAAAAAAAAAAAAAAAAAAAAAAAAAAAAAAAAAAAAAAAAAAAAAAAAAAAAAAAAAAAAAAAAAAAAAAAAAAAAAAAAAAAAAAAAAAAAAAAAAAAAAAAAAAAAAAAAAAAAAAAAAAAAAAAAAAAAAAAAAAAAAAAAAAAAAAAAAAAAAAAAAAAAAAAAAAAAAAAAAAAAAAAAAAAAAAAAAAAAAAAAAAAAAAAAAAAAAAAAAAAAAAAAAAAAAAAAAAAAAAAAAAAAAAAAAAAAAAAAAAAAAAAAAAAAAAAAAAAAAAAAAAAAAAAAAAAAAAAAAAAAAAAAAAAAAAAAAAAAAAAAAAAAAAAAAAAAAAAAAAAAAAAAAAAAAAAAAAAAAAAAAAAAAAAAAAAAAAAAAAAAAAAAAAAAAAAAAAAAAAAAAAAAAAAAAAAAAAAAAAAAAAAAAAAAAAAAAAAAAAAAAAAAAAAAAAAAAAAAAAAAAAAAAAAAAAAAAAAAAAAAAAAAAAAAAAAAAAAAAAAAAAAAAAAAAAAAAAAAAAAAAAAAAAAAAAAAAAAAAAAAAAAAAAAAAAAAAAAAAAAAAAAAAAAAAAAAAAAAAAAAAAAAAAAAAAAAAAAAAAAAAAAAAAAAAAAAAAAAAAAAAAAAAAAAAAAAAAAAAAAAAAAAAAAAAAAAAAAAAAAAAAAAAAAAAAAAAAAAAAAAAAAAAAAAAAAAAAAAAAAAAAAAAAAAAAAAAAAAAAAAAAAAAAAAAAAAAAAAAAAAAAAAAAAAAAAAAAAAAAAAAAAAAAAAAAAAAAAAAAAAAAAAAAAAAAAAAAAAAAAAAAAAAAAAAAAAAAAAAAAAAAAAAAAAAAAAAAAAAAAAAAAAAAAAAAAAAAAAAAAAAAAAAAAAAAAAAAAAAAAAAAAAAAAAAAAAAAAAAAAAAAAAAAAAAAAAAAAAAAAAAAAAAAAAAAAAAAAAAAAAAAAAAAAAAAAAAAAAAAAAAAAAAAAAAAAAAAAAAAAAAAAAAAAAAAAAAAAAAAAAAAAAAAAAAAAAAAAAAAAAAAAAAAAAAAAAAAAAAAAAAAAAAAAAAAAAAAAAAAAAAAAAAAAAAAAAAAAAAAAAAAAAAAAAAAAAAAAAAAAAAAAAAAAAAAAAAAAAAAAAAAAAAAAAAAAAAAAAAAAAAAAAAAAAAAAAAAAAAAAAAAAAAAAAAAAAAAAAAAAAAAAAAAAAAAAAAAAAAAAAAAAAAAAAAAAAAAAAAAAAAAAAAAAAAAAAAAAAAAAAAAAAAAAAAAAAAAAAAAAAAAAAAAAAAAAAAAAAAAAAAAAAAAAAAAAAAAAAAAAAAAAAAAAAAAAAAAAAAAAAAAAAAAAAAAAAAAAAAAAAAAAAAAAAAAAAAAAAAAAAAAAAAAAAAAAAAAAAAAAAAAAAAAAAAAAAAAAAAAAAAAAAAAAAAAAAAAAAAAAAAAAAAAAAAAAAAAAAAAAAAAAAAAAAAAAAAAAAAAAAAAAAAAAAAAAAAAAAAAAAAAAAAAAAAAAAAAAAAAAAAAAAAAAAAAAAAAAAAAAAAAAAAAAAAAAAAAAAAAAAAAAAAAAAAAAAAAAAAAAAAAAAAAAAAAAAAAAAAAAAAAAAAAAAAAAAAAAAAAAAAAAAAAAAAAAAAAAAAAAAAAAAAAAAAAAAAAAAAAAAAAAAAAAAAAAAAAAAAAAAAAAAAAAAAAAAAAAAAAAAAAAAAAAAAAAAAAAAAAAAAAAAAAAAAAAAAAAAAAAAAAAAAAAAAAAAAAAAAAAAAAAAAAAAAAAAAAAAAAAAAAAAAAAAAAAAAAAAAAAAAAAAAAAAAAAAAAAAAAAAAAAAAAAAAAAAAAAAAAAAAAAAAAAAAAAAAAAAAAAAAAAAAAAAAAAAAAAAAAAAAAAAAAAAAAAAAAAAAAAAAAAAAAAAAAAAAAAAAAAAAAAAAAAAAAAAAAAAAAAAAAAAAAAAAAAAAAAAAAAAAAAAAAAAAAAAAAAAAAAAAAAAAAAAAAAAAAAAAAAAAAAAAAAAAAAAAAAAAAAAAAAAAAAAAAAAAAAAAAAAAAAAAAAAAAAAAAAAAAAAAAAAAAAAAAAAAAAAAAAAAAAAAAAAAAAAAAAAAAAAAAAAAAAAAAAAAAAAAAAAAAAAAAAAAAAAAAAAAAAAAAAAAAAAAAAAAAAAAAAAAAAAAAAAAAAAAAAAAAAAAAAAAAAAAAAAAAAAAAAAAAAAAAAAAAAAAAAAAAAAAAAAAAAAAAAAAAAAAAAAAAAAAAAAAAAAAAAAAAAAAAAAAAAAAAAAAAAAAAAAAAAAAAAAAAAAAAAAAAAAAAAAAAAAAAAAAAAAAAAAAAAAAAAAAAAAAAAAAAAAAAAAAAAAAAAAAAAAAAAAAAAAAAAAAAAAAAAAAAAAAAAAAAAAAAAAAAAAAAAAAAAAAAAAAAAAAAAAAAAAAAAAAAAAAAAAAAAAAAAAAAAAAAAAAAAAAAAAAAAAAAAAAAAAAAAAAAAAAAAAAAAAAAAAAAAAAAAAAAAAAAAAAAAAAAAAAAAAAAAAAAAAAAAAAAAAAAAAAAAAAAAAAAAAAAAAAAAAAAAAAAAAAAAAAAAAAAAAAAAAAAAAAAAAAAAAAAAAAAAAAAAAAAAAAAAAAAAAAAAAAAAAAAAAAAAAAAAAAAAAAAAAAAAAAAAAAAAAAAAAAAAAAAAAAAAAAAAAAAAAAAAAAAAAAAAAAAAAAAAAAAAAAAAAAAAAAAAAAAAAAAAAAAAAAAAAAAAAAAAAAAAAAAAAAAAAAAAAAAAAAAAAAAAAAAAAAAAAAAAAAAAAAAAAAAAAAAAAAAAAAAAAAAAAAAAAAAAAAAAAAAAAAAAAAAAAAAAAAAAAAAAAAAAAAAAAAAAAAAAAAAAAAAAAAAAAAAAAAAAAAAAAAAAAAAAAAAAAAAAAAAAAAAAAAAAAAAAAAAAAAAAAAAAAAAAAAAAAAAAAAAAAAAAAAAAAAAAAAAAAAAAAAAAAAAAAAAAAAAAAAAAAAAAAAAAAAAAAAAAAAAAAAAAAAAAAAAAAAAAAAAAAAAAAAAAAAAAAAAAAAAAAAAAAAAAAAAAAAAAAAAAAAAAAAAAAAAAAAAAAAAAAAAAAAAAAAAAAAAAAAAAAAAAAAAAAAAAAAAAAAAAAAAAAAAAAAAAAAAAAAAAAAAAAAAAAAAAAAAAAAAAAAAAAAAAAAAAAAAAA
AAAAAAAAAAAAAAAAAAAAAAAAAAAAAAAAAAAAAAAAAAAAAAAAAAAAAAAAAAAAAAAAAAAAAAAAAAAAAAAAAAAAAAAAAAAAAAAAAAAAAAAAAAAAAAAAAAAAAAAAAAAAAAAAAAAAAAAAAAAAAAAAAAAAAAAAAAAAAAAAAAAAAAAAAAAAAAAAAAAAAAAAAAAAAAAAAAAAAAAAAAAAAAAAAAAAAAAAAAAAAAAAAAAAAAAAAAAAAAAAAAAAAAAAAAAAAAAAAAAAAAAAAAAAAAAAAAAAAAAAAAAAAAAAAAAAAAAAAAAAAAAAAAAAAAAAAAAAAAAAAAAAAAAAAAAAAAAAAAAAAAAAAAAAAAAAAAAAAAAAAAAAAAAAAAAAAAAAAAAAAAAAAAAAAAAAAAAAAAAAAAAAAAAAAAAAAAAAAAAAAAAAAAAAAAAAAAAAAAAAAAAAAAAAAAAAAAAAAAAAAAAAAAAAAAAAAAAAAAAAAAAAAAAAAAAAAAAAAAAAAAAAAAAAAAAAAAAAAAAAAAAAAAAAAAAAAAAAAAAAAAAAAAAAAAAAAAAAAAAAAAAAAAAAAAAAAAAAAAAAAAAAAAAAAAAAAAAAAAAAAAAAAAAAAAAAAAAAAAAAAAAAAAAAAAAAAAAAAAAAAAAAAAAAAAAAAAAAAAAAAAAAAAAAAAAAAAAAAAAAAAAAAAAAAAAAAAAAAAAAAAAAAAAAAAAAAAAAAAAAAAAAAAAAAAAAAAAAAAAAAAAAAAAAAAAAAAAAAAAAAAAAAAAAAAAAAAAAAAAAAAAAAAAAAAAAAAAAAAAAAAAAAAAAAAAAAAAAAAAAAAAAAAAAAAAAAAAAAAAAAAAAAAAAAAAAAAAAAAAAAAAAAAAAAAAAAAAAAAAAAAAAAAAAAAAAAAAAAAAAAAAAAAAAAAAAAAAAAAAAAAAAAAAAAAAAAAAAAAAAAAAAAAAAAAAAAAAAAAAAAAAAAAAAAAAAAAAAAAAAAAAAAAAAAAAAAAAAAAAAAAAAAAAAAAAAAAAAAAAAAAAAAAAAAAAAAAAAAAAAAAAAAAAAAAAAAAAAAAAAAAAAAAAAAAAAAAAAAAAAAAAAAAAAAAAAAAAAAAAAAAAAAAAAAAAAAAAAAAAAAAAAAAAAAAAAAAAAAAAAAAAAAAAAAAAAAAAAAAAAAAAAAAAAAAAAAAAAAAAAAAAAAAAAAAAAAAAAAAAAAAAAAAAAAAAAAAAAAAAAAAAAAAAAAAAAAAAAAAAAAAAAAAAAAAAAAAAAAAAAAAAAAAAAAAAAAAAAAAAAAAAAAAAAAAAAAAAAAAAAAAAAAAAAAAAAAAAAAAAAAAAAAAAAAAAAAAAAAAAAAAAAAAAAAAAAAAAAAAAAAAAAAAAAAAAAAAAAAAAAAAAAAAAAAAAAAAAAAAAAAAAAAAAAAAAAAAAAAAAAAAAAAAAAAAAAAAAAAAAAAAAAAAAAAAAAAAAAAAAAAAAAAAAAAAAAAAAAAAAAAAAAAAAAAAAAAAAAAAAAAAAAAAAAAAAAAAAAAAAAAAAAAAAAAAAAAAAAAAAAAAAAAAAAAAAAAAAAAAAAAAAAAAAAAAAAAAAAAAAAAAAAAAAAAAAAAAAAAAAAAAAAAAAAAAAAAAAAAAAAAAAAAAAAAAAAAAAAAAAAAAAAAAAAAAAAAAAAAAAAAAAAAAAAAAAAAAAAAAAAAAAAAAAAAAAAAAAAAAAAAAAAAAAAAAAAAAAAAAAAAAAAAAAAAAAAAAAAAAAAAAAAAAAAAAAAAAAAAAAAAAAAAAAAAAAAAAAAAAAAAAAAAAAAAAAAAAAAAAAAAAAAAAAAAAAAAAAAAAAAAAAAAAAAAAAAAAAAAAAAAAAAAAAAAAAAAAAAAAAAAAAAAAAAAAAAAAAAAAAAAAAAAAAAAAAAAAAAAAAAAAAAAAAAAAAAAAAAAAAAAAAAAAAAAAAAAAAAAAAAAAAAAAAAAAAAAAAAAAAAAAAAAAAAAAAAAAAAAAAAAAAAAAAAAAAAAAAAAAAAAAAAAAAAAAAAAAAAAAAAAAAAAAAAAAAAAAAAAAAAAAAAAAAAAAAAAAAAAAAAAAAAAAAAAAAAAAAAAAAAAAAAAAAAAAAAAAAAAAAAAAAAAAAAAAAAAAAAAAAAAAAAAAAAAAAAAAAAAAAAAAAAAAAAAAAAAAAAAAAAAAAAAAAAAAAAAAAAAAAAAAAAAAAAAAAAAAAAAAAAAAAAAAAAAAAAAAAAAAAAAAAAAAAAAAAAAAAAAAAAAAAAAAAAAAAAAAAAAAAAAAAAAAAAAAAAAAAAAAAAAAAAAAAAAAAAAAAAAAAAAAAAAAAAAAAAAAAAAAAAAAAAAAAAAAAAAAAAAAAAAAAAAAAAAAAAAAAAAAAAAAAAAAAAAAAAAAAAAAAAAAAAAAAAAAAAAAAAAAAAAAAAAAAAAAAAAAAAAAAAAAAAAAAAAAAAAAAAAAAAAAAAAAAAAAAAAAAAAAAAAAAAAAAAAAAAAAAAAAAAAAAAAAAAAAAAAAAAAAAAAAAAAAAAAAAAAAAAAAAAAAAAAAAAAAAAAAAAAAAAAAAAAAAAAAAAAAAAAAAAAAAAAAAAAAAAAAAAAAAAAAAAAAAAAAAAAAAAAAAAAAAAAAAAAAAAAAAAAAAAAAAAAAAAAAAAAAAAAAAAAAAAAAAAAAAAAAAAAAAAAAAAAAAAAAAAAAAAAAAAAAAAAAAAAAAAAAAAAAAAAAAAAAAAAAAAAAAAAAAAAAAAAAAAAAAAAAAAAAAAAAAAAAAAAAAAAAAAAAAAAAAAAAAAAAAAAAAAAAAAAAAAAAAAAAAAAAAAAAAAAAAAAAAAAAAAAAAAAAAAAAAAAAAAAAAAAAAAAAAAAAAAAAAAAAAAAAAAAAAAAAAAAAAAAAAAAAAAAAAAAAAAAAAAAAAAAAAAAAAAAAAAAAAAAAAAAAAAAAAAAAAAAAAAAAAAAAAAAAAAAAAAAAAAAAAAAAAAAAAAAAAAAAAAAAAAAAAAAAAAAAAAAAAAAAAAAAAAAAAAAAAAAAAAAAAAAAAAAAAAAAAAAAAAAAAAAAAAAAAAAAAAAAAAAAAAAAAAAAAAAAAAAAAAAAAAAAAAAAAAAAAAAAAAAAAAAAAAAAAAAAAAAAAAAAAAAAAAAAAAAAAAAAAAAAAAAAAAAAAAAAAAAAAAAAAAAAAAAAAAAAAAAAAAAAAAAAAAAAAAAAAAAAAAAAAAAAAAAAAAAAAAAAAAAAAAAAAAAAAAAAAAAAAAAAAAAAAAAAAAAAAAAAAAAAAAAAAAAAAAAAAAAAAAAAAAAAAAAAAAAAAAAAAAAAAAAAAAAAAAAAAAAAAAAAAAAAAAAAAAAAAAAAAAAAAAAAAAAAAAAAAAAAAAAAAAAAAAAAAAAAAAAAAAAAAAAAAAAAAAAAAAAAAAAAAAAAAAAAAAAAAAAAAAAAAAAAAAAAAAAAAAAAAAAAAAAAAAAAAAAAAAAAAAAAAAAAAAAAAAAAAAAAAAAAAAAAAAAAAAAAAAAAAAAAAAAAAAAAAAAAAAAAAAAAAAAAAAAAAAAAAAAAAAAAAAAAAAAAAAAAAAAAAAAAAAAAAAAAAAAAAAAAAAAAAAAAAAAAAAAAAAAAAAAAAAAAAAAAAAAAAAAAAAAAAAAAAAAAAAAAAAAAAAAAAAAAAAAAAAAAAAAAAAAAAAAAAAAAAAAAAAAAAAAAAAAAAAAAAAAAAAAAAAAAAAAAAAAAAAAAAAAAAAAAAAAAAAAAAAAAAAAAAAAAAAAAAAAAAAAAAAAAAAAAAAAAAAAAAAAAAAAAAAAAAAAAAAAAAAAAAAAAAAAAAAAAAAAAAAAAAAAAAAAAAAAAAAAAAAAAAAAAAAAAAAAAAAAAAAAAAAAAAAAAAAAAAAAAAAAAAAAAAAAAAAAAAAAAAAAAAAAAAAAAAAAAAAAAAAAAAAAAAAAAAAAAAAAAAAAAAAAAAAAAAAAAAAAAAAAAAAAAAAAAAAAAAAAAAAAAAAAAAAAAAAAAAAAAAAAAAAAAAAAAAAAAAAAAAAAAAAAAAAAAAAAAAAAAAAAAAAAAAAAAAAAAAAAAAAAAAAAAAAAAAAAAAAAAAAAAAAAAAAAAAAAAAAAAAAAAAAAAAAAAAAAAAA
AAAAAAAAAAAAAAAAAAAAAAAAAAAAAAAAAAAAAAAAAAAAAAAAAAAAAAAAAAAAAAAAAAAAAAAAAAAAAAAAAAAAAAAAAAAAAAAAAAAAAAAAAAAAAAAAAAAAAAAAAAAAAAAAAAAAAAAAAAAAAAAAAAAAAAAAAAAAAAAAAAAAAAAAAAAAAAAAAAAAAAAAAAAAAAAAAAAAAAAAAAAAAAAAAAAAAAAAAAAAAAAAAAAAAAAAAAAAAAAAAAAAAAAAAAAAAAAAAAAAAAAAAAAAAAAAAAAAAAAAAAAAAAAAAAAAAAAAAAAAAAAAAAAAAAAAAAAAAAAAAAAAAAAAAAAAAAAAAAAAAAAAAAAAAAAAAAAAAAAAAAAAAAAAAAAAAAAAAAAAAAAAAAAAAAAAAAAAAAAAAAAAAAAAAAAAAAAAAAAAAAAAAAAAAAAAAAAAAAAAAAAAAAAAAAAAAAAAAAAAAAAAAAAAAAAAAAAAAAAAAAAAAAAAAAAAAAAAAAAAAAAAAAAAAAAAAAAAAAAAAAAAAAAAAAAAAAAAAAAAAAAAAAAAAAAAAAAAAAAAAAAAAAAAAAAAAAAAAAAAAAAAAAAAAAAAAAAAAAAAAAAAAAAAAAAAAAAAAAAAAAAAAAAAAAAAAAAAAAAAAAAAAAAAAAAAAAAAAAAAAAAAAAAAAAAAAAAAAAAAAAAAAAAAAAAAAAAAAAAAAAAAAAAAAAAAAAAAAAAAAAAAAAAAAAAAAAAAAAAAAAAAAAAAAAAAAAAAAAAAAAAAAAAAAAAAAAAAAAAAAAAAAAAAAAAAAAAAAAAAAAAAAAAAAAAAAAAAAAAAAAAAAAAAAAAAAAAAAAAAAAAAAAAAAAAAAAAAAAAAAAAAAAAAAAAAAAAAAAAAAAAAAAAAAAAAAAAAAAAAAAAAAAAAAAAAAAAAAAAAAAAAAAAAAAAAAAAAAAAAAAAAAAAAAAAAAAAAAAAAAAAAAAAAAAAAAAAAAAAAAAAAAAAAAAAAAAAAAAAAAAAAAAAAAAAAAAAAAAAAAAAAAAAAAAAAAAAAAAAAAAAAAAAAAAAAAAAAAAAAAAAAAAAAAAAAAAAAAAAAAAAAAAAAAAAAAAAAAAAAAAAAAAAAAAAAAAAAAAAAAAAAAAAAAAAAAAAAAAAAAAAAAAAAAAAAAAAAAAAAAAAAAAAAAAAAAAAAAAAAAAAAAAAAAAAAAAAAAAAAAAAAAAAAAAAAAAAAAAAAAAAAAAAAAAAAAAAAAAAAAAAAAAAAAAAAAAAAAAAAAAAAAAAAAAAAAAAAAAAAAAAAAAAAAAAAAAAAAAAAAAAAAAAAAAAAAAAAAAAAAAAAAAAAAAAAAAAAAAAAAAAAAAAAAAAAAAAAAAAAAAAAAAAAAAAAAAAAAAAAAAAAAAAAAAAAAAAAAAAAAAAAAAAAAAAAAAAAAAAAAAAAAAAAAAAAAAAAAAAAAAAAAAAAAAAAAAAAAAAAAAAAAAAAAAAAAAAAAAAAAAAAAAAAAAAAAAAAAAAAAAAAAAAAAAAAAAAAAAAAAAAAAAAAAAAAAAAAAAAAAAAAAAAAAAAAAAAAAAAAAAAAAAAAAAAAAAAAAAAAAAAAAAAAAAAAAAAAAAAAAAAAAAAAAAAAAAAAAAAAAAAAAAAAAAAAAAAAAAAAAAAAAAAAAAAAAAAAAAAAAAAAAAAAAAAAAAAAAAAAAAAAAAAAAAAAAAAAAAAAAAAAAAAAAAAAAAAAAAAAAAAAAAAAAAAAAAAAAAAAAAAAAAAAAAAAAAAAAAAAAAAAAAAAAAAAAAAAAAAAAAAAAAAAAAAAAAAAAAAAAAAAAAAAAAAAAAAAAAAAAAAAAAAAAAAAAAAAAAAAAAAAAAAAAAAAAAAAAAAAAAAAAAAAAAAAAAAAAAAAAAAAAAAAAAAAAAAAAAAAAAAAAAAAAAAAAAAAAAAAAAAAAAAAAAAAAAAAAAAAAAAAAAAAAAAAAAAAAAAAAAAAAAAAAAAAAAAAAAAAAAAAAAAAAAAAAAAAAAAAAAAAAAAAAAAAAAAAAAAAAAAAAAAAAAAAAAAAAAAAAAAAAAAAAAAAAAAAAAAAAAAAAAAAAAAAAAAAAAAAAAAAAAAAAAAAAAAAAAAAAAAAAAAAAAAAAAAAAAAAAAAAAAAAAAAAAAAAAAAAAAAAAAAAAAAAAAAAAAAAAAAAAAAAAAAAAAAAAAAAAAAAAAAAAAAAAAAAAAAAAAAAAAAAAAAAAAAAAAAAAAAAAAAAAAAAAAAAAAAAAAAAAAAAAAAAAAAAAAAAAAAAAAAAAAAAAAAAAAAAAAAAAAAAAAAAAAAAAAAAAAAAAAAAAAAAAAAAAAAAAAAAAAAAAAAAAAAAAAAAAAAAAAAAAAAAAAAAAAAAAAAAAAAAAAAAAAAAAAAAAAAAAAAAAAAAAAAAAAAAAAAAAAAAAAAAAAAAAAAAAAAAAAAAAAAAAAAAAAAAAAAAAAAAAAAAAAAAAAAAAAAAAAAAAAAAAAAAAAAAAAAAAAAAAAAAAAAAAAAAAAAAAAAAAAAAAAAAAAAAAAAAAAAAAAAAAAAAAAAAAAAAAAAAAAAAAAAAAAAAAAAAAAAAAAAAAAAAAAAAAAAAAAAAAAAAAAAAAAAAAAAAAAAAAAAAAAAAAAAAAAAAAAAAAAAAAAAAAAAAAAAAAAAAAAAAAAAAAAAAAAAAAAAAAAAAAAAAAAAAAAAAAAAAAAAAAAAAAAAAAAAAAAAAAAAAAAAAAAAAAAAAAAAAAAAAAAAAAAAAAAAAAAAAAAAAAAAAAAAAAAAAAAAAAAAAAAAAAAAAAAAAAAAAAAAAAAAAAAAAAAAAAAAAAAAAAAAAAAAAAAAAAAAAAAAAAAAAAAAAAAAAAAAAAAAAAAAAAAAAAAAAAAAAAAAAAAAAAAAAAAAAAAAAAAAAAAAAAAAAAAAAAAAAAAAAAAAAAAAAAAAAAAAAAAAAAAAAAAAAAAAAAAAAAAAAAAAAAAAAAAAAAAAAAAAAAAAAAAAAAAAAAAAAAAAAAAAAAAAAAAAAAAAAAAAAAAAAAAAAAAAAAAAAAAAAAAAAAAAAAAAAAAAAAAAAAAAAAAAAAAAAAAAAAAAAAAAAAAAAAAAAAAAAAAAAAAAAAAAAAAAAAAAAAAAAAAAAAAAAAAAAAAAAAAAAAAAAAAAAAAAAAAAAAAAAAAAAAAAAAAAAAAAAAAAAAAAAAAAAAAAAAAAAAAAAAAAAAAAAAAAAAAAAAAAAAAAAAAAAAAAAAAAAAAAAAAAAAAAAAAAAAAAAAAAAAAAAAAAAAAAAAAAAAAAAAAAAAAAAAAAAAAAAAAAAAAAAAAAAAAAAAAAAAAAAAAAAAAAAAAAAAAAAAAAAAAAAAAAAAAAAAAAAAAAAAAAAAAAAAAAAAAAAAAAAAAAAAAAAAAAAAAAAAAAAAAAAAAAAAAAAAAAAAAAAAAAAAAAAAAAAAAAAAAAAAAAAAAAAAAAAAAAAAAAAAAAAAAAAAAAAAAAAAAAAAAAAAAAAAAAAAAAAAAAAAAAAAAAAAAAAAAAAAAAAAAAAAAAAAAAAAAAAAAAAAAAAAAAAAAAAAAAAAAAAAAAAAAAAAAAAAAAAAAAAAAAAAAAAAAAAAAAAAAAAAAAAAAAAAAAAAAAAAAAAAAAAAAAAAAAAAAAAAAAAAAAAAAAAAAAAAAAAAAAAAAAAAAAAAAAAAAAAAAAAAAAAAAAAAAAAAAAAAAAAAAAAAAAAAAAAAAAAAAAAAAAAAAAAAAAAAAAAAAAAAAAAAAAAAAAAAAAAAAAAAAAAAAAAAAAAAAAAAAAAAAAAAAAAAAAAAAAAAAAAAAAAAAAAAAAAAAAAAAAAAAAAAAAAAAAAAAAAAAAAAAAAAAAAAAAAAAAAAAAAAAAAAAAAAAAAAAAAAAAAAAAAAAAAAAAAAAAAAAAAAAAAAAAAAAAAAAAAAAAAAAAAAAAAAAAAAAAAAAAAAAAAAAAAAAAAAAAAAAAAAAAAAAAAAAAAAAAAAAAAAAAAAAAAAAAAAAAAAAAAAAAAAAAAAAAAAAAAAAAAAAAAAAAAAAAAAAAAAAAAAAAAAAAAAAAAAAAAAAAAAAAAAAAAAAAAAAAAAAAAAAAAAAAAAAAAAAAAAAAAAAAA
AAAAAAAAAAAAAAAAAAAAAAAAAAAAAAAAAAAAAAAAAAAAAAAAAAAAAAAAAAAAAAAAAAAAAAAAAAAAAAAAAAAAAAAAAAAAAAAAAAAAAAAAAAAAAAAAAAAAAAAAAAAAAAAAAAAAAAAAAAAAAAAAAAAAAAAAAAAAAAAAAAAAAAAAAAAAAAAAAAAAAAAAAAAAAAAAAAAAAAAAAAAAAAAAAAAAAAAAAAAAAAAAAAAAAAAAAAAAAAAAAAAAAAAAAAAAAAAAAAAAAAAAAAAAAAAAAAAAAAAAAAAAAAAAAAAAAAAAAAAAAAAAAAAAAAAAAAAAAAAAAAAAAAAAAAAAAAAAAAAAAAAAAAAAAAAAAAAAAAAAAAAAAAAAAAAAAAAAAAAAAAAAAAAAAAAAAAAAAAAAAAAAAAAAAAAAAAAAAAAAAAAAAAAAAAAAAAAAAAAAAAAAAAAAAAAAAAAAAAAAAAAAAAAAAAAAAAAAAAAAAAAAAAAAAAAAAAAAAAAAAAAAAAAAAAAAAAAAAAAAAAAAAAAAAAAAAAAAAAAAAAAAAAAAAAAAAAAAAAAAAAAAAAAAAAAAAAAAAAAAAAAAAAAAAAAAAAAAAAAAAAAAAAAAAAAAAAAAAAAAAAAAAAAAAAAAAAAAAAAAAAAAAAAAAAAAAAAAAAAAAAAAAAAAAAAAAAAAAAAAAAAAAAAAAAAAAAAAAAAAAAAAAAAAAAAAAAAAAAAAAAAAAAAAAAAAAAAAAAAAAAAAAAAAAAAAAAAAAAAAAAAAAAAAAAAAAAAAAAAAAAAAAAAAAAAAAAAAAAAAAAAAAAAAAAAAAAAAAAAAAAAAAAAAAAAAAAAAAAAAAAAAAAAAAAAAAAAAAAAAAAAAAAAAAAAAAAAAAAAAAAAAAAAAAAAAAAAAAAAAAAAAAAAAAAAAAAAAAAAAAAAAAAAAAAAAAAAAAAAAAAAAAAAAAAAAAAAAAAAAAAAAAAAAAAAAAAAAAAAAAAAAAAAAAAAAAAAAAAAAAAAAAAAAAAAAAAAAAAAAAAAAAAAAAAAAAAAAAAAAAAAAAAAAAAAAAAAAAAAAAAAAAAAAAAAAAAAAAAAAAAAAAAAAAAAAAAAAAAAAAAAAAAAAAAAAAAAAAAAAAAAAAAAAAAAAAAAAAAAAAAAAAAAAAAAAAAAAAAAAAAAAAAAAAAAAAAAAAAAAAAAAAAAAAAAAAAAAAAAAAAAAAAAAAAAAAAAAAAAAAAAAAAAAAAAAAAAAAAAAAAAAAAAAAAAAAAAAAAAAAAAAAAAAAAAAAAAAAAAAAAAAAAAAAAAAAAAAAAAAAAAAAAAAAAAAAAAAAAAAAAAAAAAAAAAAAAAAAAAAAAAAAAAAAAAAAAAAAAAAAAAAAAAAAAAAAAAAAAAAAAAAAAAAAAAAAAAAAAAAAAAAAAAAAAAAAAAAAAAAAAAAAAAAAAAAAAAAAAAAAAAAAAAAAAAAAAAAAAAAAAAAAAAAAAAAAAAAAAAAAAAAAAAAAAAAAAAAAAAAAAAAAAAAAAAAAAAAAAAAAAAAAAAAAAAAAAAAAAAAAAAAAAAAAAAAAAAAAAAAAAAAAAAAAAAAAAAAAAAAAAAAAAAAAAAAAAAAAAAAAAAAAAAAAAAAAAAAAAAAAAAAAAAAAAAAAAAAAAAAAAAAAAAAAAAAAAAAAAAAAAAAAAAAAAAAAAAAAAAAAAAAAAAAAAAAAAAAAAAAAAAAAAAAAAAAAAAAAAAAAAAAAAAAAAAAAAAAAAAAAAAAAAAAAAAAAAAAAAAAAAAAAAAAAAAAAAAAAAAAAAAAAAAAAAAAAAAAAAAAAAAAAAAAAAAAAAAAAAAAAAAAAAAAAAAAAAAAAAAAAAAAAAAAAAAAAAAAAAAAAAAAAAAAAAAAAAAAAAAAAAAAAAAAAAAAAAAAAAAAAAAAAAAAAAAAAAAAAAAAAAAAAAAAAAAAAAAAAAAAAAAAAAAAAAAAAAAAAAAAAAAAAAAAAAAAAAAAAAAAAAAAAAAAAAAAAAAAAAAAAAAAAAAAAAAAAAAAAAAAAAAAAAAAAAAAAAAAAAAAAAAAAAAAAAAAAAAAAAAAAAAAAAAAAAAAAAAAAAAAAAAAAAAAAAAAAAAAAAAAAAAAAAAAAAAAAAAAAAAAAAAAAAAAAAAAAAAAAAAAAAAAAAAAAAAAAAAAAAAAAAAAAAAAAAAAAAAAAAAAAAAAAAAAAAAAAAAAAAAAAAAAAAAAAAAAAAAAAAAAAAAAAAAAAAAAAAAAAAAAAAAAAAAAAAAAAAAAAAAAAAAAAAAAAAAAAAAAAAAAAAAAAAAAAAAAAAAAAAAAAAAAAAAAAAAAAAAAAAAAAAAAAAAAAAAAAAAAAAAAAAAAAAAAAAAAAAAAAAAAAAAAAAAAAAAAAAAAAAAAAAAAAAAAAAAAAAAAAAAAAAAAAAAAAAAAAAAAAAAAAAAAAAAAAAAAAAAAAAAAAAAAAAAAAAAAAAAAAAAAAAAAAAAAAAAAAAAAAAAAAAAAAAAAAAAAAAAAAAAAAAAAAAAAAAAAAAAAAAAAAAAAAAAAAAAAAAAAAAAAAAAAAAAAAAAAAAAAAAAAAAAAAAAAAAAAAAAAAAAAAAAAAAAAAAAAAAAAAAAAAAAAAAAAAAAAAAAAAAAAAAAAAAAAAAAAAAAAAAAAAAAAAAAAAAAAAAAAAAAAAAAAAAAAAAAAAAAAAAAAAAAAAAAAAAAAAAAAAAAAAAAAAAAAAAAAAAAAAAAAAAAAAAAAAAAAAAAAAAAAAAAAAAAAAAAAAAAAAAAAAAAAAAAAAAAAAAAAAAAAAAAAAAAAAAAAAAAAAAAAAAAAAAAAAAAAAAAAAAAAAAAAAAAAAAAAAAAAAAAAAAAAAAAAAAAAAAAAAAAAAAAAAAAAAAAAAAAAAAAAAAAAAAAAAAAAAAAAAAAAAAAAAAAAAAAAAAAAAAAAAAAAAAAAAAAAAAAAAAAAAAAAAAAAAAAAAAAAAAAAAAAAAAAAAAAAAAAAAAAAAAAAAAAAAAAAAAAAAAAAAAAAAAAAAAAAAAAAAAAAAAAAAAAAAAAAAAAAAAAAAAAAAAAAAAAAAAAAAAAAAAAAAAAAAAAAAAAAAAAAAAAAAAAAAAAAAAAAAAAAAAAAAAAAAAAAAAAAAAAAAAAAAAAAAAAAAAAAAAAAAAAAAAAAAAAAAAAAAAAAAAAAAAAAAAAAAAAAAAAAAAAAAAAAAAAAAAAAAAAAAAAAAAAAAAAAAAAAAAAAAAAAAAAAAAAAAAAAAAAAAAAAAAAAAAAAAAAAAAAAAAAAAAAAAAAAAAAAAAAAAAAAAAAAAAAAAAAAAAAAAAAAAAAAAAAAAAAAAAAAAAAAAAAAAAAAAAAAAAAAAAAAAAAAAAAAAAAAAAAAAAAAAAAAAAAAAAAAAAAAAAAAAAAAAAAAAAAAAAAAAAAAAAAAAAAAAAAAAAAAAAAAAAAAAAAAAAAAAAAAAAAAAAAAAAAAAAAAAAAAAAAAAAAAAAAAAAAAAAAAAAAAAAAAAAAAAAAAAAAAAAAAAAAAAAAAAAAAAAAAAAAAAAAAAAAAAAAAAAAAAAAAAAAAAAAAAAAAAAAAAAAAAAAAAAAAAAAAAAAAAAAAAAAAAAAAAAAAAAAAAAAAAAAAAAAAAAAAAAAAAAAAAAAAAAAAAAAAAAAAAAAAAAAAAAAAAAAAAAAAAAAAAAAAAAAAAAAAAAAAAAAAAAAAAAAAAAAAAAAAAAAAAAAAAAAAAAAAAAAAAAAAAAAAAAAAAAAAAAAAAAAAAAAAAAAAAAAAAAAAAAAAAAAAAAAAAAAAAAAAAAAAAAAAAAAAAAAAAAAAAAAAAAAAAAAAAAAAAAAAAAAAAAAAAAAAAAAAAAAAAAAAAAAAAAAAAAAAAAAAAAAAAAAAAAAAAAAAAAAAAAAAAAAAAAAAAAAAAAAAAAAAAAAAAAAAAAAAAAAAAAAAAAAAAAAAAAAAAAAAAAAAAAAAAAAAAAAAAAAAAAAAAAAAAAAAAAAAAAAAAAAAAAAAAAAAAAAAAAAAAAAAAAAAAAAAAAAAAAAAAAAAAAAAAAAAAAAAAAAAAAAAAAAAAAAAAAAAAAAAAAAAAAAAAAAAAAAAAAAAAAAAAAAAAAAAAAAA
AAAAAAAAAAAAAAAAAAAAAAAAAAAAAAAAAAAAAAAAAAAAAAAAAAAAAAAAAAAAAAAAAAAAAAAAAAAAAAAAAAAAAAAAAAAAAAAAAAAAAAAAAAAAAAAAAAAAAAAAAAAAAAAAAAAAAAAAAAAAAAAAAAAAAAAAAAAAAAAAAAAAAAAAAAAAAAAAAAAAAAAAAAAAAAAAAAAAAAAAAAAAAAAAAAAAAAAAAAAAAAAAAAAAAAAAAAAAAAAAAAAAAAAAAAAAAAAAAAAAAAAAAAAAAAAAAAAAAAAAAAAAAAAAAAAAAAAAAAAAAAAAAAAAAAAAAAAAAAAAAAAAAAAAAAAAAAAAAAAAAAAAAAAAAAAAAAAAAAAAAAAAAAAAAAAAAAAAAAAAAAAAAAAAAAAAAAAAAAAAAAAAAAAAAAAAAAAAAAAAAAAAAAAAAAAAAAAAAAAAAAAAAAAAAAAAAAAAAAAAAAAAAAAAAAAAAAAAAAAAAAAAAAAAAAAAAAAAAAAAAAAAAAAAAAAAAAAAAAAAAAAAAAAAAAAAAAAAAAAAAAAAAAAAAAAAAAAAAAAAAAAAAAAAAAAAAAAAAAAAAAAAAAAAAAAAAAAAAAAAAAAAAAAAAAAAAAAAAAAAAAAAAAAAAAAAAAAAAAAAAAAAAAAAAAAAAAAAAAAAAAAAAAAAAAAAAAAAAAAAAAAAAAAAAAAAAAAAAAAAAAAAAAAAAAAAAAAAAAAAAAAAAAAAAAAAAAAAAAAAAAAAAAAAAAAAAAAAAAAAAAAAAAAAAAAAAAAAAAAAAAAAAAAAAAAAAAAAAAAAAAAAAAAAAAAAAAAAAAAAAAAAAAAAAAAAAAAAAAAAAAAAAAAAAAAAAAAAAAAAAAAAAAAAAAAAAAAAAAAAAAAAAAAAAAAAAAAAAAAAAAAAAAAAAAAAAAAAAAAAAAAAAAAAAAAAAAAAAAAAAAAAAAAAAAAAAAAAAAAAAAAAAAAAAAAAAAAAAAAAAAAAAAAAAAAAAAAAAAAAAAAAAAAAAAAAAAAAAAAAAAAAAAAAAAAAAAAAAAAAAAAAAAAAAAAAAAAAAAAAAAAAAAAAAAAAAAAAAAAAAAAAAAAAAAAAAAAAAAAAAAAAAAAAAAAAAAAAAAAAAAAAAAAAAAAAAAAAAAAAAAAAAAAAAAAAAAAAAAAAAAAAAAAAAAAAAAAAAAAAAAAAAAAAAAAAAAAAAAAAAAAAAAAAAAAAAAAAAAAAAAAAAAAAAAAAAAAAAAAAAAAAAAAAAAAAAAAAAAAAAAAAAAAAAAAAAAAAAAAAAAAAAAAAAAAAAAAAAAAAAAAAAAAAAAAAAAAAAAAAAAAAAAAAAAAAAAAAAAAAAAAAAAAAAAAAAAAAAAAAAAAAAAAAAAAAAAAAAAAAAAAAAAAAAAAAAAAAAAAAAAAAAAAAAAAAAAAAAAAAAAAAAAAAAAAAAAAAAAAAAAAAAAAAAAAAAAAAAAAAAAAAAAAAAAAAAAAAAAAAAAAAAAAAAAAAAAAAAAAAAAAAAAAAAAAAAAAAAAAAAAAAAAAAAAAAAAAAAAAAAAAAAAAAAAAAAAAAAAAAAAAAAAAAAAAAAAAAAAAAAAAAAAAAAAAAAAAAAAAAAAAAAAAAAAAAAAAAAAAAAAAAAAAAAAAAAAAAAAAAAAAAAAAAAAAAAAAAAAAAAAAAAAAAAAAAAAAAAAAAAAAAAAAAAAAAAAAAAAAAAAAAAAAAAAAAAAAAAAAAAAAAAAAAAAAAAAAAAAAAAAAAAAAAAAAAAAAAAAAAAAAAAAAAAAAAAAAAAAAAAAAAAAAAAAAAAAAAAAAAAAAAAAAAAAAAAAAAAAAAAAAAAAAAAAAAAAAAAAAAAAAAAAAAAAAAAAAAAAAAAAAAAAAAAAAAAAAAAAAAAAAAAAAAAAAAAAAAAAAAAAAAAAAAAAAAAAAAAAAAAAAAAAAAAAAAAAAAAAAAAAAAAAAAAAAAAAAAAAAAAAAAAAAAAAAAAAAAAAAAAAAAAAAAAAAAAAAAAAAAAAAAAAAAAAAAAAAAAAAAAAAAAAAAAAAAAAAAAAAAAAAAAAAAAAAAAAAAAAAAAAAAAAAAAAAAAAAAAAAAAAAAAAAAAAAAAAAAAAAAAAAAAAAAAAAAAAAAAAAAAAAAAAAAAAAAAAAAAAAAAAAAAAAAAAAAAAAAAAAAAAAAAAAAAAAAAAAAAAAAAAAAAAAAAAAAAAAAAAAAAAAAAAAAAAAAAAAAAAAAAAAAAAAAAAAAAAAAAAAAAAAAAAAAAAAAAAAAAAAAAAAAAAAAAAAAAAAAAAAAAAAAAAAAAAAAAAAAAAAAAAAAAAAAAAAAAAAAAAAAAAAAAAAAAAAAAAAAAAAAAAAAAAAAAAAAAAAAAAAAAAAAAAAAAAAAAAAAAAAAAAAAAAAAAAAAAAAAAAAAAAAAAAAAAAAAAAAAAAAAAAAAAAAAAAAAAAAAAAAAAAAAAAAAAAAAAAAAAAAAAAAAAAAAAAAAAAAAAAAAAAAAAAAAAAAAAAAAAAAAAAAAAAAAAAAAAAAAAAAAAAAAAAAAAAAAAAAAAAAAAAAAAAAAAAAAAAAAAAAAAAAAAAAAAAAAAAAAAAAAAAAAAAAAAAAAAAAAAAAAAAAAAAAAAAAAAAAAAAAAAAAAAAAAAAAAAAAAAAAAAAAAAAAAAAAAAAAAAAAAAAAAAAAAAAAAAAAAAAAAAAAAAAAAAAAAAAAAAAAAAAAAAAAAAAAAAAAAAAAAAAAAAAAAAAAAAAAAAAAAAAAAAAAAAAAAAAAAAAAAAAAAAAAAAAAAAAAAAAAAAAAAAAAAAAAAAAAAAAAAAAAAAAAAAAAAAAAAAAAAAAAAAAAAAAAAAAAAAAAAAAAAAAAAAAAAAAAAAAAAAAAAAAAAAAAAAAAAAAAAAAAAAAAAAAAAAAAAAAAAAAAAAAAAAAAAAAAAAAAAAAAAAAAAAAAAAAAAAAAAAAAAAAAAAAAAAAAAAAAAAAAAAAAAAAAAAAAAAAAAAAAAAAAAAAAAAAAAAAAAAAAAAAAAAAAAAAAAAAAAAAAAAAAAAAAAAAAAAAAAAAAAAAAAAAAAAAAAAAAAAAAAAAAAAAAAAAAAAAAAAAAAAAAAAAAAAAAAAAAAAAAAAAAAAAAAAAAAAAAAAAAAAAAAAAAAAAAAAAAAAAAAAAAAAAAAAAAAAAAAAAAAAAAAAAAAAAAAAAAAAAAAAAAAAAAAAAAAAAAAAAAAAAAAAAAAAAAAAAAAAAAAAAAAAAAAAAAAAAAAAAAAAAAAAAAAAAAAAAAAAAAAAAAAAAAAAAAAAAAAAAAAAAAAAAAAAAAAAAAAAAAAAAAAAAAAAAAAAAAAAAAAAAAAAAAAAAAAAAAAAAAAAAAAAAAAAAAAAAAAAAAAAAAAAAAAAAAAAAAAAAAAAAAAAAAAAAAAAAAAAAAAAAAAAAAAAAAAAAAAAAAAAAAAAAAAAAAAAAAAAAAAAAAAAAAAAAAAAAAAAAAAAAAAAAAAAAAAAAAAAAAAAAAAAAAAAAAAAAAAAAAAAAAAAAAAAAAAAAAAAAAAAAAAAAAAAAAAAAAAAAAAAAAAAAAAAAAAAAAAAAAAAAAAAAAAAAAAAAAAAAAAAAAAAAAAAAAAAAAAAAAAAAAAAAAAAAAAAAAAAAAAAAAAAAAAAAAAAAAAAAAAAAAAAAAAAAAAAAAAAAAAAAAAAAAAAAAAAAAAAAAAAAAAAAAAAAAAAAAAAAAAAAAAAAAAAAAAAAAAAAAAAAAAAAAAAAAAAAAAAAAAAAAAAAAAAAAAAAAAAAAAAAAAAAAAAAAAAAAAAAAAAAAAAAAAAAAAAAAAAAAAAAAAAAAAAAAAAAAAAAAAAAAAAAAAAAAAAAAAAAAAAAAAAAAAAAAAAAAAAAAAAAAAAAAAAAAAAAAAAAAAAAAAAAAAAAAAAAAAAAAAAAAAAAAAAAAAAAAAAAAAAAAAAAAAAAAAAAAAAAAAAAAAAAAAAAAAAAAAAAAAAAAAAAAAAAAAAAAAAAAAAAAAAAAAAAAAAAAAAAAAAAAAAAAAAAAAAAAAAAAAAAAAAAAAAAAAAAAAAAAAAAAAAAAAAAAAAAAAAAAAAAAAAAAAAAAAAAAAAAAAAAAAAAAAAAAA
AAAAAAAAAAAAAAAAAAAAAAAAAAAAAAAAAAAAAAAAAAAAAAAAAAAAAAAAAAAAAAAAAAAAAAAAAAAAAAAAAAAAAAAAAAAAAAAAAAAAAAAAAAAAAAAAAAAAAAAAAAAAAAAAAAAAAAAAAAAAAAAAAAAAAAAAAAAAAAAAAAAAAAAAAAAAAAAAAAAAAAAAAAAAAAAAAAAAAAAAAAAAAAAAAAAAAAAAAAAAAAAAAAAAAAAAAAAAAAAAAAAAAAAAAAAAAAAAAAAAAAAAAAAAAAAAAAAAAAAAAAAAAAAAAAAAAAAAAAAAAAAAAAAAAAAAAAAAAAAAAAAAAAAAAAAAAAAAAAAAAAAAAAAAAAAAAAAAAAAAAAAAAAAAAAAAAAAAAAAAAAAAAAAAAAAAAAAAAAAAAAAAAAAAAAAAAAAAAAAAAAAAAAAAAAAAAAAAAAAAAAAAAAAAAAAAAAAAAAAAAAAAAAAAAAAAAAAAAAAAAAAAAAAAAAAAAAAAAAAAAAAAAAAAAAAAAAAAAAAAAAAAAAAAAAAAAAAAAAAAAAAAAAAAAAAAAAAAAAAAAAAAAAAAAAAAAAAAAAAAAAAAAAAAAAAAAAAAAAAAAAAAAAAAAAAAAAAAAAAAAAAAAAAAAAAAAAAAAAAAAAAAAAAAAAAAAAAAAAAAAAAAAAAAAAAAAAAAAAAAAAAAAAAAAAAAAAAAAAAAAAAAAAAAAAAAAAAAAAAAAAAAAAAAAAAAAAAAAAAAAAAAAAAAAAAAAAAAAAAAAAAAAAAAAAAAAAAAAAAAAAAAAAAAAAAAAAAAAAAAAAAAAAAAAAAAAAAAAAAAAAAAAAAAAAAAAAAAAAAAAAAAAAAAAAAAAAAAAAAAAAAAAAAAAAAAAAAAAAAAAAAAAAAAAAAAAAAAAAAAAAAAAAAAAAAAAAAAAAAAAAAAAAAAAAAAAAAAAAAAAAAAAAAAAAAAAAAAAAAAAAAAAAAAAAAAAAAAAAAAAAAAAAAAAAAAAAAAAAAAAAAAAAAAAAAAAAAAAAAAAAAAAAAAAAAAAAAAAAAAAAAAAAAAAAAAAAAAAAAAAAAAAAAAAAAAAAAAAAAAAAAAAAAAAAAAAAAAAAAAAAAAAAAAAAAAAAAAAAAAAAAAAAAAAAAAAAAAAAAAAAAAAAAAAAAAAAAAAAAAAAAAAAAAAAAAAAAAAAAAAAAAAAAAAAAAAAAAAAAAAAAAAAAAAAAAAAAAAAAAAAAAAAAAAAAAAAAAAAAAAAAAAAAAAAAAAAAAAAAAAAAAAAAAAAAAAAAAAAAAAAAAAAAAAAAAAAAAAAAAAAAAAAAAAAAAAAAAAAAAAAAAAAAAAAAAAAAAAAAAAAAAAAAAAAAAAAAAAAAAAAAAAAAAAAAAAAAAAAAAAAAAAAAAAAAAAAAAAAAAAAAAAAAAAAAAAAAAAAAAAAAAAAAAAAAAAAAAAAAAAAAAAAAAAAAAAAAAAAAAAAAAAAAAAAAAAAAAAAAAAAAAAAAAAAAAAAAAAAAAAAAAAAAAAAAAAAAAAAAAAAAAAAAAAAAAAAAAAAAAAAAAAAAAAAAAAAAAAAAAAAAAAAAAAAAAAAAAAAAAAAAAAAAAAAAAAAAAAAAAAAAAAAAAAAAAAAAAAAAAAAAAAAAAAAAAAAAAAAAAAAAAAAAAAAAAAAAAAAAAAAAAAAAAAAAAAAAAAAAAAAAAAAAAAAAAAAAAAAAAAAAAAAAAAAAAAAAAAAAAAAAAAAAAAAAAAAAAAAAAAAAAAAAAAAAAAAAAAAAAAAAAAAAAAAAAAAAAAAAAAAAAAAAAAAAAAAAAAAAAAAAAAAAAAAAAAAAAAAAAAAAAAAAAAAAAAAAAAAAAAAAAAAAAAAAAAAAAAAAAAAAAAAAAAAAAAAAAAAAAAAAAAAAAAAAAAAAAAAAAAAAAAAAAAAAAAAAAAAAAAAAAAAAAAAAAAAAAAAAAAAAAAAAAAAAAAAAAAAAAAAAAAAAAAAAAAAAAAAAAAAAAAAAAAAAAAAAAAAAAAAAAAAAAAAAAAAAAAAAAAAAAAAAAAAAAAAAAAAAAAAAAAAAAAAAAAAAAAAAAAAAAAAAAAAAAAAAAAAAAAAAAAAAAAAAAAAAAAAAAAAAAAAAAAAAAAAAAAAAAAAAAAAAAAAAAAAAAAAAAAAAAAAAAAAAAAAAAAAAAAAAAAAAAAAAAAAAAAAAAAAAAAAAAAAAAAAAAAAAAAAAAAAAAAAAAAAAAAAAAAAAAAAAAAAAAAAAAAAAAAAAAAAAAAAAAAAAAAAAAAAAAAAAAAAAAAAAAAAAAAAAAAAAAAAAAAAAAAAAAAAAAAAAAAAAAAAAAAAAAAAAAAAAAAAAAAAAAAAAAAAAAAAAAAAAAAAAAAAAAAAAAAAAAAAAAAAAAAAAAAAAAAAAAAAAAAAAAAAAAAAAAAAAAAAAAAAAAAAAAAAAAAAAAAAAAAAAAAAAAAAAAAAAAAAAAAAAAAAAAAAAAAAAAAAAAAAAAAAAAAAAAAAAAAAAAAAAAAAAAAAAAAAAAAAAAAAAAAAAAAAAAAAAAAAAAAAAAAAAAAAAAAAAAAAAAAAAAAAAAAAAAAAAAAAAAAAAAAAAAAAAAAAAAAAAAAAAAAAAAAAAAAAAAAAAAAAAAAAAAAAAAAAAAAAAAAAAAAAAAAAAAAAAAAAAAAAAAAAAAAAAAAAAAAAAAAAAAAAAAAAAAAAAAAAAAAAAAAAAAAAAAAAAAAAAAAAAAAAAAAAAAAAAAAAAAAAAAAAAAAAAAAAAAAAAAAAAAAAAAAAAAAAAAAAAAAAAAAAAAAAAAAAAAAAAAAAAAAAAAAAAAAAAAAAAAAAAAAAAAAAAAAAAAAAAAAAAAAAAAAAAAAAAAAAAAAAAAAAAAAAAAAAAAAAAAAAAAAAAAAAAAAAAAAAAAAAAAAAAAAAAAAAAAAAAAAAAAAAAAAAAAAAAAAAAAAAAAAAAAAAAAAAAAAAAAAAAAAAAAAAAAAAAAAAAAAAAAAAAAAAAAAAAAAAAAAAAAAAAAAAAAAAAAAAAAAAAAAAAAAAAAAAAAAAAAAAAAAAAAAAAAAAAAAAAAAAAAAAAAAAAAAAAAAAAAAAAAAAAAAAAAAAAAAAAAAAAAAAAAAAAAAAAAAAAAAAAAAAAAAAAAAAAAAAAAAAAAAAAAAAAAAAAAAAAAAAAAAAAAAAAAAAAAAAAAAAAAAAAAAAAAAAAAAAAAAAAAAAAAAAAAAAAAAAAAAAAAAAAAAAAAAAAAAAAAAAAAAAAAAAAAAAAAAAAAAAAAAAAAAAAAAAAAAAAAAAAAAAAAAAAAAAAAAAAAAAAAAAAAAAAAAAAAAAAAAAAAAAAAAAAAAAAAAAAAAAAAAAAAAAAAAAAAAAAAAAAAAAAAAAAAAAAAAAAAAAAAAAAAAAAAAAAAAAAAAAAAAAAAAAAAAAAAAAAAAAAAAAAAAAAAAAAAAAAAAAAAAAAAAAAAAAAAAAAAAAAAAAAAAAAAAAAAAAAAAAAAAAAAAAAAAAAAAAAAAAAAAAAAAAAAAAAAAAAAAAAAAAAAAAAAAAAAAAAAAAAAAAAAAAAAAAAAAAAAAAAAAAAAAAAAAAAAAAAAAAAAAAAAAAAAAAAAAAAAAAAAAAAAAAAAAAAAAAAAAAAAAAAAAAAAAAAAAAAAAAAAAAAAAAAAAAAAAAAAAAAAAAAAAAAAAAAAAAAAAAAAAAAAAAAAAAAAAAAAAAAAAAAAAAAAAAAAAAAAAAAAAAAAAAAAAAAAAAAAAAAAAAAAAAAAAAAAAAAAAAAAAAAAAAAAAAAAAAAAAAAAAAAAAAAAAAAAAAAAAAAAAAAAAAAAAAAAAAAAAAAAAAAAAAAAAAAAAAAAAAAAAAAAAAAAAAAAAAAAAAAAAAAAAAAAAAAAAAAAAAAAAAAAAAAAAAAAAAAAAAAAAAAAAAAAAAAAAAAAAAAAAAAAAAAAAAAAAAAAAAAAAAAAAAAAAAAAAAAAAAAAAAAAAAAAAAAAAAAAAAAAAAAAAAAAAAAAAAAAAAAAAAAAAAAAAAAAAAAAAAAAAAAAAAAAAAAAAAAAAAAAAAAAAAAAAAAAAAAAAAAAAAAAAAAAAAAAAAAAAAAAAAAAAAAAAAAAAAAAAAAA
AAAAAAAAAAAAAAAAAAAAAAAAAAAAAAAAAAAAAAAAAAAAAAAAAAAAAAAAAAAAAAAAAAAAAAAAAAAAAAAAAAAAAAAAAAAAAAAAAAAAAAAAAAAAAAAAAAAAAAAAAAAAAAAAAAAAAAAAAAAAAAAAAAAAAAAAAAAAAAAAAAAAAAAAAAAAAAAAAAAAAAAAAAAAAAAAAAAAAAAAAAAAAAAAAAAAAAAAAAAAAAAAAAAAAAAAAAAAAAAAAAAAAAAAAAAAAAAAAAAAAAAAAAAAAAAAAAAAAAAAAAAAAAAAAAAAAAAAAAAAAAAAAAAAAAAAAAAAAAAAAAAAAAAAAAAAAAAAAAAAAAAAAAAAAAAAAAAAAAAAAAAAAAAAAAAAAAAAAAAAAAAAAAAAAAAAAAAAAAAAAAAAAAAAAAAAAAAAAAAAAAAAAAAAAAAAAAAAAAAAAAAAAAAAAAAAAAAAAAAAAAAAAAAAAAAAAAAAAAAAAAAAAAAAAAAAAAAAAAAAAAAAAAAAAAAAAAAAAAAAAAAAAAAAAAAAAAAAAAAAAAAAAAAAAAAAAAAAAAAAAAAAAAAAAAAAAAAAAAAAAAAAAAAAAAAAAAAAAAAAAAAAAAAAAAAAAAAAAAAAAAAAAAAAAAAAAAAAAAAAAAAAAAAAAAAAAAAAAAAAAAAAAAAAAAAAAAAAAAAAAAAAAAAAAAAAAAAAAAAAAAAAAAAAAAAAAAAAAAAAAAAAAAAAAAAAAAAAAAAAAAAAAAAAAAAAAAAAAAAAAAAAAAAAAAAAAAAAAAAAAAAAAAAAAAAAAAAAAAAAAAAAAAAAAAAAAAAAAAAAAAAAAAAAAAAAAAAAAAAAAAAAAAAAAAAAAAAAAAAAAAAAAAAAAAAAAAAAAAAAAAAAAAAAAAAAAAAAAAAAAAAAAAAAAAAAAAAAAAAAAAAAAAAAAAAAAAAAAAAAAAAAAAAAAAAAAAAAAAAAAAAAAAAAAAAAAAAAAAAAAAAAAAAAAAAAAAAAAAAAAAAAAAAAAAAAAAAAAAAAAAAAAAAAAAAAAAAAAAAAAAAAAAAAAAAAAAAAAAAAAAAAAAAAAAAAAAAAAAAAAAAAAAAAAAAAAAAAAAAAAAAAAAAAAAAAAAAAAAAAAAAAAAAAAAAAAAAAAAAAAAAAAAAAAAAAAAAAAAAAAAAAAAAAAAAAAAAAAAAAAAAAAAAAAAAAAAAAAAAAAAAAAAAAAAAAAAAAAAAAAAAAAAAAAAAAAAAAAAAAAAAAAAAAAAAAAAAAAAAAAAAAAAAAAAAAAAAAAAAAAAAAAAAAAAAAAAAAAAAAAAAAAAAAAAAAAAAAAAAAAAAAAAAAAAAAAAAAAAAAAAAAAAAAAAAAAAAAAAAAAAAAAAAAAAAAAAAAAAAAAAAAAAAAAAAAAAAAAAAAAAAAAAAAAAAAAAAAAAAAAAAAAAAAAAAAAAAAAAAAAAAAAAAAAAAAAAAAAAAAAAAAAAAAAAAAAAAAAAAAAAAAAAAAAAAAAAAAAAAAAAAAAAAAAAAAAAAAAAAAAAAAAAAAAAAAAAAAAAAAAAAAAAAAAAAAAAAAAAAAAAAAAAAAAAAAAAAAAAAAAAAAAAAAAAAAAAAAAAAAAAAAAAAAAAAAAAAAAAAAAAAAAAAAAAAAAAAAAAAAAAAAAAAAAAAAAAAAAAAAAAAAAAAAAAAAAAAAAAAAAAAAAAAAAAAAAAAAAAAAAAAAAAAAAAAAAAAAAAAAAAAAAAAAAAAAAAAAAAAAAAAAAAAAAAAAAAAAAAAAAAAAAAAAAAAAAAAAAAAAAAAAAAAAAAAAAAAAAAAAAAAAAAAAAAAAAAAAAAAAAAAAAAAAAAAAAAAAAAAAAAAAAAAAAAAAAAAAAAAAAAAAAAAAAAAAAAAAAAAAAAAAAAAAAAAAAAAAAAAAAAAAAAAAAAAAAAAAAAAAAAAAAAAAAAAAAAAAAAAAAAAAAAAAAAAAAAAAAAAAAAAAAAAAAAAAAAAAAAAAAAAAAAAAAAAAAAAAAAAAAAAAAAAAAAAAAAAAAAAAAAAAAAAAAAAAAAAAAAAAAAAAAAAAAAAAAAAAAAAAAAAAAAAAAAAAAAAAAAAAAAAAAAAAAAAAAAAAAAAAAAAAAAAAAAAAAAAAAAAAAAAAAAAAAAAAAAAAAAAAAAAAAAAAAAAAAAAAAAAAAAAAAAAAAAAAAAAAAAAAAAAAAAAAAAAAAAAAAAAAAAAAAAAAAAAAAAAAAAAAAAAAAAAAAAAAAAAAAAAAAAAAAAAAAAAAAAAAAAAAAAAAAAAAAAAAAAAAAAAAAAAAAAAAAAAAAAAAAAAAAAAAAAAAAAAAAAAAAAAAAAAAAAAAAAAAAAAAAAAAAAAAAAAAAAAAAAAAAAAAAAAAAAAAAAAAAAAAAAAAAAAAAAAAAAAAAAAAAAAAAAAAAAAAAAAAAAAAAAAAAAAAAAAAAAAAAAAAAAAAAAAAAAAAAAAAAAAAAAAAAAAAAAAAAAAAAAAAAAAAAAAAAAAAAAAAAAAAAAAAAAAAAAAAAAAAAAAAAAAAAAAAAAAAAAAAAAAAAAAAAAAAAAAAAAAAAAAAAAAAAAAAAAAAAAAAAAAAAAAAAAAAAAAAAAAAAAAAAAAAAAAAAAAAAAAAAAAAAAAAAAAAAAAAAAAAAAAAAAAAAAAAAAAAAAAAAAAAAAAAAAAAAAAAAAAAAAAAAAAAAAAAAAAAAAAAAAAAAAAAAAAAAAAAAAAAAAAAAAAAAAAAAAAAAAAAAAAAAAAAAAAAAAAAAAAAAAAAAAAAAAAAAAAAAAAAAAAAAAAAAAAAAAAAAAAAAAAAAAAAAAAAAAAAAAAAAAAAAAAAAAAAAAAAAAAAAAAAAAAAAAAAAAAAAAAAAAAAAAAAAAAAAAAAAAAAAAAAAAAAAAAAAAAAAAAAAAAAAAAAAAAAAAAAAAAAAAAAAAAAAAAAAAAAAAAAAAAAAAAAAAAAAAAAAAAAAAAAAAAAAAAAAAAAAAAAAAAAAAAAAAAAAAAAAAAAAAAAAAAAAAAAAAAAAAAAAAAAAAAAAAAAAAAAAAAAAAAAAAAAAAAAAAAAAAAAAAAAAAAAAAAAAAAAAAAAAAAAAAAAAAAAAAAAAAAAAAAAAAAAAAAAAAAAAAAAAAAAAAAAAAAAAAAAAAAAAAAAAAAAAAAAAAAAAAAAAAAAAAAAAAAAAAAAAAAAAAAAAAAAAAAAAAAAAAAAAAAAAAAAAAAAAAAAAAAAAAAAAAAAAAAAAAAAAAAAAAAAAAAAAAAAAAAAAAAAAAAAAAAAAAAAAAAAAAAAAAAAAAAAAAAAAAAAAAAAAAAAAAAAAAAAAAAAAAAAAAAAAAAAAAAAAAAAAAAAAAAAAAAAAAAAAAAAAAAAAAAAAAAAAAAAAAAAAAAAAAAAAAAAAAAAAAAAAAAAAAAAAAAAAAAAAAAAAAAAAAAAAAAAAAAAAAAAAAAAAAAAAAAAAAAAAAAAAAAAAAAAAAAAAAAAAAAAAAAAAAAAAAAAAAAAAAAAAAAAAAAAAAAAAAAAAAAAAAAAAAAAAAAAAAAAAAAAAAAAAAAAAAAAAAAAAAAAAAAAAAAAAAAAAAAAAAAAAAAAAAAAAAAAAAAAAAAAAAAAAAAAAAAAAAAAAAAAAAAAAAAAAAAAAAAAAAAAAAAAAAAAAAAAAAAAAAAAAAAAAAAAAAAAAAAAAAAAAAAAAAAAAAAAAAAAAAAAAAAAAAAAAAAAAAAAAAAAAAAAAAAAAAAAAAAAAAAAAAAAAAAAAAAAAAAAAAAAAAAAAAAAAAAAAAAAAAAAAAAAAAAAAAAAAAAAAAAAAAAAAAAAAAAAAAAAAAAAAAAAAAAAAAAAAAAAAAAAAAAAAAAAAAAAAAAAAAAAAAAAAAAAAAAAAAAAAAAAAAAAAAAAAAAAAAAAAAAAAAAAAAAAAAAAAAAAAAAAAAAAAAAAAAAAAAAAAAAAAAAAAAAAAAAAAAAAAAAAAAAAAAAAAAAAAAAAAAAAAAAAAAAAAAAAAAAAAAAAAAAAAAAAAAAAAAAAAAAAAAAAAAAAAAAAAAAAAAAAAAAAAAAAAAAAAAAAAAAAAAAAAAAAAAAAAAAAAAAAAAAAAAAAAAAAAAAAAAAAAAAAAAAA
AAAAAAAAAAAAAAAAAAAAAAAAAAAAAAAAAAAAAAAAAAAAAAAAAAAAAAAAAAAAAAAAAAAAAAAAAAAAAAAAAAAAAAAAAAAAAAAAAAAAAAAAAAAAAAAAAAAAAAAAAAAAAAAAAAAAAAAAAAAAAAAAAAAAAAAAAAAAAAAAAAAAAAAAAAAAAAAAAAAAAAAAAAAAAAAAAAAAAAAAAAAAAAAAAAAAAAAAAAAAAAAAAAAAAAAAAAAAAAAAAAAAAAAAAAAAAAAAAAAAAAAAAAAAAAAAAAAAAAAAAAAAAAAAAAAAAAAAAAAAAAAAAAAAAAAAAAAAAAAAAAAAAAAAAAAAAAAAAAAAAAAAAAAAAAAAAAAAAAAAAAAAAAAAAAAAAAAAAAAAAAAAAAAAAAAAAAAAAAAAAAAAAAAAAAAAAAAAAAAAAAAAAAAAAAAAAAAAAAAAAAAAAAAAAAAAAAAAAAAAAAAAAAAAAAAAAAAAAAAAAAAAAAAAAAAAAAAAAAAAAAAAAAAAAAAAAAAAAAAAAAAAAAAAAAAAAAAAAAAAAAAAAAAAAAAAAAAAAAAAAAAAAAAAAAAAAAAAAAAAAAAAAAAAAAAAAAAAAAAAAAAAAAAAAAAAAAAAAAAAAAAAAAAAAAAAAAAAAAAAAAAAAAAAAAAAAAAAAAAAAAAAAAAAAAAAAAAAAAAAAAAAAAAAAAAAAAAAAAAAAAAAAAAAAAAAAAAAAAAAAAAAAAAAAAAAAAAAAAAAAAAAAAAAAAAAAAAAAAAAAAAAAAAAAAAAAAAAAAAAAAAAAAAAAAAAAAAAAAAAAAAAAAAAAAAAAAAAAAAAAAAAAAAAAAAAAAAAAAAAAAAAAAAAAAAAAAAAAAAAAAAAAAAAAAAAAAAAAAAAAAAAAAAAAAAAAAAAAAAAAAAAAAAAAAAAAAAAAAAAAAAAAAAAAAAAAAAAAAAAAAAAAAAAAAAAAAAAAAAAAAAAAAAAAAAAAAAAAAAAAAAAAAAAAAAAAAAAAAAAAAAAAAAAAAAAAAAAAAAAAAAAAAAAAAAAAAAAAAAAAAAAAAAAAAAAAAAAAAAAAAAAAAAAAAAAAAAAAAAAAAAAAAAAAAAAAAAAAAAAAAAAAAAAAAAAAAAAAAAAAAAAAAAAAAAAAAAAAAAAAAAAAAAAAAAAAAAAAAAAAAAAAAAAAAAAAAAAAAAAAAAAAAAAAAAAAAAAAAAAAAAAAAAAAAAAAAAAAAAAAAAAAAAAAAAAAAAAAAAAAAAAAAAAAAAAAAAAAAAAAAAAAAAAAAAAAAAAAAAAAAAAAAAAAAAAAAAAAAAAAAAAAAAAAAAAAAAAAAAAAAAAAAAAAAAAAAAAAAAAAAAAAAAAAAAAAAAAAAAAAAAAAAAAAAAAAAAAAAAAAAAAAAAAAAAAAAAAAAAAAAAAAAAAAAAAAAAAAAAAAAAAAAAAAAAAAAAAAAAAAAAAAAAAAAAAAAAAAAAAAAAAAAAAAAAAAAAAAAAAAAAAAAAAAAAAAAAAAAAAAAAAAAAAAAAAAAAAAAAAAAAAAAAAAAAAAAAAAAAAAAAAAAAAAAAAAAAAAAAAAAAAAAAAAAAAAAAAAAAAAAAAAAAAAAAAAAAAAAAAAAAAAAAAAAAAAAAAAAAAAAAAAAAAAAAAAAAAAAAAAAAAAAAAAAAAAAAAAAAAAAAAAAAAAAAAAAAAAAAAAAAAAAAAAAAAAAAAAAAAAAAAAAAAAAAAAAAAAAAAAAAAAAAAAAAAAAAAAAAAAAAAAAAAAAAAAAAAAAAAAAAAAAAAAAAAAAAAAAAAAAAAAAAAAAAAAAAAAAAAAAAAAAAAAAAAAAAAAAAAAAAAAAAAAAAAAAAAAAAAAAAAAAAAAAAAAAAAAAAAAAAAAAAAAAAAAAAAAAAAAAAAAAAAAAAAAAAAAAAAAAAAAAAAAAAAAAAAAAAAAAAAAAAAAAAAAAAAAAAAAAAAAAAAAAAAAAAAAAAAAAAAAAAAAAAAAAAAAAAAAAAAAAAAAAAAAAAAAAAAAAAAAAAAAAAAAAAAAAAAAAAAAAAAAAAAAAAAAAAAAAAAAAAAAAAAAAAAAAAAAAAAAAAAAAAAAAAAAAAAAAAAAAAAAAAAAAAAAAAAAAAAAAAAAAAAAAAAAAAAAAAAAAAAAAAAAAAAAAAAAAAAAAAAAAAAAAAAAAAAAAAAAAAAAAAAAAAAAAAAAAAAAAAAAAAAAAAAAAAAAAAAAAAAAAAAAAAAAAAAAAAAAAAAAAAAAAAAAAAAAAAAAAAAAAAAAAAAAAAAAAAAAAAAAAAAAAAAAAAAAAAAAAAAAAAAAAAAAAAAAAAAAAAAAAAAAAAAAAAAAAAAAAAAAAAAAAAAAAAAAAAAAAAAAAAAAAAAAAAAAAAAAAAAAAAAAAAAAAAAAAAAAAAAAAAAAAAAAAAAAAAAAAAAAAAAAAAAAAAAAAAAAAAAAAAAAAAAAAAAAAAAAAAAAAAAAAAAAAAAAAAAAAAAAAAAAAAAAAAAAAAAAAAAAAAAAAAAAAAAAAAAAAAAAAAAAAAAAAAAAAAAAAAAAAAAAAAAAAAAAAAAAAAAAAAAAAAAAAAAAAAAAAAAAAAAAAAAAAAAAAAAAAAAAAAAAAAAAAAAAAAAAAAAAAAAAAAAAAAAAAAAAAAAAAAAAAAAAAAAAAAAAAAAAAAAAAAAAAAAAAAAAAAAAAAAAAAAAAAAAAAAAAAAAAAAAAAAAAAAAAAAAAAAAAAAAAAAAAAAAAAAAAAAAAAAAAAAAAAAAAAAAAAAAAAAAAAAAAAAAAAAAAAAAAAAAAAAAAAAAAAAAAAAAAAAAAAAAAAAAAAAAAAAAAAAAAAAAAAAAAAAAAAAAAAAAAAAAAAAAAAAAAAAAAAAAAAAAAAAAAAAAAAAAAAAAAAAAAAAAAAAAAAAAAAAAAAAAAAAAAAAAAAAAAAAAAAAAAAAAAAAAAAAAAAAAAAAAAAAAAAAAAAAAAAAAAAAAAAAAAAAAAAAAAAAAAAAAAAAAAAAAAAAAAAAAAAAAAAAAAAAAAAAAAAAAAAAAAAAAAAAAAAAAAAAAAAAAAAAAAAAAAAAAAAAAAAAAAAAAAAAAAAAAAAAAAAAAAAAAAAAAAAAAAAAAAAAAAAAAAAAAAAAAAAAAAAAAAAAAAAAAAAAAAAAAAAAAAAAAAAAAAAAAAAAAAAAAAAAAAAAAAAAAAAAAAAAAAAAAAAAAAAAAAAAAAAAAAAAAAAAAAAAAAAAAAAAAAAAAAAAAAAAAAAAAAAAAAAAAAAAAAAAAAAAAAAAAAAAAAAAAAAAAAAAAAAAAAAAAAAAAAAAAAAAAAAAAAAAAAAAAAAAAAAAAAAAAAAAAAAAAAAAAAAAAAAAAAAAAAAAAAAAAAAAAAAAAAAAAAAAAAAAAAAAAAAAAAAAAAAAAAAAAAAAAAAAAAAAAAAAAAAAAAAAAAAAAAAAAAAAAAAAAAAAAAAAAAAAAAAAAAAAAAAAAAAAAAAAAAAAAAAAAAAAAAAAAAAAAAAAAAAAAAAAAAAAAAAAAAAAAAAAAAAAAAAAAAAAAAAAAAAAAAAAAAAAAAAAAAAAAAAAAAAAAAAAAAAAAAAAAAAAAAAAAAAAAAAAAAAAAAAAAAAAAAAAAAAAAAAAAAAAAAAAAAAAAAAAAAAAAAAAAAAAAAAAAAAAAAAAAAAAAAAAAAAAAAAAAAAAAAAAAAAAAAAAAAAAAAAAAAAAAAAAAAAAAAAAAAAAAAAAAAAAAAAAAAAAAAAAAAAAAAAAAAAAAAAAAAAAAAAAAAAAAAAAAAAAAAAAAAAAAAAAAAAAAAAAAAAAAAAAAAAAAAAAAAAAAAAAAAAAAAAAAAAAAAAAAAAAAAAAAAAAAAAAAAAAAAAAAAAAAAAAAAAAAAAAAAAAAAAAAAAAAAAAAAAAAAAAAAAAAAAAAAAAAAAAAAAAAAAAAAAAAAAAAAAAAAAAAAAAAAAAAAAAAAAAAAAAAAAAAAAAAAAAAAAAAAAAAAAAAAAAAAAAAAAAAAAAAAAAAAAAAAAAAAAAAAAAAAAAAAAAAAAAAAAAAAAAAAAAAAAAAAAAAAAAAAAAAAAAAAAAAAAAAAAAAAAAAAAAAAAAAAAAAAAAAAAAAAAAAAAAAAAA
AAAAAAAAAAAAAAAAAAAAAAAAAAAAAAAAAAAAAAAAAAAAAAAAAAAAAAAAAAAAAAAAAAAAAAAAAAAAAAAAAAAAAAAAAAAAAAAAAAAAAAAAAAAAAAAAAAAAAAAAAAAAAAAAAAAAAAAAAAAAAAAAAAAAAAAAAAAAAAAAAAAAAAAAAAAAAAAAAAAAAAAAAAAAAAAAAAAAAAAAAAAAAAAAAAAAAAAAAAAAAAAAAAAAAAAAAAAAAAAAAAAAAAAAAAAAAAAAAAAAAAAAAAAAAAAAAAAAAAAAAAAAAAAAAAAAAAAAAAAAAAAAAAAAAAAAAAAAAAAAAAAAAAAAAAAAAAAAAAAAAAAAAAAAAAAAAAAAAAAAAAAAAAAAAAAAAAAAAAAAAAAAAAAAAAAAAAAAAAAAAAAAAAAAAAAAAAAAAAAAAAAAAAAAAAAAAAAAAAAAAAAAAAAAAAAAAAAAAAAAAAAAAAAAAAAAAAAAAAAAAAAAAAAAAAAAAAAAAAAAAAAAAAAAAAAAAAAAAAAAAAAAAAAAAAAAAAAAAAAAAAAAAAAAAAAAAAAAAAAAAAAAAAAAAAAAAAAAAAAAAAAAAAAAAAAAAAAAAAAAAAAAAAAAAAAAAAAAAAAAAAAAAAAAAAAAAAAAAAAAAAAAAAAAAAAAAAAAAAAAAAAAAAAAAAAAAAAAAAAAAAAAAAAAAAAAAAAAAAAAAAAAAAAAAAAAAAAAAAAAAAAAAAAAAAAAAAAAAAAAAAAAAAAAAAAAAAAAAAAAAAAAAAAAAAAAAAAAAAAAAAAAAAAAAAAAAAAAAAAAAAAAAAAAAAAAAAAAAAAAAAAAAAAAAAAAAAAAAAAAAAAAAAAAAAAAAAAAAAAAAAAAAAAAAAAAAAAAAAAAAAAAAAAAAAAAAAAAAAAAAAAAAAAAAAAAAAAAAAAAAAAAAAAAAAAAAAAAAAAAAAAAAAAAAAAAAAAAAAAAAAAAAAAAAAAAAAAAAAAAAAAAAAAAAAAAAAAAAAAAAAAAAAAAAAAAAAAAAAAAAAAAAAAAAAAAAAAAAAAAAAAAAAAAAAAAAAAAAAAAAAAAAAAAAAAAAAAAAAAAAAAAAAAAAAAAAAAAAAAAAAAAAAAAAAAAAAAAAAAAAAAAAAAAAAAAAAAAAAAAAAAAAAAAAAAAAAAAAAAAAAAAAAAAAAAAAAAAAAAAAAAAAAAAAAAAAAAAAAAAAAAAAAAAAAAAAAAAAAAAAAAAAAAAAAAAAAAAAAAAAAAAAAAAAAAAAAAAAAAAAAAAAAAAAAAAAAAAAAAAAAAAAAAAAAAAAAAAAAAAAAAAAAAAAAAAAAAAAAAAAAAAAAAAAAAAAAAAAAAAAAAAAAAAAAAAAAAAAAAAAAAAAAAAAAAAAAAAAAAAAAAAAAAAAAAAAAAAAAAAAAAAAAAAAAAAAAAAAAAAAAAAAAAAAAAAAAAAAAAAAAAAAAAAAAAAAAAAAAAAAAAAAAAAAAAAAAAAAAAAAAAAAAAAAAAAAAAAAAAAAAAAAAAAAAAAAAAAAAAAAAAAAAAAAAAAAAAAAAAAAAAAAAAAAAAAAAAAAAAAAAAAAAAAAAAAAAAAAAAAAAAAAAAAAAAAAAAAAAAAAAAAAAAAAAAAAAAAAAAAAAAAAAAAAAAAAAAAAAAAAAAAAAAAAAAAAAAAAAAAAAAAAAAAAAAAAAAAAAAAAAAAAAAAAAAAAAAAAAAAAAAAAAAAAAAAAAAAAAAAAAAAAAAAAAAAAAAAAAAAAAAAAAAAAAAAAAAAAAAAAAAAAAAAAAAAAAAAAAAAAAAAAAAAAAAAAAAAAAAAAAAAAAAAAAAAAAAAAAAAAAAAAAAAAAAAAAAAAAAAAAAAAAAAAAAAAAAAAAAAAAAAAAAAAAAAAAAAAAAAAAAAAAAAAAAAAAAAAAAAAAAAAAAAAAAAAAAAAAAAAAAAAAAAAAAAAAAAAAAAAAAAAAAAAAAAAAAAAAAAAAAAAAAAAAAAAAAAAAAAAAAAAAAAAAAAAAAAAAAAAAAAAAAAAAAAAAAAAAAAAAAAAAAAAAAAAAAAAAAAAAAAAAAAAAAAAAAAAAAAAAAAAAAAAAAAAAAAAAAAAAAAAAAAAAAAAAAAAAAAAAAAAAAAAAAAAAAAAAAAAAAAAAAAAAAAAAAAAAAAAAAAAAAAAAAAAAAAAAAAAAAAAAAAAAAAAAAAAAAAAAAAAAAAAAAAAAAAAAAAAAAAAAAAAAAAAAAAAAAAAAAAAAAAAAAAAAAAAAAAAAAAAAAAAAAAAAAAAAAAAAAAAAAAAAAAAAAAAAAAAAAAAAAAAAAAAAAAAAAAAAAAAAAAAAAAAAAAAAAAAAAAAAAAAAAAAAAAAAAAAAAAAAAAAAAAAAAAAAAAAAAAAAAAAAAAAAAAAAAAAAAAAAAAAAAAAAAAAAAAAAAAAAAAAAAAAAAAAAAAAAAAAAAAAAAAAAAAAAAAAAAAAAAAAAAAAAAAAAAAAAAAAAAAAAAAAAAAAAAAAAAAAAAAAAAAAAAAAAAAAAAAAAAAAAAAAAAAAAAAAAAAAAAAAAAAAAAAAAAAAAAAAAAAAAAAAAAAAAAAAAAAAAAAAAAAAAAAAAAAAAAAAAAAAAAAAAAAAAAAAAAAAAAAAAAAAAAAAAAAAAAAAAAAAAAAAAAAAAAAAAAAAAAAAAAAAAAAAAAAAAAAAAAAAAAAAAAAAAAAAAAAAAAAAAAAAAAAAAAAAAAAAAAAAAAAAAAAAAAAAAAAAAAAAAAAAAAAAAAAAAAAAAAAAAAAAAAAAAAAAAAAAAAAAAAAAAAAAAAAAAAAAAAAAAAAAAAAAAAAAAAAAAAAAAAAAAAAAAAAAAAAAAAAAAAAAAAAAAAAAAAAAAAAAAAAAAAAAAAAAAAAAAAAAAAAAAAAAAAAAAAAAAAAAAAAAAAAAAAAAAAAAAAAAAAAAAAAAAAAAAAAAAAAAAAAAAAAAAAAAAAAAAAAAAAAAAAAAAAAAAAAAAAAAAAAAAAAAAAAAAAAAAAAAAAAAAAAAAAAAAAAAAAAAAAAAAAAAAAAAAAAAAAAAAAAAAAAAAAAAAAAAAAAAAAAAAAAAAAAAAAAAAAAAAAAAAAAAAAAAAAAAAAAAAAAAAAAAAAAAAAAAAAAAAAAAAAAAAAAAAAAAAAAAAAAAAAAAAAAAAAAAAAAAAAAAAAAAAAAAAAAAAAAAAAAAAAAAAAAAAAAAAAAAAAAAAAAAAAAAAAAAAAAAAAAAAAAAAAAAAAAAAAAAAAAAAAAAAAAAAAAAAAAAAAAAAAAAAAAAAAAAAAAAAAAAAAAAAAAAAAAAAAAAAAAAAAAAAAAAAAAAAAAAAAAAAAAAAAAAAAAAAAAAAAAAAAAAAAAAAAAAAAAAAAAAAAAAAAAAAAAAAAAAAAAAAAAAAAAAAAAAAAAAAAAAAAAAAAAAAAAAAAAAAAAAAAAAAAAAAAAAAAAAAAAAAAAAAAAAAAAAAAAAAAAAAAAAAAAAAAAAAAAAAAAAAAAAAAAAAAAAAAAAAAAAAAAAAAAAAAAAAAAAAAAAAAAAAAAAAAAAAAAAAAAAAAAAAAAAAAAAAAAAAAAAAAAAAAAAAAAAAAAAAAAAAAAAAAAAAAAAAAAAAAAAAAAAAAAAAAAAAAAAAAAAAAAAAAAAAAAAAAAAAAAAAAAAAAAAAAAAAAAAAAAAAAAAAAAAAAAAAAAAAAAAAAAAAAAAAAAAAAAAAAAAAAAAAAAAAAAAAAAAAAAAAAAAAAAAAAAAAAAAAAAAAAAAAAAAAAAAAAAAAAAAAAAAAAAAAAAAAAAAAAAAAAAAAAAAAAAAAAAAAAAAAAAAAAAAAAAAAAAAAAAAAAAAAAAAAAAAAAAAAAAAAAAAAAAAAAAAAAAAAAAAAAAAAAAAAAAAAAAAAAAAAAAAAAAAAAAAAAAAAAAAAAAAAAAAAAAAAAAAAAAAAAAAAAAAAAAAAAAAAAAAAAAAAAAAAAAAAAAAAAAAAAAAAAAAAAAAAAAAAAAAAAAAAAAAAAAAAAAAAAAAAAAAAAAAAAAAAAAAAAAAAAAAAAAAAAAAAAAAAAAAAAAAAAAAAAAAAAAAAAAAAAAAAAAAAAAAAAAAAAAAAAAAAAAAAAAAAAAAAAAAAAA
AAAAAAAAAAAAAAAAAAAAAAAAAAAAAAAAAAAAAAAAAAAAAAAAAAAAAAAAAAAAAAAAAAAAAAAAAAAAAAAAAAAAAAAAAAAAAAAAAAAAAAAAAAAAAAAAAAAAAAAAAAAAAAAAAAAAAAAAAAAAAAAAAAAAAAAAAAAAAAAAAAAAAAAAAAAAAAAAAAAAAAAAAAAAAAAAAAAAAAAAAAAAAAAAAAAAAAAAAAAAAAAAAAAAAAAAAAAAAAAAAAAAAAAAAAAAAAAAAAAAAAAAAAAAAAAAAAAAAAAAAAAAAAAAAAAAAAAAAAAAAAAAAAAAAAAAAAAAAAAAAAAAAAAAAAAAAAAAAAAAAAAAAAAAAAAAAAAAAAAAAAAAAAAAAAAAAAAAAAAAAAAAAAAAAAAAAAAAAAAAAAAAAAAAAAAAAAAAAAAAAAAAAAAAAAAAAAAAAAAAAAAAAAAAAAAAAAAAAAAAAAAAAAAAAAAAAAAAAAAAAAAAAAAAAAAAAAAAAAAAAAAAAAAAAAAAAAAAAAAAAAAAAAAAAAAAAAAAAAAAAAAAAAAAAAAAAAAAAAAAAAAAAAAAAAAAAAAAAAAAAAAAAAAAAAAAAAAAAAAAAAAAAAAAAAAAAAAAAAAAAAAAAAAAAAAAAAAAAAAAAAAAAAAAAAAAAAAAAAAAAAAAAAAAAAAAAAAAAAAAAAAAAAAAAAAAAAAAAAAAAAAAAAAAAAAAAAAAAAAAAAAAAAAAAAAAAAAAAAAAAAAAAAAAAAAAAAAAAAAAAAAAAAAAAAAAAAAAAAAAAAAAAAAAAAAAAAAAAAAAAAAAAAAAAAAAAAAAAAAAAAAAAAAAAAAAAAAAAAAAAAAAAAAAAAAAAAAAAAAAAAAAAAAAAAAAAAAAAAAAAAAAAAAAAAAAAAAAAAAAAAAAAAAAAAAAAAAAAAAAAAAAAAAAAAAAAAAAAAAAAAAAAAAAAAAAAAAAAAAAAAAAAAAAAAAAAAAAAAAAAAAAAAAAAAAAAAAAAAAAAAAAAAAAAAAAAAAAAAAAAAAAAAAAAAAAAAAAAAAAAAAAAAAAAAAAAAAAAAAAAAAAAAAAAAAAAAAAAAAAAAAAAAAAAAAAAAAAAAAAAAAAAAAAAAAAAAAAAAAAAAAAAAAAAAAAAAAAAAAAAAAAAAAAAAAAAAAAAAAAAAAAAAAAAAAAAAAAAAAAAAAAAAAAAAAAAAAAAAAAAAAAAAAAAAAAAAAAAAAAAAAAAAAAAAAAAAAAAAAAAAAAAAAAAAAAAAAAAAAAAAAAAAAAAAAAAAAAAAAAAAAAAAAAAAAAAAAAAAAAAAAAAAAAAAAAAAAAAAAAAAAAAAAAAAAAAAAAAAAAAAAAAAAAAAAAAAAAAAAAAAAAAAAAAAAAAAAAAAAAAAAAAAAAAAAAAAAAAAAAAAAAAAAAAAAAAAAAAAAAAAAAAAAAAAAAAAAAAAAAAAAAAAAAAAAAAAAAAAAAAAAAAAAAAAAAAAAAAAAAAAAAAAAAAAAAAAAAAAAAAAAAAAAAAAAAAAAAAAAAAAAAAAAAAAAAAAAAAAAAAAAAAAAAAAAAAAAAAAAAAAAAAAAAAAAAAAAAAAAAAAAAAAAAAAAAAAAAAAAAAAAAAAAAAAAAAAAAAAAAAAAAAAAAAAAAAAAAAAAAAAAAAAAAAAAAAAAAAAAAAAAAAAAAAAAAAAAAAAAAAAAAAAAAAAAAAAAAAAAAAAAAAAAAAAAAAAAAAAAAAAAAAAAAAAAAAAAAAAAAAAAAAAAAAAAAAAAAAAAAAAAAAAAAAAAAAAAAAAAAAAAAAAAAAAAAAAAAAAAAAAAAAAAAAAAAAAAAAAAAAAAAAAAAAAAAAAAAAAAAAAAAAAAAAAAAAAAAAAAAAAAAAAAAAAAAAAAAAAAAAAAAAAAAAAAAAAAAAAAAAAAAAAAAAAAAAAAAAAAAAAAAAAAAAAAAAAAAAAAAAAAAAAAAAAAAAAAAAAAAAAAAAAAAAAAAAAAAAAAAAAAAAAAAAAAAAAAAAAAAAAAAAAAAAAAAAAAAAAAAAAAAAAAAAAAAAAAAAAAAAAAAAAAAAAAAAAAAAAAAAAAAAAAAAAAAAAAAAAAAAAAAAAAAAAAAAAAAAAAAAAAAAAAAAAAAAAAAAAAAAAAAAAAAAAAAAAAAAAAAAAAAAAAAAAAAAAAAAAAAAAAAAAAAAAAAAAAAAAAAAAAAAAAAAAAAAAAAAAAAAAAAAAAAAAAAAAAAAAAAAAAAAAAAAAAAAAAAAAAAAAAAAAAAAAAAAAAAAAAAAAAAAAAAAAAAAAAAAAAAAAAAAAAAAAAAAAAAAAAAAAAAAAAAAAAAAAAAAAAAAAAAAAAAAAAAAAAAAAAAAAAAAAAAAAAAAAAAAAAAAAAAAAAAAAAAAAAAAAAAAAAAAAAAAAAAAAAAAAAAAAAAAAAAAAAAAAAAAAAAAAAAAAAAAAAAAAAAAAAAAAAAAAAAAAAAAAAAAAAAAAAAAAAAAAAAAAAAAAAAAAAAAAAAAAAAAAAAAAAAAAAAAAAAAAAAAAAAAAAAAAAAAAAAAAAAAAAAAAAAAAAAAAAAAAAAAAAAAAAAAAAAAAAAAAAAAAAAAAAAAAAAAAAAAAAAAAAAAAAAAAAAAAAAAAAAAAAAAAAAAAAAAAAAAAAAAAAAAAAAAAAAAAAAAAAAAAAAAAAAAAAAAAAAAAAAAAAAAAAAAAAAAAAAAAAAAAAAAAAAAAAAAAAAAAAAAAAAAAAAAAAAAAAAAAAAAAAAAAAAAAAAAAAAAAAAAAAAAAAAAAAAAAAAAAAAAAAAAAAAAAAAAAAAAAAAAAAAAAAAAAAAAAAAAAAAAAAAAAAAAAAAAAAAAAAAAAAAAAAAAAAAAAAAAAAAAAAAAAAAAAAAAAAAAAAAAAAAAAAAAAAAAAAAAAAAAAAAAAAAAAAAAAAAAAAAAAAAAAAAAAAAAAAAAAAAAAAAAAAAAAAAAAAAAAAAAAAAAAAAAAAAAAAAAAAAAAAAAAAAAAAAAAAAAAAAAAAAAAAAAAAAAAAAAAAAAAAAAAAAAAAAAAAAAAAAAAAAAAAAAAAAAAAAAAAAAAAAAAAAAAAAAAAAAAAAAAAAAAAAAAAAAAAAAAAAAAAAAAAAAAAAAAAAAAAAAAAAAAAAAAAAAAAAAAAAAAAAAAAAAAAAAAAAAAAAAAAAAAAAAAAAAAAAAAAAAAAAAAAAAAAAAAAAAAAAAAAAAAAAAAAAAAAAAAAAAAAAAAAAAAAAAAAAAAAAAAAAAAAAAAAAAAAAAAAAAAAAAAAAAAAAAAAAAAAAAAAAAAAAAAAAAAAAAAAAAAAAAAAAAAAAAAAAAAAAAAAAAAAAAAAAAAAAAAAAAAAAAAAAAAAAAAAAAAAAAAAAAAAAAAAAAAAAAAAAAAAAAAAAAAAAAAAAAAAAAAAAAAAAAAAAAAAAAAAAAAAAAAAAAAAAAAAAAAAAAAAAAAAAAAAAAAAAAAAAAAAAAAAAAAAAAAAAAAAAAAAAAAAAAAAAAAAAAAAAAAAAAAAAAAAAAAAAAAAAAAAAAAAAAAAAAAAAAAAAAAAAAAAAAAAAAAAAAAAAAAAAAAAAAAAAAAAAAAAAAAAAAAAAAAAAAAAAAAAAAAAAAAAAAAAAAAAAAAAAAAAAAAAAAAAAAAAAAAAAAAAAAAAAAAAAAAAAAAAAAAAAAAAAAAAAAAAAAAAAAAAAAAAAAAAAAAAAAAAAAAAAAAAAAAAAAAAAAAAAAAAAAAAAAAAAAAAAAAAAAAAAAAAAAAAAAAAAAAAAAAAAAAAAAAAAAAAAAAAAAAAAAAAAAAAAAAAAAAAAAAAAAAAAAAAAAAAAAAAAAAAAAAAAAAAAAAAAAAAAAAAAAAAAAAAAAAAAAAAAAAAAAAAAAAAAAAAAAAAAAAAAAAAAAAAAAAAAAAAAAAAAAAAAAAAAAAAAAAAAAAAAAAAAAAAAAAAAAAAAAAAAAAAAAAAAAAAAAAAAAAAAAAAAAAAAAAAAAAAAAAAAAAAAAAAAAAAAAAAAAAAAAAAAAAAAAAAAAAAAAAAAAAAAAAAAAAAAAAAAAAAAAAAAAAAAAAAAAAAAAAAAAAAAAAAAAAAAAAAAAAAAAAAAAAAAAAAAAAAAAAAA
AAAAAAAAAAAAAAAAAAAAAAAAAAAAAAAAAAAAAAAAAAAAAAAAAAAAAAAAAAAAAAAAAAAAAAAAAAAAAAAAAAAAAAAAAAAAAAAAAAAAAAAAAAAAAAAAAAAAAAAAAAAAAAAAAAAAAAAAAAAAAAAAAAAAAAAAAAAAAAAAAAAAAAAAAAAAAAAAAAAAAAAAAAAAAAAAAAAAAAAAAAAAAAAAAAAAAAAAAAAAAAAAAAAAAAAAAAAAAAAAAAAAAAAAAAAAAAAAAAAAAAAAAAAAAAAAAAAAAAAAAAAAAAAAAAAAAAAAAAAAAAAAAAAAAAAAAAAAAAAAAAAAAAAAAAAAAAAAAAAAAAAAAAAAAAAAAAAAAAAAAAAAAAAAAAAAAAAAAAAAAAAAAAAAAAAAAAAAAAAAAAAAAAAAAAAAAAAAAAAAAAAAAAAAAAAAAAAAAAAAAAAAAAAAAAAAAAAAAAAAAAAAAAAAAAAAAAAAAAAAAAAAAAAAAAAAAAAAAAAAAAAAAAAAAAAAAAAAAAAAAAAAAAAAAAAAAAAAAAAAAAAAAAAAAAAAAAAAAAAAAAAAAAAAAAAAAAAAAAAAAAAAAAAAAAAAAAAAAAAAAAAAAAAAAAAAAAAAAAAAAAAAAAAAAAAAAAAAAAAAAAAAAAAAAAAAAAAAAAAAAAAAAAAAAAAAAAAAAAAAAAAAAAAAAAAAAAAAAAAAAAAAAAAAAAAAAAAAAAAAAAAAAAAAAAAAAAAAAAAAAAAAAAAAAAAAAAAAAAAAAAAAAAAAAAAAAAAAAAAAAAAAAAAAAAAAAAAAAAAAAAAAAAAAAAAAAAAAAAAAAAAAAAAAAAAAAAAAAAAAAAAAAAAAAAAAAAAAAAAAAAAAAAAAAAAAAAAAAAAAAAAAAAAAAAAAAAAAAAAAAAAAAAAAAAAAAAAAAAAAAAAAAAAAAAAAAAAAAAAAAAAAAAAAAAAAAAAAAAAAAAAAAAAAAAAAAAAAAAAAAAAAAAAAAAAAAAAAAAAAAAAAAAAAAAAAAAAAAAAAAAAAAAAAAAAAAAAAAAAAAAAAAAAAAAAAAAAAAAAAAAAAAAAAAAAAAAAAAAAAAAAAAAAAAAAAAAAAAAAAAAAAAAAAAAAAAAAAAAAAAAAAAAAAAAAAAAAAAAAAAAAAAAAAAAAAAAAAAAAAAAAAAAAAAAAAAAAAAAAAAAAAAAAAAAAAAAAAAAAAAAAAAAAAAAAAAAAAAAAAAAAAAAAAAAAAAAAAAAAAAAAAAAAAAAAAAAAAAAAAAAAAAAAAAAAAAAAAAAAAAAAAAAAAAAAAAAAAAAAAAAAAAAAAAAAAAAAAAAAAAAAAAAAAAAAAAAAAAAAAAAAAAAAAAAAAAAAAAAAAAAAAAAAAAAAAAAAAAAAAAAAAAAAAAAAAAAAAAAAAAAAAAAAAAAAAAAAAAAAAAAAAAAAAAAAAAAAAAAAAAAAAAAAAAAAAAAAAAAAAAAAAAAAAAAAAAAAAAAAAAAAAAAAAAAAAAAAAAAAAAAAAAAAAAAAAAAAAAAAAAAAAAAAAAAAAAAAAAAAAAAAAAAAAAAAAAAAAAAAAAAAAAAAAAAAAAAAAAAAAAAAAAAAAAAAAAAAAAAAAAAAAAAAAAAAAAAAAAAAAAAAAAAAAAAAAAAAAAAAAAAAAAAAAAAAAAAAAAAAAAAAAAAAAAAAAAAAAAAAAAAAAAAAAAAAAAAAAAAAAAAAAAAAAAAAAAAAAAAAAAAAAAAAAAAAAAAAAAAAAAAAAAAAAAAAAAAAAAAAAAAAAAAAAAAAAAAAAAAAAAAAAAAAAAAAAAAAAAAAAAAAAAAAAAAAAAAAAAAAAAAAAAAAAAAAAAAAAAAAAAAAAAAAAAAAAAAAAAAAAAAAAAAAAAAAAAAAAAAAAAAAAAAAAAAAAAAAAAAAAAAAAAAAAAAAAAAAAAAAAAAAAAAAAAAAAAAAAAAAAAAAAAAAAAAAAAAAAAAAAAAAAAAAAAAAAAAAAAAAAAAAAAAAAAAAAAAAAAAAAAAAAAAAAAAAAAAAAAAAAAAAAAAAAAAAAAAAAAAAAAAAAAAAAAAAAAAAAAAAAAAAAAAAAAAAAAAAAAAAAAAAAAAAAAAAAAAAAAAAAAAAAAAAAAAAAAAAAAAAAAAAAAAAAAAAAAAAAAAAAAAAAAAAAAAAAAAAAAAAAAAAAAAAAAAAAAAAAAAAAAAAAAAAAAAAAAAAAAAAAAAAAAAAAAAAAAAAAAAAAAAAAAAAAAAAAAAAAAAAAAAAAAAAAAAAAAAAAAAAAAAAAAAAAAAAAAAAAAAAAAAAAAAAAAAAAAAAAAAAAAAAAAAAAAAAAAAAAAAAAAAAAAAAAAAAAAAAAAAAAAAAAAAAAAAAAAAAAAAAAAAAAAAAAAAAAAAAAAAAAAAAAAAAAAAAAAAAAAAAAAAAAAAAAAAAAAAAAAAAAAAAAAAAAAAAAAAAAAAAAAAAAAAAAAAAAAAAAAAAAAAAAAAAAAAAAAAAAAAAAAAAAAAAAAAAAAAAAAAAAAAAAAAAAAAAAAAAAAAAAAAAAAAAAAAAAAAAAAAAAAAAAAAAAAAAAAAAAAAAAAAAAAAAAAAAAAAAAAAAAAAAAAAAAAAAAAAAAAAAAAAAAAAAAAAAAAAAAAAAAAAAAAAAAAAAAAAAAAAAAAAAAAAAAAAAAAAAAAAAAAAAAAAAAAAAAAAAAAAAAAAAAAAAAAAAAAAAAAAAAAAAAAAAAAAAAAAAAAAAAAAAAAAAAAAAAAAAAAAAAAAAAAAAAAAAAAAAAAAAAAAAAAAAAAAAAAAAAAAAAAAAAAAAAAAAAAAAAAAAAAAAAAAAAAAAAAAAAAAAAAAAAAAAAAAAAAAAAAAAAAAAAAAAAAAAAAAAAAAAAAAAAAAAAAAAAAAAAAAAAAAAAAAAAAAAAAAAAAAAAAAAAAAAAAAAAAAAAAAAAAAAAAAAAAAAAAAAAAAAAAAAAAAAAAAAAAAAAAAAAAAAAAAAAAAAAAAAAAAAAAAAAAAAAAAAAAAAAAAAAAAAAAAAAAAAAAAAAAAAAAAAAAAAAAAAAAAAAAAAAAAAAAAAAAAAAAAAAAAAAAAAAAAAAAAAAAAAAAAAAAAAAAAAAAAAAAAAAAAAAAAAAAAAAAAAAAAAAAAAAAAAAAAAAAAAAAAAAAAAAAAAAAAAAAAAAAAAAAAAAAAAAAAAAAAAAAAAAAAAAAAAAAAAAAAAAAAAAAAAAAAAAAAAAAAAAAAAAAAAAAAAAAAAAAAAAAAAAAAAAAAAAAAAAAAAAAAAAAAAAAAAAAAAAAAAAAAAAAAAAAAAAAAAAAAAAAAAAAAAAAAAAAAAAAAAAAAAAAAAAAAAAAAAAAAAAAAAAAAAAAAAAAAAAAAAAAAAAAAAAAAAAAAAAAAAAAAAAAAAAAAAAAAAAAAAAAAAAAAAAAAAAAAAAAAAAAAAAAAAAAAAAAAAAAAAAAAAAAAAAAAAAAAAAAAAAAAAAAAAAAAAAAAAAAAAAAAAAAAAAAAAAAAAAAAAAAAAAAAAAAAAAAAAAAAAAAAAAAAAAAAAAAAAAAAAAAAAAAAAAAAAAAAAAAAAAAAAAAAAAAAAAAAAAAAAAAAAAAAAAAAAAAAAAAAAAAAAAAAAAAAAAAAAAAAAAAAAAAAAAAAAAAAAAAAAAAAAAAAAAAAAAAAAAAAAAAAAAAAAAAAAAAAAAAAAAAAAAAAAAAAAAAAAAAAAAAAAAAAAAAAAAAAAAAAAAAAAAAAAAAAAAAAAAAAAAAAAAAAAAAAAAAAAAAAAAAAAAAAAAAAAAAAAAAAAAAAAAAAAAAAAAAAAAAAAAAAAAAAAAAAAAAAAAAAAAAAAAAAAAAAAAAAAAAAAAAAAAAAAAAAAAAAAAAAAAAAAAAAAAAAAAAAAAAAAAAAAAAAAAAAAAAAAAAAAAAAAAAAAAAAAAAAAAAAAAAAAAAAAAAAAAAAAAAAAAAAAAAAAAAAAAAAAAAAAAAAAAAAAAAAAAAAAAAAAAAAAAAAAAAAAAAAAAAAAAAAAAAAAAAAAAAAAAAAAAAAAAAAAAAAAAAAAAAAAAAAAAAAAAAAAAAAAAAAAAAAAAAAAAAAAAAAAAAAAAAAAAAAAAAAAAAAAAAAAAAAAA
AAAAAAAAAAAAAAAAAAAAAAAAAAAAAAAAAAAAAAAAAAAAAAAAAAAAAAAAAAAAAAAAAAAAAAAAAAAAAAAAAAAAAAAAAAAAAAAAAAAAAAAAAAAAAAAAAAAAAAAAAAAAAAAAAAAAAAAAAAAAAAAAAAAAAAAAAAAAAAAAAAAAAAAAAAAAAAAAAAAAAAAAAAAAAAAAAAAAAAAAAAAAAAAAAAAAAAAAAAAAAAAAAAAAAAAAAAAAAAAAAAAAAAAAAAAAAAAAAAAAAAAAAAAAAAAAAAAAAAAAAAAAAAAAAAAAAAAAAAAAAAAAAAAAAAAAAAAAAAAAAAAAAAAAAAAAAAAAAAAAAAAAAAAAAAAAAAAAAAAAAAAAAAAAAAAAAAAAAAAAAAAAAAAAAAAAAAAAAAAAAAAAAAAAAAAAAAAAAAAAAAAAAAAAAAAAAAAAAAAAAAAAAAAAAAAAAAAAAAAAAAAAAAAAAAAAAAAAAAAAAAAAAAAAAAAAAAAAAAAAAAAAAAAAAAAAAAAAAAAAAAAAAAAAAAAAAAAAAAAAAAAAAAAAAAAAAAAAAAAAAAAAAAAAAAAAAAAAAAAAAAAAAAAAAAAAAAAAAAAAAAAAAAAAAAAAAAAAAAAAAAAAAAAAAAAAAAAAAAAAAAAAAAAAAAAAAAAAAAAAAAAAAAAAAAAAAAAAAAAAAAAAAAAAAAAAAAAAAAAAAAAAAAAAAAAAAAAAAAAAAAAAAAAAAAAAAAAAAAAAAAAAAAAAAAAAAAAAAAAAAAAAAAAAAAAAAAAAAAAAAAAAAAAAAAAAAAAAAAAAAAAAAAAAAAAAAAAAAAAAAAAAAAAAAAAAAAAAAAAAAAAAAAAAAAAAAAAAAAAAAAAAAAAAAAAAAAAAAAAAAAAAAAAAAAAAAAAAAAAAAAAAAAAAAAAAAAAAAAAAAAAAAAAAAAAAAAAAAAAAAAAAAAAAAAAAAAAAAAAAAAAAAAAAAAAAAAAAAAAAAAAAAAAAAAAAAAAAAAAAAAAAAAAAAAAAAAAAAAAAAAAAAAAAAAAAAAAAAAAAAAAAAAAAAAAAAAAAAAAAAAAAAAAAAAAAAAAAAAAAAAAAAAAAAAAAAAAAAAAAAAAAAAAAAAAAAAAAAAAAAAAAAAAAAAAAAAAAAAAAAAAAAAAAAAAAAAAAAAAAAAAAAAAAAAAAAAAAAAAAAAAAAAAAAAAAAAAAAAAAAAAAAAAAAAAAAAAAAAAAAAAAAAAAAAAAAAAAAAAAAAAAAAAAAAAAAAAAAAAAAAAAAAAAAAAAAAAAAAAAAAAAAAAAAAAAAAAAAAAAAAAAAAAAAAAAAAAAAAAAAAAAAAAAAAAAAAAAAAAAAAAAAAAAAAAAAAAAAAAAAAAAAAAAAAAAAAAAAAAAAAAAAAAAAAAAAAAAAAAAAAAAAAAAAAAAAAAAAAAAAAAAAAAAAAAAAAAAAAAAAAAAAAAAAAAAAAAAAAAAAAAAAAAAAAAAAAAAAAAAAAAAAAAAAAAAAAAAAAAAAAAAAAAAAAAAAAAAAAAAAAAAAAAAAAAAAAAAAAAAAAAAAAAAAAAAAAAAAAAAAAAAAAAAAAAAAAAAAAAAAAAAAAAAAAAAAAAAAAAAAAAAAAAAAAAAAAAAAAAAAAAAAAAAAAAAAAAAAAAAAAAAAAAAAAAAAAAAAAAAAAAAAAAAAAAAAAAAAAAAAAAAAAAAAAAAAAAAAAAAAAAAAAAAAAAAAAAAAAAAAAAAAAAAAAAAAAAAAAAAAAAAAAAAAAAAAAAAAAAAAAAAAAAAAAAAAAAAAAAAAAAAAAAAAAAAAAAAAAAAAAAAAAAAAAAAAAAAAAAAAAAAAAAAAAAAAAAAAAAAAAAAAAAAAAAAAAAAAAAAAAAAAAAAAAAAAAAAAAAAAAAAAAAAAAAAAAAAAAAAAAAAAAAAAAAAAAAAAAAAAAAAAAAAAAAAAAAAAAAAAAAAAAAAAAAAAAAAAAAAAAAAAAAAAAAAAAAAAAAAAAAAAAAAAAAAAAAAAAAAAAAAAAAAAAAAAAAAAAAAAAAAAAAAAAAAAAAAAAAAAAAAAAAAAAAAAAAAAAAAAAAAAAAAAAAAAAAAAAAAAAAAAAAAAAAAAAAAAAAAAAAAAAAAAAAAAAAAAAAAAAAAAAAAAAAAAAAAAAAAAAAAAAAAAAAAAAAAAAAAAAAAAAAAAAAAAAAAAAAAAAAAAAAAAAAAAAAAAAAAAAAAAAAAAAAAAAAAAAAAAAAAAAAAAAAAAAAAAAAAAAAAAAAAAAAAAAAAAAAAAAAAAAAAAAAAAAAAAAAAAAAAAAAAAAAAAAAAAAAAAAAAAAAAAAAAAAAAAAAAAAAAAAAAAAAAAAAAAAAAAAAAAAAAAAAAAAAAAAAAAAAAAAAAAAAAAAAAAAAAAAAAAAAAAAAAAAAAAAAAAAAAAAAAAAAAAAAAAAAAAAAAAAAAAAAAAAAAAAAAAAAAAAAAAAAAAAAAAAAAAAAAAAAAAAAAAAAAAAAAAAAAAAAAAAAAAAAAAAAAAAAAAAAAAAAAAAAAAAAAAAAAAAAAAAAAAAAAAAAAAAAAAAAAAAAAAAAAAAAAAAAAAAAAAAAAAAAAAAAAAAAAAAAAAAAAAAAAAAAAAAAAAAAAAAAAAAAAAAAAAAAAAAAAAAAAAAAAAAAAAAAAAAAAAAAAAAAAAAAAAAAAAAAAAAAAAAAAAAAAAAAAAAAAAAAAAAAAAAAAAAAAAAAAAAAAAAAAAAAAAAAAAAAAAAAAAAAAAAAAAAAAAAAAAAAAAAAAAAAAAAAAAAAAAAAAAAAAAAAAAAAAAAAAAAAAAAAAAAAAAAAAAAAAAAAAAAAAAAAAAAAAAAAAAAAAAAAAAAAAAAAAAAAAAAAAAAAAAAAAAAAAAAAAAAAAAAAAAAAAAAAAAAAAAAAAAAAAAAAAAAAAAAAAAAAAAAAAAAAAAAAAAAAAAAAAAAAAAAAAAAAAAAAAAAAAAAAAAAAAAAAAAAAAAAAAAAAAAAAAAAAAAAAAAAAAAAAAAAAAAAAAAAAAAAAAAAAAAAAAAAAAAAAAAAAAAAAAAAAAAAAAAAAAAAAAAAAAAAAAAAAAAAAAAAAAAAAAAAAAAAAAAAAAAAAAAAAAAAAAAAAAAAAAAAAAAAAAAAAAAAAAAAAAAAAAAAAAAAAAAAAAAAAAAAAAAAAAAAAAAAAAAAAAAAAAAAAAAAAAAAAAAAAAAAAAAAAAAAAAAAAAAAAAAAAAAAAAAAAAAAAAAAAAAAAAAAAAAAAAAAAAAAAAAAAAAAAAAAAAAAAAAAAAAAAAAAAAAAAAAAAAAAAAAAAAAAAAAAAAAAAAAAAAAAAAAAAAAAAAAAAAAAAAAAAAAAAAAAAAAAAAAAAAAAAAAAAAAAAAAAAAAAAAAAAAAAAAAAAAAAAAAAAAAAAAAAAAAAAAAAAAAAAAAAAAAAAAAAAAAAAAAAAAAAAAAAAAAAAAAAAAAAAAAAAAAAAAAAAAAAAAAAAAAAAAAAAAAAAAAAAAAAAAAAAAAAAAAAAAAAAAAAAAAAAAAAAAAAAAAAAAAAAAAAAAAAAAAAAAAAAAAAAAAAAAAAAAAAAAAAAAAAAAAAAAAAAAAAAAAAAAAAAAAAAAAAAAAAAAAAAAAAAAAAAAAAAAAAAAAAAAAAAAAAAAAAAAAAAAAAAAAAAAAAAAAAAAAAAAAAAAAAAAAAAAAAAAAAAAAAAAAAAAAAAAAAAAAAAAAAAAAAAAAAAAAAAAAAAAAAAAAAAAAAAAAAAAAAAAAAAAAAAAAAAAAAAAAAAAAAAAAAAAAAAAAAAAAAAAAAAAAAAAAAAAAAAAAAAAAAAAAAAAAAAAAAAAAAAAAAAAAAAAAAAAAAAAAAAAAAAAAAAAAAAAAAAAAAAAAAAAAAAAAAAAAAAAAAAAAAAAAAAAAAAAAAAAAAAAAAAAAAAAAAAAAAAAAAAAAAAAAAAAAAAAAAAAAAAAAAAAAAAAAAAAAAAAAAAAAAAAAAAAAAAAAAAAAAAAAAAAAAAAAAAAAAAAAAAAAAAAAAAAAAAAAAAAAAAAAAAAAAAAAAAAAAAAAAAAAAAAAAAAAAAAAAAAAAAAAAAAAAAAAAAAAAAAAAAAAAAAAAAAAAAAAAAA
AAAAAAAAAAAAAAAAAAAAAAAAAAAAAAAAAAAAAAAAAAAAAAAAAAAAAAAAAAAAAAAAAAAAAAAAAAAAAAAAAAAAAAAAAAAAAAAAAAAAAAAAAAAAAAAAAAAAAAAAAAAAAAAAAAAAAAAAAAAAAAAAAAAAAAAAAAAAAAAAAAAAAAAAAAAAAAAAAAAAAAAAAAAAAAAAAAAAAAAAAAAAAAAAAAAAAAAAAAAAAAAAAAAAAAAAAAAAAAAAAAAAAAAAAAAAAAAAAAAAAAAAAAAAAAAAAAAAAAAAAAAAAAAAAAAAAAAAAAAAAAAAAAAAAAAAAAAAAAAAAAAAAAAAAAAAAAAAAAAAAAAAAAAAAAAAAAAAAAAAAAAAAAAAAAAAAAAAAAAAAAAAAAAAAAAAAAAAAAAAAAAAAAAAAAAAAAAAAAAAAAAAAAAAAAAAAAAAAAAAAAAAAAAAAAAAAAAAAAAAAAAAAAAAAAAAAAAAAAAAAAAAAAAAAAAAAAAAAAAAAAAAAAAAAAAAAAAAAAAAAAAAAAAAAAAAAAAAAAAAAAAAAAAAAAAAAAAAAAAAAAAAAAAAAAAAAAAAAAAAAAAAAAAAAAAAAAAAAAAAAAAAAAAAAAAAAAAAAAAAAAAAAAAAAAAAAAAAAAAAAAAAAAAAAAAAAAAAAAAAAAAAAAAAAAAAAAAAAAAAAAAAAAAAAAAAAAAAAAAAAAAAAAAAAAAAAAAAAAAAAAAAAAAAAAAAAAAAAAAAAAAAAAAAAAAAAAAAAAAAAAAAAAAAAAAAAAAAAAAAAAAAAAAAAAAAAAAAAAAAAAAAAAAAAAAAAAAAAAAAAAAAAAAAAAAAAAAAAAAAAAAAAAAAAAAAAAAAAAAAAAAAAAAAAAAAAAAAAAAAAAAAAAAAAAAAAAAAAAAAAAAAAAAAAAAAAAAAAAAAAAAAAAAAAAAAAAAAAAAAAAAAAAAAAAAAAAAAAAAAAAAAAAAAAAAAAAAAAAAAAAAAAAAAAAAAAAAAAAAAAAAAAAAAAAAAAAAAAAAAAAAAAAAAAAAAAAAAAAAAAAAAAAAAAAAAAAAAAAAAAAAAAAAAAAAAAAAAAAAAAAAAAAAAAAAAAAAAAAAAAAAAAAAAAAAAAAAAAAAAAAAAAAAAAAAAAAAAAAAAAAAAAAAAAAAAAAAAAAAAAAAAAAAAAAAAAAAAAAAAAAAAAAAAAAAAAAAAAAAAAAAAAAAAAAAAAAAAAAAAAAAAAAAAAAAAAAAAAAAAAAAAAAAAAAAAAAAAAAAAAAAAAAAAAAAAAAAAAAAAAAAAAAAAAAAAAAAAAAAAAAAAAAAAAAAAAAAAAAAAAAAAAAAAAAAAAAAAAAAAAAAAAAAAAAAAAAAAAAAAAAAAAAAAAAAAAAAAAAAAAAAAAAAAAAAAAAAAAAAAAAAAAAAAAAAAAAAAAAAAAAAAAAAAAAAAAAAAAAAAAAAAAAAAAAAAAAAAAAAAAAAAAAAAAAAAAAAAAAAAAAAAAAAAAAAAAAAAAAAAAAAAAAAAAAAAAAAAAAAAAAAAAAAAAAAAAAAAAAAAAAAAAAAAAAAAAAAAAAAAAAAAAAAAAAAAAAAAAAAAAAAAAAAAAAAAAAAAAAAAAAAAAAAAAAAAAAAAAAAAAAAAAAAAAAAAAAAAAAAAAAAAAAAAAAAAAAAAAAAAAAAAAAAAAAAAAAAAAAAAAAAAAAAAAAAAAAAAAAAAAAAAAAAAAAAAAAAAAAAAAAAAAAAAAAAAAAAAAAAAAAAAAAAAAAAAAAAAAAAAAAAAAAAAAAAAAAAAAAAAAAAAAAAAAAAAAAAAAAAAAAAAAAAAAAAAAAAAAAAAAAAAAAAAAAAAAAAAAAAAAAAAAAAAAAAAAAAAAAAAAAAAAAAAAAAAAAAAAAAAAAAAAAAAAAAAAAAAAAAAAAAAAAAAAAAAAAAAAAAAAAAAAAAAAAAAAAAAAAAAAAAAAAAAAAAAAAAAAAAAAAAAAAAAAAAAAAAAAAAAAAAAAAAAAAAAAAAAAAAAAAAAAAAAAAAAAAAAAAAAAAAAAAAAAAAAAAAAAAAAAAAAAAAAAAAAAAAAAAAAAAAAAAAAAAAAAAAAAAAAAAAAAAAAAAAAAAAAAAAAAAAAAAAAAAAAAAAAAAAAAAAAAAAAAAAAAAAAAAAAAAAAAAAAAAAAAAAAAAAAAAAAAAAAAAAAAAAAAAAAAAAAAAAAAAAAAAAAAAAAAAAAAAAAAAAAAAAAAAAAAAAAAAAAAAAAAAAAAAAAAAAAAAAAAAAAAAAAAAAAAAAAAAAAAAAAAAAAAAAAAAAAAAAAAAAAAAAAAAAAAAAAAAAAAAAAAAAAAAAAAAAAAAAAAAAAAAAAAAAAAAAAAAAAAAAAAAAAAAAAAAAAAAAAAAAAAAAAAAAAAAAAAAAAAAAAAAAAAAAAAAAAAAAAAAAAAAAAAAAAAAAAAAAAAAAAAAAAAAAAAAAAAAAAAAAAAAAAAAAAAAAAAAAAAAAAAAAAAAAAAAAAAAAAAAAAAAAAAAAAAAAAAAAAAAAAAAAAAAAAAAAAAAAAAAAAAAAAAAAAAAAAAAAAAAAAAAAAAAAAAAAAAAAAAAAAAAAAAAAAAAAAAAAAAAAAAAAAAAAAAAAAAAAAAAAAAAAAAAAAAAAAAAAAAAAAAAAAAAAAAAAAAAAAAAAAAAAAAAAAAAAAAAAAAAAAAAAAAAAAAAAAAAAAAAAAAAAAAAAAAAAAAAAAAAAAAAAAAAAAAAAAAAAAAAAAAAAAAAAAAAAAAAAAAAAAAAAAAAAAAAAAAAAAAAAAAAAAAAAAAAAAAAAAAAAAAAAAAAAAAAAAAAAAAAAAAAAAAAAAAAAAAAAAAAAAAAAAAAAAAAAAAAAAAAAAAAAAAAAAAAAAAAAAAAAAAAAAAAAAAAAAAAAAAAAAAAAAAAAAAAAAAAAAAAAAAAAAAAAAAAAAAAAAAAAAAAAAAAAAAAAAAAAAAAAAAAAAAAAAAAAAAAAAAAAAAAAAAAAAAAAAAAAAAAAAAAAAAAAAAAAAAAAAAAAAAAAAAAAAAAAAAAAAAAAAAAAAAAAAAAAAAAAAAAAAAAAAAAAAAAAAAAAAAAAAAAAAAAAAAAAAAAAAAAAAAAAAAAAAAAAAAAAAAAAAAAAAAAAAAAAAAAAAAAAAAAAAAAAAAAAAAAAAAAAAAAAAAAAAAAAAAAAAAAAAAAAAAAAAAAAAAAAAAAAAAAAAAAAAAAAAAAAAAAAAAAAAAAAAAAAAAAAAAAAAAAAAAAAAAAAAAAAAAAAAAAAAAAAAAAAAAAAAAAAAAAAAAAAAAAAAAAAAAAAAAAAAAAAAAAAAAAAAAAAAAAAAAAAAAAAAAAAAAAAAAAAAAAAAAAAAAAAAAAAAAAAAAAAAAAAAAAAAAAAAAAAAAAAAAAAAAAAAAAAAAAAAAAAAAAAAAAAAAAAAAAAAAAAAAAAAAAAAAAAAAAAAAAAAAAAAAAAAAAAAAAAAAAAAAAAAAAAAAAAAAAAAAAAAAAAAAAAAAAAAAAAAAAAAAAAAAAAAAAAAAAAAAAAAAAAAAAAAAAAAAAAAAAAAAAAAAAAAAAAAAAAAAAAAAAAAAAAAAAAAAAAAAAAAAAAAAAAAAAAAAAAAAAAAAAAAAAAAAAAAAAAAAAAAAAAAAAAAAAAAAAAAAAAAAAAAAAAAAAAAAAAAAAAAAAAAAAAAAAAAAAAAAAAAAAAAAAAAAAAAAAAAAAAAAAAAAAAAAAAAAAAAAAAAAAAAAAAAAAAAAAAAAAAAAAAAAAAAAAAAAAAAAAAAAAAAAAAAAAAAAAAAAAAAAAAAAAAAAAAAAAAAAAAAAAAAAAAAAAAAAAAAAAAAAAAAAAAAAAAAAAAAAAAAAAAAAAAAAAAAAAAAAAAAAAAAAAAAAAAAAAAAAAAAAAAAAAAAAAAAAAAAAAAAAAAAAAAAAAAAAAAAAAAAAAAAAAAAAAAAAAAAAAAAAAAAAAAAAAAAAAAAAAAAAAAAAAAAAAAAAAAAAAAAAAAAAAAAAAAAAAAAAAAAAAAAAAAAAAAAAAAAAAAAAAAAAAAAAAAAAAAAAAAAAAAAAAAAAAAAAAAAAAAAAAAAAAAAAAAAAAAAAAAAAAAAAAAAAAAAAAAA
AAAAAAAAAAAAAAAAAAAAAAAAAAAAAAAAAAAAAAAAAAAAAAAAAAAAAAAAAAAAAAAAAAAAAAAAAAAAAAAAAAAAAAAAAAAAAAAAAAAAAAAAAAAAAAAAAAAAAAAAAAAAAAAAAAAAAAAAAAAAAAAAAAAAAAAAAAAAAAAAAAAAAAAAAAAAAAAAAAAAAAAAAAAAAAAAAAAAAAAAAAAAAAAAAAAAAAAAAAAAAAAAAAAAAAAAAAAAAAAAAAAAAAAAAAAAAAAAAAAAAAAAAAAAAAAAAAAAAAAAAAAAAAAAAAAAAAAAAAAAAAAAAAAAAAAAAAAAAAAAAAAAAAAAAAAAAAAAAAAAAAAAAAAAAAAAAAAAAAAAAAAAAAAAAAAAAAAAAAAAAAAAAAAAAAAAAAAAAAAAAAAAAAAAAAAAAAAAAAAAAAAAAAAAAAAAAAAAAAAAAAAAAAAAAAAAAAAAAAAAAAAAAAAAAAAAAAAAAAAAAAAAAAAAAAAAAAAAAAAAAAAAAAAAAAAAAAAAAAAAAAAAAAAAAAAAAAAAAAAAAAAAAAAAAAAAAAAAAAAAAAAAAAAAAAAAAAAAAAAAAAAAAAAAAAAAAAAAAAAAAAAAAAAAAAAAAAAAAAAAAAAAAAAAAAAAAAAAAAAAAAAAAAAAAAAAAAAAAAAAAAAAAAAAAAAAAAAAAAAAAAAAAAAAAAAAAAAAAAAAAAAAAAAAAAAAAAAAAAAAAAAAAAAAAAAAAAAAAAAAAAAAAAAAAAAAAAAAAAAAAAAAAAAAAAAAAAAAAAAAAAAAAAAAAAAAAAAAAAAAAAAAAAAAAAAAAAAAAAAAAAAAAAAAAAAAAAAAAAAAAAAAAAAAAAAAAAAAAAAAAAAAAAAAAAAAAAAAAAAAAAAAAAAAAAAAAAAAAAAAAAAAAAAAAAAAAAAAAAAAAAAAAAAAAAAAAAAAAAAAAAAAAAAAAAAAAAAAAAAAAAAAAAAAAAAAAAAAAAAAAAAAAAAAAAAAAAAAAAAAAAAAAAAAAAAAAAAAAAAAAAAAAAAAAAAAAAAAAAAAAAAAAAAAAAAAAAAAAAAAAAAAAAAAAAAAAAAAAAAAAAAAAAAAAAAAAAAAAAAAAAAAAAAAAAAAAAAAAAAAAAAAAAAAAAAAAAAAAAAAAAAAAAAAAAAAAAAAAAAAAAAAAAAAAAAAAAAAAAAAAAAAAAAAAAAAAAAAAAAAAAAAAAAAAAAAAAAAAAAAAAAAAAAAAAAAAAAAAAAAAAAAAAAAAAAAAAAAAAAAAAAAAAAAAAAAAAAAAAAAAAAAAAAAAAAAAAAAAAAAAAAAAAAAAAAAAAAAAAAAAAAAAAAAAAAAAAAAAAAAAAAAAAAAAAAAAAAAAAAAAAAAAAAAAAAAAAAAAAAAAAAAAAAAAAAAAAAAAAAAAAAAAAAAAAAAAAAAAAAAAAAAAAAAAAAAAAAAAAAAAAAAAAAAAAAAAAAAAAAAAAAAAAAAAAAAAAAAAAAAAAAAAAAAAAAAAAAAAAAAAAAAAAAAAAAAAAAAAAAAAAAAAAAAAAAAAAAAAAAAAAAAAAAAAAAAAAAAAAAAAAAAAAAAAAAAAAAAAAAAAAAAAAAAAAAAAAAAAAAAAAAAAAAAAAAAAAAAAAAAAAAAAAAAAAAAAAAAAAAAAAAAAAAAAAAAAAAAAAAAAAAAAAAAAAAAAAAAAAAAAAAAAAAAAAAAAAAAAAAAAAAAAAAAAAAAAAAAAAAAAAAAAAAAAAAAAAAAAAAAAAAAAAAAAAAAAAAAAAAAAAAAAAAAAAAAAAAAAAAAAAAAAAAAAAAAAAAAAAAAAAAAAAAAAAAAAAAAAAAAAAAAAAAAAAAAAAAAAAAAAAAAAAAAAAAAAAAAAAAAAAAAAAAAAAAAAAAAAAAAAAAAAAAAAAAAAAAAAAAAAAAAAAAAAAAAAAAAAAAAAAAAAAAAAAAAAAAAAAAAAAAAAAAAAAAAAAAAAAAAAAAAAAAAAAAAAAAAAAAAAAAAAAAAAAAAAAAAAAAAAAAAAAAAAAAAAAAAAAAAAAAAAAAAAAAAAAAAAAAAAAAAAAAAAAAAAAAAAAAAAAAAAAAAAAAAAAAAAAAAAAAAAAAAAAAAAAAAAAAAAAAAAAAAAAAAAAAAAAAAAAAAAAAAAAAAAAAAAAAAAAAAAAAAAAAAAAAAAAAAAAAAAAAAAAAAAAAAAAAAAAAAAAAAAAAAAAAAAAAAAAAAAAAAAAAAAAAAAAAAAAAAAAAAAAAAAAAAAAAAAAAAAAAAAAAAAAAAAAAAAAAAAAAAAAAAAAAAAAAAAAAAAAAAAAAAAAAAAAAAAAAAAAAAAAAAAAAAAAAAAAAAAAAAAAAAAAAAAAAAAAAAAAAAAAAAAAAAAAAAAAAAAAAAAAAAAAAAAAAAAAAAAAAAAAAAAAAAAAAAAAAAAAAAAAAAAAAAAAAAAAAAAAAAAAAAAAAAAAAAAAAAAAAAAAAAAAAAAAAAAAAAAAAAAAAAAAAAAAAAAAAAAAAAAAAAAAAAAAAAAAAAAAAAAAAAAAAAAAAAAAAAAAAAAAAAAAAAAAAAAAAAAAAAAAAAAAAAAAAAAAAAAAAAAAAAAAAAAAAAAAAAAAAAAAAAAAAAAAAAAAAAAAAAAAAAAAAAAAAAAAAAAAAAAAAAAAAAAAAAAAAAAAAAAAAAAAAAAAAAAAAAAAAAAAAAAAAAAAAAAAAAAAAAAAAAAAAAAAAAAAAAAAAAAAAAAAAAAAAAAAAAAAAAAAAAAAAAAAAAAAAAAAAAAAAAAAAAAAAAAAAAAAAAAAAAAAAAAAAAAAAAAAAAAAAAAAAAAAAAAAAAAAAAAAAAAAAAAAAAAAAAAAAAAAAAAAAAAAAAAAAAAAAAAAAAAAAAAAAAAAAAAAAAAAAAAAAAAAAAAAAAAAAAAAAAAAAAAAAAAAAAAAAAAAAAAAAAAAAAAAAAAAAAAAAAAAAAAAAAAAAAAAAAAAAAAAAAAAAAAAAAAAAAAAAAAAAAAAAAAAAAAAAAAAAAAAAAAAAAAAAAAAAAAAAAAAAAAAAAAAAAAAAAAAAAAAAAAAAAAAAAAAAAAAAAAAAAAAAAAAAAAAAAAAAAAAAAAAAAAAAAAAAAAAAAAAAAAAAAAAAAAAAAAAAAAAAAAAAAAAAAAAAAAAAAAAAAAAAAAAAAAAAAAAAAAAAAAAAAAAAAAAAAAAAAAAAAAAAAAAAAAAAAAAAAAAAAAAAAAAAAAAAAAAAAAAAAAAAAAAAAAAAAAAAAAAAAAAAAAAAAAAAAAAAAAAAAAAAAAAAAAAAAAAAAAAAAAAAAAAAAAAAAAAAAAAAAAAAAAAAAAAAAAAAAAAAAAAAAAAAAAAAAAAAAAAAAAAAAAAAAAAAAAAAAAAAAAAAAAAAAAAAAAAAAAAAAAAAAAAAAAAAAAAAAAAAAAAAAAAAAAAAAAAAAAAAAAAAAAAAAAAAAAAAAAAAAAAAAAAAAAAAAAAAAAAAAAAAAAAAAAAAAAAAAAAAAAAAAAAAAAAAAAAAAAAAAAAAAAAAAAAAAAAAAAAAAAAAAAAAAAAAAAAAAAAAAAAAAAAAAAAAAAAAAAAAAAAAAAAAAAAAAAAAAAAAAAAAAAAAAAAAAAAAAAAAAAAAAAAAAAAAAAAAAAAAAAAAAAAAAAAAAAAAAAAAAAAAAAAAAAAAAAAAAAAAAAAAAAAAAAAAAAAAAAAAAAAAAAAAAAAAAAAAAAAAAAAAAAAAAAAAAAAAAAAAAAAAAAAAAAAAAAAAAAAAAAAAAAAAAAAAAAAAAAAAAAAAAAAAAAAAAAAAAAAAAAAAAAAAAAAAAAAAAAAAAAAAAAAAAAAAAAAAAAAAAAAAAAAAAAAAAAAAAAAAAAAAAAAAAAAAAAAAAAAAAAAAAAAAAAAAAAAAAAAAAAAAAAAAAAAAAAAAAAAAAAAAAAAAAAAAAAAAAAAAAAAAAAAAAAAAAAAAAAAAAAAAAAAAAAAAAAAAAAAAAAAAAAAAAAAAAAAAAAAAAAAAAAAAAAAAAAAAAAAAAAAAAAAAAAAAAAAAAAAAAAAAAAAAAAAAAAAAAAAAAAAAAAAAAAAAAAAAAAAAAAAAAAAAAAAAAAAAAAAAAAAAAAAAAAAAAAAAAAAAA
AAAAAAAAAAAAAAAAAAAAAAAAAAAAAAAAAAAAAAAAAAAAAAAAAAAAAAAAAAAAAAAAAAAAAAAAAAAAAAAAAAAAAAAAAAAAAAAAAAAAAAAAAAAAAAAAAAAAAAAAAAAAAAAAAAAAAAAAAAAAAAAAAAAAAAAAAAAAAAAAAAAAAAAAAAAAAAAAAAAAAAAAAAAAAAAAAAAAAAAAAAAAAAAAAAAAAAAAAAAAAAAAAAAAAAAAAAAAAAAAAAAAAAAAAAAAAAAAAAAAAAAAAAAAAAAAAAAAAAAAAAAAAAAAAAAAAAAAAAAAAAAAAAAAAAAAAAAAAAAAAAAAAAAAAAAAAAAAAAAAAAAAAAAAAAAAAAAAAAAAAAAAAAAAAAAAAAAAAAAAAAAAAAAAAAAAAAAAAAAAAAAAAAAAAAAAAAAAAAAAAAAAAAAAAAAAAAAAAAAAAAAAAAAAAAAAAAAAAAAAAAAAAAAAAAAAAAAAAAAAAAAAAAAAAAAAAAAAAAAAAAAAAAAAAAAAAAAAAAAAAAAAAAAAAAAAAAAAAAAAAAAAAAAAAAAAAAAAAAAAAAAAAAAAAAAAAAAAAAAAAAAAAAAAAAAAAAAAAAAAAAAAAAAAAAAAAAAAAAAAAAAAAAAAAAAAAAAAAAAAAAAAAAAAAAAAAAAAAAAAAAAAAAAAAAAAAAAAAAAAAAAAAAAAAAAAAAAAAAAAAAAAAAAAAAAAAAAAAAAAAAAAAAAAAAAAAAAAAAAAAAAAAAAAAAAAAAAAAAAAAAAAAAAAAAAAAAAAAAAAAAAAAAAAAAAAAAAAAAAAAAAAAAAAAAAAAAAAAAAAAAAAAAAAAAAAAAAAAAAAAAAAAAAAAAAAAAAAAAAAAAAAAAAAAAAAAAAAAAAAAAAAAAAAAAAAAAAAAAAAAAAAAAAAAAAAAAAAAAAAAAAAAAAAAAAAAAAAAAAAAAAAAAAAAAAAAAAAAAAAAAAAAAAAAAAAAAAAAAAAAAAAAAAAAAAAAAAAAAAAAAAAAAAAAAAAAAAAAAAAAAAAAAAAAAAAAAAAAAAAAAAAAAAAAAAAAAAAAAAAAAAAAAAAAAAAAAAAAAAAAAAAAAAAAAAAAAAAAAAAAAAAAAAAAAAAAAAAAAAAAAAAAAAAAAAAAAAAAAAAAAAAAAAAAAAAAAAAAAAAAAAAAAAAAAAAAAAAAAAAAAAAAAAAAAAAAAAAAAAAAAAAAAAAAAAAAAAAAAAAAAAAAAAAAAAAAAAAAAAAAAAAAAAAAAAAAAAAAAAAAAAAAAAAAAAAAAAAAAAAAAAAAAAAAAAAAAAAAAAAAAAAAAAAAAAAAAAAAAAAAAAAAAAAAAAAAAAAAAAAAAAAAAAAAAAAAAAAAAAAAAAAAAAAAAAAAAAAAAAAAAAAAAAAAAAAAAAAAAAAAAAAAAAAAAAAAAAAAAAAAAAAAAAAAAAAAAAAAAAAAAAAAAAAAAAAAAAAAAAAAAAAAAAAAAAAAAAAAAAAAAAAAAAAAAAAAAAAAAAAAAAAAAAAAAAAAAAAAAAAAAAAAAAAAAAAAAAAAAAAAAAAAAAAAAAAAAAAAAAAAAAAAAAAAAAAAAAAAAAAAAAAAAAAAAAAAAAAAAAAAAAAAAAAAAAAAAAAAAAAAAAAAAAAAAAAAAAAAAAAAAAAAAAAAAAAAAAAAAAAAAAAAAAAAAAAAAAAAAAAAAAAAAAAAAAAAAAAAAAAAAAAAAAAAAAAAAAAAAAAAAAAAAAAAAAAAAAAAAAAAAAAAAAAAAAAAAAAAAAAAAAAAAAAAAAAAAAAAAAAAAAAAAAAAAAAAAAAAAAAAAAAAAAAAAAAAAAAAAAAAAAAAAAAAAAAAAAAAAAAAAAAAAAAAAAAAAAAAAAAAAAAAAAAAAAAAAAAAAAAAAAAAAAAAAAAAAAAAAAAAAAAAAAAAAAAAAAAAAAAAAAAAAAAAAAAAAAAAAAAAAAAAAAAAAAAAAAAAAAAAAAAAAAAAAAAAAAAAAAAAAAAAAAAAAAAAAAAAAAAAAAAAAAAAAAAAAAAAAAAAAAAAAAAAAAAAAAAAAAAAAAAAAAAAAAAAAAAAAAAAAAAAAAAAAAAAAAAAAAAAAAAAAAAAAAAAAAAAAAAAAAAAAAAAAAAAAAAAAAAAAAAAAAAAAAAAAAAAAAAAAAAAAAAAAAAAAAAAAAAAAAAAAAAAAAAAAAAAAAAAAAAAAAAAAAAAAAAAAAAAAAAAAAAAAAAAAAAAAAAAAAAAAAAAAAAAAAAAAAAAAAAAAAAAAAAAAAAAAAAAAAAAAAAAAAAAAAAAAAAAAAAAAAAAAAAAAAAAAAAAAAAAAAAAAAAAAAAAAAAAAAAAAAAAAAAAAAAAAAAAAAAAAAAAAAAAAAAAAAAAAAAAAAAAAAAAAAAAAAAAAAAAAAAAAAAAAAAAAAAAAAAAAAAAAAAAAAAAAAAAAAAAAAAAAAAAAAAAAAAAAAAAAAAAAAAAAAAAAAAAAAAAAAAAAAAAAAAAAAAAAAAAAAAAAAAAAAAAAAAAAAAAAAAAAAAAAAAAAAAAAAAAAAAAAAAAAAAAAAAAAAAAAAAAAAAAAAAAAAAAAAAAAAAAAAAAAAAAAAAAAAAAAAAAAAAAAAAAAAAAAAAAAAAAAAAAAAAAAAAAAAAAAAAAAAAAAAAAAAAAAAAAAAAAAAAAAAAAAAAAAAAAAAAAAAAAAAAAAAAAAAAAAAAAAAAAAAAAAAAAAAAAAAAAAAAAAAAAAAAAAAAAAAAAAAAAAAAAAAAAAAAAAAAAAAAAAAAAAAAAAAAAAAAAAAAAAAAAAAAAAAAAAAAAAAAAAAAAAAAAAAAAAAAAAAAAAAAAAAAAAAAAAAAAAAAAAAAAAAAAAAAAAAAAAAAAAAAAAAAAAAAAAAAAAAAAAAAAAAAAAAAAAAAAAAAAAAAAAAAAAAAAAAAAAAAAAAAAAAAAAAAAAAAAAAAAAAAAAAAAAAAAAAAAAAAAAAAAAAAAAAAAAAAAAAAAAAAAAAAAAAAAAAAAAAAAAAAAAAAAAAAAAAAAAAAAAAAAAAAAAAAAAAAAAAAAAAAAAAAAAAAAAAAAAAAAAAAAAAAAAAAAAAAAAAAAAAAAAAAAAAAAAAAAAAAAAAAAAAAAAAAAAAAAAAAAAAAAAAAAAAAAAAAAAAAAAAAAAAAAAAAAAAAAAAAAAAAAAAAAAAAAAAAAAAAAAAAAAAAAAAAAAAAAAAAAAAAAAAAAAAAAAAAAAAAAAAAAAAAAAAAAAAAAAAAAAAAAAAAAAAAAAAAAAAAAAAAAAAAAAAAAAAAAAAAAAAAAAAAAAAAAAAAAAAAAAAAAAAAAAAAAAAAAAAAAAAAAAAAAAAAAAAAAAAAAAAAAAAAAAAAAAAAAAAAAAAAAAAAAAAAAAAAAAAAAAAAAAAAAAAAAAAAAAAAAAAAAAAAAAAAAAAAAAAAAAAAAAAAAAAAAAAAAAAAAAAAAAAAAAAAAAAAAAAAAAAAAAAAAAAAAAAAAAAAAAAAAAAAAAAAAAAAAAAAAAAAAAAAAAAAAAAAAAAAAAAAAAAAAAAAAAAAAAAAAAAAAAAAAAAAAAAAAAAAAAAAAAAAAAAAAAAAAAAAAAAAAAAAAAAAAAAAAAAAAAAAAAAAAAAAAAAAAAAAAAAAAAAAAAAAAAAAAAAAAAAAAAAAAAAAAAAAAAAAAAAAAAAAAAAAAAAAAAAAAAAAAAAAAAAAAAAAAAAAAAAAAAAAAAAAAAAAAAAAAAAAAAAAAAAAAAAAAAAAAAAAAAAAAAAAAAAAAAAAAAAAAAAAAAAAAAAAAAAAAAAAAAAAAAAAAAAAAAAAAAAAAAAAAAAAAAAAAAAAAAAAAAAAAAAAAAAAAAAAAAAAAAAAAAAAAAAAAAAAAAAAAAAAAAAAAAAAAAAAAAAAAAAAAAAAAAAAAAAAAAAAAAAAAAAAAAAAAAAAAAAAAAAAAAAAAAAAAAAAAAAAAAAAAAAAAAAAAAAAAAAAAAAAAAAAAAAAAAAAAAAAAAAAAAAAAAAAAAAAAAAAAAAAAAAAAAAAAAAAAAAAAAAAAAAAAAAAAAAAAAAAAAAAAAAAAAAAAAAAAAAAAAAAAAAAAAAAAAAAAAAAAAAAAAAAAAAAAAAAAAAA
AAAAAAAAAAAAAAAAAAAAAAAAAAAAAAAAAAAAAAAAAAAAAAAAAAAAAAAAAAAAAAAAAAAAAAAAAAAAAAAAAAAAAAAAAAAAAAAAAAAAAAAAAAAAAAAAAAAAAAAAAAAAAAAAAAAAAAAAAAAAAAAAAAAAAAAAAAAAAAAAAAAAAAAAAAAAAAAAAAAAAAAAAAAAAAAAAAAAAAAAAAAAAAAAAAAAAAAAAAAAAAAAAAAAAAAAAAAAAAAAAAAAAAAAAAAAAAAAAAAAAAAAAAAAAAAAAAAAAAAAAAAAAAAAAAAAAAAAAAAAAAAAAAAAAAAAAAAAAAAAAAAAAAAAAAAAAAAAAAAAAAAAAAAAAAAAAAAAAAAAAAAAAAAAAAAAAAAAAAAAAAAAAAAAAAAAAAAAAAAAAAAAAAAAAAAAAAAAAAAAAAAAAAAAAAAAAAAAAAAAAAAAAAAAAAAAAAAAAAAAAAAAAAAAAAAAAAAAAAAAAAAAAAAAAAAAAAAAAAAAAAAAAAAAAAAAAAAAAAAAAAAAAAAAAAAAAAAAAAAAAAAAAAAAAAAAAAAAAAAAAAAAAAAAAAAAAAAAAAAAAAAAAAAAAAAAAAAAAAAAAAAAAAAAAAAAAAAAAAAAAAAAAAAAAAAAAAAAAAAAAAAAAAAAAAAAAAAAAAAAAAAAAAAAAAAAAAAAAAAAAAAAAAAAAAAAAAAAAAAAAAAAAAAAAAAAAAAAAAAAAAAAAAAAAAAAAAAAAAAAAAAAAAAAAAAAAAAAAAAAAAAAAAAAAAAAAAAAAAAAAAAAAAAAAAAAAAAAAAAAAAAAAAAAAAAAAAAAAAAAAAAAAAAAAAAAAAAAAAAAAAAAAAAAAAAAAAAAAAAAAAAAAAAAAAAAAAAAAAAAAAAAAAAAAAAAAAAAAAAAAAAAAAAAAAAAAAAAAAAAAAAAAAAAAAAAAAAAAAAAAAAAAAAAAAAAAAAAAAAAAAAAAAAAAAAAAAAAAAAAAAAAAAAAAAAAAAAAAAAAAAAAAAAAAAAAAAAAAAAAAAAAAAAAAAAAAAAAAAAAAAAAAAAAAAAAAAAAAAAAAAAAAAAAAAAAAAAAAAAAAAAAAAAAAAAAAAAAAAAAAAAAAAAAAAAAAAAAAAAAAAAAAAAAAAAAAAAAAAAAAAAAAAAAAAAAAAAAAAAAAAAAAAAAAAAAAAAAAAAAAAAAAAAAAAAAAAAAAAAAAAAAAAAAAAAAAAAAAAAAAAAAAAAAAAAAAAAAAAAAAAAAAAAAAAAAAAAAAAAAAAAAAAAAAAAAAAAAAAAAAAAAAAAAAAAAAAAAAAAAAAAAAAAAAAAAAAAAAAAAAAAAAAAAAAAAAAAAAAAAAAAAAAAAAAAAAAAAAAAAAAAAAAAAAAAAAAAAAAAAAAAAAAAAAAAAAAAAAAAAAAAAAAAAAAAAAAAAAAAAAAAAAAAAAAAAAAAAAAAAAAAAAAAAAAAAAAAAAAAAAAAAAAAAAAAAAAAAAAAAAAAAAAAAAAAAAAAAAAAAAAAAAAAAAAAAAAAAAAAAAAAAAAAAAAAAAAAAAAAAAAAAAAAAAAAAAAAAAAAAAAAAAAAAAAAAAAAAAAAAAAAAAAAAAAAAAAAAAAAAAAAAAAAAAAAAAAAAAAAAAAAAAAAAAAAAAAAAAAAAAAAAAAAAAAAAAAAAAAAAAAAAAAAAAAAAAAAAAAAAAAAAAAAAAAAAAAAAAAAAAAAAAAAAAAAAAAAAAAAAAAAAAAAAAAAAAAAAAAAAAAAAAAAAAAAAAAAAAAAAAAAAAAAAAAAAAAAAAAAAAAAAAAAAAAAAAAAAAAAAAAAAAAAAAAAAAAAAAAAAAAAAAAAAAAAAAAAAAAAAAAAAAAAAAAAAAAAAAAAAAAAAAAAAAAAAAAAAAAAAAAAAAAAAAAAAAAAAAAAAAAAAAAAAAAAAAAAAAAAAAAAAAAAAAAAAAAAAAAAAAAAAAAAAAAAAAAAAAAAAAAAAAAAAAAAAAAAAAAAAAAAAAAAAAAAAAAAAAAAAAAAAAAAAAAAAAAAAAAAAAAAAAAAAAAAAAAAAAAAAAAAAAAAAAAAAAAAAAAAAAAAAAAAAAAAAAAAAAAAAAAAAAAAAAAAAAAAAAAAAAAAAAAAAAAAAAAAAAAAAAAAAAAAAAAAAAAAAAAAAAAAAAAAAAAAAAAAAAAAAAAAAAAAAAAAAAAAAAAAAAAAAAAAAAAAAAAAAAAAAAAAAAAAAAAAAAAAAAAAAAAAAAAAAAAAAAAAAAAAAAAAAAAAAAAAAAAAAAAAAAAAAAAAAAAAAAAAAAAAAAAAAAAAAAAAAAAAAAAAAAAAAAAAAAAAAAAAAAAAAAAAAAAAAAAAAAAAAAAAAAAAAAAAAAAAAAAAAAAAAAAAAAAAAAAAAAAAAAAAAAAAAAAAAAAAAAAAAAAAAAAAAAAAAAAAAAAAAAAAAAAAAAAAAAAAAAAAAAAAAAAAAAAAAAAAAAAAAAAAAAAAAAAAAAAAAAAAAAAAAAAAAAAAAAAAAAAAAAAAAAAAAAAAAAAAAAAAAAAAAAAAAAAAAAAAAAAAAAAAAAAAAAAAAAAAAAAAAAAAAAAAAAAAAAAAAAAAAAAAAAAAAAAAAAAAAAAAAAAAAAAAAAAAAAAAAAAAAAAAAAAAAAAAAAAAAAAAAAAAAAAAAAAAAAAAAAAAAAAAAAAAAAAAAAAAAAAAAAAAAAAAAAAAAAAAAAAAAAAAAAAAAAAAAAAAAAAAAAAAAAAAAAAAAAAAAAAAAAAAAAAAAAAAAAAAAAAAAAAAAAAAAAAAAAAAAAAAAAAAAAAAAAAAAAAAAAAAAAAAAAAAAAAAAAAAAAAAAAAAAAAAAAAAAAAAAAAAAAAAAAAAAAAAAAAAAAAAAAAAAAAAAAAAAAAAAAAAAAAAAAAAAAAAAAAAAAAAAAAAAAAAAAAAAAAAAAAAAAAAAAAAAAAAAAAAAAAAAAAAAAAAAAAAAAAAAAAAAAAAAAAAAAAAAAAAAAAAAAAAAAAAAAAAAAAAAAAAAAAAAAAAAAAAAAAAAAAAAAAAAAAAAAAAAAAAAAAAAAAAAAAAAAAAAAAAAAAAAAAAAAAAAAAAAAAAAAAAAAAAAAAAAAAAAAAAAAAAAAAAAAAAAAAAAAAAAAAAAAAAAAAAAAAAAAAAAAAAAAAAAAAAAAAAAAAAAAAAAAAAAAAAAAAAAAAAAAAAAAAAAAAAAAAAAAAAAAAAAAAAAAAAAAAAAAAAAAAAAAAAAAAAAAAAAAAAAAAAAAAAAAAAAAAAAAAAAAAAAAAAAAAAAAAAAAAAAAAAAAAAAAAAAAAAAAAAAAAAAAAAAAAAAAAAAAAAAAAAAAAAAAAAAAAAAAAAAAAAAAAAAAAAAAAAAAAAAAAAAAAAAAAAAAAAAAAAAAAAAAAAAAAAAAAAAAAAAAAAAAAAAAAAAAAAAAAAAAAAAAAAAAAAAAAAAAAAAAAAAAAAAAAAAAAAAAAAAAAAAAAAAAAAAAAAAAAAAAAAAAAAAAAAAAAAAAAAAAAAAAAAAAAAAAAAAAAAAAAAAAAAAAAAAAAAAAAAAAAAAAAAAAAAAAAAAAAAAAAAAAAAAAAAAAAAAAAAAAAAAAAAAAAAAAAAAAAAAAAAAAAAAAAAAAAAAAAAAAAAAAAAAAAAAAAAAAAAAAAAAAAAAAAAAAAAAAAAAAAAAAAAAAAAAAAAAAAAAAAAAAAAAAAAAAAAAAAAAAAAAAAAAAAAAAAAAAAAAAAAAAAAAAAAAAAAAAAAAAAAAAAAAAAAAAAAAAAAAAAAAAAAAAAAAAAAAAAAAAAAAAAAAAAAAAAAAAAAAAAAAAAAAAAAAAAAAAAAAAAAAAAAAAAAAAAAAAAAAAAAAAAAAAAAAAAAAAAAAAAAAAAAAAAAAAAAAAAAAAAAAAAAAAAAAAAAAAAAAAAAAAAAAAAAAAAAAAAAAAAAAAAAAAAAAAAAAAAAAAAAAAAAAAAAAAAAAAAAAAAAAAAAAAAAAAAAAAAAAAAAAAAAAAAAAAAAAAAAAAAAAAAAAAAAAAAAAAAAAAAAAAAAAAAAAAAAAAAAAAAAAAAAAAAAAAAAAAAAAAAAAAAAAAAAAAAAAAAAAAAAAAAAAAAAAAAAAAAAAAAAA
AAAAAAAAAAAAAAAAAAAAAAAAAAAAAAAAAAAAAAAAAAAAAAAAAAAAAAAAAAAAAAAAAAAAAAAAAAAAAAAAAAAAAAAAAAAAAAAAAAAAAAAAAAAAAAAAAAAAAAAAAAAAAAAAAAAAAAAAAAAAAAAAAAAAAAAAAAAAAAAAAAAAAAAAAAAAAAAAAAAAAAAAAAAAAAAAAAAAAAAAAAAAAAAAAAAAAAAAAAAAAAAAAAAAAAAAAAAAAAAAAAAAAAAAAAAAAAAAAAAAAAAAAAAAAAAAAAAAAAAAAAAAAAAAAAAAAAAAAAAAAAAAAAAAAAAAAAAAAAAAAAAAAAAAAAAAAAAAAAAAAAAAAAAAAAAAAAAAAAAAAAAAAAAAAAAAAAAAAAAAAAAAAAAAAAAAAAAAAAAAAAAAAAAAAAAAAAAAAAAAAAAAAAAAAAAAAAAAAAAAAAAAAAAAAAAAAAAAAAAAAAAAAAAAAAAAAAAAAAAAAAAAAAAAAAAAAAAAAAAAAAAAAAAAAAAAAAAAAAAAAAAAAAAAAAAAAAAAAAAAAAAAAAAAAAAAAAAAAAAAAAAAAAAAAAAAAAAAAAAAAAAAAAAAAAAAAAAAAAAAAAAAAAAAAAAAAAAAAAAAAAAAAAAAAAAAAAAAAAAAAAAAAAAAAAAAAAAAAAAAAAAAAAAAAAAAAAAAAAAAAAAAAAAAAAAAAAAAAAAAAAAAAAAAAAAAAAAAAAAAAAAAAAAAAAAAAAAAAAAAAAAAAAAAAAAAAAAAAAAAAAAAAAAAAAAAAAAAAAAAAAAAAAAAAAAAAAAAAAAAAAAAAAAAAAAAAAAAAAAAAAAAAAAAAAAAAAAAAAAAAAAAAAAAAAAAAAAAAAAAAAAAAAAAAAAAAAAAAAAAAAAAAAAAAAAAAAAAAAAAAAAAAAAAAAAAAAAAAAAAAAAAAAAAAAAAAAAAAAAAAAAAAAAAAAAAAAAAAAAAAAAAAAAAAAAAAAAAAAAAAAAAAAAAAAAAAAAAAAAAAAAAAAAAAAAAAAAAAAAAAAAAAAAAAAAAAAAAAAAAAAAAAAAAAAAAAAAAAAAAAAAAAAAAAAAAAAAAAAAAAAAAAAAAAAAAAAAAAAAAAAAAAAAAAAAAAAAAAAAAAAAAAAAAAAAAAAAAAAAAAAAAAAAAAAAAAAAAAAAAAAAAAAAAAAAAAAAAAAAAAAAAAAAAAAAAAAAAAAAAAAAAAAAAAAAAAAAAAAAAAAAAAAAAAAAAAAAAAAAAAAAAAAAAAAAAAAAAAAAAAAAAAAAAAAAAAAAAAAAAAAAAAAAAAAAAAAAAAAAAAAAAAAAAAAAAAAAAAAAAAAAAAAAAAAAAAAAAAAAAAAAAAAAAAAAAAAAAAAAAAAAAAAAAAAAAAAAAAAAAAAAAAAAAAAAAAAAAAAAAAAAAAAAAAAAAAAAAAAAAAAAAAAAAAAAAAAAAAAAAAAAAAAAAAAAAAAAAAAAAAAAAAAAAAAAAAAAAAAAAAAAAAAAAAAAAAAAAAAAAAAAAAAAAAAAAAAAAAAAAAAAAAAAAAAAAAAAAAAAAAAAAAAAAAAAAAAAAAAAAAAAAAAAAAAAAAAAAAAAAAAAAAAAAAAAAAAAAAAAAAAAAAAAAAAAAAAAAAAAAAAAAAAAAAAAAAAAAAAAAAAAAAAAAAAAAAAAAAAAAAAAAAAAAAAAAAAAAAAAAAAAAAAAAAAAAAAAAAAAAAAAAAAAAAAAAAAAAAAAAAAAAAAAAAAAAAAAAAAAAAAAAAAAAAAAAAAAAAAAAAAAAAAAAAAAAAAAAAAAAAAAAAAAAAAAAAAAAAAAAAAAAAAAAAAAAAAAAAAAAAAAAAAAAAAAAAAAAAAAAAAAAAAAAAAAAAAAAAAAAAAAAAAAAAAAAAAAAAAAAAAAAAAAAAAAAAAAAAAAAAAAAAAAAAAAAAAAAAAAAAAAAAAAAAAAAAAAAAAAAAAAAAAAAAAAAAAAAAAAAAAAAAAAAAAAAAAAAAAAAAAAAAAAAAAAAAAAAAAAAAAAAAAAAAAAAAAAAAAAAAAAAAAAAAAAAAAAAAAAAAAAAAAAAAAAAAAAAAAAAAAAAAAAAAAAAAAAAAAAAAAAAAAAAAAAAAAAAAAAAAAAAAAAAAAAAAAAAAAAAAAAAAAAAAAAAAAAAAAAAAAAAAAAAAAAAAAAAAAAAAAAAAAAAAAAAAAAAAAAAAAAAAAAAAAAAAAAAAAAAAAAAAAAAAAAAAAAAAAAAAAAAAAAAAAAAAAAAAAAAAAAAAAAAAAAAAAAAAAAAAAAAAAAAAAAAAAAAAAAAAAAAAAAAAAAAAAAAAAAAAAAAAAAAAAAAAAAAAAAAAAAAAAAAAAAAAAAAAAAAAAAAAAAAAAAAAAAAAAAAAAAAAAAAAAAAAAAAAAAAAAAAAAAAAAAAAAAAAAAAAAAAAAAAAAAAAAAAAAAAAAAAAAAAAAAAAAAAAAAAAAAAAAAAAAAAAAAAAAAAAAAAAAAAAAAAAAAAAAAAAAAAAAAAAAAAAAAAAAAAAAAAAAAAAAAAAAAAAAAAAAAAAAAAAAAAAAAAAAAAAAAAAAAAAAAAAAAAAAAAAAAAAAAAAAAAAAAAAAAAAAAAAAAAAAAAAAAAAAAAAAAAAAAAAAAAAAAAAAAAAAAAAAAAAAAAAAAAAAAAAAAAAAAAAAAAAAAAAAAAAAAAAAAAAAAAAAAAAAAAAAAAAAAAAAAAAAAAAAAAAAAAAAAAAAAAAAAAAAAAAAAAAAAAAAAAAAAAAAAAAAAAAAAAAAAAAAAAAAAAAAAAAAAAAAAAAAAAAAAAAAAAAAAAAAAAAAAAAAAAAAAAAAAAAAAAAAAAAAAAAAAAAAAAAAAAAAAAAAAAAAAAAAAAAAAAAAAAAAAAAAAAAAAAAAAAAAAAAAAAAAAAAAAAAAAAAAAAAAAAAAAAAAAAAAAAAAAAAAAAAAAAAAAAAAAAAAAAAAAAAAAAAAAAAAAAAAAAAAAAAAAAAAAAAAAAAAAAAAAAAAAAAAAAAAAAAAAAAAAAAAAAAAAAAAAAAAAAAAAAAAAAAAAAAAAAAAAAAAAAAAAAAAAAAAAAAAAAAAAAAAAAAAAAAAAAAAAAAAAAAAAAAAAAAAAAAAAAAAAAAAAAAAAAAAAAAAAAAAAAAAAAAAAAAAAAAAAAAAAAAAAAAAAAAAAAAAAAAAAAAAAAAAAAAAAAAAAAAAAAAAAAAAAAAAAAAAAAAAAAAAAAAAAAAAAAAAAAAAAAAAAAAAAAAAAAAAAAAAAAAAAAAAAAAAAAAAAAAAAAAAAAAAAAAAAAAAAAAAAAAAAAAAAAAAAAAAAAAAAAAAAAAAAAAAAAAAAAAAAAAAAAAAAAAAAAAAAAAAAAAAAAAAAAAAAAAAAAAAAAAAAAAAAAAAAAAAAAAAAAAAAAAAAAAAAAAAAAAAAAAAAAAAAAAAAAAAAAAAAAAAAAAAAAAAAAAAAAAAAAAAAAAAAAAAAAAAAAAAAAAAAAAAAAAAAAAAAAAAAAAAAAAAAAAAAAAAAAAAAAAAAAAAAAAAAAAAAAAAAAAAAAAAAAAAAAAAAAAAAAAAAAAAAAAAAAAAAAAAAAAAAAAAAAAAAAAAAAAAAAAAAAAAAAAAAAAAAAAAAAAAAAAAAAAAAAAAAAAAAAAAAAAAAAAAAAAAAAAAAAAAAAAAAAAAAAAAAAAAAAAAAAAAAAAAAAAAAAAAAAAAAAAAAAAAAAAAAAAAAAAAAAAAAAAAAAAAAAAAAAAAAAAAAAAAAAAAAAAAAAAAAAAAAAAAAAAAAAAAAAAAAAAAAAAAAAAAAAAAAAAAAAAAAAAAAAAAAAAAAAAAAAAAAAAAAAAAAAAAAAAAAAAAAAAAAAAAAAAAAAAAAAAAAAAAAAAAAAAAAAAAAAAAAAAAAAAAAAAAAAAAAAAAAAAAAAAAAAAAAAAAAAAAAAAAAAAAAAAAAAAAAAAAAAAAAAAAAAAAAAAAAAAAAAAAAAAAAAAAAAAAAAAAAAAAAAAAAAAAAAAAAAAAAAAAAAAAAAAAAAAAAAAAAAAAAAAAAAAAAAAAAAAAAAAAAAAAAAAAAAAAAAAAAAAAAAAAAAAAAAAAAAAAAAAAAAAAAAAAAAAAAAAAAAAAAAAAAA
AAAAAAAAAAAAAAAAAAAAAAAAAAAAAAAAAAAAAAAAAAAAAAAAAAAAAAAAAAAAAAAAAAAAAAAAAAAAAAAAAAAAAAAAAAAAAAAAAAAAAAAAAAAAAAAAAAAAAAAAAAAAAAAAAAAAAAAAAAAAAAAAAAAAAAAAAAAAAAAAAAAAAAAAAAAAAAAAAAAAAAAAAAAAAAAAAAAAAAAAAAAAAAAAAAAAAAAAAAAAAAAAAAAAAAAAAAAAAAAAAAAAAAAAAAAAAAAAAAAAAAAAAAAAAAAAAAAAAAAAAAAAAAAAAAAAAAAAAAAAAAAAAAAAAAAAAAAAAAAAAAAAAAAAAAAAAAAAAAAAAAAAAAAAAAAAAAAAAAAAAAAAAAAAAAAAAAAAAAAAAAAAAAAAAAAAAAAAAAAAAAAAAAAAAAAAAAAAAAAAAAAAAAAAAAAAAAAAAAAAAAAAAAAAAAAAAAAAAAAAAAAAAAAAAAAAAAAAAAAAAAAAAAAAAAAAAAAAAAAAAAAAAAAAAAAAAAAAAAAAAAAAAAAAAAAAAAAAAAAAAAAAAAAAAAAAAAAAAAAAAAAAAAAAAAAAAAAAAAAAAAAAAAAAAAAAAAAAAAAAAAAAAAAAAAAAAAAAAAAAAAAAAAAAAAAAAAAAAAAAAAAAAAAAAAAAAAAAAAAAAAAAAAAAAAAAAAAAAAAAAAAAAAAAAAAAAAAAAAAAAAAAAAAAAAAAAAAAAAAAAAAAAAAAAAAAAAAAAAAAAAAAAAAAAAAAAAAAAAAAAAAAAAAAAAAAAAAAAAAAAAAAAAAAAAAAAAAAAAAAAAAAAAAAAAAAAAAAAAAAAAAAAAAAAAAAAAAAAAAAAAAAAAAAAAAAAAAAAAAAAAAAAAAAAAAAAAAAAAAAAAAAAAAAAAAAAAAAAAAAAAAAAAAAAAAAAAAAAAAAAAAAAAAAAAAAAAAAAAAAAAAAAAAAAAAAAAAAAAAAAAAAAAAAAAAAAAAAAAAAAAAAAAAAAAAAAAAAAAAAAAAAAAAAAAAAAAAAAAAAAAAAAAAAAAAAAAAAAAAAAAAAAAAAAAAAAAAAAAAAAAAAAAAAAAAAAAAAAAAAAAAAAAAAAAAAAAAAAAAAAAAAAAAAAAAAAAAAAAAAAAAAAAAAAAAAAAAAAAAAAAAAAAAAAAAAAAAAAAAAAAAAAAAAAAAAAAAAAAAAAAAAAAAAAAAAAAAAAAAAAAAAAAAAAAAAAAAAAAAAAAAAAAAAAAAAAAAAAAAAAAAAAAAAAAAAAAAAAAAAAAAAAAAAAAAAAAAAAAAAAAAAAAAAAAAAAAAAAAAAAAAAAAAAAAAAAAAAAAAAAAAAAAAAAAAAAAAAAAAAAAAAAAAAAAAAAAAAAAAAAAAAAAAAAAAAAAAAAAAAAAAAAAAAAAAAAAAAAAAAAAAAAAAAAAAAAAAAAAAAAAAAAAAAAAAAAAAAAAAAAAAAAAAAAAAAAAAAAAAAAAAAAAAAAAAAAAAAAAAAAAAAAAAAAAAAAAAAAAAAAAAAAAAAAAAAAAAAAAAAAAAAAAAAAAAAAAAAAAAAAAAAAAAAAAAAAAAAAAAAAAAAAAAAAAAAAAAAAAAAAAAAAAAAAAAAAAAAAAAAAAAAAAAAAAAAAAAAAAAAAAAAAAAAAAAAAAAAAAAAAAAAAAAAAAAAAAAAAAAAAAAAAAAAAAAAAAAAAAAAAAAAAAAAAAAAAAAAAAAAAAAAAAAAAAAAAAAAAAAAAAAAAAAAAAAAAAAAAAAAAAAAAAAAAAAAAAAAAAAAAAAAAAAAAAAAAAAAAAAAAAAAAAAAAAAAAAAAAAAAAAAAAAAAAAAAAAAAAAAAAAAAAAAAAAAAAAAAAAAAAAAAAAAAAAAAAAAAAAAAAAAAAAAAAAAAAAAAAAAAAAAAAAAAAAAAAAAAAAAAAAAAAAAAAAAAAAAAAAAAAAAAAAAAAAAAAAAAAAAAAAAAAAAAAAAAAAAAAAAAAAAAAAAAAAAAAAAAAAAAAAAAAAAAAAAAAAAAAAAAAAAAAAAAAAAAAAAAAAAAAAAAAAAAAAAAAAAAAAAAAAAAAAAAAAAAAAAAAAAAAAAAAAAAAAAAAAAAAAAAAAAAAAAAAAAAAAAAAAAAAAAAAAAAAAAAAAAAAAAAAAAAAAAAAAAAAAAAAAAAAAAAAAAAAAAAAAAAAAAAAAAAAAAAAAAAAAAAAAAAAAAAAAAAAAAAAAAAAAAAAAAAAAAAAAAAAAAAAAAAAAAAAAAAAAAAAAAAAAAAAAAAAAAAAAAAAAAAAAAAAAAAAAAAAAAAAAAAAAAAAAAAAAAAAAAAAAAAAAAAAAAAAAAAAAAAAAAAAAAAAAAAAAAAAAAAAAAAAAAAAAAAAAAAAAAAAAAAAAAAAAAAAAAAAAAAAAAAAAAAAAAAAAAAAAAAAAAAAAAAAAAAAAAAAAAAAAAAAAAAAAAAAAAAAAAAAAAAAAAAAAAAAAAAAAAAAAAAAAAAAAAAAAAAAAAAAAAAAAAAAAAAAAAAAAAAAAAAAAAAAAAAAAAAAAAAAAAAAAAAAAAAAAAAAAAAAAAAAAAAAAAAAAAAAAAAAAAAAAAAAAAAAAAAAAAAAAAAAAAAAAAAAAAAAAAAAAAAAAAAAAAAAAAAAAAAAAAAAAAAAAAAAAAAAAAAAAAAAAAAAAAAAAAAAAAAAAAAAAAAAAAAAAAAAAAAAAAAAAAAAAAAAAAAAAAAAAAAAAAAAAAAAAAAAAAAAAAAAAAAAAAAAAAAAAAAAAAAAAAAAAAAAAAAAAAAAAAAAAAAAAAAAAAAAAAAAAAAAAAAAAAAAAAAAAAAAAAAAAAAAAAAAAAAAAAAAAAAAAAAAAAAAAAAAAAAAAAAAAAAAAAAAAAAAAAAAAAAAAAAAAAAAAAAAAAAAAAAAAAAAAAAAAAAAAAAAAAAAAAAAAAAAAAAAAAAAAAAAAAAAAAAAAAAAAAAAAAAAAAAAAAAAAAAAAAAAAAAAAAAAAAAAAAAAAAAAAAAAAAAAAAAAAAAAAAAAAAAAAAAAAAAAAAAAAAAAAAAAAAAAAAAAAAAAAAAAAAAAAAAAAAAAAAAAAAAAAAAAAAAAAAAAAAAAAAAAAAAAAAAAAAAAAAAAAAAAAAAAAAAAAAAAAAAAAAAAAAAAAAAAAAAAAAAAAAAAAAAAAAAAAAAAAAAAAAAAAAAAAAAAAAAAAAAAAAAAAAAAAAAAAAAAAAAAAAAAAAAAAAAAAAAAAAAAAAAAAAAAAAAAAAAAAAAAAAAAAAAAAAAAAAAAAAAAAAAAAAAAAAAAAAAAAAAAAAAAAAAAAAAAAAAAAAAAAAAAAAAAAAAAAAAAAAAAAAAAAAAAAAAAAAAAAAAAAAAAAAAAAAAAAAAAAAAAAAAAAAAAAAAAAAAAAAAAAAAAAAAAAAAAAAAAAAAAAAAAAAAAAAAAAAAAAAAAAAAAAAAAAAAAAAAAAAAAAAAAAAAAAAAAAAAAAAAAAAAAAAAAAAAAAAAAAAAAAAAAAAAAAAAAAAAAAAAAAAAAAAAAAAAAAAAAAAAAAAAAAAAAAAAAAAAAAAAAAAAAAAAAAAAAAAAAAAAAAAAAAAAAAAAAAAAAAAAAAAAAAAAAAAAAAAAAAAAAAAAAAAAAAAAAAAAAAAAAAAAAAAAAAAAAAAAAAAAAAAAAAAAAAAAAAAAAAAAAAAAAAAAAAAAAAAAAAAAAAAAAAAAAAAAAAAAAAAAAAAAAAAAAAAAAAAAAAAAAAAAAAAAAAAAAAAAAAAAAAAAAAAAAAAAAAAAAAAAAAAAAAAAAAAAAAAAAAAAAAAAAAAAAAAAAAAAAAAAAAAAAAAAAAAAAAAAAAAAAAAAAAAAAAAAAAAAAAAAAAAAAAAAAAAAAAAAAAAAAAAAAAAAAAAAAAAAAAAAAAAAAAAAAAAAAAAAAAAAAAAAAAAAAAAAAAAAAAAAAAAAAAAAAAAAAAAAAAAAAAAAAAAAAAAAAAAAAAAAAAAAAAAAAAAAAAAAAAAAAAAAAAAAAAAAAAAAAAAAAAAAAAAAAAAAAAAAAAAAAAAAAAAAAAAAAAAAAAAAAAAAAAAAAAAAAAAAAAAAAAAAAAAAAAAAAAAAAAAAAAAAAAAAAAAAAAAAAAAAAAAAAAAA
AAAAAAAAAAAAAAAAAAAAAAAAAAAAAAAAAAAAAAAAAAAAAAAAAAAAAAAAAAAAAAAAAAAAAAAAAAAAAAAAAAAAAAAAAAAAAAAAAAAAAAAAAAAAAAAAAAAAAAAAAAAAAAAAAAAAAAAAAAAAAAAAAAAAAAAAAAAAAAAAAAAAAAAAAAAAAAAAAAAAAAAAAAAAAAAAAAAAAAAAAAAAAAAAAAAAAAAAAAAAAAAAAAAAAAAAAAAAAAAAAAAAAAAAAAAAAAAAAAAAAAAAAAAAAAAAAAAAAAAAAAAAAAAAAAAAAAAAAAAAAAAAAAAAAAAAAAAAAAAAAAAAAAAAAAAAAAAAAAAAAAAAAAAAAAAAAAAAAAAAAAAAAAAAAAAAAAAAAAAAAAAAAAAAAAAAAAAAAAAAAAAAAAAAAAAAAAAAAAAAAAAAAAAAAAAAAAAAAAAAAAAAAAAAAAAAAAAAAAAAAAAAAAAAAAAAAAAAAAAAAAAAAAAAAAAAAAAAAAAAAAAAAAAAAAAAAAAAAAAAAAAAAAAAAAAAAAAAAAAAAAAAAAAAAAAAAAAAAAAAAAAAAAAAAAAAAAAAAAAAAAAAAAAAAAAAAAAAAAAAAAAAAAAAAAAAAAAAAAAAAAAAAAAAAAAAAAAAAAAAAAAAAAAAAAAAAAAAAAAAAAAAAAAAAAAAAAAAAAAAAAAAAAAAAAAAAAAAAAAAAAAAAAAAAAAAAAAAAAAAAAAAAAAAAAAAAAAAAAAAAAAAAAAAAAAAAAAAAAAAAAAAAAAAAAAAAAAAAAAAAAAAAAAAAAAAAAAAAAAAAAAAAAAAAAAAAAAAAAAAAAAAAAAAAAAAAAAAAAAAAAAAAAAAAAAAAAAAAAAAAAAAAAAAAAAAAAAAAAAAAAAAAAAAAAAAAAAAAAAAAAAAAAAAAAAAAAAAAAAAAAAAAAAAAAAAAAAAAAAAAAAAAAAAAAAAAAAAAAAAAAAAAAAAAAAAAAAAAAAAAAAAAAAAAAAAAAAAAAAAAAAAAAAAAAAAAAAAAAAAAAAAAAAAAAAAAAAAAAAAAAAAAAAAAAAAAAAAAAAAAAAAAAAAAAAAAAAAAAAAAAAAAAAAAAAAAAAAAAAAAAAAAAAAAAAAAAAAAAAAAAAAAAAAAAAAAAAAAAAAAAAAAAAAAAAAAAAAAAAAAAAAAAAAAAAAAAAAAAAAAAAAAAAAAAAAAAAAAAAAAAAAAAAAAAAAAAAAAAAAAAAAAAAAAAAAAAAAAAAAAAAAAAAAAAAAAAAAAAAAAAAAAAAAAAAAAAAAAAAAAAAAAAAAAAAAAAAAAAAAAAAAAAAAAAAAAAAAAAAAAAAAAAAAAAAAAAAAAAAAAAAAAAAAAAAAAAAAAAAAAAAAAAAAAAAAAAAAAAAAAAAAAAAAAAAAAAAAAAAAAAAAAAAAAAAAAAAAAAAAAAAAAAAAAAAAAAAAAAAAAAAAAAAAAAAAAAAAAAAAAAAAAAAAAAAAAAAAAAAAAAAAAAAAAAAAAAAAAAAAAAAAAAAAAAAAAAAAAAAAAAAAAAAAAAAAAAAAAAAAAAAAAAAAAAAAAAAAAAAAAAAAAAAAAAAAAAAAAAAAAAAAAAAAAAAAAAAAAAAAAAAAAAAAAAAAAAAAAAAAAAAAAAAAAAAAAAAAAAAAAAAAAAAAAAAAAAAAAAAAAAAAAAAAAAAAAAAAAAAAAAAAAAAAAAAAAAAAAAAAAAAAAAAAAAAAAAAAAAAAAAAAAAAAAAAAAAAAAAAAAAAAAAAAAAAAAAAAAAAAAAAAAAAAAAAAAAAAAAAAAAAAAAAAAAAAAAAAAAAAAAAAAAAAAAAAAAAAAAAAAAAAAAAAAAAAAAAAAAAAAAAAAAAAAAAAAAAAAAAAAAAAAAAAAAAAAAAAAAAAAAAAAAAAAAAAAAAAAAAAAAAAAAAAAAAAAAAAAAAAAAAAAAAAAAAAAAAAAAAAAAAAAAAAAAAAAAAAAAAAAAAAAAAAAAAAAAAAAAAAAAAAAAAAAAAAAAAAAAAAAAAAAAAAAAAAAAAAAAAAAAAAAAAAAAAAAAAAAAAAAAAAAAAAAAAAAAAAAAAAAAAAAAAAAAAAAAAAAAAAAAAAAAAAAAAAAAAAAAAAAAAAAAAAAAAAAAAAAAAAAAAAAAAAAAAAAAAAAAAAAAAAAAAAAAAAAAAAAAAAAAAAAAAAAAAAAAAAAAAAAAAAAAAAAAAAAAAAAAAAAAAAAAAAAAAAAAAAAAAAAAAAAAAAAAAAAAAAAAAAAAAAAAAAAAAAAAAAAAAAAAAAAAAAAAAAAAAAAAAAAAAAAAAAAAAAAAAAAAAAAAAAAAAAAAAAAAAAAAAAAAAAAAAAAAAAAAAAAAAAAAAAAAAAAAAAAAAAAAAAAAAAAAAAAAAAAAAAAAAAAAAAAAAAAAAAAAAAAAAAAAAAAAAAAAAAAAAAAAAAAAAAAAAAAAAAAAAAAAAAAAAAAAAAAAAAAAAAAAAAAAAAAAAAAAAAAAAAAAAAAAAAAAAAAAAAAAAAAAAAAAAAAAAAAAAAAAAAAAAAAAAAAAAAAAAAAAAAAAAAAAAAAAAAAAAAAAAAAAAAAAAAAAAAAAAAAAAAAAAAAAAAAAAAAAAAAAAAAAAAAAAAAAAAAAAAAAAAAAAAAAAAAAAAAAAAAAAAAAAAAAAAAAAAAAAAAAAAAAAAAAAAAAAAAAAAAAAAAAAAAAAAAAAAAAAAAAAAAAAAAAAAAAAAAAAAAAAAAAAAAAAAAAAAAAAAAAAAAAAAAAAAAAAAAAAAAAAAAAAAAAAAAAAAAAAAAAAAAAAAAAAAAAAAAAAAAAAAAAAAAAAAAAAAAAAAAAAAAAAAAAAAAAAAAAAAAAAAAAAAAAAAAAAAAAAAAAAAAAAAAAAAAAAAAAAAAAAAAAAAAAAAAAAAAAAAAAAAAAAAAAAAAAAAAAAAAAAAAAAAAAAAAAAAAAAAAAAAAAAAAAAAAAAAAAAAAAAAAAAAAAAAAAAAAAAAAAAAAAAAAAAAAAAAAAAAAAAAAAAAAAAAAAAAAAAAAAAAAAAAAAAAAAAAAAAAAAAAAAAAAAAAAAAAAAAAAAAAAAAAAAAAAAAAAAAAAAAAAAAAAAAAAAAAAAAAAAAAAAAAAAAAAAAAAAAAAAAAAAAAAAAAAAAAAAAAAAAAAAAAAAAAAAAAAAAAAAAAAAAAAAAAAAAAAAAAAAAAAAAAAAAAAAAAAAAAAAAAAAAAAAAAAAAAAAAAAAAAAAAAAAAAAAAAAAAAAAAAAAAAAAAAAAAAAAAAAAAAAAAAAAAAAAAAAAAAAAAAAAAAAAAAAAAAAAAAAAAAAAAAAAAAAAAAAAAAAAAAAAAAAAAAAAAAAAAAAAAAAAAAAAAAAAAAAAAAAAAAAAAAAAAAAAAAAAAAAAAAAAAAAAAAAAAAAAAAAAAAAAAAAAAAAAAAAAAAAAAAAAAAAAAAAAAAAAAAAAAAAAAAAAAAAAAAAAAAAAAAAAAAAAAAAAAAAAAAAAAAAAAAAAAAAAAAAAAAAAAAAAAAAAAAAAAAAAAAAAAAAAAAAAAAAAAAAAAAAAAAAAAAAAAAAAAAAAAAAAAAAAAAAAAAAAAAAAAAAAAAAAAAAAAAAAAAAAAAAAAAAAAAAAAAAAAAAAAAAAAAAAAAAAAAAAAAAAAAAAAAAAAAAAAAAAAAAAAAAAAAAAAAAAAAAAAAAAAAAAAAAAAAAAAAAAAAAAAAAAAAAAAAAAAAAAAAAAAAAAAAAAAAAAAAAAAAAAAAAAAAAAAAAAAAAAAAAAAAAAAAAAAAAAAAAAAAAAAAAAAAAAAAAAAAAAAAAAAAAAAAAAAAAAAAAAAAAAAAAAAAAAAAAAAAAAAAAAAAAAAAAAAAAAAAAAAAAAAAAAAAAAAAAAAAAAAAAAAAAAAAAAAAAAAAAAAAAAAAAAAAAAAAAAAAAAAAAAAAAAAAAAAAAAAAAAAAAAAAAAAAAAAAAAAAAAAAAAAAAAAAAAAAAAAAAAAAAAAAAAAAAAAAAAAAAAAAAAAAAAAAAAAAAAAAAAAAAAAAAAAAAAAAAAAAAAAAAAAAAAAAAAAAAAAAAAAAAAAAAAAAAAAAAAAAAAAAAAAAAAAAAAAAAAAAAAAAAAAAAAAA
AAAAAAAAAAAAAAAAAAAAAAAAAAAAAAAAAAAAAAAAAAAAAAAAAAAAAAAAAAAAAAAAAAAAAAAAAAAAAAAAAAAAAAAAAAAAAAAAAAAAAAAAAAAAAAAAAAAAAAAAAAAAAAAAAAAAAAAAAAAAAAAAAAAAAAAAAAAAAAAAAAAAAAAAAAAAAAAAAAAAAAAAAAAAAAAAAAAAAAAAAAAAAAAAAAAAAAAAAAAAAAAAAAAAAAAAAAAAAAAAAAAAAAAAAAAAAAAAAAAAAAAAAAAAAAAAAAAAAAAAAAAAAAAAAAAAAAAAAAAAAAAAAAAAAAAAAAAAAAAAAAAAAAAAAAAAAAAAAAAAAAAAAAAAAAAAAAAAAAAAAAAAAAAAAAAAAAAAAAAAAAAAAAAAAAAAAAAAAAAAAAAAAAAAAAAAAAAAAAAAAAAAAAAAAAAAAAAAAAAAAAAAAAAAAAAAAAAAAAAAAAAAAAAAAAAAAAAAAAAAAAAAAAAAAAAAAAAAAAAAAAAAAAAAAAAAAAAAAAAAAAAAAAAAAAAAAAAAAAAAAAAAAAAAAAAAAAAAAAAAAAAAAAAAAAAAAAAAAAAAAAAAAAAAAAAAAAAAAAAAAAAAAAAAAAAAAAAAAAAAAAAAAAAAAAAAAAAAAAAAAAAAAAAAAAAAAAAAAAAAAAAAAAAAAAAAAAAAAAAAAAAAAAAAAAAAAAAAAAAAAAAAAAAAAAAAAAAAAAAAAAAAAAAAAAAAAAAAAAAAAAAAAAAAAAAAAAAAAAAAAAAAAAAAAAAAAAAAAAAAAAAAAAAAAAAAAAAAAAAAAAAAAAAAAAAAAAAAAAAAAAAAAAAAAAAAAAAAAAAAAAAAAAAAAAAAAAAAAAAAAAAAAAAAAAAAAAAAAAAAAAAAAAAAAAAAAAAAAAAAAAAAAAAAAAAAAAAAAAAAAAAAAAAAAAAAAAAAAAAAAAAAAAAAAAAAAAAAAAAAAAAAAAAAAAAAAAAAAAAAAAAAAAAAAAAAAAAAAAAAAAAAAAAAAAAAAAAAAAAAAAAAAAAAAAAAAAAAAAAAAAAAAAAAAAAAAAAAAAAAAAAAAAAAAAAAAAAAAAAAAAAAAAAAAAAAAAAAAAAAAAAAAAAAAAAAAAAAAAAAAAAAAAAAAAAAAAAAAAAAAAAAAAAAAAAAAAAAAAAAAAAAAAAAAAAAAAAAAAAAAAAAAAAAAAAAAAAAAAAAAAAAAAAAAAAAAAAAAAAAAAAAAAAAAAAAAAAAAAAAAAAAAAAAAAAAAAAAAAAAAAAAAAAAAAAAAAAAAAAAAAAAAAAAAAAAAAAAAAAAAAAAAAAAAAAAAAAAAAAAAAAAAAAAAAAAAAAAAAAAAAAAAAAAAAAAAAAAAAAAAAAAAAAAAAAAAAAAAAAAAAAAAAAAAAAAAAAAAAAAAAAAAAAAAAAAAAAAAAAAAAAAAAAAAAAAAAAAAAAAAAAAAAAAAAAAAAAAAAAAAAAAAAAAAAAAAAAAAAAAAAAAAAAAAAAAAAAAAAAAAAAAAAAAAAAAAAAAAAAAAAAAAAAAAAAAAAAAAAAAAAAAAAAAAAAAAAAAAAAAAAAAAAAAAAAAAAAAAAAAAAAAAAAAAAAAAAAAAAAAAAAAAAAAAAAAAAAAAAAAAAAAAAAAAAAAAAAAAAAAAAAAAAAAAAAAAAAAAAAAAAAAAAAAAAAAAAAAAAAAAAAAAAAAAAAAAAAAAAAAAAAAAAAAAAAAAAAAAAAAAAAAAAAAAAAAAAAAAAAAAAAAAAAAAAAAAAAAAAAAAAAAAAAAAAAAAAAAAAAAAAAAAAAAAAAAAAAAAAAAAAAAAAAAAAAAAAAAAAAAAAAAAAAAAAAAAAAAAAAAAAAAAAAAAAAAAAAAAAAAAAAAAAAAAAAAAAAAAAAAAAAAAAAAAAAAAAAAAAAAAAAAAAAAAAAAAAAAAAAAAAAAAAAAAAAAAAAAAAAAAAAAAAAAAAAAAAAAAAAAAAAAAAAAAAAAAAAAAAAAAAAAAAAAAAAAAAAAAAAAAAAAAAAAAAAAAAAAAAAAAAAAAAAAAAAAAAAAAAAAAAAAAAAAAAAAAAAAAAAAAAAAAAAAAAAAAAAAAAAAAAAAAAAAAAAAAAAAAAAAAAAAAAAAAAAAAAAAAAAAAAAAAAAAAAAAAAAAAAAAAAAAAAAAAAAAAAAAAAAAAAAAAAAAAAAAAAAAAAAAAAAAAAAAAAAAAAAAAAAAAAAAAAAAAAAAAAAAAAAAAAAAAAAAAAAAAAAAAAAAAAAAAAAAAAAAAAAAAAAAAAAAAAAAAAAAAAAAAAAAAAAAAAAAAAAAAAAAAAAAAAAAAAAAAAAAAAAAAAAAAAAAAAAAAAAAAAAAAAAAAAAAAAAAAAAAAAAAAAAAAAAAAAAAAAAAAAAAAAAAAAAAAAAAAAAAAAAAAAAAAAAAAAAAAAAAAAAAAAAAAAAAAAAAAAAAAAAAAAAAAAAAAAAAAAAAAAAAAAAAAAAAAAAAAAAAAAAAAAAAAAAAAAAAAAAAAAAAAAAAAAAAAAAAAAAAAAAAAAAAAAAAAAAAAAAAAAAAAAAAAAAAAAAAAAAAAAAAAAAAAAAAAAAAAAAAAAAAAAAAAAAAAAAAAAAAAAAAAAAAAAAAAAAAAAAAAAAAAAAAAAAAAAAAAAAAAAAAAAAAAAAAAAAAAAAAAAAAAAAAAAAAAAAAAAAAAAAAAAAAAAAAAAAAAAAAAAAAAAAAAAAAAAAAAAAAAAAAAAAAAAAAAAAAAAAAAAAAAAAAAAAAAAAAAAAAAAAAAAAAAAAAAAAAAAAAAAAAAAAAAAAAAAAAAAAAAAAAAAAAAAAAAAAAAAAAAAAAAAAAAAAAAAAAAAAAAAAAAAAAAAAAAAAAAAAAAAAAAAAAAAAAAAAAAAAAAAAAAAAAAAAAAAAAAAAAAAAAAAAAAAAAAAAAAAAAAAAAAAAAAAAAAAAAAAAAAAAAAAAAAAAAAAAAAAAAAAAAAAAAAAAAAAAAAAAAAAAAAAAAAAAAAAAAAAAAAAAAAAAAAAAAAAAAAAAAAAAAAAAAAAAAAAAAAAAAAAAAAAAAAAAAAAAAAAAAAAAAAAAAAAAAAAAAAAAAAAAAAAAAAAAAAAAAAAAAAAAAAAAAAAAAAAAAAAAAAAAAAAAAAAAAAAAAAAAAAAAAAAAAAAAAAAAAAAAAAAAAAAAAAAAAAAAAAAAAAAAAAAAAAAAAAAAAAAAAAAAAAAAAAAAAAAAAAAAAAAAAAAAAAAAAAAAAAAAAAAAAAAAAAAAAAAAAAAAAAAAAAAAAAAAAAAAAAAAAAAAAAAAAAAAAAAAAAAAAAAAAAAAAAAAAAAAAAAAAAAAAAAAAAAAAAAAAAAAAAAAAAAAAAAAAAAAAAAAAAAAAAAAAAAAAAAAAAAAAAAAAAAAAAAAAAAAAAAAAAAAAAAAAAAAAAAAAAAAAAAAAAAAAAAAAAAAAAAAAAAAAAAAAAAAAAAAAAAAAAAAAAAAAAAAAAAAAAAAAAAAAAAAAAAAAAAAAAAAAAAAAAAAAAAAAAAAAAAAAAAAAAAAAAAAAAAAAAAAAAAAAAAAAAAAAAAAAAAAAAAAAAAAAAAAAAAAAAAAAAAAAAAAAAAAAAAAAAAAAAAAAAAAAAAAAAAAAAAAAAAAAAAAAAAAAAAAAAAAAAAAAAAAAAAAAAAAAAAAAAAAAAAAAAAAAAAAAAAAAAAAAAAAAAAAAAAAAAAAAAAAAAAAAAAAAAAAAAAAAAAAAAAAAAAAAAAAAAAAAAAAAAAAAAAAAAAAAAAAAAAAAAAAAAAAAAAAAAAAAAAAAAAAAAAAAAAAAAAAAAAAAAAAAAAAAAAAAAAAAAAAAAAAAAAAAAAAAAAAAAAAAAAAAAAAAAAAAAAAAAAAAAAAAAAAAAAAAAAAAAAAAAAAAAAAAAAAAAAAAAAAAAAAAAAAAAAAAAAAAAAAAAAAAAAAAAAAAAAAAAAAAAAAAAAAAAAAAAAAAAAAAAAAAAAAAAAAAAAAAAAAAAAAAAAAAAAAAAAAAAAAAAAAAAAAAAAAAAAAAAAAAAAAAAAAAAAAAAAAAAAAAAAAAAAAAAAAAAAAAAAAAAAAAAAAAAAAAAAAAAAAAAAAAAAAAAAAAAAAAAAAA
AAAAAAAAAAAAAAAAAAAAAAAAAAAAAAAAAAAAAAAAAAAAAAAAAAAAAAAAAAAAAAAAAAAAAAAAAAAAAAAAAAAAAAAAAAAAAAAAAAAAAAAAAAAAAAAAAAAAAAAAAAAAAAAAAAAAAAAAAAAAAAAAAAAAAAAAAAAAAAAAAAAAAAAAAAAAAAAAAAAAAAAAAAAAAAAAAAAAAAAAAAAAAAAAAAAAAAAAAAAAAAAAAAAAAAAAAAAAAAAAAAAAAAAAAAAAAAAAAAAAAAAAAAAAAAAAAAAAAAAAAAAAAAAAAAAAAAAAAAAAAAAAAAAAAAAAAAAAAAAAAAAAAAAAAAAAAAAAAAAAAAAAAAAAAAAAAAAAAAAAAAAAAAAAAAAAAAAAAAAAAAAAAAAAAAAAAAAAAAAAAAAAAAAAAAAAAAAAAAAAAAAAAAAAAAAAAAAAAAAAAAAAAAAAAAAAAAAAAAAAAAAAAAAAAAAAAAAAAAAAAAAAAAAAAAAAAAAAAAAAAAAAAAAAAAAAAAAAAAAAAAAAAAAAAAAAAAAAAAAAAAAAAAAAAAAAAAAAAAAAAAAAAAAAAAAAAAAAAAAAAAAAAAAAAAAAAAAAAAAAAAAAAAAAAAAAAAAAAAAAAAAAAAAAAAAAAAAAAAAAAAAAAAAAAAAAAAAAAAAAAAAAAAAAAAAAAAAAAAAAAAAAAAAAAAAAAAAAAAAAAAAAAAAAAAAAAAAAAAAAAAAAAAAAAAAAAAAAAAAAAAAAAAAAAAAAAAAAAAAAAAAAAAAAAAAAAAAAAAAAAAAAAAAAAAAAAAAAAAAAAAAAAAAAAAAAAAAAAAAAAAAAAAAAAAAAAAAAAAAAAAAAAAAAAAAAAAAAAAAAAAAAAAAAAAAAAAAAAAAAAAAAAAAAAAAAAAAAAAAAAAAAAAAAAAAAAAAAAAAAAAAAAAAAAAAAAAAAAAAAAAAAAAAAAAAAAAAAAAAAAAAAAAAAAAAAAAAAAAAAAAAAAAAAAAAAAAAAAAAAAAAAAAAAAAAAAAAAAAAAAAAAAAAAAAAAAAAAAAAAAAAAAAAAAAAAAAAAAAAAAAAAAAAAAAAAAAAAAAAAAAAAAAAAAAAAAAAAAAAAAAAAAAAAAAAAAAAAAAAAAAAAAAAAAAAAAAAAAAAAAAAAAAAAAAAAAAAAAAAAAAAAAAAAAAAAAAAAAAAAAAAAAAAAAAAAAAAAAAAAAAAAAAAAAAAAAAAAAAAAAAAAAAAAAAAAAAAAAAAAAAAAAAAAAAAAAAAAAAAAAAAAAAAAAAAAAAAAAAAAAAAAAAAAAAAAAAAAAAAAAAAAAAAAAAAAAAAAAAAAAAAAAAAAAAAAAAAAAAAAAAAAAAAAAAAAAAAAAAAAAAAAAAAAAAAAAAAAAAAAAAAAAAAAAAAAAAAAAAAAAAAAAAAAAAAAAAAAAAAAAAAAAAAAAAAAAAAAAAAAAAAAAAAAAAAAAAAAAAAAAAAAAAAAAAAAAAAAAAAAAAAAAAAAAAAAAAAAAAAAAAAAAAAAAAAAAAAAAAAAAAAAAAAAAAAAAAAAAAAAAAAAAAAAAAAAAAAAAAAAAAAAAAAAAAAAAAAAAAAAAAAAAAAAAAAAAAAAAAAAAAAAAAAAAAAAAAAAAAAAAAAAAAAAAAAAAAAAAAAAAAAAAAAAAAAAAAAAAAAAAAAAAAAAAAAAAAAAAAAAAAAAAAAAAAAAAAAAAAAAAAAAAAAAAAAAAAAAAAAAAAAAAAAAAAAAAAAAAAAAAAAAAAAAAAAAAAAAAAAAAAAAAAAAAAAAAAAAAAAAAAAAAAAAAAAAAAAAAAAAAAAAAAAAAAAAAAAAAAAAAAAAAAAAAAAAAAAAAAAAAAAAAAAAAAAAAAAAAAAAAAAAAAAAAAAAAAAAAAAAAAAAAAAAAAAAAAAAAAAAAAAAAAAAAAAAAAAAAAAAAAAAAAAAAAAAAAAAAAAAAAAAAAAAAAAAAAAAAAAAAAAAAAAAAAAAAAAAAAAAAAAAAAAAAAAAAAAAAAAAAAAAAAAAAAAAAAAAAAAAAAAAAAAAAAAAAAAAAAAAAAAAAAAAAAAAAAAAAAAAAAAAAAAAAAAAAAAAAAAAAAAAAAAAAAAAAAAAAAAAAAAAAAAAAAAAAAAAAAAAAAAAAAAAAAAAAAAAAAAAAAAAAAAAAAAAAAAAAAAAAAAAAAAAAAAAAAAAAAAAAAAAAAAAAAAAAAAAAAAAAAAAAAAAAAAAAAAAAAAAAAAAAAAAAAAAAAAAAAAAAAAAAAAAAAAAAAAAAAAAAAAAAAAAAAAAAAAAAAAAAAAAAAAAAAAAAAAAAAAAAAAAAAAAAAAAAAAAAAAAAAAAAAAAAAAAAAAAAAAAAAAAAAAAAAAAAAAAAAAAAAAAAAAAAAAAAAAAAAAAAAAAAAAAAAAAAAAAAAAAAAAAAAAAAAAAAAAAAAAAAAAAAAAAAAAAAAAAAAAAAAAAAAAAAAAAAAAAAAAAAAAAAAAAAAAAAAAAAAAAAAAAAAAAAAAAAAAAAAAAAAAAAAAAAAAAAAAAAAAAAAAAAAAAAAAAAAAAAAAAAAAAAAAAAAAAAAAAAAAAAAAAAAAAAAAAAAAAAAAAAAAAAAAAAAAAAAAAAAAAAAAAAAAAAAAAAAAAAAAAAAAAAAAAAAAAAAAAAAAAAAAAAAAAAAAAAAAAAAAAAAAAAAAAAAAAAAAAAAAAAAAAAAAAAAAAAAAAAAAAAAAAAAAAAAAAAAAAAAAAAAAAAAAAAAAAAAAAAAAAAAAAAAAAAAAAAAAAAAAAAAAAAAAAAAAAAAAAAAAAAAAAAAAAAAAAAAAAAAAAAAAAAAAAAAAAAAAAAAAAAAAAAAAAAAAAAAAAAAAAAAAAAAAAAAAAAAAAAAAAAAAAAAAAAAAAAAAAAAAAAAAAAAAAAAAAAAAAAAAAAAAAAAAAAAAAAAAAAAAAAAAAAAAAAAAAAAAAAAAAAAAAAAAAAAAAAAAAAAAAAAAAAAAAAAAAAAAAAAAAAAAAAAAAAAAAAAAAAAAAAAAAAAAAAAAAAAAAAAAAAAAAAAAAAAAAAAAAAAAAAAAAAAAAAAAAAAAAAAAAAAAAAAAAAAAAAAAAAAAAAAAAAAAAAAAAAAAAAAAAAAAAAAAAAAAAAAAAAAAAAAAAAAAAAAAAAAAAAAAAAAAAAAAAAAAAAAAAAAAAAAAAAAAAAAAAAAAAAAAAAAAAAAAAAAAAAAAAAAAAAAAAAAAAAAAAAAAAAAAAAAAAAAAAAAAAAAAAAAAAAAAAAAAAAAAAAAAAAAAAAAAAAAAAAAAAAAAAAAAAAAAAAAAAAAAAAAAAAAAAAAAAAAAAAAAAAAAAAAAAAAAAAAAAAAAAAAAAAAAAAAAAAAAAAAAAAAAAAAAAAAAAAAAAAAAAAAAAAAAAAAAAAAAAAAAAAAAAAAAAAAAAAAAAAAAAAAAAAAAAAAAAAAAAAAAAAAAAAAAAAAAAAAAAAAAAAAAAAAAAAAAAAAAAAAAAAAAAAAAAAAAAAAAAAAAAAAAAAAAAAAAAAAAAAAAAAAAAAAAAAAAAAAAAAAAAAAAAAAAAAAAAAAAAAAAAAAAAAAAAAAAAAAAAAAAAAAAAAAAAAAAAAAAAAAAAAAAAAAAAAAAAAAAAAAAAAAAAAAAAAAAAAAAAAAAAAAAAAAAAAAAAAAAAAAAAAAAAAAAAAAAAAAAAAAAAAAAAAAAAAAAAAAAAAAAAAAAAAAAAAAAAAAAAAAAAAAAAAAAAAAAAAAAAAAAAAAAAAAAAAAAAAAAAAAAAAAAAAAAAAAAAAAAAAAAAAAAAAAAAAAAAAAAAAAAAAAAAAAAAAAAAAAAAAAAAAAAAAAAAAAAAAAAAAAAAAAAAAAAAAAAAAAAAAAAAAAAAAAAAAAAAAAAAAAAAAAAAAAAAAAAAAAAAAAAAAAAAAAAAAAAAAAAAAAAAAAAAAAAAAAAAAAAAAAAAAAAAAAAAAAAAAAAAAAAAAAAAAAAAAAAAAAAAAAAAAAAAAAAAAAAAAAAAAAAAAAAAAAAAAAAAAAAAAAAAAAAAAAAAAAAAAAAAAAAAAAAAAAAAAAAAAAAAAAAAAAAAAAAAAAAAAAAAAAAAAAAAAAAAAAAAAAAAAAAAAAAA
AAAAAAAAAAAAAAAAAAAAAAAAAAAAAAAAAAAAAAAAAAAAAAAAAAAAAAAAAAAAAAAAAAAAAAAAAAAAAAAAAAAAAAAAAAAAAAAAAAAAAAAAAAAAAAAAAAAAAAAAAAAAAAAAAAAAAAAAAAAAAAAAAAAAAAAAAAAAAAAAAAAAAAAAAAAAAAAAAAAAAAAAAAAAAAAAAAAAAAAAAAAAAAAAAAAAAAAAAAAAAAAAAAAAAAAAAAAAAAAAAAAAAAAAAAAAAAAAAAAAAAAAAAAAAAAAAAAAAAAAAAAAAAAAAAAAAAAAAAAAAAAAAAAAAAAAAAAAAAAAAAAAAAAAAAAAAAAAAAAAAAAAAAAAAAAAAAAAAAAAAAAAAAAAAAAAAAAAAAAAAAAAAAAAAAAAAAAAAAAAAAAAAAAAAAAAAAAAAAAAAAAAAAAAAAAAAAAAAAAAAAAAAAAAAAAAAAAAAAAAAAAAAAAAAAAAAAAAAAAAAAAAAAAAAAAAAAAAAAAAAAAAAAAAAAAAAAAAAAAAAAAAAAAAAAAAAAAAAAAAAAAAAAAAAAAAAAAAAAAAAAAAAAAAAAAAAAAAAAAAAAAAAAAAAAAAAAAAAAAAAAAAAAAAAAAAAAAAAAAAAAAAAAAAAAAAAAAAAAAAAAAAAAAAAAAAAAAAAAAAAAAAAAAAAAAAAAAAAAAAAAAAAAAAAAAAAAAAAAAAAAAAAAAAAAAAAAAAAAAAAAAAAAAAAAAAAAAAAAAAAAAAAAAAAAAAAAAAAAAAAAAAAAAAAAAAAAAAAAAAAAAAAAAAAAAAAAAAAAAAAAAAAAAAAAAAAAAAAAAAAAAAAAAAAAAAAAAAAAAAAAAAAAAAAAAAAAAAAAAAAAAAAAAAAAAAAAAAAAAAAAAAAAAAAAAAAAAAAAAAAAAAAAAAAAAAAAAAAAAAAAAAAAAAAAAAAAAAAAAAAAAAAAAAAAAAAAAAAAAAAAAAAAAAAAAAAAAAAAAAAAAAAAAAAAAAAAAAAAAAAAAAAAAAAAAAAAAAAAAAAAAAAAAAAAAAAAAAAAAAAAAAAAAAAAAAAAAAAAAAAAAAAAAAAAAAAAAAAAAAAAAAAAAAAAAAAAAAAAAAAAAAAAAAAAAAAAAAAAAAAAAAAAAAAAAAAAAAAAAAAAAAAAAAAAAAAAAAAAAAAAAAAAAAAAAAAAAAAAAAAAAAAAAAAAAAAAAAAAAAAAAAAAAAAAAAAAAAAAAAAAAAAAAAAAAAAAAAAAAAAAAAAAAAAAAAAAAAAAAAAAAAAAAAAAAAAAAAAAAAAAAAAAAAAAAAAAAAAAAAAAAAAAAAAAAAAAAAAAAAAAAAAAAAAAAAAAAAAAAAAAAAAAAAAAAAAAAAAAAAAAAAAAAAAAAAAAAAAAAAAAAAAAAAAAAAAAAAAAAAAAAAAAAAAAAAAAAAAAAAAAAAAAAAAAAAAAAAAAAAAAAAAAAAAAAAAAAAAAAAAAAAAAAAAAAAAAAAAAAAAAAAAAAAAAAAAAAAAAAAAAAAAAAAAAAAAAAAAAAAAAAAAAAAAAAAAAAAAAAAAAAAAAAAAAAAAAAAAAAAAAAAAAAAAAAAAAAAAAAAAAAAAAAAAAAAAAAAAAAAAAAAAAAAAAAAAAAAAAAAAAAAAAAAAAAAAAAAAAAAAAAAAAAAAAAAAAAAAAAAAAAAAAAAAAAAAAAAAAAAAAAAAAAAAAAAAAAAAAAAAAAAAAAAAAAAAAAAAAAAAAAAAAAAAAAAAAAAAAAAAAAAAAAAAAAAAAAAAAAAAAAAAAAAAAAAAAAAAAAAAAAAAAAAAAAAAAAAAAAAAAAAAAAAAAAAAAAAAAAAAAAAAAAAAAAAAAAAAAAAAAAAAAAAAAAAAAAAAAAAAAAAAAAAAAAAAAAAAAAAAAAAAAAAAAAAAAAAAAAAAAAAAAAAAAAAAAAAAAAAAAAAAAAAAAAAAAAAAAAAAAAAAAAAAAAAAAAAAAAAAAAAAAAAAAAAAAAAAAAAAAAAAAAAAAAAAAAAAAAAAAAAAAAAAAAAAAAAAAAAAAAAAAAAAAAAAAAAAAAAAAAAAAAAAAAAAAAAAAAAAAAAAAAAAAAAAAAAAAAAAAAAAAAAAAAAAAAAAAAAAAAAAAAAAAAAAAAAAAAAAAAAAAAAAAAAAAAAAAAAAAAAAAAAAAAAAAAAAAAAAAAAAAAAAAAAAAAAAAAAAAAAAAAAAAAAAAAAAAAAAAAAAAAAAAAAAAAAAAAAAAAAAAAAAAAAAAAAAAAAAAAAAAAAAAAAAAAAAAAAAAAAAAAAAAAAAAAAAAAAAAAAAAAAAAAAAAAAAAAAAAAAAAAAAAAAAAAAAAAAAAAAAAAAAAAAAAAAAAAAAAAAAAAAAAAAAAAAAAAAAAAAAAAAAAAAAAAAAAAAAAAAAAAAAAAAAAAAAAAAAAAAAAAAAAAAAAAAAAAAAAAAAAAAAAAAAAAAAAAAAAAAAAAAAAAAAAAAAAAAAAAAAAAAAAAAAAAAAAAAAAAAAAAAAAAAAAAAAAAAAAAAAAAAAAAAAAAAAAAAAAAAAAAAAAAAAAAAAAAAAAAAAAAAAAAAAAAAAAAAAAAAAAAAAAAAAAAAAAAAAAAAAAAAAAAAAAAAAAAAAAAAAAAAAAAAAAAAAAAAAAAAAAAAAAAAAAAAAAAAAAAAAAAAAAAAAAAAAAAAAAAAAAAAAAAAAAAAAAAAAAAAAAAAAAAAAAAAAAAAAAAAAAAAAAAAAAAAAAAAAAAAAAAAAAAAAAAAAAAAAAAAAAAAAAAAAAAAAAAAAAAAAAAAAAAAAAAAAAAAAAAAAAAAAAAAAAAAAAAAAAAAAAAAAAAAAAAAAAAAAAAAAAAAAAAAAAAAAAAAAAAAAAAAAAAAAAAAAAAAAAAAAAAAAAAAAAAAAAAAAAAAAAAAAAAAAAAAAAAAAAAAAAAAAAAAAAAAAAAAAAAAAAAAAAAAAAAAAAAAAAAAAAAAAAAAAAAAAAAAAAAAAAAAAAAAAAAAAAAAAAAAAAAAAAAAAAAAAAAAAAAAAAAAAAAAAAAAAAAAAAAAAAAAAAAAAAAAAAAAAAAAAAAAAAAAAAAAAAAAAAAAAAAAAAAAAAAAAAAAAAAAAAAAAAAAAAAAAAAAAAAAAAAAAAAAAAAAAAAAAAAAAAAAAAAAAAAAAAAAAAAAAAAAAAAAAAAAAAAAAAAAAAAAAAAAAAAAAAAAAAAAAAAAAAAAAAAAAAAAAAAAAAAAAAAAAAAAAAAAAAAAAAAAAAAAAAAAAAAAAAAAAAAAAAAAAAAAAAAAAAAAAAAAAAAAAAAAAAAAAAAAAAAAAAAAAAAAAAAAAAAAAAAAAAAAAAAAAAAAAAAAAAAAAAAAAAAAAAAAAAAAAAAAAAAAAAAAAAAAAAAAAAAAAAAAAAAAAAAAAAAAAAAAAAAAAAAAAAAAAAAAAAAAAAAAAAAAAAAAAAAAAAAAAAAAAAAAAAAAAAAAAAAAAAAAAAAAAAAAAAAAAAAAAAAAAAAAAAAAAAAAAAAAAAAAAAAAAAAAAAAAAAAAAAAAAAAAAAAAAAAAAAAAAAAAAAAAAAAAAAAAAAAAAAAAAAAAAAAAAAAAAAAAAAAAAAAAAAAAAAAAAAAAAAAAAAAAAAAAAAAAAAAAAAAAAAAAAAAAAAAAAAAAAAAAAAAAAAAAAAAAAAAAAAAAAAAAAAAAAAAAAAAAAAAAAAAAAAAAAAAAAAAAAAAAAAAAAAAAAAAAAAAAAAAAAAAAAAAAAAAAAAAAAAAAAAAAAAAAAAAAAAAAAAAAAAAAAAAAAAAAAAAAAAAAAAAAAAAAAAAAAAAAAAAAAAAAAAAAAAAAAAAAAAAAAAAAAAAAAAAAAAAAAAAAAAAAAAAAAAAAAAAAAAAAAAAAAAAAAAAAAAAAAAAAAAAAAAAAAAAAAAAAAAAAAAAAAAAAAAAAAAAAAAAAAAAAAAAAAAAAAAAAAAAAAAAAAAAAAAAAAAAAAAAAAAAAAAAAAAAAAAAAAAAAAAAAAAAAAAAAAAAAAAAAAAAAAAAAAAAAAAAAAAAAAAAAAAAAAAAAAAAAAAAAAAAAAAAAAAAAAAAAAAAAAAAAAAAAAAAAAAAAAAAAAAAAAAAAAAAAAAAAAAAAAAAA
AAAAAAAAAAAAAAAAAAAAAAAAAAAAAAAAAAAAAAAAAAAAAAAAAAAAAAAAAAAAAAAAAAAAAAAAAAAAAAAAAAAAAAAAAAAAAAAAAAAAAAAAAAAAAAAAAAAAAAAAAAAAAAAAAAAAAAAAAAAAAAAAAAAAAAAAAAAAAAAAAAAAAAAAAAAAAAAAAAAAAAAAAAAAAAAAAAAAAAAAAAAAAAAAAAAAAAAAAAAAAAAAAAAAAAAAAAAAAAAAAAAAAAAAAAAAAAAAAAAAAAAAAAAAAAAAAAAAAAAAAAAAAAAAAAAAAAAAAAAAAAAAAAAAAAAAAAAAAAAAAAAAAAAAAAAAAAAAAAAAAAAAAAAAAAAAAAAAAAAAAAAAAAAAAAAAAAAAAAAAAAAAAAAAAAAAAAAAAAAAAAAAAAAAAAAAAAAAAAAAAAAAAAAAAAAAAAAAAAAAAAAAAAAAAAAAAAAAAAAAAAAAAAAAAAAAAAAAAAAAAAAAAAAAAAAAAAAAAAAAAAAAAAAAAAAAAAAAAAAAAAAAAAAAAAAAAAAAAAAAAAAAAAAAAAAAAAAAAAAAAAAAAAAAAAAAAAAAAAAAAAAAAAAAAAAAAAAAAAAAAAAAAAAAAAAAAAAAAAAAAAAAAAAAAAAAAAAAAAAAAAAAAAAAAAAAAAAAAAAAAAAAAAAAAAAAAAAAAAAAAAAAAAAAAAAAAAAAAAAAAAAAAAAAAAAAAAAAAAAAAAAAAAAAAAAAAAAAAAAAAAAAAAAAAAAAAAAAAAAAAAAAAAAAAAAAAAAAAAAAAAAAAAAAAAAAAAAAAAAAAAAAAAAAAAAAAAAAAAAAAAAAAAAAAAAAAAAAAAAAAAAAAAAAAAAAAAAAAAAAAAAAAAAAAAAAAAAAAAAAAAAAAAAAAAAAAAAAAAAAAAAAAAAAAAAAAAAAAAAAAAAAAAAAAAAAAAAAAAAAAAAAAAAAAAAAAAAAAAAAAAAAAAAAAAAAAAAAAAAAAAAAAAAAAAAAAAAAAAAAAAAAAAAAAAAAAAAAAAAAAAAAAAAAAAAAAAAAAAAAAAAAAAAAAAAAAAAAAAAAAAAAAAAAAAAAAAAAAAAAAAAAAAAAAAAAAAAAAAAAAAAAAAAAAAAAAAAAAAAAAAAAAAAAAAAAAAAAAAAAAAAAAAAAAAAAAAAAAAAAAAAAAAAAAAAAAAAAAAAAAAAAAAAAAAAAAAAAAAAAAAAAAAAAAAAAAAAAAAAAAAAAAAAAAAAAAAAAAAAAAAAAAAAAAAAAAAAAAAAAAAAAAAAAAAAAAAAAAAAAAAAAAAAAAAAAAAAAAAAAAAAAAAAAAAAAAAAAAAAAAAAAAAAAAAAAAAAAAAAAAAAAAAAAAAAAAAAAAAAAAAAAAAAAAAAAAAAAAAAAAAAAAAAAAAAAAAAAAAAAAAAAAAAAAAAAAAAAAAAAAAAAAAAAAAAAAAAAAAAAAAAAAAAAAAAAAAAAAAAAAAAAAAAAAAAAAAAAAAAAAAAAAAAAAAAAAAAAAAAAAAAAAAAAAAAAAAAAAAAAAAAAAAAAAAAAAAAAAAAAAAAAAAAAAAAAAAAAAAAAAAAAAAAAAAAAAAAAAAAAAAAAAAAAAAAAAAAAAAAAAAAAAAAAAAAAAAAAAAAAAAAAAAAAAAAAAAAAAAAAAAAAAAAAAAAAAAAAAAAAAAAAAAAAAAAAAAAAAAAAAAAAAAAAAAAAAAAAAAAAAAAAAAAAAAAAAAAAAAAAAAAAAAAAAAAAAAAAAAAAAAAAAAAAAAAAAAAAAAAAAAAAAAAAAAAAAAAAAAAAAAAAAAAAAAAAAAAAAAAAAAAAAAAAAAAAAAAAAAAAAAAAAAAAAAAAAAAAAAAAAAAAAAAAAAAAAAAAAAAAAAAAAAAAAAAAAAAAAAAAAAAAAAAAAAAAAAAAAAAAAAAAAAAAAAAAAAAAAAAAAAAAAAAAAAAAAAAAAAAAAAAAAAAAAAAAAAAAAAAAAAAAAAAAAAAAAAAAAAAAAAAAAAAAAAAAAAAAAAAAAAAAAAAAAAAAAAAAAAAAAAAAAAAAAAAAAAAAAAAAAAAAAAAAAAAAAAAAAAAAAAAAAAAAAAAAAAAAAAAAAAAAAAAAAAAAAAAAAAAAAAAAAAAAAAAAAAAAAAAAAAAAAAAAAAAAAAAAAAAAAAAAAAAAAAAAAAAAAAAAAAAAAAAAAAAAAAAAAAAAAAAAAAAAAAAAAAAAAAAAAAAAAAAAAAAAAAAAAAAAAAAAAAAAAAAAAAAAAAAAAAAAAAAAAAAAAAAAAAAAAAAAAAAAAAAAAAAAAAAAAAAAAAAAAAAAAAAAAAAAAAAAAAAAAAAAAAAAAAAAAAAAAAAAAAAAAAAAAAAAAAAAAAAAAAAAAAAAAAAAAAAAAAAAAAAAAAAAAAAAAAAAAAAAAAAAAAAAAAAAAAAAAAAAAAAAAAAAAAAAAAAAAAAAAAAAAAAAAAAAAAAAAAAAAAAAAAAAAAAAAAAAAAAAAAAAAAAAAAAAAAAAAAAAAAAAAAAAAAAAAAAAAAAAAAAAAAAAAAAAAAAAAAAAAAAAAAAAAAAAAAAAAAAAAAAAAAAAAAAAAAAAAAAAAAAAAAAAAAAAAAAAAAAAAAAAAAAAAAAAAAAAAAAAAAAAAAAAAAAAAAAAAAAAAAAAAAAAAAAAAAAAAAAAAAAAAAAAAAAAAAAAAAAAAAAAAAAAAAAAAAAAAAAAAAAAAAAAAAAAAAAAAAAAAAAAAAAAAAAAAAAAAAAAAAAAAAAAAAAAAAAAAAAAAAAAAAAAAAAAAAAAAAAAAAAAAAAAAAAAAAAAAAAAAAAAAAAAAAAAAAAAAAAAAAAAAAAAAAAAAAAAAAAAAAAAAAAAAAAAAAAAAAAAAAAAAAAAAAAAAAAAAAAAAAAAAAAAAAAAAAAAAAAAAAAAAAAAAAAAAAAAAAAAAAAAAAAAAAAAAAAAAAAAAAAAAAAAAAAAAAAAAAAAAAAAAAAAAAAAAAAAAAAAAAAAAAAAAAAAAAAAAAAAAAAAAAAAAAAAAAAAAAAAAAAAAAAAAAAAAAAAAAAAAAAAAAAAAAAAAAAAAAAAAAAAAAAAAAAAAAAAAAAAAAAAAAAAAAAAAAAAAAAAAAAAAAAAAAAAAAAAAAAAAAAAAAAAAAAAAAAAAAAAAAAAAAAAAAAAAAAAAAAAAAAAAAAAAAAAAAAAAAAAAAAAAAAAAAAAAAAAAAAAAAAAAAAAAAAAAAAAAAAAAAAAAAAAAAAAAAAAAAAAAAAAAAAAAAAAAAAAAAAAAAAAAAAAAAAAAAAAAAAAAAAAAAAAAAAAAAAAAAAAAAAAAAAAAAAAAAAAAAAAAAAAAAAAAAAAAAAAAAAAAAAAAAAAAAAAAAAAAAAAAAAAAAAAAAAAAAAAAAAAAAAAAAAAAAAAAAAAAAAAAAAAAAAAAAAAAAAAAAAAAAAAAAAAAAAAAAAAAAAAAAAAAAAAAAAAAAAAAAAAAAAAAAAAAAAAAAAAAAAAAAAAAAAAAAAAAAAAAAAAAAAAAAAAAAAAAAAAAAAAAAAAAAAAAAAAAAAAAAAAAAAAAAAAAAAAAAAAAAAAAAAAAAAAAAAAAAAAAAAAAAAAAAAAAAAAAAAAAAAAAAAAAAAAAAAAAAAAAAAAAAAAAAAAAAAAAAAAAAAAAAAAAAAAAAAAAAAAAAAAAAAAAAAAAAAAAAAAAAAAAAAAAAAAAAAAAAAAAAAAAAAAAAAAAAAAAAAAAAAAAAAAAAAAAAAAAAAAAAAAAAAAAAAAAAAAAAAAAAAAAAAAAAAAAAAAAAAAAAAAAAAAAAAAAAAAAAAAAAAAAAAAAAAAAAAAAAAAAAAAAAAAAAAAAAAAAAAAAAAAAAAAAAAAAAAAAAAAAAAAAAAAAAAAAAAAAAAAAAAAAAAAAAAAAAAAAAAAAAAAAAAAAAAAAAAAAAAAAAAAAAAAAAAAAAAAAAAAAAAAAAAAAAAAAAAAAAAAAAAAAAAAAAAAAAAAAAAAAAAAAAAAAAAAAAAAAAAAAAAAAAAAAAAAAAAAAAAAAAAAAAAAAAAAAAAAAAAAAAAAAAAAAAAAAAAAAAAAAAAAAAAAAAAAAAAAAAAAAAAAAAAAAAAAAAAAAAAAAAAAAAAAAAAA
AAAAAAAAAAAAAAAAAAAAAAAAAAAAAAAAAAAAAAAAAAAAAAAAAAAAAAAAAAAAAAAAAAAAAAAAAAAAAAAAAAAAAAAAAAAAAAAAAAAAAAAAAAAAAAAAAAAAAAAAAAAAAAAAAAAAAAAAAAAAAAAAAAAAAAAAAAAAAAAAAAAAAAAAAAAAAAAAAAAAAAAAAAAAAAAAAAAAAAAAAAAAAAAAAAAAAAAAAAAAAAAAAAAAAAAAAAAAAAAAAAAAAAAAAAAAAAAAAAAAAAAAAAAAAAAAAAAAAAAAAAAAAAAAAAAAAAAAAAAAAAAAAAAAAAAAAAAAAAAAAAAAAAAAAAAAAAAAAAAAAAAAAAAAAAAAAAAAAAAAAAAAAAAAAAAAAAAAAAAAAAAAAAAAAAAAAAAAAAAAAAAAAAAAAAAAAAAAAAAAAAAAAAAAAAAAAAAAAAAAAAAAAAAAAAAAAAAAAAAAAAAAAAAAAAAAAAAAAAAAAAAAAAAAAAAAAAAAAAAAAAAAAAAAAAAAAAAAAAAAAAAAAAAAAAAAAAAAAAAAAAAAAAAAAAAAAAAAAAAAAAAAAAAAAAAAAAAAAAAAAAAAAAAAAAAAAAAAAAAAAAAAAAAAAAAAAAAAAAAAAAAAAAAAAAAAAAAAAAAAAAAAAAAAAAAAAAAAAAAAAAAAAAAAAAAAAAAAAAAAAAAAAAAAAAAAAAAAAAAAAAAAAAAAAAAAAAAAAAAAAAAAAAAAAAAAAAAAAAAAAAAAAAAAAAAAAAAAAAAAAAAAAAAAAAAAAAAAAAAAAAAAAAAAAAAAAAAAAAAAAAAAAAAAAAAAAAAAAAAAAAAAAAAAAAAAAAAAAAAAAAAAAAAAAAAAAAAAAAAAAAAAAAAAAAAAAAAAAAAAAAAAAAAAAAAAAAAAAAAAAAAAAAAAAAAAAAAAAAAAAAAAAAAAAAAAAAAAAAAAAAAAAAAAAAAAAAAAAAAAAAAAAAAAAAAAAAAAAAAAAAAAAAAAAAAAAAAAAAAAAAAAAAAAAAAAAAAAAAAAAAAAAAAAAAAAAAAAAAAAAAAAAAAAAAAAAAAAAAAAAAAAAAAAAAAAAAAAAAAAAAAAAAAAAAAAAAAAAAAAAAAAAAAAAAAAAAAAAAAAAAAAAAAAAAAAAAAAAAAAAAAAAAAAAAAAAAAAAAAAAAAAAAAAAAAAAAAAAAAAAAAAAAAAAAAAAAAAAAAAAAAAAAAAAAAAAAAAAAAAAAAAAAAAAAAAAAAAAAAAAAAAAAAAAAAAAAAAAAAAAAAAAAAAAAAAAAAAAAAAAAAAAAAAAAAAAAAAAAAAAAAAAAAAAAAAAAAAAAAAAAAAAAAAAAAAAAAAAAAAAAAAAAAAAAAAAAAAAAAAAAAAAAAAAAAAAAAAAAAAAAAAAAAAAAAAAAAAAAAAAAAAAAAAAAAAAAAAAAAAAAAAAAAAAAAAAAAAAAAAAAAAAAAAAAAAAAAAAAAAAAAAAAAAAAAAAAAAAAAAAAAAAAAAAAAAAAAAAAAAAAAAAAAAAAAAAAAAAAAAAAAAAAAAAAAAAAAAAAAAAAAAAAAAAAAAAAAAAAAAAAAAAAAAAAAAAAAAAAAAAAAAAAAAAAAAAAAAAAAAAAAAAAAAAAAAAAAAAAAAAAAAAAAAAAAAAAAAAAAAAAAAAAAAAAAAAAAAAAAAAAAAAAAAAAAAAAAAAAAAAAAAAAAAAAAAAAAAAAAAAAAAAAAAAAAAAAAAAAAAAAAAAAAAAAAAAAAAAAAAAAAAAAAAAAAAAAAAAAAAAAAAAAAAAAAAAAAAAAAAAAAAAAAAAAAAAAAAAAAAAAAAAAAAAAAAAAAAAAAAAAAAAAAAAAAAAAAAAAAAAAAAAAAAAAAAAAAAAAAAAAAAAAAAAAAAAAAAAAAAAAAAAAAAAAAAAAAAAAAAAAAAAAAAAAAAAAAAAAAAAAAAAAAAAAAAAAAAAAAAAAAAAAAAAAAAAAAAAAAAAAAAAAAAAAAAAAAAAAAAAAAAAAAAAAAAAAAAAAAAAAAAAAAAAAAAAAAAAAAAAAAAAAAAAAAAAAAAAAAAAAAAAAAAAAAAAAAAAAAAAAAAAAAAAAAAAAAAAAAAAAAAAAAAAAAAAAAAAAAAAAAAAAAAAAAAAAAAAAAAAAAAAAAAAAAAAAAAAAAAAAAAAAAAAAAAAAAAAAAAAAAAAAAAAAAAAAAAAAAAAAAAAAAAAAAAAAAAAAAAAAAAAAAAAAAAAAAAAAAAAAAAAAAAAAAAAAAAAAAAAAAAAAAAAAAAAAAAAAAAAAAAAAAAAAAAAAAAAAAAAAAAAAAAAAAAAAAAAAAAAAAAAAAAAAAAAAAAAAAAAAAAAAAAAAAAAAAAAAAAAAAAAAAAAAAAAAAAAAAAAAAAAAAAAAAAAAAAAAAAAAAAAAAAAAAAAAAAAAAAAAAAAAAAAAAAAAAAAAAAAAAAAAAAAAAAAAAAAAAAAAAAAAAAAAAAAAAAAAAAAAAAAAAAAAAAAAAAAAAAAAAAAAAAAAAAAAAAAAAAAAAAAAAAAAAAAAAAAAAAAAAAAAAAAAAAAAAAAAAAAAAAAAAAAAAAAAAAAAAAAAAAAAAAAAAAAAAAAAAAAAAAAAAAAAAAAAAAAAAAAAAAAAAAAAAAAAAAAAAAAAAAAAAAAAAAAAAAAAAAAAAAAAAAAAAAAAAAAAAAAAAAAAAAAAAAAAAAAAAAAAAAAAAAAAAAAAAAAAAAAAAAAAAAAAAAAAAAAAAAAAAAAAAAAAAAAAAAAAAAAAAAAAAAAAAAAAAAAAAAAAAAAAAAAAAAAAAAAAAAAAAAAAAAAAAAAAAAAAAAAAAAAAAAAAAAAAAAAAAAAAAAAAAAAAAAAAAAAAAAAAAAAAAAAAAAAAAAAAAAAAAAAAAAAAAAAAAAAAAAAAAAAAAAAAAAAAAAAAAAAAAAAAAAAAAAAAAAAAAAAAAAAAAAAAAAAAAAAAAAAAAAAAAAAAAAAAAAAAAAAAAAAAAAAAAAAAAAAAAAAAAAAAAAAAAAAAAAAAAAAAAAAAAAAAAAAAAAAAAAAAAAAAAAAAAAAAAAAAAAAAAAAAAAAAAAAAAAAAAAAAAAAAAAAAAAAAAAAAAAAAAAAAAAAAAAAAAAAAAAAAAAAAAAAAAAAAAAAAAAAAAAAAAAAAAAAAAAAAAAAAAAAAAAAAAAAAAAAAAAAAAAAAAAAAAAAAAAAAAAAAAAAAAAAAAAAAAAAAAAAAAAAAAAAAAAAAAAAAAAAAAAAAAAAAAAAAAAAAAAAAAAAAAAAAAAAAAAAAAAAAAAAAAAAAAAAAAAAAAAAAAAAAAAAAAAAAAAAAAAAAAAAAAAAAAAAAAAAAAAAAAAAAAAAAAAAAAAAAAAAAAAAAAAAAAAAAAAAAAAAAAAAAAAAAAAAAAAAAAAAAAAAAAAAAAAAAAAAAAAAAAAAAAAAAAAAAAAAAAAAAAAAAAAAAAAAAAAAAAAAAAAAAAAAAAAAAAAAAAAAAAAAAAAAAAAAAAAAAAAAAAAAAAAAAAAAAAAAAAAAAAAAAAAAAAAAAAAAAAAAAAAAAAAAAAAAAAAAAAAAAAAAAAAAAAAAAAAAAAAAAAAAAAAAAAAAAAAAAAAAAAAAAAAAAAAAAAAAAAAAAAAAAAAAAAAAAAAAAAAAAAAAAAAAAAAAAAAAAAAAAAAAAAAAAAAAAAAAAAAAAAAAAAAAAAAAAAAAAAAAAAAAAAAAAAAAAAAAAAAAAAAAAAAAAAAAAAAAAAAAAAAAAAAAAAAAAAAAAAAAAAAAAAAAAAAAAAAAAAAAAAAAAAAAAAAAAAAAAAAAAAAAAAAAAAAAAAAAAAAAAAAAAAAAAAAAAAAAAAAAAAAAAAAAAAAAAAAAAAAAAAAAAAAAAAAAAAAAAAAAAAAAAAAAAAAAAAAAAAAAAAAAAAAAAAAAAAAAAAAAAAAAAAAAAAAAAAAAAAAAAAAAAAAAAAAAAAAAAAAAAAAAAAAAAAAAAAAAAAAAAAAAAAAAAAAAAAAAAAAAAAAAAAAAAAAAAAAAAAAAAAAAAAAAAAAAAAAAAAAAAAAAAAAAAAAAAAAAAAAAAAAAAAAAAAAAAAAAAAAAAAAAAAAAAAAAAAAAAAAAAAAAAAAAAAAAAAA
AAAAAAAAAAAAAAAAAAAAAAAAAAAAAAAAAAAAAAAAAAAAAAAAAAAAAAAAAAAAAAAAAAAAAAAAAAAAAAAAAAAAAAAAAAAAAAAAAAAAAAAAAAAAAAAAAAAAAAAAAAAAAAAAAAAAAAAAAAAAAAAAAAAAAAAAAAAAAAAAAAAAAAAAAAAAAAAAAAAAAAAAAAAAAAAAAAAAAAAAAAAAAAAAAAAAAAAAAAAAAAAAAAAAAAAAAAAAAAAAAAAAAAAAAAAAAAAAAAAAAAAAAAAAAAAAAAAAAAAAAAAAAAAAAAAAAAAAAAAAAAAAAAAAAAAAAAAAAAAAAAAAAAAAAAAAAAAAAAAAAAAAAAAAAAAAAAAAAAAAAAAAAAAAAAAAAAAAAAAAAAAAAAAAAAAAAAAAAAAAAAAAAAAAAAAAAAAAAAAAAAAAAAAAAAAAAAAAAAAAAAAAAAAAAAAAAAAAAAAAAAAAAAAAAAAAAAAAAAAAAAAAAAAAAAAAAAAAAAAAAAAAAAAAAAAAAAAAAAAAAAAAAAAAAAAAAAAAAAAAAAAAAAAAAAAAAAAAAAAAAAAAAAAAAAAAAAAAAAAAAAAAAAAAAAAAAAAAAAAAAAAAAAAAAAAAAAAAAAAAAAAAAAAAAAAAAAAAAAAAAAAAAAAAAAAAAAAAAAAAAAAAAAAAAAAAAAAAAAAAAAAAAAAAAAAAAAAAAAAAAAAAAAAAAAAAAAAAAAAAAAAAAAAAAAAAAAAAAAAAAAAAAAAAAAAAAAAAAAAAAAAAAAAAAAAAAAAAAAAAAAAAAAAAAAAAAAAAAAAAAAAAAAAAAAAAAAAAAAAAAAAAAAAAAAAAAAAAAAAAAAAAAAAAAAAAAAAAAAAAAAAAAAAAAAAAAAAAAAAAAAAAAAAAAAAAAAAAAAAAAAAAAAAAAAAAAAAAAAAAAAAAAAAAAAAAAAAAAAAAAAAAAAAAAAAAAAAAAAAAAAAAAAAAAAAAAAAAAAAAAAAAAAAAAAAAAAAAAAAAAAAAAAAAAAAAAAAAAAAAAAAAAAAAAAAAAAAAAAAAAAAAAAAAAAAAAAAAAAAAAAAAAAAAAAAAAAAAAAAAAAAAAAAAAAAAAAAAAAAAAAAAAAAAAAAAAAAAAAAAAAAAAAAAAAAAAAAAAAAAAAAAAAAAAAAAAAAAAAAAAAAAAAAAAAAAAAAAAAAAAAAAAAAAAAAAAAAAAAAAAAAAAAAAAAAAAAAAAAAAAAAAAAAAAAAAAAAAAAAAAAAAAAAAAAAAAAAAAAAAAAAAAAAAAAAAAAAAAAAAAAAAAAAAAAAAAAAAAAAAAAAAAAAAAAAAAAAAAAAAAAAAAAAAAAAAAAAAAAAAAAAAAAAAAAAAAAAAAAAAAAAAAAAAAAAAAAAAAAAAAAAAAAAAAAAAAAAAAAAAAAAAAAAAAAAAAAAAAAAAAAAAAAAAAAAAAAAAAAAAAAAAAAAAAAAAAAAAAAAAAAAAAAAAAAAAAAAAAAAAAAAAAAAAAAAAAAAAAAAAAAAAAAAAAAAAAAAAAAAAAAAAAAAAAAAAAAAAAAAAAAAAAAAAAAAAAAAAAAAAAAAAAAAAAAAAAAAAAAAAAAAAAAAAAAAAAAAAAAAAAAAAAAAAAAAAAAAAAAAAAAAAAAAAAAAAAAAAAAAAAAAAAAAAAAAAAAAAAAAAAAAAAAAAAAAAAAAAAAAAAAAAAAAAAAAAAAAAAAAAAAAAAAAAAAAAAAAAAAAAAAAAAAAAAAAAAAAAAAAAAAAAAAAAAAAAAAAAAAAAAAAAAAAAAAAAAAAAAAAAAAAAAAAAAAAAAAAAAAAAAAAAAAAAAAAAAAAAAAAAAAAAAAAAAAAAAAAAAAAAAAAAAAAAAAAAAAAAAAAAAAAAAAAAAAAAAAAAAAAAAAAAAAAAAAAAAAAAAAAAAAAAAAAAAAAAAAAAAAAAAAAAAAAAAAAAAAAAAAAAAAAAAAAAAAAAAAAAAAAAAAAAAAAAAAAAAAAAAAAAAAAAAAAAAAAAAAAAAAAAAAAAAAAAAAAAAAAAAAAAAAAAAAAAAAAAAAAAAAAAAAAAAAAAAAAAAAAAAAAAAAAAAAAAAAAAAAAAAAAAAAAAAAAAAAAAAAAAAAAAAAAAAAAAAAAAAAAAAAAAAAAAAAAAAAAAAAAAAAAAAAAAAAAAAAAAAAAAAAAAAAAAAAAAAAAAAAAAAAAAAAAAAAAAAAAAAAAAAAAAAAAAAAAAAAAAAAAAAAAAAAAAAAAAAAAAAAAAAAAAAAAAAAAAAAAAAAAAAAAAAAAAAAAAAAAAAAAAAAAAAAAAAAAAAAAAAAAAAAAAAAAAAAAAAAAAAAAAAAAAAAAAAAAAAAAAAAAAAAAAAAAAAAAAAAAAAAAAAAAAAAAAAAAAAAAAAAAAAAAAAAAAAAAAAAAAAAAAAAAAAAAAAAAAAAAAAAAAAAAAAAAAAAAAAAAAAAAAAAAAAAAAAAAAAAAAAAAAAAAAAAAAAAAAAAAAAAAAAAAAAAAAAAAAAAAAAAAAAAAAAAAAAAAAAAAAAAAAAAAAAAAAAAAAAAAAAAAAAAAAAAAAAAAAAAAAAAAAAAAAAAAAAAAAAAAAAAAAAAAAAAAAAAAAAAAAAAAAAAAAAAAAAAAAAAAAAAAAAAAAAAAAAAAAAAAAAAAAAAAAAAAAAAAAAAAAAAAAAAAAAAAAAAAAAAAAAAAAAAAAAAAAAAAAAAAAAAAAAAAAAAAAAAAAAAAAAAAAAAAAAAAAAAAAAAAAAAAAAAAAAAAAAAAAAAAAAAAAAAAAAAAAAAAAAAAAAAAAAAAAAAAAAAAAAAAAAAAAAAAAAAAAAAAAAAAAAAAAAAAAAAAAAAAAAAAAAAAAAAAAAAAAAAAAAAAAAAAAAAAAAAAAAAAAAAAAAAAAAAAAAAAAAAAAAAAAAAAAAAAAAAAAAAAAAAAAAAAAAAAAAAAAAAAAAAAAAAAAAAAAAAAAAAAAAAAAAAAAAAAAAAAAAAAAAAAAAAAAAAAAAAAAAAAAAAAAAAAAAAAAAAAAAAAAAAAAAAAAAAAAAAAAAAAAAAAAAAAAAAAAAAAAAAAAAAAAAAAAAAAAAAAAAAAAAAAAAAAAAAAAAAAAAAAAAAAAAAAAAAAAAAAAAAAAAAAAAAAAAAAAAAAAAAAAAAAAAAAAAAAAAAAAAAAAAAAAAAAAAAAAAAAAAAAAAAAAAAAAAAAAAAAAAAAAAAAAAAAAAAAAAAAAAAAAAAAAAAAAAAAAAAAAAAAAAAAAAAAAAAAAAAAAAAAAAAAAAAAAAAAAAAAAAAAAAAAAAAAAAAAAAAAAAAAAAAAAAAAAAAAAAAAAAAAAAAAAAAAAAAAAAAAAAAAAAAAAAAAAAAAAAAAAAAAAAAAAAAAAAAAAAAAAAAAAAAAAAAAAAAAAAAAAAAAAAAAAAAAAAAAAAAAAAAAAAAAAAAAAAAAAAAAAAAAAAAAAAAAAAAAAAAAAAAAAAAAAAAAAAAAAAAAAAAAAAAAAAAAAAAAAAAAAAAAAAAAAAAAAAAAAAAAAAAAAAAAAAAAAAAAAAAAAAAAAAAAAAAAAAAAAAAAAAAAAAAAAAAAAAAAAAAAAAAAAAAAAAAAAAAAAAAAAAAAAAAAAAAAAAAAAAAAAAAAAAAAAAAAAAAAAAAAAAAAAAAAAAAAAAAAAAAAAAAAAAAAAAAAAAAAAAAAAAAAAAAAAAAAAAAAAAAAAAAAAAAAAAAAAAAAAAAAAAAAAAAAAAAAAAAAAAAAAAAAAAAAAAAAAAAAAAAAAAAAAAAAAAAAAAAAAAAAAAAAAAAAAAAAAAAAAAAAAAAAAAAAAAAAAAAAAAAAAAAAAAAAAAAAAAAAAAAAAAAAAAAAAAAAAAAAAAAAAAAAAAAAAAAAAAAAAAAAAAAAAAAAAAAAAAAAAAAAAAAAAAAAAAAAAAAAAAAAAAAAAAAAAAAAAAAAAAAAAAAAAAAAAAAAAAAAAAAAAAAAAAAAAAAAAAAAAAAAAAAAAAAAAAAAAAAAAAAAAAAAAAAAAAAAAAAAAAAAAAAAAAAAAAAAAAAAAAAAAAAAAAAAAAAAAAAAAAAAAAAAAAAAAAAAAAAAAAAAAAAAAAAAAAAAAAAAAAAAAAAAAAAAAAAAA
AAAAAAAAAAAAAAAAAAAAAAAAAAAAAAAAAAAAAAAAAAAAAAAAAAAAAAAAAAAAAAAAAAAAAAAAAAAAAAAAAAAAAAAAAAAAAAAAAAAAAAAAAAAAAAAAAAAAAAAAAAAAAAAAAAAAAAAAAAAAAAAAAAAAAAAAAAAAAAAAAAAAAAAAAAAAAAAAAAAAAAAAAAAAAAAAAAAAAAAAAAAAAAAAAAAAAAAAAAAAAAAAAAAAAAAAAAAAAAAAAAAAAAAAAAAAAAAAAAAAAAAAAAAAAAAAAAAAAAAAAAAAAAAAAAAAAAAAAAAAAAAAAAAAAAAAAAAAAAAAAAAAAAAAAAAAAAAAAAAAAAAAAAAAAAAAAAAAAAAAAAAAAAAAAAAAAAAAAAAAAAAAAAAAAAAAAAAAAAAAAAAAAAAAAAAAAAAAAAAAAAAAAAAAAAAAAAAAAAAAAAAAAAAAAAAAAAAAAAAAAAAAAAAAAAAAAAAAAAAAAAAAAAAAAAAAAAAAAAAAAAAAAAAAAAAAAAAAAAAAAAAAAAAAAAAAAAAAAAAAAAAAAAAAAAAAAAAAAAAAAAAAAAAAAAAAAAAAAAAAAAAAAAAAAAAAAAAAAAAAAAAAAAAAAAAAAAAAAAAAAAAAAAAAAAAAAAAAAAAAAAAAAAAAAAAAAAAAAAAAAAAAAAAAAAAAAAAAAAAAAAAAAAAAAAAAAAAAAAAAAAAAAAAAAAAAAAAAAAAAAAAAAAAAAAAAAAAAAAAAAAAAAAAAAAAAAAAAAAAAAAAAAAAAAAAAAAAAAAAAAAAAAAAAAAAAAAAAAAAAAAAAAAAAAAAAAAAAAAAAAAAAAAAAAAAAAAAAAAAAAAAAAAAAAAAAAAAAAAAAAAAAAAAAAAAAAAAAAAAAAAAAAAAAAAAAAAAAAAAAAAAAAAAAAAAAAAAAAAAAAAAAAAAAAAAAAAAAAAAAAAAAAAAAAAAAAAAAAAAAAAAAAAAAAAAAAAAAAAAAAAAAAAAAAAAAAAAAAAAAAAAAAAAAAAAAAAAAAAAAAAAAAAAAAAAAAAAAAAAAAAAAAAAAAAAAAAAAAAAAAAAAAAAAAAAAAAAAAAAAAAAAAAAAAAAAAAAAAAAAAAAAAAAAAAAAAAAAAAAAAAAAAAAAAAAAAAAAAAAAAAAAAAAAAAAAAAAAAAAAAAAAAAAAAAAAAAAAAAAAAAAAAAAAAAAAAAAAAAAAAAAAAAAAAAAAAAAAAAAAAAAAAAAAAAAAAAAAAAAAAAAAAAAAAAAAAAAAAAAAAAAAAAAAAAAAAAAAAAAAAAAAAAAAAAAAAAAAAAAAAAAAAAAAAAAAAAAAAAAAAAAAAAAAAAAAAAAAAAAAAAAAAAAAAAAAAAAAAAAAAAAAAAAAAAAAAAAAAAAAAAAAAAAAAAAAAAAAAAAAAAAAAAAAAAAAAAAAAAAAAAAAAAAAAAAAAAAAAAAAAAAAAAAAAAAAAAAAAAAAAAAAAAAAAAAAAAAAAAAAAAAAAAAAAAAAAAAAAAAAAAAAAAAAAAAAAAAAAAAAAAAAAAAAAAAAAAAAAAAAAAAAAAAAAAAAAAAAAAAAAAAAAAAAAAAAAAAAAAAAAAAAAAAAAAAAAAAAAAAAAAAAAAAAAAAAAAAAAAAAAAAAAAAAAAAAAAAAAAAAAAAAAAAAAAAAAAAAAAAAAAAAAAAAAAAAAAAAAAAAAAAAAAAAAAAAAAAAAAAAAAAAAAAAAAAAAAAAAAAAAAAAAAAAAAAAAAAAAAAAAAAAAAAAAAAAAAAAAAAAAAAAAAAAAAAAAAAAAAAAAAAAAAAAAAAAAAAAAAAAAAAAAAAAAAAAAAAAAAAAAAAAAAAAAAAAAAAAAAAAAAAAAAAAAAAAAAAAAAAAAAAAAAAAAAAAAAAAAAAAAAAAAAAAAAAAAAAAAAAAAAAAAAAAAAAAAAAAAAAAAAAAAAAAAAAAAAAAAAAAAAAAAAAAAAAAAAAAAAAAAAAAAAAAAAAAAAAAAAAAAAAAAAAAAAAAAAAAAAAAAAAAAAAAAAAAAAAAAAAAAAAAAAAAAAAAAAAAAAAAAAAAAAAAAAAAAAAAAAAAAAAAAAAAAAAAAAAAAAAAAAAAAAAAAAAAAAAAAAAAAAAAAAAAAAAAAAAAAAAAAAAAAAAAAAAAAAAAAAAAAAAAAAAAAAAAAAAAAAAAAAAAAAAAAAAAAAAAAAAAAAAAAAAAAAAAAAAAAAAAAAAAAAAAAAAAAAAAAAAAAAAAAAAAAAAAAAAAAAAAAAAAAAAAAAAAAAAAAAAAAAAAAAAAAAAAAAAAAAAAAAAAAAAAAAAAAAAAAAAAAAAAAAAAAAAAAAAAAAAAAAAAAAAAAAAAAAAAAAAAAAAAAAAAAAAAAAAAAAAAAAAAAAAAAAAAAAAAAAAAAAAAAAAAAAAAAAAAAAAAAAAAAAAAAAAAAAAAAAAAAAAAAAAAAAAAAAAAAAAAAAAAAAAAAAAAAAAAAAAAAAAAAAAAAAAAAAAAAAAAAAAAAAAAAAAAAAAAAAAAAAAAAAAAAAAAAAAAAAAAAAAAAAAAAAAAAAAAAAAAAAAAAAAAAAAAAAAAAAAAAAAAAAAAAAAAAAAAAAAAAAAAAAAAAAAAAAAAAAAAAAAAAAAAAAAAAAAAAAAAAAAAAAAAAAAAAAAAAAAAAAAAAAAAAAAAAAAAAAAAAAAAAAAAAAAAAAAAAAAAAAAAAAAAAAAAAAAAAAAAAAAAAAAAAAAAAAAAAAAAAAAAAAAAAAAAAAAAAAAAAAAAAAAAAAAAAAAAAAAAAAAAAAAAAAAAAAAAAAAAAAAAAAAAAAAAAAAAAAAAAAAAAAAAAAAAAAAAAAAAAAAAAAAAAAAAAAAAAAAAAAAAAAAAAAAAAAAAAAAAAAAAAAAAAAAAAAAAAAAAAAAAAAAAAAAAAAAAAAAAAAAAAAAAAAAAAAAAAAAAAAAAAAAAAAAAAAAAAAAAAAAAAAAAAAAAAAAAAAAAAAAAAAAAAAAAAAAAAAAAAAAAAAAAAAAAAAAAAAAAAAAAAAAAAAAAAAAAAAAAAAAAAAAAAAAAAAAAAAAAAAAAAAAAAAAAAAAAAAAAAAAAAAAAAAAAAAAAAAAAAAAAAAAAAAAAAAAAAAAAAAAAAAAAAAAAAAAAAAAAAAAAAAAAAAAAAAAAAAAAAAAAAAAAAAAAAAAAAAAAAAAAAAAAAAAAAAAAAAAAAAAAAAAAAAAAAAAAAAAAAAAAAAAAAAAAAAAAAAAAAAAAAAAAAAAAAAAAAAAAAAAAAAAAAAAAAAAAAAAAAAAAAAAAAAAAAAAAAAAAAAAAAAAAAAAAAAAAAAAAAAAAAAAAAAAAAAAAAAAAAAAAAAAAAAAAAAAAAAAAAAAAAAAAAAAAAAAAAAAAAAAAAAAAAAAAAAAAAAAAAAAAAAAAAAAAAAAAAAAAAAAAAAAAAAAAAAAAAAAAAAAAAAAAAAAAAAAAAAAAAAAAAAAAAAAAAAAAAAAAAAAAAAAAAAAAAAAAAAAAAAAAAAAAAAAAAAAAAAAAAAAAAAAAAAAAAAAAAAAAAAAAAAAAAAAAAAAAAAAAAAAAAAAAAAAAAAAAAAAAAAAAAAAAAAAAAAAAAAAAAAAAAAAAAAAAAAAAAAAAAAAAAAAAAAAAAAAAAAAAAAAAAAAAAAAAAAAAAAAAAAAAAAAAAAAAAAAAAAAAAAAAAAAAAAAAAAAAAAAAAAAAAAAAAAAAAAAAAAAAAAAAAAAAAAAAAAAAAAAAAAAAAAAAAAAAAAAAAAAAAAAAAAAAAAAAAAAAAAAAAAAAAAAAAAAAAAAAAAAAAAAAAAAAAAAAAAAAAAAAAAAAAAAAAAAAAAAAAAAAAAAAAAAAAAAAAAAAAAAAAAAAAAAAAAAAAAAAAAAAAAAAAAAAAAAAAAAAAAAAAAAAAAAAAAAAAAAAAAAAAAAAAAAAAAAAAAAAAAAAAAAAAAAAAAAAAAAAAAAAAAAAAAAAAAAAAAAAAAAAAAAAAAAAAAAAAAAAAAAAAAAAAAAAAAAAAAAAAAAAAAAAAAAAAAAAAAAAAAAAAAAAAAAAAAAAAAAAAAAAAAAAAAAAAAAAAAAAAAAAAAAAAAAAAAAAAAAAAAAAAAAAAAAAAAAAAAAA
AAAAAAAAAAAAAAAAAAAAAAAAAAAAAAAAAAAAAAAAAAAAAAAAAAAAAAAAAAAAAAAAAAAAAAAAAAAAAAAAAAAAAAAAAAAAAAAAAAAAAAAAAAAAAAAAAAAAAAAAAAAAAAAAAAAAAAAAAAAAAAAAAAAAAAAAAAAAAAAAAAAAAAAAAAAAAAAAAAAAAAAAAAAAAAAAAAAAAAAAAAAAAAAAAAAAAAAAAAAAAAAAAAAAAAAAAAAAAAAAAAAAAAAAAAAAAAAAAAAAAAAAAAAAAAAAAAAAAAAAAAAAAAAAAAAAAAAAAAAAAAAAAAAAAAAAAAAAAAAAAAAAAAAAAAAAAAAAAAAAAAAAAAAAAAAAAAAAAAAAAAAAAAAAAAAAAAAAAAAAAAAAAAAAAAAAAAAAAAAAAAAAAAAAAAAAAAAAAAAAAAAAAAAAAAAAAAAAAAAAAAAAAAAAAAAAAAAAAAAAAAAAAAAAAAAAAAAAAAAAAAAAAAAAAAAAAAAAAAAAAAAAAAAAAAAAAAAAAAAAAAAAAAAAAAAAAAAAAAAAAAAAAAAAAAAAAAAAAAAAAAAAAAAAAAAAAAAAAAAAAAAAAAAAAAAAAAAAAAAAAAAAAAAAAAAAAAAAAAAAAAAAAAAAAAAAAAAAAAAAAAAAAAAAAAAAAAAAAAAAAAAAAAAAAAAAAAAAAAAAAAAAAAAAAAAAAAAAAAAAAAAAAAAAAAAAAAAAAAAAAAAAAAAAAAAAAAAAAAAAAAAAAAAAAAAAAAAAAAAAAAAAAAAAAAAAAAAAAAAAAAAAAAAAAAAAAAAAAAAAAAAAAAAAAAAAAAAAAAAAAAAAAAAAAAAAAAAAAAAAAAAAAAAAAAAAAAAAAAAAAAAAAAAAAAAAAAAAAAAAAAAAAAAAAAAAAAAAAAAAAAAAAAAAAAAAAAAAAAAAAAAAAAAAAAAAAAAAAAAAAAAAAAAAAAAAAAAAAAAAAAAAAAAAAAAAAAAAAAAAAAAAAAAAAAAAAAAAAAAAAAAAAAAAAAAAAAAAAAAAAAAAAAAAAAAAAAAAAAAAAAAAAAAAAAAAAAAAAAAAAAAAAAAAAAAAAAAAAAAAAAAAAAAAAAAAAAAAAAAAAAAAAAAAAAAAAAAAAAAAAAAAAAAAAAAAAAAAAAAAAAAAAAAAAAAAAAAAAAAAAAAAAAAAAAAAAAAAAAAAAAAAAAAAAAAAAAAAAAAAAAAAAAAAAAAAAAAAAAAAAAAAAAAAAAAAAAAAAAAAAAAAAAAAAAAAAAAAAAAAAAAAAAAAAAAAAAAAAAAAAAAAAAAAAAAAAAAAAAAAAAAAAAAAAAAAAAAAAAAAAAAAAAAAAAAAAAAAAAAAAAAAAAAAAAAAAAAAAAAAAAAAAAAAAAAAAAAAAAAAAAAAAAAAAAAAAAAAAAAAAAAAAAAAAAAAAAAAAAAAAAAAAAAAAAAAAAAAAAAAAAAAAAAAAAAAAAAAAAAAAAAAAAAAAAAAAAAAAAAAAAAAAAAAAAAAAAAAAAAAAAAAAAAAAAAAAAAAAAAAAAAAAAAAAAAAAAAAAAAAAAAAAAAAAAAAAAAAAAAAAAAAAAAAAAAAAAAAAAAAAAAAAAAAAAAAAAAAAAAAAAAAAAAAAAAAAAAAAAAAAAAAAAAAAAAAAAAAAAAAAAAAAAAAAAAAAAAAAAAAAAAAAAAAAAAAAAAAAAAAAAAAAAAAAAAAAAAAAAAAAAAAAAAAAAAAAAAAAAAAAAAAAAAAAAAAAAAAAAAAAAAAAAAAAAAAAAAAAAAAAAAAAAAAAAAAAAAAAAAAAAAAAAAAAAAAAAAAAAAAAAAAAAAAAAAAAAAAAAAAAAAAAAAAAAAAAAAAAAAAAAAAAAAAAAAAAAAAAAAAAAAAAAAAAAAAAAAAAAAAAAAAAAAAAAAAAAAAAAAAAAAAAAAAAAAAAAAAAAAAAAAAAAAAAAAAAAAAAAAAAAAAAAAAAAAAAAAAAAAAAAAAAAAAAAAAAAAAAAAAAAAAAAAAAAAAAAAAAAAAAAAAAAAAAAAAAAAAAAAAAAAAAAAAAAAAAAAAAAAAAAAAAAAAAAAAAAAAAAAAAAAAAAAAAAAAAAAAAAAAAAAAAAAAAAAAAAAAAAAAAAAAAAAAAAAAAAAAAAAAAAAAAAAAAAAAAAAAAAAAAAAAAAAAAAAAAAAAAAAAAAAAAAAAAAAAAAAAAAAAAAAAAAAAAAAAAAAAAAAAAAAAAAAAAAAAAAAAAAAAAAAAAAAAAAAAAAAAAAAAAAAAAAAAAAAAAAAAAAAAAAAAAAAAAAAAAAAAAAAAAAAAAAAAAAAAAAAAAAAAAAAAAAAAAAAAAAAAAAAAAAAAAAAAAAAAAAAAAAAAAAAAAAAAAAAAAAAAAAAAAAAAAAAAAAAAAAAAAAAAAAAAAAAAAAAAAAAAAAAAAAAAAAAAAAAAAAAAAAAAAAAAAAAAAAAAAAAAAAAAAAAAAAAAAAAAAAAAAAAAAAAAAAAAAAAAAAAAAAAAAAAAAAAAAAAAAAAAAAAAAAAAAAAAAAAAAAAAAAAAAAAAAAAAAAAAAAAAAAAAAAAAAAAAAAAAAAAAAAAAAAAAAAAAAAAAAAAAAAAAAAAAAAAAAAAAAAAAAAAAAAAAAAAAAAAAAAAAAAAAAAAAAAAAAAAAAAAAAAAAAAAAAAAAAAAAAAAAAAAAAAAAAAAAAAAAAAAAAAAAAAAAAAAAAAAAAAAAAAAAAAAAAAAAAAAAAAAAAAAAAAAAAAAAAAAAAAAAAAAAAAAAAAAAAAAAAAAAAAAAAAAAAAAAAAAAAAAAAAAAAAAAAAAAAAAAAAAAAAAAAAAAAAAAAAAAAAAAAAAAAAAAAAAAAAAAAAAAAAAAAAAAAAAAAAAAAAAAAAAAAAAAAAAAAAAAAAAAAAAAAAAAAAAAAAAAAAAAAAAAAAAAAAAAAAAAAAAAAAAAAAAAAAAAAAAAAAAAAAAAAAAAAAAAAAAAAAAAAAAAAAAAAAAAAAAAAAAAAAAAAAAAAAAAAAAAAAAAAAAAAAAAAAAAAAAAAAAAAAAAAAAAAAAAAAAAAAAAAAAAAAAAAAAAAAAAAAAAAAAAAAAAAAAAAAAAAAAAAAAAAAAAAAAAAAAAAAAAAAAAAAAAAAAAAAAAAAAAAAAAAAAAAAAAAAAAAAAAAAAAAAAAAAAAAAAAAAAAAAAAAAAAAAAAAAAAAAAAAAAAAAAAAAAAAAAAAAAAAAAAAAAAAAAAAAAAAAAAAAAAAAAAAAAAAAAAAAAAAAAAAAAAAAAAAAAAAAAAAAAAAAAAAAAAAAAAAAAAAAAAAAAAAAAAAAAAAAAAAAAAAAAAAAAAAAAAAAAAAAAAAAAAAAAAAAAAAAAAAAAAAAAAAAAAAAAAAAAAAAAAAAAAAAAAAAAAAAAAAAAAAAAAAAAAAAAAAAAAAAAAAAAAAAAAAAAAAAAAAAAAAAAAAAAAAAAAAAAAAAAAAAAAAAAAAAAAAAAAAAAAAAAAAAAAAAAAAAAAAAAAAAAAAAAAAAAAAAAAAAAAAAAAAAAAAAAAAAAAAAAAAAAAAAAAAAAAAAAAAAAAAAAAAAAAAAAAAAAAAAAAAAAAAAAAAAAAAAAAAAAAAAAAAAAAAAAAAAAAAAAAAAAAAAAAAAAAAAAAAAAAAAAAAAAAAAAAAAAAAAAAAAAAAAAAAAAAAAAAAAAAAAAAAAAAAAAAAAAAAAAAAAAAAAAAAAAAAAAAAAAAAAAAAAAAAAAAAAAAAAAAAAAAAAAAAAAAAAAAAAAAAAAAAAAAAAAAAAAAAAAAAAAAAAAAAAAAAAAAAAAAAAAAAAAAAAAAAAAAAAAAAAAAAAAAAAAAAAAAAAAAAAAAAAAAAAAAAAAAAAAAAAAAAAAAAAAAAAAAAAAAAAAAAAAAAAAAAAAAAAAAAAAAAAAAAAAAAAAAAAAAAAAAAAAAAAAAAAAAAAAAAAAAAAAAAAAAAAAAAAAAAAAAAAAAAAAAAAAAAAAAAAAAAAAAAAAAAAAAAAAAAAAAAAAAAAAAAAAAAAAAAAAAAAAAAAAAAAAAAAAAAAAAAAAAAAAAAAAAAAAAAAAAAAAAAAAAAAAAAAAAAAAAAAAAAAAAAAAAAAAAAAAAAAAAAAAAAAAA
AAAAAAAAAAAAAAAAAAAAAAAAAAAAAAAAAAAAAAAAAAAAAAAAAAAAAAAAAAAAAAAAAAAAAAAAAAAAAAAAAAAAAAAAAAAAAAAAAAAAAAAAAAAAAAAAAAAAAAAAAAAAAAAAAAAAAAAAAAAAAAAAAAAAAAAAAAAAAAAAAAAAAAAAAAAAAAAAAAAAAAAAAAAAAAAAAAAAAAAAAAAAAAAAAAAAAAAAAAAAAAAAAAAAAAAAAAAAAAAAAAAAAAAAAAAAAAAAAAAAAAAAAAAAAAAAAAAAAAAAAAAAAAAAAAAAAAAAAAAAAAAAAAAAAAAAAAAAAAAAAAAAAAAAAAAAAAAAAAAAAAAAAAAAAAAAAAAAAAAAAAAAAAAAAAAAAAAAAAAAAAAAAAAAAAAAAAAAAAAAAAAAAAAAAAAAAAAAAAAAAAAAAAAAAAAAAAAAAAAAAAAAAAAAAAAAAAAAAAAAAAAAAAAAAAAAAAAAAAAAAAAAAAAAAAAAAAAAAAAAAAAAAAAAAAAAAAAAAAAAAAAAAAAAAAAAAAAAAAAAAAAAAAAAAAAAAAAAAAAAAAAAAAAAAAAAAAAAAAAAAAAAAAAAAAAAAAAAAAAAAAAAAAAAAAAAAAAAAAAAAAAAAAAAAAAAAAAAAAAAAAAAAAAAAAAAAAAAAAAAAAAAAAAAAAAAAAAAAAAAAAAAAAAAAAAAAAAAAAAAAAAAAAAAAAAAAAAAAAAAAAAAAAAAAAAAAAAAAAAAAAAAAAAAAAAAAAAAAAAAAAAAAAAAAAAAAAAAAAAAAAAAAAAAAAAAAAAAAAAAAAAAAAAAAAAAAAAAAAAAAAAAAAAAAAAAAAAAAAAAAAAAAAAAAAAAAAAAAAAAAAAAAAAAAAAAAAAAAAAAAAAAAAAAAAAAAAAAAAAAAAAAAAAAAAAAAAAAAAAAAAAAAAAAAAAAAAAAAAAAAAAAAAAAAAAAAAAAAAAAAAAAAAAAAAAAAAAAAAAAAAAAAAAAAAAAAAAAAAAAAAAAAAAAAAAAAAAAAAAAAAAAAAAAAAAAAAAAAAAAAAAAAAAAAAAAAAAAAAAAAAAAAAAAAAAAAAAAAAAAAAAAAAAAAAAAAAAAAAAAAAAAAAAAAAAAAAAAAAAAAAAAAAAAAAAAAAAAAAAAAAAAAAAAAAAAAAAAAAAAAAAAAAAAAAAAAAAAAAAAAAAAAAAAAAAAAAAAAAAAAAAAAAAAAAAAAAAAAAAAAAAAAAAAAAAAAAAAAAAAAAAAAAAAAAAAAAAAAAAAAAAAAAAAAAAAAAAAAAAAAAAAAAAAAAAAAAAAAAAAAAAAAAAAAAAAAAAAAAAAAAAAAAAAAAAAAAAAAAAAAAAAAAAAAAAAAAAAAAAAAAAAAAAAAAAAAAAAAAAAAAAAAAAAAAAAAAAAAAAAAAAAAAAAAAAAAAAAAAAAAAAAAAAAAAAAAAAAAAAAAAAAAAAAAAAAAAAAAAAAAAAAAAAAAAAAAAAAAAAAAAAAAAAAAAAAAAAAAAAAAAAAAAAAAAAAAAAAAAAAAAAAAAAAAAAAAAAAAAAAAAAAAAAAAAAAAAAAAAAAAAAAAAAAAAAAAAAAAAAAAAAAAAAAAAAAAAAAAAAAAAAAAAAAAAAAAAAAAAAAAAAAAAAAAAAAAAAAAAAAAAAAAAAAAAAAAAAAAAAAAAAAAAAAAAAAAAAAAAAAAAAAAAAAAAAAAAAAAAAAAAAAAAAAAAAAAAAAAAAAAAAAAAAAAAAAAAAAAAAAAAAAAAAAAAAAAAAAAAAAAAAAAAAAAAAAAAAAAAAAAAAAAAAAAAAAAAAAAAAAAAAAAAAAAAAAAAAAAAAAAAAAAAAAAAAAAAAAAAAAAAAAAAAAAAAAAAAAAAAAAAAAAAAAAAAAAAAAAAAAAAAAAAAAAAAAAAAAAAAAAAAAAAAAAAAAAAAAAAAAAAAAAAAAAAAAAAAAAAAAAAAAAAAAAAAAAAAAAAAAAAAAAAAAAAAAAAAAAAAAAAAAAAAAAAAAAAAAAAAAAAAAAAAAAAAAAAAAAAAAAAAAAAAAAAAAAAAAAAAAAAAAAAAAAAAAAAAAAAAAAAAAAAAAAAAAAAAAAAAAAAAAAAAAAAAAAAAAAAAAAAAAAAAAAAAAAAAAAAAAAAAAAAAAAAAAAAAAAAAAAAAAAAAAAAAAAAAAAAAAAAAAAAAAAAAAAAAAAAAAAAAAAAAAAAAAAAAAAAAAAAAAAAAAAAAAAAAAAAAAAAAAAAAAAAAAAAAAAAAAAAAAAAAAAAAAAAAAAAAAAAAAAAAAAAAAAAAAAAAAAAAAAAAAAAAAAAAAAAAAAAAAAAAAAAAAAAAAAAAAAAAAAAAAAAAAAAAAAAAAAAAAAAAAAAAAAAAAAAAAAAAAAAAAAAAAAAAAAAAAAAAAAAAAAAAAAAAAAAAAAAAAAAAAAAAAAAAAAAAAAAAAAAAAAAAAAAAAAAAAAAAAAAAAAAAAAAAAAAAAAAAAAAAAAAAAAAAAAAAAAAAAAAAAAAAAAAAAAAAAAAAAAAAAAAAAAAAAAAAAAAAAAAAAAAAAAAAAAAAAAAAAAAAAAAAAAAAAAAAAAAAAAAAAAAAAAAAAAAAAAAAAAAAAAAAAAAAAAAAAAAAAAAAAAAAAAAAAAAAAAAAAAAAAAAAAAAAAAAAAAAAAAAAAAAAAAAAAAAAAAAAAAAAAAAAAAAAAAAAAAAAAAAAAAAAAAAAAAAAAAAAAAAAAAAAAAAAAAAAAAAAAAAAAAAAAAAAAAAAAAAAAAAAAAAAAAAAAAAAAAAAAAAAAAAAAAAAAAAAAAAAAAAAAAAAAAAAAAAAAAAAAAAAAAAAAAAAAAAAAAAAAAAAAAAAAAAAAAAAAAAAAAAAAAAAAAAAAAAAAAAAAAAAAAAAAAAAAAAAAAAAAAAAAAAAAAAAAAAAAAAAAAAAAAAAAAAAAAAAAAAAAAAAAAAAAAAAAAAAAAAAAAAAAAAAAAAAAAAAAAAAAAAAAAAAAAAAAAAAAAAAAAAAAAAAAAAAAAAAAAAAAAAAAAAAAAAAAAAAAAAAAAAAAAAAAAAAAAAAAAAAAAAAAAAAAAAAAAAAAAAAAAAAAAAAAAAAAAAAAAAAAAAAAAAAAAAAAAAAAAAAAAAAAAAAAAAAAAAAAAAAAAAAAAAAAAAAAAAAAAAAAAAAAAAAAAAAAAAAAAAAAAAAAAAAAAAAAAAAAAAAAAAAAAAAAAAAAAAAAAAAAAAAAAAAAAAAAAAAAAAAAAAAAAAAAAAAAAAAAAAAAAAAAAAAAAAAAAAAAAAAAAAAAAAAAAAAAAAAAAAAAAAAAAAAAAAAAAAAAAAAAAAAAAAAAAAAAAAAAAAAAAAAAAAAAAAAAAAAAAAAAAAAAAAAAAAAAAAAAAAAAAAAAAAAAAAAAAAAAAAAAAAAAAAAAAAAAAAAAAAAAAAAAAAAAAAAAAAAAAAAAAAAAAAAAAAAAAAAAAAAAAAAAAAAAAAAAAAAAAAAAAAAAAAAAAAAAAAAAAAAAAAAAAAAAAAAAAAAAAAAAAAAAAAAAAAAAAAAAAAAAAAAAAAAAAAAAAAAAAAAAAAAAAAAAAAAAAAAAAAAAAAAAAAAAAAAAAAAAAAAAAAAAAAAAAAAAAAAAAAAAAAAAAAAAAAAAAAAAAAAAAAAAAAAAAAAAAAAAAAAAAAAAAAAAAAAAAAAAAAAAAAAAAAAAAAAAAAAAAAAAAAAAAAAAAAAAAAAAAAAAAAAAAAAAAAAAAAAAAAAAAAAAAAAAAAAAAAAAAAAAAAAAAAAAAAAAAAAAAAAAAAAAAAAAAAAAAAAAAAAAAAAAAAAAAAAAAAAAAAAAAAAAAAAAAAAAAAAAAAAAAAAAAAAAAAAAAAAAAAAAAAAAAAAAAAAAAAAAAAAAAAAAAAAAAAAAAAAAAAAAAAAAAAAAAAAAAAAAAAAAAAAAAAAAAAAAAAAAAAAAAAAAAAAAAAAAAAAAAAAAAAAAAAAAAAAAAAAAAAAAAAAAAAAAAAAAAAAAAAAAAAAAAAAAAAAAAAAAAAAAAAAAAAAAAAAAAAAAAAAAAAAAAAAAAAAAAAAAAAAAAAAAAAAAAAAAAAAAAAAAAAAAAAAAAAAAAAAAAAAAAAAAAAAAAAAA
AAAAAAAAAAAAAAAAAAAAAAAAAAAAAAAAAAAAAAAAAAAAAAAAAAAAAAAAAAAAAAAAAAAAAAAAAAAAAAAAAAAAAAAAAAAAAAAAAAAAAAAAAAAAAAAAAAAAAAAAAAAAAAAAAAAAAAAAAAAAAAAAAAAAAAAAAAAAAAAAAAAAAAAAAAAAAAAAAAAAAAAAAAAAAAAAAAAAAAAAAAAAAAAAAAAAAAAAAAAAAAAAAAAAAAAAAAAAAAAAAAAAAAAAAAAAAAAAAAAAAAAAAAAAAAAAAAAAAAAAAAAAAAAAAAAAAAAAAAAAAAAAAAAAAAAAAAAAAAAAAAAAAAAAAAAAAAAAAAAAAAAAAAAAAAAAAAAAAAAAAAAAAAAAAAAAAAAAAAAAAAAAAAAAAAAAAAAAAAAAAAAAAAAAAAAAAAAAAAAAAAAAAAAAAAAAAAAAAAAAAAAAAAAAAAAAAAAAAAAAAAAAAAAAAAAAAAAAAAAAAAAAAAAAAAAAAAAAAAAAAAAAAAAAAAAAAAAAAAAAAAAAAAAAAAAAAAAAAAAAAAAAAAAAAAAAAAAAAAAAAAAAAAAAAAAAAAAAAAAAAAAAAAAAAAAAAAAAAAAAAAAAAAAAAAAAAAAAAAAAAAAAAAAAAAAAAAAAAAAAAAAAAAAAAAAAAAAAAAAAAAAAAAAAAAAAAAAAAAAAAAAAAAAAAAAAAAAAAAAAAAAAAAAAAAAAAAAAAAAAAAAAAAAAAAAAAAAAAAAAAAAAAAAAAAAAAAAAAAAAAAAAAAAAAAAAAAAAAAAAAAAAAAAAAAAAAAAAAAAAAAAAAAAAAAAAAAAAAAAAAAAAAAAAAAAAAAAAAAAAAAAAAAAAAAAAAAAAAAAAAAAAAAAAAAAAAAAAAAAAAAAAAAAAAAAAAAAAAAAAAAAAAAAAAAAAAAAAAAAAAAAAAAAAAAAAAAAAAAAAAAAAAAAAAAAAAAAAAAAAAAAAAAAAAAAAAAAAAAAAAAAAAAAAAAAAAAAAAAAAAAAAAAAAAAAAAAAAAAAAAAAAAAAAAAAAAAAAAAAAAAAAAAAAAAAAAAAAAAAAAAAAAAAAAAAAAAAAAAAAAAAAAAAAAAAAAAAAAAAAAAAAAAAAAAAAAAAAAAAAAAAAAAAAAAAAAAAAAAAAAAAAAAAAAAAAAAAAAAAAAAAAAAAAAAAAAAAAAAAAAAAAAAAAAAAAAAAAAAAAAAAAAAAAAAAAAAAAAAAAAAAAAAAAAAAAAAAAAAAAAAAAAAAAAAAAAAAAAAAAAAAAAAAAAAAAAAAAAAAAAAAAAAAAAAAAAAAAAAAAAAAAAAAAAAAAAAAAAAAAAAAAAAAAAAAAAAAAAAAAAAAAAAAAAAAAAAAAAAAAAAAAAAAAAAAAAAAAAAAAAAAAAAAAAAAAAAAAAAAAAAAAAAAAAAAAAAAAAAAAAAAAAAAAAAAAAAAAAAAAAAAAAAAAAAAAAAAAAAAAAAAAAAAAAAAAAAAAAAAAAAAAAAAAAAAAAAAAAAAAAAAAAAAAAAAAAAAAAAAAAAAAAAAAAAAAAAAAAAAAAAAAAAAAAAAAAAAAAAAAAAAAAAAAAAAAAAAAAAAAAAAAAAAAAAAAAAAAAAAAAAAAAAAAAAAAAAAAAAAAAAAAAAAAAAAAAAAAAAAAAAAAAAAAAAAAAAAAAAAAAAAAAAAAAAAAAAAAAAAAAAAAAAAAAAAAAAAAAAAAAAAAAAAAAAAAAAAAAAAAAAAAAAAAAAAAAAAAAAAAAAAAAAAAAAAAAAAAAAAAAAAAAAAAAAAAAAAAAAAAAAAAAAAAAAAAAAAAAAAAAAAAAAAAAAAAAAAAAAAAAAAAAAAAAAAAAAAAAAAAAAAAAAAAAAAAAAAAAAAAAAAAAAAAAAAAAAAAAAAAAAAAAAAAAAAAAAAAAAAAAAAAAAAAAAAAAAAAAAAAAAAAAAAAAAAAAAAAAAAAAAAAAAAAAAAAAAAAAAAAAAAAAAAAAAAAAAAAAAAAAAAAAAAAAAAAAAAAAAAAAAAAAAAAAAAAAAAAAAAAAAAAAAAAAAAAAAAAAAAAAAAAAAAAAAAAAAAAAAAAAAAAAAAAAAAAAAAAAAAAAAAAAAAAAAAAAAAAAAAAAAAAAAAAAAAAAAAAAAAAAAAAAAAAAAAAAAAAAAAAAAAAAAAAAAAAAAAAAAAAAAAAAAAAAAAAAAAAAAAAAAAAAAAAAAAAAAAAAAAAAAAAAAAAAAAAAAAAAAAAAAAAAAAAAAAAAAAAAAAAAAAAAAAAAAAAAAAAAAAAAAAAAAAAAAAAAAAAAAAAAAAAAAAAAAAAAAAAAAAAAAAAAAAAAAAAAAAAAAAAAAAAAAAAAAAAAAAAAAAAAAAAAAAAAAAAAAAAAAAAAAAAAAAAAAAAAAAAAAAAAAAAAAAAAAAAAAAAAAAAAAAAAAAAAAAAAAAAAAAAAAAAAAAAAAAAAAAAAAAAAAAAAAAAAAAAAAAAAAAAAAAAAAAAAAAAAAAAAAAAAAAAAAAAAAAAAAAAAAAAAAAAAAAAAAAAAAAAAAAAAAAAAAAAAAAAAAAAAAAAAAAAAAAAAAAAAAAAAAAAAAAAAAAAAAAAAAAAAAAAAAAAAAAAAAAAAAAAAAAAAAAAAAAAAAAAAAAAAAAAAAAAAAAAAAAAAAAAAAAAAAAAAAAAAAAAAAAAAAAAAAAAAAAAAAAAAAAAAAAAAAAAAAAAAAAAAAAAAAAAAAAAAAAAAAAAAAAAAAAAAAAAAAAAAAAAAAAAAAAAAAAAAAAAAAAAAAAAAAAAAAAAAAAAAAAAAAAAAAAAAAAAAAAAAAAAAAAAAAAAAAAAAAAAAAAAAAAAAAAAAAAAAAAAAAAAAAAAAAAAAAAAAAAAAAAAAAAAAAAAAAAAAAAAAAAAAAAAAAAAAAAAAAAAAAAAAAAAAAAAAAAAAAAAAAAAAAAAAAAAAAAAAAAAAAAAAAAAAAAAAAAAAAAAAAAAAAAAAAAAAAAAAAAAAAAAAAAAAAAAAAAAAAAAAAAAAAAAAAAAAAAAAAAAAAAAAAAAAAAAAAAAAAAAAAAAAAAAAAAAAAAAAAAAAAAAAAAAAAAAAAAAAAAAAAAAAAAAAAAAAAAAAAAAAAAAAAAAAAAAAAAAAAAAAAAAAAAAAAAAAAAAAAAAAAAAAAAAAAAAAAAAAAAAAAAAAAAAAAAAAAAAAAAAAAAAAAAAAAAAAAAAAAAAAAAAAAAAAAAAAAAAAAAAAAAAAAAAAAAAAAAAAAAAAAAAAAAAAAAAAAAAAAAAAAAAAAAAAAAAAAAAAAAAAAAAAAAAAAAAAAAAAAAAAAAAAAAAAAAAAAAAAAAAAAAAAAAAAAAAAAAAAAAAAAAAAAAAAAAAAAAAAAAAAAAAAAAAAAAAAAAAAAAAAAAAAAAAAAAAAAAAAAAAAAAAAAAAAAAAAAAAAAAAAAAAAAAAAAAAAAAAAAAAAAAAAAAAAAAAAAAAAAAAAAAAAAAAAAAAAAAAAAAAAAAAAAAAAAAAAAAAAAAAAAAAAAAAAAAAAAAAAAAAAAAAAAAAAAAAAAAAAAAAAAAAAAAAAAAAAAAAAAAAAAAAAAAAAAAAAAAAAAAAAAAAAAAAAAAAAAAAAAAAAAAAAAAAAAAAAAAAAAAAAAAAAAAAAAAAAAAAAAAAAAAAAAAAAAAAAAAAAAAAAAAAAAAAAAAAAAAAAAAAAAAAAAAAAAAAAAAAAAAAAAAAAAAAAAAAAAAAAAAAAAAAAAAAAAAAAAAAAAAAAAAAAAAAAAAAAAAAAAAAAAAAAAAAAAAAAAAAAAAAAAAAAAAAAAAAAAAAAAAAAAAAAAAAAAAAAAAAAAAAAAAAAAAAAAAAAAAAAAAAAAAAAAAAAAAAAAAAAAAAAAAAAAAAAAAAAAAAAAAAAAAAAAAAAAAAAAAAAAAAAAAAAAAAAAAAAAAAAAAAAAAAAAAAAAAAAAAAAAAAAAAAAAAAAAAAAAAAAAAAAAAAAAAAAAAAAAAAAAAAAAAAAAAAAAAAAAAAAAAAAAAAAAAAAAAAAAAAAAAAAAAAAAAAAAAAAAAAAAAAAAAAAAAAAAAAAAAAAAAAAAAAAAAAAAAAAAAAAAAAAAAAAAAAAAAAAAAAAAAAAAAAAAAA
AAAAAAAAAAAAAAAAAAAAAAAAAAAAAAAAAAAAAAAAAAAAAAAAAAAAAAAAAAAAAAAAAAAAAAAAAAAAAAAAAAAAAAAAAAAAAAAAAAAAAAAAAAAAAAAAAAAAAAAAAAAAAAAAAAAAAAAAAAAAAAAAAAAAAAAAAAAAAAAAAAAAAAAAAAAAAAAAAAAAAAAAAAAAAAAAAAAAAAAAAAAAAAAAAAAAAAAAAAAAAAAAAAAAAAAAAAAAAAAAAAAAAAAAAAAAAAAAAAAAAAAAAAAAAAAAAAAAAAAAAAAAAAAAAAAAAAAAAAAAAAAAAAAAAAAAAAAAAAAAAAAAAAAAAAAAAAAAAAAAAAAAAAAAAAAAAAAAAAAAAAAAAAAAAAAAAAAAAAAAAAAAAAAAAAAAAAAAAAAAAAAAAAAAAAAAAAAAAAAAAAAAAAAAAAAAAAAAAAAAAAAAAAAAAAAAAAAAAAAAAAAAAAAAAAAAAAAAAAAAAAAAAAAAAAAAAAAAAAAAAAAAAAAAAAAAAAAAAAAAAAAAAAAAAAAAAAAAAAAAAAAAAAAAAAAAAAAAAAAAAAAAAAAAAAAAAAAAAAAAAAAAAAAAAAAAAAAAAAAAAAAAAAAAAAAAAAAAAAAAAAAAAAAAAAAAAAAAAAAAAAAAAAAAAAAAAAAAAAAAAAAAAAAAAAAAAAAAAAAAAAAAAAAAAAAAAAAAAAAAAAAAAAAAAAAAAAAAAAAAAAAAAAAAAAAAAAAAAAAAAAAAAAAAAAAAAAAAAAAAAAAAAAAAAAAAAAAAAAAAAAAAAAAAAAAAAAAAAAAAAAAAAAAAAAAAAAAAAAAAAAAAAAAAAAAAAAAAAAAAAAAAAAAAAAAAAAAAAAAAAAAAAAAAAAAAAAAAAAAAAAAAAAAAAAAAAAAAAAAAAAAAAAAAAAAAAAAAAAAAAAAAAAAAAAAAAAAAAAAAAAAAAAAAAAAAAAAAAAAAAAAAAAAAAAAAAAAAAAAAAAAAAAAAAAAAAAAAAAAAAAAAAAAAAAAAAAAAAAAAAAAAAAAAAAAAAAAAAAAAAAAAAAAAAAAAAAAAAAAAAAAAAAAAAAAAAAAAAAAAAAAAAAAAAAAAAAAAAAAAAAAAAAAAAAAAAAAAAAAAAAAAAAAAAAAAAAAAAAAAAAAAAAAAAAAAAAAAAAAAAAAAAAAAAAAAAAAAAAAAAAAAAAAAAAAAAAAAAAAAAAAAAAAAAAAAAAAAAAAAAAAAAAAAAAAAAAAAAAAAAAAAAAAAAAAAAAAAAAAAAAAAAAAAAAAAAAAAAAAAAAAAAAAAAAAAAAAAAAAAAAAAAAAAAAAAAAAAAAAAAAAAAAAAAAAAAAAAAAAAAAAAAAAAAAAAAAAAAAAAAAAAAAAAAAAAAAAAAAAAAAAAAAAAAAAAAAAAAAAAAAAAAAAAAAAAAAAAAAAAAAAAAAAAAAAAAAAAAAAAAAAAAAAAAAAAAAAAAAAAAAAAAAAAAAAAAAAAAAAAAAAAAAAAAAAAAAAAAAAAAAAAAAAAAAAAAAAAAAAAAAAAAAAAAAAAAAAAAAAAAAAAAAAAAAAAAAAAAAAAAAAAAAAAAAAAAAAAAAAAAAAAAAAAAAAAAAAAAAAAAAAAAAAAAAAAAAAAAAAAAAAAAAAAAAAAAAAAAAAAAAAAAAAAAAAAAAAAAAAAAAAAAAAAAAAAAAAAAAAAAAAAAAAAAAAAAAAAAAAAAAAAAAAAAAAAAAAAAAAAAAAAAAAAAAAAAAAAAAAAAAAAAAAAAAAAAAAAAAAAAAAAAAAAAAAAAAAAAAAAAAAAAAAAAAAAAAAAAAAAAAAAAAAAAAAAAAAAAAAAAAAAAAAAAAAAAAAAAAAAAAAAAAAAAAAAAAAAAAAAAAAAAAAAAAAAAAAAAAAAAAAAAAAAAAAAAAAAAAAAAAAAAAAAAAAAAAAAAAAAAAAAAAAAAAAAAAAAAAAAAAAAAAAAAAAAAAAAAAAAAAAAAAAAAAAAAAAAAAAAAAAAAAAAAAAAAAAAAAAAAAAAAAAAAAAAAAAAAAAAAAAAAAAAAAAAAAAAAAAAAAAAAAAAAAAAAAAAAAAAAAAAAAAAAAAAAAAAAAAAAAAAAAAAAAAAAAAAAAAAAAAAAAAAAAAAAAAAAAAAAAAAAAAAAAAAAAAAAAAAAAAAAAAAAAAAAAAAAAAAAAAAAAAAAAAAAAAAAAAAAAAAAAAAAAAAAAAAAAAAAAAAAAAAAAAAAAAAAAAAAAAAAAAAAAAAAAAAAAAAAAAAAAAAAAAAAAAAAAAAAAAAAAAAAAAAAAAAAAAAAAAAAAAAAAAAAAAAAAAAAAAAAAAAAAAAAAAAAAAAAAAAAAAAAAAAAAAAAAAAAAAAAAAAAAAAAAAAAAAAAAAAAAAAAAAAAAAAAAAAAAAAAAAAAAAAAAAAAAAAAAAAAAAAAAAAAAAAAAAAAAAAAAAAAAAAAAAAAAAAAAAAAAAAAAAAAAAAAAAAAAAAAAAAAAAAAAAAAAAAAAAAAAAAAAAAAAAAAAAAAAAAAAAAAAAAAAAAAAAAAAAAAAAAAAAAAAAAAAAAAAAAAAAAAAAAAAAAAAAAAAAAAAAAAAAAAAAAAAAAAAAAAAAAAAAAAAAAAAAAAAAAAAAAAAAAAAAAAAAAAAAAAAAAAAAAAAAAAAAAAAAAAAAAAAAAAAAAAAAAAAAAAAAAAAAAAAAAAAAAAAAAAAAAAAAAAAAAAAAAAAAAAAAAAAAAAAAAAAAAAAAAAAAAAAAAAAAAAAAAAAAAAAAAAAAAAAAAAAAAAAAAAAAAAAAAAAAAAAAAAAAAAAAAAAAAAAAAAAAAAAAAAAAAAAAAAAAAAAAAAAAAAAAAAAAAAAAAAAAAAAAAAAAAAAAAAAAAAAAAAAAAAAAAAAAAAAAAAAAAAAAAAAAAAAAAAAAAAAAAAAAAAAAAAAAAAAAAAAAAAAAAAAAAAAAAAAAAAAAAAAAAAAAAAAAAAAAAAAAAAAAAAAAAAAAAAAAAAAAAAAAAAAAAAAAAAAAAAAAAAAAAAAAAAAAAAAAAAAAAAAAAAAAAAAAAAAAAAAAAAAAAAAAAAAAAAAAAAAAAAAAAAAAAAAAAAAAAAAAAAAAAAAAAAAAAAAAAAAAAAAAAAAAAAAAAAAAAAAAAAAAAAAAAAAAAAAAAAAAAAAAAAAAAAAAAAAAAAAAAAAAAAAAAAAAAAAAAAAAAAAAAAAAAAAAAAAAAAAAAAAAAAAAAAAAAAAAAAAAAAAAAAAAAAAAAAAAAAAAAAAAAAAAAAAAAAAAAAAAAAAAAAAAAAAAAAAAAAAAAAAAAAAAAAAAAAAAAAAAAAAAAAAAAAAAAAAAAAAAAAAAAAAAAAAAAAAAAAAAAAAAAAAAAAAAAAAAAAAAAAAAAAAAAAAAAAAAAAAAAAAAAAAAAAAAAAAAAAAAAAAAAAAAAAAAAAAAAAAAAAAAAAAAAAAAAAAAAAAAAAAAAAAAAAAAAAAAAAAAAAAAAAAAAAAAAAAAAAAAAAAAAAAAAAAAAAAAAAAAAAAAAAAAAAAAAAAAAAAAAAAAAAAAAAAAAAAAAAAAAAAAAAAAAAAAAAAAAAAAAAAAAAAAAAAAAAAAAAAAAAAAAAAAAAAAAAAAAAAAAAAAAAAAAAAAAAAAAAAAAAAAAAAAAAAAAAAAAAAAAAAAAAAAAAAAAAAAAAAAAAAAAAAAAAAAAAAAAAAAAAAAAAAAAAAAAAAAAAAAAAAAAAAAAAAAAAAAAAAAAAAAAAAAAAAAAAAAAAAAAAAAAAAAAAAAAAAAAAAAAAAAAAAAAAAAAAAAAAAAAAAAAAAAAAAAAAAAAAAAAAAAAAAAAAAAAAAAAAAAAAAAAAAAAAAAAAAAAAAAAAAAAAAAAAAAAAAAAAAAAAAAAAAAAAAAAAAAAAAAAAAAAAAAAAAAAAAAAAAAAAAAAAAAAAAAAAAAAAAAAAAAAAAAAAAAAAAAAAAAAAAAAAAAAAAAAAAAAAAAAAAAAAAAAAAAAAAAAAAAAAAAAAAAAAAAAAAAAAAAAAAAAAAAAAAAAAAAAAAAAAAAAAAAAAAAAAAAAAAAAAAAAAAAAAAAAAAAAAAAAAAAAAAAAAAAAAAAAAAAAAAAAAAAAAAAAAAAA
AAAAAAAAAAAAAAAAAAAAAAAAAAAAAAAAAAAAAAAAAAAAAAAAAAAAAAAAAAAAAAAAAAAAAAAAAAAAAAAAAAAAAAAAAAAAAAAAAAAAAAAAAAAAAAAAAAAAAAAAAAAAAAAAAAAAAAAAAAAAAAAAAAAAAAAAAAAAAAAAAAAAAAAAAAAAAAAAAAAAAAAAAAAAAAAAAAAAAAAAAAAAAAAAAAAAAAAAAAAAAAAAAAAAAAAAAAAAAAAAAAAAAAAAAAAAAAAAAAAAAAAAAAAAAAAAAAAAAAAAAAAAAAAAAAAAAAAAAAAAAAAAAAAAAAAAAAAAAAAAAAAAAAAAAAAAAAAAAAAAAAAAAAAAAAAAAAAAAAAAAAAAAAAAAAAAAAAAAAAAAAAAAAAAAAAAAAAAAAAAAAAAAAAAAAAAAAAAAAAAAAAAAAAAAAAAAAAAAAAAAAAAAAAAAAAAAAAAAAAAAAAAAAAAAAAAAAAAAAAAAAAAAAAAAAAAAAAAAAAAAAAAAAAAAAAAAAAAAAAAAAAAAAAAAAAAAAAAAAAAAAAAAAAAAAAAAAAAAAAAAAAAAAAAAAAAAAAAAAAAAAAAAAAAAAAAAAAAAAAAAAAAAAAAAAAAAAAAAAAAAAAAAAAAAAAAAAAAAAAAAAAAAAAAAAAAAAAAAAAAAAAAAAAAAAAAAAAAAAAAAAAAAAAAAAAAAAAAAAAAAAAAAAAAAAAAAAAAAAAAAAAAAAAAAAAAAAAAAAAAAAAAAAAAAAAAAAAAAAAAAAAAAAAAAAAAAAAAAAAAAAAAAAAAAAAAAAAAAAAAAAAAAAAAAAAAAAAAAAAAAAAAAAAAAAAAAAAAAAAAAAAAAAAAAAAAAAAAAAAAAAAAAAAAAAAAAAAAAAAAAAAAAAAAAAAAAAAAAAAAAAAAAAAAAAAAAAAAAAAAAAAAAAAAAAAAAAAAAAAAAAAAAAAAAAAAAAAAAAAAAAAAAAAAAAAAAAAAAAAAAAAAAAAAAAAAAAAAAAAAAAAAAAAAAAAAAAAAAAAAAAAAAAAAAAAAAAAAAAAAAAAAAAAAAAAAAAAAAAAAAAAAAAAAAAAAAAAAAAAAAAAAAAAAAAAAAAAAAAAAAAAAAAAAAAAAAAAAAAAAAAAAAAAAAAAAAAAAAAAAAAAAAAAAAAAAAAAAAAAAAAAAAAAAAAAAAAAAAAAAAAAAAAAAAAAAAAAAAAAAAAAAAAAAAAAAAAAAAAAAAAAAAAAAAAAAAAAAAAAAAAAAAAAAAAAAAAAAAAAAAAAAAAAAAAAAAAAAAAAAAAAAAAAAAAAAAAAAAAAAAAAAAAAAAAAAAAAAAAAAAAAAAAAAAAAAAAAAAAAAAAAAAAAAAAAAAAAAAAAAAAAAAAAAAAAAAAAAAAAAAAAAAAAAAAAAAAAAAAAAAAAAAAAAAAAAAAAAAAAAAAAAAAAAAAAAAAAAAAAAAAAAAAAAAAAAAAAAAAAAAAAAAAAAAAAAAAAAAAAAAAAAAAAAAAAAAAAAAAAAAAAAAAAAAAAAAAAAAAAAAAAAAAAAAAAAAAAAAAAAAAAAAAAAAAAAAAAAAAAAAAAAAAAAAAAAAAAAAAAAAAAAAAAAAAAAAAAAAAAAAAAAAAAAAAAAAAAAAAAAAAAAAAAAAAAAAAAAAAAAAAAAAAAAAAAAAAAAAAAAAAAAAAAAAAAAAAAAAAAAAAAAAAAAAAAAAAAAAAAAAAAAAAAAAAAAAAAAAAAAAAAAAAAAAAAAAAAAAAAAAAAAAAAAAAAAAAAAAAAAAAAAAAAAAAAAAAAAAAAAAAAAAAAAAAAAAAAAAAAAAAAAAAAAAAAAAAAAAAAAAAAAAAAAAAAAAAAAAAAAAAAAAAAAAAAAAAAAAAAAAAAAAAAAAAAAAAAAAAAAAAAAAAAAAAAAAAAAAAAAAAAAAAAAAAAAAAAAAAAAAAAAAAAAAAAAAAAAAAAAAAAAAAAAAAAAAAAAAAAAAAAAAAAAAAAAAAAAAAAAAAAAAAAAAAAAAAAAAAAAAAAAAAAAAAAAAAAAAAAAAAAAAAAAAAAAAAAAAAAAAAAAAAAAAAAAAAAAAAAAAAAAAAAAAAAAAAAAAAAAAAAAAAAAAAAAAAAAAAAAAAAAAAAAAAAAAAAAAAAAAAAAAAAAAAAAAAAAAAAAAAAAAAAAAAAAAAAAAAAAAAAAAAAAAAAAAAAAAAAAAAAAAAAAAAAAAAAAAAAAAAAAAAAAAAAAAAAAAAAAAAAAAAAAAAAAAAAAAAAAAAAAAAAAAAAAAAAAAAAAAAAAAAAAAAAAAAAAAAAAAAAAAAAAAAAAAAAAAAAAAAAAAAAAAAAAAAAAAAAAAAAAAAAAAAAAAAAAAAAAAAAAAAAAAAAAAAAAAAAAAAAAAAAAAAAAAAAAAAAAAAAAAAAAAAAAAAAAAAAAAAAAAAAAAAAAAAAAAAAAAAAAAAAAAAAAAAAAAAAAAAAAAAAAAAAAAAAAAAAAAAAAAAAAAAAAAAAAAAAAAAAAAAAAAAAAAAAAAAAAAAAAAAAAAAAAAAAAAAAAAAAAAAAAAAAAAAAAAAAAAAAAAAAAAAAAAAAAAAAAAAAAAAAAAAAAAAAAAAAAAAAAAAAAAAAAAAAAAAAAAAAAAAAAAAAAAAAAAAAAAAAAAAAAAAAAAAAAAAAAAAAAAAAAAAAAAAAAAAAAAAAAAAAAAAAAAAAAAAAAAAAAAAAAAAAAAAAAAAAAAAAAAAAAAAAAAAAAAAAAAAAAAAAAAAAAAAAAAAAAAAAAAAAAAAAAAAAAAAAAAAAAAAAAAAAAAAAAAAAAAAAAAAAAAAAAAAAAAAAAAAAAAAAAAAAAAAAAAAAAAAAAAAAAAAAAAAAAAAAAAAAAAAAAAAAAAAAAAAAAAAAAAAAAAAAAAAAAAAAAAAAAAAAAAAAAAAAAAAAAAAAAAAAAAAAAAAAAAAAAAAAAAAAAAAAAAAAAAAAAAAAAAAAAAAAAAAAAAAAAAAAAAAAAAAAAAAAAAAAAAAAAAAAAAAAAAAAAAAAAAAAAAAAAAAAAAAAAAAAAAAAAAAAAAAAAAAAAAAAAAAAAAAAAAAAAAAAAAAAAAAAAAAAAAAAAAAAAAAAAAAAAAAAAAAAAAAAAAAAAAAAAAAAAAAAAAAAAAAAAAAAAAAAAAAAAAAAAAAAAAAAAAAAAAAAAAAAAAAAAAAAAAAAAAAAAAAAAAAAAAAAAAAAAAAAAAAAAAAAAAAAAAAAAAAAAAAAAAAAAAAAAAAAAAAAAAAAAAAAAAAAAAAAAAAAAAAAAAAAAAAAAAAAAAAAAAAAAAAAAAAAAAAAAAAAAAAAAAAAAAAAAAAAAAAAAAAAAAAAAAAAAAAAAAAAAAAAAAAAAAAAAAAAAAAAAAAAAAAAAAAAAAAAAAAAAAAAAAAAAAAAAAAAAAAAAAAAAAAAAAAAAAAAAAAAAAAAAAAAAAAAAAAAAAAAAAAAAAAAAAAAAAAAAAAAAAAAAAAAAAAAAAAAAAAAAAAAAAAAAAAAAAAAAAAAAAAAAAAAAAAAAAAAAAAAAAAAAAAAAAAAAAAAAAAAAAAAAAAAAAAAAAAAAAAAAAAAAAAAAAAAAAAAAAAAAAAAAAAAAAAAAAAAAAAAAAAAAAAAAAAAAAAAAAAAAAAAAAAAAAAAAAAAAAAAAAAAAAAAAAAAAAAAAAAAAAAAAAAAAAAAAAAAAAAAAAAAAAAAAAAAAAAAAAAAAAAAAAAAAAAAAAAAAAAAAAAAAAAAAAAAAAAAAAAAAAAAAAAAAAAAAAAAAAAAAAAAAAAAAAAAAAAAAAAAAAAAAAAAAAAAAAAAAAAAAAAAAAAAAAAAAAAAAAAAAAAAAAAAAAAAAAAAAAAAAAAAAAAAAAAAAAAAAAAAAAAAAAAAAAAAAAAAAAAAAAAAAAAAAAAAAAAAAAAAAAAAAAAAAAAAAAAAAAAAAAAAAAAAAAAAAAAAAAAAAAAAAAAAAAAAAAAAAAAAAAAAAAAAAAAAAAAAAAAAAAAAAAAAAAAAAAAAAAAAAAAAAAAAAAAAAAAAAAAAAAAAAAAAAAAAAAAAAAAAAAAAAAAAAAAAAAAAAAAAAAAAAAAAAAAAAAAAAAAAAAAAAAAAAAAAAAAAAAAAAAAAA
AAAAAAAAAAAAAAAAAAAAAAAAAAAAAAAAAAAAAAAAAAAAAAAAAAAAAAAAAAAAAAAAAAAAAAAAAAAAAAAAAAAAAAAAAAAAAAAAAAAAAAAAAAAAAAAAAAAAAAAAAAAAAAAAAAAAAAAAAAAAAAAAAAAAAAAAAAAAAAAAAAAAAAAAAAAAAAAAAAAAAAAAAAAAAAAAAAAAAAAAAAAAAAAAAAAAAAAAAAAAAAAAAAAAAAAAAAAAAAAAAAAAAAAAAAAAAAAAAAAAAAAAAAAAAAAAAAAAAAAAAAAAAAAAAAAAAAAAAAAAAAAAAAAAAAAAAAAAAAAAAAAAAAAAAAAAAAAAAAAAAAAAAAAAAAAAAAAAAAAAAAAAAAAAAAAAAAAAAAAAAAAAAAAAAAAAAAAAAAAAAAAAAAAAAAAAAAAAAAAAAAAAAAAAAAAAAAAAAAAAAAAAAAAAAAAAAAAAAAAAAAAAAAAAAAAAAAAAAAAAAAAAAAAAAAAAAAAAAAAAAAAAAAAAAAAAAAAAAAAAAAAAAAAAAAAAAAAAAAAAAAAAAAAAAAAAAAAAAAAAAAAAAAAAAAAAAAAAAAAAAAAAAAAAAAAAAAAAAAAAAAAAAAAAAAAAAAAAAAAAAAAAAAAAAAAAAAAAAAAAAAAAAAAAAAAAAAAAAAAAAAAAAAAAAAAAAAAAAAAAAAAAAAAAAAAAAAAAAAAAAAAAAAAAAAAAAAAAAAAAAAAAAAAAAAAAAAAAAAAAAAAAAAAAAAAAAAAAAAAAAAAAAAAAAAAAAAAAAAAAAAAAAAAAAAAAAAAAAAAAAAAAAAAAAAAAAAAAAAAAAAAAAAAAAAAAAAAAAAAAAAAAAAAAAAAAAAAAAAAAAAAAAAAAAAAAAAAAAAAAAAAAAAAAAAAAAAAAAAAAAAAAAAAAAAAAAAAAAAAAAAAAAAAAAAAAAAAAAAAAAAAAAAAAAAAAAAAAAAAAAAAAAAAAAAAAAAAAAAAAAAAAAAAAAAAAAAAAAAAAAAAAAAAAAAAAAAAAAAAAAAAAAAAAAAAAAAAAAAAAAAAAAAAAAAAAAAAAAAAAAAAAAAAAAAAAAAAAAAAAAAAAAAAAAAAAAAAAAAAAAAAAAAAAAAAAAAAAAAAAAAAAAAAAAAAAAAAAAAAAAAAAAAAAAAAAAAAAAAAAAAAAAAAAAAAAAAAAAAAAAAAAAAAAAAAAAAAAAAAAAAAAAAAAAAAAAAAAAAAAAAAAAAAAAAAAAAAAAAAAAAAAAAAAAAAAAAAAAAAAAAAAAAAAAAAAAAAAAAAAAAAAAAAAAAAAAAAAAAAAAAAAAAAAAAAAAAAAAAAAAAAAAAAAAAAAAAAAAAAAAAAAAAAAAAAAAAAAAAAAAAAAAAAAAAAAAAAAAAAAAAAAAAAAAAAAAAAAAAAAAAAAAAAAAAAAAAAAAAAAAAAAAAAAAAAAAAAAAAAAAAAAAAAAAAAAAAAAAAAAAAAAAAAAAAAAAAAAAAAAAAAAAAAAAAAAAAAAAAAAAAAAAAAAAAAAAAAAAAAAAAAAAAAAAAAAAAAAAAAAAAAAAAAAAAAAAAAAAAAAAAAAAAAAAAAAAAAAAAAAAAAAAAAAAAAAAAAAAAAAAAAAAAAAAAAAAAAAAAAAAAAAAAAAAAAAAAAAAAAAAAAAAAAAAAAAAAAAAAAAAAAAAAAAAAAAAAAAAAAAAAAAAAAAAAAAAAAAAAAAAAAAAAAAAAAAAAAAAAAAAAAAAAAAAAAAAAAAAAAAAAAAAAAAAAAAAAAAAAAAAAAAAAAAAAAAAAAAAAAAAAAAAAAAAAAAAAAAAAAAAAAAAAAAAAAAAAAAAAAAAAAAAAAAAAAAAAAAAAAAAAAAAAAAAAAAAAAAAAAAAAAAAAAAAAAAAAAAAAAAAAAAAAAAAAAAAAAAAAAAAAAAAAAAAAAAAAAAAAAAAAAAAAAAAAAAAAAAAAAAAAAAAAAAAAAAAAAAAAAAAAAAAAAAAAAAAAAAAAAAAAAAAAAAAAAAAAAAAAAAAAAAAAAAAAAAAAAAAAAAAAAAAAAAAAAAAAAAAAAAAAAAAAAAAAAAAAAAAAAAAAAAAAAAAAAAAAAAAAAAAAAAAAAAAAAAAAAAAAAAAAAAAAAAAAAAAAAAAAAAAAAAAAAAAAAAAAAAAAAAAAAAAAAAAAAAAAAAAAAAAAAAAAAAAAAAAAAAAAAAAAAAAAAAAAAAAAAAAAAAAAAAAAAAAAAAAAAAAAAAAAAAAAAAAAAAAAAAAAAAAAAAAAAAAAAAAAAAAAAAAAAAAAAAAAAAAAAAAAAAAAAAAAAAAAAAAAAAAAAAAAAAAAAAAAAAAAAAAAAAAAAAAAAAAAAAAAAAAAAAAAAAAAAAAAAAAAAAAAAAAAAAAAAAAAAAAAAAAAAAAAAAAAAAAAAAAAAAAAAAAAAAAAAAAAAAAAAAAAAAAAAAAAAAAAAAAAAAAAAAAAAAAAAAAAAAAAAAAAAAAAAAAAAAAAAAAAAAAAAAAAAAAAAAAAAAAAAAAAAAAAAAAAAAAAAAAAAAAAAAAAAAAAAAAAAAAAAAAAAAAAAAAAAAAAAAAAAAAAAAAAAAAAAAAAAAAAAAAAAAAAAAAAAAAAAAAAAAAAAAAAAAAAAAAAAAAAAAAAAAAAAAAAAAAAAAAAAAAAAAAAAAAAAAAAAAAAAAAAAAAAAAAAAAAAAAAAAAAAAAAAAAAAAAAAAAAAAAAAAAAAAAAAAAAAAAAAAAAAAAAAAAAAAAAAAAAAAAAAAAAAAAAAAAAAAAAAAAAAAAAAAAAAAAAAAAAAAAAAAAAAAAAAAAAAAAAAAAAAAAAAAAAAAAAAAAAAAAAAAAAAAAAAAAAAAAAAAAAAAAAAAAAAAAAAAAAAAAAAAAAAAAAAAAAAAAAAAAAAAAAAAAAAAAAAAAAAAAAAAAAAAAAAAAAAAAAAAAAAAAAAAAAAAAAAAAAAAAAAAAAAAAAAAAAAAAAAAAAAAAAAAAAAAAAAAAAAAAAAAAAAAAAAAAAAAAAAAAAAAAAAAAAAAAAAAAAAAAAAAAAAAAAAAAAAAAAAAAAAAAAAAAAAAAAAAAAAAAAAAAAAAAAAAAAAAAAAAAAAAAAAAAAAAAAAAAAAAAAAAAAAAAAAAAAAAAAAAAAAAAAAAAAAAAAAAAAAAAAAAAAAAAAAAAAAAAAAAAAAAAAAAAAAAAAAAAAAAAAAAAAAAAAAAAAAAAAAAAAAAAAAAAAAAAAAAAAAAAAAAAAAAAAAAAAAAAAAAAAAAAAAAAAAAAAAAAAAAAAAAAAAAAAAAAAAAAAAAAAAAAAAAAAAAAAAAAAAAAAAAAAAAAAAAAAAAAAAAAAAAAAAAAAAAAAAAAAAAAAAAAAAAAAAAAAAAAAAAAAAAAAAAAAAAAAAAAAAAAAAAAAAAAAAAAAAAAAAAAAAAAAAAAAAAAAAAAAAAAAAAAAAAAAAAAAAAAAAAAAAAAAAAAAAAAAAAAAAAAAAAAAAAAAAAAAAAAAAAAAAAAAAAAAAAAAAAAAAAAAAAAAAAAAAAAAAAAAAAAAAAAAAAAAAAAAAAAAAAAAAAAAAAAAAAAAAAAAAAAAAAAAAAAAAAAAAAAAAAAAAAAAAAAAAAAAAAAAAAAAAAAAAAAAAAAAAAAAAAAAAAAAAAAAAAAAAAAAAAAAAAAAAAAAAAAAAAAAAAAAAAAAAAAAAAAAAAAAAAAAAAAAAAAAAAAAAAAAAAAAAAAAAAAAAAAAAAAAAAAAAAAAAAAAAAAAAAAAAAAAAAAAAAAAAAAAAAAAAAAAAAAAAAAAAAAAAAAAAAAAAAAAAAAAAAAAAAAAAAAAAAAAAAAAAAAAAAAAAAAAAAAAAAAAAAAAAAAAAAAAAAAAAAAAAAAAAAAAAAAAAAAAAAAAAAAAAAAAAAAAAAAAAAAAAAAAAAAAAAAAAAAAAAAAAAAAAAAAAAAAAAAAAAAAAAAAAAAAAAAAAAAAAAAAAAAAAAAAAAAAAAAAAAAAAAAAAAAAAAAAAAAAAAAAAAAAAAAAAAAAAAAAAAAAAAAAAAAAAAAAAAAAAAAAAAAAAAAAAAAAAAAAAAAAAAAAAAAAAAAAAAAAAAAAAAAAAAAAAAAAAAAAAAAAAAAAAAAAAAA
AAAAAAAAAAAAAAAAAAAAAAAAAAAAAAAAAAAAAAAAAAAAAAAAAAAAAAAAAAAAAAAAAAAAAAAAAAAAAAAAAAAAAAAAAAAAAAAAAAAAAAAAAAAAAAAAAAAAAAAAAAAAAAAAAAAAAAAAAAAAAAAAAAAAAAAAAAAAAAAAAAAAAAAAAAAAAAAAAAAAAAAAAAAAAAAAAAAAAAAAAAAAAAAAAAAAAAAAAAAAAAAAAAAAAAAAAAAAAAAAAAAAAAAAAAAAAAAAAAAAAAAAAAAAAAAAAAAAAAAAAAAAAAAAAAAAAAAAAAAAAAAAAAAAAAAAAAAAAAAAAAAAAAAAAAAAAAAAAAAAAAAAAAAAAAAAAAAAAAAAAAAAAAAAAAAAAAAAAAAAAAAAAAAAAAAAAAAAAAAAAAAAAAAAAAAAAAAAAAAAAAAAAAAAAAAAAAAAAAAAAAAAAAAAAAAAAAAAAAAAAAAAAAAAAAAAAAAAAAAAAAAAAAAAAAAAAAAAAAAAAAAAAAAAAAAAAAAAAAAAAAAAAAAAAAAAAAAAAAAAAAAAAAAAAAAAAAAAAAAAAAAAAAAAAAAAAAAAAAAAAAAAAAAAAAAAAAAAAAAAAAAAAAAAAAAAAAAAAAAAAAAAAAAAAAAAAAAAAAAAAAAAAAAAAAAAAAAAAAAAAAAAAAAAAAAAAAAAAAAAAAAAAAAAAAAAAAAAAAAAAAAAAAAAAAAAAAAAAAAAAAAAAAAAAAAAAAAAAAAAAAAAAAAAAAAAAAAAAAAAAAAAAAAAAAAAAAAAAAAAAAAAAAAAAAAAAAAAAAAAAAAAAAAAAAAAAAAAAAAAAAAAAAAAAAAAAAAAAAAAAAAAAAAAAAAAAAAAAAAAAAAAAAAAAAAAAAAAAAAAAAAAAAAAAAAAAAAAAAAAAAAAAAAAAAAAAAAAAAAAAAAAAAAAAAAAAAAAAAAAAAAAAAAAAAAAAAAAAAAAAAAAAAAAAAAAAAAAAAAAAAAAAAAAAAAAAAAAAAAAAAAAAAAAAAAAAAAAAAAAAAAAAAAAAAAAAAAAAAAAAAAAAAAAAAAAAAAAAAAAAAAAAAAAAAAAAAAAAAAAAAAAAAAAAAAAAAAAAAAAAAAAAAAAAAAAAAAAAAAAAAAAAAAAAAAAAAAAAAAAAAAAAAAAAAAAAAAAAAAAAAAAAAAAAAAAAAAAAAAAAAAAAAAAAAAAAAAAAAAAAAAAAAAAAAAAAAAAAAAAAAAAAAAAAAAAAAAAAAAAAAAAAAAAAAAAAAAAAAAAAAAAAAAAAAAAAAAAAAAAAAAAAAAAAAAAAAAAAAAAAAAAAAAAAAAAAAAAAAAAAAAAAAAAAAAAAAAAAAAAAAAAAAAAAAAAAAAAAAAAAAAAAAAAAAAAAAAAAAAAAAAAAAAAAAAAAAAAAAAAAAAAAAAAAAAAAAAAAAAAAAAAAAAAAAAAAAAAAAAAAAAAAAAAAAAAAAAAAAAAAAAAAAAAAAAAAAAAAAAAAAAAAAAAAAAAAAAAAAAAAAAAAAAAAAAAAAAAAAAAAAAAAAAAAAAAAAAAAAAAAAAAAAAAAAAAAAAAAAAAAAAAAAAAAAAAAAAAAAAAAAAAAAAAAAAAAAAAAAAAAAAAAAAAAAAAAAAAAAAAAAAAAAAAAAAAAAAAAAAAAAAAAAAAAAAAAAAAAAAAAAAAAAAAAAAAAAAAAAAAAAAAAAAAAAAAAAAAAAAAAAAAAAAAAAAAAAAAAAAAAAAAAAAAAAAAAAAAAAAAAAAAAAAAAAAAAAAAAAAAAAAAAAAAAAAAAAAAAAAAAAAAAAAAAAAAAAAAAAAAAAAAAAAAAAAAAAAAAAAAAAAAAAAAAAAAAAAAAAAAAAAAAAAAAAAAAAAAAAAAAAAAAAAAAAAAAAAAAAAAAAAAAAAAAAAAAAAAAAAAAAAAAAAAAAAAAAAAAAAAAAAAAAAAAAAAAAAAAAAAAAAAAAAAAAAAAAAAAAAAAAAAAAAAAAAAAAAAAAAAAAAAAAAAAAAAAAAAAAAAAAAAAAAAAAAAAAAAAAAAAAAAAAAAAAAAAAAAAAAAAAAAAAAAAAAAAAAAAAAAAAAAAAAAAAAAAAAAAAAAAAAAAAAAAAAAAAAAAAAAAAAAAAAAAAAAAAAAAAAAAAAAAAAAAAAAAAAAAAAAAAAAAAAAAAAAAAAAAAAAAAAAAAAAAAAAAAAAAAAAAAAAAAAAAAAAAAAAAAAAAAAAAAAAAAAAAAAAAAAAAAAAAAAAAAAAAAAAAAAAAAAAAAAAAAAAAAAAAAAAAAAAAAAAAAAAAAAAAAAAAAAAAAAAAAAAAAAAAAAAAAAAAAAAAAAAAAAAAAAAAAAAAAAAAAAAAAAAAAAAAAAAAAAAAAAAAAAAAAAAAAAAAAAAAAAAAAAAAAAAAAAAAAAAAAAAAAAAAAAAAAAAAAAAAAAAAAAAAAAAAAAAAAAAAAAAAAAAAAAAAAAAAAAAAAAAAAAAAAAAAAAAAAAAAAAAAAAAAAAAAAAAAAAAAAAAAAAAAAAAAAAAAAAAAAAAAAAAAAAAAAAAAAAAAAAAAAAAAAAAAAAAAAAAAAAAAAAAAAAAAAAAAAAAAAAAAAAAAAAAAAAAAAAAAAAAAAAAAAAAAAAAAAAAAAAAAAAAAAAAAAAAAAAAAAAAAAAAAAAAAAAAAAAAAAAAAAAAAAAAAAAAAAAAAAAAAAAAAAAAAAAAAAAAAAAAAAAAAAAAAAAAAAAAAAAAAAAAAAAAAAAAAAAAAAAAAAAAAAAAAAAAAAAAAAAAAAAAAAAAAAAAAAAAAAAAAAAAAAAAAAAAAAAAAAAAAAAAAAAAAAAAAAAAAAAAAAAAAAAAAAAAAAAAAAAAAAAAAAAAAAAAAAAAAAAAAAAAAAAAAAAAAAAAAAAAAAAAAAAAAAAAAAAAAAAAAAAAAAAAAAAAAAAAAAAAAAAAAAAAAAAAAAAAAAAAAAAAAAAAAAAAAAAAAAAAAAAAAAAAAAAAAAAAAAAAAAAAAAAAAAAAAAAAAAAAAAAAAAAAAAAAAAAAAAAAAAAAAAAAAAAAAAAAAAAAAAAAAAAAAAAAAAAAAAAAAAAAAAAAAAAAAAAAAAAAAAAAAAAAAAAAAAAAAAAAAAAAAAAAAAAAAAAAAAAAAAAAAAAAAAAAAAAAAAAAAAAAAAAAAAAAAAAAAAAAAAAAAAAAAAAAAAAAAAAAAAAAAAAAAAAAAAAAAAAAAAAAAAAAAAAAAAAAAAAAAAAAAAAAAAAAAAAAAAAAAAAAAAAAAAAAAAAAAAAAAAAAAAAAAAAAAAAAAAAAAAAAAAAAAAAAAAAAAAAAAAAAAAAAAAAAAAAAAAAAAAAAAAAAAAAAAAAAAAAAAAAAAAAAAAAAAAAAAAAAAAAAAAAAAAAAAAAAAAAAAAAAAAAAAAAAAAAAAAAAAAAAAAAAAAAAAAAAAAAAAAAAAAAAAAAAAAAAAAAAAAAAAAAAAAAAAAAAAAAAAAAAAAAAAAAAAAAAAAAAAAAAAAAAAAAAAAAAAAAAAAAAAAAAAAAAAAAAAAAAAAAAAAAAAAAAAAAAAAAAAAAAAAAAAAAAAAAAAAAAAAAAAAAAAAAAAAAAAAAAAAAAAAAAAAAAAAAAAAAAAAAAAAAAAAAAAAAAAAAAAAAAAAAAAAAAAAAAAAAAAAAAAAAAAAAAAAAAAAAAAAAAAAAAAAAAAAAAAAAAAAAAAAAAAAAAAAAAAAAAAAAAAAAAAAAAAAAAAAAAAAAAAAAAAAAAAAAAAAAAAAAAAAAAAAAAAAAAAAAAAAAAAAAAAAAAAAAAAAAAAAAAAAAAAAAAAAAAAAAAAAAAAAAAAAAAAAAAAAAAAAAAAAAAAAAAAAAAAAAAAAAAAAAAAAAAAAAAAAAAAAAAAAAAAAAAAAAAAAAAAAAAAAAAAAAAAAAAAAAAAAAAAAAAAAAAAAAAAAAAAAAAAAAAAAAAAAAAAAAAAAAAAAAAAAAAAAAAAAAAAAAAAAAAAAAAAAAAAAAAAAAAAAAAAAAAAAAAAAAAAAAAAAAAAAAAAAAAAAAAAAAAAAAAAAAAAAAAAAAAAAAAAAAAAAAAAAAAAAAAAAAAAAAAAAAAAAAAAAAAAAAAAAAAAAAAAAAAAAAAAAAA
AAAAAAAAAAAAAAAAAAAAAAAAAAAAAAAAAAAAAAAAAAAAAAAAAAAAAAAAAAAAAAAAAAAAAAAAAAAAAAAAAAAAAAAAAAAAAAAAAAAAAAAAAAAAAAAAAAAAAAAAAAAAAAAAAAAAAAAAAAAAAAAAAAAAAAAAAAAAAAAAAAAAAAAAAAAAAAAAAAAAAAAAAAAAAAAAAAAAAAAAAAAAAAAAAAAAAAAAAAAAAAAAAAAAAAAAAAAAAAAAAAAAAAAAAAAAAAAAAAAAAAAAAAAAAAAAAAAAAAAAAAAAAAAAAAAAAAAAAAAAAAAAAAAAAAAAAAAAAAAAAAAAAAAAAAAAAAAAAAAAAAAAAAAAAAAAAAAAAAAAAAAAAAAAAAAAAAAAAAAAAAAAAAAAAAAAAAAAAAAAAAAAAAAAAAAAAAAAAAAAAAAAAAAAAAAAAAAAAAAAAAAAAAAAAAAAAAAAAAAAAAAAAAAAAAAAAAAAAAAAAAAAAAAAAAAAAAAAAAAAAAAAAAAAAAAAAAAAAAAAAAAAAAAAAAAAAAAAAAAAAAAAAAAAAAAAAAAAAAAAAAAAAAAAAAAAAAAAAAAAAAAAAAAAAAAAAAAAAAAAAAAAAAAAAAAAAAAAAAAAAAAAAAAAAAAAAAAAAAAAAAAAAAAAAAAAAAAAAAAAAAAAAAAAAAAAAAAAAAAAAAAAAAAAAAAAAAAAAAAAAAAAAAAAAAAAAAAAAAAAAAAAAAAAAAAAAAAAAAAAAAAAAAAAAAAAAAAAAAAAAAAAAAAAAAAAAAAAAAAAAAAAAAAAAAAAAAAAAAAAAAAAAAAAAAAAAAAAAAAAAAAAAAAAAAAAAAAAAAAAAAAAAAAAAAAAAAAAAAAAAAAAAAAAAAAAAAAAAAAAAAAAAAAAAAAAAAAAAAAAAAAAAAAAAAAAAAAAAAAAAAAAAAAAAAAAAAAAAAAAAAAAAAAAAAAAAAAAAAAAAAAAAAAAAAAAAAAAAAAAAAAAAAAAAAAAAAAAAAAAAAAAAAAAAAAAAAAAAAAAAAAAAAAAAAAAAAAAAAAAAAAAAAAAAAAAAAAAAAAAAAAAAAAAAAAAAAAAAAAAAAAAAAAAAAAAAAAAAAAAAAAAAAAAAAAAAAAAAAAAAAAAAAAAAAAAAAAAAAAAAAAAAAAAAAAAAAAAAAAAAAAAAAAAAAAAAAAAAAAAAAAAAAAAAAAAAAAAAAAAAAAAAAAAAAAAAAAAAAAAAAAAAAAAAAAAAAAAAAAAAAAAAAAAAAAAAAAAAAAAAAAAAAAAAAAAAAAAAAAAAAAAAAAAAAAAAAAAAAAAAAAAAAAAAAAAAAAAAAAAAAAAAAAAAAAAAAAAAAAAAAAAAAAAAAAAAAAAAAAAAAAAAAAAAAAAAAAAAAAAAAAAAAAAAAAAAAAAAAAAAAAAAAAAAAAAAAAAAAAAAAAAAAAAAAAAAAAAAAAAAAAAAAAAAAAAAAAAAAAAAAAAAAAAAAAAAAAAAAAAAAAAAAAAAAAAAAAAAAAAAAAAAAAAAAAAAAAAAAAAAAAAAAAAAAAAAAAAAAAAAAAAAAAAAAAAAAAAAAAAAAAAAAAAAAAAAAAAAAAAAAAAAAAAAAAAAAAAAAAAAAAAAAAAAAAAAAAAAAAAAAAAAAAAAAAAAAAAAAAAAAAAAAAAAAAAAAAAAAAAAAAAAAAAAAAAAAAAAAAAAAAAAAAAAAAAAAAAAAAAAAAAAAAAAAAAAAAAAAAAAAAAAAAAAAAAAAAAAAAAAAAAAAAAAAAAAAAAAAAAAAAAAAAAAAAAAAAAAAAAAAAAAAAAAAAAAAAAAAAAAAAAAAAAAAAAAAAAAAAAAAAAAAAAAAAAAAAAAAAAAAAAAAAAAAAAAAAAAAAAAAAAAAAAAAAAAAAAAAAAAAAAAAAAAAAAAAAAAAAAAAAAAAAAAAAAAAAAAAAAAAAAAAAAAAAAAAAAAAAAAAAAAAAAAAAAAAAAAAAAAAAAAAAAAAAAAAAAAAAAAAAAAAAAAAAAAAAAAAAAAAAAAAAAAAAAAAAAAAAAAAAAAAAAAAAAAAAAAAAAAAAAAAAAAAAAAAAAAAAAAAAAAAAAAAAAAAAAAAAAAAAAAAAAAAAAAAAAAAAAAAAAAAAAAAAAAAAAAAAAAAAAAAAAAAAAAAAAAAAAAAAAAAAAAAAAAAAAAAAAAAAAAAAAAAAAAAAAAAAAAAAAAAAAAAAAAAAAAAAAAAAAAAAAAAAAAAAAAAAAAAAAAAAAAAAAAAAAAAAAAAAAAAAAAAAAAAAAAAAAAAAAAAAAAAAAAAAAAAAAAAAAAAAAAAAAAAAAAAAAAAAAAAAAAAAAAAAAAAAAAAAAAAAAAAAAAAAAAAAAAAAAAAAAAAAAAAAAAAAAAAAAAAAAAAAAAAAAAAAAAAAAAAAAAAAAAAAAAAAAAAAAAAAAAAAAAAAAAAAAAAAAAAAAAAAAAAAAAAAAAAAAAAAAAAAAAAAAAAAAAAAAAAAAAAAAAAAAAAAAAAAAAAAAAAAAAAAAAAAAAAAAAAAAAAAAAAAAAAAAAAAAAAAAAAAAAAAAAAAAAAAAAAAAAAAAAAAAAAAAAAAAAAAAAAAAAAAAAAAAAAAAAAAAAAAAAAAAAAAAAAAAAAAAAAAAAAAAAAAAAAAAAAAAAAAAAAAAAAAAAAAAAAAAAAAAAAAAAAAAAAAAAAAAAAAAAAAAAAAAAAAAAAAAAAAAAAAAAAAAAAAAAAAAAAAAAAAAAAAAAAAAAAAAAAAAAAAAAAAAAAAAAAAAAAAAAAAAAAAAAAAAAAAAAAAAAAAAAAAAAAAAAAAAAAAAAAAAAAAAAAAAAAAAAAAAAAAAAAAAAAAAAAAAAAAAAAAAAAAAAAAAAAAAAAAAAAAAAAAAAAAAAAAAAAAAAAAAAAAAAAAAAAAAAAAAAAAAAAAAAAAAAAAAAAAAAAAAAAAAAAAAAAAAAAAAAAAAAAAAAAAAAAAAAAAAAAAAAAAAAAAAAAAAAAAAAAAAAAAAAAAAAAAAAAAAAAAAAAAAAAAAAAAAAAAAAAAAAAAAAAAAAAAAAAAAAAAAAAAAAAAAAAAAAAAAAAAAAAAAAAAAAAAAAAAAAAAAAAAAAAAAAAAAAAAAAAAAAAAAAAAAAAAAAAAAAAAAAAAAAAAAAAAAAAAAAAAAAAAAAAAAAAAAAAAAAAAAAAAAAAAAAAAAAAAAAAAAAAAAAAAAAAAAAAAAAAAAAAAAAAAAAAAAAAAAAAAAAAAAAAAAAAAAAAAAAAAAAAAAAAAAAAAAAAAAAAAAAAAAAAAAAAAAAAAAAAAAAAAAAAAAAAAAAAAAAAAAAAAAAAAAAAAAAAAAAAAAAAAAAAAAAAAAAAAAAAAAAAAAAAAAAAAAAAAAAAAAAAAAAAAAAAAAAAAAAAAAAAAAAAAAAAAAAAAAAAAAAAAAAAAAAAAAAAAAAAAAAAAAAAAAAAAAAAAAAAAAAAAAAAAAAAAAAAAAAAAAAAAAAAAAAAAAAAAAAAAAAAAAAAAAAAAAAAAAAAAAAAAAAAAAAAAAAAAAAAAAAAAAAAAAAAAAAAAAAAAAAAAAAAAAAAAAAAAAAAAAAAAAAAAAAAAAAAAAAAAAAAAAAAAAAAAAAAAAAAAAAAAAAAAAAAAAAAAAAAAAAAAAAAAAAAAAAAAAAAAAAAAAAAAAAAAAAAAAAAAAAAAAAAAAAAAAAAAAAAAAAAAAAAAAAAAAAAAAAAAAAAAAAAAAAAAAAAAAAAAAAAAAAAAAAAAAAAAAAAAAAAAAAAAAAAAAAAAAAAAAAAAAAAAAAAAAAAAAAAAAAAAAAAAAAAAAAAAAAAAAAAAAAAAAAAAAAAAAAAAAAAAAAAAAAAAAAAAAAAAAAAAAAAAAAAAAAAAAAAAAAAAAAAAAAAAAAAAAAAAAAAAAAAAAAAAAAAAAAAAAAAAAAAAAAAAAAAAAAAAAAAAAAAAAAAAAAAAAAAAAAAAAAAAAAAAAAAAAAAAAAAAAAAAAAAAAAAAAAAAAAAAAAAAAAAAAAAAAAAAAAAAAAAAAAAAAAAAAAAAAAAAAAAAAAAAAAAAAAAAAAAAAAAAAAAAAAAAAAAAAAAAAAAAAAAAAAAAAAAAAAAAAAAAAAAAAAAAAAAAA
AAAAAAAAAAAAAAAAAAAAAAAAAAAAAAAAAAAAAAAAAAAAAAAAAAAAAAAAAAAAAAAAAAAAAAAAAAAAAAAAAAAAAAAAAAAAAAAAAAAAAAAAAAAAAAAAAAAAAAAAAAAAAAAAAAAAAAAAAAAAAAAAAAAAAAAAAAAAAAAAAAAAAAAAAAAAAAAAAAAAAAAAAAAAAAAAAAAAAAAAAAAAAAAAAAAAAAAAAAAAAAAAAAAAAAAAAAAAAAAAAAAAAAAAAAAAAAAAAAAAAAAAAAAAAAAAAAAAAAAAAAAAAAAAAAAAAAAAAAAAAAAAAAAAAAAAAAAAAAAAAAAAAAAAAAAAAAAAAAAAAAAAAAAAAAAAAAAAAAAAAAAAAAAAAAAAAAAAAAAAAAAAAAAAAAAAAAAAAAAAAAAAAAAAAAAAAAAAAAAAAAAAAAAAAAAAAAAAAAAAAAAAAAAAAAAAAAAAAAAAAAAAAAAAAAAAAAAAAAAAAAAAAAAAAAAAAAAAAAAAAAAAAAAAAAAAAAAAAAAAAAAAAAAAAAAAAAAAAAAAAAAAAAAAAAAAAAAAAAAAAAAAAAAAAAAAAAAAAAAAAAAAAAAAAAAAAAAAAAAAAAAAAAAAAAAAAAAAAAAAAAAAAAAAAAAAAAAAAAAAAAAAAAAAAAAAAAAAAAAAAAAAAAAAAAAAAAAAAAAAAAAAAAAAAAAAAAAAAAAAAAAAAAAAAAAAAAAAAAAAAAAAAAAAAAAAAAAAAAAAAAAAAAAAAAAAAAAAAAAAAAAAAAAAAAAAAAAAAAAAAAAAAAAAAAAAAAAAAAAAAAAAAAAAAAAAAAAAAAAAAAAAAAAAAAAAAAAAAAAAAAAAAAAAAAAAAAAAAAAAAAAAAAAAAAAAAAAAAAAAAAAAAAAAAAAAAAAAAAAAAAAAAAAAAAAAAAAAAAAAAAAAAAAAAAAAAAAAAAAAAAAAAAAAAAAAAAAAAAAAAAAAAAAAAAAAAAAAAAAAAAAAAAAAAAAAAAAAAAAAAAAAAAAAAAAAAAAAAAAAAAAAAAAAAAAAAAAAAAAAAAAAAAAAAAAAAAAAAAAAAAAAAAAAAAAAAAAAAAAAAAAAAAAAAAAAAAAAAAAAAAAAAAAAAAAAAAAAAAAAAAAAAAAAAAAAAAAAAAAAAAAAAAAAAAAAAAAAAAAAAAAAAAAAAAAAAAAAAAAAAAAAAAAAAAAAAAAAAAAAAAAAAAAAAAAAAAAAAAAAAAAAAAAAAAAAAAAAAAAAAAAAAAAAAAAAAAAAAAAAAAAAAAAAAAAAAAAAAAAAAAAAAAAAAAAAAAAAAAAAAAAAAAAAAAAAAAAAAAAAAAAAAAAAAAAAAAAAAAAAAAAAAAAAAAAAAAAAAAAAAAAAAAAAAAAAAAAAAAAAAAAAAAAAAAAAAAAAAAAAAAAAAAAAAAAAAAAAAAAAAAAAAAAAAAAAAAAAAAAAAAAAAAAAAAAAAAAAAAAAAAAAAAAAAAAAAAAAAAAAAAAAAAAAAAAAAAAAAAAAAAAAAAAAAAAAAAAAAAAAAAAAAAAAAAAAAAAAAAAAAAAAAAAAAAAAAAAAAAAAAAAAAAAAAAAAAAAAAAAAAAAAAAAAAAAAAAAAAAAAAAAAAAAAAAAAAAAAAAAAAAAAAAAAAAAAAAAAAAAAAAAAAAAAAAAAAAAAAAAAAAAAAAAAAAAAAAAAAAAAAAAAAAAAAAAAAAAAAAAAAAAAAAAAAAAAAAAAAAAAAAAAAAAAAAAAAAAAAAAAAAAAAAAAAAAAAAAAAAAAAAAAAAAAAAAAAAAAAAAAAAAAAAAAAAAAAAAAAAAAAAAAAAAAAAAAAAAAAAAAAAAAAAAAAAAAAAAAAAAAAAAAAAAAAAAAAAAAAAAAAAAAAAAAAAAAAAAAAAAAAAAAAAAAAAAAAAAAAAAAAAAAAAAAAAAAAAAAAAAAAAAAAAAAAAAAAAAAAAAAAAAAAAAAAAAAAAAAAAAAAAAAAAAAAAAAAAAAAAAAAAAAAAAAAAAAAAAAAAAAAAAAAAAAAAAAAAAAAAAAAAAAAAAAAAAAAAAAAAAAAAAAAAAAAAAAAAAAAAAAAAAAAAAAAAAAAAAAAAAAAAAAAAAAAAAAAAAAAAAAAAAAAAAAAAAAAAAAAAAAAAAAAAAAAAAAAAAAAAAAAAAAAAAAAAAAAAAAAAAAAAAAAAAAAAAAAAAAAAAAAAAAAAAAAAAAAAAAAAAAAAAAAAAAAAAAAAAAAAAAAAAAAAAAAAAAAAAAAAAAAAAAAAAAAAAAAAAAAAAAAAAAAAAAAAAAAAAAAAAAAAAAAAAAAAAAAAAAAAAAAAAAAAAAAAAAAAAAAAAAAAAAAAAAAAAAAAAAAAAAAAAAAAAAAAAAAAAAAAAAAAAAAAAAAAAAAAAAAAAAAAAAAAAAAAAAAAAAAAAAAAAAAAAAAAAAAAAAAAAAAAAAAAAAAAAAAAAAAAAAAAAAAAAAAAAAAAAAAAAAAAAAAAAAAAAAAAAAAAAAAAAAAAAAAAAAAAAAAAAAAAAAAAAAAAAAAAAAAAAAAAAAAAAAAAAAAAAAAAAAAAAAAAAAAAAAAAAAAAAAAAAAAAAAAAAAAAAAAAAAAAAAAAAAAAAAAAAAAAAAAAAAAAAAAAAAAAAAAAAAAAAAAAAAAAAAAAAAAAAAAAAAAAAAAAAAAAAAAAAAAAAAAAAAAAAAAAAAAAAAAAAAAAAAAAAAAAAAAAAAAAAAAAAAAAAAAAAAAAAAAAAAAAAAAAAAAAAAAAAAAAAAAAAAAAAAAAAAAAAAAAAAAAAAAAAAAAAAAAAAAAAAAAAAAAAAAAAAAAAAAAAAAAAAAAAAAAAAAAAAAAAAAAAAAAAAAAAAAAAAAAAAAAAAAAAAAAAAAAAAAAAAAAAAAAAAAAAAAAAAAAAAAAAAAAAAAAAAAAAAAAAAAAAAAAAAAAAAAAAAAAAAAAAAAAAAAAAAAAAAAAAAAAAAAAAAAAAAAAAAAAAAAAAAAAAAAAAAAAAAAAAAAAAAAAAAAAAAAAAAAAAAAAAAAAAAAAAAAAAAAAAAAAAAAAAAAAAAAAAAAAAAAAAAAAAAAAAAAAAAAAAAAAAAAAAAAAAAAAAAAAAAAAAAAAAAAAAAAAAAAAAAAAAAAAAAAAAAAAAAAAAAAAAAAAAAAAAAAAAAAAAAAAAAAAAAAAAAAAAAAAAAAAAAAAAAAAAAAAAAAAAAAAAAAAAAAAAAAAAAAAAAAAAAAAAAAAAAAAAAAAAAAAAAAAAAAAAAAAAAAAAAAAAAAAAAAAAAAAAAAAAAAAAAAAAAAAAAAAAAAAAAAAAAAAAAAAAAAAAAAAAAAAAAAAAAAAAAAAAAAAAAAAAAAAAAAAAAAAAAAAAAAAAAAAAAAAAAAAAAAAAAAAAAAAAAAAAAAAAAAAAAAAAAAAAAAAAAAAAAAAAAAAAAAAAAAAAAAAAAAAAAAAAAAAAAAAAAAAAAAAAAAAAAAAAAAAAAAAAAAAAAAAAAAAAAAAAAAAAAAAAAAAAAAAAAAAAAAAAAAAAAAAAAAAAAAAAAAAAAAAAAAAAAAAAAAAAAAAAAAAAAAAAAAAAAAAAAAAAAAAAAAAAAAAAAAAAAAAAAAAAAAAAAAAAAAAAAAAAAAAAAAAAAAAAAAAAAAAAAAAAAAAAAAAAAAAAAAAAAAAAAAAAAAAAAAAAAAAAAAAAAAAAAAAAAAAAAAAAAAAAAAAAAAAAAAAAAAAAAAAAAAAAAAAAAAAAAAAAAAAAAAAAAAAAAAAAAAAAAAAAAAAAAAAAAAAAAAAAAAAAAAAAAAAAAAAAAAAAAAAAAAAAAAAAAAAAAAAAAAAAAAAAAAAAAAAAAAAAAAAAAAAAAAAAAAAAAAAAAAAAAAAAAAAAAAAAAAAAAAAAAAAAAAAAAAAAAAAAAAAAAAAAAAAAAAAAAAAAAAAAAAAAAAAAAAAAAAAAAAAAAAAAAAAAAAAAAAAAAAAAAAAAAAAAAAAAAAAAAAAAAAAAAAAAAAAAAAAAAAAAAAAAAAAAAAAAAAAAAAAAAAAAAAAAAAAAAAAAAAAAAAAAAAAAAAAAAAAAAAAAAAAAAAAAAAAAAAAAAAAAAAAAAAAAAAAAAAAAAAAAAAAAAAAAAAAAA
AAAAAAAAAAAAAAAAAAAAAAAAAAAAAAAAAAAAAAAAAAAAAAAAAAAAAAAAAAAAAAAAAAAAAAAAAAAAAAAAAAAAAAAAAAAAAAAAAAAAAAAAAAAAAAAAAAAAAAAAAAAAAAAAAAAAAAAAAAAAAAAAAAAAAAAAAAAAAAAAAAAAAAAAAAAAAAAAAAAAAAAAAAAAAAAAAAAAAAAAAAAAAAAAAAAAAAAAAAAAAAAAAAAAAAAAAAAAAAAAAAAAAAAAAAAAAAAAAAAAAAAAAAAAAAAAAAAAAAAAAAAAAAAAAAAAAAAAAAAAAAAAAAAAAAAAAAAAAAAAAAAAAAAAAAAAAAAAAAAAAAAAAAAAAAAAAAAAAAAAAAAAAAAAAAAAAAAAAAAAAAAAAAAAAAAAAAAAAAAAAAAAAAAAAAAAAAAAAAAAAAAAAAAAAAAAAAAAAAAAAAAAAAAAAAAAAAAAAAAAAAAAAAAAAAAAAAAAAAAAAAAAAAAAAAAAAAAAAAAAAAAAAAAAAAAAAAAAAAAAAAAAAAAAAAAAAAAAAAAAAAAAAAAAAAAAAAAAAAAAAAAAAAAAAAAAAAAAAAAAAAAAAAAAAAAAAAAAAAAAAAAAAAAAAAAAAAAAAAAAAAAAAAAAAAAAAAAAAAAAAAAAAAAAAAAAAAAAAAAAAAAAAAAAAAAAAAAAAAAAAAAAAAAAAAAAAAAAAAAAAAAAAAAAAAAAAAAAAAAAAAAAAAAAAAAAAAAAAAAAAAAAAAAAAAAAAAAAAAAAAAAAAAAAAAAAAAAAAAAAAAAAAAAAAAAAAAAAAAAAAAAAAAAAAAAAAAAAAAAAAAAAAAAAAAAAAAAAAAAAAAAAAAAAAAAAAAAAAAAAAAAAAAAAAAAAAAAAAAAAAAAAAAAAAAAAAAAAAAAAAAAAAAAAAAAAAAAAAAAAAAAAAAAAAAAAAAAAAAAAAAAAAAAAAAAAAAAAAAAAAAAAAAAAAAAAAAAAAAAAAAAAAAAAAAAAAAAAAAAAAAAAAAAAAAAAAAAAAAAAAAAAAAAAAAAAAAAAAAAAAAAAAAAAAAAAAAAAAAAAAAAAAAAAAAAAAAAAAAAAAAAAAAAAAAAAAAAAAAAAAAAAAAAAAAAAAAAAAAAAAAAAAAAAAAAAAAAAAAAAAAAAAAAAAAAAAAAAAAAAAAAAAAAAAAAAAAAAAAAAAAAAAAAAAAAAAAAAAAAAAAAAAAAAAAAAAAAAAAAAAAAAAAAAAAAAAAAAAAAAAAAAAAAAAAAAAAAAAAAAAAAAAAAAAAAAAAAAAAAAAAAAAAAAAAAAAAAAAAAAAAAAAAAAAAAAAAAAAAAAAAAAAAAAAAAAAAAAAAAAAAAAAAAAAAAAAAAAAAAAAAAAAAAAAAAAAAAAAAAAAAAAAAAAAAAAAAAAAAAAAAAAAAAAAAAAAAAAAAAAAAAAAAAAAAAAAAAAAAAAAAAAAAAAAAAAAAAAAAAAAAAAAAAAAAAAAAAAAAAAAAAAAAAAAAAAAAAAAAAAAAAAAAAAAAAAAAAAAAAAAAAAAAAAAAAAAAAAAAAAAAAAAAAAAAAAAAAAAAAAAAAAAAAAAAAAAAAAAAAAAAAAAAAAAAAAAAAAAAAAAAAAAAAAAAAAAAAAAAAAAAAAAAAAAAAAAAAAAAAAAAAAAAAAAAAAAAAAAAAAAAAAAAAAAAAAAAAAAAAAAAAAAAAAAAAAAAAAAAAAAAAAAAAAAAAAAAAAAAAAAAAAAAAAAAAAAAAAAAAAAAAAAAAAAAAAAAAAAAAAAAAAAAAAAAAAAAAAAAAAAAAAAAAAAAAAAAAAAAAAAAAAAAAAAAAAAAAAAAAAAAAAAAAAAAAAAAAAAAAAAAAAAAAAAAAAAAAAAAAAAAAAAAAAAAAAAAAAAAAAAAAAAAAAAAAAAAAAAAAAAAAAAAAAAAAAAAAAAAAAAAAAAAAAAAAAAAAAAAAAAAAAAAAAAAAAAAAAAAAAAAAAAAAAAAAAAAAAAAAAAAAAAAAAAAAAAAAAAAAAAAAAAAAAAAAAAAAAAAAAAAAAAAAAAAAAAAAAAAAAAAAAAAAAAAAAAAAAAAAAAAAAAAAAAAAAAAAAAAAAAAAAAAAAAAAAAAAAAAAAAAAAAAAAAAAAAAAAAAAAAAAAAAAAAAAAAAAAAAAAAAAAAAAAAAAAAAAAAAAAAAAAAAAAAAAAAAAAAAAAAAAAAAAAAAAAAAAAAAAAAAAAAAAAAAAAAAAAAAAAAAAAAAAAAAAAAAAAAAAAAAAAAAAAAAAAAAAAAAAAAAAAAAAAAAAAAAAAAAAAAAAAAAAAAAAAAAAAAAAAAAAAAAAAAAAAAAAAAAAAAAAAAAAAAAAAAAAAAAAAAAAAAAAAAAAAAAAAAAAAAAAAAAAAAAAAAAAAAAAAAAAAAAAAAAAAAAAAAAAAAAAAAAAAAAAAAAAAAAAAAAAAAAAAAAAAAAAAAAAAAAAAAAAAAAAAAAAAAAAAAAAAAAAAAAAAAAAAAAAAAAAAAAAAAAAAAAAAAAAAAAAAAAAAAAAAAAAAAAAAAAAAAAAAAAAAAAAAAAAAAAAAAAAAAAAAAAAAAAAAAAAAAAAAAAAAAAAAAAAAAAAAAAAAAAAAAAAAAAAAAAAAAAAAAAAAAAAAAAAAAAAAAAAAAAAAAAAAAAAAAAAAAAAAAAAAAAAAAAAAAAAAAAAAAAAAAAAAAAAAAAAAAAAAAAAAAAAAAAAAAAAAAAAAAAAAAAAAAAAAAAAAAAAAAAAAAAAAAAAAAAAAAAAAAAAAAAAAAAAAAAAAAAAAAAAAAAAAAAAAAAAAAAAAAAAAAAAAAAAAAAAAAAAAAAAAAAAAAAAAAAAAAAAAAAAAAAAAAAAAAAAAAAAAAAAAAAAAAAAAAAAAAAAAAAAAAAAAAAAAAAAAAAAAAAAAAAAAAAAAAAAAAAAAAAAAAAAAAAAAAAAAAAAAAAAAAAAAAAAAAAAAAAAAAAAAAAAAAAAAAAAAAAAAAAAAAAAAAAAAAAAAAAAAAAAAAAAAAAAAAAAAAAAAAAAAAAAAAAAAAAAAAAAAAAAAAAAAAAAAAAAAAAAAAAAAAAAAAAAAAAAAAAAAAAAAAAAAAAAAAAAAAAAAAAAAAAAAAAAAAAAAAAAAAAAAAAAAAAAAAAAAAAAAAAAAAAAAAAAAAAAAAAAAAAAAAAAAAAAAAAAAAAAAAAAAAAAAAAAAAAAAAAAAAAAAAAAAAAAAAAAAAAAAAAAAAAAAAAAAAAAAAAAAAAAAAAAAAAAAAAAAAAAAAAAAAAAAAAAAAAAAAAAAAAAAAAAAAAAAAAAAAAAAAAAAAAAAAAAAAAAAAAAAAAAAAAAAAAAAAAAAAAAAAAAAAAAAAAAAAAAAAAAAAAAAAAAAAAAAAAAAAAAAAAAAAAAAAAAAAAAAAAAAAAAAAAAAAAAAAAAAAAAAAAAAAAAAAAAAAAAAAAAAAAAAAAAAAAAAAAAAAAAAAAAAAAAAAAAAAAAAAAAAAAAAAAAAAAAAAAAAAAAAAAAAAAAAAAAAAAAAAAAAAAAAAAAAAAAAAAAAAAAAAAAAAAAAAAAAAAAAAAAAAAAAAAAAAAAAAAAAAAAAAAAAAAAAAAAAAAAAAAAAAAAAAAAAAAAAAAAAAAAAAAAAAAAAAAAAAAAAAAAAAAAAAAAAAAAAAAAAAAAAAAAAAAAAAAAAAAAAAAAAAAAAAAAAAAAAAAAAAAAAAAAAAAAAAAAAAAAAAAAAAAAAAAAAAAAAAAAAAAAAAAAAAAAAAAAAAAAAAAAAAAAAAAAAAAAAAAAAAAAAAAAAAAAAAAAAAAAAAAAAAAAAAAAAAAAAAAAAAAAAAAAAAAAAAAAAAAAAAAAAAAAAAAAAAAAAAAAAAAAAAAAAAAAAAAAAAAAAAAAAAAAAAAAAAAAAAAAAAAAAAAAAAAAAAAAAAAAAAAAAAAAAAAAAAAAAAAAAAAAAAAAAAAAAAAAAAAAAAAAAAAAAAAAAAAAAAAAAAAAAAAAAAAAAAAAAAAAAAAAAAAAAAAAAAAAAAAAAAAAAAAAAAAAAAAAAAAAAAAAAAAAAAAAAAAAAAAAAAAAAAAAAAAAAAAAAAAAAAAAAAAAAAAAAAAAAAAAAAAAAAAAAAAAA
AAAAAAAAAAAAAAAAAAAAAAAAAAAAAAAAAAAAAAAAAAAAAAAAAAAAAAAAAAAAAAAAAAAAAAAAAAAAAAAAAAAAAAAAAAAAAAAAAAAAAAAAAAAAAAAAAAAAAAAAAAAAAAAAAAAAAAAAAAAAAAAAAAAAAAAAAAAAAAAAAAAAAAAAAAAAAAAAAAAAAAAAAAAAAAAAAAAAAAAAAAAAAAAAAAAAAAAAAAAAAAAAAAAAAAAAAAAAAAAAAAAAAAAAAAAAAAAAAAAAAAAAAAAAAAAAAAAAAAAAAAAAAAAAAAAAAAAAAAAAAAAAAAAAAAAAAAAAAAAAAAAAAAAAAAAAAAAAAAAAAAAAAAAAAAAAAAAAAAAAAAAAAAAAAAAAAAAAAAAAAAAAAAAAAAAAAAAAAAAAAAAAAAAAAAAAAAAAAAAAAAAAAAAAAAAAAAAAAAAAAAAAAAAAAAAAAAAAAAAAAAAAAAAAAAAAAAAAAAAAAAAAAAAAAAAAAAAAAAAAAAAAAAAAAAAAAAAAAAAAAAAAAAAAAAAAAAAAAAAAAAAAAAAAAAAAAAAAAAAAAAAAAAAAAAAAAAAAAAAAAAAAAAAAAAAAAAAAAAAAAAAAAAAAAAAAAAAAAAAAAAAAAAAAAAAAAAAAAAAAAAAAAAAAAAAAAAAAAAAAAAAAAAAAAAAAAAAAAAAAAAAAAAAAAAAAAAAAAAAAAAAAAAAAAAAAAAAAAAAAAAAAAAAAAAAAAAAAAAAAAAAAAAAAAAAAAAAAAAAAAAAAAAAAAAAAAAAAAAAAAAAAAAAAAAAAAAAAAAAAAAAAAAAAAAAAAAAAAAAAAAAAAAAAAAAAAAAAAAAAAAAAAAAAAAAAAAAAAAAAAAAAAAAAAAAAAAAAAAAAAAAAAAAAAAAAAAAAAAAAAAAAAAAAAAAAAAAAAAAAAAAAAAAAAAAAAAAAAAAAAAAAAAAAAAAAAAAAAAAAAAAAAAAAAAAAAAAAAAAAAAAAAAAAAAAAAAAAAAAAAAAAAAAAAAAAAAAAAAAAAAAAAAAAAAAAAAAAAAAAAAAAAAAAAAAAAAAAAAAAAAAAAAAAAAAAAAAAAAAAAAAAAAAAAAAAAAAAAAAAAAAAAAAAAAAAAAAAAAAAAAAAAAAAAAAAAAAAAAAAAAAAAAAAAAAAAAAAAAAAAAAAAAAAAAAAAAAAAAAAAAAAAAAAAAAAAAAAAAAAAAAAAAAAAAAAAAAAAAAAAAAAAAAAAAAAAAAAAAAAAAAAAAAAAAAAAAAAAAAAAAAAAAAAAAAAAAAAAAAAAAAAAAAAAAAAAAAAAAAAAAAAAAAAAAAAAAAAAAAAAAAAAAAAAAAAAAAAAAAAAAAAAAAAAAAAAAAAAAAAAAAAAAAAAAAAAAAAAAAAAAAAAAAAAAAAAAAAAAAAAAAAAAAAAAAAAAAAAAAAAAAAAAAAAAAAAAAAAAAAAAAAAAAAAAAAAAAAAAAAAAAAAAAAAAAAAAAAAAAAAAAAAAAAAAAAAAAAAAAAAAAAAAAAAAAAAAAAAAAAAAAAAAAAAAAAAAAAAAAAAAAAAAAAAAAAAAAAAAAAAAAAAAAAAAAAAAAAAAAAAAAAAAAAAAAAAAAAAAAAAAAAAAAAAAAAAAAAAAAAAAAAAAAAAAAAAAAAAAAAAAAAAAAAAAAAAAAAAAAAAAAAAAAAAAAAAAAAAAAAAAAAAAAAAAAAAAAAAAAAAAAAAAAAAAAAAAAAAAAAAAAAAAAAAAAAAAAAAAAAAAAAAAAAAAAAAAAAAAAAAAAAAAAAAAAAAAAAAAAAAAAAAAAAAAAAAAAAAAAAAAAAAAAAAAAAAAAAAAAAAAAAAAAAAAAAAAAAAAAAAAAAAAAAAAAAAAAAAAAAAAAAAAAAAAAAAAAAAAAAAAAAAAAAAAAAAAAAAAAAAAAAAAAAAAAAAAAAAAAAAAAAAAAAAAAAAAAAAAAAAAAAAAAAAAAAAAAAAAAAAAAAAAAAAAAAAAAAAAAAAAAAAAAAAAAAAAAAAAAAAAAAAAAAAAAAAAAAAAAAAAAAAAAAAAAAAAAAAAAAAAAAAAAAAAAAAAAAAAAAAAAAAAAAAAAAAAAAAAAAAAAAAAAAAAAAAAAAAAAAAAAAAAAAAAAAAAAAAAAAAAAAAAAAAAAAAAAAAAAAAAAAAAAAAAAAAAAAAAAAAAAAAAAAAAAAAAAAAAAAAAAAAAAAAAAAAAAAAAAAAAAAAAAAAAAAAAAAAAAAAAAAAAAAAAAAAAAAAAAAAAAAAAAAAAAAAAAAAAAAAAAAAAAAAAAAAAAAAAAAAAAAAAAAAAAAAAAAAAAAAAAAAAAAAAAAAAAAAAAAAAAAAAAAAAAAAAAAAAAAAAAAAAAAAAAAAAAAAAAAAAAAAAAAAAAAAAAAAAAAAAAAAAAAAAAAAAAAAAAAAAAAAAAAAAAAAAAAAAAAAAAAAAAAAAAAAAAAAAAAAAAAAAAAAAAAAAAAAAAAAAAAAAAAAAAAAAAAAAAAAAAAAAAAAAAAAAAAAAAAAAAAAAAAAAAAAAAAAAAAAAAAAAAAAAAAAAAAAAAAAAAAAAAAAAAAAAAAAAAAAAAAAAAAAAAAAAAAAAAAAAAAAAAAAAAAAAAAAAAAAAAAAAAAAAAAAAAAAAAAAAAAAAAAAAAAAAAAAAAAAAAAAAAAAAAAAAAAAAAAAAAAAAAAAAAAAAAAAAAAAAAAAAAAAAAAAAAAAAAAAAAAAAAAAAAAAAAAAAAAAAAAAAAAAAAAAAAAAAAAAAAAAAAAAAAAAAAAAAAAAAAAAAAAAAAAAAAAAAAAAAAAAAAAAAAAAAAAAAAAAAAAAAAAAAAAAAAAAAAAAAAAAAAAAAAAAAAAAAAAAAAAAAAAAAAAAAAAAAAAAAAAAAAAAAAAAAAAAAAAAAAAAAAAAAAAAAAAAAAAAAAAAAAAAAAAAAAAAAAAAAAAAAAAAAAAAAAAAAAAAAAAAAAAAAAAAAAAAAAAAAAAAAAAAAAAAAAAAAAAAAAAAAAAAAAAAAAAAAAAAAAAAAAAAAAAAAAAAAAAAAAAAAAAAAAAAAAAAAAAAAAAAAAAAAAAAAAAAAAAAAAAAAAAAAAAAAAAAAAAAAAAAAAAAAAAAAAAAAAAAAAAAAAAAAAAAAAAAAAAAAAAAAAAAAAAAAAAAAAAAAAAAAAAAAAAAAAAAAAAAAAAAAAAAAAAAAAAAAAAAAAAAAAAAAAAAAAAAAAAAAAAAAAAAAAAAAAAAAAAAAAAAAAAAAAAAAAAAAAAAAAAAAAAAAAAAAAAAAAAAAAAAAAAAAAAAAAAAAAAAAAAAAAAAAAAAAAAAAAAAAAAAAAAAAAAAAAAAAAAAAAAAAAAAAAAAAAAAAAAAAAAAAAAAAAAAAAAAAAAAAAAAAAAAAAAAAAAAAAAAAAAAAAAAAAAAAAAAAAAAAAAAAAAAAAAAAAAAAAAAAAAAAAAAAAAAAAAAAAAAAAAAAAAAAAAAAAAAAAAAAAAAAAAAAAAAAAAAAAAAAAAAAAAAAAAAAAAAAAAAAAAAAAAAAAAAAAAAAAAAAAAAAAAAAAAAAAAAAAAAAAAAAAAAAAAAAAAAAAAAAAAAAAAAAAAAAAAAAAAAAAAAAAAAAAAAAAAAAAAAAAAAAAAAAAAAAAAAAAAAAAAAAAAAAAAAAAAAAAAAAAAAAAAAAAAAAAAAAAAAAAAAAAAAAAAAAAAAAAAAAAAAAAAAAAAAAAAAAAAAAAAAAAAAAAAAAAAAAAAAAAAAAAAAAAAAAAAAAAAAAAAAAAAAAAAAAAAAAAAAAAAAAAAAAAAAAAAAAAAAAAAAAAAAAAAAAAAAAAAAAAAAAAAAAAAAAAAAAAAAAAAAAAAAAAAAAAAAAAAAAAAAAAAAAAAAAAAAAAAAAAAAAAAAAAAAAAAAAAAAAAAAAAAAAAAAAAAAAAAAAAAAAAAAAAAAAAAAAAAAAAAAAAAAAAAAAAAAAAAAAAAAAAAAAAAAAAAAAAAAAAAAAAAAAAAAAAAAAAAAAAAAAAAAAAAAAAAAAAAAAAAAAAAAAAAAAAAAAAAAAAAAAAAAAAAAAAAAAAAAAAAAAAAAAAAAAAAAAAAAAAAAAAAAAAAAAAAAAAAAAAAAAAAAAAAAAAA
AAAAAAAAAAAAAAAAAAAAAAAAAAAAAAAAAAAAAAAAAAAAAAAAAAAAAAAAAAAAAAAAAAAAAAAAAAAAAAAAAAAAAAAAAAAAAAAAAAAAAAAAAAAAAAAAAAAAAAAAAAAAAAAAAAAAAAAAAAAAAAAAAAAAAAAAAAAAAAAAAAAAAAAAAAAAAAAAAAAAAAAAAAAAAAAAAAAAAAAAAAAAAAAAAAAAAAAAAAAAAAAAAAAAAAAAAAAAAAAAAAAAAAAAAAAAAAAAAAAAAAAAAAAAAAAAAAAAAAAAAAAAAAAAAAAAAAAAAAAAAAAAAAAAAAAAAAAAAAAAAAAAAAAAAAAAAAAAAAAAAAAAAAAAAAAAAAAAAAAAAAAAAAAAAAAAAAAAAAAAAAAAAAAAAAAAAAAAAAAAAAAAAAAAAAAAAAAAAAAAAAAAAAAAAAAAAAAAAAAAAAAAAAAAAAAAAAAAAAAAAAAAAAAAAAAAAAAAAAAAAAAAAAAAAAAAAAAAAAAAAAAAAAAAAAAAAAAAAAAAAAAAAAAAAAAAAAAAAAAAAAAAAAAAAAAAAAAAAAAAAAAAAAAAAAAAAAAAAAAAAAAAAAAAAAAAAAAAAAAAAAAAAAAAAAAAAAAAAAAAAAAAAAAAAAAAAAAAAAAAAAAAAAAAAAAAAAAAAAAAAAAAAAAAAAAAAAAAAAAAAAAAAAAAAAAAAAAAAAAAAAAAAAAAAAAAAAAAAAAAAAAAAAAAAAAAAAAAAAAAAAAAAAAAAAAAAAAAAAAAAAAAAAAAAAAAAAAAAAAAAAAAAAAAAAAAAAAAAAAAAAAAAAAAAAAAAAAAAAAAAAAAAAAAAAAAAAAAAAAAAAAAAAAAAAAAAAAAAAAAAAAAAAAAAAAAAAAAAAAAAAAAAAAAAAAAAAAAAAAAAAAAAAAAAAAAAAAAAAAAAAAAAAAAAAAAAAAAAAAAAAAAAAAAAAAAAAAAAAAAAAAAAAAAAAAAAAAAAAAAAAAAAAAAAAAAAAAAAAAAAAAAAAAAAAAAAAAAAAAAAAAAAAAAAAAAAAAAAAAAAAAAAAAAAAAAAAAAAAAAAAAAAAAAAAAAAAAAAAAAAAAAAAAAAAAAAAAAAAAAAAAAAAAAAAAAAAAAAAAAAAAAAAAAAAAAAAAAAAAAAAAAAAAAAAAAAAAAAAAAAAAAAAAAAAAAAAAAAAAAAAAAAAAAAAAAAAAAAAAAAAAAAAAAAAAAAAAAAAAAAAAAAAAAAAAAAAAAAAAAAAAAAAAAAAAAAAAAAAAAAAAAAAAAAAAAAAAAAAAAAAAAAAAAAAAAAAAAAAAAAAAAAAAAAAAAAAAAAAAAAAAAAAAAAAAAAAAAAAAAAAAAAAAAAAAAAAAAAAAAAAAAAAAAAAAAAAAAAAAAAAAAAAAAAAAAAAAAAAAAAAAAAAAAAAAAAAAAAAAAAAAAAAAAAAAAAAAAAAAAAAAAAAAAAAAAAAAAAAAAAAAAAAAAAAAAAAAAAAAAAAAAAAAAAAAAAAAAAAAAAAAAAAAAAAAAAAAAAAAAAAAAAAAAAAAAAAAAAAAAAAAAAAAAAAAAAAAAAAAAAAAAAAAAAAAAAAAAAAAAAAAAAAAAAAAAAAAAAAAAAAAAAAAAAAAAAAAAAAAAAAAAAAAAAAAAAAAAAAAAAAAAAAAAAAAAAAAAAAAAAAAAAAAAAAAAAAAAAAAAAAAAAAAAAAAAAAAAAAAAAAAAAAAAAAAAAAAAAAAAAAAAAAAAAAAAAAAAAAAAAAAAAAAAAAAAAAAAAAAAAAAAAAAAAAAAAAAAAAAAAAAAAAAAAAAAAAAAAAAAAAAAAAAAAAAAAAAAAAAAAAAAAAAAAAAAAAAAAAAAAAAAAAAAAAAAAAAAAAAAAAAAAAAAAAAAAAAAAAAAAAAAAAAAAAAAAAAAAAAAAAAAAAAAAAAAAAAAAAAAAAAAAAAAAAAAAAAAAAAAAAAAAAAAAAAAAAAAAAAAAAAAAAAAAAAAAAAAAAAAAAAAAAAAAAAAAAAAAAAAAAAAAAAAAAAAAAAAAAAAAAAAAAAAAAAAAAAAAAAAAAAAAAAAAAAAAAAAAAAAAAAAAAAAAAAAAAAAAAAAAAAAAAAAAAAAAAAAAAAAAAAAAAAAAAAAAAAAAAAAAAAAAAAAAAAAAAAAAAAAAAAAAAAAAAAAAAAAAAAAAAAAAAAAAAAAAAAAAAAAAAAAAAAAAAAAAAAAAAAAAAAAAAAAAAAAAAAAAAAAAAAAAAAAAAAAAAAAAAAAAAAAAAAAAAAAAAAAAAAAAAAAAAAAAAAAAAAAAAAAAAAAAAAAAAAAAAAAAAAAAAAAAAAAAAAAAAAAAAAAAAAAAAAAAAAAAAAAAAAAAAAAAAAAAAAAAAAAAAAAAAAAAAAAAAAAAAAAAAAAAAAAAAAAAAAAAAAAAAAAAAAAAAAAAAAAAAAAAAAAAAAAAAAAAAAAAAAAAAAAAAAAAAAAAAAAAAAAAAAAAAAAAAAAAAAAAAAAAAAAAAAAAAAAAAAAAAAAAAAAAAAAAAAAAAAAAAAAAAAAAAAAAAAAAAAAAAAAAAAAAAAAAAAAAAAAAAAAAAAAAAAAAAAAAAAAAAAAAAAAAAAAAAAAAAAAAAAAAAAAAAAAAAAAAAAAAAAAAAAAAAAAAAAAAAAAAAAAAAAAAAAAAAAAAAAAAAAAAAAAAAAAAAAAAAAAAAAAAAAAAAAAAAAAAAAAAAAAAAAAAAAAAAAAAAAAAAAAAAAAAAAAAAAAAAAAAAAAAAAAAAAAAAAAAAAAAAAAAAAAAAAAAAAAAAAAAAAAAAAAAAAAAAAAAAAAAAAAAAAAAAAAAAAAAAAAAAAAAAAAAAAAAAAAAAAAAAAAAAAAAAAAAAAAAAAAAAAAAAAAAAAAAAAAAAAAAAAAAAAAAAAAAAAAAAAAAAAAAAAAAAAAAAAAAAAAAAAAAAAAAAAAAAAAAAAAAAAAAAAAAAAAAAAAAAAAAAAAAAAAAAAAAAAAAAAAAAAAAAAAAAAAAAAAAAAAAAAAAAAAAAAAAAAAAAAAAAAAAAAAAAAAAAAAAAAAAAAAAAAAAAAAAAAAAAAAAAAAAAAAAAAAAAAAAAAAAAAAAAAAAAAAAAAAAAAAAAAAAAAAAAAAAAAAAAAAAAAAAAAAAAAAAAAAAAAAAAAAAAAAAAAAAAAAAAAAAAAAAAAAAAAAAAAAAAAAAAAAAAAAAAAAAAAAAAAAAAAAAAAAAAAAAAAAAAAAAAAAAAAAAAAAAAAAAAAAAAAAAAAAAAAAAAAAAAAAAAAAAAAAAAAAAAAAAAAAAAAAAAAAAAAAAAAAAAAAAAAAAAAAAAAAAAAAAAAAAAAAAAAAAAAAAAAAAAAAAAAAAAAAAAAAAAAAAAAAAAAAAAAAAAAAAAAAAAAAAAAAAAAAAAAAAAAAAAAAAAAAAAAAAAAAAAAAAAAAAAAAAAAAAAAAAAAAAAAAAAAAAAAAAAAAAAAAAAAAAAAAAAAAAAAAAAAAAAAAAAAAAAAAAAAAAAAAAAAAAAAAAAAAAAAAAAAAAAAAAAAAAAAAAAAAAAAAAAAAAAAAAAAAAAAAAAAAAAAAAAAAAAAAAAAAAAAAAAAAAAAAAAAAAAAAAAAAAAAAAAAAAAAAAAAAAAAAAAAAAAAAAAAAAAAAAAAAAAAAAAAAAAAAAAAAAAAAAAAAAAAAAAAAAAAAAAAAAAAAAAAAAAAAAAAAAAAAAAAAAAAAAAAAAAAAAAAAAAAAAAAAAAAAAAAAAAAAAAAAAAAAAAAAAAAAAAAAAAAAAAAAAAAAAAAAAAAAAAAAAAAAAAAAAAAAAAAAAAAAAAAAAAAAAAAAAAAAAAAAAAAAAAAAAAAAAAAAAAAAAAAAAAAAAAAAAAAAAAAAAAAAAAAAAAAAAAAAAAAAAAAAAAAAAAAAAAAAAAAAAAAAAAAAAAAAAAAAAAAAAAAAAAAAAAAAAAAAAAAAAAAAAAAAAAAAAAAAAAAAAAAAAAAAAAAAAAAAAAAAAAAAAAAAAAAAAAAAAAAAAAAAAAAAAAAAAAAAAAAAAAAAAAAAAAAAAAAAAAAAAAAAAAAAAAAAAAAAAAAAAAAAAAAAAAAAAAAAAAAAAAAAAAAAAAAAAAAAAAAAAAAA
AAAAAAAAAAAAAAAAAAAAAAAAAAAAAAAAAAAAAAAAAAAAAAAAAAAAAAAAAAAAAAAAAAAAAAAAAAAAAAAAAAAAAAAAAAAAAAAAAAAAAAAAAAAAAAAAAAAAAAAAAAAAAAAAAAAAAAAAAAAAAAAAAAAAAAAAAAAAAAAAAAAAAAAAAAAAAAAAAAAAAAAAAAAAAAAAAAAAAAAAAAAAAAAAAAAAAAAAAAAAAAAAAAAAAAAAAAAAAAAAAAAAAAAAAAAAAAAAAAAAAAAAAAAAAAAAAAAAAAAAAAAAAAAAAAAAAAAAAAAAAAAAAAAAAAAAAAAAAAAAAAAAAAAAAAAAAAAAAAAAAAAAAAAAAAAAAAAAAAAAAAAAAAAAAAAAAAAAAAAAAAAAAAAAAAAAAAAAAAAAAAAAAAAAAAAAAAAAAAAAAAAAAAAAAAAAAAAAAAAAAAAAAAAAAAAAAAAAAAAAAAAAAAAAAAAAAAAAAAAAAAAAAAAAAAAAAAAAAAAAAAAAAAAAAAAAAAAAAAAAAAAAAAAAAAAAAAAAAAAAAAAAAAAAAAAAAAAAAAAAAAAAAAAAAAAAAAAAAAAAAAAAAAAAAAAAAAAAAAAAAAAAAAAAAAAAAAAAAAAAAAAAAAAAAAAAAAAAAAAAAAAAAAAAAAAAAAAAAAAAAAAAAAAAAAAAAAAAAAAAAAAAAAAAAAAAAAAAAAAAAAAAAAAAAAAAAAAAAAAAAAAAAAAAAAAAAAAAAAAAAAAAAAAAAAAAAAAAAAAAAAAAAAAAAAAAAAAAAAAAAAAAAAAAAAAAAAAAAAAAAAAAAAAAAAAAAAAAAAAAAAAAAAAAAAAAAAAAAAAAAAAAAAAAAAAAAAAAAAAAAAAAAAAAAAAAAAAAAAAAAAAAAAAAAAAAAAAAAAAAAAAAAAAAAAAAAAAAAAAAAAAAAAAAAAAAAAAAAAAAAAAAAAAAAAAAAAAAAAAAAAAAAAAAAAAAAAAAAAAAAAAAAAAAAAAAAAAAAAAAAAAAAAAAAAAAAAAAAAAAAAAAAAAAAAAAAAAAAAAAAAAAAAAAAAAAAAAAAAAAAAAAAAAAAAAAAAAAAAAAAAAAAAAAAAAAAAAAAAAAAAAAAAAAAAAAAAAAAAAAAAAAAAAAAAAAAAAAAAAAAAAAAAAAAAAAAAAAAAAAAAAAAAAAAAAAAAAAAAAAAAAAAAAAAAAAAAAAAAAAAAAAAAAAAAAAAAAAAAAAAAAAAAAAAAAAAAAAAAAAAAAAAAAAAAAAAAAAAAAAAAAAAAAAAAAAAAAAAAAAAAAAAAAAAAAAAAAAAAAAAAAAAAAAAAAAAAAAAAAAAAAAAAAAAAAAAAAAAAAAAAAAAAAAAAAAAAAAAAAAAAAAAAAAAAAAAAAAAAAAAAAAAAAAAAAAAAAAAAAAAAAAAAAAAAAAAAAAAAAAAAAAAAAAAAAAAAAAAAAAAAAAAAAAAAAAAAAAAAAAAAAAAAAAAAAAAAAAAAAAAAAAAAAAAAAAAAAAAAAAAAAAAAAAAAAAAAAAAAAAAAAAAAAAAAAAAAAAAAAAAAAAAAAAAAAAAAAAAAAAAAAAAAAAAAAAAAAAAAAAAAAAAAAAAAAAAAAAAAAAAAAAAAAAAAAAAAAAAAAAAAAAAAAAAAAAAAAAAAAAAAAAAAAAAAAAAAAAAAAAAAAAAAAAAAAAAAAAAAAAAAAAAAAAAAAAAAAAAAAAAAAAAAAAAAAAAAAAAAAAAAAAAAAAAAAAAAAAAAAAAAAAAAAAAAAAAAAAAAAAAAAAAAAAAAAAAAAAAAAAAAAAAAAAAAAAAAAAAAAAAAAAAAAAAAAAAAAAAAAAAAAAAAAAAAAAAAAAAAAAAAAAAAAAAAAAAAAAAAAAAAAAAAAAAAAAAAAAAAAAAAAAAAAAAAAAAAAAAAAAAAAAAAAAAAAAAAAAAAAAAAAAAAAAAAAAAAAAAAAAAAAAAAAAAAAAAAAAAAAAAAAAAAAAAAAAAAAAAAAAAAAAAAAAAAAAAAAAAAAAAAAAAAAAAAAAAAAAAAAAAAAAAAAAAAAAAAAAAAAAAAAAAAAAAAAAAAAAAAAAAAAAAAAAAAAAAAAAAAAAAAAAAAAAAAAAAAAAAAAAAAAAAAAAAAAAAAAAAAAAAAAAAAAAAAAAAAAAAAAAAAAAAAAAAAAAAAAAAAAAAAAAAAAAAAAAAAAAAAAAAAAAAAAAAAAAAAAAAAAAAAAAAAAAAAAAAAAAAAAAAAAAAAAAAAAAAAAAAAAAAAAAAAAAAAAAAAAAAAAAAAAAAAAAAAAAAAAAAAAAAAAAAAAAAAAAAAAAAAAAAAAAAAAAAAAAAAAAAAAAAAAAAAAAAAAAAAAAAAAAAAAAAAAAAAAAAAAAAAAAAAAAAAAAAAAAAAAAAAAAAAAAAAAAAAAAAAAAAAAAAAAAAAAAAAAAAAAAAAAAAAAAAAAAAAAAAAAAAAAAAAAAAAAAAAAAAAAAAAAAAAAAAAAAAAAAAAAAAAAAAAAAAAAAAAAAAAAAAAAAAAAAAAAAAAAAAAAAAAAAAAAAAAAAAAAAAAAAAAAAAAAAAAAAAAAAAAAAAAAAAAAAAAAAAAAAAAAAAAAAAAAAAAAAAAAAAAAAAAAAAAAAAAAAAAAAAAAAAAAAAAAAAAAAAAAAAAAAAAAAAAAAAAAAAAAAAAAAAAAAAAAAAAAAAAAAAAAAAAAAAAAAAAAAAAAAAAAAAAAAAAAAAAAAAAAAAAAAAAAAAAAAAAAAAAAAAAAAAAAAAAAAAAAAAAAAAAAAAAAAAAAAAAAAAAAAAAAAAAAAAAAAAAAAAAAAAAAAAAAAAAAAAAAAAAAAAAAAAAAAAAAAAAAAAAAAAAAAAAAAAAAAAAAAAAAAAAAAAAAAAAAAAAAAAAAAAAAAAAAAAAAAAAAAAAAAAAAAAAAAAAAAAAAAAAAAAAAAAAAAAAAAAAAAAAAAAAAAAAAAAAAAAAAAAAAAAAAAAAAAAAAAAAAAAAAAAAAAAAAAAAAAAAAAAAAAAAAAAAAAAAAAAAAAAAAAAAAAAAAAAAAAAAAAAAAAAAAAAAAAAAAAAAAAAAAAAAAAAAAAAAAAAAAAAAAAAAAAAAAAAAAAAAAAAAAAAAAAAAAAAAAAAAAAAAAAAAAAAAAAAAAAAAAAAAAAAAAAAAAAAAAAAAAAAAAAAAAAAAAAAAAAAAAAAAAAAAAAAAAAAAAAAAAAAAAAAAAAAAAAAAAAAAAAAAAAAAAAAAAAAAAAAAAAAAAAAAAAAAAAAAAAAAAAAAAAAAAAAAAAAAAAAAAAAAAAAAAAAAAAAAAAAAAAAAAAAAAAAAAAAAAAAAAAAAAAAAAAAAAAAAAAAAAAAAAAAAAAAAAAAAAAAAAAAAAAAAAAAAAAAAAAAAAAAAAAAAAAAAAAAAAAAAAAAAAAAAAAAAAAAAAAAAAAAAAAAAAAAAAAAAAAAAAAAAAAAAAAAAAAAAAAAAAAAAAAAAAAAAAAAAAAAAAAAAAAAAAAAAAAAAAAAAAAAAAAAAAAAAAAAAAAAAAAAAAAAAAAAAAAAAAAAAAAAAAAAAAAAAAAAAAAAAAAAAAAAAAAAAAAAAAAAAAAAAAAAAAAAAAAAAAAAAAAAAAAAAAAAAAAAAAAAAAAAAAAAAAAAAAAAAAAAAAAAAAAAAAAAAAAAAAAAAAAAAAAAAAAAAAAAAAAAAAAAAAAAAAAAAAAAAAAAAAAAAAAAAAAAAAAAAAAAAAAAAAAAAAAAAAAAAAAAAAAAAAAAAAAAAAAAAAAAAAAAAAAAAAAAAAAAAAAAAAAAAAAAAAAAAAAAAAAAAAAAAAAAAAAAAAAAAAAAAAAAAAAAAAAAAAAAAAAAAAAAAAAAAAAAAAAAAAAAAAAAAAAAAAAAAAAAAAAAAAAAAAAAAAAAAAAAAAAAAAAAAAAAAAAAAAAAAAAAAAAAAAAAAAAAAAAAAAAAAAAAAAAAAAAAAAAAAAAAAAAAAAAAAAAAAAAAAAAAAAAAAAAAAAAAAAAAAAAAAAAAAAAAAAAAAAAAAAAAAAAAAAAAAAAAAAAAAAAAAAAAAAAAAAAAAAAAAAAAAAAAAAAAAAAAAAAAAAAAAAAAAAAAAAAAAAAAAAAAAAAAAAAAAAA
AAAAAAAAAAAAAAAAAAAAAAAAAAAAAAAAAAAAAAAAAAAAAAAAAAAAAAAAAAAAAAAAAAAAAAAAAAAAAAAAAAAAAAAAAAAAAAAAAAAAAAAAAAAAAAAAAAAAAAAAAAAAAAAAAAAAAAAAAAAAAAAAAAAAAAAAAAAAAAAAAAAAAAAAAAAAAAAAAAAAAAAAAAAAAAAAAAAAAAAAAAAAAAAAAAAAAAAAAAAAAAAAAAAAAAAAAAAAAAAAAAAAAAAAAAAAAAAAAAAAAAAAAAAAAAAAAAAAAAAAAAAAAAAAAAAAAAAAAAAAAAAAAAAAAAAAAAAAAAAAAAAAAAAAAAAAAAAAAAAAAAAAAAAAAAAAAAAAAAAAAAAAAAAAAAAAAAAAAAAAAAAAAAAAAAAAAAAAAAAAAAAAAAAAAAAAAAAAAAAAAAAAAAAAAAAAAAAAAAAAAAAAAAAAAAAAAAAAAAAAAAAAAAAAAAAAAAAAAAAAAAAAAAAAAAAAAAAAAAAAAAAAAAAAAAAAAAAAAAAAAAAAAAAAAAAAAAAAAAAAAAAAAAAAAAAAAAAAAAAAAAAAAAAAAAAAAAAAAAAAAAAAAAAAAAAAAAAAAAAAAAAAAAAAAAAAAAAAAAAAAAAAAAAAAAAAAAAAAAAAAAAAAAAAAAAAAAAAAAAAAAAAAAAAAAAAAAAAAAAAAAAAAAAAAAAAAAAAAAAAAAAAAAAAAAAAAAAAAAAAAAAAAAAAAAAAAAAAAAAAAAAAAAAAAAAAAAAAAAAAAAAAAAAAAAAAAAAAAAAAAAAAAAAAAAAAAAAAAAAAAAAAAAAAAAAAAAAAAAAAAAAAAAAAAAAAAAAAAAAAAAAAAAAAAAAAAAAAAAAAAAAAAAAAAAAAAAAAAAAAAAAAAAAAAAAAAAAAAAAAAAAAAAAAAAAAAAAAAAAAAAAAAAAAAAAAAAAAAAAAAAAAAAAAAAAAAAAAAAAAAAAAAAAAAAAAAAAAAAAAAAAAAAAAAAAAAAAAAAAAAAAAAAAAAAAAAAAAAAAAAAAAAAAAAAAAAAAAAAAAAAAAAAAAAAAAAAAAAAAAAAAAAAAAAAAAAAAAAAAAAAAAAAAAAAAAAAAAAAAAAAAAAAAAAAAAAAAAAAAAAAAAAAAAAAAAAAAAAAAAAAAAAAAAAAAAAAAAAAAAAAAAAAAAAAAAAAAAAAAAAAAAAAAAAAAAAAAAAAAAAAAAAAAAAAAAAAAAAAAAAAAAAAAAAAAAAAAAAAAAAAAAAAAAAAAAAAAAAAAAAAAAAAAAAAAAAAAAAAAAAAAAAAAAAAAAAAAAAAAAAAAAAAAAAAAAAAAAAAAAAAAAAAAAAAAAAAAAAAAAAAAAAAAAAAAAAAAAAAAAAAAAAAAAAAAAAAAAAAAAAAAAAAAAAAAAAAAAAAAAAAAAAAAAAAAAAAAAAAAAAAAAAAAAAAAAAAAAAAAAAAAAAAAAAAAAAAAAAAAAAAAAAAAAAAAAAAAAAAAAAAAAAAAAAAAAAAAAAAAAAAAAAAAAAAAAAAAAAAAAAAAAAAAAAAAAAAAAAAAAAAAAAAAAAAAAAAAAAAAAAAAAAAAAAAAAAAAAAAAAAAAAAAAAAAAAAAAAAAAAAAAAAAAAAAAAAAAAAAAAAAAAAAAAAAAAAAAAAAAAAAAAAAAAAAAAAAAAAAAAAAAAAAAAAAAAAAAAAAAAAAAAAAAAAAAAAAAAAAAAAAAAAAAAAAAAAAAAAAAAAAAAAAAAAAAAAAAAAAAAAAAAAAAAAAAAAAAAAAAAAAAAAAAAAAAAAAAAAAAAAAAAAAAAAAAAAAAAAAAAAAAAAAAAAAAAAAAAAAAAAAAAAAAAAAAAAAAAAAAAAAAAAAAAAAAAAAAAAAAAAAAAAAAAAAAAAAAAAAAAAAAAAAAAAAAAAAAAAAAAAAAAAAAAAAAAAAAAAAAAAAAAAAAAAAAAAAAAAAAAAAAAAAAAAAAAAAAAAAAAAAAAAAAAAAAAAAAAAAAAAAAAAAAAAAAAAAAAAAAAAAAAAAAAAAAAAAAAAAAAAAAAAAAAAAAAAAAAAAAAAAAAAAAAAAAAAAAAAAAAAAAAAAAAAAAAAAAAAAAAAAAAAAAAAAAAAAAAAAAAAAAAAAAAAAAAAAAAAAAAAAAAAAAAAAAAAAAAAAAAAAAAAAAAAAAAAAAAAAAAAAAAAAAAAAAAAAAAAAAAAAAAAAAAAAAAAAAAAAAAAAAAAAAAAAAAAAAAAAAAAAAAAAAAAAAAAAAAAAAAAAAAAAAAAAAAAAAAAAAAAAAAAAAAAAAAAAAAAAAAAAAAAAAAAAAAAAAAAAAAAAAAAAAAAAAAAAAAAAAAAAAAAAAAAAAAAAAAAAAAAAAAAAAAAAAAAAAAAAAAAAAAAAAAAAAAAAAAAAAAAAAAAAAAAAAAAAAAAAAAAAAAAAAAAAAAAAAAAAAAAAAAAAAAAAAAAAAAAAAAAAAAAAAAAAAAAAAAAAAAAAAAAAAAAAAAAAAAAAAAAAAAAAAAAAAAAAAAAAAAAAAAAAAAAAAAAAAAAAAAAAAAAAAAAAAAAAAAAAAAAAAAAAAAAAAAAAAAAAAAAAAAAAAAAAAAAAAAAAAAAAAAAAAAAAAAAAAAAAAAAAAAAAAAAAAAAAAAAAAAAAAAAAAAAAAAAAAAAAAAAAAAAAAAAAAAAAAAAAAAAAAAAAAAAAAAAAAAAAAAAAAAAAAAAAAAAAAAAAAAAAAAAAAAAAAAAAAAAAAAAAAAAAAAAAAAAAAAAAAAAAAAAAAAAAAAAAAAAAAAAAAAAAAAAAAAAAAAAAAAAAAAAAAAAAAAAAAAAAAAAAAAAAAAAAAAAAAAAAAAAAAAAAAAAAAAAAAAAAAAAAAAAAAAAAAAAAAAAAAAAAAAAAAAAAAAAAAAAAAAAAAAAAAAAAAAAAAAAAAAAAAAAAAAAAAAAAAAAAAAAAAAAAAAAAAAAAAAAAAAAAAAAAAAAAAAAAAAAAAAAAAAAAAAAAAAAAAAAAAAAAAAAAAAAAAAAAAAAAAAAAAAAAAAAAAAAAAAAAAAAAAAAAAAAAAAAAAAAAAAAAAAAAAAAAAAAAAAAAAAAAAAAAAAAAAAAAAAAAAAAAAAAAAAAAAAAAAAAAAAAAAAAAAAAAAAAAAAAAAAAAAAAAAAAAAAAAAAAAAAAAAAAAAAAAAAAAAAAAAAAAAAAAAAAAAAAAAAAAAAAAAAAAAAAAAAAAAAAAAAAAAAAAAAAAAAAAAAAAAAAAAAAAAAAAAAAAAAAAAAAAAAAAAAAAAAAAAAAAAAAAAAAAAAAAAAAAAAAAAAAAAAAAAAAAAAAAAAAAAAAAAAAAAAAAAAAAAAAAAAAAAAAAAAAAAAAAAAAAAAAAAAAAAAAAAAAAAAAAAAAAAAAAAAAAAAAAAAAAAAAAAAAAAAAAAAAAAAAAAAAAAAAAAAAAAAAAAAAAAAAAAAAAAAAAAAAAAAAAAAAAAAAAAAAAAAAAAAAAAAAAAAAAAAAAAAAAAAAAAAAAAAAAAAAAAAAAAAAAAAAAAAAAAAAAAAAAAAAAAAAAAAAAAAAAAAAAAAAAAAAAAAAAAAAAAAAAAAAAAAAAAAAAAAAAAAAAAAAAAAAAAAAAAAAAAAAAAAAAAAAAAAAAAAAAAAAAAAAAAAAAAAAAAAAAAAAAAAAAAAAAAAAAAAAAAAAAAAAAAAAAAAAAAAAAAAAAAAAAAAAAAAAAAAAAAAAAAAAAAAAAAAAAAAAAAAAAAAAAAAAAAAAAAAAAAAAAAAAAAAAAAAAAAAAAAAAAAAAAAAAAAAAAAAAAAAAAAAAAAAAAAAAAAAAAAAAAAAAAAAAAAAAAAAAAAAAAAAAAAAAAAAAAAAAAAAAAAAAAAAAAAAAAAAAAAAAAAAAAAAAAAAAAAAAAAAAAAAAAAAAAAAAAAAAAAAAAAAAAAAAAAAAAAAAAAAAAAAAAAAAAAAAAAAAAAAAAAAAAAAAAAAAAAAAAAAAAAAAAAAAAAAAAAAAAAAAAAAAAAAAAAAAAAAAAAAAAAAAAAAAAAAAAAAAAAAAAAAAAAAAAAAAAAAAAAAAAAAAAAAAAAAAAAAAAAAAAAAAAAAAAAAAAAAAAAAAAAAAAAAAAAAAAAAAAAAAAAA
AAAAAAAAAAAAAAAAAAAAAAAAAAAAAAAAAAAAAAAAAAAAAAAAAAAAAAAAAAAAAAAAAAAAAAAAAAAAAAAAAAAAAAAAAAAAAAAAAAAAAAAAAAAAAAAAAAAAAAAAAAAAAAAAAAAAAAAAAAAAAAAAAAAAAAAAAAAAAAAAAAAAAAAAAAAAAAAAAAAAAAAAAAAAAAAAAAAAAAAAAAAAAAAAAAAAAAAAAAAAAAAAAAAAAAAAAAAAAAAAAAAAAAAAAAAAAAAAAAAAAAAAAAAAAAAAAAAAAAAAAAAAAAAAAAAAAAAAAAAAAAAAAAAAAAAAAAAAAAAAAAAAAAAAAAAAAAAAAAAAAAAAAAAAAAAAAAAAAAAAAAAAAAAAAAAAAAAAAAAAAAAAAAAAAAAAAAAAAAAAAAAAAAAAAAAAAAAAAAAAAAAAAAAAAAAAAAAAAAAAAAAAAAAAAAAAAAAAAAAAAAAAAAAAAAAAAAAAAAAAAAAAAAAAAAAAAAAAAAAAAAAAAAAAAAAAAAAAAAAAAAAAAAAAAAAAAAAAAAAAAAAAAAAAAAAAAAAAAAAAAAAAAAAAAAAAAAAAAAAAAAAAAAAAAAAAAAAAAAAAAAAAAAAAAAAAAAAAAAAAAAAAAAAAAAAAAAAAAAAAAAAAAAAAAAAAAAAAAAAAAAAAAAAAAAAAAAAAAAAAAAAAAAAAAAAAAAAAAAAAAAAAAAAAAAAAAAAAAAAAAAAAAAAAAAAAAAAAAAAAAAAAAAAAAAAAAAAAAAAAAAAAAAAAAAAAAAAAAAAAAAAAAAAAAAAAAAAAAAAAAAAAAAAAAAAAAAAAAAAAAAAAAAAAAAAAAAAAAAAAAAAAAAAAAAAAAAAAAAAAAAAAAAAAAAAAAAAAAAAAAAAAAAAAAAAAAAAAAAAAAAAAAAAAAAAAAAAAAAAAAAAAAAAAAAAAAAAAAAAAAAAAAAAAAAAAAAAAAAAAAAAAAAAAAAAAAAAAAAAAAAAAAAAAAAAAAAAAAAAAAAAAAAAAAAAAAAAAAAAAAAAAAAAAAAAAAAAAAAAAAAAAAAAAAAAAAAAAAAAAAAAAAAAAAAAAAAAAAAAAAAAAAAAAAAAAAAAAAAAAAAAAAAAAAAAAAAAAAAAAAAAAAAAAAAAAAAAAAAAAAAAAAAAAAAAAAAAAAAAAAAAAAAAAAAAAAAAAAAAAAAAAAAAAAAAAAAAAAAAAAAAAAAAAAAAAAAAAAAAAAAAAAAAAAAAAAAAAAAAAAAAAAAAAAAAAAAAAAAAAAAAAAAAAAAAAAAAAAAAAAAAAAAAAAAAAAAAAAAAAAAAAAAAAAAAAAAAAAAAAAAAAAAAAAAAAAAAAAAAAAAAAAAAAAAAAAAAAAAAAAAAAAAAAAAAAAAAAAAAAAAAAAAAAAAAAAAAAAAAAAAAAAAAAAAAAAAAAAAAAAAAAAAAAAAAAAAAAAAAAAAAAAAAAAAAAAAAAAAAAAAAAAAAAAAAAAAAAAAAAAAAAAAAAAAAAAAAAAAAAAAAAAAAAAAAAAAAAAAAAAAAAAAAAAAAAAAAAAAAAAAAAAAAAAAAAAAAAAAAAAAAAAAAAAAAAAAAAAAAAAAAAAAAAAAAAAAAAAAAAAAAAAAAAAAAAAAAAAAAAAAAAAAAAAAAAAAAAAAAAAAAAAAAAAAAAAAAAAAAAAAAAAAAAAAAAAAAAAAAAAAAAAAAAAAAAAAAAAAAAAAAAAAAAAAAAAAAAAAAAAAAAAAAAAAAAAAAAAAAAAAAAAAAAAAAAAAAAAAAAAAAAAAAAAAAAAAAAAAAAAAAAAAAAAAAAAAAAAAAAAAAAAAAAAAAAAAAAAAAAAAAAAAAAAAAAAAAAAAAAAAAAAAAAAAAAAAAAAAAAAAAAAAAAAAAAAAAAAAAAAAAAAAAAAAAAAAAAAAAAAAAAAAAAAAAAAAAAAAAAAAAAAAAAAAAAAAAAAAAAAAAAAAAAAAAAAAAAAAAAAAAAAAAAAAAAAAAAAAAAAAAAAAAAAAAAAAAAAAAAAAAAAAAAAAAAAAAAAAAAAAAAAAAAAAAAAAAAAAAAAAAAAAAAAAAAAAAAAAAAAAAAAAAAAAAAAAAAAAAAAAAAAAAAAAAAAAAAAAAAAAAAAAAAAAAAAAAAAAAAAAAAAAAAAAAAAAAAAAAAAAAAAAAAAAAAAAAAAAAAAAAAAAAAAAAAAAAAAAAAAAAAAAAAAAAAAAAAAAAAAAAAAAAAAAAAAAAAAAAAAAAAAAAAAAAAAAAAAAAAAAAAAAAAAAAAAAAAAAAAAAAAAAAAAAAAAAAAAAAAAAAAAAAAAAAAAAAAAAAAAAAAAAAAAAAAAAAAAAAAAAAAAAAAAAAAAAAAAAAAAAAAAAAAAAAAAAAAAAAAAAAAAAAAAAAAAAAAAAAAAAAAAAAAAAAAAAAAAAAAAAAAAAAAAAAAAAAAAAAAAAAAAAAAAAAAAAAAAAAAAAAAAAAAAAAAAAAAAAAAAAAAAAAAAAAAAAAAAAAAAAAAAAAAAAAAAAAAAAAAAAAAAAAAAAAAAAAAAAAAAAAAAAAAAAAAAAAAAAAAAAAAAAAAAAAAAAAAAAAAAAAAAAAAAAAAAAAAAAAAAAAAAAAAAAAAAAAAAAAAAAAAAAAAAAAAAAAAAAAAAAAAAAAAAAAAAAAAAAAAAAAAAAAAAAAAAAAAAAAAAAAAAAAAAAAAAAAAAAAAAAAAAAAAAAAAAAAAAAAAAAAAAAAAAAAAAAAAAAAAAAAAAAAAAAAAAAAAAAAAAAAAAAAAAAAAAAAAAAAAAAAAAAAAAAAAAAAAAAAAAAAAAAAAAAAAAAAAAAAAAAAAAAAAAAAAAAAAAAAAAAAAAAAAAAAAAAAAAAAAAAAAAAAAAAAAAAAAAAAAAAAAAAAAAAAAAAAAAAAAAAAAAAAAAAAAAAAAAAAAAAAAAAAAAAAAAAAAAAAAAAAAAAAAAAAAAAAAAAAAAAAAAAAAAAAAAAAAAAAAAAAAAAAAAAAAAAAAAAAAAAAAAAAAAAAAAAAAAAAAAAAAAAAAAAAAAAAAAAAAAAAAAAAAAAAAAAAAAAAAAAAAAAAAAAAAAAAAAAAAAAAAAAAAAAAAAAAAAAAAAAAAAAAAAAAAAAAAAAAAAAAAAAAAAAAAAAAAAAAAAAAAAAAAAAAAAAAAAAAAAAAAAAAAAAAAAAAAAAAAAAAAAAAAAAAAAAAAAAAAAAAAAAAAAAAAAAAAAAAAAAAAAAAAAAAAAAAAAAAAAAAAAAAAAAAAAAAAAAAAAAAAAAAAAAAAAAAAAAAAAAAAAAAAAAAAAAAAAAAAAAAAAAAAAAAAAAAAAAAAAAAAAAAAAAAAAAAAAAAAAAAAAAAAAAAAAAAAAAAAAAAAAAAAAAAAAAAAAAAAAAAAAAAAAAAAAAAAAAAAAAAAAAAAAAAAAAAAAAAAAAAAAAAAAAAAAAAAAAAAAAAAAAAAAAAAAAAAAAAAAAAAAAAAAAAAAAAAAAAAAAAAAAAAAAAAAAAAAAAAAAAAAAAAAAAAAAAAAAAAAAAAAAAAAAAAAAAAAAAAAAAAAAAAAAAAAAAAAAAAAAAAAAAAAAAAAAAAAAAAAAAAAAAAAAAAAAAAAAAAAAAAAAAAAAAAAAAAAAAAAAAAAAAAAAAAAAAAAAAAAAAAAAAAAAAAAAAAAAAAAAAAAAAAAAAAAAAAAAAAAAAAAAAAAAAAAAAAAAAAAAAAAAAAAAAAAAAAAAAAAAAAAAAAAAAAAAAAAAAAAAAAAAAAAAAAAAAAAAAAAAAAAAAAAAAAAAAAAAAAAAAAAAAAAAAAAAAAAAAAAAAAAAAAAAAAAAAAAAAAAAAAAAAAAAAAAAAAAAAAAAAAAAAAAAAAAAAAAAAAAAAAAAAAAAAAAAAAAAAAAAAAAAAAAAAAAAAAAAAAAAAAAAAAAAAAAAAAAAAAAAAAAAAAAAAAAAAAAAAAAAAAAAAAAAAAAAAAAAAAAAAAAAAAAAAAAAAAAAAAAAAAAAAAAAAAAAAAAAAAAAAAAAAAAAAAAAAAAAAAAAAAAAAAAAAAAAAAAAAAAAAAAAAAAAAAAAAAAAAAAAAAAAAAAAAAAAAAAAAAAAAAAAAAAAAAAAAAAAAAAAAAAAAAAAAAAAAA
AAAAAAAAAAAAAAAAAAAAAAAAAAAAAAAAAAAAAAAAAAAAAAAAAAAAAAAAAAAAAAAAAAAAAAAAAAAAAAAAAAAAAAAAAAAAAAAAAAAAAAAAAAAAAAAAAAAAAAAAAAAAAAAAAAAAAAAAAAAAAAAAAAAAAAAAAAAAAAAAAAAAAAAAAAAAAAAAAAAAAAAAAAAAAAAAAAAAAAAAAAAAAAAAAAAAAAAAAAAAAAAAAAAAAAAAAAAAAAAAAAAAAAAAAAAAAAAAAAAAAAAAAAAAAAAAAAAAAAAAAAAAAAAAAAAAAAAAAAAAAAAAAAAAAAAAAAAAAAAAAAAAAAAAAAAAAAAAAAAAAAAAAAAAAAAAAAAAAAAAAAAAAAAAAAAAAAAAAAAAAAAAAAAAAAAAAAAAAAAAAAAAAAAAAAAAAAAAAAAAAAAAAAAAAAAAAAAAAAAAAAAAAAAAAAAAAAAAAAAAAAAAAAAAAAAAAAAAAAAAAAAAAAAAAAAAAAAAAAAAAAAAAAAAAAAAAAAAAAAAAAAAAAAAAAAAAAAAAAAAAAAAAAAAAAAAAAAAAAAAAAAAAAAAAAAAAAAAAAAAAAAAAAAAAAAAAAAAAAAAAAAAAAAAAAAAAAAAAAAAAAAAAAAAAAAAAAAAAAAAAAAAAAAAAAAAAAAAAAAAAAAAAAAAAAAAAAAAAAAAAAAAAAAAAAAAAAAAAAAAAAAAAAAAAAAAAAAAAAAAAAAAAAAAAAAAAAAAAAAAAAAAAAAAAAAAAAAAAAAAAAAAAAAAAAAAAAAAAAAAAAAAAAAAAAAAAAAAAAAAAAAAAAAAAAAAAAAAAAAAAAAAAAAAAAAAAAAAAAAAAAAAAAAAAAAAAAAAAAAAAAAAAAAAAAAAAAAAAAAAAAAAAAAAAAAAAAAAAAAAAAAAAAAAAAAAAAAAAAAAAAAAAAAAAAAAAAAAAAAAAAAAAAAAAAAAAAAAAAAAAAAAAAAAAAAAAAAAAAAAAAAAAAAAAAAAAAAAAAAAAAAAAAAAAAAAAAAAAAAAAAAAAAAAAAAAAAAAAAAAAAAAAAAAAAAAAAAAAAAAAAAAAAAAAAAAAAAAAAAAAAAAAAAAAAAAAAAAAAAAAAAAAAAAAAAAAAAAAAAAAAAAAAAAAAAAAAAAAAAAAAAAAAAAAAAAAAAAAAAAAAAAAAAAAAAAAAAAAAAAAAAAAAAAAAAAAAAAAAAAAAAAAAAAAAAAAAAAAAAAAAAAAAAAAAAAAAAAAAAAAAAAAAAAAAAAAAAAAAAAAAAAAAAAAAAAAAAAAAAAAAAAAAAAAAAAAAAAAAAAAAAAAAAAAAAAAAAAAAAAAAAAAAAAAAAAAAAAAAAAAAAAAAAAAAAAAAAAAAAAAAAAAAAAAAAAAAAAAAAAAAAAAAAAAAAAAAAAAAAAAAAAAAAAAAAAAAAAAAAAAAAAAAAAAAAAAAAAAAAAAAAAAAAAAAAAAAAAAAAAAAAAAAAAAAAAAAAAAAAAAAAAAAAAAAAAAAAAAAAAAAAAAAAAAAAAAAAAAAAAAAAAAAAAAAAAAAAAAAAAAAAAAAAAAAAAAAAAAAAAAAAAAAAAAAAAAAAAAAAAAAAAAAAAAAAAAAAAAAAAAAAAAAAAAAAAAAAAAAAAAAAAAAAAAAAAAAAAAAAAAAAAAAAAAAAAAAAAAAAAAAAAAAAAAAAAAAAAAAAAAAAAAAAAAAAAAAAAAAAAAAAAAAAAAAAAAAAAAAAAAAAAAAAAAAAAAAAAAAAAAAAAAAAAAAAAAAAAAAAAAAAAAAAAAAAAAAAAAAAAAAAAAAAAAAAAAAAAAAAAAAAAAAAAAAAAAAAAAAAAAAAAAAAAAAAAAAAAAAAAAAAAAAAAAAAAAAAAAAAAAAAAAAAAAAAAAAAAAAAAAAAAAAAAAAAAAAAAAAAAAAAAAAAAAAAAAAAAAAAAAAAAAAAAAAAAAAAAAAAAAAAAAAAAAAAAAAAAAAAAAAAAAAAAAAAAAAAAAAAAAAAAAAAAAAAAAAAAAAAAAAAAAAAAAAAAAAAAAAAAAAAAAAAAAAAAAAAAAAAAAAAAAAAAAAAAAAAAAAAAAAAAAAAAAAAAAAAAAAAAAAAAAAAAAAAAAAAAAAAAAAAAAAAAAAAAAAAAAAAAAAAAAAAAAAAAAAAAAAAAAAAAAAAAAAAAAAAAAAAAAAAAAAAAAAAAAAAAAAAAAAAAAAAAAAAAAAAAAAAAAAAAAAAAAAAAAAAAAAAAAAAAAAAAAAAAAAAAAAAAAAAAAAAAAAAAAAAAAAAAAAAAAAAAAAAAAAAAAAAAAAAAAAAAAAAAAAAAAAAAAAAAAAAAAAAAAAAAAAAAAAAAAAAAAAAAAAAAAAAAAAAAAAAAAAAAAAAAAAAAAAAAAAAAAAAAAAAAAAAAAAAAAAAAAAAAAAAAAAAAAAAAAAAAAAAAAAAAAAAAAAAAAAAAAAAAAAAAAAAAAAAAAAAAAAAAAAAAAAAAAAAAAAAAAAAAAAAAAAAAAAAAAAAAAAAAAAAAAAAAAAAAAAAAAAAAAAAAAAAAAAAAAAAAAAAAAAAAAAAAAAAAAAAAAAAAAAAAAAAAAAAAAAAAAAAAAAAAAAAAAAAAAAAAAAAAAAAAAAAAAAAAAAAAAAAAAAAAAAAAAAAAAAAAAAAAAAAAAAAAAAAAAAAAAAAAAAAAAAAAAAAAAAAAAAAAAAAAAAAAAAAAAAAAAAAAAAAAAAAAAAAAAAAAAAAAAAAAAAAAAAAAAAAAAAAAAAAAAAAAAAAAAAAAAAAAAAAAAAAAAAAAAAAAAAAAAAAAAAAAAAAAAAAAAAAAAAAAAAAAAAAAAAAAAAAAAAAAAAAAAAAAAAAAAAAAAAAAAAAAAAAAAAAAAAAAAAAAAAAAAAAAAAAAAAAAAAAAAAAAAAAAAAAAAAAAAAAAAAAAAAAAAAAAAAAAAAAAAAAAAAAAAAAAAAAAAAAAAAAAAAAAAAAAAAAAAAAAAAAAAAAAAAAAAAAAAAAAAAAAAAAAAAAAAAAAAAAAAAAAAAAAAAAAAAAAAAAAAAAAAAAAAAAAAAAAAAAAAAAAAAAAAAAAAAAAAAAAAAAAAAAAAAAAAAAAAAAAAAAAAAAAAAAAAAAAAAAAAAAAAAAAAAAAAAAAAAAAAAAAAAAAAAAAAAAAAAAAAAAAAAAAAAAAAAAAAAAAAAAAAAAAAAAAAAAAAAAAAAAAAAAAAAAAAAAAAAAAAAAAAAAAAAAAAAAAAAAAAAAAAAAAAAAAAAAAAAAAAAAAAAAAAAAAAAAAAAAAAAAAAAAAAAAAAAAAAAAAAAAAAAAAAAAAAAAAAAAAAAAAAAAAAAAAAAAAAAAAAAAAAAAAAAAAAAAAAAAAAAAAAAAAAAAAAAAAAAAAAAAAAAAAAAAAAAAAAAAAAAAAAAAAAAAAAAAAAAAAAAAAAAAAAAAAAAAAAAAAAAAAAAAAAAAAAAAAAAAAAAAAAAAAAAAAAAAAAAAAAAAAAAAAAAAAAAAAAAAAAAAAAAAAAAAAAAAAAAAAAAAAAAAAAAAAAAAAAAAAAAAAAAAAAAAAAAAAAAAAAAAAAAAAAAAAAAAAAAAAAAAAAAAAAAAAAAAAAAAAAAAAAAAAAAAAAAAAAAAAAAAAAAAAAAAAAAAAAAAAAAAAAAAAAAAAAAAAAAAAAAAAAAAAAAAAAAAAAAAAAAAAAAAAAAAAAAAAAAAAAAAAAAAAAAAAAAAAAAAAAAAAAAAAAAAAAAAAAAAAAAAAAAAAAAAAAAAAAAAAAAAAAAAAAAAAAAAAAAAAAAAAAAAAAAAAAAAAAAAAAAAAAAAAAAAAAAAAAAAAAAAAAAAAAAAAAAAAAAAAAAAAAAAAAAAAAAAAAAAAAAAAAAAAAAAAAAAAAAAAAAAAAAAAAAAAAAAAAAAAAAAAAAAAAAAAAAAAAAAAAAAAAAAAAAAAAAAAAAAAAAAAAAAAAAAAAAAAAAAAAAAAAAAAAAAAAAAAAAAAAAAAAAAAAAAAAAAAAAAAAAAAAAAAAAAAAAAAAAAAAAAAAAAAAAAAAAAAAAAAAAAAAAAAAAAAAAAAAAAAAAAAAAAAAAAAAAAAAAAAAAAAAAAAAAAAAAAAAAAAAAAAAAAAAAAAAAAAAAAA
AAAAAAAAAAAAAAAAAAAAAAAAAAAAAAAAAAAAAAAAAAAAAAAAAAAAAAAAAAAAAAAAAAAAAAAAAAAAAAAAAAAAAAAAAAAAAAAAAAAAAAAAAAAAAAAAAAAAAAAAAAAAAAAAAAAAAAAAAAAAAAAAAAAAAAAAAAAAAAAAAAAAAAAAAAAAAAAAAAAAAAAAAAAAAAAAAAAAAAAAAAAAAAAAAAAAAAAAAAAAAAAAAAAAAAAAAAAAAAAAAAAAAAAAAAAAAAAAAAAAAAAAAAAAAAAAAAAAAAAAAAAAAAAAAAAAAAAAAAAAAAAAAAAAAAAAAAAAAAAAAAAAAAAAAAAAAAAAAAAAAAAAAAAAAAAAAAAAAAAAAAAAAAAAAAAAAAAAAAAAAAAAAAAAAAAAAAAAAAAAAAAAAAAAAAAAAAAAAAAAAAAAAAAAAAAAAAAAAAAAAAAAAAAAAAAAAAAAAAAAAAAAAAAAAAAAAAAAAAAAAAAAAAAAAAAAAAAAAAAAAAAAAAAAAAAAAAAAAAAAAAAAAAAAAAAAAAAAAAAAAAAAAAAAAAAAAAAAAAAAAAAAAAAAAAAAAAAAAAAAAAAAAAAAAAAAAAAAAAAAAAAAAAAAAAAAAAAAAAAAAAAAAAAAAAAAAAAAAAAAAAAAAAAAAAAAAAAAAAAAAAAAAAAAAAAAAAAAAAAAAAAAAAAAAAAAAAAAAAAAAAAAAAAAAAAAAAAAAAAAAAAAAAAAAAAAAAAAAAAAAAAAAAAAAAAAAAAAAAAAAAAAAAAAAAAAAAAAAAAAAAAAAAAAAAAAAAAAAAAAAAAAAAAAAAAAAAAAAAAAAAAAAAAAAAAAAAAAAAAAAAAAAAAAAAAAAAAAAAAAAAAAAAAAAAAAAAAAAAAAAAAAAAAAAAAAAAAAAAAAAAAAAAAAAAAAAAAAAAAAAAAAAAAAAAAAAAAAAAAAAAAAAAAAAAAAAAAAAAAAAAAAAAAAAAAAAAAAAAAAAAAAAAAAAAAAAAAAAAAAAAAAAAAAAAAAAAAAAAAAAAAAAAAAAAAAAAAAAAAAAAAAAAAAAAAAAAAAAAAAAAAAAAAAAAAAAAAAAAAAAAAAAAAAAAAAAAAAAAAAAAAAAAAAAAAAAAAAAAAAAAAAAAAAAAAAAAAAAAAAAAAAAAAAAAAAAAAAAAAAAAAAAAAAAAAAAAAAAAAAAAAAAAAAAAAAAAAAAAAAAAAAAAAAAAAAAAAAAAAAAAAAAAAAAAAAAAAAAAAAAAAAAAAAAAAAAAAAAAAAAAAAAAAAAAAAAAAAAAAAAAAAAAAAAAAAAAAAAAAAAAAAAAAAAAAAAAAAAAAAAAAAAAAAAAAAAAAAAAAAAAAAAAAAAAAAAAAAAAAAAAAAAAAAAAAAAAAAAAAAAAAAAAAAAAAAAAAAAAAAAAAAAAAAAAAAAAAAAAAAAAAAAAAAAAAAAAAAAAAAAAAAAAAAAAAAAAAAAAAAAAAAAAAAAAAAAAAAAAAAAAAAAAAAAAAAAAAAAAAAAAAAAAAAAAAAAAAAAAAAAAAAAAAAAAAAAAAAAAAAAAAAAAAAAAAAAAAAAAAAAAAAAAAAAAAAAAAAAAAAAAAAAAAAAAAAAAAAAAAAAAAAAAAAAAAAAAAAAAAAAAAAAAAAAAAAAAAAAAAAAAAAAAAAAAAAAAAAAAAAAAAAAAAAAAAAAAAAAAAAAAAAAAAAAAAAAAAAAAAAAAAAAAAAAAAAAAAAAAAAAAAAAAAAAAAAAAAAAAAAAAAAAAAAAAAAAAAAAAAAAAAAAAAAAAAAAAAAAAAAAAAAAAAAAAAAAAAAAAAAAAAAAAAAAAAAAAAAAAAAAAAAAAAAAAAAAAAAAAAAAAAAAAAAAAAAAAAAAAAAAAAAAAAAAAAAAAAAAAAAAAAAAAAAAAAAAAAAAAAAAAAAAAAAAAAAAAAAAAAAAAAAAAAAAAAAAAAAAAAAAAAAAAAAAAAAAAAAAAAAAAAAAAAAAAAAAAAAAAAAAAAAAAAAAAAAAAAAAAAAAAAAAAAAAAAAAAAAAAAAAAAAAAAAAAAAAAAAAAAAAAAAAAAAAAAAAAAAAAAAAAAAAAAAAAAAAAAAAAAAAAAAAAAAAAAAAAAAAAAAAAAAAAAAAAAAAAAAAAAAAAAAAAAAAAAAAAAAAAAAAAAAAAAAAAAAAAAAAAAAAAAAAAAAAAAAAAAAAAAAAAAAAAAAAAAAAAAAAAAAAAAAAAAAAAAAAAAAAAAAAAAAAAAAAAAAAAAAAAAAAAAAAAAAAAAAAAAAAAAAAAAAAAAAAAAAAAAAAAAAAAAAAAAAAAAAAAAAAAAAAAAAAAAAAAAAAAAAAAAAAAAAAAAAAAAAAAAAAAAAAAAAAAAAAAAAAAAAAAAAAAAAAAAAAAAAAAAAAAAAAAAAAAAAAAAAAAAAAAAAAAAAAAAAAAAAAAAAAAAAAAAAAAAAAAAAAAAAAAAAAAAAAAAAAAAAAAAAAAAAAAAAAAAAAAAAAAAAAAAAAAAAAAAAAAAAAAAAAAAAAAAAAAAAAAAAAAAAAAAAAAAAAAAAAAAAAAAAAAAAAAAAAAAAAAAAAAAAAAAAAAAAAAAAAAAAAAAAAAAAAAAAAAAAAAAAAAAAAAAAAAAAAAAAAAAAAAAAAAAAAAAAAAAAAAAAAAAAAAAAAAAAAAAAAAAAAAAAAAAAAAAAAAAAAAAAAAAAAAAAAAAAAAAAAAAAAAAAAAAAAAAAAAAAAAAAAAAAAAAAAAAAAAAAAAAAAAAAAAAAAAAAAAAAAAAAAAAAAAAAAAAAAAAAAAAAAAAAAAAAAAAAAAAAAAAAAAAAAAAAAAAAAAAAAAAAAAAAAAAAAAAAAAAAAAAAAAAAAAAAAAAAAAAAAAAAAAAAAAAAAAAAAAAAAAAAAAAAAAAAAAAAAAAAAAAAAAAAAAAAAAAAAAAAAAAAAAAAAAAAAAAAAAAAAAAAAAAAAAAAAAAAAAAAAAAAAAAAAAAAAAAAAAAAAAAAAAAAAAAAAAAAAAAAAAAAAAAAAAAAAAAAAAAAAAAAAAAAAAAAAAAAAAAAAAAAAAAAAAAAAAAAAAAAAAAAAAAAAAAAAAAAAAAAAAAAAAAAAAAAAAAAAAAAAAAAAAAAAAAAAAAAAAAAAAAAAAAAAAAAAAAAAAAAAAAAAAAAAAAAAAAAAAAAAAAAAAAAAAAAAAAAAAAAAAAAAAAAAAAAAAAAAAAAAAAAAAAAAAAAAAAAAAAAAAAAAAAAAAAAAAAAAAAAAAAAAAAAAAAAAAAAAAAAAAAAAAAAAAAAAAAAAAAAAAAAAAAAAAAAAAAAAAAAAAAAAAAAAAAAAAAAAAAAAAAAAAAAAAAAAAAAAAAAAAAAAAAAAAAAAAAAAAAAAAAAAAAAAAAAAAAAAAAAAAAAAAAAAAAAAAAAAAAAAAAAAAAAAAAAAAAAAAAAAAAAAAAAAAAAAAAAAAAAAAAAAAAAAAAAAAAAAAAAAAAAAAAAAAAAAAAAAAAAAAAAAAAAAAAAAAAAAAAAAAAAAAAAAAAAAAAAAAAAAAAAAAAAAAAAAAAAAAAAAAAAAAAAAAAAAAAAAAAAAAAAAAAAAAAAAAAAAAAAAAAAAAAAAAAAAAAAAAAAAAAAAAAAAAAAAAAAAAAAAAAAAAAAAAAAAAAAAAAAAAAAAAAAAAAAAAAAAAAAAAAAAAAAAAAAAAAAAAAAAAAAAAAAAAAAAAAAAAAAAAAAAAAAAAAAAAAAAAAAAAAAAAAAAAAAAAAAAAAAAAAAAAAAAAAAAAAAAAAAAAAAAAAAAAAAAAAAAAAAAAAAAAAAAAAAAAAAAAAAAAAAAAAAAAAAAAAAAAAAAAAAAAAAAAAAAAAAAAAAAAAAAAAAAAAAAAAAAAAAAAAAAAAAAAAAAAAAAAAAAAAAAAAAAAAAAAAAAAAAAAAAAAAAAAAAAAAAAAAAAAAAAAAAAAAAAAAAAAAAAAAAAAAAAAAAAAAAAAAAAAAAAAAAAAAAAAAAAAAAAAAAAAAAAAAAAAAAAAAAAAAAAAAAAAAAAAAAAAAAAAAAAAAAAAAAAAAAAAAAAAAAAAAAAAAAAAAAAAAAAAAAAAAAAAAAAAAAAAAAAAAAAAAAAAAAAAAAAAAAAAAAAAAA
AAAAAAAAAAAAAAAAAAAAAAAAAAAAAAAAAAAAAAAAAAAAAAAAAAAAAAAAAAAAAAAAAAAAAAAAAAAAAAAAAAAAAAAAAAAAAAAAAAAAAAAAAAAAAAAAAAAAAAAAAAAAAAAAAAAAAAAAAAAAAAAAAAAAAAAAAAAAAAAAAAAAAAAAAAAAAAAAAAAAAAAAAAAAAAAAAAAAAAAAAAAAAAAAAAAAAAAAAAAAAAAAAAAAAAAAAAAAAAAAAAAAAAAAAAAAAAAAAAAAAAAAAAAAAAAAAAAAAAAAAAAAAAAAAAAAAAAAAAAAAAAAAAAAAAAAAAAAAAAAAAAAAAAAAAAAAAAAAAAAAAAAAAAAAAAAAAAAAAAAAAAAAAAAAAAAAAAAAAAAAAAAAAAAAAAAAAAAAAAAAAAAAAAAAAAAAAAAAAAAAAAAAAAAAAAAAAAAAAAAAAAAAAAAAAAAAAAAAAAAAAAAAAAAAAAAAAAAAAAAAAAAAAAAAAAAAAAAAAAAAAAAAAAAAAAAAAAAAAAAAAAAAAAAAAAAAAAAAAAAAAAAAAAAAAAAAAAAAAAAAAAAAAAAAAAAAAAAAAAAAAAAAAAAAAAAAAAAAAAAAAAAAAAAAAAAAAAAAAAAAAAAAAAAAAAAAAAAAAAAAAAAAAAAAAAAAAAAAAAAAAAAAAAAAAAAAAAAAAAAAAAAAAAAAAAAAAAAAAAAAAAAAAAAAAAAAAAAAAAAAAAAAAAAAAAAAAAAAAAAAAAAAAAAAAAAAAAAAAAAAAAAAAAAAAAAAAAAAAAAAAAAAAAAAAAAAAAAAAAAAAAAAAAAAAAAAAAAAAAAAAAAAAAAAAAAAAAAAAAAAAAAAAAAAAAAAAAAAAAAAAAAAAAAAAAAAAAAAAAAAAAAAAAAAAAAAAAAAAAAAAAAAAAAAAAAAAAAAAAAAAAAAAAAAAAAAAAAAAAAAAAAAAAAAAAAAAAAAAAAAAAAAAAAAAAAAAAAAAAAAAAAAAAAAAAAAAAAAAAAAAAAAAAAAAAAAAAAAAAAAAAAAAAAAAAAAAAAAAAAAAAAAAAAAAAAAAAAAAAAAAAAAAAAAAAAAAAAAAAAAAAAAAAAAAAAAAAAAAAAAAAAAAAAAAAAAAAAAAAAAAAAAAAAAAAAAAAAAAAAAAAAAAAAAAAAAAAAAAAAAAAAAAAAAAAAAAAAAAAAAAAAAAAAAAAAAAAAAAAAAAAAAAAAAAAAAAAAAAAAAAAAAAAAAAAAAAAAAAAAAAAAAAAAAAAAAAAAAAAAAAAAAAAAAAAAAAAAAAAAAAAAAAAAAAAAAAAAAAAAAAAAAAAAAAAAAAAAAAAAAAAAAAAAAAAAAAAAAAAAAAAAAAAAAAAAAAAAAAAAAAAAAAAAAAAAAAAAAAAAAAAAAAAAAAAAAAAAAAAAAAAAAAAAAAAAAAAAAAAAAAAAAAAAAAAAAAAAAAAAAAAAAAAAAAAAAAAAAAAAAAAAAAAAAAAAAAAAAAAAAAAAAAAAAAAAAAAAAAAAAAAAAAAAAAAAAAAAAAAAAAAAAAAAAAAAAAAAAAAAAAAAAAAAAAAAAAAAAAAAAAAAAAAAAAAAAAAAAAAAAAAAAAAAAAAAAAAAAAAAAAAAAAAAAAAAAAAAAAAAAAAAAAAAAAAAAAAAAAAAAAAAAAAAAAAAAAAAAAAAAAAAAAAAAAAAAAAAAAAAAAAAAAAAAAAAAAAAAAAAAAAAAAAAAAAAAAAAAAAAAAAAAAAAAAAAAAAAAAAAAAAAAAAAAAAAAAAAAAAAAAAAAAAAAAAAAAAAAAAAAAAAAAAAAAAAAAAAAAAAAAAAAAAAAAAAAAAAAAAAAAAAAAAAAAAAAAAAAAAAAAAAAAAAAAAAAAAAAAAAAAAAAAAAAAAAAAAAAAAAAAAAAAAAAAAAAAAAAAAAAAAAAAAAAAAAAAAAAAAAAAAAAAAAAAAAAAAAAAAAAAAAAAAAAAAAAAAAAAAAAAAAAAAAAAAAAAAAAAAAAAAAAAAAAAAAAAAAAAAAAAAAAAAAAAAAAAAAAAAAAAAAAAAAAAAAAAAAAAAAAAAAAAAAAAAAAAAAAAAAAAAAAAAAAAAAAAAAAAAAAAAAAAAAAAAAAAAAAAAAAAAAAAAAAAAAAAAAAAAAAAAAAAAAAAAAAAAAAAAAAAAAAAAAAAAAAAAAAAAAAAAAAAAAAAAAAAAAAAAAAAAAAAAAAAAAAAAAAAAAAAAAAAAAAAAAAAAAAAAAAAAAAAAAAAAAAAAAAAAAAAAAAAAAAAAAAAAAAAAAAAAAAAAAAAAAAAAAAAAAAAAAAAAAAAAAAAAAAAAAAAAAAAAAAAAAAAAAAAAAAAAAAAAAAAAAAAAAAAAAAAAAAAAAAAAAAAAAAAAAAAAAAAAAAAAAAAAAAAAAAAAAAAAAAAAAAAAAAAAAAAAAAAAAAAAAAAAAAAAAAAAAAAAAAAAAAAAAAAAAAAAAAAAAAAAAAAAAAAAAAAAAAAAAAAAAAAAAAAAAAAAAAAAAAAAAAAAAAAAAAAAAAAAAAAAAAAAAAAAAAAAAAAAAAAAAAAAAAAAAAAAAAAAAAAAAAAAAAAAAAAAAAAAAAAAAAAAAAAAAAAAAAAAAAAAAAAAAAAAAAAAAAAAAAAAAAAAAAAAAAAAAAAAAAAAAAAAAAAAAAAAAAAAAAAAAAAAAAAAAAAAAAAAAAAAAAAAAAAAAAAAAAAAAAAAAAAAAAAAAAAAAAAAAAAAAAAAAAAAAAAAAAAAAAAAAAAAAAAAAAAAAAAAAAAAAAAAAAAAAAAAAAAAAAAAAAAAAAAAAAAAAAAAAAAAAAAAAAAAAAAAAAAAAAAAAAAAAAAAAAAAAAAAAAAAAAAAAAAAAAAAAAAAAAAAAAAAAAAAAAAAAAAAAAAAAAAAAAAAAAAAAAAAAAAAAAAAAAAAAAAAAAAAAAAAAAAAAAAAAAAAAAAAAAAAAAAAAAAAAAAAAAAAAAAAAAAAAAAAAAAAAAAAAAAAAAAAAAAAAAAAAAAAAAAAAAAAAAAAAAAAAAAAAAAAAAAAAAAAAAAAAAAAAAAAAAAAAAAAAAAAAAAAAAAAAAAAAAAAAAAAAAAAAAAAAAAAAAAAAAAAAAAAAAAAAAAAAAAAAAAAAAAAAAAAAAAAAAAAAAAAAAAAAAAAAAAAAAAAAAAAAAAAAAAAAAAAAAAAAAAAAAAAAAAAAAAAAAAAAAAAAAAAAAAAAAAAAAAAAAAAAAAAAAAAAAAAAAAAAAAAAAAAAAAAAAAAAAAAAAAAAAAAAAAAAAAAAAAAAAAAAAAAAAAAAAAAAAAAAAAAAAAAAAAAAAAAAAAAAAAAAAAAAAAAAAAAAAAAAAAAAAAAAAAAAAAAAAAAAAAAAAAAAAAAAAAAAAAAAAAAAAAAAAAAAAAAAAAAAAAAAAAAAAAAAAAAAAAAAAAAAAAAAAAAAAAAAAAAAAAAAAAAAAAAAAAAAAAAAAAAAAAAAAAAAAAAAAAAAAAAAAAAAAAAAAAAAAAAAAAAAAAAAAAAAAAAAAAAAAAAAAAAAAAAAAAAAAAAAAAAAAAAAAAAAAAAAAAAAAAAAAAAAAAAAAAAAAAAAAAAAAAAAAAAAAAAAAAAAAAAAAAAAAAAAAAAAAAAAAAAAAAAAAAAAAAAAAAAAAAAAAAAAAAAAAAAAAAAAAAAAAAAAAAAAAAAAAAAAAAAAAAAAAAAAAAAAAAAAAAAAAAAAAAAAAAAAAAAAAAAAAAAAAAAAAAAAAAAAAAAAAAAAAAAAAAAAAAAAAAAAAAAAAAAAAAAAAAAAAAAAAAAAAAAAAAAAAAAAAAAAAAAAAAAAAAAAAAAAAAAAAAAAAAAAAAAAAAAAAAAAAAAAAAAAAAAAAAAAAAAAAAAAAAAAAAAAAAAAAAAAAAAAAAAAAAAAAAAAAAAAAAAAAAAAAAAAAAAAAAAAAAAAAAAAAAAAAAAAAAAAAAAAAAAAAAAAAAAAAAAAAAAAAAAAAAAAAAAAAAAAAAAAAAAAAAAAAAAAAAAAAAAAAAAAAAAAAAAAAAAAAAAAAAAAAAAAAAAAAAAAAAAAAAAAAAAAAAAAAAAAAAAAAAAAAAAAAAAAAAAAAAAAAAAAAAAAAAAAAAAAAAAAAAAAAAAA
AAAAAAAAAAAAAAAAAAAAAAAAAAAAAAAAAAAAAAAAAAAAAAAAAAAAAAAAAAAAAAAAAAAAAAAAAAAAAAAAAAAAAAAAAAAAAAAAAAAAAAAAAAAAAAAAAAAAAAAAAAAAAAAAAAAAAAAAAAAAAAAAAAAAAAAAAAAAAAAAAAAAAAAAAAAAAAAAAAAAAAAAAAAAAAAAAAAAAAAAAAAAAAAAAAAAAAAAAAAAAAAAAAAAAAAAAAAAAAAAAAAAAAAAAAAAAAAAAAAAAAAAAAAAAAAAAAAAAAAAAAAAAAAAAAAAAAAAAAAAAAAAAAAAAAAAAAAAAAAAAAAAAAAAAAAAAAAAAAAAAAAAAAAAAAAAAAAAAAAAAAAAAAAAAAAAAAAAAAAAAAAAAAAAAAAAAAAAAAAAAAAAAAAAAAAAAAAAAAAAAAAAAAAAAAAAAAAAAAAAAAAAAAAAAAAAAAAAAAAAAAAAAAAAAAAAAAAAAAAAAAAAAAAAAAAAAAAAAAAAAAAAAAAAAAAAAAAAAAAAAAAAAAAAAAAAAAAAAAAAAAAAAAAAAAAAAAAAAAAAAAAAAAAAAAAAAAAAAAAAAAAAAAAAAAAAAAAAAAAAAAAAAAAAAAAAAAAAAAAAAAAAAAAAAAAAAAAAAAAAAAAAAAAAAAAAAAAAAAAAAAAAAAAAAAAAAAAAAAAAAAAAAAAAAAAAAAAAAAAAAAAAAAAAAAAAAAAAAAAAAAAAAAAAAAAAAAAAAAAAAAAAAAAAAAAAAAAAAAAAAAAAAAAAAAAAAAAAAAAAAAAAAAAAAAAAAAAAAAAAAAAAAAAAAAAAAAAAAAAAAAAAAAAAAAAAAAAAAAAAAAAAAAAAAAAAAAAAAAAAAAAAAAAAAAAAAAAAAAAAAAAAAAAAAAAAAAAAAAAAAAAAAAAAAAAAAAAAAAAAAAAAAAAAAAAAAAAAAAAAAAAAAAAAAAAAAAAAAAAAAAAAAAAAAAAAAAAAAAAAAAAAAAAAAAAAAAAAAAAAAAAAAAAAAAAAAAAAAAAAAAAAAAAAAAAAAAAAAAAAAAAAAAAAAAAAAAAAAAAAAAAAAAAAAAAAAAAAAAAAAAAAAAAAAAAAAAAAAAAAAAAAAAAAAAAAAAAAAAAAAAAAAAAAAAAAAAAAAAAAAAAAAAAAAAAAAAAAAAAAAAAAAAAAAAAAAAAAAAAAAAAAAAAAAAAAAAAAAAAAAAAAAAAAAAAAAAAAAAAAAAAAAAAAAAAAAAAAAAAAAAAAAAAAAAAAAAAAAAAAAAAAAAAAAAAAAAAAAAAAAAAAAAAAAAAAAAAAAAAAAAAAAAAAAAAAAAAAAAAAAAAAAAAAAAAAAAAAAAAAAAAAAAAAAAAAAAAAAAAAAAAAAAAAAAAAAAAAAAAAAAAAAAAAAAAAAAAAAAAAAAAAAAAAAAAAAAAAAAAAAAAAAAAAAAAAAAAAAAAAAAAAAAAAAAAAAAAAAAAAAAAAAAAAAAAAAAAAAAAAAAAAAAAAAAAAAAAAAAAAAAAAAAAAAAAAAAAAAAAAAAAAAAAAAAAAAAAAAAAAAAAAAAAAAAAAAAAAAAAAAAAAAAAAAAAAAAAAAAAAAAAAAAAAAAAAAAAAAAAAAAAAAAAAAAAAAAAAAAAAAAAAAAAAAAAAAAAAAAAAAAAAAAAAAAAAAAAAAAAAAAAAAAAAAAAAAAAAAAAAAAAAAAAAAAAAAAAAAAAAAAAAAAAAAAAAAAAAAAAAAAAAAAAAAAAAAAAAAAAAAAAAAAAAAAAAAAAAAAAAAAAAAAAAAAAAAAAAAAAAAAAAAAAAAAAAAAAAAAAAAAAAAAAAAAAAAAAAAAAAAAAAAAAAAAAAAAAAAAAAAAAAAAAAAAAAAAAAAAAAAAAAAAAAAAAAAAAAAAAAAAAAAAAAAAAAAAAAAAAAAAAAAAAAAAAAAAAAAAAAAAAAAAAAAAAAAAAAAAAAAAAAAAAAAAAAAAAAAAAAAAAAAAAAAAAAAAAAAAAAAAAAAAAAAAAAAAAAAAAAAAAAAAAAAAAAAAAAAAAAAAAAAAAAAAAAAAAAAAAAAAAAAAAAAAAAAAAAAAAAAAAAAAAAAAAAAAAAAAAAAAAAAAAAAAAAAAAAAAAAAAAAAAAAAAAAAAAAAAAAAAAAAAAAAAAAAAAAAAAAAAAAAAAAAAAAAAAAAAAAAAAAAAAAAAAAAAAAAAAAAAAAAAAAAAAAAAAAAAAAAAAAAAAAAAAAAAAAAAAAAAAAAAAAAAAAAAAAAAAAAAAAAAAAAAAAAAAAAAAAAAAAAAAAAAAAAAAAAAAAAAAAAAAAAAAAAAAAAAAAAAAAAAAAAAAAAAAAAAAAAAAAAAAAAAAAAAAAAAAAAAAAAAAAAAAAAAAAAAAAAAAAAAAAAAAAAAAAAAAAAAAAAAAAAAAAAAAAAAAAAAAAAAAAAAAAAAAAAAAAAAAAAAAAAAAAAAAAAAAAAAAAAAAAAAAAAAAAAAAAAAAAAAAAAAAAAAAAAAAAAAAAAAAAAAAAAAAAAAAAAAAAAAAAAAAAAAAAAAAAAAAAAAAAAAAAAAAAAAAAAAAAAAAAAAAAAAAAAAAAAAAAAAAAAAAAAAAAAAAAAAAAAAAAAAAAAAAAAAAAAAAAAAAAAAAAAAAAAAAAAAAAAAAAAAAAAAAAAAAAAAAAAAAAAAAAAAAAAAAAAAAAAAAAAAAAAAAAAAAAAAAAAAAAAAAAAAAAAAAAAAAAAAAAAAAAAAAAAAAAAAAAAAAAAAAAAAAAAAAAAAAAAAAAAAAAAAAAAAAAAAAAAAAAAAAAAAAAAAAAAAAAAAAAAAAAAAAAAAAAAAAAAAAAAAAAAAAAAAAAAAAAAAAAAAAAAAAAAAAAAAAAAAAAAAAAAAAAAAAAAAAAAAAAAAAAAAAAAAAAAAAAAAAAAAAAAAAAAAAAAAAAAAAAAAAAAAAAAAAAAAAAAAAAAAAAAAAAAAAAAAAAAAAAAAAAAAAAAAAAAAAAAAAAAAAAAAAAAAAAAAAAAAAAAAAAAAAAAAAAAAAAAAAAAAAAAAAAAAAAAAAAAAAAAAAAAAAAAAAAAAAAAAAAAAAAAAAAAAAAAAAAAAAAAAAAAAAAAAAAAAAAAAAAAAAAAAAAAAAAAAAAAAAAAAAAAAAAAAAAAAAAAAAAAAAAAAAAAAAAAAAAAAAAAAAAAAAAAAAAAAAAAAAAAAAAAAAAAAAAAAAAAAAAAAAAAAAAAAAAAAAAAAAAAAAAAAAAAAAAAAAAAAAAAAAAAAAAAAAAAAAAAAAAAAAAAAAAAAAAAAAAAAAAAAAAAAAAAAAAAAAAAAAAAAAAAAAAAAAAAAAAAAAAAAAAAAAAAAAAAAAAAAAAAAAAAAAAAAAAAAAAAAAAAAAAAAAAAAAAAAAAAAAAAAAAAAAAAAAAAAAAAAAAAAAAAAAAAAAAAAAAAAAAAAAAAAAAAAAAAAAAAAAAAAAAAAAAAAAAAAAAAAAAAAAAAAAAAAAAAAAAAAAAAAAAAAAAAAAAAAAAAAAAAAAAAAAAAAAAAAAAAAAAAAAAAAAAAAAAAAAAAAAAAAAAAAAAAAAAAAAAAAAAAAAAAAAAAAAAAAAAAAAAAAAAAAAAAAAAAAAAAAAAAAAAAAAAAAAAAAAAAAAAAAAAAAAAAAAAAAAAAAAAAAAAAAAAAAAAAAAAAAAAAAAAAAAAAAAAAAAAAAAAAAAAAAAAAAAAAAAAAAAAAAAAAAAAAAAAAAAAAAAAAAAAAAAAAAAAAAAAAAAAAAAAAAAAAAAAAAAAAAAAAAAAAAAAAAAAAAAAAAAAAAAAAAAAAAAAAAAAAAAAAAAAAAAAAAAAAAAAAAAAAAAAAAAAAAAAAAAAAAAAAAAAAAAAAAAAAAAAAAAAAAAAAAAAAAAAAAAAAAAAAAAAAAAAAAAAAAAAAAAAAAAAAAAAAAAAAAAAAAAAAAAAAAAAAAAAAAAAAAAAAAAAAAAAAAAAAAAAAAAAAAAAAAAAAAAAAAAAAAAAAAAAAAAAAAAAAAAAAAAAAAAAAAAAAAAAAAAAAAAAAAAAAAAAAAAAAAAAAAAAAAAAAAAAAAAAAAAAAAAAAAAAAAAAAAAAAAAAAAAAAAAAAAAAAAAAAAAAAAAAAAAAAAAA
AAAAAAAAAAAAAAAAAAAAAAAAAAAAAAAAAAAAAAAAAAAAAAAAAAAAAAAAAAAAAAAAAAAAAAAAAAAAAAAAAAAAAAAAAAAAAAAAAAAAAAAAAAAAAAAAAAAAAAAAAAAAAAAAAAAAAAAAAAAAAAAAAAAAAAAAAAAAAAAAAAAAAAAAAAAAAAAAAAAAAAAAAAAAAAAAAAAAAAAAAAAAAAAAAAAAAAAAAAAAAAAAAAAAAAAAAAAAAAAAAAAAAAAAAAAAAAAAAAAAAAAAAAAAAAAAAAAAAAAAAAAAAAAAAAAAAAAAAAAAAAAAAAAAAAAAAAAAAAAAAAAAAAAAAAAAAAAAAAAAAAAAAAAAAAAAAAAAAAAAAAAAAAAAAAAAAAAAAAAAAAAAAAAAAAAAAAAAAAAAAAAAAAAAAAAAAAAAAAAAAAAAAAAAAAAAAAAAAAAAAAAAAAAAAAAAAAAAAAAAAAAAAAAAAAAAAAAAAAAAAAAAAAAAAAAAAAAAAAAAAAAAAAAAAAAAAAAAAAAAAAAAAAAAAAAAAAAAAAAAAAAAAAAAAAAAAAAAAAAAAAAAAAAAAAAAAAAAAAAAAAAAAAAAAAAAAAAAAAAAAAAAAAAAAAAAAAAAAAAAAAAAAAAAAAAAAAAAAAAAAAAAAAAAAAAAAAAAAAAAAAAAAAAAAAAAAAAAAAAAAAAAAAAAAAAAAAAAAAAAAAAAAAAAAAAAAAAAAAAAAAAAAAAAAAAAAAAAAAAAAAAAAAAAAAAAAAAAAAAAAAAAAAAAAAAAAAAAAAAAAAAAAAAAAAAAAAAAAAAAAAAAAAAAAAAAAAAAAAAAAAAAAAAAAAAAAAAAAAAAAAAAAAAAAAAAAAAAAAAAAAAAAAAAAAAAAAAAAAAAAAAAAAAAAAAAAAAAAAAAAAAAAAAAAAAAAAAAAAAAAAAAAAAAAAAAAAAAAAAAAAAAAAAAAAAAAAAAAAAAAAAAAAAAAAAAAAAAAAAAAAAAAAAAAAAAAAAAAAAAAAAAAAAAAAAAAAAAAAAAAAAAAAAAAAAAAAAAAAAAAAAAAAAAAAAAAAAAAAAAAAAAAAAAAAAAAAAAAAAAAAAAAAAAAAAAAAAAAAAAAAAAAAAAAAAAAAAAAAAAAAAAAAAAAAAAAAAAAAAAAAAAAAAAAAAAAAAAAAAAAAAAAAAAAAAAAAAAAAAAAAAAAAAAAAAAAAAAAAAAAAAAAAAAAAAAAAAAAAAAAAAAAAAAAAAAAAAAAAAAAAAAAAAAAAAAAAAAAAAAAAAAAAAAAAAAAAAAAAAAAAAAAAAAAAAAAAAAAAAAAAAAAAAAAAAAAAAAAAAAAAAAAAAAAAAAAAAAAAAAAAAAAAAAAAAAAAAAAAAAAAAAAAAAAAAAAAAAAAAAAAAAAAAAAAAAAAAAAAAAAAAAAAAAAAAAAAAAAAAAAAAAAAAAAAAAAAAAAAAAAAAAAAAAAAAAAAAAAAAAAAAAAAAAAAAAAAAAAAAAAAAAAAAAAAAAAAAAAAAAAAAAAAAAAAAAAAAAAAAAAAAAAAAAAAAAAAAAAAAAAAAAAAAAAAAAAAAAAAAAAAAAAAAAAAAAAAAAAAAAAAAAAAAAAAAAAAAAAAAAAAAAAAAAAAAAAAAAAAAAAAAAAAAAAAAAAAAAAAAAAAAAAAAAAAAAAAAAAAAAAAAAAAAAAAAAAAAAAAAAAAAAAAAAAAAAAAAAAAAAAAAAAAAAAAAAAAAAAAAAAAAAAAAAAAAAAAAAAAAAAAAAAAAAAAAAAAAAAAAAAAAAAAAAAAAAAAAAAAAAAAAAAAAAAAAAAAAAAAAAAAAAAAAAAAAAAAAAAAAAAAAAAAAAAAAAAAAAAAAAAAAAAAAAAAAAAAAAAAAAAAAAAAAAAAAAAAAAAAAAAAAAAAAAAAAAAAAAAAAAAAAAAAAAAAAAAAAAAAAAAAAAAAAAAAAAAAAAAAAAAAAAAAAAAAAAAAAAAAAAAAAAAAAAAAAAAAAAAAAAAAAAAAAAAAAAAAAAAAAAAAAAAAAAAAAAAAAAAAAAAAAAAAAAAAAAAAAAAAAAAAAAAAAAAAAAAAAAAAAAAAAAAAAAAAAAAAAAAAAAAAAAAAAAAAAAAAAAAAAAAAAAAAAAAAAAAAAAAAAAAAAAAAAAAAAAAAAAAAAAAAAAAAAAAAAAAAAAAAAAAAAAAAAAAAAAAAAAAAAAAAAAAAAAAAAAAAAAAAAAAAAAAAAAAAAAAAAAAAAAAAAAAAAAAAAAAAAAAAAAAAAAAAAAAAAAAAAAAAAAAAAAAAAAAAAAAAAAAAAAAAAAAAAAAAAAAAAAAAAAAAAAAAAAAAAAAAAAAAAAAAAAAAAAAAAAAAAAAAAAAAAAAAAAAAAAAAAAAAAAAAAAAAAAAAAAAAAAAAAAAAAAAAAAAAAAAAAAAAAAAAAAAAAAAAAAAAAAAAAAAAAAAAAAAAAAAAAAAAAAAAAAAAAAAAAAAAAAAAAAAAAAAAAAAAAAAAAAAAAAAAAAAAAAAAAAAAAAAAAAAAAAAAAAAAAAAAAAAAAAAAAAAAAAAAAAAAAAAAAAAAAAAAAAAAAAAAAAAAAAAAAAAAAAAAAAAAAAAAAAAAAAAAAAAAAAAAAAAAAAAAAAAAAAAAAAAAAAAAAAAAAAAAAAAAAAAAAAAAAAAAAAAAAAAAAAAAAAAAAAAAAAAAAAAAAAAAAAAAAAAAAAAAAAAAAAAAAAAAAAAAAAAAAAAAAAAAAAAAAAAAAAAAAAAAAAAAAAAAAAAAAAAAAAAAAAAAAAAAAAAAAAAAAAAAAAAAAAAAAAAAAAAAAAAAAAAAAAAAAAAAAAAAAAAAAAAAAAAAAAAAAAAAAAAAAAAAAAAAAAAAAAAAAAAAAAAAAAAAAAAAAAAAAAAAAAAAAAAAAAAAAAAAAAAAAAAAAAAAAAAAAAAAAAAAAAAAAAAAAAAAAAAAAAAAAAAAAAAAAAAAAAAAAAAAAAAAAAAAAAAAAAAAAAAAAAAAAAAAAAAAAAAAAAAAAAAAAAAAAAAAAAAAAAAAAAAAAAAAAAAAAAAAAAAAAAAAAAAAAAAAAAAAAAAAAAAAAAAAAAAAAAAAAAAAAAAAAAAAAAAAAAAAAAAAAAAAAAAAAAAAAAAAAAAAAAAAAAAAAAAAAAAAAAAAAAAAAAAAAAAAAAAAAAAAAAAAAAAAAAAAAAAAAAAAAAAAAAAAAAAAAAAAAAAAAAAAAAAAAAAAAAAAAAAAAAAAAAAAAAAAAAAAAAAAAAAAAAAAAAAAAAAAAAAAAAAAAAAAAAAAAAAAAAAAAAAAAAAAAAAAAAAAAAAAAAAAAAAAAAAAAAAAAAAAAAAAAAAAAAAAAAAAAAAAAAAAAAAAAAAAAAAAAAAAAAAAAAAAAAAAAAAAAAAAAAAAAAAAAAAAAAAAAAAAAAAAAAAAAAAAAAAAAAAAAAAAAAAAAAAAAAAAAAAAAAAAAAAAAAAAAAAAAAAAAAAAAAAAAAAAAAAAAAAAAAAAAAAAAAAAAAAAAAAAAAAAAAAAAAAAAAAAAAAAAAAAAAAAAAAAAAAAAAAAAAAAAAAAAAAAAAAAAAAAAAAAAAAAAAAAAAAAAAAAAAAAAAAAAAAAAAAAAAAAAAAAAAAAAAAAAAAAAAAAAAAAAAAAAAAAAAAAAAAAAAAAAAAAAAAAAAAAAAAAAAAAAAAAAAAAAAAAAAAAAAAAAAAAAAAAAAAAAAAAAAAAAAAAAAAAAAAAAAAAAAAAAAAAAAAAAAAAAAAAAAAAAAAAAAAAAAAAAAAAAAAAAAAAAAAAAAAAAAAAAAAAAAAAAAAAAAAAAAAAAAAAAAAAAAAAAAAAAAAAAAAAAAAAAAAAAAAAAAAAAAAAAAAAAAAAAAAAAAAAAAAAAAAAAAAAAAAAAAAAAAAAAAAAAAAAAAAAAAAAAAAAAAAAAAAAAAAAAAAAAAAAAAAAAAAAAAAAAAAAAAAAAAAAAAAAAAAAAAAAAAAAAAAAAAAAAAAAAAAAAAAAAAAAAAAAAAAAAAAAAAAAAAAAAAAAAAAAAAAAAAAAAAAAAAAAAAAAAAAAAAAAAAAAAAAAAAAAAAAAAAAAAAAAAAAAAAAAAAAAAAAAAAAAAAAAAAAAAAAAAAAAAA
AAAAAAAAAAAAAAAAAAAAAAAAAAAAAAAAAAAAAAAAAAAAAAAAAAAAAAAAAAAAAAAAAAAAAAAAAAAAAAAAAAAAAAAAAAAAAAAAAAAAAAAAAAAAAAAAAAAAAAAAAAAAAAAAAAAAAAAAAAAAAAAAAAAAAAAAAAAAAAAAAAAAAAAAAAAAAAAAAAAAAAAAAAAAAAAAAAAAAAAAAAAAAAAAAAAAAAAAAAAAAAAAAAAAAAAAAAAAAAAAAAAAAAAAAAAAAAAAAAAAAAAAAAAAAAAAAAAAAAAAAAAAAAAAAAAAAAAAAAAAAAAAAAAAAAAAAAAAAAAAAAAAAAAAAAAAAAAAAAAAAAAAAAAAAAAAAAAAAAAAAAAAAAAAAAAAAAAAAAAAAAAAAAAAAAAAAAAAAAAAAAAAAAAAAAAAAAAAAAAAAAAAAAAAAAAAAAAAAAAAAAAAAAAAAAAAAAAAAAAAAAAAAAAAAAAAAAAAAAAAAAAAAAAAAAAAAAAAAAAAAAAAAAAAAAAAAAAAAAAAAAAAAAAAAAAAAAAAAAAAAAAAAAAAAAAAAAAAAAAAAAAAAAAAAAAAAAAAAAAAAAAAAAAAAAAAAAAAAAAAAAAAAAAAAAAAAAAAAAAAAAAAAAAAAAAAAAAAAAAAAAAAAAAAAAAAAAAAAAAAAAAAAAAAAAAAAAAAAAAAAAAAAAAAAAAAAAAAAAAAAAAAAAAAAAAAAAAAAAAAAAAAAAAAAAAAAAAAAAAAAAAAAAAAAAAAAAAAAAAAAAAAAAAAAAAAAAAAAAAAAAAAAAAAAAAAAAAAAAAAAAAAAAAAAAAAAAAAAAAAAAAAAAAAAAAAAAAAAAAAAAAAAAAAAAAAAAAAAAAAAAAAAAAAAAAAAAAAAAAAAAAAAAAAAAAAAAAAAAAAAAAAAAAAAAAAAAAAAAAAAAAAAAAAAAAAAAAAAAAAAAAAAAAAAAAAAAAAAAAAAAAAAAAAAAAAAAAAAAAAAAAAAAAAAAAAAAAAAAAAAAAAAAAAAAAAAAAAAAAAAAAAAAAAAAAAAAAAAAAAAAAAAAAAAAAAAAAAAAAAAAAAAAAAAAAAAAAAAAAAAAAAAAAAAAAAAAAAAAAAAAAAAAAAAAAAAAAAAAAAAAAAAAAAAAAAAAAAAAAAAAAAAAAAAAAAAAAAAAAAAAAAAAAAAAAAAAAAAAAAAAAAAAAAAAAAAAAAAAAAAAAAAAAAAAAAAAAAAAAAAAAAAAAAAAAAAAAAAAAAAAAAAAAAAAAAAAAAAAAAAAAAAAAAAAAAAAAAAAAAAAAAAAAAAAAAAAAAAAAAAAAAAAAAAAAAAAAAAAAAAAAAAAAAAAAAAAAAAAAAAAAAAAAAAAAAAAAAAAAAAAAAAAAAAAAAAAAAAAAAAAAAAAAAAAAAAAAAAAAAAAAAAAAAAAAAAAAAAAAAAAAAAAAAAAAAAAAAAAAAAAAAAAAAAAAAAAAAAAAAAAAAAAAAAAAAAAAAAAAAAAAAAAAAAAAAAAAAAAAAAAAAAAAAAAAAAAAAAAAAAAAAAAAAAAAAAAAAAAAAAAAAAAAAAAAAAAAAAAAAAAAAAAAAAAAAAAAAAAAAAAAAAAAAAAAAAAAAAAAAAAAAAAAAAAAAAAAAAAAAAAAAAAAAAAAAAAAAAAAAAAAAAAAAAAAAAAAAAAAAAAAAAAAAAAAAAAAAAAAAAAAAAAAAAAAAAAAAAAAAAAAAAAAAAAAAAAAAAAAAAAAAAAAAAAAAAAAAAAAAAAAAAAAAAAAAAAAAAAAAAAAAAAAAAAAAAAAAAAAAAAAAAAAAAAAAAAAAAAAAAAAAAAAAAAAAAAAAAAAAAAAAAAAAAAAAAAAAAAAAAAAAAAAAAAAAAAAAAAAAAAAAAAAAAAAAAAAAAAAAAAAAAAAAAAAAAAAAAAAAAAAAAAAAAAAAAAAAAAAAAAAAAAAAAAAAAAAAAAAAAAAAAAAAAAAAAAAAAAAAAAAAAAAAAAAAAAAAAAAAAAAAAAAAAAAAAAAAAAAAAAAAAAAAAAAAAAAAAAAAAAAAAAAAAAAAAAAAAAAAAAAAAAAAAAAAAAAAAAAAAAAAAAAAAAAAAAAAAAAAAAAAAAAAAAAAAAAAAAAAAAAAAAAAAAAAAAAAAAAAAAAAAAAAAAAAAAAAAAAAAAAAAAAAAAAAAAAAAAAAAAAAAAAAAAAAAAAAAAAAAAAAAAAAAAAAAAAAAAAAAAAAAAAAAAAAAAAAAAAAAAAAAAAAAAAAAAAAAAAAAAAAAAAAAAAAAAAAAAAAAAAAAAAAAAAAAAAAAAAAAAAAAAAAAAAAAAAAAAAAAAAAAAAAAAAAAAAAAAAAAAAAAAAAAAAAAAAAAAAAAAAAAAAAAAAAAAAAAAAAAAAAAAAAAAAAAAAAAAAAAAAAAAAAAAAAAAAAAAAAAAAAAAAAAAAAAAAAAAAAAAAAAAAAAAAAAAAAAAAAAAAAAAAAAAAAAAAAAAAAAAAAAAAAAAAAAAAAAAAAAAAAAAAAAAAAAAAAAAAAAAAAAAAAAAAAAAAAAAAAAAAAAAAAAAAAAAAAAAAAAAAAAAAAAAAAAAAAAAAAAAAAAAAAAAAAAAAAAAAAAAAAAAAAAAAAAAAAAAAAAAAAAAAAAAAAAAAAAAAAAAAAAAAAAAAAAAAAAAAAAAAAAAAAAAAAAAAAAAAAAAAAAAAAAAAAAAAAAAAAAAAAAAAAAAAAAAAAAAAAAAAAAAAAAAAAAAAAAAAAAAAAAAAAAAAAAAAAAAAAAAAAAAAAAAAAAAAAAAAAAAAAAAAAAAAAAAAAAAAAAAAAAAAAAAAAAAAAAAAAAAAAAAAAAAAAAAAAAAAAAAAAAAAAAAAAAAAAAAAAAAAAAAAAAAAAAAAAAAAAAAAAAAAAAAAAAAAAAAAAAAAAAAAAAAAAAAAAAAAAAAAAAAAAAAAAAAAAAAAAAAAAAAAAAAAAAAAAAAAAAAAAAAAAAAAAAAAAAAAAAAAAAAAAAAAAAAAAAAAAAAAAAAAAAAAAAAAAAAAAAAAAAAAAAAAAAAAAAAAAAAAAAAAAAAAAAAAAAAAAAAAAAAAAAAAAAAAAAAAAAAAAAAAAAAAAAAAAAAAAAAAAAAAAAAAAAAAAAAAAAAAAAAAAAAAAAAAAAAAAAAAAAAAAAAAAAAAAAAAAAAAAAAAAAAAAAAAAAAAAAAAAAAAAAAAAAAAAAAAAAAAAAAAAAAAAAAAAAAAAAAAAAAAAAAAAAAAAAAAAAAAAAAAAAAAAAAAAAAAAAAAAAAAAAAAAAAAAAAAAAAAAAAAAAAAAAAAAAAAAAAAAAAAAAAAAAAAAAAAAAAAAAAAAAAAAAAAAAAAAAAAAAAAAAAAAAAAAAAAAAAAAAAAAAAAAAAAAAAAAAAAAAAAAAAAAAAAAAAAAAAAAAAAAAAAAAAAAAAAAAAAAAAAAAAAAAAAAAAAAAAAAAAAAAAAAAAAAAAAAAAAAAAAAAAAAAAAAAAAAAAAAAAAAAAAAAAAAAAAAAAAAAAAAAAAAAAAAAAAAAAAAAAAAAAAAAAAAAAAAAAAAAAAAAAAAAAAAAAAAAAAAAAAAAAAAAAAAAAAAAAAAAAAAAAAAAAAAAAAAAAAAAAAAAAAAAAAAAAAAAAAAAAAAAAAAAAAAAAAAAAAAAAAAAAAAAAAAAAAAAAAAAAAAAAAAAAAAAAAAAAAAAAAAAAAAAAAAAAAAAAAAAAAAAAAAAAAAAAAAAAAAAAAAAAAAAAAAAAAAAAAAAAAAAAAAAAAAAAAAAAAAAAAAAAAAAAAAAAAAAAAAAAAAAAAAAAAAAAAAAAAAAAAAAAAAAAAAAAAAAAAAAAAAAAAAAAAAAAAAAAAAAAAAAAAAAAAAAAAAAAAAAAAAAAAAAAAAAAAAAAAAAAAAAAAAAAAAAAAAAAAAAAAAAAAAAAAAAAAAAAAAAAAAAAAAAAAAAAAAAAAAAAAAAAAAAAAAAAAAAAAAAAAAAAAAAAAAAAAAAAAAAAAAAAAAAAAAAAAAAAAAAAAAAAAAAAAAAAAAAAAAAAAAAAAAAAAAAAAAAAAAAAAAAAAAAAAAAAAAAAAAAAAAAAAAAAAAAAAAAAAAAAAAAAAAAAAAAAAAAAAAAAAAAAAAAAAA
AAAAAAAAAAAAAAAAAAAAAAAAAAAAAAAAAAAAAAAAAAAAAAAAAAAAAAAAAAAAAAAAAAAAAAAAAAAAAAAAAAAAAAAAAAAAAAAAAAAAAAAAAAAAAAAAAAAAAAAAAAAAAAAAAAAAAAAAAAAAAAAAAAAAAAAAAAAAAAAAAAAAAAAAAAAAAAAAAAAAAAAAAAAAAAAAAAAAAAAAAAAAAAAAAAAAAAAAAAAAAAAAAAAAAAAAAAAAAAAAAAAAAAAAAAAAAAAAAAAAAAAAAAAAAAAAAAAAAAAAAAAAAAAAAAAAAAAAAAAAAAAAAAAAAAAAAAAAAAAAAAAAAAAAAAAAAAAAAAAAAAAAAAAAAAAAAAAAAAAAAAAAAAAAAAAAAAAAAAAAAAAAAAAAAAAAAAAAAAAAAAAAAAAAAAAAAAAAAAAAAAAAAAAAAAAAAAAAAAAAAAAAAAAAAAAAAAAAAAAAAAAAAAAAAAAAAAAAAAAAAAAAAAAAAAAAAAAAAAAAAAAAAAAAAAAAAAAAAAAAAAAAAAAAAAAAAAAAAAAAAAAAAAAAAAAAAAAAAAAAAAAAAAAAAAAAAAAAAAAAAAAAAAAAAAAAAAAAAAAAAAAAAAAAAAAAAAAAAAAAAAAAAAAAAAAAAAAAAAAAAAAAAAAAAAAAAAAAAAAAAAAAAAAAAAAAAAAAAAAAAAAAAAAAAAAAAAAAAAAAAAAAAAAAAAAAAAAAAAAAAAAAAAAAAAAAAAAAAAAAAAAAAAAAAAAAAAAAAAAAAAAAAAAAAAAAAAAAAAAAAAAAAAAAAAAAAAAAAAAAAAAAAAAAAAAAAAAAAAAAAAAAAAAAAAAAAAAAAAAAAAAAAAAAAAAAAAAAAAAAAAAAAAAAAAAAAAAAAAAAAAAAAAAAAAAAAAAAAAAAAAAAAAAAAAAAAAAAAAAAAAAAAAAAAAAAAAAAAAAAAAAAAAAAAAAAAAAAAAAAAAAAAAAAAAAAAAAAAAAAAAAAAAAAAAAAAAAAAAAAAAAAAAAAAAAAAAAAAAAAAAAAAAAAAAAAAAAAAAAAAAAAAAAAAAAAAAAAAAAAAAAAAAAAAAAAAAAAAAAAAAAAAAAAAAAAAAAAAAAAAAAAAAAAAAAAAAAAAAAAAAAAAAAAAAAAAAAAAAAAAAAAAAAAAAAAAAAAAAAAAAAAAAAAAAAAAAAAAAAAAAAAAAAAAAAAAAAAAAAAAAAAAAAAAAAAAAAAAAAAAAAAAAAAAAAAAAAAAAAAAAAAAAAAAAAAAAAAAAAAAAAAAAAAAAAAAAAAAAAAAAAAAAAAAAAAAAAAAAAAAAAAAAAAAAAAAAAAAAAAAAAAAAAAAAAAAAAAAAAAAAAAAAAAAAAAAAAAAAAAAAAAAAAAAAAAAAAAAAAAAAAAAAAAAAAAAAAAAAAAAAAAAAAAAAAAAAAAAAAAAAAAAAAAAAAAAAAAAAAAAAAAAAAAAAAAAAAAAAAAAAAAAAAAAAAAAAAAAAAAAAAAAAAAAAAAAAAAAAAAAAAAAAAAAAAAAAAAAAAAAAAAAAAAAAAAAAAAAAAAAAAAAAAAAAAAAAAAAAAAAAAAAAAAAAAAAAAAAAAAAAAAAAAAAAAAAAAAAAAAAAAAAAAAAAAAAAAAAAAAAAAAAAAAAAAAAAAAAAAAAAAAAAAAAAAAAAAAAAAAAAAAAAAAAAAAAAAAAAAAAAAAAAAAAAAAAAAAAAAAAAAAAAAAAAAAAAAAAAAAAAAAAAAAAAAAAAAAAAAAAAAAAAAAAAAAAAAAAAAAAAAAAAAAAAAAAAAAAAAAAAAAAAAAAAAAAAAAAAAAAAAAAAAAAAAAAAAAAAAAAAAAAAAAAAAAAAAAAAAAAAAAAAAAAAAAAAAAAAAAAAAAAAAAAAAAAAAAAAAAAAAAAAAAAAAAAAAAAAAAAAAAAAAAAAAAAAAAAAAAAAAAAAAAAAAAAAAAAAAAAAAAAAAAAAAAAAAAAAAAAAAAAAAAAAAAAAAAAAAAAAAAAAAAAAAAAAAAAAAAAAAAAAAAAAAAAAAAAAAAAAAAAAAAAAAAAAAAAAAAAAAAAAAAAAAAAAAAAAAAAAAAAAAAAAAAAAAAAAAAAAAAAAAAAAAAAAAAAAAAAAAAAAAAAAAAAAAAAAAAAAAAAAAAAAAAAAAAAAAAAAAAAAAAAAAAAAAAAAAAAAAAAAAAAAAAAAAAAAAAAAAAAAAAAAAAAAAAAAAAAAAAAAAAAAAAAAAAAAAAAAAAAAAAAAAAAAAAAAAAAAAAAAAAAAAAAAAAAAAAAAAAAAAAAAAAAAAAAAAAAAAAAAAAAAAAAAAAAAAAAAAAAAAAAAAAAAAAAAAAAAAAAAAAAAAAAAAAAAAAAAAAAAAAAAAAAAAAAAAAAAAAAAAAAAAAAAAAAAAAAAAAAAAAAAAAAAAAAAAAAAAAAAAAAAAAAAAAAAAAAAAAAAAAAAAAAAAAAAAAAAAAAAAAAAAAAAAAAAAAAAAAAAAAAAAAAAAAAAAAAAAAAAAAAAAAAAAAAAAAAAAAAAAAAAAAAAAAAAAAAAAAAAAAAAAAAAAAAAAAAAAAAAAAAAAAAAAAAAAAAAAAAAAAAAAAAAAAAAAAAAAAAAAAAAAAAAAAAAAAAAAAAAAAAAAAAAAAAAAAAAAAAAAAAAAAAAAAAAAAAAAAAAAAAAAAAAAAAAAAAAAAAAAAAAAAAAAAAAAAAAAAAAAAAAAAAAAAAAAAAAAAAAAAAAAAAAAAAAAAAAAAAAAAAAAAAAAAAAAAAAAAAAAAAAAAAAAAAAAAAAAAAAAAAAAAAAAAAAAAAAAAAAAAAAAAAAAAAAAAAAAAAAAAAAAAAAAAAAAAAAAAAAAAAAAAAAAAAAAAAAAAAAAAAAAAAAAAAAAAAAAAAAAAAAAAAAAAAAAAAAAAAAAAAAAAAAAAAAAAAAAAAAAAAAAAAAAAAAAAAAAAAAAAAAAAAAAAAAAAAAAAAAAAAAAAAAAAAAAAAAAAAAAAAAAAAAAAAAAAAAAAAAAAAAAAAAAAAAAAAAAAAAAAAAAAAAAAAAAAAAAAAAAAAAAAAAAAAAAAAAAAAAAAAAAAAAAAAAAAAAAAAAAAAAAAAAAAAAAAAAAAAAAAAAAAAAAAAAAAAAAAAAAAAAAAAAAAAAAAAAAAAAAAAAAAAAAAAAAAAAAAAAAAAAAAAAAAAAAAAAAAAAAAAAAAAAAAAAAAAAAAAAAAAAAAAAAAAAAAAAAAAAAAAAAAAAAAAAAAAAAAAAAAAAAAAAAAAAAAAAAAAAAAAAAAAAAAAAAAAAAAAAAAAAAAAAAAAAAAAAAAAAAAAAAAAAAAAAAAAAAAAAAAAAAAAAAAAAAAAAAAAAAAAAAAAAAAAAAAAAAAAAAAAAAAAAAAAAAAAAAAAAAAAAAAAAAAAAAAAAAAAAAAAAAAAAAAAAAAAAAAAAAAAAAAAAAAAAAAAAAAAAAAAAAAAAAAAAAAAAAAAAAAAAAAAAAAAAAAAAAAAAAAAAAAAAAAAAAAAAAAAAAAAAAAAAAAAAAAAAAAAAAAAAAAAAAAAAAAAAAAAAAAAAAAAAAAAAAAAAAAAAAAAAAAAAAAAAAAAAAAAAAAAAAAAAAAAAAAAAAAAAAAAAAAAAAAAAAAAAAAAAAAAAAAAAAAAAAAAAAAAAAAAAAAAAAAAAAAAAAAAAAAAAAAAAAAAAAAAAAAAAAAAAAAAAAAAAAAAAAAAAAAAAAAAAAAAAAAAAAAAAAAAAAAAAAAAAAAAAAAAAAAAAAAAAAAAAAAAAAAAAAAAAAAAAAAAAAAAAAAAAAAAAAAAAAAAAAAAAAAAAAAAAAAAAAAAAAAAAAAAAAAAAAAAAAAAAAAAAAAAAAAAAAAAAAAAAAAAAAAAAAAAAAAAAAAAAAAAAAAAAAAAAAAAAAAAAAAAAAAAAAAAAAAAAAAAAAAAAAAAAAAAAAAAAAAAAAAAAAAAAAAAAAAAAAAAAAAAAAAAAAAAAAAAAAAAAAAAAAAAAAAAAAAAAAAAAAAAAAAAAAAAAAAAAAAAAAAAAAAAAAAAAAAAAAAAAAAAAAAAAAAAAAAAAAAAAAAAAAAAAAAAAAAAAAAAAAAAAAAAAAAAAAAAAAAAAAAAAAAAAAAAAAAAAAA
AAAAAAAAAAAAAAAAAAAAAAAAAAAAAAAAAAAAAAAAAAAAAAAAAAAAAAAAAAAAAAAAAAAAAAAAAAAAAAAAAAAAAAAAAAAAAAAAAAAAAAAAAAAAAAAAAAAAAAAAAAAAAAAAAAAAAAAAAAAAAAAAAAAAAAAAAAAAAAAAAAAAAAAAAAAAAAAAAAAAAAAAAAAAAAAAAAAAAAAAAAAAAAAAAAAAAAAAAAAAAAAAAAAAAAAAAAAAAAAAAAAAAAAAAAAAAAAAAAAAAAAAAAAAAAAAAAAAAAAAAAAAAAAAAAAAAAAAAAAAAAAAAAAAAAAAAAAAAAAAAAAAAAAAAAAAAAAAAAAAAAAAAAAAAAAAAAAAAAAAAAAAAAAAAAAAAAAAAAAAAAAAAAAAAAAAAAAAAAAAAAAAAAAAAAAAAAAAAAAAAAAAAAAAAAAAAAAAAAAAAAAAAAAAAAAAAAAAAAAAAAAAAAAAAAAAAAAAAAAAAAAAAAAAAAAAAAAAAAAAAAAAAAAAAAAAAAAAAAAAAAAAAAAAAAAAAAAAAAAAAAAAAAAAAAAAAAAAAAAAAAAAAAAAAAAAAAAAAAAAAAAAAAAAAAAAAAAAAAAAAAAAAAAAAAAAAAAAAAAAAAAAAAAAAAAAAAAAAAAAAAAAAAAAAAAAAAAAAAAAAAAAAAAAAAAAAAAAAAAAAAAAAAAAAAAAAAAAAAAAAAAAAAAAAAAAAAAAAAAAAAAAAAAAAAAAAAAAAAAAAAAAAAAAAAAAAAAAAAAAAAAAAAAAAAAAAAAAAAAAAAAAAAAAAAAAAAAAAAAAAAAAAAAAAAAAAAAAAAAAAAAAAAAAAAAAAAAAAAAAAAAAAAAAAAAAAAAAAAAAAAAAAAAAAAAAAAAAAAAAAAAAAAAAAAAAAAAAAAAAAAAAAAAAAAAAAAAAAAAAAAAAAAAAAAAAAAAAAAAAAAAAAAAAAAAAAAAAAAAAAAAAAAAAAAAAAAAAAAAAAAAAAAAAAAAAAAAAAAAAAAAAAAAAAAAAAAAAAAAAAAAAAAAAAAAAAAAAAAAAAAAAAAAAAAAAAAAAAAAAAAAAAAAAAAAAAAAAAAAAAAAAAAAAAAAAAAAAAAAAAAAAAAAAAAAAAAAAAAAAAAAAAAAAAAAAAAAAAAAAAAAAAAAAAAAAAAAAAAAAAAAAAAAAAAAAAAAAAAAAAAAAAAAAAAAAAAAAAAAAAAAAAAAAAAAAAAAAAAAAAAAAAAAAAAAAAAAAAAAAAAAAAAAAAAAAAAAAAAAAAAAAAAAAAAAAAAAAAAAAAAAAAAAAAAAAAAAAAAAAAAAAAAAAAAAAAAAAAAAAAAAAAAAAAAAAAAAAAAAAAAAAAAAAAAAAAAAAAAAAAAAAAAAAAAAAAAAAAAAAAAAAAAAAAAAAAAAAAAAAAAAAAAAAAAAAAAAAAAAAAAAAAAAAAAAAAAAAAAAAAAAAAAAAAAAAAAAAAAAAAAAAAAAAAAAAAAAAAAAAAAAAAAAAAAAAAAAAAAAAAAAAAAAAAAAAAAAAAAAAAAAAAAAAAAAAAAAAAAAAAAAAAAAAAAAAAAAAAAAAAAAAAAAAAAAAAAAAAAAAAAAAAAAAAAAAAAAAAAAAAAAAAAAAAAAAAAAAAAAAAAAAAAAAAAAAAAAAAAAAAAAAAAAAAAAAAAAAAAAAAAAAAAAAAAAAAAAAAAAAAAAAAAAAAAAAAAAAAAAAAAAAAAAAAAAAAAAAAAAAAAAAAAAAAAAAAAAAAAAAAAAAAAAAAAAAAAAAAAAAAAAAAAAAAAAAAAAAAAAAAAAAAAAAAAAAAAAAAAAAAAAAAAAAAAAAAAAAAAAAAAAAAAAAAAAAAAAAAAAAAAAAAAAAAAAAAAAAAAAAAAAAAAAAAAAAAAAAAAAAAAAAAAAAAAAAAAAAAAAAAAAAAAAAAAAAAAAAAAAAAAAAAAAAAAAAAAAAAAAAAAAAAAAAAAAAAAAAAAAAAAAAAAAAAAAAAAAAAAAAAAAAAAAAAAAAAAAAAAAAAAAAAAAAAAAAAAAAAAAAAAAAAAAAAAAAAAAAAAAAAAAAAAAAAAAAAAAAAAAAAAAAAAAAAAAAAAAAAAAAAAAAAAAAAAAAAAAAAAAAAAAAAAAAAAAAAAAAAAAAAAAAAAAAAAAAAAAAAAAAAAAAAAAAAAAAAAAAAAAAAAAAAAAAAAAAAAAAAAAAAAAAAAAAAAAAAAAAAAAAAAAAAAAAAAAAAAAAAAAAAAAAAAAAAAAAAAAAAAAAAAAAAAAAAAAAAAAAAAAAAAAAAAAAAAAAAAAAAAAAAAAAAAAAAAAAAAAAAAAAAAAAAAAAAAAAAAAAAAAAAAAAAAAAAAAAAAAAAAAAAAAAAAAAAAAAAAAAAAAAAAAAAAAAAAAAAAAAAAAAAAAAAAAAAAAAAAAAAAAAAAAAAAAAAAAAAAAAAAAAAAAAAAAAAAAAAAAAAAAAAAAAAAAAAAAAAAAAAAAAAAAAAAAAAAAAAAAAAAAAAAAAAAAAAAAAAAAAAAAAAAAAAAAAAAAAAAAAAAAAAAAAAAAAAAAAAAAAAAAAAAAAAAAAAAAAAAAAAAAAAAAAAAAAAAAAAAAAAAAAAAAAAAAAAAAAAAAAAAAAAAAAAAAAAAAAAAAAAAAAAAAAAAAAAAAAAAAAAAAAAAAAAAAAAAAAAAAAAAAAAAAAAAAAAAAAAAAAAAAAAAAAAAAAAAAAAAAAAAAAAAAAAAAAAAAAAAAAAAAAAAAAAAAAAAAAAAAAAAAAAAAAAAAAAAAAAAAAAAAAAAAAAAAAAAAAAAAAAAAAAAAAAAAAAAAAAAAAAAAAAAAAAAAAAAAAAAAAAAAAAAAAAAAAAAAAAAAAAAAAAAAAAAAAAAAAAAAAAAAAAAAAAAAAAAAAAAAAAAAAAAAAAAAAAAAAAAAAAAAAAAAAAAAAAAAAAAAAAAAAAAAAAAAAAAAAAAAAAAAAAAAAAAAAAAAAAAAAAAAAAAAAAAAAAAAAAAAAAAAAAAAAAAAAAAAAAAAAAAAAAAAAAAAAAAAAAAAAAAAAAAAAAAAAAAAAAAAAAAAAAAAAAAAAAAAAAAAAAAAAAAAAAAAAAAAAAAAAAAAAAAAAAAAAAAAAAAAAAAAAAAAAAAAAAAAAAAAAAAAAAAAAAAAAAAAAAAAAAAAAAAAAAAAAAAAAAAAAAAAAAAAAAAAAAAAAAAAAAAAAAAAAAAAAAAAAAAAAAAAAAAAAAAAAAAAAAAAAAAAAAAAAAAAAAAAAAAAAAAAAAAAAAAAAAAAAAAAAAAAAAAAAAAAAAAAAAAAAAAAAAAAAAAAAAAAAAAAAAAAAAAAAAAAAAAAAAAAAAAAAAAAAAAAAAAAAAAAAAAAAAAAAAAAAAAAAAAAAAAAAAAAAAAAAAAAAAAAAAAAAAAAAAAAAAAAAAAAAAAAAAAAAAAAAAAAAAAAAAAAAAAAAAAAAAAAAAAAAAAAAAAAAAAAAAAAAAAAAAAAAAAAAAAAAAAAAAAAAAAAAAAAAAAAAAAAAAAAAAAAAAAAAAAAAAAAAAAAAAAAAAAAAAAAAAAAAAAAAAAAAAAAAAAAAAAAAAAAAAAAAAAAAAAAAAAAAAAAAAAAAAAAAAAAAAAAAAAAAAAAAAAAAAAAAAAAAAAAAAAAAAAAAAAAAAAAAAAAAAAAAAAAAAAAAAAAAAAAAAAAAAAAAAAAAAAAAAAAAAAAAAAAAAAAAAAAAAAAAAAAAAAAAAAAAAAAAAAAAAAAAAAAAAAAAAAAAAAAAAAAAAAAAAAAAAAAAAAAAAAAAAAAAAAAAAAAAAAAAAAAAAAAAAAAAAAAAAAAAAAAAAAAAAAAAAAAAAAAAAAAAAAAAAAAAAAAAAAAAAAAAAAAAAAAAAAAAAAAAAAAAAAAAAAAAAAAAAAAAAAAAAAAAAAAAAAAAAAAAAAAAAAAAAAAAAAAAAAAAAAAAAAAAAAAAAAAAAAAAAAAAAAAAAAAAAAAAAAAAAAAAAAAAAAAAAAAAAAAAAAAAAAAAAAAAAAAAAAAAAAAAAAAAAAAAAAAAAAAAAAAAAAAAAAAAAAAAAAAAAAAAAAAAAAAAAAAAAAAAAAAAAAAAAAAAAAAAAAAAAAAAAAAAAAAAAAAAAAAA
AAAAAAAAAAAAAAAAAAAAAAAAAAAAAAAAAAAAAAAAAAAAAAAAAAAAAAAAAAAAAAAAAAAAAAAAAAAAAAAAAAAAAAAAAAAAAAAAAAAAAAAAAAAAAAAAAAAAAAAAAAAAAAAAAAAAAAAAAAAAAAAAAAAAAAAAAAAAAAAAAAAAAAAAAAAAAAAAAAAAAAAAAAAAAAAAAAAAAAAAAAAAAAAAAAAAAAAAAAAAAAAAAAAAAAAAAAAAAAAAAAAAAAAAAAAAAAAAAAAAAAAAAAAAAAAAAAAAAAAAAAAAAAAAAAAAAAAAAAAAAAAAAAAAAAAAAAAAAAAAAAAAAAAAAAAAAAAAAAAAAAAAAAAAAAAAAAAAAAAAAAAAAAAAAAAAAAAAAAAAAAAAAAAAAAAAAAAAAAAAAAAAAAAAAAAAAAAAAAAAAAAAAAAAAAAAAAAAAAAAAAAAAAAAAAAAAAAAAAAAAAAAAAAAAAAAAAAAAAAAAAAAAAAAAAAAAAAAAAAAAAAAAAAAAAAAAAAAAAAAAAAAAAAAAAAAAAAAAAAAAAAAAAAAAAAAAAAAAAAAAAAAAAAAAAAAAAAAAAAAAAAAAAAAAAAAAAAAAAAAAAAAAAAAAAAAAAAAAAAAAAAAAAAAAAAAAAAAAAAAAAAAAAAAAAAAAAAAAAAAAAAAAAAAAAAAAAAAAAAAAAAAAAAAAAAAAAAAAAAAAAAAAAAAAAAAAAAAAAAAAAAAAAAAAAAAAAAAAAAAAAAAAAAAAAAAAAAAAAAAAAAAAAAAAAAAAAAAAAAAAAAAAAAAAAAAAAAAAAAAAAAAAAAAAAAAAAAAAAAAAAAAAAAAAAAAAAAAAAAAAAAAAAAAAAAAAAAAAAAAAAAAAAAAAAAAAAAAAAAAAAAAAAAAAAAAAAAAAAAAAAAAAAAAAAAAAAAAAAAAAAAAAAAAAAAAAAAAAAAAAAAAAAAAAAAAAAAAAAAAAAAAAAAAAAAAAAAAAAAAAAAAAAAAAAAAAAAAAAAAAAAAAAAAAAAAAAAAAAAAAAAAAAAAAAAAAAAAAAAAAAAAAAAAAAAAAAAAAAAAAAAAAAAAAAAAAAAAAAAAAAAAAAAAAAAAAAAAAAAAAAAAAAAAAAAAAAAAAAAAAAAAAAAAAAAAAAAAAAAAAAAAAAAAAAAAAAAAAAAAAAAAAAAAAAAAAAAAAAAAAAAAAAAAAAAAAAAAAAAAAAAAAAAAAAAAAAAAAAAAAAAAAAAAAAAAAAAAAAAAAAAAAAAAAAAAAAAAAAAAAAAAAAAAAAAAAAAAAAAAAAAAAAAAAAAAAAAAAAAAAAAAAAAAAAAAAAAAAAAAAAAAAAAAAAAAAAAAAAAAAAAAAAAAAAAAAAAAAAAAAAAAAAAAAAAAAAAAAAAAAAAAAAAAAAAAAAAAAAAAAAAAAAAAAAAAAAAAAAAAAAAAAAAAAAAAAAAAAAAAAAAAAAAAAAAAAAAAAAAAAAAAAAAAAAAAAAAAAAAAAAAAAAAAAAAAAAAAAAAAAAAAAAAAAAAAAAAAAAAAAAAAAAAAAAAAAAAAAAAAAAAAAAAAAAAAAAAAAAAAAAAAAAAAAAAAAAAAAAAAAAAAAAAAAAAAAAAAAAAAAAAAAAAAAAAAAAAAAAAAAAAAAAAAAAAAAAAAAAAAAAAAAAAAAAAAAAAAAAAAAAAAAAAAAAAAAAAAAAAAAAAAAAAAAAAAAAAAAAAAAAAAAAAAAAAAAAAAAAAAAAAAAAAAAAAAAAAAAAAAAAAAAAAAAAAAAAAAAAAAAAAAAAAAAAAAAAAAAAAAAAAAAAAAAAAAAAAAAAAAAAAAAAAAAAAAAAAAAAAAAAAAAAAAAAAAAAAAAAAAAAAAAAAAAAAAAAAAAAAAAAAAAAAAAAAAAAAAAAAAAAAAAAAAAAAAAAAAAAAAAAAAAAAAAAAAAAAAAAAAAAAAAAAAAAAAAAAAAAAAAAAAAAAAAAAAAAAAAAAAAAAAAAAAAAAAAAAAAAAAAAAAAAAAAAAAAAAAAAAAAAAAAAAAAAAAAAAAAAAAAAAAAAAAAAAAAAAAAAAAAAAAAAAAAAAAAAAAAAAAAAAAAAAAAAAAAAAAAAAAAAAAAAAAAAAAAAAAAAAAAAAAAAAAAAAAAAAAAAAAAAAAAAAAAAAAAAAAAAAAAAAAAAAAAAAAAAAAAAAAAAAAAAAAAAAAAAAAAAAAAAAAAAAAAAAAAAAAAAAAAAAAAAAAAAAAAAAAAAAAAAAAAAAAAAAAAAAAAAAAAAAAAAAAAAAAAAAAAAAAAAAAAAAAAAAAAAAAAAAAAAAAAAAAAAAAAAAAAAAAAAAAAAAAAAAAAAAAAAAAAAAAAAAAAAAAAAAAAAAAAAAAAAAAAAAAAAAAAAAAAAAAAAAAAAAAAAAAAAAAAAAAAAAAAAAAAAAAAAAAAAAAAAAAAAAAAAAAAAAAAAAAAAAAAAAAAAAAAAAAAAAAAAAAAAAAAAAAAAAAAAAAAAAAAAAAAAAAAAAAAAAAAAAAAAAAAAAAAAAAAAAAAAAAAAAAAAAAAAAAAAAAAAAAAAAAAAAAAAAAAAAAAAAAAAAAAAAAAAAAAAAAAAAAAAAAAAAAAAAAAAAAAAAAAAAAAAAAAAAAAAAAAAAAAAAAAAAAAAAAAAAAAAAAAAAAAAAAAAAAAAAAAAAAAAAAAAAAAAAAAAAAAAAAAAAAAAAAAAAAAAAAAAAAAAAAAAAAAAAAAAAAAAAAAAAAAAAAAAAAAAAAAAAAAAAAAAAAAAAAAAAAAAAAAAAAAAAAAAAAAAAAAAAAAAAAAAAAAAAAAAAAAAAAAAAAAAAAAAAAAAAAAAAAAAAAAAAAAAAAAAAAAAAAAAAAAAAAAAAAAAAAAAAAAAAAAAAAAAAAAAAAAAAAAAAAAAAAAAAAAAAAAAAAAAAAAAAAAAAAAAAAAAAAAAAAAAAAAAAAAAAAAAAAAAAAAAAAAAAAAAAAAAAAAAAAAAAAAAAAAAAAAAAAAAAAAAAAAAAAAAAAAAAAAAAAAAAAAAAAAAAAAAAAAAAAAAAAAAAAAAAAAAAAAAAAAAAAAAAAAAAAAAAAAAAAAAAAAAAAAAAAAAAAAAAAAAAAAAAAAAAAAAAAAAAAAAAAAAAAAAAAAAAAAAAAAAAAAAAAAAAAAAAAAAAAAAAAAAAAAAAAAAAAAAAAAAAAAAAAAAAAAAAAAAAAAAAAAAAAAAAAAAAAAAAAAAAAAAAAAAAAAAAAAAAAAAAAAAAAAAAAAAAAAAAAAAAAAAAAAAAAAAAAAAAAAAAAAAAAAAAAAAAAAAAAAAAAAAAAAAAAAAAAAAAAAAAAAAAAAAAAAAAAAAAAAAAAAAAAAAAAAAAAAAAAAAAAAAAAAAAAAAAAAAAAAAAAAAAAAAAAAAAAAAAAAAAAAAAAAAAAAAAAAAAAAAAAAAAAAAAAAAAAAAAAAAAAAAAAAAAAAAAAAAAAAAAAAAAAAAAAAAAAAAAAAAAAAAAAAAAAAAAAAAAAAAAAAAAAAAAAAAAAAAAAAAAAAAAAAAAAAAAAAAAAAAAAAAAAAAAAAAAAAAAAAAAAAAAAAAAAAAAAAAAAAAAAAAAAAAAAAAAAAAAAAAAAAAAAAAAAAAAAAAAAAAAAAAAAAAAAAAAAAAAAAAAAAAAAAAAAAAAAAAAAAAAAAAAAAAAAAAAAAAAAAAAAAAAAAAAAAAAAAAAAAAAAAAAAAAAAAAAAAAAAAAAAAAAAAAAAAAAAAAAAAAAAAAAAAAAAAAAAAAAAAAAAAAAAAAAAAAAAAAAAAAAAAAAAAAAAAAAAAAAAAAAAAAAAAAAAAAAAAAAAAAAAAAAAAAAAAAAAAAAAAAAAAAAAAAAAAAAAAAAAAAAAAAAAAAAAAAAAAAAAAAAAAAAAAAAAAAAAAAAAAAAAAAAAAAAAAAAAAAAAAAAAAAAAAAAAAAAAAAAAAAAAAAAAAAAAAAAAAAAAAAAAAAAAAAAAAAAAAAAAAAAAAAAAAAAAAAAAAAAAAAAAAAAAAAAAAAAAAAAAAAAAAAAAAAAAAAAAAAAAAAAAAAAAAAAAAAAAAAAAAAAAAAAAAAAAAAAAAAAAAAAAAAAAAAAAAAAAAAAAAAAAAAAAAAAAAAAAAAAAAAAA
AAAAAAAAAAAAAAAAAAAAAAAAAAAAAAAAAAAAAAAAAAAAAAAAAAAAAAAAAAAAAAAAAAAAAAAAAAAAAAAAAAAAAAAAAAAAAAAAAAAAAAAAAAAAAAAAAAAAAAAAAAAAAAAAAAAAAAAAAAAAAAAAAAAAAAAAAAAAAAAAAAAAAAAAAAAAAAAAAAAAAAAAAAAAAAAAAAAAAAAAAAAAAAAAAAAAAAAAAAAAAAAAAAAAAAAAAAAAAAAAAAAAAAAAAAAAAAAAAAAAAAAAAAAAAAAAAAAAAAAAAAAAAAAAAAAAAAAAAAAAAAAAAAAAAAAAAAAAAAAAAAAAAAAAAAAAAAAAAAAAAAAAAAAAAAAAAAAAAAAAAAAAAAAAAAAAAAAAAAAAAAAAAAAAAAAAAAAAAAAAAAAAAAAAAAAAAAAAAAAAAAAAAAAAAAAAAAAAAAAAAAAAAAAAAAAAAAAAAAAAAAAAAAAAAAAAAAAAAAAAAAAAAAAAAAAAAAAAAAAAAAAAAAAAAAAAAAAAAAAAAAAAAAAAAAAAAAAAAAAAAAAAAAAAAAAAAAAAAAAAAAAAAAAAAAAAAAAAAAAAAAAAAAAAAAAAAAAAAAAAAAAAAAAAAAAAAAAAAAAAAAAAAAAAAAAAAAAAAAAAAAAAAAAAAAAAAAAAAAAAAAAAAAAAAAAAAAAAAAAAAAAAAAAAAAAAAAAAAAAAAAAAAAAAAAAAAAAAAAAAAAAAAAAAAAAAAAAAAAAAAAAAAAAAAAAAAAAAAAAAAAAAAAAAAAAAAAAAAAAAAAAAAAAAAAAAAAAAAAAAAAAAAAAAAAAAAAAAAAAAAAAAAAAAAAAAAAAAAAAAAAAAAAAAAAAAAAAAAAAAAAAAAAAAAAAAAAAAAAAAAAAAAAAAAAAAAAAAAAAAAAAAAAAAAAAAAAAAAAAAAAAAAAAAAAAAAAAAAAAAAAAAAAAAAAAAAAAAAAAAAAAAAAAAAAAAAAAAAAAAAAAAAAAAAAAAAAAAAAAAAAAAAAAAAAAAAAAAAAAAAAAAAAAAAAAAAAAAAAAAAAAAAAAAAAAAAAAAAAAAAAAAAAAAAAAAAAAAAAAAAAAAAAAAAAAAAAAAAAAAAAAAAAAAAAAAAAAAAAAAAAAAAAAAAAAAAAAAAAAAAAAAAAAAAAAAAAAAAAAAAAAAAAAAAAAAAAAAAAAAAAAAAAAAAAAAAAAAAAAAAAAAAAAAAAAAAAAAAAAAAAAAAAAAAAAAAAAAAAAAAAAAAAAAAAAAAAAAAAAAAAAAAAAAAAAAAAAAAAAAAAAAAAAAAAAAAAAAAAAAAAAAAAAAAAAAAAAAAAAAAAAAAAAAAAAAAAAAAAAAAAAAAAAAAAAAAAAAAAAAAAAAAAAAAAAAAAAAAAAAAAAAAAAAAAAAAAAAAAAAAAAAAAAAAAAAAAAAAAAAAAAAAAAAAAAAAAAAAAAAAAAAAAAAAAAAAAAAAAAAAAAAAAAAAAAAAAAAAAAAAAAAAAAAAAAAAAAAAAAAAAAAAAAAAAAAAAAAAAAAAAAAAAAAAAAAAAAAAAAAAAAAAAAAAAAAAAAAAAAAAAAAAAAAAAAAAAAAAAAAAAAAAAAAAAAAAAAAAAAAAAAAAAAAAAAAAAAAAAAAAAAAAAAAAAAAAAAAAAAAAAAAAAAAAAAAAAAAAAAAAAAAAAAAAAAAAAAAAAAAAAAAAAAAAAAAAAAAAAAAAAAAAAAAAAAAAAAAAAAAAAAAAAAAAAAAAAAAAAAAAAAAAAAAAAAAAAAAAAAAAAAAAAAAAAAAAAAAAAAAAAAAAAAAAAAAAAAAAAAAAAAAAAAAAAAAAAAAAAAAAAAAAAAAAAAAAAAAAAAAAAAAAAAAAAAAAAAAAAAAAAAAAAAAAAAAAAAAAAAAAAAAAAAAAAAAAAAAAAAAAAAAAAAAAAAAAAAAAAAAAAAAAAAAAAAAAAAAAAAAAAAAAAAAAAAAAAAAAAAAAAAAAAAAAAAAAAAAAAAAAAAAAAAAAAAAAAAAAAAAAAAAAAAAAAAAAAAAAAAAAAAAAAAAAAAAAAAAAAAAAAAAAAAAAAAAAAAAAAAAAAAAAAAAAAAAAAAAAAAAAAAAAAAAAAAAAAAAAAAAAAAAAAAAAAAAAAAAAAAAAAAAAAAAAAAAAAAAAAAAAAAAAAAAAAAAAAAAAAAAAAAAAAAAAAAAAAAAAAAAAAAAAAAAAAAAAAAAAAAAAAAAAAAAAAAAAAAAAAAAAAAAAAAAAAAAAAAAAAAAAAAAAAAAAAAAAAAAAAAAAAAAAAAAAAAAAAAAAAAAAAAAAAAAAAAAAAAAAAAAAAAAAAAAAAAAAAAAAAAAAAAAAAAAAAAAAAAAAAAAAAAAAAAAAAAAAAAAAAAAAAAAAAAAAAAAAAAAAAAAAAAAAAAAAAAAAAAAAAAAAAAAAAAAAAAAAAAAAAAAAAAAAAAAAAAAAAAAAAAAAAAAAAAAAAAAAAAAAAAAAAAAAAAAAAAAAAAAAAAAAAAAAAAAAAAAAAAAAAAAAAAAAAAAAAAAAAAAAAAAAAAAAAAAAAAAAAAAAAAAAAAAAAAAAAAAAAAAAAAAAAAAAAAAAAAAAAAAAAAAAAAAAAAAAAAAAAAAAAAAAAAAAAAAAAAAAAAAAAAAAAAAAAAAAAAAAAAAAAAAAAAAAAAAAAAAAAAAAAAAAAAAAAAAAAAAAAAAAAAAAAAAAAAAAAAAAAAAAAAAAAAAAAAAAAAAAAAAAAAAAAAAAAAAAAAAAAAAAAAAAAAAAAAAAAAAAAAAAAAAAAAAAAAAAAAAAAAAAAAAAAAAAAAAAAAAAAAAAAAAAAAAAAAAAAAAAAAAAAAAAAAAAAAAAAAAAAAAAAAAAAAAAAAAAAAAAAAAAAAAAAAAAAAAAAAAAAAAAAAAAAAAAAAAAAAAAAAAAAAAAAAAAAAAAAAAAAAAAAAAAAAAAAAAAAAAAAAAAAAAAAAAAAAAAAAAAAAAAAAAAAAAAAAAAAAAAAAAAAAAAAAAAAAAAAAAAAAAAAAAAAAAAAAAAAAAAAAAAAAAAAAAAAAAAAAAAAAAAAAAAAAAAAAAAAAAAAAAAAAAAAAAAAAAAAAAAAAAAAAAAAAAAAAAAAAAAAAAAAAAAAAAAAAAAAAAAAAAAAAAAAAAAAAAAAAAAAAAAAAAAAAAAAAAAAAAAAAAAAAAAAAAAAAAAAAAAAAAAAAAAAAAAAAAAAAAAAAAAAAAAAAAAAAAAAAAAAAAAAAAAAAAAAAAAAAAAAAAAAAAAAAAAAAAAAAAAAAAAAAAAAAAAAAAAAAAAAAAAAAAAAAAAAAAAAAAAAAAAAAAAAAAAAAAAAAAAAAAAAAAAAAAAAAAAAAAAAAAAAAAAAAAAAAAAAAAAAAAAAAAAAAAAAAAAAAAAAAAAAAAAAAAAAAAAAAAAAAAAAAAAAAAAAAAAAAAAAAAAAAAAAAAAAAAAAAAAAAAAAAAAAAAAAAAAAAAAAAAAAAAAAAAAAAAAAAAAAAAAAAAAAAAAAAAAAAAAAAAAAAAAAAAAAAAAAAAAAAAAAAAAAAAAAAAAAAAAAAAAAAAAAAAAAAAAAAAAAAAAAAAAAAAAAAAAAAAAAAAAAAAAAAAAAAAAAAAAAAAAAAAAAAAAAAAAAAAAAAAAAAAAAAAAAAAAAAAAAAAAAAAAAAAAAAAAAAAAAAAAAAAAAAAAAAAAAAAAAAAAAAAAAAAAAAAAAAAAAAAAAAAAAAAAAAAAAAAAAAAAAAAAAAAAAAAAAAAAAAAAAAAAAAAAAAAAAAAAAAAAAAAAAAAAAAAAAAAAAAAAAAAAAAAAAAAAAAAAAAAAAAAAAAAAAAAAAAAAAAAAAAAAAAAAAAAAAAAAAAAAAAAAAAAAAAAAAAAAAAAAAAAAAAAAAAAAAAAAAAAAAAAAAAAAAAAAAAAAAAAAAAAAAAAAAAAAAAAAAAAAAAAAAAAAAAAAAAAAAAAAAAAAAAAAAAAAAAAAAAAAAAAAAAAAAAAAAAAAAAAAAAAAAAAAAAAAAAAAAAAAAAAAAAAAAAAAAAAAAAAAAAAAAAAAAAAAAAAAAAAAAAAAAAAAAAAAAAAAAAAAAAAAAAAAAAAAAAAAAAAAAAAAAAAAAAAAAAAAAAA
AAAAAAAAAAAAAAAAAAAAAAAAAAAAAAAAAAAAAAAAAAAAAAAAAAAAAAAAAAAAAAAAAAAAAAAAAAAAAAAAAAAAAAAAAAAAAAAAAAAAAAAAAAAAAAAAAAAAAAAAAAAAAAAAAAAAAAAAAAAAAAAAAAAAAAAAAAAAAAAAAAAAAAAAAAAAAAAAAAAAAAAAAAAAAAAAAAAAAAAAAAAAAAAAAAAAAAAAAAAAAAAAAAAAAAAAAAAAAAAAAAAAAAAAAAAAAAAAAAAAAAAAAAAAAAAAAAAAAAAAAAAAAAAAAAAAAAAAAAAAAAAAAAAAAAAAAAAAAAAAAAAAAAAAAAAAAAAAAAAAAAAAAAAAAAAAAAAAAAAAAAAAAAAAAAAAAAAAAAAAAAAAAAAAAAAAAAAAAAAAAAAAAAAAAAAAAAAAAAAAAAAAAAAAAAAAAAAAAAAAAAAAAAAAAAAAAAAAAAAAAAAAAAAAAAAAAAAAAAAAAAAAAAAAAAAAAAAAAAAAAAAAAAAAAAAAAAAAAAAAAAAAAAAAAAAAAAAAAAAAAAAAAAAAAAAAAAAAAAAAAAAAAAAAAAAAAAAAAAAAAAAAAAAAAAAAAAAAAAAAAAAAAAAAAAAAAAAAAAAAAAAAAAAAAAAAAAAAAAAAAAAAAAAAAAAAAAAAAAAAAAAAAAAAAAAAAAAAAAAAAAAAAAAAAAAAAAAAAAAAAAAAAAAAAAAAAAAAAAAAAAAAAAAAAAAAAAAAAAAAAAAAAAAAAAAAAAAAAAAAAAAAAAAAAAAAAAAAAAAAAAAAAAAAAAAAAAAAAAAAAAAAAAAAAAAAAAAAAAAAAAAAAAAAAAAAAAAAAAAAAAAAAAAAAAAAAAAAAAAAAAAAAAAAAAAAAAAAAAAAAAAAAAAAAAAAAAAAAAAAAAAAAAAAAAAAAAAAAAAAAAAAAAAAAAAAAAAAAAAAAAAAAAAAAAAAAAAAAAAAAAAAAAAAAAAAAAAAAAAAAAAAAAAAAAAAAAAAAAAAAAAAAAAAAAAAAAAAAAAAAAAAAAAAAAAAAAAAAAAAAAAAAAAAAAAAAAAAAAAAAAAAAAAAAAAAAAAAAAAAAAAAAAAAAAAAAAAAAAAAAAAAAAAAAAAAAAAAAAAAAAAAAAAAAAAAAAAAAAAAAAAAAAAAAAAAAAAAAAAAAAAAAAAAAAAAAAAAAAAAAAAAAAAAAAAAAAAAAAAAAAAAAAAAAAAAAAAAAAAAAAAAAAAAAAAAAAAAAAAAAAAAAAAAAAAAAAAAAAAAAAAAAAAAAAAAAAAAAAAAAAAAAAAAAAAAAAAAAAAAAAAAAAAAAAAAAAAAAAAAAAAAAAAAAAAAAAAAAAAAAAAAAAAAAAAAAAAAAAAAAAAAAAAAAAAAAAAAAAAAAAAAAAAAAAAAAAAAAAAAAAAAAAAAAAAAAAAAAAAAAAAAAAAAAAAAAAAAAAAAAAAAAAAAAAAAAAAAAAAAAAAAAAAAAAAAAAAAAAAAAAAAAAAAAAAAAAAAAAAAAAAAAAAAAAAAAAAAAAAAAAAAAAAAAAAAAAAAAAAAAAAAAAAAAAAAAAAAAAAAAAAAAAAAAAAAAAAAAAAAAAAAAAAAAAAAAAAAAAAAAAAAAAAAAAAAAAAAAAAAAAAAAAAAAAAAAAAAAAAAAAAAAAAAAAAAAAAAAAAAAAAAAAAAAAAAAAAAAAAAAAAAAAAAAAAAAAAAAAAAAAAAAAAAAAAAAAAAAAAAAAAAAAAAAAAAAAAAAAAAAAAAAAAAAAAAAAAAAAAAAAAAAAAAAAAAAAAAAAAAAAAAAAAAAAAAAAAAAAAAAAAAAAAAAAAAAAAAAAAAAAAAAAAAAAAAAAAAAAAAAAAAAAAAAAAAAAAAAAAAAAAAAAAAAAAAAAAAAAAAAAAAAAAAAAAAAAAAAAAAAAAAAAAAAAAAAAAAAAAAAAAAAAAAAAAAAAAAAAAAAAAAAAAAAAAAAAAAAAAAAAAAAAAAAAAAAAAAAAAAAAAAAAAAAAAAAAAAAAAAAAAAAAAAAAAAAAAAAAAAAAAAAAAAAAAAAAAAAAAAAAAAAAAAAAAAAAAAAAAAAAAAAAAAAAAAAAAAAAAAAAAAAAAAAAAAAAAAAAAAAAAAAAAAAAAAAAAAAAAAAAAAAAAAAAAAAAAAAAAAAAAAAAAAAAAAAAAAAAAAAAAAAAAAAAAAAAAAAAAAAAAAAAAAAAAAAAAAAAAAAAAAAAAAAAAAAAAAAAAAAAAAAAAAAAAAAAAAAAAAAAAAAAAAAAAAAAAAAAAAAAAAAAAAAAAAAAAAAAAAAAAAAAAAAAAAAAAAAAAAAAAAAAAAAAAAAAAAAAAAAAAAAAAAAAAAAAAAAAAAAAAAAAAAAAAAAAAAAAAAAAAAAAAAAAAAAAAAAAAAAAAAAAAAAAAAAAAAAAAAAAAAAAAAAAAAAAAAAAAAAAAAAAAAAAAAAAAAAAAAAAAAAAAAAAAAAAAAAAAAAAAAAAAAAAAAAAAAAAAAAAAAAAAAAAAAAAAAAAAAAAAAAAAAAAAAAAAAAAAAAAAAAAAAAAAAAAAAAAAAAAAAAAAAAAAAAAAAAAAAAAAAAAAAAAAAAAAAAAAAAAAAAAAAAAAAAAAAAAAAAAAAAAAAAAAAAAAAAAAAAAAAAAAAAAAAAAAAAAAAAAAAAAAAAAAAAAAAAAAAAAAAAAAAAAAAAAAAAAAAAAAAAAAAAAAAAAAAAAAAAAAAAAAAAAAAAAAAAAAAAAAAAAAAAAAAAAAAAAAAAAAAAAAAAAAAAAAAAAAAAAAAAAAAAAAAAAAAAAAAAAAAAAAAAAAAAAAAAAAAAAAAAAAAAAAAAAAAAAAAAAAAAAAAAAAAAAAAAAAAAAAAAAAAAAAAAAAAAAAAAAAAAAAAAAAAAAAAAAAAAAAAAAAAAAAAAAAAAAAAAAAAAAAAAAAAAAAAAAAAAAAAAAAAAAAAAAAAAAAAAAAAAAAAAAAAAAAAAAAAAAAAAAAAAAAAAAAAAAAAAAAAAAAAAAAAAAAAAAAAAAAAAAAAAAAAAAAAAAAAAAAAAAAAAAAAAAAAAAAAAAAAAAAAAAAAAAAAAAAAAAAAAAAAAAAAAAAAAAAAAAAAAAAAAAAAAAAAAAAAAAAAAAAAAAAAAAAAAAAAAAAAAAAAAAAAAAAAAAAAAAAAAAAAAAAAAAAAAAAAAAAAAAAAAAAAAAAAAAAAAAAAAAAAAAAAAAAAAAAAAAAAAAAAAAAAAAAAAAAAAAAAAAAAAAAAAAAAAAAAAAAAAAAAAAAAAAAAAAAAAAAAAAAAAAAAAAAAAAAAAAAAAAAAAAAAAAAAAAAAAAAAAAAAAAAAAAAAAAAAAAAAAAAAAAAAAAAAAAAAAAAAAAAAAAAAAAAAAAAAAAAAAAAAAAAAAAAAAAAAAAAAAAAAAAAAAAAAAAAAAAAAAAAAAAAAAAAAAAAAAAAAAAAAAAAAAAAAAAAAAAAAAAAAAAAAAAAAAAAAAAAAAAAAAAAAAAAAAAAAAAAAAAAAAAAAAAAAAAAAAAAAAAAAAAAAAAAAAAAAAAAAAAAAAAAAAAAAAAAAAAAAAAAAAAAAAAAAAAAAAAAAAAAAAAAAAAAAAAAAAAAAAAAAAAAAAAAAAAAAAAAAAAAAAAAAAAAAAAAAAAAAAAAAAAAAAAAAAAAAAAAAAAAAAAAAAAAAAAAAAAAAAAAAAAAAAAAAAAAAAAAAAAAAAAAAAAAAAAAAAAAAAAAAAAAAAAAAAAAAAAAAAAAAAAAAAAAAAAAAAAAAAAAAAAAAAAAAAAAAAAAAAAAAAAAAAAAAAAAAAAAAAAAAAAAAAAAAAAAAAAAAAAAAAAAAAAAAAAAAAAAAAAAAAAAAAAAAAAAAAAAAAAAAAAAAAAAAAAAAAAAAAAAAAAAAAAAAAAAAAAAAAAAAAAAAAAAAAAAAAAAAAAAAAAAAAAAAAAAAAAAAAAAAAAAAAAAAAAAAAAAAAAAAAAAAAAAAAAAAAAAAAAAAAAAAAAAAAAAAAAAAAAAAAAAAAAAAAAAAAAAAAAAAAAAAAAAAAAAAAAAAAAAAAAAAAAAAAAAAAAAAAAAAAAAAAAAAAAAAAAAAAAAAAAAAAAAAAAAAAAAAAAAAAAAAAAAA
AAAAAAAAAAAAAAAAAAAAAAAAAAAAAAAAAAAAAAAAAAAAAAAAAAAAAAAAAAAAAAAAAAAAAAAAAAAAAAAAAAAAAAAAAAAAAAAAAAAAAAAAAAAAAAAAAAAAAAAAAAAAAAAAAAAAAAAAAAAAAAAAAAAAAAAAAAAAAAAAAAAAAAAAAAAAAAAAAAAAAAAAAAAAAAAAAAAAAAAAAAAAAAAAAAAAAAAAAAAAAAAAAAAAAAAAAAAAAAAAAAAAAAAAAAAAAAAAAAAAAAAAAAAAAAAAAAAAAAAAAAAAAAAAAAAAAAAAAAAAAAAAAAAAAAAAAAAAAAAAAAAAAAAAAAAAAAAAAAAAAAAAAAAAAAAAAAAAAAAAAAAAAAAAAAAAAAAAAAAAAAAAAAAAAAAAAAAAAAAAAAAAAAAAAAAAAAAAAAAAAAAAAAAAAAAAAAAAAAAAAAAAAAAAAAAAAAAAAAAAAAAAAAAAAAAAAAAAAAAAAAAAAAAAAAAAAAAAAAAAAAAAAAAAAAAAAAAAAAAAAAAAAAAAAAAAAAAAAAAAAAAAAAAAAAAAAAAAAAAAAAAAAAAAAAAAAAAAAAAAAAAAAAAAAAAAAAAAAAAAAAAAAAAAAAAAAAAAAAAAAAAAAAAAAAAAAAAAAAAAAAAAAAAAAAAAAAAAAAAAAAAAAAAAAAAAAAAAAAAAAAAAAAAAAAAAAAAAAAAAAAAAAAAAAAAAAAAAAAAAAAAAAAAAAAAAAAAAAAAAAAAAAAAAAAAAAAAAAAAAAAAAAAAAAAAAAAAAAAAAAAAAAAAAAAAAAAAAAAAAAAAAAAAAAAAAAAAAAAAAAAAAAAAAAAAAAAAAAAAAAAAAAAAAAAAAAAAAAAAAAAAAAAAAAAAAAAAAAAAAAAAAAAAAAAAAAAAAAAAAAAAAAAAAAAAAAAAAAAAAAAAAAAAAAAAAAAAAAAAAAAAAAAAAAAAAAAAAAAAAAAAAAAAAAAAAAAAAAAAAAAAAAAAAAAAAAAAAAAAAAAAAAAAAAAAAAAAAAAAAAAAAAAAAAAAAAAAAAAAAAAAAAAAAAAAAAAAAAAAAAAAAAAAAAAAAAAAAAAAAAAAAAAAAAAAAAAAAAAAAAAAAAAAAAAAAAAAAAAAAAAAAAAAAAAAAAAAAAAAAAAAAAAAAAAAAAAAAAAAAAAAAAAAAAAAAAAAAAAAAAAAAAAAAAAAAAAAAAAAAAAAAAAAAAAAAAAAAAAAAAAAAAAAAAAAAAAAAAAAAAAAAAAAAAAAAAAAAAAAAAAAAAAAAAAAAAAAAAAAAAAAAAAAAAAAAAAAAAAAAAAAAAAAAAAAAAAAAAAAAAAAAAAAAAAAAAAAAAAAAAAAAAAAAAAAAAAAAAAAAAAAAAAAAAAAAAAAAAAAAAAAAAAAAAAAAAAAAAAAAAAAAAAAAAAAAAAAAAAAAAAAAAAAAAAAAAAAAAAAAAAAAAAAAAAAAAAAAAAAAAAAAAAAAAAAAAAAAAAAAAAAAAAAAAAAAAAAAAAAAAAAAAAAAAAAAAAAAAAAAAAAAAAAAAAAAAAAAAAAAAAAAAAAAAAAAAAAAAAAAAAAAAAAAAAAAAAAAAAAAAAAAAAAAAAAAAAAAAAAAAAAAAAAAAAAAAAAAAAAAAAAAAAAAAAAAAAAAAAAAAAAAAAAAAAAAAAAAAAAAAAAAAAAAAAAAAAAAAAAAAAAAAAAAAAAAAAAAAAAAAAAAAAAAAAAAAAAAAAAAAAAAAAAAAAAAAAAAAAAAAAAAAAAAAAAAAAAAAAAAAAAAAAAAAAAAAAAAAAAAAAAAAAAAAAAAAAAAAAAAAAAAAAAAAAAAAAAAAAAAAAAAAAAAAAAAAAAAAAAAAAAAAAAAAAAAAAAAAAAAAAAAAAAAAAAAAAAAAAAAAAAAAAAAAAAAAAAAAAAAAAAAAAAAAAAAAAAAAAAAAAAAAAAAAAAAAAAAAAAAAAAAAAAAAAAAAAAAAAAAAAAAAAAAAAAAAAAAAAAAAAAAAAAAAAAAAAAAAAAAAAAAAAAAAAAAAAAAAAAAAAAAAAAAAAAAAAAAAAAAAAAAAAAAAAAAAAAAAAAAAAAAAAAAAAAAAAAAAAAAAAAAAAAAAAAAAAAAAAAAAAAAAAAAAAAAAAAAAAAAAAAAAAAAAAAAAAAAAAAAAAAAAAAAAAAAAAAAAAAAAAAAAAAAAAAAAAAAAAAAAAAAAAAAAAAAAAAAAAAAAAAAAAAAAAAAAAAAAAAAAAAAAAAAAAAAAAAAAAAAAAAAAAAAAAAAAAAAAAAAAAAAAAAAAAAAAAAAAAAAAAAAAAAAAAAAAAAAAAAAAAAAAAAAAAAAAAAAAAAAAAAAAAAAAAAAAAAAAAAAAAAAAAAAAAAAAAAAAAAAAAAAAAAAAAAAAAAAAAAAAAAAAAAAAAAAAAAAAAAAAAAAAAAAAAAAAAAAAAAAAAAAAAAAAAAAAAAAAAAAAAAAAAAAAAAAAAAAAAAAAAAAAAAAAAAAAAAAAAAAAAAAAAAAAAAAAAAAAAAAAAAAAAAAAAAAAAAAAAAAAAAAAAAAAAAAAAAAAAAAAAAAAAAAAAAAAAAAAAAAAAAAAAAAAAAAAAAAAAAAAAAAAAAAAAAAAAAAAAAAAAAAAAAAAAAAAAAAAAAAAAAAAAAAAAAAAAAAAAAAAAAAAAAAAAAAAAAAAAAAAAAAAAAAAAAAAAAAAAAAAAAAAAAAAAAAAAAAAAAAAAAAAAAAAAAAAAAAAAAAAAAAAAAAAAAAAAAAAAAAAAAAAAAAAAAAAAAAAAAAAAAAAAAAAAAAAAAAAAAAAAAAAAAAAAAAAAAAAAAAAAAAAAAAAAAAAAAAAAAAAAAAAAAAAAAAAAAAAAAAAAAAAAAAAAAAAAAAAAAAAAAAAAAAAAAAAAAAAAAAAAAAAAAAAAAAAAAAAAAAAAAAAAAAAAAAAAAAAAAAAAAAAAAAAAAAAAAAAAAAAAAAAAAAAAAAAAAAAAAAAAAAAAAAAAAAAAAAAAAAAAAAAAAAAAAAAAAAAAAAAAAAAAAAAAAAAAAAAAAAAAAAAAAAAAAAAAAAAAAAAAAAAAAAAAAAAAAAAAAAAAAAAAAAAAAAAAAAAAAAAAAAAAAAAAAAAAAAAAAAAAAAAAAAAAAAAAAAAAAAAAAAAAAAAAAAAAAAAAAAAAAAAAAAAAAAAAAAAAAAAAAAAAAAAAAAAAAAAAAAAAAAAAAAAAAAAAAAAAAAAAAAAAAAAAAAAAAAAAAAAAAAAAAAAAAAAAAAAAAAAAAAAAAAAAAAAAAAAAAAAAAAAAAAAAAAAAAAAAAAAAAAAAAAAAAAAAAAAAAAAAAAAAAAAAAAAAAAAAAAAAAAAAAAAAAAAAAAAAAAAAAAAAAAAAAAAAAAAAAAAAAAAAAAAAAAAAAAAAAAAAAAAAAAAAAAAAAAAAAAAAAAAAAAAAAAAAAAAAAAAAAAAAAAAAAAAAAAAAAAAAAAAAAAAAAAAAAAAAAAAAAAAAAAAAAAAAAAAAAAAAAAAAAAAAAAAAAAAAAAAAAAAAAAAAAAAAAAAAAAAAAAAAAAAAAAAAAAAAAAAAAAAAAAAAAAAAAAAAAAAAAAAAAAAAAAAAAAAAAAAAAAAAAAAAAAAAAAAAAAAAAAAAAAAAAAAAAAAAAAAAAAAAAAAAAAAAAAAAAAAAAAAAAAAAAAAAAAAAAAAAAAAAAAAAAAAAAAAAAAAAAAAAAAAAAAAAAAAAAAAAAAAAAAAAAAAAAAAAAAAAAAAAAAAAAAAAAAAAAAAAAAAAAAAAAAAAAAAAAAAAAAAAAAAAAAAAAAAAAAAAAAAAAAAAAAAAAAAAAAAAAAAAAAAAAAAAAAAAAAAAAAAAAAAAAAAAAAAAAAAAAAAAAAAAAAAAAAAAAAAAAAAAAAAAAAAAAAAAAAAAAAAAAAAAAAAAAAAAAAAAAAAAAAAAAAAAAAAAAAAAAAAAAAAAAAAAAAAAAAAAAAAAAAAAAAAAAAAAAAAAAAAAAAAAAAAAAAAAAAAAAAAAAAAAAAAAAAAAAAAAAAAAAAAAAAAAAAAAAAAAAAAAAAAAAAAAAAAAAAAAAAAAAAAAAAAAAAAAAAAAAAAAAAAAAAAAAAAAAAAAAAAAAAAAAAAAAA
AAAAAAAAAAAAAAAAAAAAAAAAAAAAAAAAAAAAAAAAAAAAAAAAAAAAAAAAAAAAAAAAAAAAAAAAAAAAAAAAAAAAAAAAAAAAAAAAAAAAAAAAAAAAAAAAAAAAAAAAAAAAAAAAAAAAAAAAAAAAAAAAAAAAAAAAAAAAAAAAAAAAAAAAAAAAAAAAAAAAAAAAAAAAAAAAAAAAAAAAAAAAAAAAAAAAAAAAAAAAAAAAAAAAAAAAAAAAAAAAAAAAAAAAAAAAAAAAAAAAAAAAAAAAAAAAAAAAAAAAAAAAAAAAAAAAAAAAAAAAAAAAAAAAAAAAAAAAAAAAAAAAAAAAAAAAAAAAAAAAAAAAAAAAAAAAAAAAAAAAAAAAAAAAAAAAAAAAAAAAAAAAAAAAAAAAAAAAAAAAAAAAAAAAAAAAAAAAAAAAAAAAAAAAAAAAAAAAAAAAAAAAAAAAAAAAAAAAAAAAAAAAAAAAAAAAAAAAAAAAAAAAAAAAAAAAAAAAAAAAAAAAAAAAAAAAAAAAAAAAAAAAAAAAAAAAAAAAAAAAAAAAAAAAAAAAAAAAAAAAAAAAAAAAAAAAAAAAAAAAAAAAAAAAAAAAAAAAAAAAAAAAAAAAAAAAAAAAAAAAAAAAAAAAAAAAAAAAAAAAAAAAAAAAAAAAAAAAAAAAAAAAAAAAAAAAAAAAAAAAAAAAAAAAAAAAAAAAAAAAAAAAAAAAAAAAAAAAAAAAAAAAAAAAAAAAAAAAAAAAAAAAAAAAAAAAAAAAAAAAAAAAAAAAAAAAAAAAAAAAAAAAAAAAAAAAAAAAAAAAAAAAAAAAAAAAAAAAAAAAAAAAAAAAAAAAAAAAAAAAAAAAAAAAAAAAAAAAAAAAAAAAAAAAAAAAAAAAAAAAAAAAAAAAAAAAAAAAAAAAAAAAAAAAAAAAAAAAAAAAAAAAAAAAAAAAAAAAAAAAAAAAAAAAAAAAAAAAAAAAAAAAAAAAAAAAAAAAAAAAAAAAAAAAAAAAAAAAAAAAAAAAAAAAAAAAAAAAAAAAAAAAAAAAAAAAAAAAAAAAAAAAAAAAAAAAAAAAAAAAAAAAAAAAAAAAAAAAAAAAAAAAAAAAAAAAAAAAAAAAAAAAAAAAAAAAAAAAAAAAAAAAAAAAAAAAAAAAAAAAAAAAAAAAAAAAAAAAAAAAAAAAAAAAAAAAAAAAAAAAAAAAAAAAAAAAAAAAAAAAAAAAAAAAAAAAAAAAAAAAAAAAAAAAAAAAAAAAAAAAAAAAAAAAAAAAAAAAAAAAAAAAAAAAAAAAAAAAAAAAAAAAAAAAAAAAAAAAAAAAAAAAAAAAAAAAAAAAAAAAAAAAAAAAAAAAAAAAAAAAAAAAAAAAAAAAAAAAAAAAAAAAAAAAAAAAAAAAAAAAAAAAAAAAAAAAAAAAAAAAAAAAAAAAAAAAAAAAAAAAAAAAAAAAAAAAAAAAAAAAAAAAAAAAAAAAAAAAAAAAAAAAAAAAAAAAAAAAAAAAAAAAAAAAAAAAAAAAAAAAAAAAAAAAAAAAAAAAAAAAAAAAAAAAAAAAAAAAAAAAAAAAAAAAAAAAAAAAAAAAAAAAAAAAAAAAAAAAAAAAAAAAAAAAAAAAAAAAAAAAAAAAAAAAAAAAAAAAAAAAAAAAAAAAAAAAAAAAAAAAAAAAAAAAAAAAAAAAAAAAAAAAAAAAAAAAAAAAAAAAAAAAAAAAAAAAAAAAAAAAAAAAAAAAAAAAAAAAAAAAAAAAAAAAAAAAAAAAAAAAAAAAAAAAAAAAAAAAAAAAAAAAAAAAAAAAAAAAAAAAAAAAAAAAAAAAAAAAAAAAAAAAAAAAAAAAAAAAAAAAAAAAAAAAAAAAAAAAAAAAAAAAAAAAAAAAAAAAAAAAAAAAAAAAAAAAAAAAAAAAAAAAAAAAAAAAAAAAAAAAAAAAAAAAAAAAAAAAAAAAAAAAAAAAAAAAAAAAAAAAAAAAAAAAAAAAAAAAAAAAAAAAAAAAAAAAAAAAAAAAAAAAAAAAAAAAAAAAAAAAAAAAAAAAAAAAAAAAAAAAAAAAAAAAAAAAAAAAAAAAAAAAAAAAAAAAAAAAAAAAAAAAAAAAAAAAAAAAAAAAAAAAAAAAAAAAAAAAAAAAAAAAAAAAAAAAAAAAAAAAAAAAAAAAAAAAAAAAAAAAAAAAAAAAAAAAAAAAAAAAAAAAAAAAAAAAAAAAAAAAAAAAAAAAAAAAAAAAAAAAAAAAAAAAAAAAAAAAAAAAAAAAAAAAAAAAAAAAAAAAAAAAAAAAAAAAAAAAAAAAAAAAAAAAAAAAAAAAAAAAAAAAAAAAAAAAAAAAAAAAAAAAAAAAAAAAAAAAAAAAAAAAAAAAAAAAAAAAAAAAAAAAAAAAAAAAAAAAAAAAAAAAAAAAAAAAAAAAAAAAAAAAAAAAAAAAAAAAAAAAAAAAAAAAAAAAAAAAAAAAAAAAAAAAAAAAAAAAAAAAAAAAAAAAAAAAAAAAAAAAAAAAAAAAAAAAAAAAAAAAAAAAAAAAAAAAAAAAAAAAAAAAAAAAAAAAAAAAAAAAAAAAAAAAAAAAAAAAAAAAAAAAAAAAAAAAAAAAAAAAAAAAAAAAAAAAAAAAAAAAAAAAAAAAAAAAAAAAAAAAAAAAAAAAAAAAAAAAAAAAAAAAAAAAAAAAAAAAAAAAAAAAAAAAAAAAAAAAAAAAAAAAAAAAAAAAAAAAAAAAAAAAAAAAAAAAAAAAAAAAAAAAAAAAAAAAAAAAAAAAAAAAAAAAAAAAAAAAAAAAAAAAAAAAAAAAAAAAAAAAAAAAAAAAAAAAAAAAAAAAAAAAAAAAAAAAAAAAAAAAAAAAAAAAAAAAAAAAAAAAAAAAAAAAAAAAAAAAAAAAAAAAAAAAAAAAAAAAAAAAAAAAAAAAAAAAAAAAAAAAAAAAAAAAAAAAAAAAAAAAAAAAAAAAAAAAAAAAAAAAAAAAAAAAAAAAAAAAAAAAAAAAAAAAAAAAAAAAAAAAAAAAAAAAAAAAAAAAAAAAAAAAAAAAAAAAAAAAAAAAAAAAAAAAAAAAAAAAAAAAAAAAAAAAAAAAAAAAAAAAAAAAAAAAAAAAAAAAAAAAAAAAAAAAAAAAAAAAAAAAAAAAAAAAAAAAAAAAAAAAAAAAAAAAAAAAAAAAAAAAAAAAAAAAAAAAAAAAAAAAAAAAAAAAAAAAAAAAAAAAAAAAAAAAAAAAAAAAAAAAAAAAAAAAAAAAAAAAAAAAAAAAAAAAAAAAAAAAAAAAAAAAAAAAAAAAAAAAAAAAAAAAAAAAAAAAAAAAAAAAAAAAAAAAAAAAAAAAAAAAAAAAAAAAAAAAAAAAAAAAAAAAAAAAAAAAAAAAAAAAAAAAAAAAAAAAAAAAAAAAAAAAAAAAAAAAAAAAAAAAAAAAAAAAAAAAAAAAAAAAAAAAAAAAAAAAAAAAAAAAAAAAAAAAAAAAAAAAAAAAAAAAAAAAAAAAAAAAAAAAAAAAAAAAAAAAAAAAAAAAAAAAAAAAAAAAAAAAAAAAAAAAAAAAAAAAAAAAAAAAAAAAAAAAAAAAAAAAAAAAAAAAAAAAAAAAAAAAAAAAAAAAAAAAAAAAAAAAAAAAAAAAAAAAAAAAAAAAAAAAAAAAAAAAAAAAAAAAAAAAAAAAAAAAAAAAAAAAAAAAAAAAAAAAAAAAAAAAAAAAAAAAAAAAAAAAAAAAAAAAAAAAAAAAAAAAAAAAAAAAAAAAAAAAAAAAAAAAAAAAAAAAAAAAAAAAAAAAAAAAAAAAAAAAAAAAAAAAAAAAAAAAAAAAAAAAAAAAAAAAAAAAAAAAAAAAAAAAAAAAAAAAAAAAAAAAAAAAAAAAAAAAAAAAAAAAAAAAAAAAAAAAAAAAAAAAAAAAAAAAAAAAAAAAAAAAAAAAAAAAAAAAAAAAAAAAAAAAAAAAAAAAAAAAAAAAAAAAAAAAAAAAAAAAAAAAAAAAAAAAAAAAAAAAAAAAAAAAAAAAAAAAAAAAAAAAAAAAAAAAAAAAAAAAAAAAAAAAAAAAAAAAAAAAAAAAAAAAAAAAAAAAAAAAAAAAAAAAAAAAAAAAAAAAAAAAAAAAAAAAAAAAAAAAAAAAAAAAAAAAAAAAAAAAAAAAAAAAAAAAAAAAAAAAAAAAAAAA
AAAAAAAAAAAAAAAAAAAAAAAAAAAAAAAAAAAAAAAAAAAAAAAAAAAAAAAAAAAAAAAAAAAAAAAAAAAAAAAAAAAAAAAAAAAAAAAAAAAAAAAAAAAAAAAAAAAAAAAAAAAAAAAAAAAAAAAAAAAAAAAAAAAAAAAAAAAAAAAAAAAAAAAAAAAAAAAAAAAAAAAAAAAAAAAAAAAAAAAAAAAAAAAAAAAAAAAAAAAAAAAAAAAAAAAAAAAAAAAAAAAAAAAAAAAAAAAAAAAAAAAAAAAAAAAAAAAAAAAAAAAAAAAAAAAAAAAAAAAAAAAAAAAAAAAAAAAAAAAAAAAAAAAAAAAAAAAAAAAAAAAAAAAAAAAAAAAAAAAAAAAAAAAAAAAAAAAAAAAAAAAAAAAAAAAAAAAAAAAAAAAAAAAAAAAAAAAAAAAAAAAAAAAAAAAAAAAAAAAAAAAAAAAAAAAAAAAAAAAAAAAAAAAAAAAAAAAAAAAAAAAAAAAAAAAAAAAAAAAAAAAAAAAAAAAAAAAAAAAAAAAAAAAAAAAAAAAAAAAAAAAAAAAAAAAAAAAAAAAAAAAAAAAAAAAAAAAAAAAAAAAAAAAAAAAAAAAAAAAAAAAAAAAAAAAAAAAAAAAAAAAAAAAAAAAAAAAAAAAAAAAAAAAAAAAAAAAAAAAAAAAAAAAAAAAAAAAAAAAAAAAAAAAAAAAAAAAAAAAAAAAAAAAAAAAAAAAAAAAAAAAAAAAAAAAAAAAAAAAAAAAAAAAAAAAAAAAAAAAAAAAAAAAAAAAAAAAAAAAAAAAAAAAAAAAAAAAAAAAAAAAAAAAAAAAAAAAAAAAAAAAAAAAAAAAAAAAAAAAAAAAAAAAAAAAAAAAAAAAAAAAAAAAAAAAAAAAAAAAAAAAAAAAAAAAAAAAAAAAAAAAAAAAAAAAAAAAAAAAAAAAAAAAAAAAAAAAAAAAAAAAAAAAAAAAAAAAAAAAAAAAAAAAAAAAAAAAAAAAAAAAAAAAAAAAAAAAAAAAAAAAAAAAAAAAAAAAAAAAAAAAAAAAAAAAAAAAAAAAAAAAAAAAAAAAAAAAAAAAAAAAAAAAAAAAAAAAAAAAAAAAAAAAAAAAAAAAAAAAAAAAAAAAAAAAAAAAAAAAAAAAAAAAAAAAAAAAAAAAAAAAAAAAAAAAAAAAAAAAAAAAAAAAAAAAAAAAAAAAAAAAAAAAAAAAAAAAAAAAAAAAAAAAAAAAAAAAAAAAAAAAAAAAAAAAAAAAAAAAAAAAAAAAAAAAAAAAAAAAAAAAAAAAAAAAAAAAAAAAAAAAAAAAAAAAAAAAAAAAAAAAAAAAAAAAAAAAAAAAAAAAAAAAAAAAAAAAAAAAAAAAAAAAAAAAAAAAAAAAAAAAAAAAAAAAAAAAAAAAAAAAAAAAAAAAAAAAAAAAAAAAAAAAAAAAAAAAAAAAAAAAAAAAAAAAAAAAAAAAAAAAAAAAAAAAAAAAAAAAAAAAAAAAAAAAAAAAAAAAAAAAAAAAAAAAAAAAAAAAAAAAAAAAAAAAAAAAAAAAAAAAAAAAAAAAAAAAAAAAAAAAAAAAAAAAAAAAAAAAAAAAAAAAAAAAAAAAAAAAAAAAAAAAAAAAAAAAAAAAAAAAAAAAAAAAAAAAAAAAAAAAAAAAAAAAAAAAAAAAAAAAAAAAAAAAAAAAAAAAAAAAAAAAAAAAAAAAAAAAAAAAAAAAAAAAAAAAAAAAAAAAAAAAAAAAAAAAAAAAAAAAAAAAAAAAAAAAAAAAAAAAAAAAAAAAAAAAAAAAAAAAAAAAAAAAAAAAAAAAAAAAAAAAAAAAAAAAAAAAAAAAAAAAAAAAAAAAAAAAAAAAAAAAAAAAAAAAAAAAAAAAAAAAAAAAAAAAAAAAAAAAAAAAAAAAAAAAAAAAAAAAAAAAAAAAAAAAAAAAAAAAAAAAAAAAAAAAAAAAAAAAAAAAAAAAAAAAAAAAAAAAAAAAAAAAAAAAAAAAAAAAAAAAAAAAAAAAAAAAAAAAAAAAAAAAAAAAAAAAAAAAAAAAAAAAAAAAAAAAAAAAAAAAAAAAAAAAAAAAAAAAAAAAAAAAAAAAAAAAAAAAAAAAAAAAAAAAAAAAAAAAAAAAAAAAAAAAAAAAAAAAAAAAAAAAAAAAAAAAAAAAAAAAAAAAAAAAAAAAAAAAAAAAAAAAAAAAAAAAAAAAAAAAAAAAAAAAAAAAAAAAAAAAAAAAAAAAAAAAAAAAAAAAAAAAAAAAAAAAAAAAAAAAAAAAAAAAAAAAAAAAAAAAAAAAAAAAAAAAAAAAAAAAAAAAAAAAAAAAAAAAAAAAAAAAAAAAAAAAAAAAAAAAAAAAAAAAAAAAAAAAAAAAAAAAAAAAAAAAAAAAAAAAAAAAAAAAAAAAAAAAAAAAAAAAAAAAAAAAAAAAAAAAAAAAAAAAAAAAAAAAAAAAAAAAAAAAAAAAAAAAAAAAAAAAAAAAAAAAAAAAAAAAAAAAAAAAAAAAAAAAAAAAAAAAAAAAAAAAAAAAAAAAAAAAAAAAAAAAAAAAAAAAAAAAAAAAAAAAAAAAAAAAAAAAAAAAAAAAAAAAAAAAAAAAAAAAAAAAAAAAAAAAAAAAAAAAAAAAAAAAAAAAAAAAAAAAAAAAAAAAAAAAAAAAAAAAAAAAAAAAAAAAAAAAAAAAAAAAAAAAAAAAAAAAAAAAAAAAAAAAAAAAAAAAAAAAAAAAAAAAAAAAAAAAAAAAAAAAAAAAAAAAAAAAAAAAAAAAAAAAAAAAAAAAAAAAAAAAAAAAAAAAAAAAAAAAAAAAAAAAAAAAAAAAAAAAAAAAAAAAAAAAAAAAAAAAAAAAAAAAAAAAAAAAAAAAAAAAAAAAAAAAAAAAAAAAAAAAAAAAAAAAAAAAAAAAAAAAAAAAAAAAAAAAAAAAAAAAAAAAAAAAAAAAAAAAAAAAAAAAAAAAAAAAAAAAAAAAAAAAAAAAAAAAAAAAAAAAAAAAAAAAAAAAAAAAAAAAAAAAAAAAAAAAAAAAAAAAAAAAAAAAAAAAAAAAAAAAAAAAAAAAAAAAAAAAAAAAAAAAAAAAAAAAAAAAAAAAAAAAAAAAAAAAAAAAAAAAAAAAAAAAAAAAAAAAAAAAAAAAAAAAAAAAAAAAAAAAAAAAAAAAAAAAAAAAAAAAAAAAAAAAAAAAAAAAAAAAAAAAAAAAAAAAAAAAAAAAAAAAAAAAAAAAAAAAAAAAAAAAAAAAAAAAAAAAAAAAAAAAAAAAAAAAAAAAAAAAAAAAAAAAAAAAAAAAAAAAAAAAAAAAAAAAAAAAAAAAAAAAAAAAAAAAAAAAAAAAAAAAAAAAAAAAAAAAAAAAAAAAAAAAAAAAAAAAAAAAAAAAAAAAAAAAAAAAAAAAAAAAAAAAAAAAAAAAAAAAAAAAAAAAAAAAAAAAAAAAAAAAAAAAAAAAAAAAAAAAAAAAAAAAAAAAAAAAAAAAAAAAAAAAAAAAAAAAAAAAAAAAAAAAAAAAAAAAAAAAAAAAAAAAAAAAAAAAAAAAAAAAAAAAAAAAAAAAAAAAAAAAAAAAAAAAAAAAAAAAAAAAAAAAAAAAAAAAAAAAAAAAAAAAAAAAAAAAAAAAAAAAAAAAAAAAAAAAAAAAAAAAAAAAAAAAAAAAAAAAAAAAAAAAAAAAAAAAAAAAAAAAAAAAAAAAAAAAAAAAAAAAAAAAAAAAAAAAAAAAAAAAAAAAAAAAAAAAAAAAAAAAAAAAAAAAAAAAAAAAAAAAAAAAAAAAAAAAAAAAAAAAAAAAAAAAAAAAAAAAAAAAAAAAAAAAAAAAAAAAAAAAAAAAAAAAAAAAAAAAAAAAAAAAAAAAAAAAAAAAAAAAAAAAAAAAAAAAAAAAAAAAAAAAAAAAAAAAAAAAAAAAAAAAAAAAAAAAAAAAAAAAAAAAAAAAAAAAAAAAAAAAAAAAAAAAAAAAAAAAAAAAAAAAAAAAAAAAAAAAAAAAAAAAAAAAAAAAAAAAAAAAAAAAAAAAAAAAAAAAAAAAAAAAAAAAAAAAAAAAAAAAAAAAAAAAAAAAAAAAAAAAAAAAAAAAAAAAAAAAAAAAAAAAAAAAAAAAAAAAAAAAAAAAAAAAAAAAAAAAAAAAAAAAAAAAAAAAAAAAAAAAAAAAAAAAAAAAA
AAAAAAAAAAAAAAAAAAAAAAAAAAAAAAAAAAAAAAAAAAAAAAAAAAAAAAAAAAAAAAAAAAAAAAAAAAAAAAAAAAAAAAAAAAAAAAAAAAAAAAAAAAAAAAAAAAAAAAAAAAAAAAAAAAAAAAAAAAAAAAAAAAAAAAAAAAAAAAAAAAAAAAAAAAAAAAAAAAAAAAAAAAAAAAAAAAAAAAAAAAAAAAAAAAAAAAAAAAAAAAAAAAAAAAAAAAAAAAAAAAAAAAAAAAAAAAAAAAAAAAAAAAAAAAAAAAAAAAAAAAAAAAAAAAAAAAAAAAAAAAAAAAAAAAAAAAAAAAAAAAAAAAAAAAAAAAAAAAAAAAAAAAAAAAAAAAAAAAAAAAAAAAAAAAAAAAAAAAAAAAAAAAAAAAAAAAAAAAAAAAAAAAAAAAAAAAAAAAAAAAAAAAAAAAAAAAAAAAAAAAAAAAAAAAAAAAAAAAAAAAAAAAAAAAAAAAAAAAAAAAAAAAAAAAAAAAAAAAAAAAAAAAAAAAAAAAAAAAAAAAAAAAAAAAAAAAAAAAAAAAAAAAAAAAAAAAAAAAAAAAAAAAAAAAAAAAAAAAAAAAAAAAAAAAAAAAAAAAAAAAAAAAAAAAAAAAAAAAAAAAAAAAAAAAAAAAAAAAAAAAAAAAAAAAAAAAAAAAAAAAAAAAAAAAAAAAAAAAAAAAAAAAAAAAAAAAAAAAAAAAAAAAAAAAAAAAAAAAAAAAAAAAAAAAAAAAAAAAAAAAAAAAAAAAAAAAAAAAAAAAAAAAAAAAAAAAAAAAAAAAAAAAAAAAAAAAAAAAAAAAAAAAAAAAAAAAAAAAAAAAAAAAAAAAAAAAAAAAAAAAAAAAAAAAAAAAAAAAAAAAAAAAAAAAAAAAAAAAAAAAAAAAAAAAAAAAAAAAAAAAAAAAAAAAAAAAAAAAAAAAAAAAAAAAAAAAAAAAAAAAAAAAAAAAAAAAAAAAAAAAAAAAAAAAAAAAAAAAAAAAAAAAAAAAAAAAAAAAAAAAAAAAAAAAAAAAAAAAAAAAAAAAAAAAAAAAAAAAAAAAAAAAAAAAAAAAAAAAAAAAAAAAAAAAAAAAAAAAAAAAAAAAAAAAAAAAAAAAAAAAAAAAAAAAAAAAAAAAAAAAAAAAAAAAAAAAAAAAAAAAAAAAAAAAAAAAAAAAAAAAAAAAAAAAAAAAAAAAAAAAAAAAAAAAAAAAAAAAAAAAAAAAAAAAAAAAAAAAAAAAAAAAAAAAAAAAAAAAAAAAAAAAAAAAAAAAAAAAAAAAAAAAAAAAAAAAAAAAAAAAAAAAAAAAAAAAAAAAAAAAAAAAAAAAAAAAAAAAAAAAAAAAAAAAAAAAAAAAAAAAAAAAAAAAAAAAAAAAAAAAAAAAAAAAAAAAAAAAAAAAAAAAAAAAAAAAAAAAAAAAAAAAAAAAAAAAAAAAAAAAAAAAAAAAAAAAAAAAAAAAAAAAAAAAAAAAAAAAAAAAAAAAAAAAAAAAAAAAAAAAAAAAAAAAAAAAAAAAAAAAAAAAAAAAAAAAAAAAAAAAAAAAAAAAAAAAAAAAAAAAAAAAAAAAAAAAAAAAAAAAAAAAAAAAAAAAAAAAAAAAAAAAAAAAAAAAAAAAAAAAAAAAAAAAAAAAAAAAAAAAAAAAAAAAAAAAAAAAAAAAAAAAAAAAAAAAAAAAAAAAAAAAAAAAAAAAAAAAAAAAAAAAAAAAAAAAAAAAAAAAAAAAAAAAAAAAAAAAAAAAAAAAAAAAAAAAAAAAAAAAAAAAAAAAAAAAAAAAAAAAAAAAAAAAAAAAAAAAAAAAAAAAAAAAAAAAAAAAAAAAAAAAAAAAAAAAAAAAAAAAAAAAAAAAAAAAAAAAAAAAAAAAAAAAAAAAAAAAAAAAAAAAAAAAAAAAAAAAAAAAAAAAAAAAAAAAAAAAAAAAAAAAAAAAAAAAAAAAAAAAAAAAAAAAAAAAAAAAAAAAAAAAAAAAAAAAAAAAAAAAAAAAAAAAAAAAAAAAAAAAAAAAAAAAAAAAAAAAAAAAAAAAAAAAAAAAAAAAAAAAAAAAAAAAAAAAAAAAAAAAAAAAAAAAAAAAAAAAAAAAAAAAAAAAAAAAAAAAAAAAAAAAAAAAAAAAAAAAAAAAAAAAAAAAAAAAAAAAAAAAAAAAAAAAAAAAAAAAAAAAAAAAAAAAAAAAAAAAAAAAAAAAAAAAAAAAAAAAAAAAAAAAAAAAAAAAAAAAAAAAAAAAAAAAAAAAAAAAAAAAAAAAAAAAAAAAAAAAAAAAAAAAAAAAAAAAAAAAAAAAAAAAAAAAAAAAAAAAAAAAAAAAAAAAAAAAAAAAAAAAAAAAAAAAAAAAAAAAAAAAAAAAAAAAAAAAAAAAAAAAAAAAAAAAAAAAAAAAAAAAAAAAAAAAAAAAAAAAAAAAAAAAAAAAAAAAAAAAAAAAAAAAAAAAAAAAAAAAAAAAAAAAAAAAAAAAAAAAAAAAAAAAAAAAAAAAAAAAAAAAAAAAAAAAAAAAAAAAAAAAAAAAAAAAAAAAAAAAAAAAAAAAAAAAAAAAAAAAAAAAAAAAAAAAAAAAAAAAAAAAAAAAAAAAAAAAAAAAAAAAAAAAAAAAAAAAAAAAAAAAAAAAAAAAAAAAAAAAAAAAAAAAAAAAAAAAAAAAAAAAAAAAAAAAAAAAAAAAAAAAAAAAAAAAAAAAAAAAAAAAAAAAAAAAAAAAAAAAAAAAAAAAAAAAAAAAAAAAAAAAAAAAAAAAAAAAAAAAAAAAAAAAAAAAAAAAAAAAAAAAAAAAAAAAAAAAAAAAAAAAAAAAAAAAAAAAAAAAAAAAAAAAAAAAAAAAAAAAAAAAAAAAAAAAAAAAAAAAAAAAAAAAAAAAAAAAAAAAAAAAAAAAAAAAAAAAAAAAAAAAAAAAAAAAAAAAAAAAAAAAAAAAAAAAAAAAAAAAAAAAAAAAAAAAAAAAAAAAAAAAAAAAAAAAAAAAAAAAAAAAAAAAAAAAAAAAAAAAAAAAAAAAAAAAAAAAAAAAAAAAAAAAAAAAAAAAAAAAAAAAAAAAAAAAAAAAAAAAAAAAAAAAAAAAAAAAAAAAAAAAAAAAAAAAAAAAAAAAAAAAAAAAAAAAAAAAAAAAAAAAAAAAAAAAAAAAAAAAAAAAAAAAAAAAAAAAAAAAAAAAAAAAAAAAAAAAAAAAAAAAAAAAAAAAAAAAAAAAAAAAAAAAAAAAAAAAAAAAAAAAAAAAAAAAAAAAAAAAAAAAAAAAAAAAAAAAAAAAAAAAAAAAAAAAAAAAAAAAAAAAAAAAAAAAAAAAAAAAAAAAAAAAAAAAAAAAAAAAAAAAAAAAAAAAAAAAAAAAAAAAAAAAAAAAAAAAAAAAAAAAAAAAAAAAAAAAAAAAAAAAAAAAAAAAAAAAAAAAAAAAAAAAAAAAAAAAAAAAAAAAAAAAAAAAAAAAAAAAAAAAAAAAAAAAAAAAAAAAAAAAAAAAAAAAAAAAAAAAAAAAAAAAAAAAAAAAAAAAAAAAAAAAAAAAAAAAAAAAAAAAAAAAAAAAAAAAAAAAAAAAAAAAAAAAAAAAAAAAAAAAAAAAAAAAAAAAAAAAAAAAAAAAAAAAAAAAAAAAAAAAAAAAAAAAAAAAAAAAAAAAAAAAAAAAAAAAAAAAAAAAAAAAAAAAAAAAAAAAAAAAAAAAAAAAAAAAAAAAAAAAAAAAAAAAAAAAAAAAAAAAAAAAAAAAAAAAAAAAAAAAAAAAAAAAAAAAAAAAAAAAAAAAAAAAAAAAAAAAAAAAAAAAAAAAAAAAAAAAAAAAAAAAAAAAAAAAAAAAAAAAAAAAAAAAAAAAAAAAAAAAAAAAAAAAAAAAAAAAAAAAAAAAAAAAAAAAAAAAAAAAAAAAAAAAAAAAAAAAAAAAAAAAAAAAAAAAAAAAAAAAAAAAAAAAAAAAAAAAAAAAAAAAAAAAAAAAAAAAAAAAAAAAAAAAAAAAAAAAAAAAAAAAAAAAAAAAAAAAAAAAAAAAAAAAAAAAAAAAAAAAAAAAAAAAAAAAAAAAAAAAAAAAAAAAAAAAAAAAAAAAAAAAAAAAAAAAAAAAAAAAAAAAAAAAAAAAAAAAAAAAAAAAAAAAAAAAAAAAAAAAAAAAAAAAAAAAAAAAAAAAAAAAAAAAAAAAAA
AAAAAAAAAAAAAAAAAAAAAAAAAAAAAAAAAAAAAAAAAAAAAAAAAAAAAAAAAAAAAAAAAAAAAAAAAAAAAAAAAAAAAAAAAAAAAAAAAAAAAAAAAAAAAAAAAAAAAAAAAAAAAAAAAAAAAAAAAAAAAAAAAAAAAAAAAAAAAAAAAAAAAAAAAAAAAAAAAAAAAAAAAAAAAAAAAAAAAAAAAAAAAAAAAAAAAAAAAAAAAAAAAAAAAAAAAAAAAAAAAAAAAAAAAAAAAAAAAAAAAAAAAAAAAAAAAAAAAAAAAAAAAAAAAAAAAAAAAAAAAAAAAAAAAAAAAAAAAAAAAAAAAAAAAAAAAAAAAAAAAAAAAAAAAAAAAAAAAAAAAAAAAAAAAAAAAAAAAAAAAAAAAAAAAAAAAAAAAAAAAAAAAAAAAAAAAAAAAAAAAAAAAAAAAAAAAAAAAAAAAAAAAAAAAAAAAAAAAAAAAAAAAAAAAAAAAAAAAAAAAAAAAAAAAAAAAAAAAAAAAAAAAAAAAAAAAAAAAAAAAAAAAAAAAAAAAAAAAAAAAAAAAAAAAAAAAAAAAAAAAAAAAAAAAAAAAAAAAAAAAAAAAAAAAAAAAAAAAAAAAAAAAAAAAAAAAAAAAAAAAAAAAAAAAAAAAAAAAAAAAAAAAAAAAAAAAAAAAAAAAAAAAAAAAAAAAAAAAAAAAAAAAAAAAAAAAAAAAAAAAAAAAAAAAAAAAAAAAAAAAAAAAAAAAAAAAAAAAAAAAAAAAAAAAAAAAAAAAAAAAAAAAAAAAAAAAAAAAAAAAAAAAAAAAAAAAAAAAAAAAAAAAAAAAAAAAAAAAAAAAAAAAAAAAAAAAAAAAAAAAAAAAAAAAAAAAAAAAAAAAAAAAAAAAAAAAAAAAAAAAAAAAAAAAAAAAAAAAAAAAAAAAAAAAAAAAAAAAAAAAAAAAAAAAAAAAAAAAAAAAAAAAAAAAAAAAAAAAAAAAAAAAAAAAAAAAAAAAAAAAAAAAAAAAAAAAAAAAAAAAAAAAAAAAAAAAAAAAAAAAAAAAAAAAAAAAAAAAAAAAAAAAAAAAAAAAAAAAAAAAAAAAAAAAAAAAAAAAAAAAAAAAAAAAAAAAAAAAAAAAAAAAAAAAAAAAAAAAAAAAAAAAAAAAAAAAAAAAAAAAAAAAAAAAAAAAAAAAAAAAAAAAAAAAAAAAAAAAAAAAAAAAAAAAAAAAAAAAAAAAAAAAAAAAAAAAAAAAAAAAAAAAAAAAAAAAAAAAAAAAAAAAAAAAAAAAAAAAAAAAAAAAAAAAAAAAAAAAAAAAAAAAAAAAAAAAAAAAAAAAAAAAAAAAAAAAAAAAAAAAAAAAAAAAAAAAAAAAAAAAAAAAAAAAAAAAAAAAAAAAAAAAAAAAAAAAAAAAAAAAAAAAAAAAAAAAAAAAAAAAAAAAAAAAAAAAAAAAAAAAAAAAAAAAAAAAAAAAAAAAAAAAAAAAAAAAAAAAAAAAAAAAAAAAAAAAAAAAAAAAAAAAAAAAAAAAAAAAAAAAAAAAAAAAAAAAAAAAAAAAAAAAAAAAAAAAAAAAAAAAAAAAAAAAAAAAAAAAAAAAAAAAAAAAAAAAAAAAAAAAAAAAAAAAAAAAAAAAAAAAAAAAAAAAAAAAAAAAAAAAAAAAAAAAAAAAAAAAAAAAAAAAAAAAAAAAAAAAAAAAAAAAAAAAAAAAAAAAAAAAAAAAAAAAAAAAAAAAAAAAAAAAAAAAAAAAAAAAAAAAAAAAAAAAAAAAAAAAAAAAAAAAAAAAAAAAAAAAAAAAAAAAAAAAAAAAAAAAAAAAAAAAAAAAAAAAAAAAAAAAAAAAAAAAAAAAAAAAAAAAAAAAAAAAAAAAAAAAAAAAAAAAAAAAAAAAAAAAAAAAAAAAAAAAAAAAAAAAAAAAAAAAAAAAAAAAAAAAAAAAAAAAAAAAAAAAAAAAAAAAAAAAAAAAAAAAAAAAAAAAAAAAAAAAAAAAAAAAAAAAAAAAAAAAAAAAAAAAAAAAAAAAAAAAAAAAAAAAAAAAAAAAAAAAAAAAAAAAAAAAAAAAAAAAAAAAAAAAAAAAAAAAAAAAAAAAAAAAAAAAAAAAAAAAAAAAAAAAAAAAAAAAAAAAAAAAAAAAAAAAAAAAAAAAAAAAAAAAAAAAAAAAAAAAAAAAAAAAAAAAAAAAAAAAAAAAAAAAAAAAAAAAAAAAAAAAAAAAAAAAAAAAAAAAAAAAAAAAAAAAAAAAAAAAAAAAAAAAAAAAAAAAAAAAAAAAAAAAAAAAAAAAAAAAAAAAAAAAAAAAAAAAAAAAAAAAAAAAAAAAAAAAAAAAAAAAAAAAAAAAAAAAAAAAAAAAAAAAAAAAAAAAAAAAAAAAAAAAAAAAAAAAAAAAAAAAAAAAAAAAAAAAAAAAAAAAAAAAAAAAAAAAAAAAAAAAAAAAAAAAAAAAAAAAAAAAAAAAAAAAAAAAAAAAAAAAAAAAAAAAAAAAAAAAAAAAAAAAAAAAAAAAAAAAAAAAAAAAAAAAAAAAAAAAAAAAAAAAAAAAAAAAAAAAAAAAAAAAAAAAAAAAAAAAAAAAAAAAAAAAAAAAAAAAAAAAAAAAAAAAAAAAAAAAAAAAAAAAAAAAAAAAAAAAAAAAAAAAAAAAAAAAAAAAAAAAAAAAAAAAAAAAAAAAAAAAAAAAAAAAAAAAAAAAAAAAAAAAAAAAAAAAAAAAAAAAAAAAAAAAAAAAAAAAAAAAAAAAAAAAAAAAAAAAAAAAAAAAAAAAAAAAAAAAAAAAAAAAAAAAAAAAAAAAAAAAAAAAAAAAAAAAAAAAAAAAAAAAAAAAAAAAAAAAAAAAAAAAAAAAAAAAAAAAAAAAAAAAAAAAAAAAAAAAAAAAAAAAAAAAAAAAAAAAAAAAAAAAAAAAAAAAAAAAAAAAAAAAAAAAAAAAAAAAAAAAAAAAAAAAAAAAAAAAAAAAAAAAAAAAAAAAAAAAAAAAAAAAAAAAAAAAAAAAAAAAAAAAAAAAAAAAAAAAAAAAAAAAAAAAAAAAAAAAAAAAAAAAAAAAAAAAAAAAAAAAAAAAAAAAAAAAAAAAAAAAAAAAAAAAAAAAAAAAAAAAAAAAAAAAAAAAAAAAAAAAAAAAAAAAAAAAAAAAAAAAAAAAAAAAAAAAAAAAAAAAAAAAAAAAAAAAAAAAAAAAAAAAAAAAAAAAAAAAAAAAAAAAAAAAAAAAAAAAAAAAAAAAAAAAAAAAAAAAAAAAAAAAAAAAAAAAAAAAAAAAAAAAAAAAAAAAAAAAAAAAAAAAAAAAAAAAAAAAAAAAAAAAAAAAAAAAAAAAAAAAAAAAAAAAAAAAAAAAAAAAAAAAAAAAAAAAAAAAAAAAAAAAAAAAAAAAAAAAAAAAAAAAAAAAAAAAAAAAAAAAAAAAAAAAAAAAAAAAAAAAAAAAAAAAAAAAAAAAAAAAAAAAAAAAAAAAAAAAAAAAAAAAAAAAAAAAAAAAAAAAAAAAAAAAAAAAAAAAAAAAAAAAAAAAAAAAAAAAAAAAAAAAAAAAAAAAAAAAAAAAAAAAAAAAAAAAAAAAAAAAAAAAAAAAAAAAAAAAAAAAAAAAAAAAAAAAAAAAAAAAAAAAAAAAAAAAAAAAAAAAAAAAAAAAAAAAAAAAAAAAAAAAAAAAAAAAAAAAAAAAAAAAAAAAAAAAAAAAAAAAAAAAAAAAAAAAAAAAAAAAAAAAAAAAAAAAAAAAAAAAAAAAAAAAAAAAAAAAAAAAAAAAAAAAAAAAAAAAAAAAAAAAAAAAAAAAAAAAAAAAAAAAAAAAAAAAAAAAAAAAAAAAAAAAAAAAAAAAAAAAAAAAAAAAAAAAAAAAAAAAAAAAAAAAAAAAAAAAAAAAAAAAAAAAAAAAAAAAAAAAAAAAAAAAAAAAAAAAAAAAAAAAAAAAAAAAAAAAAAAAAAAAAAAAAAAAAAAAAAAAAAAAAAAAAAAAAAAAAAAAAAAAAAAAAAAAAAAAAAAAAAAAAAAAAAAAAAAAAAAAAAAAAAAAAAAAAAAAAAAAAAAAAAAAAAAAAAAAAAAAAAAAAAAAAAAAAAAAAAAAAAAAAAAAAAAAAAAAAAAAAAAAAAAAAAAAAAAAAAAAAAAAAAAAAAAAAAAAAAAAAAAAAAAAAAAAAAAAAAAAAAA
AAAAAAAAAAAAAAAAAAAAAAAAAAAAAAAAAAAAAAAAAAAAAAAAAAAAAAAAAAAAAAAAAAAAAAAAAAAAAAAAAAAAAAAAAAAAAAAAAAAAAAAAAAAAAAAAAAAAAAAAAAAAAAAAAAAAAAAAAAAAAAAAAAAAAAAAAAAAAAAAAAAAAAAAAAAAAAAAAAAAAAAAAAAAAAAAAAAAAAAAAAAAAAAAAAAAAAAAAAAAAAAAAAAAAAAAAAAAAAAAAAAAAAAAAAAAAAAAAAAAAAAAAAAAAAAAAAAAAAAAAAAAAAAAAAAAAAAAAAAAAAAAAAAAAAAAAAAAAAAAAAAAAAAAAAAAAAAAAAAAAAAAAAAAAAAAAAAAAAAAAAAAAAAAAAAAAAAAAAAAAAAAAAAAAAAAAAAAAAAAAAAAAAAAAAAAAAAAAAAAAAAAAAAAAAAAAAAAAAAAAAAAAAAAAAAAAAAAAAAAAAAAAAAAAAAAAAAAAAAAAAAAAAAAAAAAAAAAAAAAAAAAAAAAAAAAAAAAAAAAAAAAAAAAAAAAAAAAAAAAAAAAAAAAAAAAAAAAAAAAAAAAAAAAAAAAAAAAAAAAAAAAAAAAAAAAAAAAAAAAAAAAAAAAAAAAAAAAAAAAAAAAAAAAAAAAAAAAAAAAAAAAAAAAAAAAAAAAAAAAAAAAAAAAAAAAAAAAAAAAAAAAAAAAAAAAAAAAAAAAAAAAAAAAAAAAAAAAAAAAAAAAAAAAAAAAAAAAAAAAAAAAAAAAAAAAAAAAAAAAAAAAAAAAAAAAAAAAAAAAAAAAAAAAAAAAAAAAAAAAAAAAAAAAAAAAAAAAAAAAAAAAAAAAAAAAAAAAAAAAAAAAAAAAAAAAAAAAAAAAAAAAAAAAAAAAAAAAAAAAAAAAAAAAAAAAAAAAAAAAAAAAAAAAAAAAAAAAAAAAAAAAAAAAAAAAAAAAAAAAAAAAAAAAAAAAAAAAAAAAAAAAAAAAAAAAAAAAAAAAAAAAAAAAAAAAAAAAAAAAAAAAAAAAAAAAAAAAAAAAAAAAAAAAAAAAAAAAAAAAAAAAAAAAAAAAAAAAAAAAAAAAAAAAAAAAAAAAAAAAAAAAAAAAAAAAAAAAAAAAAAAAAAAAAAAAAAAAAAAAAAAAAAAAAAAAAAAAAAAAAAAAAAAAAAAAAAAAAAAAAAAAAAAAAAAAAAAAAAAAAAAAAAAAAAAAAAAAAAAAAAAAAAAAAAAAAAAAAAAAAAAAAAAAAAAAAAAAAAAAAAAAAAAAAAAAAAAAAAAAAAAAAAAAAAAAAAAAAAAAAAAAAAAAAAAAAAAAAAAAAAAAAAAAAAAAAAAAAAAAAAAAAAAAAAAAAAAAAAAAAAAAAAAAAAAAAAAAAAAAAAAAAAAAAAAAAAAAAAAAAAAAAAAAAAAAAAAAAAAAAAAAAAAAAAAAAAAAAAAAAAAAAAAAAAAAAAAAAAAAAAAAAAAAAAAAAAAAAAAAAAAAAAAAAAAAAAAAAAAAAAAAAAAAAAAAAAAAAAAAAAAAAAAAAAAAAAAAAAAAAAAAAAAAAAAAAAAAAAAAAAAAAAAAAAAAAAAAAAAAAAAAAAAAAAAAAAAAAAAAAAAAAAAAAAAAAAAAAAAAAAAAAAAAAAAAAAAAAAAAAAAAAAAAAAAAAAAAAAAAAAAAAAAAAAAAAAAAAAAAAAAAAAAAAAAAAAAAAAAAAAAAAAAAAAAAAAAAAAAAAAAAAAAAAAAAAAAAAAAAAAAAAAAAAAAAAAAAAAAAAAAAAAAAAAAAAAAAAAAAAAAAAAAAAAAAAAAAAAAAAAAAAAAAAAAAAAAAAAAAAAAAAAAAAAAAAAAAAAAAAAAAAAAAAAAAAAAAAAAAAAAAAAAAAAAAAAAAAAAAAAAAAAAAAAAAAAAAAAAAAAAAAAAAAAAAAAAAAAAAAAAAAAAAAAAAAAAAAAAAAAAAAAAAAAAAAAAAAAAAAAAAAAAAAAAAAAAAAAAAAAAAAAAAAAAAAAAAAAAAAAAAAAAAAAAAAAAAAAAAAAAAAAAAAAAAAAAAAAAAAAAAAAAAAAAAAAAAAAAAAAAAAAAAAAAAAAAAAAAAAAAAAAAAAAAAAAAAAAAAAAAAAAAAAAAAAAAAAAAAAAAAAAAAAAAAAAAAAAAAAAAAAAAAAAAAAAAAAAAAAAAAAAAAAAAAAAAAAAAAAAAAAAAAAAAAAAAAAAAAAAAAAAAAAAAAAAAAAAAAAAAAAAAAAAAAAAAAAAAAAAAAAAAAAAAAAAAAAAAAAAAAAAAAAAAAAAAAAAAAAAAAAAAAAAAAAAAAAAAAAAAAAAAAAAAAAAAAAAAAAAAAAAAAAAAAAAAAAAAAAAAAAAAAAAAAAAAAAAAAAAAAAAAAAAAAAAAAAAAAAAAAAAAAAAAAAAAAAAAAAAAAAAAAAAAAAAAAAAAAAAAAAAAAAAAAAAAAAAAAAAAAAAAAAAAAAAAAAAAAAAAAAAAAAAAAAAAAAAAAAAAAAAAAAAAAAAAAAAAAAAAAAAAAAAAAAAAAAAAAAAAAAAAAAAAAAAAAAAAAAAAAAAAAAAAAAAAAAAAAAAAAAAAAAAAAAAAAAAAAAAAAAAAAAAAAAAAAAAAAAAAAAAAAAAAAAAAAAAAAAAAAAAAAAAAAAAAAAAAAAAAAAAAAAAAAAAAAAAAAAAAAAAAAAAAAAAAAAAAAAAAAAAAAAAAAAAAAAAAAAAAAAAAAAAAAAAAAAAAAAAAAAAAAAAAAAAAAAAAAAAAAAAAAAAAAAAAAAAAAAAAAAAAAAAAAAAAAAAAAAAAAAAAAAAAAAAAAAAAAAAAAAAAAAAAAAAAAAAAAAAAAAAAAAAAAAAAAAAAAAAAAAAAAAAAAAAAAAAAAAAAAAAAAAAAAAAAAAAAAAAAAAAAAAAAAAAAAAAAAAAAAAAAAAAAAAAAAAAAAAAAAAAAAAAAAAAAAAAAAAAAAAAAAAAAAAAAAAAAAAAAAAAAAAAAAAAAAAAAAAAAAAAAAAAAAAAAAAAAAAAAAAAAAAAAAAAAAAAAAAAAAAAAAAAAAAAAAAAAAAAAAAAAAAAAAAAAAAAAAAAAAAAAAAAAAAAAAAAAAAAAAAAAAAAAAAAAAAAAAAAAAAAAAAAAAAAAAAAAAAAAAAAAAAAAAAAAAAAAAAAAAAAAAAAAAAAAAAAAAAAAAAAAAAAAAAAAAAAAAAAAAAAAAAAAAAAAAAAAAAAAAAAAAAAAAAAAAAAAAAAAAAAAAAAAAAAAAAAAAAAAAAAAAAAAAAAAAAAAAAAAAAAAAAAAAAAAAAAAAAAAAAAAAAAAAAAAAAAAAAAAAAAAAAAAAAAAAAAAAAAAAAAAAAAAAAAAAAAAAAAAAAAAAAAAAAAAAAAAAAAAAAAAAAAAAAAAAAAAAAAAAAAAAAAAAAAAAAAAAAAAAAAAAAAAAAAAAAAAAAAAAAAAAAAAAAAAAAAAAAAAAAAAAAAAAAAAAAAAAAAAAAAAAAAAAAAAAAAAAAAAAAAAAAAAAAAAAAAAAAAAAAAAAAAAAAAAAAAAAAAAAAAAAAAAAAAAAAAAAAAAAAAAAAAAAAAAAAAAAAAAAAAAAAAAAAAAAAAAAAAAAAAAAAAAAAAAAAAAAAAAAAAAAAAAAAAAAAAAAAAAAAAAAAAAAAAAAAAAAAAAAAAAAAAAAAAAAAAAAAAAAAAAAAAAAAAAAAAAAAAAAAAAAAAAAAAAAAAAAAAAAAAAAAAAAAAAAAAAAAAAAAAAAAAAAAAAAAAAAAAAAAAAAAAAAAAAAAAAAAAAAAAAAAAAAAAAAAAAAAAAAAAAAAAAAAAAAAAAAAAAAAAAAAAAAAAAAAAAAAAAAAAAAAAAAAAAAAAAAAAAAAAAAAAAAAAAAAAAAAAAAAAAAAAAAAAAAAAAAAAAAAAAAAAAAAAAAAAAAAAAAAAAAAAAAAAAAAAAAAAAAAAAAAAAAAAAAAAAAAAAAAAAAAAAAAAAAAAAAAAAAAAAAAAAAAAAAAAAAAAAAAAAAAAAAAAAAAAAAAAAAAAAAAAAAAAAAAAAAAAAAAAAAAAAAAAAAAAAAAAAAAAAAAAAAAAAAAAAAAAAAAAAAAAAAAAAAAAAAAAAAAAAAAAAAAAAAAAAAAAAAAAAAAAAAAAAA
AAAAAAAAAAAAAAAAAAAAAAAAAAAAAAAAAAAAAAAAAAAAAAAAAAAAAAAAAAAAAAAAAAAAAAAAAAAAAAAAAAAAAAAAAAAAAAAAAAAAAAAAAAAAAAAAAAAAAAAAAAAAAAAAAAAAAAAAAAAAAAAAAAAAAAAAAAAAAAAAAAAAAAAAAAAAAAAAAAAAAAAAAAAAAAAAAAAAAAAAAAAAAAAAAAAAAAAAAAAAAAAAAAAAAAAAAAAAAAAAAAAAAAAAAAAAAAAAAAAAAAAAAAAAAAAAAAAAAAAAAAAAAAAAAAAAAAAAAAAAAAAAAAAAAAAAAAAAAAAAAAAAAAAAAAAAAAAAAAAAAAAAAAAAAAAAAAAAAAAAAAAAAAAAAAAAAAAAAAAAAAAAAAAAAAAAAAAAAAAAAAAAAAAAAAAAAAAAAAAAAAAAAAAAAAAAAAAAAAAAAAAAAAAAAAAAAAAAAAAAAAAAAAAAAAAAAAAAAAAAAAAAAAAAAAAAAAAAAAAAAAAAAAAAAAAAAAAAAAAAAAAAAAAAAAAAAAAAAAAAAAAAAAAAAAAAAAAAAAAAAAAAAAAAAAAAAAAAAAAAAAAAAAAAAAAAAAAAAAAAAAAAAAAAAAAAAAAAAAAAAAAAAAAAAAAAAAAAAAAAAAAAAAAAAAAAAAAAAAAAAAAAAAAAAAAAAAAAAAAAAAAAAAAAAAAAAAAAAAAAAAAAAAAAAAAAAAAAAAAAAAAAAAAAAAAAAAAAAAAAAAAAAAAAAAAAAAAAAAAAAAAAAAAAAAAAAAAAAAAAAAAAAAAAAAAAAAAAAAAAAAAAAAAAAAAAAAAAAAAAAAAAAAAAAAAAAAAAAAAAAAAAAAAAAAAAAAAAAAAAAAAAAAAAAAAAAAAAAAAAAAAAAAAAAAAAAAAAAAAAAAAAAAAAAAAAAAAAAAAAAAAAAAAAAAAAAAAAAAAAAAAAAAAAAAAAAAAAAAAAAAAAAAAAAAAAAAAAAAAAAAAAAAAAAAAAAAAAAAAAAAAAAAAAAAAAAAAAAAAAAAAAAAAAAAAAAAAAAAAAAAAAAAAAAAAAAAAAAAAAAAAAAAAAAAAAAAAAAAAAAAAAAAAAAAAAAAAAAAAAAAAAAAAAAAAAAAAAAAAAAAAAAAAAAAAAAAAAAAAAAAAAAAAAAAAAAAAAAAAAAAAAAAAAAAAAAAAAAAAAAAAAAAAAAAAAAAAAAAAAAAAAAAAAAAAAAAAAAAAAAAAAAAAAAAAAAAAAAAAAAAAAAAAAAAAAAAAAAAAAAAAAAAAAAAAAAAAAAAAAAAAAAAAAAAAAAAAAAAAAAAAAAAAAAAAAAAAAAAAAAAAAAAAAAAAAAAAAAAAAAAAAAAAAAAAAAAAAAAAAAAAAAAAAAAAAAAAAAAAAAAAAAAAAAAAAAAAAAAAAAAAAAAAAAAAAAAAAAAAAAAAAAAAAAAAAAAAAAAAAAAAAAAAAAAAAAAAAAAAAAAAAAAAAAAAAAAAAAAAAAAAAAAAAAAAAAAAAAAAAAAAAAAAAAAAAAAAAAAAAAAAAAAAAAAAAAAAAAAAAAAAAAAAAAAAAAAAAAAAAAAAAAAAAAAAAAAAAAAAAAAAAAAAAAAAAAAAAAAAAAAAAAAAAAAAAAAAAAAAAAAAAAAAAAAAAAAAAAAAAAAAAAAAAAAAAAAAAAAAAAAAAAAAAAAAAAAAAAAAAAAAAAAAAAAAAAAAAAAAAAAAAAAAAAAAAAAAAAAAAAAAAAAAAAAAAAAAAAAAAAAAAAAAAAAAAAAAAAAAAAAAAAAAAAAAAAAAAAAAAAAAAAAAAAAAAAAAAAAAAAAAAAAAAAAAAAAAAAAAAAAAAAAAAAAAAAAAAAAAAAAAAAAAAAAAAAAAAAAAAAAAAAAAAAAAAAAAAAAAAAAAAAAAAAAAAAAAAAAAAAAAAAAAAAAAAAAAAAAAAAAAAAAAAAAAAAAAAAAAAAAAAAAAAAAAAAAAAAAAAAAAAAAAAAAAAAAAAAAAAAAAAAAAAAAAAAAAAAAAAAAAAAAAAAAAAAAAAAAAAAAAAAAAAAAAAAAAAAAAAAAAAAAAAAAAAAAAAAAAAAAAAAAAAAAAAAAAAAAAAAAAAAAAAAAAAAAAAAAAAAAAAAAAAAAAAAAAAAAAAAAAAAAAAAAAAAAAAAAAAAAAAAAAAAAAAAAAAAAAAAAAAAAAAAAAAAAAAAAAAAAAAAAAAAAAAAAAAAAAAAAAAAAAAAAAAAAAAAAAAAAAAAAAAAAAAAAAAAAAAAAAAAAAAAAAAAAAAAAAAAAAAAAAAAAAAAAAAAAAAAAAAAAAAAAAAAAAAAAAAAAAAAAAAAAAAAAAAAAAAAAAAAAAAAAAAAAAAAAAAAAAAAAAAAAAAAAAAAAAAAAAAAAAAAAAAAAAAAAAAAAAAAAAAAAAAAAAAAAAAAAAAAAAAAAAAAAAAAAAAAAAAAAAAAAAAAAAAAAAAAAAAAAAAAAAAAAAAAAAAAAAAAAAAAAAAAAAAAAAAAAAAAAAAAAAAAAAAAAAAAAAAAAAAAAAAAAAAAAAAAAAAAAAAAAAAAAAAAAAAAAAAAAAAAAAAAAAAAAAAAAAAAAAAAAAAAAAAAAAAAAAAAAAAAAAAAAAAAAAAAAAAAAAAAAAAAAAAAAAAAAAAAAAAAAAAAAAAAAAAAAAAAAAAAAAAAAAAAAAAAAAAAAAAAAAAAAAAAAAAAAAAAAAAAAAAAAAAAAAAAAAAAAAAAAAAAAAAAAAAAAAAAAAAAAAAAAAAAAAAAAAAAAAAAAAAAAAAAAAAAAAAAAAAAAAAAAAAAAAAAAAAAAAAAAAAAAAAAAAAAAAAAAAAAAAAAAAAAAAAAAAAAAAAAAAAAAAAAAAAAAAAAAAAAAAAAAAAAAAAAAAAAAAAAAAAAAAAAAAAAAAAAAAAAAAAAAAAAAAAAAAAAAAAAAAAAAAAAAAAAAAAAAAAAAAAAAAAAAAAAAAAAAAAAAAAAAAAAAAAAAAAAAAAAAAAAAAAAAAAAAAAAAAAAAAAAAAAAAAAAAAAAAAAAAAAAAAAAAAAAAAAAAAAAAAAAAAAAAAAAAAAAAAAAAAAAAAAAAAAAAAAAAAAAAAAAAAAAAAAAAAAAAAAAAAAAAAAAAAAAAAAAAAAAAAAAAAAAAAAAAAAAAAAAAAAAAAAAAAAAAAAAAAAAAAAAAAAAAAAAAAAAAAAAAAAAAAAAAAAAAAAAAAAAAAAAAAAAAAAAAAAAAAAAAAAAAAAAAAAAAAAAAAAAAAAAAAAAAAAAAAAAAAAAAAAAAAAAAAAAAAAAAAAAAAAAAAAAAAAAAAAAAAAAAAAAAAAAAAAAAAAAAAAAAAAAAAAAAAAAAAAAAAAAAAAAAAAAAAAAAAAAAAAAAAAAAAAAAAAAAAAAAAAAAAAAAAAAAAAAAAAAAAAAAAAAAAAAAAAAAAAAAAAAAAAAAAAAAAAAAAAAAAAAAAAAAAAAAAAAAAAAAAAAAAAAAAAAAAAAAAAAAAAAAAAAAAAAAAAAAAAAAAAAAAAAAAAAAAAAAAAAAAAAAAAAAAAAAAAAAAAAAAAAAAAAAAAAAAAAAAAAAAAAAAAAAAAAAAAAAAAAAAAAAAAAAAAAAAAAAAAAAAAAAAAAAAAAAAAAAAAAAAAAAAAAAAAAAAAAAAAAAAAAAAAAAAAAAAAAAAAAAAAAAAAAAAAAAAAAAAAAAAAAAAAAAAAAAAAAAAAAAAAAAAAAAAAAAAAAAAAAAAAAAAAAAAAAAAAAAAAAAAAAAAAAAAAAAAAAAAAAAAAAAAAAAAAAAAAAAAAAAAAAAAAAAAAAAAAAAAAAAAAAAAAAAAAAAAAAAAAAAAAAAAAAAAAAAAAAAAAAAAAAAAAAAAAAAAAAAAAAAAAAAAAAAAAAAAAAAAAAAAAAAAAAAAAAAAAAAAAAAAAAAAAAAAAAAAAAAAAAAAAAAAAAAAAAAAAAAAAAAAAAAAAAAAAAAAAAAAAAAAAAAAAAAAAAAAAAAAAAAAAAAAAAAAAAAAAAAAAAAAAAAAAAAAAAAAAAAAAAAAAAAAAAAAAAAAAAAAAAAAAAAAAAAAAAAAAAAAAAAAAAAAAAAAAAAAAAAAAAAAAAAAAAAAAAAAAAAAAAAAAAAAAAAAA
AAAAAAAAAAAAAAAAAAAAAAAAAAAAAAAAAAAAAAAAAAAAAAAAAAAAAAAAAAAAAAAAAAAAAAAAAAAAAAAAAAAAAAAAAAAAAAAAAAAAAAAAAAAAAAAAAAAAAAAAAAAAAAAAAAAAAAAAAAAAAAAAAAAAAAAAAAAAAAAAAAAAAAAAAAAAAAAAAAAAAAAAAAAAAAAAAAAAAAAAAAAAAAAAAAAAAAAAAAAAAAAAAAAAAAAAAAAAAAAAAAAAAAAAAAAAAAAAAAAAAAAAAAAAAAAAAAAAAAAAAAAAAAAAAAAAAAAAAAAAAAAAAAAAAAAAAAAAAAAAAAAAAAAAAAAAAAAAAAAAAAAAAAAAAAAAAAAAAAAAAAAAAAAAAAAAAAAAAAAAAAAAAAAAAAAAAAAAAAAAAAAAAAAAAAAAAAAAAAAAAAAAAAAAAAAAAAAAAAAAAAAAAAAAAAAAAAAAAAAAAAAAAAAAAAAAAAAAAAAAAAAAAAAAAAAAAAAAAAAAAAAAAAAAAAAAAAAAAAAAAAAAAAAAAAAAAAAAAAAAAAAAAAAAAAAAAAAAAAAAAAAAAAAAAAAAAAAAAAAAAAAAAAAAAAAAAAAAAAAAAAAAAAAAAAAAAAAAAAAAAAAAAAAAAAAAAAAAAAAAAAAAAAAAAAAAAAAAAAAAAAAAAAAAAAAAAAAAAAAAAAAAAAAAAAAAAAAAAAAAAAAAAAAAAAAAAAAAAAAAAAAAAAAAAAAAAAAAAAAAAAAAAAAAAAAAAAAAAAAAAAAAAAAAAAAAAAAAAAAAAAAAAAAAAAAAAAAAAAAAAAAAAAAAAAAAAAAAAAAAAAAAAAAAAAAAAAAAAAAAAAAAAAAAAAAAAAAAAAAAAAAAAAAAAAAAAAAAAAAAAAAAAAAAAAAAAAAAAAAAAAAAAAAAAAAAAAAAAAAAAAAAAAAAAAAAAAAAAAAAAAAAAAAAAAAAAAAAAAAAAAAAAAAAAAAAAAAAAAAAAAAAAAAAAAAAAAAAAAAAAAAAAAAAAAAAAAAAAAAAAAAAAAAAAAAAAAAAAAAAAAAAAAAAAAAAAAAAAAAAAAAAAAAAAAAAAAAAAAAAAAAAAAAAAAAAAAAAAAAAAAAAAAAAAAAAAAAAAAAAAAAAAAAAAAAAAAAAAAAAAAAAAAAAAAAAAAAAAAAAAAAAAAAAAAAAAAAAAAAAAAAAAAAAAAAAAAAAAAAAAAAAAAAAAAAAAAAAAAAAAAAAAAAAAAAAAAAAAAAAAAAAAAAAAAAAAAAAAAAAAAAAAAAAAAAAAAAAAAAAAAAAAAAAAAAAAAAAAAAAAAAAAAAAAAAAAAAAAAAAAAAAAAAAAAAAAAAAAAAAAAAAAAAAAAAAAAAAAAAAAAAAAAAAAAAAAAAAAAAAAAAAAAAAAAAAAAAAAAAAAAAAAAAAAAAAAAAAAAAAAAAAAAAAAAAAAAAAAAAAAAAAAAAAAAAAAAAAAAAAAAAAAAAAAAAAAAAAAAAAAAAAAAAAAAAAAAAAAAAAAAAAAAAAAAAAAAAAAAAAAAAAAAAAAAAAAAAAAAAAAAAAAAAAAAAAAAAAAAAAAAAAAAAAAAAAAAAAAAAAAAAAAAAAAAAAAAAAAAAAAAAAAAAAAAAAAAAAAAAAAAAAAAAAAAAAAAAAAAAAAAAAAAAAAAAAAAAAAAAAAAAAAAAAAAAAAAAAAAAAAAAAAAAAAAAAAAAAAAAAAAAAAAAAAAAAAAAAAAAAAAAAAAAAAAAAAAAAAAAAAAAAAAAAAAAAAAAAAAAAAAAAAAAAAAAAAAAAAAAAAAAAAAAAAAAAAAAAAAAAAAAAAAAAAAAAAAAAAAAAAAAAAAAAAAAAAAAAAAAAAAAAAAAAAAAAAAAAAAAAAAAAAAAAAAAAAAAAAAAAAAAAAAAAAAAAAAAAAAAAAAAAAAAAAAAAAAAAAAAAAAAAAAAAAAAAAAAAAAAAAAAAAAAAAAAAAAAAAAAAAAAAAAAAAAAAAAAAAAAAAAAAAAAAAAAAAAAAAAAAAAAAAAAAAAAAAAAAAAAAAAAAAAAAAAAAAAAAAAAAAAAAAAAAAAAAAAAAAAAAAAAAAAAAAAAAAAAAAAAAAAAAAAAAAAAAAAAAAAAAAAAAAAAAAAAAAAAAAAAAAAAAAAAAAAAAAAAAAAAAAAAAAAAAAAAAAAAAAAAAAAAAAAAAAAAAAAAAAAAAAAAAAAAAAAAAAAAAAAAAAAAAAAAAAAAAAAAAAAAAAAAAAAAAAAAAAAAAAAAAAAAAAAAAAAAAAAAAAAAAAAAAAAAAAAAAAAAAAAAAAAAAAAAAAAAAAAAAAAAAAAAAAAAAAAAAAAAAAAAAAAAAAAAAAAAAAAAAAAAAAAAAAAAAAAAAAAAAAAAAAAAAAAAAAAAAAAAAAAAAAAAAAAAAAAAAAAAAAAAAAAAAAAAAAAAAAAAAAAAAAAAAAAAAAAAAAAAAAAAAAAAAAAAAAAAAAAAAAAAAAAAAAAAAAAAAAAAAAAAAAAAAAAAAAAAAAAAAAAAAAAAAAAAAAAAAAAAAAAAAAAAAAAAAAAAAAAAAAAAAAAAAAAAAAAAAAAAAAAAAAAAAAAAAAAAAAAAAAAAAAAAAAAAAAAAAAAAAAAAAAAAAAAAAAAAAAAAAAAAAAAAAAAAAAAAAAAAAAAAAAAAAAAAAAAAAAAAAAAAAAAAAAAAAAAAAAAAAAAAAAAAAAAAAAAAAAAAAAAAAAAAAAAAAAAAAAAAAAAAAAAAAAAAAAAAAAAAAAAAAAAAAAAAAAAAAAAAAAAAAAAAAAAAAAAAAAAAAAAAAAAAAAAAAAAAAAAAAAAAAAAAAAAAAAAAAAAAAAAAAAAAAAAAAAAAAAAAAAAAAAAAAAAAAAAAAAAAAAAAAAAAAAAAAAAAAAAAAAAAAAAAAAAAAAAAAAAAAAAAAAAAAAAAAAAAAAAAAAAAAAAAAAAAAAAAAAAAAAAAAAAAAAAAAAAAAAAAAAAAAAAAAAAAAAAAAAAAAAAAAAAAAAAAAAAAAAAAAAAAAAAAAAAAAAAAAAAAAAAAAAAAAAAAAAAAAAAAAAAAAAAAAAAAAAAAAAAAAAAAAAAAAAAAAAAAAAAAAAAAAAAAAAAAAAAAAAAAAAAAAAAAAAAAAAAAAAAAAAAAAAAAAAAAAAAAAAAAAAAAAAAAAAAAAAAAAAAAAAAAAAAAAAAAAAAAAAAAAAAAAAAAAAAAAAAAAAAAAAAAAAAAAAAAAAAAAAAAAAAAAAAAAAAAAAAAAAAAAAAAAAAAAAAAAAAAAAAAAAAAAAAAAAAAAAAAAAAAAAAAAAAAAAAAAAAAAAAAAAAAAAAAAAAAAAAAAAAAAAAAAAAAAAAAAAAAAAAAAAAAAAAAAAAAAAAAAAAAAAAAAAAAAAAAAAAAAAAAAAAAAAAAAAAAAAAAAAAAAAAAAAAAAAAAAAAAAAAAAAAAAAAAAAAAAAAAAAAAAAAAAAAAAAAAAAAAAAAAAAAAAAAAAAAAAAAAAAAAAAAAAAAAAAAAAAAAAAAAAAAAAAAAAAAAAAAAAAAAAAAAAAAAAAAAAAAAAAAAAAAAAAAAAAAAAAAAAAAAAAAAAAAAAAAAAAAAAAAAAAAAAAAAAAAAAAAAAAAAAAAAAAAAAAAAAAAAAAAAAAAAAAAAAAAAAAAAAAAAAAAAAAAAAAAAAAAAAAAAAAAAAAAAAAAAAAAAAAAAAAAAAAAAAAAAAAAAAAAAAAAAAAAAAAAAAAAAAAAAAAAAAAAAAAAAAAAAAAAAAAAAAAAAAAAAAAAAAAAAAAAAAAAAAAAAAAAAAAAAAAAAAAAAAAAAAAAAAAAAAAAAAAAAAAAAAAAAAAAAAAAAAAAAAAAAAAAAAAAAAAAAAAAAAAAAAAAAAAAAAAAAAAAAAAAAAAAAAAAAAAAAAAAAAAAAAAAAAAAAAAAAAAAAAAAAAAAAAAAAAAAAAAAAAAAAAAAAAAAAAAAAAAAAAAAAAAAAAAAAAAAAAAAAAAAAAAAAAAAAAAAAAAAAAAAAAAAAAAAAAAAAAAAAAAAAAAAAAAAAAAAAAAAAAAAAAAAAAAAAAAAAAAAAAAAAAAAAAAAAAAAAAAAAAAAAAAAAAAAAAAAAAAAAAAAAAAAAAAAAA
AAAAAAAAAAAAAAAAAAAAAAAAAAAAAAAAAAAAAAAAAAAAAAAAAAAAAAAAAAAAAAAAAAAAAAAAAAAAAAAAAAAAAAAAAAAAAAAAAAAAAAAAAAAAAAAAAAAAAAAAAAAAAAAAAAAAAAAAAAAAAAAAAAAAAAAAAAAAAAAAAAAAAAAAAAAAAAAAAAAAAAAAAAAAAAAAAAAAAAAAAAAAAAAAAAAAAAAAAAAAAAAAAAAAAAAAAAAAAAAAAAAAAAAAAAAAAAAAAAAAAAAAAAAAAAAAAAAAAAAAAAAAAAAAAAAAAAAAAAAAAAAAAAAAAAAAAAAAAAAAAAAAAAAAAAAAAAAAAAAAAAAAAAAAAAAAAAAAAAAAAAAAAAAAAAAAAAAAAAAAAAAAAAAAAAAAAAAAAAAAAAAAAAAAAAAAAAAAAAAAAAAAAAAAAAAAAAAAAAAAAAAAAAAAAAAAAAAAAAAAAAAAAAAAAAAAAAAAAAAAAAAAAAAAAAAAAAAAAAAAAAAAAAAAAAAAAAAAAAAAAAAAAAAAAAAAAAAAAAAAAAAAAAAAAAAAAAAAAAAAAAAAAAAAAAAAAAAAAAAAAAAAAAAAAAAAAAAAAAAAAAAAAAAAAAAAAAAAAAAAAAAAAAAAAAAAAAAAAAAAAAAAAAAAAAAAAAAAAAAAAAAAAAAAAAAAAAAAAAAAAAAAAAAAAAAAAAAAAAAAAAAAAAAAAAAAAAAAAAAAAAAAAAAAAAAAAAAAAAAAAAAAAAAAAAAAAAAAAAAAAAAAAAAAAAAAAAAAAAAAAAAAAAAAAAAAAAAAAAAAAAAAAAAAAAAAAAAAAAAAAAAAAAAAAAAAAAAAAAAAAAAAAAAAAAAAAAAAAAAAAAAAAAAAAAAAAAAAAAAAAAAAAAAAAAAAAAAAAAAAAAAAAAAAAAAAAAAAAAAAAAAAAAAAAAAAAAAAAAAAAAAAAAAAAAAAAAAAAAAAAAAAAAAAAAAAAAAAAAAAAAAAAAAAAAAAAAAAAAAAAAAAAAAAAAAAAAAAAAAAAAAAAAAAAAAAAAAAAAAAAAAAAAAAAAAAAAAAAAAAAAAAAAAAAAAAAAAAAAAAAAAAAAAAAAAAAAAAAAAAAAAAAAAAAAAAAAAAAAAAAAAAAAAAAAAAAAAAAAAAAAAAAAAAAAAAAAAAAAAAAAAAAAAAAAAAAAAAAAAAAAAAAAAAAAAAAAAAAAAAAAAAAAAAAAAAAAAAAAAAAAAAAAAAAAAAAAAAAAAAAAAAAAAAAAAAAAAAAAAAAAAAAAAAAAAAAAAAAAAAAAAAAAAAAAAAAAAAAAAAAAAAAAAAAAAAAAAAAAAAAAAAAAAAAAAAAAAAAAAAAAAAAAAAAAAAAAAAAAAAAAAAAAAAAAAAAAAAAAAAAAAAAAAAAAAAAAAAAAAAAAAAAAAAAAAAAAAAAAAAAAAAAAAAAAAAAAAAAAAAAAAAAAAAAAAAAAAAAAAAAAAAAAAAAAAAAAAAAAAAAAAAAAAAAAAAAAAAAAAAAAAAAAAAAAAAAAAAAAAAAAAAAAAAAAAAAAAAAAAAAAAAAAAAAAAAAAAAAAAAAAAAAAAAAAAAAAAAAAAAAAAAAAAAAAAAAAAAAAAAAAAAAAAAAAAAAAAAAAAAAAAAAAAAAAAAAAAAAAAAAAAAAAAAAAAAAAAAAAAAAAAAAAAAAAAAAAAAAAAAAAAAAAAAAAAAAAAAAAAAAAAAAAAAAAAAAAAAAAAAAAAAAAAAAAAAAAAAAAAAAAAAAAAAAAAAAAAAAAAAAAAAAAAAAAAAAAAAAAAAAAAAAAAAAAAAAAAAAAAAAAAAAAAAAAAAAAAAAAAAAAAAAAAAAAAAAAAAAAAAAAAAAAAAAAAAAAAAAAAAAAAAAAAAAAAAAAAAAAAAAAAAAAAAAAAAAAAAAAAAAAAAAAAAAAAAAAAAAAAAAAAAAAAAAAAAAAAAAAAAAAAAAAAAAAAAAAAAAAAAAAAAAAAAAAAAAAAAAAAAAAAAAAAAAAAAAAAAAAAAAAAAAAAAAAAAAAAAAAAAAAAAAAAAAAAAAAAAAAAAAAAAAAAAAAAAAAAAAAAAAAAAAAAAAAAAAAAAAAAAAAAAAAAAAAAAAAAAAAAAAAAAAAAAAAAAAAAAAAAAAAAAAAAAAAAAAAAAAAAAAAAAAAAAAAAAAAAAAAAAAAAAAAAAAAAAAAAAAAAAAAAAAAAAAAAAAAAAAAAAAAAAAAAAAAAAAAAAAAAAAAAAAAAAAAAAAAAAAAAAAAAAAAAAAAAAAAAAAAAAAAAAAAAAAAAAAAAAAAAAAAAAAAAAAAAAAAAAAAAAAAAAAAAAAAAAAAAAAAAAAAAAAAAAAAAAAAAAAAAAAAAAAAAAAAAAAAAAAAAAAAAAAAAAAAAAAAAAAAAAAAAAAAAAAAAAAAAAAAAAAAAAAAAAAAAAAAAAAAAAAAAAAAAAAAAAAAAAAAAAAAAAAAAAAAAAAAAAAAAAAAAAAAAAAAAAAAAAAAAAAAAAAAAAAAAAAAAAAAAAAAAAAAAAAAAAAAAAAAAAAAAAAAAAAAAAAAAAAAAAAAAAAAAAAAAAAAAAAAAAAAAAAAAAAAAAAAAAAAAAAAAAAAAAAAAAAAAAAAAAAAAAAAAAAAAAAAAAAAAAAAAAAAAAAAAAAAAAAAAAAAAAAAAAAAAAAAAAAAAAAAAAAAAAAAAAAAAAAAAAAAAAAAAAAAAAAAAAAAAAAAAAAAAAAAAAAAAAAAAAAAAAAAAAAAAAAAAAAAAAAAAAAAAAAAAAAAAAAAAAAAAAAAAAAAAAAAAAAAAAAAAAAAAAAAAAAAAAAAAAAAAAAAAAAAAAAAAAAAAAAAAAAAAAAAAAAAAAAAAAAAAAAAAAAAAAAAAAAAAAAAAAAAAAAAAAAAAAAAAAAAAAAAAAAAAAAAAAAAAAAAAAAAAAAAAAAAAAAAAAAAAAAAAAAAAAAAAAAAAAAAAAAAAAAAAAAAAAAAAAAAAAAAAAAAAAAAAAAAAAAAAAAAAAAAAAAAAAAAAAAAAAAAAAAAAAAAAAAAAAAAAAAAAAAAAAAAAAAAAAAAAAAAAAAAAAAAAAAAAAAAAAAAAAAAAAAAAAAAAAAAAAAAAAAAAAAAAAAAAAAAAAAAAAAAAAAAAAAAAAAAAAAAAAAAAAAAAAAAAAAAAAAAAAAAAAAAAAAAAAAAAAAAAAAAAAAAAAAAAAAAAAAAAAAAAAAAAAAAAAAAAAAAAAAAAAAAAAAAAAAAAAAAAAAAAAAAAAAAAAAAAAAAAAAAAAAAAAAAAAAAAAAAAAAAAAAAAAAAAAAAAAAAAAAAAAAAAAAAAAAAAAAAAAAAAAAAAAAAAAAAAAAAAAAAAAAAAAAAAAAAAAAAAAAAAAAAAAAAAAAAAAAAAAAAAAAAAAAAAAAAAAAAAAAAAAAAAAAAAAAAAAAAAAAAAAAAAAAAAAAAAAAAAAAAAAAAAAAAAAAAAAAAAAAAAAAAAAAAAAAAAAAAAAAAAAAAAAAAAAAAAAAAAAAAAAAAAAAAAAAAAAAAAAAAAAAAAAAAAAAAAAAAAAAAAAAAAAAAAAAAAAAAAAAAAAAAAAAAAAAAAAAAAAAAAAAAAAAAAAAAAAAAAAAAAAAAAAAAAAAAAAAAAAAAAAAAAAAAAAAAAAAAAAAAAAAAAAAAAAAAAAAAAAAAAAAAAAAAAAAAAAAAAAAAAAAAAAAAAAAAAAAAAAAAAAAAAAAAAAAAAAAAAAAAAAAAAAAAAAAAAAAAAAAAAAAAAAAAAAAAAAAAAAAAAAAAAAAAAAAAAAAAAAAAAAAAAAAAAAAAAAAAAAAAAAAAAAAAAAAAAAAAAAAAAAAAAAAAAAAAAAAAAAAAAAAAAAAAAAAAAAAAAAAAAAAAAAAAAAAAAAAAAAAAAAAAAAAAAAAAAAAAAAAAAAAAAAAAAAAAAAAAAAAAAAAAAAAAAAAAAAAAAAAAAAAAAAAAAAAAAAAAAAAAAAAAAAAAAAAAAAAAAAAAAAAAAAAAAAAAAAAAAAAAAAAAAAAAAAAAAAAAAAAAAAAAAAAAAAAAAAAAAAAAAAAAAAAAAAAAAAAAAAAAAAAAAAAAAAAAAAAAAAAAAAAAAAAAAAAAAAAAAAAAAAAAAA
AAAAAAAAAAAAAAAAAAAAAAAAAAAAAAAAAAAAAAAAAAAAAAAAAAAAAAAAAAAAAAAAAAAAAAAAAAAAAAAAAAAAAAAAAAAAAAAAAAAAAAAAAAAAAAAAAAAAAAAAAAAAAAAAAAAAAAAAAAAAAAAAAAAAAAAAAAAAAAAAAAAAAAAAAAAAAAAAAAAAAAAAAAAAAAAAAAAAAAAAAAAAAAAAAAAAAAAAAAAAAAAAAAAAAAAAAAAAAAAAAAAAAAAAAAAAAAAAAAAAAAAAAAAAAAAAAAAAAAAAAAAAAAAAAAAAAAAAAAAAAAAAAAAAAAAAAAAAAAAAAAAAAAAAAAAAAAAAAAAAAAAAAAAAAAAAAAAAAAAAAAAAAAAAAAAAAAAAAAAAAAAAAAAAAAAAAAAAAAAAAAAAAAAAAAAAAAAAAAAAAAAAAAAAAAAAAAAAAAAAAAAAAAAAAAAAAAAAAAAAAAAAAAAAAAAAAAAAAAAAAAAAAAAAAAAAAAAAAAAAAAAAAAAAAAAAAAAAAAAAAAAAAAAAAAAAAAAAAAAAAAAAAAAAAAAAAAAAAAAAAAAAAAAAAAAAAAAAAAAAAAAAAAAAAAAAAAAAAAAAAAAAAAAAAAAAAAAAAAAAAAAAAAAAAAAAAAAAAAAAAAAAAAAAAAAAAAAAAAAAAAAAAAAAAAAAAAAAAAAAAAAAAAAAAAAAAAAAAAAAAAAAAAAAAAAAAAAAAAAAAAAAAAAAAAAAAAAAAAAAAAAAAAAAAAAAAAAAAAAAAAAAAAAAAAAAAAAAAAAAAAAAAAAAAAAAAAAAAAAAAAAAAAAAAAAAAAAAAAAAAAAAAAAAAAAAAAAAAAAAAAAAAAAAAAAAAAAAAAAAAAAAAAAAAAAAAAAAAAAAAAAAAAAAAAAAAAAAAAAAAAAAAAAAAAAAAAAAAAAAAAAAAAAAAAAAAAAAAAAAAAAAAAAAAAAAAAAAAAAAAAAAAAAAAAAAAAAAAAAAAAAAAAAAAAAAAAAAAAAAAAAAAAAAAAAAAAAAAAAAAAAAAAAAAAAAAAAAAAAAAAAAAAAAAAAAAAAAAAAAAAAAAAAAAAAAAAAAAAAAAAAAAAAAAAAAAAAAAAAAAAAAAAAAAAAAAAAAAAAAAAAAAAAAAAAAAAAAAAAAAAAAAAAAAAAAAAAAAAAAAAAAAAAAAAAAAAAAAAAAAAAAAAAAAAAAAAAAAAAAAAAAAAAAAAAAAAAAAAAAAAAAAAAAAAAAAAAAAAAAAAAAAAAAAAAAAAAAAAAAAAAAAAAAAAAAAAAAAAAAAAAAAAAAAAAAAAAAAAAAAAAAAAAAAAAAAAAAAAAAAAAAAAAAAAAAAAAAAAAAAAAAAAAAAAAAAAAAAAAAAAAAAAAAAAAAAAAAAAAAAAAAAAAAAAAAAAAAAAAAAAAAAAAAAAAAAAAAAAAAAAAAAAAAAAAAAAAAAAAAAAAAAAAAAAAAAAAAAAAAAAAAAAAAAAAAAAAAAAAAAAAAAAAAAAAAAAAAAAAAAAAAAAAAAAAAAAAAAAAAAAAAAAAAAAAAAAAAAAAAAAAAAAAAAAAAAAAAAAAAAAAAAAAAAAAAAAAAAAAAAAAAAAAAAAAAAAAAAAAAAAAAAAAAAAAAAAAAAAAAAAAAAAAAAAAAAAAAAAAAAAAAAAAAAAAAAAAAAAAAAAAAAAAAAAAAAAAAAAAAAAAAAAAAAAAAAAAAAAAAAAAAAAAAAAAAAAAAAAAAAAAAAAAAAAAAAAAAAAAAAAAAAAAAAAAAAAAAAAAAAAAAAAAAAAAAAAAAAAAAAAAAAAAAAAAAAAAAAAAAAAAAAAAAAAAAAAAAAAAAAAAAAAAAAAAAAAAAAAAAAAAAAAAAAAAAAAAAAAAAAAAAAAAAAAAAAAAAAAAAAAAAAAAAAAAAAAAAAAAAAAAAAAAAAAAAAAAAAAAAAAAAAAAAAAAAAAAAAAAAAAAAAAAAAAAAAAAAAAAAAAAAAAAAAAAAAAAAAAAAAAAAAAAAAAAAAAAAAAAAAAAAAAAAAAAAAAAAAAAAAAAAAAAAAAAAAAAAAAAAAAAAAAAAAAAAAAAAAAAAAAAAAAAAAAAAAAAAAAAAAAAAAAAAAAAAAAAAAAAAAAAAAAAAAAAAAAAAAAAAAAAAAAAAAAAAAAAAAAAAAAAAAAAAAAAAAAAAAAAAAAAAAAAAAAAAAAAAAAAAAAAAAAAAAAAAAAAAAAAAAAAAAAAAAAAAAAAAAAAAAAAAAAAAAAAAAAAAAAAAAAAAAAAAAAAAAAAAAAAAAAAAAAAAAAAAAAAAAAAAAAAAAAAAAAAAAAAAAAAAAAAAAAAAAAAAAAAAAAAAAAAAAAAAAAAAAAAAAAAAAAAAAAAAAAAAAAAAAAAAAAAAAAAAAAAAAAAAAAAAAAAAAAAAAAAAAAAAAAAAAAAAAAAAAAAAAAAAAAAAAAAAAAAAAAAAAAAAAAAAAAAAAAAAAAAAAAAAAAAAAAAAAAAAAAAAAAAAAAAAAAAAAAAAAAAAAAAAAAAAAAAAAAAAAAAAAAAAAAAAAAAAAAAAAAAAAAAAAAAAAAAAAAAAAAAAAAAAAAAAAAAAAAAAAAAAAAAAAAAAAAAAAAAAAAAAAAAAAAAAAAAAAAAAAAAAAAAAAAAAAAAAAAAAAAAAAAAAAAAAAAAAAAAAAAAAAAAAAAAAAAAAAAAAAAAAAAAAAAAAAAAAAAAAAAAAAAAAAAAAAAAAAAAAAAAAAAAAAAAAAAAAAAAAAAAAAAAAAAAAAAAAAAAAAAAAAAAAAAAAAAAAAAAAAAAAAAAAAAAAAAAAAAAAAAAAAAAAAAAAAAAAAAAAAAAAAAAAAAAAAAAAAAAAAAAAAAAAAAAAAAAAAAAAAAAAAAAAAAAAAAAAAAAAAAAAAAAAAAAAAAAAAAAAAAAAAAAAAAAAAAAAAAAAAAAAAAAAAAAAAAAAAAAAAAAAAAAAAAAAAAAAAAAAAAAAAAAAAAAAAAAAAAAAAAAAAAAAAAAAAAAAAAAAAAAAAAAAAAAAAAAAAAAAAAAAAAAAAAAAAAAAAAAAAAAAAAAAAAAAAAAAAAAAAAAAAAAAAAAAAAAAAAAAAAAAAAAAAAAAAAAAAAAAAAAAAAAAAAAAAAAAAAAAAAAAAAAAAAAAAAAAAAAAAAAAAAAAAAAAAAAAAAAAAAAAAAAAAAAAAAAAAAAAAAAAAAAAAAAAAAAAAAAAAAAAAAAAAAAAAAAAAAAAAAAAAAAAAAAAAAAAAAAAAAAAAAAAAAAAAAAAAAAAAAAAAAAAAAAAAAAAAAAAAAAAAAAAAAAAAAAAAAAAAAAAAAAAAAAAAAAAAAAAAAAAAAAAAAAAAAAAAAAAAAAAAAAAAAAAAAAAAAAAAAAAAAAAAAAAAAAAAAAAAAAAAAAAAAAAAAAAAAAAAAAAAAAAAAAAAAAAAAAAAAAAAAAAAAAAAAAAAAAAAAAAAAAAAAAAAAAAAAAAAAAAAAAAAAAAAAAAAAAAAAAAAAAAAAAAAAAAAAAAAAAAAAAAAAAAAAAAAAAAAAAAAAAAAAAAAAAAAAAAAAAAAAAAAAAAAAAAAAAAAAAAAAAAAAAAAAAAAAAAAAAAAAAAAAAAAAAAAAAAAAAAAAAAAAAAAAAAAAAAAAAAAAAAAAAAAAAAAAAAAAAAAAAAAAAAAAAAAAAAAAAAAAAAAAAAAAAAAAAAAAAAAAAAAAAAAAAAAAAAAAAAAAAAAAAAAAAAAAAAAAAAAAAAAAAAAAAAAAAAAAAAAAAAAAAAAAAAAAAAAAAAAAAAAAAAAAAAAAAAAAAAAAAAAAAAAAAAAAAAAAAAAAAAAAAAAAAAAAAAAAAAAAAAAAAAAAAAAAAAAAAAAAAAAAAAAAAAAAAAAAAAAAAAAAAAAAAAAAAAAAAAAAAAAAAAAAAAAAAAAAAAAAAAAAAAAAAAAAAAAAAAAAAAAAAAAAAAAAAAAAAAAAAAAAAAAAAAAAAAAAAAAAAAAAAAAAAAAAAAAAAAAAAAAAAAAAAAAAAAAAAAAAAAAAAAAAAAAAAAAAAAAAAAAAAAAAAAAAAAAAAAAAAAAAAAAAAAAAAAAAAAAAAAAAAAAAAAAAAAAAAAAAAAAAAAAAAAAAAAAAAAAAAA
AAAAAAAAAAAAAAAAAAAAAAAAAAAAAAAAAAAAAAAAAAAAAAAAAAAAAAAAAAAAAAAAAAAAAAAAAAAAAAAAAAAAAAAAAAAAAAAAAAAAAAAAAAAAAAAAAAAAAAAAAAAAAAAAAAAAAAAAAAAAAAAAAAAAAAAAAAAAAAAAAAAAAAAAAAAAAAAAAAAAAAAAAAAAAAAAAAAAAAAAAAAAAAAAAAAAAAAAAAAAAAAAAAAAAAAAAAAAAAAAAAAAAAAAAAAAAAAAAAAAAAAAAAAAAAAAAAAAAAAAAAAAAAAAAAAAAAAAAAAAAAAAAAAAAAAAAAAAAAAAAAAAAAAAAAAAAAAAAAAAAAAAAAAAAAAAAAAAAAAAAAAAAAAAAAAAAAAAAAAAAAAAAAAAAAAAAAAAAAAAAAAAAAAAAAAAAAAAAAAAAAAAAAAAAAAAAAAAAAAAAAAAAAAAAAAAAAAAAAAAAAAAAAAAAAAAAAAAAAAAAAAAAAAAAAAAAAAAAAAAAAAAAAAAAAAAAAAAAAAAAAAAAAAAAAAAAAAAAAAAAAAAAAAAAAAAAAAAAAAAAAAAAAAAAAAAAAAAAAAAAAAAAAAAAAAAAAAAAAAAAAAAAAAAAAAAAAAAAAAAAAAAAAAAAAAAAAAAAAAAAAAAAAAAAAAAAAAAAAAAAAAAAAAAAAAAAAAAAAAAAAAAAAAAAAAAAAAAAAAAAAAAAAAAAAAAAAAAAAAAAAAAAAAAAAAAAAAAAAAAAAAAAAAAAAAAAAAAAAAAAAAAAAAAAAAAAAAAAAAAAAAAAAAAAAAAAAAAAAAAAAAAAAAAAAAAAAAAAAAAAAAAAAAAAAAAAAAAAAAAAAAAAAAAAAAAAAAAAAAAAAAAAAAAAAAAAAAAAAAAAAAAAAAAAAAAAAAAAAAAAAAAAAAAAAAAAAAAAAAAAAAAAAAAAAAAAAAAAAAAAAAAAAAAAAAAAAAAAAAAAAAAAAAAAAAAAAAAAAAAAAAAAAAAAAAAAAAAAAAAAAAAAAAAAAAAAAAAAAAAAAAAAAAAAAAAAAAAAAAAAAAAAAAAAAAAAAAAAAAAAAAAAAAAAAAAAAAAAAAAAAAAAAAAAAAAAAAAAAAAAAAAAAAAAAAAAAAAAAAAAAAAAAAAAAAAAAAAAAAAAAAAAAAAAAAAAAAAAAAAAAAAAAAAAAAAAAAAAAAAAAAAAAAAAAAAAAAAAAAAAAAAAAAAAAAAAAAAAAAAAAAAAAAAAAAAAAAAAAAAAAAAAAAAAAAAAAAAAAAAAAAAAAAAAAAAAAAAAAAAAAAAAAAAAAAAAAAAAAAAAAAAAAAAAAAAAAAAAAAAAAAAAAAAAAAAAAAAAAAAAAAAAAAAAAAAAAAAAAAAAAAAAAAAAAAAAAAAAAAAAAAAAAAAAAAAAAAAAAAAAAAAAAAAAAAAAAAAAAAAAAAAAAAAAAAAAAAAAAAAAAAAAAAAAAAAAAAAAAAAAAAAAAAAAAAAAAAAAAAAAAAAAAAAAAAAAAAAAAAAAAAAAAAAAAAAAAAAAAAAAAAAAAAAAAAAAAAAAAAAAAAAAAAAAAAAAAAAAAAAAAAAAAAAAAAAAAAAAAAAAAAAAAAAAAAAAAAAAAAAAAAAAAAAAAAAAAAAAAAAAAAAAAAAAAAAAAAAAAAAAAAAAAAAAAAAAAAAAAAAAAAAAAAAAAAAAAAAAAAAAAAAAAAAAAAAAAAAAAAAAAAAAAAAAAAAAAAAAAAAAAAAAAAAAAAAAAAAAAAAAAAAAAAAAAAAAAAAAAAAAAAAAAAAAAAAAAAAAAAAAAAAAAAAAAAAAAAAAAAAAAAAAAAAAAAAAAAAAAAAAAAAAAAAAAAAAAAAAAAAAAAAAAAAAAAAAAAAAAAAAAAAAAAAAAAAAAAAAAAAAAAAAAAAAAAAAAAAAAAAAAAAAAAAAAAAAAAAAAAAAAAAAAAAAAAAAAAAAAAAAAAAAAAAAAAAAAAAAAAAAAAAAAAAAAAAAAAAAAAAAAAAAAAAAAAAAAAAAAAAAAAAAAAAAAAAAAAAAAAAAAAAAAAAAAAAAAAAAAAAAAAAAAAAAAAAAAAAAAAAAAAAAAAAAAAAAAAAAAAAAAAAAAAAAAAAAAAAAAAAAAAAAAAAAAAAAAAAAAAAAAAAAAAAAAAAAAAAAAAAAAAAAAAAAAAAAAAAAAAAAAAAAAAAAAAAAAAAAAAAAAAAAAAAAAAAAAAAAAAAAAAAAAAAAAAAAAAAAAAAAAAAAAAAAAAAAAAAAAAAAAAAAAAAAAAAAAAAAAAAAAAAAAAAAAAAAAAAAAAAAAAAAAAAAAAAAAAAAAAAAAAAAAAAAAAAAAAAAAAAAAAAAAAAAAAAAAAAAAAAAAAAAAAAAAAAAAAAAAAAAAAAAAAAAAAAAAAAAAAAAAAAAAAAAAAAAAAAAAAAAAAAAAAAAAAAAAAAAAAAAAAAAAAAAAAAAAAAAAAAAAAAAAAAAAAAAAAAAAAAAAAAAAAAAAAAAAAAAAAAAAAAAAAAAAAAAAAAAAAAAAAAAAAAAAAAAAAAAAAAAAAAAAAAAAAAAAAAAAAAAAAAAAAAAAAAAAAAAAAAAAAAAAAAAAAAAAAAAAAAAAAAAAAAAAAAAAAAAAAAAAAAAAAAAAAAAAAAAAAAAAAAAAAAAAAAAAAAAAAAAAAAAAAAAAAAAAAAAAAAAAAAAAAAAAAAAAAAAAAAAAAAAAAAAAAAAAAAAAAAAAAAAAAAAAAAAAAAAAAAAAAAAAAAAAAAAAAAAAAAAAAAAAAAAAAAAAAAAAAAAAAAAAAAAAAAAAAAAAAAAAAAAAAAAAAAAAAAAAAAAAAAAAAAAAAAAAAAAAAAAAAAAAAAAAAAAAAAAAAAAAAAAAAAAAAAAAAAAAAAAAAAAAAAAAAAAAAAAAAAAAAAAAAAAAAAAAAAAAAAAAAAAAAAAAAAAAAAAAAAAAAAAAAAAAAAAAAAAAAAAAAAAAAAAAAAAAAAAAAAAAAAAAAAAAAAAAAAAAAAAAAAAAAAAAAAAAAAAAAAAAAAAAAAAAAAAAAAAAAAAAAAAAAAAAAAAAAAAAAAAAAAAAAAAAAAAAAAAAAAAAAAAAAAAAAAAAAAAAAAAAAAAAAAAAAAAAAAAAAAAAAAAAAAAAAAAAAAAAAAAAAAAAAAAAAAAAAAAAAAAAAAAAAAAAAAAAAAAAAAAAAAAAAAAAAAAAAAAAAAAAAAAAAAAAAAAAAAAAAAAAAAAAAAAAAAAAAAAAAAAAAAAAAAAAAAAAAAAAAAAAAAAAAAAAAAAAAAAAAAAAAAAAAAAAAAAAAAAAAAAAAAAAAAAAAAAAAAAAAAAAAAAAAAAAAAAAAAAAAAAAAAAAAAAAAAAAAAAAAAAAAAAAAAAAAAAAAAAAAAAAAAAAAAAAAAAAAAAAAAAAAAAAAAAAAAAAAAAAAAAAAAAAAAAAAAAAAAAAAAAAAAAAAAAAAAAAAAAAAAAAAAAAAAAAAAAAAAAAAAAAAAAAAAAAAAAAAAAAAAAAAAAAAAAAAAAAAAAAAAAAAAAAAAAAAAAAAAAAAAAAAAAAAAAAAAAAAAAAAAAAAAAAAAAAAAAAAAAAAAAAAAAAAAAAAAAAAAAAAAAAAAAAAAAAAAAAAAAAAAAAAAAAAAAAAAAAAAAAAAAAAAAAAAAAAAAAAAAAAAAAAAAAAAAAAAAAAAAAAAAAAAAAAAAAAAAAAAAAAAAAAAAAAAAAAAAAAAAAAAAAAAAAAAAAAAAAAAAAAAAAAAAAAAAAAAAAAAAAAAAAAAAAAAAAAAAAAAAAAAAAAAAAAAAAAAAAAAAAAAAAAAAAAAAAAAAAAAAAAAAAAAAAAAAAAAAAAAAAAAAAAAAAAAAAAAAAAAAAAAAAAAAAAAAAAAAAAAAAAAAAAAAAAAAAAAAAAAAAAAAAAAAAAAAAAAAAAAAAAAAAAAAAAAAAAAAAAAAAAAAAAAAAAAAAAAAAAAAAAAAAAAAAAAAAAAAAAAAAAAAAAAAAAAAAAAAAAAAAAAAAAAAAAAAAAAAAAAAAAAAAAAAAAAAAAAAAAAAAAAAAAAAAAAAAAAAAAAAAAAAAAAAAAAAAAAAAAAAAAAAAAAAAAAAAAAAAAAAAAAAAAAAAAAAAAAAAAA
AAAAAAAAAAAAAAAAAAAAAAAAAAAAAAAAAAAAAAAAAAAAAAAAAAAAAAAAAAAAAAAAAAAAAAAAAAAAAAAAAAAAAAAAAAAAAAAAAAAAAAAAAAAAAAAAAAAAAAAAAAAAAAAAAAAAAAAAAAAAAAAAAAAAAAAAAAAAAAAAAAAAAAAAAAAAAAAAAAAAAAAAAAAAAAAAAAAAAAAAAAAAAAAAAAAAAAAAAAAAAAAAAAAAAAAAAAAAAAAAAAAAAAAAAAAAAAAAAAAAAAAAAAAAAAAAAAAAAAAAAAAAAAAAAAAAAAAAAAAAAAAAAAAAAAAAAAAAAAAAAAAAAAAAAAAAAAAAAAAAAAAAAAAAAAAAAAAAAAAAAAAAAAAAAAAAAAAAAAAAAAAAAAAAAAAAAAAAAAAAAAAAAAAAAAAAAAAAAAAAAAAAAAAAAAAAAAAAAAAAAAAAAAAAAAAAAAAAAAAAAAAAAAAAAAAAAAAAAAAAAAAAAAAAAAAAAAAAAAAAAAAAAAAAAAAAAAAAAAAAAAAAAAAAAAAAAAAAAAAAAAAAAAAAAAAAAAAAAAAAAAAAAAAAAAAAAAAAAAAAAAAAAAAAAAAAAAAAAAAAAAAAAAAAAAAAAAAAAAAAAAAAAAAAAAAAAAAAAAAAAAAAAAAAAAAAAAAAAAAAAAAAAAAAAAAAAAAAAAAAAAAAAAAAAAAAAAAAAAAAAAAAAAAAAAAAAAAAAAAAAAAAAAAAAAAAAAAAAAAAAAAAAAAAAAAAAAAAAAAAAAAAAAAAAAAAAAAAAAAAAAAAAAAAAAAAAAAAAAAAAAAAAAAAAAAAAAAAAAAAAAAAAAAAAAAAAAAAAAAAAAAAAAAAAAAAAAAAAAAAAAAAAAAAAAAAAAAAAAAAAAAAAAAAAAAAAAAAAAAAAAAAAAAAAAAAAAAAAAAAAAAAAAAAAAAAAAAAAAAAAAAAAAAAAAAAAAAAAAAAAAAAAAAAAAAAAAAAAAAAAAAAAAAAAAAAAAAAAAAAAAAAAAAAAAAAAAAAAAAAAAAAAAAAAAAAAAAAAAAAAAAAAAAAAAAAAAAAAAAAAAAAAAAAAAAAAAAAAAAAAAAAAAAAAAAAAAAAAAAAAAAAAAAAAAAAAAAAAAAAAAAAAAAAAAAAAAAAAAAAAAAAAAAAAAAAAAAAAAAAAAAAAAAAAAAAAAAAAAAAAAAAAAAAAAAAAAAAAAAAAAAAAAAAAAAAAAAAAAAAAAAAAAAAAAAAAAAAAAAAAAAAAAAAAAAAAAAAAAAAAAAAAAAAAAAAAAAAAAAAAAAAAAAAAAAAAAAAAAAAAAAAAAAAAAAAAAAAAAAAAAAAAAAAAAAAAAAAAAAAAAAAAAAAAAAAAAAAAAAAAAAAAAAAAAAAAAAAAAAAAAAAAAAAAAAAAAAAAAAAAAAAAAAAAAAAAAAAAAAAAAAAAAAAAAAAAAAAAAAAAAAAAAAAAAAAAAAAAAAAAAAAAAAAAAAAAAAAAAAAAAAAAAAAAAAAAAAAAAAAAAAAAAAAAAAAAAAAAAAAAAAAAAAAAAAAAAAAAAAAAAAAAAAAAAAAAAAAAAAAAAAAAAAAAAAAAAAAAAAAAAAAAAAAAAAAAAAAAAAAAAAAAAAAAAAAAAAAAAAAAAAAAAAAAAAAAAAAAAAAAAAAAAAAAAAAAAAAAAAAAAAAAAAAAAAAAAAAAAAAAAAAAAAAAAAAAAAAAAAAAAAAAAAAAAAAAAAAAAAAAAAAAAAAAAAAAAAAAAAAAAAAAAAAAAAAAAAAAAAAAAAAAAAAAAAAAAAAAAAAAAAAAAAAAAAAAAAAAAAAAAAAAAAAAAAAAAAAAAAAAAAAAAAAAAAAAAAAAAAAAAAAAAAAAAAAAAAAAAAAAAAAAAAAAAAAAAAAAAAAAAAAAAAAAAAAAAAAAAAAAAAAAAAAAAAAAAAAAAAAAAAAAAAAAAAAAAAAAAAAAAAAAAAAAAAAAAAAAAAAAAAAAAAAAAAAAAAAAAAAAAAAAAAAAAAAAAAAAAAAAAAAAAAAAAAAAAAAAAAAAAAAAAAAAAAAAAAAAAAAAAAAAAAAAAAAAAAAAAAAAAAAAAAAAAAAAAAAAAAAAAAAAAAAAAAAAAAAAAAAAAAAAAAAAAAAAAAAAAAAAAAAAAAAAAAAAAAAAAAAAAAAAAAAAAAAAAAAAAAAAAAAAAAAAAAAAAAAAAAAAAAAAAAAAAAAAAAAAAAAAAAAAAAAAAAAAAAAAAAAAAAAAAAAAAAAAAAAAAAAAAAAAAAAAAAAAAAAAAAAAAAAAAAAAAAAAAAAAAAAAAAAAAAAAAAAAAAAAAAAAAAAAAAAAAAAAAAAAAAAAAAAAAAAAAAAAAAAAAAAAAAAAAAAAAAAAAAAAAAAAAAAAAAAAAAAAAAAAAAAAAAAAAAAAAAAAAAAAAAAAAAAAAAAAAAAAAAAAAAAAAAAAAAAAAAAAAAAAAAAAAAAAAAAAAAAAAAAAAAAAAAAAAAAAAAAAAAAAAAAAAAAAAAAAAAAAAAAAAAAAAAAAAAAAAAAAAAAAAAAAAAAAAAAAAAAAAAAAAAAAAAAAAAAAAAAAAAAAAAAAAAAAAAAAAAAAAAAAAAAAAAAAAAAAAAAAAAAAAAAAAAAAAAAAAAAAAAAAAAAAAAAAAAAAAAAAAAAAAAAAAAAAAAAAAAAAAAAAAAAAAAAAAAAAAAAAAAAAAAAAAAAAAAAAAAAAAAAAAAAAAAAAAAAAAAAAAAAAAAAAAAAAAAAAAAAAAAAAAAAAAAAAAAAAAAAAAAAAAAAAAAAAAAAAAAAAAAAAAAAAAAAAAAAAAAAAAAAAAAAAAAAAAAAAAAAAAAAAAAAAAAAAAAAAAAAAAAAAAAAAAAAAAAAAAAAAAAAAAAAAAAAAAAAAAAAAAAAAAAAAAAAAAAAAAAAAAAAAAAAAAAAAAAAAAAAAAAAAAAAAAAAAAAAAAAAAAAAAAAAAAAAAAAAAAAAAAAAAAAAAAAAAAAAAAAAAAAAAAAAAAAAAAAAAAAAAAAAAAAAAAAAAAAAAAAAAAAAAAAAAAAAAAAAAAAAAAAAAAAAAAAAAAAAAAAAAAAAAAAAAAAAAAAAAAAAAAAAAAAAAAAAAAAAAAAAAAAAAAAAAAAAAAAAAAAAAAAAAAAAAAAAAAAAAAAAAAAAAAAAAAAAAAAAAAAAAAAAAAAAAAAAAAAAAAAAAAAAAAAAAAAAAAAAAAAAAAAAAAAAAAAAAAAAAAAAAAAAAAAAAAAAAAAAAAAAAAAAAAAAAAAAAAAAAAAAAAAAAAAAAAAAAAAAAAAAAAAAAAAAAAAAAAAAAAAAAAAAAAAAAAAAAAAAAAAAAAAAAAAAAAAAAAAAAAAAAAAAAAAAAAAAAAAAAAAAAAAAAAAAAAAAAAAAAAAAAAAAAAAAAAAAAAAAAAAAAAAAAAAAAAAAAAAAAAAAAAAAAAAAAAAAAAAAAAAAAAAAAAAAAAAAAAAAAAAAAAAAAAAAAAAAAAAAAAAAAAAAAAAAAAAAAAAAAAAAAAAAAAAAAAAAAAAAAAAAAAAAAAAAAAAAAAAAAAAAAAAAAAAAAAAAAAAAAAAAAAAAAAAAAAAAAAAAAAAAAAAAAAAAAAAAAAAAAAAAAAAAAAAAAAAAAAAAAAAAAAAAAAAAAAAAAAAAAAAAAAAAAAAAAAAAAAAAAAAAAAAAAAAAAAAAAAAAAAAAAAAAAAAAAAAAAAAAAAAAAAAAAAAAAAAAAAAAAAAAAAAAAAAAAAAAAAAAAAAAAAAAAAAAAAAAAAAAAAAAAAAAAAAAAAAAAAAAAAAAAAAAAAAAAAAAAAAAAAAAAAAAAAAAAAAAAAAAAAAAAAAAAAAAAAAAAAAAAAAAAAAAAAAAAAAAAAAAAAAAAAAAAAAAAAAAAAAAAAAAAAAAAAAAAAAAAAAAAAAAAAAAAAAAAAAAAAAAAAAAAAAAAAAAAAAAAAAAAAAAAAAAAAAAAAAAAAAAAAAAAAAAAAAAAAAAAAAAAAAAAAAAAAAAAAAAAAAAAAAAAAAAAAAAAAAAAAAAAAAAAAAAAAAAAAAAAAAAAAAAAAAAAAAAAAAAAAAAAAAAAAAAAAAAAAAAAAAAAAAAAAAAAAAAAAAAAAAAAAAAAAAA
AAAAAAAAAAAAAAAAAAAAAAAAAAAAAAAAAAAAAAAAAAAAAAAAAAAAAAAAAAAAAAAAAAAAAAAAAAAAAAAAAAAAAAAAAAAAAAAAAAAAAAAAAAAAAAAAAAAAAAAAAAAAAAAAAAAAAAAAAAAAAAAAAAAAAAAAAAAAAAAAAAAAAAAAAAAAAAAAAAAAAAAAAAAAAAAAAAAAAAAAAAAAAAAAAAAAAAAAAAAAAAAAAAAAAAAAAAAAAAAAAAAAAAAAAAAAAAAAAAAAAAAAAAAAAAAAAAAAAAAAAAAAAAAAAAAAAAAAAAAAAAAAAAAAAAAAAAAAAAAAAAAAAAAAAAAAAAAAAAAAAAAAAAAAAAAAAAAAAAAAAAAAAAAAAAAAAAAAAAAAAAAAAAAAAAAAAAAAAAAAAAAAAAAAAAAAAAAAAAAAAAAAAAAAAAAAAAAAAAAAAAAAAAAAAAAAAAAAAAAAAAAAAAAAAAAAAAAAAAAAAAAAAAAAAAAAAAAAAAAAAAAAAAAAAAAAAAAAAAAAAAAAAAAAAAAAAAAAAAAAAAAAAAAAAAAAAAAAAAAAAAAAAAAAAAAAAAAAAAAAAAAAAAAAAAAAAAAAAAAAAAAAAAAAAAAAAAAAAAAAAAAAAAAAAAAAAAAAAAAAAAAAAAAAAAAAAAAAAAAAAAAAAAAAAAAAAAAAAAAAAAAAAAAAAAAAAAAAAAAAAAAAAAAAAAAAAAAAAAAAAAAAAAAAAAAAAAAAAAAAAAAAAAAAAAAAAAAAAAAAAAAAAAAAAAAAAAAAAAAAAAAAAAAAAAAAAAAAAAAAAAAAAAAAAAAAAAAAAAAAAAAAAAAAAAAAAAAAAAAAAAAAAAAAAAAAAAAAAAAAAAAAAAAAAAAAAAAAAAAAAAAAAAAAAAAAAAAAAAAAAAAAAAAAAAAAAAAAAAAAAAAAAAAAAAAAAAAAAAAAAAAAAAAAAAAAAAAAAAAAAAAAAAAAAAAAAAAAAAAAAAAAAAAAAAAAAAAAAAAAAAAAAAAAAAAAAAAAAAAAAAAAAAAAAAAAAAAAAAAAAAAAAAAAAAAAAAAAAAAAAAAAAAAAAAAAAAAAAAAAAAAAAAAAAAAAAAAAAAAAAAAAAAAAAAAAAAAAAAAAAAAAAAAAAAAAAAAAAAAAAAAAAAAAAAAAAAAAAAAAAAAAAAAAAAAAAAAAAAAAAAAAAAAAAAAAAAAAAAAAAAAAAAAAAAAAAAAAAAAAAAAAAAAAAAAAAAAAAAAAAAAAAAAAAAAAAAAAAAAAAAAAAAAAAAAAAAAAAAAAAAAAAAAAAAAAAAAAAAAAAAAAAAAAAAAAAAAAAAAAAAAAAAAAAAAAAAAAAAAAAAAAAAAAAAAAAAAAAAAAAAAAAAAAAAAAAAAAAAAAAAAAAAAAAAAAAAAAAAAAAAAAAAAAAAAAAAAAAAAAAAAAAAAAAAAAAAAAAAAAAAAAAAAAAAAAAAAAAAAAAAAAAAAAAAAAAAAAAAAAAAAAAAAAAAAAAAAAAAAAAAAAAAAAAAAAAAAAAAAAAAAAAAAAAAAAAAAAAAAAAAAAAAAAAAAAAAAAAAAAAAAAAAAAAAAAAAAAAAAAAAAAAAAAAAAAAAAAAAAAAAAAAAAAAAAAAAAAAAAAAAAAAAAAAAAAAAAAAAAAAAAAAAAAAAAAAAAAAAAAAAAAAAAAAAAAAAAAAAAAAAAAAAAAAAAAAAAAAAAAAAAAAAAAAAAAAAAAAAAAAAAAAAAAAAAAAAAAAAAAAAAAAAAAAAAAAAAAAAAAAAAAAAAAAAAAAAAAAAAAAAAAAAAAAAAAAAAAAAAAAAAAAAAAAAAAAAAAAAAAAAAAAAAAAAAAAAAAAAAAAAAAAAAAAAAAAAAAAAAAAAAAAAAAAAAAAAAAAAAAAAAAAAAAAAAAAAAAAAAAAAAAAAAAAAAAAAAAAAAAAAAAAAAAAAAAAAAAAAAAAAAAAAAAAAAAAAAAAAAAAAAAAAAAAAAAAAAAAAAAAAAAAAAAAAAAAAAAAAAAAAAAAAAAAAAAAAAAAAAAAAAAAAAAAAAAAAAAAAAAAAAAAAAAAAAAAAAAAAAAAAAAAAAAAAAAAAAAAAAAAAAAAAAAAAAAAAAAAAAAAAAAAAAAAAAAAAAAAAAAAAAAAAAAAAAAAAAAAAAAAAAAAAAAAAAAAAAAAAAAAAAAAAAAAAAAAAAAAAAAAAAAAAAAAAAAAAAAAAAAAAAAAAAAAAAAAAAAAAAAAAAAAAAAAAAAAAAAAAAAAAAAAAAAAAAAAAAAAAAAAAAAAAAAAAAAAAAAAAAAAAAAAAAAAAAAAAAAAAAAAAAAAAAAAAAAAAAAAAAAAAAAAAAAAAAAAAAAAAAAAAAAAAAAAAAAAAAAAAAAAAAAAAAAAAAAAAAAAAAAAAAAAAAAAAAAAAAAAAAAAAAAAAAAAAAAAAAAAAAAAAAAAAAAAAAAAAAAAAAAAAAAAAAAAAAAAAAAAAAAAAAAAAAAAAAAAAAAAAAAAAAAAAAAAAAAAAAAAAAAAAAAAAAAAAAAAAAAAAAAAAAAAAAAAAAAAAAAAAAAAAAAAAAAAAAAAAAAAAAAAAAAAAAAAAAAAAAAAAAAAAAAAAAAAAAAAAAAAAAAAAAAAAAAAAAAAAAAAAAAAAAAAAAAAAAAAAAAAAAAAAAAAAAAAAAAAAAAAAAAAAAAAAAAAAAAAAAAAAAAAAAAAAAAAAAAAAAAAAAAAAAAAAAAAAAAAAAAAAAAAAAAAAAAAAAAAAAAAAAAAAAAAAAAAAAAAAAAAAAAAAAAAAAAAAAAAAAAAAAAAAAAAAAAAAAAAAAAAAAAAAAAAAAAAAAAAAAAAAAAAAAAAAAAAAAAAAAAAAAAAAAAAAAAAAAAAAAAAAAAAAAAAAAAAAAAAAAAAAAAAAAAAAAAAAAAAAAAAAAAAAAAAAAAAAAAAAAAAAAAAAAAAAAAAAAAAAAAAAAAAAAAAAAAAAAAAAAAAAAAAAAAAAAAAAAAAAAAAAAAAAAAAAAAAAAAAAAAAAAAAAAAAAAAAAAAAAAAAAAAAAAAAAAAAAAAAAAAAAAAAAAAAAAAAAAAAAAAAAAAAAAAAAAAAAAAAAAAAAAAAAAAAAAAAAAAAAAAAAAAAAAAAAAAAAAAAAAAAAAAAAAAAAAAAAAAAAAAAAAAAAAAAAAAAAAAAAAAAAAAAAAAAAAAAAAAAAAAAAAAAAAAAAAAAAAAAAAAAAAAAAAAAAAAAAAAAAAAAAAAAAAAAAAAAAAAAAAAAAAAAAAAAAAAAAAAAAAAAAAAAAAAAAAAAAAAAAAAAAAAAAAAAAAAAAAAAAAAAAAAAAAAAAAAAAAAAAAAAAAAAAAAAAAAAAAAAAAAAAAAAAAAAAAAAAAAAAAAAAAAAAAAAAAAAAAAAAAAAAAAAAAAAAAAAAAAAAAAAAAAAAAAAAAAAAAAAAAAAAAAAAAAAAAAAAAAAAAAAAAAAAAAAAAAAAAAAAAAAAAAAAAAAAAAAAAAAAAAAAAAAAAAAAAAAAAAAAAAAAAAAAAAAAAAAAAAAAAAAAAAAAAAAAAAAAAAAAAAAAAAAAAAAAAAAAAAAAAAAAAAAAAAAAAAAAAAAAAAAAAAAAAAAAAAAAAAAAAAAAAAAAAAAAAAAAAAAAAAAAAAAAAAAAAAAAAAAAAAAAAAAAAAAAAAAAAAAAAAAAAAAAAAAAAAAAAAAAAAAAAAAAAAAAAAAAAAAAAAAAAAAAAAAAAAAAAAAAAAAAAAAAAAAAAAAAAAAAAAAAAAAAAAAAAAAAAAAAAAAAAAAAAAAAAAAAAAAAAAAAAAAAAAAAAAAAAAAAAAAAAAAAAAAAAAAAAAAAAAAAAAAAAAAAAAAAAAAAAAAAAAAAAAAAAAAAAAAAAAAAAAAAAAAAAAAAAAAAAAAAAAAAAAAAAAAAAAAAAAAAAAAAAAAAAAAAAAAAAAAAAAAAAAAAAAAAAAAAAAAAAAAAAAAAAAAAAAAAAAAAAAAAAAAAAAAAAAAAAAAAAAAAAAAAAAAAAAAAAAAAAAAAAAAAAAAAAAAAAAAAAAAAAAAAAAAAAAAAAAAAAAAAAAAAAAAAAAAAAAAAAAAAAAAAAAAAAAAAAAAAAAAAAAAAAAAAAAAAAA
AAAAAAAAAAAAAAAAAAAAAAAAAAAAAAAAAAAAAAAAAAAAAAAAAAAAAAAAAAAAAAAAAAAAAAAAAAAAAAAAAAAAAAAAAAAAAAAAAAAAAAAAAAAAAAAAAAAAAAAAAAAAAAAAAAAAAAAAAAAAAAAAAAAAAAAAAAAAAAAAAAAAAAAAAAAAAAAAAAAAAAAAAAAAAAAAAAAAAAAAAAAAAAAAAAAAAAAAAAAAAAAAAAAAAAAAAAAAAAAAAAAAAAAAAAAAAAAAAAAAAAAAAAAAAAAAAAAAAAAAAAAAAAAAAAAAAAAAAAAAAAAAAAAAAAAAAAAAAAAAAAAAAAAAAAAAAAAAAAAAAAAAAAAAAAAAAAAAAAAAAAAAAAAAAAAAAAAAAAAAAAAAAAAAAAAAAAAAAAAAAAAAAAAAAAAAAAAAAAAAAAAAAAAAAAAAAAAAAAAAAAAAAAAAAAAAAAAAAAAAAAAAAAAAAAAAAAAAAAAAAAAAAAAAAAAAAAAAAAAAAAAAAAAAAAAAAAAAAAAAAAAAAAAAAAAAAAAAAAAAAAAAAAAAAAAAAAAAAAAAAAAAAAAAAAAAAAAAAAAAAAAAAAAAAAAAAAAAAAAAAAAAAAAAAAAAAAAAAAAAAAAAAAAAAAAAAAAAAAAAAAAAAAAAAAAAAAAAAAAAAAAAAAAAAAAAAAAAAAAAAAAAAAAAAAAAAAAAAAAAAAAAAAAAAAAAAAAAAAAAAAAAAAAAAAAAAAAAAAAAAAAAAAAAAAAAAAAAAAAAAAAAAAAAAAAAAAAAAAAAAAAAAAAAAAAAAAAAAAAAAAAAAAAAAAAAAAAAAAAAAAAAAAAAAAAAAAAAAAAAAAAAAAAAAAAAAAAAAAAAAAAAAAAAAAAAAAAAAAAAAAAAAAAAAAAAAAAAAAAAAAAAAAAAAAAAAAAAAAAAAAAAAAAAAAAAAAAAAAAAAAAAAAAAAAAAAAAAAAAAAAAAAAAAAAAAAAAAAAAAAAAAAAAAAAAAAAAAAAAAAAAAAAAAAAAAAAAAAAAAAAAAAAAAAAAAAAAAAAAAAAAAAAAAAAAAAAAAAAAAAAAAAAAAAAAAAAAAAAAAAAAAAAAAAAAAAAAAAAAAAAAAAAAAAAAAAAAAAAAAAAAAAAAAAAAAAAAAAAAAAAAAAAAAAAAAAAAAAAAAAAAAAAAAAAAAAAAAAAAAAAAAAAAAAAAAAAAAAAAAAAAAAAAAAAAAAAAAAAAAAAAAAAAAAAAAAAAAAAAAAAAAAAAAAAAAAAAAAAAAAAAAAAAAAAAAAAAAAAAAAAAAAAAAAAAAAAAAAAAAAAAAAAAAAAAAAAAAAAAAAAAAAAAAAAAAAAAAAAAAAAAAAAAAAAAAAAAAAAAAAAAAAAAAAAAAAAAAAAAAAAAAAAAAAAAAAAAAAAAAAAAAAAAAAAAAAAAAAAAAAAAAAAAAAAAAAAAAAAAAAAAAAAAAAAAAAAAAAAAAAAAAAAAAAAAAAAAAAAAAAAAAAAAAAAAAAAAAAAAAAAAAAAAAAAAAAAAAAAAAAAAAAAAAAAAAAAAAAAAAAAAAAAAAAAAAAAAAAAAAAAAAAAAAAAAAAAAAAAAAAAAAAAAAAAAAAAAAAAAAAAAAAAAAAAAAAAAAAAAAAAAAAAAAAAAAAAAAAAAAAAAAAAAAAAAAAAAAAAAAAAAAAAAAAAAAAAAAAAAAAAAAAAAAAAAAAAAAAAAAAAAAAAAAAAAAAAAAAAAAAAAAAAAAAAAAAAAAAAAAAAAAAAAAAAAAAAAAAAAAAAAAAAAAAAAAAAAAAAAAAAAAAAAAAAAAAAAAAAAAAAAAAAAAAAAAAAAAAAAAAAAAAAAAAAAAAAAAAAAAAAAAAAAAAAAAAAAAAAAAAAAAAAAAAAAAAAAAAAAAAAAAAAAAAAAAAAAAAAAAAAAAAAAAAAAAAAAAAAAAAAAAAAAAAAAAAAAAAAAAAAAAAAAAAAAAAAAAAAAAAAAAAAAAAAAAAAAAAAAAAAAAAAAAAAAAAAAAAAAAAAAAAAAAAAAAAAAAAAAAAAAAAAAAAAAAAAAAAAAAAAAAAAAAAAAAAAAAAAAAAAAAAAAAAAAAAAAAAAAAAAAAAAAAAAAAAAAAAAAAAAAAAAAAAAAAAAAAAAAAAAAAAAAAAAAAAAAAAAAAAAAAAAAAAAAAAAAAAAAAAAAAAAAAAAAAAAAAAAAAAAAAAAAAAAAAAAAAAAAAAAAAAAAAAAAAAAAAAAAAAAAAAAAAAAAAAAAAAAAAAAAAAAAAAAAAAAAAAAAAAAAAAAAAAAAAAAAAAAAAAAAAAAAAAAAAAAAAAAAAAAAAAAAAAAAAAAAAAAAAAAAAAAAAAAAAAAAAAAAAAAAAAAAAAAAAAAAAAAAAAAAAAAAAAAAAAAAAAAAAAAAAAAAAAAAAAAAAAAAAAAAAAAAAAAAAAAAAAAAAAAAAAAAAAAAAAAAAAAAAAAAAAAAAAAAAAAAAAAAAAAAAAAAAAAAAAAAAAAAAAAAAAAAAAAAAAAAAAAAAAAAAAAAAAAAAAAAAAAAAAAAAAAAAAAAAAAAAAAAAAAAAAAAAAAAAAAAAAAAAAAAAAAAAAAAAAAAAAAAAAAAAAAAAAAAAAAAAAAAAAAAAAAAAAAAAAAAAAAAAAAAAAAAAAAAAAAAAAAAAAAAAAAAAAAAAAAAAAAAAAAAAAAAAAAAAAAAAAAAAAAAAAAAAAAAAAAAAAAAAAAAAAAAAAAAAAAAAAAAAAAAAAAAAAAAAAAAAAAAAAAAAAAAAAAAAAAAAAAAAAAAAAAAAAAAAAAAAAAAAAAAAAAAAAAAAAAAAAAAAAAAAAAAAAAAAAAAAAAAAAAAAAAAAAAAAAAAAAAAAAAAAAAAAAAAAAAAAAAAAAAAAAAAAAAAAAAAAAAAAAAAAAAAAAAAAAAAAAAAAAAAAAAAAAAAAAAAAAAAAAAAAAAAAAAAAAAAAAAAAAAAAAAAAAAAAAAAAAAAAAAAAAAAAAAAAAAAAAAAAAAAAAAAAAAAAAAAAAAAAAAAAAAAAAAAAAAAAAAAAAAAAAAAAAAAAAAAAAAAAAAAAAAAAAAAAAAAAAAAAAAAAAAAAAAAAAAAAAAAAAAAAAAAAAAAAAAAAAAAAAAAAAAAAAAAAAAAAAAAAAAAAAAAAAAAAAAAAAAAAAAAAAAAAAAAAAAAAAAAAAAAAAAAAAAAAAAAAAAAAAAAAAAAAAAAAAAAAAAAAAAAAAAAAAAAAAAAAAAAAAAAAAAAAAAAAAAAAAAAAAAAAAAAAAAAAAAAAAAAAAAAAAAAAAAAAAAAAAAAAAAAAAAAAAAAAAAAAAAAAAAAAAAAAAAAAAAAAAAAAAAAAAAAAAAAAAAAAAAAAAAAAAAAAAAAAAAAAAAAAAAAAAAAAAAAAAAAAAAAAAAAAAAAAAAAAAAAAAAAAAAAAAAAAAAAAAAAAAAAAAAAAAAAAAAAAAAAAAAAAAAAAAAAAAAAAAAAAAAAAAAAAAAAAAAAAAAAAAAAAAAAAAAAAAAAAAAAAAAAAAAAAAAAAAAAAAAAAAAAAAAAAAAAAAAAAAAAAAAAAAAAAAAAAAAAAAAAAAAAAAAAAAAAAAAAAAAAAAAAAAAAAAAAAAAAAAAAAAAAAAAAAAAAAAAAAAAAAAAAAAAAAAAAAAAAAAAAAAAAAAAAAAAAAAAAAAAAAAAAAAAAAAAAAAAAAAAAAAAAAAAAAAAAAAAAAAAAAAAAAAAAAAAAAAAAAAAAAAAAAAAAAAAAAAAAAAAAAAAAAAAAAAAAAAAAAAAAAAAAAAAAAAAAAAAAAAAAAAAAAAAAAAAAAAAAAAAAAAAAAAAAAAAAAAAAAAAAAAAAAAAAAAAAAAAAAAAAAAAAAAAAAAAAAAAAAAAAAAAAAAAAAAAAAAAAAAAAAAAAAAAAAAAAAAAAAAAAAAAAAAAAAAAAAAAAAAAAAAAAAAAAAAAAAAAAAAAAAAAAAAAAAAAAAAAAAAAAAAAAAAAAAAAAAAAAAAAAAAAAAAAAAAAAAAAAAAAAAAAAAAAAAAAAAAAAAAAAAAAAAAAAAAAAAAAAAAAAAAAAAAAAAAAAAAAAAAAAAAAAAAAAAAAAAAAAAAAAAAAAAAAAAAAAAAAAAAAAA
AAAAAAAAAAAAAAAAAAAAAAAAAAAAAAAAAAAAAAAAAAAAAAAAAAAAAAAAAAAAAAAAAAAAAAAAAAAAAAAAAAAAAAAAAAAAAAAAAAAAAAAAAAAAAAAAAAAAAAAAAAAAAAAAAAAAAAAAAAAAAAAAAAAAAAAAAAAAAAAAAAAAAAAAAAAAAAAAAAAAAAAAAAAAAAAAAAAAAAAAAAAAAAAAAAAAAAAAAAAAAAAAAAAAAAAAAAAAAAAAAAAAAAAAAAAAAAAAAAAAAAAAAAAAAAAAAAAAAAAAAAAAAAAAAAAAAAAAAAAAAAAAAAAAAAAAAAAAAAAAAAAAAAAAAAAAAAAAAAAAAAAAAAAAAAAAAAAAAAAAAAAAAAAAAAAAAAAAAAAAAAAAAAAAAAAAAAAAAAAAAAAAAAAAAAAAAAAAAAAAAAAAAAAAAAAAAAAAAAAAAAAAAAAAAAAAAAAAAAAAAAAAAAAAAAAAAAAAAAAAAAAAAAAAAAAAAAAAAAAAAAAAAAAAAAAAAAAAAAAAAAAAAAAAAAAAAAAAAAAAAAAAAAAAAAAAAAAAAAAAAAAAAAAAAAAAAAAAAAAAAAAAAAAAAAAAAAAAAAAAAAAAAAAAAAAAAAAAAAAAAAAAAAAAAAAAAAAAAAAAAAAAAAAAAAAAAAAAAAAAAAAAAAAAAAAAAAAAAAAAAAAAAAAAAAAAAAAAAAAAAAAAAAAAAAAAAAAAAAAAAAAAAAAAAAAAAAAAAAAAAAAAAAAAAAAAAAAAAAAAAAAAAAAAAAAAAAAAAAAAAAAAAAAAAAAAAAAAAAAAAAAAAAAAAAAAAAAAAAAAAAAAAAAAAAAAAAAAAAAAAAAAAAAAAAAAAAAAAAAAAAAAAAAAAAAAAAAAAAAAAAAAAAAAAAAAAAAAAAAAAAAAAAAAAAAAAAAAAAAAAAAAAAAAAAAAAAAAAAAAAAAAAAAAAAAAAAAAAAAAAAAAAAAAAAAAAAAAAAAAAAAAAAAAAAAAAAAAAAAAAAAAAAAAAAAAAAAAAAAAAAAAAAAAAAAAAAAAAAAAAAAAAAAAAAAAAAAAAAAAAAAAAAAAAAAAAAAAAAAAAAAAAAAAAAAAAAAAAAAAAAAAAAAAAAAAAAAAAAAAAAAAAAAAAAAAAAAAAAAAAAAAAAAAAAAAAAAAAAAAAAAAAAAAAAAAAAAAAAAAAAAAAAAAAAAAAAAAAAAAAAAAAAAAAAAAAAAAAAAAAAAAAAAAAAAAAAAAAAAAAAAAAAAAAAAAAAAAAAAAAAAAAAAAAAAAAAAAAAAAAAAAAAAAAAAAAAAAAAAAAAAAAAAAAAAAAAAAAAAAAAAAAAAAAAAAAAAAAAAAAAAAAAAAAAAAAAAAAAAAAAAAAAAAAAAAAAAAAAAAAAAAAAAAAAAAAAAAAAAAAAAAAAAAAAAAAAAAAAAAAAAAAAAAAAAAAAAAAAAAAAAAAAAAAAAAAAAAAAAAAAAAAAAAAAAAAAAAAAAAAAAAAAAAAAAAAAAAAAAAAAAAAAAAAAAAAAAAAAAAAAAAAAAAAAAAAAAAAAAAAAAAAAAAAAAAAAAAAAAAAAAAAAAAAAAAAAAAAAAAAAAAAAAAAAAAAAAAAAAAAAAAAAAAAAAAAAAAAAAAAAAAAAAAAAAAAAAAAAAAAAAAAAAAAAAAAAAAAAAAAAAAAAAAAAAAAAAAAAAAAAAAAAAAAAAAAAAAAAAAAAAAAAAAAAAAAAAAAAAAAAAAAAAAAAAAAAAAAAAAAAAAAAAAAAAAAAAAAAAAAAAAAAAAAAAAAAAAAAAAAAAAAAAAAAAAAAAAAAAAAAAAAAAAAAAAAAAAAAAAAAAAAAAAAAAAAAAAAAAAAAAAAAAAAAAAAAAAAAAAAAAAAAAAAAAAAAAAAAAAAAAAAAAAAAAAAAAAAAAAAAAAAAAAAAAAAAAAAAAAAAAAAAAAAAAAAAAAAAAAAAAAAAAAAAAAAAAAAAAAAAAAAAAAAAAAAAAAAAAAAAAAAAAAAAAAAAAAAAAAAAAAAAAAAAAAAAAAAAAAAAAAAAAAAAAAAAAAAAAAAAAAAAAAAAAAAAAAAAAAAAAAAAAAAAAAAAAAAAAAAAAAAAAAAAAAAAAAAAAAAAAAAAAAAAAAAAAAAAAAAAAAAAAAAAAAAAAAAAAAAAAAAAAAAAAAAAAAAAAAAAAAAAAAAAAAAAAAAAAAAAAAAAAAAAAAAAAAAAAAAAAAAAAAAAAAAAAAAAAAAAAAAAAAAAAAAAAAAAAAAAAAAAAAAAAAAAAAAAAAAAAAAAAAAAAAAAAAAAAAAAAAAAAAAAAAAAAAAAAAAAAAAAAAAAAAAAAAAAAAAAAAAAAAAAAAAAAAAAAAAAAAAAAAAAAAAAAAAAAAAAAAAAAAAAAAAAAAAAAAAAAAAAAAAAAAAAAAAAAAAAAAAAAAAAAAAAAAAAAAAAAAAAAAAAAAAAAAAAAAAAAAAAAAAAAAAAAAAAAAAAAAAAAAAAAAAAAAAAAAAAAAAAAAAAAAAAAAAAAAAAAAAAAAAAAAAAAAAAAAAAAAAAAAAAAAAAAAAAAAAAAAAAAAAAAAAAAAAAAAAAAAAAAAAAAAAAAAAAAAAAAAAAAAAAAAAAAAAAAAAAAAAAAAAAAAAAAAAAAAAAAAAAAAAAAAAAAAAAAAAAAAAAAAAAAAAAAAAAAAAAAAAAAAAAAAAAAAAAAAAAAAAAAAAAAAAAAAAAAAAAAAAAAAAAAAAAAAAAAAAAAAAAAAAAAAAAAAAAAAAAAAAAAAAAAAAAAAAAAAAAAAAAAAAAAAAAAAAAAAAAAAAAAAAAAAAAAAAAAAAAAAAAAAAAAAAAAAAAAAAAAAAAAAAAAAAAAAAAAAAAAAAAAAAAAAAAAAAAAAAAAAAAAAAAAAAAAAAAAAAAAAAAAAAAAAAAAAAAAAAAAAAAAAAAAAAAAAAAAAAAAAAAAAAAAAAAAAAAAAAAAAAAAAAAAAAAAAAAAAAAAAAAAAAAAAAAAAAAAAAAAAAAAAAAAAAAAAAAAAAAAAAAAAAAAAAAAAAAAAAAAAAAAAAAAAAAAAAAAAAAAAAAAAAAAAAAAAAAAAAAAAAAAAAAAAAAAAAAAAAAAAAAAAAAAAAAAAAAAAAAAAAAAAAAAAAAAAAAAAAAAAAAAAAAAAAAAAAAAAAAAAAAAAAAAAAAAAAAAAAAAAAAAAAAAAAAAAAAAAAAAAAAAAAAAAAAAAAAAAAAAAAAAAAAAAAAAAAAAAAAAAAAAAAAAAAAAAAAAAAAAAAAAAAAAAAAAAAAAAAAAAAAAAAAAAAAAAAAAAAAAAAAAAAAAAAAAAAAAAAAAAAAAAAAAAAAAAAAAAAAAAAAAAAAAAAAAAAAAAAAAAAAAAAAAAAAAAAAAAAAAAAAAAAAAAAAAAAAAAAAAAAAAAAAAAAAAAAAAAAAAAAAAAAAAAAAAAAAAAAAAAAAAAAAAAAAAAAAAAAAAAAAAAAAAAAAAAAAAAAAAAAAAAAAAAAAAAAAAAAAAAAAAAAAAAAAAAAAAAAAAAAAAAAAAAAAAAAAAAAAAAAAAAAAAAAAAAAAAAAAAAAAAAAAAAAAAAAAAAAAAAAAAAAAAAAAAAAAAAAAAAAAAAAAAAAAAAAAAAAAAAAAAAAAAAAAAAAAAAAAAAAAAAAAAAAAAAAAAAAAAAAAAAAAAAAAAAAAAAAAAAAAAAAAAAAAAAAAAAAAAAAAAAAAAAAAAAAAAAAAAAAAAAAAAAAAAAAAAAAAAAAAAAAAAAAAAAAAAAAAAAAAAAAAAAAAAAAAAAAAAAAAAAAAAAAAAAAAAAAAAAAAAAAAAAAAAAAAAAAAAAAAAAAAAAAAAAAAAAAAAAAAAAAAAAAAAAAAAAAAAAAAAAAAAAAAAAAAAAAAAAAAAAAAAAAAAAAAAAAAAAAAAAAAAAAAAAAAAAAAAAAAAAAAAAAAAAAAAAAAAAAAAAAAAAAAAAAAAAAAAAAAAAAAAAAAAAAAAAAAAAAAAAAAAAAAAAAAAAAAAAAAAAAAAAAAAAAAAAAAAAAAAAAAAAAAAAAAAAAAAAAAAAAAAAAAAAAAAAAAAAAAAAAAAAAAAAAAAAAAAAAAAAAAAAAAAAAAAAAAAAAAAAAAAAAAAA
AAAAAAAAAAAAAAAAAAAAAAAAAAAAAAAAAAAAAAAAAAAAAAAAAAAAAAAAAAAAAAAAAAAAAAAAAAAAAAAAAAAAAAAAAAAAAAAAAAAAAAAAAAAAAAAAAAAAAAAAAAAAAAAAAAAAAAAAAAAAAAAAAAAAAAAAAAAAAAAAAAAAAAAAAAAAAAAAAAAAAAAAAAAAAAAAAAAAAAAAAAAAAAAAAAAAAAAAAAAAAAAAAAAAAAAAAAAAAAAAAAAAAAAAAAAAAAAAAAAAAAAAAAAAAAAAAAAAAAAAAAAAAAAAAAAAAAAAAAAAAAAAAAAAAAAAAAAAAAAAAAAAAAAAAAAAAAAAAAAAAAAAAAAAAAAAAAAAAAAAAAAAAAAAAAAAAAAAAAAAAAAAAAAAAAAAAAAAAAAAAAAAAAAAAAAAAAAAAAAAAAAAAAAAAAAAAAAAAAAAAAAAAAAAAAAAAAAAAAAAAAAAAAAAAAAAAAAAAAAAAAAAAAAAAAAAAAAAAAAAAAAAAAAAAAAAAAAAAAAAAAAAAAAAAAAAAAAAAAAAAAAAAAAAAAAAAAAAAAAAAAAAAAAAAAAAAAAAAAAAAAAAAAAAAAAAAAAAAAAAAAAAAAAAAAAAAAAAAAAAAAAAAAAAAAAAAAAAAAAAAAAAAAAAAAAAAAAAAAAAAAAAAAAAAAAAAAAAAAAAAAAAAAAAAAAAAAAAAAAAAAAAAAAAAAAAAAAAAAAAAAAAAAAAAAAAAAAAAAAAAAAAAAAAAAAAAAAAAAAAAAAAAAAAAAAAAAAAAAAAAAAAAAAAAAAAAAAAAAAAAAAAAAAAAAAAAAAAAAAAAAAAAAAAAAAAAAAAAAAAAAAAAAAAAAAAAAAAAAAAAAAAAAAAAAAAAAAAAAAAAAAAAAAAAAAAAAAAAAAAAAAAAAAAAAAAAAAAAAAAAAAAAAAAAAAAAAAAAAAAAAAAAAAAAAAAAAAAAAAAAAAAAAAAAAAAAAAAAAAAAAAAAAAAAAAAAAAAAAAAAAAAAAAAAAAAAAAAAAAAAAAAAAAAAAAAAAAAAAAAAAAAAAAAAAAAAAAAAAAAAAAAAAAAAAAAAAAAAAAAAAAAAAAAAAAAAAAAAAAAAAAAAAAAAAAAAAAAAAAAAAAAAAAAAAAAAAAAAAAAAAAAAAAAAAAAAAAAAAAAAAAAAAAAAAAAAAAAAAAAAAAAAAAAAAAAAAAAAAAAAAAAAAAAAAAAAAAAAAAAAAAAAAAAAAAAAAAAAAAAAAAAAAAAAAAAAAAAAAAAAAAAAAAAAAAAAAAAAAAAAAAAAAAAAAAAAAAAAAAAAAAAAAAAAAAAAAAAAAAAAAAAAAAAAAAAAAAAAAAAAAAAAAAAAAAAAAAAAAAAAAAAAAAAAAAAAAAAAAAAAAAAAAAAAAAAAAAAAAAAAAAAAAAAAAAAAAAAAAAAAAAAAAAAAAAAAAAAAAAAAAAAAAAAAAAAAAAAAAAAAAAAAAAAAAAAAAAAAAAAAAAAAAAAAAAAAAAAAAAAAAAAAAAAAAAAAAAAAAAAAAAAAAAAAAAAAAAAAAAAAAAAAAAAAAAAAAAAAAAAAAAAAAAAAAAAAAAAAAAAAAAAAAAAAAAAAAAAAAAAAAAAAAAAAAAAAAAAAAAAAAAAAAAAAAAAAAAAAAAAAAAAAAAAAAAAAAAAAAAAAAAAAAAAAAAAAAAAAAAAAAAAAAAAAAAAAAAAAAAAAAAAAAAAAAAAAAAAAAAAAAAAAAAAAAAAAAAAAAAAAAAAAAAAAAAAAAAAAAAAAAAAAAAAAAAAAAAAAAAAAAAAAAAAAAAAAAAAAAAAAAAAAAAAAAAAAAAAAAAAAAAAAAAAAAAAAAAAAAAAAAAAAAAAAAAAAAAAAAAAAAAAAAAAAAAAAAAAAAAAAAAAAAAAAAAAAAAAAAAAAAAAAAAAAAAAAAAAAAAAAAAAAAAAAAAAAAAAAAAAAAAAAAAAAAAAAAAAAAAAAAAAAAAAAAAAAAAAAAAAAAAAAAAAAAAAAAAAAAAAAAAAAAAAAAAAAAAAAAAAAAAAAAAAAAAAAAAAAAAAAAAAAAAAAAAAAAAAAAAAAAAAAAAAAAAAAAAAAAAAAAAAAAAAAAAAAAAAAAAAAAAAAAAAAAAAAAAAAAAAAAAAAAAAAAAAAAAAAAAAAAAAAAAAAAAAAAAAAAAAAAAAAAAAAAAAAAAAAAAAAAAAAAAAAAAAAAAAAAAAAAAAAAAAAAAAAAAAAAAAAAAAAAAAAAAAAAAAAAAAAAAAAAAAAAAAAAAAAAAAAAAAAAAAAAAAAAAAAAAAAAAAAAAAAAAAAAAAAAAAAAAAAAAAAAAAAAAAAAAAAAAAAAAAAAAAAAAAAAAAAAAAAAAAAAAAAAAAAAAAAAAAAAAAAAAAAAAAAAAAAAAAAAAAAAAAAAAAAAAAAAAAAAAAAAAAAAAAAAAAAAAAAAAAAAAAAAAAAAAAAAAAAAAAAAAAAAAAAAAAAAAAAAAAAAAAAAAAAAAAAAAAAAAAAAAAAAAAAAAAAAAAAAAAAAAAAAAAAAAAAAAAAAAAAAAAAAAAAAAAAAAAAAAAAAAAAAAAAAAAAAAAAAAAAAAAAAAAAAAAAAAAAAAAAAAAAAAAAAAAAAAAAAAAAAAAAAAAAAAAAAAAAAAAAAAAAAAAAAAAAAAAAAAAAAAAAAAAAAAAAAAAAAAAAAAAAAAAAAAAAAAAAAAAAAAAAAAAAAAAAAAAAAAAAAAAAAAAAAAAAAAAAAAAAAAAAAAAAAAAAAAAAAAAAAAAAAAAAAAAAAAAAAAAAAAAAAAAAAAAAAAAAAAAAAAAAAAAAAAAAAAAAAAAAAAAAAAAAAAAAAAAAAAAAAAAAAAAAAAAAAAAAAAAAAAAAAAAAAAAAAAAAAAAAAAAAAAAAAAAAAAAAAAAAAAAAAAAAAAAAAAAAAAAAAAAAAAAAAAAAAAAAAAAAAAAAAAAAAAAAAAAAAAAAAAAAAAAAAAAAAAAAAAAAAAAAAAAAAAAAAAAAAAAAAAAAAAAAAAAAAAAAAAAAAAAAAAAAAAAAAAAAAAAAAAAAAAAAAAAAAAAAAAAAAAAAAAAAAAAAAAAAAAAAAAAAAAAAAAAAAAAAAAAAAAAAAAAAAAAAAAAAAAAAAAAAAAAAAAAAAAAAAAAAAAAAAAAAAAAAAAAAAAAAAAAAAAAAAAAAAAAAAAAAAAAAAAAAAAAAAAAAAAAAAAAAAAAAAAAAAAAAAAAAAAAAAAAAAAAAAAAAAAAAAAAAAAAAAAAAAAAAAAAAAAAAAAAAAAAAAAAAAAAAAAAAAAAAAAAAAAAAAAAAAAAAAAAAAAAAAAAAAAAAAAAAAAAAAAAAAAAAAAAAAAAAAAAAAAAAAAAAAAAAAAAAAAAAAAAAAAAAAAAAAAAAAAAAAAAAAAAAAAAAAAAAAAAAAAAAAAAAAAAAAAAAAAAAAAAAAAAAAAAAAAAAAAAAAAAAAAAAAAAAAAAAAAAAAAAAAAAAAAAAAAAAAAAAAAAAAAAAAAAAAAAAAAAAAAAAAAAAAAAAAAAAAAAAAAAAAAAAAAAAAAAAAAAAAAAAAAAAAAAAAAAAAAAAAAAAAAAAAAAAAAAAAAAAAAAAAAAAAAAAAAAAAAAAAAAAAAAAAAAAAAAAAAAAAAAAAAAAAAAAAAAAAAAAAAAAAAAAAAAAAAAAAAAAAAAAAAAAAAAAAAAAAAAAAAAAAAAAAAAAAAAAAAAAAAAAAAAAAAAAAAAAAAAAAAAAAAAAAAAAAAAAAAAAAAAAAAAAAAAAAAAAAAAAAAAAAAAAAAAAAAAAAAAAAAAAAAAAAAAAAAAAAAAAAAAAAAAAAAAAAAAAAAAAAAAAAAAAAAAAAAAAAAAAAAAAAAAAAAAAAAAAAAAAAAAAAAAAAAAAAAAAAAAAAAAAAAAAAAAAAAAAAAAAAAAAAAAAAAAAAAAAAAAAAAAAAAAAAAAAAAAAAAAAAAAAAAAAAAAAAAAAAAAAAAAAAAAAAAAAAAAAAAAAAAAAAAAAAAAAAAAAAAAAAAAAAAAAAAAAAAAAAAAAAAAAAAAAAAAAAAAAAAAAAAAAAAAAAAAAAAAAAAAAAAAAAAAAAAAAAAAAAAAAAAAAAAAAAAAAAAAAAAA
AAAAAAAAAAAAAAAAAAAAAAAAAAAAAAAAAAAAAAAAAAAAAAAAAAAAAAAAAAAAAAAAAAAAAAAAAAAAAAAAAAAAAAAAAAAAAAAAAAAAAAAAAAAAAAAAAAAAAAAAAAAAAAAAAAAAAAAAAAAAAAAAAAAAAAAAAAAAAAAAAAAAAAAAAAAAAAAAAAAAAAAAAAAAAAAAAAAAAAAAAAAAAAAAAAAAAAAAAAAAAAAAAAAAAAAAAAAAAAAAAAAAAAAAAAAAAAAAAAAAAAAAAAAAAAAAAAAAAAAAAAAAAAAAAAAAAAAAAAAAAAAAAAAAAAAAAAAAAAAAAAAAAAAAAAAAAAAAAAAAAAAAAAAAAAAAAAAAAAAAAAAAAAAAAAAAAAAAAAAAAAAAAAAAAAAAAAAAAAAAAAAAAAAAAAAAAAAAAAAAAAAAAAAAAAAAAAAAAAAAAAAAAAAAAAAAAAAAAAAAAAAAAAAAAAAAAAAAAAAAAAAAAAAAAAAAAAAAAAAAAAAAAAAAAAAAAAAAAAAAAAAAAAAAAAAAAAAAAAAAAAAAAAAAAAAAAAAAAAAAAAAAAAAAAAAAAAAAAAAAAAAAAAAAAAAAAAAAAAAAAAAAAAAAAAAAAAAAAAAAAAAAAAAAAAAAAAAAAAAAAAAAAAAAAAAAAAAAAAAAAAAAAAAAAAAAAAAAAAAAAAAAAAAAAAAAAAAAAAAAAAAAAAAAAAAAAAAAAAAAAAAAAAAAAAAAAAAAAAAAAAAAAAAAAAAAAAAAAAAAAAAAAAAAAAAAAAAAAAAAAAAAAAAAAAAAAAAAAAAAAAAAAAAAAAAAAAAAAAAAAAAAAAAAAAAAAAAAAAAAAAAAAAAAAAAAAAAAAAAAAAAAAAAAAAAAAAAAAAAAAAAAAAAAAAAAAAAAAAAAAAAAAAAAAAAAAAAAAAAAAAAAAAAAAAAAAAAAAAAAAAAAAAAAAAAAAAAAAAAAAAAAAAAAAAAAAAAAAAAAAAAAAAAAAAAAAAAAAAAAAAAAAAAAAAAAAAAAAAAAAAAAAAAAAAAAAAAAAAAAAAAAAAAAAAAAAAAAAAAAAAAAAAAAAAAAAAAAAAAAAAAAAAAAAAAAAAAAAAAAAAAAAAAAAAAAAAAAAAAAAAAAAAAAAAAAAAAAAAAAAAAAAAAAAAAAAAAAAAAAAAAAAAAAAAAAAAAAAAAAAAAAAAAAAAAAAAAAAAAAAAAAAAAAAAAAAAAAAAAAAAAAAAAAAAAAAAAAAAAAAAAAAAAAAAAAAAAAAAAAAAAAAAAAAAAAAAAAAAAAAAAAAAAAAAAAAAAAAAAAAAAAAAAAAAAAAAAAAAAAAAAAAAAAAAAAAAAAAAAAAAAAAAAAAAAAAAAAAAAAAAAAAAAAAAAAAAAAAAAAAAAAAAAAAAAAAAAAAAAAAAAAAAAAAAAAAAAAAAAAAAAAAAAAAAAAAAAAAAAAAAAAAAAAAAAAAAAAAAAAAAAAAAAAAAAAAAAAAAAAAAAAAAAAAAAAAAAAAAAAAAAAAAAAAAAAAAAAAAAAAAAAAAAAAAAAAAAAAAAAAAAAAAAAAAAAAAAAAAAAAAAAAAAAAAAAAAAAAAAAAAAAAAAAAAAAAAAAAAAAAAAAAAAAAAAAAAAAAAAAAAAAAAAAAAAAAAAAAAAAAAAAAAAAAAAAAAAAAAAAAAAAAAAAAAAAAAAAAAAAAAAAAAAAAAAAAAAAAAAAAAAAAAAAAAAAAAAAAAAAAAAAAAAAAAAAAAAAAAAAAAAAAAAAAAAAAAAAAAAAAAAAAAAAAAAAAAAAAAAAAAAAAAAAAAAAAAAAAAAAAAAAAAAAAAAAAAAAAAAAAAAAAAAAAAAAAAAAAAAAAAAAAAAAAAAAAAAAAAAAAAAAAAAAAAAAAAAAAAAAAAAAAAAAAAAAAAAAAAAAAAAAAAAAAAAAAAAAAAAAAAAAAAAAAAAAAAAAAAAAAAAAAAAAAAAAAAAAAAAAAAAAAAAAAAAAAAAAAAAAAAAAAAAAAAAAAAAAAAAAAAAAAAAAAAAAAAAAAAAAAAAAAAAAAAAAAAAAAAAAAAAAAAAAAAAAAAAAAAAAAAAAAAAAAAAAAAAAAAAAAAAAAAAAAAAAAAAAAAAAAAAAAAAAAAAAAAAAAAAAAAAAAAAAAAAAAAAAAAAAAAAAAAAAAAAAAAAAAAAAAAAAAAAAAAAAAAAAAAAAAAAAAAAAAAAAAAAAAAAAAAAAAAAAAAAAAAAAAAAAAAAAAAAAAAAAAAAAAAAAAAAAAAAAAAAAAAAAAAAAAAAAAAAAAAAAAAAAAAAAAAAAAAAAAAAAAAAAAAAAAAAAAAAAAAAAAAAAAAAAAAAAAAAAAAAAAAAAAAAAAAAAAAAAAAAAAAAAAAAAAAAAAAAAAAAAAAAAAAAAAAAAAAAAAAAAAAAAAAAAAAAAAAAAAAAAAAAAAAAAAAAAAAAAAAAAAAAAAAAAAAAAAAAAAAAAAAAAAAAAAAAAAAAAAAAAAAAAAAAAAAAAAAAAAAAAAAAAAAAAAAAAAAAAAAAAAAAAAAAAAAAAAAAAAAAAAAAAAAAAAAAAAAAAAAAAAAAAAAAAAAAAAAAAAAAAAAAAAAAAAAAAAAAAAAAAAAAAAAAAAAAAAAAAAAAAAAAAAAAAAAAAAAAAAAAAAAAAAAAAAAAAAAAAAAAAAAAAAAAAAAAAAAAAAAAAAAAAAAAAAAAAAAAAAAAAAAAAAAAAAAAAAAAAAAAAAAAAAAAAAAAAAAAAAAAAAAAAAAAAAAAAAAAAAAAAAAAAAAAAAAAAAAAAAAAAAAAAAAAAAAAAAAAAAAAAAAAAAAAAAAAAAAAAAAAAAAAAAAAAAAAAAAAAAAAAAAAAAAAAAAAAAAAAAAAAAAAAAAAAAAAAAAAAAAAAAAAAAAAAAAAAAAAAAAAAAAAAAAAAAAAAAAAAAAAAAAAAAAAAAAAAAAAAAAAAAAAAAAAAAAAAAAAAAAAAAAAAAAAAAAAAAAAAAAAAAAAAAAAAAAAAAAAAAAAAAAAAAAAAAAAAAAAAAAAAAAAAAAAAAAAAAAAAAAAAAAAAAAAAAAAAAAAAAAAAAAAAAAAAAAAAAAAAAAAAAAAAAAAAAAAAAAAAAAAAAAAAAAAAAAAAAAAAAAAAAAAAAAAAAAAAAAAAAAAAAAAAAAAAAAAAAAAAAAAAAAAAAAAAAAAAAAAAAAAAAAAAAAAAAAAAAAAAAAAAAAAAAAAAAAAAAAAAAAAAAAAAAAAAAAAAAAAAAAAAAAAAAAAAAAAAAAAAAAAAAAAAAAAAAAAAAAAAAAAAAAAAAAAAAAAAAAAAAAAAAAAAAAAAAAAAAAAAAAAAAAAAAAAAAAAAAAAAAAAAAAAAAAAAAAAAAAAAAAAAAAAAAAAAAAAAAAAAAAAAAAAAAAAAAAAAAAAAAAAAAAAAAAAAAAAAAAAAAAAAAAAAAAAAAAAAAAAAAAAAAAAAAAAAAAAAAAAAAAAAAAAAAAAAAAAAAAAAAAAAAAAAAAAAAAAAAAAAAAAAAAAAAAAAAAAAAAAAAAAAAAAAAAAAAAAAAAAAAAAAAAAAAAAAAAAAAAAAAAAAAAAAAAAAAAAAAAAAAAAAAAAAAAAAAAAAAAAAAAAAAAAAAAAAAAAAAAAAAAAAAAAAAAAAAAAAAAAAAAAAAAAAAAAAAAAAAAAAAAAAAAAAAAAAAAAAAAAAAAAAAAAAAAAAAAAAAAAAAAAAAAAAAAAAAAAAAAAAAAAAAAAAAAAAAAAAAAAAAAAAAAAAAAAAAAAAAAAAAAAAAAAAAAAAAAAAAAAAAAAAAAAAAAAAAAAAAAAAAAAAAAAAAAAAAAAAAAAAAAAAAAAAAAAAAAAAAAAAAAAAAAAAAAAAAAAAAAAAAAAAAAAAAAAAAAAAAAAAAAAAAAAAAAAAAAAAAAAAAAAAAAAAAAAAAAAAAAAAAAAAAAAAAAAAAAAAAAAAAAAAAAAAAAAAAAAAAAAAAAAAAAAAAAAAAAAAAAAAAAAAAAAAAAAAAAAAAAAAAAAAAAAAAAAAAAAAAAAAAAAAAAAAAAAAAAAAAAAAAAAAAAAAAAAAAAAAAAAAAAAAAAAAAAAAAAAAAAAAAAAAAAAAAAAAAAAAAAAAAAAAAAAA
AAAAAAAAAAAAAAAAAAAAAAAAAAAAAAAAAAAAAAAAAAAAAAAAAAAAAAAAAAAAAAAAAAAAAAAAAAAAAAAAAAAAAAAAAAAAAAAAAAAAAAAAAAAAAAAAAAAAAAAAAAAAAAAAAAAAAAAAAAAAAAAAAAAAAAAAAAAAAAAAAAAAAAAAAAAAAAAAAAAAAAAAAAAAAAAAAAAAAAAAAAAAAAAAAAAAAAAAAAAAAAAAAAAAAAAAAAAAAAAAAAAAAAAAAAAAAAAAAAAAAAAAAAAAAAAAAAAAAAAAAAAAAAAAAAAAAAAAAAAAAAAAAAAAAAAAAAAAAAAAAAAAAAAAAAAAAAAAAAAAAAAAAAAAAAAAAAAAAAAAAAAAAAAAAAAAAAAAAAAAAAAAAAAAAAAAAAAAAAAAAAAAAAAAAAAAAAAAAAAAAAAAAAAAAAAAAAAAAAAAAAAAAAAAAAAAAAAAAAAAAAAAAAAAAAAAAAAAAAAAAAAAAAAAAAAAAAAAAAAAAAAAAAAAAAAAAAAAAAAAAAAAAAAAAAAAAAAAAAAAAAAAAAAAAAAAAAAAAAAAAAAAAAAAAAAAAAAAAAAAAAAAAAAAAAAAAAAAAAAAAAAAAAAAAAAAAAAAAAAAAAAAAAAAAAAAAAAAAAAAAAAAAAAAAAAAAAAAAAAAAAAAAAAAAAAAAAAAAAAAAAAAAAAAAAAAAAAAAAAAAAAAAAAAAAAAAAAAAAAAAAAAAAAAAAAAAAAAAAAAAAAAAAAAAAAAAAAAAAAAAAAAAAAAAAAAAAAAAAAAAAAAAAAAAAAAAAAAAAAAAAAAAAAAAAAAAAAAAAAAAAAAAAAAAAAAAAAAAAAAAAAAAAAAAAAAAAAAAAAAAAAAAAAAAAAAAAAAAAAAAAAAAAAAAAAAAAAAAAAAAAAAAAAAAAAAAAAAAAAAAAAAAAAAAAAAAAAAAAAAAAAAAAAAAAAAAAAAAAAAAAAAAAAAAAAAAAAAAAAAAAAAAAAAAAAAAAAAAAAAAAAAAAAAAAAAAAAAAAAAAAAAAAAAAAAAAAAAAAAAAAAAAAAAAAAAAAAAAAAAAAAAAAAAAAAAAAAAAAAAAAAAAAAAAAAAAAAAAAAAAAAAAAAAAAAAAAAAAAAAAAAAAAAAAAAAAAAAAAAAAAAAAAAAAAAAAAAAAAAAAAAAAAAAAAAAAAAAAAAAAAAAAAAAAAAAAAAAAAAAAAAAAAAAAAAAAAAAAAAAAAAAAAAAAAAAAAAAAAAAAAAAAAAAAAAAAAAAAAAAAAAAAAAAAAAAAAAAAAAAAAAAAAAAAAAAAAAAAAAAAAAAAAAAAAAAAAAAAAAAAAAAAAAAAAAAAAAAAAAAAAAAAAAAAAAAAAAAAAAAAAAAAAAAAAAAAAAAAAAAAAAAAAAAAAAAAAAAAAAAAAAAAAAAAAAAAAAAAAAAAAAAAAAAAAAAAAAAAAAAAAAAAAAAAAAAAAAAAAAAAAAAAAAAAAAAAAAAAAAAAAAAAAAAAAAAAAAAAAAAAAAAAAAAAAAAAAAAAAAAAAAAAAAAAAAAAAAAAAAAAAAAAAAAAAAAAAAAAAAAAAAAAAAAAAAAAAAAAAAAAAAAAAAAAAAAAAAAAAAAAAAAAAAAAAAAAAAAAAAAAAAAAAAAAAAAAAAAAAAAAAAAAAAAAAAAAAAAAAAAAAAAAAAAAAAAAAAAAAAAAAAAAAAAAAAAAAAAAAAAAAAAAAAAAAAAAAAAAAAAAAAAAAAAAAAAAAAAAAAAAAAAAAAAAAAAAAAAAAAAAAAAAAAAAAAAAAAAAAAAAAAAAAAAAAAAAAAAAAAAAAAAAAAAAAAAAAAAAAAAAAAAAAAAAAAAAAAAAAAAAAAAAAAAAAAAAAAAAAAAAAAAAAAAAAAAAAAAAAAAAAAAAAAAAAAAAAAAAAAAAAAAAAAAAAAAAAAAAAAAAAAAAAAAAAAAAAAAAAAAAAAAAAAAAAAAAAAAAAAAAAAAAAAAAAAAAAAAAAAAAAAAAAAAAAAAAAAAAAAAAAAAAAAAAAAAAAAAAAAAAAAAAAAAAAAAAAAAAAAAAAAAAAAAAAAAAAAAAAAAAAAAAAAAAAAAAAAAAAAAAAAAAAAAAAAAAAAAAAAAAAAAAAAAAAAAAAAAAAAAAAAAAAAAAAAAAAAAAAAAAAAAAAAAAAAAAAAAAAAAAAAAAAAAAAAAAAAAAAAAAAAAAAAAAAAAAAAAAAAAAAAAAAAAAAAAAAAAAAAAAAAAAAAAAAAAAAAAAAAAAAAAAAAAAAAAAAAAAAAAAAAAAAAAAAAAAAAAAAAAAAAAAAAAAAAAAAAAAAAAAAAAAAAAAAAAAAAAAAAAAAAAAAAAAAAAAAAAAAAAAAAAAAAAAAAAAAAAAAAAAAAAAAAAAAAAAAAAAAAAAAAAAAAAAAAAAAAAAAAAAAAAAAAAAAAAAAAAAAAAAAAAAAAAAAAAAAAAAAAAAAAAAAAAAAAAAAAAAAAAAAAAAAAAAAAAAAAAAAAAAAAAAAAAAAAAAAAAAAAAAAAAAAAAAAAAAAAAAAAAAAAAAAAAAAAAAAAAAAAAAAAAAAAAAAAAAAAAAAAAAAAAAAAAAAAAAAAAAAAAAAAAAAAAAAAAAAAAAAAAAAAAAAAAAAAAAAAAAAAAAAAAAAAAAAAAAAAAAAAAAAAAAAAAAAAAAAAAAAAAAAAAAAAAAAAAAAAAAAAAAAAAAAAAAAAAAAAAAAAAAAAAAAAAAAAAAAAAAAAAAAAAAAAAAAAAAAAAAAAAAAAAAAAAAAAAAAAAAAAAAAAAAAAAAAAAAAAAAAAAAAAAAAAAAAAAAAAAAAAAAAAAAAAAAAAAAAAAAAAAAAAAAAAAAAAAAAAAAAAAAAAAAAAAAAAAAAAAAAAAAAAAAAAAAAAAAAAAAAAAAAAAAAAAAAAAAAAAAAAAAAAAAAAAAAAAAAAAAAAAAAAAAAAAAAAAAAAAAAAAAAAAAAAAAAAAAAAAAAAAAAAAAAAAAAAAAAAAAAAAAAAAAAAAAAAAAAAAAAAAAAAAAAAAAAAAAAAAAAAAAAAAAAAAAAAAAAAAAAAAAAAAAAAAAAAAAAAAAAAAAAAAAAAAAAAAAAAAAAAAAAAAAAAAAAAAAAAAAAAAAAAAAAAAAAAAAAAAAAAAAAAAAAAAAAAAAAAAAAAAAAAAAAAAAAAAAAAAAAAAAAAAAAAAAAAAAAAAAAAAAAAAAAAAAAAAAAAAAAAAAAAAAAAAAAAAAAAAAAAAAAAAAAAAAAAAAAAAAAAAAAAAAAAAAAAAAAAAAAAAAAAAAAAAAAAAAAAAAAAAAAAAAAAAAAAAAAAAAAAAAAAAAAAAAAAAAAAAAAAAAAAAAAAAAAAAAAAAAAAAAAAAAAAAAAAAAAAAAAAAAAAAAAAAAAAAAAAAAAAAAAAAAAAAAAAAAAAAAAAAAAAAAAAAAAAAAAAAAAAAAAAAAAAAAAAAAAAAAAAAAAAAAAAAAAAAAAAAAAAAAAAAAAAAAAAAAAAAAAAAAAAAAAAAAAAAAAAAAAAAAAAAAAAAAAAAAAAAAAAAAAAAAAAAAAAAAAAAAAAAAAAAAAAAAAAAAAAAAAAAAAAAAAAAAAAAAAAAAAAAAAAAAAAAAAAAAAAAAAAAAAAAAAAAAAAAAAAAAAAAAAAAAAAAAAAAAAAAAAAAAAAAAAAAAAAAAAAAAAAAAAAAAAAAAAAAAAAAAAAAAAAAAAAAAAAAAAAAAAAAAAAAAAAAAAAAAAAAAAAAAAAAAAAAAAAAAAAAAAAAAAAAAAAAAAAAAAAAAAAAAAAAAAAAAAAAAAAAAAAAAAAAAAAAAAAAAAAAAAAAAAAAAAAAAAAAAAAAAAAAAAAAAAAAAAAAAAAAAAAAAAAAAAAAAAAAAAAAAAAAAAAAAAAAAAAAAAAAAAAAAAAAAAAAAAAAAAAAAAAAAAAAAAAAAAAAAAAAAAAAAAAAAAAAAAAAAAAAAAAAAAAAAAAAAAAAAAAAAAAAAAAAAAAAAAAAAAAAAAAAAAAAAAAAAAAAAAAAAAAAAAAAAAAAAAAAAAAAAAAAAAAAAAAAAAAAAAAAAAAAAAAAAAAAAAAAAAAAAAAAAAAAAAAAAAAAAAAAAAAAAAAAAAAAAAAAAAAA
AAAAAAAAAAAAAAAAAAAAAAAAAAAAAAAAAAAAAAAAAAAAAAAAAAAAAAAAAAAAAAAAAAAAAAAAAAAAAAAAAAAAAAAAAAAAAAAAAAAAAAAAAAAAAAAAAAAAAAAAAAAAAAAAAAAAAAAAAAAAAAAAAAAAAAAAAAAAAAAAAAAAAAAAAAAAAAAAAAAAAAAAAAAAAAAAAAAAAAAAAAAAAAAAAAAAAAAAAAAAAAAAAAAAAAAAAAAAAAAAAAAAAAAAAAAAAAAAAAAAAAAAAAAAAAAAAAAAAAAAAAAAAAAAAAAAAAAAAAAAAAAAAAAAAAAAAAAAAAAAAAAAAAAAAAAAAAAAAAAAAAAAAAAAAAAAAAAAAAAAAAAAAAAAAAAAAAAAAAAAAAAAAAAAAAAAAAAAAAAAAAAAAAAAAAAAAAAAAAAAAAAAAAAAAAAAAAAAAAAAAAAAAAAAAAAAAAAAAAAAAAAAAAAAAAAAAAAAAAAAAAAAAAAAAAAAAAAAAAAAAAAAAAAAAAAAAAAAAAAAAAAAAAAAAAAAAAAAAAAAAAAAAAAAAAAAAAAAAAAAAAAAAAAAAAAAAAAAAAAAAAAAAAAAAAAAAAAAAAAAAAAAAAAAAAAAAAAAAAAAAAAAAAAAAAAAAAAAAAAAAAAAAAAAAAAAAAAAAAAAAAAAAAAAAAAAAAAAAAAAAAAAAAAAAAAAAAAAAAAAAAAAAAAAAAAAAAAAAAAAAAAAAAAAAAAAAAAAAAAAAAAAAAAAAAAAAAAAAAAAAAAAAAAAAAAAAAAAAAAAAAAAAAAAAAAAAAAAAAAAAAAAAAAAAAAAAAAAAAAAAAAAAAAAAAAAAAAAAAAAAAAAAAAAAAAAAAAAAAAAAAAAAAAAAAAAAAAAAAAAAAAAAAAAAAAAAAAAAAAAAAAAAAAAAAAAAAAAAAAAAAAAAAAAAAAAAAAAAAAAAAAAAAAAAAAAAAAAAAAAAAAAAAAAAAAAAAAAAAAAAAAAAAAAAAAAAAAAAAAAAAAAAAAAAAAAAAAAAAAAAAAAAAAAAAAAAAAAAAAAAAAAAAAAAAAAAAAAAAAAAAAAAAAAAAAAAAAAAAAAAAAAAAAAAAAAAAAAAAAAAAAAAAAAAAAAAAAAAAAAAAAAAAAAAAAAAAAAAAAAAAAAAAAAAAAAAAAAAAAAAAAAAAAAAAAAAAAAAAAAAAAAAAAAAAAAAAAAAAAAAAAAAAAAAAAAAAAAAAAAAAAAAAAAAAAAAAAAAAAAAAAAAAAAAAAAAAAAAAAAAAAAAAAAAAAAAAAAAAAAAAAAAAAAAAAAAAAAAAAAAAAAAAAAAAAAAAAAAAAAAAAAAAAAAAAAAAAAAAAAAAAAAAAAAAAAAAAAAAAAAAAAAAAAAAAAAAAAAAAAAAAAAAAAAAAAAAAAAAAAAAAAAAAAAAAAAAAAAAAAAAAAAAAAAAAAAAAAAAAAAAAAAAAAAAAAAAAAAAAAAAAAAAAAAAAAAAAAAAAAAAAAAAAAAAAAAAAAAAAAAAAAAAAAAAAAAAAAAAAAAAAAAAAAAAAAAAAAAAAAAAAAAAAAAAAAAAAAAAAAAAAAAAAAAAAAAAAAAAAAAAAAAAAAAAAAAAAAAAAAAAAAAAAAAAAAAAAAAAAAAAAAAAAAAAAAAAAAAAAAAAAAAAAAAAAAAAAAAAAAAAAAAAAAAAAAAAAAAAAAAAAAAAAAAAAAAAAAAAAAAAAAAAAAAAAAAAAAAAAAAAAAAAAAAAAAAAAAAAAAAAAAAAAAAAAAAAAAAAAAAAAAAAAAAAAAAAAAAAAAAAAAAAAAAAAAAAAAAAAAAAAAAAAAAAAAAAAAAAAAAAAAAAAAAAAAAAAAAAAAAAAAAAAAAAAAAAAAAAAAAAAAAAAAAAAAAAAAAAAAAAAAAAAAAAAAAAAAAAAAAAAAAAAAAAAAAAAAAAAAAAAAAAAAAAAAAAAAAAAAAAAAAAAAAAAAAAAAAAAAAAAAAAAAAAAAAAAAAAAAAAAAAAAAAAAAAAAAAAAAAAAAAAAAAAAAAAAAAAAAAAAAAAAAAAAAAAAAAAAAAAAAAAAAAAAAAAAAAAAAAAAAAAAAAAAAAAAAAAAAAAAAAAAAAAAAAAAAAAAAAAAAAAAAAAAAAAAAAAAAAAAAAAAAAAAAAAAAAAAAAAAAAAAAAAAAAAAAAAAAAAAAAAAAAAAAAAAAAAAAAAAAAAAAAAAAAAAAAAAAAAAAAAAAAAAAAAAAAAAAAAAAAAAAAAAAAAAAAAAAAAAAAAAAAAAAAAAAAAAAAAAAAAAAAAAAAAAAAAAAAAAAAAAAAAAAAAAAAAAAAAAAAAAAAAAAAAAAAAAAAAAAAAAAAAAAAAAAAAAAAAAAAAAAAAAAAAAAAAAAAAAAAAAAAAAAAAAAAAAAAAAAAAAAAAAAAAAAAAAAAAAAAAAAAAAAAAAAAAAAAAAAAAAAAAAAAAAAAAAAAAAAAAAAAAAAAAAAAAAAAAAAAAAAAAAAAAAAAAAAAAAAAAAAAAAAAAAAAAAAAAAAAAAAAAAAAAAAAAAAAAAAAAAAAAAAAAAAAAAAAAAAAAAAAAAAAAAAAAAAAAAAAAAAAAAAAAAAAAAAAAAAAAAAAAAAAAAAAAAAAAAAAAAAAAAAAAAAAAAAAAAAAAAAAAAAAAAAAAAAAAAAAAAAAAAAAAAAAAAAAAAAAAAAAAAAAAAAAAAAAAAAAAAAAAAAAAAAAAAAAAAAAAAAAAAAAAAAAAAAAAAAAAAAAAAAAAAAAAAAAAAAAAAAAAAAAAAAAAAAAAAAAAAAAAAAAAAAAAAAAAAAAAAAAAAAAAAAAAAAAAAAAAAAAAAAAAAAAAAAAAAAAAAAAAAAAAAAAAAAAAAAAAAAAAAAAAAAAAAAAAAAAAAAAAAAAAAAAAAAAAAAAAAAAAAAAAAAAAAAAAAAAAAAAAAAAAAAAAAAAAAAAAAAAAAAAAAAAAAAAAAAAAAAAAAAAAAAAAAAAAAAAAAAAAAAAAAAAAAAAAAAAAAAAAAAAAAAAAAAAAAAAAAAAAAAAAAAAAAAAAAAAAAAAAAAAAAAAAAAAAAAAAAAAAAAAAAAAAAAAAAAAAAAAAAAAAAAAAAAAAAAAAAAAAAAAAAAAAAAAAAAAAAAAAAAAAAAAAAAAAAAAAAAAAAAAAAAAAAAAAAAAAAAAAAAAAAAAAAAAAAAAAAAAAAAAAAAAAAAAAAAAAAAAAAAAAAAAAAAAAAAAAAAAAAAAAAAAAAAAAAAAAAAAAAAAAAAAAAAAAAAAAAAAAAAAAAAAAAAAAAAAAAAAAAAAAAAAAAAAAAAAAAAAAAAAAAAAAAAAAAAAAAAAAAAAAAAAAAAAAAAAAAAAAAAAAAAAAAAAAAAAAAAAAAAAAAAAAAAAAAAAAAAAAAAAAAAAAAAAAAAAAAAAAAAAAAAAAAAAAAAAAAAAAAAAAAAAAAAAAAAAAAAAAAAAAAAAAAAAAAAAAAAAAAAAAAAAAAAAAAAAAAAAAAAAAAAAAAAAAAAAAAAAAAAAAAAAAAAAAAAAAAAAAAAAAAAAAAAAAAAAAAAAAAAAAAAAAAAAAAAAAAAAAAAAAAAAAAAAAAAAAAAAAAAAAAAAAAAAAAAAAAAAAAAAAAAAAAAAAAAAAAAAAAAAAAAAAAAAAAAAAAAAAAAAAAAAAAAAAAAAAAAAAAAAAAAAAAAAAAAAAAAAAAAAAAAAAAAAAAAAAAAAAAAAAAAAAAAAAAAAAAAAAAAAAAAAAAAAAAAAAAAAAAAAAAAAAAAAAAAAAAAAAAAAAAAAAAAAAAAAAAAAAAAAAAAAAAAAAAAAAAAAAAAAAAAAAAAAAAAAAAAAAAAAAAAAAAAAAAAAAAAAAAAAAAAAAAAAAAAAAAAAAAAAAAAAAAAAAAAAAAAAAAAAAAAAAAAAAAAAAAAAAAAAAAAAAAAAAAAAAAAAAAAAAAAAAAAAAAAAAAAAAAAAAAAAAAAAAAAAAAAAAAAAAAAAAAAAAAAAAAAAAAAAAAAAAAAAAAAAAAAAAAAAAAAAAAAAAAAAAAAAAAAAAAAAAAAAAAAAAAAAAAAAAAAAAAAAAAAAAAAAAAAAAAAAAAAAAAAAAAAAAAAAAAAAAAAAAAAAAAAAAAAAAAA
AAAAAAAAAAAAAAAAAAAAAAAAAAAAAAAAAAAAAAAAAAAAAAAAAAAAAAAAAAAAAAAAAAAAAAAAAAAAAAAAAAAAAAAAAAAAAAAAAAAAAAAAAAAAAAAAAAAAAAAAAAAAAAAAAAAAAAAAAAAAAAAAAAAAAAAAAAAAAAAAAAAAAAAAAAAAAAAAAAAAAAAAAAAAAAAAAAAAAAAAAAAAAAAAAAAAAAAAAAAAAAAAAAAAAAAAAAAAAAAAAAAAAAAAAAAAAAAAAAAAAAAAAAAAAAAAAAAAAAAAAAAAAAAAAAAAAAAAAAAAAAAAAAAAAAAAAAAAAAAAAAAAAAAAAAAAAAAAAAAAAAAAAAAAAAAAAAAAAAAAAAAAAAAAAAAAAAAAAAAAAAAAAAAAAAAAAAAAAAAAAAAAAAAAAAAAAAAAAAAAAAAAAAAAAAAAAAAAAAAAAAAAAAAAAAAAAAAAAAAAAAAAAAAAAAAAAAAAAAAAAAAAAAAAAAAAAAAAAAAAAAAAAAAAAAAAAAAAAAAAAAAAAAAAAAAAAAAAAAAAAAAAAAAAAAAAAAAAAAAAAAAAAAAAAAAAAAAAAAAAAAAAAAAAAAAAAAAAAAAAAAAAAAAAAAAAAAAAAAAAAAAAAAAAAAAAAAAAAAAAAAAAAAAAAAAAAAAAAAAAAAAAAAAAAAAAAAAAAAAAAAAAAAAAAAAAAAAAAAAAAAAAAAAAAAAAAAAAAAAAAAAAAAAAAAAAAAAAAAAAAAAAAAAAAAAAAAAAAAAAAAAAAAAAAAAAAAAAAAAAAAAAAAAAAAAAAAAAAAAAAAAAAAAAAAAAAAAAAAAAAAAAAAAAAAAAAAAAAAAAAAAAAAAAAAAAAAAAAAAAAAAAAAAAAAAAAAAAAAAAAAAAAAAAAAAAAAAAAAAAAAAAAAAAAAAAAAAAAAAAAAAAAAAAAAAAAAAAAAAAAAAAAAAAAAAAAAAAAAAAAAAAAAAAAAAAAAAAAAAAAAAAAAAAAAAAAAAAAAAAAAAAAAAAAAAAAAAAAAAAAAAAAAAAAAAAAAAAAAAAAAAAAAAAAAAAAAAAAAAAAAAAAAAAAAAAAAAAAAAAAAAAAAAAAAAAAAAAAAAAAAAAAAAAAAAAAAAAAAAAAAAAAAAAAAAAAAAAAAAAAAAAAAAAAAAAAAAAAAAAAAAAAAAAAAAAAAAAAAAAAAAAAAAAAAAAAAAAAAAAAAAAAAAAAAAAAAAAAAAAAAAAAAAAAAAAAAAAAAAAAAAAAAAAAAAAAAAAAAAAAAAAAAAAAAAAAAAAAAAAAAAAAAAAAAAAAAAAAAAAAAAAAAAAAAAAAAAAAAAAAAAAAAAAAAAAAAAAAAAAAAAAAAAAAAAAAAAAAAAAAAAAAAAAAAAAAAAAAAAAAAAAAAAAAAAAAAAAAAAAAAAAAAAAAAAAAAAAAAAAAAAAAAAAAAAAAAAAAAAAAAAAAAAAAAAAAAAAAAAAAAAAAAAAAAAAAAAAAAAAAAAAAAAAAAAAAAAAAAAAAAAAAAAAAAAAAAAAAAAAAAAAAAAAAAAAAAAAAAAAAAAAAAAAAAAAAAAAAAAAAAAAAAAAAAAAAAAAAAAAAAAAAAAAAAAAAAAAAAAAAAAAAAAAAAAAAAAAAAAAAAAAAAAAAAAAAAAAAAAAAAAAAAAAAAAAAAAAAAAAAAAAAAAAAAAAAAAAAAAAAAAAAAAAAAAAAAAAAAAAAAAAAAAAAAAAAAAAAAAAAAAAAAAAAAAAAAAAAAAAAAAAAAAAAAAAAAAAAAAAAAAAAAAAAAAAAAAAAAAAAAAAAAAAAAAAAAAAAAAAAAAAAAAAAAAAAAAAAAAAAAAAAAAAAAAAAAAAAAAAAAAAAAAAAAAAAAAAAAAAAAAAAAAAAAAAAAAAAAAAAAAAAAAAAAAAAAAAAAAAAAAAAAAAAAAAAAAAAAAAAAAAAAAAAAAAAAAAAAAAAAAAAAAAAAAAAAAAAAAAAAAAAAAAAAAAAAAAAAAAAAAAAAAAAAAAAAAAAAAAAAAAAAAAAAAAAAAAAAAAAAAAAAAAAAAAAAAAAAAAAAAAAAAAAAAAAAAAAAAAAAAAAAAAAAAAAAAAAAAAAAAAAAAAAAAAAAAAAAAAAAAAAAAAAAAAAAAAAAAAAAAAAAAAAAAAAAAAAAAAAAAAAAAAAAAAAAAAAAAAAAAAAAAAAAAAAAAAAAAAAAAAAAAAAAAAAAAAAAAAAAAAAAAAAAAAAAAAAAAAAAAAAAAAAAAAAAAAAAAAAAAAAAAAAAAAAAAAAAAAAAAAAAAAAAAAAAAAAAAAAAAAAAAAAAAAAAAAAAAAAAAAAAAAAAAAAAAAAAAAAAAAAAAAAAAAAAAAAAAAAAAAAAAAAAAAAAAAAAAAAAAAAAAAAAAAAAAAAAAAAAAAAAAAAAAAAAAAAAAAAAAAAAAAAAAAAAAAAAAAAAAAAAAAAAAAAAAAAAAAAAAAAAAAAAAAAAAAAAAAAAAAAAAAAAAAAAAAAAAAAAAAAAAAAAAAAAAAAAAAAAAAAAAAAAAAAAAAAAAAAAAAAAAAAAAAAAAAAAAAAAAAAAAAAAAAAAAAAAAAAAAAAAAAAAAAAAAAAAAAAAAAAAAAAAAAAAAAAAAAAAAAAAAAAAAAAAAAAAAAAAAAAAAAAAAAAAAAAAAAAAAAAAAAAAAAAAAAAAAAAAAAAAAAAAAAAAAAAAAAAAAAAAAAAAAAAAAAAAAAAAAAAAAAAAAAAAAAAAAAAAAAAAAAAAAAAAAAAAAAAAAAAAAAAAAAAAAAAAAAAAAAAAAAAAAAAAAAAAAAAAAAAAAAAAAAAAAAAAAAAAAAAAAAAAAAAAAAAAAAAAAAAAAAAAAAAAAAAAAAAAAAAAAAAAAAAAAAAAAAAAAAAAAAAAAAAAAAAAAAAAAAAAAAAAAAAAAAAAAAAAAAAAAAAAAAAAAAAAAAAAAAAAAAAAAAAAAAAAAAAAAAAAAAAAAAAAAAAAAAAAAAAAAAAAAAAAAAAAAAAAAAAAAAAAAAAAAAAAAAAAAAAAAAAAAAAAAAAAAAAAAAAAAAAAAAAAAAAAAAAAAAAAAAAAAAAAAAAAAAAAAAAAAAAAAAAAAAAAAAAAAAAAAAAAAAAAAAAAAAAAAAAAAAAAAAAAAAAAAAAAAAAAAAAAAAAAAAAAAAAAAAAAAAAAAAAAAAAAAAAAAAAAAAAAAAAAAAAAAAAAAAAAAAAAAAAAAAAAAAAAAAAAAAAAAAAAAAAAAAAAAAAAAAAAAAAAAAAAAAAAAAAAAAAAAAAAAAAAAAAAAAAAAAAAAAAAAAAAAAAAAAAAAAAAAAAAAAAAAAAAAAAAAAAAAAAAAAAAAAAAAAAAAAAAAAAAAAAAAAAAAAAAAAAAAAAAAAAAAAAAAAAAAAAAAAAAAAAAAAAAAAAAAAAAAAAAAAAAAAAAAAAAAAAAAAAAAAAAAAAAAAAAAAAAAAAAAAAAAAAAAAAAAAAAAAAAAAAAAAAAAAAAAAAAAAAAAAAAAAAAAAAAAAAAAAAAAAAAAAAAAAAAAAAAAAAAAAAAAAAAAAAAAAAAAAAAAAAAAAAAAAAAAAAAAAAAAAAAAAAAAAAAAAAAAAAAAAAAAAAAAAAAAAAAAAAAAAAAAAAAAAAAAAAAAAAAAAAAAAAAAAAAAAAAAAAAAAAAAAAAAAAAAAAAAAAAAAAAAAAAAAAAAAAAAAAAAAAAAAAAAAAAAAAAAAAAAAAAAAAAAAAAAAAAAAAAAAAAAAAAAAAAAAAAAAAAAAAAAAAAAAAAAAAAAAAAAAAAAAAAAAAAAAAAAAAAAAAAAAAAAAAAAAAAAAAAAAAAAAAAAAAAAAAAAAAAAAAAAAAAAAAAAAAAAAAAAAAAAAAAAAAAAAAAAAAAAAAAAAAAAAAAAAAAAAAAAAAAAAAAAAAAAAAAAAAAAAAAAAAAAAAAAAAAAAAAAAAAAAAAAAAAAAAAAAAAAAAAAAAAAAAAAAAAAAAAAAAAAAAAAAAAAAAAAAAAAAAAAAAAAAAAAAAAAAAAAAAAAAAAAAAAAAAAAAAAAAAAAAAAAAAAAAAAAAAAAAAAAAAAAAAAAAAAAAAAAAAAAAAAAAAAAAAAAAAAAAAAAAAAAAAAAAAAAAAAAA
AAAAAAAAAAAAAAAAAAAAAAAAAAAAAAAAAAAAAAAAAAAAAAAAAAAAAAAAAAAAAAAAAAAAAAAAAAAAAAAAAAAAAAAAAAAAAAAAAAAAAAAAAAAAAAAAAAAAAAAAAAAAAAAAAAAAAAAAAAAAAAAAAAAAAAAAAAAAAAAAAAAAAAAAAAAAAAAAAAAAAAAAAAAAAAAAAAAAAAAAAAAAAAAAAAAAAAAAAAAAAAAAAAAAAAAAAAAAAAAAAAAAAAAAAAAAAAAAAAAAAAAAAAAAAAAAAAAAAAAAAAAAAAAAAAAAAAAAAAAAAAAAAAAAAAAAAAAAAAAAAAAAAAAAAAAAAAAAAAAAAAAAAAAAAAAAAAAAAAAAAAAAAAAAAAAAAAAAAAAAAAAAAAAAAAAAAAAAAAAAAAAAAAAAAAAAAAAAAAAAAAAAAAAAAAAAAAAAAAAAAAAAAAAAAAAAAAAAAAAAAAAAAAAAAAAAAAAAAAAAAAAAAAAAAAAAAAAAAAAAAAAAAAAAAAAAAAAAAAAAAAAAAAAAAAAAAAAAAAAAAAAAAAAAAAAAAAAAAAAAAAAAAAAAAAAAAAAAAAAAAAAAAAAAAAAAAAAAAAAAAAAAAAAAAAAAAAAAAAAAAAAAAAAAAAAAAAAAAAAAAAAAAAAAAAAAAAAAAAAAAAAAAAAAAAAAAAAAAAAAAAAAAAAAAAAAAAAAAAAAAAAAAAAAAAAAAAAAAAAAAAAAAAAAAAAAAAAAAAAAAAAAAAAAAAAAAAAAAAAAAAAAAAAAAAAAAAAAAAAAAAAAAAAAAAAAAAAAAAAAAAAAAAAAAAAAAAAAAAAAAAAAAAAAAAAAAAAAAAAAAAAAAAAAAAAAAAAAAAAAAAAAAAAAAAAAAAAAAAAAAAAAAAAAAAAAAAAAAAAAAAAAAAAAAAAAAAAAAAAAAAAAAAAAAAAAAAAAAAAAAAAAAAAAAAAAAAAAAAAAAAAAAAAAAAAAAAAAAAAAAAAAAAAAAAAAAAAAAAAAAAAAAAAAAAAAAAAAAAAAAAAAAAAAAAAAAAAAAAAAAAAAAAAAAAAAAAAAAAAAAAAAAAAAAAAAAAAAAAAAAAAAAAAAAAAAAAAAAAAAAAAAAAAAAAAAAAAAAAAAAAAAAAAAAAAAAAAAAAAAAAAAAAAAAAAAAAAAAAAAAAAAAAAAAAAAAAAAAAAAAAAAAAAAAAAAAAAAAAAAAAAAAAAAAAAAAAAAAAAAAAAAAAAAAAAAAAAAAAAAAAAAAAAAAAAAAAAAAAAAAAAAAAAAAAAAAAAAAAAAAAAAAAAAAAAAAAAAAAAAAAAAAAAAAAAAAAAAAAAAAAAAAAAAAAAAAAAAAAAAAAAAAAAAAAAAAAAAAAAAAAAAAAAAAAAAAAAAAAAAAAAAAAAAAAAAAAAAAAAAAAAAAAAAAAAAAAAAAAAAAAAAAAAAAAAAAAAAAAAAAAAAAAAAAAAAAAAAAAAAAAAAAAAAAAAAAAAAAAAAAAAAAAAAAAAAAAAAAAAAAAAAAAAAAAAAAAAAAAAAAAAAAAAAAAAAAAAAAAAAAAAAAAAAAAAAAAAAAAAAAAAAAAAAAAAAAAAAAAAAAAAAAAAAAAAAAAAAAAAAAAAAAAAAAAAAAAAAAAAAAAAAAAAAAAAAAAAAAAAAAAAAAAAAAAAAAAAAAAAAAAAAAAAAAAAAAAAAAAAAAAAAAAAAAAAAAAAAAAAAAAAAAAAAAAAAAAAAAAAAAAAAAAAAAAAAAAAAAAAAAAAAAAAAAAAAAAAAAAAAAAAAAAAAAAAAAAAAAAAAAAAAAAAAAAAAAAAAAAAAAAAAAAAAAAAAAAAAAAAAAAAAAAAAAAAAAAAAAAAAAAAAAAAAAAAAAAAAAAAAAAAAAAAAAAAAAAAAAAAAAAAAAAAAAAAAAAAAAAAAAAAAAAAAAAAAAAAAAAAAAAAAAAAAAAAAAAAAAAAAAAAAAAAAAAAAAAAAAAAAAAAAAAAAAAAAAAAAAAAAAAAAAAAAAAAAAAAAAAAAAAAAAAAAAAAAAAAAAAAAAAAAAAAAAAAAAAAAAAAAAAAAAAAAAAAAAAAAAAAAAAAAAAAAAAAAAAAAAAAAAAAAAAAAAAAAAAAAAAAAAAAAAAAAAAAAAAAAAAAAAAAAAAAAAAAAAAAAAAAAAAAAAAAAAAAAAAAAAAAAAAAAAAAAAAAAAAAAAAAAAAAAAAAAAAAAAAAAAAAAAAAAAAAAAAAAAAAAAAAAAAAAAAAAAAAAAAAAAAAAAAAAAAAAAAAAAAAAAAAAAAAAAAAAAAAAAAAAAAAAAAAAAAAAAAAAAAAAAAAAAAAAAAAAAAAAAAAAAAAAAAAAAAAAAAAAAAAAAAAAAAAAAAAAAAAAAAAAAAAAAAAAAAAAAAAAAAAAAAAAAAAAAAAAAAAAAAAAAAAAAAAAAAAAAAAAAAAAAAAAAAAAAAAAAAAAAAAAAAAAAAAAAAAAAAAAAAAAAAAAAAAAAAAAAAAAAAAAAAAAAAAAAAAAAAAAAAAAAAAAAAAAAAAAAAAAAAAAAAAAAAAAAAAAAAAAAAAAAAAAAAAAAAAAAAAAAAAAAAAAAAAAAAAAAAAAAAAAAAAAAAAAAAAAAAAAAAAAAAAAAAAAAAAAAAAAAAAAAAAAAAAAAAAAAAAAAAAAAAAAAAAAAAAAAAAAAAAAAAAAAAAAAAAAAAAAAAAAAAAAAAAAAAAAAAAAAAAAAAAAAAAAAAAAAAAAAAAAAAAAAAAAAAAAAAAAAAAAAAAAAAAAAAAAAAAAAAAAAAAAAAAAAAAAAAAAAAAAAAAAAAAAAAAAAAAAAAAAAAAAAAAAAAAAAAAAAAAAAAAAAAAAAAAAAAAAAAAAAAAAAAAAAAAAAAAAAAAAAAAAAAAAAAAAAAAAAAAAAAAAAAAAAAAAAAAAAAAAAAAAAAAAAAAAAAAAAAAAAAAAAAAAAAAAAAAAAAAAAAAAAAAAAAAAAAAAAAAAAAAAAAAAAAAAAAAAAAAAAAAAAAAAAAAAAAAAAAAAAAAAAAAAAAAAAAAAAAAAAAAAAAAAAAAAAAAAAAAAAAAAAAAAAAAAAAAAAAAAAAAAAAAAAAAAAAAAAAAAAAAAAAAAAAAAAAAAAAAAAAAAAAAAAAAAAAAAAAAAAAAAAAAAAAAAAAAAAAAAAAAAAAAAAAAAAAAAAAAAAAAAAAAAAAAAAAAAAAAAAAAAAAAAAAAAAAAAAAAAAAAAAAAAAAAAAAAAAAAAAAAAAAAAAAAAAAAAAAAAAAAAAAAAAAAAAAAAAAAAAAAAAAAAAAAAAAAAAAAAAAAAAAAAAAAAAAAAAAAAAAAAAAAAAAAAAAAAAAAAAAAAAAAAAAAAAAAAAAAAAAAAAAAAAAAAAAAAAAAAAAAAAAAAAAAAAAAAAAAAAAAAAAAAAAAAAAAAAAAAAAAAAAAAAAAAAAAAAAAAAAAAAAAAAAAAAAAAAAAAAAAAAAAAAAAAAAAAAAAAAAAAAAAAAAAAAAAAAAAAAAAAAAAAAAAAAAAAAAAAAAAAAAAAAAAAAAAAAAAAAAAAAAAAAAAAAAAAAAAAAAAAAAAAAAAAAAAAAAAAAAAAAAAAAAAAAAAAAAAAAAAAAAAAAAAAAAAAAAAAAAAAAAAAAAAAAAAAAAAAAAAAAAAAAAAAAAAAAAAAAAAAAAAAAAAAAAAAAAAAAAAAAAAAAAAAAAAAAAAAAAAAAAAAAAAAAAAAAAAAAAAAAAAAAAAAAAAAAAAAAAAAAAAAAAAAAAAAAAAAAAAAAAAAAAAAAAAAAAAAAAAAAAAAAAAAAAAAAAAAAAAAAAAAAAAAAAAAAAAAAAAAAAAAAAAAAAAAAAAAAAAAAAAAAAAAAAAAAAAAAAAAAAAAAAAAAAAAAAAAAAAAAAAAAAAAAAAAAAAAAAAAAAAAAAAAAAAAAAAAAAAAAAAAAAAAAAAAAAAAAAAAAAAAAAAAAAAAAAAAAAAAAAAAAAAAAAAAAAAAAAAAAAAAAAAAAAAAAAAAAAAAAAAAAAAAAAAAAAAAAAAAAAAAAAAAAAAAAAAAAAAAAAAAAAAAAAAAAAAAAAAAAAAAAAAAAAAAAAAAAAAAAAAAAAAAAAAAAAAAAAAAAAAAAAAAAAAAAAAA
AAAAAAAAAAAAAAAAAAAAAAAAAAAAAAAAAAAAAAAAAAAAAAAAAAAAAAAAAAAAAAAAAAAAAAAAAAAAAAAAAAAAAAAAAAAAAAAAAAAAAAAAAAAAAAAAAAAAAAAAAAAAAAAAAAAAAAAAAAAAAAAAAAAAAAAAAAAAAAAAAAAAAAAAAAAAAAAAAAAAAAAAAAAAAAAAAAAAAAAAAAAAAAAAAAAAAAAAAAAAAAAAAAAAAAAAAAAAAAAAAAAAAAAAAAAAAAAAAAAAAAAAAAAAAAAAAAAAAAAAAAAAAAAAAAAAAAAAAAAAAAAAAAAAAAAAAAAAAAAAAAAAAAAAAAAAAAAAAAAAAAAAAAAAAAAAAAAAAAAAAAAAAAAAAAAAAAAAAAAAAAAAAAAAAAAAAAAAAAAAAAAAAAAAAAAAAAAAAAAAAAAAAAAAAAAAAAAAAAAAAAAAAAAAAAAAAAAAAAAAAAAAAAAAAAAAAAAAAAAAAAAAAAAAAAAAAAAAAAAAAAAAAAAAAAAAAAAAAAAAAAAAAAAAAAAAAAAAAAAAAAAAAAAAAAAAAAAAAAAAAAAAAAAAAAAAAAAAAAAAAAAAAAAAAAAAAAAAAAAAAAAAAAAAAAAAAAAAAAAAAAAAAAAAAAAAAAAAAAAAAAAAAAAAAAAAAAAAAAAAAAAAAAAAAAAAAAAAAAAAAAAAAAAAAAAAAAAAAAAAAAAAAAAAAAAAAAAAAAAAAAAAAAAAAAAAAAAAAAAAAAAAAAAAAAAAAAAAAAAAAAAAAAAAAAAAAAAAAAAAAAAAAAAAAAAAAAAAAAAAAAAAAAAAAAAAAAAAAAAAAAAAAAAAAAAAAAAAAAAAAAAAAAAAAAAAAAAAAAAAAAAAAAAAAAAAAAAAAAAAAAAAAAAAAAAAAAAAAAAAAAAAAAAAAAAAAAAAAAAAAAAAAAAAAAAAAAAAAAAAAAAAAAAAAAAAAAAAAAAAAAAAAAAAAAAAAAAAAAAAAAAAAAAAAAAAAAAAAAAAAAAAAAAAAAAAAAAAAAAAAAAAAAAAAAAAAAAAAAAAAAAAAAAAAAAAAAAAAAAAAAAAAAAAAAAAAAAAAAAAAAAAAAAAAAAAAAAAAAAAAAAAAAAAAAAAAAAAAAAAAAAAAAAAAAAAAAAAAAAAAAAAAAAAAAAAAAAAAAAAAAAAAAAAAAAAAAAAAAAAAAAAAAAAAAAAAAAAAAAAAAAAAAAAAAAAAAAAAAAAAAAAAAAAAAAAAAAAAAAAAAAAAAAAAAAAAAAAAAAAAAAAAAAAAAAAAAAAAAAAAAAAAAAAAAAAAAAAAAAAAAAAAAAAAAAAAAAAAAAAAAAAAAAAAAAAAAAAAAAAAAAAAAAAAAAAAAAAAAAAAAAAAAAAAAAAAAAAAAAAAAAAAAAAAAAAAAAAAAAAAAAAAAAAAAAAAAAAAAAAAAAAAAAAAAAAAAAAAAAAAAAAAAAAAAAAAAAAAAAAAAAAAAAAAAAAAAAAAAAAAAAAAAAAAAAAAAAAAAAAAAAAAAAAAAAAAAAAAAAAAAAAAAAAAAAAAAAAAAAAAAAAAAAAAAAAAAAAAAAAAAAAAAAAAAAAAAAAAAAAAAAAAAAAAAAAAAAAAAAAAAAAAAAAAAAAAAAAAAAAAAAAAAAAAAAAAAAAAAAAAAAAAAAAAAAAAAAAAAAAAAAAAAAAAAAAAAAAAAAAAAAAAAAAAAAAAAAAAAAAAAAAAAAAAAAAAAAAAAAAAAAAAAAAAAAAAAAAAAAAAAAAAAAAAAAAAAAAAAAAAAAAAAAAAAAAAAAAAAAAAAAAAAAAAAAAAAAAAAAAAAAAAAAAAAAAAAAAAAAAAAAAAAAAAAAAAAAAAAAAAAAAAAAAAAAAAAAAAAAAAAAAAAAAAAAAAAAAAAAAAAAAAAAAAAAAAAAAAAAAAAAAAAAAAAAAAAAAAAAAAAAAAAAAAAAAAAAAAAAAAAAAAAAAAAAAAAAAAAAAAAAAAAAAAAAAAAAAAAAAAAAAAAAAAAAAAAAAAAAAAAAAAAAAAAAAAAAAAAAAAAAAAAAAAAAAAAAAAAAAAAAAAAAAAAAAAAAAAAAAAAAAAAAAAAAAAAAAAAAAAAAAAAAAAAAAAAAAAAAAAAAAAAAAAAAAAAAAAAAAAAAAAAAAAAAAAAAAAAAAAAAAAAAAAAAAAAAAAAAAAAAAAAAAAAAAAAAAAAAAAAAAAAAAAAAAAAAAAAAAAAAAAAAAAAAAAAAAAAAAAAAAAAAAAAAAAAAAAAAAAAAAAAAAAAAAAAAAAAAAAAAAAAAAAAAAAAAAAAAAAAAAAAAAAAAAAAAAAAAAAAAAAAAAAAAAAAAAAAAAAAAAAAAAAAAAAAAAAAAAAAAAAAAAAAAAAAAAAAAAAAAAAAAAAAAAAAAAAAAAAAAAAAAAAAAAAAAAAAAAAAAAAAAAAAAAAAAAAAAAAAAAAAAAAAAAAAAAAAAAAAAAAAAAAAAAAAAAAAAAAAAAAAAAAAAAAAAAAAAAAAAAAAAAAAAAAAAAAAAAAAAAAAAAAAAAAAAAAAAAAAAAAAAAAAAAAAAAAAAAAAAAAAAAAAAAAAAAAAAAAAAAAAAAAAAAAAAAAAAAAAAAAAAAAAAAAAAAAAAAAAAAAAAAAAAAAAAAAAAAAAAAAAAAAAAAAAAAAAAAAAAAAAAAAAAAAAAAAAAAAAAAAAAAAAAAAAAAAAAAAAAAAAAAAAAAAAAAAAAAAAAAAAAAAAAAAAAAAAAAAAAAAAAAAAAAAAAAAAAAAAAAAAAAAAAAAAAAAAAAAAAAAAAAAAAAAAAAAAAAAAAAAAAAAAAAAAAAAAAAAAAAAAAAAAAAAAAAAAAAAAAAAAAAAAAAAAAAAAAAAAAAAAAAAAAAAAAAAAAAAAAAAAAAAAAAAAAAAAAAAAAAAAAAAAAAAAAAAAAAAAAAAAAAAAAAAAAAAAAAAAAAAAAAAAAAAAAAAAAAAAAAAAAAAAAAAAAAAAAAAAAAAAAAAAAAAAAAAAAAAAAAAAAAAAAAAAAAAAAAAAAAAAAAAAAAAAAAAAAAAAAAAAAAAAAAAAAAAAAAAAAAAAAAAAAAAAAAAAAAAAAAAAAAAAAAAAAAAAAAAAAAAAAAAAAAAAAAAAAAAAAAAAAAAAAAAAAAAAAAAAAAAAAAAAAAAAAAAAAAAAAAAAAAAAAAAAAAAAAAAAAAAAAAAAAAAAAAAAAAAAAAAAAAAAAAAAAAAAAAAAAAAAAAAAAAAAAAAAAAAAAAAAAAAAAAAAAAAAAAAAAAAAAAAAAAAAAAAAAAAAAAAAAAAAAAAAAAAAAAAAAAAAAAAAAAAAAAAAAAAAAAAAAAAAAAAAAAAAAAAAAAAAAAAAAAAAAAAAAAAAAAAAAAAAAAAAAAAAAAAAAAAAAAAAAAAAAAAAAAAAAAAAAAAAAAAAAAAAAAAAAAAAAAAAAAAAAAAAAAAAAAAAAAAAAAAAAAAAAAAAAAAAAAAAAAAAAAAAAAAAAAAAAAAAAAAAAAAAAAAAAAAAAAAAAAAAAAAAAAAAAAAAAAAAAAAAAAAAAAAAAAAAAAAAAAAAAAAAAAAAAAAAAAAAAAAAAAAAAAAAAAAAAAAAAAAAAAAAAAAAAAAAAAAAAAAAAAAAAAAAAAAAAAAAAAAAAAAAAAAAAAAAAAAAAAAAAAAAAAAAAAAAAAAAAAAAAAAAAAAAAAAAAAAAAAAAAAAAAAAAAAAAAAAAAAAAAAAAAAAAAAAAAAAAAAAAAAAAAAAAAAAAAAAAAAAAAAAAAAAAAAAAAAAAAAAAAAAAAAAAAAAAAAAAAAAAAAAAAAAAAAAAAAAAAAAAAAAAAAAAAAAAAAAAAAAAAAAAAAAAAAAAAAAAAAAAAAAAAAAAAAAAAAAAAAAAAAAAAAAAAAAAAAAAAAAAAAAAAAAAAAAAAAAAAAAAAAAAAAAAAAAAAAAAAAAAAAAAAAAAAAAAAAAAAAAAAAAAAAAAAAAAAAAAAAAAAAAAAAAAAAAAAAAAAAAAAAAAAAAAAAAAAAAAAAAAAAAAAAAAAAAAAAAAAAAAAAAAAAAAAAAAAAAAAAAAAAAAAAAAAAAAAAAAAAAAAAAAAAAAAAAAAAAAAAAAAAAAAAAAAAAAAAAAAAAAAA
AAAAAAAAAAAAAAAAAAAAAAAAAAAAAAAAAAAAAAAAAAAAAAAAAAAAAAAAAAAAAAAAAAAAAAAAAAAAAAAAAAAAAAAAAAAAAAAAAAAAAAAAAAAAAAAAAAAAAAAAAAAAAAAAAAAAAAAAAAAAAAAAAAAAAAAAAAAAAAAAAAAAAAAAAAAAAAAAAAAAAAAAAAAAAAAAAAAAAAAAAAAAAAAAAAAAAAAAAAAAAAAAAAAAAAAAAAAAAAAAAAAAAAAAAAAAAAAAAAAAAAAAAAAAAAAAAAAAAAAAAAAAAAAAAAAAAAAAAAAAAAAAAAAAAAAAAAAAAAAAAAAAAAAAAAAAAAAAAAAAAAAAAAAAAAAAAAAAAAAAAAAAAAAAAAAAAAAAAAAAAAAAAAAAAAAAAAAAAAAAAAAAAAAAAAAAAAAAAAAAAAAAAAAAAAAAAAAAAAAAAAAAAAAAAAAAAAAAAAAAAAAAAAAAAAAAAAAAAAAAAAAAAAAAAAAAAAAAAAAAAAAAAAAAAAAAAAAAAAAAAAAAAAAAAAAAAAAAAAAAAAAAAAAAAAAAAAAAAAAAAAAAAAAAAAAAAAAAAAAAAAAAAAAAAAAAAAAAAAAAAAAAAAAAAAAAAAAAAAAAAAAAAAAAAAAAAAAAAAAAAAAAAAAAAAAAAAAAAAAAAAAAAAAAAAAAAAAAAAAAAAAAAAAAAAAAAAAAAAAAAAAAAAAAAAAAAAAAAAAAAAAAAAAAAAAAAAAAAAAAAAAAAAAAAAAAAAAAAAAAAAAAAAAAAAAAAAAAAAAAAAAAAAAAAAAAAAAAAAAAAAAAAAAAAAAAAAAAAAAAAAAAAAAAAAAAAAAAAAAAAAAAAAAAAAAAAAAAAAAAAAAAAAAAAAAAAAAAAAAAAAAAAAAAAAAAAAAAAAAAAAAAAAAAAAAAAAAAAAAAAAAAAAAAAAAAAAAAAAAAAAAAAAAAAAAAAAAAAAAAAAAAAAAAAAAAAAAAAAAAAAAAAAAAAAAAAAAAAAAAAAAAAAAAAAAAAAAAAAAAAAAAAAAAAAAAAAAAAAAAAAAAAAAAAAAAAAAAAAAAAAAAAAAAAAAAAAAAAAAAAAAAAAAAAAAAAAAAAAAAAAAAAAAAAAAAAAAAAAAAAAAAAAAAAAAAAAAAAAAAAAAAAAAAAAAAAAAAAAAAAAAAAAAAAAAAAAAAAAAAAAAAAAAAAAAAAAAAAAAAAAAAAAAAAAAAAAAAAAAAAAAAAAAAAAAAAAAAAAAAAAAAAAAAAAAAAAAAAAAAAAAAAAAAAAAAAAAAAAAAAAAAAAAAAAAAAAAAAAAAAAAAAAAAAAAAAAAAAAAAAAAAAAAAAAAAAAAAAAAAAAAAAAAAAAAAAAAAAAAAAAAAAAAAAAAAAAAAAAAAAAAAAAAAAAAAAAAAAAAAAAAAAAAAAAAAAAAAAAAAAAAAAAAAAAAAAAAAAAAAAAAAAAAAAAAAAAAAAAAAAAAAAAAAAAAAAAAAAAAAAAAAAAAAAAAAAAAAAAAAAAAAAAAAAAAAAAAAAAAAAAAAAAAAAAAAAAAAAAAAAAAAAAAAAAAAAAAAAAAAAAAAAAAAAAAAAAAAAAAAAAAAAAAAAAAAAAAAAAAAAAAAAAAAAAAAAAAAAAAAAAAAAAAAAAAAAAAAAAAAAAAAAAAAAAAAAAAAAAAAAAAAAAAAAAAAAAAAAAAAAAAAAAAAAAAAAAAAAAAAAAAAAAAAAAAAAAAAAAAAAAAAAAAAAAAAAAAAAAAAAAAAAAAAAAAAAAAAAAAAAAAAAAAAAAAAAAAAAAAAAAAAAAAAAAAAAAAAAAAAAAAAAAAAAAAAAAAAAAAAAAAAAAAAAAAAAAAAAAAAAAAAAAAAAAAAAAAAAAAAAAAAAAAAAAAAAAAAAAAAAAAAAAAAAAAAAAAAAAAAAAAAAAAAAAAAAAAAAAAAAAAAAAAAAAAAAAAAAAAAAAAAAAAAAAAAAAAAAAAAAAAAAAAAAAAAAAAAAAAAAAAAAAAAAAAAAAAAAAAAAAAAAAAAAAAAAAAAAAAAAAAAAAAAAAAAAAAAAAAAAAAAAAAAAAAAAAAAAAAAAAAAAAAAAAAAAAAAAAAAAAAAAAAAAAAAAAAAAAAAAAAAAAAAAAAAAAAAAAAAAAAAAAAAAAAAAAAAAAAAAAAAAAAAAAAAAAAAAAAAAAAAAAAAAAAAAAAAAAAAAAAAAAAAAAAAAAAAAAAAAAAAAAAAAAAAAAAAAAAAAAAAAAAAAAAAAAAAAAAAAAAAAAAAAAAAAAAAAAAAAAAAAAAAAAAAAAAAAAAAAAAAAAAAAAAAAAAAAAAAAAAAAAAAAAAAAAAAAAAAAAAAAAAAAAAAAAAAAAAAAAAAAAAAAAAAAAAAAAAAAAAAAAAAAAAAAAAAAAAAAAAAAAAAAAAAAAAAAAAAAAAAAAAAAAAAAAAAAAAAAAAAAAAAAAAAAAAAAAAAAAAAAAAAAAAAAAAAAAAAAAAAAAAAAAAAAAAAAAAAAAAAAAAAAAAAAAAAAAAAAAAAAAAAAAAAAAAAAAAAAAAAAAAAAAAAAAAAAAAAAAAAAAAAAAAAAAAAAAAAAAAAAAAAAAAAAAAAAAAAAAAAAAAAAAAAAAAAAAAAAAAAAAAAAAAAAAAAAAAAAAAAAAAAAAAAAAAAAAAAAAAAAAAAAAAAAAAAAAAAAAAAAAAAAAAAAAAAAAAAAAAAAAAAAAAAAAAAAAAAAAAAAAAAAAAAAAAAAAAAAAAAAAAAAAAAAAAAAAAAAAAAAAAAAAAAAAAAAAAAAAAAAAAAAAAAAAAAAAAAAAAAAAAAAAAAAAAAAAAAAAAAAAAAAAAAAAAAAAAAAAAAAAAAAAAAAAAAAAAAAAAAAAAAAAAAAAAAAAAAAAAAAAAAAAAAAAAAAAAAAAAAAAAAAAAAAAAAAAAAAAAAAAAAAAAAAAAAAAAAAAAAAAAAAAAAAAAAAAAAAAAAAAAAAAAAAAAAAAAAAAAAAAAAAAAAAAAAAAAAAAAAAAAAAAAAAAAAAAAAAAAAAAAAAAAAAAAAAAAAAAAAAAAAAAAAAAAAAAAAAAAAAAAAAAAAAAAAAAAAAAAAAAAAAAAAAAAAAAAAAAAAAAAAAAAAAAAAAAAAAAAAAAAAAAAAAAAAAAAAAAAAAAAAAAAAAAAAAAAAAAAAAAAAAAAAAAAAAAAAAAAAAAAAAAAAAAAAAAAAAAAAAAAAAAAAAAAAAAAAAAAAAAAAAAAAAAAAAAAAAAAAAAAAAAAAAAAAAAAAAAAAAAAAAAAAAAAAAAAAAAAAAAAAAAAAAAAAAAAAAAAAAAAAAAAAAAAAAAAAAAAAAAAAAAAAAAAAAAAAAAAAAAAAAAAAAAAAAAAAAAAAAAAAAAAAAAAAAAAAAAAAAAAAAAAAAAAAAAAAAAAAAAAAAAAAAAAAAAAAAAAAAAAAAAAAAAAAAAAAAAAAAAAAAAAAAAAAAAAAAAAAAAAAAAAAAAAAAAAAAAAAAAAAAAAAAAAAAAAAAAAAAAAAAAAAAAAAAAAAAAAAAAAAAAAAAAAAAAAAAAAAAAAAAAAAAAAAAAAAAAAAAAAAAAAAAAAAAAAAAAAAAAAAAAAAAAAAAAAAAAAAAAAAAAAAAAAAAAAAAAAAAAAAAAAAAAAAAAAAAAAAAAAAAAAAAAAAAAAAAAAAAAAAAAAAAAAAAAAAAAAAAAAAAAAAAAAAAAAAAAAAAAAAAAAAAAAAAAAAAAAAAAAAAAAAAAAAAAAAAAAAAAAAAAAAAAAAAAAAAAAAAAAAAAAAAAAAAAAAAAAAAAAAAAAAAAAAAAAAAAAAAAAAAAAAAAAAAAAAAAAAAAAAAAAAAAAAAAAAAAAAAAAAAAAAAAAAAAAAAAAAAAAAAAAAAAAAAAAAAAAAAAAAAAAAAAAAAAAAAAAAAAAAAAAAAAAAAAAAAAAAAAAAAAAAAAAAAAAAAAAAAAAAAAAAAAAAAAAAAAAAAAAAAAAAAAAAAAAAAAAAAAAAAAAAAAAAAAAAAAAAAAAAAAAAAAAAAAAAAAAAAAAAAAAAAAAAAAAAAAAAAAAAAAAAAAAAAAAAAAAAAAAAAAAAAAAAAAAAAAAAAAAAAAAAAAAAAAAAAAAAAAAAAAAAAAAA
AAAAAAAAAAAAAAAAAAAAAAAAAAAAAAAAAAAAAAAAAAAAAAAAAAAAAAAAAAAAAAAAAAAAAAAAAAAAAAAAAAAAAAAAAAAAAAAAAAAAAAAAAAAAAAAAAAAAAAAAAAAAAAAAAAAAAAAAAAAAAAAAAAAAAAAAAAAAAAAAAAAAAAAAAAAAAAAAAAAAAAAAAAAAAAAAAAAAAAAAAAAAAAAAAAAAAAAAAAAAAAAAAAAAAAAAAAAAAAAAAAAAAAAAAAAAAAAAAAAAAAAAAAAAAAAAAAAAAAAAAAAAAAAAAAAAAAAAAAAAAAAAAAAAAAAAAAAAAAAAAAAAAAAAAAAAAAAAAAAAAAAAAAAAAAAAAAAAAAAAAAAAAAAAAAAAAAAAAAAAAAAAAAAAAAAAAAAAAAAAAAAAAAAAAAAAAAAAAAAAAAAAAAAAAAAAAAAAAAAAAAAAAAAAAAAAAAAAAAAAAAAAAAAAAAAAAAAAAAAAAAAAAAAAAAAAAAAAAAAAAAAAAAAAAAAAAAAAAAAAAAAAAAAAAAAAAAAAAAAAAAAAAAAAAAAAAAAAAAAAAAAAAAAAAAAAAAAAAAAAAAAAAAAAAAAAAAAAAAAAAAAAAAAAAAAAAAAAAAAAAAAAAAAAAAAAAAAAAAAAAAAAAAAAAAAAAAAAAAAAAAAAAAAAAAAAAAAAAAAAAAAAAAAAAAAAAAAAAAAAAAAAAAAAAAAAAAAAAAAAAAAAAAAAAAAAAAAAAAAAAAAAAAAAAAAAAAAAAAAAAAAAAAAAAAAAAAAAAAAAAAAAAAAAAAAAAAAAAAAAAAAAAAAAAAAAAAAAAAAAAAAAAAAAAAAAAAAAAAAAAAAAAAAAAAAAAAAAAAAAAAAAAAAAAAAAAAAAAAAAAAAAAAAAAAAAAAAAAAAAAAAAAAAAAAAAAAAAAAAAAAAAAAAAAAAAAAAAAAAAAAAAAAAAAAAAAAAAAAAAAAAAAAAAAAAAAAAAAAAAAAAAAAAAAAAAAAAAAAAAAAAAAAAAAAAAAAAAAAAAAAAAAAAAAAAAAAAAAAAAAAAAAAAAAAAAAAAAAAAAAAAAAAAAAAAAAAAAAAAAAAAAAAAAAAAAAAAAAAAAAAAAAAAAAAAAAAAAAAAAAAAAAAAAAAAAAAAAAAAAAAAAAAAAAAAAAAAAAAAAAAAAAAAAAAAAAAAAAAAAAAAAAAAAAAAAAAAAAAAAAAAAAAAAAAAAAAAAAAAAAAAAAAAAAAAAAAAAAAAAAAAAAAAAAAAAAAAAAAAAAAAAAAAAAAAAAAAAAAAAAAAAAAAAAAAAAAAAAAAAAAAAAAAAAAAAAAAAAAAAAAAAAAAAAAAAAAAAAAAAAAAAAAAAAAAAAAAAAAAAAAAAAAAAAAAAAAAAAAAAAAAAAAAAAAAAAAAAAAAAAAAAAAAAAAAAAAAAAAAAAAAAAAAAAAAAAAAAAAAAAAAAAAAAAAAAAAAAAAAAAAAAAAAAAAAAAAAAAAAAAAAAAAAAAAAAAAAAAAAAAAAAAAAAAAAAAAAAAAAAAAAAAAAAAAAAAAAAAAAAAAAAAAAAAAAAAAAAAAAAAAAAAAAAAAAAAAAAAAAAAAAAAAAAAAAAAAAAAAAAAAAAAAAAAAAAAAAAAAAAAAAAAAAAAAAAAAAAAAAAAAAAAAAAAAAAAAAAAAAAAAAAAAAAAAAAAAAAAAAAAAAAAAAAAAAAAAAAAAAAAAAAAAAAAAAAAAAAAAAAAAAAAAAAAAAAAAAAAAAAAAAAAAAAAAAAAAAAAAAAAAAAAAAAAAAAAAAAAAAAAAAAAAAAAAAAAAAAAAAAAAAAAAAAAAAAAAAAAAAAAAAAAAAAAAAAAAAAAAAAAAAAAAAAAAAAAAAAAAAAAAAAAAAAAAAAAAAAAAAAAAAAAAAAAAAAAAAAAAAAAAAAAAAAAAAAAAAAAAAAAAAAAAAAAAAAAAAAAAAAAAAAAAAAAAAAAAAAAAAAAAAAAAAAAAAAAAAAAAAAAAAAAAAAAAAAAAAAAAAAAAAAAAAAAAAAAAAAAAAAAAAAAAAAAAAAAAAAAAAAAAAAAAAAAAAAAAAAAAAAAAAAAAAAAAAAAAAAAAAAAAAAAAAAAAAAAAAAAAAAAAAAAAAAAAAAAAAAAAAAAAAAAAAAAAAAAAAAAAAAAAAAAAAAAAAAAAAAAAAAAAAAAAAAAAAAAAAAAAAAAAAAAAAAAAAAAAAAAAAAAAAAAAAAAAAAAAAAAAAAAAAAAAAAAAAAAAAAAAAAAAAAAAAAAAAAAAAAAAAAAAAAAAAAAAAAAAAAAAAAAAAAAAAAAAAAAAAAAAAAAAAAAAAAAAAAAAAAAAAAAAAAAAAAAAAAAAAAAAAAAAAAAAAAAAAAAAAAAAAAAAAAAAAAAAAAAAAAAAAAAAAAAAAAAAAAAAAAAAAAAAAAAAAAAAAAAAAAAAAAAAAAAAAAAAAAAAAAAAAAAAAAAAAAAAAAAAAAAAAAAAAAAAAAAAAAAAAAAAAAAAAAAAAAAAAAAAAAAAAAAAAAAAAAAAAAAAAAAAAAAAAAAAAAAAAAAAAAAAAAAAAAAAAAAAAAAAAAAAAAAAAAAAAAAAAAAAAAAAAAAAAAAAAAAAAAAAAAAAAAAAAAAAAAAAAAAAAAAAAAAAAAAAAAAAAAAAAAAAAAAAAAAAAAAAAAAAAAAAAAAAAAAAAAAAAAAAAAAAAAAAAAAAAAAAAAAAAAAAAAAAAAAAAAAAAAAAAAAAAAAAAAAAAAAAAAAAAAAAAAAAAAAAAAAAAAAAAAAAAAAAAAAAAAAAAAAAAAAAAAAAAAAAAAAAAAAAAAAAAAAAAAAAAAAAAAAAAAAAAAAAAAAAAAAAAAAAAAAAAAAAAAAAAAAAAAAAAAAAAAAAAAAAAAAAAAAAAAAAAAAAAAAAAAAAAAAAAAAAAAAAAAAAAAAAAAAAAAAAAAAAAAAAAAAAAAAAAAAAAAAAAAAAAAAAAAAAAAAAAAAAAAAAAAAAAAAAAAAAAAAAAAAAAAAAAAAAAAAAAAAAAAAAAAAAAAAAAAAAAAAAAAAAAAAAAAAAAAAAAAAAAAAAAAAAAAAAAAAAAAAAAAAAAAAAAAAAAAAAAAAAAAAAAAAAAAAAAAAAAAAAAAAAAAAAAAAAAAAAAAAAAAAAAAAAAAAAAAAAAAAAAAAAAAAAAAAAAAAAAAAAAAAAAAAAAAAAAAAAAAAAAAAAAAAAAAAAAAAAAAAAAAAAAAAAAAAAAAAAAAAAAAAAAAAAAAAAAAAAAAAAAAAAAAAAAAAAAAAAAAAAAAAAAAAAAAAAAAAAAAAAAAAAAAAAAAAAAAAAAAAAAAAAAAAAAAAAAAAAAAAAAAAAAAAAAAAAAAAAAAAAAAAAAAAAAAAAAAAAAAAAAAAAAAAAAAAAAAAAAAAAAAAAAAAAAAAAAAAAAAAAAAAAAAAAAAAAAAAAAAAAAAAAAAAAAAAAAAAAAAAAAAAAAAAAAAAAAAAAAAAAAAAAAAAAAAAAAAAAAAAAAAAAAAAAAAAAAAAAAAAAAAAAAAAAAAAAAAAAAAAAAAAAAAAAAAAAAAAAAAAAAAAAAAAAAAAAAAAAAAAAAAAAAAAAAAAAAAAAAAAAAAAAAAAAAAAAAAAAAAAAAAAAAAAAAAAAAAAAAAAAAAAAAAAAAAAAAAAAAAAAAAAAAAAAAAAAAAAAAAAAAAAAAAAAAAAAAAAAAAAAAAAAAAAAAAAAAAAAAAAAAAAAAAAAAAAAAAAAAAAAAAAAAAAAAAAAAAAAAAAAAAAAAAAAAAAAAAAAAAAAAAAAAAAAAAAAAAAAAAAAAAAAAAAAAAAAAAAAAAAAAAAAAAAAAAAAAAAAAAAAAAAAAAAAAAAAAAAAAAAAAAAAAAAAAAAAAAAAAAAAAAAAAAAAAAAAAAAAAAAAAAAAAAAAAAAAAAAAAAAAAAAAAAAAAAAAAAAAAAAAAAAAAAAAAAAAAAAAAAAAAAAAAAAAAAAAAAAAAAAAAAAAAAAAAAAAAAAAAAAAAAAAAAAAAAAAAAAAAAAAAAAAAAAAAAAAAAAAAAAAAAAAAAAAAAAAAAAAAAAAAAAAAAAAAAAAAAAAAAAAAAAAAAAAAAAAAAAAAAAAAAAAAAAAAAAAAA
AAAAAAAAAAAAAAAAAAAAAAAAAAAAAAAAAAAAAAAAAAAAAAAAAAAAAAAAAAAAAAAAAAAAAAAAAAAAAAAAAAAAAAAAAAAAAAAAAAAAAAAAAAAAAAAAAAAAAAAAAAAAAAAAAAAAAAAAAAAAAAAAAAAAAAAAAAAAAAAAAAAAAAAAAAAAAAAAAAAAAAAAAAAAAAAAAAAAAAAAAAAAAAAAAAAAAAAAAAAAAAAAAAAAAAAAAAAAAAAAAAAAAAAAAAAAAAAAAAAAAAAAAAAAAAAAAAAAAAAAAAAAAAAAAAAAAAAAAAAAAAAAAAAAAAAAAAAAAAAAAAAAAAAAAAAAAAAAAAAAAAAAAAAAAAAAAAAAAAAAAAAAAAAAAAAAAAAAAAAAAAAAAAAAAAAAAAAAAAAAAAAAAAAAAAAAAAAAAAAAAAAAAAAAAAAAAAAAAAAAAAAAAAAAAAAAAAAAAAAAAAAAAAAAAAAAAAAAAAAAAAAAAAAAAAAAAAAAAAAAAAAAAAAAAAAAAAAAAAAAAAAAAAAAAAAAAAAAAAAAAAAAAAAAAAAAAAAAAAAAAAAAAAAAAAAAAAAAAAAAAAAAAAAAAAAAAAAAAAAAAAAAAAAAAAAAAAAAAAAAAAAAAAAAAAAAAAAAAAAAAAAAAAAAAAAAAAAAAAAAAAAAAAAAAAAAAAAAAAAAAAAAAAAAAAAAAAAAAAAAAAAAAAAAAAAAAAAAAAAAAAAAAAAAAAAAAAAAAAAAAAAAAAAAAAAAAAAAAAAAAAAAAAAAAAAAAAAAAAAAAAAAAAAAAAAAAAAAAAAAAAAAAAAAAAAAAAAAAAAAAAAAAAAAAAAAAAAAAAAAAAAAAAAAAAAAAAAAAAAAAAAAAAAAAAAAAAAAAAAAAAAAAAAAAAAAAAAAAAAAAAAAAAAAAAAAAAAAAAAAAAAAAAAAAAAAAAAAAAAAAAAAAAAAAAAAAAAAAAAAAAAAAAAAAAAAAAAAAAAAAAAAAAAAAAAAAAAAAAAAAAAAAAAAAAAAAAAAAAAAAAAAAAAAAAAAAAAAAAAAAAAAAAAAAAAAAAAAAAAAAAAAAAAAAAAAAAAAAAAAAAAAAAAAAAAAAAAAAAAAAAAAAAAAAAAAAAAAAAAAAAAAAAAAAAAAAAAAAAAAAAAAAAAAAAAAAAAAAAAAAAAAAAAAAAAAAAAAAAAAAAAAAAAAAAAAAAAAAAAAAAAAAAAAAAAAAAAAAAAAAAAAAAAAAAAAAAAAAAAAAAAAAAAAAAAAAAAAAAAAAAAAAAAAAAAAAAAAAAAAAAAAAAAAAAAAAAAAAAAAAAAAAAAAAAAAAAAAAAAAAAAAAAAAAAAAAAAAAAAAAAAAAAAAAAAAAAAAAAAAAAAAAAAAAAAAAAAAAAAAAAAAAAAAAAAAAAAAAAAAAAAAAAAAAAAAAAAAAAAAAAAAAAAAAAAAAAAAAAAAAAAAAAAAAAAAAAAAAAAAAAAAAAAAAAAAAAAAAAAAAAAAAAAAAAAAAAAAAAAAAAAAAAAAAAAAAAAAAAAAAAAAAAAAAAAAAAAAAAAAAAAAAAAAAAAAAAAAAAAAAAAAAAAAAAAAAAAAAAAAAAAAAAAAAAAAAAAAAAAAAAAAAAAAAAAAAAAAAAAAAAAAAAAAAAAAAAAAAAAAAAAAAAAAAAAAAAAAAAAAAAAAAAAAAAAAAAAAAAAAAAAAAAAAAAAAAAAAAAAAAAAAAAAAAAAAAAAAAAAAAAAAAAAAAAAAAAAAAAAAAAAAAAAAAAAAAAAAAAAAAAAAAAAAAAAAAAAAAAAAAAAAAAAAAAAAAAAAAAAAAAAAAAAAAAAAAAAAAAAAAAAAAAAAAAAAAAAAAAAAAAAAAAAAAAAAAAAAAAAAAAAAAAAAAAAAAAAAAAAAAAAAAAAAAAAAAAAAAAAAAAAAAAAAAAAAAAAAAAAAAAAAAAAAAAAAAAAAAAAAAAAAAAAAAAAAAAAAAAAAAAAAAAAAAAAAAAAAAAAAAAAAAAAAAAAAAAAAAAAAAAAAAAAAAAAAAAAAAAAAAAAAAAAAAAAAAAAAAAAAAAAAAAAAAAAAAAAAAAAAAAAAAAAAAAAAAAAAAAAAAAAAAAAAAAAAAAAAAAAAAAAAAAAAAAAAAAAAAAAAAAAAAAAAAAAAAAAAAAAAAAAAAAAAAAAAAAAAAAAAAAAAAAAAAAAAAAAAAAAAAAAAAAAAAAAAAAAAAAAAAAAAAAAAAAAAAAAAAAAAAAAAAAAAAAAAAAAAAAAAAAAAAAAAAAAAAAAAAAAAAAAAAAAAAAAAAAAAAAAAAAAAAAAAAAAAAAAAAAAAAAAAAAAAAAAAAAAAAAAAAAAAAAAAAAAAAAAAAAAAAAAAAAAAAAAAAAAAAAAAAAAAAAAAAAAAAAAAAAAAAAAAAAAAAAAAAAAAAAAAAAAAAAAAAAAAAAAAAAAAAAAAAAAAAAAAAAAAAAAAAAAAAAAAAAAAAAAAAAAAAAAAAAAAAAAAAAAAAAAAAAAAAAAAAAAAAAAAAAAAAAAAAAAAAAAAAAAAAAAAAAAAAAAAAAAAAAAAAAAAAAAAAAAAAAAAAAAAAAAAAAAAAAAAAAAAAAAAAAAAAAAAAAAAAAAAAAAAAAAAAAAAAAAAAAAAAAAAAAAAAAAAAAAAAAAAAAAAAAAAAAAAAAAAAAAAAAAAAAAAAAAAAAAAAAAAAAAAAAAAAAAAAAAAAAAAAAAAAAAAAAAAAAAAAAAAAAAAAAAAAAAAAAAAAAAAAAAAAAAAAAAAAAAAAAAAAAAAAAAAAAAAAAAAAAAAAAAAAAAAAAAAAAAAAAAAAAAAAAAAAAAAAAAAAAAAAAAAAAAAAAAAAAAAAAAAAAAAAAAAAAAAAAAAAAAAAAAAAAAAAAAAAAAAAAAAAAAAAAAAAAAAAAAAAAAAAAAAAAAAAAAAAAAAAAAAAAAAAAAAAAAAAAAAAAAAAAAAAAAAAAAAAAAAAAAAAAAAAAAAAAAAAAAAAAAAAAAAAAAAAAAAAAAAAAAAAAAAAAAAAAAAAAAAAAAAAAAAAAAAAAAAAAAAAAAAAAAAAAAAAAAAAAAAAAAAAAAAAAAAAAAAAAAAAAAAAAAAAAAAAAAAAAAAAAAAAAAAAAAAAAAAAAAAAAAAAAAAAAAAAAAAAAAAAAAAAAAAAAAAAAAAAAAAAAAAAAAAAAAAAAAAAAAAAAAAAAAAAAAAAAAAAAAAAAAAAAAAAAAAAAAAAAAAAAAAAAAAAAAAAAAAAAAAAAAAAAAAAAAAAAAAAAAAAAAAAAAAAAAAAAAAAAAAAAAAAAAAAAAAAAAAAAAAAAAAAAAAAAAAAAAAAAAAAAAAAAAAAAAAAAAAAAAAAAAAAAAAAAAAAAAAAAAAAAAAAAAAAAAAAAAAAAAAAAAAAAAAAAAAAAAAAAAAAAAAAAAAAAAAAAAAAAAAAAAAAAAAAAAAAAAAAAAAAAAAAAAAAAAAAAAAAAAAAAAAAAAAAAAAAAAAAAAAAAAAAAAAAAAAAAAAAAAAAAAAAAAAAAAAAAAAAAAAAAAAAAAAAAAAAAAAAAAAAAAAAAAAAAAAAAAAAAAAAAAAAAAAAAAAAAAAAAAAAAAAAAAAAAAAAAAAAAAAAAAAAAAAAAAAAAAAAAAAAAAAAAAAAAAAAAAAAAAAAAAAAAAAAAAAAAAAAAAAAAAAAAAAAAAAAAAAAAAAAAAAAAAAAAAAAAAAAAAAAAAAAAAAAAAAAAAAAAAAAAAAAAAAAAAAAAAAAAAAAAAAAAAAAAAAAAAAAAAAAAAAAAAAAAAAAAAAAAAAAAAAAAAAAAAAAAAAAAAAAAAAAAAAAAAAAAAAAAAAAAAAAAAAAAAAAAAAAAAAAAAAAAAAAAAAAAAAAAAAAAAAAAAAAAAAAAAAAAAAAAAAAAAAAAAAAAAAAAAAAAAAAAAAAAAAAAAAAAAAAAAAAAAAAAAAAAAAAAAAAAAAAAAAAAAAAAAAAAAAAAAAAAAAAAAAAAAAAAAAAAAAAAAAAAAAAAAAAAAAAAAAAAAAAAAAAAAAAAAAAAAAAAAAAAAAAAAAAAAAAAAAAAAAAAAAAAAAAAAAAAAAAAAAAAAAAAAAAAAAAAAAAAAAAAAAAAAAAAAAAAAAAAAA
AAAAAAAAAAAAAAAAAAAAAAAAAAAAAAAAAAAAAAAAAAAAAAAAAAAAAAAAAAAAAAAAAAAAAAAAAAAAAAAAAAAAAAAAAAAAAAAAAAAAAAAAAAAAAAAAAAAAAAAAAAAAAAAAAAAAAAAAAAAAAAAAAAAAAAAAAAAAAAAAAAAAAAAAAAAAAAAAAAAAAAAAAAAAAAAAAAAAAAAAAAAAAAAAAAAAAAAAAAAAAAAAAAAAAAAAAAAAAAAAAAAAAAAAAAAAAAAAAAAAAAAAAAAAAAAAAAAAAAAAAAAAAAAAAAAAAAAAAAAAAAAAAAAAAAAAAAAAAAAAAAAAAAAAAAAAAAAAAAAAAAAAAAAAAAAAAAAAAAAAAAAAAAAAAAAAAAAAAAAAAAAAAAAAAAAAAAAAAAAAAAAAAAAAAAAAAAAAAAAAAAAAAAAAAAAAAAAAAAAAAAAAAAAAAAAAAAAAAAAAAAAAAAAAAAAAAAAAAAAAAAAAAAAAAAAAAAAAAAAAAAAAAAAAAAAAAAAAAAAAAAAAAAAAAAAAAAAAAAAAAAAAAAAAAAAAAAAAAAAAAAAAAAAAAAAAAAAAAAAAAAAAAAAAAAAAAAAAAAAAAAAAAAAAAAAAAAAAAAAAAAAAAAAAAAAAAAAAAAAAAAAAAAAAAAAAAAAAAAAAAAAAAAAAAAAAAAAAAAAAAAAAAAAAAAAAAAAAAAAAAAAAAAAAAAAAAAAAAAAAAAAAAAAAAAAAAAAAAAAAAAAAAAAAAAAAAAAAAAAAAAAAAAAAAAAAAAAAAAAAAAAAAAAAAAAAAAAAAAAAAAAAAAAAAAAAAAAAAAAAAAAAAAAAAAAAAAAAAAAAAAAAAAAAAAAAAAAAAAAAAAAAAAAAAAAAAAAAAAAAAAAAAAAAAAAAAAAAAAAAAAAAAAAAAAAAAAAAAAAAAAAAAAAAAAAAAAAAAAAAAAAAAAAAAAAAAAAAAAAAAAAAAAAAAAAAAAAAAAAAAAAAAAAAAAAAAAAAAAAAAAAAAAAAAAAAAAAAAAAAAAAAAAAAAAAAAAAAAAAAAAAAAAAAAAAAAAAAAAAAAAAAAAAAAAAAAAAAAAAAAAAAAAAAAAAAAAAAAAAAAAAAAAAAAAAAAAAAAAAAAAAAAAAAAAAAAAAAAAAAAAAAAAAAAAAAAAAAAAAAAAAAAAAAAAAAAAAAAAAAAAAAAAAAAAAAAAAAAAAAAAAAAAAAAAAAAAAAAAAAAAAAAAAAAAAAAAAAAAAAAAAAAAAAAAAAAAAAAAAAAAAAAAAAAAAAAAAAAAAAAAAAAAAAAAAAAAAAAAAAAAAAAAAAAAAAAAAAAAAAAAAAAAAAAAAAAAAAAAAAAAAAAAAAAAAAAAAAAAAAAAAAAAAAAAAAAAAAAAAAAAAAAAAAAAAAAAAAAAAAAAAAAAAAAAAAAAAAAAAAAAAAAAAAAAAAAAAAAAAAAAAAAAAAAAAAAAAAAAAAAAAAAAAAAAAAAAAAAAAAAAAAAAAAAAAAAAAAAAAAAAAAAAAAAAAAAAAAAAAAAAAAAAAAAAAAAAAAAAAAAAAAAAAAAAAAAAAAAAAAAAAAAAAAAAAAAAAAAAAAAAAAAAAAAAAAAAAAAAAAAAAAAAAAAAAAAAAAAAAAAAAAAAAAAAAAAAAAAAAAAAAAAAAAAAAAAAAAAAAAAAAAAAAAAAAAAAAAAAAAAAAAAAAAAAAAAAAAAAAAAAAAAAAAAAAAAAAAAAAAAAAAAAAAAAAAAAAAAAAAAAAAAAAAAAAAAAAAAAAAAAAAAAAAAAAAAAAAAAAAAAAAAAAAAAAAAAAAAAAAAAAAAAAAAAAAAAAAAAAAAAAAAAAAAAAAAAAAAAAAAAAAAAAAAAAAAAAAAAAAAAAAAAAAAAAAAAAAAAAAAAAAAAAAAAAAAAAAAAAAAAAAAAAAAAAAAAAAAAAAAAAAAAAAAAAAAAAAAAAAAAAAAAAAAAAAAAAAAAAAAAAAAAAAAAAAAAAAAAAAAAAAAAAAAAAAAAAAAAAAAAAAAAAAAAAAAAAAAAAAAAAAAAAAAAAAAAAAAAAAAAAAAAAAAAAAAAAAAAAAAAAAAAAAAAAAAAAAAAAAAAAAAAAAAAAAAAAAAAAAAAAAAAAAAAAAAAAAAAAAAAAAAAAAAAAAAAAAAAAAAAAAAAAAAAAAAAAAAAAAAAAAAAAAAAAAAAAAAAAAAAAAAAAAAAAAAAAAAAAAAAAAAAAAAAAAAAAAAAAAAAAAAAAAAAAAAAAAAAAAAAAAAAAAAAAAAAAAAAAAAAAAAAAAAAAAAAAAAAAAAAAAAAAAAAAAAAAAAAAAAAAAAAAAAAAAAAAAAAAAAAAAAAAAAAAAAAAAAAAAAAAAAAAAAAAAAAAAAAAAAAAAAAAAAAAAAAAAAAAAAAAAAAAAAAAAAAAAAAAAAAAAAAAAAAAAAAAAAAAAAAAAAAAAAAAAAAAAAAAAAAAAAAAAAAAAAAAAAAAAAAAAAAAAAAAAAAAAAAAAAAAAAAAAAAAAAAAAAAAAAAAAAAAAAAAAAAAAAAAAAAAAAAAAAAAAAAAAAAAAAAAAAAAAAAAAAAAAAAAAAAAAAAAAAAAAAAAAAAAAAAAAAAAAAAAAAAAAAAAAAAAAAAAAAAAAAAAAAAAAAAAAAAAAAAAAAAAAAAAAAAAAAAAAAAAAAAAAAAAAAAAAAAAAAAAAAAAAAAAAAAAAAAAAAAAAAAAAAAAAAAAAAAAAAAAAAAAAAAAAAAAAAAAAAAAAAAAAAAAAAAAAAAAAAAAAAAAAAAAAAAAAAAAAAAAAAAAAAAAAAAAAAAAAAAAAAAAAAAAAAAAAAAAAAAAAAAAAAAAAAAAAAAAAAAAAAAAAAAAAAAAAAAAAAAAAAAAAAAAAAAAAAAAAAAAAAAAAAAAAAAAAAAAAAAAAAAAAAAAAAAAAAAAAAAAAAAAAAAAAAAAAAAAAAAAAAAAAAAAAAAAAAAAAAAAAAAAAAAAAAAAAAAAAAAAAAAAAAAAAAAAAAAAAAAAAAAAAAAAAAAAAAAAAAAAAAAAAAAAAAAAAAAAAAAAAAAAAAAAAAAAAAAAAAAAAAAAAAAAAAAAAAAAAAAAAAAAAAAAAAAAAAAAAAAAAAAAAAAAAAAAAAAAAAAAAAAAAAAAAAAAAAAAAAAAAAAAAAAAAAAAAAAAAAAAAAAAAAAAAAAAAAAAAAAAAAAAAAAAAAAAAAAAAAAAAAAAAAAAAAAAAAAAAAAAAAAAAAAAAAAAAAAAAAAAAAAAAAAAAAAAAAAAAAAAAAAAAAAAAAAAAAAAAAAAAAAAAAAAAAAAAAAAAAAAAAAAAAAAAAAAAAAAAAAAAAAAAAAAAAAAAAAAAAAAAAAAAAAAAAAAAAAAAAAAAAAAAAAAAAAAAAAAAAAAAAAAAAAAAAAAAAAAAAAAAAAAAAAAAAAAAAAAAAAAAAAAAAAAAAAAAAAAAAAAAAAAAAAAAAAAAAAAAAAAAAAAAAAAAAAAAAAAAAAAAAAAAAAAAAAAAAAAAAAAAAAAAAAAAAAAAAAAAAAAAAAAAAAAAAAAAAAAAAAAAAAAAAAAAAAAAAAAAAAAAAAAAAAAAAAAAAAAAAAAAAAAAAAAAAAAAAAAAAAAAAAAAAAAAAAAAAAAAAAAAAAAAAAAAAAAAAAAAAAAAAAAAAAAAAAAAAAAAAAAAAAAAAAAAAAAAAAAAAAAAAAAAAAAAAAAAAAAAAAAAAAAAAAAAAAAAAAAAAAAAAAAAAAAAAAAAAAAAAAAAAAAAAAAAAAAAAAAAAAAAAAAAAAAAAAAAAAAAAAAAAAAAAAAAAAAAAAAAAAAAAAAAAAAAAAAAAAAAAAAAAAAAAAAAAAAAAAAAAAAAAAAAAAAAAAAAAAAAAAAAAAAAAAAAAAAAAAAAAAAAAAAAAAAAAAAAAAAAAAAAAAAAAAAAAAAAAAAAAAAAAAAAAAAAAAAAAAAAAAAAAAAAAAAAAAAAAAAAAAAAAAAAAAAAAAAAAAAAAAAAAAAAAAAAAAAAAAAAAAAAAAAAAAAAAAAAAAAAAAAAAAAAAAAAAAAAAAAAAAAAAAAAAAAAAAAAAAAAAAAAAAAAAAAAAAAAAAAAAAAAAAAAAAAAAAAAAAAAAAAAAAAA
AAAAAAAAAAAAAAAAAAAAAAAAAAAAAAAAAAAAAAAAAAAAAAAAAAAAAAAAAAAAAAAAAAAAAAAAAAAAAAAAAAAAAAAAAAAAAAAAAAAAAAAAAAAAAAAAAAAAAAAAAAAAAAAAAAAAAAAAAAAAAAAAAAAAAAAAAAAAAAAAAAAAAAAAAAAAAAAAAAAAAAAAAAAAAAAAAAAAAAAAAAAAAAAAAAAAAAAAAAAAAAAAAAAAAAAAAAAAAAAAAAAAAAAAAAAAAAAAAAAAAAAAAAAAAAAAAAAAAAAAAAAAAAAAAAAAAAAAAAAAAAAAAAAAAAAAAAAAAAAAAAAAAAAAAAAAAAAAAAAAAAAAAAAAAAAAAAAAAAAAAAAAAAAAAAAAAAAAAAAAAAAAAAAAAAAAAAAAAAAAAAAAAAAAAAAAAAAAAAAAAAAAAAAAAAAAAAAAAAAAAAAAAAAAAAAAAAAAAAAAAAAAAAAAAAAAAAAAAAAAAAAAAAAAAAAAAAAAAAAAAAAAAAAAAAAAAAAAAAAAAAAAAAAAAAAAAAAAAAAAAAAAAAAAAAAAAAAAAAAAAAAAAAAAAAAAAAAAAAAAAAAAAAAAAAAAAAAAAAAAAAAAAAAAAAAAAAAAAAAAAAAAAAAAAAAAAAAAAAAAAAAAAAAAAAAAAAAAAAAAAAAAAAAAAAAAAAAAAAAAAAAAAAAAAAAAAAAAAAAAAAAAAAAAAAAAAAAAAAAAAAAAAAAAAAAAAAAAAAAAAAAAAAAAAAAAAAAAAAAAAAAAAAAAAAAAAAAAAAAAAAAAAAAAAAAAAAAAAAAAAAAAAAAAAAAAAAAAAAAAAAAAAAAAAAAAAAAAAAAAAAAAAAAAAAAAAAAAAAAAAAAAAAAAAAAAAAAAAAAAAAAAAAAAAAAAAAAAAAAAAAAAAAAAAAAAAAAAAAAAAAAAAAAAAAAAAAAAAAAAAAAAAAAAAAAAAAAAAAAAAAAAAAAAAAAAAAAAAAAAAAAAAAAAAAAAAAAAAAAAAAAAAAAAAAAAAAAAAAAAAAAAAAAAAAAAAAAAAAAAAAAAAAAAAAAAAAAAAAAAAAAAAAAAAAAAAAAAAAAAAAAAAAAAAAAAAAAAAAAAAAAAAAAAAAAAAAAAAAAAAAAAAAAAAAAAAAAAAAAAAAAAAAAAAAAAAAAAAAAAAAAAAAAAAAAAAAAAAAAAAAAAAAAAAAAAAAAAAAAAAAAAAAAAAAAAAAAAAAAAAAAAAAAAAAAAAAAAAAAAAAAAAAAAAAAAAAAAAAAAAAAAAAAAAAAAAAAAAAAAAAAAAAAAAAAAAAAAAAAAAAAAAAAAAAAAAAAAAAAAAAAAAAAAAAAAAAAAAAAAAAAAAAAAAAAAAAAAAAAAAAAAAAAAAAAAAAAAAAAAAAAAAAAAAAAAAAAAAAAAAAAAAAAAAAAAAAAAAAAAAAAAAAAAAAAAAAAAAAAAAAAAAAAAAAAAAAAAAAAAAAAAAAAAAAAAAAAAAAAAAAAAAAAAAAAAAAAAAAAAAAAAAAAAAAAAAAAAAAAAAAAAAAAAAAAAAAAAAAAAAAAAAAAAAAAAAAAAAAAAAAAAAAAAAAAAAAAAAAAAAAAAAAAAAAAAAAAAAAAAAAAAAAAAAAAAAAAAAAAAAAAAAAAAAAAAAAAAAAAAAAAAAAAAAAAAAAAAAAAAAAAAAAAAAAAAAAAAAAAAAAAAAAAAAAAAAAAAAAAAAAAAAAAAAAAAAAAAAAAAAAAAAAAAAAAAAAAAAAAAAAAAAAAAAAAAAAAAAAAAAAAAAAAAAAAAAAAAAAAAAAAAAAAAAAAAAAAAAAAAAAAAAAAAAAAAAAAAAAAAAAAAAAAAAAAAAAAAAAAAAAAAAAAAAAAAAAAAAAAAAAAAAAAAAAAAAAAAAAAAAAAAAAAAAAAAAAAAAAAAAAAAAAAAAAAAAAAAAAAAAAAAAAAAAAAAAAAAAAAAAAAAAAAAAAAAAAAAAAAAAAAAAAAAAAAAAAAAAAAAAAAAAAAAAAAAAAAAAAAAAAAAAAAAAAAAAAAAAAAAAAAAAAAAAAAAAAAAAAAAAAAAAAAAAAAAAAAAAAAAAAAAAAAAAAAAAAAAAAAAAAAAAAAAAAAAAAAAAAAAAAAAAAAAAAAAAAAAAAAAAAAAAAAAAAAAAAAAAAAAAAAAAAAAAAAAAAAAAAAAAAAAAAAAAAAAAAAAAAAAAAAAAAAAAAAAAAAAAAAAAAAAAAAAAAAAAAAAAAAAAAAAAAAAAAAAAAAAAAAAAAAAAAAAAAAAAAAAAAAAAAAAAAAAAAAAAAAAAAAAAAAAAAAAAAAAAAAAAAAAAAAAAAAAAAAAAAAAAAAAAAAAAAAAAAAAAAAAAAAAAAAAAAAAAAAAAAAAAAAAAAAAAAAAAAAAAAAAAAAAAAAAAAAAAAAAAAAAAAAAAAAAAAAAAAAAAAAAAAAAAAAAAAAAAAAAAAAAAAAAAAAAAAAAAAAAAAAAAAAAAAAAAAAAAAAAAAAAAAAAAAAAAAAAAAAAAAAAAAAAAAAAAAAAAAAAAAAAAAAAAAAAAAAAAAAAAAAAAAAAAAAAAAAAAAAAAAAAAAAAAAAAAAAAAAAAAAAAAAAAAAAAAAAAAAAAAAAAAAAAAAAAAAAAAAAAAAAAAAAAAAAAAAAAAAAAAAAAAAAAAAAAAAAAAAAAAAAAAAAAAAAAAAAAAAAAAAAAAAAAAAAAAAAAAAAAAAAAAAAAAAAAAAAAAAAAAAAAAAAAAAAAAAAAAAAAAAAAAAAAAAAAAAAAAAAAAAAAAAAAAAAAAAAAAAAAAAAAAAAAAAAAAAAAAAAAAAAAAAAAAAAAAAAAAAAAAAAAAAAAAAAAAAAAAAAAAAAAAAAAAAAAAAAAAAAAAAAAAAAAAAAAAAAAAAAAAAAAAAAAAAAAAAAAAAAAAAAAAAAAAAAAAAAAAAAAAAAAAAAAAAAAAAAAAAAAAAAAAAAAAAAAAAAAAAAAAAAAAAAAAAAAAAAAAAAAAAAAAAAAAAAAAAAAAAAAAAAAAAAAAAAAAAAAAAAAAAAAAAAAAAAAAAAAAAAAAAAAAAAAAAAAAAAAAAAAAAAAAAAAAAAAAAAAAAAAAAAAAAAAAAAAAAAAAAAAAAAAAAAAAAAAAAAAAAAAAAAAAAAAAAAAAAAAAAAAAAAAAAAAAAAAAAAAAAAAAAAAAAAAAAAAAAAAAAAAAAAAAAAAAAAAAAAAAAAAAAAAAAAAAAAAAAAAAAAAAAAAAAAAAAAAAAAAAAAAAAAAAAAAAAAAAAAAAAAAAAAAAAAAAAAAAAAAAAAAAAAAAAAAAAAAAAAAAAAAAAAAAAAAAAAAAAAAAAAAAAAAAAAAAAAAAAAAAAAAAAAAAAAAAAAAAAAAAAAAAAAAAAAAAAAAAAAAAAAAAAAAAAAAAAAAAAAAAAAAAAAAAAAAAAAAAAAAAAAAAAAAAAAAAAAAAAAAAAAAAAAAAAAAAAAAAAAAAAAAAAAAAAAAAAAAAAAAAAAAAAAAAAAAAAAAAAAAAAAAAAAAAAAAAAAAAAAAAAAAAAAAAAAAAAAAAAAAAAAAAAAAAAAAAAAAAAAAAAAAAAAAAAAAAAAAAAAAAAAAAAAAAAAAAAAAAAAAAAAAAAAAAAAAAAAAAAAAAAAAAAAAAAAAAAAAAAAAAAAAAAAAAAAAAAAAAAAAAAAAAAAAAAAAAAAAAAAAAAAAAAAAAAAAAAAAAAAAAAAAAAAAAAAAAAAAAAAAAAAAAAAAAAAAAAAAAAAAAAAAAAAAAAAAAAAAAAAAAAAAAAAAAAAAAAAAAAAAAAAAAAAAAAAAAAAAAAAAAAAAAAAAAAAAAAAAAAAAAAAAAAAAAAAAAAAAAAAAAAAAAAAAAAAAAAAAAAAAAAAAAAAAAAAAAAAAAAAAAAAAAAAAAAAAAAAAAAAAAAAAAAAAAAAAAAAAAAAAAAAAAAAAAAAAAAAAAAAAAAAAAAAAAAAAAAAAAAAAAAAAAAAAAAAAAAAAAAAAAAAAAAAAAAAAAAAAAAAAAAAAAAAAAAAAAAAAAAAAAAAAAAAAAAAAAAAAAAAAAAAAAAAAAAAAAAAAAAAAAAAAAAAAAAAAAAAAAAAAAAAAAAAAAAAAAAAAAAAAAAAAAAAA
AAAAAAAAAAAAAAAAAAAAAAAAAAAAAAAAAAAAAAAAAAAAAAAAAAAAAAAAAAAAAAAAAAAAAAAAAAAAAAAAAAAAAAAAAAAAAAAAAAAAAAAAAAAAAAAAAAAAAAAAAAAAAAAAAAAAAAAAAAAAAAAAAAAAAAAAAAAAAAAAAAAAAAAAAAAAAAAAAAAAAAAAAAAAAAAAAAAAAAAAAAAAAAAAAAAAAAAAAAAAAAAAAAAAAAAAAAAAAAAAAAAAAAAAAAAAAAAAAAAAAAAAAAAAAAAAAAAAAAAAAAAAAAAAAAAAAAAAAAAAAAAAAAAAAAAAAAAAAAAAAAAAAAAAAAAAAAAAAAAAAAAAAAAAAAAAAAAAAAAAAAAAAAAAAAAAAAAAAAAAAAAAAAAAAAAAAAAAAAAAAAAAAAAAAAAAAAAAAAAAAAAAAAAAAAAAAAAAAAAAAAAAAAAAAAAAAAAAAAAAAAAAAAAAAAAAAAAAAAAAAAAAAAAAAAAAAAAAAAAAAAAAAAAAAAAAAAAAAAAAAAAAAAAAAAAAAAAAAAAAAAAAAAAAAAAAAAAAAAAAAAAAAAAAAAAAAAAAAAAAAAAAAAAAAAAAAAAAAAAAAAAAAAAAAAAAAAAAAAAAAAAAAAAAAAAAAAAAAAAAAAAAAAAAAAAAAAAAAAAAAAAAAAAAAAAAAAAAAAAAAAAAAAAAAAAAAAAAAAAAAAAAAAAAAAAAAAAAAAAAAAAAAAAAAAAAAAAAAAAAAAAAAAAAAAAAAAAAAAAAAAAAAAAAAAAAAAAAAAAAAAAAAAAAAAAAAAAAAAAAAAAAAAAAAAAAAAAAAAAAAAAAAAAAAAAAAAAAAAAAAAAAAAAAAAAAAAAAAAAAAAAAAAAAAAAAAAAAAAAAAAAAAAAAAAAAAAAAAAAAAAAAAAAAAAAAAAAAAAAAAAAAAAAAAAAAAAAAAAAAAAAAAAAAAAAAAAAAAAAAAAAAAAAAAAAAAAAAAAAAAAAAAAAAAAAAAAAAAAAAAAAAAAAAAAAAAAAAAAAAAAAAAAAAAAAAAAAAAAAAAAAAAAAAAAAAAAAAAAAAAAAAAAAAAAAAAAAAAAAAAAAAAAAAAAAAAAAAAAAAAAAAAAAAAAAAAAAAAAAAAAAAAAAAAAAAAAAAAAAAAAAAAAAAAAAAAAAAAAAAAAAAAAAAAAAAAAAAAAAAAAAAAAAAAAAAAAAAAAAAAAAAAAAAAAAAAAAAAAAAAAAAAAAAAAAAAAAAAAAAAAAAAAAAAAAAAAAAAAAAAAAAAAAAAAAAAAAAAAAAAAAAAAAAAAAAAAAAAAAAAAAAAAAAAAAAAAAAAAAAAAAAAAAAAAAAAAAAAAAAAAAAAAAAAAAAAAAAAAAAAAAAAAAAAAAAAAAAAAAAAAAAAAAAAAAAAAAAAAAAAAAAAAAAAAAAAAAAAAAAAAAAAAAAAAAAAAAAAAAAAAAAAAAAAAAAAAAAAAAAAAAAAAAAAAAAAAAAAAAAAAAAAAAAAAAAAAAAAAAAAAAAAAAAAAAAAAAAAAAAAAAAAAAAAAAAAAAAAAAAAAAAAAAAAAAAAAAAAAAAAAAAAAAAAAAAAAAAAAAAAAAAAAAAAAAAAAAAAAAAAAAAAAAAAAAAAAAAAAAAAAAAAAAAAAAAAAAAAAAAAAAAAAAAAAAAAAAAAAAAAAAAAAAAAAAAAAAAAAAAAAAAAAAAAAAAAAAAAAAAAAAAAAAAAAAAAAAAAAAAAAAAAAAAAAAAAAAAAAAAAAAAAAAAAAAAAAAAAAAAAAAAAAAAAAAAAAAAAAAAAAAAAAAAAAAAAAAAAAAAAAAAAAAAAAAAAAAAAAAAAAAAAAAAAAAAAAAAAAAAAAAAAAAAAAAAAAAAAAAAAAAAAAAAAAAAAAAAAAAAAAAAAAAAAAAAAAAAAAAAAAAAAAAAAAAAAAAAAAAAAAAAAAAAAAAAAAAAAAAAAAAAAAAAAAAAAAAAAAAAAAAAAAAAAAAAAAAAAAAAAAAAAAAAAAAAAAAAAAAAAAAAAAAAAAAAAAAAAAAAAAAAAAAAAAAAAAAAAAAAAAAAAAAAAAAAAAAAAAAAAAAAAAAAAAAAAAAAAAAAAAAAAAAAAAAAAAAAAAAAAAAAAAAAAAAAAAAAAAAAAAAAAAAAAAAAAAAAAAAAAAAAAAAAAAAAAAAAAAAAAAAAAAAAAAAAAAAAAAAAAAAAAAAAAAAAAAAAAAAAAAAAAAAAAAAAAAAAAAAAAAAAAAAAAAAAAAAAAAAAAAAAAAAAAAAAAAAAAAAAAAAAAAAAAAAAAAAAAAAAAAAAAAAAAAAAAAAAAAAAAAAAAAAAAAAAAAAAAAAAAAAAAAAAAAAAAAAAAAAAAAAAAAAAAAAAAAAAAAAAAAAAAAAAAAAAAAAAAAAAAAAAAAAAAAAAAAAAAAAAAAAAAAAAAAAAAAAAAAAAAAAAAAAAAAAAAAAAAAAAAAAAAAAAAAAAAAAAAAAAAAAAAAAAAAAAAAAAAAAAAAAAAAAAAAAAAAAAAAAAAAAAAAAAAAAAAAAAAAAAAAAAAAAAAAAAAAAAAAAAAAAAAAAAAAAAAAAAAAAAAAAAAAAAAAAAAAAAAAAAAAAAAAAAAAAAAAAAAAAAAAAAAAAAAAAAAAAAAAAAAAAAAAAAAAAAAAAAAAAAAAAAAAAAAAAAAAAAAAAAAAAAAAAAAAAAAAAAAAAAAAAAAAAAAAAAAAAAAAAAAAAAAAAAAAAAAAAAAAAAAAAAAAAAAAAAAAAAAAAAAAAAAAAAAAAAAAAAAAAAAAAAAAAAAAAAAAAAAAAAAAAAAAAAAAAAAAAAAAAAAAAAAAAAAAAAAAAAAAAAAAAAAAAAAAAAAAAAAAAAAAAAAAAAAAAAAAAAAAAAAAAAAAAAAAAAAAAAAAAAAAAAAAAAAAAAAAAAAAAAAAAAAAAAAAAAAAAAAAAAAAAAAAAAAAAAAAAAAAAAAAAAAAAAAAAAAAAAAAAAAAAAAAAAAAAAAAAAAAAAAAAAAAAAAAAAAAAAAAAAAAAAAAAAAAAAAAAAAAAAAAAAAAAAAAAAAAAAAAAAAAAAAAAAAAAAAAAAAAAAAAAAAAAAAAAAAAAAAAAAAAAAAAAAAAAAAAAAAAAAAAAAAAAAAAAAAAAAAAAAAAAAAAAAAAAAAAAAAAAAAAAAAAAAAAAAAAAAAAAAAAAAAAAAAAAAAAAAAAAAAAAAAAAAAAAAAAAAAAAAAAAAAAAAAAAAAAAAAAAAAAAAAAAAAAAAAAAAAAAAAAAAAAAAAAAAAAAAAAAAAAAAAAAAAAAAAAAAAAAAAAAAAAAAAAAAAAAAAAAAAAAAAAAAAAAAAAAAAAAAAAAAAAAAAAAAAAAAAAAAAAAAAAAAAAAAAAAAAAAAAAAAAAAAAAAAAAAAAAAAAAAAAAAAAAAAAAAAAAAAAAAAAAAAAAAAAAAAAAAAAAAAAAAAAAAAAAAAAAAAAAAAAAAAAAAAAAAAAAAAAAAAAAAAAAAAAAAAAAAAAAAAAAAAAAAAAAAAAAAAAAAAAAAAAAAAAAAAAAAAAAAAAAAAAAAAAAAAAAAAAAAAAAAAAAAAAAAAAAAAAAAAAAAAAAAAAAAAAAAAAAAAAAAAAAAAAAAAAAAAAAAAAAAAAAAAAAAAAAAAAAAAAAAAAAAAAAAAAAAAAAAAAAAAAAAAAAAAAAAAAAAAAAAAAAAAAAAAAAAAAAAAAAAAAAAAAAAAAAAAAAAAAAAAAAAAAAAAAAAAAAAAAAAAAAAAAAAAAAAAAAAAAAAAAAAAAAAAAAAAAAAAAAAAAAAAAAAAAAAAAAAAAAAAAAAAAAAAAAAAAAAAAAAAAAAAAAAAAAAAAAAAAAAAAAAAAAAAAAAAAAAAAAAAAAAAAAAAAAAAAAAAAAAAAAAAAAAAAAAAAAAAAAAAAAAAAAAAAAAAAAAAAAAAAAAAAAAAAAAAAAAAAAAAAAAAAAAAAAAAAAAAAAAAAAAAAAAAAAAAAAAAAAAAAAAAAAAAAAAAAAAAAAAAAAAAAAAAAAAAAAAAAAAAAAAAAAAAAAAAAAAAAAAAAAAAAAAAAAAAAAAAAAAAAAAAAAAAAAAAAAAAAAAAAAAAAAAAAAAAAAAAAAAAAAAAAAAA
AAAAAAAAAAAAAAAAAAAAAAAAAAAAAAAAAAAAAAAAAAAAAAAAAAAAAAAAAAAAAAAAAAAAAAAAAAAAAAAAAAAAAAAAAAAAAAAAAAAAAAAAAAAAAAAAAAAAAAAAAAAAAAAAAAAAAAAAAAAAAAAAAAAAAAAAAAAAAAAAAAAAAAAAAAAAAAAAAAAAAAAAAAAAAAAAAAAAAAAAAAAAAAAAAAAAAAAAAAAAAAAAAAAAAAAAAAAAAAAAAAAAAAAAAAAAAAAAAAAAAAAAAAAAAAAAAAAAAAAAAAAAAAAAAAAAAAAAAAAAAAAAAAAAAAAAAAAAAAAAAAAAAAAAAAAAAAAAAAAAAAAAAAAAAAAAAAAAAAAAAAAAAAAAAAAAAAAAAAAAAAAAAAAAAAAAAAAAAAAAAAAAAAAAAAAAAAAAAAAAAAAAAAAAAAAAAAAAAAAAAAAAAAAAAAAAAAAAAAAAAAAAAAAAAAAAAAAAAAAAAAAAAAAAAAAAAAAAAAAAAAAAAAAAAAAAAAAAAAAAAAAAAAAAAAAAAAAAAAAAAAAAAAAAAAAAAAAAAAAAAAAAAAAAAAAAAAAAAAAAAAAAAAAAAAAAAAAAAAAAAAAAAAAAAAAAAAAAAAAAAAAAAAAAAAAAAAAAAAAAAAAAAAAAAAAAAAAAAAAAAAAAAAAAAAAAAAAAAAAAAAAAAAAAAAAAAAAAAAAAAAAAAAAAAAAAAAAAAAAAAAAAAAAAAAAAAAAAAAAAAAAAAAAAAAAAAAAAAAAAAAAAAAAAAAAAAAAAAAAAAAAAAAAAAAAAAAAAAAAAAAAAAAAAAAAAAAAAAAAAAAAAAAAAAAAAAAAAAAAAAAAAAAAAAAAAAAAAAAAAAAAAAAAAAAAAAAAAAAAAAAAAAAAAAAAAAAAAAAAAAAAAAAAAAAAAAAAAAAAAAAAAAAAAAAAAAAAAAAAAAAAAAAAAAAAAAAAAAAAAAAAAAAAAAAAAAAAAAAAAAAAAAAAAAAAAAAAAAAAAAAAAAAAAAAAAAAAAAAAAAAAAAAAAAAAAAAAAAAAAAAAAAAAAAAAAAAAAAAAAAAAAAAAAAAAAAAAAAAAAAAAAAAAAAAAAAAAAAAAAAAAAAAAAAAAAAAAAAAAAAAAAAAAAAAAAAAAAAAAAAAAAAAAAAAAAAAAAAAAAAAAAAAAAAAAAAAAAAAAAAAAAAAAAAAAAAAAAAAAAAAAAAAAAAAAAAAAAAAAAAAAAAAAAAAAAAAAAAAAAAAAAAAAAAAAAAAAAAAAAAAAAAAAAAAAAAAAAAAAAAAAAAAAAAAAAAAAAAAAAAAAAAAAAAAAAAAAAAAAAAAAAAAAAAAAAAAAAAAAAAAAAAAAAAAAAAAAAAAAAAAAAAAAAAAAAAAAAAAAAAAAAAAAAAAAAAAAAAAAAAAAAAAAAAAAAAAAAAAAAAAAAAAAAAAAAAAAAAAAAAAAAAAAAAAAAAAAAAAAAAAAAAAAAAAAAAAAAAAAAAAAAAAAAAAAAAAAAAAAAAAAAAAAAAAAAAAAAAAAAAAAAAAAAAAAAAAAAAAAAAAAAAAAAAAAAAAAAAAAAAAAAAAAAAAAAAAAAAAAAAAAAAAAAAAAAAAAAAAAAAAAAAAAAAAAAAAAAAAAAAAAAAAAAAAAAAAAAAAAAAAAAAAAAAAAAAAAAAAAAAAAAAAAAAAAAAAAAAAAAAAAAAAAAAAAAAAAAAAAAAAAAAAAAAAAAAAAAAAAAAAAAAAAAAAAAAAAAAAAAAAAAAAAAAAAAAAAAAAAAAAAAAAAAAAAAAAAAAAAAAAAAAAAAAAAAAAAAAAAAAAAAAAAAAAAAAAAAAAAAAAAAAAAAAAAAAAAAAAAAAAAAAAAAAAAAAAAAAAAAAAAAAAAAAAAAAAAAAAAAAAAAAAAAAAAAAAAAAAAAAAAAAAAAAAAAAAAAAAAAAAAAAAAAAAAAAAAAAAAAAAAAAAAAAAAAAAAAAAAAAAAAAAAAAAAAAAAAAAAAAAAAAAAAAAAAAAAAAAAAAAAAAAAAAAAAAAAAAAAAAAAAAAAAAAAAAAAAAAAAAAAAAAAAAAAAAAAAAAAAAAAAAAAAAAAAAAAAAAAAAAAAAAAAAAAAAAAAAAAAAAAAAAAAAAAAAAAAAAAAAAAAAAAAAAAAAAAAAAAAAAAAAAAAAAAAAAAAAAAAAAAAAAAAAAAAAAAAAAAAAAAAAAAAAAAAAAAAAAAAAAAAAAAAAAAAAAAAAAAAAAAAAAAAAAAAAAAAAAAAAAAAAAAAAAAAAAAAAAAAAAAAAAAAAAAAAAAAAAAAAAAAAAAAAAAAAAAAAAAAAAAAAAAAAAAAAAAAAAAAAAAAAAAAAAAAAAAAAAAAAAAAAAAAAAAAAAAAAAAAAAAAAAAAAAAAAAAAAAAAAAAAAAAAAAAAAAAAAAAAAAAAAAAAAAAAAAAAAAAAAAAAAAAAAAAAAAAAAAAAAAAAAAAAAAAAAAAAAAAAAAAAAAAAAAAAAAAAAAAAAAAAAAAAAAAAAAAAAAAAAAAAAAAAAAAAAAAAAAAAAAAAAAAAAAAAAAAAAAAAAAAAAAAAAAAAAAAAAAAAAAAAAAAAAAAAAAAAAAAAAAAAAAAAAAAAAAAAAAAAAAAAAAAAAAAAAAAAAAAAAAAAAAAAAAAAAAAAAAAAAAAAAAAAAAAAAAAAAAAAAAAAAAAAAAAAAAAAAAAAAAAAAAAAAAAAAAAAAAAAAAAAAAAAAAAAAAAAAAAAAAAAAAAAAAAAAAAAAAAAAAAAAAAAAAAAAAAAAAAAAAAAAAAAAAAAAAAAAAAAAAAAAAAAAAAAAAAAAAAAAAAAAAAAAAAAAAAAAAAAAAAAAAAAAAAAAAAAAAAAAAAAAAAAAAAAAAAAAAAAAAAAAAAAAAAAAAAAAAAAAAAAAAAAAAAAAAAAAAAAAAAAAAAAAAAAAAAAAAAAAAAAAAAAAAAAAAAAAAAAAAAAAAAAAAAAAAAAAAAAAAAAAAAAAAAAAAAAAAAAAAAAAAAAAAAAAAAAAAAAAAAAAAAAAAAAAAAAAAAAAAAAAAAAAAAAAAAAAAAAAAAAAAAAAAAAAAAAAAAAAAAAAAAAAAAAAAAAAAAAAAAAAAAAAAAAAAAAAAAAAAAAAAAAAAAAAAAAAAAAAAAAAAAAAAAAAAAAAAAAAAAAAAAAAAAAAAAAAAAAAAAAAAAAAAAAAAAAAAAAAAAAAAAAAAAAAAAAAAAAAAAAAAAAAAAAAAAAAAAAAAAAAAAAAAAAAAAAAAAAAAAAAAAAAAAAAAAAAAAAAAAAAAAAAAAAAAAAAAAAAAAAAAAAAAAAAAAAAAAAAAAAAAAAAAAAAAAAAAAAAAAAAAAAAAAAAAAAAAAAAAAAAAAAAAAAAAAAAAAAAAAAAAAAAAAAAAAAAAAAAAAAAAAAAAAAAAAAAAAAAAAAAAAAAAAAAAAAAAAAAAAAAAAAAAAAAAAAAAAAAAAAAAAAAAAAAAAAAAAAAAAAAAAAAAAAAAAAAAAAAAAAAAAAAAAAAAAAAAAAAAAAAAAAAAAAAAAAAAAAAAAAAAAAAAAAAAAAAAAAAAAAAAAAAAAAAAAAAAAAAAAAAAAAAAAAAAAAAAAAAAAAAAAAAAAAAAAAAAAAAAAAAAAAAAAAAAAAAAAAAAAAAAAAAAAAAAAAAAAAAAAAAAAAAAAAAAAAAAAAAAAAAAAAAAAAAAAAAAAAAAAAAAAAAAAAAAAAAAAAAAAAAAAAAAAAAAAAAAAAAAAAAAAAAAAAAAAAAAAAAAAAAAAAAAAAAAAAAAAAAAAAAAAAAAAAAAAAAAAAAAAAAAAAAAAAAAAAAAAAAAAAAAAAAAAAAAAAAAAAAAAAAAAAAAAAAAAAAAAAAAAAAAAAAAAAAAAAAAAAAAAAAAAAAAAAAAAAAAAAAAAAAAAAAAAAAAAAAAAAAAAAAAAAAAAAAAAAAAAAAAAAAAAAAAAAAAAAAAAAAAAAAAAAAAAAAAAAAAAAAAAAAAAAAAAAAAAAAAAAAAAAAAAAAAAAAAAAAAAAAAAAAAAAAAAAAAAAAAAAAAAAAAAAAAAAAAAAAAAAAAAAAAAAAAAAAAAAAAAAAAAAAAAAAAAAAAAAAAAAAAAAAAAAAAAAAAAA
AAAAAAAAAAAAAAAAAAAAAAAAAAAAAAAAAAAAAAAAAAAAAAAAAAAAAAAAAAAAAAAAAAAAAAAAAAAAAAAAAAAAAAAAAAAAAAAAAAAAAAAAAAAAAAAAAAAAAAAAAAAAAAAAAAAAAAAAAAAAAAAAAAAAAAAAAAAAAAAAAAAAAAAAAAAAAAAAAAAAAAAAAAAAAAAAAAAAAAAAAAAAAAAAAAAAAAAAAAAAAAAAAAAAAAAAAAAAAAAAAAAAAAAAAAAAAAAAAAAAAAAAAAAAAAAAAAAAAAAAAAAAAAAAAAAAAAAAAAAAAAAAAAAAAAAAAAAAAAAAAAAAAAAAAAAAAAAAAAAAAAAAAAAAAAAAAAAAAAAAAAAAAAAAAAAAAAAAAAAAAAAAAAAAAAAAAAAAAAAAAAAAAAAAAAAAAAAAAAAAAAAAAAAAAAAAAAAAAAAAAAAAAAAAAAAAAAAAAAAAAAAAAAAAAAAAAAAAAAAAAAAAAAAAAAAAAAAAAAAAAAAAAAAAAAAAAAAAAAAAAAAAAAAAAAAAAAAAAAAAAAAAAAAAAAAAAAAAAAAAAAAAAAAAAAAAAAAAAAAAAAAAAAAAAAAAAAAAAAAAAAAAAAAAAAAAAAAAAAAAAAAAAAAAAAAAAAAAAAAAAAAAAAAAAAAAAAAAAAAAAAAAAAAAAAAAAAAAAAAAAAAAAAAAAAAAAAAAAAAAAAAAAAAAAAAAAAAAAAAAAAAAAAAAAAAAAAAAAAAAAAAAAAAAAAAAAAAAAAAAAAAAAAAAAAAAAAAAAAAAAAAAAAAAAAAAAAAAAAAAAAAAAAAAAAAAAAAAAAAAAAAAAAAAAAAAAAAAAAAAAAAAAAAAAAAAAAAAAAAAAAAAAAAAAAAAAAAAAAAAAAAAAAAAAAAAAAAAAAAAAAAAAAAAAAAAAAAAAAAAAAAAAAAAAAAAAAAAAAAAAAAAAAAAAAAAAAAAAAAAAAAAAAAAAAAAAAAAAAAAAAAAAAAAAAAAAAAAAAAAAAAAAAAAAAAAAAAAAAAAAAAAAAAAAAAAAAAAAAAAAAAAAAAAAAAAAAAAAAAAAAAAAAAAAAAAAAAAAAAAAAAAAAAAAAAAAAAAAAAAAAAAAAAAAAAAAAAAAAAAAAAAAAAAAAAAAAAAAAAAAAAAAAAAAAAAAAAAAAAAAAAAAAAAAAAAAAAAAAAAAAAAAAAAAAAAAAAAAAAAAAAAAAAAAAAAAAAAAAAAAAAAAAAAAAAAAAAAAAAAAAAAAAAAAAAAAAAAAAAAAAAAAAAAAAAAAAAAAAAAAAAAAAAAAAAAAAAAAAAAAAAAAAAAAAAAAAAAAAAAAAAAAAAAAAAAAAAAAAAAAAAAAAAAAAAAAAAAAAAAAAAAAAAAAAAAAAAAAAAAAAAAAAAAAAAAAAAAAAAAAAAAAAAAAAAAAAAAAAAAAAAAAAAAAAAAAAAAAAAAAAAAAAAAAAAAAAAAAAAAAAAAAAAAAAAAAAAAAAAAAAAAAAAAAAAAAAAAAAAAAAAAAAAAAAAAAAAAAAAAAAAAAAAAAAAAAAAAAAAAAAAAAAAAAAAAAAAAAAAAAAAAAAAAAAAAAAAAAAAAAAAAAAAAAAAAAAAAAAAAAAAAAAAAAAAAAAAAAAAAAAAAAAAAAAAAAAAAAAAAAAAAAAAAAAAAAAAAAAAAAAAAAAAAAAAAAAAAAAAAAAAAAAAAAAAAAAAAAAAAAAAAAAAAAAAAAAAAAAAAAAAAAAAAAAAAAAAAAAAAAAAAAAAAAAAAAAAAAAAAAAAAAAAAAAAAAAAAAAAAAAAAAAAAAAAAAAAAAAAAAAAAAAAAAAAAAAAAAAAAAAAAAAAAAAAAAAAAAAAAAAAAAAAAAAAAAAAAAAAAAAAAAAAAAAAAAAAAAAAAAAAAAAAAAAAAAAAAAAAAAAAAAAAAAAAAAAAAAAAAAAAAAAAAAAAAAAAAAAAAAAAAAAAAAAAAAAAAAAAAAAAAAAAAAAAAAAAAAAAAAAAAAAAAAAAAAAAAAAAAAAAAAAAAAAAAAAAAAAAAAAAAAAAAAAAAAAAAAAAAAAAAAAAAAAAAAAAAAAAAAAAAAAAAAAAAAAAAAAAAAAAAAAAAAAAAAAAAAAAAAAAAAAAAAAAAAAAAAAAAAAAAAAAAAAAAAAAAAAAAAAAAAAAAAAAAAAAAAAAAAAAAAAAAAAAAAAAAAAAAAAAAAAAAAAAAAAAAAAAAAAAAAAAAAAAAAAAAAAAAAAAAAAAAAAAAAAAAAAAAAAAAAAAAAAAAAAAAAAAAAAAAAAAAAAAAAAAAAAAAAAAAAAAAAAAAAAAAAAAAAAAAAAAAAAAAAAAAAAAAAAAAAAAAAAAAAAAAAAAAAAAAAAAAAAAAAAAAAAAAAAAAAAAAAAAAAAAAAAAAAAAAAAAAAAAAAAAAAAAAAAAAAAAAAAAAAAAAAAAAAAAAAAAAAAAAAAAAAAAAAAAAAAAAAAAAAAAAAAAAAAAAAAAAAAAAAAAAAAAAAAAAAAAAAAAAAAAAAAAAAAAAAAAAAAAAAAAAAAAAAAAAAAAAAAAAAAAAAAAAAAAAAAAAAAAAAAAAAAAAAAAAAAAAAAAAAAAAAAAAAAAAAAAAAAAAAAAAAAAAAAAAAAAAAAAAAAAAAAAAAAAAAAAAAAAAAAAAAAAAAAAAAAAAAAAAAAAAAAAAAAAAAAAAAAAAAAAAAAAAAAAAAAAAAAAAAAAAAAAAAAAAAAAAAAAAAAAAAAAAAAAAAAAAAAAAAAAAAAAAAAAAAAAAAAAAAAAAAAAAAAAAAAAAAAAAAAAAAAAAAAAAAAAAAAAAAAAAAAAAAAAAAAAAAAAAAAAAAAAAAAAAAAAAAAAAAAAAAAAAAAAAAAAAAAAAAAAAAAAAAAAAAAAAAAAAAAAAAAAAAAAAAAAAAAAAAAAAAAAAAAAAAAAAAAAAAAAAAAAAAAAAAAAAAAAAAAAAAAAAAAAAAAAAAAAAAAAAAAAAAAAAAAAAAAAAAAAAAAAAAAAAAAAAAAAAAAAAAAAAAAAAAAAAAAAAAAAAAAAAAAAAAAAAAAAAAAAAAAAAAAAAAAAAAAAAAAAAAAAAAAAAAAAAAAAAAAAAAAAAAAAAAAAAAAAAAAAAAAAAAAAAAAAAAAAAAAAAAAAAAAAAAAAAAAAAAAAAAAAAAAAAAAAAAAAAAAAAAAAAAAAAAAAAAAAAAAAAAAAAAAAAAAAAAAAAAAAAAAAAAAAAAAAAAAAAAAAAAAAAAAAAAAAAAAAAAAAAAAAAAAAAAAAAAAAAAAAAAAAAAAAAAAAAAAAAAAAAAAAAAAAAAAAAAAAAAAAAAAAAAAAAAAAAAAAAAAAAAAAAAAAAAAAAAAAAAAAAAAAAAAAAAAAAAAAAAAAAAAAAAAAAAAAAAAAAAAAAAAAAAAAAAAAAAAAAAAAAAAAAAAAAAAAAAAAAAAAAAAAAAAAAAAAAAAAAAAAAAAAAAAAAAAAAAAAAAAAAAAAAAAAAAAAAAAAAAAAAAAAAAAAAAAAAAAAAAAAAAAAAAAAAAAAAAAAAAAAAAAAAAAAAAAAAAAAAAAAAAAAAAAAAAAAAAAAAAAAAAAAAAAAAAAAAAAAAAAAAAAAAAAAAAAAAAAAAAAAAAAAAAAAAAAAAAAAAAAAAAAAAAAAAAAAAAAAAAAAAAAAAAAAAAAAAAAAAAAAAAAAAAAAAAAAAAAAAAAAAAAAAAAAAAAAAAAAAAAAAAAAAAAAAAAAAAAAAAAAAAAAAAAAAAAAAAAAAAAAAAAAAAAAAAAAAAAAAAAAAAAAAAAAAAAAAAAAAAAAAAAAAAAAAAAAAAAAAAAAAAAAAAAAAAAAAAAAAAAAAAAAAAAAAAAAAAAAAAAAAAAAAAAAAAAAAAAAAAAAAAAAAAAAAAAAAAAAAAAAAAAAAAAAAAAAAAAAAAAAAAAAAAAAAAAAAAAAAAAAAAAAAAAAAAAAAAAAAAAAAAAAAAAAAAAAAAAAAAAAAAAAAAAAAAAAAAAAAAAAAAAAAAAAAAAAAAAAAAAAAAAAAAAAAAAAAAAAAAAAAAAAAAAAAAAAAAAAAAAAAAAAAAAAAAAAAAAAAAAAAAAAAAAAAAAAAAAAAAAAAAAAAAAAAAAAAAAAAAAAA
AAAAAAAAAAAAAAAAAAAAAAAAAAAAAAAAAAAAAAAAAAAAAAAAAAAAAAAAAAAAAAAAAAAAAAAAAAAAAAAAAAAAAAAAAAAAAAAAAAAAAAAAAAAAAAAAAAAAAAAAAAAAAAAAAAAAAAAAAAAAAAAAAAAAAAAAAAAAAAAAAAAAAAAAAAAAAAAAAAAAAAAAAAAAAAAAAAAAAAAAAAAAAAAAAAAAAAAAAAAAAAAAAAAAAAAAAAAAAAAAAAAAAAAAAAAAAAAAAAAAAAAAAAAAAAAAAAAAAAAAAAAAAAAAAAAAAAAAAAAAAAAAAAAAAAAAAAAAAAAAAAAAAAAAAAAAAAAAAAAAAAAAAAAAAAAAAAAAAAAAAAAAAAAAAAAAAAAAAAAAAAAAAAAAAAAAAAAAAAAAAAAAAAAAAAAAAAAAAAAAAAAAAAAAAAAAAAAAAAAAAAAAAAAAAAAAAAAAAAAAAAAAAAAAAAAAAAAAAAAAAAAAAAAAAAAAAAAAAAAAAAAAAAAAAAAAAAAAAAAAAAAAAAAAAAAAAAAAAAAAAAAAAAAAAAAAAAAAAAAAAAAAAAAAAAAAAAAAAAAAAAAAAAAAAAAAAAAAAAAAAAAAAAAAAAAAAAAAAAAAAAAAAAAAAAAAAAAAAAAAAAAAAAAAAAAAAAAAAAAAAAAAAAAAAAAAAAAAAAAAAAAAAAAAAAAAAAAAAAAAAAAAAAAAAAAAAAAAAAAAAAAAAAAAAAAAAAAAAAAAAAAAAAAAAAAAAAAAAAAAAAAAAAAAAAAAAAAAAAAAAAAAAAAAAAAAAAAAAAAAAAAAAAAAAAAAAAAAAAAAAAAAAAAAAAAAAAAAAAAAAAAAAAAAAAAAAAAAAAAAAAAAAAAAAAAAAAAAAAAAAAAAAAAAAAAAAAAAAAAAAAAAAAAAAAAAAAAAAAAAAAAAAAAAAAAAAAAAAAAAAAAAAAAAAAAAAAAAAAAAAAAAAAAAAAAAAAAAAAAAAAAAAAAAAAAAAAAAAAAAAAAAAAAAAAAAAAAAAAAAAAAAAAAAAAAAAAAAAAAAAAAAAAAAAAAAAAAAAAAAAAAAAAAAAAAAAAAAAAAAAAAAAAAAAAAAAAAAAAAAAAAAAAAAAAAAAAAAAAAAAAAAAAAAAAAAAAAAAAAAAAAAAAAAAAAAAAAAAAAAAAAAAAAAAAAAAAAAAAAAAAAAAAAAAAAAAAAAAAAAAAAAAAAAAAAAAAAAAAAAAAAAAAAAAAAAAAAAAAAAAAAAAAAAAAAAAAAAAAAAAAAAAAAAAAAAAAAAAAAAAAAAAAAAAAAAAAAAAAAAAAAAAAAAAAAAAAAAAAAAAAAAAAAAAAAAAAAAAAAAAAAAAAAAAAAAAAAAAAAAAAAAAAAAAAAAAAAAAAAAAAAAAAAAAAAAAAAAAAAAAAAAAAAAAAAAAAAAAAAAAAAAAAAAAAAAAAAAAAAAAAAAAAAAAAAAAAAAAAAAAAAAAAAAAAAAAAAAAAAAAAAAAAAAAAAAAAAAAAAAAAAAAAAAAAAAAAAAAAAAAAAAAAAAAAAAAAAAAAAAAAAAAAAAAAAAAAAAAAAAAAAAAAAAAAAAAAAAAAAAAAAAAAAAAAAAAAAAAAAAAAAAAAAAAAAAAAAAAAAAAAAAAAAAAAAAAAAAAAAAAAAAAAAAAAAAAAAAAAAAAAAAAAAAAAAAAAAAAAAAAAAAAAAAAAAAAAAAAAAAAAAAAAAAAAAAAAAAAAAAAAAAAAAAAAAAAAAAAAAAAAAAAAAAAAAAAAAAAAAAAAAAAAAAAAAAAAAAAAAAAAAAAAAAAAAAAAAAAAAAAAAAAAAAAAAAAAAAAAAAAAAAAAAAAAAAAAAAAAAAAAAAAAAAAAAAAAAAAAAAAAAAAAAAAAAAAAAAAAAAAAAAAAAAAAAAAAAAAAAAAAAAAAAAAAAAAAAAAAAAAAAAAAAAAAAAAAAAAAAAAAAAAAAAAAAAAAAAAAAAAAAAAAAAAAAAAAAAAAAAAAAAAAAAAAAAAAAAAAAAAAAAAAAAAAAAAAAAAAAAAAAAAAAAAAAAAAAAAAAAAAAAAAAAAAAAAAAAAAAAAAAAAAAAAAAAAAAAAAAAAAAAAAAAAAAAAAAAAAAAAAAAAAAAAAAAAAAAAAAAAAAAAAAAAAAAAAAAAAAAAAAAAAAAAAAAAAAAAAAAAAAAAAAAAAAAAAAAAAAAAAAAAAAAAAAAAAAAAAAAAAAAAAAAAAAAAAAAAAAAAAAAAAAAAAAAAAAAAAAAAAAAAAAAAAAAAAAAAAAAAAAAAAAAAAAAAAAAAAAAAAAAAAAAAAAAAAAAAAAAAAAAAAAAAAAAAAAAAAAAAAAAAAAAAAAAAAAAAAAAAAAAAAAAAAAAAAAAAAAAAAAAAAAAAAAAAAAAAAAAAAAAAAAAAAAAAAAAAAAAAAAAAAAAAAAAAAAAAAAAAAAAAAAAAAAAAAAAAAAAAAAAAAAAAAAAAAAAAAAAAAAAAAAAAAAAAAAAAAAAAAAAAAAAAAAAAAAAAAAAAAAAAAAAAAAAAAAAAAAAAAAAAAAAAAAAAAAAAAAAAAAAAAAAAAAAAAAAAAAAAAAAAAAAAAAAAAAAAAAAAAAAAAAAAAAAAAAAAAAAAAAAAAAAAAAAAAAAAAAAAAAAAAAAAAAAAAAAAAAAAAAAAAAAAAAAAAAAAAAAAAAAAAAAAAAAAAAAAAAAAAAAAAAAAAAAAAAAAAAAAAAAAAAAAAAAAAAAAAAAAAAAAAAAAAAAAAAAAAAAAAAAAAAAAAAAAAAAAAAAAAAAAAAAAAAAAAAAAAAAAAAAAAAAAAAAAAAAAAAAAAAAAAAAAAAAAAAAAAAAAAAAAAAAAAAAAAAAAAAAAAAAAAAAAAAAAAAAAAAAAAAAAAAAAAAAAAAAAAAAAAAAAAAAAAAAAAAAAAAAAAAAAAAAAAAAAAAAAAAAAAAAAAAAAAAAAAAAAAAAAAAAAAAAAAAAAAAAAAAAAAAAAAAAAAAAAAAAAAAAAAAAAAAAAAAAAAAAAAAAAAAAAAAAAAAAAAAAAAAAAAAAAAAAAAAAAAAAAAAAAAAAAAAAAAAAAAAAAAAAAAAAAAAAAAAAAAAAAAAAAAAAAAAAAAAAAAAAAAAAAAAAAAAAAAAAAAAAAAAAAAAAAAAAAAAAAAAAAAAAAAAAAAAAAAAAAAAAAAAAAAAAAAAAAAAAAAAAAAAAAAAAAAAAAAAAAAAAAAAAAAAAAAAAAAAAAAAAAAAAAAAAAAAAAAAAAAAAAAAAAAAAAAAAAAAAAAAAAAAAAAAAAAAAAAAAAAAAAAAAAAAAAAAAAAAAAAAAAAAAAAAAAAAAAAAAAAAAAAAAAAAAAAAAAAAAAAAAAAAAAAAAAAAAAAAAAAAAAAAAAAAAAAAAAAAAAAAAAAAAAAAAAAAAAAAAAAAAAAAAAAAAAAAAAAAAAAAAAAAAAAAAAAAAAAAAAAAAAAAAAAAAAAAAAAAAAAAAAAAAAAAAAAAAAAAAAAAAAAAAAAAAAAAAAAAAAAAAAAAAAAAAAAAAAAAAAAAAAAAAAAAAAAAAAAAAAAAAAAAAAAAAAAAAAAAAAAAAAAAAAAAAAAAAAAAAAAAAAAAAAAAAAAAAAAAAAAAAAAAAAAAAAAAAAAAAAAAAAAAAAAAAAAAAAAAAAAAAAAAAAAAAAAAAAAAAAAAAAAAAAAAAAAAAAAAAAAAAAAAAAAAAAAAAAAAAAAAAAAAAAAAAAAAAAAAAAAAAAAAAAAAAAAAAAAAAAAAAAAAAAAAAAAAAAAAAAAAAAAAAAAAAAAAAAAAAAAAAAAAAAAAAAAAAAAAAAAAAAAAAAAAAAAAAAAAAAAAAAAAAAAAAAAAAAAAAAAAAAAAAAAAAAAAAAAAAAAAAAAAAAAAAAAAAAAAAAAAAAAAAAAAAAAAAAAAAAAAAAAAAAAAAAAAAAAAAAAAAAAAAAAAAAAAAAAAAAAAAAAAAAAAAAAAAAAAAAAAAAAAAAAAAAAAAAAAAAAAAAAAAAAAAAAAAAAAAAAAAAAAAAAAAAAAAAAAAAAAAAAAAAAAAAAAAAAAAAAAAAAAAAAAAAAAAAAAAAAAAAAAAAAAAAAAAAAAAAAAAAAAAAAAAAAAAAAAAAAAA
AAAAAAAAAAAAAAAAAAAAAAAAAAAAAAAAAAAAAAAAAAAAAAAAAAAAAAAAAAAAAAAAAAAAAAAAAAAAAAAAAAAAAAAAAAAAAAAAAAAAAAAAAAAAAAAAAAAAAAAAAAAAAAAAAAAAAAAAAAAAAAAAAAAAAAAAAAAAAAAAAAAAAAAAAAAAAAAAAAAAAAAAAAAAAAAAAAAAAAAAAAAAAAAAAAAAAAAAAAAAAAAAAAAAAAAAAAAAAAAAAAAAAAAAAAAAAAAAAAAAAAAAAAAAAAAAAAAAAAAAAAAAAAAAAAAAAAAAAAAAAAAAAAAAAAAAAAAAAAAAAAAAAAAAAAAAAAAAAAAAAAAAAAAAAAAAAAAAAAAAAAAAAAAAAAAAAAAAAAAAAAAAAAAAAAAAAAAAAAAAAAAAAAAAAAAAAAAAAAAAAAAAAAAAAAAAAAAAAAAAAAAAAAAAAAAAAAAAAAAAAAAAAAAAAAAAAAAAAAAAAAAAAAAAAAAAAAAAAAAAAAAAAAAAAAAAAAAAAAAAAAAAAAAAAAAAAAAAAAAAAAAAAAAAAAAAAAAAAAAAAAAAAAAAAAAAAAAAAAAAAAAAAAAAAAAAAAAAAAAAAAAAAAAAAAAAAAAAAAAAAAAAAAAAAAAAAAAAAAAAAAAAAAAAAAAAAAAAAAAAAAAAAAAAAAAAAAAAAAAAAAAAAAAAAAAAAAAAAAAAAAAAAAAAAAAAAAAAAAAAAAAAAAAAAAAAAAAAAAAAAAAAAAAAAAAAAAAAAAAAAAAAAAAAAAAAAAAAAAAAAAAAAAAAAAAAAAAAAAAAAAAAAAAAAAAAAAAAAAAAAAAAAAAAAAAAAAAAAAAAAAAAAAAAAAAAAAAAAAAAAAAAAAAAAAAAAAAAAAAAAAAAAAAAAAAAAAAAAAAAAAAAAAAAAAAAAAAAAAAAAAAAAAAAAAAAAAAAAAAAAAAAAAAAAAAAAAAAAAAAAAAAAAAAAAAAAAAAAAAAAAAAAAAAAAAAAAAAAAAAAAAAAAAAAAAAAAAAAAAAAAAAAAAAAAAAAAAAAAAAAAAAAAAAAAAAAAAAAAAAAAAAAAAAAAAAAAAAAAAAAAAAAAAAAAAAAAAAAAAAAAAAAAAAAAAAAAAAAAAAAAAAAAAAAAAAAAAAAAAAAAAAAAAAAAAAAAAAAAAAAAAAAAAAAAAAAAAAAAAAAAAAAAAAAAAAAAAAAAAAAAAAAAAAAAAAAAAAAAAAAAAAAAAAAAAAAAAAAAAAAAAAAAAAAAAAAAAAAAAAAAAAAAAAAAAAAAAAAAAAAAAAAAAAAAAAAAAAAAAAAAAAAAAAAAAAAAAAAAAAAAAAAAAAAAAAAAAAAAAAAAAAAAAAAAAAAAAAAAAAAAAAAAAAAAAAAAAAAAAAAAAAAAAAAAAAAAAAAAAAAAAAAAAAAAAAAAAAAAAAAAAAAAAAAAAAAAAAAAAAAAAAAAAAAAAAAAAAAAAAAAAAAAAAAAAAAAAAAAAAAAAAAAAAAAAAAAAAAAAAAAAAAAAAAAAAAAAAAAAAAAAAAAAAAAAAAAAAAAAAAAAAAAAAAAAAAAAAAAAAAAAAAAAAAAAAAAAAAAAAAAAAAAAAAAAAAAAAAAAAAAAAAAAAAAAAAAAAAAAAAAAAAAAAAAAAAAAAAAAAAAAAAAAAAAAAAAAAAAAAAAAAAAAAAAAAAAAAAAAAAAAAAAAAAAAAAAAAAAAAAAAAAAAAAAAAAAAAAAAAAAAAAAAAAAAAAAAAAAAAAAAAAAAAAAAAAAAAAAAAAAAAAAAAAAAAAAAAAAAAAAAAAAAAAAAAAAAAAAAAAAAAAAAAAAAAAAAAAAAAAAAAAAAAAAAAAAAAAAAAAAAAAAAAAAAAAAAAAAAAAAAAAAAAAAAAAAAAAAAAAAAAAAAAAAAAAAAAAAAAAAAAAAAAAAAAAAAAAAAAAAAAAAAAAAAAAAAAAAAAAAAAAAAAAAAAAAAAAAAAAAAAAAAAAAAAAAAAAAAAAAAAAAAAAAAAAAAAAAAAAAAAAAAAAAAAAAAAAAAAAAAAAAAAAAAAAAAAAAAAAAAAAAAAAAAAAAAAAAAAAAAAAAAAAAAAAAAAAAAAAAAAAAAAAAAAAAAAAAAAAAAAAAAAAAAAAAAAAAAAAAAAAAAAAAAAAAAAAAAAAAAAAAAAAAAAAAAAAAAAAAAAAAAAAAAAAAAAAAAAAAAAAAAAAAAAAAAAAAAAAAAAAAAAAAAAAAAAAAAAAAAAAAAAAAAAAAAAAAAAAAAAAAAAAAAAAAAAAAAAAAAAAAAAAAAAAAAAAAAAAAAAAAAAAAAAAAAAAAAAAAAAAAAAAAAAAAAAAAAAAAAAAAAAAAAAAAAAAAAAAAAAAAAAAAAAAAAAAAAAAAAAAAAAAAAAAAAAAAAAAAAAAAAAAAAAAAAAAAAAAAAAAAAAAAAAAAAAAAAAAAAAAAAAAAAAAAAAAAAAAAAAAAAAAAAAAAAAAAAAAAAAAAAAAAAAAAAAAAAAAAAAAAAAAAAAAAAAAAAAAAAAAAAAAAAAAAAAAAAAAAAAAAAAAAAAAAAAAAAAAAAAAAAAAAAAAAAAAAAAAAAAAAAAAAAAAAAAAAAAAAAAAAAAAAAAAAAAAAAAAAAAAAAAAAAAAAAAAAAAAAAAAAAAAAAAAAAAAAAAAAAAAAAAAAAAAAAAAAAAAAAAAAAAAAAAAAAAAAAAAAAAAAAAAAAAAAAAAAAAAAAAAAAAAAAAAAAAAAAAAAAAAAAAAAAAAAAAAAAAAAAAAAAAAAAAAAAAAAAAAAAAAAAAAAAAAAAAAAAAAAAAAAAAAAAAAAAAAAAAAAAAAAAAAAAAAAAAAAAAAAAAAAAAAAAAAAAAAAAAAAAAAAAAAAAAAAAAAAAAAAAAAAAAAAAAAAAAAAAAAAAAAAAAAAAAAAAAAAAAAAAAAAAAAAAAAAAAAAAAAAAAAAAAAAAAAAAAAAAAAAAAAAAAAAAAAAAAAAAAAAAAAAAAAAAAAAAAAAAAAAAAAAAAAAAAAAAAAAAAAAAAAAAAAAAAAAAAAAAAAAAAAAAAAAAAAAAAAAAAAAAAAAAAAAAAAAAAAAAAAAAAAAAAAAAAAAAAAAAAAAAAAAAAAAAAAAAAAAAAAAAAAAAAAAAAAAAAAAAAAAAAAAAAAAAAAAAAAAAAAAAAAAAAAAAAAAAAAAAAAAAAAAAAAAAAAAAAAAAAAAAAAAAAAAAAAAAAAAAAAAAAAAAAAAAAAAAAAAAAAAAAAAAAAAAAAAAAAAAAAAAAAAAAAAAAAAAAAAAAAAAAAAAAAAAAAAAAAAAAAAAAAAAAAAAAAAAAAAAAAAAAAAAAAAAAAAAAAAAAAAAAAAAAAAAAAAAAAAAAAAAAAAAAAAAAAAAAAAAAAAAAAAAAAAAAAAAAAAAAAAAAAAAAAAAAAAAAAAAAAAAAAAAAAAAAAAAAAAAAAAAAAAAAAAAAAAAAAAAAAAAAAAAAAAAAAAAAAAAAAAAAAAAAAAAAAAAAAAAAAAAAAAAAAAAAAAAAAAAAAAAAAAAAAAAAAAAAAAAAAAAAAAAAAAAAAAAAAAAAAAAAAAAAAAAAAAAAAAAAAAAAAAAAAAAAAAAAAAAAAAAAAAAAAAAAAAAAAAAAAAAAAAAAAAAAAAAAAAAAAAAAAAAAAAAAAAAAAAAAAAAAAAAAAAAAAAAAAAAAAAAAAAAAAAAAAAAAAAAAAAAAAAAAAAAAAAAAAAAAAAAAAAAAAAAAAAAAAAAAAAAAAAAAAAAAAAAAAAAAAAAAAAAAAAAAAAAAAAAAAAAAAAAAAAAAAAAAAAAAAAAAAAAAAAAAAAAAAAAAAAAAAAAAAAAAAAAAAAAAAAAAAAAAAAAAAAAAAAAAAAAAAAAAAAAAAAAAAAAAAAAAAAAAAAAAAAAAAAAAAAAAAAAAAAAAAAAAAAAAAAAAAAAAAAAAAAAAAAAAAAAAAAAAAAAAAAAAAAAAAAAAAAAAAAAAAAAAAAAAAAAAAAAAAAAAAAAAAAAAAAAAAAAAAAAAAAAAAAAAAAAAAAAAAAAAAAAAAAAAAAAAAAAAAAAAAAAAAAAAAAAAAAAAAAAAAAAAAAAAAAAAAAAAAAAAAAAAAAAAAAAAAAAAAAAAAAAA
AAAAAAAAAAAAAAAAAAAAAAAAAAAAAAAAAAAAAAAAAAAAAAAAAAAAAAAAAAAAAAAAAAAAAAAAAAAAAAAAAAAAAAAAAAAAAAAAAAAAAAAAAAAAAAAAAAAAAAAAAAAAAAAAAAAAAAAAAAAAAAAAAAAAAAAAAAAAAAAAAAAAAAAAAAAAAAAAAAAAAAAAAAAAAAAAAAAAAAAAAAAAAAAAAAAAAAAAAAAAAAAAAAAAAAAAAAAAAAAAAAAAAAAAAAAAAAAAAAAAAAAAAAAAAAAAAAAAAAAAAAAAAAAAAAAAAAAAAAAAAAAAAAAAAAAAAAAAAAAAAAAAAAAAAAAAAAAAAAAAAAAAAAAAAAAAAAAAAAAAAAAAAAAAAAAAAAAAAAAAAAAAAAAAAAAAAAAAAAAAAAAAAAAAAAAAAAAAAAAAAAAAAAAAAAAAAAAAAAAAAAAAAAAAAAAAAAAAAAAAAAAAAAAAAAAAAAAAAAAAAAAAAAAAAAAAAAAAAAAAAAAAAAAAAAAAAAAAAAAAAAAAAAAAAAAAAAAAAAAAAAAAAAAAAAAAAAAAAAAAAAAAAAAAAAAAAAAAAAAAAAAAAAAAAAAAAAAAAAAAAAAAAAAAAAAAAAAAAAAAAAAAAAAAAAAAAAAAAAAAAAAAAAAAAAAAAAAAAAAAAAAAAAAAAAAAAAAAAAAAAAAAAAAAAAAAAAAAAAAAAAAAAAAAAAAAAAAAAAAAAAAAAAAAAAAAAAAAAAAAAAAAAAAAAAAAAAAAAAAAAAAAAAAAAAAAAAAAAAAAAAAAAAAAAAAAAAAAAAAAAAAAAAAAAAAAAAAAAAAAAAAAAAAAAAAAAAAAAAAAAAAAAAAAAAAAAAAAAAAAAAAAAAAAAAAAAAAAAAAAAAAAAAAAAAAAAAAAAAAAAAAAAAAAAAAAAAAAAAAAAAAAAAAAAAAAAAAAAAAAAAAAAAAAAAAAAAAAAAAAAAAAAAAAAAAAAAAAAAAAAAAAAAAAAAAAAAAAAAAAAAAAAAAAAAAAAAAAAAAAAAAAAAAAAAAAAAAAAAAAAAAAAAAAAAAAAAAAAAAAAAAAAAAAAAAAAAAAAAAAAAAAAAAAAAAAAAAAAAAAAAAAAAAAAAAAAAAAAAAAAAAAAAAAAAAAAAAAAAAAAAAAAAAAAAAAAAAAAAAAAAAAAAAAAAAAAAAAAAAAAAAAAAAAAAAAAAAAAAAAAAAAAAAAAAAAAAAAAAAAAAAAAAAAAAAAAAAAAAAAAAAAAAAAAAAAAAAAAAAAAAAAAAAAAAAAAAAAAAAAAAAAAAAAAAAAAAAAAAAAAAAAAAAAAAAAAAAAAAAAAAAAAAAAAAAAAAAAAAAAAAAAAAAAAAAAAAAAAAAAAAAAAAAAAAAAAAAAAAAAAAAAAAAAAAAAAAAAAAAAAAAAAAAAAAAAAAAAAAAAAAAAAAAAAAAAAAAAAAAAAAAAAAAAAAAAAAAAAAAAAAAAAAAAAAAAAAAAAAAAAAAAAAAAAAAAAAAAAAAAAAAAAAAAAAAAAAAAAAAAAAAAAAAAAAAAAAAAAAAAAAAAAAAAAAAAAAAAAAAAAAAAAAAAAAAAAAAAAAAAAAAAAAAAAAAAAAAAAAAAAAAAAAAAAAAAAAAAAAAAAAAAAAAAAAAAAAAAAAAAAAAAAAAAAAAAAAAAAAAAAAAAAAAAAAAAAAAAAAAAAAAAAAAAAAAAAAAAAAAAAAAAAAAAAAAAAAAAAAAAAAAAAAAAAAAAAAAAAAAAAAAAAAAAAAAAAAAAAAAAAAAAAAAAAAAAAAAAAAAAAAAAAAAAAAAAAAAAAAAAAAAAAAAAAAAAAAAAAAAAAAAAAAAAAAAAAAAAAAAAAAAAAAAAAAAAAAAAAAAAAAAAAAAAAAAAAAAAAAAAAAAAAAAAAAAAAAAAAAAAAAAAAAAAAAAAAAAAAAAAAAAAAAAAAAAAAAAAAAAAAAAAAAAAAAAAAAAAAAAAAAAAAAAAAAAAAAAAAAAAAAAAAAAAAAAAAAAAAAAAAAAAAAAAAAAAAAAAAAAAAAAAAAAAAAAAAAAAAAAAAAAAAAAAAAAAAAAAAAAAAAAAAAAAAAAAAAAAAAAAAAAAAAAAAAAAAAAAAAAAAAAAAAAAAAAAAAAAAAAAAAAAAAAAAAAAAAAAAAAAAAAAAAAAAAAAAAAAAAAAAAAAAAAAAAAAAAAAAAAAAAAAAAAAAAAAAAAAAAAAAAAAAAAAAAAAAAAAAAAAAAAAAAAAAAAAAAAAAAAAAAAAAAAAAAAAAAAAAAAAAAAAAAAAAAAAAAAAAAAAAAAAAAAAAAAAAAAAAAAAAAAAAAAAAAAAAAAAAAAAAAAAAAAAAAAAAAAAAAAAAAAAAAAAAAAAAAAAAAAAAAAAAAAAAAAAAAAAAAAAAAAAAAAAAAAAAAAAAAAAAAAAAAAAAAAAAAAAAAAAAAAAAAAAAAAAAAAAAAAAAAAAAAAAAAAAAAAAAAAAAAAAAAAAAAAAAAAAAAAAAAAAAAAAAAAAAAAAAAAAAAAAAAAAAAAAAAAAAAAAAAAAAAAAAAAAAAAAAAAAAAAAAAAAAAAAAAAAAAAAAAAAAAAAAAAAAAAAAAAAAAAAAAAAAAAAAAAAAAAAAAAAAAAAAAAAAAAAAAAAAAAAAAAAAAAAAAAAAAAAAAAAAAAAAAAAAAAAAAAAAAAAAAAAAAAAAAAAAAAAAAAAAAAAAAAAAAAAAAAAAAAAAAAAAAAAAAAAAAAAAAAAAAAAAAAAAAAAAAAAAAAAAAAAAAAAAAAAAAAAAAAAAAAAAAAAAAAAAAAAAAAAAAAAAAAAAAAAAAAAAAAAAAAAAAAAAAAAAAAAAAAAAAAAAAAAAAAAAAAAAAAAAAAAAAAAAAAAAAAAAAAAAAAAAAAAAAAAAAAAAAAAAAAAAAAAAAAAAAAAAAAAAAAAAAAAAAAAAAAAAAAAAAAAAAAAAAAAAAAAAAAAAAAAAAAAAAAAAAAAAAAAAAAAAAAAAAAAAAAAAAAAAAAAAAAAAAAAAAAAAAAAAAAAAAAAAAAAAAAAAAAAAAAAAAAAAAAAAAAAAAAAAAAAAAAAAAAAAAAAAAAAAAAAAAAAAAAAAAAAAAAAAAAAAAAAAAAAAAAAAAAAAAAAAAAAAAAAAAAAAAAAAAAAAAAAAAAAAAAAAAAAAAAAAAAAAAAAAAAAAAAAAAAAAAAAAAAAAAAAAAAAAAAAAAAAAAAAAAAAAAAAAAAAAAAAAAAAAAAAAAAAAAAAAAAAAAAAAAAAAAAAAAAAAAAAAAAAAAAAAAAAAAAAAAAAAAAAAAAAAAAAAAAAAAAAAAAAAAAAAAAAAAAAAAAAAAAAAAAAAAAAAAAAAAAAAAAAAAAAAAAAAAAAAAAAAAAAAAAAAAAAAAAAAAAAAAAAAAAAAAAAAAAAAAAAAAAAAAAAAAAAAAAAAAAAAAAAAAAAAAAAAAAAAAAAAAAAAAAAAAAAAAAAAAAAAAAAAAAAAAAAAAAAAAAAAAAAAAAAAAAAAAAAAAAAAAAAAAAAAAAAAAAAAAAAAAAAAAAAAAAAAAAAAAAAAAAAAAAAAAAAAAAAAAAAAAAAAAAAAAAAAAAAAAAAAAAAAAAAAAAAAAAAAAAAAAAAAAAAAAAAAAAAAAAAAAAAAAAAAAAAAAAAAAAAAAAAAAAAAAAAAAAAAAAAAAAAAAAAAAAAAAAAAAAAAAAAAAAAAAAAAAAAAAAAAAAAAAAAAAAAAAAAAAAAAAAAAAAAAAAAAAAAAAAAAAAAAAAAAAAAAAAAAAAAAAAAAAAAAAAAAAAAAAAAAAAAAAAAAAAAAAAAAAAAAAAAAAAAAAAAAAAAAAAAAAAAAAAAAAAAAAAAAAAAAAAAAAAAAAAAAAAAAAAAAAAAAAAAAAAAAAAAAAAAAAAAAAAAAAAAAAAAAAAAAAAAAAAAAAAAAAAAAAAAAAAAAAAAAAAAAAAAAAAAAAAAAAAAAAAAAAAAAAAAAAAAAAAAAAAAAAAAAAAAAAAAAAAAAAAAAAAAAAAAAAAAAAAAAAAAAAAAAAAAAAAAAAAAAAAAAAAAAAAAAAAAAAAAAAAAAAAAAAAAAAAAAAAAAAAAAAAAAAAAAAAAAAAAAAAAAAAAAAAAAAAA
AAAAAAAAAAAAAAAAAAAAAAAAAAAAAAAAAAAAAAAAAAAAAAAAAAAAAAAAAAAAAAAAAAAAAAAAAAAAAAAAAAAAAAAAAAAAAAAAAAAAAAAAAAAAAAAAAAAAAAAAAAAAAAAAAAAAAAAAAAAAAAAAAAAAAAAAAAAAAAAAAAAAAAAAAAAAAAAAAAAAAAAAAAAAAAAAAAAAAAAAAAAAAAAAAAAAAAAAAAAAAAAAAAAAAAAAAAAAAAAAAAAAAAAAAAAAAAAAAAAAAAAAAAAAAAAAAAAAAAAAAAAAAAAAAAAAAAAAAAAAAAAAAAAAAAAAAAAAAAAAAAAAAAAAAAAAAAAAAAAAAAAAAAAAAAAAAAAAAAAAAAAAAAAAAAAAAAAAAAAAAAAAAAAAAAAAAAAAAAAAAAAAAAAAAAAAAAAAAAAAAAAAAAAAAAAAAAAAAAAAAAAAAAAAAAAAAAAAAAAAAAAAAAAAAAAAAAAAAAAAAAAAAAAAAAAAAAAAAAAAAAAAAAAAAAAAAAAAAAAAAAAAAAAAAAAAAAAAAAAAAAAAAAAAAAAAAAAAAAAAAAAAAAAAAAAAAAAAAAAAAAAAAAAAAAAAAAAAAAAAAAAAAAAAAAAAAAAAAAAAAAAAAAAAAAAAAAAAAAAAAAAAAAAAAAAAAAAAAAAAAAAAAAAAAAAAAAAAAAAAAAAAAAAAAAAAAAAAAAAAAAAAAAAAAAAAAAAAAAAAAAAAAAAAAAAAAAAAAAAAAAAAAAAAAAAAAAAAAAAAAAAAAAAAAAAAAAAAAAAAAAAAAAAAAAAAAAAAAAAAAAAAAAAAAAAAAAAAAAAAAAAAAAAAAAAAAAAAAAAAAAAAAAAAAAAAAAAAAAAAAAAAAAAAAAAAAAAAAAAAAAAAAAAAAAAAAAAAAAAAAAAAAAAAAAAAAAAAAAAAAAAAAAAAAAAAAAAAAAAAAAAAAAAAAAAAAAAAAAAAAAAAAAAAAAAAAAAAAAAAAAAAAAAAAAAAAAAAAAAAAAAAAAAAAAAAAAAAAAAAAAAAAAAAAAAAAAAAAAAAAAAAAAAAAAAAAAAAAAAAAAAAAAAAAAAAAAAAAAAAAAAAAAAAAAAAAAAAAAAAAAAAAAAAAAAAAAAAAAAAAAAAAAAAAAAAAAAAAAAAAAAAAAAAAAAAAAAAAAAAAAAAAAAAAAAAAAAAAAAAAAAAAAAAAAAAAAAAAAAAAAAAAAAAAAAAAAAAAAAAAAAAAAAAAAAAAAAAAAAAAAAAAAAAAAAAAAAAAAAAAAAAAAAAAAAAAAAAAAAAAAAAAAAAAAAAAAAAAAAAAAAAAAAAAAAAAAAAAAAAAAAAAAAAAAAAAAAAAAAAAAAAAAAAAAAAAAAAAAAAAAAAAAAAAAAAAAAAAAAAAAAAAAAAAAAAAAAAAAAAAAAAAAAAAAAAAAAAAAAAAAAAAAAAAAAAAAAAAAAAAAAAAAAAAAAAAAAAAAAAAAAAAAAAAAAAAAAAAAAAAAAAAAAAAAAAAAAAAAAAAAAAAAAAAAAAAAAAAAAAAAAAAAAAAAAAAAAAAAAAAAAAAAAAAAAAAAAAAAAAAAAAAAAAAAAAAAAAAAAAAAAAAAAAAAAAAAAAAAAAAAAAAAAAAAAAAAAAAAAAAAAAAAAAAAAAAAAAAAAAAAAAAAAAAAAAAAAAAAAAAAAAAAAAAAAAAAAAAAAAAAAAAAAAAAAAAAAAAAAAAAAAAAAAAAAAAAAAAAAAAAAAAAAAAAAAAAAAAAAAAAAAAAAAAAAAAAAAAAAAAAAAAAAAAAAAAAAAAAAAAAAAAAAAAAAAAAAAAAAAAAAAAAAAAAAAAAAAAAAAAAAAAAAAAAAAAAAAAAAAAAAAAAAAAAAAAAAAAAAAAAAAAAAAAAAAAAAAAAAAAAAAAAAAAAAAAAAAAAAAAAAAAAAAAAAAAAAAAAAAAAAAAAAAAAAAAAAAAAAAAAAAAAAAAAAAAAAAAAAAAAAAAAAAAAAAAAAAAAAAAAAAAAAAAAAAAAAAAAAAAAAAAAAAAAAAAAAAAAAAAAAAAAAAAAAAAAAAAAAAAAAAAAAAAAAAAAAAAAAAAAAAAAAAAAAAAAAAAAAAAAAAAAAAAAAAAAAAAAAAAAAAAAAAAAAAAAAAAAAAAAAAAAAAAAAAAAAAAAAAAAAAAAAAAAAAAAAAAAAAAAAAAAAAAAAAAAAAAAAAAAAAAAAAAAAAAAAAAAAAAAAAAAAAAAAAAAAAAAAAAAAAAAAAAAAAAAAAAAAAAAAAAAAAAAAAAAAAAAAAAAAAAAAAAAAAAAAAAAAAAAAAAAAAAAAAAAAAAAAAAAAAAAAAAAAAAAAAAAAAAAAAAAAAAAAAAAAAAAAAAAAAAAAAAAAAAAAAAAAAAAAAAAAAAAAAAAAAAAAAAAAAAAAAAAAAAAAAAAAAAAAAAAAAAAAAAAAAAAAAAAAAAAAAAAAAAAAAAAAAAAAAAAAAAAAAAAAAAAAAAAAAAAAAAAAAAAAAAAAAAAAAAAAAAAAAAAAAAAAAAAAAAAAAAAAAAAAAAAAAAAAAAAAAAAAAAAAAAAAAAAAAAAAAAAAAAAAAAAAAAAAAAAAAAAAAAAAAAAAAAAAAAAAAAAAAAAAAAAAAAAAAAAAAAAAAAAAAAAAAAAAAAAAAAAAAAAAAAAAAAAAAAAAAAAAAAAAAAAAAAAAAAAAAAAAAAAAAAAAAAAAAAAAAAAAAAAAAAAAAAAAAAAAAAAAAAAAAAAAAAAAAAAAAAAAAAAAAAAAAAAAAAAAAAAAAAAAAAAAAAAAAAAAAAAAAAAAAAAAAAAAAAAAAAAAAAAAAAAAAAAAAAAAAAAAAAAAAAAAAAAAAAAAAAAAAAAAAAAAAAAAAAAAAAAAAAAAAAAAAAAAAAAAAAAAAAAAAAAAAAAAAAAAAAAAAAAAAAAAAAAAAAAAAAAAAAAAAAAAAAAAAAAAAAAAAAAAAAAAAAAAAAAAAAAAAAAAAAAAAAAAAAAAAAAAAAAAAAAAAAAAAAAAAAAAAAAAAAAAAAAAAAAAAAAAAAAAAAAAAAAAAAAAAAAAAAAAAAAAAAAAAAAAAAAAAAAAAAAAAAAAAAAAAAAAAAAAAAAAAAAAAAAAAAAAAAAAAAAAAAAAAAAAAAAAAAAAAAAAAAAAAAAAAAAAAAAAAAAAAAAAAAAAAAAAAAAAAAAAAAAAAAAAAAAAAAAAAAAAAAAAAAAAAAAAAAAAAAAAAAAAAAAAAAAAAAAAAAAAAAAAAAAAAAAAAAAAAAAAAAAAAAAAAAAAAAAAAAAAAAAAAAAAAAAAAAAAAAAAAAAAAAAAAAAAAAAAAAAAAAAAAAAAAAAAAAAAAAAAAAAAAAAAAAAAAAAAAAAAAAAAAAAAAAAAAAAAAAAAAAAAAAAAAAAAAAAAAAAAAAAAAAAAAAAAAAAAAAAAAAAAAAAAAAAAAAAAAAAAAAAAAAAAAAAAAAAAAAAAAAAAAAAAAAAAAAAAAAAAAAAAAAAAAAAAAAAAAAAAAAAAAAAAAAAAAAAAAAAAAAAAAAAAAAAAAAAAAAAAAAAAAAAAAAAAAAAAAAAAAAAAAAAAAAAAAAAAAAAAAAAAAAAAAAAAAAAAAAAAAAAAAAAAAAAAAAAAAAAAAAAAAAAAAAAAAAAAAAAAAAAAAAAAAAAAAAAAAAAAAAAAAAAAAAAAAAAAAAAAAAAAAAAAAAAAAAAAAAAAAAAAAAAAAAAAAAAAAAAAAAAAAAAAAAAAAAAAAAAAAAAAAAAAAAAAAAAAAAAAAAAAAAAAAAAAAAAAAAAAAAAAAAAAAAAAAAAAAAAAAAAAAAAAAAAAAAAAAAAAAAAAAAAAAAAAAAAAAAAAAAAAAAAAAAAAAAAAAAAAAAAAAAAAAAAAAAAAAAAAAAAAAAAAAAAAAAAAAAAAAAAAAAAAAAAAAAAAAAAAAAAAAAAAAAAAAAAAAAAAAAAAAAAAAAAAAAAAAAAAAAAAAAAAAAAAAAAAAAAAAAAAAAAAAAAAAAAAAAAAAAAAAAAAAAAAAAAAAAAAAAAAAAAAAAAAAAAAAAAAAAAAAAAAAAAAAAAAAAAAAAAAAAAAAAAAAAAAAAAAAAAAAAAAAAAAAAAAAAAAAAAAAAAAAAAAAAAAA
AAAAAAAAAAAAAAAAAAAAAAAAAAAAAAAAAAAAAAAAAAAAAAAAAAAAAAAAAAAAAAAAAAAAAAAAAAAAAAAAAAAAAAAAAAAAAAAAAAAAAAAAAAAAAAAAAAAAAAAAAAAAAAAAAAAAAAAAAAAAAAAAAAAAAAAAAAAAAAAAAAAAAAAAAAAAAAAAAAAAAAAAAAAAAAAAAAAAAAAAAAAAAAAAAAAAAAAAAAAAAAAAAAAAAAAAAAAAAAAAAAAAAAAAAAAAAAAAAAAAAAAAAAAAAAAAAAAAAAAAAAAAAAAAAAAAAAAAAAAAAAAAAAAAAAAAAAAAAAAAAAAAAAAAAAAAAAAAAAAAAAAAAAAAAAAAAAAAAAAAAAAAAAAAAAAAAAAAAAAAAAAAAAAAAAAAAAAAAAAAAAAAAAAAAAAAAAAAAAAAAAAAAAAAAAAAAAAAAAAAAAAAAAAAAAAAAAAAAAAAAAAAAAAAAAAAAAAAAAAAAAAAAAAAAAAAAAAAAAAAAAAAAAAAAAAAAAAAAAAAAAAAAAAAAAAAAAAAAAAAAAAAAAAAAAAAAAAAAAAAAAAAAAAAAAAAAAAAAAAAAAAAAAAAAAAAAAAAAAAAAAAAAAAAAAAAAAAAAAAAAAAAAAAAAAAAAAAAAAAAAAAAAAAAAAAAAAAAAAAAAAAAAAAAAAAAAAAAAAAAAAAAAAAAAAAAAAAAAAAAAAAAAAAAAAAAAAAAAAAAAAAAAAAAAAAAAAAAAAAAAAAAAAAAAAAAAAAAAAAAAAAAAAAAAAAAAAAAAAAAAAAAAAAAAAAAAAAAAAAAAAAAAAAAAAAAAAAAAAAAAAAAAAAAAAAAAAAAAAAAAAAAAAAAAAAAAAAAAAAAAAAAAAAAAAAAAAAAAAAAAAAAAAAAAAAAAAAAAAAAAAAAAAAAAAAAAAAAAAAAAAAAAAAAAAAAAAAAAAAAAAAAAAAAAAAAAAAAAAAAAAAAAAAAAAAAAAAAAAAAAAAAAAAAAAAAAAAAAAAAAAAAAAAAAAAAAAAAAAAAAAAAAAAAAAAAAAAAAAAAAAAAAAAAAAAAAAAAAAAAAAAAAAAAAAAAAAAAAAAAAAAAAAAAAAAAAAAAAAAAAAAAAAAAAAAAAAAAAAAAAAAAAAAAAAAAAAAAAAAAAAAAAAAAAAAAAAAAAAAAAAAAAAAAAAAAAAAAAAAAAAAAAAAAAAAAAAAAAAAAAAAAAAAAAAAAAAAAAAAAAAAAAAAAAAAAAAAAAAAAAAAAAAAAAAAAAAAAAAAAAAAAAAAAAAAAAAAAAAAAAAAAAAAAAAAAAAAAAAAAAAAAAAAAAAAAAAAAAAAAAAAAAAAAAAAAAAAAAAAAAAAAAAAAAAAAAAAAAAAAAAAAAAAAAAAAAAAAAAAAAAAAAAAAAAAAAAAAAAAAAAAAAAAAAAAAAAAAAAAAAAAAAAAAAAAAAAAAAAAAAAAAAAAAAAAAAAAAAAAAAAAAAAAAAAAAAAAAAAAAAAAAAAAAAAAAAAAAAAAAAAAAAAAAAAAAAAAAAAAAAAAAAAAAAAAAAAAAAAAAAAAAAAAAAAAAAAAAAAAAAAAAAAAAAAAAAAAAAAAAAAAAAAAAAAAAAAAAAAAAAAAAAAAAAAAAAAAAAAAAAAAAAAAAAAAAAAAAAAAAAAAAAAAAAAAAAAAAAAAAAAAAAAAAAAAAAAAAAAAAAAAAAAAAAAAAAAAAAAAAAAAAAAAAAAAAAAAAAAAAAAAAAAAAAAAAAAAAAAAAAAAAAAAAAAAAAAAAAAAAAAAAAAAAAAAAAAAAAAAAAAAAAAAAAAAAAAAAAAAAAAAAAAAAAAAAAAAAAAAAAAAAAAAAAAAAAAAAAAAAAAAAAAAAAAAAAAAAAAAAAAAAAAAAAAAAAAAAAAAAAAAAAAAAAAAAAAAAAAAAAAAAAAAAAAAAAAAAAAAAAAAAAAAAAAAAAAAAAAAAAAAAAAAAAAAAAAAAAAAAAAAAAAAAAAAAAAAAAAAAAAAAAAAAAAAAAAAAAAAAAAAAAAAAAAAAAAAAAAAAAAAAAAAAAAAAAAAAAAAAAAAAAAAAAAAAAAAAAAAAAAAAAAAAAAAAAAAAAAAAAAAAAAAAAAAAAAAAAAAAAAAAAAAAAAAAAAAAAAAAAAAAAAAAAAAAAAAAAAAAAAAAAAAAAAAAAAAAAAAAAAAAAAAAAAAAAAAAAAAAAAAAAAAAAAAAAAAAAAAAAAAAAAAAAAAAAAAAAAAAAAAAAAAAAAAAAAAAAAAAAAAAAAAAAAAAAAAAAAAAAAAAAAAAAAAAAAAAAAAAAAAAAAAAAAAAAAAAAAAAAAAAAAAAAAAAAAAAAAAAAAAAAAAAAAAAAAAAAAAAAAAAAAAAAAAAAAAAAAAAAAAAAAAAAAAAAAAAAAAAAAAAAAAAAAAAAAAAAAAAAAAAAAAAAAAAAAAAAAAAAAAAAAAAAAAAAAAAAAAAAAAAAAAAAAAAAAAAAAAAAAAAAAAAAAAAAAAAAAAAAAAAAAAAAAAAAAAAAAAAAAAAAAAAAAAAAAAAAAAAAAAAAAAAAAAAAAAAAAAAAAAAAAAAAAAAAAAAAAAAAAAAAAAAAAAAAAAAAAAAAAAAAAAAAAAAAAAAAAAAAAAAAAAAAAAAAAAAAAAAAAAAAAAAAAAAAAAAAAAAAAAAAAAAAAAAAAAAAAAAAAAAAAAAAAAAAAAAAAAAAAAAAAAAAAAAAAAAAAAAAAAAAAAAAAAAAAAAAAAAAAAAAAAAAAAAAAAAAAAAAAAAAAAAAAAAAAAAAAAAAAAAAAAAAAAAAAAAAAAAAAAAAAAAAAAAAAAAAAAAAAAAAAAAAAAAAAAAAAAAAAAAAAAAAAAAAAAAAAAAAAAAAAAAAAAAAAAAAAAAAAAAAAAAAAAAAAAAAAAAAAAAAAAAAAAAAAAAAAAAAAAAAAAAAAAAAAAAAAAAAAAAAAAAAAAAAAAAAAAAAAAAAAAAAAAAAAAAAAAAAAAAAAAAAAAAAAAAAAAAAAAAAAAAAAAAAAAAAAAAAAAAAAAAAAAAAAAAAAAAAAAAAAAAAAAAAAAAAAAAAAAAAAAAAAAAAAAAAAAAAAAAAAAAAAAAAAAAAAAAAAAAAAAAAAAAAAAAAAAAAAAAAAAAAAAAAAAAAAAAAAAAAAAAAAAAAAAAAAAAAAAAAAAAAAAAAAAAAAAAAAAAAAAAAAAAAAAAAAAAAAAAAAAAAAAAAAAAAAAAAAAAAAAAAAAAAAAAAAAAAAAAAAAAAAAAAAAAAAAAAAAAAAAAAAAAAAAAAAAAAAAAAAAAAAAAAAAAAAAAAAAAAAAAAAAAAAAAAAAAAAAAAAAAAAAAAAAAAAAAAAAAAAAAAAAAAAAAAAAAAAAAAAAAAAAAAAAAAAAAAAAAAAAAAAAAAAAAAAAAAAAAAAAAAAAAAAAAAAAAAAAAAAAAAAAAAAAAAAAAAAAAAAAAAAAAAAAAAAAAAAAAAAAAAAAAAAAAAAAAAAAAAAAAAAAAAAAAAAAAAAAAAAAAAAAAAAAAAAAAAAAAAAAAAAAAAAAAAAAAAAAAAAAAAAAAAAAAAAAAAAAAAAAAAAAAAAAAAAAAAAAAAAAAAAAAAAAAAAAAAAAAAAAAAAAAAAAAAAAAAAAAAAAAAAAAAAAAAAAAAAAAAAAAAAAAAAAAAAAAAAAAAAAAAAAAAAAAAAAAAAAAAAAAAAAAAAAAAAAAAAAAAAAAAAAAAAAAAAAAAAAAAAAAAAAAAAAAAAAAAAAAAAAAAAAAAAAAAAAAAAAAAAAAAAAAAAAAAAAAAAAAAAAAAAAAAAAAAAAAAAAAAAAAAAAAAAAAAAAAAAAAAAAAAAAAAAAAAAAAAAAAAAAAAAAAAAAAAAAAAAAAAAAAAAAAAAAAAAAAAAAAAAAAAAAAAAAAAAAAAAAAAAAAAAAAAAAAAAAAAAAAAAAAAAAAAAAAAAAAAAAAAAAAAAAAAAAAAAAAAAAAAAAAAAAAAAAAAAAAAAAAAAAAAAAAAAAAAAAAAAAAAAAAAAAAAAAAAAAAAAAAAAAAAAAAAAAAAAAAAAAAAAAAAAAAAAAAAAAAAAAAAAAAAAAAAAAAAAAAAAAAAAAAAAAAAAAAAAAAAAAAAAAAAAAAAAAA
AAAAAAAAAAAAAAAAAAAAAAAAAAAAAAAAAAAAAAAAAAAAAAAAAAAAAAAAAAAAAAAAAAAAAAAAAAAAAAAAAAAAAAAAAAAAAAAAAAAAAAAAAAAAAAAAAAAAAAAAAAAAAAAAAAAAAAAAAAAAAAAAAAAAAAAAAAAAAAAAAAAAAAAAAAAAAAAAAAAAAAAAAAAAAAAAAAAAAAAAAAAAAAAAAAAAAAAAAAAAAAAAAAAAAAAAAAAAAAAAAAAAAAAAAAAAAAAAAAAAAAAAAAAAAAAAAAAAAAAAAAAAAAAAAAAAAAAAAAAAAAAAAAAAAAAAAAAAAAAAAAAAAAAAAAAAAAAAAAAAAAAAAAAAAAAAAAAAAAAAAAAAAAAAAAAAAAAAAAAAAAAAAAAAAAAAAAAAAAAAAAAAAAAAAAAAAAAAAAAAAAAAAAAAAAAAAAAAAAAAAAAAAAAAAAAAAAAAAAAAAAAAAAAAAAAAAAAAAAAAAAAAAAAAAAAAAAAAAAAAAAAAAAAAAAAAAAAAAAAAAAAAAAAAAAAAAAAAAAAAAAAAAAAAAAAAAAAAAAAAAAAAAAAAAAAAAAAAAAAAAAAAAAAAAAAAAAAAAAAAAAAAAAAAAAAAAAAAAAAAAAAAAAAAAAAAAAAAAAAAAAAAAAAAAAAAAAAAAAAAAAAAAAAAAAAAAAAAAAAAAAAAAAAAAAAAAAAAAAAAAAAAAAAAAAAAAAAAAAAAAAAAAAAAAAAAAAAAAAAAAAAAAAAAAAAAAAAAAAAAAAAAAAAAAAAAAAAAAAAAAAAAAAAAAAAAAAAAAAAAAAAAAAAAAAAAAAAAAAAAAAAAAAAAAAAAAAAAAAAAAAAAAAAAAAAAAAAAAAAAAAAAAAAAAAAAAAAAAAAAAAAAAAAAAAAAAAAAAAAAAAAAAAAAAAAAAAAAAAAAAAAAAAAAAAAAAAAAAAAAAAAAAAAAAAAAAAAAAAAAAAAAAAAAAAAAAAAAAAAAAAAAAAAAAAAAAAAAAAAAAAAAAAAAAAAAAAAAAAAAAAAAAAAAAAAAAAAAAAAAAAAAAAAAAAAAAAAAAAAAAAAAAAAAAAAAAAAAAAAAAAAAAAAAAAAAAAAAAAAAAAAAAAAAAAAAAAAAAAAAAAAAAAAAAAAAAAAAAAAAAAAAAAAAAAAAAAAAAAAAAAAAAAAAAAAAAAAAAAAAAAAAAAAAAAAAAAAAAAAAAAAAAAAAAAAAAAAAAAAAAAAAAAAAAAAAAAAAAAAAAAAAAAAAAAAAAAAAAAAAAAAAAAAAAAAAAAAAAAAAAAAAAAAAAAAAAAAAAAAAAAAAAAAAAAAAAAAAAAAAAAAAAAAAAAAAAAAAAAAAAAAAAAAAAAAAAAAAAAAAAAAAAAAAAAAAAAAAAAAAAAAAAAAAAAAAAAAAAAAAAAAAAAAAAAAAAAAAAAAAAAAAAAAAAAAAAAAAAAAAAAAAAAAAAAAAAAAAAAAAAAAAAAAAAAAAAAAAAAAAAAAAAAAAAAAAAAAAAAAAAAAAAAAAAAAAAAAAAAAAAAAAAAAAAAAAAAAAAAAAAAAAAAAAAAAAAAAAAAAAAAAAAAAAAAAAAAAAAAAAAAAAAAAAAAAAAAAAAAAAAAAAAAAAAAAAAAAAAAAAAAAAAAAAAAAAAAAAAAAAAAAAAAAAAAAAAAAAAAAAAAAAAAAAAAAAAAAAAAAAAAAAAAAAAAAAAAAAAAAAAAAAAAAAAAAAAAAAAAAAAAAAAAAAAAAAAAAAAAAAAAAAAAAAAAAAAAAAAAAAAAAAAAAAAAAAAAAAAAAAAAAAAAAAAAAAAAAAAAAAAAAAAAAAAAAAAAAAAAAAAAAAAAAAAAAAAAAAAAAAAAAAAAAAAAAAAAAAAAAAAAAAAAAAAAAAAAAAAAAAAAAAAAAAAAAAAAAAAAAAAAAAAAAAAAAAAAAAAAAAAAAAAAAAAAAAAAAAAAAAAAAAAAAAAAAAAAAAAAAAAAAAAAAAAAAAAAAAAAAAAAAAAAAAAAAAAAAAAAAAAAAAAAAAAAAAAAAAAAAAAAAAAAAAAAAAAAAAAAAAAAAAAAAAAAAAAAAAAAAAAAAAAAAAAAAAAAAAAAAAAAAAAAAAAAAAAAAAAAAAAAAAAAAAAAAAAAAAAAAAAAAAAAAAAAAAAAAAAAAAAAAAAAAAAAAAAAAAAAAAAAAAAAAAAAAAAAAAAAAAAAAAAAAAAAAAAAAAAAAAAAAAAAAAAAAAAAAAAAAAAAAAAAAAAAAAAAAAAAAAAAAAAAAAAAAAAAAAAAAAAAAAAAAAAAAAAAAAAAAAAAAAAAAAAAAAAAAAAAAAAAAAAAAAAAAAAAAAAAAAAAAAAAAAAAAAAAAAAAAAAAAAAAAAAAAAAAAAAAAAAAAAAAAAAAAAAAAAAAAAAAAAAAAAAAAAAAAAAAAAAAAAAAAAAAAAAAAAAAAAAAAAAAAAAAAAAAAAAAAAAAAAAAAAAAAAAAAAAAAAAAAAAAAAAAAAAAAAAAAAAAAAAAAAAAAAAAAAAAAAAAAAAAAAAAAAAAAAAAAAAAAAAAAAAAAAAAAAAAAAAAAAAAAAAAAAAAAAAAAAAAAAAAAAAAAAAAAAAAAAAAAAAAAAAAAAAAAAAAAAAAAAAAAAAAAAAAAAAAAAAAAAAAAAAAAAAAAAAAAAAAAAAAAAAAAAAAAAAAAAAAAAAAAAAAAAAAAAAAAAAAAAAAAAAAAAAAAAAAAAAAAAAAAAAAAAAAAAAAAAAAAAAAAAAAAAAAAAAAAAAAAAAAAAAAAAAAAAAAAAAAAAAAAAAAAAAAAAAAAAAAAAAAAAAAAAAAAAAAAAAAAAAAAAAAAAAAAAAAAAAAAAAAAAAAAAAAAAAAAAAAAAAAAAAAAAAAAAAAAAAAAAAAAAAAAAAAAAAAAAAAAAAAAAAAAAAAAAAAAAAAAAAAAAAAAAAAAAAAAAAAAAAAAAAAAAAAAAAAAAAAAAAAAAAAAAAAAAAAAAAAAAAAAAAAAAAAAAAAAAAAAAAAAAAAAAAAAAAAAAAAAAAAAAAAAAAAAAAAAAAAAAAAAAAAAAAAAAAAAAAAAAAAAAAAAAAAAAAAAAAAAAAAAAAAAAAAAAAAAAAAAAAAAAAAAAAAAAAAAAAAAAAAAAAAAAAAAAAAAAAAAAAAAAAAAAAAAAAAAAAAAAAAAAAAAAAAAAAAAAAAAAAAAAAAAAAAAAAAAAAAAAAAAAAAAAAAAAAAAAAAAAAAAAAAAAAAAAAAAAAAAAAAAAAAAAAAAAAAAAAAAAAAAAAAAAAAAAAAAAAAAAAAAAAAAAAAAAAAAAAAAAAAAAAAAAAAAAAAAAAAAAAAAAAAAAAAAAAAAAAAAAAAAAAAAAAAAAAAAAAAAAAAAAAAAAAAAAAAAAAAAAAAAAAAAAAAAAAAAAAAAAAAAAAAAAAAAAAAAAAAAAAAAAAAAAAAAAAAAAAAAAAAAAAAAAAAAAAAAAAAAAAAAAAAAAAAAAAAAAAAAAAAAAAAAAAAAAAAAAAAAAAAAAAAAAAAAAAAAAAAAAAAAAAAAAAAAAAAAAAAAAAAAAAAAAAAAAAAAAAAAAAAAAAAAAAAAAAAAAAAAAAAAAAAAAAAAAAAAAAAAAAAAAAAAAAAAAAAAAAAAAAAAAAAAAAAAAAAAAAAAAAAAAAAAAAAAAAAAAAAAAAAAAAAAAAAAAAAAAAAAAAAAAAAAAAAAAAAAAAAAAAAAAAAAAAAAAAAAAAAAAAAAAAAAAAAAAAAAAAAAAAAAAAAAAAAAAAAAAAAAAAAAAAAAAAAAAAAAAAAAAAAAAAAAAAAAAAAAAAAAAAAAAAAAAAAAAAAAAAAAAAAAAAAAAAAAAAAAAAAAAAAAAAAAAAAAAAAAAAAAAAAAAAAAAAAAAAAAAAAAAAAAAAAAAAAAAAAAAAAAAAAAAAAAAAAAAAAAAAAAAAAAAAAAAAAAAAAAAAAAAAAAAAAAAAAAAAAAAAAAAAAAAAAAAAAAAAAAAAAAAAAAAAAAAAAAAAAAAAAAAAAAAAAAAAAAAAAAAAAAAAAAAAAAAAAAAAAAAAAAAAAAAAAAAAAAAAAAAAAAAAAAAAAAAAAAAAAAAAAAAAAAAAAAAAAAAAAAAAAAAAAAAAAAAAAAA
AAAAAAAAAAAAAAAAAAAAAAAAAAAAAAAAAAAAAAAAAAAAAAAAAAAAAAAAAAAAAAAAAAAAAAAAAAAAAAAAAAAAAAAAAAAAAAAAAAAAAAAAAAAAAAAAAAAAAAAAAAAAAAAAAAAAAAAAAAAAAAAAAAAAAAAAAAAAAAAAAAAAAAAAAAAAAAAAAAAAAAAAAAAAAAAAAAAAAAAAAAAAAAAAAAAAAAAAAAAAAAAAAAAAAAAAAAAAAAAAAAAAAAAAAAAAAAAAAAAAAAAAAAAAAAAAAAAAAAAAAAAAAAAAAAAAAAAAAAAAAAAAAAAAAAAAAAAAAAAAAAAAAAAAAAAAAAAAAAAAAAAAAAAAAAAAAAAAAAAAAAAAAAAAAAAAAAAAAAAAAAAAAAAAAAAAAAAAAAAAAAAAAAAAAAAAAAAAAAAAAAAAAAAAAAAAAAAAAAAAAAAAAAAAAAAAAAAAAAAAAAAAAAAAAAAAAAAAAAAAAAAAAAAAAAAAAAAAAAAAAAAAAAAAAAAAAAAAAAAAAAAAAAAAAAAAAAAAAAAAAAAAAAAAAAAAAAAAAAAAAAAAAAAAAAAAAAAAAAAAAAAAAAAAAAAAAAAAAAAAAAAAAAAAAAAAAAAAAAAAAAAAAAAAAAAAAAAAAAAAAAAAAAAAAAAAAAAAAAAAAAAAAAAAAAAAAAAAAAAAAAAAAAAAAAAAAAAAAAAAAAAAAAAAAAAAAAAAAAAAAAAAAAAAAAAAAAAAAAAAAAAAAAAAAAAAAAAAAAAAAAAAAAAAAAAAAAAAAAAAAAAAAAAAAAAAAAAAAAAAAAAAAAAAAAAAAAAAAAAAAAAAAAAAAAAAAAAAAAAAAAAAAAAAAAAAAAAAAAAAAAAAAAAAAAAAAAAAAAAAAAAAAAAAAAAAAAAAAAAAAAAAAAAAAAAAAAAAAAAAAAAAAAAAAAAAAAAAAAAAAAAAAAAAAAAAAAAAAAAAAAAAAAAAAAAAAAAAAAAAAAAAAAAAAAAAAAAAAAAAAAAAAAAAAAAAAAAAAAAAAAAAAAAAAAAAAAAAAAAAAAAAAAAAAAAAAAAAAAAAAAAAAAAAAAAAAAAAAAAAAAAAAAAAAAAAAAAAAAAAAAAAAAAAAAAAAAAAAAAAAAAAAAAAAAAAAAAAAAAAAAAAAAAAAAAAAAAAAAAAAAAAAAAAAAAAAAAAAAAAAAAAAAAAAAAAAAAAAAAAAAAAAAAAAAAAAAAAAAAAAAAAAAAAAAAAAAAAAAAAAAAAAAAAAAAAAAAAAAAAAAAAAAAAAAAAAAAAAAAAAAAAAAAAAAAAAAAAAAAAAAAAAAAAAAAAAAAAAAAAAAAAAAAAAAAAAAAAAAAAAAAAAAAAAAAAAAAAAAAAAAAAAAAAAAAAAAAAAAAAAAAAAAAAAAAAAAAAAAAAAAAAAAAAAAAAAAAAAAAAAAAAAAAAAAAAAAAAAAAAAAAAAAAAAAAAAAAAAAAAAAAAAAAAAAAAAAAAAAAAAAAAAAAAAAAAAAAAAAAAAAAAAAAAAAAAAAAAAAAAAAAAAAAAAAAAAAAAAAAAAAAAAAAAAAAAAAAAAAAAAAAAAAAAAAAAAAAAAAAAAAAAAAAAAAAAAAAAAAAAAAAAAAAAAAAAAAAAAAAAAAAAAAAAAAAAAAAAAAAAAAAAAAAAAAAAAAAAAAAAAAAAAAAAAAAAAAAAAAAAAAAAAAAAAAAAAAAAAAAAAAAAAAAAAAAAAAAAAAAAAAAAAAAAAAAAAAAAAAAAAAAAAAAAAAAAAAAAAAAAAAAAAAAAAAAAAAAAAAAAAAAAAAAAAAAAAAAAAAAAAAAAAAAAAAAAAAAAAAAAAAAAAAAAAAAAAAAAAAAAAAAAAAAAAAAAAAAAAAAAAAAAAAAAAAAAAAAAAAAAAAAAAAAAAAAAAAAAAAAAAAAAAAAAAAAAAAAAAAAAAAAAAAAAAAAAAAAAAAAAAAAAAAAAAAAAAAAAAAAAAAAAAAAAAAAAAAAAAAAAAAAAAAAAAAAAAAAAAAAAAAAAAAAAAAAAAAAAAAAAAAAAAAAAAAAAAAAAAAAAAAAAAAAAAAAAAAAAAAAAAAAAAAAAAAAAAAAAAAAAAAAAAAAAAAAAAAAAAAAAAAAAAAAAAAAAAAAAAAAAAAAAAAAAAAAAAAAAAAAAAAAAAAAAAAAAAAAAAAAAAAAAAAAAAAAAAAAAAAAAAAAAAAAAAAAAAAAAAAAAAAAAAAAAAAAAAAAAAAAAAAAAAAAAAAAAAAAAAAAAAAAAAAAAAAAAAAAAAAAAAAAAAAAAAAAAAAAAAAAAAAAAAAAAAAAAAAAAAAAAAAAAAAAAAAAAAAAAAAAAAAAAAAAAAAAAAAAAAAAAAAAAAAAAAAAAAAAAAAAAAAAAAAAAAAAAAAAAAAAAAAAAAAAAAAAAAAAAAAAAAAAAAAAAAAAAAAAAAAAAAAAAAAAAAAAAAAAAAAAAAAAAAAAAAAAAAAAAAAAAAAAAAAAAAAAAAAAAAAAAAAAAAAAAAAAAAAAAAAAAAAAAAAAAAAAAAAAAAAAAAAAAAAAAAAAAAAAAAAAAAAAAAAAAAAAAAAAAAAAAAAAAAAAAAAAAAAAAAAAAAAAAAAAAAAAAAAAAAAAAAAAAAAAAAAAAAAAAAAAAAAAAAAAAAAAAAAAAAAAAAAAAAAAAAAAAAAAAAAAAAAAAAAAAAAAAAAAAAAAAAAAAAAAAAAAAAAAAAAAAAAAAAAAAAAAAAAAAAAAAAAAAAAAAAAAAAAAAAAAAAAAAAAAAAAAAAAAAAAAAAAAAAAAAAAAAAAAAAAAAAAAAAAAAAAAAAAAAAAAAAAAAAAAAAAAAAAAAAAAAAAAAAAAAAAAAAAAAAAAAAAAAAAAAAAAAAAAAAAAAAAAAAAAAAAAAAAAAAAAAAAAAAAAAAAAAAAAAAAAAAAAAAAAAAAAAAAAAAAAAAAAAAAAAAAAAAAAAAAAAAAAAAAAAAAAAAAAAAAAAAAAAAAAAAAAAAAAAAAAAAAAAAAAAAAAAAAAAAAAAAAAAAAAAAAAAAAAAAAAAAAAAAAAAAAAAAAAAAAAAAAAAAAAAAAAAAAAAAAAAAAAAAAAAAAAAAAAAAAAAAAAAAAAAAAAAAAAAAAAAAAAAAAAAAAAAAAAAAAAAAAAAAAAAAAAAAAAAAAAAAAAAAAAAAAAAAAAAAAAAAAAAAAAAAAAAAAAAAAAAAAAAAAAAAAAAAAAAAAAAAAAAAAAAAAAAAAAAAAAAAAAAAAAAAAAAAAAAAAAAAAAAAAAAAAAAAAAAAAAAAAAAAAAAAAAAAAAAAAAAAAAAAAAAAAAAAAAAAAAAAAAAAAAAAAAAAAAAAAAAAAAAAAAAAAAAAAAAAAAAAAAAAAAAAAAAAAAAAAAAAAAAAAAAAAAAAAAAAAAAAAAAAAAAAAAAAAAAAAAAAAAAAAAAAAAAAAAAAAAAAAAAAAAAAAAAAAAAAAAAAAAAAAAAAAAAAAAAAAAAAAAAAAAAAAAAAAAAAAAAAAAAAAAAAAAAAAAAAAAAAAAAAAAAAAAAAAAAAAAAAAAAAAAAAAAAAAAAAAAAAAAAAAAAAAAAAAAAAAAAAAAAAAAAAAAAAAAAAAAAAAAAAAAAAAAAAAAAAAAAAAAAAAAAAAAAAAAAAAAAAAAAAAAAAAAAAAAAAAAAAAAAAAAAAAAAAAAAAAAAAAAAAAAAAAAAAAAAAAAAAAAAAAAAAAAAAAAAAAAAAAAAAAAAAAAAAAAAAAAAAAAAAAAAAAAAAAAAAAAAAAAAAAAAAAAAAAAAAAAAAAAAAAAAAAAAAAAAAAAAAAAAAAAAAAAAAAAAAAAAAAAAAAAAAAAAAAAAAAAAAAAAAAAAAAAAAAAAAAAAAAAAAAAAAAAAAAAAAAAAAAAAAAAAAAAAAAAAAAAAAAAAAAAAAAAAAAAAAAAAAAAAAAAAAAAAAAAAAAAAAAAAAAAAAAAAAAAAAAAAAAAAAAAAAAAAAAAAAAAAAAAAAAAAAAAAAAAAAAAAAAAAAAAAAAAAAAAAAAAAAAAAAAAAAAAAAAAAAAAAAAAAAAAAAAAAAAAAAAAAAAAAAAAAAAAAAAAAAAAAAAAAAAAAAAAAAAAAAAAAAAAAAAAAAAAAAAAA
AAAAAAAAAAAAAAAAAAAAAAAAAAAAAAAAAAAAAAAAAAAAAAAAAAAAAAAAAAAAAAAAAAAAAAAAAAAAAAAAAAAAAAAAAAAAAAAAAAAAAAAAAAAAAAAAAAAAAAAAAAAAAAAAAAAAAAAAAAAAAAAAAAAAAAAAAAAAAAAAAAAAAAAAAAAAAAAAAAAAAAAAAAAAAAAAAAAAAAAAAAAAAAAAAAAAAAAAAAAAAAAAAAAAAAAAAAAAAAAAAAAAAAAAAAAAAAAAAAAAAAAAAAAAAAAAAAAAAAAAAAAAAAAAAAAAAAAAAAAAAAAAAAAAAAAAAAAAAAAAAAAAAAAAAAAAAAAAAAAAAAAAAAAAAAAAAAAAAAAAAAAAAAAAAAAAAAAAAAAAAAAAAAAAAAAAAAAAAAAAAAAAAAAAAAAAAAAAAAAAAAAAAAAAAAAAAAAAAAAAAAAAAAAAAAAAAAAAAAAAAAAAAAAAAAAAAAAAAAAAAAAAAAAAAAAAAAAAAAAAAAAAAAAAAAAAAAAAAAAAAAAAAAAAAAAAAAAAAAAAAAAAAAAAAAAAAAAAAAAAAAAAAAAAAAAAAAAAAAAAAAAAAAAAAAAAAAAAAAAAAAAAAAAAAAAAAAAAAAAAAAAAAAAAAAAAAAAAAAAAAAAAAAAAAAAAAAAAAAAAAAAAAAAAAAAAAAAAAAAAAAAAAAAAAAAAAAAAAAAAAAAAAAAAAAAAAAAAAAAAAAAAAAAAAAAAAAAAAAAAAAAAAAAAAAAAAAAAAAAAAAAAAAAAAAAAAAAAAAAAAAAAAAAAAAAAAAAAAAAAAAAAAAAAAAAAAAAAAAAAAAAAAAAAAAAAAAAAAAAAAAAAAAAAAAAAAAAAAAAAAAAAAAAAAAAAAAAAAAAAAAAAAAAAAAAAAAAAAAAAAAAAAAAAAAAAAAAAAAAAAAAAAAAAAAAAAAAAAAAAAAAAAAAAAAAAAAAAAAAAAAAAAAAAAAAAAAAAAAAAAAAAAAAAAAAAAAAAAAAAAAAAAAAAAAAAAAAAAAAAAAAAAAAAAAAAAAAAAAAAAAAAAAAAAAAAAAAAAAAAAAAAAAAAAAAAAAAAAAAAAAAAAAAAAAAAAAAAAAAAAAAAAAAAAAAAAAAAAAAAAAAAAAAAAAAAAAAAAAAAAAAAAAAAAAAAAAAAAAAAAAAAAAAAAAAAAAAAAAAAAAAAAAAAAAAAAAAAAAAAAAAAAAAAAAAAAAAAAAAAAAAAAAAAAAAAAAAAAAAAAAAAAAAAAAAAAAAAAAAAAAAAAAAAAAAAAAAAAAAAAAAAAAAAAAAAAAAAAAAAAAAAAAAAAAAAAAAAAAAAAAAAAAAAAAAAAAAAAAAAAAAAAAAAAAAAAAAAAAAAAAAAAAAAAAAAAAAAAAAAAAAAAAAAAAAAAAAAAAAAAAAAAAAAAAAAAAAAAAAAAAAAAAAAAAAAAAAAAAAAAAAAAAAAAAAAAAAAAAAAAAAAAAAAAAAAAAAAAAAAAAAAAAAAAAAAAAAAAAAAAAAAAAAAAAAAAAAAAAAAAAAAAAAAAAAAAAAAAAAAAAAAAAAAAAAAAAAAAAAAAAAAAAAAAAAAAAAAAAAAAAAAAAAAAAAAAAAAAAAAAAAAAAAAAAAAAAAAAAAAAAAAAAAAAAAAAAAAAAAAAAAAAAAAAAAAAAAAAAAAAAAAAAAAAAAAAAAAAAAAAAAAAAAAAAAAAAAAAAAAAAAAAAAAAAAAAAAAAAAAAAAAAAAAAAAAAAAAAAAAAAAAAAAAAAAAAAAAAAAAAAAAAAAAAAAAAAAAAAAAAAAAAAAAAAAAAAAAAAAAAAAAAAAAAAAAAAAAAAAAAAAAAAAAAAAAAAAAAAAAAAAAAAAAAAAAAAAAAAAAAAAAAAAAAAAAAAAAAAAAAAAAAAAAAAAAAAAAAAAAAAAAAAAAAAAAAAAAAAAAAAAAAAAAAAAAAAAAAAAAAAAAAAAAAAAAAAAAAAAAAAAAAAAAAAAAAAAAAAAAAAAAAAAAAAAAAAAAAAAAAAAAAAAAAAAAAAAAAAAAAAAAAAAAAAAAAAAAAAAAAAAAAAAAAAAAAAAAAAAAAAAAAAAAAAAAAAAAAAAAAAAAAAAAAAAAAAAAAAAAAAAAAAAAAAAAAAAAAAAAAAAAAAAAAAAAAAAAAAAAAAAAAAAAAAAAAAAAAAAAAAAAAAAAAAAAAAAAAAAAAAAAAAAAAAAAAAAAAAAAAAAAAAAAAAAAAAAAAAAAAAAAAAAAAAAAAAAAAAAAAAAAAAAAAAAAAAAAAAAAAAAAAAAAAAAAAAAAAAAAAAAAAAAAAAAAAAAAAAAAAAAAAAAAAAAAAAAAAAAAAAAAAAAAAAAAAAAAAAAAAAAAAAAAAAAAAAAAAAAAAAAAAAAAAAAAAAAAAAAAAAAAAAAAAAAAAAAAAAAAAAAAAAAAAAAAAAAAAAAAAAAAAAAAAAAAAAAAAAAAAAAAAAAAAAAAAAAAAAAAAAAAAAAAAAAAAAAAAAAAAAAAAAAAAAAAAAAAAAAAAAAAAAAAAAAAAAAAAAAAAAAAAAAAAAAAAAAAAAAAAAAAAAAAAAAAAAAAAAAAAAAAAAAAAAAAAAAAAAAAAAAAAAAAAAAAAAAAAAAAAAAAAAAAAAAAAAAAAAAAAAAAAAAAAAAAAAAAAAAAAAAAAAAAAAAAAAAAAAAAAAAAAAAAAAAAAAAAAAAAAAAAAAAAAAAAAAAAAAAAAAAAAAAAAAAAAAAAAAAAAAAAAAAAAAAAAAAAAAAAAAAAAAAAAAAAAAAAAAAAAAAAAAAAAAAAAAAAAAAAAAAAAAAAAAAAAAAAAAAAAAAAAAAAAAAAAAAAAAAAAAAAAAAAAAAAAAAAAAAAAAAAAAAAAAAAAAAAAAAAAAAAAAAAAAAAAAAAAAAAAAAAAAAAAAAAAAAAAAAAAAAAAAAAAAAAAAAAAAAAAAAAAAAAAAAAAAAAAAAAAAAAAAAAAAAAAAAAAAAAAAAAAAAAAAAAAAAAAAAAAAAAAAAAAAAAAAAAAAAAAAAAAAAAAAAAAAAAAAAAAAAAAAAAAAAAAAAAAAAAAAAAAAAAAAAAAAAAAAAAAAAAAAAAAAAAAAAAAAAAAAAAAAAAAAAAAAAAAAAAAAAAAAAAAAAAAAAAAAAAAAAAAAAAAAAAAAAAAAAAAAAAAAAAAAAAAAAAAAAAAAAAAAAAAAAAAAAAAAAAAAAAAAAAAAAAAAAAAAAAAAAAAAAAAAAAAAAAAAAAAAAAAAAAAAAAAAAAAAAAAAAAAAAAAAAAAAAAAAAAAAAAAAAAAAAAAAAAAAAAAAAAAAAAAAAAAAAAAAAAAAAAAAAAAAAAAAAAAAAAAAAAAAAAAAAAAAAAAAAAAAAAAAAAAAAAAAAAAAAAAAAAAAAAAAAAAAAAAAAAAAAAAAAAAAAAAAAAAAAAAAAAAAAAAAAAAAAAAAAAAAAAAAAAAAAAAAAAAAAAAAAAAAAAAAAAAAAAAAAAAAAAAAAAAAAAAAAAAAAAAAAAAAAAAAAAAAAAAAAAAAAAAAAAAAAAAAAAAAAAAAAAAAAAAAAAAAAAAAAAAAAAAAAAAAAAAAAAAAAAAAAAAAAAAAAAAAAAAAAAAAAAAAAAAAAAAAAAAAAAAAAAAAAAAAAAAAAAAAAAAAAAAAAAAAAAAAAAAAAAAAAAAAAAAAAAAAAAAAAAAAAAAAAAAAAAAAAAAAAAAAAAAAAAAAAAAAAAAAAAAAAAAAAAAAAAAAAAAAAAAAAAAAAAAAAAAAAAAAAAAAAAAAAAAAAAAAAAAAAAAAAAAAAAAAAAAAAAAAAAAAAAAAAAAAAAAAAAAAAAAAAAAAAAAAAAAAAAAAAAAAAAAAAAAAAAAAAAAAAAAAAAAAAAAAAAAAAAAAAAAAAAAAAAAAAAAAAAAAAAAAAAAAAAAAAAAAAAAAAAAAAAAAAAAAAAAAAAAAAAAAAAAAAAAAAAAAAAAAAAAAAAAAAAAAAAAAAAAAAAAAAAAAAAAAAAAAAAAAAAAAAAAAAAAAAAAAAAAAAAAAAAAAAAAAAAAAAAAAAAAAAAAAAAAAAAAAAAAAAAAAAAAAAAAAAAAAAAAAAAAAAAAAAAAAAAAAAAAAAAAAAAAAAAAAAAAAAA
AAAAAAAAAAAAAAAAAAAAAAAAAAAAAAAAAAAAAAAAAAAAAAAAAAAAAAAAAAAAAAAAAAAAAAAAAAAAAAAAAAAAAAAAAAAAAAAAAAAAAAAAAAAAAAAAAAAAAAAAAAAAAAAAAAAAAAAAAAAAAAAAAAAAAAAAAAAAAAAAAAAAAAAAAAAAAAAAAAAAAAAAAAAAAAAAAAAAAAAAAAAAAAAAAAAAAAAAAAAAAAAAAAAAAAAAAAAAAAAAAAAAAAAAAAAAAAAAAAAAAAAAAAAAAAAAAAAAAAAAAAAAAAAAAAAAAAAAAAAAAAAAAAAAAAAAAAAAAAAAAAAAAAAAAAAAAAAAAAAAAAAAAAAAAAAAAAAAAAAAAAAAAAAAAAAAAAAAAAAAAAAAAAAAAAAAAAAAAAAAAAAAAAAAAAAAAAAAAAAAAAAAAAAAAAAAAAAAAAAAAAAAAAAAAAAAAAAAAAAAAAAAAAAAAAAAAAAAAAAAAAAAAAAAAAAAAAAAAAAAAAAAAAAAAAAAAAAAAAAAAAAAAAAAAAAAAAAAAAAAAAAAAAAAAAAAAAAAAAAAAAAAAAAAAAAAAAAAAAAAAAAAAAAAAAAAAAAAAAAAAAAAAAAAAAAAAAAAAAAAAAAAAAAAAAAAAAAAAAAAAAAAAAAAAAAAAAAAAAAAAAAAAAAAAAAAAAAAAAAAAAAAAAAAAAAAAAAAAAAAAAAAAAAAAAAAAAAAAAAAAAAAAAAAAAAAAAAAAAAAAAAAAAAAAAAAAAAAAAAAAAAAAAAAAAAAAAAAAAAAAAAAAAAAAAAAAAAAAAAAAAAAAAAAAAAAAAAAAAAAAAAAAAAAAAAAAAAAAAAAAAAAAAAAAAAAAAAAAAAAAAAAAAAAAAAAAAAAAAAAAAAAAAAAAAAAAAAAAAAAAAAAAAAAAAAAAAAAAAAAAAAAAAAAAAAAAAAAAAAAAAAAAAAAAAAAAAAAAAAAAAAAAAAAAAAAAAAAAAAAAAAAAAAAAAAAAAAAAAAAAAAAAAAAAAAAAAAAAAAAAAAAAAAAAAAAAAAAAAAAAAAAAAAAAAAAAAAAAAAAAAAAAAAAAAAAAAAAAAAAAAAAAAAAAAAAAAAAAAAAAAAAAAAAAAAAAAAAAAAAAAAAAAAAAAAAAAAAAAAAAAAAAAAAAAAAAAAAAAAAAAAAAAAAAAAAAAAAAAAAAAAAAAAAAAAAAAAAAAAAAAAAAAAAAAAAAAAAAAAAAAAAAAAAAAAAAAAAAAAAAAAAAAAAAAAAAAAAAAAAAAAAAAAAAAAAAAAAAAAAAAAAAAAAAAAAAAAAAAAAAAAAAAAAAAAAAAAAAAAAAAAAAAAAAAAAAAAAAAAAAAAAAAAAAAAAAAAAAAAAAAAAAAAAAAAAAAAAAAAAAAAAAAAAAAAAAAAAAAAAAAAAAAAAAAAAAAAAAAAAAAAAAAAAAAAAAAAAAAAAAAAAAAAAAAAAAAAAAAAAAAAAAAAAAAAAAAAAAAAAAAAAAAAAAAAAAAAAAAAAAAAAAAAAAAAAAAAAAAAAAAAAAAAAAAAAAAAAAAAAAAAAAAAAAAAAAAAAAAAAAAAAAAAAAAAAAAAAAAAAAAAAAAAAAAAAAAAAAAAAAAAAAAAAAAAAAAAAAAAAAAAAAAAAAAAAAAAAAAAAAAAAAAAAAAAAAAAAAAAAAAAAAAAAAAAAAAAAAAAAAAAAAAAAAAAAAAAAAAAAAAAAAAAAAAAAAAAAAAAAAAAAAAAAAAAAAAAAAAAAAAAAAAAAAAAAAAAAAAAAAAAAAAAAAAAAAAAAAAAAAAAAAAAAAAAAAAAAAAAAAAAAAAAAAAAAAAAAAAAAAAAAAAAAAAAAAAAAAAAAAAAAAAAAAAAAAAAAAAAAAAAAAAAAAAAAAAAAAAAAAAAAAAAAAAAAAAAAAAAAAAAAAAAAAAAAAAAAAAAAAAAAAAAAAAAAAAAAAAAAAAAAAAAAAAAAAAAAAAAAAAAAAAAAAAAAAAAAAAAAAAAAAAAAAAAAAAAAAAAAAAAAAAAAAAAAAAAAAAAAAAAAAAAAAAAAAAAAAAAAAAAAAAAAAAAAAAAAAAAAAAAAAAAAAAAAAAAAAAAAAAAAAAAAAAAAAAAAAAAAAAAAAAAAAAAAAAAAAAAAAAAAAAAAAAAAAAAAAAAAAAAAAAAAAAAAAAAAAAAAAAAAAAAAAAAAAAAAAAAAAAAAAAAAAAAAAAAAAAAAAAAAAAAAAAAAAAAAAAAAAAAAAAAAAAAAAAAAAAAAAAAAAAAAAAAAAAAAAAAAAAAAAAAAAAAAAAAAAAAAAAAAAAAAAAAAAAAAAAAAAAAAAAAAAAAAAAAAAAAAAAAAAAAAAAAAAAAAAAAAAAAAAAAAAAAAAAAAAAAAAAAAAAAAAAAAAAAAAAAAAAAAAAAAAAAAAAAAAAAAAAAAAAAAAAAAAAAAAAAAAAAAAAAAAAAAAAAAAAAAAAAAAAAAAAAAAAAAAAAAAAAAAAAAAAAAAAAAAAAAAAAAAAAAAAAAAAAAAAAAAAAAAAAAAAAAAAAAAAAAAAAAAAAAAAAAAAAAAAAAAAAAAAAAAAAAAAAAAAAAAAAAAAAAAAAAAAAAAAAAAAAAAAAAAAAAAAAAAAAAAAAAAAAAAAAAAAAAAAAAAAAAAAAAAAAAAAAAAAAAAAAAAAAAAAAAAAAAAAAAAAAAAAAAAAAAAAAAAAAAAAAAAAAAAAAAAAAAAAAAAAAAAAAAAAAAAAAAAAAAAAAAAAAAAAAAAAAAAAAAAAAAAAAAAAAAAAAAAAAAAAAAAAAAAAAAAAAAAAAAAAAAAAAAAAAAAAAAAAAAAAAAAAAAAAAAAAAAAAAAAAAAAAAAAAAAAAAAAAAAAAAAAAAAAAAAAAAAAAAAAAAAAAAAAAAAAAAAAAAAAAAAAAAAAAAAAAAAAAAAAAAAAAAAAAAAAAAAAAAAAAAAAAAAAAAAAAAAAAAAAAAAAAAAAAAAAAAAAAAAAAAAAAAAAAAAAAAAAAAAAAAAAAAAAAAAAAAAAAAAAAAAAAAAAAAAAAAAAAAAAAAAAAAAAAAAAAAAAAAAAAAAAAAAAAAAAAAAAAAAAAAAAAAAAAAAAAAAAAAAAAAAAAAAAAAAAAAAAAAAAAAAAAAAAAAAAAAAAAAAAAAAAAAAAAAAAAAAAAAAAAAAAAAAAAAAAAAAAAAAAAAAAAAAAAAAAAAAAAAAAAAAAAAAAAAAAAAAAAAAAAAAAAAAAAAAAAAAAAAAAAAAAAAAAAAAAAAAAAAAAAAAAAAAAAAAAAAAAAAAAAAAAAAAAAAAAAAAAAAAAAAAAAAAAAAAAAAAAAAAAAAAAAAAAAAAAAAAAAAAAAAAAAAAAAAAAAAAAAAAAAAAAAAAAAAAAAAAAAAAAAAAAAAAAAAAAAAAAAAAAAAAAAAAAAAAAAAAAAAAAAAAAAAAAAAAAAAAAAAAAAAAAAAAAAAAAAAAAAAAAAAAAAAAAAAAAAAAAAAAAAAAAAAAAAAAAAAAAAAAAAAAAAAAAAAAAAAAAAAAAAAAAAAAAAAAAAAAAAAAAAAAAAAAAAAAAAAAAAAAAAAAAAAAAAAAAAAAAAAAAAAAAAAAAAAAAAAAAAAAAAAAAAAAAAAAAAAAAAAAAAAAAAAAAAAAAAAAAAAAAAAAAAAAAAAAAAAAAAAAAAAAAAAAAAAAAAAAAAAAAAAAAAAAAAAAAAAAAAAAAAAAAAAAAAAAAAAAAAAAAAAAAAAAAAAAAAAAAAAAAAAAAAAAAAAAAAAAAAAAAAAAAAAAAAAAAAAAAAAAAAAAAAAAAAAAAAAAAAAAAAAAAAAAAAAAAAAAAAAAAAAAAAAAAAAAAAAAAAAAAAAAAAAAAAAAAAAAAAAAAAAAAAAAAAAAAAAAAAAAAAAAAAAAAAAAAAAAAAAAAAAAAAAAAAAAAAAAAAAAAAAAAAAAAAAAAAAAAAAAAAAAAAAAAAAAAAAAAAAAAAAAAAAAAAAAAAAAAAAAAAAAAAAAAAAAAAAAAAAAAAAAAAAAAAAAAAAAAAAAAAAAAAAAAAAAAAAAAAAAAAAAAAAAAAAAAAAAAAAAAAAAAAAAAAAAAAAAAAAAAAAAAAAAAAAAAAAAAAAAAAAAAAAAAAAAAAAA
AAAAAAAAAAAAAAAAAAAAAAAAAAAAAAAAAAAAAAAAAAAAAAAAAAAAAAAAAAAAAAAAAAAAAAAAAAAAAAAAAAAAAAAAAAAAAAAAAAAAAAAAAAAAAAAAAAAAAAAAAAAAAAAAAAAAAAAAAAAAAAAAAAAAAAAAAAAAAAAAAAAAAAAAAAAAAAAAAAAAAAAAAAAAAAAAAAAAAAAAAAAAAAAAAAAAAAAAAAAAAAAAAAAAAAAAAAAAAAAAAAAAAAAAAAAAAAAAAAAAAAAAAAAAAAAAAAAAAAAAAAAAAAAAAAAAAAAAAAAAAAAAAAAAAAAAAAAAAAAAAAAAAAAAAAAAAAAAAAAAAAAAAAAAAAAAAAAAAAAAAAAAAAAAAAAAAAAAAAAAAAAAAAAAAAAAAAAAAAAAAAAAAAAAAAAAAAAAAAAAAAAAAAAAAAAAAAAAAAAAAAAAAAAAAAAAAAAAAAAAAAAAAAAAAAAAAAAAAAAAAAAAAAAAAAAAAAAAAAAAAAAAAAAAAAAAAAAAAAAAAAAAAAAAAAAAAAAAAAAAAAAAAAAAAAAAAAAAAAAAAAAAAAAAAAAAAAAAAAAAAAAAAAAAAAAAAAAAAAAAAAAAAAAAAAAAAAAAAAAAAAAAAAAAAAAAAAAAAAAAAAAAAAAAAAAAAAAAAAAAAAAAAAAAAAAAAAAAAAAAAAAAAAAAAAAAAAAAAAAAAAAAAAAAAAAAAAAAAAAAAAAAAAAAAAAAAAAAAAAAAAAAAAAAAAAAAAAAAAAAAAAAAAAAAAAAAAAAAAAAAAAAAAAAAAAAAAAAAAAAAAAAAAAAAAAAAAAAAAAAAAAAAAAAAAAAAAAAAAAAAAAAAAAAAAAAAAAAAAAAAAAAAAAAAAAAAAAAAAAAAAAAAAAAAAAAAAAAAAAAAAAAAAAAAAAAAAAAAAAAAAAAAAAAAAAAAAAAAAAAAAAAAAAAAAAAAAAAAAAAAAAAAAAAAAAAAAAAAAAAAAAAAAAAAAAAAAAAAAAAAAAAAAAAAAAAAAAAAAAAAAAAAAAAAAAAAAAAAAAAAAAAAAAAAAAAAAAAAAAAAAAAAAAAAAAAAAAAAAAAAAAAAAAAAAAAAAAAAAAAAAAAAAAAAAAAAAAAAAAAAAAAAAAAAAAAAAAAAAAAAAAAAAAAAAAAAAAAAAAAAAAAAAAAAAAAAAAAAAAAAAAAAAAAAAAAAAAAAAAAAAAAAAAAAAAAAAAAAAAAAAAAAAAAAAAAAAAAAAAAAAAAAAAAAAAAAAAAAAAAAAAAAAAAAAAAAAAAAAAAAAAAAAAAAAAAAAAAAAAAAAAAAAAAAAAAAAAAAAAAAAAAAAAAAAAAAAAAAAAAAAAAAAAAAAAAAAAAAAAAAAAAAAAAAAAAAAAAAAAAAAAAAAAAAAAAAAAAAAAAAAAAAAAAAAAAAAAAAAAAAAAAAAAAAAAAAAAAAAAAAAAAAAAAAAAAAAAAAAAAAAAAAAAAAAAAAAAAAAAAAAAAAAAAAAAAAAAAAAAAAAAAAAAAAAAAAAAAAAAAAAAAAAAAAAAAAAAAAAAAAAAAAAAAAAAAAAAAAAAAAAAAAAAAAAAAAAAAAAAAAAAAAAAAAAAAAAAAAAAAAAAAAAAAAAAAAAAAAAAAAAAAAAAAAAAAAAAAAAAAAAAAAAAAAAAAAAAAAAAAAAAAAAAAAAAAAAAAAAAAAAAAAAAAAAAAAAAAAAAAAAAAAAAAAAAAAAAAAAAAAAAAAAAAAAAAAAAAAAAAAAAAAAAAAAAAAAAAAAAAAAAAAAAAAAAAAAAAAAAAAAAAAAAAAAAAAAAAAAAAAAAAAAAAAAAAAAAAAAAAAAAAAAAAAAAAAAAAAAAAAAAAAAAAAAAAAAAAAAAAAAAAAAAAAAAAAAAAAAAAAAAAAAAAAAAAAAAAAAAAAAAAAAAAAAAAAAAAAAAAAAAAAAAAAAAAAAAAAAAAAAAAAAAAAAAAAAAAAAAAAAAAAAAAAAAAAAAAAAAAAAAAAAAAAAAAAAAAAAAAAAAAAAAAAAAAAAAAAAAAAAAAAAAAAAAAAAAAAAAAAAAAAAAAAAAAAAAAAAAAAAAAAAAAAAAAAAAAAAAAAAAAAAAAAAAAAAAAAAAAAAAAAAAAAAAAAAAAAAAAAAAAAAAAAAAAAAAAAAAAAAAAAAAAAAAAAAAAAAAAAAAAAAAAAAAAAAAAAAAAAAAAAAAAAAAAAAAAAAAAAAAAAAAAAAAAAAAAAAAAAAAAAAAAAAAAAAAAAAAAAAAAAAAAAAAAAAAAAAAAAAAAAAAAAAAAAAAAAAAAAAAAAAAAAAAAAAAAAAAAAAAAAAAAAAAAAAAAAAAAAAAAAAAAAAAAAAAAAAAAAAAAAAAAAAAAAAAAAAAAAAAAAAAAAAAAAAAAAAAAAAAAAAAAAAAAAAAAAAAAAAAAAAAAAAAAAAAAAAAAAAAAAAAAAAAAAAAAAAAAAAAAAAAAAAAAAAAAAAAAAAAAAAAAAAAAAAAAAAAAAAAAAAAAAAAAAAAAAAAAAAAAAAAAAAAAAAAAAAAAAAAAAAAAAAAAAAAAAAAAAAAAAAAAAAAAAAAAAAAAAAAAAAAAAAAAAAAAAAAAAAAAAAAAAAAAAAAAAAAAAAAAAAAAAAAAAAAAAAAAAAAAAAAAAAAAAAAAAAAAAAAAAAAAAAAAAAAAAAAAAAAAAAAAAAAAAAAAAAAAAAAAAAAAAAAAAAAAAAAAAAAAAAAAAAAAAAAAAAAAAAAAAAAAAAAAAAAAAAAAAAAAAAAAAAAAAAAAAAAAAAAAAAAAAAAAAAAAAAAAAAAAAAAAAAAAAAAAAAAAAAAAAAAAAAAAAAAAAAAAAAAAAAAAAAAAAAAAAAAAAAAAAAAAAAAAAAAAAAAAAAAAAAAAAAAAAAAAAAAAAAAAAAAAAAAAAAAAAAAAAAAAAAAAAAAAAAAAAAAAAAAAAAAAAAAAAAAAAAAAAAAAAAAAAAAAAAAAAAAAAAAAAAAAAAAAAAAAAAAAAAAAAAAAAAAAAAAAAAAAAAAAAAAAAAAAAAAAAAAAAAAAAAAAAAAAAAAAAAAAAAAAAAAAAAAAAAAAAAAAAAAAAAAAAAAAAAAAAAAAAAAAAAAAAAAAAAAAAAAAAAAAAAAAAAAAAAAAAAAAAAAAAAAAAAAAAAAAAAAAAAAAAAAAAAAAAAAAAAAAAAAAAAAAAAAAAAAAAAAAAAAAAAAAAAAAAAAAAAAAAAAAAAAAAAAAAAAAAAAAAAAAAAAAAAAAAAAAAAAAAAAAAAAAAAAAAAAAAAAAAAAAAAAAAAAAAAAAAAAAAAAAAAAAAAAAAAAAAAAAAAAAAAAAAAAAAAAAAAAAAAAAAAAAAAAAAAAAAAAAAAAAAAAAAAAAAAAAAAAAAAAAAAAAAAAAAAAAAAAAAAAAAAAAAAAAAAAAAAAAAAAAAAAAAAAAAAAAAAAAAAAAAAAAAAAAAAAAAAAAAAAAAAAAAAAAAAAAAAAAAAAAAAAAAAAAAAAAAAAAAAAAAAAAAAAAAAAAAAAAAAAAAAAAAAAAAAAAAAAAAAAAAAAAAAAAAAAAAAAAAAAAAAAAAAAAAAAAAAAAAAAAAAAAAAAAAAAAAAAAAAAAAAAAAAAAAAAAAAAAAAAAAAAAAAAAAAAAAAAAAAAAAAAAAAAAAAAAAAAAAAAAAAAAAAAAAAAAAAAAAAAAAAAAAAAAAAAAAAAAAAAAAAAAAAAAAAAAAAAAAAAAAAAAAAAAAAAAAAAAAAAAAAAAAAAAAAAAAAAAAAAAAAAAAAAAAAAAAAAAAAAAAAAAAAAAAAAAAAAAAAAAAAAAAAAAAAAAAAAAAAAAAAAAAAAAAAAAAAAAAAAAAAAAAAAAAAAAAAAAAAAAAAAAAAAAAAAAAAAAAAAAAAAAAAAAAAAAAAAAAAAAAAAAAAAAAAAAAAAAAAAAAAAAAAAAAAAAAAAAAAAAAAAAAAAAAAAAAAAAAAAAAAAAAAAAAAAAAAAAAAAAAAAAAAAAAAAAAAAAAAAAAAAAAAAAAAAAAAAAAAAAAAAAAAAAAAAAAAAAAAAAAAAAAAAAAAAAAAAAAAAAAAAAAAAAAAAAAAAAAAAAAAAAAAAAAAAAAAAAAAAAAAAAAAAAAAAA
AAAAAAAAAAAAAAAAAAAAAAAAAAAAAAAAAAAAAAAAAAAAAAAAAAAAAAAAAAAAAAAAAAAAAAAAAAAAAAAAAAAAAAAAAAAAAAAAAAAAAAAAAAAAAAAAAAAAAAAAAAAAAAAAAAAAAAAAAAAAAAAAAAAAAAAAAAAAAAAAAAAAAAAAAAAAAAAAAAAAAAAAAAAAAAAAAAAAAAAAAAAAAAAAAAAAAAAAAAAAAAAAAAAAAAAAAAAAAAAAAAAAAAAAAAAAAAAAAAAAAAAAAAAAAAAAAAAAAAAAAAAAAAAAAAAAAAAAAAAAAAAAAAAAAAAAAAAAAAAAAAAAAAAAAAAAAAAAAAAAAAAAAAAAAAAAAAAAAAAAAAAAAAAAAAAAAAAAAAAAAAAAAAAAAAAAAAAAAAAAAAAAAAAAAAAAAAAAAAAAAAAAAAAAAAAAAAAAAAAAAAAAAAAAAAAAAAAAAAAAAAAAAAAAAAAAAAAAAAAAAAAAAAAAAAAAAAAAAAAAAAAAAAAAAAAAAAAAAAAAAAAAAAAAAAAAAAAAAAAAAAAAAAAAAAAAAAAAAAAAAAAAAAAAAAAAAAAAAAAAAAAAAAAAAAAAAAAAAAAAAAAAAAAAAAAAAAAAAAAAAAAAAAAAAAAAAAAAAAAAAAAAAAAAAAAAAAAAAAAAAAAAAAAAAAAAAAAAAAAAAAAAAAAAAAAAAAAAAAAAAAAAAAAAAAAAAAAAAAAAAAAAAAAAAAAAAAAAAAAAAAAAAAAAAAAAAAAAAAAAAAAAAAAAAAAAAAAAAAAAAAAAAAAAAAAAAAAAAAAAAAAAAAAAAAAAAAAAAAAAAAAAAAAAAAAAAAAAAAAAAAAAAAAAAAAAAAAAAAAAAAAAAAAAAAAAAAAAAAAAAAAAAAAAAAAAAAAAAAAAAAAAAAAAAAAAAAAAAAAAAAAAAAAAAAAAAAAAAAAAAAAAAAAAAAAAAAAAAAAAAAAAAAAAAAAAAAAAAAAAAAAAAAAAAAAAAAAAAAAAAAAAAAAAAAAAAAAAAAAAAAAAAAAAAAAAAAAAAAAAAAAAAAAAAAAAAAAAAAAAAAAAAAAAAAAAAAAAAAAAAAAAAAAAAAAAAAAAAAAAAAAAAAAAAAAAAAAAAAAAAAAAAAAAAAAAAAAAAAAAAAAAAAAAAAAAAAAAAAAAAAAAAAAAAAAAAAAAAAAAAAAAAAAAAAAAAAAAAAAAAAAAAAAAAAAAAAAAAAAAAAAAAAAAAAAAAAAAAAAAAAAAAAAAAAAAAAAAAAAAAAAAAAAAAAAAAAAAAAAAAAAAAAAAAAAAAAAAAAAAAAAAAAAAAAAAAAAAAAAAAAAAAAAAAAAAAAAAAAAAAAAAAAAAAAAAAAAAAAAAAAAAAAAAAAAAAAAAAAAAAAAAAAAAAAAAAAAAAAAAAAAAAAAAAAAAAAAAAAAAAAAAAAAAAAAAAAAAAAAAAAAAAAAAAAAAAAAAAAAAAAAAAAAAAAAAAAAAAAAAAAAAAAAAAAAAAAAAAAAAAAAAAAAAAAAAAAAAAAAAAAAAAAAAAAAAAAAAAAAAAAAAAAAAAAAAAAAAAAAAAAAAAAAAAAAAAAAAAAAAAAAAAAAAAAAAAAAAAAAAAAAAAAAAAAAAAAAAAAAAAAAAAAAAAAAAAAAAAAAAAAAAAAAAAAAAAAAAAAAAAAAAAAAAAAAAAAAAAAAAAAAAAAAAAAAAAAAAAAAAAAAAAAAAAAAAAAAAAAAAAAAAAAAAAAAAAAAAAAAAAAAAAAAAAAAAAAAAAAAAAAAAAAAAAAAAAAAAAAAAAAAAAAAAAAAAAAAAAAAAAAAAAAAAAAAAAAAAAAAAAAAAAAAAAAAAAAAAAAAAAAAAAAAAAAAAAAAAAAAAAAAAAAAAAAAAAAAAAAAAAAAAAAAAAAAAAAAAAAAAAAAAAAAAAAAAAAAAAAAAAAAAAAAAAAAAAAAAAAAAAAAAAAAAAAAAAAAAAAAAAAAAAAAAAAAAAAAAAAAAAAAAAAAAAAAAAAAAAAAAAAAAAAAAAAAAAAAAAAAAAAAAAAAAAAAAAAAAAAAAAAAAAAAAAAAAAAAAAAAAAAAAAAAAAAAAAAAAAAAAAAAAAAAAAAAAAAAAAAAAAAAAAAAAAAAAAAAAAAAAAAAAAAAAAAAAAAAAAAAAAAAAAAAAAAAAAAAAAAAAAAAAAAAAAAAAAAAAAAAAAAAAAAAAAAAAAAAAAAAAAAAAAAAAAAAAAAAAAAAAAAAAAAAAAAAAAAAAAAAAAAAAAAAAAAAAAAAAAAAAAAAAAAAAAAAAAAAAAAAAAAAAAAAAAAAAAAAAAAAAAAAAAAAAAAAAAAAAAAAAAAAAAAAAAAAAAAAAAAAAAAAAAAAAAAAAAAAAAAAAAAAAAAAAAAAAAAAAAAAAAAAAAAAAAAAAAAAAAAAAAAAAAAAAAAAAAAAAAAAAAAAAAAAAAAAAAAAAAAAAAAAAAAAAAAAAAAAAAAAAAAAAAAAAAAAAAAAAAAAAAAAAAAAAAAAAAAAAAAAAAAAAAAAAAAAAAAAAAAAAAAAAAAAAAAAAAAAAAAAAAAAAAAAAAAAAAAAAAAAAAAAAAAAAAAAAAAAAAAAAAAAAAAAAAAAAAAAAAAAAAAAAAAAAAAAAAAAAAAAAAAAAAAAAAAAAAAAAAAAAAAAAAAAAAAAAAAAAAAAAAAAAAAAAAAAAAAAAAAAAAAAAAAAAAAAAAAAAAAAAAAAAAAAAAAAAAAAAAAAAAAAAAAAAAAAAAAAAAAAAAAAAAAAAAAAAAAAAAAAAAAAAAAAAAAAAAAAAAAAAAAAAAAAAAAAAAAAAAAAAAAAAAAAAAAAAAAAAAAAAAAAAAAAAAAAAAAAAAAAAAAAAAAAAAAAAAAAAAAAAAAAAAAAAAAAAAAAAAAAAAAAAAAAAAAAAAAAAAAAAAAAAAAAAAAAAAAAAAAAAAAAAAAAAAAAAAAAAAAAAAAAAAAAAAAAAAAAAAAAAAAAAAAAAAAAAAAAAAAAAAAAAAAAAAAAAAAAAAAAAAAAAAAAAAAAAAAAAAAAAAAAAAAAAAAAAAAAAAAAAAAAAAAAAAAAAAAAAAAAAAAAAAAAAAAAAAAAAAAAAAAAAAAAAAAAAAAAAAAAAAAAAAAAAAAAAAAAAAAAAAAAAAAAAAAAAAAAAAAAAAAAAAAAAAAAAAAAAAAAAAAAAAAAAAAAAAAAAAAAAAAAAAAAAAAAAAAAAAAAAAAAAAAAAAAAAAAAAAAAAAAAAAAAAAAAAAAAAAAAAAAAAAAAAAAAAAAAAAAAAAAAAAAAAAAAAAAAAAAAAAAAAAAAAAAAAAAAAAAAAAAAAAAAAAAAAAAAAAAAAAAAAAAAAAAAAAAAAAAAAAAAAAAAAAAAAAAAAAAAAAAAAAAAAAAAAAAAAAAAAAAAAAAAAAAAAAAAAAAAAAAAAAAAAAAAAAAAAAAAAAAAAAAAAAAAAAAAAAAAAAAAAAAAAAAAAAAAAAAAAAAAAAAAAAAAAAAAAAAAAAAAAAAAAAAAAAAAAAAAAAAAAAAAAAAAAAAAAAAAAAAAAAAAAAAAAAAAAAAAAAAAAAAAAAAAAAAAAAAAAAAAAAAAAAAAAAAAAAAAAAAAAAAAAAAAAAAAAAAAAAAAAAAAAAAAAAAAAAAAAAAAAAAAAAAAAAAAAAAAAAAAAAAAAAAAAAAAAAAAAAAAAAAAAAAAAAAAAAAAAAAAAAAAAAAAAAAAAAAAAAAAAAAAAAAAAAAAAAAAAAAAAAAAAAAAAAAAAAAAAAAAAAAAAAAAAAAAAAAAAAAAAAAAAAAAAAAAAAAAAAAAAAAAAAAAAAAAAAAAAAAAAAAAAAAAAAAAAAAAAAAAAAAAAAAAAAAAAAAAAAAAAAAAAAAAAAAAAAAAAAAAAAAAAAAAAAAAAAAAAAAAAAAAAAAAAAAAAAAAAAAAAAAAAAAAAAAAAAAAAAAAAAAAAAAAAAAAAAAAAAAAAAAAAAAAAAAAAAAAAAAAAAAAAAAAAAAAAAAAAAAAAAAAAAAAAAAAAAAAAAAAAAAAAAAAAAAAAAAAAAAAAAAAAAAAAAAAAAAAAAAAAAAAAAAAAAAAAAAAAAAAAAAAAAAAAAAAAAAAAAAAAAAAAAAAAAAAA
AAAAAAAAAAAAAAAAAAAAAAAAAAAAAAAAAAAAAAAAAAAAAAAAAAAAAAAAAAAAAAAAAAAAAAAAAAAAAAAAAAAAAAAAAAAAAAAAAAAAAAAAAAAAAAAAAAAAAAAAAAAAAAAAAAAAAAAAAAAAAAAAAAAAAAAAAAAAAAAAAAAAAAAAAAAAAAAAAAAAAAAAAAAAAAAAAAAAAAAAAAAAAAAAAAAAAAAAAAAAAAAAAAAAAAAAAAAAAAAAAAAAAAAAAAAAAAAAAAAAAAAAAAAAAAAAAAAAAAAAAAAAAAAAAAAAAAAAAAAAAAAAAAAAAAAAAAAAAAAAAAAAAAAAAAAAAAAAAAAAAAAAAAAAAAAAAAAAAAAAAAAAAAAAAAAAAAAAAAAAAAAAAAAAAAAAAAAAAAAAAAAAAAAAAAAAAAAAAAAAAAAAAAAAAAAAAAAAAAAAAAAAAAAAAAAAAAAAAAAAAAAAAAAAAAAAAAAAAAAAAAAAAAAAAAAAAAAAAAAAAAAAAAAAAAAAAAAAAAAAAAAAAAAAAAAAAAAAAAAAAAAAAAAAAAAAAAAAAAAAAAAAAAAAAAAAAAAAAAAAAAAAAAAAAAAAAAAAAAAAAAAAAAAAAAAAAAAAAAAAAAAAAAAAAAAAAAAAAAAAAAAAAAAAAAAAAAAAAAAAAAAAAAAAAAAAAAAAAAAAAAAAAAAAAAAAAAAAAAAAAAAAAAAAAAAAAAAAAAAAAAAAAAAAAAAAAAAAAAAAAAAAAAAAAAAAAAAAAAAAAAAAAAAAAAAAAAAAAAAAAAAAAAAAAAAAAAAAAAAAAAAAAAAAAAAAAAAAAAAAAAAAAAAAAAAAAAAAAAAAAAAAAAAAAAAAAAAAAAAAAAAAAAAAAAAAAAAAAAAAAAAAAAAAAAAAAAAAAAAAAAAAAAAAAAAAAAAAAAAAAAAAAAAAAAAAAAAAAAAAAAAAAAAAAAAAAAAAAAAAAAAAAAAAAAAAAAAAAAAAAAAAAAAAAAAAAAAAAAAAAAAAAAAAAAAAAAAAAAAAAAAAAAAAAAAAAAAAAAAAAAAAAAAAAAAAAAAAAAAAAAAAAAAAAAAAAAAAAAAAAAAAAAAAAAAAAAAAAAAAAAAAAAAAAAAAAAAAAAAAAAAAAAAAAAAAAAAAAAAAAAAAAAAAAAAAAAAAAAAAAAAAAAAAAAAAAAAAAAAAAAAAAAAAAAAAAAAAAAAAAAAAAAAAAAAAAAAAAAAAAAAAAAAAAAAAAAAAAAAAAAAAAAAAAAAAAAAAAAAAAAAAAAAAAAAAAAAAAAAAAAAAAAAAAAAAAAAAAAAAAAAAAAAAAAAAAAAAAAAAAAAAAAAAAAAAAAAAAAAAAAAAAAAAAAAAAAAAAAAAAAAAAAAAAAAAAAAAAAAAAAAAAAAAAAAAAAAAAAAAAAAAAAAAAAAAAAAAAAAAAAAAAAAAAAAAAAAAAAAAAAAAAAAAAAAAAAAAAAAAAAAAAAAAAAAAAAAAAAAAAAAAAAAAAAAAAAAAAAAAAAAAAAAAAAAAAAAAAAAAAAAAAAAAAAAAAAAAAAAAAAAAAAAAAAAAAAAAAAAAAAAAAAAAAAAAAAAAAAAAAAAAAAAAAAAAAAAAAAAAAAAAAAAAAAAAAAAAAAAAAAAAAAAAAAAAAAAAAAAAAAAAAAAAAAAAAAAAAAAAAAAAAAAAAAAAAAAAAAAAAAAAAAAAAAAAAAAAAAAAAAAAAAAAAAAAAAAAAAAAAAAAAAAAAAAAAAAAAAAAAAAAAAAAAAAAAAAAAAAAAAAAAAAAAAAAAAAAAAAAAAAAAAAAAAAAAAAAAAAAAAAAAAAAAAAAAAAAAAAAAAAAAAAAAAAAAAAAAAAAAAAAAAAAAAAAAAAAAAAAAAAAAAAAAAAAAAAAAAAAAAAAAAAAAAAAAAAAAAAAAAAAAAAAAAAAAAAAAAAAAAAAAAAAAAAAAAAAAAAAAAAAAAAAAAAAAAAAAAAAAAAAAAAAAAAAAAAAAAAAAAAAAAAAAAAAAAAAAAAAAAAAAAAAAAAAAAAAAAAAAAAAAAAAAAAAAAAAAAAAAAAAAAAAAAAAAAAAAAAAAAAAAAAAAAAAAAAAAAAAAAAAAAAAAAAAAAAAAAAAAAAAAAAAAAAAAAAAAAAAAAAAAAAAAAAAAAAAAAAAAAAAAAAAAAAAAAAAAAAAAAAAAAAAAAAAAAAAAAAAAAAAAAAAAAAAAAAAAAAAAAAAAAAAAAAAAAAAAAAAAAAAAAAAAAAAAAAAAAAAAAAAAAAAAAAAAAAAAAAAAAAAAAAAAAAAAAAAAAAAAAAAAAAAAAAAAAAAAAAAAAAAAAAAAAAAAAAAAAAAAAAAAAAAAAAAAAAAAAAAAAAAAAAAAAAAAAAAAAAAAAAAAAAAAAAAAAAAAAAAAAAAAAAAAAAAAAAAAAAAAAAAAAAAAAAAAAAAAAAAAAAAAAAAAAAAAAAAAAAAAAAAAAAAAAAAAAAAAAAAAAAAAAAAAAAAAAAAAAAAAAAAAAAAAAAAAAAAAAAAAAAAAAAAAAAAAAAAAAAAAAAAAAAAAAAAAAAAAAAAAAAAAAAAAAAAAAAAAAAAAAAAAAAAAAAAAAAAAAAAAAAAAAAAAAAAAAAAAAAAAAAAAAAAAAAAAAAAAAAAAAAAAAAAAAAAAAAAAAAAAAAAAAAAAAAAAAAAAAAAAAAAAAAAAAAAAAAAAAAAAAAAAAAAAAAAAAAAAAAAAAAAAAAAAAAAAAAAAAAAAAAAAAAAAAAAAAAAAAAAAAAAAAAAAAAAAAAAAAAAAAAAAAAAAAAAAAAAAAAAAAAAAAAAAAAAAAAAAAAAAAAAAAAAAAAAAAAAAAAAAAAAAAAAAAAAAAAAAAAAAAAAAAAAAAAAAAAAAAAAAAAAAAAAAAAAAAAAAAAAAAAAAAAAAAAAAAAAAAAAAAAAAAAAAAAAAAAAAAAAAAAAAAAAAAAAAAAAAAAAAAAAAAAAAAAAAAAAAAAAAAAAAAAAAAAAAAAAAAAAAAAAAAAAAAAAAAAAAAAAAAAAAAAAAAAAAAAAAAAAAAAAAAAAAAAAAAAAAAAAAAAAAAAAAAAAAAAAAAAAAAAAAAAAAAAAAAAAAAAAAAAAAAAAAAAAAAAAAAAAAAAAAAAAAAAAAAAAAAAAAAAAAAAAAAAAAAAAAAAAAAAAAAAAAAAAAAAAAAAAAAAAAAAAAAAAAAAAAAAAAAAAAAAAAAAAAAAAAAAAAAAAAAAAAAAAAAAAAAAAAAAAAAAAAAAAAAAAAAAAAAAAAAAAAAAAAAAAAAAAAAAAAAAAAAAAAAAAAAAAAAAAAAAAAAAAAAAAAAAAAAAAAAAAAAAAAAAAAAAAAAAAAAAAAAAAAAAAAAAAAAAAAAAAAAAAAAAAAAAAAAAAAAAAAAAAAAAAAAAAAAAAAAAAAAAAAAAAAAAAAAAAAAAAAAAAAAAAAAAAAAAAAAAAAAAAAAAAAAAAAAAAAAAAAAAAAAAAAAAAAAAAAAAAAAAAAAAAAAAAAAAAAAAAAAAAAAAAAAAAAAAAAAAAAAAAAAAAAAAAAAAAAAAAAAAAAAAAAAAAAAAAAAAAAAAAAAAAAAAAAAAAAAAAAAAAAAAAAAAAAAAAAAAAAAAAAAAAAAAAAAAAAAAAAAAAAAAAAAAAAAAAAAAAAAAAAAAAAAAAAAAAAAAAAAAAAAAAAAAAAAAAAAAAAAAAAAAAAAAAAAAAAAAAAAAAAAAAAAAAAAAAAAAAAAAAAAAAAAAAAAAAAAAAAAAAAAAAAAAAAAAAAAAAAAAAAAAAAAAAAAAAAAAAAAAAAAAAAAAAAAAAAAAAAAAAAAAAAAAAAAAAAAAAAAAAAAAAAAAAAAAAAAAAAAAAAAAAAAAAAAAAAAAAAAAAAAAAAAAAAAAAAAAAAAAAAAAAAAAAAAAAAAAAAAAAAAAAAAAAAAAAAAAAAAAAAAAAAAAAAAAAAAAAAAAAAAAAAAAAAAAAAAAAAAAAAAAAAAAAAAAAAAAAAAAAAAAAAAAAAAAAAAAAAAAAAAAAAAAAAAAAAAAAAAAAAAAAAAAAAAAAAAAAAAAAAAAAAAAAAAAAAAAAAAAAAAAAAAAAAAAAAAAAAAAAAAAAAAAAAAAAAAAAAAAAAAAA
AAAAAAAAAAAAAAAAAAAAAAAAAAAAAAAAAAAAAAAAAAAAAAAAAAAAAAAAAAAAAAAAAAAAAAAAAAAAAAAAAAAAAAAAAAAAAAAAAAAAAAAAAAAAAAAAAAAAAAAAAAAAAAAAAAAAAAAAAAAAAAAAAAAAAAAAAAAAAAAAAAAAAAAAAAAAAAAAAAAAAAAAAAAAAAAAAAAAAAAAAAAAAAAAAAAAAAAAAAAAAAAAAAAAAAAAAAAAAAAAAAAAAAAAAAAAAAAAAAAAAAAAAAAAAAAAAAAAAAAAAAAAAAAAAAAAAAAAAAAAAAAAAAAAAAAAAAAAAAAAAAAAAAAAAAAAAAAAAAAAAAAAAAAAAAAAAAAAAAAAAAAAAAAAAAAAAAAAAAAAAAAAAAAAAAAAAAAAAAAAAAAAAAAAAAAAAAAAAAAAAAAAAAAAAAAAAAAAAAAAAAAAAAAAAAAAAAAAAAAAAAAAAAAAAAAAAAAAAAAAAAAAAAAAAAAAAAAAAAAAAAAAAAAAAAAAAAAAAAAAAAAAAAAAAAAAAAAAAAAAAAAAAAAAAAAAAAAAAAAAAAAAAAAAAAAAAAAAAAAAAAAAAAAAAAAAAAAAAAAAAAAAAAAAAAAAAAAAAAAAAAAAAAAAAAAAAAAAAAAAAAAAAAAAAAAAAAAAAAAAAAAAAAAAAAAAAAAAAAAAAAAAAAAAAAAAAAAAAAAAAAAAAAAAAAAAAAAAAAAAAAAAAAAAAAAAAAAAAAAAAAAAAAAAAAAAAAAAAAAAAAAAAAAAAAAAAAAAAAAAAAAAAAAAAAAAAAAAAAAAAAAAAAAAAAAAAAAAAAAAAAAAAAAAAAAAAAAAAAAAAAAAAAAAAAAAAAAAAAAAAAAAAAAAAAAAAAAAAAAAAAAAAAAAAAAAAAAAAAAAAAAAAAAAAAAAAAAAAAAAAAAAAAAAAAAAAAAAAAAAAAAAAAAAAAAAAAAAAAAAAAAAAAAAAAAAAAAAAAAAAAAAAAAAAAAAAAAAAAAAAAAAAAAAAAAAAAAAAAAAAAAAAAAAAAAAAAAAAAAAAAAAAAAAAAAAAAAAAAAAAAAAAAAAAAAAAAAAAAAAAAAAAAAAAAAAAAAAAAAAAAAAAAAAAAAAAAAAAAAAAAAAAAAAAAAAAAAAAAAAAAAAAAAAAAAAAAAAAAAAAAAAAAAAAAAAAAAAAAAAAAAAAAAAAAAAAAAAAAAAAAAAAAAAAAAAAAAAAAAAAAAAAAAAAAAAAAAAAAAAAAAAAAAAAAAAAAAAAAAAAAAAAAAAAAAAAAAAAAAAAAAAAAAAAAAAAAAAAAAAAAAAAAAAAAAAAAAAAAAAAAAAAAAAAAAAAAAAAAAAAAAAAAAAAAAAAAAAAAAAAAAAAAAAAAAAAAAAAAAAAAAAAAAAAAAAAAAAAAAAAAAAAAAAAAAAAAAAAAAAAAAAAAAAAAAAAAAAAAAAAAAAAAAAAAAAAAAAAAAAAAAAAAAAAAAAAAAAAAAAAAAAAAAAAAAAAAAAAAAAAAAAAAAAAAAAAAAAAAAAAAAAAAAAAAAAAAAAAAAAAAAAAAAAAAAAAAAAAAAAAAAAAAAAAAAAAAAAAAAAAAAAAAAAAAAAAAAAAAAAAAAAAAAAAAAAAAAAAAAAAAAAAAAAAAAAAAAAAAAAAAAAAAAAAAAAAAAAAAAAAAAAAAAAAAAAAAAAAAAAAAAAAAAAAAAAAAAAAAAAAAAAAAAAAAAAAAAAAAAAAAAAAAAAAAAAAAAAAAAAAAAAAAAAAAAAAAAAAAAAAAAAAAAAAAAAAAAAAAAAAAAAAAAAAAAAAAAAAAAAAAAAAAAAAAAAAAAAAAAAAAAAAAAAAAAAAAAAAAAAAAAAAAAAAAAAAAAAAAAAAAAAAAAAAAAAAAAAAAAAAAAAAAAAAAAAAAAAAAAAAAAAAAAAAAAAAAAAAAAAAAAAAAAAAAAAAAAAAAAAAAAAAAAAAAAAAAAAAAAAAAAAAAAAAAAAAAAAAAAAAAAAAAAAAAAAAAAAAAAAAAAAAAAAAAAAAAAAAAAAAAAAAAAAAAAAAAAAAAAAAAAAAAAAAAAAAAAAAAAAAAAAAAAAAAAAAAAAAAAAAAAAAAAAAAAAAAAAAAAAAAAAAAAAAAAAAAAAAAAAAAAAAAAAAAAAAAAAAAAAAAAAAAAAAAAAAAAAAAAAAAAAAAAAAAAAAAAAAAAAAAAAAAAAAAAAAAAAAAAAAAAAAAAAAAAAAAAAAAAAAAAAAAAAAAAAAAAAAAAAAAAAAAAAAAAAAAAAAAAAAAAAAAAAAAAAAAAAAAAAAAAAAAAAAAAAAAAAAAAAAAAAAAAAAAAAAAAAAAAAAAAAAAAAAAAAAAAAAAAAAAAAAAAAAAAAAAAAAAAAAAAAAAAAAAAAAAAAAAAAAAAAAAAAAAAAAAAAAAAAAAAAAAAAAAAAAAAAAAAAAAAAAAAAAAAAAAAAAAAAAAAAAAAAAAAAAAAAAAAAAAAAAAAAAAAAAAAAAAAAAAAAAAAAAAAAAAAAAAAAAAAAAAAAAAAAAAAAAAAAAAAAAAAAAAAAAAAAAAAAAAAAAAAAAAAAAAAAAAAAAAAAAAAAAAAAAAAAAAAAAAAAAAAAAAAAAAAAAAAAAAAAAAAAAAAAAAAAAAAAAAAAAAAAAAAAAAAAAAAAAAAAAAAAAAAAAAAAAAAAAAAAAAAAAAAAAAAAAAAAAAAAAAAAAAAAAAAAAAAAAAAAAAAAAAAAAAAAAAAAAAAAAAAAAAAAAAAAAAAAAAAAAAAAAAAAAAAAAAAAAAAAAAAAAAAAAAAAAAAAAAAAAAAAAAAAAAAAAAAAAAAAAAAAAAAAAAAAAAAAAAAAAAAAAAAAAAAAAAAAAAAAAAAAAAAAAAAAAAAAAAAAAAAAAAAAAAAAAAAAAAAAAAAAAAAAAAAAAAAAAAAAAAAAAAAAAAAAAAAAAAAAAAAAAAAAAAAAAAAAAAAAAAAAAAAAAAAAAAAAAAAAAAAAAAAAAAAAAAAAAAAAAAAAAAAAAAAAAAAAAAAAAAAAAAAAAAAAAAAAAAAAAAAAAAAAAAAAAAAAAAAAAAAAAAAAAAAAAAAAAAAAAAAAAAAAAAAAAAAAAAAAAAAAAAAAAAAAAAAAAAAAAAAAAAAAAAAAAAAAAAAAAAAAAAAAAAAAAAAAAAAAAAAAAAAAAAAAAAAAAAAAAAAAAAAAAAAAAAAAAAAAAAAAAAAAAAAAAAAAAAAAAAAAAAAAAAAAAAAAAAAAAAAAAAAAAAAAAAAAAAAAAAAAAAAAAAAAAAAAAAAAAAAAAAAAAAAAAAAAAAAAAAAAAAAAAAAAAAAAAAAAAAAAAAAAAAAAAAAAAAAAAAAAAAAAAAAAAAAAAAAAAAAAAAAAAAAAAAAAAAAAAAAAAAAAAAAAAAAAAAAAAAAAAAAAAAAAAAAAAAAAAAAAAAAAAAAAAAAAAAAAAAAAAAAAAAAAAAAAAAAAAAAAAAAAAAAAAAAAAAAAAAAAAAAAAAAAAAAAAAAAAAAAAAAAAAAAAAAAAAAAAAAAAAAAAAAAAAAAAAAAAAAAAAAAAAAAAAAAAAAAAAAAAAAAAAAAAAAAAAAAAAAAAAAAAAAAAAAAAAAAAAAAAAAAAAAAAAAAAAAAAAAAAAAAAAAAAAAAAAAAAAAAAAAAAAAAAAAAAAAAAAAAAAAAAAAAAAAAAAAAAAAAAAAAAAAAAAAAAAAAAAAAAAAAAAAAAAAAAAAAAAAAAAAAAAAAAAAAAAAAAAAAAAAAAAAAAAAAAAAAAAAAAAAAAAAAAAAAAAAAAAAAAAAAAAAAAAAAAAAAAAAAAAAAAAAAAAAAAAAAAAAAAAAAAAAAAAAAAAAAAAAAAAAAAAAAAAAAAAAAAAAAAAAAAAAAAAAAAAAAAAAAAAAAAAAAAAAAAAAAAAAAAAAAAAAAAAAAAAAAAAAAAAAAAAAAAAAAAAAAAAAAAAAAAAAAAAAAAAAAAAAAAAAAAAAAAAAAAAAAAAAAAAAAAAAAAAAAAAAAAAAAAAAAAAAAAAAAAAAAAAAAAAAAAAAAAAAAAAAAAAAAAAAAAAAAAAAAAAAAAAAAAAAAAAAAAAAAAAAAAAAAAAAAAAAAAAAAAAAAAAAAAAAAAAAA
AAAAAAAAAAAAAAAAAAAAAAAAAAAAAAAAAAAAAAAAAAAAAAAAAAAAAAAAAAAAAAAAAAAAAAAAAAAAAAAAAAAAAAAAAAAAAAAAAAAAAAAAAAAAAAAAAAAAAAAAAAAAAAAAAAAAAAAAAAAAAAAAAAAAAAAAAAAAAAAAAAAAAAAAAAAAAAAAAAAAAAAAAAAAAAAAAAAAAAAAAAAAAAAAAAAAAAAAAAAAAAAAAAAAAAAAAAAAAAAAAAAAAAAAAAAAAAAAAAAAAAAAAAAAAAAAAAAAAAAAAAAAAAAAAAAAAAAAAAAAAAAAAAAAAAAAAAAAAAAAAAAAAAAAAAAAAAAAAAAAAAAAAAAAAAAAAAAAAAAAAAAAAAAAAAAAAAAAAAAAAAAAAAAAAAAAAAAAAAAAAAAAAAAAAAAAAAAAAAAAAAAAAAAAAAAAAAAAAAAAAAAAAAAAAAAAAAAAAAAAAAAAAAAAAAAAAAAAAAAAAAAAAAAAAAAAAAAAAAAAAAAAAAAAAAAAAAAAAAAAAAAAAAAAAAAAAAAAAAAAAAAAAAAAAAAAAAAAAAAAAAAAAAAAAAAAAAAAAAAAAAAAAAAAAAAAAAAAAAAAAAAAAAAAAAAAAAAAAAAAAAAAAAAAAAAAAAAAAAAAAAAAAAAAAAAAAAAAAAAAAAAAAAAAAAAAAAAAAAAAAAAAAAAAAAAAAAAAAAAAAAAAAAAAAAAAAAAAAAAAAAAAAAAAAAAAAAAAAAAAAAAAAAAAAAAAAAAAAAAAAAAAAAAAAAAAAAAAAAAAAAAAAAAAAAAAAAAAAAAAAAAAAAAAAAAAAAAAAAAAAAAAAAAAAAAAAAAAAAAAAAAAAAAAAAAAAAAAAAAAAAAAAAAAAAAAAAAAAAAAAAAAAAAAAAAAAAAAAAAAAAAAAAAAAAAAAAAAAAAAAAAAAAAAAAAAAAAAAAAAAAAAAAAAAAAAAAAAAAAAAAAAAAAAAAAAAAAAAAAAAAAAAAAAAAAAAAAAAAAAAAAAAAAAAAAAAAAAAAAAAAAAAAAAAAAAAAAAAAAAAAAAAAAAAAAAAAAAAAAAAAAAAAAAAAAAAAAAAAAAAAAAAAAAAAAAAAAAAAAAAAAAAAAAAAAAAAAAAAAAAAAAAAAAAAAAAAAAAAAAAAAAAAAAAAAAAAAAAAAAAAAAAAAAAAAAAAAAAAAAAAAAAAAAAAAAAAAAAAAAAAAAAAAAAAAAAAAAAAAAAAAAAAAAAAAAAAAAAAAAAAAAAAAAAAAAAAAAAAAAAAAAAAAAAAAAAAAAAAAAAAAAAAAAAAAAAAAAAAAAAAAAAAAAAAAAAAAAAAAAAAAAAAAAAAAAAAAAAAAAAAAAAAAAAAAAAAAAAAAAAAAAAAAAAAAAAAAAAAAAAAAAAAAAAAAAAAAAAAAAAAAAAAAAAAAAAAAAAAAAAAAAAAAAAAAAAAAAAAAAAAAAAAAAAAAAAAAAAAAAAAAAAAAAAAAAAAAAAAAAAAAAAAAAAAAAAAAAAAAAAAAAAAAAAAAAAAAAAAAAAAAAAAAAAAAAAAAAAAAAAAAAAAAAAAAAAAAAAAAAAAAAAAAAAAAAAAAAAAAAAAAAAAAAAAAAAAAAAAAAAAAAAAAAAAAAAAAAAAAAAAAAAAAAAAAAAAAAAAAAAAAAAAAAAAAAAAAAAAAAAAAAAAAAAAAAAAAAAAAAAAAAAAAAAAAAAAAAAAAAAAAAAAAAAAAAAAAAAAAAAAAAAAAAAAAAAAAAAAAAAAAAAAAAAAAAAAAAAAAAAAAAAAAAAAAAAAAAAAAAAAAAAAAAAAAAAAAAAAAAAAAAAAAAAAAAAAAAAAAAAAAAAAAAAAAAAAAAAAAAAAAAAAAAAAAAAAAAAAAAAAAAAAAAAAAAAAAAAAAAAAAAAAAAAAAAAAAAAAAAAAAAAAAAAAAAAAAAAAAAAAAAAAAAAAAAAAAAAAAAAAAAAAAAAAAAAAAAAAAAAAAAAAAAAAAAAAAAAAAAAAAAAAAAAAAAAAAAAAAAAAAAAAAAAAAAAAAAAAAAAAAAAAAAAAAAAAAAAAAAAAAAAAAAAAAAAAAAAAAAAAAAAAAAAAAAAAAAAAAAAAAAAAAAAAAAAAAAAAAAAAAAAAAAAAAAAAAAAAAAAAAAAAAAAAAAAAAAAAAAAAAAAAAAAAAAAAAAAAAAAAAAAAAAAAAAAAAAAAAAAAAAAAAAAAAAAAAAAAAAAAAAAAAAAAAAAAAAAAAAAAAAAAAAAAAAAAAAAAAAAAAAAAAAAAAAAAAAAAAAAAAAAAAAAAAAAAAAAAAAAAAAAAAAAAAAAAAAAAAAAAAAAAAAAAAAAAAAAAAAAAAAAAAAAAAAAAAAAAAAAAAAAAAAAAAAAAAAAAAAAAAAAAAAAAAAAAAAAAAAAAAAAAAAAAAAAAAAAAAAAAAAAAAAAAAAAAAAAAAAAAAAAAAAAAAAAAAAAAAAAAAAAAAAAAAAAAAAAAAAAAAAAAAAAAAAAAAAAAAAAAAAAAAAAAAAAAAAAAAAAAAAAAAAAAAAAAAAAAAAAAAAAAAAAAAAAAAAAAAAAAAAAAAAAAAAAAAAAAAAAAAAAAAAAAAAAAAAAAAAAAAAAAAAAAAAAAAAAAAAAAAAAAAAAAAAAAAAAAAAAAAAAAAAAAAAAAAAAAAAAAAAAAAAAAAAAAAAAAAAAAAAAAAAAAAAAAAAAAAAAAAAAAAAAAAAAAAAAAAAAAAAAAAAAAAAAAAAAAAAAAAAAAAAAAAAAAAAAAAAAAAAAAAAAAAAAAAAAAAAAAAAAAAAAAAAAAAAAAAAAAAAAAAAAAAAAAAAAAAAAAAAAAAAAAAAAAAAAAAAAAAAAAAAAAAAAAAAAAAAAAAAAAAAAAAAAAAAAAAAAAAAAAAAAAAAAAAAAAAAAAAAAAAAAAAAAAAAAAAAAAAAAAAAAAAAAAAAAAAAAAAAAAAAAAAAAAAAAAAAAAAAAAAAAAAAAAAAAAAAAAAAAAAAAAAAAAAAAAAAAAAAAAAAAAAAAAAAAAAAAAAAAAAAAAAAAAAAAAAAAAAAAAAAAAAAAAAAAAAAAAAAAAAAAAAAAAAAAAAAAAAAAAAAAAAAAAAAAAAAAAAAAAAAAAAAAAAAAAAAAAAAAAAAAAAAAAAAAAAAAAAAAAAAAAAAAAAAAAAAAAAAAAAAAAAAAAAAAAAAAAAAAAAAAAAAAAAAAAAAAAAAAAAAAAAAAAAAAAAAAAAAAAAAAAAAAAAAAAAAAAAAAAAAAAAAAAAAAAAAAAAAAAAAAAAAAAAAAAAAAAAAAAAAAAAAAAAAAAAAAAAAAAAAAAAAAAAAAAAAAAAAAAAAAAAAAAAAAAAAAAAAAAAAAAAAAAAAAAAAAAAAAAAAAAAAAAAAAAAAAAAAAAAAAAAAAAAAAAAAAAAAAAAAAAAAAAAAAAAAAAAAAAAAAAAAAAAAAAAAAAAAAAAAAAAAAAAAAAAAAAAAAAAAAAAAAAAAAAAAAAAAAAAAAAAAAAAAAAAAAAAAAAAAAAAAAAAAAAAAAAAAAAAAAAAAAAAAAAAAAAAAAAAAAAAAAAAAAAAAAAAAAAAAAAAAAAAAAAAAAAAAAAAAAAAAAAAAAAAAAAAAAAAAAAAAAAAAAAAAAAAAAAAAAAAAAAAAAAAAAAAAAAAAAAAAAAAAAAAAAAAAAAAAAAAAAAAAAAAAAAAAAAAAAAAAAAAAAAAAAAAAAAAAAAAAAAAAAAAAAAAAAAAAAAAAAAAAAAAAAAAAAAAAAAAAAAAAAAAAAAAAAAAAAAAAAAAAAAAAAAAAAAAAAAAAAAAAAAAAAAAAAAAAAAAAAAAAAAAAAAAAAAAAAAAAAAAAAAAAAAAAAAAAAAAAAAAAAAAAAAAAAAAAAAAAAAAAAAAAAAAAAAAAAAAAAAAAAAAAAAAAAAAAAAAAAAAAAAAAAAAAAAAAAAAAAAAAAAAAAAAAAAAAAAAAAAAAAAAAAAAAAAAAAAAAAAAAAAAAAAAAAAAAAAAAAAAAAAAAAAAAAAAAAAAAAAAAAAAAAAAAAAAAAAAAAAAAAAAAAAAAAAAAAAAAAAAAAAAAAAAAAAAAAAAAAAAAAAAAAAAAAAAAAAAAAAAAAAAAAAAAAAAAAAAAAAAA
AAAAAAAAAAAAAAAAAAAAAAAAAAAAAAAAAAAAAAAAAAAAAAAAAAAAAAAAAAAAAAAAAAAAAAAAAAAAAAAAAAAAAAAAAAAAAAAAAAAAAAAAAAAAAAAAAAAAAAAAAAAAAAAAAAAAAAAAAAAAAAAAAAAAAAAAAAAAAAAAAAAAAAAAAAAAAAAAAAAAAAAAAAAAAAAAAAAAAAAAAAAAAAAAAAAAAAAAAAAAAAAAAAAAAAAAAAAAAAAAAAAAAAAAAAAAAAAAAAAAAAAAAAAAAAAAAAAAAAAAAAAAAAAAAAAAAAAAAAAAAAAAAAAAAAAAAAAAAAAAAAAAAAAAAAAAAAAAAAAAAAAAAAAAAAAAAAAAAAAAAAAAAAAAAAAAAAAAAAAAAAAAAAAAAAAAAAAAAAAAAAAAAAAAAAAAAAAAAAAAAAAAAAAAAAAAAAAAAAAAAAAAAAAAAAAAAAAAAAAAAAAAAAAAAAAAAAAAAAAAAAAAAAAAAAAAAAAAAAAAAAAAAAAAAAAAAAAAAAAAAAAAAAAAAAAAAAAAAAAAAAAAAAAAAAAAAAAAAAAAAAAAAAAAAAAAAAAAAAAAAAAAAAAAAAAAAAAAAAAAAAAAAAAAAAAAAAAAAAAAAAAAAAAAAAAAAAAAAAAAAAAAAAAAAAAAAAAAAAAAAAAAAAAAAAAAAAAAAAAAAAAAAAAAAAAAAAAAAAAAAAAAAAAAAAAAAAAAAAAAAAAAAAAAAAAAAAAAAAAAAAAAAAAAAAAAAAAAAAAAAAAAAAAAAAAAAAAAAAAAAAAAAAAAAAAAAAAAAAAAAAAAAAAAAAAAAAAAAAAAAAAAAAAAAAAAAAAAAAAAAAAAAAAAAAAAAAAAAAAAAAAAAAAAAAAAAAAAAAAAAAAAAAAAAAAAAAAAAAAAAAAAAAAAAAAAAAAAAAAAAAAAAAAAAAAAAAAAAAAAAAAAAAAAAAAAAAAAAAAAAAAAAAAAAAAAAAAAAAAAAAAAAAAAAAAAAAAAAAAAAAAAAAAAAAAAAAAAAAAAAAAAAAAAAAAAAAAAAAAAAAAAAAAAAAAAAAAAAAAAAAAAAAAAAAAAAAAAAAAAAAAAAAAAAAAAAAAAAAAAAAAAAAAAAAAAAAAAAAAAAAAAAAAAAAAAAAAAAAAAAAAAAAAAAAAAAAAAAAAAAAAAAAAAAAAAAAAAAAAAAAAAAAAAAAAAAAAAAAAAAAAAAAAAAAAAAAAAAAAAAAAAAAAAAAAAAAAAAAAAAAAAAAAAAAAAAAAAAAAAAAAAAAAAAAAAAAAAAAAAAAAAAAAAAAAAAAAAAAAAAAAAAAAAAAAAAAAAAAAAAAAAAAAAAAAAAAAAAAAAAAAAAAAAAAAAAAAAAAAAAAAAAAAAAAAAAAAAAAAAAAAAAAAAAAAAAAAAAAAAAAAAAAAAAAAAAAAAAAAAAAAAAAAAAAAAAAAAAAAAAAAAAAAAAAAAAAAAAAAAAAAAAAAAAAAAAAAAAAAAAAAAAAAAAAAAAAAAAAAAAAAAAAAAAAAAAAAAAAAAAAAAAAAAAAAAAAAAAAAAAAAAAAAAAAAAAAAAAAAAAAAAAAAAAAAAAAAAAAAAAAAAAAAAAAAAAAAAAAAAAAAAAAAAAAAAAAAAAAAAAAAAAAAAAAAAAAAAAAAAAAAAAAAAAAAAAAAAAAAAAAAAAAAAAAAAAAAAAAAAAAAAAAAAAAAAAAAAAAAAAAAAAAAAAAAAAAAAAAAAAAAAAAAAAAAAAAAAAAAAAAAAAAAAAAAAAAAAAAAAAAAAAAAAAAAAAAAAAAAAAAAAAAAAAAAAAAAAAAAAAAAAAAAAAAAAAAAAAAAAAAAAAAAAAAAAAAAAAAAAAAAAAAAAAAAAAAAAAAAAAAAAAAAAAAAAAAAAAAAAAAAAAAAAAAAAAAAAAAAAAAAAAAAAAAAAAAAAAAAAAAAAAAAAAAAAAAAAAAAAAAAAAAAAAAAAAAAAAAAAAAAAAAAAAAAAAAAAAAAAAAAAAAAAAAAAAAAAAAAAAAAAAAAAAAAAAAAAAAAAAAAAAAAAAAAAAAAAAAAAAAAAAAAAAAAAAAAAAAAAAAAAAAAAAAAAAAAAAAAAAAAAAAAAAAAAAAAAAAAAAAAAAAAAAAAAAAAAAAAAAAAAAAAAAAAAAAAAAAAAAAAAAAAAAAAAAAAAAAAAAAAAAAAAAAAAAAAAAAAAAAAAAAAAAAAAAAAAAAAAAAAAAAAAAAAAAAAAAAAAAAAAAAAAAAAAAAAAAAAAAAAAAAAAAAAAAAAAAAAAAAAAAAAAAAAAAAAAAAAAAAAAAAAAAAAAAAAAAAAAAAAAAAAAAAAAAAAAAAAAAAAAAAAAAAAAAAAAAAAAAAAAAAAAAAAAAAAAAAAAAAAAAAAAAAAAAAAAAAAAAAAAAAAAAAAAAAAAAAAAAAAAAAAAAAAAAAAAAAAAAAAAAAAAAAAAAAAAAAAAAAAAAAAAAAAAAAAAAAAAAAAAAAAAAAAAAAAAAAAAAAAAAAAAAAAAAAAAAAAAAAAAAAAAAAAAAAAAAAAAAAAAAAAAAAAAAAAAAAAAAAAAAAAAAAAAAAAAAAAAAAAAAAAAAAAAAAAAAAAAAAAAAAAAAAAAAAAAAAAAAAAAAAAAAAAAAAAAAAAAAAAAAAAAAAAAAAAAAAAAAAAAAAAAAAAAAAAAAAAAAAAAAAAAAAAAAAAAAAAAAAAAAAAAAAAAAAAAAAAAAAAAAAAAAAAAAAAAAAAAAAAAAAAAAAAAAAAAAAAAAAAAAAAAAAAAAAAAAAAAAAAAAAAAAAAAAAAAAAAAAAAAAAAAAAAAAAAAAAAAAAAAAAAAAAAAAAAAAAAAAAAAAAAAAAAAAAAAAAAAAAAAAAAAAAAAAAAAAAAAAAAAAAAAAAAAAAAAAAAAAAAAAAAAAAAAAAAAAAAAAAAAAAAAAAAAAAAAAAAAAAAAAAAAAAAAAAAAAAAAAAAAAAAAAAAAAAAAAAAAAAAAAAAAAAAAAAAAAAAAAAAAAAAAAAAAAAAAAAAAAAAAAAAAAAAAAAAAAAAAAAAAAAAAAAAAAAAAAAAAAAAAAAAAAAAAAAAAAAAAAAAAAAAAAAAAAAAAAAAAAAAAAAAAAAAAAAAAAAAAAAAAAAAAAAAAAAAAAAAAAAAAAAAAAAAAAAAAAAAAAAAAAAAAAAAAAAAAAAAAAAAAAAAAAAAAAAAAAAAAAAAAAAAAAAAAAAAAAAAAAAAAAAAAAAAAAAAAAAAAAAAAAAAAAAAAAAAAAAAAAAAAAAAAAAAAAAAAAAAAAAAAAAAAAAAAAAAAAAAAAAAAAAAAAAAAAAAAAAAAAAAAAAAAAAAAAAAAAAAAAAAAAAAAAAAAAAAAAAAAAAAAAAAAAAAAAAAAAAAAAAAAAAAAAAAAAAAAAAAAAAAAAAAAAAAAAAAAAAAAAAAAAAAAAAAAAAAAAAAAAAAAAAAAAAAAAAAAAAAAAAAAAAAAAAAAAAAAAAAAAAAAAAAAAAAAAAAAAAAAAAAAAAAAAAAAAAAAAAAAAAAAAAAAAAAAAAAAAAAAAAAAAAAAAAAAAAAAAAAAAAAAAAAAAAAAAAAAAAAAAAAAAAAAAAAAAAAAAAAAAAAAAAAAAAAAAAAAAAAAAAAAAAAAAAAAAAAAAAAAAAAAAAAAAAAAAAAAAAAAAAAAAAAAAAAAAAAAAAAAAAAAAAAAAAAAAAAAAAAAAAAAAAAAAAAAAAAAAAAAAAAAAAAAAAAAAAAAAAAAAAAAAAAAAAAAAAAAAAAAAAAAAAAAAAAAAAAAAAAAAAAAAAAAAAAAAAAAAAAAAAAAAAAAAAAAAAAAAAAAAAAAAAAAAAAAAAAAAAAAAAAAAAAAAAAAAAAAAAAAAAAAAAAAAAAAAAAAAAAAAAAAAAAAAAAAAAAAAAAAAAAAAAAAAAAAAAAAAAAAAAAAAAAAAAAAAAAAAAAAAAAAAAAAAAAAAAAAAAAAAAAAAAAAAAAAAAAAAAAAAAAAAAAAAAAAAAAAAAAAAAAAAAAAAAAAAAAAAAAAAAAAAAAAAAAAAAAAAAAAAAAAAAAAAAAAAAAAAAAAAAAAAAAAAAAAAAAAAAAAAAAAAAAAAAAAAAAAAAAAAAAAAAAAAAAAAAAA
AAAAAAAAAAAAAAAAAAAAAAAAAAAAAAAAAAAAAAAAAAAAAAAAAAAAAAAAAAAAAAAAAAAAAAAAAAAAAAAAAAAAAAAAAAAAAAAAAAAAAAAAAAAAAAAAAAAAAAAAAAAAAAAAAAAAAAAAAAAAAAAAAAAAAAAAAAAAAAAAAAAAAAAAAAAAAAAAAAAAAAAAAAAAAAAAAAAAAAAAAAAAAAAAAAAAAAAAAAAAAAAAAAAAAAAAAAAAAAAAAAAAAAAAAAAAAAAAAAAAAAAAAAAAAAAAAAAAAAAAAAAAAAAAAAAAAAAAAAAAAAAAAAAAAAAAAAAAAAAAAAAAAAAAAAAAAAAAAAAAAAAAAAAAAAAAAAAAAAAAAAAAAAAAAAAAAAAAAAAAAAAAAAAAAAAAAAAAAAAAAAAAAAAAAAAAAAAAAAAAAAAAAAAAAAAAAAAAAAAAAAAAAAAAAAAAAAAAAAAAAAAAAAAAAAAAAAAAAAAAAAAAAAAAAAAAAAAAAAAAAAAAAAAAAAAAAAAAAAAAAAAAAAAAAAAAAAAAAAAAAAAAAAAAAAAAAAAAAAAAAAAAAAAAAAAAAAAAAAAAAAAAAAAAAAAAAAAAAAAAAAAAAAAAAAAAAAAAAAAAAAAAAAAAAAAAAAAAAAAAAAAAAAAAAAAAAAAAAAAAAAAAAAAAAAAAAAAAAAAAAAAAAAAAAAAAAAAAAAAAAAAAAAAAAAAAAAAAAAAAAAAAAAAAAAAAAAAAAAAAAAAAAAAAAAAAAAAAAAAAAAAAAAAAAAAAAAAAAAAAAAAAAAAAAAAAAAAAAAAAAAAAAAAAAAAAAAAAAAAAAAAAAAAAAAAAAAAAAAAAAAAAAAAAAAAAAAAAAAAAAAAAAAAAAAAAAAAAAAAAAAAAAAAAAAAAAAAAAAAAAAAAAAAAAAAAAAAAAAAAAAAAAAAAAAAAAAAAAAAAAAAAAAAAAAAAAAAAAAAAAAAAAAAAAAAAAAAAAAAAAAAAAAAAAAAAAAAAAAAAAAAAAAAAAAAAAAAAAAAAAAAAAAAAAAAAAAAAAAAAAAAAAAAAAAAAAAAAAAAAAAAAAAAAAAAAAAAAAAAAAAAAAAAAAAAAAAAAAAAAAAAAAAAAAAAAAAAAAAAAAAAAAAAAAAAAAAAAAAAAAAAAAAAAAAAAAAAAAAAAAAAAAAAAAAAAAAAAAAAAAAAAAAAAAAAAAAAAAAAAAAAAAAAAAAAAAAAAAAAAAAAAAAAAAAAAAAAAAAAAAAAAAAAAAAAAAAAAAAAAAAAAAAAAAAAAAAAAAAAAAAAAAAAAAAAAAAAAAAAAAAAAAAAAAAAAAAAAAAAAAAAAAAAAAAAAAAAAAAAAAAAAAAAAAAAAAAAAAAAAAAAAAAAAAAAAAAAAAAAAAAAAAAAAAAAAAAAAAAAAAAAAAAAAAAAAAAAAAAAAAAAAAAAAAAAAAAAAAAAAAAAAAAAAAAAAAAAAAAAAAAAAAAAAAAAAAAAAAAAAAAAAAAAAAAAAAAAAAAAAAAAAAAAAAAAAAAAAAAAAAAAAAAAAAAAAAAAAAAAAAAAAAAAAAAAAAAAAAAAAAAAAAAAAAAAAAAAAAAAAAAAAAAAAAAAAAAAAAAAAAAAAAAAAAAAAAAAAAAAAAAAAAAAAAAAAAAAAAAAAAAAAAAAAAAAAAAAAAAAAAAAAAAAAAAAAAAAAAAAAAAAAAAAAAAAAAAAAAAAAAAAAAAAAAAAAAAAAAAAAAAAAAAAAAAAAAAAAAAAAAAAAAAAAAAAAAAAAAAAAAAAAAAAAAAAAAAAAAAAAAAAAAAAAAAAAAAAAAAAAAAAAAAAAAAAAAAAAAAAAAAAAAAAAAAAAAAAAAAAAAAAAAAAAAAAAAAAAAAAAAAAAAAAAAAAAAAAAAAAAAAAAAAAAAAAAAAAAAAAAAAAAAAAAAAAAAAAAAAAAAAAAAAAAAAAAAAAAAAAAAAAAAAAAAAAAAAAAAAAAAAAAAAAAAAAAAAAAAAAAAAAAAAAAAAAAAAAAAAAAAAAAAAAAAAAAAAAAAAAAAAAAAAAAAAAAAAAAAAAAAAAAAAAAAAAAAAAAAAAAAAAAAAAAAAAAAAAAAAAAAAAAAAAAAAAAAAAAAAAAAAAAAAAAAAAAAAAAAAAAAAAAAAAAAAAAAAAAAAAAAAAAAAAAAAAAAAAAAAAAAAAAAAAAAAAAAAAAAAAAAAAAAAAAAAAAAAAAAAAAAAAAAAAAAAAAAAAAAAAAAAAAAAAAAAAAAAAAAAAAAAAAAAAAAAAAAAAAAAAAAAAAAAAAAAAAAAAAAAAAAAAAAAAAAAAAAAAAAAAAAAAAAAAAAAAAAAAAAAAAAAAAAAAAAAAAAAAAAAAAAAAAAAAAAAAAAAAAAAAAAAAAAAAAAAAAAAAAAAAAAAAAAAAAAAAAAAAAAAAAAAAAAAAAAAAAAAAAAAAAAAAAAAAAAAAAAAAAAAAAAAAAAAAAAAAAAAAAAAAAAAAAAAAAAAAAAAAAAAAAAAAAAAAAAAAAAAAAAAAAAAAAAAAAAAAAAAAAAAAAAAAAAAAAAAAAAAAAAAAAAAAAAAAAAAAAAAAAAAAAAAAAAAAAAAAAAAAAAAAAAAAAAAAAAAAAAAAAAAAAAAAAAAAAAAAAAAAAAAAAAAAAAAAAAAAAAAAAAAAAAAAAAAAAAAAAAAAAAAAAAAAAAAAAAAAAAAAAAAAAAAAAAAAAAAAAAAAAAAAAAAAAAAAAAAAAAAAAAAAAAAAAAAAAAAAAAAAAAAAAAAAAAAAAAAAAAAAAAAAAAAAAAAAAAAAAAAAAAAAAAAAAAAAAAAAAAAAAAAAAAAAAAAAAAAAAAAAAAAAAAAAAAAAAAAAAAAAAAAAAAAAAAAAAAAAAAAAAAAAAAAAAAAAAAAAAAAAAAAAAAAAAAAAAAAAAAAAAAAAAAAAAAAAAAAAAAAAAAAAAAAAAAAAAAAAAAAAAAAAAAAAAAAAAAAAAAAAAAAAAAAAAAAAAAAAAAAAAAAAAAAAAAAAAAAAAAAAAAAAAAAAAAAAAAAAAAAAAAAAAAAAAAAAAAAAAAAAAAAAAAAAAAAAAAAAAAAAAAAAAAAAAAAAAAAAAAAAAAAAAAAAAAAAAAAAAAAAAAAAAAAAAAAAAAAAAAAAAAAAAAAAAAAAAAAAAAAAAAAAAAAAAAAAAAAAAAAAAAAAAAAAAAAAAAAAAAAAAAAAAAAAAAAAAAAAAAAAAAAAAAAAAAAAAAAAAAAAAAAAAAAAAAAAAAAAAAAAAAAAAAAAAAAAAAAAAAAAAAAAAAAAAAAAAAAAAAAAAAAAAAAAAAAAAAAAAAAAAAAAAAAAAAAAAAAAAAAAAAAAAAAAAAAAAAAAAAAAAAAAAAAAAAAAAAAAAAAAAAAAAAAAAAAAAAAAAAAAAAAAAAAAAAAAAAAAAAAAAAAAAAAAAAAAAAAAAAAAAAAAAAAAAAAAAAAAAAAAAAAAAAAAAAAAAAAAAAAAAAAAAAAAAAAAAAAAAAAAAAAAAAAAAAAAAAAAAAAAAAAAAAAAAAAAAAAAAAAAAAAAAAAAAAAAAAAAAAAAAAAAAAAAAAAAAAAAAAAAAAAAAAAAAAAAAAAAAAAAAAAAAAAAAAAAAAAAAAAAAAAAAAAAAAAAAAAAAAAAAAAAAAAAAAAAAAAAAAAAAAAAAAAAAAAAAAAAAAAAAAAAAAAAAAAAAAAAAAAAAAAAAAAAAAAAAAAAAAAAAAAAAAAAAAAAAAAAAAAAAAAAAAAAAAAAAAAAAAAAAAAAAAAAAAAAAAAAAAAAAAAAAAAAAAAAAAAAAAAAAAAAAAAAAAAAAAAAAAAAAAAAAAAAAAAAAAAAAAAAAAAAAAAAAAAAAAAAAAAAAAAAAAAAAAAAAAAAAAAAAAAAAAAAAAAAAAAAAAAAAAAAAAAAAAAAAAAAAAAAAAAAAAAAAAAAAAAAAAAAAAAAAAAAAAAAAAAAAAAAAAAAAAAAAAAAAAAAAAAAAAAAAAAAAAAAAAAAAAAAAAAAAAAAAAAAAAAAAAAAAAAAAAAAAAAAAAAAAAAAAAAAAAAAAAAAAAAAAAAAAAAAAAAAAAAAAAAAAAAAAAAAAAAAAAAAAAAAAAAAAAAAAAAAAAAAAAAAAAAAA
AAAAAAAAAAAAAAAAAAAAAAAAAAAAAAAAAAAAAAAAAAAAAAAAAAAAAAAAAAAAAAAAAAAAAAAAAAAAAAAAAAAAAAAAAAAAAAAAAAAAAAAAAAAAAAAAAAAAAAAAAAAAAAAAAAAAAAAAAAAAAAAAAAAAAAAAAAAAAAAAAAAAAAAAAAAAAAAAAAAAAAAAAAAAAAAAAAAAAAAAAAAAAAAAAAAAAAAAAAAAAAAAAAAAAAAAAAAAAAAAAAAAAAAAAAAAAAAAAAAAAAAAAAAAAAAAAAAAAAAAAAAAAAAAAAAAAAAAAAAAAAAAAAAAAAAAAAAAAAAAAAAAAAAAAAAAAAAAAAAAAAAAAAAAAAAAAAAAAAAAAAAAAAAAAAAAAAAAAAAAAAAAAAAAAAAAAAAAAAAAAAAAAAAAAAAAAAAAAAAAAAAAAAAAAAAAAAAAAAAAAAAAAAAAAAAAAAAAAAAAAAAAAAAAAAAAAAAAAAAAAAAAAAAAAAAAAAAAAAAAAAAAAAAAAAAAAAAAAAAAAAAAAAAAAAAAAAAAAAAAAAAAAAAAAAAAAAAAAAAAAAAAAAAAAAAAAAAAAAAAAAAAAAAAAAAAAAAAAAAAAAAAAAAAAAAAAAAAAAAAAAAAAAAAAAAAAAAAAAAAAAAAAAAAAAAAAAAAAAAAAAAAAAAAAAAAAAAAAAAAAAAAAAAAAAAAAAAAAAAAAAAAAAAAAAAAAAAAAAAAAAAAAAAAAAAAAAAAAAAAAAAAAAAAAAAAAAAAAAAAAAAAAAAAAAAAAAAAAAAAAAAAAAAAAAAAAAAAAAAAAAAAAAAAAAAAAAAAAAAAAAAAAAAAAAAAAAAAAAAAAAAAAAAAAAAAAAAAAAAAAAAAAAAAAAAAAAAAAAAAAAAAAAAAAAAAAAAAAAAAAAAAAAAAAAAAAAAAAAAAAAAAAAAAAAAAAAAAAAAAAAAAAAAAAAAAAAAAAAAAAAAAAAAAAAAAAAAAAAAAAAAAAAAAAAAAAAAAAAAAAAAAAAAAAAAAAAAAAAAAAAAAAAAAAAAAAAAAAAAAAAAAAAAAAAAAAAAAAAAAAAAAAAAAAAAAAAAAAAAAAAAAAAAAAAAAAAAAAAAAAAAAAAAAAAAAAAAAAAAAAAAAAAAAAAAAAAAAAAAAAAAAAAAAAAAAAAAAAAAAAAAAAAAAAAAAAAAAAAAAAAAAAAAAAAAAAAAAAAAAAAAAAAAAAAAAAAAAAAAAAAAAAAAAAAAAAAAAAAAAAAAAAAAAAAAAAAAAAAAAAAAAAAAAAAAAAAAAAAAAAAAAAAAAAAAAAAAAAAAAAAAAAAAAAAAAAAAAAAAAAAAAAAAAAAAAAAAAAAAAAAAAAAAAAAAAAAAAAAAAAAAAAAAAAAAAAAAAAAAAAAAAAAAAAAAAAAAAAAAAAAAAAAAAAAAAAAAAAAAAAAAAAAAAAAAAAAAAAAAAAAAAAAAAAAAAAAAAAAAAAAAAAAAAAAAAAAAAAAAAAAAAAAAAAAAAAAAAAAAAAAAAAAAAAAAAAAAAAAAAAAAAAAAAAAAAAAAAAAAAAAAAAAAAAAAAAAAAAAAAAAAAAAAAAAAAAAAAAAAAAAAAAAAAAAAAAAAAAAAAAAAAAAAAAAAAAAAAAAAAAAAAAAAAAAAAAAAAAAAAAAAAAAAAAAAAAAAAAAAAAAAAAAAAAAAAAAAAAAAAAAAAAAAAAAAAAAAAAAAAAAAAAAAAAAAAAAAAAAAAAAAAAAAAAAAAAAAAAAAAAAAAAAAAAAAAAAAAAAAAAAAAAAAAAAAAAAAAAAAAAAAAAAAAAAAAAAAAAAAAAAAAAAAAAAAAAAAAAAAAAAAAAAAAAAAAAAAAAAAAAAAAAAAAAAAAAAAAAAAAAAAAAAAAAAAAAAAAAAAAAAAAAAAAAAAAAAAAAAAAAAAAAAAAAAAAAAAAAAAAAAAAAAAAAAAAAAAAAAAAAAAAAAAAAAAAAAAAAAAAAAAAAAAAAAAAAAAAAAAAAAAAAAAAAAAAAAAAAAAAAAAAAAAAAAAAAAAAAAAAAAAAAAAAAAAAAAAAAAAAAAAAAAAAAAAAAAAAAAAAAAAAAAAAAAAAAAAAAAAAAAAAAAAAAAAAAAAAAAAAAAAAAAAAAAAAAAAAAAAAAAAAAAAAAAAAAAAAAAAAAAAAAAAAAAAAAAAAAAAAAAAAAAAAAAAAAAAAAAAAAAAAAAAAAAAAAAAAAAAAAAAAAAAAAAAAAAAAAAAAAAAAAAAAAAAAAAAAAAAAAAAAAAAAAAAAAAAAAAAAAAAAAAAAAAAAAAAAAAAAAAAAAAAAAAAAAAAAAAAAAAAAAAAAAAAAAAAAAAAAAAAAAAAAAAAAAAAAAAAAAAAAAAAAAAAAAAAAAAAAAAAAAAAAAAAAAAAAAAAAAAAAAAAAAAAAAAAAAAAAAAAAAAAAAAAAAAAAAAAAAAAAAAAAAAAAAAAAAAAAAAAAAAAAAAAAAAAAAAAAAAAAAAAAAAAAAAAAAAAAAAAAAAAAAAAAAAAAAAAAAAAAAAAAAAAAAAAAAAAAAAAAAAAAAAAAAAAAAAAAAAAAAAAAAAAAAAAAAAAAAAAAAAAAAAAAAAAAAAAAAAAAAAAAAAAAAAAAAAAAAAAAAAAAAAAAAAAAAAAAAAAAAAAAAAAAAAAAAAAAAAAAAAAAAAAAAAAAAAAAAAAAAAAAAAAAAAAAAAAAAAAAAAAAAAAAAAAAAAAAAAAAAAAAAAAAAAAAAAAAAAAAAAAAAAAAAAAAAAAAAAAAAAAAAAAAAAAAAAAAAAAAAAAAAAAAAAAAAAAAAAAAAAAAAAAAAAAAAAAAAAAAAAAAAAAAAAAAAAAAAAAAAAAAAAAAAAAAAAAAAAAAAAAAAAAAAAAAAAAAAAAAAAAAAAAAAAAAAAAAAAAAAAAAAAAAAAAAAAAAAAAAAAAAAAAAAAAAAAAAAAAAAAAAAAAAAAAAAAAAAAAAAAAAAAAAAAAAAAAAAAAAAAAAAAAAAAAAAAAAAAAAAAAAAAAAAAAAAAAAAAAAAAAAAAAAAAAAAAAAAAAAAAAAAAAAAAAAAAAAAAAAAAAAAAAAAAAAAAAAAAAAAAAAAAAAAAAAAAAAAAAAAAAAAAAAAAAAAAAAAAAAAAAAAAAAAAAAAAAAAAAAAAAAAAAAAAAAAAAAAAAAAAAAAAAAAAAAAAAAAAAAAAAAAAAAAAAAAAAAAAAAAAAAAAAAAAAAAAAAAAAAAAAAAAAAAAAAAAAAAAAAAAAAAAAAAAAAAAAAAAAAAAAAAAAAAAAAAAAAAAAAAAAAAAAAAAAAAAAAAAAAAAAAAAAAAAAAAAAAAAAAAAAAAAAAAAAAAAAAAAAAAAAAAAAAAAAAAAAAAAAAAAAAAAAAAAAAAAAAAAAAAAAAAAAAAAAAAAAAAAAAAAAAAAAAAAAAAAAAAAAAAAAAAAAAAAAAAAAAAAAAAAAAAAAAAAAAAAAAAAAAAAAAAAAAAAAAAAAAAAAAAAAAAAAAAAAAAAAAAAAAAAAAAAAAAAAAAAAAAAAAAAAAAAAAAAAAAAAAAAAAAAAAAAAAAAAAAAAAAAAAAAAAAAAAAAAAAAAAAAAAAAAAAAAAAAAAAAAAAAAAAAAAAAAAAAAAAAAAAAAAAAAAAAAAAAAAAAAAAAAAAAAAAAAAAAAAAAAAAAAAAAAAAAAAAAAAAAAAAAAAAAAAAAAAAAAAAAAAAAAAAAAAAAAAAAAAAAAAAAAAAAAAAAAAAAAAAAAAAAAAAAAAAAAAAAAAAAAAAAAAAAAAAAAAAAAAAAAAAAAAAAAAAAAAAAAAAAAAAAAAAAAAAAAAAAAAAAAAAAAAAAAAAAAAAAAAAAAAAAAAAAAAAAAAAAAAAAAAAAAAAAAAAAAAAAAAAAAAAAAAAAAAAAAAAAAAAAAAAAAAAAAAAAAAAAAAAAAAAAAAAAAAAAAAAAAAAAAAAAAAAAAAAAAAAAAAAAAAAAAAAAAAAAAAAAAAAAAAAAAAAAAAAAAAAAAAAAAAAAAAAAAAAAAAAAAAAAAAAAAAAAAAAAAAAAAAAAAAAAAAAAAAAAAAAAAAAAAAAAAAAAAAAAAAAAAAAAAAAAAAAAAAAAAAAAAAAAAAAAAAAAAAAAAAAAAA
AAAAAAAAAAAAAAAAAAAAAAAAAAAAAAAAAAAAAAAAAAAAAAAAAAAAAAAAAAAAAAAAAAAAAAAAAAAAAAAAAAAAAAAAAAAAAAAAAAAAAAAAAAAAAAAAAAAAAAAAAAAAAAAAAAAAAAAAAAAAAAAAAAAAAAAAAAAAAAAAAAAAAAAAAAAAAAAAAAAAAAAAAAAAAAAAAAAAAAAAAAAAAAAAAAAAAAAAAAAAAAAAAAAAAAAAAAAAAAAAAAAAAAAAAAAAAAAAAAAAAAAAAAAAAAAAAAAAAAAAAAAAAAAAAAAAAAAAAAAAAAAAAAAAAAAAAAAAAAAAAAAAAAAAAAAAAAAAAAAAAAAAAAAAAAAAAAAAAAAAAAAAAAAAAAAAAAAAAAAAAAAAAAAAAAAAAAAAAAAAAAAAAAAAAAAAAAAAAAAAAAAAAAAAAAAAAAAAAAAAAAAAAAAAAAAAAAAAAAAAAAAAAAAAAAAAAAAAAAAAAAAAAAAAAAAAAAAAAAAAAAAAAAAAAAAAAAAAAAAAAAAAAAAAAAAAAAAAAAAAAAAAAAAAAAAAAAAAAAAAAAAAAAAAAAAAAAAAAAAAAAAAAAAAAAAAAAAAAAAAAAAAAAAAAAAAAAAAAAAAAAAAAAAAAAAAAAAAAAAAAAAAAAAAAAAAAAAAAAAAAAAAAAAAAAAAAAAAAAAAAAAAAAAAAAAAAAAAAAAAAAAAAAAAAAAAAAAAAAAAAAAAAAAAAAAAAAAAAAAAAAAAAAAAAAAAAAAAAAAAAAAAAAAAAAAAAAAAAAAAAAAAAAAAAAAAAAAAAAAAAAAAAAAAAAAAAAAAAAAAAAAAAAAAAAAAAAAAAAAAAAAAAAAAAAAAAAAAAAAAAAAAAAAAAAAAAAAAAAAAAAAAAAAAAAAAAAAAAAAAAAAAAAAAAAAAAAAAAAAAAAAAAAAAAAAAAAAAAAAAAAAAAAAAAAAAAAAAAAAAAAAAAAAAAAAAAAAAAAAAAAAAAAAAAAAAAAAAAAAAAAAAAAAAAAAAAAAAAAAAAAAAAAAAAAAAAAAAAAAAAAAAAAAAAAAAAAAAAAAAAAAAAAAAAAAAAAAAAAAAAAAAAAAAAAAAAAAAAAAAAAAAAAAAAAAAAAAAAAAAAAAAAAAAAAAAAAAAAAAAAAAAAAAAAAAAAAAAAAAAAAAAAAAAAAAAAAAAAAAAAAAAAAAAAAAAAAAAAAAAAAAAAAAAAAAAAAAAAAAAAAAAAAAAAAAAAAAAAAAAAAAAAAAAAAAAAAAAAAAAAAAAAAAAAAAAAAAAAAAAAAAAAAAAAAAAAAAAAAAAAAAAAAAAAAAAAAAAAAAAAAAAAAAAAAAAAAAAAAAAAAAAAAAAAAAAAAAAAAAAAAAAAAAAAAAAAAAAAAAAAAAAAAAAAAAAAAAAAAAAAAAAAAAAAAAAAAAAAAAAAAAAAAAAAAAAAAAAAAAAAAAAAAAAAAAAAAAAAAAAAAAAAAAAAAAAAAAAAAAAAAAAAAAAAAAAAAAAAAAAAAAAAAAAAAAAAAAAAAAAAAAAAAAAAAAAAAAAAAAAAAAAAAAAAAAAAAAAAAAAAAAAAAAAAAAAAAAAAAAAAAAAAAAAAAAAAAAAAAAAAAAAAAAAAAAAAAAAAAAAAAAAAAAAAAAAAAAAAAAAAAAAAAAAAAAAAAAAAAAAAAAAAAAAAAAAAAAAAAAAAAAAAAAAAAAAAAAAAAAAAAAAAAAAAAAAAAAAAAAAAAAAAAAAAAAAAAAAAAAAAAAAAAAAAAAAAAAAAAAAAAAAAAAAAAAAAAAAAAAAAAAAAAAAAAAAAAAAAAAAAAAAAAAAAAAAAAAAAAAAAAAAAAAAAAAAAAAAAAAAAAAAAAAAAAAAAAAAAAAAAAAAAAAAAAAAAAAAAAAAAAAAAAAAAAAAAAAAAAAAAAAAAAAAAAAAAAAAAAAAAAAAAAAAAAAAAAAAAAAAAAAAAAAAAAAAAAAAAAAAAAAAAAAAAAAAAAAAAAAAAAAAAAAAAAAAAAAAAAAAAAAAAAAAAAAAAAAAAAAAAAAAAAAAAAAAAAAAAAAAAAAAAAAAAAAAAAAAAAAAAAAAAAAAAAAAAAAAAAAAAAAAAAAAAAAAAAAAAAAAAAAAAAAAAAAAAAAAAAAAAAAAAAAAAAAAAAAAAAAAAAAAAAAAAAAAAAAAAAAAAAAAAAAAAAAAAAAAAAAAAAAAAAAAAAAAAAAAAAAAAAAAAAAAAAAAAAAAAAAAAAAAAAAAAAAAAAAAAAAAAAAAAAAAAAAAAAAAAAAAAAAAAAAAAAAAAAAAAAAAAAAAAAAAAAAAAAAAAAAAAAAAAAAAAAAAAAAAAAAAAAAAAAAAAAAAAAAAAAAAAAAAAAAAAAAAAAAAAAAAAAAAAAAAAAAAAAAAAAAAAAAAAAAAAAAAAAAAAAAAAAAAAAAAAAAAAAAAAAAAAAAAAAAAAAAAAAAAAAAAAAAAAAAAAAAAAAAAAAAAAAAAAAAAAAAAAAAAAAAAAAAAAAAAAAAAAAAAAAAAAAAAAAAAAAAAAAAAAAAAAAAAAAAAAAAAAAAAAAAAAAAAAAAAAAAAAAAAAAAAAAAAAAAAAAAAAAAAAAAAAAAAAAAAAAAAAAAAAAAAAAAAAAAAAAAAAAAAAAAAAAAAAAAAAAAAAAAAAAAAAAAAAAAAAAAAAAAAAAAAAAAAAAAAAAAAAAAAAAAAAAAAAAAAAAAAAAAAAAAAAAAAAAAAAAAAAAAAAAAAAAAAAAAAAAAAAAAAAAAAAAAAAAAAAAAAAAAAAAAAAAAAAAAAAAAAAAAAAAAAAAAAAAAAAAAAAAAAAAAAAAAAAAAAAAAAAAAAAAAAAAAAAAAAAAAAAAAAAAAAAAAAAAAAAAAAAAAAAAAAAAAAAAAAAAAAAAAAAAAAAAAAAAAAAAAAAAAAAAAAAAAAAAAAAAAAAAAAAAAAAAAAAAAAAAAAAAAAAAAAAAAAAAAAAAAAAAAAAAAAAAAAAAAAAAAAAAAAAAAAAAAAAAAAAAAAAAAAAAAAAAAAAAAAAAAAAAAAAAAAAAAAAAAAAAAAAAAAAAAAAAAAAAAAAAAAAAAAAAAAAAAAAAAAAAAAAAAAAAAAAAAAAAAAAAAAAAAAAAAAAAAAAAAAAAAAAAAAAAAAAAAAAAAAAAAAAAAAAAAAAAAAAAAAAAAAAAAAAAAAAAAAAAAAAAAAAAAAAAAAAAAAAAAAAAAAAAAAAAAAAAAAAAAAAAAAAAAAAAAAAAAAAAAAAAAAAAAAAAAAAAAAAAAAAAAAAAAAAAAAAAAAAAAAAAAAAAAAAAAAAAAAAAAAAAAAAAAAAAAAAAAAAAAAAAAAAAAAAAAAAAAAAAAAAAAAAAAAAAAAAAAAAAAAAAAAAAAAAAAAAAAAAAAAAAAAAAAAAAAAAAAAAAAAAAAAAAAAAAAAAAAAAAAAAAAAAAAAAAAAAAAAAAAAAAAAAAAAAAAAAAAAAAAAAAAAAAAAAAAAAAAAAAAAAAAAAAAAAAAAAAAAAAAAAAAAAAAAAAAAAAAAAAAAAAAAAAAAAAAAAAAAAAAAAAAAAAAAAAAAAAAAAAAAAAAAAAAAAAAAAAAAAAAAAAAAAAAAAAAAAAAAAAAAAAAAAAAAAAAAAAAAAAAAAAAAAAAAAAAAAAAAAAAAAAAAAAAAAAAAAAAAAAAAAAAAAAAAAAAAAAAAAAAAAAAAAAAAAAAAAAAAAAAAAAAAAAAAAAAAAAAAAAAAAAAAAAAAAAAAAAAAAAAAAAAAAAAAAAAAAAAAAAAAAAAAAAAAAAAAAAAAAAAAAAAAAAAAAAAAAAAAAAAAAAAAAAAAAAAAAAAAAAAAAAAAAAAAAAAAAAAAAAAAAAAAAAAAAAAAAAAAAAAAAAAAAAAAAAAAAAAAAAAAAAAAAAAAAAAAAAAAAAAAAAAAAAAAAAAAAAAAAAAAAAAAAAAAAAAAAAAAAAAAAAAAAAAAAAAAAAAAAAAAAAAAAAAAAAAAAAAAAAAAAAAAAAAAAAAAAAAAAAAAAAAAAAAAAAAAAAAAAAAAAAAAAAAAAAAAAAAAAAAAAAAAAAAAAAAAAAAAAAAAAAAAAAAAAAAAAAAAAAAAAAAAAAAAAAAAAAAAAAAAAAAAAAAA
AAAAAAAAAAAAAAAAAAAAAAAAAAAAAAAAAAAAAAAAAAAAAAAAAAAAAAAAAAAAAAAAAAAAAAAAAAAAAAAAAAAAAAAAAAAAAAAAAAAAAAAAAAAAAAAAAAAAAAAAAAAAAAAAAAAAAAAAAAAAAAAAAAAAAAAAAAAAAAAAAAAAAAAAAAAAAAAAAAAAAAAAAAAAAAAAAAAAAAAAAAAAAAAAAAAAAAAAAAAAAAAAAAAAAAAAAAAAAAAAAAAAAAAAAAAAAAAAAAAAAAAAAAAAAAAAAAAAAAAAAAAAAAAAAAAAAAAAAAAAAAAAAAAAAAAAAAAAAAAAAAAAAAAAAAAAAAAAAAAAAAAAAAAAAAAAAAAAAAAAAAAAAAAAAAAAAAAAAAAAAAAAAAAAAAAAAAAAAAAAAAAAAAAAAAAAAAAAAAAAAAAAAAAAAAAAAAAAAAAAAAAAAAAAAAAAAAAAAAAAAAAAAAAAAAAAAAAAAAAAAAAAAAAAAAAAAAAAAAAAAAAAAAAAAAAAAAAAAAAAAAAAAAAAAAAAAAAAAAAAAAAAAAAAAAAAAAAAAAAAAAAAAAAAAAAAAAAAAAAAAAAAAAAAAAAAAAAAAAAAAAAAAAAAAAAAAAAAAAAAAAAAAAAAAAAAAAAAAAAAAAAAAAAAAAAAAAAAAAAAAAAAAAAAAAAAAAAAAAAAAAAAAAAAAAAAAAAAAAAAAAAAAAAAAAAAAAAAAAAAAAAAAAAAAAAAAAAAAAAAAAAAAAAAAAAAAAAAAAAAAAAAAAAAAAAAAAAAAAAAAAAAAAAAAAAAAAAAAAAAAAAAAAAAAAAAAAAAAAAAAAAAAAAAAAAAAAAAAAAAAAAAAAAAAAAAAAAAAAAAAAAAAAAAAAAAAAAAAAAAAAAAAAAAAAAAAAAAAAAAAAAAAAAAAAAAAAAAAAAAAAAAAAAAAAAAAAAAAAAAAAAAAAAAAAAAAAAAAAAAAAAAAAAAAAAAAAAAAAAAAAAAAAAAAAAAAAAAAAAAAAAAAAAAAAAAAAAAAAAAAAAAAAAAAAAAAAAAAAAAAAAAAAAAAAAAAAAAAAAAAAAAAAAAAAAAAAAAAAAAAAAAAAAAAAAAAAAAAAAAAAAAAAAAAAAAAAAAAAAAAAAAAAAAAAAAAAAAAAAAAAAAAAAAAAAAAAAAAAAAAAAAAAAAAAAAAAAAAAAAAAAAAAAAAAAAAAAAAAAAAAAAAAAAAAAAAAAAAAAAAAAAAAAAAAAAAAAAAAAAAAAAAAAAAAAAAAAAAAAAAAAAAAAAAAAAAAAAAAAAAAAAAAAAAAAAAAAAAAAAAAAAAAAAAAAAAAAAAAAAAAAAAAAAAAAAAAAAAAAAAAAAAAAAAAAAAAAAAAAAAAAAAAAAAAAAAAAAAAAAAAAAAAAAAAAAAAAAAAAAAAAAAAAAAAAAAAAAAAAAAAAAAAAAAAAAAAAAAAAAAAAAAAAAAAAAAAAAAAAAAAAAAAAAAAAAAAAAAAAAAAAAAAAAAAAAAAAAAAAAAAAAAAAAAAAAAAAAAAAAAAAAAAAAAAAAAAAAAAAAAAAAAAAAAAAAAAAAAAAAAAAAAAAAAAAAAAAAAAAAAAAAAAAAAAAAAAAAAAAAAAAAAAAAAAAAAAAAAAAAAAAAAAAAAAAAAAAAAAAAAAAAAAAAAAAAAAAAAAAAAAAAAAAAAAAAAAAAAAAAAAAAAAAAAAAAAAAAAAAAAAAAAAAAAAAAAAAAAAAAAAAAAAAAAAAAAAAAAAAAAAAAAAAAAAAAAAAAAAAAAAAAAAAAAAAAAAAAAAAAAAAAAAAAAAAAAAAAAAAAAAAAAAAAAAAAAAAAAAAAAAAAAAAAAAAAAAAAAAAAAAAAAAAAAAAAAAAAAAAAAAAAAAAAAAAAAAAAAAAAAAAAAAAAAAAAAAAAAAAAAAAAAAAAAAAAAAAAAAAAAAAAAAAAAAAAAAAAAAAAAAAAAAAAAAAAAAAAAAAAAAAAAAAAAAAAAAAAAAAAAAAAAAAAAAAAAAAAAAAAAAAAAAAAAAAAAAAAAAAAAAAAAAAAAAAAAAAAAAAAAAAAAAAAAAAAAAAAAAAAAAAAAAAAAAAAAAAAAAAAAAAAAAAAAAAAAAAAAAAAAAAAAAAAAAAAAAAAAAAAAAAAAAAAAAAAAAAAAAAAAAAAAAAAAAAAAAAAAAAAAAAAAAAAAAAAAAAAAAAAAAAAAAAAAAAAAAAAAAAAAAAAAAAAAAAAAAAAAAAAAAAAAAAAAAAAAAAAAAAAAAAAAAAAAAAAAAAAAAAAAAAAAAAAAAAAAAAAAAAAAAAAAAAAAAAAAAAAAAAAAAAAAAAAAAAAAAAAAAAAAAAAAAAAAAAAAAAAAAAAAAAAAAAAAAAAAAAAAAAAAAAAAAAAAAAAAAAAAAAAAAAAAAAAAAAAAAAAAAAAAAAAAAAAAAAAAAAAAAAAAAAAAAAAAAAAAAAAAAAAAAAAAAAAAAAAAAAAAAAAAAAAAAAAAAAAAAAAAAAAAAAAAAAAAAAAAAAAAAAAAAAAAAAAAAAAAAAAAAAAAAAAAAAAAAAAAAAAAAAAAAAAAAAAAAAAAAAAAAAAAAAAAAAAAAAAAAAAAAAAAAAAAAAAAAAAAAAAAAAAAAAAAAAAAAAAAAAAAAAAAAAAAAAAAAAAAAAAAAAAAAAAAAAAAAAAAAAAAAAAAAAAAAAAAAAAAAAAAAAAAAAAAAAAAAAAAAAAAAAAAAAAAAAAAAAAAAAAAAAAAAAAAAAAAAAAAAAAAAAAAAAAAAAAAAAAAAAAAAAAAAAAAAAAAAAAAAAAAAAAAAAAAAAAAAAAAAAAAAAAAAAAAAAAAAAAAAAAAAAAAAAAAAAAAAAAAAAAAAAAAAAAAAAAAAAAAAAAAAAAAAAAAAAAAAAAAAAAAAAAAAAAAAAAAAAAAAAAAAAAAAAAAAAAAAAAAAAAAAAAAAAAAAAAAAAAAAAAAAAAAAAAAAAAAAAAAAAAAAAAAAAAAAAAAAAAAAAAAAAAAAAAAAAAAAAAAAAAAAAAAAAAAAAAAAAAAAAAAAAAAAAAAAAAAAAAAAAAAAAAAAAAAAAAAAAAAAAAAAAAAAAAAAAAAAAAAAAAAAAAAAAAAAAAAAAAAAAAAAAAAAAAAAAAAAAAAAAAAAAAAAAAAAAAAAAAAAAAAAAAAAAAAAAAAAAAAAAAAAAAAAAAAAAAAAAAAAAAAAAAAAAAAAAAAAAAAAAAAAAAAAAAAAAAAAAAAAAAAAAAAAAAAAAAAAAAAAAAAAAAAAAAAAAAAAAAAAAAAAAAAAAAAAAAAAAAAAAAAAAAAAAAAAAAAAAAAAAAAAAAAAAAAAAAAAAAAAAAAAAAAAAAAAAAAAAAAAAAAAAAAAAAAAAAAAAAAAAAAAAAAAAAAAAAAAAAAAAAAAAAAAAAAAAAAAAAAAAAAAAAAAAAAAAAAAAAAAAAAAAAAAAAAAAAAAAAAAAAAAAAAAAAAAAAAAAAAAAAAAAAAAAAAAAAAAAAAAAAAAAAAAAAAAAAAAAAAAAAAAAAAAAAAAAAAAAAAAAAAAAAAAAAAAAAAAAAAAAAAAAAAAAAAAAAAAAAAAAAAAAAAAAAAAAAAAAAAAAAAAAAAAAAAAAAAAAAAAAAAAAAAAAAAAAAAAAAAAAAAAAAAAAAAAAAAAAAAAAAAAAAAAAAAAAAAAAAAAAAAAAAAAAAAAAAAAAAAAAAAAAAAAAAAAAAAAAAAAAAAAAAAAAAAAAAAAAAAAAAAAAAAAAAAAAAAAAAAAAAAAAAAAAAAAAAAAAAAAAAAAAAAAAAAAAAAAAAAAAAAAAAAAAAAAAAAAAAAAAAAAAAAAAAAAAAAAAAAAAAAAAAAAAAAAAAAAAAAAAAAAAAAAAAAAAAAAAAAAAAAAAAAAAAAAAAAAAAAAAAAAAAAAAAAAAAAAAAAAAAAAAAAAAAAAAAAAAAAAAAAAAAAAAAAAAAAAAAAAAAAAAAAAAAAAAAAAAAAAAAAAAAAAAAAAAAAAAAAAAAAAAAAAAAAAAAAAAAAAAAAAAAAAAAAAAAAAAAAAAAAAAAAAAAAAAAAAAAAAAAAAAAAAAAAAAAAAAAAAAAAAAAAAAAAAAAAAAAAAAAAAAAAAAAAAAAAAAAAAAA
AAAAAAAAAAAAAAAAAAAAAAAAAAAAAAAAAAAAAAAAAAAAAAAAAAAAAAAAAAAAAAAAAAAAAAAAAAAAAAAAAAAAAAAAAAAAAAAAAAAAAAAAAAAAAAAAAAAAAAAAAAAAAAAAAAAAAAAAAAAAAAAAAAAAAAAAAAAAAAAAAAAAAAAAAAAAAAAAAAAAAAAAAAAAAAAAAAAAAAAAAAAAAAAAAAAAAAAAAAAAAAAAAAAAAAAAAAAAAAAAAAAAAAAAAAAAAAAAAAAAAAAAAAAAAAAAAAAAAAAAAAAAAAAAAAAAAAAAAAAAAAAAAAAAAAAAAAAAAAAAAAAAAAAAAAAAAAAAAAAAAAAAAAAAAAAAAAAAAAAAAAAAAAAAAAAAAAAAAAAAAAAAAAAAAAAAAAAAAAAAAAAAAAAAAAAAAAAAAAAAAAAAAAAAAAAAAAAAAAAAAAAAAAAAAAAAAAAAAAAAAAAAAAAAAAAAAAAAAAAAAAAAAAAAAAAAAAAAAAAAAAAAAAAAAAAAAAAAAAAAAAAAAAAAAAAAAAAAAAAAAAAAAAAAAAAAAAAAAAAAAAAAAAAAAAAAAAAAAAAAAAAAAAAAAAAAAAAAAAAAAAAAAAAAAAAAAAAAAAAAAAAAAAAAAAAAAAAAAAAAAAAAAAAAAAAAAAAAAAAAAAAAAAAAAAAAAAAAAAAAAAAAAAAAAAAAAAAAAAAAAAAAAAAAAAAAAAAAAAAAAAAAAAAAAAAAAAAAAAAAAAAAAAAAAAAAAAAAAAAAAAAAAAAAAAAAAAAAAAAAAAAAAAAAAAAAAAAAAAAAAAAAAAAAAAAAAAAAAAAAAAAAAAAAAAAAAAAAAAAAAAAAAAAAAAAAAAAAAAAAAAAAAAAAAAAAAAAAAAAAAAAAAAAAAAAAAAAAAAAAAAAAAAAAAAAAAAAAAAAAAAAAAAAAAAAAAAAAAAAAAAAAAAAAAAAAAAAAAAAAAAAAAAAAAAAAAAAAAAAAAAAAAAAAAAAAAAAAAAAAAAAAAAAAAAAAAAAAAAAAAAAAAAAAAAAAAAAAAAAAAAAAAAAAAAAAAAAAAAAAAAAAAAAAAAAAAAAAAAAAAAAAAAAAAAAAAAAAAAAAAAAAAAAAAAAAAAAAAAAAAAAAAAAAAAAAAAAAAAAAAAAAAAAAAAAAAAAAAAAAAAAAAAAAAAAAAAAAAAAAAAAAAAAAAAAAAAAAAAAAAAAAAAAAAAAAAAAAAAAAAAAAAAAAAAAAAAAAAAAAAAAAAAAAAAAAAAAAAAAAAAAAAAAAAAAAAAAAAAAAAAAAAAAAAAAAAAAAAAAAAAAAAAAAAAAAAAAAAAAAAAAAAAAAAAAAAAAAAAAAAAAAAAAAAAAAAAAAAAAAAAAAAAAAAAAAAAAAAAAAAAAAAAAAAAAAAAAAAAAAAAAAAAAAAAAAAAAAAAAAAAAAAAAAAAAAAAAAAAAAAAAAAAAAAAAAAAAAAAAAAAAAAAAAAAAAAAAAAAAAAAAAAAAAAAAAAAAAAAAAAAAAAAAAAAAAAAAAAAAAAAAAAAAAAAAAAAAAAAAAAAAAAAAAAAAAAAAAAAAAAAAAAAAAAAAAAAAAAAAAAAAAAAAAAAAAAAAAAAAAAAAAAAAAAAAAAAAAAAAAAAAAAAAAAAAAAAAAAAAAAAAAAAAAAAAAAAAAAAAAAAAAAAAAAAAAAAAAAAAAAAAAAAAAAAAAAAAAAAAAAAAAAAAAAAAAAAAAAAAAAAAAAAAAAAAAAAAAAAAAAAAAAAAAAAAAAAAAAAAAAAAAAAAAAAAAAAAAAAAAAAAAAAAAAAAAAAAAAAAAAAAAAAAAAAAAAAAAAAAAAAAAAAAAAAAAAAAAAAAAAAAAAAAAAAAAAAAAAAAAAAAAAAAAAAAAAAAAAAAAAAAAAAAAAAAAAAAAAAAAAAAAAAAAAAAAAAAAAAAAAAAAAAAAAAAAAAAAAAAAAAAAAAAAAAAAAAAAAAAAAAAAAAAAAAAAAAAAAAAAAAAAAAAAAAAAAAAAAAAAAAAAAAAAAAAAAAAAAAAAAAAAAAAAAAAAAAAAAAAAAAAAAAAAAAAAAAAAAAAAAAAAAAAAAAAAAAAAAAAAAAAAAAAAAAAAAAAAAAAAAAAAAAAAAAAAAAAAAAAAAAAAAAAAAAAAAAAAAAAAAAAAAAAAAAAAAAAAAAAAAAAAAAAAAAAAAAAAAAAAAAAAAAAAAAAAAAAAAAAAAAAAAAAAAAAAAAAAAAAAAAAAAAAAAAAAAAAAAAAAAAAAAAAAAAAAAAAAAAAAAAAAAAAAAAAAAAAAAAAAAAAAAAAAAAAAAAAAAAAAAAAAAAAAAAAAAAAAAAAAAAAAAAAAAAAAAAAAAAAAAAAAAAAAAAAAAAAAAAAAAAAAAAAAAAAAAAAAAAAAAAAAAAAAAAAAAAAAAAAAAAAAAAAAAAAAAAAAAAAAAAAAAAAAAAAAAAAAAAAAAAAAAAAAAAAAAAAAAAAAAAAAAAAAAAAAAAAAAAAAAAAAAAAAAAAAAAAAAAAAAAAAAAAAAAAAAAAAAAAAAAAAAAAAAAAAAAAAAAAAAAAAAAAAAAAAAAAAAAAAAAAAAAAAAAAAAAAAAAAAAAAAAAAAAAAAAAAAAAAAAAAAAAAAAAAAAAAAAAAAAAAAAAAAAAAAAAAAAAAAAAAAAAAAAAAAAAAAAAAAAAAAAAAAAAAAAAAAAAAAAAAAAAAAAAAAAAAAAAAAAAAAAAAAAAAAAAAAAAAAAAAAAAAAAAAAAAAAAAAAAAAAAAAAAAAAAAAAAAAAAAAAAAAAAAAAAAAAAAAAAAAAAAAAAAAAAAAAAAAAAAAAAAAAAAAAAAAAAAAAAAAAAAAAAAAAAAAAAAAAAAAAAAAAAAAAAAAAAAAAAAAAAAAAAAAAAAAAAAAAAAAAAAAAAAAAAAAAAAAAAAAAAAAAAAAAAAAAAAAAAAAAAAAAAAAAAAAAAAAAAAAAAAAAAAAAAAAAAAAAAAAAAAAAAAAAAAAAAAAAAAAAAAAAAAAAAAAAAAAAAAAAAAAAAAAAAAAAAAAAAAAAAAAAAAAAAAAAAAAAAAAAAAAAAAAAAAAAAAAAAAAAAAAAAAAAAAAAAAAAAAAAAAAAAAAAAAAAAAAAAAAAAAAAAAAAAAAAAAAAAAAAAAAAAAAAAAAAAAAAAAAAAAAAAAAAAAAAAAAAAAAAAAAAAAAAAAAAAAAAAAAAAAAAAAAAAAAAAAAAAAAAAAAAAAAAAAAAAAAAAAAAAAAAAAAAAAAAAAAAAAAAAAAAAAAAAAAAAAAAAAAAAAAAAAAAAAAAAAAAAAAAAAAAAAAAAAAAAAAAAAAAAAAAAAAAAAAAAAAAAAAAAAAAAAAAAAAAAAAAAAAAAAAAAAAAAAAAAAAAAAAAAAAAAAAAAAAAAAAAAAAAAAAAAAAAAAAAAAAAAAAAAAAAAAAAAAAAAAAAAAAAAAAAAAAAAAAAAAAAAAAAAAAAAAAAAAAAAAAAAAAAAAAAAAAAAAAAAAAAAAAAAAAAAAAAAAAAAAAAAAAAAAAAAAAAAAAAAAAAAAAAAAAAAAAAAAAAAAAAAAAAAAAAAAAAAAAAAAAAAAAAAAAAAAAAAAAAAAAAAAAAAAAAAAAAAAAAAAAAAAAAAAAAAAAAAAAAAAAAAAAAAAAAAAAAAAAAAAAAAAAAAAAAAAAAAAAAAAAAAAAAAAAAAAAAAAAAAAAAAAAAAAAAAAAAAAAAAAAAAAAAAAAAAAAAAAAAAAAAAAAAAAAAAAAAAAAAAAAAAAAAAAAAAAAAAAAAAAAAAAAAAAAAAAAAAAAAAAAAAAAAAAAAAAAAAAAAAAAAAAAAAAAAAAAAAAAAAAAAAAAAAAAAAAAAAAAAAAAAAAAAAAAAAAAAAAAAAAAAAAAAAAAAAAAAAAAAAAAAAAAAAAAAAAAAAAAAAAAAAAAAAAAAAAAAAAAAAAAAAAAAAAAAAAAAAAAAAAAAAAAAAAAAAAAAAAAAAAAAAAAAAAAAAAAAAAAAAAAAAAAAAAAAAAAAAAAAAAAAAAAAAAAAAAAAAAAAAAAAAAAAAAAAAAAAAAAAAAAAAAAAAAAAAAAAAAAAAAAAAAAAAAAAAAAAAAAAAAAAAAAAAAAAAAAAAAAA
AAAAAAAAAAAAAAAAAAAAAAAAAAAAAAAAAAAAAAAAAAAAAAAAAAAAAAAAAAAAAAAAAAAAAAAAAAAAAAAAAAAAAAAAAAAAAAAAAAAAAAAAAAAAAAAAAAAAAAAAAAAAAAAAAAAAAAAAAAAAAAAAAAAAAAAAAAAAAAAAAAAAAAAAAAAAAAAAAAAAAAAAAAAAAAAAAAAAAAAAAAAAAAAAAAAAAAAAAAAAAAAAAAAAAAAAAAAAAAAAAAAAAAAAAAAAAAAAAAAAAAAAAAAAAAAAAAAAAAAAAAAAAAAAAAAAAAAAAAAAAAAAAAAAAAAAAAAAAAAAAAAAAAAAAAAAAAAAAAAAAAAAAAAAAAAAAAAAAAAAAAAAAAAAAAAAAAAAAAAAAAAAAAAAAAAAAAAAAAAAAAAAAAAAAAAAAAAAAAAAAAAAAAAAAAAAAAAAAAAAAAAAAAAAAAAAAAAAAAAAAAAAAAAAAAAAAAAAAAAAAAAAAAAAAAAAAAAAAAAAAAAAAAAAAAAAAAAAAAAAAAAAAAAAAAAAAAAAAAAAAAAAAAAAAAAAAAAAAAAAAAAAAAAAAAAAAAAAAAAAAAAAAAAAAAAAAAAAAAAAAAAAAAAAAAAAAAAAAAAAAAAAAAAAAAAAAAAAAAAAAAAAAAAAAAAAAAAAAAAAAAAAAAAAAAAAAAAAAAAAAAAAAAAAAAAAAAAAAAAAAAAAAAAAAAAAAAAAAAAAAAAAAAAAAAAAAAAAAAAAAAAAAAAAAAAAAAAAAAAAAAAAAAAAAAAAAAAAAAAAAAAAAAAAAAAAAAAAAAAAAAAAAAAAAAAAAAAAAAAAAAAAAAAAAAAAAAAAAAAAAAAAAAAAAAAAAAAAAAAAAAAAAAAAAAAAAAAAAAAAAAAAAAAAAAAAAAAAAAAAAAAAAAAAAAAAAAAAAAAAAAAAAAAAAAAAAAAAAAAAAAAAAAAAAAAAAAAAAAAAAAAAAAAAAAAAAAAAAAAAAAAAAAAAAAAAAAAAAAAAAAAAAAAAAAAAAAAAAAAAAAAAAAAAAAAAAAAAAAAAAAAAAAAAAAAAAAAAAAAAAAAAAAAAAAAAAAAAAAAAAAAAAAAAAAAAAAAAAAAAAAAAAAAAAAAAAAAAAAAAAAAAAAAAAAAAAAAAAAAAAAAAAAAAAAAAAAAAAAAAAAAAAAAAAAAAAAAAAAAAAAAAAAAAAAAAAAAAAAAAAAAAAAAAAAAAAAAAAAAAAAAAAAAAAAAAAAAAAAAAAAAAAAAAAAAAAAAAAAAAAAAAAAAAAAAAAAAAAAAAAAAAAAAAAAAAAAAAAAAAAAAAAAAAAAAAAAAAAAAAAAAAAAAAAAAAAAAAAAAAAAAAAAAAAAAAAAAAAAAAAAAAAAAAAAAAAAAAAAAAAAAAAAAAAAAAAAAAAAAAAAAAAAAAAAAAAAAAAAAAAAAAAAAAAAAAAAAAAAAAAAAAAAAAAAAAAAAAAAAAAAAAAAAAAAAAAAAAAAAAAAAAAAAAAAAAAAAAAAAAAAAAAAAAAAAAAAAAAAAAAAAAAAAAAAAAAAAAAAAAAAAAAAAAAAAAAAAAAAAAAAAAAAAAAAAAAAAAAAAAAAAAAAAAAAAAAAAAAAAAAAAAAAAAAAAAAAAAAAAAAAAAAAAAAAAAAAAAAAAAAAAAAAAAAAAAAAAAAAAAAAAAAAAAAAAAAAAAAAAAAAAAAAAAAAAAAAAAAAAAAAAAAAAAAAAAAAAAAAAAAAAAAAAAAAAAAAAAAAAAAAAAAAAAAAAAAAAAAAAAAAAAAAAAAAAAAAAAAAAAAAAAAAAAAAAAAAAAAAAAAAAAAAAAAAAAAAAAAAAAAAAAAAAAAAAAAAAAAAAAAAAAAAAAAAAAAAAAAAAAAAAAAAAAAAAAAAAAAAAAAAAAAAAAAAAAAAAAAAAAAAAAAAAAAAAAAAAAAAAAAAAAAAAAAAAAAAAAAAAAAAAAAAAAAAAAAAAAAAAAAAAAAAAAAAAAAAAAAAAAAAAAAAAAAAAAAAAAAAAAAAAAAAAAAAAAAAAAAAAAAAAAAAAAAAAAAAAAAAAAAAAAAAAAAAAAAAAAAAAAAAAAAAAAAAAAAAAAAAAAAAAAAAAAAAAAAAAAAAAAAAAAAAAAAAAAAAAAAAAAAAAAAAAAAAAAAAAAAAAAAAAAAAAAAAAAAAAAAAAAAAAAAAAAAAAAAAAAAAAAAAAAAAAAAAAAAAAAAAAAAAAAAAAAAAAAAAAAAAAAAAAAAAAAAAAAAAAAAAAAAAAAAAAAAAAAAAAAAAAAAAAAAAAAAAAAAAAAAAAAAAAAAAAAAAAAAAAAAAAAAAAAAAAAAAAAAAAAAAAAAAAAAAAAAAAAAAAAAAAAAAAAAAAAAAAAAAAAAAAAAAAAAAAAAAAAAAAAAAAAAAAAAAAAAAAAAAAAAAAAAAAAAAAAAAAAAAAAAAAAAAAAAAAAAAAAAAAAAAAAAAAAAAAAAAAAAAAAAAAAAAAAAAAAAAAAAAAAAAAAAAAAAAAAAAAAAAAAAAAAAAAAAAAAAAAAAAAAAAAAAAAAAAAAAAAAAAAAAAAAAAAAAAAAAAAAAAAAAAAAAAAAAAAAAAAAAAAAAAAAAAAAAAAAAAAAAAAAAAAAAAAAAAAAAAAAAAAAAAAAAAAAAAAAAAAAAAAAAAAAAAAAAAAAAAAAAAAAAAAAAAAAAAAAAAAAAAAAAAAAAAAAAAAAAAAAAAAAAAAAAAAAAAAAAAAAAAAAAAAAAAAAAAAAAAAAAAAAAAAAAAAAAAAAAAAAAAAAAAAAAAAAAAAAAAAAAAAAAAAAAAAAAAAAAAAAAAAAAAAAAAAAAAAAAAAAAAAAAAAAAAAAAAAAAAAAAAAAAAAAAAAAAAAAAAAAAAAAAAAAAAAAAAAAAAAAAAAAAAAAAAAAAAAAAAAAAAAAAAAAAAAAAAAAAAAAAAAAAAAAAAAAAAAAAAAAAAAAAAAAAAAAAAAAAAAAAAAAAAAAAAAAAAAAAAAAAAAAAAAAAAAAAAAAAAAAAAAAAAAAAAAAAAAAAAAAAAAAAAAAAAAAAAAAAAAAAAAAAAAAAAAAAAAAAAAAAAAAAAAAAAAAAAAAAAAAAAAAAAAAAAAAAAAAAAAAAAAAAAAAAAAAAAAAAAAAAAAAAAAAAAAAAAAAAAAAAAAAAAAAAAAAAAAAAAAAAAAAAAAAAAAAAAAAAAAAAAAAAAAAAAAAAAAAAAAAAAAAAAAAAAAAAAAAAAAAAAAAAAAAAAAAAAAAAAAAAAAAAAAAAAAAAAAAAAAAAAAAAAAAAAAAAAAAAAAAAAAAAAAAAAAAAAAAAAAAAAAAAAAAAAAAAAAAAAAAAAAAAAAAAAAAAAAAAAAAAAAAAAAAAAAAAAAAAAAAAAAAAAAAAAAAAAAAAAAAAAAAAAAAAAAAAAAAAAAAAAAAAAAAAAAAAAAAAAAAAAAAAAAAAAAAAAAAAAAAAAAAAAAAAAAAAAAAAAAAAAAAAAAAAAAAAAAAAAAAAAAAAAAAAAAAAAAAAAAAAAAAAAAAAAAAAAAAAAAAAAAAAAAAAAAAAAAAAAAAAAAAAAAAAAAAAAAAAAAAAAAAAAAAAAAAAAAAAAAAAAAAAAAAAAAAAAAAAAAAAAAAAAAAAAAAAAAAAAAAAAAAAAAAAAAAAAAAAAAAAAAAAAAAAAAAAAAAAAAAAAAAAAAAAAAAAAAAAAAAAAAAAAAAAAAAAAAAAAAAAAAAAAAAAAAAAAAAAAAAAAAAAAAAAAAAAAAAAAAAAAAAAAAAAAAAAAAAAAAAAAAAAAAAAAAAAAAAAAAAAAAAAAAAAAAAAAAAAAAAAAAAAAAAAAAAAAAAAAAAAAAAAAAAAAAAAAAAAAAAAAAAAAAAAAAAAAAAAAAAAAAAAAAAAAAAAAAAAAAAAAAAAAAAAAAAAAAAAAAAAAAAAAAAAAAAAAAAAAAAAAAAAAAAAAAAAAAAAAAAAAAAAAAAAAAAAAAAAAAAAAAAAAAAAAAAAAAAAAAAAAAAAAAAAAAAAAAAAAAAAAAAAAAAAAAAAAAAAAAAAAAAAAAAAAAAAAAAAAAAAAAAAAAAAAAAAAAAAAAAAAAAAAAAAAAAAAAAAAAAAAAAAAAAAAAAAAAAAAAAAAAA
AAAAAAAAAAAAAAAAAAAAAAAAAAAAAAAAAAAAAAAAAAAAAAAAAAAAAAAAAAAAAAAAAAAAAAAAAAAAAAAAAAAAAAAAAAAAAAAAAAAAAAAAAAAAAAAAAAAAAAAAAAAAAAAAAAAAAAAAAAAAAAAAAAAAAAAAAAAAAAAAAAAAAAAAAAAAAAAAAAAAAAAAAAAAAAAAAAAAAAAAAAAAAAAAAAAAAAAAAAAAAAAAAAAAAAAAAAAAAAAAAAAAAAAAAAAAAAAAAAAAAAAAAAAAAAAAAAAAAAAAAAAAAAAAAAAAAAAAAAAAAAAAAAAAAAAAAAAAAAAAAAAAAAAAAAAAAAAAAAAAAAAAAAAAAAAAAAAAAAAAAAAAAAAAAAAAAAAAAAAAAAAAAAAAAAAAAAAAAAAAAAAAAAAAAAAAAAAAAAAAAAAAAAAAAAAAAAAAAAAAAAAAAAAAAAAAAAAAAAAAAAAAAAAAAAAAAAAAAAAAAAAAAAAAAAAAAAAAAAAAAAAAAAAAAAAAAAAAAAAAAAAAAAAAAAAAAAAAAAAAAAAAAAAAAAAAAAAAAAAAAAAAAAAAAAAAAAAAAAAAAAAAAAAAAAAAAAAAAAAAAAAAAAAAAAAAAAAAAAAAAAAAAAAAAAAAAAAAAAAAAAAAAAAAAAAAAAAAAAAAAAAAAAAAAAAAAAAAAAAAAAAAAAAAAAAAAAAAAAAAAAAAAAAAAAAAAAAAAAAAAAAAAAAAAAAAAAAAAAAAAAAAAAAAAAAAAAAAAAAAAAAAAAAAAAAAAAAAAAAAAAAAAAAAAAAAAAAAAAAAAAAAAAAAAAAAAAAAAAAAAAAAAAAAAAAAAAAAAAAAAAAAAAAAAAAAAAAAAAAAAAAAAAAAAAAAAAAAAAAAAAAAAAAAAAAAAAAAAAAAAAAAAAAAAAAAAAAAAAAAAAAAAAAAAAAAAAAAAAAAAAAAAAAAAAAAAAAAAAAAAAAAAAAAAAAAAAAAAAAAAAAAAAAAAAAAAAAAAAAAAAAAAAAAAAAAAAAAAAAAAAAAAAAAAAAAAAAAAAAAAAAAAAAAAAAAAAAAAAAAAAAAAAAAAAAAAAAAAAAAAAAAAAAAAAAAAAAAAAAAAAAAAAAAAAAAAAAAAAAAAAAAAAAAAAAAAAAAAAAAAAAAAAAAAAAAAAAAAAAAAAAAAAAAAAAAAAAAAAAAAAAAAAAAAAAAAAAAAAAAAAAAAAAAAAAAAAAAAAAAAAAAAAAAAAAAAAAAAAAAAAAAAAAAAAAAAAAAAAAAAAAAAAAAAAAAAAAAAAAAAAAAAAAAAAAAAAAAAAAAAAAAAAAAAAAAAAAAAAAAAAAAAAAAAAAAAAAAAAAAAAAAAAAAAAAAAAAAAAAAAAAAAAAAAAAAAAAAAAAAAAAAAAAAAAAAAAAAAAAAAAAAAAAAAAAAAAAAAAAAAAAAAAAAAAAAAAAAAAAAAAAAAAAAAAAAAAAAAAAAAAAAAAAAAAAAAAAAAAAAAAAAAAAAAAAAAAAAAAAAAAAAAAAAAAAAAAAAAAAAAAAAAAAAAAAAAAAAAAAAAAAAAAAAAAAAAAAAAAAAAAAAAAAAAAAAAAAAAAAAAAAAAAAAAAAAAAAAAAAAAAAAAAAAAAAAAAAAAAAAAAAAAAAAAAAAAAAAAAAAAAAAAAAAAAAAAAAAAAAAAAAAAAAAAAAAAAAAAAAAAAAAAAAAAAAAAAAAAAAAAAAAAAAAAAAAAAAAAAAAAAAAAAAAAAAAAAAAAAAAAAAAAAAAAAAAAAAAAAAAAAAAAAAAAAAAAAAAAAAAAAAAAAAAAAAAAAAAAAAAAAAAAAAAAAAAAAAAAAAAAAAAAAAAAAAAAAAAAAAAAAAAAAAAAAAAAAAAAAAAAAAAAAAAAAAAAAAAAAAAAAAAAAAAAAAAAAAAAAAAAAAAAAAAAAAAAAAAAAAAAAAAAAAAAAAAAAAAAAAAAAAAAAAAAAAAAAAAAAAAAAAAAAAAAAAAAAAAAAAAAAAAAAAAAAAAAAAAAAAAAAAAAAAAAAAAAAAAAAAAAAAAAAAAAAAAAAAAAAAAAAAAAAAAAAAAAAAAAAAAAAAAAAAAAAAAAAAAAAAAAAAAAAAAAAAAAAAAAAAAAAAAAAAAAAAAAAAAAAAAAAAAAAAAAAAAAAAAAAAAAAAAAAAAAAAAAAAAAAAAAAAAAAAAAAAAAAAAAAAAAAAAAAAAAAAAAAAAAAAAAAAAAAAAAAAAAAAAAAAAAAAAAAAAAAAAAAAAAAAAAAAAAAAAAAAAAAAAAAAAAAAAAAAAAAAAAAAAAAAAAAAAAAAAAAAAAAAAAAAAAAAAAAAAAAAAAAAAAAAAAAAAAAAAAAAAAAAAAAAAAAAAAAAAAAAAAAAAAAAAAAAAAAAAAAAAAAAAAAAAAAAAAAAAAAAAAAAAAAAAAAAAAAAAAAAAAAAAAAAAAAAAAAAAAAAAAAAAAAAAAAAAAAAAAAAAAAAAAAAAAAAAAAAAAAAAAAAAAAAAAAAAAAAAAAAAAAAAAAAAAAAAAAAAAAAAAAAAAAAAAAAAAAAAAAAAAAAAAAAAAAAAAAAAAAAAAAAAAAAAAAAAAAAAAAAAAAAAAAAAAAAAAAAAAAAAAAAAAAAAAAAAAAAAAAAAAAAAAAAAAAAAAAAAAAAAAAAAAAAAAAAAAAAAAAAAAAAAAAAAAAAAAAAAAAAAAAAAAAAAAAAAAAAAAAAAAAAAAAAAAAAAAAAAAAAAAAAAAAAAAAAAAAAAAAAAAAAAAAAAAAAAAAAAAAAAAAAAAAAAAAAAAAAAAAAAAAAAAAAAAAAAAAAAAAAAAAAAAAAAAAAAAAAAAAAAAAAAAAAAAAAAAAAAAAAAAAAAAAAAAAAAAAAAAAAAAAAAAAAAAAAAAAAAAAAAAAAAAAAAAAAAAAAAAAAAAAAAAAAAAAAAAAAAAAAAAAAAAAAAAAAAAAAAAAAAAAAAAAAAAAAAAAAAAAAAAAAAAAAAAAAAAAAAAAAAAAAAAAAAAAAAAAAAAAAAAAAAAAAAAAAAAAAAAAAAAAAAAAAAAAAAAAAAAAAAAAAAAAAAAAAAAAAAAAAAAAAAAAAAAAAAAAAAAAAAAAAAAAAAAAAAAAAAAAAAAAAAAAAAAAAAAAAAAAAAAAAAAAAAAAAAAAAAAAAAAAAAAAAAAAAAAAAAAAAAAAAAAAAAAAAAAAAAAAAAAAAAAAAAAAAAAAAAAAAAAAAAAAAAAAAAAAAAAAAAAAAAAAAAAAAAAAAAAAAAAAAAAAAAAAAAAAAAAAAAAAAAAAAAAAAAAAAAAAAAAAAAAAAAAAAAAAAAAAAAAAAAAAAAAAAAAAAAAAAAAAAAAAAAAAAAAAAAAAAAAAAAAAAAAAAAAAAAAAAAAAAAAAAAAAAAAAAAAAAAAAAAAAAAAAAAAAAAAAAAAAAAAAAAAAAAAAAAAAAAAAAAAAAAAAAAAAAAAAAAAAAAAAAAAAAAAAAAAAAAAAAAAAAAAAAAAAAAAAAAAAAAAAAAAAAAAAAAAAAAAAAAAAAAAAAAAAAAAAAAAAAAAAAAAAAAAAAAAAAAAAAAAAAAAAAAAAAAAAAAAAAAAAAAAAAAAAAAAAAAAAAAAAAAAAAAAAAAAAAAAAAAAAAAAAAAAAAAAAAAAAAAAAAAAAAAAAAAAAAAAAAAAAAAAAAAAAAAAAAAAAAAAAAAAAAAAAAAAAAAAAAAAAAAAAAAAAAAAAAAAAAAAAAAAAAAAAAAAAAAAAAAAAAAAAAAAAAAAAAAAAAAAAAAAAAAAAAAAAAAAAAAAAAAAAAAAAAAAAAAAAAAAAAAAAAAAAAAAAAAAAAAAAAAAAAAAAAAAAAAAAAAAAAAAAAAAAAAAAAAAAAAAAAAAAAAAAAAAAAAAAAAAAAAAAAAAAAAAAAAAAAAAAAAAAAAAAAAAAAAAAAAAAAAAAAAAAAAAAAAAAAAAAAAAAAAAAAAAAAAAAAAAAAAAAAAAAAAAAAAAAAAAAAAAAAAAAAAAAAAAAAAAAAAAAAAAAAAAAAAAAAAAAAAAAAAAAAAAAAAAAAAAAAAAAAAAAAAAAAAAAAAAAAAAAAAAAAAAAAAAAAAAAAAAAAAAAAAAAAAAAAAAAAAAAAAAAAAAAAAAAAA
AAAAAAAAAAAAAAAAAAAAAAAAAAAAAAAAAAAAAAAAAAAAAAAAAAAAAAAAAAAAAAAAAAAAAAAAAAAAAAAAAAAAAAAAAAAAAAAAAAAAAAAAAAAAAAAAAAAAAAAAAAAAAAAAAAAAAAAAAAAAAAAAAAAAAAAAAAAAAAAAAAAAAAAAAAAAAAAAAAAAAAAAAAAAAAAAAAAAAAAAAAAAAAAAAAAAAAAAAAAAAAAAAAAAAAAAAAAAAAAAAAAAAAAAAAAAAAAAAAAAAAAAAAAAAAAAAAAAAAAAAAAAAAAAAAAAAAAAAAAAAAAAAAAAAAAAAAAAAAAAAAAAAAAAAAAAAAAAAAAAAAAAAAAAAAAAAAAAAAAAAAAAAAAAAAAAAAAAAAAAAAAAAAAAAAAAAAAAAAAAAAAAAAAAAAAAAAAAAAAAAAAAAAAAAAAAAAAAAAAAAAAAAAAAAAAAAAAAAAAAAAAAAAAAAAAAAAAAAAAAAAAAAAAAAAAAAAAAAAAAAAAAAAAAAAAAAAAAAAAAAAAAAAAAAAAAAAAAAAAAAAAAAAAAAAAAAAAAAAAAAAAAAAAAAAAAAAAAAAAAAAAAAAAAAAAAAAAAAAAAAAAAAAAAAAAAAAAAAAAAAAAAAAAAAAAAAAAAAAAAAAAAAAAAAAAAAAAAAAAAAAAAAAAAAAAAAAAAAAAAAAAAAAAAAAAAAAAAAAAAAAAAAAAAAAAAAAAAAAAAAAAAAAAAAAAAAAAAAAAAAAAAAAAAAAAAAAAAAAAAAAAAAAAAAAAAAAAAAAAAAAAAAAAAAAAAAAAAAAAAAAAAAAAAAAAAAAAAAAAAAAAAAAAAAAAAAAAAAAAAAAAAAAAAAAAAAAAAAAAAAAAAAAAAAAAAAAAAAAAAAAAAAAAAAAAAAAAAAAAAAAAAAAAAAAAAAAAAAAAAAAAAAAAAAAAAAAAAAAAAAAAAAAAAAAAAAAAAAAAAAAAAAAAAAAAAAAAAAAAAAAAAAAAAAAAAAAAAAAAAAAAAAAAAAAAAAAAAAAAAAAAAAAAAAAAAAAAAAAAAAAAAAAAAAAAAAAAAAAAAAAAAAAAAAAAAAAAAAAAAAAAAAAAAAAAAAAAAAAAAAAAAAAAAAAAAAAAAAAAAAAAAAAAAAAAAAAAAAAAAAAAAAAAAAAAAAAAAAAAAAAAAAAAAAAAAAAAAAAAAAAAAAAAAAAAAAAAAAAAAAAAAAAAAAAAAAAAAAAAAAAAAAAAAAAAAAAAAAAAAAAAAAAAAAAAAAAAAAAAAAAAAAAAAAAAAAAAAAAAAAAAAAAAAAAAAAAAAAAAAAAAAAAAAAAAAAAAAAAAAAAAAAAAAAAAAAAAAAAAAAAAAAAAAAAAAAAAAAAAAAAAAAAAAAAAAAAAAAAAAAAAAAAAAAAAAAAAAAAAAAAAAAAAAAAAAAAAAAAAAAAAAAAAAAAAAAAAAAAAAAAAAAAAAAAAAAAAAAAAAAAAAAAAAAAAAAAAAAAAAAAAAAAAAAAAAAAAAAAAAAAAAAAAAAAAAAAAAAAAAAAAAAAAAAAAAAAAAAAAAAAAAAAAAAAAAAAAAAAAAAAAAAAAAAAAAAAAAAAAAAAAAAAAAAAAAAAAAAAAAAAAAAAAAAAAAAAAAAAAAAAAAAAAAAAAAAAAAAAAAAAAAAAAAAAAAAAAAAAAAAAAAAAAAAAAAAAAAAAAAAAAAAAAAAAAAAAAAAAAAAAAAAAAAAAAAAAAAAAAAAAAAAAAAAAAAAAAAAAAAAAAAAAAAAAAAAAAAAAAAAAAAAAAAAAAAAAAAAAAAAAAAAAAAAAAAAAAAAAAAAAAAAAAAAAAAAAAAAAAAAAAAAAAAAAAAAAAAAAAAAAAAAAAAAAAAAAAAAAAAAAAAAAAAAAAAAAAAAAAAAAAAAAAAAAAAAAAAAAAAAAAAAAAAAAAAAAAAAAAAAAAAAAAAAAAAAAAAAAAAAAAAAAAAAAAAAAAAAAAAAAAAAAAAAAAAAAAAAAAAAAAAAAAAAAAAAAAAAAAAAAAAAAAAAAAAAAAAAAAAAAAAAAAAAAAAAAAAAAAAAAAAAAAAAAAAAAAAAAAAAAAAAAAAAAAAAAAAAAAAAAAAAAAAAAAAAAAAAAAAAAAAAAAAAAAAAAAAAAAAAAAAAAAAAAAAAAAAAAAAAAAAAAAAAAAAAAAAAAAAAAAAAAAAAAAAAAAAAAAAAAAAAAAAAAAAAAAAAAAAAAAAAAAAAAAAAAAAAAAAAAAAAAAAAAAAAAAAAAAAAAAAAAAAAAAAAAAAAAAAAAAAAAAAAAAAAAAAAAAAAAAAAAAAAAAAAAAAAAAAAAAAAAAAAAAAAAAAAAAAAAAAAAAAAAAAAAAAAAAAAAAAAAAAAAAAAAAAAAAAAAAAAAAAAAAAAAAAAAAAAAAAAAAAAAAAAAAAAAAAAAAAAAAAAAAAAAAAAAAAAAAAAAAAAAAAAAAAAAAAAAAAAAAAAAAAAAAAAAAAAAAAAAAAAAAAAAAAAAAAAAAAAAAAAAAAAAAAAAAAAAAAAAAAAAAAAAAAAAAAAAAAAAAAAAAAAAAAAAAAAAAAAAAAAAAAAAAAAAAAAAAAAAAAAAAAAAAAAAAAAAAAAAAAAAAAAAAAAAAAAAAAAAAAAAAAAAAAAAAAAAAAAAAAAAAAAAAAAAAAAAAAAAAAAAAAAAAAAAAAAAAAAAAAAAAAAAAAAAAAAAAAAAAAAAAAAAAAAAAAAAAAAAAAAAAAAAAAAAAAAAAAAAAAAAAAAAAAAAAAAAAAAAAAAAAAAAAAAAAAAAAAAAAAAAAAAAAAAAAAAAAAAAAAAAAAAAAAAAAAAAAAAAAAAAAAAAAAAAAAAAAAAAAAAAAAAAAAAAAAAAAAAAAAAAAAAAAAAAAAAAAAAAAAAAAAAAAAAAAAAAAAAAAAAAAAAAAAAAAAAAAAAAAAAAAAAAAAAAAAAAAAAAAAAAAAAAAAAAAAAAAAAAAAAAAAAAAAAAAAAAAAAAAAAAAAAAAAAAAAAAAAAAAAAAAAAAAAAAAAAAAAAAAAAAAAAAAAAAAAAAAAAAAAAAAAAAAAAAAAAAAAAAAAAAAAAAAAAAAAAAAAAAAAAAAAAAAAAAAAAAAAAAAAAAAAAAAAAAAAAAAAAAAAAAAAAAAAAAAAAAAAAAAAAAAAAAAAAAAAAAAAAAAAAAAAAAAAAAAAAAAAAAAAAAAAAAAAAAAAAAAAAAAAAAAAAAAAAAAAAAAAAAAAAAAAAAAAAAAAAAAAAAAAAAAAAAAAAAAAAAAAAAAAAAAAAAAAAAAAAAAAAAAAAAAAAAAAAAAAAAAAAAAAAAAAAAAAAAAAAAAAAAAAAAAAAAAAAAAAAAAAAAAAAAAAAAAAAAAAAAAAAAAAAAAAAAAAAAAAAAAAAAAAAAAAAAAAAAAAAAAAAAAAAAAAAAAAAAAAAAAAAAAAAAAAAAAAAAAAAAAAAAAAAAAAAAAAAAAAAAAAAAAAAAAAAAAAAAAAAAAAAAAAAAAAAAAAAAAAAAAAAAAAAAAAAAAAAAAAAAAAAAAAAAAAAAAAAAAAAAAAAAAAAAAAAAAAAAAAAAAAAAAAAAAAAAAAAAAAAAAAAAAAAAAAAAAAAAAAAAAAAAAAAAAAAAAAAAAAAAAAAAAAAAAAAAAAAAAAAAAAAAAAAAAAAAAAAAAAAAAAAAAAAAAAAAAAAAAAAAAAAAAAAAAAAAAAAAAAAAAAAAAAAAAAAAAAAAAAAAAAAAAAAAAAAAAAAAAAAAAAAAAAAAAAAAAAAAAAAAAAAAAAAAAAAAAAAAAAAAAAAAAAAAAAAAAAAAAAAAAAAAAAAAAAAAAAAAAAAAAAAAAAAAAAAAAAAAAAAAAAAAAAAAAAAAAAAAAAAAAAAAAAAAAAAAAAAAAAAAAAAAAAAAAAAAAAAAAAAAAAAAAAAAAAAAAAAAAAAAAAAAAAAAAAAAAAAAAAAAAAAAAAAAAAAAAAAAAAAAAAAAAAAAAAAAAAAAAAAAAAAAAAAAAAAAAAAAAAAAAAAAAAAAAAAAAAAAAAAAAAAAAAAAAAAAAAAAAAAAAAAAAAAAAAAAAAAAAAAAAAAAAAAAAAAAAAAAAAAAAAAAAAAAAAAAAAAAAAAAAAAAAAAAAAAAAA
AAAAAAAAAAAAAAAAAAAAAAAAAAAAAAAAAAAAAAAAAAAAAAAAAAAAAAAAAAAAAAAAAAAAAAAAAAAAAAAAAAAAAAAAAAAAAAAAAAAAAAAAAAAAAAAAAAAAAAAAAAAAAAAAAAAAAAAAAAAAAAAAAAAAAAAAAAAAAAAAAAAAAAAAAAAAAAAAAAAAAAAAAAAAAAAAAAAAAAAAAAAAAAAAAAAAAAAAAAAAAAAAAAAAAAAAAAAAAAAAAAAAAAAAAAAAAAAAAAAAAAAAAAAAAAAAAAAAAAAAAAAAAAAAAAAAAAAAAAAAAAAAAAAAAAAAAAAAAAAAAAAAAAAAAAAAAAAAAAAAAAAAAAAAAAAAAAAAAAAAAAAAAAAAAAAAAAAAAAAAAAAAAAAAAAAAAAAAAAAAAAAAAAAAAAAAAAAAAAAAAAAAAAAAAAAAAAAAAAAAAAAAAAAAAAAAAAAAAAAAAAAAAAAAAAAAAAAAAAAAAAAAAAAAAAAAAAAAAAAAAAAAAAAAAAAAAAAAAAAAAAAAAAAAAAAAAAAAAAAAAAAAAAAAAAAAAAAAAAAAAAAAAAAAAAAAAAAAAAAAAAAAAAAAAAAAAAAAAAAAAAAAAAAAAAAAAAAAAAAAAAAAAAAAAAAAAAAAAAAAAAAAAAAAAAAAAAAAAAAAAAAAAAAAAAAAAAAAAAAAAAAAAAAAAAAAAAAAAAAAAAAAAAAAAAAAAAAAAAAAAAAAAAAAAAAAAAAAAAAAAAAAAAAAAAAAAAAAAAAAAAAAAAAAAAAAAAAAAAAAAAAAAAAAAAAAAAAAAAAAAAAAAAAAAAAAAAAAAAAAAAAAAAAAAAAAAAAAAAAAAAAAAAAAAAAAAAAAAAAAAAAAAAAAAAAAAAAAAAAAAAAAAAAAAAAAAAAAAAAAAAAAAAAAAAAAAAAAAAAAAAAAAAAAAAAAAAAAAAAAAAAAAAAAAAAAAAAAAAAAAAAAAAAAAAAAAAAAAAAAAAAAAAAAAAAAAAAAAAAAAAAAAAAAAAAAAAAAAAAAAAAAAAAAAAAAAAAAAAAAAAAAAAAAAAAAAAAAAAAAAAAAAAAAAAAAAAAAAAAAAAAAAAAAAAAAAAAAAAAAAAAAAAAAAAAAAAAAAAAAAAAAAAAAAAAAAAAAAAAAAAAAAAAAAAAAAAAAAAAAAAAAAAAAAAAAAAAAAAAAAAAAAAAAAAAAAAAAAAAAAAAAAAAAAAAAAAAAAAAAAAAAAAAAAAAAAAAAAAAAAAAAAAAAAAAAAAAAAAAAAAAAAAAAAAAAAAAAAAAAAAAAAAAAAAAAAAAAAAAAAAAAAAAAAAAAAAAAAAAAAAAAAAAAAAAAAAAAAAAAAAAAAAAAAAAAAAAAAAAAAAAAAAAAAAAAAAAAAAAAAAAAAAAAAAAAAAAAAAAAAAAAAAAAAAAAAAAAAAAAAAAAAAAAAAAAAAAAAAAAAAAAAAAAAAAAAAAAAAAAAAAAAAAAAAAAAAAAAAAAAAAAAAAAAAAAAAAAAAAAAAAAAAAAAAAAAAAAAAAAAAAAAAAAAAAAAAAAAAAAAAAAAAAAAAAAAAAAAAAAAAAAAAAAAAAAAAAAAAAAAAAAAAAAAAAAAAAAAAAAAAAAAAAAAAAAAAAAAAAAAAAAAAAAAAAAAAAAAAAAAAAAAAAAAAAAAAAAAAAAAAAAAAAAAAAAAAAAAAAAAAAAAAAAAAAAAAAAAAAAAAAAAAAAAAAAAAAAAAAAAAAAAAAAAAAAAAAAAAAAAAAAAAAAAAAAAAAAAAAAAAAAAAAAAAAAAAAAAAAAAAAAAAAAAAAAAAAAAAAAAAAAAAAAAAAAAAAAAAAAAAAAAAAAAAAAAAAAAAAAAAAAAAAAAAAAAAAAAAAAAAAAAAAAAAAAAAAAAAAAAAAAAAAAAAAAAAAAAAAAAAAAAAAAAAAAAAAAAAAAAAAAAAAAAAAAAAAAAAAAAAAAAAAAAAAAAAAAAAAAAAAAAAAAAAAAAAAAAAAAAAAAAAAAAAAAAAAAAAAAAAAAAAAAAAAAAAAAAAAAAAAAAAAAAAAAAAAAAAAAAAAAAAAAAAAAAAAAAAAAAAAAAAAAAAAAAAAAAAAAAAAAAAAAAAAAAAAAAAAAAAAAAAAAAAAAAAAAAAAAAAAAAAAAAAAAAAAAAAAAAAAAAAAAAAAAAAAAAAAAAAAAAAAAAAAAAAAAAAAAAAAAAAAAAAAAAAAAAAAAAAAAAAAAAAAAAAAAAAAAAAAAAAAAAAAAAAAAAAAAAAAAAAAAAAAAAAAAAAAAAAAAAAAAAAAAAAAAAAAAAAAAAAAAAAAAAAAAAAAAAAAAAAAAAAAAAAAAAAAAAAAAAAAAAAAAAAAAAAAAAAAAAAAAAAAAAAAAAAAAAAAAAAAAAAAAAAAAAAAAAAAAAAAAAAAAAAAAAAAAAAAAAAAAAAAAAAAAAAAAAAAAAAAAAAAAAAAAAAAAAAAAAAAAAAAAAAAAAAAAAAAAAAAAAAAAAAAAAAAAAAAAAAAAAAAAAAAAAAAAAAAAAAAAAAAAAAAAAAAAAAAAAAAAAAAAAAAAAAAAAAAAAAAAAAAAAAAAAAAAAAAAAAAAAAAAAAAAAAAAAAAAAAAAAAAAAAAAAAAAAAAAAAAAAAAAAAAAAAAAAAAAAAAAAAAAAAAAAAAAAAAAAAAAAAAAAAAAAAAAAAAAAAAAAAAAAAAAAAAAAAAAAAAAAAAAAAAAAAAAAAAAAAAAAAAAAAAAAAAAAAAAAAAAAAAAAAAAAAAAAAAAAAAAAAAAAAAAAAAAAAAAAAAAAAAAAAAAAAAAAAAAAAAAAAAAAAAAAAAAAAAAAAAAAAAAAAAAAAAAAAAAAAAAAAAAAAAAAAAAAAAAAAAAAAAAAAAAAAAAAAAAAAAAAAAAAAAAAAAAAAAAAAAAAAAAAAAAAAAAAAAAAAAAAAAAAAAAAAAAAAAAAAAAAAAAAAAAAAAAAAAAAAAAAAAAAAAAAAAAAAAAAAAAAAAAAAAAAAAAAAAAAAAAAAAAAAAAAAAAAAAAAAAAAAAAAAAAAAAAAAAAAAAAAAAAAAAAAAAAAAAAAAAAAAAAAAAAAAAAAAAAAAAAAAAAAAAAAAAAAAAAAAAAAAAAAAAAAAAAAAAAAAAAAAAAAAAAAAAAAAAAAAAAAAAAAAAAAAAAAAAAAAAAAAAAAAAAAAAAAAAAAAAAAAAAAAAAAAAAAAAAAAAAAAAAAAAAAAAAAAAAAAAAAAAAAAAAAAAAAAAAAAAAAAAAAAAAAAAAAAAAAAAAAAAAAAAAAAAAAAAAAAAAAAAAAAAAAAAAAAAAAAAAAAAAAAAAAAAAAAAAAAAAAAAAAAAAAAAAAAAAAAAAAAAAAAAAAAAAAAAAAAAAAAAAAAAAAAAAAAAAAAAAAAAAAAAAAAAAAAAAAAAAAAAAAAAAAAAAAAAAAAAAAAAAAAAAAAAAAAAAAAAAAAAAAAAAAAAAAAAAAAAAAAAAAAAAAAAAAAAAAAAAAAAAAAAAAAAAAAAAAAAAAAAAAAAAAAAAAAAAAAAAAAAAAAAAAAAAAAAAAAAAAAAAAAAAAAAAAAAAAAAAAAAAAAAAAAAAAAAAAAAAAAAAAAAAAAAAAAAAAAAAAAAAAAAAAAAAAAAAAAAAAAAAAAAAAAAAAAAAAAAAAAAAAAAAAAAAAAAAAAAAAAAAAAAAAAAAAAAAAAAAAAAAAAAAAAAAAAAAAAAAAAAAAAAAAAAAAAAAAAAAAAAAAAAAAAAAAAAAAAAAAAAAAAAAAAAAAAAAAAAAAAAAAAAAAAAAAAAAAAAAAAAAAAAAAAAAAAAAAAAAAAAAAAAAAAAAAAAAAAAAAAAAAAAAAAAAAAAAAAAAAAAAAAAAAAAAAAAAAAAAAAAAAAAAAAAAAAAAAAAAAAAAAAAAAAAAAAAAAAAAAAAAAAAAAAAAAAAAAAAAAAAAAAAAAAAAAAAAAAAAAAAAAAAAAAAAAAAAAAAAAAAAAAAAAAAAAAAAAAAAAAAAAAAAAAAAAAAAAAAAAAAAAAAAAAAAAAAAAAAAAAAAAAAAAAAAAAAAAAAAAAAAAAAAAAAAAAAAAAAAAAAAAAAAAAAAAAAAAAAAAAAAAAAAAAAAAAAAAAAAAAAAAAAA
AAAAAAAAAAAAAAAAAAAAAAAAAAAAAAAAAAAAAAAAAAAAAAAAAAAAAAAAAAAAAAAAAAAAAAAAAAAAAAAAAAAAAAAAAAAAAAAAAAAAAAAAAAAAAAAAAAAAAAAAAAAAAAAAAAAAAAAAAAAAAAAAAAAAAAAAAAAAAAAAAAAAAAAAAAAAAAAAAAAAAAAAAAAAAAAAAAAAAAAAAAAAAAAAAAAAAAAAAAAAAAAAAAAAAAAAAAAAAAAAAAAAAAAAAAAAAAAAAAAAAAAAAAAAAAAAAAAAAAAAAAAAAAAAAAAAAAAAAAAAAAAAAAAAAAAAAAAAAAAAAAAAAAAAAAAAAAAAAAAAAAAAAAAAAAAAAAAAAAAAAAAAAAAAAAAAAAAAAAAAAAAAAAAAAAAAAAAAAAAAAAAAAAAAAAAAAAAAAAAAAAAAAAAAAAAAAAAAAAAAAAAAAAAAAAAAAAAAAAAAAAAAAAAAAAAAAAAAAAAAAAAAAAAAAAAAAAAAAAAAAAAAAAAAAAAAAAAAAAAAAAAAAAAAAAAAAAAAAAAAAAAAAAAAAAAAAAAAAAAAAAAAAAAAAAAAAAAAAAAAAAAAAAAAAAAAAAAAAAAAAAAAAAAAAAAAAAAAAAAAAAAAAAAAAAAAAAAAAAAAAAAAAAAAAAAAAAAAAAAAAAAAAAAAAAAAAAAAAAAAAAAAAAAAAAAAAAAAAAAAAAAAAAAAAAAAAAAAAAAAAAAAAAAAAAAAAAAAAAAAAAAAAAAAAAAAAAAAAAAAAAAAAAAAAAAAAAAAAAAAAAAAAAAAAAAAAAAAAAAAAAAAAAAAAAAAAAAAAAAAAAAAAAAAAAAAAAAAAAAAAAAAAAAAAAAAAAAAAAAAAAAAAAAAAAAAAAAAAAAAAAAAAAAAAAAAAAAAAAAAAAAAAAAAAAAAAAAAAAAAAAAAAAAAAAAAAAAAAAAAAAAAAAAAAAAAAAAAAAAAAAAAAAAAAAAAAAAAAAAAAAAAAAAAAAAAAAAAAAAAAAAAAAAAAAAAAAAAAAAAAAAAAAAAAAAAAAAAAAAAAAAAAAAAAAAAAAAAAAAAAAAAAAAAAAAAAAAAAAAAAAAAAAAAAAAAAAAAAAAAAAAAAAAAAAAAAAAAAAAAAAAAAAAAAAAAAAAAAAAAAAAAAAAAAAAAAAAAAAAAAAAAAAAAAAAAAAAAAAAAAAAAAAAAAAAAAAAAAAAAAAAAAAAAAAAAAAAAAAAAAAAAAAAAAAAAAAAAAAAAAAAAAAAAAAAAAAAAAAAAAAAAAAAAAAAAAAAAAAAAAAAAAAAAAAAAAAAAAAAAAAAAAAAAAAAAAAAAAAAAAAAAAAAAAAAAAAAAAAAAAAAAAAAAAAAAAAAAAAAAAAAAAAAAAAAAAAAAAAAAAAAAAAAAAAAAAAAAAAAAAAAAAAAAAAAAAAAAAAAAAAAAAAAAAAAAAAAAAAAAAAAAAAAAAAAAAAAAAAAAAAAAAAAAAAAAAAAAAAAAAAAAAAAAAAAAAAAAAAAAAAAAAAAAAAAAAAAAAAAAAAAAAAAAAAAAAAAAAAAAAAAAAAAAAAAAAAAAAAAAAAAAAAAAAAAAAAAAAAAAAAAAAAAAAAAAAAAAAAAAAAAAAAAAAAAAAAAAAAAAAAAAAAAAAAAAAAAAAAAAAAAAAAAAAAAAAAAAAAAAAAAAAAAAAAAAAAAAAAAAAAAAAAAAAAAAAAAAAAAAAAAAAAAAAAAAAAAAAAAAAAAAAAAAAAAAAAAAAAAAAAAAAAAAAAAAAAAAAAAAAAAAAAAAAAAAAAAAAAAAAAAAAAAAAAAAAAAAAAAAAAAAAAAAAAAAAAAAAAAAAAAAAAAAAAAAAAAAAAAAAAAAAAAAAAAAAAAAAAAAAAAAAAAAAAAAAAAAAAAAAAAAAAAAAAAAAAAAAAAAAAAAAAAAAAAAAAAAAAAAAAAAAAAAAAAAAAAAAAAAAAAAAAAAAAAAAAAAAAAAAAAAAAAAAAAAAAAAAAAAAAAAAAAAAAAAAAAAAAAAAAAAAAAAAAAAAAAAAAAAAAAAAAAAAAAAAAAAAAAAAAAAAAAAAAAAAAAAAAAAAAAAAAAAAAAAAAAAAAAAAAAAAAAAAAAAAAAAAAAAAAAAAAAAAAAAAAAAAAAAAAAAAAAAAAAAAAAAAAAAAAAAAAAAAAAAAAAAAAAAAAAAAAAAAAAAAAAAAAAAAAAAAAAAAAAAAAAAAAAAAAAAAAAAAAAAAAAAAAAAAAAAAAAAAAAAAAAAAAAAAAAAAAAAAAAAAAAAAAAAAAAAAAAAAAAAAAAAAAAAAAAAAAAAAAAAAAAAAAAAAAAAAAAAAAAAAAAAAAAAAAAAAAAAAAAAAAAAAAAAAAAAAAAAAAAAAAAAAAAAAAAAAAAAAAAAAAAAAAAAAAAAAAAAAAAAAAAAAAAAAAAAAAAAAAAAAAAAAAAAAAAAAAAAAAAAAAAAAAAAAAAAAAAAAAAAAAAAAAAAAAAAAAAAAAAAAAAAAAAAAAAAAAAAAAAAAAAAAAAAAAAAAAAAAAAAAAAAAAAAAAAAAAAAAAAAAAAAAAAAAAAAAAAAAAAAAAAAAAAAAAAAAAAAAAAAAAAAAAAAAAAAAAAAAAAAAAAAAAAAAAAAAAAAAAAAAAAAAAAAAAAAAAAAAAAAAAAAAAAAAAAAAAAAAAAAAAAAAAAAAAAAAAAAAAAAAAAAAAAAAAAAAAAAAAAAAAAAAAAAAAAAAAAAAAAAAAAAAAAAAAAAAAAAAAAAAAAAAAAAAAAAAAAAAAAAAAAAAAAAAAAAAAAAAAAAAAAAAAAAAAAAAAAAAAAAAAAAAAAAAAAAAAAAAAAAAAAAAAAAAAAAAAAAAAAAAAAAAAAAAAAAAAAAAAAAAAAAAAAAAAAAAAAAAAAAAAAAAAAAAAAAAAAAAAAAAAAAAAAAAAAAAAAAAAAAAAAAAAAAAAAAAAAAAAAAAAAAAAAAAAAAAAAAAAAAAAAAAAAAAAAAAAAAAAAAAAAAAAAAAAAAAAAAAAAAAAAAAAAAAAAAAAAAAAAAAAAAAAAAAAAAAAAAAAAAAAAAAAAAAAAAAAAAAAAAAAAAAAAAAAAAAAAAAAAAAAAAAAAAAAAAAAAAAAAAAAAAAAAAAAAAAAAAAAAAAAAAAAAAAAAAAAAAAAAAAAAAAAAAAAAAAAAAAAAAAAAAAAAAAAAAAAAAAAAAAAAAAAAAAAAAAAAAAAAAAAAAAAAAAAAAAAAAAAAAAAAAAAAAAAAAAAAAAAAAAAAAAAAAAAAAAAAAAAAAAAAAAAAAAAAAAAAAAAAAAAAAAAAAAAAAAAAAAAAAAAAAAAAAAAAAAAAAAAAAAAAAAAAAAAAAAAAAAAAAAAAAAAAAAAAAAAAAAAAAAAAAAAAAAAAAAAAAAAAAAAAAAAAAAAAAAAAAAAAAAAAAAAAAAAAAAAAAAAAAAAAAAAAAAAAAAAAAAAAAAAAAAAAAAAAAAAAAAAAAAAAAAAAAAAAAAAAAAAAAAAAAAAAAAAAAAAAAAAAAAAAAAAAAAAAAAAAAAAAAAAAAAAAAAAAAAAAAAAAAAAAAAAAAAAAAAAAAAAAAAAAAAAAAAAAAAAAAAAAAAAAAAAAAAAAAAAAAAAAAAAAAAAAAAAAAAAAAAAAAAAAAAAAAAAAAAAAAAAAAAAAAAAAAAAAAAAAAAAAAAAAAAAAAAAAAAAAAAAAAAAAAAAAAAAAAAAAAAAAAAAAAAAAAAAAAAAAAAAAAAAAAAAAAAAAAAAAAAAAAAAAAAAAAAAAAAAAAAAAAAAAAAAAAAAAAAAAAAAAAAAAAAAAAAAAAAAAAAAAAAAAAAAAAAAAAAAAAAAAAAAAAAAAAAAAAAAAAAAAAAAAAAAAAAAAAAAAAAAAAAAAAAAAAAAAAAAAAAAAAAAAAAAAAAAAAAAAAAAAAAAAAAAAAAAAAAAAAAAAAAAAAAAAAAAAAAAAAAAAAAAAAAAAAAAAAAAAAAAAAAAAAAAAAAAAAAAAAAAAAAAAAAAAAAAAAAAAAAAAAAAAAAAAAAAAAAAAAAAAAAAAAAAAAAAAAAAAAAAAAAAAAAAAAAAAAAAAAAAAAAAAAAAAAAAAAAAAAAAAAAAAAAAAAAAAAAAAAAAAAAAAA
AAAAAAAAAAAAAAAAAAAAAAAAAAAAAAAAAAAAAAAAAAAAAAAAAAAAAAAAAAAAAAAAAAAAAAAAAAAAAAAAAAAAAAAAAAAAAAAAAAAAAAAAAAAAAAAAAAAAAAAAAAAAAAAAAAAAAAAAAAAAAAAAAAAAAAAAAAAAAAAAAAAAAAAAAAAAAAAAAAAAAAAAAAAAAAAAAAAAAAAAAAAAAAAAAAAAAAAAAAAAAAAAAAAAAAAAAAAAAAAAAAAAAAAAAAAAAAAAAAAAAAAAAAAAAAAAAAAAAAAAAAAAAAAAAAAAAAAAAAAAAAAAAAAAAAAAAAAAAAAAAAAAAAAAAAAAAAAAAAAAAAAAAAAAAAAAAAAAAAAAAAAAAAAAAAAAAAAAAAAAAAAAAAAAAAAAAAAAAAAAAAAAAAAAAAAAAAAAAAAAAAAAAAAAAAAAAAAAAAAAAAAAAAAAAAAAAAAAAAAAAAAAAAAAAAAAAAAAAAAAAAAAAAAAAAAAAAAAAAAAAAAAAAAAAAAAAAAAAAAAAAAAAAAAAAAAAAAAAAAAAAAAAAAAAAAAAAAAAAAAAAAAAAAAAAAAAAAAAAAAAAAAAAAAAAAAAAAAAAAAAAAAAAAAAAAAAAAAAAAAAAAAAAAAAAAAAAAAAAAAAAAAAAAAAAAAAAAAAAAAAAAAAAAAAAAAAAAAAAAAAAAAAAAAAAAAAAAAAAAAAAAAAAAAAAAAAAAAAAAAAAAAAAAAAAAAAAAAAAAAAAAAAAAAAAAAAAAAAAAAAAAAAAAAAAAAAAAAAAAAAAAAAAAAAAAAAAAAAAAAAAAAAAAAAAAAAAAAAAAAAAAAAAAAAAAAAAAAAAAAAAAAAAAAAAAAAAAAAAAAAAAAAAAAAAAAAAAAAAAAAAAAAAAAAAAAAAAAAAAAAAAAAAAAAAAAAAAAAAAAAAAAAAAAAAAAAAAAAAAAAAAAAAAAAAAAAAAAAAAAAAAAAAAAAAAAAAAAAAAAAAAAAAAAAAAAAAAAAAAAAAAAAAAAAAAAAAAAAAAAAAAAAAAAAAAAAAAAAAAAAAAAAAAAAAAAAAAAAAAAAAAAAAAAAAAAAAAAAAAAAAAAAAAAAAAAAAAAAAAAAAAAAAAAAAAAAAAAAAAAAAAAAAAAAAAAAAAAAAAAAAAAAAAAAAAAAAAAAAAAAAAAAAAAAAAAAAAAAAAAAAAAAAAAAAAAAAAAAAAAAAAAAAAAAAAAAAAAAAAAAAAAAAAAAAAAAAAAAAAAAAAAAAAAAAAAAAAAAAAAAAAAAAAAAAAAAAAAAAAAAAAAAAAAAAAAAAAAAAAAAAAAAAAAAAAAAAAAAAAAAAAAAAAAAAAAAAAAAAAAAAAAAAAAAAAAAAAAAAAAAAAAAAAAAAAAAAAAAAAAAAAAAAAAAAAAAAAAAAAAAAAAAAAAAAAAAAAAAAAAAAAAAAAAAAAAAAAAAAAAAAAAAAAAAAAAAAAAAAAAAAAAAAAAAAAAAAAAAAAAAAAAAAAAAAAAAAAAAAAAAAAAAAAAAAAAAAAAAAAAAAAAAAAAAAAAAAAAAAAAAAAAAAAAAAAAAAAAAAAAAAAAAAAAAAAAAAAAAAAAAAAAAAAAAAAAAAAAAAAAAAAAAAAAAAAAAAAAAAAAAAAAAAAAAAAAAAAAAAAAAAAAAAAAAAAAAAAAAAAAAAAAAAAAAAAAAAAAAAAAAAAAAAAAAAAAAAAAAAAAAAAAAAAAAAAAAAAAAAAAAAAAAAAAAAAAAAAAAAAAAAAAAAAAAAAAAAAAAAAAAAAAAAAAAAAAAAAAAAAAAAAAAAAAAAAAAAAAAAAAAAAAAAAAAAAAAAAAAAAAAAAAAAAAAAAAAAAAAAAAAAAAAAAAAAAAAAAAAAAAAAAAAAAAAAAAAAAAAAAAAAAAAAAAAAAAAAAAAAAAAAAAAAAAAAAAAAAAAAAAAAAAAAAAAAAAAAAAAAAAAAAAAAAAAAAAAAAAAAAAAAAAAAAAAAAAAAAAAAAAAAAAAAAAAAAAAAAAAAAAAAAAAAAAAAAAAAAAAAAAAAAAAAAAAAAAAAAAAAAAAAAAAAAAAAAAAAAAAAAAAAAAAAAAAAAAAAAAAAAAAAAAAAAAAAAAAAAAAAAAAAAAAAAAAAAAAAAAAAAAAAAAAAAAAAAAAAAAAAAAAAAAAAAAAAAAAAAAAAAAAAAAAAAAAAAAAAAAAAAAAAAAAAAAAAAAAAAAAAAAAAAAAAAAAAAAAAAAAAAAAAAAAAAAAAAAAAAAAAAAAAAAAAAAAAAAAAAAAAAAAAAAAAAAAAAAAAAAAAAAAAAAAAAAAAAAAAAAAAAAAAAAAAAAAAAAAAAAAAAAAAAAAAAAAAAAAAAAAAAAAAAAAAAAAAAAAAAAAAAAAAAAAAAAAAAAAAAAAAAAAAAAAAAAAAAAAAAAAAAAAAAAAAAAAAAAAAAAAAAAAAAAAAAAAAAAAAAAAAAAAAAAAAAAAAAAAAAAAAAAAAAAAAAAAAAAAAAAAAAAAAAAAAAAAAAAAAAAAAAAAAAAAAAAAAAAAAAAAAAAAAAAAAAAAAAAAAAAAAAAAAAAAAAAAAAAAAAAAAAAAAAAAAAAAAAAAAAAAAAAAAAAAAAAAAAAAAAAAAAAAAAAAAAAAAAAAAAAAAAAAAAAAAAAAAAAAAAAAAAAAAAAAAAAAAAAAAAAAAAAAAAAAAAAAAAAAAAAAAAAAAAAAAAAAAAAAAAAAAAAAAAAAAAAAAAAAAAAAAAAAAAAAAAAAAAAAAAAAAAAAAAAAAAAAAAAAAAAAAAAAAAAAAAAAAAAAAAAAAAAAAAAAAAAAAAAAAAAAAAAAAAAAAAAAAAAAAAAAAAAAAAAAAAAAAAAAAAAAAAAAAAAAAAAAAAAAAAAAAAAAAAAAAAAAAAAAAAAAAAAAAAAAAAAAAAAAAAAAAAAAAAAAAAAAAAAAAAAAAAAAAAAAAAAAAAAAAAAAAAAAAAAAAAAAAAAAAAAAAAAAAAAAAAAAAAAAAAAAAAAAAAAAAAAAAAAAAAAAAAAAAAAAAAAAAAAAAAAAAAAAAAAAAAAAAAAAAAAAAAAAAAAAAAAAAAAAAAAAAAAAAAAAAAAAAAAAAAAAAAAAAAAAAAAAAAAAAAAAAAAAAAAAAAAAAAAAAAAAAAAAAAAAAAAAAAAAAAAAAAAAAAAAAAAAAAAAAAAAAAAAAAAAAAAAAAAAAAAAAAAAAAAAAAAAAAAAAAAAAAAAAAAAAAAAAAAAAAAAAAAAAAAAAAAAAAAAAAAAAAAAAAAAAAAAAAAAAAAAAAAAAAAAAAAAAAAAAAAAAAAAAAAAAAAAAAAAAAAAAAAAAAAAAAAAAAAAAAAAAAAAAAAAAAAAAAAAAAAAAAAAAAAAAAAAAAAAAAAAAAAAAAAAAAAAAAAAAAAAAAAAAAAAAAAAAAAAAAAAAAAAAAAAAAAAAAAAAAAAAAAAAAAAAAAAAAAAAAAAAAAAAAAAAAAAAAAAAAAAAAAAAAAAAAAAAAAAAAAAAAAAAAAAAAAAAAAAAAAAAAAAAAAAAAAAAAAAAAAAAAAAAAAAAAAAAAAAAAAAAAAAAAAAAAAAAAAAAAAAAAAAAAAAAAAAAAAAAAAAAAAAAAAAAAAAAAAAAAAAAAAAAAAAAAAAAAAAAAAAAAAAAAAAAAAAAAAAAAAAAAAAAAAAAAAAAAAAAAAAAAAAAAAAAAAAAAAAAAAAAAAAAAAAAAAAAAAAAAAAAAAAAAAAAAAAAAAAAAAAAAAAAAAAAAAAAAAAAAAAAAAAAAAAAAAAAAAAAAAAAAAAAAAAAAAAAAAAAAAAAAAAAAAAAAAAAAAAAAAAAAAAAAAAAAAAAAAAAAAAAAAAAAAAAAAAAAAAAAAAAAAAAAAAAAAAAAAAAAAAAAAAAAAAAAAAAAAAAAAAAAAAAAAAAAAAAAAAAAAAAAAAAAAAAAAAAAAAAAAAAAAAAAAAAAAAAAAAAAAAAAAAAAAAAAAAAAAAAAAAAAAAAAAAAAAAAAAAAAAAAAAAAAAAAAAAAAAAAAAAAAAAAAAAAAAAAAAAAAAAAAAAAAAAAAAAAAAAAAAAAAAAAAAAAAAAAAAAAAAAAAAAAAAAAAAAAAAAAAAAAAAAAAAAAAAAAAAAAAA
AAAAAAAAAAAAAAAAAAAAAAAAAAAAAAAAAAAAAAAAAAAAAAAAAAAAAAAAAAAAAAAAAAAAAAAAAAAAAAAAAAAAAAAAAAAAAAAAAAAAAAAAAAAAAAAAAAAAAAAAAAAAAAAAAAAAAAAAAAAAAAAAAAAAAAAAAAAAAAAAAAAAAAAAAAAAAAAAAAAAAAAAAAAAAAAAAAAAAAAAAAAAAAAAAAAAAAAAAAAAAAAAAAAAAAAAAAAAAAAAAAAAAAAAAAAAAAAAAAAAAAAAAAAAAAAAAAAAAAAAAAAAAAAAAAAAAAAAAAAAAAAAAAAAAAAAAAAAAAAAAAAAAAAAAAAAAAAAAAAAAAAAAAAAAAAAAAAAAAAAAAAAAAAAAAAAAAAAAAAAAAAAAAAAAAAAAAAAAAAAAAAAAAAAAAAAAAAAAAAAAAAAAAAAAAAAAAAAAAAAAAAAAAAAAAAAAAAAAAAAAAAAAAAAAAAAAAAAAAAAAAAAAAAAAAAAAAAAAAAAAAAAAAAAAAAAAAAAAAAAAAAAAAAAAAAAAAAAAAAAAAAAAAAAAAAAAAAAAAAAAAAAAAAAAAAAAAAAAAAAAAAAAAAAAAAAAAAAAAAAAAAAAAAAAAAAAAAAAAAAAAAAAAAAAAAAAAAAAAAAAAAAAAAAAAAAAAAAAAAAAAAAAAAAAAAAAAAAAAAAAAAAAAAAAAAAAAAAAAAAAAAAAAAAAAAAAAAAAAAAAAAAAAAAAAAAAAAAAAAAAAAAAAAAAAAAAAAAAAAAAAAAAAAAAAAAAAAAAAAAAAAAAAAAAAAAAAAAAAAAAAAAAAAAAAAAAAAAAAAAAAAAAAAAAAAAAAAAAAAAAAAAAAAAAAAAAAAAAAAAAAAAAAAAAAAAAAAAAAAAAAAAAAAAAAAAAAAAAAAAAAAAAAAAAAAAAAAAAAAAAAAAAAAAAAAAAAAAAAAAAAAAAAAAAAAAAAAAAAAAAAAAAAAAAAAAAAAAAAAAAAAAAAAAAAAAAAAAAAAAAAAAAAAAAAAAAAAAAAAAAAAAAAAAAAAAAAAAAAAAAAAAAAAAAAAAAAAAAAAAAAAAAAAAAAAAAAAAAAAAAAAAAAAAAAAAAAAAAAAAAAAAAAAAAAAAAAAAAAAAAAAAAAAAAAAAAAAAAAAAAAAAAAAAAAAAAAAAAAAAAAAAAAAAAAAAAAAAAAAAAAAAAAAAAAAAAAAAAAAAAAAAAAAAAAAAAAAAAAAAAAAAAAAAAAAAAAAAAAAAAAAAAAAAAAAAAAAAAAAAAAAAAAAAAAAAAAAAAAAAAAAAAAAAAAAAAAAAAAAAAAAAAAAAAAAAAAAAAAAAAAAAAAAAAAAAAAAAAAAAAAAAAAAAAAAAAAAAAAAAAAAAAAAAAAAAAAAAAAAAAAAAAAAAAAAAAAAAAAAAAAAAAAAAAAAAAAAAAAAAAAAAAAAAAAAAAAAAAAAAAAAAAAAAAAAAAAAAAAAAAAAAAAAAAAAAAAAAAAAAAAAAAAAAAAAAAAAAAAAAAAAAAAAAAAAAAAAAAAAAAAAAAAAAAAAAAAAAAAAAAAAAAAAAAAAAAAAAAAAAAAAAAAAAAAAAAAAAAAAAAAAAAAAAAAAAAAAAAAAAAAAAAAAAAAAAAAAAAAAAAAAAAAAAAAAAAAAAAAAAAAAAAAAAAAAAAAAAAAAAAAAAAAAAAAAAAAAAAAAAAAAAAAAAAAAAAAAAAAAAAAAAAAAAAAAAAAAAAAAAAAAAAAAAAAAAAAAAAAAAAAAAAAAAAAAAAAAAAAAAAAAAAAAAAAAAAAAAAAAAAAAAAAAAAAAAAAAAAAAAAAAAAAAAAAAAAAAAAAAAAAAAAAAAAAAAAAAAAAAAAAAAAAAAAAAAAAAAAAAAAAAAAAAAAAAAAAAAAAAAAAAAAAAAAAAAAAAAAAAAAAAAAAAAAAAAAAAAAAAAAAAAAAAAAAAAAAAAAAAAAAAAAAAAAAAAAAAAAAAAAAAAAAAAAAAAAAAAAAAAAAAAAAAAAAAAAAAAAAAAAAAAAAAAAAAAAAAAAAAAAAAAAAAAAAAAAAAAAAAAAAAAAAAAAAAAAAAAAAAAAAAAAAAAAAAAAAAAAAAAAAAAAAAAAAAAAAAAAAAAAAAAAAAAAAAAAAAAAAAAAAAAAAAAAAAAAAAAAAAAAAAAAAAAAAAAAAAAAAAAAAAAAAAAAAAAAAAAAAAAAAAAAAAAAAAAAAAAAAAAAAAAAAAAAAAAAAAAAAAAAAAAAAAAAAAAAAAAAAAAAAAAAAAAAAAAAAAAAAAAAAAAAAAAAAAAAAAAAAAAAAAAAAAAAAAAAAAAAAAAAAAAAAAAAAAAAAAAAAAAAAAAAAAAAAAAAAAAAAAAAAAAAAAAAAAAAAAAAAAAAAAAAAAAAAAAAAAAAAAAAAAAAAAAAAAAAAAAAAAAAAAAAAAAAAAAAAAAAAAAAAAAAAAAAAAAAAAAAAAAAAAAAAAAAAAAAAAAAAAAAAAAAAAAAAAAAAAAAAAAAAAAAAAAAAAAAAAAAAAAAAAAAAAAAAAAAAAAAAAAAAAAAAAAAAAAAAAAAAAAAAAAAAAAAAAAAAAAAAAAAAAAAAAAAAAAAAAAAAAAAAAAAAAAAAAAAAAAAAAAAAAAAAAAAAAAAAAAAAAAAAAAAAAAAAAAAAAAAAAAAAAAAAAAAAAAAAAAAAAAAAAAAAAAAAAAAAAAAAAAAAAAAAAAAAAAAAAAAAAAAAAAAAAAAAAAAAAAAAAAAAAAAAAAAAAAAAAAAAAAAAAAAAAAAAAAAAAAAAAAAAAAAAAAAAAAAAAAAAAAAAAAAAAAAAAAAAAAAAAAAAAAAAAAAAAAAAAAAAAAAAAAAAAAAAAAAAAAAAAAAAAAAAAAAAAAAAAAAAAAAAAAAAAAAAAAAAAAAAAAAAAAAAAAAAAAAAAAAAAAAAAAAAAAAAAAAAAAAAAAAAAAAAAAAAAAAAAAAAAAAAAAAAAAAAAAAAAAAAAAAAAAAAAAAAAAAAAAAAAAAAAAAAAAAAAAAAAAAAAAAAAAAAAAAAAAAAAAAAAAAAAAAAAAAAAAAAAAAAAAAAAAAAAAAAAAAAAAAAAAAAAAAAAAAAAAAAAAAAAAAAAAAAAAAAAAAAAAAAAAAAAAAAAAAAAAAAAAAAAAAAAAAAAAAAAAAAAAAAAAAAAAAAAAAAAAAAAAAAAAAAAAAAAAAAAAAAAAAAAAAAAAAAAAAAAAAAAAAAAAAAAAAAAAAAAAAAAAAAAAAAAAAAAAAAAAAAAAAAAAAAAAAAAAAAAAAAAAAAAAAAAAAAAAAAAAAAAAAAAAAAAAAAAAAAAAAAAAAAAAAAAAAAAAAAAAAAAAAAAAAAAAAAAAAAAAAAAAAAAAAAAAAAAAAAAAAAAAAAAAAAAAAAAAAAAAAAAAAAAAAAAAAAAAAAAAAAAAAAAAAAAAAAAAAAAAAAAAAAAAAAAAAAAAAAAAAAAAAAAAAAAAAAAAAAAAAAAAAAAAAAAAAAAAAAAAAAAAAAAAAAAAAAAAAAAAAAAAAAAAAAAAAAAAAAAAAAAAAAAAAAAAAAAAAAAAAAAAAAAAAAAAAAAAAAAAAAAAAAAAAAAAAAAAAAAAAAAAAAAAAAAAAAAAAAAAAAAAAAAAAAAAAAAAAAAAAAAAAAAAAAAAAAAAAAAAAAAAAAAAAAAAAAAAAAAAAAAAAAAAAAAAAAAAAAAAAAAAAAAAAAAAAAAAAAAAAAAAAAAAAAAAAAAAAAAAAAAAAAAAAAAAAAAAAAAAAAAAAAAAAAAAAAAAAAAAAAAAAAAAAAAAAAAAAAAAAAAAAAAAAAAAAAAAAAAAAAAAAAAAAAAAAAAAAAAAAAAAAAAAAAAAAAAAAAAAAAAAAAAAAAAAAAAAAAAAAAAAAAAAAAAAAAAAAAAAAAAAAAAAAAAAAAAAAAAAAAAAAAAAAAAAAAAAAAAAAAAAAAAAAAAAAAAAAAAAAAAAAAAAAAAAAAAAAAAAAAAAAAAAAAAAAAAAAAAAAAAAAAAAAAAAAAAAAAAAAAAAAAAAAAAAAAAAAAAAAAAAAAAAAAAAAAAAAAAAAAAAAAAAAAAAAAAAAAAAAAAAAAAAAAAAAAAAAAAAAAAAAAAAAAAAAAAAAAAAAAAA
AAAAAAAAAAAAAAAAAAAAAAAAAAAAAAAAAAAAAAAAAAAAAAAAAAAAAAAAAAAAAAAAAAAAAAAAAAAAAAAAAAAAAAAAAAAAAAAAAAAAAAAAAAAAAAAAAAAAAAAAAAAAAAAAAAAAAAAAAAAAAAAAAAAAAAAAAAAAAAAAAAAAAAAAAAAAAAAAAAAAAAAAAAAAAAAAAAAAAAAAAAAAAAAAAAAAAAAAAAAAAAAAAAAAAAAAAAAAAAAAAAAAAAAAAAAAAAAAAAAAAAAAAAAAAAAAAAAAAAAAAAAAAAAAAAAAAAAAAAAAAAAAAAAAAAAAAAAAAAAAAAAAAAAAAAAAAAAAAAAAAAAAAAAAAAAAAAAAAAAAAAAAAAAAAAAAAAAAAAAAAAAAAAAAAAAAAAAAAAAAAAAAAAAAAAAAAAAAAAAAAAAAAAAAAAAAAAAAAAAAAAAAAAAAAAAAAAAAAAAAAAAAAAAAAAAAAAAAAAAAAAAAAAAAAAAAAAAAAAAAAAAAAAAAAAAAAAAAAAAAAAAAAAAAAAAAAAAAAAAAAAAAAAAAAAAAAAAAAAAAAAAAAAAAAAAAAAAAAAAAAAAAAAAAAAAAAAAAAAAAAAAAAAAAAAAAAAAAAAAAAAAAAAAAAAAAAAAAAAAAAAAAAAAAAAAAAAAAAAAAAAAAAAAAAAAAAAAAAAAAAAAAAAAAAAAAAAAAAAAAAAAAAAAAAAAAAAAAAAAAAAAAAAAAAAAAAAAAAAAAAAAAAAAAAAAAAAAAAAAAAAAAAAAAAAAAAAAAAAAAAAAAAAAAAAAAAAAAAAAAAAAAAAAAAAAAAAAAAAAAAAAAAAAAAAAAAAAAAAAAAAAAAAAAAAAAAAAAAAAAAAAAAAAAAAAAAAAAAAAAAAAAAAAAAAAAAAAAAAAAAAAAAAAAAAAAAAAAAAAAAAAAAAAAAAAAAAAAAAAAAAAAAAAAAAAAAAAAAAAAAAAAAAAAAAAAAAAAAAAAAAAAAAAAAAAAAAAAAAAAAAAAAAAAAAAAAAAAAAAAAAAAAAAAAAAAAAAAAAAAAAAAAAAAAAAAAAAAAAAAAAAAAAAAAAAAAAAAAAAAAAAAAAAAAAAAAAAAAAAAAAAAAAAAAAAAAAAAAAAAAAAAAAAAAAAAAAAAAAAAAAAAAAAAAAAAAAAAAAAAAAAAAAAAAAAAAAAAAAAAAAAAAAAAAAAAAAAAAAAAAAAAAAAAAAAAAAAAAAAAAAAAAAAAAAAAAAAAAAAAAAAAAAAAAAAAAAAAAAAAAAAAAAAAAAAAAAAAAAAAAAAAAAAAAAAAAAAAAAAAAAAAAAAAAAAAAAAAAAAAAAAAAAAAAAAAAAAAAAAAAAAAAAAAAAAAAAAAAAAAAAAAAAAAAAAAAAAAAAAAAAAAAAAAAAAAAAAAAAAAAAAAAAAAAAAAAAAAAAAAAAAAAAAAAAAAAAAAAAAAAAAAAAAAAAAAAAAAAAAAAAAAAAAAAAAAAAAAAAAAAAAAAAAAAAAAAAAAAAAAAAAAAAAAAAAAAAAAAAAAAAAAAAAAAAAAAAAAAAAAAAAAAAAAAAAAAAAAAAAAAAAAAAAAAAAAAAAAAAAAAAAAAAAAAAAAAAAAAAAAAAAAAAAAAAAAAAAAAAAAAAAAAAAAAAAAAAAAAAAAAAAAAAAAAAAAAAAAAAAAAAAAAAAAAAAAAAAAAAAAAAAAAAAAAAAAAAAAAAAAAAAAAAAAAAAAAAAAAAAAAAAAAAAAAAAAAAAAAAAAAAAAAAAAAAAAAAAAAAAAAAAAAAAAAAAAAAAAAAAAAAAAAAAAAAAAAAAAAAAAAAAAAAAAAAAAAAAAAAAAAAAAAAAAAAAAAAAAAAAAAAAAAAAAAAAAAAAAAAAAAAAAAAAAAAAAAAAAAAAAAAAAAAAAAAAAAAAAAAAAAAAAAAAAAAAAAAAAAAAAAAAAAAAAAAAAAAAAAAAAAAAAAAAAAAAAAAAAAAAAAAAAAAAAAAAAAAAAAAAAAAAAAAAAAAAAAAAAAAAAAAAAAAAAAAAAAAAAAAAAAAAAAAAAAAAAAAAAAAAAAAAAAAAAAAAAAAAAAAAAAAAAAAAAAAAAAAAAAAAAAAAAAAAAAAAAAAAAAAAAAAAAAAAAAAAAAAAAAAAAAAAAAAAAAAAAAAAAAAAAAAAAAAAAAAAAAAAAAAAAAAAAAAAAAAAAAAAAAAAAAAAAAAAAAAAAAAAAAAAAAAAAAAAAAAAAAAAAAAAAAAAAAAAAAAAAAAAAAAAAAAAAAAAAAAAAAAAAAAAAAAAAAAAAAAAAAAAAAAAAAAAAAAAAAAAAAAAAAAAAAAAAAAAAAAAAAAAAAAAAAAAAAAAAAAAAAAAAAAAAAAAAAAAAAAAAAAAAAAAAAAAAAAAAAAAAAAAAAAAAAAAAAAAAAAAAAAAAAAAAAAAAAAAAAAAAAAAAAAAAAAAAAAAAAAAAAAAAAAAAAAAAAAAAAAAAAAAAAAAAAAAAAAAAAAAAAAAAAAAAAAAAAAAAAAAAAAAAAAAAAAAAAAAAAAAAAAAAAAAAAAAAAAAAAAAAAAAAAAAAAAAAAAAAAAAAAAAAAAAAAAAAAAAAAAAAAAAAAAAAAAAAAAAAAAAAAAAAAAAAAAAAAAAAAAAAAAAAAAAAAAAAAAAAAAAAAAAAAAAAAAAAAAAAAAAAAAAAAAAAAAAAAAAAAAAAAAAAAAAAAAAAAAAAAAAAAAAAAAAAAAAAAAAAAAAAAAAAAAAAAAAAAAAAAAAAAAAAAAAAAAAAAAAAAAAAAAAAAAAAAAAAAAAAAAAAAAAAAAAAAAAAAAAAAAAAAAAAAAAAAAAAAAAAAAAAAAAAAAAAAAAAAAAAAAAAAAAAAAAAAAAAAAAAAAAAAAAAAAAAAAAAAAAAAAAAAAAAAAAAAAAAAAAAAAAAAAAAAAAAAAAAAAAAAAAAAAAAAAAAAAAAAAAAAAAAAAAAAAAAAAAAAAAAAAAAAAAAAAAAAAAAAAAAAAAAAAAAAAAAAAAAAAAAAAAAAAAAAAAAAAAAAAAAAAAAAAAAAAAAAAAAAAAAAAAAAAAAAAAAAAAAAAAAAAAAAAAAAAAAAAAAAAAAAAAAAAAAAAAAAAAAAAAAAAAAAAAAAAAAAAAAAAAAAAAAAAAAAAAAAAAAAAAAAAAAAAAAAAAAAAAAAAAAAAAAAAAAAAAAAAAAAAAAAAAAAAAAAAAAAAAAAAAAAAAAAAAAAAAAAAAAAAAAAAAAAAAAAAAAAAAAAAAAAAAAAAAAAAAAAAAAAAAAAAAAAAAAAAAAAAAAAAAAAAAAAAAAAAAAAAAAAAAAAAAAAAAAAAAAAAAAAAAAAAAAAAAAAAAAAAAAAAAAAAAAAAAAAAAAAAAAAAAAAAAAAAAAAAAAAAAAAAAAAAAAAAAAAAAAAAAAAAAAAAAAAAAAAAAAAAAAAAAAAAAAAAAAAAAAAAAAAAAAAAAAAAAAAAAAAAAAAAAAAAAAAAAAAAAAAAAAAAAAAAAAAAAAAAAAAAAAAAAAAAAAAAAAAAAAAAAAAAAAAAAAAAAAAAAAAAAAAAAAAAAAAAAAAAAAAAAAAAAAAAAAAAAAAAAAAAAAAAAAAAAAAAAAAAAAAAAAAAAAAAAAAAAAAAAAAAAAAAAAAAAAAAAAAAAAAAAAAAAAAAAAAAAAAAAAAAAAAAAAAAAAAAAAAAAAAAAAAAAAAAAAAAAAAAAAAAAAAAAAAAAAAAAAAAAAAAAAAAAAAAAAAAAAAAAAAAAAAAAAAAAAAAAAAAAAAAAAAAAAAAAAAAAAAAAAAAAAAAAAAAAAAAAAAAAAAAAAAAAAAAAAAAAAAAAAAAAAAAAAAAAAAAAAAAAAAAAAAAAAAAAAAAAAAAAAAAAAAAAAAAAAAAAAAAAAAAAAAAAAAAAAAAAAAAAAAAAAAAAAAAAAAAAAAAAAAAAAAAAAAAAAAAAAAAAAAAAAAAAAAAAAAAAAAAAAAAAAAAAAAAAAAAAAAAAAAAAAAAAAAAAAAAAAAAAAAAAAAAAAAAAAAAAAAAAAAAAAAAAAAAAAAAAAAAAAAAAAAAAAAAAAAAAAAAAAAAAAAAAAAAAAAAAAAAAAAAAAAAAAAAAAAAAAAAAAAAAAAAAAAAAAAAAA
AAAAAAAAAAAAAAAAAAAAAAAAAAAAAAAAAAAAAAAAAAAAAAAAAAAAAAAAAAAAAAAAAAAAAAAAAAAAAAAAAAAAAAAAAAAAAAAAAAAAAAAAAAAAAAAAAAAAAAAAAAAAAAAAAAAAAAAAAAAAAAAAAAAAAAAAAAAAAAAAAAAAAAAAAAAAAAAAAAAAAAAAAAAAAAAAAAAAAAAAAAAAAAAAAAAAAAAAAAAAAAAAAAAAAAAAAAAAAAAAAAAAAAAAAAAAAAAAAAAAAAAAAAAAAAAAAAAAAAAAAAAAAAAAAAAAAAAAAAAAAAAAAAAAAAAAAAAAAAAAAAAAAAAAAAAAAAAAAAAAAAAAAAAAAAAAAAAAAAAAAAAAAAAAAAAAAAAAAAAAAAAAAAAAAAAAAAAAAAAAAAAAAAAAAAAAAAAAAAAAAAAAAAAAAAAAAAAAAAAAAAAAAAAAAAAAAAAAAAAAAAAAAAAAAAAAAAAAAAAAAAAAAAAAAAAAAAAAAAAAAAAAAAAAAAAAAAAAAAAAAAAAAAAAAAAAAAAAAAAAAAAAAAAAAAAAAAAAAAAAAAAAAAAAAAAAAAAAAAAAAAAAAAAAAAAAAAAAAAAAAAAAAAAAAAAAAAAAAAAAAAAAAAAAAAAAAAAAAAAAAAAAAAAAAAAAAAAAAAAAAAAAAAAAAAAAAAAAAAAAAAAAAAAAAAAAAAAAAAAAAAAAAAAAAAAAAAAAAAAAAAAAAAAAAAAAAAAAAAAAAAAAAAAAAAAAAAAAAAAAAAAAAAAAAAAAAAAAAAAAAAAAAAAAAAAAAAAAAAAAAAAAAAAAAAAAAAAAAAAAAAAAAAAAAAAAAAAAAAAAAAAAAAAAAAAAAAAAAAAAAAAAAAAAAAAAAAAAAAAAAAAAAAAAAAAAAAAAAAAAAAAAAAAAAAAAAAAAAAAAAAAAAAAAAAAAAAAAAAAAAAAAAAAAAAAAAAAAAAAAAAAAAAAAAAAAAAAAAAAAAAAAAAAAAAAAAAAAAAAAAAAAAAAAAAAAAAAAAAAAAAAAAAAAAAAAAAAAAAAAAAAAAAAAAAAAAAAAAAAAAAAAAAAAAAAAAAAAAAAAAAAAAAAAAAAAAAAAAAAAAAAAAAAAAAAAAAAAAAAAAAAAAAAAAAAAAAAAAAAAAAAAAAAAAAAAAAAAAAAAAAAAAAAAAAAAAAAAAAAAAAAAAAAAAAAAAAAAAAAAAAAAAAAAAAAAAAAAAAAAAAAAAAAAAAAAAAAAAAAAAAAAAAAAAAAAAAAAAAAAAAAAAAAAAAAAAAAAAAAAAAAAAAAAAAAAAAAAAAAAAAAAAAAAAAAAAAAAAAAAAAAAAAAAAAAAAAAAAAAAAAAAAAAAAAAAAAAAAAAAAAAAAAAAAAAAAAAAAAAAAAAAAAAAAAAAAAAAAAAAAAAAAAAAAAAAAAAAAAAAAAAAAAAAAAAAAAAAAAAAAAAAAAAAAAAAAAAAAAAAAAAAAAAAAAAAAAAAAAAAAAAAAAAAAAAAAAAAAAAAAAAAAAAAAAAAAAAAAAAAAAAAAAAAAAAAAAAAAAAAAAAAAAAAAAAAAAAAAAAAAAAAAAAAAAAAAAAAAAAAAAAAAAAAAAAAAAAAAAAAAAAAAAAAAAAAAAAAAAAAAAAAAAAAAAAAAAAAAAAAAAAAAAAAAAAAAAAAAAAAAAAAAAAAAAAAAAAAAAAAAAAAAAAAAAAAAAAAAAAAAAAAAAAAAAAAAAAAAAAAAAAAAAAAAAAAAAAAAAAAAAAAAAAAAAAAAAAAAAAAAAAAAAAAAAAAAAAAAAAAAAAAAAAAAAAAAAAAAAAAAAAAAAAAAAAAAAAAAAAAAAAAAAAAAAAAAAAAAAAAAAAAAAAAAAAAAAAAAAAAAAAAAAAAAAAAAAAAAAAAAAAAAAAAAAAAAAAAAAAAAAAAAAAAAAAAAAAAAAAAAAAAAAAAAAAAAAAAAAAAAAAAAAAAAAAAAAAAAAAAAAAAAAAAAAAAAAAAAAAAAAAAAAAAAAAAAAAAAAAAAAAAAAAAAAAAAAAAAAAAAAAAAAAAAAAAAAAAAAAAAAAAAAAAAAAAAAAAAAAAAAAAAAAAAAAAAAAAAAAAAAAAAAAAAAAAAAAAAAAAAAAAAAAAAAAAAAAAAAAAAAAAAAAAAAAAAAAAAAAAAAAAAAAAAAAAAAAAAAAAAAAAAAAAAAAAAAAAAAAAAAAAAAAAAAAAAAAAAAAAAAAAAAAAAAAAAAAAAAAAAAAAAAAAAAAAAAAAAAAAAAAAAAAAAAAAAAAAAAAAAAAAAAAAAAAAAAAAAAAAAAAAAAAAAAAAAAAAAAAAAAAAAAAAAAAAAAAAAAAAAAAAAAAAAAAAAAAAAAAAAAAAAAAAAAAAAAAAAAAAAAAAAAAAAAAAAAAAAAAAAAAAAAAAAAAAAAAAAAAAAAAAAAAAAAAAAAAAAAAAAAAAAAAAAAAAAAAAAAAAAAAAAAAAAAAAAAAAAAAAAAAAAAAAAAAAAAAAAAAAAAAAAAAAAAAAAAAAAAAAAAAAAAAAAAAAAAAAAAAAAAAAAAAAAAAAAAAAAAAAAAAAAAAAAAAAAAAAAAAAAAAAAAAAAAAAAAAAAAAAAAAAAAAAAAAAAAAAAAAAAAAAAAAAAAAAAAAAAAAAAAAAAAAAAAAAAAAAAAAAAAAAAAAAAAAAAAAAAAAAAAAAAAAAAAAAAAAAAAAAAAAAAAAAAAAAAAAAAAAAAAAAAAAAAAAAAAAAAAAAAAAAAAAAAAAAAAAAAAAAAAAAAAAAAAAAAAAAAAAAAAAAAAAAAAAAAAAAAAAAAAAAAAAAAAAAAAAAAAAAAAAAAAAAAAAAAAAAAAAAAAAAAAAAAAAAAAAAAAAAAAAAAAAAAAAAAAAAAAAAAAAAAAAAAAAAAAAAAAAAAAAAAAAAAAAAAAAAAAAAAAAAAAAAAAAAAAAAAAAAAAAAAAAAAAAAAAAAAAAAAAAAAAAAAAAAAAAAAAAAAAAAAAAAAAAAAAAAAAAAAAAAAAAAAAAAAAAAAAAAAAAAAAAAAAAAAAAAAAAAAAAAAAAAAAAAAAAAAAAAAAAAAAAAAAAAAAAAAAAAAAAAAAAAAAAAAAAAAAAAAAAAAAAAAAAAAAAAAAAAAAAAAAAAAAAAAAAAAAAAAAAAAAAAAAAAAAAAAAAAAAAAAAAAAAAAAAAAAAAAAAAAAAAAAAAAAAAAAAAAAAAAAAAAAAAAAAAAAAAAAAAAAAAAAAAAAAAAAAAAAAAAAAAAAAAAAAAAAAAAAAAAAAAAAAAAAAAAAAAAAAAAAAAAAAAAAAAAAAAAAAAAAAAAAAAAAAAAAAAAAAAAAAAAAAAAAAAAAAAAAAAAAAAAAAAAAAAAAAAAAAAAAAAAAAAAAAAAAAAAAAAAAAAAAAAAAAAAAAAAAAAAAAAAAAAAAAAAAAAAAAAAAAAAAAAAAAAAAAAAAAAAAAAAAAAAAAAAAAAAAAAAAAAAAAAAAAAAAAAAAAAAAAAAAAAAAAAAAAAAAAAAAAAAAAAAAAAAAAAAAAAAAAAAAAAAAAAAAAAAAAAAAAAAAAAAAAAAAAAAAAAAAAAAAAAAAAAAAAAAAAAAAAAAAAAAAAAAAAAAAAAAAAAAAAAAAAAAAAAAAAAAAAAAAAAAAAAAAAAAAAAAAAAAAAAAAAAAAAAAAAAAAAAAAAAAAAAAAAAAAAAAAAAAAAAAAAAAAAAAAAAAAAAAAAAAAAAAAAAAAAAAAAAAAAAAAAAAAAAAAAAAAAAAAAAAAAAAAAAAAAAAAAAAAAAAAAAAAAAAAAAAAAAAAAAAAAAAAAAAAAAAAAAAAAAAAAAAAAAAAAAAAAAAAAAAAAAAAAAAAAAAAAAAAAAAAAAAAAAAAAAAAAAAAAAAAAAAAAAAAAAAAAAAAAAAAAAAAAAAAAAAAAAAAAAAAAAAAAAAAAAAAAAAAAAAAAAAAAAAAAAAAAAAAAAAAAAAAAAAAAAAAAAAAAAAAAAAAAAAAAAAAAAAAAAAAAAAAAAAAAAAAAAAAAAAAAAAAAAAAAAAAAAAAAAAAAAAAAAAAAAAAAAAAAAAAAAAAAAAAAAAAAAAAAAAAAAAAAAAAAAAAAAAAAAAAAAAAAAAAAAAAAAAAAAAAAAA
AAAAAAAAAAAAAAAAAAAAAAAAAAAAAAAAAAAAAAAAAAAAAAAAAAAAAAAAAAAAAAAAAAAAAAAAAAAAAAAAAAAAAAAAAAAAAAAAAAAAAAAAAAAAAAAAAAAAAAAAAAAAAAAAAAAAAAAAAAAAAAAAAAAAAAAAAAAAAAAAAAAAAAAAAAAAAAAAAAAAAAAAAAAAAAAAAAAAAAAAAAAAAAAAAAAAAAAAAAAAAAAAAAAAAAAAAAAAAAAAAAAAAAAAAAAAAAAAAAAAAAAAAAAAAAAAAAAAAAAAAAAAAAAAAAAAAAAAAAAAAAAAAAAAAAAAAAAAAAAAAAAAAAAAAAAAAAAAAAAAAAAAAAAAAAAAAAAAAAAAAAAAAAAAAAAAAAAAAAAAAAAAAAAAAAAAAAAAAAAAAAAAAAAAAAAAAAAAAAAAAAAAAAAAAAAAAAAAAAAAAAAAAAAAAAAAAAAAAAAAAAAAAAAAAAAAAAAAAAAAAAAAAAAAAAAAAAAAAAAAAAAAAAAAAAAAAAAAAAAAAAAAAAAAAAAAAAAAAAAAAAAAAAAAAAAAAAAAAAAAAAAAAAAAAAAAAAAAAAAAAAAAAAAAAAAAAAAAAAAAAAAAAAAAAAAAAAAAAAAAAAAAAAAAAAAAAAAAAAAAAAAAAAAAAAAAAAAAAAAAAAAAAAAAAAAAAAAAAAAAAAAAAAAAAAAAAAAAAAAAAAAAAAAAAAAAAAAAAAAAAAAAAAAAAAAAAAAAAAAAAAAAAAAAAAAAAAAAAAAAAAAAAAAAAAAAAAAAAAAAAAAAAAAAAAAAAAAAAAAAAAAAAAAAAAAAAAAAAAAAAAAAAAAAAAAAAAAAAAAAAAAAAAAAAAAAAAAAAAAAAAAAAAAAAAAAAAAAAAAAAAAAAAAAAAAAAAAAAAAAAAAAAAAAAAAAAAAAAAAAAAAAAAAAAAAAAAAAAAAAAAAAAAAAAAAAAAAAAAAAAAAAAAAAAAAAAAAAAAAAAAAAAAAAAAAAAAAAAAAAAAAAAAAAAAAAAAAAAAAAAAAAAAAAAAAAAAAAAAAAAAAAAAAAAAAAAAAAAAAAAAAAAAAAAAAAAAAAAAAAAAAAAAAAAAAAAAAAAAAAAAAAAAAAAAAAAAAAAAAAAAAAAAAAAAAAAAAAAAAAAAAAAAAAAAAAAAAAAAAAAAAAAAAAAAAAAAAAAAAAAAAAAAAAAAAAAAAAAAAAAAAAAAAAAAAAAAAAAAAAAAAAAAAAAAAAAAAAAAAAAAAAAAAAAAAAAAAAAAAAAAAAAAAAAAAAAAAAAAAAAAAAAAAAAAAAAAAAAAAAAAAAAAAAAAAAAAAAAAAAAAAAAAAAAAAAAAAAAAAAAAAAAAAAAAAAAAAAAAAAAAAAAAAAAAAAAAAAAAAAAAAAAAAAAAAAAAAAAAAAAAAAAAAAAAAAAAAAAAAAAAAAAAAAAAAAAAAAAAAAAAAAAAAAAAAAAAAAAAAAAAAAAAAAAAAAAAAAAAAAAAAAAAAAAAAAAAAAAAAAAAAAAAAAAAAAAAAAAAAAAAAAAAAAAAAAAAAAAAAAAAAAAAAAAAAAAAAAAAAAAAAAAAAAAAAAAAAAAAAAAAAAAAAAAAAAAAAAAAAAAAAAAAAAAAAAAAAAAAAAAAAAAAAAAAAAAAAAAAAAAAAAAAAAAAAAAAAAAAAAAAAAAAAAAAAAAAAAAAAAAAAAAAAAAAAAAAAAAAAAAAAAAAAAAAAAAAAAAAAAAAAAAAAAAAAAAAAAAAAAAAAAAAAAAAAAAAAAAAAAAAAAAAAAAAAAAAAAAAAAAAAAAAAAAAAAAAAAAAAAAAAAAAAAAAAAAAAAAAAAAAAAAAAAAAAAAAAAAAAAAAAAAAAAAAAAAAAAAAAAAAAAAAAAAAAAAAAAAAAAAAAAAAAAAAAAAAAAAAAAAAAAAAAAAAAAAAAAAAAAAAAAAAAAAAAAAAAAAAAAAAAAAAAAAAAAAAAAAAAAAAAAAAAAAAAAAAAAAAAAAAAAAAAAAAAAAAAAAAAAAAAAAAAAAAAAAAAAAAAAAAAAAAAAAAAAAAAAAAAAAAAAAAAAAAAAAAAAAAAAAAAAAAAAAAAAAAAAAAAAAAAAAAAAAAAAAAAAAAAAAAAAAAAAAAAAAAAAAAAAAAAAAAAAAAAAAAAAAAAAAAAAAAAAAAAAAAAAAAAAAAAAAAAAAAAAAAAAAAAAAAAAAAAAAAAAAAAAAAAAAAAAAAAAAAAAAAAAAAAAAAAAAAAAAAAAAAAAAAAAAAAAAAAAAAAAAAAAAAAAAAAAAAAAAAAAAAAAAAAAAAAAAAAAAAAAAAAAAAAAAAAAAAAAAAAAAAAAAAAAAAAAAAAAAAAAAAAAAAAAAAAAAAAAAAAAAAAAAAAAAAAAAAAAAAAAAAAAAAAAAAAAAAAAAAAAAAAAAAAAAAAAAAAAAAAAAAAAAAAAAAAAAAAAAAAAAAAAAAAAAAAAAAAAAAAAAAAAAAAAAAAAAAAAAAAAAAAAAAAAAAAAAAAAAAAAAAAAAAAAAAAAAAAAAAAAAAAAAAAAAAAAAAAAAAAAAAAAAAAAAAAAAAAAAAAAAAAAAAAAAAAAAAAAAAAAAAAAAAAAAAAAAAAAAAAAAAAAAAAAAAAAAAAAAAAAAAAAAAAAAAAAAAAAAAAAAAAAAAAAAAAAAAAAAAAAAAAAAAAAAAAAAAAAAAAAAAAAAAAAAAAAAAAAAAAAAAAAAAAAAAAAAAAAAAAAAAAAAAAAAAAAAAAAAAAAAAAAAAAAAAAAAAAAAAAAAAAAAAAAAAAAAAAAAAAAAAAAAAAAAAAAAAAAAAAAAAAAAAAAAAAAAAAAAAAAAAAAAAAAAAAAAAAAAAAAAAAAAAAAAAAAAAAAAAAAAAAAAAAAAAAAAAAAAAAAAAAAAAAAAAAAAAAAAAAAAAAAAAAAAAAAAAAAAAAAAAAAAAAAAAAAAAAAAAAAAAAAAAAAAAAAAAAAAAAAAAAAAAAAAAAAAAAAAAAAAAAAAAAAAAAAAAAAAAAAAAAAAAAAAAAAAAAAAAAAAAAAAAAAAAAAAAAAAAAAAAAAAAAAAAAAAAAAAAAAAAAAAAAAAAAAAAAAAAAAAAAAAAAAAAAAAAAAAAAAAAAAAAAAAAAAAAAAAAAAAAAAAAAAAAAAAAAAAAAAAAAAAAAAAAAAAAAAAAAAAAAAAAAAAAAAAAAAAAAAAAAAAAAAAAAAAAAAAAAAAAAAAAAAAAAAAAAAAAAAAAAAAAAAAAAAAAAAAAAAAAAAAAAAAAAAAAAAAAAAAAAAAAAAAAAAAAAAAAAAAAAAAAAAAAAAAAAAAAAAAAAAAAAAAAAAAAAAAAAAAAAAAAAAAAAAAAAAAAAAAAAAAAAAAAAAAAAAAAAAAAAAAAAAAAAAAAAAAAAAAAAAAAAAAAAAAAAAAAAAAAAAAAAAAAAAAAAAAAAAAAAAAAAAAAAAAAAAAAAAAAAAAAAAAAAAAAAAAAAAAAAAAAAAAAAAAAAAAAAAAAAAAAAAAAAAAAAAAAAAAAAAAAAAAAAAAAAAAAAAAAAAAAAAAAAAAAAAAAAAAAAAAAAAAAAAAAAAAAAAAAAAAAAAAAAAAAAAAAAAAAAAAAAAAAAAAAAAAAAAAAAAAAAAAAAAAAAAAAAAAAAAAAAAAAAAAAAAAAAAAAAAAAAAAAAAAAAAAAAAAAAAAAAAAAAAAAAAAAAAAAAAAAAAAAAAAAAAAAAAAAAAAAAAAAAAAAAAAAAAAAAAAAAAAAAAAAAAAAAAAAAAAAAAAAAAAAAAAAAAAAAAAAAAAAAAAAAAAAAAAAAAAAAAAAAAAAAAAAAAAAAAAAAAAAAAAAAAAAAAAAAAAAAAAAAAAAAAAAAAAAAAAAAAAAAAAAAAAAAAAAAAAAAAAAAAAAAAAAAAAAAAAAAAAAAAAAAAAAAAAAAAAAAAAAAAAAAAAAAAAAAAAAAAAAAAAAAAAAAAAAAAAAAAAAAAAAAAAAAAAAAAAAAAAAAAAAAAAAAAAAAAAAAAAAAAAAAAAAAAAAAAAAAAAAAAAAAAAAAAAAAAAAAAAAAAAAAAAAAAAAAAAAAAAAAAAAAAAAAAAAAAAAAAAAAAAAAAAAAAAAAAAAAAAAAAAAAAAAAAAAAA
AAAAAAAAAAAAAAAAAAAAAAAAAAAAAAAAAAAAAAAAAAAAAAAAAAAAAAAAAAAAAAAAAAAAAAAAAAAAAAAAAAAAAAAAAAAAAAAAAAAAAAAAAAAAAAAAAAAAAAAAAAAAAAAAAAAAAAAAAAAAAAAAAAAAAAAAAAAAAAAAAAAAAAAAAAAAAAAAAAAAAAAAAAAAAAAAAAAAAAAAAAAAAAAAAAAAAAAAAAAAAAAAAAAAAAAAAAAAAAAAAAAAAAAAAAAAAAAAAAAAAAAAAAAAAAAAAAAAAAAAAAAAAAAAAAAAAAAAAAAAAAAAAAAAAAAAAAAAAAAAAAAAAAAAAAAAAAAAAAAAAAAAAAAAAAAAAAAAAAAAAAAAAAAAAAAAAAAAAAAAAAAAAAAAAAAAAAAAAAAAAAAAAAAAAAAAAAAAAAAAAAAAAAAAAAAAAAAAAAAAAAAAAAAAAAAAAAAAAAAAAAAAAAAAAAAAAAAAAAAAAAAAAAAAAAAAAAAAAAAAAAAAAAAAAAAAAAAAAAAAAAAAAAAAAAAAAAAAAAAAAAAAAAAAAAAAAAAAAAAAAAAAAAAAAAAAAAAAAAAAAAAAAAAAAAAAAAAAAAAAAAAAAAAAAAAAAAAAAAAAAAAAAAAAAAAAAAAAAAAAAAAAAAAAAAAAAAAAAAAAAAAAAAAAAAAAAAAAAAAAAAAAAAAAAAAAAAAAAAAAAAAAAAAAAAAAAAAAAAAAAAAAAAAAAAAAAAAAAAAAAAAAAAAAAAAAAAAAAAAAAAAAAAAAAAAAAAAAAAAAAAAAAAAAAAAAAAAAAAAAAAAAAAAAAAAAAAAAAAAAAAAAAAAAAAAAAAAAAAAAAAAAAAAAAAAAAAAAAAAAAAAAAAAAAAAAAAAAAAAAAAAAAAAAAAAAAAAAAAAAAAAAAAAAAAAAAAAAAAAAAAAAAAAAAAAAAAAAAAAAAAAAAAAAAAAAAAAAAAAAAAAAAAAAAAAAAAAAAAAAAAAAAAAAAAAAAAAAAAAAAAAAAAAAAAAAAAAAAAAAAAAAAAAAAAAAAAAAAAAAAAAAAAAAAAAAAAAAAAAAAAAAAAAAAAAAAAAAAAAAAAAAAAAAAAAAAAAAAAAAAAAAAAAAAAAAAAAAAAAAAAAAAAAAAAAAAAAAAAAAAAAAAAAAAAAAAAAAAAAAAAAAAAAAAAAAAAAAAAAAAAAAAAAAAAAAAAAAAAAAAAAAAAAAAAAAAAAAAAAAAAAAAAAAAAAAAAAAAAAAAAAAAAAAAAAAAAAAAAAAAAAAAAAAAAAAAAAAAAAAAAAAAAAAAAAAAAAAAAAAAAAAAAAAAAAAAAAAAAAAAAAAAAAAAAAAAAAAAAAAAAAAAAAAAAAAAAAAAAAAAAAAAAAAAAAAAAAAAAAAAAAAAAAAAAAAAAAAAAAAAAAAAAAAAAAAAAAAAAAAAAAAAAAAAAAAAAAAAAAAAAAAAAAAAAAAAAAAAAAAAAAAAAAAAAAAAAAAAAAAAAAAAAAAAAAAAAAAAAAAAAAAAAAAAAAAAAAAAAAAAAAAAAAAAAAAAAAAAAAAAAAAAAAAAAAAAAAAAAAAAAAAAAAAAAAAAAAAAAAAAAAAAAAAAAAAAAAAAAAAAAAAAAAAAAAAAAAAAAAAAAAAAAAAAAAAAAAAAAAAAAAAAAAAAAAAAAAAAAAAAAAAAAAAAAAAAAAAAAAAAAAAAAAAAAAAAAAAAAAAAAAAAAAAAAAAAAAAAAAAAAAAAAAAAAAAAAAAAAAAAAAAAAAAAAAAAAAAAAAAAAAAAAAAAAAAAAAAAAAAAAAAAAAAAAAAAAAAAAAAAAAAAAAAAAAAAAAAAAAAAAAAAAAAAAAAAAAAAAAAAAAAAAAAAAAAAAAAAAAAAAAAAAAAAAAAAAAAAAAAAAAAAAAAAAAAAAAAAAAAAAAAAAAAAAAAAAAAAAAAAAAAAAAAAAAAAAAAAAAAAAAAAAAAAAAAAAAAAAAAAAAAAAAAAAAAAAAAAAAAAAAAAAAAAAAAAAAAAAAAAAAAAAAAAAAAAAAAAAAAAAAAAAAAAAAAAAAAAAAAAAAAAAAAAAAAAAAAAAAAAAAAAAAAAAAAAAAAAAAAAAAAAAAAAAAAAAAAAAAAAAAAAAAAAAAAAAAAAAAAAAAAAAAAAAAAAAAAAAAAAAAAAAAAAAAAAAAAAAAAAAAAAAAAAAAAAAAAAAAAAAAAAAAAAAAAAAAAAAAAAAAAAAAAAAAAAAAAAAAAAAAAAAAAAAAAAAAAAAAAAAAAAAAAAAAAAAAAAAAAAAAAAAAAAAAAAAAAAAAAAAAAAAAAAAAAAAAAAAAAAAAAAAAAAAAAAAAAAAAAAAAAAAAAAAAAAAAAAAAAAAAAAAAAAAAAAAAAAAAAAAAAAAAAAAAAAAAAAAAAAAAAAAAAAAAAAAAAAAAAAAAAAAAAAAAAAAAAAAAAAAAAAAAAAAAAAAAAAAAAAAAAAAAAAAAAAAAAAAAAAAAAAAAAAAAAAAAAAAAAAAAAAAAAAAAAAAAAAAAAAAAAAAAAAAAAAAAAAAAAAAAAAAAAAAAAAAAAAAAAAAAAAAAAAAAAAAAAAAAAAAAAAAAAAAAAAAAAAAAAAAAAAAAAAAAAAAAAAAAAAAAAAAAAAAAAAAAAAAAAAAAAAAAAAAAAAAAAAAAAAAAAAAAAAAAAAAAAAAAAAAAAAAAAAAAAAAAAAAAAAAAAAAAAAAAAAAAAAAAAAAAAAAAAAAAAAAAAAAAAAAAAAAAAAAAAAAAAAAAAAAAAAAAAAAAAAAAAAAAAAAAAAAAAAAAAAAAAAAAAAAAAAAAAAAAAAAAAAAAAAAAAAAAAAAAAAAAAAAAAAAAAAAAAAAAAAAAAAAAAAAAAAAAAAAAAAAAAAAAAAAAAAAAAAAAAAAAAAAAAAAAAAAAAAAAAAAAAAAAAAAAAAAAAAAAAAAAAAAAAAAAAAAAAAAAAAAAAAAAAAAAAAAAAAAAAAAAAAAAAAAAAAAAAAAAAAAAAAAAAAAAAAAAAAAAAAAAAAAAAAAAAAAAAAAAAAAAAAAAAAAAAAAAAAAAAAAAAAAAAAAAAAAAAAAAAAAAAAAAAAAAAAAAAAAAAAAAAAAAAAAAAAAAAAAAAAAAAAAAAAAAAAAAAAAAAAAAAAAAAAAAAAAAAAAAAAAAAAAAAAAAAAAAAAAAAAAAAAAAAAAAAAAAAAAAAAAAAAAAAAAAAAAAAAAAAAAAAAAAAAAAAAAAAAAAAAAAAAAAAAAAAAAAAAAAAAAAAAAAAAAAAAAAAAAAAAAAAAAAAAAAAAAAAAAAAAAAAAAAAAAAAAAAAAAAAAAAAAAAAAAAAAAAAAAAAAAAAAAAAAAAAAAAAAAAAAAAAAAAAAAAAAAAAAAAAAAAAAAAAAAAAAAAAAAAAAAAAAAAAAAAAAAAAAAAAAAAAAAAAAAAAAAAAAAAAAAAAAAAAAAAAAAAAAAAAAAAAAAAAAAAAAAAAAAAAAAAAAAAAAAAAAAAAAAAAAAAAAAAAAAAAAAAAAAAAAAAAAAAAAAAAAAAAAAAAAAAAAAAAAAAAAAAAAAAAAAAAAAAAAAAAAAAAAAAAAAAAAAAAAAAAAAAAAAAAAAAAAAAAAAAAAAAAAAAAAAAAAAAAAAAAAAAAAAAAAAAAAAAAAAAAAAAAAAAAAAAAAAAAAAAAAAAAAAAAAAAAAAAAAAAAAAAAAAAAAAAAAAAAAAAAAAAAAAAAAAAAAAAAAAAAAAAAAAAAAAAAAAAAAAAAAAAAAAAAAAAAAAAAAAAAAAAAAAAAAAAAAAAAAAAAAAAAAAAAAAAAAAAAAAAAAAAAAAAAAAAAAAAAAAAAAAAAAAAAAAAAAAAAAAAAAAAAAAAAAAAAAAAAAAAAAAAAAAAAAAAAAAAAAAAAAAAAAAAAAAAAAAAAAAAAAAAAAAAAAAAAAAAAAAAAAAAAAAAAAAAAAAAAAAAAAAAAAAAAAAAAAAAAAAAAAAAAAAAAAAAAAAAAAAAAAAAAAAAAAAAAAAAAAAAAAAAAAAAAAAAAAAAAAAAAAAAAAAAAAAAAAAAAAAAAAAAAAAAAAAAAAAAAAAAAAAAAAAAAAAAAAAAAAAAAAAAAAAAAAAAAAAAAAAAAAAAAAAAAAAAA
AAAAAAAAAAAAAAAAAAAAAAAAAAAAAAAAAAAAAAAAAAAAAAAAAAAAAAAAAAAAAAAAAAAAAAAAAAAAAAAAAAAAAAAAAAAAAAAAAAAAAAAAAAAAAAAAAAAAAAAAAAAAAAAAAAAAAAAAAAAAAAAAAAAAAAAAAAAAAAAAAAAAAAAAAAAAAAAAAAAAAAAAAAAAAAAAAAAAAAAAAAAAAAAAAAAAAAAAAAAAAAAAAAAAAAAAAAAAAAAAAAAAAAAAAAAAAAAAAAAAAAAAAAAAAAAAAAAAAAAAAAAAAAAAAAAAAAAAAAAAAAAAAAAAAAAAAAAAAAAAAAAAAAAAAAAAAAAAAAAAAAAAAAAAAAAAAAAAAAAAAAAAAAAAAAAAAAAAAAAAAAAAAAAAAAAAAAAAAAAAAAAAAAAAAAAAAAAAAAAAAAAAAAAAAAAAAAAAAAAAAAAAAAAAAAAAAAAAAAAAAAAAAAAAAAAAAAAAAAAAAAAAAAAAAAAAAAAAAAAAAAAAAAAAAAAAAAAAAAAAAAAAAAAAAAAAAAAAAAAAAAAAAAAAAAAAAAAAAAAAAAAAAAAAAAAAAAAAAAAAAAAAAAAAAAAAAAAAAAAAAAAAAAAAAAAAAAAAAAAAAAAAAAAAAAAAAAAAAAAAAAAAAAAAAAAAAAAAAAAAAAAAAAAAAAAAAAAAAAAAAAAAAAAAAAAAAAAAAAAAAAAAAAAAAAAAAAAAAAAAAAAAAAAAAAAAAAAAAAAAAAAAAAAAAAAAAAAAAAAAAAAAAAAAAAAAAAAAAAAAAAAAAAAAAAAAAAAAAAAAAAAAAAAAAAAAAAAAAAAAAAAAAAAAAAAAAAAAAAAAAAAAAAAAAAAAAAAAAAAAAAAAAAAAAAAAAAAAAAAAAAAAAAAAAAAAAAAAAAAAAAAAAAAAAAAAAAAAAAAAAAAAAAAAAAAAAAAAAAAAAAAAAAAAAAAAAAAAAAAAAAAAAAAAAAAAAAAAAAAAAAAAAAAAAAAAAAAAAAAAAAAAAAAAAAAAAAAAAAAAAAAAAAAAAAAAAAAAAAAAAAAAAAAAAAAAAAAAAAAAAAAAAAAAAAAAAAAAAAAAAAAAAAAAAAAAAAAAAAAAAAAAAAAAAAAAAAAAAAAAAAAAAAAAAAAAAAAAAAAAAAAAAAAAAAAAAAAAAAAAAAAAAAAAAAAAAAAAAAAAAAAAAAAAAAAAAAAAAAAAAAAAAAAAAAAAAAAAAAAAAAAAAAAAAAAAAAAAAAAAAAAAAAAAAAAAAAAAAAAAAAAAAAAAAAAAAAAAAAAAAAAAAAAAAAAAAAAAAAAAAAAAAAAAAAAAAAAAAAAAAAAAAAAAAAAAAAAAAAAAAAAAAAAAAAAAAAAAAAAAAAAAAAAAAAAAAAAAAAAAAAAAAAAAAAAAAAAAAAAAAAAAAAAAAAAAAAAAAAAAAAAAAAAAAAAAAAAAAAAAAAAAAAAAAAAAAAAAAAAAAAAAAAAAAAAAAAAAAAAAAAAAAAAAAAAAAAAAAAAAAAAAAAAAAAAAAAAAAAAAAAAAAAAAAAAAAAAAAAAAAAAAAAAAAAAAAAAAAAAAAAAAAAAAAAAAAAAAAAAAAAAAAAAAAAAAAAAAAAAAAAAAAAAAAAAAAAAAAAAAAAAAAAAAAAAAAAAAAAAAAAAAAAAAAAAAAAAAAAAAAAAAAAAAAAAAAAAAAAAAAAAAAAAAAAAAAAAAAAAAAAAAAAAAAAAAAAAAAAAAAAAAAAAAAAAAAAAAAAAAAAAAAAAAAAAAAAAAAAAAAAAAAAAAAAAAAAAAAAAAAAAAAAAAAAAAAAAAAAAAAAAAAAAAAAAAAAAAAAAAAAAAAAAAAAAAAAAAAAAAAAAAAAAAAAAAAAAAAAAAAAAAAAAAAAAAAAAAAAAAAAAAAAAAAAAAAAAAAAAAAAAAAAAAAAAAAAAAAAAAAAAAAAAAAAAAAAAAAAAAAAAAAAAAAAAAAAAAAAAAAAAAAAAAAAAAAAAAAAAAAAAAAAAAAAAAAAAAAAAAAAAAAAAAAAAAAAAAAAAAAAAAAAAAAAAAAAAAAAAAAAAAAAAAAAAAAAAAAAAAAAAAAAAAAAAAAAAAAAAAAAAAAAAAAAAAAAAAAAAAAAAAAAAAAAAAAAAAAAAAAAAAAAAAAAAAAAAAAAAAAAAAAAAAAAAAAAAAAAAAAAAAAAAAAAAAAAAAAAAAAAAAAAAAAAAAAAAAAAAAAAAAAAAAAAAAAAAAAAAAAAAAAAAAAAAAAAAAAAAAAAAAAAAAAAAAAAAAAAAAAAAAAAAAAAAAAAAAAAAAAAAAAAAAAAAAAAAAAAAAAAAAAAAAAAAAAAAAAAAAAAAAAAAAAAAAAAAAAAAAAAAAAAAAAAAAAAAAAAAAAAAAAAAAAAAAAAAAAAAAAAAAAAAAAAAAAAAAAAAAAAAAAAAAAAAAAAAAAAAAAAAAAAAAAAAAAAAAAAAAAAAAAAAAAAAAAAAAAAAAAAAAAAAAAAAAAAAAAAAAAAAAAAAAAAAAAAAAAAAAAAAAAAAAAAAAAAAAAAAAAAAAAAAAAAAAAAAAAAAAAAAAAAAAAAAAAAAAAAAAAAAAAAAAAAAAAAAAAAAAAAAAAAAAAAAAAAAAAAAAAAAAAAAAAAAAAAAAAAAAAAAAAAAAAAAAAAAAAAAAAAAAAAAAAAAAAAAAAAAAAAAAAAAAAAAAAAAAAAAAAAAAAAAAAAAAAAAAAAAAAAAAAAAAAAAAAAAAAAAAAAAAAAAAAAAAAAAAAAAAAAAAAAAAAAAAAAAAAAAAAAAAAAAAAAAAAAAAAAAAAAAAAAAAAAAAAAAAAAAAAAAAAAAAAAAAAAAAAAAAAAAAAAAAAAAAAAAAAAAAAAAAAAAAAAAAAAAAAAAAAAAAAAAAAAAAAAAAAAAAAAAAAAAAAAAAAAAAAAAAAAAAAAAAAAAAAAAAAAAAAAAAAAAAAAAAAAAAAAAAAAAAAAAAAAAAAAAAAAAAAAAAAAAAAAAAAAAAAAAAAAAAAAAAAAAAAAAAAAAAAAAAAAAAAAAAAAAAAAAAAAAAAAAAAAAAAAAAAAAAAAAAAAAAAAAAAAAAAAAAAAAAAAAAAAAAAAAAAAAAAAAAAAAAAAAAAAAAAAAAAAAAAAAAAAAAAAAAAAAAAAAAAAAAAAAAAAAAAAAAAAAAAAAAAAAAAAAAAAAAAAAAAAAAAAAAAAAAAAAAAAAAAAAAAAAAAAAAAAAAAAAAAAAAAAAAAAAAAAAAAAAAAAAAAAAAAAAAAAAAAAAAAAAAAAAAAAAAAAAAAAAAAAAAAAAAAAAAAAAAAAAAAAAAAAAAAAAAAAAAAAAAAAAAAAAAAAAAAAAAAAAAAAAAAAAAAAAAAAAAAAAAAAAAAAAAAAAAAAAAAAAAAAAAAAAAAAAAAAAAAAAAAAAAAAAAAAAAAAAAAAAAAAAAAAAAAAAAAAAAAAAAAAAAAAAAAAAAAAAAAAAAAAAAAAAAAAAAAAAAAAAAAAAAAAAAAAAAAAAAAAAAAAAAAAAAAAAAAAAAAAAAAAAAAAAAAAAAAAAAAAAAAAAAAAAAAAAAAAAAAAAAAAAAAAAAAAAAAAAAAAAAAAAAAAAAAAAAAAAAAAAAAAAAAAAAAAAAAAAAAAAAAAAAAAAAAAAAAAAAAAAAAAAAAAAAAAAAAAAAAAAAAAAAAAAAAAAAAAAAAAAAAAAAAAAAAAAAAAAAAAAAAAAAAAAAAAAAAAAAAAAAAAAAAAAAAAAAAAAAAAAAAAAAAAAAAAAAAAAAAAAAAAAAAAAAAAAAAAAAAAAAAAAAAAAAAAAAAAAAAAAAAAAAAAAAAAAAAAAAAAAAAAAAAAAAAAAAAAAAAAAAAAAAAAAAAAAAAAAAAAAAAAAAAAAAAAAAAAAAAAAAAAAAAAAAAAAAAAAAAAAAAAAAAAAAAAAAAAAAAAAAAAAAAAAAAAAAAAAAAAAAAAAAAAAAAAAAAAAAAAAAAAAAAAAAAAAAAAAAAAAAAAAAAAAAAAAAAAAAAAAAAAAAAAAAAAAAAAAAAAAAAAAAAAAAAAAAAAAAAAAAAAAAAAAAAAAAAAAAAAAAAAAAAAAAAAAAAAAAAAAAAAAAAAAAAAAAAAAAAAAAAAAAAAAAAAAA
AAAAAAAAAAAAAAAAAAAAAAAAAAAAAAAAAAAAAAAAAAAAAAAAAAAAAAAAAAAAAAAAAAAAAAAAAAAAAAAAAAAAAAAAAAAAAAAAAAAAAAAAAAAAAAAAAAAAAAAAAAAAAAAAAAAAAAAAAAAAAAAAAAAAAAAAAAAAAAAAAAAAAAAAAAAAAAAAAAAAAAAAAAAAAAAAAAAAAAAAAAAAAAAAAAAAAAAAAAAAAAAAAAAAAAAAAAAAAAAAAAAAAAAAAAAAAAAAAAAAAAAAAAAAAAAAAAAAAAAAAAAAAAAAAAAAAAAAAAAAAAAAAAAAAAAAAAAAAAAAAAAAAAAAAAAAAAAAAAAAAAAAAAAAAAAAAAAAAAAAAAAAAAAAAAAAAAAAAAAAAAAAAAAAAAAAAAAAAAAAAAAAAAAAAAAAAAAAAAAAAAAAAAAAAAAAAAAAAAAAAAAAAAAAAAAAAAAAAAAAAAAAAAAAAAAAAAAAAAAAAAAAAAAAAAAAAAAAAAAAAAAAAAAAAAAAAAAAAAAAAAAAAAAAAAAAAAAAAAAAAAAAAAAAAAAAAAAAAAAAAAAAAAAAAAAAAAAAAAAAAAAAAAAAAAAAAAAAAAAAAAAAAAAAAAAAAAAAAAAAAAAAAAAAAAAAAAAAAAAAAAAAAAAAAAAAAAAAAAAAAAAAAAAAAAAAAAAAAAAAAAAAAAAAAAAAAAAAAAAAAAAAAAAAAAAAAAAAAAAAAAAAAAAAAAAAAAAAAAAAAAAAAAAAAAAAAAAAAAAAAAAAAAAAAAAAAAAAAAAAAAAAAAAAAAAAAAAAAAAAAAAAAAAAAAAAAAAAAAAAAAAAAAAAAAAAAAAAAAAAAAAAAAAAAAAAAAAAAAAAAAAAAAAAAAAAAAAAAAAAAAAAAAAAAAAAAAAAAAAAAAAAAAAAAAAAAAAAAAAAAAAAAAAAAAAAAAAAAAAAAAAAAAAAAAAAAAAAAAAAAAAAAAAAAAAAAAAAAAAAAAAAAAAAAAAAAAAAAAAAAAAAAAAAAAAAAAAAAAAAAAAAAAAAAAAAAAAAAAAAAAAAAAAAAAAAAAAAAAAAAAAAAAAAAAAAAAAAAAAAAAAAAAAAAAAAAAAAAAAAAAAAAAAAAAAAAAAAAAAAAAAAAAAAAAAAAAAAAAAAAAAAAAAAAAAAAAAAAAAAAAAAAAAAAAAAAAAAAAAAAAAAAAAAAAAAAAAAAAAAAAAAAAAAAAAAAAAAAAAAAAAAAAAAAAAAAAAAAAAAAAAAAAAAAAAAAAAAAAAAAAAAAAAAAAAAAAAAAAAAAAAAAAAAAAAAAAAAAAAAAAAAAAAAAAAAAAAAAAAAAAAAAAAAAAAAAAAAAAAAAAAAAAAAAAAAAAAAAAAAAAAAAAAAAAAAAAAAAAAAAAAAAAAAAAAAAAAAAAAAAAAAAAAAAAAAAAAAAAAAAAAAAAAAAAAAAAAAAAAAAAAAAAAAAAAAAAAAAAAAAAAAAAAAAAAAAAAAAAAAAAAAAAAAAAAAAAAAAAAAAAAAAAAAAAAAAAAAAAAAAAAAAAAAAAAAAAAAAAAAAAAAAAAAAAAAAAAAAAAAAAAAAAAAAAAAAAAAAAAAAAAAAAAAAAAAAAAAAAAAAAAAAAAAAAAAAAAAAAAAAAAAAAAAAAAAAAAAAAAAAAAAAAAAAAAAAAAAAAAAAAAAAAAAAAAAAAAAAAAAAAAAAAAAAAAAAAAAAAAAAAAAAAAAAAAAAAAAAAAAAAAAAAAAAAAAAAAAAAAAAAAAAAAAAAAAAAAAAAAAAAAAAAAAAAAAAAAAAAAAAAAAAAAAAAAAAAAAAAAAAAAAAAAAAAAAAAAAAAAAAAAAAAAAAAAAAAAAAAAAAAAAAAAAAAAAAAAAAAAAAAAAAAAAAAAAAAAAAAAAAAAAAAAAAAAAAAAAAAAAAAAAAAAAAAAAAAAAAAAAAAAAAAAAAAAAAAAAAAAAAAAAAAAAAAAAAAAAAAAAAAAAAAAAAAAAAAAAAAAAAAAAAAAAAAAAAAAAAAAAAAAAAAAAAAAAAAAAAAAAAAAAAAAAAAAAAAAAAAAAAAAAAAAAAAAAAAAAAAAAAAAAAAAAAAAAAAAAAAAAAAAAAAAAAAAAAAAAAAAAAAAAAAAAAAAAAAAAAAAAAAAAAAAAAAAAAAAAAAAAAAAAAAAAAAAAAAAAAAAAAAAAAAAAAAAAAAAAAAAAAAAAAAAAAAAAAAAAAAAAAAAAAAAAAAAAAAAAAAAAAAAAAAAAAAAAAAAAAAAAAAAAAAAAAAAAAAAAAAAAAAAAAAAAAAAAAAAAAAAAAAAAAAAAAAAAAAAAAAAAAAAAAAAAAAAAAAAAAAAAAAAAAAAAAAAAAAAAAAAAAAAAAAAAAAAAAAAAAAAAAAAAAAAAAAAAAAAAAAAAAAAAAAAAAAAAAAAAAAAAAAAAAAAAAAAAAAAAAAAAAAAAAAAAAAAAAAAAAAAAAAAAAAAAAAAAAAAAAAAAAAAAAAAAAAAAAAAAAAAAAAAAAAAAAAAAAAAAAAAAAAAAAAAAAAAAAAAAAAAAAAAAAAAAAAAAAAAAAAAAAAAAAAAAAAAAAAAAAAAAAAAAAAAAAAAAAAAAAAAAAAAAAAAAAAAAAAAAAAAAAAAAAAAAAAAAAAAAAAAAAAAAAAAAAAAAAAAAAAAAAAAAAAAAAAAAAAAAAAAAAAAAAAAAAAAAAAAAAAAAAAAAAAAAAAAAAAAAAAAAAAAAAAAAAAAAAAAAAAAAAAAAAAAAAAAAAAAAAAAAAAAAAAAAAAAAAAAAAAAAAAAAAAAAAAAAAAAAAAAAAAAAAAAAAAAAAAAAAAAAAAAAAAAAAAAAAAAAAAAAAAAAAAAAAAAAAAAAAAAAAAAAAAAAAAAAAAAAAAAAAAAAAAAAAAAAAAAAAAAAAAAAAAAAAAAAAAAAAAAAAAAAAAAAAAAAAAAAAAAAAAAAAAAAAAAAAAAAAAAAAAAAAAAAAAAAAAAAAAAAAAAAAAAAAAAAAAAAAAAAAAAAAAAAAAAAAAAAAAAAAAAAAAAAAAAAAAAAAAAAAAAAAAAAAAAAAAAAAAAAAAAAAAAAAAAAAAAAAAAAAAAAAAAAAAAAAAAAAAAAAAAAAAAAAAAAAAAAAAAAAAAAAAAAAAAAAAAAAAAAAAAAAAAAAAAAAAAAAAAAAAAAAAAAAAAAAAAAAAAAAAAAAAAAAAAAAAAAAAAAAAAAAAAAAAAAAAAAAAAAAAAAAAAAAAAAAAAAAAAAAAAAAAAAAAAAAAAAAAAAAAAAAAAAAAAAAAAAAAAAAAAAAAAAAAAAAAAAAAAAAAAAAAAAAAAAAAAAAAAAAAAAAAAAAAAAAAAAAAAAAAAAAAAAAAAAAAAAAAAAAAAAAAAAAAAAAAAAAAAAAAAAAAAAAAAAAAAAAAAAAAAAAAAAAAAAAAAAAAAAAAAAAAAAAAAAAAAAAAAAAAAAAAAAAAAAAAAAAAAAAAAAAAAAAAAAAAAAAAAAAAAAAAAAAAAAAAAAAAAAAAAAAAAAAAAAAAAAAAAAAAAAAAAAAAAAAAAAAAAAAAAAAAAAAAAAAAAAAAAAAAAAAAAAAAAAAAAAAAAAAAAAAAAAAAAAAAAAAAAAAAAAAAAAAAAAAAAAAAAAAAAAAAAAAAAAAAAAAAAAAAAAAAAAAAAAAAAAAAAAAAAAAAAAAAAAAAAAAAAAAAAAAAAAAAAAAAAAAAAAAAAAAAAAAAAAAAAAAAAAAAAAAAAAAAAAAAAAAAAAAAAAAAAAAAAAAAAAAAAAAAAAAAAAAAAAAAAAAAAAAAAAAAAAAAAAAAAAAAAAAAAAAAAAAAAAAAAAAAAAAAAAAAAAAAAAAAAAAAAAAAAAAAAAAAAAAAAAAAAAAAAAAAAAAAAAAAAAAAAAAAAAAAAAAAAAAAAAAAAAAAAAAAAAAAAAAAAAAAAAAAAAAAAAAAAAAAAAAAAAAAAAAAAAAAAAAAAAAAAAAAAAAAAAAAAAAAAAAAAAAAAAAAAAAAAAAAAAAAAAAAAAAAAAAAAAAAAAAAAAAAAAAAAAAAAAAAAAAAAAAAAAAAAAAAAAAAAAAAAAAAAAAAAAAAAAAAAAAAAAAAAAAAAAAAAAAAAAAAAAAAAAAAAAAAAAAAAA
AAAAAAAAAAAAAAAAAAAAAAAAAAAAAAAAAAAAAAAAAAAAAAAAAAAAAAAAAAAAAAAAAAAAAAAAAAAAAAAAAAAAAAAAAAAAAAAAAAAAAAAAAAAAAAAAAAAAAAAAAAAAAAAAAAAAAAAAAAAAAAAAAAAAAAAAAAAAAAAAAAAAAAAAAAAAAAAAAAAAAAAAAAAAAAAAAAAAAAAAAAAAAAAAAAAAAAAAAAAAAAAAAAAAAAAAAAAAAAAAAAAAAAAAAAAAAAAAAAAAAAAAAAAAAAAAAAAAAAAAAAAAAAAAAAAAAAAAAAAAAAAAAAAAAAAAAAAAAAAAAAAAAAAAAAAAAAAAAAAAAAAAAAAAAAAAAAAAAAAAAAAAAAAAAAAAAAAAAAAAAAAAAAAAAAAAAAAAAAAAAAAAAAAAAAAAAAAAAAAAAAAAAAAAAAAAAAAAAAAAAAAAAAAAAAAAAAAAAAAAAAAAAAAAAAAAAAAAAAAAAAAAAAAAAAAAAAAAAAAAAAAAAAAAAAAAAAAAAAAAAAAAAAAAAAAAAAAAAAAAAAAAAAAAAAAAAAAAAAAAAAAAAAAAAAAAAAAAAAAAAAAAAAAAAAAAAAAAAAAAAAAAAAAAAAAAAAAAAAAAAAAAAAAAAAAAAAAAAAAAAAAAAAAAAAAAAAAAAAAAAAAAAAAAAAAAAAAAAAAAAAAAAAAAAAAAAAAAAAAAAAAAAAAAAAAAAAAAAAAAAAAAAAAAAAAAAAAAAAAAAAAAAAAAAAAAAAAAAAAAAAAAAAAAAAAAAAAAAAAAAAAAAAAAAAAAAAAAAAAAAAAAAAAAAAAAAAAAAAAAAAAAAAAAAAAAAAAAAAAAAAAAAAAAAAAAAAAAAAAAAAAAAAAAAAAAAAAAAAAAAAAAAAAAAAAAAAAAAAAAAAAAAAAAAAAAAAAAAAAAAAAAAAAAAAAAAAAAAAAAAAAAAAAAAAAAAAAAAAAAAAAAAAAAAAAAAAAAAAAAAAAAAAAAAAAAAAAAAAAAAAAAAAAAAAAAAAAAAAAAAAAAAAAAAAAAAAAAAAAAAAAAAAAAAAAAAAAAAAAAAAAAAAAAAAAAAAAAAAAAAAAAAAAAAAAAAAAAAAAAAAAAAAAAAAAAAAAAAAAAAAAAAAAAAAAAAAAAAAAAAAAAAAAAAAAAAAAAAAAAAAAAAAAAAAAAAAAAAAAAAAAAAAAAAAAAAAAAAAAAAAAAAAAAAAAAAAAAAAAAAAAAAAAAAAAAAAAAAAAAAAAAAAAAAAAAAAAAAAAAAAAAAAAAAAAAAAAAAAAAAAAAAAAAAAAAAAAAAAAAAAAAAAAAAAAAAAAAAAAAAAAAAAAAAAAAAAAAAAAAAAAAAAAAAAAAAAAAAAAAAAAAAAAAAAAAAAAAAAAAAAAAAAAAAAAAAAAAAAAAAAAAAAAAAAAAAAAAAAAAAAAAAAAAAAAAAAAAAAAAAAAAAAAAAAAAAAAAAAAAAAAAAAAAAAAAAAAAAAAAAAAAAAAAAAAAAAAAAAAAAAAAAAAAAAAAAAAAAAAAAAAAAAAAAAAAAAAAAAAAAAAAAAAAAAAAAAAAAAAAAAAAAAAAAAAAAAAAAAAAAAAAAAAAAAAAAAAAAAAAAAAAAAAAAAAAAAAAAAAAAAAAAAAAAAAAAAAAAAAAAAAAAAAAAAAAAAAAAAAAAAAAAAAAAAAAAAAAAAAAAAAAAAAAAAAAAAAAAAAAAAAAAAAAAAAAAAAAAAAAAAAAAAAAAAAAAAAAAAAAAAAAAAAAAAAAAAAAAAAAAAAAAAAAAAAAAAAAAAAAAAAAAAAAAAAAAAAAAAAAAAAAAAAAAAAAAAAAAAAAAAAAAAAAAAAAAAAAAAAAAAAAAAAAAAAAAAAAAAAAAAAAAAAAAAAAAAAAAAAAAAAAAAAAAAAAAAAAAAAAAAAAAAAAAAAAAAAAAAAAAAAAAAAAAAAAAAAAAAAAAAAAAAAAAAAAAAAAAAAAAAAAAAAAAAAAAAAAAAAAAAAAAAAAAAAAAAAAAAAAAAAAAAAAAAAAAAAAAAAAAAAAAAAAAAAAAAAAAAAAAAAAAAAAAAAAAAAAAAAAAAAAAAAAAAAAAAAAAAAAAAAAAAAAAAAAAAAAAAAAAAAAAAAAAAAAAAAAAAAAAAAAAAAAAAAAAAAAAAAAAAAAAAAAAAAAAAAAAAAAAAAAAAAAAAAAAAAAAAAAAAAAAAAAAAAAAAAAAAAAAAAAAAAAAAAAAAAAAAAAAAAAAAAAAAAAAAAAAAAAAAAAAAAAAAAAAAAAAAAAAAAAAAAAAAAAAAAAAAAAAAAAAAAAAAAAAAAAAAAAAAAAAAAAAAAAAAAAAAAAAAAAAAAAAAAAAAAAAAAAAAAAAAAAAAAAAAAAAAAAAAAAAAAAAAAAAAAAAAAAAAAAAAAAAAAAAAAAAAAAAAAAAAAAAAAAAAAAAAAAAAAAAAAAAAAAAAAAAAAAAAAAAAAAAAAAAAAAAAAAAAAAAAAAAAAAAAAAAAAAAAAAAAAAAAAAAAAAAAAAAAAAAAAAAAAAAAAAAAAAAAAAAAAAAAAAAAAAAAAAAAAAAAAAAAAAAAAAAAAAAAAAAAAAAAAAAAAAAAAAAAAAAAAAAAAAAAAAAAAAAAAAAAAAAAAAAAAAAAAAAAAAAAAAAAAAAAAAAAAAAAAAAAAAAAAAAAAAAAAAAAAAAAAAAAAAAAAAAAAAAAAAAAAAAAAAAAAAAAAAAAAAAAAAAAAAAAAAAAAAAAAAAAAAAAAAAAAAAAAAAAAAAAAAAAAAAAAAAAAAAAAAAAAAAAAAAAAAAAAAAAAAAAAAAAAAAAAAAAAAAAAAAAAAAAAAAAAAAAAAAAAAAAAAAAAAAAAAAAAAAAAAAAAAAAAAAAAAAAAAAAAAAAAAAAAAAAAAAAAAAAAAAAAAAAAAAAAAAAAAAAAAAAAAAAAAAAAAAAAAAAAAAAAAAAAAAAAAAAAAAAAAAAAAAAAAAAAAAAAAAAAAAAAAAAAAAAAAAAAAAAAAAAAAAAAAAAAAAAAAAAAAAAAAAAAAAAAAAAAAAAAAAAAAAAAAAAAAAAAAAAAAAAAAAAAAAAAAAAAAAAAAAAAAAAAAAAAAAAAAAAAAAAAAAAAAAAAAAAAAAAAAAAAAAAAAAAAAAAAAAAAAAAAAAAAAAAAAAAAAAAAAAAAAAAAAAAAAAAAAAAAAAAAAAAAAAAAAAAAAAAAAAAAAAAAAAAAAAAAAAAAAAAAAAAAAAAAAAAAAAAAAAAAAAAAAAAAAAAAAAAAAAAAAAAAAAAAAAAAAAAAAAAAAAAAAAAAAAAAAAAAAAAAAAAAAAAAAAAAAAAAAAAAAAAAAAAAAAAAAAAAAAAAAAAAAAAAAAAAAAAAAAAAAAAAAAAAAAAAAAAAAAAAAAAAAAAAAAAAAAAAAAAAAAAAAAAAAAAAAAAAAAAAAAAAAAAAAAAAAAAAAAAAAAAAAAAAAAAAAAAAAAAAAAAAAAAAAAAAAAAAAAAAAAAAAAAAAAAAAAAAAAAAAAAAAAAAAAAAAAAAAAAAAAAAAAAAAAAAAAAAAAAAAAAAAAAAAAAAAAAAAAAAAAAAAAAAAAAAAAAAAAAAAAAAAAAAAAAAAAAAAAAAAAAAAAAAAAAAAAAAAAAAAAAAAAAAAAAAAAAAAAAAAAAAAAAAAAAAAAAAAAAAAAAAAAAAAAAAAAAAAAAAAAAAAAAAAAAAAAAAAAAAAAAAAAAAAAAAAAAAAAAAAAAAAAAAAAAAAAAAAAAAAAAAAAAAAAAAAAAAAAAAAAAAAAAAAAAAAAAAAAAAAAAAAAAAAAAAAAAAAAAAAAAAAAAAAAAAAAAAAAAAAAAAAAAAAAAAAAAAAAAAAAAAAAAAAAAAAAAAAAAAAAAAAAAAAAAAAAAAAAAAAAAAAAAAAAAAAAAAAAAAAAAAAAAAAAAAAAAAAAAAAAAAAAAAAAAAAAAAAAAAAAAAAAAAAAAAAAAAAAAAAAAAAAAAAAAAAAAAAAAAAAAAAAAAAAAAAAAAAAAAAAAAAAAAAAAAAAAAAAAAAAAAAAAAAAAAAAAAAAAAAAAAAAAAAAAAAAAAAAAAAAAAAAAAAAAAAAAAAAAAAAAAAAAAAAAAAAAAAAAAAAAAAAAAA
AAAAAAAAAAAAAAAAAAAAAAAAAAAAAAAAAAAAAAAAAAAAAAAAAAAAAAAAAAAAAAAAAAAAAAAAAAAAAAAAAAAAAAAAAAAAAAAAAAAAAAAAAAAAAAAAAAAAAAAAAAAAAAAAAAAAAAAAAAAAAAAAAAAAAAAAAAAAAAAAAAAAAAAAAAAAAAAAAAAAAAAAAAAAAAAAAAAAAAAAAAAAAAAAAAAAAAAAAAAAAAAAAAAAAAAAAAAAAAAAAAAAAAAAAAAAAAAAAAAAAAAAAAAAAAAAAAAAAAAAAAAAAAAAAAAAAAAAAAAAAAAAAAAAAAAAAAAAAAAAAAAAAAAAAAAAAAAAAAAAAAAAAAAAAAAAAAAAAAAAAAAAAAAAAAAAAAAAAAAAAAAAAAAAAAAAAAAAAAAAAAAAAAAAAAAAAAAAAAAAAAAAAAAAAAAAAAAAAAAAAAAAAAAAAAAAAAAAAAAAAAAAAAAAAAAAAAAAAAAAAAAAAAAAAAAAAAAAAAAAAAAAAAAAAAAAAAAAAAAAAAAAAAAAAAAAAAAAAAAAAAAAAAAAAAAAAAAAAAAAAAAAAAAAAAAAAAAAAAAAAAAAAAAAAAAAAAAAAAAAAAAAAAAAAAAAAAAAAAAAAAAAAAAAAAAAAAAAAAAAAAAAAAAAAAAAAAAAAAAAAAAAAAAAAAAAAAAAAAAAAAAAAAAAAAAAAAAAAAAAAAAAAAAAAAAAAAAAAAAAAAAAAAAAAAAAAAAAAAAAAAAAAAAAAAAAAAAAAAAAAAAAAAAAAAAAAAAAAAAAAAAAAAAAAAAAAAAAAAAAAAAAAAAAAAAAAAAAAAAAAAAAAAAAAAAAAAAAAAAAAAAAAAAAAAAAAAAAAAAAAAAAAAAAAAAAAAAAAAAAAAAAAAAAAAAAAAAAAAAAAAAAAAAAAAAAAAAAAAAAAAAAAAAAAAAAAAAAAAAAAAAAAAAAAAAAAAAAAAAAAAAAAAAAAAAAAAAAAAAAAAAAAAAAAAAAAAAAAAAAAAAAAAAAAAAAAAAAAAAAAAAAAAAAAAAAAAAAAAAAAAAAAAAAAAAAAAAAAAAAAAAAAAAAAAAAAAAAAAAAAAAAAAAAAAAAAAAAAAAAAAAAAAAAAAAAAAAAAAAAAAAAAAAAAAAAAAAAAAAAAAAAAAAAAAAAAAAAAAAAAAAAAAAAAAAAAAAAAAAAAAAAAAAAAAAAAAAAAAAAAAAAAAAAAAAAAAAAAAAAAAAAAAAAAAAAAAAAAAAAAAAAAAAAAAAAAAAAAAAAAAAAAAAAAAAAAAAAAAAAAAAAAAAAAAAAAAAAAAAAAAAAAAAAAAAAAAAAAAAAAAAAAAAAAAAAAAAAAAAAAAAAAAAAAAAAAAAAAAAAAAAAAAAAAAAAAAAAAAAAAAAAAAAAAAAAAAAAAAAAAAAAAAAAAAAAAAAAAAAAAAAAAAAAAAAAAAAAAAAAAAAAAAAAAAAAAAAAAAAAAAAAAAAAAAAAAAAAAAAAAAAAAAAAAAAAAAAAAAAAAAAAAAAAAAAAAAAAAAAAAAAAAAAAAAAAAAAAAAAAAAAAAAAAAAAAAAAAAAAAAAAAAAAAAAAAAAAAAAAAAAAAAAAAAAAAAAAAAAAAAAAAAAAAAAAAAAAAAAAAAAAAAAAAAAAAAAAAAAAAAAAAAAAAAAAAAAAAAAAAAAAAAAAAAAAAAAAAAAAAAAAAAAAAAAAAAAAAAAAAAAAAAAAAAAAAAAAAAAAAAAAAAAAAAAAAAAAAAAAAAAAAAAAAAAAAAAAAAAAAAAAAAAAAAAAAAAAAAAAAAAAAAAAAAAAAAAAAAAAAAAAAAAAAAAAAAAAAAAAAAAAAAAAAAAAAAAAAAAAAAAAAAAAAAAAAAAAAAAAAAAAAAAAAAAAAAAAAAAAAAAAAAAAAAAAAAAAAAAAAAAAAAAAAAAAAAAAAAAAAAAAAAAAAAAAAAAAAAAAAAAAAAAAAAAAAAAAAAAAAAAAAAAAAAAAAAAAAAAAAAAAAAAAAAAAAAAAAAAAAAAAAAAAAAAAAAAAAAAAAAAAAAAAAAAAAAAAAAAAAAAAAAAAAAAAAAAAAAAAAAAAAAAAAAAAAAAAAAAAAAAAAAAAAAAAAAAAAAAAAAAAAAAAAAAAAAAAAAAAAAAAAAAAAAAAAAAAAAAAAAAAAAAAAAAAAAAAAAAAAAAAAAAAAAAAAAAAAAAAAAAAAAAAAAAAAAAAAAAAAAAAAAAAAAAAAAAAAAAAAAAAAAAAAAAAAAAAAAAAAAAAAAAAAAAAAAAAAAAAAAAAAAAAAAAAAAAAAAAAAAAAAAAAAAAAAAAAAAAAAAAAAAAAAAAAAAAAAAAAAAAAAAAAAAAAAAAAAAAAAAAAAAAAAAAAAAAAAAAAAAAAAAAAAAAAAAAAAAAAAAAAAAAAAAAAAAAAAAAAAAAAAAAAAAAAAAAAAAAAAAAAAAAAAAAAAAAAAAAAAAAAAAAAAAAAAAAAAAAAAAAAAAAAAAAAAAAAAAAAAAAAAAAAAAAAAAAAAAAAAAAAAAAAAAAAAAAAAAAAAAAAAAAAAAAAAAAAAAAAAAAAAAAAAAAAAAAAAAAAAAAAAAAAAAAAAAAAAAAAAAAAAAAAAAAAAAAAAAAAAAAAAAAAAAAAAAAAAAAAAAAAAAAAAAAAAAAAAAAAAAAAAAAAAAAAAAAAAAAAAAAAAAAAAAAAAAAAAAAAAAAAAAAAAAAAAAAAAAAAAAAAAAAAAAAAAAAAAAAAAAAAAAAAAAAAAAAAAAAAAAAAAAAAAAAAAAAAAAAAAAAAAAAAAAAAAAAAAAAAAAAAAAAAAAAAAAAAAAAAAAAAAAAAAAAAAAAAAAAAAAAAAAAAAAAAAAAAAAAAAAAAAAAAAAAAAAAAAAAAAAAAAAAAAAAAAAAAAAAAAAAAAAAAAAAAAAAAAAAAAAAAAAAAAAAAAAAAAAAAAAAAAAAAAAAAAAAAAAAAAAAAAAAAAAAAAAAAAAAAAAAAAAAAAAAAAAAAAAAAAAAAAAAAAAAAAAAAAAAAAAAAAAAAAAAAAAAAAAAAAAAAAAAAAAAAAAAAAAAAAAAAAAAAAAAAAAAAAAAAAAAAAAAAAAAAAAAAAAAAAAAAAAAAAAAAAAAAAAAAAAAAAAAAAAAAAAAAAAAAAAAAAAAAAAAAAAAAAAAAAAAAAAAAAAAAAAAAAAAAAAAAAAAAAAAAAAAAAAAAAAAAAAAAAAAAAAAAAAAAAAAAAAAAAAAAAAAAAAAAAAAAAAAAAAAAAAAAAAAAAAAAAAAAAAAAAAAAAAAAAAAAAAAAAAAAAAAAAAAAAAAAAAAAAAAAAAAAAAAAAAAAAAAAAAAAAAAAAAAAAAAAAAAAAAAAAAAAAAAAAAAAAAAAAAAAAAAAAAAAAAAAAAAAAAAAAAAAAAAAAAAAAAAAAAAAAAAAAAAAAAAAAAAAAAAAAAAAAAAAAAAAAAAAAAAAAAAAAAAAAAAAAAAAAAAAAAAAAAAAAAAAAAAAAAAAAAAAAAAAAAAAAAAAAAAAAAAAAAAAAAAAAAAAAAAAAAAAAAAAAAAAAAAAAAAAAAAAAAAAAAAAAAAAAAAAAAAAAAAAAAAAAAAAAAAAAAAAAAAAAAAAAAAAAAAAAAAAAAAAAAAAAAAAAAAAAAAAAAAAAAAAAAAAAAAAAAAAAAAAAAAAAAAAAAAAAAAAAAAAAAAAAAAAAAAAAAAAAAAAAAAAAAAAAAAAAAAAAAAAAAAAAAAAAAAAAAAAAAAAAAAAAAAAAAAAAAAAAAAAAAAAAAAAAAAAAAAAAAAAAAAAAAAAAAAAAAAAAAAAAAAAAAAAAAAAAAAAAAAAAAAAAAAAAAAAAAAAAAAAAAAAAAAAAAAAAAAAAAAAAAAAAAAAAAAAAAAAAAAAAAAAAAAAAAAAAAAAAAAAAAAAAAAAAAAAAAAAAAAAAAAAAAAAAAAAAAAAAAAAAAAAAAAAAAAAAAAAAAAAAAAAAAAAAAAAAAAAAAAAAAAAAAAAAAAAAAAAAAAAAAAAAAAAAAAAAAAAAAAAAAAAAAAAAAAAAAAAAAAAAAAAAAAAAAAAAAAAAAAAAAAAAAAAAAAAAAAAAAAAAAAAAAAAAAAAAAAAAAAAAAAAAAAAAAAAAAAAA
AAAAAAAAAAAAAAAAAAAAAAAAAAAAAAAAAAAAAAAAAAAAAAAAAAAAAAAAAAAAAAAAAAAAAAAAAAAAAAAAAAAAAAAAAAAAAAAAAAAAAAAAAAAAAAAAAAAAAAAAAAAAAAAAAAAAAAAAAAAAAAAAAAAAAAAAAAAAAAAAAAAAAAAAAAAAAAAAAAAAAAAAAAAAAAAAAAAAAAAAAAAAAAAAAAAAAAAAAAAAAAAAAAAAAAAAAAAAAAAAAAAAAAAAAAAAAAAAAAAAAAAAAAAAAAAAAAAAAAAAAAAAAAAAAAAAAAAAAAAAAAAAAAAAAAAAAAAAAAAAAAAAAAAAAAAAAAAAAAAAAAAAAAAAAAAAAAAAAAAAAAAAAAAAAAAAAAAAAAAAAAAAAAAAAAAAAAAAAAAAAAAAAAAAAAAAAAAAAAAAAAAAAAAAAAAAAAAAAAAAAAAAAAAAAAAAAAAAAAAAAAAAAAAAAAAAAAAAAAAAAAAAAAAAAAAAAAAAAAAAAAAAAAAAAAAAAAAAAAAAAAAAAAAAAAAAAAAAAAAAAAAAAAAAAAAAAAAAAAAAAAAAAAAAAAAAAAAAAAAAAAAAAAAAAAAAAAAAAAAAAAAAAAAAAAAAAAAAAAAAAAAAAAAAAAAAAAAAAAAAAAAAAAAAAAAAAAAAAAAAAAAAAAAAAAAAAAAAAAAAAAAAAAAAAAAAAAAAAAAAAAAAAAAAAAAAAAAAAAAAAAAAAAAAAAAAAAAAAAAAAAAAAAAAAAAAAAAAAAAAAAAAAAAAAAAAAAAAAAAAAAAAAAAAAAAAAAAAAAAAAAAAAAAAAAAAAAAAAAAAAAAAAAAAAAAAAAAAAAAAAAAAAAAAAAAAAAAAAAAAAAAAAAAAAAAAAAAAAAAAAAAAAAAAAAAAAAAAAAAAAAAAAAAAAAAAAAAAAAAAAAAAAAAAAAAAAAAAAAAAAAAAAAAAAAAAAAAAAAAAAAAAAAAAAAAAAAAAAAAAAAAAAAAAAAAAAAAAAAAAAAAAAAAAAAAAAAAAAAAAAAAAAAAAAAAAAAAAAAAAAAAAAAAAAAAAAAAAAAAAAAAAAAAAAAAAAAAAAAAAAAAAAAAAAAAAAAAAAAAAAAAAAAAAAAAAAAAAAAAAAAAAAAAAAAAAAAAAAAAAAAAAAAAAAAAAAAAAAAAAAAAAAAAAAAAAAAAAAAAAAAAAAAAAAAAAAAAAAAAAAAAAAAAAAAAAAAAAAAAAAAAAAAAAAAAAAAAAAAAAAAAAAAAAAAAAAAAAAAAAAAAAAAAAAAAAAAAAAAAAAAAAAAAAAAAAAAAAAAAAAAAAAAAAAAAAAAAAAAAAAAAAAAAAAAAAAAAAAAAAAAAAAAAAAAAAAAAAAAAAAAAAAAAAAAAAAAAAAAAAAAAAAAAAAAAAAAAAAAAAAAAAAAAAAAAAAAAAAAAAAAAAAAAAAAAAAAAAAAAAAAAAAAAAAAAAAAAAAAAAAAAAAAAAAAAAAAAAAAAAAAAAAAAAAAAAAAAAAAAAAAAAAAAAAAAAAAAAAAAAAAAAAAAAAAAAAAAAAAAAAAAAAAAAAAAAAAAAAAAAAAAAAAAAAAAAAAAAAAAAAAAAAAAAAAAAAAAAAAAAAAAAAAAAAAAAAAAAAAAAAAAAAAAAAAAAAAAAAAAAAAAAAAAAAAAAAAAAAAAAAAAAAAAAAAAAAAAAAAAAAAAAAAAAAAAAAAAAAAAAAAAAAAAAAAAAAAAAAAAAAAAAAAAAAAAAAAAAAAAAAAAAAAAAAAAAAAAAAAAAAAAAAAAAAAAAAAAAAAAAAAAAAAAAAAAAAAAAAAAAAAAAAAAAAAAAAAAAAAAAAAAAAAAAAAAAAAAAAAAAAAAAAAAAAAAAAAAAAAAAAAAAAAAAAAAAAAAAAAAAAAAAAAAAAAAAAAAAAAAAAAAAAAAAAAAAAAAAAAAAAAAAAAAAAAAAAAAAAAAAAAAAAAAAAAAAAAAAAAAAAAAAAAAAAAAAAAAAAAAAAAAAAAAAAAAAAAAAAAAAAAAAAAAAAAAAAAAAAAAAAAAAAAAAAAAAAAAAAAAAAAAAAAAAAAAAAAAAAAAAAAAAAAAAAAAAAAAAAAAAAAAAAAAAAAAAAAAAAAAAAAAAAAAAAAAAAAAAAAAAAAAAAAAAAAAAAAAAAAAAAAAAAAAAAAAAAAAAAAAAAAAAAAAAAAAAAAAAAAAAAAAAAAAAAAAAAAAAAAAAAAAAAAAAAAAAAAAAAAAAAAAAAAAAAAAAAAAAAAAAAAAAAAAAAAAAAAAAAAAAAAAAAAAAAAAAAAAAAAAAAAAAAAAAAAAAAAAAAAAAAAAAAAAAAAAAAAAAAAAAAAAAAAAAAAAAAAAAAAAAAAAAAAAAAAAAAAAAAAAAAAAAAAAAAAAAAAAAAAAAAAAAAAAAAAAAAAAAAAAAAAAAAAAAAAAAAAAAAAAAAAAAAAAAAAAAAAAAAAAAAAAAAAAAAAAAAAAAAAAAAAAAAAAAAAAAAAAAAAAAAAAAAAAAAAAAAAAAAAAAAAAAAAAAAAAAAAAAAAAAAAAAAAAAAAAAAAAAAAAAAAAAAAAAAAAAAAAAAAAAAAAAAAAAAAAAAAAAAAAAAAAAAAAAAAAAAAAAAAAAAAAAAAAAAAAAAAAAAAAAAAAAAAAAAAAAAAAAAAAAAAAAAAAAAAAAAAAAAAAAAAAAAAAAAAAAAAAAAAAAAAAAAAAAAAAAAAAAAAAAAAAAAAAAAAAAAAAAAAAAAAAAAAAAAAAAAAAAAAAAAAAAAAAAAAAAAAAAAAAAAAAAAAAAAAAAAAAAAAAAAAAAAAAAAAAAAAAAAAAAAAAAAAAAAAAAAAAAAAAAAAAAAAAAAAAAAAAAAAAAAAAAAAAAAAAAAAAAAAAAAAAAAAAAAAAAAAAAAAAAAAAAAAAAAAAAAAAAAAAAAAAAAAAAAAAAAAAAAAAAAAAAAAAAAAAAAAAAAAAAAAAAAAAAAAAAAAAAAAAAAAAAAAAAAAAAAAAAAAAAAAAAAAAAAAAAAAAAAAAAAAAAAAAAAAAAAAAAAAAAAAAAAAAAAAAAAAAAAAAAAAAAAAAAAAAAAAAAAAAAAAAAAAAAAAAAAAAAAAAAAAAAAAAAAAAAAAAAAAAAAAAAAAAAAAAAAAAAAAAAAAAAAAAAAAAAAAAAAAAAAAAAAAAAAAAAAAAAAAAAAAAAAAAAAAAAAAAAAAAAAAAAAAAAAAAAAAAAAAAAAAAAAAAAAAAAAAAAAAAAAAAAAAAAAAAAAAAAAAAAAAAAAAAAAAAAAAAAAAAAAAAAAAAAAAAAAAAAAAAAAAAAAAAAAAAAAAAAAAAAAAAAAAAAAAAAAAAAAAAAAAAAAAAAAAAAAAAAAAAAAAAAAAAAAAAAAAAAAAAAAAAAAAAAAAAAAAAAAAAAAAAAAAAAAAAAAAAAAAAAAAAAAAAAAAAAAAAAAAAAAAAAAAAAAAAAAAAAAAAAAAAAAAAAAAAAAAAAAAAAAAAAAAAAAAAAAAAAAAAAAAAAAAAAAAAAAAAAAAAAAAAAAAAAAAAAAAAAAAAAAAAAAAAAAAAAAAAAAAAAAAAAAAAAAAAAAAAAAAAAAAAAAAAAAAAAAAAAAAAAAAAAAAAAAAAAAAAAAAAAAAAAAAAAAAAAAAAAAAAAAAAAAAAAAAAAAAAAAAAAAAAAAAAAAAAAAAAAAAAAAAAAAAAAAAAAAAAAAAAAAAAAAAAAAAAAAAAAAAAAAAAAAAAAAAAAAAAAAAAAAAAAAAAAAAAAAAAAAAAAAAAAAAAAAAAAAAAAAAAAAAAAAAAAAAAAAAAAAAAAAAAAAAAAAAAAAAAAAAAAAAAAAAAAAAAAAAAAAAAAAAAAAAAAAAAAAAAAAAAAAAAAAAAAAAAAAAAAAAAAAAAAAAAAAAAAAAAAAAAAAAAAAAAAAAAAAAAAAAAAAAAAAAAAAAAAAAAAAAAAAAAAAAAAAAAAAAAAAAAAAAAAAAAAAAAAAAAAAAAAAAAAAAAAAAAAAAAAAAAAAAAAAAAAAAAAAAAAAAAAAAAAAAAAAAAAAAAAAAAAAAAAAAAAAAAAAAAAAAAAAAAAAAAAAAAAAAAAAAAAAAAAAAAAAAAAAAAAAAAAAAAAAAAAAAAAAAAA
AAAAAAAAAAAAAAAAAAAAAAAAAAAAAAAAAAAAAAAAAAAAAAAAAAAAAAAAAAAAAAAAAAAAAAAAAAAAAAAAAAAAAAAAAAAAAAAAAAAAAAAAAAAAAAAAAAAAAAAAAAAAAAAAAAAAAAAAAAAAAAAAAAAAAAAAAAAAAAAAAAAAAAAAAAAAAAAAAAAAAAAAAAAAAAAAAAAAAAAAAAAAAAAAAAAAAAAAAAAAAAAAAAAAAAAAAAAAAAAAAAAAAAAAAAAAAAAAAAAAAAAAAAAAAAAAAAAAAAAAAAAAAAAAAAAAAAAAAAAAAAAAAAAAAAAAAAAAAAAAAAAAAAAAAAAAAAAAAAAAAAAAAAAAAAAAAAAAAAAAAAAAAAAAAAAAAAAAAAAAAAAAAAAAAAAAAAAAAAAAAAAAAAAAAAAAAAAAAAAAAAAAAAAAAAAAAAAAAAAAAAAAAAAAAAAAAAAAAAAAAAAAAAAAAAAAAAAAAAAAAAAAAAAAAAAAAAAAAAAAAAAAAAAAAAAAAAAAAAAAAAAAAAAAAAAAAAAAAAAAAAAAAAAAAAAAAAAAAAAAAAAAAAAAAAAAAAAAAAAAAAAAAAAAAAAAAAAAAAAAAAAAAAAAAAAAAAAAAAAAAAAAAAAAAAAAAAAAAAAAAAAAAAAAAAAAAAAAAAAAAAAAAAAAAAAAAAAAAAAAAAAAAAAAAAAAAAAAAAAAAAAAAAAAAAAAAAAAAAAAAAAAAAAAAAAAAAAAAAAAAAAAAAAAAAAAAAAAAAAAAAAAAAAAAAAAAAAAAAAAAAAAAAAAAAAAAAAAAAAAAAAAAAAAAAAAAAAAAAAAAAAAAAAAAAAAAAAAAAAAAAAAAAAAAAAAAAAAAAAAAAAAAAAAAAAAAAAAAAAAAAAAAAAAAAAAAAAAAAAAAAAAAAAAAAAAAAAAAAAAAAAAAAAAAAAAAAAAAAAAAAAAAAAAAAAAAAAAAAAAAAAAAAAAAAAAAAAAAAAAAAAAAAAAAAAAAAAAAAAAAAAAAAAAAAAAAAAAAAAAAAAAAAAAAAAAAAAAAAAAAAAAAAAAAAAAAAAAAAAAAAAAAAAAAAAAAAAAAAAAAAAAAAAAAAAAAAAAAAAAAAAAAAAAAAAAAAAAAAAAAAAAAAAAAAAAAAAAAAAAAAAAAAAAAAAAAAAAAAAAAAAAAAAAAAAAAAAAAAAAAAAAAAAAAAAAAAAAAAAAAAAAAAAAAAAAAAAAAAAAAAAAAAAAAAAAAAAAAAAAAAAAAAAAAAAAAAAAAAAAAAAAAAAAAAAAAAAAAAAAAAAAAAAAAAAAAAAAAAAAAAAAAAAAAAAAAAAAAAAAAAAAAAAAAAAAAAAAAAAAAAAAAAAAAAAAAAAAAAAAAAAAAAAAAAAAAAAAAAAAAAAAAAAAAAAAAAAAAAAAAAAAAAAAAAAAAAAAAAAAAAAAAAAAAAAAAAAAAAAAAAAAAAAAAAAAAAAAAAAAAAAAAAAAAAAAAAAAAAAAAAAAAAAAAAAAAAAAAAAAAAAAAAAAAAAAAAAAAAAAAAAAAAAAAAAAAAAAAAAAAAAAAAAAAAAAAAAAAAAAAAAAAAAAAAAAAAAAAAAAAAAAAAAAAAAAAAAAAAAAAAAAAAAAAAAAAAAAAAAAAAAAAAAAAAAAAAAAAAAAAAAAAAAAAAAAAAAAAAAAAAAAAAAAAAAAAAAAAAAAAAAAAAAAAAAAAAAAAAAAAAAAAAAAAAAAAAAAAAAAAAAAAAAAAAAAAAAAAAAAAAAAAAAAAAAAAAAAAAAAAAAAAAAAAAAAAAAAAAAAAAAAAAAAAAAAAAAAAAAAAAAAAAAAAAAAAAAAAAAAAAAAAAAAAAAAAAAAAAAAAAAAAAAAAAAAAAAAAAAAAAAAAAAAAAAAAAAAAAAAAAAAAAAAAAAAAAAAAAAAAAAAAAAAAAAAAAAAAAAAAAAAAAAAAAAAAAAAAAAAAAAAAAAAAAAAAAAAAAAAAAAAAAAAAAAAAAAAAAAAAAAAAAAAAAAAAAAAAAAAAAAAAAAAAAAAAAAAAAAAAAAAAAAAAAAAAAAAAAAAAAAAAAAAAAAAAAAAAAAAAAAAAAAAAAAAAAAAAAAAAAAAAAAAAAAAAAAAAAAAAAAAAAAAAAAAAAAAAAAAAAAAAAAAAAAAAAAAAAAAAAAAAAAAAAAAAAAAAAAAAAAAAAAAAAAAAAAAAAAAAAAAAAAAAAAAAAAAAAAAAAAAAAAAAAAAAAAAAAAAAAAAAAAAAAAAAAAAAAAAAAAAAAAAAAAAAAAAAAAAAAAAAAAAAAAAAAAAAAAAAAAAAAAAAAAAAAAAAAAAAAAAAAAAAAAAAAAAAAAAAAAAAAAAAAAAAAAAAAAAAAAAAAAAAAAAAAAAAAAAAAAAAAAAAAAAAAAAAAAAAAAAAAAAAAAAAAAAAAAAAAAAAAAAAAAAAAAAAAAAAAAAAAAAAAAAAAAAAAAAAAAAAAAAAAAAAAAAAAAAAAAAAAAAAAAAAAAAAAAAAAAAAAAAAAAAAAAAAAAAAAAAAAAAAAAAAAAAAAAAAAAAAAAAAAAAAAAAAAAAAAAAAAAAAAAAAAAAAAAAAAAAAAAAAAAAAAAAAAAAAAAAAAAAAAAAAAAAAAAAAAAAAAAAAAAAAAAAAAAAAAAAAAAAAAAAAAAAAAAAAAAAAAAAAAAAAAAAAAAAAAAAAAAAAAAAAAAAAAAAAAAAAAAAAAAAAAAAAAAAAAAAAAAAAAAAAAAAAAAAAAAAAAAAAAAAAAAAAAAAAAAAAAAAAAAAAAAAAAAAAAAAAAAAAAAAAAAAAAAAAAAAAAAAAAAAAAAAAAAAAAAAAAAAAAAAAAAAAAAAAAAAAAAAAAAAAAAAAAAAAAAAAAAAAAAAAAAAAAAAAAAAAAAAAAAAAAAAAAAAAAAAAAAAAAAAAAAAAAAAAAAAAAAAAAAAAAAAAAAAAAAAAAAAAAAAAAAAAAAAAAAAAAAAAAAAAAAAAAAAAAAAAAAAAAAAAAAAAAAAAAAAAAAAAAAAAAAAAAAAAAAAAAAAAAAAAAAAAAAAAAAAAAAAAAAAAAAAAAAAAAAAAAAAAAAAAAAAAAAAAAAAAAAAAAAAAAAAAAAAAAAAAAAAAAAAAAAAAAAAAAAAAAAAAAAAAAAAAAAAAAAAAAAAAAAAAAAAAAAAAAAAAAAAAAAAAAAAAAAAAAAAAAAAAAAAAAAAAAAAAAAAAAAAAAAAAAAAAAAAAAAAAAAAAAAAAAAAAAAAAAAAAAAAAAAAAAAAAAAAAAAAAAAAAAAAAAAAAAAAAAAAAAAAAAAAAAAAAAAAAAAAAAAAAAAAAAAAAAAAAAAAAAAAAAAAAAAAAAAAAAAAAAAAAAAAAAAAAAAAAAAAAAAAAAAAAAAAAAAAAAAAAAAAAAAAAAAAAAAAAAAAAAAAAAAAAAAAAAAAAAAAAAAAAAAAAAAAAAAAAAAAAAAAAAAAAAAAAAAAAAAAAAAAAAAAAAAAAAAAAAAAAAAAAAAAAAAAAAAAAAAAAAAAAAAAAAAAAAAAAAAAAAAAAAAAAAAAAAAAAAAAAAAAAAAAAAAAAAAAAAAAAAAAAAAAAAAAAAAAAAAAAAAAAAAAAAAAAAAAAAAAAAAAAAAAAAAAAAAAAAAAAAAAAAAAAAAAAAAAAAAAAAAAAAAAAAAAAAAAAAAAAAAAAAAAAAAAAAAAAAAAAAAAAAAAAAAAAAAAAAAAAAAAAAAAAAAAAAAAAAAAAAAAAAAAAAAAAAAAAAAAAAAAAAAAAAAAAAAAAAAAAAAAAAAAAAAAAAAAAAAAAAAAAAAAAAAAAAAAAAAAAAAAAAAAAAAAAAAAAAAAAAAAAAAAAAAAAAAAAAAAAAAAAAAAAAAAAAAAAAAAAAAAAAAAAAAAAAAAAAAAAAAAAAAAAAAAAAAAAAAAAAAAAAAAAAAAAAAAAAAAAAAAAAAAAAAAAAAAAAAAAAAAAAAAAAAAAAAAAAAAAAAAAAAAAAAAAAAAAAAAAAAAAAAAAAAAAAAAAAAAAAAAAAAAAAAAAAAAAAAAAAAAAAAAAAAAAAAAAAAAAAAAAAAAAAAAAAAAAAAAAAAAAAAAAAAAAAAAAAAAAAAAAAAAAAAAAAAAAAAAAAAAAAAAAAAA
AAAAAAAAAAAAAAAAAAAAAAAAAAAAAAAAAAAAAAAAAAAAAAAAAAAAAAAAAAAAAAAAAAAAAAAAAAAAAAAAAAAAAAAAAAAAAAAAAAAAAAAAAAAAAAAAAAAAAAAAAAAAAAAAAAAAAAAAAAAAAAAAAAAAAAAAAAAAAAAAAAAAAAAAAAAAAAAAAAAAAAAAAAAAAAAAAAAAAAAAAAAAAAAAAAAAAAAAAAAAAAAAAAAAAAAAAAAAAAAAAAAAAAAAAAAAAAAAAAAAAAAAAAAAAAAAAAAAAAAAAAAAAAAAAAAAAAAAAAAAAAAAAAAAAAAAAAAAAAAAAAAAAAAAAAAAAAAAAAAAAAAAAAAAAAAAAAAAAAAAAAAAAAAAAAAAAAAAAAAAAAAAAAAAAAAAAAAAAAAAAAAAAAAAAAAAAAAAAAAAAAAAAAAAAAAAAAAAAAAAAAAAAAAAAAAAAAAAAAAAAAAAAAAAAAAAAAAAAAAAAAAAAAAAAAAAAAAAAAAAAAAAAAAAAAAAAAAAAAAAAAAAAAAAAAAAAAAAAAAAAAAAAAAAAAAAAAAAAAAAAAAAAAAAAAAAAAAAAAAAAAAAAAAAAAAAAAAAAAAAAAAAAAAAAAAAAAAAAAAAAAAAAAAAAAAAAAAAAAAAAAAAAAAAAAAAAAAAAAAAAAAAAAAAAAAAAAAAAAAAAAAAAAAAAAAAAAAAAAAAAAAAAAAAAAAAAAAAAAAAAAAAAAAAAAAAAAAAAAAAAAAAAAAAAAAAAAAAAAAAAAAAAAAAAAAAAAAAAAAAAAAAAAAAAAAAAAAAAAAAAAAAAAAAAAAAAAAAAAAAAAAAAAAAAAAAAAAAAAAAAAAAAAAAAAAAAAAAAAAAAAAAAAAAAAAAAAAAAAAAAAAAAAAAAAAAAAAAAAAAAAAAAAAAAAAAAAAAAAAAAAAAAAAAAAAAAAAAAAAAAAAAAAAAAAAAAAAAAAAAAAAAAAAAAAAAAAAAAAAAAAAAAAAAAAAAAAAAAAAAAAAAAAAAAAAAAAAAAAAAAAAAAAAAAAAAAAAAAAAAAAAAAAAAAAAAAAAAAAAAAAAAAAAAAAAAAAAAAAAAAAAAAAAAAAAAAAAAAAAAAAAAAAAAAAAAAAAAAAAAAAAAAAAAAAAAAAAAAAAAAAAAAAAAAAAAAAAAAAAAAAAAAAAAAAAAAAAAAAAAAAAAAAAAAAAAAAAAAAAAAAAAAAAAAAAAAAAAAAAAAAAAAAAAAAAAAAAAAAAAAAAAAAAAAAAAAAAAAAAAAAAAAAAAAAAAAAAAAAAAAAAAAAAAAAAAAAAAAAAAAAAAAAAAAAAAAAAAAAAAAAAAAAAAAAAAAAAAAAAAAAAAAAAAAAAAAAAAAAAAAAAAAAAAAAAAAAAAAAAAAAAAAAAAAAAAAAAAAAAAAAAAAAAAAAAAAAAAAAAAAAAAAAAAAAAAAAAAAAAAAAAAAAAAAAAAAAAAAAAAAAAAAAAAAAAAAAAAAAAAAAAAAAAAAAAAAAAAAAAAAAAAAAAAAAAAAAAAAAAAAAAAAAAAAAAAAAAAAAAAAAAAAAAAAAAAAAAAAAAAAAAAAAAAAAAAAAAAAAAAAAAAAAAAAAAAAAAAAAAAAAAAAAAAAAAAAAAAAAAAAAAAAAAAAAAAAAAAAAAAAAAAAAAAAAAAAAAAAAAAAAAAAAAAAAAAAAAAAAAAAAAAAAAAAAAAAAAAAAAAAAAAAAAAAAAAAAAAAAAAAAAAAAAAAAAAAAAAAAAAAAAAAAAAAAAAAAAAAAAAAAAAAAAAAAAAAAAAAAAAAAAAAAAAAAAAAAAAAAAAAAAAAAAAAAAAAAAAAAAAAAAAAAAAAAAAAAAAAAAAAAAAAAAAAAAAAAAAAAAAAAAAAAAAAAAAAAAAAAAAAAAAAAAAAAAAAAAAAAAAAAAAAAAAAAAAAAAAAAAAAAAAAAAAAAAAAAAAAAAAAAAAAAAAAAAAAAAAAAAAAAAAAAAAAAAAAAAAAAAAAAAAAAAAAAAAAAAAAAAAAAAAAAAAAAAAAAAAAAAAAAAAAAAAAAAAAAAAAAAAAAAAAAAAAAAAAAAAAAAAAAAAAAAAAAAAAAAAAAAAAAAAAAAAAAAAAAAAAAAAAAAAAAAAAAAAAAAAAAAAAAAAAAAAAAAAAAAAAAAAAAAAAAAAAAAAAAAAAAAAAAAAAAAAAAAAAAAAAAAAAAAAAAAAAAAAAAAAAAAAAAAAAAAAAAAAAAAAAAAAAAAAAAAAAAAAAAAAAAAAAAAAAAAAAAAAAAAAAAAAAAAAAAAAAAAAAAAAAAAAAAAAAAAAAAAAAAAAAAAAAAAAAAAAAAAAAAAAAAAAAAAAAAAAAAAAAAAAAAAAAAAAAAAAAAAAAAAAAAAAAAAAAAAAAAAAAAAAAAAAAAAAAAAAAAAAAAAAAAAAAAAAAAAAAAAAAAAAAAAAAAAAAAAAAAAAAAAAAAAAAAAAAAAAAAAAAAAAAAAAAAAAAAAAAAAAAAAAAAAAAAAAAAAAAAAAAAAAAAAAAAAAAAAAAAAAAAAAAAAAAAAAAAAAAAAAAAAAAAAAAAAAAAAAAAAAAAAAAAAAAAAAAAAAAAAAAAAAAAAAAAAAAAAAAAAAAAAAAAAAAAAAAAAAAAAAAAAAAAAAAAAAAAAAAAAAAAAAAAAAAAAAAAAAAAAAAAAAAAAAAAAAAAAAAAAAAAAAAAAAAAAAAAAAAAAAAAAAAAAAAAAAAAAAAAAAAAAAAAAAAAAAAAAAAAAAAAAAAAAAAAAAAAAAAAAAAAAAAAAAAAAAAAAAAAAAAAAAAAAAAAAAAAAAAAAAAAAAAAAAAAAAAAAAAAAAAAAAAAAAAAAAAAAAAAAAAAAAAAAAAAAAAAAAAAAAAAAAAAAAAAAAAAAAAAAAAAAAAAAAAAAAAAAAAAAAAAAAAAAAAAAAAAAAAAAAAAAAAAAAAAAAAAAAAAAAAAAAAAAAAAAAAAAAAAAAAAAAAAAAAAAAAAAAAAAAAAAAAAAAAAAAAAAAAAAAAAAAAAAAAAAAAAAAAAAAAAAAAAAAAAAAAAAAAAAAAAAAAAAAAAAAAAAAAAAAAAAAAAAAAAAAAAAAAAAAAAAAAAAAAAAAAAAAAAAAAAAAAAAAAAAAAAAAAAAAAAAAAAAAAAAAAAAAAAAAAAAAAAAAAAAAAAAAAAAAAAAAAAAAAAAAAAAAAAAAAAAAAAAAAAAAAAAAAAAAAAAAAAAAAAAAAAAAAAAAAAAAAAAAAAAAAAAAAAAAAAAAAAAAAAAAAAAAAAAAAAAAAAAAAAAAAAAAAAAAAAAAAAAAAAAAAAAAAAAAAAAAAAAAAAAAAAAAAAAAAAAAAAAAAAAAAAAAAAAAAAAAAAAAAAAAAAAAAAAAAAAAAAAAAAAAAAAAAAAAAAAAAAAAAAAAAAAAAAAAAAAAAAAAAAAAAAAAAAAAAAAAAAAAAAAAAAAAAAAAAAAAAAAAAAAAAAAAAAAAAAAAAAAAAAAAAAAAAAAAAAAAAAAAAAAAAAAAAAAAAAAAAAAAAAAAAAAAAAAAAAAAAAAAAAAAAAAAAAAAAAAAAAAAAAAAAAAAAAAAAAAAAAAAAAAAAAAAAAAAAAAAAAAAAAAAAAAAAAAAAAAAAAAAAAAAAAAAAAAAAAAAAAAAAAAAAAAAAAAAAAAAAAAAAAAAAAAAAAAAAAAAAAAAAAAAAAAAAAAAAAAAAAAAAAAAAAAAAAAAAAAAAAAAAAAAAAAAAAAAAAAAAAAAAAAAAAAAAAAAAAAAAAAAAAAAAAAAAAAAAAAAAAAAAAAAAAAAAAAAAAAAAAAAAAAAAAAAAAAAAAAAAAAAAAAAAAAAAAAAAAAAAAAAAAAAAAAAAAAAAAAAAAAAAAAAAAAAAAAAAAAAAAAAAAAAAAAAAAAAAAAAAAAAAAAAAAAAAAAAAAAAAAAAAAAAAAAAAAAAAAAAAAAAAAAAAAAAAAAAAAAAAAAAAAAAAAAAAAAAAAAAAAAAAAAAAAAAAAAAAAAAAAAAAAAAAAAAAAAAAAAAAAAAAAAAAAAAAAAAAAAAAAAAAAAAAAAAAAAAAAAAAAAAAAAAAAAAAAAAAAAAAAAAAAAAAAAAAAAAAAAAAAAAAAAAAAAAAAAAAAAA
AAAAAAAAAAAAAAAAAAAAAAAAAAAAAAAAAAAAAAAAAAAAAAAAAAAAAAAAAAAAAAAAAAAAAAAAAAAAAAAAAAAAAAAAAAAAAAAAAAAAAAAAAAAAAAAAAAAAAAAAAAAAAAAAAAAAAAAAAAAAAAAAAAAAAAAAAAAAAAAAAAAAAAAAAAAAAAAAAAAAAAAAAAAAAAAAAAAAAAAAAAAAAAAAAAAAAAAAAAAAAAAAAAAAAAAAAAAAAAAAAAAAAAAAAAAAAAAAAAAAAAAAAAAAAAAAAAAAAAAAAAAAAAAAAAAAAAAAAAAAAAAAAAAAAAAAAAAAAAAAAAAAAAAAAAAAAAAAAAAAAAAAAAAAAAAAAAAAAAAAAAAAAAAAAAAAAAAAAAAAAAAAAAAAAAAAAAAAAAAAAAAAAAAAAAAAAAAAAAAAAAAAAAAAAAAAAAAAAAAAAAAAAAAAAAAAAAAAAAAAAAAAAAAAAAAAAAAAAAAAAAAAAAAAAAAAAAAAAAAAAAAAAAAAAAAAAAAAAAAAAAAAAAAAAAAAAAAAAAAAAAAAAAAAAAAAAAAAAAAAAAAAAAAAAAAAAAAAAAAAAAAAAAAAAAAAAAAAAAAAAAAAAAAAAAAAAAAAAAAAAAAAAAAAAAAAAAAAAAAAAAAAAAAAAAAAAAAAAAAAAAAAAAAAAAAAAAAAAAAAAAAAAAAAAAAAAAAAAAAAAAAAAAAAAAAAAAAAAAAAAAAAAAAAAAAAAAAAAAAAAAAAAAAAAAAAAAAAAAAAAAAAAAAAAAAAAAAAAAAAAAAAAAAAAAAAAAAAAAAAAAAAAAAAAAAAAAAAAAAAAAAAAAAAAAAAAAAAAAAAAAAAAAAAAAAAAAAAAAAAAAAAAAAAAAAAAAAAAAAAAAAAAAAAAAAAAAAAAAAAAAAAAAAAAAAAAAAAAAAAAAAAAAAAAAAAAAAAAAAAAAAAAAAAAAAAAAAAAAAAAAAAAAAAAAAAAAAAAAAAAAAAAAAAAAAAAAAAAAAAAAAAAAAAAAAAAAAAAAAAAAAAAAAAAAAAAAAAAAAAAAAAAAAAAAAAAAAAAAAAAAAAAAAAAAAAAAAAAAAAAAAAAAAAAAAAAAAAAAAAAAAAAAAAAAAAAAAAAAAAAAAAAAAAAAAAAAAAAAAAAAAAAAAAAAAAAAAAAAAAAAAAAAAAAAAAAAAAAAAAAAAAAAAAAAAAAAAAAAAAAAAAAAAAAAAAAAAAAAAAAAAAAAAAAAAAAAAAAAAAAAAAAAAAAAAAAAAAAAAAAAAAAAAAAAAAAAAAAAAAAAAAAAAAAAAAAAAAAAAAAAAAAAAAAAAAAAAAAAAAAAAAAAAAAAAAAAAAAAAAAAAAAAAAAAAAAAAAAAAAAAAAAAAAAAAAAAAAAAAAAAAAAAAAAAAAAAAAAAAAAAAAAAAAAAAAAAAAAAAAAAAAAAAAAAAAAAAAAAAAAAAAAAAAAAAAAAAAAAAAAAAAAAAAAAAAAAAAAAAAAAAAAAAAAAAAAAAAAAAAAAAAAAAAAAAAAAAAAAAAAAAAAAAAAAAAAAAAAAAAAAAAAAAAAAAAAAAAAAAAAAAAAAAAAAAAAAAAAAAAAAAAAAAAAAAAAAAAAAAAAAAAAAAAAAAAAAAAAAAAAAAAAAAAAAAAAAAAAAAAAAAAAAAAAAAAAAAAAAAAAAAAAA and that's the number of posts!

Did you know? Tumblr DOES have a post length limit. Strangely, though, it's based on how many blocks of text you have. Supposedly this implies that you can have any length post so long as it's one block of text? Very strange, will have to investigate further.
#so far at text block number 262 out of 784 this will be it for my first copy pasting session. There have already been several bugs I've seen#editing the first text block has been getting more and more laggy and the Save as draft button will get grayed out. Lost approx 8 blocks of#progress due to that a few times. I am including this in the tags as well there's nowhere for it to go in the post really. Also hitting tag#limit at the same time would be fun. I have reworded these tags so each one so far hits character limit. I want this to be such an odd post#pasting session 2 and I've got to the A wall gonna stop here at 20 blocks of it there are 166 blocks and a partial block of As at the start#and end of it. If you don't want to scroll to see it there are approximately 500000 As at the end of this number. This happens because A is#“0” in base64 and the number has a lotttt of zeros at the end because 26 is 2*13 and 2^big number means there are a lot of 0s at the end in#any base that is a power of 2 and base64 fits that. This is going to be the worst part to double check. I might skip it just check the rest#I am now done. This post is SO LAGGY to edit. That's another good reason for typing this in the tags and not at the end. Somehow using tags#isn't laggy. I don't know how. But I am thankful. I had to redo the end after a draft failed to save. Recounting the As was not so much fun#now that it's over let me talk some more about details for how I did this. My first approach was to use DC. Which is an arbitrary precision#calculator built into linux. And it did work. It did calculate 2^4096000 the only problem is it can't convert to another base quickly which#is bad for these purposes. Because as mentioned base 10 will not work for this. Even worse is DC does not support bases higher than 16 well#so DC was not going to work for this unless I could convert the base 10 text output to base64 easily. I opted not to try doing it this way.#so turns out python can handle arbitrarily large numbers. And is quite easy to code a base64 conversion in. This was the method I went with#it took a few minutes to calculate 26^4096000 and took a few hours to convert that to base64. So now all I need to do (theoretically) is to#split this up into chunks of 4096 and post them one by one. I had already made a script to do this for the base 10 version before realising#I couldn't post that version. I simply ran sed -ri “s:(.{4096}):&\n” file.txt and it (seems to have) worked. Now all that's left is to post#it. As mentioned above I did this in 3 sessions I had this draft open on the left half of my screen. And a text editor (geany) on the right#half. Both of them massively zoomed out to make scrolling through this less painful. I thankfully learned my text editor has a very helpful#shortcut of ctrl+shift+c to copy an entire line of text at once. This obviously sped things up massively. And that's how this post was made#I did check some things by searching through it. And “tumblr” is not within the text anywhere. However tumb is 4 times and post is 5 times.#since I don't think I can upload the text file itself in any nice way if anybody wants any more information about it just tell me and I can#try checking for you. If people really want I may upload this somewhere if I can find a nice place to do so (would pastebin work for this?)#and now to discuss caveats. So first of all this is not the number of possible posts. This is assuming every post uses only a-z and nothing#else. Which is obviously not true (it's why this post was possible) if I was restricted to only 26 characters then this post wouldn't exist#as mentioned at the start. Now other caveats. I believe symbols do not count towards the character limit? I think this because the A blocks#seem to be maxed. As expected. I split them into sections of 4096 characters. But the other blocks seem to not be quite maxed? They are not#full. Which is odd to me. Somebody should test this more. God knows I don't want to. Anyway as for more caveats. Tags polls and the results#images audio etc. Tumblr posts are near infinite. But these tags are not sadly. All are full (140 chars) and this the last (30th) so.. bye!
37K notes
·
View notes
Text
How to have animated rentry graphics with semi-transparency!!
Have you ever had this problem? You find this super pretty clipping mask that you wanna use...

...But when you try to save it as a gif, it suddenly breaks the pretty blurring?

So, let's talk about APNG:
APNG (Animated PNG) is exactly what it sounds like: a png that can be animated, with all the benefits of our beloved png format!! Such as unlimited colours!! Bet you didn't know this could be done!
Actually, you probably didn't know that for a good reason: APNG does not work everywhere. For example, I&'m not using it in this post because the animation won't work on Tumblr. It also doesn't work on old browsers, which you can check here if yours supports it or not:

However, even if the animation doesn't work, it will show the first frame as a still image!! So even those on older devices will still get to enjoy the graphic!!! (unless like... you want to do a fade-into-existence animation where the first frame will have nothing... but those are uncommon anyway)
But for this post, what's important is where it DOES work, and that is image hosting websites like imgur or catbox. And so, by extension, it will also work on Rentry + its forks!!
So how does one actually make an APNG?
Ezgif:
Note: DO NOT CONVERT GIFS TO APNG! It's useless because the gif file does not store any information about transparency, has less colours/lower quality, and you'll be needlessly removing backwards compatibility.
Go to APNG Maker and upload your frames individually. Check "don't stack frames" and make your APNG.

Photopea:
Works normally same as if you would save a gif. File -> Export as -> PNG. (You do need to have the frames layers in a folder same as you would for a gif)

Photoshop and Ibis Paint:
Unfortunately, Photoshop and Ibis do not let you just export as an APNG like that. You'll have to save each frame individually and then import them into Ezgif or Photopea.

As you can see, it's that simple! If you'd like, you can see a rentry template I& made using this the example APNG I& was showing throughout the tutorial here. I& was not able to find who made the overlay mask in the first place but a frame version of the cherry blossoms there did show up on adobe stock when I& tried to reverse search it so all they did was fill in a circle in the middle anyway.
Lastly, I& wanted to address one more question:
Why not use WEBP and/or AVIF instead? They offer the same benefits!
Well for one, fuck Google and fuck WEBP all my& homies hate WEBP. But for two, APNG has the benefit of backward compatibility: it's older (supported by more browser versions) and if the animation doesn't work, it still shows the first frame of it. WEBP and AVIF, on the other hand, don't show up at all/show alt text.
That's all, happy APNGing!
#rentry#rentry graphics#editblr#rentry tutorial#tutorial#edit tutorial#graphics#pfp masks#clipping mask#apng
199 notes
·
View notes
Text
Digital Stamp Making Tutorial
Hello, and welcome to the long-awaited(at least on my part) digital stamp-making tutorial from neosprites! I’d like to preface that I learned what I was doing from this tutorial so it may be a bit redundant, but if anything I get a bit more specific. Thank you so much to @graphic--horde for your work, it changed me as a graphic maker. This is gunna be a long post so feel free to bookmark it for later. Now, onto the show!

The frame I will be using for this tutorial (which is the frame I use on 99.9% of my stamps) I found from the above linked post, which I believe is from a creator that OP lost track of. Its inner dimensions are 94x50 pixels and its outer dimensions are 99x56 pixels. Here it is!

Find your material! - I recommend using websites like Tumblr and searching with the “GIF” filter only on, or alternatives such as Giphy or Tenor. Your browser may let you directly save the .gif file; if not and you are noticing it restricts you to save it as a .webp file you can try an extension like “Save webp as PNG or JPEG” (for Firefox but I image other browsers have similar functions, but I really recommend you switch to Firefox). To use this you will right click on your source .gif like normal but instead of clicking on “Save image as…” click “Save webP as…” and then click “GIF”. You should be redirected to the website ezgif.com where we will actually be doing all of our editing! Here’s the .gif we’ll be working with.

Convert to GIF (optional) - if you used the extension from the above step you should already be ready to click the blue “Convert to GIF” button. If not, go ahead and open ezgif.com and click on “webP” and then “WebP to GIF”; then convert to a gif with the blue button.

Resize the GIF - now that we have a gif ready to edit, let’s make it the right size. The easiest method I have found is to change it directly to the frame’s inner dimensions, 94x50 pixels. [EDIT: Make sure in the aspect ratio drop drop menu you select "stretch to fit" and not "center and crop to fit" like I did in the photo example.] Click “resize” and then type [94] in for the width and [50] for the height. Next press the blue “resize image” button.


Add the frame - next click “overlay” then click the thin blue button that says “Extend canvas size(use if overlay exceeds GIF sizes)”. This will give us some extra room to add the frame onto the design. Next click “Browse…” and find the frame you have saved onto your device, then click the blue “Upload image” button.


After that it’s going to be misaligned, that’s normal! It will say you have the option to drag it into place, but don’t bother. That’s one of the reasons my old stamps look wack, it’s just harder to do. Instead type [44] in for the Left box and [22] in for the Right box. It took me a while to figure out these dimensions to be honest, and I’ve only tested it with this frame so I don't know if it works with others. Then click the blue “Generate image” button.


Crop the transparent edges - click on “crop”. You will have the option to check a box that says “trim transparent pixels around the image” however, I don’t recommend this as it tends to crop a few of the frame’s pixels with it sometimes. Next, set the Left position to [44] and the Right position to [22]. For the other dimensions we will use the outer dimensions of the frame which are 99x56 pixels, this will trim everything except the tiny spaces in between the stamp frame’s spikes. Type the width as [99] and the height as [56] and click the tiny blue button that says “set”. After that click the blue “Crop image” button.


Save and use! - all that's left is to click “save” and upload the graphic to your liking. (best seen on dark mode obviously)

If you’d like to tag me in stamps you’ve made using my tutorial I would love to see them, but it’s not required!! Make sure to always give credit for pictures/gifs when you can and try not to make stuff out of personal/fan art. Thank you to the person in my inbox who requested this tutorial, I had been meaning to for a while but it was just the kick I needed. :)
#carrd graphics#carrd resources#carrd stuff#rentry graphics#rentry resources#rentry decor#rentry pixels#rentry stuff#rentry inspo#deviantart#neocities#mine#my graphics#my tutorials#resources#tutorials#tutorial#how to#stamps#blinkies#graphics#web graphic#old internet#early internet#spacehey#da stamps#page decor#custom#old web#frames
130 notes
·
View notes
Text
Friday, September 8th, 2023
🌟 New
We’ve rolled out dashboard tab configuration options to everyone. We’re still working on adding the ability to change the default tab between Following and For You. Also, if you were in the experiment and had enabled certain tabs, like Popular Reblogs and Blog Subs, please note that those settings have moved back to the Tumblr Labs settings, instead of being configurable options in the new config screen.
We’ve deployed some performance and stability improvements for browsing feeds through the site, including the ability to truly handle endless scrolling. If you disabled endless scrolling in your dashboard preferences on web because it was laggy, give it another try! If you disabled it because you like paged browsing better, keep on keeping on! You’ll still benefit from these improvements.
We’re working on improving search across Tumblr, and one of our latest experiments is to try surfacing posts in search results based on image recognition. If you search for something on Tumblr and it returns a bunch of images that aren’t actually related to what you searched for, and have no other text or tags to indicate why you’re seeing it, please send us some feedback via Support about it, providing the search term you used and what posts didn’t make sense.
In the post editor on web, you can now choose to convert a link block down to an inline text link if you’d like, via the meatball menu on the link block that’s generated when you paste a link.
We’re shortening the ask button label maximum length to 26 characters, and providing better error messages when exceeding that limit.
Replies/reblogs/likes from blogs that have blocked the author, or the author has blocked, will no longer appear in the notes view on your posts for anyone.
We’re now filtering asks and submissions from blogs that have blocked the receiver.
🛠 Fixed
We fixed an issue on the Following and For You tabs that was sometimes causing it to take 10+ seconds to load subsequent pages as you scroll.
In the post editor on web, we’ve fixed a variety of issues with copying and pasting and selecting text.
Clicking to like a post while logged out, and then logging in, now brings you back to the post, instead of bringing you to Explore.
When uploading media in the post editor on the web, the “Post” button stays disabled until the media finishes uploading.
Removing a reblog or reply from the notes on your post removes the associated activity item as well.
Folks can no longer mention blogs that they’ve blocked or are blocked by — this was already covered in most circumstances, but we’ve fixed a few rare cases that have popped up where people have gotten around it.
🚧 Ongoing
Nothing to report here today.
🌱 Upcoming
Nothing to report here today.
Experiencing an issue? File a Support Request and we’ll get back to you as soon as we can!
Want to share your feedback about something? Check out our Work in Progress blog and start a discussion with the community.
685 notes
·
View notes
Text
Hello 👋🏽
I’ve completed uploading episodes 1-4 of “are you sure” 🥳It goes without saying, but this is a Taekook focused blog so all of these posts, just like all my other posts, highlight Taekook and their bond (or in some instances, my posts archive important pieces of information so others can’t distort facts).
I wanted to upload episode 3 as one post, and episode 4 as one post, but Tumblr wouldn’t let that happen due to their sizes. When I shrank photos to make each episode one post, text and images became blurred and my OCD couldn’t stand it. I hate that they each have 2 posts, but I preferred it to the alternative of unreadable pieces.
I’m not sure if I’ve ever gone in depth about the uploading process? It’s quite an undertaking for long pieces. I first draft the posts in Google docs. This can take days as I rewatch things, chat with friends and gather what people have noticed from my timeline. One episode can take 3-4 hours to watch, as I draft as I go and then go back through and fill in further, then tighten it all up.
After this, I upload the draft into Word Press. It’s not straightforward anymore. When I copy and paste the draft into WP, only the text follows. I have to then go back to Google docs and copy / paste the pictures one by one, and then add the timestamps and hyperlinks under these pictures.
Once that’s done, I convert the post into HTML code. I can’t simply hit “select all.” I have to drag my finger down the entire post and carefully hit copy, or else I erase the whole post (which has happened). I then copy / paste the HTML code into my email and email it to myself.
From there, I copy / paste the code and upload it into Tumblr. Tumblr won’t let me post more than 30 photos a post now, sadly, which means splitting posts up. I have to read the HTML code and decide where to break things up.
I upload the post, then reblog it to its respective year, so you can read the post in the “main” timeline, but also in chronological order in the year it happened. When it’s reblogged to its year of occurrence, I have to scroll to events that happened around that date to determine what backdate to make that piece, so it lands in the correct spot of the timeline.
Uploading these posts took me all morning. Factoring in drafting, I spent at least 2-2.5 days on these episodes.
I’m not sure why I felt like sharing that today, except that I wanted to really take a moment and sincerely thank anyone who stops by to read my blog and let you know it’s so appreciated. Even if no one read this blog, I archive Taekook’s moments as one way of supporting them. I really enjoy preserving their moments - we have so many! - and looking back fondly.
So I’d do it no matter if no one read this, but knowing people do read this blog and treasure it as much as I do means so much to me. I’m thankful for the friendships formed, the people I’ve been able to talk to and some I’ve been fortunate to meet in real life, and it’s all thanks to this blog.
Not only that, my anxiety gets the best of me. I greatly admire those who tweet on Twitter, or post on Instagram, without giving much thought. I can’t do it. I wish I could. I will sit on posts, get anxious, bail out of posting, or post then mute because I’m so tense. I’m not sure why that is. Sometimes I wish my accounts were smaller so I could maybe feel more comfortable freely speaking my mind. But I also think I’d be anxious no matter what because social media is so toxic and dark and my energy can’t stand it. It doesn’t help I’m still trying to figure out my medical mysteries, and that’s been such a drain on my energy. I can’t find it in me to do much more than lurk on Twitter and IG right now.
Here on tumblr, I feel like I’m in my little safe space. It’s quiet here, I post my pieces and show my support, and my support is measured in a more meaningful way for who I am as a person (in addition to streaming, buying their merch etc). I really am so grateful for this space. We all support in our ways and though I wish I was bolder on TW and IG, I appreciate those who are and I also appreciate that we are all here to equally love and support Tae and Jk. That’s what matters.
So if you’re reading this, I want to thank you from the bottom of my heart for being here and reading this blog💜💚
76 notes
·
View notes
Note
Hi! I don't know if you already have a tutorial but would you mind sharing your gif making process? Thank you!
hiiii anon!
thank you for sending this in :) it's my first time getting a tutorial request hehe i tried to explain each step i do as best as i can.
i'll put the gif making process and tutorial under the cut bc it's image + text heavy
before starting, i'd just like to share what i use in creating gifs:
i'm on mac (i used to do them on windows... the ps steps are the same if you're using one)
i'm currently using photoshop 2022
i use 9xbuddy or video downloadhelper extension on firefox mainly for downloading videos
best quality to download for hq gifs is ideally 1080p and above. (although you can get away with 720p for smaller gif sizes)
i use mplayer-osx extended to get the screencaps/frames for my gifs (if i'm not doing the import option in photoshop)
for this tutorial, i'm using the latam highlights video from louis' ig reels to make today's gif. on to the tutorial / process!
please click the screenshots i've included below and zoom in on the texts on them to see them clearly (apologies for the quality!)
IMPORT YOUR FRAMES. once you've downloaded your video, open photoshop and click FILE > IMPORT > VIDEO FRAMES TO LAYERS
SELECT THE PART YOU WANT TO GIF. the shorter, the better because you want to keep it crisp and keep the file under 10mb when you save it after all the layers. here are the settings i use:

toggle the smaller arrows under the bar to select the parts you want to gif. once you have your frames loaded, it should show you a timeline table at the bottom and their corresponding layers on the right side. (if you can't see the timeline, go to WINDOW > click TIMELINE)
3. DELETE EXTRA LAYERS, CROP PARTS YOU WANT TO FOCUS ON, AND RESIZE.

after cropping the parts of the gifs, resize them according to the tumblr sizing to prevent your gifs from looking blurry once you upload them. you can use this size guide for your reference :) the gif's height can be any size as far as i know. go to IMAGE > IMAGE SIZE > INPUT THE SIZE. for this gif, we'll do 540 x 540
4. CHANGE GIF SPEED and CONVERT TO SMART OBJECT

once you've selected all frames

set the delay to 0.07. this is usually the natural, normal speed for gifs on here. it depends on the number of frames you have but i usually do .07 or .05 (sometimes .08 haha)
with all your timeline frames still selected, then select all the layers on the right side. go to SELECT > ALL LAYERS
then convert them to smart object so we can edit all the layers all at once. go to LAYER > SMART OBJECTS > CONVERT TO SMART OBJECT
5. SHARPEN (one of my fave parts!)
this is the basic one that most users use:
STEP 1: go to FILTER > SHARPEN > SMART SHARPEN

radius usually goes from 0.3-0.4
STEP 2: Repeat STEP 1, but this time change the settings to:

you can stop here but i like my gifs crispier and to have more texture! i use the sharpening settings from this tutorial or these sharpening action packs from user brainwasheds. i highly recommend these! i mix and match the settings when i'm not happy with how they look on my gifs. but for this gif we'll use the sharpening settings from this tutorial.
in addition to the settings from that tutorial, i also added FILTER > OTHER > HIGH PASS at 3.4 radius, then set the opacity to 60-80
then lastly add FILTER > ADD NOISE > NOISE at gaussian setting with 1.5 amount, then set opacity to 20-30
6. BRIGHTENING, COLORING, BALANCING, ADDING TEXTURE
now for the fun part!
STEP 1: BRIGHTEN UP THE GIF this is my go-to way to increase the brightness. go to LAYER > NEW ADJUSTMENT LAYER > BRIGHTNESS / CONTRAST then change its blending mode from NORMAL to SCREEN


you now have a very bright, highly saturated gif but we'll fix that lol
STEP 2: ADD CONTRAST BY FIXING THE BLACKS AND WHITES add a new adjustment layer > LEVELS

i usually play around with these. middle and black arrows add shadows and contrast while the white arrows add highlights/brightness to the gifs.

these are my settings! these are not definite bc it varies depending on what you're working on, so adjust them accordingly. next, add another adjustment layer > CURVES

i usually zoom in to locate the darkest / black area using the black dropper. then once that's done, do the same and locate the brightest/white area. this adds further contrast to your gif that wasn't done in the previous step.
STEP 3: COLORING (my fave part!!!) add a new adjustment layer > SELECTIVE COLOR this is the part where i like to neutralize the skin color when it gets too yellow or red, make the colors pop, and sometimes change them too. louis' skin was looking too red heavy, so i wanted to reduce that! i start with balancing out the skin color with REDS & YELLOWS.

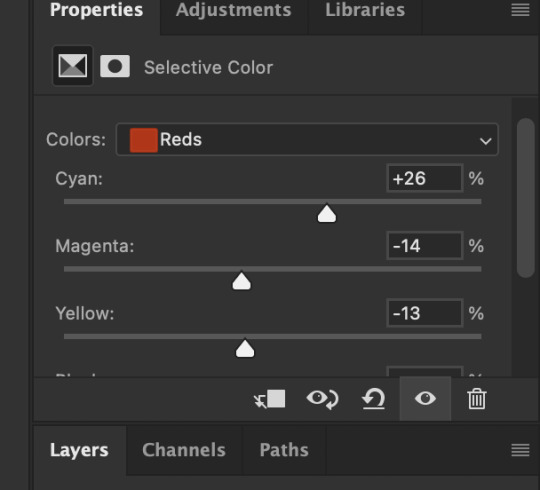

these are my settings for this gif! adjust them and observe the changes it makes on the person's skin. if you know color theory, it's helpful to see how it affects the colors on your gifs. putting the arrows more on the left side, adds more 'cool' tones, whilst putting the arrows to the right side, adds more 'warm' tones.
i like to deepen the blacks on my gifs further so, go to selective color's BLACKS and on the black scale, add more to the right! for this one, i added +10
add a new SELECTIVE COLOR adjustment layer. for this one, we'll make the surrounding colors pop more!


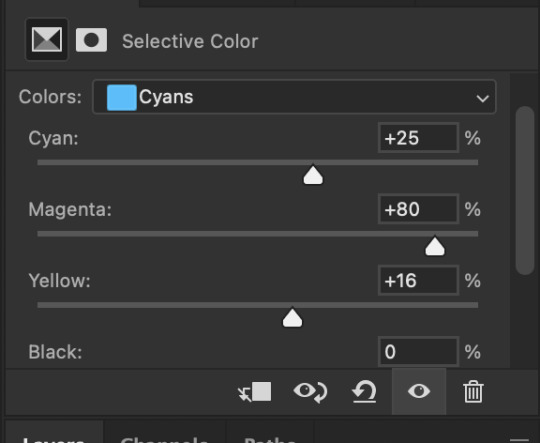

for these settings, i made the leaves more vivid while the teal(?) wall, i adjusted them made it more blue.
next, add a new adjustment layer > COLOR BALANCE this is where you can make further adjustments on the overall colors of your gif. you can also change the color tone of your gifs here if you want to make it more 'cool' tone or 'warm' tone looking.


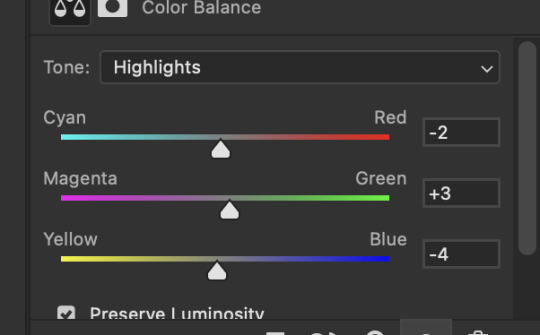
earlier's color theory applies here as well!
6.5. OPTIONAL STEP: ADD TEXTURE/OVERLAYS after the last step, you can save your gif as is but again, i like adding textures to my gifs so we'll add one. i use the textures/overlays that i got from here :)
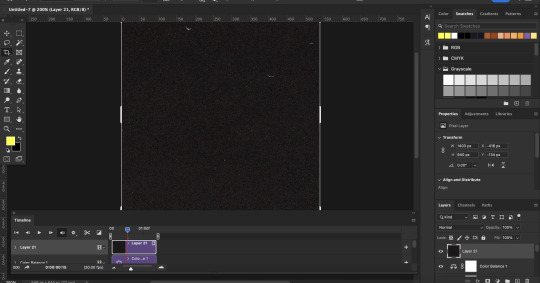
i like to use film, grainy textures! add the texture you want on top of all the layers.

then change the blending mode to LIGHTEN or SCREEN. adjust the opacity to 20-40%. for this gif i used screen with 40%.
7. EXPORT AND SAVE YOUR GIF time to save your gif! click FILE > EXPORT > SAVE FOR WEB

this is my default setting for my gifs. i also tick the interlaced option sometimes.
here's the finished gif:
there you go anon! :) if you have any more questions, just lmk or you can directly dm me off-anon if you want.
i also get inspo, guides, and other tutorials over at @usergif
77 notes
·
View notes
Text
➲ how to make a gif tut ! ✼


♡ hii this is a tutorial on how to make two types of flash gifs! the first gif will be a flash gif with a png overlay and video effects. the second flash gif is a sort of stop-motion-like gif made from multiple images.
this was for an ask in my inbox, but i accidently deleted it cuz tumblr was being weird.. anyways hope this helps anyone who's curious!


⤷ flash gif w/ png overlay + video effects
⋯ to make this type of gif i use capcut and a website called ezgif.com.
first, start a new project on capcut and select all the pictures you want to use in the gif (except the png) and click add.


⋯ once the pics are loaded in, adjust the duration of the photos to your liking (i do 0.6 but you can adjust to your preference). changing the duration of the pictures will determine how fast the pictures in the gif will pop up and how long the gif is.
i screenrecorded my process in capcut since it's kinda hard to explain with screenshots so feel free to replay certain parts you were stuck on!
⋯ after changing the duration of pics, overlay the png and then apply an animation to the png overlay (not required!). i like to apply a fade in and fade out animation on the png so it can appear and disappear in the gif smoother. then add video effects and adjust the settings to your preference. i mostly use video effect called iridescent for sparkles (you can use whichever effects u prefer tho!)
once you're satisfied with how it looks, export the gif to save it on your device. then go to ezgif.com and the tab that says video to gif.


⋯ upload the video you just saved from capcut onto ezgif then scroll down and convert to gif. you should then get your outputted gif and save to your device!

⋯ one of the cons i don't like about ezgif tho is that it greys out the colors of video to gifs.. if you know how to recolorize gifs or a different gif convertor website you can use that instead (pls tell me).

⤷ regular stop-motion flash gif
⋯ for this gif you only need to use ezgif.com. this is mainly for gifs where the images are moving without transitions and no effects. (png overlays are made beforehand and saved in different photos) luckily the colors don't change for this type of gif!
first you want to go to the gif maker tab then click switch to manually ordered upload. after that, upload all the images you want in your gif.


⋯ then change the delay time for all images to adjust how fast the gif will play. the larger the number, the slower the gif. i personally like to make the delay time 35 but it's not necessary for you to change the auto delay time of 20.


⋯ after changing the delay time, click make a gif! your outputted gif should load below and then save to device.
hopefully this was easy to understand 😓 comment or feel free to dm any questions if you're confused or need help! this is just a base tut for making gifs in mbs, you can change anything to your own preferences !
36 notes
·
View notes
Photo

EKG Leads
I’ve gotten a few requests to make ekgs/ecgs for infants! (I’m not sure how accurate these are, I used a few reference images on google so I apologize if you’re in the medical field and you’re scratching your head at the placement and colors lol)
i-e
one swatch
bgc
disabled for random
slider enabled
facepaint category
📁DOWNLOAD | FREE
curseforge | youtube | tumblr | patreon
Terms Of Use:
link back to original post if you recolor/convert
do not upload to sites such as simsdom or thesimsresource
do not put my content behind adfly
do not recolor/edit/convert and upload until my content is publicly released
#ts4cc#sims 4 cc#sims4cc#s4cc#ts4#infants cc#ts4 infant#ts4 infants cc#ts4 cc#sims 4 medical#ts4 medical#sims 4#the sims 4#mycc
464 notes
·
View notes
Note
How are you able to post so many images at once?
When I try it keeps telling me there's an issue and to try again. I've tried lowering the quality of the images I post and converting them to JPEG but nothing works :(
Are you by chance uploading from the app? I’ve heard that sometimes the app will mess up A LOT when it comes to posting a lot of images. (I’ve had so many images lost to the abyss because of it) I’ve tried looking up some solutions online but nothing really helped. It could be possible the images are too large. If you have access to a PC that could solve the problem.
I’m sorry I can’t really provide a solution :( Tumblr sucks sometimes but if anyone had this same problem and fixed it, feel free to share.
40 notes
·
View notes
Text


Welcome to family Cotididae, one so large I literally had to save it as a PDF (to preserve quality) cut in half, convert it back into a PNG because Tumblr doesn't support PDFs, and then upload it. Hope you enjoy, more info under the cut.
The issue with this one was genus Spectaculum. I made this genus because they mainly focus on roleplaying instead of their "gimmick" however, the genus on the far right, Moderatus, seems to be trending towards that direction as well. We'll see. If you think your blog deserves a reclassification, hit my line.
Sidebar: Tumblr (apparently) has either a file size limit, or a image size limit. That's why I had to cut it in half.
325 notes
·
View notes
Text

hi everyone! I've gotten several requests to make a tutorial on how to make gifs for someone just starting out and I finally got around to slapping a tutorial together.
This tutorial will cover:
software recommendations
choosing what to gif
creating a gif step by step with probably a lot of unnecessary detail
some tips and tricks:)
(This particular tutorial will not cover how to find tv and movies to download and gif, or any specific instructions on coloring. only the basic gif making process.)
so for the purposes of this tutorial, we will be using Adobe Photoshop, which is the most common program for making gifs, and the one I recommend. the version you have doesn't make a major difference in terms of capabilities but the interface may be slightly different looking if you have an older version or a different type of device. you cannot make or edit gifs in any mobile version of the photoshop application. Optionally, we will also be using Adobe Premiere Rush/Pro or another video editing software of your choice. wherever you are downloading Photoshop, whether from Adobe or a third party, you should easily be able to acquire Premiere as well. I am aiming to be as detailed as possible in this tutorial, so it may sound more time consuming than it really is. once you get the hang of things, it goes fast. the most time consuming part by far is the editing and coloring. in my opinion, one thing that majorly saves time while giffing is knowing your keyboard shortcuts and using your mouse/trackpad as little as possible. I will be going over these in this tutorial as well.
before we begin, some general tips:
gifs of single shots that do not cut between angles or subjects generally will look the best, barring exceptions
for a single gif set, choosing scenes and shots with similar lighting will be easiest to get to look uniform when compiled together, since editing wildly different looking scenes to have similar coloring and lighting is hard and takes some practice!
avoid shots that will require you to majorly crop or zoom to properly frame the subject, as this will greatly diminish quality
speaking of quality, gifs will look best using 1080p video, but you can get away with 720p as well. I would not recommend giffing with anything lower resolution than that
Tumblr's upload capacity for image and gif files is 10mb. be sure when exporting your finished gif that it is under that size. if it is a bit over, you can try trimming a few frames off your gif in the video timeline.
if you get frustrated, don't give up! giffing is hard and complicated especially if you are new to photoshop. I tried to make this tutorial as detailed as possible so it's easy to understand (although im sure I still forgot some stuff)
ok onto the tutorial!!!
STEP ONE: choose what range of frames you want to gif, and how.
once you have decided what you want to gif, there are two main way to convert your episode into a range of frames to make into a gif. the first is by screencapping. this involves downloading a program like mplayer or vlc which can be used to convert video files into "stacks" of screencaps, which can then be separated into whatever range of frames you want and imported into photoshop. this is seemingly by far the most common method I have seen amongst gifmakers*, but personally I don't care for it and I think it's more confusing and time consuming overall, so I will be explaining the second method: importing video frames to layers.
now, normally what this would mean is opening the full episode in photoshop and using the pathetic little playheads on either end of the scrub bar to trim the file into a clip. this is where your video editing software comes into play.
open whatever episode or movie you want to gif in your program. if it is a large file like a long movie in 1080p, this may take a few seconds. like I said, I am using Premiere Rush. I will be using a random episode of 9-1-1 for my example gif.
in your media browser, hover over whichever episode you want (you can also just add the whole episode to your project and scrub through, but that can take longer unless you know what time stamp you're after). click the fullscreen button by the bottom righthand corner.

now you can scrub through and trim the episode before you even import it to premiere. this makes trimming your clip even easier.
use the trim bar (yellow outlines) to trim as close as you can around the scene you want to gif.

then click this plus, and then "add" below. this will add the clip to your project.
now, move the blue playhead up to the frame you want your gif to start on. then, use the scissors button off to the left to slice the clip. select the portion before the playhead, and delete it.
now move the playhead to where you want the gif to stop. a good length for most gifs is around 1.5-2 seconds in my opinion. some may be shorter depending on how long the shot is, or longer if you plan on making them smaller (remember, the uploading capacity on Tumblr is 10mb per file.) trim again, now delete the portion after the playhead. you can also use the left and right arrows beside the play button to move frame by frame, and you can adjust the side of the horizontal scroll bar below your clip to “zoom” in on it and make scrubbing easier.
once you have your clip, go up to where it says "share". your clip will be rendered, and then you can click export to save it.
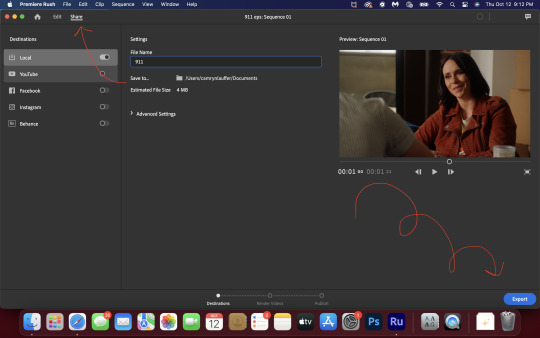
repeat step one as many times as you want for each gif. I know this may sound complicated, but like I said above once you get in the rhythm this step takes only a few seconds.
STEP TWO: create your gif!
close premiere. open photoshop. head to the control bar at the top. select file > import > import video frames to layers.
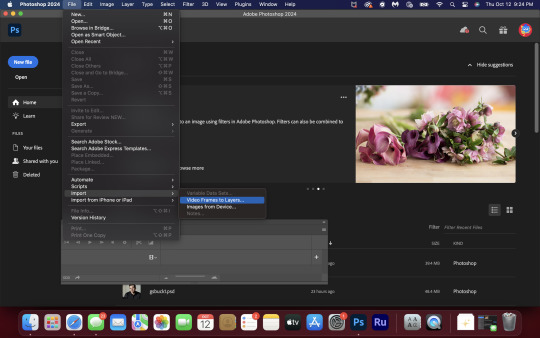
navigate to whatever folder you exported your clip to. select it, and hit enter. a second popup will appear asking you to select your range of frames. since you have already trimmed your clip to your liking, simply hit enter a second time.
now your screen looks like this, and we are going to crop and resize our gif! (troubleshooting: if you do not see the timeline bar at the bottom, select window from the control bar, scroll down, and make sure timeline is selected as part of your workspace. Adjustments and layers should be there automatically but if not add them too).

Tumblr posts are 540px wide, so in order to make my gifs as small as possible while maintaining quality, I typically crop my gifs to be around 550-600px wide, with varying heights depending on what shape I want the gif to be. experiment with this a little and decide what works for you. just don't make the width lower than 540px. once you have the portion of the frame you want inside the cropping grid, hit enter again. sometimes you have to hit it twice.
here are the measurements I am using for this gif

now in your timeline, select frame 1. hold down the shift key and scroll to the end to select the very last frame, thereby highlighting them all. from here we will edit our frame delay rate. photoshop will automatically set it to .03s, which will make your finished gif awkwardly fast. I typically use .05s, or .06s if I want a gif to be subtly slower (this comes in handy if the shot you are trying to gif is very short). anything longer than .06s will look weird though. choose "other" from this menu and type in your delay rate. make sure not to miss the zero after the decimal.
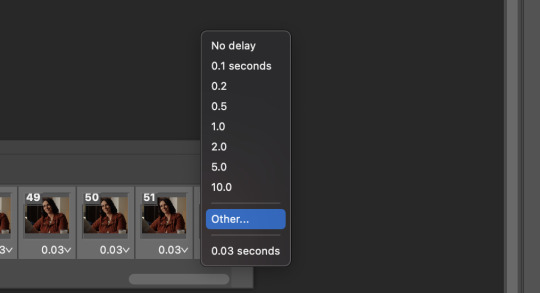
once you've set your frame rate, go to the other end of your timeline and click here to convert your frames into a video timeline.

then press option + command + A (on Mac) or windows + alt + A (on PC) to select all layers. then right click (control + click with a trackpad) on any one of the highlighted layers in your layers tab off to the right. scroll down in the popup menu and select Convert to Smart Object.
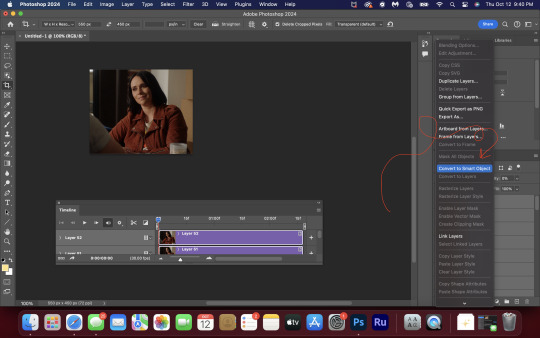
THAT'S IT!! CONGRATULATIONS!!!!! WE HAVE GIF!!!
from here comes the fun part!! you will begin adding action filters like sharpening as well as adjustment layers to color and edit your gif. experiment with different adjustments and styles until you find something you like. too many adjustment layers will up the size of the finished gif though, so I tend to keep mine to 3-4 layers max unless its a really hard to color scene. if anyone is interested in a separate coloring tutorial, please let me know!
once you are finished editing your gif, click file > export > save for web (legacy) OR hit shift + option + command + S. play your gif in the export window to make sure it looks okay, and then hit save!
I hope you guys find this helpful and informative! please hit up my in box if you have any questions or if anything doesn't make sense. happy giffing!!!
*one reason people seem to prefer screencapping to this method, is saving all the individual clips as video files does take up a lot of space on your scratch drive, which in turn can cause your computer to work slowly or crash programs. this can be rectified by making sure to delete the clips from your computer once you are done making the gifs. another space hoarder to look out for is the proxy files of your episodes that will be automatically saved to your hard drive whenever you add an episode to your project in Premiere. Periodically, go through your storage and delete all the .proxy video files. this will not delete the original episode files, only the proxy files created by Premiere.
tagging some mutuals to sb hehe: @shitouttabuck @lover-of-mine @honestlydarkprincess @eddiediaaz @compactdiscmp3 @eddiebabygirldiaz @bigfootsmom @callaplums @athenagranted @firemedicdiaz @sibylsleaves @loserdiaz @buck2eddie @diazass @eddiediaztho @giddyupbuck @monsterrae1 @icecreampotluck @sunflowerdiaiz @swiftfootedachilles @singlethread @aziraaphales @911onabc
136 notes
·
View notes
Text

a very foking detailed GIF tutorial you asked for and how I color my gifs
However, I color them individually, so there will be explanation of tools I choose instead of showing what settings I used for this specific gif in this tutorial.
I will go through entire process of how I create gifs, the process of gifmaking can be different for others and there is no obligation of how to create a gif. Basically, do it however you like and enjoy the process.
this is part I, part II is here\in reblogs.
First, you will need to prepare everything, you choose the moment you want to gif and make screencaps. I use mpv player to create them, here is a great tutorial on how to install it. So I won't go over it, just follow it and or use another player which allows to make screencaps, such as kmplayer.
Once you make screencaps go to photoshop - file - scripts - load files into stack - browse - select screencaps and upload them.
At this point I will also add that I use keyboard shortcuts a lot, you can set them up to your preference, that is much easier for me and might be for you too, and I am so used to them that I forget where are some settings. You can do it from edit - keyboard shortcuts, you may set up anything there.
You will have all screencaps uploaded into one file. Once I have it I change canvas/image size, I also remove 10 pixels from each side, because I hate that some files have that weird black line which looks awful on gifs. But that's up to you. Use proper dimensions for tumblr, that is important since your gifs will look 'not good' when you upload them. I will go with 540x500px this time. (correct dimensions for tumblr are 540px for big gifs, 268px for two gifs along each other and 177-178-177px for the three gifs together)
Go to images - image size (crtl+alt+i) and change the size.
After that I make animation, because without it we would not be able to convert all the screencaps into smart filters. Go to windows - timeline
you will have something like this by default

click on create frame animation - then on 4 horizontal lines which will open menu - make frames from layers

click on convert to video timeline (that 3 horizontal lines and 1 vertical line or whatever it is, right under the first layer) you will get something like this.

now, this will be animated. If you choose convert to video timeline right away it will not be animated.
Now, select all the layers - filters - convert to smart filters
You will have something like this, and if you play it - it will be animated anyway. That way you can edit ALL the screencaps at once.

I usually start with sharpening, settings may change according to the files I have, for some you will need more sharpening, for some less. I go with filters - sharpen - smart sharpen and usually that's enough
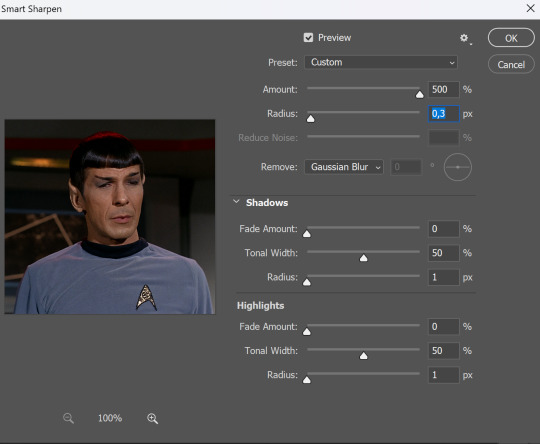
but I sometimes add more sharpening, just change radius to 0,2. So, repeat the action.
You will have it like this
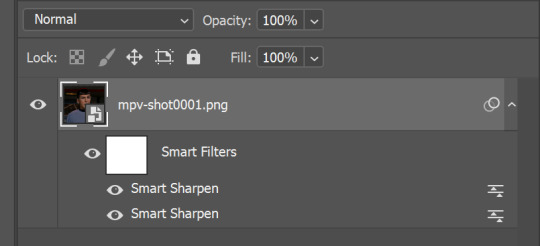
and at any point of making gif you will be able to change settings for it, if after coloring it will look not as good as you wanted to.
I will not go into a lot of details about coloring for this gif, because does not matter how good the coloring on this gif will be, it won't work as good on another gif.
There is no right way to start coloring, you may start with curves, levels or selective colors depending on the screencaps you want to edit.
Well, this time I did start with layer - new adjustment layer - curves. (yeah, i guess by the end of the day we all do lmao) (Always use 'layer - new adjustment layer'. That's the only thing I suggest to remember when you color. ) Just to brighten gif a little bit, but you also can change colors with it.
those are not settings I used for this gif!
Curves have option to edit colors, just press RGB and you will see options for RED, GREEN, BLUE. Upper slider adds the said color, the slider at the bottom removes it. That's a great tool if you have a very red\yellow\blue\green scene, with those settings and moving sliders here and there you will be able to add the color you want, for red scene I suggest to use more green and blue, as well as for yellows but with less green. Just move them to see what fits your gif better.


there are also eyedrop tools which will help you to edit picture, with the first one you need to find the darkest part of your gif and click, it will adjust your picture according to it. If there's too much red, it will make it bluer, etc. The middle one is the one I use the most out of them, cos it changes the midtones, it's great if you have very yellow picture, just press the yellow part and it will make it bluer\greenish, depends on the picture, and then you can adjust it to make it look better. And the last one you can use to lighten picture as well, just find the brightest part of the picture and press it. It will adjust other colors accordingly.
I like to play with settings, I could add more darkness to the gif by levels, by selective colors making dark colors even darker, but sometimes I just use layer - new adjustment layer - black & white. Putting it on soft light blending mode and changing opacity. Idk, I like the effect :D Also, by using these, you will be able to darken part or lighten specific colors


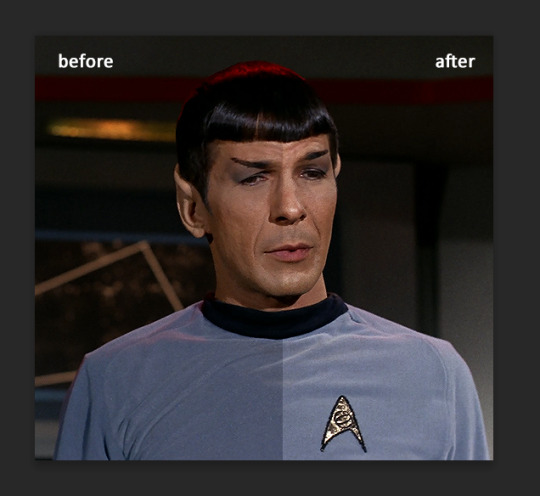
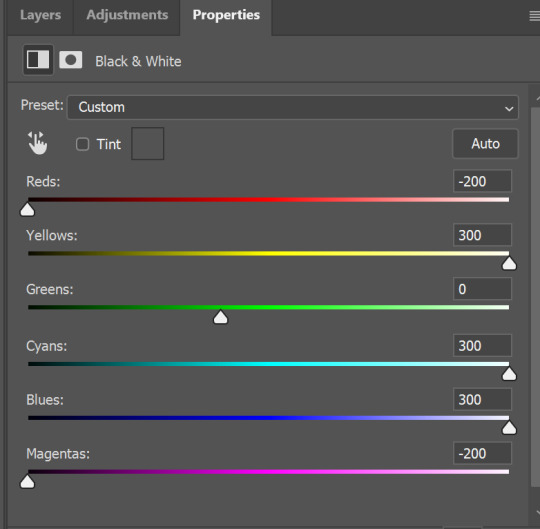
so yeah, play around and figure out what is the best way for you.
after that I used layer - new adjustment layer - selective colors. I think this is one of my favorite tools out there, I love it, I usually end up with 30 selective color layers if I make a super complex gif :D
You can change colors with it, make them more vibrant, or less.

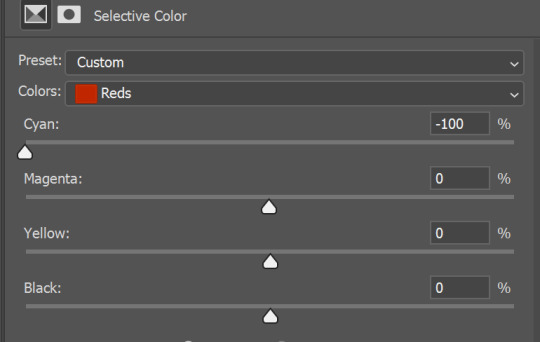
for each color you will have 'cyan, magenta, yellow and black' and by dragging sliders you can change colors, make them darker or lighter for the lovers of those paster gifs :D
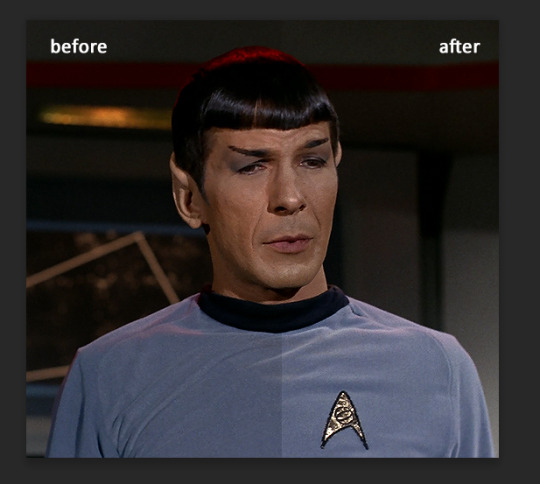
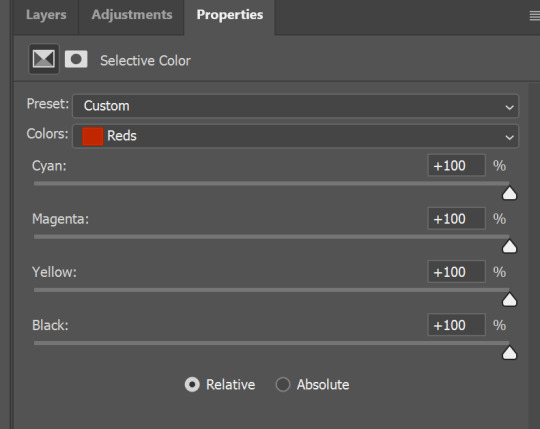
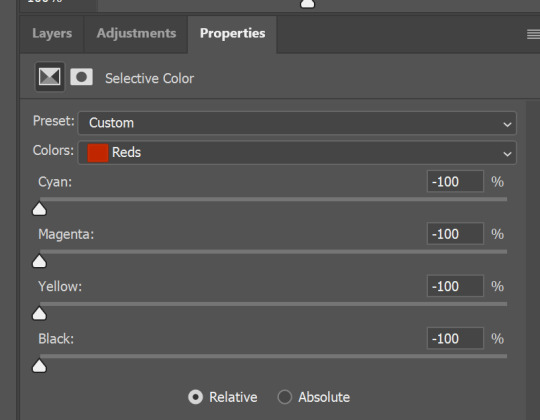

But don't worry, that's not where I will go with the gif, so it will look better, i promise.
You know how much I love making blue even more blue. So I go with more selective color layers to enhance it.
You do not have to use just one, and you won't be able to make it with just one sometimes. So add as many as you like to get the result you want.
next is one of my favorites - layers - adjustment layers - levels
with it you can darken colors or lighten them, there's also auto, as well as on curves, which will find the most suitable settings for your picture.
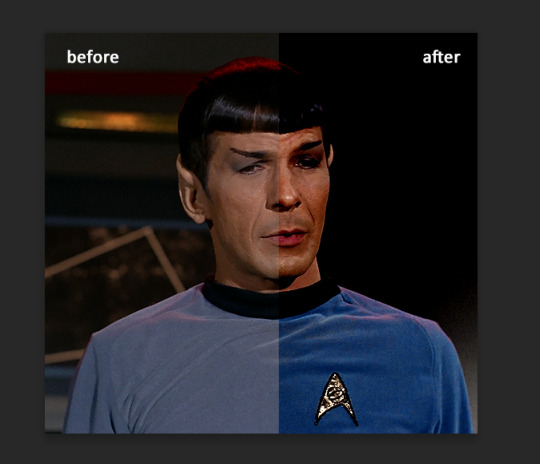
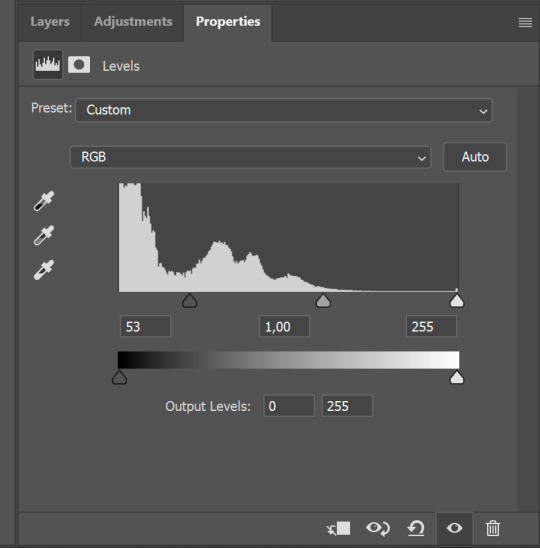

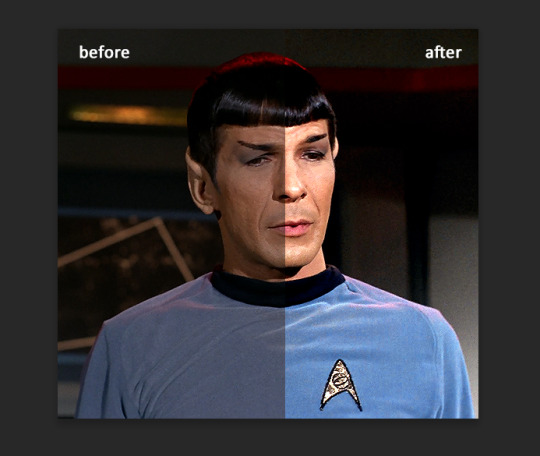
I hardly ever change the middle slider, cos
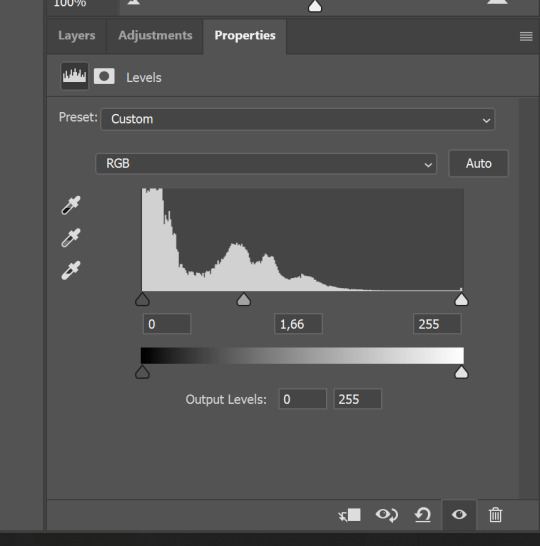
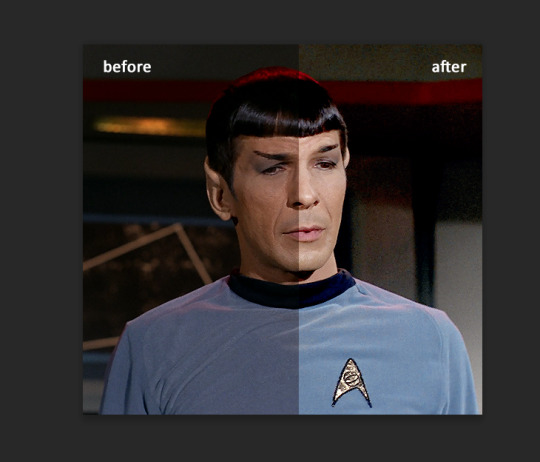
nope.
so, we are at this part of the gif by dragging sliders.
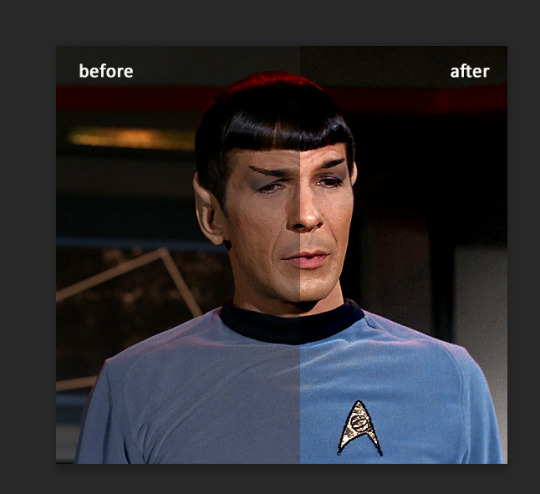
next one I used is layers - adjustment layers - color balance. right now I will stop adding directory, this tutorial is already long enough, so most of the things are there in layers - adjustment layers.
Absolutely love it, most of settings do the same things but a little differently, this one changes colors but also entire picture, not just part of it. You have shadows, midtones and highlights
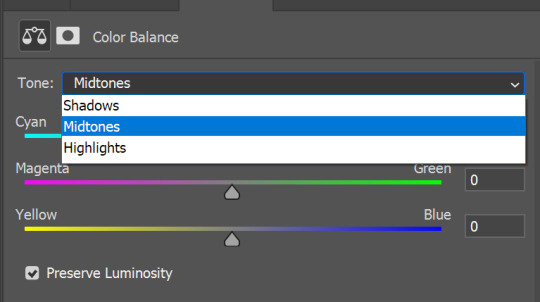
Each of them is really great when you have a yellow\red\blue\green picture to edit. And each of them has 3 sliders cyan\magenta\yellow.
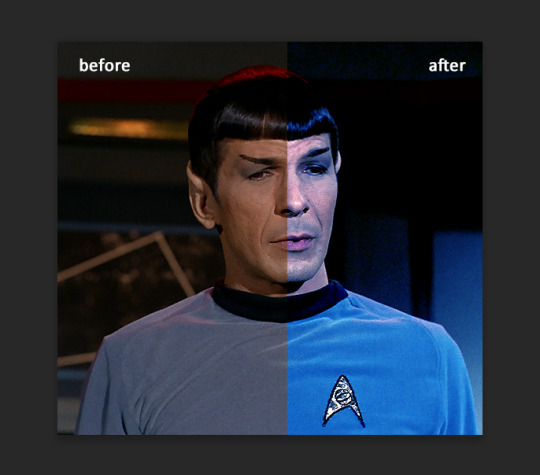
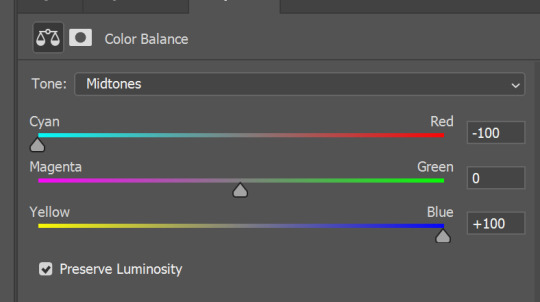
You see, if you drags sliders the other way it will make picture more yellow.
END OF PART I
since tumblr

129 notes
·
View notes
Text
Have you ever wished you could use Discord emojis in your AO3 comments? Here's a guide on how to do just that:
Unfortunately, part of this is for desktop only, but ultimately once you have the link to the emoji, you can use it in comments on mobile too!
Saving The Emoji:
First: pick the one you want
For this example, I'm going to use one called :chinhands_pleading: , that looks like this:

This process will let us add emojis without the dark background, and bigger.
Second: right click the emoji, then choose 'open link'

Third: when you open it, you'll get a link like this:

We want to delete the highlighted part, in this case the part that says "?size=96&quality=lossless", then hit enter.
Fourth: right-click and save
Right click, choose 'Save Image As...', and then give your emoji a name. You should be able to save it as a png (even though it's a webp image) by just adding '.png' to the end, i.e. 'chinhands_pleading.png'
If you can't, you can use online converters or sites like photopea to change the image to a png
Using Emojis In AO3 Comments:
First: upload the emoji online
I use a private Discord server for this personally, but where they're uploaded isn't that important, just that they have a link
On Discord:
Upload it like a normal file
Right-click the image and choose 'Copy Link'
Second: use a little bit of html code

(I would type it out, but I'm not sure how Tumblr will react to code, sorry. If you can't see the image, it does have an image description with the code typed out.)
Once you have that, simply replace the word link with the actual link. You need to keep the quotation marks, they are important!!
If you would like to adjust the size of your emoji, you can also add a height or width value. I've found that 30px is close to the right size, but a bit bigger
Example:

Third: copy the code and paste it in the comment box
At this stage, all you have to do is copy it -- from < to > -- then paste it in!!
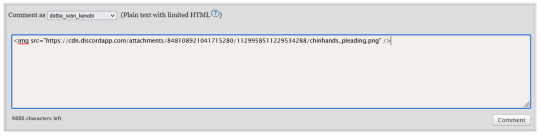
And voila!! Here's what it looks like:

This also works with gif emojis and gifs from other websites such as Tenor. Happy commenting <3
#ao3 comments#ao3 community#comment guide#fanfiction comments#comments#commenting#mod post#not fic rec#i tried to add image descriptions but.. i havent before so they aren't the best#also hello im not dead lmao
114 notes
·
View notes
Note
Hiii, how are u? I hope you're doing well, sooo I wanted to ask you (if it is not a problem) how are your gifs always looking so crisp? like what type of setting you put on them to make them look with a high quality? i'm sorry for bothering, i'm just curious 😭
hey, no worries. i'm happy to help! warning: this is going to be a very long post so sit back and relax...
first you need adobe photoshop. now the sharpen setting won't look good if your source is not HD so you have to really invest on getting a 1080p copy of your chosen video (4k works too, but i found that it takes up a lot of memory and, you know, tumblr only allows us to upload 10mb gifs so yeah. i guess you could still try 4k and use additional apps to optimize the memory, anyways).
now let's say you've gotten all the stuff you need. let's go to the sharpen settings.
there are multiple ways on how to do this step. people use actions but i don't because i have no fucking idea how to do it and after maybe the millionth time of trying to understand how it works, i just gave up so that means my method is time-consuming and gritty...
i usually GIF by frame not on video timeline.


(left is video timeline and the right is by frame)
what's the difference? i honestly have no idea LMFAO??? cause i found editing gifs on video timeline too complicated for my brain + i learned gifing by frames first so it's really the method i'm used to doing.
before you ask, why did i mention giving by video timeline or by frame? and what is actions? actions i think preloads all the commands for you which makes the grueling process of giving easier, avoids consuming your time. if you gifed by frame however... you have to sharpen each fucking layer/frame of your images. so if you have 60 frames, you have to press ctrl + f 60 fucking times HAHAH (and trust me, this process is not fun and i've had a much worse method back then)
anyway before i get sidetracked let's go to the main concern: sharpening.
i want you to select a layer. go to filter and select 'convert to smart filter' and then go back to filter > smart sharpen.

this tab should appear now what i want you to do is to follow this numbers. click enter and repeat the process--btw you do not have to convert to smart filter every layer, yeah? just use ctrl + f--depending on how many layers you have.
now let's say you're done with the first sharpening setting!!! yay!! it's not over yet.
we have a second sharpen setting to go through again. highlight the layer where you've converted it to a smart filter and then filter > smart sharpen (or just use ctrl + f) the tab above will appear again but this time, change the settings to this:

i want you to repeat the process i detailed above for the first sharpening method.
so now you've got your gifs lookin crisp as heck!
for comparison:


additional tips: feel free to play around with the setting. if it's too sharp or crispy for you, you can tone it down by going to the first sharpen setting and lowering the radius from 0.4 to 0.3 and etc. same goes with the second sharpen setting.
i hope you learned something from this. im bad at explaining...
#kai's asks#kai yaps#since i did yap tf out of this ask#hope this helped you anon#also fucking grammarly keeps correcting 'gifing' as 'giving' so my apologies if that had u confused
8 notes
·
View notes