#Tumblr app reduces the quality of the gifs
Explore tagged Tumblr posts
Visit Tumblr Blog
Explore Tumblr blogs with no restrictions, modern design and the best experience.
Last Seen Tumblr Blogs


Fun Fact
China blocked Tumblr because of pornography and censorship problems in 2013.
Text


#chris evans#Film Friday#The Gray Man#the gifs look better on pc#Tumblr app reduces the quality of the gifs
71 notes
·
View notes
Text

Hi ^^
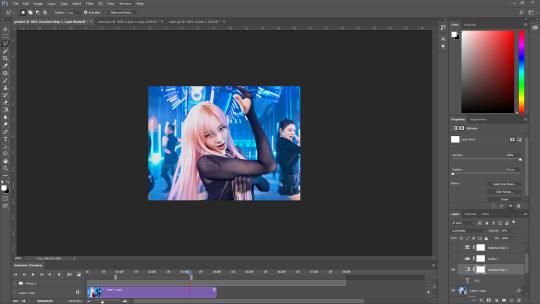
It’s me, the creator of some gifs you like and the creator of many gifs you could’ve probably lived without. A few people have asked me for a giffing tutorial recently so I have made one documenting my normal process! I’m going to gif this Aespa stage in this tutorial because I am still pretty bad at coloring stages. So come struggle along with me 🫶!
Step 1. Getting Sources & Vapoursynth
The worst enemy of the tumblr gifmaker is tumblr itself. You will spend your time making the clearest gif imagineable only for the blue site to reduce it to pixels. But alas, we must gif on. The best way to get good results is have a good source and to precompress your gif with vapoursynth.
As far as downloading from Youtube the best app to use is 4k Video Downloader. 4kVD let's you get download your file as a .mkv which is how youtube stores their 4k quality vids. Only limitation is on the free tier you get only 10 downloads. There are other more technically dubious methods to get 4kvids but I've literally never hit this limit.
10 out of 10 gifmakers agree if you want those good good crystal clear gifs you gotta stick with 4k or 1080p sources. Although if you are a complete sicko like me you can gif 720p and still get pretty good (not great) results.
So now you got your source video but you won't actually be able to open that bad boy up in PS yet. This is where the Vapoursynth step comes in. Vapoursynth will blast that footage into a nice denoised, sharpened and resized little baddie of a video clip for us.

To download VS and get a more in depth explanation of the exact steps on how to use it please reference this post. The basic steps of Vapooursynth are:
Drop your source video on the "vapourscript (drop a video file on me).bat" icon and type in the timestamps
Crop your gif to your liking (I do a lot of 540 x405 or 540x335 for horizontal gifs. 268x480 for vertical.)
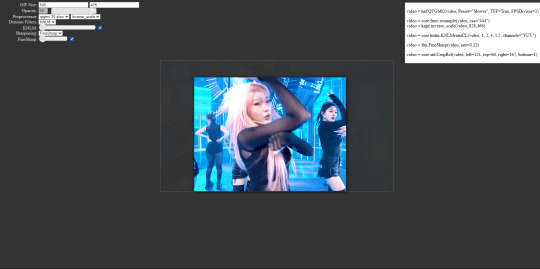
Apply the sharpness and denoise (these are the options I use):

copy the code from the white box and paste it into the script like below
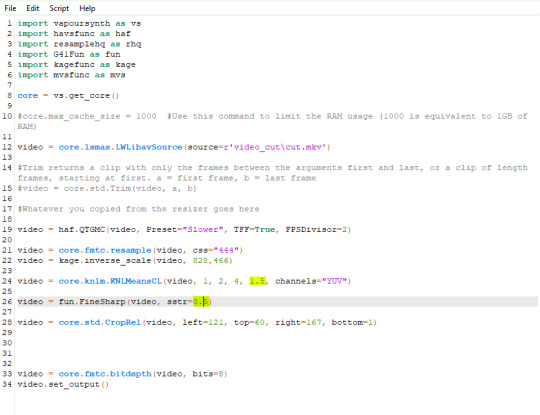
I set my denoiser to 1.5 and my sharpening to .5. (I stole this from @hyeongseo lol)
Go to Script > Encode Video. Make sure on this screen to name your file and set the header option to 'Y4M'. (Sometimes this is the step where it crashes and all your dreams are ruined because it can't convert it unfortunately. But 99% of videos are good lol)
You will find your Photoshop ready clip in gifs/output
Step 2. Photoshop
You are now good to open up your clip in Photoshop.

if we export our gif at this moment it will look like this:

Which isn't too bad. They just are pretty washed out and a lot of times at this step you'll see a lot of grain.
Sharpening (again lol) and Noise:
This might sound weird cause we just denoised lmao but stick with me.
We are going to convert our clip to a smart object. If you want to slow down or speed up your clip make sure to do so before converting.
(Often times if i have 60fps clip I put it at half speed, but if the action of the gif is really jerky or flashy at 30fps a lot of times I'll set it to 85% speed)
Convert your video to a smart object by right clicking it in the layers panel and selecting the "Convert to Smart Object" option
Create a copy of layer 1 and arrange it so it is aligned perfectly on top of the first video in the timeline. You have to drag it outside of the video group to do this. It should look like this once you are done:

On the bottom clip (layer 1), select filters -> sharpen -> smart sharpen. Apply the filter with these settings:

Then on the same clip (layer 1) apply the same smart sharpen filter with these settings

Setting up the Sharpness like this makes sure the finer details with stand out with crisp lines in the final product. (Look at how the mesh on her arms is in finer detail now)

Your video might look a little crispy at this point and that is ok cause we are going to soften that.
Now on our top video layer (layer 1 copy) select filters -> Blur -> Gaussian Blur. Use this setting:

Finally apply filters-> Noise -> Add Noise to layer 1 copy with these settings

"Vacancy what the hell? It looks like shit now."
Yeah... But now we'll put layer 1 copy at 25% opacity and it will look less like the shit that it does look like right now I prommy. Here is the current output:

The idea behind all this blurring and adding noise is that it will help create smoother transitions between the colors of the gif and reduce large blotchy bands of pixels that can sometimes show up
PLEASE!!! Save your current step as a PSD file. You can skip having to apply all those filters and just drag the filter groups on to the layers after the smart object conversion step.
Step 3. Coloring
Now to the fun part! There is a lot of trial and error in this step since we only have 256 colors to play with.
Typically my goals for this step are:
Raise the black point (Make Giselle's outfit in this gif black so more color can be used on her hair, skin and the background.)
Reduce the overall contrast of the gif. (Darken the lightest lights if possible)
Saturate the colors enough so they stand out but not so much that everything looks gross.
Depending on how we do these steps we may need to subtract frames from the gif. (Which I hope not cause there is exactly 69 frames in the current version lol)
Here is an example of what my coloring difference can look like:


In this case the colored gif is actually smaller because I elminated a lot of the dark greys in the background.
Vacancy's Dumbass Original Recipe thing
This is probably the only thing different that I do from most creators
My first adjustment layer is usually a gradient map. The green and red one to be more specific.

I then change the blend mode to luminosity and set the opacity somewhere between 12 and 20% (Usually 15%).
This step brings all our shades closer together so we have more freedom with coloring later. Also when idols are very white wash this seems to bring out the shadows and skin tone better in later steps as well. If you overdo it though the person in the gif can wind up looking very orange or yellow so less is sometimes more here.
There's also probably a better way to achieve this but you know... oh well
My Other adjusment layers usually consist of:
Levels: With the gradient map applied you can darken the blackpoint of your gif pretty significantly.
Selective Color: This is the most useful adjustment layer. Make sure to expirement with adding to the black slider on the blacks and neutrals color options. Often times kpop vids are over exposed and darkening this can bring out a lot of unseen color.
Hue/Saturation: I use this layer to darken the blues of the background with the lightness slider as well. You can adjust individual colors with this layer and with selective color and that is a very powerful tool for coloring.
Start:
Finish:
Because I darkened the gif so much I was able to add around 6 frames!
Though I’m not 100% satisfied with this gif, this would be my process from the start. You can put those adjustment layers all in a group and save it to the psd as well to skip all the steps to apply them. I used all the same adjustment layers for the header gif of this post as well which saved me a lot of time ^^!
Since every video is different you usually have to play around with the sliders a lot between clips.
Step 4. It Flops…
Jk jk but it does happen a lot tho on this site so don’t get discouraged ☺️
Parting Notes
If you want a really nicely colored fancam to practice on I would see if MIRAI on YouTube has a fancam of your fave idol. Their videos are really nicely color balanced from the start where stages like this tend to be very bright.
I’ll probably make a follow up post with more coloring tips and my thought processes while making gifs but this is the very basics to making hq gifs hope you learned a lot.
You can always hit my dms or inbox with questions if you have them ^^!
#hope this helps#tagging a few people#tuserflora#userdoyeons#forparker#useranusia#rhitag#usercherry#<- these are all creators I try to learn from#flashing tw#flashing cw#tutorials
89 notes
·
View notes
Text
Webp format reduces the original image quality, and if you use a webp-to-gif tool, unfortunately that further degrades the quality of the image.
For gifs on tumblr, if you click the image and remove the "v" off the end of the link, that gives you the original gif. You have to do it for each image, but the quality is much better. Step by step:
-> Click an individual gif so the link is for the image. -> Copy image link (right-click on desktop; "share photo" on app) -> You'll see the link ends in .gifv format -> Delete the "v" to get .gif -> Hit enter to load that .gif image and download.
me when i meet the person who created webp files
98K notes
·
View notes
Text


My new gifset (tumblr app reduces quality, see with browser desktop mode or pc)
#doctor strange#doctor strange 2#sinister strange#marvel#mcu#dsmom#dsitmom#dr strange#benedict cumberbatch#marvel phase 4#benedict#dr.strange#stephen strange#ask doctor strange#marvel phase four
158 notes
·
View notes
Text
Let's talk about the .webp format.
Webp for animations
We will hereby examine the various ways to turn the above clip from Princess Tutu, which I'm uploading as a 600 pixels tall 967,000 byte mp4, into a GIF-style looping animation. The easiest way is obviously to turn each frame into an image and make people page through them. Let's do that, and, to keep things simple, we'll use the Microsoft Paint BMP format, which uses no image compression:
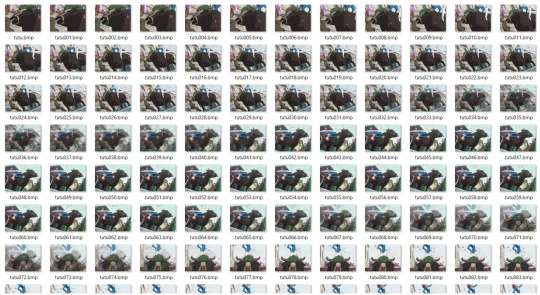
Job done 😌 we now have 187 BMP files that i should be able to share with all of my friends over the internet. Except, wait,

Our clip has gone from 967,000 bytes to 387,773,298 bytes. This is 400 times bigger. If I start a social network where people can share clips and they do it by sending hundreds of BMPs back and forth, I will use up a lot of storage space and bandwidth, and the user experience will probably be somewhat slow. Maybe a less simplistic approach is in order.
I have also created a nice GIF version of the scene. It is not pictured, because it is 3 times Tumblr's maximum GIF size limit:

This saves a lot of hard drive space over the "hundreds of BMPs" approach, but it still yields a fairly large file. The GIF format was created in 1987 and last updated in 1989; it was intended to display simple clip art on computers that looked like this:
One way this makes itself evident is through the limited color palette that each GIF uses. If you don't want to use weird tricks that explode the file size, a GIF can only use 256 distinct colors per file. Here some of them are, plainly visible in a detail shot of my new GIF:

Artful blending of these colors can hide the limited palette a lot of the time, but it seems like a dumb sacrifice to have to make when using such a large file. Anyway: if we want a Tumblrable GIF, we need to put more work in. Let's try shrinking the GIF to 300 pixels tall, cutting the frame rate to 15 per second, and reducing the quality using the gifsicle utility's "lossy" option:
It's here 🥺
It's 6,010,622 bytes (6mb), so it's about 6 times bigger than the original mp4, and looks much worse.
"What was wrong with the original mp4, anyway?" Nothing, except that browsers and image viewers know to play GIFs automatically and loop them, and Tumblr lets you arrange them into a grid. If everyone were to listen to me, I could simply say, "if you rename a .mp4 file to end with .mp4loop instead, it needs to be autoplayed and looped, and can't have sound" and we could just use those instead. But no one listens to me.
Let's continue to try to find technical solutions to this dumb standardization problem. Weren't we supposed to talk about Webp files?
A 6mb Webp file can store the clip at its original resolution and framerate. Evidence
If we reduce the Webp to 300 pixels tall and 15 frames per second like we did with the GIF, it's now 1,902,920 bytes, which is roughly a third of the size that the GIF was. Evidence
So it's obvious that using Webp files allows for much higher quality and/or much smaller files, which is extremely desirable if you're running a website, or if you're a website user that wants things to load quickly. Everyone should want this thing. You may have noticed, though, that I had to link to those Webp files instead of uploading them directly. This is because Tumblr doesn't support uploading them (probably because they don't think you'll have any Webps you'll want to upload from your computer.) Neither do browsers support them particularly well: Despite the fact that the format has been out for 10 years and growing in prominence the whole time, only recent versions of Safari on Apple computers and phones can display Webp files; the browser watchdog website CanIUse estimates that they're available to about 93% of devices. If you're running a social media site, you probably don't want to block 7% of people from seeing animated content. Also, if I try to download them, I soon find out that the Photos app on my Windows 10 laptop has no idea what these files are.
So, websites are strongly incentivized to use the Webp format instead of the GIF format and users are not necessarily going to like it when they do, probably because developers of software like browsers and image viewers don't realize how inefficient GIFs are from website creators' point of view and how they should be replaced. Great job, guys. Are there any other places where Webp images could be used?
Webp for still images
Although Google claims that Webp files are 30% smaller than JPGs, they are actually usually not smaller than JPGs that are created with an advanced encoder like Mozilla's MozJPEG. However, Webps are 26% smaller on average than equivalent PNGs no matter what, which means that they're the naturally preferred format for images with transparency, which means you might as well just use them for everything instead of having both PNGs and JPGs (which are smaller than PNGs but don't support transparency at all), assuming people upgrade their browsers.
The Conclusion
Websites use Webp files so they don't have to distribute larger, lower-quality GIF files (and just plain larger PNGs) to you. One alternate way people have tried to replace the GIF format is: those things labeled "GIF" on Twitter are actually just normal mp4 video files that they try to force browsers to autoplay and loop. Attentive readers will note that this is very similar to the ".mp4loop" replacement for the GIF format that I proposed. However, Twitter's solution only works on Twitter, because if you download one of these "GIFs" you'll get a non-looping video that looks like it should have sound and doesn't, which makes them harder and more confusing to play and share around. But people continue to not listen to me. If you're annoyed at Webp files now, wait until you start seeing the new AVIF, APNG, animated SVG, and HEIF formats. The fact that the term GIF at this point refers not just to a type of binary file but, effectively, to a genre of highly shareable media is fascinating to me; the goal people should have is to create a file type that removes the GIF format's technical limitations while preserving its social capabilities. A coordinated solution to this goal is only difficult because of the need for coordination.
7 notes
·
View notes
Note
I've been wanting to this but I've been too shy for too long hahahaha
I've been making verivery content for a while but I really want to improve my gif sets, and your gifs are mighty beautiful TT_TT may I ask for advice? Like do you use your laptop or your phone? Do you use photoshop??
oh feel free to ask me anything ! :D and yes of course ! gifmaking is actually fairly complex on tumblr ;-; so i'll try my best to include the basics and all the important stuff !
for gifmaking i use photoshop 2018 and so i use a laptop >.< i’ve seen a lot of asks where people ask about what apps gifmakers use... and to put it nicely ... there is no easy way to get nice gifs T-T the reason gifmakers on tumblr have such nice gifs, is bc there’s a lot of patience, learning, and practice involved in creating gifs for this platform... you can’t just plug in a video clip to a gif converter and expect it to spit out an hd gif for you ... unfortunately ...
before beginning i’ll recommend this tutorial ! it’s the tutorial i used when i was first learning... and my best advice is to have lots of patience ;;;; tumblr is a hard platform to make gifs for and learning how to make nice gifs will not happen overnight
Photoshop and other resources
i personally downloaded ps 2018 and that works fine for me but i’ve noticed that ps cs5 or earlier tends to have a broken ‘import frames to layers’ action so i’d suggest newer versions for gifmaking ! to download i basically looked up youtube videos and checked comments to make sure the tutorials actually worked,,, but if you want you can try these posts ! (1, 2) i’m not sure if they work but usually there’s a lot of posts made on tumblr + other sites for downloading it for free !
About video processing programs
i also use avisynth to process my frames... this might be a really complex bit to learn and it’s not 100% necessary so i’d say you can skip over it when you’re first learning photoshop and everything but if you are interested ! basically programs like avisynth and vapoursynth reduce the video file size down to tumblr’s preferred image size without reducing the quality as much as resizing in photoshop does :o ! additionally it helps process torrents (these are the ts and tp files for live performance stages that are super hd !) but again it’s somewhat complicated i’d recommend this tutorial for download and use if you ever want to ! (vapoursynth additionally has sharpening and denoising options, but since i’ve never used vs it’d be easier to look up a vs tutorial than to ask me >.<)
Where to get videos
this part is CRITICAL !! for gifmaking,,, you could be the best gifmaker on this whole site but if you have a video with poor quality... no matter what,,, your gifs will not come out nicely T-T so when downloading any vlives or youtube videos, they should be at least 1080p in quality ! or as high quality as possible ! this is bc you need to reduce the file size down by a lot for tumblr’s dimensions and this means you need the best quality :o ! i typically just screenrecord videos these days bc downloading whole hour long vlives / long youtube videos is a strain on my laptop hhh ;;; for live perfo stages you should always download torrents to use but this means you need video processing programs like i said above >.< there’s a resource here to help find them !
these are the basic tools you’ll need hhhh there’s a lot more including sizing, sharpening, coloring, frame rate delay, exporting, saving, etc... and i don’t want to make this too long but !
essentially tumblr has size dimension restrictions for image files, a pixel too big or too small will cause tumblr to stretch or compress your gifs making them blurry... the dimensions are optimally: a.) 540pixels (width) for one gif in a row b.) 268pixels (width) for two gifs in a row c.) 177pixels / 178pixels / 177pixels for three gifs in a row
for sharpening many people use topaz etc. and i’ll point you to other tutorials if you want to use it but tbh ! i use photoshop’s smart sharpen options and those work just fine for me... (plus topaz takes forever to render and i h8 its guts so)
coloring - okay so this is probably THE MOST time consuming part for gifs for me.... idk if you’ve noticed but lots of times, gifmakers’ gifs have pretty colors and nice lighting when you compare to the original video ! that’s bc we add layer adjustments in photoshop to make them look nice ! these include brightness, saturation, exposure, vibrancy, etc. but knowing how to use adjustments is a whole post on its own >.< there’s lots of coloring tutorials out there as well if you want me to direct you to them !
for frame rate delay, i use 0.05 seconds for 30fps (so your normal videos) and 0.03 for 60fps (if none of that made sense that’s okie ! it’s just basically how fast you set frames to play in your gif !)
when exporting - tumblr has a 10mb gif limit but honestly anything above 8mb starts making me anxious or takes too long to load .... so most my gifs are like ... 3-7mb only
but yea these are just some basic tips and stuff ?? i’m sorry it took me so long to respond and it wasn’t as nicely organized as it could be... there are a lot of really good gif tutorials out there ! you just have to look a little ! if you have any additional questions tho feel free to let me know ! i just didn’t have the heart to type out the literal process i have to go through everyday when making just one gif :p i’m sure a lot of gifmakers can relate haha,,,, happy gifmaking !~
#one day when i'm about to d*e i will release a comprehensive gif tutorial#but for now .... even i am astounded still on how much work making content is sigh#me and my cc moots should be getting paid .... ngl T_T#bonknanab#asks#🌱.text#resources#the way this doesn't even go over sharpening all that well sigh ....#there's just so much#and sorry if this sounds?? like salty in any way LMAO#idk how many times i've seen asks where people are like ??? what app do you use on your phone#and bro .... there is no app it is all my blood sweat tears and avisynth#like the frustration i feel#when people repost and are like ? what's up it's just a video anyone could make gifs#and i'm like ??? then make your own and stop reposting mine ???#sigh#anyway i hope this was helpful ;;;;#i've been gifmaking for a while and even now i'm like ... but do my gifs actually look ok#or am i making it up in my head and they're ugly ;((#fjhdgkfjghdkf#do people even want to hear gif things from me LOL
18 notes
·
View notes
Note
what app do you use to make your gifs? how do you make them?
hi!! i use adobe photoshop 2021 to make my gifs!!
⮇how under the cut⮇ (i'm really bad at explaining things so sorry in advance for all the photos skfkwui)

— downloading and screencapping
i make my gifs using the screencapping process, meaning i download t*rrents from a site (i use rarbg, but others use different ones) and open them in a screencapping software (i use potplayer, but i know that mkvplayer also works well) that takes screenshots of each individual frame.
— opening screencaps
when i open photoshop, i go to "file -> scripts -> load frames into stacks..." [outlined in blue below]


which opens a menu that looks like this

then i click "browse" [outlined below] which opens the folder that holds my screencaps and i select the ones that i want

— making the gif
once i have all my layers (screencaps) laid out like this (using lena as my example skdjf)

i click "timeline -> create frame animation" (it may say "create video timeline at first"; all you have to do is click the little arrow to the right and click "create frame animation")

once the frame animation has been created, it looks like this

then i click the three little lines in the top right [outlined in white below]

in the menu that opens, i click "make frames from layers" [highlighted in blue below]

which does this, meaning all the frames have been loaded.

loading the screencaps this way reverses the order, so next i click (in the three line menu again) "select all frames + reverse frames" which puts all the frames in the order i want them to appear

then, with all the the frames selected, i click the bottom part that says “0 sec.” and click ‘other’ on the dropdown menu [highlighted in blue below]

when setting the frame delay, to get a gif that plays in the same speed as the film/tv show i’m giffing, i would set it to 0.05 or 0.06 because that’s the amount that’s in the actual film; i like my gifs to be a little slower than the media is, so i set mine to 0.07 seconds

then i click the bars at the very bottom of the timeline screen [outlined in white above], which turns it from a frame animation to a video timeline

next, i click the ‘layers’ tab and select all of the layers by selecting the top one and scrolling to the bottom and clicking the last one while holding shift and i right-click and select “convert to a smart object” [higlighted in blue below]

which combines all of the layers, making it look like this

— cropping & resizing
before i can save the gif, i have to crop and resize the image to fit tumblr’s limits, 540px wide & 810px high. most of the tv shows i gif are 540 by 260-300, so i usually make my cropping size within that range (crop shortcut is c)

i make it the image size as well, by clicking “image -> image size” or the shortcut, alt + ctrl + i


— saving
(shortcut: alt + ctrl + shift + s) my save settings are as follows. i change ‘adaptive’ to ‘selective’, matte to ‘none’ and quality to ‘bilinear’ instead of ‘bicubic’


et voilà! i have a gif ^_^ if this is all you needed, i’m glad i could help!! however, i’ve also included my colouring and sharpening settings so that you could have the full experience of how i make my gifs

— sharpening
personally, i like my gifs Crisp and Clear, so i use smart sharpen, and two layers of it. i click “filter -> sharpen -> smart sharpen”

the first layer is in the amount 500%, radius 0.4px and reduced noise at 10% the second layer is in the amount 500%, radius 10.0px and reduced noise at 0%, and removing gaussian blur


which gives me this:

i usually prefer my gifs to have noise (all further examples will contain noise), so i add an additional noise layer in the amount 1.2%, distributed gaussian and monochromatic

which looks like this:

— colouring
all of the colouring options i use are mainly adjustment layers, found in the adjustments tab (katie mcgrath is very pale, so my lightening settings might be a little too light for any other subject)

— brightness/contrast
most of the time, i start with a brightness/contrast layer, the icon for which looks like a shining sun that’s half-hollow

my brightness and contrast settings depend on the lighting of the scene and how i want the final product to look. for this gif, i found that having my brightness set at 45 and the contrast at -30 yielded the results i wanted

here’s the brightened gif:

— levels
next i add a levels layer (i’m not 100% sure how/what it does), the icon for which looks a little bit like a crown to me

i use the eyedroppers on the left-hand side to change the levels of black, grey and white in the colours i drop it on. [the grey dropper is outlined in white below; the black one is above it and the white one is below it] i pretty much always use the grey one, as it gives me the results i want better than the black or white ones. i usually click around until i find colouring that suits the scene

then i up the first blank to 20 and see whether i want to raise or lower it, and do the same with the second one, upping it to 1.70 and playing around with it until it looks the way i want it to

which makes it look like this:

— curves
next i add a curves layer, the icon for which looks like a graph with a curved line going through it

there’s really no rhyme or reason to how i use the curves layer, it’s all up to my discretion and how light or dark i’m aiming for the gif to be

and it turns out like this:

— exposure
exposure is one of my favourite settings !! the icon looks like a rectangle in the yin/yang fashion, divided diagonally, with a + in the white half and a - in the dark half

my exposure settings generally don’t exceed 0.500

which makes the gif brighter:

— vibrance/saturation
these help me make the gif either more or less vibrant. the icon is an upside-down triangle with some shading in the middle

i turn the vibrance down and bring the saturation up, mostly playing around until it looks right
achieving the colouring i want:

—gradient map
sometimes i add a black and white gradient map, set in soft light & in the opacity 20%. the gradient map icon is a rectangle with a dark-to-white gradient

without any change:

to change the light & opacity, i open blending options [outlined in white and highlighted in blue below]


to change the light, i click “normal” and select “soft light” in the dropdown menu [highlighted in blue below]

soft light, opacity 100%:


soft light, opacity 20%:

and i’m done! i hope that made sense and if you have any more questions, please don’t hesitate to ask <3
#ask#anonymous#gif tutorial#tutorial#clubgif#long post#i had to use small text otherwise this would've been entirely too long
12 notes
·
View notes
Photo

The people have spoken! I’m going to show you how I do my
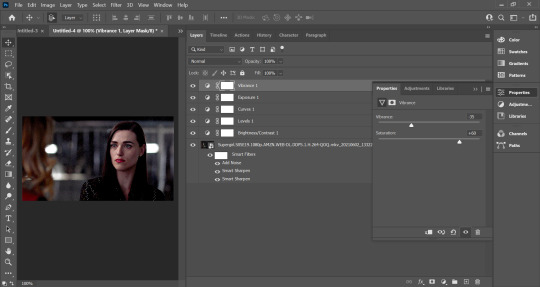
ADJUSTMENT LAYERS
Curves are awesome but we’re not using them today
I’m obsessed with Vibrance layers right now and I figured out that using them in a specific way actually brings up darkness in super dark things like Mr. Robot!
You may already know you can have multiple sharpening layers but maybe you didn’t know that you can alter their opacity?
Color balance isn’t always ideal but it’s great when the footage is already well-lit (like with the footage we’re starting with)
The best thing this method does is that it will make the light and colors in your gifs POP.
Full disclosure: this is best viewed on a desktop—it almost made my phone’s Tumblr app crash. Lots of media under the cut!
Disclaimer: I use this method of making gifs and you will need a passing understanding of Photoshop and adjustment layers, which I did attempt to describe how to use. Not going to describe it here, but click the link above or DM me with questions.
Here’s what it looks like already resized from 1080p video down to Tumblr width of 540px. A bit dim, no clarity.

An image like this deserves to pop! So! We’re going to make heavy use of Vibrance adjustment layers.
Basically:
1. Create a new Vibrance layer and bump the “vibrance” slider all the way up. Then change the blend mode to Color Dodge. Chances are good 100% Fill is way, way too much—but take it all the way down to 0% and then bring the slider up until the highlights begin to jump out. 28% worked here.

2. Make a Copy of that Vibrance layer! (Drag the layer down to the little + in a box button at the bottom right of the layers.) Then change the Blend Mode to Screen and move the fill percentage around until you’re happy (40% in this case).
This is my new TRICK and it does amazing things to brighten up dark footage. It’s great because it is less likely to create mottled color noise.

3. Make a Copy of THAT Vibrance layer and keep the blending mode on Screen! I did this by accident once and realized it does such a nice job of building on the subtle brightening the previous layer did. In this particular gif, I took the fill percentage way down to 8% and the change is almost negligible so I’m not including a screenshot.
4. MAKE YET ANOTHER COPY of the Vibrance layer! But instead of going brighter, we’re now going to bring back the blacks. Change the Blend Mode to Color Burn. Then bring the Fill way down and slide it back up until you’re happy that the darkest tones in your image look substantial. In this case, it was 10%. With the Color Burn Vibrance layer, a little bit goes a long, long way.

5. Finally, create a new Color Balance adjustment layer and fiddle as needed. In this case, I kept the adjustments from a previous section of the video that was very red—so I worked to dial back those reds by incorporating more cyans/blues without letting it go too green.
I only adjusted the Shadows and Midtones here, not the Highlights (because that’s where his skin tone, in this lighting, needs to remain the most natural—remember to respect and work WITH people’s skin tones, never work to “correct” them!).
The difference is subtle and I’m not sure it makes it better but it certainly makes the colors more... separate.

That’s it for adjustment layers! Here’s what it looks like as you turn on each layer. I’ll show you my sharpening method after this!

Sharpening
So I’m using three sharpening layers (technically not layers, but smart filters) these days. It can take longer for the computer to render it, but I’m loving the results.
As long as whatever is in the timeline is currently a Smart Image, then you can turn them on and off and change their opacity and this is a powerful way to make sure things are both smooth and not over-sharpened!
Here are the specs for each of the sharpening layers in the order that I usually turn them on:
Sharpen.
Smart sharpen. [Amount: 500px, Radius: 0.3, Reduce Noise: 20%, Remove: Gaussian Blur]
Smart sharpen. [Amount: 10, Radius: 10.0, Reduce Noise: 4%, Remove: Gaussian Blur]
But here’s the deal: those will over-sharpen and no matter how you move the sliders, you’ll find there’s nothing you can do. SO! You just tone down the overall effect by clicking on the icon to the right of the sharpening layer:

And then you can change the blending mode and opacity of each sharpening layer. I keep all of the Blending Modes on Normal, then change the opacity:
Sharpen. [Opacity: 64%]
Smart Sharpen. [Opacity: 100%]
Smart Sharpen. [Opacity: 100%]
It’s possible you’ll move these opacity sliders all over to make this look good! Always depends on how much of the image your subject is taking up and how good the quality of the original footage is.

And then of course, here’s the final product!
And...
If you want an example of what this Vibrance layer method can do for dark Mr. Robot footage, check this out:

Hope that gets the gears turning for y’all. I’m looking forward to seeing what you guys do, and if you have any cool adjustment layer ideas that come about as a result of these, please share! I love seeing new, experimental ideas!
cc: @ilygwilym and @xmxisxforxmaybe who said they’d be interested in this 😀
93 notes
·
View notes