#The Sims 4 Guide
Explore tagged Tumblr posts
Visit Tumblr Blog
Explore Tumblr blogs with no restrictions, modern design and the best experience.
Last Seen Tumblr Blogs


Fun Fact
Tumblr Inc. is funded by 13 investors.
Text
Guide on making custom coat presets. (Allows for better quality custom coats)
31/08/2023: The guide has been updated to reflect a step I missed - when exporting your custom textures, make sure to select "generate mipmaps", the step is reflected in more detail under the appropriate part. Ctrl+f and enter "mipmaps" to skip to it.
16/10/2023: Updated to add more info re: generating hash ID's.
Okay, I decided to throw this together. There's some things I can't figure out still, but oh well, we're just getting through this as we go.
To clarify what I mean - this is not a stencil or a brush.
This will appear here:
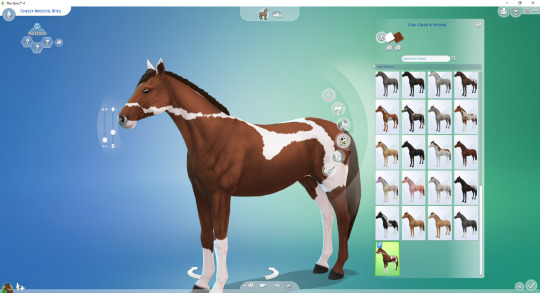
To preface this guide though, I cannot, for the life of me, figure out how to make it appear as an individual option in-game, so, these are considered SWATCHES of the original coats.
Okay, with that out of the way.
Things you'll need:
Sims 4 Studio
GIMP
Probably Notepad, but it's optional on how easy it is for you to track things.
Guide:
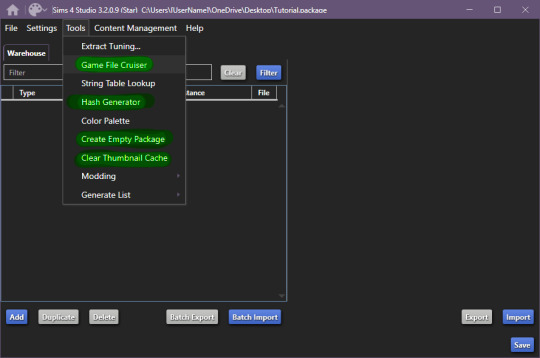
These are the tools we'll be using in S4S.
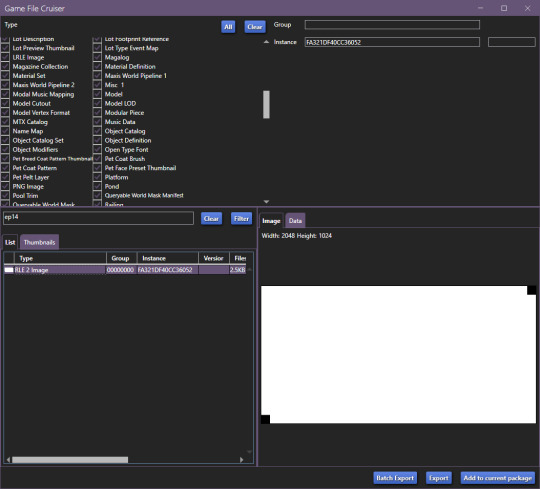
Start by creating your empty package, once you're done, open up Game File Cruiser:
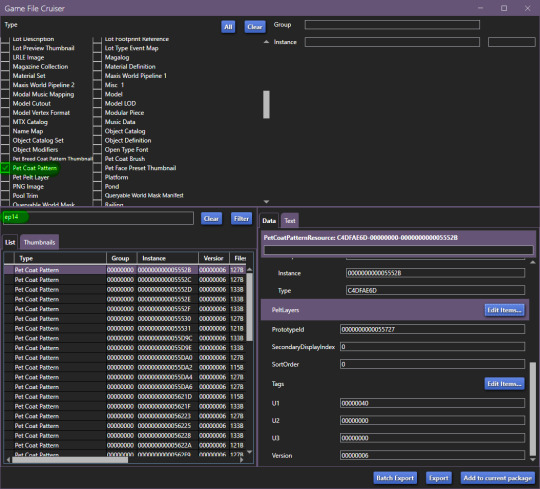
before you do ANYTHING, make absolutely sure that the search bar below the file list has "EP14" in it, otherwise you will 100% end up editing a cat or a dog coat pattern and that's now what we want, at all.
Add the first horse file to your package
In our case, it's the Lusitano Dapple coat, don't worry, if you're making a breed-specific coat, you can change this later.
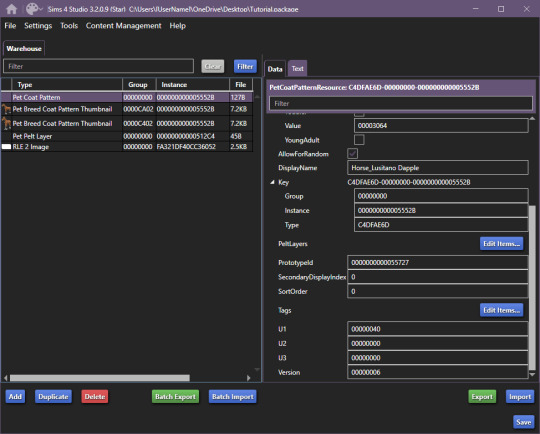
Now that it's been added to our package file, it should look like this:

We now have two options, I'll explain this to those who don't care about creating a game-generated thumbnail and want to find it easier.
To make your "test" thumbnail, you'll want to copy the instance ID of the file we just added to our package:
It should look like this, the instance ID should be in 2nd from the top search bar, then, select all and click filter (it just makes life easier than finding the specific file type).

These are the current, in-game CAS thumbnails. We'll add both of them to the package, they're for ponies and adult horses.
Now you can export these two pictures (They need to be saved as .png's), edit them as you'd like and then import them back into the package.
Now, you CAN add up to 5 different pelt layers that can be easily recoloured in-game, however, we'll only be working with two pelt layers in this tutorial, because it's a tutorial and you'll learn how to make more of them anyway.
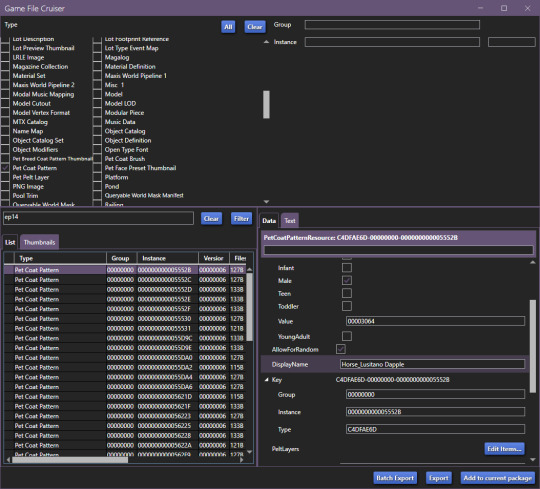
Click on "Pet Coat Pattern" and then look over the data:

From there, Click on "PetPeltLayers":
The first pelt layer is ALWAYS a solid colour, we'll begin by copying the LayerID (Instance ID) and going back to game file cruiser.
Just like previously, you should keep EP14 in the search bar and just use the instance ID bar to find things, as that's all we'll be doing.

Add the Pet Pelt Layer to your package file, then, copy the "texture key" from the Pet Pelt Layer:
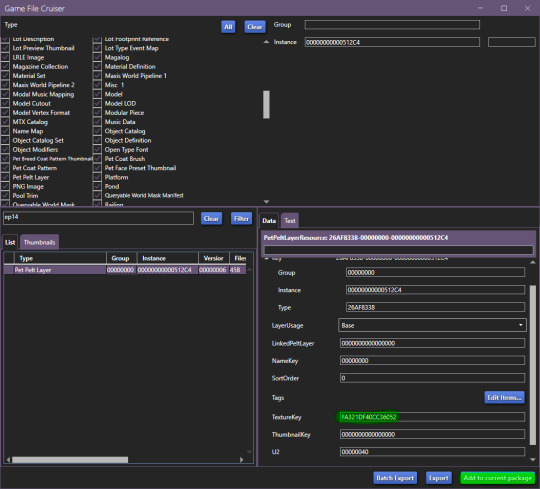
Then find the Texture Key:
This is the solid colour layer, it HAS to be there as this is what will help you edit your base colour. Add this to your package file.
Now, our package file will look like this:
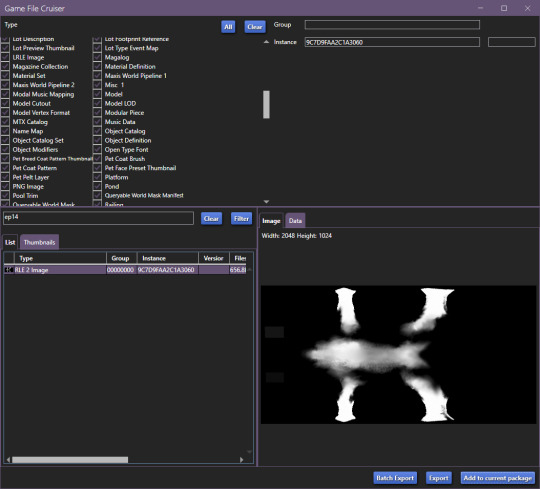
Unfortunately, we're not done, just yet, we'll want to grab at least the second PetPeltLayer:

Just like before, we're going to copy the ID and find the Pet Pelt Layer + the Texture for this layer:

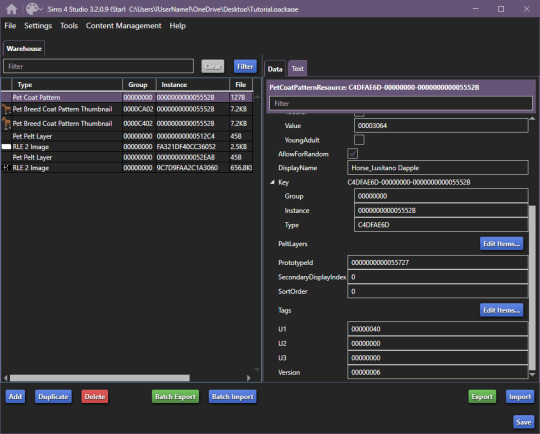
Now, our package file will look like this:
You can now go ahead and close the Game File Cruiser, we won't be using it anymore.
Right now, this is our package file and we need to do some cleanup first.
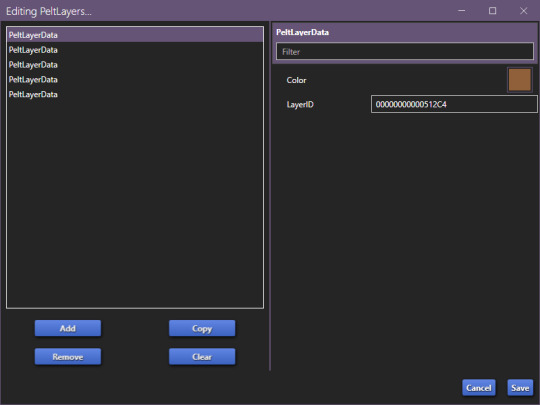
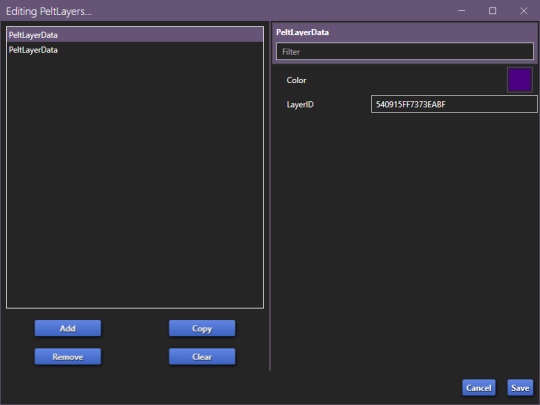
We'll be opening up the PetPeltLayers once more and we'll remove the last 3 entries:
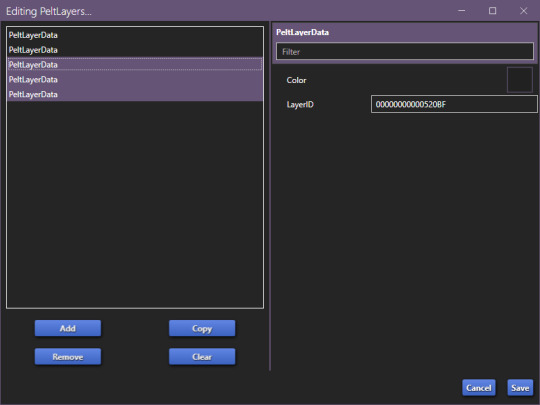
You should be left with only two entries, as that is what we'll be editing (leaving the other 3 will break the preset).
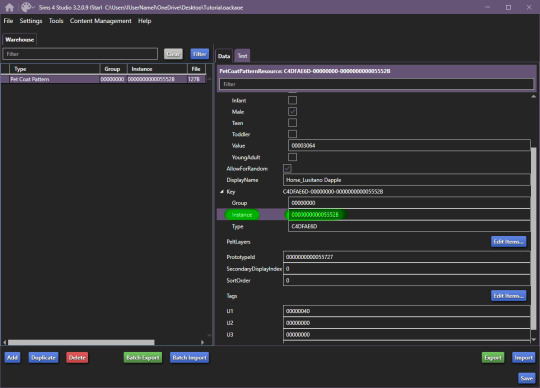
Now, we'll start generating new hash codes for everything:
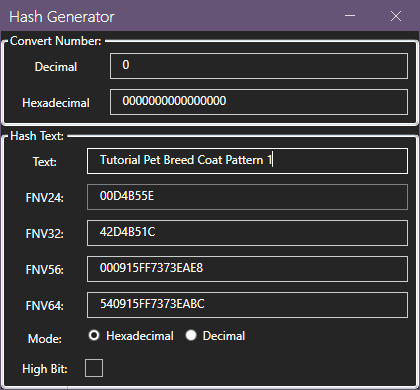
Edited 16/10/2023: When generating your hash ID's, please use your creator name ie.: "[YourCreatorName/Blogname]TutorialPetBreedCoatPattern11", this will give you a more unique hash code than hoping to be as descriptive as possible when generating the hashes (in this case instance ID's).
Thanks to Mizore Yukii for this advice, from Creator's Musings discord.
As in my previous guides, be descriptive with what you're typing there and then just change the last number.
The process is annoying and slow, so bear with the images, and follow along.
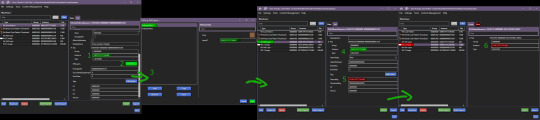
The TextureKey coloured in red is the 3rd ID you'll generate, it's what links the texture to the Pet Pelt Layer, which links it to the Pattern we're creating. (Sorry for the squished thumbnail, open it in your browser, I was running out of picture space for the rest of the tutorial lol).
And now we repeat this for the second Pet Pelt Layer.
Now, if you want the game to just generate the thumbnail for you, you can skip this step, if you want to make a custom thumbnail, then copy the Pet Coat Pattern Instance ID into the two Thumbnails we've added to our package file:
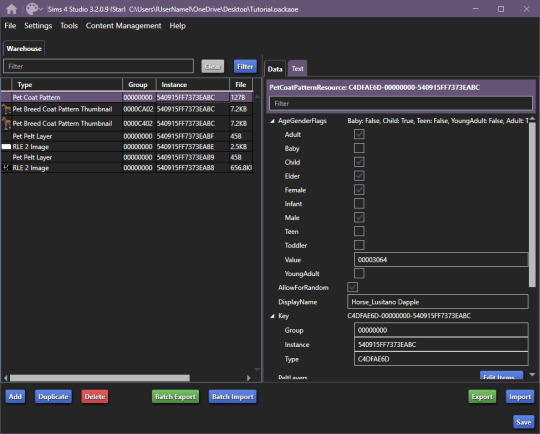
This is what the package file has to look like at this point.
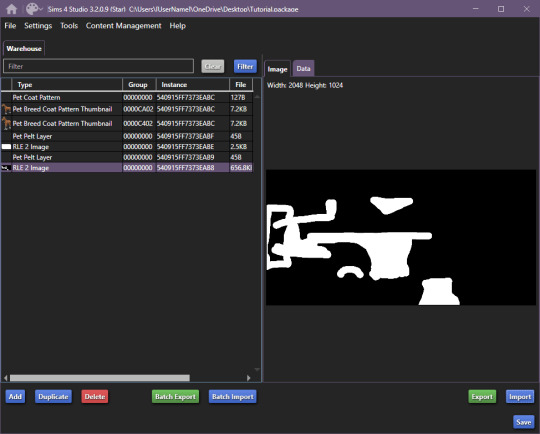
Now is the relatively easy part, editing the second RLE 2 Image. We won't touch the base, because it's not necessary.
I recommend using the Horse Diffuse Map as a base when you're drawing your pattern. It'll be easier to see what you're doing. You can download it here: Horse Diffuse Map.
Remember, that your pattern HAS to be white, black space is IGNORED by the game and considered a "transparent" layer, so that you can see the layer beneath the you're working on.
This is my quick, and lazy test one I've made, I use a PNG of the Diffuse Map as a base and on a separate layer I draw with white coloured brushes:
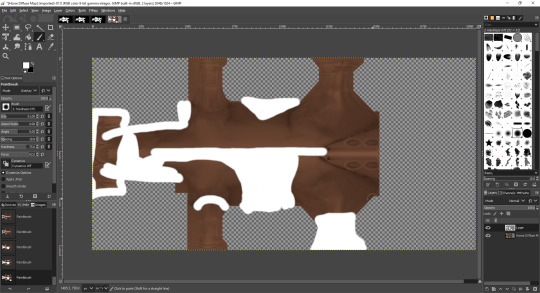
You may notice the very straight lines on the diffuse map - make sure to colour OVER them as if you do not, it will appear in-game because those are the seams where the mesh "meets"
Once you're satisfied with your pattern, you can go to export, just make sure that the white pattern is on a separate layer to the diffuse map. At this point you can add a black background underneath the white and export.
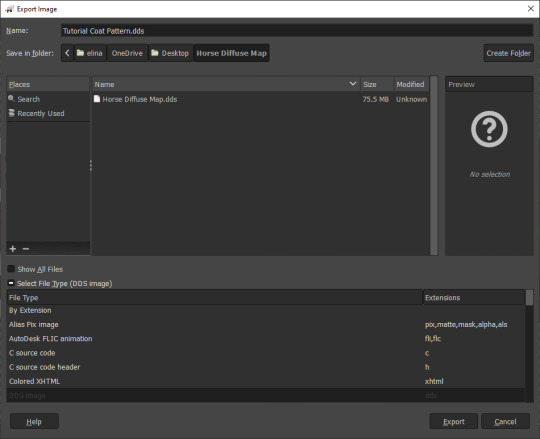
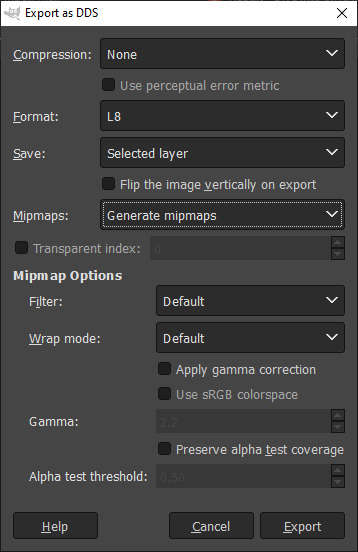
All you have to do is export the RLE2 Image you've edited as a DDS image in the L8 format and (edited 31/08/2023) select "Generate mipmaps" otherwise you will experience a glitch in-game where the coat disappears. You can leave the mipmap options as default, it should work correctly.
Then, we're going to import it into our package and save our package:
Remember to not touch the completely white base coat!
Now that this is over, we'll go back to Pet Coat Pattern and edit some settings.
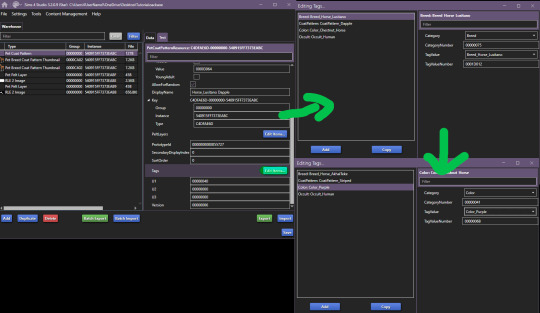
The first three settings is what I recommend changing around. The first setting changes the breed, the second setting changes how the coat pattern is labeled and the third setting changes the colour it's tagged under.
Only change "TagValue" - it will give you a dropdown menu, don't change anything else. The TagValueNumber changes automatically, so don't worry about it.
EDITED TO ADD:
Additionally, don't forget to go into "PetPeltLayer" and change the colours, this is what will show up as "base" colour that you can change in-game. You can change them for every PeltLayerData file you have.
Now, save and go test it out in game:

Bada bing, bada boom we've got our "custom" coat preset.
If I've forgotten anything, let me know. This took me 2 hours to write, so forgive my typos. If anything is unclear, let me know. I ran into a struggle with the picture limit on Tumblr (found out that it's 30, I should move my guides somewhere else, but where?)
#The Sims 4#Sims 4#The Sims 4 Horses#The Sims 4 Pets#the sims 4 horse ranch#the sims 4 guide#sims 4 guide#sims 4 custom content guide#sims 4 horses guide
146 notes
·
View notes
Video
youtube
All Small Business Perks Explained And Rated | The Sims 4 Guide
7 notes
·
View notes
Text

Quick Guide: Stay Safe While Downloading Sims 4 CC & Mods
I just published a quick guide to help you download Sims 4 CC & mods safely. ⚠️ From trusted sources to spotting red flags. Keep your game clean and secure! 😊
Read it now
#avoid malware in sims 4 mods#how to avoid malware sims 4 mods#how to download mods safely sims 4#patreon sims 4 cc download#safe sims 4 cc creators#safe sims 4 download sites#sims 4 cc best practices#sims 4 cc community guide#sims 4 cc download checklist#sims 4 cc education#sims 4 cc folder structure#sims 4 cc mod manager#sims 4 cc mod security tips#sims 4 cc mods support guide#sims 4 cc protection#sims 4 cc safe download#sims 4 cc safe hosting platforms#sims 4 cc safety guide#sims 4 cc safety tutorial#sims 4 cc virus warning#sims 4 cc zip file tips#sims 4 custom content security#sims 4 custom content tips#sims 4 mod folder organization#sims 4 mod malware prevention#sims 4 mod safety#sims 4 mod safety checklist#sims 4 modding guide#sims 4 mods antivirus#sims 4 script mod warning
286 notes
·
View notes
Text
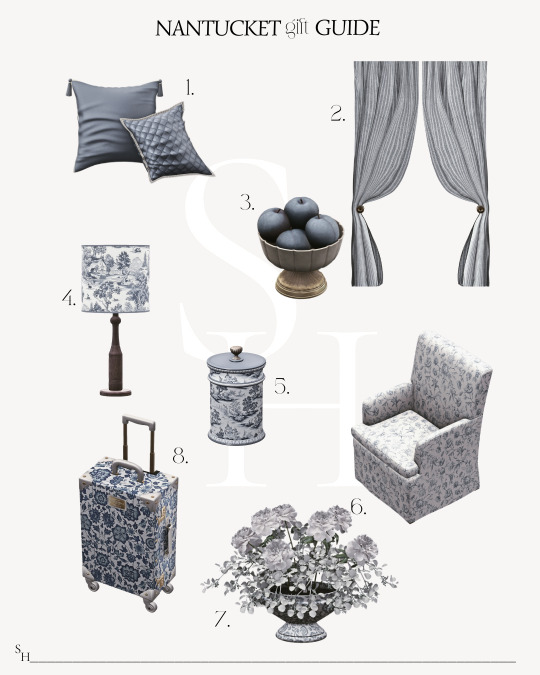
𝚂𝚑𝚘𝚙 𝚝𝚑𝚎 𝙶𝚒𝚏𝚝´𝚜
𝟏.𝑳𝒐𝒓𝒓𝒂𝒏𝒊𝒂 𝑽𝒊𝒍𝒏𝒖𝒆 𝑷𝒊𝒍𝒍𝒐𝒘𝒔 𝟐.𝑨𝒄𝒂𝒅𝒆𝒎𝒊𝒂 𝑪𝒖𝒓𝒕𝒂𝒊𝒏𝒔 𝟑.𝑷𝒍𝒖𝒎 𝑩𝒐𝒘𝒍 𝟒.𝑻𝒐𝒊𝒍𝒆 𝑻𝒂𝒃𝒍𝒆𝒍𝒂𝒎𝒑 𝟓.𝑻𝒐𝒊𝒍𝒆 𝑪𝒂𝒏𝒅𝒍𝒆 𝟔.𝑭𝒂𝒓𝒎𝒉𝒐𝒖𝒔𝒆 𝑫𝒊𝒏𝒊𝒏𝒈 𝒄𝒉𝒂𝒊𝒓 𝟕.𝑭𝒍𝒐𝒓𝒆𝒏𝒕𝒊𝒏𝒆 𝑪𝒆𝒓𝒂𝒎𝒊𝒗 𝑽𝒂𝒔𝒆 𝟖.𝑶𝒓𝒚𝒏 𝑺𝒖𝒊𝒕��𝒂𝒔𝒆
𝙽𝚊𝚗𝚝𝚞𝚌𝚔𝚎𝚝 𝙶𝚒𝚏𝚝𝚜 𝙱𝚢
@sims4luxury @kerriganhouse @ bambisims
#the huntington#SH Luxury Gift Guide#ts4 cc finds#ts4 aesthetic#the sims interior#gift guide#ts4#ts4 interior#simspiration#sims4 cc#sims 4 community#ts4 inspo#sims interior#sims 4 aesthetic#cc finds#the sims cc#sims4 cc finds#the sims 4#sims#sims 4#sims 4 cc#maxis match#ts4 alpha#simblr#simblog#ts4 simblr#the huntington interior
261 notes
·
View notes
Text
L&D Trans Sim Tagging: EA Made an Oopsie
Xan here. Remember how I never got into Fullbody outfits, in the original Trans Sim tutorial? Well, I am honor-bound to get into it a little. Why? Because I made a discovery, and it's...not great.
TL;DR: The Part Flags for most of Life & Death are messed up. Trans Sims are wearing the wrong meshes and it cannot be avoided; EA has to fix it.
If this concerns you, please upvote the report, and spread the word. They have ignored the Sims community about gender-related glitches in the past. Help us make them fix this, so we don't have to.
In-depth explanation about the problem below.
I was stoked to see we got clothes for both frames in the newer packs. Finally, Sims can wear whatever gender clothing they want! That's the goal, right? But, recent testing made me wonder how they handle opposite-frames. I thought I could learn something to help with inclusive tagging. So, I stuck Carmen in a dress from L&D, and:

It passes from the front, but...her chest. That's the opposite gender distortion. The one caused by putting a AM (masc frame) mesh on any AF (female) Sim, trans or not. I've definitely talked about this.

I went and cloned both meshes to check the tags, and sure enough:

Quick tagging lesson: toggling Restrict Opposite Frame means Carmen can't wear the AF one. She has to wear the AM frame dress, because as a trans Sim, her frame is AM. (Literally, the Opposite Frame of her gender.) But because she has breasts, she inherits the chest distortion all female Sims get wearing a man's top. The same applies for Erik, her counterpart (AM w/AF frame).
With a sinking feeling, I went back to the game and tried...everything.

I ran out of space, there are more. Trans-men are the same. I got halfway through the AM catalog and ran out of willpower. I'm betting almost every item made for both frames in this pack is tagged wrong. It's locked by frame, instead of gender. With pants, that's not a problem--but tops, dresses and suits will all be swapped.
So, now we know Fullbody meshes work similarly to tops. They need to be locked by Gender. And it's really just that tag. To test, I went back to my cloned dresses, and fixed it with two clicks:

This means all women regardless of frame can use the AF, and all men can use the AM. And here's the result: AF dress on AF Sim, AM dress on AM Sim. They literally swapped dresses.


So, easily fixed! That's 2 files out of...all of them. (sigh) I filed a Bug Report, linked above. Hopefully the amount of evidence I provided will get an actual response. That, or they'll think I'm an arrogant prat for telling them how their game works. But, I didn't break it.
Moral of the Story: this is a great example of what not to do if you make cc, or if you retag what you download. Remember, if you want to limit who can wear a mesh:
"Restrict Opposite Gender" for Tops and Fullbody; this makes sure all AF and AM Sims wear their meshes, and don't end up with chest lumps.
"Restrict Opposite Gender" for AF Bottoms; Trans-AM Sims break in half. Don't Restrict AM Bottoms at all. They fit everyone.
Or, Don't Restrict Anything, if you want all options. Note: distortions will happen. Mark your gender filters. They help a lot.
Earrings, Hats, Makeup, Gloves, Socks, Tights work for everyone
Necklaces and Nails are "Restrict Opposite Frame"; Trans Sims can't wear these from their own gender. They don't fit.
If you got this far, thank you for sticking it out. My innocent question turned into a tagging lesson (again). But, if it helps anyone in the future, I'll be glad. At least now we know there's a problem.
Please boost the Bug Report, share if you found it useful, and thanks for reading. I'm on the soap box again re: trans inclusion, but it's still Pride and I can't not stand up for my people. The more we know, the better we can do on our side.
Finally, tagging some folks who might want to know, if they don't already (feel free to ignore): @sejianismodding @the-crypt-o-club @yooniesim @whyhellosims @thefoxburyinstitute @sims4tutorials @mmfinds @gncc
#sims 4 bugs#ts4 bugs#s4 tutorial#ts4 tutorial#sims 4 studio#lgbt sims#ts4 trans#carmilla#phantom#realizing I never actually explained how tagging works#might be time soon#in my defense I didn't know when I wrote the first guide#but I'd rather not annoy everyone banging on about this
136 notes
·
View notes
Text
Transferring animations between rigs (e.g. adult to child)
The steps below describe how to transfer an animation from an adult rig to a child rig but the method should be applicable for any transfer between human rigs.
However, I haven't tested other constellations. Let me know if you have any other tips, suggestions, corrections or run into any issues.
Many thanks to thepancake1 for helping figuring out the details that are not obvious at all 💛
I posted this little guide in Creator Musings for someone wondering about it but sharing it here as well.

Step 1)
Export the adult sim animation you want to transfer (=your source) to Blender.
Open a blend file with a child rig (=your target).
Append the adult rig with the animation to the child rig in Blender (File > Append > Select the blend file > folder "Object" > select rig and mesh there)
Select the animation from the adult rig for the child rig (select the child rig in the Outliner menu > select the scene tab in the properties panel below > in "S4S AnimationTools" select the adult animation as the "active animation")
This will get the job mostly done, but the animation will be offset and jumping around, as you see below. To correct for that you will need to set up several constraints as described in step 2.


Step 2)
As you see below the height of the ROOT_bind of the adult sim and child sim differ by about a factor of 0,7:

You can check the exact location in Edit mode:
The ROOT_bind of the child rig is located at 0.6920, the ROOT_bind of the adult rig at 1.0112 on the Z axis, which gives a factor of 0.6920/1.0112=0.6843354430379747

With that information you now need to do the following:
In the Dope Sheet menu, select "Action Editor" and press "New Action" there to make a copy of the selected animation for the child rig.
In the Dope Sheet Summary open the ROOT_bind and disable the location channels but keep the rotation channels enabled (the latter matters if the ROOT_bind is also rotated in an animation). The setting should look like this:

In the Transform menu (now in Pose mode) type in -0,6920 on the X axis for ROOT_bind (thus resetting its position to 0 in the animation; can't properly explain why X axis is chosen here instead of Y but it has something to do with how local rotations of a bone are determined according to pancake).

Create a "Copy Location" constraint for ROOT_bind of the child rig targetting it to the ROOT_bind of the adult rig (this is done in the Properties panel > Bone Constraints), set Influence to 0.6843354430379747 (factor calculated above). (Edit/Correction: Previously I recommended to create another "Copy Location" constraint separately for the "Z" axis and to check "Offset" there. However, upon further testing, this doesn't seem to be necessary. Leaving info here just in case.)
You might then also need to add a "Copy Rotation" constraint for ROOT_bind of the child rig targetting it to the ROOT_bind of the default rig (Influence can stay at 1 here).

The animation should now play as expected:

Step 3)
All you need to do now is bake the animation (thus applying all the constraints you set up). Select Pose > Animation > "Bake Action...", then check "Visual Keying" and "Clear Constraints" in the pop up. The animation will now work stand alone and you can delete the adult rig.
Alternatively, if you use Pancakes animation tools, you just need to export the clips, the constraints will be applied automatically.
288 notes
·
View notes
Text

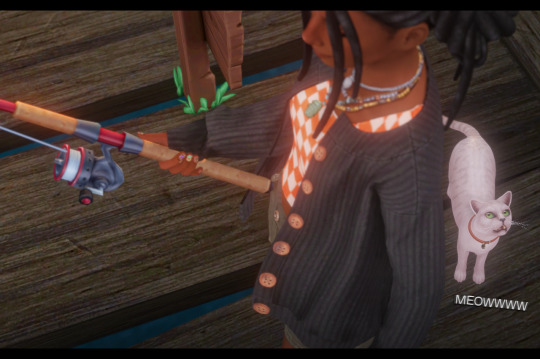


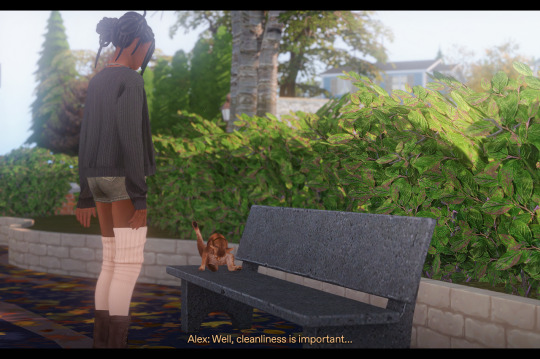

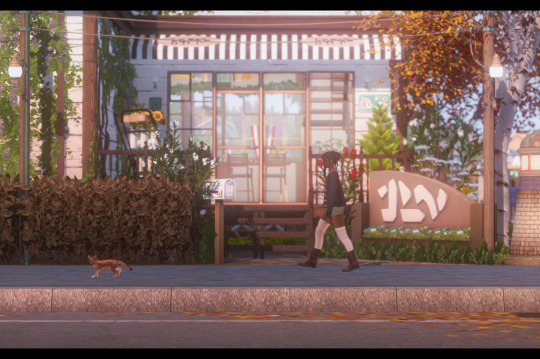
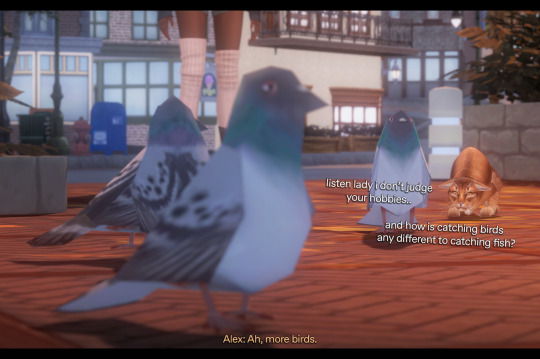


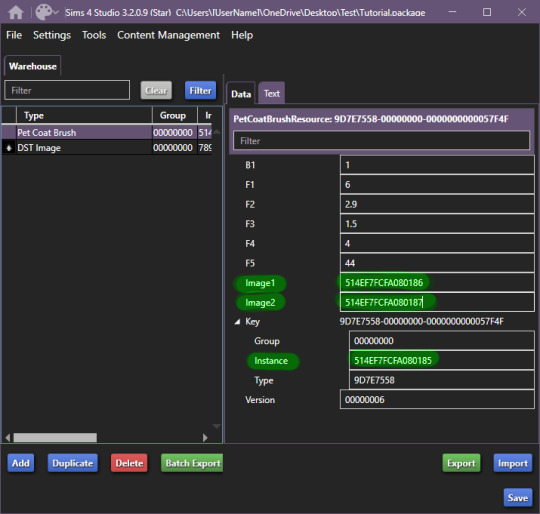
Previous // Next
[waves lapping] Alex: [gasps] Hey, buddy! Awh.. I haven’t caught anything yet. Alex: And you brought your friends! Alex: No wonder you’re the stinky one-.. wait! I KNOW YOU!! Alex: Is that your girlfriend? Alex: Yeah, I do that too. Alex: Well, cleanliness is important… Alex: Ah, more birds. Alex: Take me to your house. Alex: Are we done digging yet? That’s a pretty big hole. Alex: Now you go fast-.. on SAND? Toulouse! Alex: LOU!
#ts4#sims 4#simblr#ts4 story#sims story#forever in between#fib#alexandra sampson#ᓚᘏᗢ#go lou go!!#way better than google maps#10/10 would hire as a guide#ehehehueheu#i was gonna have em meet later n alex would've been bummed to not find him for a while but thought it'd be cute if lou led her to him..#EVENTUALLY#then i saw him rolling around in the fish whilst alex was fishing and it was perfect#SRY.. purrfect#lmao
201 notes
·
View notes
Text

I wrote a guide on my main blog on writing SimLit a while back, but I figured I'd amend it to make it more suitable to Tumblr and post it here as well.
Please note, that there is no one way to write SimLit; creative work is always subjective. You do not have to do everything in this guide, obviously- just focus on the bits that apply to you and what you want to write. This is a gathering of my own ideas, the way I do things, and other options as well. Depending on your writing style, some of this will be more relevant to you than other bits will. This is both for the challenge players and the people who write stories with little basis off anything going on in the game.

I have made a story / challenge-planning document that you can read about here that will give you a place to put all your ideas!
The fun part...sort of...is coming up with all your rough ideas. Things to think about are:
. Where you'll put your story: The most popular place for SimLit these days seems to be Wordpress, but there is always Blogger and LiveJournal as another option for a place to put your story. Tumblr is a great place for stories that are more picture-based and less textual, or if you plan to only have dialogue for your story text. Have a look at what different platforms have to offer to see what suits you.
Whilst I would say Blogger is a bit harder to properly customise than Wordpress and you have to rely on custom templates made by other people and some HTML editing if you want a nice blog template, it is very generous in terms of picture limit. To my knowledge, any image under 2048 on the longer width won't count toward your Photo space (as of 2025).

. Narrative or Gameplay-Driven: Some writers will write commentaries to go alongside images of challenges they're doing. Some write commentary for their general gameplay. Others use Sims solely as a way to 'direct' a story they've come up with themselves instead. Others make comics. Some do a mix of various things... Have a think about what kind of story you want to do. It might even change halfway through writing, you never know!
. Genre: You won't always have an easily-defined genre for your story, but you might have some ideas. Romance, Fantasy, Sci-Fi, Horror, Family...the options are more or less endless.
. Custom Content: If you use CC, it can help to look for CC you might need for your story- whether that's poses, CAS items or Build/Buy items.
. How you will plan your story: Some SimLit authors write entirely around the game and don't pre-plan anything (brave people you are going by the seat of your pants, I used to do this but now I could never), but others like to plan story points and character notes beforehand. There are plenty of ways to plan your story, whether that's jotting ideas in a notebook or on a word processing document. There is one I already made linked at the beginning of this section.
There are also programs like Scrivener designed for writers to plan stories (it's not free, though). It depends how in-depth you need to plan things out before you write. With me, it really depends. Some story ideas, I have most of the plot planned in my head from the get-go. Other times, I only have a rough idea and have to go from there.
. What challenge you will do: If you want to write a commentary/story around a challenge, look for one you'll find fun first. Long or short? What rules will you change or omit? How much will you let the challenge and game drive the story? Will you be writing commentary, or will you be writing in a narrrative-type style inspired by what happens in the challenge?
. Rough plot / character ideas: Write down any plot or character notes that immediately come to mind, even if you don't know if you will use them. Anything that comes to you straight away is a good place to build on later and should be jotted down whilst it's still fresh in your mind.
. How you will write your story: - Commentary VS. Narrative: Will you write a commentary around your screenshots/gameplay, or will you write it in the style of a prose-like story? You can also mix both of these approaches in various ways.
Or do you want to go about it in a different way? Maybe you could use your screenshots to make a comic-style story. Another option is to possibly have something like an epistolary novel (written almost entirely in letters) or even a 'scrapbook story' (a story told in multiple ways with multiple artifacts- letters, newspaper clippings, phone calls, almost anything).
- Tense and Viewpoint: Will you write in past tense or present tense? Will you write in third person, or first person? How many different characters' viewpoints will you have if you write in first person? (...Or are you like me, and will accidentally switch between tenses throughout the whole story?)
. Themes: It's good to think more in-depth of what themes will appear in your story. Family bonds, friendships, relationships in general, dealing with various aspects of life, prejudices, overcoming fear...the list goes on forever. Whilst I personally don't like reducing stories to tropes, tropes are always a place to start if it works for you.
. General length: Do you want to ideally write a short story, or something longer? This won't always be something you'll have in mind straight away, but that's fine.
. How much to plan and when to start: It's up to you how much you need to pre-plan and when to start writing, but I don't start writing until I'm at a point where I know that the story can be resolved. I don't start writing straight away, in case I end up with a story I somehow can't finish.
. Upload frequency: You won't always stick to this, since most of us are busy, sad and tired adults- but it's good to try and think about how often you want to upload chapters. Are you aiming for weekly, monthly, or just whenever you manage to get a chapter out? What I will say is please TRY NOT TO STRESS about schedules. If your readers are impatient that's their problem and they can wait until you're ready!
. Gather inspiration: Whether it's authors, shows, films, art, music...anything that gets you in the right mood and frame of mind for what you want to do. Moodboards are sometimes a good idea as well for collecting inspiring pictures. Make inspiring playlists of songs that get you in the mood for the story or characters.
. The sliding scale of 'Utopia' and 'Dystopia': On a scale of 'Paradise' to 'Hell-hole world', what's the rough state of the world in your story like? Maybe it isn't that simple, but it helps to have an idea if it's thematically relevant somehow.
. Any messages or lessons: Are there any messages you hope to get across in your story, or anything that a reader may be able to learn from it at all? Not always the case with every story, and this is not the sort of thing that you'll do intentionally. For my own story, it's very much just a snapshot of history so there isn't really much of a defined moral to the story.

This is geared more towards people who are writing mostly story-driven SimLit, since commentary and gameplay-driven stories often don't require any sort of major world-building. That, and the challenge you are doing might already have the worldbuilding situation laid out for you, like the Apocalypse Challenge or the Alien Adoption challenge, but I'll build on this a bit too.
As someone who has been Game Master for DnD and Pathfinder, I'm used to fleshing out worlds, building on lore and the like- and being a Game Master often requires you to do it on the spot sometimes. For me, it's good to have some level of lore and world-building written out. I like having a certain set of 'rules' to stick with, mainly to help keep consistency of the universe's 'rules'. This is especially important with my Magic Universe since the magic system needs a level of consistency I have to try and stick to. (That said, I have occasionally changed tiny less-significant bits of lore as I go...shh...don't tell anyone!)
But where do you start with such a thing? First off, this isn't something you have to do in massive levels of detail (unless you want to!).
Here's the general way of how I do things. Feel free to pick and choose which bits will apply to your story; you don't have to pre-plan every little last detail about your world if you don't need/want to.
--Starting with the already-established relevant worlds and lore--
I almost always start out with the 'official' stuff first. You can find this in-game, in item and world descriptions, in trailers, and on Sims Wikis. Sims isn't the most lore-heavy game for obvious reasons, but now and again you've got something to work with. It all depends on exactly what you're writing about, and how much your story will revolve around the actual Sims universe.
--Seeing what I want to keep from the already-established worlds and lore, and what to get rid of--
I don't keep everything all of the time, and it's unlikely you will either. Sometimes your idea is better, or fits better with what you've already got in mind. Or perhaps the Sims 'lore' behind the thing is too comical and wouldn't fit a slightly more serious story.
--Start stealing ideas! (Go careful though)--
Writers worry way too much about originality, but everyone takes little bits of ideas off each other all of the time- everything is inspired by something. That, and in my opinion there’s absolutely nothing wrong with doing a story that’s a ‘love letter’ to a genre with all the tropes and cliches you can think of.
So gather up some inspiration and see what ideas others have; have a quick read of SimLits that are similar to your idea. Look at the lore behind shows or video games that are the same genre as you are writing. Think about your favourite shows, films and video games as well. Or even look at the official Sims forum or Tumblr to see what people have done with worlds, premade characters and the like. On the official forum, there are a lot of ‘What have you done with…’ threads where people discuss what they have done with premades and in-game places.
One thing I tend to focus on the most when worldbuilding, is the sort of socio-political aspect of the world. 'But why does everything have to be political?', you say, but everyone's life is governed by social and political ideas - some more than others, so for me it's what makes up a big chunk of the worldbuilding because of how much it influences the characters living in that world. That, and a few big historical events I tend to think of as well to flesh the world out. If this sounds like something you feel like delving into, then here's some ideas:
NOTE: Some of this won't apply to your world or focus, so just ignore the stuff that isn't relevant to your story.
--Events in history leading up to your story--
This will depend entirely on what you story is about, but events to think about are:
. Inspiring figures from the past: For example, if you're writing about vampires, are there any in history who are still iconic to this day? What made them iconic?
. Any miscellaneous important events? My more specific ones are geared more towards conflict, but there's always going to be important events that happened that stay with people that happen in the world and they aren't always going to be bad. (Yes, the author of Divided really did just say that.)
.Changes in laws and/or major attitudes towards groups: Were there any rules or legislations that came into play that completely shook the world of your story?
.Conflicts: Wars and other major conflicts in history will linger around for years and years in various ways
Modern society
This is looking at your present day in the story in more depth. This can help you with characterisation as well- how has modern society affected your character and their development and current attitudes?
. Attitudes towards certain groups: Who or what is celebrated in society? Who has to deal with negative attitudes and why? How are people choosing to fight back, positively or negatively, against positive or negative change? Is there any prejudice at all, or is your world almost entirely accepting of different types of people?
. General morale: How happy are the different groups of people in your world? Is there still need for change, or are people more or less okay with the way things are? Is there an imbalance in the welfare of different groups and why?
. What's/who's popular: From people to events relevant to the story you're trying to tell, what's popular and well-known? Are there any events or people that are causing change or debate that might be addressed later?
. Fashions: It helps to think about what's fashionable in your universe sometimes, but maybe that will all depend on what kind of CC you can get a hold of.
. What the future holds: What ideas do people have for the way things may change as time passes?
-
Magic, superpowers, or other power systems
If your story has some kind of system of 'special' power- magic, or superhero powers, certain chemicals, powers granted from deities or the like- it's good to have some rough idea for how they work:
. Is this power innate? Can it be learned? Is it within the person, or is it an outside source of some kind?
. Is this power a finite or infinite source? Is it a physical object, is it ethereal/energy, a chemical, etc?
. What limits are there to the use of this power? When can it/can't it be used? What downsides are there to using this power (illnesses, magical overcharge, death, etc)? What consequences are there for overuse of the power?
-
Beliefs and belief systems
Your story might have some sort of 'collective' belief systems- common superstitions, or religions like Sims Medieval’s Jacoban or Peteran faiths, or maybe even cults. If so, it's good to outline those, though the amount of detail you'll need for it will depend on the kinds of beliefs and the story you're telling.
. What are the core / defining rules / lessons /ways of living of this belief?
. What actions/attitudes etc are rewarded, and what attitudes are frowned upon? What rewards and punishments are there for such things, if any?
. How has this belief system affected other people outside of that belief system? What do 'outsiders' think of the belief and the people that practice it?
. Are there any key figures in this belief system? Are they real objects/people, metaphysical beings, or are they not real at all?
. Are there any specific meetings or practices etc. associated with this belief?
. Do people of this belief own specific special clothes or objects? What significance do they have?
IMPORTANT SIDE NOTE: When it comes to world-building, ALWAYS go careful when using any real-life cultures, beliefs or events outside of your own culture etc- especially those of marginalised groups. Try to do your research as thoroughly as possible.
To avoid potential upset or misrepresentation, I either rely on fictional creations or keep things vague. For example, I'm using the lore behind the Sims Medieval's Jacoban and Peteran religions in an upcoming story to avoid making a fictional religion that people might mistake as a parody of an existing one.
Do any research you need to do
Once again, how in-depth you go depends on how far you want to go- how realistic you want it to be, how historically-accurate you want it to be...Sometimes it's good to just have enough to get a rough idea of something to add on to. For example, if you're doing a historical story, it might be worth just seeing what big events happened, social taboos, etiquette etc. just to get a feel for the rough world of your story. For anything that isn't an important topic, I'm not bothered if it's inaccurate. For example: if it turns out the soft background science of something in my work is a bit wonky, I don't entirely care. However, for serious subjects like mental health etc, I always make sure to get a good idea of what I'm doing before I write it. If I get it wrong, I could end up spreading massive misconceptions and that's the last thing I want to do. -
World-building towns and cities
Not everyone's story is going to have a huge deal of focus on this sort of thing, and additionally to the top you might want to go even further with building onto what's already given to us. So here's some other things that might be worth thinking about if you want to do a bit of extra fleshing-out for the game worlds. When I say 'individual world' I mean the actual playable worlds on their own as opposed to the ts4 worlds altogether at once. If you're doing a challenge and the challenge has worldbuilding aspects, like Alien Adoption Challenge or the Apocalypse Challenge then that is a brilliant thing to give you some level of a framework for some aspects of your story's world.
. Rough population of the individual world etc.
.Landmarks and their significance
.Tourism, what do other people like to do whilst they're there
.What sorts of people tend to live there
. What the individual world is known for the most, what puts them 'on the map', so to speak

Characters are my main focus as both a writer and a reader. I can have a good story with great characters and a thin plot, but a story with a great plot and boring characters is never going to interest me. They can also be difficult to come up with ideas for. Here is a rough idea of how I come up with characters, and how I build on pre-made characters.
Some people have written 'character interviews' - these can sometimes be helpful. You fill them out from the characters' point of view, or from a third-person perspective but about the character. The 'Marcel Proust' character interview is a great one to use, since it asks questions that will no doubt be relevant to both the character and the plot later on. Some of them have questions about favourite food, colours etc. but for me, this is more often extraneous than not. Then again, knowing too much about your character for some people is better than not knowing enough.
My own character 'interview' is here. It's technically not an interview and is just a list of things to consider about your character. You may get some use out of it.
First off, before anything: think of what to base your character on, roughly. Think of the traits of people you know or have known, think of aspects about yourself. Of course, we can't forget basing characters off of your favourite fictional characters!
If you are writing a premade character, and you're unsure on what to expand on, first off look at their in-game traits, any information provided in trailers/promotional material, and then look at fan theories and ideas about the character. Those are good places to start if you're using a premade Sim.
As well as specific characters, think of your favourite traits, archetypes, and development types as well. One of my favourites is the downfall of a character, a tragic character whose constant screw-ups land them in a deeper and deeper mess. Even better when they start going off the rails a bit as well. I also love characters who struggle with others' kindness, who learn to let themselves be loved over time.
Then you can get to outlining them.
The basics about your character
. Name: Is there any meaning behind this name in-story? Did the character choose it themselves or is it their birth name? What nicknames do they have, if any? Which do they like, and which do they hate? (Names don't have to have meaning. I only use meaningful names in certain contexts- most names are just names I like, names that just fit for some reason, or that a character's parents thought sounded nice).
NOTE ON NAMES: If you want an authentic name for a character from a specific time period, look at census records for the country if they're available or see if you can find articles on people from that country and time period. You can also Google naming conventions, as they can change within a country over time as well. I also recommend avoiding baby name websites or baby-related websites when you want authentic names for characters that aren't English or American. It's best to find blogs written by people from that country. Sometimes travel blogs for the country will sometimes talk about names, authenticity and such. Sometimes Wikipedia has lists of names as well, but it's worth double-checking any info found there.
. Rough description: Height, rough weight, colours of skin/hair/eyes, the general 'vibe' of their attire or a more in-depth description. Anything notable about them, like specific jewellery, clothes, tattoos or scars/other injuries?
. Identity: This could be anything from where they grew up, gender, race, sexual orientation, or if they are an occult sim or some other made-up species or race. How has their identity affected their life? Do they face any prejudice or mistreatment for any of it at all, or does it give them more of an advantage over others?
. Family: People in a character's family, whether blood family or found family.
.Beliefs: What they do (and maybe don't) believe in.
. Protagonist or antagonist: Not always this black and white for every character, but good to think about your character's rough place in the story. Of course, one can become the other as the story progresses.
-
Character-defining aspects
. General personality traits: You can use in-game traits and Randomise to give you ideas, or you can think of your own personality traits for the character.
. Upbringing: What it was like growing up for them. Who was good to them? Who wasn't? How have these people and experiences shaped who they are today? How was the world different growing up to what it's like now? Does the character mourn the old ways of the world or do they like the change?
. Social class: How has this affected their life?
. Education: Might also connect with upbringing here- how was school/university etc. for them?4
. Goals/dreams: Almost everyone has a goal, even if they never achieve it. Even if it's just getting out of bed to make breakfast and then getting back in again.
. Social life: Extrovert, introvert or somewhere in the middlle? What do they do when they hang out with friends etc?
. Fears: What are they afraid of? What do they do to avoid that fear, if anything?
. Any conditions, illnesses, or neurodivergence: (ONCE AGAIN, go careful when writing things like this and do research where it's needed.) How have they affected the character's life and their outlook in general? How does it affect how others percieve them, if it does at all? If applicable, what caused them?
. If not that, then general physical/mental health: How well (or not) does the character look after themselves in these ways? What do they do for self-care and distraction?
. Likes and dislikes: People, things, events, hobbies...What makes them happy and what makes them want to punch a wall?
. Character 'flaws': Flaws don't necessarily have to be absolutely-horrible things, it can be just things that can hold the character back in some way. Some things that characters may overcome in a story might not necessarily be flaws as well- for example, introversion isn't a flaw (I wish writers would stop treating it as one), but possibly some characters may seek to try and 'come out of their shell' socially a little. Most characters have some kind of flaw or personality 'aspect' to overcome or learn to deal with, but the best kind of character flaws are the ones that actually get in the character's way in the story. The joy is in seeing how the character overcomes these flaws...or even how the character gives into them more and more as the story goes on. Wretched excess is fun sometimes!
. What they're good/bad at: Where do they excel, where do they need a little practice, and what are they absolutely terrible at?
. Any special ablities or powers: What can this character do? What are the limits of this power? How do they feel about this power?
. Things they are known for: Whether by friends, family, colleagues or the world. What are they known for? What do people like and dislike about them?
. Ideas for development: How do you (at the moment) see the character changing? If you have any ideas for it, who or what will help to influence that change?
. Relationships with other characters: How they do (and don't) get along with other established characters, and maybe why. -
Things to think about character-wise when writing your story
Once you get to writing your character, here's a couple of things that it helps to think about- though some of it is more relevant if writing in the first person.
. What your character does and doesn't notice: How do they approach the world around them? What sort of things do they notice first in their surroundings?
. Manner of speech: Formal, or informal? Do they have any mottos, catchphrases or words they use often? Do they speak about feelings a lot? Do they lie, and how often? Sometimes what isn't spoken can say as much as what is spoken.
. How they socialise and deal with others: Do they overthink things in discussion? Do they pick up on social cues? Do they often over-analyse the actions of others, or do they let everything go over their head? Are they confident in socialising, or not? Maybe their out-of-dialogue musings are complex, but they keep to not revealing much in their speech.
. How they cope with negative emotions: Do they break down, or blame others? Or do they power through it?
. In connection to some of the above points, think about your character both from the outside and inside: How do others see them? How do they think they come across to others? How do they come across to themselves? And finally, who are they really on the inside?
An important aspect to think about especially is character motivation. I've written this one separately from the bullet points since I think it's especially important given character motivation will play a major part in driving the plot along, as well as relationships with the other characters. This might not be something you'll have a solid answer to until you start writing, but it's good to have some starting ideas.
. In the broadest and simplest sense, what does your character want? Money, fame, honour, redemption, happiness, revenge...Have a think about what it is that they strive for deep down. (If you're struggling for ideas, maybe it might help to look at the in-game Aspirations, or maybe even the Traits will give you some ideas).
. How far are they willing to go to get it? Are there limits they won't go to in order to get what they want? Or are they willing to step on whoever's toes? This might be a change that occurs over the story, that's always an interesting concept. Seeing the well-behaved character slowly and gradually challenge what is acceptable...
. Who, or what 'kickstarted' this motivation? Some people just naturally come to want something, maybe as they grow up and/or their general interests, hobbies etc. change. Some motivations are brought on by events, though. Maybe harm done to a loved one motivates them to seek revenge, or something they did in their past motivates them to seek forgiveness or redemption for their actions.
For challenge players, you can always define your characters through funny commentary, I always like seeing that. One story had one generation founder constantly break the fourth wall and be the only one who realised they were in a game and it made them stand out in a comical way.

Let me start off by saying: Plot is my weak point. I struggle to organise ideas when both reading and writing, I always have done. As usual, for plots it's best to think of your favourite plots from stories or a 'stock plot' like The Hero's Journey, Wretched Excess etc. It's also good to think about any potential plot points that come to mind straight away, so then you have starting points and can fill in the gaps- this is generally what I do. And honestly, I don't think it's that bad to re-use themes and plot pieces sometimes. Sometimes it works better to stick with what you're familiar with, than it is to try a thousand things at once that are new or different to you.
Do you see yourself as a 'plotter' or a 'pantser'? I'm a bit of both, though I'm leaning towards more of a plotter now. I wish I could write everything by the seat of my pants, but sadly I can't.
The way I initially began planning for a longer, more in-depth story is by making a table in a word processing document that is one column wide, with loads of rows. Just one giant row of loads of columns. Each box in this table will be for specific notes, and the order of these notes in the planning table goes like this:
. Title ideas/preliminary ideas: What it says on the tin, and the very, very first ideas for the story.
. Rough story ideas: Any ideas that come to me in the pre-planning stage go here. Ideas for anything at all- screenshots, scenes, lines of dialogue, anything!
.Background information to be aware of: Any relevant lore or research goes here. Sometimes I keep story research in a separate document.
. Previous story points to be aware of: Any previous characters or events to be aware of to aid in consistency.
. Current plot threads: Keeping track of plot threads that need to be resolved in some way, to help prevent plot holes.
. Character info: Character information in varying levels of depth. At this point, this usually only covers main characters.
. Character Development: This almost always changes halfway through, but this is my plan for how characters will change as the story goes on, and the events and characters that will be catalysts for that change.
. Backstory: Character backstory goes here instead, to keep things organised.
. Ideas for future chapters: Any ideas at all for upcoming chapters, no matter how vague. This also includes things that absolutely have to happen later on.
. Story ideas: Various boxes, all of which have more detailed story ideas. At the moment these are defined by specific events, and these are just for the direction of the story.
. Chapter (X): The main story planning, with one box for every chapter. This is where the story starts to be sorted by chapters as opposed to just events. Things always get swapped around during the writing process: Some things get moved until later, moved to happen earlier, or omitted/changed entirely.
The general idea as I'm going, is that each chapter has to move at least something forward. We learn something new about someone, a character's actions have changed something or caused a consequence, a character has learned something, etc. Somehow things have to be different from the beginning of the chapter to the end of the chapter and that is generally how I go about it. Whilst a lot of people frown on whole chapters that 'info-dump', for some stories it might be necessary- especially for futuristic or alternate history stories where the author will need some filling-in on the general state of this unfamiliar world.
Again, how much you want to/need to plan depends on what you're doing. Nowadays I write narratively, and the game has little bearing on the actual story.
If you're going with a gameplay or challenge-driven story you probably won't need much planning, if any at all.If it helps, it's worth doing what you can to create associations of some type within your planning- whether it's symbols, bold/italic, colour-coding, anything. That might aid you in keeping important bits of the notes tied together somehow, whether it's done by scene, character, important plot points etc.
It may help to highlight important bits as well in your word processor, so you can easily find things you know you have to go back to soon. I sometimes do this since I easily get lost in my own notes...
-
Other Planning Ideas
. Starting from the end: It might be easier to go backwards if you come up with your ending before your intro. You can always start with your end point, and then figure out how you got there.
. Mind-maps: If a massive list of boxes doesn't sound ideal, it might help do a sort of mind-map or flowchart. This is better if you are the sort of person who'd rather take in small bite-sized pieces at a time. You could have one mind-map for the beginning, middle and end, and then do little branches off for different events. And then from those branches, possibly add more for other details surrounding that specific story event, or things to remember for later on down the line.
. 'Snowflake method': Put simply, it's writing down a simple plot point or idea and then continually expanding on it until it's at the level of detail you need for your plan- the way a typical snowflake's points branch out. As a random example: - Dave goes to get some cheese. - Dave has discovered a monster in his kitchen, and it demands a block of cheese or Dave's life. Terrified, Dave goes out to get some cheese to appease the monster. - A monster that can only live off of cheese is used to eating the bits of dropped cheese off Dave's kitchen floor, but Dave has decided to do more cleaning now his girlfriend is moving in. Desperate for survival, the monster has escaped its hiding place, demanding a block of cheese from Dave for its survival. If Dave does not supply cheese, he will be killed by the monster.
. 'Five-part narrative'/Pyramid: Breaking down your story into the five main parts of most stories: - Exposition: This is mainly setting up the world of your story - the setting, the main goings-on in the area, the characters we will be following throughout the story, and also the driving point which sets the main characters ahead doing plot stuff. - Rising action: The rising action is generally the part where the characters' antics, or possibly something caused by the world around them, sets stakes higher and puts more pressure on them. Perhaps the character has made a grave mistake. People could be after them. Or perhaps some kind of natural disaster has caused massive issues for the character. How will they come to navigate all of this? - Climax: The rise up to the 'turning point' or the height of the drama in your story. Maybe your character finally has some kind of breakdown, their actions have led them into the worst situation possible, but good can arise from this...or your character can just keep going down the slippery slope. - Falling Action: This is generally the process of gradually resolving all that has happened during the story. Maybe the main characters have realised their mistakes and aim to solve them, or perhaps your characters have overcome the main antagonist, or possibly made peace with them somehow. - Denouement: The resolution to the story, or at least where the characters end up. Then again, who's to say that everything will be resolved by the end if you want to make a series rather than a one-off? And who's to say the resolution will be a clean pretty one?
. For the challenge/game-driven writers: It helps to make notes of anything that happens in-game that could become a plot idea. Whether it's something from a mod, Lifestyles, Sentiments, or other autonomous actions- anything that gives you idea for a potential relationship change, conflict or story point, jot it down and maybe you can build on it later. If your Sims end up with positive or negative Sentiments for each other, then maybe it could be fun to come up with a reason why they feel that way.

My biggest piece of advice is: If you are stuck with what to do next in a story, let the game do some of the storytelling for you if you need to. Look at what happens autonomously, Likes/Dislikes, traits, anything caused by mods that add story depth to the game, Sentiments that people have for others etc. You probably even have mods that actually add some real depth to the game that you can go off of. It's a great way to help you get new ideas. It's gotten me through a lot of brick walls in the plot.
. Do not use ChatGPT or any generative AI! The whole point of creative writing is the CREATIVE part and neither of these are at all creative. Don't bother writing a story if you can't be bothered to do the writing.
. Be sure to try and use content warnings for aspects of the story that may need it. You can use the trigger tags and can warn in chapter headers. You can't catch everything, of course you can't, but it's a helpful way to help a reader decide whether or not it's worth getting into a story, or whether they may want to skip a page or chapter. My own story has a lot of potential triggers so I warn about them as much as possible.
. Portrayal is not automatically endorsement. Your story does not have to be entirely morally-pure and neither do your characters. Not every story is about the perfect people who do no wrong and somehow manage to tick every box on how to be the perfect Leftist. You also don't have to provide disclaimers on the fact you are not okay with what's being portrayed, but you can do so if you want to save your own skin.
. Do not worry too much about word counts. Some people like to keep an eye on word counts, but make sure you're not letting it dictate your entire workflow. It's great to have goals to keep you going, but to let them define your work entirely can get stressful. If you miss your goals, don't beat yourself up about it.
. Use online generators if necessary! Names, plot points, rough plot outlines, there are generators for everything online. They are there both for fun and to help you get a starting point, and you are NOT cheating for using them! No other writer ever does absolutely everything themselves. We all get ideas from somewhere, so there's absolutely zero shame in using generators for ideas and such.
. Do not get hung up on looking for writing advice. I know, I just gave my advice and yet I'm saying this! Over the years I've looked at so many writing advice blogs, and almost all of it has been useless to me in the long run. Most of my learning has been from reading others' writing, and I have also learned from other kinds of art as well- films, pictures, etc. Do not rely too much on one person's style or advice. It's no good wanting to be someone else, and take that from someone who's been super jealous of loads of creators over the years. Whether it's art or writing, I've learned more from looking at others' art than I ever have from people who've told me how to do it. On top of that, don't let others' advice dictate what you do too much. After all, people are so quick to label absolutely anything as 'bad writing' these days. Continuing on from this point...
. Do not let others' writing advice become super-strict rules. Including my own! The problem with some people and their advice, is that they tend to think their way is the only way, for everyone. And as I mentioned earlier, people are quick to slap the latest cool 'smart writer's term on anything. Remember when Mary-Sue/Marty-Stu started off as an overpowered character who never faces consequences, but then seemingly became any character with supernatural powers and/or unnatural hair and eye colours? Remember when we got taught 'said is dead' in primary school, and then authors and Internet writers suddenly became obsessed with it to the point where you were terrible for using 'said' at all?
All of those writing blogs demanding complete originality when every conceivable story is inspired by something, subconsciously or otherwise? Getting thrown overboard for using clichés? The same three authors being used as a style model? It's great to take inspiration from other people, but don't think that others' writing advice is always 100% going to improve your writing because as I have said ad nauseum throughout this whole thing- art is subjective. Even if the advice-giver is an excellent author that's been published 1205 times, that doesn't necessarily mean their way is the only way for everyone. My likes and dislikes are not ultimate. Neither are theirs, and neither are yours. Write the clichéd character, add the cool thing because it's fun, use 'said' all of the time, enjoy yourself.
. Also worth adding that just because someone writes their writing 'advice' in an incredibly harsh or 'my way is the only way' manner, it doesn't mean they're 100% right and that you should change how you do things because a bored stranger on the Internet thinks they're the last word on how to create things. You are not going to please everyone, and that's fine. And let's face it- some people are never pleased. Ever. Don’t write to please these types of people, it’s not worth it. I've come across them plenty of times in the past on creative websites, and I've fallen into the trap of trying to do what they say because they must be right, right? And really, why should I? Why should anyone?
Don't fall into the trap of feeling like you have to do what the angry man on Wordpress told everyone to do. Maybe these types occasionally have something good to share, but you should only use writing advice you find genuinely helpful to you.
. When it comes to doing research on things like stereotypes or tired archetypes / plotlines for certain marginalised groups, be aware that everyone has a different opinion on what is harmful and what isn't. You cannot write a character of any experience that every single person will agree with or consider to be a sympathetic portrayal. One man's good representation is another man's problematic.
You are also occasionally going to find some people writing these portrayal guides who will consider every experience out of their own individual one to be wrong (I've come across plenty of 'how to write autistic characters' guides where the autistic writer is convinced their experiences are the only kind of 'proper' autistic experience... and we are all very different people in reality!). Try to get a rough idea from multiple sources and go from there.
. In addition to the above: Go careful where you get your research/advice from. I will happily admit when I don't know what I'm talking about sometimes. Other people, not so much. Go careful who you choose to do any research from. On top of that, when you are looking for advice specific to a culture or identity, most of the time it's best to find things written by people who are actually a part of the group. It's good to be as thorough as you can.
. Be imperfect. No-one is a perfect writer, though some certainly think they are! Perfectionism is common, but in my opinion it holds people back a lot of the time. Don't stress too much- SimLit is meant to be a fun hobby.
. Always aim to finish your work. Even if you have to pull a plot point out of your backside to do it, try to finish everything where you can. I have only ever discontinued one story, and that was only five chapters into it. If you're having trouble, don't be afraid to leave a project for a while. I find in the meantime, I come up with new ideas. Sometimes a necessary distance to a project is needed to see it in a different light, and then any issues can be (hopefully) figured out.
. Don't get caught up in the 'reboot loop'. It's a dangerous game, to constantly want to re-do your work. I'd know - I have a personal project that's been rebooted over 10 times and still not completed that's been a work-in-progress since almost 2014. Don't get caught up in it otherwise you'll never finish anything. If there's something you don't like, assess first if it's best to just move on with the story despite it. In connection to my above point, I'd rather a story be finished badly, personally, than not finished at all.
. Do not get put off by low reader numbers or lack of comments. It's part of the creative process- either you'll get feedback or you won't. People nowadays tend to go for shorter stories either due to not having time, language barriers are also a thing that can put people off a longer prose-based story, or due to the modern age trying to make everything as succinct as possible - and like I said earlier, a lot of people are tired busy adults and likely won't have time.
Some things are also typically more niche than others.
Do not publicly whine or guilt-trip people over lack of feedback or attention. There are always going to be times where lack of attention to your work will get you down, and in my eyes, that's a good sign to take a break from it until the passion for creation comes back to you. Otherwise the story will likely suffer for it as will your wellbeing.
. Do not get put off by negative critique. Critique can be helpful, but let's face it, many people often don't know how to write a good or useful critique and a lot of people nowadays want to be a edgy, feisty caustic critic, might as well say it. Even if someone is nice about it, your first reaction might be ‘owch’.
Keep the useful critique in mind, bin the rest. You don't need to change anything about your story, at the end of the day nobody can force you to do that - but it's also not healthy to ignore absolutely all critique completely. Sometimes others' ideas can be helpful. Sometimes.

. Jarte - A free fancier version of Wordpad that I use for note-taking and plot-planning.
. My planning document and character questions linked earlier.
. MyNoise - If you like background noise to focus but music isn't for you, these are various noise machines. It includes chanting, white noise, natural sounds (thunder, rain etc), bar ambience and much more. There's an amazing selection.
. Writing Plot Prompts and Generators - A bunch of generators for plot-related events. Rough plots, possible things that could go wrong, ideas for how characters meet and general writing prompts.
. Character Generator - A bunch of character-related generators that will generate all sorts of ideas- from rough descriptions, to in-detail outlines, to causes of death, and a separate generator for ideas for LGBT+ characters as well.
. Evernote- a free (with paid options) note-taking app for mobile and for PC. It allows you to create to-do lists, clip whole web pages, screenshots, articles PDFs and bookmarks - great for storing research or other important things! You can also sync your PC notes with your mobile ones so you always have a space to dump your ideas wherever you come up with them.
. Random Town Name Generator - with some fun tidbits about town naming in general.
. Fantasy Map Generator - for the super-world-builders!
I hope this has given you something of a starting point, or has otherwise given you something else to think about. Happy writing!
99 notes
·
View notes
Text
5th try at writing the guide on custom pet paint mode brushes, if tumblr manages to mess this one up i will have a fit
16/10/2023 Edited: Updated to add better hash ID generating practices.
Things you'll need:
Sims 4 Studio
GIMP
Notepad
Guide:
Tools that we will be using:

We'll begin by creating a new, empty package.
Save it somewhere convenient and easy to access.
Once you've saved the package, you'll be met with this screen:

From here, we'll go to Tools > Game File Cruiser
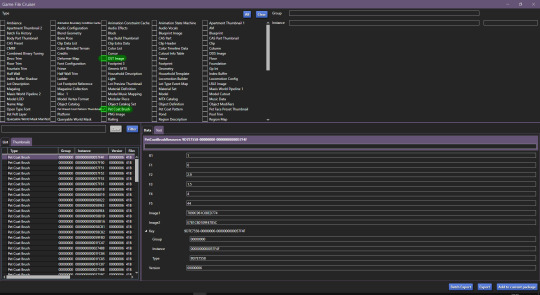
We'll be working with Pet Coat Brush files and DST Image, but for now we'll only select Pet Coat Brush file, so that it's easier for us.
I've selected the first brush file and I've highlighted the piece of data we'll need to use.
We'll have to use the Game File Cruiser search function, but first, press "Add to current package". When you've gotten the hang of this, you can explore the pre-existing brush files and decide which one you'd prefer to use as your base, all are different and correspond to different brushes/stamps in-game.
Once you've clicked on "add to current package" your package editor should look like this:

Now we'll copy the Image1 ID and go back to Game File Cruiser, select DST Image from the file type list and enter the ID into the search bar:

Now, click "Add to current package" and now the package file you're working on will look like this:

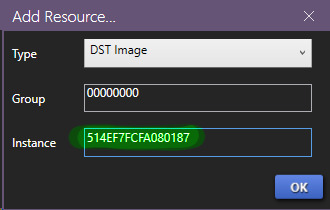
Before we move further, we need to generate new instance ID's, we'll need 3 of them.
Go to Tools > Hash Generator

Edited 16/10/2023: When generating your hash ID's, please use your creator name ie.: "[YourCreatorName/Blogname]TutorialCustomFurCoat1", this will give you a more unique hash code than hoping to be as descriptive as possible when generating the hashes (in this case instance ID's).
Thanks to Mizore Yukii for this advice, from Creator's Musings.
In the "text" field, enter whatever text you want, I just go with the item name/description + a number, to indicate which ID it is.
We'll need 3 of FNV64 hash codes.
These are the 3 ID's that I've generated:
514EF7FCFA080185
514EF7FCFA080186
514EF7FCFA080187
We'll use the first code for the Pet Coat Brush file, the second code for Image1 (Brush file) and the third for Image2 (Brush icon file).
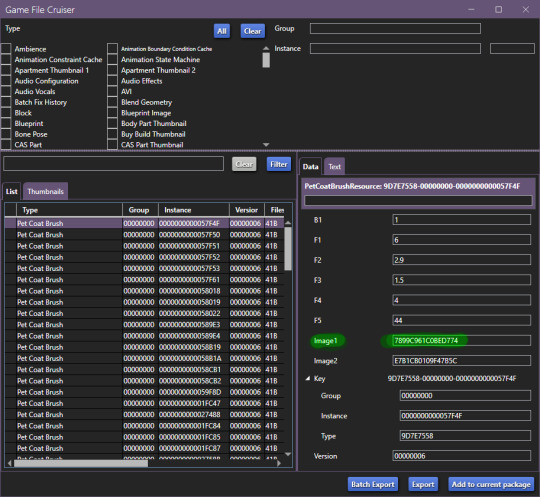
Your Pet Coat Brush file should look like this now, with the updated ID's.
Moving forward, we'll be changing the ID for the DST Image1 (Brush in-game) -

Now that you've done this, you need to right click on DST Images > Duplicate, you'll be prompted with this window:
In this window, you'll use the last hash code you generated for the Image2 new ID (in-game icon).
Now! It'll all look like this:

To edit the brush we'll be seeing in-game, we'll now have to edit the image, begin by exporting the image available in DST Image.
Once that's done, open it up in whatever editing software you want to use, I'll be using GIMP, because it has built in DDS exporter, I recommend you do the same, however if not interested in doing so, make sure your program can export DDS images in L8 format, if not, edit in preferred software and use GIMP to export as DDS.
Once you've made your brush, you'll want to do as follows:

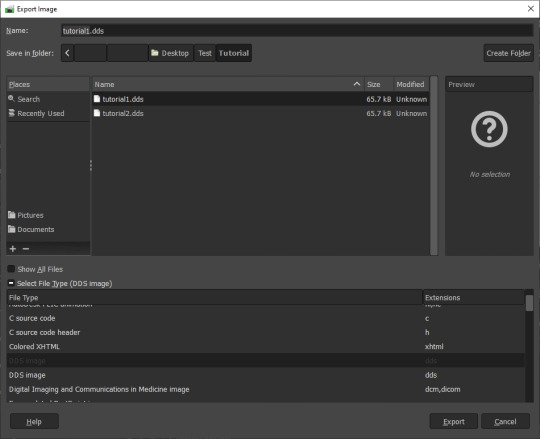

IMPORTANT
It MUST be exported in the format L8, it will appear broken in-game otherwise.
Then, import your custom made brush into S4S package editor:
Do the same for the icon:

You've got the easiest part down, now, comes the part with testing how well the brush works and behaves in-game.
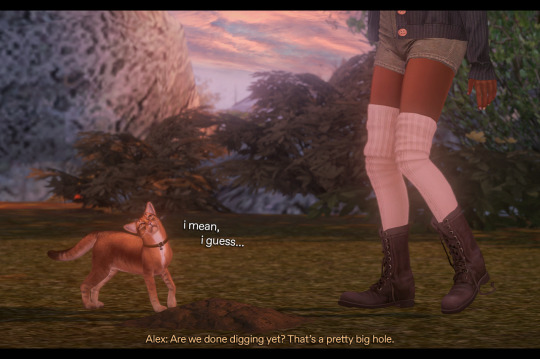
The responsibility of this falls onto the values you may have seen in Pet Coat Brush file -
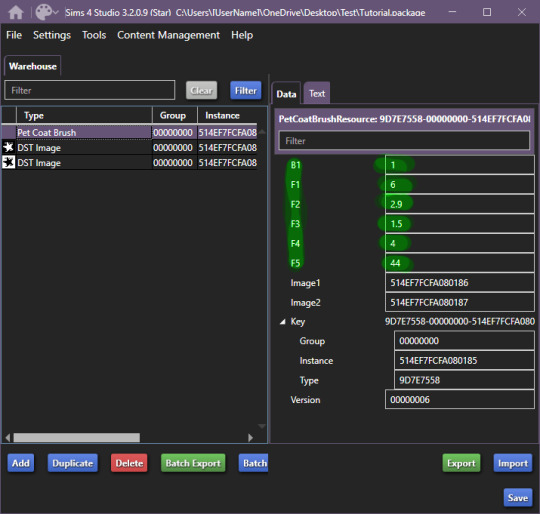
These are the values responsible for how the brush works in-game.
I'll be upfront right now, I can't get the rotation value to work, I'm not sure if I'm doing something incorrectly, but if I figure it out, I'll add to the guide eventually. I haven't had time to test this further, but as far as I've been able to test it, it works like a charm.
These are the value meanings -
Sorry for how lazy this is presented, as once I figured out the basic meaning, I moved forward.
B1 is responsible for sorting on whether your brush is considered a Brush or a Stamp. 0 & 2 - Brush, 1 & 3 Stamp EDITED 24/10/2023: 0 is non-rotating brush, 2 is a rotating brush!
For F1, I do NOT recommend using 0 or 5, when I tested these values in-game, they were extremely laggy when attempting to paint. 1 - Smooth Painting, 2 - Spaced Apart Slightly, Overlap, 3 - Spaced One After Another, Some Overlap, 4 - Spaced One After Another, No Overlap
F2 changes the size of the brush in-game, meaning how small it can be, I believe. 0 - 1px smallest size brush, scaling up changes how small the brush can get.
F3 I suspect is brush rotation, but I could not make it work on any of the brushes I tried making, so I'm not 100 sure. This is one of the brushes you'll have to look at values for in the existing in-game brush files, as I could not get this to work for myself.
F4 is the maximum the size of the brush will become. Maximum size the brush can get, I've tested it from 0 to 5, 5 is quite large, so I recommend that, but go for smaller as well.
F5 I'm not entirely sure, however during my testing, I found that this changes where exactly the brush appears in both stamps and brush tabs in-game. There may be more to it, however, I could not figure it out. The values I tested for this were 0, 1 and 2, this affected where the item appeared - 0 - First Row, First Item, 1, First Row, 2nd Item, 2 - 2nd Row, First Item, I've seen that these can go quite high, ie the base file I used being 44, so keep that in mind while changing this setting. For my personal brushes I use 0.
I recommend comparing existing brush files to the one you're looking to edit.
I believe this is it. If there are any questions, I'll try to answer as best as I can. If anyone wants to add anything to this, please do so, I'll be elated to update and credit you for the information shared.
This all came to be because I could not find a guide, but fortunately for me, I'm too good at figuring things out and even though I didn't quite understand how the Game File Cruiser worked a few days ago, I've consumed so much information it hurts my brain.
Forgot to add: Finished product
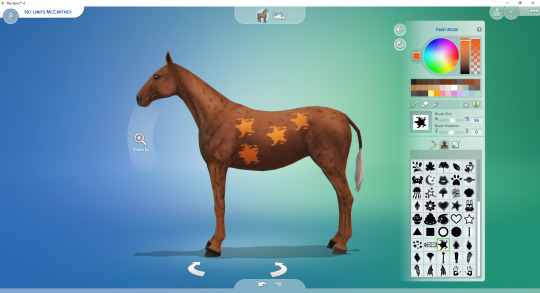
Because I didn't edit the Pet Coat Brush file I was working on, I've made a stamp, I recommend messing around for a while though and finding what you prefer. The values themselves are pretty easy and forgiving to edit.
So account for that, you'll definitely want to edit the values responsible for the brush working correctly. If you have any questions, please let me know, I tried to make this as clear as possible, and I know this is probably over the top for a guide, but I'm the kind of person who needs every small direction, to even know what I'm doing, when I'm following a guide.
UPDATED AGAIN, I FORGOT TO ADD THE ACTUAL VALUES I FOUND.
#The Sims 4 Guide#The Sims 4 Horse Ranch#The Sims 4 Custom Brushes#The Sims 4 CC guide#TS4 CC Guide#TS4 Horse Ranch#TS4 Horses#The Sims 4 Horses#Sims 4 Horses#Sims 4#Sims 4 Horse Ranch#The Sims 4 Tutorial#Sorry if this isn't a great guide#i tried really had and nearly had an aneurysm because tumblr deleted my previous attempts like 4 times
97 notes
·
View notes
Text
this guide is specifically for my friend mel <3 but of course anyone is free to reference it x
𖡡 you've downloaded the game, played around a little bit, and now you're looking to add mods and custom content (cc) into your game
────୨ৎ────
this game is basically nothing without mod and cc creators, so all credit and love to them ♡
step 01: setting up your mods folder
open file explorer, go to documents, and find the folder labeled electronic arts. then click on the sims 4.
you'll see a folder labeled mods - pin it to quick access [this will make accessing it easier]
step 02: downloading mods and cc
you can find cc and mods so many ways!! tumblr, youtube, pinterest, instagram, etc. there are a lot of blogs on tumblr specifically for cc finds too
make sure you're downloading things from a reliable source. for example - a creator's patreon/tumblr or website, simfileshare.net [often linked as sfs], google docs, curseforge, itch.io, and *unanimously hated* thesimsresource.com → the sims resource is hated because of all of the fucking ads lmaooo
you'll be downloading package files and zip files. you'll find them in your downloads in file explorer
step 03: installing mods and cc
navigate to downloads in file explorer
package files can be simply dragged into the mods folder
zip files need to be extracted, then you can drag and drop the unzipped folder into your mods folder → whatever you put into your mods folder can only be one extra folder deep or it won't show up in your game
when it comes to mods [not cc], creators will often have instructions for you. follow those exactly
step 04: mods + game updates
sometimes mods break when there's a game update. it's just a very annoying part of the game at this point lol
some mods will have a pop-up in the game letting you know it needs to be updated. but if it doesn't and you notice something is fucked up, you can google 'broken mods' and usually someone else will be having the same problem and can let you know to update it
if a mod is broken, remove it from your mods folder and go download the new version from the creator → a lot of mod creators update very quickly [like the same day or within a couple days] but sometimes they don't. just be patient and check for updates periodically
recommended: the sims 4 mod manager // dl here → the mod manager will allow you to see and deactivate or remove mods and cc from your game [it's automatically connected to your mods folder and can be helpful when you can't find broken mods or cc]
gameplay mods i recommend
mccc by @deaderpoolmc // dl here ✧ gives a you a lot of control of your game
tool by @twistedmexi // dl here ✧ place and size things however you want
better build/buy by @twistedmexi // dl here ✧ gives you easier access to things in build/buy that you'd normally have to use cheats for
relationship and pregnancy overhaul by lumpinou // dl here ✧ more realistic gameplay [this one is essential!!]
lgbtqia+ by lumpinou // dl here ✧ gender identity, gender affirmation and transition, self-discovery, coming out, dating apps and lot traits [i love this mod so much!!]
healthcare redux by adeepindigo // dl here ✧ adds illness, injury, chronic conditions, allergies, medical emergencies, etc
childbirth mod by @pandasamacc // dl here ✧ good for family gameplay
snbills by @simrealist // dl here ✧ bank accounts
also want to mention milk thistle & sunblind by @softerhaze ✧ the lighting with these mods is *essential* pls check them out!!
create-a-sim [cas] mods i recommend
cas backgrounds // you can download mine here but i also love vyxated ✧ these are just extra fun!! you can find a lot on tumblr or youtube to download. it's a super easy drag and drop into your mods folder. but when you want to change it, make sure you remove the current one or it won't work!!
gentle cas lighting by northerin siberia winds // dl here ✧ replaces the ea lighting in cas with a softer glow and shadows
any cas lighting by helgatisha // dl here ✧ i like the colors they have!!
custom content [let's make your sims hot!!]
cc creators i love: @kumikya @dogsill @aladdin-the-simmer @arethabee @imvikai @jius-sims @northernsiberiawinds @oakiyo @its-adrienpastel @daylifesims @twisted-cat @madlensims @miikocc @obscurus-sims @evoxyr @powluna @pralinesims @simandy @sentate @simstrouble @christopher067 @aharris00finds @bluecravingcc @crypticsim @gorillax3-cc @gegesimmer @frzrbunny @greenllamas @lisatrait @joshseoh @liyahsim @thatonegreenleaf @trillyke @waterlily0210 @clumsyalienn @johnnysimmer @lamatisse
────୨ৎ────
anyways mel, i really enjoyed making this for you and i hope you enjoy the game!! <3
#sims4guide#sims 4#the sims 4#ts4#gameplay mods#cas mods#create a sim mods#sims 4 mods#sims 4 cc#sims 4 guide#cas#simblr#cc finds#sims 4 game mods#sims 4 beginners guide#ts4 beginner guide#mod tutorial#cc tutorial#sims 4 cc creators#sims 4 mod creators#where can i find sims 4 cc#the sims community#sims community#create a sim#cas lighting#cas backgrounds#lumpinou mods#pandasama mods#adeepindigo mods#mccc
27 notes
·
View notes
Text
🧚♀️✨ NEW VIDEO! ✨🧚♀️
Fairies in The Sims 3 are still THAT girl — and I’ve got the cozy deep dive to prove it 🌸💫
In the latest episode of my What's Cooking Up-Dates series, I’m sharing everything you need to know about playing as a fairy in The Sims 3 Supernatural — powers, auras, fairy houses, social tricks, AND a bit of ✨tea✨ on how The Sims 4 fairies are shaping up.
It’s part guide, part chill chat — from my cozy corner to yours. ☕🌿 Watch here → 🌊
🧚 Drop a fairy emoji if you’re #TeamFae 💬 Or tell me: which occult do you ride for in The Sims?
#thesims3#sims 3 fairies#sims 3 supernatural#sims 3 gameplay#sims 3 occult#sims 3 legacy#sims 3 guide#sims 4 fairies#sims 3 vs sims 4#simblr#simblr community#sims community#cozy sims#sims youtube#sims video#whats cooking updates#thesirensims#youtube#sims youtuber#the sims 3#sims 3#the sims
22 notes
·
View notes
Text
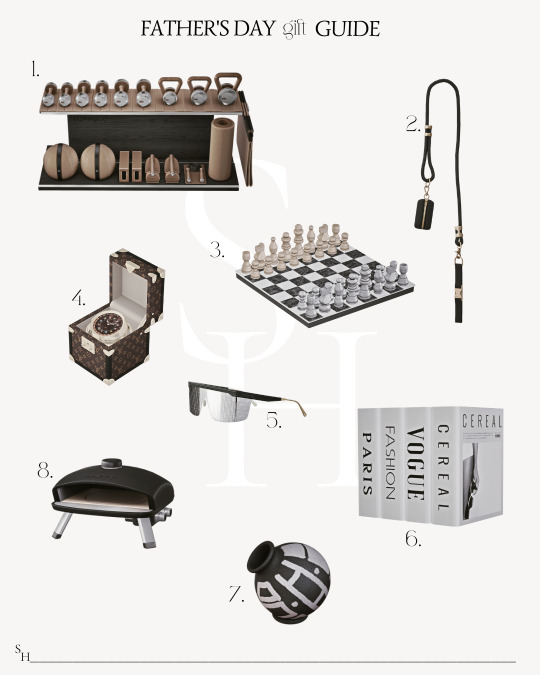
𝚂𝚑𝚘𝚙 𝚝𝚑𝚎 𝙶𝚒𝚏𝚝´𝚜
𝟏.𝑨𝑵𝑨™ 𝑪𝑶𝑴𝑩𝑶 𝑺𝒆𝒕 𝑾𝒊𝒕𝒉 𝑮𝒚𝒎 𝑬𝒒𝒖𝒊𝒑𝒎𝒆𝒏𝒕 𝟐. 𝑻𝒐𝒎 𝑭𝒐𝒓𝒅 𝑫𝒐𝒈 𝒍𝒆𝒂𝒔𝒉 𝟑.𝑨𝒓𝒉𝒂𝒖𝒔 𝒔𝒕𝒐𝒏𝒆 𝑪𝒉𝒆𝒔𝒔 𝑺𝒆𝒕 𝟒.𝑳𝒖𝒊𝒔 𝑽𝒖𝒊𝒕𝒕𝒐𝒏 𝑻𝒓𝒖𝒏𝒌 𝑻𝒂𝒃𝒍𝒆 𝑪𝒍𝒐𝒄𝒌 𝟓.𝑫𝒊𝒐𝒓 𝑪𝒍𝒖𝒃 𝑴𝟏 𝑺𝒖𝒏𝒈𝒍𝒂𝒔𝒔𝒆𝒔 𝟔.𝑻𝒂𝒃𝒍𝒆 𝑭𝒂𝒔𝒉𝒊𝒐𝒏 𝑩𝒐𝒐𝒌𝒔 𝟕.𝑴𝒂𝒏𝒉𝒂𝒕𝒕𝒂𝒏 𝑽𝒂𝒔𝒆 𝟖. 𝑴𝒂𝒍𝒊𝒃𝒖 𝑷𝒐𝒓𝒕𝒂𝒃𝒍𝒆 𝑷𝒊𝒛𝒛𝒂 𝑶𝒗𝒆𝒏
𝙵𝚊𝚝𝚑𝚎𝚛'𝚜 𝙳𝚊𝚢 𝙶𝚒𝚏𝚝𝚜 𝙱𝚢
@cowbuild @bergdorfverse @leosims4cc @bambi ✿
#the huntington#SH Luxury Gift Guide#ts4 aesthetic#gift guide#ts4#ts4 cc finds#ts4 interior#ts4 cc#sims 4 cc#the sims interior#simspiration#simblog#simblr#the huntington interior#the sims 4#the sims community#the sims screenshots#sims 4 aesthetic#cc finds#sims4 cc finds#the sims cc#sims 4#ts4 simblr#sims4 cc
173 notes
·
View notes
Text
Screenshot tip!
So idk if I'm late to the game in figuring this out and ya'll knew this already BUT I wanted to share in case someone else can benefit from this tip!
Historically when I'm working on a scene and a character is overexposed, I mess around with light placement and decreasing the intensity of the lights. Sometimes I'd get it just right and other times I'd get it close enough and say "screw it"
While working on a scene for chapter 6 I tried something different. I changed the color of the light from white to grey. NIGHT AND DAY DIFFERENCE! It fixed the issue and didn't impact the overall brightness of the room. It makes total sense when you think about it and I'm kicking myself for not thinking of it sooner. I'm sure there's instances that it won't work but it's a great tool to have in your back pocket!
Here's the difference:
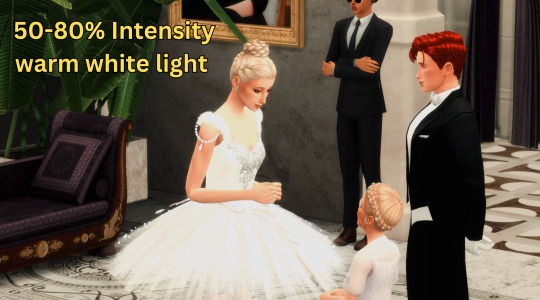
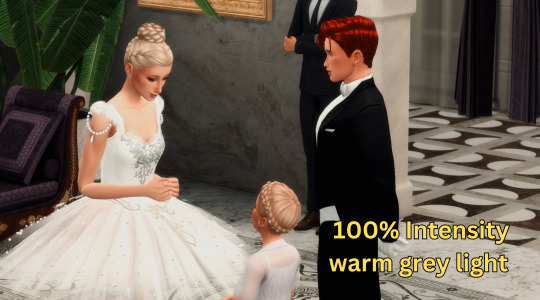
Here's the exact settings I have all of the lights on:
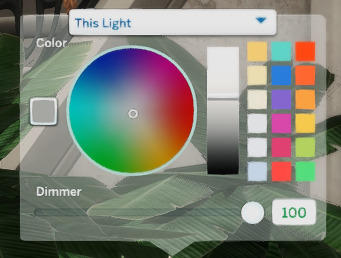
#ts4#sims community#simblr#the sims 4#sims 4#ts4 simblr#ts4 guide#sims 4 tips#ts4 screenshot tips#trentonguides
81 notes
·
View notes
Text
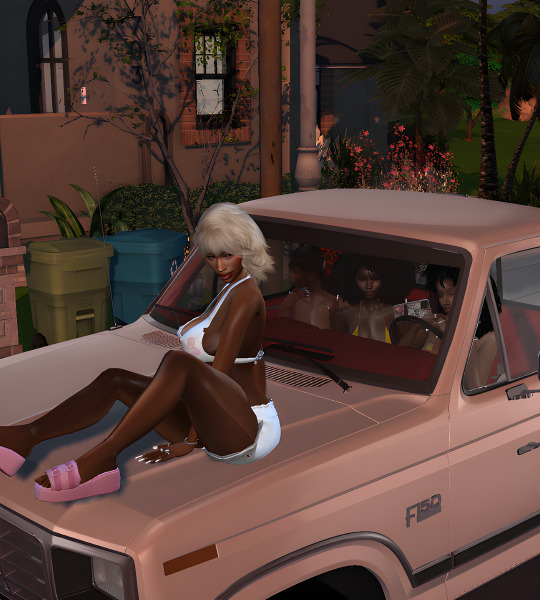
Barbara's Guide to Friendship: Quality Time
* The beautiful build in the back is by @ophernelia
#sunny's blog#sunny's sims: barbara jean#Barbara's Guide#simblr#sims 4#the sims#the sims 4#ts4#sunny's sims#showusyoursims#ts4 screenies#ts4 screenshots
64 notes
·
View notes
Text

holiday gift guide: luxury edition
♡ black stilettos
♡ simlish orcaella speaker
♡ chanel sunglasses
♡ prada handbag
♡ cosmetics
♡ house slippers
part three of my holiday gift guide. as always, thank you so much to all of the amazing and talented cc creators! @xplatinumxluxexsimsx @wondymoondesign @syboubou @pinkbox-anye @sundays-sims
#simsplymaddy#cc recs#the sims 4 cc finds#the sims 4#ts4#ts4 simblr#ts4 maxis cc#ts4cc#the sims community#sims 4#ts4 screenshots#sims 4 cc#sims 4 simblr#the sims cc#sims#sims 4 gift guide#sims 4 christmas#sims 4 holiday#the sims 4 cc#the sims 4 simblr#new simblr#cc finds#ts4 maxis mix
188 notes
·
View notes