#Task List Template Blank
Explore tagged Tumblr posts
Visit Tumblr Blog
Explore Tumblr blogs with no restrictions, modern design and the best experience.
Last Seen Tumblr Blogs


Fun Fact
Tumblr was named as a finalist in Lead411’s New York City Hot 125 in Aug 2010.
Text
OUTDATED Tutorial: adding new shapes to bodyshapes mod
Edit 25-05-15: Please note that this tutorial is outdated. The DBPF Scripter from Pick'N'Mix Mods is much simpler to use and offers a sample script for this task. Also archived at Simblr.cc.
Here's the promised tutorial. I'm sorry about the delay. Please also note that this is for v2 of the mod only; v1 is no longer supported.
Before I begin, I've realized I forgot to credit Quinctia the first time around. Their tattoo boxes and tutorial were where I started experimenting with overlays, and this mod contains resources cloned from their work. So, I'm giving them belated credit here.

First, one very important warning that was exceptionally frustrating to figure out and is responsible for most of the delay: you MUST use SimPE v0.73.44 for this. IIRC, later versions process certain kinds of resources a little differently, and the difference in the resulting package breaks a few kinds of mods/CC. This is apparently among them. Following this tutorial with any version of SimPE past 0.73.44 will very likely damage the character file of the sims the resulting overlay is applied to. (Specifically, in testing I found it to screw up the face and body meshes stored there.) If you test the overlay and the test subject's UI portrait completely blanks out (not just their face texture, but their hair/body/accessories too), then this is probably what's happened, and the best thing to do is throw it all out and start over.
With that out of the way, you'll need...
a pair of nude meshes, top and bottom, for each age group the shape is available for. A full-body nude mesh won't work.
a full set of seven outfits in the shape, set up as in this tutorial, for each age group the shape is available for. YA/A/E can all use the same outfits as long as they're enabled for all three ages.
a shape number. This has to be an eight-digit hex number; the first six digits all have to be zero, and the last two can't be zero or one and can't be the same as any other shape for the same gender. I've got a list here on Dreamwidth of a few numbers I've used or am planning to use. Please leave a comment telling the rest of us which number you're using for any shape you set up.
these template files.
You probably want...
a hex editor. This is optional, but it speeds things up quite a bit. I'm using HxD in the screenshots.
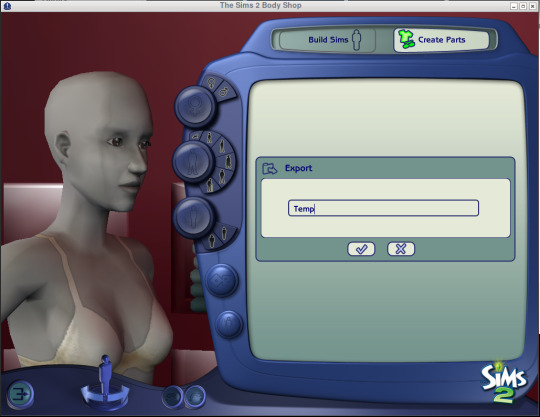
Open up Bodyshop and start a new project. All we need are valid group and family numbers; once you've copied those down somewhere, you should throw the project out. (If you leave it in the Projects folder, it'll conflict with your shape.) An eye color is probably quickest.
Get the following numbers together:

the new group and family numbers from your Bodyshop project
the shape number
two new GUIDs (generated however)
the instance-high and instance numbers for both the CRES and SHPE of each nude mesh
the group number for each outfit being used
Make a copy of the two template files and the template spreadsheet.
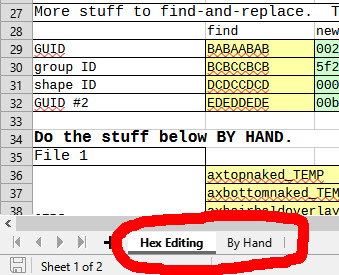
You have two main options from this point: either use the 'Hex Editing' tab on the template spreadsheet to find-and-replace various numbers reasonably quickly and then do a few more things by hand, or go the slower route, use the 'By Hand' tab, and replace them all in SimPE.
If you're using a hex editor:
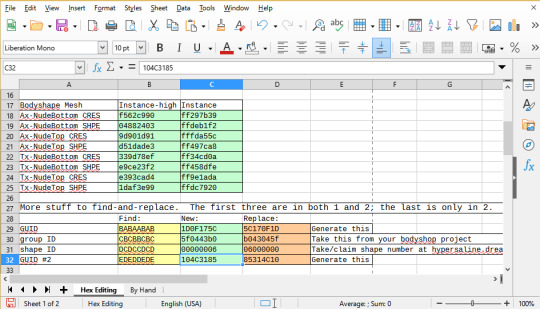
Fill the requested numbers into the correct green boxes in the "Hex Editing" tab. Do all of them before you do any find-and-replacing.

Copy/paste the orange boxes into the hex editor's "replace" field, and copy/paste the yellow boxes into the hex editor's "find" field.
Make sure you pay attention to which numbers you can expect to find in which file, make sure you're in hex mode when you f&r, and make sure the numbers you're using are correct. If you paste in something with a different number of digits, your file will break and you'll need to start over.
Once you're done with find-and-replace, open up SimPE. Make sure you don't get any errors when opening resources up, and do a few spot checks to make sure, for example, that the most common group number you're seeing is the same as what Bodyshop gave you. If things seem OK, do the remaining replacements listed in the "Hex Editing" sheet by hand.
If you're editing by hand:
Look at the "By Hand" tab in the template workbook, which lists the various places you'll find the numbers you need to swap out and gives you room to organize the new ones. Please note that all numbers are hexadecimal even where not marked: 10 isn't twice five but twice eight.
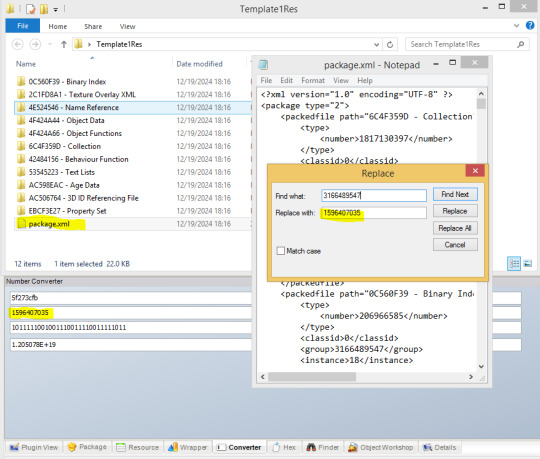

If you'd like to speed things up without a hex editor: export all the resources inside Template1.package, open up the package.xml file in a text editor, find-and-replace every instance of "3166489547" with the DECIMAL version of whatever group number you got from your Bodyshop project, save, and then import those resources to a new (shape)1.package file using the edited package.xml file. (Note that SimPE won't show you the package.xml file by default.) You'll still have a heck of a lot of numbers to replace, but this will take care of several dozen.
Regardless of the method:
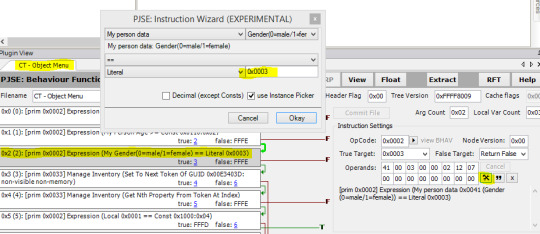
You'll need to make the BHAV edit pictured above - change Literal 3 (which is invalid) to Literal 0 or Literal 1 as appropriate.
One thing you'll want to keep in mind: the gender BHAVs detect for any given sim will always match the pronouns on their chance cards. If you're setting up a shape for trans women, for example, you'll want the BHAV to make it available to women even though those outfits are in the broader-shouldered half of the catalog. The mod won't be able to stop you from trying to apply a shape to sims it won't fit; if that happens, you'll get an error message and the sim's appearance won't change.

At this point you're ready to check things out in game.

One last, frustrating troubleshooting note: if most things seem fine but one particular outfit makes the game crash when a sim swaps into it, then after double-checking that it's been referenced correctly, make sure the GZPS in the recolor file is not compressed. I don't know why that's sometimes a problem, but I ran into it a couple of times during testing.
Here's a link to the updated V2 SFS folder, which contains the shape templates (note that the UniformTemplate file is for the older tutorial on giving sims with certain traits different age-up outfits), an updated version of the core mod and the Lady Apple files, and the Athletic Girl files created while getting this tutorial together. All meshes are included. If you set up any other shapes, please let me know!
106 notes
·
View notes
Text
Stop Wasting Time Writing, Hire Pro Article Writers Who Drive Results!
If you're running a small business or growing agency, chances are you’re wearing too many hats. You're managing sales, putting out fires, chasing clients, and somehow also trying to keep your blog, website, or social media active. But let’s be honest: writing high-converting, search-optimized content isn't something you should squeeze in between Zoom calls.
It’s time to stop doing it all. And start doing it right.
Here’s the reality: good writing builds real trust.
People don’t just click, they read, compare, scroll, and decide. That decision is often made based on how your content makes them feel and how well it answers their questions. Whether you’re selling digital services, real estate, or running a design agency, your words are selling before you ever speak to the customer.
And no, a few generic blogs written by an AI or pulled from a template library won’t cut it. If you want to increase your Google rankings, get picked up by AI search tools, or simply get people to stay on your site longer, you need human-first, SEO-ready writing.
So, what’s the solution?
Hire a professional article writer, ideally one who understands both your niche and how content fuels visibility. Not only does this save you time, but it also transforms your business into a trusted brand with consistent, helpful, and engaging messaging.
Thousands of business owners are now turning to OnlineJobs.ph to hire skilled Filipino writers who specialize in creative writing, blog creation, landing page copy, newsletters, and more. These professionals are affordable, English-proficient, and fully remote. It’s a simple, scalable way to build a content engine without blowing your budget.
In fact, if you’re still unsure how to get started, I shared some real-world advice on how to hire a great article writer and what red flags to watch for. Spoiler: Cheap doesn’t always mean effective. But with the right approach, you’ll get quality work that drives long-term traffic.
Great writers don’t just create content; they position you as an expert.
Want proof? Here’s how real estate pros are scaling smarter by outsourcing content and focusing on what they do best: closing deals and growing their business. One post, one landing page, or one newsletter won’t change your brand. But consistent, strategic content absolutely will.
Don’t just take my word for it. Check out this free Substack case study on how experts win in competitive markets not with flashy ads, but with smart words that sell.
Or watch this short YouTube video breakdown on the value of professional writing in the era of machine learning and automation.
Final thoughts: If you want to grow, write less, and delegate smarter.

Words build authority. They shape perception. They bring you customers. But only if they’re written well, with a purpose. Don’t spend another week staring at a blank doc. Hire a content writer who gets your voice, understands your market, and can help you scale without burning out.
✨ Ready to get started? Go here → OnlineJobs.ph Content & Creative Writing Experts
Stop treating content like a to-do list task. Start treating it like a growth strategy. 💼✍️
0 notes
Text
Using AI for Document Review in Immigration Cases

If you’ve ever spent hours double-checking immigration forms, you know how exhausting it can be. The good news? AI document analysis is making that job a whole lot easier. With today’s legal AI tools, you can review paperwork faster, catch more errors, and save serious time. Thanks to immigration paperwork automation, smart legal review software and other AI tools, immigration law firms are finally getting the break they need. Let’s walk through how it works—and why it’s worth a closer look.
What exactly does AI do in immigration document review?
Here’s how it works:
Scan and extract. The AI reads passports, resumes, I‑94s, and transcripts. It grabs dates, names, numbers.
Auto-fill forms: It populates USCIS forms quickly and accurately.
Flag issues: It spots inconsistencies, missing info, or obsolete language.
Translate documents: It can translate bilingual entries in seconds.
Draft letters and narratives: It suggests cover letters, petitions, or support narratives.
Many busy firms report faster document preparation and fewer errors.
Why choose AI over manual review?
Save time: What takes hours now takes minutes.
Reduce errors: Data entry mistakes cost clients and time.
Handle more cases: Automation frees you to do other work.
Enhance client service: You get to spend more time advising—not filling forms.
What are smart legal review software options?
Here are some top tools:
MyLegalSoftware – A customizable platform that helps you compare and integrate the best AI tools for document review, intake, and form automation—designed specifically for immigration attorneys.
Docketwise – Extracts passport and green-card data, auto-fills forms.
Parley – Upload documents; it drafts visa support letters fast.
VisaLaw.AI – Handles document analysis and certified translations.
Filevine AI – Automates form prep, tracks deadlines.
Some systems even alert you about USCIS updates or offer chat bots for client intake.
How does this differ from basic form templates?
Classic document automation uses fill-in-the-blank templates. But AI document analysis adds context.
It learns. It detects patterns. It adapts to subtleties.
Think of it as having a smart assistant on your team—not just a form-filler. It even summarizes long documents and flags anomalies.
How do you start using AI at your firm?
Getting started with AI might sound intimidating—but it doesn’t have to be. Here’s how to make the process simple:
1. Figure Out What Slows You Down
Start by asking: Where do we waste the most time?
Is it retyping client information? Drafting the same forms over and over? Searching for missing documents? Make a short list of tasks that are repetitive or time-consuming.
2. Pick the Right Tool for the Job
Not all AI tools are created equal. Some are built specifically for immigration law. Look for one that handles your biggest headaches—like form filling, document scanning, or bilingual translation. Many of these tools offer free demos or trials, so you can test them before committing.
3. Try It on a Few Simple Cases First
No need to change everything at once.
Start small. Use the AI on just a few basic or low-risk cases. This lets your team get comfortable without the pressure of big deadlines.
4. Train Your Team
Make sure your staff knows how the new tool works.
You don’t need to be tech experts. But everyone should understand how the software fits into their daily work.
5. Review Everything Before You Submit
AI is smart—but it’s not perfect.
Always review documents before filing. Think of AI as your assistant, not your replacement.
6. Track the Results
After a few weeks, ask:
Did this save us time?
Did we make fewer mistakes?
Are clients happier?
If yes, consider expanding to more cases.
Should you worry about risks or ethics?
Yes. But they’re manageable.
Bias or outdated rules. AI needs regular reviews.
Data security. Use encrypted tools with strict access controls.
Accuracy limits. AI may struggle with unusually complex cases—always human-review.
The American Bar Association emphasizes transparency and ethical use in AI-assisted legal work.
Who’s benefiting now?
Solo attorneys charging flat fees love tools like Parley. Some are doubling revenue thanks to time saved.
Boutique firms rely on MyLegalSoftware-powered tools to build case narratives faster.
Mid-sized practices implement full intake automation via chatbots and document workflows.
Quick checklist: AI readiness
Identify repetitive tasks
Choose immigration-specific AI tools
Pilot small, then scale
Train your staff
Maintain human oversight
Secure data, stay compliant
Final thought
AI is more than a trend in immigration law. It’s a productivity booster. A quality enhancer. A competitive edge.
If you want to streamline processes and improve accuracy, consider smart legal review software and immigration paperwork automation. They free your time. They improve client experiences. They help you grow.
Ready to get started?
Visit MyLegalSoftware.com today. Compare tools, read reviews, and find the right solution for your firm. Automate smarter so you can work better—and serve your clients with confidence.
Frequently Asked Questions (FAQs)
1. What is AI document analysis in immigration cases?
It’s software that scans forms and IDs, extracts key data (names, dates, numbers), auto-fills forms, flags errors, and suggests drafts—all in minutes.
2. Are legal AI tools safe for client data?
Yes—as long as you choose tools with encryption, access controls, and compliance features built for legal use.
3. Can AI automate USCIS form filling?
Absolutely. Tools like Docketwise and Parley auto-populate dozens of common USCIS forms fast.
4. Will AI replace immigration attorneys?
No. AI handles repetitive tasks. You focus on strategy, advice, and serious legal thinking. It’s a partner, not a replacement.
5. How do I pick the right smart legal review software?
List your top pain points—like intake errors or slow form preparation. Pick tools made for those tasks. Try demos, test them, and then decide.
0 notes
Text
How to Write a Composition for Secondary School: A Step-by-Step Guide

To compose an essay at secondary school can be overwhelming, particularly if you have no idea where to begin. Whatever essay you are producing - descriptive, narrative or argumentative - is rather more than just literally writing words on paper. Producing a successful piece of composition writing is rather more about getting meaning across clearly, structuring ideas into a coherent order and keeping your reader interested from start to finish.
If you have ever tried to write but sat in front of a blank page and could not find the starting point, do not be discouraged - you are not alone. The goal of this article is to demystify the writing process and make it less stressful and more fun, even if you have struggled with it in the past.
Step 1: Check Your Knowledge of the Composition's Subject
Before you proceed with writing, make sure to pause and consider exactly what the question is asking. You may be tempted to just begin, especially when you feel rushed. However, you will find that taking a moment to understand the prompt allows you to save yourself some stress at a later point.
Many students lose marks not because they are not capable of writing in a sophisticated way, but because they haven't understood the task set in front of them. It's not always about grammar; it's about depth of thought and staying motivated.
So ask yourself:
What is this piece? Are you expected to tell a story? Are you describing something in detail? Will you be explaining the workings of something? Are you providing your opinion on a certain topic?
What is the aim? Is the point to inform? Is the piece to entertain? Is the writing to persuade someone of something?
Who is the reader? Is the piece for your teacher? Are you writing it for a friend? Who is the reader?
Once you have made these determinations, everything else follows. You will have more directed ideas, and you will be writing to answer the question, which is already half the battle.
Step 2: Organising and Generating Ideas
You might find planning to be inefficient when all you want to do is write, but it can save you a lot of time with your writing efforts. Good composition writing at the secondary level, especially, begins with precisely organized and clear ideas.
Take out a notebook or a piece of blank paper, and start brainstorming.
Try this:
Jot down any thoughts that occur to you, even if they initially seem absurd.
Sort related concepts into groups called categories.
Consider potential incidents, facts, or examples to bolster your arguments.
This step keeps you on topic and helps you make your point more clear.
Step 3: Create a Basic Outline
After assembling your thoughts from the phase before, it's time to make your initial writing plan. When you start writing, a simple outline will help you stay on topic and help you organise your writing.
Here is a straightforward template that will fit most types of compositions:
Introduction
Hook (interesting beginning)
Background or context
Main idea or thesis statement
Body Paragraphs
A main idea can be the focus of each paragraph section
Add justifications, illustrations, and transitions
Conclusion
Restate your primary argument
List the main points
Give the reader something to think about for a while.
When you begin writing, even a few bullet points for every part will boost your confidence.
Step 4: Create a Powerful Introduction
Your introduction establishes the general tone of your work. A dull or ambiguous introduction can alienate readers, even if the rest of your work is superb.
So, how can one write a strong introduction?:
Start with a hook. It can be a surprising fact, any question, or a simple story.
Provide some background. Help the reader understand the context of the topic.
End with a clear thesis statement. This makes it clear to anyone reading it what your writing is about.
For instance: "The majority of people take their daily schedules for granted, but what happens if everything changes all at once? I'll discuss how one day changed my outlook on friendships, priorities, and life in this essay."
Step 5: Create Body Paragraphs That Are Clear and Focused
This is where your concepts become a reality. Each paragraph in your composition for secondary school should focus on a single point or event.
To build strong body paragraphs:
Start with a topic sentence. It will tell the audience what the paragraph is explain about.
Support your point. Use examples, reasons, or experiences.
Use transitions. Transition words such as "and," "however," "for instance," and "in addition" help to create flow between ideas.
Just a friendly reminder - don't make your paragraphs too long or too short. A paragraph should be a development of four to six sentences in length.

Step 6: End with a Memorable Conclusion
Many students conclude their writing by rushing through, so they can finish their writing. An ending is the last opportunity to make an impression.
A good conclusion:
Restates your main point.
Summarises the main points or plot points.
Makes the audience think.
Whether it's a personal reflection or a call to action, your conclusion should feel comprehensive rather than abrupt.
As an illustration, "That day taught me that change is not always bad—it's often the push we need to grow." I've come to realise that obstacles can serve as the best teachers.
Step 7: Make revisions and edits
Take a brief rest after finishing your first draft. You'll read your writing with fresh eyes when you get back.
Editing makes your work stronger and more understandable. This little action has the potential to have a big effect.
Look out for:
Grammatical or spelling errors
Confusing or repeated sentences
Paragraphs that don’t flow together
Punctuation or formatting errors
Reading your work aloud may also help you identify things that might seem off. If possible, ask someone else to read it as well, so that they might detect things you missed.
Conclusion
Secondary school composition writing doesn't have to be as hard as it seems. It will become much easier once you grasp a few basic steps, such as comprehending the task at hand, organising your ideas, draughting a rough outline, and making some final revisions.
In fact, nobody wakes up one morning an outstanding writer. All of us start out as beginners, and the more we attempt writing, the more skilled the beginner becomes. You will be more comfortable, and so will your marks! The next time you catch yourself gazing blankly at a page, don't worry - just breathe in deeply, think small and simply attempt to write down what you are thinking. You can do it and you are learning more than you are aware of!
0 notes
Text
You Don’t Need More Apps - You Need a Smarter Assistant (Built with AI)

Let’s be honest.
You’ve downloaded every productivity app out there:
To-do list apps Note-taking tools Calendar blockers Focus timers Habit trackers
Each one promised to simplify your life. Instead? You’re juggling tabs, syncing tasks, and still feeling behind.
The truth is, you don’t need more apps. You need a smarter assistant - one that actually thinks with you.
Not another interface to manage. A system that learns how you work, supports your decisions, and removes the clutter before it slows you down.
That’s exactly what Crompt is built for.
Apps Help You Manage.
Assistants Help You Move.
Apps ask you to organize. Assistants organize for you.
Apps give you blank templates. Assistants give you decisions.
Apps wait for input. Assistants offer intelligent output - before you ask.
Crompt isn’t another tool in your stack. It’s the thinking layer that sits on top of it all.
Let’s break that down.
1. Task Prioritizer
Forget color-coded lists and dragging blocks around.
Just brain dump your chaos. Crompt ranks it into a smart, executable order - based on urgency, ROI, and effort.
Use it now
2. Document Summarizer
Stop reading what you don’t need.
Upload a doc, email, or report. Crompt gives you the key takeaways in plain English.
Try it
3. Email Assistant
No more blank screens or awkward follow-ups.
You describe the situation. Crompt writes the email - with clarity, tone, and confidence baked in.
Use the email assistant
4. Sentiment Analyzer
Feeling scattered? Blocked? Burned out?
Drop in your internal chatter. Crompt reads the tone, spots the stress, and helps you reset your headspace.
Run an analysis
5. AI Personal Assistant
You don’t need to ask it what to do. You just talk to it.
“Plan my day.” “Remind me of this tomorrow.” “Summarize my meeting notes.” “Write a follow-up with urgency.”
Crompt listens. Then it builds.
Meet your assistant
Apps are great at storing things. But you don’t need another place to put tasks.
You need a system that knows what to do with them.
That’s what a real assistant does. That’s what Crompt delivers - without the overwhelm, subscriptions, or 12-tab setup.
In 2025, your competitive edge won’t be how many apps you’ve mastered.
It’ll be how fast you make smart decisions - and how little time you waste doing what AI can handle better.
Crompt is the only assistant you need:
✓ Plans your day ✓ Writes your content ✓ Clarifies your thoughts ✓ Speeds up your workflow ✓ Saves your brain
Start free at Crompt.ai
Because productivity isn’t about adding more. It’s about using less to do more - with intelligence.
0 notes
Text
Dickie Bush & Nicolas Cole – Create And Launch A Digital Course In 30 Days + Upsell
Dickie Bush & Nicolas Cole – Create And Launch A Digital Course In 30 Days + Upsell (50 Prompts To Build Your Sales Page, Outline & Write Your Course, Warm Up Your List, Launch Your Offer, And Follow Up Post Launch) Here’s How It Works: The Write The Course Prompt Library is an asynchronous system taken at your own pace – but designed to be completed over a 30-day period. All of the prompts are plug-and-play and work with your specific expertise as input. Here’s the simple 3-step process: Follow the 30-day roadmap. Each day has specific tasks and prompts to move you closer to launch – but you can work through it at whatever pace fits your schedule. Plug in your expertise. Every prompt is designed to work with YOUR knowledge, YOUR audience, and YOUR unique perspective as the input. Let AI handle the heavy lifting. Copy, paste, and customize our proven prompts in ChatGPT, Claude, or your AI writer of choice to create your course content, sales pages, and marketing materials. By the end of 30 days, you’ll have a complete course ready to launch and start generating income. What You’ll Learn In Create And Launch A Digital Course In 30 Days + Upsell 1) Topic & Research Acceleration Prompts Most course creators fail because they build something nobody wants. These prompts help you identify profitable topics and validate demand before you waste time creating. Inside this section, you’ll find: Our FFGA framework prompts that mine your existing analytics to reveal what your audience actually wants Competitor research templates that systematically identify market gaps and opportunities AI brainstorming prompts that generate multiple profitable course ideas based on your specific expertise The result? You’ll know exactly what your audience wants and will pay for instead of guessing and hoping. 2) Course Offer Blueprint Prompts Even great course ideas fail without the right positioning. These prompts help you to transform your idea into an irresistible offer with clear value and strategic pricing. You get: Complete offer stack development prompts that combine features, benefits, bonuses and strategic pricing Positioning frameworks that make you stand out from competitors and become the obvious choice Course naming templates and offer scripts that turn curious browsers into eager buyers With this set of prompts you’ll create offers so compelling that price becomes secondary to value. 3) Course Co-Writer Prompts This is where your course comes to life. This section includes: Course and module introduction templates that hook students from the very first lesson 5 different lesson formats (step-by-step, limiting beliefs, mistakes, listicles, universal) so you never run out of ways to teach Content supplement prompts for templates, resources, case studies and examples that reinforce learning Instead of staring at the blank pages wondering what to write, you’ll have prompts that guide you through every piece of content. 4) Sales & Marketing Engine Prompts The best course in the world won’t sell itself. So, in this section we give you the complete marketing system to turn interested prospects into paying customers. This includes: Complete sales page templates using our proven conversion framework that’s generated millions in sales Email sequence templates including 5-day validation, 9-day launch, and 5-day nurture campaigns Social media promotion prompts and upsell templates that maximize revenue per customer Most creators just “put it out there” and hope people buy. This helps you do better than that. More courses from the same author: Dickie Bush & Nicolas Cole
0 notes
Text
EMR Studio Features Requirements and Limits AWS

Amazon EMR Studio features, specs, and limitations:
Amazon EMR Studio describes an IDE for data preparation and visualisation, departmental collaboration, and application debugging. When utilising EMR Studio, consider tool usage, cluster demands, known issues, feature constraints, service limits, and regional availability.
Features of Amazon EMR Studio
Service Catalogue lets administrators connect EMR Studio to cluster templates. This lets users create Amazon EC2 EMR clusters for workspaces. Administrators can grant or deny Studio users access to cluster templates.
The Amazon EMR service role is needed to define access permissions to Amazon S3 notebook files or AWS Secrets Manager secrets because session policies do not allow them.
Multiple EMR Studios can control access to EMR clusters in different VPCs.
Use the AWS CLI to configure Amazon EMR on EKS clusters. Connect these clusters to Workspaces via a controlled API in Studio to run notebook jobs.
Amazon EMR and EMR Studio use trusted identity propagation, which has extra considerations. IAM Identity Centre and trusted identity propagation are required for EMR Studio to connect to EMR clusters that use it.
To secure Amazon EMR off-console applications, application hosting domains list their apps in the Public Suffix List (PSL). Examples are emrappui-prod.us-east-1.amazonaws.com, emrnotebooks-prod.us-east-1.amazonaws.com, and emrstudio-prod.us-east-1.amazonaws.com. For sensitive cookies in the default domain name, a __Host- prefix can prevent CSRF and add security.
EMR Studio Workspaces and Persistent UI endpoints use FIPS 140-certified cryptographic modules for encryption-in-transit, making the service suitable for regulated workloads.
Amazon EMR Studio requirements and compatibility
EMR Studio supports Amazon EMR Software versions 5.32.0 and 6.2.0.
EMR clusters using IAM Identity Centre with trusted identity propagation must use it.
Before setting up a Studio, disable browser proxy control applications like FoxyProxy or SwitchyOmega. Active proxies can cause Studio creation network failures.
Amazon EMR Studio restrictions and issues
EMR Studio does not support Python magic commands %alias, %alias_magic, %automagic, %macro, %%js, and %%javascript. Changing KERNEL_USERNAME or proxy_user using %env or %set_env or %configure is not supported.
Amazon EMR on EKS clusters does not support SparkMagic commands in EMR Studio.
All multi-line Scala statements in notebook cells must end with a period except the last.
Amazon EMR kernels on EKS clusters may timeout and fail to start. Should this happen, restart the kernel and close and reopen the notebook file. The Restart kernel operation requires restarting the Workspace, and EMR on EKS clusters may not work.
If a workspace is not connected to a cluster, starting a notebook and choosing a kernel fails. Choose a kernel and attach the workspace to run code, but ignore this error.
With Amazon EMR 6.2.0 security, the Workspace interface may be blank. For security-configured EMRFS S3 authorisation or data encryption, choose a different supported version. Troubleshooting EMR on EC2 tasks may disable on-cluster Spark UI connectivity. Run %%info in a new cell to regenerate these links.
5.32.0, 5.33.0, 6.2.0, and 6.3.0 Amazon EMR primary nodes do not have idle kernels cleaned away by Jupyter Enterprise Gateway. This may drain resources and crash long-running clusters. A script in the sources configures idle kernel cleanup for certain versions.
If the auto-termination policy is enabled on Amazon EMR versions 5.32.0, 5.33.0, 6.2.0, or 6.3.0, a cluster with an active Python3 kernel may be designated as inactive and terminated since it does not submit a Spark task. Amazon EMR 6.4.0 or later is recommended for Python3 kernel auto-termination.
Displaying a Spark DataFrame using %%display may truncate wide tables. Create a scrollable view by right-clicking the output and selecting Create New View for Output.
If you interrupt a running cell in a Spark-based kernel (PySpark, Spark, SparkR), the Spark task stays running. The on-cluster Spark UI is needed to end the job.
EMR Studio Workspaces as the root user in an AWS account causes a 403: Forbidden error because Jupyter Enterprise Gateway settings disallow root user access. Instead of root, employ alternate authentication methods for normal activities.
EMR Studio does not support Amazon EMR features:
connecting to and running tasks on Kerberos-secured clusters.
multi-node clusters.
AWS Graviton2-based EC2 clusters for EMR 6.x releases below 6.9.0 and 5.x releases below 5.36.1.
A studio utilising trusted identity propagation cannot provide these features:
Building EMR clusters without templates using serverless applications.
Amazon EMR launches on EKS clusters.
Use a runtime role.
Supporting SQL Explorer or Workspace collaboration.
Limited Amazon EMR Studio Service
Service Restriction The sources list EMR Studio service limits:
EMR Studios:
Each AWS account can have 100 max.
Maximum five subnets per EMR Studio.
IAM Identity Centre Groups are limited to five per EMR Studio.
EMR Studios can have 100 IAM Identity Centre users.
#EMRStudio#AmazonEMRStudio#AmazonEMR#EKSclusters#News#Technews#Techology#Technologynews#Technologytrendes#Govindhtech
0 notes
Text
Building My Scene UE5
Okay, so first, I had to set up a brand new project. I used a blank film template for the first time as I feel like this would be more configured to what I intend to make.

After this, I added a landscape to my scene in the landscape drop-down menu:

I then browsed on Quixel Bridge for ground materials, and I ended up finding one I really liked until I realised that Quixel Bridge no longer works and there's a new Fab Plugin for unreal that works basically the same. THE ONLY ISSUE IS that the material I wanted is not listed ANYWHERE on Fab, so obviously it got lost in the transition.

after this, I was then tasked with having to find an alternative material that I matched the one shown above as closely as possible. I ended up coming across this one which I liked a lot:

now that I had this material I imported it using the fab plugin and then applied it to my landscape material which gave me this:

I wasn't super happy with this because of the repeating textures, so instead I went to YouTube to find a way to hide this in UE5 and got a really good video. It worked by blending a bunch of noise maps and vector parameters with the original material to create a 'smoother' landscape. Here is how the landscape is now looking:

Video Source:
youtube
I then added my house to the scene to get a better idea of how it would work with the landscape material:

Next, I used the lanscape sculpt and erode tools to give the landscape some shape, as I just didn't have the time to figure out how to add a height map to the terrain and ended up with this:

Next, I wanted to do a little bit of research, I had been saving to do with how I was going to approach painting my foliage and that was to gather a reference sheet of abandoned Detroit homes. Detroit has many abandoned and burnt down homes because of a mix of an economic decline, people suffering job losses and social issues. The city used to be a thriving place for car manufacturing but factories gradually moved or shut down, which then caused mass unemployment. As the jobs disappeared, people then left the city looking for employment elsewhere, which led to a shrinking population. During the 2008 financial crisis, many homes were foreclosed and left empty. I then found on top of that, Detroit became known for arson on "Devil’s Night" (the night before Halloween), where people would set fire to abandoned buildings. In 2013, the city went bankrupt and had to cut essential services like fire response, making things worse. Efforts have been made to demolish or rebuild, but the damage remains widespread.
Here is a some anaylsis I made on a few home examples:

I found this video here which shows off the devastation left behind:
youtube
This house in particular stood out to me by how much nature had overpowered it:

^ like the house is barely visible here and I think I wanna do something similar with the neighbouring houses to my main one being consumed by like the trees.
For trees I already had them added to my project from a previous blog post but the foliage for grass I didn't. Here are the main ones I used:


So all that was left was to paint the foliage in. I painted each pack individually so I could adjust the density for each to fit accordingly (did the same for the trees):

I started with the long grass as the base then painted everything else in to blender well with it afterwards:

I ended up making lots of use of the Kangaroo Paw as this really went well with my desired overgrown look (best bit foliage in my opinion, big and dense).
Here is a close up of the foliage all painted into the ground:

^ I am really happy as its super diverse and looks very believable.
After this I added the other neighbouiring houses to the scene and placed them off to the side like I said I would (hidden in trees) previously:

Next I sent a screenshot to my friend to get their opinion on the scene so far and they said they loved it expect for the house being too small compared to the trees.

I took another look and realised that was definitely off with the house so I upscaled the size of it.

Here is a wide shot of everything painted in:

Next I added some vines to the house as that's what I originally planned to have covering areas.


Here is my whole scene built now:

Here is a path traced high res screenshot of my scene:

Overall, I am really happy with how this scene turned out, considering I managed to build it in one long day. If I had more time, I know I could've made it even better in terms of foliage distribution and potentially lighting but overall, what I have meets my minimum expectations.
0 notes
Text
What Are the Key Components of a PTE Course

A strong PTE (Pearson Test of English) course is built on several essential pillars that together ensure you’ll step into the exam room fully prepared, confident, and clear on what to expect. Below, we break down the key components that any high-quality PTE course should include.
1. Diagnostic Assessment Before you kick off your studies, a thorough diagnostic test helps identify your strengths and weaknesses across the four skills—Speaking, Writing, Listening, and Reading. This initial snapshot:
Reveals which item types or question formats give you the most trouble
Sets a baseline score, so you can measure real progress over time
Guides your instructor or study plan to focus on areas that need the most attention
2. Skill-by-Skill Modules A comprehensive PTE course divides its content into dedicated modules for each macro-skill:
Speaking Module covers: personal introductions, Read Aloud, Repeat Sentence, Describe Image, and Retell Lecture. You’ll learn pronunciation, fluency, and pacing techniques.
Writing Module focuses on: Summarize Written Text and Essay writing. You’ll master structure (introduction, body, conclusion), paraphrasing, and time management.
Listening Module addresses: Summarize Spoken Text, Multiple-Choice Questions, Fill in the Blanks, Highlight Correct Summary, and more. Training includes active listening strategies, note-taking shorthand, and predicting answers.
Reading Module teaches: Multiple-Choice, Reorder Paragraphs, Fill in the Blanks, and Reading & Writing—Fill in the Blanks. You’ll hone skimming/scanning skills and learn to deduce meaning from context.
3. Integrated Practice Tests Periodic full-length mock exams replicate real-test conditions:
Strict timing and uninterrupted format
Official PTE scoring algorithms whenever possible
Immediate result analysis to track your score trajectory These tests build stamina, reduce test-day anxiety, and let you practice pacing across all sections in one sitting.
4. Detailed Feedback & Score Analytics Simply doing practice questions isn’t enough—actionable feedback is key. A quality course provides:
Item-level corrections, model answers, and explanations
Automated and/or instructor-led feedback on pronunciation, grammar, and essay structure
Score dashboards showing how you’re trending against your target band
5. Strategy Workshops & Technique Drills Knowing question formats is one thing; mastering exam-taking strategies is another. Workshops should cover:
Time-saving hacks (e.g., “when to move on from a difficult question”)
Guess-and-eliminate tactics for multiple-choice items
Smart note-taking methods for listening and speaking
Essay planning templates that ensure coherence under time pressure
6. Vocabulary & Grammar Support Strong language underpins every PTE task. Expect:
Targeted word-lists for academic, general, and idiomatic vocabulary
Grammar primer sessions emphasizing structures common to high-scoring responses
Contextual exercises that reinforce new words and grammar in realistic PTE prompts
7. Personalized Coaching & Peer Interaction Learning in isolation can stall your progress. Top courses balance:
One-on-one coaching for tailored guidance on your specific hurdles
Small-group classes to practice speaking tasks, offer peer feedback, and simulate discussion-based prompts
Online forums or chat groups where you can post essays or recordings and receive community support
8. Study Materials & Resources A robust resource library often includes:
Official PTE practice kits and past-paper compilations
Video tutorials demonstrating each item type
Sample essay collections and model answer banks
Mobile apps or flashcards for on-the-go review
9. Progress Tracking & Goal Setting Success in PTE is a journey of small, measurable improvements. Your course should:
Offer a clear timeline with milestones (e.g., “reach 65 in Speaking by Week 4”)
Send regular progress reports
Adjust study plans dynamically based on your ongoing performance
10. Exam Registration & Test-Day Preparation Finally, a truly student-centered course helps with the logistics:
Guidance on registering for your PTE date
Checklists for test-day essentials (ID, arrival times, approved materials)
Mental preparation tips to manage nerves, ensure good sleep, and eat well before the exam
Conclusion By combining a diagnostic assessment, skill-specific modules, regular PTE Mock Tests, detailed feedback, and targeted strategies—all wrapped in a supportive coaching environment—a PTE course delivers everything you need to hit your target score. When you choose a program that incorporates these key components, you’re not just practicing for the exam—you’re building lasting English skills and test confidence that will carry you through test day and beyond.
0 notes
Text
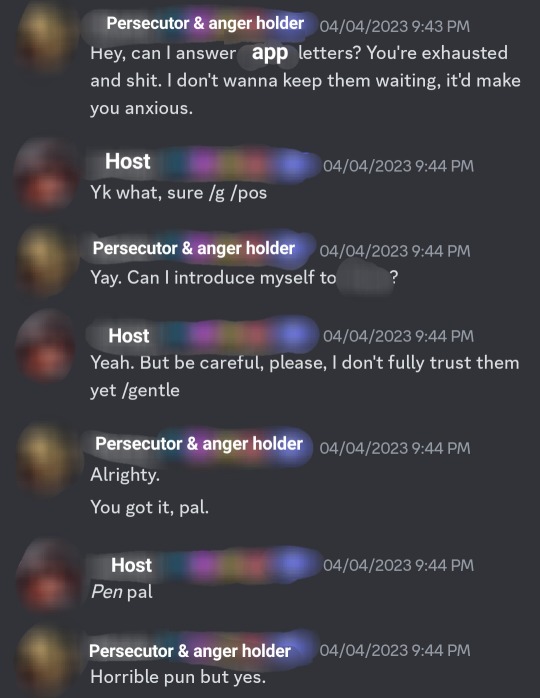
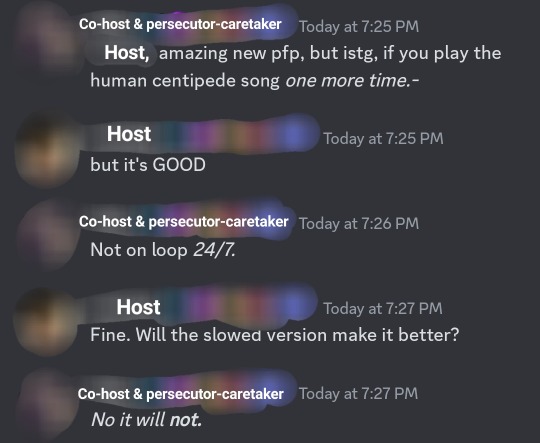
Echoes of Home: 114 - Tsu'na ("wind chimes")
Echoes of Home: FFXIV AU OC – WoLs on Earth
I am trying to find things to do.
There are many things I can do. I have a lot of books I can read. Husband has collected videos I can watch. There are shards and materials to gather, and things to build. I can go into Tulsa and play the game, or simply explore. There are truly things to do.
But the thing I keep thinking about is the thing I cannot do. I am not fighting in Myra's fights. I am not Cat's Meow.
It is a piece of identity that I had made for myself, and now it is gone. Husband would perhaps say I am still me, and I must agree that that is true, but when I find myself wondering if I am even real it is nice to have more pieces of me.
I should perhaps ask Husband to ask Scott about other fights, since Scott seems to know about betting. But that is only part of the question.
I type this at the workshop. I have been here all day. I came here in the morning, thinking perhaps to work on something in Husband's our project list. Instead I opened a blank doc to type my thoughts. When I did not have any, I played a wind chime video and listened while I stared at the doc some more.
Husband has almost finished his our airplane. The propeller keeps breaking, or trying to. I think he uses working on furniture for the bar as his zen, since he will make a table or some chairs between trying to make another propeller. He certainly needs the zen after each propeller breaks.
Other than the airplane, the largest project on our list is a greenhouse. It will be a lot of work, perhaps more than the workshop, since the frame from the old shed was still available, even though I do not think there is any of it left. The greenhouse will require cedar and plexiglass, and something for a floor, and perhaps concrete or cermet, and we may also want lights and water pipes. It will require thought and planning.
Husband insisted on adding gardening as a separate project after the greenhouse. I do not understand why, unless he is concerned about crossbreeding. Plants want daily watering, but do not need specific tending before they finish growing in three or four days, so they should not affect our other tasks.
Listening to the wind chime sound made me curious about it. I googled wind chimes and saw pictures of ones that were for sale. They looked simple enough to make. There are things that make noise when hit ("tubes" or "rods"), things that do the hitting ("clapper"), things that are pushed by the wind to move the clapper ("feather"), string, and something for everything to hang from ("top piece").
We have a lot of copper and hempen yarn. The "feather" does not look like an actual feather; some seem to be made of thin wood, while others are a piece of leather. The top piece could be metal or wood. It seems most people use stone for a clapper; we have not been keeping a lot of stone, but there is granite nearby.
I could have written a recipe for wind chimes that used copper tubes and hempen yarn and granite and maple. But that would have been a recipe for one kind of wind chimes, and there were a lot of pictures of different kinds in google. Husband had talked about "template recipes" that would allow us to change one thing, as some of the recipes we learned let us do. But I thought that would not be enough.
Zhloe Aliapoh ran an orphanage in Idyllshire, and wanted us to make things for her that she could use to raise money to take care of children. But she did not have specific recipes for specific things. She had recipes that used "materials" to make "components" that would then make things.
The materials would sometimes change. She often wanted "keepsakes" of Western Coerthas; the materials for these were once dragon scale and mythrite, and another time were dark chestnut wood and yeti fur. When I had different materials I made different keepsakes. Yet the recipe did not change.
I studied Zhloe's recipe in the workshop, looking to see how and where it specified things to use and what to make. Both Husband and Eorzean scholars spoke of intent when working with aether, and I saw how to blend my own intent into the recipe to take what materials I had to make what I wanted made.
And so I wrote a recipe that took metal ore and stone and wood and yarn and made metal tubes and a metal ring and a stone disk and lengths of string and a flat wooden plate, then a further recipe that took these pieces and made a wind chime, with tubes of different lengths and string of the right lengths and a clapper and feather, all connected to a metal top piece. And it made sound when I touched the feather.
Hanging it in the workshop would not do, since there was no wind inside, so I made a signpost without a sign, placed it outside and hung the wind chime from that. The sound was different from the video I had listened to, and not as pleasant, so I took it down, desynthesized it and tried again.
I made four more attempts before Husband got back from gathering. After making a chime I tested the clapper against each of the tubes to consider the sound. I could make thinner-walled tubes and wider or narrower tubes to change the range of sound and how long the sound lasted after they were hit.
Husband returned as I was making one more set of components. He studied my recipes, copied them to his own journal, and started his own attempt as I hung up my last chime. He was very happy with the idea, and wants to try making food recipes the same way. I am willing to try a meat pie made that way, but I think I am content buying Guiseppe's pizza.
Husband called me brilliant as he has before. I do not know if I am brilliant, or if either of us are. But I am someone who can think of things like this.
I am an artisan. I make things. This is not news to me. It does not tell me anything about who or what I am that I did not already know. It does not truly tell me my identity.
But it is a piece of it.
And now we have wind chimes.
#ffxiv#ffxiv echoes of home#ffxiv writers#ffxiv fanfiction#final fantasy xiv fanfic#ffxiv writing#writeblr
1 note
·
View note
Text
How School Exercise Books Cultivate Organization and Spark Creativity
In our increasingly digital world, the humble exercise book might seem like a relic of the past. Yet, these unassuming companions – from the standard school exercise books to bespoke creations – hold a surprising power in fostering both organization and creativity. They are more than just collections of blank pages; they are tangible tools that can shape our thoughts, structure our learning, and ignite our imaginations. Let's delve into the remarkable ways school exercise books contribute to these essential skills.
The Foundation of Order: Exercise Books as Organizational Pillars
At its core, an exercise book provides a dedicated space for thoughts and ideas. This simple act of containment is the first step towards organization. Whether it's jotting down lecture notes, working through mathematical problems, or brainstorming project ideas, the exercise book becomes a central hub for a specific subject or task.
✅ Structured Learning: School exercise books, often with pre-defined lines or grids, naturally encourage structured thinking. This format helps students organize their work neatly, making it easier to review, understand, and build upon previous concepts. The act of writing within these lines reinforces the importance of clarity and precision.
✅ Chronological Tracking: Exercise books inherently offer a chronological record of learning and thought processes. Flipping through the pages allows individuals to trace their progress, identify patterns, and revisit earlier ideas. This historical perspective is invaluable for understanding the evolution of a concept or the development of a skill.
✅ Task Management: Beyond academic settings, exercise books serve as excellent tools for personal and professional task management. They can be used to create to-do lists, track project milestones, and record meeting minutes. The physical act of writing and reviewing these lists can enhance focus and accountability.
✅ Reduced Digital Distraction: In a world saturated with digital notifications and distractions, the exercise book offers a sanctuary of focused attention. Without the lure of social media or email, individuals can immerse themselves fully in their thoughts and tasks, leading to more organized and coherent outcomes.
✅ Tangible Progress: Unlike digital documents that can feel ephemeral, a filled exercise book provides a tangible record of accomplishment. Seeing the pages fill with notes, solutions, or ideas offers a sense of progress and motivates continued engagement.
Igniting the Spark: Exercise Books as Catalysts for Creativity
While their organizational benefits are clear, exercise books also play a vital role in nurturing creativity. The blank page, far from being intimidating, can be a powerful invitation to explore, experiment, and generate novel ideas.
✅ Free-Flow Thinking: The unconstrained nature of a blank page encourages free-flow thinking and brainstorming. Without the limitations of digital templates or specific software, individuals can let their thoughts wander, make connections, and explore unconventional ideas without judgment.
✅ Visual Thinking and Sketching: Exercise books are ideal for visual thinkers. They provide a space to sketch diagrams, mind maps, and visual representations of concepts. This visual exploration can unlock new perspectives and foster a deeper understanding.
✅ Iterative Development: Creativity is often an iterative process. Exercise books allow for the easy jotting down of initial ideas, followed by revisions, refinements, and the exploration of different approaches. The ability to physically cross out, add notes, and connect ideas with lines fosters a dynamic and evolving creative process.
✅ Tangible Idea Capture: Ideas can be fleeting. Having an exercise book readily available allows for the immediate capture of inspiration, whether it strikes during a lecture, a commute, or a quiet moment of reflection. This ensures that valuable thoughts are not lost.
✅ Personalized Expression: Unlike standardized digital interfaces, exercise books offer a personal canvas for expression. The choice of pen, the style of handwriting, and the way ideas are organized all contribute to a unique and personal creative output.
The Power of Print: Why Physical Exercise Books Still Matter
While digital tools have their place, the physicality of printed exercise books offers unique advantages for both organization and creativity.
✅ Sensory Engagement: The tactile experience of writing on paper engages different senses, which can enhance memory and learning. The feel of the pen on the page, the sound of writing, and the visual feedback of ink on paper create a more immersive and memorable experience.
✅ Spatial Memory: Studies have shown that writing by hand can improve spatial memory. The act of physically moving the hand across the page helps create a mental map of the information, making it easier to recall later.
✅ Reduced Eye Strain: Spending extended periods looking at digital screens can lead to eye strain and fatigue. Exercise books offer a welcome respite, allowing the eyes to focus on a non-illuminated surface.
✅ Durability and Longevity: Physical exercise books, especially well-bound ones, can last for years, providing a permanent record of learning and creative endeavors. This tangible archive can be a valuable resource for future reference and reflection.
Tailored Tools: The Rise of Bespoke School Exercise Books
Recognizing the unique needs of different educational institutions, bespoke school exercise book print has gained popularity. These customized books offer several advantages:
✅ Branding and Identity: Bespoke exercise books can feature the school's logo, colors, and mission statement, fostering a sense of belonging and reinforcing school identity.
✅ Curriculum Alignment: The internal layout of bespoke exercise books can be tailored to specific subjects or teaching methodologies. This might include specific section headings, graph paper for mathematics, or lined pages with wider margins for annotations.
✅ Specialized Content: Bespoke books can include supplementary materials such as formulas, vocabulary lists, or study tips relevant to the curriculum. This provides students with readily accessible resources within their exercise book.
✅ Enhanced Organization: By providing a structured format tailored to specific needs, bespoke exercise books can further enhance organizational skills and streamline the learning process.
✅ Increased Engagement: Students may feel a greater sense of ownership and engagement with exercise books that are specifically designed for their school and their learning needs.
Conclusion
While technology offers numerous tools for organization and creativity, the humble exercise book remains a powerful and versatile asset. From the structured learning fostered by standard school exercise books to the personalized approach offered by bespoke options, these tangible companions provide a unique blend of order and inspiration. The physical act of writing, the absence of digital distractions, and the inherent structure of the exercise book all contribute to enhanced organization. Simultaneously, the blank pages invite exploration, the tactile experience stimulates creativity, and the chronological record allows for reflection and growth.
So, whether you're a student striving for academic excellence, a professional managing complex projects, or an individual seeking to unlock your creative potential, consider the enduring power of the exercise book. Embrace the analog advantage in our digital age and discover how these unassuming tools can help you organize your thoughts, ignite your imagination, and ultimately, unleash your full potential. The simple act of putting pen to paper in a dedicated space can be the first step towards a more organized and creatively fulfilling journey.
0 notes
Text
Printed Pads: The Ultimate Tool for Organization and Creativity

Printed pads are an essential tool for individuals looking to stay organised while expressing their creativity. Whether you're a business professional, an artist, or a student, these versatile items can help streamline your tasks and spark innovative ideas. Let’s explore the benefits of printed pads, how they can enhance your organisational skills, and their role in fostering creativity.
Benefits of Printed Pads
1. Enhanced Organisation
One of the primary advantages of using printed pads is their ability to help you stay organised. Printed pads often come with pre-designed layouts, such as grids, lists, or checkboxes, which assist in structuring your thoughts, tasks, or notes. Whether you need to manage your daily schedule, track progress on a project, or jot down quick ideas, printed pads provide a simple yet effective solution. The act of writing things down, combined with a well-organised structure, encourages productivity and ensures you stay on top of your responsibilities.
2. Customisable Designs
Printed pads are available in a wide variety of designs, allowing you to tailor them to your specific needs. You can choose from options with specific templates for meetings, to-do lists, or project management. Some pads even allow you to add your branding, making them an excellent choice for businesses looking to promote their identity. The customisation possibilities make printed pads a valuable tool not only for personal organisation but also for professional settings.
3. Encouraging Creativity
In addition to helping with organisation, printed pads can also be a great tool for unlocking your creativity. Whether you’re sketching, brainstorming, or writing, the structured yet flexible nature of printed pads can guide your creative process. The presence of grids or blank spaces can inspire new ideas and make the writing or drawing process feel less daunting. Artists and designers can use them to plan projects, while writers can use printed pads to organise their thoughts and notes, enhancing their creative flow.
4. Environmentally Friendly
For those who are environmentally conscious, printed pads offer an eco-friendly option. Many companies produce printed pads using recycled paper, which reduces the environmental impact. By choosing printed pads made from sustainable materials, you can stay organised and creative without compromising your commitment to the planet.
Final Thoughts
Printed pads are the ultimate tool for both organisation and creativity. Their practical design and customisable features help individuals stay on top of their tasks while fostering a creative environment. Whether you’re managing your work schedule or planning your next artistic masterpiece, these versatile pads can be an indispensable part of your daily routine. With a range of options available, printed pads offer a simple yet effective way to enhance productivity and inspire creativity.
0 notes
Text
Exciting New Tools for Designers, July 2024
July 01, 2024
Welcome to this July’s collection of tools, gathered from around the web over the past month. We hope you’ll find something here to make work just that little bit easier. Enjoy!
Sometimes inspiration is slow in coming when faced with a blank screen. This aptly named AI design helper can get you started with color schemes and font suggestions.
The trend of remote working is becoming increasingly common among designers and developers. This platform is designed for remote workers who wish to make the most of their location independence by arranging home swaps that meet their technical needs.
Gluetrail can create articles and enhanced videos from a single screen recording, which could really speed up the process of making guides and tutorials. It’s a browser extension, currently Chrome only.
Linktopia describes itself as a link building community for founders. You submit blog articles to receive backlinks and send link requests to boost your SEO. All submissions are checked manually.
While there are existing font identifier browser extensions that work on Safari, they only work on desktop. What Font for Safari has been built specifically for Safari and works across all current Apple devices.
Koosh simplifies video embedding using pre-designed templates for single and multiple videos. It also has options for adding interactions.
Spending an hour here and there accidentally browsing is a common pitfall of working on the web. Tell Intentional what you’re working on, and it will stop you from accessing anything irrelevant.
The Figgy web app helps you track your design contributions and monitor your productivity by displaying your Figma activity in a GitHub-style contribution chart.
There are lots of task timers out there, but Bubble Time (currently for iPhone only) may have the most enjoyable and stress-free interface. Additionally, it does not collect any data.
Uizard has added a conversational modality to Autodesigner, allowing you to use plain English in prompts to generate or edit UI components or component sets.
Portfolo lets you create an online showcase for your work, using markdown. It’s simple and fast, allowing you to focus on the work you want to show.
This AI image generator from Icons8 has been trained on the illustrations created by Icons8’s own team of artists. You can get a set of consistent images, with no legal or ethical issues.
DynaUI is a set of animated components built with React, Tailwind CSS, and Framer Motion. The smaller components are free, while a one-off payment gets you page sections and templates.
The Dualite plugin for exporting Figma to code has had a major update. The new features are Component Mode, for generating reusable code components, and Page Mode for converting animations and pages to code.
Most To Do lists expect you to prioritize tasks yourself: One Task uses AI to do the prioritizing for you. If you feel overwhelmed trying to decide what to do next this might be the answer.
Paddi MacDonnell
Read more here https://www.vingle.net/d5media
0 notes
Text
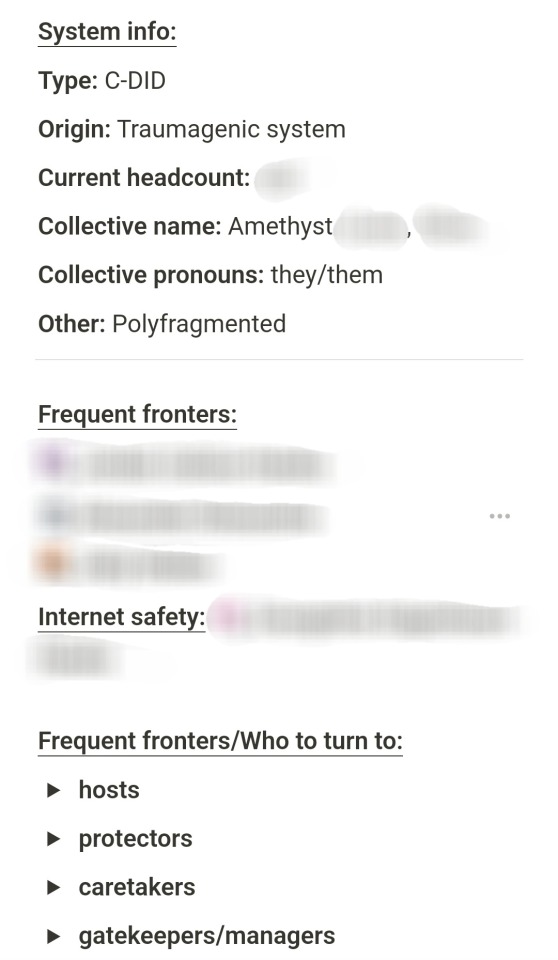
Our system journal is... all over the place. To the point where we don't count it as a "journal," but more of a:

Kinda thing.
We use a template on Notion as a collective system journal. It was an idea presented to us by a person named Mickie who made a template for systems to help work with each other, including newly discovered systems (their discord server is Mickie Makes Things, if I remember correctly). It's digital.
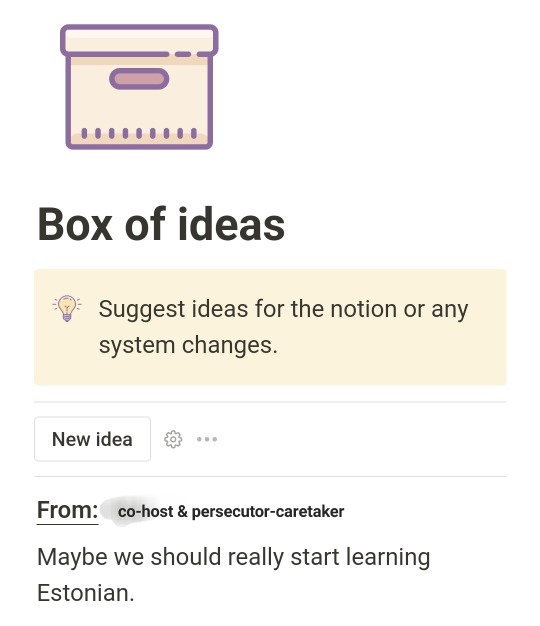
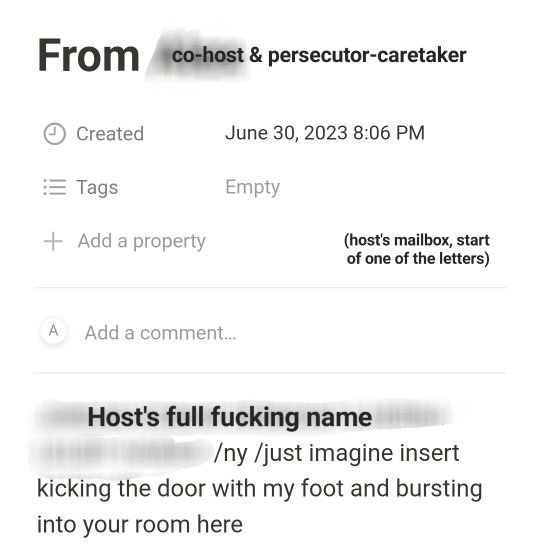
We have alter pages there with information about us and linked diaries of our own or just stuff we like. List of emergency contacts, descriptions of safe/dangerous people/places, a list of tasks, important things for us to know, and one of our favorites: pictures and descriptions of inner world locations. As well as something we called "the box of ideas," which is a page where we put ideas about what we should/shouldn't do. Also, our lovely partner system came up with the idea of mailboxes, and they are pages where you can leave letters for alters to see later when they're fronting.
I added a few other things like information about the body for new alters in case somebody fronts and has no idea who we are, then info about our guidelines, rules, and info about us. Also directory to pages with certain stuff.
It's... all over the place, lmao. But it's also chaoticall organized how potentially only we can understand.
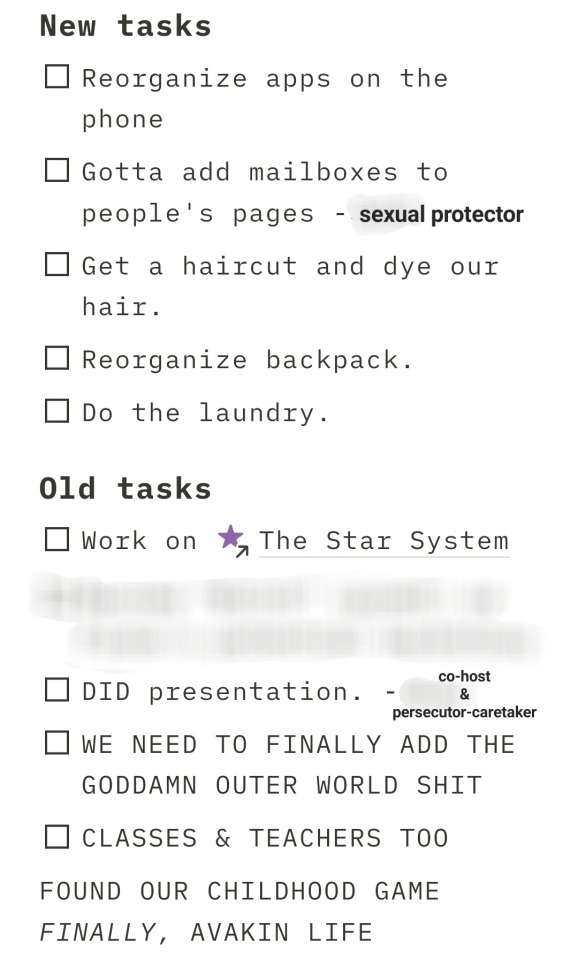
(Spoiler: we still did not add the goddamn outer world shit. Nor class & teachers. It's been months)
We also have our own discord server where we use PK to communicate with each other. We have separate channels for our own rants that others aren't allowed to look into unless there's a reason, a channel for homework, picrews, music, and a general chatting channel.


And, at last, there's Antar. We use it less due to fear of important conversations being lost (it has no backup), but it works for us, too.
Short answer: no rules, go as wild as you can as much as you need. System journal is a tool that shouldn't be used by a textbook, and it doesn't have to just be a journal, too. I didn't even realize we had a journal until I thought about it. Go as hot as wold as you can, my friend. If you have trouble with alter communication, write to each other, cuss each other out on paper, that's awesome, too. If you have trouble staying on top of tasks for one reason or another, write a list if tasks and keep it updated in the journal.
A system journal is basically a collection of all the tools and information you have of/about/for your system. There isn't a limit to what you can do. I wouldn't say "write what you want" because your mind would just go blank on it and you still gotta follow some sort of rules/guidelines of your system if you have them, but I would say write about you, your experience, about what you have/need to do, and anything else you find necessary or just for fun.
Hope that helps!
(I like how this post implies we have our shit together, but we really don't, lol. We just have experience in certain fields. I didn't even realize everything I listed was an actual journal, I thought of it as tools for system communication and things that every system has for each other. But nope, it's a journal. A big, messy, chaotic as fuck, organized in our unique way journal)
-host
to systems who have system journals, how do you do it? Is there rules? Does everyone just write what they want?
I started a journal for us, but I’m not completely sure what we do with it. So far we’re just keeping it like a normal journal
-host
#osdd system#did#did system#osdd#system#dissociative identity disorder#other specified dissociative disorder#system stuff#system things#did osdd#osdd 1a#osdd 1b#complex dissociative identity disorder#did positivity#osdd positivity#system positivity#plural positivity#tools#helpful tips#tips#advice#system advice#notion#discord server#discord chat#out of context discord
311 notes
·
View notes
Text
Elevate Your Planning Game with the reMarkable 2 Template Feature

In the fast-paced, digitally-driven world we live in today, staying organized is not just a choice; it's a necessity. And when it comes to planning, the reMarkable 2 Template feature is an absolute game-changer. This remarkable device has taken the concept of digital planning to new heights, offering a wide array of templates that can transform the way you organize your life. Let's dive into the world of Remarkable 2 templates and discover why they are essential for your planner.
1. Tailored for You: The Remarkable 2 template feature recognizes that planning isn't a one-size-fits-all endeavor. With a rich library of templates at your disposal, you have the power to customize your planner according to your unique needs and preferences. Whether you're a busy professional, a student juggling assignments, or someone planning personal goals, there's a template that perfectly fits your requirements.
2. Efficiency Redefined: Planning is all about efficiency, and the Remarkable 2 template feature is designed to streamline your tasks. Imagine having a daily planner template that lets you outline your schedule, to-do lists, and even jot down important notes, all in one place. With these templates, you can optimize your time, reduce clutter, and ensure that nothing slips through the cracks.
3. Visualize Your Goals: Visualization is a powerful tool when it comes to achieving your goals. The Remarkable 2 templates make it easy to create vision boards or goal-setting templates. Whether you're striving for personal growth, career milestones, or fitness objectives, these templates enable you to visually map out your journey and track your progress.
4. Embrace Creativity: Your planner doesn't have to be mundane. For the creative souls out there, the Remarkable 2 offers an array of artistic templates. From blank canvases for doodles and sketches to specialized templates for creative writing or brainstorming sessions, this device encourages you to infuse your planner with your unique creativity.
5. Go Green, Stay Organized: Beyond the personal benefits, the Remarkable 2 template feature champions sustainability. By eliminating the need for physical paper planners, you're reducing your environmental footprint. You can plan, organize, and strategize without wasting paper or resources, making it a win-win for both you and the planet.
6. Seamless Integration: The Remarkable 2 seamlessly integrates with your digital life. You can easily import and export templates, share them with colleagues or classmates, and access your planner from various devices. This level of flexibility ensures that you can stay on top of your game, no matter where you are.
In a world where time is of the essence, and being organized is key, the reMarkable 2 template feature empowers you to take control of your life, your goals, and your creativity. It's more than just a planner; it's a versatile tool that adapts to your needs and enhances your daily routine. So, if you're looking to make your planning remarkable, look no further than the Remarkable 2 template feature—it's your ticket to a more organized, efficient, and creative life.
1 note
·
View note
Text
Email Marketing Perfected: A Moosend Review You Can't-Miss
Today, we're diving into the world of email marketing and automation with an in-depth Moosend review, exploring the game-changing features of this platform. If you're seeking simplicity, modernity, and results that boost revenue, you're in for a treat.

But before we get into the nitty-gritty, let's face it: email marketing can be time-consuming and challenging. Crafting that perfect campaign seems like an endless struggle, and hitting that "send" button can make you feel like you're rolling the dice. But fear not! Moosend promises to be the ultimate solution, helping you create engaging campaigns effortlessly and achieve your marketing goals.
So, let's buckle up and explore how Moosend makes your email marketing dreams a reality.
Unleash The Potential Of Moosend
When it comes to email marketing, Moosend is the cream of the crop. Their newly redesigned platform takes the complexity out of email campaigns, making it super easy to create and send your marketing masterpieces in under 5 minutes. Yes, you read that right – minutes, not hours! Say goodbye to time-wasting tasks and hello to an intuitive, user-friendly experience that will change the way you approach email marketing.
With Moosend, the days of staring at a blank email template, wondering where to start, are long gone. Their drag & drop newsletter editor is a godsend, allowing you to effortlessly customize your emails with images, text, and buttons. You can truly let your creativity flow, and the best part is that you don't need to be a tech wizard to use it. The interface is designed to be user-friendly, so even if you're a beginner, you'll feel right at home.
Craft Emails That Shine
Sending emails is one thing, but sending emails that actually get opened and clicked is a whole different ballgame. Moosend equips you with all the tools to create eye-catching emails that captivate your subscribers from the get-go. With fully customizable templates and a drag & drop newsletter editor, you can let your creativity flow effortlessly.
Let's talk about subject lines – they can make or break your email's success. With Moosend's A/B testing feature, you can create multiple subject lines and let the platform determine which one performs the best. It's like having a magic crystal ball that shows you the most engaging subject line for your audience. And if that's not enough, they even have an AI Subject Line Optimizer, which uses artificial intelligence to analyze your subject line and suggest improvements for higher open rates. Talk about innovation at its finest!
But it's not just about the subject line; the content of your email matters too. With Moosend's Content A/B Testing, you can experiment with different email layouts, call-to-action buttons, or even the tone of your writing. This invaluable feature lets you understand what resonates best with your audience, allowing you to refine your content strategy and maximize your campaign's impact.
Segmentation: The Key To Personalization
Moving forward with our candid Moosend review, We all know that personalization is vital for successful email marketing. Luckily, Moosend's list segmentation feature takes care of that for you. By segmenting your subscribers based on their interests, behaviors, or demographics, you can deliver personalized content that resonates with each recipient. It's like having a one-on-one conversation with your entire audience! Engaging your subscribers on a personal level builds trust, and loyalty, and ultimately leads to conversions.
Say Hello To The Perfect Forms
Growing your mailing list and collecting valuable data is a breeze with Moosend's beautiful and editable email signup forms. Whether you want a simple newsletter signup or a more interactive gamification form, they've got you covered. With advanced display rules, you can trigger the right message at the right time, ensuring your forms appear to the right audience. Plus, their anti-bot protection keeps pesky spambots at bay, ensuring that your data remains accurate and reliable.
Automate Like A Pro
Repetitive tasks, be gone! Moosend's automation capabilities take your marketing efforts to a whole new level. Their pre-made automation templates make it effortless to set up customer journeys that trigger specific actions based on user behavior. From welcome sequences to abandoned cart reminders, you can engage with your audience at the perfect moment. The visual workflow builder is a true lifesaver, making the automation process intuitive and enjoyable. And with over 100 triggers at your disposal, you can rest assured that no opportunity for customer engagement slips through the cracks.
Closing Out!
In conclusion, Moosend is a powerhouse email marketing and automation platform that redefines simplicity and effectiveness. It empowers businesses to create stunning campaigns, build personalized relationships, and drive real revenue growth without breaking a sweat. With its user-friendly interface, and impressive features like A/B testing, segmentation, and automation, Moosend is undoubtedly a top choice for marketers looking to level up their email game.
Head over to Moosend and experience the magic for yourself.
There you have it, folks – our comprehensive Moosend review. So, what are you waiting for? Embrace the power of Moosend and witness your email campaigns soar to new heights.
0 notes