#Single Image HDR
Explore tagged Tumblr posts
Visit Tumblr Blog
Explore Tumblr blogs with no restrictions, modern design and the best experience.
Last Seen Tumblr Blogs


Fun Fact
Tumblr’s website traffic is steadily declining.
Video

flickr
Remembering a Monday in Shenandoah National Park by Mark Stevens Via Flickr: A setting looking to the southeast while taking in views of this creek setting as it flowed through the nearby forest. This was along the Mill Prong Horse Trail in Shenandoah National Park.
#Appalachian Mountains#Aurora HDR#Aurora HDR Pro#Azimuth SE#Blue Ridge Mountains#Blue Skies#Blues Skies with Clouds#Color Efex Pro#Day 3#DxO PhotoLab 7 Edited#Forest#Forest Landscape#HDR#Landscape#Landscape - Scenery#Looking 145#Mill Prong Horse Trail#Nature#Nikon Z8#No People#Northern Blue Ridge#Outside#Partly Sunny#Project365#Scenics - Nature#Shenandoah Blue Ridge Great Smoky Mountains#Shenandoah National Park#Shenandoah-Middle Section#Single Image HDR#Single Image HDR TIFF Image
1 note
·
View note
Note
thank you for speaking rational thought AS AN ARTIST into the ai debate. i get so tired of people over simplifying, generalizing, and parroting how they’ve been told ai works lmao. you’re an icon
some of the worst AI art alarmists are professional artists as well but theyre in very specific fields with very specific work cultures and it would take a long and boring post to explain all the nuance there but i went to the same extremely tiny, hypefocused classic atelier school in San Francisco as Karla Ortiz and am actually acquainted with her irl so i have a different perspective on this particular issue and the people involved than the average fan artist on tumblr. the latter person is also perfectly valid and so is their work, all im saying is that we have different life experiences and my particular one has accidentally placed me in a weird and relevant position to observe what the AI art panic is actually about.
first thing i did when the pearl-clutching about AI art started is go on the Midjourney discord, which is completely public and free, and spent a few burner accounts using free credits to play with the toolset. everyone who has any kind of opinion about AI art should do the same because otherwise you just wont know what youre talking about. my BIGGEST takeaway is that it is currently and likely always will be (because of factors that are sort of hard to explain) extremely difficult to make an AI like Midjourney spit out precisely wht you want UNLESS what you want is the exact kind of hyperreal, hyperpretty Artstation Front Page 4k HDR etc etc style pictures that, coincidentally, artists like Karla Ortiz have devoted their careers to. Midjourney could not, when asked, make a decent Problem Glyph. or even anything approaching one. and probably never will, because there isn't any profit incentive for it to do so and probably not enough images to train a dataset anyway.
the labor issues with AI are real, but they are the result of the managerial class using AI's existence as an excuse to reduce compensation for labor. this happens at every single technological sea change and is unstoppable, and the technology itself is always blamed because that is beneficial to the capitalists who are actually causing the labor crisis each time. if you talk to the artists who are ACTUALLY already being affected, they will tell you what's happening is managers are telling them to insert AI into workflows in ways that make no sense, and that management have fully started an industry-wide to "pivot" to AI production in ways that aren't going to work but WILL result in mass loss of jobs and productivty and introduce a lot of problems which people will then be hired to try to fix, but at greatly-reduced salaries. every script written and every picture generated by an AI, without human intervention/editing/cleanup, is mostly unusable for anything except a few very specific use cases that are very tolerant of generality. i'm seeing it being used for shovelware banner ads, for example, as well as for game assets like "i need some spooky paintings for the wall of a house environment" or "i need some nonspecific movie posters for a character's room" that indie game devs are making really good use of, people who can neither afford to hire an artist to make those assets and cant do them themselves, and if the ai art assets weren't available then that person would just not have those assets in the game at all. i've seen AI art in that context that works great for that purpose and isn't committing any labor crimes.
it is also being used for book covers by large publishing houses already, and it looks bad and resulted directly in the loss of a human job. it is both things. you can also pay your contractor for half as many man hours because he has a nailgun instead of just hammers. you can pay a huge pile of money to someone for an oil portrait or you can take a selfie with your phone. there arent that many oil painters around anymore.
but this is being ignored by people like the guy who just replied and yelled at me for the post they imagined that i wrote defending the impending robot war, who is just feeling very hysterical about existential threat and isn't going to read any posts or actually do any research about it. which is understandable but supremely unhelpful, primarily to themselves but also to me and every other fellow artist who has to pay rent.
one aspect of this that is both unequivocally True AND very mean to point out is that the madder an artist is about AI art, the more their work will resemble the pretty, heavily commercialized stuff the AIs are focused on imitating. the aforementioned Artstation frontpage. this is self-feeding loop of popular work is replicated by human artists because it sells and gets clicks, audience is sensitized to those precise aesthetics by constant exposure and demands more, AI trains on those pictures more than any others because there are more of those pictures and more URLs pointing back to those pictures and the AI learns to expect those shapes and colors and forms more often, mathematically, in its prediction models. i feel bad for these people having their style ganked by robots and they will not be the only victims but it is also true, and has always been true, that the ONLY way to avoid increasing competition in a creative field is to make yourself so difficult to imitate that no one can actually do it. you make a deal with the devil when you focus exclusively on market pleasing skills instead of taking the massive pay cut that comes with being more of a weirdo. theres no right answer to this, nor is either kind of artist better, more ideologically pure, or more talented. my parents wanted me to make safe, marketable, hotel lobby art and never go hungry, but im an idiot. no one could have predicted that my distaste for "hyperreal 4k f cup orc warrior waifu concept art depth of field bokeh national geographic award winning hd beautiful colorful" pictures would suddenly put me in a less precarious position than people who actually work for AAA studios filling beautiful concept art books with the same. i just went to a concept art school full of those people and interned at a AAA studio and spent years in AAA game journalism and decided i would rather rip ass so hard i exploded than try to compete in such an industry.
which brings me to what art AIs are actually "doing"--i'm going to be simple in a way that makes computer experts annoyed here, but to be descriptive about it, they are not "remixing" existing art or "copying" it or carrying around databases of your work and collaging it--they are using mathematical formulae to determine what is most likely to show up in pictures described by certain prompts and then manifesting that visually, based on what they have already seen. they work with the exact same very basic actions as a human observing a bunch of drawings and then trying out their own. this is why they have so much trouble with fingers, it's for the same reason children's drawings also often have more than 5 fingers: because once you start drawing fingers its hard to stop. this is because all fingers are mathematically likely to have another finger next to them. in fact most fingers have another finger on each side. Pinkies Georg, who lives on the end of your limb and only has one neighbor, is an outlier and Midjourney thinks he should not have been counted.
in fact a lot of the current failings by AI models in both visual art and writing are comparable to the behavior of human children in ways i find amusing. human children will also make up stories when asked questions, just to please the adult who asked. a robot is not a child and it does not have actual intentions, feelings or "thoughts" and im not saying they do. its just funny that an AI will make up a story to "Get out of trouble" the same way a 4 year old tends to. its funny that their anatomical errors are the same as the ones in a kindergarten classroom gallery wall. they are not people and should not be personified or thought of as sapient or having agency or intent, they do not.
anyway. TLDR when photography was invented it became MUCH cheaper and MUCH faster to get someone to take your portrait, and this resulted in various things happening that would appear foolish to be mad about in this year of our lord 2023 AD. and yet here we are. if it were me and it was about 1830 and i had spent 30 years learning to paint, i would probably start figuring out how to make wet plate process daguerreotypes too. because i live on earth in a technological capitalist society and there's nothing i can do about it and i like eating food indoors and if i im smart enough to learn how to oil paint i can certainly point a camera at someone for 5 minutes and then bathe the resulting exposure in mercury vapor. i know how to do multiple things at once. but thats me!!!!!!!!!!!!!!!!!!!!!!!!!!!!
#ai#asks#blog#this post is bugged and keeps changing itself and moving the Read More around#if you see multple versions thats why
651 notes
·
View notes
Note
hi! i was wondering if you have any advice/certain programs or anything you use for making gifs, because there’s something i really want to make but i have zero experience 💔💔
hello hello!
ah, yes, I have a TON, let's hope this ADHD girlie can give a somewhat concise description lmao. I will answer this publicly, in case it's useful for anyone else.
Software I use:
To make the screenshots: - for single scenes: KMPlayer 12.22.30 (the newer versions are trash) - for shorter videos, or something you want to get all the screenshots out of Free Video to JPG converter is awesome.
To make the gifs: - Adobe Photoshop 2021 (I don't recommend much later versions, because of the Cloud connection they have)
General gif-maker wisdom: "we spend more time on making sure that something looks serviceable, not pixelated, and good quality, than to get it moving and shit" - Confucius, probably
Useful stuff to make your life easy:
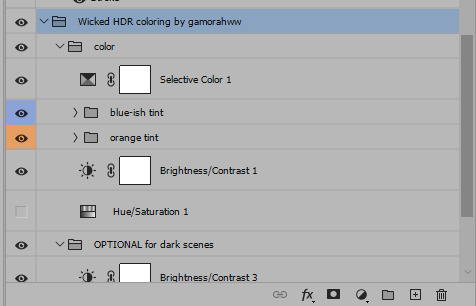
- Squishmoon's action pack for sharpening your screenshots. You can also find their detailed use explained here. - If you are planning to gif Wicked, some scenes are a bit tricky, ngl. But I have two PSDs that you can use, while you're perecting your own craft, and you can edit and update them to make them more "you".
A neutral PSD for mostly indoors and lighter scenes | download

A blue-enhancing PSD for darker scenes | download
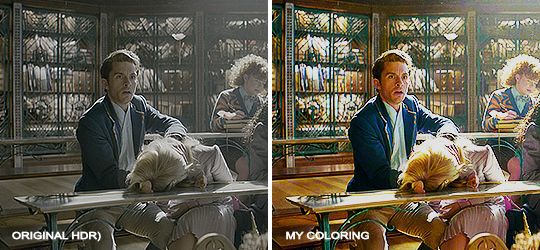
Some info on videos to use: - always, always (ALWAYS) use at least HD videos. Otherwise your gif will look like shit. This should be ideally at least 720p in resolution, but go with 1080p for the best results. Coloring gifs in 1080p is easy, but... - if you want to go pro *rolls eyes*, you could go for HDR (2160p) quality. However HDR is a mf to color properly and I would not recommend it for a beginner. When you extract frames from an HDR video, the image colors will end up being washed out and muddy so you will always have to balance those colors out for it to look decent, however, the quality and number of pixels will be larger. If you ar okay with making small/medium sized images, then stick with 1080p. (Storytime, I spent a lot of time making HDR screenshots, only for me to realize that I really hate working with them, so I'm actually considering going back to 1080p, despite that not being "industry standard" on Tumblr lmao. I'm not sure yet But they take up so much space, and if you have a laptop that is on the slower side, you will suffer.)
See the below example of the image differences, without any effects. You will probably notice, that HDR has some more juicy detail and is a LOT sharper, but well... the color is just a lot different and that's something you will have to calculate in and correct for.

The ✨Process✨
Screencaptures
I like to have all screenshots/frames ready for use. So as step one, you need to get the movie file from somewhere. This should definitely be a legal source, and nothing else (jk).
Once I have the movie. I spend a lot of time making and sorting screencaps. Since I mostly work in the Wicked fandom only atm, that means I will only need to make the frames once, and thats awesome, cause this is the most boring part.
For this, I let the Video to JPG Converter run the whole movie while I was aleep, and by morning, it created gorgeous screenshots for me and my laptop almost went up in flames.
You need to make sure you capture every single frame, so my settings looked like this:
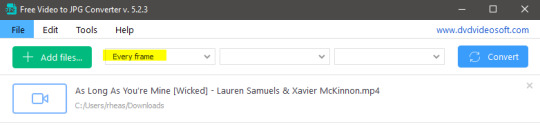
Screenshots do take up a lot of space, so unless your computer has a huge brain, I suggest storing the images in an external drive. For Wicked, the entire movie was I think around 200k frames total. I reduced that to about 120k that I will actually use.
And then I spend some time looking through them, deleting the scenes I know I won't do ever (goodbye Boq, I will never gif you, I'm so sorry :((( ) and also, I like to put them into folders by scene. My Wicked folder looks like this:

If you don't want this struggle and you only need a few specific scenes, there is this great tutorial on how to make frames from KMPlayer. Note that some of the info in this tutorial on gif quality requirements and Tumblr's max allowance of size and # of frames are outdated. You are allowed to post a gif that is a maximum of 10 Mb and 120 frames (maybe it can be even more, idk, said the expert) on Tumblr. But the process of screencapturing is accurate. Also ignore the gifmaking process in this tutorial, we have a lot easier process now as well!
Prepping the images
I have a folder called "captures", where I put all of the specific screenshots for a set I want to use. Inside this folder I paste all the shots/scenes I want to work on for my current gifset, and then I create subfolders. I name them 1, 2, 3, etc, I make one folder for each gif file I want to make. Its important that only the frames you want to be in the gif are in the folder. I usually limit the number of images to 100, I don't really like to go above it, and usually aim to go lower, 50-70 frames, but sometimes you just need the 100.
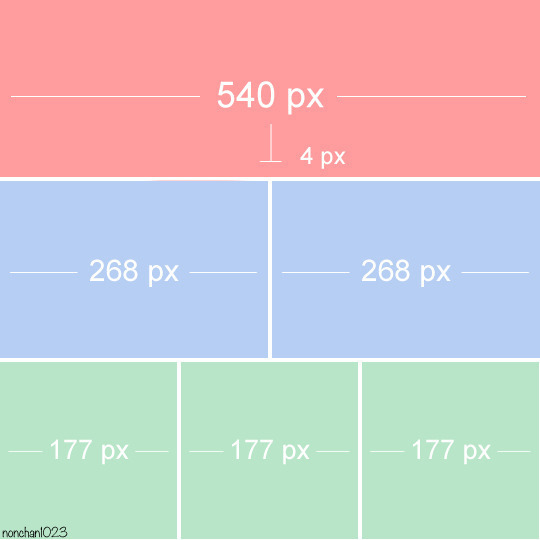
Sidetrack, but: Keep in mind that Tumblr gifs also need to be a specific width, so that they don't get resized, and blurry. (Source) Height is not that important, but witdth is VERY. But since there is a limit on Mb as well, for full width (540px) gifs you will want to go with less frames, than for smaller ones.
Once you have the frames in folders, you will open Photoshop, and go to: File > Scripts > Load files into stack.
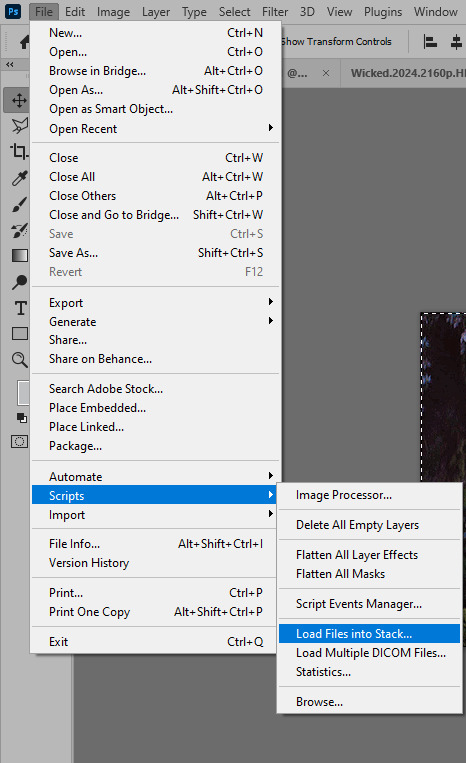
Here you select Folder from the dropdown menu, and then navigate to the folder where you put the frames for your first gif. It will take a moment to load the frames into the window you have open, but it will look like this:

You click "OK" and then it will take anther few moments for Photoshop to load all the frames into a file.
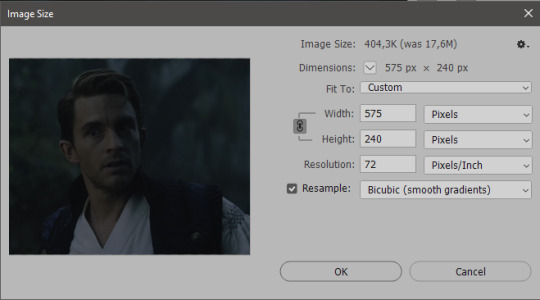
But once that's done, and you have the frames, you next have to resize the image. Go to Image > Image size... When you resize in Photoshop, and save as gif, sometimes you do end up with a light transparent border on the edge that looks bad, so, when you resize, you have to calculate in that you will be cutting off a few pixels at the end. In this example, I want to make a 268px width gif. I usually look at heights first, so lets say I want it to be a close-up, and I will cut off the sides, and it will be more square-ish. So I set height to 240px. Always double check that your width doesn1t run over your desired px numbers, but since 575 is larger than 268 (can you tell I'm awesome at math?), I should be good. I click OK.
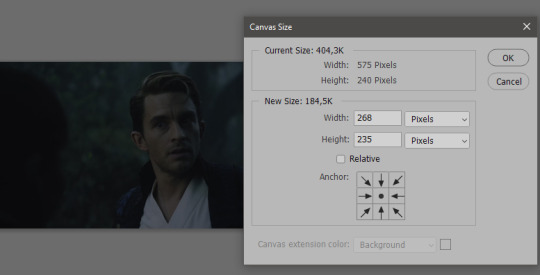
Next, you have to crop the image. Go to Image > Canvas size... At this point we can get rid of those extra pixels we wanted to drop from the bottom as well, so we will make it drop from the height and the width as well. I set the width to 268px, and the height to 235px, because I have OCD, and numbers need to end with 0 or 5, okay?
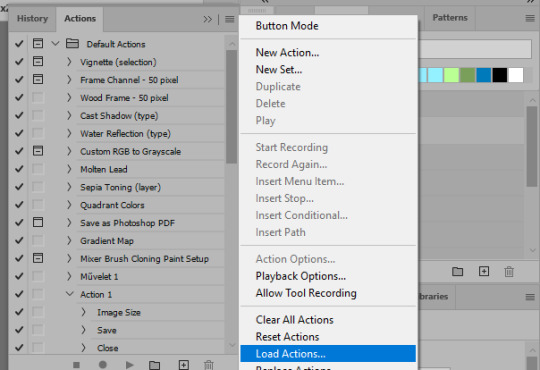
And now, the magic happens! First, go to Window > Actions to have the actions window show up. While you're at it, in the Window menu also select Timeline (this will be your animation timeline at the button) and also Layers. Once you have the Actions window showing up, on the menu in the upper right corner click the three lines menu button, and from the list select "Load Actions". I hope you downloaded the Squishmoon action pack from the start of this post, if not, do it now! So you save that file, and then after you clicked Load, you... well, load it. It will show up in your list like so:
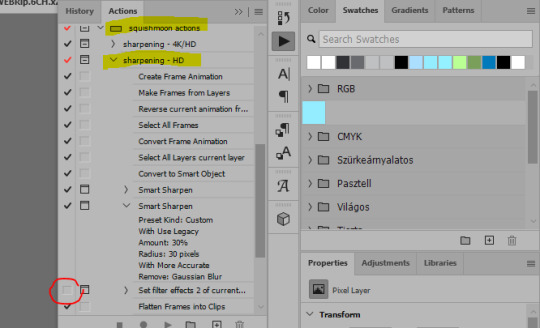
You will want to use the sharpening - HD one, BUT I personally like to go, and remove the tick from the spot I circled above, so leave that empty. This will result in the image having more contrast, which is very much needed for these darker scenes.
When you have that, you select the action itself like so, and click the play button at the bottom. The action will do everything for you, sharpen, increase contrast and also, create the gif and set the frame speed. You won't need to edit anything, just whatever window pops up, click "OK"

Now it should all look like something like this:
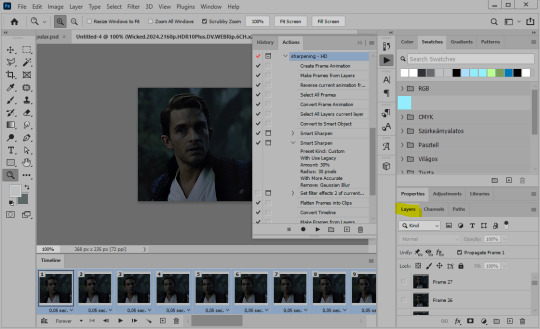
In the Layers window on the side, scroll all the way up to the top. The frame on the top is your last frame. Every effect you want to add to the gif should go to here, otherwise it won't apply to all frames. So at this point I open my PSD for darker scenes, and pull the window of it down, above the gif I'm working on like so:

And then I grab the folder I marked with yellow, left click, hold the click down, and drag that folder over to my current gif. And bamm, it will have the nice effect I wanted! You can click the little play button at the button to see a preview.

Once you have it sorted, now its time to extract it, but first, here's our before and after view:

Now, if you are happy with this, you can just save and close.
If you want to add subtitles, you can do that as well either manually with the text tool (remember, to add as the TOP layer as we did with the coloring) or you can use a pre-set PSD for that as well, here's mine.
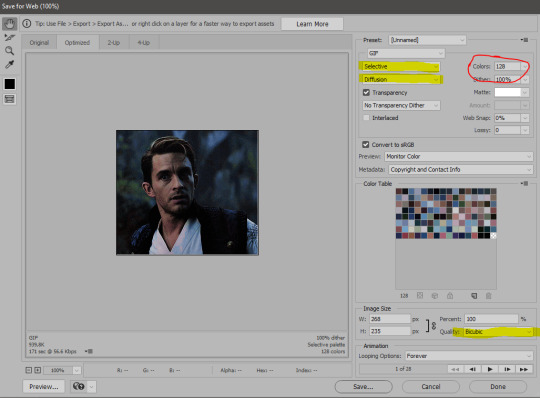
Now, we just need to export it. Go to File > Export > Save for Web (Legacy) and copy my settings here. Others may use other settings, but these are mine, so! I hope you are happy with them :3
In this case, for colors, I picked 128 colors, because on dark sscenes you can get away with using less colors, and the larger that number is, the bigger the filesize. If you use lighter images, you will need to bump that shit up to 256, but that will make your file larger. You can see at the bottom of the screen, how large your file will end up being. So long as you are under 9 Mb, you should be good :3
Conclusion
Look, Gif making and Photoshop in general is a bit scary at first. There are a lot of settings you can mess around on your own, a lot to play with, and also a lot can go wrong. This is a very basic tutorial, and also my current process and preferred coloring. However if you look at "gif psd" or "gif tutorial" or similar tags on Tumblr, you can find a LOT of great resources and steps, for many-many things. Usually people are not too antsy about sharing their methods either. You make 4-5 gifs, and you will have the steps locked down, and then it's all about experimenting.
After you have some muscle memory, your next step should be to explore what is inside a PSD coloring folder that you use. Open them up, try clicking around, click the little eye, to see what happens if they are turned off, and double click them, and play around with the sliders, to see what each does. Most people on Tumblr don't really know what each one does, we all just pressed a few buttons and got really lucky with the results, lol.
If anything is unclear, don't hesitate to ask, I'll gladly help!
Good luck <3
33 notes
·
View notes
Note
I’m pretty new to Megaman, so I haven’t gone through all of the canon media yet but I am enjoying your comics so… what’s NOVAS, what’s up with, and why is it bad?
Aaah, Novas Aventuras de Megaman....
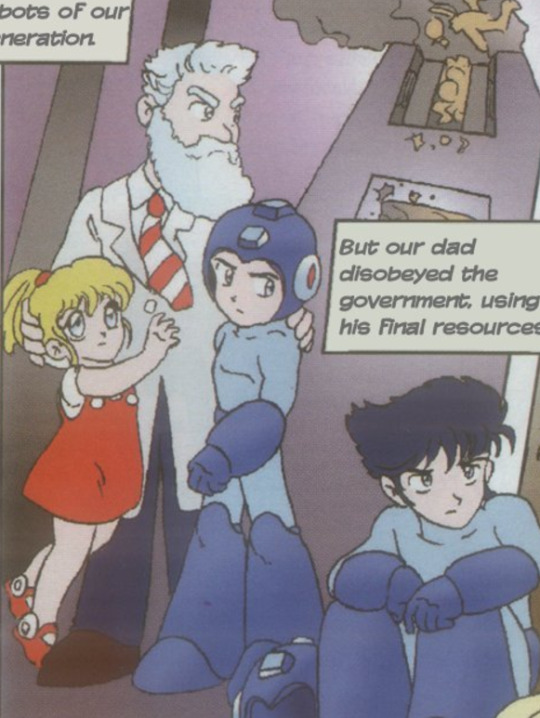
Novas was a licensed Brazilian Mega Man comic book developed by Estúdio PPA and published by Editora Magnum in the 90s. It's well-known for being... bad. The kindest words I can use to describe Novas is "edgy" and "unprofessional."
I'm interpreting this quesion to be not just "what is Novas" but also "WHY is Novas" so I did a little bit of research to get you a full answer, and not just my horrified reaction to it.
The book was published not long after the Ruby Spears cartoon. Apparently the book's early writer and editor, José Roberto Pereira and Sérgio Peixoto had been in touch with Character Toy Trade, who licensed Capcom products to Brazil. Upon hearing of the Ruby Spears release, Pereira and Peixoto pitched a comic to Editora Magnum.
Apparently, they wanted to do this so badly that, to convince Magnum's execs to enter a publishing deal, they offered to work... for free, earning nothing for the first ten or twelve issues.
While it's not unusual for a comic run to use multiple artists and contain varying art styles throughout, most of THIS title was drawn using unpaid labor from fans solicited through the magazigne it was published in, Animax, and it shows. Readers were prompted to submit their art tests to the publishers, and out of those the best of the lot was selected. To participate, the candidate had to send 6 pages of comics, 2 in pencil, two finished art and two colored. Contributing artists were compensated with a copy of the published issue to use in their portfolio. Quite literally working on spec for exposure.


Most of it is, simply put, not the quality you expect from a publisher. Fair is fair, though, and I would be remiss not to aknowledge that some of these artists went on to be very well-respected comic artists, such as Daniel HDR (who did MM2 and 16, and has now worked for Marvel, DC, Dynamite Ent. and Image Comics, was the winner of DRAGON AWARDS 2020 - BEST GRAPHIC NOVEL for Battlestar Galactica: Counterstrike, and is the CEO of Dínamo Estúdio art School in Brazil) and Érica Awano (who got her start with MM4, and now known for her works related to the Tormenta universe and has recieved the Troféu HQ Mix).
The art... is the least of their issues, though. I've read plenty of webcomics where the art began, let's say, amaturish, but the story and writing more than made up for it. I can't say the same is true for Novas.
It's baffling that Pereira and Peixoto fought to have this book, given neither of them appeared to give a single shit about the source material. My understanding is manga and anime was very popular in Brazil at the time. I'd call it a cashgrab, but they weren't paid for most of it. Editor-in-chief Sérgio Peixoto admitted neither he nor Pereira had ever played a Mega Man game before and all they knew about the story was some information they got from someone who played the games. Further more, despite the first two issues including promotional art from Ruby Spears and official art from the games, including a large centerfold poster that remained for two additional issues, Pereira believed Ruby Spears was "very bad." He didn't think much of the games' plot either, what little he knew of it.
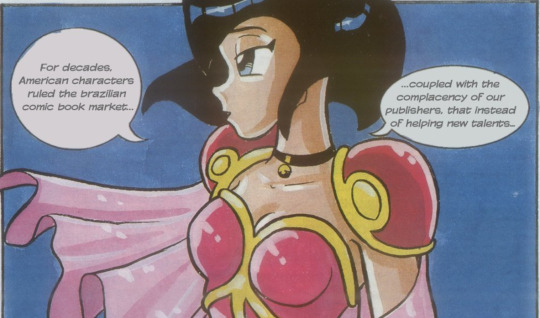
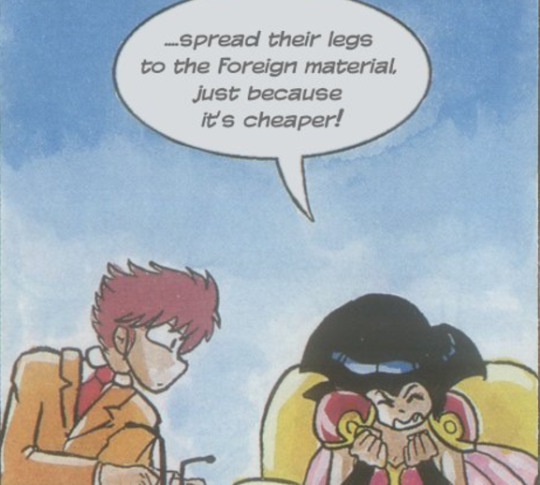
Pereira's distaste for American media and adaptations is painfully obvious within the text of Novas, which takes the time to address the audiance to soapbox about imported media. This is, in part, done in a self-depricating sort of way, but seems to be the driving force behind the decision to even make Novas. Peixoto admits Character offered them "the original Megaman manga" (the Shigeto Ikehara "Rockman" manga, I believe) but he turned it down to do a Brazilian-made book. They wanted Megaman to be drawn by Brazilians and in the manga style - very fixated on being a "manga" rather than a "comic." Despite apparently knowing the product is low-quality, Peixoto appears to be proud to have "made 16 editions of the first manga magazine created entirely in Brazil, using a world-famous character."
I suppose that's the tipping point - "a world-famous character." No care for Megaman, no, but care that he's famous. Pereira apparently had every intention to have his own OCs take over the book after Megaman got readers in the door - apparently intending to kill off the megaman characters in graphic ways - but he left the project after #5, citing that he couldn't actually write his "own" story and... well, lack of payment. Peixoto wrote number 6, and Orlando Tosetto Jr. was brought on to do 7-16.
The desire to provide opportunities for local writers and artists is admirable... in theory... but... hardly anyone got paid and it's not exactly a book I would be proud to have my name on.
But enough about Novas' unpaid labor, quesionable motivations, and poor research. The writing is just... bad.

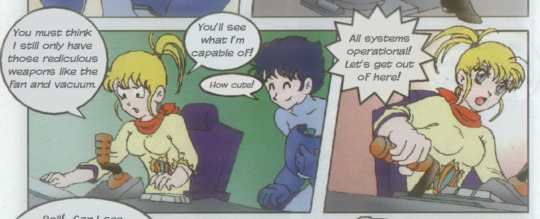
The plot is all over the place. There are so many dropped plot threads, tone shifts, continuity issues, and retcons in only 16 issues, it'll make your head spin. It reads like a 15-year-old boy made a megaman comic because he thought there should be more swearing and naked girls.
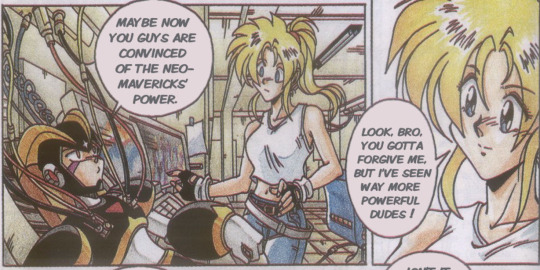
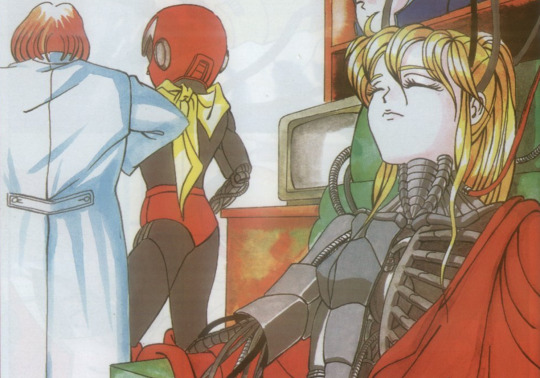
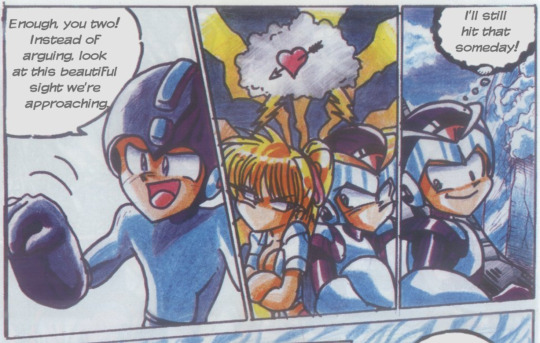
The least of the writing's issues stem from the fact that they barely knew the plot, so character backstories, personalities, relationships, etc. are all over the place. Forte/Bass is named "Slasher" and he takes on a Protoman-type role as a Light bot and sibling, while Protoman is implied to be this mysterious mastermind-type character pulling strings behind the scene, Roll used to be human and is super special for some reason, Rock's an asshole, and X is a horny whiney pissbaby asshole...
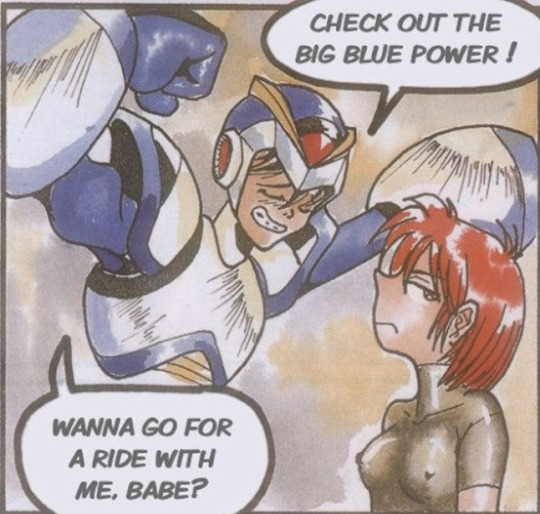

It's crude.
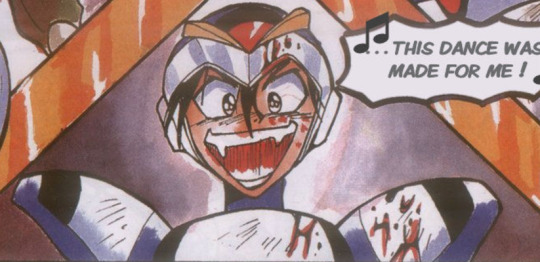
It's bloody.
It's horny.

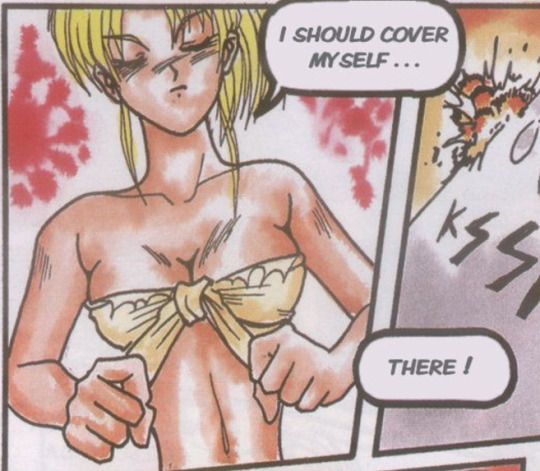
Sometimes downright disgusting.
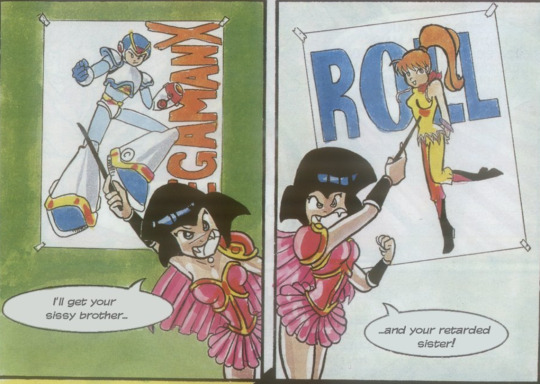
And one can't ignore the incest.
There are... MUCH more egregious panels, I'm trying to keep it tame. There's a LOT of pointless nudity, including a scene near the end where they're kidnapped and tied up but only the women are stripped naked... for no discernable reason, I can't even say it's because their kidnappers are being disgusting, because they're not, even X is behaving himself for once.
I'd love to say the incest was an accident, but it's not, they actively call each other brother and sister.
Occationally the comic veers into dark topics, but the ever shifting tone and oversexualization makes it hard to tell how I - the reader - am supposed to feel about it. While I'm busy being horrified, I can't help worrying someone's getting off on child abuse and murder.
Maybe this kind of misogynistic gross-out shock-value was funny at the time. I've seen a few people remark on this comic's run fondly, saying they liked it when it came out. I can't imagine ever thinking it was good.
If anyone would like to know more about Novas without subjecting themselves to reading it, Mechanical Maniacs does their best to summarize.
25 notes
·
View notes
Text
canmom's notes on fixing the colours
ok so if you've been following along on this blog for the last week or two i've been banging on about colour calibration. and i feel like it would be good to sum up what i've learned in a poast!
quick rundown on colour spaces
So. When you represent colour on a computer, you just have some numbers. Those numbers are passed to the monitor to tell it to turn some tiny lights up and down. The human visual system is capable of seeing a lot of colours, but your monitor can only display some of them. That's determined by its primaries, basically the exact colour* of its red, green and blue lights.
(*if you're wondering, the primaries are specified in terms of something called the CIELAB colour space, which is a model of all the different colours that humans can possibly see, devised by experiments in the early-mid 20th century where the subjects would turn lights at different frequencies up and down until they appeared visually the same. Through this, we mapped out how eyes respond to light, enabling basically everything that follows. Most human eyes tend to respond in pretty close to identical ways - of course, some people are colourblind, which adds an extra complication!)
Now, the problem we face is that every display is different. In particular, different displays have different primaries. The space in between the primaries is the gamut - the set of all colours that a display can represent. You can learn more about this concept on this excellent interactive page by Bartosz Ciechanowski.
The gamut is combined with other things like a white point and a gamma function to map numbers nonlinearly to amounts of light. All these bits of info in combination declare exactly what colour your computer should display for any given triplet of numbers. We call this a colour space.
There are various standard sets of primaries, the most famous being the ITU-R Rec.709 primaries used in sRGB, first defined in 1993, often just called the sRGB primaries - this is a fairly restricted colour space, intended to be an easy target for monitor manufacturers and to achieve some degree of colour consistency on the web (lol).
Since then, a much wider gamut called Rec.2020 has recently been defined for 'HDR' video. This is a very wide gamut, and no existing displays can actually show it in full. Besides that, there are various other colour spaces such as AdobeRGB and P3, which are used in art and design and video editing.
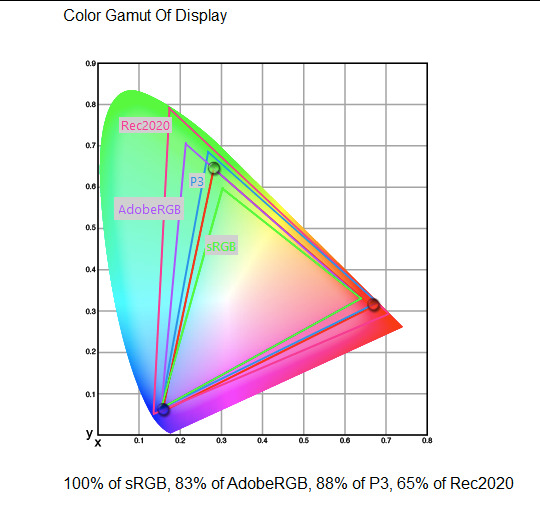
What you see above is something called a 'chromaticity diagram'. the coordinate system is CIE xyY with fixed Y. The curved upper edge to the shape is the line of monochromatic colours (colours created by a single frequency of light); everything other colour must be created by combining multiple frequencies of light. (Note that the colours inside the shape are not the actual colours of those points in CIE XY, they're mapped into sRGB.)
In this case, the red, green and blue dots are the primaries of my display. Since they are outside the green triangle marked sRGB, it qualifies as a 'wide gamut' display which can display more vivid colours.
Sidebar: you might ask why we didn't define the widest possible gamut we could think of at the start of all this. Well, besides consistency, the problem is that you only have so many bits per channel. For a given bit depth (e.g. 8 bits per channel per pixel), you have a finite number of possible colours you can display. Any colours in between get snapped to the nearest rung of the ladder. The upshot is that if you use a higher gamut, you need to increase the bit depth in order to avoid ugly colour banding, which means your images take up more space and take more time to process. But this is why HDR videos in Rec.2020 should always be using at least 10 bits per colour channel.
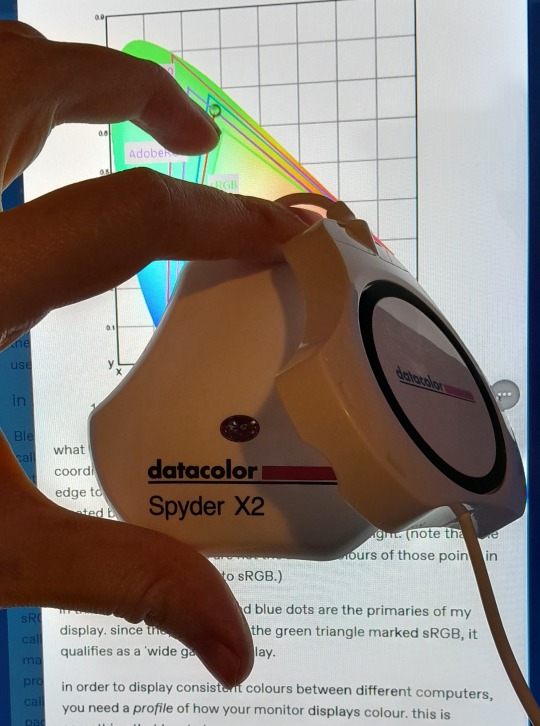
in order to display consistent colours between different computers, you need a profile of how your monitor displays colour. Yhis is something that has to be measured empirically, because even two monitors of the same model will be slightly different. You get this information by essentially taking a little gadget which has a lens and a sensitive, factory-calibrated colour meter, and holding it against your screen, then making the screen display various colours to measure what light actually comes out of it. This information is packed into a file called an ICC profile.
(Above is the one I got, the Spyder X2. I didn't put a lot of thought into this, and unfortunately it turns out that the Spyder X2 is not yet supported by programs like DisplayCal. The Spyder software did a pretty good job though.)
Wonderfully, if you have two different ICC profiles, and you want to display the same colour in each space, you can do some maths to map one into the other. So, to make sure that a picture created on one computer looks the same on another computer, you need two things: the colour space (ICC profile) of the image and the colour space (ICC profile) of the screen.

Now different operating systems handle colour differently, but basically for all three major operating systems there is somewhere you can set 'here is the icc profile for this screen'. You might think that's the whole battle: calibrate screen, get ICC profile, you're done! Welcome to the world of consistent colour.
Unfortunately we're not done.
the devil in the details
The problem is the way applications tell the operating system about colour is... spotty, inconsistent, unreliable. Applications can either present their colours in a standard space called sRGB, and let the OS handle the rest - or they can bypass that entirely and just send their numbers straight to the monitor without regard for what space it's in.
Then we have some applications that are 'colour managed', meaning you can tell the application about an ICC profile (or some other colour space representation), and it will handle converting colours into that space. This allows applications to deal with wider colour gamuts than sRGB/Rec.709, which is very restricted, without sacrificing consistency between different screens.
So to sum up, we have three types of program:
programs which only speak sRGB and let the OS correct the colours
programs which aren't colour aware and talk straight to the monitor without any correction (usually games)
programs which do colour correction themselves and talk straight to the monitor.
That last category is the fiddly one. It's a domain that typically includes art programs, video editors and web browsers. Some of them will read your ICC profile from the operating system, some have to be explicitly told which one to use.
Historically, most monitors besides the very high end were designed to support sRGB colours and not much more. However, recently it's become easier to get your hands on a wide gamut screen. This is theoretically great because it means we can use more vivid colours, but... as always the devil is in the details. What we want is that sRGB colours stay the same, but we have the option to reach for the wider gamut deliberately.
Conversely, when converting between colour spaces, you have to make a decision of what to do with colours that are 'out of gamut' - colours that one space can represent and another space can't. There's no 'correct' way to do this, but there are four standard approaches, which make different tradeoffs of what is preserved and what is sacrificed. So if you look at an image defined in a wide colour space such as Rec.2020, you need to use one of these to put it into your screen's colour space. This is handled automatically in colour managed applications, but it's good to understand what's going on!
(*You may notice a difference in games even if they're not colour managed. This is because one of the things the calibration does is update the 'gamma table' on your graphics card, which maps from numeric colour values to brightness. Since the human eye is more sensitive to differences between dark colours, this uses a nonlinear function - a power law whose exponent is called gamma. That nonlinear function also differs between screens, and your graphics card can be adjusted to compensate and make sure everyone stays on the standard gamma 2.2. Many games offer you a slider to adjust the gamma, as a stopgap measure to deal with the fact that your computer's screen probably isn't calibrated.)
For what follows, any time you need the ICC profile, Windows users should look in C:\Windows\System32\spool\drivers\color. MacOS and Linux users, see this page for places it might be. Some applications can automatically detect the OS's ICC profile, but if not, that's where you should look.
on the web
Theoretically, on the web, colours are supposed to be specified in sRGB if not specified otherwise. But when you put an image on the web, you can include an ICC profile along with it to say exactly what colours to use. Both Firefox and Chrome are colour-managed browsers, and able to read your ICC profile right from the operating system. So an image with a profile should be handled correctly in both (with certain caveats in Chrome).
However, Firefox by default for some reason doesn't do any correction on any colours that don't have a profile, instead passing them through without correction. This can be fixed by changing a setting in about:config: gfx.color_management.mode. If you set this to 1 instead of the default 2, Firefox will assume colours are in sRGB unless it's told otherwise, and correct them.
Here is a great test page to see if your browser is handling colour correctly.
Chrome has fewer options to configure. by default it's almost correctly colour-managed but not quite. So just set the ICC on your OS and you're as good as it's gonna get. The same applies to Electron apps, such as Discord.
To embed a colour profile in an image, hopefully your art program has the ability to do this when saving, but if not, you can use ImageMagick on the command line (see below). Some websites will strip metadata including ICC profile - Tumblr, fortunately, does not.
For the rest of this post I'm going to talk about how to set up colour management in certain programs I use regularly (Krita, Blender, mpv, and games).
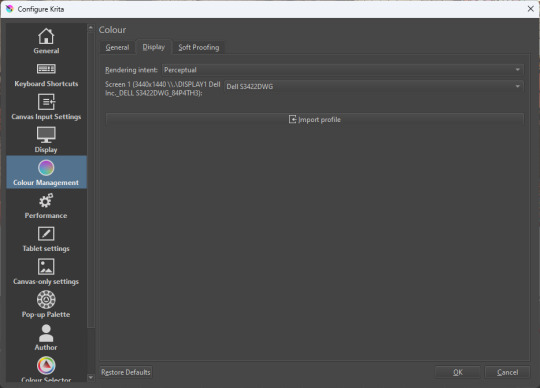
in Krita
Krita makes it pretty easy: you go into the settings and give it the ICC profile of your monitor. You can create images in a huge variety of spaces and bit depths and gamma profiles. When copying and pasting between images inside Krita, it will convert it for you.
The tricky thing to consider is pasting into Krita from outside. By default, your copy-paste buffer does not have colour space metadata. Krita gives you the option to interpret it with your monitor's profile, or as sRGB. I believe the correct use is: if you're copying and pasting an image from the web, then sRGB is right; if you're pasting a screenshot, it has already been colour corrected, you should use 'as on monitor' so Krita will convert it back into the image's colour space.
in Blender
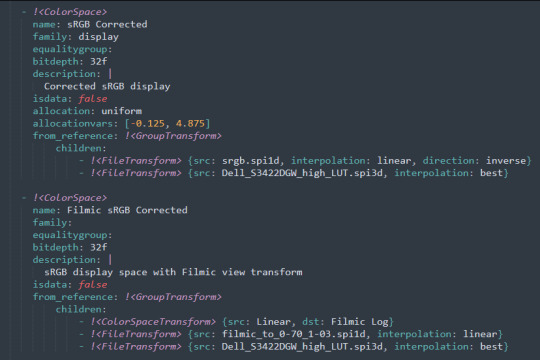
Blender does not use ICC profiles, but a more complicated system called OpenColorIO. Blender supports various models of mapping between colour spaces, including Filmic and ACES, to go from its internal scene-referred HDR floating-point working space (basically, a space that measures how much light there is in absolute terms) to other spaces such as sRGB. By default, Blender assumes it can output to sRGB, P3, etc. without any further correction.
So. What we need to do is add another layer after that which takes the sRGB data and corrects it for our screen. This requires something called a Lookup Table (LUT), which is basically just a 3D texture that maps colours to other colours. You can generate a LUT using a program called DisplayCal, which can also be used for display calibration - note that you don't use the main DisplayCal program for this, but instead a tool called 3DLUT Maker that's packaged along with it. see this Stack Overflow thread for details.
Then, you describe in the OpenColorIO file how to use that LUT, defining a colour space.

The procedure described in the thread recommends you set up colour calibration as an additional view transform targeting sRGB. This works, but strictly speaking it's not a correct use of the OpenColorIO model. We should also set up our calibrated screen as an additional display definition, and attach our new colour spaces to that display. Also, if you want to use the 'Filmic' View Transform with corrected colours (or indeed any other), you need to define that in the OpenColorIO file too. Basically, copy whatever transform you want, and insert an extra line with the 3D LUT.
Here's how it looks for me:
in games (using ReShade)
So I mentioned above that games do not generally speaking do any colour correction beyond the option to manually adjust a gamma slider. However, by using a post-processing injection framework such as ReShade, you can correct colours in games.
If you want to get the game looking as close to the original artistic intent as possible, you can use the LUT generator to generate a PNG lookup table, save it in the Reshade textures folder, then you load it into the LUT shader that comes packaged with Reshade. Make sure to set the width, height and number of tiles correctly or you'll get janked up results.
However... that might not be what you want. Especially with older games, there is often a heavy green filter or some other weird choice in the colour design. Or maybe you don't want to follow the 'original artistic intent' and would rather enjoy the full vividness your screen is capable of displaying. (I certainly like FFXIV a lot better with a colour grade applied to it using the full monitor gamut.)
A 3D Lookup Table can actually be used for more than simply calibrating colour to match a monitor - it is in general a very powerful tool for colour correction. A good workflow is to open a screenshot in an image editor along with a base lookup table, adjust the colours in certain ways, and save the edited lookup table as an image texture; you can then use it to apply colour correction throughout the game. This procedure is described here.
Whatever approach you take, when you save screenshots with Reshade, it will not include any colour information. If you want screenshots to look like they do in-game when displayed in a properly colour managed application, you need to attach your monitor's ICC profile to the image. You can do this with an ImageMagick command:
magick convert "{path to screenshot}" -strip -profile "{path to ICC profile}" "{output file name}.webp"
This also works with TIFF and JPEG; for some reason I couldn't get it to work with PNG (you generate a PNG but no colour profile is attached.)
It's possible to write a post-save command in ReShade which could be used to attach this colour space info. If I get round to doing that, I'll edit into this post.
video
In MPV, you can get a colour-corrected video player by setting an appropriate line in mpv.conf, assuming you're using vo=gpu or vo=gpu-next (recommended). icc-profile-auto=yes should automatically load the monitor ICC profile from the operating system, or you can specify a specific one with icc-profile={path to ICC profile}.
For watching online videos, it seems that neither Firefox nor Chrome applies colour correction, even though the rest of the browser is colour-managed. If you don't want to put up with this, you can open Youtube videos in MPV, which internally downloads them using Youtube-DL or yt-dlp. This is inconvenient! Still haven't found a way to make it colour-corrected in-browser.
For other players like VLC or MPC-HC, I'm not so familiar with the procedure, you'll need to research this on your own.
what about HDR?
HDR is a marketing term, and a set of standards for monitor features (the VESA DisplayHDR series), but it does also refer to a new set of protocols around displaying colour, known as Rec. 2100. This defines the use of a 'perceptual quantiser' function in lieu of the old gamma function. HDR screens are able to support extreme ranges of brightness using techniques like local dimming and typically have a wider colour gamut.
If your screen supports it, Windows has a HDR mode which (I believe) switches the output to use Rec.2100. The problem is deciding what to do with SDR content on your screen (which is to say most things) - you have very little control over anything besides brightness, and for some reason Windows screws up the gamma. Turning on HDR introduced truly severe colour banding all over the shop for me.
My colorimeter claims to be able to profile high brightness/hdr screens, but I haven't tested the effect of profiling in HDR mode yet. There is also a Windows HDR calibration tool, but this is only available on the Microsoft store, which makes it a real pain to set up if you've deleted that from your operating system in a fit of pique. (Ameliorated Edition is great until it isn't.)
Anyway, if I get around to profiling my monitor in HDR mode, I will report back. However, for accurate SDR colour, the general recommendation seems to be to simply turn it off. Only turn it on if you want to watch content specifically authored for HDR (some recent games, and HDR videos are available on some platforms like Youtube). It's a pain.
is this all really worth the effort?
Obviously I've really nerded out about all this, and I know the likely feeling you get looking at this wall of text is 'fuck this, I'll just put up with it'. But my monitor's gamma was pretty severely off, and when I was trying to make a video recently I had no idea that my screen was making the red way more saturated and deep than I would see on most monitors.
If you're a digital artist or photographer, I think it's pretty essential to get accurate colour. Of course the pros will spend thousands on a high end screen which may have built in colour correction, but even with a screen at the level I'm looking at (costing a few hundred quid), you can do a lot to improve how it looks 'out of the box'.
So that's the long and short of it. I hope this is useful to someone to have all of this in one place!
I don't know if we'll ever reach a stage where most monitors in use are calibrated, so on some level it's a bit of a fool's errand, but at least with calibration I have some more hope that what I put in is at least on average close to what comes out the other end.
94 notes
·
View notes
Text

728-88, 89... 91... where is flight 90?
Wh- they put the delayed flights on a different screen? Who decided-
Screw it. I'ma hit the Cinna-Bon.
The image(s) above in this post were made using an autogenerated prompt and/or have not been modified/iterated extensively. As such, they do not meet the minimum expression threshold, and are in the public domain. Prompt under the fold.
Prompt: Dino-Knight Allosaurus, in the Dino-Base command center, humanoid dinosaur in power armor, still frame from the Dino-Guard, 1992 animated cartoon series, by TOEI, AKOM, Sunbow:: a zaftig octopus-fursona, tentacle hair, a fighting game character from 1998, Darkstalkers 3 promotional art by bengus, john byrne, and akiman, tako fursona, whiplash curves, line art with flat anime cel shading, victory pose, resembles nicki minaj and kat dennings, curvateous, full body, on white background, full body, feet visible:: a photorealistic pile of glass beads shaped like pokemon, volumetric light, cinematic, 4K, hyperrealistic:: character design, britney spears as a gold and uranium glass android cyborg, mist, photorealistic, octane render, unreal engine, hyper detailed, volumetric lighting, hdr, dynamic angle, cinametic:: two dinosaur-people at a state fair, rides and snack stands in background, ultra-sharp photograph, ILM, national geographic, walking with dinosaurs, life magazine, 5k, ilm, weta digital:: Peter Falk 's Detective Columbo in JoJo's Bizarre Adventure:: A blueprint of an alien space craft, with technical details and data on the blue paper background. The design includes a detailed plan showing its shape, structure, intricate features like wings or propelling engines, as well as precise grid lines for scale in low resolution. Atop it is depicted a giant praying mantis sitting atop it's back legs holding onto tonasa, as if readying itself for launch. There should be a text bubble that says Inhotep Zyt at Nified Ape XInsta & RT.
--
This is a 'prompt smash' experiment, combining random (mostly) machine-generated prompts into a single prompt with multiple sub-prompts. Midjourney blends concepts in these situations, making vivid but essentially random results.
#unreality#midjourney v6#generative art#ai artwork#public domain art#public domain#free art#auto-generated prompt#sci-fi#alien#alien creature#extraterrestrial
8 notes
·
View notes
Text
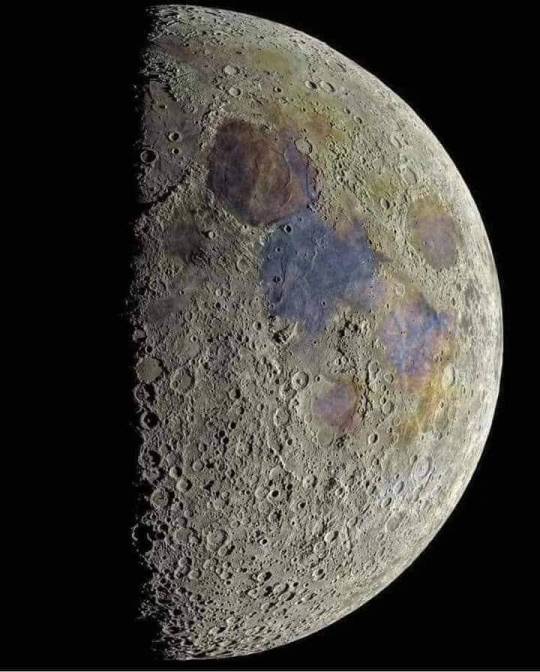
An incredibly detailed image of the Moon was compiled by an Indian teenager, who captured 55,000 photographs — accumulating more than 186 gigabytes on his laptop in the process — to obtain a pastache of celestial proportions.
Prathamesh Jaju, 16, from Pune, Maharashtra, shared his HDR image of a waning crescent moon on Instagram. He admitted that compiling so many photos for his most detailed and sharp image to date tested his technology. "The laptop almost killed me with the processing," he said.
The amateur astrophotographer began the project by filming several videos of different small sections of the Moon in the early hours of May 3. Each video contains about 2000 frames; the trick was to merge and stacking the videos to create a single image, while overlapping them to generate a three-dimensional effect.
"So I took about 38 videos," Jaju explained, according to News 18. "We now have 38 images." "We focus each of them manually and then photoshop them together, like a huge tile."
Jaju told ANI on Twitter that he learned to capture and process those composite images with web articles and YouTube videos. After some touch-ups, the nearly 40-hour processing resulted in an impressive composition of the Moon with magnificent details, rich texture, and an amazing range of colors.
Colors are a fascinating phenomenon. They represent the minerals of the Moon that DSLR cameras can distinguish with greater clarity than the human eye.
"The blue tones reveal areas rich in ilmenite, which contains iron, titanium, and oxygen," he said. "While the colors orange and purple show relatively poor regions in titanium and iron." White and gray tones indicate areas exposed to more sunlight.
The teenager shared with his tech-savvy followers on Instagram the specifications of his telescope, high-speed USB camera, tripod, and lenses, as well as the software he used to capture the images.
In the future, Jaju hopes to become a professional astrophysicist.
9 notes
·
View notes
Text
Sony Semiconductor Solutions to Release the Industry's First CMOS Image Sensor for Automotive Cameras That Can Simultaneously Process and Output RAW and YUV Images
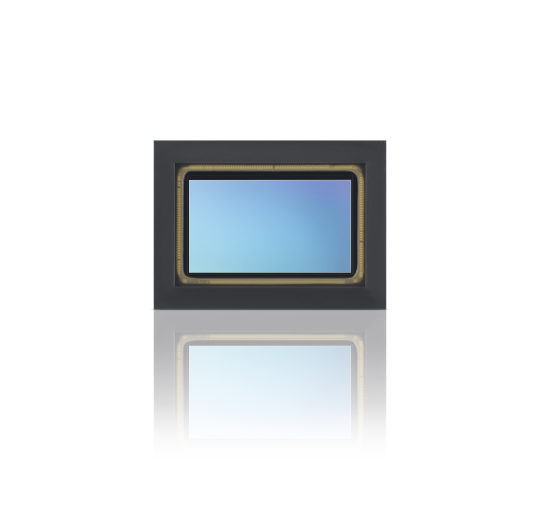
Sony Semiconductor Solutions Corporation (SSS) has announced the upcoming release of the ISX038 CMOS image sensor for automotive cameras, the industry's first*1 product that can simultaneously process and output RAW*2 and YUV*3 images. The new sensor product has proprietary ISP*4 inside and can process and output RAW and YUV images simultaneously. RAW images are required for external environment detection and recognition in advanced driver-assistance systems (ADAS) and autonomous driving systems (AD), while the YUV images are provided for infotainment applications such as the drive recorder and augmented reality (AR). By expanding the applications a single camera can offer, the new product helps simplify automotive camera systems and saves space, cost, and power. *1 Among CMOS sensors for automotive cameras. According to SSS research (as of announcement on October 4, 2024).*2 Image for recognition on a computer.*3 Image for driver visual such as recording or displaying on a monitor.*4 Image signal processor – a circuit for image processing. Model nameSampleshipment date(planned)Sample price(including tax)ISX038 1/1.7-type (9.30 mm diagonal)8.39- effective-megapixel*5CMOS image sensorOctober 2024¥15,000*6 *5 Based on the image sensor effective pixel specification method.*6 May vary depending on the volume shipped and other conditions. The roles of automotive cameras continue to diversify in line with advances in ADAS and AD and increasing needs and requirements pertaining to the driver experience. On the other hand, there is limited space for installing such cameras, making it impossible to continue adding more indefinitely, which in turn has created a demand to do more with a single camera. The ISX038 is the industry's first*1 CMOS image sensor for automotive cameras that can simultaneously process and output RAW and YUV images. It uses a stacked structure consisting of a pixel chip and a logic chip with signal processing circuit, with the SSS' proprietary ISP on the logic chip. This design allows a single camera to provide high-precision detection and recognition capabilities of the environment outside the vehicle and visual information to assist the driver as infotainment applications. When compared with conventional methods such as a multi-camera system or a system that outputs RAW and YUV images using an external ISP, the new product helps simplify automotive camera systems, saving space, costs, and power. ISX038 will offer compatibility with the EyeQ™6 System-on-a-Chip (SoC) currently offered by Mobileye, for use in ADAS and AD technology. Processing and output of Sony's ISX038 sensor (right) compared to conventional image sensors (left) Main Features - Industry's first*1 sensor capable of processing and outputting RAW and YUV images simultaneouslyThe new sensor is equipped with dedicated ISPs for RAW and YUV images and is capable of outputting two types of images simultaneously with image quality optimized for each application on two independent interfaces. Expanding the applications a single camera can offer helps build systems that save space, costs, and power compared to multi-camera systems or systems with an external ISP. - Wide dynamic range even during simultaneous use of HDR and LED flicker mitigationIn automobile driving, objects must be precisely detected and recognized even in road environments with significant differences in brightness, such as tunnel entrances and exits. Automotive cameras are also required to suppress LED flicker, even while in HDR mode, to deal with the increasing prevalence of LED signals and other traffic devices. The proprietary pixel structure and unique exposure method of this product improves saturation illuminance, yielding a wide dynamic range of 106 dB even when simultaneously employing HDR and LED flicker mitigation (when using dynamic range priority mode, the range is even wider, at 130 dB). This design also helps reduce motion artifacts*7 generated when capturing moving subjects. *7 Noise generated when capturing moving subjects with HDR. - Compatibility with conventional products*8This product shares the same compatibility with SSS' conventional products,*8 which have already built a proven track record for ADAS and AD applications with multiple automobile manufacturers. The new product makes it possible to reuse data assets collected on previous products such as driving data from automotive cameras. This helps streamline ADAS and AD development for automobile manufacturers and partners. *8 SSS' IMX728 1/1.7 type 8.39 effective megapixel CMOS image sensor. - Compliant with standards required for automotive applicationsThe product is qualified for AEC-Q100 Grade 2 automotive electronic component reliability tests by mass production. Also, SSS has introduced a development process compliant with the ISO 26262 road vehicle functional safety standard, at automotive safety integrity level ASIL-B(D). This contributes to improve automotive camera system reliability. Key Specifications Model nameISX038Effective pixels3,857×2,177(H×V), approx. 8.39 megapixelsImage sizeDiagonal 9.30mm (1/1.72-type)Unit cell size2.1μm×2.1μm (H×V)Frame rate (all pixels)30fps (RAW&YUV dual output)Sensitivity (standard value F5.6, 1/30 secondcumulative)880mV (Green Pixel)Dynamic range (EMVA 1288 standard)106 dB (with LED flicker mitigation)130 dB (dynamic range priority)InterfaceMIPI CSI-2 serial output (Single port with 4-lanes / Dual port with 2-lanes per port)Package192pin BGAPackage size11.85mm×8.60mm (H×V) SOURCE Sony Semiconductor Solutions Corporation Photo of Sony's ISX038 CMOS image sensor for automotive cameras Read the full article
2 notes
·
View notes
Text
Unveiling the Vivo V40e 5G: A Perfect Blend of Design, Performance, and Photography
The Vivo V40e 5G mobile is more than just a smartphone; it's an innovation crafted to redefine your mobile experience. Whether you're a photography enthusiast, a video content creator, or someone who values sleek design, this latest addition to the Vivo family ticks all the boxes. With its ultra-slim 3D curved display, stunning camera, and powerful performance, the new Vivo V40e 2024 is here to elevate your smartphone experience.
In this blog, we'll dive into the exciting features, design, and performance that make the Vivo V40e 5G a must-have in 2024.
Luxury Design and Display
The first thing you'll notice about the Vivo V40e mobile is its ultra-slim 3D curved display. At just 183 grams and a thickness of 0.749 cm, it is India's slimmest smartphone in the 5500 mAh battery category. Despite its lightweight feel, the phone exudes luxury and style, offering exceptional comfort in your hand.
The 6.77-inch Full HD+ display provides an immersive visual experience with a 120 Hz refresh rate, HDR10+, and a contrast ratio of 8,000,000:1. The 93.3% screen-to-body ratio and P3 colour gamut ensure that every image and video pop with vivid colours and sharpness, perfect for streaming and gaming. Whether you're binge-watching your favourite shows or playing graphic-intensive games, the Vivo V40e 5G offers a stunning visual experience like never before.
Performance and Battery: Light Yet Powerful
The Vivo V40e 5G is not just about looks; it's a powerhouse of performance too. Powered by the MediaTek Dimensity 7300 chipset, the smartphone ensures you enjoy fast processing speeds, efficient power consumption, and real-time focus optimization. The 4nm process technology offers 50% increased dynamic range in 4K HDR recording, making it perfect for mobile photographers and videographers.
With a massive 5500 mAh battery, this smartphone is built to last throughout the day, even with heavy usage. The 80W FlashCharge ensures that your phone powers up in mere seconds, giving you 22 hours of video streaming or 98 hours of music playback. Plus, just 5 seconds of charging provides enough juice to keep you connected to what matters.
Redefining Mobile Photography
The Vivo V40e camera is a true marvel for anyone passionate about photography. The device boasts a 50 MP Sony Professional Night Portrait Camera with the Sony IMX882 Sensor and Optical Image Stabilization (OIS). This setup ensures crystal-clear photos even in low-light conditions, making it a great companion for night photography. The 2x Professional Portrait Mode and natural bokeh effect enhance facial clarity and texture, ensuring that you are the centre of attention in every shot.
For wider shots, the 8 MP Ultra-Wide Angle Camera with a 116° field of view captures more scenery and people in a single frame. On the front, the 50 MP Eye-AF Group Selfie Camera lets you take stunning selfies with precise details, thanks to the advanced JN1 Sensor and 92° field of view.

Studio-Quality Portraits with Aura Light
The Vivo V40e 5G comes with Studio Quality Aura Light Portrait, providing enhanced lighting for every shot. Whether you're in warm or cool lighting, this feature adjusts the color temperature and ensures accurate skin tones, allowing you to capture professional-grade portraits every time. The Smart Color Temperature Adjustment helps blend you seamlessly into your surroundings, reducing harsh ambient light for naturally vibrant results.
4K Ultra-Stable Video: Shoot Like a Pro
The Vivo V40e 5G makes shooting videos effortless. Thanks to its Hybrid Image Stabilization (OIS+EIS) feature, you can shoot smooth, shake-free 4K videos. The camera eliminates unwanted hand movements, ensuring that your videos look professional even when you’re on the move. Moreover, the front camera also supports 4K recording, so your vlogs or social media clips will have the same professional quality as your main footage.
Sleek Design Meets Comfort
The Vivo V40e design is not just about aesthetics; it’s also about ergonomics. The phone’s ultra-slim and lightweight body is designed to fit perfectly in your hand. It’s available in two elegant colors:
Royal Bronze: Evokes opulence and strength, blending historical richness with modern sophistication.
Mint Green: Captures the essence of nature, inspiring freedom and progress with its fresh, vibrant hue.
The Infinity Eye Camera Module Design further enhances the luxurious feel, combining style with functionality, ensuring that your phone not only performs well but also looks incredibly premium.
AI-Powered Connectivity and Funtouch OS 14
The Vivo V40e 5G is equipped with AI SuperLink, featuring a 360º Omnidirectional Antenna that improves connectivity, even in weak signal areas. It intelligently switches networks based on your environment, ensuring you stay connected without interruptions. The phone also runs on Funtouch OS 14, a personalized and intuitive mobile system designed for seamless usability.
Additionally, the phone includes exciting features like Dynamic Light for call and message notifications, Vlog Movie Creator for content creation, and AI Eraser for cleaning up unwanted elements in your photos.
Vivo V40e Offers and Availability
Ready to make this sleek device yours? You can buy Vivo V40e 5G at Poorvika showrooms or online, with some exciting offers. The Vivo V40e 5G price in India makes it a great value for those looking for premium features without breaking the bank. Plus, when you purchase the Vivo V40e 5G, you can avail of free TWS earbuds worth ₹3,999 as part of the introductory offer. Don't miss out on the chance to own this stylish powerhouse.
Conclusion
The Vivo V40e new launch is a game-changer in the smartphone industry, offering a perfect blend of performance, design, and cutting-edge photography. Whether you're a casual user, a mobile gamer, or a photography enthusiast, the Vivo V40e mobile will exceed your expectations.
Buy Vivo V40e 5G today and experience the future of mobile technology!
#best smartphones#best mobiles#mobiles#smartphone#deals#mobile offers#offers#trending#new#vivo#vivo mobile#vivo v40e#vivo v40
2 notes
·
View notes
Text
HDR photos
i think there's a sort of widespread misconception about HDR photos and i want to clear up some stuff
and first, a question:
when you look at the moon by naked eye, is what you see closer to the image on the left or the one on the right?
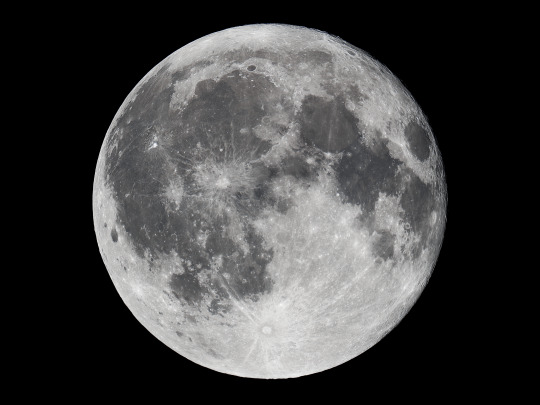

and of course, it's a trick question, because what everyone sees is closer to this
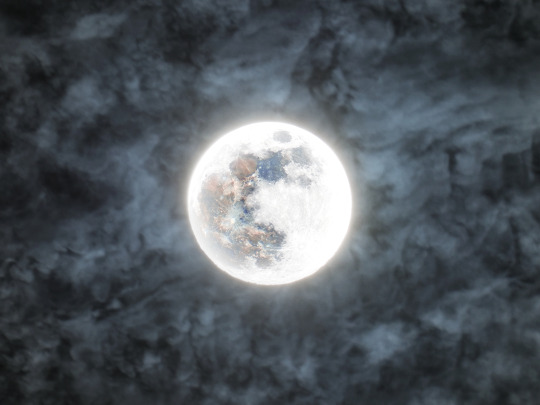
bright and illuminating to the sky around it, but with darker surface detail still visible by eye. this'll make sense later, keep reading:
HDR = High Dynamic Range, meaning the dynamic range (range of values within which you can still see detail) of a photo is more extended than normal, usually via compositing multiple photos at different exposures together
the misconception is that HDR is somehow unnatural or digitally manipulated because it involves compositing photos together to create something that wasn't in any single photo. and in the age of photoshop and ai imagery i can understand the concern of photos becoming less and less ''real'' seeming
but the key thing that everyone spreading these misconceptions doesn't realize, is that cameras inherently have a way lower dynamic range than the human eye
the human eye can, on a sunny day, see detail in immensely bright clouds near the sun and detail in the darkest shadows of trees and bushes- cameras cannot do this. not remotely. they are extremely limited in what detail can be captured in a single photo, and you expose specifically for the detail you want to capture in that photo
i think this is a good point to introduce the term ''clipped'', which means whenever an extreme value (white or black) becomes ''fully'' white or black; i.e it is exactly 0 0 0 or 255 255 255 in rgb value. if a highlight or shadow gets clipped by being too bright/dark, it instantly loses all detail and becomes a uniform value- meaning that, by choosing how to expose a photo in contrast-y conditions (sunny day, bright lights indoors, the moon at night etc) you are also choosing which detail inevitably gets clipped
(note that in a lot of regular conditions like cloudy days, sunsets, uniform indoor lighting, etc, no detail necessarily has to be clipped)
now back to the main point: obviously, the human eye almost never clips detail because of how high the dynamic range is. this is exactly why all the misconceptions are wrong, because by taking multiple photos at different exposures to get detail throughout the entire range, you are actually making the end result closer to how the scene would look to the naked eye- it's not photoshop or digital manipulation in that it's meant to deceive or show something not real, it is literally meant to show a scene more similarly to how it would've looked in real life
this is why the 3rd moon image, despite being a composite of multiple photos, looks more natural to us than the others do- it's more akin to what we see with our eyes every day
6 notes
·
View notes
Text
The Art of Composition in Photography
Photography is not simply about capturing moments; it is an art form that enables us to express ourselves and tell stories through images. One of the key elements that can transform a simple snapshot into a captivating photograph is composition. Composition refers to how the elements within a photograph are arranged and organized. It is like a painter's canvas, where every brushstroke matters. In this article, we will embark on a journey to explore the art of composition in photography, unlocking your inner artist along the way.
Imagine yourself facing a blank canvas, ready to be painted. Similarly, when you peer through the viewfinder of your camera, you see a frame brimming with potential. As an artist, you hold the power to decide what to include and what to exclude from the frame. This is known as framing. By carefully selecting the elements to include, you can create a harmonious composition that draws the viewer's attention to the subject of your photograph.
One fundamental principle of composition is the rule of thirds. Imagine dividing your frame into nine equal parts by drawing two horizontal lines and two vertical lines, like a tic-tac-toe board. The rule of thirds suggests that placing your subject or key elements along these lines or at their intersections creates a more visually appealing composition. By avoiding placing the subject in the center, you can add a sense of balance and intrigue to your photograph.
Another powerful tool at your disposal is minimalism. Simplifying your composition by removing any unnecessary elements can enhance the impact of your photograph. By focusing on a single subject or a few key elements, you can create a sense of clarity and elegance. Minimalism allows the viewer to appreciate the beauty in the simplicity of your image.
Now, let's introduce the Fibonacci sequence. The Fibonacci sequence is a mathematical pattern where each number is the sum of the two preceding ones (1, 1, 2, 3, 5, 8, 13, and so on). This sequence can be found in nature, architecture, and even the human body. Applying the Fibonacci spiral or the golden ratio to your composition can add a sense of balance and harmony. By positioning your subject or key elements along these spiral lines or golden ratio points, you create a visually pleasing composition that resonates with the natural order found in the world around us.
As an artist, you possess the ability to play with shapes, colors, and patterns to create visually striking compositions. Consider the different shapes present within your frame. Are they geometric or organic? How do they interact with each other? By experimenting with shapes and their relationships, you can add a sense of rhythm and harmony to your photographs. Additionally, colors can evoke specific moods and emotions. Use them intentionally to enhance the impact of your composition. A splash of red against a monochromatic background, for example, can create a focal point and add drama to your image.
Furthermore, patterns can be found everywhere in the world around us. From the repetition of windows in a cityscape to the intricate details of a flower petal, patterns add a mesmerizing element to your photographs. Recognizing and incorporating patterns into your composition can transform a seemingly ordinary scene into a captivating work of art.
While exploring composition techniques, it is essential to be mindful of fad composition trends that have become overused and may overshadow the essence of your photograph. Techniques like High Dynamic Range (HDR), which enhances the dynamic range of an image, forced perspective, which manipulates the viewer's perception of depth, and selective coloring, where only a specific portion of the image is in color, have been excessively employed and can diminish the impact of your composition. Instead, focus on creating compositions that are genuine and speak to your artistic vision.
Lastly, don't be afraid to experiment and break the rules of composition. As an artist, you have the freedom to push boundaries and create your own unique style. Sometimes, unconventional compositions can result in the most intriguing and thought-provoking photographs. Trust your instincts and let your creativity guide you.
In conclusion, composition is a powerful tool in the world of photography. By understanding and applying the principles of composition, including the rule of thirds, minimalism, and even the Fibonacci sequence, you can elevate your images from mere snapshots to compelling works of art. Remember, photography is not just about capturing what you see, but also about expressing your unique vision and creativity. So grab your camera, embrace your inner artist, and let the world be your canvas.
#PhotographyComposition#artisticcapture#visual storytelling#compositionmatters#photographyart#pictureperfect#photoagent#photography#photography agent#photographer for hire
3 notes
·
View notes
Text
HDMI VS Displayport
The HDMI and DisplayPort are two of the most common types of connectors used in computing today. Both have their own strengths and weaknesses, making them suitable for different needs. When deciding between the two technologies, it's important to understand the differences between them to make an informed decision about which one is best for your project.
HDMI (High Definition Multimedia Interface) is a consumer-grade connector that supports both audio and video signals up to 4K resolution. It uses a single cable for easy setup and has support for digital rights management (DRM), making it ideal for home entertainment systems. Its main downside is that it doesn't support higher resolutions like 8K or 10K, so if you're looking for something with more advanced features you should consider DisplayPort instead.
When it comes to connecting your devices to an external monitor, there are two primary options: HDMI and DisplayPort. Both of these offer a high-quality connection, but they have some distinct differences in terms of video quality. If you’re looking for the best HD experience, here’s what you need to know about HDMI vs DisplayPort video quality.
Video Quality
HDMI is the most common form of video connection used today and offers excellent image quality with support for 4K resolution at 60 frames per second (fps). It also supports HDR content and has audio pass-through capabilities which can stream audio from your device directly to your monitor or speakers. However, HDMI does not support adaptive refresh rates like FreeSync or G-SYNC.
When it comes to connecting audio devices to a computer, there are two major options: HDMI and DisplayPort. Each of these connectors offer different features, but one of the most important considerations for many people is the question of audio quality.
Audio Quality
When comparing HDMI and DisplayPort’s audio quality, it depends on what type of device you’re using. Generally speaking, DisplayPort offers superior sound quality with its ability to handle up to 24-bit/192kHz resolution compared to HDMI’s 16-bit/48kHz resolution. However, when it comes to gaming consoles or other devices that don't require higher bit rates then HDMI can still provide high-quality sound with its more advanced compression methods. Additionally, newer versions of both options offer increased bandwidth which further improves the overall sound quality.
2 notes
·
View notes
Text
Real Estate Photo Editing: Secrets to Capturing Buyers’ Attention
In the fiercely competitive real estate market, where first impressions are everything, your property photos can make or break a sale. With over 90% of homebuyers starting their search online, eye-catching visuals are no longer a luxury—they're a necessity. This is where real estate photo editing services step in, turning ordinary photos into extraordinary showcases that captivate buyers.
Why Real Estate Photo Editing Matters
Imagine scrolling through a real estate listing and seeing dull, dark, or cluttered images. Would you click to learn more? Likely not. Professionally edited photos, on the other hand, can highlight a property’s best features, create an emotional connection, and increase buyer interest.
Here are some secrets that real estate photo editing services use to make homes irresistible:
1. Brightness and Contrast Adjustments
Proper lighting can transform an image. Editing enhances brightness and contrast, ensuring the property looks inviting and vibrant—even if the photos were taken on a cloudy day.
2. Clutter Removal and Virtual Staging
Buyers want to imagine themselves in the space. Removing unnecessary items and adding virtual furniture can make empty or cluttered rooms feel like home.
3. Day-to-Dusk Conversion
A magical sunset view can evoke warmth and charm. Real estate photo editing services can turn daytime shots into stunning twilight images, perfect for showcasing outdoor spaces.
4. Sky Replacement
Overcast skies can dull a property’s appeal. Editing services can replace gray skies with bright blue ones, making outdoor shots pop with life.
5. HDR Blending
High Dynamic Range (HDR) editing merges multiple exposures into a single image, balancing light and shadows to create a natural, yet striking look.
The Benefits of Professional Real Estate Photo Editing
Boost Online Engagement: Listings with high-quality images receive more clicks and views.
Increase Selling Speed: Attractive photos can lead to quicker sales.
Higher Selling Price: Buyers perceive visually appealing properties as more valuable.
Partnering with Experts
DIY editing might save a few dollars, but professional real estate photo editing services deliver polished results that stand out. Companies like Outsource Right Choice Solutions specialize in elevating real estate photos to attract serious buyers.
Conclusion
In real estate, a picture truly is worth a thousand words—or possibly thousands of dollars. By leveraging the power of real estate photo editing services, you can capture buyers’ attention and make your listings unforgettable. Don’t just list properties—sell dreams.
Ready to make your listings shine? Partner with real estate photo editing experts today and watch your properties soar to the top of buyers’ wish lists!
#photo editing services#image editing services#real estate#outsource right choice solutions#virtual staging#united states#united kingdom#real estate agent#real estate marketing#canada#real estate photo editing company#real estate photo editing service#real estate photo editing
0 notes
Text

Maelstrom Manipulation
High level magic, but mostly for show.
The image(s) above in this post were made using an autogenerated prompt and/or have not been modified/iterated extensively. As such, they do not meet the minimum expression threshold, and are in the public domain. Prompt under the fold.
Prompt: HS screengrab of the opening to an anime show about magic knights called Knights of the Magic Light in yellow and blue, silhouette shot of two knights glowing with light on their bodies standing back-to-back in mid-air in a dark room, a floating golden lion is seen next to them, text at the bottom reads HDR Oil Painted Art Style, vibrant colors, detailed background.:: 80s video game screenshot of the sun, glitchy pixel art, colorful streaks on a white background, text logo ConGoal in the lower right corner.:: A scene from the cartoon The Boiler Room with an extremely caricatured young woman wearing a purple cape and an orange man, both sinking in water, designed in the style of Don Bluth, with a retro animation, vintage-style anime aesthetic, a screen grab of an episode of Captain Aerial in a wide shot on film.
--
This is a 'prompt smash' experiment, combining random (mostly) machine-generated prompts into a single prompt with multiple sub-prompts. Midjourney blends concepts in these situations, making vivid but essentially random results.
My Nijijourney Style Code (Used in this piece): --p p6grcgq
#unreality#nijijourney v6#generative art#ai artwork#midjourney#nijijourney#niji#public domain art#public domain#free art#auto-generated prompt#landscape#ai landscapes#colors
9 notes
·
View notes
Text
DJI Flip - Mini Camera Drone

The DJI Flip has recently made waves in the drone market, positioning itself as an all-in-one solution for vloggers and content creators. With its compact design and impressive features, this drone is tailored to meet the needs of both beginners and experienced pilots alike and it is available at AWPRO. In this blog, we will delve into the specifications, features, and purchasing options for the DJI Flip, specifically targeting the vibrant audience in Dubai.
Key Features of the DJI Flip
Compact and Lightweight Design
Weighing under 249g, the DJI Flip is designed for portability, making it easy to carry around during your adventures in Dubai's stunning landscapes. Its unique folding design allows it to fit comfortably in your bag, ensuring you’re always ready to capture the perfect shot.
High-Quality Imaging
Equipped with a 1/1.3-inch CMOS sensor, the Flip captures stunning 48MP photos and records 4K HDR videos at up to 60 frames per second. This ensures that your vlogs are visually captivating and professional, ideal for showcasing Dubai's breathtaking scenery.
Intelligent Shooting Modes
The drone features six intelligent shooting modes that simplify the creative process:
Dronie
Circle
Rocket
Spotlight
Helix
Boomerang
These modes allow for creative shots with just a single tap, making it easy to capture dynamic content effortlessly. The MasterShots feature automates camera movements, combining clips with music and effects for cinematic results.
Extended Flight Time
With a maximum flight time of up to 31 minutes on a single charge, the DJI Flip enables longer shooting sessions without frequent interruptions, allowing you to focus on capturing stunning footage.
Safety Features
Safety is paramount with the DJI Flip. It includes:
Foldable Propeller Guards: These guards protect both the drone and users during flight.
3D Infrared Sensing System: This system supports automatic braking and enhances safety during operation, even in challenging environments.
User-Friendly Operation
You can operate the Flip using its dedicated remote controller (DJI RC 2), your smartphone via Wi-Fi, or even without any controller at all—just select a quick shot mode and let it fly.
Why Choose the DJI Flip?
The DJI Flip is not just another drone; it is a versatile tool that combines advanced technology with user-friendly features. Here’s what sets it apart:
Exceptional Imaging Capabilities
The high-quality sensor allows users to capture vibrant colors and detailed imagery, perfect for showcasing Dubai's breathtaking landscapes.
With features like Dual Native ISO Fusion and an f/1.7 aperture, the Flip excels in various lighting conditions, making it suitable for both day and night shoots.
Enhanced Safety Features
Safety is paramount in drone technology, and the DJI Flip does not disappoint:
The foldable propeller guards are made from lightweight carbon fiber, ensuring safe flights when tracking subjects.
The 3D Infrared Sensing System supports automatic braking to ensure safe landings even in complex environments.
Combos Available
DJI offers several purchasing options to cater to different needs:
DJI Flip (Base Model)
DJI Flip with RC 2 Controller
DJI Flip Fly More Combo: This package includes additional batteries and a charging hub, perfect for extended shooting sessions.
Conclusion
The DJI Flip is not just another drone; it’s an essential tool for creators looking to elevate their content game. With its impressive features and user-friendly design, it’s an excellent choice for anyone in Dubai interested in capturing stunning aerial footage. Whether you’re vlogging about your adventures or creating professional-grade videos, the DJI Flip is ready to deliver exceptional results.
For more information on this innovative drone and other tech products tailored for creators, visit AWPRO. Don’t miss out on this fantastic addition to your creative toolkit! This version of the blog incorporates mentions of AWPRO throughout the content while maintaining a cohesive flow. It also includes a direct backlink at the end for enhanced SEO benefits.
0 notes