#Raspberry Pi 3 B+
Explore tagged Tumblr posts
Text
Raspberry Pi 4 - Best single board computer for projects
One of the most prominent board to start with for the student mini projects or major projects is he Raspberry Pi 4. Directly skip to Raspberry Pi Projects
There are many single board computer / mini computer in the market for student projects like Raspberry Pi Boards, Asus Tinker Boards, Libre Computer Boards, BeagleBone Boards, Odroid Boards and many more. One of the most prominent board to start with for the student mini projects or major projects is the Raspberry Pi 4. Directly skip to Raspberry Pi Projects Table of ContentsRaspberry…

View On WordPress
#Major Projects#Mini Projects#Projects on Raspberry Pi#Projects on Raspberry Pi 3#Projects on Raspberry Pi 3 Model B#Projects on Raspberry Pi 3 Model B+#Projects on Raspberry Pi 4#Projects on Raspberry Pi 4 Model B#Raspberry#Raspberry Pi#Raspberry Pi 3 Model B#Raspberry Pi 3 Model B+#Raspberry Pi 3 Project#Raspberry Pi 3 Projects#Raspberry Pi 4#Raspberry Pi 4 Model B#Raspberry Pi 4 Project#Raspberry Pi 4 Projects#Raspberry Pi Major Projects#Raspberry Pi Mini Projects#Raspberry Pi Project#Raspberry Pi Project Ideas#Raspberry Pi Projects#Single Board Computer
0 notes
Text
Apropos of nothing
If you are the techiest person in the house (and for many of you, this is not techy at all), today is a good day to build a pihole thanks to Google's new TLDs.
For the record, this straight up stopped Dad from getting computer viruses when coupled with the Ublock browser extension, so I will volunteer my time to get you set up. We will find an evening and do a Zoom call. I am serious.
Prerequisities:
Before you start, this will be way way easier if your router has a magic way to:
Set static IP addresses
Set a custom DNS server
If you can't do this, I'm not saying you're stuck, but there's some non-obvious failure modes and maybe it's time to buy a better router.

Parts:
Raspberry Pi 4B. 2GB if you just want to set and forget, 8GB if you want to do more things on this than just your pihole (Coughs in a MarioKart box) -> https://www.raspberrypi.com/products/raspberry-pi-4-model-b/
Spare USB-C charger if you don't have one already. I'm a fan of https://www.amazon.com/Argon-USB-C-Power-Supply-Switch/dp/B0919CQKQ8/ myself
A microSD card at least UHS class 3 or better. 32 is fine for just a pihole, I have a 512 in some of mine that I use for more stuff. https://www.tomshardware.com/best-picks/raspberry-pi-microsd-cards
Some method of flashing the card if you don't have one (Some come with SD to micro-SD adapters, if not a USB to SD/micro-SD adapter is about $10 off Amazon)
If you really feel like going nuts, go buy yourself an Argon case and then very very carefully never ever install the software for the fan that does nothing. The value is entirely in having a big giant brick that is self-cooling. If you want to play MarioKart, I would consider this a requirement. https://www.amazon.com/Argon-Raspberry-Aluminum-Heatsink-Supports/dp/B07WP8WC3V
Setup:
Do yourself a favor and ignore all the signs telling you to go get Raspbian and instead go grab an ISO of Ubuntu 64-bit using RPi Imager. Because Raspbian cannot be upgraded across version WHY U DO THIS
Download Rpi Imager, plug the microSD card into your computer,
Other General Purpose OS -> Ubuntu -> Ubuntu 22.04 LTS
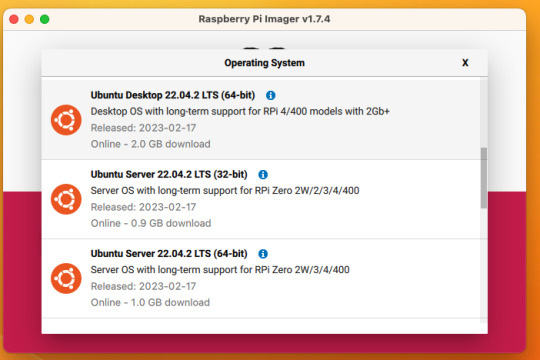
So now you have an operating system on an SD card.
Assemble the case if you bought one, plug in the SD card, power supply, ethernet cable if you have one or mouse and (mini) HDMI cable if you don't. If you bought that Argon case, you can just plug a keyboard (server OS means no mouse gang; In this house, we use the Command Line) and HDMI cable into the Pi. Turn it on.
Gaining access
The end state of this is that your pi is:
Connected to the internet by cable or wifi
You can SSH to it (Also not scary)
If you plugged in an ethernet cable, once it's done booting (1-2 minutes?), you should be able to ssh to "ubuntu@<the IP of the system>". Look it up in your router. It may make sense to give the static IP NOW to keep it stable.
If you've never used SSH before, I think the standard is Putty on Window or you can just open a terminal in Mac. (And if you know enough Linux to have a Linux computer, why are you reading this?)
If you didn't plug it in, and need to setup the wifi, there's magic incantations to attach it to the wifi and to be quite blunt, I forget what they are.
Your username is ubuntu, your password is ubuntu and then it will ask you to make a new password. If you know the meaning of the phrase "keypair-based access", it may make sense to run `ssh-copy-id` at this point in time.
Router settings (part 1)
Give your new Pi a static IP address, and reboot your pi (as simple as typing in `sudo reboot`).
Open a new SSH session to the pihole on the new address.
Installing pihole
Open up an SSH session and
curl -sSL https://install.pi-hole.net | bash
This is interactive. Answer the questions
When it's done, on your other computer, navigate to <the ip>/admin
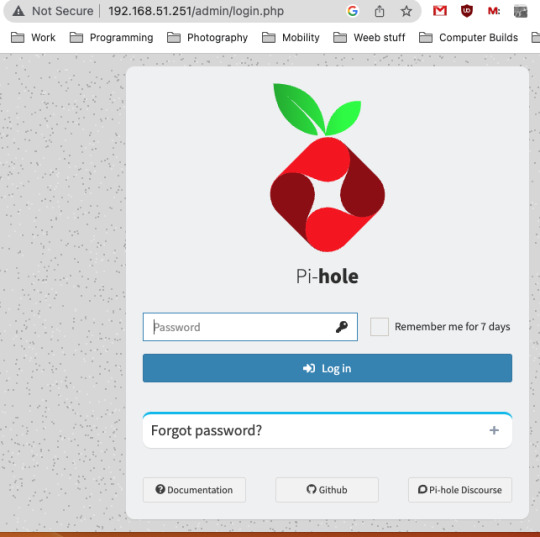
Login with the password you just set. Router settings part 2
Give your new Pi a static IP address then point your router at that address
Set the DNS servers to the static IP
Then ensure you're blocking something. Anything.
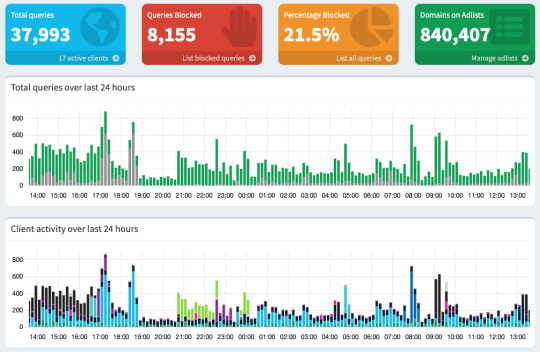
Then do what you want to do. You'll probably need to whitelist some sites, blacklist some more, but the main thing is going to be "Adding more list of bad sites". Reddit has some lists.

And... enjoy.
/But seriously, there's some stuff to do for maintenance and things. I wasn't joking about the pair setup.
2K notes
·
View notes
Text


New project: Pwnagotchi battery case for Waveshare UPS Hat
There are already plenty of cases for the most adorable ai ever out there, but most of them require an external power source. I wanted an integrated battery and since I had a Waveshare hat left from a different project I tried it as an alternative to the pi sugar. The case fits the following parts, stacked on top of each other: 1) Waveshare E-Ink Display pHAT 2.13 inch 2) Raspberry Pi Zero WH 3) Waveshare UPS Hat (C) The 1000 mAh battery gives aprox. 4 hours of runtime, afterwards you can either a) recharge the battery while the pi remains off b) recharge the battery while the pi is on (the hat supports pass through) c) plug your external power source directly into the pi and recharge the battery later. All ports are still accessible and I also added a wider loop to attach a molle style key fob.
.STL files are available here: sarahkastrau.limitedrun.com
21 notes
·
View notes
Text
Raspberry Pi Board: Revolutionizing Computing and Education
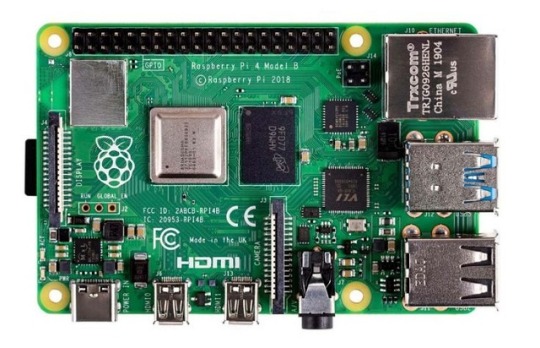
The Raspberry Pi board is a series of small, affordable single-board computers developed by the Raspberry Pi Foundation, a UK-based charity focused on promoting computer science education and digital literacy. Since its launch in 2012, the Raspberry Pi has transformed from a niche educational tool into a versatile platform used in a wide range of applications, from DIY electronics projects to industrial automation.
A Brief History
The first Raspberry Pi, the Model B, was released in February 2012. Designed to promote basic computer science in schools and developing countries, it featured a 700 MHz ARM11 processor, 256 MB of RAM, and basic connectivity options. The success of the Model B led to a rapid expansion of the Raspberry Pi lineup, with various models offering improved performance, more memory, and enhanced connectivity.
Key Features and Models
Raspberry Pi 1 Model B (2012):
Processor: 700 MHz ARM11
Memory: 256 MB RAM
Ports: 2 USB 2.0 ports, HDMI, Composite video, 3.5mm audio jack, Ethernet
Storage: SD card slot
Raspberry Pi 2 Model B (2015):
Processor: 900 MHz quad-core ARM Cortex-A7
Memory: 1 GB RAM
Ports: 4 USB 2.0 ports, HDMI, Composite video, 3.5mm audio jack, Ethernet
Storage: MicroSD card slot
Raspberry Pi 3 Model B (2016):
Processor: 1.2 GHz quad-core ARM Cortex-A53
Memory: 1 GB RAM
Ports: 4 USB 2.0 ports, HDMI, Composite video, 3.5mm audio jack, Ethernet
Wireless: Wi-Fi and Bluetooth
Raspberry Pi 4 Model B (2019):
Processor: 1.5 GHz quad-core ARM Cortex-A72
Memory: Options of 2 GB, 4 GB, and 8 GB RAM
Ports: 2 USB 3.0 ports, 2 USB 2.0 ports, 2 Micro HDMI ports, Ethernet, USB-C for power
Wireless: Wi-Fi and Bluetooth
Raspberry Pi Zero (2015) and Zero W (2017):
Processor: 1 GHz single-core ARM11
Memory: 512 MB RAM
Ports: Mini HDMI, Micro USB OTG, Micro USB for power, GPIO pins
Wireless (Zero W): Wi-Fi and Bluetooth
Applications and Uses
The versatility of the Raspberry Pi has led to its adoption in numerous fields:
Education:
Coding and Programming: Used in schools and educational programs to teach students programming languages such as Python, Scratch, and Java.
Computer Science Concepts: Introduces concepts like hardware, software, and networking.
DIY Projects and Maker Community:
Home Automation: Controls smart home devices, including lights, thermostats, and security systems.
Media Centers: Powers home media centers using software like Kodi.
Retro Gaming: Emulates classic gaming consoles using software like RetroPie.
Industrial and Commercial Applications:
IoT Devices: Serves as a hub for Internet of Things (IoT) devices, enabling data collection and remote control.
Automation and Control Systems: Used in factories and labs for monitoring and controlling equipment.
Research and Development:
Prototyping: Facilitates rapid prototyping of electronic devices and systems.
Data Collection: Gathers data from various sensors in environmental and scientific research.
Community and Ecosystem
The Raspberry Pi has cultivated a vibrant global community of developers, hobbyists, educators, and students. Online forums, tutorials, and community projects provide extensive support and resources for users at all skill levels. The Raspberry Pi Foundation also offers official accessories, including cases, cameras, and expansion boards, further enhancing the functionality of the Raspberry Pi.
Conclusion
The Raspberry Pi board has revolutionized the way people learn about and interact with technology. Its affordability, versatility, and extensive support network have made it an indispensable tool in education, DIY projects, and professional applications. As technology continues to evolve, the Raspberry Pi Foundation remains committed to expanding the capabilities and accessibility of this remarkable platform, ensuring that computing remains within reach for everyone.
2 notes
·
View notes
Text
If I disappear from society, don't be surprised.
I am so so so tired of capitalism.
For Christmas I got a Raspberry Pi. The goal was to host my own website off it. This was entirely for fun.
Step one: set up raspberry Pi so I can host a site on it. Easy. Ubuntu is free (thank fuck), I know how to set it up, but hold on! According to xfinity, I cannot change dmz or dms rules on their router. I can't even REQUEST it. I can't even use a workaround because I'm not allowed to edit the port forward that was automatically added to my router. I dig through years old forums and find out that this is because I'm using the modem provided by xfinity. I now have to buy a new modem from xfinity's "approved list".
Step two: get a domain. I swim through 4 million outrageous prices that say shit like "pay $0.01 for the first year!" with the text below saying "with purchase of 3 year agreement". I finally get to godaddy and am able to convince the stupid checkout to give me 1 year of my domain (after, of course, it corrected my awful mistake to 3 years and, if I hadn't been hyper-vigilant, I wouldn't have noticed. I have to dig through 5 pages in settings to find a way to turn off auto pay because I know better by now. While I'm there I also turn off all email notifications, which were all automatically on. It also didn't tell me that I can't transfer my domain outside of godaddy for 60 days, so I just essentially paid for something I can't use for 2 months. Great. (out of curiosity, I dug through godaddy for some time. The 60 day thing appears nowhere except on the help center page when specifically searching for it.)
Step three: create a site. WordPress, once my most beloved website creation software, now slams subscription fees on me like cardi B audios on teenager girls's tiktoks. Unrelenting. Bloodthirsty. I power through to just get past "let AI design your site!" and "pick one of our patterns" so I can reach the point where I can edit the template. I already have a free template zip file. I drop it in the box. "wait!" says WordPress, in a screen-covering popup "upgrade to the creator plan to access the theme install features!" I click the only button on the screen. It takes me IMMEDIATELY to a filled out checkout page. WordPress Creator is $300 per year. Per. Year.
I read through the "features included with your purchase" to see things like "sftp/SSH certificates", "github deployments", "free staging site", and "install plugins and themes". All of these were free 5 years ago. "Save 20% by paying for two years!" No, I don't think I will.
Out of pure spite against the demon that is modern capitalism, I'm teaching myself html and css. I would kiss the creator of w3schools on the mouth, right after I kiss the creator of Ubuntu. I'm so angry. The internet is useless now.
5 notes
·
View notes
Text
Raspberry Pi Pico W has been designed to be a low cost yet flexible development platform for RP2040, with a 2.4GHz wireless interface and the following key features:
RP2040 microcontroller with 2MB of flash memory
On-board single-band 2.4GHz wireless interfaces (802.11n)
Micro USB B port for power and data (and for reprogramming the flash)
40 pin 21mmx51mm ‘DIP’ style 1mm thick PCB with 0.1″ through-hole pins also with edge castellations
Exposes 26 multi-function 3.3V general purpose I/O (GPIO)
23 GPIO are digital-only, with three also being ADC capable
Can be surface mounted as a module
3-pin ARM serial wire debug (SWD) port
Simple yet highly flexible power supply architecture
Various options for easily powering the unit from micro USB, external supplies or batteries
High quality, low cost, high availability
Comprehensive SDK, software examples, and documentation
Dual-core Cortex M0+ at up to 133MHz
On-chip PLL allows variable core frequency
264kByte multi-bank high-performance SRAM
2 notes
·
View notes
Text
It's alive!!
I can read out the A and B buttons. It was quite easy to do despite having little experience with electronics. (But C programming experience.)
The board here is an Arduino UNO R4 Wifi. It can act as a USB HID (human interface device) so I could write code to actually use it as a game controller on my computer. Also, it has a fancy little LED display as you can see, and it does 5V digital logic, so I don't need a logic-level converter. (E.g., if you directly connect this controller to a Raspberry Pi, it can destroy the GPIO pins.)
My 3-button controller is not alive, sadly.
5 notes
·
View notes
Text
Tangents
okay, so heres that tangent I warned about
so for the last like 10 years I have had this fantasy of winning the lottery and starting a business.....that first part is mostly the fantasy, because without that theres no way I could afford to do the latter
basically it comes down to new technology that allows automation for small guys like me, stuff like these
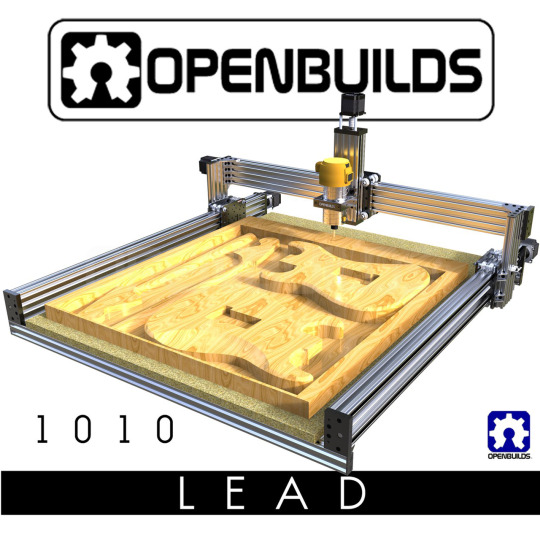

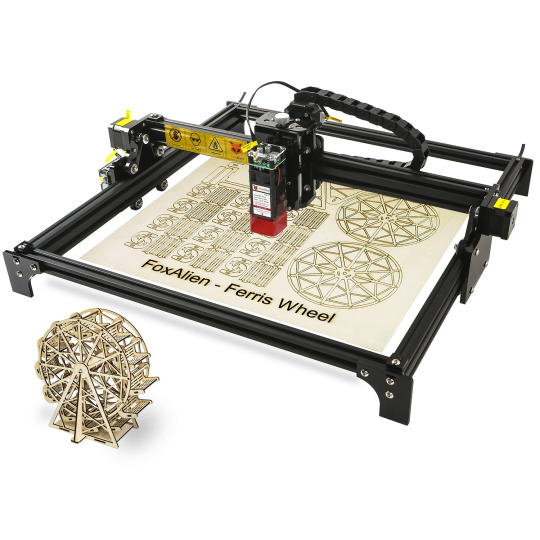

basically with 3D printing and affordable cnc and laser cutting machines, a guy like me could have the man power of like 10 people, and if I hired maybe 10 people total to assist, I could easily do something on par with much bigger companies.
my initial fantasy just involved making guitars, granted more advanced guitars then I think the market insists upon, because they are locked in the habit of what has proven sellable to MOST people. fender scale length, bolt on neck, 2 humbuckers, faux les paul look and feel. every company does it, no shame. just not my thing.
I've had this idea, which I've experimented with and talked about in the past, the guitar of the future. Ive done mockups etc like this

but as I've grown older, honestly what I think it should really be is a cheap reliable guitar with a few tricks up its sleeve. so I have reimagined it as basically this

telecasters are simple, and on a cnc machine if you made it as layers that were later glued together, you could make it very easily. the 4x2 headstock is better for straight string pull, and helps eliminate tuning instability. replacing the old school pickups with active style pickups like emg would make it more versatile, and then adding the b bender, along with string drops a g bender, and maybe even a strap actuated bender, the guitar could cover a lot more roles then a standard electric guitar. plus I honestly think benders are cool and more people need to play them, so making them as cheap and accessable as possible is a good idea
just a simple guitar, maybe of paulownia or plywood, cut as 2 or 3 sections and glued together, and then maybe even using a circuit board instead of wire to speed up production, its a great idea.
but I started looking into what else I could do with this hypothetical company that basically 3D prints things, and cncs plywood
I guess bikes

I am a big fan of ebikes, mainly because I believe genuinely in the next 10 years they will begin to be a lot more common in most major cities, their prices will come down as there are more batteries in circulation for evs, and being able to make quick simple bikes like this to sell locally, it seems like a way to directy serve the market I want to live in.
I also looked into stereo equipment, as I am a big hifi guy, and I am a huge raspberry pi fan, so seeing stuff for hifi pi, again it would be a market i understand, and think shouldnt be so fuckin expensive

I also genuinely would love to make a cheap hammond organ clone
like sub $500, because when I was wanting to pickup the instrument it was very hard to get the $ together to do so, and I know if you could injection mold the keys, cnc the body print the circuit boards, and use an arduino or raspberry pi to run a soft synth hammond clone, you could easily hit that price point

more people need to play the organ
lastly is furniture
I love basic designs and furniture has always been something that I enjoy looking at, modern furniture designs, stuff from the last 50s early 60s, its so timeless and the open source furniture movement just scratches that itch. it's simple, but stylish, its utilitarian but it doesnt look bland


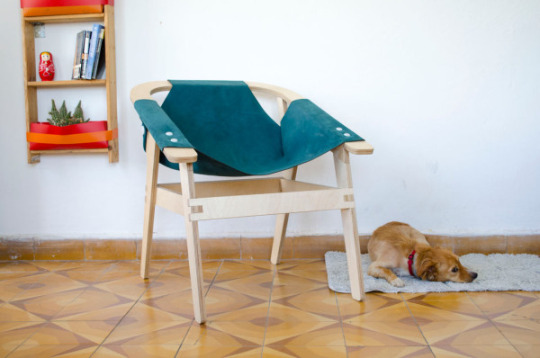
the idea of being able to make these things, locally, and just being able to put out into the world things I want and I know other people would too.....I think i'd like that
just wish I didnt have to win the lottery to do it
8 notes
·
View notes
Text
RaspberryPi 4 Basic Kit is Now Available
The Raspberry Pi 4 Kit is now available Spread the good news or refer it to your friend using our Affiliate Program and get a 5% commission on each kit sold.
Here are the Raspberry Pi 4 Kits we have in store for all of you:
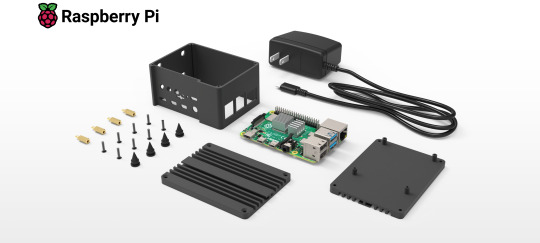
We have three variants and three different options available:

RAK Raspberry Pi 4 Kit is the latest addition to the popular Raspberry Pi series. It offers an excellent increase in processor speed, multimedia performance, memory, and connectivity over the previous generation Raspberry Pi 3 Model B+, while maintaining backward compatibility and similar power consumption.

Build your developer gateway for LoRaWAN® with the RAK Raspberry Pi 4 Kit for LoRaWAN®. It includes a Pi 4 (4 GB), a ready-to-use microSD card with Raspbian OS pre-loaded, a case, a power supply, a RAK2287 concentrator, a PiHAT for the concentrator, and a LoRa® antenna.

The Raspberry Pi 4 Model B (4 GB) is the best single-board computer for developing your IoT project and launching your first LoRaWAN® gateway.
Become a RAKwireless Affiliate and get your own Raspberry Pi 4 Basic Kit here: https://store.rakwireless.com/collections/raspberry-pi
3 notes
·
View notes
Quote
ポケコンはロマンである。使い道はまだない。
[B! PC] 3万円台でディスプレイ&フルキーボード搭載のRaspberry Piベースポケットコンピューター「uConsole」が登場
2 notes
·
View notes
Text
Raspberry Pi 4 - Best single board computer for projects
One of the most prominent board to start with for the student mini projects or major projects is he Raspberry Pi 4. Directly skip to Raspberry Pi Projects
There are many single board computer / mini computer in the market for student projects like Raspberry Pi Boards, Asus Tinker Boards, Libre Computer Boards, BeagleBone Boards, Odroid Boards and many more. One of the most prominent board to start with for the student mini projects or major projects is the Raspberry Pi 4. Directly skip to Raspberry Pi Projects Table of ContentsRaspberry…

View On WordPress
#Major Projects#Mini Projects#Projects on Raspberry Pi#Projects on Raspberry Pi 3#Projects on Raspberry Pi 3 Model B#Projects on Raspberry Pi 3 Model B+#Projects on Raspberry Pi 4#Projects on Raspberry Pi 4 Model B#Raspberry#Raspberry Pi#Raspberry Pi 3 Model B#Raspberry Pi 3 Model B+#Raspberry Pi 3 Project#Raspberry Pi 3 Projects#Raspberry Pi 4#Raspberry Pi 4 Model B#Raspberry Pi 4 Project#Raspberry Pi 4 Projects#Raspberry Pi Major Projects#Raspberry Pi Mini Projects#Raspberry Pi Project#Raspberry Pi Project Ideas#Raspberry Pi Projects#Single Board Computer
0 notes
Text
Enhance Your Kiosk: Adding USB Camera Features to Raspberry Pi Systems
In the realm of modern technology, the Raspberry Pi has established itself as a versatile platform capable of powering a myriad of applications, from simple DIY projects to complex industrial solutions. One of the key features that can significantly enhance the functionality of Raspberry Pi-based systems is the integration of USB cameras. Whether you're looking to improve security, enable video conferencing capabilities, or develop innovative computer vision applications, adding a USB camera to your Raspberry Pi setup opens up a world of possibilities.
Understanding USB Cameras and Raspberry Pi Compatibility
USB cameras, also known as webcams, are peripheral devices that connect to a host system via a USB port. They come in various forms, from basic models offering standard resolution to advanced versions capable of HD and even 4K video capture. For Raspberry Pi enthusiasts and developers, USB cameras are particularly attractive due to their plug-and-play nature and wide compatibility with the Raspberry Pi's Linux-based operating systems.
Raspberry Pi models such as the Raspberry Pi 4 Model B and the Raspberry Pi Zero W support USB cameras out of the box, thanks to their multiple USB ports and robust hardware specifications. This compatibility makes it straightforward to integrate USB cameras into existing projects or to start new ones focused on image and video processing.
Practical Applications of USB Cameras with Raspberry Pi
1. Video Surveillance and Monitoring Systems
Enhancing the security of homes, offices, or outdoor spaces can be achieved economically with a Raspberry Pi and a USB camera. By utilizing motion detection software and live streaming capabilities, users can monitor their premises remotely through a web interface or a dedicated mobile app. This setup is ideal for both personal use and small businesses looking to bolster their security infrastructure without investing in expensive proprietary systems.
2. Interactive Kiosk and Digital Signage
Imagine deploying an interactive kiosk powered by a Raspberry Pi equipped with a high-definition USB camera. Such a setup can enable features like gesture recognition, customer analytics through facial recognition, and interactive user experiences. Retailers, museums, and educational institutions can leverage this technology to deliver engaging content and gather valuable visitor data for analytics and personalized experiences.
3. Video Conferencing and Remote Collaboration
With the rise of remote work and virtual meetings, turning your Raspberry Pi into a capable video conferencing station is both practical and cost-effective. By connecting a USB camera and a microphone array, users can conduct high-quality video calls using popular platforms like Zoom or Microsoft Teams. This solution is ideal for home offices, classrooms, and small businesses seeking reliable video conferencing without relying on traditional desktop setups.
Getting Started: Setting Up a USB Camera with Raspberry Pi
Integrating a USB camera with your Raspberry Pi system is straightforward, even for beginners. Here's a basic guide to help you get started:
Step 1: Choose the Right USB Camera
Select a USB camera based on your specific requirements, such as resolution, frame rate, and compatibility with the Raspberry Pi operating system (Raspbian, Raspberry Pi OS).
Step 2: Connect the USB Camera
Plug the USB camera into one of the available USB ports on your Raspberry Pi. Ensure the camera is securely connected and recognized by the system.
Step 3: Install Camera Drivers (if needed)
In most cases, modern USB cameras are recognized automatically by Raspberry Pi OS. However, for certain advanced features or specific camera models, you may need to install additional drivers or software packages provided by the camera manufacturer.
Step 4: Configure Software and Applications
Utilize software libraries and applications such as OpenCV, motion detection scripts, or video streaming solutions to leverage the full potential of your USB camera. Customize settings such as resolution, frame rate, and image processing algorithms to suit your application needs.
Step 5: Test and Deploy
Once configured, test your USB camera setup thoroughly to ensure functionality and reliability. Deploy your Raspberry Pi system equipped with a USB camera in your desired application environment, whether it's a smart home project, commercial installation, or educational experiment.
Conclusion
Adding USB camera features to Raspberry Pi systems expands their capabilities beyond basic computing tasks, transforming them into powerful tools for imaging, surveillance, communication, and interactive experiences. Whether you're a hobbyist exploring new projects or a developer creating innovative solutions, the combination of Raspberry Pi and USB cameras offers endless possibilities for creativity and functionality. By harnessing the flexibility and affordability of these technologies, you can enhance your kiosk or project with advanced visual capabilities that cater to diverse applications in today's digital landscape. Unlock the potential of USB cameras with Raspberry Pi and embark on your journey towards building smarter, more interactive solutions for the future.
for more details visit below website
https://www.vadzoimaging.com/usb3-cameras
0 notes
Text
0 notes
Text
Raspberry Pi Projekt: Prozessinformationen auf OLED Display anzeigen
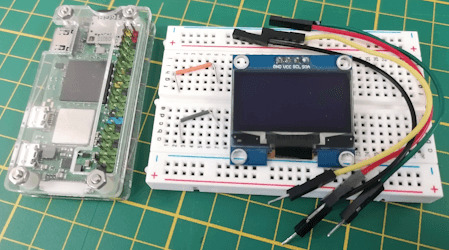
Wie du am Raspberry Pi ein OLED Display anschließt und programmierst, habe ich dir bereits gezeigt. Im heutigen Beitrag soll es darum gehen wie du Prozessinformationen auf dem OLED Display visualisierst. Es ist hier empfehlenswert ein großes Display zu verwenden, da die Daten, welche angezeigt werden sollen, doch recht umfangreich sind (oder man muss Abstriche bei den Daten machen). https://youtu.be/nOQnx6_ekVE Für diesen Beitrag verwende ich den Raspberry Pi Zero 2 WH, da mein eigentlich für solche Beiträge verwendete Raspberry Pi 3b+ nun in ein RetroPi verwandelt wurde. Jedoch steht der kleine Pi Zero 2 dem großen in nichts nach und kann für solche Projekte ebenso verwendet werden und du kannst dieses auch auf dein Pi nachbauen.
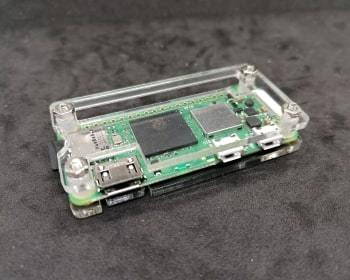
Acrylgehäuse für den Raspberry Pi Zero
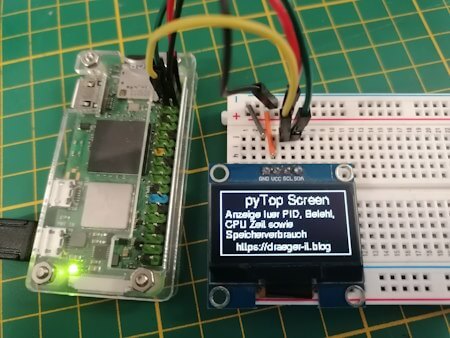
Splashscreen des Python Projektes - "pyTop Screen"
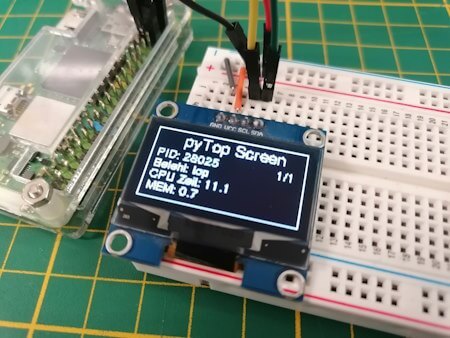
Daten aktuellen Prozessen auf dem OLED-Display Die Idee zu diesem Beitrag kommt aus einem Kommentar zu meinem YouTube-Video OLED Display am Raspberry Pi anschließen und per I2C steuern: So geht’s!. Ich bin immer froh, wenn solch Input aus meiner Community kommt und ich damit euch helfen kann und ich ebenso neuen Content generieren kann.
Benötigte Ressourcen für dieses Projekt
Wenn du dieses kleine Projekt nachbauen möchtest, dann benötigst du: - einen Raspberry Pi* inkl. Netzteil, SD-Karte etc., - ein OLED Display mit I2C Anschluss*, - ein paar Breadboardkabel*, - ein 400 Pin Breadboard* Hinweis von mir: Die mit einem Sternchen (*) markierten Links sind Affiliate-Links. Wenn du über diese Links einkaufst, erhalte ich eine kleine Provision, die dazu beiträgt, diesen Blog zu unterstützen. Der Preis für dich bleibt dabei unverändert. Vielen Dank für deine Unterstützung!
Was soll dargestellt werden?
Auf dem Display möchte ich die laufenden Prozesse darstellen, diese kann man sich recht einfach über den Befehl top anzeigen lassen. pi@raspberrypi:~ $ top top - 10:27:00 up 1:27, 1 user, load average: 0,07, 0,06, 0,09 Tasks: 194 total, 1 running, 193 sleeping, 0 stopped, 0 zombie %CPU(s): 0,5 us, 0,6 sy, 0,0 ni, 98,8 id, 0,1 wa, 0,0 hi, 0,0 si, 0,0 st MiB Spch: 426,7 total, 102,6 free, 132,7 used, 191,5 buff/cache MiB Swap: 100,0 total, 7,6 free, 92,4 used. 229,0 avail Spch PID USER PR NI VIRT RES SHR S %CPU %MEM ZEIT+ BEFEHL 17628 mysql 20 0 614080 67592 9212 S 1,3 15,5 3:49.26 mariadbd 22393 pi 20 0 11476 3204 2612 R 1,3 0,7 0:01.13 top 839 zabbix 20 0 128416 3552 2988 S 0,3 0,8 0:01.97 zabbix_server 857 zabbix 20 0 132984 2092 1808 S 0,3 0,5 0:00.36 zabbix_server 1 root 20 0 34948 5260 3568 S 0,0 1,2 0:28.14 systemd 2 root 20 0 0 0 0 S 0,0 0,0 0:00.03 kthreadd 3 root 0 -20 0 0 0 I 0,0 0,0 0:00.00 rcu_gp 4 root 0 -20 0 0 0 I 0,0 0,0 0:00.00 rcu_par_gp 5 root 0 -20 0 0 0 I 0,0 0,0 0:00.00 slub_flushwq 6 root 0 -20 0 0 0 I 0,0 0,0 0:00.00 netns 10 root 0 -20 0 0 0 I 0,0 0,0 0:00.00 mm_percpu_wq Jedoch interessieren mich hier nur die Werte, PID, %CPU, %MEM sowie der BEFEHL. Da wir diese Daten in Python weiterverarbeiten möchten, exportieren wir diese Daten mit einem Befehl in eine Semikolonseparierte CSV-Datei. (Das Komma wird in den Daten für die Gelitkommazahlen verwendet!) echo "PID;Befehl;CPU Zeit;Speicherverbrauch" > prozesse.csv && top -b -n 1 | awk 'NR > 7 { print $1 ";" $12 ";" $9 ";" $10 }' >> prozesse.csv Damit erhalten wir wie gewünscht lediglich die Daten für die Spalten PID, %CPU, %MEM, BEFEHL. PID;Befehl,CPU Zeit,Speicherverbrauch 22545;top;111;0,7 1;systemd;0,0;1,2 2;kthreadd;0,0;0,0 3;rcu_gp;0,0;0,0 4;rcu_par_gp;0,0;0,0;
Aufbau der Schaltung - Raspberry Pi mit OLED Display
Wie bereits erwähnt baue ich die Schaltung am Raspberry Pi Zero 2 WH auf, du kannst diese aber ebenso am normalen Raspberry Pi nachbauen (solltest jedoch zusätzlich auf das ggf. geänderte Pinout achten).
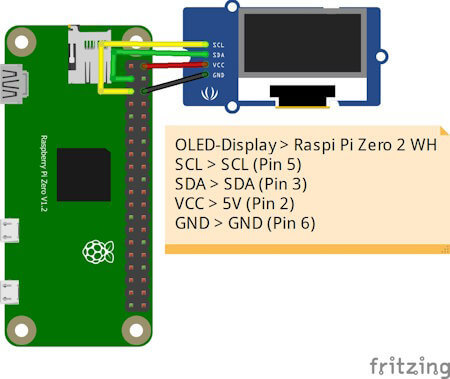
OLED-DisplayRaspberry Pi Zero 2 WHVCC5V (Pin 2)GNDGND (Pin 6)SDASDA (Pin 3)SCLSCL (Pin 5)
Python Skript im Hintergrund laufen lassen
Ich möchte das kleine Skript einmal starten und dann über die Tasten Funktionen ausführen können, während ich gleichzeitig weiterhin im geöffneten Terminalfenster arbeite. Deshalb soll das Skript im Hintergrund laufen. Es gibt hier mehrere Möglichkeiten, in diesem Beitrag möchte ich die einfachste nutzen und hänge lediglich ein & Zeichen an den Befehl und als Rückgabe erhalte ich eine PID. Mit dieser Prozess-ID kann ich dieses Skript auch jederzeit mit dem Befehl kill beenden. pi@raspberrypi:~/Python/DisplayTop $ python3 displayHello.py & 23467 pi@raspberrypi:~/Python/DisplayTop $ kill 23467 pi@raspberrypi:~/Python/DisplayTop $
Programmieren des Skriptes zum anzeigen der laufenden Prozesse
Starten wir nun und lassen die laufenden Prozesse auf dem OLED Display am Raspberry Pi anzeigen. Das Skript erstellen wir iterativ und nach jedem Schritt hast du quasi ein kleines lauffähiges Skript mit einer zusätzlichen Funktion. Schritt 1 - Willkommensnachricht anzeigen Im ersten Schritt lassen wir auf dem Display zunächst einen Text anzeigen, welcher kurz erläutert welche Daten angezeigt werden. import time from luma.core.interface.serial import i2c, spi, pcf8574 from luma.core.interface.parallel import bitbang_6800 from luma.core.render import canvas from luma.oled.device import sh1106 from PIL import ImageFont serial = i2c(port=1, address=0x3C) device = sh1106(serial) fontBig = ImageFont.truetype('FreeSans.ttf', 14) fontNormal = ImageFont.truetype('FreeSans.ttf', 10) while True: with canvas(device) as draw: draw.rectangle(device.bounding_box, outline="white", fill="black") draw.text((25, 3), "pyTop Screen", font=fontBig, fill="white") draw.text((5, 20), "Anzeige fuer PID, Befehl,", font=fontNormal, fill="white") draw.text((5, 30), "CPU Zeit sowie", font=fontNormal, fill="white") draw.text((5, 40), "Speicherverbrauch", font=fontNormal, fill="white") In meinem Fall nutze ich ein 1.3" OLED Display und musste die Schriftgröße auf 14 & 10 setzen. Hier gilt wie zuvor ein möglichst großes Display zu verwenden.

Splashscreen des Python Projektes - "pyTop Screen" Schritt 2 - exportieren der laufenden Prozesse als CSV Datei In einem Abschnitt zuvor habe ich dir gezeigt, wie der Befehl lautet, um die benötigten Daten der laufenden Prozesse in eine CSV Datei zu schreiben. Diesen wollen wir jetzt alle 2 Minuten ausführen. Damit wir eine Funktion im Hintergrund laufen lassen können, benötigen wir zusätzlich das Modul "schedule" dieses muss über den Befehl "python3 -m pip install schedule" installiert werden. pi@raspberrypi:~/Python/DisplayTop $ python3 -m pip install schedule Looking in indexes: https://pypi.org/simple, https://www.piwheels.org/simple Collecting schedule Downloading https://www.piwheels.org/simple/schedule/schedule-1.2.1-py3-none-any.whl (11 kB) Installing collected packages: schedule Successfully installed schedule-1.2.1 pi@raspberrypi:~/Python/DisplayTop $ import subprocess import schedule import time ... def loadProcessInformations(): command = 'echo "PID;Befehl;CPU Zeit;Speicherverbrauch" > prozesse.csv && top -b -n 1 | awk 'NR > 7 { print $1 ";" $12 ";" $9 ";" $10 }' >> prozesse.csv' subprocess.run(command, shell=True) loadProcessInformations() schedule.every(2).minutes.do(loadProcessInformations) ... while True: schedule.run_pending() Wenn wir das Skript ausgeführt wird, dann wird im aktuellen Verzeichnis die Datei "prozesse.csv" mit einem auszug der Daten von top angezeigt. pi@raspberrypi:~/Python/DisplayTop $ python3 pyTopScreen.py & 24037 pi@raspberrypi:~/Python/DisplayTop $ ls -ll insgesamt 12 -rw-r--r-- 1 pi pi 4987 21. Apr 11:43 prozesse.csv -rw-r--r-- 1 pi pi 1242 21. Apr 11:38 pyTopScreen.py pi@raspberrypi:~/Python/DisplayTop $ Schritt 3 - Parsen der CSV Datei in ein Dictionary Für einen einfachen Zugriff auf die exportierten Daten, parsen wir die CSV Datei in ein Dictionary. Es interessieren mich jedoch nur laufende Prozesse, diese haben eine CPU Zeit und einen Speicherverbrauch größer 0. import csv ... def loadProcessInformations(): command = 'echo "PID;Befehl;CPU Zeit;Speicherverbrauch" > prozesse.csv && top -b -n 1 | awk 'NR > 7 { print $1 ";" $12 ";" $9 ";" $10 }' >> prozesse.csv' subprocess.run(command, shell=True) prozesse_dict = {} with open('prozesse.csv', 'r') as file: csv_reader = csv.DictReader(file, delimiter=';') for row in csv_reader: pid = row cpu_zeit = float(row.replace(',', '.')) speicherverbrauch = float(row.replace(',', '.')) if cpu_zeit > 0 and speicherverbrauch > 0: befehl = row prozesse_dict = {'Befehl': befehl, 'CPU Zeit': cpu_zeit, 'Speicherverbrauch': speicherverbrauch} print(prozesse_dict) Immer wenn die neuen Daten geladen werden, werden diese zusätzlich im Terminalfenster ausgegeben. pi@raspberrypi:~/Python/DisplayTop $ python3 pyTopScreen.py { '24261': {'Befehl': 'python3', 'CPU Zeit': 100.0, 'Speicherverbrauch': 3.2}, '24530': {'Befehl': 'top', 'CPU Zeit': 5.9, 'Speicherverbrauch': 0.7} } Schritt 4 - Anzeigen der Prozessinformationen auf dem OLED Display am Raspberry Pi Kommen wir nun zum letzten Schritt und lassen die Prozessinformationen auf dem OLED Display anzeigen. Dazu müssen wir unseren bisherigen Code etwas anpassen, denn das Dictionary muss global abgelegt werden. prozesse_dict = {} def loadProcessInformations(): ... global prozesse_dict ... In der Endlosschleife in welchem der Code zum anzeigen der Daten wiederholt wird, legen wir dann eine For-Each-Schleife an welche über das Dictionary mit den Daten läuft. while True: schedule.run_pending() total = len(prozesse_dict) index = 1 for entry in prozesse_dict: showProcessEntry(entry, index, total) index += 1 time.sleep(2) Als Nächstes legen wir dann eine neue Funktion an welche einen Eintrag aus diesem Dictionary behandelt, bzw. wir übergeben lediglich die ID (die Prozess-ID / PID), zusätzlich wird noch die länge des Dictionarys sowie der aktuelle Index als Parameter übergeben (diese beiden Daten werden oben rechts im Display angezeigt). def showProcessEntry(entry, index, total): with canvas(device) as draw: draw.rectangle(device.bounding_box, outline="white", fill="black") draw.text((25, 3), "pyTop Screen", font=fontBig, fill="white") draw.text((105, 20), str(index) + "/"+ str(total), font=fontNormal, fill="white") draw.text((5, 20), "PID: "+ str(entry), font=fontNormal, fill="white") draw.text((5, 30), "Befehl: "+prozesse_dict, font=fontNormal, fill="white") draw.text((5, 40), "CPU Zeit: "+str(prozesse_dict), font=fontNormal, fill="white") draw.text((5, 50), "MEM: "+str(prozesse_dict), font=fontNormal, fill="white") Damit ist nun unser kleines Programm fertig und wir erhalten nun die Ausgabe der aktuellen Prozesse auf dem OLED-Display.

Daten aktuellen Prozessen auf dem OLED-Display Das fertige Python Skript zum anzeigen der Prozessinformationen auf einem OLED-Display Hier nun das fertige Python Skript als ZIP-Datei zum download. Programm - "pyTop-Screen" für das Anzeigen von Prozessinformationen auf einem OLED-DisplayHerunterladen import csv import subprocess import schedule import time from luma.core.interface.serial import i2c, spi, pcf8574 from luma.core.interface.parallel import bitbang_6800 from luma.core.render import canvas from luma.oled.device import sh1106 from PIL import ImageFont serial = i2c(port=1, address=0x3C) device = sh1106(serial) fontBig = ImageFont.truetype('FreeSans.ttf', 14) fontNormal = ImageFont.truetype('FreeSans.ttf', 10) fontSmall = ImageFont.truetype('FreeSans.ttf', 8) prozesse_dict = {} def loadProcessInformations(): command = 'echo "PID;Befehl;CPU Zeit;Speicherverbrauch" > prozesse.csv && top -b -n 1 | awk 'NR > 7 { print $1 ";" $12 ";" $9 ";" $10 }' >> prozesse.csv' subprocess.run(command, shell=True) global prozesse_dict prozesse_dict.clear() with open('prozesse.csv', 'r') as file: csv_reader = csv.DictReader(file, delimiter=';') for row in csv_reader: pid = row cpu_zeit = float(row.replace(',', '.')) speicherverbrauch = float(row.replace(',', '.')) if cpu_zeit > 0 and speicherverbrauch > 0: befehl = row prozesse_dict = {'Befehl': befehl, 'CPU Zeit': cpu_zeit, 'Speicherverbrauch': speicherverbrauch} print(prozesse_dict) def showProcessEntry(entry, index, total): with canvas(device) as draw: draw.rectangle(device.bounding_box, outline="white", fill="black") draw.text((25, 3), "pyTop Screen", font=fontBig, fill="white") draw.text((105, 20), str(index) + "/"+ str(total), font=fontNormal, fill="white") draw.text((5, 20), "PID: "+ str(entry), font=fontNormal, fill="white") draw.text((5, 30), "Befehl: "+prozesse_dict, font=fontNormal, fill="white") draw.text((5, 40), "CPU Zeit: "+str(prozesse_dict), font=fontNormal, fill="white") draw.text((5, 50), "MEM: "+str(prozesse_dict), font=fontNormal, fill="white") loadProcessInformations() schedule.every(15).seconds.do(loadProcessInformations) with canvas(device) as draw: draw.rectangle(device.bounding_box, outline="white", fill="black") draw.text((25, 3), "pyTop Screen", font=fontBig, fill="white") draw.text((5, 20), "Anzeige fuer PID, Befehl,", font=fontNormal, fill="white") draw.text((5, 30), "CPU Zeit sowie", font=fontNormal, fill="white") draw.text((5, 40), "Speicherverbrauch", font=fontNormal, fill="white") draw.text((15, 52), "https://draeger-it.blog", font=fontNormal, fill="white") time.sleep(3) while True: schedule.run_pending() total = len(prozesse_dict) index = 1 for entry in prozesse_dict: showProcessEntry(entry, index, total) index += 1 time.sleep(2)
Fazit & Ausblick zu Raspberry Pi Prozessinformationen am OLED Display anzeigen
Als Fazit ziehe ich ich jedoch das, dass kleine 1,3" OLED Display zu klein ist für die Informationen hier muss ich mal schauen ob es deutlich größere gibt um dieses kleine Projekt deutlich aufzuwerten. Die Nächste Ausbaustufe zu diesem Projekt könnte nun sein, drei Taster anzuschließen mit welchen man durch die aktiven Prozesse blättern kann. Zusätzlich mit einem roten Taster könnte man den Befehl kill auf einen Prozess anstoßen um den angezeigten Prozess hart zu beenden. Read the full article
0 notes
Text
TEDにて
ニコラス・ネグロポンテ:子供に1人1台ラップトップ計画を語る
(詳しくご覧になりたい場合は上記リンクからどうぞ)
MITメディアラボラトリーの創始者であるニコラス・ネグロポンテが、どのようにして「子供に1人1台ラップトップ」計画を通じて100ドルラップトップを作り、配布するのかを語ります。
一部を書き加えていくと、子供の眼が輝いて、関心や興味が集まることがよくわかりますね。
スティーブジョブズも出てきます。1980年代、セネガルにいた私たちに、スティーブジョブズがラップトップを送ってくれたそうです。
現在のイタリア製のArduino(アルデゥイーノ)やイギリスのラズベリーパイ財団のRaspberry Pi(ラズベリーパイ)というARMパソコンがあり、このニコラス・ネグロポンテによって共感されたアイデアが広がったかもしれません。
小さな使いやすいオープンソースのマイクロコントローラーがシングルボードコンピューターで10年前のパソコンの処理能力(ほぼ700MHz)が搭載されています。
たった数千円で電子工作以上のPICプログラムが組めるなんて•••
しかも、会社でしかできなかったことが、簡単にできるなんて素晴らしい世の中になったもんですね。2015年の現在では、一人一台Raspberry Pi Zeroがたった5ドルです!
2017年では、Raspberry Pi 3になって数年前のノートパソコン並みに64ビットのクワッドコアになり処理速度を上げています。Wi-FiとBluetoothも内蔵されました。
(合成��誤謬について)
合成の誤謬とは、ミクロの視点では正しいことでも、それが、合成されたマクロ(集計量)の世界では、必ずしも意図しない結果が生じること。物理学では、相転移みたいな現象です。性質が変わってしまうということ。
ミクロのメカニズムが個人同士の経済における仕組みであるのに対して、マクロのメカニズムは、国家間や経済全体の循環における仕組みだからである。
例えば、家計の貯蓄などがよく登場するが悪い例えです。前提条件が、所得が一定の場合!!所得が一定じゃない増加する場合は?これは、論じていませんので参考になりません!!(法人が提供する製品やサービスの価格も一定の場合も前提条件です)
1930年代のアメリカ経済が金融危機2008と似たような状態に陥った時、ケインズは、「倹約のパラドックス」というケインズ経済学の法則を発見しています。
それは、ポール・A・サミュエルソン(1915-2009)が、近代経済学の教科書「経済学」の冒頭で「個人を富裕にする貯金は、経済全体を貧困にする!(所得が一定の場合)」というわかりやすい言葉で表現しました。しかし、庶民の所得が増加し、貯蓄が投資、消費に回る場合には、「倹約のパラドックス」は生じません。
その後、この「倹約のパラドックス」は、アメリカの経済学者・ケネス・J・アロー(1921- )が「合成の誤謬」を数学的論理に基づいて「個人個人がそれぞれ合理的選択をしても、社会システム全体は合理的選択をするとは限らない」を検証してみせた。
要するに、部分最適ではなく、全体最適させていくということ。
つまり、新産業でイノベーションが起きるとゲーム理論でいうところのプラスサムになるから既存の産業との
戦争に発展しないため共存関係を構築できるメリットがあります。デフレスパイラルも予防できる?人間の限界を超えてることが前提だけど
しかし、独占禁止法を軽視してるわけではありませんので、既存産業の戦争を避けるため新産業だけの限定で限界を超えてください!ということに集約していきます。
なお、金融危機2008では、マイケル・メトカルフェも言うように、「特別資金引出権(SDR)」は、2008年に行われた緊急対策で、一国だけで行われたのではなく、驚くほど足並みの揃った協調の下に国際通貨基金(IMF)を構成する188ヶ国が各国通貨で総額2500億ドル相当を「特別資金引出権(SDR)」を用いて世界中の準備通貨を潤沢にする目的で増刷してます。
このアイデアの根本は、元FRB議長であったベンバーナンキの書籍「大恐慌論」です。この研究がなければ、誰一人として、変動相場制での当時の状況を改善し解決できなかったと言われています。
それ以前では、固定相場制でのマーシャルプランが有名です。
続いて、トリクルダウンと新自由主義
インターネットの情報爆発により隠れていた価値観も言葉となり爆発していくことになった。
しかし、法定通貨の方が、その価値、概念に対する通貨量拡大として価格で応じることができず、圧倒的に通貨量が足りない状況が生まれていたのが、2010年代の問題点のひとつでした。
リーマンショックの後に、新自由主義が誤りであることが、ピケティやサンデルによって指摘され、当時のFRBバーナンキ議長が、通貨供給量を大幅に増やした対策により、ベースマネーの金融、銀行間の相互不信を解消して収束した。
それでも、まだ足りないが、適正水準に収まったことで、さらに価値も増幅され、マネーストックの財政政策から再分配、事前分配を大規模に行い、さらなる通貨供給量が重要となっている現在の日本国内。
例えば
Googleがしようとしてた事は、まだ新産業として、基礎研究から発展できない機械学習の先端の成果をすべて持ち込んだ社会実験に近いこと。
シュンペーターの創造的破壊は、一定数の創造の基礎を蓄積後に、未来を高密度なアイデアで練り上げてから破壊をするのが本質です。
こうして、憎しみの連鎖や混乱を最小限にする。
アルビン・トフラーの言うように、法人と行政府とのスピードの違いが縮まらないのは、構造上の違いであって、それを補うためにプラスサムな連携するということが、必要になってくることを説いています。
三権分立が、規制のないGAFAMを非政府部門としてMMT(現代貨幣理論)からプラスサムに連携したらどこで均衡するのか?という社会実験も兼ねています。
このような前提で、あらゆるインターネット企業が、創業時、貢献するためコンセプトの中心であったものが、今では、悪性に変質して違う目的に成り下がっています。
再分配、事前分配の強化がスッポリ抜けてる欠点があり、ここに明かしたくないイノベーションの余地があります!!
2021年には、新自由主義のような弱肉強食では自然とトリクルダウンは生じないことは明らかになる。
確かに、トリクルダウンは発生しないが、法律で人工的に同じ効果は、貨幣の再分配、事前分配という形にできる可能性は高い。
再分配や事前分配をケムにまく「金持ちを貧乏にしても、貧乏人は金持ちにならない」「価値を生み出している人を罰するつもりがないのであれば税に差をつけないほうがいい」(サッチャー)
とあるが、新自由主義は誤りで、ピケティやサンデルによると違うみたいだ。
(個人的なアイデア)
One such rocket engine, about one hundred million yen units in a unit of several hundred million yen It is real to realize the product in the price range that can not reach the price range of hundreds of thousands of yen reaching ordinary people with technologies far beyond the limits of human beings It may be an innovation that will become a plus-sam of it.
こういうロケットエンジン、ジェット機くらいのひとつ数億円単位で手の届かない価格帯の商品を庶民に手の届く数十万円くらいの価格帯に人間の限界を遥かに超えるテクノロジーで実現することが本当のプラスサムになるイノベーションかもしれません。
<おすすめサイト>
「Mシリーズ」チップM2から始まるAppleシリコン版チックタック戦略?
Make: Live - Raspberry Pi Robo Car
NVIDIA Jetson Partner Stories: Jibo Makes Its Robot More Social with the Jetson Platform
量子コンピューターの基本素子である超電導磁束量子ビットについて2019
2012年のノーベル物理学賞(量子コンピューター)について
Thunderbolt3端子搭載で電気自動車、燃料電池車を外部CPU、GPUとして活用するアイデア2018
1984年に、ニコラス・ネグロポンテが語った5つの予測
ニコラス・ネグロポンテ:今後の未来への30年史
デール・ドーファティ:私たちはメーカーMakerである!
マッシモ・バンジ:創造力をオープンソース化するArdurino
Raspberry Pi Zero 5ドル
Raspberry Pi touch display(ラズベリーパイのタッチディスプレイ)
Raspberry Pi 3 model B Launch - 64-bit quad-core ARM Cortex A53
<提供>
東京都北区神谷の高橋クリーニングプレゼント
独自サービス展開中!服の高橋クリーニング店は職人による手仕上げ。あなたが服を持ち込む手間も無用。家まで届けてくれる。お手頃50ですよ。往復送料、詳細は、今すぐ電話。東京都内限定。北部、東部、渋谷区周囲。地元周辺区もOKです
東京都北区神谷高橋クリーニング店Facebook版
#ニコラス#ネグロポンテ#PC#一部#オープン#ソース#arduino#アルデゥイーノ#ラズベリー#��イ#量子#3D#Printer#PIC#スティーブ#ジョブズ#fab#プログラム#raspberry#Pi#MIT#日本#ヒーリング#食#NHK#zero#ニュース#発見#discover#discovery
0 notes