#Occlusal
Explore tagged Tumblr posts
Visit Tumblr Blog
Explore Tumblr blogs with no restrictions, modern design and the best experience.
Last Seen Tumblr Blogs


Fun Fact
After the announcement of the deal with Yahoo!, there were 170K signatures of unhappy Tumblr users petitioning to prevent the sale in 2013.
Text
Unlock the advantages of sports mouthguards! Discover how these essential accessories enhance performance and protect your smile. Read our blog for insights and reach out to ensure your dental safety today! 🦷
#dentist in cypress#cypress dentist#dentist cypress#Sports Mouthguards#Sports Mouth Guards Benefits#cypressdentist#Occlusal#Occlusal in Cypress#Mouthguards in Cypress#Cypress Dental Care#dentistry#dental health
0 notes
Text
Here's a timelapse of the drawing I posted the other day! ☘️
#ambient occlusion shading my beloved#art#artists on tumblr#illustration#digital painting#digital art#plants
3K notes
·
View notes
Text

the post office is open for business!!
#going postal#going postal fanart#moist von lipwig#terry pratchett#discworld#I HAVENT FINISHED IT YET SO NO SPOILERS PLEASE ; W ;#and so marcia continues her journey on her way to become the most unpalatable artist on tumblr dot com#managing to alienate both the people who followed her for her rendering and for her previous fandoms all with a single picture#but i wont apologise for my weird girl era#ive had enough of ambient occlusions and subsurface scattering#its time to shit colour maximalist style#illustration#digital art#original art#artists on tumblr#character art#marcia#marciaillust
1K notes
·
View notes
Text

alright....im gettin the hang of it......
#fake graffiti#photo editing#image editing#artists on tumblr#clip studio paint#digital illustration#digital art#ftr what im doing to the drawings is just messing w layer effects (multiply; overlay; etc) and a blurred noise texture on top of it#as well as some airbrushing for ambient occlusion
285 notes
·
View notes
Text
I FINALLY GOT MY INVISALIGN REMOVED 🙌 I've had it for almost two years aaaaa I have straight teeth at last!! I'm so happy they really did wonders for my occlusion, it changed my whole lower face it's wild!!
#personal#I had really crooked teeth and my occlusion was completely off and to one side and my palate was too narrow it was a mess I had little hope#but these things did more for me in less than two years than 6 years of braces as a child#I still have a lot of asymmetry and weird jaw structure since I grew up wrong but overall it looks so much better aaahhh 😭#nips blogs
303 notes
·
View notes
Text

Finished the cover art for part 1 of my sculk-y Decked Out 2 AU!!! It starts during double life (thus the ranchers outfit) and then goes on into decked out! I will put a link to the fic on ao3 in the replies :D
#occlusion au#tangotek#tangotek fanart#hermitcraft fanfic#i suddenly have forgotten how to tag things . uhhh . thumbs up !
258 notes
·
View notes
Text

UNCALLED FOR!!
42 notes
·
View notes
Text
A Better Ear Plug
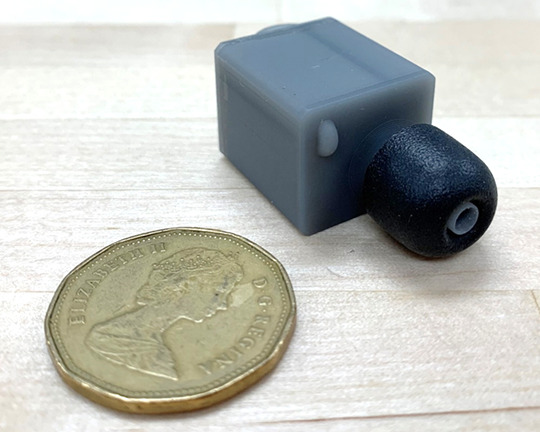
Ear plugs can be wonderful at blocking outside noise, but they come with a downside: they typically amplify internal bodily sounds, like our heartbeat, breathing, and chewing. (Image and research credit: K. Carillo et al.; via APS Physics) Read the full article
192 notes
·
View notes
Text
Ugh, I'm such an idiot. 🤦♀️
I'm a huge High Republic fan, but I totally didn't catch the Chancellor's Great Works when they brought it up on Skeleton Crew.
On the bright side, this pretty much confirms my theory that At Attin became isolated sometime during the High Republic era.
But the Great Works were supposed to connect the larger galaxy, not hide away. My guess would be that the Republic established a settlement there, and that the Nihil Crisis + Occlusion Zone cut it off.
18 notes
·
View notes
Text
sometimes art improvement is not that complicated. for instance i have recently revolutionized my lighting process by realizing 1) the edges of shadows don’t always have to be clean lines and 2) highlights can go places other than hair
#mumbling#like these are things i’ve done a LITTLE with before but for some reason never internalized that it’s Actually Allowed#also every so often i’ll remember ambient occlusion exists and my art quality will spike dramatically until i forget again#just gotta get past the art gremlin in my head telling me the smudge tool is a crutch#like ok edgelord we get it you’re soooo good at shapes but sometimes important shadows really are gradual#you don’t actually Need to shade everything with a single color hard brush and nothing else#you’ve done your time in cell shading jail you can be free
31 notes
·
View notes
Text
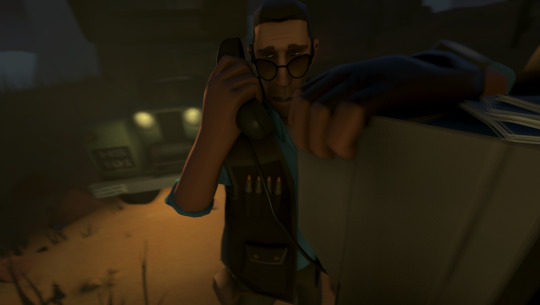
They won’t be picking up the phone again…
#reupload bc I forgot the ambient occlusion. y’know. like a man who almost has 170+ hours in this software smh#<- “almost” shut up me u have 172 hours in it as of writing this#I only realized HOURS LATER bc I was watching smthn and it reminded me smfh#anyway. yeah like I said before I recently reread the comics and got a lil inspired to make this#don’t mind the fact he’s BLU it just looked better with the scene ok bye#team fortress 2#tf2#sfm poster#source filmmaker#sfm#sniper tf2
31 notes
·
View notes
Text
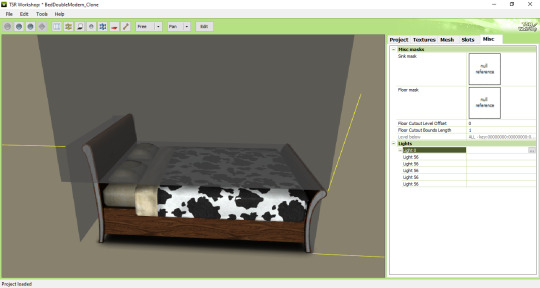
Editing occlusion shadows on objects
This is a tutorial aimed at creators and converters who want to understand, at least a little, how to improve the appearance of their objects in the game. Yes, it’s a bit exhausting, just like creating an object from scratch, mapping it and texturing it, but the result is worth it. The shadow dynamics of TS3 are different from TS4. In TS4, the game itself creates these shadows when the object approaches a wall. In TS3 it is necessary for these shadows to be created using “lights” in TSRW. Of course, the occlusion is not perfect, but it gives the game a more realistic aspect by creating this idea of depth.
The icing on the cake: keep these shadows if they are large objects, like cabinets, sofas, beds, tables, chairs… Small decorative objects, like clutter, you can just delete these shadows. But if you are crazy about perfection and details, and really want even an ant to create its shadow when approaching a wall, my tip is that you clone using a small object as a base as this will make editing the shadows easier.
I will use as an example this armoire that I edited a while ago. The shadows have been edited and look like this when you open them in TSRW:
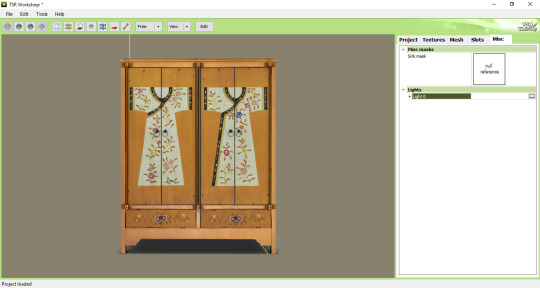
In the game, this is how the shadows appear when we position the object close to a wall:

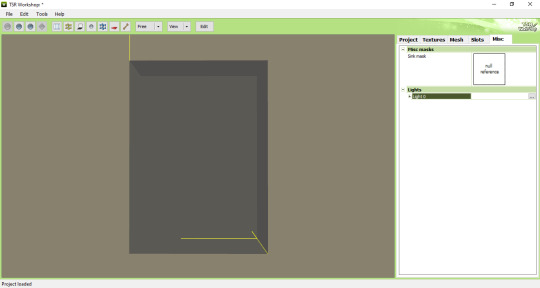
To edit the shadows, you must click on the "MISC" tab in TSRW. These shadows are right below, where "LIGHTS" is written. Note that there is a + sign next to it and when you click it, a drop-down list appears with all the shadows separated. In this example there are 3 of these shadows. The names are the same, but let's say we have shadow 1 (front), shadow 2 (top) and shadow 3 (side). Edits must be made in the order they appear.
Click on the three dots to the right of lights. A window as shown in the image below will appear:
The lights that must be edited are found in the part where it says "OCCLUDERS". In this case, "Entry 1" corresponds to our "SHADOW 1" (front)...
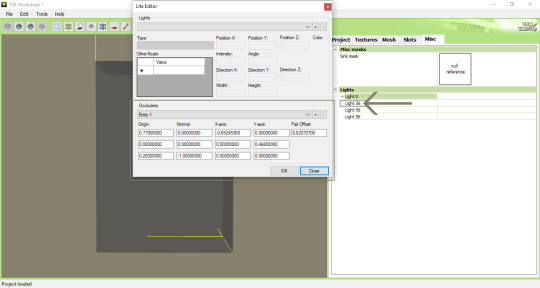
For the front shadow, we will start by changing these two parameters that correspond to the width and position of the shadow. My tip is that you copy the original value, change this value to 1 and then click on "OK" to see what happens (that is, to see what changes when changing the value, so you will know if you need to change it to a higher value or smaller...). If it's not what you need, just paste the original value copied previously into the corresponding field and change it little by little until you reach the correct size of the object.
Front shadow height:

For the distance the shadow is from the object, this field must be edited - remembering that we are still editing the front shadow (which corresponds to the shadow that will replicate the width of the object on the wall):

For the other shadows, you must follow the same path: changing the values until it is proportional to the size of the object.
Bonus tip: Open various base game objects in TSRW and see how shadows are created. For example, select a chair and study each shade individually. With practice, you will realize that all you have to do is create a shadow on all sides of the object. For example: on a bed, you should have a shade for the headboard, another for the footboard, another for the side and another for the top, which would be the mattress. Therefore, it is important to study each type of object separately.
Now you might be asking yourself: Oh, yes, thank you very much... But where do I start? How will I know how to create a shadow from scratch? OMG! Help me!
Don't worry, it's very simple: when cloning an object, like a bed for example, it's obvious that you will use a bed from the game as a clone... So just edit the original shadows that correspond to the clone, so that they are the size of the bed you are creating for the game. Only that.
I say again: each object is a specific case. This tutorial is just a simple way to show you the way to understand how these shadows work and how they are generated for the game.
Yes, creating a beautiful object is hard work and requires dedication, time and effort. Therefore, value the creators who strive to deliver you a quality object ♥.
If you feel like helping me, here is a link for donations. Thank you very much ♥.
Tutorial inspired by: @bioniczombie and @sideshowsnob
#tutorial/ usefull#sims 3 tutorial#ts3 tutorial#ts3 creation tutorial#sims 3 creation tutorial#sims 3 meshing#sims 3 object tutorial#sims 3 occlusion shadows#sims 3 occluders#ts3 meshing tutorial#sims 3 TSRW
39 notes
·
View notes
Text

Me when Ratio has to be moderately competent about providing medical care
#writing#asymptotic fic#dr ratio#not pictured: 'medical gauze vs. occlusive dressing'#'how do emts cut away clothing'#'field medic treatment setup'#and an internet deep dive trying to reclaim everything i learned about anatomy and physiology from my ill-fated semester of nursing school#i hate this man he's not even a practicing medical doctor#but he studied medicine so he has to Know Things#mr professor-engineer-mathematician-biochemist-philosopher-theologian out here collecting careers like barbie
16 notes
·
View notes
Text
a contact lens that makes you blinder
22 notes
·
View notes
Text
Honestly I'm also not fully happy with what they did with Whis this book
#morningtalks#asc spoilers#Not like they gave Whistlepaw a lot of screentime at all despite how relevant WindClan was all of a sudden#(nooooo that had to go to Crowfeather. Not like he's got enough attention with TNP + PO3 + his super edition + deputyship + TBC#+ Changing Skies now too. Noooooooooooooooooooo we really can't have a single other cat in WindClan be important)#At least Whis had an excuse. Making Additional Content for another book that readers have to buy and be USELESS in that book#But Whistlebreeze?#Out of all the fun names you could've chosen. Whistlebreeze?#At least it's not Whistlepelt or Whistleheart#But really? Whistlebreeze?#I find it boring honestly#It's obviously a me thing. I'm obviously going to take Whis' name more seriously than most because I draw that damned cat Every Single Day#But there were so many possibilities for really poetic and pretty names#But they stuck with the simple option. Whistlebreeze#I obviously wanted Whistlebird#But with Ivypool's Therapy Session you could've made an argument for Whistlestorm#Even if it doesn't sound good at all. The two 't' s really don't make for a good name#But it would've been better than Whistlebreeze as far as I'm concerned#-breeze as a suffix can be cute and I like it but it has little to do with Whis aside from WindClan#Whistlebird neither but it sounds fun and has a rare suffix#Obviously Whistlefrost would've been hilarious#Heck. I just thought about Whistlecreek. Kinda odd but could be a more discrete hommage to Frostdawn as a RiverClan cat#(Frostdawn is a good name tho. Pissed she's back to being a healer but Frostdawn is good at least)#I also love the -berry suffix but with Berryheart just being a nuisance it would've been a very stupid decision here#But I'm just annoyed that they went with Whistlebreeze. It's boring. It's kinda pretty yeah but it adds nothing#It says ''Whis is a WindClan cat.''#Whistle- is a hard prefix to work with. The 't' and 'l' at the end makes it nearly impossible for a good amount of suffixes#Because they wouldn't sound good. (Any occlusive or lateral would've been horrendous. That's why Whistlelight sounds bad. Too many L's)#Whistlebreeze does sound nice at least but again it's bland and I am disappointed and really they could've done so much#With this name. Whistle is a difficult prefix but it offers so much poetic potential
6 notes
·
View notes
Text

Part 2 of Occlusion AU is posted!!! Cringefail Tango momence and "Oh God Snow Is Really Rather Unpleasant" realizations all the while the sculk-y-ness is ever-increasing :D Link in replies!!
[Very happy with how this art turned out also, I am starting to be more comfortable doing digital art yay!!]
43 notes
·
View notes