#sims 3 TSRW
Explore tagged Tumblr posts
Visit Tumblr Blog
Explore Tumblr blogs with no restrictions, modern design and the best experience.
Last Seen Tumblr Blogs


Fun Fact
Tumblr.com is the 103rd most visited website in the world.
Text
Editing occlusion shadows on objects
This is a tutorial aimed at creators and converters who want to understand, at least a little, how to improve the appearance of their objects in the game. Yes, it’s a bit exhausting, just like creating an object from scratch, mapping it and texturing it, but the result is worth it. The shadow dynamics of TS3 are different from TS4. In TS4, the game itself creates these shadows when the object approaches a wall. In TS3 it is necessary for these shadows to be created using “lights” in TSRW. Of course, the occlusion is not perfect, but it gives the game a more realistic aspect by creating this idea of depth.
The icing on the cake: keep these shadows if they are large objects, like cabinets, sofas, beds, tables, chairs… Small decorative objects, like clutter, you can just delete these shadows. But if you are crazy about perfection and details, and really want even an ant to create its shadow when approaching a wall, my tip is that you clone using a small object as a base as this will make editing the shadows easier.
I will use as an example this armoire that I edited a while ago. The shadows have been edited and look like this when you open them in TSRW:
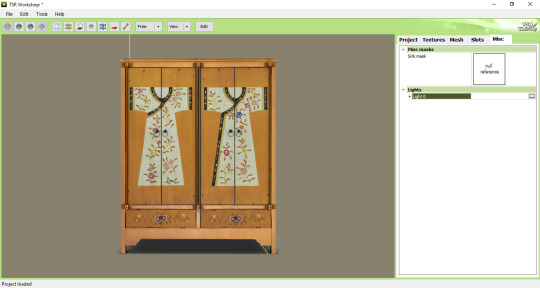
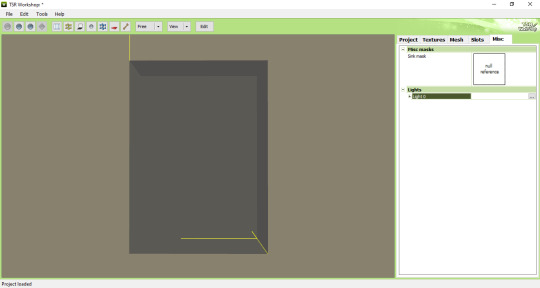
In the game, this is how the shadows appear when we position the object close to a wall:

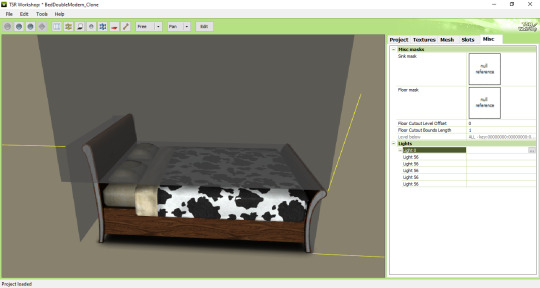
To edit the shadows, you must click on the "MISC" tab in TSRW. These shadows are right below, where "LIGHTS" is written. Note that there is a + sign next to it and when you click it, a drop-down list appears with all the shadows separated. In this example there are 3 of these shadows. The names are the same, but let's say we have shadow 1 (front), shadow 2 (top) and shadow 3 (side). Edits must be made in the order they appear.
Click on the three dots to the right of lights. A window as shown in the image below will appear:
The lights that must be edited are found in the part where it says "OCCLUDERS". In this case, "Entry 1" corresponds to our "SHADOW 1" (front)...
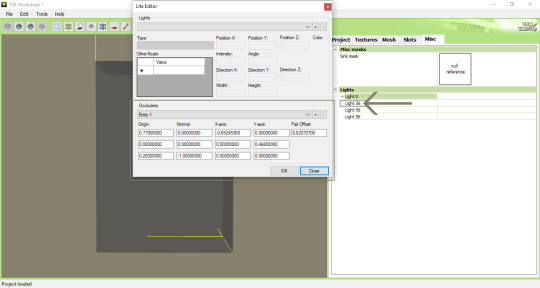
For the front shadow, we will start by changing these two parameters that correspond to the width and position of the shadow. My tip is that you copy the original value, change this value to 1 and then click on "OK" to see what happens (that is, to see what changes when changing the value, so you will know if you need to change it to a higher value or smaller...). If it's not what you need, just paste the original value copied previously into the corresponding field and change it little by little until you reach the correct size of the object.
Front shadow height:

For the distance the shadow is from the object, this field must be edited - remembering that we are still editing the front shadow (which corresponds to the shadow that will replicate the width of the object on the wall):

For the other shadows, you must follow the same path: changing the values until it is proportional to the size of the object.
Bonus tip: Open various base game objects in TSRW and see how shadows are created. For example, select a chair and study each shade individually. With practice, you will realize that all you have to do is create a shadow on all sides of the object. For example: on a bed, you should have a shade for the headboard, another for the footboard, another for the side and another for the top, which would be the mattress. Therefore, it is important to study each type of object separately.
Now you might be asking yourself: Oh, yes, thank you very much... But where do I start? How will I know how to create a shadow from scratch? OMG! Help me!
Don't worry, it's very simple: when cloning an object, like a bed for example, it's obvious that you will use a bed from the game as a clone... So just edit the original shadows that correspond to the clone, so that they are the size of the bed you are creating for the game. Only that.
I say again: each object is a specific case. This tutorial is just a simple way to show you the way to understand how these shadows work and how they are generated for the game.
Yes, creating a beautiful object is hard work and requires dedication, time and effort. Therefore, value the creators who strive to deliver you a quality object ♥.
If you feel like helping me, here is a link for donations. Thank you very much ♥.
Tutorial inspired by: @bioniczombie and @sideshowsnob
#tutorial/ usefull#sims 3 tutorial#ts3 tutorial#ts3 creation tutorial#sims 3 creation tutorial#sims 3 meshing#sims 3 object tutorial#sims 3 occlusion shadows#sims 3 occluders#ts3 meshing tutorial#sims 3 TSRW
40 notes
·
View notes
Text
IMPORTANT: If you export as .package through TSRW:
You need to compress your .package! TSRW, being as reliable as always, does NOT compress your package files exported through File Contents, but it DOES compress Sims3Packs (the difference in file size can be seen when changing those Sims3Packs to packages). Just use S3PE to open up your package, CTRL-A to select everything, go to Resource and click Compressed, then save!
I keeeeeeep seeing package sizes that go up to 40 MB or more because they have uncompresed 2048 IMG files, which add up. Depending on what your package contains, compressing it will bring it down to around 2,000 KB or less!
111 notes
·
View notes
Text
I know what went wrong now after asking around.
So Maxis has a design feature in how certain ID groups are handled, which could make items with those ID groups be exported with different items, lots, sims, etc.
The available CC creation tools at the time had initially been using the same ID groups that EA was using for their own work. Due to that, the doll was assigned to ID groups that allowed it to be packaged with seemingly random exports, such as tattoos or furniture. After the doll incident, said tools were then updated to avoid those ID groups to keep another incident from happening again. EA would then patch the game themselves shortly thereafter to prevent it as well.
The doll had already been remade and re-uploaded using an updated version of TSRW, but my guess is it was taken down anyway given everything that had happened.
Additionally, I want to apologize for my skepticism. It really did cause all of those issues, and it was really bizarre how it happened.
I'm curious as to which ID groups the OG doll was misassigned, but that would require the og exported doll file. That, or finding an old version of TSRW to export it to potentially look there, as the version I currently have (2.0.88) was patched after the ID Group fix.
This would explain why the doll isn't causing any harm in my game, or was attaching itself in either version of my games, even though I was exporting from the og wrk file last edited Feb 15, 2010. Workshop and Sims have been fixed to keep it from causing any damage.
It makes me wonder, if not with Girl Doll Dressed, then when would this have cropped up at all? Had it not happened to Rebecah, which creator would have been unlucky enough for it to happen to? Those are just some hypotheticals that make me wonder, since it could have happened to anyone. Hell, it may HAVE happened, but the doll managed to be the poster child for it. After all, people are gonna notice a weird doll showing up in their game a hell of a lot more than a random table, or pattern. There was also some other rather pervasive bad CC that could have been copied around in a similar manner. The night boots and that one pink photoskinned outfit immediately come to mind, namely because they were the bane of my game.
All that said though, now that I have the answer to why the doll did what it did, there's not much need to look into it any further. There are some lingering questions, but if you're running your game on 1.67-9 then your game is safe from the doll.
#sims 3#thesims 3#girl doll dressed#the cursed doll#Now to figure out why TSRW isn't seeing all of my packs#I have the itch#I have so many old files to dust off...
15 notes
·
View notes
Text
Why do my eye conversions keep showing up like this 😭
#ts3#sims 3#they look fine in tsrw and s3pe so idk the problem#i just made two today and they're both doing this but the old ones aren't
2 notes
·
View notes
Text
how does anyone have the time of day using TSRW. If I click one too many times I get an error msg.
Christ on a bike i've had enough.
3 notes
·
View notes
Text
TSRW Workshop flaw with cloning items. Possible fixes. BZ : https://bioniczombie.tumblr.com/post/725756054757048320/fixing-walls-floors-with-the-same-catalog-names CardinalSims: “You could try using S3OC's 'Fix Integrity', which will renumber and standalone-ify a package. Some objects take to it better than others, so it's not abnormal if it still breaks in a different way after this. Otherwise, I'd probably just delete V2 and remake it on a new clone entirely.” Aisquared: “It's actually a flaw in TSRW when cloning build items. The workaround should be saving your project, then at the new project screen re-import your saved project then at the screen where the project name is shown change the text in every space which you can edit later anyway. Export it again and yes, your cloned object should be magically renumbered successfully..”
1 note
·
View note
Note
Was exactly what I was looking for when I had the issue with converting glasses. Weird I didn't find this at all through google, but glad I decided to go back to her Tumblr hoping to find more info. Now I can finally convert the sci-fi glasses! Thank you so much for this (old) but still helpful and relevant guide!
Hi. I was following your tutorial of how to convert ts4 accessories to ts3 (I'm trying to convert glasses) but when I try to "do bones assignments and Save" a error message pops up "Object reference not set to an instance of an object." or something like this, I used google translate... I exported the EA glasses mesh idk why this is happening, can you help me, please?
Hi there lovely anon! I hope you’re having an amazing weekend?
Ah wait yes I see what’s happening :) THe tutorial is focused on 1 group, instead of 2, which your glasses probably will have because shaders and fancy modern stuff! But! I’ll explain that right over:
Keep reading
#tutorials#tutorial#tsrw#sims 3#ts3#sims#maybe someone else will need this in the future so I will reblog#also so i can find it again whenever I need it#thank you so much#bless you
39 notes
·
View notes
Text


TS3 - Golden Years (Elder F&M CAS set/ plus age conversions)
General details-CAS:
7 new meshes + 7 items converted from the sets: TS3 - Warm & Cozy - part 1 and part 2; JOY Set II ; Cara Coat (find the download links for the YA versions under Creator Notes below)
Original meshes by me;
Age: elder females & males;
Base Game compatible;
All LODs & Morphs;
Disabled for maternity & random;
1k & 2k textures;
Normal maps included;
Custom thumbnails for both Launcher and CAS;
sims3pack & package files;
Compressed;
Meshed with Blender, adapted to TS3 with Milkshape, Photoshop, Corel painter, TSRW.
► Belt Dress -EF
Poly: 4.5k
Outfits section;
3 presets, 3 recolorable channels;
Categories: Everyday; Formal.
► Knit Sweater - EF
Poly: 3.4k;
Tops section;
3 presets, 1 recolorable channel;
Categories: Everyday, Formal, Outerwear;
► Jeans - EF
Poly: 0.9k;
Bottoms section;
3 presets, 1 recolorable channel;
Categories: Everyday, Formal, Outerwear;
► Pants - EF
Poly: 0.9k;
Bottoms section;
3 presets, 1 recolorable channel;
Categories: Everyday, Formal, Outerwear;
► Cardigan - EM
Poly: 3.7k;
Tops section;
3 presets, 2 recolorable channels;
Categories: Everyday, Formal, Outerwear;
► Jeans - EM
Poly: 1.1k;
Bottoms section;
3 presets, 1 recolorable channel;
Categories: Everyday, Formal, Outerwear;
► Pants - EM
Poly: 1.1k;
Bottoms section;
3 presets, 1 recolorable channel;
Categories: Everyday, Formal, Outerwear;
———————————————
Creator Notes:
the female top and dress have black spots along the neckline in CAS, but look okay in game.
for the conversions part of this upload, you can download the YA versions by accessing the links below:
Warm & Cozy - part 1
Warm & Cozy - part 2
JOY Set II
Cara Coat
———————————————
Download on PATREON (Early Access; public on December 16th, 2024)
Hope you enjoy them!
Thank you & Happy Simming!
———————————————
You can also support me on Ko-fi.
———————————————
Thank you to my supporters on Patreon & Ko-fi!
———————————————
TOU 🔊 Do not re-upload my creations. Do not claim as your own. Do not put them anywhere up for download and don’t add adfly to my links.
#ts3#ts3 download#ts3cc#sims 3 custom content#ts3 cc#ts3 clothing#ts3 simblr#sims 3 clothing#clothing#ts3 elder clothing#ts3 elders#sims3#sims 3 cc#sims3 cc
710 notes
·
View notes
Text
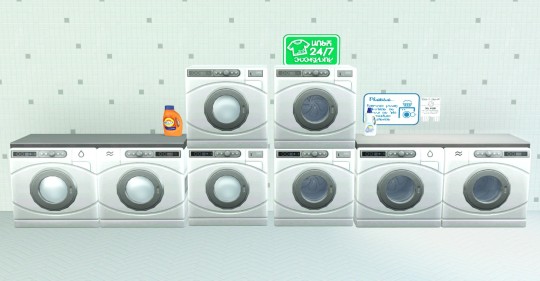
Laundromat Set 🧺
I've wanted to convert the washer and dryer from The Sims 4: Laundry Day since the pack came out, but all of the washers in The Sims 3 are top-loading, so I couldn't make the project work. That is, until @olomaya released her Combo Washer/Dryer mod. Now both the washer and dryer can be front-loaded!
Olomaya also included a stacked washer and dryer, so I converted and remade the stacked version of the washer and dryer from Laundry Day as well.
The washer, dryer, and stacked set all include a coin slot swatch for extra realism in your laundromats (as seen on the stacked set). You also have the option of frosted or clear glass doors.
You'll need the Combo Washer/Dryer mod for these appliances to work. I also recommend my Dirty Laundry Mod and @echoweaver's Laundromat Fix to enhance laundry/laundromat gameplay 😉
The detergent bottles are from Around The Sims 3 here, the laundromat signs are from wanderingsims here, and the tile flooring is a previous conversion of mine here.
Large Appliances
Green Clean Washing Machine: three channels | §500 |
Fyre Dryer: three channels | §525 |
Green Clean Washing & Drying Machine: three channels | §1025 |
Green Clean Washing Machine_V2: three channels | §500 |
Fyre Dryer_V2: three channels | §525 |
Green Clean Washing & Drying Machine_V2: three channels | §1025 |
| All TS4 presets included and base game compatible |
Credit: meshes by EA, The Sims 4, Sims4Studio, TSRW, Blender, Milkshape, Photoshop, and Gimp.
Download (SFS, package) | Mirror (MEGA, package)
If you like my work, please consider tipping me on Ko-fi.
Experiencing issues with my conversions? Inbox me. Enjoy! 💙
408 notes
·
View notes
Text


MY FIRST RECOLORABLE CONVERSION! RIMINGS NEW GIFT BOX 19 Glossy Maxi Dress CONVERSION
so i finlly gave it a try and did a conversion with a recolor (two slots one for the chest strings and the other for the rest of the dress
also shine ON THE DRESS is CUSTOM AND PUT IN BY ME!
POLY: 20K
Age: young-adult and adult
credit: rimings
recolorable: yes! (3 variants and 1 non recolorable)
CUSTOM THUMBNAIL: ON
before you download: if you will try to make your sims body fat with this dress pls dont i tried to make it for all body types but the glitching in tsrw was insane even tho i did everything i should have from the tutorial so the only body thing that you can adjust are boobs in cas :)
here is how it will look if you try t o make your sims body big and wide:

known issue: armpit clipping on one side

if you still want to download here it is!
DOWNLOAD
#the sims 3#sims 3#ts3#the sims#s3cc#4to3#ts4 to ts3#4t3 conversion#ts3 cc#ts3 download#s3cc download#s3ccfinds#sims#4t3#sims 4 to sims 3#4to3 conversion#my conversions#ts3 simblr#ts3cc#sims 3 simblr#thesims3
454 notes
·
View notes
Text

MORE HIGH WAISTED PANTS FOR MEN !!! NOW !!!
^ I screamed into the void, so I did it myself... More coming!
These are stolen from a full-body store outfit, with essentially the top cut off & the UV map and textures resized to fit within the pants UV space only. THAT part was easy. Then I got to making sure the higher-than-usual waist acted normal, and now we're two days later.
Download SFS/ Mediafire
Everyday, formal, outerwear, career
Young adult & adult male
High waisted version (grey and green flames) and slightly lower waisted version (dark pink floral and turquoise baroque)
2-channel plain version and a 3-channel ombre version of each
All morphs, as shown above
All LODS for both versions:
HLOD: 656 Verts, 988 Faces
MLOD: 322 Verts, 482 faces
LLOD: 182 Verts, 240 Faces
Custom Thumbnails, these:


Imperfections:
Mild clipping at the waist in more extreme movements at max weight/fitness. Trust me, I tried, I learned weightpainting in blender for this bitch.
The high-high waisted version clips with some croptops, the slightly lower high waist still has a slight gap with some. As all tops are different, it's the best I could do.
Anything else, let me know ASAP!
Made with:
Blender 3.6
Meshtoolkit
Smugtomato’s Geom tools
TSRW
S3PE
Affinity Photo
With thanks to @blamseastore where I got the OG storefile I stole the pants from
With roundabout thanks to @sim-songs whose Rusty Urban city set High waisted pants I used as a ref somewhere along the way, it was a spur of the moment try-out so I forgot to ask.
@eternalccfinds @pis3update @matchsim @simfluencer-network
205 notes
·
View notes
Text
How to convert Sims 4 3D CAS Rooms to Sims 3

Disclaimer: If you’re not familiar with Blender/TSRW/UVs then this tutorial may not be for you. If you don’t have Sims 4 Studio which needs the Sims 4 base game (or don’t know how to extract the meshes without it) this tutorial may not be for you. Honestly it’s pretty straight forward, but there’s a lot of trial and error and going in game and out of game checking placement, etc. I use Blender 4.1 for this, but you should still be able to do the same things in the older versions. I'm trying to make this as easy as possible. I’m here to answer any questions though 💕 Tutorial below
Things you’ll need:
Blender (whatever version you prefer)
Sims 4 Studio
TSRW ( I use version 2.0.86)
My Christmas CAS Room here
My TSRW work file here
Tutorial:
Find a Sims 4 CAS room that you like and open it up in Sims4Studio. This is the one I'll be using for the tutorial.

In the Texture tab, export the textures. The only textures that matter are the first 3 diffuse. Go to the Meshes tab and export the mesh, it will save as a .blend file. After that you can close out of Sims4Studio.


Open my Christmas CAS Room in TSRW. You'll get this message. Hit ignore and don't send. We only need this file as a reference to resize the SIms 4 CAS room. Export the mesh as an obj, name it whatever you like. You can close TSRW for now.

Open Blender and open the .blend file you exported from Sims4Studio. Make sure to delete studio_mesh_0 as it's just the shadow map and we don't need that. This is what mine looks like after fixing the textures.

Then import the wavefront obj you just exported from TSRW. Again we're just using this as a size reference.
This is what it looks like after I added the obj. I scaled, moved, and rotated the room to match up as close as I could with my reference mesh. When you have it lined up to your liking you can delete the reference mesh. I usually import the sims 3 body to see where my sim would be in CAS as well so feel free to do that too.

Now we have to separate the objects that use transparency in the scene to their own group. The transparent objects will always be located on studio_mesh_1. I usually do this in UV mode. Make sure UV Sync Selection is on. Where the red arrow is, that's the UV Selection button. It's blue so that means its on.

Tip: If you're using the same Blender version I am (I'm not sure if the older versions below Blender 3.0 do this) you can disconnect the alpha in shader editor and then you can easily see what uses transparency because it has a black background like the plants. Don't worry about the one outside the window as that's on the backdrop image and doesn't show in CAS.
Important: Also, make sure you delete the back of the mirror frame or it will show through the mirror in game. I usually select it in the UV editor as well and delete it.

After selecting all the objects that use transparency, I go to the 3D viewport window and press P, then selection. Now they're on their own layer as you can see. That's a very important step so please don't miss it.

Sims 4 CAS Rooms don't have a closed room like ts3 and if you don't add walls/ceiling with planes you'll be able to see that it in CAS. You can do this in any way you're comfortable with. If you don't understand how to do it feel free to ask me. For this tutorial I will not be doing this perfectly lol I've done enough rooms and I'm just trying to teach here 😩

Okay now last is renaming groups to import into TSRW. Make sure it's in this exact order and uses the exact group numbers.
Group 0 - Mirror
Group 1 - Windows/Curtains
Group 2 - View outside the window
Group 3 - Walls
Group 4 - Objects with transparency
Depending on the CAS Room you convert, yours may not have a mirror you know. You can delete groups in TSRW, experiment, feel free to ask me questions as well.
After renaming the groups, select only the groups you renamed and export as an obj. Make sure that object groups is checked so that they can stay in groups.

Open TSRW and open the testroom_cas.wrk file.
After opening the file you'll see this exact room in this tutorial lol because I had to test some things first 😅

Import the CAS room you converted from ts4. You'll get these two messages. Click yes on the first and no on the second.
Disclaimer: Make sure you reduce polygon sizes or it won't import and give you an error


Import your textures (yours may be different than mine depends on the converter) but most have been the same that I've seen. Group 0 is the mirror it doesn't require a texture. Group 1 and Group 4 usually have the same texture.
Disclaimer: TSRW an be finnicky with textures sizes, I havent gotten any issues since using the 4GB patch, but just in case. Texture sizes from ts4 can run pretty big 4096x2048 even 8196x4096. I would resize to no bigger than 2048x1024 in my opinion, but whatever works for you.
After export to sims3pack or export as package file. Make sure you compress your files and you should be good to test your CAS room in game.

This is the finished product. Should look something like this or better lol considering this was quick 😅
If you would like to make your own from the original ts3 cas room, I would suggest watching this Youtube video (it's for TS4 but it still applies and is helpful) and the link to the original ts3 cas room is here. Since we can convert ts4 to ours you could probably just build your own and go from there as well.
Thanks to @mookymilksims for testing things for me and converting her own. If you would like to try this tutorial out and experiment with room placements using @boringbones Ultra wide CAS mod which changes the field of view in cas so that you can see the whole cas room, it is here. I didn't use it for mine, but that's only because I found out about it after from Mooky lol and I'm tired of converting them 😅 but feel free to ask me any questions if you need help 😊
#ts3#tutorial#sims3#I hope this helped#been procrastinating finishing this 🙃#cas room tutorial#sorry if it's long#tried to be thorough and make sure everything was correct
161 notes
·
View notes
Text
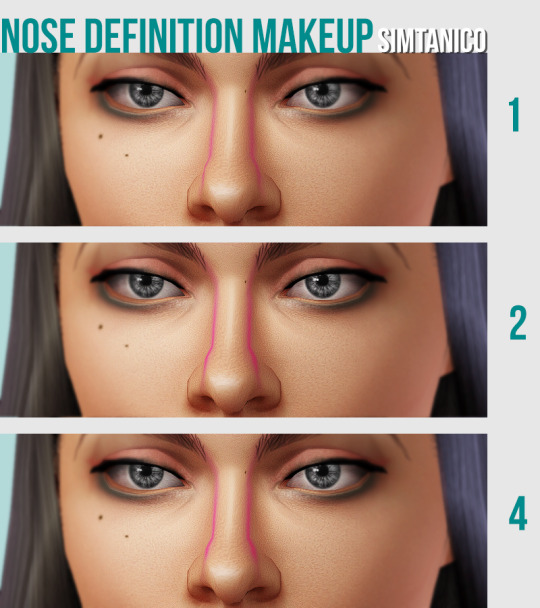
Nose Definition makeup (#1, #2, and #4)
Pretty much what it looks like! Of my usual "squint and you'll see it" fare. I've had these done up for a while and I've used them a ton, so I hope you all might too.
This makeup (I, II, IV) can define the shape of a sim's nose bridge without going full contour. Feel free to use at different opacity for even more subtle results!
No. 2 and 4 might look SUPER DUPER similar, but I assure you they are not.
When I can finally decide on #3 I shall put it here along with any applicable nose makeup I come up with :)
Details:
under Makeup > Lipstick
Male & Female ~ Teen - Elder // Thumbnail included
1 channel, see photo
1024x texture, borderline microscopic mask to save size
0.1 MB each, Compressorized
Enabled for most categories, not for random
Credits: TSRW, Photoshop
TOU Do what you need to do; Do not claim as your own!
Download at .zip Sim File Share: https://simfileshare.net/download/4433938/
Or at SIMBLR.CC
636 notes
·
View notes
Text
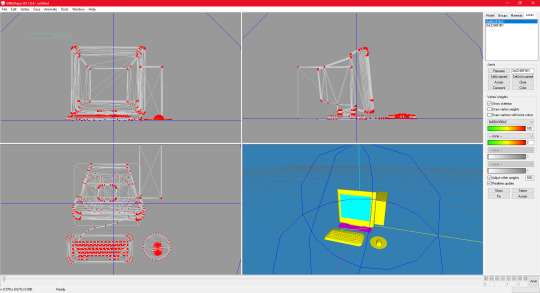
[tutorial] how to make computers functional in the sims 3 by sideshow_snob
Programs needed: TSRW [i use the old version] Blender 2.7 [you can use any version] Milkshape 1.8.4
You can download this tutorial as a .doc HERE
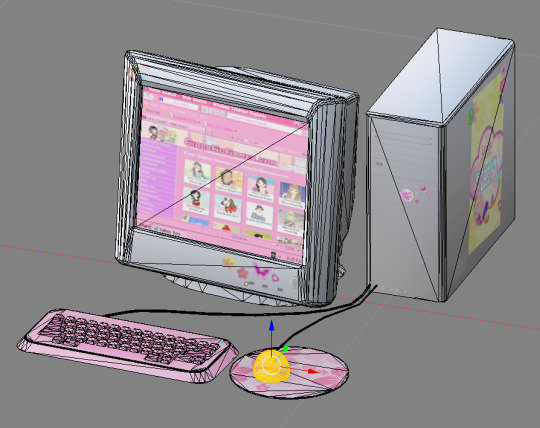
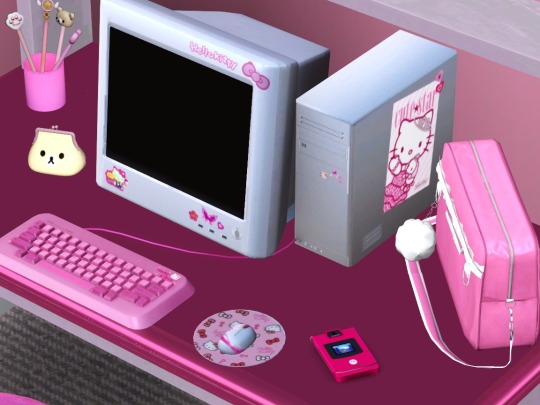
Original [right] TS3 version [left]

So, how do we start?
Seperate your computer of choice into pieces. [mouse, keyboard, monitor, monitor screen, mousepad if applicable, drop shadow if applicable]. This can be done by selecting faces and holding 'shift +' to select that entire piece. if shift + doesn't work you'll have to do it by hand. Once your desired piece is selected, press 'P' to separate.
Once you've seperated all your parts, go ahead an open TSRW and clone a similar PC. I chose this one
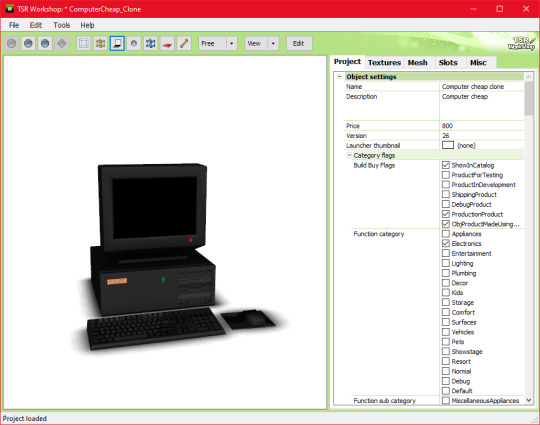
Go ahead and export the .wso AND .obj file for this computer in the mesh tab. I named my exports 'eapcref' we're going to be using this PC as a reference to modify our mesh, and assign bones in milkshape.
go ahead and import the .obj into blender, where your separated PC is.
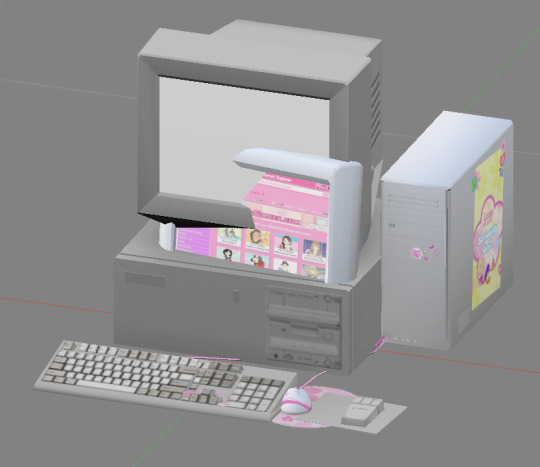
As you can see, these computers are pretty different. We're going to move each piece around until its in a similar size and position as the EA one, so the PC animates properly. Helpful shortcuts ---> G [grab] S [scale] R [Rotate]
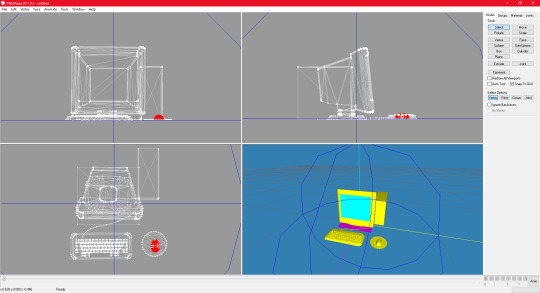
This is what mine looked like when I finished moving it around:

Keep in mind, i actually tested mine quite a few times in game because the animation was not lining up with the PC location, so this is what mine looks like after a few modifications. Make sure you save this .blend file so you can modify it if necessary after you assign the bones.
Now onto actually assigning the bones…
Open milkshape and import all your seperated PC files.
Your PC parts should be grouped like this:
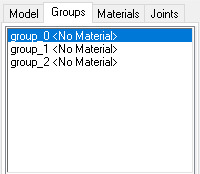
group_0: the monitor, mousepad [basically everything except the drop shadow, screen, and mouse] group_1: drop shadow group_2: screen
Now import your EA pc .wso file
Select the EA pc parts in the groups tab, then go to the joints tab and click 'show' Then go back to the groups tab, with the ea pc still selected, and select all your PC parts. Go back to the joints tab, and click 'assign'.
Now delete the EA PC.

the first bone is the mouse assignment, and the second bone is the rest of the computer.
go ahead and click 'selassigned' and clear the bone assignment since its incorrect.
To assign the bones, go to the model tab and click 'select' alt shift left click all the bones in your mouse
go back to the joints tab and click assign
now to assign the PC bones
Select everything except the mouse and drop shadow, then go back to the joints tab and click assign
you can check to see if your bones are properly assigned by clicking 'selassigned' on both bones
export as .wso and your finished!
something to note:
if your mousepad gets in the way while assigning bones, you can keep it seperate and just regroup it back into the mesh after assigning bones.
251 notes
·
View notes
Text
Self-use Sims 3 CC Tutorials List
Here is a list of tutorials from which I learn to convert/create sims 3 cc in a few months (and as a poor English speaker). I think it might help someone who also wants to try making things for sims 3 but doesn't know where to start, though it's been 15 years from the game release and even Inzoi is coming hahah.
The list covers objects, clothes, hairs and eyes. I know there're lots of tutorials not listed here, that's because I haven't tried them in my projects by hand. But The list will be updated with new things I learn. Most tutorials are in English. Thanks to all these creators for sharing their precious knowledge!
Sorry for the miserable format, cuz I wrote them in Patreon and paste here. You can also read it there, free of course.
Where I find tutorials
sims 3 tutorial hub
ts3 creators cave and its discord
Mod the sims tutorial wiki and the forum
pis3update tutorials tag
General
CC basic concepts by nightosphere (for clothes, most knowledge is shared with objects)
Tools
TSRW guide by apple (for objects, most knowledge is shared with clothes)
Blender
shortcut by Blender Guru
beginner tutorial for version 2.5, 2.8, 3.0, 4.0
3.5入门教程 (youtube / bilibili)
设置切换语言快捷键 change language shortcut settings
图片取色器网站
Mesh ToolKit with Seam Fixer for all ages
Topaz gigapixel AI guide / higher quality texture
Texture
Nicer bake / bake in blender 2.78
Bake in blender 2.93
Make normal map
small size blank texture
Reasons for black blocks on baked image
Adjust texture color without losing quality
Object
clone obejcts with S3OC
4t3
Functional Objects
Functional bed
TSRW setting
Combining Textures for Objects with Multiple Textures
Add normal map to objects
Introduction to slot categories
Add slots in TSRW
Edit in-door shadow or occluders in TSRW / Talks about 3 kinds of in-game shadow by Pocci
Clothes
4t3 by nightosphere
Reduce polycount / fix seams, holes, shadows or normals
Bone reference rule
Avoid milkshape workflow / adjust bone assignment and morphs in blender
Manually fix bone in blender
Convert between ages/body meshes
TSRW check list
Fix long clothes clip with body
Fix holes on morphs (easier in blender)
Extrude collars
Create texture in PS
Avoid TSRW workflow / CTU tutorial
Hairs
Avoid milkshape and TSRW workflow / delete backfaces / handmade morphs / DABOOBS guide
Keys pointing to in-game blank textures to save file size (for DABOOBS not TSRW)
Reduce polycount
4t3
Fix weird seam lines on hairs from s4s
Fix pigtail issue
Eyes
Convert contacts to default eyes
193 notes
·
View notes
Text
Heart-Shaped Glasses and Spiked Collar For TS3
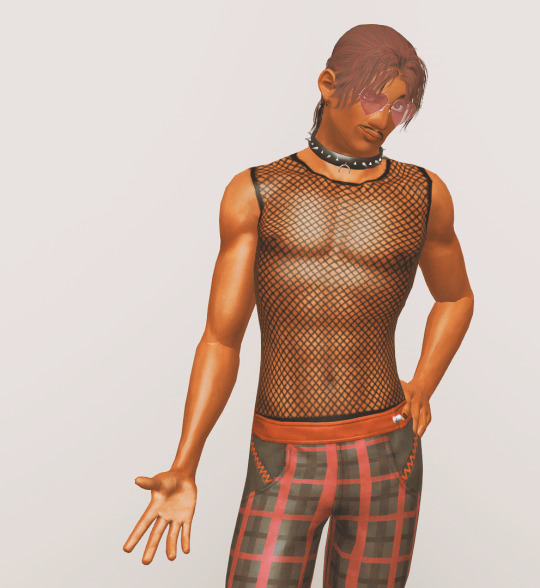
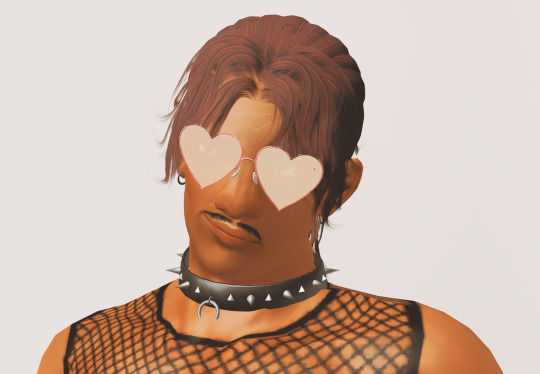
In Nobody-Asked-But section, we have low-poly and sort of kinky accessories for your male sims. Yes, these are male only, as my lovely model Danzig demonstrates, because I'm lazy. Feel free to convert to female if you wish.
When I was playing Danzig's generation I searched for these glasses and found none. There was one for sims 2 but I wasn't into converting accessories back then so I gave up and used something else.
Then, a couple of months ago, I bumped into a simblr post - that I cannot suffer to search for - with a link to a character maker called Panqueques Maker on Picrew. I had my fun with it and ended up with this boi:

I know you're saying "I don't give a damn about your stupid stories, give me my CC!" Well, I like my stories, even if nobody listens. It's OK, you can easily scroll down.
Making this, I realised that I really need those glasses, that collar/choker, and those chains for Bismarck. So another blender adventure started for me and Bismarck had his gifts at his photoshoot.
A word of caution, though: These are really low-poly items designed for gameplay only. If you want fancy screenshots these may not be for you. Keep in mind that these are not perfect. Glasses can be see-through or semi-reflective depending on the angle as you see in the screenshots. They are cloned from the Aviator Glasses and use the temples, bridge and nose pads from that mesh. Although, I had to adjust them accordingly. Front frame and lenses are created from an .svg file done in GIMP.
The collar have clipping issues especially at the chest with the ring. I thought I handled that issue but then I idiotically overwrote my only perfect copy with another project. Yeah, I do these kinds of things a lot. So, whatever I had elsewhere seemed fine enough and I'm not going back at it.
I remember trying to make it BGC since it was cloned from the Late Night spiked collar. Let me know if I failed. I'll try again.
Also chains are not included because they're so low-effort, low-poly shit, that it would be a really bad joke to release them. And now even more technical details:
Heart-shaped Glasses
3 Channels, 3 Presets, Re-colourable Lenses
Polycount -> Highest: 1296 Mid: 838 Lowest: 160
Compatible with glasses sliders
Spiked Collar
3 Channels, 3 Presets
Polycount -> Highest: 776 High: 690 Mid: 274 Lowest: 84
Made with: GIMP, s3oc, s3pe, Blender, CAS Texture+Unitool, and TSRW
@pis3update @kpccfinds @katsujiiccfinds

- DOWNLOAD -
Heartshaped Glasses
:: MEDIAFIRE | SFS ::
Spiked Collar
:: MEDIAFIRE | SFS ::
#ts3cc#ts3#download: cas#cas: accessories#acc: glasses#acc: neck#Danzig Lin#sort of a late Valentine's Day gift
75 notes
·
View notes