#I won’t take down my cc but like I won’t keep it Here on tumblr
Explore tagged Tumblr posts
Text
alright high key I’ve decided to quit gaming as it’s quite seriously ruining my life and I will be turning this account into my new writing account in the next few days
#if you want the blender files for cc I’ve been working on I’ll fr just give it to you#I won’t take down my cc but like I won’t keep it Here on tumblr#if you want the files just in case I’ll fr send those out too idc#otherwise fr im just#deleting the sims franchise from my laptop#I cannot live like this#as I cannot play the sims and also live#lol#slash srs#/srs#serious post#like fr genuinely I want to partake in my creative hobbies again#twink speaks
7 notes
·
View notes
Note
I have been away since the MCC, and I haven't been really posting things or keeping up with the group activity. Imagine my fucking reaction when I wake up on a Sunday morning to Discord exploding over night.
I have some conflicting emotions towards CCs talking so openly about fanfics. Part of me is glad that they acknowledge our existence, like I know a few of them are here, and even seen my own posts, like OMG MY STREAMERS KNOW I EXIST. And fanfics, it's huge! It's a step up from liveblogging and headcanon posts, it's a fanart in its spirit, but painted with words, and similarly poured the author's soul into.
But there's like that thing with...prejudice? I've seen people mention fanfiction in Chilled's streams before, and in yt as well, and there were not exactly positive opinions. I know they were talking about there being very few smut works, but it feels like they were bringing them up the most, and it's just frustrating to not be understood in the right way. After all, everything we do here, and everything we write on Ao3 is us expressing our love and support in the ways we can, none of us have any malicious thought or want to be hurtful and spread hatred or smth.
Do you think there's a world where they could speak of Tumblr/Ao3 part of their community from a bit of a different angle? Do you think that fanfiction should be acknowledged and spoken about more?
(Also, I know it's stupid, but I feel just the tiniest bit salty. I wrote good stuff, why won't they talk about me too?!)
Yeah, I have very conflicting emotions about it too. (Mostly I feel betrayed by whoever was linking Platy fics LMAO)
Tumblr and Ao3 get a bad rap for being “cringe” I guess. Personally I think that they are the only places left on the internet that are well-known and not too corrupted by capitalism and algorithms (especially Ao3 my beloved). But I really don’t give a shit - I hate cringe culture with a passion.
But yeah. It’s the whole thing of like. You can’t post works on the internet and expect people (especially the streamers themselves) to just not see it? Because it’s out in the public. They have every right to view it.
But, I’d personally rather my fics NOT be spoken about on a livestream, in front of thousands of people. That’s just my preference, because honestly the reason I post fics at all is this is a very small fandom, and they won’t blow up or be noticed and judged by multitudes of people. I’m far more comfortable with a small audience, and I would not want my fics to be mentioned on stream where lots of people (far too many for my liking) may go looking for them. (This is why I post more about PR1 than mcyt, even tho I love both equally).
But i think if the streamers are fine with fanfic being posted, I see no reason for people to hate on fanfic??? In fact, I see no reason for people to hate it at all? You can inform someone that a creator is uncomfortable with fanfic/certain types of fanworks and ask them to take it down without being a hater. Decency is not difficult, and when you’re in a fandom that is not against fanfic and stuff I don’t see why you’d ever waste your energy hating on something that literally doesn’t effect you?
It’s the same thing with any type of hate comment. If there’s no reason to be upset by something other than the fact that You Don’t Like It, take some preschool advice and walk away. It doesn’t concern you. (Btw Tasha, I don’t mean you specifically, I mean the Royal You!!! Sorry if this was confusing I just realised lmao)
Sorry for getting pretty serious, but I am just quite upset by people who discourage artists when they haven’t done anything wrong.
That said, if a creator has expressed a desire to not have fanworks made of them, then I implore you to respect their boundaries. It’s just the kind thing to do.
#this got rant-y fast I’m sorry. but this is a sore subject I guess.#I have gotten hate comments before and while I cringe at what I made too. there was no reason for them to give me that hate.#it was unnecessary and discouraging as a writer and I did not appreciate it. I don’t like what I wrote either but I dislike more that peopl#feel the need to leave hate like that. it’s just rude and I would never. you don’t know where someone is at. you don’t know their age or#their level. they could be a beginner or shit could be going on in their life. you have no right to give unwanted. rude. hateful criticism#again. sorry but I’m passionate about this#private recording 1#asks and answers
13 notes
·
View notes
Text

about me
kitty | 92′ liner | she/they | aquarius | intj-t | and more...
part time worker – full-time kpop trash
i’m a gif maker! DO NOT SAVE AND REPOST my work ANYWHERE. i will block anyone who steals anything, no questions asked, bc i’m so sick of seeing stuff being stolen. if you like something, you should REBLOG it.
if you want to use my gifs (or other cc's gifs) in posts you can do so by using the gif search feature on the site. please DO NOT use my gifs for any smut-related writing. fluff is okay, but absolutely NO SMUT
DO NOT leave your hard/smutty thoughts on ANY of my gifsets. mutuals or not, i DO NOT consent to seeing that on my stuff. if it’s in the tags or in the comments, i can see EVERYTHING put in any of those places. please keep your hard/smutty thoughts to yourself. thanks.
if your blog is blank; no posts AND no likes, i will block you. if you’re still getting the hang of tumblr, at least have a post saying something like, “i know it’s bare, but i’m still getting the hang of this!” so i don’t accidentally block you if you’re a real person!
tracking #bitsforkitts you can tag me in any skz gifs or gfxs you create that you want me to see! we don’t have to be mutuals, but pls use the tag only for skz things as i am exclusively a skz blog
this is a side blog, so i won’t be able to follow you from here, but i’ll follow and like from @peachyberryji 💖

hi, hey, hello! you can call me kitty! or if you think of a cute nickname for me, just run it by me! i love nicknames lol
i am a stray kids blog! you will find the whole group on my blog, but my bias is felix, so it's mostly him. anyway, here is a basic run-down:
bias: lee felix bias wrecker: han jisung and hwang hyunjin first song: maniac fave song: 아니 (any) favorite skz era: thunderous

✨ please keep in mind that since i work part-time, my blog runs on a queue. i promise i reblog everything i like, it might just take some time for it to show up! occasionally i live blog, but it’s very rare. ✨

updated: 4/2024 – some wording changes and MBTI type updated
54 notes
·
View notes
Text
sisterinnit!
cc!wilbur soot x tommy’s older sister
tw: language
note: this one uses specifically she/her pronouns, however, you can replace them with your pronouns. it won’t change the story at all. sorry that this is kinda shit but tumblr deleted my draft and i had to completely rewrite it so this is what i’ve got. hope you enjoy! <3

“y/n this is wilbur, wilbur this is y/n.” tommy gave the basic introductions with a bored look on his face.
“y/n simons, pleasure to meet you.”
“wilbur soot, the pleasure is all mine.”
as he shook your hand, you stared into each other’s eyes. he wore a small smile, that was almost a smirk. was it just you, or was there electricity when your hands touched? that had to be in your head, right? your gaze lingered on the other for perhaps a little too long before you let go of each other’s hands.
“now get out, y/n.” tommy pushed you towards the door.
•••
“y/n can you see wilbur out? i’m busy!”
wilbur looked at you with a smile, causing you to blush. you nodded and yelled back at your brother, “yeah!”
you led wilbur to the front door, opening it and stepping to the side. you looked at him to find he was already looking at you. he grabbed your hand and placed a kiss on your knuckles.
“it was nice meeting you, y/n.”
as you stuttered out a reply, he gave you that same almost-smirk and turned away, walking down your driveway.
•••
“what are you doing up?”
you jumped, not expecting to see someone in your kitchen at two am. then you remembered tommy had invited friends over.
“oh, it’s you. i… i can’t sleep. what are you still doing awake?”
you filled a glass up with water and began to drink it, putting it in the sink when you were done.
“tommy snores really loud.”
you both let out a light laugh at your younger brother’s expense.
“well, since we’re both awake, do you want to do something? we could watch friends? that’s all i was doing anyway.”
“that sounds great.”
you both made your way up the stairs and into your room. you sat on the bed and set up the laptop with the episode you were currently on. eventually you were laying down together watching joey do lunges in all of chandler’s clothes.
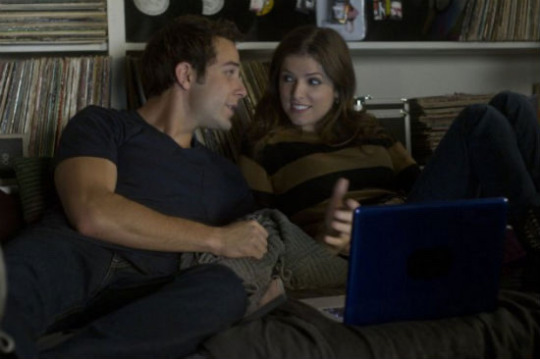
(like this ^^^)
you were about halfway through a second episode when tommy interrupted.
“what the hell are you guys doing?”
you both looked up at the tired gremlin child.
“watching friends.” wilbur gave him a cheeky smile.
•••
“hello?”
“oh! uh, hello…?”
“oh it’s you, wilbur!” you spoke over your brother’s headset while he was in the bathroom.
“y/n? hi! what are you doing?”
“well tommy’s in the toilet so i wanted to see who he was talking to. turns out it’s you!”
wilbur let out a chuckle. “it’s me!”
“GET OUT OF MY BEDROOM!”
“uh oh, gotta go!” you threw down the headset before running for your life.
•••
“y/n, hang out with us!”
you stopped at the doorway, looking back at the group of boys all sitting on the floor. jack manifold, tubbo, and wilbur all stared up at you.
“no, y/n, get out of my room.” tommy spoke from his spot on the bed.
“aww, why can’t she stay?”
“yeah, tommy, don’t be a dick, man.”
“y/n, stay!”
“no, y/n, leave.”
you looked nervous, being pulled in two different directions, before ultimately deciding that you had other things to do.
“sorry guys, i should probably go.”
a chorus of disappointed groans and “aww”s left the group before you waved and closed the door behind you.
you went back to your room, deciding to give your brother his space despite your loneliness and boredom. you knew you’d want the same from him.
you decided to mess around with your ukulele to pass the time. you played your favorite song, singing along quietly. it wasn’t long before a knock on the door made you stop.
“come in.”
the door opened and none other than wilbur soot popped his head in.
“hey.”
“hey. tommy asked me to tell you to shut up, but i think you sound lovely.”
you turned slightly pink. “oh, uh, thanks. tell tommy i’m sorry and i’ll keep it down.”
“no need, he’s a prick anyway.” he made his way to where you sat on the bed, taking a seat next to you.
“what are you playing?”
you smiled and told him about how it was your favorite song by your favorite artist and you loved how fun it was. he requested you play a little bit for him, so you did. when you were done, you started to talk about it a little more.
at least until you realized he wasn’t listening. he was staring at your lips, leaning in. you followed suit.
the door burst open, causing you two to spring apart.
“wilbur, what the hell is taking so long? and what are you two doing in here with the door closed?”
wilbur smiled at tommy. “playing music, of course.”
tommy gave a skeptical look, dragging wilbur out of the room with a “keep it down, y/n!”
wilbur stopped at the doorway. “by the way, i quite like hanging out with you, y/n.”
•••
“your hands are so tiny!”
“they are not,” you gasped. “your hands are just huge, probably because you’re a giant of a man.”
wilbur laughed. “put your hand up,” he instructed. he touched his to yours gently, showing off the size difference.
you both giggled before stopping and looking into each other’s eyes. he gave you a gentle smile and slipped his fingers in between yours, interlocking them and holding your hand in his larger one.
you looked back at him and smiled.
•••
you knocked on the door three times, and he answered not long after.
“y/n? what are you doing here?”
“tommy thinks he left his sweater here and asked if i could drop by and pick it up on my way home.”
“oh yeah, one second.”
he disappeared for a moment before returning, holding your brother’s red hoodie. “here you go,” he said with a smile.
“thank you. sorry to bother you.”
“it’s no trouble. can i walk you home?”
you felt yourself heating up and smiled. “if you’d like.”
he nodded and grabbed his jacket. then you both started off toward the simons residence. you almost made it before it started raining.
it was light rain at first, so you carried on. however, it got heavier by the second, and pretty soon it was pouring on you two.
wilbur took off his jacket and held it above your heads. “we’re almost there, run!”
the two of you ran the rest of the way, only stopping once you got to your porch. you looked at each other for a moment, catching your breath. then you started laughing. you were both soaked and standing there like idiots, laughing at yourselves.
your laughter soon died down, and then you were just smiling at each other. he reached over to you and brushed a wet piece of hair behind your ear, getting it out of your face.
you weren’t stupid. you knew the look he was giving you was a lovestruck gaze, but you decided to play dumb.
“what?”
then finally it happened. after months of flirting and mutual pining, he closed the gap and kissed you. with his right hand on your face he crashed his lips to yours (a/n: that sounds violent but it’s not meant to be lol), pulling you closer with his left. you wrapped your arms around him, hands tangling in his hair.
passion mingled with desperation and you kissed long after you were breathless. you didn’t part until you heard a loud yell of disgust.
you instantly sprang apart with swollen lips and red faces.
“are you fucking kidding me? that’s my sister, man!” tommy yelled, glaring at wilbur.
he then looked to you. “and you, kissing my best mate?!”
you stood there shocked for a moment before coming to your senses.
“uhhh, I wasn’t kissing, were you kissing?” you said, turning to wilbur and praying to god he caught on to your obvious lie.
“no, i wasn’t kissing.” he shook his head.
“neither was i! see, no kissing here.”
“i’m not stupid,” said tommy, voice low and angry as opposed to the shock and disgust from before. “i saw everything.”
he then turned and walked away from the door, leaving you two alone again.
a moment of awkward silence passed. “i should probably… you know.” you said, pointing to the house.
“oh yeah, no, definitely.” he rubbed the back of his neck.
“and look, i’m sorry if i ruined your friendship with tommy. i know you guys are close, and i hope he forgives you.”
he gave you a sad smile. “same here, love.” he then kissed your cheek and took off into the rain once more.
you went inside and tried fixing things with tommy, who refused to speak to you. after sitting outside his bedroom door for nearly an hour, you finally gave up and headed back into your room. you opened discord.
[your username]: tommy’s ignoring me. i’ve just sat outside his room for an hour and he refuses to talk to me.
WilburSoot: i’ll give it a go.
he did not speak to wilbur. tommy left him on read every time.
•••
tommy avoided you entirely for two weeks. he left the room if you walked in, and he wouldn’t speak to you at the dinner table. your mother was curious what was going on between you two, but neither of you would say anything about it.
finally, you’d had enough.
you asked your mother to call tommy out of his room, since he wouldn’t answer if you were to try. she did, just wanting you two to speak again. once he arrived in the living room, you jumped him. you grabbed him around the middle and threw him on the couch, planting yourself on top of him so he couldn’t run away. your mum left the room.
“hey, you asshole, get off of me!”
“no, tommy! enough is enough! you’re not leaving until you hear me out!”
“no, i don’t want to talk to you!”
“too bad because i’m not moving until you hear what i have to say! i don’t want us to keep avoiding each other like this.”
he went silent and thought about it for a moment, an angry and skeptical look on his face. “…fine. get it over with.”
you took a deep breath.
“tommy, you’re my little brother, and i love you. i’ll always love you, even when you hate me. just know that i never meant to hurt you or make you angry. however… you can’t tell me how to live my life, or who i can be with. i want to be with wilbur. i can’t help it, tommy, i love him. you can be happy for me or not, that’s your choice. but what isn’t your choice, is who i love.”
by the end of your speech, your voice was shaking and your eyes were watery. you got off of tommy and helped him sit up.
his face softened. “you… you love him?”
your tears ran down your cheeks. you nodded. “i do.”
tommy sighed before pulling you into a hug. it was rare for him to show affection, especially to you, but after everything that happened between the two of you, he felt it was important.
“i love you, y/n. you’re my sister, i could never hate you. i’m happy for you. but just know, best mate or not, i’ll castrate him if he makes you sad.”
you laughed, wiping away your tears.
“i should… probably speak with wilbur, yeah?”
you nodded. tommy stood and went back to his room. you followed not long after, and even though you knew it was frowned upon, you stopped to listen at his door.
“tommy, thank god you’re speaking to me. listen, man, i–”
“do you love her, wilbur?”
“what?”
“my sister. do you love her?”
“i– yeah. yeah, i do.”
“good. listen, all i want is for y/n to be happy. meaning if you make her cry, i’ll murder you.”
wilbur chuckled on the other line, making you smile.
“you won’t have to worry about that. i promise you i’ll take care of her.”
“just don’t make my sister cry and don’t be gross in front of me, alright big man?”
“you’ve got yourself a deal, tommyinnit.”
you smiled again before heading off in the direction of your room.
#wilbur soot#wilbur soot x reader#wilbur soot x you#wilbur soot x y/n#wilbur mcyt#wilbur dsmp#wilbur dream smp#tommyinnit#tommyinnit x sibling reader#sisterinnit#dsmp x reader#x reader#dream smp#tommy dream smp#tommy dsmp
759 notes
·
View notes
Text
Dream SMP fandom etiquette
So. This post is probably too little, too late, considering the fandom and the issues I'm about to talk about have existed for so long now, and a lot of the people who need to hear this probably aren't on tumblr anyways, but I just wanted to dedicate a quick post to talk about fandom etiquette. Mostly pertaining to discourse, and interactions with people outside of our circle. These are just going to be my own personal thoughts, of course, but I felt it could be good to bring some of this to attention. So without further introduction:
Where to (not) talk about discourse:
Don't go into other streamer's vods to only focus about a different character. If you want to analyse, for example, c!Techno, do it in Techno's stream. Don't go into unrelated streams, like Tommy's, Tubbo's etc. to do it, even if they were a part of the event in question. This is, of course, with the exception if the character in question didn't stream their own pov. But otherwise, stay in your own space. This is to prevent cluttering a streamer's comments about unrelated discussion. To give further example: Tubbo's vod comments should primarily focus on Tubbo's character. Not Tommy's, Ranboo's, Techno's or whoever else's.
Don't start discourse in the comments of animatics. Seriously, stop that. Animatics aren't discussion boards. The comments are there to analyse and appreciate the video presented, not argue. It's especially rude if you pick a small detail, that wasn't even the focus of the animatic, or even a completely unrelated issue to rant out your frustrations about. To give examples: starting disc discourse in an animatic of Tommy talking to Wilbur, or rambling about how tragic Techno's character is in an animatic focused on clingy duo, etc.
This applies to fan songs as well.
Video essays are the exception to these rules. I think it's safe to say they're the place to bring your hot takes, if you really feel so inclined to argue in youtube comment sections (Though I'd personally advise to still keep the topic relevant).
Keep negativity out of fanfic comments. This isn't nearly as big of an issue as the last points, but I've seen it happen a couple times, so I'm deciding to mention it. Fanfics are written for fun. Even if you disagree with the characterisation or something else, unless the author is clear in accepting critique, keep criticism to yourself. And definitely don't rant about how you dislike a character unrelated to the fanfic. Sharing your thoughts on the fanfic itself is of course fine and welcomed, but when it turns from discussing the author's story to talking about how you dislike a character in canon, that's when it crosses a line. Example: comment talking about what you don't like about c!Tommy on a Bench Trio fanfiction.
When commenting on art, keep the feedback positive. Even if you dislike any presented character, keep that to yourself. Example: Don't say things like "I hate x character, but this art is good". You might think the author would feel honoured, but it's actually just hurtful.
How to deal with discourse:
This is gonna be a shorter section, because I think we all chose to do it in different ways, and that's valid. Also, it's just that I, myself, am still learning how to do this well, but I thought it could be good to try to lay it out anyways.
Try to scroll past takes you disagree with instead of arguing if you don't think you'd be able to keep your cool. Noone likes a random person yelling at them through a screen, and if you rant, you'll get an equally frustrated reply back, and noone will be happy. Either explain your point in a calm manner, or scroll past/ unfollow/block.
On the keeping cool thing, remember to just step away. Take a deep breath and calm yourself down before proceeding. To minimize the frustration you feel on a daily basis, filter tags, block people, avoid videos and youtube comment sections that you know will upset you, and leave certain internet spaces if you find yourself unable to escape negativity even with all those steps. Remember: in the end, it's all a game played by friends, a story, and your enjoyment of it lies in what you take from it. Abandon what makes you unhappy. Marie Kondo your fandom experience.
Also, here's your reminder, to whom this is relevant, to take care of yourself. Hydrate, eat, sleep, clean up, get fresh air, remember the things outside of all this. There's plenty to do outside of this fandom, and what you can do here can wait. There is no pressure, or obligation. Not for the content you create, not for the discussions you bring, not for responding to discourse, not for anything. Fandom is meant purely for fun, so take care <3
Interacting with people outside of the fandom:
This is something that I've seen a bit of talk about, and I thought I'd drop in my own thoughts on this as well. No matter the differences, we're all just trying to vibe, and I think these are important things to keep in mind to leave both sides better off:
Don't interact with hate posts. Just don't. You don't want to see them, they don't want to see you. Even if your response is lighthearted, their animosity is not. They will feel frustrated regardless, and the grudge will only grow. And if they're being agressive, calm discussion most likely won't happen even if you're being polite. Just leave it, please.
Correct misinformation calmly. I completely get how it can be frustrating to see blatant lies and all, but with our reputation, people will not listen if you're being antagonistic. Provide sources, explain, and leave it at that.
Don't be hateful, send death threats, or assume privilege or whatever else. That's stepping into the same shoes of the people you hate. Misunderstandings go both ways, and the fact of the matter is, I think most people who dislike DSMP, even the ones who are agressive about it, don't have their stance rooted in maliciousness. To expand on why the situation became what it is today, taken from a discussion on discord:
I think it's just a combination of Dream growing so insanely quickly + how internet spaces have changed over the years. When ccs like jackstepticeye or pewdiepie etc. grew popular, activism wasn't as prevalent and held to such importance. Now it's thankfully more talked about, but that also leads to Dream being more scrutinized in comparision. Add twitter trends and the general prevalence of the fandom, and you've got everyone feeling tired and frustrated and paranoid. People also tend not to fact check stuff, especially when it comes to celebrities and stuff they're not really interested in, so rumors spread fast.
And actually, I think there's absolutely valid reasons to be made uncomfortable by Dream SMP, either in it's creators, content or fandom, and there is, of course, stuff to criticise in general. The problem is the hate and misinformation and overexposure, but we are not going to solve any of that by being aggressive in return.
(This is, by the way, not talking about more serious cases. Like doxxing, or leaving gore images in hashtags, or similar instances. That's a whole different complicated issue that I don't feel qualified to tackle.)
And finally, don't overwhelm outsiders who merely mention the Dream SMP. Don't send asks asking them to watch it, don't write paragraphs explaining the lore, don't confuse them with inside jokes, just... Don't jump on people like that. Unless they're explicitly clear in wanting interaction and getting into the fandom, that kind of thing will just drive them away. This is in no way exclusive to the Dream SMP fandom, pretty much every fandom has people enthiastic to have more people involved, but since there are so unbelievably many of us, it's especially easy to go overboard with this stuff. Just... be polite, and don't pressure anyone. Be nice, please.
So.... ya! This would be it for this one, I think. Sorry that it's kinda long, thank you if you read it at all. Hope y'all have pleasant days ^^
#dream smp#mcyt#fandom#fandom etiquette#fandom critical#tommyinnit#technoblade#tubbo#dreamwastaken#let me know if i should remove tjose tags - i'm not sure whether it counts as crosstagging or not sorry#long post#my own post
187 notes
·
View notes
Text
GIF Tutorial for Beginners
People keep asking me to teach them how to make gifs and I end up writing them long confusing messages, so I figured maybe it’s time to just write up an actual clean tutorial instead! This is supposed to be for total beginners! (Or people who want to switch to a new process that I’ve curated and streamlined over 8 years of making gifs.) I’ll try to keep this as barebones as possible, and won’t include all the advanced stuff I usually add. I hope it’s easy enough to follow, and I’ll include some links at the end for more stuff. I really do think it’s better to make a few simple gifs before doing more complicated stuff though, just to get used to it!
There will be three sections in this tutorial: #1 Basics - How to make a gif in PS at all #2 Sharpen - How to use sharpen/denoise filters in an easy way #3 Colouring - Just a few very basic adjustment layers
What you need:
A video (most common formats should work, although .mkv doesn’t always)
Photoshop (I use PS CC 2018 - this one because I'm morally opposed to Adobe’s subscription model - but versions aren’t super different from each other)
In the end, you should hopefully be able to make something like this:
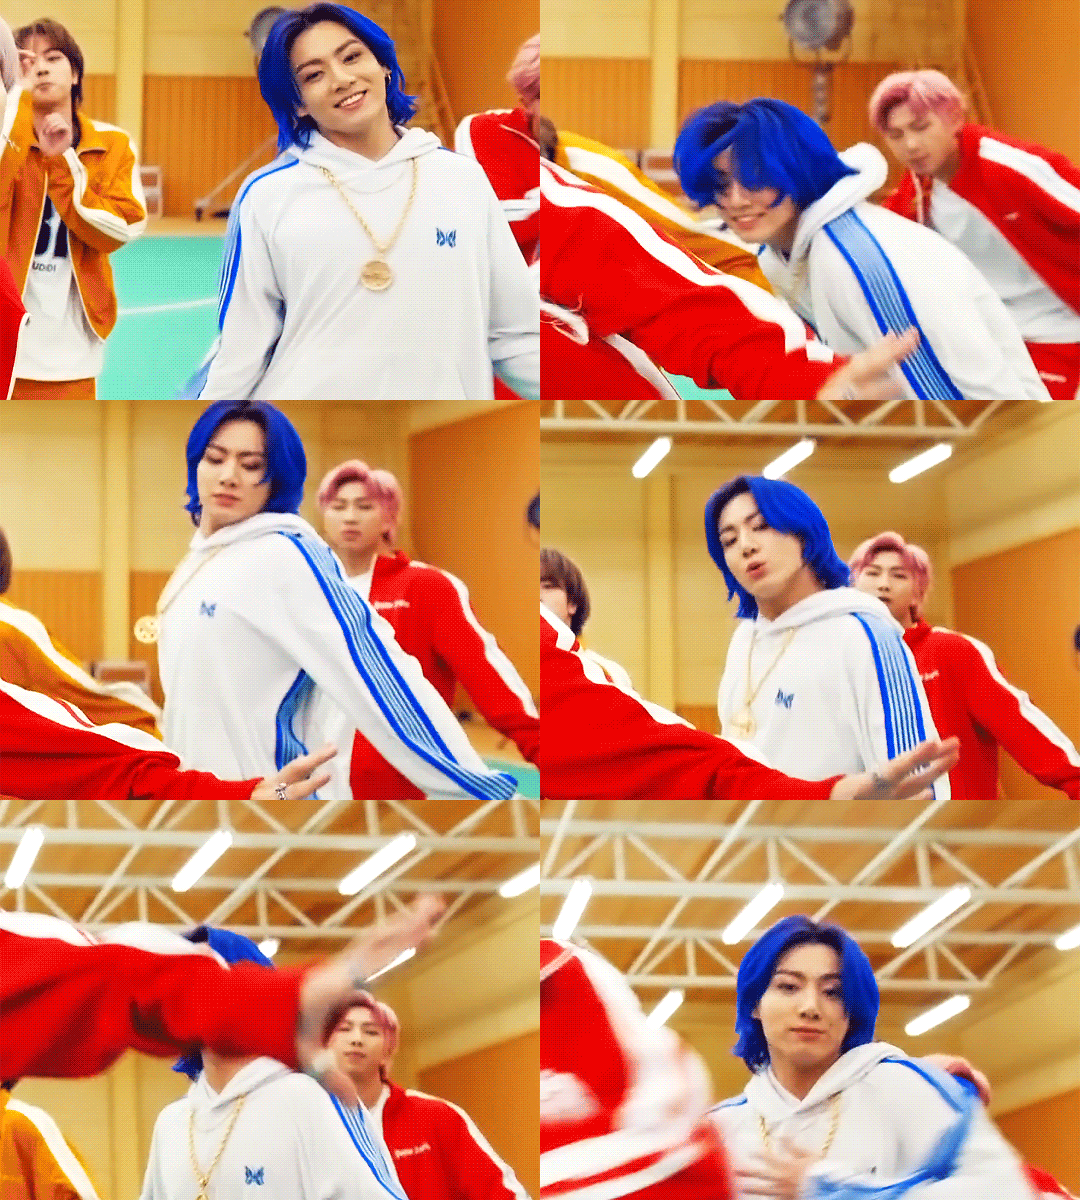
This is gonna be so long. Sorry. You can make a gif with just part #1! The rest is just to make it look better.
#1 Basics
If any of the tools/functions aren’t where they should be for you, your best bet is googling it, you might need to change something in your preferences!
Make sure to save your PS file... often. PS has a tendency to crash, especially on laptops.
First, you need to get the video file. I recommend a shorter video, a few minutes long, if it’s longer you might want to cut it into shorter parts beforehand. This is just because PS’s video import tool sucks.
I chose the Butter MV, specifically Jungkook’s body roll at 1:24 because that’s what I want to look at for the duration of this tutorial. No further questions, thanks.
1. Open PS, go to File > Import > Video Frames to Layers

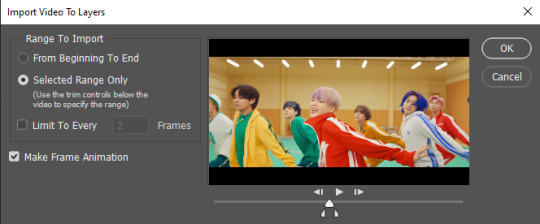
2. In the little pop-up, choose the part of the video that you want to gif. This will import every frame of the video into PS as a layer, so it has to be a relatively short part, or it’ll take ages (and gifs can’t be that big anyway). Now you can also see why it’s almost impossible to select the correct part if the video is too long.
The little controls at the bottom are for trimming, the one in the middle just for the preview. Make sure “Make Frame Animation” is selected! Then click OK.
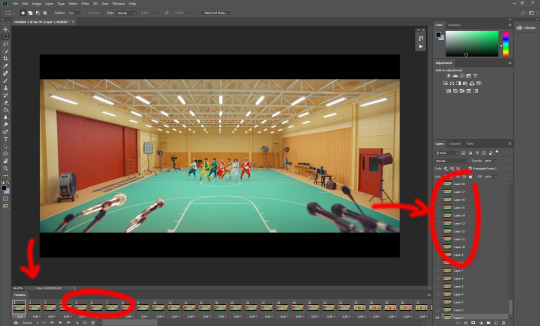
3. Now you have your layers, and you have a frame animation! On the right are your layers, that’s where we’ll apply the colouring etc. later on. On the bottom, that’s your timeline or frame animation - that’s what the gif will be in the end! So if you delete frames, the layers will still be there, but they won’t show up in the gif. If you click on a frame, you can see the little eye checkmark on the layer that’s currently visible.
4. The timeline controls at the bottom that are relevant right now: set to “forever” so the gif will loop, you can play the animation with the play button, and you can delete the selected frame(s). The number on each frame is the speed of the gif, depending on the video I usually set it to 0.05 or 0.06 (photoshop lies to you when you play the animation, the only way to test this is to open the finished gif, preferably on tumblr or wherever you want to upload it).

5. As you can see, the animation starts a bit before the actual part that I want, so go ahead and delete all the frames in the animation that you don’t want! You can delete the corresponding layers too if you want, to make the PS file smaller, but it has no influence on the gif. (Hold Shift to select multiple frames as usual)
6. Next, we’re gonna crop the gif however we want! You can do this with the crop tool in the left sidebar, but with gifs like this where there’s a lot of moving parts, I sometimes just use the selection tool in the left sidebar, like so:
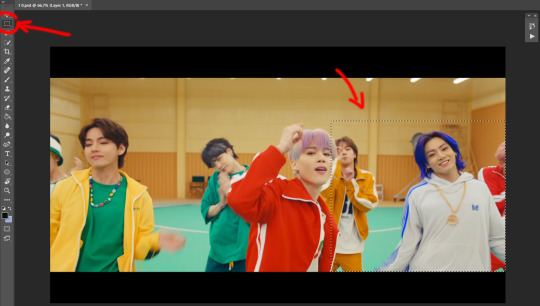
When you click on different frames, the selection stays, and you can check to make sure Jungkook doesn’t suddenly go out of frame if you crop it like that!
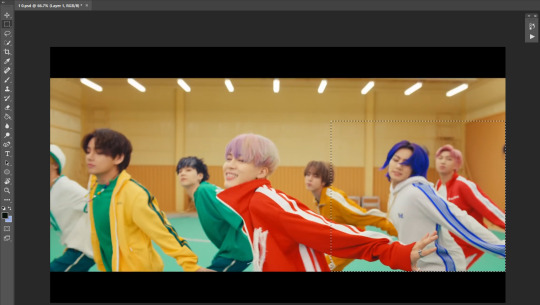
At this point, make sure the selection/crop isn’t smaller than you want the gif to be! For tumblr, what matters is the width (in pixels) of gifs. In the end, the width dimensions on tumblr should be 540px (1 gif per row), 268px (2 gifs per row), or 177/178px (3 gifs per row). Anything else will lead to very shitty resizing!
For this gif I’m going full sized, meaning 540px wide, so I made sure my selection isn’t smaller than that.
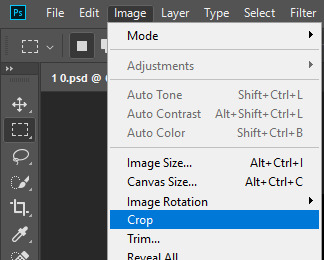
Then just go to Image > Crop, and it’s done!
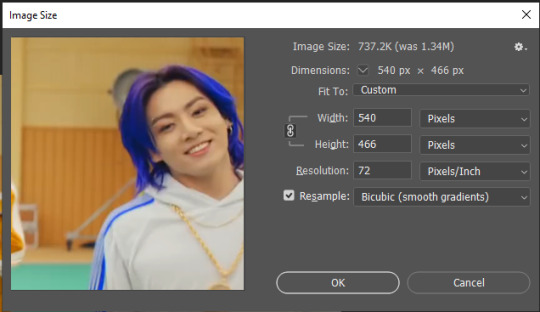
7. Check to see if this is what you want, then resize: go to Image > Image Size to resize the picture. Make sure the little “link” between Width and Height is active (to keep the same aspect ratio), then set the width to 540px or whatever you chose. I always set the resample option to Bicubic.
Once that’s done, set the zoom to 100% right above the timeline, to see what it really looks like.
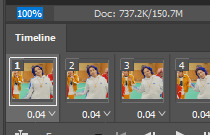
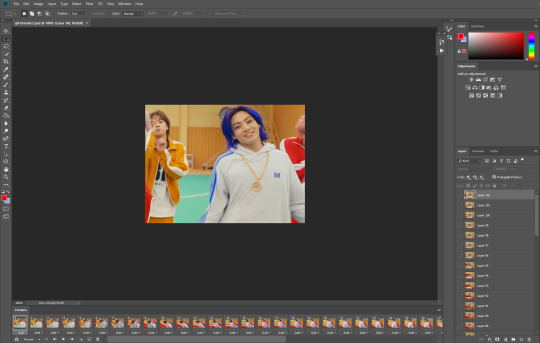
Almost done! A little note about the sizing: width is the important part for tumblr, but if you want to make a whole gif set (especially with more than 1 gif per row!!!) make sure to make all the gifs the same height, otherwise they won’t line up and tumblr will do whatever it wants.
I ended up making mine 540 x 400 and ended up with this:
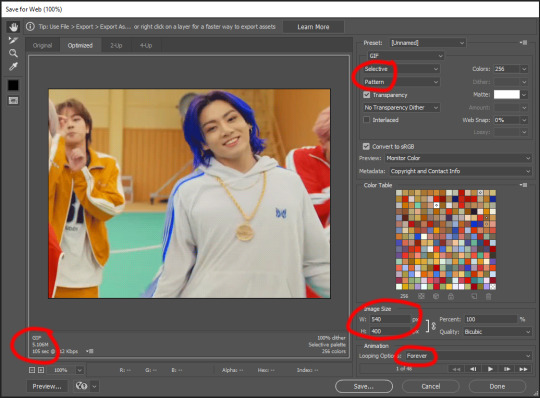
8. Time to save the gif!! Go to File > Export > Save for Web (OR just use the shortcut Ctrl + Shift + Alt + S) (or whatever it is on Mac).
In the pop-up, you can change things about the gif, but most things should already be the way you want it (Image size, Looping option forever). Selective should be the default, just like the rest.
You can choose between Pattern and Diffusion, some gif makers swear on one or the other, I go back and forth.
On the bottom left, you can see the size of your gif. Keep an eye on that! I believe Tumblr allows every single gif to be up to 10mb, but I try to keep mine under 5mb or close to it, because I think tumblr adds compression if it gets closer to 10mb?? Anyway back in my day you couldn’t upload anything over 1mb. You’ll never know our struggles.
Then just save it, and that’s it, you made a gif! Well done!! Here’s the end result:
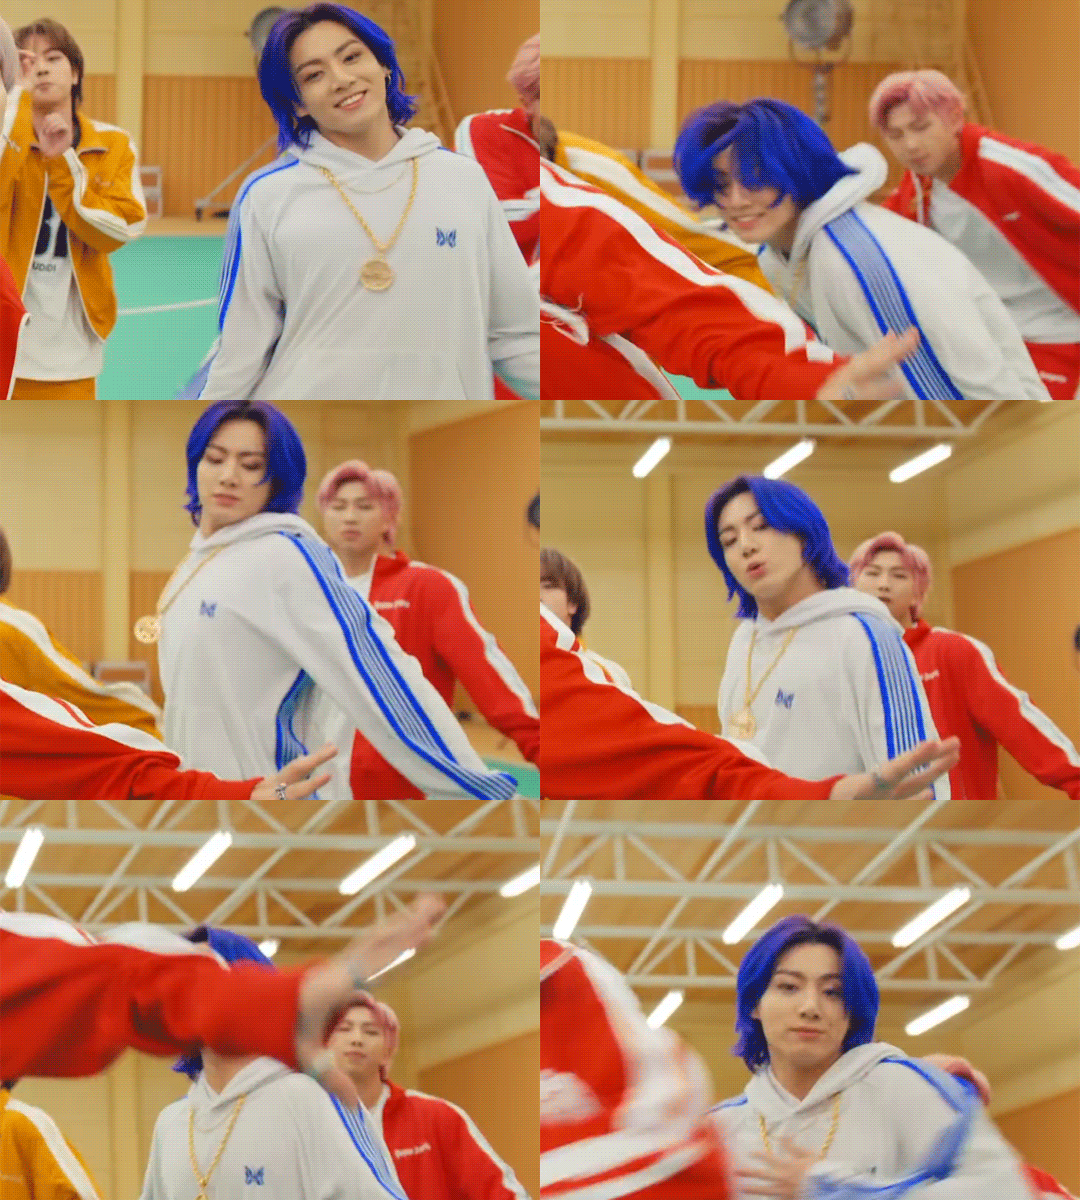
:)
#2 Sharpen
There are countless ways out there to make gifs as smooth and clean as possible! Here I’ll show you the easiest way, but it also provides a good basis for other methods. The main difficulty is that you you need to sharpen the layers, but you don’t want to 100 layers one by one. So what we’re gonna do is convert the layers into a Smart Object, which functions as one layer!
1. Convert the frame animation timeline to a video timeline with the little button right underneath on the left:
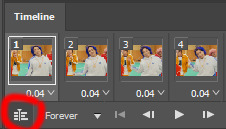
It should look like this, and I’m sorry but I can’t explain this one because I’m not an expert here, but you can just ignore it:

2. Select all layers: Select > All Layers, or just manually.
Then right click on the layers > Convert to Smart Object. Now there’s only one layer left, but don’t worry, the frames are still there!
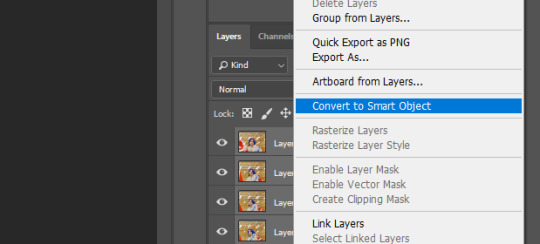
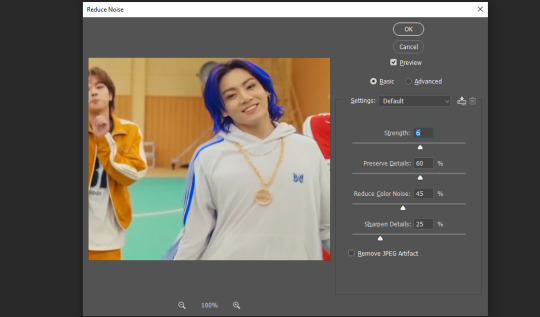
3. De-noise! It reduces noise, takes away some of that grain. More necessary in some videos. It also makes it less sharp, so I do this one first. Filter > Noise > Reduce Noise

My default settings are, Strength: 6, Preserve Details: 60, Reduce Color Noise: 45, Sharpen Details: 25, Remove JPEG Artifact: No. But you can play around, especially with the strength, and see how the little preview looks. Don’t apply too much of it! Or it will look weirdly smooth with no details in the end.
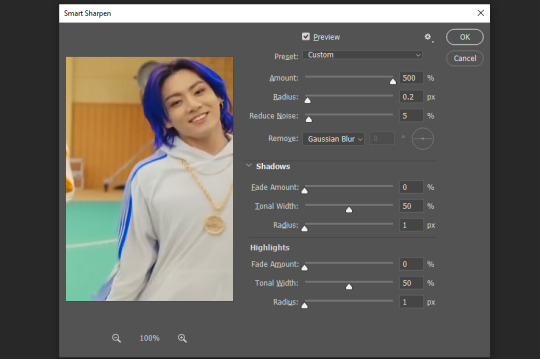
4. File > Sharpen > Smart Sharpen.
Settings: I usually have mine at Amount: 500, Reduce Noise: 5, and Radius at either 0.2 or 0.3, depending on the video. I’ll actually do 0.3 here, because I find it a bit blurry otherwise. If you sharpen more, it can quickly get grainy.
The difference isn’t huge, but here’s a little before and after denoise & sharpen:
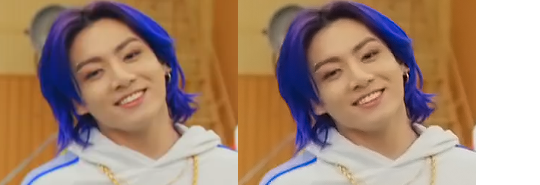
5. Technically you can just save it as a gif (save for web) as shown above now, or you can convert it back to a frame animation, which I’d recommend especially if you use certain other sharpening methods (I’ll show you how to convert it back at the end of the colouring part), but for now, let’s go straight to the next part:
#3 Colouring
Now, you CAN do this part right after part #1, still in frame animation, without a smart object. I prefer it like this because sometimes PS acts weird, but if you want to skip the smart object stuff: select all frames, and add the adjustment layers at the very top, above all the other layers. (It only affects selected frames; and it only affects the layers under it.)
The adjustment layers should be above the layer tray, and these are the ones we’ll use today: Brightness/Contrast, Curves, Vibrance, Color Balance, Selective Color.
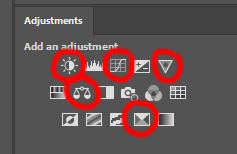
All of these are optional! You can do one, or all, or any combination. This is just the very most basic for me to get a gif to a point that I like. I’d recommend sticking to these for a start, but once you get the hang of it, definitely feel free to play around! It’s fun! Every gif maker has different preferences here, too, so there’s tutorials for everything.
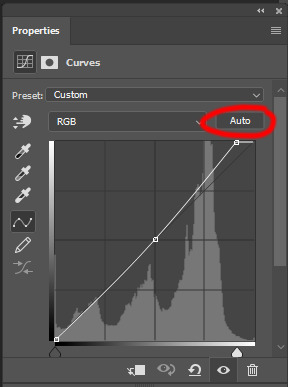
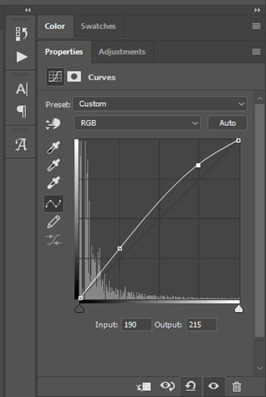
1. Curves: Just click Auto, tbh. You can play around, but Auto works fine for me as a start, just to brighten or darken some parts as a base.
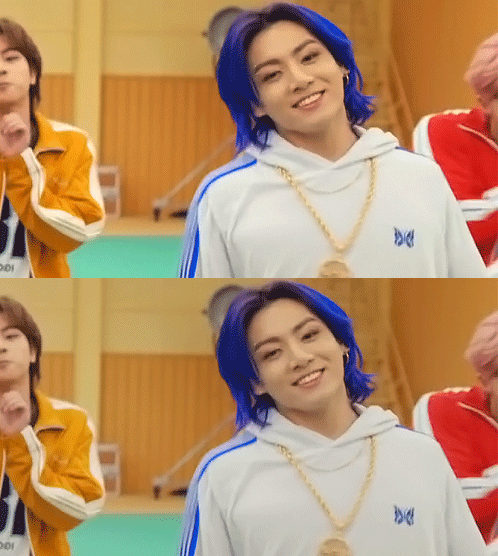
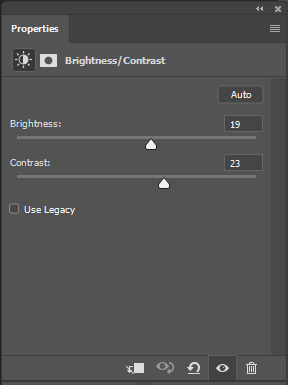
2. Brightness/Contrast: Usually videos are a bit dark, and contrast can help to make it seem sharper AND cut down on gif size, so I usually just up both of them a bit (but not too much! Or it’ll look cheap). Here I put them at B: 19, C: 23
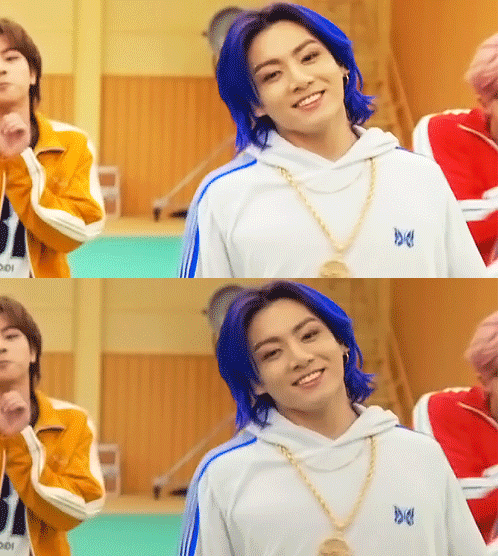
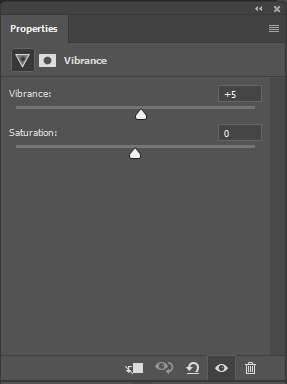
3. Vibrance: I love very vibrant and colourful gifs, so I usually up the vibrance (and sometimes the saturation). This one is already very vibrant, so I only put +5, but if you try to colour, say, a very moody tv show, this can help wonders, especially if you want to work with the colours more later.
If you prefer less vibrant gifs, you can also lower the values here!
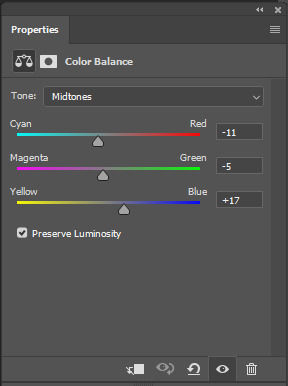
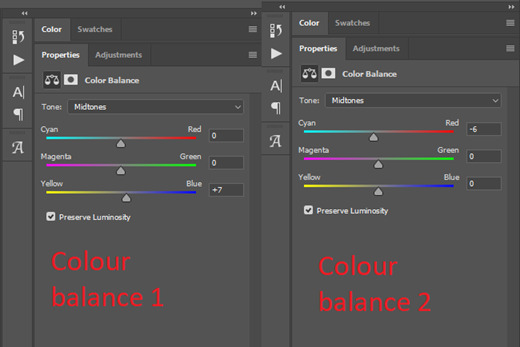
4. Color Balance: getting a bit more complicated now. Often, videos will have a slight yellow or green or blue tint, and this is where you can correct that. This video is a bit yellow, so I added +17 Blue. It was still too warm, so i added -11 Cyan as well. This neutralized the yellow tint, but I wanted some of the reddish tone back, so I added -5 Magenta. I usually do a similar process like that, depending on the tone.
Instead of Midtones, you can also do this for Shadows and Highlights individually.

5. Selective Color: now this is the most complicated, but also the most fun to play around in my opinion! Be careful here, if you do something too extreme it’ll look like shit or make the gif super grainy. I some rough goals in mind here: make the blue hair as blue as possible, make their skin tone a bit less pale, and enhance the black and white (which I always do).
You choose a colour at the top, and then add or subtract cyan/magenta/yellow/black values for that colour.
Skin tone: yellow and red. For this gif, I just added black to both, making them darker. Sometimes, if you change one or both those colours for a different part of the gif (for example, if I wanted to make the background less yellow, I’d subtract yellow from the yellows - but then I’d add yellow to the reds, to make the skin tone natural again.)
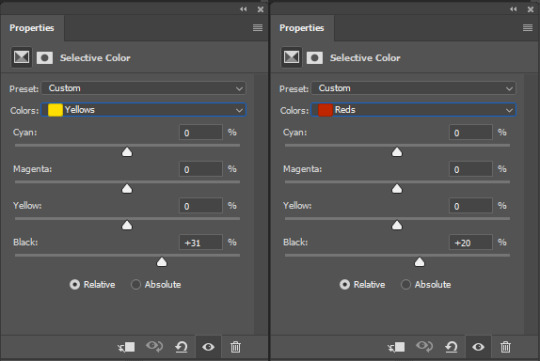
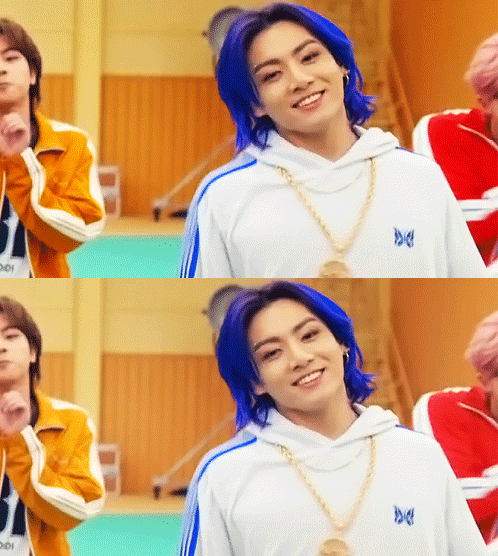
Blue hair: Just ramp up the cyan for the blues. Be careful with putting anything to +100, but here it’s already so bright that it should be fine. His roots are more purple, so I changed the magentas by adding cyan and black, and subtracting magenta and yellow. It’s not super clean, but fine for our purposes.
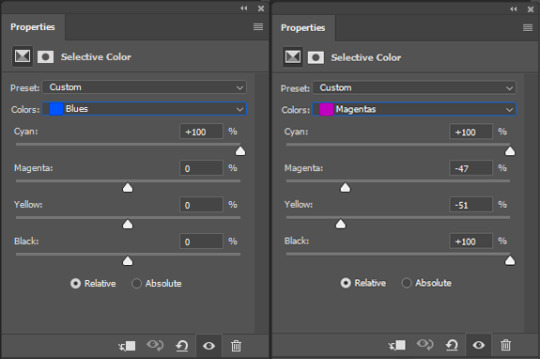
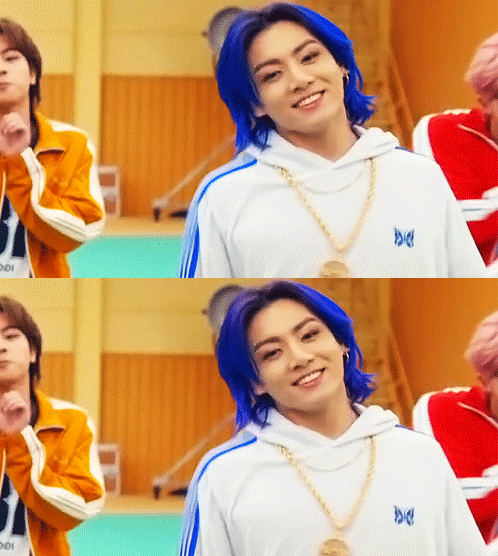
Black/white: depending on the gif, I often either add or subtract black to the whites. Adding makes the highlights less blinding, a bit darker, and flatter (I like to do that if one side of the face is bright white in the sunlight, for example). Subtracting creates contrast, makes it brighter, can wash it out. It can also lessen the gif size, and here it’s mostly just the tracksuit instead of important details, so I subtracted black. For the blacks, I almost always just add a bit of black, to make it more intense. Just like adding contrast, this can make the gif seem sharper and less grainy.
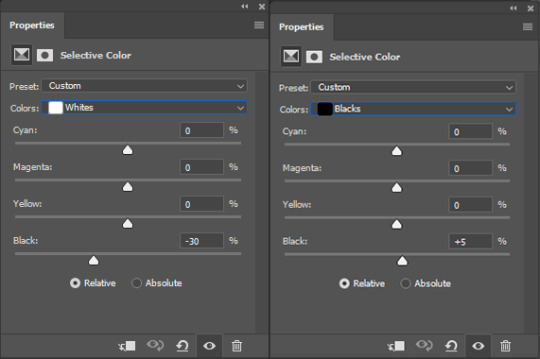

And done!
6. You could just save it as gif now, but as I said, I prefer to convert it back to frame animation timeline first, if only because I like to let it play through before I save it, and it works better for me there than in the video timeline.
Select all frames, then click the little menu on the top right of the video timeline > Convert Frames > Flatten Frames into Clips
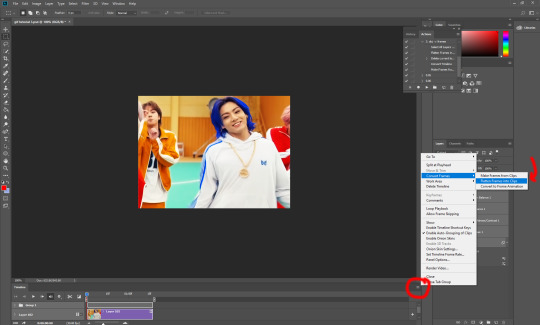
7. When you scroll down to the bottom of the layers now, the old smart object + adjustment layers should be at the bottom, under all the new layers. Delete the old ones, we don’t need them anymore.
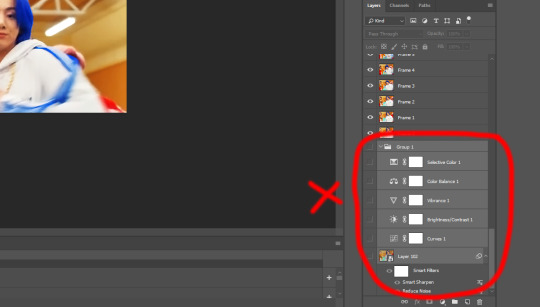
8. Convert the timeline back to frame animation, by clicking the little button at the bottom left of the video timeline:

9. Click on the menu top right of the timeline again > Make Frames from Layers
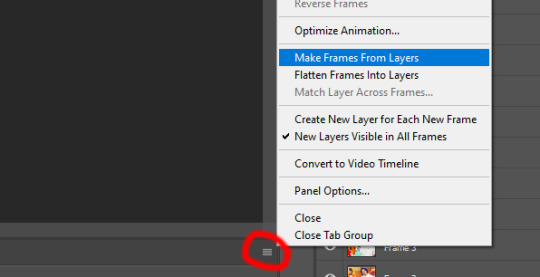
10. Now, just some potential cleaning left to do. Sometimes, there’s a doubled or empty frame or layer at the beginning or end, just delete those as necessary. The timing of the frames is probably off, too, just select all frames and set the delay time to 0.05 (or whatever).
Now your done! Save as gif, and you should get this:

I included some bonus links and tips after this but tumblr ate that whole part so I guess it’s going into a separate post. (Here is is)
Anyway, I tried to make this as easy to follow as possible for beginners, but feel free to send me an ask for clarification anytime. Hope this helps, now go make gifs and have fun!!
#photoshop#tutorial#gif tutorial#ps tutorial#btsgif#*#*tutorial#this took so much longer than i expected i'm not giffing for at least a week now
233 notes
·
View notes
Text
COMPREHENSIVE GIFFING TUTORIAL (vapoursynth + ps cc 2018) + some tips and tricks on color correction, blending and subtitles
You guys asked for it, so here we are! This is by no means the gold standard to giffing. Rather, this is simply my process and my own preferences. Take it as you will. Additionally since I use a mac some of my controls/panels may look different than what you would see for windows users.
DOWNLOADING YOUR SOURCE
This step is extremely important to the quality of your gifset. If you want high-quality gifs I would recommend giffing sources in 1080p whenever possible (especially if you’re going for larger dimensions). You may get away with 720p for smaller gifs. For kdramas, your go-to source would be dr*maday or torrents. (you can search my faq tag if you’d like to know specifics on finding and downloading torrents).
IMPORTING + PROCESSING YOUR FILES WITH VAPOURSYNTH (VS)
Please note that this tutorial does not cover basic installation and set-up of vs. If you would like to know how to download and set-up vapoursynth (it works for both mac and pc) along with some of it’s basics you can find more information at: https://hackmd.io/@nibreon/vapoursynth-book/%2F%40nibreon%2Fvapoursynth-book
Once you’ve identified what portion of your video you’d like to gif, simply drag your video file into VS. Specify the start time and duration of the clip you’d like to import. Typically you’ll be aiming for ~3-8 second clip depending on how big your gifs will be. I am very lazy when it comes to importing. The less of it I have to do, the better. Therefore, I often import clips that are 10-15 seconds long, sometimes even up to 20 seconds. I wouldn’t recommend going over 15 seconds most of the time though, because this will usually bring you over the 500 frames photoshop allows you to import at once. (when I do go over, I will sometimes import the processed VS file into PS in segments). You can also choose to import the VS output as segments if you want all your gifs on separate canvases. (I'll go into more detail on this later)
Once you’ve imported the clip into VS your screen should roughly look like this once the resizer pops up:
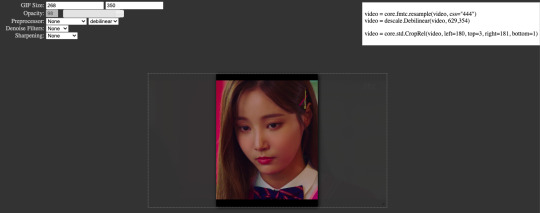
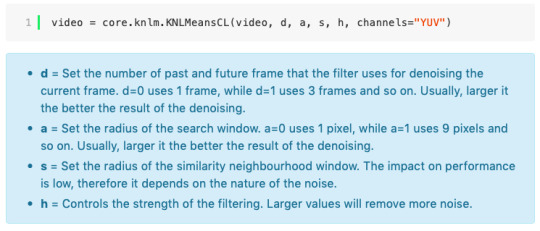
In the top left is where you will be applying your cropping, sharpening and denoising filters. Cropping: Keep in mind the Tumblr dimensions: 540px for full-width gifs and 268px for half size gifs, 177/178/177px for 3 gifs across. The height is completely up to your own preference. Usually I work in 540x300px. Once you edit those parameters you can drag/resize your video file to fit your new canvas. Sharpening + Denoising: You can choose to skip this if you would rather sharpen in ps. I personally do all my cropping, denoising and sharpening in vs. I use finesharp and KNML for sharpening and denoising respectively. Once you select those two filters from their drop down menus, be sure the select the checkbox as well. You should now notice 2 additional lines of code in the top right box. The line that reads: video = core.knlm.KNLMeansCL(video, 0, 6, 4, 1.2, channels="YUV") is where you will adjust your denoising parameters. You will only be adjusting those 4 numbers. I usually use: 0, 1, 0, 1.2. Now find the line that reads: video = hnw.FineSharp(video, sstr=0.22). These are your sharpening parameters. once again we’re only adjusting the number at the end. I typically use somewhere between 0.33-0.55. Depending on the quality of your source and preferences these parameters may change.
Here is a breakdown of the KNML parameters (source: @/nibreon HackMD):
Once you have finalized your parameters, copy all the code in that top right box and paste it into your vapoursynth editor. Note: you can ‘inactivate’ certain lines of code by adding the # symbol at the start the line. That line of code will then be greyed-out. This is what your code should now look like (the highlighted section is the part I just copy and pasted):
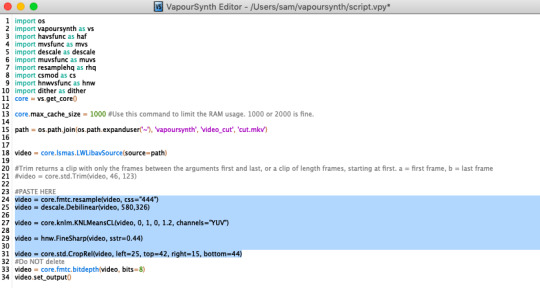
If you would like to preview your filters and see if you need to make any adjustments, simply navigate to the top bar and select script > preview. If you like what you see, great! If not, you can adjust the parameters directly in the editor until you see a result you’re happy with. Once you’re happy you can move onto the final step in vs: processing.
Processing: Once again, navigate to the top bar and select script > encode video. Another window should pop up. Make sure you set ‘header’ to ‘Y4M’ then click ‘start’. Patiently wait for that to finish processing. The longer your clip is and the more filters you add, the longer it will take.
IMPORTING YOUR CLIP INTO PHOTOSHOP (PS)
Now you’re done with the vapoursynth section! Not too hard, right? I use the timeline method when I gif. To import your video file into ps navigate to file > import > video frames to layers. Here you can use the sliders to further specify what range you would like to import. Make sure the ‘make frame animation’ box is checked. To optimize smoothness of your gif, avoid checking the ‘limit to every _ frames’ box. Hit ‘OK’ and wait for the frames to import. Depending on the size of your clip, ps may notify you that you are importing a large file and it may take a long time to process, simply say ‘ok’ to this. UNLESS you get a message saying it will limit to 500 frames. This means your clips contained more than 500 frames and you should select a smaller section to avoid cutting out any critical parts. (Note: you can always go back and repeat this process to select a smaller range of frames from the same video clip until you’ve imported all the frames you need).
Timing: You can adjust the timing of your gifs before converting to timeline. Select all the frames (Navigate to the icon with the 4 bars at the bottom right of you screen. Select “select all frames”). Click the drop down next to the timing of any of the frames. Select ‘other’ and input a your preferred timing. I personally use ‘0.04′ but I've seen people use anywhere from 0.4-0.8ms. Also as a note: when you convert your gif to timeline it has a tendency to mess up your timing so even if you input 0.04 or 0.05 it won’t actually be that timing later. If you want the true frame rate you can set your timing right before saving. You can also adjust timing at the end. (see export/saving gif section for more info)
Now the next part can be tedious and for that reason I’ve created numerous actions to speed up this process. But for the sake of this tutorial I will walk you through the steps. At the bottom of your screen is your timeline. As you can see, it defaults to frames, but we want to convert this into a smart object so that all your coloring/edits are made to all of the layers. To do this: 1) Navigate to the icon with the 4 bars at the bottom right of you screen. Select “select all frames” 2) Now select all your layers in your layer panel. On mac you can use cmd + option + A as a shortcut. 3) Back to the icon with the 4 bars, select “convert to video timeline” 4) Right click on all layers (which should still all be selected) and find “convert to smart object”
(Aside: Actions) actions are SUPER helpful to streamlining your giffing process. you can find actions people have made available on resource blogs like itsphotoshop OR you can choose to make your own custom actions. To do this, all you need to do is locate your action panel. Then from the controls at the bottom of the panel select the one that looks like a sheet of paper to “create a new action” Once you’ve named it and hit ‘ok’ the record icon should now be red. PS will now basically ‘record’ whatever you do. To stop recording hit the square icon. Now whenever you want ps to execute the same set of steps you just did, you can locate the action you just made and ‘play’ it by selecting the triangle icon. I highly recommend making an action for the steps I just outlined above to convert your gif into a smart object timeline. It will make your process much faster and more painless.
COLORING
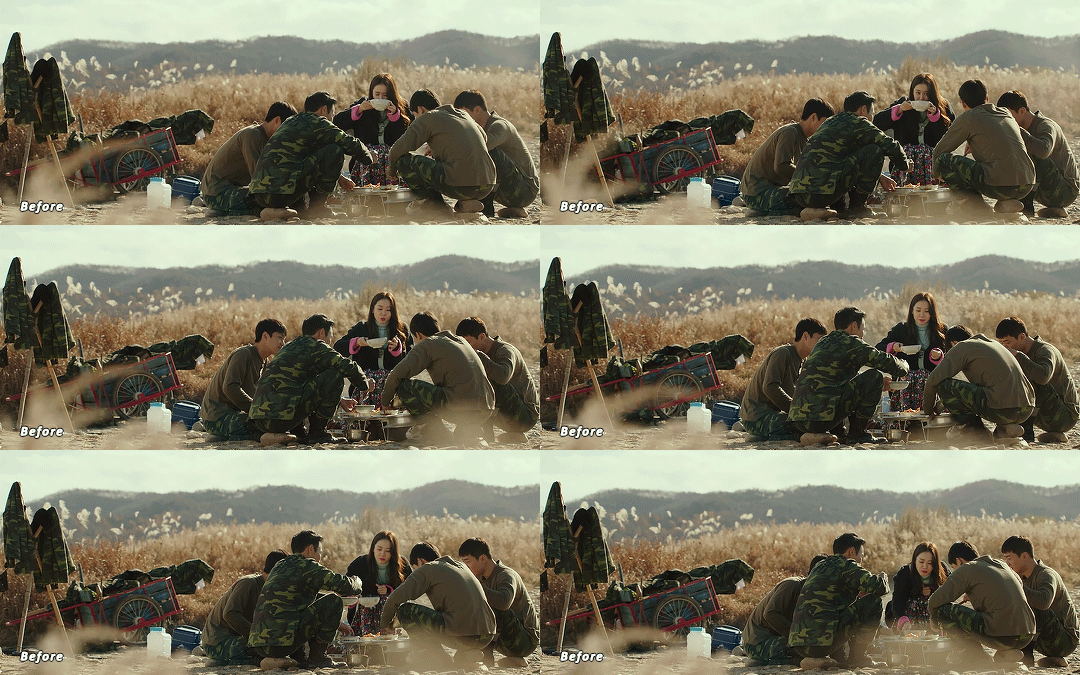
Now the fun part! I focus on emphasizing the colors already present in the video source or getting rid of some less-than desirable overtones when I color. It gives the gif a natural look, but makes everything pop a little more. We will be working with selective color, curves, levels, and brightness/contrast mostly. This is the original gif I will be using to demonstrate coloring:
Curves: I always start with curves. The first curve layer I use to set a desirable black point. To do this, locate the top dropper icon from the curves panel and select the darkest point of your image. This will set that section to “true black” Feel free to play around with this until you find a desirable outcome. Now add another curves layer. This one we will be using to adjust the brightness/contrast. First, I always start off with ‘auto’ and see where that takes me. If you like the outcome, great! If you don’t play around with the different curve points until you get an outcome you like.

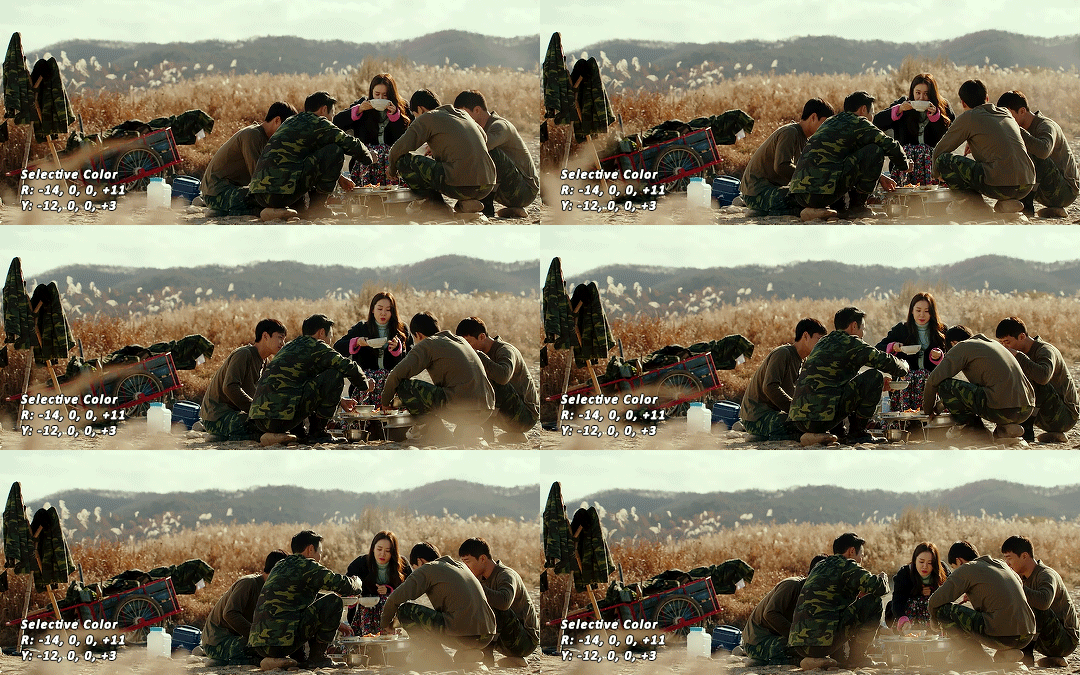
Selective Color: This adjustment layer will be your best friend. For me, I will typically work with reds, yellows, and black. If the source has a lot of blue/cyan I will use those too. Basically look at your source and determine which base colors you’d like to emphasize/alter. For blacks I usually up the black by +1-5 depending on the source. For reds, it also depends on the source. But I will typically either decrease cyan (to make red stand out more) or increase cyan (to make the red not look so overexposed). You want to be careful here. Overexposing the red can make your skin tones look like red tomatoes! And for my content base, where most of the actors are of asian descent, we should be emphasizing the yellows and NOT the reds (see aside on color correction + skin tones for more info). After altering the reds to my liking, I do the same process for the yellows. To bring back natural skin tones and color, you will likely want to darken the yellows, expose them a bit more and maybe even up the yellow slider. A common rule of thumb: if you want to make any of the colors less exposed, increase the cyan. If you want to increase exposure on any of the colors, decrease the cyan. If you want a color to appear more strongly or prominently, increase the black. The magentas and yellows I use more to adjust hues. You can add multiple selective color layers to further emphasize your changes.
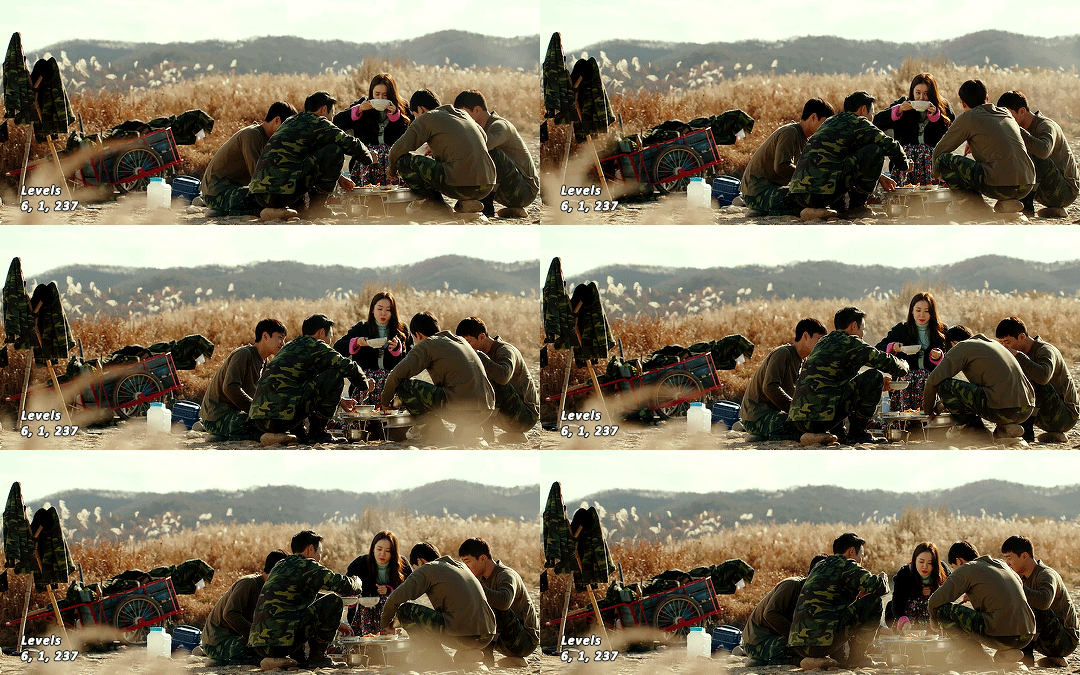
Levels: Now we will work on the lighting some more. This creates more contrast and depth to your gif, often making them look ‘crisper’ To emphasize the bright parts, move the right-hand slider to the left. The emphasize the dark parts, move the left-hand slider to the right. You may also choose to move the middle slider to adjust more neutral lighting. Do so until you find a setting to your liking.
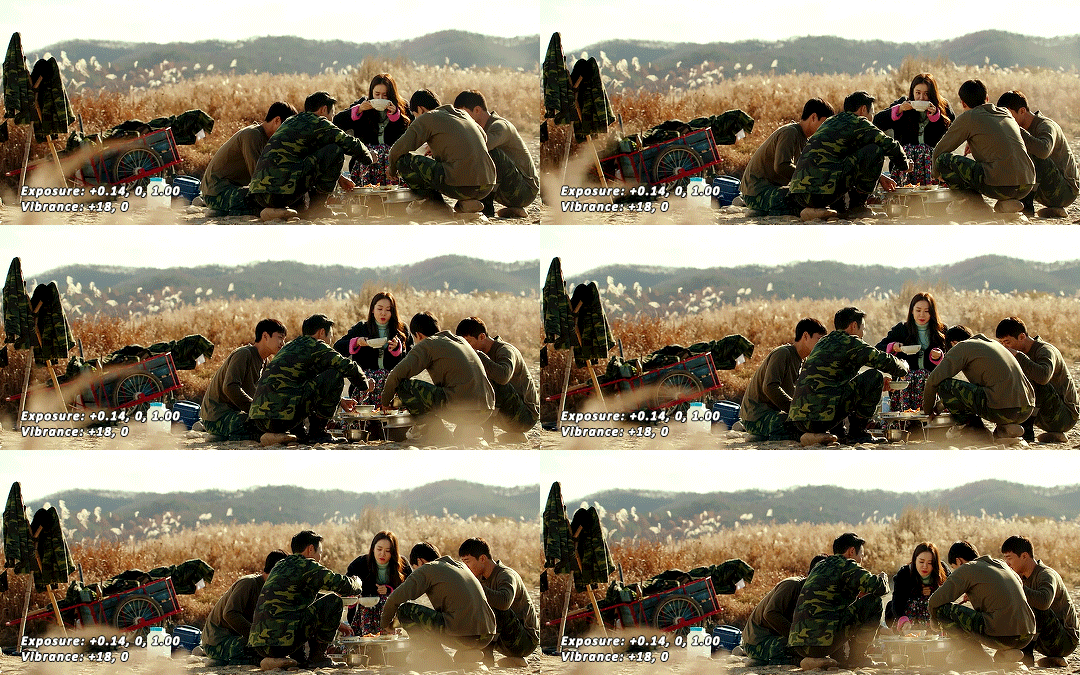
Miscellaneous: Depending on your gif you may need to play with other adjustment layers. Some other ones I often use are the brightness/contrast and exposure to adjust lighting and add more dimension to the gif. For additional color correction I use color balance and to a lesser extent hue/saturation and vibrance.
(Aside: Color correction + skin tones): We are anti-whitewashing and anti-redwashing when it comes to asian media. Like I mentioned earlier, natural asian skin tones have yellow undertones, not red/pink. Therefore when you’re bringing in color you should be mindful of this delicate balance. Adding more red does NOT equal un-whiteashing. Be VERY careful how you balance the yellows with selective color/hues/color balance.
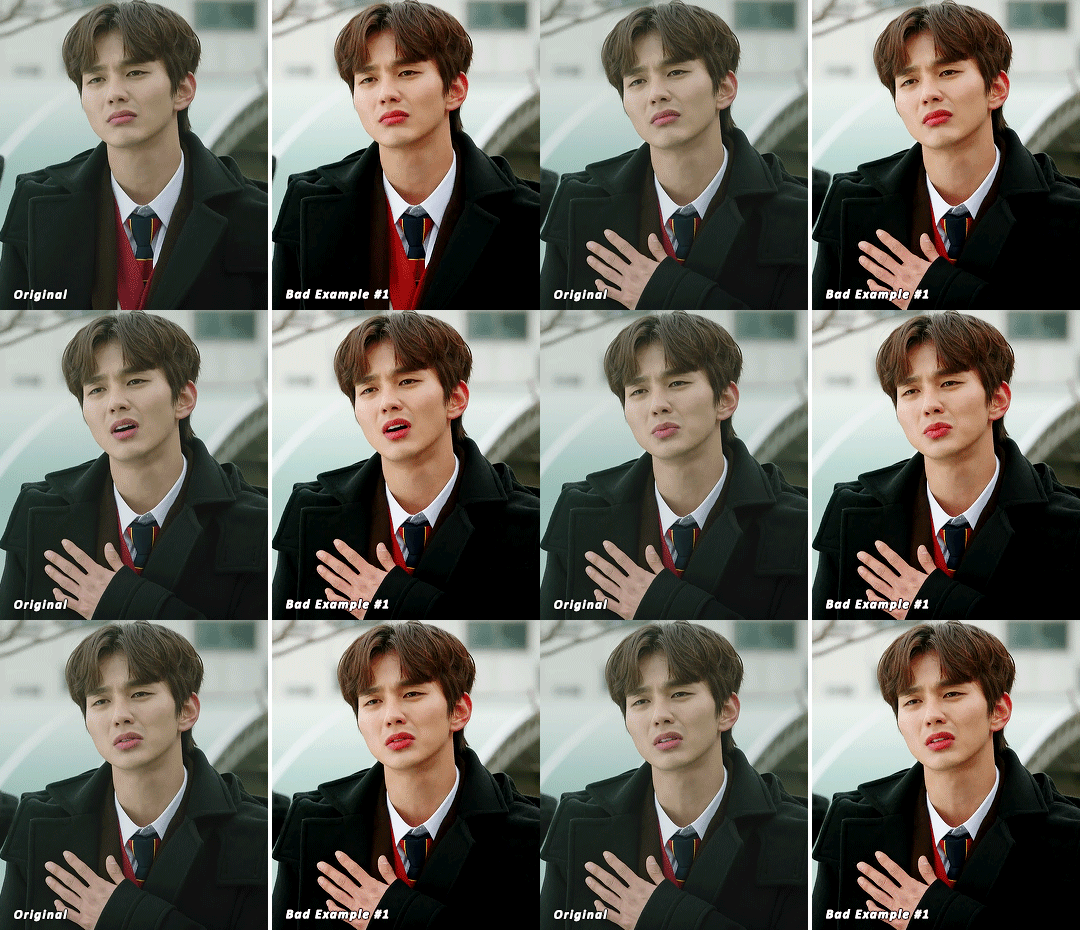
^^ Here is an example of what I mean by overexposing the reds. Poor seungho is looking as sunburnt as a cherry tomato. Note: if your original source is already overexposed with red, fix it! You can do this by applying the same basic principles I explained earlier. Try upping the cyan on the reds in selective color, or shifting the color balance to favor cyan over red with the color balance adjustment layer. You may also choose to favor the yellow over blue.
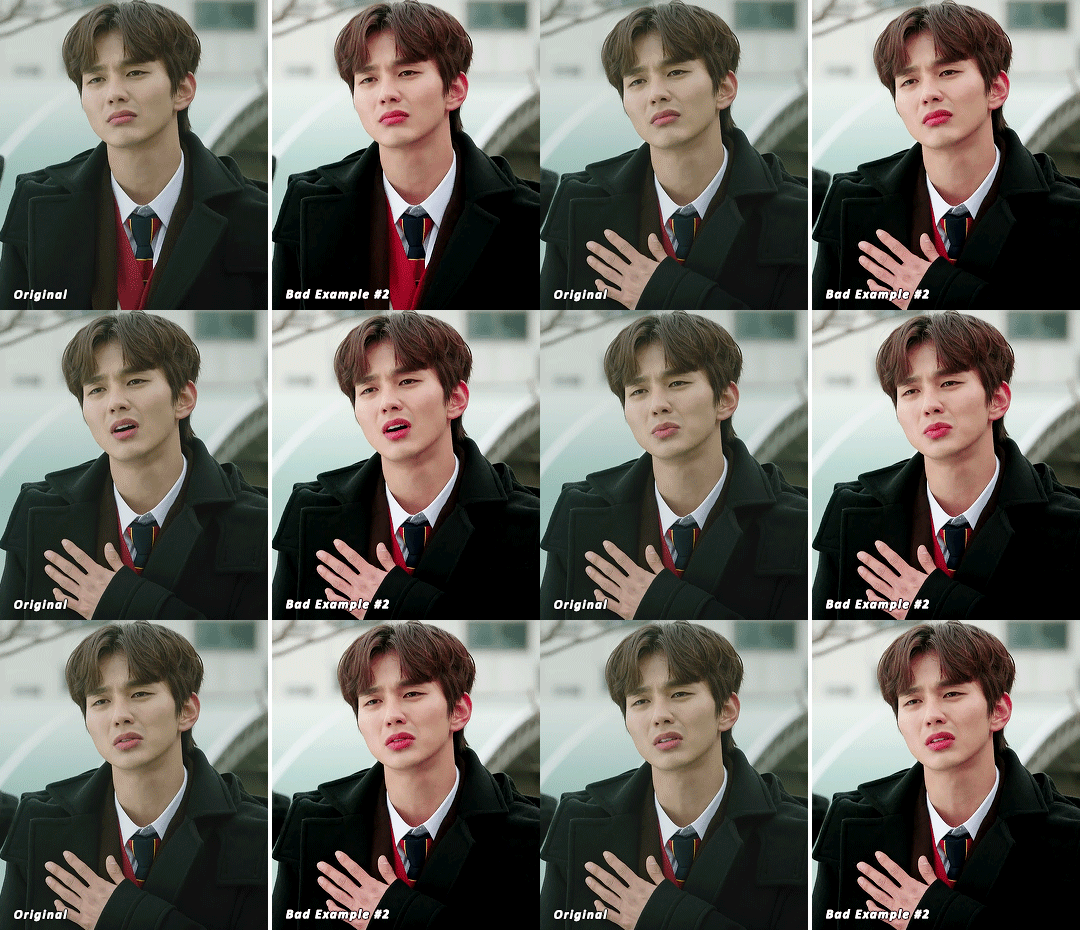
^^ Now this is straight-up whitewashing. This is what happens when you are not careful with your correction of yellow. I’m not saying you can’t touch the yellow slider or get rid of some yellow form the overall image (because sometimes it is very much needed), but you should be very mindful how your corrections can affect skin tones. If you decide to decrease saturation of yellows, or decrease yellow in the selective color section of the reds, do so with caution. If your reds are looking too pink, add some yellow in the red selective color, up the yellow and black of the yellow selective color.
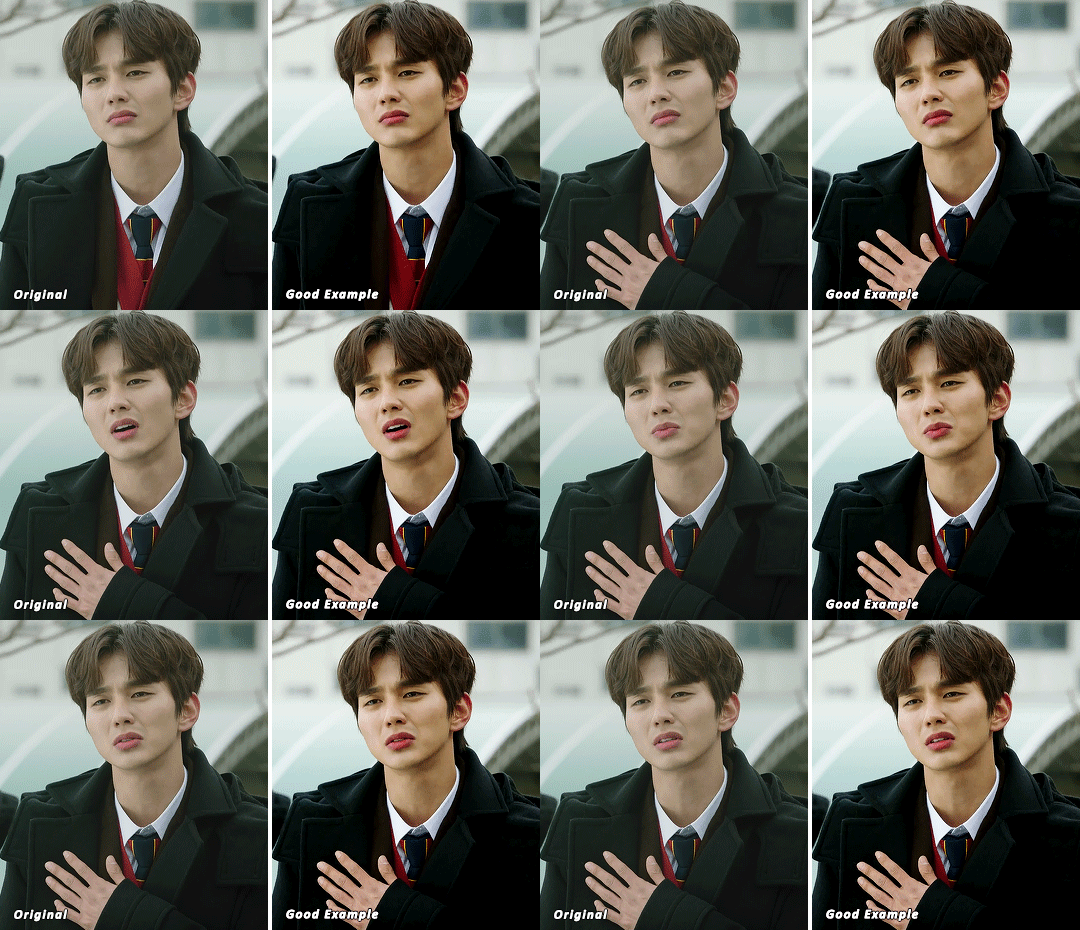
^^ If you hit that happy medium, you can emphasize the natural skin tones without overexposure. Here the underlying tones are very much still in the yellow range.
(Aside: Blending): I will very briefly talk about how to blend two gifs together. First make sure you’ve imported both your gifs into ps and converted them into the timeline format. On one of the gifs, right click the gif layer in the layer panel > duplicate layer > select the canvas of the gif you’d like to blend the gif with. On the canvas you just copied your second gif to, you can now drag the two layers around the on the canvas to get your desired positioning. On the top gif apply a layer mask. This can be found in your layers panel at the bottom, and is indicated by the white rectangle with the circle. Next, make sure you select the mask in the layer panel (it will show up as a white rectangle on the layer you applied the mask). Grab your paintbrush tool and make sure your color is set to black. Now you can effectively ‘erase’ the part of the top gif you don’t want to show anymore. I recommend setting your brush hardness to 0% to get a smoother transition. You can also play with the opacity settings. If you want to add back in a part you erased, just switch to a white paintbrush and you will be able to undo what you had just ‘erased’ with the black. When you merge the gifs, they will play the same number of frames. This means your blended gif length is limited by the gif with the fewer number of frames. You can move around your timeline layer and shorten the included portion by dragging either end of the timeline layer in until you get both gifs to play the parts you want.

CAPTIONS/SUBTITLES
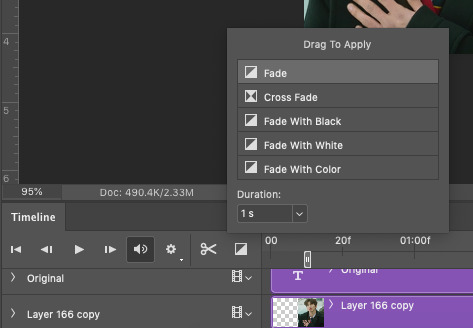
I often get asked about my subtitle font/styling settings. Personally I find the best fonts for subtitles are calibri and arial. I use calibri with the following settings: 12-14px, bold italic plus faux bold, 1px black stroke (optional: drop shadow set to ‘multiply’ at around 85% opacity), and tracking (VA) set to 75. If you would like your subtitles to fade-in or fade-out you can apply the ‘fade effect’. Locate the b/w square icon in your timeline panel. Select fade and drag it onto your text layer in your timeline. You can then right click on the wedge shape to adjust your fade duration. I usually use 0.35s. If you drag and drop the effect towards the beginning of your text you can get the fade-in effect. To get the fade-out, simply drag and drop your fade towards the end of your text layer.
SAVING/EXPORTING YOUR GIF
We’ve reached the final stretch! If you need to adjust your frame rate timing: you will need to revert your timeline to frames. To do this: 1) Navigate to the icon of 4 bars at the right of your timeline panel. Select convert frames > flatten frames into clips. 2) Navigate to the icon of 4 bars at the right of your timeline panel. Select convert frames > convert to frame animation > when promoted hit ’ok’. If at this point you see more than one frame in your timeline panel, delete the frames until only one is left. In the example below I would delete the first frame by hitting the trash icon from the timeline panel.

If there is only one frame, leave it as is. 3) Navigate to the icon of 4 bars at the right of your timeline panel. Select ‘make frames from layers’ You will most likely need to delete the first frame in your timeline panel (it won’t have your coloring). Sometimes ps adds in some ‘blank’ frames as well, delete those too. Now you can adjust your timing.
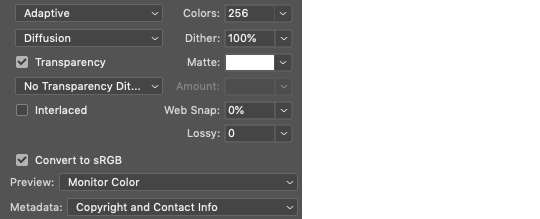
Once your timing is set: When you’re saving your gif, just keep in mind it must be under 10mb. Navigate to file > export > save for web. When it comes to your save settings I typically use either selective diffusion or adaptive diffusion. I also also occasionally use adaptive pattern (I find this is best for dark scenes without a lot of contrast). Set colors to 256, quality to bicubic and looping options to forever. If you want to preview your gif, hit the preview button in the bottom left. Otherwise, go ahead a hit ‘save’ and you’re DONE!

ADDITIONAL RESOURCES
Feel free to check out my ‘ps things’ tag for more photoshop stuff/mini tutorials. Additionally @/nibreon and the hackmd site I linked previously are your best resources for vs questions. If you would like to see my giffing process in motion feel free to check out this video. It’s sped up but you can slow down the playback. Additionally be sure to check out resource blogs like itsphotoshop for more helpful tutorials and resources.
If you reached the end of this beast, kudos to you! I hope this helps and never be afraid to reach out with any questions.
542 notes
·
View notes
Photo
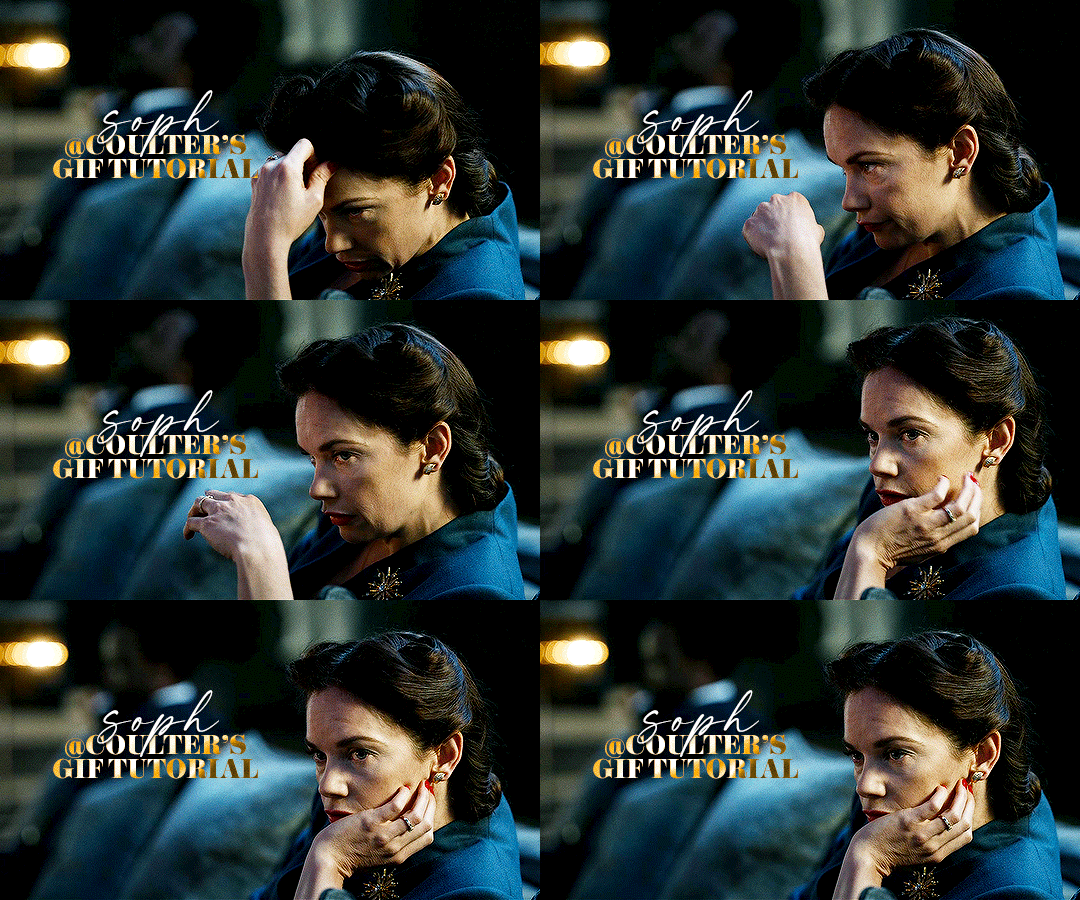
Hello! As requested, here is a tutorial on how I make my gifs. I would like to preface this by saying there are many ways to make gifs, and there’s no right or wrong answer imo. This is just how I personally go about doing so!
I will be using PS CC 2017, but as long as you have the video timeline option, it shouldn’t matter too much; on any version of PS, you should be able to adapt anything I mention here! You will also need some kind of screen recording software. I’ll talk a little more about that under the cut.
To start, you need the source material you will be making the gifs from! I get mine from snahp(.)it (avoiding links so tumblr hopefully doesn’t banish this from the tags lmao) and I always opt for either 1080p or 2160p. Not all laptops will support 2160p as it’s 4K, but either works great! You just want your gifs to be the best quality possible.
Next is where the screen recording comes in. I don’t use the screencapping method to make my gifs (where you use a program to cap a clip and then load those caps into a stack in PS). This isn’t for any particular reason… it’s just how my friends, (who very kindly taught me to gif), had always done it, so it’s now how I do it too. Personally, I find the quality to be just as good as the screencapping method, and have never noticed a difference between the two.
As I have a PC, I use the software built into it for screen-recording. If you go here: theverge(.)com/2020/4/21/21222533/record-screen-pc-windows-laptop-xbox-game-bar-how-to – you can see how to use the XBOX screenrecorder to record from files you have d*wnloaded. This also works on some streaming sites, but I think it depends on what browser you use. Personally, I recommend Firefox, as that seems to bypass a lot of the blocking and ads that occur when trying to do this sort of thing.
For MAC users, I have been told handbrake works well, as it converts MKV files to MP4, which can then be used to make gifs. You only need to convert part of the file to MP4 depending on how much you want to gif, and this also bypasses the screenrecording stage, as you can edit MP4 clips on Quicktime. I am told you can split them into smaller clips by going to edit > trim and it saves the new clip!
I have also used anyvideoconverter for small clips, but I can’t say what it does to the quality of your video, or how big of a file it lets you put in! With the XBOX screenrecorder, it doesn’t matter what type of video files you get, as the recording will save to MP4 anyway.
LOADING YOUR FRAMES
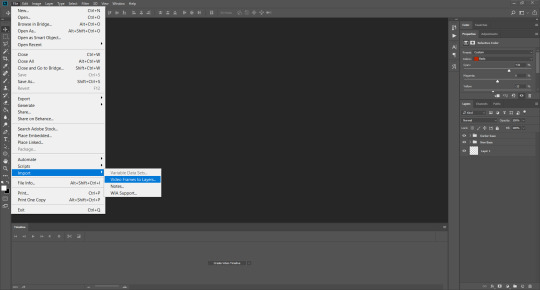
Now, go ahead and record whatever clips you want to gif. Make sure you have the video timeline open, by going to window > timeline. Then, go to file > import > video frames to layers.
Next, select and open your clip from where it has saved (with the XBOX recorder, it saves in video > captures). You should see a little window pop up, where you can move the sliders back and forth to clip your recording to whichever part(s) you specifically want to gif. I recommend trying not to load a lot of frames into photoshop at once, but I would be a hypocrite to say that, since I do it a lot lmao. Just be patient if you do!
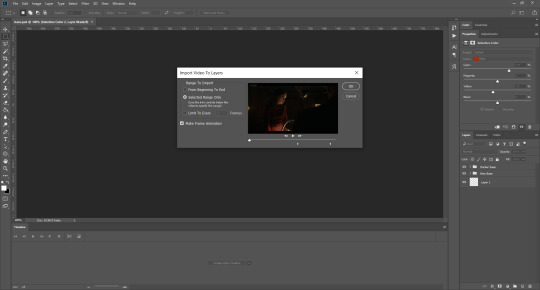
Once you have chosen the length, click okay. Never, EVER, I repeat NEVER click the button that says “limit to every __ frames”. This really ruins the flow and quality of your gif—it’s better to have shorter, but smoother gifs, I promise. And with tumblr’s new 10 MB limit, it shouldn’t be a problem anyway!
Then, your frames should open up. What we want to do is make them into a smart object, so we can edit all the layers at the same time. To do this, click the small button in the left-hand corner. ALWAYS click this first. If you don’t, it will only convert the first frame to a smart object and the gif won’t work.

Give it a second to sort itself out, then, on the right-hand side, select all your frames at once using the shift key.
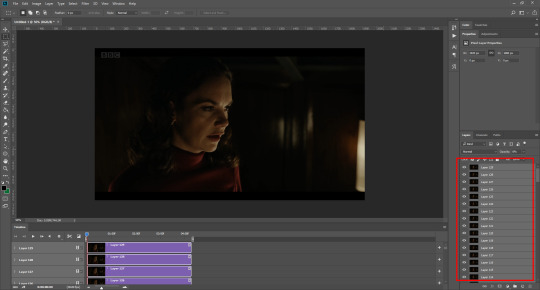
Then, go to filter > convert for smart filters. This might take a minute. Don’t click anything else in case PS gets angry lmao, just leave it for a second and it’ll do its thing. The more frames you have, the longer it takes! Now we have our gif, but it needs to be cropped, sharpened and coloured!
CROPPING
You want to start by selecting the rectangular marquee tool on the left-hand side, then drag it across by clicking and highlighting the area you would like to crop your gif to, like so:
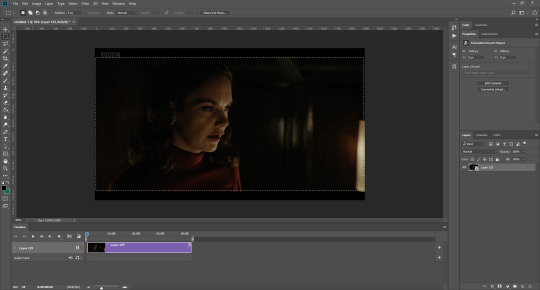
What I tend to do is select everything inside the black lines you sometimes get around your gif (this depends on what file you d*wnload), and also the tiniest bit inside the sides. This is because I’ve found if you crop it right up to the edge, you get a tiny bit of transparency on the sides of your gifs, which I’d rather avoid.
Once you have your desired selection, go to image > crop. Now, the dimensions for tumblr are 540px width, so all your gifs have to be that width. However, the length is up to you. I really like big gifs, so sometimes I even make a full square, or even longer. It’s entirely up to you, and what kind of set you want to make.
For the purposes of this gif, I will stick to what I usually go for, 540px by 350 px. This will mean you’ll have to crop some width off, but that’s okay, since Marisa isn’t central anyway. The cropping is always trial and error for me, as sometimes people move out of the frame within in the gif. The best thing to do is just try it, and then move the slider in the timeline window at the bottom to see if the person stays inside the gif, and if not, adjust accordingly.
Next, go to image > image size:
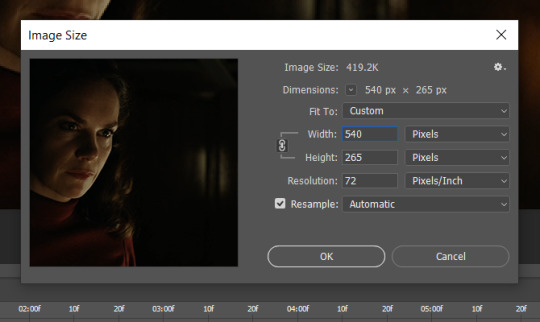
In this box, if I put the width as 540, the gif is a smaller height than I want, as it keeps to the dimensions of the gif when you load it into PS. That’s okay, just put the height you want instead, and we’ll crop off the excess.
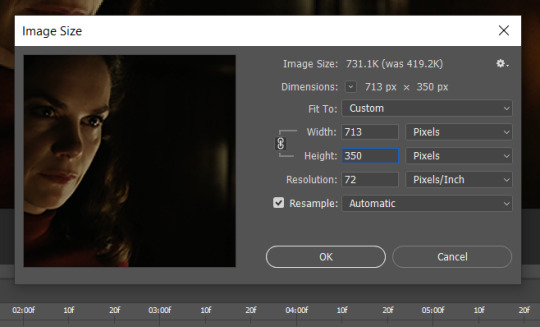
Then click OK. Using the rectangular marquee tool again, we need to remove the excess width. Part of the reason I like this version of PS is that it tells you the width of your selection as you do it, but you can always use the ruler as a guide, and check the size of your image by going to image > image size again.
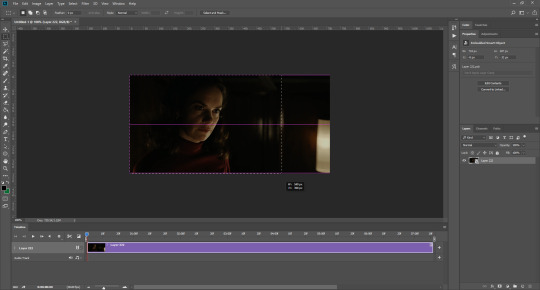

Again, use image > crop, and your gif should now be the correct size!
You can also use the crop tool in the timeline window to crop the length of your gif:
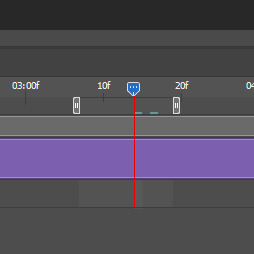
However, I tend to wait until later on to do this (which will be explained further down!)
SHARPENING
Next you want to go to filter > sharpen > smart sharpen.
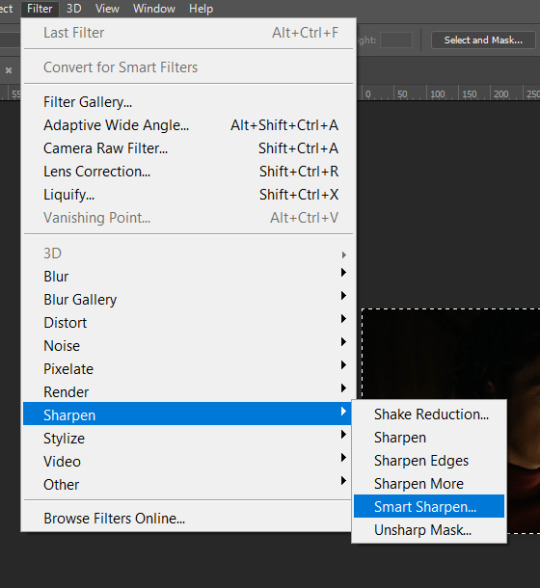
These are my settings. However, 0.4px is very sharp, too much so, but that’s easily fixed.
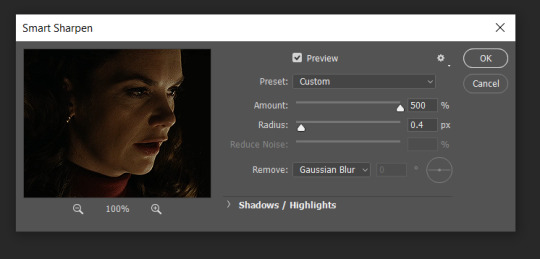
Go to filter > blur > Gaussian blur and then set it to 1.0.
Now on the right-hand side, we need to reduce the blur, so double click the little adjustment button, and change the opacity of the blur. I usually go for 20-30%!

Then click OK, and that’s your sharpening done!
COLOURING
I picked this scene on purpose as it’s dark, so good for showing how to colour a gif. I have a base psd which consists of some very basic adjustments, but it mostly exists so I don’t forget what adjustment layers I like to use. I adjust them every time I make a gif, essentially colouring each gif from scratch.
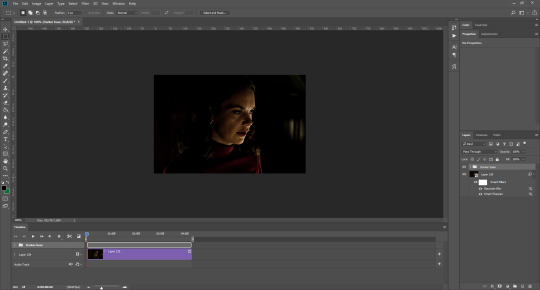
In this case, the psd actually makes it darker. So, what I will do is turn each layer off, and adjust as I go. A lot of people say using lots of adjustment layers ruins the quality of your gif��� I have never found this to be true, as long as you are gentle with them. If you whack the brightness right up to the top, it’s going to ruin your gif no matter if you use 1 adjustment layer or 100. I would just say use your common sense, and adjust a little at a time!
I start with a simple black to white gradient map set to soft light, because I think it helps you see depth once you add some brightness to it. I usually do this on about 10%, or more if needed. It’s probably unnecessary, I just like how it looks!
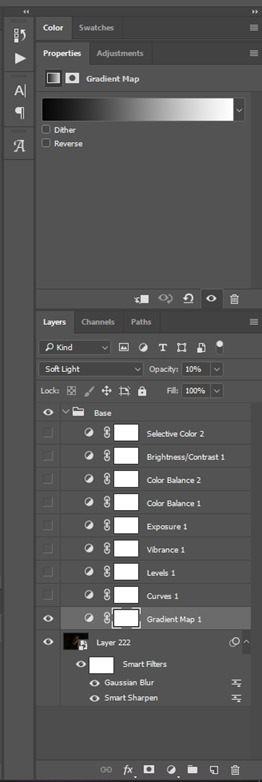
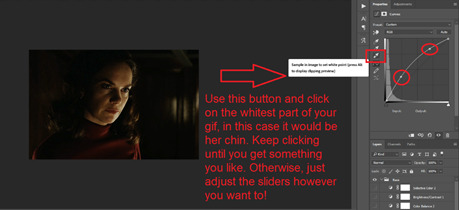
Then, I move onto using curves and levels. This is where things can diverge depending on who you’re colouring. If this person is white, it doesn’t matter too much. If they’re not white, you don’t want to white wash them. My best advice is to play around with it. By adding vibrance and other (usually the red) selective colour settings later, you can ensure you don’t change the person’s skin tone from what it originally was. You can also use layer masks at varying opacities (various shades of grey), on your curves and levels, to remove some brightening so that you’re not changing anyone’s skin colour. Just brighten slowly and check in with yourself honestly about how your gif looks.
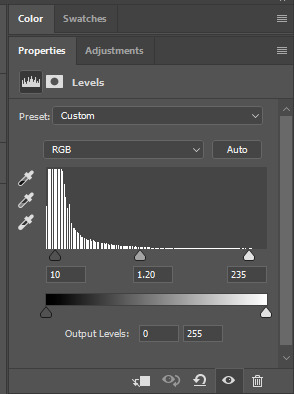
Some people don’t like using levels, or curves. It’s completely up to you. I tend to use both because levels are good for bringing depth, even if not brightening (though I like to use them for that as well).
One thing you can do is use the white point of the gif to make PS adjust the curves itself, however I like to drag the sliders myself and see what it looks like. Just make sure it’s not too bright, as we will be using further layers to brighten more, after.
Next is levels. The slider on the left controls the black point, the one in the middle controls the midtones, and the one on the right controls the white points. The black brings depth, the midtones adjust the overall brightness, and the white points produce stronger highlights. Again, you’ll get a feel for how this works as you practice. Just don’t use the white point excessively, especially if your characters are not white.
Then I add vibrance (+20!), because we’ve removed a lot of it when lightening the gif. Next is exposure, which I find brings out the highlight and shadow areas more effectively:

Then colour balance! This helps with scenes that might be a certain colour, i.e. too blue, too green, too red, etc. Moving the sliders in the opposite direction of the colour your gif is will counteract it. The best thing to do when accounting for different colours, is to make a new layer every time you change colour, so that you don’t get confused. I always add a new layer for colour balance and selective colour if I want to change more than one thing. So one for red, one for yellow, one for pink, etc.
A layer of brightness just to make the gif pop, and because the scene is extra dark, I added a very gentle extra curves layer:
SAVING YOUR GIF
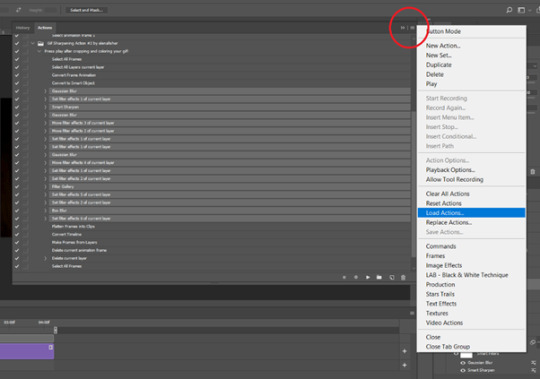
Time to save the gif. You can go ahead and file > export > save for web (legacy) now, but then you’ll have to reopen the gif to reset the frame rate from 0.07, to 0.05. Instead of doing that, I use a modified action. The original was made by the very talented @elenafisher! So I do not take credit for that at all. You can find the original here: elenafisher(.)tumblr(.)com/post/190817437374/gif-sharpening-action-2-preview-download and in my resources tag. Please reblog it if you’re going to use this!
To use an action, first make sure you have actions turned on in window > actions. To load in your action, go to the little lines circled, and then load the action from your downloads:
Obviously if you don’t want to sharpen your gifs yourself, you can use the action as it is, and it will give you a beautiful glowing effect. If you’d just like to use it to flatten your gif into frames like I do, make sure to take out all the items I have highlighted:
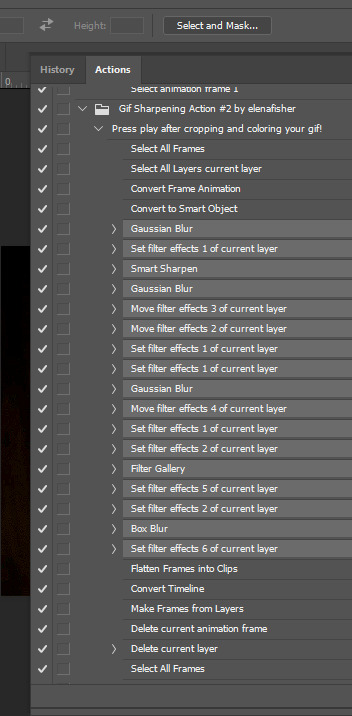
Until it looks like this!
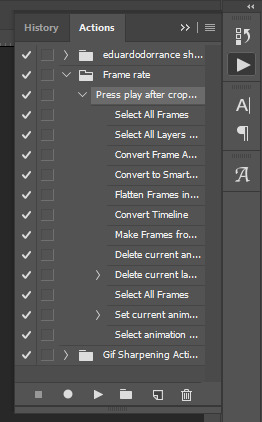
Make sure you have the layer under the file name highlighted, and then click the play button at the bottom! (If you get a screen saying select all frames cannot be found, don’t worry, just click continue!) You can delete the layer that does that if you want, I just keep it in case I realise I’ve forgotten to do something, because you can click cancel and edit your gif before you flatten it. Of course you can undo the steps to get back to the smart object version of your gif, it just takes longer!
And now your gif is in frames and set to 0.05 already, so you don’t have to change the speed! All you need to do now before saving is change the gif cycle to “forever” in the bottom left-hand corner:
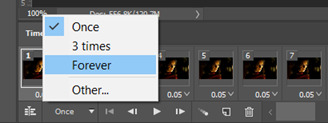
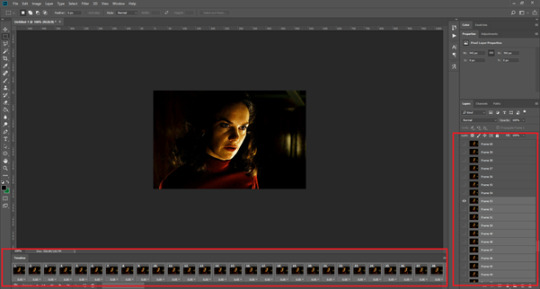
Then to save the gif go to file > export > save for web (legacy). Sometimes, the gif is bigger than the tumblr 10MB limit. You’ll be able to see this in the bottom left-hand corner of the gif save settings. If this is the case, I like to preview the gif, to see whether it would be best to cut frames off of the beginning or the end, or both. When you’ve decided, you can select the frames at the bottom, and in the right-hand side panel, and delete them both using the little bins/trash icons.
I keep checking and deleting frames until I get the gif under 10 MB! Just don’t delete frames from the middle, as then you’ll have the same issue as if you selected “every other frame” when making the gif: it won’t flow!
Lastly, these are my save settings:
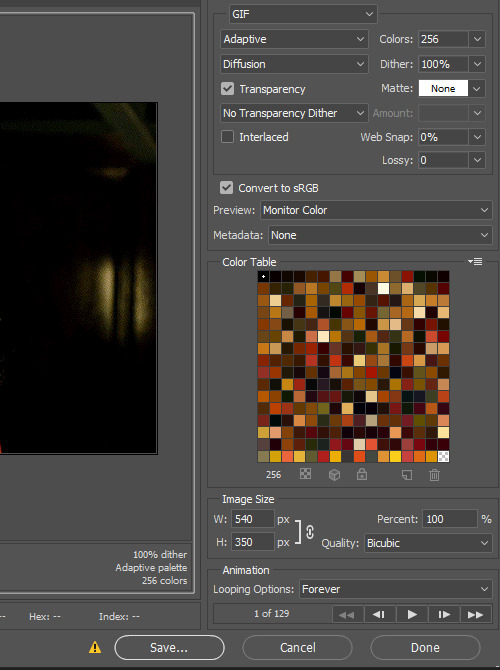
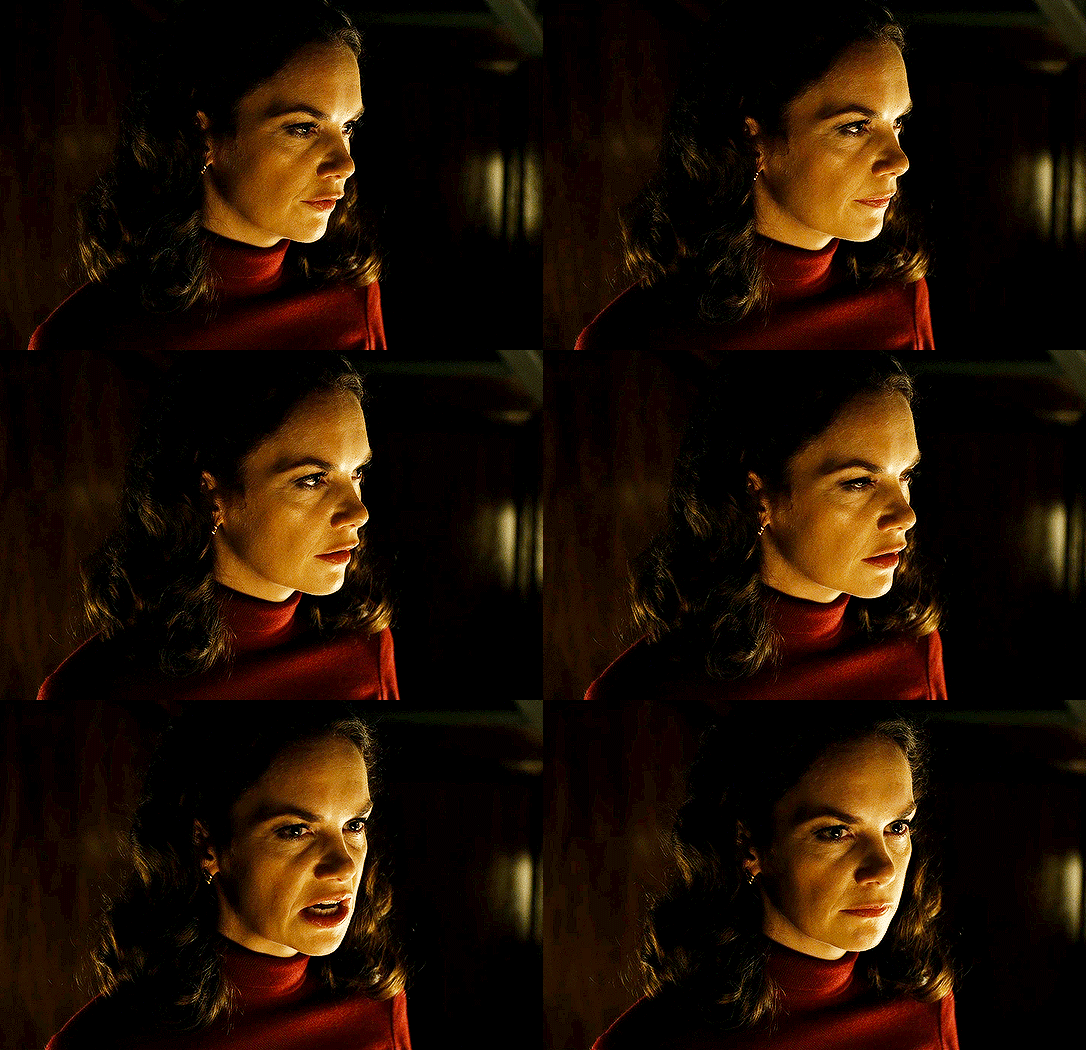
So that’s it! That’s how I make all my gifs. Blending I do when the gifs are in the grouped, smart filter stage, whereas text I add on during the framing section above! Really hope this is helpful, please feel free to ask any questions you may have! 💖
#gif tutorial#tutorial*#completeresources#yeahps#chaoticresources#allresources#mikesmom#usergeo#userava#usertix#usersmile#usertom#if you'd like me to cover anything more advanced just shout#i wanted to show how i add text too but tumblr wouldn't let me add any more pics#but people can let me know if that's something you'd want!
516 notes
·
View notes
Text
I’ve been getting plenty of messages questioning my absence from his blog and my frequent leaves from my CC, I think this is a good time to bring this up.

I receive these sort of messages on a regular basis. Which means I have to screen through and delete them on a regular basis. CC has filters, but sometimes they don’t work, and sometimes the regular messages don’t come through, and instead these do. By the way, this is only one of the many hate messages from haters camping in my cc and blog. How do I know? They only send in messages when I’m actively responding, and is silent when I spend days away from my cc.
Usually you won’t see them, because I choose to delete them for the comfort of Taejinnies who come here for a peace of mind, and also giving haters attention means they’ll keep coming with more. But I think I should address this now anyway.
Thankfully, this does not affect me the way this anon wishes to - which is probably to make me feel mentally unwell, drive me away from my blog and cc, and ultimately close down. None of which I will be doing. Or maybe they even send these in thoughtlessly and is eagerly snickering behind their screens seeing me finally “respond” to them. I’m guessing the one who sends these in are the same few people, most likely children, someone with stunted maturity, or perhaps someone who needs help themselves.
After addressing this, I will be going on with my usual agenda. I go on my cc to interact or fangirl with other Taejinnies, but having to screen through and delete messages all the time, and this is not including spam and messages from other shippers is actually really exhausting.
(Case in example from this blog alone:


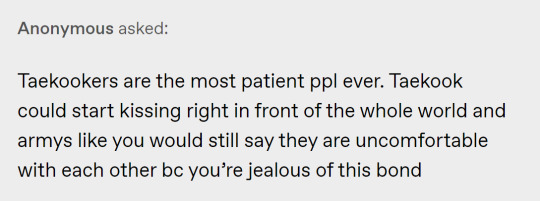


This is only a fraction of it.
Not to mention the number of people who finds my cc link from word of mouth without knowing about my blog and why/how my cc exists in the first place means I have to respond to ‘basic’ questions constantly - which is why I created the FAQ post.
I will still be responding to messages as best as I can, but do understand that I face some challenges in doing so.
Moving on, I’m really absent from this blog for a few reasons:
1. I have other growing responsibilities and activities taking up more of my time.
2. I have a made a few reliable army friends whom I chat regularly with. My blog is mainly a ranting space about Taejin, so I rely on my tumblr less to express my thoughts about them. I will of course leave this blog open since many Taejinnies have told me that this blog was of help to them when they felt confused.
3. I have been informed of a Taejin youtube channel who does timelines in video format here: https://www.youtube.com/channel/UCJrcFVn4G7lxJ2TIAMzTzVg
I think their videos are good and resourceful.
4. Besides the timeline posts which are kind of in progress, I don’t feel the need to “analyze” or scrutinize Taejin’s interactions anymore. This is because I am no longer confused or is doubtful about the nature of their bond. Unless a definitive incident happens where their dynamics change or is indicative of any sort of conflict, I will most likely not making anymore analysis or speculations.
5. If something like Dynamite or BE comeback vlive happens again or if I feel hyped enough to make a post, I probably will.
Lastly, thank you to those who dropped me messages of concern, I really appreciate it. I still love Taejin very much and enjoy watching them and I will most definitely still be around for BTS.
46 notes
·
View notes
Text
Long Post Discussing Dream TWT: Featuring Fan, Hate, and Trending Talks Mostly (Interaction Absolutely Encouraged)
(A lot of this can actually be applied to all fanbases but I chose the one relevant to my current interests and issues that were on my radar.)
I made a post previously that my love for mcyts (Specifically members of the Dream SMP) was dying because of nonstop Dream hate on Twitter. I felt like I couldn't safely look through a trending tag (which will be a separate discussion in this) without having to also see endless insults, attacks, and belittlement amongst people just trying to have fun with CCs. To make this understandable and easy for me to keep on theme I'm gonna break it down into the relevant topics also this is absolutely open for discussion as long as everyone is being respectful. Do not insult people and if they seem like a troll just leave them be.
Fans vs Stans:
So this, I think, is a center point for the Dream hate. It feels that anyone expressing interest in Dream and related CCs content is immediately targeted and made fun of because obviously you can't enjoy something without being an awful person to people who don't enjoy said thing. That last statement was sarcastic (just so its clear). People especially on Twitter will be relentless in preying on just basic fans for simply posting about a funny moment. They claim its because its annoying and nonstop and all of their fans are obviously brainwashed.
No. Just. No.
Enjoying something means you consume it. If you enjoy sports you watch the team play. No one says yeah this is my favorite team I watched one game once. That would be ridiculous. So it makes no sense to attack people for watching a person's content and knowing their content when they're a fan of said content.
That being said, yes people can get carried away and be rude to people for no reason. This however includes people hating on fans simply for being fans. You can't say you're disrespectful to all fans because one time a few were rude to you. Every fan base has rude people and at this point in the internet people WILL talk more about bad than good so please don't assume the worst because you heard a story or saw one wildly talked about incident where a small percentage of fans were involved and where other fans were actively telling the others to chill out.
Trending and Interaction:
This is the topic I sort of touched on in my last post. So to summarize, Dream and his friends trend A LOT. This isn't surprising as one, they're popular at the moment and two, they're streamers so when something happens a ton of people all know at once and will post at once. That's how trending works after all.
Here's where it gets annoying though, and no, not due to fans. Fans are allowed to post about content they enjoy and are allowed to joke and interact online with people who enjoy the same content. So you can't gatekeep the trending tab. It's literally impossible and just because its not enjoyable for you and not something you're interested in doesn't mean it shouldn't be trending.
This is where interaction comes in. Twitter and pretty much every social media ever tracks what you consume. This is why Twitter actually has multiple trending pages. The "For you" trending is what we'll mostly be discussing now though. The "For you" trending is the first page it opens up and will consist of things Twitter knows you interact with. So in other words, constantly viewing Dream and related content just to get angry and insult people? Guess what! You just ensured it will constantly be on your radar. Easy solution? Don't interact with content you don't enjoy. Yes you won't always be able to avoid it but this is true for everything. Just do your best and watch out for your own interests as best as possible (this statement applies to the actual trending page as well). Unless you're intentionally interacting just so you can continue bullying people its not that hard to avoid. And if you are doing that, I feel really sorry that you don't have something you actually enjoy to consume instead of just spreading hate (this is genuine not an attack).
CC Relationships:
A lot of Dream and related creator haters often state that the creators and fans have an unhealthy relationship. This is not a fair statement to the standard fan. People who actually show obsessive traits and attack people over their creators do have an unhealthy connection, but what is not unhealthy is-
Enjoying a creators content
Following their social media
Making posts and content about creators
These actions are literally the basis of being a fan of content. So no, posting about something a creator said or did is not creepy and obsessive just because its not funny or entertaining to you. Its like when your friend does something stupid and you will randomly bring it up whenever you can because it was a funny moment. Thats essentially what this is. No, we are not friends of the creators most of the time, but we do have a relationship to the creators. Most of the time with CCs their fan base consists of people with similar interests, senses of humor, and personalities. So we can relate to the things that happen with them and their friends and since they're broadcasting it we will find it funny when they find it funny. And that's okay and shouldn't be a hot take.
Also creators saying they love their fans is not a bad thing. Platonic love of people who share in your accomplishments, support you, and encourage your growth is not a bad thing. Thats what this type of relationship is and should be with CCs. They are where they are because people connected with them and they connected with those people. Let them express that admiration and gratitude.
Joking vs Attacking:
Final rant because this is already long and probably won't get attention anyways. A lot of Dream fans have tough skin after being a part of this sudden shift to mainstream and constant hate. This means that sometimes fans will make their own jokes about hating the fans even though they are one. However, this can sometimes be extremely misleading and damaging to see. No I'm not saying you can't make these jokes after all some are actually really funny! But try to make it clear that you aren't actually a part of the people who are actively trying to tear down a fanbase. Sometimes intentions don't come across well and insults can actually be, well, insulting when not phrased correctly. This is by no means an attempt at gatekeeping but rather just a general public announcement as a fan who often times saw something that actually added to the sadness of feeling constantly attacked and belittled only to see that the poster was also a fan.
That was long and probably a little all over the place so if you made it this far just know that I appreciate you and hope you're doing well in these times. 💕 I just really needed a place to get out these thoughts and figured hey Tumblr is significantly less mean than Twitter in my experience so let's attempt this.
Final statement! If you see this in a tag you think it shouldn't be in or know a tag you think I should add please let me know! I'm still new to posting my own content and don't want to cause problems where there need not be any.
#dream smp#dreamwastaken#georgenotfound#sapnap#quackity#tommyinnit#wilbur soot#philza#technoblade#badboyhalo#tubbo mcyt#fundy minecraft#ranboo#dream team#antfrost
105 notes
·
View notes
Text
It’s an Update
Hello, Riddle here! I know I’ve been pretty quiet on Tumblr lately. Here’s an update on my situation:
I will definitely post more fanfic updates soon. I’ve picked at drafts, but haven’t posted anything lately. Here are the reasons why:
I got a new IRL job. It’s a good fit for me, but I have less free time than I used to, of course. It’s a job that involves writing lots of articles on a variety of topics, and I enjoy how every day is a little different
Most of my free time for the last year has gone towards my mod work at the Creature-Crossing ARPG, and to my personal CC writing. I’ve been working on new activities over there (my recent favorite being our seasonal familiar shows... I won first place in the summer show!) and I have a lot of plot plans that are coming together now. If you ever want to see my original characters and read my CC writing, you can find my character directory HERE and my Table of Contents HERE.
Once November 1st hits, I won’t be preparing for the release of any more CC activities or events. All future activity or event releases will be overseen by the other mods, and I’ll simply be someone they can ask for extra help if needed. This is a big change for a mod who spent the last 12 months working on new releases, and will give me back some of the free time my IRL job will eat
The Creature-Crossing admin (my boss) greenlit my request to bring an assistant on the mod team who will specifically help me with a lot of my behind-the-scenes work, such as data entry and organization. I’ve never had another mod who specifically helps me with the back end duties before, so that will be awesome. I will need to spend some time training them, but once they are official, that will take some of my workload off and allow me more free time for this blog and personal writing time.
===
Fanfic updates you can expect to see soon:
- Reedfilter Rules
- Frayed Knots
- Origin of the Pixies
- Debut of Factor It In, my Kid Math-centric “WordGirl” fanfic (Subtitled “Tales of a third-grade superhero in training”)... Yes I am still in love with this idiot boy, expect lots of doodle pages soon
- The 130 Prompts project is on a slow-burn writing schedule... I’ll write for it when I want to, but I mostly want to focus on Origin and Knots this year.
Further info below the cut. There is more info about non-Fairly OddParents ‘fics in here too (under “non-FOP fanfics”), so if you’re looking forward to Mario World or “WordGirl” ‘fics from me, give this a click so you know what’s coming!
So, what does this update mean for your fanfics?
They’ll be active again soon! I’ve been picking at them behind the scenes, trying to build up a buffer. In an ideal world, I would love to release a new chapter for SOMETHING every Friday. I doubt this will be possible, but it’s something I would love to work towards in the future. Realistically, you can probably expect some kind of fanfic update once every two Fridays (two updates per month).
There might be some Fridays where posting an update is not possible. Instead, I’ll make a post about what progress I made instead. In the past, I often overworked myself to get a chapter out in time for my old deadline. I will not be doing that anymore, but will instead hold myself to a goal of “Make progress on something every week.”
In the best ideal world, I would love to post one FOP fanfic update per week and one non-FOP fanfic update per week. This is not likely to happen for a long, long time, but that would be the dream.
-
Here are the things I most likely worked on if there is no fanfic update:
- A fanfic chapter draft that needs more time
- A sideblog profile
- A Toyhouse profile for personal characters
- IRL work or mod work may have kept me busy this week
- Creature-Crossing writing... I will try to prioritize my fanfics more, but my CC writing is still important to me and I will be working on it in a lot of my free time too. At the moment, I have a hard deadline of December 14th that I need to meet if I want to release huge plot drama on the day that it happens in canon. I’ve been building up to this for a long time, so I’m really excited about that.
I currently have summer or autumn 2022 planned as the “finale” for the majority of my plot to explode. I will be hosting a member-run event in Creature-Crossing that will last for two months, so a lot of my time from January until the event’s release will be spent doing event prep. Once the event ends, my story content will mostly be a “return to slice of life.” Stories will be more casual one-offs as characters grow, live their lives, and start their own families. Hitting seasonal deadlines for plot will no longer be so important. I’ll be giving Creature-Crossing work less attention after that, and much more attention to my fanfics.
- I may not have a fanfic chapter out each week, but I WILL post a note every Friday to let you know what I have been doing with my time. You’ll see me around. Feel free to send Asks and talk!
===
What non-FOP fanfics would you like to work on?
For literal years, I’ve been claiming I want to post Mario World fanfics. This is still something I want to do. I tag Mario World posts as “mushrooms and more.” I’ve already done a lot of worldbuilding, I have thousands of words of content written for this fandom... I just haven’t posted any of it. I hope to do this soon.
- “WordGirl” fanfics are prioritized over Mario World fanfics. After I finish my first “WordGirl” multi-chapter, I will probably be ready to post my Mario World ‘fics. I may possibly post some Mario World one-shots in between other fanfic updates. Might take another year or more before I touch Mario stuff unless there’s high interest in seeing it sooner?
I also really want to write some WordGirl ‘fics and get more involved with the fandom community. I’ve been building headcanons and lore for this show ever since I was a kid, and I have multiple ‘fics for this fandom that I want to write.
- “AlgoRhythm” is a ‘fic I have already posted on FFN and AO3, about WordGirl introducing Kid Math to the villains in town
- 28 Cities is a ‘fic I started about Rhyme and Reason before they arrived in Fair City. I put it on hiatus since it didn’t seem like anyone was interested, but I’m willing to post more for it if there is interest in it now that years have passed and I’ve gotten more followers who like WordGirl. I have a lot of worldbuilding and plot I never shared for it
- Factor It In is a ‘fic I’ve been working for a while that parallels the official show from the moment Kid Math arrives in town. It focuses on Rex’s struggle to adjust to this world as a child coming into his superpowers for the first time (Y’know, the whole “superheroes don’t have powers when they’re on their home planets” thing), his struggle to adapt to the social world of a non-logical planet, and Becky’s struggle to help him become accustomed to Earth and learn to share it with her as well. If the episode “Kid Math” was a full-length novel about Rex’s arrival and character development, that’s what this story is. This is the highest priority of all my non-FOP ‘fics... I’ve had a cover image made for 6 months and even though I tried setting it aside, I’ve always been super inspired to write for it. If I felt like it would be a good idea to commit to weekly updates alongside my FOP updates, I would, haha.
- I have two one-shot WIPs called “Squishy Feelings” and “A Little Ambiguity”, one of them focusing on Becky and Rex talking about the events of “Rhyme and Reason” and what it means for Rex’s secret identity, and the latter being a future ‘fic showing WordGirl and Kid Math dealing with life 10 to 15 years down the road. I’ll probably post the latter, not sure yet on the former.
- If desired, I may make a WordGirl specific sideblog where I post lore, answer Asks, post character profiles [smaller than my FOP sideblog ones], and mention fanfic updates. If you would be interested in this, feel free to send me an Ask requesting I do this. If there’s not interest, I’ll just keep my WordGirl stuff on the main blog.
- I’d like to get more involved in the WordGirl community, so I’ll probably post more content and reblog more art and headcanons
I also have a handful of miscellaneous ideas I might follow through with. I’d like to write at least one “TUFF Puppy” fanfic so I can say I did. In a perfect world I would like to finish the two “Danny Phantom” and “Bunsen Is a Beast” fanfics I started because... I just kind of want to dip my toe in each of the Hartman shows once since I already went through all the effort of worldbuilding for them to make them canon in a single Hartman show universe. “ChalkZone” is another show I adore and might touch someday (You may recall I have a full outline planned for an FOP/ChalkZone crossover ‘fic called “Dust to Dust”).
Will I write all of these things? Maybe not. I have no idea if I want to spend the next 10+ years writing fanfics, or if I’ll simply be done with all misc. fanfics immediately once I decide to be done with my main ‘fics. I definitely intend to write for a few more years and finish my main ‘fics, but I might not go through with some less popular side ‘fics if life is getting busy for me.
===
What is the posting schedule for FOP ‘fics?
Reedfilter Rules, Frayed Knots, Origin of the Pixies, the 130 Prompts project, and “Come What May” are all high priority FOP writings. I will swap between them depending on my mood that week.
Here are some other ‘fics I want to work on.
- If you like, you can send me Asks requesting I work on a specific story above the rest. I will try to prioritize whichever stories interest you guys most.
Snips and Snails is a ‘fic I started and posted the first chapter for years ago. I’m not sure when I will get back to it, as I ran into some writer’s block. It’s still on tentative hiatus for now..... Possibly forever, though I hope it isn’t forever since it’s only supposed to be, like, five more chapters.
Pink and Gray is on official hiatus. I actually have a lot written for it, but I know it’s a little weird to put so much time and energy into Gary and Betty content when... well, let’s be honest: they’re my niche favorites and most of you probably don’t care. So, I am lifting my usual “no spoilers” policy from my Ask Box. If you would like to ask about my Gary and Betty backstory headcanons, feel free. I will tag my replies as “ridwriting spoilers” for anyone who wants to blacklist the tag, and spoilers will be hidden under a Read More line.
I’d like to return to this story someday because there are tons of things I like about it (ranging from Betty’s secret tattoos to Gary’s plot drama with his mom to the background drama between Talon and Anti-Cosmo, but I always feel immense pressure to make it extra cool to make up for the fact these are weird side characters, so... it’s officially at the bottom of the priority pile. Once Talon shows up in Frayed Knots and readers understand who he is and why he exists, I’ll consider coming back to it.
Identity Theft is a story about Foop and his time in the alternate dimension he was flung into following the episode “Playdate of Doom.” To put it short, Foop was abused by alternate versions of his parents in this dimension and he witnessed some pretty intense stuff, including the death of the alt version of himself who existed in that reality. The trauma he experienced resulted in his alternate personality, Hiccup. Foop himself has very few memories of what happened, as Hiccup has all of those memories. This story is canon in my works, and it is regularly referred to during the 130 Prompts as part of Foop’s backstory. It’s my highest priority side story to work on.
Along the Cherry Lane is a 20-chapter work focusing on the lives of the main human cast from age 11 to age 30, with one chapter showing a snippet of their lives each year. You see Timmy raising Tommy and Tammy in this ‘fic, and it ends with them receiving godparents. Since the 130 Prompts don’t give humans much attention, this ‘fic does. You’ll probably see it debut two years from now, closer to when the 130 Prompts is ready to talk more about humans.
If this becomes a popular ‘fic of mine, I’ll probably write a sequel or continue it past Chapter 30 and write about Tammy and Tommy living with fairies, but I won’t if there’s no interest in that.
Little Imperfections is a Pixie AU ‘fic of mine about what life would be like in a universe where the Fairies are even more like insects than I play them as during my main works (where I already play them as semi-similar to insects). In this world, the Head Pixie is a figurehead whose duty is to reproduce for the sake of the colony and do nothing else, and he’s bored out of his mind until he befriends Sanderson, who introduces him to music. It’s extremely self-indulgent and silly because I like Pixies.
Francis is a multi-chapter ‘fic about bully Francis’s life getting yet another fairy godparent in a long string of memory wipes and godparents. It takes place during the canon series, and when you see an “orange fairy” mentioned in some of my writings, it’s usually referring to this fairy. His name is Rover and I occasionally post art of him. I feel like I can’t truly call myself an FOP fanfic writer until I actually write about a godkid and their godparents, haha...
Hawthorn Haven is a side ‘fic that will be posted towards the end of the 130 Prompts, as it veers off from the prompts in its own self-contained multi-chapter story. It will be approximately the length of “Baby, You’re a Rich Man.”
Acacia Arcadia is a far-past ‘fic detailing the fall of the ancient fae, the imprisonment of the nature spirits, the rise and fall of the chimera nation, the fall of the Martian genies, and the early days of the cloudlands. This is close to the bottom of the priority pile... It’s something I spend time on for personal reference to ensure accuracy in my other ‘fics, but it’s probably not what you guys came here to read.
AA has a bunch of characters in it that you might vaguely recognize, such as Ezekiel Whimsifinado, Evadne, Ione, Two Feathers, Rho, and Sablewood (If you’re astute, you might recall cloudland legends and landmarks in modern day that refer back to these characters). There are also a lot of characters who were reincarnated as Anti-Fairies, in accordance to traditional Anti-Fairy beliefs; Foop for example exists as a main character in one of his past lives, and you’ll see a hint dropped about each of his lives in the first chapter of Identity Theft. My tentative plan is to use Foop’s past lives as my central characters, following the events of each part of the timeline until he gets killed and reincarnates at a later point of the timeline.
I also keep some one-shots in a file I call Mixed Nuts and I may possibly post them someday (they’re mostly just one-shots of main cast characters I do to get a feel for their personalities, I have some Wanda and Cupid in here). @zachbrightside and I are also working on a collab ‘fic called Like a House On Fire that shows more of Timmy and Chloe’s lives during Season 10 (especially around the time of “Which Is Wish?”) No news on a release date for that yet.
-
As I’ve said before, once all my other FOP works are complete, I will write Devil’s Backbone, which is my far-future ‘fic and the finale of my FOP writing. I do not plan to write any more FOP content after that story is finished, as I expect to have all other FOP projects done by then.
- Devil’s Backbone is a finale 'fic, so all worldbuilding from all stories is fair game to blend together, and it’s highly recommended you read everything else first. This story has been outlined since 2016, and it might not be published for another 10 years... Who knows! But it’s something I always work towards as a concrete endgame goal.
- If something serious comes up in my life and I officially decide I don’t want to write this story, I will post the outline for it. The link to this draft is included with all the other Google Docs links I have in a far-future queued post unveiling my WIPs in case I unexpectedly die and you still want to know how my stories would have gone, so you’ll get access to this story eventually even if I die young. Yes, share access is turned on for them all and I do take extra careful measures to be sure that post doesn’t get posted early skldfj
===
What is the plan for the main blog?
Every Friday, I will post either a fanfic chapter or a progress update. You can blacklist the tag “ridlife” if you do not want to see the progress updates on your dashboard. Fanfic updates will not have the “ridlife” tag, so you will not be blocking them.
During the rest of the week, I might post doodles, reblogs, or general comments. Basically... you’ll see the blog become active again. Feel free to send in Asks about my worldbuilding and thoughts on fanfic characters.
@fountainpenguin is my personal blog, so you will see non-fandom things on here sometimes
@riddledeep is my FOP-exclusive sideblog. It contains all my lore notes and goes into a ton of depth, more than my fanfics give in one breath
===
What does this mean for the Riddledeep sideblog?
I really want to go back and edit those character profiles that were posted early by mistake. The reason they were queued is because if I turned them into drafts, they would have been buried all the way at the beginning of my draft collection, and I have many, many drafts saved. There are no page numbers to navigate quickly through the draft collection, so I would have to click through each page one by one if I ever wanted to look at them. I hated doing this, which is why I kept my posts queued.
I was regularly updating the queue deadlines, trying to keep things in the order I wanted to post them in, but Tumblr made a change to the way drafts are dated and it kept throwing off my system. My inability to remember when my queued things would post combined with my busy schedule led to some profiles being posted early and incomplete. I want to fix these.
Over a year ago, my good friend Vulpix150 helped me finalize my designs for the Aos Sí and Daoine Sith. I’ve been sitting on that art in secret for a while, and at some point I plan to post it on the sideblog and talk more about that lore.
Updating fanfics is my higher priority (and it was the priority my followers voted for when I asked you to send votes to my Ask Box a while back). So, I will usually spend my free time working on fanfics unless I need a break from them and want to work on sideblog profiles instead. Thank you for your patience!
===
TL;DR
I’m posting fanfics again soon. I’m going to take a more relaxed approach to posting them. I’m going to post more of what I want to post and what I feel motivated to post, not always a main ‘fic update. If I’m not “feeling it” when working on a draft, then I’ll set it aside for a while unless I know my followers and readers have high interest in the next chapter of that story. I always write for me first, but if I know there are other people who care a lot about a story, then of course I want to write it for you too!
I’m going to embrace my decade-long love for WordGirl and post more ‘fics and art or this fandom. I’ve always been a little shy about doing this, but I’m ready to make it an official fandom on my main blog (unless there are lots of requests for WordGirl things to be contained in their own sideblog). I will be posting the first chapter for a ‘fic called Factor It In very soon. Love my easily frustrated alien kiddos having a long day.
I am working on Creature-Crossing stuff too, and will be especially busy in November and December. Updates will be slow for a few months, but I hope to find my groove and a good pace soon.
Each Friday, I will post either a fanfic update or a mention of what I am working on. I will be checking in on Tumblr regularly. Feel free to talk! I much prefer you send messages to my Ask Box, not my private messenger, please <3
===
Is there a specific story of mine you like and want more updates for?
Asks and reviews help me know which ‘fics people are enjoying. I plan to keep writing ‘fics no matter what, but I definitely give more time to the ‘fics that get more attention (and I have been spending so much time writing for Creature-Crossing because that’s where the attention was coming from)
It’s easy to stay motivated and get the next part of a story out soon if I know that people like it. It’s always harder if you feel like people are silently judging you and ignoring your posts. So, let me know what you’re interested in. And if you only leave Likes or Favorites instead of asks and reviews, that’s okay too! Thank you for interacting anyway and enjoying my work.
Thanks for reading!
#WordGirl#Factor It In#Kid Math#FAIRIES!#ridlife#riddleverse mention#ridwriting#Mushrooms and more#Satirical vocab alien child show#Frayed Knots#130 Prompts#Origin of the Pixies#Pink and Gray#Acacia Arcadia#Devil's Backbone#Hawthorn Haven#Along the Cherry Lane
10 notes
·
View notes
Text
GIF Making Tutorial Using Photoshop CC

Here’s my GIF making tutorial, hope it helps you guys :).
Hey all, since people on Twitter and on Tumblr keep asking me how to make GIFs, I’ve decided to make a Stephen Amell / Arrow GIF tutorial.
Everyone makes GIFs differently, but here is how I make mine. I’m also on PC, if you’re using a Mac GOM player won’t work for you, so you need to find a method to make your screencaps. If you’re able to make them just skip to the GOM player part.
What you need:
GOM Player – You can download it here.
Photoshop CC – You can get a free trial of Photoshop CC for a month. Click here.
What you need to know:
Tumblr GIF sizes: For big GIFs the size is 500p x 500p. For GIF sets, people normally use 245p x 245p, for GIF sets that have three small GIFs in a row, one next to each other the size is 160p x 160p. Tumblr will not accept GIFs that are over 2mb in size. You’ll be able to upload the GIF, however it won’t play.
GIFs on Twitter: On twitter the size of your GIF needs to be 500p. Anything below that will look distorted. I think the maximum size for GIFs on Twitter is 3mb.
GIF colouring & PSDs: Keep in mind that Arrow is a dark show, which makes colouring the GIFs harder. You can colour your own GIFs (which I’ll show you how to do below) or use PSDs which you can find on tumblr. You can search “Arrow PSDs” on Tumblr and you should be able to find some. I prefer to colour my own GIFs.
Video size: Keep in mind that the video size you should be using should be either 720p or 1080p. The higher the quality, the better your GIF will look. Sometimes people GIFing in lower resolutions will use darker PSDs.
Let’s get started shall we? I’ll start by GIFing a scene from Stephen Amell on Reel Side
Open your video with GOM Player. You could always open your video directly in Photoshop, but I don’t like doing that and this is my tutorial lol.
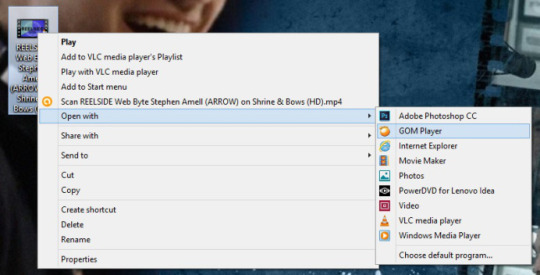
Go to the scene you want to GIF hit pause, then hit Ctrl+G, the screencap menu will pop up and here are the settings you should set, for GIFs. Make sure your “Burst Interval Sec.” is at 0.05 (this is the speed for normal GIFs), “Quality” should be at 255 and for Burst Capture Image you can set it to the amount of frames you want. I just keep my settings like the ones below and just delete the frames I don’t want. Also, make sure to check in which folder your screencaps are going to go.
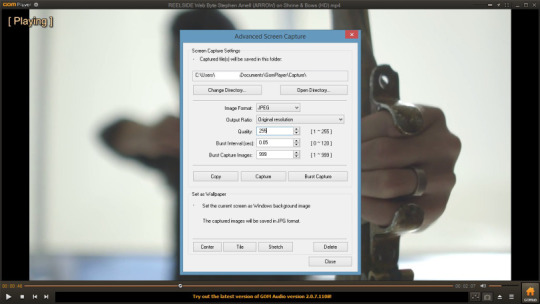
Start by playing the video and hit the “Burst capture” button. Once the scene is done, close GOM player.
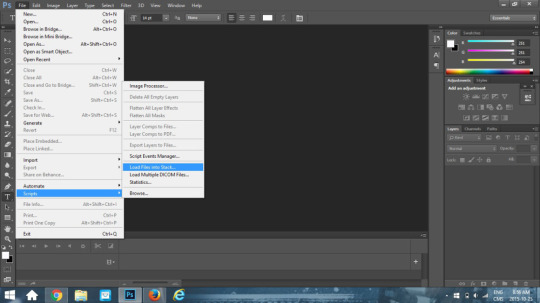
Open photoshop, click “File” scroll down to “Script” and select “Load Files into Stack…”
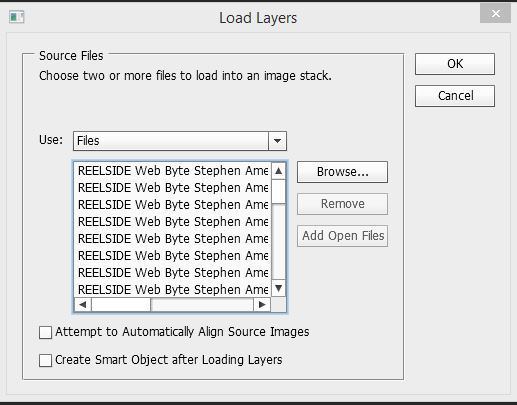
It will bring you to a browse button so you can go find your screencaps on your computer. Select all the ones you want to use for the GIF. The above menu should pop up, click “Ok” and let Photoshop load the layers.
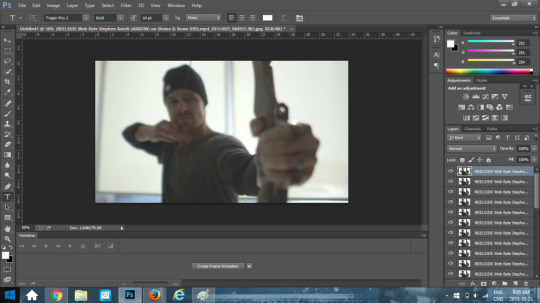
This is my screen after doing the steps above. You can see all my screencaps loaded on the sidebar on the right. You guys ready? We’re going to go through a series of steps now, it might seem complicated at first but once you get the hang of it, you’ll do it automatically. Click on the “Create Frame Animation Button”. One screencap will load.
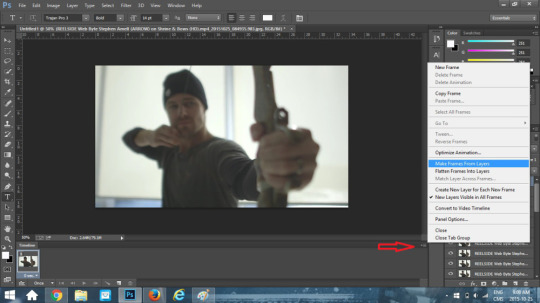
Click on the little button where the red arrow is, a menu will pop up, click on “Make Frames From Layers”. All your screencaps will load at the bottom.
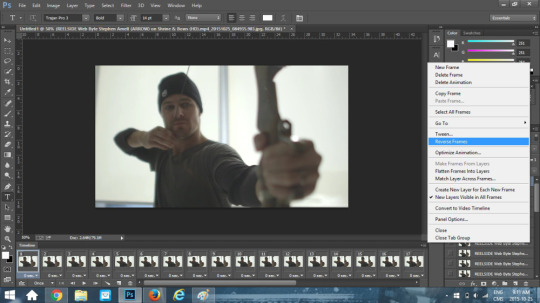
Click on the button again and then click on “Reverse Frames”. For some reason, Photoshop, always loads frames in reverse order. Again, click on the button and this time click “Select all Frames”.
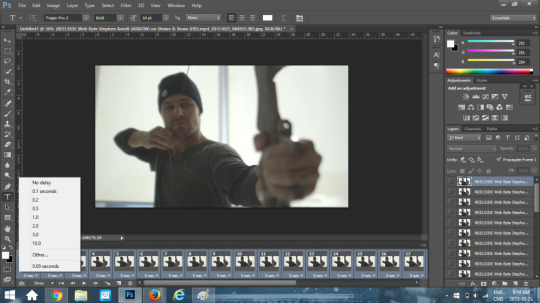
Now that all your frames are selected, click on the little downward arrow at the bottom of a frame where the speed is, it should be written “0 sec.”. Click “Other”
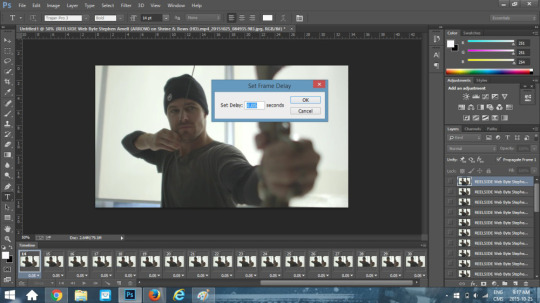
Another menu will pop up to let you chose your speed. If I’m making a GIF at normal speed I’m going to enter 0.1. Choose your speed and click “OK”. Still following me? Let’s continue ;)
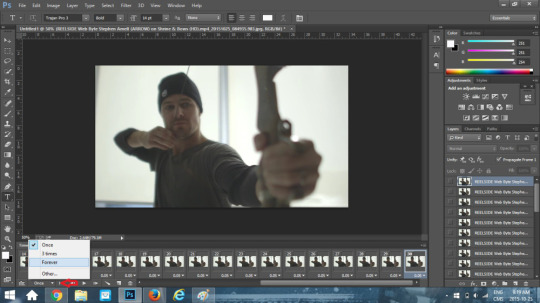
See the button at the bottom that says “Once”? If you keep the “Once” setting, your GIF is just going to run one time and stop. You want a GIF with a loop. So click on the “Forever” button. At this point if you click the play button arrow at the bottom you should see your GIF animation.
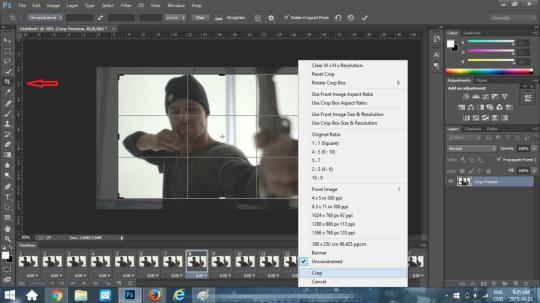
I’m going to crop my GIF first, so I’m going to click on the crop button on the left and then crop my GIF according to what I want in the frame. Once I’ve select the area I want cropped out, I’m going to click “Crop”.
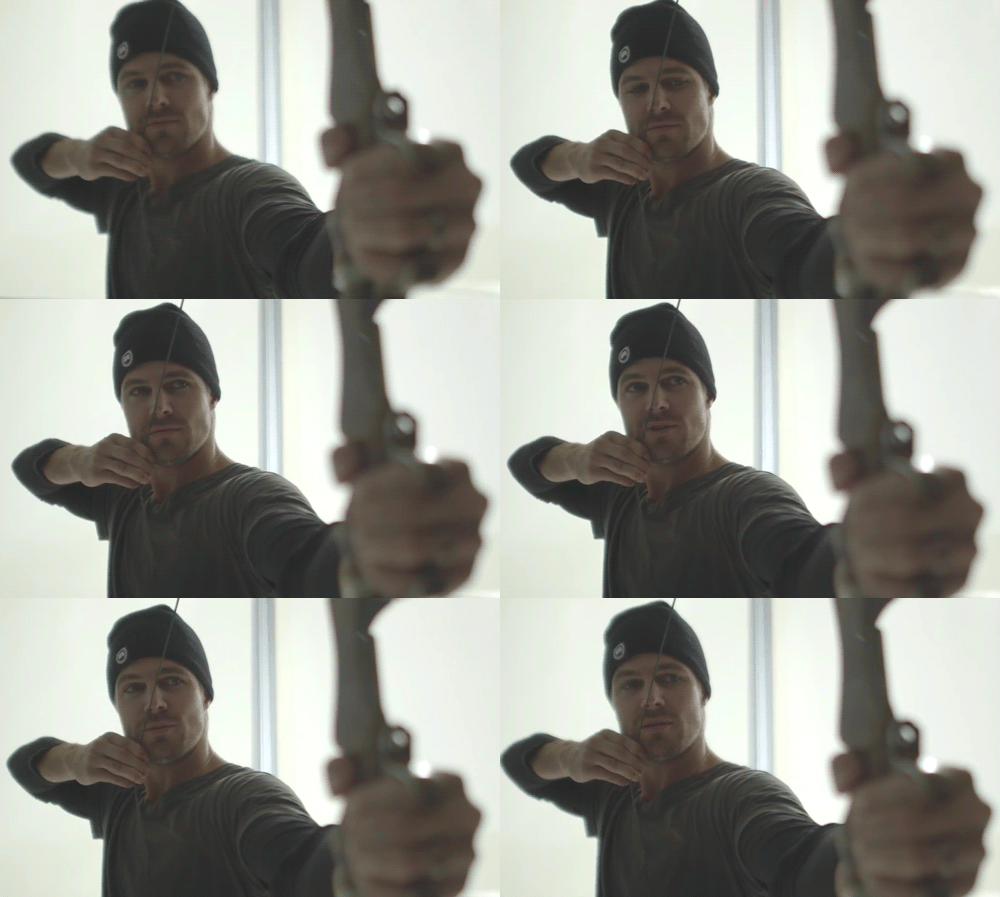
This is what my GIF looks like now. I think it’s a little too fast, so I’m going to go back to the step about speed and set my speed to 0.15.

This is my GIF at 0.15. I like the GIF speed now, however, look at the colouring. It’s kind of meh right? We’re going to go change the colour. At this point you could just add a PSDs over it, but like I mentioned I like making my own. Also, I probably should have used a different video to do make a tutorial, as this one is dark. But too late.
Still with me? Okay, let’s keep going.
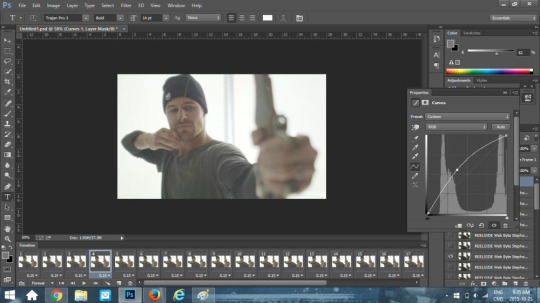
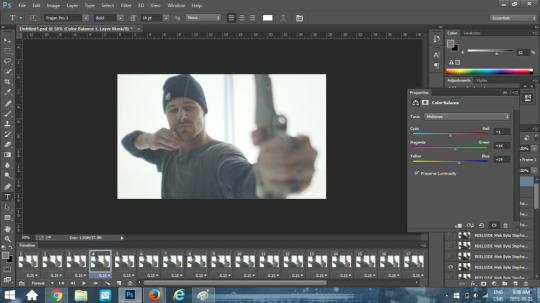
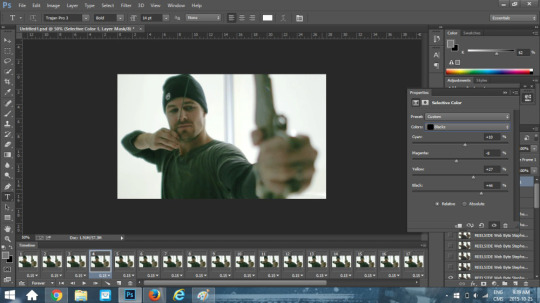
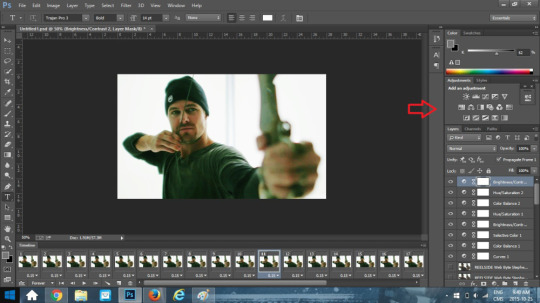
As you can see from above, I went to play in the curves, colour balance, selective colour and I also went in the brightness/contrast. All of these are available where the red arrow is. You can see all the changes I’ve made in the sidebar. Also note that in selective colour, you go colour by colour changing the tone as you go. Choose what looks best to you.

This is my GIF now. It’s a little greenish, but since this is a tutorial and it’s already taking me forever I’m going to let it be. If you wanted to stop at this point and not add text you could click on “File” and then “Save for Web”.
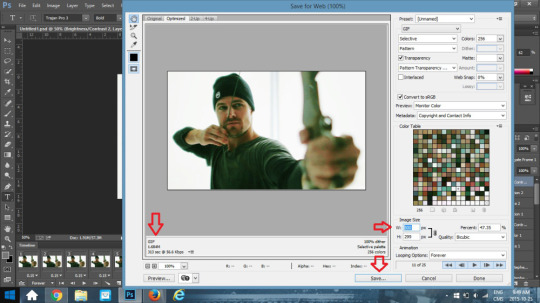
A menu will pop up, make sure the setting are as above. Check the size of your GIF to make sure it’s the correct size to be uploaded on Tumblr or Twitter. If it isn’t, go back and delete some frames. I wasn’t going for a square GIF, if so I would have cropped it as a square. I wanted a GIF with a width of 500p, so if you look where the “W:” is I entered a width of 500p. If I would have done a square crop the “H:” would have automatically re-adjusted to 500p as well, once I entered 500p for the width.
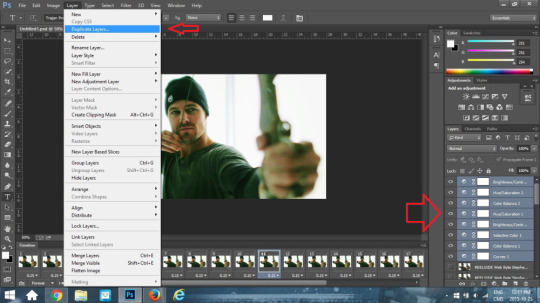
If you’re making a GIF set, you’re going to want to save your layers so your colours remain the same throughout the GIF set. To do that, you need to make a PSDs file. Select all your layers on the right side bar (don’t select the frames). Click the “Layer” button at the top and go down and click on “Duplicate Layers”
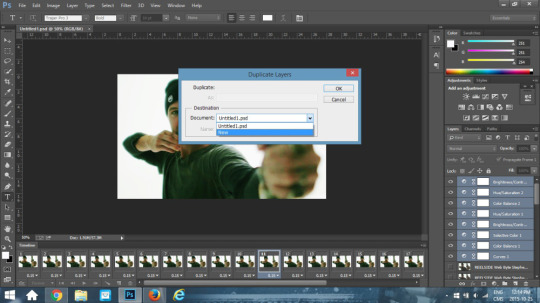
A drop down menu will appear, click “New”, then add a name. I’m going to name mine SA Reel Side.
18 notes
·
View notes
Text
detailed giffing + basic coloring tutorial for beginners
so a lot of gif/coloring tutorials are pretty outdated or not that detailed & i wanted to put my own out there! in this:
how to get the screencaps for your gifs
how to make a general gif
basic coloring (no psds here, it just gives you a basic idea for making colors pop and look nice. you can look up how to use psds, but i prefer making my own for every gif as it’s much more personal, gratifying, and creative. there’s nothing wrong with using psds as long as you don’t claim them as your own, it’s just not my personal thing)
how to save a gif
we’ll be going from this:

to this

what you need:
photoshop (cc 2019 is what i’m using, but this works with any version of photoshop really as long as you download a version with the timeline feature) i won’t add download links here since i don’t want this deleted, but you can look some up on tumblr or use the pirate bay (current url is pirateproxy.blue as of 4/29/2020) & follow the instructions there.
for windows: potplayer/kmplayer (both use literally the exact same instructions) this tutorial uses potplayer but kmplayer uses like literally the same instructions, it just doesnt work right on my computer
for mac: mplayer. this tutorial does NOT cover this so find a tutorial on tumblr on how to take screencaps with mplayer & then skip to the “how to make a general gif” section. though, again, i’m on a pc so i have no idea if this is entirely accurate for mac.
if you’re downloading from youtube: clipconverter
if you’re Definitely Legaly torrenting: utorrent + the pirate bay (again, current url is pirateproxy.blue as of 4/29/2020) or another torrent site + you should really consider getting a VPN when torrenting (i use privateinternetaccess but you can find one that suits you)
note: download an adblock of some kind, disable automatic downloads on your computer, & download an antivirus program if you want because some sites are sketchier than others! this is ESPECIALLY crucial on sites like piratebay. keep your computer safe babes.
1. screencapping
there’s several ways to get screencaps on photoshop, but this is the easiest imo and i’ve never done the whole convert video frames to layers thing. like i said, you’ll need potplayer or kmplayer. i’m using potplayer. important note: don’t accidentally download viruses here! read each screen carefully & make sure you’re not hitting accept to download any secondary programs.
1. download your .mp4/.mkv. you can go to youtube & find a clip/scene/whatever and use clipconverter to download it. just make sure you download it at 720 (or higher) as anything lower than that will give you a poor quality gif. you can also download using somewhere like the pirate bay, but for this you need utorrent & i would HIGHLY recommend using a vpn if you live in a country where torrenting copyrighted content is illegal, as your internet provider may flag your ip address if you don’t & you torrent too often.
2. download potplayer/kmplayer & get it set up
3. create a screencaps folder. i always put mine on my desktop. in your screencaps folder, make a folder for however many gifs you want in your set. i just have one for mine so:
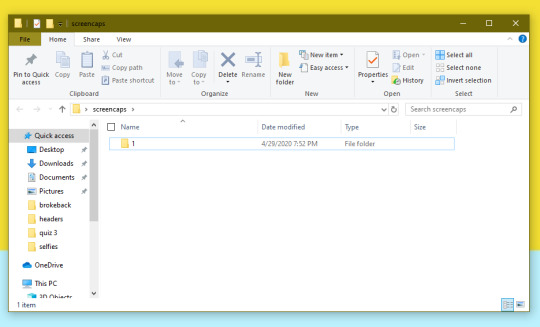
4. open up your .mp4/.mkv
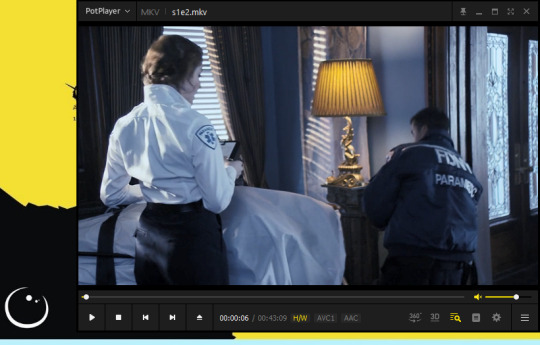
5. hit ctrl + g to bring up the screen capture pop-up & set your settings to these. click the button w/the three dots next to the storage option & select the folder you created for your first gif
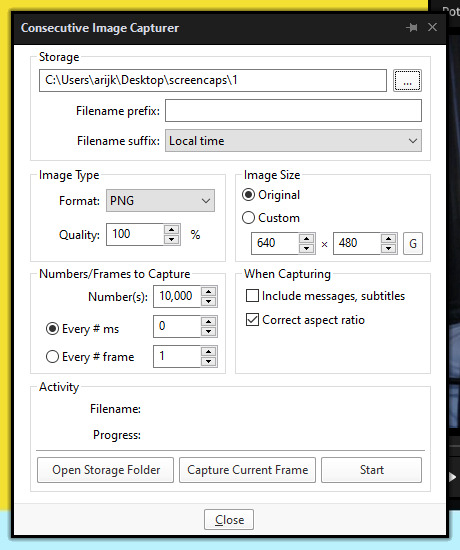
6. navigate to the scene you want to gif. when you’re there, pause it and hit the start button on the consecutive image capture screen, then play the video. how many screencaps you need depends on the size of your gif. for larger gifs (so like 540px wide gifs), you’re probably going to want to keep it below 30 frames. for smaller gifs (268px wide or less) you can maybe stretch it to 60, depending on how much coloring you add. you can always delete screencaps later though in photoshop, so don’t worry about it too much. for this gif, i only had 17 frames because the scene was really short lmao
7. go to your screencap folder you made & delete any unnecessary frames. it’ll look like this:
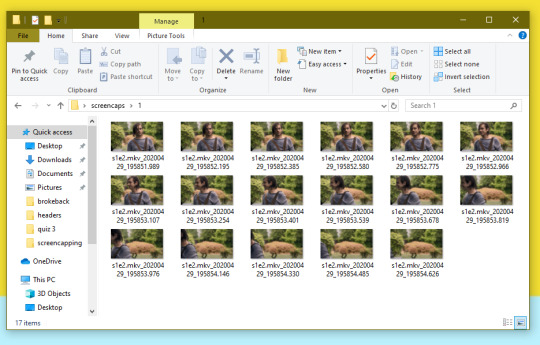
8. repeat the process for any other gifs, making new folders in your “screencaps” folder, numbered for however many gifs you’re making. make sure to change the folder you’re loading the images into on the image capture pop up though so they don’t all go into folder 1.
2. making a simple gif (+sharpening)
1. first, you need to load your screencaps. when you open up photoshop, go to file > scripts > load files into stack
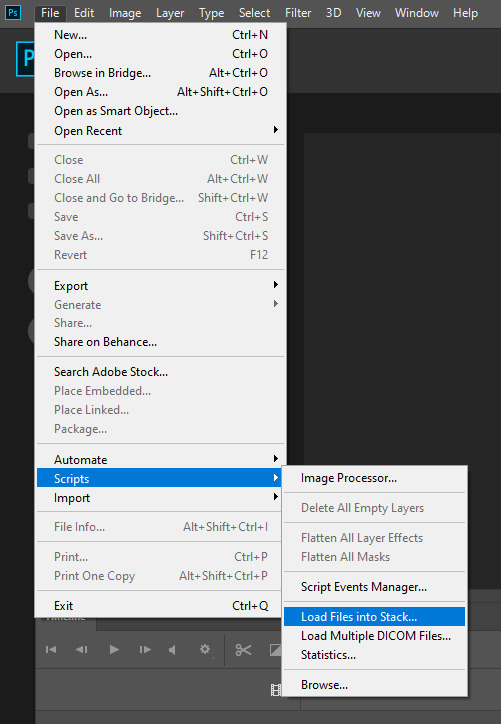
2. when the window pops up, switch the “file” option to “folder”
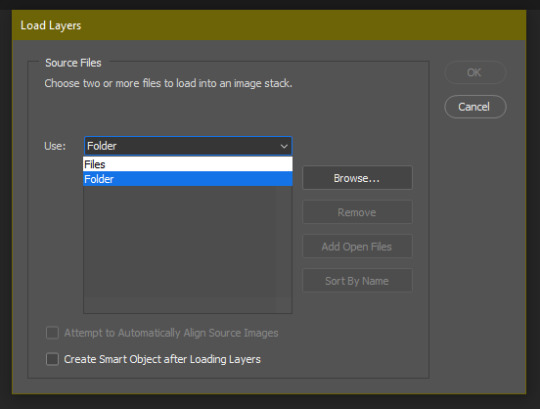
3. click browse and find your screencap folder for your first gif (in my case, desktop > screencaps > 1) once it’s all loaded, click “OK”
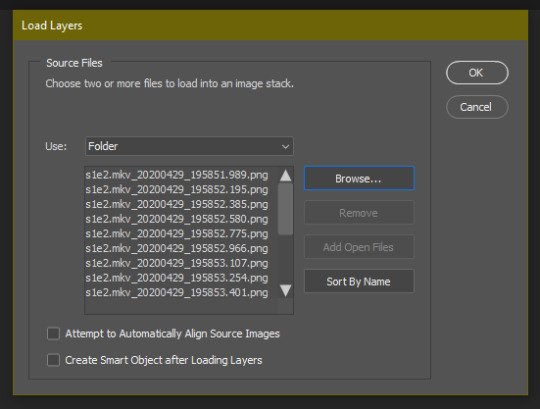
4. it’ll take a minute to load all your screencaps into photoshop. when they do, go to the upper bar on photoshop > windows > timeline
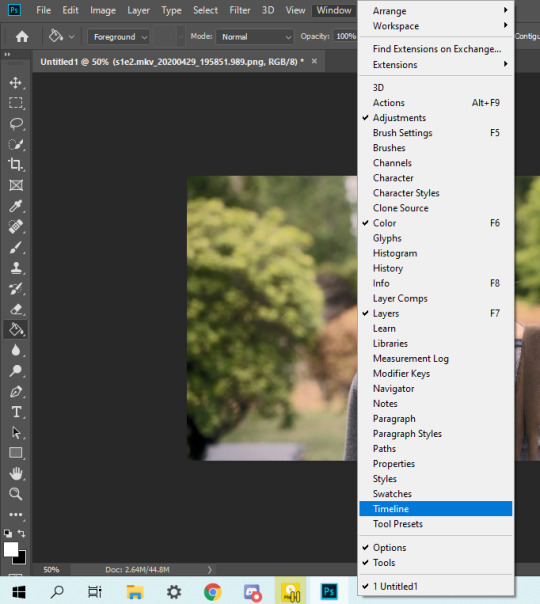
5. when the timeline bar shows up, click “create frame animation”

6. hit this button and click “make frames from layers”

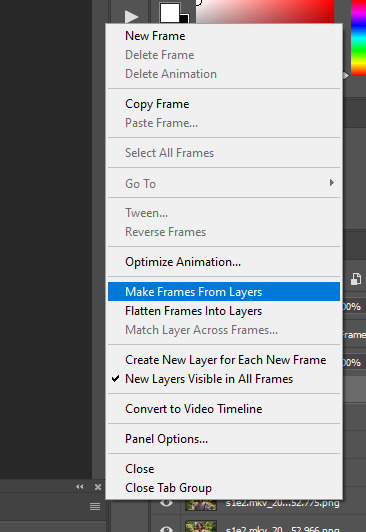
7. hit the button again and click “reverse frames”
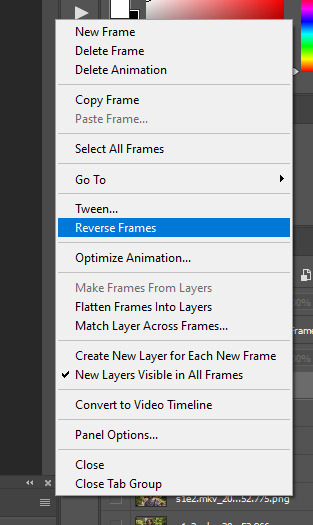
8. click back onto your first gif. then select the rectangular marquee tool and set it to whatever gif size you want. the width for 2 small gifs next to each other is 268px, the width for full size gifs is 540px. most people use 268x150 px for gifsets of 4+


9. use the marquee tool to select what area you want for your gif, like this. it’s up to you how to crop it! get creative!
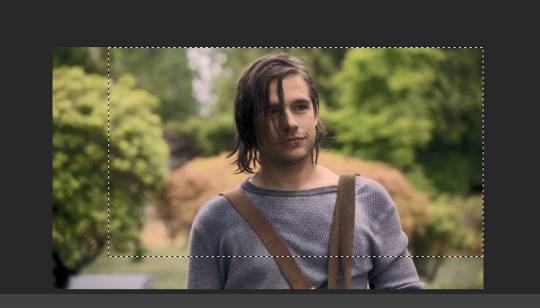
10. go to image > crop
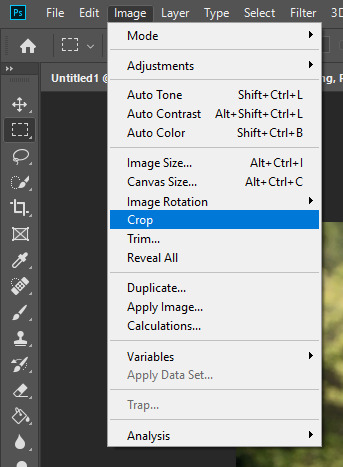
11. now that your image is cropped, go to image > image size. change the size to your desired gif size (in this case 268x150). hit “OK”. then make sure it’s zoomed in to 100%
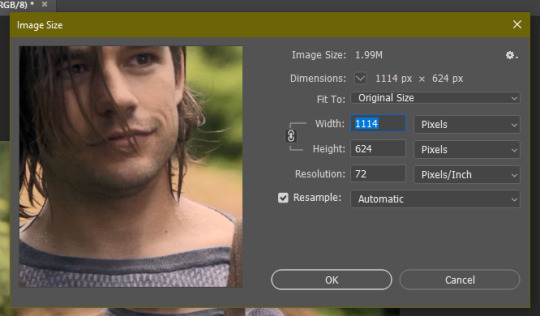
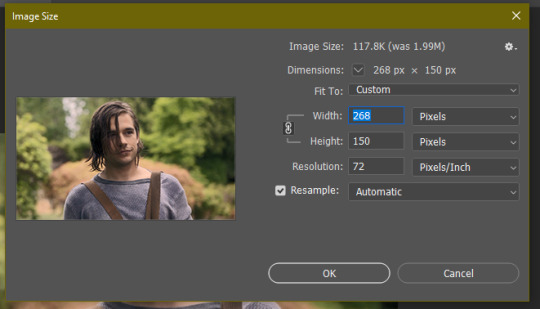

12. now, you COULD just save this gif, but they look way better sharpened. so you need to convert this to a smart object. to do so, first select all your layers in the righthand layer window. to select all the layers, click on your top layer, hold shift, and scroll down to your bottom layer & click on it as well while still holding shift
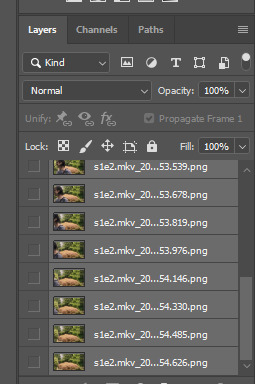
13. next, you need to select all your frames. go back to the options button from part 6 > select all frames
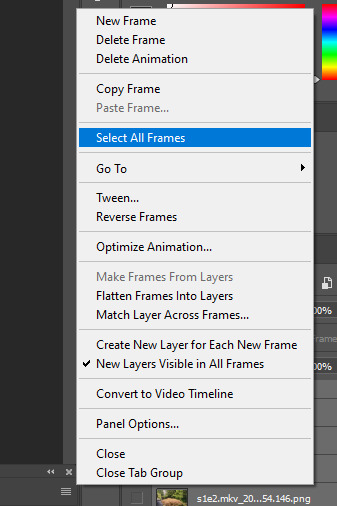
14. next, we’re going to create an action to make your life 100x easier when it comes to sharpening gifs in the future. to do so, go to the actions icon (may look different on different versions of photoshop, but basically just find the actions window)
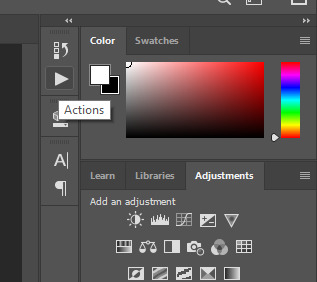
15. create a new action with this button. name it something. i named this one “sharpen tutorial” and hit “record”
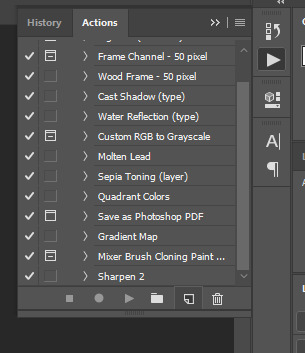
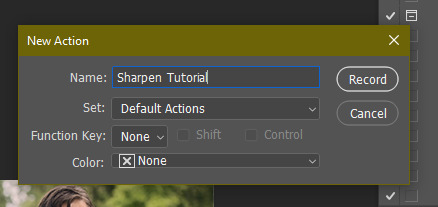
16. click this button to convert to video timeline
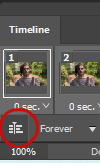
17. go to filter > convert for smart objects
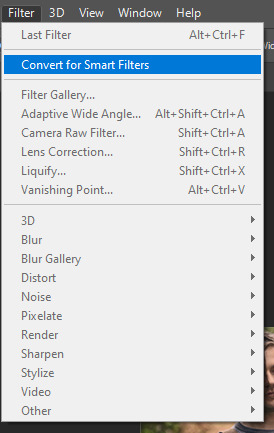
18. go to your single created layer and right click and click duplicate layer. this helps get rid of the transparent border around the gif.
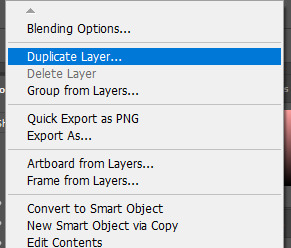
19. go to filter > sharpen > smart sharpen & use these settings
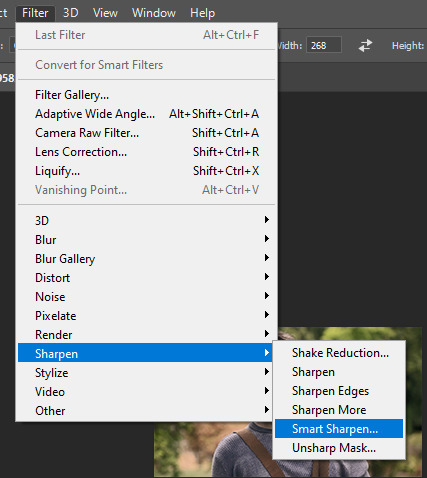
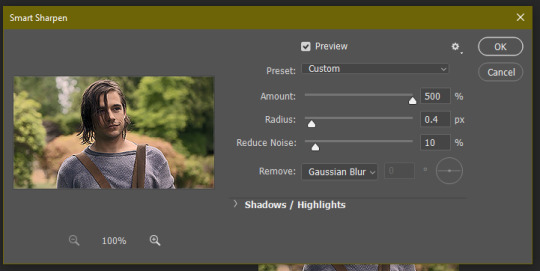
20. go to filter > blur > gaussian blur. set it to these settings.
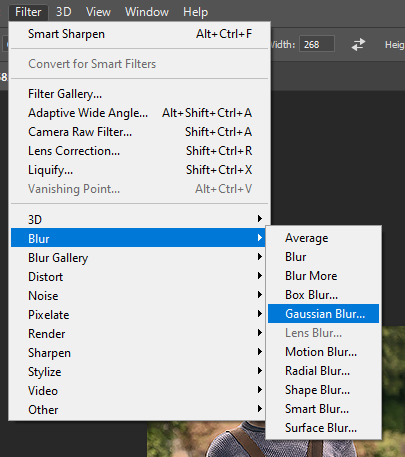
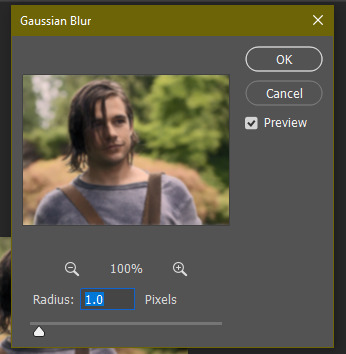
21. go to your second layer with the filters on it & right click on the gaussian blur filter to select “edit smart filter blending options” and set the opacity to 50%. you can mess around with this for different levels of sharpness. the closer to 0%, the sharper your gif will be.
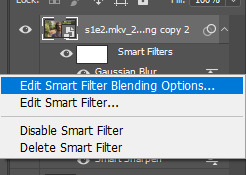
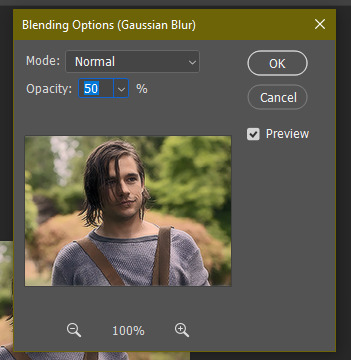
22. hit the stop recording button on your sharpen action. now you’ll have an action to use next time you make a gif! after you’ve followed all the steps 1-13 you simply go to actions, click on your saved sharpening action, and hit play instead & it’ll do steps 14-21 in a few seconds. here’s a pic of the stop button on the actions window
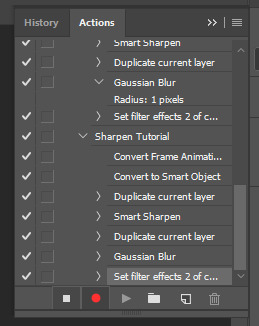
23. our gif is now sharpened! you can end with this & skip to the saving a gif section, or you can continue to coloring. here’s what we have so far.

3. coloring
now on to coloring. this is pretty basic coloring and it probably won’t work if you follow my numbers exactly, as every single scene is different color + lighting wise. but this is just an example of the kind of thing you could do. basically, if you’re making vibrant gifs, you want to up the brightness + contrast + vibrance and make the colors already present pop. if you want anything more complicated (pale gifs, changing the colors to make, say, quentin’s shirt in these gifs red instead of blue), you’ll have to find other tutorials or experiment on your own. learning how to color & finding your style takes time! you can download psds if you want, but imo those kinda take the fun out of making gifs? that’s just me though.
after each step, i’ll show you what the gif looks like.
1. i usually start with a curves layer. i usually don’t mess with the color curve options, just this one:
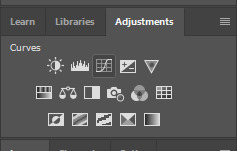
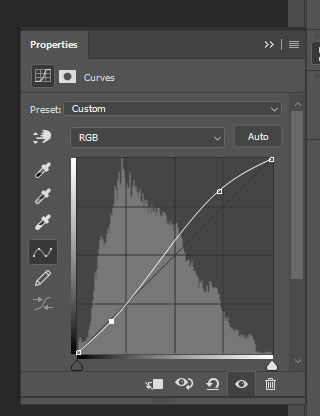

2. next, i do a brightness/contrast layer
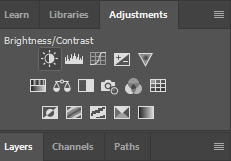
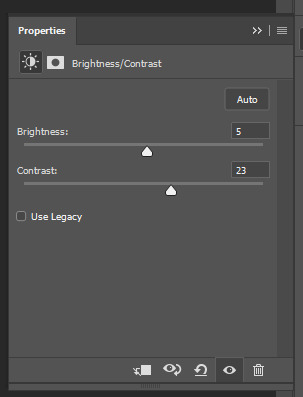

3. next, i do a vibrance layer. make sure not to make it TOO saturated or it’ll look bad.
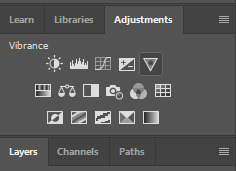
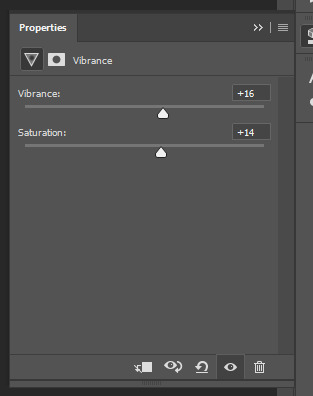

4. next i do a color balance layer. this is where it really starts differing depending on what color you want your gif to be.
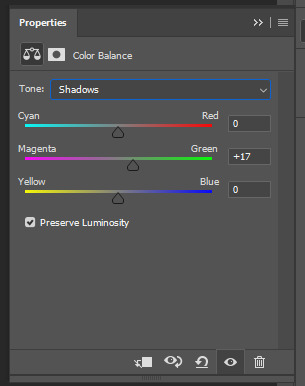
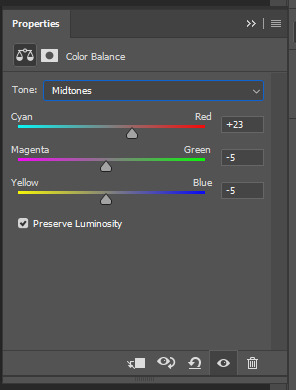
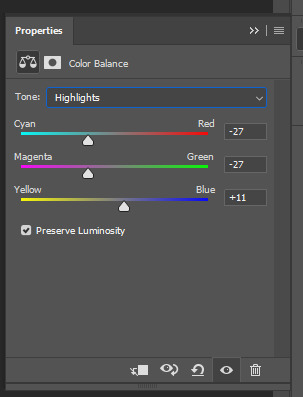

5. next we move to the selective color layers, which are arguably the most powerful. here you can make colors pop, change colors, etc. it’ll take lots of practice & messing around with, but here’s what i did with this gif. this one is making yellow + blue pop
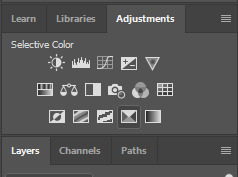
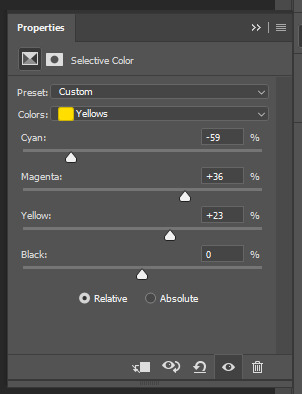
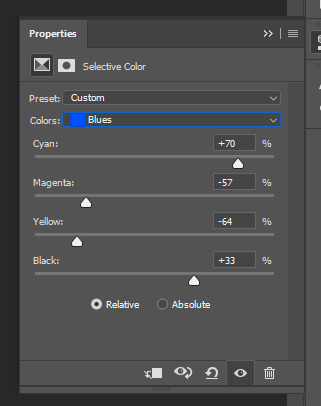

6. next, i did two more selective color layers editing the blue tab to make the blue pop even more
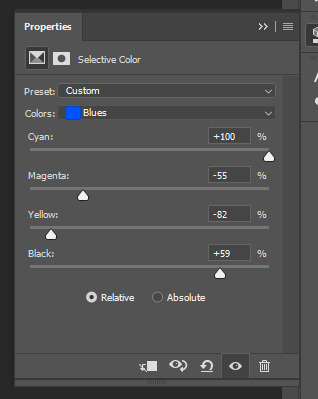

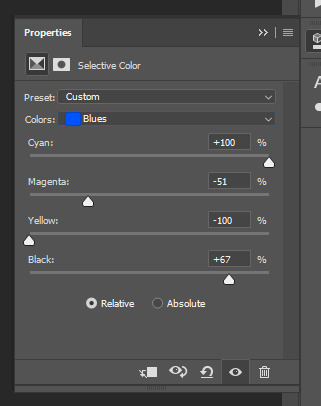

7. i still wasn’t quite happy with it, so i added another selective color layer to edit the blacks + neutrals + greens
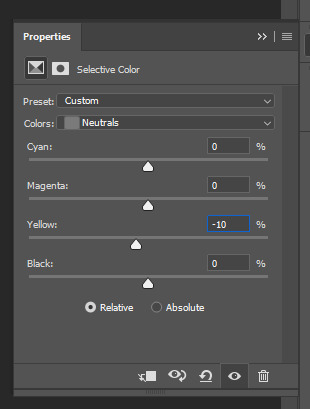
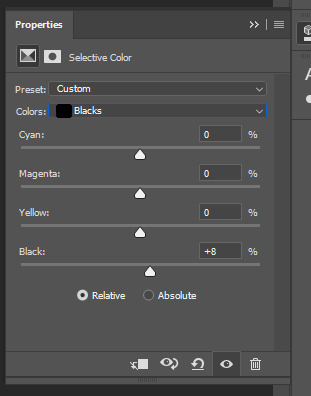
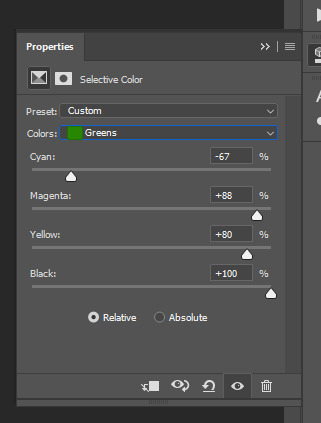

8. for good measure, i added one more brightness/contrast layer
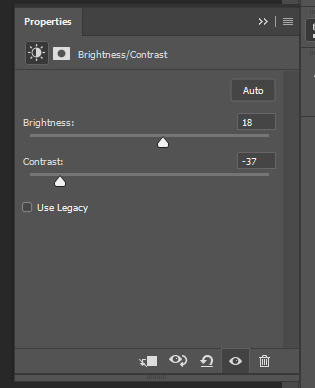

9. and the gif is done! however, you can play around with various adjustment layers until you’re happy. again, this is just an example of how to do basic coloring. it’s a skill like any other & takes practice. to keep consistent coloring in a gifset,
9b. you may want to make a psd of this coloring. to do so, you need to put all your adjustment layers in a folder, delete your frame layers, and click file > save as. save it as a .psd. then you can open it and drag it onto any other gifs you make, adjusting the coloring accordingly but still with the same vibes. you don’t have to do this, but it makes life easier. here’s how to use your saved psd, though obviously you’re using your own in this case and not a downloaded one.
4. saving your gif
1. on photoshop cc 2019, you go to file > export > save for web (legacy). for other versions, you can just go to file > save for web. use these settings. the gif size limit is 3mb per gif, so make sure your file size is under that. if it’s not, you’ll need to delete some frames or some adjustment layers.
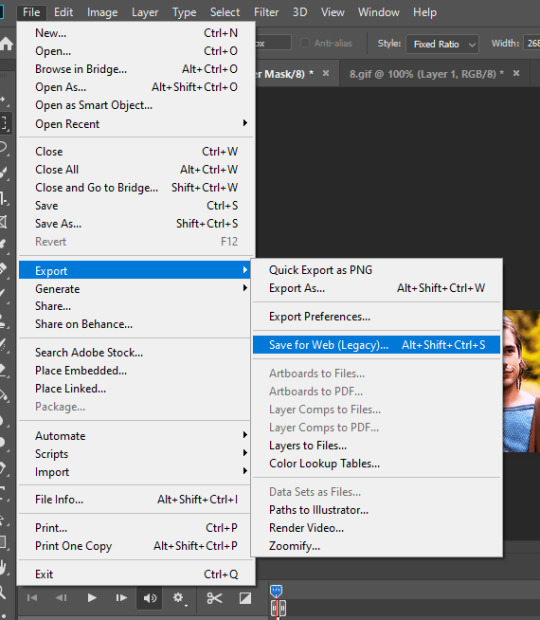
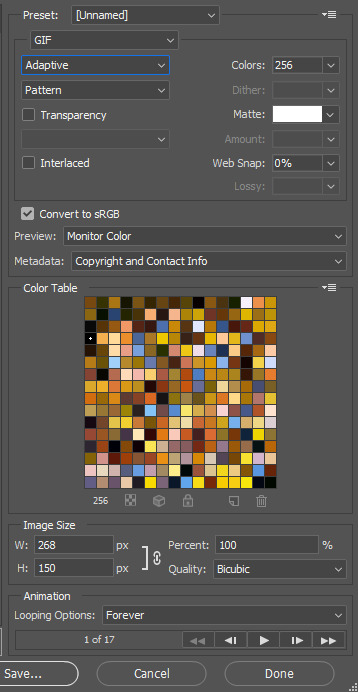
2. now, photoshop is a bit of a pain & this gif timing will not be right. so you need to open your newly saved gif. then you hit this button + select all frames


3. click this button & select “other”. tumblr gifs are typically .05-.08. my photoshop is glitchy and i have to set mine to .1-.15 or they’re WAY too fast. but usually, go with .05-.08 unless yours ends up glitching too.

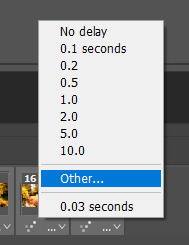
4. save it like you did the first time and ta-da! you’ve made a gif!
#gif tutorial#photoshop tutorial#edit tutorial#coloring tutorial#yes im using the magicians its my hyperfixation and i get to choose the gifs
164 notes
·
View notes
Link
Chapters: 1/1 Fandom: Star Wars - All Media Types, Star Wars: The Clone Wars (2008) - All Media Types Rating: General Audiences Warnings: No Archive Warnings Apply Relationships: Mace Windu & Padmé Amidala Characters: Mace Windu, Padmé Amidala Additional Tags: Alternate Universe - Canon Divergence, Fix-It, Sheev Palpatine Dies Off Screen, Anakin Skywalker Doesn't Turn to the Dark Side, Mentioned Anakin Skywalker/Padmé Amidala - Freeform, Mentioned CC-5052 | Bly/Aayla Secura, The Jedi Knew About Padme/Anakin All Along, don’t ask me to explain what happens in the background of this idk either, mace&padme probably end up friends after this (much to anakin's horror), ft. some Excellent tea, Mace Windu Appreciation Day 2020 Summary:
Mace Windu is not having a good day. He’s not been having a good day this entire week, month, year - the whole war, truly. And now the Chancellor is dead.
[full text under the cut if you wanna read this on here, since it’s a tumblr event]
Mace Windu is not having a good day.
He’s not been having a good day this entire week, month, year - the whole war, truly.
And now the Chancellor is dead. The Chancellor who just so turned out to be the Sith Lord who has been playing them all for fools. Who the entire Order has been searching for since Qui-Gon died. Who would’ve continued to evade them if he hadn’t been revealed by Darth Maul, of all people, in a series of events that Mace refuses to think about unless absolutely necessary.
He’s going to have a headache again.
And now this.
“Senator Amidala,” he says, politely, to the woman who is for some inexplicable reason cornering him in a surprisingly empty Senate corridor instead of off dealing with the political nightmare that Palpatine’s death kicked off.
“What can I do for you?”
“Master Windu,” she replies, also politely, instantly putting him on guard. “Do you have a minute? This won’t take long.”
Force, there better not be yet another new problem.
“Of course.”
“This way, please.”
Oh no, she is smiling her Smile. People tell horror stories of the things Padme Amidala gets up to while smiling like that.
They walk in silence to her office, Mace trying to beat off an incoming migraine all the while. Likely pointless but one must have hope.
“Please, sit,” she says when the door’s been closed and they are alone.
He finds two cups of still-steaming tea on the little table she gestures to instead of her desk. He raises an eyebrow but doesn’t comment on the blatant contradiction with her words outside. Tea is tea, and Amidala is highly likely to be serving the good stuff. Manners are important, even when one is clearly setting up a trap.
No wonder Obi-Wan likes her, Mace thinks, amused somewhere under the exhaustion and exasperation.
He picks up his cup and stays silent.
And so does she.
They drink the tea - yes, it is the good kind - and don’t say anything, and stare at each other politely.
And stare. And stare.
Really, she’s not going to win this. At any other time she might because he is usually a very busy person and doesn’t have time for this but not now. Now, as much as he doesn’t want to deal with whatever this is, sitting here and drinking good tea in silence is much more preferable than trying to reason with yet more hysterical Senators who refuse to be sensible or even uphold the basic principles of the Republic and pass the vote to give the clones citizenship already.
Eventually, when almost all of the tea is gone and it’s become lukewarm, the senator speaks.
“Master Windu, I must say, I have a great deal of respect for you,” she begins.
Mace is lost. He has no idea what this could possibly be about, since it’s clearly not some kind of emergency. He is however certain that Skywalker is responsible, somehow.
“The sentiment is mutual, Senator. Your work is an example for us all,” he replies and doesn’t tense when The Smile returns.
“I try, Master.” She sets her cup down on the table and- there. “It has come to my attention that the Council is aware of my and Anakin’s marriage.”
“As is anyone who has been around Skywalker for any amount of time in the past two years,” he replies dryly because really. Subtlety is not a trait Anakin Skywalker possesses. “I fail to see how that led to me being here, however.”
Amidala doesn’t respond for a second and he sees a flicker of emotion pass over her face, too quick to tell what it is.
“Am I to assume, then, that the Jedi will not… object? To our relationship?”
He gives in to the urge to rise an eyebrow at her.
“Is there a reason we should be objecting?”
This makes her pause. She narrows her eyes at him.
“Isn’t this kind of attachment forbidden for Jedi?”
“Attachment is forbidden,” he retorts. “A Jedi’s commitment must always be to the protection of life and the Force first and foremost. Attachments - for example, a typical marriage - go against that and so it is heavily discouraged. But there are no rules that explicitly forbid it, no.”
He doesn’t mention the exceptions to this non-rule, such as Ki-Adi-Mundi, since she must be aware of them already.
Amidala is almost obviously frowning now. As she takes a moment to think his words over, Mace takes another sip of his tea. She seems to come to some kind of conclusion because her expression smooths out and she looks him dead in the eyes.
“Master Windu, so there are no misunderstandings between us, what I am asking is this: if we publicly announce our marriage, will you or will you not expel Anakin from the Order?”
Now he rises both of his eyebrows at her. “I will be doing nothing. If the Council is given reason to think that Knight Skywalker is not doing his duty as a Jedi, he will be asked to make a choice to either recommit to the Jedi or to leave. Forcefully expelling people from the Order is a rare measure, Senator, and one only used in truly extreme cases.” And because he can already see the next question and it has been on his mind a lot lately, he continues in a slightly less rigid tone. “While it’s true that such an announcement will not make either you or him friends among the more traditionally inclined parts of the Order, it’s hardly like there aren’t other Jedi in relationships. I’m sure you are aware of Master Secura and Commander Bly’s announcement?”
Amidala looks amused at his description of the event. It is probably stretching it to call Aayla and Bly making out obviously and loudly in front of the Senate building in view of over a dozen reporters an ‘announcement’ but it’s not like he can say it like that; he has a reputation to preserve.
“I have, yes, and I see your point,” she says and smiles a more true smile. “Thank you for your time, Master.”
He nods gravely and sets his empty teacup on the table. “Thank you for the excellent tea, Senator.”
And because he just might be a bit of a bastard, he adds as he’s leaving:
“Do tell Skywalker that if he’s going to attempt to keep a secret, he should be less obvious about having a secret to hide. And to talk to Kenobi already, he’s going to wear a hole in the floor if he keeps pacing.”
The door closes behind him but not fast enough to cut off Amidala’s laugh.
#macewinduappreciationday#mace windu#padme amidala#fanfic#star wars#tcw#clone wars#link#mine my own#it's already 23rd here ha#this is unbetaed and also my first fic :p#my fics
131 notes
·
View notes
Text
Introduction
Gen
they/him | Nonbinary | young adult | lgbtqa+ rights | I tag-talk a lot | You can call me Space! | I swear sometimes | I ship dnf
My Blogs/accounts:

@dreamspace-originals ONLY Reblogs of all my original (mcyt) content

@correct-mcyt-quotes Sideblog, posts only
(@allet-trash Main blog)
My MCYT Fanfics
Justice Well Served (AO3)
- “Dream has been fleeing his three persistant hunters for two months now. Life hasn’t been the same ever since the King demanded his head, and the more time goes on, the more he sees his future crumble. Maybe he never should have crossed him in the first place.
George and his two best friends have been sent on a neckbreaking mission to catch the most dangerous criminal in the kingdom of Rua. Guided by compasses and orders from the King, they’re determined to catch up very, very soon.”
(Long on-going work. I am writing this as chapter 20 is posted, and the work stands at 84.5k words currently. Here’s its tumblr post.)
Road Trip (If You Mean It) (AO3)
“George giggles despite himself. “Dream,” he says, and Dream feels his heart firmly punch his chest. Somehow, the same effect of Sapnap looking more attractive in reality applies to George, except fucking ten-fold. Sapnap teasingly whines something along the lines of ‘what about me?’, but Dream barely hears him.
Dream takes a step closer, suddenly very aware that George is as small as Sapnap is, a good head smaller than him, only really reaching up to his chest. George has to look up at him, a silent question in his eyes.
The glance upwards, all glittering dark eyes and dark hair and just George, is enough to slay him on the spot.
Dream doesn’t mean to sound so soft, his voice to be so drawled. “Can I hug you?”
George slides his bag off his shoulder, letting it hit the ground. “I- yeah.””
(“heat-waves-esque” but the song is Road Trip by Dreamwastaken himself this time, because Road Trip has been stuck in my head and Heat Waves has left me emotionally in pain. Long on-going work. Tumblr post)
Obsidian (AO3)
- “Despite all his divine power, Dream ends up trapped in his own prison… surrounded by nothing but the darkness, his torturously immortal mind and four cold, obsidian walls.” (Complete oneshot. Please read tags/warnings on ao3 before proceeding to read. ~3.4k words. Tumblr post.)
(For more of my writing, you can check out the tag #space writes on my blog.)
✨ More details and tags/dni/personal info under the cut ✨
Info
This is a side-blog so you won’t see me in notes/likes! My main is allet-trash but I don’t post any mcyt there at all.
This blog is 95% mcyt. I lov the mcytblrs with all my heart and I’m happy to be part of this cool community. I browse the mcyt tag a lot. Feel free to yell at my inbox/DMs if u wanna.
If I leave you on read in DMs that’s cause tumblr ate my notifs, I read it and forgot to respond or I haven’t figured out what to say yet sdlkfj. I’ll get back to you eventually (But you can also toss me an ask to remind me if you want as soon as I haven’t responded within about 48 hours).
ABOUT ME
Name: I typically go by Space here, but feel free to call me whatever.
Pronouns/gender: they/them/he/him, with a preference for he/him. I’m nonbinary.
I support the lgbtqa+ community wholeheartedly: Aro/ace, Biromantic/bisexual, Trans (whether that be ftm, mtf, mtn or ftn), Lesbian/gay/their romantic versions, Panromantic/pansexual, agender, nonbinary, genderfluid and people with neopronouns. PLEASE tell me if I forgot something. Knowing me, I might have. If it’s not p*dophilia, I probably just forgot to mention it here.
Age: I’m a young adult, 18-26. When talking to someone in DMs, especially about ships/fanfic/nsfw, I might ask if you’re a minor or not to make sure I know who I’m talking to!
PERSONAL TAGS
#dreamteamspace speaks
Asks that I answer, oneshots, any original posts, when I add a lot of my own ideas/writing/opinions on posts that I reblog, and my digital art if I make any.
#space writes
In cases of oneshots, lore, ideas, sometimes vividly depicted theories and generally creative writing, I will tag posts with #dreamteamspace speaks AND #space writes.
#space art
my digital art!
#liveblogging - Whenever I’m liveblogging about a vod/stream/premier/etc.
#srb - self reblog, when reblogging a post I myself made, sometimes with an addition.
#fav - This tag saves things for me for later. Things I might want to rewatch/reread and that give me serotonin.
#ask - any asks I answer.
#anonymous ask - any anonymous asks I answer.
On tagging asks: When answering an ask, I can’t tag it immedietly, but have to go back to edit the ask and tag it (If there’s a way around this please tell me). If an ask isn’t tagged at all, wait about 20 seconds and refresh.
#negativity
Any non-positive posts, including fandom drama, valid criticism of ccs, warning posts, venting, ranting, pessimism and shipping discourse. /j’d posts that are meant positively do not fall under this tag.
I won’t reblog posts I fundamentally and fully disagree with, rather, I may fully agree with a post and still tag it as #negativity.
If you would like something tagged #negativity that is not tagged, do not be afraid to toss me an ask/DM and ask for me to tag it. If you’re not sure if it’s reasonable or not, just ask! I don’t bite.
I use this tag less than once a day on average.
#criticism
Any posts that are ALREADY tagged #negativity but are about valid criticism of ccs or the fandom, usually making a good point I agree with.
((I generally will not reblog political posts onto this blog. Instead I do that to my main blog, @allet-trash, where they are tagged #politics.))
IMPORTANT! I do not tag my swearing.
I fully understand it can be bothersome to some people, and I’ve tried to tag it on other blogs in the past and I just- don’t manage. I don’t swear every second sentence and sometimes I’ll try to tone it down. If you’re very bothered by swearing, either filter the words themselves or keep your distance.
TWs
I’ll tag general things such as blood/death/selfharm/etc. If you need something triggering tagged that is not tagged, please tell me. If I tag something #blood tw I will also tag it #blood for easier filtering. I sometimes tag mentions.
Tone indicators
I use /lh (light hearted), /hj (half-joking), /j (joking), /srs (serious)
DNI (Do not interact)
-anybody who thinks p*dophilia is a kink/orientation or in any way part of the lgbtqa community
-if you romantically ship ccs that are minors with other ccs. Same goes for shipping ccs in ways they’ve confirmed to not be okay with or if they’re not okay with shipping in general
-Please just respect CCs boundaries I beg of you it’s the least we can do
34 notes
·
View notes
Photo

@beomgyutie was asking me about giffing with topaz and i couldn’t find a tutorial that was similar to how i gif and me being me i decided to be Extra and just make a whole tutorial for it! tutorial under the cut
things you will need:
photoshop (i’m using photoshop cc 2018, but i’ve used this same/similar process on cs6)
topaz plug ins clean and denoise downloaded and installed
downloaded video to gif in the highest quality you can find
side note: i’ve seen people say “don’t bother giffing something if it isn’t at least 720p”, but like that isn’t always practical or possible. so just find the video in the highest quality you can
.ts files are the way to go for giffing live stages! you can find a really great guide for how to find .ts files here.
one of the main things that determines gif quality is the video quality of what you’re giffing, so it’s important to use the highest definition you can!
if you’re interested in seeing my vapoursynth process you can see it here! the tutorial i used to learn how to use vapoursynth has been deleted, so if you would like a more detailed explanation let me know!
also i did not include how to add text or how to blur out part of a gif, so send me an ask if you’d like help with it!
all right so here we go:
1. figure out which part(s) of the video you’d like to gif! people do this in lots of ways; i usually watch the video through then make notes of what time stamps i want to gif.
2. open up photoshop and go to file -> import... -> video frames to layers
3. this window will pop up with your video! use the little slider things i’ve circled in red to select where you want your gif to start and end. don’t worry about it being too exact; we’ll narrow it down further in a minute. make sure that the limit to every x frames box is NOT checked!

4. it will create a frame animation from the clip you’ve selected. now you can trim the gif down even further and get the exact moment you’d like to gif by deleting frames from the beginning and/or end of the animation. i usually aim to have between 60-80 frames in a gif. keep in mind that bigger gifs mean bigger file sizes, so if you’re going for a big gif it might be best to go with fewer frames. (ex. if you’re making a gif that’s 540px by 400px, aim for 60 frames to help keep the file size down)

5. tbh it doesn’t matter when exactly you crop your gif in the process, but i usually crop and resize it at the beginning. i ended up cropping this gif again at the end too, so it really, truly doesn’t matter when you crop it.
you’ll also want to make sure your gif fits the current tumblr sizes for photosets which you can find by googling. the main ones i keep in mind are 540px wide for one gif per row and 268px wide for two gifs per row. for posting purposes, the height is not as important as the width, so don’t worry too much about the height.
you can crop the gif to whatever looks good to you then go to image -> image size and change it to the appropriate width. make sure you’ve clicked the little chain/handcuff looking button so your height will also be adjusted to maintain the height to width ratio!

6. next we’ll need to convert the frames into a smart object in order to sharpen and use topaz. click on the three bars just above your frame animation to select all frames, and also select all of your layers by using shift + click on the first and last layers (you can see the layers in the bottom right corner of the second image). you’ll want to make sure every single layer and frame is selected, otherwise part of the gif won’t be converted into a smart object.

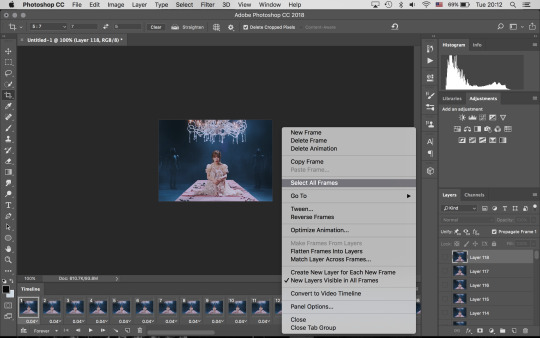
7. convert frame animation to timeline animation by clicking this button i’ve circled in the bottom left corner

you’ll want to make sure the blue play head button thing is at the very beginning of the gif before continuing

8. click filter -> convert for smart filters and your smart object will be made!
9. next we’ll use smart sharpen to sharpen the gif. go to filter -> sharpen -> smart sharpen, and this window will pop up. these are the settings i use for every gif, unless it is a lower quality video in which case i will turn down the amount percent

10. now it’s time to use topaz! i always start with topaz clean for whatever reason, but regardless you’ll go to filter -> topaz labs -> topaz clean. there are two settings i choose from that i’ve saved as presets. for this handong gif i chose the first settings. you can compare the settings with the unedited version by clicking the original button at the top of the preview window.

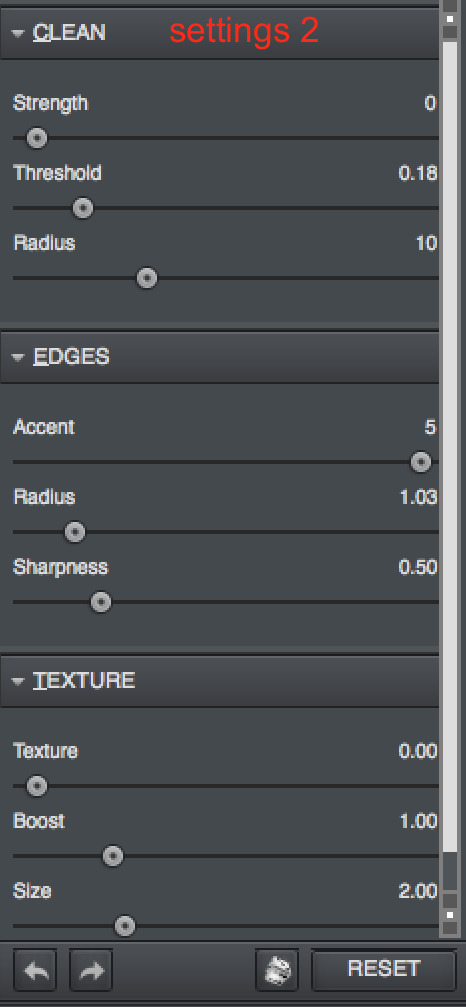
11. next up is topaz denoise! same process as before: filter -> topaz labs -> topaz denoise. i always use these settings but adjust the overall strength. i usually end up somewhere between 0.03 and 0.05.
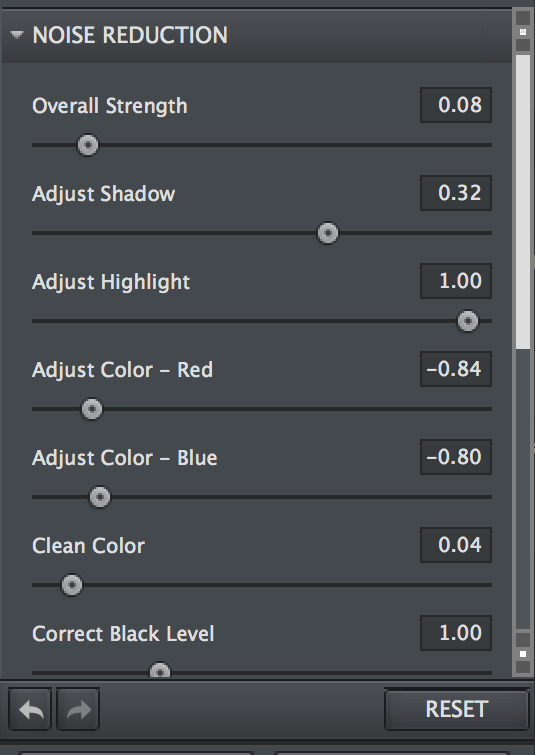

12. now we’ll click on the three bar menu again and select convert frames -> flatten frames into clips. do NOT touch your computer while it’s processing!! topaz is a finicky creature, and we cannot upset it while it’s working. there’ll be a progress bar so you can have an idea of how far along it is in the process. it does take a while, so be patient!
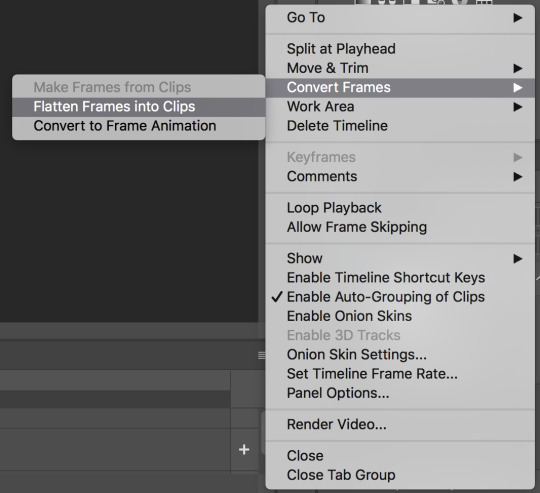
13. the process of flattening frames back into clips creates an extra layer that we don’t need, so go ahead and delete the layer where you can see all the smart filters we’ve just applied listed. it will be at the very bottom of the layers list, and also the only one labeled layer (you can see the rest are called frames now) as well as the only one that’s hidden (aka it doesn’t have the little eye icon to the left of its name)
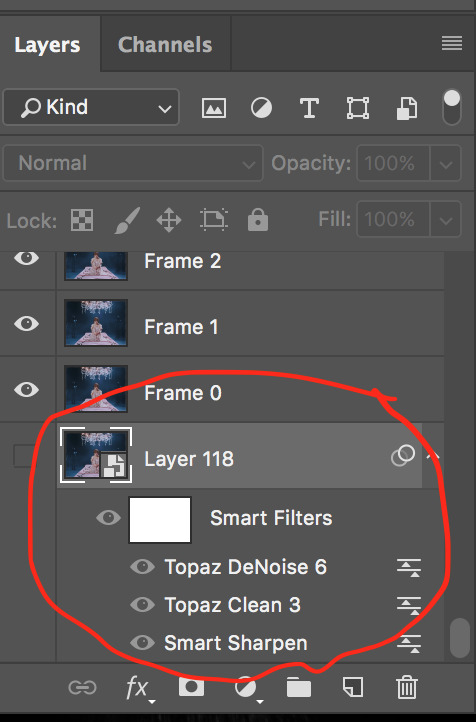
14. for the moment we’ll still be in timeline animation, so we’ll want to click on the three squares in the lower left corner to go back to frame animation

15. you should only see one frame in the animation window for now. click on the three bar menu again and select “make frames from layers” and we’ll have all of the frames we started with back except this time with sharpening and topaz-ing!
16. using the three bar menu again, you can select all frames then adjust the delay between frames (aka the timing!). once the frames are selected, click on the little arrow next to the number underneath one of the frames (doesn’t matter which one as long as they’re all selected). then you can choose a preset time or enter your own. my gifs are usually 0.04, 0.05, or 0.06. for this handong gif, i went with 0.05.

17. now you can add coloring! i’m not really going to get into how to color, but you can either find psds (aka premade colorings) that creators have shared on tumblr as a starting point or just mess around with different editing layers (like levels, selective color, curves, etc) until you land on something you like. when coloring while in frame animation make sure you drag the editing layer to the top of the layer list so the coloring is applied to all the frames!
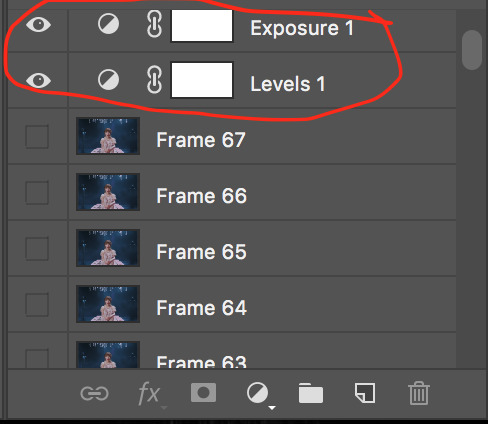
18. now we can export the gif! i use save for web and these settings. sometimes i will change the quality (circled in red) from bicubic smoother to bicubic sharper, but i usually leave it on bicubic smoother
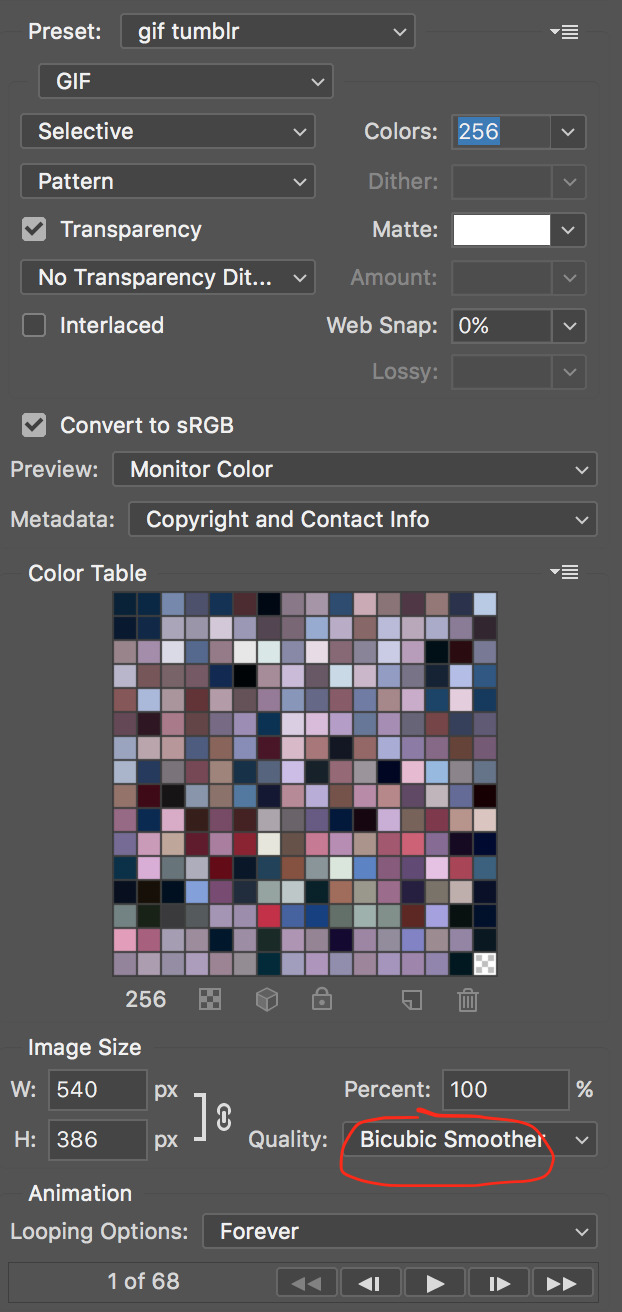
19. and now you can upload it to tumblr and you’re done! here’s the final result without text

let me know if you have any questions!
#gif tutorial#mine#tutorial#i'm not the best gif maker in the world but i'm pretty happy with how my gifs turn out so yeah#also i am v sleepy so i hope this makes sense ;alksdjf;aslkdjfas#giffing info
57 notes
·
View notes