#HOWto
Explore tagged Tumblr posts
Visit Tumblr Blog
Explore Tumblr blogs with no restrictions, modern design and the best experience.
Last Seen Tumblr Blogs


Fun Fact
The average Tumblr user visits about 67 pages every month.
Photo
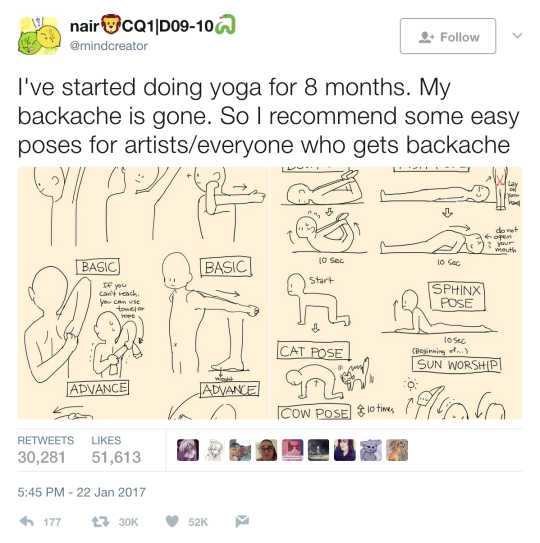
Gonna try this later


761K notes
·
View notes
Photo
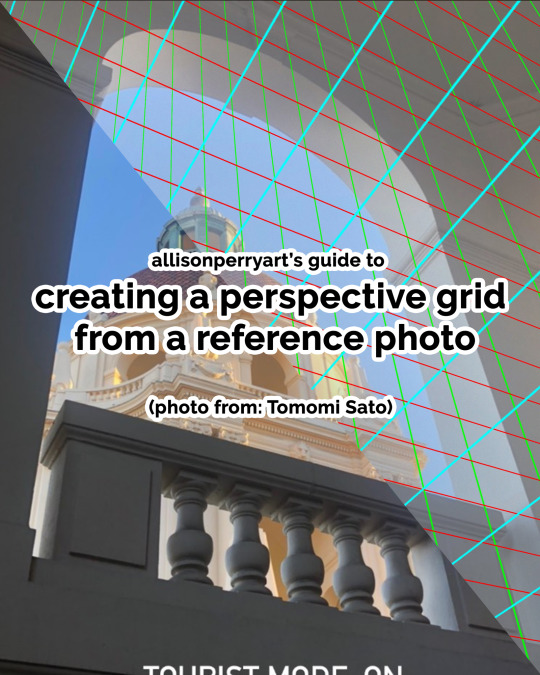

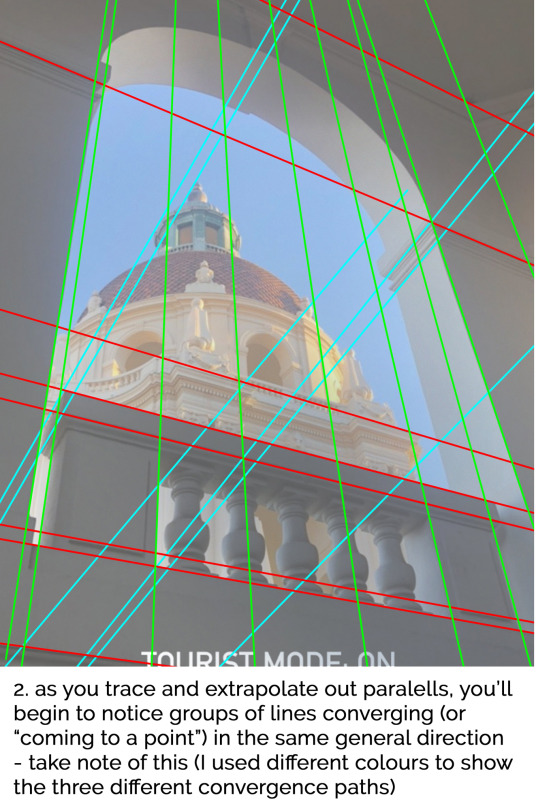
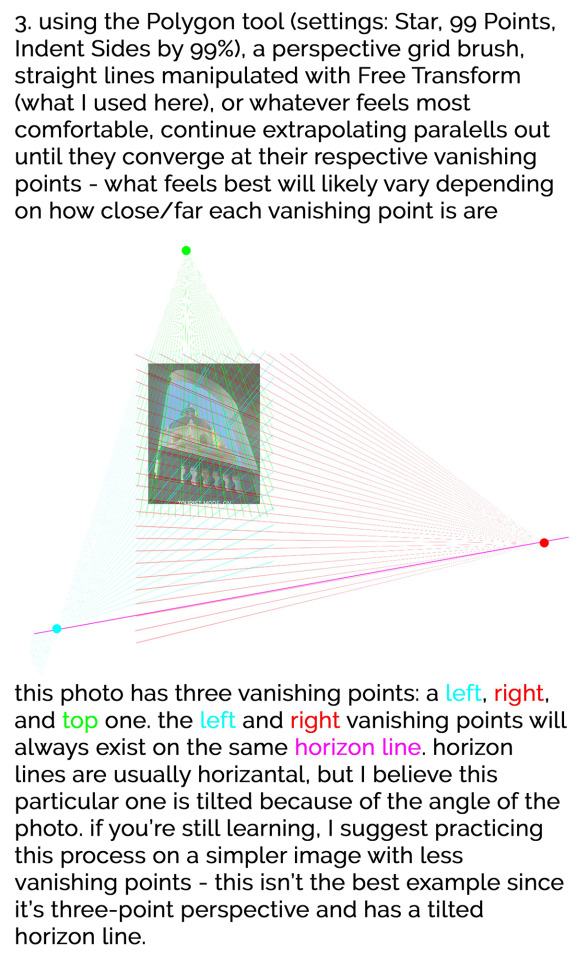

In case you missed it, here's a #TutorialTuesday someone requested on Twitter to go with last week's process video on how to create a perspective grid from a photo (from Tomomi Sato) which you can use for studies, drawings, paintings, etc. Hope this helps with drawing/painting in perspective!!
#tutorial#art tutorial#art help#artistsupport#art tricks#arttrick#art tips#arttip#howto#digital#digital art#concept art#concept#perspective#grid#vanishing point#horizon line#guide#underlay#overlay#visual development#visdev#illustration#allison perry#allisonperryart
9K notes
·
View notes
Text
Some Tumblr Tricks
1. Get a random blogpost from a blog
You like the content of a blog but theres just so much content and you want to see some older stuff? Great, just append /random to the URL and a random blogpost from that blog will be shown:
BLOGNAME.tumblr.com/random
2. Use Keyboard Shortcuts
When you are on your dashboard you can use the following keybinds:
J -> Scroll forward K -> Scroll backward L -> Like the current post N -> See the number of notes Shift + E -> Add post to your queue Shift + R -> Fast reblog Z + Tab -> Quickly switch between dashboard and blog Z + C -> Quickly compose a post Space -> View photoset in a lightbox or start playing a video post
3. More URL tricks
Show all posts with a specific tag:
BLOGNAME.tumblr.com/tagged/<tag>
Sort entries with a specific tag in chronological order
BLOGNAME.tumblr.com/tagged/<tag>/chrono
Get all Posts from a date
BLOGNAME.tumblr.com/day/JJJ/MM/TT
PS: Do not forget you can go totally crazy with the custom theme editor by for example adding a music player https://www.scmplayer.net/ or whatever. Make personal websites cringe again!
2K notes
·
View notes
Text

gesso on scraps from old pants, let dry, black sharpie. looks just like my book covers in high school circa 1996. still got it!

Never saw OpIvy, so Rancid at the Palladium Outdoor will have to do.
Worcester, Massachusetts
September 15, 2019
71 notes
·
View notes
Text
Tutorial: How-To Create Striking Gradient Shapes & Waves for Adobe Illustrator for iPad

In this tutorial, we will explore step-by-step instructions and tips to create striking gradient waves and shapes that can enhance any project, from digital illustration to web design and marketing materials.

Starting off you'll want to open Adobe Illustrator on your iPad, and select 'custom size'.

Create a canvas that measures at 3000 x 3000 points.

Set the colour mode as 'RGB'.

Select the 'Pencil' tool, and then select 'Paint Brush'.

Select 'Calligraphic' brushes, and scroll down until you find the 15 pt. 'Round' brush and select it.

Select the 'Fill' option and set the colour value to none.

Select the 'Stroke' option and set the colour value to a colour of your choosing.

Select the 'Smoothness' option and set it to the maximum value (10).

Draw a wavy line.

Select the 'Stroke' tool and choose a new colour.

Draw another wavy line over the top of the previous.

Select the 'Stroke' tool and choose another new colour.

Draw another wavy line over the top of the previous two.

Select the 'Selection' tool.

Select all of the shapes.

Select the 'Repeat' tool.
Within the 'Repeat' tool, select the 'Blend' option.
Tip: If you have a keyboard connected to your iPad, you can use the keyboard shortcut 'Command+Alt+B' when objects are selected to blend them.

Now our gradient wave shape has been created!

Once the shapes have been blended, you can manipulate the spacing of each shape with the three dots in the middle, each one represents each of the lines.

Move each point around until you feel comfortable with their spacing.

We may want to make some alterations to our shape such as changing the rotation, shape, size, order of lines. Here’s how we can do that.
Select the 'Selection' tool.

Drag and select the shape.

Select the 'Object' tool.
Select the 'Release' option.

Now the objects are unblended they can be altered or manipulated to our liking.

To put our gradient wave back in place, first select the 'Repeat' tool.

Then select the 'Blend' option.
Congratulations on completing the tutorial on creating striking gradient waves and shapes in Adobe Illustrator for iPad! You've taken significant steps in enhancing your design skills, learning how to apply gradients effectively, and bringing your digital artwork to life with vibrant colours and dynamic forms.
Keep Practicing - As with any creative skill, practice is key to mastery. Continue experimenting with different gradient combinations, wave patterns, and shapes. Find new ways to enhance your designs.
The more you practice, the more confident and proficient you will become.
If you're interested in supporting me, or checking out some free eBooks, Wallpapers, and more. Please consider checking out my Ko-Fi page: https://ko-fi.com/spikeeager
#freebies#guides#guide#how to#howto#how-to#how-to's#how-tos#art guide#art#design#illustration#art help#art tip#art advice#art tutorial#drawing tips#graphic design#creative#unique#marketing#tips#artwork#art process#digital painting#drawing#illustrators on tumblr#illustrator#illustrative art
138 notes
·
View notes
Text
Three Ways to Express Interest in Russian
In Russian, there are three distinct grammatical structures to convey interest in something:
Я интересуюсь политикой.
Translation: I am interested in politics, I care about politics.
Structure: Я + интересуюсь + Instrumental
Меня интересует политика.
Translation: Politics interests me, I find politics interesting.
Structure: Меня (Accusative) + интересует (интересуют for plural) + Nominative
Мне интересна политика.
Translation: Politics is interesting to me.
Structure: Мне (Dative) + интересна (интересен/интересно/интересны) + Nominative
Bonus:
Я заинтересован в политике.
Translation: I have an interest in politics (for example, it's my business).
Structure: Я + заинтересован + в + Prepositional
Listen to the audio to learn how to pronounce these phrases correctly!
50 notes
·
View notes
Text

Commodore 64 Nano SwinSID Tutorial (German)
48 notes
·
View notes
Text
How to Pause a Tamagotchi Connection 20th Anniversary

Sometimes you need a break. The Tamagotchi Connection 20th Anniversary features unique programming, and part of that is the exclusion of the pause featured that was available on the older models. So how can you pause your Tamagotchi Connection 20th Anniversary when you’re busy? Here’s how!

Clock Set Trick - This is when you access the clock screen by pressing the “A” button. Once you see the clock screen you’ll then press buttons “A” and “C” at the same time until you see the word “SET” in the bottom right-hand corner. This will essentially pause your Tamagotchi as it is waiting for the time to be set. Once you return back and want to resume your Tamagotchi, adjust the date and time accordingly and you’re back at it! Please note that all growth will be pause as well during this time.
It is important to note that this is the only pause method on the Tamagotchi Connection 20th Anniversary. Enjoy!
#tamapalace#tamagotchi#tmgc#tamagotchiconnection#tamagotchi connection#connection#tamatag#virtualpet#bandai#howto#how to#pause
75 notes
·
View notes
Text


Free pattern from me: Timeless Granny Square Blanket! Video tutorial on my YT channel. Full pattern and step by step photo tutorial on my blog! Pick your fav way to learn! ✨️💕🫶
youtube
#yarn#fiberart#crochet365#crochet#crocheting#crocheted#crochetersofinstagram#crochetblanket#patterns#tutorials#crocheteveryday#crocheter#crochetaddict#crochetallthethings#crochetaddicted#crochetdesigner#crochet_feature_page#crochetblogger#crochetvideo#youtube#youtuber#crochetonyoutube#crochettutorial#crochetpattern#freecrochetpattern#freecrochetpatterns#diy#howto#craft#handmade
47 notes
·
View notes
Text

$40,000 MASSIVE Epoxy Table


#家具デザイン研究室#rivertable#art#homemade#diyepoxy#DoItYourselfWithGreg#resinart#Woodcutting#resintable#MakingmoneywithDIY#epoxyart#DIYWithGreg#diyresin#Woodprojects#LiquidGlass#Concrete#diy#painting#table#woodwork#wood#Howto#woodworking#handmade#diyprojects#workstudio#doityourself#Epoxy#epoxyresin
29 notes
·
View notes
Text
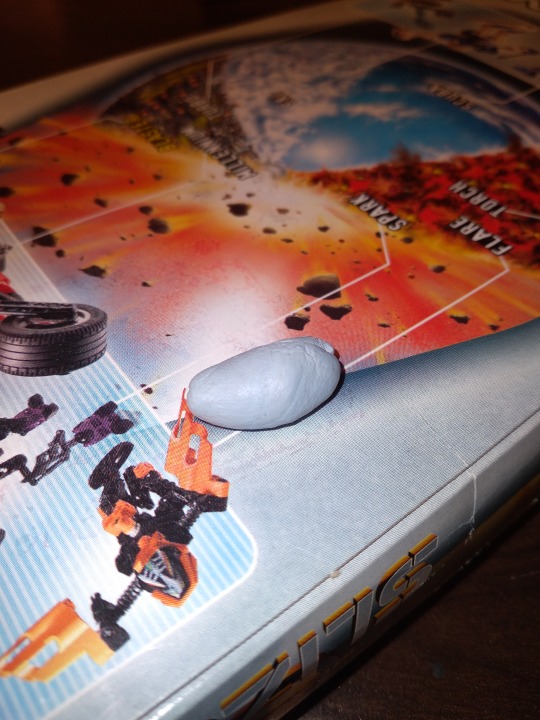
How to get Stickers/Tape off of boxes
There's nothing worse than spending money on a sealed Bionicle set, or just tracking down one with the box, only to find that some criminal went and stuck things all over it.
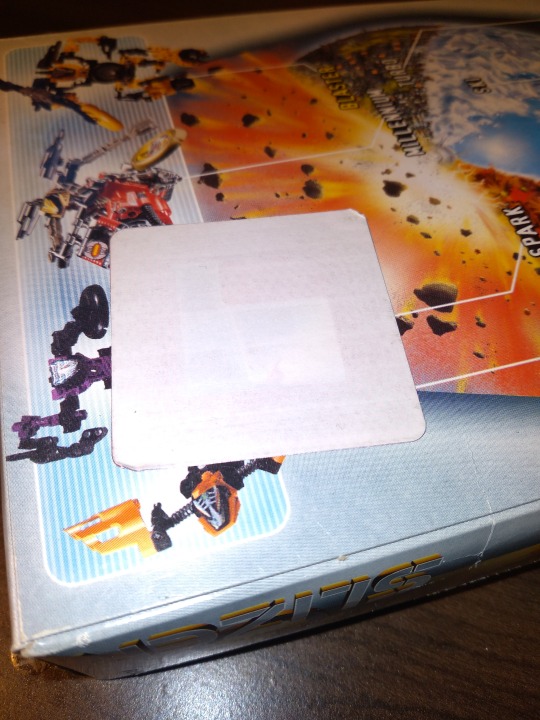
This is a problem that I've faced a lot, and have found a pretty good solution to!
First, blast the sticker with a hair dryer. This will soften the adhesive and allow you to get a small knife underneath an edge
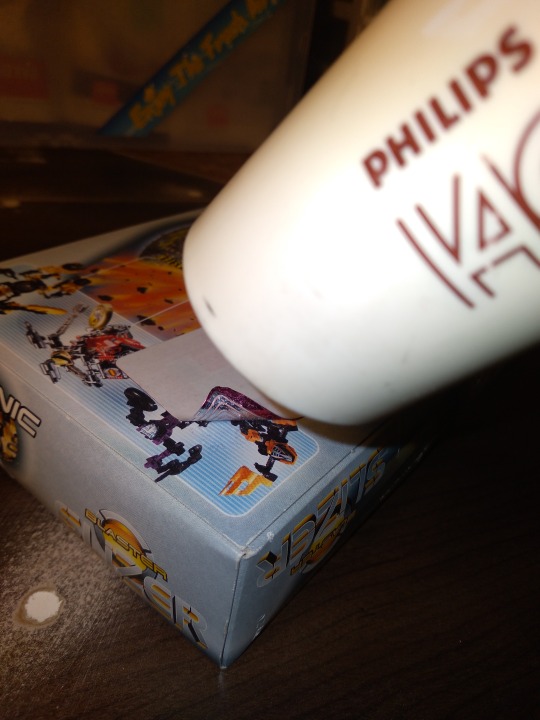
Then you can start carefully peeling it up. Ideally you would use some tweezers to grip the sticker, but none of mine have enough grip so I just end up sing my fingers. My fingers are very sore afterwards from all the hot air...
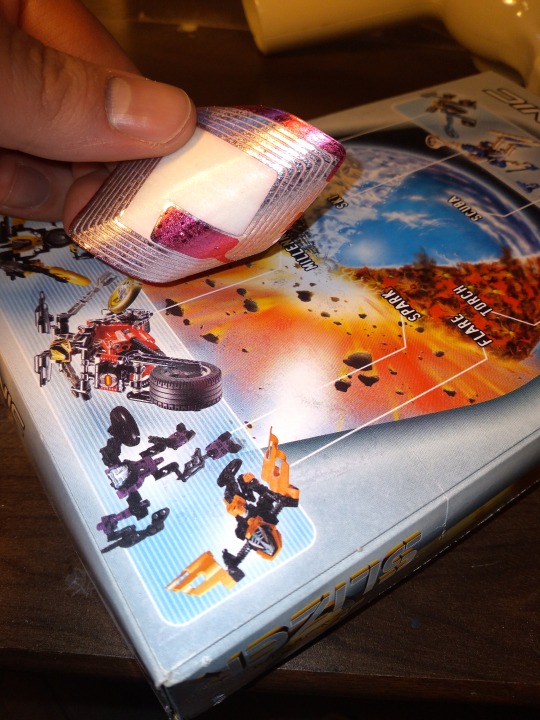
Now while this removed the sticker itself there's probably a lot of adhesive left on the box.
You could try washing it, but water and cardboard don't mix...so recently I found that Blutack works amazingly well!

You simply roll it over the surface gently, and slowly but surely the blutack will stick to the adhesive and pull it off!. It will take quite a while, and its a bit hard to roll it with burnt fingers, so maybe don't do the two steps back to back...
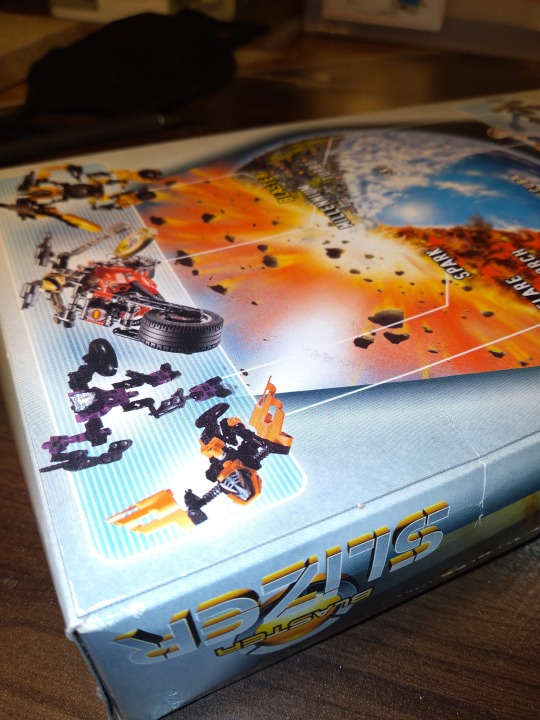
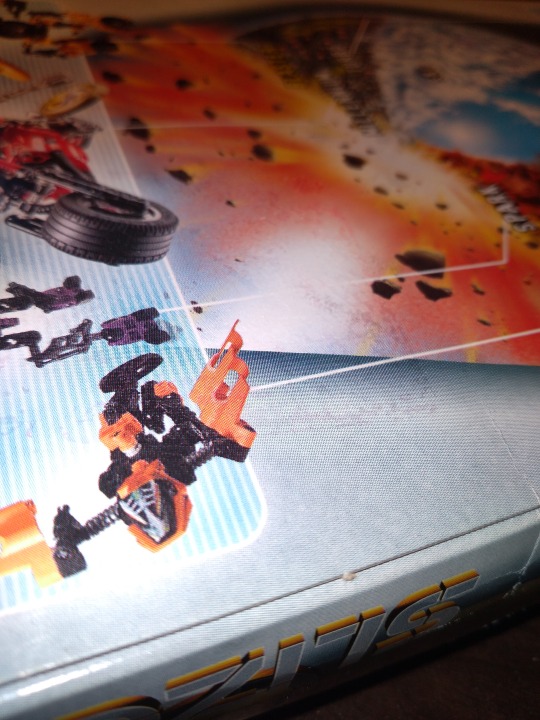
But eventually your work will be rewarded! A nice clean box to enjoy.
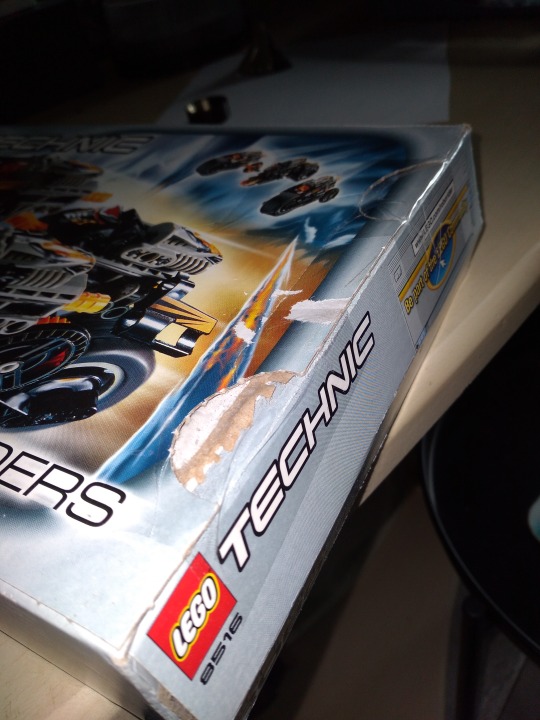
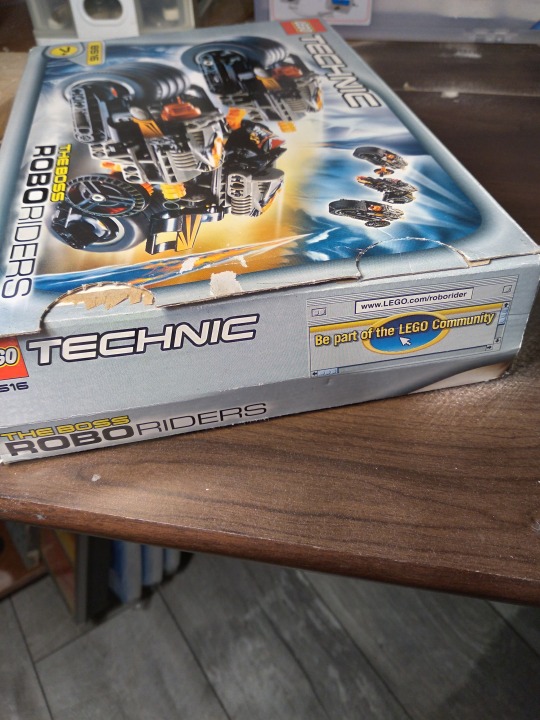
Here's another example. Note: near edges or parts where the cardboard has torn you have to be very careful, as the blutack is strong enough to tear the cardboard up. But a slight dab of glue on the underside is enough to repair it.
Also: This specifically is an English brand of Blutack, the north american version is different so I'm not sure how well it would work, so be ware.
77 notes
·
View notes
Text
youtube
RUNNING A CAR DEALERSHIP AT HOME (CC-free)
...with the SIMOLEON SAVERS household. They live in a renovated version of PORTICO MODEL ONE in TWINBROOK (20x30), but in this version it is set up as a home business using the Savvy Seller Set from the Store.

Using Items from:
No CC
Store items: Savvy Seller Collection (comes with Midnight Hollow)
EPs: WA, Ambitions, Late Night, Generations, Pets, Showtime, Seasons, University Life and Island Paradise.
SPs: High End Loft, Fast Lane, Outdoor Living, Town Life, Mastersuite, Diesel and the 70s,80s,90s pack . I also own the Movie Stuff pack but I’m pretty sure I haven’t used anything from it in this lot.
DOWNLOAD (household included)
I use markers on my lots: skip level, hidden room, public room… So to be able to modify any of these buildings you need to have cheats on: ‘testingcheatsenabled true’, then ‘restrictbuildbuyinbuildings false’ To see/remove the markers you need ‘buydebug on.
62 notes
·
View notes
Text
How To Make Your Picture Look Like Shit (Weirdcore Dreamcore Baidexweb Whateverelsecore)
Download image toolbox https://github.com/T8RIN/ImageToolbox
Go to resize and convert
Change file type to jpg or jpg2000
Reduce the ratio and quality (play around with it)
Ratio: 500 pixels or less for that trashy jagged edges
Quality: 50% or less for prominent jpg artifacts
Play with jpeg compression algorithms (scale Mode): you have a lot to choose from, so pick whatever you like
Save and re-resize and convert back up to original pixel ratios if you reduced it ( You can convert file back to png or jpg if you are using jpg2000 since programs like ibispaint wont accept that file type)
Bring it into your digital art workstation (bring multiple types to blend different artifacts/ jpeg algorithm amounts if wanted using transparency, blending, and eraser tools).
Lastly, flatten image, sharpen, tone curve, exposure, etc., to test (experiment with different sharpening amounts and blend them).
Rest is up to you but dont be afraid to experiment
12 notes
·
View notes
Text
♈️Aries: This blend is not for the faint of heart, but neither is teatime with Aries!
Tea is ours, mold is from JOANN Fabrics, chocolate is from fellow Seattle area indie The Chocolate Man.
#fridaytea#tea#seattle#thirstynerds#tastyteas#synesthesia#aries#astrology#horoscope#howto#baking#dessert#recipe
13 notes
·
View notes
Quote
5社の就職試験を受け、なんと5社すべてから内定をいただきました。 誰にでもできるシンプルな作戦ではあるのですが、実際にやるとなるとすこし大変かもしれません。けれど、どうしてもコピーライターになりたかった私は、自分が編み出したこの方法を実践することで、内定がもらえるだろうという自信のようなものがありました。なぜならその方法は、日本中の誰も(きっと)やったことがない方法だと思っていたからです。 ということでさっそく、その手の内を明かしますね。こたえは簡単。 「写経」です。 わかりますでしょうか? 一般的にはお坊さんがお経をひたすら写し取る作���のことを指しますよね? コピーライターの場合もほぼ同じ意味です。「過去の(名作といわれる)コピーを手で書き写すこと」。これだけです。本当にこれだけのことを行うだけで、試験を受けたすべての会社から内定をもらうことができました。 ちなみにこの写経、コピーライターを志す人や、若いコピーライターなら、経験済みという人も多いと思いますし、上司から「やれ」と言われることもありますよね。それほど“ベタ”な方法なわけです。それでもこの方法で内定がもらえると自信があったのは、人とはちがうやり方を発見したからです。 前置きが長くなってしまいましたが、さっそく具体的な方法をお伝えします。 それは“圧倒的な量”をこなすことです。 あまりにも単純でしょうか? がっかりしたでしょうか? すみません… けれどもなぜわたしが、そんなサルでも思いつくような方法を実践しようと思ったのか。その経緯も説明しておきますね。 わたしは当時、宣伝会議が主催する『コピーライター養成講座』に通っていました。 (…) さまざまな講師の方に、“定点観測をするように”、尋ねました。 「コピーライターになるために今やっておいたほうがいいいちばんの練習ってなんですか?」 シンプルな質問です。答えの中でもっとも多かったのが、さきほど紹介した��写経」だったのです。さらに偶然なのですが、当時読んだ広告業界への就職に関するの書籍の中で、ある人がこう言っていました。「コピー年鑑の1年分のすべての文字を書き写しました」。 よし、これだ! 未経験のじぶんがコピーライターになるための方法はこれしかない! そのときそう思ったんです。 けれど1年分じゃその人の真似で終わってしまいます。倍の2年分にしようか? いやいや、それだとインパクトは弱いかな…。思いきって5年分! うーん…中途半端? ということで結論、 10年分のコピー年鑑を写経しました。 これがわたし流の、すべての会社から内定をゲットした方法です。 さて、やるべきことは決めたものの、そのためにはコピー年鑑を入手しないといけません。ご存知の方も多いと思いますが、コピー年鑑といえば1冊約2万円!もする高額書籍です。若かったジブンが簡単に購入できる書籍ではありません。そこで近所の図書館を何件かはしごして、10年分を手元に入手しました。10冊すべてを自宅のデスクに積み上げると壮観でしたが、これをすべて写すのかと思うと、果てしない道のりにも感じました。 (…) さて、準備が整いました。コピー年鑑は最初から写していきます。TCC賞、審査委員賞、部門別コピー、新人賞という流れだったかと思います(現在の年鑑��は新人賞が前の方に来ていますね)。とくに新人賞の受賞者は年齢や作品が大きく取り上げられていたので、勝手にライバル視していました。 また、ひとつの広告に絞ると、キャッチコピー⇒リードコピー⇒ボディコピー⇒そして小さな文字で書かれた注釈まですべてを写します。肉眼で見えない部分は、“100均”で購入した虫眼鏡を使って読み取りました。コピーの良し悪しなんて当時はまったくわかりません。それでもコピー年鑑に掲載されている時点ですべてお手本だと思ってひたすら作業を続けました。 (…) 写経の過程でたくさんの発見もありました。コピーを写すことでいいとされるコピーを知識として知ったということはもちろんですが、それ以外にも、毎年掲載されているコピーライターの名前は嫌でも覚えます。また、その人の文体までなんとなくわかってきます。細かい点でいうと、「ボディコピーってこれくらいの長さが一般的なんだな」など、そういった感覚もついてきます。10年分を通して見ると、じつは毎年同じような作品が掲載されていることも知りました。そのため作業に飽きてしまう日もありましたが、言葉を変えれば“飽きるほどやる”ということは、覚えてしまったということでもあありますよね。とにかくとても大切な経験だったと思っています。 さて、作業自体は楽しかったのですが、困ったこともありました。朝から晩まで写経を続けていると、8時間くらい経過したところで、目の前がチカチカして、軽い眩暈のような状態になるんです。遠近感がつかめず、立ち眩みがするのです。心ではもっと書きたいと思うのですが、その症状が発症したら作業は終了と決めました。1日約8時間。1冊を写し終えるのに5日くらいかかっていたと思います。 10年分を3か月で写経完了! 写経したコピーが書かれたプロジェクトペーパーは、さきほども言ったようにパンチ穴をあけて、リングファイルのいちばん背幅が厚いものに綴じていきます。10年分ですから相当の厚さになります。重量も5kgくらいはあったでしょうか。 ちょうどその頃、養成講座も修了するタイミングでしたので、就職活動も開始しました。養成講座の受講生だけが見られる求人票や、マスメディアンのサービスを利用しました。当時は地方在住だったため、面接のためには上京の必要がありました。交通費をなるべく抑えたかったので、なるべく面接は1日にまとめるようにして、その結果、5社を1日で受けられるようにスケジュールを組みました。 ※書類選考は半分ほどの割合で通過しました。 “写経ファイル”は、キャリーバッグに入れないと持ち運びができないほどの大きさにふくれあがっていました。ですが、面接で毎回そのファイルを見��もらうと、必ずといっていいほどウケます。若干ひかれていたかもしれません。「なにそれ?」「こんなヤツ初めて見た」「誰もやったことないんじゃない?」「うちで決めちゃえば?」などなど…。手ごたえを感じるたくさんの言葉をいただくことができました。 未経験者がコピーライターという肩書きを手に入れるためには、どうすればいいのか。内定から逆算して行動できたことがよかったと思います。元々、学生時代に行った就職活動もけっこう好きでした。いろんな会社にタダで葉入れて、話が聞ける。そしてもちろんたくさん落ちました。そんななかで自分をアピールする方法を考えないといけないということも学びました。 どうすれば、「人と差別化できて」「インパクトを残せて」「いっしょに働いてみたい」と思ってもらえるか。 そういった視点で準備をすることが重要です。しょせん私自身は、実際としては“経験ゼロの若造”なわけですから。それでも「おもしろいヤツだな」と思っていただけると、次のステップに進めるのではないかと考えていました。結果としてすべての会社から内定をいただくことができましたが、正直そこまでの結果は予想していませんでしたけど。 この方法を実践すれば、すべての会社とは言わないまでも、ある程度の確率でいいところまで行けるのではないでしょうか。もちろんもっと楽でスマートな方法もあるかもしれません。でも、本当にかなえたい夢のためなら、努力はできると思います。逆に、これくらいの努力ができないのであれば、あなたはあまりコピーライターには向いていないかもしれません。 ちなみにわたしの場合は、電通や博報堂に入社することよりも、コピーライターになる方が重要でした。 結果として10年以上がたった今も、毎日楽しく働くことができていますし、「会社行くの嫌だなぁ」と思ったことは一度もありません!
未経験でコピーライターの内定を“確実にもらう”方法(実証済み!)|ai0167
91 notes
·
View notes
Text


Commodore 64 RR-Net MK3 Network Module
#commodore#c64#rr-net#module#cartridge#retro#retrocomputing#classic#vintage#network#tutorial#howto#deutsch#german#rj45
120 notes
·
View notes