#English Language tutorial
Explore tagged Tumblr posts
Visit Tumblr Blog
Explore Tumblr blogs with no restrictions, modern design and the best experience.
Last Seen Tumblr Blogs


Fun Fact
130K people were victims of a chain letter scam that affected Tumblr in May 2011.
Text

225 notes
·
View notes
Text
how to do super basic gyaru eye makeup
1. Circulenses
2.Apply light shadow all over the eyelid
3.Apply dark shadow to the waterline and eyelid
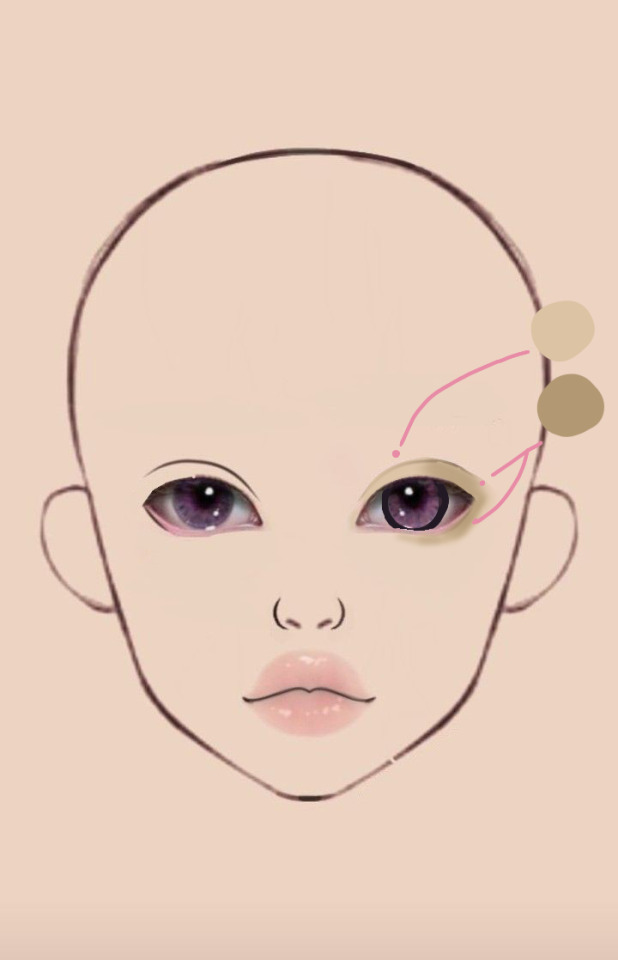

4. Line the lash line and the water line (Only up to half the eye)
5. App
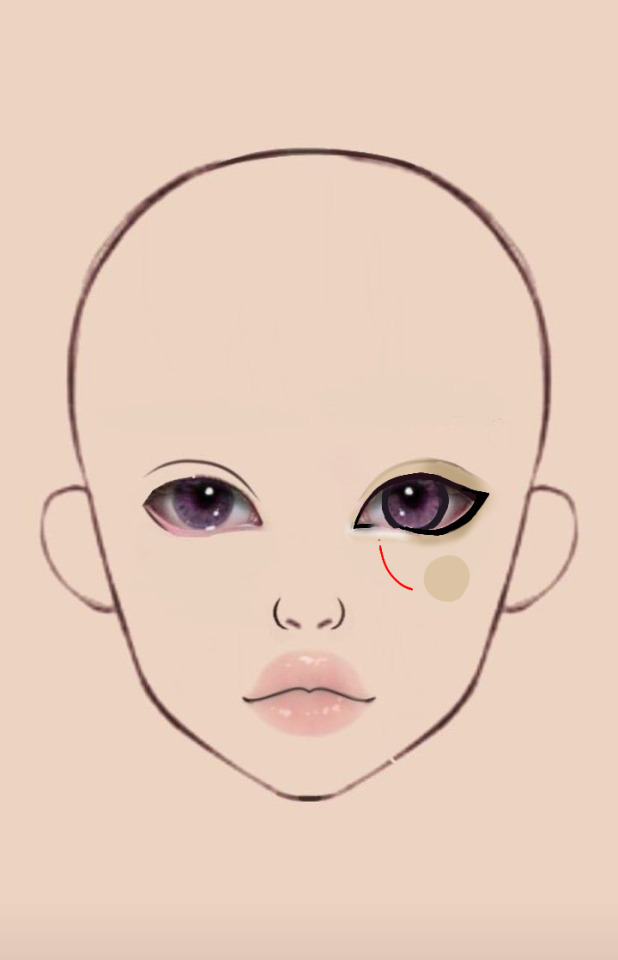
7.apply highlighter

8.put false eyelashes
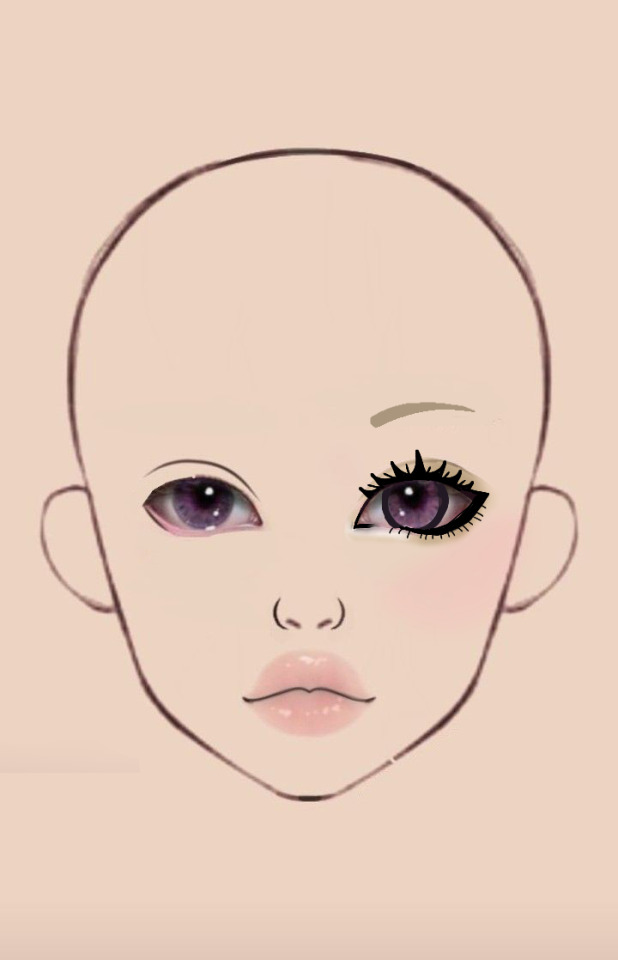
9.Apply lower lashes or coat lashes with mascara💖
Ready !!!
#English is not my first language 😔#I hope it helps the baby gals 💖#gyaru#gyaru fashion#gyaru makeup#ギャル#makeup tutorial
32 notes
·
View notes
Text
Pirating stuff in English is easy as hell, the real challenge is pirating stuff in your own native language
#post#the worst part is KNOWING a movie has a spanish dub but NOT BEING ABLE TO FIND IT ANYWHERE#all those pirating tips and tricks and websites and tutorials are really just useful for only english#it's very solitary pirating in spanish. you really have to figure out what english tips are useful in spanish n then discard the rest#bcus no one makes pirating tutorials for spanish. or any other language as far as I can see#piracy
5 notes
·
View notes
Text
Understanding 〜てばかりいる in the Japanese Language
Japanese is a language rich with nuance and subtle grammatical expressions. One such structure is 〜てばかりいる, a phrase used to indicate that someone is repeatedly or exclusively engaging in a specific action. In this post, we will explore the formation, meaning, nuances, and advanced usage of this structure. Additionally, we include example sentences, interactive exercises, and practice questions to…
#advanced Japanese expressions#advanced Japanese language learning#〜てばかりいる usage#daily prompt#effective Japanese learning#English#high-volume Japanese keywords#japan#Japanese#Japanese blog optimization#Japanese conversation tips#Japanese cultural insights#Japanese Culture#Japanese expression examples#Japanese grammar 〜てばかりいる#Japanese grammar exercises#Japanese grammar for beginners#Japanese grammar lesson#Japanese grammar practice#Japanese habit expressions#Japanese language#Japanese language blog#Japanese language learning#japanese language proficiency test#Japanese language SEO#Japanese language structure#Japanese language tutorial#Japanese linguistic nuances#Japanese repetitive behavior#Japanese study tips
5 notes
·
View notes
Note
Hiii! I was wondering if you do any editing to your pictures besides using reshade !! I love how your screenshots look <3
Hello! My editing is pretty simple. I use Adobe Photoshop 2021, Topaz Clean and Analog Effex Pro plugins.
First I crop my picture and run all-in-one action from this pack to make it look crisp and smooth like this:
next I apply Analog Effex Pro 2 plugin (i play around with different filters from picture to picture depending on what I want to achieve so i don't have any go-to presets). It's such a lifesaver tool providing a wide rage of editing options. I go with basic adjustments, film type, and dust and scratches to get smthn like this:
At this point if I feel like going extra I may apply color grading or use some @wooldawn's actions

For an outdoor shot that would be it, but if the picture was taken indoors like this one I enhance lighting by, well, paining it. Here's what I do: first create an empty layer, fill with color black and change blending mode to soft light. Then take large soft brush (color white), paint areas where you imagine the light source is and apply gaussian blur (set the radius to high values to make the edge of dark and light areas smooth). Lower the opacity to 15-30%

Here's what I get in the end. Hope that was helpful
77 notes
·
View notes
Text

ravelry
#crochet#crochet pattern#type: amigurumi & toys#motif: cats#motif: plants#paid pattern#free pattern#(there is a free video tutorial in the source link as well)#written pattern#video pattern#source: ravelry#language: english
2 notes
·
View notes
Text
Shopping Haul


A few days ago I went to Hobby Lobby and the prices of these items were insane! Yarn that would cost me 10.99 cost me 2.74. I'm so happy!
#writing#language learning#english#learning#love#japanese#chinese#french#language#tarot#crochet#yarnblr#tutorial#art#diy projects#dark aesthetic#dark academia#lana del rey#manifesting#girlblogging#female rage#nannobuys#lgbtqia#spirituality#religion#haul#books and reading#anime and manga#fanfiction reccomendations#shopping
4 notes
·
View notes
Text
youtube
#LearnEnglish#English lessons#English tutorials#English language learning#English grammar#English vocabulary#English speaking practice#English listening exercises#English pronunciation#English conversation#English Language Tips and Tricks#Daily English Practice#Business English#IELTS Preparation#TOEFL Preparation#ESL (English as a Second Language)#English for Advanced Learners#English for Intermediate Learners#English Writing Skills#Youtube
3 notes
·
View notes
Text

152 notes
·
View notes
Text
Y'all
Im not on tiktok and never have been, but I downloaded RedNote just to see what is up, and I am witnessing something truly amazing
The Chinese user community is giving the American tiktok refugees an overwhelmingly warm welcome, meanwhile the American users seem to have collectively agreed that not only will they not let the app be taken over with English and they will provide Mandarin subtitles for everything, they are LEARNING MANDARIN. Ive scrolled through so many videos of Americans offering greetings in Mandarin to try to acclimate to the new environment and be respectful, and speakers of both languages are posting lots of tutorials on language basics and internet slang in Mandarin
My God, there is an AMAZING outpouring of curiosity and delight among everyone to learn about each others cultures and daily lives. People are posting videos of landscapes, cities, towns, and natural areas in USA and China, posting recipes and traditional foods, vlogs of everyday life, and reaching out to find people with similar hobbies.
And it's not just young people! There are loads of videos from middle-aged American guys who have come to post about fishing or motorcycles and are now happily chatting with Chinese users sharing the same interests using Google translate
One American guy who was like. in his 60's had a comment on one of his videos that was like "Red Neck?" and he replied "Yes!" and I just about fucking lost it
Also the Chinese users love, and I mean LOVE, Luigi Mangione. He is apparently broadly adored in China. There is SO much fanart and SO many edits.
There are many threads initiating Chinese users to ask questions of American users about the USA, and vice versa, and everyone on both sides is clearing up a lot of misconceptions. Some of the questions I saw a lot from Chinese users were: "Is it true that American parents kick you out of the house as soon as you turn 18" (not often, but sometimes) "Do you all really wear shoes in bed" (NO!!! Apparently a lot of characters in American sitcoms are shown lying in bed with shoes on which I never noticed before!) and "are there really guns everywhere" (yes).
For the most part Chinese content creators seem just overwhelmed by the sudden influx of hundreds of followers that are super enthusiastic about what they're doing. A lot of them have made posts about how initially they thought the uptick in follower count was some kind of error, or that there was some kind of joke or prank, but then they realized the interest and enthusiasm was genuine and now they're welcoming all the newcomers.
I found several posts by Chinese users saying that this felt like a really profound historical moment, where these previously separated worlds are suddenly smashing together and suddenly there is freedom to learn about each other's cultures and connect. One of them said something along the lines of "This is a 21st century Tower of Babel and even though I'm an atheist I hope God lets this tower stand." OUGH MY HEART.
The app itself works a little bit like a video-based version of Pinterest. It's not really my thing so I probably won't be on there long term but it's been amazing to see what's happening.
49K notes
·
View notes
Text
youtube
100 American English Sight Words - List 1 - Learn how to pronounce common American English sight words.
#hooray easy english#learn English#learn English ESL#English language learning#ESL lessons online#beginner English course#learn English for beginners#basic English lessons#ESL English practice#how to learn English#English speaking practice#English language course#English vocabulary lessons#ESL tutorials#Youtube
0 notes
Text
My GIF Making process: Screen capturing using MPV player, Organizing files, 3 Sharpening settings, Basic Coloring PSD + Actions set

This is a very long post so heads up.
I’ll try to be as thorough and true as much as possible to the way I make my gifs (I already use Photoshop Actions which I’ve long since set up but now for this tutorial I’m reviewing them to show you the exact steps I’ve learned to create my gifs 😃) and present them to you in a semi-coherent way. Also, please bear with me since English is my second language.
First things first. Below are the things and tools we need to do this:
Downloaded 4K or 1080p quality videos (let’s all assume we know where to get these—especially for high definition movies and tv series—so this post doesn’t get removed, okay? 😛)
Adobe Photoshop CC or the CS versions can work as well, but full disclosure I haven’t created gifs using the CS versions since 2020. I’m currently using Adobe Photoshop 2024.
mpv player. Use mpv player to get those frames/screenshots or any other video player that has a screen grabber feature. I’ve used adapter for the longest time but I’ve switched to mpv because the press to screenshot feature while the video is playing has been a game changer not to mention ultimate time saver for me. For adapter you need to play it in another video player (like VLC player), to get the start and end timestamps of the scene you want to gif which takes me ages before I can even open Photoshop.
Anyway! Please stop reading this post for a moment and head over to this amazing tutorial by kylos. She perfectly tells you how to install and use mpv player, both for Mac and Windows users.
One thing I have to share though, I had a tough time when I updated my MacOS to Sonoma since MPV is suddenly either duplicating frames or when I delete the duplicates the player seems to be skipping frames :/ I searched and found a solution here, though it didn’t work for me lol. My workaround for this in the meantime is decreasing the speed down to 0.70 then start screenshotting—it’s not the same pre Sonoma update but it works so I’ll have to accept it rather than have jumpy looking gifs.
Now, after this part of kylos’ tutorial:

you can continue reading the following sections of my gif tutorial below.
I want to share this little tip (sorry, this will only cater to Mac users) that I hope will be helpful for organizing the screenshots that MPV saved to the folder you have selected. Because believe me you don’t want to go through 1k+ of screenshots to select just 42-50 frames for your gif.
The Control + Command + N shortcut
This shortcut allows you to create a new folder from files you have pre-selected. As you can see below I have already created a couple of folders, and inside each folder I have selected screenshots that I want to include in one single gif. It's up to you how you want to divide yours, assuming you intend to create and post a Tumblr gifset rather than just one gif.

Another tip is making use of tags. Most of, if not all the time, I make supercorp gifs so I tag blue for Kara and red (or green) for Lena—just being ridiculously on brand and all that.
Before we finally open Photoshop, there's one more thing I want to say—I know, please bear with me for the third? fourth? time 😅
It's helpful to organize everything into their respective folders so you know the total number of items/frames you have. This way, you can add or delete excess or unnecessary shots before uploading them in Photoshop.
For example below there are 80 screenshots of Kara inside this folder and for a 1:1 (540 x 540 px) Tumblr gif, Photoshop can just work around with 42-50 max number of frames with color adjustments applied before it exceeds the 10 MB file size limit of Tumblr.

Sometimes I skip this step because it can be exhausting (haha) and include everything so I can decide visually which frames to keep later on. You'll understand what I mean later on. But it's important to keep the Tumblr 10 MB file size limit in mind. Fewer frames, or just the right amount of frames, is better.
So, with the screenshot organization out of the way, let's finally head over to Photoshop.
Giffing in Photoshop, yay!
Let’s begin by navigating to File > Scripts > Load Files into Stack…

The Load Layers window will appear. Click the Browse button next.
Find your chosen screenshots folder, press Command + A to select all files from that folder then click Open. Then click OK.
After importing and stacking your files, Photoshop should display the following view:

By the way, I'll be providing the clip I've used in this tutorial so if want to use them to follow along be my guest :)
If you haven't already opened your Timeline panel, navigate to Windows > Timeline.
Now, let's focus on the Timeline panel for the next couple of steps.
Click Create Video Timeline, then you’ll have this:

Now click the menu icon on the top right corner then go to Convert Frames > Make Frames from Clips

Still working on the Timeline panel, click the bottom left icon this time—the icon with the three tiny boxes—to Convert to Frame Animation
Select Make Frames From Layers from the top right corner menu button.
So now you have this:

Go and click the top right menu icon again to Select All Frames
Then click the small dropdown icon to set another value for Frame Delay. Select Other…

The best for me and for most is 0.05 but you can always play around and see what you think works for you.
Click the top right menu icon again to Reverse Frames.
I think Photoshop has long since fixed this issue but usually the first animation frame is empty so I just delete it but now going through all these steps there seems to be none of that but anyways, the delete icon is the last one among the line of feature buttons at the bottom part of the Timeline panel.
Yay, now we can have our first proper GIF preview of a thirsty Lena 😜

Press spacebar to watch your gif play for the very first time! After an hour and half of selecting and cutting off screenshots! 😛 Play it some more. No really, I’m serious. I do this so even as early (lol) as this part in the gif making process, I can see which frames I can/should delete to be within the 10 MB file size limit. You can also do it at the end of course 🙂
Now, let’s go to the next important steps of this tutorial post which I’ve numbered below.
Crop and resize to meet Tumblr's required dimensions. The width value should be either 540px, 268px, or 177px.
Convert the gif to a Smart Object for sharpening.
Apply lighting and basic color adjustments before the heavy coloring. I will be sharing the base adjustments layers I use for my gifs 😃.
1. Crop and Resize
Click on the Crop tool (shortcut: the C key)

I like my GIFs big so I always set this to 1:1 ratio if the scene allows it. Press the Enter key after selecting the area of the frame that you want to keep.
Side note: If you find that after cropping, you want to adjust the image to the left or another direction, simply unselect the Delete Cropped Pixels option. This way, you will still have the whole frame area available to crop again as needed and as you prefer.
Now we need to resize our gif and the shortcut for that is Command + Opt + I. Type in 540 as the width measurement, then the height will automatically change to follow the ratio you’ve set while cropping.
540 x 540 px for 1:1
540 x 405 px for 4:3
540 x 304 px for 16:9
For the Resample value I prefer Bilinear—but you can always select the other options to see what you like best.
Click OK. Then Command + 0 and Command + - to properly view the those 540 pixels.

Now we get to the exciting part :) the sharpen settings!
2. Sharpen
First we need to have all these layers “compressed” intro a single smart object from which we can apply filters to.
Select this little button on the the bottom left corner of the Timeline panel.


Select > All Layers
Then go to Filter > Convert for Smart Filters
Just click OK when a pop-up shows up.
Now you should have this view on the Layers panel:

Now I have 3 sharpen settings to share but I’ll have download links to the Action packs at the end of this long ass tutorial so if you want to skip ahead, feel free to do so.
Sharpen v1
Go to Filter > Sharpen > Smart Sharpen…
Below are my settings. I don’t adjust anything under Shadows/Highlights.
Amount: 500
Radius: 0.4
Click OK then do another Smart Sharpen but this time with the below adjustments.
Amount: 12
Radius: 10.0

As you can see Lena’s beautiful eyes are “popping out” now with these filters applied. Click OK.
Now we need to Convert to Frame Animation. Follow the steps below.
Click on the menu icon at the top right corner of the Timeline panel, then click Convert Frames > Flatten Frames into Clips
Then Convert Frames > Convert to Frame Animation
One more click to Make Frames From Layers
Delete the first frame then Select All then Set Frame Delay to 0.05

and there you have it! Play your GIF and make sure it’s just around 42-50 frames. This is the time to select and delete.
To preview and save your GIF go to File > Export > Save for Web (Legacy)…
Below are my Export settings. Make sure to have the file size around 9.2 MB to 9.4 MB max and not exactly 10 MB.

This time I got away with 55 frames but this is because I haven’t applied lighting and color adjustments yet and not to mention the smart sharpen settings aren't to heavy so let’s take that into consideration.
Sharpen v1 preview:

Sharpen v2
Go back to this part of the tutorial and apply the v2 settings.
Smart Sharpen 1:
Amount: 500
Radius: 0.3
Smart Sharpen 2:
Amount: 20
Radius: 0.5
We’re adding a new type of Filter which is Reduce Noise (Filter > Noise > Reduce Noise...) with the below settings.

Then one last Smart Sharpen:
Amount: 500
Radius: 0.3
Your Layers panel should look like this:

Then do the Convert to Frames Animation section again and see below preview.
Sharpen v2 preview:

Sharpen v3:
Smart Sharpen 1:
Amount: 500
Radius: 0.4
Smart Sharpen 2:
Amount: 12
Radius: 10.0
Reduce Noise:
Strength: 5
Preserve Details: 50%
Reduce Color Noise: 0%
Sharpen Details: 50%
Sharpen v3 preview:

And here they are next to each other with coloring applied:
v1

v2

v3

Congratulations, you've made it to the end of the post 😂
As promised, here is the download link to all the files I used in this tutorial which include:
supercorp 2.05 Crossfire clip
3 PSD files with sharpen settings and basic coloring PSD
Actions set
As always, if you're feeling generous here's my Ko-fi link :) Thank you guys and I hope this tutorial will help you and make you love gif making.
P.S. In the next post I'll be sharing more references I found helpful especially with coloring. I just have to search and gather them all.
-Jill
#tutorial#gif tutorial#photoshop tutorial#gif making#sharpening#sharpening tutorial#photoshop#photoshop resources#psd#psd coloring#gif coloring#supercorp#supercorpedit#lena luthor#supergirl#my tutorial#this has been a long time coming#guys. i'm BEGGING you. use the actions set - it was a pain doing all this manually again ngl LMAO#i've been so used to just playing the actions#so this has been a wild refresher course for me too 😆
539 notes
·
View notes
Note
Thank you so much for the detailed and thoughtful response, I'm super excited to try and set up my own builds like this! It really helps seeing the process laid out like this, I bet this will help not only me but anyone interested in buiding complex lots :) Also thank you so much for all the inspiration - I want to take a special moment to say that people like you @pixelglam, @farfallasims, @simsjii and @pixelplayground are my absolute favorite builders/simblrs and I just wanted to point out, you are so selfless in the way you share your creations and thought processes when you didn't have to, you all really inspire me in creating my own world and simblr and maybe sharing here too. It's really nice seeing the passion you put out through your creations here, and I love seeing the characters and worlds you create! It reignites my passion for the game whenever I see the way you engage with it.
Hi Amelie! I love the aesthetic of your game and builds. You've shared some pictures of a build named "Residences & Shops in Munich, Germany". I have been reeally in love with "multipurpose" builds with more than 1 building in a block like that. I'd like to ask, do you have any tips in building a large "block/street" like that? I'm having a hard time visualizing compatible floorplans. Would you ever be interested in sharing a bit of how you build, like a backstage view of your process? Thank you
Hello! I really appreciate your kind words! I actually answered a question on my building tips and the steps I personally take when starting a build here. In terms of building larger multipurpose lots I actually haven't built anything else like this but here are some more tips that I thought of when building my Munich shops: (these are quite specific but hopefully will still be helpful to you!)

Define the Purpose: Start by deciding the main functions of your build (e.g., apartments, clothing store, office spaces). This will guide your design choices and floorplans.
Entrance Design: Ensure each area has its own entrance. For commercial spaces, a storefront with large windows is inviting, while residential units usually have private entries.
Access: Consider how Sims will move between the different areas. Use staircases or elevators to connect each floor.
Common Areas: For apartment buildings, consider creating shared spaces like a laundry room, lounge, or outdoor area that residents can enjoy and use.
Theme and Branding: Decide on a theme for your store (e.g., clothing, grocery, bakery). This will help everything look and feel cohesive.
Display and Layout: Create displays with items on shelves or counters. Feel free to look up actual floorplans of clothing or grocery stores for realism.
Backroom Storage: Include a small storage area or backroom for employees to manage inventory. This adds realism.
Functional Space (for Offices): Design offices with functional workspaces, including desks, chairs, and meeting areas. Consider creating cubicles or open spaces based on your inspiration photo/idea.
Break Area: Incorporate a break room or lounge where employees can relax. A kitchenette with a coffee maker and snacks can make it more inviting.
Decor: Use office-related decor like filing cabinets, plants, and artwork to make the space feel professional yet comfortable.
Here is an example that might further help you:
Ground Floor: Retail store with a large display area, checkout counter, and storage in the back.
Second Floor: Offices with multiple rooms, including a reception area and meeting room. Ensure there's a small break area for employees.
Third Floor: Apartments with a mix of layouts (one-bedroom and studio units). Each unit can have a small kitchen and living area, with balconies for outdoor space.
#ts4#ts4 build tutorial#ts4 tutorial#ts4 process#(english is my second language so I hope this is an understandable ramble)#i just wanted to express my thanks#sims community can be pretty nice
34 notes
·
View notes
Text
FINALLY, i can't believe it's finally here!!! 😍😍😍
I present you "The Raven and the Snake - vol. 1" of the so talented @choccy-milky, finally in my own physical book version 😍❤️❤️❤️!
I was more excited about this one cause it's the beginning of choccy's story, and it's been so long since the last time i read these firsts chapters that i can't wait to start all over again! 🥰🥰🥰 (of course, right after i finish the book i'm currently reading xD)


Notes: This is just for my personal collection (no selling involved). Wait for more update of the next volumes in the next months ❤️ (especially you, @choccy-milky 😘).
P.s.: i did not forget about who asked me about a tutorial to format a book. It's just a bit too long process to explain and a lot of technical words that i don't know in my own language (let alone in english XD), that it will take a while to do. BUT i'm planning to post something about it in the future, at least to explain the big part of the work behind it.
#hogwarts legacy#hogwarts legacy fanart#hogwarts legacy fanfic#hogwarts legacy fandom#choccy milky's fic#choccyart#The Raven and the Snake#The Raven and the Snake - vol. 1
298 notes
·
View notes
Text
𝑺𝒎𝒖𝒕𝒎𝒂𝒔 𝑫𝒂𝒚 𝟪 ✧ 𝑪𝒉𝒓𝒊𝒔 𝑺𝒕𝒖𝒓𝒏𝒊𝒐𝒍𝒐


𝒘𝒄. 𝟨𝟦𝟤
����𝒔𝒂. English is not my first language! 𝑴𝑫𝑵𝑰
𝒄𝒐𝒏𝒕𝒆𝒏𝒕𝒔⚠ fluff, low-key a cooking tutorial, cowgirl & leaning cowgirl, unprotected sex, creampie, pet names, strong language.

Chris loved your cooking. He loved watching you do your thing in the kitchen and he especially loved helping you out. Today, you two decided to cook together one of your faves—creamy carbonara. "Alright, the pastas cookin’, y’need any more help ma?" You smiled, leaning closer and pecked his lips, "can you grate the cheese please?" Chris’ smile widened when you pecked his lips, a soft adorning look in his eyes as he nodded and started doing as told.
Your gaze occasionally left the skillet to your boyfriend, the concentrated look on his face, the way he furrowed his eyebrows and the slightly parted lips combined made you feel... aroused. You groaned internally at how easily turned on you were when it came to Chris, everything he did seemed to make your undies soak with arousal. Biting your bottom lip subtly at the side as you shifted your gaze back to the skillet, quickly adding the egg yolks to the whole milk.
"Here ya go, one plate of grated cheese for m’lady." Chris dramatically bowed as he handed you the plate of grated parmesan, making you laugh. You barely suppressed your giggles as you took the plate, playfully lifting your imaginary gown at the side while bowing. Chris chuckled heartily, enjoying how you matched his energy. You added the cheese, seasoned the sauce and put in the sautéed pork.
A wide grin still on your face as you drained the water from the spaghetti before adding it to the sauce, mixing it all together. "Mhm, lookin’ delicious as always, love your cookin’ as much as I love you." You grinned, "oh, ain’t you in a flirty mood today? been hitting me up all evening." He grinned wider at your words, "mm, what can I say... you’re lookin’ as delicious as the carbonara, might need a taste of you afterwards yeah?" his voice dropped an octave—betraying his arousal.

"mffh—yeah, fuck, just like that... o—h fuck yeah ma, bounce on that dick." Chris moaned lowly as you rode him, his eyes heavy-lidded and full of desire as he gazed up at your tits bouncing with you. His hands snaked up and groped your tits, his thumbs and index fingers tweaking and pulling at your nipples. The feeling made you clench around him as profanities left your lips.
"Chris, ohh—Chris feels so good," you moaned, throwing your head back as you rode him faster, almost desperate for more, but soon enough your thighs ached from exertion. Chris took notice of your hips slowing down and immediately gripped them tightly. You looked at him with a dazed expression, confused at the sudden pressure on your hips from how tightly he was gripping them.
Just as you were about to say something Chris started to thrust up, slowly at first, but even in a languid pace you could feel him kissing your cervix. You moaned his name, his hands left your hips to help you down so you were laying on him before gripping your ass possessively. Your vision blurred with tears of pleasure when he started to pound into you from below.
"Y’feel so good baby, oh fu—ck, like that– fuckin’ suffocate my cock," he groaned loudly as he felt your inner walls flutter and clench tightly around his pistoning shaft, your body warning him for your impending orgasm. Chris quickly withdrew one of his hands from your backside and drew tight rapid circles on your soaked clit.
Your fingers clawed at his shoulders as you cried out in pure ecstasy when the pressure finally broke in you. The feeling of your spasming pussy was enough to make him fill you up. "Oh fuck, I’m cummin’ inside... fillin’ you up," he mumbled shakily as he held you close, his hips jerking as he shot out rope after rope of hot cum right into your welcoming cunt.
𓆩♡𓆪
𝒔𝒎𝒖𝒕𝒎𝒂𝒔 𝒕𝒂𝒈𝒍𝒊𝒔𝒕: @h3arts4nat @imjusthereforthesturniolosmut @courta13 @bumbl3b34 @slag2 @slut4chris888 @chrissluttyygf @billiesbabya @chrissbows @kaybug88 @sturniolo-fann @itsmaddielouis @urfavppls133 @certified-sturniolo @emkhlo @madisonsls @sammy1z @friendlyneighborhoodemo @layvvy @bellabooxx333 @wh0remikasas @ja75ahm @hearts4werka @miabumbia @slut4music @plrlvssnz @hannahhsturn1oloo @sturninsworld @idkwuttopit @madssturniolo @devilese @thatsitsthings @pr3ttyf4wn @stvrnioloslvt @d3adfa1ry @valsenoj @maddie-2024 @fallingforfalll2 @sagesturns @alicesturns @ccsturns @slxt4chriss @sturniolosfr3shl0v3
© 𝒔𝒘𝒆𝒆𝒕𝒔𝒉𝒖𝒈𝒂
#chris sturniolo#𓆩smutmas𓆪#𓆩chris o. sturniolo𓆪#fanfiction#smut#chris x reader#chris x you#christopher sturniolo x reader#chris sturniolo x reader#christopher sturniolo x you#chris sturniolo x you#chris#christopher sturniolo smut#christopher owen sturniolo#christopher sturniolo#chris sturniolo smut#chris sturniolo fanfic#fanfic#chris sturniolo oneshot#oneshot#christopher sturniolo oneshot#christopher sturniolo fanfic#chris o sturn#sturniolo triplets#matt sturniolo#nick sturniolo#sweetshugacs#𓆩♡𓆪sweetshuga#smutmas#christmas
231 notes
·
View notes
Text

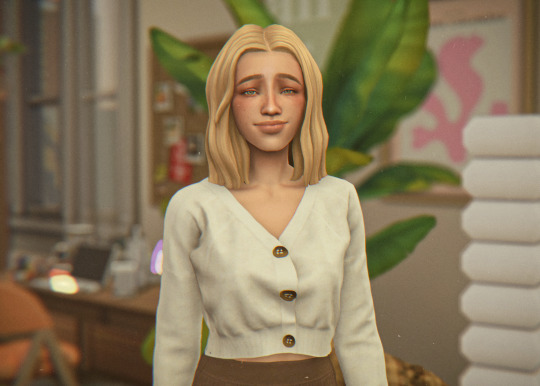
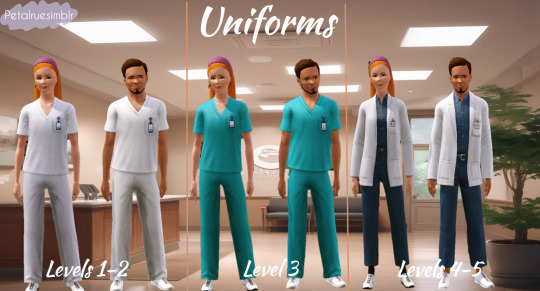
Hello and welcome back to my blog!
My fifth and final gift for the Petalruesimblr Advent Calendar is: Dermatology Career! This is my third full-time career that I've created for The Sims 3 and I'm so happy it is finally complete.
I just want to wish you all a very Merry Christmas and hope your holiday season is filled with joy and love! 💜
If you are interested, click on ’Keep Reading’ below for more information and pictures of the Dermatology Career.
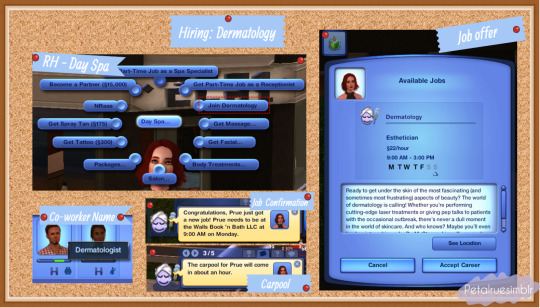


Dermatology Career

Sim File Share

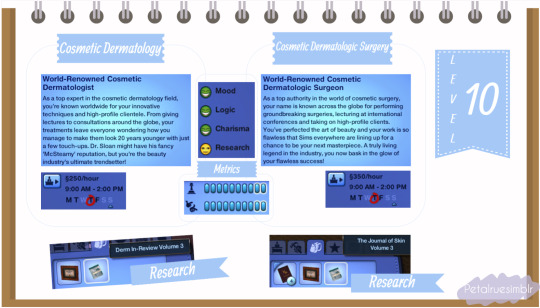
Ready to get under the skin of the most fascinating (and sometimes most frustrating) aspects of beauty? The world of dermatology is calling! Whether you’re performing cutting-edge laser treatments or giving pep talks to patients with the occasional outbreak, there’s never a dull moment in the world of skincare. And who knows? Maybe you’ll even land an internship under Dr. McSteamy himself - so apply now!

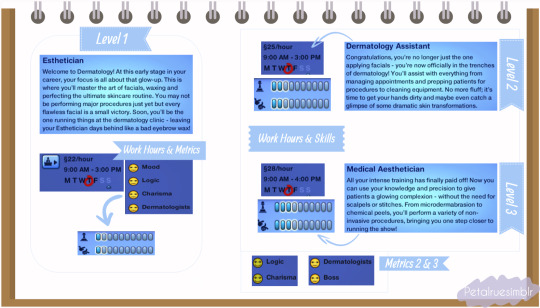
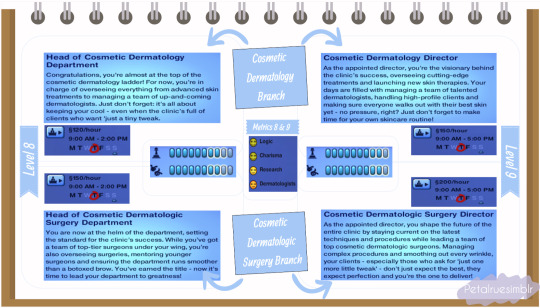
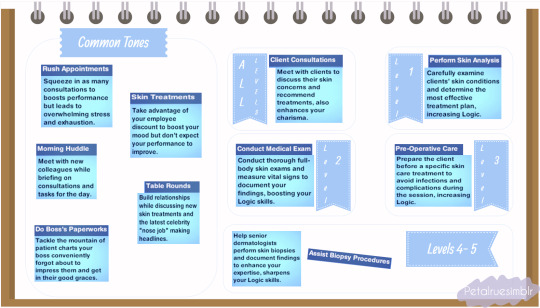
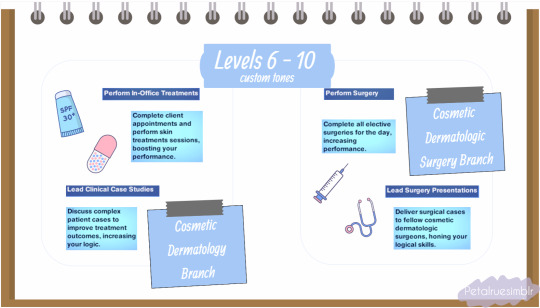
Career Type: Full Time Available for: Young Adults, Adults and Elders Available Languages: English Levels: 10 Rabbit Hole: DaySpa Does it have Carpool? Yes Does it have Uniforms? Yes (details under Final Notes) File Type: Package Min. Required Game Version: 1.42 Packs Needed: The Sims 3 📣All descriptions for the levels, tones and metrics as well as skills required, salary, uniforms and other details are provided on the pictures above. Right-click on a picture and select ’Open image in new tab’ for a clearer view.

NRAAS Careers Mod

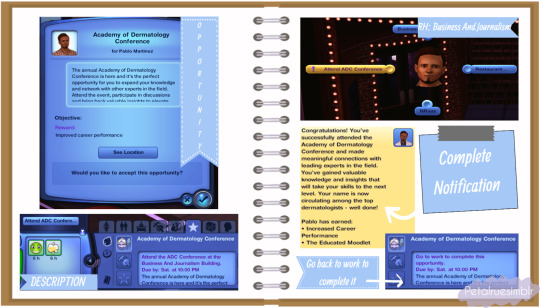
Branches and Wages: I decided to focus on two branches for my Dermatology career, which branch out after level 5: Cosmetic Dermatology, focusing on non-surgical treatments and Cosmetic Dermatologic Surgery, which specializes in skin surgery. The two branches share the same skill and metric requirements, as they are both part of the medical field. The main difference lies in their salaries, with the Cosmetic Dermatologic Surgery branch offering a higher pay. I aimed to make the wages as realistic as possible however to compensate for the increased days off and decreased work hours as the level increases, I had to raise the hourly wages beyond the normal salary ranges for Levels 6-10 for both branches. Metrics and Books: This career is similar to the medical career in The Sims 3, particularly in terms of the logic skill and research as part of its metrics. However, I also included charisma, as I believe it’s a vital skill for patients to trust and feel comfortable with their doctors, especially when it comes to skin treatments. Opportunities and Uniforms: With a bit of experience in creating opportunities, I decided to add four this time, three of which are repeatable! All of them are relatively simple and offer bonuses, as well as salary increases for some as rewards upon completion. For uniforms, I’ve provided a picture above to highlight the differences between the levels by assigning different colors to the scrubs. There isn’t a general color assigned to dermatology uniforms, as hospitals usually decide the scrub colors for their various departments. As stated above, you will need NRAAS Careers Mod for these careers to show up in the game and as long as you have the latest version of it, it should work for higher patches. You can also read my #psa regarding these careers, click here. I’m not fluent in any other languages to translate so if anyone is interested in translating this career, please don’t hesitate to send me a message here, comment on this post or let me know in my Ask/Contact form (if you don’t have a Tumblr account) and will let you know the details. I have tested this career in my game, so far it is working and all scripts are showing up. All feedback is very welcome to help me learn and improve my skills so please let me know if you experience any problems on your end and I’ll do my best to sort it as soon as possible.

MissyHissy step-by-step tutorial Twallan for the Career Mod S3pe
#petalruesimblr#custom career#the sims 3#ts3#ts3cc#sims 3#the sims 3 advent calendar 2024#ts3 simblr#ts3 advent calendar#ts3 simmer#sims 3 download#sims 3 screenshots#ts3 download#ts3 mods#ts3 community#ts3 screenshots#ts3 career#the sims 3 mods#the sims 3 career#the sims 3 advent calendar#advent calendar
208 notes
·
View notes