#DPi
Explore tagged Tumblr posts
Visit Tumblr Blog
Explore Tumblr blogs with no restrictions, modern design and the best experience.
Last Seen Tumblr Blogs


Fun Fact
Kazakhstan’s Minister of Communications and Informatics has blocked the Tumblr site because it contained 60 sites of terrorism, extremism, and pornography in 2015.
Text
canvas problem sos
hello i need help on the dpi size of a canvas i use krita i usally use a4 size with 300 dpi but whenever i post it it ends up blurry in some certain websites including this one pls helpp???
#help please#artwork#krita#digital drawing#krita illustration#canvas#dpi#art#artists on tumblr#digital art#illustration#drawings#art process
6 notes
·
View notes
Text
Some basic file management info
I love file management
My job however will not let me run a file management class :(
3 notes
·
View notes
Text


Twitter user @ mielzy_png provided tweet replies with text versions of the above, as well, as given below:
"Text versions: Canvas size needed to print at 300dpi: 16.5in x 300dpi = 4950 px/in^2 23.4in x 300dpi = 7020 px/in^2 To print an A2 size image at 300dpi ⇒ your canvas size needs to be 4950 x 7020 px Bleed borders: ~20mm = 0.78 ≈ 0.8in 0.8 x 300 = 240 px
Dimensions of A-series paper sizes A1 ⇢ 594 x 841mm ⇢ 23.4 x 33.1in A2 ⇢ 420 x 594mm ⇢ 16.5 x 23.4in A3 ⇢ 297 x 430mm ⇢ 11.7 x 16.5in ⇢3510 x 4950px A4 ⇢ 210 x 497mm ⇢ 8.3 x 11.7in
Generally you want at least 300dpi for printing, I personally like to go higher just in case I want to print larger than anticipated!"
15 notes
·
View notes
Text
Slap this on every beginner art class

*In general- Some specific software may have reasons to use specific DPI in a pixel canvas, such as text clarity or brush size. But if you know that, you know this. Some tutorials I've been seeing and TikToks popped up on my feed have been confusing for people setting up their DPI settings and canvas settings and I was asked about this. When you set up a canvas and print something the dots per inch (the DPI!) will determine the amount of pixels your canvas has and the clarity your print has. Each printer has a max, inkjet printers may range from (what your software will call) 300 to 720 DPI. Setting your canvas to 600DPI if your printer is 300 max will not better your print. ((for the purpose of simple settings- Getting into line tones and half tones and how printers have like 9kDPI and can have different DPI in the print head axis direction is unimportant to the beginner artist-printer)) An 8.5x11 inch canvas with 600DPI is 5100x6600 pixels This will look good printed on 8.5x11 paper, perhaps even upscaled at small poster size if its very successful! A canvas set to 612x792 pixels at 72DPI is also an 8.5x11 size paper, but it will end up pixelated. If you bump the DPI to 300 but leave the canvas at 612x792 pixels, It will still be unclear. Its only clear at 2x2.5 inches when printed! (Also note that your monitor has its own PPI (pixels per inch!) and if its low, when you zoom out on any screen your art may look pixelated.) So what's the solution? That depends on what you're doing with your art! If you're printing, learn your frame sizes, paper sizes and conversions. Maybe you're only planning for a mini-print, but what if its really good? Will you want to be able to print it as a poster later? 300 DPI at the end product size may not be enough to print it bigger later. I would recommend setting up your canvases in the measurement unit of your paper at 300/600/1200 DPI as your machine is capable of. If your doing digital and have no intentions of printing it depends- If you are having trouble with not reaching the clarity you want and still want to use pixel canvases, you can use a ratio calculator to figure out how much to increase your pixel canvas if you want to keep your canvas height to width aspect ratio. And of course! You don't have to listen yo me at all if your don't want to, If you're satisfied- its not a problem.
18 notes
·
View notes
Text
i just accidentally set my dpi to 10000 and now can't close i3 or open a terminal. well i can still use a different tty :)
(setting my dpi to the proper value of 144 still makes everything way too small)
8 notes
·
View notes
Text
That feeling when you learn about 300 dpi
#Artist meta#Text#dpi#for those who don’t know essentially if you are planning on printing out digital art#make sure the original piece is drawn in 300 dpi or higher#Otherwise it will look all crunchy and pixelated
5 notes
·
View notes
Text
Notes on canvas size, screen resolutions and compression
Tumblr image sizes
”We recommend your images be 540 pixels wide by 810 tall. Stay within that limit to avoid your images being scaled down on the dashboard. If you click on an image in a post, you will be taken to a larger version of the image if one is available. That larger version can be up to 2048 pixels wide and 3072 pixels tall.”
Enabling high resolution images (check if this is up to date)
Canvas sizes
https://folio.procreate.com/discussions/5/17/40092
2 notes
·
View notes
Text
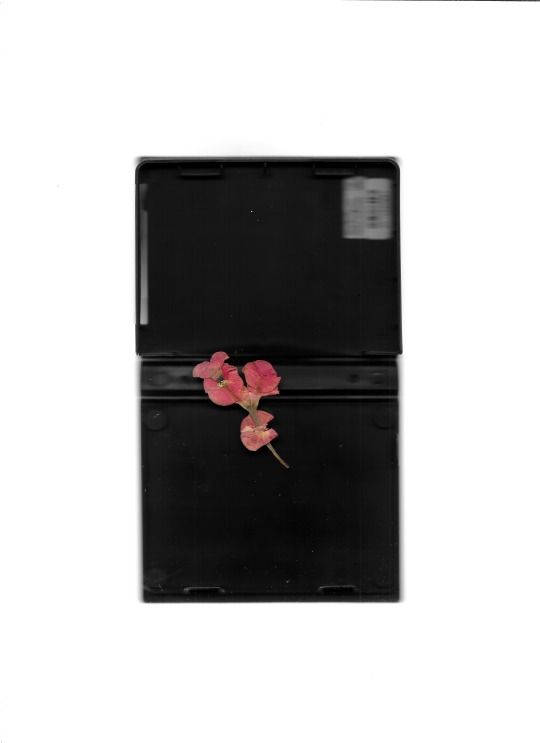
scan by me
#abstract#flower#art#flower art#artwork#poster#contemporary art#contemporary#scanner#scanner art#dpi#red
3 notes
·
View notes
Text
Durante Ambiente Lavoro a Bologna, Cifa e Confsal propongono un polo unico Inail e incentivi per le imprese che puntano sulla sicurezza. Focus su formazione e intelligenza artificiale. Scopri di più su Alessandria today.
#AI sul lavoro#Alessandria today#ambiente lavoro#Andrea Cafà#Angelo Raffaele Margiotta#Bologna#cantieri intelligenti#Cesare Damiano#Cifa#Confsal#contrattazione collettiva#DPI#emolumento rischio#FonARCom#fondi interprofessionali#formazione sicurezza#Google News#INAIL#incentivi imprese#infortuni sul lavoro#innovazione lavoro#Intelligenza artificiale#italianewsmedia.com#Lava#lavori pericolosi#machine learning#Marcello Fiori#normativa sicurezza#Pier Carlo#polo unico sicurezza
0 notes
Text
How to Ensure Quality During Production Inspections
In the complex choreography of global manufacturing, quality assurance isn't a one-time event; it's a continuous process that unfolds at every critical stage. While Pre-Production Inspections (PPIs) lay the groundwork and Pre-Shipment Inspections (PSIs) serve as the final gate, there's a crucial checkpoint in between that often determines the ultimate success of an order: the During Production Inspection (DPI), also known as an In-Process Inspection.
At The Inspection Company, we recognize the immense value of DPIs. This isn't just about catching errors; it's about course-correction, optimizing processes, and preventing widespread defects while the majority of your order is still being manufactured. This blog post will delve into How to Ensure Quality During Production Inspections, offering actionable strategies for both buyers and suppliers to maximize the effectiveness of this pivotal quality control measure.
Understanding the During Production Inspection (DPI)
A During Production Inspection (DPI) typically takes place when a certain percentage of your order has been completed – usually between 10% and 20% of the total production volume. At this point, the initial production kinks should have been ironed out, and the factory should be in full swing.
The primary objectives of a DPI are to:
✅ Verify Initial Production Quality: Assess the quality of the products already manufactured to ensure they meet specifications.
✅ Identify Recurring Defects: Detect any recurring issues or deviations that might indicate problems with the production process, machinery, or materials.
✅ Monitor Production Schedule: Check the factory's progress against the production timeline.
✅ Assess Internal QC Procedures: Observe the factory's own quality control processes on the production line.
✅ Implement Corrective Actions Early: Provide an opportunity for immediate corrective actions to be taken before the entire order is completed with defects.
Think of a DPI as a critical mid-course review. It's your chance to check the compass, adjust the sails, and ensure your ship is heading in the right direction before it's too late.
How to Ensure Quality During Production Inspections
Maximizing the effectiveness of a DPI requires a concerted effort from both the buyer and the supplier. It's a partnership aimed at delivering excellence.
1. Clear Communication and Detailed Specifications (Buyer & Supplier Responsibility)
Just like with a PPI, crystal-clear communication forms the bedrock of a successful DPI. Ambiguity can lead to misunderstandings and missed defects.
For Buyers:
✅ Provide Full Documentation: Ensure the inspection company and the factory have the most updated and comprehensive set of specifications, technical drawings, approved golden samples, color codes, packaging requirements, and any specific performance criteria.
✅ Define Critical Quality Points: Highlight specific features, dimensions, or functionalities that are particularly critical to your product's quality and performance. This helps the inspector focus their attention.
✅ Communicate DPI Purpose: Reinforce with the factory that the DPI is a collaborative effort to ensure smooth production and prevent large-scale issues, rather than just a pass/fail audit.
For Factories:
✅ Thorough Understanding: Ensure your production team, line supervisors, and internal QC personnel fully understand all buyer specifications and critical quality points.
✅ Immediate Clarification: If any specification is unclear or ambiguous, seek immediate clarification from the buyer before production begins.
Why it matters for DPI success: The inspector will use these specifications as their primary reference. Any lack of clarity can result in misinterpretations and failures to identify non-compliance.
2. Ensure Sufficient Production Completion for Inspection (Factory Responsibility)
A DPI can only be effective if there's enough product to inspect. Scheduling it too early can lead to insufficient data, while scheduling it too late misses the opportunity for early intervention.
✅ Reach Agreed-Upon Percentage: Do not schedule or allow the DPI to proceed until the agreed-upon percentage of goods (e.g., 10-20%) is genuinely completed and ready for inspection. This means finished or near-finished items, not just components.
✅ Segregate and Prepare Goods: Have the completed units moved to a designated, well-lit, and accessible inspection area. These units should represent the actual production run, not hand-picked "good" samples.
✅ Provide Adequate Space: Ensure the inspector has enough clear table space, chairs, and good lighting to perform their checks. Access to power outlets may be needed for functional tests.
Why it matters for DPI success: The sample size for a DPI needs to be representative of the ongoing production. Insufficient or unrepresentative samples can lead to skewed results and a missed opportunity to catch systemic issues.
3. Facilitate Access to Production Lines and In-Process QC Records (Factory Responsibility)
A key aspect of a DPI is observing the actual manufacturing process and the factory's internal quality control points.
✅ Allow Production Line Access: The inspector should be allowed to walk the production lines, observe manufacturing processes, and potentially select samples directly from the line, not just from a finished goods area.
✅ Share In-Process QC Documents: Make your internal QC checklists, work instructions, in-process test results, and any corrective action records readily available to the inspector. This provides insight into the factory's own QC efforts.
✅ Assign a Knowledgeable Contact: Designate a factory representative (e.g., QC manager or production supervisor) who can accompany the inspector, answer questions about processes, and retrieve specific batches or documentation as needed. This person should have the authority to make decisions if minor issues arise.
Why it matters for DPI success: A DPI goes beyond just product checks; it evaluates the process. Access to the production floor and internal QC data allows the inspector to identify systemic issues that might be causing defects.
4. Be Prepared for On-Site Testing and Observation (Factory Responsibility)
DPIs often involve more than just visual checks; they can include functional testing, measurement verification, and observation of critical processes.
✅ Provide Tools/Equipment: Ensure access to factory tools that might be needed for the inspector's checks, such as measuring tapes, calipers, weight scales, or specific jigs.
✅ Functional Test Setups: If functional tests are part of the inspection scope (e.g., plugging in an electronic device, operating a mechanical part), ensure the necessary power, water, or other resources are available for the inspector to perform these tests.
✅ Assistance with Disassembly/Reassembly: For certain products, the inspector might need to partially disassemble a unit to check internal components. Be prepared to provide assistance for this, as well as for re-packaging.
✅ Observe Workmanship: The inspector will be looking at workmanship quality on the line. Ensure that operators are following best practices and that any rework procedures are being handled correctly.
Why it matters for DPI success: Comprehensive checks are crucial. Being prepared for functional tests and allowing process observation ensures a deeper dive into quality, rather than just superficial checks.
5. Act Swiftly on Inspection Findings and Implement Corrective Actions (Buyer & Supplier Responsibility)
The true value of a DPI lies in the immediate action taken based on its findings. This is where quality improvement happens.
For Buyers:
✅ Prompt Report Review: As soon as you receive the DPI report from The Inspection Company, review it meticulously. Pay immediate attention to any "pending" or "fail" findings.
✅ Decisive Action: Communicate clear, actionable instructions to the factory. If major defects are found, halt production until corrective actions are confirmed. If minor, specify how they should be rectified.
✅ Follow-Up Verification: If significant issues were identified, consider requesting a follow-up visit or photo verification of the implemented corrective actions before allowing production to continue.
For Factories:
✅ Immediate Corrective Action: Do not wait. If the DPI identifies issues, take immediate steps to address them on the production line. This might involve re-training staff, adjusting machinery, or isolating defective raw materials.
✅ Root Cause Analysis: For recurring issues, conduct a thorough root cause analysis to implement effective corrective and preventive actions (CAPA) to avoid recurrence.
✅ Communicate Actions: Provide timely updates to the buyer and the inspection company on the corrective actions taken, along with evidence if possible (e.g., photos of reworked items, updated process flows).
Why it matters for DPI success: A DPI is a warning system. Ignoring its signals is akin to ignoring a fire alarm. Swift and effective corrective action is paramount to preventing a small problem from becoming a catastrophic failure for the entire order.
Conclusion
The During Production Inspection is a vital, proactive step that can save your business immense time, money, and reputational damage. By systematically applying these strategies, both buyers and suppliers can transform a DPI from a mere compliance check into a powerful tool for continuous quality improvement.
At The Inspection Company, our experienced inspectors are trained to be your eyes and ears on the ground, providing objective, detailed insights into your production quality at this critical mid-stage. We empower you to make informed decisions and ensure that your final product not only meets but exceeds expectations. Don't let defects multiply unchecked. Contact us today, and safeguard your quality every step of the way.
#During Production Inspection#DPI#Product Inspection#Inspection Company#Quality Inspection#The Inspection Company#TIC
0 notes
Text
MannKind: Why I'm Nonetheless Bullish Regardless of Tyvaso DPI Competitors
MannKind: Why I'm Nonetheless Bullish Regardless of Tyvaso DPI Competitors
0 notes
Text
FederArchitetti Roma: Cantieri insicuri, il vero rischio è ignorare le regole
Alla XV Giornata Nazionale promossa da FederArchitetti Roma, esperti e istituzioni chiedono più formazione, più controlli e più responsabilità. Una giornata di confronto, dati alla mano, per ribadire che la sicurezza nei cantieri non è una voce accessoria, ma una priorità ancora troppo spesso disattesa. La XV Giornata Nazionale per la Sicurezza nei Cantieri, organizzata da FederArchitetti Roma,…
#cultura della prevenzione#DPI#edilizia#FederArchitetti#formazione#infortuni sul lavoro#ispezioni#lavoratori stranieri#roma#sicurezza nei cantieri
0 notes
Text
#Copyright#RoyaltyFreeImages#StockPhotos#FreeImages#CreativeCommons#Photography#ContentCreation#DigitalAssets#VisualContent#ImageResources#GraphicDesign#SocialMediaMarketing#BrandStrategy#DPI#ProfessionalPhotography#OnlineMarketing#ContentStrategy#UserGeneratedContent#ArtisticLicense#VisualStorytelling
1 note
·
View note
Text
0 notes
Text
Important reference
How big should you make your art?
I’ve noticed some digital artists out there who just kind of guess when choosing the dimensions of their artwork. Trying to understand ppi, dpi, print dimensions, and resolution can send you down a rabbit hole of complexity likely to break your brain.
If you are creating an image only for the web, it is really up to you how big you want to make it. The only relevant dimensions are the pixels. Print size and pixels per inch are of no consequence. A 1920x1080 300ppi image will be the same as a 1920x1080 600ppi image. Your screen only cares about pixel dimensions.
If you plan to print your image, that is where things can get complicated.
Here is the simple version…
First you need to determine the maximum size that your work may be printed. Here are the most commonly used sizes for poster prints.

Now you need to know the brand of printer that will be used. Typically it will be Epson, HP, or Canon.
For Epson printers…
Input the width and height.
Input a resolution of 360 pixels per inch.
For Canon, HP, and most other printers…
Input the width and height.
Input a resolution of 300 pixels per inch.
So let’s say you are in photoshop and you want your art to be printed at 11" x 17" on an Epson printer. This is how you should create your document.

If you do not know how your work will be printed, I recommend erring on the side of “too big.” If you end up having to enlarge your work, it could result in some quality loss.
Hypothetical situation…
You don’t know how your work will be printed. So you decide to make your art 24" x 36" at 360 pixels per inch. Your image size dialog box looks like this.

You find out that the art will be printed at 11" x 17" on a Canon printer. You need to resize your document for optimal sharpness. You’ll want to change the largest dimension value. In this case, 36" is the largest, so you change that to 17". Since it will be a Canon printer, you will need to adjust the resolution to 300 pixels per inch. And because you are making the image smaller, you’ll want to use “bicubic sharper” to maintain the best image quality.

Now you have to crop off that .333 from the width. That is done in canvas size.

Hit okay and now you have an 11" x 17" document at 300 pixels per inch ready to print on a Canon printer.
Getting more technical…
The goal is to size your work so that the printer does not resample your image. Meaning the printer driver doesn’t take your image and make it bigger or smaller. Your image editor is always going to do a better job of resampling than your printer, so if you can set up your document to the native resolution of your printer, it will output with the highest possible sharpness.
A lot of people see the dpi of printers and think that is its resolution. The manufacturer will even say that is its resolution. It’s not. That is just how many dots it can cram on the page. Many dots make up just one pixel of your image. And the number of pixels your printer can cram on the page is actually its resolution.
The printer’s resolution is measured in ppi or pixels per inch. You will notice in photoshop it doesn’t actually say dpi. It says pixels per inch. Many, many people use ppi and dpi interchangeably and it is frustrating and confusing for everyone. They aren’t the same thing, but most people say dpi for everything. Even the manufacturers will use dpi incorrectly. To make matters worse, usually printer manuals don’t even list the native pixels per inch. Probably because it is a low number and looks less impressive when marketing.
Some oddball printers may not use the 300 or 360ppi native resolution. If your images still look soft and you want to be absolutely sure of your printer’s native pixels per inch, the best option is to email the manufacturer about your model. Be very specific about what you are asking. If they give you a crazy high number like 6000 x 12000 dpi, you tell them, “NO, YOU FARTNUGGET. I WANT THE NUMBER OF PIXELS PRINTED IN ONE INCH, NOT THE NUMBER OF DOTS!” If they respond back with something like 400 pixels per inch, then that is the resolution you’ll want to use for your document.
Epsons typically are 360ppi or 720ppi. Other manufacturers are usually 300ppi or 600ppi. Wide format printers almost always have the lower ppi. The higher ppi’s are typically only used for fine detail vector printouts and you have to set your driver to use that fine detail mode. The nice thing about vector illustrations is that you can alter their dimensions and ppi without any quality loss. You can certainly make your digital paintings at those higher ppi’s, but I’m told there is little quality difference when printing and the files at that resolution can be a lot for your computer to handle.
Hopefully this was helpful. If you have had problems with images looking soft, I think this might help you get them looking sharp. Take care and make some art.
21K notes
·
View notes
Text
GoodbyeDPI ile İnternet Sansürünü Aş! | DPI Engellerine Veda Et!
İnternette özgürce gezmek istiyor ama bazı sitelere erişemiyor musun? O zaman GoodbyeDPI tam sana göre! 🚀
🔍 GoodbyeDPI Nedir?
GoodbyeDPI, Deep Packet Inspection (DPI) engellemelerini aşmak için geliştirilmiş açık kaynaklı bir yazılımdır. Özellikle Türkiye gibi bazı ülkelerde uygulanan HTTPS engellemeleri, sansürler ve erişim kısıtlamaları için etkili bir çözümdür.
💡 Neden GoodbyeDPI Kullanmalıyım?
📵 İnternet sansürünü kaldırır
🌐 Web sitelerine özgürce erişmeni sağlar
🧠 Hafif ve hızlı çalışır
💻 Her açılışta otomatik başlatılabilir
🔒 VPN gibi yavaşlatmaz, doğrudan bağlantı sağlar
📦 GoodbyeDPI Nasıl Kurulur?
GitHub’dan en güncel sürümü indir: 👉 https://github.com/ValdikSS/GoodbyeDPI
Zip dosyasını çıkar ve Start.bat dosyasını yönetici olarak çalıştır.
Artık sansürsüz internete hazırsın! 🎉
#goodbyedpi#internetözgürlüğü#dpi#sansür#erişimengeli#vpnalternatifi#githubtools#internetsansürü#tumblrengel
0 notes