#Cricut Explore Air 2 Bluetooth Connection
Explore tagged Tumblr posts
Visit Tumblr Blog
Explore Tumblr blogs with no restrictions, modern design and the best experience.
Last Seen Tumblr Blogs


Fun Fact
Mobile US users spent an average of 115.8 minutes on Tumblr app monthly.
Text
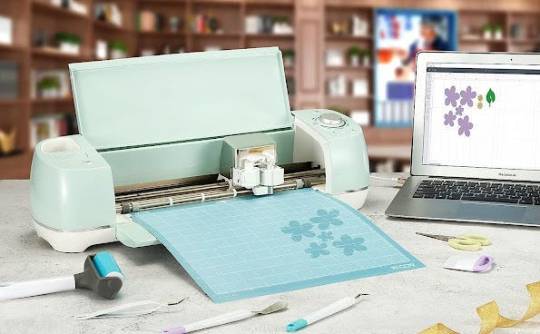
Cricut Explore Air 2 Bluetooth Connection: Simplified Guide

Hi there! Are you looking for a Cricut Explore Air 2 Bluetooth connection? If so, then I’ve got you covered! I’ve always preferred connecting my Cricut via Bluetooth. Do you know why? Because I can’t have my computer and Cricut on the same table☹️. I had to keep them separately, so I had no option but to use a Bluetooth connection. Besides, I hate dealing with those clumsy wires. However, I don’t think anyone would like those messy wires😅.
Well, now getting to the point: I am a professional crafter who loves making DIY projects on Cricut. As an avid Cricut user, I am here to teach you how to connect your Cricut Explore Air 2 Setup via Bluetooth. If you are ready, let’s dive in!
Cricut Explore Air 2 Bluetooth Connection on Computer
If you want to connect your Cricut cutting machine to a Windows or Mac computer, follow the steps below. Ensure you have placed your Cricut and computer within 10 to 15 feet. After that, you are ready to go😍!
For Windows
Here are the simplified steps to connect Cricut to a Windows computer using Bluetooth:
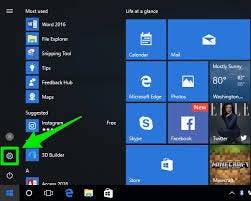
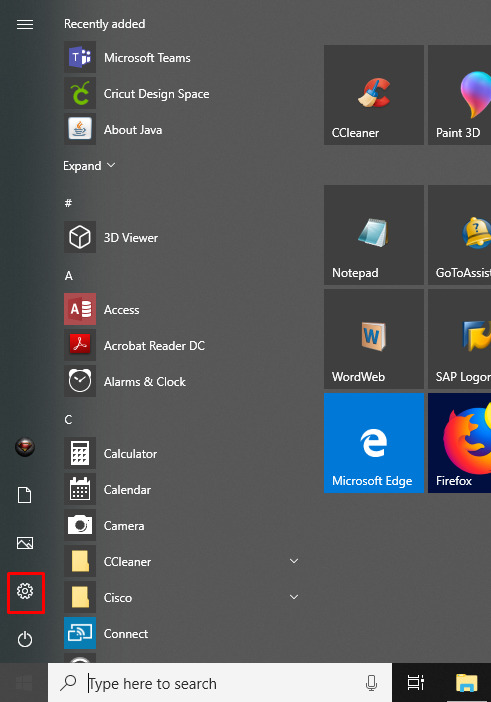
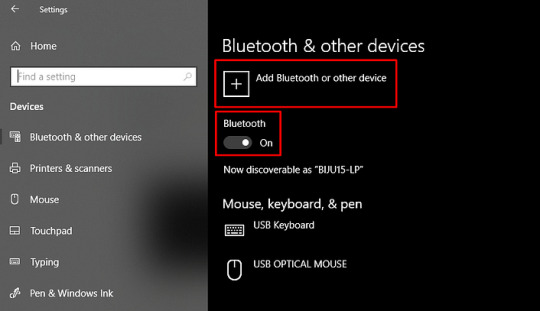
The first thing you have to do is turn on your Bluetooth. To do so, navigate to the Start menu from the taskbar.
And click on the Settings (Gear icon).
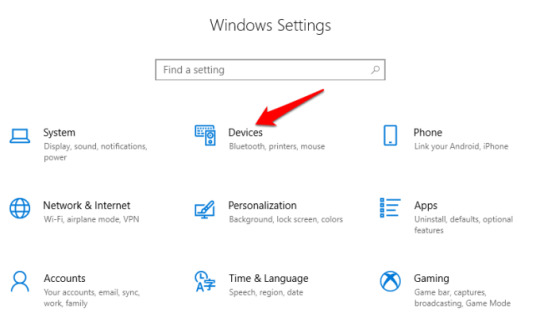
Then, open the Devices option.
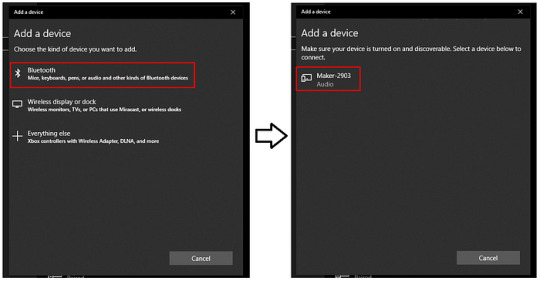
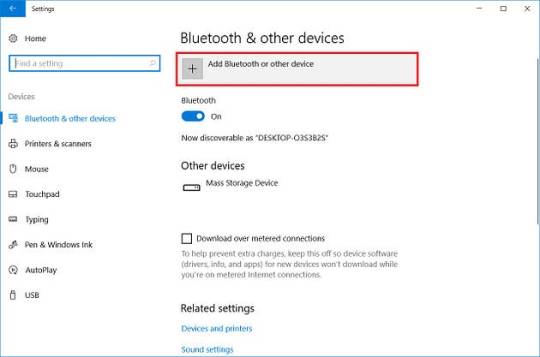
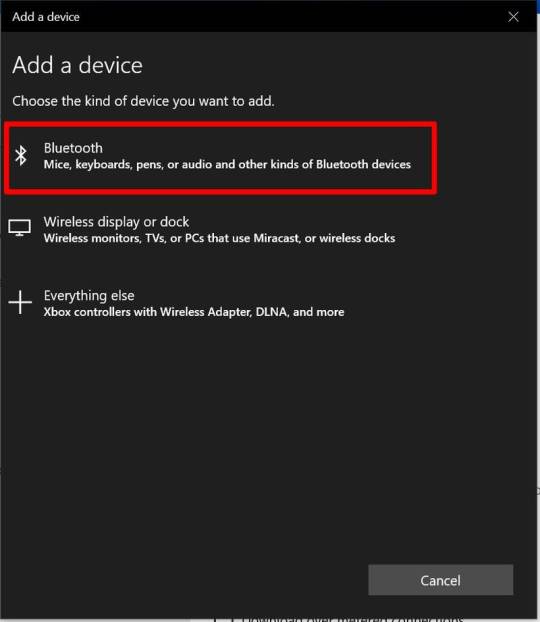
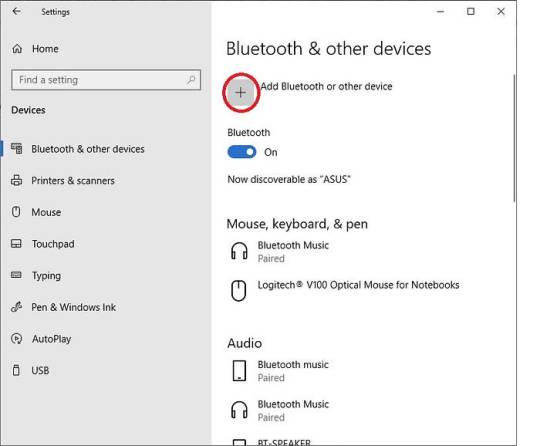
Make sure you need to turn it on and click Add Bluetooth or other device.
After that, you have to move further and select Bluetooth.
Afterward, wait a while and see if your computer has detected your Cricut machine.
Now, you will notice that your Cricut model is visible. The process is the same for all Cricut models.
Finally, your Cricut machine has been paired with a Bluetooth connection.
Launch the Cricut Design Space software and navigate to New Product Setup to confirm whether your Cricut is connected. There, you will see whether your Cricut is connected.
For MacBook
Here are the simplified steps to connect Cricut to your Mac system using Bluetooth:
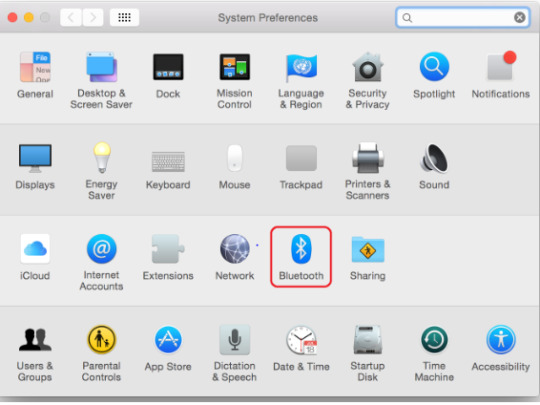
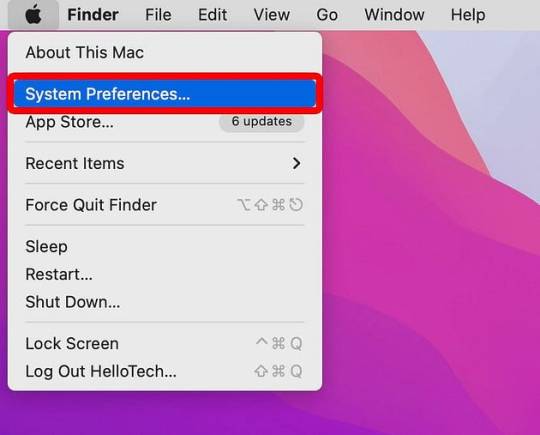
Under the Apple menu, you will find an option called System Preferences; you have to select it.
Afterward, you will need to look for the Bluetooth app.
Now, you should launch the Bluetooth app and check whether your Bluetooth is on or off.
Once Bluetooth is turned on, you must wait for it to detect your Cricut machine.
When the machine is detected, select the Pair tab to connect your Cricut with your MacBook.
Finally, you have paired your Cricut to your Mac.
To confirm, return to your Cricut Design Space and then Cricut New Product Setup. There, Cricut will show you that your device is connected during setup.
Cricut Explore Air 2 Bluetooth Connection on Mobile
Connecting your Cricut Explore Air 2 to your smartphone or tablet is also possible. All you need is a compatible device to install the Cricut app on it. Therefore, it is recommended that you use a compatible device only. If you are a Windows user, you must have Android 6.0 or later. If you are using iOS, you have to use iOS 11 or later.
Note: Your mobile device should be within the range of 10 to 15 feet from the Cricut machine.
For Android
Here are the simplified steps to connect Cricut to an Android phone using Bluetooth:
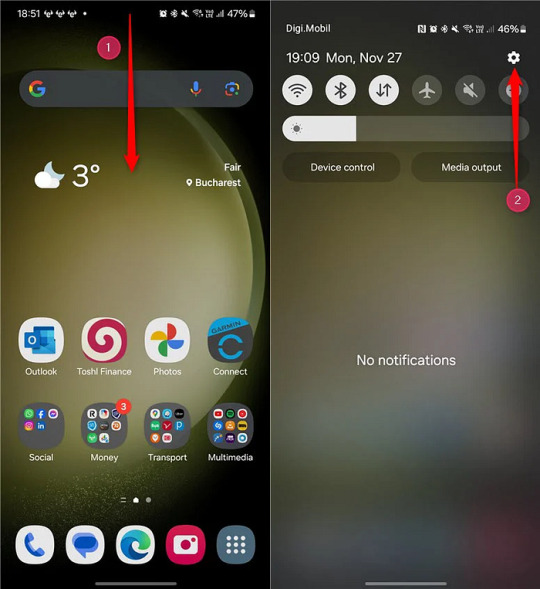
On your Android phone, swipe below and click the gear icon to open your Settings.
Once you have entered your phone Settings, go to the Bluetooth option.
Now, turn on your Bluetooth.
Wait and see until your device finds your nearby Cricut machine.
Once it finds the Cricut machine, you have to click on it to pair.
Finally, the Cricut Explore Air 2 Bluetooth connection is done.
For iOS
Here are the simplified steps to connect Cricut to an iOS phone using Bluetooth:
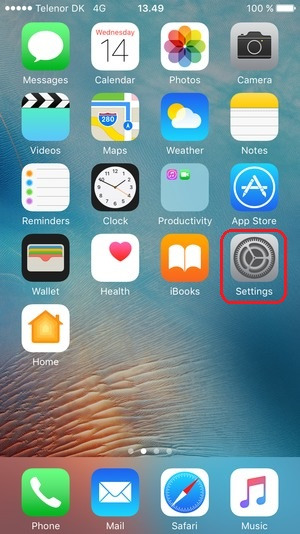
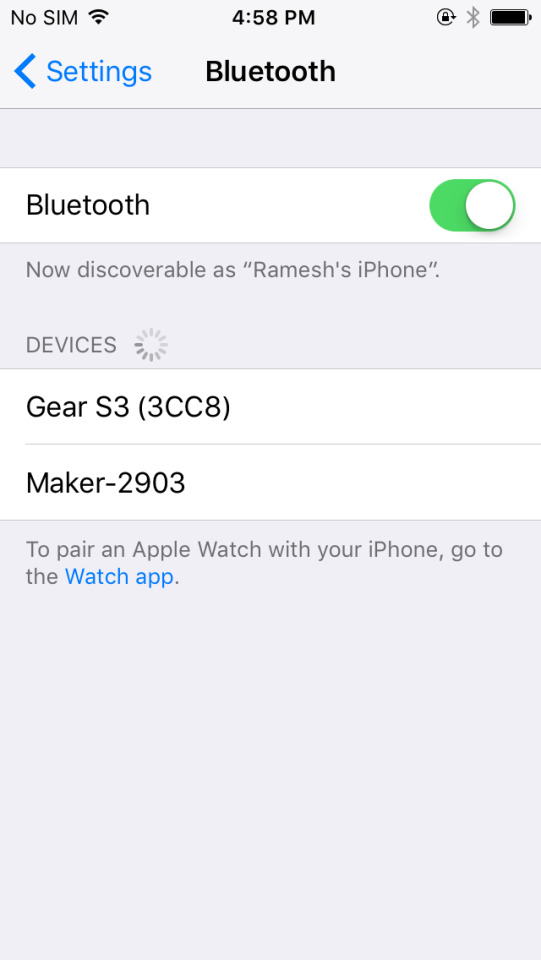
Go to your iPhone and open the Settings app.
Now, turn on the Bluetooth by tapping on the toggle button.
Wait and let your iPhone look for your Cricut model.
Once detected, click on it to pair.
Now, you have connected your Cricut to your iOS device in no time.
So, weren’t those steps easy for you? I think it would be much better for beginner crafters who will be connecting their Cricut for the first time. That’s all for this guide on the Cricut Explore Air 2 Bluetooth connection. Happy crafting!😃
FAQs
What do I need to connect my Cricut Explore Air 2 to computer?
If you are connecting your Explore Air 2 machine via Bluetooth, you need a computer with in-built Bluetooth features. You also need a Cricut machine of any model. In addition, you should have a flat surface like a table or a floor to position your machine. Despite this, if you are connecting your Cricut via Bluetooth, you should have a USB cable instead of Bluetooth.
Can I connect all Cricut models to Bluetooth?
Not all Cricut models have Bluetooth connectivity. The Cricut Explore, Cricut Maker Setup, Joy, and Venture series are easily connectable via Bluetooth because they have built-in Bluetooth. However, older Cricut models, like the Explore One machine, require a wireless Bluetooth adapter. In short, all Cricut models except the Explore One can be connected using Bluetooth.
Why is my Cricut not connecting?
If your Cricut machine is not connecting to your device, you might need to check the following points:
If you are connecting it to the USB cable, check whether your cable is damaged.
You can change the USB port on your computer. If the issue persists, you need to replace the USB cord.
If you use Bluetooth, ensure you have placed the device and machine within 10 to 15 feet of each other.
For more information: cricut.com/setup app cricut design space download
Source: Cricut Explore Air 2 Bluetooth Connection
#Cricut Explore Air 2 Bluetooth Connection#cricut explore air 2 setup#cricut explore one setup#how to setup cricut explore#cricut new product setup#cricut design space software#cricut design space download
2 notes
·
View notes
Text
How to Connect Bluetooth to Cricut Explore Air 2: Full Guide
How to connect Bluetooth to Cricut Explore Air 2? — Is that what you were looking for? Kudos to you! You have landed on the right page. This write-up focuses on establishing a connection between Cricut and computer/mobile devices using Bluetooth.
When I started crafting with Cricut, I was a little overwhelmed as I didn’t know where to start. Thanks to Cricut’s easy manual, it saved me a lot of time. Yet, I had to rely on various tutorials on the internet. Anyway, companies try their best to make their manual easier, but still sometimes it’s not easy for users to get everything on their own. Hence, that’s when this blog comes into a play.
However, crafting experts like me can’t sit alone doing their own crafting. It really doesn’t interest me🥴. I believe “The secret to growth is helping others grow.” Hence, I want to teach the best to all my novice crafters. So, let’s connect the Cricut machine to a device without any further ado!
How to Connect Bluetooth to Cricut Explore Air 2 (Desktop)?
Whether it is a Mac or Windows computer, you need to make sure you have built-in Bluetooth. Having a system with Bluetooth is a must to establish a connection via Bluetooth. To connect, follow the steps described below:
For Windows
You have to begin by turning on the Cricut machine.
Then, ensure you have placed your Cricut Explore 10 to 15 feet from your PC.
Now, you should hit the Windows logo + I keys on the keyboard, and it will open your PC’s Settings.
After that, click on Devices.

Next, you need to check if your Bluetooth is turned on. If not, you have to turn it on.
As you have turned on Bluetooth, hit Add Bluetooth or other device.

Also, you will receive a pop-up to add a device.
There, you need to select Bluetooth.
After that, wait and let your PC’s Bluetooth detect your Cricut model.
Now, you have to pair it with your Windows PC.
For macOS
The first and second steps will be the same as Windows (See above steps for Windows computer).
After that, press the power button on your Mac and turn it on.
Then, you have to head to your Apple menu.
Now, you should choose System Preferences.
Next, you will need to search for the Bluetooth choice.
Also, you should ensure that your Mac’s Bluetooth is turned on.
If it is on, choose the Cricut machine from the list.
How to Connect Bluetooth to Cricut Explore Air 2 (Mobile)?
Mobile phones are also compatible with Cricut machines. Hence, you can easily connect your Cricut to your mobile device. Whether Android or iOS, both devices are easily connected; let’s follow the steps I have explained below.
For Android
On Android, look for phone Settings.
On settings, head to the Bluetooth option.
Now, you will need to turn on your Bluetooth.
Once it is turned on, you have to wait.
Wait until your phone’s Bluetooth discovers nearby Cricut Explore Air 2.
Once the Cricut Explore Air 2 name is visible in the list, select it to pair it.
For iPhone/iPad
On an iPhone or iPad, look for the Settings.
Once you’ve found the Settings app, you have to launch it.
Then, you need to search for the Bluetooth option.
Now, enable your Bluetooth by clicking on the toggle button.
After that, you will need to wait.
Next, let your iPhone or iPad search for your Cricut Explore Air 2.
Once it is detected, you will need to click on it to pair.
By now, you must have understood how to connect Bluetooth to Cricut Explore Air 2. You can connect to any device you want, from a computer to a mobile phone.
FAQs
Question 1: Which software do I need to connect my Cricut to device?
Answer: There is nothing to do with Cricut software if you want to connect your Cricut to your computer or mobile device. However, you will need to download the Cricut Design Space later to setup your Cricut cutting machine. Besides design creation or setup, you will not need Cricut software for any reason.
Question 2: Can I only connect my Cricut via Bluetooth?
Answer: No! You can insert your USB cable into the Cricut machine’s USB port to connect it to your desktop. However, you can’t use USB when you want to connect your Cricut to your smartphone. For this, Bluetooth is compulsory, as the smartphone does not have bigger USB ports like the one your desktop has.
Question 3: Why do I need to connect Cricut to any device?
Answer: In order to setup your Cricut machine, you will need to connect it to your computer or smartphone using USB or Bluetooth. Without connecting, your computer can’t communicate with your Cricut, making it impossible for you to send your design to the machine for cutting. In short, you have to connect Cricut to your devices because you want your design to be sent from your device to your Cricut for further operations.
Final Words
Throughout this blog, I have highlighted how to connect Bluetooth to Cricut Explore Air 2 on a Windows, MacBook, or smartphone (Android or iOS). Connection is important if you want to setup your Cricut machine. Without Cricut setup, you can’t perform any other operations easily on your cutting machine, meaning a single cut is impossible without it. Get ready with your Cricut and connect it to your device via Bluetooth in no time.
Read more: cricut setup for pc
install cricut design space app
Cricut New Machine Setup
Source: How to Connect Bluetooth to Cricut Explore Air 2
#How to Connect Bluetooth to Cricut Explore Air 2#Cricut New Machine Setup#install cricut design space app#cricut.com/setup#cricut setup for pc
0 notes
Text
How to Connect My Cricut Maker 3 to Bluetooth: Easy Guide
How to connect my Cricut Maker 3 to Bluetooth is the most frequently asked question I receive from my readers. The question is easy to answer, and I will make it easier for you.
I remember the day I got my first Cricut Maker 3 machine. I was a little bit, but somehow, I learned to connect Cricut to a device using Bluetooth. When I can do this, you can also do it in no time. For this, you will need a compatible computer or mobile device to which you want to connect. Let’s learn how to connect a Cricut machine with different devices, including Windows, macOS, iOS, and Android. Let’s delve into this blog and start establishing a connection. ��
How to Connect My Cricut Maker 3 to Bluetooth on Windows?
Connecting your Cricut cutting machine to a Windows computer using Bluetooth is not rocket science. By following the simple steps given below, anyone can easily connect their Cricut to their PC.
Here’s how to connect Cricut Maker 3 to Bluetooth on Windows 10:
How to Connect My Cricut Maker 3 to Bluetooth on Mac?
Cricut is easily compatible with the MacBook. Besides, the first and second steps are the same for all devices as for the Windows computer. So, take out your Cricut machine outside or unbox it if you haven’t done it yet and start connecting it to your Mac.
Here’s how to connect Cricut Maker 3 to Bluetooth on Windows 10:
How to Connect My Cricut Maker 3 to Bluetooth on iOS?
So, now I am going to talk about the steps to connect your Cricut cutting machine to your iOS devices, including your iPhone or iPad. The steps will be the same for both iPhone and iPad devices.
Here’s how to connect your Cricut machine to your iOS device via Bluetooth:
How to Connect My Cricut Maker 3 to Bluetooth on Android?
Android users can also establish a connection between their Cricut Maker 3 and Android smartphones without any hassle. All you need is an Android phone that is compatible with Cricut.
Here’s how to connect your Cricut machine to your iOS device via Bluetooth:
FAQs
Question 1: What if I can’t connect my Cricut machine to Bluetooth?
Answer: Here are some things that you must try to connect:
Question 2: What’s wrong with my Cricut that it doesn’t connect?
Answer: It is probably some of the reasons that you must know. First thing, you will need to know whether you have connected your Cricut to your computer or mobile device. It should also be connected to the WiFi network. If everything is okay, you can check your other cable connection.
Question 3: Which MacBook should I try with my Cricut?
Answer: I think the Apple MacBook Air (M2, 2022) is the best, in my opinion, as it is comfortable and portable in performance. Windows computers properly need to connect with each other. For this, users can check their system requirements and choose Mac accordingly. Besides, I prefer to have this MacBook Air laptop.
Visit: install cricut design space app www.cricut.com setup login cricut.com/setup
Source: https://cricutdesignappspace.wordpress.com/2024/05/21/how-to-connect-my-cricut-maker-3-to-bluetooth-easy-guide/
#cricut.com/setup#cricut design space#cricut explore air 2#cricut new machine setup#cricut.com/setup mac#cricut drivers#cricut.com/setup app#cricut.com/setup login#cricut.com/setup windows#install cricut design space app#install cricut design space#cricut install setup#install cricut explore air 2#cricut create connect to computer#cricut setup on computer#cricut new product device#cricut new product setup#cricut.com setup mac#setting up your cricut maker#Cricut Maker 3 to Bluetooth
0 notes
Text
Cricut Explore Air 2 Connect to Computer: A Stepwise Guide
Hey crafters, are you here to learn the Cricut Explore Air 2 connect to Computer? Here, you will get what you are looking for. Chill and relax; I am going to teach you everything that you need to know to establish the connection between your Cricut and computer.
But hold on! Do you want to connect your Cricut machine to Windows or Mac? Don’t worry, I will teach you both. All you need to do is make sure that your computer meets all the system requirements. For this, you can navigate to Cricut’s official website, where they have mentioned every requirement for Mac and Windows computers.
I am a professional crafter with years of experience. My years of hard work have taught me so much, and now I am excited to share all this with you. Let’s get started!
Cricut Explore Air 2 Connect to Computer (Windows)
Connect your Cricut cutting machine to your computer if you are a Windows user. You can connect it to them easily. Take your Windows computer out. No matter which brand of computer you are using, it should have a compatible or latest operating system. To know the system requirements, you can visit Cricut’s official site. Now, let’s learn how to connect Cricut Explore Air 2 Bluetooth.
Place your PC near your Cricut Explore machine. Make sure your PC has Windows 10 or later version.
After that, you need to look for a flat surface.
Once you find a suitable place, such as a table and floor, you can place the Cricut Explore without exceeding its maximum range, which is 10–15 feet.
Once everything is set up, you need to move to the Settings section.
For Settings, you have to navigate to your taskbar and connect to the Start menu.
From the Start menu, you will need to hit the gear icon, Settings.


Then, turn on the Bluetooth by simply clicking on the toggle button.
Now, select Add Bluetooth or other device.
Here, your Cricut will be detected by your Windows computer.
Once detected, click your Cricut model to pair.
Cricut Explore Air 2 Connect to Computer (macOS)
If you are a Mac user, then you have to follow the steps below. The following steps are for only Mac users; make sure you follow them one by one. After that, you will need to start setting up your Mac. Let’s first learn how to connect Cricut Explore Air 2 Bluetooth.
Choose the right place, such as a flat table.
After that, you need to place your Cricut on it.
Have a minimum gap of about 10 feet between your Cricut and Mac computer.
Then, you should find the Apple menu on your Mac and click on it.
After that, you will need to click the System Preferences.

Once you find it, you will need to turn on the Bluetooth.
Finally, you have to click on your Cricut model from the available list.
When you have followed all the above steps, you will find your Cricut connected to your computer.
Cricut Explore Air 2 Connect to Computer via USB
Don’t want to connect to Bluetooth? Don’t worry; I’ve got another option, i.e., you need to connect it to your simply via a USB cable.
First, you will need to turn on the Cricut product by pressing its power button.
Then, switch on your Mac or Windows.
Once you have turned on both devices, take your USB cable and insert it into them.
First, take one small side and insert it into the back of your machine.
After that, you need to take the bigger side and plug it into your CPU or laptop’s USB port.
Use the one’s end of your USB cable and plug it inside your desktop’s USB port.
Finally, you have connected your Cricut to your computer via a USB cord.
FAQs
Question 1: Can I connect my Dell Vostro 3568 model to Cricut?
Answer: Yes, absolutely; you can connect this Dell Vostro 3568 model hassle-free. Cricut machines are compatible with most popular brands like HP, Asus, Dell, and others. However, you should know that Cricut doesn’t support Google Chromebook or Unix/Linux. Besides Mac, Cricut only supports the Windows operating system. Hence, any laptop with a Windows operating system will be perfect for using Cricut.
Question 2: Should I use the Cricut app to connect my Cricut?
Answer: Yes, you have to use the Cricut software to connect your Cricut machine. There are two possible connections that you can establish on your Cricut: the first is via USB cable, and the second is Bluetooth. If you choose to connect your Cricut via Bluetooth, you don’t need to worry about anything, as it is reliable and frees you from clumsy wire. However, most people also prefer a USB connection, as it is easier than a Bluetooth connection.
Question 3: Is a Bluetooth must for Cricut Explore Air 2?
Answer: No, it’s not! Besides Bluetooth, you can also connect your Cricut using your USB connection. You will find a USB connection easier than the Bluetooth. However, Cricut recommends that if you are using Maker 3 or Explore 3 with a Windows computer + AMD Ryzen, then you have to use a Bluetooth connection. But, this is not the case with the Cricut Explore Air 2 model.
Source: Cricut Explore Air 2 Connect to Computer
Visit here For More Information: cricut.com/setup
Pinterest
#Cricut Explore Air 2 Connect to Computer#how to connect Cricut Explore Air 2 Bluetooth#cricut.com/setup#Cricut Explore Air 2
0 notes
Text
Cricut Bluetooth Connection: Quick and Easy Pairing Guide
Hey, Cricut enthusiasts! I hope you all are doing well! Today, I have come up with an important topic that all beginners out there might be waiting for. This is nothing but a Cricut Bluetooth connection. As the days pass, I can see Windows and Apple launching their new operating systems. Due to this, it becomes difficult for you as a newbie to understand the methods used to connect Cricut to various devices. Whether it is a computer or mobile device, you will need a solid solution so that you can easily establish a connection between your Cricut and your device.
But you know what? I am a professional crafter with years of expertise in making connections between Cricut and devices. Yes, you heard that right! I have been making crafts with Cricut ever since Cricut launched a Cricut Explore One machine. So what are you waiting for? Let’s dive in to learn how to connect Cricut Bluetooth on a computer and smartphone.
Cricut Bluetooth Connection on Your Windows PC
Most people still use Windows computers, whether Windows 10 or 11. Whatever it is, make sure you are using Windows 8 or later. The previous version, which is older than Windows 8, is not supportable at all. So, if you have Windows 10, you are good to go. Let’s start the connection now:
Note: I know you don’t need a specific operating system to connect to Cricut, but later on, you will be downloading the app; hence, it is a must to prepare in advance.
Cricut Bluetooth Connection on a Mac Computer
Now, for Mac, you will need to use macOS 10.13 or later. Despite this, you must have a CPU with 1.83 GHz; the minimum RAM should be 4 GB. In addition, 50 MB of free disk space is required. Without any much delay, let’s get into the steps below:
Cricut Bluetooth Connection on an Android Device
When it comes to Android devices, you must use Android 6.0 or higher. You can use both mobile devices and tablets, as Cricut supports both devices properly. Now, let’s shift our attention to the steps described below:
Cricut Bluetooth Connection on an iOS Smartphone
iOS device users must have iOS 11 or later. However, it doesn’t matter whether you are using an iPhone, iPad, or iPod. Cricut supports all of them hassle-free.
Thank god😃it is done now! So, have you understood anything so far? If yes, you must be ready to establish the Cricut Bluetooth connection on your device. So, if you really understand how to connect Cricut Bluetooth, then my best wishes will always be with you.
So, what are you waiting for? Just dive into your Cricut journey today and create amazing crafts!
Have a nice day ahead!🤗
FAQs
Question 1: Can I connect my Cricut to my iPhone 15 Pro?
Answer: Absolutely, yes! Cricut supports iOS 11 or later, so you can easily connect it via Bluetooth. Cricut also supports iPad and iPod devices. Since all of Apple’s products are compatible with Cricut, you no longer need to worry about them. Get the Cricut product installed on your iPhone using AppStore and enjoy creating or modifying your designs quickly and easily.
Question 2: Which computer is best to connect my Cricut?
Answer: There is no specific laptop or computer to connect your Cricut product. In simpler terms, you will not need a specific model of your computer to use a Cricut machine. However, you need a computer that has an in-built Bluetooth. Besides, if your computer has a USB port, it will be a plus point as you can connect Cricut via a USB cord.
Question 3: Is connecting a Cricut to a Windows and Mac different?
Answer: Certainly, yes! Both are different computers with different interfaces. Microsoft builds a PC and has its own settings, and all the options given differ from those of Mac. In short, there is a great difference between Windows and macOS; therefore, you can’t follow the same steps for a PC to connect to a Mac system.
Visit: cricut.com/setup www.cricut.com/setup login cricut.com setup mac design.cricut.com/setup
Source: https://cricricutdesigncut.wordpress.com/2024/04/12/cricut-bluetooth-connection-quick-and-easy-pairing-guide/
#Cricut Bluetooth Connection#cricut.com/setup#design.cricut.com/setup#www.cricut.com/seup#www.cricut.com setup login#www.cricut.com/setup\cricut explore air 2 setup#design space setup#cricut design space setup#cricut.com setup mac
0 notes
Text
How to Use Cricut Explore Air 2: Create DIY Projects at Home
Are you excited to express your creativity with the Cricut Explore Air 2 machine? This flexible cutting machine can make your crafting dreams come true. It cuts over 100+ various materials, like paper, cardboard, vinyl, and even leather.
Whether you’re a pro crafter or a beginner, this machine is perfect for bringing your ideas to life. This stepwise guide will walk you through ‘how to use Cricut Explore Air 2‘, download the Design Space app, and create your first project.
So, get ready to venture on a crafting adventure and discover the joy of DIY projects. Let’s dive in and explore the world of Cricut!
Downloading Cricut Design Space on Your Computer
The first thing to use the machine is to download the Cricut Design Space software. To download it, navigate to design.cricut.com from your Windows or Mac. If you already have a Cricut account, log in to the app after downloading it.
If you want to download the software on your mobile device, either Android or iPhone, go to their Play Store/App Store and look for the app in the search bar. It will be a square icon with Cricut written at the center.
NOTE: You must have an account beforehand to use the app. If you don’t have one, you should create one on the sign-up page. Also, you don’t need a Bluetooth adapter to use the machine, as it comes with built-in Bluetooth. The earlier Explore series, such as the Explore One, required a Bluetooth adapter.
Connecting Cricut Machine to Your Computer With USB
Although you can use your machine wirelessly, let’s examine how to use it through USB.
Step 1: First, place it on a clean and flat surface with 10-15 inches of space behind and front to let the cutting machine move freely.
Step 2: After that, you must plug in your Explore cutting machine.
Step 3: And then attach the USB cable and power adapter.
Step 4: Next, you need to turn on your Explore machine and your computer.
Step 5: Open the Cricut Design Space software discussed in the previous section and log in using your credentials.
Step 6: Within the app, select the Menu icon visible at the top and choose New Machine Setup. This will guide you through the installation, the first project you will make, and a greeting card.
Now, you are almost ready to use the machine. The next section will examine how to make a project on your machine. So, let’s get into that.
How to Use Cricut Explore Air 2: Creating Your First Project
Now, let us walk through a project that can be made with the materials that came with the box of your machine. If this is your first project, don’t worry—it will be easy!
Step 1: From the “Cricut New Machine Setup,” you will see a design on your screen. If you don’t find it, head over to cricut.com/setup. Then, find the Menu on the top side and click “New Machine Setup.”
Step 2: Prepare all the materials that came with the machine, such as cardstock, mat, paper, and pen. Remove the plastic film from your machine and keep it aside for future use.
Step 3: Afterward, you need to load the cardstock on the machine mat. The textured side should be facing up and lined up on the machine mat vertically. Make sure to line it up on the upper side, right below the Cricut logo.
Step 4: In the next step, you must insert your cutting mat into your Explore machine. Ensure that you load the machine mat as per the guidelines. You also need to take care that it is pressed against the roller while you press the “load/unload” buttons, which are located at the top of your cutting machine. The icon looks like a set of double arrows.
Step 5: Now, you need to insert the pen in clamp A. To do that, you need to remove the cap and place it tip-down until the arrow on the pen disappears. After you are done with this, you can close the clamp.
Step 6: Then, check the design on your screen and tap the Go button.
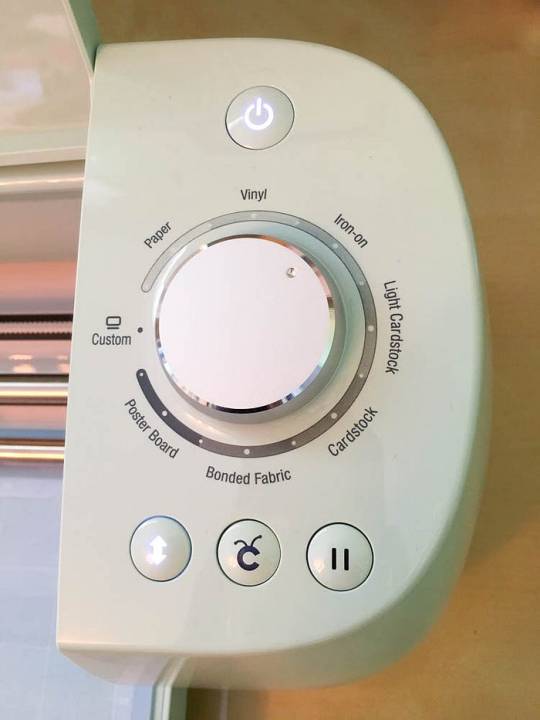
Step 7: Next, you need to set the dial to cardstock on the machine.
Step 8: As soon as you are ready to make the necessary changes in the design, the preview “C” button on the machine will start flashing.
Step 9: Also, you will have to unload the machine mat. Once you complete the project, click on the load/unload button to take off the pen.
Step 10: Afterward, remember to put the machine mat face down on a flat surface and then curl the edge up toward you. It will be removed from the cutting mat, and as you take it off, keep curling it up to make it easier.
Step 11: Fold your paper card over, and then crease it in half. Place the same on your plain blue paper inside the card. You can glue this in place if you like.
Hoorah, you have finished your first project. Pat yourself on the back and know that your journey in this crafting world has begun.
Summing Up
That concludes our guide on ‘how to use Cricut Explore Air 2‘ for beginners. Reading the above blog should make you feel fairly comfortable working on a new project. Now, you know how to download the Design Space app, set up the machine, and use it properly. Plus, you can always return here for a quick refresher!
FAQs
How do I enable the fast mode in my Cricut Explore Air 2?
To enable Fast Mode on your machine, load your material onto the cutting mat and place it in the machine. Choose the proper material setting in the Cricut Design Space software, such as vinyl or cardstock. Then, seek the option to enable Fast Mode. After selecting it, click the blinking “C” button to cut. This mode allows your machine to cut and write up to two times faster, making it appropriate for certain materials.
What can I make with a Cricut Explore Air 2?
It is an amazing and versatile cutting machine that allows users to make unique designs and projects. It has the ability to cut over 100 materials, like vinyl, cardstock, and iron-on, and even thicker materials, including wood. Its additional features, like writing and scoring capabilities, enable the creation of custom cards, labels, and stickers. This machine gives users access to thousands of designs through Cricut Design Space; users can easily make personalized items suited to their tastes.
Can I use Cricut Explore Air 2 without a computer?
Yes, one can use the machine without a desktop by pairing it to a smartphone via Bluetooth. The machine has built-in Bluetooth connectivity, which allows one to use the Cricut Design Space app on iOS or Android devices to design and send projects to the machine. However, some features may be limited compared to those of a computer.
Visit: install cricut design space app cricut.com setup mac
Source: https://explorenewmachine.com/how-to-use-cricut-explore-air-2-create-diy-projects-at-home/
#cricut.com/setup#cricut.com/setup mac#cricut.com/setup windows#cricut.com/setup login#install cricut design space app#install cricut explore air 2#install cricut design space#install cricut#www.cricut.com setup login#www.cricut.com/setup#www.cricut.com/setup login#cricut explore air 2#cricut setup#cricut design space download#cricut design space app#cricut design space software#cutfiles#cricut design space setup#cricutprojects#cutfilesforcricut
0 notes
Text
How to Calibrate Cricut Explore Air 2? (Full Guide!)
Cricut Explore Air 2 is a worthwhile machine for crafters who want to make pro-level crafting projects. The machine offers precise cuts for more than 100 different types of materials, including Cricut Smart Material, leather, wood, glass, metal, etc. With its easy-to-use interface, the machine allows users to work on DIY projects even if they are novices. Moreover, sometimes crafters may need to perform Cricut Explore Air 2 calibration before a cut.
Calibration is a process that helps set the machine’s blade to cut the design accurately without any flaws. Many users don’t know the procedure and struggle to get the perfect cut. If you have the same problem, then the follow-up blog will provide you with all the information about calibrating your machine.
Cricut Explore Air 2 Calibration on Windows/Mac
If you are using your Cricut Explore Air 2 machine on a computer, then the following is the extensive guide that will help you perform the calibration process.
Step 1: Selecting the Printer
Open the ‘Cricut Design Space app‘, sign in to your account, and then click on the Settings option.
Then, follow the path Machines > Machine Calibration, and select Cricut Explore Air 2.
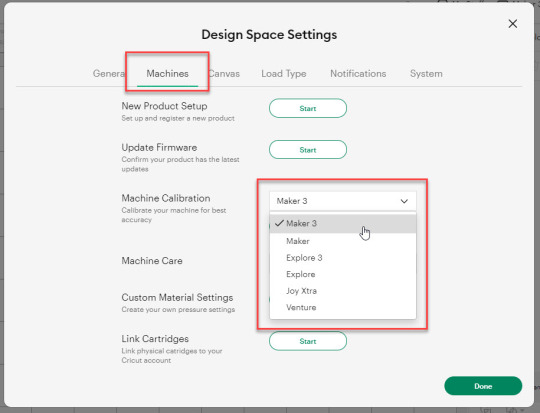
After selecting your crafting machine, click on the Start option.
Depending on the machine you choose, you will be asked to complete the calibration; select the Print Then Cut option.
In the next step, choose what you like to use with your printer machine for the process.
After that, click on the Continue option.
Step 2: Starting the Calibration Cut
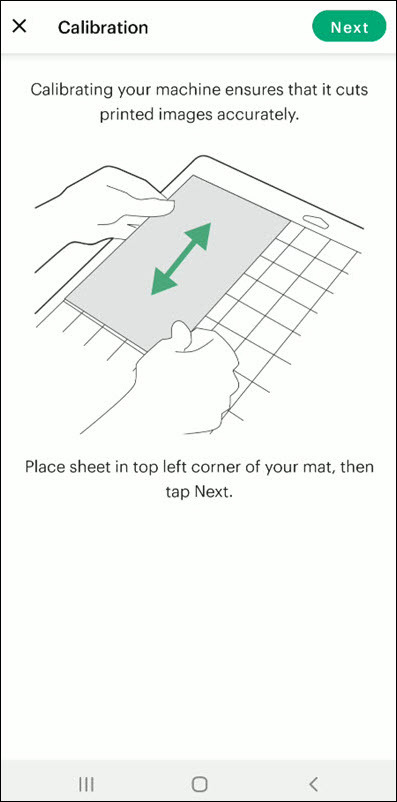
Now, you should place the printed calibration sheet on the mat, position it perfectly, and select the Continue option.
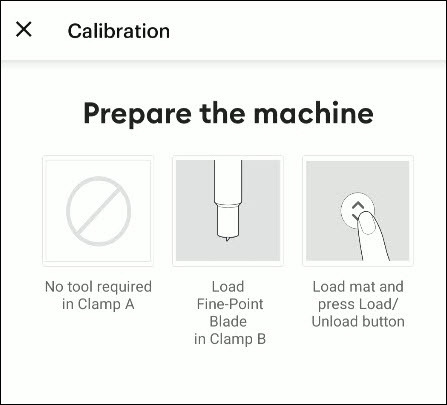
For the next step, ensure that your machine is ON and connected to your computer using USB or Bluetooth. Select the machine from the drop-down menu, insert the cutting mat into your crafting machine, and click Go.
Furthermore, the device will start scanning the markings for the calibration.
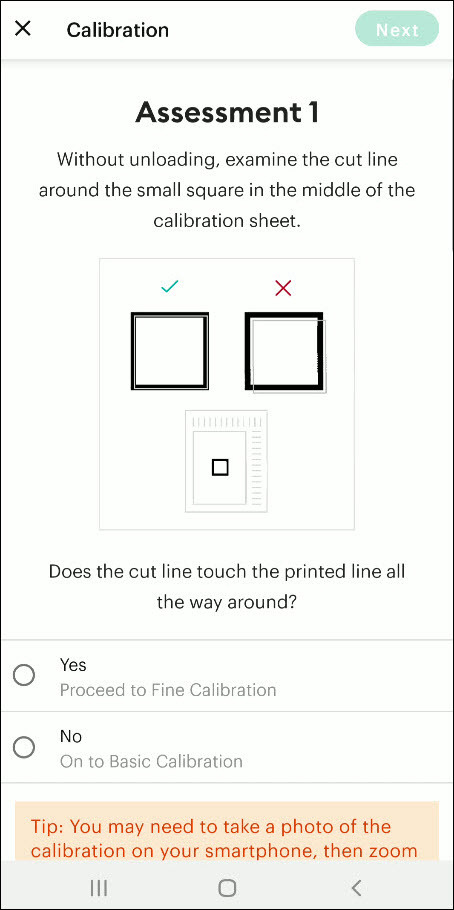
After the cutting is complete, check if the cut-makings are touched without unloading the mat from the machine. (If the markings are touched, then choose the Yes option in the app and select Continue to move to the next step.)
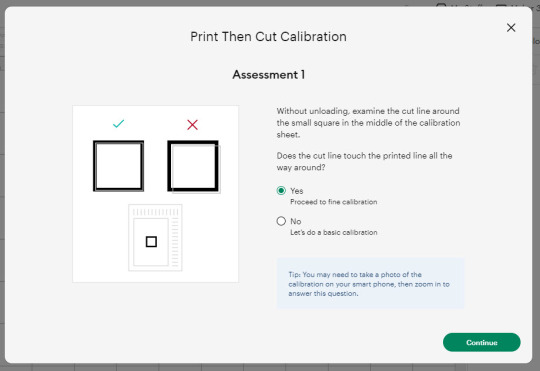
Note: If you choose the No option, then the machine will perform a cut for the next time for the accurate cut.
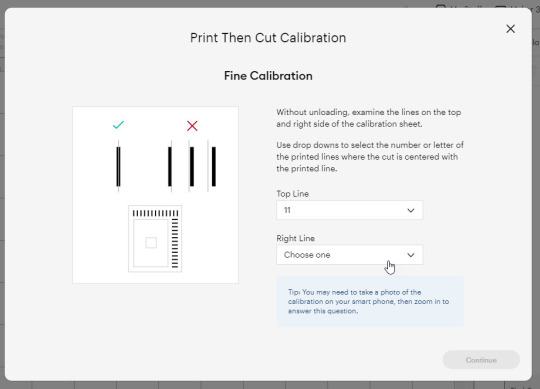
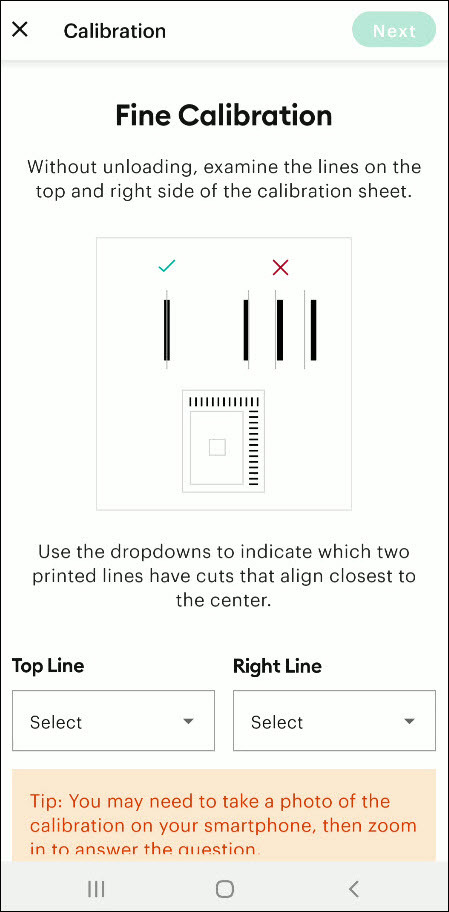
Also, the machine will start the calibration cut at the top and side of the page.
Now, check if the markings are correct without unloading the mat from the device. (The cut should be on or before line 1 and on or before line 21.)
If your cut meets all the conditions, choose the line closest to the center of the printed lines, the same as the following image; when you are done, select the Continue option.
In the next step, the Cricut Explore Air 2 machine will perform a confirmation cut around the large sheet. When this step is complete, unload the mat from the machine and remove the calibration sheet; now, you need to answer the final question on the app.
You need to choose Yes, cut is close enough to the center if you are happy with the cut. (Select no and follow the further process if you are not happy with the cut.)
Cricut Explore Air 2 Calibration On iOS/Android
The follow-up method will allow you to Calibrate your Explore Air 2 machine without any hassle. So, let’s begin the process.
Step 1: Connecting the Printer to Your Machine
Start by signing into your Cricut account on the app and selecting the menu option from the upper right corner.
After that, tap on Settings and then select Print Then Cut Settings.
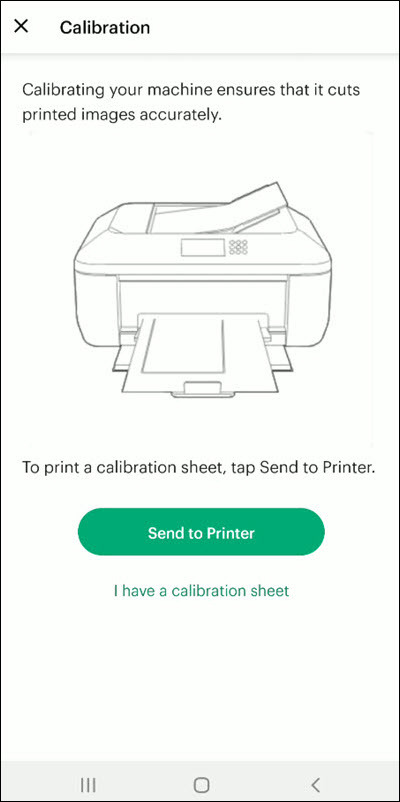
Also, tap on the Calibration.
Next, you have to choose the Send to Printer, or I have a calibration sheet option.
Now, the preview of the calibration sheet will appear on the screen (it can be a little different depending on the device you are using.)
Afterward, tap “Select a printer” and select the printer device you are using. Then, choose Next.
Step 2: Perform Sheet Calibration Process
After that, take the printed calibration sheet, place it onto the machine mat perfectly, and select Next.
Specify the appropriate material setting for your machine.
Then, after loading the mat into the machine, press the Go button on it.
Also, the machine will look for the marking for the calibration and then start the cutting process near the small square.
Afterward, without unloading the mat from the machine, check for the cut to ensure the cut touches the marked lines all the way around. (If the lines touch the cut, then tap Yes in the app, then select Next to proceed with the next step.)
However, if you select the No option, then the machine will try to cut close to the top and sides of the page. (Once done, look closely without unloading the mat; there should be a cut before line 1 and on or after line 21.)
If the cut meets these lines, you need to specify which cut is closest to the center of the printed lines and the right side of the calibration sheet.
Once you are done, select Next to move forward.
After that, keep following the instructions on the screen to complete the procedure.
Once the process is complete, you can start cutting materials on your machine.
Final Words
Cricut Explore Air 2 calibration is the best way to get the pin-point cuts. These methods will help you to perform the calibration process on computer and smartphone devices. With these methods, you cannot only calibrate your Explore Air 2 but also any other cutting machine of the brand. Furthermore, if you have any doubts regarding the procedure or have any issues, then it would be good to ask for more assistance and guidance.
Frequently Asked Questions
Why Is My Cricut Explore 2 Not Cutting Properly?
Cricut Explore machines are known for their flawless and fast-cutting results. Sometimes, it is due to the material you are trying to cut on your device. Also, in some cases, the machine faces technical issues. To get your machine out of this problem and start cutting properly, you can use the calibration procedure. The process to calibrate your machine is simple.
Why Should I Calibrate My Cricut Machine?
However, the cuts can sometimes be misaligned due to various reasons. Crafters can calibrate their devices to get the blades and cuts aligned to their initial position. After the calibration, the machine starts to provide flawless cuts once again. However, the calibration process is a little complex and differs from device to device. So, you must know the whole process before performing it.
What Is the Thickest Setting on Cricut Explore Air 2?
We all know that Cricut cutting machines are known for their fast and flawless cuts, even for intricate designs. Thus, the Cricut Explore machine can cut a wide range of materials of a certain thickness. If you want to cut the wood, metal, leather, etc., then your machine can cut up to 2mm. However, different materials need to use specific blades to get the desired results.
Source: How to Calibrate Cricut Explore Air 2
#how to calibrate cricut explore air 2#cricut design space app#cricut design space download#cricut design space software#cricut machine setup#cricut explore air 2 setup
1 note
·
View note
Text
How to Use a Cricut Maker to Create a DIY Project? (Easy Guide)
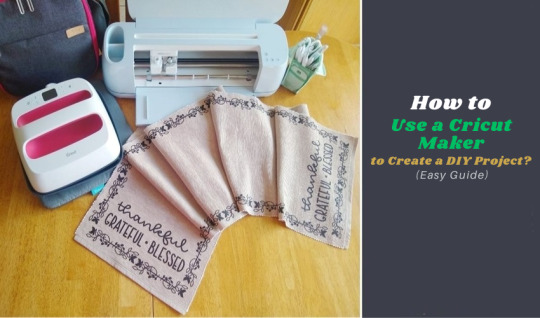
Are you thinking of buying a Cricut Maker? Or you have just got one and are not sure where to start? This guide will walk you through all the different ways to learn how to use a Cricut Maker without any previous experience.
This cutting machine is advanced and unique from other models, like Explore Air 2 and Joy machine. It delivers a wide range of features, tools, and accessories for crafting projects. With this machine, you can cut fabric, vinyl, cardstock, chipboard, and more precisely.
So, if you are a beginner and don’t know how to use this machine—don’t worry; we are here to help! Read this blog, and you will learn how to use it easily.
How to Use a Cricut Maker: Unboxing and Initial Setup
Once you have got your machine in your hands, it is time to check if you have all the necessary supplies and tools that come with the machine or not. So, in order to do that, you must follow these steps:
Step 1: Unbox Your Machine
Carefully remove the machine from the box, ensuring that all packaging materials are removed. Inside the box, you will find the machine, a power cable, a USB cable, a cutting mat, a fine-point blade, and a welcome guide.
Step 2: Positioning Your Machine
Place the machine on a flat surface, ensuring at least 10 inches of space in front and behind the machine. This space allows the cutting machine to move freely during operation.
Step 3: Connecting to Power
Now that you have unboxed your machine, it’s time to take the most important step: giving it life support. To do that, you must insert the power cable into the back of the machine and plug it into an electrical outlet. Once you finish the connection part, let us look into how to activate your machine.
How to Activate a Cricut Maker: Quick and Easy Steps
The first thing to do is activate the machine. To do so, from your Windows/Mac, you must head over to cricut.com/setup from any browser of your choice. Activating the machine is even easier if you have already used the Design Space app. To set up the machine from the app, go to the Menu icon and then select ‘Cricut New Product Setup.’ After that, follow the prompts that let you choose your machine.
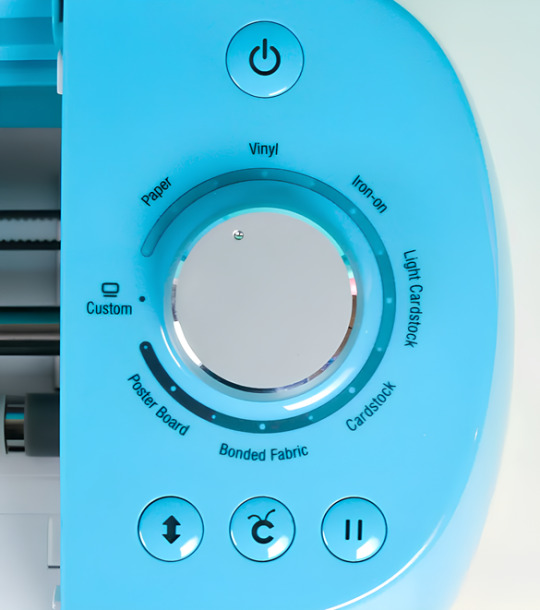
To open the machine, you must lift its lid. This will open the cover of the machine automatically.
Power button: With this button, you can turn the machine on and off.

Feeding switch: This button lets you feed your mat into the machine.

Cricut switch: This is the button with the initial C. Press it when you want to start cutting (it is also called the confirm button).

Pause button: This button gives you the flexibility to pause your machine in between. It’s extremely handy if you’re in the middle of a cut and want to change something or for any other reason.

That’s all in terms of design. In the next section, we’ll look at the steps to create a project.
How to Use a Cricut Maker: 5 Easy-To-Follow Steps
To use a machine, follow these detailed steps from setup to your first project. As the Cricut Maker Setup is a versatile cutting machine, it can handle various materials, making it ideal for crafting projects.
Step 1: Connecting to Your Device
In order to get a hold of the machine, you must connect it to your desktop or computer. This is crucial because, without the connection, the machine cannot communicate with your device. Even though the Design Space app can work offline, you still need a connection at least once to save it on the app.
You can connect your machine to your device via a USB cable or Bluetooth. Connect the square end to the machine and the USB end to your PC via USB. To pair your device with the machine using Bluetooth, turn on the machine and then go to the Bluetooth settings.
Visit the official website or surf design.cricut.com and download the Design Space application. It is essential for project creation and supports various platforms, like Mac, iPad, and iPhone.
Step 2: Setting Up Design Space
This is the most important step after connecting the machine and your device (Mac/Windows). Once you have downloaded the app, you must do these things for a smooth experience:
Open the software and fill out the required fields to create an account. The account allows one to save their projects and access various design features.
In the software, select “New Machine Setup” from your profile. Finish the on-screen steps to choose your machine model and perform the setup process. The app will guide you in connecting your device to the machine.
Step 3: Designing Your DIY Project
Now that you have done all this, let’s start creating your first project. To do so, let’s look at these steps:
Start a New Project: Once your machine is connected, you can start a new project using the software. Select the type of project you want to create, such as a card, decal, or label.
Choose Your Materials: Design Space allows you to select the material. If you use cardstock, set the material type accordingly.
Prepare Your Cutting Mat: Place your chosen material onto the mat. Ensure it is aligned correctly and adheres well to avoid shifting during cutting.
Step 4: Start the Cutting Process
Now that you are familiar with downloading the app and activating the machine, let us look at its main purpose: the cutting process. It happens as described below; follow the steps carefully for a seamless cutting.
Load the Mat: Insert the mat into your crafting machine until it clicks into place. This will automatically feed the mat in for cutting.
Start Cutting: Press the “C” button on the machine to begin cutting. Your device will display a percentage of the cut completion and allow you to monitor the progress.
Completion: Once the cutting is finished, the machine will signal it is done. Carefully remove the mat and peel off your cut material.
Step 5: Post-Cutting Steps
It is equally important to know what to do after you are done with your cutting process.
Removing Your Cut Material: Gently lift the material from the machine mat. If you use delicate materials, such as intricate designs, use a spatula tool to help lift them without curling.
Assemble Your Project: Depending on your project, you may also need to assemble various pieces. Follow any additional steps to add embellishments or complete your design.
Conclusion
Don’t be discouraged if your first project isn’t perfect. The more you use your cutting machine, the more comfortable you will become with the process. Take time to explore the features of Design Space, like templates, images, and fonts. This exploration can inspire new project ideas. Using a crafting machine opens up a world of creative possibilities. Following these steps, you can confidently set up your machine, design your projects, and bring your creative ideas to life. Happy crafting!
FAQs
How do you use a Cricut for beginners?
To use a crafting machine as a beginner, unbox your machine and follow the setup steps. Download the Design Space software on your computer or mobile device for project creation. Familiarize yourself with basic operations like uploading images, selecting materials, and changing settings. Start with modest projects, such as stickers or paper cards, to build confidence. Use online resources and community forums to get more support and inspiration.
What do you use a Cricut Maker for?
A Cricut Maker is a versatile creative gadget that can cut materials like vinyl, paper, and fabric. It’s excellent for making unique designs for home decor, apparel, and more. The machine is capable of cutting a variety of materials, making it appropriate for both simple and intricate crafts. Beginners begin with projects such as greeting cards or decals, gradually discovering their full potential as they gain skills.
Do I need a computer to use a Cricut?
While a computer is not required to use a Cricut, it is suggested for maximum performance. The Design Space software can be accessible from a computer, tablet, or smartphone, making design management easier. Using a computer allows for a wider screen and more accurate control when making complex designs. However, several users have operated their machines using mobile apps, allowing them to create while on the road.
Source: How to Use a Cricut Maker
#how to use a cricut maker#cricut design space download#cricut design space app#cricut design space software#Cricut Maker Setup#cricut new product setup#how to setup cricut maker#cricut new machine setup
1 note
·
View note
Text
What Is Cricut Machine: A Beginner's Guide to Crafting Tools

What is Cricut machine? In simple terms, Cricut machines are smart cutting machines that make crafting projects easy. This machine allows you to cut versatile projects, from paper crafts to vinyl decals, fabric, leather, wood, etc. It also allows you to make precision cuts, plots, and crafts. It is so easy to use; you do not need a computer or laptop to operate it. You can easily connect the machine to your phone via Bluetooth and use it. Each machine comes with some accessories.
The market has three types of Cricut, each with different speeds. Cricut Explore 3, Cricut Maker, and Cricut Joy. You will need a Design Space app to use any machine. Read this blog to learn about the Cricut machine and its types.
Types of Cricut Machine and Its Pros and Cons
Learn more about what is a Cricut machine, and their types. Three types of Cricut Machines are available in the market: the Cricut Joy, the Cricut Explore, and the Cricut Maker.
Let’s get started to learn about their features and what their pros and cons are.
Cricut Joy
This machine is the easiest, most portable, and perfect for quick and everyday crafts and projects. You can make your design using Cricut Design Space software and send your intricate design to the machine for cutting. It can cut one image up to five new inches wide and 4 feet long and a maximum of 20 feet long. The Cricut Joy machine is the best for your project if you need a simple, quick, compact, and portable cutting machine.
Pros:
Cricut Explore Air 2 is the lowest price machine available.
It is easy to use and capable of making Cricut projects and so much more.
This machine can cut materials without a mat.
This machine is portable and can be stored easily.
In single creations, it can be up to four feet long, and repeated cuts up to 20 feet long.
It has a mat, especially for cutting cards.
Cons:
It cannot cut as many materials as bigger machines. It can cut 50+materials
You cannot use any other pens and blades of your own or from Cricut Explore or Cricut Maker. You will have to use machine-specific tools and accessories.
If your design includes both cutting and writing, then you need to manually switch teh blade with the pen.
Materials are limited to a dimension of about 5 inches on one side. So, if you think of making some larger items, be mindful.
There are some unavailable features.
Cricut Explore Air 2
The Cricut Explore is a mid-level option. The machine lets you connect wirelessly to your computer or phone. With Explorer 2, you can cut various materials like cardstock, vinyl and iron-on materials, photo paper, leather, silk, etc., and use it to make decals for t-shirts, bags, shoes, wood decor, etc. It has a smart set of dial settings that make the machine easy to adjust based on the materials that are being cut.
Pros:
It is cut with ultimate precision.
It can write more than 370 fonts.
The ability to write and cut is two times faster than the previous series.
It can cut more than 100+ materials with its smart set dial setting.
You can connect to devices using Bluetooth.
The Cricut Explore Air 2 lets you import your design from your computer, tablet, or mobile device, which you design with Design Space software.
Cons:
iOS users need help; they find it hard to use the Design Space app with Cricut Explore Air 2. If you use an iPad or an iOS device, ensure you have iOS 15 or a later version.
Cricut Maker 3
The Cricut Maker works with almost all materials, from paper and fabric to wood. You can make everything with it. It is the best machine ever crafted. It can cut Smart materials, which can be used to cut over 300. It enables you to switch out 13 different tools to cut, draw, deboss, engrave score, and a foil of various materials.
Pros:
Works with 300+ materials, including vinyl, iron-on, and cardstock.
It comes with expandable and extra tools.
Use your computer or mobile devices with the Cricut.
The device dock lets you work closely with the machine.
Cons:
The knife blade is sold separately
Complaints that it will not work with an iPad.
Conclusion
In conclusion, you read about the Cricut machine and its types. Cricut is a powerful tool for crafters and DIY enthusiasts. It is an easy machine with versatile cutting capabilities. It can cut paper, fabric, vinyl, wood, matboard, leather, etc. With cut-through materials, the possibilities are endless. Every crafter or anyone who loves to create should have this machine. So, start making crafts with the Cricut machine today.
FAQs
What is the Cricut tool used for?
A Cricut machine is a digital cutting machine that can cut various materials and make different kinds of art like cards, t-shirts, iron-on designs, stickers, and labels. The flexibility of this machine to cut other materials makes it a great companion for crafters. The best thing about these machines is that they are easy to use, and you can connect them wirelessly with Bluetooth.
What should I do if my Cricut machine has power issues?
If your Cricut machine has power issues, first check your power adapter; maybe your cord is damaged, or your adapter has problems. If both are in fine condition, try plugging the power cord into a different wall outlet. If that does not work, try replacing your power adapter and cord.
Which Cricut machine is ideal to use?
There is no right or wrong machine. It depends on what you want to create, the materials and tools you want to use, and the space you have for your machine. After reading this blog post about the Cricut machine and its different types, You can decide which machine is right for you.
For more informaion visit: Cricut.com/setup Cricut machine setup
Source: https://cricutmakerdownload.wordpress.com/2024/10/24/what-is-cricut-machine/
#what is cricut machine#cricut design space download#cricut design space app#cricut maker setup#cricut explore air 2 setup#cricut machine setup#cricut maker 3 setup#Cricut Design Space Software
0 notes
Text
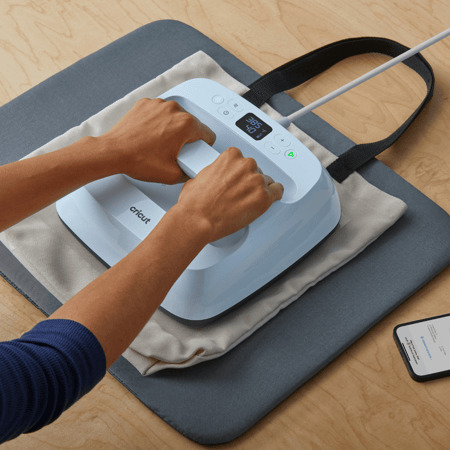
Cricut Heat Press: Get Fast and Perfect Heat Transfer Results
Are you considering starting a craft business but need clarification about choosing the best among many variations? Choosing the right Cricut Heat Press is tricky since most of this decision rests on what one wants to make. If you know the answer to this question, your confusion is half removed already.
This guide will help you learn about every variation of a heat press and how to set them up. Let's get right into it and make your business journey decision easier!
What Is a Cricut Heat Press?
These machines are used for applying heat transfers to different types of products, such as T-shirts and mugs. They quickly apply heat transfer vinyl and infusible ink to a range of fabrics, along with other materials like mugs, shoes, and hats. These tools feature precision temperature control for consistently successful transfers compared to a household iron. These machines do heat transfer work by consistently maintaining a certain temperature required for both materials.
Different Types of Cricut Heat Press Machines
Cricut offers many heat press machines. With so many options, one has the flexibility to choose whichever machine is best for them. Some of the most popular ones are in the section below:
Cricut EasyPress
It was the first of Cricut's heat machines released in 2017. With its 9 in x 9 in heat plate, this amazing tool is speedy, convenient, and produces lasting heat transfer results, even after regular washes.
Cricut EasyPress 2
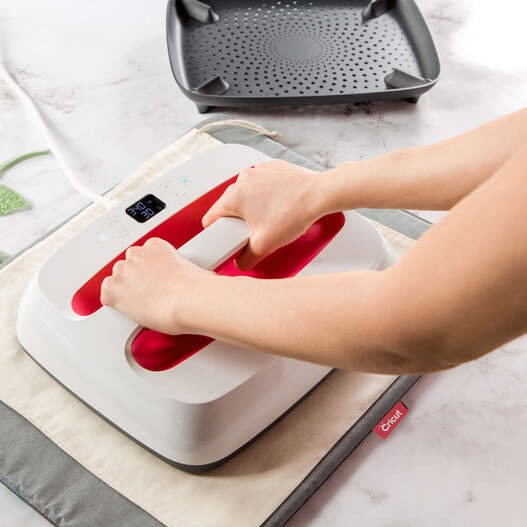
Cricut EasyPress got its updated version in 2018, which is suitable for a variety of iron-on projects. It allows users to choose various products in 3 sizes: 6 in x 7 in, 9 in x 9 in, and 12 in x 10 in, giving more flexibility to users. It was an upgrade to the original model and, therefore, is faster and can bear higher temperatures than its predecessor.
Cricut EasyPress Mini
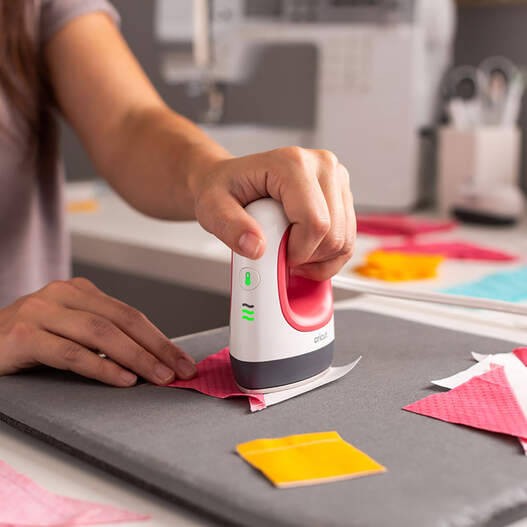
In 2019, Cricut added a new member to the heat press family: a mini version of EasyPress. This latest model is perfect for transferring heat to unusual and hard-to-reach places like caps, hats, shoes, and more. With its precision tip, it is also ideal for working around zippers and buttons.
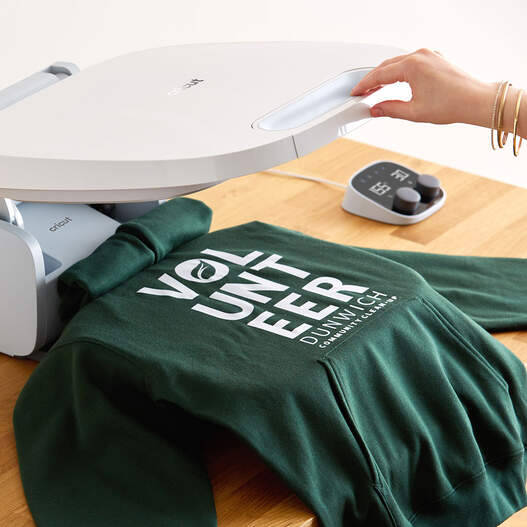
Cricut EasyPress 3
This is the latest in Cricut's series of heat presses. To use this product, one needs to install the app and connect it via Bluetooth. This model comes with a ceramic-coated heat plate. It also has an auto-off feature and an easy-to-grip handle. It works with nearly all major brands of iron-on, infusible ink, and sublimation materials.
Cricut Mug Press
This machine allows you to make custom-designed mugs with compatible ceramic mugs and infusible ink. You can use their Maker, Explore Air 2, or Joy to cut projects and apply them on a blank mug.
As this machine requires no manual temperature or pressure settings, customizing infusible ink-compatible mugs with unique art or text makes it easy to create a perfect sublimation mug anytime. One can also use this machine for infusible ink products, and it serves as the ideal choice for any cutting machine or heat press.
Cricut Hat Press
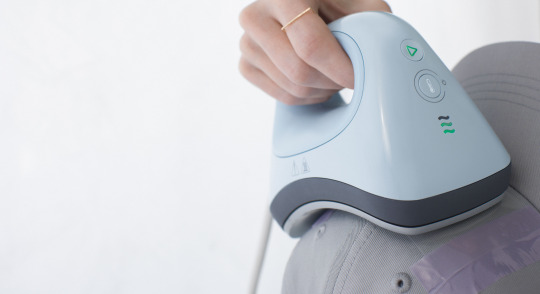
This unusual machine is perfect for designing hats. It comes with a heat plate, allowing heat up to 400ºF for consistency. Also, the machine comes bearing a hat-pressing form, which is best for making a firm pressing surface for almost any hat. Compatible with the app, one can send the suggested settings directly to your press and get the steps from your mobile device with the help of Bluetooth.
It also has an auto-off feature, which lets users not worry about the fabric getting destroyed. Its comfortable grip and safety base make it easier to use. It works with almost all major iron-on (HTV) brands, infusible ink, and sublimation products and can serve as the best thing for all cutting machines.
Cricut Autopress
This one-of-a-kind Cricut Heat Press machine is ideal for professionals and has a large ceramic-coated heat plate (15" x 12"). With edge-to-edge heating, it can raise the temperature up to 400 degrees and is the most advanced machine of all. It can adjust materials up to 2 inches thick and auto-releases when the transfer is done.
This amazing machine allows users to transfer designs on T-shirts, tote bags, pillows, and more. Like others in the Cricut Heat Press series, it also works with iron-on, infusible ink, and sublimation materials.
Download Cricut Heat App on a Mobile for Using Your Machine
One can download and install the app on their mobile device, which will reduce the manual work and burden of operating the press machine. To get the software, you must go to the Google Play Store (if you are using an Android device) and App Store (for iOS devices). Let's start the process with your Android device here:
The following steps are for downloading the app on Android. Please follow them word by word, as failing to do so will result in insufficient results.
Hop on to the Play Store app from your home screen or by searching for it.
Once inside the app, search for the Cricut Heat app and click the Search button. If you find the app, select the Install button and wait for the installation to finish.
This EasyPress 3 comes with warranty details, a user guide, and some test materials. After buying the product, one needs to download the app onto your mobile phone. Once you have downloaded it, follow the steps on your screen to set up the EasyPress 3. The firmware updates for your machine will be completed at the same time. If a Bluetooth icon appears on your machine, then it means that your app and the machine are now ready to use.
Along with the app, the heat press can also be used manually using the buttons on the machine. If you want to change the temperature manually, look for a wave button on the machine, press it once, and use the plus or minus keys to increase or decrease the temperature until the desired temperature is reached.
Now, press the heat button once more to set that particular temperature. The timer changes the same way, but in order to do that, you must press the stopwatch button instead. Upon reaching the desired heat and temperature, the play button on the app will turn green, and a beep will sound.
How to Control Cricut Heat Press Using Cricut Heat App?
You can also use the heat press machine through the app. First, make sure that the machine is on, and then open the app. Now, follow the steps below:
After opening the app, look for your machine model, and it will automatically connect via Bluetooth to your phone.
Once you connect it, you can move on to select a new project.
After opening it, search for the drop-down menu, which lets you set the transfer material type and what material you should apply to.
After selecting these, click the Next button. Upon tapping it, a project overview screen will appear, telling you about the details, the settings to press your project and the materials.
Also, you will need to send those settings to your device by hitting the send settings button on your heat press machine.
The next screen will tell you how long it will take for your heat press to reach the desired temperature. Set those things onto the machine and wait for it to reach that temperature. Once done, your machine's play button will turn green and make a beep sound.
How to Use a Cricut Heat Press: Quick and Easy Steps
After learning about the settings for your press machine, now it is time to know how you can use the machine by following these steps:
First, turn the machine on and look for a comfortable, flat, heat-resistant surface. (You must not use any ironing board that can be easily damaged.)
Now, set the time and temperature required by reviewing the Cricut Help Guide for your project.
Next, press the timer/watch button as per your suggested time. The orange light shows a rising temperature, while the green light means that you have reached the threshold temperature.
Once the temperature is reached, place your machine on the fabric for a time, as suggested by the app. It is crucial that the shiny, clear carrier face up.
After that, you will need to apply the heat.
Also, you must put your machine on the base material and then press the Go button in order to start the timer.
Now, hold the press machine and apply the amount of pressure.
To remove the carrier sheet, you can use the Cricut Heat app.
Following the above steps, one can have a seamless, hassle-free experience setting up and using their heat press machines.
Final Thoughts
Cricut Heat Press machines are wonderful for starting your craft business. After reading this blog, one can have a general idea about which heat press to start your business with and how to set them up. With these various machines available, you are now aware of how to start your iron-on project.
Visit here to Know More:" Cricut.com/setup
Twitter
Pinterest
0 notes
Text
How to Set Up Cricut Explore Air 2: A Complete Tutorial
Are you wondering how to Set up Cricut Explore Air 2? If yes, then you are in the right place! With years of experience using the Cricut machine, I am here to guide you through every step of the setup process. The Cricut Explore Air 2 is a versatile tool that allows you to cut and craft with over 100+ materials, like cardboard, paper, cardstock, vinyl, fabric, and leather. To get started, unbox the machine, connect it, and download the Cricut Design Space app. Let’s start the entire procedure in a step-by-step manner.
Unboxing Cricut Explore Air 2
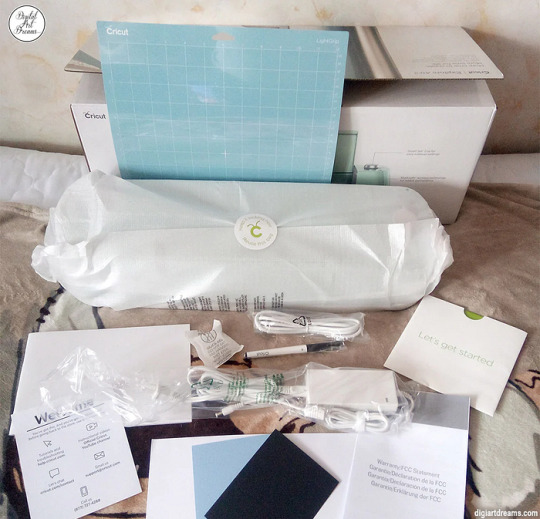
Once you go to set up Cricut Explore Air 2, the first thing you need to do is unbox the machine. Then, remove all the items inside the machine and check whether they are present. Once you have checked all the materials, you can move toward setting up the machine.
Here are the tools and supplies you get inside the box:
Cricut Explore Air 2
USB cable
Power adapter
Guidebook
Accessory adapter
Fine-point blade
Materials for a test cut
LightGrip cutting mat
Cricut Access trial for a month
These are the items you will get inside the box with your machine. To work on DIY projects, you will need other tools and accessories that you will have to buy personally. These tools will be a mat, a scraper, a weeding tool, a lint roller, and the materials required for your crafts.
Set up Cricut Explore Air 2
Once you have unboxed the machine and checked all the items, you can proceed to set up the Cricut cutting machine. For the setup process, you have to follow these steps:
First, you have to take the machine and place it on a flat surface. Try to put it in a place where it is safe, and you can keep it for a long time so you don’t have to move it more often.
Then, plug in the machine using the power adapter. It will give the machine a power supply.
Next, press the power button on the machine and turn it on.
Now, connect the machine to your device using Bluetooth or USB.
Afterward, visit cricut.com/setup and download Cricut Design Space.
Also, open the Design Space and log in with your username and password.
First-time Cricut users need to create an account, as Cricut requires an ID to work on it.
Connect Cricut Explore Air 2 to a Computer
Now that you know the process of setting up Cricut Explore Air 2, you can connect your machine to your computer. Here, we will see how to connect the machine to a Windows computer:
To start the connection, you should first turn on the machine. This will allow the machine to be connected to your computer.
The next thing you need to remember is that you should keep the machine within 10–15 feet of range.
After that, you should click on the Start menu and go to Settings.
Also, select the machine from the list. If the device asks you to enter a code, type 0000 and then connect.
Your Cricut machine is now connected to your computer device.
Downloading Cricut Design Space on Your Computer
Downloading the Design Space app is important for setting up the Cricut cutting machine. The software helps you control and use the machine on your device. On the app, you have the option to select, create, and upload a design that you will later cut on your machine. The steps to download the software are written below:
Initially, you have to turn on the computer and open a web browser.
Next, visit cricut.com/setup and click Download on the Design Space app. Before that, you will have to tick the box to agree to the Cricut Terms of Use & Privacy Policy.
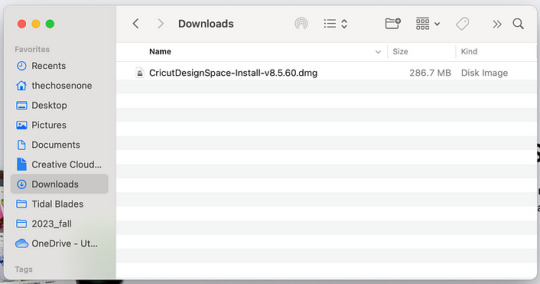
Then, you should go to the Downloads folder and click on the downloaded file twice.
A new window will pop up on the computer’s screen, which means the computer has started installing the app.
By the way, before the installation starts, your computer may ask you to agree that you trust the app on your computer. If you see it, you have to agree that you trust the app.
Once the app is installed, you have to log in with your Cricut ID.
Conclusion
In short, it is important to learn how to set up Cricut Explore Air 2 if you want to use it for your projects. It is an amazing crafting machine, especially great for beginners. It is simple to use and gives you a lot of options to make your projects. To use a Cricut machine, you need Cricut Design Space on your device. With the app, you can use designs to cut on the machine and create unique designs and projects.
FAQs
What Can I Do Using Cricut Explore Air 2?
This Cricut Explore machine allows you to make multiple projects. It is powerful enough to cut from the thinnest to tough materials. You can cut materials like adhesive vinyl, heat transfer vinyl, sticker paper, cork, cardstock, fabric, and heat transfer vinyl. With all these materials, you can create stickers, mug designs, designs on fabrics, greeting cards, and many more things.
Is It Easy to Set Up Cricut Explore Air 2?
Yes, it is! You will have to follow the steps to set up your Cricut cutting machine. The first thing you have to do after buying a machine is unboxing it and checking for the accessories. Then, you must prepare the machine for the setup process. Once the machine is prepared, you should connect it to your device and then download the Cricut Design app. Once you log in with the app, your setup is complete.
Do I Need Software to Work With Cricut Explore Air 2?
Yes, you will need Cricut software to use the Cricut Explore Air 2 machine. Cricut has two different software programs that you can use. The first one is Cricut Design Space, which is a free app that you can download and use on your device. The other app is Cricut Access. You can also download it from the internet, but it is a premium app, and you will have to subscribe to use it.
Source: Set up Cricut Explore Air 2
Visit here to know More: Cricut Joy Xtra
Pinterest
0 notes
Text
How to Set up a Cricut Explore Air 2: A Complete Guide
The Cricut Explore Air 2 is a powerful machine for working on your DIY projects, especially for beginners. As a second-gene Cricut machine, it comes at a reasonable price. To work on crafts, you have to connect it to your device and download Cricut software. With the software, you can select a design and cut it with Cricut, creating beautiful projects. So, let’s get started with the setup procedure.
How to Set up a Cricut Explore Air 2?
It is very important to know the procedure for setting up a Cricut machine. To learn how you can do it, you should check out the steps written below.
Initially, you have to add the machine to a power source. You should use a power adapter to connect it to the wall socket and then turn it on by pressing the power button.
Then, use a USB cable or Bluetooth to connect the machine to your phone or computer.
Now, open an internet browser on your device and head over to cricut.com/setup.
After that, you should download the Cricut Design Space app.
Next, you should sign in to the app with a Cricut account.
When the log-in is complete, your Cricut cutting machine will be ready to cut.
How to Connect Cricut Explore Air 2 to a Computer?
Once you have learned how to set up a Cricut Explore Air 2, you should connect it to your computer. For connection, you can use a USB cable or wireless Bluetooth. Here is the process to connect Cricut to your computer:
Option 1: With a USB Cable
To start, you have to connect the Cricut product to an electric socket with a power adapter.
After that, take a USB cable and connect it to both devices.
You should connect the cable at one end to the device and the other end to the Explore machine.
The Cricut cutting machine and your computer will be connected.
Option 2: Through Bluetooth
Again, you will need to connect your Cricut Explore machine to a power socket using an adapter.
Then, press the power key and hold for some time. The machine will be turned on.
Tap on to the Start menu, then open Settings, and then Devices.

How to Connect Cricut Explore Air 2 to a Smartphone?
If you want to use the Cricut Explore machine on a phone instead of a computer, you can do that now. You can connect your Android and iPad/iPhone to the machine using USB or Bluetooth. Here are the steps you need to follow:
Option 1: Using a USB Cable
Turn on your Cricut machine after you plug it into a power socket.
Use a USB cable and attach it to the machine and your smartphone on both ends.
Your mobile device and the Cricut Explore machine will be paired.
Option 1: Via Bluetooth
In the beginning, plug in the Explore Air 2 machine and turn it on.
In the next step, open the Settings tab on your device.
On the following screen, search for the Cricut model.

Select your machine, and the connection will be made.
To confirm, open the Design Space app and go to the New Product Setup section. Your Cricut machine appears connected to a device.
How to Download Cricut Design Space?
After you have connected the Cricut Explore Air 2 to your device, you should download the Cricut Design Space app. Here is the process for downloading the Cricut application on your phone and computer.
Here is how you can download the Design Space app:
On Phone
On your phone, go to the App Store and search the Cricut Design Space app.
When you see it, click on Get/Install and wait for the download.

When it is downloaded, open the app and log in with your username and password.
On Computer
Open the browser and navigate through cricut.com/setup.
Next, agree to the Cricut Terms & Policies. Check the box and tick it.
Now, click Download near the app and wait for it to download.
After you download the app, go to the Downloads folder and double-click on it.
Then, agree that you trust the app, and the installation will begin.
When the app is finally downloaded, you can start designing your projects.
After downloading the Cricut Design app, you’ll need to log in with a Cricut account. However, if you have never created an account before, create one now. After creating your Cricut ID, remember your username and password. Start making amazing designs and projects using your Cricut cutting machine.
Conclusion
Now, after reading this post, you have learned everything you need to know about how to set up a Cricut Explore Air 2 on a mobile or computer. You can now easily set up a Cricut machine. For the setup, start by learning the process to avoid mistakes. Begin by connecting Cricut to your compatible desktop or mobile device, and then finish by downloading the Cricut Design Space software. Finally, you can start creating your DIY projects with Cricut.
FAQs
What Basics Do I Need to Setup My Cricut Explore Air 2?
If you want to set up the Cricut cutting machine, there are some basic tools you will need. First, you need the Cricut machine. Along with that, you need some materials to cut, such as paper, cardstock, vinyl, and iron-on vinyl. A Cricut cutting mat is needed to hold the material, and blades are required to cut the material. Many of these tools and supplies come with the Cricut machine, but you may need to buy some separately.
Does Cricut Explore Air 2 Need a Phone or Desktop?
Yes, actually! You will also need either a phone or a computer to work with the Cricut machine. Note that not all mobile devices or desktops are compatible with the Cricut Design Space app. It works with Windows and Mac, and for smartphones, you can use Android or iPad/iPhone. Chromebook devices do not support Cricut machines. Even if your device is compatible, it must meet certain specifications.
Does a Cricut Explore Air 2 Need a Wi-Fi Network?
Wi-Fi is not necessarily required to use a Cricut machine. You can work on Cricut projects without it. However, a stable Wi-Fi network can enhance the machine’s performance. On a computer, a stable Wi-Fi connection allows for smooth operation, but a data dongle will also work. When using a smartphone, a cellular network is sufficient for the machine to work properly.
Source: How to set up a Cricut Explore Air 2
Visit here to know more: Cricut Venture
Pinterest
0 notes
Text
How to Use My Cricut Explore Air 2: A Complete Guide
When we are beginners to something, we are always worried about it. When I first bought my Cricut machine, I was concerned about how to use my Cricut Explore Air 2. If you have also bought your first Cricut product and want to learn how to use it, I would advise reading this blog, and then you will be able to use your Cricut machine.
When you buy a Cricut machine, there are a few things you need to do before you can start using it. You must first prepare the machine for use, or in other words, you have to set up the machine. To use a Cricut Explore Air 2, you will need to download the Cricut app on a device. With the help of the app, you can easily use the machine.
Introduction to Cricut Explore Air 2
Cricut Explore Air 2 is an excellent machine for making crafts. It can cut over 100 materials. It is versatile and the best in its price range. The machine is known for its precise cutting. Unlike its old Cricut models, it has a Smart Dial, so it can choose the material itself while cutting it.
This Cricut cutting machine has built-in Bluetooth connectivity, so you will not need to buy an external Bluetooth adapter. Its speed is adjustable for writing and cutting, so you do not have to worry about it. The machine is available in multiple colors, so you can pick a color you like.
After buying a Cricut product, when you open the box, these are the items you get inside the box:
The Explore Air 2 machine
A power adapter
A USB cable
Fine-point blade
Blade housing (Pre-installed)
Pen and other accessories.
A welcome book
Quick start book
A cutting mat
Materials for your test cut.
How to Set up Cricut Explore Air 2?
When I look to learn how to use my Cricut Explore Air 2, the first thing I am concerned about is how to set it up. Similarly, to use your Cricut machine, you first have to unbox the machine, check for the item, and then set up the machine for use. To learn the procedure to set the machine up, you need to follow these steps:
First, plug the Explore Air 2 machine into an electric socket using the power adapter.
After that, turn the machine on by pressing the power button.
Now, connect the machine to your operating device with the help of a USB cord or Bluetooth.
Next, you need to download the Cricut Design Space app on your device.
Follow the app instructions and sign in with a Cricut ID.
Your setup has been completed soon after the log-in.
Now, you can go on to use the Cricut machine and create beautiful DIY projects.
How to Connect Cricut Explore Air 2?
When you have learned the process of setting up the Cricut cutting machine, you should connect it to your device. To connect Cricut products, you can use both a computer and a phone. For connection, you can use either a USB cord or Bluetooth. Here, I am writing the wireless procedure.
Option 1: With Bluetooth
To connect your computer to Cricut, you should be following this procedure:
First, give the machine a power supply and turn it on. Keep the device and the machine within 10-15 feet.
Now, open your computer and go to Settings. There, select the Devices option.
Next, open Bluetooth and make sure you have turned it on.
Then, click on Add Bluetooth or other device.
After that, select the Bluetooth option.
Also, you will see the Cricut model has appeared along with the other nearby devices.
Lastly, click on the machine, and it will connect to the computer.
Option 2: Via a USB Cable
A USB is very simple and easy as compared to a Bluetooth connection. You can simply connect them like this:
First, get the machine and your device ready for the connection.
Then, take the USB cable and connect it to your computer.
Also, connect the other end to your Cricut cutting machine.
Now, the USB connection is complete.
Your Cricut setup is not complete even after you connect it to your computer. To use a Cricut machine, you will have to download the Cricut Design app to your device. To download it, head over tocrictut.com/setup. When you have downloaded the app, sign in with your account. Once you have signed in, you are ready to use Cricut and work on your projects.
How to Use My Cricut Explore Air 2?
Once you log in with a Cricut ID on the Cricut Design Space app, you can start using the machine. The software has thousands of images, fonts, and pre-created projects that you can use for your crafts. You can also customize these designs however you want.
This is how you can use the Explore Air 2 machine:
Open the app on your device and select a design. You can edit the shape & size of the image. You can also upload a design if you want.
Then, follow the instructions on the screen and click on Make It.
Next, put the material on a Cricut mat and place it inside the machine. Check whether the fine-point blade is installed. Press the Load/Unload button.
After that, open the Design Space app again and tap the Go button.
The cutting process will begin. When it is completed, press the Unload button.
Remove the mat, pick a design up, and use it on your project.
Conclusion
How to use my Cricut Explore Air 2 would have been solved by now if you had read the blog. Using a Cricut machine has a procedure, and if you follow it well, you will be able to use it effectively. In this guide, I wrote everything regarding the Cricut setup and using it. When you purchase the machine, you first install it and connect it to your device. To use the Cricut cutting machine, you need to download the Cricut Design Space software. After installing it on your device, you can start crafting with your Cricut.
FAQs
What Are the System Requirements for Cricut Explore Air 2?
To use a Cricut Explore machine, you will need to download Cricut software on your phone or computer. Your computer needs to have some features to run the device. It should have 4GB RAM and 2GB disk space. Bluetooth or USB connectivity is a must to connect your Cricut machine. You need to have a 1024 x 768-pixel resolution. The device has to have a speed of 2-3 Mbps to download and upload the images.
Can I Use My Own Designs on Cricut Explore Air 2?
Yes, you can! To use your own designs or just to use a Cricut machine, you will have to install the Cricut Design Space app on your device. Usually, you pick or select a design from the app, edit it however you want, and then cut it on the machine. But if you want, you can even upload a design or an image to the Cricut app. Similarly, you can customize the design as well. Finally, you can cut it using the uploaded design.
What Are Some Things I Can Do With Cricut Explore Air 2?
With the help of Cricut Explore Air 2, you can do a lot of things. You can cut over a hundred materials and make amazing projects. Also, you can use over 370 fonts and create beautiful handwritten notes. You can create other things, like greeting cards, stickers, decals, bookmarks, keychains, tote bags, phone covers, and many more. You can create these things for yourself and can gift them to your friends and family members as well.
Source :- https://cricutnewmachinesetup6.wordpress.com/2024/06/21/how-to-use-my-cricut-explore-air-2-a-complete-guide/
0 notes
Text
Cricut Setup Explore Air 2: A Complete Tutorial in 4 Steps
Looking for a way to Cricut setup Explore Air 2? You are in the right place. Ever since I bought a Cricut machine, the setup has been a crucial part. I have not only setup Cricut Explore Air 2 but also setup other models such as Cricut Maker, Joy, and Venture. Although every machine setup is the same, you will need to know the proper steps to connect your Cricut to your device.
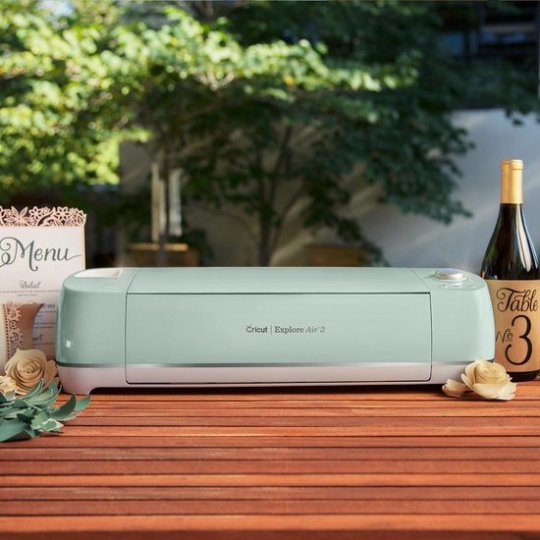
Without any further ado, let’s delve into this Cricut Explore Air 2 setup tutorial and learn things like checking the PC’s requirements, downloading Cricut Design Space, creating a Cricut account, and finally finishing the setup process, which includes further sub steps. Remember, the following steps for Cricut machine setup are only on a Windows computer. Let’s get started now.
Step 1: Check System Requirements for Your Desktop
In the first step, you must ensure that the PC you will use is compatible with your Cricut Explore Air 2 machine. This is a must for the Cricut setup Explore Air 2 because if your PC doesn’t meet the basic requirements, you won’t be able to download the Cricut Design Space, which I will discuss in the next step.
Here, I have mentioned the system requirements for Windows 10 PC to run the Cricut software:
Operating System - Windows 10 or later (64-bit)
CPU - Intel Dual Core or equivalent to AMD processor
A PC/laptop with a USB port or built-in Bluetooth
Display - Minimum 1024px x 768px screen resolution
RAM - Minimum 4 GB
Disk - 2 GB free
Step 2: Download Cricut Design Space
Above, I covered the basic system requirements to download the Cricut Design Space app on Windows 10. Now, I will show you how to download the software stepwise. Since the Cricut setup Explore Air 2 is not possible, you have to download this software on your PC.
Here’s how to download Cricut Design Space on a Windows PC:
First of all, you have to navigate to your compatible PC device.
You will see a small Windows icon on your PC desktop’s screen on a taskbar. You have to click on it.

Just start typing Chrome and hit the Enter key on your keyboard; it will open your Google Chrome browser.
Once you have opened your browser, you have to go to its search bar.
After that, you have to visit design.cricut.com, paste it into the browser’s search bar, and hit the Enter key.
Now, you will move to Cricut’s official website, from where you can download the Cricut software.
Here, you will notice a small squared checkbox. Click on it to check.
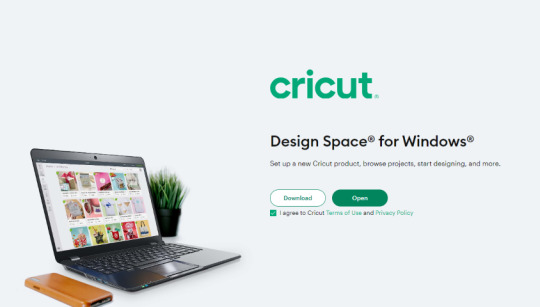
After ticking the checkbox, your Download button will be enabled. Click on it to start downloading Cricut Design Space.
Before downloading, it will open your File Explorer and will confirm where you want to save this file. By default, it will be saved to your Downloads folder.
When the download is finished, you have to go to your File Explorer > Downloads folder or wherever you have saved your downloaded file.
Double-click on this downloaded file to begin installation.
For installation, you can simply follow the instructions on your screen.
Step 3: Creating a Cricut Account ID
The second last step is to create a Cricut account. It is a must; without an account, you won’t be able to do Cricut setup Explore Air 2. In this method, you will learn to create an account from scratch and then log in to your Cricut ID. Let’s get started.
In the beginning, visit cricut.com/setup.
After that, hit the green Get Started button.
Enter your first and last name, including your email address.
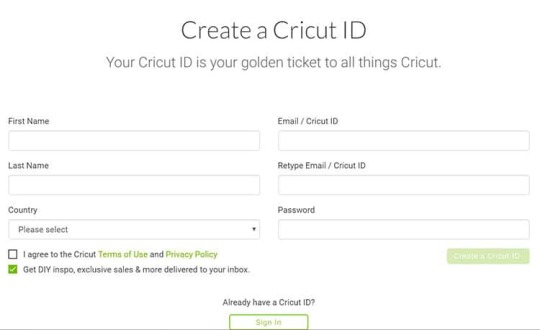
Then, you have to choose your country. (For example, the United States, Canada, or the United Kingdom.
Now, you will need to read the Cricut terms of use.
On the following screen, tick the checkbox.
Next, click on Create User ID.
You will now receive an Updated Policies pop-up window. To proceed, click the Accept button.
Step 4: Cricut Setup Explore Air 2 on Your Computer
Once you have created your Cricut ID, you will move to a Prepare Workspace screen, where Cricut displays it’s on-screen instructions. You can set up your device by following these instructions. While displaying on-screen instructions, it will ask you to connect your Cricut to your PC. To connect, follow the steps below:
Step 1: Connect Your Cricut Machine to Windows
Users can connect to a Cricut cutting machine using two methods: Bluetooth and a USB cord.
Method 1: Via Bluetooth
Switch on your Cricut Explore Air 2 cutting machine.
After that, position your Cricut machine 10 to 15 feet from your PC.
Then, open Settings on yourWindows computer.
When your Settings window is open, you have to select the Devices option.
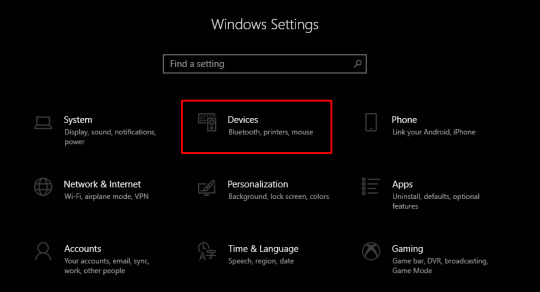
Now, confirm whether your Bluetooth is turned on. If not, then you have to turn it on.
Afterward, you will need to click on Add Bluetooth or other device.

Next, you will see a pop-up to add a device; select Bluetooth.
Subsequently, you have to wait for your nearby Cricut model.

Once the PC finds your Cricut machine, select it and finish the pairing.
Method 2: Using a USB Cord
If you do not want to connect your Cricut wirelessly, you can easily do so with a USB cord. Connecting via a USB cable is a breeze. Follow the steps to connect with a USB cable:
Turn on your PC and Cricut Explore Air 2 machine.
After that, you will need to take your USB’s one end and connect it to your PC’s USB port.
Then, you have to take the other side of the USB cable and insert it into the Cricut’s USB port.
Once done, you’ve successfully connected your Cricut.
Once you have established the connection, you need to click Continue on your PC.
Step 2: Cricut Machine Updates
As you click the Continue button, it will start updating your Cricut cutting machine. Click on the Update button to start updating your machine. Once the machine has been updated, click next to proceed.
Step 3: Register Your Cricut Model
After updating the machine, the next step is to register it. To register your Cricut, click the checkbox and then click the Register button. After registration, click next.
You will see a screen for the Cricut Access Trial. If you’ve selected to try out Cricut Access, go ahead and fill out the required information. Once done, you’ll be prompted to do a test cut. Move further and follow the on-screen instructions to perform a test cut.
FAQs
Question 1: Are the setup steps similar for Mac, iOS, and Android?
Answer: Not really! Overall, the steps will be the same, but as you delve deeper into the details, they may vary. For example, connecting Cricut to a PC differs greatly from connecting it to your Mac or any other mobile device. The same goes for downloading Cricut Design Space.
Question 2: Is a Cricut account a must for machine setup?
Answer: Yes, absolutely! Without a Cricut account, you can’t use your Cricut Design Space and half of the setup uses Cricut software. So, it is a must to download the Cricut app on your compatible device. Cricut is compatible with Windows, Mac, Android, and iOS. So, make sure you download this app before setting up your Cricut.
Question 3: What is a test cut in Cricut setup?
Answer: A test cut is generally performed in the last stage of your Cricut setup. When you have almost completed your machine setup, Cricut will ask you to perform a test cut. It ensures whether everything has been done correctly or not. If any problem will be there, it will be detected right away while performing the test cut.
0 notes
Text
How to Connect Cricut to Bluetooth on Computer and Phone?
Hey daydreamers! Are you here to learn how to connect Cricut to Bluetooth? If so, you are in the right place. In today’s tutorial, I will share the connection process, which is very important for new beginners who just want to start with Cricut stuff. Whether you use your computer or mobile device, you can easily connect your Cricut to Bluetooth.
I understand that for beginners, it might be exhausting or complicated, but with the right guidance, you will be able to perform the setup in no time. To learn more about this connection, you have to delve into this blog. Make sure you follow the instructions for your device. Let’s get started!
How to Connect Cricut to Bluetooth on Windows/Mac?
When I bought my Windows computer, I used it for my Cricut. It works really great, but gradually, I moved to Mac later. Whatever, I have connected my Cricut to both devices. Want to know how to do this? If yes, follow the steps below:
Windows
Here are the steps to connect your Cricut to Bluetooth on a Windows computer:
Since you have connected your Cricut to a Windows computer using Bluetooth, let’s move on to learning how to connect Cricut to Bluetooth on a Mac computer.
Mac
Here are the steps to connect your Cricut to Bluetooth on a Mac computer:
In the next section, I will help you connect your Cricut to mobile devices. Android users and iOS users can move to the suitable section accordingly.
How to Connect Cricut to Bluetooth on Android/iOS?
Connecting Cricut to a mobile phone is a breeze. With easy-to-follow instructions, you will get your desirable phone connected to your Cricut in no time. Start following the steps mentioned below:
Android
Here are the steps to connect your Cricut to Bluetooth on Android:
iOS (iPhone & iPad)
Here are the steps to connect your Cricut to Bluetooth on iOS smartphones:
Now, you have learned how to connect Cricut to Bluetooth on a computer and mobile device, and you can thrive in your crafting journey.
FAQs
Question 1: How to fix Cricut won’t connect to Bluetooth?
Answer: Below are some steps that you can try if your Cricut machine is not connecting to Bluetooth:
Question 2: Do I need a computer to connect my Cricut to Bluetooth?
Answer: Not necessarily. There are other ways to connect your Cricut to Bluetooth. In addition to computers, you can connect Cricut to mobile devices using iOS or Android operating systems. Even they work excellently with phones too. Thus, you don’t need to worry about establishing a connection with your Cricut. So, even if you have an Android or iOS, just start using your Cricut hassle-free.
Question 3: Can I connect my Cricut machine without Bluetooth?
Answer: Yes, it is! Most Cricut models, except Cricut Joy, can be connected via USB cable. However, connecting through a USB cord is better than connecting to Bluetooth. This is because the connection with the USB cable is secured and stable. Also, Cricut receives information from a computer or mobile device uninterruptedly. Last but not least, connecting your Cricut via a USB cord is not as complex as connecting to a Bluetooth one.
Visit: cricut.com/setup
Source: https://cricricutdesigncut.wordpress.com/2024/03/27/how-to-connect-cricut-to-bluetooth-on-computer-and-phone/
#digital design#design space setup#How to Connect Cricut to Bluetooth#cricut setup#design space cricut#cricut#cricut explore air 2#install cricut explore air 2 setup#install cricut design space app#install cricut explore air 2#cricut explore#www.cricut.com setup login#www.cricut.com/setup login#www.cricut.com/setup\cricut explore air 2 setup#www.cricut.com/seup#cricut.com setup mac#design.cricut.com/setup
0 notes
Text
How to Connect Cricut Maker 3 to Bluetooth: Full Guide
Whether you want to connect Cricut Maker 3 to Bluetooth or a USB cable, this step is always recommended when you are up to the Cricut setup! However, this blog will especially focus on how to connect Cricut Maker 3 to computer and mobile devices.
Like many of you, I remember the day I started crafting with my first Cricut Explore Air 2, purchased with my savings. The excitement was real, but so was the confusion. I found myself unable to connect my device to the Cricut machine, a common issue for beginners. However, with the help of the internet, I was able to overcome this challenge and learn the steps to connect my Cricut machine.
Besides, the connection is exactly the same for all devices. Being an expert in crafting, I can teach you to connect your Cricut Maker 3 to your Windows, MacBook, Android, and iOS devices. So, let’s get started now!
Connect Cricut Maker 3 to Bluetooth on Windows 10
When it came to establishing a connection with Windows computers, I was very excited. It is still a cakewalk for me. I can do it within a minute, and so can you! Yes, you can also make this connection in a couple of minutes. Let me show you how.
Here are the superb, simple steps you need to follow to connect Cricut to a PC via Bluetooth:
Connect Cricut Maker 3 to Bluetooth on MacBook
Thanks to Cricut, we can use Cricut on our MacBook without any hassle. However, the first step would be the same for Mac as for Windows 10. To learn the steps to connect to Cricut, users need to do the following:
Connect Cricut Maker 3 to Bluetooth on Android
Android devices, including Samsung, Google Pixel, LG, Motorola, and One Plus, are compatible with Cricut machines. Hence, if you want to connect Cricut Maker 3 to your Android devices via Bluetooth, you need to go through the following steps:
Connect Cricut Maker 3 to Bluetooth on iPhone/iPad
Are you using an iPhone or iPad? You can also connect your Cricut to Bluetooth on these devices without hassle. To connect, you have to follow the steps below:
FAQs
Question 1: Why is my Cricut Maker 3 not connecting to my Android?
Answer: Whenever you encounter this issue on your Android, you will need to check for the following points:
Question 2: Can I connect Cricut Maker 3 to a PC via a USB cable?
Answer: Yes, you can! You can connect Cricut to your computer using a USB cable. To connect, you have to go along with the following steps:
Question 3: What do I need to connect my Cricut Maker 3 to PC?
Answer: In order to connect a Cricut machine to your Windows computer, you will need things as follows:
Visit: install cricut design space app cricut.com/setup
Source: https://cricutmakermachines.com/how-to-connect-cricut-maker-3-to-bluetooth-full-guide/
#cricut install setup#install cricut design space#install cricut design space app#install cricut explore air 2#cricut.com/setup login#cricut.com/setup windows#cricut.com/register#cricut.com/create#cricut.com/setup#cricut.com sign in#cricut.com design space#www.cricut.com setup login#cricut new machine setup#cricut design space#cricut explore 3#cricut explore air 2#cricut setup maker#cricut setup#cricut setup create account#cricut setup download#cricut setup on computer#cricut create connect to computer#setting up my cricut maker#setting up your cricut maker
0 notes