When downloading Live2D it will link you to basic tutorials, so check those out! Here are some other tutorials i found very helpful outside of those [sans 1]. Playlist
Don't wanna be here? Send us removal request.
Text
PSD to get started with Live2D
hi!! hello!! i’ve seen a lotta people around the web confused about where to even begin with drawing their character in parts. which parts do you need separated? which parts should have their own layers in Live2D?
Well, I’ve made a very basic PSD with all layers in folders to give people a starting point. This is not a base! It does NOT have art to start with, that’s all on you. But if you get confused about layers and parts, this might be a good start for you. All layers and folders are named!
It has some notes on a layer you may delete, however I will write them here too because my writing Isn’t The Best.
https://www.dropbox.com/s/39rk6wk4h72ehu7/Live2d%20Layer%20Base.psd?dl=0
1) The 50% eyebrows on top are if you want to see them through the hair. Just make sure to put both 100% and 50% in same deformers if using both
2) All folders are more or less optional. [If you aren’t making a full body rig you won’t need the leg layers, for example]
3) If this canvas is too big, change to 1024px x 1024
4) If too small, change to 4096 or higher. Must be a multiple or 1024 (1024 x 2 - 2048 or 2048 + 1024 = 3072)
Have fun! Remember, if it moves, it might need its own layer.
If you need to add any layers [like ponytails] then you can def do so! if you need re-order any layers, feel free! this is just a starting point.
#if im wrong abt anything feel free to lmk!#pl ea se#text#resource#q#i wanna start posting yt tutorials ive seen that are very helpful#and then like tag them to organise#live2d
23 notes
·
View notes
Note
how to change ui live2d?
if you mean to make it larger, i have this post here!
https://live2d-e.tumblr.com/post/637085083508129792/do-you-know-if-theres-a-way-to-increase-the-uis
otherwise i am not sure..! <0) i hope it becomes easier in the future, it's insanely tiny
0 notes
Note
do you know if there's a way to increase the ui's text size? reading the menus hurts my eyes and i cant find a setting for it
i feel that, so i finally did a bunch of digging to figure this out cuz it’s been bothering me for months HDHFHSFHDS, and i found out!!
Right click the Live2d Cubism Editor shortcut/icon and click “Properties”

Next click “Compatibility” and “Change high DPI settings”

Then at the bottom click the check box for “Override high DPI scaling behaviour” and click on the drop down box below it and select “System (Enhanced)”
select OK and then Apply and then re-open Live2d!


worked for me, so i hope it works for you! i don’t know anything about MAC/ other OS so if anyone wants to reblog with how to do this on other OS’ i’ll reblog it back here for future reference 0)!
#apparently it has to do w screen resolution or something#hope this helps!#ask#text#anon#font size#text size#live2d#Anonymous
1 note
·
View note
Text
i’m making this post so next time i don’t forget how to fix this problem
Issue: a certain part was swinging wildly on its own whenever affected by the breathing parameter, later it even ended up spinning in an entire circle
Solution: i had the deform i was using on too many parameters, so i created a new one for the part so i could properly rig the physics w/o the piece moving wildly out of control
#IT WAS FUNNY BUT GOD DAMN#text#live2d#facerig#troubleshooting#i didnt notice the popup for the warning either the text box is so small i tell you
1 note
·
View note
Video
youtube
Live2D is happy to announce the development of Euclid, technology that will let you use your 2D illustrations in 3D space!
If you’re interested in learning more, click here.
30 notes
·
View notes
Text
A look at Physics in 4.0
The old physics tutorials i was looking at was not up to date with I believe 3.3 and onward.
If you’ve found the older tutorial and find it doesn’t look like your physics menu, then I did my best to figure it out in the new one!
im not an expert, i dont know a lot about live2d, but there is a serious lack in english tutorials and a lot of people i asked for help would redirect me to tutorials i would need to translate, or outdated tutorials.
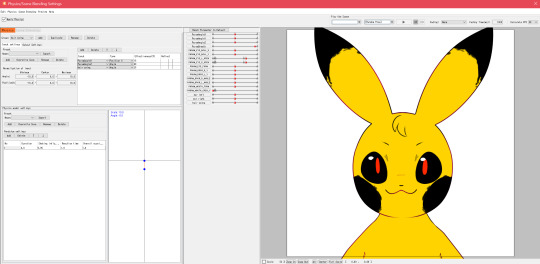
This is what the physics mode looks like in the version I am using.
Quick notes:
I don’t really dabble in the actual animation portion of the program atm, I mostly rig the models for use in FaceRig.
Your animations won’t show up unless labelled properly in the ID.
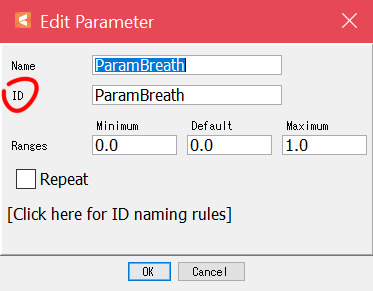
For me, I name the layer the same as the ID to avoid confusion on my part.
I follow >>this<< doc for facerig + live2d
IIRC, the old physics tutorial mentions Live2D’s physics is its own program as part of the package, but now it’s inside Live2D itself

to get your model to respond to you clicking and dragging, go into Preview > Settings of cursor tracking
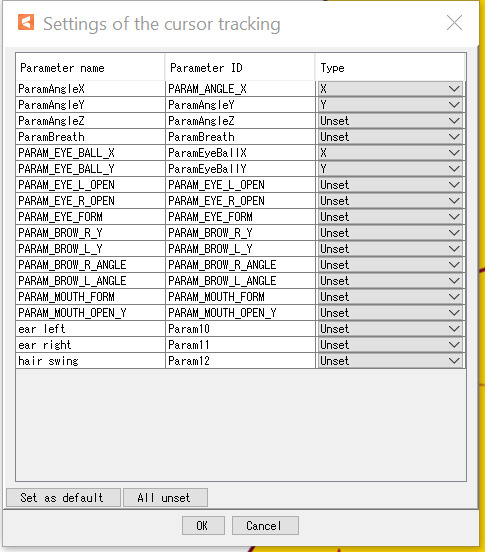
Mine currently looks like this
Now for the full tutorial portion:
You will need to create parameters for your physics.
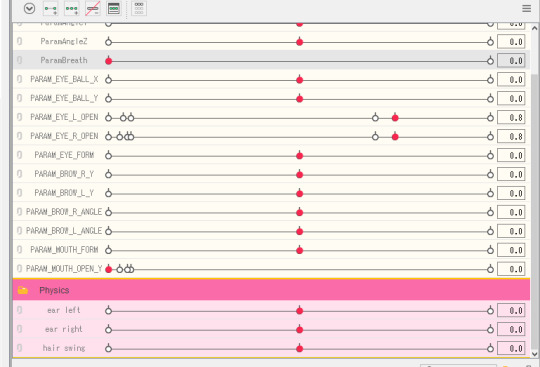
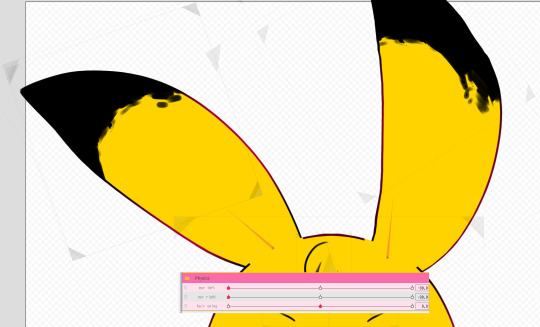
these are just for swinging physics, i’ve rigged the ears to their individual swinging animations. not only do they move by being rotated, but ive deformed them similar to actual frame-by-frame animation.

kind of like this. this will just make it bounce more. these parameters don’t need specific IDs.
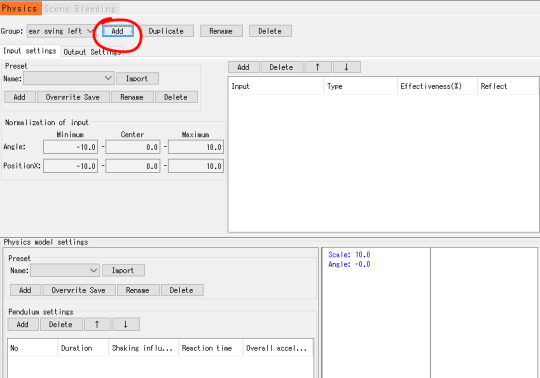
Hit add here, it will create a new physics rule.

underlined you can see “input settings”, this is just the motion that will cause the swing.
the top right “add” here adds parameters that will *cause* the motion. i add in the physics one anyways. the bottom left “add” is to add a pendulum.

Circle 1, make sure to pay attention to which ones are labeled “position” and “angle”. if you have an angle set as “position”, it will cause the object being moved to flip back and forth really quickly instead of swing.
Circle 2, this is how much the input will affect output. I believe the maxmimum % in total is %115. This means all the inputs must add up to 115 or less.

circled on the right is just the preview of the motion/swing.
Underlined is how the swing happens. duration how long the swing effects on average will last, shaking influence is just how much the object will shake [the max is 1.0], reaction time also effects how long the object shakes for, overall acceleration will change how much it shakes [also affects duration].
overall from what ive used it for, they’re all more or less the same, try tweaking it yourself to see how well it works. you can add more than one pendulum to one object, too. this is recommended for longer objects, like long hair.
i dont have a good example for two pendulums, so again i suggest trying it out.

next we click on the underlined part to get to output settings, this is the object/parameter that will be affected by the input. If you’ve tested your physics before adding this, you’ll notice nothing happened. basically, input = output happens [the shaking]
Arrow points to where you add your object being moved, if you have more than 1 pendulum, make sure to change “pendulum no” to the max pendulums you have. so if you have 3 pendulums, set this number to 3.
Circle 1 i dont really mess with. circle *2*, however, will directly affect how much your object is affected by the input. i set it to 100 first and then change it from there.

you’ll notice this portion just above your preview of the model.
1: if u have any animations made for the model, this is where you can select it to play here with your physics.
2: this will work even without animations and is what i use to test more movements.
3: pauses everything [except breathing]
4: replays the scene on loop
5: speeds up the scene [afaik doesn’t affect random pose i tried]
at the moment i dont have much else for this, and its just an overall view of everything from what i have learned so far, if i am wrong about anything, please add onto this post with corrections or additions.

finally, you don’t need to export physics settings if you export as moc3 [necessary for facerig]. it will export the physics with everything else, as well.
6 notes
·
View notes
Video
i've managed to figure out parameter bugs i had when doing this. i havent messed with the animation portion since this video so im not sure how to fix the prioritizing issue i had [the breathing and arm animation couldn't happen at the same time or the arm would jump around, things like that] you will probably see this error often when u first try live2d "maximum one object3 parameters are assigned to the object. maximum size of parameters per object is 3. parameters assigned evenly among deformers of preceding hierarchy will result in better performance, efficient editing, and minimal errors." when making your model, remember the rule of 3: each piece/layer can be added to 3 parameters, and each piece can have 1 deform and 1 angle deform. each deform can be added to 3 parameters, and each angle can be added to 3 parameters. if u select two pieces at once and give it a deform, even if one piece has a deform, the new deform can be created and added to 3 parameters. make sure you balance these and think about which deforms/pieces you add to which parameters. for example, if i just wanted to rotate a piece, i can add a rotation deform instead of putting the piece or a free deform directly into a parameter, even though you can rotate a piece without it. that way if i need to actually edit and deform the piece, i can still do that in 3 other parameters. managing your deforms will help u in the long run!

tumblr
the last post had an error and i fucking told tumblr not to post it and it posteD ANYWAYS SO THANKS TUMBLR
anyways i am done messing w this– merry chrimmus
135 notes
·
View notes
Video
ive since learned how to "fix" the tail here, since it has chipping in the side that was not intentional. when u start adding mesh to your models, if you use the auto generated one like me, sometimes if u click on "complex" instead of "simple", it will bug out. either it creates chips like so, or the layer will disappear. the only way i've found out how to manage this is to pay close attention to each piece as i generate the mesh, and save between each layer. if the piece bugs out, hit undo, then select simple and then change to complex.
youtube
literally can’t upload this anywhere else and even have a gif ver <0(
i played arnd w live2d 0)!!
66 notes
·
View notes
Text
bluemorgrem
replied to your
video
:
Hello I’ve made a Live2D + FaceRig model for BRVR…
how do you do the mouth I’m sobbing I cant do it mine looks so dumb when I try
OK SO THE MOUTH IS A PAIN IN THE ASS I 100% UNDERSTAND
i’ll show u both brvr’s and toby’s


i ended up not using closed yellow, cuz stretching open yellow worked fine!


for toby, i have the white on top so i could move the bottom lips upwards without needing to deform it too much
youtube
ive made a quick video showing how brvr’s mouth works in live2d itself, too!
i made use of the opacity feature on live2d to make things disappear when not needed, like the inside of the mouth or the bottom of the mouth

u can change the opacity setting on every “keyframe” u add a parameter, that’s why i have so many at the start.
sorry i made this post long, but i wanted to make sure u can clearly see layers and stuff!
41 notes
·
View notes