
For hobbyists and pro-crafters, Cricut is a one-stop platform. It provides great help, from offering cutting-edge crafting tools (like heat press cutting machines) to essential supplies (pens, weeding tools, blades, materials, mat, etc.) In addition, it provides the companion app Cricut Design Space and quick guidance to help crafters use their devices without any hassle. The Cricut app is free and comes with various resources and features to make jaw-dropping DIY projects. It is easy to use and works on all the prominent operating systems like Windows, Mac, iOS, and Android.
Don't wanna be here? Send us removal request.
Statistics
We looked inside some of the posts by cricutproduct and here's what we found interesting.
Average Info
Notes Per Post
7
Likes Per Post
7
Reblog Per Post
0
Reply Per Post
0
Time Between Posts
9 days
Number of Posts By Type
Text
3
Last Seen Tumblr Blogs


Fun Fact
Tumblr.com is the 103rd most visited website in the world.
Text
How to Make Stickers With Cricut? (Easy Guide)
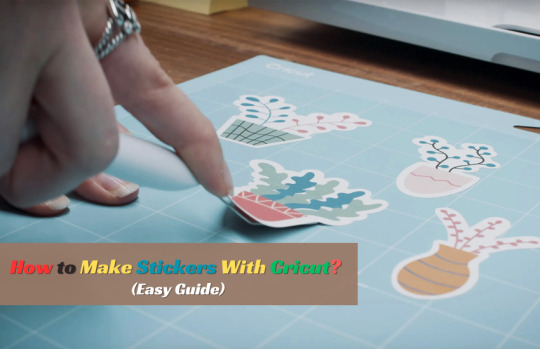
Everyone likes stickers, and it does not matter if you are a child or a grown-up. You do not need a printer to make stickers. Making stickers with Cricut is easy, but you need a basic understanding of the designs, supplies, and ‘how to make stickers with Cricut‘.
Stickers may seem like a normal sheet of paper, but they’re a great way to personalize and decorate your gifts. Whether you are a Cricut user, run a small business, or work on your planner or any other DIY project, you can tap into the fun and creative side of Cricut. Whether you are a craft expert or a beginner, with a machine and Cricut Design Space, you can make any kind of sticker in any shape, color, and size you can imagine.
There are three general types of stickers you can create with Cricut: vinyl decals, Print Then Cut stickers, and written labels. In this blog, you will learn how to make Print Then Cutstickers.
Materials You Need for Print Then Cut Stickers
These are the main tools and supplies you need to create custom stickers with your crafting machine.
Cricut Explore 3, Explore Air 2, and Maker or Maker 3
Cricut Design Space
LightGrip cutting mat
Inkjet printer
Finally, you know the basic materials for creating stickers. Now, let’s start learning the complete procedure to make stickers using the Print Then Cut feature.
How to Make Stickers With Cricut: Simple Steps
Here are some quick and easy steps to make unique and beautiful stickers with your crafting machine:
If you have never printed anything with your machine, you should first calibrate it. It is necessary; otherwise, your stickers will not be properly cut.
In Design Space, choose the Calibrate option from the main menu. Then, it will show you three options. Choose the Print Then Cut option.
After that, you can design your sticker using the Cricut Design Space software or choose a pre-design sticker that Cricut members upload. Or you can upload your SVG file.
Now, select the Offset feature once you have uploaded or chosen your sticker design from the app library. You can change the offset width and color. By default, it shows dark gray, which you can change to white.
Next, group your offset and flatten it together. In the software, the Flatten button is on the right-hand side, down towards the bottom. Flattering items makes them into one layer. You can also unflatten the image. You can select attach to keep your sticker intact and in one layer.
Afterward, select Basic from the Operation dropdown menu tool and change it from Basic to Print Then Cut.
Once you are done designing your stickers, click on “Make It.”
After that, you will be prompted to print your design. Now, a preview box will appear, and you can check your print settings. For Print Then Cut, the crafting machine can print a maximum image size of 9.25 in x 6.75 in.
Your design is ready to send to the printer, so load your printer with the sticker/printable paper. When your stickers are printed, put them on the machine mat, and they will be ready to be cut.
The final process is to cut the stickers using a machine. Remember to change your Custom settings to Sticker paper. They have white and clear options, so choose accordingly. When the stickers are done cutting, remove them from the mat, and they’re ready to use.
Finally, we create custom stickers with the help of a crafting machine and the Cricut Design Space software. Now, you make a variety of projects at home using this machine.
Conclusion
The Cricut Design Space app and your cutting machine allow you to design and cut personalized stickers in various colors, shapes, and sizes. You can create stickers for your journal, notebook, or customized gifts. Not just from an artistic perspective, but it is also a great way to add a unique touch to your belongings.
This blog explored the Print Then Cut feature and how to make stickers with Cricut. Now, you can choose which type of stickers you want to create.
FAQS
Which printer is compatible with Cricut Print Then Cut feature?
The printer needs to be an inkjet printer, not a laser printer. Using a laser printer can cause damage to the materials and stickers. The material you are planning to print on should be printable paper, sticker paper, vinyl, or clear sticker paper. Cricut recommends the whiter material, but you can use light to medium colors.
What is the process for making stickers?
First, calibrate your printer. After that, design your sticker using the Cricut Design Space app or upload your printable images. Offset the sticker, flatten it, and attach it. Then, choose the Print Then Cut feature and load the mat with stickers that need to be printed. The machine is ready to cut the stickers.
What is the offset feature in Cricut app?
You must use an offset feature while designing your stickers because it adds an outline and a decorative shadow. It works best with closed paths images. You can change the color of the offset, and you can use it for print cut design as well as regular cut design.
Source: How to Make Stickers With Cricut
#how to make stickers with Cricut#cricut design space app#cricut design space software#Cricut.com/setup
1 note
·
View note
Text
How to Calibrate Cricut Explore Air 2? (Full Guide!)
Cricut Explore Air 2 is a worthwhile machine for crafters who want to make pro-level crafting projects. The machine offers precise cuts for more than 100 different types of materials, including Cricut Smart Material, leather, wood, glass, metal, etc. With its easy-to-use interface, the machine allows users to work on DIY projects even if they are novices. Moreover, sometimes crafters may need to perform Cricut Explore Air 2 calibration before a cut.
Calibration is a process that helps set the machine’s blade to cut the design accurately without any flaws. Many users don’t know the procedure and struggle to get the perfect cut. If you have the same problem, then the follow-up blog will provide you with all the information about calibrating your machine.
Cricut Explore Air 2 Calibration on Windows/Mac
If you are using your Cricut Explore Air 2 machine on a computer, then the following is the extensive guide that will help you perform the calibration process.
Step 1: Selecting the Printer
Open the ‘Cricut Design Space app‘, sign in to your account, and then click on the Settings option.
Then, follow the path Machines > Machine Calibration, and select Cricut Explore Air 2.
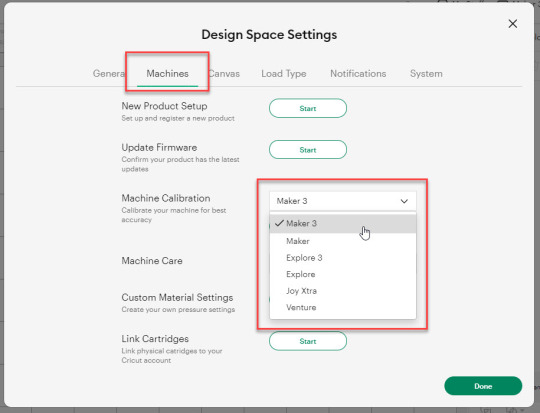
After selecting your crafting machine, click on the Start option.
Depending on the machine you choose, you will be asked to complete the calibration; select the Print Then Cut option.
In the next step, choose what you like to use with your printer machine for the process.
After that, click on the Continue option.
Step 2: Starting the Calibration Cut
Now, you should place the printed calibration sheet on the mat, position it perfectly, and select the Continue option.
For the next step, ensure that your machine is ON and connected to your computer using USB or Bluetooth. Select the machine from the drop-down menu, insert the cutting mat into your crafting machine, and click Go.
Furthermore, the device will start scanning the markings for the calibration.
After the cutting is complete, check if the cut-makings are touched without unloading the mat from the machine. (If the markings are touched, then choose the Yes option in the app and select Continue to move to the next step.)
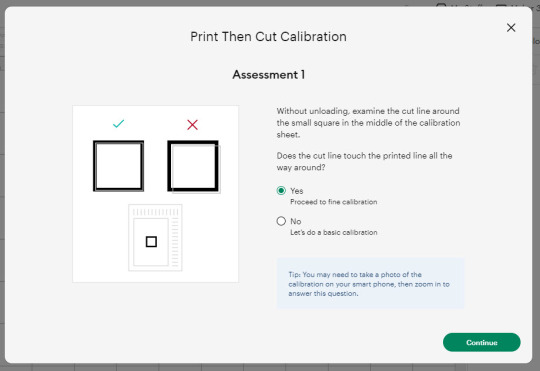
Note: If you choose the No option, then the machine will perform a cut for the next time for the accurate cut.
Also, the machine will start the calibration cut at the top and side of the page.
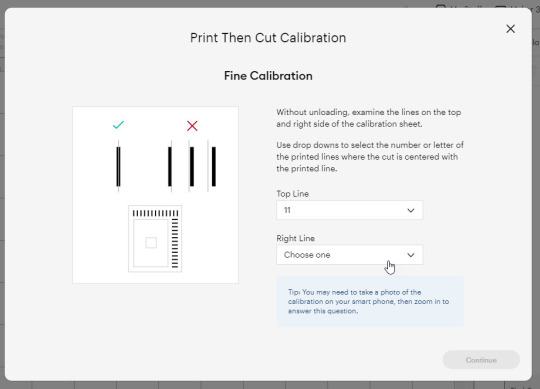
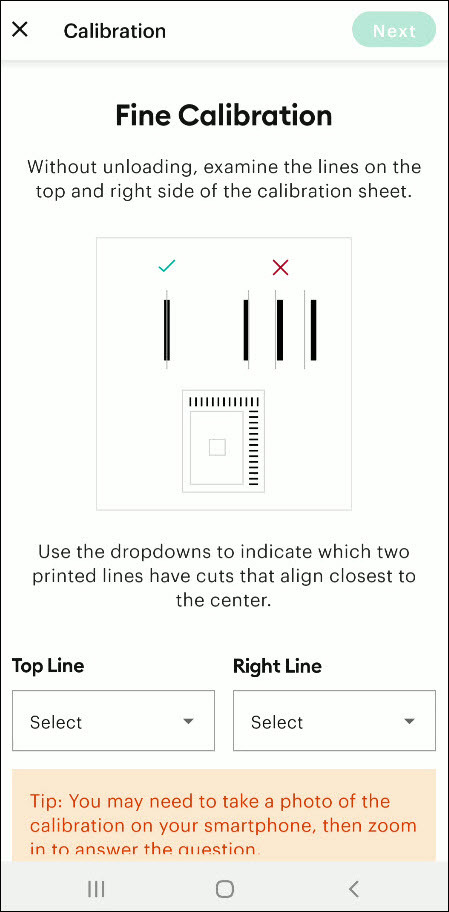
Now, check if the markings are correct without unloading the mat from the device. (The cut should be on or before line 1 and on or before line 21.)
If your cut meets all the conditions, choose the line closest to the center of the printed lines, the same as the following image; when you are done, select the Continue option.
In the next step, the Cricut Explore Air 2 machine will perform a confirmation cut around the large sheet. When this step is complete, unload the mat from the machine and remove the calibration sheet; now, you need to answer the final question on the app.
You need to choose Yes, cut is close enough to the center if you are happy with the cut. (Select no and follow the further process if you are not happy with the cut.)
Cricut Explore Air 2 Calibration On iOS/Android
The follow-up method will allow you to Calibrate your Explore Air 2 machine without any hassle. So, let’s begin the process.
Step 1: Connecting the Printer to Your Machine
Start by signing into your Cricut account on the app and selecting the menu option from the upper right corner.
After that, tap on Settings and then select Print Then Cut Settings.
Also, tap on the Calibration.
Next, you have to choose the Send to Printer, or I have a calibration sheet option.
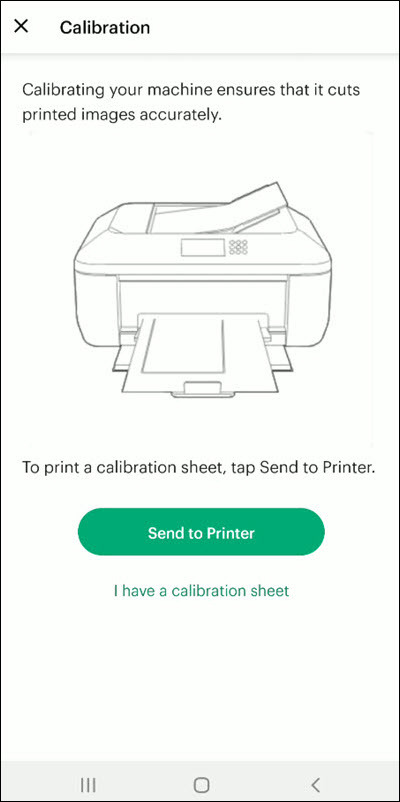
Now, the preview of the calibration sheet will appear on the screen (it can be a little different depending on the device you are using.)
Afterward, tap “Select a printer” and select the printer device you are using. Then, choose Next.
Step 2: Perform Sheet Calibration Process
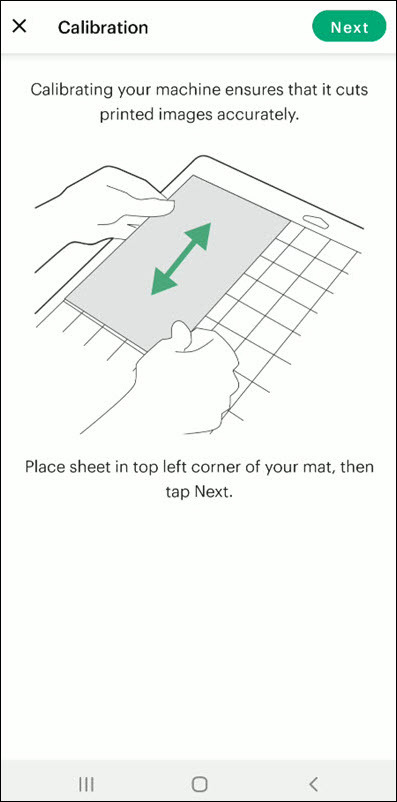
After that, take the printed calibration sheet, place it onto the machine mat perfectly, and select Next.
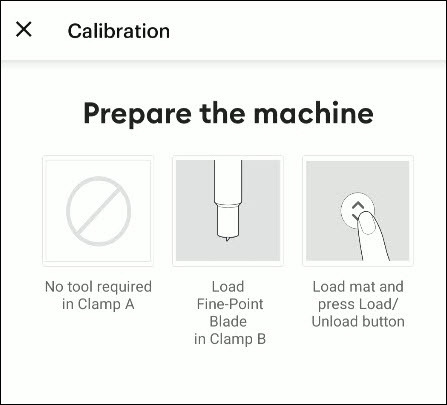
Specify the appropriate material setting for your machine.
Then, after loading the mat into the machine, press the Go button on it.
Also, the machine will look for the marking for the calibration and then start the cutting process near the small square.
Afterward, without unloading the mat from the machine, check for the cut to ensure the cut touches the marked lines all the way around. (If the lines touch the cut, then tap Yes in the app, then select Next to proceed with the next step.)
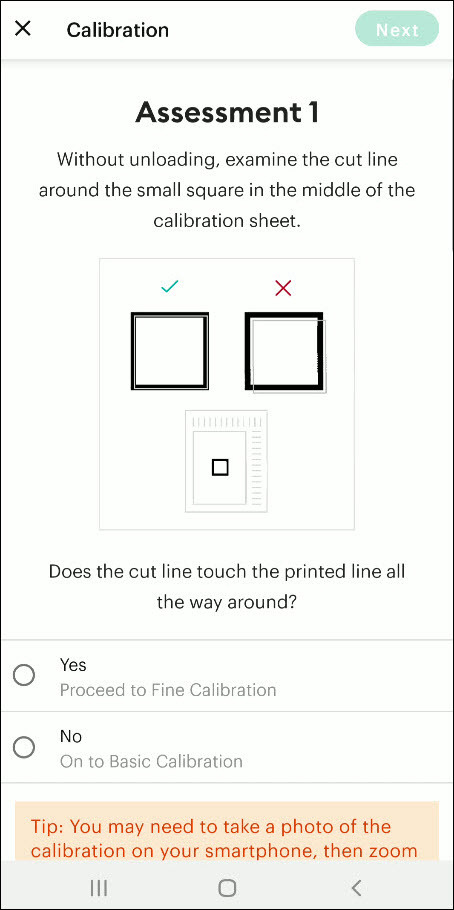
However, if you select the No option, then the machine will try to cut close to the top and sides of the page. (Once done, look closely without unloading the mat; there should be a cut before line 1 and on or after line 21.)
If the cut meets these lines, you need to specify which cut is closest to the center of the printed lines and the right side of the calibration sheet.
Once you are done, select Next to move forward.
After that, keep following the instructions on the screen to complete the procedure.
Once the process is complete, you can start cutting materials on your machine.
Final Words
Cricut Explore Air 2 calibration is the best way to get the pin-point cuts. These methods will help you to perform the calibration process on computer and smartphone devices. With these methods, you cannot only calibrate your Explore Air 2 but also any other cutting machine of the brand. Furthermore, if you have any doubts regarding the procedure or have any issues, then it would be good to ask for more assistance and guidance.
Frequently Asked Questions
Why Is My Cricut Explore 2 Not Cutting Properly?
Cricut Explore machines are known for their flawless and fast-cutting results. Sometimes, it is due to the material you are trying to cut on your device. Also, in some cases, the machine faces technical issues. To get your machine out of this problem and start cutting properly, you can use the calibration procedure. The process to calibrate your machine is simple.
Why Should I Calibrate My Cricut Machine?
However, the cuts can sometimes be misaligned due to various reasons. Crafters can calibrate their devices to get the blades and cuts aligned to their initial position. After the calibration, the machine starts to provide flawless cuts once again. However, the calibration process is a little complex and differs from device to device. So, you must know the whole process before performing it.
What Is the Thickest Setting on Cricut Explore Air 2?
We all know that Cricut cutting machines are known for their fast and flawless cuts, even for intricate designs. Thus, the Cricut Explore machine can cut a wide range of materials of a certain thickness. If you want to cut the wood, metal, leather, etc., then your machine can cut up to 2mm. However, different materials need to use specific blades to get the desired results.
Source: How to Calibrate Cricut Explore Air 2
#how to calibrate cricut explore air 2#cricut design space app#cricut design space download#cricut design space software#cricut machine setup#cricut explore air 2 setup
2 notes
·
View notes
Text
Why Is My Cricut Not Connecting? (Quick Fixes)
Cricut machines are one of the most useful tools for crafters, which makes it easy for them to create complex designs and projects. However, users may become extremely frustrated as a result of connectivity problems. It is important to comprehend the causes of these issues. This will enable you to troubleshoot them more successfully. This blog will look into the query, “Why is my Cricut not connecting?” alongside the typical causes of connectivity problems for your machine.
Method 1: Check the Connection of Devices
Cricut machines can connect either via a USB cable or with the help of Bluetooth. Knowing how each connection type works is essential for troubleshooting connectivity issues.
USB Connection

The USB that you are using must be in good condition; otherwise, you will have trouble connecting it to your machine. Plus, you must ensure the wire is correctly plugged into your computer and the machine. A malfunctioning cable or port could be the cause of the connection loss. An alternative USB cable or port might help fix the problem.
Bluetooth Connection
With the Bluetooth option, you can have a wireless connection to your machine. Just ensure that you turn on Bluetooth on your device. If your machine’s name does not appear in the list of available devices, then you should try the following steps:
Restart your devices: Sometimes, a simple restart of your device can resolve the issue. So, start with that.
Forget the device: If that does not work, you can try forgetting the device. To do this on your computer or mobile device, go to Bluetooth settings, find your machine model, and select “Forget.” After that, try to reconnect again.
These steps often answer the question, Why is my Cricut not connecting?
Method 2: Update Design Space or Operating System
Another main factor in connectivity issues is software compatibility. You need to make sure that both the app and the device’s operating system are up to date. Older software often leads to connectivity problems.
Updating Design Space
To check whether the app is updated or not, follow the below steps:
On Windows
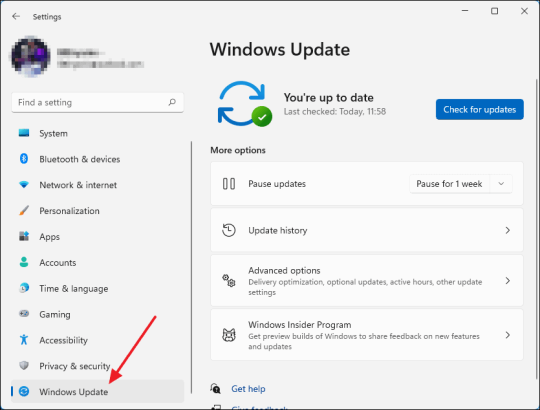
You need to open the app and then need to click on the three horizontal lines in the top left corner. Once there, go on to select “Check for updates” and click OK. Your app will be updated if you have some older versions.
On Mac
If you have a Mac, open the app and click on “Design Space” from the menu bar. Afterward, select the “Check for updates” option. If updates are available, go ahead and install them. Once installed, you must restart the application. This way, you can resolve the issue related to why is my Cricut not connecting.
Method 3: Diagnosing the Network Settings
Network settings can mainly impact wireless connectivity. You must ensure that your antivirus software does not block the firewall settings for the Cricut Design Space app. If found positive, you might need to adjust your firewall settings so that the app can communicate through the network.
Method 4: Check the Firewall Settings
Sometimes, you need to configure the firewall settings properly so that the machine can connect properly. In order to do that, follow the below steps for Windows and Mac.
Windows
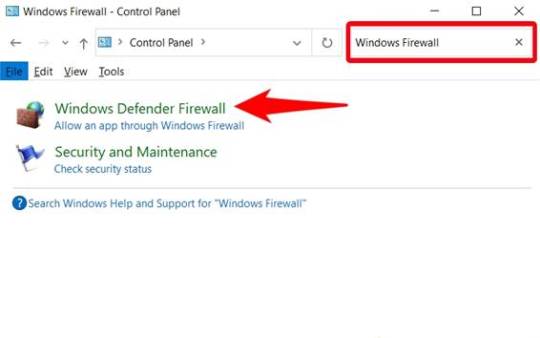
First, you need to go to the Control Panel, then to System and Security, and from there you must open Windows Defender Firewall. Once you reach there, check for the option “Allow an app through Windows Defender Firewall.” Click on it and ensure the app is allowed.
Mac
On Mac, go to System Preferences, then Security & Privacy, and then Firewall. Once there, select the Firewall option and ensure that the Design Space software is allowed. Adjusting these settings can help answer why is my Cricut not connecting.
Method 5: Ensure Your Device Is Compatible
You will have to make sure that your computer or mobile device meets these minimum system requirements for using Design Space. If your operating system has insufficient RAM or processing power, you might have difficulty connecting or might not connect altogether.
Method 6: Checking System Requirements
The minimum system specs for the application include:
Windows: Windows 10 or later, and at least 4 GB RAM or more.
Mac: macOS 10.12 or later, and at least 4 GB RAM or more.
Mobile: iOS 12 or later or Android 5.0 or later.
If your device does not fulfill these requirements, you should consider upgrading your hardware or changing the device that connects your machine.
Troubleshooting Steps
If you still face trouble with the connectivity, then follow these quick and simple steps:
Restart your machine: Turn off your machine and wait a few seconds. Then, turn it on again. This will surely solve the issue.
Reset Bluetooth settings: If you are using Bluetooth, reset your device’s Bluetooth settings and try to reconnect. It should fix the problem.
Reinstall Design Space: Uninstall the app and reinstall it. Reinstalling will ensure a fresh start, and hopefully, you will be able to reconnect again.
Conclusion
In short, connectivity issues with your Cricut machine can arise from various factors, including connection type, software compatibility, network settings, and device compatibility. Following the tips and suggestions mentioned above, one can address the question, “Why is my Cricut not connecting?”
Just remember to check your connections, and ensure that the software is updated, also make sure your device meets the necessary requirements. With these methods, one can enjoy a seamless crafting experience with their machine.
FAQs
1. What should I do if my Cricut machine doesn’t turn on?
Ensure that your power cord is securely connected to both the machine and the electric outlet. If using a power strip, try plugging directly into a wall outlet. You should also check the power cord for any visible damage.
2. How can I improve Bluetooth connectivity with my Cricut?
Make sure that your machine is within range of your device and that Bluetooth is enabled. Restart both devices and try forgetting the machine in the Bluetooth settings before reconnecting.
3. What are the minimum system requirements for Cricut Design Space?
For Windows, you need Windows 10 or later with at least 4 GB RAM. For Mac, macOS 10.12 or later with 4 GB RAM is required. Mobile devices should run iOS 12 or Android 5.0 or later.
4. How do I check for updates in Cricut Design Space?
On Windows, open the app and click the three horizontal lines in the top left corner to select “Check for Updates.” On Mac, click “Design Space” in the menu bar and select “Check for Updates.“
5. What should I do if my Cricut App is crashing?
Try reinstalling the app to ensure a fresh start. Also, check for software updates and clear your device’s cache to improve performance.
Source: Why Is My Cricut Not Connecting
#why is my cricut not connecting#cricut design space#cricut design space app#cricut design space software#cricut design space download#cricut machine setup
4 notes
·
View notes