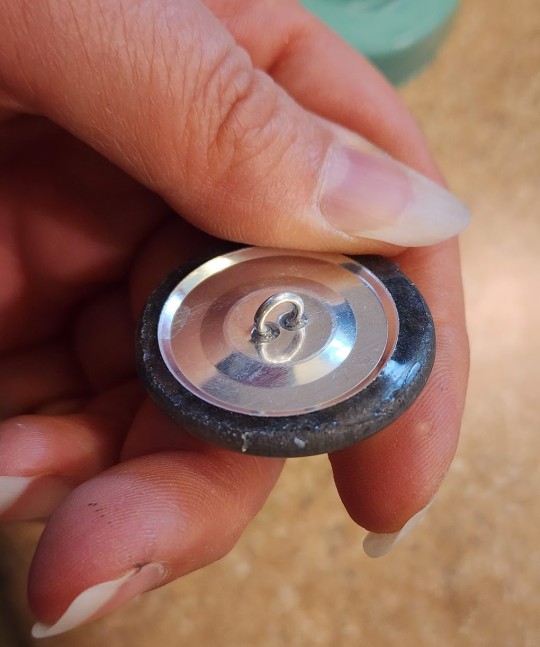
#Compostable paper cups
Explore tagged Tumblr posts
Visit Tumblr Blog
Explore Tumblr blogs with no restrictions, modern design and the best experience.
Last Seen Tumblr Blogs


Fun Fact
Total funding amounts to $125.3M.
Text
Paper Cup Manufacturing Overview
Introduction
Paper cups are ubiquitous in our daily lives and are used for a variety of purposes such as holding hot and cold beverages, food items, and even as promotional material. They are lightweight, easy to handle, and disposable, making them convenient for use in various settings, including homes, offices, restaurants, and events.
The manufacturing of paper cups involves several processes, including paper cutting, printing, and shaping. The raw material used for making paper cups is usually virgin paperboard, which is sourced from sustainable forests. The paperboard is then coated with a thin layer of plastic, which makes it waterproof and helps the cup retain its shape when filled with liquid.
Paper cups
The demand for paper cups has grown significantly over the years due to the growing concerns about the negative impact of single-use plastics on the environment. The shift towards eco-friendly alternatives has led to an increase in the production and use of paper cups.
In this context, the paper cup manufacturing industry plays a crucial role in meeting the rising demand for paper cups while also ensuring that the manufacturing process is sustainable and eco-friendly. Our industry also provides employment opportunities for thousands of people worldwide and contributes to the growth of the economy.
Why choose Blpcpl disposable paper cup manufactures in USA
There are several reasons why one might consider choosing BLPCPL disposable paper cup manufacturers in the USA:
High-Quality Products: We manufacture high-quality paper cups that are made from premium quality paperboard and are coated with food-grade plastic, ensuring that they are durable, leak-proof, and safe to use.
Customization: BLPCPL offers a range of customization options for paper cups, including printing of company logos and designs, making them ideal for use as promotional material for businesses.
Sustainability: We are committed to sustainability and uses paperboard that is sourced from sustainable forests. We also offer eco-friendly options, including biodegradable and compostable paper cups.
Timely Delivery: BLPCPL has a robust supply chain management system that ensures timely delivery of products, making it a reliable option for businesses that require a steady supply of paper cups.
Competitive Pricing: We offers competitive pricing for its paper cups, making them an affordable option for businesses of all sizes.
Summary, BLPCPL is a reliable and reputable paper cup manufacturer in the USA that offers high-quality products, customization options, sustainable solutions, timely delivery, and competitive pricing, making it an excellent choice for businesses looking for paper cup manufacturer.
Are plastic -free paper cups beneficial?
Yes, plastic-free paper cups are beneficial for several reasons, including:
Environmental Benefits: Traditional paper cups are often coated with a thin layer of plastic to make them waterproof, which makes them difficult to recycle and results in the generation of plastic waste. Plastic-free paper cups eliminate this issue, as they are made from paperboard that is not coated with plastic, making them easier to recycle and reducing the amount of plastic waste generated.
Sustainable Sourcing: Many plastic-free paper cups are made from sustainably sourced paperboard, which is better for the environment and helps to support responsible forest management.
Consumer Preference: As consumers become increasingly aware of the impact of plastic waste on the environment, they are more likely to choose products that are plastic-free. Offering plastic-free paper cups can help businesses appeal to environmentally conscious consumers and demonstrate their commitment to sustainability.
Cost Savings: While plastic-free paper cups may initially cost more than traditional paper cups, they can result in cost savings in the long term. This is because plastic-free paper cups are easier to recycle, which can reduce waste disposal costs, and they can also help to reduce the risk of damage to recycling machinery caused by plastic-coated cups.
Overall, plastic-free paper cups are a beneficial alternative to traditional paper cups that offer environmental benefits, sustainable sourcing, consumer preference, and potential cost savings. By choosing plastic-free paper cups, businesses can demonstrate their commitment to sustainability and appeal to environmentally conscious consumers.
Blpcpl Fine product supplier of paper cup in USA: We make Quality products
BLPCPL is a leading supplier of high-quality paper cups in the USA, committed to providing the finest products to our customers. We take great pride in our paper cups, which are made from premium quality paperboard and coated with food-grade plastic, ensuring that they are durable, leak-proof, and safe to use.
Our team of experts has years of experience in the paper cup industry and is dedicated to ensuring that every product we make meets our rigorous quality standards. We use the latest manufacturing technology and adhere to strict quality control procedures to ensure that our paper cups are of the highest quality and meet the specific needs of our customers.
At BLPCPL, we understand the importance of sustainability and are committed to using paperboard that is sourced from sustainable forests. We also offer eco-friendly options, including biodegradable and compostable paper cups, which help to reduce the impact of plastic waste on the environment.
We believe in building long-term relationships with our customers and are committed to providing them with exceptional service and support. Our customer service team is always available to answer any questions and address any concerns that our customers may have.
Conclusion
In conclusion, paper cups are an essential part of our daily lives, and the manufacturing of paper cups plays a crucial role in meeting the rising demand for eco-friendly alternatives to single-use plastics. As a leading supplier of paper cups in the USA, BLPCPL is committed to providing high-quality products, customization options, sustainable solutions, timely delivery, and competitive pricing to businesses of all sizes.
By using premium quality paperboard and food-grade plastic coatings, BLPCPL ensures that their paper cups are durable, leak-proof, and safe to use. Additionally, the company is committed to sustainability and uses paperboard that is sourced from sustainable forests, while also offering eco-friendly options, including biodegradable and compostable paper cups.
Contact us for the best plastic-free paper cups in USA, we are always ready to supply you the best quality paper cups!
0 notes
Text
Premium Triple-Layer Kraft Black Ripple Cup 8 oz | Greenwich Packaging

Explore Greenwich Packaging's premium triple-layer Kraft black ripple cup, featuring an elegant 8 oz size with an S-wave design. Ideal for businesses prioritizing sustainability and style, these eco-friendly paper cups are perfect for hot beverages. Discover our range of sustainable packaging solutions and order your eco-conscious choice today! Visit Now
#eco-friendly cups#sustainable packaging#Kraft ripple cups#black paper cups#8 oz cups#S-wave design#coffee cup supplier#biodegradable cups#compostable cups
0 notes
Text
Okay, it's time. It's time to start the regular and the biggest wave of seeds. The middle of February is the best time to start if you live in a southern-ish country on the northern hemisphere that gets it's last from in the middle of April/start of May, if you're a bit more northern, then wait!
If you currently have a little bit of a backyard outside, with some grass on it, or maybe you have a nice balcony where you could place a little pot or two – you could do this too. If you're thinking 'oh but I don't have any containers' any plastic cup will do. If you're thinking 'oh but I don't have any seeds' if you have a tomato or a pepper from the store anywhere in your house, even if they're going bad, you can take seeds out of it and start them. Maybe you're thinking 'I don't have any soil' if you have access to go to a forest, or to a place with a lot of trees, you can find good soil underneath a tree that's been allowed to compost all of its leaves, it's usually forests that get to do this! You do need light and airy soil, because little seedlings wouldn't be able to push roots trough clay.
So if you have a plastic cup, a tomato or a pepper (or a hot pepper! or eggplant), access to some soil, you could grow a nice food plant! If you're worried you'd be bad at it – it's still so much fun, and you might be proven wrong, tomato plants are forgiving and vigorous. You might get free food out of this! And if you start multiple plants there's a good chance at least half of them will survive, and then you just put away the dead ones and it looks like you're an amazing gardener with 100% success rate. Lots of my plants die too! I put them away and look at my hundred live plants and feel pretty good about myself.
I'm gonna go with my 'tried and true' germinating method. I'm gonna put seeds on a paper towel, spray them with water, put a label inside, and then shut them tightly in a plastic bag. This way I can check in on them daily, and the conditions are ideal because the bag keeps all that dampness in, they cannot dry out! They usually germinate faster this way too, and then you get to plant only the ones who have already activated, so you're sure they're going to sprout.
Once your plants get big (in a month and a half), you'll need to get them adjusted to the outside conditions, they need a bit of time to adjust to being in the sun! This is achieved by giving them few hours in the sun every day, they'll grow darker green and more beautiful in the process, and each day you leave them for one hour longer in the direct sunlight. Then, if there's no danger of frost, you can transplant them outside, or in a bigger pot! If you don't have a bigger pot, do not fear. You can grab a bucket and use it. You can grab an empty container of a big laundry detergent or softener, cut out the top, and use it as a container. You have a big 5L or 7L plastic bottle? Cut the top and plant the thing inside. Plants just want to have access to more soil, they're not picky. Ideally your makeshift pot will have some holes on the bottom! But if not, you can just become a master at watering and water them the exact amount they need.
If you do have some backyard land, and you didn't plant on it before, now would be an excellent time to start gathering compost from the kitchen, and putting it outside on that piece of land. It won't have time to compost and create fertile ground in a month or two, but it will prevent the grass from growing on that spot by blocking the light, and if it rains, some of the nutrients from it will be transferred to the earth and your plant will get good food from it! When it's warmer outside, it will compost faster, and you can leave it on top of the soil for your plant to slowly absorb all that food. If some worms and bugs come along, they'll help it fall apart too, you love this, you love the wormies and the bugs. They'll even help your soil be more airy and easy for your plants to grow in.
There's nothing to lose in letting yourself try out a plant or two, and you might be surprised by how much food you can get from even a few plants! Try this awesome new hobby and hack the agriculture and food security with no budget and a lot of heart. And hey, if you don't feel like doing it right now, you can still do it during the entirety of March and April, you have plenty of time until summer.
#seed starting#gardening motivation#how to start gardening#how to start seeds#how to grow transplants#how to get seeds#how to get soil#trying out gardening
34 notes
·
View notes
Text
Native Gardening: A Guide for Cold Stratification
It's nearly January, which means that it's time for me to start stratification for my native seeds.
Many native seeds have a built-in dormancy mechanism which will prevent germination until it is broken either naturally by weather, or artificially via cold/moist stratification in the refrigerator. This is a guide for the refrigeration method.
It's best done about 2-3 months before spring if you plan on starting the seeds indoors, or 2-3 months before your last frost date if sowing outdoors (depending on germination requirements). This year I'm using peat moss but you can substitute it with moist sand or damp paper towels.
Choosing Your Plants
One thing to consider before buying native seeds is how successful they will be once planted in your garden. The best way to determine this is by going outside and seeing what grows naturally in the yard.
For example, my yard has mostly shade-loving plants like the Common Blue Violet, Bloodroot, and Witchgrass, along with some hardier, more tolerant species like Blue Wood-Aster and Common Milkweed. Sun-loving plants like goldenrod are present but restricted to the edges of the property. Despite having no natural water source, I have seen a few water-dwelling species pop up as well.
This means that I have a pretty moist/shady backyard and that I should focus on species that either prefer these conditions or are very tolerant of them.
Remember to choose species that grow naturally in your biosphere. Some native seed vendors will provide range maps which will show you where certain plants exist in the wild. This is important because the entire point of native gardening is to support your local ecology and wildlife.
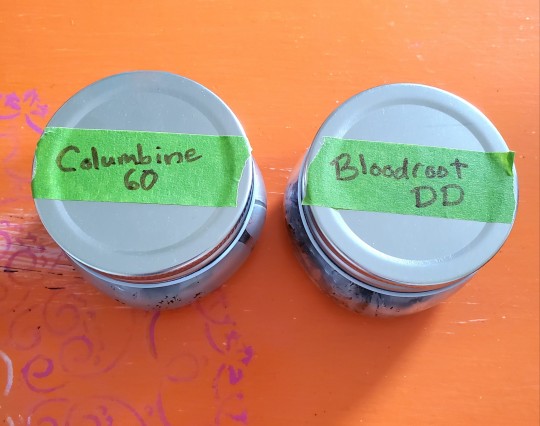
This year I'm raising Virginia Strawberry, Early Goldenrod, Sundial Lupine, Columbine, Spotted-Touch-Me-Not, Bloodroot, and Highbush Cranberry. In addition to pollinators like bees, wasps. and butterflies, these plants will be beneficial to songbirds, hummingbirds, and small mammals.
I always buy seeds from Prairie Moon Nursery. I've had great experiences with them and they even offer native range maps and germination instructions for each species.
Materials:
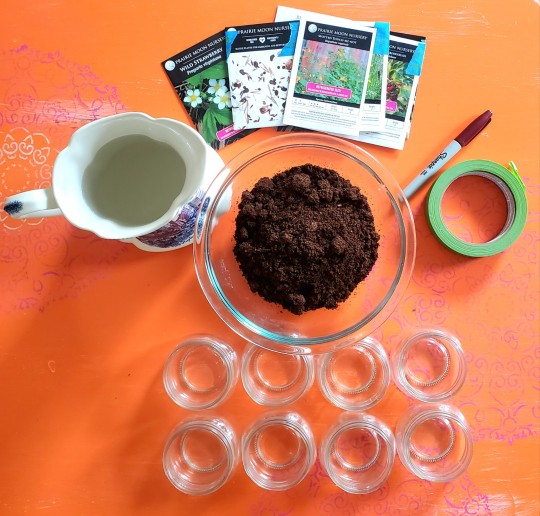
One bag of peat moss
A mixing bowl
A pitcher or measuring cup of water
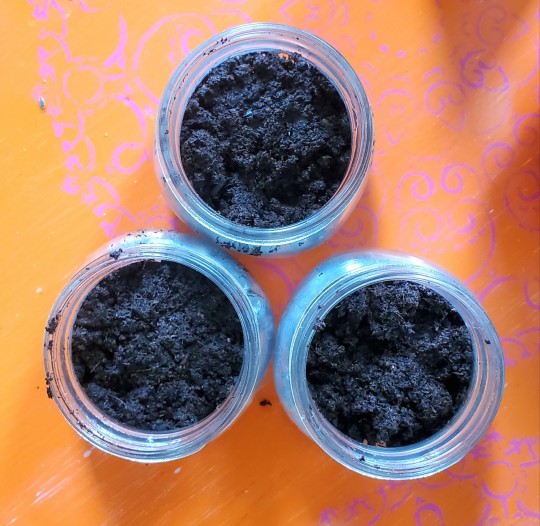
Lidded jars or sealable plastic bags (1 per species)
A permanent marker and painters tape for labels.
Seeds of your choosing
Instructions:
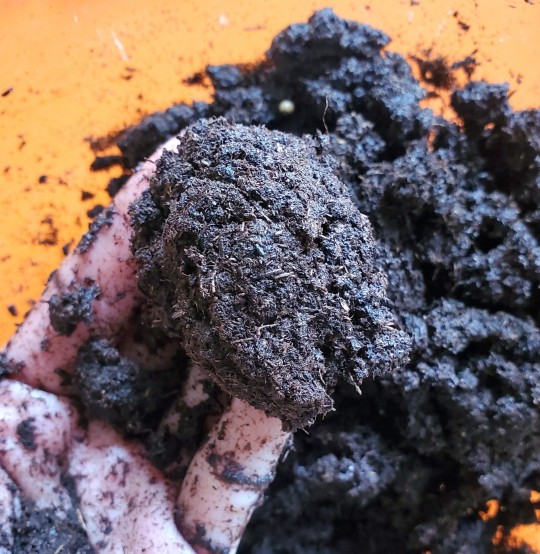
Fill your mixing bowl with peat moss.
Slowly add water and mix with your hands until the moss is moist but not soaked. You should be able to form it into a ball.
Press peat moss into each container.
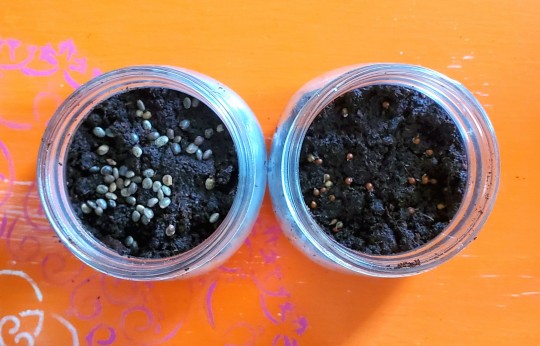
Sprinkle in the seeds. I covered the larger seeds with more peat moss, but the smaller seeds were just sprinkled on top so that I can actually find them when it's time to plant.
Seal containers and label each with the species name, length of time required in the fridge, (usually 60-90 days), and if it requires double dormancy.***
After this, place the containers in the fridge for 60-90 days, depending on the germination requirements. You should check on them weekly to make sure they don't dry out or grow mold. If a seed starts sprouting during stratification, remove it from the container and plant it in a starter pot.
After the 60-90 day period, the seeds will be ready to germinate. Move them into starter pots with soil or plant them directly into your garden bed.
I prefer starting my plants in Peat Pots, which are compostable and can be planted directly in the ground. This allows me to raise my seedlings indoors without the threat of wildlife or competition while preventing me from disturbing their root system when transplanting.
***Note on Double Dormancy
Some plants have double dormancy requirements for germination and can be more challenging to grow. This means that the plant will need a period of cold moisture, then warm moisture, and finally another period of cold moisture before they will germinate. Bloodroot, American Cranberrybush, and Spotted-Touch-Me-Not are all species that need double dormancy.
18 notes
·
View notes
Text
If you’re starting a garden and have little to no proper materials, I’ve got stuff for you.
All you need is
Groceries such as fruit or vegetables that have visible seeds. Even apples; just gather as many as possible just in case one doesn’t work.
Solo cups, coffee filters or metal tins such as tuna or coffee tins. Anything that can be used as a container really.
Ziploc bags
Hairties
Any light source that emits heat. Maybe even just a window will do.
Take some soil from either store bought bags or backyard, pour it into the container of your choice. Make sure the container has a hole in the bottom to drain excess water to avoid root rot/drowning the seeds.
Take out seeds from any fruit or vegetable groceries to plant. You can germinate them by placing them in a ziploc bag with a damp paper towel and tape it to a window that gets sun until they start sprouting or you can just plant them in. Plant as many as you can into one container to ensure at least one grows. It’s plant material anyways so it won’t really harm the crop.
You can actually use the excess fruit and vegetable for compost if you want! Food waste like eggshells and used coffee grains are actually really good for the soil, so if you can add that gradually or mix it in with the soil beforehand, that will help plant growth.
Next, prepare a shelf or area to put the lights of your choice. Water the potted seedlings before slipping the ziploc bags over the containers, securing them with a hair tie each. Once the inside of the bag starts to get foggy and damp, it’s humid and works as a makeshift greenhouse!
I’ve tried this so far with pumpkins and now I have several feet of pumpkin plants with several pumpkin fruit. So I guess it works. If you don’t have too much time to garden though, you can try chaos gardening; basically getting old seeds and chucking them out in a certain area and hoping for the best. This is actually good for the environment, as growing the same thing over and over in the same place actually ruins the soil as opposed to the viability of random seeds!
Hope this helps in any gardening endeavors!
243 notes
·
View notes
Text
Living lighter
I've been consciously trying to figure out ways to leave less of an imprint on the earth... here are a few things that I've implemented:
Reducing plastic use:
Water delivery in glass jars (spring water AND no plastic!)
Laundry pods instead of plastic containers
Refillable deodorant
Reusable jars for when I go to the herb store
I buy compostable garbage bags and reuse the produce ones for daily trash (would like to eliminate those though)
Reducing paper waste:
Using towels instead of paper towels and napkins
Using canvas totes when grocery shopping
Shopping local:
I stopped shopping at huge corporate owned grocery stores like Whole Foods and shop at my local neighborhood places
Curbed my Amazon addiction (still definitely use it, but try my best to reduce as much as possible)
Diet:
Eating mostly plant based (but some wings and fish here and there)
Things that weren't so great that were reusable:
Menstruation cup (super messy and not for me)
Q-tips (I bought this off a kickstarter and didn't feel like it was cleaning anything)
If I owned my own place, things I'd implement:
Bidet (use way less toilet paper and everything is so much cleaner)
Solar panels
Ways to reuse gray water
Compost (you'd think LA apartments would have this but nope)
It might not seem like much listed out, but it does make me feel better that I'm actively trying to reduce my imprint. If everyone did something small, it'd add up to something big! A book that I just finished, Braiding Sweet Grass, really made me think about our relationship with the Earth and how we can make it more reciprocal.
I'm always looking for more ways to improve, so if anyone has any suggestions, would love to learn!
96 notes
·
View notes
Text
SiliNOT! Testing and Review
Since I run a lot of casting workshops, I've had several people in the costuming/maker community ask me my opinion on SiliNOT!, a relatively new product advertised as a budget- and eco-friendly moldmaking alternative to silicone, urethane, and other single-use materials.
I finally bought a couple of bottles to play with, so I did a test project. My experience and findings are below! (It's not a recipe blog, but if you want to skip the play-by-play and get to the TL;DR, it's under the big "In Summary" header near the bottom.)

First, if you aren't familiar with this material, SiliNOT! is a remeltable, reusable medium for making molds. Though its exact ingredients are not disclosed, it purports to nontoxic, food-safe, and compostable. It melts in a household microwave or double boiler and solidifies at room temperature (or in a refrigerator/freezer for faster results). The website is https://silinot.com/.
(I am not an affiliate, and have no connection to this company apart from having made one retail purchase from them. I just have a lot of casting experience and like trying out new products.)
The Positive Original
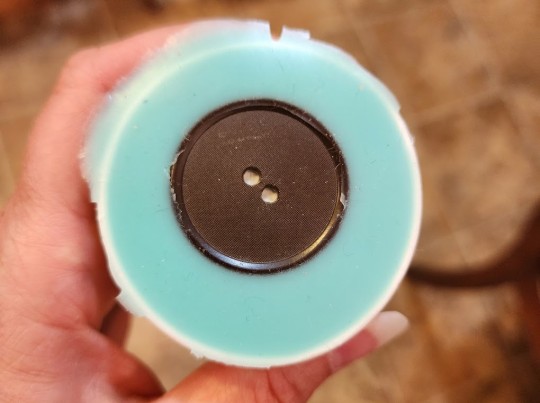
I’m still in the middle of a Vincent Valentine build, so I decided to test the SiliNOT! on his custom buttons. My original is a stack of various nonporous materials: an antique (probably Bakelite) coat button, an epoxy resin dome I cast using a mold I already had in my library, and some engraved Worbla’s Pearly Art for the raised detail. The button shanks won’t be added until the final casting, so the original can be mounted flat for the moldmaking process.
Sample Worbla on the left; completed button stack on the right:

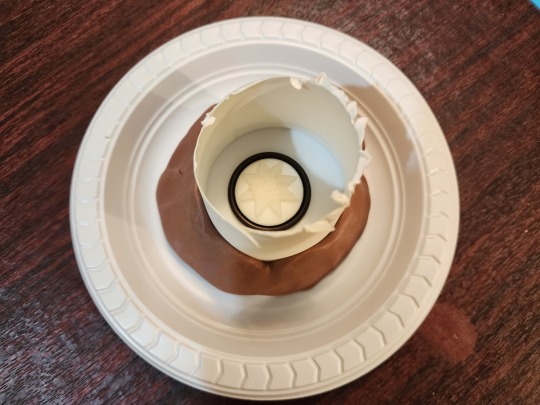
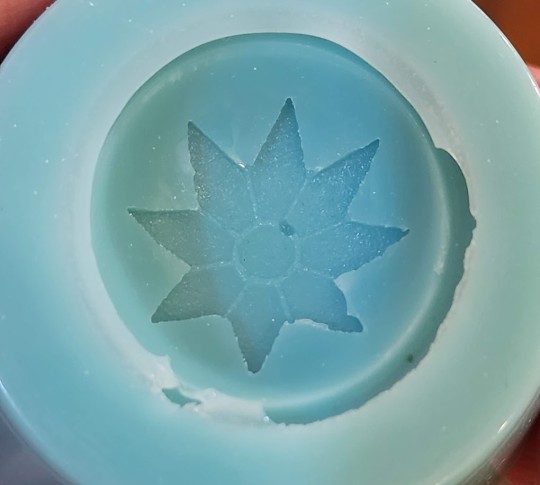
The Mold
I built the mold container the same way I do for silicone pours, with the flat back of the button fixed to a styrene plate and a cylinder (actually a small paper cup with the bottom cut off) surrounding it for the walls. The lip of the cup is sealed all the way around with Monster Clay to prevent leaks.
Heating and Pouring
The SiliNOT! didn’t take long at all to heat up; I did maybe four or five 20-second bursts before it was completely fluid. The bottle does get rather warm, so hand protection isn’t a bad idea. If you have heat-resistant gloves, you can use those; I was working in my kitchen (yay for nontoxic stuff!), so I just grabbed an oven mitt with a silicone grip.
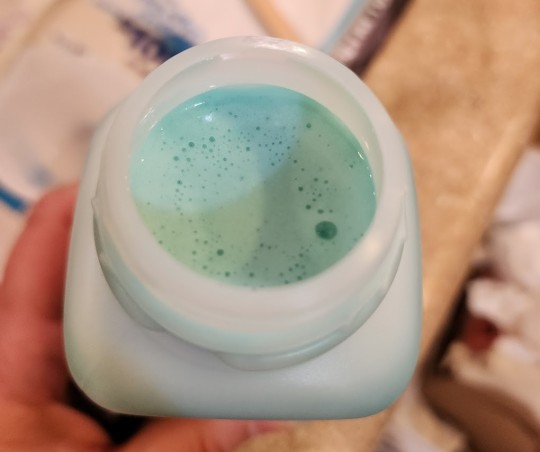
The melted SiliNOT! looks a bit like Luke Skywalker’s blue milk. It’s about the consistency of a yogurt smoothie and likes to pour in a thicker stream compared to silicone. While silicone can be stretched into a thin ribbon for delicate pours or chemically thinned with solvent for really tricky jobs, SiliNOT!'s viscosity is dependent on temperature and never seems to get quite as thin as silicone.
I’d automatically made my mold compact to conserve material (not really a concern with a reusable moldmaking material like SiliNOT!, but after using silicone for more than a decade, I’ve trained myself to be as efficient as possible), so the walls of my mold container were only about half or three quarters of an inch from my object. Because the target was so narrow, I found it difficult to accurately fill from the lowest area of the mold with the SiliNOT! The heavier pour also means more air can get trapped in or under the material.
Bubbles are one of the areas in which SiliNOT! is decidedly inferior to silicone. SiliNOT! has higher viscosity, so bubbles don’t want to rise to the surface without vigorous tapping, which can distort the mold edges or affect leveling depending on your mold container. The bubbles that do make their way to the surface are difficult to pop, even when poked with a sharp implement. Heat gun degassing doesn’t have much effect.
Since the bubble surface cools and skins over quickly, I actually had to use a tool and scoop some large bubbles completely out of the mold to allow the surface to level. Critically, the SiliNOT! is opaque, so you can’t spot bubbles clinging to the surface of your original. (This is why my first mold was a reject, and I had to repour. More on that below.)
Hardening
Once the surface had set, I carefully moved the mold into the refrigerator to cool faster. Here’s another area where some types of silicone can have an advantage: I typically use fast-curing Smooth-On products (because I always have random quantities left to use up after our casting workshops), so I rarely have to wait more than half an hour for a silicone mold to cure, regardless of its size or mass.
The SiliNOT! has to chill completely before handling, though, and discharging that amount of heat requires a fair amount of time even in a cool environment. My mold was pretty small, maybe 2 1/2” wide by 1” deep, and it still took around 40 minutes to cool completely. A larger, deeper mold could hold considerably more energy in the center, and might have to be left in the freezer for a couple of hours before use.
Demolding the Original
When the mold was completely chilled, I removed it from the refrigerator and popped it off the plastic plate I’d used for the base of the mold. The texture was very different from what I’d expected: Unlike other meltable materials (Monster Clay, et al.) that have a firm surface when cool, the SiliNOT! remains tacky, which means it promptly collects any debris that crosses its path. In my case, this meant I had to pick dog hair off the surface throughout the casting process (and I don’t want to think about what would happen if glitter had contaminated the work space).
I’d used a paper cup for my mold walls, which usually works fine with fast-curing silicone. But the SiliNOT! must have a high oil content, because the cup absorbed some of it:
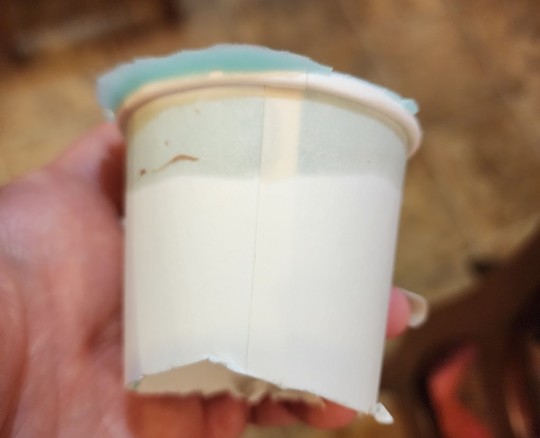
Lesson learned; use only nonporous containers with this stuff.
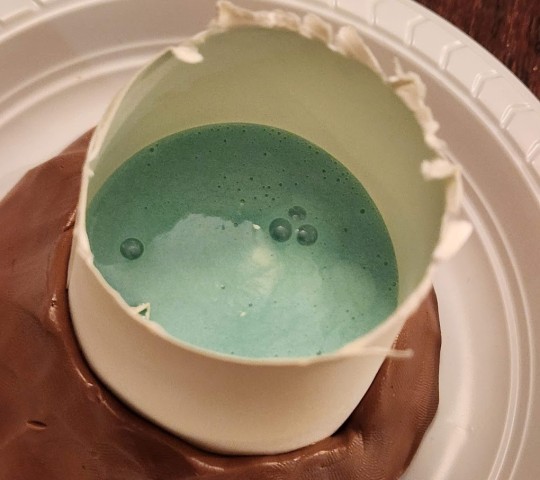
The SiliNOT!! really wanted to cling to the edges of my original, so I had to go slow at first to avoid tearing the thin flanges of the mold off. However, it did demold nicely from the smooth surfaces, and preserved texture very well. You can see the Worbla pebbling and the engraving channels clearly in the mold (as well as some dust and dog hair, because I made the mistake of setting it down briefly):
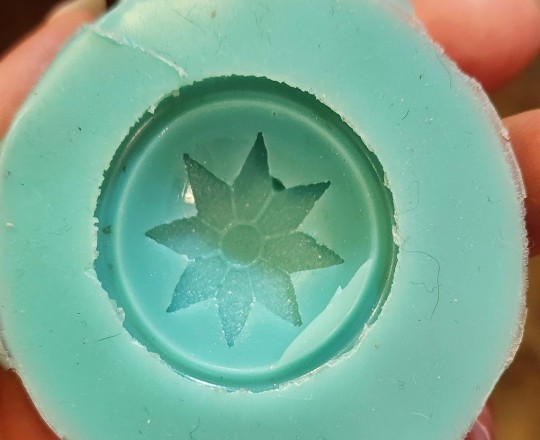
Unfortunately, as you can see, a large bubble had stuck to my original and created a pit in the mold, so I decided to do a second mold pour. I figured I’d tear up the failed mold and put the pieces back in the bottle to remelt… and discovered I couldn’t. The mold would stretch and twist, but not tear. It also seemed to return to its original shape relatively faithfully. Here’s a video of me manhandling the mold:
As you can see, the SiliNOT! has much better stretch and recovery than many silicone products (there are silicones that stretch well -- some of the Dragon Skin products come to mind -- but they’re not typically marketed for moldmaking). This means it’s likely well suited to casting objects with moderate undercuts or oddly-shaped bits that need the mold to stretch during demolding.
You can cut the SiliNOT! easily with scissors, which is the recommended method for getting it back in the bottle when you’re ready to remelt.
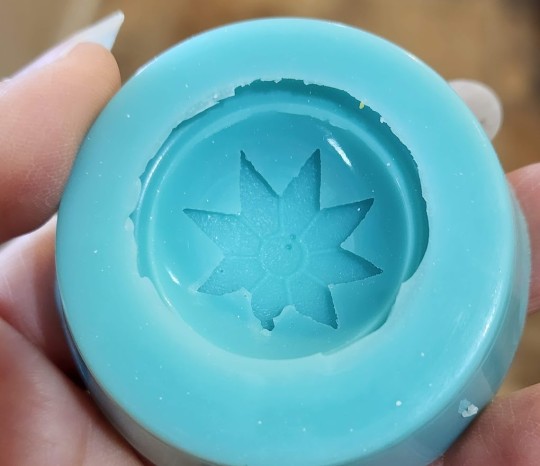
Take Two
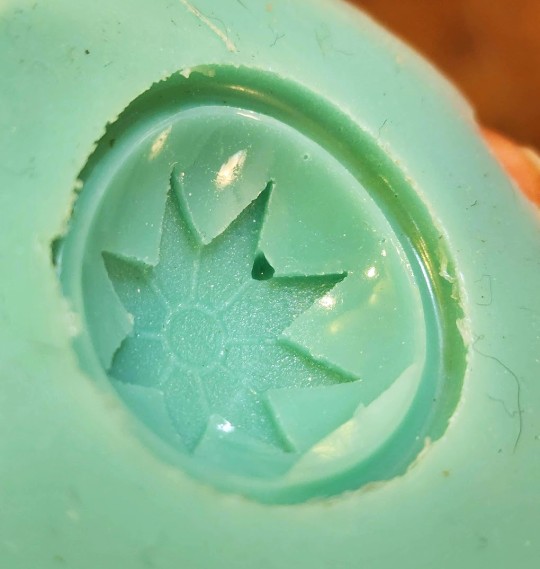
Using what I’d learned from the first pour, I did the second one inside a hard plastic ramekin. This gave me a bit more room to pour into the floor of the mold, reducing the bubble risk, and also eliminated the porous paper cup that had absorbed oil. I still had the issue with bubbles that didn’t want to pop, but there were fewer of them this time.

The ramekin made for a much cleaner mold, buuuuut there was ANOTHER BUBBLE right in the middle of the design. >.<
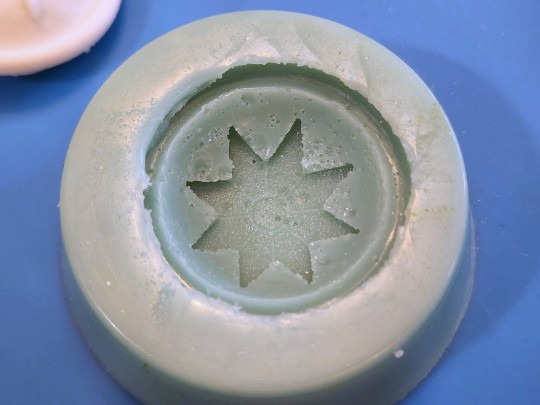
Take Three
Lather, rinse, repeat. Or in this case, melt, pour, chill.
This time I heated the SiliNOT! as much as I dared and did the absolute slowest, narrowest pour I could manage, giving the air extra time to escape as the mold was filled from the bottom. The risk with stringing out the pour like this is that in a thinner stream, the heat escapes faster, leading to uneven viscosity as the liquid fills the mold. I don’t think that’s a major problem for this particular piece, but it’s something to pay attention to as regards leveling and degassing, especially for larger molds that will take longer to fill.
The result of pour three:
/siiiiigh/ Well, at least the bubbles are smaller, this time. They may not show up enough to matter in the final cast. I’ll give it a try.
Casting
I had leftover workshop resin that was getting on toward the end of its shelf life, so I used Smooth-On Smooth-Cast 300 for my initial resin trial. It’s an opaque white resin with about a 10-minute cure time (the fast turnaround is why we use it for workshops).
Before pouring, I had to do a little mold cleanup where the SiliNOT! had managed to sneak under the edge of the Worbla (I think I’d loosened the corner of the star from prying it out of so many molds), but since the SiliNOT! stretches so well, it was pretty easy to invert it to get little scissors down into the bottom of the depression.
For the first cast, I didn’t use anything but the resin in order to get a baseline. Ideally I’d like to cold cast or dye the resin so I don’t have to worry about paint chipping, but since I’m doing a trial here (and need multiple buttons anyway) I figured some plain white extras wouldn’t hurt.
So, my first cast…
…smacked into a big problem, which I probably should have seen coming: The resin I’m using is a fast cure formula, which means it discharges a fair amount of heat as it's going through that rapid chemical reaction -- enough heat to melt the SiliNOT!, as it turned out. When I tried to demold it (after giving it a few extra minutes beyond label time to be sure it was done), the surface of the mold had melted to the resin and even embedded itself in a few places. It’s difficult to see the resin detail in the photos (my camera went into white balance panic mode with all the shades of white and blue), but you can see how pitted the formerly-smooth mold surface is.
In fairness to the SiliNOT!, the bottle does say that you should put the mold in the freezer for half an hour before casting high-temperature materials. But I assumed high-temperature material was something like candle wax or melted chocolate, rather than ordinary resin. (And the mold had just come out of the refrigerator.)
So, on to pour FOUR of the SiliNOT! mold…
Take Four
NGL, this is getting a little old. >.<
Fourth mold definitely needed some cleanup around the edges, and there are still a couple of tiny bubbles I can’t seem to get rid of, but it’s good enough for a test. (I’m starting to despair of using these for actual production, given how many times I’ve had to redo the molds because of bubbles...)

Deep in the recesses of my basement, I found some transparent epoxy resin with a 24-hour cure time -- much slower and lower-temperature than the Smooth-Cast. Since it cures clear, I went ahead and mixed in some metallic powder pigment on the off chance that I get a usable button out of this one. I had excess resin after mixing, so I poured that into my first mold, which has a bubble in the design but is otherwise fine. Two test pieces are better than one, right?
Results
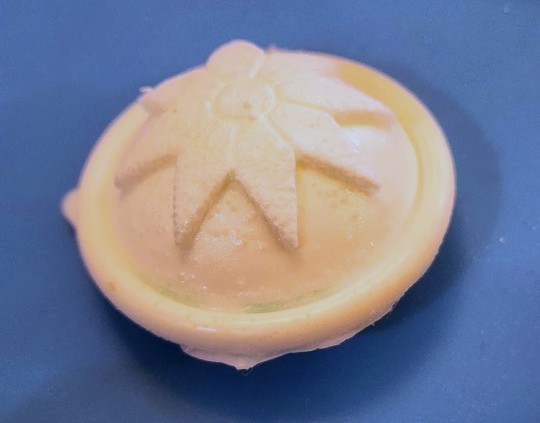
Here are the results of the slow-curing resin out of mold #4:

Finally, a (mostly) clean cast!
As you can see, the detail reproduction is excellent -- certainly on par with the pulls from the silicone mold I ended up making while waiting on this set to cure (purely for time reasons; I couldn’t afford five days to cast the buttons using slow-curing resin, and with a silicone mold and fast-curing resin I could get them all done within a couple of hours).
However, you can also see a few spots where bits of the SiliNOT! embedded themselves in the final cast. Part of that may be due to design flaw in the original; I didn’t want to glue anything permanently to the antique button, and that resulted in a tiny gap between the button and the resin hemisphere. Silicone has enough strength to resist tearing out in that kind of area, but apparently the SiliNOT! doesn’t. The bits of mold around the outer edge seem to have stuck just to be difficult, as there was no structural reason for those to have become embedded in the resin. This means the mold could be damaged by successive casts, reducing its usable life and accuracy.
Still, the mold definitely produced decent results for a first cast, and a different shape might not have had as much of a problem with tearing off mold parts. The slow-curing resin is a bit of a limitation, but not a unique one (I use this same epoxy resin for any glass-clear casts I do, and only use the Smooth-Cast 300 for opaque items or things I need very quickly). I don’t personally use UV resin, but I’d be curious to learn how it performs with the SiliNOT!
IN SUMMARY:
Here’s the TL;DR on SiliNOT!
Pros
Cost effectiveness. This is the most obvious advantage of SiliNOT! over silicone; it’s (theoretically) infinitely reusable, and even with natural attrition/inevitable contamination from use, you can likely get over a hundred pours out of a bottle. That's a lot cheaper per use than silicone.
Non-toxicity. SiliNOT! is touted as food contact-safe, so you don’t have to panic if you get it on your skin or kitchen counters. While platinum-cure silicone is also relatively harmless (some varieties are labeled for food or life casting), other common moldmaking materials such as tin-cure silicone or urethane are not. (NOTE: Since the company is very hush-hush about what actually makes up the SiliNOT! secret formula, I do not know if it might release any vapors or fumes that would be irritating or harmful to pet birds. In general, I advise not doing any kind of casting around birds.)
Eco-friendliness. This is the biggest draw for me personally: Given the number of casting workshops I run and all the things I sell commercially, I have constant guilt about the amount of waste I generate for creative projects. In most areas of life I’m an aggressive reduce/reuse/recycler and try to use organic materials instead of synthetics whenever possible, so a mold that’s reusable and compostable is very appealing.
Ease of use. It’s honestly pretty hard to mess this up -- just microwave according to the directions and pour. No measuring, no A/B mixture, no concerns about chemical contamination from latex or sulfur, etc.
Shelf life. Unlike silicones, which have a shelf life of anywhere from six months to three years depending on storage conditions, the SiliNOT! purports to be shelf-stable. It's compostable, so don’t bury it in your yard, but otherwise it appears that it could be kept on hand for years.
Cons
Bubbles. Honestly the most irritating thing about this stuff for me. I’m used to being able to see bubbles forming as I pour, tap them to the surface, and remove them. The fact that I poured four molds of the same object and never once got one without bubbles is super irritating.
Stickiness. I’m not a big fan of the tacky surface texture, and while I haven’t done any cold casting yet, I can imagine that it would be very difficult to clean out any pigment or mica powder that got where you didn’t want it. I probably wouldn’t use this for any kind of cold casting that required isolated colored areas or changing colors between casts.
Set time. The SiliNOT! may take longer to cool than a fast silicone would to cure when dealing with larger molds, so it’s not ideal for projects with a really tight turnaround. (But cosplayers would never be casting something the night before a con, right? We always plan ahead and never, ever procrastinate!)
Library life. The SiliNOT! may or may not structurally degrade over time the way urethane, latex, and tin cure silicones do, but I noticed even in my very limited casts that it was prone to having tiny bits of the mold (particularly at edges) stick and pull off. While I keep most of my platinum silicone molds for years and reuse them, I don’t feel that the SiliNOT! molds would hold up to repeated casting, and they’re far more sensitive to ambient temperature, so they’re probably best used for short term only. (I also wonder about the possibility of oil leaching out in long-term storage.)
Comparative Ranking
Ranking it against other mold-making materials, I’d place SiliNOT! below platinum-cure silicone in terms of performance, but maybe somewhere in the neighborhood of urethane and tin-cure silicone. It's definitely superior to latex. (Though to be honest, I'd rank Play-Doh above latex. I hate working with that stuff.)
Factoring in cost and environmental impact, it beats out urethane and tin-cure silicone. I'm still not sure if I'd rank it above platinum-cure silicone, though... Silicone costs much more and isn't eco-friendly, but the performance and lifespan is significantly better, so it still makes more sense for some projects.
Alginate is another type of material entirely, but in some ways SiliNOT! is comparable to it -- both are more cost-effective than silicone, both are biodegradable, both are skin safe, and both have long shelf lives. But SiliNOT! is easier to use for beginners than alginate, which has to be mixed to the right consistency and has an extremely short lifespan once poured.
Overall, I would recommend SiliNOT! for:
People who want accurate, non-shrinking molds but don’t have the budget for platinum-cure silicone
People who are committed to eliminating waste from single-use materials, and are willing to trade off a little performance for a more eco-friendly material
Projects with smooth surfaces and no indentations/sharp edges/undercuts where bubbles might stick (e.g. cabochons; simple geometric forms)
Projects where you need only one or two casts of something, rather than many casts from the same mold
Casting oddly-shaped pieces around which the mold needs to stretch in order to demold
Use with slow-curing resins that do not generate much heat
I would NOT recommend SiliNOT! for:
Extremely complex or detailed pieces, or pieces with a lot of surface texture that bubbles might stick to
Two-part molds
Projects requiring many identical casts out of the same mold
Molds that you intend to add to your library for future or repeat casting
Use with fast-curing resins, melted wax, melted Monster Clay, or any other material that emits heat
Cold casting with precise color application
My Overall Opinion
It's... okay? I will almost certainly keep SiliNOT! in my toolkit for certain specific applications. It's MUCH cheaper over the long term, I love the idea of recycling mold material, and there are some projects for which it will likely perform very well (those listed in the above bullet points). I will also admit that three days of working with it does not constitute a comprehensive familiarity with the product, and it might be the sort of thing that you get better at working with after more practice. (Just learning how to eliminate bubbles would go a long way toward making me adopt this for more projects!)
However, I don't quite buy the "better than silicone" tagline. It's definitely more difficult to get a perfect result, and there are some projects for which platinum-cure silicone is always going to be more reliable (e.g. high-temperature casting, mass production, large-scale life casting).
For those looking for a recommendation of whether or not to buy, I'd say look at your project budget and the applications for which you're going to be making molds, and let those factors guide which mold material you go with. People doing some kinds of projects are likely going to find this a godsend, while those doing different projects would probably hate working with it.
38 notes
·
View notes
Text
Forget conspicuous consumption – it feels like we have entered an era of contemptuous consumption. From supercommuting CEOs to billionaires conducting joyrides in space to families like India’s super-wealthy Ambanis throwing weddings estimated to cost upwards of $600m, the rich are spending shamelessly. Dwindling natural resources simply represent lucrative new markets: the luxury water market continues to grow, while the climate crisis makes droughts more frequent. Even clean air is becoming a luxury good.

10 notes
·
View notes
Note
What would be one of Tom and Hermione's silly domestic squabbles while they take refuge in the cottage? Ex: cups face up or down in the cupboard, shoes by the front door or not, toilet paper one way or another, saving food scraps for compost or throw everything away, etc.
(And while writing this, I'm realizing what a different lifestyle this will be for Hermione!! She hasn't "roughed" it in a while-- not including prison, of course. Living with Hebzibah and Hokey, the ultra-fancy NYC penthouse... she's had it pretty good in the 50s! I bet she'll love cozying up with Tom in Albania though, toilet paper direction notwithstanding.)
lol tbd! And yes she has had it pretty damn good thus far. Such a spoiled girlie
11 notes
·
View notes
Text


Just got New York Fries and they have new cups! All paper, all compostable. It's really cool!
#nyf is a canadian fast food place in food courts btw#fries and hot dogs and stuff#i like nyf but kf im honest i got it today just for the cup
5 notes
·
View notes
Text
10 Easy Ways to Start Your Sustainable Journey Today
Introduction:
Embarking on a sustainable journey doesn't require a complete overhaul of your lifestyle. In fact, small, mindful steps can lead to significant positive changes for both you and the environment. If you're new to sustainability or looking for simple ways to make a difference, you're in the right place. In this post, we'll explore ten easy steps you can take right now to kickstart your sustainable living journey.
1. Reduce, Reuse, Recycle:
The classic mantra holds true. Start by properly recycling items like paper, glass, and plastics. Before tossing something out, consider if it can be repurposed or upcycled. Reducing waste begins with conscious choices.
2. Conserve Energy:
Switch off lights and unplug devices when not in use. Opt for energy-efficient LED bulbs and appliances. Even adjusting your thermostat by a degree or two can make a difference.
3. Ditch Single-Use Plastics:
Invest in reusable shopping bags, water bottles, and coffee cups. Say goodbye to disposable utensils and straws. These small changes can significantly reduce plastic waste.
4. Choose Sustainable Transportation:
Whenever possible, opt for walking, biking, or using public transportation. Consider carpooling or investing in an electric or hybrid vehicle if it aligns with your needs.
5. Support Local and Sustainable Food:
Frequent local farmers' markets, and choose seasonal, locally sourced produce. Reducing food miles and supporting sustainable farming practices benefit both you and the planet.
6. Unplug and Disconnect:
Set aside tech-free time to reduce screen time and energy consumption. Encourage family or friends to join you in reconnecting with nature and each other.
7. Practice Mindful Consumption:
Before making a purchase, ask yourself if it's a necessity. Invest in high-quality, durable items that will last. Choose brands with a commitment to sustainability.
8. Compost Your Kitchen Waste:
Turn food scraps and yard waste into nutrient-rich compost for your garden. It's a fantastic way to reduce landfill waste and enrich your soil naturally.
9. Educate Yourself and Others:
Stay informed about environmental issues and solutions. Share your knowledge with friends and family to inspire collective action.
10. Get Involved Locally:
Engage with local environmental groups and community initiatives. Participate in clean-up events, tree planting, or sustainability workshops. Your active involvement can create positive change at the grassroots level.
Conclusion:
Remember, sustainability is a journey, not a destination. Each step you take, no matter how small, contributes to a brighter, greener future. So, start today, and together, we can make a meaningful impact. Stay tuned for more insights and tips on sustainable living from GreenLife Insights!
#sustainability#greenliving#eco friendly#Environmental Conservation#reduce#reuseandrecycle#energy conservation#mindful consumption
37 notes
·
View notes
Text
Premium Triple-Layer Kraft Brown Ripple Cup Supplier - Greenwich Packaging

Discover Greenwich Packaging's premium triple-layer Kraft brown ripple cup, featuring a stylish S-wave design for eco-conscious businesses. Our 12 oz paper cups are crafted with sustainability in mind, offering durability and aesthetic appeal for hot beverages. Ideal for cafes, events, and offices looking to enhance their environmentally friendly practices. Explore our complete range of sustainable packaging solutions, including custom branding options, and order your preferred quantities conveniently online. Trust Greenwich Packaging for quality, eco-friendly paper cups that reflect your commitment to sustainability Visit our website to order yours today!
#eco-friendly cups#sustainable packaging#Kraft ripple cups#brown paper cups#12 oz cups#S-wave design#coffee cup supplier#biodegradable cups#compostable cups
0 notes
Text
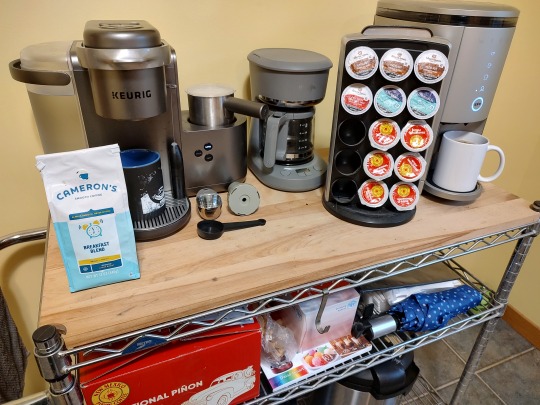
We made a coffee bar in our kitchen. It has three coffee makers.
The Keurig is nice for ease of use and sampling differently flavored coffees. If we have overnight guests almost everyone knows how to use a Keurig without help.
Amazon sells a big box of K-Cups with about 24 different flavors. Right now though we have a box of only one flavor: New Mexico Piñon Coffee. This is good stuff. Sheila is not usually a big coffee drinker but really likes the Piñon.
in the middle is a $10 coffee pot from Target. This guy lives in the travel trailer all summer long. I love to smell the coffee brewing when camping. In the winter he comes in the house.
I always seem to have a bag of ground coffee around to use up in this machine. There is a K-Cup adapter for the Keurig so it too can brew coffee grounds that didn't come in tiny plastic cups, but that reusable thing doesn't fill the kitchen with the aroma of coffee.
On the right is a fancy brewer we got as a gift. The Spinn is wi-fi enabled. If I put a cup under it before bed in the morning I can have hot joe flowing before I walk down the steps. A fresh cup of coffee will be waiting for me when I enter the kitchen. It's easy to adjust the amount of water and the grams of beans to use for each cup.
The Spinn grinds whole beans, mug by mug. It doesn't use paper filters, which helps offset the hit my Earth Cred score takes with those plastic K-Cups. This machine is loud. But I know the noisy spinning is how the grounds are separated from the drink and deposited into a little tank. To empty the tank I pour it over my compost pile.
The Spinn was starting to make weaker coffee. Eventually a red warning light of death appeared. The milk frother in the Keruig stopped working some time ago.
Yesterday I got on Reddit and found some advice on fixing these problems. The Spinn needed cleaning that isn't user friendly, as evidenced by the me needing tools to open it up and clean and vacuum some parts. It wasn't difficult though. The red light went away, replaced by the soothing white light assuring me hot coffee is coming soon. And holy moley, the coffee started tasting amazing again!
The Keurig was easier to fix. I'd been monkeying around with settings and cleaning. When that didn't work I shunned the frother, hoping it was miserably enjoying being a selfish asshole. I looked away from when I walked through the kitchen. That seemed to have done the trick, because this morning, just for the heck of it, I tried the frother AND IT WORKED.
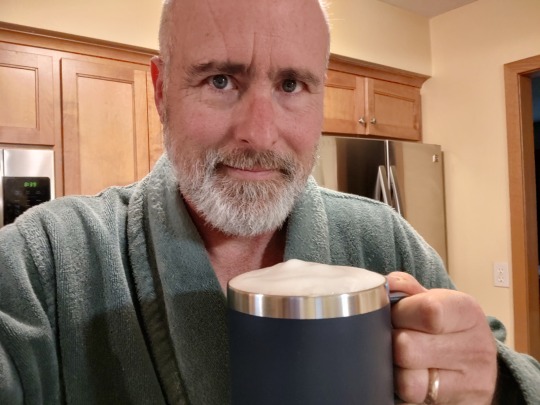
Oh my, that is tasty, hot, and caffeinated.
51 notes
·
View notes
Text
My Journey to Minimalism and Sustainability, and How You Can Start Yours
I began my journey towards minimalism and sustainability when I was 13, thanks to my favorite famous twins, Bill and Tom Kaulitz from the German band Tokio Hotel. They had just gone vegetarian, and their lifestyle shift made me rethink my own habits. I’ve always had pets—cats, dogs, hamsters, and even a horse I visited and fed every day (Okay, it wasn't mine, but I wished it was!)—but up until then, I hadn't really considered the wellbeing of wildlife or the broader environment.
Cutting out meat was my first step towards a more eco-friendly lifestyle. Over the years, I’ve made plenty of small swaps and sacrifices to lessen my impact on the planet. But don’t worry—sustainability doesn’t have to be overwhelming! In a world where some eco-warriors are aiming to fit a year’s worth of waste into a single jar, it’s easy to feel like you have to go to extremes. The truth is, you don’t have to make drastic changes to start your sustainability journey.
Below are some simple swaps I’ve made that have helped me live a little greener...

Bamboo Charcoal Menstrual Pads
Switching from disposable pads to reusable bamboo charcoal pads was one of the easiest changes I made. They’re washable, so still hygienic, plus they cut down on waste and microplastics. After the recent news about there being arsenic in tampons, I’m so glad I made this switch years ago!
Reusable Water Bottles and Coffee Cups
Instead of buying plastic water bottles or using disposable coffee cups, I now carry my own reusable versions. Not only does this help reduce plastic waste, but it’s also so convenient to always have a water bottle on hand.
Reusable Cotton Makeup Pads
I used to go through countless cotton pads while removing makeup. Now I use reusable ones that I can just toss in the wash. It’s a small change, but it makes a difference in how much waste I create each day.
Eating Less Meat
If you care about animals and want to reduce your carbon footprint, eat less meat. You don’t have to cut it out completely to make a difference. If you want to go the extra mile for our oceans, you can cut down your fish intake too.
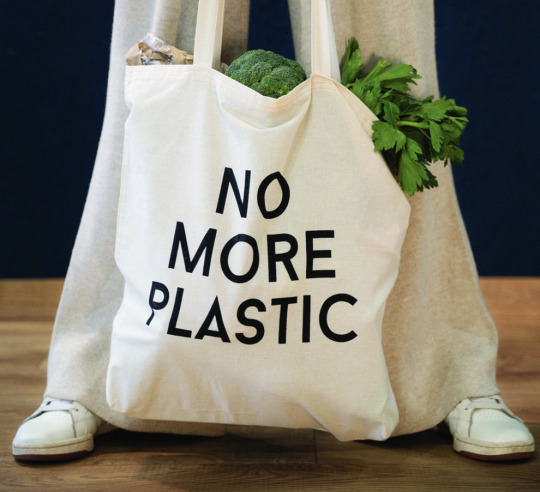
Reusable Shopping Bags
We’ve all heard this one, but it’s such a simple habit to get into! Keeping reusable shopping bags in my car or bag ensures I never have to rely on plastic ones when I’m out.
Recycling
This might sound basic, but committing to recycling properly is one of the simplest ways to contribute to a healthier planet. I make sure to recycle everything I can, from paper and plastics to glass and metals.
Those are a few swaps I’ve made over the past twelve years, but there’s always room to improve, so here are a few things I plan to try next:
Buying Less Clothing
I’m a legit shopping addict and tend to spend more than I make 😅 but I know fast fashion has a huge impact on the environment, so I’m working on being more mindful about what I buy and sticking to timeless, sustainable pieces.
Not Upgrading Tech Every Couple Of Years
It’s tempting to get the latest phone or gadget, but holding onto tech for longer reduces electronic waste.
Avoiding Palm Oil
Palm oil is in so many everyday products, and its production is harmful to the environment. I’m aiming to be more conscious about the products I buy and look for palm oil-free alternatives.
Composting
This is a big one I’ve been meaning to start! Composting food scraps instead of throwing them away can significantly reduce the amount of waste I send to landfills.
Sustainability is a journey, and it’s all about progress, not perfection. You don’t need to change everything at once. Start small, make swaps where you can, and keep growing from there. Every little bit helps!
What are some eco-friendly changes you’ve made? I’d love to hear your tips and ideas in the comments!
4 notes
·
View notes
Text
Parks and Ring Creation
Or, the one in which Beren is a scruffy young singer, Luthien is the daughter of a clean energy giant and a foreign princess, Nargothrond is a modern American municipality, and everything that goes wrong in (Middle) Earth is somehow Finrod’s problem.
Finrod walked into City Hall wearing sandals and a flower-patterned shirt, carrying a cup of coffee in a compostable paper sleeve. Buying coffee in a disposable cup wasn’t the most eco-friendly of choices he could have made that morning, but the coffee was fair-trade, at least, and purchased from the locally-owned coffee shop, Local Grounds. It was a reasonable trade-off—or that’s what he told himself, at any rate. Perfection was unattainable, of course, but he always felt as if he had better do his best to get close to it, in order to offset some of the damage that his family had caused.
His grandfather, the original founder of Finn Corp., had been a venture capitalist, a weapons manufacturer, and a pillar of Boston society for many years. His uncle had been a Silicon Valley tech mogul. By contrast, Finrod, formerly the organizing head of the Earth-Wise Tribe, an “affinity network of concerned Earth-citizens, developed along the principles of green knowing, nonviolence, and peaceful living in harmony with the land,” was now, and much to his own bemusement, mayor of the small city of River Cave, California.
Edrahil would say that the city had only elected him on account of having been settled by a voting majority of retired hippies. But then, he always was a pessimist.
Read more on Ao3
4 notes
·
View notes
Text
How to Properly Manage Waste: 10 Effective Ways to Protect Our Environment
Waste management is a critical issue facing our planet today. Improper disposal of waste not only leads to pollution but also wastes valuable resources. The good news is that each of us can make a big difference by adopting simple yet effective waste management practices in our daily lives. Here are 10 ways to properly manage waste and reduce your environmental impact:
1.Reduce Waste at the Source: Reducing waste begins with mindful purchasing and consumption. Choose products with minimal packaging or buy in bulk to decrease plastic waste. Avoid single-use items like straws, plastic cutlery, and bottled drinks whenever possible.
2. Practice Recycling: Separate recyclables like paper, glass, and plastic, follow local recycling guidelines, and clean items necessary to avoid contamination.
3. Composting Organic Waste; Compost organic waste like food scraps and yard trimmings to create nutrient-rich soil and reduce methane emissions. Use a small compost bin or Join community composting programs if you don't have a garden.
4. Avoid Disposable Products: Reduce waste by using reusable items like cloth napkins, towels, and travel mugs instead of disposables like paper towels and plastic cups.
5. Donate Unwanted Items: Donate unwanted clothes, electronics, or furniture to reduce waste and help others. Many organizations offer pick-up services for larger items.
6. Repurpose and Upcycle: Turn old items like jars or clothes into new, useful things to reduce waste and spark creativity.
7. Buy Sustainable Products: Choose eco-friendly products made from recycled materials and support ethical brands.
8. Educate on Waste Management: Share tips and facts about proper waste disposal to raise awareness and promote collective action.
9. Reduce E-Waste: Recycle or donate old electronics to prevent toxic waste and reduce environmental harm.
10. Buy Less, Choose Wisely: Avoid impulse purchases by opting for durable, high-quality items that reduce waste.
2 notes
·
View notes