#CS-80

Text
Tumblr Book Clubs I am Currently Following, in order of how hard I think they would be to catch up on if you wanted to join the fun:
Around the World Hourly (Around the World in Eighty Days with entries sent according to the in-story hour of events, started Oct 2)
The Public Domain Book Club (started Frankenstein for the month of October on Oct 1)
Lord of the Rings Newsletter (started late September with some very long posts, but will be variable length as they follow the dates of events in the story)
Dracula Daily via Re:Dracula (chronological Dracula by Bram Stoker - OK, you've missed most of this one, but the audio format is very engaging - you could still catch up for the exciting conclusion!)
My Dear Wormwood (The Screwtape Letters by CS Lewis - 22 short letters so far, posted on a weekly basis)
What Manner of Man (original vampire romance by St John Starling - 24 shortish and very fun chapters so far, posted on a weekly basis)
Whale Weekly (Moby Dick by Herman Melville with roughly chronological timescale - we're 70-some chapters in but there are often long breaks between them so you could probably catch up)
Les Mis Letters (a chapter of Les Miserables by Victor Hugo every day for a year - catch-up difficulty level: impossible)
Please add your own!
#dracula daily#whale weekly#moby dick#dracula#around the world hourly#around the world in 80 days#jules verne#frankenstein#mary shelley#re: dracula#bram stoker#herman melville#lotr newsletter#lord of the rings#jrr tolkien#my dear wormwood#the screwtape letters#cs lewis#what manner of man#st john starling#stjohnstarling#les mis#les mis letters#les miserables#victor hugo#tumblr book club#join the chaos#the public domain book club
218 notes
·
View notes
Text


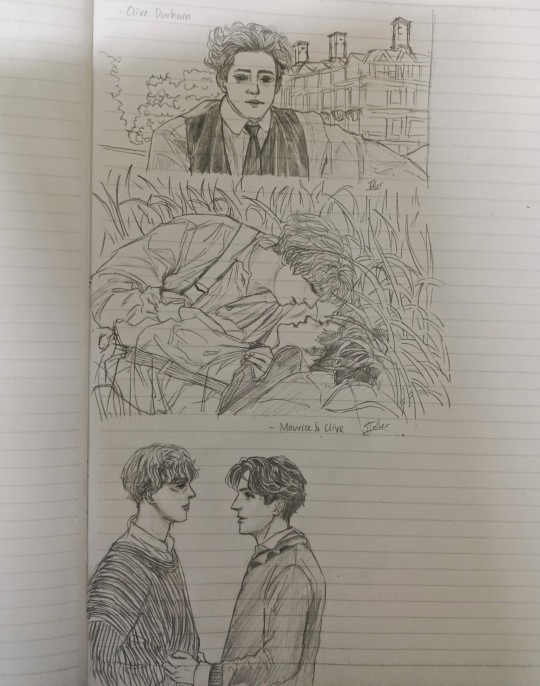
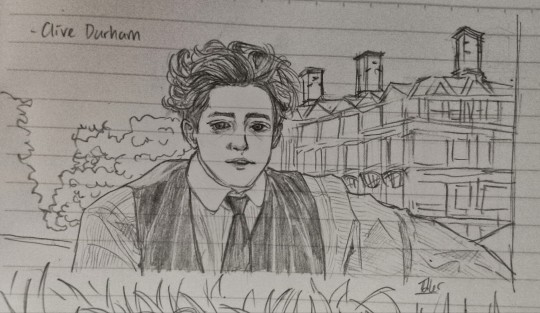
I watched Maurice
#maurice#maurice 1987#clive durham#maurice hall#gay#repressed gays#lgbtq#gays in denial#graphite sketch#black and white#cs i'm too lazy to draw anything complete#this movie is so beautiful#hugh grant#james wilby#80s films
26 notes
·
View notes
Text
Wip Wednesday
More from the same post-canon au as last week!
Genesis tried to suck in a steadying breath but even to his own ears it was a gasping death knell.
He kept his head bowed, careful not to look up. He didn’t want to see what he looked like in the mirror right now. As the countertop started to creek under his fingers he peeled them off. His fists instantaneously clamped shut once they were no longer clinging to the surface. Fingers burrowed in as they fought to break the skin of his palm as if it would bring him some type of relief.
He wished, but the pain didn’t even steady him.
As he was now it only blurred into the rest. His insides buzzed with the static of an all encompassing ache. Only the emerging silver blade of a dehydration headache was truly distinct. It near blithely occurred to him that he should remedy that. A cup and faucet were both in his line of sight after all.
How ironic- You can lead a man to water but you can’t make him drink. Especially not if he thinks he knows best. Even more so if he’s passively desperate to be hurting as if it will lessen the emotional typhoon.
A distinguishable pain to distract was preferable to being too alone with his thoughts right now.
It didn’t help, the persistent sharp ache only served to amplify his thoughts coming to the forefront. Genesis had sealed his fate when he’d made the fatal misstep of thinking. He’d made the fatal error of letting such thoughts in instead of forcing them back down in a split second of weakness staring at Sephiroth’s form before darting away. That only led into the mistake of mulling over the reality it seemed he was going to have to live with that he was going through now.
Was he to simply nurse his former lover back to health only to play executioner at the end of whatever plot the little Cetra had concocted?
#genesis rhapsodos#ff7#ffvii#sephesis#sephgen#crisis core#sephiroth#angst#fanfic#Genesis is having a bad time#we're about 80 years post canon here too#Riv's CS au#for peeps who read tags :3 that stands for 'Catatonic Sephiroth'#Aerith is trying to help- she means well I promise#wip wednesday#this whole series is a big gets worse before it gets better#rivkae writes
14 notes
·
View notes
Text

HAPPY ANNIVERSARY CROSSING SOULS!

#ooooh boy i can do long rants about this game if u allow me#i love this game so muchhhh RAAAGH#MAYBE bc it starts as a corny 80s stereotype (positive way)#OR MAYBE is because the characters ARE SOO WELL WRITTEN#theyre all unique. i love it so much ou h ouh#if u love 80s aesthetics ULL LOVE CS. TRUST ME#GIVE THIS GAME SOME LOVE!#anywayz#crossing souls#devolver digital#art#my art#digital art#fanart#fanartist#artists on tumblr
9 notes
·
View notes
Text
I’m honestly bummed the fact that Wayne (and possibly by extension Raj?) wearing a cup the entire show never came up after episode 1. Like during episode 7, he and Raj get beat up by a cassowary, fall down a mountain (and survive) and Wayne just weakly goes “good thing I’m still wearing my cup!” and passes out. Perfect bookends for his time on the island. Also because I know guys who unironically wear a cup in normal settings.
#it honestly felt like a wave to say ''we're not doing that kind of slapstick anymore'' which I mean I guess#though they made that same joke in Chase's intro so idk if they wanted to get it all out in the first ep#total drama spoilers#total drama#td spoilers#this is also a point that Wayne (and possibly by extension Raj) is one of the most micro-strategic cast members#sure characters like Bowie and Julia played the long game but Wayne focused on lasting to the long game which. smart to do#not everyone was born with plot armor so. wear a cup.#SORRY FOR BEING A JOCK BTW I genuinely did understand 80% of Wayne and Raj's sports talk#I just don't consume hockey as much so. idk every position and term.#I do appreciate the A and Cs on their jerseys being correct and giving an immediate understanding the difference between Raj and Wayne#Wayne is the captain and Raj is one of two alternative captains#would you know this from screen time distribution no. but personality yes.#piggy's TD posting
27 notes
·
View notes
Text
you listen to me now boy. fuck midterms. fuck finals. what you do is grind out homework assignments and mini quizzes and projects and you get those minty fresh and you show up to class as often as possible and take notes even if you can't bring yourself to look at them later it'll help you to remember shit more if you write it down. unless you're in a Weirdo Class that only has a midterm and a final or if that shit's like 80% of your grade or whatever you can almost certainly be sure you can pass with a low grade and still have a b in the class these websites (2 of them) are your best friend when it comes to trying to figure how hard you have to study for finals and chances are you've been tryharding finals that you only needed like a 61% on
#college#finals#collegeposting from someone who has been through the college ringer (BS in CS and a math minor) and Completely Gave Up at the end-#because of funny :b:ovid but trust me on this one i never had a class final score that went below a b (80%)#there's no shame in flunking the shit out of your finals if your grade is high enough going into them i did that shit all the time-#junior and senior year. of course exceptions may apply etc etc use your better judgement etc etc con the game but do it with caution#purple philosophies#and for those who want cramming tips: when i needed to cram i just literally either a. binged all recorded lecture videos or-#b. re-read through the textbook and took notes. yes even if you took notes on them during actual lecture. the idea is to write them down-#because (for me anyway) the physical act of writing notes helped me remember the content of said notes#train and fight warrior male remember that your most powerful ally for finals is a good night of sleep ilu all good luck
28 notes
·
View notes
Note
Apart from Le Chevre obviously, who's your favourite? Faculty included 👀
(when was this sent like 2 days ago lol someone help me already)
(btw.)
(I forgot what to say lol btw my air conditioning is not working so I'm a bit nuts rn lol ha 😋)
Who told you I play favorites..I don't have favourites.. I like all the people I've met..
I mean..if I was forced I would go with Black Sheep but then again I can't because Black Sheep isn't Black Sheep anymore and Black Sheep is Carmen SanDiego now..
Then I could say Crackle, but Crackle's favourite is Black Sheep and Ehm..I don't like playing favourites.. didn't I already say that..
I don't play favorites with the faculty either..Though if I would have to pick it be Dr. Bellum.. most of the instructors don't really care about our needs and whatnot, just because we're adults doesn't mean we aren't teens..and from what I heard, teens have necessities.
Dr. Bellum did the same but at least she could relate to our pain in a way.. though I wonder how she knows what we go through everyday on the island and why..and she's very amusing outside of working hours for her..I could consider her telling Ms. Countess Cleo how some students should start dating amusing..?
Well ehm..that is it..I guess so.
👋
-p.s: Le Chèvre isn't my favourite either even with his role in my life, but that's mainly because I know him way more personally than others..so no, he's not either. :3
#carmen sandeigo 2019#carmen sandeigo netflix#btw.#cs el topo#cs le chevre#help#its like 80 degress in my house#isnt it kinda of he does have favorites though#btw new headcanon bellum was probably a student at vile she knows the pain#i wanna move to cananada so its cold and i can watch Total Drama Reboot legally#“why did you put that in the p.s” because married couples have arguments#i need to see Jeantonio arguments#there was already conflict with Rajbow and that's what we call character development#Bowie: okay let's cheat we are so going to win this; Raj: ahem!!; Bowie: omg hi raj so not cheating rn not in the game or on you either#Jeantonio contlict when! ao3 do me better please.#wait why is there more total drama than cs#sorry guys this Rajbow hyperfixation just goes had its been 2 months already!!#yea
2 notes
·
View notes
Text
Vídeo aleatório de 2021 kkk
4 notes
·
View notes
Text
#NO CS WHY DID HE EAT LIKE THISSSSS ????#I FEEL LIKE DANCING IN ONE OF THOSE VAMPIRE NIGHT CLUBS IN THE 80S SNSJSJSN#✧。˚ 𓇼 𝑀𝒪𝒞𝐻𝒜’𝒮 𝐹𝑀.
4 notes
·
View notes
Text

ok epic
#love the and/or#i did baller on my science regents exams but the math ones were in the 80-85 range#wait it says mastery in math and/or science so yeah i did not get a mastery in math. rip </3#sorry this is an incredibly local thing. regents are only a thing in new york state lol#brot posts#god. academically i peaked in high school#graduated with advanced regents. with honors. mastery in science#now look at me . Cs get degrees baby
2 notes
·
View notes
Video
youtube
Yamaha CS-80 Blade Runner sound on a DX7
The Yamaha CS-80 and Yamaha DX7 are probably polar opposites in both operation and sound. The CS-80 is an analog subtractive synthesizer, whereas the DX7 is a digital synthesizer that uses frequency modulation (FM) synthesis. The only thing they really have in common is the Yamaha brand name.
This experiment was an attempt to see if I could make the DX7 sound somewhat close to the iconic CS-80 sound famously used by Vangelis in the Blade Runner soundtrack.
The DX7 patch will soon be available for download at store.dehlimusikk.no as part of a DX7 bank/cartridge I'm currently working on.
Instrument:
Yamaha DX7
Effects:
Fulltone Tube Tape Echo
Chase Bliss Audio & Meris CXM 1978
Music: Main Titles from the Blade Runner soundtrack by Vangelis
0 notes
Text
i actually started heaven' son in the land of the rising sun (that is a mouthful in japanese too) and yeah well. i no longer get surprised at how i see one line of plot and i go i know what you are. and it's not even a vibe~ its like the missing evolutionary step
#the more 70s and 80s yaoi i read the funnier it becomes that mi**a only constantly mentioned kazeki like...the boarding school???#anyway bishonen historian work aside im having fun. they're having a violent succession so of course i am#cs pacat of c*ptive prince fame also this mangaka is still alive i hope you havent dismissed the legal team yet#a
0 notes
Text
"What's your denomination?"
"Baptist u"
"Christian Scientist"
"How does that work like Scientology lol"
>Rolls my eyes so hard I do a backflip straight into the Sun
#I am so tired of this mistake#Scientology is completely unrelated in all ways to CS#but because it shares “scien” and people hear about it more we the actual church which is at least 80 years its senior#get lumped in with this evil stupid money hungry cult#bad enough to be called a cultist because of false ideas about our own theology#but to be mistaken for theirs??? Awful#pers com#personal#online dating#I try not to talk about CS on here because I hate arguing about it#I prefer to be ignored frankly#my life IRL is devoted to God and idc what people mistakenly believe online about CS#But this is about online dating where I constantly have to explain CS to new people
0 notes
Text
My GIF Making process: Screen capturing using MPV player, Organizing files, 3 Sharpening settings, Basic Coloring PSD + Actions set

This is a very long post so heads up.
I’ll try to be as thorough and true as much as possible to the way I make my gifs (I already use Photoshop Actions which I’ve long since set up but now for this tutorial I’m reviewing them to show you the exact steps I’ve learned to create my gifs 😃) and present them to you in a semi-coherent way. Also, please bear with me since English is my second language.
First things first. Below are the things and tools we need to do this:
Downloaded 4K or 1080p quality videos (let’s all assume we know where to get these—especially for high definition movies and tv series—so this post doesn’t get removed, okay? 😛)
Adobe Photoshop CC or the CS versions can work as well, but full disclosure I haven’t created gifs using the CS versions since 2020. I’m currently using Adobe Photoshop 2024.
mpv player. Use mpv player to get those frames/screenshots or any other video player that has a screen grabber feature. I’ve used adapter for the longest time but I’ve switched to mpv because the press to screenshot feature while the video is playing has been a game changer not to mention ultimate time saver for me. For adapter you need to play it in another video player (like VLC player), to get the start and end timestamps of the scene you want to gif which takes me ages before I can even open Photoshop.
Anyway! Please stop reading this post for a moment and head over to this amazing tutorial by kylos. She perfectly tells you how to install and use mpv player, both for Mac and Windows users.
One thing I have to share though, I had a tough time when I updated my MacOS to Sonoma since MPV is suddenly either duplicating frames or when I delete the duplicates the player seems to be skipping frames :/ I searched and found a solution here, though it didn’t work for me lol. My workaround for this in the meantime is decreasing the speed down to 0.70 then start screenshotting—it’s not the same pre Sonoma update but it works so I’ll have to accept it rather than have jumpy looking gifs.
Now, after this part of kylos’ tutorial:

you can continue reading the following sections of my gif tutorial below.
I want to share this little tip (sorry, this will only cater to Mac users) that I hope will be helpful for organizing the screenshots that MPV saved to the folder you have selected. Because believe me you don’t want to go through 1k+ of screenshots to select just 42-50 frames for your gif.
The Control + Command + N shortcut
This shortcut allows you to create a new folder from files you have pre-selected. As you can see below I have already created a couple of folders, and inside each folder I have selected screenshots that I want to include in one single gif. It's up to you how you want to divide yours, assuming you intend to create and post a Tumblr gifset rather than just one gif.

Another tip is making use of tags. Most of, if not all the time, I make supercorp gifs so I tag blue for Kara and red (or green) for Lena—just being ridiculously on brand and all that.
Before we finally open Photoshop, there's one more thing I want to say—I know, please bear with me for the third? fourth? time 😅
It's helpful to organize everything into their respective folders so you know the total number of items/frames you have. This way, you can add or delete excess or unnecessary shots before uploading them in Photoshop.
For example below there are 80 screenshots of Kara inside this folder and for a 1:1 (540 x 540 px) Tumblr gif, Photoshop can just work around with 42-50 max number of frames with color adjustments applied before it exceeds the 10 MB file size limit of Tumblr.

Sometimes I skip this step because it can be exhausting (haha) and include everything so I can decide visually which frames to keep later on. You'll understand what I mean later on. But it's important to keep the Tumblr 10 MB file size limit in mind. Fewer frames, or just the right amount of frames, is better.
So, with the screenshot organization out of the way, let's finally head over to Photoshop.
Giffing in Photoshop, yay!
Let’s begin by navigating to File > Scripts > Load Files into Stack…

The Load Layers window will appear. Click the Browse button next.
Find your chosen screenshots folder, press Command + A to select all files from that folder then click Open. Then click OK.
After importing and stacking your files, Photoshop should display the following view:

By the way, I'll be providing the clip I've used in this tutorial so if want to use them to follow along be my guest :)
If you haven't already opened your Timeline panel, navigate to Windows > Timeline.
Now, let's focus on the Timeline panel for the next couple of steps.
Click Create Video Timeline, then you’ll have this:

Now click the menu icon on the top right corner then go to Convert Frames > Make Frames from Clips

Still working on the Timeline panel, click the bottom left icon this time—the icon with the three tiny boxes—to Convert to Frame Animation
Select Make Frames From Layers from the top right corner menu button.
So now you have this:

Go and click the top right menu icon again to Select All Frames
Then click the small dropdown icon to set another value for Frame Delay. Select Other…

The best for me and for most is 0.05 but you can always play around and see what you think works for you.
Click the top right menu icon again to Reverse Frames.
I think Photoshop has long since fixed this issue but usually the first animation frame is empty so I just delete it but now going through all these steps there seems to be none of that but anyways, the delete icon is the last one among the line of feature buttons at the bottom part of the Timeline panel.
Yay, now we can have our first proper GIF preview of a thirsty Lena 😜

Press spacebar to watch your gif play for the very first time! After an hour and half of selecting and cutting off screenshots! 😛 Play it some more. No really, I’m serious. I do this so even as early (lol) as this part in the gif making process, I can see which frames I can/should delete to be within the 10 MB file size limit. You can also do it at the end of course 🙂
Now, let’s go to the next important steps of this tutorial post which I’ve numbered below.
Crop and resize to meet Tumblr's required dimensions. The width value should be either 540px, 268px, or 177px.
Convert the gif to a Smart Object for sharpening.
Apply lighting and basic color adjustments before the heavy coloring. I will be sharing the base adjustments layers I use for my gifs 😃.
1. Crop and Resize
Click on the Crop tool (shortcut: the C key)

I like my GIFs big so I always set this to 1:1 ratio if the scene allows it. Press the Enter key after selecting the area of the frame that you want to keep.
Side note: If you find that after cropping, you want to adjust the image to the left or another direction, simply unselect the Delete Cropped Pixels option. This way, you will still have the whole frame area available to crop again as needed and as you prefer.
Now we need to resize our gif and the shortcut for that is Command + Opt + I. Type in 540 as the width measurement, then the height will automatically change to follow the ratio you’ve set while cropping.
540 x 540 px for 1:1
540 x 405 px for 4:3
540 x 304 px for 16:9
For the Resample value I prefer Bilinear—but you can always select the other options to see what you like best.
Click OK. Then Command + 0 and Command + - to properly view the those 540 pixels.

Now we get to the exciting part :) the sharpen settings!
2. Sharpen
First we need to have all these layers “compressed” intro a single smart object from which we can apply filters to.
Select this little button on the the bottom left corner of the Timeline panel.


Select > All Layers
Then go to Filter > Convert for Smart Filters
Just click OK when a pop-up shows up.
Now you should have this view on the Layers panel:

Now I have 3 sharpen settings to share but I’ll have download links to the Action packs at the end of this long ass tutorial so if you want to skip ahead, feel free to do so.
Sharpen v1
Go to Filter > Sharpen > Smart Sharpen…
Below are my settings. I don’t adjust anything under Shadows/Highlights.
Amount: 500
Radius: 0.4
Click OK then do another Smart Sharpen but this time with the below adjustments.
Amount: 12
Radius: 10.0

As you can see Lena’s beautiful eyes are “popping out” now with these filters applied. Click OK.
Now we need to Convert to Frame Animation. Follow the steps below.
Click on the menu icon at the top right corner of the Timeline panel, then click Convert Frames > Flatten Frames into Clips
Then Convert Frames > Convert to Frame Animation
One more click to Make Frames From Layers
Delete the first frame then Select All then Set Frame Delay to 0.05

and there you have it! Play your GIF and make sure it’s just around 42-50 frames. This is the time to select and delete.
To preview and save your GIF go to File > Export > Save for Web (Legacy)…
Below are my Export settings. Make sure to have the file size around 9.2 MB to 9.4 MB max and not exactly 10 MB.

This time I got away with 55 frames but this is because I haven’t applied lighting and color adjustments yet and not to mention the smart sharpen settings aren't to heavy so let’s take that into consideration.
Sharpen v1 preview:

Sharpen v2
Go back to this part of the tutorial and apply the v2 settings.
Smart Sharpen 1:
Amount: 500
Radius: 0.3
Smart Sharpen 2:
Amount: 20
Radius: 0.5
We’re adding a new type of Filter which is Reduce Noise (Filter > Noise > Reduce Noise...) with the below settings.

Then one last Smart Sharpen:
Amount: 500
Radius: 0.3
Your Layers panel should look like this:

Then do the Convert to Frames Animation section again and see below preview.
Sharpen v2 preview:

Sharpen v3:
Smart Sharpen 1:
Amount: 500
Radius: 0.4
Smart Sharpen 2:
Amount: 12
Radius: 10.0
Reduce Noise:
Strength: 5
Preserve Details: 50%
Reduce Color Noise: 0%
Sharpen Details: 50%
Sharpen v3 preview:

And here they are next to each other with coloring applied:
v1

v2

v3

Congratulations, you've made it to the end of the post 😂
As promised, here is the download link to all the files I used in this tutorial which include:
supercorp 2.05 Crossfire clip
3 PSD files with sharpen settings and basic coloring PSD
Actions set
As always, if you're feeling generous here's my Ko-fi link :) Thank you guys and I hope this tutorial will help you and make you love gif making.
P.S. In the next post I'll be sharing more references I found helpful especially with coloring. I just have to search and gather them all.
-Jill
#tutorial#gif tutorial#photoshop tutorial#gif making#sharpening#sharpening tutorial#photoshop#photoshop resources#psd#psd coloring#gif coloring#supercorp#supercorpedit#lena luthor#supergirl#my tutorial#this has been a long time coming#guys. i'm BEGGING you. use the actions set - it was a pain doing all this manually again ngl LMAO#i've been so used to just playing the actions#so this has been a wild refresher course for me too 😆
120 notes
·
View notes
Text
dead poets in a somewhat cliche highschool flick
neil perry - theater kid. popular, but in a sweet way that makes theatre seem cool. throws the most elaborate senior prank.
todd anderson - quiet guy at the back of the class, that talks only to like 3 people. he writes poetry instead of learning, and gets straight Cs. dark hoodies with the hood up, messy doodled over notebooks and textbooks. theatre boy neil brings him out of his shell a little
charlie dalton - punk/bad boy in a band that gets sent out of class at least twice a week. undiagnosed adhd, black nail polish, facial piercings, vandalized desks and lockers, wild parties every other weekend, skipping classes to smoke under the bleachers. also lowkey ferris bueller vibes
knox overstreet - wannabe playboy. he just really wants a girlfriend, okay? actually a pretty good football player. love letters in lockers, full schedule of "tutoring". secretly a geek
steven meeks - burnt out nerd. easily influenceable. used to be used as an example for good behavior/grades but now is chronically distracted (mostly by his punk bf, let’s be honest). still gets pretty good grades and lets ppl copy and cheat off him for a price
gerard pitts - geeky plug, always either high or working on a wacky invention that blows up in his face eventually (like in those 80s movie)
richard cameron - sarcastic tutor. top 5 in every every class he's in and never lets anyone copy off him. i mean he does but he;s petty about it
chris noel - kindest and funniest lead cheerleader you’ll ever meet. plaid skirts, oversized letterman jacket, broken dresscode, abusing hall passes to gossip and loiter.
ginny danburry - confrontational theatre girl that's also somehow inhumanly shy. she will call the chemistry teacher a misoginist then be trembling and near tears trying to talk to the cute girl she has a crush on.
#funny how i never really attended a 'typical highschool party'#or smoked weed while in hs#dead poets society#dead poets fandom#dead poets headcanons#hellton boys#neil perry#todd anderson#knox overstreet#charlie dalton#steven meeks#richard cameron#john keating#mr keating
67 notes
·
View notes
Last Seen Blogs

ostribruxos
pesquisando

iranildebritoexecutiva
Drª Iranilde Brito
iranildebritoexecutiva
Drª Iranilde Brito

my-horiizon
Meu nome é fogo
my-horiizon
Meu nome é fogo