#Benefits of using primer before painting
Explore tagged Tumblr posts
Visit Tumblr Blog
Explore Tumblr blogs with no restrictions, modern design and the best experience.
Last Seen Tumblr Blogs


Fun Fact
Mobile Tumblr US users spend an average of 4.04 minutes per session on the app.
Text
Best Practices For Painting High-Use Spaces At Home
Painting high-use areas in your home requires careful consideration and planning. These areas, such as hallways, kitchens, and living rooms, see a lot of use and must withstand daily wear and tear. Here are some tips to help you achieve a long-lasting and attractive finish in these busy spaces, especially if you’re looking for a house painting Melbourne project. 1. Choose the right paint Look…
#Benefits of using primer before painting#Best paint for high-traffic areas in homes#Best practices for painting high-traffic spaces#Best Practices For Painting High-Use Spaces At Home#Choosing washable paint for busy areas#commercial painting#Decorative painting techniques for high-use areas#exterior painting#Hiring a professional painter in Melbourne#home painting tips#home-improvement#house painting#How many coats of paint for a durable finish#How to achieve a long-lasting paint finish in busy areas#How to prepare walls for painting high-use spaces#interior painting#Maintaining the paint in high-use spaces#Melbourne#Painting tips for kitchens and hallways#Professional home interior painting services in Melbourne#residential painting#Semi-gloss vs. satin finish for busy areas#Tips for painting high-traffic areas at home#Using dark colors to hide wall imperfections
0 notes
Text
Cater Diamond: Woke Up Lookin’ Like This
The way that goofy diamond mascot follows Cater into his various outfits 💀
dbsjgejeje Can’t believe he’s being an beauty guru/influencer showing off makeup products and shooting a GRWM vid in his groovy… OTL
Rise and Shine!

Looking like you have it together is far different than actually having it together.
Some days—like today—Cater had trouble getting himself out of bed. He always did in the end, but with great effort, like lugging a sack of potatoes to the washroom. A splash of ice-cold water often did the trick, rousing him awake and adding a faint flush or pink to his face.
But color is a flaw. Imperfect. No pure diamond has splotches of another color tainting it.
He’d paint over his half-dead canvas with cleanser, toner, serum, and moisturizer. Skincare was less routine and more ritual for him. A special magic charm, complete with an incantation muttered to himself.
Smile already. You’re never fully dressed without it.
By the time he patted himself dry, his face managed to settle into its usual arrangement. The upward curve of his lips, a friendly sparkle set in his eyes, tangerine waves pushed back by a headband to show off the mask he wore. This was “himself”—the thinnest sliver of Cater he showed the world.
He plopped down on at the foot his bed. His phone was mounted on a tripod, and just out of camerashot were various pieces of equipment. Extra lights, reflectors—tricks to flatter him. To distract, deceive. Even the placement of the plushies on his bed had been arranged for maximum visual appeal in the eye of the camera.
Aaand… action.
The recording started.
Cater flashed a huge grin and waved to his phone. “Gooood morning, Magicam fam! How’re you doing today?”
His spectators were, of course, no one. Not now, at least. He’d have to edit this footage later, tweak and fine tune it to achieve perfection before releasing it to the public. Then he would lap up that sweet, addictive validation.
And so he donned that mask once more, playing to his imaginary audience.
“Hahah, you guys are so silly.” He playfully tossed a few of his locks. “Did you think Cay-kun woke up like this? It takes effort to look this good!”
Cater winked, pointing at his imagined audience members. “You can do it too! I’ll walk you through my base makeup routine 🎵”
He held up a slim grey tube, his palm acting as its backstop to keep the camera focused on it. Other products were neatly lined up before him like a procession of card soldiers.
“Lately, I’ve been really gravitating to this beand new UV primer! Have you heard of it? It literally just came out this month. I got my hands on it as soon as I could and I’ve been wearing it every day since!”
Cater rattled off the benefits and uses of the primer: UV protection, dewy—not greasy (this difference was important) finish, great coverage, evening skin tone. “You can put powder on top or dab it on with a tissue over a full face of makeup and it still looks good! This is sure to go viral ⭐️”
He was in the middle of a demonstration when the knocking came. Cater startled, smearing a blob of product across one cheek.
“Aaah, shoot…!”
He scrambled for his phone, cutting off the recording. Then Cater shot up, rushing to his door while rubbing the primer into his skin.
"Coming...! Wait just a sec!" he called.
An aside, to consult his reflection in the mirror and ensure that every last bit of product had been pressed in. His skin was left supple and glowing, giving the impression of a guy that hadn't spent the last hour before drifting off doomscrolling and commenting on shallow posts. A guy that had it all together.
Cater slicked back a stray strand of hair and braced himself for his next act. The door swung open, revealing you and your school bag.
“Mornin’~! You’re up bright and early!” he chirped, casually leaning against the doorframe. “Wasn’t expecting you to be over so soon.”
“Oh—well, I wanted to see if I could catch you without your full face on.” You squinted at him. “Wow, did you really wake up looking like this?"
Cater gave a laugh that was light and effortless. "What do you think?" he asked teasingly. An expert dodging of the question--not the truth, but not quite a lie either.
You bit your lower lip, considering it. "Come on. Nobody's that perfect. Even Vil-senpai has to work hard to be the way he is."
You took a step toward him, and he backed up. One foot rested on that line dividing his room from the rest of Heartslabyul. You teetered there, as if on a tightrope. One more step, and you'd breach into his territory--his room, his most intimate place.
"... What's your secret?"
My secret?
He had many. Too many. They writhed like worms inside of him, those ugly pieces that shrank from the sunshine.
Cater turned away, plucking up another tube of product. He squeezed a dollop onto his index finger. "What's the fun in giving it away? I think..."
His arm shot out, poking you in the chin.
"... It's more fun to give chase! If you spot a white rabbit hopping around, you'd be curious about where it's going, right?"
Your reached for where he had marked you. Your fingers came away moist with a thick cream. With a sigh, you rubbed at it, the cream vanishing into your skin.
"You're impossible."
Cater smiled--perhaps for the first real time since he had woken up. "That's one impossibility! Come up with five more before breakfast and maybe I'll be nice enough to give you a hint~"

#twisted wonderland#twst#disney twisted wonderland#disney twst#Cater Diamond#twst x reader#twisted wonderland x reader#Cater Diamond x Reader#Reader#self insert#jp spoilers#something no one asked for#Cater birthday takeover#twst imagines#twisted wonderland imagines#twst scenarios#twisted wonderland scenarios
246 notes
·
View notes
Text
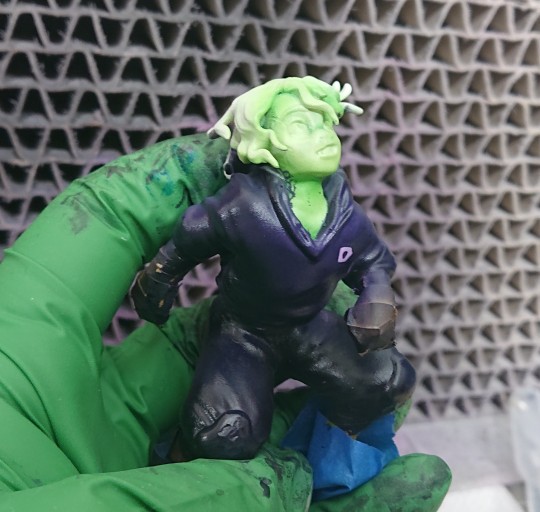
Here she is!!!
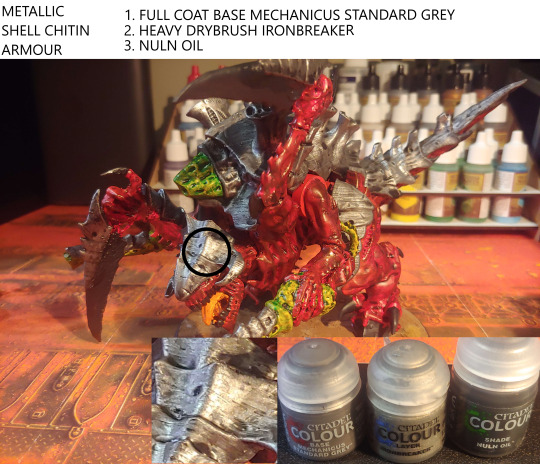
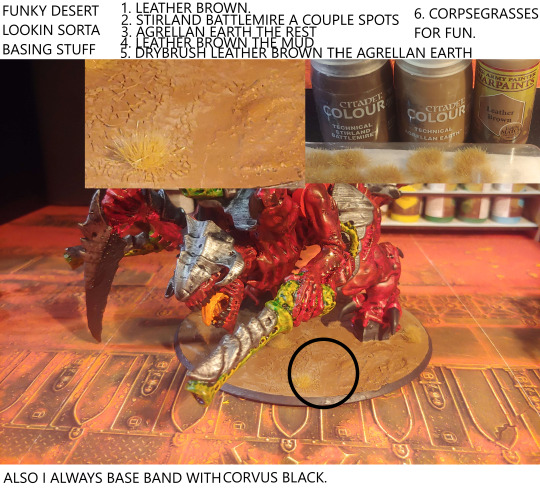
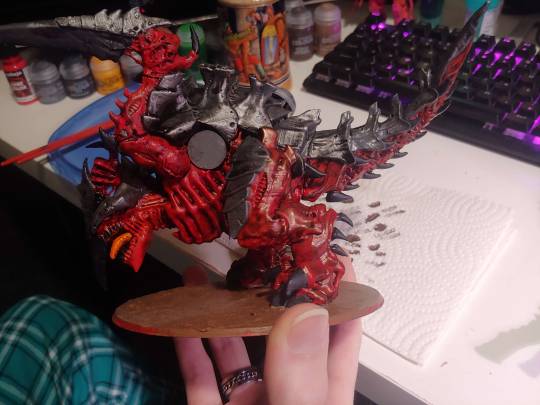
HIERODULE HAS ENTERED THE BATTLEFIELD
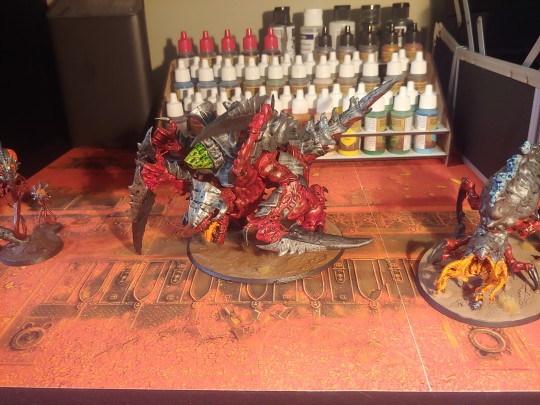
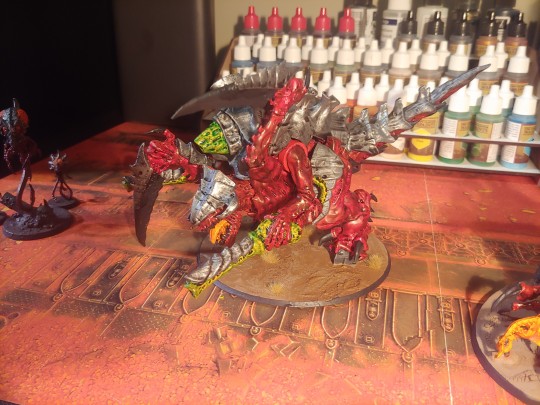
with both Scything Talons and twin Bio-Cannons to bring to bear, the Hierodule Bio-Titan is a walking nightmare, whether it's the Barbed or Scythed variant.
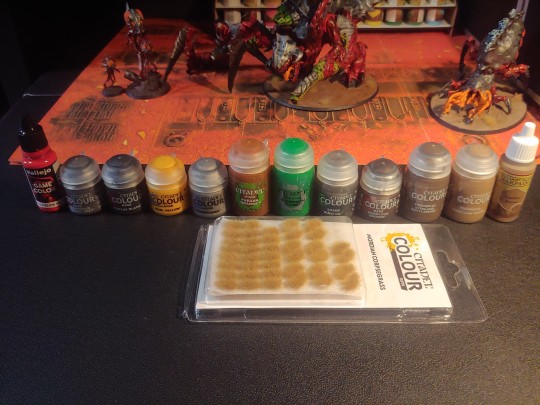
I used 12 paints to colour this model, starting with a spray primer similar to Vallejo Bloody Red.
I tried to basically liveblog the process of painting this model, but for anyone interested anyway, here's some
~Paint Recipes~
okay so those were a lot of fun to make but obviously i don't paint each separate part fully before i move on to the next, my process looks more something like this;
1- RED with a spray primer. i bought the "Bloody Red" bottle i have because it's close to the primer colour i have which i bought from michael's.
2- Mechanicus Standard Grey all the shell bits
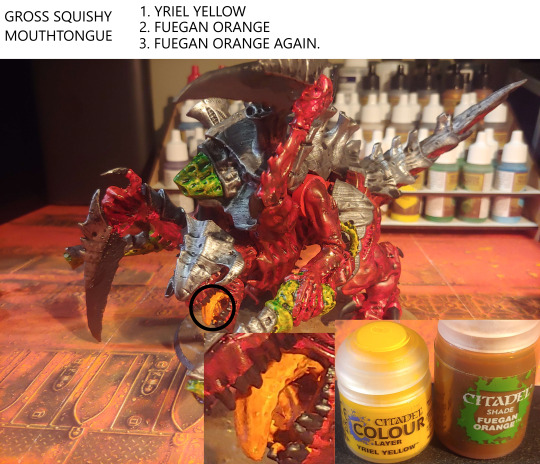
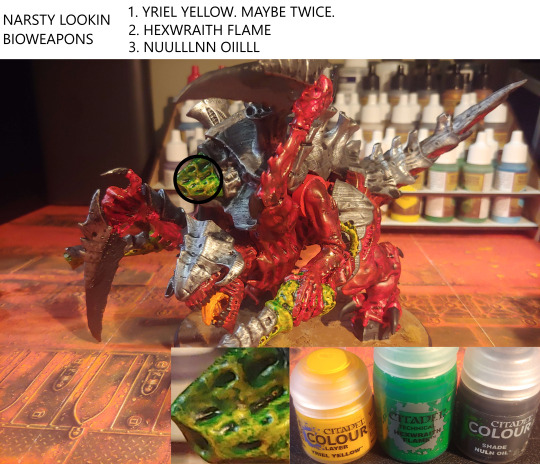
3- Yriel Yellow all gun bits and mouth parts, often twice if it needs it since that's a Layer paint, not a Base paint, so it's less pigmented.
4- Two coats Fuegan Orange in the mouth area to really get it lookin squishy and gross
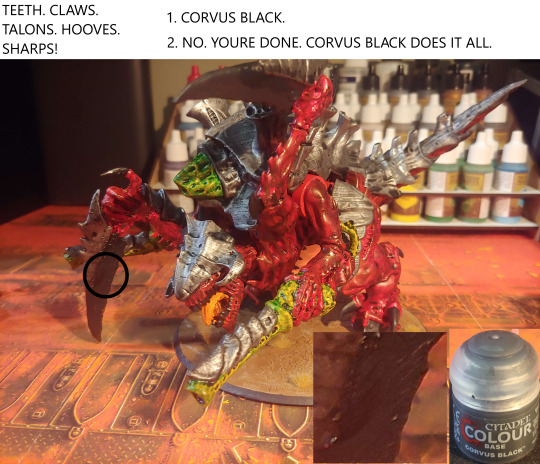
5- Corvus Black talons, teeth, hooves, spikes, etc.
6- Hexwraith Flame the gunparts, may need a drybrush of Yriel Yellow again after to keep it yellow enough, since green is a cold colour and doesn't compliment the reds and oranges in this colour scheme
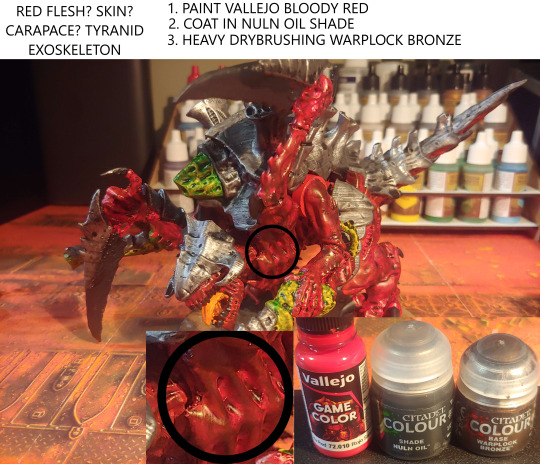
7- NULN OIL EVERYTHING. THE WHOLE MODEL. ALL AT ONCE. not including the mouthparts, that's already sufficiently shaded by the Fuegan Orange and wouldn't benefit from a black shade.
8- Drybrush Warplock Bronze over all the red parts. I'm kinda on the fence on whether this step and colour are really a good addition, it adds some variation and shine/highlighting to the colours of the carapace that i think improves it?, while also darkening the overall colour in a way that I like.
I took a photo of this step while I was doing it because I had the thought of that nobody not actually holding the model would really be able to tell the difference
front half without bronzing, back half with.
9- model's done! basing time~ For this base, I started with a coating of Leather Brown, because that's what would be showing through the cracks of the Crackle Paint
10- I experimented with using both my technicals on this one, so I started with applying two Mud Puddles of the Stirland Battlemire
11- after the battlemire mud dried, the rest got covered in a very generous coating of Agrellan Earth, so it would crackle nicely.
12- Stirland Battlemire and Agrellan Earth are... very different shades of brown. to even them out, I painted over the mire with Leather Brown, and drybrushed the earth with the same.
13- the final step of any model that I paint, and what i use to signify to myself that the model is done, is the base band! i like to use Corvus Black because its nice and neutral, but for my models that I have multiple with different loadouts such as tyranid warriors, I've been considering adding coloured stripes to the base bands to help identify individuals more easily.
78 notes
·
View notes
Text
Durable Epoxy Flooring Services in Lathrop for Homes and Businesses
Epoxy Flooring Services in Lathrop: Built for Heavy Use and Long Life
If you’re searching for epoxy flooring services in Lathrop, you probably want a surface that’s strong, easy to maintain, and looks sharp. Whether it’s your garage, shop floor, or commercial space, epoxy flooring is a practical upgrade that holds up under pressure.
At Brush Masters Painting Inc, we install garage epoxy flooring, commercial epoxy flooring, industrial epoxy flooring, and even basement epoxy floors for Lathrop homes and businesses. Let’s walk through the benefits, options, and what to expect from our epoxy flooring services.

Why Choose Epoxy Flooring in Lathrop?
Concrete on its own is porous and wears down over time. Epoxy seals and strengthens it, making it resistant to:
Chemicals and oil spills
Heavy equipment and foot traffic
Water and moisture damage
Stains and cracking
Here’s why our Lathrop clients go with epoxy:
Fast cleanup
Long lifespan
Custom colors and finishes
Slip-resistant surface (available)
Garage Epoxy Flooring for Lathrop Homes
Your garage takes a beating—tools, cars, bikes, and weather exposure. Garage epoxy flooring is a solid way to protect the concrete and keep the space looking clean.
Benefits:
Resists oil, tire marks, and stains
Improves lighting with reflective surface
Creates a polished, finished look
Options:
Flake finishes for grip and style
Solid color coatings
Glossy or matte sealers
Our team preps the concrete thoroughly before applying epoxy, so it bonds properly and lasts.
Basement Epoxy Floors: Clean and Moisture-Resistant
If you’ve got a finished or semi-finished basement, epoxy is a smart flooring option. It’s seamless, mold-resistant, and stands up to spills and humidity.
Why Homeowners Choose Basement Epoxy:
Easy to clean
Won’t warp like wood or carpet
Helps control dust and allergens
You can also customize colors and textures for a more livable look—especially useful for home gyms, storage areas, or entertainment spaces.
Commercial Epoxy Flooring in Lathrop
For businesses, durability and appearance matter. Whether you’re running a retail store, medical office, or restaurant, commercial epoxy flooring offers a professional look that’s also tough as nails.
Ideal for:
Showrooms
Kitchens and food service areas
Auto shops and service bays
Office buildings
Features:
Anti-slip coatings available
High-gloss finish to reflect light
Durable under carts, chairs, and rolling equipment
We schedule jobs to fit your business hours so there’s no unnecessary downtime.
Industrial Epoxy Flooring for High-Demand Spaces
Industrial epoxy flooring is built for impact, chemicals, and constant traffic. If you manage a warehouse, factory, or logistics facility in Lathrop, epoxy makes your floors safer and longer lasting.
Features:
High chemical resistance
Anti-static options available
Custom marking for safety zones or walkways
We tailor our materials and coatings to your facility’s specific demands.
How We Install Epoxy Floors in Lathrop
Our epoxy flooring process is detailed and built to last:
Site Evaluation – We inspect the condition of the concrete.
Surface Prep – Grind, clean, and repair surface damage.
Primer Layer – Apply bonding agent.
Epoxy Application – Roll or squeegee multiple coats.
Topcoat – Add sealer or flake finish if requested.
Dry time ranges from 24–72 hours depending on the space and use. We’ll walk you through it all before we start.
Frequently Asked Questions
How long does epoxy flooring last? With proper prep and maintenance, 10–15 years or more.
Is epoxy slippery? Standard epoxy can be slick, but we offer non-slip coatings for added safety.
Can you epoxy over old concrete? Yes, as long as the surface is stable and prepped properly.
How do I clean it? Use mild soap and water. Avoid harsh abrasives.
Why Lathrop Residents Trust Brush Masters Painting Inc
We’re more than painters. We know coatings—from paint to epoxy—and we understand how different environments affect different surfaces.
What You Get with Us:
Local experience with Lathrop weather and soil conditions
Skilled installers—not subcontractors
Commercial-grade equipment
Clear communication and no hidden fees
We don’t cut corners. We build floors that last.
Custom Epoxy Floor Designs Available
Want a specific look? We can customize epoxy floors with:
Metallic finishes
Flake patterns
Custom colors
Company logos or safety striping
Perfect for man caves, showrooms, or branded workspaces.
Need Epoxy Flooring Services Near You in Lathrop?
You found the right team. If you’re searching for garage epoxy flooring, commercial epoxy flooring, basement epoxy floors, or full industrial epoxy flooring in Lathrop—we’re ready to help. Call Brush Masters Painting Inc today for a free estimate.
#Epoxy Flooring Services in Lathrop#Epoxy Flooring Services in San Joaquin#Basement Epoxy Floors#Industrial Epoxy Flooring#commercial epoxy flooring#garage epoxy flooring#painting#power washing services in san joaquin
2 notes
·
View notes
Text
Can Residential Metal Roofing Be Painted in Custom Colors?
Metal roofing has become a popular choice for homeowners due to its durability, energy efficiency, and modern aesthetic. But what if you want to give your home a unique, personalized touch? Can residential metal roofing be painted in custom colors? The short answer is yes! Painting your metal roof allows you to customize its appearance while enhancing its performance.
This article will guide you through the benefits, considerations, and steps to successfully paint your metal roof in custom colors, ensuring a long-lasting, professional finish.
Why Paint a Residential Metal Roof?
There are several reasons why homeowners in Omaha and beyond choose to paint their metal roofs:
Aesthetic Appeal: Custom colors allow you to match your roof with your home's exterior design, landscaping, or even your neighborhood's aesthetic. A unique color can make your home stand out or blend seamlessly with its surroundings.
Enhanced Protection: High-quality roof paint can protect the metal from rust, corrosion, and UV damage, significantly extending its lifespan.
Energy Efficiency: Certain paint colors and finishes, such as reflective or light-colored coatings, can help reduce heat absorption, keeping your home cooler in the summer and lowering energy costs.
Choosing the Right Paint for Metal Roofing
Not all paints are suitable for metal surfaces, especially those exposed to the elements. Here’s what you need to know:
Paint Type:
Acrylic Latex Paint: Ideal for painting over existing paint or bare metal. It provides excellent adhesion and durability.
Oil-Based Alkyd Paint: Works well with a galvanized metal primer and is highly resistant to weathering.
Durability: Opt for paint specifically designed for metal roofing to ensure it withstands Omaha’s fluctuating weather conditions, from hot summers to icy winters.
Reflective Coatings: Consider paints with reflective properties if you want to improve your roof's energy efficiency. These coatings are designed to minimize heat absorption and keep your home cooler.
Color Selection: Choose colors that complement your home's style. Neutral tones like gray and beige are timeless, while bold shades like red or blue can add a dramatic flair.
How to Prepare Your Metal Roof for Painting
Proper preparation is the foundation for a successful and long-lasting paint job. Follow these steps before painting:
1. Cleaning the Surface
Use a power washer or scrub brush with a mild detergent to remove dirt, debris, and grease.
Ensure the surface is completely dry before moving on to the next step.
2. Removing Rust and Old Paint
Use a wire brush or sanding tool to remove rust and peeling paint.
For severe rust, apply a rust remover or metal prep solution to prevent further damage.
3. Priming the Roof
Apply a high-quality metal primer to improve paint adhesion and add a protective layer against rust and corrosion. Ensure the primer is compatible with your chosen paint type.
Step-by-Step Guide to Painting Your Metal Roof
Now that your roof is prepped, it’s time to paint. Follow these steps for a professional finish:
1. Choose the Right Tools
Use a paint sprayer for even coverage, especially on large roofs.
A roller with a long handle or a high-quality brush works well for smaller areas or touch-ups.
2. Apply Thin Layers
Avoid thick coats, which can lead to drips and uneven drying. Apply multiple thin layers, allowing each coat to dry completely before applying the next.
3. Monitor Weather Conditions
Choose a day with mild, dry weather to prevent paint from drying too quickly or unevenly. Avoid painting during rain or extreme heat.
4. Finish and Inspect
Once the final coat is dry, inspect the roof for any missed spots or imperfections. Touch up as needed.
Benefits of Painting a Metal Roof in Omaha
Omaha’s climate presents unique challenges for homeowners. Painting your metal roof can help address these challenges while enhancing your home's overall performance:
Weather Resistance: Custom paint protects against Omaha's seasonal extremes, including summer heat and winter snow.
Curb Appeal: A freshly painted roof can instantly boost your home's resale value and attractiveness.
Eco-Friendly Options: Reflective coatings reduce your carbon footprint by lowering your home's cooling needs.
Maintenance Tips for Painted Metal Roofs
To keep your painted roof looking its best and performing well over the years, follow these maintenance tips:
Regular Cleaning: Clean your roof every six months using a gentle detergent and a soft brush to remove dirt and debris.
Inspect for Damage: Check for peeling paint, rust, or other signs of wear and tear. Address issues promptly to prevent further damage.
Repaint as Needed: Depending on the paint quality and environmental factors, plan to repaint your roof every 10–15 years.
Can you do it yourself, or should you hire a professional?
While painting a metal roof can be a DIY project, it requires careful preparation, the right tools, and a lot of patience. Hiring a professional ensures:
Even streak-free coverage
Proper handling of difficult-to-reach areas
Use of high-quality materials for long-lasting results
If you’re confident in your skills and have the necessary tools, you can tackle the project yourself. However, for Omaha homeowners looking for guaranteed results, consulting a professional is often the best choice.
Conclusion
Painting your residential metal roof in custom colors is a fantastic way to personalize your home, enhance its durability, and improve energy efficiency. With the right preparation, tools, and paint, you can achieve a stunning, long-lasting finish that transforms your home's appearance and performance.
If you're ready to take the next step in customizing your metal roof, consider consulting a local roofing expert or paint specialist to guide you through the process. Transform your roof today and enjoy the benefits for years to come!
7 notes
·
View notes
Text
Wood Painting Services Near Me: Transforming Your Wooden Surfaces
When it comes to maintaining the charm and durability of wooden surfaces in your home or office, professional wood painting services are essential. Whether it's your outdoor deck, interior furniture, or wooden fences, a fresh coat of paint can work wonders. This article explores the benefits of hiring experts, what to expect from these services, and frequently asked questions to help you make an informed decision.
Why Choose Professional Wood Painting Services?
While painting wood might seem like a DIY-friendly task, it often requires expertise to achieve flawless and long-lasting results. Professionals understand the intricacies of surface preparation, such as sanding, cleaning, and priming. They use high-quality paints and finishes to ensure your wood is protected against moisture, UV rays, and wear and tear. By choosing local wood painting services, you also benefit from their knowledge of the climate and conditions in your area, ensuring your wooden surfaces remain vibrant and durable for years.
The Process of Wood Painting Services
When you hire experts for wood painting, they typically follow a detailed process:
Surface Assessment: Professionals inspect the wood to determine its condition and recommend the best approach.
Preparation: Old paint removal, sanding, and filling cracks or gaps ensure a smooth surface for painting.
Priming: Applying a primer enhances paint adhesion and provides a protective base layer.
Painting: Professionals use specialized brushes, sprayers, or rollers for an even application.
Finishing Touches: Once painted, a sealant or protective finish is applied for added durability and shine.
This meticulous process ensures your wooden surfaces are not only visually appealing but also resistant to environmental elements.
Benefits of Hiring Local Wood Painting Services Near Me
Opting for nearby wood painting services has distinct advantages:
Quick Response Time: Local professionals can often accommodate your schedule more efficiently.
Familiarity with Local Conditions: They understand how regional weather patterns impact wood and can recommend the best paints and finishes.
Cost-Effective: Reduced travel costs and the ability to source materials locally often make hiring nearby services more budget-friendly.
Community Reputation: Local businesses thrive on word-of-mouth referrals, so you can trust their commitment to quality.
When searching for “wood painting services near me,” check online reviews and ask for recommendations to find reliable providers.
Types of Wood Painting Projects
Professional wood painting services cover a wide range of projects, including:
Interior Woodwork: Doors, window frames, cabinets, and furniture.
Exterior Woodwork: Decks, fences, and siding.
Custom Projects: Artistic finishes, textured paints, or staining for unique aesthetics.
Restoration: Bringing old or weathered wooden pieces back to life with a fresh coat of paint or stain.
Regardless of the project, experts can tailor their services to meet your specific needs and preferences.
Frequently Asked Questions (FAQs)
Q1: How much do wood painting services cost?The cost varies based on the project size, type of wood, paint quality, and labor involved. On average, expect to pay $2-$5 per square foot for most wood painting projects.
Q2: How often should I repaint wooden surfaces?Interior wooden surfaces typically need repainting every 5-7 years, while exterior wood may require touch-ups every 2-3 years due to exposure to weather.
Q3: Can wood painting services repair damaged wood?Yes, most professionals offer minor repair services, such as filling cracks, replacing rotted sections, or smoothing uneven surfaces, before painting.
Q4: What type of paint is best for wood?Latex-based paints are durable and easy to clean, while oil-based paints offer a smooth finish. Your painter will recommend the best option based on your wood type and project location.
Q5: How do I maintain painted wooden surfaces?Regular cleaning with a damp cloth, avoiding harsh chemicals, and applying protective coatings every few years can extend the life of painted wood.
Conclusion: Enhance Your Wooden Surfaces Today
Investing in professional wood painting services ensures your wooden surfaces remain beautiful and durable for years to come. Whether you need to refresh your deck or add character to your furniture, hiring skilled painters near you guarantees quality results. Begin your search for “Exterior painting services near me” today and discover how local experts can transform your space.
2 notes
·
View notes
Text
Okay, I could talk about each of these topics in greater depth, but I'll keep it boiled down or else I'll be typing for a loooong time. If anyone wants elaboration on the following steps or on any particular pieces I've done, let me know and I'll give more tips and tricks later :) Apologies for the formatting, I'm still getting used to posting on Tumblr
-------------------------
Step 1: Clean up and prep I start by sanding down leftover pieces and flaws in the model caused by the production process. In traditional model kits, these are pour tabs, flash and seam lines. For 3D printed, these would be pits or bumps left behind from supports and layers lines.
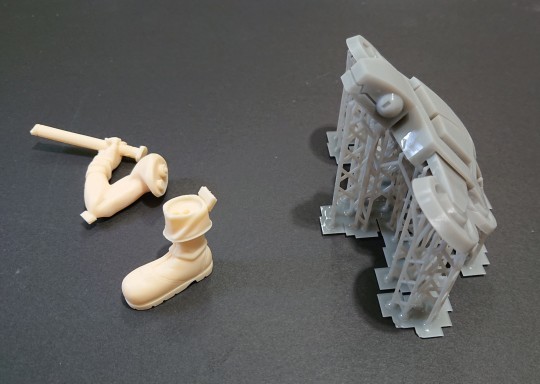
The arm and boots on the left are from a traditional model kit, and have visible tab chunks that will need snipping then sanding. S.H.E.L.L.D.O.N on the right needs his supports removed, then sanding. Every piece (minus those with fine texture) gets buffed with 240, 320, 600 and 1000 grit sandpaper/sanding sponges (clear parts and any pieces intended to be painted with clear paints, such as character skin, are additionally polished with a melamine sponge, also known as a magic eraser).
This is to make sure the surface is level and uniform. Any bumps or scratches that aren't removed will show up in the final paint job.
(Note for beginners: It's fine to just remove production remnants and do a little clean up before going to the next step. All that prep is tedious! Just have fun with it for now!)
Step 2: Make sure the model parts fit well together. It's very common for a model to not fit together perfectly right away. Dipping the model in hot water to soften it, then pressing the pieces together usually fixes this. Be careful not to burn yourself! Sometimes drilling and sanding is required. At this point, larger model kits will require drilling and pinning, though most are fine being assembled later just with glue.
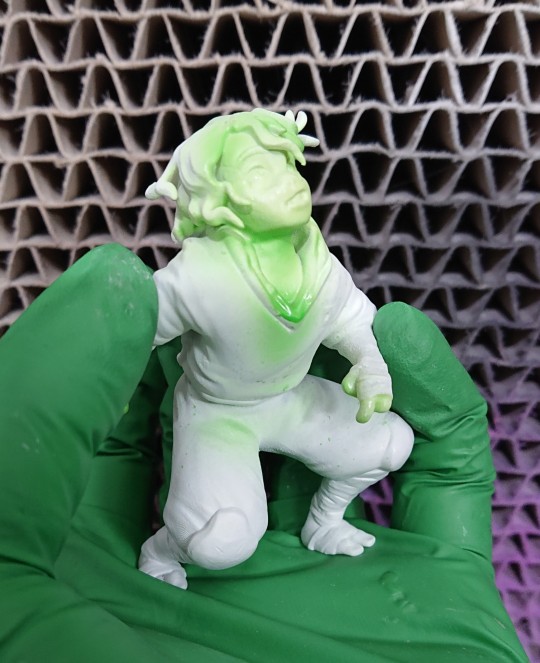
Step 3: Primer
I secure the pieces on clips to keep them elevated, and spray them in thin, even layers of primer. Primer is essential, as it is what makes the paint stick to the model. - White primer: Best for anime and cartoon figures, makes colors pop - Grey: For realistic characters, dulls colors down a little. - Black: For metal or specialty products, like Armored Komodo pigments
Primer will make any unresolved blemishes become more visible, so I usually go back to step 1 until I get them all.
Step 4: Clear coat
For an even, level paint job, I spray a layer of Gloss clear coat on every piece, to smooth the surface even more. I skip this for finely textured pieces, so the details don't get filled in. Spray in a well ventilated area with protection!

There are many brands of clear coats. These are my favorites!
Step 5: Paint
I use three kinds of paint:
Lacquer: Expensive, take a little while to cure, must be thinned with a solvent. Sometimes hard to find. Offers lovely effects, is durable and sticks very well. Can be difficult to correct if something goes wrong. *HAZARDOUS, use in a well ventilated or outside area and use breathing protection!*
Enamel: A little easier to find, takes a long time to cure, which sometimes is a benefit, as it can level itself and provide a smoother surface. Must be thinned with a solvent, sticks very well. Most importantly, enamel can be used on top of lacquers and erased without damaging the lacquer layer. *HAZARDOUS, use in a well ventilated or outside area and use breathing protection!*
Acrylic: Great, vibrant colors, easy to find, very affordable! Dries very fast, even faster if you lightly use a hair dryer. Very delicate, prone to scratches and chips. Can be easily stained by other acrylic color. You only need water to thin it!
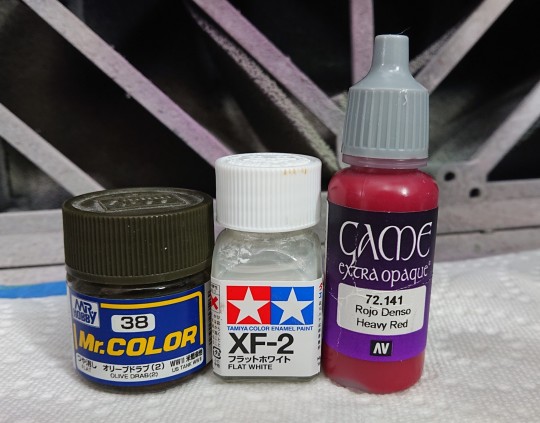
Left to right: Creos Mr Hobby Lacquers, Tamiya Enamel, Vallejo Acrylics
I usually start with the character's skin first. This is because I paint skin using built up layers of clear colors, to get a sort of 'glow' that shines through to the primer and differentiates the skin from clothing and hair pieces.
Afterwards and throughout the project, I 'save' my work by spraying a layer of clear Gloss or Matte spray. I use an airbrush, so to further protect other parts of my work, I cover the finished pieces in masking liquid and/or masking tape, before spraying the next color. Because Enamel can be easily wiped off of lacquers without affecting the lower color layers, I use this type of paint second. If you use Enamel first, you may run into issues with the underlying lacquer causing paint cracking in the future.
(Note for beginners: Using just acrylics is fine. :) I have painted entire models with acrylic paints obtained from craft stores and Walmart, and had very good results.)
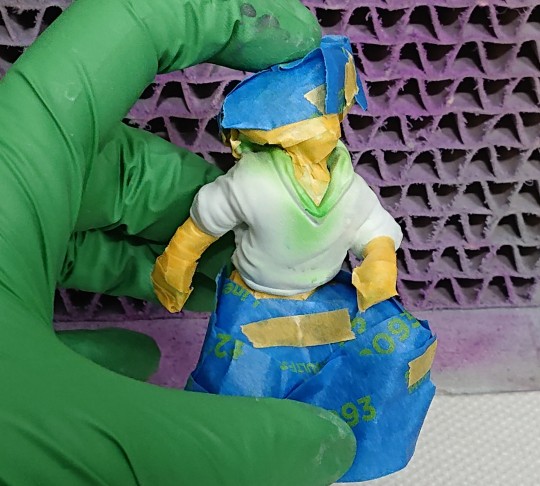
Despite my masking, some enamel paint leaked through on Casey's neck. Masking is rarely perfect, so expect to do touch ups after removal.
Step 6: Face eyes and details
...this is an entire essay on it's own, which will require another post. But I use layers of enamel for eyes, water color pencils for eyebrows, chalk pastels for makeup/shading and acrylics for eye lashes.
I have shaky hands sometimes, so the ability to erase my work and start again is very helpful here, hence why I don't use lacquers for this part.
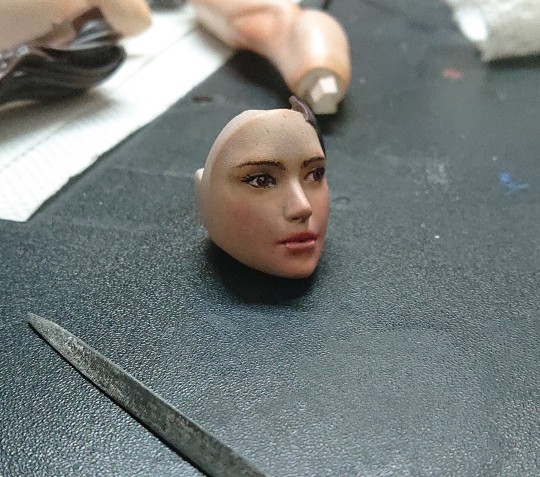
There are... So many products and colors in this one piece... Step 7: Touch ups then gluing
I typically do touch ups as I go, but now is the last chance to correct anything. Once it's ready, 2-part epoxy or crazy glue (sometimes both) will be enough to get most models together entirely.
----------------------------
That's a basic breakdown for my process, though for things like effects, clear pieces and fancier/realistic models, it can get quite elaborate. I don't want to scare anyone away from the hobby, so I'll just say this...
You don't have to do allllll this stuff!! Find a model you love (repainting dollar store figures is a great place to start!), prime it, and slap some paint on it! Just have fun, and then go from there!! My first model was lumpy, and looked like she was painted with nail polish, but I kept going and just enjoyed myself, trying new tips and tricks along the way. The point is to have fun! Make sure to take proper precautions and read product instructions as well, if you choose to use the more toxic products.
If anyone decides to give figure painting a shot, send pics of your projects my way, I'd love to see them!! :D It's always great to have more people in the hobby! And I'm always up for more questions, they might just take me a little while to get to replying.
16 notes
·
View notes
Text
How to Spray Paint Kitchen Units in Bradford for a Fresh, Modern Look
If your kitchen is starting to feel dated, worn, or just not your style anymore, there’s a cost-effective solution that can completely transform the space—spray painting your kitchen units. At Transform My UPVC Ltd, we’ve helped countless homeowners spray paint kitchen units in Bradford to give their kitchens a stunning, like-new appearance without the high price tag of a full renovation.
In this blog, we’ll guide you through everything you need to know about the spray painting process, the benefits, and why it's the smart choice for Bradford homeowners looking to refresh their kitchens.

What Does It Mean to Spray Paint Kitchen Units?
Spray painting kitchen units is a professional technique where cabinet doors, drawers, and panels are coated with a high-quality, durable paint using a spray gun rather than traditional brushes or rollers. This method gives a smooth, factory-like finish that instantly modernises any kitchen.
Whether your units are wood, laminate, or MDF, this method provides excellent adhesion and longevity when done by experts like Transform My UPVC Ltd.
Why Choose Spray Painting Over Replacing Kitchen Units?
Here are the top benefits of spray painting your kitchen cabinets instead of replacing them:
1. Cost-Effective Renovation
Replacing kitchen units can cost thousands of pounds. Spray painting offers the same fresh, modern result at a fraction of the cost.
2. Quick Turnaround
Most kitchens can be completed in just 1–3 days, minimising disruption to your home life.
3. Huge Range of Colours
We offer a full RAL colour chart, so whether you want a classic white, deep navy, or trendy sage green, we’ve got you covered.
4. Eco-Friendly
Reuse what you already have—less waste, less mess, and more sustainability.
5. Professional Finish
With our industrial-grade spray systems and skilled technicians, you get a flawless, long-lasting result that rivals brand-new installations.
Step-by-Step: How We Spray Paint Kitchen Units in Bradford
At Transform My UPVC Ltd, we follow a thorough and proven process to ensure every job is top-notch:
Step 1: Preparation
We start by protecting all surrounding areas with sheeting and masking tape. Then we clean, degrease, and lightly sand all surfaces to ensure optimal paint adhesion.
Step 2: Priming
A specialist primer is applied to provide a solid base coat, especially important for surfaces like laminated MDF.
Step 3: Spray Application
Using professional HVLP or airless spray systems, we apply multiple even coats of colour. This results in a smooth, streak-free finish that brush painting simply can’t match.
Step 4: Curing & Clean-Up
We allow adequate drying time, inspect all areas for quality, and clean up your kitchen to leave it spotless.
FAQs About Spray Painting Kitchen Units in Bradford
Q: How long will the paint last? A: When done professionally, spray-painted units can last 5–10 years or more with proper care.
Q: Can you paint over any material? A: Yes! Whether your cabinets are wood, MDF, or laminate, we can spray them with no issue.
Q: Is this service available across Bradford? A: Absolutely. We serve all areas in and around Bradford, Leeds, and West Yorkshire.
Real Results from Bradford Customers
We’ve completed dozens of kitchen transformations in Bradford—from small flats to large family homes. Here’s what one happy customer had to say:
“The team at Transform My UPVC Ltd completely changed the look of our kitchen in just two days. It looks brand new, and we saved a fortune!” — Sarah T., Bradford
Check out our portfolio for real before-and-after results.
Give Your Kitchen a Makeover Today
Whether you're preparing your home for sale or simply want to enjoy a fresh new space, Transform My UPVC Ltd is here to help. We’re trusted professionals when it comes to spray painting kitchen units in Bradford, with years of experience and unbeatable service.
📍 Address: 88 Ridgeway, Leeds, England, LS8 4DF 📞 Phone: +44 7469 586634 🌐 Website: transformmyupvc.co.uk 📧 Email: [email protected]
Request a Free Quote Today
Ready to transform your kitchen? 👉 Contact us now for a free, no-obligation quote or to book your spray painting service in Bradford.
0 notes
Text
Industrial Painting

Industrial Painting: A Critical Investment for Safety, Durability, and Aesthetics
Introduction
Industrial painting is far more than just a coat of color—it's a protective measure, a strategic investment, and a crucial step in maintaining the longevity and functionality of equipment, buildings, and infrastructure. In environments where machinery endures extreme conditions, or where facilities are exposed to weather, chemicals, or intense wear and tear, industrial painting becomes a key line of defense. It helps prevent corrosion, reduces maintenance costs, enhances safety, and even improves workplace morale by maintaining a professional and clean appearance.
In this article, we’ll dive deep into what industrial painting really involves, the benefits it offers, the types of coatings and methods used, and the industries that rely heavily on it. Whether it’s a bridge, a power plant, or a factory floor, understanding the role of industrial painting can shed light on why it’s such a vital part of operations across the world.
Understanding Industrial Painting
Industrial painting refers to the application of specialized coatings to surfaces in manufacturing, construction, and infrastructure settings. Unlike residential or decorative painting, which focuses on aesthetics, industrial painting is primarily functional. It aims to protect structures, machinery, and surfaces from deterioration, weather, chemicals, and physical damage.
The types of surfaces commonly painted in industrial settings include steel, concrete, piping, tanks, production equipment, and more. These materials are frequently exposed to environments that can degrade them rapidly without proper protection.
Before any paint or coating is applied, industrial painters go through rigorous surface preparation, including sandblasting, chemical cleaning, or power washing. This ensures that the surface is clean and ready for the coating to adhere properly, which is essential for longevity and effectiveness.
Key Benefits of Industrial Painting
Corrosion Resistance
Corrosion is one of the most serious threats to industrial infrastructure, especially for metal surfaces exposed to moisture, chemicals, or salt. Industrial painting provides a protective barrier that prevents water, air, and contaminants from reaching the substrate. Specialized coatings like epoxy, zinc-rich primers, and polyurethane topcoats are commonly used to resist corrosion, extending the lifespan of assets significantly.
Improved Safety
Industrial painting isn't just about protecting assets—it's also about protecting people. Non-slip floor coatings can prevent accidents in high-traffic areas, while high-visibility paints on safety rails and hazardous zones help workers remain aware of potential dangers. Additionally, temperature-resistant coatings can prevent burns and fireproof paints can delay the spread of fire in case of emergencies.
Maintenance Cost Reduction
By preventing damage, rust, and surface wear, industrial painting greatly reduces the need for frequent repairs and part replacements. This not only cuts down maintenance expenses but also minimizes operational downtime, which can be costly in industries like manufacturing or logistics.
Aesthetic and Professional Appearance
Even in heavy-duty settings, appearance matters. A well-maintained facility communicates professionalism and attention to detail. Industrial painting helps buildings and equipment look clean, uniform, and in top condition. This can enhance employee pride, improve morale, and create a better impression for visitors or inspectors.
Environmental Protection
In certain industries, such as petrochemical or wastewater treatment, equipment leaks and spills can harm the environment. Industrial coatings can contain these substances and prevent leaks, helping companies meet environmental regulations and avoid fines or reputational damage.
Types of Industrial Paints and Coatings
Industrial painting uses a range of specialized coatings, each tailored to a specific need. Here are some of the most commonly used:
Epoxy Coatings: Highly durable and resistant to abrasion and chemicals, epoxy coatings are commonly used on floors, tanks, and structural steel.
Polyurethane Coatings: Known for their flexibility and UV resistance, these coatings are ideal for surfaces exposed to sunlight and harsh weather.
Zinc-Rich Primers: These primers provide cathodic protection, similar to galvanizing, and are used as a base coat for steel surfaces.
Fire-Resistant Coatings: Also known as intumescent coatings, these expand when exposed to high heat, forming a protective char layer that insulates the material underneath.
Anti-Graffiti and Anti-Microbial Coatings: Useful in urban and healthcare environments, these coatings prevent surface contamination and are easy to clean.
Common Application Methods
Industrial painting requires specialized techniques to ensure coatings are applied evenly and effectively. The method chosen depends on the type of coating, the surface area, and the environmental conditions. Some of the most popular application methods include:
Airless Spray: This method uses high pressure to atomize paint, offering a smooth and consistent finish, especially over large surfaces.
Brush and Roller: Used for precision work or smaller areas, this method allows for greater control but is more labor-intensive.
Electrostatic Painting: A technique where paint is electrically charged and attracted to the surface, reducing overspray and waste—ideal for metal surfaces.
Powder Coating: While not always categorized under traditional painting, powder coating involves applying a dry powder that is cured under heat, creating an incredibly durable finish.
Industries That Depend on Industrial Painting
Industrial painting serves a wide range of sectors, including:
Oil & Gas: To prevent corrosion and weather damage on pipelines, tanks, and offshore rigs.
Manufacturing: For machinery, floors, ceilings, and production lines that need to withstand heat, wear, and chemicals.
Marine: Ships, docks, and equipment exposed to saltwater are particularly vulnerable to corrosion.
Power Generation: Facilities like nuclear plants and power stations use coatings for insulation, corrosion protection, and safety markings.
Transportation: Railroads, bridges, and tunnels use industrial painting for both protective and aesthetic purposes.
Construction: Steel frameworks, rebar, and concrete structures often require coating to meet safety and durability standards.
Challenges in Industrial Painting
Industrial painting isn’t without its challenges. Environmental conditions such as humidity, temperature, and wind can affect application and curing. Surface preparation must be meticulously done, or the entire coating system can fail. Safety is another concern—working at heights, in confined spaces, or with hazardous materials requires strict adherence to safety protocols and often certified, experienced professionals.
Moreover, regulatory compliance must be maintained. Many coatings contain volatile organic compounds (VOCs), which are subject to environmental regulations. Ensuring compliance without compromising performance is an ongoing balancing act in the industry.
Conclusion
Industrial painting is not a luxury—it’s a necessity. From extending the life of valuable infrastructure to ensuring the safety of workers and the environment, its impact is both broad and deep. With the right coatings, preparation, and application methods, industrial painting can save organizations time, money, and operational headaches in the long run.
Whether you’re maintaining a power plant, safeguarding a factory, or reinforcing a bridge, industrial painting plays a pivotal role in protecting your investment and preserving performance. It’s a blend of science, engineering, and craftsmanship—one that should never be underestimated.
1 note
·
View note
Text
How Spray Painting Services Can Give Your Fence a Fresh New Look

A fence is more than just a boundary. It adds beauty, privacy, and value to your property. Over time, weather and wear can make it look dull and lifeless. Spray painting services offer a fast and effective way to refresh your fence and make it look brand new.
In this article, we’ll explore the benefits of spray painting services, how they work, and why they’re the best choice for your fence makeover.
Why Choose Spray Painting for Your Fence?
Spray painting is a game-changer for fence restoration. Here’s why:
Smooth and Even Finish – Unlike brushes or rollers, spray painting provides a flawless coat without visible brush strokes.
Quick and Efficient – A spray gun covers large areas faster, saving time and effort.
Long-Lasting Results – Quality paint protects your fence from moisture, UV rays, and rust.
Variety of Colors – Choose various colours to match your home’s style.
Cost-Effective – Spray painting services are often more affordable than replacing an old fence.
Step-by-Step Guide to Spray Painting Your Fence
1. Prepare the Fence
Before painting, proper preparation is key. Follow these steps:
Clean the Surface – Remove dirt, dust, and old paint with a pressure washer or scrub brush.
Repair Any Damage – Fix loose boards, cracks, or rust spots.
Sand Rough Areas – Smooth out rough patches for better paint adhesion.
Apply a Primer – A primer helps the paint stick better and last longer.
2. Choose the Right Paint and Equipment
Not all paints are suitable for fences. Use:
Weather-resistant paint – Prevents peeling and fading.
Oil-based or acrylic paint – Both work well on wood and metal fences.
High-quality spray gun – Ensures even coverage and a professional finish.
3. Start Spray Painting
Use Proper Technique – Hold the spray gun 6-12 inches away and move it in smooth, even strokes.
Apply Multiple Thin Coats – This prevents drips and ensures even colour distribution.
Allow Drying Time – Let each coat dry completely before applying the next one.
4. Protect Surrounding Areas
Spray paint can drift, so take precautions:
Cover plants, sidewalks, and outdoor furniture with plastic sheets.
Wear protective gear like a mask and gloves.
5. Maintain Your Freshly Painted Fence
Regular Cleaning – Wash your fence occasionally to remove dirt and debris.
Touch-Up When Needed – If you notice small chips, do a quick touch-up to maintain the fresh look.
Inspect for Damage—Look for cracks, rust, or peeling paint and address them early.
Benefits of Hiring Professional Spray Painting Services
While DIY spray painting is an option, hiring experts has its advantages:
Expertise and Experience – Professionals know the best techniques for a flawless finish.
High-Quality Materials – They use top-grade paint and equipment.
Time-Saving – No need to spend hours preparing and painting.
Guaranteed Results – Professionals ensure long-lasting beauty and protection.
If you want a perfect fence makeover, consider spray painting services for professional results.
Common Mistakes to Avoid When Spray Painting Your Fence
Even with the right tools, mistakes can happen. Here are some common errors to watch out for:
Skipping Preparation – Failing to clean and sand the fence can lead to poor paint adhesion.
Using Low-Quality Paint – Cheap paint may peel or fade quickly.
Not Allowing Enough Drying Time – Rushing through the process can result in uneven colour and texture.
Over-Spraying – Holding the spray gun too close can cause drips and streaks.
Ignoring Weather Conditions – Wind and humidity can affect the paint’s drying process.
How Often Should You Repaint Your Fence?
The frequency of repainting depends on various factors, such as weather conditions, paint quality, and fence material. Generally:
Wood Fences – Should be repainted every 3-5 years to prevent weather damage.
Metal Fences – Require repainting every 5-7 years to prevent rust and corrosion.
Vinyl Fences – Usually don’t need painting but may require occasional touch-ups.
Choosing the Right Color for Your Fence
Colour plays a crucial role in enhancing your property’s aesthetics. Some popular choices include:
Classic White – A timeless option that suits any home style.
Earthy Tones – Browns and greens blend well with natural surroundings.
Bold Colors – Dark blues or blacks create a modern, sophisticated look.
Matching Home Exterior – Coordinating the fence colour with your house adds harmony to your outdoor space.
Environmental Benefits of Spray Painting Your Fence
Using spray painting services can also be an environmentally friendly option. Here’s how:
Less Paint Waste – Spray guns distribute the paint evenly, reducing excess use.
Eco-Friendly Paint Options – Water-based and low-VOC paints are available.
Durability – Long-lasting results mean fewer repaints, reducing environmental impact.
Final Thoughts
A fresh coat of paint can transform your old fence into a stunning feature. Spray painting services provide a quick, cost-effective, and long-lasting solution. Whether you DIY or hire experts, your fence will look brand new in no time. Revamp your outdoor space today with the power of spray painting services! You can enjoy a beautiful, durable wall for years with proper preparation, materials, and expert techniques.
0 notes
Text
Bring Back the Lost Charm of Your Windows with Window Painting Services

With time, our windows can lose their brightness owing to weather, dirt, and fading colours. Window painting can effectively help restore their lost beauty. Window painting services in Melbourne are some special services that help to make old and dull windows look new again. These services involve applying fresh paint to your windows, reviving their colour and charm. Whether you are preparing for a special event, wanting to brighten your home's look, or just maintaining your property, window painting is a great choice.
By knowing when to hire, understanding the benefits, avoiding common mistakes, and keeping important things in mind, you can ensure a successful window painting project. Let’s start the blog.
When to hire window painting services?
There are several times when you might consider hiring window painting services:
1 . Windows looking dull: If the paint on your windows is fading, peeling, or chipping, they need a refresh. Fresh paint can immediately improve the look of your home.
2. Before special events: If you have a plan to arrange a special event, like a birthday party or family gathering, freshly painted windows can enhance the overall look of your home.
3. For home renovations: Painting the windows is great to match the new look of your home. It’s especially good when you have just done major renovations.
4. While selling your home: Are you planning to sell your house? Then painting the windows can make it look more appealing to potential buyers. A nice appearance can also increase the value of your home.
5. Seasonal maintenance: Consider painting your windows at the start of spring or fall. This helps safeguard them from seasonal weather changes and thereby the damages.
Top 5 benefits of window painting service:-
Choosing to paint the windows has the following benefits:
1 . Protection from weather: Quality paint acts as a blockade against rain, extreme temperatures and UV rays. This can help your windows last long.
2. Enhanced aesthetic appeal: Fresh paint can drastically change the look of your home, making it more inviting and attractive.
3. More property value: Well-maintained windows can enhance the value of your home. Potential buyers will be impressed by clean, beautifully painted windows.
4. Less maintenance costs: By painting your windows per 1-2 years, you can prevent bigger repairs down the road. This will save you some money in the long run.
5. More comfort level: Windows in decent condition help with insulation, making your home more comfortable during cold winters and hot summers.
5 common mistakes made by inexpert professionals:-
Even though window painting may seem simpler, inexperienced or untrained professionals can make some common mistakes causing issues:
1 . Poor surface preparatory: If the surface is not made cleaned properly before painting, the new paint won't adhere there well. It may cause peeling or chipping.
2. Rushing the job: There is no shortcut. Good paint jobs take time. Rushing can cause bad finishes, drips, or missed spots.
3. Not protecting surrounding Areas: Not covering nearby surfaces can lead to unwanted paint splatters. A professional should take time to guard areas around the windows.
4. Ignoring the primer: Primer is great for helping the paint stick better and provide a smoother finish. Some people may skip this step, resulting in uneven painting.
5. Selecting the wrong type of paint: Different materials need definite types of paint. Using the wrong paint can lead to fast wear or damage.
Important things to keep in mind when hiring window painters:-
While choosing someone to paint your windows, there are important factors to consider:
1 . Ask about the process: Which kind of paint will they use? How do they prepare your windows? Understanding their procedure can help you remain pre-informed about their ability to perform well.
2. Experience with reputation: Go for those painters who have experience in window painting. Ask for references or check online reviews to ensure they have a good track record.
3. Previous work sample: Experienced painters often have portfolios showcasing their completed projects. Looking at their previous work can help you decide if their style matches your preferences.
4. License and insurance: Make sure the painter is properly licensed and insured. This protects you in case of any accidents or damage during the job.
5. Quotes and pricing: Get multiple quotes from multiple service providers. Compare the costs and check what is included in the price. Be cautious of remarkably low prices; they might give you bad-quality work.
6. Communication: Choose those professionals who can communicate well. A good painter should be ready and happy to answer your questions, keeping you informed throughout the project.
The final thought: selecting the best Window painting services nearby
All the above-mentioned info was given to make you aware of the necessary facts on Window painting services. Already you have understood that Window painting services are a treasured way to bring back the appeal and attraction of your windows. Whether your windows look worn out or you simply want to improve your home’s beauty, painting is an effective solution. Now, if you want to select the best one in the industry, Edge Painting is there for you. They offer 12 12-month workmanship guarantee with astounding quality work for window or Concrete floor painting in Brighton.
0 notes
Text
The Power and Purpose of Industrial Coatings: Why They Matter More Than You Think
In every industry, from energy and manufacturing to water treatment and infrastructure, the need to protect, preserve, and perform is non-negotiable. That’s where industrial coatings come in. They’re not just paint—they're protection, performance enhancers, and sometimes even life-savers.
Whether it’s a metal bridge weathering decades of storms or a food processing facility that needs anti-bacterial, easy-to-clean floors, industrial coatings are the invisible shield keeping these environments functional and safe. In this article, we’ll dive deep into what industrial coatings are, why they matter, and how they are shaping the future of infrastructure and industry around the world.
What Are Industrial Coatings?
Industrial coatings refer to a specialized type of protective finish or layer applied to surfaces in industrial settings. Unlike decorative paints used in homes or offices, these coatings are engineered to withstand extreme environmental conditions, prevent corrosion, resist chemicals, enhance durability, and even increase safety.
They are commonly applied to surfaces made of metal, concrete, plastic, or other industrial materials, and are used on everything from pipelines and storage tanks to machinery, floors, and structural steel.
Industrial coatings are tailored to the specific environment in which they’ll operate. For example, a coating designed for a marine vessel will have entirely different properties than one applied to a pharmaceutical lab floor. This customization is what makes them powerful.
Key Functions of Industrial Coatings
While the type of coating varies by application, the core functions of industrial coatings include:
1. Corrosion Resistance
Metal structures and machinery are especially vulnerable to rust, especially when exposed to moisture, salt, or chemicals. Industrial coatings form a barrier that prevents oxidization, reducing the risk of corrosion and the costly failures it can lead to.
2. Chemical Resistance
Facilities such as chemical plants, water treatment centers, and oil refineries regularly work with corrosive materials. Industrial coatings are engineered to withstand aggressive chemicals, acids, and alkalis, maintaining surface integrity even under frequent exposure.
3. Abrasion and Impact Resistance
In high-traffic or heavy-use environments like warehouses or manufacturing floors, surfaces are constantly subjected to mechanical wear and tear. Industrial coatings can significantly enhance the lifespan of these surfaces, reducing damage from equipment, foot traffic, or dropped tools.
4. Temperature Tolerance
Industrial coatings are often required to maintain performance across a wide range of temperatures—from cryogenic environments to extreme heat. Certain formulations are designed to stay intact and functional even under thermal shock or sustained high-temperature exposure.
5. Safety and Compliance
Many coatings offer fire resistance, anti-slip properties, or antimicrobial benefits, directly impacting worker safety and hygiene. In regulated industries, the right coating also helps facilities meet OSHA, FDA, USDA, or other industry-specific standards.
Common Types of Industrial Coatings
There’s no one-size-fits-all when it comes to industrial coatings. Here are some of the most common types used across various sectors:
Epoxy Coatings – Known for their durability and chemical resistance, epoxies are widely used on concrete floors, pipelines, tanks, and marine vessels.
Polyurethane Coatings – These offer excellent UV resistance and flexibility, making them ideal for outdoor applications and environments with frequent temperature changes.
Zinc-Rich Primers – Often used as a base coat, these provide galvanic protection to steel surfaces, effectively stopping rust before it starts.
Intumescent Coatings – Designed to expand when exposed to heat, these coatings offer passive fire protection in industrial and commercial buildings.
Fluoropolymer Coatings – Highly resistant to corrosion, chemicals, and UV degradation, these coatings are used in highly aggressive environments like chemical storage and offshore platforms.
Where Industrial Coatings Are Used
Industrial coatings are found in nearly every major sector of the economy, including:
Oil and Gas: Protecting rigs, refineries, pipelines, and tanks from corrosive chemicals and harsh climates.
Marine: Coatings resist saltwater corrosion, biofouling, and UV damage on ships, docks, and offshore platforms.
Transportation: Bridges, rail cars, and heavy machinery rely on coatings to prevent rust, wear, and structural degradation.
Manufacturing and Warehousing: Floors, machinery, and storage systems need abrasion resistance and easy-clean surfaces to maintain productivity.
Utilities and Energy: Power plants, water treatment facilities, and solar or wind installations depend on coatings for environmental protection and safety compliance.
Food and Beverage: FDA-approved coatings maintain sanitary conditions on floors, walls, and equipment.
The Science Behind the Surface
Industrial coatings are more than just a coat of paint—they’re a blend of chemistry, physics, and material science. Engineers and chemists work together to develop formulations that bond with specific substrates and maintain performance under exacting conditions.
Surface preparation is also critical. If a coating is applied to a poorly prepped surface, even the most advanced formula won’t perform. Methods like abrasive blasting, chemical etching, or pressure washing are used to clean and roughen surfaces for maximum adhesion.
Thickness, cure time, and method of application (brush, spray, roller, or electrostatic) all factor into the coating’s success. Many coatings are applied in multiple layers—primer, base coat, and topcoat—to build up resistance and performance features.
The Economic Value of Industrial Coatings
Applying the right coating might be a large upfront investment, but it pays off in long-term cost savings. Here’s how:
Extended Equipment Life: Coatings prevent rust, corrosion, and degradation, reducing the need for replacement.
Reduced Downtime: Equipment failures and facility closures for repairs can cost thousands per hour. Coatings prevent avoidable disruptions.
Lower Maintenance Costs: Coated surfaces are easier to clean and maintain, leading to fewer man-hours and reduced repair bills.
Insurance and Liability Protection: Fire-resistant or slip-resistant coatings can help mitigate risks and reduce insurance premiums.
Compliance Avoidance Costs: Meeting safety or sanitation codes prevents fines, shutdowns, and legal liability.
The Shift Toward Eco-Friendly Coatings
As industries move toward more sustainable practices, the world of industrial coatings is shifting too. Traditional solvent-based coatings can release high levels of volatile organic compounds (VOCs), which are harmful to the environment and worker health.
To address this, manufacturers are developing:
Water-based coatings
Powder coatings (no solvent needed)
Low-VOC and no-VOC formulations
Bio-based and recyclable materials
These innovations reduce emissions, improve indoor air quality, and support broader sustainability goals—all without sacrificing performance.
Looking Ahead: Innovation in Industrial Coatings
Technology continues to push industrial coatings forward. Research is currently underway on:
Self-healing coatings that repair minor scratches and cracks automatically.
Smart coatings that can detect corrosion or chemical exposure and send alerts.
Nano-coatings that offer ultra-thin protection with extreme resistance.
Antimicrobial coatings that help reduce the spread of bacteria and viruses in sensitive environments.
These advancements could dramatically reshape how we protect infrastructure in the years to come.
Conclusion
Industrial coatings are one of the most underappreciated heroes of modern industry. Quietly working behind the scenes, they protect our bridges, factories, machinery, and more from the elements, chemicals, and time itself.
From increasing asset life and reducing costs to improving safety and ensuring compliance, the impact of industrial coatings goes far beyond aesthetics. They’re a fusion of science and strategy—where performance, protection, and precision come together to support progress.
As industries evolve, the coatings that protect them must evolve too. And with today’s innovation and sustainability trends, the future of industrial coatings is looking brighter—and tougher—than ever.
1 note
·
View note
Text
Roof Insulation: Building Protection and a Long-Term Investment Roof insulation is one of the most important stages of construction and finishing any residential, commercial, or industrial building. It not only improves occupant comfort, but also plays a significant role in preserving the building's infrastructure and reducing long-term costs associated with maintenance, cooling, and heating.
In this article, we will review the concept of roof insulation, its types, benefits, implementation methods, and best practices to ensure insulation efficiency and quality.
✅ What is roof insulation? Roof insulation is the process of covering a building's surface with specific layers of insulating materials to protect the building from various weather factors such as rain, heat, humidity, and direct sunlight. Insulation can be water-based, thermal-based, or a combination of both, depending on the climatic factors affecting the area.
🧱 Types of Roof Insulation
Waterproofing It aims to prevent water from seeping into the building and is used in areas exposed to heavy rain or high humidity.
Types:
Bitumen insulation: A black adhesive used in hot or cold conditions.
Plastic foil (PVC or EPDM): Flexible, water-resistant materials.
Asphalt insulation: A traditional and effective option.
Acrylic or liquid polyurethane insulation: Sprayed or painted onto the surface.
Thermal insulation: This insulation aims to reduce heat absorption or loss from the building, improving cooling or heating efficiency and saving energy.
Types:
Styrofoam boards.
Rock wool or glass wool boards.
Spray foam polyurethane.
Insulation using ceramic or heat-reflective panels.
Dual insulation (thermal + water) This insulation is used to provide complete protection for roofs, especially in areas with harsh weather conditions.
🌟 Benefits of roof insulation Protecting the building from damage: Prevents water infiltration, dampness, and mold, and prolongs the life of the building.
Energy Savings: Reduces the need for air conditioning and heating, leading to lower electricity bills.
Thermal Comfort: Maintains a moderate temperature inside the building year-round.
Noise Reduction: Some insulation materials also reduce sound transmission.
Increase Property Value: Insulated buildings are more attractive to buyers and tenants.
Reduced Maintenance: Reduces cracks and fissures caused by heat and humidity.
🛠️ Methods for Implementing Roof Insulation Clean the surface thoroughly: Remove dust, dirt, and oils before starting work.
Repair any cracks or holes: Use appropriate adhesives or cementitious materials.
Apply a primer (preparatory) layer: Helps the insulation material adhere better.
Install the base insulation layer: Use appropriate materials according to the type of insulation required.
Add a protective layer or final paint: Protect the insulation from external factors such as sun or scratches.
⚠️ Common Roof Insulation Mistakes to Avoid: Using a material that is not suitable for the climate.
Implementing insulation without properly cleaning or preparing the surface.
Not testing the insulation material before use.
Ignoring the need for a slight slope for water drainage.
Neglecting to periodically inspect the insulation after installation.
🧪 How to choose the right type of insulation? The choice of insulation type depends on several factors:
Climate type: Hot regions require strong thermal insulation, while rainy regions require effective waterproofing.
Building type: Is it residential, industrial, or commercial?
Project budget: Some materials are more expensive but last longer.
Exposure to weather: Fully exposed buildings require stronger protection.
♻️ Insulation and the environment Good insulation not only saves money, but also contributes to reducing energy consumption and thus lowering harmful emissions. Many modern insulation materials are made from recyclable or environmentally friendly materials, making insulation an ideal choice for sustainable buildings.
🧾 Conclusion Roof insulation is no longer a secondary option; it has become an urgent necessity to protect buildings from damage, improve interior comfort, and save energy. With the availability of many modern materials and technologies, it's now possible to design insulation systems to suit all needs and budgets. Investing in insulation is an investment in the future, in the quality of life, and in the sustainability of buildings.
شركة ترميم حمامات بالعيون
شركة ترميم حمامات بالمبرز
شركة ترميم حمامات بتاروت
شركة ترميم حمامات بالظهران
0 notes
Text
A Guide to Emulsion Paint: Benefits, Types & How to Use It

Summary:
Emulsion paints are a popular choice for homeowners due to their durability, smooth finish, and versatility. This guide explores the benefits, types, and best application methods for emulsion paints, with a special focus on Colour Valley’s high-quality offerings. As a leading paint manufacturer in Gwalior, Colour Valley provides superior interior and exterior emulsion paints, including white emulsion paint and tractor emulsion, designed to withstand heat, resist fading, and maintain a fresh look in any season.
Why Choose Colour Valley’s Emulsion Paints?
At Colour Valley, we understand that the right paint can transform a space. Our emulsion paints offer superior durability, aesthetic appeal, and advanced protective features to ensure long-lasting beauty for your interiors and exteriors. Whether you’re looking for white emulsion paint for a modern touch or tractor emulsion paint for a robust finish, we have the perfect solution tailored to your needs.
Benefits of Colour Valley Emulsion Paints
Long-Lasting Durability – Our emulsion paints create a tough protective layer, ensuring your walls remain pristine for years.
Heat Resistance – Designed to withstand extreme temperatures, our paints help maintain a cooler indoor environment.
Fade-Resistant Colors – Colour Valley’s advanced formulation prevents fading, ensuring vibrant walls even in harsh sunlight.
Smooth & Elegant Finish – Whether matte, satin, or silk, our paints provide a flawless finish to elevate any space.
Low Odor & Eco-Friendly – With low VOC content, our paints are safer for homes and the environment.
Washable & Stain-Resistant – Perfect for high-traffic areas, our interior wall paints resist stains and can be easily cleaned.
Types of Emulsion Paints Offered by Colour Valley
White Emulsion Paint – Ideal for creating bright, spacious interiors with a refined look.
Tractor Emulsion Paint – Known for its affordability and smooth finish, perfect for budget-friendly home makeovers.
Premium Interior Wall Paint – Provides a luxurious finish with superior washability and stain resistance.
Exterior Emulsion Paint – Designed to resist weather elements, ensuring a long-lasting fresh appearance.
How to Use Colour Valley Emulsion Paints for the Best Results
Prepare the Surface – Ensure walls are clean, dry, and free from dust or grease before application.
Apply a Primer – A good primer enhances adhesion and extends the paint’s lifespan.
Use Quality Tools – Rollers provide an even coat, while brushes help with detailing.
Apply in Layers – Two coats are recommended for uniform coverage and a rich finish.
Allow Proper Drying Time – Ensure each coat dries completely before applying the next.
Beat the Heat with Colour Valley Paints
With rising temperatures, your walls need extra protection. Colour Valley’s heat-resistant emulsion paints reflect sunlight, keeping interiors cooler while preventing cracks and peeling caused by thermal expansion. Our formulations also resist humidity, making them ideal for Indian climates.
Why Colour Valley is the Best Paint Manufacturer in Gwalior
As a trusted paint manufacturer in Gwalior, Colour Valley is committed to delivering top-quality paints that enhance and protect your home. Our extensive range of interior and exterior paints caters to every style and budget, ensuring superior performance and aesthetics. Whether you are repainting your home or giving it a fresh look, Colour Valley has the perfect emulsion paint for you.
Upgrade your home with Colour Valley – where quality meets innovation.
0 notes
Text
Garage Epoxy Flooring: The Durable Upgrade Your Space Needs
Why Garage Epoxy Flooring Is Worth It
Garage floors take a beating. From oil stains to heavy tools, they go through daily wear. But there's a solution that boosts both durability and appearance: Garage Epoxy Flooring. If you're searching for epoxy flooring services near me, this guide breaks down everything you need to know. Whether you're a homeowner, a contractor, or just tired of looking at a cracked floor, you're in the right place.
At Brush Masters Painting Inc, we bring years of residential and commercial experience, helping homeowners and business owners upgrade with confidence.
What Is Garage Epoxy Flooring?
Epoxy flooring is a system that bonds a resin and hardener to form a rigid plastic material. It's strong, chemically resistant, and sticks to concrete like a glove.
Key Benefits:
Long-lasting finish
Resistant to stains and chemicals
Slip-resistant textures available
Custom colors and finishes
Easy to clean and maintain
Why It’s Ideal for Garages
Garage epoxy flooring can handle:
Heavy vehicles
Spills from oil, gas, and cleaners
Constant foot traffic
Humidity and temperature changes
Different Types of Epoxy Flooring Services
1. Residential Garage Epoxy Flooring
Perfect for homeowners who want a clean, sleek garage without constant maintenance.
2. Commercial Epoxy Flooring
For businesses that require durable flooring in service bays or maintenance areas.
3. Industrial Epoxy Flooring
Used in warehouses and production facilities. Built to handle forklifts, machinery, and more.
4. Basement Epoxy Floors
Want to waterproof and finish your basement floor? Epoxy is great for moisture-prone spaces too.
5. Epoxy Flake and Metallic Options
Flake Epoxy: Colored flakes added for texture and a terrazzo-like look
Metallic Epoxy: Swirled colors for a high-end, marbled finish
Signs You Need Epoxy Flooring
Your garage floor may need attention if you see:
Cracks and chips in the concrete
Persistent stains from oil or chemicals
Uneven surface
Dusty, chalky residue on the floor
These signs mean it's time to consider epoxy flooring services in San Joaquin or nearby areas.
How Garage Epoxy Flooring Is Installed
Professional installation ensures the job lasts for years. Here’s what to expect:
Step-by-Step Process:
Surface Prep: Clean and grind the floor for adhesion
Crack Repair: Fill and level damaged areas
Primer Layer: Helps epoxy bond with the surface
Epoxy Application: Layered and spread evenly
Topcoat Seal: Adds durability and shine
Pro Tip: Avoid DIY kits from big box stores. They lack industrial-grade quality and often peel within months.
Why Hire Pros Like Brush Masters Painting Inc?
Searching for epoxy flooring services near me or specifically epoxy flooring services in San Joaquin? Here's why locals trust us:
Trained and certified installers
Industrial-grade epoxy materials
Full site preparation and clean-up
Custom design options
We serve:
Homes
Commercial garages
Auto shops
Warehouses
Common Questions About Garage Epoxy Flooring
How long does epoxy garage flooring last?
With professional installation, expect 10–15 years or more.
How long before I can walk or park on it?
Light foot traffic: 24 hours
Vehicles: 3–5 days
Will it crack or peel?
Not when installed correctly. Surface prep is key.
Is it slippery?
We offer slip-resistant finishes to make it safe in wet or oily conditions.
Maintenance Tips
Garage epoxy flooring is low-maintenance, but here’s how to keep it looking good:
Sweep regularly to avoid dust buildup
Mop with a gentle cleaner monthly
Wipe up oil or chemical spills quickly
Avoid dragging sharp tools or metal objects
Ideal for More Than Just Garages
While it’s great for garages, epoxy flooring is also ideal for:
Basement Epoxy Floors
Laundry Rooms
Workshops
Mudrooms
If your space needs a durable, easy-to-clean surface, epoxy fits the bill.
Get Epoxy Flooring Services in San Joaquin
Looking to transform your garage or commercial space? Brush Masters Painting Inc provides reliable, high-quality epoxy flooring services in San Joaquin and nearby regions.
Service Highlights:
Quick turnaround
On-site consultations
Budget-friendly options
Licensed and insured team
Don’t gamble with your floors. Work with a team that knows what they’re doing.
Final Thoughts: Durable, Stylish, and Practical
Garage epoxy flooring is a smart upgrade for anyone looking to protect their concrete and improve the space. Whether you need commercial epoxy flooring, basement epoxy floors, or industrial strength for your workspace, epoxy checks all the boxes.
Stop searching "epoxy flooring services near me" — Brush Masters Painting Inc is here to help.
Call to Action
Ready to upgrade your garage floor? Contact Brush Masters Painting Inc today to schedule a consultation. We’ll help you choose the right finish and get the job done right the first time. 📞 Call us or 📧 email to request a free estimate. Let’s get your floor looking and performing better than ever.
#Epoxy Flooring Services in San Joaquin#basement epoxy floors#Epoxy Flooring Services Near Me#Industrial Epoxy Flooring#commercial epoxy flooring#garage epoxy flooring
0 notes
Text
Painting Roller Brush
Introduction
Painting walls is an essential part of home improvement, whether for aesthetic appeal or maintenance. Traditional painting methods using brushes can be time-consuming and inefficient. This is where Kabawat Painting Roller Brushes come into play, providing a seamless and professional painting experience.
What is a Painting Roller Brush?
A painting roller brush is a cylindrical tool designed to evenly distribute paint on surfaces like walls, ceilings, and furniture. It consists of a rotating core covered with an absorbent fabric that ensures smooth application. Unlike conventional paintbrushes, rollers cover large areas quickly, reducing effort and improving efficiency.

Features of Kabawat Painting Roller Brush
Kabawat painting roller brushes are crafted with precision, ensuring superior performance. Here are some key features:
High-Quality Material
The roller fabric is made from durable synthetic or natural fibers, ensuring long-lasting use.
The ergonomic handle offers a comfortable grip, reducing strain on the wrist during extended use.
Smooth and Even Application
Designed to absorb and release paint evenly, avoiding streaks and uneven layers.
Ideal for both smooth and textured surfaces.
Time-Saving Efficiency
Covers large surface areas quickly compared to traditional brushes.
Reduces the need for multiple coats, saving both paint and labor.
Versatility
Suitable for all types of paints, including oil-based, latex, and emulsion paints.
Works well on various surfaces, including walls, wood, and metal.
Easy Maintenance and Cleaning
Can be cleaned easily after use, ensuring longevity.
Compatible with most cleaning solutions, allowing repeated usage.
Benefits of Using Kabawat Painting Roller Brushes
1. Enhanced Painting Experience
Kabawat rollers provide a professional touch, making DIY painting projects easier and more enjoyable. Whether you are a homeowner or a professional painter, these brushes ensure a flawless finish.
2. Cost-Effective Solution
By reducing paint wastage and minimizing reapplications, Kabawat rollers help save money on paint and labor costs.
3. Eco-Friendly Choice
With reusable and washable roller covers, Kabawat contributes to sustainable painting solutions, reducing waste and environmental impact.
4. Reduces Physical Strain
Unlike handheld brushes that require repetitive strokes, roller brushes make painting easier by covering larger sections with minimal effort.
How to Use a Painting Roller Brush Effectively
Prepare the Surface
Clean and smooth the wall to remove dust, grease, or old paint residues.
Apply a primer if necessary for better paint adhesion.
Choose the Right Roller
Use a short-nap roller for smooth surfaces and a long-nap roller for textured walls.
Load the Roller with Paint
Pour paint into a tray and roll the brush evenly to absorb paint without overloading.
Apply Paint in Sections
Use a ‘W’ or ‘M’ pattern to distribute paint evenly before filling in the gaps.
Avoid excessive pressure to prevent streaks or roller marks.
Allow Drying and Apply a Second Coat if Needed
Wait for the first coat to dry before applying another layer for better coverage.
Why Choose Kabawat for Painting Roller Brushes?
Kabawat stands out due to its commitment to quality and affordability. The brand offers a variety of roller brush options suitable for different painting needs. With a focus on user convenience, Kabawat ensures that its products are both durable and easy to use.
Where to Buy Kabawat Painting Roller Brushes
Kabawat painting roller brushes are available on online marketplaces like IndiaMART and local hardware stores. Customers can explore different sizes and designs to match their specific painting requirements.
Conclusion
Kabawat Painting Roller Brushes redefine the painting experience by making it faster, easier, and more professional. Whether for home renovations or commercial projects, these rollers offer reliability and efficiency. Upgrade your painting tools today and experience the difference with Kabawat!

For more information or to request a consultation, visit their website: https://www.indiamart.com/kabawatbrushcompany/
To stay updated with the latest posts, follow us on social media:
📸 Instagram - https://www.instagram.com/kabawatbrush/
📘 Facebook - https://www.facebook.com/kabawatbrushcompany/
📌 Pinterest - https://in.pinterest.com/kabawatb/
🧵 Thread - https://www.threads.net/@kabawatbrush
🥁 Tumblr - https://www.tumblr.com/kabawatbrush
▶️ YouTube - https://www.youtube.com/@KabawatBrushCompany
Contact: Kabawat Brush Company +91- 82096 17061 / +91- 98218 25663 https://www.indiamart.com/kabawatbrushcompany/
Digital Partner:
TVM INFOSOLUTIONS PVT LTD
Contact: TVM Info Solutions Pvt. Ltd.
+91-9004590039
Follow us on Social Media
🌐 Website
📸 Instagram
📘 Facebook
🔗 Linkedin▶️ Youtube
0 notes