#Admin Panel Dashboard
Explore tagged Tumblr posts
Visit Tumblr Blog
Explore Tumblr blogs with no restrictions, modern design and the best experience.
Last Seen Tumblr Blogs


Fun Fact
Kazakhstan’s Minister of Communications and Informatics has blocked the Tumblr site because it contained 60 sites of terrorism, extremism, and pornography in 2015.
Text
Upgrade Project Design with Minimal lite Bootstrap Admin Template
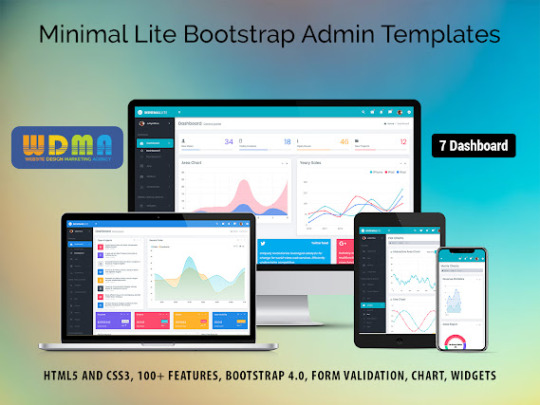
Minimal Lite – Responsive Web Application Kit boasts an extensive array of functionalities, including mobile responsiveness, flexible colour palettes, data presentation utilities, and intuitive interfaces. This Responsive Web Application Kit seamlessly integrates with numerous plugins and add-ons, enriching the administrative dashboard's capabilities. Minimal Lite comes complete with pre-built components, widgets, and styling alternatives, streamlining the development journey. Leveraging the Latest Bootstrap Beta Framework, alongside cutting-edge technologies HTML5 and CSS3, this Premium Admin Template ensures agility and adaptability. Lightweight and highly adaptable, it caters specifically to developers seeking customization options. For inquiries and acquisition of our sophisticated Bootstrap Admin Template.
#Responsive Web Application Kit#Responsive Admin Dashboard Template#Premium Admin Template#Bootstrap Admin Web App#Admin Dashboard Ui Kit#Dashboard Design#Admin Panel Dashboard#Admin Theme#WebApp Template#Dashboard UI Kit
0 notes
Text
Kamatera Review – The Best Scalable Cloud Host Yet?
New Post has been published on https://thedigitalinsider.com/kamatera-review-the-best-scalable-cloud-host-yet/
Kamatera Review – The Best Scalable Cloud Host Yet?
This Kamatera review will help you decide whether the web host is the best option for you!
Being able to scale your resource demand effortlessly as your website grows… paying only for the resources you use… no-single-point-of-failure security guarantee… what’s not to love about cloud hosting?
As a web hosting consultant I have helped hundreds of my clients choose the best web hosts to migrate their websites to – and many times, they were also upgrading from a shared or VPS plan to cloud hosting. Kamatera has always been high up in the list of options when we were considering cloud hosts, so I decided to check out their service and take you along.
In the rest of this Kamatera review, I’ll discuss all the web host’s plans, features you can expect to enjoy, how much you should budget, real-time performance figures, their dedication to customer support, and other important factors you should look out for.
Kamatera Review
Founded in 1995, Kamatera is no new kid on the block. They offer generic cloud hosting and every other cloud hosting hybrid you can think of – from managed and unmanaged cloud servers to virtual private cloud (VPC) services and cloud VPS hosting. They also offer reseller hosting for mini hosting companies and web professionals who want to cross-sell this with their core services.
I get it. The differences between their virtual private cloud hosting and cloud VPS hosting can be subtle but don’t worry we’ll discuss them in detail.
Kamatera’s cloud hosting plans are incredibly affordable too. I also like that on all their core plans, you can choose between ready-made packages or customize your plan yourself by setting the number of CPUs, memory (RAM), traffic, storage, and bandwidth. Kamatera also allows you to choose where you want your servers to be located.
Kamatera has been reviewed by 200 users on TrustPilot and users give them a rather decent 3.2 stars. Their positive reviews are from users praising how easy it to set up a server, transparent pricing, and uncommon level of support.
Kamatera Ratings – My Personal Take
It’s been a tradition for me to always give my personal ratings of each host I recommend – and Kamatera will be no different. there’s really no guarantee you can trust the reviews that many web hosts publish on their websites. Plus many businesses doctor reviews on popular platforms like TrustPilot.
The best approach to know exactly how great a web host’s services are? A non-biased overall rating of the web host through expert eyes.
Considering Kamatera’s key features and their real-life performance, here’s how I’d rate the web host on a scale of 1-5. Note that these scores are not static and only reflect their offerings at the time of this writing:
Quality My rating Why I gave this score Features and specs 5.0 Exceptional scalability, a cloud firewall, load balancing tech, and their specialized disaster recovery service makes Kamatera one of the most reliable cloud hosts on the market. They get a resounding 5.0 stars here. Pricing 4.9 Starting at $4/month for their cloud servers, Kamatera’s services are also undoubtedly some of the cheapest on the market. Many VPS plans from other hosting providers even cost more. Performance stats 4.7 My personal tests of Kamatera’s servers recorded a response time of 270 ms. That’s really decent and up there, even though a good number of hosts still perform better so they get a 4.7 in this category. Ease of use 4.0 One of the chief complaints users filed about Kamatera was how it logged you out repeatedly with an IP error message and I experienced this first-hand. Asides that, Kamatera makes it easy to manage your website backend using cPanel, Plesk, Vesta, and CyberPanel. I give them a 4.0 here Customer support guarantee 4.5 Several call lines for their different support portals, email addresses, ticketing, and a knowledgebase are how Kamatera caters to its users’ inquiries. However, I’d have loved to see a live chat option for real-time support. I give them a 4.5 here.
Kamatera Hosting Plans and Prices – 2024
Kamatera offers cloud servers, managed cloud services, virtual private cloud hosting, cloud VPS hosting, and reseller hosting. One small caveat you need to know about Kamatera’s plans is they don’t have a money back guarantee and even if you cancel your plans within the first month, they still charge you the full month’s fee.
You can pay for any Kamatera hosting plan you’ve decided on using your credit card or via Paypal.
Kamatera cloud servers
Kamatera ‘Simple’ cloud hosting plans come in three tiers and allow you to choose your server location and server specs – Windows, Linux, or SSD-optimized.
These plans start at $4/month and you get between 1-2 vCPUs, 1-2 GB RAM of memory, 20-30 GB SSD storage, and 5TB of data transfer on all plans. I love just how much server flexibility you get with Kamatera’s hosting.
Custom cloud servers on Kamatera
What’s more? Kamatera also allows you to configure your hosting plan – you can choose the number of processors you want, where you want your data centers to be located, the amount of memory you need, amount of storage, your OS, amount of traffic, and number of IPs. You also get to decide whether you want to pay for their services per month or per hour. Amazing!
Who this is for:
Kamatera’s cloud servers are for businesses that need to be able to add or remove hosting resources when necessary. With these plans, you can manage your spending exceptionally and don’t have to pay for infrastructure you may not use. Monthly payment drives home your control over what you spend even further.
Kamatera’s managed cloud hosting
Pro Managed
Features – OS monitoring, firewall & networking management, DNS setup, server resources performance metrics, apps installation and configuration, 24/7 NOC support, dedicated account manager on plans with 10+ servers.
Price – $50/month
Premium Managed
Features – Everything in Pro Managed plus custom and application monitoring, database high availability setup, application/service updates, quicker customer agent response times, and dedicated account managers on all plans.
Price – $150/month
Who this is for:
Kamatera’s managed cloud hosting plans take the hassle of managing the technical aspect of your cloud servers out of your hands. From monitoring and setup, to technical support, reporting, and application management, the host does these critical processes for you. What’s more? Kamatera also dedicates a particular human support agent to you who’ll be in charge of your account and you can count on to respond to any inquiries you might have.
Don’t know much about the server-side of websites? Kamatera’s managed cloud hosting plans might just be for you.
Kamatera’s virtual private cloud hosting
Kamatera’s virtual private cloud (VPC) packages are exactly identical to their cloud server plans on both the ‘Simple’ and ‘Customized’ fronts. They are also priced similarly and give you the same features.
Kamatera’s reseller hosting plans
Want to create your own web hosting business or are you a web dev, IT guy, or marketing professional looking to sell web hosting with your core services as a comprehensive package to your clients? Kamatera’s reseller hosting plans are just for you.
Here are some of the benefits you get to enjoy:
Managed setup
With Kamatera’s reseller hosting, their agents support you through setting up your servers and handling client requests.
Outsourced support
You have access to Kamatera’s support team to service your clients whenever they have inquiries.
Less as you grow
The more customers you get, the more discounts you get and the less you have to pay, meaning more profitability for your business.
Ready to get started with Kamatera’s reseller hosting? You’ll need to contact their sales department by creating a support ticket:
Who this is for:
Selling web hosting is one of the best ways to scale your business as a web dev, marketer, or IT professional. You can offer these as part of a comprehensive package and your clients are more likely to buy from you since they already buy your core services from you.
And for web-hosting-only businesses, you can rest assured that you have a business that’s evergreen. Websites will always need website hosting to stay online and it’s an excellent recurring revenue model.
Kamatera Features
Here’s an overview of some of Kamatera’s main features:
SSD storage
Custom hosting plans
Superior load balancing technology
High-performance block storage
Cloud firewall
Transparent pricing
Kamatera, as a cloud-only host, provides premium features that emphasize superior performance and security with its packages.
But some of its more unique features are the load balancers that instantly distribute workloads across a network of servers, ensuring high speeds and quick response times.
Kamatera’s block storage technology emulates a virtual private disk for your cloud plans and ensures there’s no single point of failure. It also ensures extremely low latency (or very quick response times and data transfer) further improving the performance of your website.
Kamatera Performance Tests
Your web host’s servers are your website home and how they perform are exactly how your website will perform. Some important factors to consider when choosing a hosting provider like Kamatera are the server response speeds and uptime.
The web host’s server speed is a measure of how quickly their servers respond and send back your website data to a visitor. On the other hand, the uptime measures the availability of their servers – i.e how much of the time their servers are online to serve up your website’s content to visitors.
The quicker the server speeds are, the less time it will take for your website to load. And the higher the uptime, the more reliable your website will be and you won’t risk losing traffic just because your website was down.
To measure Kamatera’s speed and uptime, I tested a website hosted on their platform and these were the results I got:
Kamatera’s servers started sending the first byte of data back in 276 ms. Quite impressive, even though I still expected better as some high performers respond in sub 100ms.
For the uptime, the website I tested has been available 100% of the time over the last 30 days:
This confirms their 99.9% uptime guarantee!
Kamatera’s Customer Support
It’s easy for web hosts to promise heaven and earth but once many of them take your money, it’s cricket-y silence. Kamatera does well though in terms of customer support. You can reach out to their agents via:
Phone
Kamatera has phone lines for its sales and account managers, technical support, and billing departments.
Email
You can also reach out to Kamatera via email at [email protected], [email protected], and [email protected].
I tried reaching out to their technical support agents via email and got a response in a few hours – quite decent!
Support ticket
Create a support ticket to talk with an agent, fill in your details and phone, and write down your inquiry. Kamatera will reach out to you via email.
Knowledgebase
Simple and straight-to-the-point, Kamatera’s knowledgebase is just how I like it. The built-in search engine also makes it easy to find answers to questions around server setup and security.
Blog
And finally, Kamatera has an up-to-date blog with relevant posts on latest industry information for website and business owners.
Kamatera Security Features
If there’s one thing I like about Kamatera, it’s their security guarantee. First, is their native Cloud Firewall designed to protect your website from attacks while monitoring your servers in real time.
Kamatera’s Cloud Firewall allows you to set rules and filter data packets, exclusively authorizing the entry of certified and approved data packets to your servers. What’s more? The firewall can also function as a VPN giving you even more functionality!
Another core part of Kamatera’s security is the disaster recovery portal. Unforeseen events can impact your website severely. Kamatera’s disaster recovery provides backups, recovery, and failover systems to minimize service disruptions.
Your website’s database is archived at restore points for immediate recovery. And finally, Kamatera’s backup machines are automatically triggered in the event of a system failure to ensure your user experience is not affected.
Kamatera’s hosting plans also allow you to install a free Lets Encrypt SSL certificate, giving your website the padlock seal of trust in the eyes of search engines.
Kamatera User Friendliness – Ease of Use
How to register an account on Kamatera
Setting up an account on Kamatera is super easy. Simply select the plan you want and click on ‘Create server’. You’ll be redirected to the sign up page:
Fill in your email and choose a password you can remember easily – your password should contain at least one lowercase letter, one uppercase letter, a number, and should be at least 8 characters long. Click on ‘Create Free Account’
You’ll receive a confirmation link in your email. Click on it and your account should be ready to go!
How to create a server on Kamatera
To create a new server on Kamatera, from your account dashboard, navigate to “My Cloud” on the left and under the dropdown options, select “Create New Server”
Next, select your preferred data center location and then the operating system you want on the server.
Once that’s done, choose the number of CPUs and specify your server specs – RAM and SSD storage amount.
And finally, configure the fine print – backup, select whether you want a dedicated account manager, set a password, and select your billing schedule. Click on ‘Create server’ and it should be done in a few minutes.
Kamatera control panel
Kamatera doesn’t come with a custom control panel like some other high performing hosts – SiteGround, Hostinger, and A2Hosting – however, Kamatera gives you access to cPanel, Plesk, Vesta, and CyberPanel.
How to install WordPress on Kamatera
The swiftest way to deploy WordPress on Kamatera is via your control panel. Using cPanel as an example, we’ll use the Softaculous installer:
In your cPanel account, navigate to ‘Tools’ and click on ‘Softaculous Apps Installer’.
In the search engine, type in ‘WordPress’. Click ‘Install’ and then ‘Choose protocol’.
Next, choose the domain name you want WordPress installed on and configure the directory. If you’re not sure, just choose the default values and proceed.
Configure your ‘Site Name’ and ‘Site description’. Whatever you put here will be shown in the title bar of a website visitor’s browser.
Next, configure your ‘Admin Username’, ‘Admin password’, and ‘Admin Email’. These are the login details you will use to access your WordPress dashboard once it is installed.
Select the auto update boxes for WordPress, plugins, and themes.
Now configure where you want your website backups to be stored and check the ‘Automated backups’ so Softaculous makes backups of your website at specified intervals.
Review all the installation options and click ‘Install’. Voila!
Kamatera Server Footprint
If Kamatera had just one thing going for them, it’d be their continent-wide server footprint. Their servers are spread across dozens of data centers in Europe, the Americas, and Asia and several countries in between.
This guarantees exceptional website performance for businesses targeting audiences spread across the globe.
Conclusion – Should You Choose Kamatera?
Kamatera is a very decent dedicated cloud host and their performance and built-in features are no joke. I recommend Kamatera if you’re looking for affordable packages and have outgrown your shared/VPS plans.
Their block storage, load balancers, cloud firewall, and disaster recovery ensure your website performs exceptionally and is protected from bad actors.
My only fault with Kamatera would be their account creation process. Their IP address protocol system glitches often and may log you out for no reason at all.
Visit Kamatera →
FAQs
What is Kamatera?
Kamatera is a cloud hosting company that provides web hosting infrastructure mainly to eCommerce businesses and other enterprises that require exceptionally scalable resources.
What is cloud server monitoring?
Cloud server monitoring is one of the services offered by Kamatera to customers. The host constantly monitors your website servers to prevent malware and minimize service disruptions.
What payment methods does Kamatera accept?
Kamatera accepts payments for their hosting plans via credit cards and standing order. They also accept Paypal payments.
#A2Hosting#admin#agent#agents#amazing#Americas#amp#approach#apps#Asia#backup#backups#Best cloud hosting#Blog#browser#Business#Byte#Cloud#Cloud hosting#cloud services#Companies#comprehensive#content#control panel#credit card#dashboard#data#Data Center#Data Centers#data transfer
2 notes
·
View notes
Text

1 note
·
View note
Text
How to Write JavaScript
JavaScript is a powerful and versatile programming language used widely in web development. This guide provides beginners with the basic steps necessary to start writing JavaScript code and emphasizes how it can be used to develop dynamic functionalities such as an instant admin panel.
Understanding the Basics
Before diving into JavaScript, it's essential to have a grasp of HTML and CSS, as these technologies work together to create interactive web pages. JavaScript can manipulate the elements and styles defined by HTML and CSS, making it a critical tool for dynamic web applications.
To start writing JavaScript, you can embed the code directly within an HTML document using the <script> tag or link to an external JavaScript file. This separation of concerns promotes cleaner code, easier maintenance and better performance.
Working with Functions and Events
JavaScript functions are blocks of code designed to perform particular tasks when called. Here's a simple example:
To make your webpage interactive, JavaScript uses events. Events are actions that occur as a result of the user's interaction, such as clicks, mouse movements or keyboard actions. You can set up event listeners to trigger functions, enhancing the user experience. For instance, if you're developing an instant admin panel, you might use a button-click event to fetch and display user data dynamically.
Debugging and Tools
As you write more complex JavaScript, debugging becomes crucial. Modern browsers come equipped with developer tools, which include a console where you can test and debug your JavaScript code. These tools also allow you to inspect HTML elements and view any changes made through JavaScript in real time.
With these fundamentals, you'll be well on your way to writing effective JavaScript for various applications, from adding simple animations to creating an admin panel. Practice regularly and utilize online resources to deepen your understanding and refine your coding skills.
Read a similar article about admin panel software here at this page.
0 notes
Text
Bootstrap Templates to Build a Stunning Online Portfolio
LettStartDesign is a marketplace from where users can discover high-quality website templates. We offer a variety of website templates consisting of landing pages, HTML templates, Bootstrap templates, admin dashboards, angular templates, and nextjs templates built with modern web standards. Using LettStartDesign templates, you can create a website, make a high-quality home page, a landing page for support, and a service website followed by the best web standards.
The best bootstrap website templates that you will at any point find for your site. Basically founded on Bootstrap 4 and 5 to capitalize on your site or impending task. We take care of basically any class like Internet business, business, portfolio, blog, training, photography, one page, point of arrival, and some more. We discharge a format consistently, and we are focused on making the most broad determination of free responsive bootstrap themes made. A large number of these templates are totally free. Bootstrap has assumed control over the world, and a great many engineers are utilizing it, however we made it above and beyond and took Bootstrap format improvement under our umbrella. With north of 1,000 premium quality formats, we have changed the game for eternity! Because of these shocking Bootstrap portfolio landing pages, fostering a site for yourself or your clients has never been more straightforward.
free Bootstrap Templates premium bootstrap templates bootstrap templates 2023 best free bootstrap templates Bootstrap admin Dashboards
Are you want to submit a free blog post? Writing a post is a great way to express your thoughts and share your experiences with a larger audience. Blog Acadamy offers a free blog post submission. Benefits of submitting blog posts on Blog Acadamy
#bootstrap html themes#Bootstrap Five Templates#Bootstrap Templates#Bootstrap admin Dashboards#Bootstrap admin Panels#Bootstrap admin Templates#bootstrap templates 2023#free bootstrap templates
0 notes
Photo
false
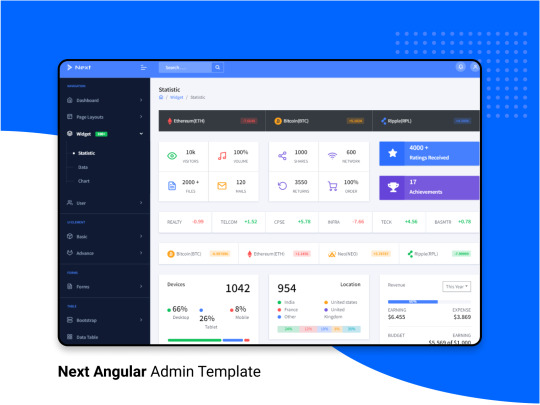
Hello Friend, Next Angular admin is a Premium Admin Dashboard template with a unique & modern design concept.
Next Admin is super manageable, robust, clean & modern responsive. it is a fully customizable template.
#admin dashboard#Web Template#web design#webdev#admin panel#dark theme#web development#web developers#programming#programmers#web design trends#templates#HTML#bootstrap templates#ThemeForest#100daysofcode#coding#angular js#angularjs
3 notes
·
View notes
Text
How to Enable Auto-Sync Photos from Dropbox to WordPress?
Managing media files and keeping them organized on your WordPress website can be a daunting task. Dropbox users can now simplify this process with the powerful File Manager for Dropbox (Integrate Dropbox plugin), which allows seamless auto-synchronization of your Dropbox folders with your WordPress site. Whether you're uploading photos, videos, or documents, this plugin ensures your content is always up-to-date and easily accessible. Here’s how you can get started:
What is Integrate Dropbox?
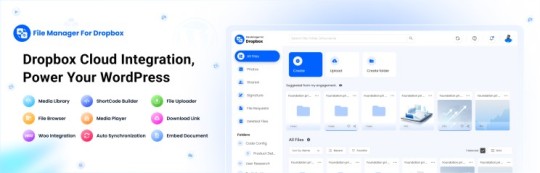
File Manager for Dropbox (Integrate Dropbox) is a WordPress plugin designed to sync your Dropbox content directly to your WordPress pages, posts, or media library. This plugin makes it easy to:
Upload images, videos, or files from Dropbox to your WordPress site.
Auto-sync shared folders for real-time updates.
Showcase Dropbox content on your website without the hassle of manual uploads.
By automating the synchronization process, Integrate Dropbox saves time and improves efficiency for bloggers, photographers, businesses, and anyone managing a WordPress site.
Who Benefits from the Integrate Dropbox Plugin?
Photographers: Automatically sync and display photo albums on your portfolio site.
Content Creators: Keep your website updated with the latest files, presentations, or videos.
Businesses: Share brochures, product catalogs, and documents seamlessly with your clients.
Using the Integrate Dropbox Plugin, you can seamlessly upload photos to your website in real time by creating a Dropbox folder and embedding it on your site using a shortcode. This functionality is perfect for events like photo booths at Christmas or New Year’s parties, where you want the latest uploads to be visible instantly.
How to Auto-Sync Photos from Dropbox to WordPress
youtube
Step 1: Install and Activate the Integrate Dropbox Plugin
Download and install the Integrate Dropbox Plugin from the WordPress Plugin Directory.
Activate the plugin from the Plugins section of your WordPress Dashboard.
youtube
Step 2: Connect Your Dropbox Account
Go to Settings > Integrate Dropbox in your WordPress admin panel.
Click Connect Dropbox Account.
Authorize the connection by logging in to Dropbox and allowing the app access.
Step 3: Create a Dropbox Folder for Uploads
Log in to your Dropbox account.
Create a new folder named, for example, Event Photos.
Share the folder with your event team or photographers, allowing them to upload photos in real time.
Step 4: Sync the Dropbox Folder with Your Website
In your WordPress dashboard, navigate to the Integrate Dropbox section.
Click Shortcode Builder and select Gallery or Slider Carousel module.
Choose the Dropbox folder (Event Photos) you created earlier.
Customize display settings like layout, style, and auto-refresh interval.
Copy the generated shortcode.
Why Use the File Manager for Dropbox Plugin?
Here are a few reasons why Dropbox users find this plugin invaluable
Effortless Media Management: Say goodbye to manually downloading files from Dropbox and re-uploading them to WordPress. With auto-sync, your Dropbox content is always mirrored on your site.
Real-Time Updates: Any changes made in your Dropbox folder are automatically reflected on your WordPress site. This feature is particularly useful for shared folders, ensuring collaboration is seamless.
Streamlined Image and Photo Uploads: Photographers and content creators can easily showcase their work by syncing their image folders directly to WordPress. No need for duplicate uploads or tedious file management.
Embed Dropbox Content: Display Dropbox files in a visually appealing format on your WordPress posts and pages, perfect for portfolios, galleries, or downloadable resources.
Customizable Settings: Configure folder synchronization, access permissions, and display preferences to meet your specific needs.
Wrapping Up
File Manager for Dropbox plugin simplifies your workflow and eliminates the hassle of manual uploads, making it the perfect solution for Dropbox users who rely on WordPress. To learn more about this plugin and its features, visit the plugin directory or explore the settings after installation.
Start syncing your Dropbox folders today and elevate your WordPress site to the next level!
5 notes
·
View notes
Text
@7wolfmoon replied to your post “I'm missing something. There's no reason why I...”:
whoa. thats really weird. what do you mean by laoded up the admin panel? did you mean to log in in the first place?
I meant to log in, but when I opened up the site, I was already "nameless-brand" with the admin version of the dashboard. Can't log out either or make an account either.
Also the admin dashboard does nothing except maybe remind me that I'm really just along for the crazy ride that is Tunglr.
16 notes
·
View notes
Text
How to increase your Magento application speed?

Understanding the Magento application and its challenges
The Magento application is a popular e-commerce platform that provides businesses with a robust and scalable solution for their online stores. However, one of the common challenges faced by Magento users is the slow speed of their applications. This can have a significant impact on the user experience, resulting in decreased customer satisfaction and lower conversion rates.
BigCloudy offers best optimized and caching hosting services and prioritizes delivering an exceptional hosting experience tailored specifically for Magento websites, ensuring optimal speed, reliability, and overall performance for online businesses built on this powerful e-commerce platform.
Introduction to BigCloudy and its features
BigCloudy is a powerful platform that can help optimize the speed of Magento applications.
It is designed to address the common issues that slow down Magento applications and provide businesses with a faster and more efficient online store.
One of the key features of BigCloudy is its advanced caching capabilities.
Another key feature of BigCloudy is its server optimization capabilities. It provides recommendations for optimizing the server configuration and ensures that all software components are up to date.
By following these recommendations, businesses can ensure that their Magento applications are running on an optimized and efficient server environment.
How to get started with BigCloudy in your Magento application?
Getting started with BigCloudy in your Magento application is a straightforward process. The first step is to sign up for a BigCloudy account and install the BigCloudy extension in your Magento store.
Once the extension is installed, you can access the BigCloudy dashboard and start optimizing your application.
The BigCloudy dashboard provides a range of tools and features to optimize your Magento application.
You can configure caching settings, optimize database queries, and receive recommendations for server optimization.
The dashboard also provides real-time performance insights and analytics to help you monitor the speed and performance of your application.
10 Actionable Steps to Improve Magento 2 Speed
Below are ten practical steps to help you enhance your Magento 2 store’s performance and create a seamless shopping experience for your customers.
Step 1- Optimize Server and System Requirements
The choice of hosting and system requirements are critical factors that influence your Magento 2 store’s speed. To boost performance, consider the following:
Server Requirements: Opt for a dedicated server or VPS hosting instead of shared hosting, as Magento requires more resources to run efficiently.
System Requirements: Familiarize yourself with the necessary system requirements for Magento 2, which can be found in their official documentation.
Step 2- Update to the Latest Version of Magento 2
Regularly updating your Magento 2 store to the latest version ensures optimal performance, as each update includes performance improvements and other tweaks. To upgrade your Magento 2 store, follow their comprehensive guide, Step 3- Implement Caching Strategies
Caching can significantly improve your Magento 2 store’s speed. Some caching strategies include:
Enable Varnish Cache: Varnish Cache is a powerful caching solution that can help improve Magento 2 loading speed. To enable Varnish Cache, follow the steps outlined on their website.
Memcached is a free, open-source distributed memory object caching system that reduces database load. Learn how to configure Memcached for Magento 2.
Database read speed is a common reason for slow Magento 2 site performance. To address this issue, enable Flat Catalog for categories and products by following these steps:
Step 4- Enable Flat Categories and Products
Log in to your Magento store’s admin panel.
Navigate to Store > Configuration > Catalog.
Click on Catalog under the Catalog tab.
In the Storefront section, set Use Flat Catalog Category and Use Flat Catalog Product to Yes.
Step 5- Optimize JavaScript and CSS
Optimizing JavaScript and CSS files can enhance your Magento 2 store’s speed. To minimize and merge these files, follow these steps:
Log in to your Magento store’s admin panel.
Navigate to Store > Configuration > Advanced.
Click on Developer under the Advanced tab.
In the Javascript Settings section, set Merge JavaScript Files, Enable JavaScript Bundling, and Minify JavaScript Files to Yes.
In the CSS Settings section, set Merge CSS Files and Minify CSS Files to Yes.
Step 6- Set Up a Content Delivery Network (CDN)
A CDN can help speed up your Magento 2 store by serving static content from a network of servers located closer to end users. To configure a CDN for your Magento 2 store, check their guide.
Step 7- Choose a Lightweight Theme
Selecting a lightweight and fast theme can significantly improve your Magento 2 store’s loading speed. Browse through a collection of the best Magento 2 themes to find the right one for your store.
Step 8- Use Reliable Extensions
Using unverified or buggy extensions can slow down your Magento 2 store. Ensure you only use reliable, bug-free third-party extensions from reputable sources. Explore this collection of the best Magento 2 extensions for your store.
Step 9- Optimize Images
Proper image optimization can improve your Magento 2 store’s speed. Consider the following image optimization practices:
Compress images to reduce file size.
Use an Image Optimizer module to automate the optimization process.
Use PNG or SVG format for your store’s logo.
Save product images in JPEG format.
Step 10- Utilize Magento 2 Performance Optimization Services
If you need additional assistance in optimizing your Magento 2 store’s speed and performance, consider using professional Magento 2 performance optimization services These services can help analyze your website and provide tailored solutions to improve your store’s performance.
Conclusion
In conclusion, BigCloudy is a powerful platform that can help optimize the speed of Magento applications. By addressing common issues such as improper caching configuration, inefficient database queries, and server optimization, BigCloudy ensures that your Magento application delivers a fast, seamless, and enjoyable user experience. Get started with BigCloudy today and unlock the full potential of your Magento store.
3 notes
·
View notes
Text

To the anon who brought up the concern about lack of replies and closed starters, we kindly invite you to come off anon and have a more specific discussion with us if you feel comfortable doing so. As admins, we've noticed that some notifications might be missing from our activity panel and dashboard, which could be contributing to the issue.
In the meantime, we'd like to remind everyone to reply to each other and be considerate of one another's efforts. Requesting closed starters should only be done if you have the time to respond within a reasonable window. It's not fair for those who put effort into writing them to be left hanging for days without a response.
If you're facing any issues, we encourage open communication with us. Sharing your concerns off-anon allows us to better assist and support you. With that said, we truly appreciate each and every one of you; you all are amazing, and we value your presence in our community every day. Thank you! 🤍
5 notes
·
View notes
Text
Skystra Review – The Best New Host on The Market?
New Post has been published on https://thedigitalinsider.com/skystra-review-the-best-new-host-on-the-market/
Skystra Review – The Best New Host on The Market?
As an online marketer and web hosting consultant who’s helped dozens of clients set up their websites, I have tested 100s of web hosting providers, but younger web hosting companies have always been the most fun to evaluate.
When you are trying to make a name for yourself in the market, you go above and beyond with superb customer support, affordable plans, and excellent performance. Skystra is one such underdog host, and with their customers continuing to hail them as their Robin Hood, I just had to check out what they’re about.
In this Skystra review, we’ll take a look through the web host’s plans, the price tag on these plans, how fast their servers are, their support portals, and everything else you should consider as a website owner. Let’s dive in!
Skystra Review
As one of the young web hosts on the market, Skystra is just a little over a decade old and was founded in 2011. While they don’t explicitly say how many customers they cater to, they have an impressive client profile of bloggers, business owners, marketing agencies, and so many more.
Skystra offers cloud hosting packages best suited for small to mid-sized websites. Their all-in-one double-tier packages are then optimized for WordPress websites, eCommerce websites, web apps, and other platform-specific hosting.
On all Skystra plans, you get SSD storage, a free SSL certificate, and a professional email address. What’s more? Skystra has a rather impressive reputation with helping website owners recover their hacked websites. Transferring your website to Skystra is also free. Skystra has been reviewed by over 110 people on TrustPilot and scores an impressive 4.4.
Skystra Pros and Cons
Skystra has very affordable web hosting plans
Their servers are incredibly fast
Not having too many customers means dedicated support
They offer free website migration
Their pricing is transparent
Their web hosting plans are straightforward
They have an excellent history resolving hacked websites
They may not have the resources for large websites
Not enough details about their hosting plans
Skystra Rating – Here’s How I’d Rate Them
With thousands of web hosts on the market, it can be hard to choose the right provider for your website. Plus, there’s really no guarantee you can trust the reviews that many web hosts publish on their websites.
The best approach to know exactly how great a web host’s services are? A no-bs review of the web host from a third party who’s in no way affiliated with them – me.
Considering the key features that Skystra offers and how they perform in real life, here’s how I’d rate the web host on a scale of 1-5. Note that these scores are not static and do not reflect how I’d rate them in the future, should their offerings improve:
Quality My rating Why I gave this score Features and specs 4.8 SSD storage, cloud hosting, a free SSL certificate, free email and free website transfer make Skystra an amazing host. However, they only offer one hosting type in two tiers. Pricing 5.0 Skystra starts at $4/month for its GO plan for 50% off and is renewed at $8/month after the first year. This makes them one of the most affordable hosts where most big providers charge between $10-15/month for shared hosting. Performance stats 5.0 I tested a website hosted on Skystra myself and got an incredible server response time of 72 ms. This places them at the very top in terms of performance. Ease of use 4.9 It’s super easy to set up an account on Skystra. The web host also gives you access to your website’s backend via a custom hosting control panel. Customer support guarantee 4.9 And here, Skystra shines. With the founder of the company himself and other executives helping migrate websites, Skystra’s customer support is unrivaled. However, they are yet to roll out other support portals like live chat.
Skystra Plans and Pricing
Skystra launched as a cloud hosting platform and offers just one plan in two tiers to website owners. When you choose a plan on Skystra, you can pay via credit card.
Cloud hosting
GO
Storage – 10 GB SSD storage
Number of websites – 1 website
Features – Free SSL, free transfer and free professional email
Price – $4/month billed annually
PLUS
Storage – 50 GB SSD storage
Number of websites – 5 website
Features – Free SSL, free transfer and free professional email,
Price – $9/month billed annually
Depending on how many websites you can choose either Skystra’s GO hosting plan for 1 website or the more economical PLUS plan that allows you to host 5 websites at $9/month for the first year. For new users, Skystra’s web hosting plans are sold at 50% off meaning after the first year, your hosting fees double – which is still very fair compared to other web hosts that woo you in with cheaper prices that then triple or quadruple from the next year.
Who this is for:
Skystra’s cloud hosting plans are best for small to mid-sized website owners that have little or a decent amount of traffic. Bloggers, creatives, marketers, agencies, and freelancers enjoy Skystra’s plans the most.
Skystra’s Features
Free SSL and professional email
SSD storage
Free website migration
AI-powered web application firewall
1-click installs for common apps – WordPress, Joomla, Drupal
Renewable energy matched servers
Online-only support
Skystra custom hosting control panel
Skystra stands out amongst other web hosts thanks to its superior performance and simplistic hosting plans. No need to navigate through dozens of plans with complicated conditions and features – you know exactly what you get. They also stand out with their custom hosting control panel that makes managing your hosting account and website’s backend super convenient.
Skystra’s Performance Tests
And onto Skystra’s real-life performance. It’s super important to consider the speed and uptime of any web host you are looking at, and Skystra will be treated no differently.
The web host’s server response speeds contribute to the overall loading time of your website. The faster the web host’s servers respond, the quicker your website will load.
Experts recommend that websites should load within 2 seconds to minimize customer bounce rate so your choice of a web host also affects how much traffic your website gets.
The uptime, on the other hand, tells us how much of the time the web host keeps your website active. You don’t want a web host that has service disruptions every other day as this will also mean you can lose potential customers who can’t access your website.
Skystra hosting speed test
To test Skystra’s speed, I used GTMetrix to analyze one of the websites hosted o their platform. These were the results:
Skystra’s servers had an incredible server response time (time to first byte) of 70 milliseconds.
And the overall performance was 100%, which is excellent.
To test Skystra’s uptime, I ran the same website on Uptime Robot and got these results:
Skystra’s servers were up 100% of the time over the last 30 days.
Skystra’s Customer Support
In terms of support, Skystra is decent – not spectacular. You get support on Skystra via:
Skystra knowledgebase
Here, you’ll find all the answers to questions on managing your website, email, setting up your domain names, etc. The help center comes with a search engine to help you find answers quickly.
Support ticket
To reach Skystra as a non-customer, you can create a ticket:
I tested their support ticket and was a bit disappointed because it took at least 7 hours to get a reply back. However, I got the answers to all the questions I asked.
Human support
Skystra also prides itself on providing 100% human support. Unlike most big hosts with too many customers to cater to who will have you chatting with a bot initially, Skystra only provides support through human agents.
My thoughts: Skystra is great for their human support and while the support process itself is excellent, they don’t have as many support channels as I’d like to see.
I was looking forward to seeing a blog section, live chat, tutorials page, or maybe phone support. However, most of these aren’t on Skystra. Their live chat support becomes available after you pay for a plan.
Skystra’s Security Features
Security is the watch-word of the digital age where cyberattackers are getting more sophisticated. To encrypt your website’s data, Skystra gives you a free SSL certificate out-of-the-box, ensuring your website has the ‘padlock’ and ‘HTTPS’ seal of trust.
With every plan you purchase on Skystra, you also get a web application firewall powered by AI that detects any threats to your website’s security automatically and quarantines them.
Skystra also integrates seamlessly with many of the well known content delivery networks (CDNs), opening up your website to be stored across a network of servers globally and improving your website’s performance. All your third-party software is also updated automatically.
Skystra’s Website Builder
This is going to be a short one. Skystra doesn’t come with any native website builder – it’s to be expected though, they are a young host. However, Skystra offers 1-click installs to the most popular content management systems (CMS) and no-code website builders on the market – WordPress, Drupal, and Joomla.
Skystra’s User Friendliness
So how easy is it to use Skystra for your website management essentials – creating an account, the control panel, and installing WordPress? Let’s take a look:
How to create an account on Skystra
Like with most web hosting providers on the market, to create an account you’d just need to buy one of their hosting plans.
Step 1
Choose the plan you want and click on ‘BUY NOW’. You’ll then be redirected to the domain name confirmation/checkout page.
Step 2
Next, choose the addons you want and fill in your personal details:
Step 3
Finally, fill in your payment details. You’ll then receive a confirmation email to the email address you provided with your login credentials. And that’s it! You now have a hosting account with Skystra.
Skystra’s control panel
Skystra actually gives you a custom control panel to manage your website’s backend. I was genuinely impressed as it’s only usually the very top hosting providers that offer this.
Through your Skystra control panel, you can access settings for your domains, emails, website files, database, security features, and so much more.
Plus their user account dashboard is quite decent too:
Systra’s control panel is more user-friendly than the traditional cPanel making the platform incredibly easy to use.
How to install WordPress on Skystra
Installing WordPress on Skystra is super easy. Simply login to your hosting control panel and click the dropdown at the top right beside the internet logo:
Next, scroll to the ‘tools’ section and click on ‘WordPress Manager’:
This opens up the WordPress installation tool.
Click on ‘Install’.
You’ll then be prompted to select the domain name you want WordPress installed on.
Under ‘Choose installation URL’ select your domain name. Now scroll down to the ‘Admin Account’ section and choose your Admin Username and ‘Admin Password’.
You can decide to leave the default ones or put in new ones – whichever you choose, make sure to copy and save them securely as you’ll need them to login. Next fill in your ‘Admin email’ which can be any email address you have access to.
Double check all your details and click ‘Install’
You’ll then get a confirmation page with your Administrative URL which is the link you’ll use to login to your WordPress dashboard.
And that’s it!
Conclusion: Do We Recommend Skystra?
Skystra is a relatively young hosting provider that’s revolutionizing customer support and ease of use. They offer 100% human support and quite surprisingly, a custom control panel that many big hosts don’t even have.
What’s more? Their double-tier single plan doesn’t leave too much to figure out – you can simply one of the two and move forward quickly. I absolutely recommend Skystra for small to mid-sized websites who need a dependable host they can count on. Their performance stats too are through the roof!
On the other hand, they are not the best host for people with much larger websites who may need dedicated resources. Another aspect they can improve on is to have more support channels like live chat and phone support for quicker contact.
Visit Skystra →
FAQs
Is Skystra’s phone number available?
Skystra does not list any phone numbers for support on their website. However, you can reach out to one of their support agents by creating a support ticket.
Need a host for new travel blog – Skystra or BlueHost?
Creatives and bloggers love Skystra in particular thanks to their dedicated support and superior performance. BlueHost, on the other hand, provides way more features than just hosting – domains, website builder, email, etc.
If you own a travel blog, I recommend Skystra because their success stories have been mostly with bloggers and creatives.
#admin#agents#ai#amazing#approach#apps#Blog#bot#box#Business#Byte#Cloud#Cloud hosting#CMS#code#Companies#content#content management systems#control panel#credentials#credit card#dashboard#data#Database#details#domain name#domain names#domains#double#dropdown
0 notes
Text
Bootstrap Admin Template – Developing Complex Progressive Web App
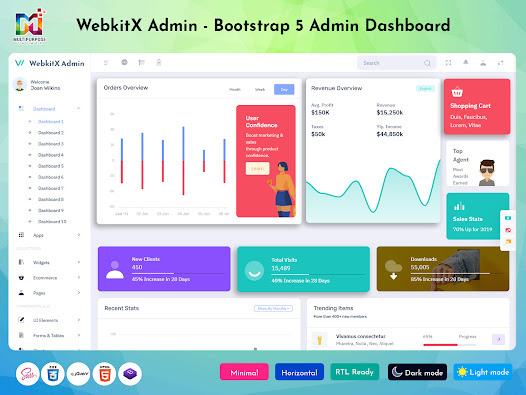
Bootstrap Admin Template have become an integral part of web applications and websites. Whether for managing content, monitoring performance, or tracking business metrics, admin templates provide an organized way to interact with complex data. One of the most popular frameworks for developing admin dashboards is Bootstrap, an open-source front-end framework. Its flexibility, scalability, and ease of use have made it a go-to choice for developers.
Our Bootstrap Admin Template comes with a powerful set of features, including seven analytics dashboards and three CRM dashboards, all built with the latest Bootstrap 5 framework. In this article, we will delve into the importance of Bootstrap admin templates, explore the benefits of our master dashboard, discuss the web development process with our Bootstrap admin template, and explain why we stand out in the competitive market.
1. Importance of Bootstrap Admin Template
Admin templates serve as the backbone of modern web applications, providing users with a structured and functional interface to interact with data. In any web application, especially those dealing with large amounts of information or business operations, managing the backend is just as crucial as the frontend. Here's why a Bootstrap Admin Template is important:
a. Consistency and Efficiency
Bootstrap provides a consistent design system that ensures your Master Dashboard looks polished and professional across all devices. The admin template built on Bootstrap follows this system, which results in a responsive layout, intuitive user interface, and easy-to-use components. By leveraging Bootstrap, you avoid having to create these elements from scratch.
b. Time-Saving
For web developers, time is a precious resource. A pre-built Bootstrap Admin Template like ours saves a significant amount of time during the development process. Instead of building every feature from the ground up, developers can use the template’s pre-built features, like navigation menus, charts, and tables, which speeds up development without compromising on quality.
c. Mobile Responsiveness
In today’s mobile-first world, ensuring that your admin panel works flawlessly on mobile devices is crucial. Bootstrap’s grid system allows developers to create responsive layouts with minimal effort, ensuring your dashboard will look great on screens of all sizes—whether it’s a desktop, tablet, or smartphone.
d. Customization Flexibility
While WebApp Template come with a set of predefined elements, they also offer ample room for customization. Developers can easily modify or extend the templates to meet the specific needs of their project. From changing the color scheme to adding new widgets, Bootstrap admin templates allow easy modification to align with the brand’s identity.
e. Built-In Components and Widgets
Bootstrap is known for its comprehensive library of UI components. From buttons and cards to forms and modals, everything you need to create an admin dashboard is available. Bootstrap 5 offers enhanced features like improved grid layouts, native custom form controls, and additional utilities, all of which help in developing complex admin dashboards.
2. Benefits of Our Master Dashboard
Our Master Dashboard, built with the latest Bootstrap 5 framework, offers a comprehensive solution for managing and monitoring all aspects of your application or business. It is packed with features to ensure an efficient and productive experience for both administrators and end-users. Here are some of the key benefits:
a. Comprehensive Analytics Dashboards
Our dashboard offers seven analytics UI Dashboard, each tailored for specific use cases. Whether you’re tracking user engagement, sales data, traffic patterns, or marketing performance, these dashboards are designed to give you valuable insights at a glance.
Real-Time Data: The analytics dashboards provide real-time data, allowing you to make informed decisions quickly.
Advanced Charts and Graphs: With rich charts, graphs, and tables, the dashboard transforms raw data into digestible, visual representations.
Customizable Widgets: You can add, remove, or customize widgets to suit your specific needs.
b. CRM Dashboards for Customer Relationship Management
Our three CRM dashboards are designed to help businesses track and improve their customer relationships. The dashboards offer valuable insights that assist in managing leads, tracking sales pipelines, and improving customer satisfaction.
Lead Management: Easily track the status of leads and opportunities with detailed reports and timelines.
Customer Interactions: Monitor customer interactions, allowing your team to provide more personalized service.
Task and Activity Tracking: Keep an eye on sales activities, ensuring that important tasks are completed on time.
c. User-Friendly Interface
One of the core principles of our Dashboard UI is its user-friendly interface. Thanks to Bootstrap 5’s sleek and intuitive design, the dashboard is easy to navigate, even for non-technical users. The layout is structured logically, allowing users to access the information they need without confusion.
d. Customization and Scalability
Our Master Dashboard is not just functional but also highly customizable. You can change the design, add new features, or tweak existing ones to better fit your business requirements. Whether you need to add a new widget or adjust the layout for specific devices, the template allows easy modifications. Plus, the modular structure of the dashboard makes it scalable, meaning it can grow as your business or application does.
e. Optimized Performance
Our Admin Dashboard UI is optimized for performance. It’s lightweight, ensuring fast loading times, even when dealing with large datasets. Bootstrap’s modular design helps ensure that only necessary resources are loaded, keeping the page load time to a minimum.
3. Web Development Process with Our Bootstrap Admin Template
The web development process can be complex, especially when building an admin dashboard that requires features like analytics, CRM tools, and real-time data tracking. Our Bootstrap Admin Template simplifies this process and makes it more efficient.
a. Step 1: Planning and Requirement Gathering
The first step is to clearly define the project’s goals and understand the requirements. This involves determining the key metrics you want to track, understanding user roles (admin, manager, user), and identifying the features you need, such as the analytics dashboards, CRM tools, or data visualizations.
b. Step 2: Designing the User Interface
Once the requirements are set, the next step is designing the user interface. The UI design ensures the user experience (UX) is smooth and intuitive. Thanks to Bootstrap 5, developers have access to a modern, responsive grid system that adapts to any device, ensuring a seamless experience across desktops, tablets, and smartphones.
Our template provides pre-designed pages, including dashboards, login screens, and user management, allowing you to build a professional-looking admin panel without the hassle of custom design.
c. Step 3: Setting Up the Template
After the design phase, the next step is integrating the Bootstrap Admin Template into the project. This is where the real development begins. You can begin customizing the provided template, adding your desired components, and incorporating data into the analytics and CRM dashboards.
Our Admin Dashboard UI includes built-in components like charts, tables, forms, and modals, which can be configured to fetch data dynamically and be used in the backend of your web application. The template also includes pre-configured JavaScript and jQuery components for handling events and interactions.
d. Step 4: Data Integration
Once the design and layout are ready, the next step is integrating the data. Whether you are pulling data from a database or external API, you can configure the dashboard to fetch and display data dynamically. The analytics and CRM dashboards will be connected to your backend systems, allowing the data to update in real-time.
e. Step 5: Testing and Optimization
Testing is a critical part of the development process. Our Bootstrap Admin Template is built with cross-browser compatibility in mind, so it works seamlessly on different browsers (Chrome, Firefox, Safari, etc.). You can test the template on various screen sizes and devices to ensure its responsiveness.
Performance testing is another crucial aspect. The template is optimized to handle large datasets without compromising speed or performance. Developers can use tools like Google Page Speed Insights or Lighthouse to test and improve performance.
f. Step 6: Deployment and Maintenance
Once everything is in place and tested, it’s time to deploy the application to a live environment. Our Bootstrap Admin Template ensures that deployment is smooth, whether you’re using shared hosting, VPS, or cloud services. Post-launch, you can continue to make updates and improvements as needed, thanks to the template’s scalability.
4. Why We Are Better?
In a competitive market filled with various Bootstrap admin templates, what makes our Bootstrap Admin Panel stand out? Here are a few reasons why we are the best choice for your project:
a. Built with Latest Bootstrap 5
We’ve used the latest version of Bootstrap (Bootstrap 5), which comes with new features like custom form controls, enhanced grid systems, and improved utilities. This ensures the template is future-proof and delivers an outstanding user experience.
b. Fully Responsive and Customizable
Our Dashboard Template is fully responsive and adaptable to any screen size, providing a seamless experience on desktop, tablet, and mobile devices. Plus, it’s highly customizable, allowing you to tailor it to your specific business needs.
c. Pre-Built Dashboards
We’ve included seven powerful analytics dashboards and three CRM dashboards, offering a comprehensive suite of tools to help businesses track performance and customer data effectively. The dashboards are easy to use and packed with features to boost productivity.
d. Optimized for Performance
Our Bootstrap Admin Theme is optimized for high performance, ensuring quick load times even with large datasets. This makes it suitable for high-traffic web applications and enterprise solutions.
e. Detailed Documentation and Support
We provide detailed documentation, ensuring that developers can easily understand how to use and customize the template. Plus, our dedicated support team is always ready to assist you with any questions or issues you may have.
5. Contact Us
If you are looking for a high-quality Bootstrap Admin Template to power your web application, look no further. Our master dashboard comes packed with all the features you need, from analytics tools to CRM dashboards, all built on the latest Bootstrap 5 framework.
#admin dashboard ui#Bootstrap Admin Panel#Dashboard UI#Bootstrap Admin Template#UI Dashboard#Master Dashboard
0 notes
Text
How to Integrate Your Database Data with External APIs
Application programming interfaces (APIs) are tools that allow you to take action with your data. APIs enable you to connect programs with external sources, such as databases, to create dynamic applications that provide real value to users. At their core, APIs are a set of protocols that govern how different applications exchange data, serving as an intermediary between client and server programs.
The Benefits of Using APIs
There are many reasons to utilize an admin dashboard UI to connect your data to external APIs. The biggest is to enhance the user experience. APIs can greatly improve an application's functionality, creating a data-driven experience that benefits customers, end users and even in-house data teams.
Furthermore, APIs can reduce the costs and complexities of web development. They allow you to scale your applications while significantly improving their performance.
How to Use External APIs
The first step in integrating your database data with an external API is to obtain an API key. That involves registering with the API provider. It's also wise to read all API documentation, ensuring you understand how it works, what data formats it supports, etc.
Then, you must choose which tools and languages you'll use to write and send requests to the API endpoint. Some of the most common include JavaScript, Postman, curl and Python. When integrating the external API, you use those languages to generate and send requests. The API will then produce responses with the requested data in JSON, CSV or XML formats.
Many tools and languages are available to parse those responses and make sense of the data received. From there, your goal is to decide how you display and manipulate the data received from the API. How you approach that task will depend on its purpose.
There are many ways to integrate database data with an external API. But one of the most efficient is to use an admin dashboard UI. With the right tools, you can connect your database to various APIs and put your data to good use. Define attributes of the API connection, track action history, monitor statuses and more.
Master your operations: access the ultimate admin panel now! Click for streamlined management and effortless control.
0 notes
Link

#React Admin Dashboard#Angular Portfolio Templates#Angular Dashboard Templates#Bootstrap portfolio landing pages#HTML landing pages#Bootstrap admin Panels#Bootstrap Templates
0 notes
Text
It’s fun to work on so that’s a big bonus
My current task is to create more graphs for different data and display it on the dashboard of the admin panel so the shop owners have access to the data from their website itself and don’t need to go to an external site to view it

do it :3
24K notes
·
View notes
Text
Explore the Advantages of Orbi Login
In today’s fast-paced world, Orbi Routers are well-regarded for their tri-band mesh technology, which offers expectational network speeds and eliminates dead zones. They are celebrated for providing a stable and secure internet connection. To fully benefit from these features, it’s important to understand the orbi login process.
Moreover, this page provides a comprehensive guide to logging in. We outline the essential requirements, detail the methods for completing the orbi router login procedure, and offer troubleshooting solutions in case you encounter difficulties while attempting to log in. Let’s dive into the step-by-step procedure outlined below.
How to Login Netgear Orbi Router?
Additionally, several factors are important for the login procedure of Orbi Router. Here are the initial requirements for accessing the admin panel of your networking device: an active internet connection, a web/IP address, the default admin credentials, the Netgear Orbi app, a laptop or computer, a mobile phone, and ethernet cables.
Furthermore, once you have gathered all the necessary items, you can proceed with the steps to log in to your smart router. The login process can be completed using two methods: via the web GUI method or through the Netgear Orbi app. Below, you will find clear and straightforward steps for both methods.
Orbi Login Using the Web Interface
Firstly, make sure that the Orbi device is powered on.
Now, connect the Windows system to the router’s network.
Hereon, you can use a wired connection via an ethernet cable to link with the network, or you can directly join the Wi-Fi.
Then, open the web browser and type the orbilogin.net web address in the browser bar.
Later, enter the default admin credential on the login window that appears on the screen.
Next, you visit the smart home page of the device.
After that, navigate the Basic Settings>Wireless>Edit the SSID name and pre-shared key domain.
Now, mention your network name and a powerful password for your router’s network.
Further, tap on Apply to perform and save the alterations.
Finally, you are done with the login process of the Orbi Router.
How to Login Netgear Orbi Router Through the App
First and foremost, confirm that the smartphone is connected to the present network available.
Now, install and download the modernized version of the Netgear Orbi app on your mobile phone by visiting the Play/App Store.
Then, open the app and then create a new account or use your email to register on the app.
Next, mention the valid credentials on the login window that seems on your screen.
After that, you reach the smart setup dashboard of the device.
Next, tap on the Basic>Wireless/Wi-Fi settings of the device to alter the SSID name and password domain.
Further, type the unique network name and complicated passwords in the alteration field.
Afterward, click on Save/Apply to end the login process of the networking device.
Not Able to Perform the Orbi Router Login Process? Here Are the Fix-Outs!
If you are having difficulty logging into your Orbi device, several factors could be causing the issue. Common problems include a weak internet connection, browser-related issues, power outages, or incorrect admin credentials.
It is important to resolve these issues quickly to ensure that your smart router operates effectively. Here are some effective methods to help you identify and address these problems:
Ensure that the Orbi device has a stable internet connection.
Make sure you are entering the correct admin login credentials.
Confirm that the power cord and adaptor are properly connected to a working electrical outlet.
Enter the accurate web address in the browser bar to perform the orbi login effortlessly.
Temporarily disable any VPNs, firewalls, or ad blockers while attempting to log into the Orbi Router.
Make sure you have installed the modernized version of the Netgear Orbi app on your mobile device.
Confirm that there is an adequate power supply to the Orbi device and its associated devices.
Check that your mobile phone is compatible with the Netgear Orbi app.
Consider performing a soft reset on the networking device to eliminate technical bugs and glitches.
Bottom line
Overall, the information provided above can help you access your orbi login with ease. Additionally, we have included a troubleshooting guide to assist you in resolving common issues during the login process.
1 note
·
View note