#bootstrap html themes
Explore tagged Tumblr posts
Visit Tumblr Blog
Explore Tumblr blogs with no restrictions, modern design and the best experience.
Last Seen Tumblr Blogs


Fun Fact
28.6 is the average number of monthly visits per US mobile user.
Text
Bootstrap Templates to Build a Stunning Online Portfolio
LettStartDesign is a marketplace from where users can discover high-quality website templates. We offer a variety of website templates consisting of landing pages, HTML templates, Bootstrap templates, admin dashboards, angular templates, and nextjs templates built with modern web standards. Using LettStartDesign templates, you can create a website, make a high-quality home page, a landing page for support, and a service website followed by the best web standards.
The best bootstrap website templates that you will at any point find for your site. Basically founded on Bootstrap 4 and 5 to capitalize on your site or impending task. We take care of basically any class like Internet business, business, portfolio, blog, training, photography, one page, point of arrival, and some more. We discharge a format consistently, and we are focused on making the most broad determination of free responsive bootstrap themes made. A large number of these templates are totally free. Bootstrap has assumed control over the world, and a great many engineers are utilizing it, however we made it above and beyond and took Bootstrap format improvement under our umbrella. With north of 1,000 premium quality formats, we have changed the game for eternity! Because of these shocking Bootstrap portfolio landing pages, fostering a site for yourself or your clients has never been more straightforward.
free Bootstrap Templates premium bootstrap templates bootstrap templates 2023 best free bootstrap templates Bootstrap admin Dashboards
Are you want to submit a free blog post? Writing a post is a great way to express your thoughts and share your experiences with a larger audience. Blog Acadamy offers a free blog post submission. Benefits of submitting blog posts on Blog Acadamy
#bootstrap html themes#Bootstrap Five Templates#Bootstrap Templates#Bootstrap admin Dashboards#Bootstrap admin Panels#Bootstrap admin Templates#bootstrap templates 2023#free bootstrap templates
0 notes
Text
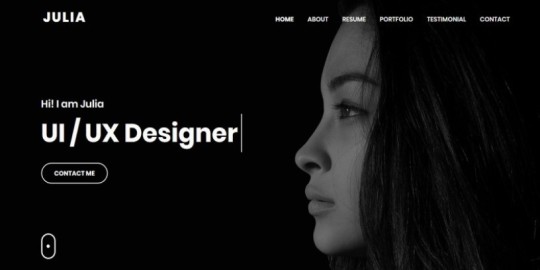
Portfolio Website Template
#designer portfolio#portfolio website#portfolio template#personal portfolio#html css#mouritheme#css#bootstrap templates#bootstrap themes#webdesign#html#css3#landing page template
7 notes
·
View notes
Text

♥ NTT docomo Toyhouse Theme♥ Hihi I made a little ToyHouse html theme!!! It took about a week to figure out how to do, so a little promo here!! Totally f2u :o39
#toyhouse#toyhouse theme#non art#i need to now make Ais actual profile in this...#i miss normal html bootstrap is such a pain in the ass
23 notes
·
View notes
Text

Investment Platforms: Investment UIUX Bootstrap 5 Admin Dashboard
Preview LearningUIUX now!
In today's dynamic financial landscape, user-friendly and intuitive interfaces are crucial for the success of any investment platform. Investment UIUX offers a powerful solution, providing a collection of high-quality Bootstrap 5 HTML templates specifically designed for investment and mutual fund management software.
Key Features of Investment UIUX:
Bootstrap 5 Foundation: Built on the robust and responsive Bootstrap 5 framework, ensuring seamless adaptability across all devices.
Investment-Specific Design: Includes pre-built pages tailored for investment tracking, portfolio management, transaction history, risk assessment, and more.
User-Centric Interface: Features intuitive dashboards, clear data visualizations, and easy-to-navigate menus for a seamless user experience.
Enhanced Data Visualization: Enables users to easily track investment performance, analyze market trends, and gain valuable insights into their portfolios.
Streamlined Development: Accelerates development with pre-built components, reusable code modules, and a well-structured codebase.
Customization Options: Offers extensive customization options to tailor the templates to your specific brand and design requirements.
Integration with Third-Party Services: Seamlessly integrates with popular financial APIs and data providers.
Benefits of Using Investment UIUX:
Reduced Development Time: Leverage pre-built components and a robust framework to significantly reduce development time and costs.
Improved User Experience: Enhance user engagement and satisfaction with a visually appealing and intuitive interface.
Enhanced Data Analysis: Empower users with powerful data visualization tools to make informed investment decisions.
Competitive Advantage: Gain a competitive edge by offering a modern and user-friendly platform to your clients.
Increased Efficiency: Streamline operations and improve productivity with automated workflows and streamlined data management.
Key Features:
50+ Ready-to-Use Pages: Includes a wide range of pre-built pages for dashboards, transactions, portfolio management, user profiles, and more.
14+ Customizable Styles: Offers a variety of pre-defined styles and color schemes to match your brand identity.
100+ UI Components: Provides a rich library of UI components, including charts, graphs, tables, and more.
Checkout now our product and portfolio 🏄���️
💌 Email Us: [email protected]
😍 Social media : Instagram | Linked In | X/Twitter
🛍️ Adminuiux Product: Themeforest | Gumroad
Preview LearningUIUX now!
#mobile app company#mobile app development#mobile app developers#mobileapp#mobile application development#bootstrap#Bootstrap themes#bootstrap templates#admin#admin dashboard#admin templates#html5 css3#dashboard html
1 note
·
View note
Text
Metronic HTML Template: Elevate Your Best Web Design Game
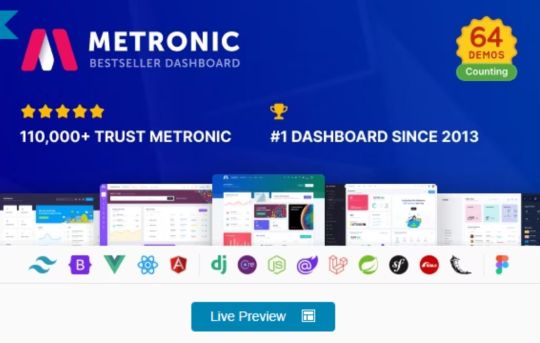
Are you looking for a reliable admin dashboard template to power your next project? Look no further than Metronic Html Template! This powerful tool is designed to help you create beautiful and intuitive admin interfaces that will impress your clients and users alike.
In this review, we’ll take a closer look at what makes Metronic Html Template such a great choice for developers and businesses alike. We’ll explore its features, functionality, and compatibility with popular frameworks like Tailwind, Bootstrap, React, Vue, Angular, Asp.Net & Laravel. So, let’s dive in!
Features
Metronic Html Template comes loaded with a wealth of features that make it an excellent choice for developers and businesses alike. Some of its standout features include:
– High Resolution: Metronic Html Template is optimized for high-resolution displays, so your dashboard will look crisp and clear on any device. – Responsive Layout: The template is designed to be fully responsive, so your dashboard will look great on any screen size.
– Well Documented: Metronic Html Template comes with comprehensive documentation to help you get up and running quickly.
– Compatible Browsers: The template is compatible with all popular web browsers, including Firefox, Safari, Opera, Chrome, and Edge.
– Compatible With: Metronic Html Template is compatible with Angular 13.x.x, AngularJS, ReactJS, Bootstrap 5.x, Bootstrap 4.x, and other popular frameworks.
– Admin Dashboard Template: Metronic Html Template is designed specifically for use as an admin dashboard template, so you can be sure it has all the features you need to create a powerful and intuitive dashboard.
– Admin Themes: The template comes with a range of pre-built themes to help you get started quickly.
– PHP Files: Metronic Html Template comes with all the PHP files you need to get started quickly.
– HTML Files: The template comes with a range of pre-built HTML files, so you can get started quickly.
– CSS Files: Metronic Html Template comes with a range of pre-built CSS files to help you customize your dashboard.
– Sass Files: The template includes Sass files for advanced customization.
– SCSS Files: The template includes SCSS files for advanced customization.
– JS Files: Metronic Html Template includes a range of pre-built JavaScript files to help you get started quickly.
Compatibility
Metronic Html Template is compatible with a wide range of popular frameworks and platforms, including:
– Tailwind – Bootstrap – React – Vue – Angular – Asp.Net & Laravel
This makes it an excellent choice for developers who want a flexible and versatile tool that can be used with a variety of different frameworks and platforms.
12 Advanced Apps For Real-world Demands
Complete CRUD solution with managable datatables, advance form controls, wizards flows and interactive modals for any project requirements you can imagine
Metronic UI Kit Develop Design Fast
Create cohesive user interfaces for single or multiple projects without having to start from scratch. Metronic UI Kit is helpful for designers who are just starting out or who are working on projects with tight deadlines.
Company made it! Smart & Low-cost!
One stop solution that boosts your projects’ design and development at shortest amount of time and at ridiculously low cost. In the past 10 years, hundreds of thousands of web apps successfully launched by Metronic that are used by hundreds of millions of end users everyday
Pricing
Metronic Html Template is available for purchase on ThemeForest for just $49. This includes a Regular License, which allows you to use the template in a single end product that is not charged for. If you need to use the template in a product that will be sold to end users, you can purchase an Extended License for $969.
If you purchase the Regular License, you’ll receive quality checking by Envato, future updates, and six months of support from keenthemes. You can also extend your support to 12 months for an additional fee.
Reviews
Mr. Levan Dvalishvili Chief (Software Architect) at solarspace.io said Hands down the most developer friendly package that I have worked with.. A+++++
platform we tried out Metronic. I can not overestimate the impact Metronic has had. Its accelerated development 3x and reduced QA issues by 50%. If you add up the reduced need for design time/resources, the increase in dev speed and the reduction in QA, it’s probably saved us $100,000 on this project alone, and I plan to use it for all platforms moving forward. The flexibility of the design has also allowed us to put out a better looking & working platform and reduced my headaches by 90%. Thank you KeenThemes! Jonathan Bartlett, Metronic Customer
Metronic is an incredible template. Even with purchasing an extended license, the cost savings is immeasurable. The code & CSS is well organized and while it is feature rich, it is not bloated. It was quickly integrated into our relatively complex product and had ready-made UX for our many use cases. Where we needed to extend functionality, this system made it incredibly easy. A tremendous job by the Metronic team. Fatica, Metronic Customer
Conclusion
In conclusion, Metronic Html Template is an excellent choice for developers and businesses alike. It comes loaded with features, is compatible with a wide range of popular frameworks and platforms, and is available at an affordable price. Whether you’re building a new dashboard from scratch or looking to upgrade an existing one, this Template is definitely worth considering.
So, what are you waiting for? Head over to ThemeForest and check out Metronic Html Template today!
#admin dashboard template#admin themes#angular#asp.net core#blazor#bootstrap#bootstrap 5#django#html#laravel#metronic#react#tailwind#tailwind css#vuejs
0 notes
Photo
false
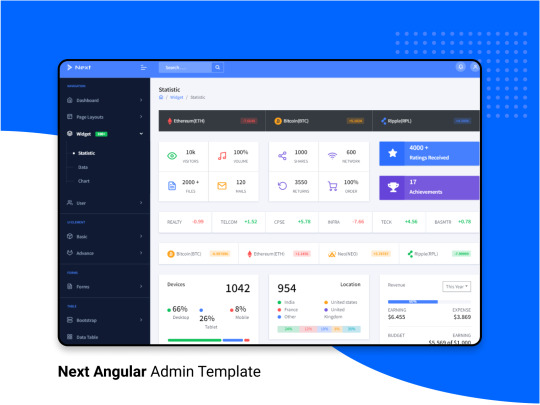
Hello Friend, Next Angular admin is a Premium Admin Dashboard template with a unique & modern design concept.
Next Admin is super manageable, robust, clean & modern responsive. it is a fully customizable template.
#admin dashboard#Web Template#web design#webdev#admin panel#dark theme#web development#web developers#programming#programmers#web design trends#templates#HTML#bootstrap templates#ThemeForest#100daysofcode#coding#angular js#angularjs
3 notes
·
View notes
Photo


⟢ ∘ 。 DREAM GiRL ⦂
JUNE 2023 , TUMBLR THEME .
⟡ ⟡ ⟡
∘ 。⟣ briefing .
dream girl is a cute lil theme geared toward indie users who enjoy having their muse page match their theme with it's muse tab design but it really can be used for anything u see fit ! there are many ways u can style this theme and every single feature is optional so u can create a unique design that fits ur aesthetic .
note : if u are interested in utilizing icons such as the hearts i've used as decor throughout this theme , the code is loaded to support bootstrap icons . click here to be directed to my brief tutorial on using bootstrap icons in themes ( tutorial is free to non patreons ) .
please give this post a reblog and a like and take care of urself ! keep hydrated and pet a cute animal today !
∘ 。⟣ specs .
this theme is compatible with both npf post styles ( beta ) and legacy blogs HOWEVER please be aware that both the audio posts and quote posts are not customizable with tumblr's current json structure . this is something i am looking into for future themes .
single sidebar image .
( optional ) sidebar background image .
( optional ) asterisk - style stars svg on the sidebar .
( optional ) abstract doodle svgs ( see other example ) for the sidebar .
( optional ) sidebar background decor text .
offers both 300px and 375px post styles .
offers accessible font sizing option that gets rid of the outlined font within the posts ( not in the titles / decor styling ) .
custom ask box tagline .
1 editable link for u to use for whatever .
nav tab with single icon + description and title .
6 editable links in the nav tab .
muse tab with single image + description .
muse tab must be edited in the html but is heavily annotated for ease .
various font styles for the muse tab to be utilized as headers .
complete list of credits and inspirations are detailed in the code .
click the source to view a live preview and here to become a patreon !
* i coded this theme slightly smaller to display posted images , gifs and videos without sacrificing quality .
#rp theme#indie rp theme#rph#rpt#indie rph#supportcontentcreators#mine#rec#themes#for patreons#for patrons#preview style inspired by springdoy
100 notes
·
View notes
Text
WEBCOMIC TEMPLATES
Every couple of months or so I scour the internet looking for new and innovative webcomic templates to use, since ComicPress has abandoned us and Webcomic is not very useful. Here are a few that I came across recently ... not that they are necessarily new, but I was not aware of their existence.
Rarebit is an HTML Webcomic Template written in simple and extensively commented code that even an HTML/JS beginner can figure it out, but modular enough that an HTML/JS pro can make it special. Everything is done in HTML and vanilla JavaScript, you don't need Bootstrap or JQuery or anything. Just download the template and plug your comics in.

The second one is ...

For those of you familiar with Square Space here is a template by Clay Yount.

This is probably the slickest most professional looking template I have seen but Clay stopped using it because of a a bug that fundamentally broke his comic archive template and no recieved no support from Square Space so he moved on.
#makecomics#webcomics#webcomic#clipstudio#webtoon#webcomicstemplate#toocheke#rarebit#comicfury#comicpress
3 notes
·
View notes
Text
Automatic Dark Mode Switching For Bootstrap 5
This JavaScript snippet enables automatic dark mode switching in your Bootstrap 5 projects. It applies user theme preferences and maintains them across sessions using local storage. How It Works: The script listens for the DOM content to load. It then retrieves the HTML element and the switch element. It checks local storage for a saved theme preference. If none exists, it defaults to dark mode.…
2 notes
·
View notes
Note
hii <3 im new to coding and am choosing a career path for me. i want to start building sites i guess but i have a few questions that i cant even find on google! when we build sites for ourselves, is it able to hold unlimited data like photos, videos, etc?
also, for the ppl who make tumblr blogs, do you actually code every single thing in the html bc omg!! that is a lot. thank u sm! im a compsci baby
Hiya! 💗 That’s great you want to start building websites, it’s really fun! I can totally help with answering your questions!

Now, in terms of holding “unlimited data” such as media like photos, video, files etc, files depends on several factors. Key thing: A hosting provider is just a site that lets you add your website live online for you - they host you site on the web (that’s how I learnt it). Good examples are GitHub pages, Neocites, Vercel etc.
Hosting Services
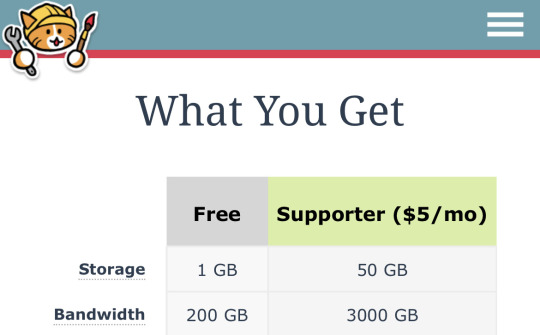
The hosting service you choose plays a crucial role in determining the storage capacity of your website. Shared hosting plans often have limitations on disk space and bandwidth, which means there will be a cap on the amount of data you can store for instance Neocities let’s you store up to 1GB of data on their free plan, anything above that and the site won’t work as they don’t have the storage space for you. However, some hosting providers offer larger storage options or even specialized plans for websites with high data requirements - you’ll just have to pay for extra space.
Storage Upgrades
Like I mentioned briefly above, some hosting providers allow you to upgrade your storage capacity as your website grows. This can involve increasing the storage allocation or transitioning to a higher-tier hosting plan that offers more resources. Be sure to check with your hosting provider for available options and any associated costs. This more geared towards much bigger projects than small personal projects you’re building.
There’s more such as using CDNs (Content Delivery Networks) to create more space in your primary hosting provider but I’m not too familiar to talk about it.
It's worth noting that while these options can provide ample storage, truly "unlimited" data storage doesn't exist in practical terms. Facebook, Instagram, Amazon all have a limit somewhere and they would either pay for more space or figure out a way to storage their large data for less space.
Coding everything for Tumblr blogs
I think like the most of us on here, we’re too lazy to code everything and would actually install a theme someone else has made. But for the theme creators, they would code everything in HTML, CSS, JavaScript (if necessary) to build the blog because it is a website and the foundation of web development is those basic 3 (if anything, just HTML to be honest).
A lot of copying and pasting and editing the code, but essentially yeah it’s HTML code with CSS styling and JavaScript functionality to make the blog work. They might add frameworks such as Bootstrap and libraries like jQuery if they wanted! I’m not an expert on Tumblr theme building but I have built websites for work and personal projects and that’s how it is in the basics! 😊
Hope this helps! There’s more to it but this is as far as I know~! 💗
22 notes
·
View notes
Text
Baseline Status in a WordPress Block
New Post has been published on https://thedigitalinsider.com/baseline-status-in-a-wordpress-block/
Baseline Status in a WordPress Block
You know about Baseline, right? And you may have heard that the Chrome team made a web component for it.
Here it is!
Of course, we could simply drop the HTML component into the page. But I never know where we’re going to use something like this. The Almanac, obs. But I’m sure there are times where embedded it in other pages and posts makes sense.
That’s exactly what WordPress blocks are good for. We can take an already reusable component and make it repeatable when working in the WordPress editor. So that’s what I did! That component you see up there is the <baseline-status> web component formatted as a WordPress block. Let’s drop another one in just for kicks.
Pretty neat! I saw that Pawel Grzybek made an equivalent for Hugo. There’s an Astro equivalent, too. Because I’m fairly green with WordPress block development I thought I’d write a bit up on how it’s put together. There are still rough edges that I’d like to smooth out later, but this is a good enough point to share the basic idea.
Scaffolding the project
I used the @wordpress/create-block package to bootstrap and initialize the project. All that means is I cd‘d into the /wp-content/plugins directory from the command line and ran the install command to plop it all in there.
npm install @wordpress/create-block
The command prompts you through the setup process to name the project and all that.
The baseline-status.php file is where the plugin is registered. And yes, it’s looks completely the same as it’s been for years, just not in a style.css file like it is for themes. The difference is that the create-block package does some lifting to register the widget so I don’t have to:
<?php /** * Plugin Name: Baseline Status * Plugin URI: https://css-tricks.com * Description: Displays current Baseline availability for web platform features. * Requires at least: 6.6 * Requires PHP: 7.2 * Version: 0.1.0 * Author: geoffgraham * License: GPL-2.0-or-later * License URI: https://www.gnu.org/licenses/gpl-2.0.html * Text Domain: baseline-status * * @package CssTricks */ if ( ! defined( 'ABSPATH' ) ) exit; // Exit if accessed directly. function csstricks_baseline_status_block_init() register_block_type( __DIR__ . '/build' ); add_action( 'init', 'csstricks_baseline_status_block_init' ); ?>
The real meat is in src directory.
The create-block package also did some filling of the blanks in the block-json file based on the onboarding process:
"$schema": "https://schemas.wp.org/trunk/block.json", "apiVersion": 2, "name": "css-tricks/baseline-status", "version": "0.1.0", "title": "Baseline Status", "category": "widgets", "icon": "chart-pie", "description": "Displays current Baseline availability for web platform features.", "example": , "supports": "html": false , "textdomain": "baseline-status", "editorScript": "file:./index.js", "editorStyle": "file:./index.css", "style": "file:./style-index.css", "render": "file:./render.php", "viewScript": "file:./view.js"
Going off some tutorials published right here on CSS-Tricks, I knew that WordPress blocks render twice — once on the front end and once on the back end — and there’s a file for each one in the src folder:
render.php: Handles the front-end view
edit.js: Handles the back-end view
The front-end and back-end markup
Cool. I started with the <baseline-status> web component’s markup:
<script src="https://cdn.jsdelivr.net/npm/[email protected]/baseline-status.min.js" type="module"></script> <baseline-status featureId="anchor-positioning"></baseline-status>
I’d hate to inject that <script> every time the block pops up, so I decided to enqueue the file conditionally based on the block being displayed on the page. This is happening in the main baseline-status.php file which I treated sorta the same way as a theme’s functions.php file. It’s just where helper functions go.
// ... same code as before // Enqueue the minified script function csstricks_enqueue_block_assets() wp_enqueue_script( 'baseline-status-widget-script', 'https://cdn.jsdelivr.net/npm/[email protected]/baseline-status.min.js', array(), '1.0.4', true ); add_action( 'enqueue_block_assets', 'csstricks_enqueue_block_assets' ); // Adds the 'type="module"' attribute to the script function csstricks_add_type_attribute($tag, $handle, $src) if ( 'baseline-status-widget-script' === $handle ) $tag = '<script type="module" src="' . esc_url( $src ) . '"></script>'; return $tag; add_filter( 'script_loader_tag', 'csstricks_add_type_attribute', 10, 3 ); // Enqueues the scripts and styles for the back end function csstricks_enqueue_block_editor_assets() // Enqueues the scripts wp_enqueue_script( 'baseline-status-widget-block', plugins_url( 'block.js', __FILE__ ), array( 'wp-blocks', 'wp-element', 'wp-editor' ), false, ); // Enqueues the styles wp_enqueue_style( 'baseline-status-widget-block-editor', plugins_url( 'style.css', __FILE__ ), array( 'wp-edit-blocks' ), false, ); add_action( 'enqueue_block_editor_assets', 'csstricks_enqueue_block_editor_assets' );
The final result bakes the script directly into the plugin so that it adheres to the WordPress Plugin Directory guidelines. If that wasn’t the case, I’d probably keep the hosted script intact because I’m completely uninterested in maintaining it. Oh, and that csstricks_add_type_attribute() function is to help import the file as an ES module. There’s a wp_enqueue_script_module() action available to hook into that should handle that, but I couldn’t get it to do the trick.
With that in hand, I can put the component’s markup into a template. The render.php file is where all the front-end goodness resides, so that’s where I dropped the markup:
<baseline-status <?php echo get_block_wrapper_attributes(); ?> featureId="[FEATURE]"> </baseline-status>
That get_block_wrapper_attibutes() thing is recommended by the WordPress docs as a way to output all of a block’s information for debugging things, such as which features it ought to support.
[FEATURE]is a placeholder that will eventually tell the component which web platform to render information about. We may as well work on that now. I can register attributes for the component in block.json:
"attributes": { "showBaselineStatus": "featureID": "type": "string" ,
Now we can update the markup in render.php to echo the featureID when it’s been established.
<baseline-status <?php echo get_block_wrapper_attributes(); ?> featureId="<?php echo esc_html( $featureID ); ?>"> </baseline-status>
There will be more edits to that markup a little later. But first, I need to put the markup in the edit.js file so that the component renders in the WordPress editor when adding it to the page.
<baseline-status ...useBlockProps() featureId= featureID ></baseline-status>
useBlockProps is the JavaScript equivalent of get_block_wrapper_attibutes() and can be good for debugging on the back end.
At this point, the block is fully rendered on the page when dropped in! The problems are:
It’s not passing in the feature I want to display.
It’s not editable.
I’ll work on the latter first. That way, I can simply plug the right variable in there once everything’s been hooked up.
Block settings
One of the nicer aspects of WordPress DX is that we have direct access to the same controls that WordPress uses for its own blocks. We import them and extend them where needed.
I started by importing the stuff in edit.js:
import InspectorControls, useBlockProps from '@wordpress/block-editor'; import PanelBody, TextControl from '@wordpress/components'; import './editor.scss';
This gives me a few handy things:
InspectorControls are good for debugging.
useBlockProps are what can be debugged.
PanelBody is the main wrapper for the block settings.
TextControl is the field I want to pass into the markup where [FEATURE] currently is.
editor.scss provides styles for the controls.
Before I get to the controls, there’s an Edit function needed to use as a wrapper for all the work:
export default function Edit( attributes, setAttributes ) // Controls
First is InspectorTools and the PanelBody:
export default function Edit( attributes, setAttributes ) // React components need a parent element <> <InspectorControls> <PanelBody title= __( 'Settings', 'baseline-status' ) > // Controls </PanelBody> </InspectorControls> </>
Then it’s time for the actual text input control. I really had to lean on this introductory tutorial on block development for the following code, notably this section.
export default function Edit( attributes, setAttributes ) <> <InspectorControls> <PanelBody title= __( 'Settings', 'baseline-status' ) > // Controls <TextControl label= __( 'Feature', // Input label 'baseline-status' ) value= onChange= ( value ) => setAttributes( featureID: value ) /> </PanelBody> </InspectorControls> </>
Tie it all together
At this point, I have:
The front-end view
The back-end view
Block settings with a text input
All the logic for handling state
Oh yeah! Can’t forget to define the featureID variable because that’s what populates in the component’s markup. Back in edit.js:
const featureID = attributes;
In short: The feature’s ID is what constitutes the block’s attributes. Now I need to register that attribute so the block recognizes it. Back in block.json in a new section:
"attributes": "featureID": "type": "string" ,
Pretty straightforward, I think. Just a single text field that’s a string. It’s at this time that I can finally wire it up to the front-end markup in render.php:
<baseline-status <?php echo get_block_wrapper_attributes(); ?> featureId="<?php echo esc_html( $featureID ); ?>"> </baseline-status>
Styling the component
I struggled with this more than I care to admit. I’ve dabbled with styling the Shadow DOM but only academically, so to speak. This is the first time I’ve attempted to style a web component with Shadow DOM parts on something being used in production.
If you’re new to Shadow DOM, the basic idea is that it prevents styles and scripts from “leaking” in or out of the component. This is a big selling point of web components because it’s so darn easy to drop them into any project and have them “just” work.
But how do you style a third-party web component? It depends on how the developer sets things up because there are ways to allow styles to “pierce” through the Shadow DOM. Ollie Williams wrote “Styling in the Shadow DOM With CSS Shadow Parts” for us a while back and it was super helpful in pointing me in the right direction. Chris has one, too.
A few other more articles I used:
First off, I knew I could select the <baseline-status> element directly without any classes, IDs, or other attributes:
baseline-status /* Styles! */
I peeked at the script’s source code to see what I was working with. I had a few light styles I could use right away on the type selector:
baseline-status background: #000; border: solid 5px #f8a100; border-radius: 8px; color: #fff; display: block; margin-block-end: 1.5em; padding: .5em;
I noticed a CSS color variable in the source code that I could use in place of hard-coded values, so I redefined them and set them where needed:
baseline-status --color-text: #fff; --color-outline: var(--orange); border: solid 5px var(--color-outline); border-radius: 8px; color: var(--color-text); display: block; margin-block-end: var(--gap); padding: calc(var(--gap) / 4);
Now for a tricky part. The component’s markup looks close to this in the DOM when fully rendered:
<baseline-status class="wp-block-css-tricks-baseline-status" featureid="anchor-positioning"></baseline-status> <h1>Anchor positioning</h1> <details> <summary aria-label="Baseline: Limited availability. Supported in Chrome: yes. Supported in Edge: yes. Supported in Firefox: no. Supported in Safari: no."> <baseline-icon aria-hidden="true" support="limited"></baseline-icon> <div class="baseline-status-title" aria-hidden="true"> <div>Limited availability</div> <div class="baseline-status-browsers"> <!-- Browser icons --> </div> </div> </summary><p>This feature is not Baseline because it does not work in some of the most widely-used browsers.</p><p><a href="https://github.com/web-platform-dx/web-features/blob/main/features/anchor-positioning.yml">Learn more</a></p></details> <baseline-status class="wp-block-css-tricks-baseline-status" featureid="anchor-positioning"></baseline-status>
I wanted to play with the idea of hiding the <h1> element in some contexts but thought twice about it because not displaying the title only really works for Almanac content when you’re on the page for the same feature as what’s rendered in the component. Any other context and the heading is a “need” for providing context as far as what feature we’re looking at. Maybe that can be a future enhancement where the heading can be toggled on and off.
Voilà
Get the plugin!
This is freely available in the WordPress Plugin Directory as of today! This is my very first plugin I’ve submitted to WordPress on my own behalf, so this is really exciting for me!
Future improvements
This is far from fully baked but definitely gets the job done for now. In the future it’d be nice if this thing could do a few more things:
Live update: The widget does not update on the back end until the page refreshes. I’d love to see the final rendering before hitting Publish on something. I got it where typing into the text input is instantly reflected on the back end. It’s just that the component doesn’t re-render to show the update.
Variations: As in “large” and “small”.
Heading: Toggle to hide or show, depending on where the block is used.
#000#almanac#anchor positioning#aria#Articles#attributes#author#background#Bootstrap#border-radius#browser#cdn#chart#chrome#classes#code#Color#command#command line#content#course#CSS#css-tricks#details#Developer#development#digitalocean#direction#display#displays
0 notes
Text
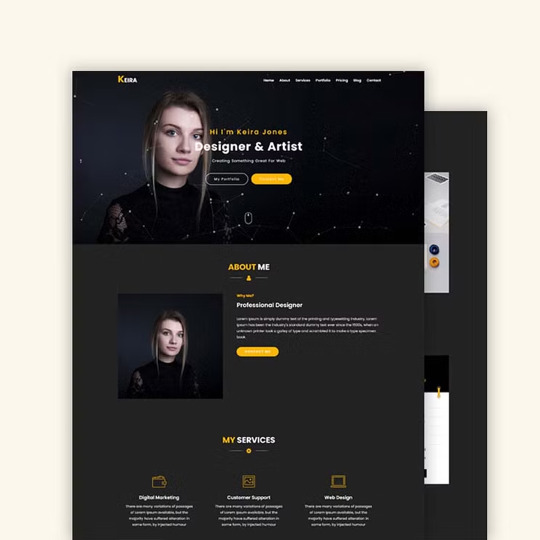
Portfolio Website Template
#personal portfolio html template#html css#designer portfolio#portfolio template#personal portfolio#portfolio website#webdesign#css#html#css3#bootstrap themes#mourithemes#resume#cv
4 notes
·
View notes
Text
Web Development Institute in Laxmi Nagar

Web Development Institute in Laxmi Nagar
The demand for web developers has skyrocketed in recent years, making web development one of the most sought-after skills in the digital world. If you’re looking to enhance your skills or start a career in web development, finding the right institute is crucial. For those in Delhi, Modulation Digital, the leading Web Development Institute in Laxmi Nagar, offers the perfect learning platform to achieve your goals.
Why Web Development is an Essential Skill
Web development is more than just coding—it’s about creating functional, user-friendly, and visually appealing websites. The internet is integral to businesses today, and websites are the foundation of their online presence. Here’s why learning web development is essential:
Versatile Career Opportunities: Web developers are in demand across various industries.
High Earning Potential: Companies are willing to pay competitive salaries to skilled developers.
Creative Freedom: Build custom solutions and express your creativity through design.
Work Flexibility: Remote work opportunities abound for skilled web developers.
Entrepreneurial Growth: Use your skills to launch your own business or freelance services.
By enrolling at a reputed Web Development Institute in Laxmi Nagar, like Modulation Digital, you can master the art of creating dynamic websites.
Features of Modulation Digital
Modulation Digital stands out as a top-tier Web Development Institute in Laxmi Nagar, offering:
Expert Trainers: Our instructors are industry veterans with hands-on experience.
Comprehensive Curriculum: We cover frontend, backend, full stack, and CMS development.
State-of-the-Art Labs: Practical training is emphasized in our fully equipped labs.
Flexible Timings: Batches are available for working professionals and students.
Affordable Fees: Quality education accessible to everyone.
Real-Time Projects: Gain experience by working on live industry projects.
Detailed Course Curriculum
At Modulation Digital, we provide courses tailored for beginners and professionals. Here's a breakdown:
1. Frontend Development
Learn HTML, CSS, and JavaScript.
Responsive design with Bootstrap.
Focus on user experience (UX) and interface design.
2. Backend Development
Master server-side languages like PHP, Python, and Node.js.
Work with databases such as MySQL and MongoDB.
Understand APIs and their integration.
3. Full Stack Development
Combine frontend and backend skills.
Learn frameworks like React, Angular, and Vue.js.
Build and deploy full-scale web applications.
4. CMS and E-commerce Development
Learn to work with WordPress, Shopify, and Magento.
Customize themes and plugins.
E-commerce website creation with secure payment gateways.
Why Laxmi Nagar is the Perfect Location
Laxmi Nagar is a prime educational hub in Delhi. It attracts students and professionals due to its excellent facilities and accessibility. Here’s why it’s the best place for your learning journey:
Central Location: Easily accessible via public transport.
Affordable Living: Reasonable accommodation and food costs for students.
Learning Environment: Surrounded by other institutes fostering a culture of education.
With Modulation Digital, the premier Web Development Institute in Laxmi Nagar, you get the added advantage of learning in this vibrant locale.
Advantages of Learning at Modulation Digital
Practical Learning: Gain hands-on experience in real-world scenarios.
Industry-Ready Skills: Our training is aligned with current market trends.
Portfolio Building: Create a portfolio to showcase your skills to potential employers.
Personalized Attention: Small batch sizes ensure every student gets the necessary guidance.
Placement Assistance: Get job support with mock interviews and resume preparation.
Certifications: Earn globally recognized certifications to enhance your credibility.
Career Opportunities After Completing the Course
Once you complete your training at the Web Development Institute in Laxmi Nagar, you can pursue the following roles:
Frontend Developer: Design visually appealing user interfaces.
Backend Developer: Develop and maintain server-side applications.
Full Stack Developer: Handle end-to-end web development processes.
CMS Specialist: Customize content management systems.
E-commerce Developer: Build feature-rich online stores.
Additionally, freelancing and entrepreneurial opportunities make this career path highly flexible and rewarding.
Testimonials from Students
"Modulation Digital is the best institute for web development. The live projects and practical learning approach helped me secure a job in a top company." – Amit Verma
"Thanks to Modulation Digital, I was able to learn full-stack development and launch my freelancing career successfully." – Ritika Singh
Placement Success Stories
Our students have been placed in reputed companies and startups. The Web Development Institute in Laxmi Nagar ensures you are equipped to excel in competitive job markets.
How to Join Modulation Digital
Taking the first step toward your dream career is simple:
Visit https://www.midmweb.com/web-development-in-delhi.
Explore our course details and curriculum.
Contact us to schedule a free demo session.
Enroll in the course and start your journey to becoming a web development expert.
Conclusion
If you’re ready to embark on an exciting journey in web development, there’s no better choice than Modulation Digital, the leading Web Development Institute in Laxmi Nagar. With our industry-relevant curriculum, expert trainers, and practical training approach, you’ll be fully prepared to excel in the competitive field of web development.
Don’t wait—visit Modulation Digital today and take the first step toward a successful career!
0 notes
Text
https://beachdressesforwomen.com/metronic-html-template/
#admin dashboard#admin dashboard template#admin themes#angular#asp.net core#blazor#bootstrap#bootstrap 5#django#html#laravel#metronic#react#tailwind#tailwind css#vuejs#hire vuejs developers
0 notes
Text
Blank 8.0.0
Blank is now hosted on GitHub and released as an open source project under the MIT license: https://github.com/willwood/Blank-RapidWeaver-Theme
Version 8 of Blank has been published today. Changes in this major update include the following:
Removed support for banners, to improve page loading speed and avoid gaps at the top.
Removed the background colour picker, so it no longer conflicts with certain CSS libraries.
Removed the %sidebar%, %sidebar_title% and %plugin_sidebar%, as these were seldom used.
Disabled automatic theme updates, owing to unreliability and high bandwidth costs.
New attribution and theme details shown in a comment block, at the top of the source code.
Simplified the HTML markup for the content container. We are now only using a tag.
Adds support for picnic.css as a new and alternative CSS library. Updated Bootstrap Icons to version 1.11, giving you over 300 new icon designs.
Adds support for LaTeX.css. A CSS library which makes a page look like a LaTeX document.
To download the latest version from GitHub, simply click the button labelled 'Latest' in the sidebar, under releases. That takes you to a page listing the ZIP package to download on your computer. Unzip and install the theme in the normal way.
0 notes
Text
10 Essential Skills Every Web Designer Should Master

In 2025, Proper skills make a huge Difference between a good designer & great designer in the fastest digital world of web design. Mastery of the most essential skills make it possible for a website not only to look fantastic but also function well & be more user friendly.
In this Blog,We mentioned some skills that every web designer must have in 2025 . This can help on their career path .These skills not only enhance your ability to create visually stunning websites but also improve functionality, usability, and the overall user experience. Let's break it down into 5 essential skills Every web designer Should have.
1. User Experience (UX) Design
Effective web design depends on the Understand of User experience (UX). UX Designer is all about creating a website through all elements that are easy to navigate , more enjoyable. A good UX design ensures visitors can find what they need quickly without frustration.
Practical example :
When you visit Amazon, you can quickly find what you’re looking for thanks to the clear categories, filters, and search bar. For example, if you type “headphones,” you immediately see a list of products, reviews, and prices. This makes shopping easy and enjoyable.
How to Master UX Design:
Familiarize yourself with tools like Adobe XD and Figma.
Study user behavior and apply data-driven insights.
Continuously gather feedback and refine your designs.
2. Responsive Design
When it comes to Web Design, Responsive design is non negotiable. Websites only look good that is not essential but also all the layouts,elements must smoothly run across various devices in all sizes like from desktops,laptops, tab & mobile phones .
Why It Matters:
Responsive design helps to improve your Functionality, more mobile friendly for boost SEO Ranking.
How to Master Responsive Design:
Test your designs on various devices and browsers.
Use frameworks like Bootstrap or CSS media queries to create fluid layouts.
Practical example :
Open Facebook on your phone and then on a computer. You’ll notice how the layout adjusts to fit the screen size. On your phone, the menu is compact, and posts are arranged vertically for easy scrolling. This ensures it works smoothly no matter what device you’re using.
3. Visual Hierarchy
Visual Hierarchy is a key principle in design that helps to organize & prioritize content on web pages to guide the viewers. It ensures that the most important elements stand out while maintaining a clean & logical flow of Information.
Practical example :
Visit Apple’s website and see how they highlight their latest products. For example, the newest iPhone is shown in a large image with a bold headline like “iPhone 15 Pro.” Below it, you’ll find smaller details and links like “Learn More” or “Buy Now.” Your eyes are naturally guided from the most important information to the details.
How to Achieve Visual Hierarchy:
Use size, color, contrast, alignment, and spacing effectively.
Focus on making the website engaging and easy to navigate
4. Knowledge of Web Development Tools
A web designer will be more confident When the understanding the basic programming language & tools because it can help to collaborate with developers & together they both can design in a more practical way & achievable .
Tools and Skills to Explore:
Learn basic programming languages like HTML, CSS, and JavaScript.
Familiarize yourself with tools such as WordPress, Webflow, and code editors.
Practical Example :
On WordPress.com, you can design a basic website using its pre-made themes. However, knowing a little HTML or CSS allows you to customize the design further, like changing the colors or layout to match a brand’s style.
5. Communication Skills
Web design is not technical expertise, It is also about understanding your audience & engaging them through your message effectively. Strong communication skills help you collaborate with clients, developers, and other stakeholders.
What to do :
Invest time to improve your listening skills, & clear voice makes your communication strong with your clients But In the same way you understand human behaviour & human psychology helps you to convey your message in the website.
Practical Example :
Think of how Netflix promotes new shows. Their homepage uses big banners and clear text like “Watch Now” to tell you what’s popular. Similarly, web designers need to use simple language and design elements to help visitors understand what to do, like clicking a “Sign Up” button.
Conclusion
Mastering these five essential skills—UX design, responsive design, visual hierarchy, web development tools, and communication—can set you apart as a web designer. Start by focusing on one skill at a time, practice regularly, and stay updated with the latest trends in web design. Remember, great web design is not just about aesthetics but also about creating meaningful and seamless user experiences.
By honing these skills, you’ll not only improve your craft but also create designs that truly make an impact. Ready to level up your web design game? Start today, and watch your expertise soar!
0 notes