#AND i can basically only wear stretchy fabrics
Explore tagged Tumblr posts
Visit Tumblr Blog
Explore Tumblr blogs with no restrictions, modern design and the best experience.
Last Seen Tumblr Blogs


Fun Fact
Premium Tumblr themes are available from anywhere between $9 to $49.
Text
looking at the notes of that poll. god i wish that were me
#chirping#ughhhhhhhhhh#i tried going out w/o a bra and i just Could Not Do It#i need to start seriously looking into top surgery. like holy god that would fix my life#like even if i didn't have dysphoria my chest is still such a pain#my back hurts all the time i gotta get expensive bras and i have to order shirts one size bigger if it's made for men/unisex#AND i can basically only wear stretchy fabrics#it's such bullshit wth!!!!!#and don't even get me started on bindingggggggg#actually i'm really tired so. sparing y'all lmaooo#chest mention#dysphoria mention#ask to tag
2 notes
·
View notes
Text
Clothes and Fashion
Link: Disclaimer regarding D&D "canon" & Index [tldr: D&D lore is a giant conflicting mess. Larian's lore is also a conflicting mess. There's a lot of lore; I don't know everything. You learn to take what you want and leave the rest, etc etc etc]
Clothes in general; underwear; not wasting trousers on children who'll only outgrow them within the week; pockets! Sparkly hats; cosmetics; the word for hair care products; etc.
Demihuman cultures might vary slightly from this, but will generally follow the gist of it and they're all noted to be far less fashion conscious than humans. Dwarves, gnomes and orcs as a norm like to dress practically in durable clothes. Halflings, goblins and kobolds will blend in quietly until special occasions, where they'll dress as brightly and colourfully as possible. Elves have their own various culture-specific fashion trends, but mostly tend to wear whatever the hell they personally feel like wearing, be that human fashion, diaphanous gowns, or just living plants trained to be worn as garments with some jewellery.
-
Underwear:
Dethmas: '...a tight cloth breast-binding or sling (the equivalent of a modern sports bra, although instead of stretchy fabric covering a lot of skin, the Realms version is more like a trough or shelf of tightly-stretched cloth sewn to cords (precisely because elastic fabric is largely unknown in the Realms).
The concept of wire for breast support and shaping is unknown in the Realms, but corsets (laced-up, tight boiled hide, not whalebone or any sort of stiffeners) and stomachers that cinch the waist tight are popular, and many of them have shaped panels for the hips and a top ‘shelf’ to thrust out and support the breasts. Corsets are also unisex garments.
Clouts: '...a very tight leather, cloth, or cord (listed here in descending order of perceived quality and durability) belt worn around the hips, and usually held tight by multiple hooks (like a modern bra) at the front. Then a long, diaper-like strip of rectangular cloth (usually cotton) is passed between the legs, up through the front of the belt to dangle down, and up through the back of the belt to dangle down. [...] In many cases, the dangling front and back ends are designed to be tied together, and the cloth may be folded in on itself for absorbency [menstruation] and padding [horse riding].' (Ed Greenwood) Clouts come in fancy lingerie styles and are easily available in cities. Those who menstruate place extra layers of thick red cloth in and change as necessary.
Codpieces are also normally worn. May be button up or lace up. Linen is basic material, but velvet and silk are available for fancy dress. Embroidery is also popular. If you're feeling rich/ridiculous you can get them encrusted with gems. Come in flat or 'bag' varieties.
Bustles came into fashion with Sembian noblewomen in the 1300s, and started spreading from there.
Fullcloths are full-body one-piece woollen underwear, usually worn by people planning to head into colder regions.
Hoisery and stockings make up your first layer of footwear.
It's also common enough for people to wear a money belt concealed under their clothes.
Black - and especially red - are considered the 'sexy' colours, especially when applied to undergarments. I'm going to make a different post about dating and so on in Faerûn though, so I'll talk about dressing sexy there instead.
Dressing gown and slippers exist.
-
Children:
Nobody wastes money getting complicated clothes for growing children who are going to outgrow their garments in a matter of weeks or months. All children wear smocks, usually hand-me-downs, ‘with leggings or pull-on hose (long stockings tied to an underbelt to keep them from “riding down”) with boots, clogs, slippers for indoor wear, or bare feet.���
Nevertheless, customisation is common enough in children’s clothes. Things such as belts, scarves, deliberately arranging a too-big smock to bare one shoulder in a way that I do remember doing myself as a child, curiously.
-
General:
The majority of people in the Realms can afford a sizable wardrobe. Daily wear tends to be practical, but almost everyone has some kind of fine clothing they’ll bring out on special occasions. Noble and the wealthy women are often seen in fancy gowns, but will likely be wearing practical garb underneath and be prepared to pin up their hems if need be. Nobles also really like their cloaks
All cities and markets will have tailors and seamstresses for altering garments as necessary, whether as repairs and maintenance or for aesthetics like dyes and adornments. Almost all clothiers found in cities are prepared to do on-the-spot alterations. Enameled metals, coloured cut-glass and painted wire are popular amongst the working glass who want to look flashy but can’t afford genuine fancy stuff. Many outfits may be modified, so that armour such as breastplates and gorgets are disguised within fabric and bodices, or jerkins reinforced with armour plating.
Breeches and tunics, the former usually made of leather, are the most common garment on all genders in most of the continent. Chemises are often worn as a base. Skirts are rarely seen, though gowns are common enough. Bare arms, a low neckline that exposes a ‘little bosom’, and a hemline at the mid-calf or lower is considered dressing conservatively. 'Low-cut peasant blouses and even lace trimmings are widely used.'
Keyhole necklines are common along the trade routes of the Heartlands, and they're called 'gracetels' which is an elven word of unknown meaning. The elven empire of Cormanthor was known for skin-exposing risqué fashions (by real-world and in-universe dwarven and gnomish standards, at least), so possibly the word comes from there, although humans were cutting their clothes like this long before Netheril.
It's also called a 'heartbare' or 'heartbearing' cut, and Waterdhavian generation of the 1350s to the 1370s called it a 'splendour-glance.'
The commons style of jerkin on Faerun is a heavy, fitted garment that goes down to the knees and fastens down the front or side by a sustem of toggles and loops. Shoulder padding and a stand-up collar are common, and they usually have pockets (internal or external)
One way to accessorise is simply to tie a sash around your waist. Wool, linen and silk are examples of material used.
Most people will be wearing belts and baldrics (belts that go diagonally across the chest, over the shoulder) for holding clothes up and carrying items.
A tammalar is a type of baldric with many pouches attached.
Bracelars are leather braces with pouches, popular with merchants.
'...and the scrip, which in recent centuries has come to mean a large piece of leather or cloth with sewn-on ties or thongs, and sewn-on loop or sleeves for those ties to go through. It is gathered up (around goods, to form a carrysack) into a bundle, and kept that way by threading ties through the sleeves (and a user’s belt, to carry it at the hip or hanging from the rear waist).'
Hat fashions come and go rapidly. A ‘fancy-me’ or ‘dee’ is a hat that’s been augmented with several feathers, gauze, gemstones and various sparkly things, usually worn by those concerned with fashion.
Footwear
Typical shoes are either boots or open-toed sandals. Thigh-high boots and stiletto heels canonically exist, ways to make them stop murdering your feet when you wear them apparently do not.
Various types of dancing shoes are available for said activity.
Dwarven engineering has produced the steel-toed workboots.
-
Outdoors wear:
Weathercloaks are ankle-length cloaks made from a light material held together by a brooch. They’re noted to not be much use at keeping the cold out, but are better than nothing. Those with more coin can afford leather longcoats that keep the rain off and greatcloaks for the cold.
-
Piercings:
Ear piercings and naval piercings are common, but other piercings are much more rarely seen outside of some priests who have ritual piercings for religious reasons. In the Western Heartlands (including the Gate) piercing your nostrils is also normal.
A person who has piercings other than these areas is assumed to be clergy, as these alterations are done for religious rites of passages rather than cosmetics.
-
Cosmetics:
Makeup on Toril is called 'fleshpaint' in the tradestongue (i.e., Common), and apparently 'dardarra' in Chondathan and 'adratha' in Alzhedo (unless those are localised words in dialects of Common. It wasn't specified). Apparently they don't know the word 'makeup' at all.
The stuff that we'd recognise as cosmetics is created from a powder base of mud or chalk, mixed with the boiled essences of bark, reptile hide, plant matter or whatever else and then some kind of lipid (animal fat, seed oil, etc), simmered over heat before having colours and maybe scents added in. High-end brands may be enchanted with cantrips or orisons to keep it from going bad.
Fleshpaint is mostly popular in the south (Vilhon reach and lower), with most of the cosmetics industry working in southern Tethyr, the Vilhon, Chessenta and etc.
In the northern half of Faerûn, for the most part, your cosmetics options are mostly stuff like crushed berries that temporarily dye the skin that you can make in the kitchen.
Obviously trade hubs like the Gate and Waterdeep import the stuff, though it may not be cheap. You can buy it from street stalls or from beauty stores. Average decent quality product is 4-8gp, with the worse stuff peddled on the street going for 4sp (which is a decent chunk of most people's weekly wages gone). The luxury brands go for 20-75+gp per tiny bottle. It's also mostly popular with nobles and the nouveau-riche 'who may have closets full of a wide selection of scents, fleshpaints, specialized lip-paints, and so on.'
There's also a trend for doing decorative beauty spots in fancy shapes (flowers, stars, etc) painted onto the skin with something like a very thin tapered stick... or tattooed under the skin with a needle.
Painting your nails is also popular.
.
Hair:
Thurdrixes are hair products that work as dyes or to encourage hair growth (up to several inches a day). These treatments are also expensive, and may not be widely trusted due to being arcane magic. These products usually have long, fanciful sounding names.
Barbers and trained hairdressers aren't much of a thing, though they do exist. Usually you ask a family member to cut it for you, so there's not much call for professionals in the market
Plucking and shaving body hair is a fashion in the Southern hemisphere, but not really present in the rest of Faerûn (so not common in Baldur's Gate outside of places like Little Calimshan).
The fashion for men in the Heartlands is to have facial hair, though no particular style is more popular than others. Illuskans favour long beards, provided that they're not too impractical. Calishite fashion involves oils and perfumes to keep lice out, and a popular fashion in the South is for bare chins and long moustaches and sideburns which may well be seen further north due to trade and migration.
#lore stuff#Elminster's Forgotten Realms is just like browsing ye olde Candlekeep archives but with less talk of sex
26 notes
·
View notes
Note
I am trying to find a person who's tags I've read about their grunge skirt that they pin a hundred ways and I think after all it was you 😵 Can you share the pictures please? I am so curious how that looks!
yeah absolutely!! i mess with this thing all the time (i hope you can see it well enough, my room has 1 singular window and is very busy)
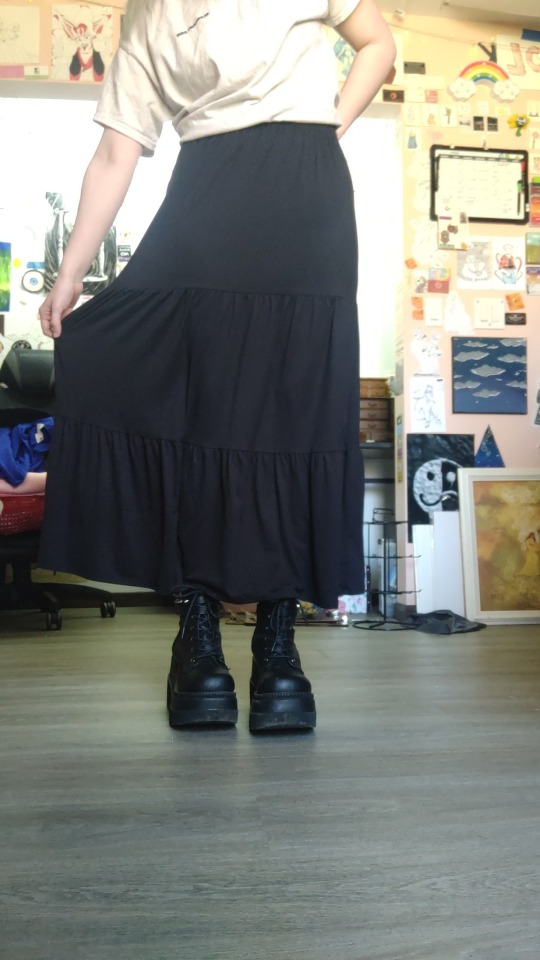

for one thing, its the most basic skirt imaginable. black stretchy fabric, no pockets, and 3 tiers of fabric. shes got plenty of walking room, and makes for a perfect base. would not be surprising to find it in the all-american white woman wardrobe. but i am not the all-american woman, therefore i get a little silly with it from time to time


my favorite way to pin it is just one side straight up, it gives dimension and some Pizzazz without being a nuisance (and without getting too cold in the winter). I use one bigass safety pin, but sometimes i get a bit anxious about it coming loose, so i put a bunch of little safety pins around it. you cant see them super well but theyre there i promise

the reflection is miserable but actual pins make it fun too!
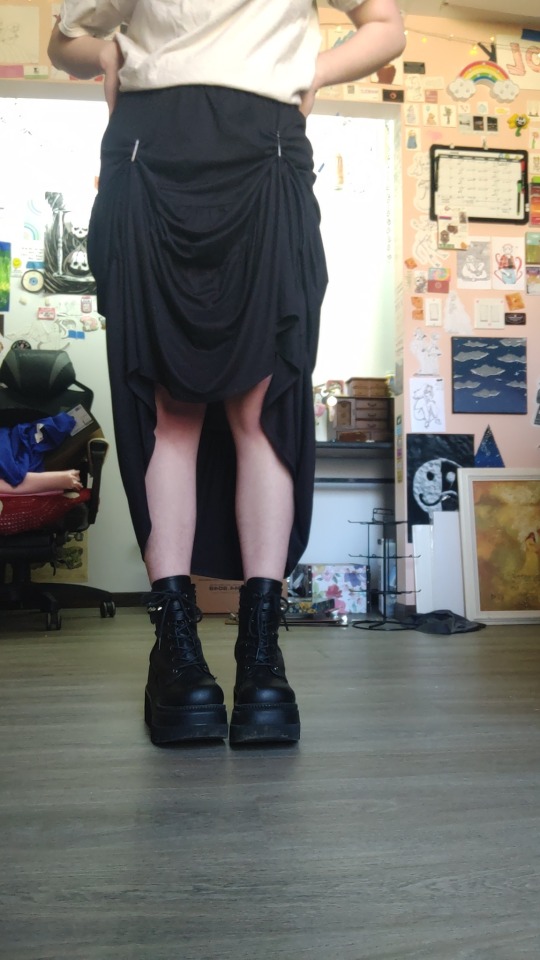
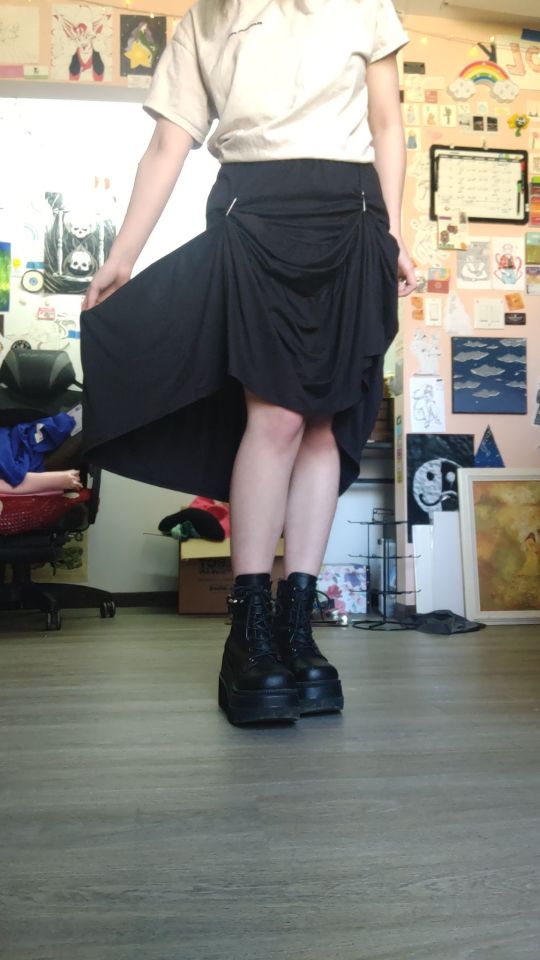
when i go to more goth/alternative functions, i do a double pin to make it look like curtains. i like to wear long socks and tights so this lets you see the patterns with some drama. its super fun but i only do it for special occasions LOL


i recently started double pinning on opposite sides, making the overall skirt shorter and more gathered. it might look a bit like a big bag to some, but i like it for the warmer days


my last trick is just to put something around the waist to spice it up. i have this gorgeous green/blue silk scarf and its the perfect size to tie like a belt. very shiny and sleek, and i love the pattern too. another staple is a chain belt, i actually got this one from hot topic (sometimes they have bangers) and i wear it all the damn time, i love it. you can see both of these accessories in Several of my outfit posts teehee
i hope these are helpful! i dont really have a tripod or something to properly take nice pictures so i just sit my phone against my windowsill and hope its good enough... but i hope this gives you some ideas for your own clothes!
#answering asks#hopefully this is legible to anyone who comes to find it LMAO#goth fashion#style#fashion#goth#original post
14 notes
·
View notes
Text
The myth of the corset
So, when you think about the corset, you might think of 'oh no, torture, ahhh.' And while this can be true, it isn't always the case.
The corset has been around for centuries in many different forms. However, people often get the corset confused with the 'Stay', the only re-occuring reason behind the stay was that it held the weight of your skirt or dress, also acting as your shaping. Corsets we're used in a similar way.
Corsets have been around since the c. 1000 in its earliest form as we know them today. You may hear earlier or later, but circa 1000 is generally acceptable in my experience, in a work of art by the Minoans, who lived near Greece. In this art piece, a goddess is depicted as wearing what appears to be a corset.
We see many different styles throughout the history of the corset, in different forms. They kinda died out in the early to mid-20th century, though. Tbus is due to...well, bras becoming more common and fabric shorteges after two world wars. The corset was not only a way to support heavy skirts and layers upon layers of petticoats but also support for your bust and a posture correct-er for women. I feel as though when corsets are mentioned, people go to the victorian women fainting on the streets because their corsets were so extreme. This did happen, but it's only heavily documented around the victorian period. This is due to a little something called ✨️tight lacing✨️ and, I mean, do I really have to go into depth on what that is?
A woman's corset would be laced so tight it could damage her organs or spin, commonly both. The victorian period is the first time we see the incredibly dramatic shape of a HUGE bustle, large bust, and wrap-both-hands-around-comfortably waist. This was just the trend.
The corset hasn't always promised medical issues, while the victorian period was famously dangerous for women in fashion. They also had corsets with more flexible boning to allow movement. Further on, you have the 1920s corset, used really to create a flatter stomach. The regency corset was essentially just a bra in most forms. The focus of the corset was to distract from your typical waist line and have it virtually under your bust, the empire waist, and your bust was lifted. They were essentially push-up bras and not technically corsets. They are often recognised as 'stays' in modern media.
Generally, corsets might be uncomfortable, but before mainstream tight lacing... they weren't often recognised as a threat to your health. The victorian period created a lot of fear for corsetting.
As someone who has made a corset and owns a waist trainer(basically a stretchy underbust corset), corsets aren't that bad if you know how to wear them. If you want to try a lace-up corset, I recommend breathing in so your chest inflates and adjusting the lacing accordingly so you can breathe. If it's an underbust? Breathe in through your belly! And though I understand you may desire a more dramatic shape, please understand that some corsets can replicate an hourglass or whatever just through the construction! Don't compromise your well-being for glamour and corset safely.
Anyway, toodles!
(Let me know if you want me to write on anything else in history or politics or whatever, and I'll do my best!)
5 notes
·
View notes
Text
TOS Dress Failures Post
So as I mentioned, I'm beginning a little post here about things I did wrong with my first (yellow) Star Trek: TOS dress, and in the coming days I'll post a few updates about my second (red) dress, and try to show off what I'm doing differently! I am very much an amateur sewer, so maybe don't expect this to be super comprehensive, but I'm going to do my best to talk about the issues I had and just try to shed some light on what ended up being a pretty bare bones pattern. So much stuff I could have done better, some my own folly, some issues with the pattern.
To give you an idea, this is everything that came with the pattern:
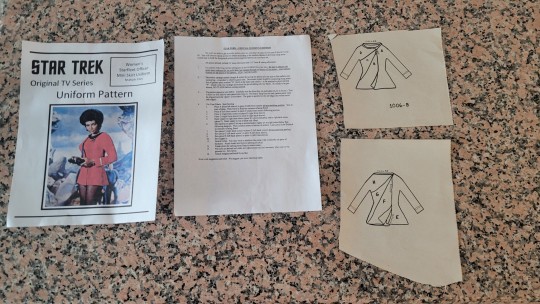
The instructions page is double sided, but the other side is just a sizing chart and recommended fabric types, in fact, the instructions occasionally mentioned diagrams that I did not receive, however, from my scouring the internet, this really is the best pattern if you want the right looking fit of the tos skant dresses, so I went with it anyway.
Some of the issue I ran into were:
Length: The little I saw online did suggest you lengthen the skirt and yeah, they were right. I did try to do this, but my lack a familiarity with the patterns made it really inconsistent.
Although the front is actually a good length, it's uneven because I tried to eyeball it (laziness strikes again), and the back (which I obviously didn't do as well) is waay too short for me to consider wearing in public. But the main issue was, being new to the pattern, I didn't realize that piece 'C' would also be forming part of the hemline, leading to this:

As you can see this was a combo of my own follies and lack of comprehensive instructions.
Solution: add a specific amount of CMs to the pattern length and add it every piece (except the H&D sleeve pieces). I will make a post about this when I begin cutting my red fabric to show you all exactly what I'm doing, because I want to make some more measurements before I settle on a length.
2. Sleeves: The guides also said the lengthen and widen the sleeves, which I didn't do but definitely should have, I ripped so many seams just trying it on because the sleeves were too tight:
I also used super stretchy fabric for this yellow dress, so with the cotton I'm using this time I will definitely have to be careful about adding a fair amount of width.
I will say the sleeve length is more of a matter of taste, but for an accurate costume I want them at least to my wrists, and this pattern's sleeve barely reached them, so lengthening is also a good idea. It's always easier to take something in than to let it out!
Solution: Add a few cm to the sleeve width and length, I will probably be doing 5cm extra for both because it's a nice round number, and gives me some wiggle room. For Americans in the audience this is about 2 inches.
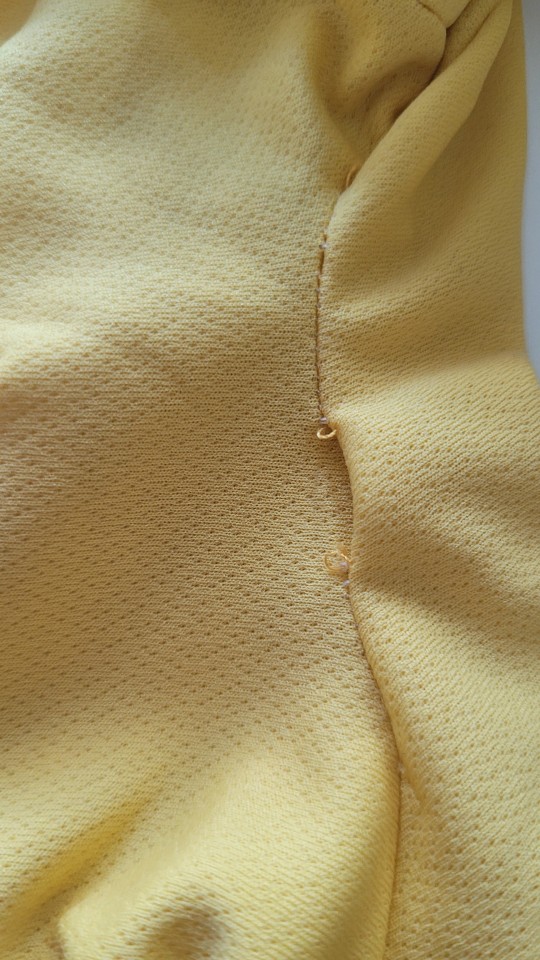
3. Zipper: With the stretchy fabric I used I almost definitely did not need a zipper. So I didn't fully put it in. Basting the zipper is step 5 of the pattern, so I just sort of... basted it in and then never fully attached it or made the zipper opening because I was confused about where it went. This is where the pattern insists I should have been following a diagram I did not have:

But I did have the little picture, where the zipper is hidden in the pleat, like so:
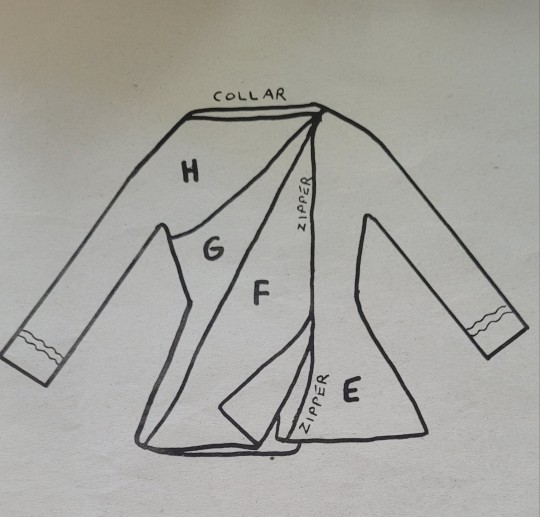
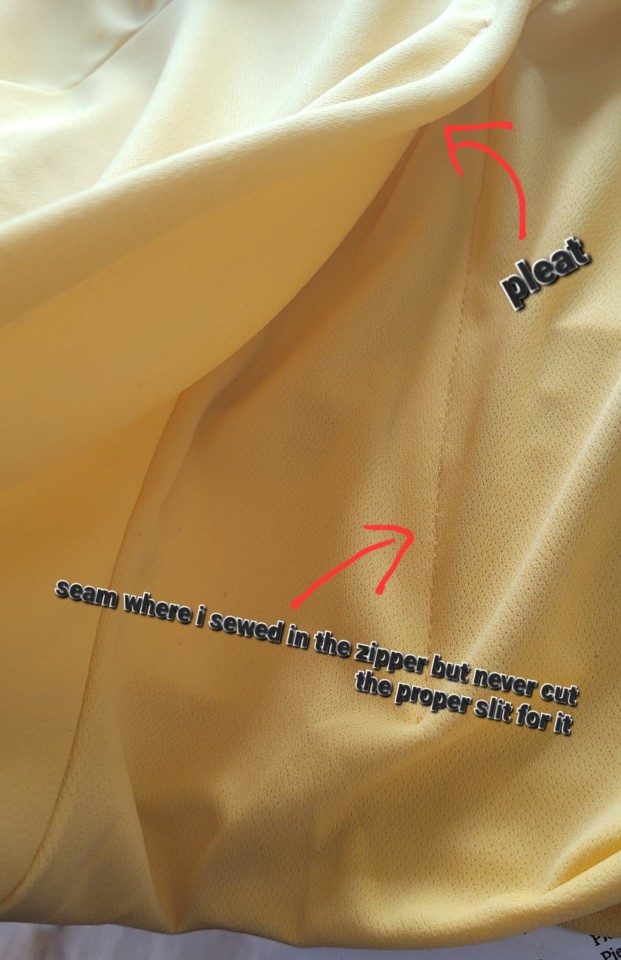
As you can see there is supposed to be a slit in the fabric for the zipper to peek through, but the fabric I used was stretchy enough that I could basically just pull it on. Therefore, I never actually cut the slit and just pulled it on. With my less stretchy cotton I will have to put in a zipper, which will be okay because I figured out how to do it properly.
Solution: Instead of sewing the zipper all the way down right away (what I did) you are only supposed to sew it to the top part of the pattern, and leave the hidden/skirt part to sew in later. To be fair, the pattern does say this, I was just confused about the pleating due to my inexperience which led to confusion about the zipper. Generally though, next time, I will start at the top of the garment and work my way to the bottom... that maybe should have been obvious.
So those were the major problems I dealt with with this pattern, and they're also why I'm excited to try it again and make a better version!
I also had a lot of trouble with the pleating, but that was genuinely just my inexperience and not the pattern giving me issues. I could make another post about the problems I had with that if there are other beginners who might want some tips though.
9 notes
·
View notes
Note
Tomorrow's outfit 🤍
Tomorrow our university's med students will do their yearly celebration. It's my first time participating in this sort of event and I am excited to join the celebration with my friend whom I haven't seen in such a long time, I am excited to finally meet and talk with her again, and we will have the chance to meet some of our distinguished faculty members. I also have a few friends that I haven't seen in a while and I am looking forward to seeing them again.
A simple white lace blouse.
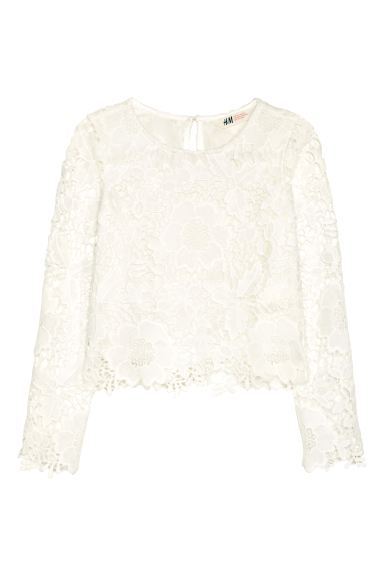

I love this lace blouse, it is very feminine and it looks even more stunning in person. The fabric looks very delicate and like it will rip with just one abrupt move but the fabric is quite stretchy. The sleeves are transparent and I can't show my arms for religious reasons, so I'll just wear a white long-sleeved leotard underneath which is VERY convenient because I have a Pilates class tomorrow morning and I can just get changed within seconds. It will also be a little chilly tomorrow so the extra layer will provide me with enough warmth to get through the day. It's a dainty blouse and I just got it but I know that I will get a lot of wear out of it since it is so versatile and I know of a million ways to combine it.
A dark navy skirt.
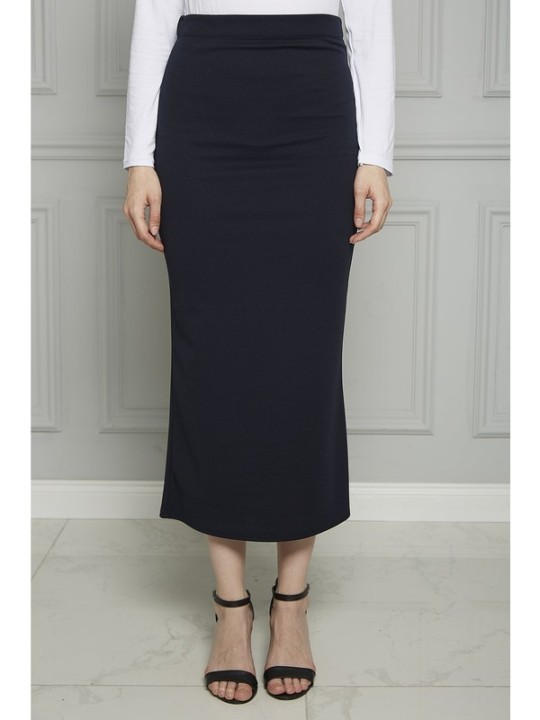
My absolute favorite, I wear this almost every day along with my black pencil skirt. It's a staple in my closet, I throw this on and I look super polished with absolutely no effort. I always get compliments when I wear this even though there's nothing special about it but it fits me perfectly. My grandma bought me a ton of A-line skirts a while ago and I hate to say it but they are somewhere at the back of my closet now because they are the most uncomfortable skirts in the whole world and they restrict my movement, I always end up ripping them because I can't walk properly in them. This pencil skirt, on the other hand, is a whole different story - the material is extremely stretchy (it is 100% polyester) and it is pretty much impossible to rip, it fits me perfectly and enhances my body beautifully while still being modest. The skirt rides up so I'll have to wear sheer stockings underneath them and I have to go over it with my lint roller to make sure there is no fuzz.
A lilac chiffon hijab.


Most of my hijabs are chiffon, it's my go-to material because I like how flowy and lightweight it is, chiffon is very easy to work with and there are a million different styles. I have found a style that frames my face beautifully and suits my face shape perfectly and I do my hijab the same way pretty much every day. This color is muted and has a grey undertone and it looks very beautiful in combination with navy blue. My dad got me some silver hijab pins, they're a small detail but make me look a million times more put together, I need 4 pins to do the usual style and only 2 of them are visible so I just take the needles and put them to secure my scarf and make sure it stays where it is for the whole day (it never does). I will be wearing silver jewelry with this outfit so they're a nice touch and give me a more cohesive look.
Silver Jewelry.


All the clothes in my outfit have a cold undertone, so naturally I will wear silver with this ensemble. I will stack the Cartier Love Bracelet in Silver (thin model) with a basic diamond bracelet. I thought about adding Just un clou but I think that would be a little too much and it will not match the blouse. I am not really a big fan of Guess, and I don't own much from the brand but I love silver, I love butterflies and I am beyond obsessed with anything that is cute and classy and this watch ticks every box and it looks so adorable in person, I love it. I also wear earrings with my hijab whenever I can, they always need to be extra long to be visible over my scarf and I love the way they add some sparkle to my face, and how they swing with my every movement, it makes me look more vibrant and lively.
Lacoste Concept Zip Tote Bag. Tommy Hilfiger Ballet Flats.
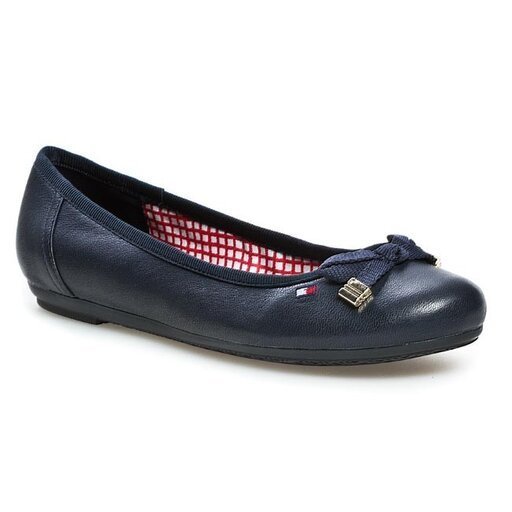
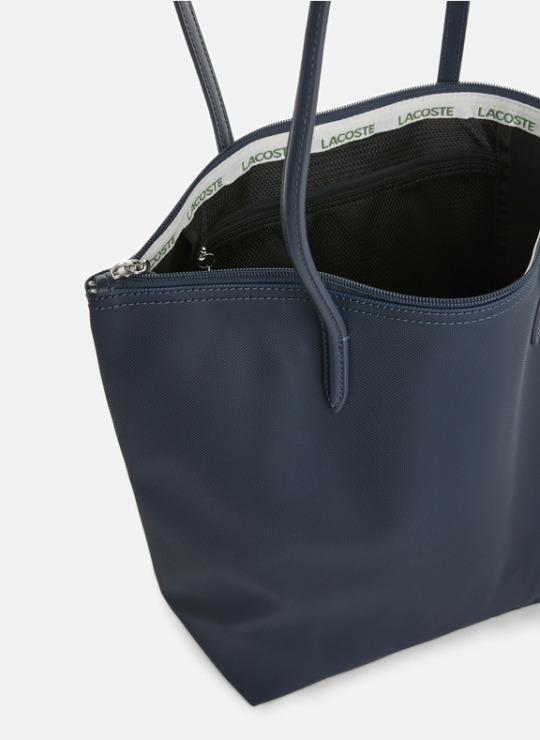
Lacoste Tote Bags are ridiculously spacious, they fit everything you can think of but the handles are extremely thin so I am very hesitant about carrying some of my heavier stuff with me, I wouldn't trust it with my laptop or heavier books but it is extremely wide so it fits a lot of binders and notebooks with no issues and it does not damage the corners due to its width like my other bags, and you can just throw things and it is a convenient bag. The Tommy Hilfiger Ballet Flats are from Spring Season 2014 but you can't tell, they look like I just brought them out of the box and it's one of the reasons I love thrifting, you can find great prices for very low prices and they are of such great quality, the ballet flats are real leather and they do not look dated because it's a classic and timeless style.
2 notes
·
View notes
Text
Why I Ditched My Jeans for This $198 Soft Knit French Lounge Pant | Comfortable & Stylish Loungewear
If you've ever thought of trading in your jeans for something more comfortable but equally stylish, it’s time to meet your new wardrobe staple—the $198 Soft Knit French Lounge Pant. As someone who used to live in jeans, I never thought I’d ditch them for something cozier, but these pants have completely changed my perspective on loungewear. Perfect for both lounging at home and running errands, they offer an unbeatable combination of comfort, style, and versatility. Let me tell you why I made the switch and why you should consider adding these lounge pants to your wardrobe.

The Comfort Factor: Soft Knit That Feels Like a Dream
The first thing that caught my attention about these lounge pants is the luxurious soft knit fabric. Made from a high-quality French knit, these pants feel incredibly soft against the skin, making them perfect for all-day wear. They offer the kind of comfort you can only dream of in jeans, with a cozy yet breathable fabric that keeps you feeling relaxed no matter where you are. Once you experience the softness of these pants, you’ll understand why they’re an easy upgrade from your standard denim.
Effortless Style: The Perfect Blend of Casual and Chic
One of the most significant selling points of the Soft Knit French Lounge Pant is its versatility. Unlike your average sweatpants, these lounge pants have a chic, tailored look that elevates your casual style. The relaxed fit and minimalist design make them easy to dress up or down, depending on the occasion. Pair them with a classic white tee and sneakers for a laid-back weekend look, or style them with a sleek sweater and ankle boots for a more polished outfit. These pants are proof that you don’t have to sacrifice style for comfort.
Why I Ditched My Jeans
Jeans have been my go-to for years, but they often felt too restrictive for everyday wear. After slipping into the Soft Knit French Lounge Pant, I quickly realized that these pants offer all the ease and comfort my jeans lacked. With their stretchy waistband and relaxed fit, these lounge pants move with you, making them perfect for everything from working from home to going out for a casual dinner. And unlike jeans, which can feel stiff or tight, these pants offer a more relaxed vibe without sacrificing style.
Perfect for Travel: The Ideal Airplane Outfit
If you’re looking for travel-friendly pants that can take you from the airport to your destination in style, these lounge pants are it. The soft knit fabric ensures you’ll be comfortable during long flights, while the chic silhouette means you won’t look like you just rolled out of bed. Pair them with a cozy cardigan and a pair of sneakers, and you’re ready for any travel adventure. Plus, they’re lightweight and easy to pack, making them a great choice for weekend getaways or vacations.
How to Style the Soft Knit French Lounge Pant
These pants are the epitome of versatility, which means you can style them in multiple ways to suit any occasion. Here are a few ideas to inspire your looks:
Casual Day Out: Pair the pants with a basic tee and white sneakers for a casual, effortless look.
Work-from-Home Chic: Add a fitted turtleneck and cozy slippers to create a comfy yet stylish outfit for those Zoom calls.
Weekend Brunch: Dress them up with a chunky knit sweater and ankle boots for a cozy yet put-together brunch outfit.
Evening Stroll: For a casual evening walk, throw on a denim jacket and a pair of stylish flats.
The Investment: Are They Worth $198?
At $198, these lounge pants are an investment, but one that’s well worth it. The premium fabric, versatile design, and unmatched comfort make them a wardrobe essential that you’ll reach for time and time again. Consider how often you’ll wear them—they’re perfect for lounging, working from home, running errands, and even casual outings. With their quality construction and timeless style, these pants are built to last, giving you excellent value for your money.
Final Thoughts: Ditch Your Jeans for the Soft Knit French Lounge Pant
If you’re on the fence about swapping your jeans for something more comfortable, I can’t recommend the Soft Knit French Lounge Pant enough. With their cozy knit fabric, versatile style, and all-day comfort, they’re the perfect alternative to restrictive denim. After making the switch, I’ve never looked back—and I’m sure you won’t either. Whether you’re lounging at home, traveling, or heading out for a casual day, these pants are a must-have for anyone seeking both comfort and style.
0 notes
Text
Evolution of Martanity Wear: Traditional to Modern

While its origins are traditional, Martanity wear evolved with the changing needs and tastes of today's woman. This journey thus reflects broader changes in fashion and lifestyle as well: how clothes cope under pressure with modern life without discarding their historical roots.
Traditional Martanity Wear: A Brief Overview
This is a far cry from the maternity wear of old, which, while functional, rarely bore an emphasis on style. The traditional garment, basically designed for comfort and practicality, usually had a simple cut in a modest design. Loose-fitting dresses and tunics were the staple garments that women relied on, as these accommodated the growing bellies but didn't really consider the fashionable aspects of maternity clothing.
The Shift to Modern Martanity Wear
The shift from traditional to modern martanity wear was therefore initiated late in the 20th century. Society and attitude towards fashion have changed tremendously and also towards women. Today, maternity wear does not only look towards comfort; it feels good, incorporating style and individuality. Designers have started including trendy fabrics, vibrant colors, and contemporary cuts to make the martanity wear functional yet fashionable.
Modern Trends in Martanity Wear
1. Stylish Comfort: The modern martanity wear gives maximum emphasis on comfort without compromising on style. Stretchy fabrics, adjustable features, and innovative designs ensure that the mother-to-be is feeling good while looking great. These garments are crafted to provide ease of movement while maintaining a stylish appearance.
2. Versatile Designs: Martanity wear has versatile designs to be worn during and after pregnancy. This is just part of a larger trend towards practicality and sustainability within fashion.
3. Integrated Technology: Improvements in fabric technology have brought about Martany Wear endowed with temperature control and moisture-wicking ability to ensure the woman is comfortable across various scenarios.
Practical Tips: How Long Can I Wear a Maternity Belt After Delivery in a Day?
The evolution of martanity wear also comes with practical considerations for new mothers. Among the typical concerns of a new mother during the post-delivery period is how long to wear a maternity belt after delivery in a day.
A maternity belt is essential in the postpartum period since it can offer critically needed support, therefore helping reduce discomfort and supporting the abdominal muscles. One can wear it for some hours during the day, especially at times when one needs to be on their feet. However, it is always best to listen to one's body and make any adjustments according to comfort and need in the duration of use. Consultation from a healthcare professional can give one custom-made advice on how long to use a maternity belt after delivery.
Embracing Modern Solutions
Modern maternity wear is more of a reflection of changing lifestyles and needs than just a fashion statement. The journey of maternity wear, from traditional designs to modern day innovations, speaks of a broader story of change and adjustment. With women continuing to seek clothes that offer as much comfort as style, the industry will evolve further, combining practicality with modern aesthetics.
Knowing how long to wear it after delivery and other practical aspects are just part of the broader evolution of martanity wear. One does enjoy a better and more stylish pregnancy with the adoption of tradition combined with modernity. As we move into the future, martanity wear has in store much more new innovations that will further ensure the continuity of meeting the dynamic needs of women worldwide.
0 notes
Link
Check out this listing I just added to my Poshmark closet: Angie Split Front Striped Palazzo Pants, Small, $32.
0 notes
Text


*leans casually on wall* hey,
i will take ANY excuse to design an outfit, especially wedding outfits, idk why— I just think they're fun.
there were originally two tuxedos involved in this (on the hair timeline drawing), with Flash's white and Peter's blue, but as I was editing my notes I ended up moving some stuff around and shunted Flash's transition forward by about a year and a half because it made more sense to happen around the time they get married instead of nearly 2 years later...
So like any reasonable person, I thought to myself, "oh boy! time to spend four days on a wedding dress!" (the drawing didn't take four days, i just spent a lot of time looking stuff up)
💐
edited to add peter's glasses, which i could have sworn i already did but w/e
closeups and thoughts under the cut:
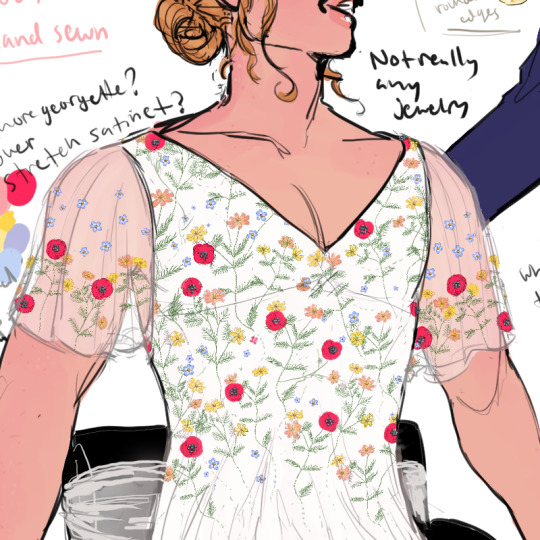
in my head the top part of the dress is at least partially some kind of soft, flexible fabric, like a stretch satinet or whatever, or one of those really soft matte stretchy fabrics, but i honestly wasn't sure how exactly to handle that considering I'm not a tailor myself... like there should probably be a waist seam where the top meets the skirt, though probably hidden by the embroidery at least a little bit... though i guess it could also be that there is a layer of already-embroidered georgette over the top of a slip...
i did not hand draw this embroidery by the way. i almost tried. and then after .5 seconds i said, "oh this doesn't look good and i don't know what i'm doing." so then i used some brushes in clip studio paint and colored in colors i liked and added some beads that are basically not visible at 100% zoom (lmao)
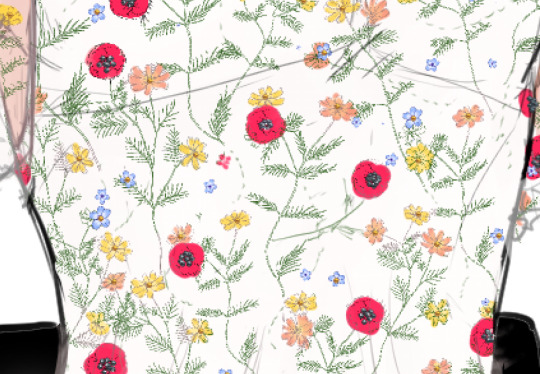
they're there, i swear. i just think it would be cute if there were some very small beads adding a bit of sparkle...
Anyway, I just thought the flowers and colors would be nice. And I know you're probably thinking "huh, where'd they get sheer fabric that's only embroidered on part of it?" considering all those pre-made fabrics w/ the flowers all over... or "where did they get that dress custom-made? did one of their friends pay for it?" to which normally I would say "yeah lol they know at least a half a dozen rich people" but in this case... Well, this is a wedding that involves Peter. and Peter is nothing if not extra, impulsive, romantic, and a masochist—
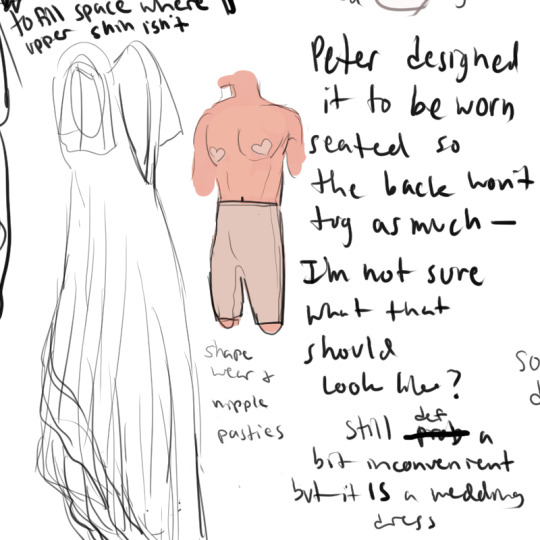
Peter hand-sewed the entire dress, including the embroidery.
I figure, if he can embroider spider webs onto his suit then surely he can handle this ,as long as he has something to go off of. the dress itself isn't exactly the most complex, except maybe the skirt part falling in a specific way, so this is just another idk how many hours for him to spend futzing around with a needle and thread and insisting he can finish it in time. point in favor, because he does, but only because they have to postpone the wedding from March to May for other, unrelated reasons LMAO
also i just think it's romantic... and i like the idea of him making things with his hands all the time... he takes up woodworking a year or two before this iirc lol (the reasons for that are more morbid though... 😅)

anyway, i wanted the skirt to look nice in a wheelchair without getting in the way of things like the brake grips or the push-rims, so Flash can still move herself around (esp since she doesn't have handles on the back of her wheelchair lol) so that was another thing i was looking at pictures of. I really like georgette so I think it's probably layers of georgette, but drawing that is... hard.
probably looks a little more like this?
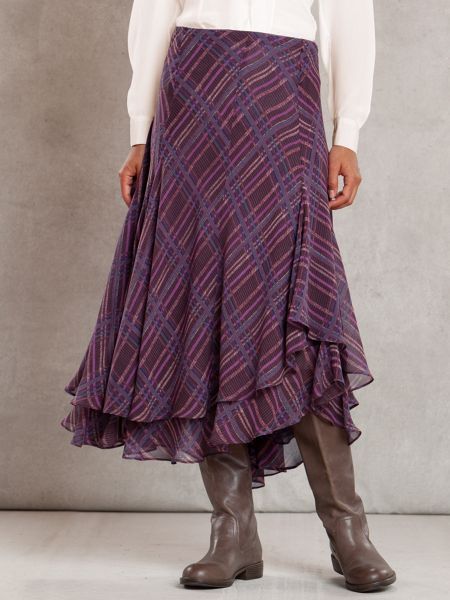
but plain ivory obviously, not plaid. drapey with a soft hand, not too fluffy or stiff. probably a satin slip or something underneath.

elegant... backless... I mean if Peter is the one designing it (though presumably Flash has SOME input, I mean, she's the one wearing it) how could he possibly resist the opportunity? (i just think backless dresses look nice) (also it shows off her back muscles, probably)
lmao
as it says in the pic, i figured this should be designed so it's comfortable to sit in and doesn't get tugged around a bunch but I will be honest. i did not have a lot of luck trying to research that so I gave up. I'm sure there's a way to do it but I have no idea how to draw it so I'm handwaving it along with the mysterious missing waist seam LOL
but also it's a wedding dress and most wedding dresses are wildly inconvenient even if you have absolutely no disabilities whatsoever.
at least she doesn't have to go commando...
though i'm sure going to the bathroom is a real nightmare lol

the bouquet and the veil are both on the back of the wheelchair—this was already true even before I decided Flash was gonna use this as an opportunity to be way more girly than usual, but it's still true here too. Though I did end up changing the flowers cause I realized I didn't like what I had, so the final bouquet is a mix of peonies, flowering dogwood, and some kind of wildflower that would be in season in May. Plus the red ribbon to match Peter's accessories.
oh and there's Flash's makeup too. Simple, not too dramatic. I don't imagine her ever being a red lipstick and dramatic eyeshadow kind of person, whether at a wedding with colorful dress or not, but some lip gloss and a little bit of shimmery eyeshadow that you can barely see sounds nice... maybe copper mascara or whatever but nothing dark.

her hair is also not super complicated or fancy, and she has no jewelry or anything like that, aside from the engagement ring... just a nice low bun with some pretty wisps 💞 Courtesy of MJ almost definitely!!
And the yarmulke is for a multitude of reasons. "Technically" Flash is not "legally" a woman at this point, isn't even out to her family yet (lol. lmao.) and hasn't legally changed her name yet either (she's going to after they get married), and I don't even know what the rabbi would think (i mean, i'm sure they've discussed by the time the wedding happens lol) but women wear yarmulkes these days too (these days is... 2014... btw), and Flash will have converted like 4 years before the wedding already (for reasons unrelated to Peter) so it's important to her... so, ultimately, regardless of requirements or level of reformness, I think she just wants to wear one.
Peter gets one too.

isn't he handsome?
lbr he probably wouldn't have even thought about it if Flash didn't bring it up. too busy thinking about what color of tiny beads to sew onto her dress XD
I DID loosely base some elements of Peter's tuxedo on the one from the iconic PeterMJ wedding cover—
—but mostly in ways I probably would have done anyway (dark blue tux... red cummerbund... etc.) (actually now that i think about it, the comic tux is probably meant to be black, huh) and I didn't want to make it actually the same so I gave him a pleated shirt and I didn't use a carnation for his boutonniere. Instead, dogwood (to match the bouquet obviously)—all the flowers I picked I'm PRETTY sure are in-season in May in NYC. as if they couldn't just go to any random garden and get some damn roses but I wanted to be more specific.

Peter doesn't make his tuxedo XD He also doesn't buy or rent it—Johnny Storm is the one in charge here because he insists, Peter. It's a special occasion!! He'd never let his best friend who he's totally not a little bit in love with wear a rental tuxedo to his own wedding! God Forbid. Peter eventually allows him to do so under the stipulation that Johnny keeps it tasteful and classy and "not too expensive."
Which to Johnny means "expensive silks and wools."
he's probably wearing suspenders. i didn't bother drawing that.
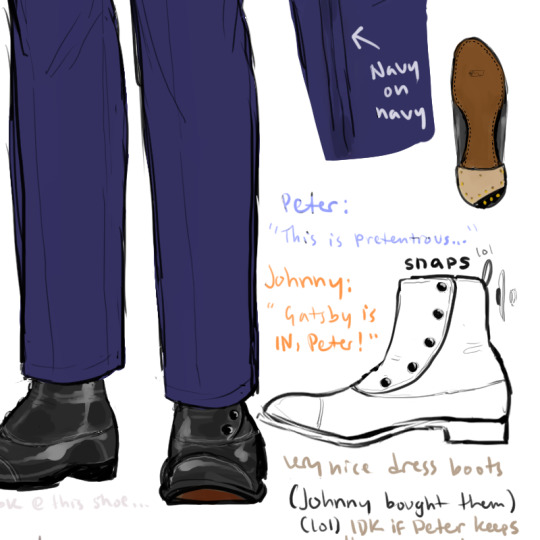
also these fucking shoes
NO idea if Peter keeps these. I only came up with them today. He was just gonna wear normal shoes before... but again, this is tasteful a la Johnny Storm. But Peter doesn't usually have occasions to dress fancy so having weird pseudo-spat dress boots is like. "What do I even do with these?" ("Wear them!!!")
I almost made the top part white (thus, pseudo-spats) but I think that kind of requires more of a white tie look... it looks nicer black. and hides his spidey-tighties (except he's not wearing his costume under this). Snaps, too! easy on, easy off!
(vaguely based on (these shoes) btw but not 100%)
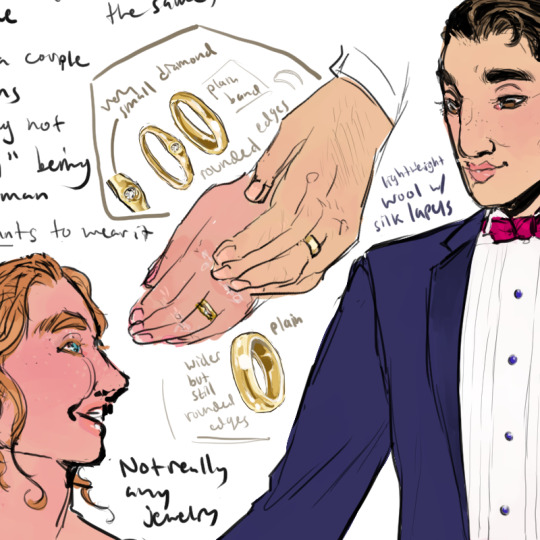
wedding rings 💍
i already drew the rings a while ago (though i did slightly modify the coloring) so that's still the same. the engagement ring is essentially Flash's very first step into admitting who she wants to be... Peter doesn't even have a proposal planned, he just asks one day over breakfast lmfao but Flash has to think about it a lot so by the time Peter gets a yes (after a serious conversation with Flash about it) Flash is also like... can I have a ring??? and Peter is like OF COURSE (and actually he did have some money saved for this but he didn't know what to do...)
he'd probably make the ring himself if she asked—he doesn't though, they get it from a jeweler. it's... not cheap but it's less than $1000 at least? benefits of being very small and discreet.
Peter probably also offers to get himself one so they're equals here esp since power dynamics is part of the serious conversation and why Flash has to think about his proposal, but it's just not practical for Science Teacher Spider-Man to have an engagement ring and also they do not have money for that many rings.
in my notes Peter is wearing his uncle's wedding ring btw 🥹 i don't think they have Richard and Mary's rings so that's probably not an option. so, resizing Uncle Ben's ring instead.
anyway...
that's everything
here's Flash again, look how pretty she is
normally she just wears comfy athletic clothes and no makeup lol
#peterflash#trans flash#nadiart#arghdesign#fanadiart#rough art#peter parker#flash thompson#came in through the window last night#fun fact: i tried to use the generic 3d models as a base to make my life easier. that didn't work out.#also considering flash getting peter an all white tallit for this... (and possibly herself as well tbh)
38 notes
·
View notes
Link
Check out this listing I just added to my Poshmark closet: St. Johns Basics Women's Pants Size 12 Black.
0 notes
Text
@kanrix too many pictures to put in a reply or anything so i'm just gonna make a post FHLDSKJFHDLSKf this also goes out to anyone else who could benefit from my little gaster cosplay tutorial fhjkghkfg
aight this is the earliest picture i have but basically I cut an oval out of 4mm foam, and used scrap pieces of the same size foam that i just had laying around to do another layer on top for added support and thickness. after that i did my best to roughly mark where my eyes, nose and mouse were and cut the eyes out so that they would line up with my own, and used the markings for the mouth and nose to cut a hole into the inside of the mask for my nose to fit into. the mask has a higher layer of foam only on the very tip of the nose because i had to keep my nose from sticking out or pushing the mask too far off my face lol.
anyway after all of that i used a heat gun to heat the foam (WITHOUT melting it and preferably in a well-ventilated area) on both sides and then held it to my face in position to help it mold better to the shape of my head. it looked like this when i was done (i also cut into the upper layer of foam to make the eye scars)
after that I covered the entire thing with this amazing thing called foam-mo, it's basically like foam in a water-based binder that behaves like craft clay. it's easy to work with and SUPER lightweight when it dries and it's absolutely perfect for making organic textures
it lost a bit of the dimensionality in the drips after it dried, but I just went over it with another layer where I wanted more texture, and used a dremel tool with a sanding bit to sand down parts that I wanted more depressed.
then after that were the first and second paint jobs. this included using an ultra dark carbon nanotube ink in the scars to get them as black as possible (and matte). after the second paint job I used a type of fabric called "speaker cloth" to cover up the eye and mouth holes. I hot glued the speaker cloth down from the inside and then painted over the fabric on both sides with fabric stiffener on the mouth hole ONLY (it can make it harder to see through the eye holes) since the mouth hole is so wide and is most subject to the shape distortion from how the mask was heat-shaped.

then finally the last paint job which included final shading touchups AND some extra work with white puffy paint, which I used to give the effect of the face dripping down.
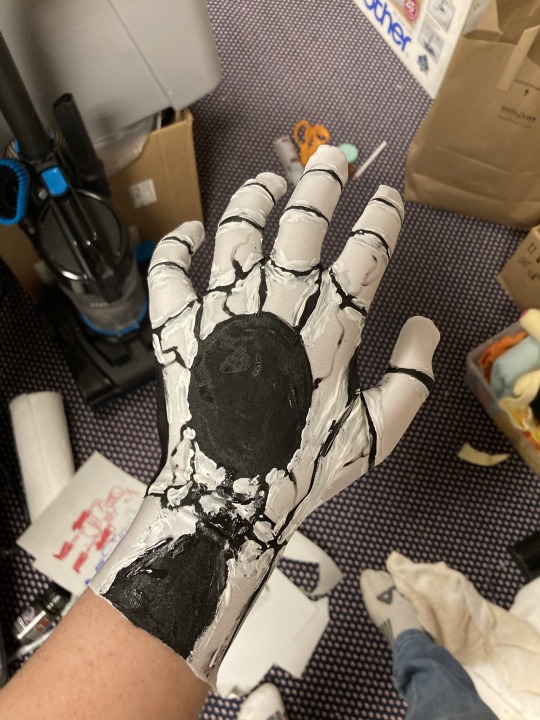
the very last step was adding the pupils as a dot of intense blue glow in the dark paint. it took a few coats to get it thick enough, and then on top of the bead of glow in the dark paint i added a tiny dot of plain white paint to make them pop even more. add a 1/2 inch elastic strap around the back of the mask glued down on the inside and you're done!
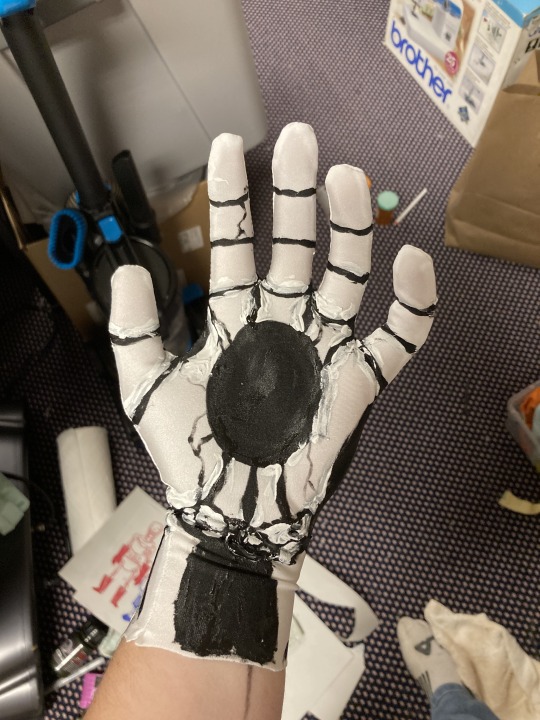
also, here's some pictures of the first glove I painted, if the reference would be helpful. The gloves were sewn using a self-made "hand turkey" pattern from tracing the shape of my hand onto paper. it's not a perfect pattern, but it's serviceable enough for stretchy fabrics. and I did use a stretchy fabric: white moisture-wicking athletic wear fabric, because I was worried my hands would sweat a lot. and I was right! but this choice of fabric makes that much less of a problem. and also makes you feel like your hands are freezing off (being in the void simulator ig)
the painting job was done with just plain black and white acrylics mixed with a fabric paint medium. i traced the finger joints where my fingers actually creased, and just kind of... did my best to make the palm holes match up lmfao
As for the cloak and robe, I did sew those both myself, so I can't point you to a seller. BUT what I CAN do is tell you what patterns and fabrics I used and whether or not it was worth the intense labor of love! (short answer, for the cloak? yes! for the robe? NO.) I'd have to go dig up the patterns though, so let me know if that's of interest to anybody
but yeah, hope this post is informative and potentially helpful!
#mine#my art#art#cosplay#gaster#undertale#deltarune#utdr#w.d. gaster#cosplay tutorial#gaster cosplay#long post
620 notes
·
View notes
Note
Dear Audrey, love reading your articles on the development of the Cheongsam. Some of the ‘technical terms’ went over my head (trim, beading, darts, collar/shoulder seams, piping etc) and I thought a glossary with definitions might help. Maybe a photo showing what exactly they look like and where they are located on the dress? It’s just a suggestion but I think it would help clarify all the great work you have done with each article :)
Hi, that's a great idea actually, thanks for suggesting it! My apologies for assuming that the people reading are also hobby sewists... For most of these you could look up the more detailed definitions online, I’ll just explain some common sewing terminology and how they are applied to historical Chinese clothing. I don’t know how much the average reader knows about sewing so let’s start with the basics.
Glossary of generic sewing terminology
Seams
The seam is the line along which two pieces of fabric are stitched together. It could be recognized on the outside of a garment as a bulging line or where the patterns don’t match up. Depending on the construction method, seams will be placed at different places. For Chinese historical clothing, they were usually present at the sides/underarms, center front, collar and sleeve extension.

Source here
The stitching line is the seam.

Source here
30s cheongsam. You can see the line at her left side which is the side/underarm seam.
Seam allowance
After two pieces of fabric are stitched together, there will be two thin rows of fabric left over on the inside that wouldn’t be seen (unless it’s a Hong Kong seam). This extra bit is the seam allowance. The width of the seam allowance could vary greatly depending on the purpose, but in Western historical clothing it was usually 1/2 inch or 3/4 inch; I actually have no idea how big the standard seam allowance was in China, maybe there was no standard and everybody just did what they liked. If you were planning to make the garment bigger in the future, you could use a big seam allowance so that there is some extra fabric.
The turquoise part is the seam allowance.
Raw edge
Any edge of a piece of fabric that is not bound or finished in any way is a raw edge, including the edges of seam allowances. It’s good practice to finish the raw edges so the fabric doesn’t fray and make the garment fall apart.
Fraying
Fabric that are loosely woven could have threads unravel at raw edges, which, if left unfinished, will slowly wear the fabric away. Some fabrics don’t fray, like jersey and wool, but these were European and weren’t available in China before the 18th century.

Source here
Right and wrong side
The side of the fabric where the pattern is more visible is the right side, whereas the side that needs to be hidden is the wrong. With plain fabrics this isn’t a big deal since both sides look the same, but for printed fabrics or fabrics with woven patterns like 妆花 zhuanghua and 缂丝 kesi it’s important to note because only the right side has the pattern, the wrong side is just a bunch of incomprehensible lines. Ok some woven fabrics have patterns on both sides but they’re rare and expensive. I’ll make a glossary post for fabrics some time in the future. Most seams are made by stitching the fabric pieces with the right sides facing each other, so that when the seam is opened, the seam allowances would be inside and not visible.

Source here
Selvage
The edges of a fabric at the left and right. Spelled selvedge in British English.
Warp and weft
The warp thread of a fabric goes up and down and is parallel to the selvage, the weft thread left and right and perpendicular.
Grain
The grain of a fabric refers to the directions of the threads. When a piece is cut perpendicular or parallel to the selvage it’s on a straight grain, when diagonal it’s on bias. Pieces cut on the straight grain are stable and stiff, those cut on bias are more stretchy and tend to wiggle about. Most Chinese clothing pieces were cut on the straight grain, but the bias grain played an important role in the shaping of cheongsam.

Source here
Stitch
A stitch is a method in which the thread is worked through the fabric to connect, secure or decorate it. For some reason it’s very difficult to find information on what stitches were used on historical Chinese clothing... I think the most common stitches for Chinese historical clothing are the running stitch, running basting stitch and backstitch, all done by hand of course.
Topstitch
Any stitch that is visible on the outside of the garment.
Running stitch
A running stitch is made by simply running the needle and thread up and down across the line of stitching, used to hold seams that don’t get a lot of stress. It’s relatively weak so it’s not good to use it on seams that require strength.

Source here
Basting stitch
Basically a running stitch but wider. It’s used to hold seams together temporarily since it’s fast to do and easy to pull out.
Backstitch
A backstitch is made by running the thread backward every time a forward running stitch is made. It’s very strong when done tightly by hand so it was the most common stitch used for seams that experience a lot of wear and tear. Backstitches didn’t have to be extremely strong before the republican era because Chinese clothes then were looser and didn’t require a lot of strength in the seams, but since tight fitting clothes became a thing in the 1910s, compact backstitches would be required for the side, underarm and collar seams so they won’t burst open.

Source here

Source here
1930s form fitting cheongsam. For the seam at the side, which you can see from the mismatched pattern, a strong backstitch needs to be used if done by hand, otherwise the side would burst open. It could also be done by machine.
Machine stitch
As the name suggests, a stitch made by a sewing machine. Sewing machines were patented around the 1840s and began to be used in China in the 1870s, commonly made by Singer. China started producing its own sewing machines in the 1920s. Machine stitches look like running backstitches but are different to hand stitches in that they use two different threads that lock into each other as they move forward.
Slipstitch
Only slightly visible on the outside, a slipstitch is mostly used for hemming and finishes. Made at where the hem is folded up by only picking up a couple threads on the outer fabric and then running through the folded layer.

Source here
Raw edge finishes
I mentioned before that raw edges need to be finished to prevent fraying; there are many different ways to do this.
French seam
A classic seam finish in historical Chinese sewing. It’s not actually from France just called that in English lmao. This seam is kind of special and difficult to pull off because it requires you to stitch the fabrics wrong sides together first with a small seam allowance and then flipping it over and stitching them together again right sides together with a bigger seam allowance, encasing the smaller first seam allowance in the bigger second one. I used this for my 1930s cheongsam project which will be posted as soon as my pankou arrives.

Source here
Binding
Using separate strips of fabric that are thin, long and usually cut on the bias (bias binding tape) to encase the raw edge. Could be completely functional or decorative like in 1930s cheongsam or 1890s ao. On cheongsam and ao it’s usually used around the outside edges i.e. along the slit, hem, placket and neck, at the sleeve hem, at the collar.

Source here

Source here
1930s cheongsam worn by Ruan Lingyu, finished with two rows of decorative bias tape.
Hemming
By folding up the edge of the fabric twice and securing it to the main body with a slipstitch. Often used for robe, sleeve or skirt hems for unlined garments.
Construction systems
平裁 pingcai or flat tailoring
The historical method of cutting and making garments used in China and neighboring countries from the beginning of time to the 1950s. It involves cutting the front and back of the garment as one piece on fold twice (once at the shoulder once at the center front/back), resulting in a giant fabric piece that looks like a cross shape. Pingcai clothes could be hung flat in a T shape.

Source here
Sewing pattern for a Ming Dynasty men’s robe.

Source here
Pingcai kimono hung flat.
立裁 licai, 3D tailoring or Western tailoring
Western clothing construction techniques varied throughout eras but the general idea was that you could use shaped pattern pieces sewn together to create very 3D silhouettes. Sometimes they were so form fitting that they created artificial silhouettes out of the wearer’s body, which was the case with corsetry. Western pattern pieces usually look very funky with a lot of indentations and weird shapes.
Construction features
Armhole/armscye
In pingcai, there is no armhole, the upper half of the sleeves are connected to the bodice; in the West this would be called a dolman sleeve. In licai, the bodice and sleeves are separate, so sleeves have to be “inserted” to a hole created by the front and back pieces. Methods and styles of sleeve insertion were different for each era.

Source here
Generic Victorian/Edwardian bodice sewing pattern. The curve labelled 7 on the front and 5 on the back will become the armhole after sewing, and the sleeve has to be stitched to around that hole. That seam is the armhole seam.

Source here
Modern hybrid cheongsam/aodai contraption. You can obviously see the seam at the shoulder, indicated by a line and stark contrast in light. The sleeves are very neat and angular when the arms are down because that’s the angle at which the sleeves were inserted, but when the arms are raised they begin to pucker. Most modern cheongsam have these sleeves despite having no historical precedent before the 1970s...

Source here
1940s cheongsam with a dolman sleeve (no sleeve insertion or armhole seam). It looks rounded and smooth, with puckering under the armpits. When the arms are raised there will be no creases because the fabric was cut in this T shape.
Cap sleeve
A non-insertion sleeve that is very short, only covering the shoulders.

Source here
1950s cheongsam. The two on the left are cap sleeved and the right one is sleeveless.
Darts
An important technique for shaping in Western tailoring is the dart. On sewing patterns they look like sharp, well, darts, and are made by pinching the fabric and stitching along this dart shape. This will make the fabric three dimensional. Darts on bodices are usually added at the waist and under the armpits to accommodate the protrusion of breasts, as well as at the hips for skirts. On a finished garment, a dart will appear like a seam but ends abruptly.
The two sharp dagger shapes on the front piece are the darts.

Source here
How to sew a dart.

Source here
1960s cheongsam sewing pattern. There are darts at the waist, back and under the armpits. By reducing fabric at these strategic places, the waist will become smaller and the chest area more protruding.
Pleating
Universal sewing technique. Done by folding a part of the fabric and stitching the top of it to the fabric underneath, creating a fitted part that then flares out. There are many different types of pleats but the most common ones used in China were knife pleat and box pleat. Commonly used for skirts in China.

Source here

Source here
Qing Dynasty mamian skirt with knife pleats.
Gathering
Not really a thing in China before the 1920s. Done by running two rows of loose basting stitches through the top of a fabric and then pulling one side of the threads against the fabric, causing the fabric to bunch together. The gathers are then secured by a topstitch. Similar purpose to pleating as it creates a fitted top and a flared bottom, but has a more bulging, messy appearance compared to pleats which are ironed and neat. Also used to make skirts for aoqun ensembles.

Source here

Source here
Late 20s evening skirt with a gathered waist.
Embellishments
Piping
A strip of fabric containing a round cord sandwiched in between a seam. Commonly used as decoration at raw edges of ao or cheongsam sandwiched between the outer fabric and lining. It could also be topstitched to the surface of a fabric as decoration, such as in 17th century changshan collars. In Europe it was commonly used on military uniforms and upholstery.

Source here
A piece of piping.

Source here
40s cheongsam finished with thin piping.
Trimmings/trim
Any kind of prefabricated flat ornamental strips that could be sewn to the edges of a garment. Common examples are lace, fringe and floral embroidery.

Source here
Lace trims.

Source here
30s cheongsam with geometric trim.
Embroidery
A method of ornamentation which runs colored threads through the fabric with needles to form patterns. Used throughout Chinese history but became very prevalent on clothing in the 18th/19th century.

Source here
Embroidery in progress

Source here
Mid 19th century robe with embroidery.
Beading
A method of ornamentation in which beads (small, three dimensional stone formed objects with a hole through which threads could be run) are strewn and sewn onto fabrics. Common beads include rhinestones, pearls, sequins and glass beads. In China, beading wasn’t commonly used until the late 1920s, even then it was reserved for eveningwear and quite rare.

Source here
Beaded 1920s Western evening dress.
That’s all I could think of for now. I’ll probably add to this in the future :3
#historic fashion#chinese fashion#chinese history#sewing#historical costuming#cheongsam#republican era
365 notes
·
View notes
Note
Im the same anon asking for the pattern, um sorry to insist.
Do you have suggestions on the fabric to use and/or advice on how to make it double sided?
I've only made very basic stuff so im kind of intimidated to try. That's why i tried my luck jaja
OH BELIEVE ME NO WORRIES IM HAPPY TO RAMBLE ABOUT COSPLAY HAHAHFJKSD i went for something a little on the stiff side so the coat would hold its shape a little bit when coming off my hips, not just totally sag lifelessly like satin or spandex; specifically, i used black and white gabardine! i also used interfacing to help make it a lil extra stiff :^)
(the red is just a 2-way stretchy knit, and the only reason its stretchy is because i knew i was gonna use it to make the red band of the hat, and i wanted to make sure it could stretch a bit to flip inside and out lmAO-- SO IF U CAN FIND A RED GABARDINE I FIGURE MAYBE ITS BEST TO KEEP FABRICS CONSISTENT AND ALL--?)
and honestly the entire reason the 'reversible' part of the coat was possible was because it's basically entirely hemmed with bias tape! i made the white coat and black coat entirely separately, but didnt hem the sleeves, the opening of the coat, the bottom, or the collar until i put them together and could slap bias tape on top and hide all the raw edges >:j
also a note! for the cuffs and the collar specifically; the white coat actually had black cuffs and a black collar attached, and the black coat had white cuffs and a white collar! since, when you wear one side, you effectively turn the collar and cuffs inside out, so--they had to be opposite colors to make up for that, if that makes sense :^);;
EDIT: ALSO CANNOT STRESS THIS ENOUGH MAKE SURE IF YOU DO A SHIT TON OF PANELLING LIKE I DID (in that all the stripes were their own individually cut out squared of fabric) MAKE SURE UR SEAMS LINE UP AS CLOSELY AS POSSIBLE OR ITS GONNA LAY ALL WRONG MAYBE THATS OBVIOUS BUT I LEARNED THE HARD WAY LOLLL--
35 notes
·
View notes
Text
Ok so I know that Xmas is basically done, and I have like 3 requests to do but Saimatsu brainrot is real and I gotta get this out so I'm gonna go insane.
!Portlypianist #2!
"Ngh...come on...huff...wheeze...Shuichi...can you give me a hand here?" Kaede huffed as she lay flat on the bed.
Shuichi strolled in to find his girlfriend in quite the well...tight predicament.
Since our last encounter with the two, their relationship had been going pretty smoothly. More affectionate nights, tummy rubs, and of course: food...alot of it.
This of course caused our portly pianist to soften up even more. Now with a more pronounced waddle, a much heavier tummy that drooped heavily below her crotch, a thick double chin along with her limbs being more jiggly and cellulite covered than ever, even her feet and ankles has plumped up a little too. The 340lb pianist was sure living the hedonistic lifestyle to its fullest...although it came with the unfortunate inconvenience of clothes sizes.
Now after the skirt incident, Kaede had chosen for more stretchy material to reside herself in, sweat pants and super huge Tshirts were her usual attire, especially after the mysterious Monokuma started selling out more casual clothes for the students.
This didnt mean she didnt try to dress well at ALL though, she knew that shuichi went ballistic if she wore a tight dress or have her tummy peak out of a shirt so those tighter garments were still used. Though that tight pile soon grew larger as her frame widened.
However on the other side of this food filled coin we have our lovable plank of wood Shuichi! Well nowadays I wouldn't call him a plank of wood. All the food binges and general attitude to the relationship caused our little emo investigator to indulge himself in some of the finer culinary arts, with that said he now sported a less pale and "frail" look and had a much more fair and healthy vibe to him, and maybe...just maybe...on the right day, when his thicker attire was put away, you could see the form of a round little belly.
But anyways, back to the present. Kaede lay flat on the bed with shuichi staring her down, her massive bulge of a belly spilling out of some ill fitted pants. And a snug sweater clinging to her boobs.
"Uh...heheh...a little help? These are the only ones that were clean and since it's kinda cold I didnt wanna wear a skirt and none of my leggings...fit..." Kaedes face flushed a faint shade of red as she placed her hands on top of her tummy hearing it rumble slightly from its lack of constant food.
Shuichi chuckled a little bit and walked over to his pudgy girlfriend, this was not the first time he had needed to help with clothing predicaments, although most of them consisted of taking off clothes rather than putting them on, but this didnt seem like too much of an issue.
"Alright, suck it in!" Shuichi replied as Kaede sucked in her lard filled middle as hard as she could as Shuichi tugged at both sides with what little strength he had.
"Ngh...Cmon...almost...AHA...haaah...there...I did it" Shuichi yelped in excitment as he finally buttoned up Kaedes pants.
Kaede slowly relaxed her tummy and winced a little at the pressure of the constricting fabric, the button and zipper creaking in response to the overabundance of flab.
"Oooh boy ok thanks...uh...heheh...you mind helping me up?" Kaede replied giggling at bit as she held out her hand for shuichi to grab, Shuichi of course grabbed it and tugged her off the bed, after a little heaving Kaede finally got to her feet giving Shuichi a lil hug in the process.
"*grumble* ugh I'm fucking starving let's get to that new years party already!" Kaede chirped as she plodded out of the room towards the outside common area with shuichi right behind her.
With the new year mere hours away from being present, the whole class decided to have an outside food festival to celebrate, with a firework show ready for midnight the whole gang came together with all kinds of meals and snacks.
Kaedes tummy rumbled with anticipation as she met with the other students.
"Ah Kirumi, has everything else been set up for the festival?" Kaede asked wanting to know if there was any extra help needed.
"Nope the deep fryer just got filled and Kaito helped me finish up the snack tables, so please tell me if you require any special foods prepared" Kirumi replied calmly as she screwed in the massive water cooler.
"Thanks I'll be sure to let you know!" Kaede giggled patting her belly before being lured over to the massive table of pastries and cakes laid out for everyone.
"They're from my magic bakery book! Each one is full of surprises! A spell shall be casted on you once consumed!! Nyah haha!" Himiko beamed at Kaede as she cut herself a giant slice of caramel chocolate cake and bit into it.
Her face lit up with wonder as the flavours hit her tongue like lightning with all kinds of sweetened flavours that gave her so many happy feelings it was unreal.
"Hibiko Dis ib so guuuuud!" Kaede beamed back as small chunks of cake flew out of her mouth.
"You know I laced that cake with cyanide" Kokichi added.
"MMMF- YOU WHAT?!" Kaede almost choked as she tried to spit out what was left in her mouth.
"HAH THATS A LIE, HAHA" Kokichi giggled back running away before Kaede could do anything.
"UGH YOU LITTLE- Whatever, I need more food" Kaede grumbled as she reached for more baked goods, taking a pile of donuts, some pastries, tw huge bags of marshmallows and a litre of chocolate milk. Kaede found a spot at one of the tables and immediately sat down and chowed down.
Shuichi quickly joined soon after with his own small stash of goodies, mainly just a bowl of chips and a few cupcakes.
The two chatted as per usual as Kaede went back and fourth between the tables grabbing as many types of food as possible, with Shuichi being the lil encourager he is Kaede had no notion of stopping so she would just keep eating till her hearts content.
-sometime later-
"CHUG CHUG CHUG CHUG" The class chanted as Kaede took it upon herself to destroy a whole crate of Panta bottles.
"URRRRRRRRRRRRP...Oooh god..." Kaede moaned as she dropped another panta bottle with the pile of others.
"Ugh no more..." Kaede complained as her tummy was already stuffed to the brim with all kinds of fried/sweet foods.
"Aw cmon Kaede theres only one bottle left! The 40th! You got it in ya to finish it I know it!" Kaito yelled with encouragement. The whole class had basically gotten used to Kaedes new weight with only a few light hearted jokes here and there, many just left her their food to clear up during meals.
Kaede sighed and picked up the last bottle, every fiber of her being was telling her no but peering at Shuichis encouraging look of approval she knew she had to at least try.
She unscrewed the bottle and tipped it back.
GLUG
GLUG
GLUG
GLUG
*creeeeaaak* *POP*
Her pants had finally lost the war as the button finally burst free and smacked Kokichi right inbetween his forehead. Her tummy bursting the zipper open too as its stuffed and rounded exterior now oozed out of her broken pants with the new added room.
"OH f-UUUURRRP-uck sorry Kokichi!" Kaede called out as she tossed the 40th bottle in the crate.
"Oooh boy I need to go sit down..." Kaede moaned as she waddled back to the bench and plopped down onto it. Impulsively untucking her tummy out of her pants.
Shuichi instinctively came over to give her a celebratory tummy rub.
"Oooh thanks Shuichi...." Kaede stifled another burp as she leaned her weight onto Shuichi.
"Anytime sweetheart" Shuichi replied massaging Kaedes overstuffed belly.
"ALRIGHT EVERYONE PLACES! ITS ALMOST TIME FOR THE COUNTDOWN!" Kaito shouted as he Kiibo loaded up the fireworks.
The countdown started and as the clock reached 0 thousands of colourful lights exploded into the sky filling the world with the brightest of colours.
Everyone cheered and clapped with joy to bring on the new year.
And Kaede and shuichi shared a tender smooch underneath the starry rainbow nights, wrapped in a soft and padded embrace.
Happy new years everyone :)
21 notes
·
View notes
Text
battle jacket guide for baby punks
battle jackets or vests are really big in the punk scene. they also look cool as fuck. one of my favorite things about them is that each person's is different and represents their own style and interests. there are a few different steps u can follow to make one
step one. acquire the jacket
when making a battle jacket it's best to get one without any stretch to the denim bc the elastic threads in stretchy denkm break down faster than regular denim and when you're sewing things on it you might get a weird puckering effect. thrift stores like goodwill or salvation army are good places to look if you have time, but in my experience they don't have a lot of jean jackets. you can probably find one at walmart in the mens section, or target. if you'd like something with a more modern edge or higher quality denim you can check outlet stores like ross and marshalls. that's where i found mine for around 20 dollars. of course if you have the money you can get a Levi's trucker jacket or somewhere else more expensive. the color of the jacket is up to you. now that you have a base layer you can move on to customization
step two. washing the jacket
one important thing to remember about battle jackets is that they're handwash/no wash so it's best to wash your jacket before you begin. you have no idea who has worn or touched it before now. just throw it in the washing machine on cold and go blast laura jane grace for a little bit. personally i run mine through the dryer but if you'd prefer to air dry make sure you lay it flat because if not it will get stretched out shoulders.
step three. dyeing or painting
this is the part where you can possibly dye or paint your jacket. i have never dyed my jacket, but you can find fabric dye at Walmart and just follow the instructions on the bottle. i decided to spray paint mine because i had some cheap black spray paint and i wanted to know what would happen. if you're going to spray paint your jacket, make sure you do it outside and let it dry thoroughly before bringing it in. i left mine for about 18 hours so that the smell was completely gone. after that you want to turn it inside out and run it through the dryer with a couple bath towels for about 30 minutes to heat set it. spray painting your jacket will make it a bit more stiff. walmart and some craft stores sell spray paint that is made for fabric, but i didn't feel like paying for those so i used what i had on hand. i know those are pretty expensive and the bottles don't have a lot in them. if you only plan to handwash your jacket or don't plan to wash it at all, regular spray paint should work fine for you.
step four. back patch
most battle jackets that i have seen have a larger central patch in the back, with smaller ones on the front and around it. it's not essential to have a back patch but i think it helps to tie the whole jacket together. you can either make a back patch yourself or buy one. the site angryyoungandpoor.com has some back patches for popular bands. some bands also have back patches on their merch stores, or you can make one yourself. i made mine out of an old against me t-shirt. i measured around the design, cut it out, and then sewed it on the back of my jacket. if you want to make your own back patch you can do so in one of several ways that i will cover in just a second
step five. embroidering patches
there are a lot of patches out there that you can buy, but most of the time it's cheaper just to make them yourself. embroidery thread is pretty cheap at walmart, and all you need is sturdy scrap fabric to make something really cool. when you're embroidery a patch it's a good idea to get an embroidery hoop to keep your fabric taut. if you don't like the color of your scrap denim you can layer a different fabric over it. i had some stretchy cotton left over from cropping a t shirt that i layered over denim to help keep it in shape. this also makes it easier when you're sewing your patch onto your jacket. i don't recommend embroidering directly onto your jacket because it's harder to manage and if you decide you don't like how it looks and you rip it out you're left with weird holes that don't look good. it's all up to you but i wouldn't recommend it.
step six. painting patches
if you'd rather just paint your patches, you can always use fabric paint or fabric pens. it's best to avoid using acrylic paint because it wears off and cracks, but i have heard you can prevent that by mixing fabric medium into it. i have painted a few patches with acrylic paint but i used a layer of mod podge over the top to protect it. acrylic painted patches CANNOT go through the washing machine.
if you'd like to copy a particular logo or image with paint and you're not good with freehand you can make a stencil for it. the way i make stencils is by printing out my design and then covering the paper front and back with masking tape. once I've done that, i use an exacto knife to cut out the lines of my design and then i'm ready to go. you can use spray paint with a stencil or you can sponge fabric paint onto the design. if you choose to use spray paint make sure you have fabric paint in that color so you can fix up any problems with the design when you're done.
step seven. attaching your patches.
sewing is one of the most tedious parts of making a battle jacket. if you don't know how to sew you can google it. a lot of people use white embroidery floss or dental floss and whip stitch around their patch. if you're attaching an iron on patch that you bought, you should stitch around it too to secure it. make sure you're using a thimble if you're going over seams of the jacket, or sewing on an iron-on patch. at first it might seem fine, if a little time consuming, but days of finger pain isn't worth it. i prefer to pin my patches before sewing them, but you do you. for larger patches i first attach it with a thread that matches the fabric before using a contrasting whip stitch. that just makes things easier for me but it's not mandatory.
step eight. adding metal
spikes, studs and safety pins are a staple of punk clothing. safety pins are easy because you can get them anywhere and just put them anywhere. i got a bunch of varying sizes from walmart and i put them on everything. just play around and see what you like. you can find studs at your local craft store, probably in the leather working section. you just have to poke two holes in the fabric, push the prongs on your stud through, and then bend them back to secure it. you can also get studs online if you need to. i bought a couple packs of screw back spikes a little while ago, and i have since been adding those to a lot of my clothing. spikes are simple to add too. you poke a hole in the fabric, push the screw through, and then screw on the spike. some people recommend adding a dot of super glue in between the spike and screw to secure it, but personally I haven't needed to do that.
another way to add metal to your jacket is with chains. you can sew them on all the day down, or leave them hanging. it just depends on what you want to do. you can get short chains from walmart, or big rolls of chain from craft stores.
step nine. finish up
that's honestly about it. any of the information here can be applied to vests too. if your jacket is really crusty and you don't want it on your skin you can always wear a hoodie underneath, especially when it's cold. battle jackets can be worn with basically anything. mine has always been my go-to jacket for any occasion. make sure it actually represents your political beliefs and bands you listen to. get ready for people to look at you weird in the grocery store. if anyone has anything to add feel free to reblog, and if you have questions my ask box is open. you can always submit a photo of your jacket to my blog because i love seeing other people's diy stuff. wear a mask, stay safe, and fuck the pigs <3
863 notes
·
View notes