#2 pin electrical connector
Explore tagged Tumblr posts
Text
https://www.futureelectronics.com/p/interconnect--pin-and-socket-connectors--crimp-terminals/2-520102-2-te-connectivity-1904077
Crimp Terminals, Socket mount wire, Circular connector, 6 Pin Contacts
Ultra Fast 22-18 AWG Straight Fully Insulated Receptacle Assembly
#TE Connectivity#2-520102-2#Connectors#Pin and Socket Connectors#Pin Contacts#Pin Through Hole Coin Cell Holder#receptacle socket#Electrical circuit#Board mount connector#edge connector#Crimp Terminals#Socket mount wire
0 notes
Text
How to Make: Electronic Wings for Cosplay

Hello Everyone! It's been a while since I last uploaded a written tutorial on here and since I just finished and wore my Dame Aylin cosplay this last weekend it seemed appropriate to jump back in with a tutorial on one of the costume pieces!
Her wings were the star of the show this weekend and I know a lot of people were curious about how I made them! A huge source of knowledge and inspiration behind these wings was this video by Axceleration, I made a few changes to the frame shape and electrical circuitry for mine but her tutorial was a huge stepping stone to give me the confidence to tackle them myself!

Health and Safety:
When working with Sintraboard (as well as other thermoplastics) it is incredibly important you wear a respirator as well as goggles when heating, moulding and cutting it. The fumes this plastic will give off when heated up are no joke! Make sure you're in a well-ventilated space!
Basic tool safety knowledge is also really important! wearing gloves when using power tools can be more dangerous in most situations, so always be aware of where your hands are vs where the tools are. Always cut away from yourself and take things slowly, don't panic.
Electrical safety! You're working with live wires and circuitry! make sure your hands are dry, you aren't touching the bare wires at any point when they are connected to a power source, and if you choose to solder anything, make sure you're wearing heat-proof gloves and a mask in a ventilated space!
Tools
Wire stripper
Screwdriver and wrench
Dremel - I recommend the Dremel 3000 rotary tool personally! Some essential Dremel bits you'll need for this include, a sanding bit, drill bit (smaller or same size as your screws/bolts), and a small/narrow cutting bit. These will usually come with the Dremel!
Heat Gun (A hairdryer will not get hot enough to heat the Sintraboard!!)
Pipe cutter (alternatively you can use a hacksaw for this!)
Hacksaw
Ruler
Scissors (for cutting fabric straps)
Materials
Heat shrink Tubing
2 core electrical wire
switch (you want a three position, six pin switch, like this one, even better if it has the Screws on the pins! otherwise you'll need a soldering kits to solder the wires to the pins.
2x 8AA 12v Battery Holders
2x 12v Linear Actuators (Mine had a stroke length of 100mm)
21.5mm PVC Pipes (I got 2x 3m Lengths)
2x 21.5mm PVC Pipe straight couplers
6mm 8"x12" Sintraboard
Nuts/Bolts/Screws (I used M5 bolts for the base & Actuator connectors and M6 screws to attach the hinges to the pipes! You'll need Washers for every Nut & Bolt!)
Hinges (I used 2.5cm wide hinges that were skinny but long so they would just about fit along the PVC pipe! 3" gate hinges would work!)
50 metre Polythene Jiffy foam roll (in retrospect this was ALOT of foam, you could definitely get away with maybe a 20-30 metre roll! I now have a load leftover XD)
16 AA Batteries (I used 16 and had enough for the whole day with them on, I think They'd probably be enough for another half a day-full day too! but have spares just in case!)
Webbing strap ( I went for grey to match my base suit colour!)
Buckle - as wide as the webbing strap you use!
3 metres of white cotton fabric (or whatever colour wings youre going for!)
Optional
Zipties (for cleaning up the wires)
Lets Go!

Sintraboard is this wonderfully stable thermoplastic that is relatively easy to cut into (with the right tools) and when heated allows you to mould its shape! I started by using a mannequin and heating the Sintraboard with a heat gun for a few minutes to make it pliable, I recommend using gloves for this part as the materials gets VERY HOT! Press the board into the shape of the mannequin's back, taking note of the edges especially! you want this board to sit as comfortably to your body shape as possible as it makes a huge difference to how long you can wearing the wings for in this backplate is comfy!
Once shaped, I placed it against my back to make sure it was a good fit, heating again and making any alterations I needed (again don't place bright hot plastic to your bare skin! wear protective clothes and wait till its slightly cooler to do this, with the help of a friend!). I then took a hacksaw and rounded the corners, before sanding the edges with my Dremel! Try to avoid cutting off loads, just enough to make things less likely to snag.
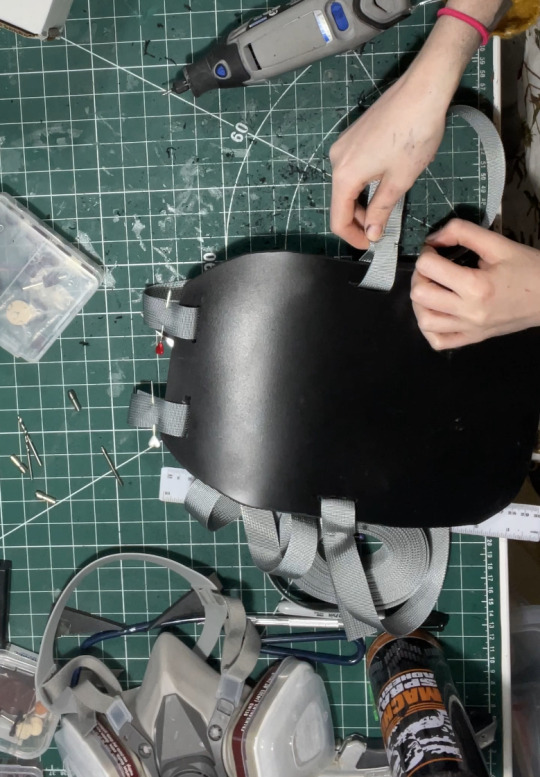
3. I then cut in four holes, wide enough to feed my webbing strap through, two at the top and one on either side below where my arms would sit! I measured the webbing strap by firstly feeding them through the top holes and pinning them, and then bring the strap over my should to everything sits where it should and seeing where the strap hits the side hole and cutting the length there! you'll also want a strap that attaches across the chest, meeting in the centre with a buckle!
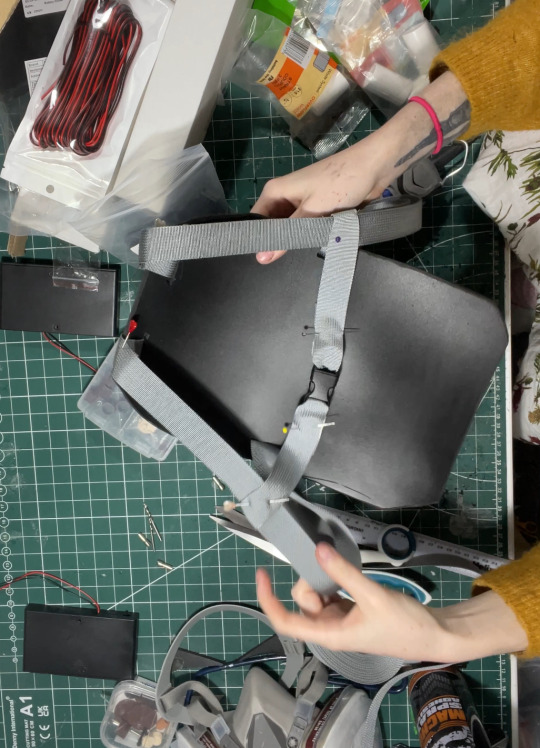
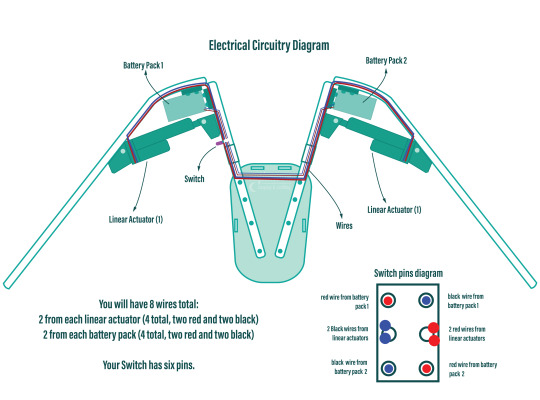
4. After sewing the straps closed I was able to move onto the PVC pipe structure! This may change slightly depending on the finished shape you want but I needed the PVC pipes to come out from inside a breastplate so had a particularly angle as well as character references to work with! I began by heating the pipe over my heat gun and flattening a portion of it under a heavy object so it would sit much more flush against the backboard and sit better underneath my breastplate before moving onto securing the first portion of the structure to the backplate. This mainly involved lots of try-ons and measuring to make sure the angles were correct and symmetrical and was quite fiddly but well-worth the effort! I'll include a diagram of the general shape I went with below:
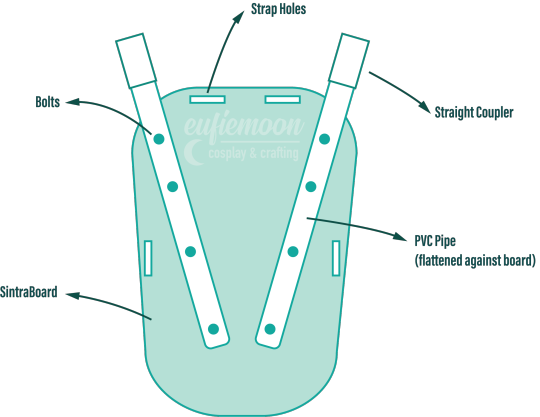
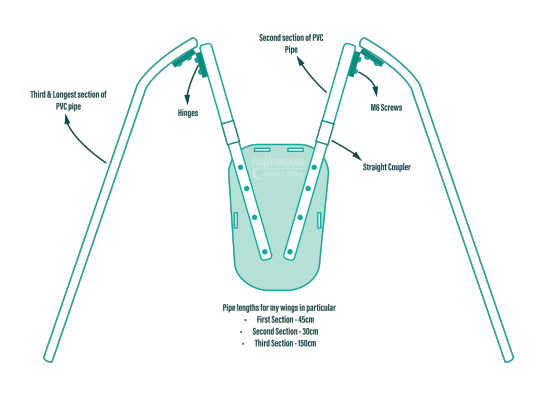
5. I wanted my wings to be relatively modular for ease of travel so I needed to make sure certain portions of them could come away from other parts easily, so I popped a straight coupler on the top of the pipes that were attach to the breastplate, this also meant I could slot the breastplate over these shorter pipes and wear everything correctly! Then these second pipes slot on and at the other end they are attached via hinges to the longest portion of the pipe 'skeleton', Diagram below:
6. Now that the skeleton was put together, it's time for the electrical stuff! It's a good idea to figure out where your circuit is going to lay on the skeleton - consider if you want the battery packs mounted the the backplate or, like me, put them inside the actual wings in removeable pockets for easy access and removal for battery changes. all your wires will go through the switch so deciding where you want to place that is very important! Mine was placed just over my shoulder on the front side, mounted to the PVC pipe with a metal cover I drilled a hole into to slip the switch through and then drill through the pipe.
I've included another diagram below that explains all the electrical circuitry, including which wires go on which pins on the switch!
Important to note: The linear actuators need to be placed and bolted into the PVC pipes at *exactly* the same angle on each side, any slight deviation will lead to the wings going up wonkily! So take your time and make as many adjustments as necessary.
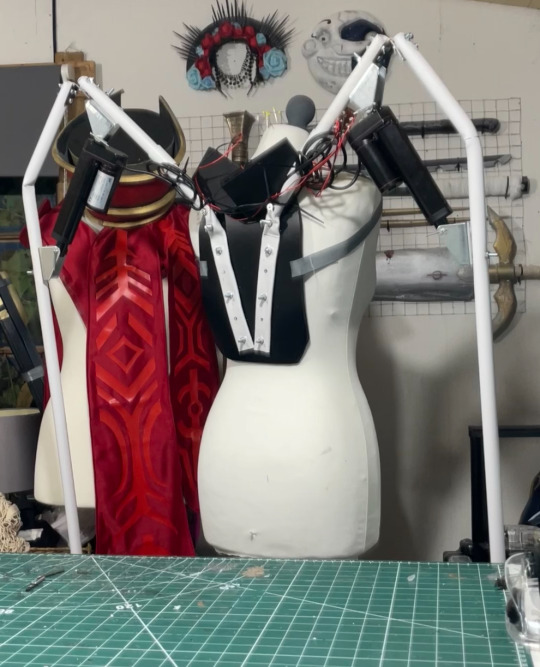
7. You can extend your wires by adding on the electrical wire, just match the colours, and put heat shrink tubing over the connections to hide the live wires! I ended up zip-tying the wires into organised bundles once the wings were done to help keep everything safe from snags.
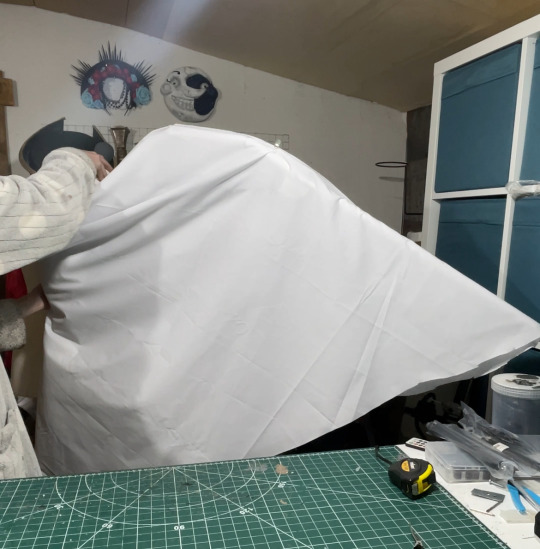
8. Now its time for the Wings themselves! I drafted my base pattern by just draping the white cotton fabric I had over the wing when it was fully extended. I then pinned the wings to the shape I wanted them to be along the bottom before cutting along the pins. I ran the fabric through my sewing machine to close the bottom edge, leaving a gap wide enough by the wing base so I could slip the wing on and off, closing it with velcro. I also added little fabric pockets inside of these to hold my battery packs, which also connected via velcro for easy removal!
9. Now that I had a wing base I was able to begin making feathers! I cut out a total of 800 feathers out of polythene jiffy roll for these wings, in 6 different styles and using real life bird wings to dictate the shapes I used and where I placed them. I ended up hot gluing every individual feather onto the white fabric base, going row by row until every side was covered, the wing covers themselves are super light because of the foam feathers and they shine light through them in a really magical way!
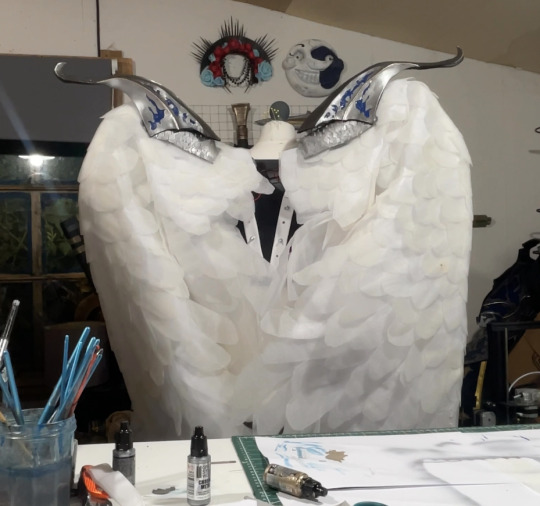
Optional: I also ended up going over these feathers with my airbrush and some super light beige paint to help darken the shadows, this is entirely optional and may change depending on the wings you're looking to make!
When in neutral position and in extended position the wings looks like this:

Mine had a wingspan of about 7ft total when fully extended but when in neutral position they were fairly close to my own proportions! mainly staying behind me and weren't much of a problem in a packed con hall!

Photo by: Helloimfran (on Instagram and Twitter)
I hope this tutorial helped and if there are any questions about anything in specific don't hesitate to reach out at [email protected] or on my instagram or twitter (@eufiemoon)
Happy Crafting!

#cosplay#cosplayer#cosplaying#baldurs gate iii#baldur’s gate 3#baldurs gate 3#bg3#dame aylin#aylin x isobel#bg3 aylin#cosplay tutorial#Wings#fantasy#tutorial#cosplay help#cosplay tips
155 notes
·
View notes
Text
ANAPHYLAXIS FILTER - WASPsynth multi-mode filter with double LFO and distortion
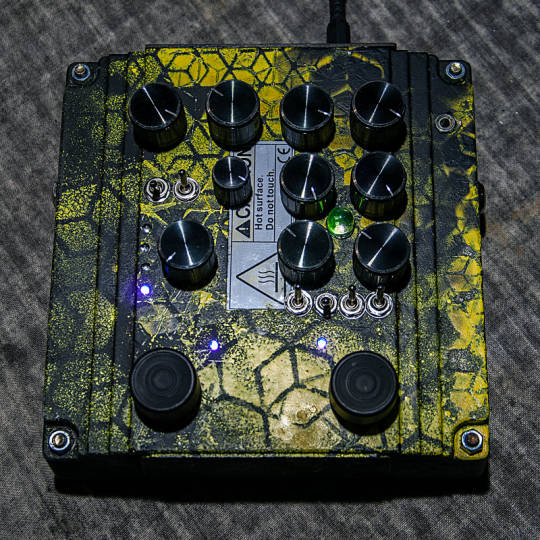
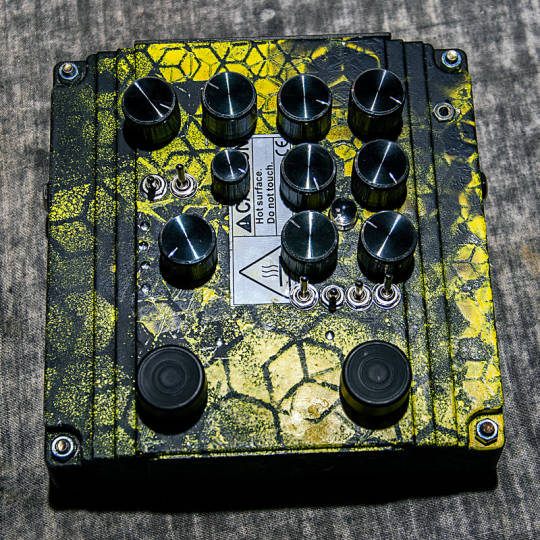
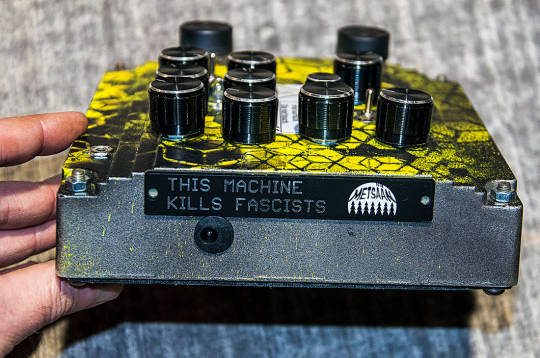
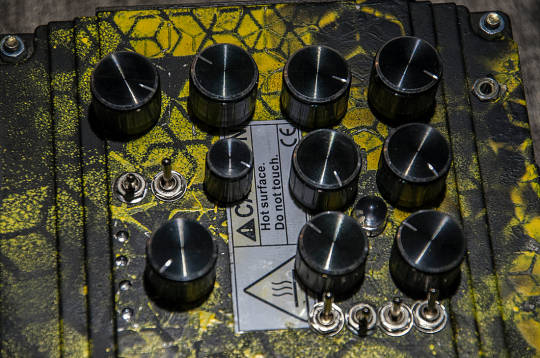
The ANAPHYLAXIS FILTER is a multi-mode filter with double LFO modulator for the CUTOFF frequency based the filter section of the notorious WASP synthesizer that was created by Electric Dream Plant in 1978. This standalone pedal version of the filter allows you to use it for the input signals of your choice. The FILTER MODE selector is a 4 position rotary switch (up to down: LOW PASS, BAND PASS, HIGH PASS and NOTCH) with the position indicated by small purple UV LEDs. The input signal is controlled with the GAIN control, that can boost even weaker input signal to overdrive the filter. A dedicated RESONANCE control determines the amount of RESONANCE at the CUTOFF point, that of course has a control knob as well. Furthermore the RESONANCE has two settings: EXTREME (up) and NORMAL(down), selected with a toggle switch. In HIGH PASS mode the filter can self-oscillate without any input, in case you need a high frequency SINE WAVE oscillator. In that case the FREQUENCY can be dialed in with the CUTOFF control. A 3.5mm mono input socket for EXTERNAL CV (Beware only use max. +5VDC, everything else destroys the circuit!). This input is used to modulate the filter’s CUTOFF with external gear (as i demonstrate in a demo video of a previous build). But the ANAPHYLAXIS FILTER can do more, as it has 2 build in LFOs that are modulating the CUTOFF frequency, with independent SPEED and DEPTH controls, which allows to generate a more complex modulation waveform. Each LFO has a RANGE toggle that selects: SLOW (down) or FAST (up) as well a 3 position toggle switch that selects the SHAPE: SQUARE (down), OFF (middle) and triangle (up). The fast LFO range goes well into audio range and enables you to create some very interesting frequency modulation filter effects. With slower rates, especially with the triangle shape and the 2 LFOs running at non-synced rates, even the most static sounding input get ‘alive’. The SPEED of each LFO is indicated by either red or green color in the big LED in the middle of the LFO section. The 1st stomp switch is TRUE BYPASS and if that is not enough, the 2nd stomp switch engages the DISTORTION, both with UV indicator LEDs. The level of the DISTORTION is controlled by the DISTORTION knob and the toggle switch next to it adds a TREBLE BOOST (up) or a HIGH CUT (down) setting to the DISTORTION. In the end of the signal path is a signal booster based on the EHX LBP1 with a global VOLUME control. The ANAPHYLAXIS FILTER runs on 9V DC and has a ‘boss style’ 2.1mm DC barrel plug socket with the negative pin inside. The enclosure is a heavy duty scavenged industrial engine power connector housing made from die-cast aluminum with a bottom plate made from found material and is painted in the industrial burnout camo pattern in matte black and bright yellow. Handmade by GRM for METSÄÄN. Sold.

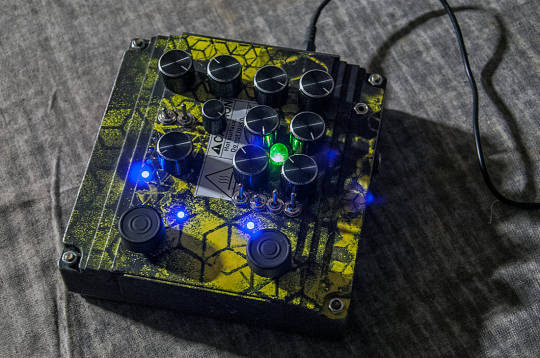
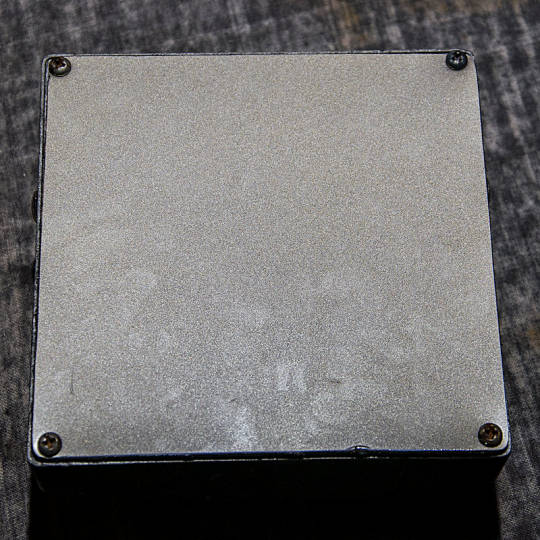
#anaphylaxis filter#distortion#multi mode filter#waspsynth#waspfilter#metsään#thismachinekillsfascists
4 notes
·
View notes
Text

**Interventerential Camping Equipment User Guide**
Please take a moment to familiarize yourself with the many features and capabilities of this Interventerential Camping Equipment Kit: *Your life may depend on it!*
Interventerential Camping, or Backcountry Camping, within the Mystery Flesh Pit National Park’s many unreinforced, natural trails offers unparalleled challenges and opportunities to the serious hiker and outdoorsman. Leaving behind the maintained and civilized infrastructure of the main park area requires more than exceptional physical endurance and psychological fortitude: the environment of the flesh pit demands the use of machinery specifically designed to help you get the most out of your hiking adventure.
The **yellow** bag in your kit contains your Interventerential Tent: Unlike traditional tents, this tent has been designed specifically to accommodate the known biomaterial sheeting found within the Mystery Flesh Pit. This retracting fabric, once assembled, will protect you from the potentially crushing embrace of parasitic muscles that will wrap you as you sleep, while the special lining of the fabric prevents the pit from becoming aware of your body.
The **orange** bag in your kit contains your Support Pack: an all-in-one unit designed to provide you with air filtration, water filtration, an electric stove, and conditioned air. Also contained in the orange bag are the necessary hoses to connect your Support Pack to your Interventerential Tent.
---
**Additional Tips:**
- Coin-operated Hiking Support Kiosks are located at 5-mile intervals along natural trails. These illuminated stations each provide a clean water nozzle, a gasoline nozzle, desiccant filters, exhaust filters, snack & cigarette vending, and an emergency telephone line to the lower visitor center. Your support pack is designed to be recharged at these kiosks. Please do not dispose of used filters or trash at these stations or along trail routes; used filters may be recycled at the lower visitor center.
- Remember to stay fully hydrated, as the high-temperature, high-humidity environment can quickly lead to fatigue when combined with strenuous physical activity.
- Do not approach any wildlife you encounter while hiking. Observe from a distance, but do not attempt to disturb any inter-pit life forms.
- Exercise an attitude of respect and courtesy for fellow hikers you may encounter. Your time in the deep recesses of the multi-day natural trail is a deeply personal and intimate journey made by people of all races, creeds, and walks of life. However, if another party invites you to join them for a rest or meal, consider accepting it! Memories made on the trails are often moments that last a lifetime.
- Natural trails within the Mystery Flesh Pit consist of complete, damp darkness for long stretches. Headlamps and camp lights are operational before setting out.
- When finished, please return your Interventerential Camping Equipment Kit to the Hiking Equipment Check-out Counter on level 4 of the lower visitor center.
---
**Interventerential Tent Assembly & Setup**
1. Unfold upper and lower sections while keeping assembly upright.
(Fig. A)
2. Ensure proper clearance before setting up your tent for ventilation and structure.
Minimum 7ft height and 12ft width clearance are required.
3. Engage locking joints and begin unfolding the tent.
4. Take care not to damage sensitive lining during the unfolding process.
(Fig. B)
5. Continue expanding the structure until it forms the full shape. Ensure all locking pins are fully engaged.
(Fig. C)
6. Do not start Support Pack until the tent is fully assembled and all pins are locked.
(Fig. D)
---
**Support Pack Overview**
The support pack includes a full range of features for hiking in the Mystery Flesh Pit, including an air duct connector, exhaust fan, water filtration unit, and stove among other components. Follow all instructions to ensure safe and effective use during your hike.
4 notes
·
View notes
Text


With my existing snatch block and block and tackle style pulley systems tested and working decently at 16:1 downgearing ratio which feels pretty complex and capped out by space constraints, I am now turning my attention back to some prior concepts for rotating in place pulleys I had planned years back and not revisited till now.
The basic idea is you have a big pulley and a small pulley attached to eachother one on top of the other and so when the big one winds, the small one moves too and going from a small to a big to a small again (just like gears) gives you mechanical advantage. This is like gearless gears in a way works exact same way as gears except can't go continuously in one direction since its limited by amount of windings you can fit on it.
Having a setup like this mounted direct to the motor is a no brainer I think. It will give me a 2:1 or 3:1 downgear straight off the batt and should be fairly easy to make using a 1mm OD x 20mm length stainless steel dowel pin mounted to side of motor sewn into place tightly and then using a little copper tubing for a electrical connector as the rotating sleeve and onto this sleeve gluing down the flanges using the same plastic as what I used for the pulleys (clear sushi and produce containers plastic). That pre-downgearing at the location of the motor will bring our Archimedes pulley system from 16:1 down to 32:1 and possibly 48:1 roughly if we can get between 2:1 and 3:1 downgearing ratio on the motor.
I also am considering just doing ONLY these types of rotating in place pulleys instead of the Archimedes pulleys style of downgearing. It might be more space efficient perhaps. I don't know which will be more robust and which will be a maintenance nightmare. I just dont know which is easiest to work with. Also which is easier to make. I have to make both styles and compare. I think the turn in place style may be more space efficient by a long shot but not 100% sure on this.
When I do the turn in place style mounted flat onto the robot's bones, I plan to use a flat head thumb tack for this as the bone mounted base and then have the rotating pulleys turning in place over this. The flat head thumb tack can be sewn tightly onto the bone sleeve to secure it in place well. I'm not sure how well this approach will scale to higher forces of larger muscles though. Perhaps it will scale fine if I just make the pulleys bigger. So much to experiment with...
2 notes
·
View notes
Text
My PC Screen Upgrades Review - Part 2 (w/ my paper dolls) [Recorded on Jan 14th, 2024]
Hello, February! The wait is over! 😁 Because here's "Part 2" of my "PC Screen Upgrades Review" (featuring my paper dolls). Yup, this is my second attempt after I replaced the CPU cooling and added two PC fans in June of 2023. 🖥️🔧 This year is for the screen monitor by replacing/installing this trio of PC-related items! 😁
But before that, if you haven't seen my previous topics that related to my "PC Upgrades", then I'll provide some links down below: ↓ 😉
- My PC Cooling Upgrades Review - • Part 1 [First Half] [Recorded on Jun 9th, 2023] • Part 1 [Second Half] [Recorded on Jun 9th, 2023] • Part 2 [First Half] [Recorded on Jun 9th, 2023] • Part 2 [Second Half] (Final) [Recorded on Jun 9th, 2023]
- My NVME Upgrade - • Part 1: Samsung SSD 970 EVO Plus NVMe M.2 SSD (1TB) Review [Apr 7th, 2023] • Part 2: Thermalright M.2 2280 Pro Review [Apr 11th, 2023] • Part 3: Installation and trial & error [Recorded on Apr 21st, 2023] (published: Apr 22nd, 2023) • Part 4: Another Trial & Error [Apr 21st, 2023] (published: Apr 22nd, 2023 • Part 5: Timing comparison - HDD vs SSD NVMe M.2 Drive [Apr 25th, 2023] • Part 6 (Final): Samsung Magician & HWiNFO Softwares [Apr 25th, 2023]
And don't forget this "Part 1", in case you missed it → [CLICK ME!].
So, without further ado, let's get started:
My Recorded Video [edited by: Filmora 9] 🎦🎞️: ↑
• Once again, in my recorded video, I'm showing off one-by-one of my trio of PC upgrades before I installed. 🖥️🔧🙂 Please, enjoy my unboxing video. Otherwise, you could at least check it out my snapshots, down below. ↓ 😉
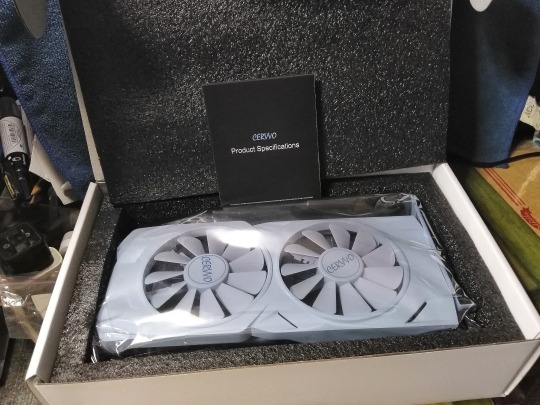
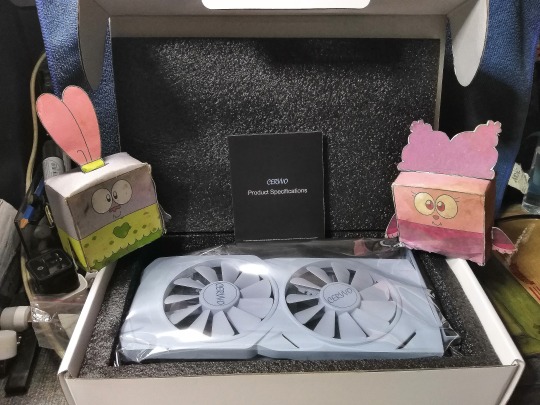
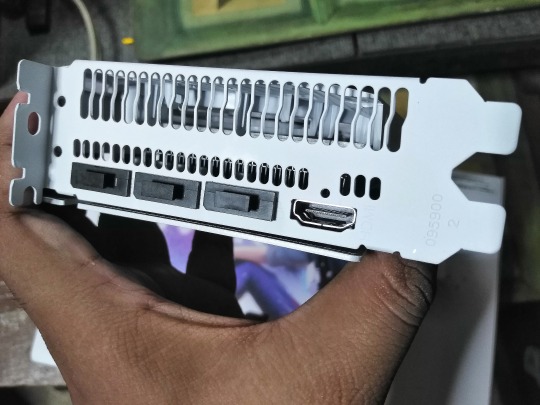
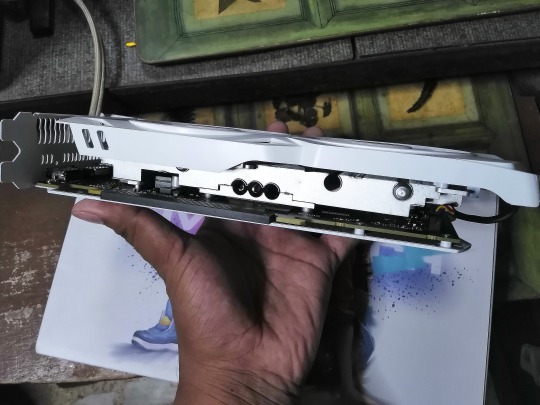
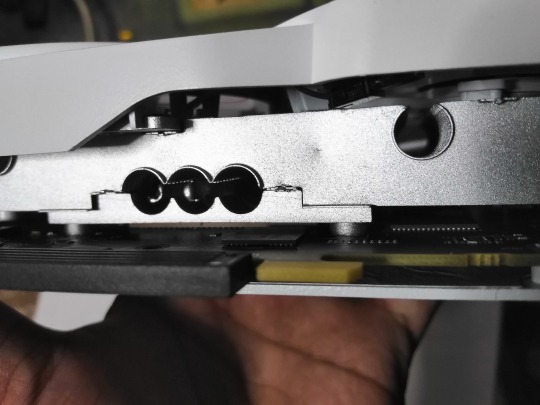
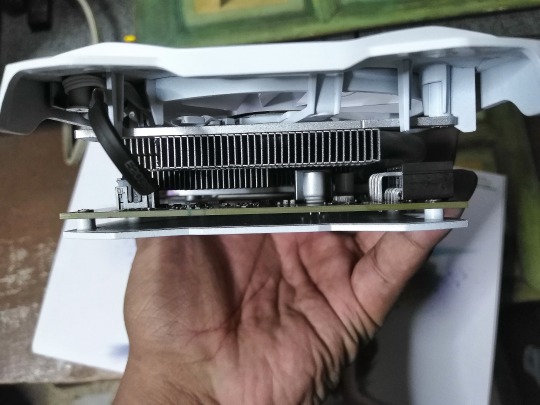
14th to 24th Image(s) 📷📲: ↑
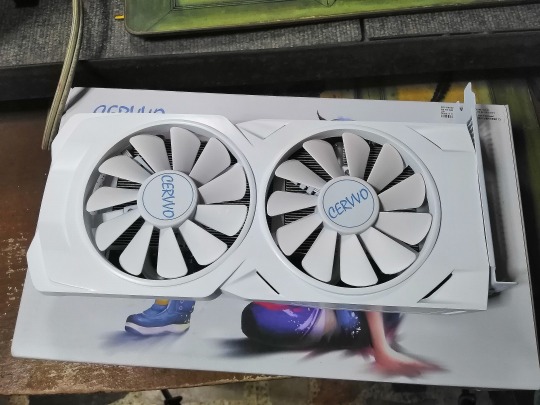
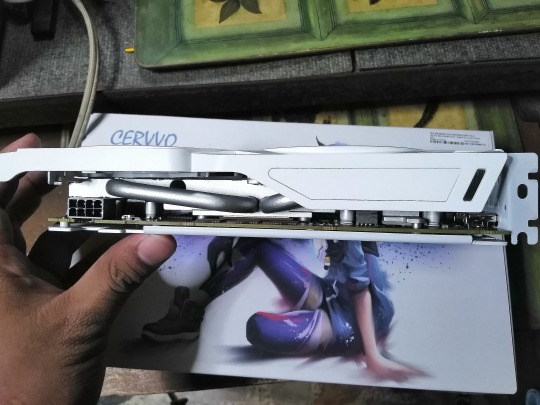
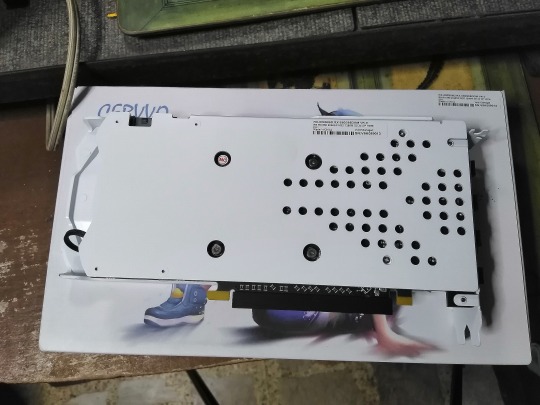
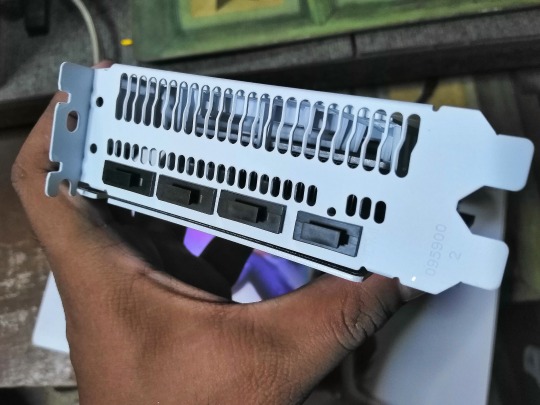
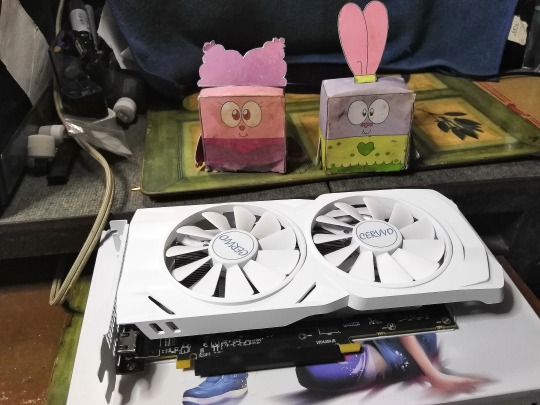
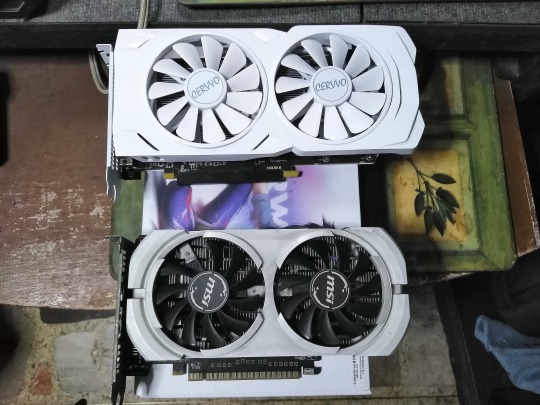
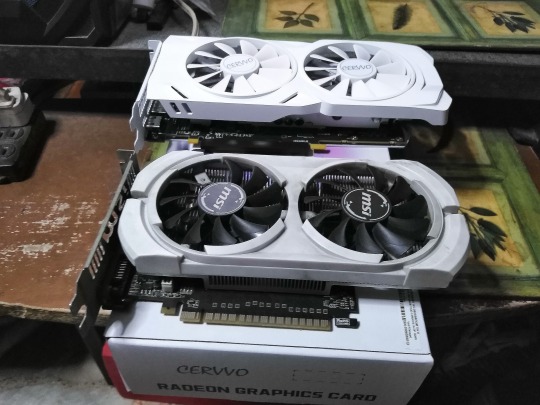
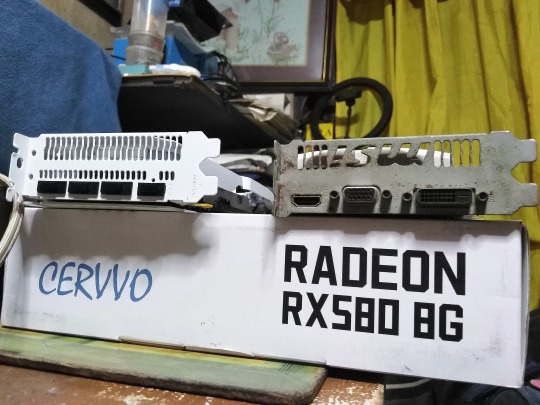
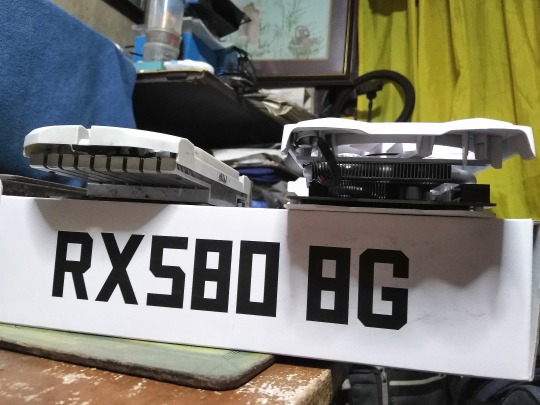
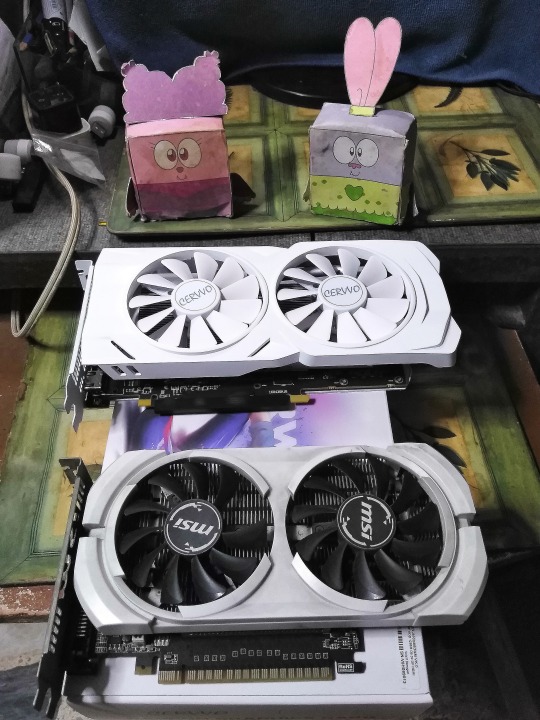
• Okay, unboxing time - snapshot edition! 😊 First off is the CERVVO GPU Card. This box contains a Product Specifications booklet with few instructions, and the main item covered in anti-static plastic to prevent conducting electricity. I also mentioned, that the GPU Card also available in black color, but the seller gave me a white variant. After all, it matches the color from the old MSi GTX 750 Ti GPU.
25th to 29th Image(s) 📷📲: ↑
• Speaking of, here's a comparison with my aforementioned one, and in terms of length & size sees through our visions. 👀
30th to 33rd Image(s) 📷📲: ↑
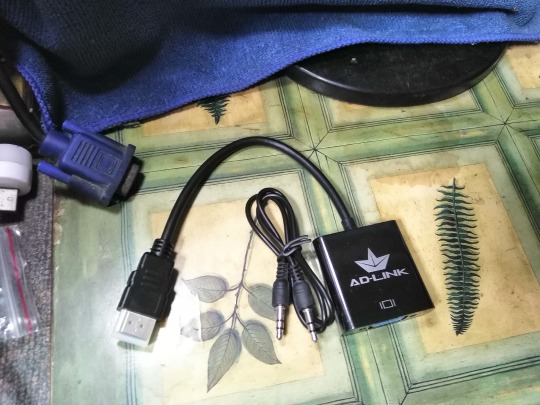
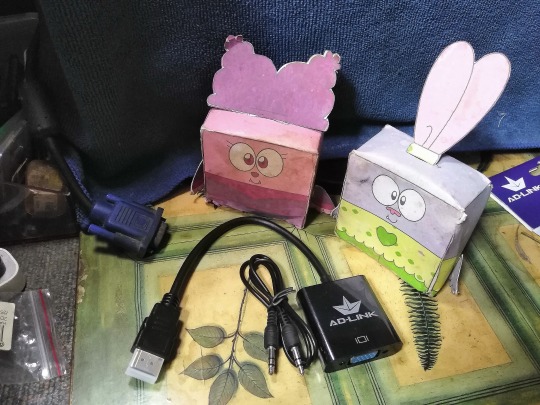
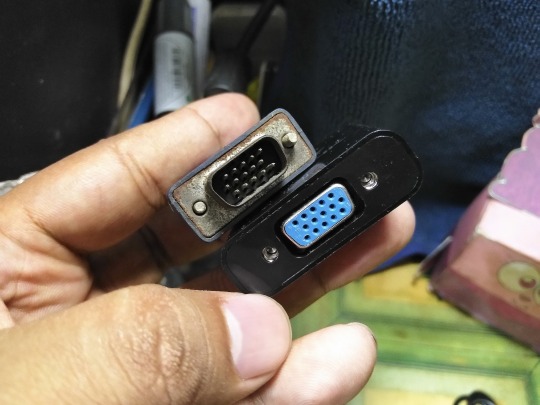
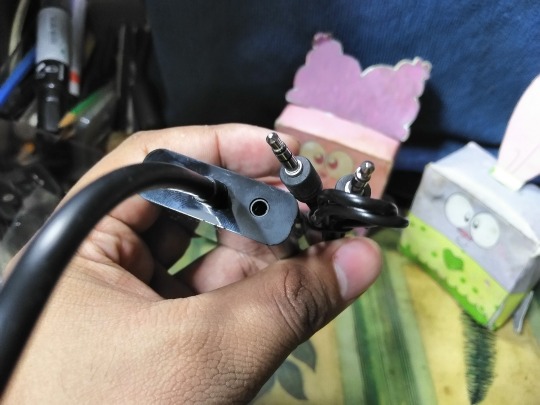
• Okay, let's moved on to my next item, this is the Ad-Link HDMI to VGA converter. And I confirmed, that the AOC's old VGA port would fit in right through the converter. Plus, a 3.5mm audio jack port built right in, with the included auxiliary cable. Although, I don't need it, to be honest. 🤷♀️
34th to 42nd Image(s) 📷📲: ↑
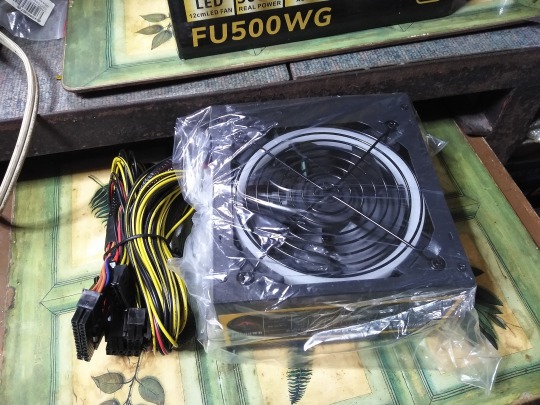
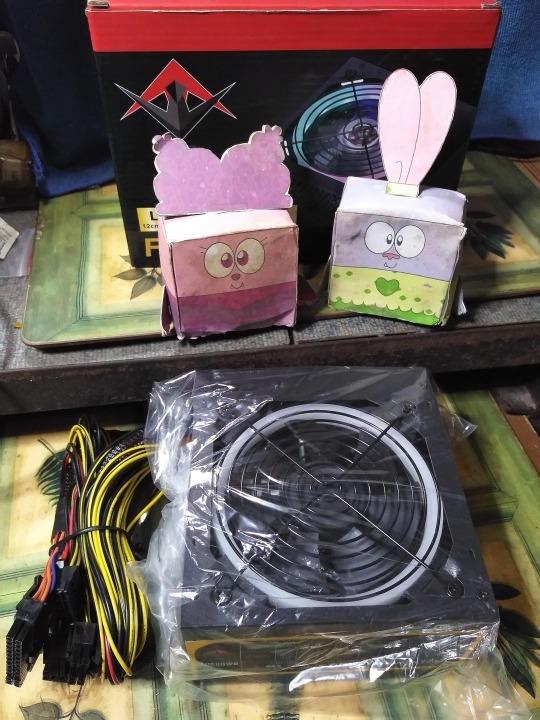
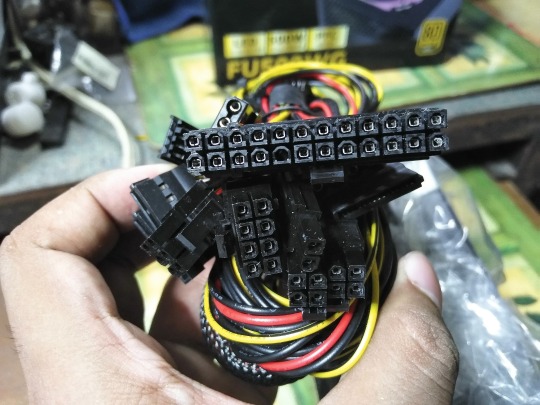
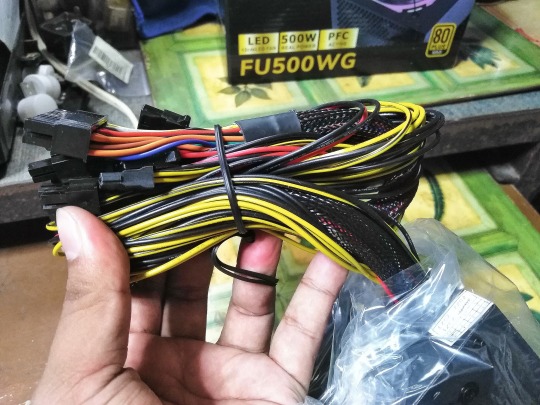
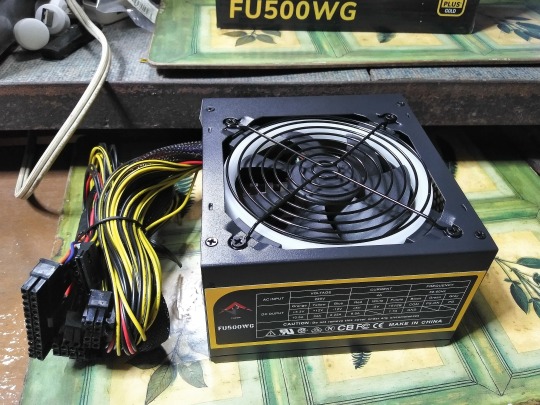
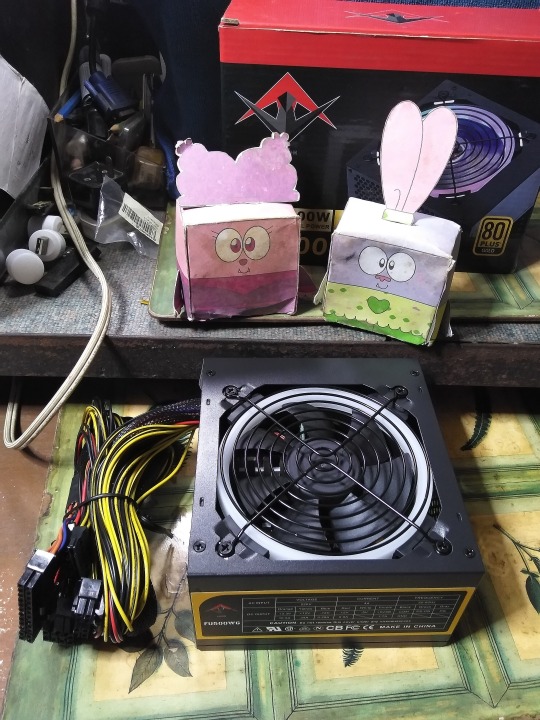
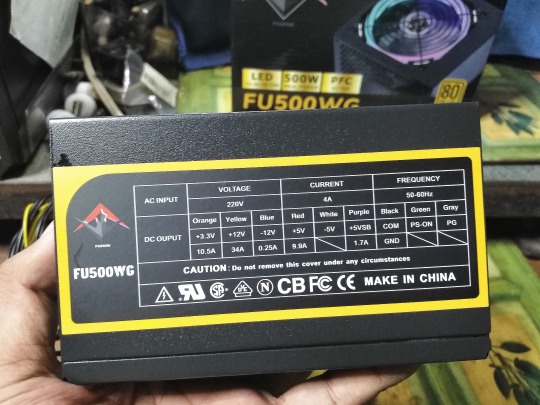
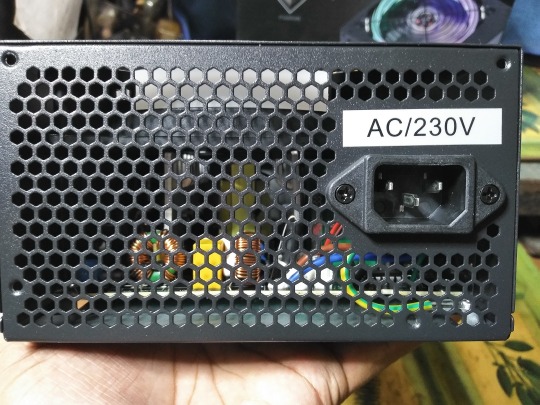
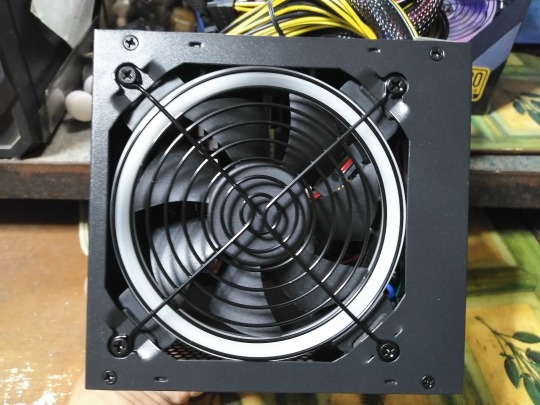
• And finally, the Fuzion PC power supply. With no additional accessories, this thing will slapped on any format desktop tower case. And unlike my old PC power supply, aside from the aforementioned PCI-E ports, the 24-pin ATX power connector cable was covered in nylon braided-ish material. Yes, I said "Nylon-Braided" because it looks like one, although the material doesn't have the same as the soft thread nylon-braided ones from our existing USB cables for mobile devices. 🙂
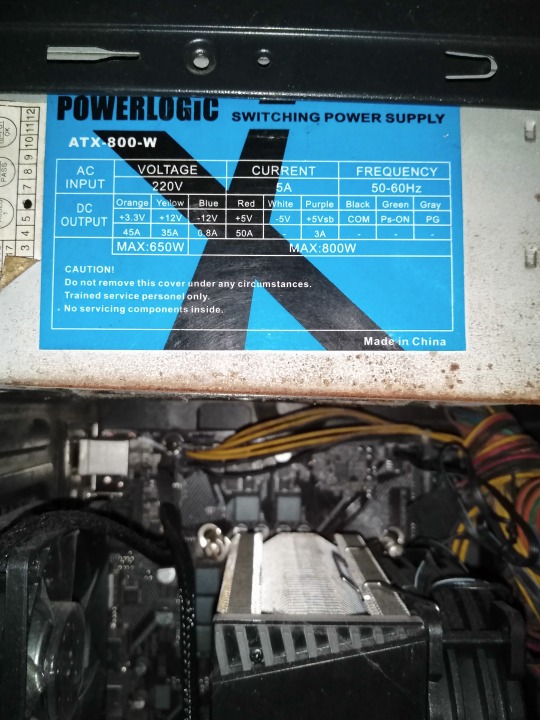
43rd Image 📷📲 [Jan 12th, 2024]: ↑
• Ah yeah, I forgot. Here's the specs information about the old PC Power Supply from Powerlogic as a comparison against my new PC Power Supply from Fuzion. ⚡🖥️ To be honest and in my opinion, I wish my new Fuzion PC PS (Power Supply) would have the same specs as my old Powerlogic PC PS. Just saying. ☺
Well, that's the end of my "Part 2". "Part 3" is now available! Pls proceed → [CLICK ME!]. 🙂
And GOOD NEWS! I'm attending my job as a "Volunteering Worker" for the "Person's With Disabilities and Senior Citizen's Cash For Work Program"! 😁👷♂️ "Four hours" on weekdays for "Four months" until I get paid! So, I'll do my best! 😊
Well, that's all for now.
Tagged: @lordromulus90, @bryan360, @carmenramcat, @leapant, @rafacaz4lisam2k4, @paektu, @alexander1301
#My Video#MyVideo#My Photos#My Photo#MyPhotos#MyPhoto#Photos#Photo#Chowder#Panini#Chowder Panini#Paper Dolls#My PC Upgrade#PC Upgrade#CERVVO#GPU Card#Graphics Card#AD-Link#AD Link#Screen Converter#Fuzion#PC Power Supply#Personal Computer#PC Desktop#Photography
4 notes
·
View notes
Text
Mastering the Craft: The Ultimate Guide to Split Rivets and Their Applications
Rivets have been the unsung heroes in the world of fasteners, but among them, split rivets stand tall as versatile, reliable, and adaptable connectors. Whether you're an enthusiast in metalworking, a DIY aficionado, or a professional in the manufacturing industry, understanding the ins and outs of split rivets is essential. This comprehensive guide will walk you through everything you need to know about split rivets—applications, best practices, and how to leverage their unique features for various projects.
What are Split Rivets?
Split rivets, also known as bifurcated rivets, are two-piece fasteners consisting of a tubular rivet and a separate, headed pin. The rivet is slotted longitudinally, allowing the pin to expand its legs when inserted, securing materials together. This unique design grants split rivets exceptional flexibility and resilience against vibrations, making them ideal for applications that require a sturdy yet adaptable connection.
Applications of Split Rivets
1. Leather working
In the realm of leather craft, split rivets find their place in securing straps, belts, and decorative elements. Their ability to maintain a strong grip while allowing for movement makes them indispensable in leather goods manufacturing.
2. Metalworking and Automotive Industries
Split rivets play a pivotal role in assembling metal sheets, panels, and components in automotive manufacturing and sheet metal fabrication. Their reliability in withstanding mechanical stress and vibrations makes them a favorite choice.
3. Electronics and Electrical Equipment
Within the electronics industry, split rivets provide secure connections in circuit boards and housing assemblies, ensuring stable and durable constructions despite frequent movements or potential stress.
4. DIY Projects
From repairing household items to creating custom-made accessories, split rivets offer a convenient solution due to their ease of use and adaptability to various materials, making them a staple in DIY enthusiasts' tool kits.
Best Practices for Working with Split Rivets
1. Proper Selection
Choose the right size and material of split rivets based on the application. Factors like material thickness, load-bearing requirements, and environmental conditions should be considered.
2. Preparation and Alignment
Ensure the materials to be riveted are properly aligned and prepared. Drill accurate holes to fit the rivet snugly without causing distortion.
3. Riveting Technique
Insert the pin through the pre-drilled holes and use an appropriate tool to deform the rivet legs evenly. Avoid over-compression, which may weaken the connection.
4. Inspection and Testing
After riveting, inspect the joint for proper deformation and structural integrity. Perform stress tests when necessary to ensure the connection's reliability.
Conclusion
Split rivets are more than just fasteners—they are the silent champions of structural integrity and flexibility in various industries. Their ability to securely join materials while allowing movement makes them a preferred choice across different applications.
Mastering the art of using split rivets involves understanding their capabilities, selecting the right type for the job, and employing proper techniques during installation. Whether you're a seasoned professional integrating split rivets into your projects can elevate the quality and durability of your creations.
So, the next time you're in need of a sturdy yet flexible fastening solution, consider the humble split rivet—the unassuming hero that holds things together, quite literally!
3 notes
·
View notes
Text
Electric Wall Charger and EV Station Maintenance Checklist for Hassle-Free Charging

Introduction
Properly functioning electric wall chargers and stations are crucial for the convenience and efficiency of electric vehicles (EVs). A malfunctioning charger or station can lead to frustrating downtime, decreased charging speeds, and even safety hazards for your employees and customers.
To ensure hassle-free charging and maintain the performance of electric wall chargers and EV stations, you must invest in regular maintenance. Tercero Inc. offers extensive EV charging services, including charger maintenance and installation. This article examines the importance of regular EV wall charger repair, common issues with EV chargers, and when to call an expert.
Whether you are a station manager or own a charging station, this article will help you spot potential problems before they become significant, improve the quality of your service, and enhance customer and employee safety.
Key Components of an EV Wall Charger and Charging Station
1. Power Supply
The power supply is one of the main components of electric wall chargers. It converts the grid’s AC or DC electrical power into the appropriate voltage and current to charge the EV battery. The power supply typically consists of a transformer, rectifier, and control circuitry.
There are two types of power supply used in EV charging. They are:
AC (Alternating Current) power supply: This power supply is used by level 1 and level 2 chargers. The chargers take AC power from the grid and convert it to the correct voltage and current your battery needs to charge.
DC (Direct Current) power supply: This power supply is used by DC fast chargers. The chargers take high-voltage DC power from the grid and convert it into the voltage and current your electric vehicle needs to charge.
Any fault to the power supply can affect charging speed and damage your battery. It can also constitute a grave danger to employees and customers.
2. Connectors

EV charger connectors ensure that your battery gets the electric power it needs. They are plugged into your vehicle’s charging ports and an electric socket. The connectors charge your battery through small pins, which create a pathway through which electric current passes. The pins are designed to handle high amounts of electric current without getting hot.
There are different types of different types of connectors used for EV charging. They are:
Type 1 (SAE J1772): This connector has five pins and is commonly found in North America and Japan. Its relatively low power rating (handling up to 16 amps) makes it more suitable for slow and medium-speed charging.
Type 2 (IEC 62196): This connector has seven pins. It has a higher electric power rating (handling up to 43 kW) and is suitable for a faster charging experience. The type 2 connectors are commonly used in Europe and Australia.
CHAdeMO: This connector has a distinctive “gun” shape. It can handle up to 62.5 kW of power, making it highly suitable for DC fast chargers. The CHAdeMO connector is commonly used in Japan.
Combined Charging System (CCS): This connector combines the type 2 AC connector with two additional DC pins. It can handle up to 350 kW and is suitable for a faster and more stable charging experience.
Most electric vehicles have a built-in connector that fits your region’s standards, but some models allow you to switch between connector types. When choosing a connector, ensure it is compatible with your charging needs and battery specifications.
3. Charging Cable
The charging cable is the line that connects and carries electric current from the electric wall charger to the EV’s battery. It consists of the connector that attaches to the EV and the cable itself. The cable is made of high-strength materials like aluminum and copper to withstand the weight of various EVs.
Several types of EV charging cables are available. The kind you need will depend on your vehicle’s make and model. Type 1 cables are commonly used in North America and Japan, while type 2 cables are popular in Europe.
4. Control Board
The control board is your charging station’s central processing unit (CPU). It manages the charging process and ensures the EV battery is not overwhelmed by the current it receives. A well-designed control board is essential for a charging station’s safety, efficiency, and reliability. Its sub-components include a microcontroller, voltage and current sensors, relays and contactors, a communication interface, and more.
5. Smart Features
Smart features in EV chargers enhance convenience and functionality. Some examples of smart features in EV chargers include mobile apps, touchscreen, RFID card readers, and more.
Importance of Regular EV Wall Charger Maintenance

Like any technology, maintaining your EV wall charger is very important. Here are some reasons why:
1. Optimal Performance
Regular maintenance ensures that your EV charger operates at optimal capacity. This not only results in a faster and more efficient charge but also in a more efficient use of electricity.
2. Safety
Chargers, especially those used frequently, will acquire wear and tear, making them a safety hazard if they are not properly maintained. Issues like frayed cables or loose connections can cause electric shocks or fire outbreaks.
3. Longevity
EV chargers are built to last, but regular maintenance can significantly prolong their lifespan. Overlooking minor issues can lead to more significant problems, necessitating costly repairs and replacements.
4. Cost Efficiency
Proactive maintenance helps identify and fix minor issues before they become more significant and expensive problems.
5. Peace of Mind
Regular maintenance gives you comfort and peace of mind, knowing your charger is in good condition, especially when going on a long trip.
Common Issues Requiring EV Charger Repair
Some of the most common signs that your electric wall charger requires repair and maintenance are:
1. External Damage
Any damage to the body of your EV charger can affect charging efficiency and compromise the safety of persons and property.
2. Exposed Wiring
The wiring is supposed to be inside the charging cable. If it is outside, you should get it fixed immediately, as it constitutes a safety hazard.
3. Slow Charging Speed
If your charger takes longer to charge thank it used to, it is best to call for an inspection.
EV Charging Station Maintenance Checklist
1. Daily or Weekly Maintenance Tasks
Here are some daily and weekly tasks to help keep your EV charger in good working condition:
Visual Inspection: Check the charger for damage, corrosion, and other wear and tear signs.
Cleanliness: Ensure the charger and surrounding areas are free of dirt, dust, and moisture.
Software Updates: Check for available software updates and apply them as necessary to ensure your charger remains compatible with evolving charging needs.
2. Monthly or Quarterly Checks
Here are some monthly and quarterly checks to keep your EV charger in good working condition:
Cable and Connector Inspection: Inspect charging cables for signs of wear, damage, or corrosion.
Charger Firmware Updates: Check for available firmware updates and apply them to ensure you stay up-to-date with evolving safety and industry regulations.
Charger Calibration: Verify the charger is properly calibrated and functioning within the manufacturer’s rules.
3. Annual Maintenance Tasks
Here are some yearly maintenance tasks for your EV charging station:
Arc Fault Detection: Verify the charger’s arc fault detection system is functioning correctly.
Ground Fault Protection: Test the charger’s ground fault protection system to ensure it’s working correctly.
Electrical Connections: Inspect and tighten all electrical connections to prevent loose connections.
When to Call for EV Charging Station Repair Services

You should call for professional repair services for the following EV issues:
Electrical shock or fire
Complete loss of power
Overheating
Slow charging
Charging errors
Visible damage
Cable damage
Connect issues
If you experience any of these issues, calling and scheduling electric wall charger repair services is always best.
Tips for Proactive Maintenance
1. Regular Inspections
Set a routine to inspect your charging station for signs of wear and tear, damage, and corrosion. Often times this can be done remotely.
2. Software and Firmware Updates
Regularly check the manufacturer’s website for updates and apply them as soon as they become available.
3. Cleanliness
Keep the area around the EV charger and charging station free of dust, debris, dirt, and other substances that can affect the charger’s efficiency or cause damage.
Conclusion
Regular electric wall charger repair is crucial to ensuring the safe, efficient, and reliable operation of EV charging stations. By performing daily, weekly, and yearly maintenance, you can prevent unexpected downtime, ensure safety, and optimize charging performance. Contact Tercero Inc. for a free quote to schedule regular EV charging inspections and maintenance today.
Original Source: https://terceroinc.com/blog/ev-wall-charger-maintenance-checklist/
0 notes
Text
How to Select the Perfect Power Supply Unit for Your Computer System

From upgrading to building your PC, the Power Supply Unit will always be one of the more important components. The power supply is often overlooked and it is highly important in a working, efficient, and safely run system. It provides your computer with the much-needed power to operate, and choosing the right one may affect the stability, performance, and durability of your setup.
This article will lead you through the necessary considerations for picking the ideal PSU for your system and offer you some advice on how to find the best deals.
1. Understand Your Power Requirements
Before even looking at different power supplies, it is essential to try and estimate how much power a given system will require. How much power the system will require in total wattage depends on various things:
CPU and GPU: These are the power-consuming parts of your computer. More powerful processors and graphic cards will need more power.
Additional Components: Hard drives, SSDs, RAM, cooling systems, and peripherals all draw power.
Overclocking: If you plan on overclocking your CPU or GPU, extra wattage will be needed to maintain performance.
Online tools, such as PC Part Picker's Power Supply Calculator, can be used to approximate the wattage required, but generally speaking, adding 20-30% to the recommended wattage gives your system headroom for any upgrades or in case of a power spike.
2. Choose the Right Wattage
The rating varies in different ways, from 300W to 1500W and even higher. It is supposed to be exactly matched to your power needs because too little a power supply would result in instability or crashing, while too big a supply is inefficient and could hike the energy bills.
Basic Systems: The normal PSU rating required for a standard office or light gaming computer falls between 400W and 600W.
For Gaming PCs: If running a powerful GPU-like the RTX 3080 or 4090-you will require a PSU rating around 750W to 1000W.
For Workstations and High-End PCs: The higher-end configuration, with several GPUs or an advanced CPU, would correspond to PSUs above 1000 Watts.
3. Efficiency Rating: 80 Plus Certification
The efficiency of a PSU is important not only for your electricity bill but also for the overall health of your system. 80 Plus Certification is a standard that indicates a PSU meets certain efficiency thresholds. PSUs with this certification are more efficient at converting power from the wall into usable power for your system.
80 Plus Bronze: Offers about 82% efficiency at 50% load.
80 Plus Silver: About 85% efficiency at 50% load.
80 Plus Gold: About 87-90% efficiency at 50% load.
80 Plus Platinum: About 90-92% efficiency at 50% load.
80 Plus Titanium: The highest efficiency, around 94% at 50% load.
Higher efficiency means less heat generation, lower power consumption, and overall better performance. If you’re building a high-performance PC or want to future-proof your system, consider going for a Gold or Platinum certified PSU.
4. Modular vs. Non-Modular Power Supply Units
There are two main configurations for PSUs: modular and non-modular.
Non-Modular PSUs: These come with all cables attached, so you’ll need to deal with unused cables cluttering your case. They’re typically more affordable but less flexible in terms of cable management.
Modular PSUs: These you connect only the cables you need, which helps to improve airflow and cable management inside your case. Generally, they are more expensive but definitely worth the extra cost if you're building a high-end system and want a cleaner setup.
Some PSUs come in a semi-modular design where the necessary cables—like the 24-pin motherboard connector—are attached and other cables, such as those for additional storage devices or GPUs, are detachable. This kind of arrangement strikes a good balance between price and flexibility.
5. Protection Features
The best PSUs have built-in protection mechanisms to protect your components from electrical damage. These include:
Over-Voltage Protection (OVP): Protection against voltage spikes.
Under-Voltage Protection (UVP): Ensures the PSU doesn't supply too little power.
Over-Power Protection (OPP): Prevents overloading of the PSU.
Short Circuit Protection (SCP): Cuts power if a short circuit is detected.
Over-Temperature Protection (OTP): Shuts the PSU down if it overheats.
Your PSU should at least have some protection features, so it could protect your components from possible electrical issues.
6. Brand and Warranty
Not all PSUs are made equal, and although budget options exist, it's always a good idea to go with reputable brands. Brands like Corsair, EVGA, Seasonic, and Cooler Master are known to make high-quality, reliable PSUs. A good PSU can last many years, so investing in a trusted brand is a good choice.
Also, check the duration of the warranty. A better warranty, such as that ranging from 5-10 years, shows belief in the product's quality by the manufacturer. Be sure to always get a power supply with at least a 5-year warranty.
7. Check for Reviews and User Feedback
Before buying a PSU, it is worth spending some time reading reviews and user comments. These are invaluable in gauging the reliability, noise levels, and real-world performance of the PSU. Websites like Tom's Hardware, AnandTech, and JonnyGuru have comprehensive reviews, while user reviews on retail websites will help point out any issues or gains.
8. Where to Buy: Best Deals on Power Supply Units
Once you have filtered out the best PSU for your system, it is time to purchase. If you're looking for quality PSUs at great prices, check out Raasta Deals. At Raasta Deals, you can get a wide range of power supply units from top brands within your budget, as per your needs and budget. Whether you're looking for budget-friendly options or high-end power supplies for a gaming rig, Raasta Deals has got you covered.
Conclusion
Choosing the right Power Supply Unit for your computer system is one of the most important steps in building a reliable and long-lasting PC. By understanding your power requirements, choosing the right wattage, and considering efficiency, protection features, and brand reputation, you can make an informed decision.
Take the time to research and choose the perfect PSU for your system, keeping in mind that quality power delivery is vital to keep your computer running in top condition and safe.
For a great choice of PSUs at very reasonable prices, be sure to check out Raasta Deals for your next purchase!
0 notes
Text
https://www.futureelectronics.com/p/interconnect--pin-and-socket-connectors--crimp-terminals/2-520102-2-te-connectivity-1904077
Pin Through Hole Coin Cell Holder, Circular Connectors, Socket receptacle
Ultra Fast 22-18 AWG Straight Fully Insulated Receptacle Assembly
#TE Connectivity#2-520102-2#Connectors#Pin and Socket Connectors#Pin Contacts#Pin Through Hole Coin Cell Holder#receptacle socket#Electrical circuit#Board mount connector#edge connector#Crimp Terminals#Socket mount wire
1 note
·
View note
Text
Price: [price_with_discount] (as of [price_update_date] - Details) [ad_1] Model Number: Mini Digital Gadgets Storage Box Feature: Eco-Friendly Feature: Folding Feature: Stocked Type: Storage Boxes & Bins Style: Modern Shape: Round Use: Earphone Wire/Electric Wire Product: Other Function: multifunction material: PVC+ABS Name: Data cable storage box Equipped with ejector pin and TF card slot/SIM card slotYou can store after removing the card toprevent SIM/TF card loss. Friendly Phone / ipad HolderThe cable box can be expanded into a mobile phone holder ,compatible with all mobile phones , ipad , tablet. Multiple interface conversion. Charging and transfer data for Android / ios / Type-c / devices. 1. USB C to USB C 2. USB C to Lighting 3. USB C to Micro USB 4. USB A to USB C 5. USB A to Micro USB 6. USB A to Lighting And so on a variety of combination of ways to wait for your development. 【Safe Charging and Data Transfer】:- The mini digital gadget has four different ports for conversion, charging, transmission and more. Contains USB C cable with 3 USB adapters got all you need to charge and transfer data for Android/IOS devices. 【All-in-One Charging Solution】:- No fumbling for the right connector through a tangled mess. This portable storage box has all you need to charge and sync your device. The storage case protects the ends of the cables, and prevents them from getting tangled in your bag 【Durable Material】:- All the adapters made of a scratch resistant aluminum alloy. The internal copper wire is larger and thicker than normal cables, which helps increase charging speed and transfer data for cell phones, tablets, laptops and other devices. 【Compact & Portable】:- This cable kit in 3.2*0.4 inches, it is easy to be taken in pocket, wallet and handbag 【Multi-functional Storage Case】:- The digital travel kit with 3 storage slots, 2 for nano SIM cards, 1 for micro SIM card storage (SIM card is not included) and a SIM eject tool, help you swap and store your SIM cards easily. The carry case is also a phone holder [ad_2]
0 notes
Text
ASRock PSUs Are Now Compatible With PCIe 5.1 And ATX 3.1

ASRock PSUs
With the introduction of ASRock power supply units (PSUs) for the ASRock’s latest market is DIY. A world leader in motherboards, graphics cards, small PCs, and gaming displays, is once again broadening its product portfolio. The well-liked Taichi, Phantom Gaming, Steel Legend, and Challenger series are the names of the new PSU product lineup, which is made to accommodate a variety of user requirements.
The most recent Intel ATX 3.1 and PCIe 5.1 standards are fully supported by ASRock PSU, which can handle instantaneous peak power loads ranging from 200% to 235%. By doing this, users are guaranteed reliable power supply for upcoming technology. The single-line output, which has native 12V-2×6 cables and can deliver up to 600W, is made to satisfy the demanding power needs of next-generation premium graphics cards.
Quick identification is made possible by the dual-color 16-pin connection design, which guarantees correct insertion into the GPU‘s power socket. In order to ensure system stability and safety, the Taichi and Phantom Gaming models also have a unique integrated NTC sensor that tracks connector temperatures in real-time and switches on protection mode if temperatures rise above acceptable bounds.Image credit to ASRock
Taichi Series Power Supply Unit
In addition to being certified for 80 PLUS and Cybenetics Titanium efficiency, the flagship Taichi series power supply unit also possesses Cybenetics LAMBDA A+ ultra-quiet certification. Two native PCIe 12V 2×6 cables are among the fully modular cables found in these PSUs, which come in 1650W and 1300W variants. With a 10-year warranty and premium parts like SiC SBD, Infineon CoolMOS, and all-Japanese capacitors, the series offers dependable power for extremely high-performance systems.
ASRock Phantom Gaming
Phantom Gaming Series Power Supply Unit
With cutting-edge technology and elegant design, the Phantom Gaming series power supply unit supports gaming systems. Gaming may be possible with 1600W, 1300W, 1000W, 850W, and 750W power options. LAMBDA Platinum & Gold Cybenetics ratings Acoustic and 80 PLUS Gold efficiency certifications guarantee energy efficiency and low noise.The fully modular design, native 12V-2×6 connectors, high-quality all-Japanese capacitors, and 10-year warranty ensure consistent gaming system power.Image credit to ASRock
Steel Legend Series Power Supply Unit
Steel Legend series power supplies come in “Steel Black” and “Steel White” and have 1000W, 850W, 750W, and 650W variations for mainstream systems. With 80 PLUS Gold efficiency, Cybenetics Platinum & Gold rating, and LAMBDA A+/A/A- acoustic certification, it delivers excellent energy performance.
The fully modular flat cable architecture and small 150mm shell facilitate smooth cable management and installation while enhancing airflow for ideal system cooling. The Steel Legend series power supply unit can offer the power for next-generation systems with the same strength and dependability as steel with premium all-Japanese capacitors and ASRock’s 10-year warranty.
Challenger Series Power Supply Unit
With 80 PLUS Gold models in 850W, 750W, and 650W options and 80 PLUS Bronze versions in 750W, 650W, and 550W, the Challenger series is designed for consumers on a budget. These power supply units use 120mm golf blade fans for outstanding cooling and silent operation, together with steady, high-efficiency power. The Challenger series is prepared to push boundaries now is the time to upgrade and comes with flat, hard-lined wires for simple installation and a 5-year warranty.
What is power supply unit?
The hardware part that transforms alternating current (AC) from a wall outlet into direct current (DC) for a computer or other electronic device is called a power supply unit (PSU):
The primary purposes of a PSU are:
Conversion: Changing a wall outlet’s high voltage AC electricity into DC current
Controlling the DC output voltage to the levels needed by the computer’s parts is known as regulation.
Distribution: Giving the remaining components of the computer access to the DC electricity.
PSUs are a crucial component of servers, laptops, PCs, and other devices like game consoles. To preserve the hardware’s integrity, they make sure the system gets clean, consistent power.
Read more on govindhtech.com
#ASRockPSU#AreNowCompatible#PCIe51#ATX31#graphicscards#powersupply#PhantomGaming#gpu#psu#Cybenetics#ChallengerSeries#gaming#SteelLegendSeries#technology#technews#news#govindhtech
1 note
·
View note
Text
ANAPHYLAXIS FILTER - WASPsynth multi-mode filter with double LFO and distortion (#3.2024)
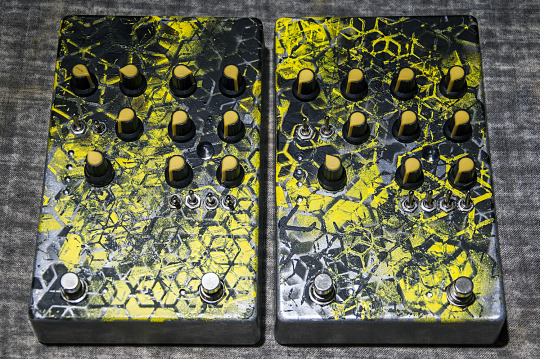
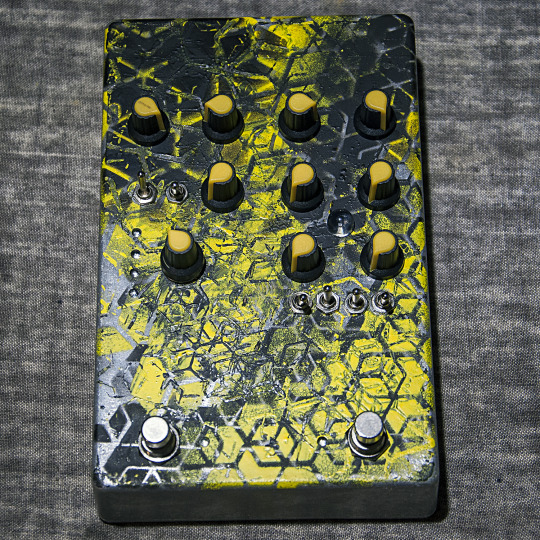
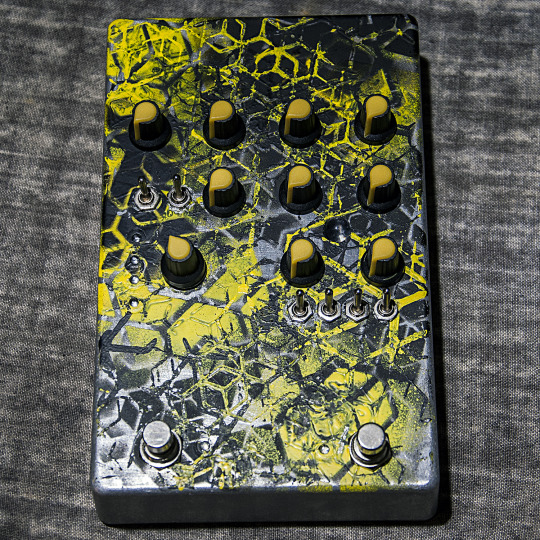
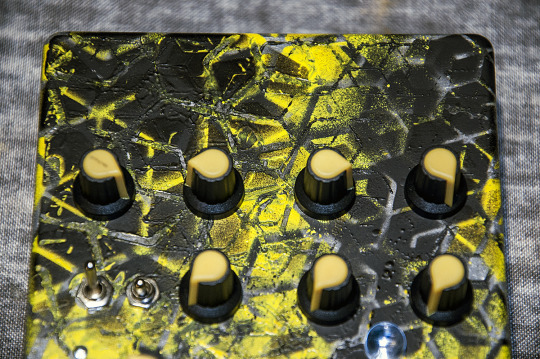
The ANAPHYLAXIS FILTER is a multi-mode filter with double LFO modulator for the CUTOFF frequency based the filter section of the notorious WASP synthesizer that was created by Electric Dream Plant in 1978. This standalone pedal version of the filter allows you to use it for the input signals of your choice. The FILTER MODE selector is a 4 position rotary switch (up to down: LOW PASS, BAND PASS, HIGH PASS and NOTCH) with the position indicated by small purple UV LEDs. The input signal is controlled with the GAIN control, that can boost even weaker input signal to overdrive the filter. A dedicated RESONANCE control determines the amount of RESONANCE at the CUTOFF point, that of course has a control knob as well. Furthermore the RESONANCE has two settings: EXTREME (up) and NORMAL(down), selected with a toggle switch. In HIGH PASS mode the filter can self-oscillate without any input, in case you need a high frequency SINE WAVE oscillator. In that case the FREQUENCY can be dialed in with the CUTOFF control. But the ANAPHYLAXIS FILTER can do more, as it has 2 build in LFOs that are modulating the CUTOFF frequency, with independent SPEED and DEPTH controls, which allows to generate a more complex modulation waveform. Each LFO has a RANGE toggle that selects: SLOW (down) or FAST (up) as well a 3 position toggle switch that selects the SHAPE: SQUARE (down), OFF (middle) and triangle (up). The fast LFO range goes well into audio range and enables you to create some very interesting frequency modulation filter effects. With slower rates, especially with the triangle shape and the 2 LFOs running at non-synced rates, even the most static sounding input get ‘alive’. The SPEED of each LFO is indicated by either red or green color in the big LED in the middle of the LFO section. The 1st stomp switch is TRUE BYPASS and if that is not enough, the 2nd stomp switch engages the DISTORTION, both with UV indicator LEDs. The level of the DISTORTION is controlled by the DISTORTION knob and the toggle switch next to it adds a TREBLE BOOST (up) or a HIGH CUT (down) setting to the DISTORTION. In the end of the signal path is a signal booster based on the EHX LBP1 with a global VOLUME control. The ANAPHYLAXIS FILTER runs on 9V DC and has a ‘boss style’ 2.1mm DC barrel plug socket with the negative pin inside. The enclosure is a heavy duty scavenged industrial engine power connector housing made from die-cast aluminum with a bottom plate made from found material and is painted in the industrial burnout camo pattern in matte black and bright yellow. Handmade by GRM for METSÄÄN.
Buy link. (links to webshop.)
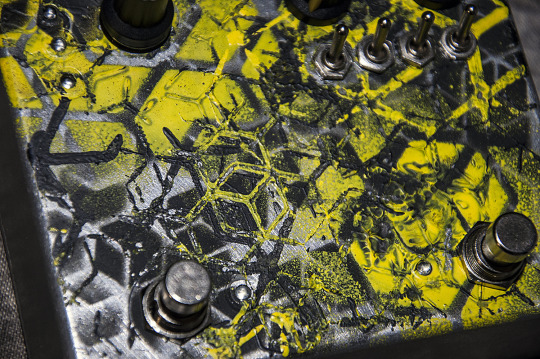
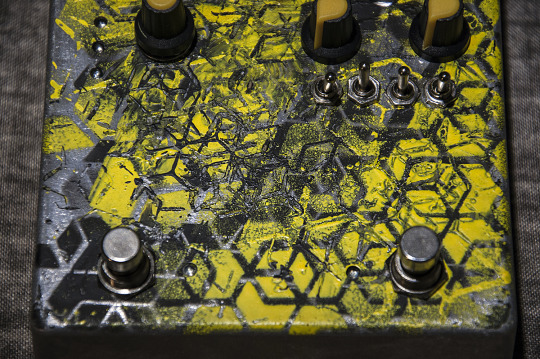
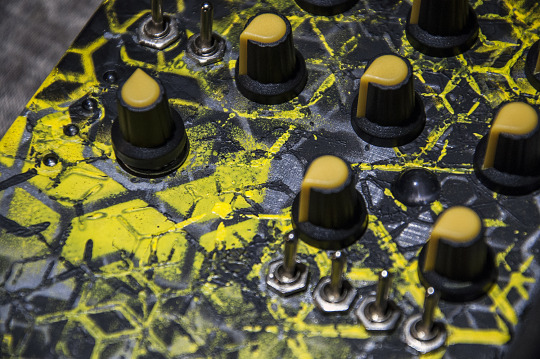
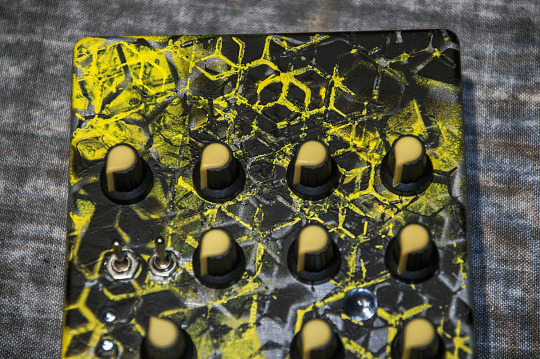
youtube
youtube
youtube
#anaphylaxis filter#waspsynth#wasp filter#wasp synthesizer#distortion#distortion pedal#filter pedal#effectpedal#Youtube
4 notes
·
View notes
Text
Essential Audio Cables and Connectors for DJs and Live Sound Professionals
When it comes to DJing and live sound, having the right equipment is crucial. However, one of the often-overlooked aspects of a successful performance is the audio cables and connectors you use. They are the unsung heroes that carry the sound from one device to another, ensuring that your audience experiences every beat, note, and word clearly and effectively. In this blog, we will explore the essential audio cables and connectors for DJs and live sound professionals, helping you understand their importance, features, and how to choose the right ones for your setup.

Why Audio Cables and Connectors Matter
Audio cables and connectors play a significant role in your sound system. They help transmit audio signals with minimal loss and interference, ensuring the best possible sound quality during your performances. The wrong type of cable or connector can lead to poor sound quality, unwanted noise, or even signal loss, which can be disastrous during a live show. Understanding the different types of cables and connectors can make a world of difference in your performance.
Common Types of Audio Cables
Here are some of the most common audio cables you’ll encounter as a DJ or live sound professional:
1. XLR Cables
XLR cables are the industry standard for professional audio applications. They typically have three pins (male and female connectors) and are used primarily for microphones and balanced audio connections.
Key Features:
Balanced Signal: XLR cables carry a balanced signal, which helps eliminate noise and interference, especially over long distances.
Durability: These cables are built to withstand heavy use and are often made with rugged materials.
Ideal Uses: XLR cables are commonly used for connecting microphones to mixers, mixers to amplifiers, and in any application where high-quality audio is needed.
2. TRS Cables
TRS (Tip-Ring-Sleeve) cables are often used for line-level connections. They come in various sizes, including 1/4-inch and 1/8-inch, and can be used for stereo signals as well.
Key Features:
Balanced or Unbalanced: TRS cables can carry balanced signals (when used for connecting equipment like mixers) or unbalanced signals (when used for instruments).
Versatility: They can connect various devices, such as mixers, speakers, and audio interfaces.
Ideal Uses: TRS cables are great for connecting audio interfaces to speakers or for linking multiple audio devices together.
3. TS Cables
TS (Tip-Sleeve) cables are unbalanced cables primarily used for instrument connections. They usually come in 1/4-inch size.
Key Features:
Simplicity: TS cables are straightforward with only two contacts, making them easy to use but more susceptible to interference.
Short Distances: They are best for short runs due to their unbalanced nature.
Ideal Uses: You’ll find TS cables being used for connecting electric guitars, keyboards, and other instruments to amplifiers.
4. RCA Cables
RCA cables are typically used for consumer audio equipment, such as connecting turntables to mixers or other devices.
Key Features:
Color Coding: They often come with color-coded connectors (red and white) for easy identification.
Unbalanced: RCA cables are unbalanced, making them less ideal for professional settings where interference is a concern.
Ideal Uses: RCA cables are commonly used for connecting DJ equipment, home audio systems, and some consumer electronics.
5. Speakon Cables
Speakon cables are designed for connecting amplifiers to speakers. They offer a secure connection and are capable of carrying high power levels.
Key Features:
Locking Mechanism: The connectors lock in place, preventing accidental disconnections during performances.
High Power Handling: They can handle large amounts of power without overheating.
Ideal Uses: Speakon cables are best suited for professional sound systems, especially in live settings where high-quality sound and reliability are crucial.

Essential Audio Connectors
Connectors are just as important as the cables themselves. Here are some essential connectors you should know about:
1. XLR Connectors
As mentioned earlier, XLR connectors are commonly used with XLR cables. They provide a secure, locking connection for microphones and other audio devices.
2. TRS Connectors
TRS connectors are used with TRS cables and are often found on audio interfaces and mixers. They come in different sizes, with 1/4-inch and 1/8-inch being the most common.
3. TS Connectors
TS connectors are used with TS cables for instrument connections. They are typically 1/4-inch in size and are found on guitars and amplifiers.
4. RCA Connectors
RCA connectors are commonly used in consumer audio devices and can be found on turntables, mixers, and home audio systems.
5. Speakon Connectors
Speakon connectors are used with Speakon cables and are ideal for connecting amplifiers to speakers securely. They are designed to handle high power and provide a reliable connection.
Tips for Choosing the Right Cables and Connectors
Choosing the right cables and connectors is essential for ensuring the best sound quality in your setup. Here are some tips to consider:
Determine Your Needs: Identify the equipment you’ll be using and what types of connections are required. This will help you decide which cables and connectors to purchase.
Prioritize Quality: Invest in high-quality cables and connectors from reputable brands. Cheap options may seem appealing, but they can lead to sound issues and may not last long.
Consider Length: Choose the appropriate cable length for your setup. Avoid overly long cables that can lead to signal loss and interference. However, make sure you have enough length to reach your devices comfortably.
Check Compatibility: Ensure that the cables and connectors you choose are compatible with your equipment. Always verify the types of inputs and outputs on your devices.
Keep Backup Cables: It’s always a good idea to have spare cables on hand. Cables can get damaged or fail unexpectedly, so having backups can save you from a potential disaster during a performance.
Understanding the essential audio cables and connectors for DJs and live sound professionals is crucial for delivering high-quality performances. By knowing the differences between XLR, TRS, TS, RCA, and Speakon cables, as well as their corresponding connectors, you can make informed decisions that enhance your sound setup.Investing in quality cables and connectors from professional, reputable audio equipment shops like VIP PRO AUDIO not only ensures a better performance but also adds reliability to your setup. The right audio connections will help you deliver a clear and powerful sound that engages your audience and keeps them coming back for more. So, whether you’re a budding DJ or an experienced live sound engineer, taking the time to understand and invest in your audio cables and connectors will pay off in the long run.
#music#audiogears#audio#dj#brooklyn#musician#professional audio equipment#audio shops#audio cable#audio connector
0 notes
Text
Understanding the Role of Connectors in Signal Integrity
In today's world of electronics, fast data transmission is very important. Because of this, signal integrity is a major concern. While many focus on circuit design and PCB layout, the simple connector is often overlooked. However, it plays a crucial role in keeping signal integrity.
This blog post will discuss why connectors are important for signal quality. It will explain how choosing and using the right connectors can greatly affect your electronic design.
What is Signal Integrity?
Before diving into the role of connectors, let's briefly define signal integrity.
Definition
Signal integrity refers to the quality of an electrical signal as it travels through a transmission path. It encompasses the signal's ability to reliably and accurately transmit information from source to destination.
Why Signal Integrity Matters
Poor signal integrity can lead to:
Data errors
Reduced system performance
Electromagnetic interference (EMI)
Compliance failures
The Impact of Connectors on Signal Integrity
Data rates are increasing, and signal quality is becoming more important. Electronics professionals need to stay updated on connector technology. They should also be aware of best practices. are more than just mechanical joining points; they are integral parts of the electrical path.
Key Connector Characteristics Affecting Signal Integrity
Impedance matching
Insertion loss
Return loss
Crosstalk
Shielding effectiveness
Types of Connectors and Their Signal Integrity Considerations
Different connector types have varying impacts on signal integrity. Let's explore some common types:
1. Board-to-Board Connectors
These connectors join two PCBs together.
Signal Integrity Considerations:
Pin density and spacing
Shielding options
Impedance control
2. Cable Connectors
Used to connect cables to boards or other cables.
Signal Integrity Considerations:
Shielding and grounding
Impedance matching with cable
Strain relief
3. RF Connectors
Specialized connectors for radio frequency applications.
Signal Integrity Considerations:
Impedance matching (typically 50 or 75 ohms)
Frequency range
Power handling capability
4. High-Speed Data Connectors
Designed for protocols like USB, HDMI, and Ethernet.
Signal Integrity Considerations:
Differential pair routing
Skew control
EMI shielding
Connector Design Features for Improved Signal Integrity
Modern connectors incorporate various design features to enhance signal integrity:
1. Controlled Impedance
Maintaining consistent impedance throughout the connector helps minimize reflections.
2. Shielding
Proper shielding reduces EMI and crosstalk between adjacent signals.
3. Ground Planes and Pins
Strategic placement of ground connections helps maintain signal reference and reduce noise.
4. Differential Pair Optimization
Careful routing and pin assignment for differential pairs improve high-speed signal transmission.
5. Material Selection
Using low-loss materials can reduce signal attenuation and improve overall performance.
Best Practices for Connector Selection and Implementation
To ensure optimal signal integrity, follow these best practices:
1. Match Impedance
Choose connectors with impedance matching your transmission line and termination.
2. Consider Frequency Range
Ensure the connector is rated for your operating frequency range.
3. Evaluate Insertion Loss
Select connectors with low insertion loss to minimize signal attenuation.
4. Assess Return Loss
High return loss indicates better impedance matching and less signal reflection.
5. Analyze Crosstalk Performance
Look for connectors with low crosstalk specifications, especially for high-density designs.
6. Check Shielding Effectiveness
For EMI-sensitive applications, choose connectors with appropriate shielding.
7. Consider Mechanical Factors
Evaluate factors like mating cycles, locking mechanisms, and environmental sealing.
Connector Layout and PCB Considerations
Proper connector implementation extends beyond selection to layout and PCB design:
1. Maintain Impedance Control
Ensure trace impedance matches the connector impedance up to the mating point.
2. Minimize Stubs
Avoid unterminated stubs, which can cause reflections and degrade signal quality.
3. Use Ground Planes
Implement solid ground planes near connectors to maintain signal reference.
4. Consider Signal Routing
Route high-speed signals with minimal layer transitions and avoid sharp bends.
5. Implement Proper Termination
Use appropriate termination techniques near connectors to reduce reflections.
Testing and Verifying Connector Performance
To ensure connectors are not compromising signal integrity, consider these testing methods:
1. Time Domain Reflectometry (TDR)
TDR helps identify impedance discontinuities along the signal path, including through connectors.
2. Vector Network Analysis (VNA)
VNA measures S-parameters, providing insight into insertion loss, return loss, and other RF characteristics.
3. Eye Diagram Analysis
Eye diagrams offer a visual representation of signal quality, helping identify issues like jitter and noise.
4. Bit Error Rate Testing (BERT)
BERT assesses the overall system performance, including the impact of connectors on data transmission accuracy.
Emerging Trends in Connector Technology for Signal Integrity
As data rates continue to increase, connector technology evolves to meet new challenges:
1. High-Frequency Materials
Advanced materials like liquid crystal polymers (LCP) offer improved performance at high frequencies.
2. Integrated Circuits in Connectors
Some connectors now incorporate active components for signal conditioning or protocol conversion.
3. Photonic Connectors
For ultra-high-speed applications, photonic connectors using fiber optics are emerging as a solution.
4. Modular Connector Systems
Flexible, modular connector systems allow customization for specific signal integrity requirements.
Conclusion: The Critical Role of Connectors in Signal Integrity
As we've explored, connectors play a vital role in maintaining signal integrity in electronic systems. From impedance matching to shielding, every part of connector design affects signal quality.
By understanding the important role connectors play, engineers can improve system performance. They should follow best practices for choosing, using, and testing connectors. This way, these often-overlooked parts will help the system instead of becoming weak links in the signal chain.
Data rates are increasing, and signal quality is becoming more important. Electronics professionals need to stay updated on connector technology. They should also be aware of best practices. Remember, in the world of high-speed design, every component matters – and connectors are no exception. Need the Right Connectors for Your Project? For expert advice and high-quality connectors, trust Electronify India. Our team is here to help you select the best connectors to optimize your system’s performance. Contact Electronify India today for reliable solutions and support!
0 notes
Text
Female Connector: Powering Connections in Electronics
In brand new global, connectivity is the backbone of each technological development, and at the heart of this connectivity lies one small but important issue—the female connector. Whether in patron electronics, industrial devices, or superior instrumentation systems, female connectors play a pivotal role in making sure easy conversation among diverse devices.
This weblog delves into the arena of lady connectors, their importance in electronics, their kinds, and why it’s vital to partner with a dependable lady connector provider.
What is a Female Connector?
A female connector is a sort of electric connector with a socket or receptacle into which a male counterpart (plug) is inserted. Unlike a male connector, which has pins, the female connector consists of holes or slots that align with the male pins, ensuring a stable, practical connection. These connectors are appreciably used throughout diverse industries, such as telecommunications, automotive, aerospace, and greater.
Female connectors can be located in cables, circuit boards, and devices that want to interface with different components to transmit electricity, facts, or signals. Their particular design allows for secure and reliable connections, making them quintessential for normal electronics and complex commercial structures.
Types of Female Connectors
When it involves female connectors, they arrive in numerous styles and sizes, relying on their utility. Some of the most common types consist of:
USB Female Connectors
USB female connectors are possibly the most extensively identified kinds. They are used in computers, mobile phones, and different digital devices. These connectors get hold of male USB plugs to facilitate information switching or device charging.
RF Female Connectors
These connectors are mainly designed for radio frequency applications. They are utilized in the telecommunications and broadcasting industries, in which they ensure the smooth transmission of radio indicators between devices.
Audio/Video Female Connectors
Found in consumer electronics, which include televisions, home theater systems, and sound equipment, these female connectors receive input from male audio/video cables, providing seamless sound and video transfer.
Power Female Connectors
Used in diverse industrial and purchaser electronic products, electricity lady connectors are essential for connecting devices to energy resources effectively. These connectors can deal with high voltage and are important for the dependable performance of heavy equipment and appliances.
Circular Female Connectors
These connectors are regularly utilized in business programs and outside environments because they offer better resistance to harsh conditions, inclusive of dust, moisture, and vibrations. Circular connectors can be seen in aerospace, medical devices, and manufacturing facility automation structures.
Choosing an appropriate kind of female connector is important for the right functioning of any digital gadget. A legitimate female connector dealer will provide a wide range of alternatives to make certain that the connector meets your particular requirements.
Applications of Female Connectors
Female connectors are used across a large spectrum of packages in extraordinary industries. Below are some terrific examples:
1. Consumer Electronics
Mobile telephones, tablets, laptops, and home equipment all utilize lady connectors to acquire energy and transfer statistics. USB, HDMI, and audio connectors are examples of female connectors that connect with corresponding male connectors to enable charging, information transfer, or media streaming.
2. Industrial Automation
In industries consisting of manufacturing, lady connectors are integral for connecting diverse kinds of business equipment. They transmit signals among exceptional elements of a device or among machines to facilitate automation and manage tactics. A reliable female connector supplier ensures that those connectors can withstand harsh industrial environments, such as exposure to chemical substances, warmth, and mechanical stress.
3. Telecommunications
In telecommunications infrastructure, female connectors are crucial for connecting network additives, ensuring that indicators are transferred with no lack of first-class. Fiber optic structures, radio antennas, and different telecommunications equipment all rely upon long-lasting lady connectors.
4. Aerospace and Defense
The aerospace and protection industries call for the best requirements in terms of stability, reliability, and precision. Female connectors utilized in plane and military systems ought to meet stringent specs, frequently requiring connectors that can undergo severe temperatures, strain versions, and shock resistance.
5. Medical Equipment
In healthcare, female connectors are extensively utilized in diagnostic systems, tracking gadgets, and surgical units. Medical connectors need to be extraordinarily dependable, as any malfunction might be existence-threatening. A trustworthy female connector supplier gives products designed particularly for the excessive overall performance requirements of medical technology.
Benefits of High-Quality Female Connectors
Using amazing female connectors gives numerous advantages, such as:
1. Durability
Premium female connectors are built to remain. Whether used in customer electronics or harsh industrial environments, a first-rate connector ensures lengthy-term capability without frequent replacement.
2. Reliable Performance
Choosing a great female connector dealer guarantees that you get hold of components that offer steady and dependable overall performance. Inferior connectors can cause data loss, signal interference, or maybe equipment harm; however, a nicely-manufactured connector guarantees seamless operation.
3. Ease of Installation
Female connectors are designed for smooth and secure installation, imparting a consumer-pleasant interface even for complicated structures. This simplicity is essential for decreasing downtime and ensuring fast, efficient renovation.
4. Versatility
A true female connector provider offers an extensive kind of connector that caters to one-of-a kind necessities. Whether you need connectors for business automation, telecommunications, or medical gadgets, you’ll find a versatile answer tailored to your software.
Why Choose a Trusted Female Connector Supplier?
When sourcing female connectors, it's vital to partner with a reputable female connector provider. High-satisfactory suppliers offer licensed products that meet global requirements, ensuring that your system capabilities reach ultimate overall performance degrees.
One such trusted name is Instrumxx Industries, an agency hooked up in 2021 and ISO-licensed for production instrumentation hardware. Under the logo called IXX, Instrumxx Industries offers female connectors and different products associated with "Xtra Quality and Xtra Endurance." Partnering with Instrumxx Industries guarantees that your procurement desires for instrumentation products, which includes fittings, valves, condensate pots, air headers, and female connectors, are met with superb quality and reliability.
Conclusion
The function of female connectors in powering connections in electronics cannot be overstated. From consumer gadgets to state-of-the-art business structures, these connectors are the backbone of smooth and efficient conversation between devices. Choosing the proper female connector supplier is crucial to ensure sturdiness, performance, and simplicity of set up to your application.
When thinking about the exceptional supplier for your connector needs, Instrumxx Industries stands out with its commitment to high-quality and performance beneath the IXX emblem. Established in 2021 and ISO licensed, Instrumxx Industries ensures that your instrumentation wishes are met with products designed for staying power and reliability, making it a one-forestall vacation spot for your female connector and instrumentation hardware necessities.
0 notes