
Don't wanna be here? Send us removal request.
Statistics
We looked inside some of the posts by aaryan-mwa-blogs and here's what we found interesting.
Average Info
Notes Per Post
26
Likes Per Post
26
Reblog Per Post
0
Reply Per Post
0
Time Between Posts
2 days
Number of Posts By Type
Text
17
Last Seen Tumblr Blogs


Fun Fact
28.6 is the average number of monthly visits per US mobile user.
Text
Transforming Static LEDs into Moving Visuals for Stage Performances
In live entertainment, the magic of LED lighting lies not just in brightness but in motion. With pixel control and creative programming, lighting designers can make stationary fixtures appear to flow, spin, and pulse—turning any stage into an immersive visual experience.
Even without moving heads, pixel-mapped LEDs can create energy that syncs perfectly with the music. Here’s how to master motion illusions for your next show.
Start with Pixel Mapping and Zoning
Pixel mapping breaks LED fixtures into controllable segments or “pixels.” Instead of one big wash of color, your lights can run intricate patterns and gradients that simulate motion.
For example, a line of LED bars behind a DJ or performer can chase from left to right, creating a visual rhythm that feels like movement.

Directional Chases to Simulate Flow
One of the easiest ways to trick the audience’s eye is with sequential pixel chases. Lights that turn on in order from one end to the other create the illusion of motion. Adjusting the speed to match the beat enhances the experience—fast for drops, slow for dramatic builds.
Color Gradients for Visual Depth
Blending colors across LEDs adds richness to your stage look. Gradual transitions between two or three colors create flowing effects that look alive, especially on vertical LED bars or panel arrays.
Subtle Strobe and Pulse Effects
Brief bursts of strobing or blinking pixels can add impact and simulate sudden motion or acceleration. Use these sparingly and time them to key moments in your music to enhance the illusion without overwhelming the show.
Spirals and Rotations for 3D Illusions
LED panels arranged in grids or circular trusses can mimic spinning motion through spiral sequencing. When paired with haze or smoke, beams appear to twist in space, creating a 3D vortex effect that captivates the audience.

Negative Space is Key
Leaving some pixels dark provides contrast that sharpens the overall illusion. Strategic blackouts can form patterns, simulate heartbeat effects, or make visual movement feel cleaner and more intentional.
Seamless Mapping Across Multiple Fixtures
For a truly immersive stage design, extend pixel patterns across multiple fixtures as if your entire lighting rig is one canvas. Continuous chases and gradients can wrap around a stage, making small setups feel like full-scale productions.
Wrapping Up
By understanding pixel mapping, layering colors, and timing patterns with music, you can create motion-rich visuals using static LED lighting. These techniques bring energy, depth, and excitement to live shows—without the cost or complexity of mechanical fixtures.To bring these effects to life, explore high-quality LED fixtures and controllers from a pro audio shop. The right gear will help you design shows that feel alive and unforgettable.
#audiogears#moving head#led lighting#led lights#professional audio equipment#dj#dj set up#dj light#dj lighting
1 note
·
View note
Text
Creating Professional Portable Stages That Impress
A stage isn’t just a place to perform—it’s the visual anchor of an event. But when portability is necessary, it’s easy to fall into the trap of wobbly risers, dangling wires, and setups that scream “temporary.” The good news? Today’s portable stages can look polished, cohesive, and event-ready with the right planning and tools.
Modern mobile stages can match the aesthetics of permanent installs by using modular risers, strategic lighting, and smart cable management.

Breaking Free from the “Temporary” Look
The phrase “portable stage” used to conjure images of fold-up decks and fast, uninspired setups. Now, event pros approach portable stages as designed systems rather than last-minute solutions. With modular gear and creative planning, portable setups can feel like they’re meant to be in any space—sleek, solid, and intentional.
Solid Platforms: The Backbone of the Stage
Stability comes first. Lightweight aluminum risers and collapsible decks today feature locking systems, skid-resistant tops, and adjustable feet, making them sturdy without being heavy. In irregular venues like rooftops or tented spaces, adjustable legs help keep everything level. Skirting or scrims around the risers hide structural elements, maintaining a clean and professional aesthetic.
Keeping Cables Invisible
Loose cables instantly cheapen the look of a stage. They’re also a trip hazard. Use Velcro wraps, cable trays, and floor ramps to organize and conceal wiring. Labeled and color-coded cables simplify setup and teardown. Consider multi-pin or hybrid cables for audio, lighting, and video to minimize clutter.
Enhancing Visual Design with Panels and Scrims
Portable stages can look as intentional as permanent ones with the right visual treatments. Scrims, truss sleeves, and modular backdrop panels mask walls, hide hardware, and create uniformity. Fabric backdrops and PVC panels instantly frame the performance area and eliminate visual distractions.Truss frames with integrated banners or lighting can add branding and depth without overcomplicating transport or setup.
Lighting as a Design Tool
Lighting defines stage space as much as it enhances performance. Strategic placement of uplights, LED bars, and moving heads creates visual depth and directs attention. Warm washes work for elegant events, while cool, tight beams bring energy to club-style shows. Pre-programmed DMX scenes allow automated transitions without constant control.
Choosing Gear with Visual Consistency
Every visible piece of equipment impacts your stage presence. Use gear that shares consistent colors, finishes, and form. Custom faceplates for DJ booths or AV racks hide controls while presenting a sleek front. Monitor placement, drum shields, and synth risers should all respect the visual flow.

Fast Setup with Thoughtful Planning
Speed doesn’t need to mean sloppy. Pre-wired racks, foldable stages with integrated cable channels, and dual-purpose lighting fixtures keep setups efficient and clean. Solo performers and small bands often travel with plug-and-play racks, allowing for setup in minutes without messy patching.
Scalable and Flexible Configurations
Modern mobile stages are modular, making it easy to scale up or down for different events. Start with a compact system of interlocking risers, truss sections, and lighting. Expand with extra decks, scrims, or lights for larger crowds—all while maintaining a cohesive visual style.
Details That Sell the Illusion
Small, thoughtful touches separate amateur builds from pro results:
Consistent truss heights
Symmetrical lighting and spacing
Hidden cable paths and matching mats
Branded or decorative backdrops
These elements ensure a portable stage feels designed, not improvised.
Conclusion: Mobile Stages, Professional Results
With today’s technology, portable stage setups no longer need to look temporary. Smart modular gear, visual planning, and attention to finishing details make it possible to deliver a stage that feels permanent, packs quickly, and works for venues of all sizes.
1 note
·
View note
Text
Professional DJ Laptop Stands vs. Integrated Case Shelves
From festival stages to rooftop parties, DJs need reliable gear setups that can handle unpredictable conditions. Laptop placement often seems minor—until a shaky stand wobbles or a cable comes loose in the middle of a set. Not all mounting solutions are built for the energy of live performances, and using the wrong stand can turn a great night into a troubleshooting nightmare. An increasingly popular solution is the DJ controller case with a built-in laptop shelf and optional LED lighting—offering durability, faster setups, and visual polish in one piece. In this blog, we’ll discuss why laptop stability is vital, why basic stands fall short, and why case-mounted solutions are preferred by touring DJs.

During live shows, a sturdy integrated shelf prevents accidental slips or vibration issues, keeping your laptop exactly where you need it.
Why Your Laptop Setup Matters
Modern DJs use laptops as the command hub—running playback, syncing visuals, and managing lighting. On stage, unlike in a home studio, the booth might be cramped, unstable, and exposed to vibrations. Flimsy, foldable stands often fail under real-world pressure.
Why Secure Mounting is Critical
1. Gear Safety A tumble from an unstable stand can damage the laptop and end a performance. Shelves built into DJ cases travel with the gear, providing a locked-in solution from load-in to teardown.
2. Cable Reliability Shifting stands can pull on USB, power, or audio lines, causing dropouts or latency spikes. Integrated case shelves remove flex and keep everything securely connected.
3. Smooth Performance WorkflowStable platforms make it easier to trigger cues, navigate tracks, and control effects. Proper height and angle reduce fatigue, helping DJs stay comfortable during long sets.
The Problem with Traditional Laptop Stands
Thin Frames: Shake under bass and movement.
No Secure Locks: Risk of folding or sliding.
Weak Base Support: Prone to tipping in busy booths.
Slippery Surfaces: Vibration can make laptops drift.
Controller cases with integrated shelves avoid these pitfalls with reinforced, road-ready designs.
What Defines a Gig-Ready Case
Fixed Shelves with Locking Hinges that won’t shift mid-set.
LED-Backlit Options for dark venues and better visibility.
All-in-One Portability for faster setup and safer transport.
Tour-Grade Construction from plywood, aluminum, and steel hardware.
Studio vs. Stage Environments
At home, a foldable or desk-mounted stand is fine. On stage, vibration-resistant case-mounted shelves provide professional reliability.
Touring DJs often prefer bringing their own integrated cases to avoid the risk of venue stands that might be unstable, worn, or improperly sized.

Tips for Outdoor or Mobile Shows
Secure the case to the floor with sandbags if necessary.
Clip or tie down cables to prevent strain.
Avoid designs where the shelf overhangs the base too far.
Final Thoughts
Your laptop is the backbone of your set, and stability ensures your performance runs flawlessly. While traditional stands may work for casual streaming or rehearsals, a DJ controller case with a secure laptop shelf and optional LED lighting is a professional, stage-ready solution. For mobile DJs, club performers, or festival sets, investing in a gig-ready case ensures safety, speed, and confidence on every show.
1 note
·
View note
Text
Tweeter Directionality: Why Angle Matters for Car Sound Clarity
When it comes to car audio systems, tweeters are often viewed as small components with a minor role. But just like subwoofers shape the feeling of bass, tweeters define the character of sound—especially in the highs. Whether it's the shimmer of a hi-hat or the subtle texture of a vocal, properly aimed tweeters can make or break the clarity of your soundstage.

A-pillars are a go-to location for tweeters, offering ideal angles for stereo imaging and driver-focused sound.
This article explores why tweeter angle and placement matter more than most realize, how it affects perceived sound quality inside a car, and how installers and enthusiasts can fine-tune high frequencies for better results—without relying solely on EQ settings.
The Myth of “Any Direction Works”
A common mistake in car audio setups is assuming tweeters will perform the same no matter where they’re mounted. Since high frequencies are extremely directional by nature, their effectiveness is heavily influenced by angle and placement.
Poorly aimed tweeters can lead to:
Harsh reflections off glass or dashboard surfaces
Uneven soundstage where only one listener hears crisp detail
Lost high-frequency energy, especially in padded interiors
While woofers disperse sound more broadly, tweeters behave more like spotlights—what they’re pointed at is what they’ll hit. That makes proper aiming essential, particularly in sedans, coupes, and SUVs where reflections and cabin asymmetry come into play.
Matching Tweeter Aim to Listening Position
Driver-Focused Positioning
In many car installs—especially solo-use or competition systems—tweeters are aimed directly at the driver. This produces maximum detail for the primary listening position but can lead to imbalance for passengers.
For example, when tweeters are mounted in sail panels or A-pillars, aiming them toward the driver’s ears can provide tight imaging and crisp clarity on vocals, cymbals, and effects. However, it may create a lopsided stereo image that’s bright on one side and dull on the other.
Equalized Soundstage
To create a balanced experience for both the driver and front passenger, tweeters can be angled to “crossfire” toward the center console or windshield. This spreads high-frequency energy more evenly, allowing both seats to share the stereo image without hot spots.
Advanced installers sometimes measure the distance between tweeter and listener, using time alignment or digital signal processors (DSPs) to delay or attenuate signals. However, mechanical aiming remains one of the most effective first steps in tuning.
Mounting Styles and Their Acoustic Impact

Tweeter mounting styles—from flush to angled surface pods—directly influence how highs reach the listener.
Flush Mount
Flush-mounted tweeters sit flat against the mounting surface—ideal for minimizing visual impact. But they often fire directly into hard surfaces like dashboards or windshields, causing early reflections and reducing clarity.
Surface Mount
Surface-mounted tweeters sit at an angle, typically on brackets or pods. This allows better control over direction and can help avoid reflective surfaces. They’re often used in custom installs for superior imaging.
Swivel or Pivot Mounts
Some coaxial speakers and component tweeters include pivoting or rotating designs. These are great for subtle tweaks in direction without requiring custom fabrication. For example, if a door-mounted tweeter is too harsh, a 10–15° rotation away from the listener can reduce sibilance.
Reflections, Absorption, and High-Frequency Decay
Inside a vehicle, tweeter output is affected by more than just direction—cabin materials and reflective surfaces shape it.
Glass surfaces like windshields can create sharp reflections, exaggerating certain frequencies and causing ear fatigue.
Pillars and dashboards made from soft materials like vinyl or foam can absorb treble energy, making the sound dull if tweeters are poorly aimed.
Headliner and floor reflections are less impactful for tweeters due to angle and dispersion patterns but still play a role in overall system tuning.
Much like placing subwoofers near walls changes bass behavior, the direction of a tweeter relative to cabin features defines how highs are perceived.
Aiming Tips Based on Vehicle Type
Compact Cars
Due to the tight interior, tweeter placement in compact vehicles should avoid bouncing off glass. Aim slightly away from hard surfaces and toward head height for smoother top-end response. Kick panel or dash-level mounting can work well with slight upward tilt.
Sedans
In larger sedans, door panel or A-pillar mounting gives flexibility. Crossfire aiming—tweeters directed toward the center of the cabin—is often ideal for shared listening zones. Avoid directing tweeters toward side windows or sunroofs.
SUVs and Vans
With more vertical space, tweeters can be mounted higher for a broader image. Use the larger cabin to your advantage by widening the stereo field but beware of reflective side glass. Swivel mounts or angled pods help tune the sweet spot.
Time Alignment and DSP: Complement, Not Substitute
Digital tuning tools are powerful but should be used to enhance a well-aimed system—not correct poor physical layout. Time alignment, EQ, and DSP can adjust delay and frequency balance, but they cannot correct a tweeter aimed into a seat or door panel.
That’s why audio professionals still emphasize physical directionality as the foundation. A properly aimed tweeter requires less EQ correction, preserving headroom and reducing distortion.
What About Rear Tweeters?
Rear tweeters are often included in multi-speaker systems, but their placement should be handled carefully. If they’re aimed directly at rear passengers’ ears, the sound can feel “rear-heavy” or harsh. Some installers opt to attenuate rear tweeters or angle them away from passengers to maintain a front-focused soundstage.
As with subs, more isn’t always better. Proper placement and tuning deliver better results than simply adding more tweeters.
Considerations for Car Audio Enthusiasts and Installers
Before locking in a tweeter location, test multiple angles using double-sided tape or temporary mounts.
Use familiar test tracks with clear vocal content and ambient detail to evaluate soundstage and brightness.
Avoid aiming tweeters directly at glass, metal, or highly reflective surfaces unless intentionally designing a bright system.
Always consider listener height and seating angle, especially in sloped vehicles.
If unsure, working with an experienced car audio specialist can help fine-tune both directionality and system balance. Pro audio stores often allow in-car demos or offer expert installation, making it easier to get high frequencies just right.
Final Thoughts: It’s Not Just Volume, It’s Vision Tweeters may be small, but they shape a massive part of the car audio experience. Angling them the right way isn't about chasing louder highs—it’s about crafting a soundstage where every detail has its place. Whether installing a two-way system or building a full active front stage, paying attention to tweeter directionality ensures that brilliance isn’t just heard—it’s precisely aimed. As with subwoofers in live sound, clarity beats power. And the smartest car audio setups start with precision, not just volume.
3 notes
·
View notes
Text
More Than Just Wires: Why Your Audio Cables Matter More Than You Think
In the live sound and professional audio system world, loudspeakers, mixers, and digital signal processors receive a lot of attention. But silently lurking in the background is an element that usually doesn't receive much notice: the audio cable. They may appear to be passive participants in the sequence, but in reality, cables are the literal backbone of a system's signal path. Their quality, their type, and their placement can be the determining difference between a sharp, clean result and a maddening failure of hums, dropouts, or signal loss.

Behind the scenes: A well-organized cable rig ensures clean signal flow and fewer technical issues during live shows.
A quality subwoofer installation provides visceral effect—but only if it's fed a clean signal. That precision begins at the cable level. Just as a properly tuned subwoofer system depends on careful placement, crossover tuning, and phase alignment, audio cables are critical to maintaining that accuracy throughout the system. Consider cables not as add-ons, but as highways for the signal. If the highway is fractured, even the most highly regarded vehicle can't get where it needs to go.
The Cable's Secret Power Over Audio Quality
On first glance, a cable can look like a basic plug from one device to another. Yet every cable—XLR, TRS, RCA, speakON, or digital—is special in its strengths, shielding properties, and best applications. Balanced XLR and TRS cables, to name a couple, are actually engineered to reject interference over long runs and therefore are a must for microphones and line-level signal in large halls.
Unbalanced lines such as TS or RCA, while smaller, are much more subject to noise and need to be kept short. On crowded stage settings or mobile DJ configurations, being aware of when and where to use balanced vs. unbalanced lines can be the key to a clean set vs. one full of hiss or buzz.
When Cable Choice Impacts Performanced
Subwoofer planning isn't merely speaker choice—signal integrity. A strong dual 18-inch enclosure will under-sound if powered through a badly shielded or mismatched cable. Ground loops, phase cancel, and signal loss are all threats that escalate when cable quality is overlooked.
This is particularly relevant in medium- and large-sized rooms, where there are likely to be long runs of cable. A cheap mic cable draped 50 feet around a ballroom can add noise that will not be taken out by any amount of EQ or gain staging. It's the same principle as over-saturating a small room with sub-bass—too much of the wrong element can very quickly trash the mix.
Shielding, Connectors, and Build Quality
One of the easiest ways to protect a live sound system is to invest in cables with robust shielding and reliable connectors. Foil-shielded cables offer excellent coverage against radio-frequency interference, while braided shielding adds durability for on-the-road setups. Gold-plated connectors, though often viewed as luxury add-ons, provide more stable long-term connections—especially in humid or dusty environments.
Locking connectors, such as speakON or locking XLRs, also prevent accidental disconnections during high-energy performances. Think of this as the audio equivalent of locking wheels and isolation platforms used with subwoofers to protect gear and floors.
Matching Cable Length and Type to the Job
Just as subwoofers are matched to room size and audience expectations, cable selection should follow the same principle. For short runs between a mixer and powered speaker, a 3-foot XLR might suffice. But for front-of-house feeds or long stage snakes, low-capacitance cables with heavy shielding are the safer bet.
Likewise, speaker cables and instrument cables are not interchangeable. Mixing these up can result in poor performance or even damage. Speaker cables carry high wattage and require thicker gauges, while instrument cables handle sensitive, low-level signals that benefit from better shielding.
The Role of Digital and Hybrid Cabling
As audio systems become increasingly integrated with digital gear—USB mixers, Dante networks, or AES/EBU transmission—the importance of high-quality digital cabling grows. A single faulty Ethernet or coaxial run can take down an entire digital audio feed. Much like cardioid subwoofer arrays that offer controlled dispersion, digital cabling offers streamlined, clean signal flow—but only when infrastructure is up to the task.
Hybrid cables, combining power and signal lines in one sheath, are popular in mobile DJ rigs and compact live systems. These streamline setup but also concentrate potential failure points into a single cable. Choosing rugged, road-tested versions with reinforced strain relief can make all the difference during setup and teardown.
Smart Cable Practices: Planning Like a Pro
In high-pressure environments, good cable management isn't just about aesthetics—it’s about reliability. Loose cables create trip hazards, tangled snakes cause setup delays, and unlabeled wires can derail quick fixes during live performances.
Labeling cables, coiling them properly, and using color-coded wraps or heat-shrink tags can make troubleshooting far easier. Just as proper subwoofer placement—ground-stacked, flown, or distributed—can define coverage, organized cabling defines workflow and performance readiness.
How DJs and Engineers Can Benefit
For DJs, poorly shielded RCA cables can introduce unwanted hum—especially near lighting power supplies. Swapping to properly grounded and isolated signal cables can immediately improve clarity. In venues where subwoofer positioning changes week to week, flexible cable lengths and rugged connectors prevent unnecessary downtime.

A clean cable layout behind the DJ booth ensures minimal signal noise and smooth transitions during high-energy sets.
Touring engineers often build custom looms and patch panels, ensuring consistency across venues. The same logic applies to DJs traveling between gigs—standardizing cable lengths, labeling inputs/outputs, and packing spares creates a more professional and resilient setup.
Conclusion: Small Cables, Big Impact
Much like subwoofer systems, where size and placement matter far less than intelligent tuning, the impact of audio cables is often underestimated. They're not just transmission tools—they're tone shapers, reliability enhancers, and workflow enablers.Instead of treating cables as an afterthought, technicians and performers should approach them with the same intent they reserve for loudspeakers and mixers. Because when the signal is clean, every beat hits harder, every vocal cuts through, and every event runs smoother. It’s not about more wires—it’s about using the right ones, the right way. For those unsure where to begin, consulting with experienced technicians or pro audio stores can help match the right cable to the right task—ensuring both sound quality and system reliability.
#Pro Audio Tips#Audio Cables Matter#Live Sound Setup#DJ Gear Essentials#Sound System Design#Signal Path Clarity#Stage Cable Management#DJ event's#DJ#Pro audio shop#Pro audio stores#Professional audio equipment's
3 notes
·
View notes
Text
The 2025 Guide to Choosing the Best Amplifier for Your Car
Choosing the right car amplifier in 2025 involves more than wattage. Explore how power handling, channels, compatibility, and real-world usage shape the ideal audio upgrade.
Why Car Amplifiers Still Matter in 2025
Upgrading a car’s sound system goes far beyond just adding volume. In 2025, the role of the amplifier is more critical than ever. It defines how accurately your music plays—whether you’re pushing hard-hitting bass or preserving vocal detail on long drives.

Smart under-dash amplifier and speaker integration allows for clean installs without sacrificing clarity or power.
A properly chosen amplifier not only brings out the full potential of your speakers but also ensures long-term system efficiency. It must fit the vehicle, match speaker specs, and support modern integration without hassle. This guide breaks down what matters when choosing a car amplifier today.
1. RMS vs. Peak Power—What You Should Really Look At
Peak power numbers often grab attention, but RMS is what truly defines usable performance. RMS (Root Mean Square) is the steady power your amp can deliver without distortion.
Match the amplifier’s RMS rating to that of your speakers—not the inflated peak rating.
Underrated amps tend to distort early; overpowering amps can damage components if not tuned properly.
Subwoofers generally require more wattage than tweeters or full-range speakers.
Also, don’t overlook impedance. Whether your speakers are 2-ohm or 4-ohm affects how much power your amp can safely push.
2. Understanding Channel Layout: 2, 4, or Multi-Channel
Amplifiers come in different configurations based on the number of speakers (or subs) they’ll power:
2-channel: Great for front speakers or bridging into a single sub.
4-channel: A standard for full vehicle coverage—typically front and rear doors.
5-channel or more: For those running complete systems with a subwoofer and four speakers from one unit.
Mono-block amps remain the most reliable option for subs. They’re built to handle heavy low-frequency loads with clean, distortion-free output.
3. Amplifier Classes: A/B or D?
Technology has made Class D amplifiers the go-to for most builds. They're smaller, generate less heat, and perform efficiently at high output levels. Still, Class A/B designs are favored by listeners who want smoother midrange tones or analog-style warmth.
Class A/B: Typically more linear and preferred for clarity in vocals or acoustic instruments.
Class D: Offers compact size and efficient power delivery—ideal for subwoofers or tight installs.
Modern Class D models now include low-noise components and fine filtering, closing the gap between digital efficiency and analog warmth.
4. Smart Features That Make Tuning Easier
Today’s amplifiers often come loaded with features that reduce setup time and improve flexibility:
Built-in Crossovers: Let you fine-tune what each speaker receives (e.g., sending only bass to subs).
Bass Boost Controls: Adjust low-frequency response without touching the head unit.
Integrated DSP: Allows for advanced tuning like time alignment or equalization via app or onboard controls.
Look for amps with signal processing if you want precision without bulky external gear.
5. Compatibility with OEM Audio Systems
Modern vehicles come with complex factory audio systems. If you’re keeping the original head unit, make sure the amplifier you choose can handle OEM signals:
High-level input support means you can feed speaker-level signals directly into the amp.
Signal sensing inputs trigger the amp to power on automatically.
Line-output converters help interface with digital factory systems when needed.
Many compact digital amps are now designed specifically to integrate with today’s in-vehicle electronics.
6. Planning for Install: Fit, Cooling, and Location
Not all vehicles offer the same install options, and placement can affect performance:
Under-seat installations save space but may restrict airflow or power.
Trunk-mounted amps offer more breathing room and support larger power stages.
Look for models with aluminum casings, thermal protection, and low-profile heatsinks in hot environments.

Matching amplifiers with proper cables, tools, and layout planning ensures peak performance and system safety.
Install kits with clean wiring harnesses and secure mounting brackets help keep everything safe and streamlined.
7. Matching Amps to Your Speakers and Subs
You can't choose an amp in isolation—it must work with your speakers and enclosure design:
Make sure your amp supports the impedance (ohm rating) of your subwoofer.
Enclosure type (sealed vs ported) influences how much power you’ll actually need.
If running a multi-amp system, split high frequencies to a 4-channel and lows to a mono amp for cleaner results.
Use passive crossovers or DSP to control how each driver contributes to the final mix.
8. Budget vs. Premium: What Really Changes?
Premium amplifiers typically offer:
Better internal components (capacitors, op-amps, heat sinks)
Lower distortion and improved clarity
Greater tuning precision
Improved thermal and overload protection
That said, today’s market also features mid-range amplifiers with strong specs and reliability. For daily use, a solid budget amp with good tuning features may perform better than a premium amp that’s improperly set up.
Final Thoughts: Make Your Power Count
There’s no single “best” amplifier—only the right one for your vehicle and listening style. From everyday upgrades to full competition setups, the right amp should bring out the best in your system without compromise.If you're unsure, working with a professional pro audio supplier ensures compatibility, quality, and expert advice tailored to your setup. They can guide you through everything from wattage matching to advanced DSP tuning tools that make a major difference in the final result.
0 notes
Text
Beyond Loudness: What to Look for in Professional Speakers
Choosing professional speakers isn’t only about volume. Discover critical factors—driver clarity, dispersion patterns, build quality, and workflow integration—for sound that truly performs.
Introduction: Sound That Goes Beyond Decibels
When assembling a professional audio setup, chasing speaker wattage alone won’t guarantee quality sound. High volume is easy to find, but clarity, control, and consistency come from smart speaker choices—ones that respect your source material, venue, and creative design. To raise performance beyond sheer loudness, let’s explore what really matters in professional-grade speakers.
A Short Look Back: From PA Blasts to Precision Tools
Public-address systems in the early days focused on crowd reach, not fidelity—often producing harsh midrange and muddy lows. As live sound evolved, so did speaker design: neodymium magnets, variable waveguides, and precise crossovers became standard. Today’s professional tools are defined by their ability to reproduce detail and dynamics at any volume—without compromising tonal balance or audience appeal.
Frequency Response: More Than Numbers on Paper

A speaker’s real performance is measured by its frequency accuracy and consistency—not just its decibel rating.
Speaker frequency charts show a range—often 40 Hz to 20 kHz—but those specs don’t tell the whole story. What matters is how evenly these frequencies play in real rooms. Look for flat response curves and low distortion drivers, not exaggerated lows or highs that may overwhelm or distort in complex mixes. Midrange transparency is especially important for vocals and lead instruments.
Dispersion and Coverage Patterns
One speaker might be powerful, but if its sound focuses narrowly or spreads unevenly, your audience won’t hear the difference. Choose the right dispersion pattern (e.g., 90° x 60°) based on room shape and size. Consistent off-axis response ensures audiences in every seat hear a balanced mix. Curved waveguides help maintain even projection and reduce “dead spots” in unconventional stage layouts.
Power Handling, Headroom & Thermal Management
Speakers rated for “1000 W RMS” may differ widely in how well they manage peak demands. What counts is headroom—the ability to handle sudden transients—without overheating or compressing. Look for designs with robust voice coils, heat-dissipating ports, or cooling fins. Extended usage shouldn’t cause speaker fatigue or thermal shutdown, especially under challenging environments.
Driver Design & Build Quality
A good speaker is built to last. High-performance models use durable cones (like treated neodymium, Kevlar, or reinforced paper), cooling systems, and rugged enclosures. A top-notch woofer should center consistently without rubbing, and the compression driver should maintain clarity under load. Construction also affects resonance handling—well-damped cabinets eliminate ringing or coloration.
Crossover Quality & Integration
The crossover is the unseen hero of accurate speaker systems. A well-designed passive crossover transitions between woofer and horn-driver smoothly—without audible dips or overlaps. Active crossovers and built-in DSP offer more control, letting you tailor frequency alignment, time-delay, and EQ per speaker or room. This is especially important in touring or multi-room setups where consistency is key.
Enclosure Design & Portability
Enclosures aren’t just boxes—they define sound character and usability. Sealed boxes offer tight, controlled bass but take more power. Ported designs boost low-end output but risk “chuffing” without proper tuning. Many professionals prefer pole-mountable, trapezoidal enclosures for easy stacking and stage wedge configuration. Durability and weight are also key when touring or loading in and out daily.
Flexibility & Configuration Options
Speaker systems today must adapt across applications—not tied to a single use case. Look for designs that support multiple modes (e.g., full-range, monitor, sub-level) or stack cleanly with cardioid sub arrays. Flyable configurations or built-in rigging options streamline setup time. Digital-ready models with included network control and presets will save you from custom tuning in live scenarios.
Reliability & Serviceability
Downtime during events is not an option. Select brands that provide accessible parts, service options, and documented repair manuals. Removable grills, replaceable connectors, and durable feet or handles extend lifespan. Environments vary—humidity, dust, travel—so protective coatings and rubberized corners matter.
Testing Before Commitment

Professional sound isn’t just about powerful gear—it’s about precision tuning, acoustic balance, and the right speaker configuration for the space.
Specs are helpful—but your ears confirm the fit. Listen to demo tracks that include vocals, percussion, and acoustic instruments. Test linear response at different volumes, and listen off-axis. Check how the system performs under real-world room conditions. Professional audio retailers often offer in-house demo rooms or demo gear, giving you insight before you invest.
Support, Warranty & Professional Help
No speaker's knowledge is complete in a vacuum. Working with pro audio specialist in speaker selection and venue setup ensures your purchase matches both technical requirements and acoustic goals. They can guide trip hazards, recommend covers, and even suggest protective soft cases or flight cases—investment in longevity often pays off. Reliable support and fair warranties guard against unforeseen defects or wear.
Putting It All Together: System Synergy
Choosing the right professional speaker is a holistic decision—matching frequency response, dispersion, build quality, and support to your venue and content. A mid-priced speaker with thoughtful engineering may outperform a louder but poorly designed model in practice. Always consider these factors together, not as standalone features.
Final Thoughts: Clarity Trumps Volume
If it’s just loud you’re after, any high-wattage speaker can do it. True professionalism lies in speakers that reproduce your mix cleanly—with nuance, control, and reliability. Whether you’re touring, producing, or mixing live, your audience experiences sound through your gear. Choosing the right tools means giving them not just volume—but presence, clarity, and immersion.
#DJ#DJ equipment's#DJ event's#pro audio#pro audio equipment#pro audio shop#pro audio stores#professional audio#professional audio equipment's#pro speakers#Loudness#speakers#live sound
1 note
·
View note
Text
Choosing a Truss System for Live Events: Safety and Aesthetics Matter
Learn how to select the right truss setup for live performances—balancing structural integrity and visual appeal to deliver safe, stunning results.
When Looks and Load Go Hand in Hand
Planning the rigging for a live event isn’t just about hanging lights and speakers—it’s about creating a structure that’s both strong and visually polished. The truss system you choose can make or break a show. If it’s underspecified, you risk collapse. If it’s too industrial, it clashes with the creative vision. The best truss system hits both marks: structural security and crisp visual design.

A large-scale truss structure delivering synchronized lighting, video, and sound—proving that structural design and visual impact can elevate the live event experience.
Truss systems evolved from basic aluminum beams to sleek, load-bearing sculptures that complement immersive stage design. Today, hybrid setups featuring curved sections, LED integration, and variable heights raise the bar for what’s possible at live events—from concerts to corporate launches.
A Brief Evolution of Rigging Infrastructure
Early live productions used heavy steel scaffolds to support lighting and audio. They worked, but were bulky, inflexible, and visually unappealing. As aluminum alloy manufacturing advanced, truss systems became lighter and modular, enabling complex shapes and effortless assembly.
In the 1990s, venue safety codes caught up, and event planners started to integrate engineering calculations into every rig. Today, truss sellers offer pre‑engineered kits rated for advanced dynamic loads, weather resilience, and even aerial rigging—making safety and spectacle an intentional part of design.
Why Safety & Aesthetics Must Be Equally Valued
Structural Integrity First
Load Ratings & Safety MarginsEach truss has a maximum load rating (live and dead loads). But real-world setups are never static. Lights move, wind gusts appear outdoors, and performers might hang off the grid. Rigging professionals always apply safety margins—typically only loading to 50–70% of rated capacity. That headroom is essential to prevent failure under vibration or shifting loads.
Engineering CertificationSome venues require stamped engineering diagrams or third-party inspections to validate their load-bearing capacity. These certifications aren’t cosmetic—they’re vital proof that the structure can safely hold what’s attached.
Installation & Bolt PatternsRigging isn’t plug-and-play. The way truss sections connect—bolt patterns, pins, gussets, and tolerances—affects rigidity. Specialists torque connections and use safety wiring to avoid slipping mid-set. Mediocre fastening can be a silent hazard.
Dynamic Effects & MovementShows with moving fixtures or motors bring additional forces: torque, sway, and dynamic load spikes. Systems must be built to absorb and dissipate those stresses without bending or shifting. That often means choosing stronger truss members or supplementing with internal bracing.
Visual Appeal: As Important as Strength
Clean, Studio‑grade FinishAluminum truss with powder‑coated black or white finishes brings a polished look to upscale events. Reflective surfaces, curved corners, or integrated LED-ready channels reduce the visual noise of wires and fasteners.
Modular Shapes & ConfigurationsToday’s grids include arcs, cubes, triangles, and even spiral forms. Hexagonal towers or asymmetric designs can create sculptural impact. When truss becomes part of the art—not just the frame—the event space becomes immersive.
Lighting IntegrationSome systems include recessed LED trim, channel slots for pixel bars, or hidden cable routing. The result is a clean, seamless aesthetic where the rig fades into the design, and lighting becomes the star.
Branding & Screen MountsLive events often require signage, video walls, or banner walls. Truss systems with integrated mounting points make adding fabric prints or LED screens fast and secure—without jury‑rigged anchor plates.
Key Factors for Choosing the Right Truss Setup
1. Define Your Load Profile
Start by estimating total live load:
Lighting fixtures (moving heads, strobes)
Audio arrays (speakers, subwoofers)
Screens or projectors
Moving or rig‑attached performers
Add in environmental considerations: wind load for outdoor events, motion forces, and safety factors. It’s better to overestimate and choose a heavier-duty truss than to come up short.
2. Pick a Compatible Geometry
Box/Beam Truss: Good for straight runs (e.g. stage front triangles, side arrays)
Curved/Arch Truss: Ideal for curved stage fronts, entryways, or sweep designs
Triangular/DMX Truss: Narrow and rigid, perfect for accent lighting and linear rigs
Circular/Full-round truss: Great for center hung lighting fixtures or chandeliers
Consider mixing profiles for both functional and visual impact.
3. Choose the Right Finish and Visual Style
Raw aluminum shows structural honesty, but lacks polish
Powder coating or anodizing protects the surface and refines the look
LED channel-ready truss streamlines lighting installations and cuts visual clutter
Tagline color customization: Panels or wraps in event colors tie truss into event branding
4. Check Certification and Venue Requirements
Ensure your supplier provides calculated load tables, stamped engineering documents, and alloys tested to local safety codes. If rigging outdoors, confirm wind load engineering. Venues (especially theaters, conference centers, or sports arenas) often require this documentation in advance.
5. Account for Assembly, Transport & Labor
Weight: Heavy-duty truss may need motorized winches. Modular systems with curved pieces add complexity.
Connection hardware: Using spigots and quick-pins speeds installation; threaded bolts and spanners take longer.
Rigging time: The more pieces you use, the more time and rigging crew you need. Modular shapes may require template layouts. Consider your budget for labor.
Balancing Looks, Safety & Budget
For small shows or intimate gatherings, a basic box truss with powder-coating and simple lighting might suffice.
For mid-sized productions, curved and LED-channel truss adds polish without pro-level labor costs.
For premium festivals or corporate events, invest in certified kits with full finishes, integrated cable channels, and clean lighting aesthetic.
The sweet spot is a system that supports your load with at least a 30–50% safety margin, appears streamlined, and can be assembled efficiently by your crew.

Modular truss systems with integrated LED channels and branding mounts elevate both the function and presentation of live events.
Final Takeaways: Truss Decisions That Shine—Safely
Safety over flashiness: Never sacrifice structural integrity for visual appeal. Load calculations and certified kits come first.
Modular design is your friend: It makes transport and adaptability easier.
Aesthetic finishes matter: Powder coats, LED channels, and matching colors turn the rig into part of the set, not just support.
Plan for rigging time and labor: Even the best-looking structure needs reliable hardware and skilled crew.
Never skip engineering sign-off: It isn’t red tape—it’s insurance your show stays standing.
When done well, your truss system becomes a silent star—setting the stage for lights, audio, and performers without calling attention to itself. The best systems don't just hold things up; they elevate the entire experience. Rig your spaces with care, let the visuals flow, and know that safety and design can coexist—beautifully.
#DJ#DJ equipment's#DJ GEARS#pro audio stores#pro audio equipment#truss#truss systems#DJ event's#LED lighting#pro audio shop#DJ SET UP#professional audio equipment's
2 notes
·
View notes
Text
Budget vs. Premium: Are Expensive Car Audio Amplifiers Worth It?
Wondering if a premium car amplifier is truly better? Learn the real differences between budget and high-end amps—so your system sounds its best.
When Power Alone Isn’t Enough
Choosing a new amplifier for your car's audio system can be deceptively tricky. On paper, it’s all about wattage and volume—but in practice, there’s much more to the equation.
It’s tempting to chase a bigger number or jump on a low-cost deal. But not all amplifiers are created equal, and the difference between entry-level and premium models becomes clear the moment you hit play—especially when sound quality and long-term reliability come into focus.

Side-by-side comparison: While both amps claim similar power, design and internal components often tell a very different story.
How Car Amplifiers Have Changed Over Time
Back when factory sound systems dominated, aftermarket upgrades mostly meant replacing speakers. Amplifiers were secondary. But as car audio culture grew, so did expectations—pushing manufacturers to deliver more precise sound reproduction, cleaner signal paths, and smarter performance management.
Today, there’s an amplifier for nearly every kind of setup: from basic mono blocks to multi-channel units with built-in signal processing. Still, there’s a noticeable gap in performance, especially when it comes to what truly matters—how your system actually sounds on the road.
Where Budget and Premium Models Differ
1. Materials and Internal Design
Cheaper amps tend to rely on general-purpose components, often with looser tolerance ratings. That might work fine in casual settings—but when things heat up (literally), inconsistencies can creep in.
By contrast, premium models use more precise circuitry and thermal design. That tighter engineering helps reduce internal noise, keep distortion low, and maintain stable output under load.
2. Sound Reproduction and Clarity
Budget amps can sound fine—especially at lower volumes—but they often struggle when pushed. Audio starts to smear, and detail is lost. Instruments might feel less separated, and punchy moments may fall flat.
Premium designs, on the other hand, aim for accuracy and transparency. Lower distortion, wider dynamic range, and stronger bass control mean the sound feels more alive, even during intense playback.
3. Power Ratings: What’s Real vs. What’s Printed
Just because an amp says “1000W” doesn’t mean it consistently delivers that much power. Lower-end models often use peak ratings (measured in split-second bursts), which aren’t useful for real-world performance.
Higher-end options are typically tested under standardized conditions, offering more consistent power and safer operation—especially important if your setup includes subwoofers or multiple components.
4. Cooling and System Longevity
In hot climates or extended listening sessions, heat is a major concern. Budget units might shut down, throttle performance, or wear out quicker due to limited heat protection.
More advanced models often include thermal monitoring, overcurrent protection, and sometimes active cooling systems—giving you peace of mind and consistent output even in demanding situations.
5. Adjustment and Fine-Tuning
A basic amplifier might offer simple bass or treble knobs, maybe a fixed crossover setting. That can work well for plug-and-play installs—but leaves little room for optimization.
Premium gear often includes a full suite of adjustment tools: variable crossovers, gain control, phase adjustment, and more. Some even offer digital control or app-based tuning—ideal for dialing in a system that fits your car’s acoustics.
When It’s Smart to Stick with Budget
Not every system needs a top-tier solution. In fact, there are several cases where an affordable amp is the right call:
You’re pairing with stock or basic upgraded speakers
Your goal is volume, not studio-grade clarity
The install is temporary, experimental, or entry-level
You're keeping the rest of your system factory-fresh
In short, if expectations are modest and the gear is matched properly, a budget amp can still deliver a satisfying experience.
When Premium Delivers Long-Term Value
If you’re investing in upgraded speakers, custom installs, or multi-zone configurations, a premium amp quickly proves its worth. Here’s where they shine:
Systems with subwoofers that require accurate low-end control
Multi-channel setups where imaging and balance matter
Users who enjoy tuning and customization
Vehicles with noise challenges that demand clean signal delivery
Over time, premium models tend to last longer and sound better—especially in environments that push them beyond casual use.

Premium amps offer more than power—they deliver control, tuning flexibility, and long-term stability.
It’s About Fit, Not Just Finish
The best amp isn’t necessarily the most expensive—it’s the one that fits your setup and listening habits. Think in terms of synergy: how does the amp pair with your current gear, and where do you plan to take your system in the future?
For some, that means an efficient two-channel amp with just enough headroom to clean up vocals. For others, it’s a six-channel powerhouse with enough muscle to power an entire aftermarket array.
And when you’re unsure, browsing through professional-grade audio stores or getting advice from experienced technicians helps narrow the field—while keeping compatibility and reliability in check.
Final Thoughts: Sound That Reflects Smart Choices
Upgrading an amplifier is one of the most important steps in building a great-sounding car audio system. But louder doesn’t always mean better. An amp that supports your goals, integrates well with your other gear, and performs consistently under pressure is the real upgrade.
So, are premium amplifiers worth the cost? In many builds—absolutely. But not because they’re expensive. Because they’re engineered for better control, cleaner power, and long-term satisfaction.
#car amplifier#car audio#dj#DJ GEARS#pro audio equipment#pro audio shop#pro audio stores#professional audio equipment's#music#audio shops#audio#dj gear
1 note
·
View note
Text
Why Festival Engineers Are Swapping Gear Mid-Set
It’s not a glitch—it’s a strategy. Behind the lights and sound, something deliberate is happening during live sets.
In the middle of a festival performance, audio engineers are quietly swapping out gear. Not because it failed—but because the conditions demand it. Whether it’s adapting to evolving set dynamics, minimizing risk, or optimizing real-time performance, these behind-the-scenes moves reflect a growing shift in how live sound is engineered.
This isn’t just about keeping the music going—it’s about making it sound better, moment by moment.
A Look Back: How Live Sound Gear Evolved
In the early days of live performance, setups were bulky and fixed. Once the mix was dialed in, no one touched a thing until teardown. Analog systems were sensitive, and gear swaps mid-show invited risk more than reward.
But as digital mixers, modular rigs, and networked audio tools entered the scene, things changed. Modern festival environments now rely on flexible ecosystems—gear that can be hot-swapped, pre-loaded, and even remotely controlled. That shift enables engineers to respond to the music in real time.
Now, if a drum mic distorts or a channel begins to fade, it doesn’t need to derail the set. It can be swapped, adjusted, or rerouted—all while the performance continues.

A front-of-house engineer makes a fast swap behind the rack while the performance continues—proof that adaptability is part of the soundcheck now.
Why the Mid-Set Swap Makes Sense
1. Environmental Drift Affects Gear Response
Outdoor festivals are dynamic. Temperatures rise, humidity fluctuates, and wind introduces unpredictable noise. All these factors can affect certain gear—especially analog components or condenser microphones. Swapping a piece of hardware mid-set is sometimes the only way to maintain consistency as conditions change.
2. Setlists Now Span Multiple Styles
Many artists now blend genres in a single set—transitioning from bass-heavy drops to stripped-down acoustic moments. Rather than forcing one setup to do it all, engineers prepare alternate gear pre-calibrated for different dynamics. Swapping allows seamless transitions that match the artist’s creative shifts.
3. Backup Isn’t Just a Safety Net—It’s an Asset
Today’s tech teams don’t see redundancy as just emergency backup. It's strategic. Having a second console or alternate signal chain allows for load balancing and minimal downtime. Swapping isn’t a panic move—it’s part of the plan.
Tools Enabling This Quiet Shift
Festival engineers rely on compact, modular gear that can be deployed quickly—think rack-mounted systems, patchable interfaces, and digital mixers with scene recall.

Real-time mixing adjustments during a set give engineers the control to fine-tune audio without ever hitting pause.
Wireless in-ear monitoring systems, real-time EQ analyzers, and programmable controllers make mid-set adjustments smoother and safer. These tools are designed for fast reaction times and hot-swapping, especially on complex festival stages where multiple artists rotate quickly.
And when these tools come from trusted, performance-ready sources, the reliability gap closes even further. Working with professional audio retailers ensures your gear aligns with specific performance needs, especially for mission-critical festival use.
Creative Flexibility Drives It Forward
Beyond solving problems, mid-set gear swaps offer engineers more freedom. Want to introduce a different vocal processor for the last half of a set? Easy. Need to bypass a limiter for one high-energy drop, then bring it back? Done.
This approach aligns with modern performance trends where no two songs—or sets—feel the same. Engineers are no longer static mixers—they’re real-time collaborators in the show’s evolution.
Subtle But Strategic
To the crowd, nothing seems out of place. But for those behind the scenes, that small gear swap or signal shift may be the difference between a decent show and an unforgettable one.
And it’s happening more than ever.
Festival engineers now prepare for flexibility. They load backup scenes, pre-wire alternate signal paths, and keep calibrated gear ready to go—so if something sounds off or just needs enhancing, the fix is quick, clean, and nearly invisible.
Where It’s All Heading
As live shows continue to push creative and technical boundaries, the role of audio engineers is becoming more responsive and interactive. Swapping gear mid-set may still feel unconventional to some, but it’s increasingly the mark of a seasoned, forward-thinking crew.
Expect even more intelligent systems ahead—gear that predicts performance shifts, automates adjustments, and works seamlessly across changing stages.
Final Thoughts: Rethinking What “Live” Means
Mid-set gear swaps reflect a deeper idea: live sound isn’t fixed—it’s fluid. Every performance is its own environment, and modern engineers are adapting on the fly.
As tools evolve and expectations rise, so will the strategies. Whether managing heat-sensitive gear, compensating for changing acoustics, or enhancing setlist variety, mid-set swaps are here to stay—and quietly shaping the sound of the future.
#DJ equipment's#DJ GEARS#DJ SET UP#dj#pro audio shop#pro audio stores#pro audio gears#pro audio#professional audio equipment's#live sound gear#festival engineers
3 notes
·
View notes
Text
Bluetooth LE Audio: Final Verdict First — Real-World Results You Need to Know
Discover how Bluetooth LE Audio performs in real-world tests. We break down battery life, latency, sound quality, and who truly benefits from this tech shift.

Bluetooth LE Audio delivers real-world performance gains in battery life, latency, and sound quality—backed by measurable test data.
Final Verdict First: What the Data Says
Bluetooth LE Audio delivers on its promises: extended battery life, cleaner audio via the LC3 codec, significantly reduced latency, and new capabilities like Aura-cast. These aren’t theoretical improvements—they’re backed by real-world results.
Whether commuting, creating, or using assistive tech, LE Audio already outperforms older standards in measurable ways. For many users, it’s not just hype—it’s a functional upgrade that reshapes how wireless sound is experienced.
Why Bluetooth LE Audio Deserves a Closer Look
Bluetooth isn’t just background tech—it’s the backbone of modern listening. From podcasts on the go to wireless live-stream setups, audio needs to be reliable, clear, and fast. LE Audio answers that need smarter performance and broader use cases.
This blog digs into real-world tests—not just specs—so you can decide if this upgrade matters for how you listen, move, or create.
What Sets LE Audio Apart?
Bluetooth LE Audio is a next-generation audio standard built on the Bluetooth Low Energy (BLE) protocol. Key features include:
LC3 Codec: Higher-quality sound at lower bit-rates
Aura-cast: Multi-user broadcast streaming
Earbud Synchronization: Better left/right audio timing
Accessibility Support: Designed for low-power hearing aids and assistive gear
Together, these changes create a more efficient, inclusive, and future-ready wireless ecosystem.
A Brief Look Back: How We Got Here
Traditional Bluetooth audio (SBC, AAC, aptX) offered decent mobility—but at a cost. Listeners often faced battery drain, codec limitations, and lag. As wireless use exploded—from gaming to Zoom calls—the cracks became harder to ignore.
Bluetooth SIG introduced LE Audio in 2022 with a sharper focus: better quality, less power, and smarter broadcasting. At the core of this shift is the LC3 codec, designed to deliver richer sound even at compressed bit-rates.
Real-World Performance: The Test Results
Battery Life: Measurably Longer
In looping playback tests using identical content and mid-volume levels, LE Audio consistently extended listening time:

Result: A 30–45% increase in battery life—especially helpful for travelers, creators, and all-day wearers.
Audio Quality: LC3 in Focus
In blind listening tests (same track, matched bit-rate at ~192 kbps), users rated each version on clarity, warmth, and noticeable artifacts:

Feedback often noted “clearer vocals” and “more natural instrument separation,” especially in acoustic and vocal-heavy tracks.
Latency: Cut Nearly in Half
Latency matters—especially for gaming, video sync, and live-streaming. Loop-back mic tests showed:
Classic Bluetooth: 120–150 ms
Bluetooth LE Audio: 60–80 ms
At ~60 ms, lag becomes nearly imperceptible in most real-world uses, giving LE Audio a significant edge.
Where It Shines: Real-World Scenarios
From travel to assistive tech, Bluetooth LE Audio enables smarter, more accessible wireless listening across a range of real-life scenarios.
Commuters & Travelers
More hours per charge, fewer drops in noisy environments, and better voice clarity make LE Audio ideal for on-the-go use.
Shared Listening (Aura-cast)
Tested in public zones like airports and gyms, Aura-cast allowed multiple listeners to tune in to the same stream with zero noticeable sync drift.
Assistive Listening
Smart hearing aids running LE Audio showed up to 25% reduced power draw, improving usability in clinical settings and daily wear.
Gaming & Home Media
With latency cut nearly in half, LE Audio made voice and picture sync accurate enough for casual gaming and video editing—without wires.
Watch Outs Before You Buy
Limited Ecosystem (for now): Many phones, earbuds, and laptops need firmware updates to support LE Audio fully.
Mixed Mic Performance: While audio playback shines, mic clarity still varies by brand—important for call-heavy users.
Broadcast Clashes: In dense Bluetooth environments, Aura-cast may experience overlapping signals unless properly managed.
Firmware maturity and antenna design still matter. Working with professional audio retailers ensures gear meets your use case and avoids feature lockouts.
The Big Picture: What LE Audio Means Long-Term
LE Audio isn’t just a better codec—it’s a platform shift. It supports group listening, saves battery across devices, and lowers the barrier for hearing support tech. That’s a wide impact, spanning creative, casual, and clinical use cases.
As device compatibility grows, expect LE Audio to become standard—quietly transforming how wireless sound works in homes, public spaces, and professional setups.
In Summary
Bluetooth LE Audio holds up—and then some. Whether you're chasing longer battery life, cleaner audio, or seamless sharing, LE Audio delivers noticeable gains. While not every device is ready just yet, the foundation is solid and evolving fast.
For creators, listeners, and anyone who depends on wireless audio daily, this isn’t just hype—it’s a real, tested improvement.
#DJ equipment's#DJ GEARS#pro audio shop#pro audio stores#professional audio equipment's#Bluetooth#Bluetooth LE audio#pro audio equipment#audio shops#audio gears
2 notes
·
View notes
Text
Packing the Perfect “Emergency Audio Kit” for Road Gigs
Discover what to pack in an emergency audio kit for road gigs. From spare cables to backup mics, here's how to keep the show running—no matter what goes wrong.
Why Every Performer Needs an Audio Plan B

What a real emergency audio kit looks like: compact, complete, and built for chaos.
No matter how much prep goes into a show, something always goes wrong. A cable dies. A mixer freezes. A mic stops responding mid-set. For anyone hitting the road—whether you’re a DJ, sound engineer, or performer—having a well-packed emergency audio kit isn’t just smart. It’s essential.
Think of it as your on-the-go safety net. Not a full rig, but the curated set of tools that turns tech panic into a smooth recovery.
A Brief History of Backup Gear Culture
In the early days of live audio, gear was big, analog, and bulky. Touring engineers traveled with road cases full of backups because replacement options were limited, and everything had a “just in case” counterpart.
Today’s gear is more compact and digital—but ironically, more fragile in certain ways. Touchscreens freeze. Wi-Fi drops. USB ports wear out. The “gear bag” has evolved from a box of spares to a curated survival kit for modern live tech.
And in an era where convenience often overshadows reliability, pros who prepare for failure still outperform.
What Belongs in an Emergency Audio Kit?
1. Redundant Signal Path Tools
Always carry:
Backup cables (XLR, TRS, USB, RCA)—don’t just carry one of each, carry spares in usable lengths.
DI boxes (active and passive)—to troubleshoot hum, signal loss, or laptop feeds.
Cable adapters—quarter-inch to mini, XLR to TRS, RCA to 1/8”, etc. They’re small but show-saving.
Even a quality signal chain can break down due to something as simple as a worn cable. Keeping extras on hand isn't excessive—it’s practical.
2. Power and Connectivity Essentials

Don’t overlook power—these tools solve problems before they hit the speakers.
You’d be surprised how often power becomes the problem:
Power strips with surge protection
IEC and figure-8 power cables
Battery packs for mobile devices or wireless receivers
Spare extension cords
Ground lift adapters
Always assume the venue forgot a crucial power detail—and be the person who didn’t.
3. Microphone Backups
A solid fallback mic is worth its weight. Keep:
1 dynamic vocal mic (think SM58-style)
1 instrument mic or small diaphragm condenser
Clips, windscreens, and spare cables for both
Even if your main wireless mic dies, having a simple wired dynamic in your kit guarantees the show doesn’t stop.
4. Monitoring Options
If your in-ears glitch or wedges fail:
Spare in-ear monitors or wired headphones
Mini headphone amp to plug in directly if your wireless belt pack dies
Small powered speaker (battery-powered if possible) to use as a last-ditch monitor
It’s not about luxury—it’s about options when your stage sound disappears.
5. Media and Playback Redundancy
Don’t trust the cloud alone.
USB drive with key backing tracks or set files
Tablet or phone loaded with music (in airplane mode)
3.5mm aux cable—every sound tech’s last resort
SD card reader or USB-C hub for modern laptops
One song going missing mid-set can kill the vibe. Back it up like your career depends on it—because sometimes it does.
6. Tools and Quick Fix Supplies
A small pouch with:
Gaffer tape (not duct tape)
Multi-tool or screwdriver
Spare batteries (AA, AAA, 9V)
Cable ties or Velcro straps
Flashlight or headlamp for dark venues
These aren’t “nice to haves.” They’re what separate pros from panicked amateurs.
Kit Philosophy: Versatile, Compact, and Show-Proof
An emergency audio kit should be:
Lightweight enough to carry easily
Modular, so you can swap parts based on venue
Tested—check every item monthly so you’re not hauling dead gear
Don’t just build a kit once and forget it. Update it as your gear evolves, as tech changes, and as your experience teaches you what really fails.
What the Pros Pack (That Amateurs Forget)

Pro-level backups most people forget—until they’re the reason your show doesn’t crash.
Some audio veterans go one step further and carry:
A line checker to test cables on the fly
A network switch for digital rigs using Dante or AVB
Spare SD cards for mixers or field recorders
A Wi-Fi access point for tablet-controlled mixers
These items aren’t always necessary, but in high-stakes gigs or tech-heavy venues, they’ve saved entire shows.
Why This Matters for Retailers and Creators
When assembling your kit, gear choice is key. Not everything sold as “pro” gear can handle the rigors of travel or fast replacement under pressure. This is where working with professional audio retailers can be a huge advantage—they help tailor kits based on real-world performance, not just spec sheets.
A good retailer will suggest:
Cross-compatible adapters
Travel-friendly formats
Rugged, reliable hardware that doesn’t over-complicate
And if you’re just starting to tour, they can recommend scaled kits that grow as your setup expands.
Final Thoughts: Think Like a Sound Paramedic
Live audio is unpredictable. But that doesn’t mean you need to be unprepared. Your emergency audio kit isn’t a luxury—it’s your lifeline. It keeps your set alive, your reputation intact, and your stress levels low.
In the end, the audience shouldn’t know there was ever a problem. With the right kit, they won’t.
Because in this business, it’s not just about sounding great—it’s about staying ready when everything else goes sideways.
#music#audio#dj#audio shops#audiogears#professional audio equipment#dj gears#pro audio shop#emergency audio kit#pro audio equipment's#dj equipments
2 notes
·
View notes
Text
Flying vs. Floor-Standing Speakers: What Touring Crews Really Think
Every sound system tells a story—not just through what comes out of the speakers, but how those speakers are positioned. If you’ve ever walked into a venue and seen speakers hanging from the ceiling or stacked tall on the stage, you’ve seen two very different philosophies at play. Flying vs. floor-standing speakers isn’t just about looks—it's a real-world decision that impacts clarity, coverage, and the entire live sound experience.
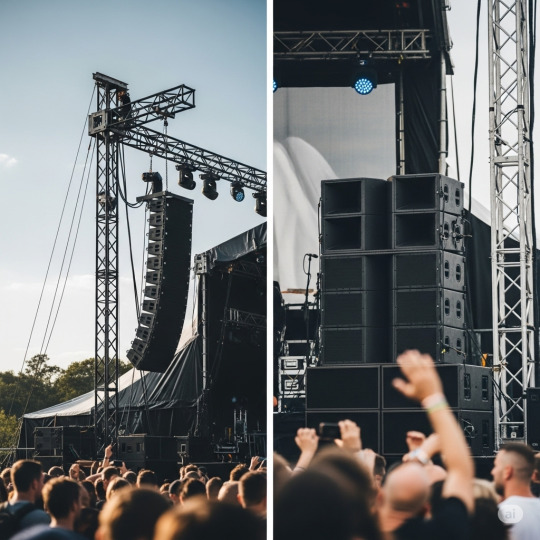
Flying vs. stacking: more than a visual choice—it shapes how the audience hears the show.
So how much loyalty do touring crews actually prefer? The answer is more about logistics, consistency, and the venue itself.
A Brief History of Live Speaker Placement
Before digital signal processing and line arrays, speaker stacking was the standard. Crews simply placed massive boxes on the stage or sub platforms to fill the space with sound. It worked, but with compromises—sound often bounced off the floor or walls unpredictably, causing muddiness and uneven coverage.
Then came flying speaker systems—rigged from trusses or overhead supports. Once limited to large productions due to cost and complexity, flying systems have become more accessible with lightweight enclosures, modular rigging, and digital optimization tools. Now, both setups have valid roles in touring sound, and the best choice depends on much more than just budget.
Why Flying Speakers Are Often the First Choice
1. Better Coverage, Less Interference
Flying speakers can be precisely angled and aimed using array prediction software, letting engineers target exactly where sound should go—and where it shouldn't. This minimizes reflections from floors and ceilings and helps avoid dead zones or hot spots.
For venues with balconies, uneven shapes, or large crowds, flying systems provide the kind of even frequency response floor stacks just can't match.
2. Space-Saving and Safety
On tight stages, floor-standing speakers can be a tripping hazard or block sightlines. Hanging the speakers keeps the performance area clear and improves safety for performers and crew. That’s a big win on high-traffic or fast-turnaround tours.
3. Visual Cleanliness
In visually-driven productions, flying systems disappear into lighting grids or trusses. That sleek look matters—especially in corporate shows, festivals, or theatrical performances where visual design is as important as sound.
Where Floor-Standing Speakers Still Shine
1. Speed, Simplicity, and Budget
Not every venue has rigging points, trusses, or time to hang gear. Floor-standing systems are fast to deploy, require fewer crew, and are often ideal for small- to mid-size gigs. For tight changeovers or DIY touring artists, they remain practical and effective.
Stacking also minimizes rigging risks—no need for lift equipment or safety inspections. Just plug in, stack, and go.
2. Bass That Feels the Floor
There's something visceral about ground-stacked subwoofers. They couple directly with the floor, delivering physical bass that’s harder to achieve when flying. For bass-heavy genres like EDM, hip-hop, or reggae, many crews still prefer ground-level low-end—even if the tops are flown.
3. Acoustic Compromise in Tough Rooms
Ironically, in some venues, flying isn’t ideal. Low ceilings, reflective surfaces, or complex architecture can make flown systems behave unpredictably. In those cases, tight floor stacks with well-controlled dispersion might outperform a poorly implemented fly system.
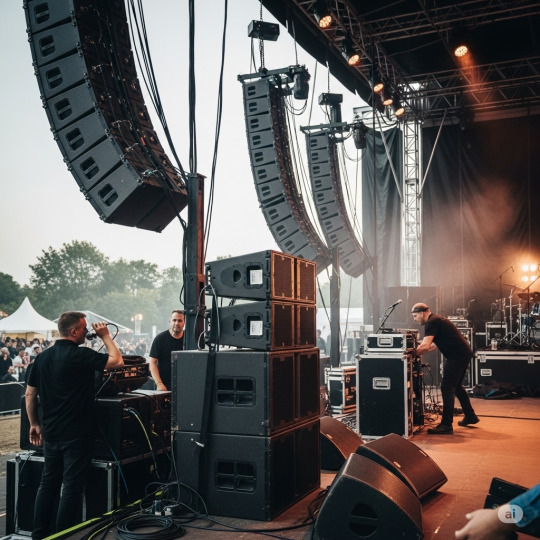
Many touring crews rely on hybrid setups—flying mains for clarity, stacking subs for physical bass.
What Touring Crews Say Behind the Scenes
Seasoned engineers often rely on a hybrid approach: flying the mains, stacking the subs, and deploying fills as needed. The goal is always the same—coverage and clarity.
Crews point out that flying systems require more prep, planning, and safety measures. But the reward is worth it: consistent sound across the venue, reduced feedback risk, and better vocal intelligibility.
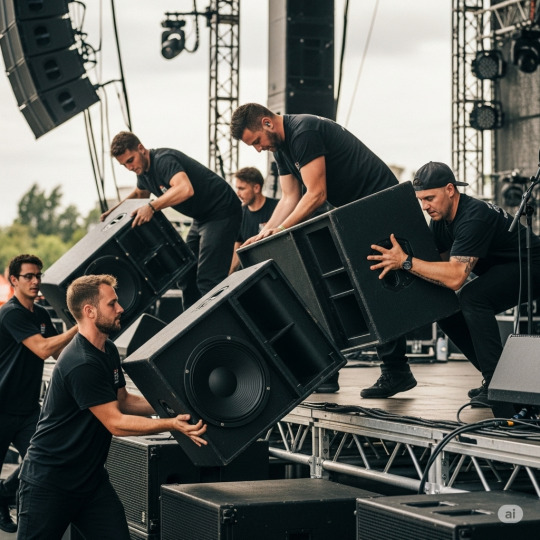
For speed and punch, floor-standing setups still hold their ground—especially on fast-paced tours.
Meanwhile, floor stacks win points for speed, ruggedness, and predictability—especially when tour stops vary widely in infrastructure and space.
And let’s be real—sometimes the decision isn’t even up to the crew. Venue limitations, local regulations, and stage design often dictate the approach before the first XLR is even plugged in.
Smart Choices Begin with Smart Gear
Whether flying or stacking, speaker performance starts with the right equipment. That means understanding coverage patterns, SPL handling, rigging compatibility, and system tuning.
Working with a knowledgeable pro audio retailer can help simplify these decisions—especially when matching speakers to the kind of venues, music styles, and tour logistics you’re dealing with. It’s not about what looks the coolest—it’s about what translates cleanly from stage to audience.
What the Future Holds
Look for more flying and stacking systems that can be adapted to whatever gig comes their way. Lighter-weight materials, rigged-out enclosures, and tuning software controlled by AI are making both faster and safer than ever.
Also, as spatial and immersive audio become more prevalent in live applications, speaker placement will only increase in significance. Systems might soon adjust automatically in real time according to crowd concentration or acoustic feed-back—whether the speakers are floating in the air or placed on the ground.
Final Thoughts: It's Not Either/Or—It's What Works
There ain't no one size fits all in the flying vs. floor-standing debate. It's all a matter of context. Budget, time, venue shape, genre, and crew size all make up the right decision.
The most important thing is to identify the strengths and compromises of each technique. And if the proper setup is chosen, even the lowliest rig can deliver world-class sound.
So whether your speakers are soaring high over the pack or planted in stacks of bass, choose with intention. Because sound is not just loud—it's clear, controlled, and remembered.
#music#audiogears#audio#dj#audio shops#professional audio equipment#speakers#pro audio gear#pro audio equipment's#pro audio shop#professional audio gear#dj equipments
2 notes
·
View notes
Text
Can You Mix at Home Using Only Open-Back Headphones?
Home studios are more powerful than ever, and gear is more accessible than at any point in music history. But one question keeps popping up for aspiring producers and engineers: Can you actually mix music using only open-back headphones?
It's a bold move—ditching studio monitors entirely. But in small rooms with bad acoustics (or thin walls and angry neighbors), it may not just be a choice... it may be a necessity.
A Quick Look Back: Why Monitors Ruled the Mix World
Traditionally, mixing was done using studio monitors in acoustically treated rooms. Engineers relied on accurate room reflections and speaker response to craft mixes that translated across various listening systems. This approach dominated the industry for decades, from analog tape days through digital consoles and into the DAW era.
Open-back headphones, meanwhile, were originally intended more for audiophile listening or critical reference—not primary mixing. Their natural airflow and detailed imaging made them a useful supplement, but rarely a standalone tool.
Fast-forward to now, and everything’s different. Software can simulate environments, headphone response is more accurate than ever, and digital tools have shifted how we hear—not just what we hear.
So, does that mean open-back headphones can carry the full weight of a mix?
Why Open-Back Headphones Might Be Enough
1. Natural Soundstage and Spatial Accuracy
Open-back headphones allow air and sound to move freely through the earcups, which avoids the pressure buildup and artificial bass common in closed-back designs. This creates a more realistic stereo image and helps mimic the experience of listening through speakers—without actually needing them.
It’s not identical to monitor mixing, but it’s surprisingly close, especially when paired with reference-grade headphones made for critical listening.
2. Room Problems? Not Yours
One major benefit: they remove the room from the equation. In small or untreated spaces, low-frequency buildup, flutter echo, and phase issues can seriously distort perception. With open-back headphones, what you hear is the source—not the reflections. That’s a huge advantage when working without acoustic treatment.

Open-back headphones bypass room reflections, letting you hear the mix directly—perfect for untreated spaces.
3. Consistent Monitoring Anywhere
Unlike speakers, headphones don’t change based on where you sit. You can produce at night, in a dorm, on a train—your environment barely matters. This makes open-back models ideal for mobile or space-limited creators.
4. Affordable Accuracy
Good monitors need acoustic treatment. Great headphones just need a clean signal path. If you're building a budget setup, investing in a solid pair of open-backs and a clean interface can offer more honest monitoring than cheap monitors in a bad room.
But Don’t Throw Out the Monitors Just Yet
There are still limitations. And knowing them is key to mixing successfully on headphones.
1. No Crossfeed = Unrealistic Imaging
In real life, each ear hears some of both speakers. On headphones, the left and right are completely isolated. This can make panning choices feel wider and more impressive than they really are. That epic stereo guitar? It might collapse on a car stereo.

Headphones offer clean separation, while monitors naturally blend both channels—essential for realistic stereo judgment.
Some plugins simulate speaker-like crossfeed, helping bridge this gap. But it’s still something to be cautious about.
2. Bass Translation Is Tricky
Low frequencies don’t resonate the same in headphones. Even with open-back models, sub energy can be underrepresented. You might think your kick or bass is punchy, only to find it disappears on speakers.
Using reference tracks or a frequency analyzer helps. So does double-checking mixes on other playback systems when possible.
3. Ear Fatigue Creeps In
Headphones can lead to faster ear fatigue—especially during long sessions. The proximity and intensity can numb your sensitivity to high frequencies, leading to overly bright or dull mixes.
Regular breaks and level control are essential. Never mix loud on headphones.
Tools That Enhance Headphone-Only Mixing

Visualizing the essential tools for accurate headphone-only mixing.
Headphone calibration software: These apps compensate for your headphone’s frequency response, flattening it out for more accurate decisions.
Virtual room simulation plugins: These simulate speaker playback in a virtual room, helping you judge space, reverb, and stereo width more realistically.
Reference tracks: Comparing your mix to professionally released songs in the same genre is even more important when using headphones exclusively.
Real-time analyzers: Visual tools help spot low-end issues or harsh resonances your ears might miss after hours of listening.
Tips to Get the Most Out of Your Open-Back Headphones
Use them for balance and detail—but test your mix on other systems whenever possible.
Calibrate your ears by regularly listening to commercial mixes on the same headphones.
Mix at moderate volume levels to avoid ear fatigue and inaccurate EQ decisions.
High-pass instruments that don't need sub energy—this avoids low-end buildup that headphones won’t reveal.
If possible, pair your headphones with a trusted Pro Audio retailer’s advice to ensure you're using a model tuned for critical listening, not just consumer enjoyment.
A Hybrid Approach Works Too
Even if you're mixing primarily on headphones, a pair of cheap but neutral reference monitors can still help—especially for final checks on spatial imaging and how a mix “sits” in a room. You don’t need to mix entirely in one place or one way. Many pros use headphones and speakers interchangeably throughout the process.
Where the Future Is Headed
As mixing software, headphone modeling, and room simulation tech improve, headphone-only mixing is becoming more viable every year. For small creators, remote collaborators, and digital nomads, the idea of mixing from anywhere using open-back headphones isn't just possible—it's increasingly preferred.
Expect the future of production to keep embracing flexibility. High-end monitoring may still live in commercial studios, but for everyone else, the tools now exist to create professional-quality mixes using nothing more than a solid pair of open-back headphones and a clear signal chain.
Final Thoughts: Not Just a Compromise—A Strategy
Open-back headphones aren’t just a fallback for those without monitors. Used intentionally, they can be a smart, efficient, and even liberating way to mix. The key is understanding what they offer—and what they don’t.
Master that balance, and your home setup might be a whole lot more powerful than you think.
#dj#audio shops#professional audio equipment#audiogears#music#speakers#mixing headphones#professional audio gear#pro audio equipment's#dj equipments
1 note
·
View note
Text
Ghost Frequencies: What Your Venue Speakers Don’t Tell You
Ever dialed the ideal mix only to have it sound boomy, hollow, or altogether wrong once it reaches the venue? That's not room acoustics or bad fortune—it's usually due to ghost frequencies. They're the naughty, usually inaudible low or high frequencies that misrepresent your sound in a live setup, ruining clarity, punch, and perceived balance.
Knowing how ghost frequencies impact live sound is vital to any performer, DJ, or audio tech who uses venue speakers or PA. Since what you hear in the booth—or even during soundcheck—isn't necessarily what the crowd hears.
A Brief History of Frequency Awareness in Live Sound
In the early days of live performance, most sound systems had limited frequency response. Early PA systems were more about volume than fidelity. Subwoofers weren’t even common until the late '70s, and full-range clarity was often sacrificed for power. Engineers didn’t have the tools to detect or fix the kinds of frequency imbalances that haunt venues today.
As technology advanced, so did expectations. Line arrays, digital mixers, and spectrum analyzers gave engineers more control than ever—but they also revealed how easily venues could betray your mix. Today, even small venues deal with room modes, low-frequency buildup, and phantom resonances that aren't immediately obvious to the performer.
What Are Ghost Frequencies?
Ghost frequencies are frequencies that aren’t clearly audible during mixing or setup but still influence how your sound is perceived. These can include:
Sub-bass rumble that eats up headroom without adding musical value
High-frequency reflections that cause harshness only audible from certain angles
Standing waves that amplify or cancel out frequencies in specific areas of the room

Ghost frequencies behave differently across the venue, creating unpredictable highs, lows, and dead zones.
They’re called “ghost” frequencies not because they’re fake—but because they lurk beneath the mix, causing real damage that’s hard to trace.
Why You Might Miss Them
The problem often lies in speaker placement, room acoustics, and monitoring limitations. What you hear at the front of house or onstage rarely reflects the full spectrum experienced by the crowd. In some cases, a subwoofer may exaggerate the low-end boom in the back of the room, while the front seems balanced. Or, a slight bump in the 4–6kHz range causes listener fatigue over time, even if it sounds clean to you during soundcheck.
These discrepancies are why mixes that sound great in rehearsal can fall apart under venue conditions.
Spotting the Signs of Ghost Frequencies

Your mix sounds different in every corner of the room—thanks to reflections, build-ups, and standing waves.
1. Inconsistent Sound Across the Room
If your bass sounds huge in one corner and disappears in another, you're likely dealing with standing waves. These are fixed-frequency buildups caused by sound reflecting between parallel surfaces in the venue. You can’t EQ them out—you need to work around them.
2. Muddy Mix Despite Clean Meters
Ghost frequencies often hide below what your meters detect. That subtle low-end rumble might not clip your output, but it’ll smother your vocal clarity and make your kick feel soft.
3. Listeners Complaining of “Harshness” or “Boom”
These subjective descriptions often point to objective problems. A harsh-sounding PA might be reflecting high-mids off walls or ceilings, while a boomy one may be overloaded with sub frequencies you didn’t intend to boost.
How to Control What You Can’t Hear
Use a Spectrum Analyzer in Real-Time
A real-time analyzer (RTA) can help visualize what your ears can’t hear. By comparing the input signal to what’s actually coming through the speakers, you can identify excess energy in certain bands—even if you don’t consciously perceive it.
Walk the Room Before Finalizing Your Mix
Sound changes drastically depending on where you stand. Always take a few minutes before the show to walk the venue. Check corners, dead zones, and directly in front of subs. If you notice certain frequencies spiking or dipping in multiple locations, adjust accordingly.
High-Pass and Low-Pass Filters Are Your Friends
Rolling off unnecessary low-end with a high-pass filter helps eliminate subsonic mud that builds up in large spaces. Similarly, a gentle low-pass on instruments not meant to dominate the highs can make room for vocals or lead elements without harshness.

Spectrum analyzers and smart filter use help reveal and tame ghost frequencies
Don’t Just Trust the Gear—Trust the Room
Even if your gear is top-notch, every room colors your sound. The best audio professionals know when to compensate—not just calibrate. And working with a trusted Pro Audio shop can help ensure that your gear is selected with these real-world acoustic factors in mind, not just spec sheets.
Future-Proofing Your Live Sound
With hybrid events, immersive experiences, and portable line arrays on the rise, managing venue-specific frequency behavior is more relevant than ever. Expect to see more tools that use AI and predictive modeling to help automate live EQ based on venue acoustics.
But until then, ears—and awareness—are still your best tools. As you grow as a live performer or engineer, learning how to identify and address ghost frequencies will elevate your mixes from passable to powerful.
Final Thoughts: Hear What Isn't Said
Venue speakers won't tip you off about the frequencies they're overemphasizing—or suppressing. And your crowd won't always be able to put into words what sounds "off." But with appropriate tools, techniques, and attitude, you can begin to hear what most systems aren't telling you—and repair it before it kills your set.
Because at the end of the night your mix shouldn't simply sound clean to you. It should sound right to everybody in the room.
#music#audiogears#audio#dj#audio shops#professional audio equipment#speakers#frequencies#audio gear#dj gear#pro audio equipment#professional audio gear
1 note
·
View note
Text
Why Most Creators Are Using Mixing Headphones Wrong
Mixing headphones are a standard in home recording studios. They're small, accurate, and almost too good to be true for music making. But here's the catch—most producers aren't utilizing them the way they're intended to be utilized. And that's not merely a novice's error—it's an old habit that might be stunting your mixes.
From Studio Monitors to Headphones: A Change in Workflow
Before the advent of portable setups and bed-studio setups, mixing was mostly on studio monitors. Engineers depended on the way sound behaved in a room, working on tracks that sounded good on most playback systems. But with equipment becoming more available and affordable, headphones were an instant solution—providing isolation, convenience, and a controlled environment in any location.

Mixing headphones offer isolation, but they can disconnect you from the spatial context that speakers naturally provide.
But in doing so, this new shift brought problems. Unlike with speakers, headphones cut out entirely from the room acoustics. That may seem like a positive thing, but what it does is make the mix too isolated—without the spatial cues that influence how a track sounds on speakers, in a car, or through a phone.
From most veteran producers, headphones are a mighty instrument—but only if employed with purpose and an open realization of their strengths and weaknesses.
The Misuse of Mixing Headphones
1. Relying on Them as the Only Mixing Tool
The biggest issue? Mixing entirely on headphones. It might feel safe to craft a mix in isolation, but that controlled environment doesn’t represent the real world. Mixing headphones often overemphasize stereo width and detail, which can trick the ears into thinking a mix is more balanced than it actually is.
Instead, use headphones as a secondary reference—a way to double-check details after roughing in your mix on speakers or monitors.
2. Ignoring Frequency Response Curves
Not all headphones are built for critical listening. Many consumer-grade models exaggerate bass or treble to enhance the listening experience—but that’s the opposite of what’s needed in mixing. Even professional headphones have unique frequency response curves that can mislead mixing decisions if you don’t know how they behave.
Using headphone calibration software or learning the characteristics of your headphones over time is essential for consistent results.
3. No Breaks, No Balance
Long hours of headphone mixing can lead to ear fatigue, a condition that reduces your ability to make accurate judgments about balance, EQ, and dynamics. That’s why many professionals recommend taking frequent breaks or switching listening environments throughout the session. What sounds great at 1 a.m. in headphones might fall apart the next day through studio monitors.
4. Misjudging Stereo Imaging
Because headphones feed different signals directly into each ear—without crossfeed (the natural blending of sounds between left and right)—they can exaggerate stereo separation. Panning decisions made in this environment might feel immersive in headphones but fall flat on speakers. Consider using tools that simulate speaker-like listening or simply double-check your stereo spread on nearfields.

Mixing only on headphones can lead to distorted judgments, fatigue, and a misleading sense of balance.
How to Use Mixing Headphones the Right Way
Use Them for Detail, Not Decisions
Mixing headphones are excellent for spotting small issues—clicks, pops, breath noises, or overly harsh sibilance. They're great for editing and fine-tuning, but foundational mix moves like EQ balancing and panning should be validated on other systems.
Balance Them with Multiple References
The pros hardly ever swap on one system. Alternating between headphones, studio monitors, laptop speakers, and even a car stereo provides a broad perspective on how a track will sound. Headphones mixing should be one of numerous tools—not exclusively.
Treat the Headphones Like a Studio Monitor
This requires being familiar with your equipment, relying on your ears, and not being fooled by what sounds comfortable. If you're spending money on mixing headphones, ensure they're flat response-tuned and made for critical listening—more so than casual listening.

Not all headphones are created equal—understanding their purpose helps avoid mixing mistakes.
Dealing with a Pro Audio store will likely assist you in discovering headphones that are actually designed for mixing—not simply promoted as such. Employees within credible audio stores tend to appreciate the fine points between headphones made for monitoring, general listening, and actual mixing work.
The Increasing Role of Headphone Mixing
As more producers work from cramped quarters or tour with mobile rigs, mixing on headphones is no longer a hack—it's an integral part of the process. Software developers are even creating headphone-centric mixing tools, like binaural monitoring plugins and room simulation tools.
This development is part of a larger movement: the need for flexibility without compromising quality. As long as creatives recognize the capabilities of their headphones and adjust accordingly, there is no problem with constructing a mix from the ears in.
Final Thoughts: Mix Smart, Not Loud
It's simple to think that more equipment = better audio—but technique prevails. Mixing headphones are just as good as the ears on which they are placed. Learn their weaknesses, utilize them correctly, and always reference. A great mix isn't one that is great in your cans—it's one that translates everywhere.
So the next time you're wearing those headphones, just remember: it's not about what you're hearing—it's about what you may be missing.
#music#audiogears#audio#dj#audio shops#professional audio equipment#speakers#MIXING HEADPHONES#dj gear#pro audio shop#pro audio equipment's
1 note
·
View note
Text
Component vs Coaxial Speakers: What You Need to Know for Car Audio
Whether it’s a late-night drive or a mid-day cruise, sound matters. And when it comes to upgrading your car’s audio system, one big question always comes up: Should you go with component speakers or coaxial speakers? The answer isn’t just technical—it’s personal. It depends on how you listen, what you value in sound, and how much you're willing to invest in getting it right.
Let's dissect it all—without the hype, and without assuming you're an audio engineer.
A Quick Look Back: How Car Audio Got Here
Early car sound systems were simple. Early factory installations often used simple full-range speakers integrated into the dash or doors—enough to hear the news or listen to AM radio but far from involving.
As listening habits changed with the advent of cassette tapes and compact discs, so did expectations. Enthusiasts began modifying their vehicles with aftermarket equipment—spurring a speaker innovation boom. Coaxial speakers, or "full-range" speakers, became popular in the 1980’s because they were convenient: a single speaker unit played highs and lows. But sooner or later, sophisticated listeners called for more definition and segregation in their sound, and component speaker systems were born—a configuration in which tweeters, woofers, and crossovers are discrete, presenting an improved soundstage.
Now, that progression continues—with enthusiasts and audiophiles alike balancing sound quality, price, and ease of installation with every choice.
What Are Coaxial Speakers?
Coaxial speakers are a go-to for those who want a noticeable upgrade without overcomplicating things. These speakers combine a woofer (for mids and bass) and a tweeter (for highs) into a single unit. That means less hassle during installation—just plug them in where your factory speakers were and go.
Pros:
• All-in-one design makes them easy to install
• Typically more budget-friendly
• Fit easily into most factory speaker locations
• Perfect for everyday listeners or those who want a cleaner sound without rewiring
Cons:
• Tweeters and woofers are on the same axis, meaning sound separation isn't as accurate
• Less adjustable in terms of sound directionality
• Internal crossovers are generally passive and simple
Coaxials are perfect for an individual who wants to enhance the audio quality of their car without going into too much technicality. Many find this upgrade alone gives new life to commutes and playlists.
What Are Component Speakers?
Component speakers isolate the tweeter and woofer into separate units, joined by a crossover that splits the audio signal by frequency. This enables each to specialize in the range for which it is best suited—woofers providing clean mids and lows, tweeters crisp highs.
Pros:
•tighter sound clarity and imaging
•tweeter placement can be customized to enhance sound staging
•higher-quality crossovers and materials result in higher fidelity
Cons:
•More complicated setup, frequently involving drilling or bolting into new places
•Generally more costly
•Might require amplification to sound at their best
If studio-quality sound on the go is what you're craving—and you don't mind investing a bit more time and effort into getting everything configured—component speakers are the ultimate.

Side-by-side comparison: coaxial speaker (left) vs component setup (right) highlighting design differences.
Real-World Comparison: Which One’s Right for You?

The coaxial vs component debate boils down to your goals and how you experience music. Here’s a simplified breakdown:Still unsure? Think about this: if your car is your main listening space, and you deeply care about vocal clarity, instrument separation, and tonal balance, component systems might be worth the investment. If you just want more punch and clarity than stock speakers can offer—with minimal installation drama—coaxials are the way to go.
Buying Smart: It's All About the Source
Whichever way you go, where you purchase your equipment is as significant as what you're buying. Shopping with experienced audio retailers guarantees your install actually conforms to your vehicle and your performance aspirations. Whether it's after that window-rattling bass or a balanced, clean sound—solid advice is the key.
Professional installers and sound-conscious shops usually provide bundled packages, quality tuning, and upgrade options down the road. That's something that won't come from sketchy online ads or supermarket shelf sales.

Installation styles: coaxial speakers typically replace factory mounts; component systems offer more flexibility and staging.
Myths Busted
"Coaxial speakers are cheap quality."
False. A number of high-quality coaxial speakers deliver great sound and longevity. It's a matter of finding the product to suit your listening habits.
"Component speakers are for show cars only."
False again. Although favored for competition-level projects, components also fit well for everyday drivers that are concerned with sound quality.
"You need to replace everything at once."
Not so. Don't worry about upgrading all at once—begin with front door speakers, move on to rears, and only if necessary, think about amplifiers or subwoofers.
Where It's All Heading
With continuing advances in streaming quality and the ever-increasing role of in-car entertainment in daily life, consumers' appetites for improved car audio remain on the upswing. Increasing numbers of manufacturers are combining technologies—hybrid coaxial-component systems, more intelligent crossovers, and plug-and-play configurations that minimize install time but deliver top-tier sound.
The trend is unmistakable: people are concerned about how their music sounds, even when they're moving. And with more flexible equipment options than ever, tailoring your car sound no longer necessitates a garage's worth of equipment or an expert-level proficiency.
Conclusion: Tune Into What Matters
In the end, there is no "one-size-fits-all" solution in the coaxial vs component battle. The optimal option is the one that suits your budget, lifestyle, and passion for sound. What's important is that you're enjoying the process—whether that's upgrading bit by bit, or jumping into a complete system revamp.
Creativity is powered by curiosity. If this article left you with questions or ideas, investigate further. Try it out. Speak to experts. Hear demos. A car audio experience that's better isn't just about more volume—it's about making your favorite music come alive, on every drive you make.
#audiogears#audio shops#professional audio equipment#dj#speakers#audio equipment#car audio#audio store#dj equipments#pro audio gear#pro audio shop
1 note
·
View note